

Page 1

Configuration Guide for Cisco Secure ACS
4.2
February 2008
Americas Headquarters
Cisco Systems, Inc.
170 West Tasman Drive
San Jose, CA 95134-1706
USA
http://www.cisco.com
Tel: 408 526-4000
800 553-NETS (6387)
Fax: 408 527-0883
Text Part Number: OL-14390-02
Page 2

THE SPECIFICATIONS AND INFORMATION REGARDING THE PRODUCTS IN THIS MANUAL ARE SUBJECT TO CHANGE WITHOUT NOTICE. ALL
STATEMENTS, INFORMATION, AND RECOMMENDATIONS IN THIS MANUAL ARE BELIEVED TO BE ACCURATE BUT ARE PRESENTED WITHOUT
WARRANTY OF ANY KIND, EXPRESS OR IMPLIED. USERS MUST TAKE FULL RESPONSIBILITY FOR THEIR APPLICATION OF ANY PRODUCTS.
THE SOFTWARE LICENSE AND LIMITED WARRANTY FOR THE ACCOMPANYING PRODUCT ARE SET FORTH IN THE INFORMATION PACKET THAT
SHIPPED WITH THE PRODUCT AND ARE INCORPORATED HEREIN BY THIS REFERENCE. IF YOU ARE UNABLE TO LOCATE THE SOFTWARE LICENSE
OR LIMITED WARRANTY, CONTACT YOUR CISCO REPRESENTATIVE FOR A COPY.
The Cisco implementation of TCP header compression is an adaptation of a program developed by the University of California, Berkeley (UCB) as part of UCB’s public
domain version of the UNIX operating system. All rights reserved. Copyright © 1981, Regents of the University of California.
NOTWITHSTANDING ANY OTHER WARRANTY HEREIN, ALL DOCUMENT FILES AND SOFTWARE OF THESE SUPPLIERS ARE PROVIDED “AS IS” WITH
ALL FAULTS. CISCO AND THE ABOVE-NAMED SUPPLIERS DISCLAIM ALL WARRANTIES, EXPRESSED OR
LIMITATION, THOSE OF MERCHANTABILITY, FITNESS FOR A PARTICULAR PURPOSE AND NONINFRINGEMENT OR ARISING FROM A COURSE OF
DEALING, USAGE, OR TRADE PRACTICE.
IN NO EVENT SHALL CISCO OR ITS SUPPLIERS BE LIABLE FOR ANY INDIRECT, SPECIAL, CONSEQUENTIAL, OR INCIDENTAL DAMAGES, INCLUDING,
WITHOUT LIMITATION, LOST PROFITS OR LOSS OR DAMAGE TO DATA ARISING OUT OF THE USE OR INABILITY TO USE THIS MANUAL, EVEN IF CISCO
OR ITS SUPPLIERS HAVE BEEN ADVISED OF THE POSSIBILITY OF SUCH DAMAGES.
CCDE, CCENT, Cisco Eos, Cisco Lumin, Cisco StadiumVision, the Cisco logo, DCE, and Welcome to the Human Network are trademarks; Changing the Way We Work,
Live, Play, and Learn is a service mark; and Access Registrar, Aironet, AsyncOS, Bringing the Meeting To You, Catalyst, CCDA, CCDP, CCIE, CCIP, CCNA, CCNP, CCSP,
CCVP, Cisco, the Cisco
Collaboration Without Limitation, EtherFast, EtherSwitch, Event Center, Fast Step, Follow Me Browsing, FormShare, GigaDrive, HomeLink, Internet Quotient, IOS, iPhone,
iQ Expertise, the iQ logo, iQ Net Readiness Scorecard, iQuick Study, IronPort, the IronPort
Networking Academy, Network Registrar, PCNow, PIX, PowerPanels, ProConnect, ScriptShare, SenderBase, SMARTnet, Spectrum Expert, StackWise, The Fastest Way to
Increase Your Internet Quotient, TransPath, WebEx, and the WebEx
other countries.
All other trademarks mentioned in this document or Website are the property of their respective owners. The use of the word partner does not imply a partnership relationship
between Cisco and any other company. (0804R)
Any Internet Protocol (IP) addresses used in this document are not intended to be actual addresses. Any examples, command display output, and figures included in the
document are shown for illustrative purposes only. Any use of actual IP addresses in illustrative content is unintentional and coincidental.
Configuration Guide for Cisco Secure ACS 4.2
© 2008 Cisco Systems, Inc. All rights reserved.
Certified Internetwork Expert logo, Cisco IOS, Cisco Press, Cisco Systems, Cisco Systems Capital, the Cisco Systems logo, Cisco Unity,
logo, LightStream, Linksys, MediaTone, MeetingPlace, MGX, Networkers,
logo are registered trademarks of Cisco Systems, Inc. and/or its affiliates in the United States and certain
IMPLIED, INCLUDING, WITHOUT
Page 3

CONTENTS
Preface ix
Audience ix
Organization ix
Conventions x
Product Documentation x
Related Documentation xii
Obtaining Documentation and Submitting a Service Request xii
Notices iii-xii
OpenSSL/Open SSL Project iii-xiii
License Issues iii-xiii
CHAPTER
CHAPTER
1 Overview of ACS Configuration 1-1
Summary of Configuration Steps 1-1
Configuration Flowchart 1-5
2 Deploy the Access Control Servers 2-1
Determining the Deployment Architecture 2-1
Access Types 2-2
Wired LAN Access 2-2
Wireless Access Topology 2-5
Dial-up Access Topology 2-9
Placement of the RADIUS Server 2-11
Determining How Many ACSs to Deploy (Scalability) 2-11
Number of Users 2-11
Number of Network Access Servers 2-12
LAN Versus WAN Deployment (Number of LANs in the Network) 2-12
WAN Latency and Dependability 2-12
Determining How Many ACS Servers to Deploy in Wireless Networks 2-13
Deploying ACS Servers to Support Server Failover 2-13
Load Balancing and Failover 2-13
Database Replication Considerations 2-13
Replication Design 2-14
Database Synchronization Considerations 2-14
OL-14390-02
Configuration Guide for Cisco Secure ACS 4.2
iii
Page 4

Contents
Deploying ACS in a NAC/NAP Environment 2-15
Additional Topics 2-16
Remote Access Policy 2-16
Security Policy 2-17
Administrative Access Policy 2-17
Separation of Administrative and General Users 2-18
Database Considerations 2-19
Number of Users 2-19
Type of Database 2-19
Network Latency and Reliability 2-19
CHAPTER
CHAPTER
3 Configuring New Features in ACS 4.2 3-1
New Global EAP-FAST Configuration Options 3-1
Disabling of EAP-FAST PAC Processing in Network Access Profiles 3-3
Disabling NetBIOS 3-4
Configuring ACS 4.2 Enhanced Logging Features 3-5
Configuring Group Filtering at the NAP Level 3-6
Option to Not Log or Store Dynamic Users 3-7
Active Directory Multi-Forest Support 3-7
Configuring Syslog Time Format in ACS 4.2 3-7
RSA Support on the ACS SE 3-8
Purging the RSA Node Secret File 3-10
Configuring RSA SecurID Token and LDAP Group Mapping 3-11
Turning Ping On and Off 3-16
4 Using RDBMS Synchronization to Create dACLs and Specify Network Configuration 4-1
New RDBMS Synchronization Features in ACS Release 4.2 4-1
Using RDBMS Synchronization to Configure dACLs 4-2
Step 1: Enable dACLs 4-2
Step 2: Create a Text File to Define the dACLs 4-2
Step 3: Code an accountActions File to Create the dACL and Associate a User or Group with the
dACL 4-4
Sample accountActions CSV File 4-4
Step 4: Configure RDBMS Synchronization to Use a Local CSV File 4-5
Step 5: Perform RDBMS Synchronization 4-8
Running RDBMS Synchronization from the ACS GUI 4-8
Running CSDBSync Manually to Create the dACLs 4-8
Performing RDBM Synchronization Using a Script 4-9
iv
Configuration Guide for Cisco Secure ACS 4.2
OL-14390-02
Page 5

Step 6: View the dACLs 4-9
Error Messages 4-11
Reading, Updating, and Deleting dACLs 4-12
Updating or Deleting dACL Associations with Users or Groups 4-14
Using RDBMS Synchronization to Specify Network Configuration 4-14
Creating, Reading, Updating and Deleting AAA clients 4-15
Contents
CHAPTER
CHAPTER
5 Password Policy Configuration Scenario 5-1
Limitation on Ability of the Administrator to Change Passwords 5-1
Summary of Configuration Steps 5-2
Step 1: Add and Edit a New Administrator Account 5-2
Step 2: Configure Password Policy 5-4
Specify Password Validation Options 5-6
Specify Password Lifetime Options 5-6
Specify Password Inactivity Options 5-7
Specify Incorrect Password Attempt Options 5-7
Step 3: Configure Session Policy 5-7
Step 4: Configure Access Policy 5-9
Viewing Administrator Entitlement Reports 5-12
View Privilege Reports 5-13
6 Agentless Host Support Configuration Scenario 6-1
Overview of Agentless Host Support 6-1
Using Audit Servers and GAME Group Feedback 6-2
Summary of Configuration Steps 6-3
OL-14390-02
Basic Configuration Steps for Agentless Host Support 6-4
Step 1: Install ACS 6-4
Step 2: Configure a RADIUS AAA Client 6-5
Step 3: Install and Set Up an ACS Security Certificate 6-6
Obtain Certificates and Copy Them to the ACS Host 6-7
Run the Windows Certificate Import Wizard to Install the Certificate (ACS for Windows) 6-7
Enable Security Certificates on the ACS Installation 6-8
Install the CA Certificate 6-9
Add a Trusted Certificate 6-9
Step 4: Configure LDAP Support for MAB 6-10
Configure an External LDAP Database for MAB Support 6-10
Create One or More LDAP Database Configurations in ACS 6-13
Step 5: Configure User Groups for MAB Segments 6-17
Configuration Guide for Cisco Secure ACS 4.2
v
Page 6

Contents
Step 6: Enable Agentless Request Processing 6-18
Create a New NAP 6-18
Enable Agentless Request Processing for a NAP 6-20
Configure MAB 6-21
Step 7: Configure Logging and Reports 6-23
Configuring Reports for MAB Processing 6-23
Configuration Steps for Audit Server Support 6-24
Configure GAME Group Feedback 6-24
CHAPTER
CHAPTER
7 PEAP/EAP-TLS Configuration Scenario 7-1
Summary of Configuration Steps 7-1
Step 1: Configure Security Certificates 7-1
Obtain Certificates and Copy Them to the ACS Host 7-2
Run the Windows Certificate Import Wizard to Install the Certificate 7-2
Enable Security Certificates on the ACS Installation 7-3
Install the CA Certificate 7-4
Add a Trusted Certificate 7-4
Step 2: Configure Global Authentication Settings 7-5
Step 3: Specify EAP-TLS Options 7-6
Step 4: (Optional) Configure Authentication Policy 7-6
8 Syslog Logging Configuration Scenario 8-1
Overview 8-1
Configuring Syslog Logging 8-1
Format of Syslog Messages in ACS Reports 8-4
Facility Codes 8-4
Message Length Restrictions 8-5
CHAPTER
vi
9 NAC Configuration Scenario 9-1
Step 1: Install ACS 9-1
Step 2: Perform Network Configuration Tasks 9-2
Configure a RADIUS AAA Client 9-2
Configure the AAA Server 9-4
Step 3: Set Up System Configuration 9-5
Install and Set Up an ACS Security Certificate 9-5
Obtain Certificates and Copy Them to the ACS Host 9-6
Set Up the ACS Certification Authority 9-6
Edit the Certificate Trust List 9-7
Configuration Guide for Cisco Secure ACS 4.2
OL-14390-02
Page 7

Install the CA Certificate 9-7
Install the ACS Certificate 9-8
Set Up Global Configuration 9-8
Set Up Global Authentication 9-9
Set Up EAP-FAST Configuration 9-12
Configure the Logging Level 9-14
Configure Logs and Reports 9-14
Step 4: Set Up Administration Control 9-17
Add Remote Administrator Access 9-17
Step 5: Set Up Shared Profile Components 9-20
Configure Network Access Filtering (Optional) 9-20
Configure Downloadable IP ACLs 9-21
Adding an ACL 9-22
Adding an ACE 9-23
Saving the dACL 9-25
Configure Radius Authorization Components 9-25
Contents
Step 6: Configure an External Posture Validation Audit Server 9-31
Add the Posture Attribute to the ACS Dictionary 9-31
Configure the External Posture Validation Audit Server 9-32
Step 7: Configure Posture Validation for NAC 9-35
Configure Internal Posture Validation Policies 9-35
Configure External Posture Validation Policies 9-38
Configure an External Posture Validation Audit Server 9-40
Add the Posture Attribute to the ACS Dictionary 9-40
Configure the External Posture Validation Audit Server 9-41
Authorization Policy and NAC Audit 9-43
Step 8: Set Up Templates to Create NAPs 9-44
Sample NAC Profile Templates 9-44
Sample NAC Layer 3 Profile Template 9-44
Profile Setup 9-45
Protocols Policy for the NAC Layer 3 Template 9-47
Authentication Policy 9-48
Sample Posture Validation Rule 9-49
Sample NAC Layer 2 Template 9-49
Profile Setup 9-50
Protocols Settings 9-53
Authentication Policy 9-54
Sample Posture Validation Rule 9-55
Sample NAC Layer 2 802.1x Template 9-55
OL-14390-02
Configuration Guide for Cisco Secure ACS 4.2
vii
Page 8

Contents
Profile Setup 9-56
Protocols Policy 9-58
Authorization Policy 9-59
Sample Posture Validation Rule 9-60
Sample Wireless (NAC L2 802.1x) Template 9-60
Profile Setup 9-61
Protocols Policy 9-63
Authorization Policy 9-64
Sample Posture Validation Rule 9-65
Using a Sample Agentless Host Template 9-65
Profile Setup 9-67
Protocols Policy 9-68
Authentication Policy 9-69
Step 9: Map Posture Validation Components to Profiles 9-69
Step 10: Map an Audit Server to a Profile 9-71
G
LOSSARY
I
NDEX
Step 11 (Optional): Configure GAME Group Feedback 9-72
Import an Audit Vendor File by Using CSUtil 9-73
Import a Device-Type Attribute File by Using CSUtil 9-73
Import NAC Attribute-Value Pairs 9-73
Configure Database Support for Agentless Host Processing 9-74
Enable Posture Validation 9-74
Configure an External Audit Server 9-74
Configure an External Posture Validation Audit Server 9-74
Add the Posture Attribute to the ACS Dictionary 9-74
Configure the External Posture Validation Audit Server 9-76
Enable GAME Group Feedback 9-79
viii
Configuration Guide for Cisco Secure ACS 4.2
OL-14390-02
Page 9

Preface
Audience
This guide is for security administrators who use Cisco Secure Access Control Server (ACS), and who
set up and maintain network and application security.
Organization
This document contains:
• Chapter 1, “Overview of ACS Configuration”—Provides an overview of ACS configuration,
including a summary of configuration steps and configuration flowchart that show the sequence of
configuration steps.
• Chapter 2, “Deploy the Access Control Servers”—Describes factors to consider when deploying ACS,
including the access type, network topology, and whether database synchronization and replication
are required.
• Chapter 3, “Configuring New Features in ACS 4.2”—Describes how to configure the most important
new features in ACS 4.2.
• Chapter 4, “Using RDBMS Synchronization to Create dACLs and Specify Network
Configuration”—Describes how to configure new RDBMS synchronization features in ACS 4.2 and run
RDBMS Sync remotely on the ACS Solution Engine.
• Chapter 5, “Password Policy Configuration Scenario”—Describes how to configure Sarbanes-Oxley
(SOX) support when adding administrators.
• Chapter 6, “Agentless Host Support Configuration Scenario”—Describes how to configure ACS for
agentless host support (MAC authentication bypass).
• Chapter 7, “PEAP/EAP-TLS Configuration Scenario”—Describes how to configure ACS for
PEAP/EAP-TLS support.
• Chapter 8, “Syslog Logging Configuration Scenario”—Describes how to configure ACS to log
syslog messages.
• Chapter 9, “NAC Configuration Scenario”—Describes how to configure ACS in a Cisco Network
Admission Control (NAC) and Microsoft Network Access Protection (NAP) environment.
• “Glossary”—Lists common terms used in ACS.
OL-14390-02
Configuration Guide for Cisco Secure ACS 4.2
ix
Page 10

Conventions
This document uses the following conventions:
Preface
Item Convention
Commands, keywords, special terminology, and options that should
be selected during procedures
Variables for which you supply values and new or important
terminology
Displayed session and system information, paths and file names screen font
Information you enter boldface screen font
Variables you enter italic screen font
Menu items and button names boldface font
Indicates menu items to select, in the order you select them. Option > Network Preferences
boldface font
italic font
Tip Identifies information to help you get the most benefit from your product.
Note Means reader take note. Notes identify important information that you should reflect upon before
continuing, contain helpful suggestions, or provide references to materials not contained in the
document.
Caution Means reader be careful. In this situation, you might do something that could result in equipment
damage, loss of data, or a potential breach in your network security.
Warning
Identifies information that you must heed to prevent damaging yourself, the state of software, or
equipment. Warnings identify definite security breaches that will result if the information presented
is not followed carefully.
Product Documentation
Note We sometimes update the printed and electronic documentation after original publication. Therefore,
you should also review the documentation on Cisco.com for any updates.
Table 1 describes the product documentation that is available.
Configuration Guide for Cisco Secure ACS 4.2
x
OL-14390-02
Page 11

Preface
Ta b l e 1 ACS 4.2 Documentation
Document Title Available Formats
Documentation Guide for Cisco
Secure ACS Release 4.2
• Shipped with product.
• PDF on the product CD-ROM.
• On Cisco.com:
http://www.cisco.com/en/US/docs/net_mgmt/
cisco_secure_access_control_server_for_windows/
4.2/roadmap/DGuide42.html
Release Notes for Cisco Secure ACS
Release 4.2
On Cisco.com:
http://www.cisco.com/en/US/docs/net_mgmt/
cisco_secure_access_control_server_for_windows/
4.2/release/notes/ACS42_RN.html
Configuration Guide for Cisco Secure
ACS Release 4.2
• On Cisco.com:
http://www.cisco.com/en/US/docs/net_mgmt/
cisco_secure_access_control_server_for_windows/
4.2/configuration/guide/acs42_config_guide.html
Installation Guide for Cisco Secure
ACS for Windows Release 4.2
• On Cisco.com:
http://www.cisco.com/en/US/docs/net_mgmt/
cisco_secure_access_control_server_for_windows/
4.2/installation/guide/windows/IGwn42.html
Installation Guide for Cisco Secure
ACS Solution Engine Release 4.2
• On Cisco.com:
http://www.cisco.com/en/US/docs/net_mgmt/
cisco_secure_access_control_server_for_solution_engine/
4.2/installation/guide/solution_engine/SE42.html
Configuration Guide for Cisco Secure
ACS 4.2
• On Cisco.com:
http://www.cisco.com/en/US/docs/net_mgmt/
cisco_secure_access_control_server_for_windows/
4.2/user/guide/ACS4_2UG.html
Regulatory Compliance and Safety
Information for the Cisco Secure ACS
Solution Engine Release 4.2
• Shipped with product.
• PDF on the product CD-ROM.
• On Cisco.com:
• http://www.cisco.com/en/US/docs/net_mgmt/
cisco_secure_access_control_server_for_solution_engine/
4.2/regulatory/compliance/RCSI_42.html
Installation and Configuration Guide
for Cisco Secure ACS Remote Agents
Release 4.2
• On Cisco.com:
• http://www.cisco.com/en/US/docs/net_mgmt/
cisco_secure_access_control_server_for_solution_engine/
4.2/installation/guide/remote_agent/rmag42.html
Supported and Interoperable Devices
and Software Tables for Cisco Secure
ACS Solution Engine Release 4.2
• On Cisco.com:
http://www.cisco.com/en/US/docs/net_mgmt/
cisco_secure_access_control_server_for_windows/
4.2/device/guide/sdt42.html
OL-14390-02
Configuration Guide for Cisco Secure ACS 4.2
xi
Page 12

Preface
Notices
Table 1 ACS 4.2 Documentation (continued)
Document Title Available Formats
Installation and User Guide for Cisco
Secure ACS User-Changeable
Passwords
Troubleshooting Guide for Cisco
Secure Access Control Server
Online Documentation In the ACS HTML interface, click Online Documentation.
Online Help In the ACS HTML interface, online help appears in the right-hand frame when you
• On Cisco.com:
http://www.cisco.com/en/US/docs/net_mgmt/
cisco_secure_access_control_server_for_windows/
4.2/installation/guide/user_passwords/ucp42.html
• On Cisco.com
http://www.cisco.com/en/US/docs/net_mgmt/
cisco_secure_access_control_server_for_windows/4.2/trouble/guide/
ACS_Troubleshooting.html
are configuring a feature.
Related Documentation
Note We sometimes update the printed and electronic documentation after original publication. Therefore,
you should also review the documentation on Cisco.com for any updates.
A set of white papers about ACS are available on Cisco.com at:
http://www.cisco.com/warp/public/cc/pd/sqsw/sq/tech/index.shtml
For information on Network Admission Control, various NAC components, and ACS see:
http://www.cisco.com/go/NAC
Obtaining Documentation and Submitting a Service Request
For information on obtaining documentation, submitting a service request, and gathering additional
information, see the monthly What’s
revised Cisco
http://www.cisco.com/en/US/docs/general/whatsnew/whatsnew.html
Subscribe to the What’s New in Cisco Product Documentation as a Really Simple Syndication (RSS) feed
and set content to be delivered directly to your desktop using a reader application. The RSS feeds are a free
service and Cisco currently supports RSS version 2.0.
technical documentation, at:
New in Cisco Product Documentation, which also lists all new and
Notices
xii
The following notices pertain to this software license.
Configuration Guide for Cisco Secure ACS 4.2
OL-14390-02
Page 13

Preface
OpenSSL/Open SSL Project
This product includes software developed by the OpenSSL Project for use in the OpenSSL Toolkit
(
http://www.openssl.org/).
This product includes cryptographic software written by Eric Young (eay@cryptsoft.com).
This product includes software written by Tim Hudson (tjh@cryptsoft.com).
License Issues
The OpenSSL toolkit stays under a dual license, i.e. both the conditions of the OpenSSL License and the
original SSLeay license apply to the toolkit. See below for the actual license texts. Actually both licenses
are BSD-style Open Source licenses. In case of any license issues related to OpenSSL please contact
openssl-core@openssl.org.
OpenSSL License:
Copyright © 1998-2007 The OpenSSL Project. All rights reserved.
Redistribution and use in source and binary forms, with or without modification, are permitted provided
that the following conditions are met:
1. Redistributions of source code must retain the copyright notice, this list of conditions and the
following disclaimer.
Notices
2. Redistributions in binary form must reproduce the above copyright notice, this list of conditions, and
the following disclaimer in the documentation and/or other materials provided with the distribution.
3. All advertising materials mentioning features or use of this software must display the following
acknowledgment: “This product includes software developed by the OpenSSL Project for use in the
OpenSSL Toolkit (
4. The names “OpenSSL Toolkit” and “OpenSSL Project” must not be used to endorse or promote
http://www.openssl.org/)”.
products derived from this software without prior written permission. For written permission, please
contact openssl-core@openssl.org.
5. Products derived from this software may not be called “OpenSSL” nor may “OpenSSL” appear in
their names without prior written permission of the OpenSSL Project.
6. Redistributions of any form whatsoever must retain the following acknowledgment:
“This product includes software developed by the OpenSSL Project for use in the OpenSSL Toolkit
(
http://www.openssl.org/)”.
THIS SOFTWARE IS PROVIDED BY THE OpenSSL PROJECT “AS IS”' AND ANY EXPRESSED OR
IMPLIED WARRANTIES, INCLUDING, BUT NOT LIMITED TO, THE IMPLIED WARRANTIES
OF MERCHANTABILITY AND FITNESS FOR A PARTICULAR PURPOSE ARE DISCLAIMED. IN
NO EVENT SHALL THE OpenSSL PROJECT OR ITS CONTRIBUTORS BE LIABLE FOR ANY
DIRECT, INDIRECT, INCIDENTAL, SPECIAL, EXEMPLARY, OR CONSEQUENTIAL DAMAGES
(INCLUDING, BUT NOT LIMITED TO, PROCUREMENT OF SUBSTITUTE GOODS OR
SERVICES; LOSS OF USE, DATA, OR PROFITS; OR BUSINESS INTERRUPTION) HOWEVER
CAUSED AND ON ANY THEORY OF LIABILITY, WHETHER IN CONTRACT, STRICT
LIABILITY, OR TORT (INCLUDING NEGLIGENCE OR OTHERWISE) ARISING IN ANY WAY
OUT OF THE USE OF THIS SOFTWARE, EVEN IF ADVISED OF THE POSSIBILITY OF SUCH
DAMAGE.
This product includes cryptographic software written by Eric Young (eay@cryptsoft.com). This product
includes software written by Tim Hudson (tjh@cryptsoft.com).
OL-14390-02
Configuration Guide for Cisco Secure ACS 4.2
xiii
Page 14

Notices
Preface
Original SSLeay License:
Copyright © 1995-1998 Eric Young (eay@cryptsoft.com). All rights reserved.
This package is an SSL implementation written by Eric Young (eay@cryptsoft.com).
The implementation was written so as to conform with Netscapes SSL.
This library is free for commercial and non-commercial use as long as the following conditions are
adhered to. The following conditions apply to all code found in this distribution, be it the RC4, RSA,
lhash, DES, etc., code; not just the SSL code. The SSL documentation included with this distribution is
covered by the same copyright terms except that the holder is Tim Hudson (tjh@cryptsoft.com).
Copyright remains Eric Young’s, and as such any Copyright notices in the code are not to be removed.
If this package is used in a product, Eric Young should be given attribution as the author of the parts of
the library used. This can be in the form of a textual message at program startup or in documentation
(online or textual) provided with the package.
Redistribution and use in source and binary forms, with or without modification, are permitted provided
that the following conditions are met:
1. Redistributions of source code must retain the copyright notice, this list of conditions and the
following disclaimer.
2. Redistributions in binary form must reproduce the above copyright notice, this list of conditions and
the following disclaimer in the documentation and/or other materials provided with the distribution.
3. All advertising materials mentioning features or use of this software must display the following
acknowledgement:
“This product includes cryptographic software written by Eric Young (eay@cryptsoft.com)”.
The word ‘cryptographic’ can be left out if the routines from the library being used are not
cryptography-related.
4. If you include any Windows specific code (or a derivative thereof) from the apps directory
(application code) you must include an acknowledgement: “This product includes software written
by Tim Hudson (tjh@cryptsoft.com)”.
THIS SOFTWARE IS PROVIDED BY ERIC YOUNG “AS IS” AND ANY EXPRESS OR IMPLIED
WARRANTIES, INCLUDING, BUT NOT LIMITED TO, THE IMPLIED WARRANTIES OF
MERCHANTABILITY AND FITNESS FOR A PARTICULAR PURPOSE ARE DISCLAIMED. IN NO
EVENT SHALL THE AUTHOR OR CONTRIBUTORS BE LIABLE FOR ANY DIRECT, INDIRECT,
INCIDENTAL, SPECIAL, EXEMPLARY, OR CONSEQUENTIAL DAMAGES (INCLUDING, BUT
NOT LIMITED TO, PROCUREMENT OF SUBSTITUTE GOODS OR SERVICES; LOSS OF USE,
DATA, OR PROFITS; OR BUSINESS INTERRUPTION) HOWEVER CAUSED AND ON ANY
THEORY OF LIABILITY, WHETHER IN CONTRACT, STRICT LIABILITY, OR TORT
(INCLUDING NEGLIGENCE OR OTHERWISE) ARISING IN ANY WAY OUT OF THE USE OF
THIS SOFTWARE, EVEN IF ADVISED OF THE POSSIBILITY OF SUCH DAMAGE.
The license and distribution terms for any publicly available version or derivative of this code cannot be
changed. i.e. this code cannot simply be copied and put under another distribution license [including the
GNU Public License].
xiv
Configuration Guide for Cisco Secure ACS 4.2
OL-14390-02
Page 15

Overview of ACS Configuration
This chapter describes the general steps for configuring Cisco Secure Access Control Server, hereafter
referred to as ACS, and presents a flowchart showing the sequence of steps.
Note If you are configuring ACS to work with Microsoft clients in a Cisco Network Access Control/Microsoft
Network Access Protection (NAC/NAP) network, refer to Chapter 9, “NAC Configuration Scenario.”
This chapter contains:
• Summary of Configuration Steps, page 1-1
• Configuration Flowchart, page 1-5
Summary of Configuration Steps
CHAP T ER
1
To configur e ACS :
Step 1 Plan the ACS Deployment.
Determine how many ACS servers you need and their placement in the network.
For detailed information, see Chapter 2, “Deploy the Access Control Servers.”
Step 2 Install the ACS Servers.
Install the ACS servers as required. For detailed installation instructions, refer to:
• Installation Guide for Cisco Secure ACS for Windows Release 4.2, available on Cisco.com at:
http://www.cisco.com/en/US/docs/net_mgmt/cisco_secure_access_control_server_for_windows/
4.2/installation/guide/windows/IGwn42.html
• Installation Guide for Cisco Secure ACS Solution Engine Release 4.2, available on Cisco.com at:
http://www.cisco.com/en/US/docs/net_mgmt/cisco_secure_access_control_server_for_solution_en
gine/4.2/installation/guide/solution_engine/ACS_42_SE_install.html
Step 3 Configure Additional Administrators.
When you install the Windows version of ACS, there are initially no administrative users. When you
install Cisco Secure ACS Solution Engine (ACS SE), there is initially one administrator.
To set up additional administrative accounts:
a. Add Administrators.
OL-14390-02
Configuration Guide for Cisco Secure ACS 4.2
1-1
Page 16

Summary of Configuration Steps
b. For each administrator, specify administrator privileges.
c. As needed, configure the following optional administrative policies:
–
–
–
For detailed information, see Chapter 5, “Password Policy Configuration Scenario.”
Step 4 Configure the Web Interface:
a. Add AAA clients and specify the authorization protocols that the clients will use.
b. Click Interface Configuration.
c. On the Interface Configuration page, configure the interface to include one or more of:
–
Chapter 1 Overview of ACS Configuration
Access Policy—Specify IP address limitations, HTTP port restrictions, and secure socket layer
(SSL) setup.
Session Policy—Specify timeouts, automatic local logins, and response to invalid IP address
connections.
Password Policy—Configure the password policy for administrators.
RADIUS Configuration Options—For detailed information, see “Displaying RADIUS
Configuration Options” in Chapter 2 of the User Guide for Cisco Secure ACS 4.2, “Using the
Web Interface.”
–
TACACS+ Configuration Options—For detailed information, see “Displaying TACACS+
Configuration Options” in Chapter 2 of the User Guide for Cisco Secure ACS 4.2, “Using the
Web Interface.”
–
Advanced Options—For detailed information, see “Displaying RADIUS Configuration
Options” in Chapter 2 of the User Guide for Cisco Secure ACS 4.2, “Using the Web Interface.”
–
Customized User Options—For detailed information, see “Displaying RADIUS Configuration
Options” in Chapter 2 of the User Guide for Cisco Secure ACS 4.2, “Using the Web Interface.”
Step 5 Configure Basic ACS System Settings:
a. Click System Configuration.
b. Configure:
–
Service Control
–
Logging
–
Date Format Control
–
Local Password Management
–
ACS Backup
–
ACS Restore
–
ACS Service Management
–
(optional) IP Pools Server
–
(optional) IP Pools Address Recovery
For detailed instructions, see “Displaying RADIUS Configuration Options” in Chapter 2 of the User
Guide for Cisco Secure ACS 4.2, “Using the Web Interface.”
Step 6 Configure Users:
1-2
a. As required for your network security setup, configure users. You can configure users:
–
Manually, by using the ACS web interface
–
By using the CSUtil utility to import users from an external database
Configuration Guide for Cisco Secure ACS 4.2
OL-14390-02
Page 17

Chapter 1 Overview of ACS Configuration
–
By using database synchronization
–
By using database replication
For detailed instructions, see “Displaying RADIUS Configuration Options” in Chapter 2 of the User
Guide for Cisco Secure ACS 4.2, “Using the Web Interface.”
Step 7 Configure Certificates.
This step is required if you are using EAP-TLS, Secure Sockets Layer (SSL), or Cisco Network
Admission Control (NAC).
For detailed instructions, see Step 3: Install and Set Up an ACS Security Certificate, page 6-6.
Step 8 Configure Global Authentication Settings.
Configure the security protocols that ACS uses to authenticate users. You can configure the following
global authentication methods:
• PEAP
• EAP-FAST
• EAP-TLS
• LEAP
• EAP-MD5
• Legacy authentication protocols, such as MS-CHAP Version 1 and Version 2
Summary of Configuration Steps
For detailed instructions, see “Global Authentication Setup” in Chapter 8 of the User Guide for Cisco
Secure ACS 4.2, “System Configuration: Authentication and Certificates.”
Step 9 Configure Shared Profile Components.
You can configure the following shared profile components:
• Downloadable IP ACLs
• Network Access Filtering
• RADIUS Authorization Components
• Network Access Restrictions
• Command Authorization Sets
For detailed instructions, see Chapter 3 of the User Guide for Cisco Secure ACS 4.2, “Shared Profile
Components.”
Step 10 Set Up Network Device Groups.
You can set up network device groups to simplify configuration of common devices. For detailed
information, see the User Guide for Cisco Secure ACS 4.2.
Step 11 Add AAA clients.
You can add RADIUS clients or TACACS+ clients. For detailed instructions, see Step 2: Configure a
RADIUS AAA Client, page 6-5.
Step 12 Set Up User Groups.
Set up user groups to apply common configuration settings to groups of users. For detailed instructions,
see Chapter 2 of the User Guide for Cisco Secure ACS 4.2, “User Group Management.”
Step 13 Configure Posture Validation.
If you are using ACS with NAC, configure posture validation.
OL-14390-02
Configuration Guide for Cisco Secure ACS 4.2
1-3
Page 18

Summary of Configuration Steps
Step 14 Set Up Network Access Profiles.
If required, set up Network Access Profiles.
Step 15 Configure Logs and Reports.
Configure reports to specify how ACS logs data. You can also view the logs in HTML reports. For
detailed instructions, see Chapter 9 of the User Guide for Cisco Secure ACS 4.2, “Logs and Reports.
Chapter 1 Overview of ACS Configuration
1-4
Configuration Guide for Cisco Secure ACS 4.2
OL-14390-02
Page 19
Chapter 1 Overview of ACS Configuration
Configuration Flowchart
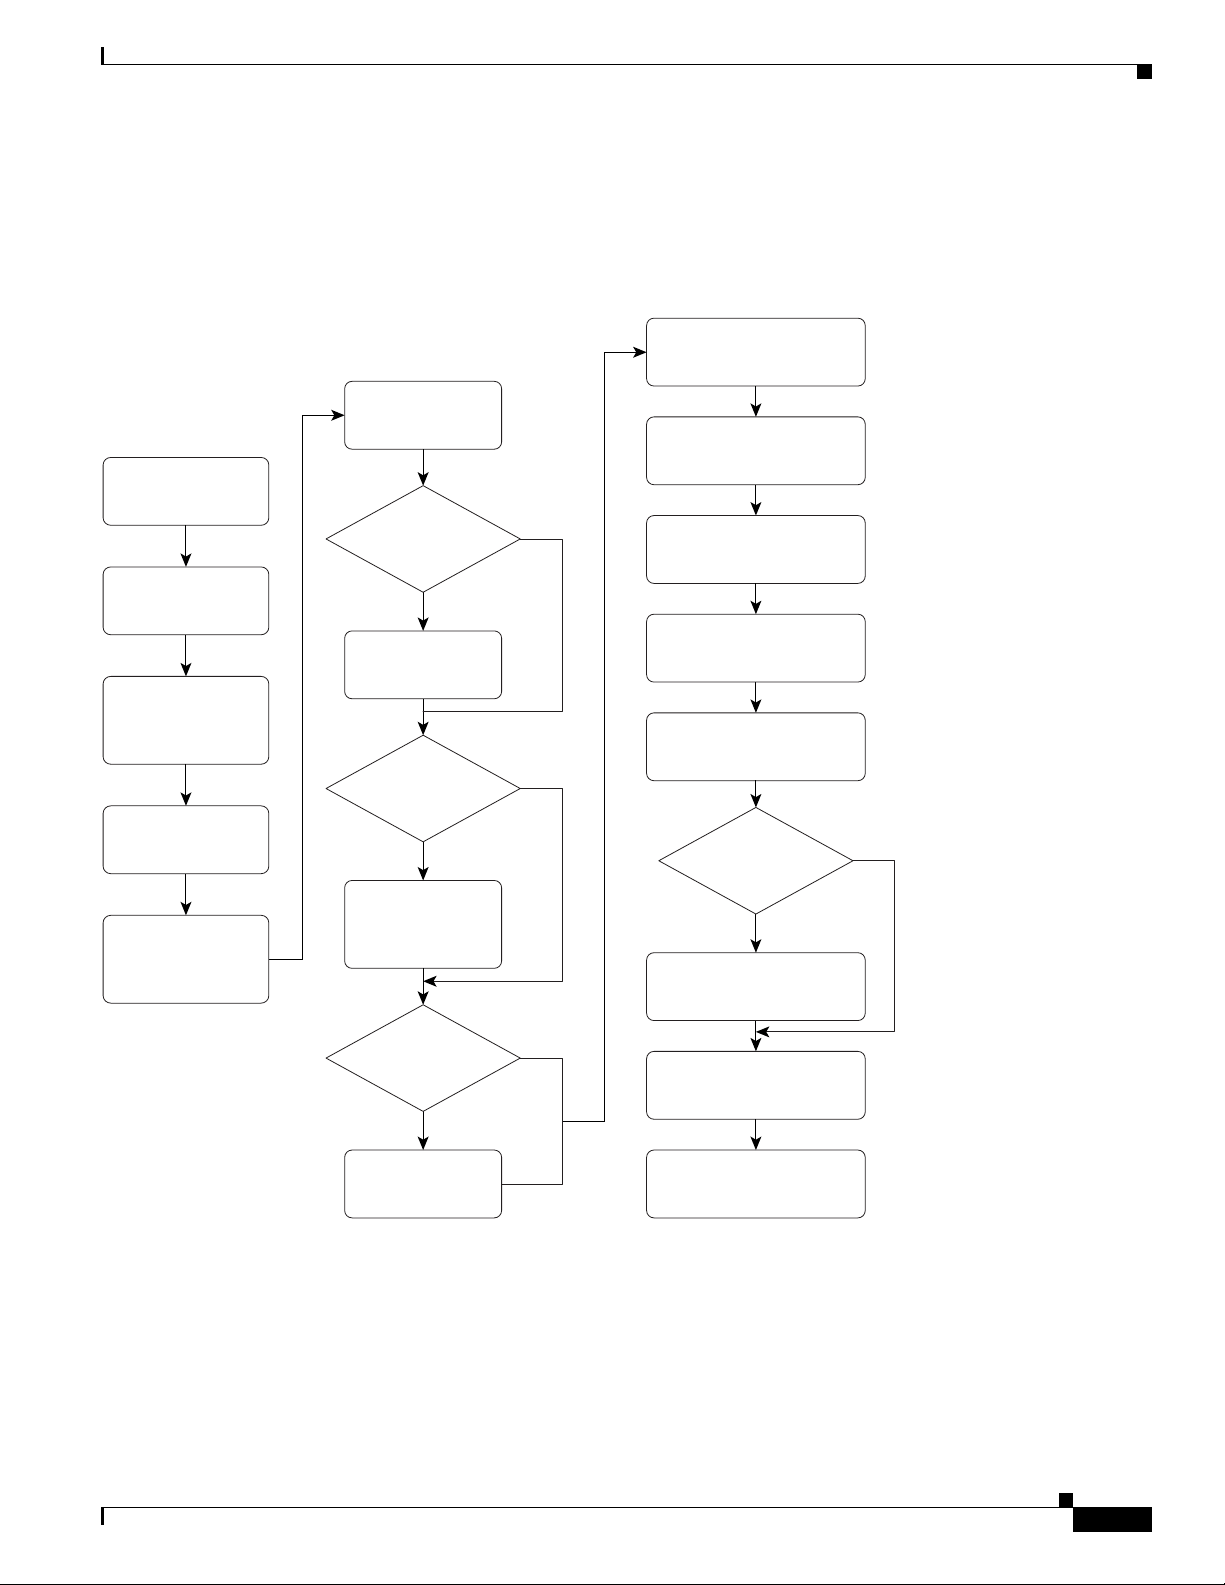
Figure 1-1 is a configuration flowchart that shows the main steps in ACS configuration.
Figure 1-1 ACS Configuration Flowchart
Step 6:
Configure Users
Step 1: Plan the
Deployment
Step 2: Install
ACS Servers
Step 3: Configure
Additional
Administrators
Step 4: Configure
the Web Interface
Is there a
Remote ODBC User
Database?
Yes
Configure
Database
Synchronization
Is there a
Large User
Database?
Yes
No
No
Step 8: Configure Global
Authentication Settings
Step 9: Configure Shared
Profile Components
Step 10: Set Up
Network Device Groups
Step 11: Add
AAA Clients
Step 12: Set Up
User Groups
Are you
using NAC?
Configuration Flowchart
No
Step 5: Configure
Basic ACS
System Settings
Use CSUtil for
Bulk User
Data Import
Are you using
EAP-TLS, SSL,
or NAC?
Yes
Step 7: Configure
Certificates
No
Yes
Step 13: Configure
Posture Validation
Step 14: Set Up
Network Access Profiles
Step 15: Configure
Logs and Reports
158309
Refer to the list of steps in Summary of Configuration Steps, page 1-1 for information on where to find
detailed descriptions of each step.
OL-14390-02
Configuration Guide for Cisco Secure ACS 4.2
1-5
Page 20

Configuration Flowchart
Chapter 1 Overview of ACS Configuration
1-6
Configuration Guide for Cisco Secure ACS 4.2
OL-14390-02
Page 21

CHAP T ER
2
Deploy the Access Control Servers
This chapter discusses topics that you should consider before deploying Cisco Secure Access Control
Server, hereafter referred to as ACS.
This document does not describe the software installation procedure for ACS or the hardware installation
procedure for the ACS SE. For detailed installation information, refer to:
• Installation Guide for Cisco Secure ACS for Windows Release 4.2, available on Cisco.com at:
http://www.cisco.com/en/US/docs/net_mgmt/cisco_secure_access_control_server_for_windows/
4.2/installation/guide/windows/IGwn42.html
• Installation Guide for Cisco Secure ACS Solution Engine Release 4.2, available on Cisco.com at:
http://www.cisco.com/en/US/docs/net_mgmt/
cisco_secure_access_control_server_for_solution_engine/4.2/installation/guide/solution_engine/
ACS_42_SE_install.html
Note For more detailed information on deploying ACS, see the Cisco Secure Access Control Server
Deployment Guide at
http://www.cisco.com/application/pdf/en/us/guest/products/
ps2086/c1244/cdccont_0900aecd80737943.pdf.
This chapter contains:
• Determining the Deployment Architecture, page 2-1
• Determining How Many ACSs to Deploy (Scalability), page 2-11
• Deploying ACS Servers to Support Server Failover, page 2-13
• Deploying ACS in a NAC/NAP Environment, page 2-15
• Additional Topics, page 2-16
Determining the Deployment Architecture
How your enterprise network is configured and the network topology are likely to be the most important
factors in deploying ACS.
Configuration Guide for Cisco Secure ACS 4.2
OL-14390-02
2-1
Page 22

Determining the Deployment Architecture
This section discusses:
• Access types—How users will access the network (through wireless access, LAN access through
• Network architecture—How the network is organized (centrally through campus LANs, regional
This section contains:
• Access Types, page 2-2
• Placement of the RADIUS Server, page 2-11
Access Types
This section contains:
• Wired LAN Access, page 2-2
• Wireless Access Topology, page 2-5
Chapter 2 Deploy the Access Control Servers
switches, and so on) and the security protocols used to control user access; for example, RADIUS,
EAP- TLS, Microsoft Active Directory, and so on.
LANs, WLANs, and so on.
Wired LAN Access
• Dial-up Access Topology, page 2-9
You can use wired LAN access in a small LAN environment, a campus LAN environment, or a regionally
or globally dispersed network. The number of users determines the size of the LAN or WLAN:
Size Users
small LAN 1 to 3,000
medium-sized LAN 3,000 to 25,000
large LAN 25,000 to 50,000
very large LAN or WLAN over 50,000
The wired LAN environment uses the following security protocols:
• RADIUS—RADIUS is used to control user access to wired LANs. In broadcast or switch-based
Ethernet networks, you can use RADIUS to provide virtual LAN identification information for each
authorized user.
• EAP—Extensible Authentication Protocol (EAP), provides the ability to deploy RADIUS into
Ethernet network environments. EAP is defined by Internet Engineering Task Force (IETF) RFC
2284 and the IEEE 802.1x standards.
The 802.1x standard, also known as EAP over LAN (EAPoL), concerns the part of the wider EAP
standard that relates to broadcast media networks. Upon connection, EAPoL provides a
communications channel between an end user on a client LAN device to the AAA server through
the LAN switch. The functionality is similar to what Point-to-Point Protocol (PPP) servers on
point-to-point links provide.
2-2
By supporting complex challenge-response dialogues, EAP facilitates the user-based authentication
demands of both conventional one-way hashed password authentication schemes such as Challenge
Handshake Authentication Protocol (CHAP) and of more advanced authentication schemes such as
Transport Layer Security (TLS), or digital certificates.
Configuration Guide for Cisco Secure ACS 4.2
OL-14390-02
Page 23

Chapter 2 Deploy the Access Control Servers
• EAP-TLS—Extensible Authentication Protocol-Transport Layer Security (EAP-TLS). EAP-TLS
uses the TLS protocol (RFC 2246), which is the latest version of the Secure Socket Layer (SSL)
protocol from the IETF. TLS provides a way to use certificates for user and server authentication
and for dynamic session key generation.
• PEAP— Protected Extensible Authentication Protocol (PEAP) is an 802.1x authentication type for
wireless LANs (WLANs). PEAP provides strong security, user database extensibility, and support
for one-time token authentication and password change or aging. PEAP is based on an Internet Draft
that Cisco Systems, Microsoft, and RSA Security submitted to the IETF.
Small LAN Environment
In a small LAN environment (a LAN containing up to 3,000 users; see Figure 2-1), a single ACS is
usually located close to the switch and behind a firewall. In this environment, the user database is usually
small because few switches require access to ACS for AAA, and the workload is small enough to require
only a single ACS.
However, you should still deploy a second ACS server for redundancy, and set up the second ACS server
as a replication partner to the primary server; because, losing the ACS would prevent users from gaining
access to the network. In
these are likely to be features of such a network; but, they are not strictly related to the Cisco Catalyst
AAA setup or required as part of it.
You should also limit access to the system hosting the ACS to as small a number of users and devices as
necessary. As shown in
on the firewall. Access to this segment is limited only to the Cisco Catalyst Switch client and those user
machines that require HTTP access to the ACS for administrative purposes. Users should not be aware
that the ACS is part of the network.
Determining the Deployment Architecture
Figure 2-1, an Internet connection via firewall and router are included because
Figure 2-1, you set access by connecting the ACS host to a private LAN segment
Figure 2-1 ACS Server in a Small LAN Environment
Catalyst 2900/3500
Switch
Internet
Firewall
Cisco Secure ACS
Campus LAN
158316
You can use ACS for wired access in a campus LAN. A campus LAN is typically divided into subnets.
Figure 2-2 shows an ACS deployment in a wired campus LAN.
OL-14390-02
Configuration Guide for Cisco Secure ACS 4.2
2-3
Page 24
Determining the Deployment Architecture
Figure 2-2 ACS in a Campus LAN
Chapter 2 Deploy the Access Control Servers
Segment 1
A
Segment 3
A
Segment 2
A
Internet
Remote office
158308
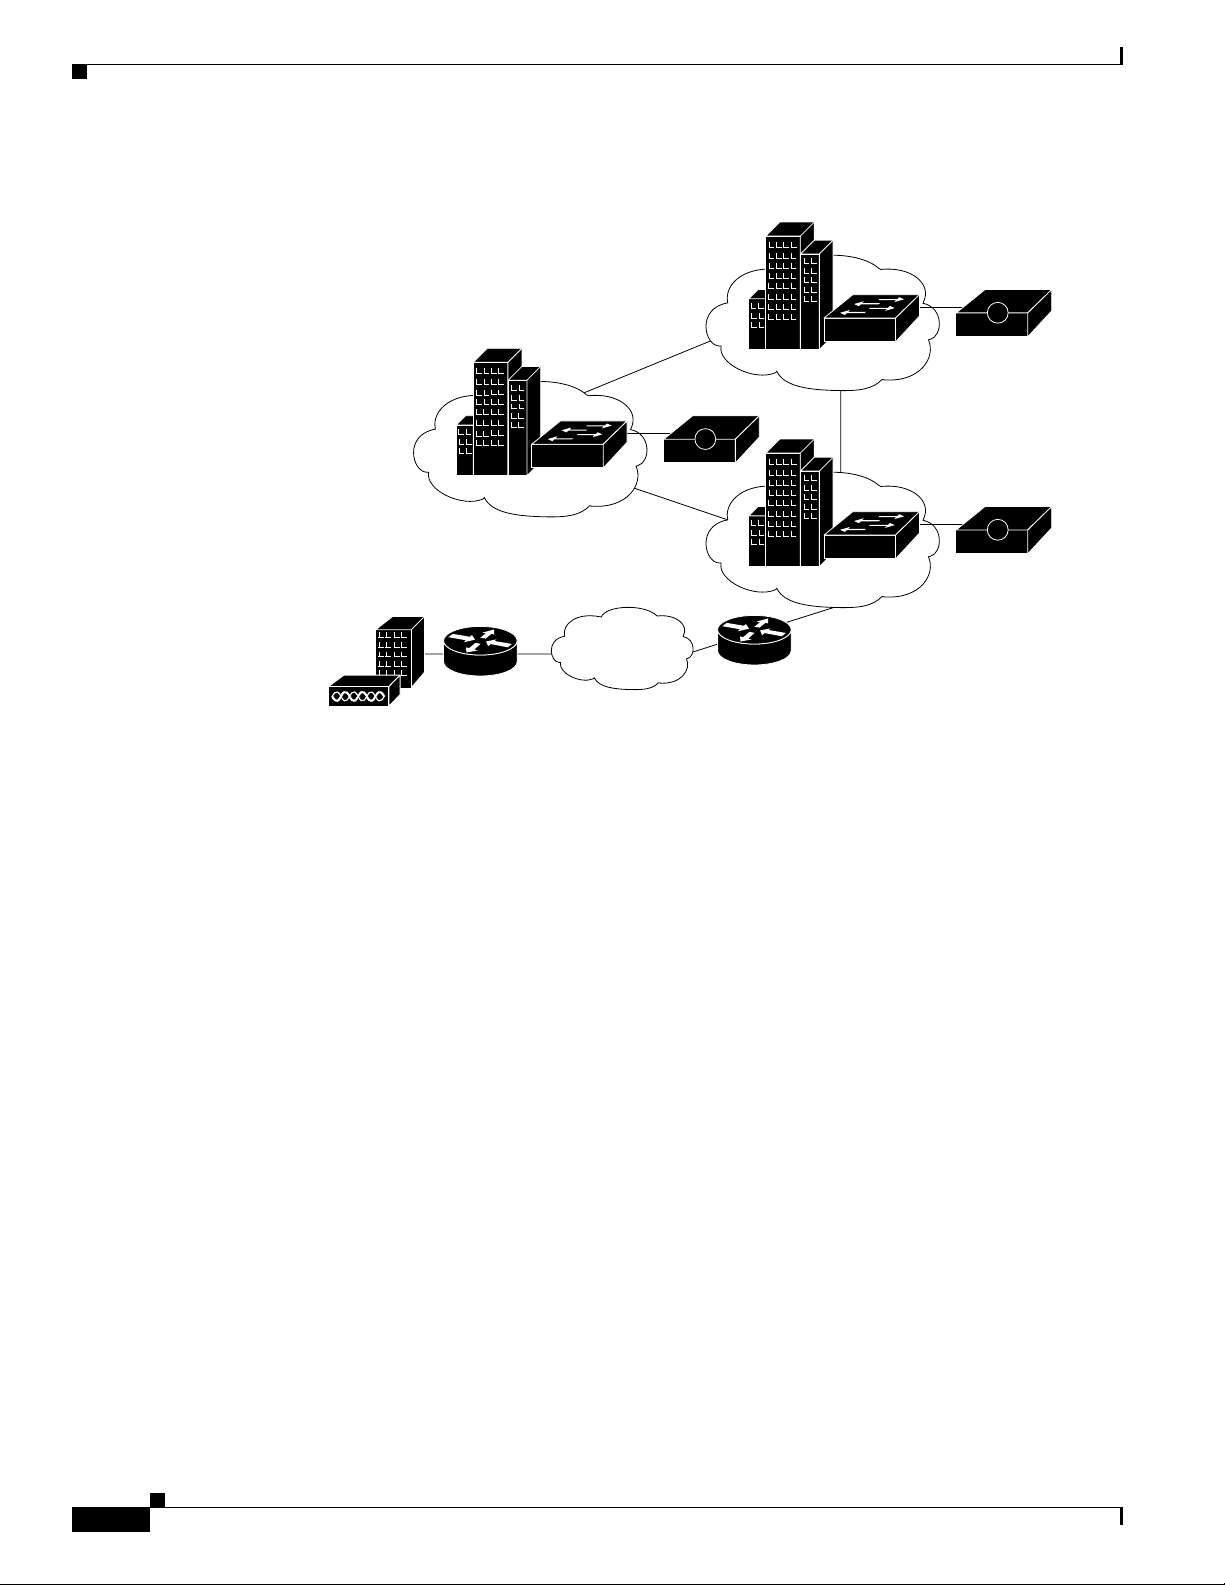
Figure 2-2 shows a possible distribution of ACS in a wired campus LAN. In this campus LAN, buildings
are grouped into three segments. Each segment consists of 1 to 3 buildings and all the buildings in the
segment are on a common LAN. All interbuilding and intersegment network connections use
one-gigabyte fiber-optic technology. Primary network access is through switch ports over wired
Ethernet.
You use ACS to provide RADIUS authentication for the network access servers, and you configure it to
use an external database. One ACS is deployed for each segment of 5 to 10 buildings. A Cisco
LocalDirector content switch is placed before each ACS for load balancing and failover.
Geographically Dispersed Wired LAN
In a larger network that is geographically dispersed, speed, redundancy, and reliability are important in
determining whether to use a centralized ACS service or a number of geographically dispersed ACS
units. As with many applications, AAA clients rely on timely and accurate responses to their queries.
Network speed is an important factor in deciding how to deploy ACS; because delays in authentication
that the network causes can result in timeouts at the client side or the switch.
A useful approach in large extended networks, such as for a globally dispersed corporation, is to have at
least one ACS deployed in each major geographical region. Depending on the quality of the WAN links,
these servers may act as backup partners to servers in other regions to protect against failure of the ACS
in any particular region.
2-4
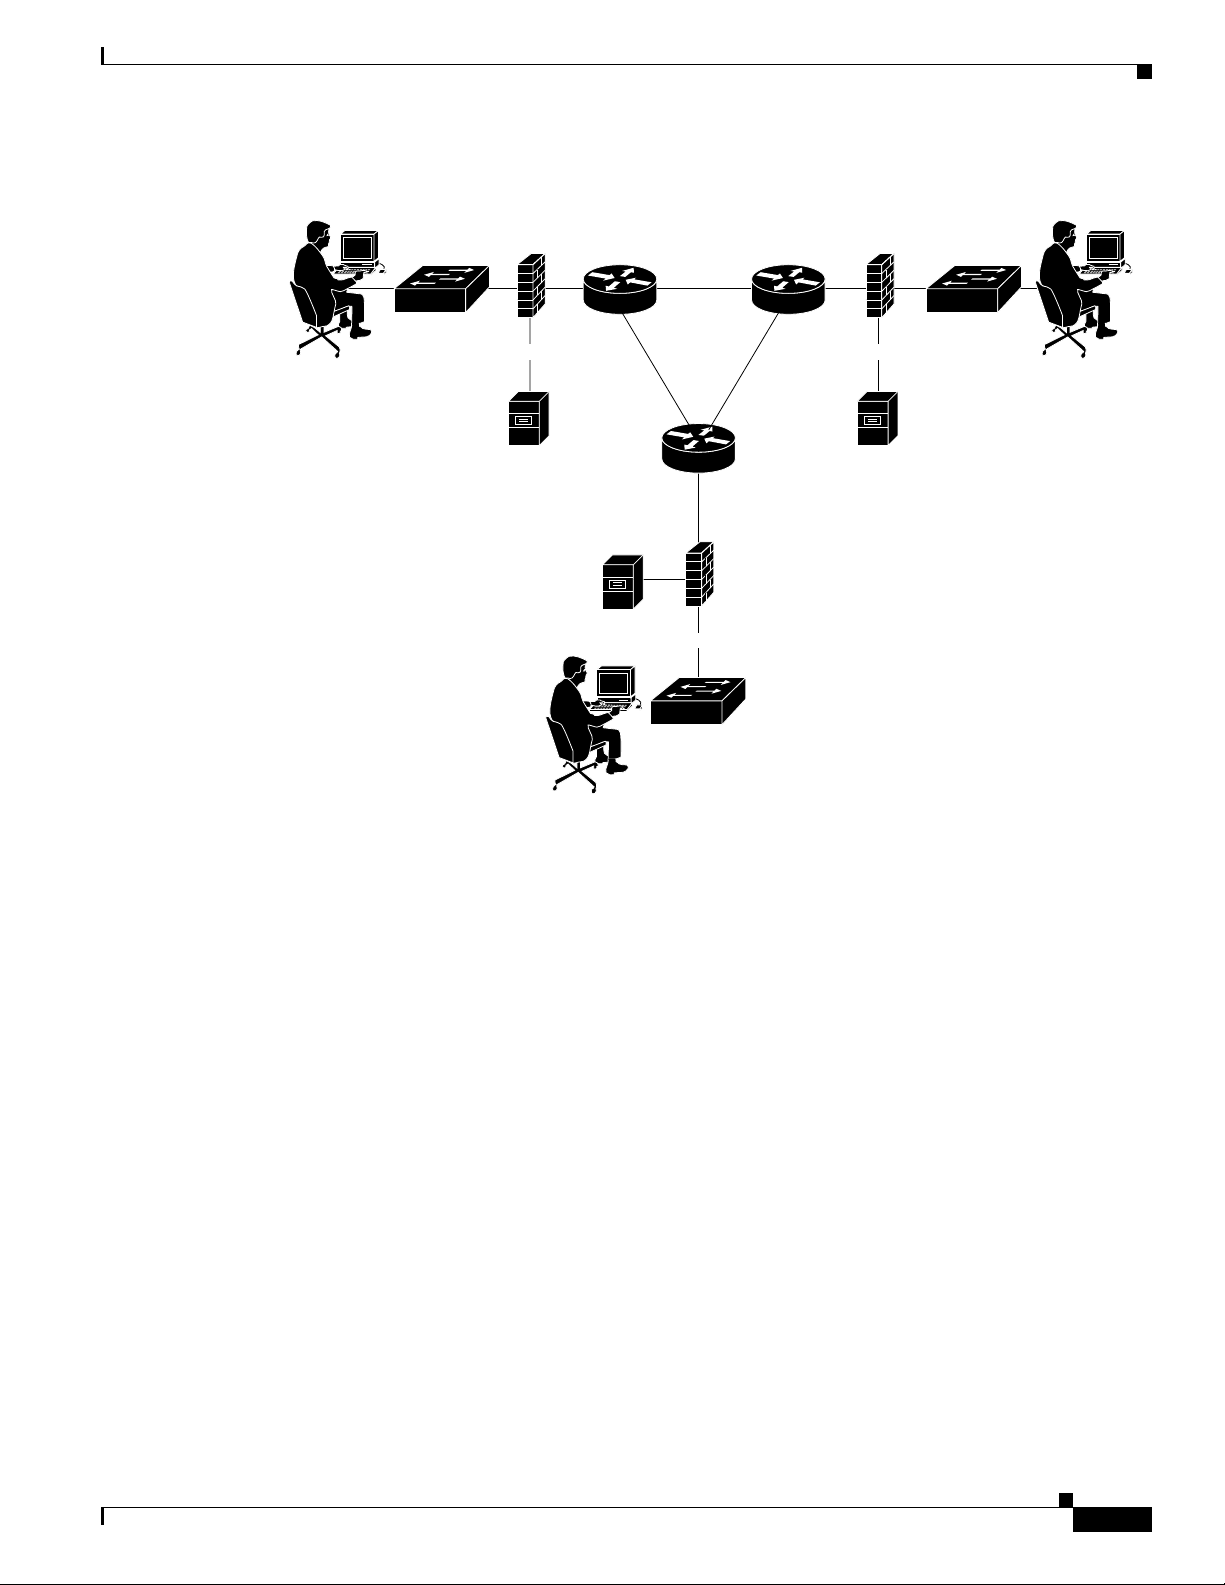
Figure 2-3 shows ACS deployed in a geographically dispersed wired LAN. In the illustration, Switch 1
is configured with ACS 1 as its primary AAA server but with ACS 2 of Region 2 as its secondary. Switch
2 is configured with ACS 2 as its primary but with ACS 3 as its secondary. Likewise, Switch 3 uses ACS
3 as its primary but ACS 1 as its secondary. Using a local ACS as the primary AAA server minimizes
AAA WAN traffic. When necessary, using the primary ACS from another region as the secondary further
minimizes the number of ACS units.
Configuration Guide for Cisco Secure ACS 4.2
OL-14390-02
Page 25
Chapter 2 Deploy the Access Control Servers
Figure 2-3 ACS in a Geographically Dispersed LAN
Determining the Deployment Architecture
Switch 1
Region 1
Firewall
ACS 1
T1 T1
ACS 3
Firewall
Switch 3
Region 3
Region 2
Switch 1
T1
Firewall
ACS 2
158313
Wireless Access Topology
A wireless access point (AP), such as the Cisco Aironet series, provides a bridged connection for mobile
end-user clients into the LAN. Authentication is absolutely necessary, due to the ease of access to the
AP. Encryption is also necessary because of the ease of eavesdropping on communications.
Scaling can be a serious issue in the wireless network. The mobility factor of the WLAN requires
considerations similar to those given to the dial-up network. Unlike the wired LAN, however, you can
more readily expand the WLAN. Though WLAN technology does have physical limits as to the number
of users who can connect via an AP, the number of APs can grow quickly. As with the dial-up network,
you can structure your WLAN to allow full access for all users, or provide restricted access to different
subnets among sites, buildings, floors, or rooms. This capability raises a unique issue with the WLAN:
the ability of a user to roam among APs.
Simple WLAN
A single AP might be installed in a simple WLAN (Figure 2-4). Because only one AP is present, the
primary issue is security. An environment such as this generally contains a small user base and few
network devices. Providing AAA services to the other devices on the network does not cause any
significant additional load on the ACS.
OL-14390-02
Configuration Guide for Cisco Secure ACS 4.2
2-5
Page 26
Determining the Deployment Architecture
Figure 2-4 Simple WLAN
Chapter 2 Deploy the Access Control Servers
Segment 1
A
Segment 3
A
Segment 2
A
Internet
Remote office
158308
Campus WLAN
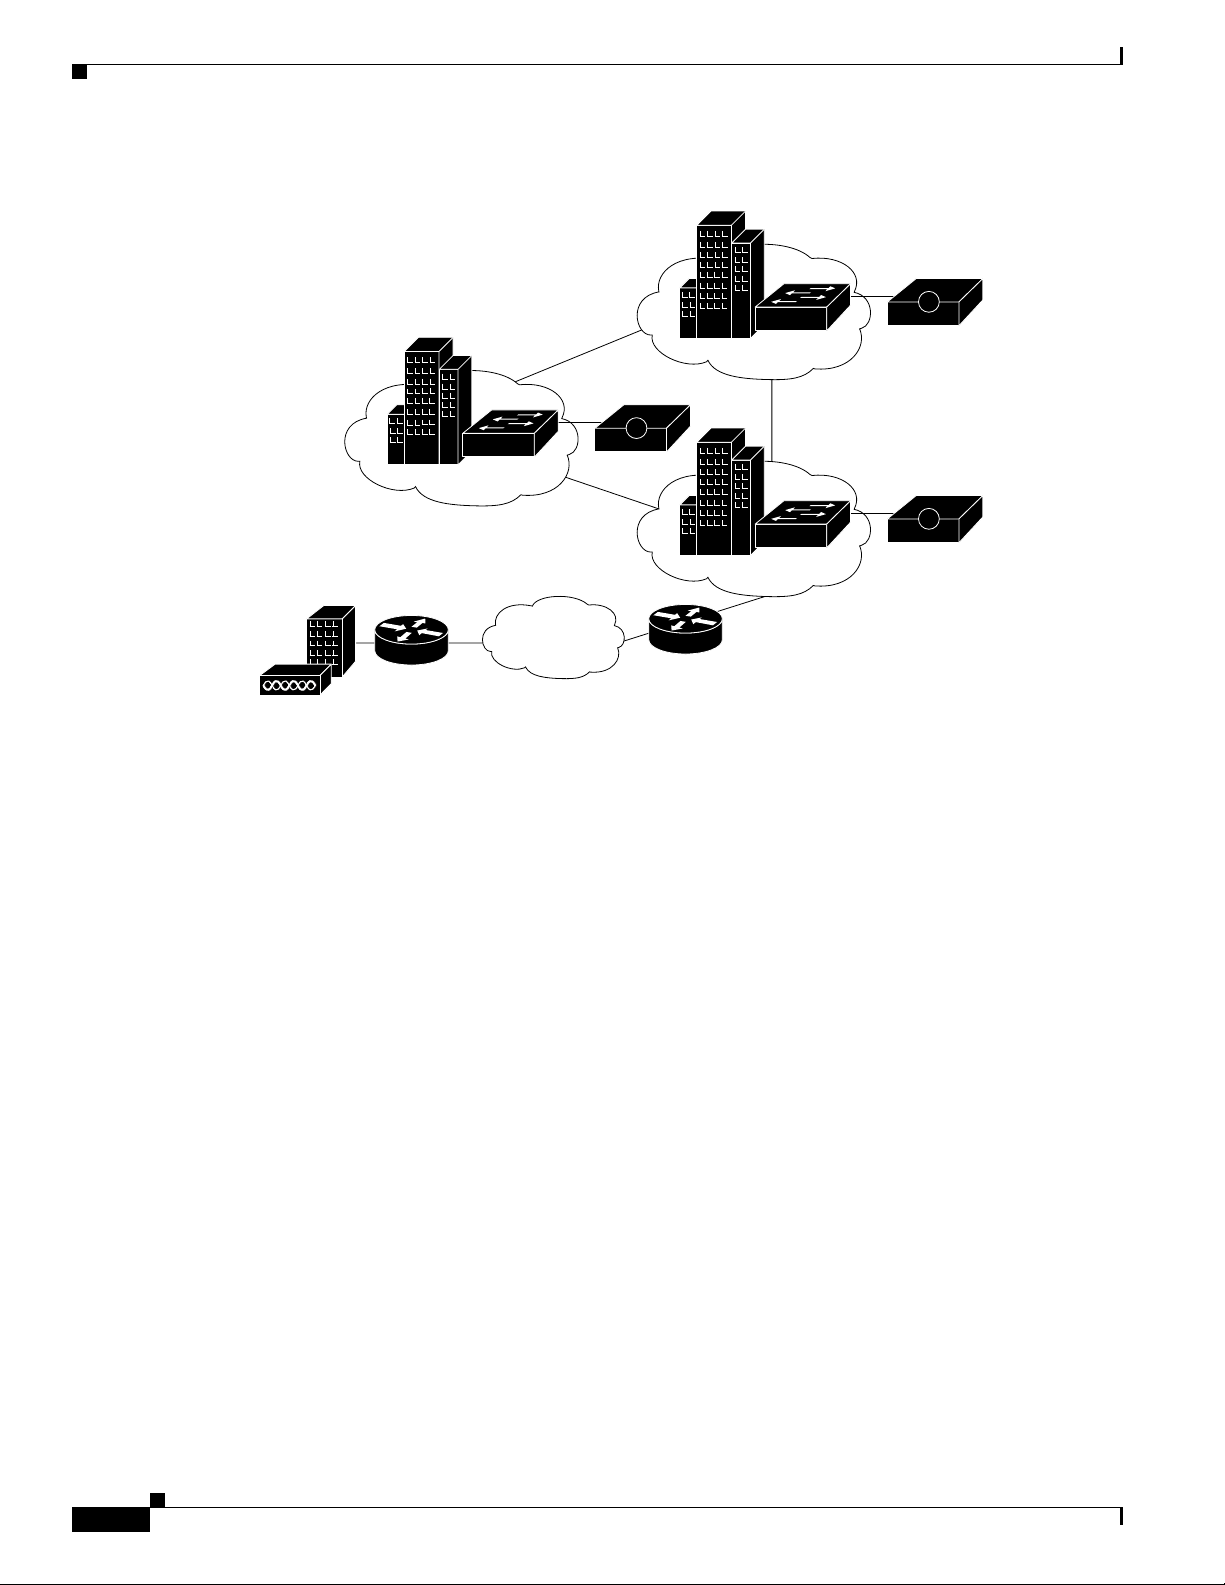
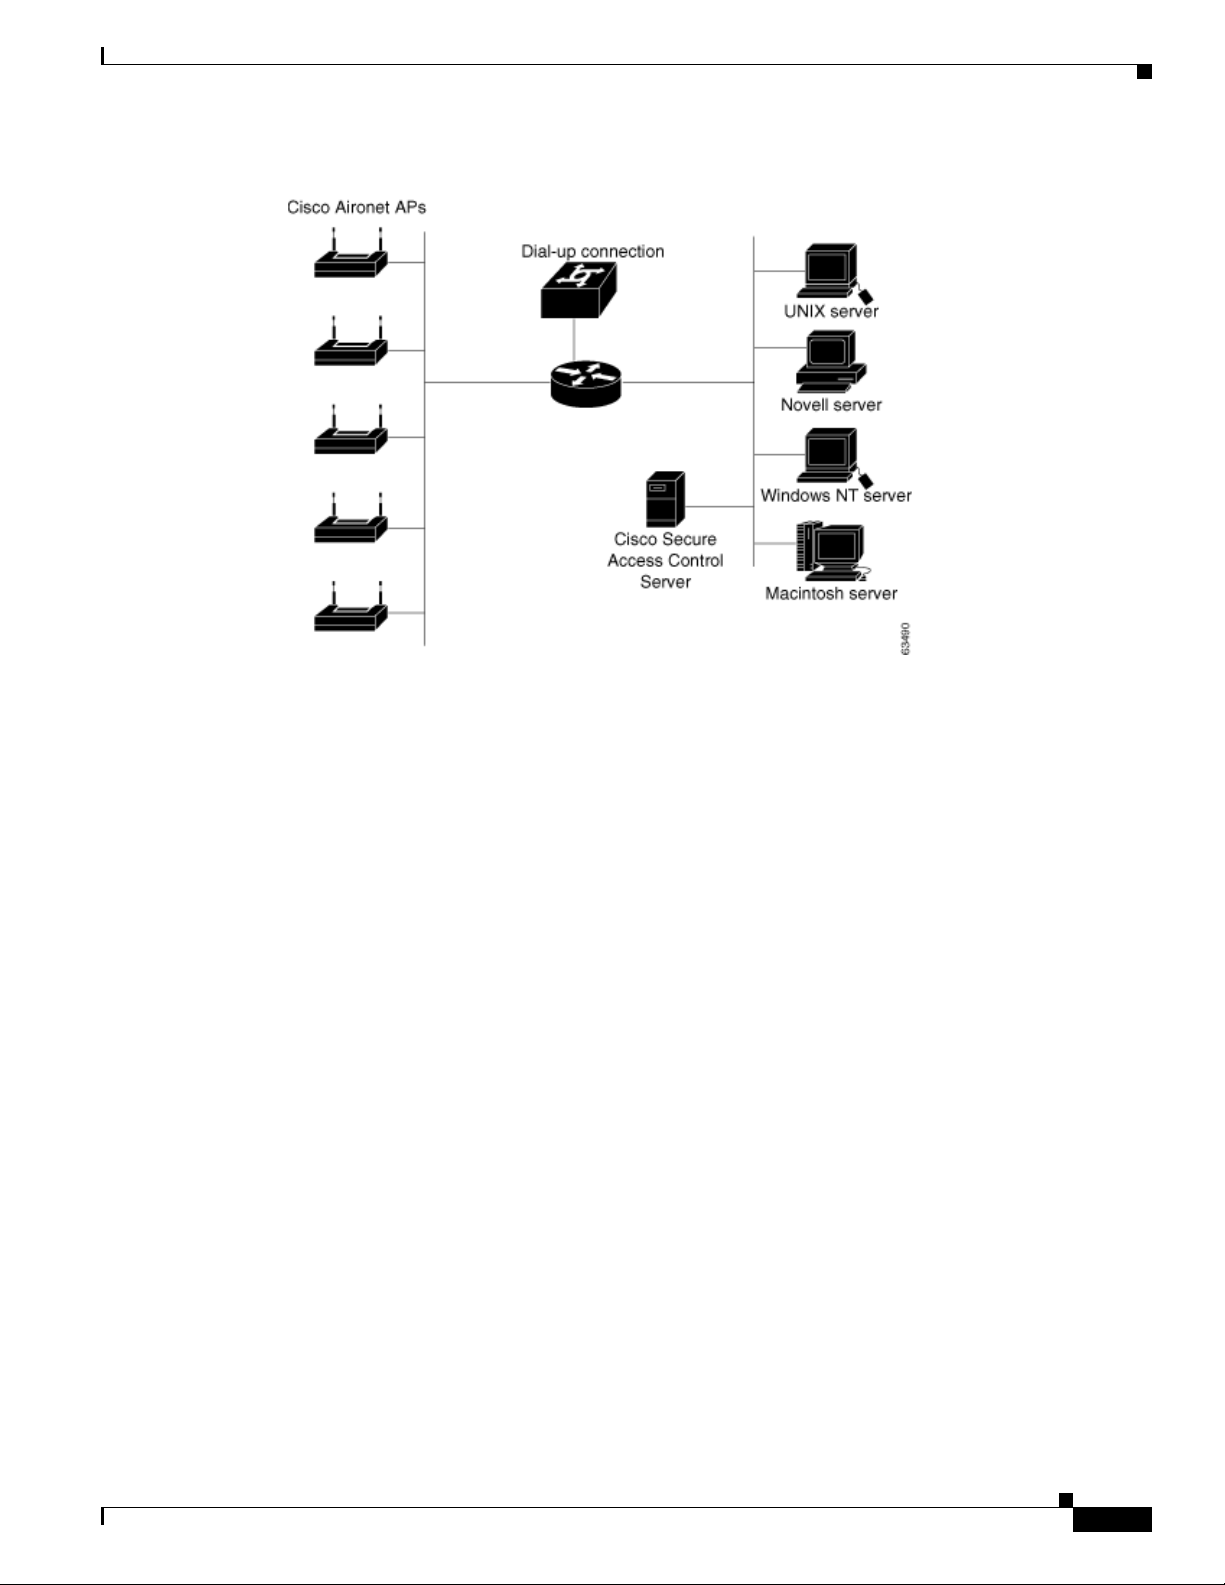
In a WLAN where a number of APs are deployed, as in a large building or a campus environment, your
decisions on how to deploy ACS become more complex. Depending on the processing needs of the
installation, all of the APs might be on the same LAN.
Figure 2-5 shows all APs on the same LAN;
however, the APs might also be distributed throughout the LAN, and connected via routers, switches,
and so on.
2-6
Configuration Guide for Cisco Secure ACS 4.2
OL-14390-02
Page 27
Chapter 2 Deploy the Access Control Servers
Figure 2-5 Campus WLAN
Determining the Deployment Architecture
Regional WLAN Setting
In a given geographical or organizational region, the total number of users might or might not reach a
critical level for a single ACS. Small offices would not qualify for separate installations of ACSs and a
regional office might have sufficient reserve capacity. In this case, the small offices can authenticate
users across the WAN to the larger regional office. Once again, you should determine that this does not
pose a risk to the users in the remote offices. Assess critical connectivity needs against the reliability and
throughput to the central ACS.
OL-14390-02
Configuration Guide for Cisco Secure ACS 4.2
2-7
Page 28
Determining the Deployment Architecture
Figure 2-6 shows a regional WLAN.
Figure 2-6 ACS in a Regional WLAN
Chapter 2 Deploy the Access Control Servers
Corporate Headquarters
Small
Remote
Office
Cisco Aironet
A
Cisco Secure ACS
Small
Remote
Office
Corporate Region
A
A
Internet
A
Regional
Office
158314
Large Enterprise WLAN Setting
In a very large geographically dispersed network (over 50,000 users), access servers might be located in
different parts of a city, in different cities, or on different continents. If network latency is not an issue,
a central ACS might work; but, connection reliability over long distances might cause problems. In this
case, local ACSs may be preferable to a central ACS.
If the need for a globally coherent user database is most important, database replication or
synchronization from a central ACS may be necessary. For information on database replication
considerations, see
Database Replication Considerations, page 2-13 and Database Synchronization
Considerations, page 2-14. Authentication by using external databases, such as a Windows user database
or the Lightweight Directory Access Protocol (LDAP), can further complicate the deployment of
distributed, localized ACSs.
2-8
Configuration Guide for Cisco Secure ACS 4.2
OL-14390-02
Page 29

Chapter 2 Deploy the Access Control Servers
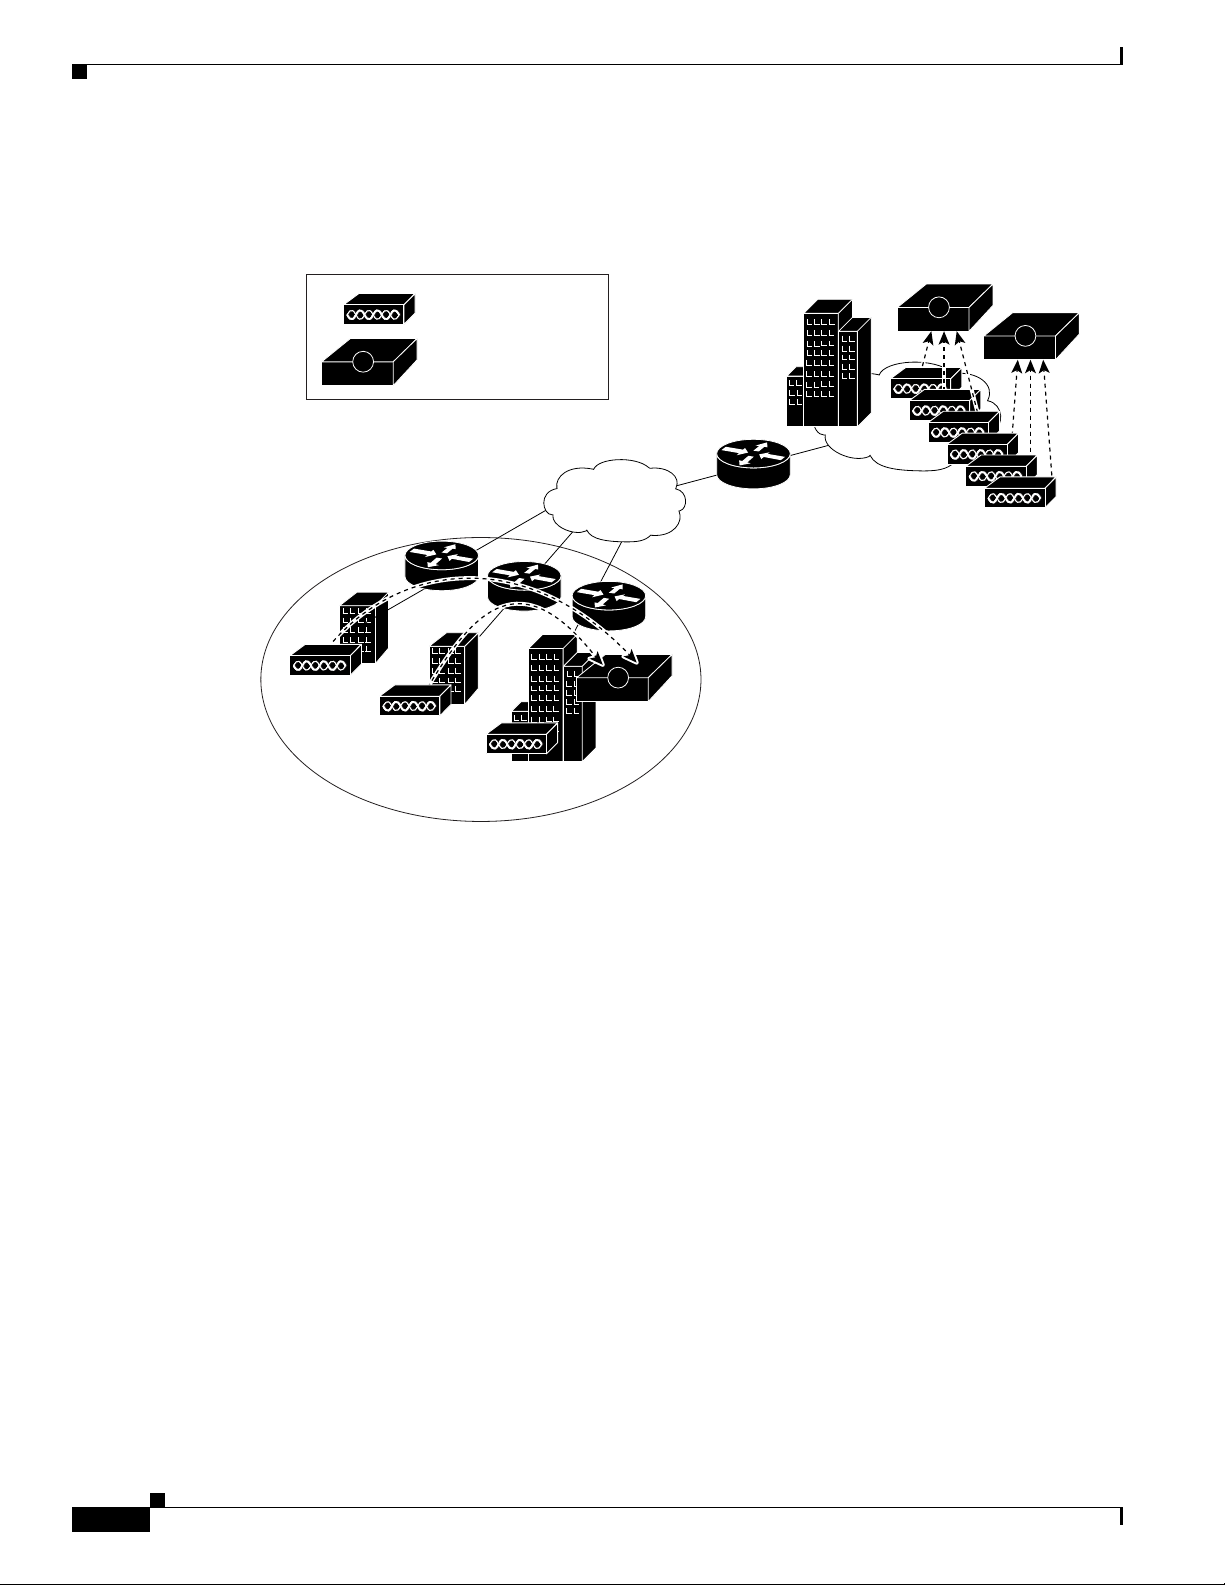
Figure 2-7 shows ACS installations in a geographically dispersed network that contains many WLANs.
Figure 2-7 ACS in a Geographically Dispersed WLAN
Determining the Deployment Architecture
I
For the model in Figure 2-7, the location of ACS depends on whether all users need access on any AP,
or require only regional or local network access. Along with database type, these factors control whether
local or regional ACSs are required, and how database continuity is maintained. In this very large
deployment model (over 50,000 users), security becomes a more complicated issue, too.
Additional Considerations for Deploying ACS in a WLAN Environment
You should also consider the following when deploying ACS in a WLAN environment, consider if:
• Wireless is secondary to wired access, using a remote ACS as a secondary system is acceptable.
• Wireless is the primary means of access, put a primary ACS in each LAN.
• The customer uses ACS for user configuration, data replication is critical.
Dial-up Access Topology
Until recently, dial-up access was the most prevalent method for providing remote access to network
resources. However, DSL access and access through VPNs have largely replaced dial-up access through
modems.
ACS is still used in some LAN environments to provide security for dial-up access. You can provide
dial-up access for a small LAN or for a large dial-in LAN.
Small Dial-Up Network Access
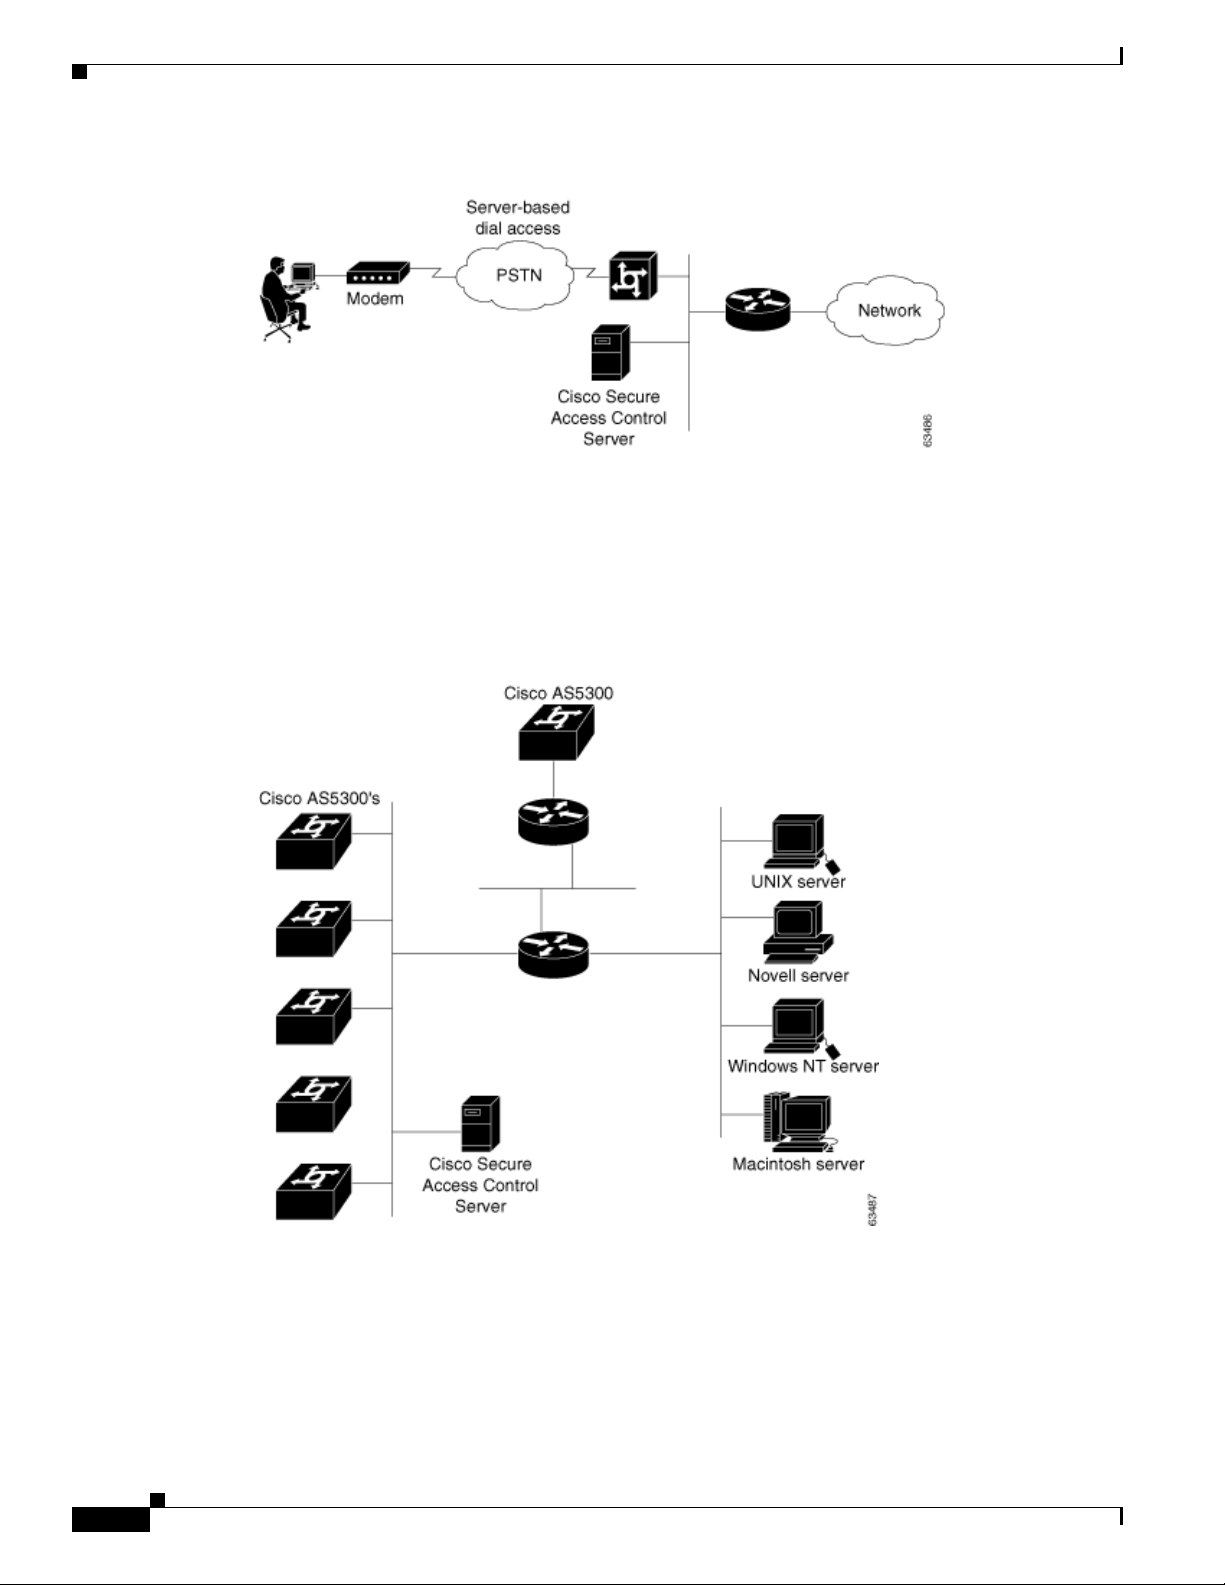
In the small LAN environment, see Figure 2-8, network architects typically place a single ACS internal
to the AAA client, which a firewall and the AAA client protect from outside access. In this environment,
the user database is usually small; because, few devices require access to the ACS for authentication,
authorization and accounting (AAA), and any database replication is limited to a secondary ACS as a
backup.
63491
OL-14390-02
Configuration Guide for Cisco Secure ACS 4.2
2-9
Page 30
Determining the Deployment Architecture
Figure 2-8 Small Dial-up Network
Large Dial-Up Network Access
In a larger dial-in environment, a single ACS with a backup may be suitable, too. The suitability of this
configuration depends on network and server access latency.
dial-in network. In this scenario, the addition of a backup ACS is recommended.
Chapter 2 Deploy the Access Control Servers
Figure 2-9 shows an example of a large
Figure 2-9 Large Dial-up Network
2-10
Configuration Guide for Cisco Secure ACS 4.2
OL-14390-02
Page 31

Chapter 2 Deploy the Access Control Servers
Determining How Many ACSs to Deploy (Scalability)
Placement of the RADIUS Server
From a practical standpoint, the RADIUS server should be inside the general network, preferably within
a secure subnet designated for servers, such as DHCP, Domain Name System (DNS), and so on. You
should avoid requiring RADIUS requests to travel over WAN connections because of possible network
delays and loss of connectivity. Due to various reasons, this type of configuration is not always possible;
for example, with small remote subnets that require authentication support from the enterprise.
You must also consider backup authentication. You may use a system that is dedicated as the RADIUS
secondary. Or, you may have two synchronized systems that each support a different network segment
but provide mutual backup if one fails. Refer to the documentation for your RADIUS server for
information on database replication and the use of external databases.
Determining How Many ACSs to Deploy (Scalability)
A number of factors affect the scalability of an ACS installation (that is, how effectively each ACS can
process user access requests) and how many ACS servers you should deploy in the network.
For detailed information on scalability considerations, see the following white papers on ACS
deployment, which are available on Cisco.com at:
http://www.cisco.com/en/US/products/sw/secursw/ps2086/prod_white_papers_list.html
• Building a Scalable TACACS+ Device Management Framework
• Catalyst Switching and ACS Deployment Guide
• Deploying Cisco Secure ACS for Windows in Cisco Aironet Environment
• EAP-TLS Deployment Guide for Wireless LAN Networks
• Guidelines for Placing ACS in the Network
This section contains:
• Number of Users, page 2-11
• Number of Network Access Servers, page 2-12
• LAN Versus WAN Deployment (Number of LANs in the Network), page 2-12
• WAN Latency and Dependability, page 2-12
• Determining How Many ACS Servers to Deploy in Wireless Networks, page 2-13
Number of Users
In all topologies, the number of users is an important consideration. For example, assuming that an ACS
can support 21,000 users, if an wireless access point can support 10 users, then a given ACS could
support 2,100 wireless access points in a WLAN environment.
OL-14390-02
Configuration Guide for Cisco Secure ACS 4.2
2-11
Page 32

Determining How Many ACSs to Deploy (Scalability)
The size of the LAN or WLAN is determined by the number of users who use the LAN or WLAN:
Size Users
Small LAN 1 to 3,000
Medium-sized LAN 3,000 to 25,000
Large LAN 25,000 to 50,000
Very large LAN or WLAN Over 50,000
For a detailed formula, see the white paper Deploying Cisco Secure ACS for Windows in Cisco Aironet
Environment, which is available on Cisco.com at this location:
http://www.cisco.com/en/US/products/sw/secursw/ps2086/prod_white_papers_list.html
Number of Network Access Servers
An ACS can support up 5,000 discrete network access servers (NASs). You can use the multi-NAS
capability of ACS to increase this number.
Chapter 2 Deploy the Access Control Servers
LAN Versus WAN Deployment (Number of LANs in the Network)
In general, you should provide one ACS server per LAN. If a backup ACS is required, the backup ACS
may reside on the same LAN or can be an ACS on another LAN.
WAN Latency and Dependability
The distance between LANs in a large network (25,000 to 50,000 users) is also a consideration.
If the network is centralized, one primary ACS and one secondary ACS might be sufficient.
If the network is geographically dispersed, the number of ACS servers required varies with the needs of
the regions. For example:
• Some regions may not need a dedicated ACS.
• Larger regions (regions with over 10,000 users), such as corporate headquarters, might need several
ACSs.
The distance between subnets is also a consideration. If subnets are close together, the connections will
be more reliable, and fewer ACS servers will be needed. Adjacent subnets could serve other buildings
with reliable connections. If the subnets are farther apart, more ACS servers might be needed.
The number of subnets and the number of users on each subnet is also a factor. For example, in a WLAN,
a building may have 400 potential users and the same subnet might comprise four buildings. One ACS
assigned to this subnet will service 1,600 users (about one tenth of the number of current users). Other
buildings could be on adjacent subnets with reliable WAN connections. ACSs on adjacent subnets could
then be used as secondary systems for backup.
If the WAN connections between buildings in this subnet are short, reliable, and pose no issue of network
latency, two ACSs can service all of these buildings and all the users. At 40-percent load, one ACS would
take half of the access points as the primary server, and the other ACS would take the remaining APs.
Each ACS would provide backup for the other. Again, at 40-percent load, a failure of one ACS would
2-12
Configuration Guide for Cisco Secure ACS 4.2
OL-14390-02
Page 33

Chapter 2 Deploy the Access Control Servers
Deploying ACS Servers to Support Server Failover
only create an 80-percent load on the other ACS for the duration of the outage. If the WAN is not suitable
for authentication connections, we recommend using two or more ACSs on the LAN in a primary or
secondary mode or load balanced.
Determining How Many ACS Servers to Deploy in Wireless Networks
In planning how many ACS servers to deploy in a wireless network, consider:
• The location and number of access points. For example, with 4,200 APs:
–
One ACS could handle half of the APs as primary server.
–
Other ACSs could handle the remaining APs.
• The number of EAP-TLS clients together with EAP-TLS authentications per second
• The number of clients
• Scalability with different protocols
For example, if you use EAP-TLS, you will need more ACS servers; but, if you use PEAP, you will
need fewer. EAP-TLS is slower than PEAP due to public-key infrastructure (PKI) processing time.
For a detailed formula that you can be use to calculate the number of ACS servers required in a wireless
network, see the white paper titled Deploying Cisco Secure ACS for Windows in an Aironet Environment,
available on Cisco.com at:
http://www.cisco.com/en/US/products/sw/secursw/ps2086/prod_white_papers_list.html
Deploying ACS Servers to Support Server Failover
This section discusses deployment topologies for implementing server failover. This section contains:
• Load Balancing and Failover, page 2-13
• Database Replication Considerations, page 2-13
• Database Synchronization Considerations, page 2-14
Load Balancing and Failover
To implement load balancing, you can set up user groups and then assign groups to a specific
RADIUS server (usually the nearest RADIUS server).
Database Replication Considerations
OL-14390-02
Database replication replicates selected database information, such as user and group information, from
a primary ACS to one or more ACS backups or clients. The following aspects of replication are
configurable with ACS:
• Configuration components for replication—What is replicated.
• Replication scheduling—When replication occurs.
• Replication frequency—How often systems are replicated.
• Replication partners—Which systems are replicated.
Configuration Guide for Cisco Secure ACS 4.2
2-13
Page 34

Deploying ACS Servers to Support Server Failover
Secondary
remote-system
California
• Client configuration—How to configure the client.
• Reports and event (error) handling—What information to include in the logs.
Replication Design
Because database replication in a ACS is a top-down approach, using the cascade method minimizes
replication-induced downtime on the master server. If the primary server is not used for authentication
services, but for database maintenance only, the cascade method may not be as critical.
However, when traveling across time zones, particularly international time zones, it may be necessary to
use the cascade method going to remote secondaries. In this case, when you configure database
replication on the Database replication setup page, click At specific times instead of Automatically
triggered cascade.
Use the automatically triggered cascade method so that local replication occurs during a time that will
minimize the impact on user authentication. During these long-distance replications, replicating to the
backup or secondary server first also helps reduce this impact.
deployment for replication where each region has a primary and a secondary ACS deployed. In this
scenario, replication is made to the secondary servers to avoid replication downtime to the primary, but,
may not be needed if the primary is used mainly for database maintenance but not for authentication.
Chapter 2 Deploy the Access Control Servers
Figure 2-10 shows a hypothetical
Figure 2-10 ACS Database Replication Scenario
Master
system 1
secondary
A
Master/
system 2
Secondary
A
system 2
A
California
Database Synchronization Considerations
An alternative to database replication is the use of Relational Database Management System (RDBMS)
synchronization. You use the RDBMS synchronization feature to update the ACS user database with
information from an Open Database Connectivity (ODBC)-compliant data source. The
ODBC-compliant data source can be the RDBMS database of a third-party application. It can also be an
intermediate file or database that a third-party system updates. Regardless of where the file or database
resides, ACS reads the file or database via the ODBC connection. RDBMS synchronization supports
addition, modification, and deletion for all data items it can access.
China
A
Secondary
remote-system
158371
2-14
Configuration Guide for Cisco Secure ACS 4.2
OL-14390-02
Page 35

Chapter 2 Deploy the Access Control Servers
Deploying ACS in a NAC/NAP Environment
You can deploy ACS in a Cisco Network Admission Control and Microsoft Network Access Protection
(NAC/NAP) environment. In the NAC/NAP environment, NAP client computers authorize with ACS by
using EAP over UDP (EoU) or EAP over 802.1x.
Table 2-1 describes the components of a NAC/NAP deployment.
Ta b l e 2-1 Components of a NAC/NAP Deployment
Component Description
NAP client A computer running Windows Vista or Windows Server 2008. NAP
clients send their health credentials as Statements of Health (SoHs) or
as a health certificate.
NAP agent A process running on a NAP client that sends SoHs or health
certificates to ACS.
Network access devices Cisco devices through which you can access the network, such as
routers, switches, wireless access points, and VPN concentrators.
ACS Cisco AAA server product.
Network Policy Server (NPS) A Microsoft server that validates health certificates from NAP clients
and provides remediation instructions if needed.
Health Registration Authority A Microsoft certificate server that obtains health certificates on
behalf of NAP clients from a public key infrastructure (PKI).
Policy Servers Servers that provide current system health state for Microsoft NPSs.
Deploying ACS in a NAC/NAP Environment
When a NAP client connects, it uses a NAP agent to send ACS one of the following:
• A list of SoHs.
• A certificate that the client has received from a Microsoft Health Registration Authority (HRA).
The ACS host validates the client credentials. If the NAP agent sends a:
• List of SoHs, the ACS sends the list to a Microsoft NPS by using the Cisco Host Credentials
Authorization Protocol (HCAP). The NPS evaluates the SoHs. The ACS then sends an appropriate
NAP to the network access device (switch, router, VPN, and so on) to grant the authorized level of
access to the client.
• Health certificate rather than a list of SoHs, then ACS validates the certificate as the EAP-FAST
session is established to determine the overall health of the client. The ACS then sends the
appropriate NAP to the network to grant the authorized level of access to the client.
OL-14390-02
Configuration Guide for Cisco Secure ACS 4.2
2-15
Page 36

Additional Topics
Chapter 2 Deploy the Access Control Servers
Figure 2-11 illustrates the architecture of a NAC/NAP network.
Figure 2-11 NAC/NAP Deployment Architecture
NAP client
System Health Agents
NAP agent
EAP Host
EAP-Host
NAP
Enforcement
Client
EAP over
802.1X
Supplicant
Supplicant
Other
EAP
types
UDP
Cisco switches and routers
EAP-FAST over
802.1X or UDP
carrying the list
of SoHs or a
health certificate
Health Registration
Authority (HRA)
HCAP
Cisco ACS
(Network Access)
RADIUS
Microsoft NPS
(System Health)
RADIUS
Policy
Servers
Additional Topics
This section describes additional topics to consider when deploying ACS. This section contains:
• Remote Access Policy, page 2-16
• Security Policy, page 2-17
• Administrative Access Policy, page 2-17
• Database Considerations, page 2-19
• Network Latency and Reliability, page 2-19
Remote Access Policy
Remote access is a broad concept. In general, it defines how the user can connect to the LAN, or from
the LAN to outside resources (that is, the Internet). Connectivity is possible in many ways: dial-in,
ISDN, wireless bridges, and secure Internet connections. Each method incurs its own advantages and
disadvantages, and provides a unique challenge to providing AAA services. In addition to the method of
270297
2-16
Configuration Guide for Cisco Secure ACS 4.2
OL-14390-02
Page 37

Chapter 2 Deploy the Access Control Servers
access, other decisions can also affect how ACS is deployed; these include specific network routing
(access lists), time-of-day access, individual restrictions on AAA client access, access control lists
(ACLs), and so on.
You can implement remote-access policies for employees who telecommute, or mobile users who dial
in over ISDN or a public switched telephone network (PSTN). Such policies are enforced at the
corporate campus with ACS and the AAA client. Inside the enterprise network, remote-access policies
can control wireless access by individual employees.
ACS remote-access policies provide control by using central authentication and authorization of remote
users. The Cisco user database maintains all user IDs, passwords, and privileges. You can download ACS
policies in the form of ACLs to network access servers such as the Cisco AS5300 Network Access
Server, or by allowing access during specific periods, or on specific access servers.
Remote-access policies are part of the overall Cisco corporate security policy.
Security Policy
Every organization that maintains a network should develop a security policy for the organization. The
sophistication, nature, and scope of your security policy directly affect how you deploy ACS.
For more information about developing and maintaining a comprehensive security policy, refer to these
documents:
Additional Topics
• Network Security Policy: Best Practices White Paper
• Cisco IOS Security Configuration Guide
Administrative Access Policy
Managing a network is a matter of scale. Providing a policy for administrative access to network devices
depends directly on the size of the network and the number of administrators required to maintain the
network. A network device can be authenticated locally; but, this ability is not scalable. The use of
network management tools can help in large networks (25,000 to 50,000 users); but, if local
authentication is used on each network device, the policy usually entails a single login on the network
device. A single login on the network device does not provide adequate network device security.
ACS provides a centralized administrator database, and you can add or delete administrators at one
location. TACACS+ is the recommended AAA protocol for controlling AAA client administrative access
because of its ability to provide per-command control (command authorization) of AAA client
administrator access to the device. RADIUS is not well suited for this purpose because of the one-time
transfer of authorization information at the time of initial authentication.
The type of access is also an important consideration. In the case of different administrative access levels
to the AAA clients, or if a subset of administrators is to be limited to certain systems, you can use ACS
with command authorization per network device to restrict network administrators as necessary. Using
local authentication restricts the administrative access policy to no login on a device or by using privilege
levels to control access.
Controlling access by means of privilege levels is cumbersome and not very scalable. Such control
requires altering the privilege levels of specific commands on the AAA client device and defining
specific privilege levels for the user login. You can easily create more problems by editing command
privilege levels. Using command authorization on ACS does not require that you alter the privilege level
of controlled commands. The AAA client sends the command to ACS to be parsed and ACS determines
whether the administrator has permission to use the command. The use of AAA allows authentication
on any AAA client for any user on ACS and limits access to these devices on a per-AAA-client basis.
OL-14390-02
Configuration Guide for Cisco Secure ACS 4.2
2-17
Page 38

Additional Topics
Chapter 2 Deploy the Access Control Servers
A small network with a small number of network devices may require only one or two individuals to
administer it. Local authentication on the device is usually sufficient. If you require more granular
control than what authentication can provide, some means of authorization is necessary. As discussed
earlier, controlling access by using privilege levels can be cumbersome. ACS reduces this problem.
In large enterprise networks, with many devices to administer, the use of ACS practically becomes a
necessity. Because administration of many devices requires a larger number of network administrators,
with varying levels of access, the use of local control is simply not a viable way to track network-device
configuration changes that are required when changing administrators or devices.
The use of network management tools, such as CiscoWorks, helps to ease this burden; but, maintaining
security is still an issue. Because ACS can comfortably handle up to 300,000 users, the number of
network administrators that ACS supports is rarely an issue. If a large remote-access population is using
RADIUS for AAA support, the corporate IT team should consider separate TACACS+ authentication by
using ACS for the administrative team. Separate TACACS+ authentication would isolate the general user
population from the administrative team and reduce the likelihood of inadvertent access to network
devices. If the use of TACACS+ is not a suitable solution, using TACACS+ for administrative (shell or
exec) logins, and RADIUS for remote network access, provides sufficient security for the network
devices.
Separation of Administrative and General Users
You should prevent the general network user from accessing network devices. Even though the general
user may not intend to gain unauthorized access, inadvertent access could accidentally disrupt network
access. AAA and ACS provide the means to separate the general user from the administrative user.
The easiest and recommended method to perform such separation is to use RADIUS for the general
remote-access user and TACACS+ for the administrative user. One issue is that an administrator may
also require remote network access, like the general user. If you use ACS, this issue poses no problem.
The administrator can have RADIUS and TACACS+ configurations in ACS. By using authorization,
RADIUS users can set PPP (or other network access protocols) as the permitted protocol. Under
TACACS+, only the administrator would be configured to have shell (exec) access.
For example, if the administrator is dialing in to the network as a general user, a AAA client would use
RADIUS as the authenticating and authorizing protocol, and the PPP protocol would be authorized. In
turn, if the same administrator remotely connects to a AAA client to make configuration changes, the
AAA client would use the TACACS+ protocol for authentication and authorization. Because this
administrator is configured on ACS with permission for shell under TACACS+, the administrator would
be authorized to log in to that device. This does require that the AAA client have two separate
configurations on ACS, one for RADIUS and one for TACACS+.
An example of a AAA client configuration under IOS that effectively separates PPP and shell logins is:
aaa new-model
tacacs-server host ip-address
tacacs-server key secret-key
radius-server host ip-address
radius-server key secret-key
aaa authentication ppp default group radius
aaa authentication login default group tacacs+ local
aaa authentication login console none
aaa authorization network default group radius
aaa authorization exec default group tacacs+ none
aaa authorization command 15 default group tacacs+ none
username user password password
line con 0
login authentication console
2-18
Configuration Guide for Cisco Secure ACS 4.2
OL-14390-02
Page 39

Chapter 2 Deploy the Access Control Servers
Conversely, if a general user attempts to use his or her remote access to log in to a network device, ACS
checks and approves the username and password; but, the authorization process would fail because that
user would not have credentials that allow shell or exec access to the device.
Database Considerations
Aside from topological considerations, the user database is one of the most influential factors in
deployment decisions for ACS. The size of the user base, distribution of users throughout the network,
access requirements, and type of user database are all factors to consider when you decide how to deploy
ACS.
Number of Users
ACS is designed for the enterprise environment, and can handle 300,000 users. This capacity is usually
more than adequate for a corporation. In an environment that exceeds these numbers, the user base would
typically be geographically dispersed, which requires the use of more than one ACS configuration. A
WAN failure could render a local network inaccessible because of the loss of the authentication server.
In addition, reducing the number of users that a single ACS handles improves performance by lowering
the number of logins occurring at any given time and reducing the load on the database.
Additional Topics
Type of Database
ACS supports several database options, including the ACS internal database or by using remote
authentication with any of the external databases that ACS supports. Each database option has its own
advantages and limitations in scalability and performance.
Network Latency and Reliability
Network latency and reliability are also important factors in how you deploy ACS. Delays in
authentication can result in timeouts for the end-user client or the AAA client.
The general rule for large, extended networks, such as those in a globally dispersed corporation, is to
have at least one ACS deployed in each region. This configuration may not be adequate without a
reliable, high-speed connection between sites. Many corporations use secure VPN connections between
sites so that the Internet provides the link. Although this option saves time and money, it does not provide
the speed and reliability of a dedicated frame relay or T1 link. If a reliable authentication service is
critical to business functionality, such as a WLAN of retail outlets with cash registers that are linked by
a WLAN, the loss of WAN connection to a remote ACS could be catastrophic.
The same issue can be applied to an external database that ACS uses. You should deploy the database
close enough to ACS to ensure reliable and timely access. Using a local ACS with a remote database can
result in the same problems as using a remote ACS. Another possible problem in this scenario is that a
user may experience timeout problems. The AAA client would be able to contact ACS; but, ACS would
wait for a reply that might be delayed or never arrive from the external user database. If the ACS were
remote, the AAA client would time out and try an alternate method to authenticate the user; but, in the
latter case, it is likely the end-user client would time out first.
OL-14390-02
Configuration Guide for Cisco Secure ACS 4.2
2-19
Page 40

Additional Topics
Chapter 2 Deploy the Access Control Servers
2-20
Configuration Guide for Cisco Secure ACS 4.2
OL-14390-02
Page 41

CHAP T ER
3
Configuring New Features in ACS 4.2
This chapter describes how to configure several new features provided with ACS 4.2.
For information on new features that accompany both ACS for Windows and the ACS SE, see:
• New Global EAP-FAST Configuration Options, page 3-1
• Disabling of EAP-FAST PAC Processing in Network Access Profiles, page 3-3
• Disabling NetBIOS, page 3-4
• Configuring ACS 4.2 Enhanced Logging Features, page 3-5
• Configuring Group Filtering at the NAP Level, page 3-6
• Option to Not Log or Store Dynamic Users, page 3-7
• Active Directory Multi-Forest Support, page 3-7
For information on new features that accompany ACS SE only, see:
• Configuring Syslog Time Format in ACS 4.2, page 3-7
• RSA Support on the ACS SE, page 3-8
• Turning Ping On and Off, page 3-16
New Global EAP-FAST Configuration Options
The EAP-FAST Configuration page in the Global Authentication Setup section contains several new
options.
Figure 3-1 shows the new options on the EAP-FAST Configuration page.
OL-14390-02
Configuration Guide for Cisco Secure ACS 4.2
3-1
Page 42

New Global EAP-FAST Configuration Options
Figure 3-1 New Global EAP-FAST Configuration Options
Chapter 3 Configuring New Features in ACS 4.2
Table 3-1 describes the new EAP-FAST settings.
Ta b l e 3-1 New EAP-FAST Global Configuration Settings with Release 4.2
Option Description
Allow Full TLS Renegotiation in Case of Invalid
PAC
This option handles cases of an invalid or expired
PAC. In this situation, the EAP server can select a
different cipher than the one normally used with
the invalid PAC to start the full TLS handshake
and authentication.
Check the Allow Full TLS Renegotiation in Case
of Invalid PAC check box if you have clients that
might attempt to authenticate by using certificates
that are unusually old.
Allow Anonymous In-band PAC Provisioning ACS provisions an end-user client with a PAC
using EAP-FAST phase zero. If you check this
check box, ACS establishes a secured connection
with the end-user client to provide the client with
a new PAC.
Enable anonymous TLS renegotiation If you check the Allow Anonymous in-band PAC
Provisioning check box, you can also check the
Enable anonymous TLS renegotiation check box.
Check the Enable anonymous TLS renegotiation
check box if your network contains Vista clients,
to prevent Vista users from being prompted twice
for their password.
3-2
Configuration Guide for Cisco Secure ACS 4.2
OL-14390-02
Page 43

Chapter 3 Configuring New Features in ACS 4.2
Disabling of EAP-FAST PAC Processing in Network Access Profiles
Disabling of EAP-FAST PAC Processing in Network Access
Profiles
In the Protocols section for Network Access Profile (NAP) configuration, you can now set up a NAP that
causes ACS to use EAP-FAST but not issue or accept tunnel or machine PACs.
Figure 3-2 shows the EAP-FAST section of the NAP Protocols page for ACS 4.2.
Figure 3-2 Use PAC and Do Not Use PAC Options
OL-14390-02
Configuration Guide for Cisco Secure ACS 4.2
3-3
Page 44

Disabling NetBIOS
Chapter 3 Configuring New Features in ACS 4.2
Figure 3-2 shows the new options on the NAP Protocols page.
Ta b l e 3-2 New Options on the NAP Protocols Page
Option Description:
Use PACs Click the Use PACs radio button if you want ACS to
authenticate clients to which this NAP is applied by using
EAP-FAST with PACs enabled.
If you click the Use PACs radio button, then the same
EAP-FAST configuration options that are available in the
global EAP-FAST configuration are available.
Do Not Use PACs Click the Do Not Use PACs radio button if you want ACS to
authenticate clients to which this NAP is applied by using
EAP-FAST without PACs enabled.
Require Client Certificate If you click the Do Not Use PACs radio button, the Require
Client Certificate option is available. Choose this option to
require a client certification for EAP-FAST tunnel
establishment.
Disable Client Certificate Lookup
and Comparisons
Assign Group If you check the Disable Client Certificate Lookup and
If you click the Do Not Use PACs radio button, you can check
the Disable Client Certificate Lookup and Comparisons check
box to disable client certificate lookup and to enable
EAP-FAST PKI Authorization Bypass.
If you check the Disable Client Certificate Lookup and
Comparisons check box, ACS establishes an EAP-FAST
tunnel without authorizing the user based on user group data or
a public key infrastructure (PKI) certificate in a user database;
instead, ACS maps the user to a preconfigured user group.
Comparisons check box; then, from the drop-down list of user
groups in the Assign Group field, select a user group to apply
to the client.
Disabling NetBIOS
Because disabling NetBIOS might be desirable in some cases, you can run ACS 4.2 with NetBIOS
disabled.
ACS SE 4.2 runs on a customized version of Windows 2003 that includes some but not all Windows 2003
services.
Note Although you can use Windows 2000, Windows XP, and Windows Server 2003 to disable NetBIOS over
TCP/IP (NetBT), many corporate networks do not, since most of them still have legacy (Windows 9.x or
Windows NT) machines on their network. These machines need NetBIOS to function properly on a
network, since they use NetBIOS to log in to domains, find one another, and establish sessions for
accessing shared resources.
Configuration Guide for Cisco Secure ACS 4.2
3-4
OL-14390-02
Page 45

Chapter 3 Configuring New Features in ACS 4.2
To disable NetBIOS over TCP/ IP in Windows 2000, XP, or 2003:
Step 1 Right-click My Network Places and choose Properties.
Step 2 Right-click the appropriate Local Area Connection icon, and click Properties.
Step 3 Click Internet Protocol (TCP/IP) and choose Properties.
Step 4 Click Advanced, and click the WINS tab.
Step 5 On the WINS tab, enable or disable NetBIOS over TCP/IP.
The changes take effect immediately without rebooting the system.
Optionally, if you are using a DHCP server that can selectively enable and disable NetBIOS
configurations through DHCP option types, you can choose the Use NetBIOS setting from the DHCP
server. NetBIOS over TCP/IP can also be disabled for computers that are running Windows 2000/2003
by using the advanced DHCP option types that are supported by the Windows 2000/2003 DHCP Server
service.
Configuring ACS 4.2 Enhanced Logging Features
Note Computers that are running an operating system prior to Windows 2000 will be unable to browse, locate,
or create file and print share connections to a Windows 2000/XP/2003 computer with NetBIOS disabled.
Configuring ACS 4.2 Enhanced Logging Features
ACS 4.2 provides several new logging features. When you configure the CSV Failed Attempts and
Passed Authentications reports, you can add several new fields:
• Response Time—Indicates how long it takes ACS to respond to a client after receiving an
authentication request.
• Framed-IP-address—If ACS is configured to assign IP addresses when it receives Access-Request
messages or if an incoming Access-Request contains an IP address, indicates the framed IP address.
• Session-ID—Indicates the session ID of a user session.
To add a field to the CSV Failed Attempts or Passed Authentications report:
Step 1 In the navigation bar, click System Configuration.
Step 2 Click Logging.
The Logging Configuration page opens.
Step 3 In the CSV column, click Configure next to the name of the report you want to configure.
The configuration page for the selected report opens.
Step 4 To add a field to the report, click the field name in the Attributes column and then click the right arrow
button to move it to the Logged Attributes column.
.
OL-14390-02
Step 5 Click Submit to save the report configuration.
Configuration Guide for Cisco Secure ACS 4.2
3-5
Page 46

Chapter 3 Configuring New Features in ACS 4.2
Configuring Group Filtering at the NAP Level
Configuring Group Filtering at the NAP Level
You can use ACS 4.2 to grant and deny access to users who are authenticated through a LDAP database
based on the LDAP group to which the users belong. This feature is called group filtering at the NAP
level.
To configure group filtering at the NAP level:
Step 1 Configure LDAP on the ACS server.
Step 2 Set up a Network Access Profile.
a. In the navigation bar, click Network Access Profiles.
The Network Access Profile page opens.
b. Click the Authentication link for the profile.
The Authentication page for the selected profile appears. The top of the Authentication page
contains the Group Filtering for LDAP database section, as shown in
Figure 3-3 Group Filtering for LDAP Database Configuration
Figure 3-3.
3-6
c. From the drop-down list for LDAP databases, choose the LDAP database that you want to use to
filter user access.
d. From the list of LDAP user groups in the Available Groups list, choose the groups for which to allow
access.
Choose a group in the Available Groups list and click the right arrow (-->) button to move the group
to the list of Selected Groups.
e. If you want to sort the lists, click the Up and Down buttons to move a group up or down in a list.
Step 3 Click Submit.
Configuration Guide for Cisco Secure ACS 4.2
OL-14390-02
Page 47

Chapter 3 Configuring New Features in ACS 4.2
Option to Not Log or Store Dynamic Users
When ACS authenticates users by using external databases, such as Active Directory or LDAP, and a
user is successfully authenticated with the external database, then, by default, ACS stores the
information for the user in the ACS internal database. The users that ACS creates in this manner are
called dynamic users.
With ACS 4.2, you can configure ACS not to not create or store data on dynamic users.
To disable creation of dynamic users in the ACS internal database:
Step 1 In the navigation bar, choose External User Databases > Unknown User Policy.
The Configure Unknown User Policy page opens.
Step 2 Scroll down to the Configure Caching Unknown Users section, shown in Figure 3-4:
Figure 3-4 Disabling Creation of Dynamic Users
Option to Not Log or Store Dynamic Users
Step 3 Check the Disable Dynamic users check box.
Step 4 Click Submit.
Active Directory Multi-Forest Support
ACS supports machine authentication in a multi-forest environment. Machine authentications succeed
as long as an appropriate trust relation exists between the primary ACS forest and the requested domain's
forest. When a requested user's or machine's domain is part of a trusted forest, machine authentication
will succeed.
ACS supports user authentication between multiple forests for EAP-FAST, version1a with PEAP,
MSPEAP, and for EAP-TLS.
Note The multi-forest feature works only where the username contains the domain information.
Configuring Syslog Time Format in ACS 4.2
ACS SE 4.2 provides a new option for configuring the time format that ACS uses to send messages to
syslog servers.
OL-14390-02
Configuration Guide for Cisco Secure ACS 4.2
3-7
Page 48

RSA Support on the ACS SE
In previous releases, ACS SE devices could only send syslog messages using the local time that is set on
the ACS device. With release 4.2, you can configure the ACS SE to send syslog messages by using the
local time setting or Greenwich Mean Time (GMT).
To configure the time format used for events sent to a syslog server:
Step 1 In the navigation bar, choose System Configuration > Date Format Control.
The Date Format Control page opens.
Step 2 In the Time Zone Selection for syslog section, specify the date format for events sent to syslog servers.
To speci f y :
• Local time, click the Use Local Time radio button.
• GMT time, click the Use GMT Time radio button.
Step 3 Click Submit and Restart.
Chapter 3 Configuring New Features in ACS 4.2
RSA Support on the ACS SE
ACS 4.2 adds support for RSA Token Server on the ACS SE. To add this support:
Step 1 In the navigation bar, click External User Databases.
The External User Databases page opens.
Step 2 Click Database Configuration.
The External User Databases Configuration page opens, as shown in Figure 3-5.
3-8
Configuration Guide for Cisco Secure ACS 4.2
OL-14390-02
Page 49

Chapter 3 Configuring New Features in ACS 4.2
Figure 3-5 External User Databases Page (ACS SE)
RSA Support on the ACS SE
Step 3 Click RSA SecureID Token Server.
The Database Configuration Creation page appears.
Step 4 Click Create New Configuration.
The Create a New External Database Configuration page appears, as shown in Figure 3-6.
Figure 3-6 Create a New External Database Configuration Page.
Step 5 Enter the name for the RSA SecureID Token Server and then click Submit.
You are prompted to choose what to do with the Token Sever.
Step 6 Click Configure.
You are prompted to upload the sdconf.rec file.
OL-14390-02
Step 7 Click Upload scconf.rec.
Step 8 The Cisco Secure ACS to RSA SecurID Configuration page appears, as shown in Figure 3-7.
Configuration Guide for Cisco Secure ACS 4.2
3-9
Page 50

RSA Support on the ACS SE
Figure 3-7 Cisco Secure ACS to RSA SecurID Configuration Page
Chapter 3 Configuring New Features in ACS 4.2
Step 9 On the Cisco Secure ACS to RSA SecurID Configuration page, enter the information shown in Table 3-3
Ta b l e 3-3 RSA SecureID Server Configuration
Field Description
FTP Server: The IP address of the FTP server that contains the
Login: The login name for the FTP server.
Password: The password for the FTP server.
Directory: The directory on the FTP server where the
Step 10 Click Submit.
Purging the RSA Node Secret File
When you change the RSA Token Server configuration, you must purge the existing Node Secret file.
To purge the Node Secret file:
sdconf.rec file. This the configuration file for your
RSA TokenID installation.
sdconf.rec file is located.
3-10
Step 1 In the navigation bar, click External User Databases.
The External User Databases page opens.
Step 2 Click Database Configuration.
The External User Databases Configuration page opens.
Step 3 Click RSA SecurID Token Server.
Configuration Guide for Cisco Secure ACS 4.2
OL-14390-02
Page 51

Chapter 3 Configuring New Features in ACS 4.2
The External User Database Configuration page opens.
Step 4 Click Configure.
The Cisco Secure ACS to RSA SecurID Configuration page opens.
Step 5 Click Purge Node Secret.
Configuring RSA SecurID Token and LDAP Group Mapping
You can perform authentication with RSA in native mode and also by using LDAP group mapping, with
RSA. If you use RSA with LDAP group mapping, then the user's LDAP group membership controls
authorization. When RSA native mode authentication succeeds, group mapping occurs with LDAP. The
user's group is applied based on the group mapping configuration.
Note Before you configure RSA authentication with LDAP Group Mapping, ensure that you have the correct
installation or configuration of the third-party DLLs required to support this type of external database.
RSA Support on the ACS SE
To configure RSA authentication with LDAP Group Mapping:
Step 1 Enable RSA support as described in RSA Support on the ACS SE, page 3-8.
Step 2 In the navigation bar, click External User Databases.
Step 3 Click Database Configuration.
ACS lists all possible external user database types.
Step 4 Click RSA SecurID Token and LDAP Group Mapping.
The External Database Configuration page appears.
Step 5 Click Configure.
The LDAP Native RSA Configuration page opens.
Step 6 Click Configure LDAP.
The RSA SecurID Token and LDAP Group Mapping Configuration page opens, as shown in Figure 3-8.
OL-14390-02
Configuration Guide for Cisco Secure ACS 4.2
3-11
Page 52

RSA Support on the ACS SE
Figure 3-8 RSA SecurID Token and LDAP Group Mapping Configuration Page
Chapter 3 Configuring New Features in ACS 4.2
3-12
Step 7 If you do not want ACS to filter LDAP authentication requests by username, under Domain Filtering,
choose Process all usernames.
Configuration Guide for Cisco Secure ACS 4.2
OL-14390-02
Page 53

Chapter 3 Configuring New Features in ACS 4.2
Step 8 If you want to limit authentications processed by this LDAP configuration to usernames with a specific
domain qualification:
Note For information about domain filtering, see “Domain Filtering” in chapter 12 of the User Guide
for Cisco Secure ACS, 4.2.
a. Under Domain Filtering, click the Only process usernames that are domain qualified radio
button.
b. From the Qualified by list, choose the applicable type of domain qualification: Suffix or Prefix. Only
one type of domain qualification is supported per LDAP configuration.
For example, if you want this LDAP configuration to authenticate usernames that begin with a
specific domain name, select Prefix. If you want this LDAP configuration to authenticate usernames
that end with a specific domain name, select Suffix.
c. In the Domain Qualifier box, type the name of the domain for which you this LDAP configuration
should authenticate usernames. Include the delimiting character that separates the user ID from the
domain name. Ensure that the delimiting character appears in the applicable position: at the end of
the domain name if Prefix is selected on the Qualified by list; at the beginning of the domain name
if Suffix is selected on the Qualified by list.
Only one domain name is supported per LDAP configuration. You can type up to 512 characters.
d. If you want ACS to remove the domain qualifier before submitting it to the LDAP database, check
the Strip domain before submitting username to LDAP server check box.
RSA Support on the ACS SE
e. If you want ACS to pass the username to the LDAP database without removing the domain qualifier,
uncheck the Strip domain before submitting username to LDAP server check box.
Step 9 If you want to enable ACS to strip domain qualifiers from usernames before submitting them to an LDAP
server:
Note For information about domain filtering, see “Domain Filtering” in chapter 12 of the User Guide
for Cisco Secure ACS, 4.2.
a. Under Domain Filtering, click the Process all usernames after stripping domain name and
delimiter radio button.
b. If you want ACS to strip prefixed domain qualifiers, check the Strip starting characters through
the last X character check box, and then type the domain-qualifier delimiting character in the X
box.
Note The X box cannot contain the following special characters: the pound sign (#), the question
mark (?), the quote (“), the asterisk (*), the right angle bracket (>), and the left angle bracket
(<). ACS does not allow these characters in usernames. If the X box contains any of these
characters, stripping fails.
c. If you want ACS to strip suffixed domain qualifiers, check the Strip ending characters from the
first X character check box, and then type the domain-qualifier delimiting character in the X box.
OL-14390-02
Configuration Guide for Cisco Secure ACS 4.2
3-13
Page 54

RSA Support on the ACS SE
Step 10 Under Common LDAP Configuration, in the User Directory Subtree box, type the DN of the tree
containing all your users.
Step 11 In the Group Directory Subtree box, type the DN of the subtree containing all your groups.
Step 12 In the User Object Type box, type the name of the attribute in the user record that contains the username.
You can obtain this attribute name from your Directory Server. For more information, refer to your
LDAP database documentation.
Note The default values in the UserObjectType and following fields reflect the default configuration
Chapter 3 Configuring New Features in ACS 4.2
Note The X box cannot contain the following special characters: the pound sign (#), the question
mark (?), the quote (“), the asterisk (*), the right angle bracket (>), and the left angle bracket
(<). ACS does not allow these characters in usernames. If the X box contains any of these
characters, stripping fails.
of the Netscape Directory Server. Confirm all values for these fields with your LDAP server
configuration and documentation.
Step 13 In the User Object Class box, type the value of the LDAP objectType attribute that identifies the record
as a user. Often, user records have several values for the
objectType attribute, some of which are unique
to the user, while others are shared with other object types. Choose a value that is not shared.
Step 14 In the GroupObjectType box, type the name of the attribute in the group record that contains the group
name.
Step 15 In the GroupObjectClass box, type a value for the LDAP objectType attribute in the group record that
identifies the record as a group.
Step 16 In the GroupAttributeName box, type the name of the attribute of the group record that contains the list
of user records who are a member of that group.
Step 17 In the Server Timeout box, type the number of seconds that ACS waits for a response from an LDAP
server before determining that the connection with that server has failed.
Step 18 To enable failover of LDAP authentication attempts, check the On Timeout Use Secondary check box.
Step 19 In the Failback Retry Delay box, type the number of minutes after the primary LDAP server fails to
authenticate a user that ACS resumes sending authentication requests to the primary LDAP server first.
Note To specify that ACS should always use the primary LDAP server first, type zero (0) in the
Failback Retry Delay box.
Step 20 In the Max. Admin Connection box, enter the number of maximum concurrent connections with LDAP
administrator account permissions.
Step 21 For the Primary LDAP Server and Secondary LDAP Server tables:
3-14
Note If you did not check the On Timeout Use Secondary check box, you do not need to complete
the options in the Secondary LDAP Server table.
a. In the Hostname box, type the name or IP address of the server that is running the LDAP software.
If you are using DNS on your network, you can type the hostname instead of the IP address.
Configuration Guide for Cisco Secure ACS 4.2
OL-14390-02
Page 55

Chapter 3 Configuring New Features in ACS 4.2
b. In the Port box, type the TCP/IP port number on which the LDAP server is listening. The default is
389, as stated in the LDAP specification. If you do not know the port number, you can find this
information by viewing those properties on the LDAP server. If you want to use secure
authentication, port 636 is usually used.
c. To specify that ACS should use LDAP version 3 to communicate with your LDAP database, check
the LDAP Version check box. If the LDAP Version check box is not checked, ACS uses LDAP
version 2.
d. If you want ACS to use SSL to connect to the LDAP server, check the Use secure authentication
check box and complete the next three steps. If you do not use SSL, the username and password
credentials are normally passed over the network to the LDAP directory in clear text.
e. ACS SE only: If you checked the Use Secure Authentication check box, perform one of the
following procedures:. Check the:
–
Trusted Root CA check box, and in the adjacent drop-down list, choose a Trusted Root CA.
–
Certificate Database Path check box, and download a cert7.db file.
Note To download a cert7.db certificate database file to ACS now, complete the steps in
“Downloading a Certificate Database (Solution Engine Only)” in Chapter 12 of the User Guide
for Cisco Secure ACS, 4.2, and then continue with Step f. You can download a certificate
database later. Until a certificate database is downloaded for the current LDAP server, secure
authentication to this LDAP server fails.
RSA Support on the ACS SE
f. ACS for Windows only: If you checked the Use Secure authentication check box, perform one of
the following procedures. Click the:
–
Trusted Root CA radio button, and in the adjacent drop-down list, choose a Trusted Root CA.
–
Certificate Database Path radio button, and in the adjacent box, type the path to the Netscape
cert7.db file, which contains the certificates for the server to be queried and the trusted CA.
g. The Admin DN box requires the fully qualified Distinguished Name (DN) of the administrator; that
is, the LDAP account which, if bound to, permits searches for all required users under the User
Directory subtree.
In the Admin DN box, type the following information from your LDAP server:
uid=user id,[ou=organizational unit,]
[ou=next organizational unit]o=organization
where user id is the username
organizational unit is the last level of the tree
next organizational unit is the next level up the tree.
For example:
uid=joesmith,ou=members,ou=administrators,o=cisco
Tip If you are using Netscape DS as your LDAP software, you can copy this information from the
Netscape console.
OL-14390-02
h. In the Password box, type the password for the administrator account that is specified in the Admin
DN box. The server determines password case sensitivity.
Step 22 Click Submit.
Configuration Guide for Cisco Secure ACS 4.2
3-15
Page 56

Turning Ping On and Off
Note ACS saves the generic LDAP configuration that you created. You can now add it to your Unknown User
Policy or assign specific user accounts to use this database for authentication.
Turning Ping On and Off
With ACS 4.2, you can enable and disable pinging of the ACS SE device. Prior to release 4.2, when
remote devices sent a ping request to an SE device, the ping was always rejected because, by default, the
Cisco Security Agent (CSA) runs on the ACS SE device. CSA automatically rejects remote ping
requests.
ACS 4.2 provides software patches for you to turn ping on and off by updating the policies in the CSA:
• Ping Turn On Patch—This patch turns on the ping option in the CSA, which makes it possible to
ping the ACS SE.
• Ping Turn Off Patch—This patch turns off the ping option in the CSA, which causes the ACS SE
to reject pings.
For detailed information on installing these patches, see “Turning Ping On and Off” in Chapter 3 of the
the Installation Guide for Cisco Secure ACS Solution Engine, 4.2, “Installing and Configuring Cisco
Secure ACS Solution Engine 4.2.”
Chapter 3 Configuring New Features in ACS 4.2
3-16
Configuration Guide for Cisco Secure ACS 4.2
OL-14390-02
Page 57

CHAP T ER
4
Using RDBMS Synchronization to Create dACLs and Specify Network Configuration
This chapter describes how to configure ACS 4.2 to enable new RDBMS Synchronization features
introduced with ACS 4.2.
For detailed information on RDBMS Synchronization, see “RDBMS Synchronization” in Chapter 8 of
the User Guide for Cisco Secure ACS, 4.2, “System Configuration: Advanced.”
For detailed information on the accountActions codes to use with RDBMS Synchronization, see
Appendix E of the User Guide for Cisco Secure ACS, 4.2, “RDBMS Synchronization Import
Definitions.”
This chapter contains:
• New RDBMS Synchronization Features in ACS Release 4.2, page 4-1
• Using RDBMS Synchronization to Configure dACLs, page 4-2
• Reading, Updating, and Deleting dACLs, page 4-12
• Updating or Deleting dACL Associations with Users or Groups, page 4-14
• Using RDBMS Synchronization to Specify Network Configuration, page 4-14
New RDBMS Synchronization Features in ACS Release 4.2
ACS 4.2 provides enhanced support for RDBMS Synchronization:
• Configuration of Downloadable ACLs (dACLs) for Specified Users and Groups—You can
specify dACLs by entering permit ip and deny ip commands in a comma-separated value (CSV)
accountActions file. By using new account action codes that you include in the accountActions file,
you can create a dACL that contains the commands that the text file specifies.
On ACS for Windows, you can perform dACL configuration from the RDBMS Synchronization
page in the ACS GUI or by running the CSDBSync command.
On the ACS SE, you can perform dACL configuration from the RDBMS Synchronization page in
the ACS SE GUI; or, connect to the ACS SE by using an SSH client and then running the csdbsync
-syncnow command from the SSH shell.
• Support for Creation, Reading, Updating, and Deleting of Single or Multiple AAA Clients
Through RDBMS Synchronization—With the capability to read AAA client data, you can export
the AAA client list for a particular NDG, an AAA client list with a specified IP range, or the list of
all AAA clients.
Configuration Guide for Cisco Secure ACS 4.2
OL-14390-02
4-1
Page 58

Chapter 4 Using RDBMS Synchronization to Create dACLs and Specify Network Configuration
Using RDBMS Synchronization to Configure dACLs
• Remote Invocation of the CSDBSync Service on the ACS Solution Engine—With ACS 4.2, you
can run the CSDBSync service on a remote ACS SE, over an SSH connection.
Using RDBMS Synchronization to Configure dACLs
With ACS 4.2, you can use RDBMS Synchronization to set up downloadable dACLs and associate
dACLs with specified Users or Groups.
To configure dACLs by using RDBMS Synchronization:
Step 1 Enable RDBMS Synchronization and dACLs.
Step 2 Create a text file to define the dACLs.
Step 3 Code an accountActions CSV file to create the dACL, and associate a User or Group with the dACL.
Step 4 Configure RDBMS Synchronization to use a local CSV file.
Step 5 Perform RDBMS Synchronization in one of two ways:
• From the ACS GUI.
• By running the csdbsync -syncnow command from the Windows command shell or in an SSH
connection with a remote ACS SE.
Step 6 View t h e dAC L.
Step 1: Enable dACLs
To enabl e d ACL s :
Step 1 In the Navigation Bar, click Interface Configuration.
Step 2 Click Advanced Options.
The Advanced Options page opens.
Step 3 Check the User-Level Downloadable ACLs check box.
Step 4 Check the Group-Level Downloadable ACLs check box.
This enables assigning a dACL to a Group Name.
Step 5 Check the RDBMS Synchronization check box.
Step 6 Click Submit.
Step 2: Create a Text File to Define the dACLs
To create a text file to define dACLs:
Step 1 Use a text editor of your choice to create a text file; for example Notepad.
Configuration Guide for Cisco Secure ACS 4.2
4-2
OL-14390-02
Page 59

Chapter 4 Using RDBMS Synchronization to Create dACLs and Specify Network Configuration
Example 4-1 shows a sample text file.
Example 4-1 Sample Text File for Creating a dACL
[DACL#1]
Name = DACL_For_Troy
Description = Test_DACL_For_ACS_42
Content#1= content1
Definition#1#1= permit ip any host 192.168.1.152
Definition#1#2= permit ip any host 192.168.5.152
Definition#1#3= permit ip any host 192.168.29.33
Definition#1#4= permit ip any host 192.168.29.34
Definition#1#5= permit ip any host 192.168.9.50
Definition#1#6= permit ip any host 192.168.9.20
Definition#1#7= permit ip any host 192.168.7.20
Definition#1#8= permit ip any host 192.168.128.1
Definition#1#9= permit ip any 192.168.24.0 0.0.0.255
Definition#1#10= permit ip any 192.168.0 0.0.0.255
Definition#1#11= permit ip any 192.0.0.0 0.255.255.255
Definition#1#12= deny ip any 192.168.0.0 0.3.255.255
Definition#1#13= deny ip any 192.168.0.0 0.1.255.255
Definition#1#14= permit ip any any
Using RDBMS Synchronization to Configure dACLs
Step 2 Code the information in the file as described in Table 4-1.
Ta b l e 4-1 Keywords for Creating a dACL By Coding a Text File
Keyword Value
dACL number The first line of the text file must specify the dACL number, enclosed in square
brackets; for example,
[DACL#n], where n is the number of the dACL. In
Example 4-1, the first line specifies DACL#1, because the file specifies only one
dACL.
Name Specifies the name of the dACL that is created when you run CSDBSync.
Description Specifies a short description of the dACL.
Content Specifies the number of a content block that consists of definitions for access
privileges associated with the dACL. This keyword has the format
where
n specifies the number of the content block. The file shown in
Example 4-1 has only one content block.
Definition keywords Specify a series of permit IP or deny ip commands that ACS applies to Users
or Groups to which you associate the dACL. Each Definition keyword has the
format
Definition #n#n1, where n is the number of the content block of
definition keywords and n1 is the number of each definition.
Step 3 Save the file:
• ACS for Windows—Save the file to a directory on the Windows machine that is running ACS.
• ACS SE—Save the file to a directory on an FTP server used with the ACS SE.
Content#n,
OL-14390-02
Configuration Guide for Cisco Secure ACS 4.2
4-3
Page 60

Chapter 4 Using RDBMS Synchronization to Create dACLs and Specify Network Configuration
Using RDBMS Synchronization to Configure dACLs
Step 3: Code an accountActions File to Create the dACL and Associate a User or Group with the dACL
To create a an AccountActions CSV file to create a dACL and assign it to a User or Group:
Step 1 Create a text file by using a text editor of your choice; for example, Notepad.
Step 2 Code a statement to create a User or Group. For example, to create a User named Troy, who belongs to
a Group named Group, and has an initial password of ipassword, code the following statement:
1,1,Troy,Group 5,100,ipassword,7/8/2008 15:00,0,,,0
Step 3 Code a statement to create a dACL. For example, to create a dACL called DACL_for_Troy that is
specified in a text file called dACL_create.txt, code the following statement:
2,1,,,385,C:\dACL_folder\dACL_create.txt,7/8/2008 15:00,0,,,0
Action code 385 creates a dACL. The value directly after the action code specifies the directory path and
filename of the text file that specifies the dACL. In the sample code shown in
Example 4-2, this is the dACL_create.txt file.
The value after the directory path and filename must specify a timestamp for the file; for example,
7/8/2008 15:00.
Step 4 Code a statement to associate the dACL with a specified User. For example, to associate the dACL
DACL_for_Troy with the User Troy, code:
3,1,Troy,,380,DACL_For_Troy,7/8/2008 15:00,0,,,0
Example 4-1 and
The third value in this statement specifies the User (Troy) to associate the dACL with. Action code 380
associates dACL with the User, and the value immediately after the action code specifies the dACL name
(dACL_for_Troy).
The value after the dACL name must specify a timestamp for the action; for example, 7/8/2008 15:00.
Step 5 Save the file:
• ACS for Windows—Save the file to a directory on the Windows machine that is running ACS.
• ACS SE—Save the file to a directory on an FTP server used with the ACS SE.
Sample accountActions CSV File
Example 4-2 shows a sample accountActions CSV file.
Note The default filename for the CSV is accountactions.csv. However, you can rename it.
Example 4-2 Sample accountActions CSV File
SequenceId,Priority,UserName,GroupName,Action,ValueName,DateTime,MessageNo,ComputerNames,A
ppId,Status
1,1,Troy,Group 5,100,ipassword,7/8/2008 15:00,0,,,0
2,1,,,385,C:\dACL_folder\dACL_create.txt,7/8/2008 15:00,0,,,0
3,1,Troy,,380,DACL_For_Troy,7/8/2008 15:00,0,,,0
4-4
Configuration Guide for Cisco Secure ACS 4.2
OL-14390-02
Page 61

Chapter 4 Using RDBMS Synchronization to Create dACLs and Specify Network Configuration
Using RDBMS Synchronization to Configure dACLs
Table 4-2 describes the accountActions codes used in Example 4-2 to add a User, create a dACL, and
associate the dACL with a specified User or Group.
Ta b l e 4-2 Account Action Codes to Create dACLs and Assign Them to Specified Users or Groups
Action Code Name Required Description
100 ADD_USER UN|GN, V1 Creates a User (32 characters maximum). The variable V1 is used
as the initial password. Optionally, you can assign the User to a
Group.
385 CREATE_DACL VN Use this action code to create a dACL.
VN = <input_file_name>
where input_file_name is a text file that contains definitions for
dACLs.
On ACS for Windows, this file resides in a directory on the
Windows machine that is running ACS.
On the ACS SE, this file resides on an FTP server used with the
ACS SE.
You can specify the absolute file path; for example:
C:\DACL\create_DACL_for_User_1.txt for ACS for Windows.
The dACL definition is ignored if it is already present, or contains
an invalid definition, content name, content definition, or NAF
name.
380 CREATE_USER_DACL UN|GN, VN This action code associates a specified dACL with a User or
Group. The dACL name specified should be valid and present in
ACS. The codes are:
UN = valid Username
GN = Valid Group name (optional)
VN = dACL name. (This dACL must be defined in Shared Profile
Components).
Step 4: Configure RDBMS Synchronization to Use a Local CSV File
To configure RDBMS Synchronization to use a local CSV file:
Step 1 In the navigation bar, click System Configuration.
Step 2 Click RDBMS Synchronization.
Note If this feature does not appear, choose Interface Configuration > Advanced Options, then
check the RDBMS Synchronization check box.
The RDBMS Synchronization Setup page appears.
Step 3 If you are using ACS for Windows, complete these steps:
a. Complete the required fields on the RDBMS Synchronization Setup page (Figure 4-1).
OL-14390-02
Configuration Guide for Cisco Secure ACS 4.2
4-5
Page 62

Using RDBMS Synchronization to Configure dACLs
Figure 4-1 RDBMS Synchronization Setup Page (ACS for Windows)
b. Check the Use local CSV file check box.
c. In the AccountActions file field, enter the filename of the accountActions CSV file that you created
in
Step 3: Code an accountActions File to Create the dACL and Associate a User or Group with the
dACL, page 4-4.
d. In the Directory field, enter the directory path to the accountActions CSV file.
ACS has the information with which to access the accountActions table.
Step 4 If you are using ACS SE:
Chapter 4 Using RDBMS Synchronization to Create dACLs and Specify Network Configuration
a. Complete the required fields on the RDBMS Synchronization Setup page (Figure 4-2).
Figure 4-2 RDBMS Synchronization Setup Page (ACS SE)
b. Enter the following information:
• Actions File— The name of the accountActions file. The default name is accountactions.csv. The
filename provided must match the name of the accountActions file on the FTP server.
4-6
• FTP Server—The IP address or hostname of the FTP server from which ACS obtains the
accountActions file. If you specify a hostname, DNS must be enabled on your network.
• Directory—The relative path from the FTP server root directory to the directory where the
accountActions file resides. To specify the FTP root directory, enter a single dot (.).
• Username—A valid username to enable ACS to access the FTP server.
Configuration Guide for Cisco Secure ACS 4.2
OL-14390-02
Page 63

Chapter 4 Using RDBMS Synchronization to Create dACLs and Specify Network Configuration
• Password—The password for the username provided in the Login box.
The ACS SE has the information necessary to get the accountActions file from the FTP server.
Step 5 (ACS for Windows and ACS SE) Set the Synchronization Scheduling and Synchronization Partners
options as required.
Figure 4-3 shows the Synchronization Scheduling and Synchronization Partners sections of the RDBMS
Synchronization Setup page.
Figure 4-3 Synchronization Scheduling and Synchronization Partners Options
Using RDBMS Synchronization to Configure dACLs
OL-14390-02
Step 6 Specify the following Synchronization Scheduling information:
• Manually—If you want to disable automatic RDBMS Synchronization, check the Manually check
box.
• Every X minutes—ACS performs synchronization on a set frequency. The unit of measurement is
minutes, with a default update frequency of 60 minutes.
• At specific times—ACS performs synchronization at the time that is specified in the day and hour
graph. The minimum interval is one hour, and the synchronization occurs on the hour that you chose.
Configuration Guide for Cisco Secure ACS 4.2
4-7
Page 64

Chapter 4 Using RDBMS Synchronization to Create dACLs and Specify Network Configuration
Using RDBMS Synchronization to Configure dACLs
Step 7 For each ACS that you want this ACS to update with data from the accountActions table, click the ACS
in the AAA Servers list, and then click the right arrow button (-->) on the interface.
The ACS that you chose appears in the Synchronize list.
Step 8 To remove ACSs from the Synchronize list, click the ACS in the Synchronize list, and then click the left
arrow button (<--).
The ACS that you chose is removed from the Synchronize list.
Step 9 At the bottom of the browser window, click Synchronize Now.
ACS immediately begins a synchronization event. To check the status of the synchronization, view the
RDBMS Synchronization report in Reports and Activity.
Step 5: Perform RDBMS Synchronization
You can perform the RDBMS Synchronization and create the dACLs in two ways. By running:
• RDBMS Synchronization from the ACS GUI.
• CSDBSync manually to create the dACLs.
Running RDBMS Synchronization from the ACS GUI
When you click Synchronize Now on the RDBMS Synchronization page for ACS for Windows or for
the ACS SE, ACS begins a synchronization event and creates the dACLs specified in the accountActions
CSV file.
Running CSDBSync Manually to Create the dACLs
You can run CSDBSync manually to create the dACLs.
ACS for Windows
In Windows, use the command line interface to invoke the csdbsync -run command.
The CSDBSync service reads each statement from the accountActions CSV file and updates the ACS
internal database as the action codes in the file specify. In a distributed environment, a single ACS,
known as the senior synchronization partner, accesses the accountActions table and sends
synchronization commands to its synchronization partners.
Step 1 Open a command prompt window.
Step 2 Enter the following commands:
a. To stop t h e CSDBSync service, enter net stop csdbsync.
b. Enter net start csdbsync.
4-8
c. Enter one of the following commands:
–
csdbsync -run
–
csdbsync -syncnow
Configuration Guide for Cisco Secure ACS 4.2
OL-14390-02
Page 65

Chapter 4 Using RDBMS Synchronization to Create dACLs and Specify Network Configuration
ACS fetches the CSV file from the database, reads the action codes in the file, and performs the RDBMS
Synchronization operations that the file specifies.
ACS SE
On the ACS SE, you can run the csdbsync -syncnow command to invoke RDBMS Synchronization
To run CSDBSync manually on the ACS SE:
Step 1 Check connectivity between the ACS SE and the FTP server, and be certain that you have write
permissions to the FTP server directory.
Step 2 Start a SSH command shell.
Step 3 Enter the following commands:
a. To stop t h e CSDBSync service, enter net stop csdbsync.
b. Enter net start csdbsync.
c. Enter one of the following commands:
–
csdbsync -run
–
csdbsync -syncnow
ACS SE fetches the CSV file from the database, reads the action codes in the file, and performs the
RDBMS Synchronization operations that file specifies.
Using RDBMS Synchronization to Configure dACLs
Performing RDBM Synchronization Using a Script
On the ACS SE, you can change ACS configuration from a remote system by using a command-line
utility for RDBMS Synchronization that includes SSH support. You can use the mechanism that starts
the SSH server to add Administrator privileges and invoke the csdbsync -syncnow command. The
csdbsync -syncnow and csdbsync -run commands work the same, without stopping or starting the
CSDBSync service.
You can include the commands to perform these actions in a script that you run remotely on a specified
ACS SE.
Step 6: View the dACLs
After you have run RDBMS Synchronization to create the dACLs, view the dACLs to ensure that they
are correct.
To view the d ACLs:
Step 1 In the Navigation Bar, click Shared Profile Components.
Step 2 Click Downloadable IP ACLs.
The Downloadable IP ACLs page opens
In the Name column of the Downloadable IP ACLs table, you should se e the dACL that was specified in
the text file that you coded in
Step 2: Create a Text File to Define the dACLs, page 4-2.
OL-14390-02
Step 3 Click the name of the dACL.
Configuration Guide for Cisco Secure ACS 4.2
4-9
Page 66

Using RDBMS Synchronization to Configure dACLs
The Downloadable IP ACLs page displays the selected dACL, as shown in Figure 4-4.
Figure 4-4 Entry for the Sample dACL
Chapter 4 Using RDBMS Synchronization to Create dACLs and Specify Network Configuration
In the ACL Contents column, you should see the content name specified in the Content#1 block that you
coded in the text file in
Step 4 Click the content name.
The Downloadable IP ACL Content page appears. The Content Name and ACL Definitions appear on
the page, as shown in
Figure 4-5 Downloadable IP ACL Content Page
Step 2: Create a Text File to Define the dACLs, page 4-2.
Figure 4-5.
4-10
Configuration Guide for Cisco Secure ACS 4.2
OL-14390-02
Page 67

Chapter 4 Using RDBMS Synchronization to Create dACLs and Specify Network Configuration
Step 5 If the dACL was not created correctly, review the steps in Using RDBMS Synchronization to Configure
dACLs, page 4-2 and check for errors.
For a list of error messages, see Error Messages, page 4-11.
Error Messages
Table 4-3 lists the error messages associated with dACL creation using CSDBSync.
.
Ta b l e 4-3 dACL Creation Errors
Error Message Explanation
Failed to process DACL. DACL not defined.
Failed to process DACL. Could not find NAF.
Using RDBMS Synchronization to Configure dACLs
Possible Cause The dACL was not specified
correctly in the text file used to define the
dACLs.
Recommended Action Review the text file that
you coded to specify the dACLs and ensure
that the syntax is correct.
Possible Cause The text file provided to
define the dACL did not correctly define a
NAF.
Failed to process DACL. Failed to get UserID.
Failed to process DACL. DACL content not
found.
Failed to upload file into FTP server.
Recommended Action Review the text file that
you coded to specify the dACLs and ensure
that the syntax is correct.
Possible Cause On the ACS SE, the user ID
specified for the FTP server in the RDBMS
Synchronization configuration was incorrect.
Recommended Action Check to ensure that the
specified user ID exists on the FTP server
used with the ACS SE.
Possible Cause The text file used to specify
the dACL did not correctly specify the dACL
content.
Recommended Action Check the syntax in the
text file and ensure that it is correct. Ensure
that the ACLs defined in the file are correct.
Possible Cause The FTP server was not
reachable, or a network error occurred.
Recommended Action Ensure that the IP
address for the FTP server in the RDBMS
configuration is correct and that the network
is functioning correctly.
OL-14390-02
Configuration Guide for Cisco Secure ACS 4.2
4-11
Page 68

Chapter 4 Using RDBMS Synchronization to Create dACLs and Specify Network Configuration
Reading, Updating, and Deleting dACLs
Table 4-3 dACL Creation Errors (continued)
Error Message Explanation
Failed to import DACL file.
Failed to access Host DB.
Reading, Updating, and Deleting dACLs
Possible Cause The user ID specified in the
RDBMS Synchronization configuration does
not have write access to the ACS.
Recommended Action Ensure that the specified
user has write access to the ACS.
Possible Cause The CSDBSync service could
not access the database on the host ACS.
Recommended Action Ensure that the database
on the ACS is configured correctly and
enabled correctly in the ACS GUI.
Table 4-4 lists the account action codes that you can use to read, update, or delete a dACL.
4-12
Configuration Guide for Cisco Secure ACS 4.2
OL-14390-02
Page 69

Chapter 4 Using RDBMS Synchronization to Create dACLs and Specify Network Configuration
Reading, Updating, and Deleting dACLs
.
Ta b l e 4-4 Account Action Codes for Creating, Reading, Updating, or Deleting dACLs
Action Code Name Required Description
386 READ_DACL VN, V1 (optional) Use this action code to read dACL attributes and save them in a
file for later use.
VN = contains dACL name or * for all dACLs.
V1 = <output_file_name>
where output_file_name contains the exported dACLs definition.
On the ACS SE, output_file_name specifies the file in the FTP
server for the ACS SE. If not is specified the default filename
DumpDACL.txt is used.
On ACS for Windows, you can specify the absolute file path; for
example, C:\temp\DACL.txt for ACS for Windows. If you do not
specify the file path and filename, ACS writes the data to a file in
the ACS\bin directory.
387 UPDATE_DACL VN, V1(optional) Use this action code to update dACL attributes.
VN = <input_file_name>
where input_file_name specifies the file that contains the
definition for the dACL to be updated.
On the ACS SE platform, input_file_name specifies the file name
present in the FTP server for ACS SE.
You can specify the absolute file path; for example:
C:\DACL\dump.txt for ACS for Windows.
V1=DACL_REPLACE or DACL_APPEND
The default option is:
DACL_REPLACE
The DACL_REPLACE option replaces the existing dACL with the
new one.
DACL_APPEND appends the new dACL content and its
definition to the existing dACL.
If the dACL has not been defined, the new dACL is added to the
existing list.
The dACL definition is ignored if it contains an invalid definition,
content name, content definition or NAF name.
388 DELETE_DACL VN Use this action code to delete a dACL.
VN = The name of the dACL to delete. To delete all dACLs, code
an asterisk (*).
By default, all the dACLs are deleted.
Users and Groups associated with this dACL will be dereferenced
after deleting the dACL.
OL-14390-02
Configuration Guide for Cisco Secure ACS 4.2
4-13
Page 70

Chapter 4 Using RDBMS Synchronization to Create dACLs and Specify Network Configuration
Updating or Deleting dACL Associations with Users or Groups
Updating or Deleting dACL Associations with Users or Groups
Table 4-5 lists the account action codes to update the dACL or remove the association of the dACL and
the User or Group.
Ta b l e 4-5 Account Action Codes to Create or Remove dACL Associations With Users and User
Groups
Action Code Name Required Description
381 UPDATE_USER_DACL UN|GN, VN This action code updates the dACL for a
specified User or Group. The dACL name
specified should be valid and should be
present in ACS.
UN = Valid Username
GN = Valid Group name (optional)
VN = dACL name. (This dACL must be
defined in Shared Profile Component)
382 DELETE_USER_DACL UN|GN This action code disassociates a dACL from
a specified User or Group.
UN = valid Username
GN = Valid Group name (optional)
Using RDBMS Synchronization to Specify Network Configuration
You can use RDBMS Synchronization to perform network configuration tasks, such as:
• Add AAA clients.
• Delete AAA clients.
• Set AAA client configuration details.
• Add AAA servers.
• Delete AAA servers.
• Set AAA server configuration details.
• Add and configure Proxy Distribution Table entries.
Note For specific information about all actions that RDBMS Synchronization can perform, see Appendix E,
“RDBMS Synchronization Import Definition,” in the User Guide for Cisco Secure ACS, 4.2.
4-14
Configuration Guide for Cisco Secure ACS 4.2
OL-14390-02
Page 71

Chapter 4 Using RDBMS Synchronization to Create dACLs and Specify Network Configuration
Using RDBMS Synchronization to Specify Network Configuration
Creating, Reading, Updating and Deleting AAA clients
The RDBMS Synchronization feature supports creation and deletion of single or multiple AAA clients.
In addition, accountActions codes 224 and 225 enable reading and updating AAA client information.
This section describes the various RDBMS Synchronization tasks that you can perform on single or
multiple AAA clients.
Table 4-6 lists the account action codes that are used to read and update single or multiple AAA clients.
Ta b l e 4-6 Account Action Codes for Create, Read, Update, Delete for AAA Clients
Action Code Name Required Description
224 UPDATE_NAS VN, V1, V2, V3 Use this action code to update AAA clients.
VN = AAA Client Name
V1 = IP-Address
V2 = Shared Secret Key
V3 = Vendor
225 READ_NAS VN, V1
(optional)
Use this action code to export an AAA client list
to an output file that can be used to associate the
list with members of a particular NDG or with
all AAA clients. You can use this output file as
input for CSUtil, to import NASs.
VN = <output_file_name>
where output_file_name specifies the filename
for the FTP server used with the ACS SE. If
nothing is specified, the default name
DumpNAS.txt is used.
For the ACS for Windows platform, you can
specify the absolute file path; for example:
C:\MyNAS\dump.txt. If no value is specified, the
AAA client lists is written to the
\ACS\bin\DumpNAS.txt file.
V1 = NDG name (optional)
V1 should contain a valid NDG name.
OL-14390-02
Configuration Guide for Cisco Secure ACS 4.2
4-15
Page 72

Chapter 4 Using RDBMS Synchronization to Create dACLs and Specify Network Configuration
Using RDBMS Synchronization to Specify Network Configuration
4-16
Configuration Guide for Cisco Secure ACS 4.2
OL-14390-02
Page 73

CHAP T ER
5
Password Policy Configuration Scenario
Cisco Secure ACS, hereafter referred to as ACS, provides new password features to support corporate
requirements mandated by the Sarbanes-Oxley Act of 2002. Sarbanes-Oxley (SOX) requires stricter
enforcement of password restrictions.
ACS provides SOX support, which includes:
• Enforcement of password lifetime policy
• Enforcement of inactivity limits
• Improved password constraints
To enable password configuration that includes these new features, ACS provides a new password policy
page.
All administrator logins are subject to the policy that you configure for passwords and accounts, unless
you check the Account Never Expires check box. For example, ACS provides configurable limits on
password lifetime and activity, and incorrect password attempts. These options can force password
change and can result in automatic account lockout. Privileged administrators can also lock out an
account. In addition, you can monitor the last password change and last account activity for each
administrator.
Limitation on Ability of the Administrator to Change Passwords
If an administrator is not granted full administrative access, the only action the administrator can take is
to change his or her own password.
Configuration Guide for Cisco Secure ACS 4.2
OL-14390-02
5-1
Page 74

Summary of Configuration Steps
Summary of Configuration Steps
To configure password policy in ACS:
Step 1 Add a new administrator account.
Add a new administrator account, specify the administrator name and password, and grant access
privileges. See
Step 2 Configure password policy.
Configure restrictions on the admin user password. See Step 2: Configure Password Policy, page 5-4 for
details.
Step 3 Configure session policy.
Configure restrictions on the admin user’s session. See Step 3: Configure Session Policy, page 5-7 for
details.
Step 4 Configure access policy.
Configure restrictions on admin access, such as the IP addresses from which administrators can log in.
See
Step 4: Configure Access Policy, page 5-9 for details.
Step 1: Add and Edit a New Administrator Account, page 5-2 for details.
Chapter 5 Password Policy Configuration Scenario
Step 1: Add and Edit a New Administrator Account
To add a new administrator account:
Step 1 In the navigation bar, click Administration Control.
The Administration Control page appears, as shown in Figure 5-1.
5-2
Configuration Guide for Cisco Secure ACS 4.2
OL-14390-02
Page 75

Chapter 5 Password Policy Configuration Scenario
Figure 5-1 Administration Control Page
Step 1: Add and Edit a New Administrator Account
The Administration Control page initially lists no administrators. If administrators have been
configured, the page lists the configured administrators.
Step 2 To add an administrator, click Add Administrator.
The Add Administrator page opens.
Step 3 In the Administrator Details area, enter:
Option Description
Administrator Name Enter the login name for the ACS administrator account. Administrator names
can contain 1 to 32 characters, excluding the left angle bracket (<), the right
angle bracket (>), and the backslash (\). An ACS administrator name does not
have to match a network user name.
Password Enter the password for the administrator to access the ACS web interface.
The password can match the password that the administrator uses for dial-in
authentication; or, it can be a different password. ACS enforces the options in
the Password Validation Options section on the Administrator Password Policy
page.
Passwords must be at least 4 characters long and contain at least 1 numeric
character. The password cannot include the username or the reverse username,
must not match any of the previous 4 passwords. and must be in ASCII
characters. For errors in passwords, ACS displays the password criteria.
If the password policy changes and the password does not change, the
administrator remains logged in. ACS enforces the new password policy at the
next login.
Confirm Password Reenter the password that you entered in the password field.
OL-14390-02
Configuration Guide for Cisco Secure ACS 4.2
5-3
Page 76

Step 2: Configure Password Policy
Option Description
Account Never
Expires
Account Locked If you want to lock out an administrator who is denied access due to the account
Chapter 5 Password Policy Configuration Scenario
If you want to override the lockout options set up on the Administrator
Password Policy page (with the exception of manual lockout), check the check
box next to Account Never Expires. If you check this option, the account never
expires but password change policy remains in effect. The default value is
unchecked (disabled).
policy options specified on the Password Policy page, check the check box for
Account Locked. When unchecked (disabled), this option unlocks an
administrator who was locked out.
Administrators who have the Administration Control privilege can use this
option to manually lock out an account or reset locked accounts. The system
displays a message that explains the reason for a lockout.
When an administrator unlocks an account, ACS resets the Last Password
Change and the Last Activity fields to the day on which the administrator
unlocks the account.
The reset of a locked account does not affect the configuration of the lockout
and unlock mechanisms for failed attempts.
Step 4 Click Grant All or Revoke All to globally add or remove all privileges,
Step 5 If you want to grant specific privileges to the administrator, check the check boxes that correspond to
the privileges that you want to grant.
Note For more information on administrative privileges, see the “Add Administrator and Edit
Administrator Pages” section in Chapter 11 of the User Guide for Cisco Secure Access Control
Server 4.2, “Administrators and Administrative Policy.”
Step 6 Go to Step 2: Configure Password Policy, page 5-4 (the next section of this chapter) and follow the steps
to specify password restrictions.
Step 2: Configure Password Policy
To configure password policy:
Step 1 On the Administration Control page, click Password Policy.
The Administrator Password Policy Setup page appears, shown in Figure 5-2.
5-4
Configuration Guide for Cisco Secure ACS 4.2
OL-14390-02
Page 77

Chapter 5 Password Policy Configuration Scenario
Figure 5-2 The Administrator Password Policy Setup Page
Step 2: Configure Password Policy
OL-14390-02
Configuration Guide for Cisco Secure ACS 4.2
5-5
Page 78

Step 2: Configure Password Policy
Step 2 On the Password Policy Setup Page, specify:
• Password Validation Options
See Specify Password Validation Options, page 5-6.
• Password Lifetime Options
See Specify Password Lifetime Options, page 5-6.
• Password Inactivity Options
See Specify Password Inactivity Options, page 5-7.
• Incorrect Password Attempt Option
See Specify Incorrect Password Attempt Options, page 5-7.
Specify Password Validation Options
In the Password Validation Options section, configure:
• Password may not contain the username—If enabled, the password cannot contain the username
or the reverse username.
Chapter 5 Password Policy Configuration Scenario
• Minimum length n characters—n specifies the minimum length of the password (default = 4,
range = 4 to 20).
• Uppercase alphabetic characters—If enabled, the password must contain uppercase alphabetic
characters.
• Lowercase alphabetic characters—If enabled, the password must contain lowercase alphabetic
characters.
• Numeric characters—If enabled, the password must contain numeric characters.
• Non alphanumeric characters—If enabled, the password must contain nonalphanumeric
characters; for example, the at symbol (@).
• Password must be different from the previous n versions—If enabled, the password must be
different from the previous n versions (default = 10, range = 0 to 99).
Specify Password Lifetime Options
In the Password Lifetime Options section, configure:
• The password will require change after n days—Following a change of password, if this option
is enabled, n specifies the number of days before ACS requires a change of password due to
password age (the default value is 30 days). The range is 1 to 365. When checked (enabled), the
Administrator will be locked after n days option causes ACS to compare the two password lifetime
Options and use the greater value of the two.
• The Administrator will be locked out after n days—Following a change of password, if this
option is enabled, n specifies the number of days before ACS locks out the associated administrator
account due to password age. The default value is 30 days; the range is1 to 365 days.
5-6
Configuration Guide for Cisco Secure ACS 4.2
OL-14390-02
Page 79

Chapter 5 Password Policy Configuration Scenario
Specify Password Inactivity Options
In the Password Inactivity Options section, configure:
• The password will require change after n days—Following the last account activity, if enabled, n
specifies the number of days before ACS requires a change of password due to password inactivity
The default value is 30 days; the range is 1 to 365 days. When checked (enabled), the Administrator
will be locked after n days option causes ACS to compare the two Password Inactivity Options and
use the greater value of the two.
Note For additional security, ACS does not warn users who are approaching the limit for password inactivity.
• The Administrator will be locked out after n days—Following the last account activity, if
enabled, n specifies the number of days before ACS locks out the associated administrator account
due to password inactivity (default = 30, range = 1 to 365).
Note For additional security, ACS does not warn users who are approaching the limit for account inactivity.
Step 3: Configure Session Policy
Specify Incorrect Password Attempt Options
In the Incorrect Password Attempt Options section, configure:
Lock out Administrator after n successive failed attempts—If checked (enabled), n specifies the
allowable number of incorrect password attempts. When checked, n cannot be set to zero (0). If not
checked (disabled), ACS allows unlimited successive failed login attempts. The default value is 3 days;
the range = 1 to 98 days.
Note For additional security, ACS does not warn users who are approaching the limit for failed attempts. If
the Account Never Expires option is checked (enabled) for a specific administrator, this option is
ignored.
Step 3: Configure Session Policy
To configure session policy:
Step 1 On the Administration Control page, click Session Policy.
The Session Policy Setup page opens, as shown in Figure 5-3.
OL-14390-02
Configuration Guide for Cisco Secure ACS 4.2
5-7
Page 80

Step 3: Configure Session Policy
Figure 5-3 The Session Policy Setup Page
Step 2 On the Session Policy Setup page, set session options as required.
You can specify:
• Session idle timeout (minutes)—Specifies the time, in minutes, that an administrative session must
remain idle before ACS terminates the connection (4-character maximum).
When an administrative session terminates, ACS displays a dialog box asking whether the
administrator wants to continue. If the administrator chooses to continue, ACS starts a new
administrative session.
Chapter 5 Password Policy Configuration Scenario
This parameter only applies to the ACS administrative session in the browser. It does not apply to
an administrative dial-up session.
• Allow Automatic Local Login (ACS for Windows Only—Enables administrators to start an
administrative session without logging in, if they are using a browser on the computer that runs ACS.
ACS uses a default administrator account named local_login to conduct these sessions.
When unchecked (disabled), administrators must log in by using administrator names and
passwords.
Note To prevent accidental lockout when there are no defined administrator accounts, ACS does not require
an administrator name and password for local access to ACS.
The local_login administrator account requires the Administration Control privilege. ACS records
administrative sessions that use the local_login account in the Administrative Audit report under the
local_login administrator name.
• Respond to invalid IP address connections—Enables ACS to send an error message in response
to attempts to start a remote administrative session by using an IP address that is invalid according
to the IP address range settings in the Access Policy. If this check box is unchecked, ACS does not
display an error message when a user makes an invalid remote connection attempt. This option is
checked (enabled) by default.
Disabling this option can help to prevent unauthorized users from discovering ACS.
5-8
Configuration Guide for Cisco Secure ACS 4.2
OL-14390-02
Page 81

Chapter 5 Password Policy Configuration Scenario
Step 4: Configure Access Policy
This section describes how to configure administrative access policy.
Before You Begin
If you want to enable the SSL for administrator access, you must have completed the steps in Install the
CA Certificate, page 7-4, and Add a Trusted Certificate, page 7-4. After you have enabled SSL, ACS
begins using the SSL at the next administrator login. This change does not affect current administrator
sessions. In the absence of a certificate, ACS displays an error message when you attempt to configure
SSL.
To set up an ACS access policy:
Step 1 In the navigation bar, click Administration Control.
ACS displays the Administration Control page.
Step 2 Click Access Policy.
The Access Policy Setup page appears, as shown in Figure 5-4.
Step 4: Configure Access Policy
OL-14390-02
Configuration Guide for Cisco Secure ACS 4.2
5-9
Page 82

Step 4: Configure Access Policy
Figure 5-4 Access Policy Setup Page
Chapter 5 Password Policy Configuration Scenario
5-10
Step 3 Click the appropriate IP Address Filtering option
Ta b l e 5-1 Access Policy Options
Option Description
IP Address Filtering
Allow all IP addresses to connect Enables remote access to the web interface from any IP address.
Allow only listed IP addresses to
connect
Configuration Guide for Cisco Secure ACS 4.2
Restricts remote access to the web interface to IP addresses
within the specified IP Address Ranges.
OL-14390-02
Page 83

Chapter 5 Password Policy Configuration Scenario
Table 5-1 Access Policy Options (continued)
Option Description
Reject connections from listed IP
addresses
IP Address Ranges
Start IP Address Defines the lowest included IP address in the specified range (up
End IP Address Defines the highest included IP address in the specified range (up
HTTP Configuration
HTTP Port Allocation
Step 4: Configure Access Policy
Restricts remote access to the web interface to IP addresses
outside of the specified IP Address Ranges.
IP filtering operates on the IP address received in an HTTP
request from a remote administrator's web browser. If the
browser is configured to use an HTTP proxy server or the
browser runs on a workstation behind a network device
performing network address translation, IP filtering applies only
to the IP address of the HTTP proxy server or the NAT device.
The IP Address Ranges table contains ten rows for configuring
IP address ranges. The ranges are always inclusive; that is, the
range includes the Start and End IP addresses.
Use dotted-decimal format. The IP addresses that define a range
must differ only in the last octet (Class C format).
to 16 characters).
to 16 characters).
Allow any TCP ports to be used for
Administration HTTP Access
Restrict Administration Sessions to
the following port range From Port
n to Port n
Enables ACS to use any valid TCP port for remote access to the
web interface.
Restricts the ports that ACS can use for remote access to the web
interface. Use the boxes to specify the port range (up to five
digits per box). The range is always inclusive; that is, the range
includes the start and end port numbers. The size of the specified
range determines the maximum number of concurrent
administrative sessions.
ACS uses port 2002 to start all administrative sessions. Port 2002
does not need to be in the port range. Also, ACS does not allow
definition of an HTTP port range that consists only of port 2002.
The port range must consist of at least one port other than port
2002.
A firewall configured to permit HTTP traffic over the ACS
administrative port range must also permit HTTP traffic through
port 2002, because this is the port that a web browser must
address to initiate an administrative session.
We do not recommend allowing administration of ACS from
outside a firewall. If access to the web interface from outside a
firewall is necessary, keep the HTTP port range as narrow as
possible. A narrow range can help to prevent accidental
discovery of an active administrative port by unauthorized users.
An unauthorized user would have to impersonate, or “spoof,” the
IP address of a legitimate host to make use of the active
administrative session HTTP port.
OL-14390-02
Configuration Guide for Cisco Secure ACS 4.2
5-11
Page 84

Viewing Administrator Entitlement Reports
Table 5-1 Access Policy Options (continued)
Option Description
Secure Socket Layer Setup
Use HTTPS Transport for
Administration Access
Chapter 5 Password Policy Configuration Scenario
Enables ACS to use the secure socket layer (SSL) protocol to
encrypt HTTP traffic between the CSAdmin service and the web
browser that accesses the web interface. This option enables
encryption of all HTTP traffic between the browser and ACS, as
reflected by the URLs, that begin with HTTPS. Most browsers
include an indicator for SSL-encrypted connections.
To enable SSL, first install an a server certificate and a
certification authority certificate. Choose System
Configuration > ACS Certificate Setup to access the
installation process. With SSL enabled, ACS begins using
HTTPS at the next administrator login. Current administrator
sessions are unaffected. In the absence of a certificate, ACS
displays an error.
Step 4 Type the appropriate IP address ranges in accordance with the IP Address Filtering option.
Step 5 Click the appropriate HTTP Port Allocation option to allow all ports or restrict access to certain ports.
If you restrict access, type the range of the restricted ports.
Step 6 Check this option if you want ACS to use the SSL.
Step 7 Click Submit.
ACS saves and begins enforcing the access policy settings.
Viewing Administrator Entitlement Reports
To assist in SOX compliance, ACS produces entitlement report, which contain data extracted from the
ACS configuration and formatted into text based files.
ACS produces entitlement reports for administrators and users. The reports that you can generate are:
• Privilege—The privileges granted to a selected administrator.
• Combined Privilege—The privileges granted to all administrators.
• Users to Groups Mapping—The group membership of every user.
5-12
Configuration Guide for Cisco Secure ACS 4.2
OL-14390-02
Page 85

Chapter 5 Password Policy Configuration Scenario
View Privilege Reports
To view privilege reports:
Step 1 In the navigation bar, click Reports and Activity.
The Reports page opens.
Step 2 Click Entitlement Reports.
A list of the available entitlement reports appears. Figure 5-5 shows an example list.
Figure 5-5 List of Entitlement Reports
Viewing Administrator Entitlement Reports
Step 3 To view a report, click the report name.
Each report is downloaded to the local computer in the form of an Excel spreadsheet.
OL-14390-02
Configuration Guide for Cisco Secure ACS 4.2
5-13
Page 86

Viewing Administrator Entitlement Reports
Chapter 5 Password Policy Configuration Scenario
5-14
Configuration Guide for Cisco Secure ACS 4.2
OL-14390-02
Page 87

CHAP T ER
6
Agentless Host Support Configuration Scenario
This chapter describes how to configure the agentless host feature in Cisco Secure Access Control
Server, hereafter referred to as ACS.
Note The procedure in this chapter describes how to configure agentless host support by using ACS with a
Lightweight Directory Access Protocol (LDAP) database. You can also configure agentless host support
by using the ACS internal database: but, using an LDAP database is generally more efficient.
This chapter contains the following sections:
• Overview of Agentless Host Support, page 6-1
• Summary of Configuration Steps, page 6-3
• Basic Configuration Steps for Agentless Host Support, page 6-4
• Configuration Steps for Audit Server Support, page 6-24
Overview of Agentless Host Support
Many hosts that ACS authenticates run agent software that requests access to network resources and
receives authorization from ACS. However, some hosts do not run agent software. For example:
• Many 802.1x port security deployments authenticate hosts that do not have appropriate security
agent software, such as Cisco Trust Agent.
• When an agentless host is connected to a Layer 2 device and an Extensible Authentication Protocol
over User Datagram Protocol timeout (EoU timeout) occurs, in-band posture validation cannot
occur.
ACS solves this problem by using the MAC address of the host device to identify and authenticate the
host. This technique is called MAC authentication bypass (MAB).
1. When an agentless host connects to a network access device (NAD), the NAD detects that the host
does not have an appropriate software agent and uses the host's MAC address to identify it.
2. The NAD sends ACS a RADIUS authorization request with servicetype=10 and the MAC address
of the host contained in the
OL-14390-02
calling-station-id attribute.
Configuration Guide for Cisco Secure ACS 4.2
6-1
Page 88

Overview of Agentless Host Support
3. If you configure ACS for MAB, it searches the authentication database for the host’s MAC address
The database can be:
–
–
4. During the database lookup:
–
–
–
–
–
–
Figure 6-1 shows the flow of MAB information.
Chapter 6 Agentless Host Support Configuration Scenario
ACS internal
LDAP (if you configure LDAP)
ACS looks up the MAC address in an identity store (the internal ACS database or an LDAP
database).
ACS maps the MAC address to an ACS user group.
If ACS finds the MAC address, ACS associates the access request to an ACS user group.
If ACS does not find the MAC address, ACS assigns the access request to a default group that
has been configured for failed MAB. At this stage, ACS proceeds with authorization as for all
other access requests.
The expected value in the calling-station-id attribute is a MAC address; however, if the
attribute contains a different value (IP address), ACS looks for the IP address in the access
database
ACS applies authorization rules based on the user group and associated policies that a Network
Access Profile contains.
Figure 6-1 MAB Flow
Request: MAC address lookup
Response: MAC address exists + user group
MAC address MAC address
Agentless host
NAD
Service-type-10
Using Audit Servers and GAME Group Feedback
You can configure ACS to use audit servers. An audit server is a device that checks the information that
the NAD provides against a list of predetermined device types.
The audit server can categorize an end device and provide additional information to ACS. ACS can then
make a group assignment decision based on the categorization of the device. For example, if the device
is a printer, ACS can assign the device to a user group that includes printers.
LDAP
ACS
158372
6-2
In a Cisco Network Admission Control (NAC) environment, ACS supports audit server authentication
by enabling Generic Authorization Message Exchange (GAME) group feedback.
Configuration Guide for Cisco Secure ACS 4.2
OL-14390-02
Page 89

Chapter 6 Agentless Host Support Configuration Scenario
GAME group feedback provides an added security check for MAC address authentication by checking
the device type categorization that ACS determines by associating a MAC address with a user group
against information stored in a database on an audit server.
To use the GAME group feedback feature, you must add a NAC attribute-value pair to the ACS RADIUS
dictionary before configuring a posture validation policy that uses GAME group feedback.
You then configure a posture validation policy in a NAP that requests device type authentication from
the audit server. For details on configuring posture validation, see Enable Posture Validation, page
The detailed steps for configuring GAME group feedback are described in Enable GAME Group
Feedback, page
7-46 in Chapter 9, “NAC Configuration Scenario.”
Summary of Configuration Steps
To configure agentless host support in ACS:
Step 1 Install ACS for Windows or ACS Solution Engine (ACS SE).
See Step 1: Install ACS, page 6-4 for details.
Step 2 Configure a RADIUS AAA client.
See Step 2: Configure a RADIUS AAA Client, page 6-5 for details.
Summary of Configuration Steps
7-46.
Configure restrictions on the admin user password.
Step 3 Install and set up an ACS security certificate:
Note This step is required to enable posture validation and Network Access Profiles.
a. Obtain certificates and copy them to the ACS host.
b. Run the Windows certificate import wizard to install the certificate
c. Enable security certificates on the ACS installation.
d. Install the CA certificate.
e. Add a trusted certificate.
See Step 3: Install and Set Up an ACS Security Certificate, page 6-6 for details.
Step 4 Configure LDAP support for MAB:
a. Configure an external LDAP database for MAB support.
b. Create One or More LDAP Database Configurations in ACS.
See Step 4: Configure LDAP Support for MAB, page 6-10 for details.
Step 5 Configure user groups for MAB segments.
See Step 5: Configure User Groups for MAB Segments, page 6-17 for details.
Step 6 Enable agentless request processing:
a. Create a new Network Access Profile.
OL-14390-02
b. Enable agentless host processing for the profile.
c. Configure MAB.
See Step 6: Enable Agentless Request Processing, page 6-18 for details.
Configuration Guide for Cisco Secure ACS 4.2
6-3
Page 90

Chapter 6 Agentless Host Support Configuration Scenario
Basic Configuration Steps for Agentless Host Support
Step 7 Configure logging and reports.
Add the Bypass Info attribute to the Passed Authentications and Failed Attempts reports. See Step 7:
Configure Logging and Reports, page 6-23.
Note If you are using ACS with NAC, configure audit server support and, optionally, configure GAME group
feedback. See Configure GAME Group Feedback, page 6-24 for details.
Basic Configuration Steps for Agentless Host Support
This section describes the basic configuration steps for agentless host support.
Step 1: Install ACS
This section describes the installation process that you perform to run ACS, which runs on a Windows
2000 Server, a Windows 2003 system, or a Cisco Secure ACS SE.
To install ACS:
Step 1 Start ACS installation.
For detailed information on ACS installation, refer to the:
• Installation Guide for Cisco Secure ACS for Windows 4.2
• Installation Guide for Cisco Secure ACS Solution Engine 4.2
During the installation process, you are prompted to enter a password for encrypting the internal
database.
Step 2 Enter a password that is at least 8 characters long, and contains letters and numbers.
The ACS installation process for ACS for Windows automatically creates a shortcut to the ACS
administrative GUI on your desktop.
Note If you are installing ACS on the ACS SE, you must manually create an administrative GUI user
by using the use the add-guiadmin command to create a GUI account. For information on this
command, see Appendix A of the Installation Guide for Cisco Secure ACS Solution Engine 4.2,
“Command Reference.” You can then access the administrative GUI through a supported
browser. For a list of supported browsers, see Supported and Interoperable Devices and Software
Tables for Cisco Secure ACS Solution Engine Release 4.1.
6-4
Step 3 Double-click the ACS Admin icon to open a browser window to the ACS administrative GUI.
Step 4 If you do not see the ACS Admin icon on the desktop, open your browser from the machine on which
you installed ACS and go to one of the following locations:
• http://IP_address:2002
• http://hostname:2002
Configuration Guide for Cisco Secure ACS 4.2
OL-14390-02
Page 91

Chapter 6 Agentless Host Support Configuration Scenario
where IP_address is the IP address of the host that is running ACS and hostname is the hostname of the
host that is running ACS.
Step 2: Configure a RADIUS AAA Client
Before you can configure agentless host support, you must configure a RADIUS AAA client.
To configure a RADIUS AAA client:
Step 1 In the navigation bar, click Network Configuration.
The Network Configuration page opens.
Step 2 Do one of the following:
• If you are using Network Device Groups (NDGs), click the name of the NDG to which you want to
assign the AAA client. Then, click Add Entry below the AAA Clients table.
• To add AAA clients when you have not enabled NDGs, click Add Entry below the AAA Clients
table.
The Add AAA Client page opens, shown in Figure 6-2.
Basic Configuration Steps for Agentless Host Support
OL-14390-02
Configuration Guide for Cisco Secure ACS 4.2
6-5
Page 92

Basic Configuration Steps for Agentless Host Support
Figure 6-2 Add AAA Client Page
Chapter 6 Agentless Host Support Configuration Scenario
Step 3 In the AAA Client Hostname box, type the name assigned to this AAA client (up to 32 alphanumeric
characters).
Step 4 In the AAA Client IP Address box, type the AAA client IP address or addresses.
Step 5 If you are using NDGs, from the Network Device Group list, select the name of the NDG to which this
AAA client should belong, or select Not Assigned to set this AAA client to be independent of NDGs
Step 6 From the Authenticate Using list, select RADIUS (IOS/PIX).
Step 7 Specify additional AAA client settings as required.
Step 8 Click Submit + Apply.
Step 3: Install and Set Up an ACS Security Certificate
This section describes a simplified procedure for the ACS for Windows platform. For detailed
information on installing certificates, and also for information on how to install certificates on the Cisco
Secure ACS SE platform, see Chapter 9 of the User Guide for Cisco Secure ACS 4.2, “Advanced
Configuration: Authentication and Certificates.”
Configuration Guide for Cisco Secure ACS 4.2
6-6
OL-14390-02
Page 93

Chapter 6 Agentless Host Support Configuration Scenario
The steps in this section are required to enable posture validation, which is used in Network Access
Profiles.
Obtain Certificates and Copy Them to the ACS Host
To copy a certificate to the ACS host:
Step 1 Obtain a security certificate.
Step 2 Create a \Certs directory on the ACS server.
a. Open a DOS command window.
b. To create a certificates directory, enter:
mkdir <selected_drive>:\Certs
where selected_drive is the currently selected drive.
Step 3 Copy the following files to the \Certs directory:
• server.cer (server certificate)
• server.pvk (server certificate private key)
• ca.cer (CA certificate)
Basic Configuration Steps for Agentless Host Support
Run the Windows Certificate Import Wizard to Install the Certificate (ACS for Windows)
To run the Windows Certificate Import wizard to install the certificate on the server:
Step 1 Start Windows Explorer.
Step 2 Go to <selected_drive>:\Certs.
where selected_drive is the currently selected drive.
Step 3 Double-click the \Certs\ca.cer file.
The Certificate dialog appears.
OL-14390-02
Configuration Guide for Cisco Secure ACS 4.2
6-7
Page 94

Basic Configuration Steps for Agentless Host Support
Step 4 Select Install Certificate.
The Windows Certificate Import wizard starts.
Step 5 To install the certificate, follow the instructions that the wizard displays.
Step 6 Accept the default options for the wizard.
Note Only perform this process once on a Windows 2000 Server.
Enable Security Certificates on the ACS Installation
To enable security certificates:
Step 1 In the navigation bar, click System Configuration.
The System Configuration page opens.
Chapter 6 Agentless Host Support Configuration Scenario
Step 2 Click ACS C ertificate Setup.
Step 3 Click Install ACS Certificate.
Step 4 The Install ACS Certificate page opens, shown in Figure 6-3.
Figure 6-3 Install ACS Certificate Page
Step 5 Ensure that you click the Read certificate from file radio button.
Step 6 In the Certificate file text box, enter the server certificate location (path and name); for example
c:\Certs\server.cer.
Step 7 In the Private Key File text box, type the server certificate private key location (path and name); for
example:
c:\Certs\server.pvk.
6-8
Step 8 In the Private Key password text box, type 1111.
Step 9 Click Submit.
Step 10 ACS displays a message indicating that the certificate has been installed and instructs you to restart the
ACS services.
Configuration Guide for Cisco Secure ACS 4.2
OL-14390-02
Page 95

Chapter 6 Agentless Host Support Configuration Scenario
Step 11 Do not restart the services at this time.
Restart the services later, after you have completed the steps for adding a trusted certificate. See Add a
Trusted Certificate, page 6-9.
Install the CA Certificate
To install the CA Certificate:
Step 1 Choose System Configuration > ACS Certificate Setup > ACS Certification Authority Setup.
Step 2 The ACS Certification Authority Setup page appears, shown in Figure 6-4.
Figure 6-4 ACS Certification Authority Setup Page
Basic Configuration Steps for Agentless Host Support
Step 3 In the CA certificate file box, type the CA certificate location (path and name). For example:
c:\Certs\ca.cer.
Step 4 Click Submit.
Add a Trusted Certificate
After you add a server certificate and set up the certificate authority, install a trusted certificate.
To add a trusted certificate:
Step 1 Choose System Configuration > ACS Certificate Setup > Edit Certificate Trust List.
The Edit Certificate Trust List appears.
Step 2 Locate the trusted certificate that you want to install and check the corresponding check box by the
certificate name. For example, find the Stress certificate and check the corresponding check box.
Step 3 Click Submit.
Step 4 To restart ACS, choose System Configuration > Service Control, and then click Restart.
OL-14390-02
Configuration Guide for Cisco Secure ACS 4.2
6-9
Page 96

Basic Configuration Steps for Agentless Host Support
Step 4: Configure LDAP Support for MAB
You can configure the ACS internal database to manage MAB used with the agentless host feature;
however, if you have a large number of MAC addresses to process (for example, several thousand), it is
more efficient to use an external LDAP database than to configure the MAC address mappings manually
through the ACS GUI.
To configure LDAP support for MAB:
Step 1 Configure an External LDAP database for MAB support.
See Configure an External LDAP Database for MAB Support, page 6-10for details.
Step 2 Create one or more LDAP database configurations in ACS.
See Create One or More LDAP Database Configurations in ACS, page 6-13 for details.
Configure an External LDAP Database for MAB Support
Chapter 6 Agentless Host Support Configuration Scenario
Configure one or more external LDAP databases for MAB support. In each LDAP database, create:
• Device records that describe the agentless hosts that ACS will authenticate.
• LDAP groups that define an LDAP schema to enable MAB for agentless host support.
Example 6-1 shows portions of a sample Lightweight Directory Interchange Format (LDIF) file that
defines an LDAP database for agentless host support.
Example 6-1 Sample LDAP Schema for MAB Support
dn: ou=MAB Segment, o=mycorp
ou: MAB Segment
objectClass: top
objectClass: organizationalUnit
description: MAC Authentication Bypass Sub-Tree
dn: ou=MAC Addresses, ou=MAB Segment, o=mycorp
ou: MAC Addresses
objectClass: top
objectClass: organizationalUnit
dn: ou=MAC Groups, ou=MAB Segment, o=mycorp
ou: MAC Groups
objectClass: top
objectClass: organizationalUnit
dn: cn=user00-wxp.emea.mycorp.com,ou=MAC Addresses, ou=MAB Segment, o=mycorp
ipHostNumber: 10.56.60.100
objectClass: top
objectClass: ipHost
objectClass: ieee802Device
macAddress: 00:11:22:33:44:55
cn: user00-wxp.emea.mycorp.com
6-10
dn: cn=user11-wxp.emea.mycorp.com,ou=MAC Addresses, ou=MAB Segment, o=mycorp
ipHostNumber: 10.56.60.111
objectClass: top
objectClass: ipHost
objectClass: ieee802Device
Configuration Guide for Cisco Secure ACS 4.2
OL-14390-02
Page 97

Chapter 6 Agentless Host Support Configuration Scenario
macAddress: 11-22-33-44-55-66
cn: user11-wxp.emea.mycorp.com
dn: cn=Group_1_colon,ou=MAC Groups, ou=MAB Segment, o=mycorp
objectClass: top
objectClass: groupofuniquenames
description: group of delimited MAC Addresses
uniqueMember: cn=user00-wxp.emea.mycorp.com, ou=MAC Addresses, ou=MAB Segment,
o=mycorp
uniqueMember: cn=user77a-wxp.emea.mycorp.com, ou=MAC Addresses, ou=MAB Segment
, o=mycorp
uniqueMember: cn=user88-wxp.emea.mycorp.com, ou=MAC Addresses, ou=MAB Segment,
o=mycorp
cn: Group_1_colon
dn: cn=Group_2_dash,ou=MAC Groups, ou=MAB Segment, o=mycorp
objectClass: top
objectClass: groupofuniquenames
description: group of - delimited MAC Addresses
uniqueMember: cn=user11-wxp.emea.mycorp.com, ou=MAC Addresses, ou=MAB Segment,
o=mycorp
uniqueMember: cn=user77b-wxp.emea.mycorp.com, ou=MAC Addresses, ou=MAB Segment
, o=mycorp
cn: Group_2_dash
Basic Configuration Steps for Agentless Host Support
Description of the Settings in the Sample LDAP Schema
Figure 6-5 shows the tree structure of the LDAP schema that is presented in Example 6-1.
Figure 6-5 Tree Structure for a MAB Support LDAP Schema
MAB segment
MAC addresses MAC groups
802.1x device n 802.1x device n+1
LDAP user
group 00
LDAP user
group 11
158373
OL-14390-02
Configuration Guide for Cisco Secure ACS 4.2
6-11
Page 98

Basic Configuration Steps for Agentless Host Support
How the Subtrees Work
The sample LDAP schema in Example 6-1 contains code to define two subtrees:
dn: ou=MAC Addresses, ou=MAB Segment, o=mycorp
ou: MAC Addresses
objectClass: top
objectClass: organizationalUnit
dn: ou=MAC Groups, ou=MAB Segment, o=mycorp
ou: MAC Groups
objectClass: top
objectClass: organizationalUnit
The LDAP subtrees are:
• MAC Addresses—A user directory subtree that contains device records that specify MAC
addresses for agentless hosts (IEEE 802.1x devices that require agentless host authentication by
ACS).
When you specify a user directory subtree during LDAP configuration in the ACS user interface,
you enter the name assigned to the user directory subtree in your LDAP schema in the User
Directory Subtree text box.
• MAC Groups—A group directory subtree that contains LDAP user groups of users who connect
from specified MAC devices that are identified in the device records.
When you specify a group directory subtree during LDAP configuration in the ACS user interface,
you enter the name assigned to the group directory subtree in your LDAP schema in the Group
Directory Subtree text box.
Chapter 6 Agentless Host Support Configuration Scenario
How the LDAP User Groups Work
Each LDAP user group record sets up an LDAP user group that maps users connecting through one or
more devices to the specified group.
For example, the LDAP user group identified as cn=Group_1_colon sets up an LDAP user group that
will map users connecting from the host at 10.56.60.100 as well as from two other hosts:
dn: cn=Group_1_colon,ou=MAC Groups, ou=MAB Segment, o=mycorp
objectClass: top
objectClass: groupofuniquenames
description: group of delimited MAC Addresses
uniqueMember: cn=user00-wxp.emea.mycorp.com, ou=MAC Addresses, ou=MAB Segment,
o=mycorp
uniqueMember: cn=user77a-wxp.emea.mycorp.com, ou=MAC Addresses, ou=MAB Segment
, o=mycorp
uniqueMember: cn=user88-wxp.emea.mycorp.com, ou=MAC Addresses, ou=MAB Segment,
o=mycorp
cn: Group_1_colon
ACS queries the LDAP database to determine to which user groups to assign users who connect from a
host with a specified MAC address. ACS then assign users in the LDAP user group to a specified ACS
user group that you configure.
6-12
Configuration Guide for Cisco Secure ACS 4.2
OL-14390-02
Page 99

Chapter 6 Agentless Host Support Configuration Scenario
Basic Configuration Steps for Agentless Host Support
Table 6-1 describes the attributes of the sample LDAP groups.
Ta b l e 6-1 Attributes in LDAP User Groups for Agentless Host Support
Attribute Name Description
objectClass The value in the example indicates that this is a “group of unique names.” The value that you
specify here must match the name that you specify in the Group Object Class text box when
you specify the Common LDAP configuration during ACS LDAP configuration.
For information on configuring LDAP, see Configure an External LDAP Database for MAB
Support, page 6-10.
uniqueMember The value in the example is uniqueMember. One or more uniqueMember entries are used to
specify one or more device type records that have been set up in the LDAP schema to define
agentless hosts with specified MAC addresses. The objectClass field in the LDAP user group
shown in the previous code sample includes user00, user77a, and user88.
The name that you give to this field in your LDAP schema must match the value that you
enter in the Group Attribute Name text box when you specify the common LDAP
configuration during ACS LD configuration.
For information on configuring LDAP, see Configure an External LDAP Database for MAB
Support, page 6-10.
Create One or More LDAP Database Configurations in ACS
After you have configured one or more LDAP databases to support MAB, configure ACS to query the
LDAP databases.
The settings in the following procedure are based on the LDAP schema described in the previous section,
Configure an External LDAP Database for MAB Support, page 6-10. For your ACS installation,
configure ACS based on the schema that you set up for your network.
To create a LDAP configuration in ACS:
Step 1 In the navigation bar, click External User Databases.
The External User Databases page opens.
Step 2 Click Database Configuration.
The External User Database Configuration page opens.
Step 3 Click Generic LDAP.
The Database Configuration Creation table appears. If an LDAP configuration exists, the External User
Database Configuration table also appears.
Step 4 Do one of the following. If:
• There are no existing LDAP database configurations, click Create New Configuration.
• The External User Database table appears, click Configure.
Step 5 If you are creating a new LDAP configuration, enter the name of the new configuration for generic LDAP
and then click Submit.
Step 6 Click Configure.
OL-14390-02
The Generic LDAP Configuration page appears and contains four sections:
• Domain Filtering—Use to configure domain filtering, which is an optional configuration setting.
Configuration Guide for Cisco Secure ACS 4.2
6-13
Page 100

Basic Configuration Steps for Agentless Host Support
• Common LDAP Configuration—Configure the settings in this section to specify how ACS queries
the LDAP database.
• Primary LDAP Server—Configure the settings in this section to specify the primary LDAP server.
• Secondary LDAP Server—Configure the settings in this section if you are setting up LDAP
failback.
Step 7 If you want to set up Domain Filtering, refer to the “Configuring a Generic LDAP External User
Database” section in Chapter 12 of the User Guide for Cisco Secure Access Server 4.2.
Step 8 Specify the common LDAP configuration
Figure 6-6 shows the Common LDAP Configuration section.
Figure 6-6 Common LDAP Configuration Section
Chapter 6 Agentless Host Support Configuration Scenario
6-14
You must specify:
• User Directory Subtree—Enter the distinguished name (DN) of the user directory subtree that
contains all users. In MAB configuration, the users are, in effect, host devices.
In the LDAP schema shown in Example 6-1, the DN of the User Directory Subtree is ou=MAC
Addresses, ou=MAB Segment, o=mycorp.
• Group Directory Subtree—Enter the DN for the group directory subtree that contains all user
groups as defined in your LDAP schema. In MAB configuration, the members of user groups are
actually groups of MAC addresses.
In the LDAP schema shown in Example 6-1, the DN of the group directory subtree is ou=MAC
Groups, ou=MAB Segment, o=cisco.
• UserObjectType— Enter the name of the user object type that is defined in your LDAP schema. In
the LDAP schema shown in
Configuration Guide for Cisco Secure ACS 4.2
Example 6-1, the user object type is specified as macAddress.
OL-14390-02
 Loading...