

Page 1

Cisco 7945 IP Phone Quick Reference
Information Systems
Guide
Page 2

Contents
Cisco 7945 IP Phone Quick Reference Guide
Contents Page 2
Introduction 3
Overview of Phone 3
How Do I: 4
Place a Call? 4
Put a Call on Hold? 4
Use Call Waiting/Handle multiple Calls? 4
Transfer a Call? 4
Set Up a Conference Call? 4
Redirect an Incoming Call? 4
Operate the LCD Screen? 5
Use Voice Mail? 5
View my Missed Calls? 6
Forward All Calls? 6
Make Hands Free Calls? (speaker function) 7
Make Hands Free Calls using a headset? 7
Make a Video Call? 7
Adjust the Screen Brightness? 8
Wake the phone screen from sleep mode? 8
2
Adjust the Handset Volume? 8
Adjust the Ringer Volume? 8
Where to Find More Information 8
Page 3
Introduction:
This document has been written to help you get up and running with the new Cisco 7945 IP
Phone.
This document will show you how to make and receive a call. Change any phone settings,
forward or put a call on hold and log into your Unity Voi cemail box.
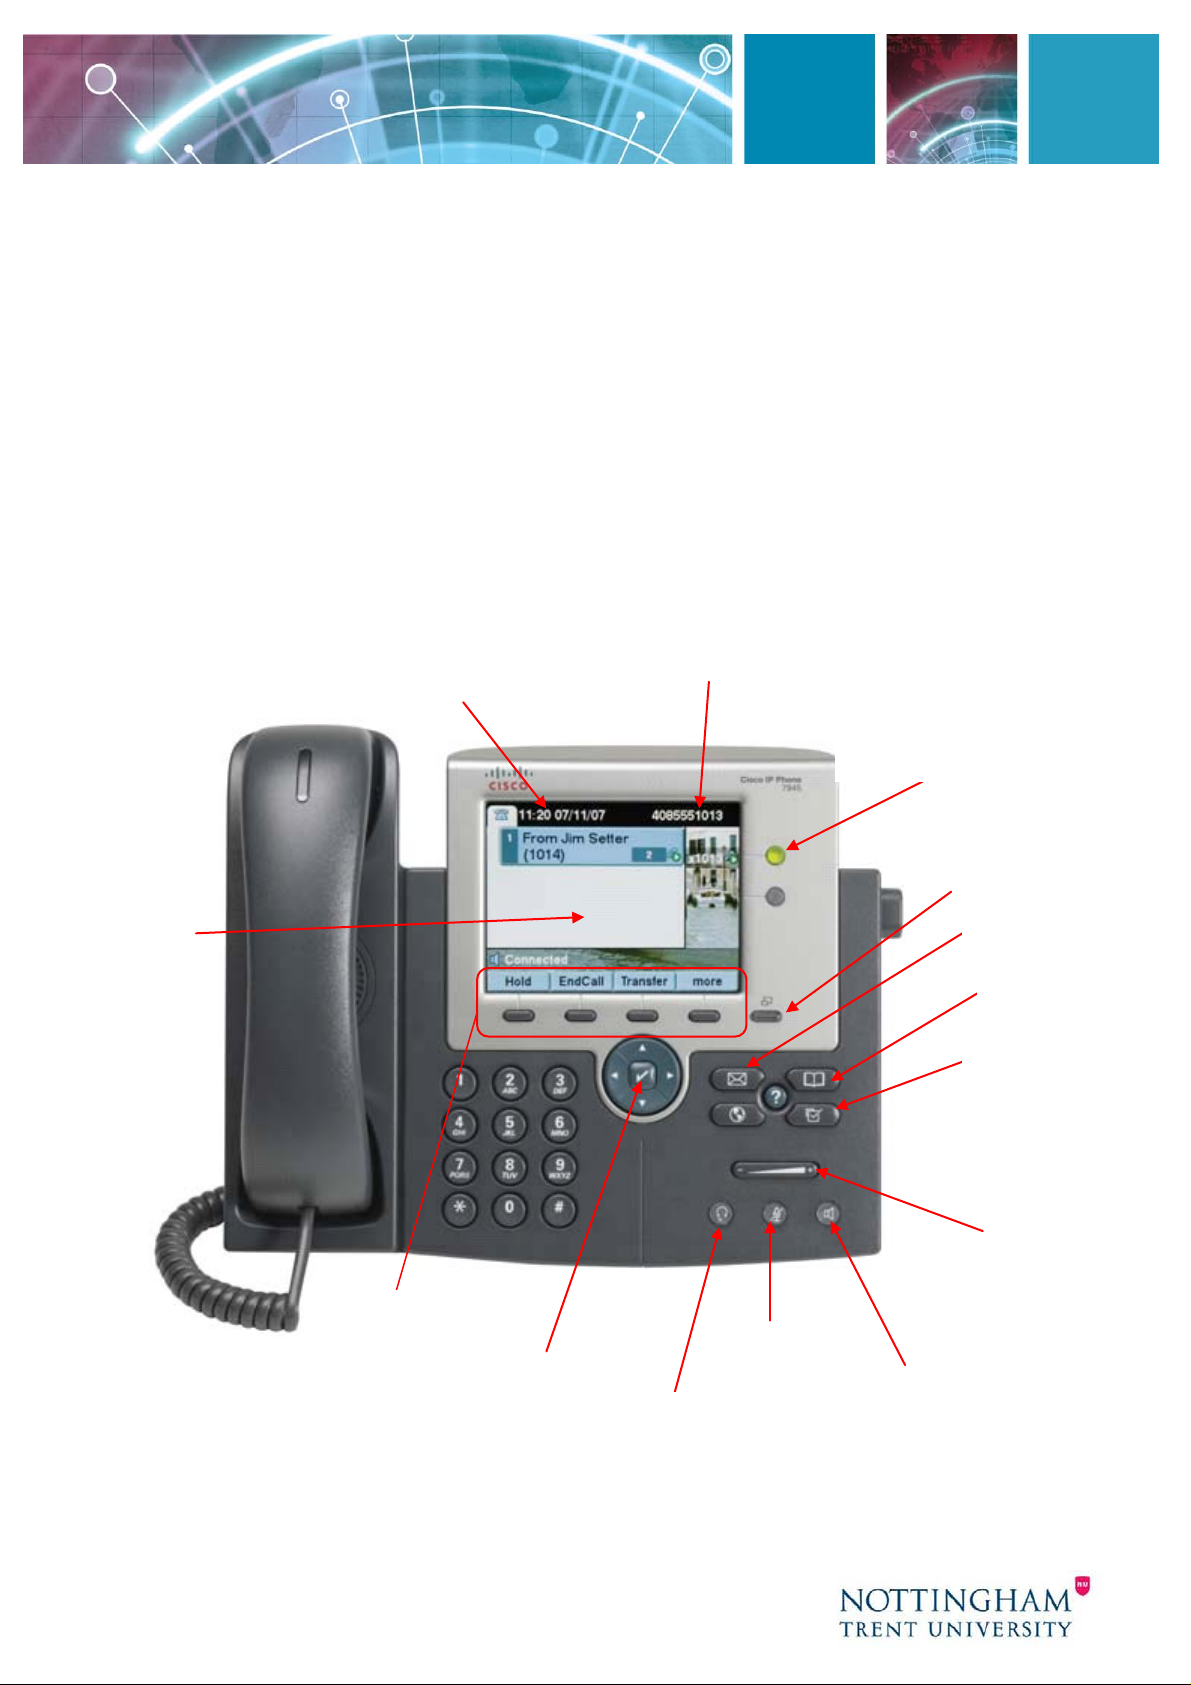
Overview of Phone:
Colour LCD
Screen
Date & Time
Phone Extension
Phone Line Buttons
Screen Wake-up
Voicemail
Directories
Settings
Volume Control
3
Soft Keys
Navigation Pad
Mute Button
Speaker Button
Headset Button
Page 4

informed
How Do I? Solution Tip
Place a Call? Lift the handset and dial the number
Put a Call on
Hold?
OR Press the New Call softkey and dial the number
OR Press the Redial softkey
Press the Hold softkey.
The call will display a paused
symbol
To return to the call, press the Resume softkey
A call on hold remains active
even though you and the other
party cannot hear each other.
You can answer or place
another call wh ile a call is on
hold.
Note as there is no hold music
please keep the caller
Use Call
Waiting?
Transfer a
Call?
Set Up a
Conference
Call?
Redirect an
incoming call?
To answer the new call, p ress the Answer softkey.
When you do so, the origina l c all is put on hold.
To return to the original call, select it (using the
directional pad) and press the Resume softkey.
You can use the Hold and Resume softkeys and
directional pad to switch between the calls.
Step 1 During a call, press the Trnsfer softkey.
Doing so automatically puts the call on hold.
Step 2 Dial the number or office extension to which
you want to transfer the call.
Step 3 When the call rings on the other end, press
Trnsfer. Or, when the party answers, announce the
call and then press Trnsfer.
To turn a two-party call into a conference call:
Step 1 During a call, press More then the Confrn
softkey. Doing so automatically activates a new line
and puts the first party on hold.
Step 2 Place a call to another number or extension.
Step 3 When the call connects, press Confrn to add
the new party to the conference call.
Repeat these steps to add additional parties to the
conference call.
While your phone is ringing press the iDivert
soft key. This will cause t he call to divert to voicemail
as it would if unanswered.
If you are on a call when
another call comes in, you will
hear a call waitin g tone and
see caller ID information on
the phone’s LCD screen.
If the person you are
transferring to doe s not
answer then you can return to
the original call if necessary.
Press EndCall to end the
outgoing call then Resume to
take the first call off hold.
Note Once the conference call
initiator discon nects, no
additional parties can be
added.
4
Page 5

How Do I? Solution Tip
Operate the
LCD Screen?
To control the cursor:
Press the >> softkey to re-position the cursor.
Press the << softkey to delete a character or digit in
an entry.
To select a menu item:
Press the Navigation pad to select (highlight) a
menu item. Then press Select (Centre button with a
tick).
Operating your phone’s LCD
screen is easy. Use the
Navigation button, softkeys,
and the keypad to make your
selections.
Tip To exit out of a menu on
your phone’s LCD screen,
press the Exit softkey.
OR
Press the number key on your phone’s dial pad that
corresponds to the item number in the menu.
Use Voice
Mail?
Set up voice mail:
Press the Voicemail
button on your Cisco IP
Phone or dial 85555 and enter your PIN/password as
prompted.
Allows you to save a recorded name set up a voice
greeting and change your PIN/password. (Press 0 for
help)
Access voice mail:
Press the Voicemail
button or dial 85555 and
inter your voicemail pin/password as prompted.
Access voice mail from another IP Phone:
Press the Voicemail
button or dial 85555. When
prompted for a password press *. Enter yo ur
voicemail ID and PIN/password as prompted
Access voice mail from outside NTU:
Dial 0115 848 5555. When you hear a Cisco Unity
message press *. Enter your voicemail ID and
Voicemail ID: Your Ext
(eg. 88500)
Voicemail password: 12345
(you should log in and change
this)
When you have one or more
new voice mail messages, the
red light on your ph one’s
handset remain s lit.
For more information on using
Unity Voicemail refer to the
user guides section of the IS
website.
See Where to Find More
Information at the end of this
guide
PIN/password as prompted
5
Page 6

How Do I? Solution Tip
View my
Missed Calls?
To view your call records:
Press the Directories
button.
Select Missed Calls (option 1)
Or choose another list:
Received Calls
Placed Calls
To dial from a call record:
Step 1 Follow the steps above to open your Missed,
Received, or Placed Calls directory.
Step 2 Use the Navigation button to select
(highlight) a particular record.
Step 3 Lift the handset or press the Dial softkey.
Your phone’s LCD display will
indicate if you have missed a
call.
Use the Directories m enu to
view (and dial from) call
records in your Missed Calls,
Received Calls, and Placed
Calls directories.
A call record contains the time
and date of the call, and a
phone number (if available ) .
To delete your call records:
Select an entire directory and press the Clear softkey
or select a particular call record and press the Delete
softkey.
Forward All
Calls to
another
extension?
To forward all of your incoming calls to another
number:
Step 1 Press the CFwdAll softkey. You will hear two
beeps.
Step 2 Enter the number to w hich you want to divert
Forward all of
your calls
directly to
Voicemail
all of your calls to. Enter the number exactly as you
would if you were placing a call to that number.
Step 3 After you enter the number you will hear two
beeps
The LCD screen displays a message confirming the
number to which your calls are being forwarded.
To forward all incoming calls to your Voicemail:
Step 1: Press the CFwdAll softkey. You will hear two
beeps
Note To cancel call
forwarding, press the CfwdAll
softkey.
• You can use call forwarding
to send your incom ing calls to
another Cisco I P Phone or to
voicemail.
• If call forwar ding is active
and there is no answer at the
forwarded number, the c a ll will
be redirected to your voice
mail box
Step 2; Press the Messages
button and you
will hear two beeps.
The LCD screen displays a message confirming the
number to which your calls are being forwarded.
6
Page 7

How Do I? Solution Tip
Make Hands
Free Calls?
Make Hands
Free Calls
using a
headset?
Make a video
Call
To activate the speaker:
During a call, press the Speaker
button, ensure it
lights up in green and then hang u p t he receiver.
To switc h from the speaker to the handset: Pick
up the handset.
To turn off the speaker and hang up: Press t h e
Speaker
button.
To adjust the speaker volume: Press the up or
down Volume
button when the speaker is in
use. Press the Save softkey to save your change.
To start a call: Press the Headset
button (It will
glow green when activated), or if it is already lit
press the New Call softkey.
To answer a call: Press the Headset
button or if
the headset button is already Illuminated press the
Answer softkey.
To end a call: At the end of the call press the
EndCall softkey to disconnect. The phone will still be
in headset mode ready for the next call.
During a call: To m ov e a call to headset from the
receiver or speaker press the Headset
button,
confirm it lights up then hang up the receiver.
To go back to using the normal handset pick the
receiver up during a call or to answer a call and the
Headset
light will go off.
To adjust the headset volume: Press the up or
down Volume
button when the headset is in
use.
Press the Save softkey to save your change.
You must have the follow i ng:
1. Video calling enabled on your phone
(look for the icon on the phone display)
2. A compatible webcam installed on your PC
3. Cisco Video Advantage installed and running on
your PC
4. You must be calling either another party with the
same setup or a 7985 video phone
As long as the above criteria are met simply d ial as
normal and video will start automatically on your PC
when the call connects.
Note: Once the headset light
is on you will remain in
headset mode until you press
the button again or answer a
call using the receiver.
When in headset mode you
only need to use the s oftkeys
to make and answer calls
For more information on video
calling and Cisco Video
Advantage refer to the user
guides section of the IS
website.
See Where to Find More
Information at the end of this
guide
7
Page 8

How Do I? Solution Tip
Adjust the
Screen
Brightness?
Wake the
phone screen
from sleep
mode?
Adjust the
Handset
Volume?
Adjust the
Ringer
Volume?
Press the Settings
Select User Preferences (option 1) from the menu.
Select Brightness (option 4) from the menu.
Press the Up or Down softkeys to set the desired
contrast.
Press the Save softkey to accept your changes.
Press any button or lift the handset.
After 5:30pm, the phone screen enters sleep mode to
save power. In this mode, the phone scree n appe ars
blank and the Display
Press the up or down Volume button when
the handset is in use.
Press the Save softkey to save your change.
Press the up or down Volume button when
the handset is not in use (in the handset cradle).
button.
button is lit.
Where to Find
More
Information
The IS Service Desk should be your first point of contact if you have problems using
Cisco Video Advantage or your Cisco IP phone.
Webform at
Email to
Phone ext 88500
Further user guides can be found on the Infor mation Systems site at:
http://www.ntu.ac.uk/information_systems/help_support/user_guides/
For training enquiries contact the Centre for Professional Learning and Development
CPLDenquiries@ntu.ac.uk
https:\\www.ntu.ac.uk\issr
its.servicedesk@ntu.ac.uk
8
 Loading...