

Page 1

Phone Guide
Cisco Unified IP Phone
7961G/7961G-GE and
7941G/7941G-GE for Cisco Unified
CallManager 5.0 (SCCP)
INCLUDING LICENSE AND WARRANTY
Corporate Headquarters
Cisco Systems, Inc.
170 West Tasman Drive
San Jose, CA 95134-1706
USA
http://www.cisco.com
Tel: 408 526-4000
800 553-NETS (6387)
Fax: 408 526-4100
Page 2

Page 3
number
AbbrDial Dial using a speed dial index
Softkey Definitions
Answer Answer a call
line
Back Return to the previous Help topic
Barge Add yourself to a call on a shared
CallBack Receive notification when a busy
Quick Reference
extension becomes available
Cancel Cancel an action or exit a screen
without applying changes
cBarge Add yourself to a call on a shared
line and establish a conference
the cursor when using EditDial
multiparty call in the Missed
Calls and Received Calls logs
CFwdALL Set up/cancel call forwarding
Clear Delete records or settings
Close Close the current window
ConfList View conference participants
Confrn Create a conference call
Delete Remove characters to the right of
Details Open the Details record for a
Cisco Unified IP Phone
7961G/7961G-GE and
7941G/7941G-GE for
Dial Dial a phone number
DirTrfr Transfer two calls to each other
EditDial Edit a number in a call log
EndCall Disconnect the current call
Erase Reset settings to their defaults
Cisco Unified
CallManager 5.0 (SCCP)
Softkey Definitions
Phone Screen Icons
Button Icons
Common Phone Tasks
Exit Return to the previous screen
group
GPickUp Answer a call ringing in another
Press .
View online help on
Common Phone Tasks
after dialing a number.
Navigation button while
on-hook to see your Placed
Calls log.
Pick up the handset.
the phone
Place a call Go-off hook before or
Redial a number Press Redial. Or press the
Switch to the
handset during a call
Press or , then
hang up the handset.
Switch to the
speaker or headset
during a call
OL-8163-01
Press Tra ns fer, enter the
number, then press
Trans fe r again.
Press more > Confrn, dial
the participant, then press
Start a standard
Confrn again.
conference call
Copyright © 2006 Cisco Systems, Inc. All rights reserved. Cisco, Cisco IOS,
Cisco Systems, and the Cisco Systems logo are registered trademarks of Cisco
Systems, Inc. or its affiliates in the United States and certain other countries.
All other trademarks mentioned in this document or Website are the property
of their respective owners. The use of the word partner does not imply a
partnership relationship between Cisco and any other company. (0502R)
call log. To dial, highlight
a listing and go off-hook.
Transfer a call to a
Mute your phone Press .
Use your call logs Press to choose a
Edit a number Press EditDial, << or >>.
new number
Hold/resume a call Press Hold or Resume.
Page 4
Messages
Services
Help
Directories
Settings
Volu me
Speaker
Mute
Headset
Busy line in a speed-dial, call log, or
directory listing (BLF feature)
Idle line in speed-dial, call log, or
directory listing (BLF feature)
Speed-dial, call log, or directory
listing (line status unknown)
Message waiting
Video enabled
Option selected
Feature enabled
Phone service URL assigned
Other Features
Call Forwarding enabled
Call on hold
Connected call
Incoming call
Line and Call State
Phone Screen Icons
Off-hook
On-hook
Button Icons
Shared line in use
Authenticated call
Encrypted call
Secure Calls
Critical Calls
Priority call
Medium priority call
High priority call
Highest priority call
Selected Device
Handset in use
Headset in use
Speakerphone in use
iDivert Send a call to your voice
messaging system
single line to create a conference
Join Join several calls already on a
associated group
Links View related Help topics
Main Display the Help main menu
MeetMe Host a Meet-Me conference call
more Display additional softkeys
NewCall Make a new call
OPickUp Answer a call ringing in an
Park Store a call using Call Park
system administrator
number
PickUp Answer a call in your group
QRT Submit call problems to the
Redial Redial the most recently dialed
Remove Remove a conference participant
conference call
Resume Resume a call on hold
RmLstC Drop the last party added to a
Save Save the chosen settings
Search Search for a directory listing
Select Select a menu item or call
Trans fe r Transfer a call
Update Refresh content
VidMode Choose a video display mode
<< Delete entered characters
>> Move through entered characters
Page 5

Contents
Getting Started 1
Using this Guide 1
Finding Additional Information 2
Safety and Performance Information 2
Accessibility Features 11
Connecting Your Phone 12
An Overview of Your Phone 15
Understanding Buttons and Hardware 15
Understanding Phone Screen Features 19
Cleaning the Phone Screen 19
Understanding Feature Buttons and Menus 20
Understanding the Help System on Your Phone 20
Understanding Lines vs. Calls 21
Understanding Line and Call Icons 21
Understanding Feature Availability 22
Basic Call Handling 23
Placing a Call—Basic Options 23
Placing a Call—Additional Options 24
Answering a Call 25
Ending a Call 26
Using Hold and Resume 26
Using Mute 27
Switching Between Multiple Calls 27
Viewing Multiple Calls 27
Transferring Calls 28
Cisco Unified IP Phone 7961G/7961G-GE and 7941G/7941G-GE for Cisco Unified CallManager 5.0 (SCCP) iii
Page 6

Forwarding All Calls to Another Number 29
Making Conference Calls 30
Understanding Types of Conference Calls 30
Starting and Joining a Standard Conference 31
Starting or Joining a Meet-Me Conference Call 33
Advanced Call Handling 34
Speed Dialing 34
Picking Up a Redirected Call on Your Phone 35
Using a Shared Line 36
Understanding Shared Lines 36
Adding Yourself to a Shared-Line Call 37
Preventing Others from Viewing or Barging a Shared-Line Call 38
Storing and Retrieving Parked Calls 38
Making and Receiving Secure Calls 39
Tracing Suspicious Calls 39
Prioritizing Critical Calls 40
Using Cisco Extension Mobility 41
Using BLF to Determine a Line State 41
Using a Handset, Headset, and Speakerphone 42
Obtaining a Headset 42
Using AutoAnswer 43
Using Phone Settings 44
Customizing Rings and Message Indicators 44
Customizing the Phone Screen 45
Using Call Logs and Directories 46
Using Call Logs 46
Directory Dialing 48
Using Corporate Directory on Your Phone 48
Using Personal Directory on Your Phone 49
iv OL-8163-01
Page 7

Accessing Voice Messages 52
Customizing Your Phone on the Web 53
Accessing Your User Options Web Pages 53
Configuring Features and Services on the Web 54
Using Personal Directory on the Web 54
Using Your Personal Address Book on the Web 54
Configuring Fast Dials on the Web 55
Using the Address Book Synchronization Tool 56
Setting Up Speed Dials on the Web 56
Setting Up Phone Services on the Web 57
Controlling User Settings on the Web 58
Controlling Line Settings on the Web 59
Using Cisco WebDialer 61
Understanding Additional Configuration Options 63
Troubleshooting Your Phone 65
General Troubleshooting 65
Viewing Phone Administration Data 66
Using the Quality Reporting Tool 66
Cisco One-Year Limited Hardware Warranty Terms 67
Index 69
Cisco Unified IP Phone 7961G/7961G-GE and 7941G/7941G-GE for Cisco Unified CallManager 5.0 (SCCP) v
Page 8

vi OL-8163-01
Page 9
Getting Started
Using this Guide
This guide provides you with an overview of the features available on your phone. You can read it
completely for a solid understanding of your phone’s capabilities, or refer to the table below for
pointers to commonly used sections.
If you want to... Then...
Explore your phone on your own Press on the phone when you need assistance.
Review safety information See the “Safety and Performance Information” section on page 2.
Connect your phone See the “Connecting Your Phone” section on page 12.
Use your phone after it is installed Start with the “An Overview of Your Phone” section on page 15.
Learn what the button lights mean See the “Understanding Buttons and Hardware” section on
page 15.
Learn about the display See the “Understanding Phone Screen Features” section on
page 19.
Make calls See the “Placing a Call—Basic Options” section on page 23.
Put calls on hold See the “Using Hold and Resume” section on page 26.
Mute calls See the “Using Mute” section on page 27.
Transfer calls See the “Transferring Calls” section on page 28.
Make conference calls See the “Making Conference Calls” section on page 30.
Set up speed dialing See the “Speed Dialing” section on page 34.
Share a phone number See the “Using a Shared Line” section on page 36.
Use your phone as a speakerphone See the “Using a Handset, Headset, and Speakerphone” section on
page 42.
Change the ring volume or tone See the “Using Phone Settings” section on page 44.
View your missed calls See the “Using Call Logs and Directories” section on page 46.
Listen to your voice messages See the “Accessing Voice Messages” section on page 52.
See softkey and icon definitions See the Quick Reference Card in the front of this guide.
Cisco Unified IP Phone 7961G/7961G-GE and 7941G/7941G-GE for Cisco Unified CallManager 5.0 (SCCP) 1
Page 10

Finding Additional Information
You can access the most current Cisco Unified IP Phone documentation on the World Wide Web at this
URL:
http://www.cisco.com/univercd/cc/td/doc/product/voice/c_ipphon/index.htm
You can access the Cisco website at this URL:
http://www.cisco.com/
International Cisco websites can be accessed from this URL:
http://www.cisco.com/public/countries_languages.shtml
Safety and Performance Information
Read the following safety notices before installing or using your Cisco Unified IP Phone:
Warning
Waarschuwing
IMPORTANT SAFETY INSTRUCTIONS
This warning symbol means danger. You are in a situation that could cause
bodily injury. Before you work on any equipment, be aware of the hazards
involved with electrical circuitry and be familiar with standard practices for
preventing accidents. Use the statement number provided at the end of each
warning to locate its translation in the translated safety warnings that
accompanied this device.
SAVE THESE INSTRUCTIONS
BELANGRIJKE VEILIGHEIDSINSTRUCTIES
Dit waarschuwingssymbool betekent gevaar. U verkeert in een situatie die
lichamelijk letsel kan veroorzaken. Voordat u aan enige apparatuur gaat
werken, dient u zich bewust te zijn van de bij elektrische schakelingen
betrokken risico's en dient u op de hoogte te zijn van de standaard praktijken
om ongelukken te voorkomen. Gebruik het nummer van de verklaring
onderaan de waarschuwing als u een vertaling van de waarschuwing die bij
het apparaat wordt geleverd, wilt raadplegen.
BEWAAR DEZE INSTRUCTIES
Statement 1071
2 OL-8163-01
Page 11

Getting Started
Varoitus
Attention
Warnung
TÄRKEITÄ TURVALLISUUSOHJEITA
Tämä varoitusmerkki merkitsee vaaraa. Tilanne voi aiheuttaa ruumiillisia
vammoja. Ennen kuin käsittelet laitteistoa, huomioi sähköpiirien
käsittelemiseen liittyvät riskit ja tutustu onnettomuuksien yleisiin
ehkäisytapoihin. Turvallisuusvaroitusten käännökset löytyvät laitteen
mukana toimitettujen käännettyjen turvallisuusvaroitusten joukosta
varoitusten lopussa näkyvien lausuntonumeroiden avulla.
SÄILYTÄ NÄMÄ OHJEET
IMPORTANTES INFORMATIONS DE SÉCURITÉ
Ce symbole d'avertissement indique un danger. Vous vous trouvez dans une
situation pouvant entraîner des blessures ou des dommages corporels. Avant
de travailler sur un équipement, soyez conscient des dangers liés aux circuits
électriques et familiarisez-vous avec les procédures couramment utilisées
pour éviter les accidents. Pour prendre connaissance des traductions des
avertissements figurant dans les consignes de sécurité traduites qui
accompagnent cet appareil, référez-vous au numéro de l'instruction situé à la
fin de chaque avertissement.
CONSERVEZ CES INFORMATIONS
WICHTIGE SICHERHEITSHINWEISE
Dieses Warnsymbol bedeutet Gefahr. Sie befinden sich in einer Situation, die
zu Verletzungen führen kann. Machen Sie sich vor der Arbeit mit Geräten mit
den Gefahren elektrischer Schaltungen und den üblichen Verfahren zur
Vorbeugung vor Unfällen vertraut. Suchen Sie mit der am Ende jeder Warnung
angegebenen Anweisungsnummer nach der jeweiligen Übersetzung in den
übersetzten Sicherheitshinweisen, die zusammen mit diesem Gerät
ausgeliefert wurden.
BEWAHREN SIE DIESE HINWEISE GUT AUF.
Cisco Unified IP Phone 7961G/7961G-GE and 7941G/7941G-GE for Cisco Unified CallManager 5.0 (SCCP) 3
Page 12

Avvertenza
Advarsel
Aviso
IMPORTANTI ISTRUZIONI SULLA SICUREZZA
Questo simbolo di avvertenza indica un pericolo. La situazione potrebbe
causare infortuni alle persone. Prima di intervenire su qualsiasi
apparecchiatura, occorre essere al corrente dei pericoli relativi ai circuiti
elettrici e conoscere le procedure standard per la prevenzione di incidenti.
Utilizzare il numero di istruzione presente alla fine di ciascuna avvertenza per
individuare le traduzioni delle avvertenze riportate in questo documento.
CONSERVARE QUESTE ISTRUZIONI
VIKTIGE SIKKERHETSINSTRUKSJONER
Dette advarselssymbolet betyr fare. Du er i en situasjon som kan føre til skade
på person. Før du begynner å arbeide med noe av utstyret, må du være
oppmerksom på farene forbundet med elektriske kretser, og kjenne til
standardprosedyrer for å forhindre ulykker. Bruk nummeret i slutten av hver
advarsel for å finne oversettelsen i de oversatte sikkerhetsadvarslene som
fulgte med denne enheten.
TA VARE PÅ DISSE INSTRUKSJONENE
INSTRUÇÕES IMPORTANTES DE SEGURANÇA
Este símbolo de aviso significa perigo. Você está em uma situação que poderá
ser causadora de lesões corporais. Antes de iniciar a utilização de qualquer
equipamento, tenha conhecimento dos perigos envolvidos no manuseio de
circuitos elétricos e familiarize-se com as práticas habituais de prevenção de
acidentes. Utilize o número da instrução fornecido ao final de cada aviso para
localizar sua tradução nos avisos de segurança traduzidos que acompanham
este dispositivo.
GUARDE ESTAS INSTRUÇÕES
¡Advertencia!
INSTRUCCIONES IMPORTANTES DE SEGURIDAD
Este símbolo de aviso indica peligro. Existe riesgo para su integridad física.
Antes de manipular cualquier equipo, considere los riesgos de la corriente
eléctrica y familiarícese con los procedimientos estándar de prevención de
accidentes. Al final de cada advertencia encontrará el número que le ayudará
a encontrar el texto traducido en el apartado de traducciones que acompaña
a este dispositivo.
GUARDE ESTAS INSTRUCCIONES
4 OL-8163-01
Page 13
Getting Started
Varning!
VIKTIGA SÄKERHETSANVISNINGAR
Denna varningssignal signalerar fara. Du befinner dig i en situation som kan
leda till personskada. Innan du utför arbete på någon utrustning måste du vara
medveten om farorna med elkretsar och känna till vanliga förfaranden för att
förebygga olyckor. Använd det nummer som finns i slutet av varje varning för
att hitta dess översättning i de översatta säkerhetsvarningar som medföljer
denna anordning.
SPARA DESSA ANVISNINGAR
Cisco Unified IP Phone 7961G/7961G-GE and 7941G/7941G-GE for Cisco Unified CallManager 5.0 (SCCP) 5
Page 14
Aviso
INSTRUÇÕES IMPORTANTES DE SEGURANÇA
Este símbolo de aviso significa perigo. Você se encontra em uma situação em
que há risco de lesões corporais. Antes de trabalhar com qualquer
equipamento, esteja ciente dos riscos que envolvem os circuitos elétricos e
familiarize-se com as práticas padrão de prevenção de acidentes. Use o
número da declaração fornecido ao final de cada aviso para localizar sua
tradução nos avisos de segurança traduzidos que acompanham o dispositivo.
GUARDE ESTAS INSTRUÇÕES
6 OL-8163-01
Page 15
Getting Started
Advarsel
VIGTIGE SIKKERHEDSANVISNINGER
Dette advarselssymbol betyder fare. Du befinder dig i en situation med risiko
for legemesbeskadigelse. Før du begynder arbejde på udstyr, skal du være
opmærksom på de involverede risici, der er ved elektriske kredsløb, og du
skal sætte dig ind i standardprocedurer til undgåelse af ulykker. Brug
erklæringsnummeret efter hver advarsel for at finde oversættelsen i de
oversatte advarsler, der fulgte med denne enhed.
GEM DISSE ANVISNINGER
Cisco Unified IP Phone 7961G/7961G-GE and 7941G/7941G-GE for Cisco Unified CallManager 5.0 (SCCP) 7
Page 16
8 OL-8163-01
Page 17

Getting Started
Warning
Warning
Read the installation instructions before you connect the system to its power source.
Ultimate disposal of this product should be handled according to all national laws and
regulations.
Warning
Do not work on the system or connect or disconnect cables during periods of lightning
activity.
Cisco Unified IP Phone 7961G/7961G-GE and 7941G/7941G-GE for Cisco Unified CallManager 5.0 (SCCP) 9
Page 18

Warning
Caution Inline power circuits provide current through the communication cable. Use the Cisco
To avoid electric shock, do not connect safety extra low voltage (SELV) circuits to
telephone network voltage (TNV) circuits. LAN ports contain SELV circuits, and WAN
ports contain TNV circuits. Some LAN and WAN ports use RJ-45 connectors. Use caution
when connecting cables.
provided cable or a minimum 24 AWG communication cable.
Using an External Power Supply
The following warnings apply when you use the external power supply with the
Cisco Unified IP Phone:
Warning
Warning
This product relies on the building's installation for short-circuit (over current)
protection. Ensure that a fuse or circuit breaker no larger than 120 VAC, 15A U.S. (240
VAC, 10A international) is used on the phase conductors (all current-carrying
conductors).
The device is designed to work with TN power systems.
Warning
Warning
Caution Only use the Cisco specified power supply with this product.
The plug-socket combination must be accessible at all times because it serves as the
main disconnecting device.
The power supply must be placed indoors.
Power Outage
Your accessibility to emergency service through the phone is dependent on the phone being powered.
If there is an interruption in the power supply, Service and Emergency Calling Service dialing will not
function until power is restored. In the case of a power failure or disruption, you may need to reset or
reconfigure equipment before using the Service or Emergency Calling Service dialing.
10 OL-8163-01
Page 19

Getting Started
Using External Devices
The following information applies when you use external devices with the Cisco Unified IP Phone:
Cisco recommends the use of good quality external devices (such as headsets) that are shielded against
unwanted radio frequency (RF) and audio frequency (AF) signals.
Depending on the quality of these devices and their proximity to other devices such as mobile phones
or two-way radios, some audio noise may still occur. In these cases, Cisco recommends that you take
one or more of the following actions:
• Move the external device away from the source of the RF or AF signals.
• Route the external device cables away from the source of the RF or AF signals.
• Use shielded cables for the external device, or use cables with a better shield and connector.
• Shorten the length of the external device cable.
• Apply ferrites or other such devices on the cables for the external device.
Cisco cannot guarantee the performance of the system because Cisco has no control over the quality
of external devices, cables, and connectors. The system will perform adequately when suitable devices
are attached using good quality cables and connectors.
Caution In European Union countries, use only external speakers, microphones, and headsets that
are fully compliant with the EMC Directive [89/336/EC].
Accessibility Features
A list of accessibility features is available upon request.
Cisco Unified IP Phone 7961G/7961G-GE and 7941G/7941G-GE for Cisco Unified CallManager 5.0 (SCCP) 11
Page 20
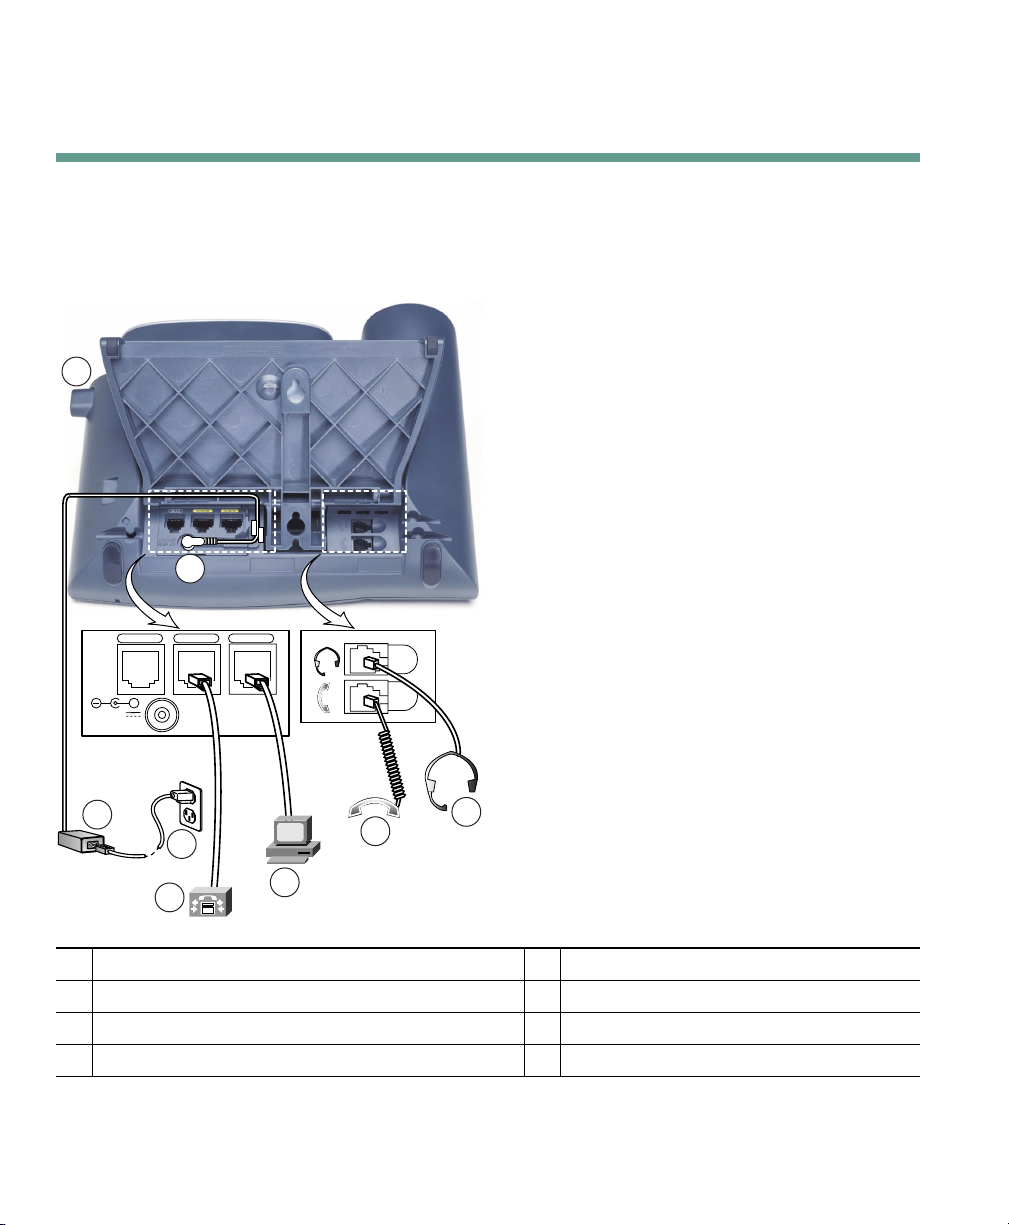
Connecting Your Phone
Your system administrator will likely connect your new Cisco Unified IP Phone to the corporate IP
telephony network. If that is not the case, refer to the figure and table below to connect your phone.
8
1
AUX
10/100 SW 10/100 PC
+
DC48V
2
3
4
1
DC adaptor port (DC48V)
2
AC-to-DC power supply
3
AC power cord
4
Network port (10/1001 SW)
1. Your phone may show 10/100/1000.
12 OL-8163-01
5
6
7
113656
5
Access port (10/1001 PC)
6
Handset port
7
Headset port
8
Footstand button
Page 21

Connecting Your Phone
Adjusting the Footstand
To change the angle of the phone base, adjust the footstand while pressing the footstand button.
Adjusting the Handset Rest
Cisco recommends adjusting the handset rest, particularly when wall mounting the phone, as this will
ensure that the receiver will not readily slip out of the cradle. See the table below for instructions.
1 2 3
120521
Set the handset aside and pull the square plastic tab from the handset rest.
1
Rotate the tab 180 degrees.
2
Slide the tab back into the handset rest. An extension protrudes from the top of the rotated tab.
3
Return the handset to the handset rest.
Registering with TAPS
After your phone is connected to the network, your system administrator might ask you to
auto-register your phone using TAPS (Tool for Auto-Registered Phones Support). TAPS might be used
for a new phone or to replace an existing phone.
To register with TAPS, pick up the handset, enter the TAPS extension provided by your system
administrator, and follow the voice prompts. You might need to enter your entire extension, including
the area code. After your phone displays a confirmation message, hang up. The phone will re-start.
Cisco Unified IP Phone 7961G/7961G-GE and 7941G/7941G-GE for Cisco Unified CallManager 5.0 (SCCP) 13
Page 22

Headset Information
To use a headset, connect it to the headset port on the back of your phone.
Although Cisco Systems performs some internal testing of third-party headsets for use with the
Cisco Unified IP Phones, Cisco does not certify or support products from headset or handset vendors.
Because of the inherent environmental and hardware inconsistencies in the locations where
Cisco Unified IP Phones are deployed, there is not a single “best” solution that is optimal for all
environments. Cisco recommends that customers test the headsets that work best in their environment
before deploying a large number of units in their network.
In some instances, the mechanics or electronics of various headsets can cause remote parties to hear
an echo of their own voice when they speak to Cisco Unified IP Phone users.
Cisco Systems recommends the use of good quality external devices, like headsets that are screened
against unwanted radio frequency (RF) and audio frequency (AF) signals. Depending on the quality of
these devices and their proximity to other devices such as cell phones and two-way radios, some audio
noise may still occur. See the “Using External Devices” section on page 11 for more information.
The primary reason that a particular headset would be inappropriate for the Cisco Unified IP Phone
is the potential for an audible hum. This hum can be heard by either the remote party or by both the
remote party and you, the Cisco Unified IP Phone user. Some potential humming or buzzing sounds
can be caused by a range of outside sources, for example, electric lights, being near electric motors,
large PC monitors. In some cases, a hum experienced by a user may be reduced or eliminated by using
a local power cube. See the “Using an External Power Supply” section on page 10 for more
information.
Audio Quality Subjective to the User
Beyond the physical, mechanical and technical performance, the audio portion of a headset must
sound good to you (the user) and to the party on the far end. Sound is subjective and Cisco cannot
guarantee the performance of any headsets or handsets, but some of the headsets and handsets on the
sites listed below have been reported to perform well on Cisco Unified IP Phones.
Nevertheless, it is ultimately still the customer's responsibility to test this equipment in their own
environment to determine suitable performance.
For information about headsets, see:
http://www.vxicorp.com/cisco
http://www.plantronics.com
14 OL-8163-01
Page 23

An Overview of Your Phone
An Overview of Your Phone
The Cisco Unified IP Phone 7961G and 7961G-GE (gigabit Ethernet version) and the 7941G and
7941G-GE (gigabit Ethernet version) are full-feature telephones that provide voice communication
over the same data network that your personal computer uses, allowing you to place and receive phone
calls, put calls on hold, speed dial numbers, transfer calls, make conference calls, and so on.
The gigabit Ethernet Cisco Unified IP Phone 7961G-GE and 7941G-GE deliver the latest technology
and advancements in Gigabit Ethernet VoIP telephony, providing gigabit throughput to your desktop.
In addition to basic call-handling features, your phone can provide enhanced productivity features that
extend your call-handling capabilities. Depending on configuration, your phone supports:
• Access to network data, XML applications, and web-based services.
• Online customizing of phone features and services from your User Options web pages.
• A comprehensive online help system that displays information on the phone screen.
Understanding Buttons and Hardware
You can use Figure 1 and Figure 2 to identify buttons and hardware on your phone.
Cisco Unified IP Phone 7961G/7961G-GE and 7941G/7941G-GE for Cisco Unified CallManager 5.0 (SCCP) 15
Page 24
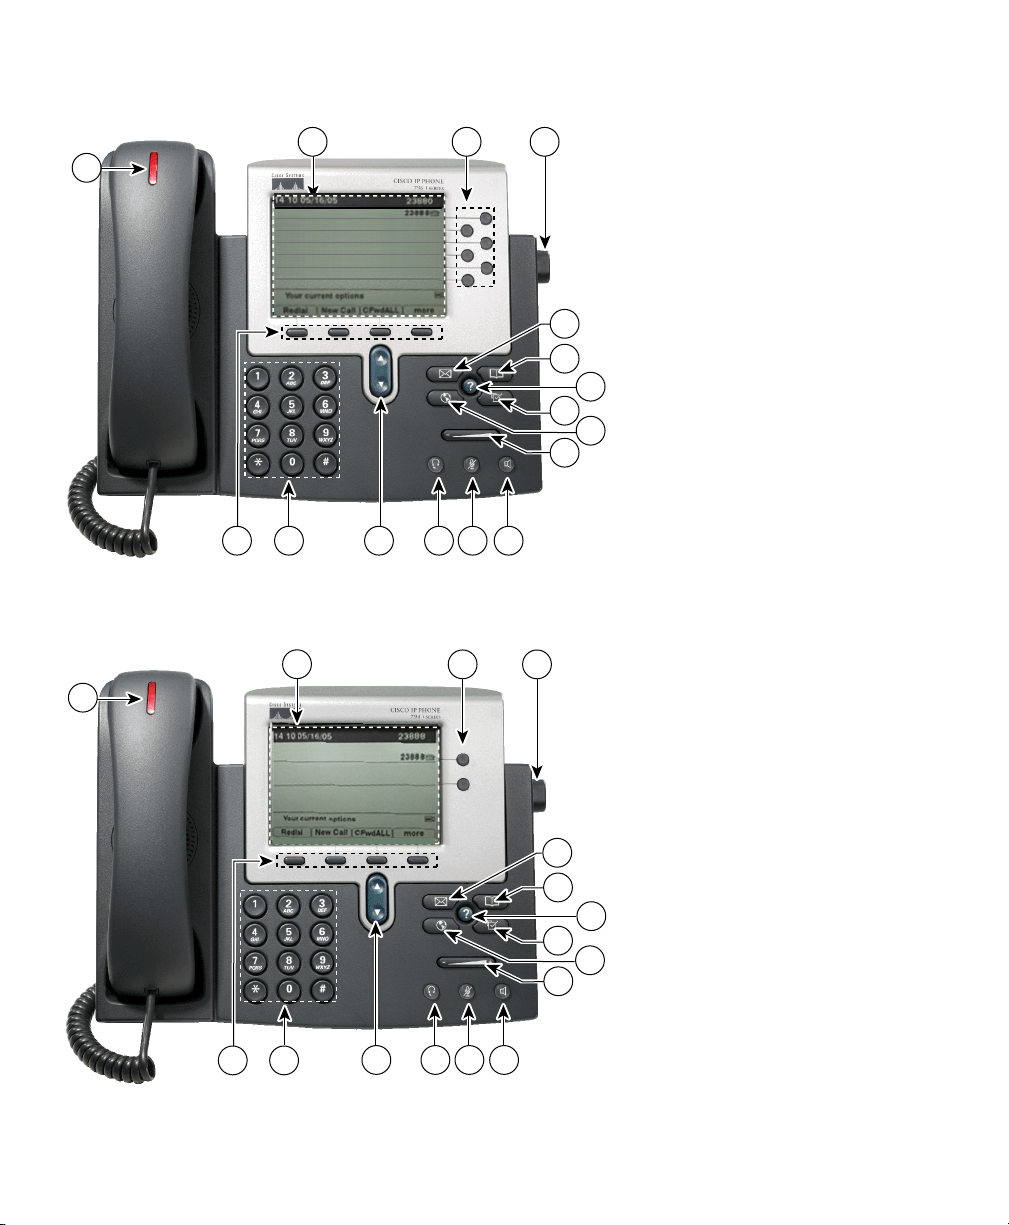
Figure 1 Cisco Unified IP Phone 7961G and 7961G-GE
12
16
1
3
4
5
6
7
8
9
101112131415
Figure 2 Cisco Unified IP Phone 7941G and 7941G-GE
2
16
13
1
101112131415
137503
4
5
6
7
8
9
137504
16 OL-8163-01
Page 25

An Overview of Your Phone
Item Description For more information, see...
Programmable
1
buttons
Depending on configuration,
programmable buttons provide access to:
• Phone lines (line buttons)
• Speed-dial numbers (speed-dial
buttons, including the BLF speed-dial
feature)
• Web-based services (for example, a
Personal Address Book (PAB) button)
• Phone features (for example, a Privacy
button)
The buttons illuminate to indicate status:
Green, steady—Active call
Green, flashing—Held call
Amber, steady—Privacy in use
Amber, flashing—Incoming call
• Understanding Phone
Screen Features, page 19
• Basic Call Handling,
page 23
• Speed Dialing, page 34
• Using a Shared Line,
page 36
• Using BLF to Determine a
Line State, page 41
Red, steady—Remote line in use
(shared line or BLF status)
Phone screen Shows phone features. Understanding Phone Screen
2
Features, page 19
Footstand button Allows you to adjust the angle of the phone
3
base.
Messages button Auto-dials your voice message service
4
(varies by service).
Directories button Opens/closes the Directories menu. Use it
5
to access call logs and directories.
Help button Activates the Help menu. Understanding the Help
6
Settings button Opens/closes the Settings menu. Use it to
7
control phone screen contrast and ring
sounds.
Services button Opens/closes the Services menu. Customizing Your Phone on
8
Cisco Unified IP Phone 7961G/7961G-GE and 7941G/7941G-GE for Cisco Unified CallManager 5.0 (SCCP) 17
Adjusting the Footstand,
page 13
Accessing Voice Messages,
page 52
Using Call Logs, page 46
System on Your Phone,
page 20
Using Phone Settings, page 44
the Web, page 53
Page 26
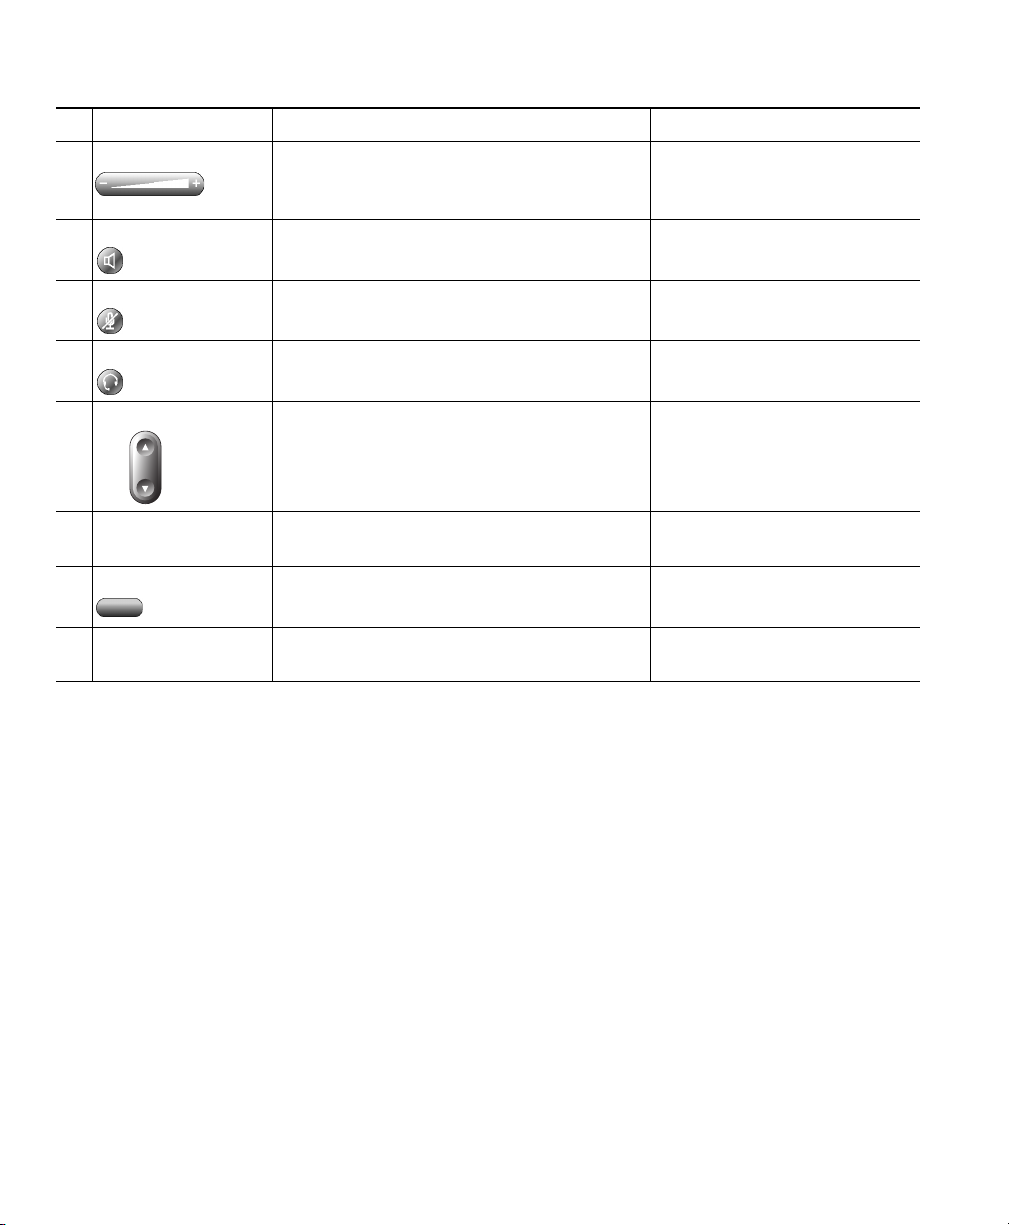
Item Description For more information, see...
Volume button Controls the handset, headset, and
9
speakerphone volume (off-hook) and the
ringer volume (on-hook).
Speaker button Toggles the speakerphone on or off. When
10
the speakerphone is on, the button is lit.
Using a Handset, Headset,
and Speakerphone, page 42
Using a Handset, Headset,
and Speakerphone, page 42
Mute button Toggles the Mute feature on or off. When
11
Mute is on, the button is lit.
Headset button Toggles the headset on or off. When the
12
headset is on, the button is lit.
Navigation button Allows you to scroll through menus and
13
highlight items. When the phone is
on-hook, displays phone numbers from
your Placed Calls log.
Keypad Allows you to dial phone numbers, enter
14
letters, and choose menu items.
Softkey buttons Each activates a softkey option (displayed
15
on your phone screen).
Handset light strip Indicates an incoming call or new voice
16
message.
Using Mute, page 27
Using a Handset, Headset,
and Speakerphone, page 42
Using Call Logs, page 46
Basic Call Handling, page 23
Understanding Phone Screen
Features, page 19
Accessing Voice Messages,
page 52
18 OL-8163-01
Page 27

An Overview of Your Phone
Understanding Phone Screen Features
This is what your main phone screen might look like with active calls and several feature menus open:
17
6
77961
2
5
4
3
137522
Primary phone
1
line
Programmable
2
button
indicators
Softkey labels Each displays a softkey function. To activate a softkey, press the softkey button
3
Status line Displays audio mode icons, status information, and prompts.
4
Call activity
5
area
Phone tab Indicates call activity. Press this tab to return to the call activity area, if needed.
6
Feature tabs Each indicates an open feature menu. See the “Understanding Feature Buttons
7
Displays the phone number (directory number) for your primary phone line.
When several feature tabs are open, the phone number and the time and date
alternate display in this area.
Programmable buttons can serve as phone line buttons, speed-dial buttons,
phone service buttons or phone feature buttons. Icons and labels indicate how
these buttons are configured. For an icon reference, see the “Phone Screen
Icons” section in the Quick Reference Card at the front of this guide.
.
Displays current calls per line, including caller ID, call duration, and call state
for the highlighted line (standard view). See the “Understanding Line and Call
Icons” section on page 21 and the “Viewing Multiple Calls” section on page 27.
and Menus” section on page 20.
Cleaning the Phone Screen
Use only a soft, dry cloth to wipe the phone screen. Do not use any liquids or powders on the phone,
as they can contaminate phone components and cause failures.
Cisco Unified IP Phone 7961G/7961G-GE and 7941G/7941G-GE for Cisco Unified CallManager 5.0 (SCCP) 19
Page 28

Understanding Feature Buttons and Menus
Press a feature button to open or close a feature menu.
If you want to... Then...
Open or close a feature
menu
Scroll through a list or
menu
Go back one level in a
feature menu
Switch among open
feature menus
Press a feature button:
Messages
Services
Directories
Settings
Help
Press the Navigation button.
Press Exit. Pressing Exit from the top level of a menu, closes the menu.
Press a feature tab. Each feature menu has a corresponding tab. The tab is
visible when the feature menu is open.
Understanding the Help System on Your Phone
Your phone provides a comprehensive online help system. Help topics appear on the phone screen.
If you want to... Then...
View the main menu Press on your phone and wait a few seconds for the menu to display.
Main menu topics include:
• About Your Cisco Unified IP Phone—Details about your phone
• How do I...?—Procedures for common phone tasks
• Calling Features—Descriptions and procedures for calling features
• Help—Tips on using and accessing Help
Learn about a button or
softkey
Learn about a menu
item
Get help using Help Press twice quickly. Select the help topic you need.
20 OL-8163-01
Press , then quickly press a button or softkey.
Press , , or to display a feature menu.
Highlight a menu item, then press twice quickly.
Page 29

An Overview of Your Phone
Understanding Lines vs. Calls
To avoid confusion about lines and calls, refer to these descriptions:
Lines—Each line corresponds to a directory number that others can use to call you. The
Cisco Unified IP Phone 7961G/7961G-GE supports one to six lines and the Cisco Unified IP Phone
7941G/7941G-GE supports one to two lines, depending on configuration. To see how many lines you
have, look at the right side of your phone screen. You have as many lines as you have directory
numbers and phone line icons: .
Calls—Each line can support multiple calls. By default, your phone supports four connected calls per
line, but your system administrator can adjust this number according to your needs. Only one call can
be active at any time; other calls are automatically placed on hold.
Understanding Line and Call Icons
Your phone displays icons to help you determine the call and line state.
Icon Line or Call State Description
On-hook line No call activity on this line.
Off-hook line You are dialing a number or an outgoing call is ringing.
Connected call You are currently connected to the other party.
Ringing call An incoming call is ringing on one of your lines.
Call on hold You have put the call on hold. See the “Using Hold and Resume” section
on page 26.
Remote-in-use Another phone that shares your line has a connected call. See the “Using
a Shared Line” section on page 36 for details.
Authenticated
call
Encrypted call See the “Making and Receiving Secure Calls” section on page 39.
Idle line (BLF) See the “Using BLF to Determine a Line State” section on page 41.
Busy line (BLF) See the “Using BLF to Determine a Line State” section on page 41.
Cisco Unified IP Phone 7961G/7961G-GE and 7941G/7941G-GE for Cisco Unified CallManager 5.0 (SCCP) 21
See the “Making and Receiving Secure Calls” section on page 39.
Page 30

Understanding Feature Availability
Depending on your phone system configuration, features included in this Phone Guide might not be
available to you or might work differently on your phone. Contact your support desk or system
administrator for information about feature operation or availability.
22 OL-8163-01
Page 31

Basic Call Handling
Basic Call Handling
You can perform basic call-handling tasks using a range of features and services. Feature availability
can vary; see your system administrator for more information.
Placing a Call—Basic Options
Here are some easy ways to place a call on your Cisco Unified IP Phone.
If you want to... Then... For more information, see...
Place a call using the handset Pick up the handset and enter a number. An Overview of Your
Phone, page 15
Place a call using the
speakerphone
Place a call using a headset Press and enter a number. Or if
Redial a number Press Redial to dial the last number, or
Place a call when another call
is active (using the same line)
Dial from a call log 1. Choose > Missed Calls,
Press and enter a number. Using a Handset, Headset,
and Speakerphone, page 42
Using a Handset, Headset,
is lit, press New Call and enter a number.
press the Navigation button (with the
phone idle) to see your Placed Calls.
1. Press Hold.
2. Press New Call.
3. Enter a number.
Received Calls, or Placed Calls.
2. Select the listing or scroll to it and go
off-hook.
and Speakerphone, page 42
Using Call Logs, page 46
Using Hold and Resume,
page 26
Using Call Logs, page 46
Tips
• You can dial on-hook, without a dial tone (pre-dial). To pre-dial, enter a number, then go off-hook
by lifting the handset or pressing Dial, , or .
• When you pre-dial, your phone tries to anticipate the number you are dialing by displaying
matching numbers (if available) from your Placed Calls log. This is called Auto Dial. To call a
number displayed with Auto Dial, press the number, or scroll to it and go off-hook.
• If you make a mistake while dialing, press << to erase digits.
Cisco Unified IP Phone 7961G/7961G-GE and 7941G/7941G-GE for Cisco Unified CallManager 5.0 (SCCP) 23
Page 32

Placing a Call—Additional Options
You can place calls using special features and services that might be available on your phone. See your
system administrator for more information about these additional options.
For more information,
If you want to... Then...
Place a call while another call
is active (using a different
line)
Speed dial a number Do one of the following:
Dial from a corporate
directory on the phone
Dial from a corporate
directory on your personal
computer using
Cisco WebDialer
Use Cisco CallBack to receive
notification when a busy or
ringing extension is available
See if a line associated with a
speed-dial, call record, or
directory listing is busy before
placing a call to that line
Make a priority (precedence)
call
1. Press for the new line. The first
call is automatically placed on hold.
2. Enter a number.
• Press (a speed-dial button).
• Use the Abbreviated Dial feature.
• Use the Fast Dial feature.
1. Choose > Corporate
Directory (exact name can vary).
2. Enter a name and press Search.
3. Highlight a listing and go off-hook.
1. Open a web browser and go to a
WebDialer-enabled corporate
directory.
2. Click the number that you want to
dial.
1. Press CallBack while listening to the
busy tone or ring sound.
2. Hang up. Your phone alerts you
when the line is free.
3. Place the call again.
Look for Busy Lamp Field indicators. Using BLF to Determine a
Enter the MLPP access number, then
enter the phone number.
see...
Using Hold and Resume,
page 26
Speed Dialing, page 34
Using Call Logs, page 46
Using Cisco WebDialer,
page 61
Your system
administrator
Line State, page 41
Prioritizing Critical Calls,
page 40
24 OL-8163-01
Page 33

Basic Call Handling
For more information,
If you want to... Then...
Dial from a Personal Address
Book (PAB) entry
Place a call using a billing or
tracking code
Place a call using your Cisco
Unified Extension Mobility
profile
1. Choose > Personal
Directory to log in.
2. Choose Personal Address Book and
search for a listing.
1. Dial a number.
2. After the tone, enter a client matter
code (CMC) or a forced
authorization code (FAC).
Log in to the Extension Mobility service
on a phone.
see...
Using Personal Directory
on Your Phone, page 49
Your system
administrator
Using Cisco Extension
Mobility, page 41
Answering a Call
You can answer a call by lifting the handset, or you can use other options if they are available on your
phone.
If you want to... Then... For more information, see...
Answer with a headset Press , if unlit. Or, if is already
lit, press Answer or (flashing).
Answer with the
speakerphone
Switch from a connected call
to answer a new call
Answer using call waiting Press Answer. Using Hold and Resume,
Send a call to your voice
messaging system
Auto-connect calls Use AutoAnswer. Using AutoAnswer, page 43
Retrieve a parked call on
another phone
Cisco Unified IP Phone 7961G/7961G-GE and 7941G/7941G-GE for Cisco Unified CallManager 5.0 (SCCP) 25
Press , Answer, or (flashing). Using a Handset, Headset,
Press Answer, or if the call is ringing
on a different line, press (flashing).
Press iDivert. Accessing Voice Messages,
Use Call Park. Storing and Retrieving
Using a Handset, Headset,
and Speakerphone, page 42
and Speakerphone, page 42
Using Hold and Resume,
page 26
page 26
page 52
Parked Calls, page 38
Page 34

If you want to... Then... For more information, see...
Use your phone to answer a
call ringing elsewhere
Answer a priority call Hang up the current call and press
Use Call Pickup. Picking Up a Redirected
Call on Your Phone,
page 35
Prioritizing Critical Calls,
Answer.
page 40
Ending a Call
To end a call, hang up. Here are some more details.
If you want to... Then...
Hang up while using the handset Return the handset to its cradle. Or press EndCall.
Hang up while using the headset Press . If you want to keep headset mode activate, press
EndCall.
Hang up while using the speakerphone Press or EndCall.
Hang up one call but preserve another
call on the same line
Press EndCall. If necessary, remove the call from hold first.
Using Hold and Resume
You can hold and resume calls.
If you want to... Then...
Put a call on hold 1. Make sure the call you want to put on hold is highlighted.
2. Press Hold.
Remove a call from
hold on the current line
Remove a call from
hold on a different line
Tips
• Engaging the Hold feature typically generates music or a beeping tone.
• A held call is indicated by the call-on-hold icon: .
26 OL-8163-01
1. Make sure that the appropriate call is highlighted.
2. Press Resume.
Press for the appropriate line.
If a single call holding on this line, the call automatically resumes. If
multiple calls are holding, scroll to the appropriate call and press Resume.
Page 35

Basic Call Handling
Using Mute
With Mute enabled, you can hear other parties on a call but they cannot hear you. You can use Mute
in conjunction with the handset, speakerphone, or a headset.
If you want to... Then...
Toggle Mute on Press .
Toggle Mute off Press .
Switching Between Multiple Calls
You can switch between multiple calls on one or more lines. If the call that you want to switch to is
not automatically highlighted, use the Navigation button to scroll to it.
If you want to... Then...
Switch between
connected calls on one
line
Switch between
connected calls on
different lines
Switch from a
connected call to
answer a ringing call
1. Make sure the call that you want to switch to is highlighted.
2. Press Resume.
Any active call is placed on hold and the selected call is resumed.
Press for the line that you are switching to.
If a single call is holding on the line, the call automatically resumes. If
multiple calls are holding, highlight the appropriate call and press Resume.
Press Answer, or if the call is ringing on a different line press (flashing).
Any active call is placed on hold and the selected call is resumed.
Viewing Multiple Calls
Understanding how multiple calls are displayed on your phone can help you organize your
call-handling efforts.
In standard viewing mode, your phone displays calls as follows for the highlighted line:
• Calls with the highest precedence and longest duration display at the top of the list.
• Calls of a similar type are grouped together. For example, calls that you have interacted with are
grouped near the top, and calls on hold are grouped last.
Cisco Unified IP Phone 7961G/7961G-GE and 7941G/7941G-GE for Cisco Unified CallManager 5.0 (SCCP) 27
Page 36

You can use these additional methods to view multiple calls on multiple lines:
If you want to... Then...
View calls on another
line
Switch to call overview
mode
1. Press .
2. Immediately press the line button .
Press for the highlighted line.
The phone switches to call overview mode, displaying one call per line. The
displayed call is either the active call or the held call with the longest
duration.
To return to standard viewing mode, press , then immediately press the
line button.
Transferring Calls
Transfer redirects a connected call. The target is the number to which you want to transfer the call.
If you want to... Then...
Transfer a call without
talking to the transfer
recipient
Talk to the transfer
recipient before transferring
a call (consult transfer)
1. From an active call, press Trans f er.
2. Enter the target number.
3. Press Trans f er again to complete the transfer or EndCall to cancel.
Note
Note
If your phone supports on-hook transfer, you can alternately
complete the transfer by hanging up.
1. From an active call, press Trans f er.
2. Enter the target number.
3. Wait for the transfer recipient to answer.
4. Press Tra n sfe r again to complete the transfer or EndCall to cancel.
If your phone supports on-hook transfer, you can alternately
complete the transfer by hanging up.
28 OL-8163-01
Page 37

Basic Call Handling
If you want to... Then...
Transfer two current calls
to each other (direct
transfer) without staying on
the line
Redirect a call to your voice
messaging system
1. Scroll to highlight any call on the line.
2. Press Select.
3. Repeat this process for the second call.
4. With one of the selected calls highlighted, press DirTrfr. (To
display DirTrfr, you might need to press more.)
The two calls connect to each other and drop you from the call.
Note
Press iDivert. The call is automatically transferred to your voice
message greeting. You can use iDivert with a call that is active, ringing,
or on hold.
If you want to stay on the line with the callers, use Join instead.
Tips
• If on-hook transfer is enabled on your phone, you can either hang up to complete the call, or press
Transf e r and then hang up.
• If on-hook transfer is not enabled on your phone, hanging up without pressing Tra n s fer again
places the call on hold.
• You cannot use Trans f e r to redirect a call on hold. Press Resume to remove the call from hold
before transferring it.
Forwarding All Calls to Another Number
You can use Call Forward All to redirect incoming calls from your phone to another number.
If you want to... Then...
Set up call forwarding on your
primary line
Cancel call forwarding on
your primary line
Verify that call forwarding is
enabled on your primary line
Cisco Unified IP Phone 7961G/7961G-GE and 7941G/7941G-GE for Cisco Unified CallManager 5.0 (SCCP) 29
Press CFwdALL and enter a target phone number.
Press CFwdALL.
Look for:
• The call forward icon above the primary phone number: .
• The call forwarding target number in the status line.
Page 38

If you want to... Then...
Set up or cancel call
forwarding remotely, or for a
non-primary line
1. Log in to your User Options web pages. (See the “Accessing Your
User Options Web Pages” section on page 53.)
2. Access your call forwarding settings (See the “Controlling Line
Settings on the Web” section on page 59.)
Note
When call forwarding is enabled for any line other than the
primary line, your phone does not provide you with any
confirmation that calls are being forwarded. Instead, you must
confirm your settings in the User Options web pages.
Tips
• Enter the call forward target number exactly as you would dial it from your phone. For example,
enter an access code or the area code, if necessary.
• You can forward your calls to a traditional analog phone or to another IP phone, although your
system administrator might restrict the call forwarding feature to numbers within your company.
• Call forwarding is phone line specific. If a call reaches you on a line where call forwarding is not
enabled, the call will ring as usual.
• Your system administrator can change call forwarding conditions for your phone lines.
Making Conference Calls
Your Cisco Unified IP Phone allows you to combine three or more separate calls into one conversation,
creating a conference call.
Understanding Types of Conference Calls
There are two types of conference calls: Standard and Meet-Me.
Standard Conference Calls
You can create a standard conference in different ways, depending on your needs and the softkeys
available on your phone:
• Confrn—Use this softkey to establish a standard conference by calling each participant. Standard
conference calling is a default feature available on most phones.
• Join—Use this softkey to establish a standard conference by joining several calls already on one
line.
• cBarge—Use this softkey to add yourself to an existing call on a shared line and to turn the call
into a standard conference call. This feature is available only on phones that use shared lines.
30 OL-8163-01
Page 39

Basic Call Handling
See the “Starting and Joining a Standard Conference” section on page 31 for additional instructions.
Meet-Me Conference Calls
You can create a Meet-Me conference by calling the Meet-Me phone number at a specified time.
See the “Starting or Joining a Meet-Me Conference Call” section on page 33 for additional
instructions.
Starting and Joining a Standard Conference
A standard conference allows at least three people to participate in a single call.
If you want to... Then...
• Create a conference by
calling participants
• Add new participants to
an existing conference
Create a conference by joining
two or more existing calls
Participate in a conference Answer the phone when it rings.
Create a conference by
barging a call on a shared line
View a list of conference
participants
Get an updated list of
participants
1. From a connected call, press Confrn. (You may need to press the
more softkey to see Confrn.)
2. Enter the participant’s phone number.
3. Wait for the call to connect.
4. Press Confrn again to add the participant to your call.
5. Repeat to add additional participants.
1. Make sure that you have two or more calls on a single line.
2. Highlight a call that you want to add to the conference.
3. Press Select.
The selected call displays this icon .
4. Repeat this process for each call that you want to add.
5. From one of the selected calls, press Join. (You may need to press
the more softkey to see Join.)
Note
Highlight a call on a shared line and press cBarge. (You may need to
press the more softkey to display cBarge.)
See the “Using a Shared Line” section on page 36.
1. Highlight an active conference.
2. Press ConfList.
Participants are listed in the order in which they join the conference
with the most recent additions at the top.
While viewing the conference list, press Update.
The active call is automatically selected.
Cisco Unified IP Phone 7961G/7961G-GE and 7941G/7941G-GE for Cisco Unified CallManager 5.0 (SCCP) 31
Page 40

If you want to... Then...
See who started the
conference
Drop the last party added to
the conference
Remove any conference
participant
End your participation in a
conference
While viewing the conference list, locate the person listed at the
bottom of the list with an asterisk (*) next to the name.
Press RmLstC.
You can remove participants only if you initiated the conference call.
1. Highlight the participant’s name.
2. Press Remove.
You can remove participants only if you initiated the conference.
Hang up or press EndCall.
Tips
• Calls must be on the same line before you can add them to a conference. If calls are on different
lines, transfer them to a single line before using Confrn or Join.
• Depending on how your phone is configured, if you leave a conference after creating it, the
conference might end. To avoid this, transfer the conference before hanging up.
32 OL-8163-01
Page 41

Basic Call Handling
Starting or Joining a Meet-Me Conference Call
Meet-Me conferencing allows you to start or join a conference by calling the conference number.
If you want to... Then...
Start a Meet-Me conference 1. Obtain a Meet-Me phone number from your system administrator.
2. Distribute the number to participants.
3. When you are ready to start the meeting, go off-hook to invoke a
dial tone, then press MeetMe.
4. Dial the Meet-Me conference number.
Participants can now join the conference by dialing in.
Note
Join a Meet-Me conference Dial the Meet-Me conference number (provided by the conference
initiator).
Note
End a Meet-Me conference All participants must hang up.
The conference does not automatically end when the conference
initiator disconnects.
Participants hear a busy tone if they call the conference before the
initiator has joined. In this case, participants must call back.
Participants hear a busy tone if they call the conference before the
initiator has joined. In this case, try your call again.
Cisco Unified IP Phone 7961G/7961G-GE and 7941G/7941G-GE for Cisco Unified CallManager 5.0 (SCCP) 33
Page 42

Advanced Call Handling
Advanced call-handling tasks involve special features that your system administrator might configure
for your phone depending on your call-handling needs and work environment.
Speed Dialing
Speed dialing allows you to enter an index number, press a button, or select a phone screen item to
place a call. Depending on configuration, your phone can support several speed-dial features:
• Speed-dial buttons
• Abbreviated Dialing
• Fast Dials
Note • To set up speed-dial buttons and Abbreviated Dial, you must access your User Options
web pages. See “Accessing Your User Options Web Pages” section on page 53.
• To set up Fast Dials, you must access the Personal Directory feature. See “Using Personal
Directory on Your Phone” section on page 49.
• Alternately, your system administrator can configure speed-dial features for you.
If you want to... Then...
Use speed-dial
buttons
Use Abbreviated
Dial
Use Fast Dial 1. Create a Personal Address B ook entry and assign a Fast Dials code. See
34 OL-8163-01
1. Set up speed-dial buttons. See the “Setting Up Speed Dials on the Web”
section on page 56.
2. To place a call, press (a speed-dial button).
Note
1. Set up Abbreviated Dialing codes. See the “Setting Up Speed Dials on the
2. To place a call, enter the Abbreviated Dialing code and press AbbrDial.
2. To place a call, access the Fast Dial service on your phone. See the “Using
If your phone supports the Busy Lamp Field (BLF) speed-dial feature, you can
see if the speed-dial number is busy before dialing. See the “Using BLF to
Determine a Line State” section on page 41.
Web” section on page 56.
“Using Personal Directory on the Web” section on page 54.
Personal Directory on Your Phone” section on page 49.
Page 43

Advanced Call Handling
Picking Up a Redirected Call on Your Phone
Call PickUp allows you to answer a call that is ringing on a coworker’s phone by redirecting the call
to your phone. You might use Call PickUp if you share call-handling with coworkers.
If you want to... Then...
Answer a call that is ringing on
another extension within your call
pickup group
Answer a call that is ringing on
another extension outside of your
group
Answer a call that is ringing on
another extension in your group or
in an associated group
1. Do one of the following:
• If the PickUp softkey is available, press it.
• If the PickUp softkey is not available, go off-hook
to display it, then press PickUp.
If your phone supports auto-pickup, you are now
connected to the call.
2. If the call rings, press Answer to connect to the call.
1. Do one of the following:
• If the GPickUp softkey is available, press it.
• If the GPickUp softkey is not available, go
off-hook to display it, then press GPickUp.
2. Enter the group pickup code.
If your phone supports auto-pickup, you are now
connected to the call.
3. If the call rings, press Answer to connect to the call.
1. Do one of the following:
• If the OPickUp softkey is available, press it.
• If the OPickUp softkey is not available, go
off-hook to display it, then press OPickUp.
If your phone supports auto-pickup, you are now
connected to the call.
2. If the call rings, press Answer to connect to the call.
Tips
• Pressing PickUp and GPickUp connects you to the call that has been ringing for the longest time.
• Pressing OPickUp connects you to the call in the pickup group with the highest priority.
• If you have multiple lines and want to pick up the call on a non-primary line, first press for
the desired line, then press a Call PickUp softkey.
Cisco Unified IP Phone 7961G/7961G-GE and 7941G/7941G-GE for Cisco Unified CallManager 5.0 (SCCP) 35
Page 44

Using a Shared Line
Your system administrator might ask you to use a shared line if you:
• Have multiple phones and want one phone number
• Share call-handling tasks with coworkers
• Handle calls on behalf of a manager
Understanding Shared Lines
Remote-in-Use Icon
The Remote-in-Use icon appears when another phone that shares your line has a connected call.
You can place and receive calls as usual on the shared line, even when the Remote-in-Use icon appears.
Sharing Call Information and Barging
Phones that share a line each display information about calls that are placed and received on the shared
line. This information might include caller ID and call duration. (See the Privacy section for
exceptions.)
When call information is visible in this way, you and coworkers who share a line can add yourselves
to calls using either Barge or cBarge. See the “Adding Yourself to a Shared-Line Call” section on
page 37.
Privacy
If you do not want coworkers who share your line to see information about your calls, enable the
Privacy feature. Doing so also prevents coworkers from barging your calls. See the “Preventing Others
from Viewing or Barging a Shared-Line Call” section on page 38.
Note The maximum number of calls that a shared line supports can vary by phone.
36 OL-8163-01
Page 45

Advanced Call Handling
Adding Yourself to a Shared-Line Call
Depending on how your phone is configured, you can add yourself to a call on a shared line using
either Barge or cBarge.
If you want to... Then...
See if the shared line is
in use
View details about
current calls on the
shared line
Add yourself to a call
on a shared line using
the Barge softkey
Add yourself to a call
on a shared line using
the cBarge softkey
Add new conference
participants to a call
that you have barged
Leave a barged call Hang up.
Look for the remote-in-use icon next to a red line button .
Press the red line button for the remote-in-use line. All non-private calls
appear in the call activity area of the phone screen.
1. Highlight a remote-in-use call.
2. Press Barge. (You may need to press the more softkey to display
Barge.)
Other parties hear a beep tone announcing your presence.
1. Highlight a remote-in-use call.
2. Press cBarge. (You may need to press the more softkey to display
cBarge.)
Other parties hear a tone and brief audio interruption, and call
information changes on the phone screen.
Barge the call using cBarge, if available.
Unlike Barge, cBarge converts the call into a standard conference call,
allowing you to add new conference participants. See the “Making
Conference Calls” section on page 30.
If you hang up after using Barge, the remaining parties hear a disconnect
tone and the original call continues.
If you hang up after using cBarge, the call remains a conference call
(provided at least three participants remain on the line).
Tips
• If a phone that is using the shared line has Privacy enabled, call information and barge softkeys
will not appear on the other phones that share the line.
• You will be disconnected from a call that you have joined using Barge if the call is put on hold,
transferred, or turned into a conference call.
Cisco Unified IP Phone 7961G/7961G-GE and 7941G/7941G-GE for Cisco Unified CallManager 5.0 (SCCP) 37
Page 46

Preventing Others from Viewing or Barging a Shared-Line Call
If you share a phone line, you can use the Privacy feature to prevent others who share the line from
viewing or barging (adding themselves to) your calls.
If you want to... Then...
Prevent others from viewing or
barging calls on a shared line
Allow others to view or barge calls
on a shared line
Tips
• If the phone that shares your line has Privacy enabled, you can make and receive calls using the
shared line as usual.
• The Privacy feature applies to all shared lines on your phone. Consequently, if you have multiple
shared lines and Privacy is enabled, coworkers will not be able to view or barge calls on any of
your shared lines.
1. Press Private .
2. To verify that Privacy is on, look for the Privacy-enabled
icon next to an amber line button .
1. Press Private .
2. To verify that Privacy is off, look for the Privacy-disabled
icon next to an unlit line button .
Storing and Retrieving Parked Calls
You can park a call when you want to store the call so that you or someone else can retrieve it from
another phone in the Cisco Unified CallManager system (for example, a phone at a coworker’s desk
or in a conference room).
If you want to... Then...
Store an active call
using Call Park
Retrieve a parked call Enter the call park number from any Cisco Unified IP Phone in your
Note You have a limited amount of time to retrieve a parked call before it reverts to ringing at the
original number. See your system administrator for details.
38 OL-8163-01
1. During a call, press Park. (You may need to press the more softkey to
see Park.)
2. Note the call park number displayed on your phone screen.
3. Hang up.
network to connect to the call.
Page 47

Advanced Call Handling
Making and Receiving Secure Calls
Depending on how your system administrator has configured your phone system, your phone might
support making and receiving secure calls.
Your phone is capable of supporting these types of calls:
• Authenticated call—The identities of all phones participating in the call have been verified.
• Encrypted call—The phone is receiving and transmitting encrypted audio (your conversation)
within the Cisco IP network. Encrypted calls are also authenticated.
• Non-secure call—At least one of the participating phones or the connection does not support these
security features, or the phones cannot be verified.
If you want to... Then...
Check the security level of a call Look for a security icon in the top right corner of the call
activity area, next to the call duration timer:
Authenticated call
Encrypted call
Neither security icon appears if the call is non-secure.
Determine if secure calls can be
made in your company
Note There are interactions, restrictions, and limitations that affect how security features work on
your phone. For more information, ask your system administrator.
Contact your system administrator.
Tracing Suspicious Calls
If you are receiving suspicious or malicious calls, your system administrator can add the Malicious Call
Identification (MCID) feature to your phone. This feature enables you to identify an active call as
suspicious, which initiates a series of automated tracking and notification messages.
If you want to... Then...
Notify your system
administrator about a
suspicious or harassing call
Cisco Unified IP Phone 7961G/7961G-GE and 7941G/7941G-GE for Cisco Unified CallManager 5.0 (SCCP) 39
Press MCID.
Your phone plays a tone and displays the message, “MCID successful”.
Page 48

Prioritizing Critical Calls
In some specialized environments, such as military or government offices, you might need to make and
receive urgent or critical calls. If you have the need for this specialized call handling, your system
administrator can add Multilevel Precedence and Preemption (MLPP) to your phone.
Keep these terms in mind:
• Precedence indicates the priority associated with a call.
• Preemption is the process of ending an existing, lower priority call while accepting a higher
priority call that is sent to your phone.
If you... Then...
Want to choose a priority
(precedence) level for an outgoing call
Want to make a priority (precedence)
call
Hear a special ring (faster than usual)
or special call waiting tone
Want to view priority level of a call Look for an MLPP icon on your phone screen:
Contact your system administrator for a list of
corresponding precedence numbers for calls.
Enter the MLPP access number (provided by your system
administrator) followed by the phone number.
You are receiving a priority (precedence) call. An MLPP icon
on your phone screen indicates the priority level of the call.
Priority call
Medium priority (immediate) call
High priority (flash) call
Highest priority (flash override) or Executive
Override call
Higher priority calls are displayed at the top of your call list.
If you do not see an MLPP icon, the priority level of the call
is normal (routine).
Want to accept a higher-priority call Answer the call as usual. If necessary, end an active call first.
Hear a continuous tone interrupting
your call
You or the other party are receiving a call that must preempt
the current call. Hang up immediately to allow the higher
priority call to ring through.
Tips
• When you make or receive an MLPP-enabled call, you will hear special ring tones and call waiting
tones that differ from the standard tones.
• If you enter an invalid MLPP access number, a verbal announcement will alert you of the error.
40 OL-8163-01
Page 49

Advanced Call Handling
Using Cisco Extension Mobility
Cisco Extension Mobility (EM) allows you to temporarily configure a Cisco Unified IP Phone as your
own. Once you log in to EM, the phone adopts your user profile, including your phone lines, features,
established services, and web-based settings. Your system administrator must configure EM for you.
If you want to... Then...
Log in to EM 1. Choose > EM Service (name can vary).
2. Enter your user ID and PIN (provided by your system administrator).
3. If prompted, select a device profile.
Log out of EM 1. Choose > EM Service (name can vary).
2. When prompted to log out, press Ye s.
Tips
• EM automatically logs you out after a certain amount of time. This time limit is established by
your system administrator.
• Changes that you make to your EM profile (from the User Options web pages) take effect the next
time that you log in to EM on a phone.
• Settings that are controlled on the phone only are not maintained in your EM profile.
Using BLF to Determine a Line State
Depending on configuration, you can use the Busy Lamp Field (BLF) to determine the state of another
phone line that is associated with a speed-dial button, call log, or directory listing on your phone. You
can place a call to this line, regardless of the BLF status. This feature does not prevent dialing.
If you want to... Then...
See the state of a
speed-dial line
See the state of a line
listed in a call log or
directory
Cisco Unified IP Phone 7961G/7961G-GE and 7941G/7941G-GE for Cisco Unified CallManager 5.0 (SCCP) 41
Look for one of these indicators next to the line number:
+ Line is in-use.
+ Line is idle.
BLF indicator unavailable for this line.
Look for one of these indicators next to the line number:
Line is in-use.
Line is idle.
BLF indicator unavailable for this line.
Page 50

Using a Handset, Headset, and Speakerphone
You can use your phone with a handset, headset, or speakerphone.
If you want to... Then...
Use the handset Lift it to go off-hook; replace it to go on-hook.
Use a headset Press to toggle headset mode on and off. If you use
AutoAnswer, see the “Using AutoAnswer” section on page 43 for
exceptions.
You can use the headset in conjunction with all of the controls on
your phone, including and .
Use the speakerphone Press to toggle speakerphone mode on or off.
Many of the actions you can take to dial a number or answer a call
will automatically trigger speakerphone mode, assuming that the
handset is in its cradle and is not lit.
Switch to the headset or
speakerphone (from the
handset) during a call
Switch to the handset (from the
speakerphone or headset)
during a call
Adjust the volume level for a
call
Press or , then hang up the handset.
Lift the handset (without pushing any buttons).
Press during a call or after invoking a dial tone.
This action adjusts the volume for the handset, speakerphone, or
headset, depending on which device is in use.
Press Save to preserve the volume level for future calls.
Obtaining a Headset
Your phone supports four- or six-wire headset jacks. For information about purchasing headsets, see
the “Headset Information” section on page 14.
42 OL-8163-01
Page 51

Using a Handset, Headset, and Speakerphone
Using AutoAnswer
When AutoAnswer is enabled, your phone answers incoming calls automatically after a few rings.
Your system administrator configures AutoAnswer to use either the speakerphone or a headset. You
might use AutoAnswer if you receive a high volume of incoming calls.
If you... Then...
Use AutoAnswer with a
headset
Use AutoAnswer with the
speakerphone
Keep headset mode active (in other words, keep illuminated) even
when you are not on a call.
To keep headset mode active, do one of the following:
• Press EndCall to hang up.
• Press New Call or Dial to place new calls.
If your phone is set up to use AutoAnswer in headset mode, calls will be
answered automatically only if is illuminated. Otherwise, calls ring
normally and you must manually answer them.
Keep the handset in the cradle and headset mode inactive ( unlit).
Otherwise, calls ring normally and you must manually answer them.
Cisco Unified IP Phone 7961G/7961G-GE and 7941G/7941G-GE for Cisco Unified CallManager 5.0 (SCCP) 43
Page 52

Using Phone Settings
You can customize your Cisco Unified IP Phone by adjusting the ring tone, background image, and
other settings.
Customizing Rings and Message Indicators
You can customize how your phone indicates an incoming call and a new voice mail message. You can
also adjust the ringer volume for your phone.
If you want to... Then...
Change the ring tone per
line
Change the ring pattern per
line (flash-only, ring once,
beep-only, etc.)
Adjust the volume level for
the phone ringer
Change the way that the
voice message light on your
handset works
1. Choose > User Preferences > Rings.
2. Choose a phone line or the default ring setting.
3. Choose a ring tone to play a sample of it.
4. Press Select and Save to set the ring tone, or press Cancel.
1. Log in to your User Options web pages. (See the “Accessing Your
User Options Web Pages” section on page 53.)
2. Access your call ring pattern settings. (See the “Controlling Line
Settings on the Web” section on page 59.)
Note
Press while the handset is in the cradle and the headset
and speakerphone buttons are off. The new ringer volume is saved
automatically.
Note
Before you can access this setting, your system administrator might
need to enable it for you.
1. Log in to your User Options web pages. (See the “Accessing Your
User Options Web Pages” section on page 53.)
2. Access your message indicator settings. (See the “Controlling Line
Settings on the Web” section on page 59.)
Typically, the default system policy is to indicate a new voice
message by displaying a steady light on the handset light strip.
44 OL-8163-01
Page 53

Customizing the Phone Screen
You can adjust the characteristics of your phone screen.
If you want to... Then...
Change the phone
screen contrast
Change the background
image
Change the language on
your screen
Change the line text
label
1. Choose > User Preferences > Contrast.
2. To make adjustments, press Up, Down or .
3. Press Save, or press Cancel.
Note
Note
If you accidentally save a very light or very dark contrast and cannot
see the phone screen display:
Press and then press 1, 3 on the keypad.
Next, press to change the contrast until you can see the
phone screen display, and then press Save.
1. Choose > User Preferences > Background Images.
2. Scroll through available images and press Select to choose an image.
3. Press Preview to see a larger view of the background image.
4. Press Exit to return to the selection menu.
5. Press Save to accept the image or press Cancel.
If you do not see a selection of images, then this option has not been
enabled on your system.
1. Log in to your User Options web pages. (See the “Accessing Your User
Options Web Pages” section on page 53.)
2. Access your user settings. (See the “Controlling User Settings on the
Web” section on page 58.)
1. Log in to your User Options web pages. (See the “Accessing Your User
Options Web Pages” section on page 53.)
2. Access your line label settings. (See the “Controlling Line Settings on
the Web” section on page 59.)
Using Phone Settings
Cisco Unified IP Phone 7961G/7961G-GE and 7941G/7941G-GE for Cisco Unified CallManager 5.0 (SCCP) 45
Page 54

Using Call Logs and Directories
This section describes how you can use call logs and directories. To access both features, use the
Directories button .
Using Call Logs
Your phone maintains records of your missed, placed, and received calls.
If you want to... Then...
View your call logs Choose > Missed Calls, Placed Calls, or Received Calls. Each stores up
to 100 records. To view a truncated listing, highlight it and press EditDial.
Erase your call logs Press , then press Clear. Doing so erases all records in all logs.
Dial from a call log
(while not on
another call)
1. Choose > Missed Calls, Placed Calls, or Received Calls.
2. Highlight a call record from the log.
Note
If the Details softkey displays, the call is the primary entry of a multiparty
call. See the Tip section below.
3. If you need to edit the displayed number, press EditDial followed by << or
>>. To delete the number, press EditDial followed by Delete. (You may
need to press the more softkey to display Delete.)
4. Go off-hook to place the call.
46 OL-8163-01
Page 55

If you want to... Then...
Dial from a call log
(while connected to
another call)
1. Choose > Missed Calls, Placed Calls, or Received Calls.
2. Highlight a call record from the log.
Note
3. If you need to edit the displayed number, press EditDial followed by << or
>>. To delete the number, press EditDial followed by Delete. (You may
need to press the more softkey to display Delete.)
4. Press Dial.
5. Choose a menu item to handle the original call:
See if the line in the
call log is busy
Look for Busy Lamp Field indicators. See the “Using BLF to Determine a Line
State” section on page 41.
before placing a
call to that line
Using Call Logs and Directories
If the Details softkey displays, the call is the primary entry of a multiparty
call. See the Tip section below.
• Hold—Puts the first call on hold and dials the second.
• Transf e r —Transfers the first party to the second and drops you
from the call. (Press Trans f er again after dialing to complete the
action.)
• Conference—Creates a conference call with all parties, including
you. (Press Confrn again after dialing to complete the action.)
• EndCall—Disconnects the first call and dials the second.
Tip
To view the complete call record of a multiparty call, press Details. The Details call record shows two
entries for each missed or received multiparty call. The entries are listed in reverse chronological order:
• The first logged entry is the name/number of the last completed call of a multiparty call received
on your phone.
• The second logged entry is the name/number of the first completed call of a multiparty call
received on your phone.
Cisco Unified IP Phone 7961G/7961G-GE and 7941G/7941G-GE for Cisco Unified CallManager 5.0 (SCCP) 47
Page 56

Directory Dialing
Depending on configuration, your phone can provide corporate and personal directory features:
• Corporate Directory—Corporate contacts that you can access on your phone. Corporate
Directory is set up and maintained by your system administrator.
• Personal Directory—If available, personal contacts and associated speed-dial codes that you can
configure and access from your phone and User Options web pages. Personal Directory is
comprised of Personal Address Book (PAB) and Fast Dials:
–
PAB is a directory of your personal contacts.
–
Fast Dials allows you to assign codes to PAB entries for quick dialing.
Using Corporate Directory on Your Phone
You can use a corporate directory to place calls to coworkers.
If you want to... Then...
Dial from a corporate
directory (while not on
another call)
Dial from a corporate
directory (while on
another call)
See if the phone line in
the directory is busy
1. Choose > Corporate Directory (exact name can vary).
2. User your keypad to enter a full or partial name and press Search.
3. To dial, select the listing, or scroll to the listing and go off-hook.
1. Choose > Corporate Directory (exact name can vary).
2. User your keypad to enter a full or partial name and press Search.
3. Scroll to a listing and press Dial.
4. Choose a menu item to handle the original call:
• Hold—Puts the first call on hold and dials the second.
• Transf e r —Transfers the first party to the second and drops you
from the call. (Press Tran sf er again after dialing to complete the
action.)
• Conference—Creates a conference call with all parties, including
you. (Press Confrn again after dialing to complete the action.)
• EndCall—Disconnects the first call and dials the second.
Look for Busy Lamp Field (BLF) indicators. See the “Using BLF to Determine
a Line State” section on page 41.
Tip
Use the numbers on your keypad to enter characters on your phone screen. Use the Navigation button
on your phone to move between input fields.
48 OL-8163-01
Page 57

Using Call Logs and Directories
Using Personal Directory on Your Phone
The Personal Directory feature set contains your Personal Address Book (PAB) and Fast Dials. This
section describes how to set up and use Personal Directory on your phone. Alternately, see the “Using
Personal Directory on the Web” section on page 54.
If you want to... Then...
Access Personal
Directory (for PAB
and Fast Dial codes)
Search for a PAB
entry
Dial from a PAB
entry
Delete a PAB entry 1. Search for a listing.
Edit a PAB entry 1. Search for a listing.
1. Choose > Personal Directory (exact name can vary).
Enter your Cisco Unified CallManager user ID and PIN, then press
2.
Submit.
1. Access Personal Directory, then choose Personal Address Book.
2. Enter search criteria and press Submit.
3. You can choose Previous or Next to move through listings.
4. Highlight the PAB listing that you want and press Select.
1. Search for a listing.
2. Highlight the listing and press Select.
3. Press Dial. (You may need to press the more softkey to see Dial.)
4. Enter the participant’s phone number.
5. Highlight the number that you want to dial and press OK.
6. Press OK again to dial the number.
2. Highlight the listing and press Select.
3. Press Delete.
4. Choose OK to confirm the deletion.
2. Highlight the listing and press Edit to modify a name or email address.
3. If necessary, choose Phones to modify a phone number.
4. Press Update.
Cisco Unified IP Phone 7961G/7961G-GE and 7941G/7941G-GE for Cisco Unified CallManager 5.0 (SCCP) 49
Page 58

If you want to... Then...
Add a new PAB entry 1. Access Personal Directory, then choose Personal Address Book.
2. Access the Search page by choosing Submit. (You do not need to input
search information first.)
3. Press New.
4. Use your phone keypad to enter a name and e-mail information.
5. Choose Phones and use the keypad to enter phone numbers. Be sure to
include any necessary access codes such as a 9 or 1.
6. Choose Submit to add the entry to the database.
Assign a Fast Dial
code to a PAB entry
Add a new Fast Dial
code (not using a PAB
entry)
Search for Fast Dial
codes
Place a call using a
Fast Dial code
Delete a Fast Dial
code
Log out of Personal
Directory
1. Search for a PAB entry.
2. Highlight the listing and press Select.
3. Press Fast Dial.
4. Highlight the number that you want to dial and press Select.
5. Highlight the Fast Dial code that you want to assign to the number and
press Select.
1. Choose > Personal Directory > Personal Fast Dials.
2. Press Fast Dial.
3. Highlight a Fast Dial code that is unassigned and press Select.
4. Press Assign.
5. Enter a phone number.
6. Press Update.
1. Choose > Personal Directory > Personal Fast Dials.
2. You can choose Previous or Next to move through listings.
3. Highlight the listing that you want and press Select.
1. Search for a Fast Dial code.
2. Highlight the listing you want and press Select.
3. Press Dial.
4. Choose OK to complete the action.
1. Search for a Fast Dial code.
2. Highlight the listing you want and press Select.
3. Press Remove.
1. Choose > Personal Directory (exact name can vary).
2. Choose Logout.
50 OL-8163-01
Page 59

Using Call Logs and Directories
Tips
• Your system administrator can provide you with the user ID and PIN that you need to log in to
Personal Directory.
• Personal Directory automatically logs you out after a certain amount of time. This time limit can
vary. Ask your system administrator for more information.
• Use the numbers on your keypad to enter characters on your phone screen. Use the Navigation
button on your phone to move between input fields.
Cisco Unified IP Phone 7961G/7961G-GE and 7941G/7941G-GE for Cisco Unified CallManager 5.0 (SCCP) 51
Page 60

Accessing Voice Messages
To access voice messages, use the button.
Note Your company determines the voice message service that your phone system uses. For the most
accurate and detailed information, refer to the documentation that came with your voice
message system.
If you want to... Then...
Set up and personalize
your voice message
service
See if you have a new
voice message
Listen to your voice
messages or access the
voice messages menu
Send a call to your
voice message system
Press and follow the voice instructions.
If a menu appears on your screen, choose an appropriate menu item.
Look for:
• A steady red light on your handset. (This indicator can vary. See the
“Customizing Rings and Message Indicators” section on page 44.)
• A flashing message waiting icon and text message on your screen.
Press .
Depending on your voice message service, doing so either auto-dials the
message service or provides a menu on your screen.
Press iDivert.
The iDivert feature automatically transfers a call (including a ringing or
held call) to your voice message system. Callers will hear your voice
message greeting and can leave you a message.
52 OL-8163-01
Page 61

Customizing Your Phone on the Web
Customizing Your Phone on the Web
Your Cisco Unified IP Phone is a network device that can share information with other network
devices in your company, including your personal computer. You can use your computer to log in to
your Cisco Unified CallManager User Options web pages, where you can control features, settings,
and services for your Cisco Unified IP Phone. For example, you can set up speed-dial buttons from
your User Options web pages.
Accessing Your User Options Web Pages
This section describes how to log in to your User Options web pages.
If you want to... Then do this...
Log in to your User
Options web pages
Select a device after
logging in
1. Obtain a User Options web page URL, user ID, and default password from
your system administrator.
2. Open a web browser on your computer, enter the URL, and log on.
3. If prompted to accept security settings, click Yes or Install Certificate.
The Cisco Unified CallManager User Options main web page displays.
From this page you can choose User Options to access User Settings,
Directory features, a Personal Address Book, and Fast Dials.
Or, to access phone-specific options, select a device (see below).
1. After you have logged in to your User Options web pages, choose User
Options > Device.
The Device Configuration page displays.
2. If you have multiple devices assigned to you, verify that the appropriate
device (phone model or Extension Mobility profile) is selected. If necessary,
choose another device from the Name drop-down menu.
From the Device Configuration page, you can access all of the various
configuration options available for your phone (other pages might not
provide access to all options).
–
Choose User Options to access User Settings, Directory, Personal
Address Book, and Fast Dials.
–
Choose toolbar buttons to access phone-specific options, such as line
settings, phone service settings, and speed dials.
To return to the Device Configuration page from another page, choose
User Options > Device.
Cisco Unified IP Phone 7961G/7961G-GE and 7941G/7941G-GE for Cisco Unified CallManager 5.0 (SCCP) 53
Page 62

Configuring Features and Services on the Web
The topics in this section describe how to configure features and services from your User Options web
pages after logging in. See the“Accessing Your User Options Web Pages” section on page 53.
Using Personal Directory on the Web
The Personal Directory feature set consists of:
• A Personal Address Book (PAB)
• Fast Dials
• The Address Book Synchronization Tool (TABSynch)
Note You can also access PAB and Fast Dials from your phone. See the“Using Personal Directory
on Your Phone” section on page 49.
Using Your Personal Address Book on the Web
This section describes how to use your PAB from the User Options web pages.
If you want to... Then do this after you log in...
Add a new PAB entry 1. Choose User Options > Personal Address Book.
2. Click New.
3. Enter information for the entry.
4. Click Save.
Search for a PAB entry 1. Choose User Options > Personal Address Book.
2. Specify search information and click Find.
Edit a PAB entry 1. Search for a PAB entry.
2. Click a name or nickname.
3. Edit the entry as needed and click Save.
Delete a PAB entry 1. Search for a PAB entry.
2. Select one or more entries.
3. Click Delete Selected.
54 OL-8163-01
Page 63

Customizing Your Phone on the Web
Configuring Fast Dials on the Web
This section describes how to assign Fast Dials from your User Options web pages.
If you want to... Then do this after you log in...
Assign a Fast Dial code
to a PAB entry
Assign a Fast Dial code
to a phone number
(without using a PAB
entry)
Search for a Fast Dial
entry
Edit a Fast Dial phone
number
Delete a Fast Dial entry 1. Search for a Fast Dial.
1. Create a PAB entry. See the “Using Your Personal Address Book on the
Web” section on page 54.
2. Choose User Options > Fast Dials.
3. Click Add New.
4. Change the Fast Dial code, if desired.
5. Use the Search Options area to find the appropriate PAB entry.
6. Click a phone number in the Search Results area.
7. Click Save.
1. Choose User Options > Fast Dials.
2. Click Add New.
3. Change the Fast Dial code, if desired.
4. Enter a phone number.
5. Click Save.
1. Choose User Options > Fast Dials.
2. Specify search information and click Find.
1. Choose User Options > Fast Dials.
2. Search for the Fast Dial entry that you want to edit.
3. Click on a component of the entry.
4. Change the phone number.
5. Click Save.
2. Select one or more entries.
3. Click Delete Selected.
Tips
• You can create up to 500 Fast Dial and PAB entries.
• You can create a new Fast Dial entry without using a PAB entry. Such Fast Dial entries are labeled
“raw” in the User Options web pages and do not display a configurable text label.
Cisco Unified IP Phone 7961G/7961G-GE and 7941G/7941G-GE for Cisco Unified CallManager 5.0 (SCCP) 55
Page 64

Using the Address Book Synchronization Tool
You can use the Address Book Synchronization Tool (TABSynch) to synchronize your existing
Microsoft Windows Address Book (if applicable) with your PAB. Entries from your Microsoft
Windows Address Book will then be accessible on your Cisco Unified IP Phone and User Options web
pages. Your system administrator can give you access to TABSynch and provide detailed instructions.
Setting Up Speed Dials on the Web
Depending on configuration, your phone can support several speed-dial features:
• Speed-dial buttons
• Abbreviated Dialing
• Fast Dials
Note For help using speed-dial features, see the “Speed Dialing” section on page 34.
If you want to... Then do this after you log in...
Set up speed-dial
buttons
Set up Abbreviated
dialing
Set up Fast Dials See the “Configuring Fast Dials on the Web” section on page 55.
1. Select a device.
2. Click Speed Dials.
3. Enter a number and label for a speed-dial button (programmable button)
on your phone.
4. Click Save.
Note
You can also set up Fast Dials on your phone. See the “Using Personal Directory
on Your Phone” section on page 49.
Your phone uses the ASCII Label field if the phone does not support
double-byte character sets.
1. Select a device.
2. Click Speed Dials.
3. Enter a number and label for an Abbreviated Dialing code.
4. Click Save.
Tip
You can set up a speed-dial button for each programmable button on your phone that is not reserved
as a line button. Alternately, use Abbreviated Dial or Fast Dial.
56 OL-8163-01
Page 65

Customizing Your Phone on the Web
Setting Up Phone Services on the Web
Phone services can include special phone features, network data, and web-based information (such as
stock quotes and movie listings). You must first subscribe to a phone service before accessing it on
your phone.
If you want to... Then do this after you log in and select a device...
Subscribe to a service 1. Select a device.
2. Click Phone Services.
3. Click Add New.
4. Choose a service from the drop-down list and click Next.
5. Change the service label and/or enter additional service information, if
available (optional).
6. Click Save.
Search for services 1. Select a device.
2. Click Phone Services.
3. Click Find.
Change or end services 1. Search for services.
2. Select one or more entries.
3. Click Delete Selected.
Change a service name 1. Search for services.
2. Click on the service name.
3. Change the information and click Save.
Add a service to an
available
programmable phone
button
1. Select a device.
2. Click Service URL.
Note
If you do not see this option, ask your system administrator to
configure a service URL button for your phone.
3. Choose a service from the Button Service drop-down list.
4. If you want to rename the service, edit the label fields.
Note
Access a service on your
phone
Cisco Unified IP Phone 7961G/7961G-GE and 7941G/7941G-GE for Cisco Unified CallManager 5.0 (SCCP) 57
Press on your phone. Or, if you have added a service to a
programmable button , press the button.
Your phone uses the ASCII Label field if the phone does not support
double-byte character sets.
5. Click Save.
6. Click Reset to reset your phone (necessary to see the new button label
on your phone).
Page 66

Controlling User Settings on the Web
User settings include your password, PIN, and language (locale) settings.
If you want to... Then do this after you log in...
Change your password 1. Choose User Options > User Settings.
2. In the Browser Password area, enter information.
3. Click Save.
Change your PIN 1. Choose User Options > User Settings.
2. In the Phone PIN area, enter information.
3. Click Save.
Change the language (locale) for
your User Options web pages
Change the language (locale) for
your phone screen
1. Choose User Options > User Settings.
2. In the User Locale area of the User Settings page, choose an
item from the Locale drop-down list.
3. Click Save.
1. Go to the Device Configuration page by choosing User
Options > Device.
2. Choose an item from the User Locale drop-down list.
3. Click Save.
Tip
Your PIN and password allow you to access different features and services. For example, use your PIN
to log in to Cisco Extension Mobility or Personal Directory on your phone. Use your password to log
in to your User Options web pages and Cisco WebDialer on your personal computer. For more
information, ask your system administrator.
58 OL-8163-01
Page 67

Customizing Your Phone on the Web
Controlling Line Settings on the Web
Line settings affect a specific phone line (directory number) on your phone. Line settings can include
call forwarding, voice message indicators, ring patterns, and line labels.
Note • You can also set up call forwarding (for your primary phone line) directly on your phone.
See the “Forwarding All Calls to Another Number” section on page 29.
• To learn about phone settings that you can access directly on your phone, see the “Using
Phone Settings” section on page 44.
If you want to... Then do this after you log in...
Set up call forwarding
per line
Change the voice
message indicator
setting per line
1. Select a device.
2. Click Line Settings.
3. If you have more than one directory number (line) assigned to your
phone, verify that the appropriate line is selected or choose a new one.
4. In the Incoming Call Forwarding area, choose call forwarding settings
for various conditions.
5. Click Save.
1. Select a device.
2. Click Line Settings.
3. If you have more than one directory number (line) assigned to your
phone, verify that the appropriate line is selected or choose a new one.
4. In the Message Waiting Lamp area, choose from various settings.
Note
Typically, the default message waiting setting prompts your phone to
display a steady red light from the handset light strip to indicate a new
voice message.
5. Click Save.
Cisco Unified IP Phone 7961G/7961G-GE and 7941G/7941G-GE for Cisco Unified CallManager 5.0 (SCCP) 59
Page 68

If you want to... Then do this after you log in...
Change the ring pattern
per line
1. Select a device.
2. Click Line Settings.
3. If you have more than one directory number (line) assigned to your
phone, verify that the appropriate line is selected or choose a new one.
4. In the Ring Settings area, choose a setting to tell your phone how to
indicate an incoming call on the selected line.
5. Click Save.
Note
Change or create a line
text label that appears
on your phone screen
The “idle” ring setting pertains if you receive an incoming call when the
phone is idle. The “consecutive” ring setting pertains if you receive an
incoming call when the phone is active.
1. Select a device.
2. Click Line Settings.
3. If you have more than one directory number (line) assigned to your
phone, verify that the appropriate line is selected or choose a new one.
4. In the Line Text Label area, enter a text label.
5. Click Save.
Note
Your phone uses the ASCII Label field if the phone does not support
double-byte character sets.
60 OL-8163-01
Page 69

Customizing Your Phone on the Web
Using Cisco WebDialer
Cisco WebDialer allows you to make calls on your Cisco Unified IP Phone to directory contacts by
clicking items in a web browser. Your system administrator must configure this feature for you.
If you want to... Then...
Use WebDialer with
your User Options
directory
Use WebDialer with
another online
corporate directory
(not your User
Options directory)
1. Log into your User Options web pages. See the “Accessing Your User
Options Web Pages” section on page 53.
2. Choose User Options > Directory and search for a coworker.
3. Click the number that you want to dial.
4. If this is your first time using WebDialer, set up preferences and click
Submit. (See the last row in this table for details.)
5. If the Make Call page appears, click Dial. (See the last row in this table
to learn how to suppress this page in the future, if desired.)
The call is now placed on your phone.
6. To end a call, click Hangup or hang up from your phone.
1. Log into a WebDialer-enabled corporate directory and search for
coworkers.
2. Click the number that you want to dial.
3. When prompted, enter your user ID and password.
4. If this is your first time using WebDialer, set up preferences and click
Submit. (See the last row in this table for details.)
5. If the Make Call page appears, click Dial. (See the last row in this table
to learn how to suppress this page in the future, if desired.)
The call is now placed on your phone.
6. To end a call, click Hangup or hang up from your phone.
Cisco Unified IP Phone 7961G/7961G-GE and 7941G/7941G-GE for Cisco Unified CallManager 5.0 (SCCP) 61
Page 70

If you want to... Then...
Log out of WebDialer Click the logout icon in the Make Call or Hang Up page.
Set up, view, or
change WebDialer
preferences
Access the Preferences page.
The Preferences page appears the first time that you use WebDialer (after you
click the number that you want to dial.)
To return to Preferences in the future, click the preferences icon from the
Make Call or Hang Up page.
The Preferences page contains the following options:
• Preferred language—Determines the language used for WebDialer
settings and prompts.
• Use permanent device—Identifies the Cisco Unified IP Phone and
directory number (line) that you will use to place WebDialer calls. If you
have one phone with a single line, the appropriate phone and line are
automatically selected. Otherwise, choose a phone and/or line. Phones
are specified by host name. (To display the host name on the phone,
choose > Network Configuration > Host Name.)
• Use Extension Mobility—If selected, prompts WebDialer to use the
Cisco Unified IP Phone that is associated with your Extension Mobility
profile (if available).
• Do not display call confirmation—If selected, prompts WebDialer to
suppress the Make Call page. This page appears by default after you click
a phone number in a WebDialer-enabled online directory.
62 OL-8163-01
Page 71

Understanding Additional Configuration Options
Understanding Additional Configuration Options
Your system administrator can configure your phone to use specific button and softkey templates
along with special services and features, if appropriate. This table provides an overview of some
configuration options that you might want to discuss with your phone system administrator based on
your calling needs or work environment.
Note You can locate Phone Guides and other documents listed in this table on the web:
http://www.cisco.com/univercd/cc/td/doc/product/voice/c_ipphon/index.htm
If you... Then... For more information...
Need to handle more
calls on your phone line
Need more than one
phone line
Need more speed-dial
buttons
Work with (or work as)
an administrative
assistant
Want to use one
extension for several
phones
Ask your system administrator to
configure your line to support more
calls.
Ask your system administrator to
configure one or more additional
directory numbers for you.
First make sure that you are using all
of your currently available speed-dial
buttons.
If you need additional speed-dial
buttons, try using Abbreviated Dialing
or subscribing to the Fast Dial service.
Another option is to attach the
Cisco Unified IP Phone Expansion
Module 7914 to your phone.
Consider using:
• Cisco Unified CallManager
Assistant service
• A shared line
Request a shared line. This allows you
to use one extension for your desk
phone and lab phone, for example.
Talk to your system administrator
or phone support team.
Talk to your system administrator
or phone support team.
See the:
• “Speed Dialing” section on
page 34
• Cisco Unified IP Phone
Expansion Module 7914
Phone Guide
See the:
• “Using a Shared Line” section
on page 36
• Cisco Unified CallManager
Assistant User Guide
See the “Using a Shared Line”
section on page 36.
Cisco Unified IP Phone 7961G/7961G-GE and 7941G/7941G-GE for Cisco Unified CallManager 5.0 (SCCP) 63
Page 72

If you... Then... For more information...
Share phones or office
space with coworkers
Answer calls frequently
or handle calls on
someone’s behalf
Need to make video
calls
Determine the state of a
phone line associated
with a speed-dial
button, call log, or
directory listing on
your phone
Want to temporarily
apply your phone
number and settings to
a shared
Cisco Unified IP Phone
Consider using:
• Call Park to store and retrieve
calls without using the transfer
feature
• Call Pickup to answer calls ringing
on another phone
• A shared line to view or join
coworkers’ calls
• Cisco Extension Mobility to apply
your phone number and user
profile to a shared
Cisco Unified IP Phone
Ask your system administrator to set
up the AutoAnswer feature for your
phone.
Consider using Cisco Unified Video
Advantage, which enables you to make
video calls using your Cisco IP Phone,
your personal computer, and an
external video camera.
Ask your administrator to set up the
Busy Lamp Field (BLF) feature for
your phone.
Ask your system administrator about
the Cisco Extension Mobility Service.
Ask your system administrator
about these features and see the:
• “Advanced Call Handling”
section on page 34
• “Using a Shared Line” section
on page 36
• “Using Cisco Extension
Mobility” section on page 41
See the “Using AutoAnswer”
section on page 43.
Contact your system
administrator for additional
assistance and see the Cisco
Unified Video Advantage Quick
Start Guide and User Guide.
See the “Using BLF to Determine a
Line State” section on page 41.
See the “Using Cisco Extension
Mobility” section on page 41.
64 OL-8163-01
Page 73

Troubleshooting Your Phone
Troubleshooting Your Phone
This section provides information to help you troubleshoot problems with your phone.
General Troubleshooting
This section provides information to help you troubleshoot general problems with your phone. For
more information, see your system administrator.
Symptom Explanation
You cannot hear a dial
tone or complete a call
The Settings button is
unresponsive
The softkey that you
want to use does not
appear
Join fails Join requires multiple selected calls. Be sure that you have selected at least
Barge fails and results
in a fast busy tone
You are disconnected
from a call that you
joined using Barge
Cisco CallBack fails The other party might have call forwarding enabled.
One or more of the following factors might apply:
• You must log into the Extension Mobility service.
• You must enter a client matter code or forced authorization code after
dialing a number.
• Your phone has time-of-day restrictions that prevent you from using
some features during certain hours of the day.
Your system administrator might have disabled on your phone.
One or more of the following factors might apply:
• You must press more to reveal additional softkeys.
• You must change the line state (for example, go off-hook or have a
connected call).
• Your phone is not configured to support the feature associated with
that softkey.
one call in addition to the active call, which is selected automatically. Join
also requires the selected calls to be on the same line. If necessary, transfer
calls to one line before joining them.
You cannot barge an encrypted call if the phone you are using is not
configured for encryption. When your barge attempt fails for this reason,
your phone plays a fast busy tone.
You will be disconnected from a call that you have joined using Barge if the
call is put on hold, transferred, or turned into a conference call.
Cisco Unified IP Phone 7961G/7961G-GE and 7941G/7941G-GE for Cisco Unified CallManager 5.0 (SCCP) 65
Page 74

Viewing Phone Administration Data
Your system administrator might ask you to access administration data on your phone for
troubleshooting purposes.
If you are asked to... Then...
Access network
configuration data
Access status data Choose > Status and select the status item that you want to view.
Access phone model
information
Access phone call and
voice quality
information
Choose > Network Configuration and select the network
configuration item that you want to view.
Choose > Model Information.
Choose > Status > Call Statistics.
Using the Quality Reporting Tool
Your system administrator may temporarily configure your phone with the Quality Reporting Tool
(QRT) to troubleshoot performance problems. You can press QRT to submit information to your
system administrator. Depending on configuration, use the QRT to:
• Immediately report an audio problem on a current call.
• Select a general problem from a list of categories and choose reason codes.
66 OL-8163-01
Page 75

Cisco One-Year Limited Hardware Warranty Terms
Cisco One-Year Limited Hardware Warranty Terms
There are special terms applicable to your hardware warranty and various services that you can use
during the warranty period. Your formal Warranty Statement, including the warranties and license
agreements applicable to Cisco software, is available on Cisco.com. Follow these steps to access and
download the Cisco Information Packet and your warranty and license agreements from Cisco.com.
1. Launch your browser, and go to this URL:
http://www.cisco.com/univercd/cc/td/doc/es_inpck/cetrans.htm
The Warranties and License Agreements page appears.
2. To rea d the Cisco Information Packet, follow these steps:
a. Click the Information Packet Number field, and make sure that the part number
78-5235-03A0 is highlighted.
b. Select the language in which you would like to read the document.
c. Click Go.
The Cisco Limited Warranty and Software License page from the Information Packet appears.
d. Read the document online, or click the PDF icon to download and print the document in
Adobe Portable Document Format (PDF).
Note You must have Adobe Acrobat Reader to view and print PDF files. You can
download the reader from Adobe’s website: http://www.adobe.com
3. To read translated and localized warranty information about your product, follow these steps:
a. Enter this part number in the Warranty Document Number field:
78-10747-01C0
b. Select the language in which you would like to view the document.
c. Click Go.
The Cisco warranty page appears.
d. Read the document online, or click the PDF icon to download and print the document in
Adobe Portable Document Format (PDF).
You can also contact the Cisco service and support website for assistance:
http://www.cisco.com/public/Support_root.shtml.
Duration of Hardware Warranty
One (1) Year
Cisco Unified IP Phone 7961G/7961G-GE and 7941G/7941G-GE for Cisco Unified CallManager 5.0 (SCCP) 67
Page 76

Replacement, Repair, or Refund Policy for Hardware
Cisco or its service center will use commercially reasonable efforts to ship a replacement part within
ten (10) working days after receipt of a Return Materials Authorization (RMA) request. Actual
delivery times can vary, depending on the customer location.
Cisco reserves the right to refund the purchase price as its exclusive warranty remedy.
To Receive a Return Materials Authorization (RMA) Number
Contact the company from whom you purchased the product. If you purchased the product directly
from Cisco, contact your Cisco Sales and Service Representative.
Complete the information below, and keep it for reference.
Company product purchased from
Company telephone number
Product model number
Product serial number
Maintenance contract number
68 OL-8163-01
Page 77

Index
A
Address Book Synchronization Tool 56
answering calls, options for 25
ASCII label field support 56, 57
audio problems 66
audio, quality of 14
authenticated calls 39
Auto Dial 23
AutoAnswer 43
B
barge
and privacy
and shared lines 36
using 37
BLF 41
Busy Lamp Field
see BLF
38
41
C
call activity area, viewing 19
call forwarding 29
call logs
erasing
viewing and dialing from 46
46
call park 38
call pickup, using 35
call waiting 25
caller ID 19
call-handling, advanced 34
call-handling, basic 23
calls
answering
barging 37
compared to lines 21
conference features for 30
ending 26
forwarding 29
handling multiple 27
holding and resuming 26
icons for 21
maximum per line 21
multiple parties on 30
multiple, switching between 27
muting 27
parking 38
placing 23
prioritizing 40
redirecting while ringing 25, 35
reporting problems with 66
secure 39
storing and retrieving 38
25
Cisco Unified IP Phone 7961G/7961G-GE and 7941G/7941G-GE for Cisco Unified CallManager 5.0 (SCCP) 69
Page 78

7914
31, 33
52
28
13
63
61
55
24
transferring
viewing 19, 27
viewing multiple 27
cBarge 37
Cisco Unified IP Phone
adjusting height of
connecting 12
description of 15
feature configuration for 22, 63
illustration of 16
online help for 20
registering 13
securing handset rest 13
Cisco Unified IP Phone Expansion Module
Cisco Unified Video Advantage 64
Cisco WebDialer
See also WebDialer
Client Matter Code 25
CMC 25
conference calls
Meet-Me
standard 30, 31
configuration
Fast Dials
features and services 54
options 63
corporate directory
dialing from web page with
using on phone 24
customization
messages
D
dialing, options for 23
directory
corporate
dialing from web page with 24
personal 48
using on phone 24, 46
48
E
encrypted calls 39
ending a call, options for 26
Extension Mobility
log in
41
log out 41
extension numbers, viewing 19
F
FAC 25
Fast Dial service
dialing with
feature buttons
help
17
messages 17
services 17
settings 17
feature menus, using 22
features, availability of 22, 63
footstand
adjusting
button, identifying 17
Forced Authorization Code 25
25
13
70 OL-8163-01
Page 79

forwarding calls, options for
29
G
group call pickup, using 35
H
handset
light strip
securing in cradle 13
using 42
hanging up, options for 26
headset
answering calls with
audio quality 14
button, identifying 18
hanging up with 26
mode 42
obtaining 42
headset performance, general 14
help button, description of 17
help, using 20
hold
and resuming calls
and switching calls 27
and transferring 28
using 26
18
25
26
I
icons
for call states
21
for lines 21
iDivert
description of
transferring calls with 29, 52
installing, Cisco Unified IP Phone 12
2
K
keypad
description of
18
L
language (locale) settings 58
line buttons, identifying 17
lines
and call states
and using BLF 41
description of 21
icons 21
viewing 19
21
M
Malicious Call Identification (MCID), using 39
Meet-Me conferences 31, 33
menus, using 22
messages
indicator for
listening to 52
messages button, description of 17
missed calls, records of 46
MLPP, using 40
44, 52
Cisco Unified IP Phone 7961G/7961G-GE and 7941G/7941G-GE for Cisco Unified CallManager 5.0 (SCCP) 71
Page 80

multiple calls, handling
mute button, description of 18
mute, using 27
27
N
navigation button, description of 18
network configuration data, locating 65
O
on-hook dialing 23
online help, using 20
P
PAB 48
Personal Address Book
See PAB
Personal Address Book (PAB)
dialing from
phone lines
buttons for
description of 21
viewing 19
phone screen
adjusting contrast of
changing language of 45
cleaning 19
features of 19
phone services
See also User Options web pages
placed calls, records of 46
49
25
17
45
57
placing calls, options for 23
prioritizing calls 40
privacy
and shared lines
using 38
programmable buttons
description of
labels for 19
36
17
Q
QRT 66
QRT, using 66
Quality Reporting Tool 66
R
received calls, records of 46
redial 23
Remote-in-Use icon for shared lines 36
resume, using 26
ringer
customizing
indicator for 18
44
S
safety, warnings 2
secure calls 39
security
levels of
making and receiving secure calls 39
verifying non-secure calls 39
39
72 OL-8163-01
Page 81

services
changing or ending
service names 57
subscribing to 57
services button, description of 17
settings button, description of 17
shared lines
and Remote-in-Use icon
description of 36
with barge 37
with privacy 38
softkey buttons
description of
labels for 19
sound
See audio, quality of
speakerphone
answering calls with
button, identifying 18
hanging up with 26
mode 42
speed dial 34
buttons, identifying 17
labels 19
using 24
status data, locating 65
status line, viewing 19
subscriptions
See services, subscribing to
suspicious calls, tracing 39
switching calls 27
57
36
18
14
25
57
T
Tabs, phone and feature 19
TABSynch 56
TAPS, using 13
text, entering on phone 22
Tool for Auto-Registered Phones Support 13
transferring, options for 28
troubleshooting 65
See also QRT 65
U
User Options web pages
subscribing and unsubscribing to phone
services
57
V
voice message indicator 52
voice message service 52
volume button, description of 18
W
warnings, safety 2
web-based services
See User Options web pages
WebDialer 24
57
Cisco Unified IP Phone 7961G/7961G-GE and 7941G/7941G-GE for Cisco Unified CallManager 5.0 (SCCP) 73
Page 82

74 OL-8163-01
Page 83

Page 84

Corporate Headquarters
Cisco Systems, Inc.
170 West Tasman Drive
San Jose, CA 95134-1706
USA
www.cisco.com
Tel: 408 526-4000
800 553-NETS (6387)
Fax: 408 526-4100
European Headquarters
Cisco Systems International BV
Haarlerbergpark
Haarlerbergweg 13-19
1101 CH Amsterdam
The Netherlands
www-europe.cisco.com
Tel: 31 0 20 357 1000
Fax: 31 0 20 357 1100
Americas Headquarters
Cisco Systems, Inc.
170 West Tasman Drive
San Jose, CA 95134-1706
USA
www.cisco.com
Tel: 408 526-7660
Fax: 408 527-0883
Asia Pacific Headquarters
Cisco Systems, Inc.
168 Robinson Road
#28-01 Capital Tower
Singapore 068912
www.cisco.com
Tel: +65 6317 7777
Fax: +65 6317 7799
Cisco Systems has more than 200 offices in the following countries. Addresses, phone numbers, and fax numbers are listed on the
Cisco Web site at www.cisco.com/go/offices
Argentina • Australia • Austria • Belgium • Brazil • Bulgaria • Canada • Chile • China PRC • Colombia • Costa Ri ca • Croatia • Cyprus • Czech Republic • Denmark • Dubai, UAE
Finland • France • Germany • Greece • Hong Kong SAR • Hungary • India • Indonesia • Ireland • Israel • Italy • Japan • Korea • Luxembourg • Malaysia • Mexico
The Netherlands • New Zealand • Norway • Peru • Philippines • Poland • Portugal • Puerto Rico • Romania • Russia • Saudi Arabia • Scotland • Singapore
Slovakia • Slovenia • South Africa • Spain • Sweden • Switzerland • Taiwan • Thailand • Turkey • Ukraine • United Kingdom • United States • Venezuela • Vietnam • Zimbabwe
CCSP, CCVP, the Cisco Square Bridge logo, Follow Me Browsing, and StackWise are trademarks of Cisco Systems, Inc.; Changing the Way We Work, Live, Play, and Learn, and
iQuick Study are service marks of Cisco Systems, Inc.; and Access Registrar, Aironet, ASIST, BPX, Catalyst, CCDA, CCDP, CCIE, CCIP, CCNA, CCNP, Cisco, the Cisco Certified
Internetwork Expert logo, Cisco IOS, Cisco Press, Cisco Systems, Cisco Systems Capital, the Cisco Systems logo, Cisco Unity, Empowering the Internet Generation,
Enterprise/Solver, EtherChannel, EtherFast, EtherSwitch, Fast Step, FormShare, GigaDrive, GigaSt ack, HomeLink, Internet Quotient, IOS, IP/TV, iQ Expertise, the iQ logo, iQ
Net Readiness Scorecard, LightStream, Linksys, MeetingPlace, MGX, the Networkers logo, Networking Academy, Network Registrar, Packet, PIX, Post-Routing, Pre-Routing,
ProConnect, RateMUX, ScriptShare, SlideCast, SMARTnet, StrataView Plus, TeleRouter, The Fastest Way to Increase Your Internet Quotient, and TransPath are registered
trademarks of Cisco Systems, Inc. and/or its affiliates in the United States and certain other countries.
All other trademarks mentioned in this document or Website are the property of their respective owners. The use of the word partner does not imply a partnership relationship
between Cisco and any other company. (0502R)
© 2006 Cisco Systems, Inc. All rights reserved.
The Java logo is a trademark or registered trademark of Sun Microsystems, Inc. in the U.S. or other countries.
OL-8163-01
 Loading...