

Page 1

USER GUIDE
Cisco Unified IP Phone Guide 3911 (SIP)
Cisco Unified Communications Manager Express
7.1
1 Overview, page 2
2 Ope
3 Phon
rating Your Phone, page 5
e Features and Functions List, page 13
Page 2

1 Overview
1
This guide provides phone layout and feature descriptions for the Cisco Unified IP Phone 3911.
Physical Layout
The Cisco Unified IP phone 3911 is a single-line phone. Buttons near the handset provide direct access to several features.
1 2 3
17
16
15
14
13
CISCO
GHI
PQRS
Cisco SIP Phone
3911
4
5
6
1
2
1
4
7
ABC
JKL
TUV
3
DEF
6
5
MNO
9
8
WXYZ
#
0
7
8
9
10
1112
84399
Item Description
Phone screen Displays phone menus a nd call activi ty includin g caller ID (pho ne number), ca ll durati on, and
1
Message waiting
2
indicator
Phone model The Cisco Unified IP Phone model.
3
call state.
Indicates new voice message (steady red) or an incoming call (blinking).
Cancel button Cancels an action, exits a menu, or hangs up a call.
4
OK button Displays menus, sele cts or con firms a me nu opti on, answe rs a call, or resume s a call.
5
2
Page 3
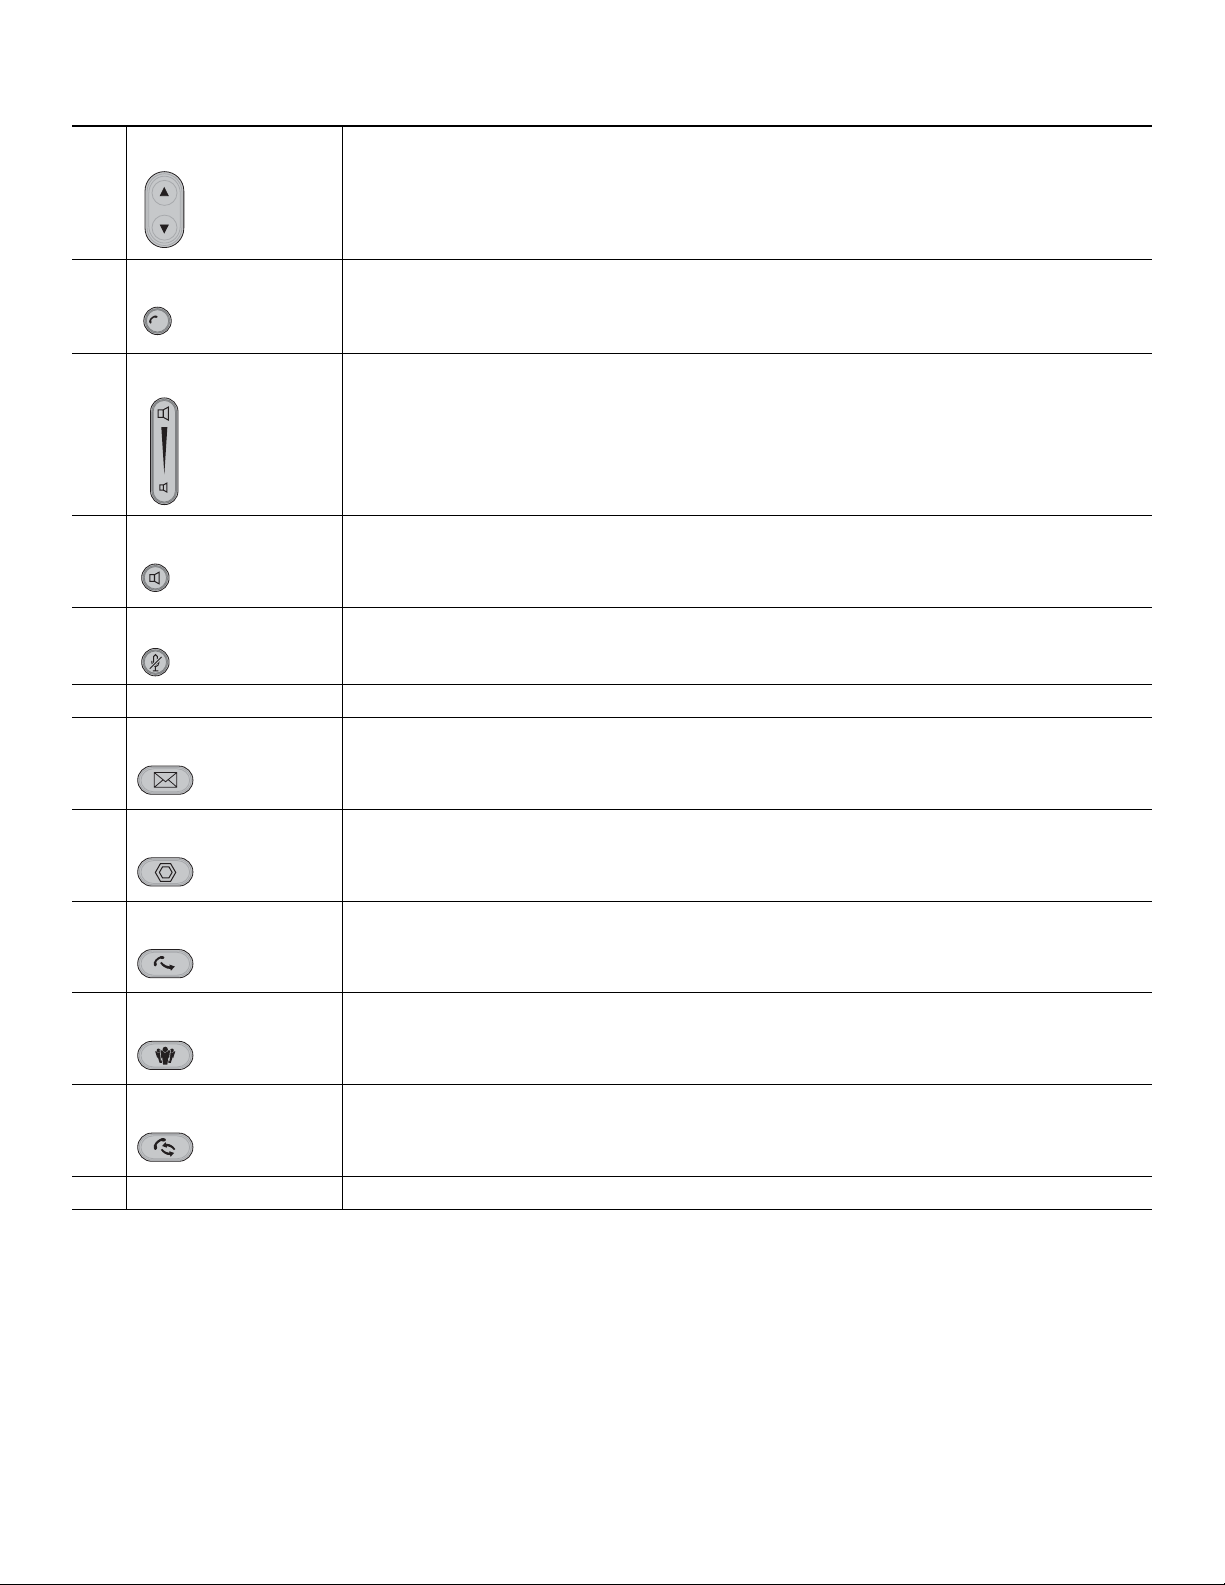
Navigation button Allows you to sc roll th rough menu items an d highl ig ht item s. Whe n the ph one is on-ho ok,
displays the call logs (Missed C alls , R eceived Cal ls, Pl aced C alls) and your Spe ed D ials.
6
Line button s Allows you to select a line for making a call or to answer a call on the line.
7
2
Volume button Controls the handset, headset, speakerphone, and ringer volume.
• A fast blink indicates an incoming call.
• A slow blink indicates a held call.
8
Speaker button Selects the speakerphone. When the speakerphone is on, the button is lit.
9
Mute button Mutes the speakerphone and handset. If the button is lit, the speaker and handset are muted.
10
Keypad Allows you to dial phone nu mbers, and ente r numb ers or le tter s.
11
Message button Connects to your voice mail box. If the button is lit, you have a message waiting.
12
Hold butt o n Places the current call on hold, resumes a call that was held, and switches between an active
call and a call on hold.
13
Transfer button Transfers a call to another number.
If the button is lit, you have a call on hold.
14
Conference button Starts a standard (ad hoc) conference call. If the button is lit, a conference call is taking place.
15
New Call/Redial butt on Makes a new call or redials the last called number.
16
Handset Phone handset.
17
3
Page 4
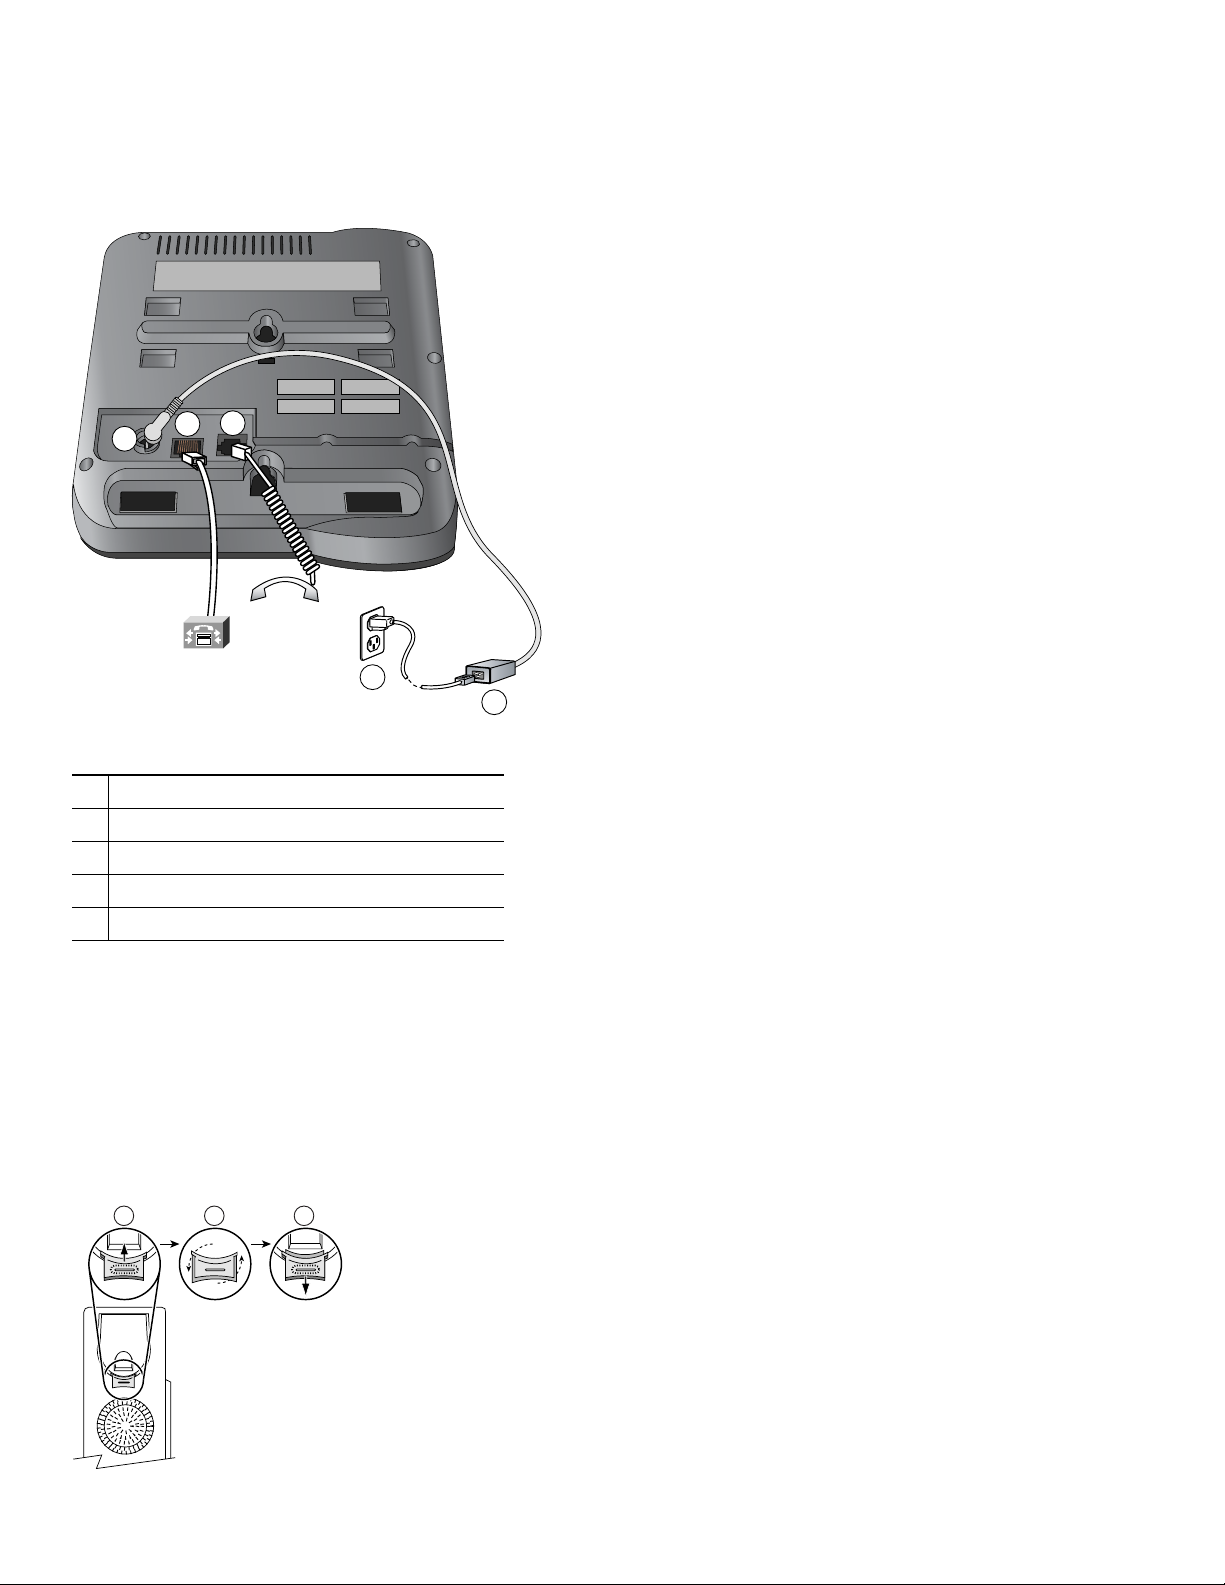
Connecting Your Phone
1
1
This section shows and explains the connectors on your Cisco IP phone.
2
3
1
5
4
80259
Network port ( 10/1 00 SW)
1
Handset port
2
DC adapter port (DC48V)
3
AC-to-DC power supply
4
AC power cord
5
Adjusting the Handset Rest
When you connect your phone, you can adjust the handset rest so that the receiver does not slip out of the cradle. Use the
following method to adjust the handset:
1. Set the handset aside and pull the square plastic tab from the handset rest.
2. Rotate the tab 180 degrees.
3. Slide the tab back into the handset rest. An extension protrudes from the top of the rotated tab. Return the handset to the
handset rest.
1 2 3
20521
4
Page 5

2 Operating Your Phone
This section describes how to operate your Cisco Unified IP phone. Because of differences in phone and site configuration, not
all features and procedures described here might apply to your phone. Consult your system administrator for more information.
Note In the following procedu res, you might r equire to ente r information using the keypad. Press the backspace (<<) soft key
to erase digits that you enter incorrectly.
Place a Call, Basic
1. Select a phone line
2. Press . or .
3. Dial the number.
Place a Call Using the Handset
1. Pick up the handset or pre ss , then dial the number.
Dial on-hook (with dial tone)
1 2
1. Press . or , then dial the number.
2. Use the speake rpho ne (if alr eady a ctiv ate d) o r pick up th e hand set .
1 2
Redial a Number
Press .
Place a Call When Another Call is Acti ve
Press and dial the number. The other call is placed on hold.
Dial From a Call Log
1. Do one of th e f o ll ow in g :
• Press the Navigation button and choose Missed Calls, Received Calls, or Placed Calls.
• Press and choose Directories > Missed Calls, Received Calls, or Placed Calls.
2. Select a number, then select Dial.
Answer a Call
You can answer a call by simply selecting the line with the incoming call and lifting the handset
Answer a Call, Speakerphone
1. Press the line button, if not already selected.
2. Press .
End a Call
To end a call:
5
Page 6

Hang Up Using the Handset
Return the handset to its cradle.
Hang Up Using the Speakerphone
Press .
Hang Up One Call, and Pres er ve An othe r Call on t he Sa me Li ne
Press . If necessary, remove the call from hold first by pressing .
Hold and Resume
Only one call can be active at any time; all other connected calls must be placed on hold
Put a Call on Hold
1. Make sure the ca ll yo u wan t to pu t on ho ld is h ighli gh ted.
2. Press .
Remove a Call from Hold
1. Make sure the appropriate call is highlighted.
2. Press .
Engaging the Hold feature typically generates music or a beeping.
A held call is indicated by the call-on-hold icon: .
The line button with a held c all blin ks slo wly.
Mute
With Mute enabled , yo u can he ar ot her par tie s on a ca ll an d the y canno t he ar yo u. You can use Mute in con jun ction with the
handset or speakerphone.
Toggle Mute On or Off
Press .
Switching Between Multiple Calls
You can switch between multiple calls on your phone.
Switch Between C onnected Calls o n One Line
1. Make sure t he ca ll t h at yo u w an t to sw i tch t o i s hi gh li g hte d .
2. Press . Any active call is placed on hold and the selected call is resumed.
Switch Between Connected Calls on Different Lines
1. Select the other line. Any active call is placed on hold.
2. Make sure t he ca ll th a t y o u wa nt t o swi tch t o i s hi gh li g hte d an d p re ss .
6
Page 7

Switch From a Connected Cal l to Answer a Ri ng in g Call on th e Same Line
Press or the line button.
Switch From a Connected Cal l to Answer a Ri ngin g Cal l on the Other Line
1. Press the line button with the incoming call.
2. Press .
Viewing Multiple Calls
Understanding how multiple calls are displayed on your phone can help you organize your call-handling efforts.
Your phone displays calls as follows for the highlighted line:
• Calls with the longest duration display at the top of the list.
• Calls of a similar type are grouped together. For example, calls that you have taken are grouped near the top, and calls on
hold are gr ou pe d l a st.
Transferring Calls
Transfer redirects a connected call. The target is the number to which you want to transfer the call.
Transfer a Call Withou t Talk ing t o the Tr ans fe r Recip ie nt
1. From an active call, press .
2. Enter the target number.
3. Press again to complete the transfer, or press to cancel.
Note If the transfer is canceled, press to resume t h e c all .
Talk to the Transfer Recipient Before Trans ferring a Call (Consultative Tr ansfer)
1. From an active call, press .
2. Enter the target number. Wait for the transfer recipient to answer.
3. Press again to complete the transfer, or press to cancel.
Note If the transfer is canceled, press to resume t h e c all .
Transfer Two Current Calls to Each Other (direct transfer) Without Staying On the Line
1. Scroll to h ig hl igh t a ny c all o n t h e line .
2. Press Select.
3. Repeat this process for the second call.
4. With one of the sele c ted ca l ls hi gh li ght e d , p re ss DirTrfr. (To display DirTrfr, you might need to press more.) The two calls
connect to each other and drop you from the call.
–
If you want to stay on the line with the callers, use Join instead.
–
If on-hook tran sfe r is en able d on yo ur ph one, you can eit her han g up to comp let e the c all, o r pre ss and then
hang up.
–
You cannot transfer a call on hold. Press again to remove the call from hold before transferring it.
7
Page 8

Forwarding All Calls to Another Number
You can use Call Forward All to redirect incoming calls from your phone to another number.
Set up call forwarding on your line
1. Press and choose Settings > User Preferences > CFwdALL .
2. Enter the call forward target number.
Cancel call forwarding on your line
Press and choose Settings > User Preferences > CFwdAL L.
Verify that call forwarding is enabled on your line
On the phone screen, look for:
• Call forwar di ng i co n
• Call forward target number next to the call forwarding icon
Enter the call forward target number exactly as you would dial it from your phone. For example, enter an access code or the
area code, if necessary.
You can forward your calls to a traditional analog phone or to another IP phone, although your system administrator might
restrict the ca ll f o rwa rdi n g f eat u re to numbers within your company.
Call forwarding is pho ne lin e spec ific. I f a ca ll re ache s you on a li ne wher e call fo rwar ding is not en abl ed, the call ri ngs as usual.
Your system administrator can change call forwarding conditions for your phone line.
Making Conference Calls
With your Cisco Unified IP phone you can join three people into one telephone conversation to create a conference call.
Create a Conference by Adding a Participant
1. From a connect ed ca ll, pres s .
2. Enter the participant’s phone number.
3. Wait for the call to connect.
4. Press again to a dd t h e p art ic i pan t t o you r call.
Create a Conference by Joining Two or More Existing Calls
1. Make sure that you have two or more calls on a single line.
2. Highlight a call that you want to a dd to the c onference.
3. Press Select. The selected call displays this icon .
4. Repeat this process for each call that you want to add.
5. From one of the selected calls, press Join. (You might need to press the more soft key to see Join.)
Note The active call is automatically selected.
Participate in a Conference
Answer the phone when it rings.
8
Page 9

End Your Participat io n in a Conf ere nce
Hang up. If you leave a conference after creating it, the conference ends.
Speed Dialing
Speed dialing allows you to sele ct a phone scr een i tem to pla ce a call.
Set up Speed Dials
1. Press and choose Directories > Speed Dials.
2. Select an empty speed dial (shown as None).
3. Choose Edit and enter a speed dial number.
4. Enter a name for the speed dial.
Use Speed Dials
To place a call, press the Navigation button and choose Speed Dials.
If you make a mi stak e ent eri n g a nu mb er or n ame , p ress to erase digits or letters.
When you are entering numbers and letters, press # to switch from numbers to letters, and from uppercase letters to lowercase
letters.
Customizing the Phone
You can adjust the ringer volume for your phone and customize the contrast on your phone screen.
Adjust the Volume Level for t he Ph one Rin ger
Press the Volume button while the handset is in the cradle. The new ringer volume is saved automatically.
Change the Contrast on the Phone Screen
1. Press and choose Settings > User Preferences > Contrast.
2. Press the Navigation button to set the contrast.
Using Call Logs
Your phone maintains logs of your missed, placed, and received calls.
View Your Call Logs
Press , and choose Directories > Missed Calls, Placed Calls, or Receiv ed C al ls.
Erase a Call from the Call Log
1. Press , and choose Directories > Missed Calls, Placed Calls, or Received Calls.
2. Select a call record, then select Delete.
Dial from a Call Lo g (Whi le no t on An othe r C all )
1. Press and choose Directories > Mi ssed Calls , Placed Calls, or Received Calls.
2. Select a call record from the log, press , and choose Dial.
9
Page 10

Dial from a call log (While Connected to Another Call)
1. Press and choose Directories > Mi ssed Calls , Placed Calls, or Received Calls.
2. Select a call record from the log.
3. Press . The other call is placed on hold.
Using Call Logs
Your phone maintains logs of your missed, placed, and received calls.
View your call logs
Press , and choose Directories > Missed Calls, Placed Calls, or Receiv ed C al ls.
Erase a Call from the Call Log
1. Press , and choose Directories > Missed Calls, Placed Calls, or Received Calls.
2. Select a call record, then select Delete.
Dial from a Call Lo g (Whi le no t on An othe r C all )
1. Press and choose Directories > Mi ssed Calls , Placed Calls, or Received Calls.
2. Select a call record from the log, press , and choose Dial.
Dial from a Call Log (W hile Co nn ect ed to A noth er Call)
1. Press and choose Directories > Mi ssed Calls , Placed Calls, or Received Calls.
2. Select a call record from the log.
3. Press . The other call is placed on hold.
10
Page 11

Accessing Voice Messages
To access voice messages, select the line and press .
Note Your company determin es the voice me ssage se rvic e that your phon e system uses. For the mos t accura te and de taile d
information, see the documentation for your voice mes sage se rvice.
Set up and Personalize Your Voice Message Service
For each line, press and follow the voice instructions.
Check for New Voice Message
Look for:
• A steady red light on your message waiting indicator (above your phone screen).
• A steady green light on the M essages ( ) button.
• A message waiting icon on your phone screen for the line selected.
Listen to Your Voice Messages or Access the Voice Messag es Menu
Press , and follow the voice instructions.
If there is a message on th e active lin e, pressi ng connects you to your voice mailbox on this line. If there are no messages
on the active line and you have a message on the other (inactive) line, pressing connects you to the voice mailbox on
the inactive line . If th ere ar e no messag es on eith er lin e, pr es sing connects you to the voice mailbox of the active line.
The Messages button lights if there is a message on either line and only the line with a message displays the message
waiting icon . You have access only t o the v oic e mail box o f the li ne w ith a messa ge.
Using a Handset and Speakerphone
You can use your phone with a handset or speakerphone.
Use the Speakerphone
Press to toggle speakerphone mode on or off.
Switch to the speakerphone (from the handset) during a call.
Press , then hang up the handset.
Switch to the Handset (from a Speakerphone) During a Call
Lift the handset without pushing any buttons.
Adjust the Volume Level for a Call
Press the up or down Volume button during a call or after a dial tone.
This action adjusts the volume for the handset or speakerphone, depending on which device is in use.
11
Page 12

Park a Call
Call park allows a user to place a call on hold at a designated parking slot from which the call can be retrieved by anyone on
the system.
Note Contact your system admin istr ator for your c all park slot nu mber.
To park a call:
• Press and choose Park.
The Cisco Unified Communications Manage r Express system au toma ticall y sel ects an availab le call park sl ot and d isplays
the number on the Cisco Unified IP phone screen.
To r etrieve a park ed ca l l:
• Dial the park slot ext ensio n.
To park a call to a directed call park slot:
• Press followed by the call park slot number provided by your system administrator.
To retrieve a call parked at a directed call park slot:
• Dial the retrieval park-slot extension.
12
Page 13

3 Phone Features and Functions List
The following is an alphabetical list of features and functions for your IP phone.
• Accessing Voice Messages 12
• Adjust the volume level for a call 12
• Answer a Call 7
• Answer a Call, S peak erp hone 7
• Customizing the Phone 10
• Dial from a call log 7
• Dial on-hook (with dial tone) 6
• Ending a Call 7
• Forwarding All Calls to Another Number 9
• Hold and Resu me 7
• Making Confer en ce Ca lls 9
• Mute 8
• Park a Call 12
• Place a call using the handset 6
• Place a call when another call is active 7
• Place a Call, Basic 6
• Redial a number 6
• Speed Dialing 10
• Switching B etwe en Mu lt iple Calls 8
• Transferring Calls 8
• Using a Handset and Speakerphone 12
• Using Call Lo gs 11
• View your call logs 11
• Viewing Multiple Calls 8
13
Page 14

Americas Headquarters
Cisco Systems, Inc.
170 West Tasman Drive
San Jose, CA 95134-1706
USA
www.cisco.com
Tel: 408 526-4000
800 553-NETS (6387)
Fax: 408 527-0883
Asia Pacific Headquarters
Cisco Systems, Inc.
168 Robinson Road
#28-01 Capital Tower
Singapore 068912
www.cisco.com
Tel: +65 6317 7777
Fax: +65 6317 7799
Europe Headquarters
Cisco Systems International BV
Haarlerbergpark
Haarlerbergweg 13-19
1101 CH Amsterdam
The Netherlands
www-europe.cisco.com
Tel: 31 0 800 020 0791
Fax: 31 0 20 357 1100
Cisco has more than 200 offices worldwide. Addresses, phone numbers, and fax numbers are listed on the
Cisco Website at www.cisco.com/go/offices.
Cisco, Cisco Systems, the Cisco logo, and the Cisco Systems logo are registered trademarks or trademarks of Cisco Systems, Inc. and/or its affiliates
in the United States and certain other countries. All other trademarks mentioned in this document or Website are the property of t heir respective
owners. The use o f th e word partner d oes n ot i mp ly a partnership r elat i o nsh ip be t ween Cisco and any o th er c ompany. (0705R)
© 200
9 Cisco Systems, Inc. All rights reserved.
O
L-16718-02
 Loading...