

Page 1
Installing the Grounding Lug on Cisco 2600
Series and Cisco 3600 Series Routers
For some types of network connections, a grounding lug must be installed on Cisco 2600 series and
Cisco 3600 series routers to ensure proper electrical protection. The grounding lug must be installed
before certain network modules areused.
Note Grounding lugs are necessary for Cisco 2600 series and Cisco 3600 series routers using
the NM-1V, NM-2V, NM-8AM, NM-16 and NM-16AM network modules.
Sections in this document include:
• Safety Recommendations, page 2
• Required Tools and Equipment, page 3
• Installing the Grounding Lug on a Cisco 2600 Series Router, page 4
• Installing the Grounding Lug on a Cisco 3620 or Cisco 3640 Router, page 5
• Installing the Grounding Lug on a Cisco 3660 Router, page 11
• For More Information, page 13
Note Use this document with the appropriate hardware installation guide and Regulatory
Compliance and Safety Information document.
Corporate Headquarters: Cisco Systems, Inc., 170 West Tasman Drive, San Jose, CA 95134-1706 USA
Copyright © 2000, Cisco Systems, Inc. All rights reserved.
78-11640-01
Page 2
Safety Recommendations
Safety Recommendations
Follow these guidelines to ensure general safety:
• Keep the chassis area clear and dust-free during and after installation.
• Do not wear loose clothing that could get caught in the chassis. Fasten your tie or scarf and roll up
your sleeves.
• Wear safety glasses when working under any conditions that might be hazardous to your eyes.
• Do not perform any action that creates a potential hazard to people or makes th e equipment un safe.
Warning Definition
Warning
This warning symbol means danger. Y ou are in a situation that could cause bodily injury .
Before you work on any equipment, be aware of the hazards involved with electrical
circuitry and be familiar with standard practices for preventing accidents. To see
translations of the warnings that appear in this publication, refer to the Regulatory
Compliance and Safety Information document that accompanied this device.
Waarschuwing Dit waarschuwingssymbool betekent gevaar. U verkeert in een situatie die
lichamelijk letsel kan veroorzaken. Voordat u aan enige apparatuur gaat werken, dient u zich bewust te
zijn van de bij elektrische schakelingen betrokken risi co's en dient u op de hoog te te zijn v an standaard
maatregelen om ongelukken te voorkomen. Voor vertalingen van de waarschuwingen die in deze
publicatie verschijnen, kunt u het document Regulatory Complian ce and Safety Information (Informatie
over naleving van veiligheids- en andere voorschriften) raadplegen dat bij dit toestel is ingesloten.
Varoitus Tämä varoitusmerkki merkitsee vaaraa. Olet tilanteessa, joka voi johtaa ruumiinvammaan.
Ennen kuin työskentelet minkään laitteiston parissa, ota selvää sähkökytkentöihin liittyvistä vaaroista
ja tavanomaisista onnettomuuksien ehkäisykeinoista. Tässä julkaisussa esiintyvien varoitusten
käännökset löydät laitteen mukana olevasta Regulatory Complia nce an d Safety Information -kirjasesta
(määräysten noudattaminen ja tietoa turvallisuudesta).
Attention Ce symbole d'avertissement indique un danger. Vous vous trouvez dans une situation
pouvant causer des blessures ou des dommages corporels. Avant de travailler sur un équipement, soyez
conscient des dangers posés par les circuits électriques et familiarisez-vous avec les procédures
couramment utilisées pour éviter les accidents. Pour prendre connaissance des traductions
d’avertissements figurant dans cette publication, consultez le document Regulatory Compliance and
Safety Information (Conformité aux règlements et consignes de sécurité) qui accompagne cet appareil.
Warnung Dieses Warnsymbol bedeutet Gefahr. Sie befinden sich in einer Situation, die zu einer
Körperverletzung führen könnte. Bevor Sie mit der Arbeit an irgendeinem Gerät beginnen, seien Sie
sich der mit elektrischen Stromkreisen verbundenen Gefahren und der Standardpraktiken zur
Vermeidung von Unfällen bewußt. Übersetzungen der in dieser Veröffentlichung enthaltenen
W arnhinweise finden Sie im Dokument Regulatory Compliance and Sa fety Information (Informationen
zu behördlichen Vorschriften und Sicherheit), das zusammen mit diesem Gerät geliefert wurde.
Avvertenza Questo simbolo di avvertenza indica un pericolo. La situazione potrebbe causare infortuni
alle persone. Prima di lavorare su qualsiasi a pparecchiatura, occorre c onoscere i pericoli relativi ai
circuiti elettrici ed essere al corrente delle pratiche standard per la prevenzione di incidenti. La
traduzione delle avvertenze riportate in questa pubblicazione si trova nel documento Regulatory
Compliance and Safety Information (Conformità alle norme e informazioni sulla sicurezza) che
accompagna questo dispositivo.
Installing the Grounding Lug on Cisco 2600 Series and Cisco 3600 Series Routers
2
78-11640-01
Page 3
Required Tools and Equipment
Advarsel Dette v arselsymbolet bety r fare. Du befi nner deg i en situ asjon som kan føre til personskade.
Før du utfører arbeid på utstyr, må du vare oppmerksom på de faremomentene som elektriske kretser
innebærer, samt gjøre deg kjent med vanlig praksis når det gjelder å unngå ulykker. Hvis du vil se
oversettelser av de advarslene som finnes i denne publikasjonen, kan du se i dokumentet Regulatory
Compliance and Safety Information (Overholdelse av forskrifter og sikkerhetsinformasjon) som ble
levert med denne enheten.
Aviso Este símbolo de aviso indica perigo. Encontra-se numa situação que lhe poderá causar danos
físicos. Antes de começar a trabalhar com qualquer equipamento, familiarize-se com os perigos
relacionados com circuitos eléctricos, e com quaisquer práticas comuns que possam prevenir possíveis
acidentes. Para ver as traduções dos avisos que constam desta publicação, consulte o documento
Regulatory Compliance a nd Safety In formation (Informação de Se gurança e Disposições Reguladoras)
que acompanha este dispositivo.
¡Advertencia! Este símbolo de aviso significa peligro. Existe riesgo para su integridad fí sica. A ntes
de manipular cualquier equipo, considerar los riesgos que entraña la corriente eléctrica y f amiliarizar se
con los procedimientos estándar de prevención de accidentes. Para ver una traducción de las
advertencias que aparecen en esta publicación, consultar el documento titulado Re gulatory Co mpliance
and Safety Information (Información sobre seguridad y conformidad con las disposiciones
reglamentarias) que se acompaña con este dispositivo.
Varning! Denna varningssymbol signalerar fara. Du befinner dig i en situation som kan leda till
personskada. Innan du utför arbete på någon utrustning måste du vara medveten om farorna med
elkretsar och känna till vanligt förfarande för att förebygga skador. Se förklaringar a v de v arning ar som
förkommer i denna publikation i dokumentet Regulatory Compliance and Safety Information
(Efterrättelse av föreskrifter och säkerhetsinformation), vilket medföljer denna anordning.
Required Tools and Equipment
Warning
Only trained and qualified personnel should be allowed to install or replace this
equipment.
Installation might require some tools and equipment that are not provided as standard equipment with
the router. Following are the tools and parts required for a typical router installation:
• Flat-blade screwdrivers: small, 3/16-in. (0.476 cm) and medium, 1/4-in. (0.625 cm)
• No. 2 Phillips screwdriver
• ESD-preventive wrist strap
• Tape
• Number 6 gauge grounding wire
• Pliers to connect grounding wire to connector
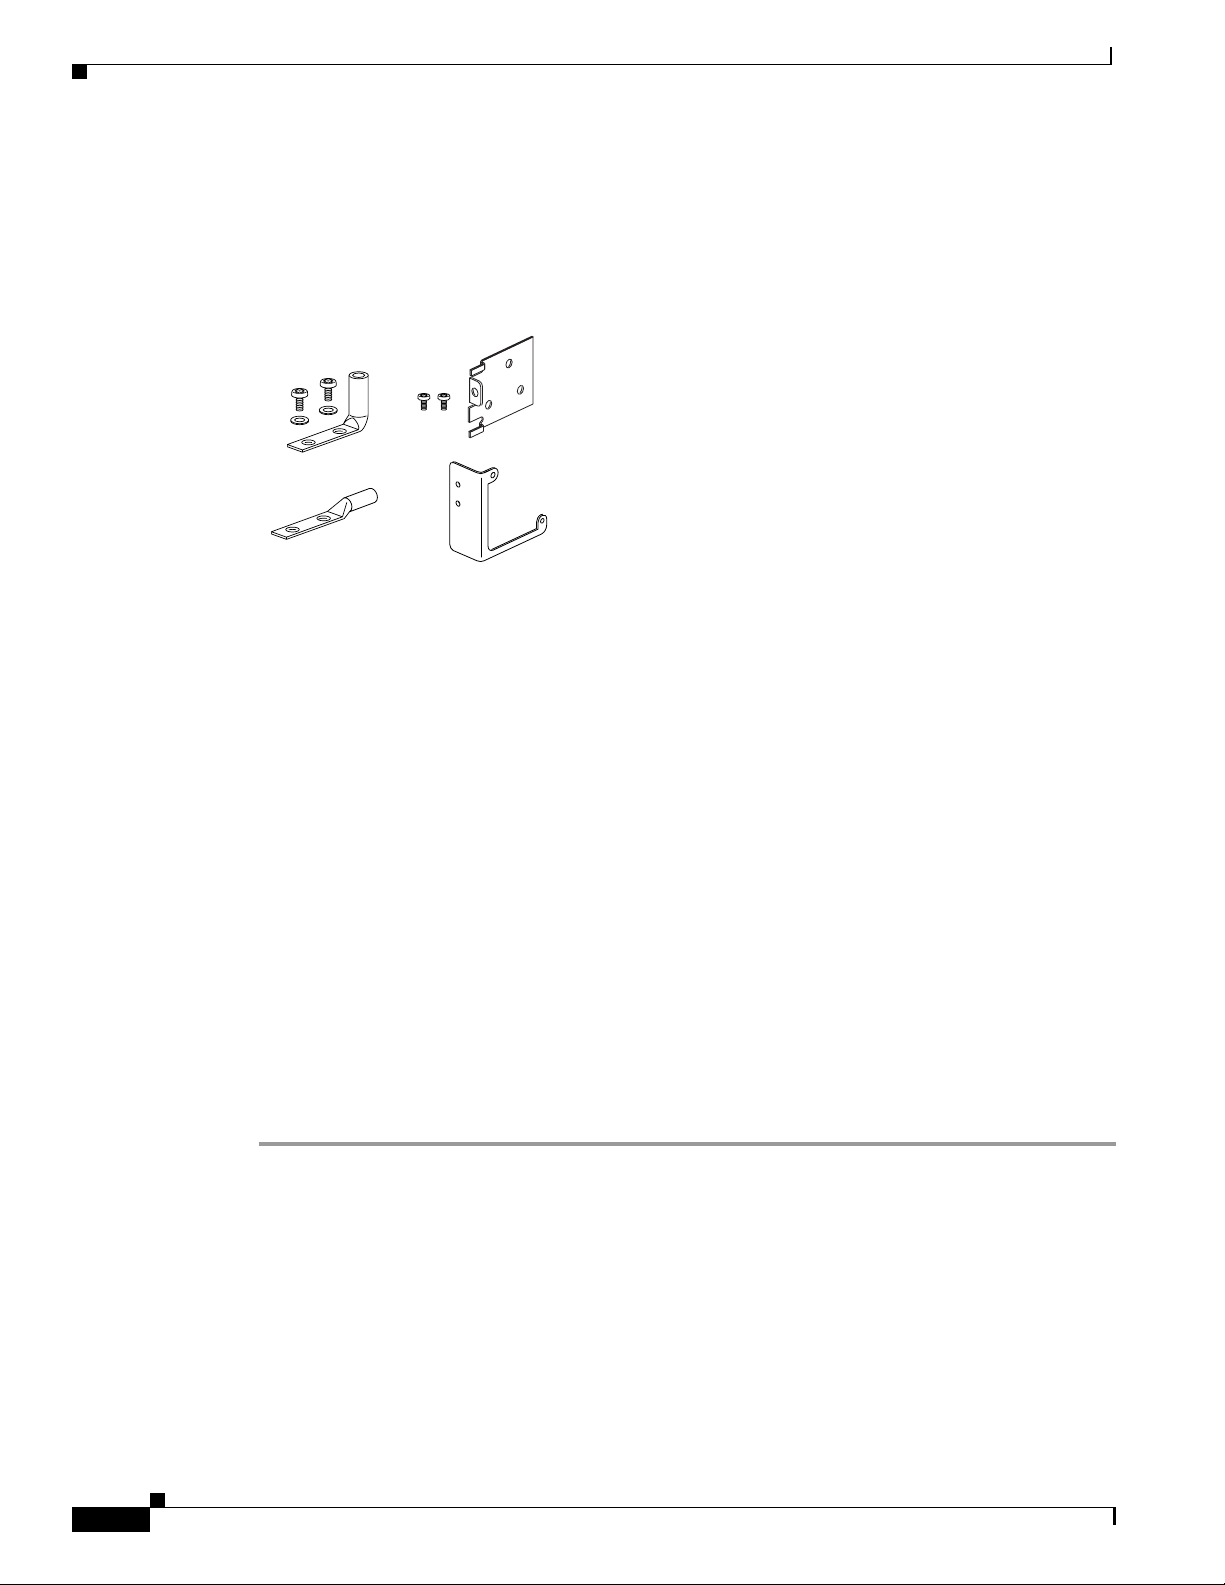
The grounding lugs kit consists of:
• Cisco 3620 grounding lug bracket
• Cisco 3640 grounding lug bracket
• Angled grounding lug (for Cisco 2600 series and Cisco 3660 routers)
• Straight grounding lug (for Cisco 3620 and Cisco 3640 routers)
78-11640-01
Installing the Grounding Lug on Cisco 2600 Series and Cisco 3600 Series Routers
3
Page 4
Installing the Grounding Lug on a Cisco 2600 Series Router
• 2 bracket screws (to attach the bracket to the chassis)
• 2 grounding lug screws (to attach the grounding lug to the bracket or chassis)
The contents of thegrounding lug kit are shown in Figure 1.
Figure 1 Cisco Grounding Lug Kit Contents
36136
Installing the Grounding Lug on a Cisco 2600 Series Router
This section describes the procedure to connect the grounding lug to a Cisco 2600 series rout er . Figure 2
shows the typical location for placing the grounding lug on the router.
Figure 2 Cisco 2600 Series Grounding Lug Location
T o connect a g rounding wire to the grounding lug on a Cisco 2600 series router, complete the follo wing
tasks:
Step 1 Place a number 6 gauge grounding wire in the grounding lug connector.
Step 2 Squeeze the grounding lug connector until the grounding wire is firmly in place.
Step 3 Mount the grounding lug to the Cisco 2600 series chassis using the supplied screws as shown in
Figure 3.
Installing the Grounding Lug on Cisco 2600 Series and Cisco 3600 Series Routers
4
78-11640-01
Page 5
Installing the Grounding Lug on a Cisco 3620 or Cisco 3640 Router
36453
SEE MANUAL BEFORE INSTALLATION
SERIAL 1
SERIAL 0
CONN
CONN
WIC
2A/S
SEE MANUAL BEFORE INSTALLATION
SERIAL 1
SERIAL 0
CONN
CONN
WIC
2A/S
Cisco 2611
W0
AUX
CONSOLE
ETHERNET 0/0
ACT
LINKACTETHERNET 0/1LINK
G
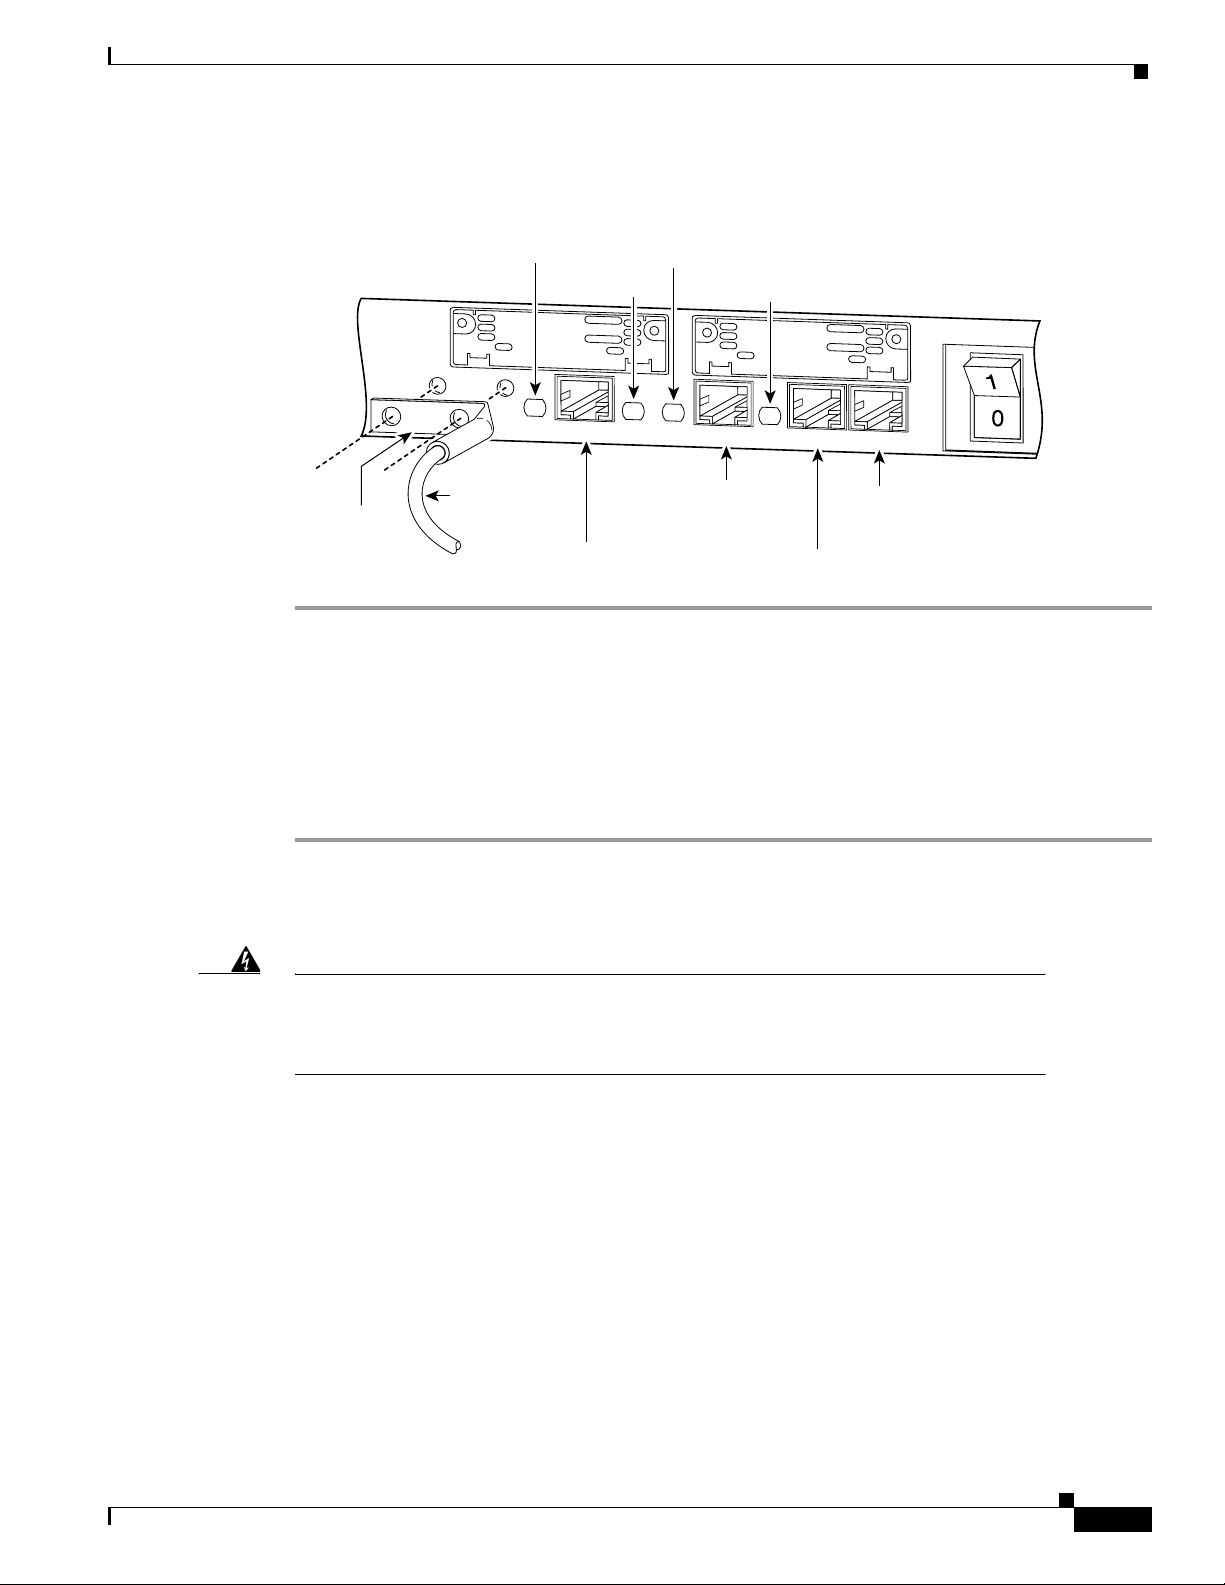
Figure 3 Cisco 2600 Series Grounding Lug Installation
Link
LED
Grounding cable
rounding lug
Ethernet 0/1
10BASE-T
port (RJ-45)
ACT
LED
Link
LED
Ethernet 0/0
10BASE-T
port (RJ-45)
ACT
LED
Auxiliary
port (RJ-45)
Console
port (RJ-45)
Installing the Grounding Lug on a Cisco 3620 or
Cisco 3640 Router
To attach the grounding lug to your router chassis, complete the following tasks:
Step 1 Turn OFF power to the router. However, to channel ESD voltages to ground, do not unplug the power
cable. Remove all network interface cables, including telephone cables, from the rear panel.
The following warning applies to routers that use a DC power supply:
Warning
Before performing any of the following procedures, ensure that power is removed from
the DC circuit. To ensure that all power is OFF, locate the circuit breaker on the panel
board that services the DC circuit, switch the circuit breaker to the OFF position, and
tape the switch handle of the circuit breaker in the OFF position.
Step 2 Use a no. 2 Phillips screwdriver to remove either of the following:
• 1 mounting screw from the power supply on the right side of the Cisco 3620 router rear panel
• 2 mounting screws from the power supply on the right side of the Cisco 3640 router rear panel
Figure 4 and Figure 5 show Cisco 3620 DC and AC power supplies; Figure 6 and Figure 7 show
Cisco 3640 DC and AC power supplies. The DC and AC power supplies for these router models differ
in appearance, but the number and position of the mounting screws are the same for each platform.
78-11640-01
Installing the Grounding Lug on Cisco 2600 Series and Cisco 3600 Series Routers
5
Page 6

Installing the Grounding Lug on a Cisco 3620 or Cisco 3640 Router
15853
supply
12961
P
s
Figure 4 Cisco 3620 DC Power Supply Mounting Screw
Mounting
Power
Figure 5 Cisco 3620 AC Power Supply Mounting Screw
Mounting screw
Power
Figure 6 Cisco 3640 DC Power Supply Mounting Screws
Mounting
screws
ower
upply
Installing the Grounding Lug on Cisco 2600 Series and Cisco 3600 Series Routers
6
5858
78-11640-01
Page 7

Installing the Grounding Lug on a Cisco 3620 or Cisco 3640 Router
P
s
15849
et
Figure 7 Cisco 3640 AC Power Supply Mounting Screws
Mounting
screws
ower
upply
Step 3
Attach the bracket over the power supply using the screw(s) that you removed in Step 2. (See Figure 8
and Figure 9.)
Figure 8 Attaching the Bracket over the Cisco 3620 Power Supply
Power
supply
Bracket
Figure 9 Attaching the Bracket over the Cisco 3640 Power Supply
Mounting
screws
Brack
ower
Step 4
upply
Strip one end of the 6-AWG wire to expose approximately 0.75 in. (20 mm).
15846
Step 5 Crimp the grounding lug around t he wire. (See Figure 10.)
Installing the Grounding Lug on Cisco 2600 Series and Cisco 3600 Series Routers
78-11640-01
7
Page 8

Installing the Grounding Lug on a Cisco 3620 or Cisco 3640 Router
10360
15850
Figure 10 Crimping the Lug Around the Wire
Step 6
Use the no. 2 Phillips screwdriver to fasten the grounding lug to the bracket on Cisco 3620 and Cisco
3640 routers. (See Figure 11, Figure 12, and Figure 13.)
Note If your Cisco 3620 router is connected to an redundant power supply (RPS) unit, fasten
the grounding lug to its bracket diagonally as shown in Figure 12. This modified
installation allows clearance for the RPS cable.
Figure 11 Grounding Lug Fastened to Bracket on Cisco 3620 Power Supply
Power
supply
Bracket
Ground lug mounted
on a Cisco 3620 router
without Cisco RPS
Installing the Grounding Lug on Cisco 2600 Series and Cisco 3600 Series Routers
8
78-11640-01
Page 9

Installing the Grounding Lug on a Cisco 3620 or Cisco 3640 Router
15851
15847
P
s
Figure 12 Grounding Lug Fastened to Bracket on Cisco 3620 Power Supply with RPS
DC INPUT FOR USE WITH CISCO RPS
+5V–– –14A, +12V– – –5A, -12V– – –3A
Power
Ground lug
mounted on a
Cisco 3620 router
with Cisco RPS
Bracket
Figure 13 Grounding Lug Fastened to Bracket on Cisco 3640 Power Supply
supply
Ground lug
ower
upply
Step 7
Connect the other end of the grounding lug wire to a grounding point at your site.
Step 8 If you have a Cisco 3620 router, apply the “Disconnect All Connections Before Opening the Cover”
label to the upper part of the power supply. (See Figure 14.)
If you have a Cisco 3640 router, apply the “Disconnect All Connections Before Opening the Cover”
label to the upper part of the power supply, and apply the supplied voltage rating label for your power
supply to the lower part of the bracket. (See Figure 15.)
78-11640-01
Installing the Grounding Lug on Cisco 2600 Series and Cisco 3600 Series Routers
9
Page 10

Installing the Grounding Lug on a Cisco 3620 or Cisco 3640 Router
15852
P
s
Figure 14 Cisco 3620 Power Supply Label
CONNECTIONS BEFORE
OPENING THE COVER
Bracket
Ground lug
DISCONNECT ALL
DISCONNECT ALL
CONNECTIONS BEFORE
OPENING THE COVER
Power
supply
Figure 15 Cisco 3640 Power Supply Labels
Ground lug
DISCONNECT ALL
CONNECTIONS BEFORE
OPENING THE COVER
ower
CISCO 3640-DC
INPUT (-48) - (-60)V 5A 200W
15848
Step 9
upply
Reinstall network cables, and turn ON power to the router.
Caution NEBS/ETSI Intrabuilding Lightning Requirement
This equipment is suitable for connection to intrab uilding or none xposed wiring or cabling
only. This cabling must be shielded.
Installing the Grounding Lug on Cisco 2600 Series and Cisco 3600 Series Routers
10
78-11640-01
Page 11

Installing the Grounding Lug on a Cisco 3660 Router
The following warning applies to routers that use a DC power supply:
Warning
After wiring the DC power supply, remove the tape from the circuit breaker switch
handle and reinstate power by moving the handle of the circuit breaker to the ON
position.
Installing the Grounding Lug on a Cisco 3660 Router
To attach the grounding lug to your router chassis, complete the following tasks:
Step 1 Turn OFF power to the router. However, to channel ESD voltages to ground, do not unplug the power
cable. Remove all network interface cables, including telephone cables, from the rear panel.
The following warning applies to routers that use a DC power supply:
Warning
Step 2 Strip one end of the 6-AWG wire to expose approximately 0.75 in. (20 mm).
Step 3 Crimp the grounding lug around t he wire. (See Figure 16.)
Before performing any of the following procedures, ensure that power is removed from
the DC circuit. To ensure that all power is OFF, locate the circuit breaker on the panel
board that services the DC circuit, switch the circuit breaker to the OFF position, and
tape the switch handle of the circuit breaker in the OFF position.
Step 4
Figure 16 Crimping the Lug Around the Wire
0360
Use the no. 2 Phillips screwdriver to fasten the grounding lug to the Cisco 3660 router chassis. (See
Figure 17.)
78-11640-01
Installing the Grounding Lug on Cisco 2600 Series and Cisco 3600 Series Routers
11
Page 12

Installing the Grounding Lug on a Cisco 3660 Router
ETH 0
ETH 3
ETHERNET
4E
ETH 2
ETH 1
12
3
ACT
LINK
0
CN/LP
RXC
SERIAL 3
SERIAL 2
SERIAL 1 SERIAL 0
RXD
TXC
TXD
CN/LP
RXC
RXD
TXC
TXD
CN/LP RXC
RXD
TXC
TXD
CN/LP RXC
RXD
TXC
TXD
EN
SERIAL
4T
VOICE
2V
V0
V1
EN
HIGH SPEED SERIAL
1HSSI
HS
TD
TC
RD
RC
LB/CN
Figure 17 Grounding Lug Fastened to Cisco 3660 Chassis
VCC OK
SYSTEM
FDX
LINK
100Mbps
VIC
FXS
IN USE
1
SEE MANUAL BEFORE INSTALLATION
FDX
LINK
100Mbps
IN USE
0
1
0
22659
Ground lug
Step 5
Connect the other end of the grounding lug wire to a grounding point at your site.
Caution NEBS/ETSI Intrabuilding Lightning Requirement
This equipment is suitable for connection to intrab uilding or none xposed wiring or cabling
only. This cabling must be shielded.
Step 6 Turn ON power to the router.
The following warning applies to routers that use a DC power supply:
Warning
After wiring the DC power supply, remove the tape from the circuit breaker switch
handle and reinstate power by moving the handle of the circuit breaker to the ON
position.
12
Installing the Grounding Lug on Cisco 2600 Series and Cisco 3600 Series Routers
78-11640-01
Page 13

For More Information
For moreinformation about Cisco 2600 series routers, Cisco 3600 series routers, and associated network
modules and WAN interface cards, refer to the following documents:
• Cisco 2600 Series Hardware Installation Guide
• Cisco 3600 Series Hardware Installation Guide
• Cisco Network Module Hardware Installation Guide
For technical assistance, contact the Technical Assistance Center. In North America, TAC can be
reached at 800 553-2447 or 408 526-7209. For other telephone numbers and TAC e-mail addresses
worldwide, consult the following web site:
http://www.cisco.com/warp/public/687/Directory/DirTAC.shtml.
Access Registrar, AccessPath, Are You Ready, ATM Director, Browse with Me, CCDA, CCDE, CCDP, CCIE, CCN A, CCNP, CCSI, CD-PAC,
CiscoLink, the Cisco NetWorks logo, Cisco Powered Network logo, Cisco Systems Networking Academy, Fast Step, FireRunner, Follow Me
Browsing, FormShare, GigaStack, IGX, Intelligence in the Optical Core, Internet Quotient, IP/VC, iQ Breakthrough, iQ Expertise, iQ FastTrack,
iQ Logo, iQ Readiness Scorecard, Kernel Proxy, MGX, Natural Network Viewer, Network Registrar, the Networkers logo, Packet, PIX, Point and
Click Internetworking, Policy Builder, RateMUX, ReyMaster, ReyView, ScriptShare, Secure Script, Shop with Me, SlideCast, SMARTnet, SVX,
TrafficDirector, TransPath, VlanDirector, Voice LAN, Wavelength Router, WebViewer, Workgroup Director, and Workgroup Stack are trademarks
of Cisco Systems, Inc.; Changing the W ay We Work , Liv e, Play , an d Learn, Empowering the Internet Generation, are service marks of C is co
Systems, Inc.; and Aironet, ASIST, BPX, C atalys t, Cis co, th e Cis co Ce rtified Internet work E xpert Logo, Cisco IOS, t he Cis co IOS logo, Cisco
Press, Cisco Systems, Cisco Systems Capital, the Cisco Systems logo, Collision Free, Enterprise/Solver, EtherChannel, EtherSwitch, FastHub,
FastLink, FastPAD, IOS, IP/TV, IPX, Li ghtStream, LightSwitc h, MICA, NetRanger, Post -Routing, Pre-Routing, Registrar, StrataView Plus, Stratm,
SwitchProbe, TeleRouter, and VCO are registered trademarks of Cisco Systems, Inc. or it s affiliates in the U.S. and certain other countries.
All other brands, names, or trademarks mentioned in this document or Web site are the property of their respective owners. The use of the word
partner does not imply a partnership relationship between Cisco and any other company. (0010R)
Copyright © 2000 Cisco Systems, Inc.
All rights reserved.
For More Information
78-11640-01
Installing the Grounding Lug on Cisco 2600 Series and Cisco 3600 Series Routers
13
Page 14

For More Information
14
Installing the Grounding Lug on Cisco 2600 Series and Cisco 3600 Series Routers
78-11640-01
 Loading...