

Page 1

REVIEW DRAFT—CISCO CONFIDENTIAL
Cisco Aironet 600 Series OfficeExtend Access
Point User Guide
The Cisco Aironet 600 Series OfficeExtend Access Point User Guide includes the following
information:
• Unpacking the Cisco Aironet 600 Series OfficeExtend Access Point
• Cisco Aironet 600 Series OfficeExtend Access Point Overview
• Installation Guidelines
• Cisco Aironet 600 Series OfficeExtend Access Point Radio Frequency Coverage
• Understanding Cisco Aironet 600 Series OfficeExtend Access Point LEDs
• Configuring a Personal SSID on a Cisco Aironet 600 Series OfficeExtend Access Point
• Configuring a Primary IP Address on a Cisco Aironet 600 Series OfficeExtend Access Point
• Viewing the Event Log
• Accessing Online Help
• Troubleshooting
• Cisco Aironet 600 Series OfficeExtend Access Point Local Customer Interface
• Declarations of Conformity and Regulatory Information
Unpacking the Cisco Aironet 600 Series OfficeExtend Access
Point
Each Cisco Aironet 600 Series OfficeExtend Access Point package contains the following items:
• Cisco Aironet 600 Series OfficeExtend Access Point
• Ethernet Cable
• Cisco Aironet AP600 Series Power Module (universal power supply)
• Quick reference guide
• Cisco product registration and Cisco documentation feedback cards
Americas Headquarters:
Cisco Systems, Inc., 170 West Tasman Drive, San Jose, CA 95134-1706 USA
Page 2
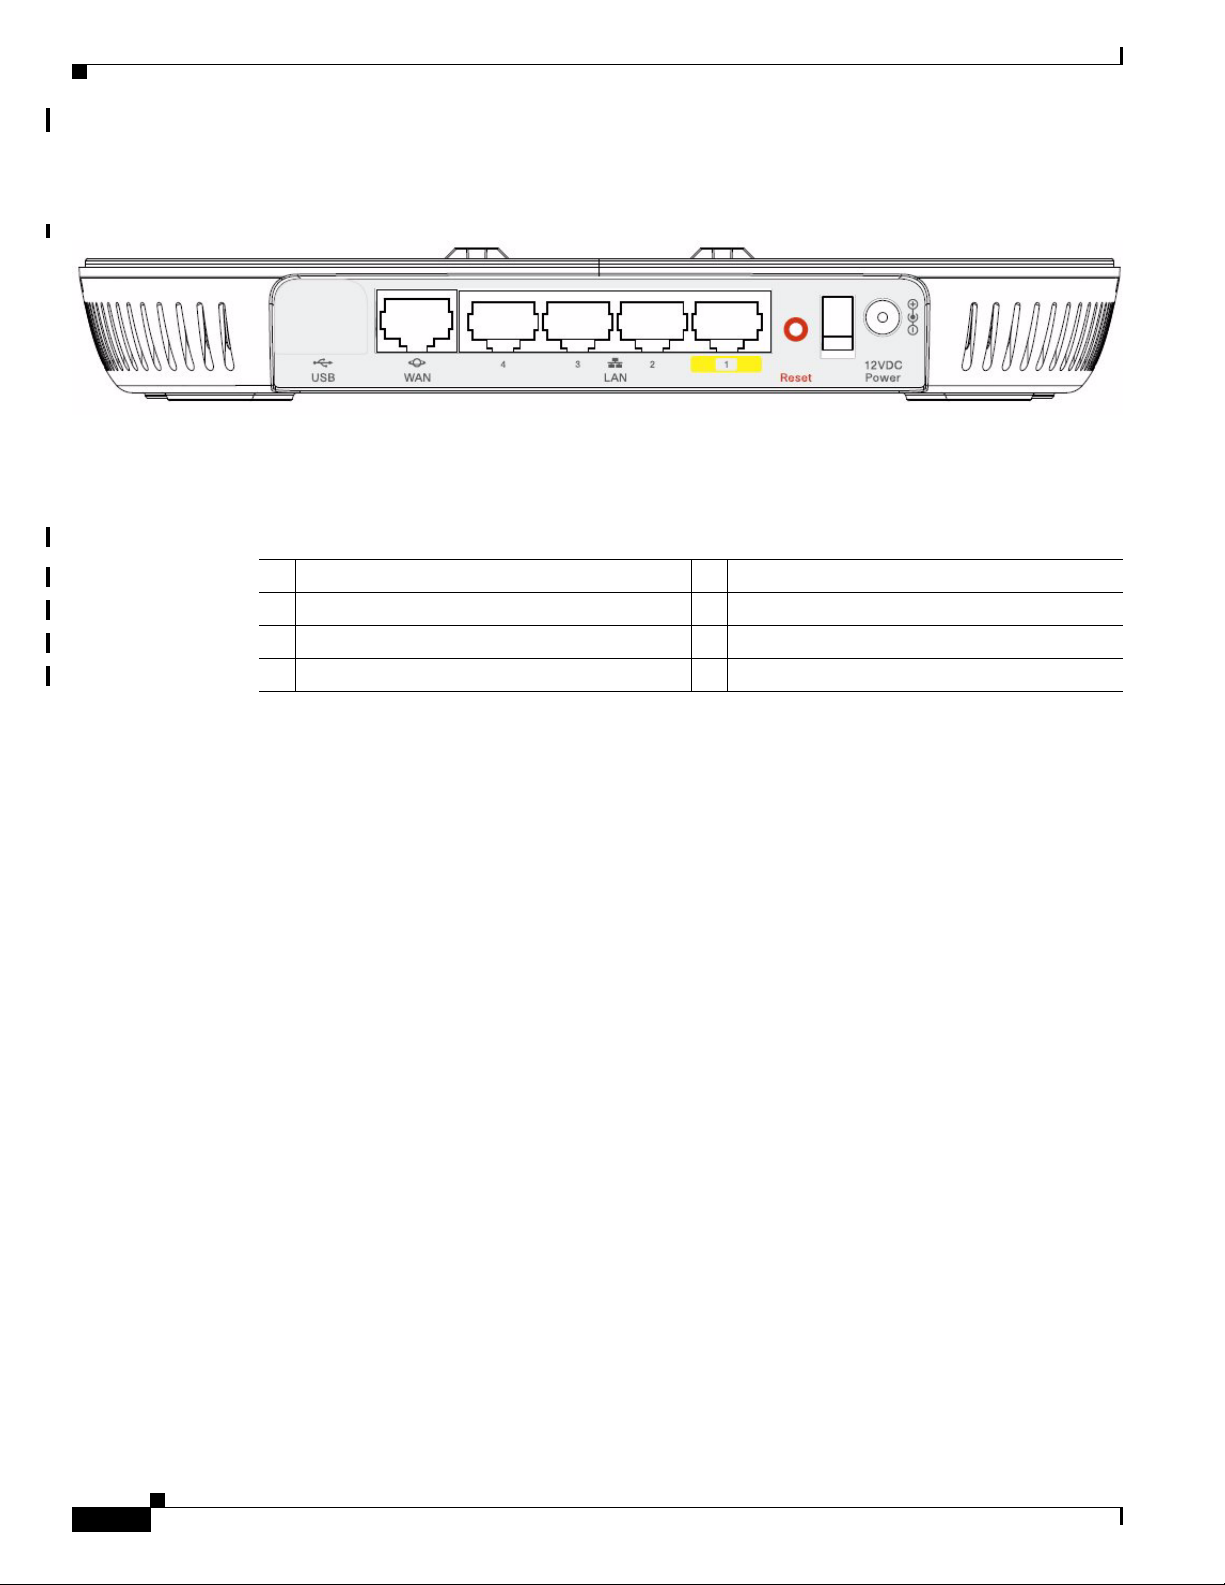
Cisco Aironet 600 Series OfficeExtend Access Point Overview
REVIEW DRAFT—CISCO CONFIDENTIAL
Cisco Aironet 600 Series OfficeExtend Access Point Overview
1 Power Connector 5 Ethernet [E] LEDs 1 through 4
2 Ethernet Ports 1 through 4 6 Status LED
3 WA N P o r t 7 Power Indicator LED
4 Power Toggle Switch 8
Cisco Aironet 600 Series OfficeExtend Access Point User Guide
2
Page 3
REVIEW DRAFT—CISCO CONFIDENTIAL
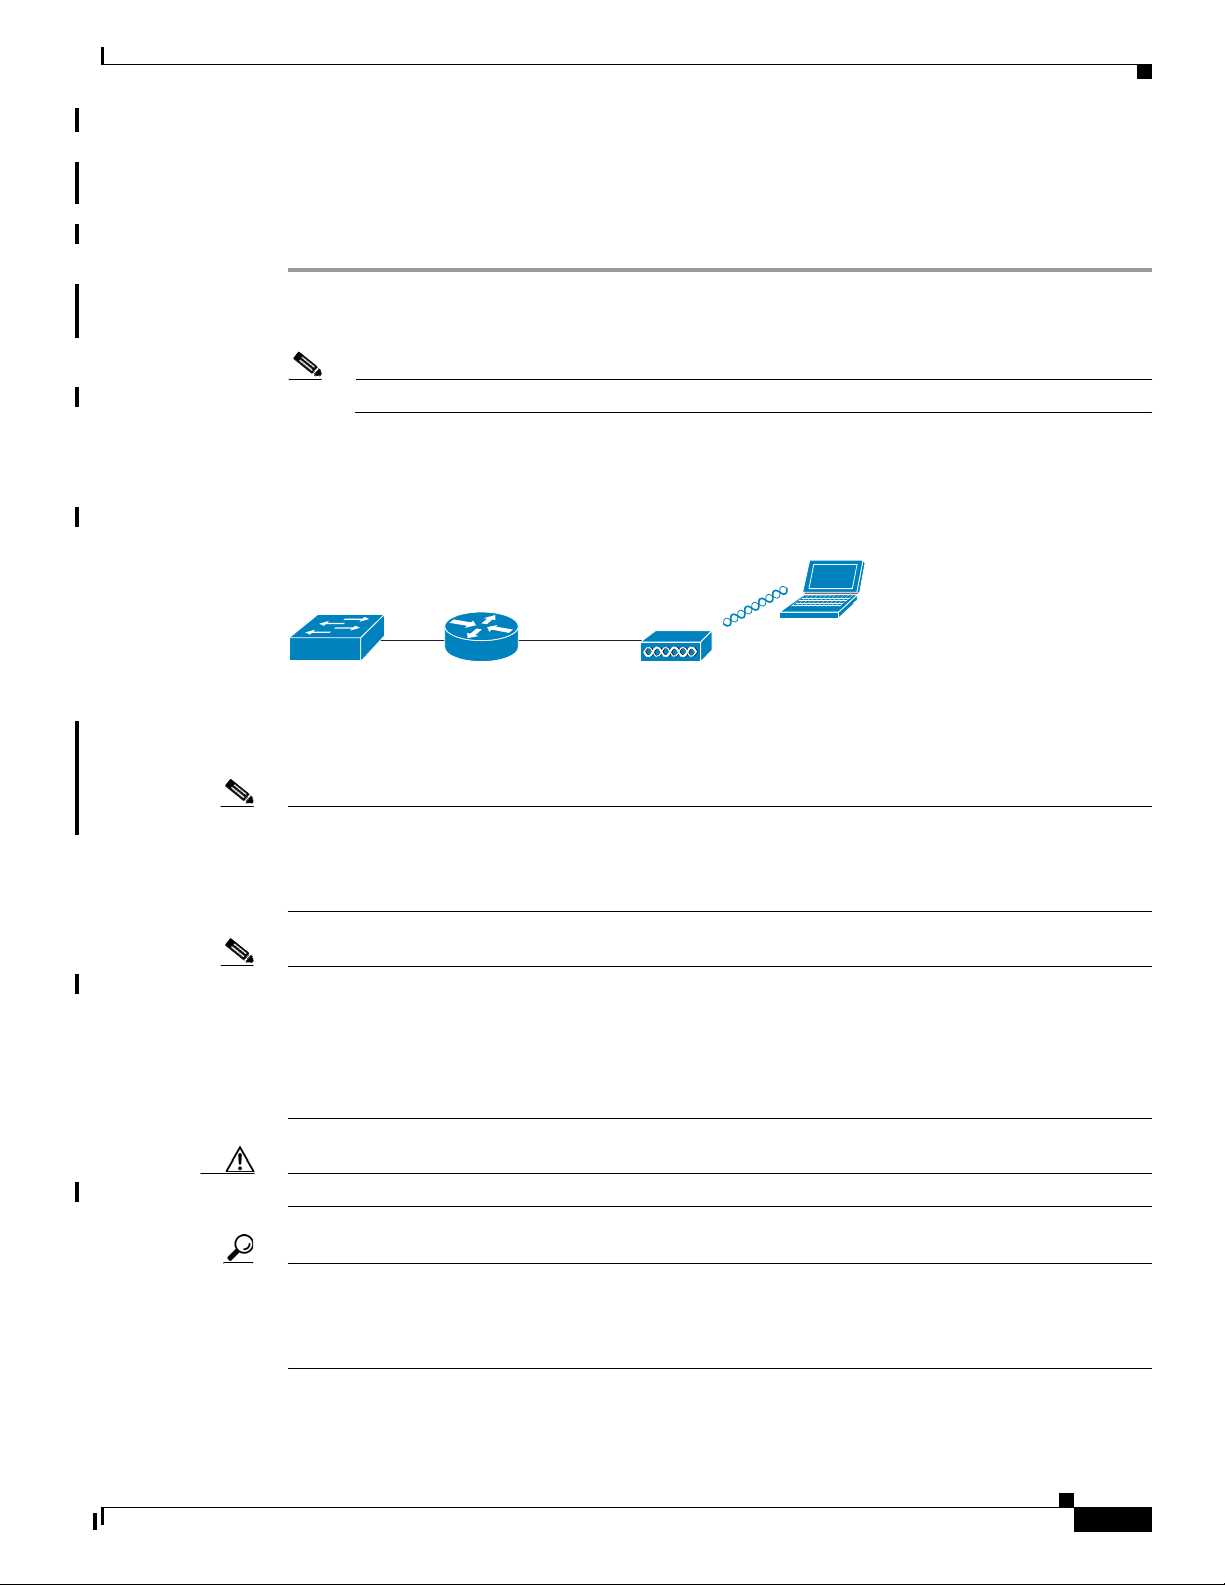
DSL/Cable
Modem
Router OfficeExtended
AP
Client
275941
Installation Guidelines
To install the Cisco Aironet 600 Series OfficeExtend Access Point, follow these steps:
Step 1 Plug the Ethernet cable into the Ethernet port.
Step 2 Insert the other end of the Ethernet cable into an Ethernet port 1, 2, or 3 of your router.
Note Ethernet port 4 should not be used.
Step 3 Plug the power cord into the power connector.
Step 4 Plug the power cord into your power source.
Step 5 Press the power toggle switch to the on position.
Installation Guidelines
Step 6 Use the 600 Series OfficeExtend Access Point LED table below (Tab le 1) to better understand the Status
LED and the Ethernet LEDs located on the top panel of the access point.
Note The first time you connect the 600 Series OfficeExtend Access Point, the process may take anywhere
between 2 and 15 minutes due to an image download. If more than 10 access points are joining, the
process could take as long as 60 minutes. When associated, your access point Status LED on the top
panel displays a solid blue.
Note You do not need to configure any SSIDs for your 600 Series OfficeExtend Access Point to connect to
your company’s network. The access point receives the company’s SSID when it connects to the
company network by way of the Internet. If you have any problems connecting to your company’s
network, contact your IT administrator.
You can configure your local SSID WLAN for other devices. See “Configuring a Personal SSID on a
Cisco Aironet 600 Series OfficeExtend Access Point” for more information.
Caution Be careful when handling the 600 Series OfficeExtend Access Point. The bottom may be HOT.
Tip To manage the heat generated from the access point, maintain air flow between the metal plate of the
access point and the surface on which it is placed.
A laptop cooling pad (such as ones containing gel or cooling crystals) is a possible option for an access
point placed on a flat surface. Another option for managing the heat is to hang the access point on a wall.
Cisco Aironet 600 Series OfficeExtend Access Point User Guide
3
Page 4

Cisco Aironet 600 Series OfficeExtend Access Point Radio Frequency Coverage
REVIEW DRAFT—CISCO CONFIDENTIAL
Note Cisco Aironet 600 Series OfficeExtend access points are designed to work behind a router or other
gateway device that is using network address translation (NAT). NAT allows a device, such as a router,
to act as an agent between the Internet (public) and a personal network (private), thereby enabling an
entire group of computers to be represented by a single IP address. In controller software release 6.0,
only one Cisco Aironet 600 Series OfficeExtend access point can be deployed behind a single NAT
device.
Cisco Aironet 600 Series OfficeExtend Access Point Radio
Frequency Coverage
To ensure the best RF coverage for your access point, keep the following in mind:
• Position the access point lower than or with the LED side facing your devices.
Note Most of the coverage area is located towards the LED side of the access point.
• If the access point is in close proximity and above your device, the signal may become skewed.
Understanding Cisco Aironet 600 Series OfficeExtend Access Point LEDs
You can use the Status LED on the top panel or the Ethernet LED in the cable bay area to assess the unit
status. The table below displays LED status indications for AP600s (
Ta b l e 1 LED Status Indications for AP600
Status LED
(Top of Unit)
Off Off Normal bootloader operation.
Off Off Linux start. Evora/CAPWAP start.
Flashing On if a local client is
On if CAPWAP is
connected
On Flashing Software Upgrade.
Flashing Flashing out of sequence
Flashing Flashing in sequence
Ethernet LED
(Cable Bay Area) Description
CAPWAP Discovery Join in process.
associated. Otherwise,
off.
On if a client is
associated
from Status LED (LED 1
on, LED 2 off, LED 1 off,
LED2 of)
with Status LED
Association Status.
No IP Address/Ethernet is not up.
Bootloader warnings.
Table 1).
Cisco Aironet 600 Series OfficeExtend Access Point User Guide
4
Page 5

Configuring a Personal SSID on a Cisco Aironet 600 Series OfficeExtend Access Point
REVIEW DRAFT—CISCO CONFIDENTIAL
Configuring a Personal SSID on a Cisco Aironet 600 Series
OfficeExtend Access Point
Follow these steps to log into the GUI of the 600 Series OfficeExtend access point and configure a
personal SSID:
Step 1 Obtain the IP address of your 600 Series OfficeExtend access point from your company’s IT
professional.
Note The default IP address is 10.0.0.1.
Step 2 With the 600 Series OfficeExtend access point connected to your home router, enter the IP address of
the 600 Series OfficeExtend access point in the Address field of your Internet browser
(http:://<ap-ipaddress>) and click Go.
Note Make sure you are not connected to your company’s network using a virtual private network
(VPN) connection.
Step 3 When prompted, enter the username and password to log into the access point.
Note The default username and password are admin and admin.
Step 4 On the 600 Series OfficeExtend Access Point Welcome page, click Enter. The 600 Series Office Extend
Access Point Home page appears (see
Figure 1).
Cisco Aironet 600 Series OfficeExtend Access Point User Guide
5
Page 6

Configuring a Personal SSID on a Cisco Aironet 600 Series OfficeExtend Access Point
REVIEW DRAFT—CISCO CONFIDENTIAL
Figure 1 Cisco Aironet 600 Series OfficeExtend Access Point Home Page
This page shows the access point name, IP address, AP mode, controller name, MAC address, AP
uptime, and software version.
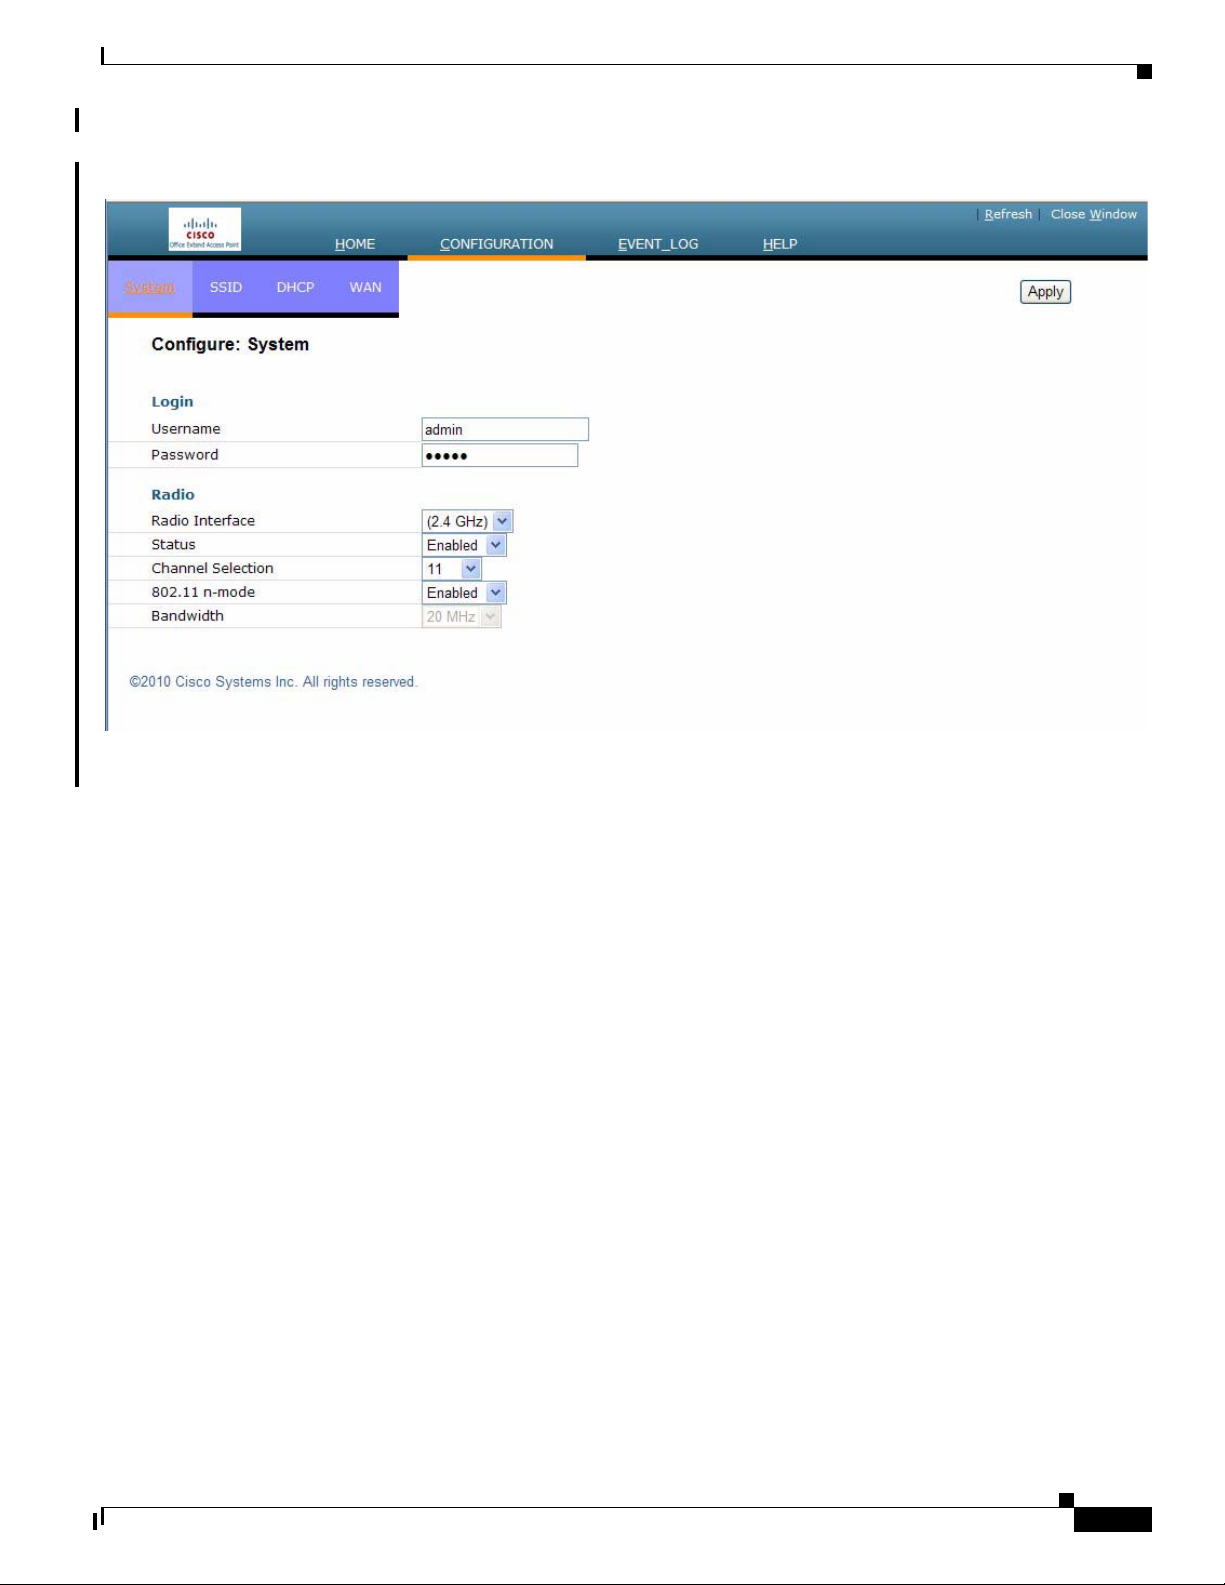
Step 5 Click Configuration to open the Configuration System page (see Figure 3).
The Configuration System displays general system information, such as username and password for the
access point and radio interface information
Cisco Aironet 600 Series OfficeExtend Access Point User Guide
6
Page 7
Configuring a Personal SSID on a Cisco Aironet 600 Series OfficeExtend Access Point
REVIEW DRAFT—CISCO CONFIDENTIAL
Figure 2 Cisco Aironet 600 Series OfficeExtend Access Point Configuration System Page
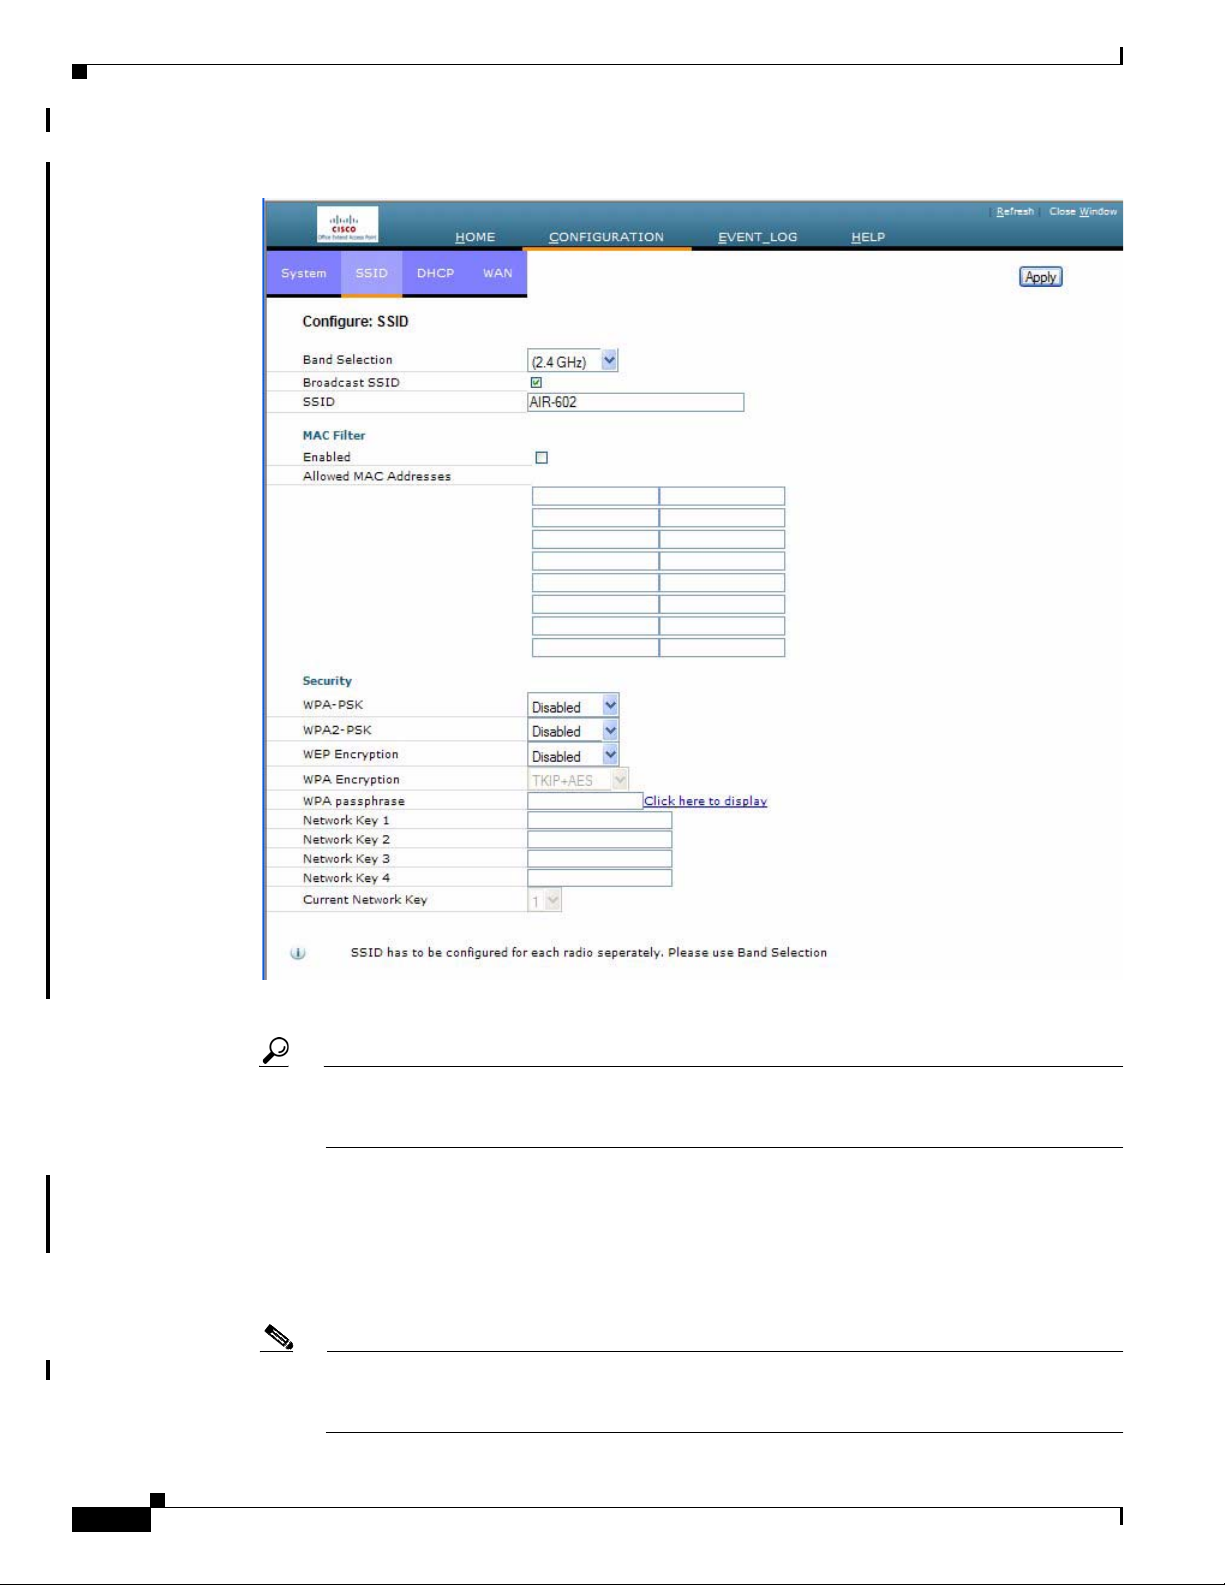
Step 6 Click the SSID tab to open the Configuration SSID page (Figure 3).
Step 7 Check the Broadcast SSID check box to enable this wireless connection. The default value is disabled.
Cisco Aironet 600 Series OfficeExtend Access Point User Guide
7
Page 8
Configuring a Personal SSID on a Cisco Aironet 600 Series OfficeExtend Access Point
REVIEW DRAFT—CISCO CONFIDENTIAL
Figure 3 Cisco Aironet 600 Series OfficeExtend Access Point Configuration SSID Page
Step 8 In the SSID field, enter the personal SSID that you want to assign to this access point. This SSID will
be locally switched.
Tip Your personal SSID WLAN and your company SSID WLAN are different. When you configure
your personal WLAN, use an SSID name that is different from your company’s SSID to help
avoid confusion.
Step 9 From the Security drop-down boxes, enable either WPA, WPA2, WPA+WPA2, or WEP to set the
security type to be used by this access point.
Step 10 If you chose WPA2/PSK (AES) in Step 9, enter an 8- to 38-character WPA2 passphrase in the Secret
field. If you chose 104 bit WEP, enter a 13-character ASCII key in the Key field.
Step 11 Click Apply to commit your changes.
Note If you ever want to use the Cisco Aironet 600 Series OfficeExtend access point for another
application, you can clear this configuration and return the access point to factory default
settings by clicking Clear Config.
Cisco Aironet 600 Series OfficeExtend Access Point User Guide
8
Page 9

Configuring a Primary IP Address on a Cisco Aironet 600 Series OfficeExtend Access Point
REVIEW DRAFT—CISCO CONFIDENTIAL
Configuring a Primary IP Address on a Cisco Aironet 600 Series
OfficeExtend Access Point
Follow these steps to configure a primary IP address on your Cisco Aironet 600 Series OfficeExtend
access point.
Step 1 Click the WA N tab to open the Configuration SSID page (Figure 3).
Figure 4 Cisco Aironet 600 Series OfficeExtend Access Point Configuration WAN Page
Step 2 Obtain the IP address of your primary controller from your company’s IT professional.
Step 3 Enter the IP address of the primary controller in the Primary Controller field.
Step 4 Leave the Static IP check box unchecked to allow the WAN IP address to be assigned by DHCP.
Step 5 Click Apply to commit your changes.
Viewing the Event Log
Select Event Log to view the ongoing list of event logs for this access point (Figure 5).
Cisco Aironet 600 Series OfficeExtend Access Point User Guide
9
Page 10

Accessing Online Help
REVIEW DRAFT—CISCO CONFIDENTIAL
Figure 5 Cisco Aironet 600 Series OfficeExtend Access Point Event Log Window
Accessing Online Help
Click Help to access the current Cisco Aironet 600 Series OfficeExtend Access Point online help.
Cisco Aironet 600 Series OfficeExtend Access Point User Guide
10
Page 11

REVIEW DRAFT—CISCO CONFIDENTIAL
Troubleshooting
Problem LED Status Reasons Possible Solution
Access point Status
LED is stuck in amber.
Access point Status
LED is light green but
clients are unable to
associate.
The access point
suddenly stopped
working.
Access point is quickly
blinking white.
Access point’s LED
returns to amber.
The access point signal
is low.
Access point has not
joined the controller and
the access point did not
get an IP address or the
firewall/NAT is
blocking control traffic.
Access point has joined
the controller but the
firewall/NAT is
blocking control traffic.
Some ISP change public
IP address frequently.
Client is unable to
associate.
Access point keeps
dropping off from
controller.
The access point may
not be in the optimal
position in relation to
your device(s). If the
access point is in close
proximity and above
your device, the signal
may become skewed.
Troubleshooting
Restart your modem,
followed by your router
(sometimes the order is
important).
Configure the firewall
correctly.
Restart your modem,
followed by your router
(sometimes the order is
important).
Configure the firewall
correctly.
Restart your home
router followed by your
600 Series
OfficeExtend Access
Point.
Reboot the SOHO
router followed by a
reboot of the access
point.
Check your internet
connection.
Position the access
point lower than or with
the LED side facing
your devices.
Cisco Aironet 600 Series OfficeExtend Access Point Local Customer Interface
The Cisco Aironet 600 Series OfficeExtend access point console supports the following configuration
items:
• Local SSID
–
SSID Name
Cisco Aironet 600 Series OfficeExtend Access Point User Guide
11
Page 12

Cisco Aironet 600 Series OfficeExtend Access Point Local Customer Interface
REVIEW DRAFT—CISCO CONFIDENTIAL
–
MAC Filtering
–
Security type: None, WEP, WPA, WPA2, with Controller Override to require WPA/WPA2
–
SSID Broadcast/Hidden
• Bands supported (2.4Ghz (B/G/N 20/40), 5Ghz (A/N 20/40), All)
• Selection of either manual or automatic channel selection per band
• Configuration of optional local DHCP Server
–
Local IP address
–
Subnet address and mask
–
Range of addresses that may be allocated
• Ability to set the IP Address of the initial controller to which to connect
• Use of DHCP or static address for the uplink port (local IP address, netmask, and default router)
• View into logged errors, and ability to clear the log
In the instance of the Local SSID, the system must recognize when allowing security to be disabled is
not allowed. Mechanism TBS.
In addition, the web should allow for a password to be added and operate only over https.
AP GUI
The following sections provide the screens associated with the configuration.
AP GUI has four major sections:
• HOME - This page shows general information about the AP settings and a summary of the statistics.
• CONFIGURATION - This page is a multi-tab page which allows the user to configure different
options like personal SSID, local DHCP server, etc.
• EVENT LOG - This page provides the user the ability to view the logged errors and ability to clear
the log.
• HELP - This displays help for the pages listed above, especially the configuration page.
The rest of this section shows the appearance of each page/tab.
12
Cisco Aironet 600 Series OfficeExtend Access Point User Guide
Page 13

Login Screen
Cisco Aironet 600 Series OfficeExtend Access Point Local Customer Interface
REVIEW DRAFT—CISCO CONFIDENTIAL
Figure 6 Login Screen
Cisco Aironet 600 Series OfficeExtend Access Point User Guide
13
Page 14

Cisco Aironet 600 Series OfficeExtend Access Point Local Customer Interface
REVIEW DRAFT—CISCO CONFIDENTIAL
Home Page
The Home page will appear as shown in Figure 7:
Figure 7Home Page
14
Cisco Aironet 600 Series OfficeExtend Access Point User Guide
Page 15

REVIEW DRAFT—CISCO CONFIDENTIAL
Configuration Page
The Configuration page has multiple tabs to allow the user to configure different options.
Wherever applicable, default values will be shown.
The main options that can be configured on this page are:
• System
• SSID
• Local DHCP Server
• Wireless Access Network (WAN)
Shown below are illustrations of each of the tabs. Please note that the configuration fields/options shown
are not final and may need some rework.
System Tab
Figure 8System Tab
Cisco Aironet 600 Series OfficeExtend Access Point Local Customer Interface
Cisco Aironet 600 Series OfficeExtend Access Point User Guide
15
Page 16

Cisco Aironet 600 Series OfficeExtend Access Point Local Customer Interface
REVIEW DRAFT—CISCO CONFIDENTIAL
SSID Tab
Figure 9 SSID Tab
16
Cisco Aironet 600 Series OfficeExtend Access Point User Guide
Page 17

DHCP Tab
Cisco Aironet 600 Series OfficeExtend Access Point Local Customer Interface
REVIEW DRAFT—CISCO CONFIDENTIAL
Figure 10 DHCP Tab
Cisco Aironet 600 Series OfficeExtend Access Point User Guide
17
Page 18

Cisco Aironet 600 Series OfficeExtend Access Point Local Customer Interface
REVIEW DRAFT—CISCO CONFIDENTIAL
WAN Tab
Figure 11 WAN Tab
18
Cisco Aironet 600 Series OfficeExtend Access Point User Guide
Page 19

REVIEW DRAFT—CISCO CONFIDENTIAL
Event Log Page
This page displays all logged events and has a button to clear the log. The Event Log page is shown
below:
Figure 12 Event Log Page
Cisco Aironet 600 Series OfficeExtend Access Point Local Customer Interface
Cisco Aironet 600 Series OfficeExtend Access Point User Guide
19
Page 20

Cisco Aironet 600 Series OfficeExtend Access Point Local Customer Interface
REVIEW DRAFT—CISCO CONFIDENTIAL
Help Page
The Help page provides detailed information about the other pages, especially Configuration.
Figure 13 Help Page
20
Cisco Aironet 600 Series OfficeExtend Access Point User Guide
Page 21

Declarations of Conformity and Regulatory Information
Tested To Comply
With FCC Standards
FOR HOME OR OFFICE USE
REVIEW DRAFT—CISCO CONFIDENTIAL
Declarations of Conformity and Regulatory Information
This section provides declarations of conformity and regulatory information for the Cisco Aironet 600
Series OfficeExtend Access Point.
This section contains the following subsections:
• Manufacturers Federal Communication Commission Declaration of Conformity Statement, page 21
• Industry Canada, page 23
• European Community, Switzerland, Norway, Iceland, and Liechtenstein, page 23
• Declaration of Conformity for RF Exposure, page 26
• Declaration of Conformity Statements, page 26
Manufacturers Federal Communication Commission Declaration of Conformity Statement
Access Point Model:
AIR-OEAP602I-A-K9
FCC Certification number:
LDK102077
Manufacturer:
Cisco Systems, Inc.
170 West Tasman Drive
San Jose, CA 95134-1706
USA
This device complies with Part 15 rules. Operation is subject to the following two conditions:
1. This device may not cause harmful interference, and
2. This device must accept any interference received, including interference that may cause undesired
operation.
This equipment has been tested and found to comply with the limits of a Class B digital device, pursuant
to Part 15 of the FCC Rules. These limits are designed to provide reasonable protection against harmful
interference when the equipment is operated in a residential environment. This equipment generates,
uses, and radiates radio frequency energy, and if not installed and used in accordance with the
instructions, may cause harmful interference. However, there is no guarantee that interference will not
occur. If this equipment does cause interference to radio or television reception, which can be determined
by turning the equipment off and on, the user is encouraged to correct the interference by one of the
following measures:
Cisco Aironet 600 Series OfficeExtend Access Point User Guide
21
Page 22

Declarations of Conformity and Regulatory Information
REVIEW DRAFT—CISCO CONFIDENTIAL
• Reorient or relocate the receiving antenna.
• Increase separation between the equipment and receiver.
• Connect the equipment to an outlet on a circuit different from which the receiver is connected.
• Consult the dealer or an experienced radio/TV technician.
Caution The Part 15 radio device operates on a non-interference basis with other devices operating at this
frequency when using the integrated antennas. Any changes or modification to the product not expressly
approved by Cisco could void the user’s authority to operate this device.
Caution Within the 5.15 to 5.25 GHz band (5 GHz radio channels 34 to 48) the U-NII devices are restricted to
indoor operations to reduce any potential for harmful interference to co-channel Mobile Satellite System
(MSS) operations.
22
Cisco Aironet 600 Series OfficeExtend Access Point User Guide
Page 23

REVIEW DRAFT—CISCO CONFIDENTIAL
Industry Canada
Model:
AIR-OEAP602I-A-K9
Certification number:
2461B-102077
Canadian Compliance Statement
This Class B Digital apparatus meets all the requirements of the Canadian Interference-Causing
Equipment Regulations.
Cet appareil numerique de la classe B respecte les exigences du Reglement sur le material broilleur du
Canada.
This device complies with Class B Limits of Industry Canada. Operation is subject to the following two
conditions:
1. This device may not cause harmful interference, and
2. This device must accept any interference received, including interference that may cause undesired
operation.
Cisco Aironet 2.4-GHz Access Points are certified to the requirements of RSS-210 for 2.4-GHz spread
spectrum devices, and Cisco Aironet 54-Mbps, 5-GHz Access Points are certified to the requirements of
RSS-210 for 5-GHz spread spectrum devices.The use of this device in a system operating either partially
or completely outdoors may require the user to obtain a license for the system according to the Canadian
regulations. For further information, contact your local Industry Canada office.
Declarations of Conformity and Regulatory Information
European Community, Switzerland, Norway, Iceland, and Liechtenstein
Access Point Model:
AIR-OEAP602I-E-K9
Cisco Aironet 600 Series OfficeExtend Access Point User Guide
23
Page 24

Declarations of Conformity and Regulatory Information
REVIEW DRAFT—CISCO CONFIDENTIAL
Declaration of Conformity with Regard to the 1999/5/EC (R&TTE Directive)
This declaration is only valid for configurations (combinations of software, firmware, and hardware)
provided and supported by Cisco Systems. The use of software or firmware not provided and supported
by Cisco Systems may result in the equipment no longer being compliant with the regulatory
requirements.
24
Cisco Aironet 600 Series OfficeExtend Access Point User Guide
Page 25

Declarations of Conformity and Regulatory Information
REVIEW DRAFT—CISCO CONFIDENTIAL
This device complies with the EMC requirements (EN 60601-1-2) of the Medical Directive 93/42/EEC.
For 2.4 GHz radios, the following standards were applied:
• Radio: EN 300.328-1, EN 300.328-2
• EMC: EN 301.489-1, EN 301.489-17
• Safety: EN 60950
Note This equipment is intended to be used in all EU and EFTA countries. Outdoor use may be restricted to
certain frequencies and/or may require a license for operation. For more details, contact Cisco Corporate
Compliance.
Cisco Aironet 600 Series OfficeExtend Access Point User Guide
25
Page 26

Declarations of Conformity and Regulatory Information
REVIEW DRAFT—CISCO CONFIDENTIAL
For 54 Mbps, 5 GHz access points, the following standards were applied:
• Radio: EN 301.893
• EMC: EN 301.489-1, EN 301.489-17
• Safety: EN 60950
The following CE mark is affixed to the access point with a 2.4 GHz radio and a 54 Mbps, 5 GHz radio:
Declaration of Conformity for RF Exposure
The radio has been found to be compliant to the requirements set forth in CFR 47 Sections 2.1091, and
15.247 (b) (4) addressing RF Exposure from radio frequency devices as defined in Evaluating
Compliance with FCC Guidelines for Human Exposure to Radio Frequency Electromagnetic Fields. The
equipment shoud be installed more than 20 cm (7.9 in.) from your body or nearby persons.
Declaration of Conformity Statements
All the Declaration of Conformity statements related to this product can be found at the following URL:
http://www.ciscofax.com
26
Cisco Aironet 600 Series OfficeExtend Access Point User Guide
 Loading...