

Page 1
CHICCO AUTO-FIX GR. 0+
0-13Kg
•ISTRUZIONI D’USO
•MODE D’EMPLOI
•BEDIENUNGSANLEITUNG
•INSTRUCTIONS FOR USE
•INSTRUCCIONES DE USO
•INSTRUÇÕES PARA A UTILIZAÇÃO
•GEBRUIKSAANWIJZINGEN
•ΟΔΗΓΙΕΣ ΧΡΗΣΗΣ
•BRUGSANVISNING
•KÄYTTÖOHJEET
•NÁVOD K POUŽITÍ
•BRUKSANVISNING
•ANVÄNDNINGSINSTRUKTIONER
•INSTRUKCJE SPOSOBU
UŻYCIA
•HASZNÁLATI UTASÍTÁS
•UPUTE ZA UPORABU
•ИНСТРУКЦИЯ
•NÁVOD NA POUŽITIE
•NAVODILA ZA UPORABO
•KULLANIM ÖNERILERI
•INSTRUCŢIUNI DE
UTILIZARE
Page 2
A
!
B
C
2
Page 3
D
1
OK
D
NO!
!
2
2 a
3
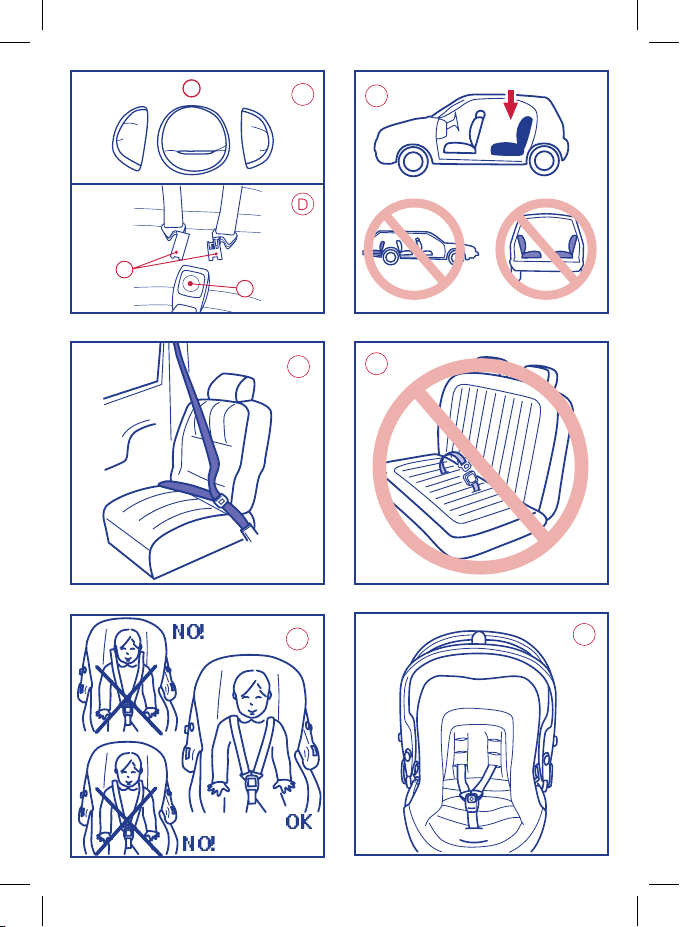
NO! NO!
NO!
4
NO!
OK
3
Page 4
5
6
6 a
7 a 7 b
6 b
CLICK
8
4
Page 5
9
10
C
11 12
13 14
B
A
D
5
Page 6
20 a
20 b
15
17
19
16
CLACK
18
20 a
OK
OK
NO!
6
Page 7
20 b
NO!
22 23
21
24 a
24 b
OK OK
7
Page 8
25
NO!
29 30
26
2827
8
Page 9

I
AUTO-FIX
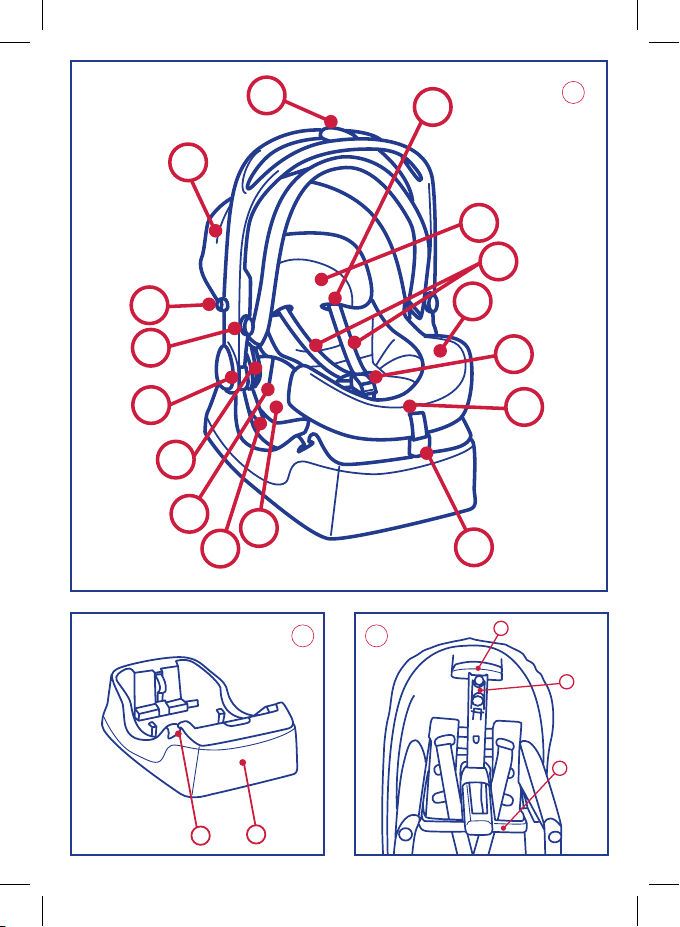
COMPONENTI : (Fig. A, B, C, D)
1. Base
2. Guscio
3. Manico
4. Maniglia di sgancio
5. Fodera
6. Cuscino comfort
7. Capote parasole
8. Innesto capottina parasole
9. Guida della cintura auto diagonale
10. Guide della cintura auto orizzontale sulla
base
10A. Guide della cintura auto orizzontale sul
seggiolino
11. Cintura di regolazione
12. Fibbia delle cinture
13. Linguette della fi bbia
13 A. Pulsante di apertura della fi bbia
14. Pulsante di regolazione delle cinture (sotto
la patella in tessuto)
15. Cinture
16. Imbottiture per le cinture (se previste)
17. Asole di passaggio delle cinture
18. Pulsanti per reclinazione manico
19. Manopola per ag gancio al
passeggino
20. Pulsante di sgancio dal passeggino
21. Barra posizionatrice
22. Fermo stabilizzatore
23. Etichetta di omologazione
24. Etichetta istruzioni montaggio
con e senza base
IMPORTANTISSIMO!
• Leggere attentamente e integralmente il ma-
• Per il montaggio e l’installazione del prodotto
• Conservare questo manuale per utilizzi futuri.
• Secondo le statistiche degli incidenti, il sedile
• ATTENZIONE! GRAVE PERICOLO! Non uti-
DA LEGGERE SUBITO
nuale di istruzioni prima di utilizzare il prodotto.
seguire scrupolosamente le istruzioni. Evitare
che qualcuno utilizzi il prodotto senza aver letto le istruzioni.
auto posteriore è più sicuro di quello anteriore,
quindi da preferire per l’installazione del seggiolino.
lizzare mai questo seggiolino su un sedile anteriore dotato di airbag frontale. E’ possibile
installare il seggiolino sul sedile anteriore soltanto se l’airbag frontale è stato disattivato:
verifi care con la casa automobilistica o sul manuale d’is truzioni del la vostra auto la po ssibilità
di disinserire l’airbag.
• Se il seggiolino viene posizionato sul sedile anteriore (solo se l’airbag frontale non è presente
o è stato disattivato), si consiglia di arretrare
il più possibile il sedile compatibilmente con
la presenza di altri passeggeri sul sedile posteriore.
• Non utilizzare mai questo seggiolino su sedili
rivolti lateralmente o opposti al senso di marcia.
• Non allacciare mai il seggiolino su un sedile
auto dotato di una cintura solo addominale (a
due punti).
• Nessun seggiolino auto può garantire la totale
sicurezza del bambino in caso d’incidente, ma
l’utilizzo di questo prodotto riduce il rischio
d’infortunio e di morte del bambino.
• Un utilizzo non corretto del prodotto aumenta
il rischio di seri danni al bambino, non solo in
caso d’incidente, ma anche in altre situazioni:
verifi care sempre che il seggiolino sia agganciato correttamente al sedile.
• Nel caso in cui il seggiolino fosse danneggiato,
deformato o fortemente usurato, deve essere
sostituito: potrebbe aver perso le caratteristiche originali di sicurezza.
• Non effettuare modifi che o ag giunte al prodotto senza l’approvazione del costruttore. Non
installare accessori, par ti di ricambio e componenti non forniti dal costruttore.
• Non lasciare mai il bambino incustodito nel
seggiolino per nessun motivo.
• Per evitare rischi di caduta del bambino, allacciare il bambino al seggiolino anche durante il
trasporto a mano.
• Nell’utilizzo fuori dall’auto, è pericoloso utilizzare il seggiolino posto su una superfi cie rialzata.
• Non lasciare mai il seggiolino sul sedile dell’auto non agganciato: potrebbe urtare e ferire i
passeggeri.
• Non interporre nulla, che non sia un accessorio
approvato per il prodotto, sia tra il sedile auto
e il seggiolino, sia tra il seggiolino e il bambino:
in caso di incidente il seggiolino potrebbe non
funzionare correttamente.
• Nel caso in cui l’auto venisse lasciata sotto il
sole diretto, si consiglia di coprire il seggiolino.
• In seguito ad un incidente anche lieve, il seggiolino può subire danni non visibili ad occhio
nudo: perciò bisogna sostituirlo comunque.
• Prima di trasportare manualmente il seggiolino, assicurarsi che il bambino sia allacciato con
le cinture e che il manico sia correttamente
bloccato nella posizione verticale.
• Per il trasporto con il seg giolino combinato con
passeggino, utilizzare questo seggiolino esclusivamente con i passeggini Chicco predisposti
per l’aggancio.
9
Page 10
• Prima di trasportare il bambino con il seggiolino combinato con il passeg gino, assicurar si che
questo sia correttamente agganciato.
• Non utilizzare seggiolini di seconda mano:
potrebbero avere subito danni strutturali non
visibili ad occhio nudo, ma compromettenti la
sicurezza del prodotto.
• La società Artsana declina ogni responsabilità
per un uso improprio del prodotto.
ISTRUZIONI D’USO
CARATTERISTICHE DEL PRODOTTO
Il seggiolino, sia nella versione solo seggiolino
che nella versione seggiolino con base, è omologato “Gruppo 0+”, per il trasporto in auto di
bambini dalla nascita fi no a 13 Kg. di peso.
L’omolgazione è di tipo “universal”, quindi il seggiolino p uò essere utiliz zato su qualsiasi model lo
di automobile.
ATTENZIONE! “Universal” signifi ca che è compatibile con la maggior parte, ma non con tutti
i sedili auto.
AVVISO IMPORTANTE
1. Questo é un dispositivo di ritenuta bambini “Uni versale”, omologa to secondo Regol amento N°44, emendamenti serie 04. Adatto
all’impiego generale nei veicoli e compatibile
con la maggior par te, ma non tutti, i sedili di
veicolo.
2. La per fetta compatibilità é più facilmente ottenibile nei casi in cui il costruttore del
veicolo dichiara nel manuale del veicolo che il
veicolo prevede l’installazione di dispositivi di
ritenuta bambini “Universali” per la fascia di
età in questione.
3. Questo dispositivo di ritenuta é stato
classifi cato “Universale” secondo criteri di
omologazione più severi rispetto a modelli
precedenti che non dispongono del presente
avviso.
4. Adatto solamente per l’impiego nei veicoli
dotati di cintura di sicurezza a 3 punti, statica o con arrotolatore, omologata in base al
Regolamento UN/ECE N°16 o altri standard
equivalenti.
5. In caso di dubbio, contattare il produttore
del dispositivo di ritenuta oppure il rivenditore.
Il seggiolino può anche essere utilizzato
fuori dall’auto, in maniera combinata con il
passeggino, oppure come sdraietta.
LIMITAZIONI DELL’UTILIZZO
ATTENZIONE! Rispettare scrupolosamente le
seguenti limitazioni all’utilizzo del prodotto: in
caso contrario non è garantita la sicurezza.
1. Il peso del bambino non deve essere superiore
a 13 Kg.
2. Non utilizzare mai questo seggiolino su un
sedile anteriore dotato di airbag frontale , ma
soltanto se l’airbag frontale è stato disattivato:
verifi care con la casa automobilistica o sul manuale d’istruzioni della vostra auto la possibilità
di disinserire l’airbag.
3. Non utilizzare mai il cuscino comfort se il
bambino ha un peso superiore a 6 Kg.
REQUISITI NECESSARI
DEL SEDILE AUTO E
DELLA CINTURA DI SICUREZZA
Il seggiolino può essere installato su un sedile
anteriore lato passeggero o posteriore qualsiasi, ma con le seguenti limitazioni: il sedile deve
essere:
- rivolto in senso di marcia (fi g.1)
- dotato di cintura a 3 punti di ancoraggio
statica o con arrotolatore (fi g.2)
Si consiglia di installare sempre il seggiolino sul
sedile posteriore dell’auto.
ATTENZIONE! GRAVE PERICOLO! Non utilizzare mai questo seggiolino su un sedile anteriore
dotato di airbag frontale.
ATTENZION E! Non install are mai il seggi olino su
un sedile dotato di una cintura solo addominale
(fi g. 2A)
REGOLAZIONE DELLA POSIZIONE DELLE
ATTENZION E! Le cinture dovr anno sempre es sere adattate alla crescita del bambino.
Prima di installare il seggiolino in auto bisogna
posizionare all’altezza corretta le cinture di ritenuta del bambino.
La posizione corretta dell’altezza delle cinture è
leggermente al di sotto del livello delle spalle.
(fi g. 3). Il seggiolino è dotato di 3 posizioni in
altezza (fi g. 4).
Il seggiolino è dotato di cuscino comfort che garantisce al bimbo dalla nascita ai 6 Kg di peso il
corretto contenimento e la posizione ideale per
collo e schiena.
Per installare il cuscino comfort verifi care che le
cinture si ano infi late nell’asola più bassa. AT TENZIONE : è l’unica posizione consentita nell’uso
con cuscino comfort (fi g. 5).
Attenzione : per garantire la massima
sicurezza del prodotto rimuovere il cuscino
comfort dopo che il bambino ha raggiunto i 6
Kg. di peso.
Per effettuare lo spostamento delle cinture pro-
10
CINTURE
Page 11

cedere come segue:
- aprire la fi bbia, premendo il bottone rosso (fi g.
6)
- sfi lare le cinture da dietro e infi larle nell’asola
più adatta all’altezza del bambino
(fi g. 7A e 7B).
ATTENZIONE! Assicurarsi che le cinture passino
sempre tra la barra posizionatrice e il guscio.
Le cinture devono sempre essere correttamente
tensionate.
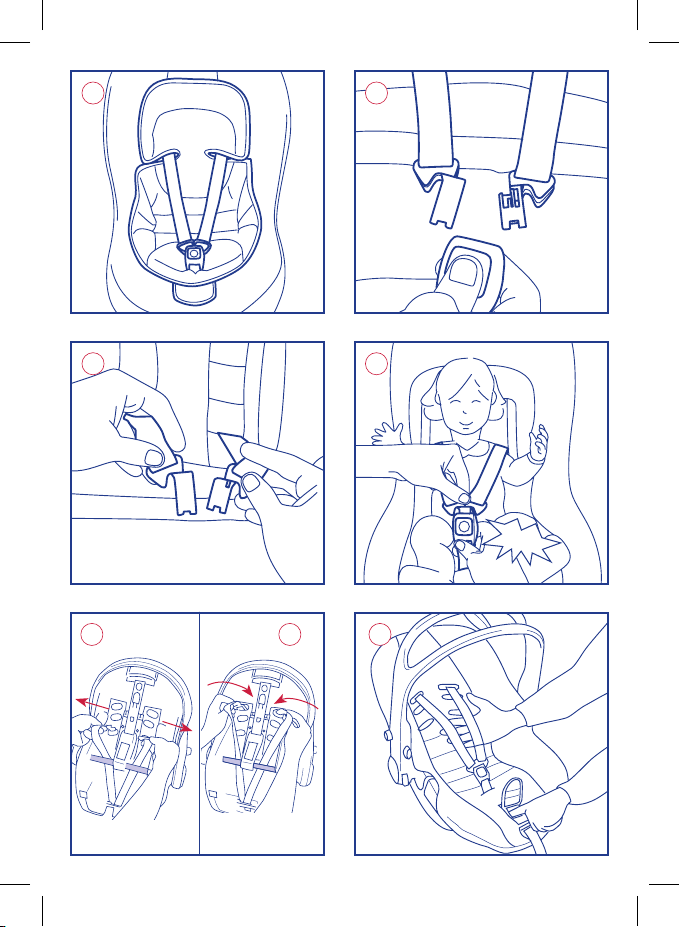
ALLOGGIAMENTO DEL BAMBINO
1. sollevare la patella in tessuto, mantenere pre-
muto il pulsante di regolazione e tirare le cinture
del seggiolino in modo da allentarle (fi g. 8)
2. aprire la fi bbia, premendo il bottone rosso;
(fi g. 6)
3. allog giare il bambino
4. sovrapporre le due linguette della fi bbia (fi g.
6A)
5. inserire entrambe le linguette della fi bbia fi no
a sentire un “click”. (fi g. 6B)
ATTENZIONE : non infi lare mai una sola linguetta nella fi bbia
6. tensionare le cinture di sicurezza del bambino,
tirando la cintura di regolazione centrale (fi g.9)
ATTENZIONE: le cinture devono essere tese ma
non troppo. Se potete infi lare le dita tra la cintura e il corpo del bimbo signifi ca che sono state
tensionate correttamente
POSIZIONI DEL MANICO
Il manico del seggiolino è regolabile in 4 posizioni (fi g. 10):
A. Posizione trasporto in auto (ATTENZIONE:
questa è l’unica posizione consentita durante il
trasporto in auto).
B. Posizione trasporto a mano.
C. Posizione uso sdraiet ta a dondolo o posizione
per aggancio passeggino Chicco predisposto.
D. Posizione uso sdraietta fi ssa.
Per effettuare la regolazione premere contemporaneamente i pulsanti sul manico (fi g. 11),
ruotare il manico nella posizione scelta fi no a
udire uno scatto (clack).
Leggere con attenzione il paragrafo: REQUISITI
NECESSARI DEL SEDILE AUTO E DELLA CINTURA DI SICUREZZA.
Il seggiolino, sia nella versione con base che senza, deve essere installato solo in senso contrario
rispetto alla direzione di marcia. ATTENZIONE!
ESTREMAMENTE PERICOLOSO: NON INSTAL-
DEL SEGGIOLINO
INSTALLAZIONE IN AUTO
DEL SEGGIOLINO
LARE SU SEDILI EQUIPAGGIATI DI AIRBAG, a
meno che quest’ultimo non sia stato disattivato.
ATTENZION E! Non install are mai il seggi olino su
un sedile dotato di una cintura solo addominale.
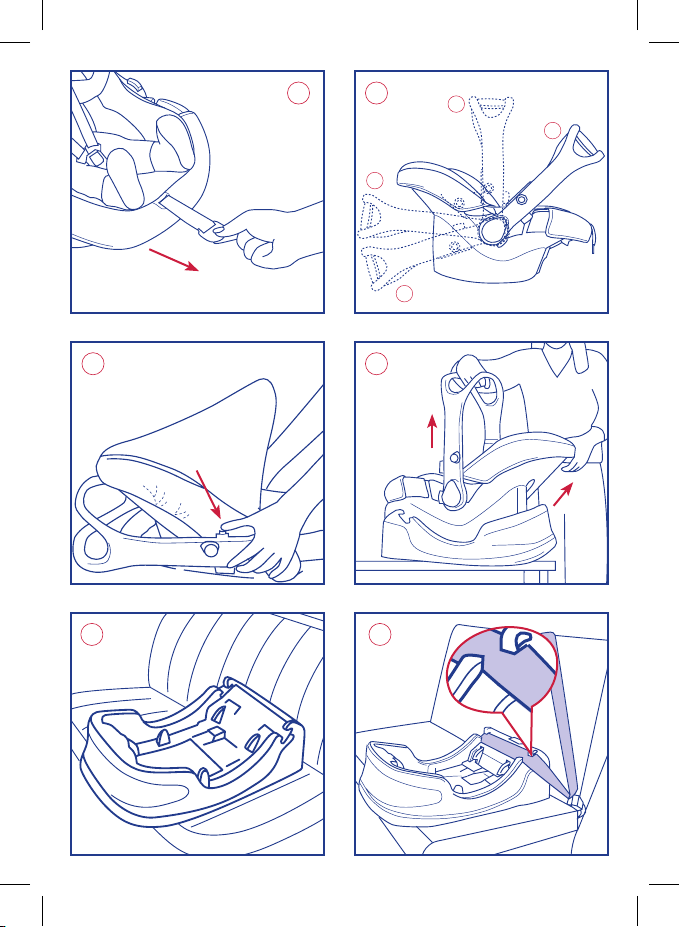
INSTALLAZIONE CON BASE:
Per installare il seggiolino con la base sul sedile,
procedere come segue:
1. sganciare il seggiolino dalla base tirando la
maniglia di aggancio (fi g.12) e contemporaneamente sollevarla tramite l’impugnatura
2. posizionare la base sul sedile prescelto per
l’installazione, orientandola come in fi gura 13, e
facendo in modo che sia a contatto con lo schienale del sedile auto
3. tirare la cintura di sicurezza dell’auto ed agganciarla alla corrispondente fi bbia, facendo
passare la parte orizzontale nelle due apposite
guide (fi g.14)
4. prima di inserire il seggiolino nella base, verifi care che il fermo stabilizzatore sia chiuso (fi g.
15).
5. Inserire il seggiolino nella base (rivolto in senso contrario a quello di marcia) spingendolo verso il basso fi no ad ott ene re l’a gga ncio (ud iret e un
“clack” di fi ssaggio) (fi g. 16);
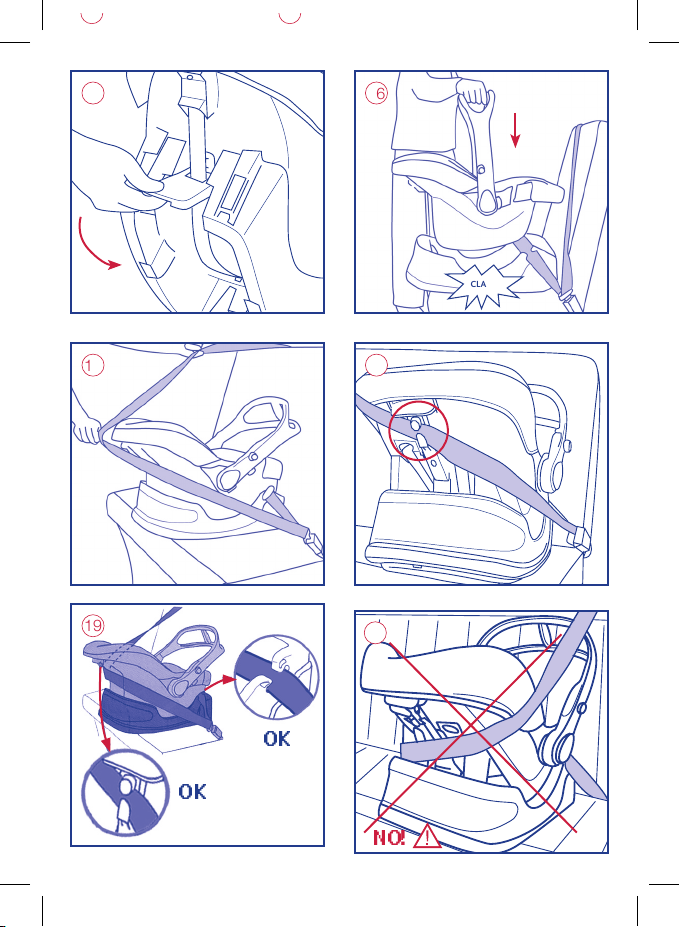
6. Verifi care il corretto aggancio del seggiolino
alla base tentando di sollevarlo sia dalla parte
anteriore che da quella posteriore;
7. Impugnare la cintura diagonale dell’auto e
farla passare nell’apposita guida posta sul retro
dello schienale del seggiolino (fi g. 17);
ATTENZIONE: LA CINTURA DIAGONALE DELL’AUTO DURANTE IL TRASPORTO DEVE ESSERE SEMPRE NELLA POSIZIONE INDICATA IN
FIG.18: NON UTILIZZATE MAI IL SEGGIOLINO
SENZA FAR PASSARE LA CINTURA NELL’APPOSITA GUIDA:
QUESTO POTREBBE COMPROMETTERE SERIAMENTE LA SICUREZZA.
8. Tendere attorno al seggiolino la cintura il più
possibile, senza lasciare eccessi di nastro, ed assicurarsi che non sia attorcigliata.
9. Posizionare l’impugnatura in “A” (fi g. 10)
Per estrarre il seggiolino dalla base:
sfi lare dalla guida sullo schienale la cintura diagonale, riportare l’impugnatura nella posizione
“B” (fi g. 10), sganciare il seggiolino tirando l’apposita maniglia e contemporaneamente sollevare il seggiolino stesso tramite l’impugnatura.
ATTENZIONE! Dopo l’installazione verifi care
SEMPRE che la cintura dell’auto sia correttamente in tensione e che la sua fi bbia non forzi la
cintura a d uscire dalle app osite guide sulla ba se e
che non interferisca con le guide stesse.
11
Page 12

ATTENZIONE: NON FAR PASSARE MAI LA CINTURA DELL’AUTO IN POSIZIONI DIVERSE DA
QUELLE INDICATE IN FIG. 19
In fi g. 20 sono indicati alcuni esempi di installazione non corretta.
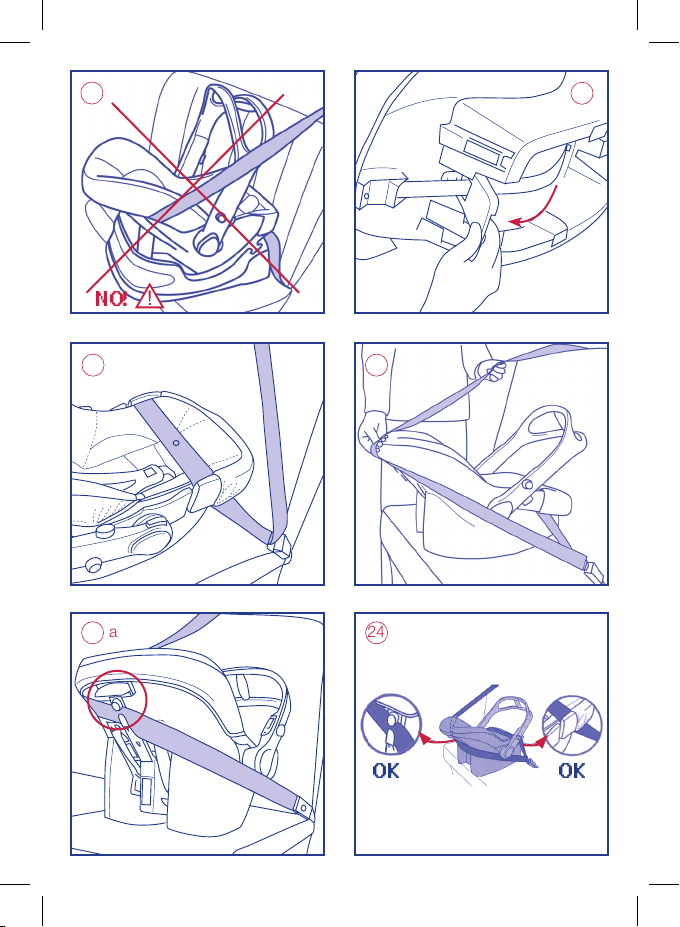
INSTALLAZIONE SENZA BASE
Per installare il seggiolino senza base sull’automobile, procedere come segue:
1. abbassare il fermo stabilizzatore. (fi g. 21)
posizionare il seg giolino sul sedile dell’auto prescelto;
2. Tirare la cintura di sicurezza dell’auto ed ag-
ganciarla alla corrispondente fi bbia, facendo
passare la parte orizzontale della cintura nelle
due apposite guide del seggiolino (fi g. 22);
3. Impugnare la cintura diagonale dell’auto e
farla passare nell’apposita guida posta sul retro
dello schienale del seggiolino (fi g. 23);
4. Tendere attorno al seggiolino la cintura il più
possibile senza lasciare eccessi di nastro, ed assicurarsi che non sia attorcigliata. ATTENZIONE:
LA CINTURA DIAGONALE DELL’AUTO DURANTE IL TRASPORTO DEVE ESSERE SEMPRE NELLA
POSIZIONE INDICATA IN FIG. 24. NON UTILIZZATE MAI IL SEGGIOLINO SENZA FAR PASSARE
LA CINTURA NELL’APPOSITA GUIDA: QUESTO
POTREBBE COMPROMETTERE SERIAMENTE LA
SICUREZZA.
5. Posizionare l’impugnatura in “A” (fi g. 10);
6. Per sganciare il seggiolino dal sedile, sganciare
la cintura dell’auto premendo la fi bbia, sfi lare la
cintura d alla guida diagon ale e da quella ori zzontale posta sul seg giolino.
Riportare l’impugnatura nella posizione “B” (fi g.
10).
In fi g. 25 sono indicati alcuni esempi di installazione non corretta.
UTILIZZO DELLA CAPOTTINA
Il seggiolino è dotato di una capottina per proteggere il bimbo dal sole e dal vento.
Si aggancia e sgancia facilmente al seggiolino
mediante due appositi innesti e può essere reclinata a piacere. (fi g. 26)
POSIZIONE FISSA O BASCULANTE DEL
SEGGIOLINO (USO SDRAIETTA)
Quando non viene utilizzato n auto, il seggiolino, può anche essere usato come dondolino o
sdraietta. Per renderlo basculante, riporre il fermo stabilizzatore (fi g. 15) e posizionate i l manico
nella posizione “B”. (fi g. 10)
Per utilizzare in posizione fi ssa estrarre il fermo
stabilizzatore (fi g. 21) e posizionare il manico
nella posizione “D”. (fi g. 10)
PARASOLE
Utilizz o non consigliato co me sdraiett a per bambini che sono già capaci di alzarsi da soli (fi no
circa 6 mesi di età o 9 Kg. di peso).
Per evitare rischi di caduta allacciare sempre le
cinture.
Non lasciare mai il bambino incustodito.
E’ pericoloso usare il seggiolino su superfi ci elevate o inclinate.
ATTENZIONE : prima di trasportare il seggiolino
riportare e bloccare sempre il manico in posizione verticale “B” (fi g.10)
VERSIONE SEGGIOLINO AUTO
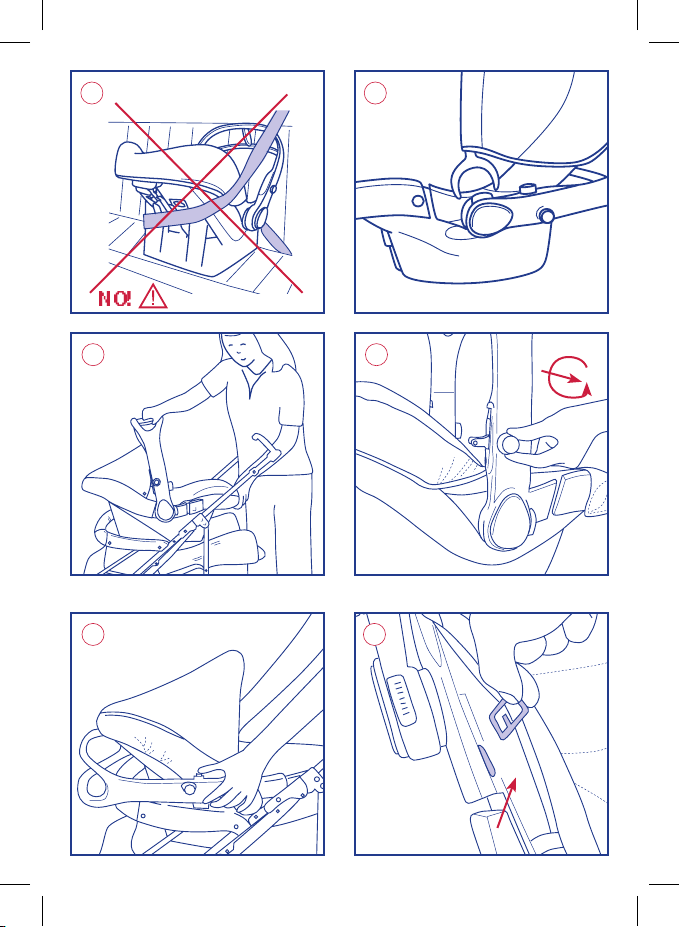
ATTENZIONE! Per l’utilizzo insieme al passeggino fare riferimento alle istruzioni del passeggino.
I nuovi passeggini CHICCO dotati di sistema
CLIK CLAK hanno braccioli con speciali dispositivi che permettono di agganciare il seggiolino
direttamente sul passeggino, senza dover utilizzare ulteriori accessori.
- aprire il passeggino seguendo le istruzioni del
manuale dedicato;
- impugnare il seggiolino dal manico e posizionarlo sul passeggino, come indicato in fi g. 27;
- estrarre i due perni di aggancio dal manico, tirando e r uotando le due man opole di aggan cio al
passeggino (fi g. 28):
- ruotare il manico agendo sui tasti inferiori fi no
a che non sia parallelo agli appoggiabraccia e
fi no a che i due innesti si blocchino all’interno
degli stessi (spingere verso il basso il seggiolino
dalla parte dei piedi del bambino per bloccare il
manico nella posizione corretta);
- per sganciare il seggiolino dal passeggino, e’
suffi ciente premere i due tasti rossi posti sul manico, come indicato in fi g. 29.
- alzare il manico ruotandolo, far rientrare i due
perni di aggancio estratti al punto D e togliere il
seggiolino dal passeggino.
ATTENZIONE: l’aggancio e lo sgancio si possono
effettuare anche con il bambino nel seggiolino
con il peso del bambino, le operazioni suddette potrebbero risultare meno agevoli. In questo
caso si raccomanda attenzione nell’effettuare le
operazioni di cui sopra.
• Per lavare la fodera del seggiolino, slacciare le
cinture ed estrarre la fodera dopo aver sfi lato i
due fermi metallici dalla loro sede (fi g. 30). Per
il lavaggio seguire attentamente le istruzioni
indicate sull’etichetta posta sulla fodera stessa.
• Cinture, fi bbia e parti in plastica devono essere
12
+ PASSEGGINO
SFODERABILITA’/LAVABILITA’
DEL SEGGIOLINO
Page 13

pulite solo con un pan no umido. Non usare solventi o candeggianti che possano danneggiarle
e renderle insicure.
AVVERTENZE: DA LEGGERE
PRIMA DEL VIAGGIO:
1. Il se gg io li no de ve e s se re i ns t al la to s eg ue ndo scrupolosamente le istruzioni fornite.
2. Non lasciate mai il bambino incustodito
nel seggiolino per nessun motivo.
3. Non fate passare la cintura dell’auto in
posizion i diverse da quelle indicate in q ueste
istruzioni: compromettereste la sicurezza
del vostro bambino (esempi di installazione
NON corretta sono dati in fi g. 20 e 25).
4. Installate il seggiolino solo su sedili correttamente fi ssati alla struttura dell’auto e
rivolti verso la parte anteriore della vettura.
Fate attenzione a non lasciare sedili auto
pieghevoli o rotanti non ben agganciati. In
caso di incidente potrebbero costituire un
pericolo.
5. Prestate attenzione a come installate il
seggiolino in auto in modo da evitare che un
sedile mobile o la portiera possano interferire con esso.
6. Attenzione: questo seggiolino NON deve
ess ere utilizzato in n essun c aso con l a cintura auto a due punti di ancoraggio.
7. Ve ri fi cate sempr e che il bambino non a pra
la fi bbia della cintura di sicurezza.
8. Nell’utilizzo con base, verifi cate sempre
che la base sia correttamente fi ssata al sedile auto.
9. Nessuna modifi ca o aggiunta devono essere fat ti al prodotto ta l quale senza l’appro vazione del costruttore. Non applicare accessori, parti di ricambio e componenti non
forniti dal costruttore. Eventuali modifi che
apportate ai prodotti, declinano il costruttore da ogni responsabilità.
10. Se il seggiolino per qualunque motivo
risultasse danneggiato, deformato o for temente usurato, sostituitelo: potrebbe non
possedere più le caratteristiche originali di
sicurezza.
11. La fodera può essere sostituita esclusivamente con una approvata dal costruttore,
poichè costituisce una parte integrante del
seggiolino auto. Il seggiolino auto non deve
essere mai usato senza la fodera.
12. Controllate che il nastro della cintura
non risu lti attorcigliato . Evitate che ques t’ultimo o parti del seggiolino vengano pizzicate
tra le por tiere o sfreghino contro punti taglienti. Qualora la cintura presentasse tagli
o sfi lacciature sensibili, sostituitela.
13. Assicuratevi che, sia la cintura per il bambino che la cintura a 3 punti dell’auto siano
corret tamente tese pe r garantire la mas sima
protezione al vostro bambino.
14. Non utilizzare il prodotto se alcune par ti
risultano rotte o mancanti. Potrebbe essere
pericoloso.
15. In seguito ad un incidente anche lieve,
seggiolino e cintura possono subire danni
non visibili ad occhio nudo. Si raccomanda
di sostituirli.
16. Assicurarsi che non vengano trasportati
in auto oggetti non fi ssati, soprattutto sul
ripiano posteriore, che in caso di incidente
possano ferire gli occupanti.
17. Assicuratevi che tutti i passeggeri della vettura utilizzino la cintura di sicurezza,
per la propria sicurezza e perchè nel caso di
incidente potrebbero urtare gravemente il
bambino.
18. Se l’auto è rimasta ferma sotto il sole
per un lungo periodo ispezionare accuratamente il seggiolino prima di accomodare
il bambino; alcune parti potrebbero essersi
surriscaldate: lasciatele raffreddare.
19. In caso di lunghi viaggi fate delle soste
frequenti. Il bambino si stanca molto facilmente. Per nessuna ragione estrarre il
bambino dal seggiolino auto mentre l’auto
è in movimento. Se il Vostro bambino ha bisogno di attenzione, trovate un posto sicuro
e accostate.
20. Non utilizzate seggiolini di seconda
mano. Potrebbero avere subito dei danni
strutturali
estremamente pericolosi, non visibili ad occhio nudo.
21. Neonati prematuri: nati con meno di 37
settimane di gestazione possono essere a
rischio nel seggiolino. Tali neonati possono
avere diffi coltà respiratorie mentre sono
seduti nel seggiolino auto. Vi consigliamo
di rivolgerVi al Vostro Medico o al personale
dell’Ospedale affi nchè possano valutare il
Vostro bambino e raccomandare il seggiolin o auto o l a carrozz ina auto adatti pr ima di
lasciare l’Ospedale.
22. Il seggiolino può essere usato come
mezzo di trasporto o sdraietta anche fuori
dal veicolo. Fuori dall’auto, non mettete il
seggiolino su superfi ci alte, come tavoli, piani di lavoro, letti etc., o su superfi ci inclinate
o instabili, onde evitare cadute. Utilizzare
sempre le cinture di sicurezza.
23. I tessuti del seg giolino non sono impermeabili; si consiglia pertanto nell’uso con il
passeggino, di utilizzare gli accessori para-
13
Page 14

pioggia Chicco.
24. Tenere i sacchetti di plastica lontani dal
bambino per evitare rischi di soffocamento.
25. Queste istruzioni devono essere conservate con cura e devono essere facilmente
reperibili.
26. La società ARTSANA declina ogni responsabilità per un uso improprio del prodotto.
Per ulteriori informazioni e per richieste
di parti di ricambio contattare il Servizio
Clienti.
Artsana S.p.A.
Via Saldarini Catelli 1
22070 Grandate COMO – ITALY
Tel. +39 031 38200 0
Fax +39 031 382500
www.chicco.com
14
Page 15

F
AUTO-FIX
ELEMENTS : (Fig. A, B, C, D)
1. Base
2. Coque
3. Anse
4. Manette de décrochage
5. Housse
6. Coussin confort
7. Canopy pare-soleil
8. Attaches canopy pare-soleil
9. Passant de la sangle auto diagonale
10. Passants de la sangle auto ventrale sur la
base
10A. Passants de la sangle auto ventrale sur le
siège auto
11. Sangle de réglage
12. Boucle des sangles
13. Languettes de la boucle
13 A. Bouton d’ouverture de la boucle
14. Bouton de réglage des sangles (sous la
patte en tissu)
15. Sangles
16. Capitonnage pour les sangles (si elles sont
prévues)
17. Œillet de passage des sangles
18. Boutons pour l’inclinaison de la poignée
de transport
19. Poignée d’accrochage à la poussette
20. Bouton de décrochage de la poussette
21. Barre de positionnement
22. Blocage stabilisateur
23. Etiquette d’homologation
24. Etiquette d’instructions de montage avec
et sans base
TRES IMPORTANT ! A LIRE
• Lire attentivement et intégralement la notice
d’instructions avant de se ser vir du produit.
• Pou r le mon tag e et l’i ns tal lat ion du p ro dui t, s ui-
vre scrupuleusement les instructions. Ne laisser personne se servir du produit avant d’avoir
lu les instructions.
• Conser ver cette notice pour toute consultation
future.
• Les statistiques des accidents montrent que le
siège arrière des voitures est plus sûr que celui
de devant et doit donc être préféré pour l’installation du siège auto.
• ATTENTION ! DANGER GRAVE ! Ne jamais
se servir de ce siège auto sur un siège avant
muni d’un airbag frontal. On ne peut installer
le siège auto sur le siège avant de la voiture que
si l’airbag frontal a été désactivé : vérifi er avec
le constructeur automobile ou sur la notice
d’instructions de la voiture s’il est possible de
TOUT DE SUITE
désactiver l’airbag.
• Si le siège auto est placé sur le siège avant de la
voiture (uniquement si l’airbag frontal n’est pas
présent ou a été désactivé), nous conseillons
de reculer le siège le plus possible, en fonction
de la présence d’autres passagers sur le siège
arrière.
• Ne jamais utiliser ce siège auto sur les sièges de
voiture orientés latéralement ou dans le sens
contraire de la marche.
• Ne jamais accrocher le siège auto sur un siège
muni uniquement d’une sangle abdominale (à
deux points).
• Aucun siège auto ne peut garantir la sécurité
totale de l’enfant en cas d’accident, mais l’utilisation de ce produit réduit le risque de blessure
et de mort de l’enfant.
• L’utilisation non correcte du produit augmente
le risque de dommages sérieux pour l’enfant,
mais aussi dans d’autres situations : toujours
vérifi er si le siège auto est correctement accroché au siège de la voiture.
• Au cas où le siège auto serait endommagé, déformé ou fortement usé, le remplacer : il risque
d’avoir perdu ses caractéristiques de sécurité
d’origine.
• Ne pas faire de modifi cations ou d’ajouts au
produit sans l’approbation du fabricant. Ne pas
ins taller d’ac cessoire s, de pièce s de rec hange et
d’éléments non fournis par le fabricant.
• Ne jamais laisser l’enfant sans surveillance dans
le siège auto, quel qu’en soit le motif.
• Pour éviter tout risque de chute de l’enfant, attacher l ’enfa nt au s iège a uto même qu and o n le
transporte à la main.
• Quand on s’en sert hors de la voiture, il peut
être dangereux d’utiliser le siège auto en le posant sur une surface surélevée.
• Ne jamais laisser le siège auto sur le siège de
la voiture sans l’attacher : il pourrait heurter et
blesser les passagers.
• Ne rien mettre, sauf un accessoire approuvé
pour le produit, entre le siège auto et le siège
de la voiture, ou entre le siège auto et l’enfant :
en cas d’accident le siège auto pourrait ne pas
fonctionner correctement.
• Au cas où on laisserait la voiture sous le soleil direct, nous conseillons de couvrir le siège
auto.
• A la suite d’un accident même léger, le siège
auto pourrait avoir subi des dommages invisibles à l’œil nu : on doit donc le remplacer de
toute façon.
• Avant de transpor ter le siège auto à la main,
s’assurer que l’enfant est bien attaché avec le
harnais et que la anse est correctement bloquée en position verticale.
• Pour le transport avec le siège auto monté sur
15
Page 16
poussette, utiliser ce siège auto uniquement
avec les poussettes Chicco prévues pour l’y
accrocher.
• Avant de transporter l’enfant avec le siège auto
monté sur poussette, s’assurer que celui-ci est
correctement accroché.
• Ne pas utiliser de sièges auto d’occasion : ils
pourraient avoir subi des dommages structuraux invisibles à l’œil nu mais susceptibles de
compromettre la sécurité du produit.
• La société Artsana décline toute responsabilité
en cas d’utilisation impropre du produit.
MODE D’EMPLOI
CARACTERISTIQUES DU PRODUIT
Qu’il soit e n version siège aut o seul ou en version
siège auto avec base, il est homologué “Groupe
0+”, pour le transport en auto d’enfants, de leur
naissance à un poids de 13 Kg.
L’homologation est du type “universel”, par conséquent le siège auto peut être utilisé sur n’importe quel modèle de voiture.
ATTENTION ! “Universel” signifi e qu’il est compatible avec la plupart, mais pas avec tous les
sièges de voiture.
1. Il s’agit d’un dispositif de retenue “Universel” pour enfant, homologué selon le Règlement N° 44, amendement série 04. Adapté
à l’utilisation générale dans les véhicules et
compatible avec la plupart, mais pas avec
tous les sièges de voiture.
2. La parfaite compatibilité est plus facile à
obtenir dans les cas où le constructeur du
véhicule déclare dans le manuel du véhicule
que celui-ci prévoit l’installation de dispositifs de retenue “Universels” pour les enfants
de la tranche d’âge en question.
3. Ce dispositif de retenue a été classé “Universel” selon les critères d’homologation les
plus sévères par rappor t à des modèles précédents qui ne disposent pas de cet avis.
4. Uniquement adapté à l’emploi dans les
véhicules munis de ceintures de sécurité à
3 points, statiques ou à enrouleurs, homologuées conformément à la norme UN/ECE
N°16 ou autres normes équivalentes.
5. En cas de doute, contacter le producteur
du dispositif de retenue ou le revendeur.
On peut aussi utiliser le siège auto hors de
la v oitu re, en le com bina nt av ec la p ouss ette
ou comme transat.
AVIS IMPORTANT
ATTENTION ! Respecter scrupuleusement les
limitations suivantes à l’emploi du produit : dans
le cas contraire la sécurité n’est pas garantie.
1. Le poids de l’enfant ne doit pas dépasser 13
Kg.
2. Ne jamais utiliser ce siège auto sur un siège
de voiture avant muni d’un airbag frontal, ou
uniquement si l’airbag frontal a été désactivé :
vérifi er avec le constructeur automobile ou sur
le manuel d’instructions de votre voiture s’il est
possible de désactiver l’airbag.
3. Ne jamais utiliser le coussin confort si le poids
de l’enfant dépasse 6 Kg.
Le siège auto peut être installé sur un siège de
voiture avant, côté passager, ou arrière quelconque, mais en o bservant le s limitations suiv antes :
le siège de la voiture doit être :
• orienté face à la route (fi g.1)
• muni d’une ceinture à 3 points d’ancrage stati-
Nous conseillons de toujours installer le siège
auto sur le siège arrière de la voiture.
ATTENTION ! DANGER GRAVE ! Ne jamais utiliser ce siège auto sur un siège de voiture avant
muni d’un airbag frontal.
ATTENTION ! Ne jamais installer le siège auto
sur un siège de voiture uniquement muni d’une
ceinture abdominale (fi g. 2A)
ATTENTION ! Les sangles du harnais doivent
toujours être adaptées à la croissance de l’enfant.
Avant d’inst aller le siège auto dans la voiture, ré gler les sangles de retenue de l’enfant à la bonne
hauteur.
La hauteur correcte des sangles est légèrement
au-dessous du niveau des épaules. (fi g. 3). Le
siège auto permet 3 hauteurs. (fi g. 4)
Le siège auto est muni d’un coussin confort qui
garantit à l’enfant, de sa naissance à un poids de
6 Kg, un maintien correct et la position idéale
pour le cou et le dos.
Pour installer le coussin confort vérifi er si les
sangles sont enfi l ées dans l’œillet le plu s bas. ATTENTION : c’est la seule position permise pour
l’utilisation avec le coussin confort (fi g. 5)
Attention : pour garantir la plus grande sécurité
du produit, enlever le coussin confor t une fois
que l’enfant a atteint 6 Kg.
Pour déplacer les sangles, procéder comme suit :
16
LIMITATION D’EMPLOI
CONDITIONS REQUISES POUR LE SIEGE
AUTO ET LE HARNAIS
DE SECURITE
que ou à enrouleur (fi g.2)
REGLAGE DE LA POSITION
DES SANGLES
Page 17

• ouvrir la boucle en appuyant sur le bouton
rouge (fi g. 6)
• désenfi ler les sangles par derrière et les enfi ler
dans l’œillet le plus adapté à la hauteur de l’enfant (fi g. 7A et 7B).
ATTENTION ! S’assurer que les sangles passent
toujours entre la barre de positionnement et la
coque.
Les sangles doivent être correctement tendues :
POSITIONNEMENT DE L’ENFANT
1. soulever la patte en tissu, tenir le bouton de
réglage enfoncé et tirer sur les sangles du siège
auto pour les desserrer (fi g. 8)
2. ouvrir la boucle en enfonçant le bouton rouge
; (fi gure 6)
3. installer l’enfant
4. superposer les deux languettes de la boucle
(fi gure 6A)
5. enfoncer les deux languettes de la boucle jus-
qu’au déclic qui indique la fermeture. (fi g. 6B)
ATTENTION : ne jamais enfi ler une seule languette dans la boucle.
6. tendre le harnais de sécurité de l’enfant en ti-
rant sur la sangle de réglage centrale (fi g.9)
ATTENTION : les sangles doivent tendues mais
pas trop. Enfi ler les doigts entre la sangle et le
corps de l’enfant pour voir si la tension est correcte.
POSITIONS DE LA ANSE
DE TRANSPORT DU SIEGE AUTO
La anse de transport du siège auto est réglable
en 4 positions (fi g. 10):
A. Position de transport en voiture (ATTENTION
: c’est la seule position permise pendant le tra nsport en voiture).
B. Position de transport à la main.
C.Position pour l’emploi comme transat à bascul e ou en p ositi on pou r la fi xat ion sur une poussette Chicco prévue à cet effet.
D.Position pour l’emploi comme transat fi xe.
Pour le réglage, appuyer en même temps sur les
boutons présents sur la anse de transport (fi g.
11) puis tourner la anse dans la position choisie
jusqu’au déclic.
INSTALLATION DU SIEGE
Li re ave c att enti on le para grap he : C ONDI TION S
REQUISES POUR LE SIEGE AUTO ET LE HARNAIS
DE SECURITE.
Que ce soit en version avec base ou dans celle
sans, on doit installer le siège auto uniquement
dos à la route. ATTENTION ! EXTREMEMENT
DANGEREUX : NE PAS L’INSTALLER SUR DES
AUTO EN VOITURE
SIEGES MUNIS D’UN AIRBAG, à moins d’avoir
désactivé ce dernier.
ATTENTION ! Ne jamais installer le siège auto
sur un siège de voiture uniquement muni d’une
ceinture abdominale)
INSTALLATION AVEC BASE :
Pour installer le siège auto avec la base sur le
siège de la voiture, procéder comme suit :
1. détacher le siège auto de la base en tirant sur
la manette d’accrochage (fi g.12) tout en le soulevant à l’aide de la anse de transpor t
2. mettre la base sur le siège choisi pour l’installation en l’orientant comme sur la fi gure 13, et
en faisant en sorte qu’il soit en contact avec le
dossier du siège auto.
3. tirer la ceinture de sécurité de la voiture et
l’accrocher à la boucle correspondante en faisant
passer la partie horizontale dans les deux passants prévus à cet effet (fi g.14)
4. avant d’installer le siège auto sur la base, vérifi er si le blocage stabilisateur est fermé (fi g. 15).
5. monter le siège auto sur la base (tourné dos à
la route) en le poussant vers le bas jusqu’au déclic (on entend un “clic” de fi xation) (fi g. 16).
6. vérifi er si le siège auto est bien accroché à la
base en essayant de le soulever par l’avant et par
l’arrière.
7. prendre la sangle diagonale de la voiture et la
faire passer dans le passant prévu à cet effet sur
l’arrière du dossier du siège auto (fi g. 17)
ATTENTION : LA SANGLE DIAGONALE DE L A
VOITURE DOIT TOUJOURS SE TROUVER DANS
LA POSITION INDIQUEE SUR LA FIG. 18 PENDANT LE TRANSPORT : NE JAMAIS UTILISER LE
SIEGE AUTO SANS AVOIR FAIT PASSER LA SANGLE DANS LE PASSANT PREVU A CET EFFET :
CELA POURRAIT SERIEUSEMENT COMPROMETTRE LA SECURITE.
8. Tendre la sangle le plus possible autour du
siège auto, sans en laisser en trop, et s’assurer
qu’elle n’est pas entortillée.
9. mettre la poignée de transpor t en position “A”
(fi g. 10)
Pour extraire le siège auto de la base :
désenfi ler la sangle diagonale du passant sur le
dossier en remettant la anse de transport en
position “B” (fi g. 10), décrocher le siège auto en
tirant sur la poignée prévue à cet effet tout en le
soulevant à l’aide de la anse de transport.
ATTENTION ! Après l’installation, TOUJOURS
vérifi er si la ceinture de la voiture est correctement tendue et si la boucle ne force pas la ceinture à sor tir des passants prévus à cet ef fet sur la
base et n’interfère pas avec les passants.
17
Page 18

ATTENTION : NE JAMAIS FAIRE PASSER LA
CEINTUR E DE LA VOITURE PAR D’AUTRES P OSITIONS QUE CELLES INDIQUEES SUR LA FIG. 19
Sur la fi g. 20 nous indiquons quelques exemples
d’installation incorrecte.
INSTALLATION SANS BASE
Pour installer le siège auto sans base sur la voiture, procéder comme suit :
1. Baisser le blocage stabilisateur. (fi g. 21)
2. Mettre le siège auto en place sur le siège de
la voiture choisi
3. Tirer la ceinture de sécurité de la voiture et
l’accrocher à la boucle correspondante en faisant
passer la partie horizontale de la ceinture dans
les deux passants du siège auto (fi g. 22);
4. Prendre la sangle diagonale de la voiture et la
faire passer dans le passant prévu à cet effet sur
l’arrière du dossier du siège auto fi g.23
5. Tendre la ceinture le plus possible autour du
siège san s en laisser trop et s’assurer qu’elle n’est
pas tor tillée. ATTENT ION : PENDANT LE TR ANSPORT LA SANGLE DIAGONALE DE LA VOITURE
DOIT TOUJOURS SE TROUVER DANS LA POSITION INDIQUEE SUR LA FIG. 24. NE JAMAIS
UTI LISER LE SIE GE AUTO S ANS FAI RE PASS ER LA
SANGLE DANS LE PASSANT PREVU A CE T EFFET
: CELA POURRAIT COMPROMETTRE SERIEUSEMENT LA SECURITE.
6. Mettre la poig née de transport en position “A”
(fi g. 10)
7. Pour détacher le siège auto du siège de la voi-
ture, détacher la ceinture de l’auto en appuyant
sur la bou cle, puis dése nfi ler le har nais du passa nt
diagonal et horizontal situés sur le siège auto.
Remettre la poignée en position “B” (fi g. 10).
Sur la fi g. 25 nous indiquons quelques exemples
d’installation incorrecte.
Pour enlever le siège auto de la base : répéter
les opérations précédentes en sens inverse : désenfi ler la sangle diagonale du passant situé sur
le dossier, remettre la poignée de transport en
position “B” (fi g. 10), détacher le siège auto en
tirant l a poignée prévu e à cet effet tout en so ulevant le siège à l’aide de la poignée de transport.
UTILISATION DU CANOPY
Le siège auto est muni d’un canopy pour protéger l’enfant du soleil et du vent.
Il s’accroche et se décroche facilement au siège
auto à l’aide des deux ancr ages prévus à cet ef fet
et peut être incliné à volonté. (fi g. 26)
POSITION FIXE OU BASCULANTE
PARE-SOLEIL
DU SIEGE AUTO
(UTILISATION COMME TRANSAT)
Quand on ne l’utilise pas en voiture, on peut
aussi se servir du siège auto comme bascule ou
transat. Pour le rendre basculant, remettre le
blocage stabilisateur (fi g. 15) et placer la poignée
de transport en position “B”. (fi g. 10)
Pour l’utiliser en position fi xe, extraire le blocage
stabilisateur (fi g. 21) et mettre la poignée de
transport en position “D”. (fi g. 10)
Utilisation non conseillée comme transat pour
les enfants déjà capables de se lever seuls (jusqu’à environ 6 mois ou 9Kg).
Pour éviter tout risque de chute, toujours attacher le harnais.
Ne jamais laisser l’enfant sans surveillance.
Utiliser le siège auto sur des surface surélevées
ou inclinées peut être dangereux.
ATTENTION : avant de transporter le siège
auto toujours remettre et bloquer la poignée de
transport en position verticale “B” (fi g.10)
VERSION SIEGE AUTO + POUSSETTE
ATTENTIO N ! Pour l’utilisation av ec la pousset te,
consulter la notice de la poussette
Les nouvelles poussettes CHICCO munies d’un
système CLIK CL AK ont des accoudoirs munis d e
dispositifs spéciaux qui permettent d’accrocher
le siège auto directement sur la poussette, sans
avoir besoin d’accessoires supplémentaires.
- ouvrir la poussette en suivant les instructions
de la notice d’emploi.
- prendre le siège auto par la poignée de transport et le mettre sur la poussette comme indiqué sur la fi g. 27.
- extraire les deux pivots de fi xation de la poignée de transport, en tirant et en tournant les
deux poignées d’accrochage à la poussette (fi g.
28).
- tourner la poignée de transpor t en poussant
sur les boutons inférieurs jusqu’à ce qu’elle soit
parallèle avec les accoudoirs et que les deux
ancrages se bloquent à l’intérieur des accoudoirs (pousser le siège auto vers le bas du côté
des pieds de l’enfant pour bloquer la poignée de
transport en position correcte).
- pour détacher le siège auto de la poussette, on
doit juste presser les deux boutons rouges situés
sur la poignée de transport, comme indiqué sur
la fi gure 29.
- lever la poignée de transport en la faisant
tourner, faire rentrer les deux pivots de fi xation
extraits au point D et enlever le siège auto de
la poussette.
ATTENTION : l’accrochage et le décrochage
peuvent aussi se faire avec l’enfant dans le
siège auto. Le poids de l’enfant pourrait rendre
ces opérations plus diffi ciles. Dans ce cas, nous
18
Page 19
recommandons la plus grande attention pour
exécuter les opérations ci-dessus.
DEHOUSSAGE/LAVAGE
• pour laver la housse du siège auto, détacher le
harnais et ôter la housse après avoir désenfi lé
les deux blocages métalliques de leur logement
(fi g. 30). Pour le lavage, suivre attentivement
les instructions indiquées sur l’étiquette de la
housse.
• Sangles, boucle et parties en plastique doivent
être nettoyées uniquement avec un chiffon
humide. Ne pas se servir de solvants ou d’eau
de javel, qui pourraient les endommager et les
rendre moins sûres.
1. Le siège auto doit être installé en suivant
scrupuleusement les instructions données.
2. Ne jamais laisser l’enfant sans surveillance dans le siège auto, quelle qu’en soit la
raison.
3. Ne pas faire passer la sangle de la voiture par des positions différentes de celles
indiquées dans ces instructions : cela compromettrait la sécurité de l’enfant (nous
donnons des exemples d’installation INCORRECTES sur les fi g. 20 et 25.
4. Installer le siège auto uniquement sur
des sièges de voiture correctement fi xés à
la structure du véhicule et tournés dans le
sens de la marche. Attention à ne pas laisser de sièges auto pliants ou pivotants mal
accrochés. En cas d’accident ils pourraient
constituer une source de danger.
5. Faire attention à la façon d’installer le
siège auto dans la voiture pour éviter qu’un
siège mobile ou la portière n’interfèrent
avec.
6. Attention : N’utiliser EN AUCUN CAS ce
siège auto avec une ceinture de sécurité
auto à deux points d’ancrage.
7. Toujours contrôler si l’enfant n’ouvre pas
la boucle du harnais de sécurité.
8. Dans l’utilisation avec base, toujours vérifi er si la base est correctement fi xée au
siège auto.
9. Ne faire aucun ajout ou modifi cation au
produit sans l’approbation du fabricant. Ne
pas appliquer d’accessoires, de pièces de
rechange et d’éléments non fournis par le
fabricant. En cas de modifi cations apportées au produit, le fabricant décline toute
responsabilité.
10. Si, pour quelque raison que ce soit, le
DU SIEGE AUTO
AVERTISSEMENTS : A LIRE
AVANT LE VOYAGE:
siège auto est endommagé, déformé ou
fortement usé, le remplacer : il pourrait ne
plus avoir ses caractéristiques de sécurité
d’origine.
11. La housse ne peut être remplacée que
par une autre approuvée par le fabricant car
elle fait partie intégrante du siège auto. Le
siège auto ne doit jamais être utilisé sans
sa housse.
12. Contrôler si la sangle du harnais n’est
pas entortillée. Ne pas laisser cette de rnière
ou des parties du siège coincées entre les
portières et éviter les frottements avec des
parties coupantes. Si la sangle laisse apparaître des coupures ou des effi lochements
évidents, la remplacer.
13. S’assurer que le harnais de l’enfant et la
ceinture à 3 points de la voiture sont correctement tendus pour garantir la plus grande
protection possible à l’enfant.
14. Ne pas utiliser le produit si certaines
parties sont cassées ou manquantes. Cela
pourrait être dangereux.
15. Après un accident, même léger, siège
auto et harnais peuvent subir des dommages invisibles à l’œil nu. Nous recommandons de les remplacer.
16. S’assurer de ne pas transporter d’objets non fi xés dans la voiture, surtout sur
la plage arrière, qui pourraient blesser les
occupants en cas d’accident.
17. S’assurer que tous les passagers de la
voiture utilisent le harnais de sécurité, pour
leur sécu rité et parce qu’en cas d’acci dent ils
pourraient heurter violemment l’enfant.
18. Si la voiture est resté arrêtée au soleil
pendant une période prolongée, inspecter
soigneusement le siège auto avant d’y mettre l’enfant ; certaines parties pourraient
être surchauffées. Les laisser refroidir.
19. En cas de longs voyages, s’arrêter souvent. L’enfant se fatigue très facilement.
N’enlever l’enfant pour aucune raison du
siège auto quand la voiture est en mouvement. Si l’enfant a besoin d’attention, trouver un endroit sûr et stationner.
20. Ne pas utiliser de sièges auto d’occasion. Ils pourraient avoir subi des dommages structuraux extrêmement dangereux et
invisibles à l’œil nu.
21. Nouveau-nés prématurés : il peut être
risqué de transporter les enfants nés à
moins de 37 semaines de gestation sur le
siège auto. Ces bébés peuvent éprouver des
problèmes respiratoires lorsqu’ils sont assis
sur le siège auto. Nous vous conseillons de
vous adresser à votre médecin ou au per-
19
Page 20
sonnel de l’Hôpital pour examiner votre
enfant et recommander le siège auto ou la
nacelle auto les plus adaptés avant de quitter l’Hôpital.
22. Le siège auto peut être utilisé comme
moyen de transport ou comme transat
même en-dehors du véhicule. Hors de la
voiture, ne pas mettre le siège auto sur des
surfaces élevées, comme des tables, des
plans de travail, des lits, etc., ou sur des
surfaces inclinées ou instables pour éviter
les chutes. Toujours se servir du harnais de
sécurité.
23. Les tissus du siège auto ne sont pas imperméables ; nous conseillons donc, quand
on l’utilise avec la poussette, d’utiliser les
accessoires pluie Chicco.
24. Tenir les sacs en plastique hors de
portée des enfants pour éviter tout risque
d’étouffement.
25. Toujours co nserver ces i nstructio ns avec
soin de façon à pouvoir les retrouver avec
facilité.
26. La société ARTSANA décline toute responsabilité en cas d’utilisation impropre du
produit.
Pour plus d’informations, et pour les demandes de pièces de rechange, contacter le
Service Clients Artsana :
CHICCO Puériculture de France
Rue Gay Lussac
Z.I Mitry Compans
77292 Mitry Mory cedex
Tel : 01 64 67 44 88
20
Page 21

D
AUTO-FIX
KOMPONENTEN : (Abb. A, B, C, D)
1. Standbasis
2. Schale
3. Tragebügel
4. Entriegelungsgriff
5. Bezug
6. Komfort-Kissen
7. Sonnendach
8. Sonnendach-Befestigung
9. Führung für den Auto-Brustgurt
10. Führungen für den waagerechten
Autogurt an der Standbasis
10 A . Führunge n für den waagere chten Autogur t
am Kinderautositz
11. Verstellgurt
12. G urtsch loss
13. Zungen des Gurtschlosses
13 A. Öffnungstaste des Gurtschlosses
14. Taste für die Gurtregulierung (unter dem
Stoffteil)
15. Gurte
16. Gurtpolsterungen (wenn vorgesehen)
17. Führungsschlitze der Gurte
18. Druck knöpfe für die Neigung des
Tragebüge ls
19. Riegel für die Befestigung am Spor twagen
20. Taste zum Entriegeln aus dem
Sportwagen
21. Positionsstange
22. Schaukelsperre
23. Zulassungsetikett
24. Montageanleitungsetikett mit und ohne
Standbasis
SEHR WICHTIG! SOFORT LESEN
• Vor der Benutzung des Produktes soll die Gebrauchsanleitung unbedingt gelesen werden.
• Für Montage und Installation des Produktes befolgen Si e bitte genau die A nweisung. Verhi ndern
Sie, dass jemand das Produkt verwendet, ohne
vorher die Anleitung gelesen zu haben.
• Bewahren Sie dieses Handbuch für künftiges
Nachschlagen auf.
• Nach den Unfallstatistiken ist der hintere Fahrzeugsitz sicherer als der vordere, deshalb ist er für
die Montage des Kinderautositzes vorzuziehen.
• WARNU NG ! GROSSE GEFAHR ! Verwe nden Sie
diesen Kinderautositz niemals auf einem Vordersitz mit Fro ntal-Airbag. D er Kinderautositz kann
auf dem Vordersitz nur dann installiert werden,
wenn der Frontal-Airbag deaktiviert wurde: Mit
dem Autohersteller oder in dem Handbuch Ihres
Autos die Möglichkeit einer Deaktivierung des
Airbags prüfen.
• Wenn der Kinderautositz auf dem Vordersitz
positioniert wird (nur wenn der Frontal-Airbag
nicht vorhanden oder deaktiviert worden ist),
wird empfohlen, den Sitz so weit zurückzustellen wie es mit den anderen Fahrgästen auf dem
Rücksitz vereinbar ist.
• Niemals diesen Kinderautositz auf Sitzen verwenden , die seitlich od er gegen die Fahr trichtung
liegen.
• Den Kinderautositz niemals an einem Autositz
anbringen, der nur einen Beckengurt (ZweipunktGurt) hat.
• Kein Kinderautositz kann bei einem Unfall die
totale Sicherheit des Kindes gewährleisten; aber
die Verwendung dieses Produktes reduzier t das
Verletzungs- und Todesrisiko des Kindes.
• Eine nicht korrekte Verwendung des Produktes
erhöht das Risiko schwerer Schäden an dem Kind
nicht nur b ei einem Unfall , sondern au ch in anderen Situationen: Prüfen Sie stets, ob der Kinderautositz korrekt an dem Sitz befestigt ist.
• Wenn der Kinderautositz beschädigt, verformt
oder stark abgenutzt ist, muss er ersetzt werden:
Die Sicherheitsfaktoren könnten nicht mehr gewährleistet sein.
• Nehmen Sie am Produkt ohne Zustimmung der
zuständigen Behörden keinerlei Veränderung vor.
Montieren Sie stets nur Zubehör-, Ersatz- oder
Bestandteile, die vom Hersteller für dieses Produkt vorgesehen sind.
• Lass en Sie das Kind nie mals ohne Auf sicht in dem
Kinderautositz.
• Um das Risiko zu verhindern, dass das Kind herausfallen könnte, schnallen Sie das Kind an dem
Kinderautositz auch während des Tragens an.
• Bei der Verwendung außerhalb des Autos ist es
gefähr lich, den Kind erautositz a uf einer erhö hten
Fläche zu verwenden.
• Lassen Sie niemals den Kinderautositz auf dem
Autositz, ohne ihn zu befestigen: Er könnte die
Passagiere verletzen.
• Legen Sie nichts, wenn es nicht ein für das Produkt zugelassenes Zubehör ist, zwischen den
Fahrzeugsitz und den Kinderautositz oder zwischen d en Kinderaut ositz und das K ind: Bei eine m
Unfall könnte der Kinderautositz dadurch nicht
mehr funktionsfähig sein.
• Sollte das Auto direkt in der Sonne stehen gelassen werden, wird empfohlen, den Kinderautositz
abzudecken.
• Nach einem auch nur leichten Unfall kann der
Kinderautositz Beschädigungen aufweisen, die
mit bloßem Auge nicht zu erkennen sind : Daher
muss er auf jeden Fall ersetzt werden.
• Bevor der Kinderautositz getragen wird, vergewissern Sie sich, dass das Kind mit den Sicherheitsgurten angeschnallt ist und dass der
Tragebügel korrekt in der senkrechten Stellung
blockiert ist.
21
Page 22
• Für den Transport mit dem Kinderautositz kombiniert mit dem Sportwagen verwenden Sie diesen
Kinderautositz ausschließlich mit einem ChiccoSportwagen, der mit einer Andock-Vorrichtung
ausgestattet ist.
• Bevor das Kind in dem Kinderautositz kombiniert mit dem Sportwagen transportiert wird,
vergewissern Sie sich, dass dieser korrekt befestigt ist.
• Ver wenden Sie bitte keine Secondhand-Kinderautositze. Sie könnten extrem gefährliche
strukturelle Schäden haben, die mit bloßem
Auge nicht zu erkennen sind, aber die Sicherheit
des Produktes beeinträchtigen.
• Die Gesellschaft ARTSANA übernimmt bei unsachgemäßer Verwendung dieses Produktes
keine Haftung.
BEDIENUNGSANLEITUNG
PRODUKTEIGENSCHAFTEN
Der Kind erautositz is t sowohl in Version „mit“ als
auch in Version „ohne“ Sta ndbasis für die Gr uppe
0+ zugelassen. Er ist für den Autotransport von
Kindern bis zu 13 kg Körpergewicht genehmigt.
Die Zula ssung gehör t zu dem „Univer sal“-Typ, also
kann der Kinderautositz für jeden Fahrzeug-Typ
verwendet werden.
WARNUNG ! „Universal“ bedeutet, dass er mit
den meisten, aber nicht mit allen PKW-Sitzen
kompatibel ist.
WICHTIGER HINWEIS
1. Dies ist eine „Universal“- Rückhalteeinrichtung für Kinder, die gemäß der europäischen
Prüfnorm ECE 44 - 04 zugelassen ist. Sie ist
für die allgemeine Ver wendung in Fahrzeugen
geeigne t und mit den meisten , aber nicht mit
allen PKW-Sitzen kompatibel.
2. Die perfekte Kompatibilität ist in den Fällen
leichter erhältlich, indem der Fahrzeughersteller in dem Fahrzeughandbuch erklärt, dass das
Fahrzeug den Einbau von „Universal“-Rückhalteeinrichtungen für Kinder der jeweiligen
Altersgruppe vorsieht.
3. Diese Rückhalteeinrichtung für Kinder wurde nach strengeren Bedingungen in die Klasse
„Univer sal“ eingest uft als vor hergehend e Ausführungen, die diese Aufschrif t nicht tragen.
4. Nur geeignet, wenn das genehmigte Fahrzeug mit Dreipunkt-/ Statik- oder Retrak torSicherheitsgurten ausgerüstet ist, die der
UN/ECE-Regelung Nr. 16 oder anderen vergleichbaren Normen entsprechen.
5. Sollte n Zweifel bestehe n, kann der Her steller der Rückhalteeinrichtung für Kinder oder
der Fachhändler befragt werden.
Der Kinderautositz kann außerhalb des Fahrzeugs an einem Chicco-Spor twagen mit Andock-Vorrichtung befestigt oder als Wippe
benutzt werden.
VERWENDUNGSEINSCHRÄNKUNGEN
WARNUNG! Beachten Sie sorgfältig folgende
Verwendungseinschränkungen des Produktes:
Andernfalls ist die Sicherheit nicht gewährleistet:
1. Das Körpergewicht des Kindes darf nicht über
13 kg lie gen.
2. Verwenden Sie diesen Kinderautositz niemals
auf einem Vord ersitz mit Front al-Airbag, s ondern
nur, wenn der Frontal-Airbag deaktiviert wurde:
Mit dem Autohersteller oder in Ihrem Fahrzeughandbu ch die Möglichke it einer Deak tivierung d es
Airbags prüfen.
3. Verwenden Sie niemals das Komfort-Kissen,
wenn das Kind ein Körpergewicht über 6 kg hat.
NOTWENDIGE ANFORDERUNGEN AN AU-
TOSITZ UND SICHERHEITSGURT
Der Kinderautositz kann auf dem Beifahrersitz oder
einem Rücksitz installiert werden, aber mit folgenden Einschränkungen: Der Sitz muss
• in Fahrtrichtung sein (Abb. 1) und
mit einem Dreipunkt-, Statik- oder Retrak tor-Sicherheitsgur t ausgestattet sein (Abb. 2).
Es wird empfohlen, den Kinderautositz stets auf
dem Rücksitz des Autos zu installieren.
WARNUNG ! EXTREM GEFÄHRLICH! Verwenden
Sie diesen Kinderautositz niemals auf einem Vordersitz mit Frontal-Airbag.
WARNUNG! Installieren Sie den Kinderautositz
niemals auf einem Sitz, der nur einen Beckengurt
(Zweipunktgurt) hat (Abb. 2A).
SO WIRD DIE GURTPOSITION
WARNUNG! Die Gurte müssen stets an das
Wachstum des Kindes angepasst werden.
Vor dem Installieren des Kinderautositzes müssen
die Rückhaltegurte für das Kind auf die richtige
Höhe eingestellt werden.
Die richtige Höheneinstellung der Gurte liegt etwas unter den Schultern
(Abb. 3). Der Kinderautositz hat 3 Höheneinstellungen der Gurte. (Abb. 4)
Der Kinderautositz ist mit einem Komfort-Kissen
verseh en, das dem Kin d von der Gebur t bis zu 6 kg
Körpergewicht die richtige Größe und eine ideale
Position für Hals und Rücken garantiert.
Zur Mont age des Komfor t-Kissens pr üfen Sie bitte ,
ob die Gurte durch die unteren Führungsschlitze
gezogen sind. WARNUNG: Dies ist die einzig zulässig e Position bei de r Verwendung m it KomfortKissen (Abb. 5)
Warnung : Um d ie größte Sicherh eit des Produk tes
22
VERSTELLT
Page 23

zu gewährleisten, darf das Komfort-Kissen nicht
mehr ver wendet werden, wenn das Kind ein Körpergewicht von 6 kg erreicht hat.
Für die Verstellung der Gurte gehen Sie bitte folgendermaßen vor:
• das Gurtschloss öffnen, indem die rote Taste
gedrückt wird (Abb. 6)
• d ie Gurte von hinte n herauszie hen und sie in den
Schlit z einziehen, d er sich am Beste n für die Größe des Kindes eignet (Abb. 7A und 7B).
WARNUNG! Ver gewissern Sie s ich, dass die Gur te
stets zwischen der Positionsstange und der Schale
geführt sind.
Die Gurte müssen stets korrekt gestrafft sein.
AUFNAHME DES KINDES
1. Den Stoffteil anheben, die Einstelltaste gedrückt
halten und die Gurte des Kinderautositzes so ziehen, dass sie locker werden (Abb. 8)
2. Das Gur tschloss öffnen, indem die rote Taste
gedrückt wird (Abbildung 6)
3. Das Kind hineinsetzen
4. Die beiden Zungen des Gurtschlosses überein-
ander legen (Abbildung 6A)
5. Die beiden Zungen in das Schloss stecken bis
sie mit einem „Klick“ hörbar einrasten (Abb. 6B).
WARNUNG : Niemals nur eine Zunge in das
Schloss stecken.
6. Die Sicherheitsgurte des Kindes spannen, indem
Sie den zentralen Gurtl ängenversteller vorn in der
Mitte ziehen (Abb. 9)
WARNUNG: Beachten Sie dabei, sie nicht zu eng
zu straffen. Wenn Sie die Finger zwischen Gurt
und Körper des Kindes stecken können, sind sie
optimal gespannt.
SO WIRD DER TRAGEBÜGEL DES KINDERAU-
Der Tragebügel des Kinderautositzes ist 4fach
verstellbar (Abb. 10):
A . Pos it ion für de n Tra ns por t i m Au to ( WAR NUN G
: Diese Position ist die einzige, die für den Autotransport zugelassen ist).
B. Trageposition
C. Schaukelposition oder Position zum Andocken
an einem Chicco-Sport wagen
D. Wippe ohne Schaukelfunktion
Für die Einste llung gleichzeit ig die Druckkn öfe am
Tragebügel d rücken (Abb. 11) und den Tragebügel
in die gewünschte Position drehen, bis dieser mit
einem „Klack“ hörbar einrastet.
Lesen Sie aufmerksam den Paragraphen: NOTWENDIGE ANFORDERUNGEN FÜR DEN AUTO-
TOSITZES VERSTELLT
SO WIRD DER KINDERAUTOSITZ
IM AUTO BEFESTIGT
SITZ UND DEN SICHERHEITSGURT.
Der Kinderautositz darf sowohl in der Version
„mit“ als auch „ohne“ Standbasis und nur gegen
die Fahrtrichtung installiert werden. WARNUNG
! SEHR GEFÄHRLICH: NICHT AUF SITZEN MIT
AIRBAG INSTALLIEREN, es sei denn, der Airbag
wurde deaktiviert.
WARNUNG ! Niemals den Kinderautositz auf
einem Sitz mit Beckengurt (Zweipunkt-Gurt)
installieren.
MONTAGE MIT STANDBASIS
Für die Montage des Kinderautositzes mit der
Standbasis auf dem Fahrzeugsitz gehen Sie bitte
folgendermaßen vor:
1. Lösen Sie den Kinderautositz von der Standbasis,
indem Sie d en Entriegelung sgriff (Abb. 12) ziehen
und den Ki nderautosit z gleichzeitig d urch den Tragebügel anheben.
2. Stellen Si e die Standbasis a uf den Platz, auf d em
Sie sie mon tieren wollen u nd positionie ren Sie diese wie in Ab bildung 13 gezeigt . Beachten Sie da bei,
dass die Standbasis ganz nah an der Rückenlehne
des Fahrzeugsitzes ist.
3. Ziehen Sie an dem Sicherheitsgurt des Autos
und stecken sie ihn in das entsprechende Gur tschloss, wobei der waagerechte Teil des Gurtes
durch die beiden dafür vorgesehenen Führungen
des Kinderautositzes gezogen wird. (Abb.14)
4. Bevor der Kinderautositz in die Standbasis eingesetz t wird, prüfen Si e bitte, dass di e Schaukelsp erre
geschlossen ist (Abb. 15).
5. Den Kin derautosit z in der Standbas is fi xieren (er
muss stets gegen die Fahrtrichtung sein), indem
Sie den Kinderautositz nach unten drücken, bis er
mit einem „Klack“ hörbar einrastet. (Abb. 16).
6. Vergewissern Sie sich der korrekten Fixierung
des Kinderautositzes an der Standbasis, indem Sie
versuchen, ihn sowohl an der vorderen als auch an
der hinteren Seite nach oben zu ziehen.
7. Ziehen Sie den Brustgurt des Autos durch die
dafür vorgesehene Führung auf der Rückseite der
Rückenlehne des Kinderautositzes (Abb. 17)
WARN UNG: WÄHR END DES AUTOTR ANSPO RTES MUSS SICH DER BRUSTGURT STETS IN DER
IN ABB. 18 GEZEIGTEN POSITION BEFINDEN:
DER KINDERAUTOSITZ DARF NUR DANN BENUTZT WERDEN, WENN DER GURT IN DIE DAFÜR VORGESEHENE GURTFÜHRUNG GEFÜHRT
IST: ANDERNFALLS KÖNNTE ERNSTHAFT DIE
SICHERHEIT GEFÄHRDET SEIN.
8. Den Fahrzeug gurt so weit wie möglich um den
Kinderautositz spannen, ohne dass er locker ist,
und vergewissern Sie sich, dass er nicht verdreht
ist.
9. Den Tragebügel in die Position „A“ bringen
23
Page 24

(Abb. 10)
Wie der Kinderautositz aus der Standbasis genommen wird:
Den Br ustgurt au s der Führung an d er Rückenleh ne
herausziehen, den Tragebügel wieder in die Position „B“ bringen (Abb. 10), den Kinder autositz entriegeln, indem an dem dafür vorgesehenen Griff
gezogen wird und gleichzeitig den Kinderautositz
durch den Tragebügel nach oben ziehen.
WARNUNG! Vergewissern Sie sich nach der
Montage STETS, dass der Autogurt korrekt unter
Spa nnun g steh t, das s er je doch n icht zu st raff angezogen ist und dass er nicht mit den Führungen
in Berührung kommt.
WARNUNG : FÜHREN SIE DEN AUTOGURT, NUR
WIE IN DER GEB RAUCHSANLEIT UNG IN ABB. 19
BESCHRIEBEN, EIN.
In Abb. 20 sind einige Beispiele für eine nicht korrekte Montage aufgeführ t.
MONTAGE OHNE STANDBASIS
Für die Mont age des Kinde rautositze s ohne Standbasis im Fah rzeug gehen Si e bitte folgen dermaßen
vor:
1. Senken Sie die Schaukelsperre. (Abb. 21)
2. Positionieren Sie den Kinderautositz auf dem
gewählten Fahrzeugsitz.
3. Ziehen Sie an dem Sicherheitsgurt des Autos
und stecken Sie ihn in das entsprechende Gur tschloss, wobei der waagerechte Teil des Gurtes
durch die beiden dafür vorgesehenen Führungen
des Kinderautositzes gezogen wird. (Abb. 22);
4. Ziehen Sie den Brustgurt des Autos durch die
dafür vorgesehene Führung auf der Rückseite der
Rückenlehne des Kinderautositzes (Abb. 23).
5. Spannen Sie den Gurt so weit wie möglich um
den Kinderautositz, ohne dass er zu locker ist, und
vergewissern Sie sich, dass er nicht verdreht ist.
WARNUNG: WÄHREND DES AUTOTRANSPORTES MUSS SICH DER BRUSTGURT IMMER IN DER
IN ABB. 24 GEZEIGTEN POSITION BEFINDEN:
DER KINDERAUTOSITZ DARF NUR DANN BENUTZT WERDEN, WENN DER GURT IN DIE DAFÜR VORGESEHENE GURTFÜHRUNG GEFÜHRT
IST: ANDERNFALLS KÖNNTE ERNSTHAFT DIE
SICHERHEIT GEFÄHRDET SEIN.
6. Den Tragebügel in die Position „ A“ bringen
(Abb. 10)
In Abb. 2 5 sind ei nige Be ispiele für ei ne nich t korrekte Montage aufgeführ t.
7. So wird der Kinderautositz vom Fahrzeugsitz
entfernt: Lösen Sie zuerst den Sicherheitsgurt
des Fahr zeuges, inde m Sie auf das Schlos s drücken
und ziehen dann den diagonalen und
horizontalen Gurt aus der Führung des Kinderautositzes heraus. Nun stellen Sie den
Tragebügel in Position „B“ (Abb. 10).
SO WIRD DAS SONNENDACH
Der Kinderautositz ist mit einem Sonnendach
ausgestattet, welches das Kind vor Sonne und
Wind schützt.
Es lässt sich leicht durch zwei dafür vorgesehene
Befestigungen in „Gabel-Form“ an dem Kinderautositz anbringen und kann nach Belieben zurückgestellt werden. (Abb. 26)
Wird der Kinderautositz nicht gerade für den Autotransport eingesetzt, kann er als Wippe (mit
und ohne S chaukelfunk tion) benut zt werden. Z um
Schauke ln setzen Sie wi eder die Scha ukelsper re ein
(Abb. 15) und ste llen Sie den Trageb ügel in Position
„B“. (Abb. 10)
Wenn Sie den Kindersitz in Fix-Position benutzen
wollen, lösen Sie die Schaukelsperre
(Abb. 21) und positionieren Sie den Tragebügel in
der Position „D“. (Abb. 10)
Eine Verwendung als Wippe für Kinder, die sich
selbst ändig hochzieh en können (ab ca. 6 M onaten
oder 9 kg Körpergewicht) wird nicht empfohlen.
Legen Sie dem Kind stets die Sicherheitsgurte an,
damit es nicht herausfallen kann.
Lassen Sie das Kind niemals ohne Aufsicht.
Die Verwendung des Kinderautositzes auf hohen
oder schrägen Flächen ist gefährlich.
WARNUNG: Vor dem Transport des Kinderautositzes den Tragebügel stets in die senkrechte
Position „B“ bringen und blockieren (Abb.10)
ACHTUNG! Für die Verwendung mit dem Sportwagen be achten Sie bitte d ie Anleitung de s Sportwagens
Die neuen CHICCO-Sportwagen mit dem „CLIKCLAK“-Andock-System haben Armstützen mit
einer speziellen Vorrichtung, die das Einhaken
des Kinderautositzes direkt am Sportwagen ohne
weitere Zubehör teile ermöglicht.
- Öffnen Sie den Sportwagen, indem Sie dessen
Gebrauchsanleitung befolgen.
- Greifen Sie den Tragebügel des Kinderautositzes
und posit ionieren Sie die sen auf dem Spor twagen,
wie in Abb. 27 gezeigt.
- Ziehen Sie zwei Befestigungshaken aus dem
Tragebügel, indem Sie die zwei roten Handräder
ziehen und drehen (Abb. 28).
- Drücken Sie die beiden hinteren roten Tasten und
stelle n Sie den Tragebügel n ach hinten, bis sic h die-
24
VERWENDET
FIX- ODER SCHAUKELPOSITION
DES KINDERAUTOSITZES
(VERWENDUNG ALS WIPPE)
VERSION KINDERAUTOSITZ
+ SPORTWAGEN
Page 25
ser parallel zu den Armstützen befi ndet; die zwei
Befestigungshaken lassen sich automatisch in die
Steck-Vorrichtungen der Armstützen arretieren
(drücken Sie das Fußende des Kinderautositzes
nach unten, damit der Tragebügel in die korrekte
Position gebracht wird).
- Um den Kinderautositz vom Sportwagen abzu-
nehmen , drücken Sie einf ach die zwei roten Tast en,
die sich am Tragebügel befi nden, wie in Abbildung
29 gezeigt.
- Stellen Sie n un den Tragebügel na ch oben, setze n
Sie die beid en Befestigu ngshaken (Pun kt D) wieder
ein und nehmen Sie den Kinderautositz aus dem
Sportwagen.
WARNUNG : Die Montage /Demont age des Kinde rautositzes kann auch dann vorgenommen werden,
wenn sich das Kind darin befi ndet. Aber denken
Sie bitte an das „zusätzliche“ Gewicht, das eine
„leichte“ Montage/Demontage beeinträchtigen
könnte. Die oben genannten Anleitungen sollten
stets gewissenhaft durchgeführt werden.
SO WIRD DER BEZUG ENTFERNT:
• Zu m Waschen des Be zuges, öffn en Sie zuerst die
Sicherheitsgurte des Kinderautositzes und lösen
Sie danach die zwei Metallhaken (Abb. 30). Nun
ziehen Sie den Bezug ab. Bitte beachten Sie die
Waschanleitung , die sich am Bezug befi ndet.
• Sicherheitsgurte, Schloss und Kunststoffteile
dürfen nur mit einem feuchten Tuch gereinigt
werden. Verwenden Sie keinesfalls Lösungsmittel
oder Bleiche, die die o. g. Teile beschädigen können und somit die Sicherheit beeinträchtigen.
WICHTIGE HINWEISE: BITTE VOR DER
1. Bei der Montage des Kinderautositzes müssen die mit gelieferte n Gebrauchsa nleitungen
genau befolgt werden.
2. Lassen Sie Ihr Kind niemals ohne Aufsicht
in dem Kinderautositz.
3. Führen Sie den Autogurt stets nur in die
Positionen, die in dieser Gebrauchsanleitung
gezeigt werden, da sonst die Sicherheit Ihres
Kindes gefährdet ist (Beispiele über NICHT
korrekte Montage werden in den Abbildungen
20 und 25 gezeigt).
4. Installieren Sie den Kinderautositz nur auf
Autositzen, die korrekt mit der FahrzeugStruktur fi xiert und in Fahrtrichtung sind.
Achten Sie bitte darauf, dass verstellbare
oder drehbare Fahrzeugsitze korrekt fi xiert
sind. Bei einem Unfall könnten sie eine Gefahr darstellen.
5. Führen Sie die Montage des Kinderautositzes im Fahrzeug sehr gewissenhaft durch,
damit ein Verhaken mit einem verstellbaren
Sitz oder mit der Autotür vermieden wird.
FAHRT LESEN
6. Warnung: Dieser Kinderautositz darf NIEMALS mit einem Beckengurt (2-Punkt-Gurt)
befestigt werden.
7. Kontrollieren Sie während der Fahrt regelmäßig, dass Ihr Kind das Gurtschloss nicht
geöffnet hat.
8. Wenn Sie den Kinderautositz mit der Standbasis benutzen, vergewissern Sie sich stets,
dass die Standbasis korrekt am Fahrzeugsitz
befestigt ist.
9. Nehmen Sie an dem Produkt keinerlei
Veränderung ohne Zustimmung der zuständigen Behörde vor. Montieren Sie stets nur
Zubehör-, Ersatz- oder Bestandteile, die vom
Hersteller für dieses Produkt vorgesehen sind.
Der Hersteller ist nicht haftungspfl ichtig für
den Fall, dass am Produkt Veränderungen
vorgenommen wurden.
10. Wenn der Kinderautositz aus irgendeinem
Grund beschädigt, deformiert oder stark abgenutzt ist, darf dieser nicht mehr benutzt
werden. Die Sicherheitsfaktoren könnten
nicht mehr gegeben sein.
11. Der Bezug sollte niemals durch einen
anderen ersetzt werden, sofern dieser nicht
vom Hersteller geliefert wurde, da der Bezug
Bestandteil des Kinderrückhaltesystems ist.
Der Kinderautositz darf niemals ohne Bezug
benutzt werden.
12. Kontrollieren Sie, dass das Gurtband nicht
verdreht ist. Vermeiden Sie, dass das Gurtband
oder Teile de s Kinderautos itzes in die Autot ür
eingeklemmt werden oder an scharfen Stellen
scheuern. Sollte der Gurt Risse zeigen oder
ausgefr anst sein, ersetzen Sie ihn bitte s ofort
durch einen neuen.
13. Vergewissern Sie sich, dass sowohl die
Gurte Ihres Kindes als auch der DreipunktGurt Ihres Autos korrekt und straff sitzen.
Nur so erreichen Sie den optimalen Schutz
für Ihr Kind.
14. Verwenden Sie das Produkt nicht mehr,
wenn Teile fehlen oder beschädigt sind. Dies
könnte gefährlich sein.
15. Auch nach einem leichten Unfall können
Kinderautositz und Gurte Beschädigungen
aufweisen, die mit bloßem Auge nicht zu erkennen sind. Es wird empfohlen, diese dann
stets durch neue zu ersetzen.
16. Achten Sie darauf, dass sich im Fahrzeug,
vor allem auf der Hutablage, keine Gegenstände befi nden, die bei einem Unfall Insassen verletzen könnten. Alle Gegenstände im
Auto sollten in geeigneter Weise gesichert
werden.
17. Achten Sie darauf, dass alle Insassen zu
ihrer eigenen Sicherheit im Fahrzeug ange-
25
Page 26

schnallt sind. Ein Insasse, der nicht mit dem
Sicherheitsgurt angeschnallt ist, kann bei
einem Unfall eine Gefahr für das Kind im
Kinderautositz darstellen.
18. Falls Ihr Fahrzeug länger in der Sonne
stand, vergewissern Sie sich bitte, bevor Sie
das Kind in den Kinderautositz setzen, dass
kein Teil des Kinderautositzes überhitzt ist:
Lassen Sie bitte die Sitzfl äche abkühlen.
19. Machen Sie während einer langen Autofahrt öfters Pause, da Kinder schnell ermüden.
Während d er Fahrt darf das Kind niemals aus
dem Kinderautositz genommen werden. Wenn
das Kind Ihre Aufmerksamkeit braucht, dann
halten Sie an einem geeigneten Platz an.
20. Verwenden Sie bitte keine SecondhandKinderautositze. Sie könnten extrem gefährliche strukturelle Schäden haben, die mit
bloßem Auge nicht zu erkennen sind.
21. Frühgeborene: Neugeborene, die vor der
37. Schwangerschaftswo che geboren werden,
können ein Risiko im Kinderautositz haben.
Diese Frühgeborenen können Atmungsschwierigkeiten haben, wenn sie im Kinderautositz sitzen. Bevor Sie das Krankenhaus
verlassen, fragen Sie bitte Ihren Kinderarzt
oder das Krankenhauspersonal. Sie können
den Zustand Ihres Kindes beurteilen und
Ihnen einen geeigneten Kinderautositz oder
Rückhalteeinrichtung empfehlen.
22. Der Kinderautositz kann außerhalb des
Fahrzeugs auch als Transpor tmittel oder als
Wippe benutzt werden. Um einem Herunterfallen vorzubeugen, darf der Kinderautositz niemals auf erhöhten Ebenen, wie z. B.,
Tischen, Arbeitsplatten, Betten usw. oder auf
schrägen Flächen abgestellt werden. Verwenden Sie stets die Sicherheitsgurte.
23. Die Bezüge des Kinderautositzes sind
nicht wasserabweisend. Verwenden Sie bitte
die Chicco-Regenverdecke, die als Zubehör
erhältlich sind.
24. Polybeutel stets fern von Kindern aufbewahren. Erstickungsgefahr!
25. Diese B edienungsa nleitung muss sor gfältig aufbewahrt werden und stets griffbereit
sein.
26. Die Ge sellscha ft ARTSANA übe rnimmt bei
unsachgemäßer Verwendung dieses Produktes keine Haftung.
Wenn Sie zusätzliche Informationen benötigen, wenden Sie sich bitte an:
CHICCO Babyausstattung GmbH
Postfach 2036
63120 Dietzenbach
www.chicco.com
26
Page 27

GB
AUTO-FIX
COMPONENTS: (diag. A, B, C, D)
1. Base unit
2. Shell
3. Carry handle
4. Release handle
5. Seat Fabric
6. Comfort cushion insert
7. Hood
8. Sun canopy joint
9. Diagonal car belt guide
10. Horizontal car belt guides on base unit
10 A. Horizontal car belt guides on the child car
seat
11. Adjustment strap
12. Harness buckle
13. Buckle straps
13 A. Buckle release button
14. Belt adjustment button (under the fabric
fl ap)
15. Belt s
16. Belt padding (if provided)
17. Belt holes
18. Buttons for reclining the handle
19. Knob for fi tting to the stroller
20. Button for releasing the seat from the
stroller
21. Roller bar
22. Securing device
23. Conformity label
24. Instruction label for assembling the seat
with or without base unit
VERY IMPORTANT! TO BE
• Please read all these instructions carefully before using the product.
• Please read these instructions carefully before
assembling and fi tting the product. Ensure that
no person uses the product before reading the
instructions.
• Please keep this instruction manual for future
reference.
• According to car accident statistics, the back
seat of the car is safer than the front seat; it is
therefore recommended to fi t the child c ar seat
in the back of the car.
• WARNING! SERIOUS DANGER! Never use this
child car seat on a front seat equipped with
frontal airbag. The child car seat can be fi tted
in the front seat of a car only if the frontal air
bag has been de-activated. Check with the car
manufacturer or in your car instruction manual
whether the airbag may be de-activated.
• If the child car seat is fi tted in the front seat of
the car (only if the frontal airbag is not present
READ IMMEDIATELY
or it has been de-activated), it is recommended
to pull the seat back as much as possible, but
ensuring that any passenger sitting in the back
seat has enough room for leg movement.
• Never use this child car seat on side-facing or
rear-facing car seats.
• Never fi t the child car seat in a car seat w hich is
only equipped with a 2 point car safety belt.
• No child car seat can guarantee the complete
safety of your child in the case of an accident;
its use, however, reduces the risk of injury or
death of your child.
• The incorrect use of the product increases the
risk of serious damage to the child, not only
in the case of accident, but also in other situations: always check that the child car seat is
correctly fi tted to the car seat.
• The child ca r seat must be replaced if it is damaged, deformed or worn out, since it may no
longer comply with the original safety standards.
• Do not modify or add components to the product unless approved by the relevant authority.
Do not use accessories, spare parts, or any
component not supplied by the manufacturer.
• Never leave your child unattended in the car
seat, even for the shortest time.
• To prevent the risk that your child may fall, fasten your child by the safet y harness even when
carrying the child car seat by hand.
• It is dangerous to use the child car seat on
raised surfaces out of the car.
• Never leave the child car seat unsecured in the
car: it may hurt or injure the passengers.
• Do not place anything between the car seat
and the child car seat, or between the child
car seat and your child, unless it is an accessory a pproved by the manufacturer: in the case
of accident, the child car seat may not work as
required by safety standards.
• If the car is left under the direct sunlight, it is
recommended to cover the child car seat.
• An accident, even minor, may damage the child
car seat, even if it not visible to the naked eye:
it must be replaced in any case.
• Before carrying the child car seat by hand,
ensure that your child is fastened with the restraint harness and that the handle is correctly
locked in the vertical position.
• To transport your child in a child car seat fi tted
to a stroller, only use this child car seat with
Chicco strollers specifi cally designed for this
purpose.
• Before transpor ting your child in the child car
seat fi tted to the s troller, ensure t hat it is locked
safely.
• Do not use second-hand child car seats: they
may have suffered structural damage not vis-
27
Page 28

ible to the naked eye, which could compromise
the safet y of the product.
• ARTSANA declines all responsibility for the incorrect use of this product.
INSTRUCTIONS FOR USE
PRODUCT CHARACTERISTICS
The child car seat (i.e. in the child car seat only
and child car seat with base version) is approved
for Group 0+, for children from birth up to 13
Kg.
The child car seat has been classifi ed as “Universal” and, therefore, it can be used with any kind
of car model.
WARNING! “Universal” means that the child car
seat can be fi tted on most, but not all, car seats.
IMPORTANT WARNING
1. This is a “Universal“ child restraint. It is
approved to Regulation No. 44.04 series of
amendments, for general use in vehicles,
and it will fi t most, but not all car seats.
2. A correct fi t is likely if the vehicle manufacturer has declared that the vehicle is
capable of accepting a “Universal” child restraint for this age group.
3. This child restraint has been classifi ed as
“Universal“ und er more stringe nt conditions
than those that have been applied to earlier
designs that do not carry this notice.
4. Only suitable if the vehicle is fi tted with
a 3 point static or 3 point retractor safety
belts approved to UN/ECE Regulation No.
16 or other equivalent standard.
5. If in doubt, consult either the child restraint manufacturer or the retailer.
The child c ar seat can also b e used out of the car,
fi tted to the stroller or as a rocker or baby chair.
WARNING! Read these use restrictions carefully
to ensure the safe use of the product.
1. The child must not weigh more than 13 Kg.
2. Never use this child car seat on a front seat
equipped with frontal airbag, but only if the
frontal airbag has been de-activated : check with
the car manufacturer or in your car instruction
manual whether the airbag can be de-activated.
3. Never use the comfort cushion if your child
weighs more than 6 kg.
The child car seat may be fi tted to the front passenger seat or any rear seat, but in compliance
USE RESTRICTIONS
NECESSARY REQUISITES OF THE CAR’S
SAFETY BELT AND SEAT
with the following restrictions. The seat must:
• Be fi tted in a front-facing position (diag. 1)
Be fi tted with a 3 point st atic or 3 point retra ctor
safety belts (diag. 2)
It is re com men ded to al way s fi t the ch ild car seat
in the rear seat of the car.
WARNING! SERIOUS DANGER! Never use this
child car s eat on a front seat eq uipped with fro ntal airbag.
• WARNING ! Never fi t the child car seat in a car
seat which is only equipped with a 2 point car
safety belt safety belt (diag. 2A).
ADJUSTING THE RESTRAINT
WARNING! The restraint harness must always
be adapted according to your child’s growth.
Before fi tting the chid car seat into the car, adjust the child restraint harnesses to the correct
height.
The correct position of the harness height is
slightly below your child’s shoulders (diag. 3).
The child car seat can be adjusted to 3 positions
(diag. 4).
The child car seat is equipped with a comfort
cushion, which guarantees the correct fastening
of your child and the ideal position for neck and
back, from birth until the child weighs 6 kg.
To fi t the comfort cushion, check that the belts
are inse rted in the hol e placed in the lowe st position. WARN ING: this is the o nly position allo wed
for using the child car seat with the comfort
cushion (diag. 5).
Warning: to guarantee the maximum safety of
the product, remove the comfort cushion when
the child weighs 6 Kg.
To adjust the restraint harnesses, proceed as
follows:
• Open the buckle by pressing the red button
(diag. 6).
• Remove the harnes s from the back and insert it
into the ho le, which is the mos t suitable one for
your child’s height.
(diag. 7A and 7B).
WARNING! Ensure that the safety harness is
always inserted between the roller bar and the
child car seat’s shell.
The safety harness must always be tightened to
the correct position.
PLACING THE CHILD IN THE SEAT
1. Lift the fabric fl ap, keep the adjusting button
pressed and pull the child c ar seat harness to untighten it (diag. 8).
2. Open the buckle by pressing the red button
(diag. 6).
28
HARNESS
Page 29

3. Place the child.
4. Overlap the t wo buckle straps (diag. 6A).
5. Insert both buckle straps until an audible
“click” is heard (diag. 6B). WARNING: never insert only one strap in the buckle.
6. Tighten the child safety belts by pulling the
central adjustment belt (diag.9).
WARNING ! Do no t over- tight en th e belt s. If you
can insert your fi ngers between the harness and
your child’s body, it means that they are tightened correctly.
CARRY HANDLE POSITIONS
The carry handle of the child car seat can be adjusted to 4 -positions (diag. 10):
A. Position for car transport (WARNING: this is
the only position allowed during car transport).
B. Position for carrying the child car seat by its
hand.
C. Position for using the child car seat as a baby
rocker or fi tting it to the Chicco stroller.
D. Position for using the child car seat as a baby
chair.
To adjust the ha ndle, press th e buttons place d on
the handle simultaneously (diag. 11), rotate the
handle to the desired position until an audible
click is heard.
FITTING THE CHILD C AR SEAT
Please read this paragraph carefully: NECESSARY REQUIREMENTS OF THE CAR SEAT AND
SAFETY BELT.
The child car seat, with or without base, must be
fi tted only rear-facing. WARNING! EXTREMELY
DANGEROUS: DO NOT FIT ON CAR SEATS
EQUIPPED WITH AIRBAGS, unless the airbags
have been de-activated.
WARNING! Never fi t the child car seat to a car
seat if it is only equipped with a 2 point car safety belt safety belt.
To fi t the child car seat with base unit to the car
seat, proceed as follows:
1. Release the child car seat from the base unit
by pulling the release handle (diag.12), and simultaneously lift it by using the carry handle.
2. Place t he base unit on the d esired car seat , and
adjust it as shown in diag. 13, ensuring that it is
placed against the backrest of the car seat.
3. Pull th e car seat belt and f asten it to the buck le
by passing the horizontal part through the ap-
INTO THE CAR
FITTING THE CHILD C AR
SEAT WITH BASE UNIT:
propriate belt guides (diag.14).
4. Before fi tting the child car seat on to its base
unit, check that the securing device is closed
(diag. 15).
5. Place the child car seat on to its base unit in
a rear-facing position, and press downward until it is secured (you will hear an audible click)
(diag. 16).
6. Check that the child car seat has been cor-
rectly secured to its base unit by trying to pull it
upward, both from the front and rear part.
7. Take the diagonal belt of the car, and pass it
through the belt guide located at the rear of the
child car seat’s backrest diag. 17)...
WARNING: DURING TRANSPORT, THE DIAGONAL BELT OF THE C AR MUST ALWAYS BE IN THE
POSITION SHOWN IN DIAG. 18A; NEVER USE
THE CHILD CAR SEAT WITHOUT PASSING THE
BELT THROUGH THE APPROPRIATE GUIDE:
IT COULD SERIOUSLY COMPROMISE THE
SAFETY STANDARDS.
8. Pull the belt around the child car seat as tight
as possible, ensuring that it is not slack or twisted (diag. 18B).
9. Place the handle in the “A” position (diag. 10).
To remove the child car seat from its base unit:
Remove the diagonal belt from the guide placed
on the backrest, reposition the handle in the “B”
position (diag. 10), release the child car seat by
pulling t he appropriate r elease handle an d simultaneously lift the seat by the carry handle.
WARNING! After fi tting the child car seat, ALWAYS check that the car seat belt is pulled tight
and tensioned correctly. Ensure that its buckle
does not force the belt out of the appropriate
guides on the base unit, and that it does not interfere with the guides.
WARNING: NEVER SECURE THE CAR SEAT BELT
IN ANY OTHER POSITION THAN THE ONE
SHOWN IN DIAG. 19.
Diag. 20 shows some examples of incorrect fi tting.
FITTING THE CHILD C AR SEAT WITHOUT
To fi t the child car seat without base unit in the
car, proceed as follows:
1. Lower the stop (diag. 21).
2. Place the child car seat onto the desired car
seat.
3. Pull the car seat belt and fasten it to the cor-
responding buckle by passing the horizontal par t
through the appropriate belt guides on the child
car seat (diag. 22).
4. Take the car’s diagonal seat belt and pass it
29
BASE UNIT
Page 30

through the belt guide located at the rear of the
child car seat’s backrest (diag.23).
5. Pull the belt around the child car seat as
tight as possible, ensuring that it is not slack or
twisted. WARNING: DURING TRANSPORT, THE
CAR’S DIAGONAL SEAT BELT MUST ALWAYS
BE IN THE POSITION INDICATED IN DIAG. 24.
NEVER USE THE CHILD CAR SEAT WITHOUT
PASSING THE BELT THROUGH THE APPROPRIATE GUIDE: THIS MAY SERIOUSLY COMPROMISE YOUR CHILD’S SAFETY.
6. Put the handle into the “A” position (diag. 10).
7. To remove the child car seat from the base
unit: repeat the above operations in reverse:
slide out the car’s diagonal belt from the guide
on the backrest, reposition the handle in the “B”
position (diag. 10), unlock the child car seat by
pulling t he appropriate r elease handle an d simultaneously lift the seat by the carry handle.
Diag. 25 shows some examples of incorrect fi tting.
Remove the diagonal belt from the guide placed
on the backrest, reposition the handle in the “B”
position (diag. 10), release the child car seat by
pulling t he appropriate r elease handle an d simultaneously lift the seat by the
USING THE SUN CANOPY
The child car seat comes with a sun canopy to
protect your child from the sun and wind.
It can be easily locked and unlocked to the child
car seat by t wo joints, and it can be adjusted to
the desired position (diag. 26).
USING THE CHILD CAR SEAT IN A FIXED
OR ROCKING POSITION
(BABY ROCKING CHAIR USE)
When the child car seat is not used in the car, it
can also be used as a rocking or baby chair. To
use it as a rocking chair, push the stop (diag. 15)
and move the handle to position “B” (diag. 10).
To use it in a fi xed position, pull out the stop
(diag. 21) and move the handle to position “D”
(diag. 10).
The child car seat should not be used as a babyrocker chair with children who are already able
to stand up on their own (until around 6 months
of age or weighing 9 Kg.).
Always fasten the restraint harness to prevent
accidental falls.
Never leave your child unattended.
WARNING: do not use the child car seat on high
or sloped surfaces.
WARNING: before transporting the child car
seat by hand, always put and lock the handle in
the vertical position “B” (diag.10).
CHILD CAR SEAT
WARNING! Please refer to the stroller instructions to use the child car seat with the stroller
The new CHICCO strollers, featuring the CLIK
CLAK system, have armrests with special devices, which allow you to fi t the child car seat
directly onto the stroller without using other accessories. To fi t the child car seat to the stroller
you must fi rst open the stroller and then follow
the stroller’s instructions.
1. To fi t the child car seat to the stroller, hold the
child car seat by the carry handle and carefully
place it onto the stroller, as shown in diag. 27.
2. Pull out the two locking pins from the carr y
handle, by pulling and turning the two knobs, on
the sides of the carry handle (diag. 28).
3. Move the carry handle, by pressing the lower
buttons, until it is parallel with the stroller armrest s. Fit the locki ng pins into the lock ing slots on
the stroller armrest s by pushing down the child
car seat and by pressing on the footrest area of
the child car seat, until an audible click is heard.
Check that the child car seat is securely fi tted
to the stroller by attempting to lift the child car
seat out of the stroller.
4. To release the child car seat from the stroller
simultaneously press the two red buttons located on the carry handle, as shown in diag. 29.
5. Move the carry handle back to its vertical
position and store away the two locking pins
that were previously pulled out at point 2, and
remove the child car seat from the stroller.
WARNING: the child car seat can be fi tted or removed from the stroller with your child stra pped
to the child car seat. However, these operations
may be more diffi cult due to the weight of your
child. We therefore recommend that you exercise extra caution when carr ying out the above
operations.
• To clean the child car seat’s fabric cover, unfas-
• The harness, buckle and other plastic parts
30
+ STROLLER VERSION
REMOVING/CLEANING THE CHILD CAR
SEAT’S FABRIC COVER
ten the harness, pull the two metal joints out
of their slots and re move the seat’s fabr ic cover
(diag. 30). Please refer to the care label for instructions on cleaning the seat’s fabric cover.
should be cleaned with a soft damp cloth. Do
not use solvents or bleach, they may damage
them and make them unsafe.
Page 31

WARNING: PLEASE READ
BEFORE A JOURNEY:
1. The child car seat must be fi tted exactly
as described in the instructions provided.
2. Never leave your child unattended, even
for the shortest time.
3. Do not fi t the car safety belt in any way
other than that indicated in these instructions; it can compromise the safety of your
child (some examples of INCORRECT fi tting
are shown in diag. 20 and 25).
4. Fit the child car seat only to car seats that
are correctly secured to the car frame and
are forward-facing. Ensure that folding or
rotating car seats are always secured correctly. They could be dangerous in the case
of accident.
5. Take care when fi tting the child car seat
into a vehicle and ensure that it does not
come into contact or interfere with moving
seats or doors.
6. WARNING: this child car seat MUST NOT
be fi tted using a 2-point car safety belt.
7. Check regularly that your child has not released the child car seat’s safety belt.
8. When using the base unit, always ensure
that it is correctly fi tted to the car seat.
9. This product must not be modifi ed in any
way unle ss approved by the r elevant authority. Do not use accessories, spare parts, or
any components not supplied by the manufacturer. Any unauthorised modifi cations
carri ed out to the produc t will invalidate a ny
manufacturer guarantee.
10. The child car seat must be replaced if it
is damaged, deformed or worn out, since
it may no longer comply with the original
safety standards.
11. The seat’s fabric cover must only be replaced with a replacement approved by the
manufacturer, as it constitutes an integral
part of the child restraint device. The child
car seat must never be used without the
seat’s fabric cover.
12. Check that the belt is not twisted. Ensure that no part of the child car seat or harness is trapped in the car door or is rubbing
against s harp objects . Should the belt be cut
or frayed it must be replaced.
13. Check that the child car seat restraint
harness and the 3-point car safety belt are
pulled tightly, to ensure the safety of your
child.
14. Do not use the product if some of its
parts are broken or missing. This could be
dangerous.
15. An accident, even minor, can damage the
child car seat and restraint harne ss, even if it
is not visible to the naked eye. It is recommended to replace the child car seat.
16. Loose, heav y or sharp objects shou ld not
be transported in the car, especially on the
rear shelf. Loose objects are liable to cause
injur y in the event of sharp breaki ng, sudden
movement or an accident.
17. Always ensure that all passengers in the
car wear safety belts for their own safety
and because they could seriously injure your
child in the event of an accident.
18. If the car has been left in the sun for a
long time, check the car seat before placing
your child in it, some parts could be very
hot, and should be allowed to cool down.
19. 0n long journeys make frequent stops.
Childre n tire easily. Never t ake your child out
of the child car seat whilst the car is moving
for any reason. If your child needs attention,
fi nd a safe place to stop and pull over.
20.Do not use second-hand child car seats..
They may have suffered extremely dangerous structural damage, even if it is not visible to the naked eye.
21. Premature newborn babies, born af ter
37 weeks, could be at risk if placed in the
child car seat. They may suffer respiratory
problems when seated in the child car seat.
We recommend that you seek the advice of
your Doctor or qualifi ed Hospital Personnel,
in order to evaluate your child’s needs and
recommend the appropriate child car seat
or car carrycot for your child before leaving
hospital.
22. The ch ild car seat can be u sed as a means
of transport or as a baby-rocking chair also
out of the vehicle. When used out of the car,
never place the child car seat on raised surfaces, such as tables, worktops, beds, etc., or
on sloped or unstable surfaces, to prevent
any falls. Always use the safety harness
provided.
23. The child car seat’s fabric cover is not
waterproof; we therefore recommend using
a Chicco raincover.
24. Keep the pl astic bags away f rom children
to prevent the risk of suffocation.
25. These instructions should be carefully
stored i n a safe place where t hey can be easily found.
26. ARTSANA declines all responsibility for
the incorrect use of this product.
31
Page 32

For further information or spare parts requests, please contact
Chicco Customer Service:
Chicco UK Ltd
Prospect Close
Lowmoor Road Business Park
Kirkby in Ashfi eld
Nottinghamshire
NG17 7LF
Customer Services Helpline Tel: 01623
750870 (offi ce hours only)
www.chicco.com
32
Page 33

E
AUTO-FIX
COMPONENTES : (Fig. A, B, C, D)
1. Base
2. Armazón
3. Manillar
4. Palanca de desenganche
5. Funda
6. Reductor
7. Capota parasol
8. Acoplamiento capota parasol
9. Guía del cinturón de seguridad torácico
del automóvil
10. Guías del cinturón de seguridad
abdominal del automóvil sobre la base
10 A. Guía s del cinturón de se guridad abdom inal
del automóvil sobre la sillita
11. Cinta de regulación
12. Hebilla del arnés
13. Lengüetas de la hebilla
13 A. Botón de apertura de la hebilla
14. Botón de regulación del arnés (bajo la so-
lapa de tela)
15. Correas
16. Acolchado para las correas (si está
previsto)
17. Ranuras de pasaje de las correas
18. Botones para la reclinación del manillar
19. Manivela de enganche a la silla de paseo
20. Botón de desenganche de la silla de
paseo
21. Barra de posición
22. Retén de bloqueo
23. Etiqueta de homologación
24. Etiqueta instrucciones de montaje con y
sin la base
¡MUY IMPORTANTE! LEER
• Leer atentamente el manual de instrucciones
completo antes de utilizar el producto.
• Para el mo ntaje y la insta lación del pro ducto siga
cuidadosamente las instrucciones. No permita
que nadie utilice el producto sin haber leído las
instrucciones.
• Conserve este manual para futuras consultas.
• E s preferible ins talar la silla e n el asiento tra sero
del vehículo ya que según las estadís ticas sobre
accidentes es más seguro que el delantero.
• ¡ADVERTENCIA! ¡ PELIGRO GRAVE! No utilizar
nunca es ta silla en un asiento delantero dotado
de air bag frontal. L a silla se puede instalar en el
asiento delantero sólo si el airbag frontal está
desactivado: verifi que con el f abricante o con sultando el m anual de instr ucciones de su ve hículo
la posibilidad de desactivar el airbag.
• Si se coloca la silla en el asiento delantero (sólo
EN PRIMER LUGAR
si no tiene airbag frontal o si ha sido desactivado), se aconseja desplazarlo el máximo posible
hacia atrás, si lo permite la presencia de otros
pasajeros en el asiento posterior.
• No utilice nunca esta silla en asientos girados
lateralmente ni orientados en sentido contrar io
a la marcha.
• No enganchar nunca la silla a un asiento de automóvil que tenga sólo un cinturón abdominal
(de dos puntos).
• Ninguna silla infantil para automóvil puede garantizar la seguridad total del niño en caso de
accidente, pero la utilización de este producto
reduce el riesgo del niño de muerte o lesiones.
• Un uso incor recto del pro ducto aument a el riesgo de daños graves en el niño, no sólo en caso
de accidente sino también en otras situaciones:
verifi que s iempre que la sil la esté corre ctamente
enganchada al asiento.
• En caso de que la silla estuviese dañada, deformad a o muy desgasta da, debe ser sus tituida:
podría h aber perdido l as caracter ísticas origi nales de seguridad.
• No modifi que ni incorpor e partes adicionales al
produc to sin la expre sa aprobació n del fabrican te. No instale accesorios, piezas de repuesto ni
componentes no provistos por el fabricante.
• No dejar nunca al niño en la silla sin vigilancia.
• Para evitar riesgo de caídas del niño, engancharlo a la silla incluso si la misma se transporta a
mano.
• Si se utiliza fuera del coche, es peligroso usar
la sillita colocándola sobre una superfi cie elevada.
• No deje nunca la silla sobre el asiento del vehículo sin enganchar: podría golpear y herir a
los pasajeros.
• No interponer nada que no sea un accesorio
aprobado para el producto, entre el asiento del
vehículo y la silla ni entre la silla y el niño: en
caso de accidente la silla podría no funcionar
correctamente.
• Si s e de ja e l ve híc ulo ex pue sto al s ol , se aco nse ja
cubrir la sillita.
• Como resultado de un accidente de cualquier
tipo, la si llita podría ha ber sufrido dañ os no visibles. En ese caso es necesario reemplazarla.
• Antes de transpor tar la sillita manualmente,
asegurarse de que el bebé esté enganchado con
las cor reas y que el manillar esté bl oqueado correctamente en la posición vertical.
• Si se utiliz a la silla de auto con u na silla de pase o,
hacerlo exclusivamente con las sillas de paseo
Chicco preparadas para ello.
• Antes de transpor tar al bebé con la s illa de auto
en la silla de paseo, asegurarse de que esté correctamente enganchada a la misma.
• No utilice si llas de segund a mano. Su estr uctura
33
Page 34

podría haber sufrido daños no visibles que podrían comprometer la seguridad del producto.
• La sociedad Artsana no asume responsabilidad
alguna por el uso inadecuado del producto.
INSTRUCCIONES DE USO
CARACTERÍSTICAS DEL PRODUCTO
La silla d e auto, tanto en la ver sión sencilla como
en la versión provista de base, está homologada
en el “Grupo 0+”, para trasladar a niños que no
superen los 13 Kg. de peso.
La hom ol oga ció n es de t ip o “un iv ers al”, po r lo q ue
se puede utilizar la silla en cualquier modelo de
automóvil.
¡ADVERT ENCIA! “Unive rsal” signifi ca que es compatible co n la mayoría de los as ientos de vehículo,
pero no con todos.
1. E st e es un d isp os iti vo d e re ten ció n “ Uni ver sal” del niño, homologado según el Reglamento N°44, enm iendas categor ía 04. Idóne o para
ser empleado normalmente en los vehículos
y compatible con la mayoría de los asientos
de éstos, si bien no con todos.
2. La perfecta compatibilidad se obtiene en
aquellos casos en que el fabricante del vehículo declara expresamente en el manual que
ha sido prev ista la instal ación de dispositivos
“Universales” de sujeción para niños cuya
edad esté comprendida dentro del rango
considerado.
3. Este dispositivo de retención ha sido declarado “U niversal” de a cuerdo con unos c riterios
de homologación más estrictos respecto de
anteriores modelos, los cuales no disponen de
la presente advertencia.
4. Adecua do para ser utiliz ado sólo en los vehículos pr ovistos de cintur ón de seguridad d e
3 puntos, estático o extensible, homologado
en base a la normativa UN/ ECE N°16 u otros
estándares equivalentes.
5. En caso de duda, consulte al fabricante
del dispositivo de retención o al vendedor
del mismo.
La silla d e auto se puede ut ilizar tambié n fuera del
automóvil, de manera combinada con la silla de
paseo o bien como hamaca.
¡AT EN CIÓ N! R esp et ar l as s igu ien tes lim ita ci one s
de uso del producto: en caso contrario no se garantiza la seguridad.
1. El peso del niño no debe superar los 13 Kg.
2. No utilizar nunca esta silla en un asiento de-
lantero dotado de airbag frontal. La silla se puede
ADVERTENCIA
LIMITACIONES DEL USO
instalar en el asiento delantero sólo si el airbag
frontal está desactivado: verifi que con el fabr icante o consultando el manual de instrucciones de su
vehículo la posibilidad de desactivar el airbag.
3. No u til iza r el red uc tor en n ing ún c as o si e l be bé
supera los 6 kg. de peso.
REQUISITOS NECESARIOS DEL ASIENTO DEL
AUTOMÓVIL Y DEL CINTURÓN DE SEGURIDAD
La silla se puede instalar en el asiento al lado del
conductor o en uno de los asientos posteriores,
pero observando las siguientes indicaciones: el
asiento debe:
• Mirar hacia adelante (fi g.1)
Estar dotado de cinturón de seguridad de 3 puntos
de anclaje estático o extensible (fi g.2)
Se aconseja instalar siempre la silla en el asiento
posterior del coche.
¡ADVERTENCIA! ¡EXTREMADAMENTE PELIGROSO! No instalar nunca esta silla en asientos delanteros equipados con airbag frontal.
¡ADVERTENCIA! No instalar nunca la silla en un
asiento dotado sólo de cinturón de seguridad
abdominal (fi g. 2A)
REGULACIÓN DE LA POSICIÓN
¡ADVERT ENCIA! Las cor reas deben siem pre ajustarse a la altura del niño.
Antes de instalar la silla en el coche es necesario colocar las correas de retención del niño a la
altura correcta.
La posición correcta de la altura de las correas
se encuentra ligeramente por debajo del nivel de
los hombros. (fi g. 3) . La silla perm ite 3 posiciones
diferentes de altura. (fi g. 4)
La silla está dotada de reductor que garantiza
la retención correcta y la posición ideal para el
cuello y la espalda de los recién nacidos hasta
los 6 kg. de peso.
Para instalar el reductor verifi car que las correas
estén introducidas en la ranura más baja. ADVERTENCIA: Ésta es la única posición permitida si se
utiliza el reductor (fi g. 5)
Atención : para garantizar la máx ima seguridad del
produc to, retirar el re ductor una vez q ue el bebé ha
alcanzado los 6 kg. de peso.
Cuando se a necesario ajus tar las correa s, proceder
como se indica a continuación :
• abrir la hebilla, pulsando el botón rojo (fi g. 6)
• extra er del respaldo l as correas y volv er a introducirlas en la ranura más idónea para la altura
del niño.
(fi g. 7A y 7B).
¡ADVERTENCIA! Asegúrese de que las correas
pasen siempre entre la barra de posición y el
armazón.
34
DE LAS CORREAS
Page 35

Las correas deben estar siempre correctamente
tensadas.
COLOCACIÓN DEL NIÑO
1. levantar la solapa de tela, mantener apretado
el botón de regulación y tirar de las correas de la
silla para afl ojarlas (fi g. 8)
2. abrir la hebilla, apretando el botón rojo; (fi gura 6)
3. sentar al niño en la silla
4. sobreponer las dos lengüetas de la hebilla,
fi gura 6A
5. Introducir las dos lengüetas en la hebilla hasta
oír claramente un “click”. (fi g. 6B) ADVERTENCIA: no introducir nunca una sola lengüeta en
la hebilla
6. tensar los cinturones de la silla, tirando de la
cinta central de regulación (fi g.9)
ADVERTENCIA: las correas deben estar bien ten sadas pe ro no demasiado . Si puede meter un de do
entre la s correas y el cue rpo del niño sig nifi ca que
están correctamente tensadas.
El manillar de la silla de auto se puede regular en
4 posiciones distintas (fi g. 10):
A . Pos ici ón t ra sla do e n e l co che (ATE NCI ÓN : es ta
es la única posición permitida durante el traslado
en el coche).
B. Posición traslado a mano.
C. Posición balancín o posición para enganche a
la silla de paseo Chicco.
D. Posición tumbona fi ja.
Para efectuar la regulación apretar al mismo
tiempo los botones del manillar (fi g. 11) y girarlo
situándolo en la posición elegida, hasta oír un
resorte (clack).
INSTALACIÓN DE LA SILLA EN EL COCHE
Leer atentamente el párrafo: REQUISITOS NECESARIOS DEL ASIENTO DEL AUTOMÓVIL Y DEL
CINTURÓN DE SEGURIDAD.
La silla se debe instalar sólo en sentido contrario
a la marcha, tanto si se instala con la base como
si se instala sin ella. ¡ATENCIÓN! EXTREMADAMENTE PELIGROSO: NO INSTALARLA EN ASIENTOS EQUIPADOS CON AI RBAG, a menos de ha ber
desactivado el dispositivo.
¡ADVERTENCIA! No instalar nunca la silla en
asientos dotados sólo de cinturón abdominal.
Pa ra i ns tal ar e n e l co che la s ill a d e au to p rov ist a d e
base, proceder de la siguiente manera:
1. desenganchar la silla de la base tirando de la
palanca de enganche (fi g.12) y al mismo tiempo
EN LA SILLA
REGULACIÓN DEL MANILLAR
INSTALACIÓN DE LA SILLA
DE AUTO CON BASE:
levantarla tirando del manillar.
2. colocar la base en el asiento elegido para la
in sta laci ón, ori entá ndo la c omo m ues tra la fi gura
13, y haciendo que quede lo más pegada posible
contra el respaldo del asiento.
3. tirar del cinturón de seguridad del coche e in-
troducirlo en la hebilla correspondiente, haciendo
pasar la correa abdominal por las dos guías predispuestas (fi g.14)
4. antes de acoplar la silla a la base, comprobar
que el retén de bloqueo esté cerrado (fi g. 15).
5. colocar la silla en la base (en sentido contrario
a la marcha) y presionar hacia abajo hasta que
quede enganchado (oirá un “clack” de fi jación)
(fi g. 16).
6. comprobar que l a silla esté correctamente en-
ganchada a la base intentando levantar la parte
delantera y la trasera.
7. hacer pasar la correa torácica del cinturón de
seguridad del coche por la guía situada en el respaldo de la silla de auto (fi g. 17).
ADVERTENCIA: DURANTE EL VIAJE, LA CORREA
TORÁCICA DEL COCHE DEBERÁ QUEDAR SIEMPR E EN L A POS ICIÓ N SEÑ ALA DA EN LA FI GUR A
18A: NO UTILIZAR NUNCA LA SILLA DE AUTO
SIN QUE LA CORREA PASE POR EL ENGANCHE
ESPECIAL:
ESTO PODRÍA COMPROMETER SERIAMENTE LA
SEGURIDAD.
8. Tensar bien el cinturón alrededor de la silla,
sin que quede fl ojo y asegurarse de que no esté
retorcido (fi g. 18B)
9. colocar el manillar en “A” (fi g. 10)
Para extraer la silla de la base:
sacar la parte abdominal del cinturón de la guía
situada en el respa ldo, colocar de nuevo el manillar en la posición “B” (fi g. 10), desenganchar la
silla tir ando de la pala nca y levantán dola al mismo
tiempo con el manillar.
¡ADVERT ENCIA! Despu és de haber pro cedido a la
instalación, comprobar SIEMPRE que el cinturón
del coche esté bien tenso y que la h ebilla no provoque su salida de las guías situadas en la base,
ni difi culte su paso por las mismas.
ADVERTENCIA: NO HACER PASAR NUNCA EL
CINTURÓN DE SEGURIDAD DEL COCHE POR
PUNTOS DISTINTOS DE LOS SEÑALADOS EN
LA FIGURA 19
En la fi g. 20 se muestran algunos ejemplos de
instalación incorrecta.
INSTALACIÓN DE LA SILLA
Para instalar la silla de auto sin base, proceder de
35
DE AUTO SIN BASE
Page 36

la siguiente manera:
1. bajar la palanca de bloqueo. (fi g. 21)
2. colocar la silla en el asiento elegido para la
instalación.
3. tirar del cinturón de seguridad del coche y engancharlo en la hebilla correspondiente, haciendo
pasar l a correa abdom inal (la parte h orizontal) po r
las dos guías situadas en la silla (fi g. 22);
4. Tir ar d e l a cor re a to rác ica (la par te tra nsv er sal )
y hacerla pasar por la guía situada en la parte
posterior del respaldo de la silla, fi g.23
5. Tensar bien el cinturón alrededor de la silla,
sin que quede fl ojo y asegurarse de que no esté
retorcido. ADVERTEN CIA: DURANTE EL VIAJE L A
CORREA TOR ÁCICA DEL COCHE D EBERÁ ESTAR
SIEMPRE EN LA POS ICIÓN INDICADA EN LA FIG .
24 . NO U TI LIZ AR N UN CA L A S ILL A D E AUT O SI N
QU E L A COR RE A PA SE P OR E L EN GAN CHE ESP ECIAL: ESTO PODRÍA COMPROMETER SERIAMENTE LA SEGURIDAD.
6. Colocar el manillar en “A” (fi g. 10)
7. Para deseng anchar la silla d el asiento del co che,
desabrochar el cinturón de seguridad apretando la
hebilla, sacar el cinturón de la guía diagonal y de
la hori zontal situada en l a silla . Coloc ar de nuevo
el manillar en la posición “B” (fi g. 10)
En la fi g. 25 se muestran algunos ejemplos de
instalación incorrecta.
Para extraer la silla de la base: repetir las operaciones descritas anteriormente en sentido
opuesto: extraer la correa torácica del coche de
la guía situada en el respaldo, colocar de nuevo el
ma nil la r en l a p osi ció n “B ” (fi g. 10), desenganchar
la silla tirando de la palanca y al mismo tiempo
levantarla tirando del manillar.
UTILIZACIÓN DE LA CAPOTA
La silla cuenta con una capota para proteger al
bebé del sol y del viento.
Se enganc ha y se desengan cha fácilmen te a la silla
mediante dos botones y se puede reclinar como
se desee. (fi g. 26)
POSICIÓN FIJA O BASCULANTE DE LA SI-
LLA DE AUTO (USO TUMBONA)
Cuando no se utiliza en el coche, la silla de auto
puede servir de balancín o tumbona. Para dejarla en la posición basculante, bajar la palanca de
bloqueo (fi g. 15) y llevar el manillar a la posición
“B”. (fi g. 10)
Para utilizarla en la posición fi ja subir la palanca de
bloqueo (fi g. 21) y llevar el manillar a la posición
“D”. (fi g. 10)
No se aconseja utilizar la silla como tumbona
con niños que sean capaces de levantarse solos
PARASOL
(aproximadamente hasta los 6 meses de edad o
los 9 kg de peso).
Para evitar el riesgo de caídas, abrochar siempre
las correas.
No dejar nunca al niño sin vigilancia.
Es peligroso ut ilizar la si lla de au to sobre super fi cies elevadas o inclinadas.
ADVERTENCIA: antes de transportar la silla de
auto colocar siempre el manillar en posición vertical “B” y bloquearlo (fi g.10)
VERSIÓN SILLA DE AUTO
¡ADVERTENCIA! Para utilizar la silla de auto con
la silla de paseo, consultar las instrucciones de
la silla de paseo
Las nuevas sillas de paseo CHICCO con sistema
CLIK CLAK poseen apoyabrazos provistos de dispositivos especiales que permiten enganchar la
silla de auto directamente, sin tener que recurrir
a ulteriores accesorios.
- abrir la s illa de paseo si guiendo las ins trucciones
del manual correspondiente.
- coger la silla de auto por el manillar y colocarla
en la silla de paseo, como muestra la fi g. 27.
- extraer los dos pernos de enganche del mani-
llar, tirando de las dos ruedecillas de enganche y
girándolas (fi g. 28).
- presionando los pulsadores inferiores girar el
manilla r, hasta que qued e paralelo a los ap oyabrazos: los d os acoplamiento s quedarán bloq ueados
en su interior (apretar hacia ab ajo la silla del lado
de los pies, para bloquear el manillar en la posición correcta).
- para desenganchar la silla de auto de la silla de
paseo, será sufi ciente presionar los dos botones
rojos situados en el manillar, como muestra la
fi gura 29.
- subir el manillar girándolo, hasta que los dos
pernos de enganche mencionados en el punto
D vuelvan dentro, y quitar la silla de auto de la
silla de paseo.
ADVERTENCI A: la silla de a uto se puede enga nchar
y desenganchar con el niño dentro, aunque debido
a su peso l as operacion es descrit as arriba pue den
re sult ar m ás di fíci les . En e ste c aso s e re comi end a
efectuarlas prestando mucha atención.
• Para lavar la funda de la silla de auto: desabrochar las correas y quitar la funda, después de
haber sacado los dos seguros metálicos de su
alojamiento (fi g. 30). A continuación, seguir
atentamente las instrucciones indicadas en la
etiqueta de la funda.
• Las correas, hebillas y partes de plástico debe-
36
+ SILLA DE PASEO
DESENFUNDADO/LAVADO
DE LA SILLA DE AUTO
Page 37

rán limpiarse con un paño húmedo. No utilizar
disolventes o lejías: pueden dañarlas restando
seguridad.
ADVERTENCIAS: LEER
1. La silla deberá ser instalada siguiendo las
instrucciones al pie de la letra.
2. No dejar nunca al niño en la silla sin vigilancia.
3. No hacer pasar el cinturón del coche por
puntos distintos de los señalados en estas
instrucciones: puede ser perjudicial para la
seguridad del niño (ejemplos de instalaciones INCORRECTAS se muestran en las fi g.
20 y 25.
4. Ins ta lar la s ill a d e au to s ólo en a sie nto s fi jados corr ectamente e n la estruct ura del coche
y dirigid os hacia la par te delantera de l mismo.
No dejar en e l coche sillas p legables o gira torias que no estén bien enganchadas. En caso
de accidente pueden resultar peligrosas.
5. Prestar atención a la instalación de la silla
de auto par a evitar que un asie nto móvil o la
puerta puedan estorbar.
6. Atención: esta silla NO debe ser utilizada
en ningún caso con un cinturón de seguridad
provisto de dos puntos de anclaje.
7. Comprobar siempre que el niño no haya
desabrochado la hebilla del cinturón de seguridad.
8. Cuando se utiliza la base, comprobar
siempre que esté fi jada correctamente en el
asiento del coche.
9. No aportar modifi caciones ni añadir elementos sin l a autorización d el fabricante. N o
aplica r accesorios, p iezas de repue sto o componente s que no sean de fábrica. Eventuales
modifi caciones liberan al fabricante de toda
responsabilidad.
10. Si por cualquier razón la silla resultase
dañada , estuviese d eformada o muy ga stada
se deberá proceder a su sustitución: puede ser
perjudicial para la seguridad del niño.
11. La funda deberá ser sustituida exclusivamente por otra aprobada por el fabricante,
si end o pa rte int egr ant e de l a si lla . No u til iza r
nunca la silla sin su funda.
12. Comprobar que las correas no estén
retorcidas. Evitar que las mismas o algunas
parte s de la silla qued en pilladas con l as puertas del coche o rocen con alguna super fi cie
cortante. En el supuesto de que el cinturón
tenga cor tes o esté deshilachado, e s necesario sustituirlo.
13. Cerciorarse de que las correas del niño y
el cinturón de 3 puntos del coche estén bien
tensos para garantizar la máxima seguridad
ANTES DEL VIAJE:
del niño.
14 . No u ti liz ar e l ar tí cul o en ca so d e fa lta r e lementos o estar rotos. Puede ser peligroso.
15. Después de un accidente de cualquier
tipo, la sillita y el cinturón podrían haber
sufridos daños no visibles. Se recomienda su
sustitución.
16. Cerciorarse de que no haya objetos
sueltos en el coche, sobre todo en la parte
trasera; en caso de accidente podrían herir
a los ocupantes.
17. Cerciorarse de que todos los viajeros utilicen el cinturón de seguridad; por su propio
bien pero también porque en caso de accidente podrían golpear al niño.
18. Cuand o el coche haya qu edado bajo el so l
durante mucho tiempo, inspeccionar cuidadosame nte la silla de auto an tes de acomodar
al niño; algunas partes podrían estar demasiado
calientes, en cuyo caso se deberá esperar hasta
que se enfríen.
19. Durante los viajes largos se aconseja parar
a menudo: el niño se cansa con facilidad. No
se deb er á s aca r d e la sil la b aj o ni ngú n co nc ept o
mientras el coche esté en movimiento. Si el
niño necesita cuidados especiales, detener el
vehículo en un lugar seguro.
20 . No u til iza r sil las de a uto d e se gun da ma no.
Su estructura podría haber sufrido daños no
visibles pero que pueden resultar extremadamente peligrosos.
21. Recién nacidos prematuros: es posible que
los niños nacidos antes de la 37ª semana de
gestac ión tengan probl emas en la silla d e auto;
pueden presentar difi cultades respiratorias
mientras estén sentados en ella. Antes de dejar
la c línic a, se re comie nda di rigir se al m édico de
confi anza o al personal del hospital para que
vean al pequeño y establezcan la silla de auto
o el capazo adecuados.
22. La sil la de auto pued e utilizars e como medio
de transporte o asiento fuera del coche. En e ste
caso no se deberá colocarla sobre superfi cies
altas, como por ejemplo mesas, camas, etc., ni
tampoco sobre superfi cies inclinadas o inestables para prevenir eventuales caídas. Utilizar
siempre el cinturón de seguridad.
23. Los tejid os de la silla de auto n o son impermeables; se recomienda utilizar los accesor ios
im pe rme ab les Ch icc o cu and o s e us a co mb ina da con la silla de paseo.
24. Mantener las bolsas de plástico lejos del
alcance de los niños para prevenir el peligro
de asfi xia.
25. Estas instrucciones deben guardarse para
poder ser consultadas en cualquier mome nto.
26. La sociedad ARTSANA no se responsabiliza
en caso de uso incorrecto de la silla.
37
Page 38

Para mayor información dirigirse al Servicio de
Atención al Cliente de Chicco Española:
CHICCO ESPAÑOLA, S.A .
C/ Industrias, 10
Polígono Industrial Urtinsa
28923 Alcorcón - Madrid
Servicio de Atención al Consumidor
Teléfono 9 02.11.70. 93
www.chicco.com
38
Page 39

P
AUTO-FIX
COMPONENTES: (Fig. A, B, C, D)
01. Ba se
02. Estrutura
03. Alça de transporte
04. Manípulo de desencaixe
05. Forro
06. Almofada comfort
07. Capota pára-sol
08. Encaixe para a capota pára-sol
09. Guia de passagem da correia diagonal do cinto
do automóvel
10. Guia de passagem da correia horizontal do
cinto do automóvel na base
10 A . Guias de pas sagem da correia h orizontal do
cinto do automóvel na cadeira auto
11. Correia reguladora central de tensão
12. Fecho do cinto
13. Linguetas de encaixe no fecho
13 A. Botão de abertura do fecho
14. Botão para regulação do cinto (por baixo da
patilha em tecido)
15. C into
16. Almofadas das correias dos ombros (só nalguns modelos)
17. Ranhuras de passagem dos cintos
18. Botões para reclinação da alça
19. Manípulo para fi xação ao carrinho de passeio
20. Botão para desbloquear a cadeira do carrinho
de passeio
21. Barra de posicionamento
22. Fecho estabilizador
23. Etiqueta de homologação
24. Etiqueta com instruções de montagem com
e sem a base
IMPORTANTÍSSIMO! PARA
• Leia atenta e integralmente o manual de instru-
ções, antes de utilizar o produto.
• Efectue a montagem e a instalação do produto
seguindo escrupulosamente as instruções. Não
permita que alguém possa utilizar o produto
sem ter lido as instruções.
• Conser ve este manual para consultas futuras.
• Segundo as estatísticas dos acidentes, o banco
traseiro é mais seguro do que o banco da frente,
portanto é preferível usá-lo para a instalação da
cadeira auto.
• ATENÇÃO! GRAVE PERIGO! Nunca utilize esta
cadeira auto no banco da frente do automóvel,
equipado com airbag frontal. É possível instalar
a cadeira auto no banco da frente do automóvel somente se o airbag estiver devidamente
desactivado: contacte o fabricante ou consulte
o manual de instruções do seu automóvel, para
LER DE IMEDIATO
verifi car a possibilidade de desactivar o airbag.
• Se coloca r a cadeira auto no b anco da frente, (s omente se não estiver equipado com airbag frontal ou o mesmo estiver des activado), p ara maior
segurança, é aconselhável recuá-lo o mais atrás
possível, de forma compatível com a presença
de outros passageiros no banco de trás.
• Nunca coloque esta cadeira auto em bancos
do automóvel posicionados lateralmente ou no
sentido contrário à marcha.
• Esta cad eira auto nun ca deverá se r instala da num
banco do automóvel equipado com um cinto de
segurança de apenas dois pontos de fi xação.
• Nenhuma cadeira auto pode garantir a segurança total da criança em caso de acidente, mas a
utilização deste produto reduz o risco de ferimentos e morte da criança.
• Uma utilização incorrecta do produto aumenta
o risco de lesões graves para a criança, não só
em caso de acidente, mas também noutras situações: verifi que sempre se a cadeira auto está
fi xada correctamente no banco do automóvel.
• Se a cadeira auto estiver danifi cada, deformada
ou excessivamente desgastada, deve ser substituída: poderá ter perdido as características originais de segurança.
• Nunca efectue modifi cações ou acréscimos no
produto sem a aprovação do fabricante. Não
utilize acessórios, peças de substituição e componentes não fornecidos pelo fabricante.
• Nunca deixe a criança na cadeira auto sem vigilância, por nenhum motivo.
• Para evitar o risco de queda da criança, utilize
o cinto de segurança, mesmo durante o transporte à mão.
• Ao utiliza r a cadeira fora d o automóvel, é per igoso colocá-la sobre superfícies elevadas.
• Nunca deixe a cadeira auto no banco do automóvel sem estar devidamente fi xada: poderá
cair sobre os passageiros do veículo e feri-los.
• Não coloque objectos que não sejam acessórios
aprovados pelo fabricante entre o banco do automóvel e a cadeira auto nem entre a cadeira e
a criança: em caso de acidente, a cadeira auto
poderá não funcionar cor rectamente.
• Se o veículo fi car parado ao sol, é aconselhável
tapar a cadeira auto.
• Após um acidente, ainda que ligeiro, a cadeira
pode ter s ofrido danos não visíveis a ol ho nu, por
isso é necessário substitui-la.
• Antes de tr ansporta r a cadeira à mão, cer tifi quese de que os cintos de retenção da criança estão
devidamente apertados e que a alça está bloqueada correctamente na posição vertical.
• Para a utilização da cadeira montada no carrinho
de passeio, utilize exclusivamente carrinhos de
passeio Chicco, equipados com os respectivos
encaixes para esse efeito.
39
Page 40

• Antes de transpor tar a criança na cadeira montada no carrinho de passeio, certifi que-se de que
está fi xada correctamente.
• Não utilize cadeiras em segunda mão. Poderão
ter sofrido danos estruturais não visíveis a olho
nu mas que comprometem a segurança do produto.
• A sociedade ARTSANA declina qualquer responsabilidade pelo uso impróprio do produto.
INSTRUÇÕES PARA A UTILIZAÇÃO
CARACTERÍSTICAS DO PRODUTO
Esta cadeira, tanto na versão só cadeira auto
como na versão cadeira auto com base, está homologada para o “Grupo 0+”, para transportar no
automóvel crianças desde o nascimento até 13
Kg de peso.
A homologação é do tipo “universal”, portanto,
esta cadeira auto pode ser utilizada em qualquer
modelo de automóvel.
ATE NÇÃO ! “U nive rsa l” si gnifi ca que é compatível
com a maior parte, mas não todos os modelos de
bancos de automóvel.
AVISO IMPORTANTE
1. Este é um dispositivo de retenção para
crianças, do tipo “Universal”, homologado
segundo o Regulamento N°44, extensão
série 04. É indicado para a utilização generalizada em veículos e compatível com a maior
parte, mas não todos, os modelos de bancos
de automóvel.
2. A per feita compat ibilidade é mai s facilmen te conseguida nos casos em que o fabricante
do veículo declare no manual do mesmo que
este prevê a instalação de dispositivos de retenção para crianças, tipo “Universal”, para a
faixa etária em questão.
3. Este dispositivo de retenção é classifi cado
como “Universal” segundo critérios de homologaç ão mais rigorosos d o que em relação
a modelos anteriores, que não dispõem do
presente aviso.
4. Indicado exclusivamente para a utilização
em veículos equipados com cinto de segurança de 3 pontos, estático ou com enrolador, homologado segundo o Regulamento
UN/ECE N°16 ou outras normas standard
equivalentes.
5. Em c aso de dúvida , contacte o produt or do
dispositivo de retenção ou o seu revendedor.
Esta cadeira auto também pode ser utilizada fora
do automóvel, instalada no carrinho de passeio,
ou como espreguiçadeira.
REGRAS DE UTILIZAÇÃO
ATENÇÃO! Respeite escrupulosamente as seguintes regras de utilização do produto: caso contrário, comprometerá as condições de segurança.
1. O peso da criança não deve ser superior a 13
Kg.
2. Nunca utilize esta cadeira auto num banco da
frente do automóvel, equipado com airbag frontal. É possível instalar a cadeira auto no banco da
frente do automóvel somente se o airbag estiver
devidamente desactivado. Contacte o fabricante
ou consulte o manual de instruções do seu automóvel para verifi car a possibilidade de desactivar
o airbag.
3. Nunca utilize a cadeira auto com a almofada
comfort se a criança tiver um peso superior a 6
Kg.
REQUISITOS NECESSÁRIOS DO BANCO E DO
A cadeira auto pode ser instalada no banco da
frente, ao lado do passageiro ou em qualquer um
dos bancos de trás, mas de acordo com as seguintes condições: o banco do automóvel deve estar:
• virado no sentido da marcha (Fig. 1);
• equipad o com cinto de segur ança de 3 pontos d e
fi xação, estático ou com enrolador (Fig. 2).
É aconselhável instalar sempre a cadeira auto no
banco traseiro do automóvel.
ATENÇÃO! GR AVE PERIGO! Nunca utilize esta
cadeira auto num banco da frente do automóvel,
equipado com airbag frontal.
ATENÇÃO! Nunca instale esta cadeira auto num
banco equipado apenas com um cinto de segurança horizontal - cinto só com 2 pontos de fi xação (fi g. 2A).
ATENÇÃO! As correias dos ombros devem acompanhar o crescimento da criança.
Antes de montar a cadeira auto no automóvel é
necessário regular a altura das correias dos ombros da criança.
A altura correcta das correias é ligeiramente abaixo dos ombros da criança. (fi g. 3). A cadeira auto
permite 3 posições de altura para as correias do
cinto. (fi g. 4)
Esta cadeira auto dispõe de uma almofada
comfort, adequada para crianças desde o nascimento até 6 Kg de peso, que garante uma sustentação correcta e a posição ideal do pescoço e da
coluna do bebé.
Para instalar a almofada comfort verifi que se as
correias estão introduzidas nas ranhuras mais bai-
40
CINTO DE
SEGURANÇA DO AUTOMÓVEL
REGULAÇÃO DA ALTURA
DAS CORREIAS DOS OMBROS
Page 41

xas. ATENÇÃO : esta é a única posição permitida
para a utilização da cadeira auto com a almofada
comfort (fi g. 5).
Atenção : para garantir a máxima segurança do
produto retire a almofada comfort logo que a
criança atinja os 6 Kg de peso.
Para modifi car a posição dos cintos proceda do
seguinte modo:
• abra o fecho, premindo o botão vermelho (fi g.
6);
• retire os cintos pela parte de trás do encosto e
introduza-os nas ranhuras mais adequadas à altura dos ombros da criança (fi g. 7A e 7B).
ATENÇ ÃO ! C ert ifi que-se de que os cintos passam sempre entre a barra de posicionamento e
a estrutura.
Os cintos devem estar sempre esticados correctamente.
COLOCAÇÃO DA CRIANÇA
1. Levante a patilha em tecido e, mantendo pre-
mido o botão de regulação, puxe as correias dos
ombros da cadeira auto de modo a folgá-las (fi g.
8);
2. Abra o fecho do cinto, premindo o botão ver-
melho (fi gura 6);
3. Coloque a criança na cadeira auto;
4. Sobreponha as duas linguetas do cinto (fi gura
6A);
5. Introduza ambas as linguetas no fecho até ou-
vir um estalido. (fi g. 6B) ATENÇÃO : nunca insira
apenas uma lingueta no fecho;
6. Ajuste as correias dos ombros da criança, pu-
xando a correia reguladora central de tensão
(fi g.9).
ATENÇÃO! O cinto deve fi car bem esticado e
aderente ao corpo da criança mas não excessivamente. O cinto estará esticado correctamente
quando for possível introduzir um dedo entre o
cinto e o corpo da criança.
A alça da cadeira auto pode ser regulada em 4
posições (fi g. 10):
A. Posição de transporte no automóvel (ATENÇÃO: esta é a única posição consentida durante
o transporte no automóvel).
B. Posição de transporte à mão.
C. Posição de utilização como cadeira de baloiço
ou posição para encaixe num carrinho de passeio
Chicco adequado.
D. Posição de utilização como espreguiçadeira.
Para efectuar a regulação, prima simultaneamente os botõe s exi stente s nas r ótula s da al ça (fi g. 11)
e rode-a, colocando-a na posição desejada, até
NA CADEIRA AUTO
POSIÇÕES DA ALÇA DA
CADEIRA AUTO
ouvir um estalido.
INSTALAÇÃO DA CADEIRA
AUTO NO AUTOMÓVEL
Leia com atenção o parágrafo: REQUISITOS NECESSÁRIOS DO BANCO E DO CINTO DE SEGURANÇA DO AUTOMÓVEL.
A cadeira auto, tanto na versão com base como
na versão sem base, deve ser instalada sempre
no sentido contrário ao da marcha. ATENÇÃO!
EXTREMAMENTE PERIGOSO: NÃO INSTALE A
CADEIR A AUTO EM BANCOS EQUIPADOS COM
AIRBAG, a n ão ser que o mesmo s e encontre devidamente desactivado.
ATENÇÃO! Nunca instale a cadeira auto num
banco equipado apenas com um cinto de segurança horizontal - cinto só com 2 pontos de fi xação.
INSTALAÇÃO DA CADEIRA
Para instalar a cadeira auto com a base no banco
do automóvel, proceda do seguinte modo:
1. Remova a cadeira auto da base, puxando pelo
manípulo de desencaixe (fi g. 12) e simultaneamente levante-a, segurando-a pela alça.
2. Coloque a base sobre o banco do automóvel
onde pretende instalá-la, orientando-a conforme
ilustrado na fi gura 13, de modo a que fi que em
contacto com o encosto do banco do automóvel.
3. Estique o cinto de segurança do automóvel e
aperte-o no respectivo fecho, fazendo passar a
correia horizontal nas duas guias específi cas (fi g.
14) .
4. Antes de colocar a cadeira auto na base, verifi que se o fecho estabilizador está fechado (fi g.
15) .
5. Coloque a cadeira auto na base (no sentido
contrário ao da marcha) e pressione-a para baixo
até a encaixar devidamente (ouvir-se-á um estalido) (fi g. 16).
6. Verifi que se a cadeira auto está encaixada correctamente na base, tentando levantar tanto a
parte da frente como a parte de trás da cadeira.
7. Faça passar a cor reia diagonal do cinto de segurança do automóvel na respectiva guia adequada
que se encontra na parte de trás do encosto da
cadeira auto (fi g. 17).
ATENÇÃO: DURANTE O TRANSPORTE, A CORREIA DIAGO NAL DO CINTO DE SEGUR ANÇA DO
AUTOMÓVEL DEVE ESTAR SEMPRE NA POSIÇÃO
INDICADA NA FIG.18. NUNCA UTILIZE A CADEIRA AUTO SEM FAZER PASSAR A CORREIA NA
RESPECTIVA GUIA ADEQUADA PARA O EFEITO:
PODERÁ COMPROMETER SERIAMENTE A SEGURANÇA DO SEU FILHO.
41
AUTO COM A BASE:
Page 42

8. Est ique ao máximo o cin to de segurança à v olta
da cadeira auto, de modo que as correias fi quem
bem ader entes e certifi cando-se d e que não fi cam
torcidas.
9. Coloque a alça na posição “A” (fi g. 10)
Para retirar a cadeira auto da base:
Remova a correia diagonal do cinto de segurança
do a utomóv el da gu ia exis tente no enco sto da c adeira auto, coloque a alça na posição “B” (fi g. 10),
desencaixe a cadeira auto, puxando o respectivo
manípulo e simultaneamente levante a cadeira
auto, segurando -a pela alça.
ATENÇÃO! Após a instalação da cadeira auto,
verifi que SEMPRE se o cinto de segurança do automóvel e stá devidame nte esticado e se o re spectivo fech o não força as correias a saíre m das guias
específi cas existentes na base e se não interfere
com as próprias guias.
ATENÇÃO: NUNCA FAÇA PASSAR O CINTO DE
SEGURANÇA DO AUTOMÓVEL EM POSIÇÕES
DIFERENTES DAS INDICADAS NA FIG. 19
Na fi g. 20 são indicados alguns exemplos de instalação incorrecta.
INSTALAÇÃO DA CADEIRA
Para instalar a cadeira auto no automóvel sem a
base, proceda do seguinte modo:
1. Baixe o fecho estabilizador. (fi g. 21)
2. Coloque a cadeira auto sobre o banco do auto-
móvel onde pretende instalá-la.
3. Estique o cinto de segurança do automóvel e
aperte-o no respectivo fecho, fazendo passar a
correia horizontal nas duas guias específi cas (fi g.
22).
4. Faça pas sar a correia diago nal do cinto de segu -
rança do automóvel na respectiva guia adequada
que se encontra na parte de trás do encosto da
cadeira auto (fi g. 23).
5. Esti que ao máximo o cint o de segurança à vo lta
da cadeir a auto, de modo a que a s correias fi quem
bem ader entes e certifi cando-se d e que não fi cam
torcidas. ATENÇÃO: DURANTE O TRANSPORTE,
A CORREIA DIAGONAL DO CINTO DE SEGURANÇA DO AUTOMÓVEL DEVE ESTAR SEMPRE
NA POSIÇÃO INDICADA NA FIG. 24. NUNCA
UTILIZE A CADEIRA AUTO SEM FAZER PASSAR
A CORREIA NA RESPECTIVA GUIA ADEQUADA
PARA O EFEITO: PODERÁ COMPROMETER SERIAMENTE A SEGURANÇA DO SEU FILHO.
6. Coloque a alça na posição “A” (fi g. 10)
7. Para remover a cadeira auto, desaperte o cinto
do automóvel, premindo o fecho e retire o cinto
da guia diagonal e da horizontal, existente na cadeira auto.
8. Coloque a alça na posição “B” (fi g.10).
AUTO SEM A BASE
Na fi g. 25 são indicados alguns exemplos de instalação incorrecta.
Para retirar a cadeira auto da base, repita as operações anteriores mas em ordem inversa: remova
a correia diagonal do cinto de segurança do automóvel da guia existente no encosto da cadeira auto, coloque a pega na posição “B” (fi g. 10),
desencaixe a cadeira auto, puxando o manípulo
específi co e, simultaneamente, levante a cadeira
auto, segurando -a pela alça.
UTILIZAÇÃO DA CAPOTA PÁRA-SOL
A cadeira auto dispõe de uma capota pára-sol,
para proteger a criança do sol e do vento.
Pode ser fi xada ou removida facilmente graças
aos dois encaixes adequados para o efeito, existentes na ca deira auto, e a sua incl inação pode ser
regulada, conforme desejar. (fi g. 26)
POSIÇÃO FIXA OU DE BALOIÇO (UTILIZA-
ÇÃO COMO ESPREGUIÇADEIRA)
Quando não estiver a ser utilizada no automóvel, esta cadeira auto pode também ser utilizada
como cadeirinha de baloiço ou como espreguiçadeira. Para que possa baloiçar, recolha o fecho
estabilizador (fi g . 15) e posicio ne a alça na posiçã o
“B”. (fi g. 10)
Para a utilizar na posição fi xa, abra o fecho estabilizador (fi g. 21) e coloque a alça na posição “D”.
(fi g. 10)
A u til iz aç ão d a ca de ira au to c om o es pr egu iç ade ir a
não é aconselhada para crianças que já se levantam sozinhas (aproxi madamente com 6 meses de
idade ou 9 Kg de peso).
Para evitar o risco de queda da criança, coloque
sempre o cinto de segurança.
Nunca deixe a criança sem vigilância.
É perigoso colocar a cadeira auto com a criança,
sobre superfícies elevadas ou inclinadas.
ATENÇÃO: antes de transpor tar a cadeira auto à
mão, colo que e bloqueie sem pre a alça na posição
vertical “B” (fi g. 10)
VERSÃO CADEIRA AUTO
+ CARRINHO DE PASSEIO
ATENÇÃO! Para instalar a cadeira auto no carrinho de passeio, consulte as instruções do carrinho
de passeio.
Os novos carrinhos de passeio CHICCO estão
equipados com o sistema CLIK CLAK, dispositivos
especiais, localizados nos apoios dos braços, que
permitem fi xar a cadeira auto directamente no
carrinho de passeio, sem necessitar de quaisquer
acessórios complementares.
- Abra o carrinho de passeio seguindo as instruções do respectivo manual.
42
Page 43

- Segure na cadeira pela alça e coloque-a sobre o
carrinho de passeio, conforme indicado na fi g. 27.
- Exponha os dois pernes de fi xação da alça, pu-
xando e rodando os dois botões (fi g. 28).
- Rode a alça, pressionando os botões inferiores,
até fi car paralela aos apoios dos braços e até que
os dois pernes fi quem bloqueados no interior das
ranhuras (pressione para baixo a cadeira na zona
junto aos pés da criança, para bloquear a alça na
posição correcta).
- Para reti rar a cadeira do c arrinho de p asseio, bas-
ta premir os dois botões vermelhos, existentes na
alça, conforme indicado na fi gura 29.
- Levante a al ça, rodando -a, recolha os do is pernes
de fi xação, retirados no ponto D, e retire a cadeira
auto do carrinho de passeio.
ATENÇÃO: a instalação da cadeira auto no carrinho de passeio e a sua remoção podem ser
efectuadas com a criança na cadeira, no entanto,
com o peso da criança estas operações poderão
tornar-se mais difíceis de executar. Neste caso,
recomenda-se a máxima atenção ao efectuar as
referidas operações.
DESFORRAGEM/LIMPEZA
• Se pretender lavar o forro da cadeira, abra o cinto e remova o forro depois de ter desenfi ado as
duas correias com os fechos metálicos através
das respectivas ranhuras (fi g. 30). Para a lavagem siga atentamente as indicações da etiqueta
têxtil, existente no forro.
• O cinto, o fecho e as partes de plástico devem
ser limpos apenas com um pano húmido. Não
utilize solventes ou branqueadores pois podem
danifi car e fragilizar estes componentes, comprometendo as condições de segurança.
1. A cadeira deve ser instalada seguindo escrupulosamente as instruções fornecidas.
2. Nunca deixe a criança na cadeira sem vigilância.
3. Não faça passar o cinto do carro em posições diferentes das indicadas nestas instruções: pode comprometer a segurança do seu
fi lho (são dados alguns exemplos de instalação INCORRECTA nas fi g. 20 e 25).
4. Instale o produto exclusivamente em bancos correctamente fi xados à estrutura do
veículo e virados para a frente do automóvel. Não deixe bancos rebatíveis, amovíveis
ou giratórios do automóvel mal fi xados. Em
caso de acidente poderão constituir um grave
perigo.
5. Preste atenção à forma como instala a
cadeira no carro de modo a evitar que esta
DA CADEIRA AUTO
ADVERTÊNCIAS: PARA LER
ANTES DE VIAJAR:
possa interferir com um assento móvel ou
com a porta.
6. Atenção: esta cadeira auto NUNCA deve
ser instalada com um cinto de segurança do
automóvel só de dois pontos de fi xação.
7. Cer tifi que-se sempre de que a criança não
abre o fecho do cinto de segurança.
8. No caso de instalar a cadeira auto com a
base, verifi que sempre se esta última está fi xada correctamente no banco do automóvel.
9. Nenhuma modifi cação ou adição devem
ser real izadas no produ to sem a aprovaçã o do
fabricante. Não aplique acessórios, peças de
substituição ou componentes não fornecidos
pelo fabricante. Eventuais modifi cações realizadas nos produtos ilibam o fabricante de
qualquer responsabilidade.
10. Se a cadeira auto estiver danifi cada, deformada ou excessivamente desgastada,
deve ser substituída: poderá ter perdido as
características originais de segurança.
11. O forro da cadeira pode ser substituído
exclusivamente por um outro fornecido ou
aprovado pelo fabricante, pois constitui parte integrante da cadeira auto. A cadeira auto
nunca deve ser utilizada sem o forro.
12. Verifi que se as correias do cinto de segurança do automóvel não estão torcidas. Evite
que o cinto de segurança do automóvel ou
qualquer um dos componentes da cadeira
auto fi quem entalados nas portas do automóvel ou em contacto com pontos cor tantes.
Se o cinto de segurança estiver danifi cado ou
deteriorado, substitua-o.
13. C erti fi que-se sem pre de que tanto o cinto
de segurança da criança como o cinto de segurança de 3 pontos do automóvel se encontram es ticados corre ctamente par a garantir a
máxima segurança ao seu fi lho.
14. Não utili ze o produto se es tiver danifi cado
ou se faltarem peças. Poderá ser perigoso.
15. Após um acidente, ainda que ligeiro, a
cadeira e o cinto podem sofrer danos não
visíveis a olho nu. Recomenda-se a sua substituição.
16. Certifi que-se de que não transporta no
carro objectos não fi xados, sobretudo na
prateleira posterior, que em caso de acidente,
possam ferir os ocupantes.
17. Ce rtifi que-se de que todos os passageiros
do veículo u tilizam o cinto de se gurança, par a
a sua própria segurança e porque em caso de
acidente, poderão bater gravemente contra
a criança.
18. Se o veículo tiver fi cado parado ao so l por
muito tempo, inspeccione cuidadosamente a
cadeira antes de colocar a criança; algumas
43
Page 44

partes poderão estar excessivamente quentes; deixe-as arrefecer.
19. Em caso de viagens longas, pare frequentemente. A criança cansa-se muito facilmente. Não retire a criança da cadeira, por nenhuma razão, enquanto o veículo estiver em
movimento. Se a criança precisar de atenção,
procure um lugar seguro e pare.
20. Não uti lize cadeiras e m segunda mão. Poderão ter sofrido danos estruturais, ex tremamente perigosos, não visíveis a olho nu.
21. Os recém-nascidos prematuros, nascidos
com menos de 37 semanas de gestação, correm risco se forem transportados na cadeira
auto. Estes recém-nascidos podem ter problemas respir atórios, ao estare m sentados na
cadeira auto. É aconselhável contactar o seu
médico ou pessoal hospitalar habilitado, para
que possam avaliar as condições específi cas
do seu fi lho e recomendar-lhe a cadeira auto
ou a alcofa auto mais adequadas, antes de
sair da maternidade.
22. Esta cadeira auto pode ser utilizada para
transportar a criança no automóvel e também como espreguiçadeira fora do veículo.
Quando for utilizada fora do automóvel, para
evitar q uedas, não a col oque sobre sup erfícies
altas, tais como mesas, bancadas, camas etc.
nem sobre super fícies inclinadas ou ins táveis.
Quando a criança estiver na cadeira coloquelhe sempre o cinto de segurança.
23. O forro da cadeira não é impermeável,
portanto, quando utilizar a cadeira instalada
no carrinho de passeio, se necessário (com
chuva), é aconselhável utilizar os acessórios
impermeáveis Chicco.
24. Mantenha os sacos de plástico fora do alcance da criança, para evitar riscos de asfi xia.
25. Conserve cuidadosamente estas instruções num local de fácil e rápido acesso.
26. A sociedade ARTSANA declina qualquer
responsabilidade pelo uso impróprio do produto.
Para mais informações e para o fornecimento de
peças de substituição contacte o Serviço de Assistência Chicco:
Farsana Portugal, S.A.
Atendimento ao Consumidor
R. Humberto Madeira, nº 9
Queluz de Baixo
2730 -097 BARCA RENA
telefone: 21 434 78 00
www.chicco.com
44
Page 45

NL
AUTO-FIX
COMPONENTEN : (Fig. A, B, C, D)
1. Basis
2. Schild
3. Handgreep
4. Ontkoppelingshandgreep
5. Bekleding
6. Comfortkussen
7. Zonnekap
8. Koppeling zonnekap
9. Diagonale autogordelgleuf
10. Horizontale autogordelgleuven op de basis
10 A. Horizontale autogordelgleuven op het
autostoeltje
11. Re gel gorde l
12. Gordel gesp
13. Gesplipjes
13 A. Openingsknop gesp
14. Gordelregelknop (onder het stoffen napje)
15. Gordels
16. Vulling voor gordels (indien aanwezig)
17. Gordeldoorhaallussen
18. Knoppen voor instelling handgreep
19. Knop voor bevestiging aan wandelwagen
20. Knop voor ontkoppeling van wandelwagen
21. Plaatsingsstaaf
22. Stabilisator
23. Goedkeuringslabel
24. Label met montagevoorschriften met en
zonder basis
HEEL BELANGRIJK! METEEN LEZEN
• Lees de gebruiksaanwijzingen vóór gebruik van
het artikel goed door.
• Houd je voor de montage en installatie van het
artikel strikt aan de voorschriften. Zorg er voor
dat niemand het artikel gebruikt zonder de gebruiksaanwijzingen gelezen te hebben.
• Bewaar deze gebruiksaanwijzingen voor latere
raadpleging.
• Volgens de ongelukkenstatistieken, is de achterbank van de auto veiliger dan de voorbank
en daarom te verkiezen om het autostoeltje te
installeren.
• LET OP! GROOT GEVAAR! Gebruik dit autostoeltje nooit op een voorbank met airbag aan
de voorkant. Je kunt het autostoeltje alleen op
de voorbank installeren indien de airbag aan de
voorkant gedesactiveerd is: controleer bij de autofabrikant of in de gebruiksaanwijzingen van je
auto of de airbag gedesactiveerd kan worden.
• In die n he t au tos to elt je o p de voo rb ank gep la at st
wordt (al leen als er gee n airbag aan de voo rkant
is of als deze gedesactiveerd is), is het beter de
vo orb ank zov eel m oge lij k na ar ac hte ren te t rekken, voor zover de aanwezigheid van andere pas-
sagiers op de achterbank dit toelaat.
• Gebruik dit stoeltje nooit op naar de zijkant of
in tegengestelde rijrichting gerichte autozittingen.
• Maak het auto stoeltje nooi t vast op een autoz itting met enkel een buikgordel (2-punts).
• Geen enkel s toeltje kan het k ind in geval van ee n
ongeluk v olledige bes cherming bied en, maar het
gebruik van dit artikel vermindert het risico op
letsels en de dood van het kind.
• Een verkeerd gebruik van het ar tikel verhoogt
het risico op ernstig letsel aan het kind, niet alleen bij ee n ongeluk maar oo k in andere situ aties:
controleer altijd of het stoeltje goed aan de autozitting bevestigd is.
• Het stoeltje moet vervangen worden indien het
beschadigd, vervormd of erg versleten is: het
zou zijn oorspronkelijke veiligheidskenmerken
verloren kunnen hebben.
• Breng gee n wijzigingen of toe voegingen aan he t
artikel aan zonder toestemming van de fabrikant. Installeer geen toebehoren, onderdelen
en componenten die niet door de fabrikant
geleverd zijn.
• Laat het ki nd nooi t zond er toez icht in het aut ostoeltje, om geen enkele reden.
• Ma ak h et k ind alt ijd vas t i n he t st oel tje zod at h et
er niet uit kan vallen, ook wanneer je hem met
de hand transporteert.
• Buiten de auto is het gevaarlijk het stoeltje op
een verhoogd oppervlak te gebruiken.
• Zorg ervoor dat het autostoeltje altijd aan de
autozitting bevestigd is: het zou anders de passagiers kunnen stoten en verwonden.
• Leg niets dat geen voor dit artikel goedgekeurd
toebehoren is tussen de autozitting en het autostoelje of tussen het autostoeltje en het kind:
dit zou de go ede werking v an het stoeltje bij e en
ongeluk in het gedrang kunnen brengen.
• Bedek het stoeltje indien de auto in de zon gelaten wordt.
• Het auts toeltje kan ten gev olge van ook ee n licht
ongeval schade oplopen, die met het blote oog
ni et z ich tba ar i s: d aa rom moe t he t in ied er g eva l
vervangen worden.
• Controleer of het kind goed met de gordels vastgemaakt is en of de handgreep verticaal goed
geblokkeerd is alvorens het autostoeltje met de
hand te transporteren.
• Gebruik dit autostoeltje voo r transport in combinatie met de wandelwagen alleen voor hierop
ingestelde Chicco wandelwagens.
• Controleer bij transport van het kind met het
autostoeltje in combinatie met de wandelwagen
eerst of hij goed bevestigd is.
• Gebruik geen tweedehands autostoeltjes: het
zou niet met het blote oog zichtbare structurele schade kunnen hebben opgelopen die de
45
Page 46

veiligheid van het ar tikel echter in het gedrang
kan brengen.
• Artsana acht zich niet aansprakelijk voor een
oneigenlijk gebruik van het artikel.
GEBRUIKSAANWIJZINGEN
PRODUCTKENMERKEN
Het autostoeltje is in zowel de versie van alleen
autostoeltje als in de versie van autostoeltje met
basis ge homologeerd “G roep 0+”, voor transpo rt
in de auto van kinderen vanaf de geboorte tot een
gewicht van 13 kg.
Dit is een “universal” goedkeuring , hetgeen betekent dat het autostoeltje op alle automodellen
gebruikt kan worden.
LET OP! “ Universal” bete kent dat het compat ibel
is met de meeste, maar niet met alle autozittingen.
BELANGRIJKE MEDEDELING
1. Dit is een “Universeel” vasthoudmechanisme voor kinderen, goedgekeurd volgens
Regelement N°44, amendamenten serie
04. Geschikt voor algemeen gebruik in
voertuigen en compatibel met de meeste,
maar niet alle, autozittingen.
2. Totale compa biliteit is nog gemak kelijker
bereikbaar indien de autofabrikant in het
gebruikershandboek van het voertuig de
installatie van “Universele” vasthoudmechanismen voor kinderen van deze leeftijdsgroep al voorzien heeft.
3. Dit vasthoudmechanisme is als “Universeel” geclassifi ceerd volgens strengere
goedkeuringscriteria dan de vorige modellen zonder deze mededeling.
4. Alleen geschikt voor gebruik in voertuigen uitge rust met 3-p untsveiligh eidsgordel,
statisch of met opwikkelaar, goedgekeurd
op basis van Regelement UN/ECE n°16 of
equivalente norm.
5. Neem contact op met de fabrikant van
het vasthoudmechanisme of met de winkelier, in geval van twijfel.
Het stoe ltje kan ook buiten d e auto gebruik t
worden, in combinatie met de wandelwagen
of als ligstoeltje.
GEBRUIKSBEPERKINGEN
LET OP! Houd je strikt aan de volgende productgebruiksbeperkingen: anders is de veiligheid niet
verzekerd.
1. Het kind mag niet meer dan 13 kg wegen.
2. Gebr uik dit stoeltje no oit op een voor bank met
airbag aan de voor kant, maar alleen als de airbag
aan de voorkant gedesactiveerd is: controleer
bij de autofabrikant of in de gebruiksaanwijzingen van je auto of de airbag gedesactiveerd kan
worden.
3. Gebruik het comfortkussen nooit als het kind
meer dan 6 kg weegt.
BENODIGDE VEREISTEN AUTOZITTING EN
Het autos toeltje kan op ee n voorbank aa n de kant
van de passagier of op de achterbank geïnstalleerd
worden, maar met de volgende beperkingen: de
autozitting moet:
- In de rijrichting staan (fi g.1)
uitger ust zijn met een go rdel met 3 veran keringspunten, statisch of met opwikkelaar (Fig. 2).
Installeer indien mogelijk het autostoeltje altijd
op de achterbank van de auto.
LET OP! GROOT GEVAAR! Gebruik dit autostoeltje nooit op een voorbank met airbag aan
de voorkant.
LET OP! Installeer het autostoeltje nooit op een
stoel met alleen een horizontale riem (Fig. 2A).
LET OP! De gordels moeten altijd aangepast zijn
aan de groei van het kind.
Al vor en s he t aut os toe ltj e in de a uto te in st all ere n
moeten eerst de vasthoudgordels van het kind op
de goede hoogte geplaatst worden.
De goe de gor del ho og te is ie ts o nd er d e sc hou de rs .
(fi g. 3). Het autostoeltje kan op 3 verschillende
hoogtes versteld worden. (fi g. 4)
Het autos toeltje heef t een comfort kussen waar in
het kind van de geboorte totdat het 6 kg weegt
goed in past, met de ideale positie voor nek en
rug.
Controleer voor de installatie van het comfortkussen of de gordels door de laagste lus gehaald
zijn. LE T OP: dit is de enige toe gestane posit ie bij
gebruik van het comfortkussen (fi g. 5)
Let op: ter verzekering van maximale productveiligheid moet het comfortkussen verwijderd
worden zodra het kind een gewicht van 6 kg
bereikt heeft
Verplaats de gordels als volgt:
- open de gesp door op de rode knop (fi g. 6) te
drukken
- haal de gordels er van achteren uit en steek
ze door de voor de hoogte van het kind meest
geschikte lus
(fi g. 7A en 7B).
LET OP! Ver zeker je er van dat de gordel s altijd tussen de plaatsingsstaaf en het schild doorlopen.
De gordels moeten altijd goed gespannen zijn:
46
VEILIGHEIDSGORDEL
GORDELPOSITIE REGELEN
Page 47

PLAATSING VAN HET KIND
1. hef het stof fen napje op, houd de regelknop
ingedrukt en trek aan de gordels van het autostoeltje om ze los te maken (fi g. 8)
2. open de gesp door op de rode knop (fi g. 6) te
drukken
3. zet het kind in het stoeltje
4. leg de twee lipjes over elkaar in de gesp van
fi guur 6A
5. steek beide gesplipjes in de gesp totdat je een
“klik” hoort. (fi g. 6B) LET OP : steek nooit alleen
één lipje in de gesp
6. span de veiligheidsgordels van het kind aan door
aan de middelste regelriem te trekken (fi g. 9)
LET OP: de gordels moeten goed maar niet te
strak gespannen zijn. Als je je vingers tussen de
gordel en het kinderlichaam kan steken dan zijn
ze goed gespannen
HANDGREEPSTANDEN VAN
De handg reep van het auto stoeltje kan op 4 s tanden versteld worden (fi g. 10):
A. Positie in de auto tijdens het rijden (LET OP: dit
is de enige toegestane positie in de auto tijdens
het rijden).
B. Positie transport aan de hand.
C. Positie bij gebruik als schommelligstoel of om
aan daartoe ingestelde Chicco wandelwagen te
bevestigen.
D. Positie bij gebruik als vaste ligstoel.
Druk tegelijkertijd op de handgreepknoppen (fi g.
11) en draai de handgreep in de gewenste stand
totdat je een klik hoort, om hem in te stellen.
INSTALLATIE VAN HET AUTOSTOELTJE IN DE
AUTO
Lees het volgende hoofdstuk goed door: BENODIGDE VEREISTEN AUTOZITTING EN VEILIGHEIDSGORDEL
Het autostoeltje mag zowel in de versie met als
zonder basis alleen tegen de rijrichting in geïnstalleerd worden. LET OP! ZEER GEVAARLIJK: NIET
INSTALLEREN OP AUTOZITTINGEN MET AIRBAG,
tenzij de airbag gedesactiveerd is.
LET OP! Installeer het autostoeltje nooit op een
autozitting met alleen een buikgordel (Fig. 2A).
Ga als vol gt te werk om het a utostoeltje me t basis
op de autozitting te installeren:
1. maak het autostoeltje los van de basis door
aan de bevestigingshandgreep (fi g. 12) te trekken en het tegelijkertijd bij het handvat omhoog
te heffen
2. pla at s de bas is o p de voo r d e in sta ll ati e ge koz en
HET AUTOSTOELTJE
INSTALLATIE MET BASIS:
zitting, richt hem zoal s afgebeeld op fi guur 13 en
zorg er voor dat hij in aanraking is met de rugleuning van de autozitting
3. trek aan de veiligheidsgordel van de auto en
bevestig hem aan de overeenkomende gesp
zodat het horizontale deel in de twee daarvoor
bestemde gleuven gaat (fi g. 14)
4. controleer of de stabilisator goed dicht is
(fi g. 15) alvorens het autostoeltje op de basis te
plaatsen.
5. zet het autostoeltje op de basis (tegen de rijrichting in) en duw hem naar beneden todat hij
vastz it (je hoor t een klik ten teken dat hij vastzit)
(fi g. 16).
6. cont role er of h et au tos toel tje go ed op de ba sis
vast zit door te prober en hem zowel van vo ren als
van achteren op te heffen.
7. pak de diagonale autogordel vast en haal hem
door de daarvoor bestemde gleuf achter de rugleuning van het autostoeltje (fi g. 17)
LET OP: DE DIAGONALE AUTOGORDEL MOET
TIJDENS HET RIJDEN ALTIJD IN DE IN FIG. 18
AANGEGEVEN POSITIE STAAN: GEBRUIK HET
AUTOSTOELTJE NOOIT ZONDER DE GORDEL
DOOR DE DAARVOOR BESTEMDE GLEUF TE
HALEN:
DIT KAN DE VEILIGHEID ERNSTIG IN HET GEDRANG BRENGEN.
8. Sp an de gordel zo s trak mogelijk om het autostoeltje zonder extra lint te laten hangen en zorg
ervoor dat hij niet opgewikkeld is.
9. zet de handgreep in positie “A” (fi g. 10)
Om het autostoeltje van de basis af te nemen:
haal de diagonale autogordel uit de gleuf op de
rugleuning, breng de handgreep weer in positie
“B” (fi g. 10), haak het autostoeltje los door aan
de hendel achter de rugleuning te trekken en tegelijkertijd het autostoeltje op te heffen aan de
handgreep.
LET OP! Co ntroleer na he t installere n ALTIJD of de
autogordel goed aangespannen is en of de gesp
de gordel niet uit de gleuven op de basis trekt.
Controleer ook of de gesp van de autogordel de
gleuven niet in de weg zit.
LET OP: MAAK DE AUTOGORDEL NIET IN ANDERE POSITIES OM DE BASIS VAST DAN ALS
AANGEDUID OP FIG. 19
In fi g 20 zijn enkele voorbeelden van een verkeerde installatie te vinden.
INSTALLATIE ZONDER BASIS
Ga als vol gt te w erk om h et a uto st oel tje ZON DER
basis in de auto te installeren:
1. breng de stabilisator omlaag. (fi g. 21)
47
Page 48

2. zet het autostoeltje op de autozitting van uw
keuze
3. trek aan de autogordel en zet hem vast in de
overeenkomende gesp en haal daarbij het horizontale deel door de twee daarvoor bestemde
gleuven (fi g. 22);
4. Pak de diagonale autogordel vast en haal hem
door de daarvoor bestemde gleuf achter de rugleuning van het autostoeltje (fi g. 23)
5. Span de gordel zo strak mogelijk om het auto-
stoeltje zonder extra lint te laten hangen en zorg
ervo or dat hij niet opgewi kkeld is. LET OP: DE DIAGONALE GO RDEL IN DE AUTO MOET TIJ DENS
HET RIJDEN ALTIJD IN DE IN FIG. 24 AANGEGEVEN POSIT IE ZIJN. GEBRUIK H ET AUTOSTOELTJE
NOOIT ZONDER DE GORDEL DOOR DE SPECIALE GLEUF TE HALEN: DIT KAN DE VEILIGHEID
ERNSTIG IN GEVAAR BRENGEN.
6. Zet de handgreep in positie “A” (fi g. 10)
In fi g 25 zijn enkele voorbeelden van een verkeerde installatie te vinden.
7. H aal het aut ost oe ltj e va n de aut ozi tt ing doo r op
de ges p te dr ukk en o m de aut ogo rd el l os t e ma ken
en haal de gordel uit de diagonale en horizontale
gleuven van het autostoeltje.
Zet de handgreep terug in positie “B” (fi g. 10).
In fi g 25 zijn enkele voorbeelden van een verkeerde installatie te vinden.
Om het autostoeltje van de basis af te nemen:
herhaa l de bovenverme lde handelinge n in tegengestelde volgorde: haal de diagonale autogordel
uit de gleuf o p de rugleuning , breng de hand greep
weer in po sitie “B” (fi g . 10 ), ha ak h et a utos toe ltj e
los door aan de hendel achter de rugleuning te
trekken en tegelijkertijd het autostoeltje op te
heffen aan de handgreep.
GEBRUIK VAN DE ZONNEKAP
Het autostoeltje is uitgerust met een zonnekap
om het kind te beschermen tegen zon en wind.
De zonnekap is gemakkelijk vast te maken aan en
los te haken va n het autos toeltje met behulp van
twee speciale koppelingen en kan in de gewenste
positie gebracht worden. (fi g. 26)
VASTE OF SCHOMMELSTAND VAN HET
Wa nne er h et a uto st oel tje nie t in de a uto g eb rui kt
wordt, kan het ook als schommel stoel of ligstoel
gebruikt worden. Om het in schommelstand te
zetten, zet je de stabilisator (fi g. 15) terug en
plaats je de handgreep in positie “B”. (fi g. 10)
Voor gebru ik in vaste stan d moet je de stab ilisator
(fi g. 21) naar buiten trekken en de handgreep in
positie “D” plaatsen. (fi g. 10)
AUTOSTOELTJE
(GEBRUIK ALS LIGSTOEL)
Voor kinderen die zich al zelf kunnen oprichten
(tot ongeve er 6 maanden of een g ewicht van 9 kg )
kan het beter niet als ligstoel gebruikt worden.
Bi nd d e au tog ord el s al tij d va st z oda t he t k ind nie t
kan vallen.
Laat het kind nooit zonder toezicht achter.
Het gebruik van het autostoeltje op een hoog of
hellend opper vlak is gevaarlijk.
LET OP: zet de handgreep altijd weer vast in de
verticale positie “B” (fi g. 10) alvorens het autostoeltje te transporteren.
VERSIE AUTOSTOELTJE
LET OP! Raadpleeg voor het gebruik met de
wandelwagen de gebruiksaanwijzingen voor de
wandelwagen.
De nieuwe CHICCO wandelwagens zijn uitgersut
met een KLIK KLAK systeem: de armleuningen
beschikken over speciale mechanismen waardoor
het autostoeltje rechtstreeks op de wandelwagen
bevestigd kan worden zonder dat extra toebehoren vereist is.
- open de wandelwagen volgens de gebruiksaanwijzingen.
- pak het autostoeltje vast bij de handgreep en
zet het op de wandelwagen, zoals aangegeven
in fi g. 27.
- trek de twee bevestigingspinnen uit de handgreep door tegelijkertijd aan de twee bevestigingsknoppen te trekken en te draaien (fi g. 28).
- draai de handgreep zo dat ze parallel met de
armleuningen komt te staan door op de knoppen
on de raa n te dru kk en. De t we e be ve sti gin gs pin ne n
zullen in het mechanisme van de armleuningen
blokkeren (duw vervolgens het voeteneinde van
het autostoeltje omlaag om de handgreep in de
goede stand te blokkeren).
- om het autostoeltje van de wandelwagen af te
ne men d ruk j e gew oon o p de t wee r ode k nop pen
op de handgreep, zoals aangegeven in fi guur 29.
- hef de handgreep omhoog door eraan te draaien,
draai de t wee bevestig ingspinnen di e je bij punt D
uitgetrokken hebt weer naar binnen en neem het
autostoeltje van de wandelwagen af.
LET OP: h et autostoeltj e kan ook op de wan delwagen beve stigd /ervan lo sgehaakt word en met het
kind erin, door het gewicht van het kind zouden
deze handelingen iets minder gemakkelijk kunnen
verlopen. Wees in dit geval voorzichtig wanneer
je deze handelingen uitvoert.
· Als je de b ekleding van h et autostoeltj e wilt wassen, maa k je de gordels v an het autostoe ltje los en
trek je de metalen sluitingen uit hun bevestiging
48
+ WANDELWAGEN
BEKLEDING AUTOSTOELTJE
AFNEMEN/WASSEN
Page 49

(fi g. 30) om zo de bekleding te kunnen ver wijderen. Houd je nauwgezet aan de wasvoorschriften
op het bekledingslabel.
· Gordel s, gesp en plastic delen mogen enkel met
een vochtige doek gereinigd worden. Gebruik geen
oplos- of bleekmi ddelen die ze kunnen besc hadigen en onveilig maken.
WAARSCHUWINGEN: LEES
1. Het autostoeltje moet precies volgens de
verstrekte gebruiksaanwijzingen geïnstalleerd
worden.
2. Laat het kind nooit zonder toezicht in het
autostoeltje achter, om geen enkele reden.
3. Bevestig de autogordel niet in een andere
positie dan aangegeven in deze gebruiksaanwijzingen: je zou de veiligheid van je kind in
het gedrang brengen (voorbeelden van een
VERKEERDE installatie zijn te vinden in fi g.
20 en 25.
4. Installeer het autostoeltje alleen op goed
aan de autostructuur bevestigde en naar de
voorkant van het voertuig gerichte autozittingen. Let erop dat je opvouwbare of draaien de aut ozit ting en alt ijd go ed va stz et. D eze
zouden bij een ongeluk een gevaar kunnen
vormen.
5. Inst alleer het autos toeltje zodanig d at een
mobiele zitting of het portier niet in de weg
kunnen zitten.
6. Let op: dit autostoeltje mag IN GEEN GEVAL bevestigd worden met de twee-puntsgordel van de auto.
7. Co nt rol eer alt ijd of he t k ind d e ge sp van d e
veiligheidsgordel niet los kan maken.
8. Contr oleer bij gebr uik van het autost oeltje
met basi s altijd of de basis goe d aan de autozitting bevestigd is.
9. Er mag niets aan het artikel veranderd of
toegevoegd worden zonder goedkeuring van
de fabrikant. Installeer geen toebehoren,
onderdelen en componenten die niet door
de fabrikant geleverd zijn. De constructeur
kan niet verantwoordelijk gesteld worden
indien er wijzigingen aan het product aangebracht zijn.
10. Vervang het autostoeltje indien het om
de een of andere reden beschadigd, vervormd
of erg versleten is: het zou zijn oorspronkelijke veiligheidskenmerken verloren kunnen
hebben.
11. Vervang de bekleding indien nodig door
een bek leding die goedge keurd is door de fabrikant, want deze maakt integraal deel uit
van het autostoeltje. Het autostoeltje mag
nooit zonder bekleding gebruik t worden.
12. Controleer of het gordellint niet opgewik-
DIT VÓÓR DE REIS :
keld is. Vermijd dat de gordel of delen van
het autostoeltje tussen het portier geklemd
worden of tegen scherpe punten wrijven. Vervang de gordel indien hij scheurtjes vertoont
of rafelig geworden is.
13. Controleer voor een zo groot mogelijke
be sc her min g va n je kin d of zow el d e vo or h et
kind bestemde gordel als de 3-puntsautogordel goed strak zitten.
14. Gebruik het artikel niet indien er delen
be sc had igd zij n of o nt bre ken . D at z ou g eva arlijk kunnen zijn.
15. Zelfs bij een licht ongeluk kunnen het
autostoeltje en de gordel voor het blote oog
onzichtbare schade opgelopen hebben. Vervang ze in dat geval.
16. Verzeker je ervan dat er vooral op de hoedenplank geen losse voorwerpen vervoerd
worden, die in geval van een ongeluk de personen in de auto kunnen verwonden.
17. Verzeker je ervan dat alle passagiers in
het voertuig de veiligheidsgordel gebruiken,
voor hun eigen veiligheid maar ook omdat
ze tijdens de reis tegen het kind zouden kunnen stoten.
18. Inspecteer het autostoeltje goed indien de
auto in de zo n stil heeft ge staan en cont roleer
of er geen oververhitte delen zijn, alvorens
het kind er in te zetten : laat het afkoelen.
19. Stop regel matig bij een lang e rit. Kindere n
worden gauw moe. Neem het kind nooit uit
het autostoeltje als de auto rijdt. Parkeer de
auto op een veilige plaats indien het kind je
aandacht nodig heeft.
20. Gebr uik geen tweedehands autostoeltje.
Het zou uite rst gevaarlijke s tructuele sc hade
opgelopen kunnen hebben
die niet zichtbaar is voor het blote oog.
21. Premature kinderen: geboren na minder
dan 37 weken zwangerschap kunnen risico
lopen in het autostoeltje. Ze kunnen ademhalingsmoeilijkheden ondervinden als ze in
het autostoeltje zitten. Wend je tot een arts
of ziekenhuispersoneel zodat zij de toestand
van je kind kunnen beoordelen en een geschikt autostoeltje of geschikte draagmand
kunnen aanbevelen.
22. Het autostoeltje kan ook buiten de auto
gebruikt worden als transportmiddel of ligstoel. Het autostoeltje kan ook buiten de auto
gebruikt worden. Zet het in dat geval niet op
een hoog vlak, zoals tafels, werkvlakken of
onstabiele vlakken, om te vermijden dat
het kind valt. Gebruik altijd de veiligheidsgordels.
23. De bekleding van het autostoeltje is niet
waterdicht; daarom raden we je aan bij ge-
49
Page 50

bruik me t de wandelwage n de Chicco regenkleding te gebruiken.
24. Houd plastic zakjes uit de buurt van het
kind, om verstikkingsgevaar te voorkomen.
25. Deze gebruiksaanwijzingen moeten goe d
bewaard worden op een gemakkelijk bereikbare plaats.
26. ARTSANA acht zich niet aansprakelijk
voor een oneigenlijk gebruik van het artikel.
Voor nadere informatie en verzoeken om
onderdelen kan je contact opnemen met de
Klantenservice:
PHARSANA NV
Maccabilaan 34
2660 Hoboken - BELGIE
tel. 03 828 08 80
fax 03 828 40 59
www.chicco.com
50
Page 51

GR
AUTO-FIX
ΣΤΟΙΧΕΙΑ: (Σχέδια. A, B, C, D)
1. Βάση
2. Περίβλημα
3. Λαβή
4. Μοχλός αφαίρεσης
5. Επένδυση
6. Μαξιλαράκι comfort
7. Τέντ α για τον ήλιο
8. Σύνδεση τέντας
9. Οδηγός της διαγώνιας ζώνης του
αυτοκινήτου
10. Οδηγοί της οριζόντιας ζώνης του
αυτοκινήτου στη βάση
10 Α Οδηγοί της οριζόντιας ζώνης του
αυτοκινήτου στο παιδικό κάθισμα
11. Ζώνη ρύθμισης
12. Αγκράφα των ζωνών
13. Προεξοχές της αγκράφας
13 Α Πλήκτρο
14. Πλήκτρο ρύθμισης των ζωνών (κάτω
από το υφασμάτινο διαχωριστικό)
15. Ζώνες
16. Επενδύσεις για τις ζώνες (αν
προβλέπονται)
17. Σχισμές περάσματος των ζωνών
18. Πλήκτρα για την κλίση της λαβής
19. Μοχλός στερέωσης στο καροτσάκι
20. Πλήκτρο αφαίρεσης από το καροτσάκι
21. Μπάρα τοποθέτησης
22. Σταθεροποιητής
23. Ετικέτα έγκρισης
24. Ετικέτες με οδηγίες συναρμολόγησης με
ή χωρίς βάση
ΕΞΑΙΡΕΤΙΚΑ ΣΗΜΑΝΤΙΚΟ! ΔΙΑΒΑΣΤΕ
• Διαβάστε προσεκτικά όλες τις οδηγίες
χρήσης πριν χρησιμοποιήσετε το προϊόν.
• Διαβάστε προσεκτικά τις οδηγίες χρήσης
πριν συναρμολογήσετε και εφαρμόσετε
το προϊόν. Το προϊόν δεν πρέπει να
χρησιμοποιείται από άτομα που δεν
γνωρίζουν τις οδηγίες χρήσης.
• Κρατήστε αυτές τις οδηγίες για μελλοντική
χρήση.
• Σύμφωνα με τις στατιστικές των
ατυχημάτων, το πίσω κάθισμα του
οχήματος είναι πιο ασφαλές από το
μπροστινό και επομένως πρέπει να
προτιμάται για την τοποθέτηση του
καθίσματος.
• ΠΡΟΣΟΧΗ! ΣΟΒΑΡΟΣ ΚΙΝΔΥΝΟΣ! Μην
χρησιμοποιείτε ποτέ αυτό το καθισματάκι
σε μπροστινό κάθισμα που διαθέτει
αερόσακο. Μπορείτε να τοποθετήσετε το
καθισματάκι στο μπροστινό κάθισμα μόνο
αν ο αερόσακος έχει απενεργοποιηθεί.
Συμβουλευτείτε την κατασκευαστική
εταιρεία ή τις οδηγίες χρήσης του
ανοίγματος της ζώνης
ΑΜΕΣΩΣ.
οχήματος για να διαπιστώσετε αν ο
αερόσακος μπορεί να απενεργοποιηθεί.
• Αν το κάθισμα τοποθετείται στο μπροστινό
κάθισμα του αυτοκινήτου (μόνο αν δεν
υπάρχει μπροστινός αερόσακος ή αν
έχει απενεργοποιηθεί), για μεγαλύτερη
ασφάλεια συνιστάται να τραβάτε προς
τα
πίσω το κάθισμα του αυτοκινήτου όσο
το δυνατόν περισσότερο ανάλογα με το αν
υπάρχουν επιβάτες στο πίσω κάθισμα.
• Μην χρησιμοποιείτε ποτέ αυτό το κάθισμα
σε καθίσματα αυτοκινήτου στραμμένα
στο πλάι ή με αντίθετη κατεύθυνση από
αυτήν της πορείας.
• Μη δένετε ποτέ το καθισματάκι σε ένα
κάθισμα αυτοκινήτου που διαθέτει
κοιλιακή ζώνη (δύο σημείων).
• Κανένα κάθισμα αυτοκινήτου δεν εγγυάται
την απόλυτη ασφάλεια του παιδιού σε
περίπτωση ατυχήματος, αλλά η χρήση
αυτού του προϊόντος μειώνει τον κίνδυνο
τραυματισμού και θανάτου του παιδιού.
• Η μη σωστή χρήση του προϊόντος αυξάνει
τον κίνδυνο σοβαρών βλαβών για το παιδί,
όχι μόνο σε περίπτωση ατυχήματος, αλλά
και σε άλλες κατασ τάσεις: Ελέγχετε
πάντα ότι το κάθισμα είναι στερεωμένο
σωστά στο κάθισμα του αυτοκινήτου.
• Σε περίπτωση που το κάθισμα είναι
κατεστραμμένο, παραμορφωμένο ή
παρουσιάζει έντονη φθορά, πρέπει να
αντικαθίσταται. Μπορεί να έχει χάσει τα
αρχικά χαρακτηρισ τικά αφαλείας.
• Μην κάνετε μετατροπές ή προσθήκες
στο προϊόν χωρίς την έγκριση του
κατασκευασ τή. Μην τοποθετείτε
εξαρτήματα, ανταλλακτικά και στοιχεία
που δεν προμηθεύονται από τον
κατασκευασ τή.
• Μην αφήνετε το παιδί στο κάθισμα χωρίς
επίβλεψη για κανένα λόγο.
• Για να αποφύγετε τον κίνδυνο πτώσεων,
δένετε το παδί πάντα στο καθισματάκι
ακόμα και όταν το μεταφέρετε με το χέρι.
• Κατά τη χρήση του καθίσματος εκτός
αυτοκινήτου, είναι επικίνδυνη η
τοποθέτησή του σε μία υπερυψωμένη
επιφάνεια.
• Μην αφήνετε ποτέ το καθισματάκι στο
κάθισμα του αυτοκινήτου χωρίς να είναι
στερεωμένο. Μπορεί να χτυπήσει και να
τραυματίσει τους επιβάτες.
• Μην τοποθετείτε τίποτα, εκτός από
εγκεκριμένα για το προϊόν αξεσουάρ,
ανάμεσα στο κάθισμα του αυτοκινήτου
και το καθισματάκι ή ανάμεσα στο
καθισματάκι και το παιδί. Σε περίπτωση
ατυχήματος το κάθισμα μπορεί να μην
λειτουργήσει σωστά.
• Σε περίπτωση που το όχημα μείνει
εκτεθειμένο στον ήλιο, συνιστάται να
σκεπάσετε το κάθισμα.
51
μόνο
Page 52

• Μετά από ένα έστω και μικρό ατύχημα,
το κάθισμα μπορεί να υποστεί μη ορατές
ζημιές. Γι αυτό πρέπει σε κάθε περίπτωση
να το αντικαταστήσετε.
• Σε περίπτωση που μεταφέρετε το
καθισματάκι με το χέρι βεβαιωθείτε ότι
το παιδί είναι δεμένο με τις ζώνες και ότι
η λαβή έχει μπλοκάρει σωστά
θέση.
• Για τη μεταφορά με το καθισματάκι
σε συνδυασμό με το καροτσάκι,
χρησιμοποιήστε αυτό το καθισματάκι
αποκλειστικά με τα καροτσάκια Chicco
που διαθέτουν το μηχανισμό στερέωσης.
• Πριν μεταφέρετε το παιδί με το καθισματάκι
πάνω στο καροτσάκι, βεβαιωθείτε ότι το
ίδιο έχει στερεωθεί σωστά.
• Μην χρησιμοποιείτε καθίσματα από
• Η εταιρεία Artsana δεν αναλαμβάνει καμία
Το καθισματάκι με ή χωρίς βάση ανήκει
στην “Ομάδα 0+” για τη μεταφορά παιδιών
από
Το κάθισμα διαθέτει έγκριση “Universal”
, δηλαδή μπορεί να χρησιμοποιηθεί με
οποιοδήποτε μοντέλο αυτοκινήτου.
ΠΡΟΣΟΧΗ! “Universal” σημαίνει ότι είναι
συμβατό με τα περισσότερα αλλά όχι με
όλα τα καθίσματα των οχήματων.
χέρι: Μπορεί να έχουν υποστεί
δεύτερο
ζημιές μη ορατές με γυμνό μάτι που
μπορεί να επηρεάσουν την ασφάλεια του
προϊόντος.
ευθύνη σε περίπτωση μη σωστής χρήσης
του προϊόντος.
ΟΔΗΓΙΕΣ ΧΡΗΣΗΣ
ΧΑΡΑΚΤΗΡΙΣΤΙΚΑ ΤΟΥ ΠΡΟΪΟΝΤΟΣ
τη γέννηση έως 13 κιλά.
ΣΗΜΑΝΤΙΚΗ ΠΡΟΕΙΔΟΠΟΙΗΣΗ
Αυτό είναι ένα κάθισμα αυτοκινήτου
για παιδιά “Universal” εγκεκριμένο
σύμφωνα με τον κανονισμό N° 44
τροποποίηση 04. Κατάλληλο για γενική
χρήση
στα οχήματα και συμβατό με
τα περισσότερα αλλά όχι με όλα τα
καθίσματα των αυτοκινήτων.
Η απόλυτη συμβατότητα επιτυγχάνεται
ευκολότερα στις περιπτώσεις που ο
κατασκευασ τής του οχήματος δηλώνει
στο εγχειρίδιο του οχήματος ότι το
αυτοκίνητο είναι κατάλληλο για
τοποθέτηση καθισμάτων για παιδιά
“Universal” για τη συγκεκριμένη ηλικιακή
ομάδα.
Αυτό το κάθισμα
“Universal” με πιο αυστηρά κριτήρια
έγκρισης από τα προηγούμενα μοντέλα
που δεν διαθέτουν την παρούσα
προειδοποίηση.
Είναι κατάλληλο μόνο για χρήση
σε οχήματα που διαθέτουν ζώνη
έχει καταταχθεί ως
σε κάθετη
ασφαλείας 3 σημείων, στατική ή
τυλισσόμενη βάσει του Κανονισμού
UN/ECE N°16 ή άλλους ανάλογους
κανονισμούς.
Σε περίπτωση αμφιβολίας,
επικοινωνήστε με τον κατασκευασ τή ή
τον
αντιπρόσωπο.
Το καθισματάκι μπορεί να χρησιμοποιηθεί
και εκτός αυτοκινήτου σε συνδυασμό με το
καροτσάκι περιπάτου ή ως ρηλάξ.
ΠΕΡΙΟΡΙΣΜΟΙ ΣΤΗ ΧΡΗΣΗ
ΠΡΟΣΟΧΗ! Σεβαστείτε τους ακόλουθους
περιορισμούς στη χρήση του προϊόν τος:
Στην αντίθετη περίπτωση η ασφάλεια δεν
είναι εγγυημένη.
Το βάρος του παιδιού δεν πρέπει να είναι
πάνω από 13 κιλά.
Μην χρησιμοποιείτε
στο κάθισμα του συνοδηγού με μπροστινό
αερόσακο, αλλά μόνο αν ο μπροστινός
αερόσακος έχει απενεργοποιηθεί:
Συμβουλευτείτε την κατασκευαστική
εταιρεία ή τις οδηγίες χρήσης του οχήματος
για να διαπιστώσετε αν ο αερόσακος
μπορεί να απενεργοποιηθεί.
Μην χρησιμοποιείτε ποτέ το μαξιλαράκι
comfort αν το παιδί είναι πάνω από 6 κιλά.
ΑΠΑΡΑΙΤΗΤΕΣ
ΚΑΘΙΣΜΑΤΟΣ ΑΥΤΟΚΙΝΗΤΟΥ ΚΑΙ ΤΗΣ
Το καθισματάκι μπορεί να τοποθετηθεί στο
κάθισμα του συνοδηγού ή σε οποιοδήποτε
πίσω κάθισμα, αλλά με τους εξής
περιορισμούς: Το κάθισμα πρέπει να είναι:
-Στραμμένο προς εμπρός (σχέδιο 1).
Να διαθέτει ζώνη 3 σημείων στερέωσης,
στατική ή τυλισσόμενη (σχέδιο 2).
Συνιστάται να τοποθετείτε πάντα το
καθισματάκι
αυτοκινήτου.
ΠΡΟΣΟΧΗ! ΣΟΒΑΡΟΣ ΚΙΝΔΥΝΟΣ! Μην
χρησιμοποιείτε ποτέ αυτό το καθισματάκι
σε μπροστινό κάθισμα που διαθέτει
αερόσακο.
ΠΡΟΣΟΧΗ! Μην τοποθετείτε ποτέ το
καθισματάκι σε ένα κάθισμα που διαθέτει
μόνο κοιλιακή ζώνη (σχέδιο 2Α)
ΡΥΘΜΙΣΗ ΤΗΣ ΘΕΣΗΣ ΤΩΝ ΖΩΝΩΝ
ΠΡΟΣΟΧΗ! Οι ζώνες πρέπει να
προσαρμόζονται σύμφωνα με την
του παιδιού. Πριν τοποθετήσετε
ανάπτυξη
το καθισματάκι στο αυτοκίνητο πρέπει
να ρυθμίσετε στο σωστό ύψος τις ζώνες
συγκράτησης του παιδιού.
Η σωστή ρύθμιση του ύψους των ζωνών
είναι ελαφρώς κάτω από το ύψος των
ώμων. (σχέδιο. 3). Το καθισματάκι διαθέτει
52
ποτέ το καθισματάκι
ΠΡΟΫΠΟΘΕΣΕΙΣ ΤΟΥ
ΖΩΝΗΣ ΑΣΦΑΛΕΙΑΣ
στο πίσω κάθισμα του
Page 53

3 θέσεις ύψους. (σχέδιο. 4).
Το καθισματάκι διαθέτει μαξιλαράκι comfort
που εγγυάται στο παιδί από τη γέννηση
μέχρι το βάρος των 6 κιλών τη σωστή
τοποθέτηση και θέση για το λαιμό και την
πλάτη.
Για να τοποθετήσετε το μαξιλαράκι comfort
βεβαιωθείτε ότι οι ζώνες είναι περασμένες
στην πιο χαμηλή σχισμή.
ΠΡΟΣΟΧΗ: Είναι η μόνη επιτρεπτή
το μαξιλαράκι comfort (σχέδιο. 5).
Προσοχή: Γι α την απόλυτη ασφάλεια του
προϊόντος, αφαιρέστε το μαξιλαράκι
comfort μόλις το βάρος του παιδιού φτάσει
τα 6 κιλά.
Για να μετακινήσετε τις ζώνες, ενεργήστε
ως εξής:
Ανοίξτε την αγκράφα, πιέζοντας το κόκκινο
πλήκτρο (σχέδιο. 6).
Βγάλτε τις ζώνες από το πίσω μέρος και
περάστε τες στην
ύψος του παιδιού σχισμή (σχέδιο. 7Α και
7Β).
ΠΡΟΣΟΧΗ! Βεβαιωθείτε ότι οι ζώνες περνούν
πάντα ανάμεσα στη μπάρα τοποθέτησης
και το περίβλημα.
Οι ζώνες πρέπει να είναι πάντα σωστά
τεντωμένες.
ΤΟΠΟΘΕΤΗΣΗ ΤΟΥ ΠΑΙΔΙΟΥ
Σηκώστε το υφασμάτινο κάλυμμα,
κρατήστε πατημένο το πλήκτρο ρύθμισης
και τραβήξτε τις ζώνες
να χαλαρώσ ουν (σχέδιο. 8).
Ανοίξτε την αγκράφα, πιέζοντας το κόκκινο
πλήκτρο (σχέδιο. 6).
Τοποθετήστε το παιδί.
Τοποθετήστε τη μία πάνω στην άλλη τις
δύο προεξοχές της αγκράφας (σχέδιο. 6Α).
Εισάγετε και τις δύο προεξοχές της
αγκράφας μέχρι να ακούσετε ένα “κλικ”.
(σχέδιο. 6Β). ΠΡΟΣΟΧΗ:Μην εισάγετε ποτέ
μόνο μία
Τε ν τώστε τις ζώνες ασφαλείας του
παιδιού, τραβώντας την κεντρική ζώνη
ρύθμισης (σχέδιο 9).
ΠΡΟΣΟΧΗ: Οι ζώνες πρέπει να είναι
τεντωμένες αλλά όχι υπερβολικά. Αν
μπορείτε να περάσετε τα δάκτυλά σας
ανάμεσα στη ζώνη κι το σώμα του παιδιού,
σημαίνει ότι έχουν τεντώσει σωστά.
ΘΕΣΕΙΣ ΤΗΣ ΛΑΒΗΣ ΤΟΥ ΚΑΘΙΣΜΑΤΟΣ
Η
λαβή του καθίσματος ρυθμίζεται σε 4
θέσεις (σχέδιο 10):
A. Θέση μεταφοράς στο αυτοκίνητο
(ΠΡΟΣΟΧΗ:Αυτή είναι η μοναδική
επιτρεπόμενη θέση κατά τη μεταφορά με
το αυτοκίνητο).
B. Θέση μεταφοράς με το χέρι.
Γ. Θέση για χρήση ως λικνιζόμενο ρηλάξ ή
θέση για στερέωση στο καροτσάκι Chicco
πιο κατάλ ληλη για το
ρύθμισης έτσι ώστε
προεξοχή στην αγκράφα.
θέση με
που διαθέτει αυτή τη λειτουργία.
Δ. Θέση
για χρήση ως σταθερό ρηλάξ.
Για να πραγματοποιήσετε τη ρύθμιση,
πιέστε ταυτόχρονα τα πλήκτρα στη λαβή
(σχέδιο 11) και στρέψτε τη λαβή στην
επιθυμητή θέση μέχρι να ακούσετε ένα
“κλακ”.
ΤΟΠΟΘΕΤΗΣΗ ΤΟΥ ΚΑΘΙΣΜΑΤΟΣ ΣΤΟ
Διαβάστε με προσοχή την παράγραφο:
ΑΠΑΡΑΙΤΗΤΕΣ ΠΡΟΫΠΟΘΕΣΕΙΣ ΤΟΥ
ΚΑΘΙΣΜΑΤΟΣ ΑΥΤΟΚΙΝΗΤΟΥ ΚΑΙ ΤΗΣ ΖΩΝΗΣ
ΑΣΦΑΛΕΙΑΣ.
Το καθισματάκι
και χωρίς , πρέπει να τοποθετείται
με κατεύθυνσ η αντίθετη από αυτή της
πορείας. ΠΡΟΣΟΧΗ! ΠΟΛΥ ΕΠΙΚΙΝΔΥΝΟ:
ΜΗΝ ΤΟ ΤΟΠΟΘΕΤΕΙΤΕ ΣΕ ΚΑΘΙΣΜΑΤΑ ΠΟΥ
ΔΙΑΘΕΤΟΥΝ ΑΕΡΟΣΑΚΟ, εκτός αν αυτός έχει
απενεργοποιηθεί.
ΠΡΟΣΟΧΗ! Μην τοποθετείτε ποτέ το
καθισματάκι σε ένα κάθισμα που διαθέτει
μόνο μία κοιλιακή ζώνη.
Για να τοποθετήσετε το καθισματάκι με τη
βάση στο κάθισμα, ενεργήστε ως εξής:
Βγάλτε το καθισματάκι από τη βάση,
τραβώντας το μοχλό στερέωσης (σχέδιο12)
και ταυτόχρονα τραβώντας τον προς επάνω
με τη λαβή .
Τοποθετήστε τη βάση στο κάθισμα που έχετε
επιλέξει, με τον τρόπο που υποδεικνύεται
στο σχέδιο 13, έτσι ώστε
με την πλάτη του καθίσματος αυτοκινήτου.
Τρα βήξ τ ε τη ζώνη αφαλείας του
αυτοκινήτου και δέστε την στην αντίστοιχη
αγκράφα, περνώντας το οριζόντιο τμήμα
στους δύο ειδικούς οδηγούς (σχέδιο14) .
Πριν εισάγετε το καθισματάκι στη βάση,
βεβαιωθείτε ότι ο σταθεροποιητής είναι
κλειστός (σχέδιο 15).
Εισάγετε το κάθισμα στη βάση (στραμμένο
προς
της πορείας) πιέζοντας προς τα κάτω
μέχρι να εφαρμόσει (θα ακούσετε το “κλακ”
στερέωσης) (σχέδιο 16).
Βεβαιωθείτε για τη σωστή στερέωση του
καθίσματος στη βάση προσπαθώντας να
το σηκώσετε από το μπροστινό και από το
πίσω μέρος.
Πιάστε τη διαγώνια ζώνη του αυτοκινήτου
και περάστε την
βρίσκεται στο πίσω μέρος της πλάτης του
καθίσματος (σχέδιο 17).
ΠΡΟΣΟΧΗ: Η ΔΙΑΓΩΝΙΑ ΖΩΝΗ ΤΟΥ
ΑΥΤΟΚΙΝΗΤΟΥ ΚΑΤΑ ΤΗ ΜΕΤΑΦΟΡΑ ΠΡΕΠΕΙ ΝΑ
ΕΙΝΑΙ ΠΑΝΤΑ ΣΤΗ ΘΕΣΗ ΠΟΥ ΥΠΟΔΕΙΚΝΥΕΤΑΙ
ΣΤΟ ΣΧΕΔΙΟ 18Α: ΜΗΝ ΧΡΗΣΙΜΟΠΟΙΕΙΤΕ
ΠΟΤΕ ΤΟ ΚΑΘΙΣΜΑΤΑΚΙ ΧΩΡΙΣ ΝΑ ΠΕΡΑΣΕΤΕ
53
ΑΥΤΟΚΙΝΗΤΟ
τόσο με τη βάση όσο
ΤΟΠΟΘΕΤΗΣΗ ΤΗΣ
ΒΑΣΗΣ
να είναι σε επαφή
την αντίθετη κατεύθυνση από αυτήν
απο τον ειδικό οδηγό που
Page 54

ΤΗ ΖΩΝΗ ΣΤΟΝ ΕΙΔΙΚΟ ΟΔΗΓΟ:
ΑΥΤΟ ΜΠΟΡΕΙ ΝΑ ΕΠΗΡΕΑΣΕΙ ΣΗΜΑΝΤΙΚΑ
ΤΗΝ ΑΣΦΑΛΕΙΑ.
Τεντώ σ τ ε γύρω από το καθισματάκι τη
ζώνη όσο περισσότερο μπορείτε, χωρίς
να αφήσετε περίσσευμα ταινίας, και
βεβαιωθείτε ότι δεν είναι μπερδεμένη .
Τοποθετήστε τη λαβή στο “A” (σχέδιο 10)
Για να βγάλετε το καθισματάκι από τη
βάση:
Βγάλτε από τον οδηγό της πλάτης τη
διαγώνια ζώνη, φέρτε τη λαβή στη θέση “Β”
(σχέδιο 10 ), απελευθερώστε το καθισματάκι
τραβώντας τον ειδικό μοχλό και ταυτόχρονα
σηκώστε το καθισματάκι από τη λαβή.
ΠΡΟΣΟΧΗ!Μετά την τοποθέτηση ελέγχετε
ΠΑΝΤΑ ότι η ζώνη του αυτοκινήτου είναι
σωστά τεντωμένη και ότι η αγκράφα δεν
πιέζει τη ζώνη να βγει
οδηγούς και ότι δεν πιέζει τους ίδιους τους
οδηγούς.
ΠΡΟΣΟΧΗ: ΜΗΝ ΠΕΡΝΑΤΕ ΠΟΤΕ ΤΗ ΖΩΝΗ
ΤΟΥ ΑΥΤΟΚΙΝΗΤΟΥ ΣΕ ΔΙΑΦΟΡΕΤΙΚΕΣ ΘΕΣΕΙΣ
ΑΠΟ ΑΥ ΤΕΣ ΠΟΥ ΥΠΟΔΕΙΚΝΥΟΝΤΑΙ ΣΤΟ
ΣΧΕΔΙΟ 19.
Στο σχέδιο 20 δίνονται ορισμένα
παραδείγματα μη σωστής τοποθέτησης.
ΤΟΠΟΘΕΤΗΣΗ ΧΩΡΙΣ ΒΑΣΗ
Για να τοποθετήσετε το καθισματάκι χωρίς
τη βάση στο αυτοκίνητο, ενεργήστε ως
εξής:
Κατεβάσ τε το σταθεροποιητή (σχέδιο 21)
Τοποθετήστε το καθισματάκι στο κάθισμα
του αυτοκινήτου που επιλέξατε.
Τρα βήξ τ ε τη ζώνη ασφαλείας του
αυτοκινήτου και δέστε την στην αντίστοιχη
αγκράφα, περνώντας το οριζόντιο τμήμα
της ζώνης στους ειδικούς οδηγούς του
καθίσματος (σχέδιο 22).
Πιάστε τη διαγώνια ζώνη του αυτοκινήτου
και περάστε την από τους ειδικούς οδηγούς
που βρίσκονται στο πίσω μέρος της πλάτης
του καθίσματος (σχέδιο 23 )
Τεντώ σ τ ε γύρω από το καθισματάκι τη ζώνη
όσο πιο πολύ μπορείτε, χωρίς να αφήσετε
περίσσευμα ταινίας, και βεβαιωθείτε ότι
δεν είναι μπερδεμένη.
ΠΡΟΣΟΧΗ: Η ΔΙΑΓΩΝΙΑ ΖΩΝΗ ΤΟΥ
ΑΥΤΟΚΙΝΗΤΟΥ ΚΑΤΑ ΤΗ ΜΕΤΑΦΟΡΑ ΠΡΕΠΕΙ ΝΑ
ΕΙΝΑΙ ΠΑΝΤΑ ΣΤΗ ΘΕΣΗ ΠΟΥ ΥΠΟΔΕΙΚΝΥΕΤΑΙ
ΣΤΟ ΣΧΕΔΙΟ 24: ΜΗΝ ΧΡΗΣΙΜΟΠΟΙΕΙΤΕ ΠΟΤΕ
ΤΟ ΚΑΘΙΣΜΑΤΑΚΙ ΧΩΡΙΣ ΝΑ ΠΕΡΑΣΕΤΕ ΤΗ
ΖΩΝΗ ΣΤΟΝ ΕΙΔΙΚΟ ΟΔΗΓΟ:
ΑΥΤΟ ΜΠΟΡΕΙ ΝΑ ΕΠΗΡΕΑΣΕΙ ΣΗΜΑΝΤΙΚΑ
ΤΗΝ ΑΣΦΑΛΕΙΑ.
Τοποθετήστε τη λαβή στο “A” (σχέδιο 10)
Για να βγάλετε το παιδικό κάθισμα από το
κάθισμα του αυτοκινήτου, ανοίξτε τη ζώνη
από τους ειδικούς
του αυτοκινήτου πιέζοντας την αγκράφα,
βγάλτε τη ζώνη από
και από τον οριζόντιο που βρίσκεται στο
παιδικό κάθισμα. Φέρτε τη λαβή στη θέση
“Β” (σχέδιο 10).
Στο σχέδιο 25 δίνονται ορισμένα
παραδείγματα μη σωστής τοποθέτησης.
Για να βγάλετε το καθισματάκι από τη
βάση:Επαναλάβετε τις προηγούμενες
ενέργειες με την αντίθετη σειρά:Βγάλτε από
τον οδηγό της πλάτης τη διαγώνια ζώνη,
φέρτε τη λαβή στη θέση “B” (σχέδιο 10),
απελευθερώστε το καθισματάκι τραβώντας
τον ειδικό μοχλό και ταυτόχρονα σηκώστε
το καθισματάκι από τη λαβή.
ΧΡΗΣΗ ΤΗΣ ΤΕΝΤΑΣ ΓΙΑ ΤΟΝ ΗΛΙΟ
Το καθισματάκι διαθέτει μία τέντα που
προστατεύει το παιδί από τον ήλιο και
τον αέρα.
Τοποθετείται και αφαιρείται εύκολα από το
καθισματάκι
και μπορείτε να τις δώσετε την κλίση που
επιθυμείτε (σχέδιο 26)
Όταν δεν χρησιμοποιείται στο αυτοκίνητο,
το καθισματάκι μπορεί να χρησιμοποιηθεί
και ως σταθερό ή λικνιζόμενο ρηλάξ. Γι α
να γίνει λικνιζόμενο, τοποθετήστε το
σταθεροποιητή (σχέδιο 15) και τοποθετήσ τε
τη λαβή στη θέση “B”. (σχέδιο 10)
Για να το χρησιμοποιήσετε στη σταθερή
θέση βγάλτε το σταθεροποιητή (σχέδιο
21) και τοποθετήστε τη λαβή στη θέση“D”.
(σχέδιο 10)
Δεν συνιστάται η χρήση ως ρηλάξ για
παιδιά που μπορούν ήδη να σηκωθούν μόνα
τους (μέχρι περίπου την ηλικία των 6 μηνών
ή με βάρος 9 κιλά).
Για να αποφύγετε τον κίνδυνο πτώσεων
δένετε πάντα τις ζώνες.
Μην αφήνετε ποτέ το παιδί χωρίς
επίβλεψη.
Είναι επικίνδυνο να χρησιμοποιείτε το
καθισματάκι σε υπερυψωμένες ή επικλινείς
επιφάνειες.
ΠΡΟΣΟΧΗ: Πριν μεταφέρετε
το καθισματάκι τοποθετείτε και ασφαλίζετε
πάντα τη λαβή στην κάθετη θέση “B” (σχέδιο
10)
ΠΡΟΣΟΧΗ! Για τη χρήση μαζί
περιπάτου συμβουλευτείτε τις οδηγίες του
καροτσιού περιπάτου.
54
με τις δύο ειδικές συνδέσεις
ΛΙΚΝΙΖΟΜΕΝΗ Ή ΣΤΑΘΕΡΗ ΘΕΣΗ ΤΟΥ
ΚΑΘΙΣΜΑΤΟΣ (ΧΡΗΣΗ ΡΗΛΑΞ)
ΚΑΘΙΣΜΑΤΑΚΙ ΑΥΤΟΚΙΝΗΤΟΥ
+ΚΑΡΟΤΣΑΚΙ ΠΕΡΙΠΑΤΟΥ
το διαγώνιο οδηγό
ΕΚΔΟΣΗ
με το καροτσάκι
Page 55

Τα καινούρια καροτσάκια CHICCO που
διαθέτουν το σύστημα ΚΛΙΚ ΚΛΑΚ έχουν
μπράτσα με ειδικά εξαρτήματα, έτσι ώστε
να μπορεί να εφαρμόσει το καθισματάκι
στο καροτσάκι περιπάτου
άλλων εξαρτημάτων.
Ανοίξτε το καροτσάκι ακολουθώντας τις
αντίστοιχες οδηγίες χρήσης.
Πιάστε το καθισματάκι από τη λαβή
και τοποθετήστε το στο καροτσάκι
περιπάτου,όπως υποδεικνύεται στο σχέδιο
27.
Βγάλτε τους δύο άξονες στερέωσης από
τη λαβή,τραβώντας και στρέφοντας τους
δύο μοχλούς στερέωσης στο καροτσάκι
περιπάτου (σχέδιο 28).
Στρέψτε τη λαβή
πλήκτρα μέχρι να έρθει σε παράλληλη θέση
με τα μπράτσα και μέχρι να μπλοκάρουν οι
δύο συνδέσεις στο εσωτερικό των ιδίων
(Σπρώξτε προς τα κάτω το καθισματάκι
από τη μεριά των ποδιών του παιδιού για
να μπλοκάρετε τη λαβή στη σωστή θέση).
Για να βγάλετε το
περιπάτου, αρκεί να πιέσετε τα δύο κόκκινα
πλήκτρα που βρίσκονται στη λαβή, όπως
υποδεικνύεται στο σχέδιο 29.
Σηκώστε τη λαβή στρέφοντάς την, εισάγετε
στη θέση τους τους δύο άξονες στερέωσης
που είχαν εξαχθεί στο σημείο D και βγάλτε
το κάθισμα από το καροτσάκι περιπάτου.
ΠΡΟΣΟΧΗ:Η τοποθέτηση και
μπορούν να πραγματοποιηθούν με το παιδί
στο κάθισμα. Με το βάρος του παιδιού,
οι προαναφερόμενες ενέργειες μπορεί να
είναι ευκολότερες. Στην περίπτωση αυτή
συνιστάται προσοχή κατά την εκτέλεση
των παραπάνω ενεργειών.
ΑΦΑΙΡΕΣΗ/ΠΛΥΣΙΜΟ ΤΗΣ ΕΠΕΝΔΥΣΗΣ ΤΟΥ
Για να βγάλετε την επένδυση του
καθίσματος, λύστε τις ζώνες και βγάλτε
επένδυση αφού έχετε πρώτα βγάλει τα δύο
μεταλλικά κλιπ από τη θέση τους (σχέδιο
30). Γι α το πλύσιμο ακολουθήστε πιστά τις
οδηγίες που αναγράφονται στην ετικέτα
της επένδυσης.
Ζώνες, αγκράφα και πλαστικά τμήματα
πρέπει να καθαρίζονται μόνο με ένα υγρό
πανάκι. Μην χρησιμοποιείτε διαλυτικά ή
χλωρίνη που μπορεί αν τα
και να ελαττώσουν την ασφάλειά τους.
κάθισμα από το καροτσάκι
ΚΑΘΙΣΜΑΤΟΣ
ΠΡΟΕΙΔΟΠΟΙΗΣΕΙΣ:ΔΙΑΒΑΣΤΕ ΠΡΙΝ ΤΟ
Το καθισματάκι πρέπει να τοποθετείται
ακολουθώντας πιστά τις οδηγίες
χρήσεως.
Μην αφήνετε ποτέ το παιδί στο
καθισματάκι χωρίς επίβλεψη για
χωρίς τη χρήση
πιέζοντας τα δύο κάτω
η αφαίρεση
την
καταστρέψουν
ΤΑΞΙΔΙ
κανένα λόγο.
Μην περνάτε τις ζώνες ασφαλείας
σε διαφορετικές θέσεις από αυτές
που υποδεικνύονται σε αυτές
τις οδηγίες χρήσεως: Θέτετε σε
κίνδυνο την ασφάλεια του παιδιού
σας.(Παραδείγματα ΜΗ σωστής
τοποθέτησης περιγράφονται στα
σχέδια 20 και 25.)
Τοποθετήστε το προϊόν μόνο σε
καθίσματα σωστά στερεωμένα στο
πλαίσιο του οχήματος και στραμμένα
προς τη
αυτοκινήτου. Όλα τα πτυσσόμενα,
ανατρεπόμενα ή περιστρεφόμενα
καθίσματα αυτοκινήτου πρέπει
να είναι καλά στερεωμένα. Σε
περίπτωση ατυχήματος ή απότομου
φρεναρίσματος μπορεί να χτυπήσουν
και να τραυματίσουν τους επιβάτες.
Τοποθετήστε το προϊόν έτσι ώστε να
μην επηρεάζεται από κινητά καθίσματα
ή από τις πόρτες του οχήματος.
Προσοχή:Αυτό
πρέπει να χρησιμοποιείται σε καμία
περίπτωση με ζώνη αυτοκινήτου δύο
σημείων στερέωσης.
Ελέγχετε τακτικά ότι το παιδί δεν ανοίγει
την αγκράφα της ζώνης ασφαλείας.
Όταν χρησιμοποιείτε με τη βάση, να
βεβαιώνεστε πάντα ότι η βάση είνα
σωστά στερεωμένη στο κάθισμα του
αυτοκινήτου.
Καμία μετατροπή ή προσθήκη δεν
πρέπει
την έγκριση του κατασκευαστή. Μην
εφαρμόζετε αξεσουάρ, ανταλλακτικά
ή στοιχεία που δεν προμηθεύονται από
τον κατασκευαστή. Τυχό ν μετατροπές
στα προϊόντα, απαλλάσσουν τον
κατασκευασ τή από κάθε ευθύνη.
Αν το καθισματάκι για οποιοδήποτε λόγο
είναι κατεσ τραμμένο, παραμορφωμένο
ή πολύ φθαρμένο, αντικαταστήστε το:
Μπορεί να μη διαθέτει πλέον
χαρακτηριστικά ασφαλείας.
Η επένδυση μπορεί να αντικατασταθεί
αποκλειστικά με μία εγκεκριμένη
από τον κατασκευασ τή, γιατί
αποτελεί αναπόσπαστο τμήμα
του καθίσματος αυτοκινήτου. Το
καθισματάκι αυτοκινήτου δεν πρέπει
να χρησιμοποιείται ποτέ χωρίς την
επένδυση.
Ελέγχετε ότι η ταινία της ζώνης δεν
είναι μπερδεμένη. Προσέχετε έτσι ώστε
να μην πιάνεται η ταινία
καθίσματος ανάμεσα στις πόρτες ή
να μην έρχονται σε επαφή με αιχμηρά
αντικείμενα. Σε περίπτωση που η ζώνη
παρουσιάσει κοψίματα ή σχισίματα,
55
μπροστινή πλευρά του
το καθισματάκι ΔΕΝ
να γίνεται στο προϊόν χωρίς
ή τμήματα του
τα αρχικά
Page 56

αντικαταστήστε την.
Βεβαιωθείτε ότι τόσο η ζώνη του
παιδιού, όσο και η ζώνη 3 σημείων του
αυτοκινήτου είναι σωστά τεντωμένες
για να εξασφαλίζουν τη μέγιστη
προστασία για το παιδί σας.
Μην χρησιμοποιείτε το προϊόν αν
ορισμένα τμήματά του είναι σπασμένα
ή απουσιάζουν. Μπορεί να είναι
επικίνδυνο.
Μετά και από ένα μικρό ατύχημα, το
καθισματάκι και η ζώνη μπορεί να έχουν
υποστεί ζημιές μη ορατές με γυμνό μάτι.
Συνιστάται η αντικατάστασή τους.
Βεβαιωθείτε ότι δεν μεταφέρονται στο
αυτοκίνητο μη στερεωμένα αντικείμενα,
κυρίως στο πίσω μέρος, γιατί σε
περίπτωση ατυχήματος μπορεί να
τραυματίσουν τους επιβάτες.
Βεβαιωθείτε ότι όλοι οι επιβάτες του
οχήματος χρησιμοποιούν τη
ασφαλείας, τόσο για τη δική τους
ασφάλεια, όσο και γιατί σε περίπτωση
ατυχήματος μπορεί να τραυματίσουν
σοβαρά το παιδί.
Αν το αυτοκίνητο παρέμεινε
σταθμευμένο κάτω από τον ήλιο για
μεγάλο διάστημα, ελέγξτε προσεκτικά
το καθισματάκι πριν τοποθετήσετε το
παιδί. Ορισμένα τμήματά του μπορεί
να έχουν υπερθερμανθεί. Αφήστε τα να
κρυώσουν.
Σε περίπτωση μεγάλων ταξιδιών κάντε
συχνές στάσεις. Το παιδί κουράζεται
πολύ εύκολα. Δεν πρέπει να βγάζετε για
κανένα λόγο το παιδί από το κάθισμα
αυτοκινήτου όταν το όχημα είναι σε
κίνηση. Αν το παιδί σας χρειάζεται
φροντίδα, βρείτε έναν ασφαλή χώρο
και σταθμεύστε.
Μη χρησιμοποιείτε καθίσματα από
δεύτερο χέρι. Μπορεί να έχουν υποστει
πολύ επικίνδυνες κατασκευασ τικές
ζημιές, μη ορατές με γυμνό μάτι.
Πρόωρα νεογέννητα: Τα βρέφη που έχουν
γεννηθεί μετά από την 37η εβδομάδα
της κύησης μπορεί να κινδυνεύουν
στο καθισματάκι. Τα νεογέννητα αυτά
μπορεί να παρουσιάσουν αναπνευστικά
προβλήματα, ενώ βρίσκονται στο
κάθισμα. Απευθυνθείτε στο γιατρό σας
ή στο προσωπικό του νοσοκομείου οι
οποίοι θα κρίνουν αν για το μωρό σας
είναι πιο κατάλ ληλο το κάθισμα ή το
πορτ-μπεμπέ αυτοκινήτου.
Το κάθισμα μπορεί να χρησιμοποιηθεί
ως μέσο μεταφοράς ή εκτός αυτοκινήτου
ως ρηλάξ. Εκτός αυτοκινήτου,
μην τοποθετείτε το καθισματάκι σε
ψηλές επιφάνειες, όπως τραπέζια,
επιφάνειες εργασίας, κρεβάτια, κ.τ.λ.
ζώνη
ή σε επικλινείς ή ασ ταθείς επιφάνειες,
για να αποφύγετε τον κίνδυνο των
πτώσεων. Χρησιμοποιείτε πάντα τις
ζώνες ασφαλείας.
Το ύφασμα του καθίσματος δεν είναι
αδιάβροχο. Όταν χρησιμοποιείται με
το καροτσάκι περιπάτου, συνιστάται
η χρήση των αδιάβοχων αξεσουάρ της
Chicco.
Φυλάξτε τις πλαστικές σακούλες μακριά
από τα παιδιά, για να αποφύγετε τον
κίνδυνο ασφυξίας.
Αυτές οι οδηγίες πρέπει να φυλάσσονται
προσεκτικά σε ένα χώρο με εύκολη
πρόσβαση.
Η εταιρεία ARTSANA δεν αναλαμβάνει
καμία ευθύνη σε περίπτωση
λανθασμένης χρήσης του προϊόντος.
Για οποιαδήποτε πληροφορία
επικοινωνήστε μαζί μας στη διεύθυνση:
Β. & Μ. ΣΚΑΡΜΟΥΤΣΟΣ Α.Ε.
ΑΝΔΡΕΑ ΜΕΤΑΞΑ 6
145- 64, ΚΑΤΩ ΚΗΦΙΣΙΑ
ΤΗΛ. 210 6241400
www.chicco.com
56
Page 57

DK
AUTO-FIX
DELE: (fi g. A, B, C, D)
1. Bund
2. Skal
3. Håndtag
4. Udløserhåndtag
5. Stof
6. Komfor t pude
7. Kale che
8. Påsætning til kaleche
9. Indføring af bilens diagonale sikkerhedssele
10. Indføring af bilens horisontale sele på autostolens bund.
10 A Indfø ring af bilens ho risontale s ele på auto-
stolen.
11. Re guleri ngs sel e
12. Selespænde
13. Spændetapper
13 A Knap til åbning af spænde
14. Knap til regulering af seler (under stofdelen)
15. Seler
16. Polstring til sikkerhedssele (hvis forudset)
17. Ring til passage af seler
18. Knap til tilbagelænelse af håndtag
19. Knap til fastgøring til klapvogn
20. Knap til udløsning fra klapvogn
21. Placeringss tang
22. Stabilisatorfastgørelse
23. Godkendelsesetikette
24. Etikette vedrørende montage med eller uden
bund
YDERST VIGTIGT! SKAL LÆSES STRAKS
• Læs brugsanvisningen nøje og helt igennem,
inden produktet tages i anvendelse.
• For så vidt angår montage og installation af
produktet, skal brugsanvisningen følges meget
nøje. Undgå enhver anvendelse af produktet,
inden anvisningerne er gennemlæst.
• Opbevar denne vejledning med henblik på
fremtidig anvendelse.
• Jævnfø r statistiker over færdselsuhe ld, er bilens
bagsæde mere sikkert end passagersædet, hvilket også e r årsagen til at in stallation af au tostolen foretrækkes på bagsædet.
• VIGTIGT! ALVORLIG FARE! Anvend aldrig
denne autostol på et forsæde, som er udstyret med frontal airbag. Det er kun muligt at
installere autostolen på forsædet, såfremt den
frontale airbag er sat ud af funktion. Kontroller
med bilens fabrikant eller i bilens brugsanvisning om det er muligt at sætte bilens airbag ud
af funktion.
• Hvis autostolen placeres på passagersædet
(kun hvis den frontale airbag ikke er til stede
eller hvis den er sat ud af funktion), tilrådes det
at skubbe sædet så meget som muligt tilbage,
uden dog at forstyrre eventuelle passagerer på
bagsædet.
• Anvend aldrig autostolen på sæder, som er vender lateralt eller modsat kørselsretningen.
• Fastgør aldrig autostolen på et bilsædet, som
kun er udstyret med en mavesele (sele bestående af to punkter).
• Ingen autostol kan garantere barnets fulde sikkerhed i tilfælde af færdselsuheld, men anvendelse af dette produkt formindsker risikoen for
uheld og for barnedød.
• En ikke korrekt anvendelse af produktet øger
for risikoen for alvorlige skader for barnet ikke
kun i tilfælde af uheld, men også i andre situationer: kontroller derfor altid, at autostolen er
fastg jort ordentligt til bilens sæde:
• I de tilfælde hvor autostolen måtte være beskadiget, deform eller have været udsat for stærk
slitage, skal den udskiftes. Den kan have mistet
sine originale sikkerhedskarakteristika.
• Udfør ikke ændringer eller tilføjelse r på produktet uden godkendelse fra fabrikanten. Installer
ikke ekstraudstyr, reservedele eller udstyr som
ikke er leveret af fabrikanten.
• Efterlad aldrig under nogen omstændigheder
barnet uden opsyn i autostolen.
• For at undgå at barnet falder ud, fastspænd det
da altid med sikkerhedsselen også under håndtransport.
• Når autostolen anvendes udenfor bilen, vær
da opmærksom på, at det er farligt at anvende
stolen på hævende overfl ader.
• Efterlad aldrig en ikke fastspændt autostol på
bilsædet, den kan støde imod og såre bilens
passagerer.
• Placer ikke udstyr, som ikke er godkendt til
produktet, hverken mellem bilens sæde og
autostolen eller mellem autostolen og barnet:
i tilfælde af uheld vil autostolen muligvis ikke
kunne fungere korrekt.
• I tilfælde af at bilen efterlades i direkte sollys,
tilrådes det at dække autostolen til.
• Efter selv lettere uheld, kan autostolen blive
udsat for ikke synlige skader: og den skal derfor
under alle omstændigheder udskiftes.
• Før stolen transporteres manuelt, kontroller
da, at barnet er fastspændt med selerne og
at håndtaget er korrekt blokeret i ver tikal position.
• Når stolen transporteres kombineret med
klapvogn, anvend da kun denne autostol med
chicco klapvogne med tilhørende påsætningsmekanisme.
• Inden barnet transporteres med autostol kombineret med klapvogn, sørg da for, at den er
korrekt fastg jort.
• Anvend ikke brugte autostole. De kan have
57
Page 58

været udsat for strukturelle skader, som ikke er
synlige med det blotte øje, men som alligevel
kan gå ud over produktets sikkerhed.
• Virksomheden ar tsana fratager sig ethvert ansvar for ukorrekt anvendelse af produktet.
BRUGSANVISNING
PRODUKTETS KARAKTERISTIKA
Autosto len, både i versio nen autostol og i ve rsionen autostol med bund er godkendt til ”gruppe
0+” til transport af børn i bil indtil en vægt på 13
kg. Godkendelsen er ”universal”, derfor kan autostolen installeres i en hvilken som helt bil.
VIGTIGT! ”universal” betyder, at den kan tilpasses med størstedelen, men dog ikke alle typer af
bilsæder.
VIGTIGT INFORMATION
1. Dette er en ”universalindretning til fastgørelse af børn, som er godkendt i henhold
til reglement nr. 44, tilføjelser serie 08. Den
egner sig t il generel anve ndelse i kør etøjer og
kan tilp asses stør stedelen, dog i kke alle typer
af bilsæder.
2. Perfekt tilpasning er lettest at opnå, i de
tilfælde hvor bilfabrikanten i bilens vejledning
oplyse r, at der i k øretøjet kan in stalleres ”uni versal” indretninger til fastgørelse af børn i
den omtalte aldersgruppe.
3. Denne fastgørelsesindreting er klassifi ceret som ”unive rsal” i overenss temmelse med
strengere godkendelseskriterier end dem ,
der var gældende for de tidligere modeller,
som ikke var udstyret med dette informationsafsnit.
4. Er kun eg net til anvendel se i køretø jer, som
er udst yret med sikke rhedssel er beståend e af
3 statis ke punkter elle r med oprulnin g, som er
godkendt i henhold til reglement UN/ECE nr.
16 eller andre tilsvarende standarder.
5. i tvivlstilfælde bør kontakt rettes til producenten af fastgørelsesanordningen eller til
forhandleren.
Autostolen kan også anvendes udenfor bilen, på
den kombinerede måde med klapvogn eller som
lænestol.
BEGRÆNSNINGER I ANVENDELSEN
VIGTIGT! Respekter nøje efterfølgende begrænsninger i produktets i anvendelse, i modsat
fald garanteres der ikke for sikkerheden.
1. Barnets vægt må ikke overstige 13 kg.
2. Anvend aldrig denne autostol på passagersæ-
der, som er udstyrede med frontal airbag, men
ku n hvis den f ront ale a irba g er s at ud a f fun kti on:
Kontrol ler med bilfabri kanten eller i bile ns brugs-
anvisning, om det er muligt at sætte airbagen ud
af funktion.
3. Anvend aldrig komfort puder, hvis barnets
vægt overstiger 6 kg.
NØDVENDIGE KRAV TIL BILENS SÆDE OG
Autostolen kan installeres på bilens forsæde på
passagersædet eller på et hvilket som helst bagsæde, dog med følgende begrænsninger: Sædet
skal være:
- Vend i kørselsretningen (fi g. 1)
Og udstyret med en sikkerhedssele bestående af
3 statiske fastgørelsespunkter eller med oprulning (fi g. 2).
Det tilrådes altid at installere autostolen på bilens bagsæde.
VIGTIGT! ALVORLIG FARE! Anvend aldrig denne
autostol på forsæder, som er udstyret med frontal airbag.
VIGTIGT! Installer aldrig autostolen på sæder,
som er udstyret med en enkelt mavesele (fi g.
2A).
VIGTIGT! Selerne skal altid tilpasses, når barnet
vokser.
Inden autostolen installeres i bilen, skal selerne
til fastgørelse af barnet altid tilpasses barnets
højde.
Den korrekte placering af sikkerhedsselerne er
en lille smule under skuldrenes niveau. (fi g. 3).
Autostolen er udstyret med 3 højdepositioner.
(fi g. 4).
Autostolen er udstyret med en komfortpude,
som garanterer for det nyfødte barn og indtil 6
kg, en korrekt fastholdelse og ideel position for
hals og ryg.
For installation af komfort puden kontroller da,
om selerne er sat ind i det nederste hul.
VIGTIGT: Dette er den eneste tilladte position,
når komfortpuden anvendes (fi g. 5).
Vigtigt: for at garanterer maksimal sikkerhed for
produktet, skal komfortpuden fjernes, når barnet
har opnået en vægt på 6 kg.
For at fl ytte selerne gøres følgende:
- åbn spændet ved at trykke på den røde knap
(fi g. 6)
- tag selerne ud bagfra og sæt dem ind i det
hul, som passer bedst til barnets højde (fi g. 7A
og 7B).
- V IGT IGT ! Sør g al tid for, a t se ler ne p ass ere r ge nnem placeringsstangen og skallen.
- Selerne skal altid være i korrekt spænd.
TIL SIKKERHEDSSELEN
REGULERING AF
SELERNES POSITION
PLACERING AF BARNET
58
Page 59

1. Løft delen i stof og hold reguleringsknappen
nede og træk i stolens seler på en sådan måde,
at de løsnes (fi g. 8)
2. Åbn spændet ved at trykke på den røde knap
(fi gur 6)
3. Placer barnet i stolen
4. Sæt spændets to tapper ovenpå hinanden,
som vist på fi gur 6A
5. Sæt spændets to tapper i, indtil der høres en
”klik” (fi g. 6B) VIGTIGT: sæt aldrig kun den ene
tap ned i spændet.
6. Spænd barnet s sikkerhedsseler ved at trække i
den centrale reguleringssele (fi g. 9)
VIGTIGT: Selerne skal være spændte med ikke
for meget. Såfremt der er plads til ens fi ngre
mellem selen og barnets krop, betyder det, at
selerne er i korrekt spænd.
PLACERING AF STOLENS HÅNDTAG
Stolens håndtag kan reguleres i 4 positioner (fi g.
10):
A. Position til transport i bil (VIGTIGT: dette er
den eneste tilladte position under transport i
bil).
B. Position til transport i hånd.
C. Position til anvendelse som gyngestol eller
position til påsætning på de dertil beregnede
Chicco klapvogne.
D. Position til anvendelse som lænestol.
For at udføre regulering trykkes der samtidigt
på knapperne på håndtaget (fi g. 11), håndtaget
drejes hen i den ønskede position, indtil der høres en klik.
AUTOSTOLENS INSTALLATION I BIL
Læs nøje afsnittet: NØDVENDIGE KRAV TIL BILENS SÆDE OG TIL SIKKERHEDSSELE.
Autostolen både i udgaven med og uden bund,
må kun installeres i modsat køreretning. VIGTIGT! YDERST FARLIGT: INSTALLER IKKE STOLEN PÅ SÆDER, SOM ER UDSTYRET MED AIRBAG, med mindre at disse er sat ud af funktion.
VIGTIGT! Installer aldrig stolen på sæder, som
kun er udstyret med en enkelt mavesele.
INSTALLATION MED BUND:
For at installere autostolen med bund skal følgende fremgangsmåde følges:
1. Løsn autostolen fra bunden ved at trække i
håndtaget (fi g. 12) og løft samtidigt ved hjælp
af grebet.
2. Placer bunden på det sæde, der er valgt til in-
stallationen, ved at vende den, som vist på tegning 13 og ved at sørge for, at den er i kontakt
med bilsædets ryglæn .
3. Træk i bilens sikkerhedssele og fastgør den i
det dertil hørende spænde og vær samtidigt opmærksom på, at den vandrette del passerer gen-
nem de to dertil beregnede indføringer (fi g. 14).
4. Inden stolen sættes på bunden, kontroller da,
om stabiliseringsspændet er lukket (fi g. 15).
5. Sæt stolen ind i bunden (vendt i modsat køreretning) ved at skubbe den nedad indtil den fastspændes (der høres et ”klik”, som bekræfter, at
korrekt fastgøring har fundet sted) (fi g. 16).
6. Kontroller, at korrekt fastgøring af stolen har
fundet sted ved at prøve at løfte den, både fra
den forreste og den bageste del.
7. Tag fat om bilens diagonale sele og før den
gennem den dertil beregnede indføring, som er
placeret bagpå autostolens ryglæn (fi g. 17).
VIGTIGT: BILENS DIAGONALE SELE SKAL UNDER TRANSPORTEN ALTID VÆRE PLACERET I
DEN POSITION, SOM ER ANVIST I FIG. 18. ANVEND ALDRIG AUTOSTOLEN, HVIS IKKE SELEN
ER FØRT IND I DEN DERTIL BEREGNEDE INDFØRING : DET TE KAN GÅ ALVORLIGT UD OVER
SIKKERHEDEN.
8. Stræk selen rundt om autostolen så meget
som muligt, uden at efterlade overskydende sele
og sørg for, at selen ikke er snoet (fjern fi g. 18B).
9. Placer håndtaget i positionen ”A” (fi g. 10)
For at fjerne stolen fra bunden:
Fjern den diagonale sele fra indføringen på r yglænet, sæt håndtaget tilbage i position ”B” (fi g.
10), løsn stolen ved at trække i grebet og samtidig løfte selve stolen ved hjælp af håndtaget.
VIGTIGT! Når stolen er installeret, kontroller
da ALTID, om bilens sikkerhedssele er i korrekt
spænd og at dets spænde ikke forcerer selen, så
den kommer ud af sine indføringer på bunden og
at den ikke interfererer med selve indføringen.
VIGTIGT: INDFØR ALDRIG BILENS SIKKERHEDSSELE PÅ ANDEN MÅDE, END DEN DER ER ANVIST I FIG. 19.
På fi g. 20 er der anvist nogle eksempler på ikke
korrekt installation
INSTALLATION UDEN BUND
For at installere autostolen uden bund i bilen,
følges nedenstående fremgangsmåde:
1.sænk fastgørelsesstabilisatoren (fi g. 21).
2. placer stolen på det udvalgte bilsæde.
3. Træk i bilens sikkerhedssele og fastspænd den
i det dertil hørende spænde, ved at lade den horisontale sele føre ind i de to tilhørende indføringer på stolen (fi g. 22)
4. Tag fat om bilens diagonale sikkerhedssele og
før den ind i den dertil hørende indføring bagpå
autostolens ryglæn fi g. 23.
5. Før sikkerhedsselen rundt om stolen, så meget som muligt uden at efterlade overskydende
bånd, og sørg for, at den ikke snoes. VIGTIGT:
59
Page 60

BILENS DIAGONALE SELE SKAL UNDER TRANSPORTEN ALTID VÆRE I DEN POSITION, SOM ER
ANVIST I FIG. 24. ANVEND ALDRIG STOLEN,
UDEN AT SIKKERHEDSSELEN ER FØRT GENNEM
DE DERTIL HØRENDE INDFØRINGER: DETTE
KAN GÅ ALVORLIGT UD OVER SIKKERHEDEN.
6. Placer håndtaget i position ”A” (fi g. 10).
På fi g. 25 er der anvist nogle eksempler på ikke
korrekt installation.
7. For at fjerne stolen fra sædet, frigøres bilens
sikkerhedssele ved at der trykkes på spændet,
selen tages ud af den diagonale og den horisontale indføring, som er placeret på stolen. Placer
håndtaget i position ”B” igen (fi g. 10).
På fi g. 25 er der anvist eksempler på ikke korrekt
installation.
For at tage stolen ud af bunden: gentag de ovenfor anførte punkter i modsat rækkefølge: tag
den diagonale sikkerhedssele ud af indføringen
på ryglænet, før håndtaget tilbage i position ”B”
(fi g. 10), l øsn stolen ved at tr ække i det dertil beregned e håndtag og ved sa mtidigt at løf te stolen
ved hjælp af grebet.
ANVENDELSE AF KALECHE
Stolen er udstyret med kaleche til at beskytte
barne t mod sol og vind. D en spændes let af o g på
stolen ved hjælp af de to podninger og kan lænes
tilbage, som man nu måtte ønske. (fi g. 26)
FAST ELLER GYNGEPOSITION
(anvendelse som lænestol)
Når stolen ikke anvendes i bil, kan det også anvendes som gyngestol eller som lænestol. For at
få den til at gynge, føres stabilisatoren (fi g. 15)
tilbage og håndtaget placeres i positionen ”B”
(fi g. 10).
For at anvendes stolen i fast position, tages stabilisatorbremsen ud (fi g . 21) og håndta get placeres i positionen ”D” (fi g. 10).
Det er ikke tilrådeligt at anvendes stolen som
lænestol til børn, som allerede er i stand til at
rejse sig (indtil ca. 6 måneders alderen eller en
kropsvægt på 9 kg.).
For at undgå risiko for fald, skal selerne altid anvendes.
Efterlad aldrig barnet uden opsyn.
Det er farligt at anvendes stolen på hævede eller
skrånende overfl ader.
VIGTIGT: Inden stolen transporteres, før da altid
håndtaget tilbage i vertikal position ”B”, hvor det
ligeledes blokeres (fi g. 10).
VERSION AUTOSTOL + KLAPVOGN
VIGTIG T! For anvendel se sammen me d klapvogn
henvises der til klapvognens brugsanvisning.
De nye Chicco klapvogne er udstyrede med CLIK
CLAK systemet og har armlæn med specielle
indretninger, som gør det muligt at fastspænde
autostolen direkte på klapvognen, uden anvendelse af ekstraudstyr.
- åbn klapvognen ved at følge den der til beregnede brugsanvisning.
- Tag fat om autostolens håndtag og placer stolen ovenpå klapvognen, som vist på fi g. 27.
- Tag de to fast spændingsta pper ud af håndtag et
ved at trække og dreje på knapperne oven på
klapvognen (fi g. 28).
- Drej håndtaget ved at dreje på de nederste
knapper indtil de opnår parallel position med
armlænene og indtil de to podninger blokeres
indeni sig selv (skub stolen fra barnets fødders
del nedad, for at blokere håndtaget i den korrekte position).
- For at spænde stolen af klapvognen igen, er
det tilstrækkeligt at trykke på de to røde knapper, som er placeret på håndtaget, som vist på
fi g. 29.
- Løft håndtaget ved at dreje på det og få de to
ved punkt D udtagne fastspændingstapper til
at komme ud igen og fjern autostolen fra klapvognen.
VIGTIGT: Aftagning og påsætning kan også
udføres, mens barnet sidder i stolen. Dog kan
barnets vægt gøre ovennævnte operationer lidt
mere bes værlige. I disse tilfælde anbefales det at
være yderst påpasselig ved udførelse af ovennævnte operationer.
AFTAGNING AF STOF SAMT
· Hvis autostolens stof ønskes vasket, tages autostolens seler ud og stoffet tages af, efter at have
taget de to metalliske indretninger ud af deres
plads (fi g. 30). Hvad angår vask, henvises der til
etikettens anvisninger på selve stoffet.
· Seler, spænde og plastikdele skal rengøres med
en fugtig klud. Anvend ikke opløsningsmidler eller klorin, som kan skade produktet og gøre det
usikkert.
60
VASK AF AUTOSTOL
BEMÆRKNINGER SOM SKAL LÆSES,
INDEN PRODUKTET TAGES
1. Autostolen skal installeres ved nøjagtigt
at følge de medsendte anvisninger.
2. Efterlad aldrig under nogen omstændigheder barnet uden opsyn i stolen.
3. Bilens sikkerhedssele må ikke føres igennem på anden måde, end den der er anført
i denne brugsanvisning. Det kan gå ud over
jeres barns sikkerhed (eksempler på IKKE
I ANVENDELSE
Page 61

korrekt installation er vist i fi g. 20 og 25.
4. Installer kun stolen på sæder, som er korrekt fastgjort til bilens struktur og vendt i
kørselsretningen. Vær opmærksom på, ikke
at efterlade sammenbøjede eller roterende
bilsæder ikke ordentligt fastspændte. Ved
uheld kan de udgøre fare.
5. Vær opmærksom på, hvordan stolen installeres i bilen, for at undgå at den kommer
i kontakt med mobile sæder eller bildøre.
6. Vigtigt: denne stol må under INGEN omstændigheder anvendes med en sikkerhedssele bestående af to punkter.
7. Kontroller altid, at barnet ikke selv åbner
sikkerhedsselens spænde.
8. Når stolen anvendes med bund, kontroller da altid, at bunden er fastgjort korrekt til
bilens sæde.
9. Ændringer eller tilføjelser må ikke udføres
på produktet, medmindre det er godkendt af
fabrikanten. Sæt ikke ekstraudstyr, reservedele og ikke originale dele på produktet uden
producentens godkendelse. Eventuelle ændringer foretaget på produkterne fratager
producenten for ethvert ansvar.
10. Hvis stolen af en eller anden årsag forekommer beskadiget, deform eller meget
slidt, bør den udskiftes: den svarer muligvis
ikke længere til de oprindelige sikkerhedsnormer.
11. Stoffet må kun udskiftes med et andet,
som er godkendt af fabrikanten, da det udgør en integreret del af autostolen. Autostolen må aldrig anvendes uden stof.
12. Kontroller, at sikkerhedsselens bånd ikke
snoer. Undgå, at sidstnævnte eller dele af
autostolen bliver klemt mellem dørene eller
slides mod skærende dele. I det tilfælde hvor
sikkerhedsselen er skåret over eller meget
slidt, bør den udskiftes.
13. Sørg for, at barnets sikkerhedssele og bilens sikkerhedssele bestående af 3 punkter
er i korrekt spænd, for at garantere maksimal besk yttelse af jeres barn.
14. Anvend ikke produktet, hvis visse dele
forekommer ødelagte eller direkte mangler.
Det kan være farligt.
15. Efter selv et lettere færdselsuheld kan
autostol og seler have været udsat for skader, som ikke er synlige med det blotte øje.
Det anbefales derfor at udskifte dem.
16. Udgå at transportere ikke fastgjorte
ting i bilen, især på hattehylden. I tilfælde af
uheld kan de såre passagererne.
17. Sørg for, at alle bilens passagerer anvender sikkerhedsseler, både for egen sikkerhed
og for i tilfælde af uheld at undgå at gøre
alvorlig skade på barnet.
18. Hvis bilen har stået længe i solen, kontroller da grundigt autostolen, inden barnet
sætte s ned i den. Nogle d ele kan være bleve t
overophedede : lad den derfor afkøle.
19. I tilfælde af lange rejser, bør der holdes
mange pauser. Børn bliver meget hurtigt
trætte. Barnet må under ingen omstændigheder tages ud af autostolen, mens bilen er
i bevægelse. Hvis jeres barn har brug for opmærksomhed, fi nd da en sikker holdeplads
og hold en pause.
20. Anvend aldrig brugte autostole. De kan
have været udsat for strukturelle skader,
som kan være yderst farlige og som ikke er
synlige med det blotte øje.
21. For tidligt fødte børn: børn født tidligere
end 37. graviditetsuge kan udsættes for risiko ved at sidde i stolen. Disse nyfødte kan
have vejrtrækningsproblemer, når de sidder
i autostolen. Det anbefales derfor at rette
henvendelse til egen læge eller til personalet
på sygehuset for at få barnet kontrolleret og
for at få godkendt egnet autostol eller lift,
inden hospitalet forlades.
22. Autostolen kan anvendes som transportmiddel eller som stol også udenfor køretøjet. For at undgå fald må stolen udenfor
bilen ikke placeres på høje overfl ader, såsom
borde, arbejdsborde, senge osv., skråninger
og ustabile overfl ader. Anvend altid sikkerhedsseler.
23. Klapvognens og stolens stof er ikke
vandtætte. Det tilrådes derfor at anvende
Chicco’s regnudstyr.
24. Hold plastikposer langt fra børnenes
rækkevidde, da de kan være årsag til kvælning.
25. Denne brugsanvisning skal opbevares
omhyggeligt og på et sted, hvor den er let
tilgængelig.
26. ARTSANA fratager sig ethvert ansvar
ved ukorrekt anvendelse af produktet.
For yderligere oplysninger for anmodning
om reser vedele, kontaktes Artsana’s kundeservice på følgende adresse:
ARTSANA SPA
Via Saldarini Catelli 1
22070 Grandate - Como - Italy
Kundeservice 0039 031 382000
Fax 0039 031 382500
www.chicco.com
61
Page 62

FIN
AUTO-FIX
OSAT : (Kuvat A, B, C, D)
1. Jalusta
2. Kuori
3. Kädensija
4. Irrotuskahva
5. Päällinen
6. Comfort-tyyny
7. Aur ink oku omu
8. Aurinkokuomun liitäntä
9. Hartiavyön johdin
10. Jalustassa sijaitsevat lantiovyön johtimet
10 A. Istuimessa sijaitsevat lantiovyön johtimet
11. Sä ätövyö
12. Vöiden solki
13. Soljen kielikappaleet
13 A. Soljen avauspainike
14. Vöiden säätöpainike (kangassuojuksen alla)
15. Vyöt
16. Vöiden pehmusteet (mikäli ne ovat käytös-
sä)
17. Vöiden pujotusaukot
18. Kahvan kallistuspainikkeet
19. Kahva rattaisiin kiinnittämistä varten
20. Painike rattaista irottamiseen
21. Asennustanko
22. Vakainlukko
23. Hyväksyntäetiketti
24. Etiketti, jossa kokoamisohjeet istuimeen ja-
lustalla ja ilman
ERITTÄIN TÄRKEÄÄ! LUE HETI
• Lue ohjeet huolella läpi ennen tuotteen käyttöönottoa.
• Kootessasi ja asentaessasi tuotteen seuraa
käyttöohjeit a huolellisesti. Älä anna kenenkään
käyttää tuotetta ennen ohjeiden lukemista.
• Säilytä ohjeet tulevaa tarvetta varten.
• Onnettomuuksia koskevien tilastotietojen
mukaan auton takaistuin on etuistuinta turvallisempi, joten turvaistuin on parempi asentaa
taakse.
• HUOMIO! VAKAVA VAARA! Älä koskaan asenna istuinta sellaiselle etupenkille, jonka eteen
on asennetu törmäystyyny. Istuin voidaan
asentaa etupenkille ainoastaan silloin, kun törmäystyyny on kytketty pois päältä. Ota selvää
autotehtaalta tai autosi käyttöohjeista, voidaanko törmäystyyny k ytkeä pois päältä.
• Mikäli asennat istuimen etupenkille (vain siinä
tapauksessa, ettei sen edessä ole törmäystyynyä tai se on kytketty pois päältä), siirrä
auton penkkiä niin paljon taaksepäin kuin
mahdollista sen mukaan istuuko takapenkillä
muita matkustajia.
• Älä aseta näitä istuimia koskaan poikittain
tai selkä menosuuntaan käännetyille auton
penkeille.
• Älä kiinnitä istuinta koskaan sellaiselle auton
penkille, joka on varustettu ainoastaan lantiovyöllä (2-pistevyöllä).
• Mikään tur vaistuin ei voi taata lapselle täydellistä tur vaa onnettomuustilanteessa, mutta
tämän tuotteen käyttö vähentää sekä onnettomuuden että lapsen kuoleman vaaraa.
• Jos tuotetta ei käytetä asianmukaisesti, lapsi
on suuremmassa vaarassa vahingoittua vakavasti, ei ainoastaan onnettomuuden sattuessa,
vaan myös muissa tilanteissa. Varmista aina,
että istuin on kiinnitetty auton penkkiin asianmukaisesti.
• Mikäli istuin on vahingoittunut, muuttanut
muotoaan tai erittäin kulunut, se on vaihdettava uuteen, koska se on saattanut menettää
alkuperäisiä turvaominaisuuksiaan.
• Älä tee tuotteeseen muutoksia tai lisää siihen
mitään ilman valmistajan hyväksyntää. Asenna
siihen ainoastaan valmistajalta saatuja lisä- tai
varaosia.
• Älä jätä lasta koskaan minkään syyn takia vartioimatta turvaistuimeen.
• Jottei lapsi olisi vaarassa pudota, kiinnitä hänet
turvavöillä myös kantaessasi häntä istuimessa.
• Kun istuinta käytetään muualla kuin autossa,
on vaarallista asettaa sitä korkealle tasolle.
• Älä jätä istuinta koskaan kiinnittämättä auton
penkkiin, koska istuin saattaisi kolhia ja haavoittaa matkustajia.
• Älä aseta mitään muuta kuin tuotetta var ten
hyväk syttyä lisäosaa auton penkin ja turvaistuimen tai istuimen ja lapsen väliin, koska
istuin ei ehkä toimisi tällöin asianmukaisesti
onnettomuustilanteessa.
• Mikäli auto jätetään suoraan auringonpaisteeseen, on suositeltavaa peittää istuin.
• Pienikin onnettomuus saattaa aiheuttaa
istuimeen sellaisia vaurioita, jotka eivät erotu
paljaalla silmällä, joten istuin on joka tapauksessa vaihdettava uuteen.
• Ennenkuin kannat lasta turvaistuimessa varmista, että lapsi on kiinnitetty turvavöillä ja
kädensija on lukittu asianmukaisesti pystysuoraan asentoon.
• Kun lasta kuljetetaan istuimessa, joka on yhdistetty rattaisiin, istuinta on käytettävä ainoastaan sellaisissa Chicco-rattaissa, jotka on valmistettu istuimen kiinnittämistä varten.
• Ennenkuin kuljetat lasta rattaisiin kiinnitetyssä
istuimessa varmista, että istuin on kiinnitetty
asianmukaisesti.
• Älä hanki k äytettyä t urvaistuin ta. Sen rungos sa
saatt aa olla vaurioi ta, jotka eivät e rotu paljaalla
silmällä, mutta jotka vaarantavat tuotteen turvallisuuden.
62
Page 63

• Ar tsana ei ole va stuussa tuotte en asiattomas ta
käytöstä.
KÄYTTÖOHJEET
TUOTTEEN OMINAISUUDET
• Istuin on hyväksytty sekä ainoastaan turvaistuin- että turvaistuin
• jalustalla -versiona “ryhmässä 0+” lasten
kuljettamiseen autossa
• vastasyntyneistä 13 kg painoisiin. Hyväksyntä
on tyyppiä “universal”,
• joten istuinta voidaan käy ttää missä tahansa
automallissa.
• HUOMIO! “Universal” tarkoittaa sitä, että
istuin soveltuu suurimpaan
• osaan, mutta ei kaikkiin auton penkkeihin.
1. Tämä on “Universal” lasten istuin,
hyväk sytty ohjesäännön nro 44 muutoksen 04 mukaan. Se sopii yleiseen ajoneuvokäyttöön ja soveltuu melkein kaikkiin auton
penkkeihin.
2. Täydellisesti tuote soveltuu autoihin, joiden käyttöohjeissa on valmistajan maininta
siitä, että ajoneuvoon voidaan asentaa kyseiselle ikäluokalle tarkoitettu lasten “Universal” turvaistuin.
3. Tämä turvaistuin on saanut “Universal”luokituksen ankarampien hy väksyntävaatimusten mukaisesti kuin edelliset mallit,
joissa ei ole kyseistä ilmoitusta.
4. Soveltuu ainoastaan sellaisiin ajoneuvoihin, jotka on varustettu 3-pisterullaturvavyöllä tai staattisella vyöllä, jotka on
hyväk sytty säädöksen UN/ECE nro 16 tai
muiden vastaavien standardien mukaisesti.
5. Ollessasi epätietoinen ota yhteyttä turvaistuimen valmistajaan tai jälleenmyyjään.
Istuinta voidaan myös käyttää muualla kuin autossa, yhdistet tynä rattaisiin tai sitterinä.
HUOMIO! Seuraa huolellisesti seuraavia tuotteen käyttöä koskevia rajoituksia, koska niiden
laiminlyönti vähentää istuimen turvallisuutta.
Lapsi ei saa painaa yli 13 kg.
Istuint a ei saa koskaan käy ttää etupenk illä, jonka
edessä on törmäystyyny, paitsi silloin, kun törmäystyyny on kytketty pois päältä. Ota selvää
valmistajalta tai autosi käyttöohjeista, voidaanko törmäystyyny k ytkeä pois päältä.
Comfort-tyynyä ei saa koskaan käyttää, mikäli
lapsi painaa yli 6 kg.
TÄRKEÄ TIEDOTUS
KÄYTTÖRAJOITUKSET
AUTON PENKKIÄ JA TURVAVYÖTÄ KOSKE-
VAT VÄLTTÄMÄTTÖMÄT
Istuimen voi asentaa etupenkille matkustajan
paikalle tai mille tahansa takapenkeistä seuraavin rajoituksin: penkin on oltava
- käännetty ajosuuntaan (kuva 1)
varustettu 3 pisteen staattisella tai rullavyöllä
(kuva 2).
Suosittelemme istuimen asentamista aina auton
takapenkille.
HUOMIO ! VAKAVA VA AR A! Älä käyt ä ist uint a
koskaan sellaisella etupenkillä, jonka edessä on
törmäystyyny.
HUOMIO! Älä asenna istuinta koskaan sellaiselle auton penkille, joka on varustettu ainoastaan
lantiov yöllä (kuva 2A)
HUOMIO! Turvavyöiden sijainti on sovitettava
aina lapsen kasvun mukaan.
Ennenkuin asennat istuimen autoon, asenna lapsen turvavyöt oikealle korkeudelle.
Turvavöiden oikea korkeus on hieman hartiatason alapuolella (kuva 3). Istuin voidaan asentaa
kolmelle eri korkeudelle (kuva 4)
Istuin on varustettu comfort-tyynyllä, joka
takaa la pselle vasta syntynee stä 6 kg painoise ksi
asianmukaisen suojan ja ihanteellisen asennon
niskalle ja selälle.
Comfort-tyynyn asentamiseksi tarkista, että
vyöt on pujotettu alimpaan aukkoon.
HUOMIO: tämä on ainoa sallittu sijainti käytettäessä comfort-tyynyä (kuva 5)
Huomio : jotta tuote takaisi lapselle par haimman
mahdollisen turvan, poista comfort-tyyny silloin, kun lapsi saavuttaa 6 kg painon.
Siirtääksesi turvavyöt toimi näin:
- avaa solki painamalla punaista painiketta (kuva
6)
- vedä vyöt ulos takaa ja pujota ne siihen
aukkoon, joka on oikealla
korkeudella lapsen pituuteen nähden ( kuvat 7A
ja 7B).
HUOMIO! Varmista, että vyöt kulkevat aina
asennuspuomin ja kuoren
välistä.
Vöiden on oltava aina kiristetty asianmukaisesti.
LAPSEN SIJOITTAMINEN ISTUIMEEN
Nosta kangassuojusta, pidä säätöpainike alaspainettuna ja vedä istuimen vöitä niin, että ne
löystyvät (kuva 8)
Avaa solki punaista nappia painamalla (kuva 6)
Sijoita lapsi istuimeen
Aseta soljen molemmat kielekkeet päällekkäin
63
VAATIMUKSET
TURVAVÖIDEN SIJAINNIN SÄÄTÖ
Page 64

(kuva 6A)
Aseta molemmat soljen kielekkeet paikoilleen
siten, että ne loksahtavat paikalleen (kuva 6B)
HUOMIO : älä pujota koskaan solkeen vain yhtä
kielekettä.
Kiristä lapsen turvavyöt keskimmäisestä
säätövyöstä vetämällä
(kuva 9).
HUOMIO: Vöiden täytyy olla sopivan kireät, ei
liian tiukat. Ne on säädetty oikein, jos voit pujottaa sormesi vyön ja lapsen vartalon väliin.
ISTUIMEN KÄDENSIJAN ASENNOT
Istuimen kädensija voidaan säätää neljään eri
asentoon (kuva 10):
Asento autokäyttöön (HUOMIO: tämä on ainoa
sallittu asento silloin, kun istuinta käytetään autossa).
B. Asento lapsen kantamiseen istuimessa.
C. Asento silloin, kun istuinta käytetään keinuna
tai asento istuimen kiinnittämiseen sitä varten
tarkoitettuihin Chicco-rattaisiin.
D. Asento istuimen käyttämiseen kiinteänä sitterinä.
Istuimen säätämiseksi paina yhtä aikaa molempia kahvassa sijaitsevia painikkeita (kuva 11) ja
kierrä kahva valitsemaasi asentoon niin pitkälle,
että se loksahtaa paikalleen.
ISTUIMEN ASENTAMINEN AUTOON
Lue huolella kappale: TARPEELLISET AUTON
PEN KKIÄ JA TURVAVYÖTÄ KOSKE VAT VA AT IMUKSET.
Istuin sekä jalustalla varustettuna että ilman
jalustaa on asennettava ainoastaan selkä menosuuntaa n. HUOMIO! Ä ÄRETTÖMÄN VAA RALLISTA: ÄLÄ ASENNA TÖRMÄYSTY YNYLLÄ VARUSTETUILLE PENKEILLE, ellei tyyny ole kytketty
pois päältä.
HUOMIO! Älä koskaan asenna istuinta sellaiselle auton penkille, joka on varustettu ainoastaan
lantiovyöllä.
ASENNUS JALUSTALLA:
Asentaaksesi istuimen jalustalla varustettuna
auton penkille, toimi näin:
1. irrota istuin jalustasta vetämällä kiinni-
tyskahvaa (kuva 12) ja nostamalla sitä
samanaikaisesti kahvan avulla
aseta jal usta valits emallesi penk ille suunnaten se
kuvan 13 mukaisesti ja asettaen
sen niin, että se koskettaa auton penkin selkänojaa
vedä auton turvavyötä ja kiinnitä se vastaavaan
solkeen siten, että pujotat vaakasuoran osan
kumpaankin asianomaiseen johtimeen (kuva
14)
ennenkuin asetat istuimen jalustaan tarkista,
että vakainlukkoon kiinni (kuva 15)
5. aseta istuin jalustaan (käännettynä selkä menosuuntaan) painaen sitä alaspäin niin pitkälle,
että se loksahtaa lukkoon (kuva 16)
6. varmista istuimen asianmukainen kiinnitys
jalustaan yrittäen nostaa istuinta sekä etu- että
takapäästä
7. tartu auton hartiavyöhön ja pujota se asianomaiseen johtimeen istuimen selkänojan takana
(kuva 17)
HUOMIO: AUTON HARTIAVYÖN ON OLTAVA
AJON AIKANA AINA KUVASSA 18 NÄKYVÄSSÄ
ASENNOSSA. ÄLÄ KÄYTÄ ISTUINTA KOSKAAN
PUJOTTAMATTA VYÖTÄ ASIANOMAISEEN
JOHTIMEEN, JOTTA ET VAARANTAISI LAPSESI
TURVALLISUUTTA.
8. Kiristä vyö istuimen ympärille niin hyvin kuin
mahdollista jättämättä ylimääräistä nauhaa ja
varmista, ettei se ole kier teillä
9. Aseta kahva “A”-asentoon (kuva 10)
Irrottaaksesi istuimen jalustasta:
pujota hartiavyö ulos selkänojassa olevasta
johtimesta, aseta kahva takaisin “B”-asentoon
(kuva 10), irrota istuin kädensijasta vetämällä ja
nosta samanaikaisesti istuinta kahvasta.
HUOMIO! Asennuksen jälkeen tarkista AINA,
että auton turvavyö on asianmukaisen kireä ja
että se n solki ei työnn ä vyötä ulos jalus tan johtimista ja ettei se sekaannu itse johtimiin.
HUOMIO: ÄLÄ ASETA AUTON
TURVAVYÖTÄ KOSKAAN MUIHIN KUIN
KUVASSA 19 MAINITTUIHIN KOHTIIN.
Kuvassa 20 näky y joitakin esimerkkejä väärin
suoritetusta asennuksesta.
ASENNUS ILMAN JALUSTAA
Asentaaksesi istuimen autoon ilman jalustaa
toimi näin:
1. laske vakainlukko alas (kuva 21)
2. aseta istuin valitsemallesi auton penkille
3. vedä auton turvavyötä ja kiinnitä se asianomaiseen solkeen pujottaen vyön lantio-osa
istuimen johtimiin (kuva 22)
4. tartu auton hartiavyöhön ja pujota se istuimen selkänojan takana sijaitsevaan johtimeen
(kuva 23)
5. kiristä turvavyö istuimen ympärille niin
tiukkaan kuin mahdollista jättämättä ylimääräistä nauhaa ja varmista, ettei se ole kierteillä.
HUOMIO: AUTON HARTIAVYÖN ON OLTAVA
AJON AIKANA AINA KUVAN 24 ASENNOSSA.
ISTUINTA EI SAA KOSKAAN KÄYTTÄÄ NIIN,
ETTEI TURVAVYÖ OLE PUJOTETTU ASIANOMAISEEN JOHTIMEEN, KOSKA ISTUIMEN TUR-
64
Page 65

VAOM INAISUUDE T SA ATTAISI VAT H EI KENTYÄ
HUOMATTAVASTI.
6. Aseta kahva “A”-asentoon (kuva 10)
7. Irrottaaksesi istuimen auton penkistä irrota
auton turvavyö painamamalla solkea, pujota
vyö esiin istuimen hartiavyön ja lantiovyön
johtimesta.
Aseta kahva takaisin “B”-asentoon (kuva 10),
Kuvassa 25 näkyy joitakin esimerkkejä väärin
suoritetusta asennuksesta.
Istuimen irrottamiseksi jalustasta toista edelliset toimenpiteet päinvastaisessa järjestyksessä:
pujota hartiavyö ulos selkänojan johtimesta,
aseta kahva takaisin “B”-asentoon (kuva 10), irrota istuin asianomaisesta kädensijasta vetämällä ja nosta samanaikaisesti istuinta kahvasta.
AURINKOKUOMUN KÄYTTÖ
Istuin on varustettu aurinkokuomulla, joka suojaa lasta auringolta ja tuulelta.
Kuomu kiinnitetään istuimeen ja irrotetaan siitä
helposti kahden liitännän avulla ja se voidaan
kallistaa mieleiseen asentoon (kuva 26).
ISTUIMEN KIINTEÄ TAI KEINUVA ASENTO
Silloin, kun istuinta ei käytetä autossa, sitä voidaan käyttää myös keinuna tai sitterinä. Jotta
saisit sen keinumaan, poista vakainlukko uudelleen (kuva 15) ja aseta kahva “B”-asentoon
(kuva 10).
Käyttääksesi istuinta kiinteässä asennossa vedä
vakainlukko esiin (kuva 21) ja aseta kahva “D”asentoon (kuva 10).
Ei ole suositeltavaa käyttää istuinta sitterinä sellaisille lapsille, jotka osaavat nousta ylös itse ( yli
6 kuukauden ikäiset tai yli 9 kg painoiset).
Välttääksesi putoamisvaaran kiinnitä aina turvavyöt.
Älä jätä lasta koskaan vartioimatta.
On vaarallista käyttää istuinta korkeilla tai kaltevilla tasoilla.
HUOMIO : ennen lapsen kuljettamista istuimessa vie kahva aina
takaisin pystysuoraan “B”-asentoon ja lukitse se
(kuva 10)
HUOMIO! Kun istuinta käytetään yhdessä rattaiden kanssa, on seurattava rattaita koskevia
käyttöohjeita
Uusien CLIK CLAK -systeemillä varustettujen
CHICCO-rattaiden käsinojissa on erikoiset laitteet, joiden avulla istuin voidaan kiinnittää suoraan rattaisiin ilman mitään lisälaitteita
(KÄYTTÖ SITTERINÄ)
AUTONISTUIN + RATTAAT -VERSIO
- avaa rattaat noudattaen niitä koskevia käyttöohjeita
- tartu istuimen kahvaan ja aseta istuin rattaisiin
kuvan 27 mukaisesti
- vedä molemmat kiinnitystapit esiin kahvasta
vetämällä ja kiertämällä
kumpaakin kiinnitysnuppia (kuva 28)
- kierrä kahvaa painaen alempia painikkeita kunnes kahva on samansuuntainen käsinojien kanssa
ja kunne s molemmat liitän nät lukkiutuv at niiden
sisään (paina istuinta alaspäin lapsen jalkopäästä
lukitaksesi kahvan oikeaan asentoon)
- irrottaaksesi istuimen rattaista paina molempia kahvalla sijaitsevia punaisia painikkeita kuvan
29 mukaisesti
- nosta k ahvaa kiertä mällä sitä niin, et tä molemmat ulosvedetyt tapit menevät uudelleen sisään
D-kohtaan ja irrota istuin rattaista.
HUOMIO: kiinnittäminen ja irrottaminen voidaan suor ittaa myöski n lapsen istue ssa rattais sa,
mutta lapsen paino saattaisi vaikeuttaa kyseisiä
toimenpiteitä. Ole varovainen suorittaessasi yllä
mainittuja toimenpiteitä.
ISTUIMEN PÄÄLLISEN
Pestäksesi istuimen päällisen irrota turvavyöt ja
vedä päällinen ir ti sen
jälkeen, kun olet pujottanut molemmat metallilukot paikoiltaan (kuva 30). Seuraa tarkoin
päälliseen kiinnitettyyn etikettiin merkittyjä
pesuohjeita.
Vyöt, soljet ja muoviosat on puhdistettava ainoastaan kostealla liinalla. Älä käytä liuotteita
tai valkaisuaineita, jotka saattaisivat vahingoittaa niitä tai heikentää niiden turvallisuutta.
65
IRROTTAMINEN/PESU
VAROTOIMENPITEET. LUE ENNEN MA-
Istuin on asennettava seuraten tarkkaan annettuja ohjeita
Älä jätä lasta koskaan mistään syystä vartioimatta istuimeen.
Älä pujota auton turvavyötä muihin kuin
näissä ohjeissa mainittuihin kohtiin, koska
vaarantaisit lapsesi turvallisuuden ( kuvassa
20 ja 25 on esimerkkejä väärin suoritetusta
asentamisesta).
Asenna istuin ainoastaan sellaisille auton
penkeille, jotka on kiinnitetty oikealla tavalla
auton runkoon ja käännetty auton etuosaan
päin. Varmista, että auton taittuvat tai kiertyvät istuimet on kiinnitetty k unnolla, koska
huonosti kiinnitetyt istuimet saattaisivat
olla vaarallisia onnettomuustilanteessa.
Asentaessasi istuimen autoon varmista, ettei se jää minkään liikkuvan penkin tai oven
väliin.
TKALLE LÄHTÖÄ
Page 66

Huomio: istuinta EI saa missään tapauksessa käyttää auton 2-pistev yön kanssa.
Varmista aina, ettei lapsi avaa turvavyön
solkea.
Kun istuinta käytetään jalustan kanssa, varmista aina, että jalusta on kiinnitetty auton
penkkiin asianmukaisesti.
Tuotteeseen ei saa tehdä mitään muutoksia
tai lisäyksiä ilman valmistajan hyväk syntää.
Älä kiinnitä tuotteeseen muita kuin valmistajalta saatuja lisä- tai varaosia. Mahdolliset tuotteeseen tehdyt muutokset vapauttavat valmistajan kaikesta vastuusta.
Mikäli istuin on mistä tahansa syystä vahingoittunut, muuttanut muotoaan tai hyvin
kulunut, se on vaihdettava uuteen, koska
sen alkuperäiset turvaominaisuudet ovat
saattaneet heikentyä.
Päällisen saa vaihtaa ainoastaan toiseen
valmistajan hyväksymään päälliseen, koska se on turvaistuimen olennainen osa.
Turvaistuinta ei saa koskaan käyttää ilman
päällistä.
Tarkista, ettei vyön nauha ole kierteillä.
Vältä sen tai istuimen osien jäämistä ovien
väliin tai niiden hankautumista teräviä
kohtia vasten.
Mikäli vyössä on viiltoja tai se on hyvin rispautunut, vaihda se uuteen.
Varmista, että sekä lapsen turvavyö sekä
auton 3-pistev yö ovat asianmukaisen kireät
tarjotakseen parhaan mahdollisen turvan
lapsellesi.
Älä käytä tuotet ta, jos jotkut sen osista ovat
rikki tai puuttuvat, koska se saattaisi olla
vaarallista.
Lievänkin onnettomuuden seurauksena
istuin ja turvavyö ovat saattaneet vahingoittua vaikka sitä ei paljaalla silmällä näkyisi. Suosittelemme silloin niiden vaihtamista
uusiin.
Varmista, ettei autossa kuljeteta irrallisia
esineitä, varsinkaan takaikkunalla, koska
ne saattaisivat onnettomuuden sattuessa
vahingoittaa matkustajia.
Varmista, että kaikki autossa olevat matkustajat käyttävät turvavyötä sekä oman
turvallisuutensa takia, että siksi koska he
saattaisivat onnettomuustilanteessa kolhia
lasta pahasti.
Mikäli auto on seisonut pitkään auringossa,
tarkista huolellisesti, etteivät
mitkään istuimen osista ole kuumenneet
liikaa. Anna niiden jäähtyä ennenkuin asetat
lapsen istuimeen.
Pysähdy pitkien matkojen aikana usein,
koska lapsi väsyy helposti. Älä mistään syy-
stä nosta lasta pois turvaistuimesta auton
ollessa liikkeessä. Mikäli lapsesi tarvitsee
huomiota osakseen, etsi turvallinen paikka
ja pysähdy.
Älä hanki käytettyä turvaistuinta, koska
sen rungossa saattaa olla paljaalla silmällä
näkymättömiä, erittäin vaarallisia vaurioita.
Keskosille, jotka ovat syntyneet alle 37
viikkoa kestäneen raskauden jälkeen, istuin
saattaa olla vaarallinen. Kyseisillä keskosilla saattaa olla hengitysvaikeuksia heidän
istuessaan turvaistuimessa. Käänny ennen
sairaalasta lähtöä sinua hoitaneen lääkärin
tai sairaalan henkilökunnan puoleen, jotta he voisivat arvioida lapsesi tilanteen ja
suositella sopivaa turvaistuinta tai autoon
tarkoitettua koppaa.
Istuinta voidaan käyttää kulkuvälineenä tai
sitterinä myös muualla kuin autossa. Älä
aseta istuinta tällöin korkeille tasoille, kuten
pöydälle, työtasolle, vuoteelle jne. tai kaltevalle tai epävakaalle pinnalle välttääksesi
lapsen putoaminen. Käytä aina turvavöitä.
Istuimen päällinen ei ole vedenkestävä. Sen
tähden suosittelemme Chicco- sadevarusteiden käyttöä silloin, kun istuin on asennettu rattaisiin.
Pidä muovipussit poissa lapsen ulottuvilta
tukehtumisvaaran välttämiseksi.
Säilytä näitä ohjeita huolella ja pidä ne helposti saatavissa.
ARTSANA ei ole vastuussa tuotteen asiattomasta käytöstä.
Saadaksesi lisätietoja tai varaosia ota
yhteyttä Artsanan asiakaspalveluun.
ARTSANA SPA
Via Saldarini Catelli 1
22070 Grandate COMO - ITALY
Asiakaspalvelu 0039 031 382000
Fax 0039 031 382500
www.chicco.com
66
Page 67

CZ
AUTO-FIX
SLOŽENÍ: (Obr. A, B, C a D)
1. Základna
2. Zadní kryt
3. Rukojeť
4. Uvolňovací páčka
5. Potah
6. Přídavné polstrování Comfort
7. S lune ční stříška
8. Koncovky sluneční stříšky
9. Vodící přezka ramenního popruhu
10. Vodící přezky břišního pásu na
základně
10A. Vodící přezky břišního pásu na
autosedačce
11. Centrální pás na utažení pásů
autosedačky
12. Spona pásu
13. Jazýčky spony
14. T lačítko na rozepnutí pásů
15. Pásy autosedačky
16. Vycpávky na pásy (pokud existují)
17. Otvory na výškové nastavení pásů
autosedačky
18. Tlačítka na úpravu polohy rukojeti
19. Kolečko na připevnění ke kočárku
20. Tlačítko na uvolnění od kočárku
21. Vodící lišta
22. Blokovací páčka
23. Homo logační štítek
24. Štítek s pokyny na připevnění
autosedačky se základnou a bez.
VELMI DŮLEŽITÉ! PŘEČTĚTE IHNED
• Pozorně si pročtěte celý návod dříve
než začnete výrobek používat.
• Při montáži a připevňování výrobku se
přesně řiďte tímto návodem. Nedovolte,
aby kdokoliv používal výrobek, aniž by
se obeznámil s tímto návodem.
• Návod uschovejte pro případné další
použití.
• Ze statistik nehod v yplývá, že zadní
sedadlo je bezpečnější než přední,
tudíž je vhodnější pro připevnění
autosedačky.
• VELMI NEBEZPEČNÉ: Nikdy nepoužívejte
tuto autosedačku na předním sedadle, pokud je vybaveno airbagem.
Autosedačku je možné připevnit na
přední sedadlo, pouze pokud je airbag vyřazen: ověřte si možnost vyřadit
airbag přímo u výrobce nebo v příručce
k vozidlu.
• Pokud umístíte autosedačku na přední
sedadlo ( pouze pokud není v ybaveno a ir-
bagem nebo je vyřazen), doporučujeme
posunout sedadlo co nejvíce dozadu,
ejmě dle možností pokud jsou
samozř
vzadu spolucestující.
• Nikdy nepřipevňujte tuto autosedačku
na sedadla otočená do boku nebo proti
směru jízdy.
• Nikdy nepřipevňujte autosedačku na
sedadlo, které je vybaveno pouze
dvoubodovým bezpečnostním pásem
(břišním pásem).
• Žádná autosedačka nezaručí úplnou
bezpečnost dítěte v případě nehody,
ale její použití sníží riziko zranění nebo
smrti dítěte.
• Nesprávné použití výrobku zv yšuje riziko vážného zranění dítěte, a to nejen
v případě nehody, ale i jiných situacích.
Vždy si ověřte, jestli je autosedačka
dobře připevněná k sedadlu.
• Pokud je autosedačka poškozená, deformovaná nebo velmi opotřebovaná,
musí být vyměněna: nemusí už splňovat
původní požadavky na bezpečnost.
• Na výrobku nesmí být provedena žádná
úprava nebo změna bez p
souhlasu výrobce. Nepoužívejte
doplňky, náhradní díly nebo části, které
nejsou dodávány výrobcem.
• Nikdy nenechávejte dítě v autosedačce
bez dozoru.
• Abyste zamezili možnosti vypadnutí
dítěte při přenášení, připevněte jej pásy
k autosedačce i při přenášení.
• Pokud používáte autosedačku mimo
vozidlo, nepokládejte ji na vyvýšená
místa.
• Nikdy nenechávejte autosedačku
nepřipevněnou k sedadlu vozidla:
mohla by zasáhnout a zranit osoby ve
vozidle.
• Nepoužívejte žádný předmět, pokud
není označen výrobcem jako doplněk, ať
už mezi sedadlem a autosedačkou nebo
mezi autosedačkou a dítětem: v případě
nehody by autosedačka nemusela být
plně funkční.
• Pokud necháte stát auto na slunci,
doporučujeme autosedačku přikrýt.
• I při malé dopravní nehodě může dojít
k poškození, neznatelnému pouhým
okem: proto je nutné ji v každém
případě vyměnit.
• Pokud chcete přenést dítě v autosedačce,
nejdříve se ubezpečte, zda je dítě
připevněné pásy autosedačky a rukojeť
je zablokovaná ve svislé poloze.
• Tuto aut ose da čku lze připevnit výhradně
67
ředchozího
Page 68

na kočárky značky Chicco, které jsou
vybaveny příslušnou upevňovací soupravou.
• Dříve než použijete autosedačku kombinovanou s kočárkem, ověřte si, zda je
správně připevněna ke kočárku.
• Nepoužívejte autosedačky zakoupené
jako použité, mohlo dojít k vážnému
poškození struktury autosedačky, i když
není znatelné pouhým okem, ale které
mohlo snížit bezpečnost výrobku.
• Společnost Artsana nenese žádnou
odpovědnost za nesprávné nebo nevhodné používání výrobku.
NÁVOD K POUŽITÍ
VLASTNOSTI VÝROBKU
Tato autosedačka, jak v provedení se
základnou tak bez základny, je homologována pro “Tříd u 0+”. To zn amen á, ž e
byla schválena pro přepravu dětí v autě
s váhou do 13 kg.
Tato autosedačka byla klasifi kována jako
“univerzální”, tudíž může být používána
v jakémkoliv autě.
UPOZORNĚNÍ: “Univerzální” znamená,
že autosedačka je použitelná na většině
sedadel vozidla, i když ne na všech.
DŮLEŽITÉ OZNÁMENÍ
1. Jedná se o “univerzální” dětský
zádržný systém, který byl schválen
podle 04. novely evropské normy ECE 44. Je vhodné pro běžné
použití ve vozidlech a je použitelné
na většině sedadel vozidla, i když
ne na všech.
2. Zádržné zařízení je plně kompatibilní, pokud výrobce v příručce k
vozidlu uvádí, že se pro dané vozidlo předpokládá použití dětských
zádržných zařízení univerzálního
typu pro danou věkovou kategorii.
3. Toto zádržné zařízení bylo klasifi kováno jako “univerzální”, protože
vyhovuje přísnějším požadavkům pro
homologaci oproti předcházejícím
modelům, které takto označeny
nejsou.
4. Je vhodné pouze pro použití ve
vozidlech, vybavených tříbodovými
bezpečnostními pásy, pevnými nebo
s automatickým navíjením, které byly
schváleny dle dispozic normy UN/
ECE č. 16 nebo jiné jí odpovídající
normy.
5. V případě jakýchkoliv pochybností se obraťte na výrobce zádržného
zařízení nebo na příslušnou prodejnu.
Tato autosedačka může být používána i
mimo vozidlo, buď připevněná ke kočárku
nebo jako lehátko.
OMEZENÍ PŘI POUŽÍVÁNÍ VÝROBKU
POZOR! Respektujte následující omezení
při používání v ýrobku: v opačném případě
není zaručena plná bezpečnost.
1. Dítě nesmí vážit více než 13 kg.
2. Nikdy nepoužívejte tuto autosedačku
na předním sedadle, pokud je vybaveno airbagem. Autosedačku je možné
připevnit na přední sedadlo, pouze pokud je airbag v yřazen: ověř te si možnost
vyřadit airbag přímo u výrobce nebo v
příručce k vozidlu.
3. Nikdy nepoužívejte přídavné polstrování Comfort, pokud dítě váží více než
6 kg.
POŽADAVKY NA SEDADLO
VOZIDLA A BEZPEČNOSTNÍ PÁS
Autosedačka může být připevněna na
předním sedadle pro spolujezdce nebo
na jakémkoliv ze zadních sedadel, ale s
následujícími omezeními: sedadlo musí
být:
- otočeno po směru jízdy (obr. 1)
- vybaveno tříbodovým bezpečnostním
pásem, pevným nebo s automatickým
navíjením (obr. 2).
Doporučujeme vždy připevnit autosedačku
na zadní sedadlo vozidla.
VAROVÁNÍ ! VELMI NEBEZPEČNÉ! Nikdy
nepoužívejte na předním sedadle v ybaveném airbagem.
VAROVÁNÍ ! Nikdy nepřipevňujte
autosedačku na sed adl o, k teré je v yb aveno pouze dvoubodovým bezpečnostním
pásem (obr. 2A).
NASTAVENÍ VÝŠKY UCHYCENÍ PÁSŮ
POZOR! Pásy musí být vždy upraveny
podle v ýšky dítěte.
Dříve než umístíte autosedačku do vozidla, je nutné zkontrolovat výšku uchycení
pásů.
Správná výška pásů je lehce pod úrovní ramen dítěte (obr. 3). Autosedačka
je vybavena třemi otvory pro výškové
nastavení pásů (obr.4).
Tato autosedačka je také vybavena
68
AUTOSEDAČKY
Page 69

přídavným polstrováním Comfort, které
je určeno pro novorozence a děti s váhou
do 6 kg. Tento výrobek vám umožní dítě
správně připnout a zajistí mu vhodnou
polohu pro krk a záda.
Pokud chcete připevnit přídavné polstrování Comfor t, pásy musí bý t uchyceny v
nejnižších otvorech.
POZOR: Toto je jediná poloha povolená
pro přídavné polstrování (obr. 5).
Upozornění: Abyste zajistili maximální
bezpečnost vašeho dítěte, odstraňte
příd avn é po lst rov ání, jak mil e vá ha d ítěte
dosáhne 6 kg.
Při úpravě výšky uchycení pásů postupujte
následovně:
- stiskněte červené tlačítko spony a
rozepněte pásy autosedačky (obr. 6).
- vy táhněte oba pásy opěrkou autosedačky
na zadní stranu a poté je vsuňte do otvorů,
které jsou pro vaše dítě nejvhodnější (obr.
7A a 7B).
POZOR! Ověřte si, zda oba pásy procházejí vždy mezi upevňovací destičkou a
krytem.
Pásy musí být vždy správně napnuty.
1. Rozepněte látkové pouzdro na
autosedačce, stiskněte a přidržte kovové tlačítko, které se v něm nachází
a zatáhněte za oba pásy autosedačky
(obr. 8).
2. Stiskněte červené tlačítko spony a
rozepněte pásy autosedačky (obr. 6).
3. Usaďte dítě.
4. Položte na sebe oba ja zýčky spony tak,
jak je znázorněno na obr. 6A.
5. Zasuňte současně oba jazýčky do
spony, dokud neuslyšíte cvaknutí (obr.
6B). POZOR: nikdy nezasunujte do spony
pouze jeden z jazýčků.
6. zatáhněte za příslušný centrální pás a
napněte pásy autosedačky (obr. 9).
POZOR: pásy musí být napnuty, ale ne
příliš těsně. Pokud můžete vsunout prst y
mezi pás a tělo dítěte, znamená to, že
jste pás napnuli správně.
Rukojeť autosedačky je možno nastavit
do 4 poloh (obr. 10):
A. Poloha pro převoz v autě (POZOR:
toto je jediná poloha, která je povolena
při převozu v autě)
B. Poloha pro přenos autosedačky
C. Houpací poloha nebo poloha pro
USAZENÍ DÍTĚTE
ÚPRAVA POLOHY RUKOJETI
upevnění na kočárek Chicco vybavený
připevňovací soupravou
D. Pevná poloha při použití jako
lehátko.
Pokud chcete upravit polohu rukojeti, stiskněte současně obě tlačítka na
rukojeti (obr. 11), pak otočte rukojeť do
požadované polohy, dokud neuslyšíte
cvaknutí.
UPEVNĚNÍ AUTOSEDAČKY
Pozorně si přečtete bod: POŽADAVKY
NA SEDADLO VOZIDLA A BEZPEČNOSTNÍ
PÁS.
Tat o au tose dačka, jak v provedení se
základnou tak bez základny, musí být
připevněna pouze proti směru jízdy.
VAROVÁNÍ! VELMI NEBEZPEČNÉ: NIKDY
NEPOUŽÍVEJTE NA PŘEDNÍM SEDADLE VYBAVENÉM AIRBAGEM, pokud není možné
jej vyřadit.
VAROVÁNÍ! Nikdy nepřipevňujte
autosedačku na sed adl o, k teré je v yb aveno pouze dvoubodovým bezpečnostním
pásem.
Při upevňování autosedačky se základnou
do vozidla postupujte následovně:
1. zatáhněte za příslušnou páčku (obr.
12), současně zvedněte autosedačku za
rukojeť a uvolněte ji od základny.
2. umístěte zákl adn u na sed adlo , na kte ré
chcete autosedačku připevnit a otočte
jej tak, jak je znázorněno na obrázku
č. 13. Dbejte, aby se základna dotýkala
opěradla sedadla.
3. natáhněte bezpečnostní pás vozidla a
zapněte jej do příslušné spony. Protáhněte
břišní popruh bezpečnostního pásu
oběma vodícími přezkami (obr. 14).
4. dříve než připevníte autosedačku na
základnu, zkontrolujte, zda je sklopená
upevňovací páčka (obr. 15).
5. nasaďte autosedačku (otočenou proti směru jízdy) na základnu a tlačte ji
směrem dolů, dokud neuslyšíte cvaknutí (obr. 16).
6. ověřte si, zda je autosedačka správně
uchycena na základně a pokuste se ji
zvednout jak vepředu tak i vzadu.
7. uchopte ramenní popruh
bezpečnostního pásu a provlékněte jej
vodící přezkou na zadní straně opěrky
autosedačky (obr. 17).
69
DO VOZIDLA
UPEVNĚNÍ AUTOSEDAČKY
SE ZÁKLADNOU:
Page 70

POZOR: RAMENNÍ
POPRUH BEZPEČNOSTNÍHO PÁSU AUTA
MUSÍ BÝT PŘI PŘEPRAVĚ VŽDY V POLOZE VYZNAČENÉ NA OBRÁZKU Č. 18:
NIKDY NEPOUŽÍVEJTE AUTOSEDAČKU,
ANIŽ BYSTE PROTÁHLI PÁS PŘÍSLUŠNOU
PŘEZ KOU. M OHLO BY T O VÁŽN Ě OHROZIT
BEZPEČNOST VAŠEHO DÍTĚTE.
8. co možná nejv íce napněte bezpečností
pás vozidla a ověřte si, zda není nikde
překroucen.
9. nastavte rukojeť do polohy “A” (obr.
10).
Pokud chcete autosedačku uvolnit od
základny, postupujte následovně:
vyvlékněte bezpečnostní pás z vodící přezky na zadní straně opěrky
autosedačky, přetočte rukojeť do polohy
“B” (obr. 10), zatáhněte za příslušnou
páčku, současně zvedněte rukojeť a
autosedačku uvolněte.
POZOR! Po upevnění autosedačky VŽDY
zkontrolujte, zda je bezpeč
řádně napnutý a zda přezka pásu netlačí
pás z přezek na základně. Mimo jiné si
ověřte, zda se přezka pásu auta nedotýká
vodících přezek.
POZOR: NIKDY NEPROTAHUJTE
BEZPEČNOSTNÍ PÁS VOZIDLA MIMO MÍSTA ZNÁZORNĚNÁ NA OBR. 19.
Na obrázku č. 20 jsou znázorněny
některé příklady nesprávného připevnění
autosedačky.
UPEVNĚNÍ AUTOSEDAČKY
Při upevňování autosedačky bez základny
do vozidla postupujte následovně:
1. sklopte upevňovací páčku (obr. 21).
2. umístěte autosedačku na sedadlo, na
které ji hodláte připevnit.
3. natáhněte bezpečnostní pás vozidla a
zapněte jej do příslušné spony. Prot áhněte
břišní popruh bezpečnostního pásu
oběma vodícími přezkami, (obr. 22).
4. uchopte ramenní popruh
bezpečnostního pásu a provlékněte jej
vodící přezkou na zadní straně opěrky
autosedačky (obr. 23).
5. co možná nejvíce napněte bezpečností
pás vozidla a ověřte si, zda není nikde
překroucen. POZOR: RAMENNÍ POPRUH
BEZPEČNOSTNÍHO PÁSU AUTA MUSÍ BÝT
PŘI PŘEPRAVĚ VŽDY V POLOZE VYZN AČENÉ
NA OBRÁZKU Č. 24. NIKDY NEPOUŽÍVEJTE
BEZ ZÁKLADNY
nostní pás
70
AUTOSEDAČKU, ANIŽ BYSTE PROTÁHLI
PÁS PŘÍSLUŠNOU PŘEZKOU. MOHLO BY
TO VÁŽNĚ OHROZIT BEZPEČNOST VAŠEHO
TE.
DÍTĚ
6. nastavte rukojeť do polohy “A” (obr.
10).
7. pokud chcete autosedačku uvolnit
od sedadla, stiskněte sponu, uvolněte
bezpečnostní pás vozidla a vyvlékněte
jej z vodících přezek na autosedačce.
Nyní přetočte rukojeť do polohy “B”
(obr. 10).
Na obrázku č. 25 jsou znázorněny
některé příklady nesprávného připevnění
autosedačky.
Pokud chcete autosedačku uvolnit od
základny, zopakujte předchozí pokyny v
opačném pořadí: vy vlékněte bezpečnostní
pás z vodící přezky na zadní straně opěrky
autosedačky, přetočte rukojeť do polohy
“B” (obr. 10), zatáhněte za příslušnou
páčku, současně zvedněte rukojeť a
autosedačku uvolněte.
POUŽITÍ SLUNEČNÍ STŘÍŠKY
Autosedačka je vybavena sluneční
stříškou, která ochrání dítě před sluncem i větrem.
Je možno ji snadno připevnit i uvolnit pomo cí d vo u konc ovek a může být libovolně
naklopena (obr. 26).
PEVNÁ NEBO HOUPACÍ POLOHA
AUTOSEDAČKY (POUŽITÍ JAKO
Pokud není autosedačka používána v
autě, může také sloužit jako kolébka
nebo lehátko. Houpací polohu zvolíte,
když zasunete upevňovací páčku (obr.
15) a posunete rukojeť do polohy B (obr.
10).
Pokud chcete autosedačku zablokovat
v pevné poloze, vytáhněte upevňovací
páčku a přesuňte rukojeť do polohy D
(obr. 10).
Nedoporučujeme používat jako lehátko
pro děti, které jsou již schopny se samy
postavit (od 6 měsíců nebo 9 kg váhy).
Abyste zabránili případnému vypadnutí dítěte z autosedačky, zapněte vždy
pásy.
Nikdy nenechávejte dítě v autosedačce
bez dozoru.
Je nebezpečné pokládat autosedačku na
vyvýšené nebo nakloněné plochy.
LEHÁTKO)
Page 71

POZOR: Dříve než začnete autosedačku
přenášet, přetočte vždy rukojeť do svislé
polohy “B” (obr. 10).
AUTOSEDAČKA + KOČÁREK
POZOR! Pokud chcete používat
autosedačku připevněnou na kočárek,
řiďte se pokyny uvedenými v návodu ke
kočárku.
Nové kočárky značky Chicco jsou vybaveny upínací systémem CLIK CLAK a
mají opěrky na ruce vybaveny speciál-
ním úchytným zařízením, které umožňuje
připevnit autosedačku přímo na kočárek,
bez použití dalších doplňků.
- otevřete kočárek dle pokynů uvedených
v příslušném návodu k použití.
- uchopte autosedačku za rukojeť
a položte ji na kočárek tak, jak je
znázorněno na obrázku č. 22.
- zatáhněte za obě červená kolečka,
pootočte jimi a tak v ysuňte oba pojistné
nýtky na rukojetích (obr. 28).
- stiskněte červená tlačítka na rukoje-
ti a otočte ji tak, aby byla rovnoběžná
s opěrkami na ruce; obě koncovky do
sebe zapadnou a zablokují se (stlač
autosedačku dolů na straně nohou a
upravte rukojeť do správné polohy).
- autosedačku uvolníte, když stlačíte
červená tlačítka na rukojeti tak, jak je
znázorněno na obrázku č. 29.
- zvedněte rukojeť, zasuňte znovu oba
po jis tné nýtk y, k ter é jste vy sunul i v b odě
D a odstraňte autosedačku z kočárku.
POZOR: autosedačka může být připevněna
nebo uvolněna, pokud v ní sedí dítě;
výše uvedené úkony, by ale díky váze
dítěte, mohly být hůře proveditelné.
Doporučujeme proto věnovat výše uvedeným úkonům zvýšenou pozornost.
SEJMUTÍ / ČISTĚNÍ POTAHU
·Pokud chcete vyprat potah autosedačky,
rozepněte pásy, vytáhněte dvě kovové
sponky a stáhněte potah (obr. 30). Při
praní se přesně řiďte pokyny uvedenými
na štítku potahu.
· Pásy, přezky a části z umělé hmoty
mohou bý t otírány vlhkým hadříkem.
Nepoužívejte ředidla ani bělidla, mohly by
je poškodit a omezit jejich funkčnost.
PŘED POUŽITÍM AUTOSEDAČKY:
1. Autosedačka musí být upevněna
AUTOSEDAČKY
UPOZORNĚNÍ: PROČTĚTE SI
te
do vozidla přesně podle uvedených
pokynů.
2. Nikdy nenechávejte dítě v
autosedačce bez dozoru.
3. Neprotahujte bezpečnostní
pás vozidla jinak, než je uvedeno v tomto návodu: mohli byste
ohrozit bezpečnost vašeho dítěte
(příklady NESPR ÁVNÉHO použití jsou
znázorněny na obrázcích 20 a 25).
4. Upev něte autosedačku p ouze na se-
dadla, která jsou správně připevněná
na strukturu vozidla a otočená po
směru jízdy. Dbejte na to, abyste
nenechali sklopné nebo otáčivé části
sedadel nezajištěny. V případě nehody
by mohly být nebezpečné.
5. Během připevňování autosedačky
do auta věnujte pozornost tomu, aby
se nemohla dostat do styku se dveřmi
auta nebo s předním sedadlem, když
je posunete dozadu.
6. Pozor: tato autosedačka NESMÍ být
nikdy připevněna pouze dvoubodovým bezpečnostním pásem.
7. P rav id el ně kontrolujte, zda se dítěti
nepodařilo rozepnout bezpečnostní
pás vozidla.
8. Pokud používáte autosedačku se
základnou, vždy zkontrolujte, jestli
je základna řádně připevněna k sedadlu auta.
9. Na autosedačce nesmí bý t provedena žádná úprava nebo změna,
pokud nebyla schválena výrobcem.
Nepoužívejte doplňky, náhradní díly
nebo části, které nejsou dodávány
výrobcem. Výrobce nenese žádnou
odpovědnos t, p oku d by ly na vý rob ku
provedeny nějaké úpravy.
10. Pokud je autosedačka z jakéhokoliv důvodu poškozena, deformovaná
nebo velmi opotřebovaná, vyměňte
ji: nemusela by už splňovat původní
požadavky na bezpečnost.
11. Potah smí být nahrazen pouze
potahem, schváleným od výrobce,
protože tvoří neoddělitelnou součást
autosedačky. Autosedačka nesmí být
nikdy používána bez potahu.
12. Zkontrolujte, zda bezpečnostní
pás není nikde překroucen. Dbejte,
aby pás auta ani autosedačky nebyl
přivřen dveřmi nebo aby se dotýkal
ostrých hran. Pokud je pás natržený
nebo se páře, vyměňte jej.
13. Zkontrolujte, zda jsou správně
71
Page 72

napnuty jak tříbodový bezpečnostní
pás tak i pás autosedačky, aby byla
zajištěna maximální ochrana vašeho
dítěte.
14. Výrobek nepoužívejte, pokud některá jeho část chybí nebo
je poškozená. Mohlo by to být
nebezpečné.
15. I při malé dopravní nehodě může
dojít k poškození, třeba i neznatelnému pouhým okem, autosedačky
a pásů, proto je doporučujeme
vyměnit.
16. Ujistěte se, zda nevezete volně
ležící předměty a to především na
zadní odkládací desce, které by v
případě nehody mohly zranit osoby
ve vozidle.
17. Uji stěte se, zda všichni spolujezdci
mají zapnutý bezpečnostní pás a to
jak pro jejich vlastní bezpečnost, tak
i proto, že v případě ne hod y by moh li
dítě těžce zranit.
18. Pokud auto zůstalo dlouho stát
na slunci, pozorně autosedačku zkontrolujte, dříve než do ní dítě usadíte;
některé části by mohly být rozpálené:
nechejte je dříve vychladnout.
19. V p
řípadě dlouhých cest dělejte
často zastávky. Dítě se rychle unaví.
Z žádného důvodu neodpínejte dítě z
autosedačky, pokud je auto v pohybu.
Jestliže dítě v yž aduje v aši pozorn ost ,
najděte vhodné místo a zastavte.
20. Nepoužívejte autosedačky zakoupené jako použité, protože mohlo
dojít k vážnému poškození její struktury, i když to není znatelné pouhým
okem.
21. Nedonoš ené děti: (novorozenci
narození před 37. t ýdnem těhotenství)
mohou bý t v autosedačce ohroženy.
U těchto dětí se mohou vyskytnout
dýchací obtíže, pokud jsou usazeny
v autosedačce. Proto doporučujeme
obrátit se na vašeho lékaře nebo na
personál porodnice, který po zhodnocení stavu vašeho dítěte, vám
doporučí dříve než opustíte nemocnici, zda použít autosedačku nebo
přenosnou tašku.
22. Autosedačka může být používána
k přepravě dítěte nebo jako lehátko
i mimo vozidlo. V tom případě ji nepokládejte na vyvýšená místa jako
například stoly, pracovní stoly, postele atd. nebo na nestabilní nebo
nakloněné plochy, abyste zabránili
pádům autosedačky. Vždy používejte
bezpečnostní úchytné pásy.
23. Látka na autosedačce není nepromokavá; proto doporu
ji používáte na kočárku, případně
použít pláštěnky značky Chicco.
24. Uchovávejte igelitové sáčky mimo
dosah dítěte, abyste odstranili riziko
udušení.
25. Pečlivě uschovejte tento návod na
snadno dostupném místě.
26. Společnost ARTSANA nenese
odpovědnost za nesprávné nebo
nevhodné používání výrobku.
Pro další informace nebo náhradní
díly se obraťte ne Službu klientům
Artsany:
ARTSANA SPA
Via Saldarini Catelli 1
22070 Grandate COMO - ITÁLIE
Služba klientům 0039 031 382000
fax 0039 031 382500
čujeme, pokud
www.chicco.com
72
Page 73

N
AUTO-FIX
KOMPONENTER : (Fig. A , B, C, D)
1. Base
2. Skall
3. Håndtak
4. Utløsningshåndtak
5. Fôr
6. Komfortpute
7. S olk alesj e
8. Bajonettskjøt for solkalesje
9. Spor for diagonalt bilbelte
10. Spor for horisontalt bilbelte på basen
10A Spor for horisontalt bilbelte på barnesetet
11. Re guleri ngs bel te
12. Beltespenner
13. Spennetunger
13A. Knapp for åpning av belte
14. Reguleringsknapp for belter (under tôyklaf-
fen)
15. Belter
16. Vattering for belter (hvis forutsett)
17. Hull for passering av belter
18. Kapper for bøying av håndtaket
19. Knott for hekting til sportsvognen
20. Knapp for hekting av sportsvognen
21. Posisjonsstang
22. Stabiliseringslåsepinne
23. Godkjennelsesetikett
24. Etikett med instruksjoner for montering med
og uten base
MEGET VIKTIG! MÅ LESES STRAKS
• Les hele håndboken nøye før produktet brukes.
• Følg skrupuløst instruk sjonene for montering og
installering av produktet. Unngå at noen bruker
produktet uten å ha lest instruksjonene.
• Oppbevar denne håndboken for senere bruk.
• Et ter ulykkesst atistikken er ba ksetet sikre re enn
forsete t, derfor er de tte å foretrek ke for installe ring av barnesetet.
• ADVARSEL! ALVORLI G FARE! Bruk aldr i dette bar-
nesetet p å et forsete uts tyrt med f rontal airbag .
Det er mulig å installere barnesetet på forsetet
kun hvis ai rbaggen for an er deaktiv ert: kontro ller
med bilfi rmaet eller les håndboken for bilen din
for muligheten av å deaktivere airbaggen.
• Hvis barnes etet blir satt på forsetet (kun hvis det
er uten airbag eller sistnevnte er blitt deaktivert),
råder ma n til å dra forsetet s å langt bakover s om
mulig, kompatibelt med nærvær av andre passasjerer på baksetet.
• Bruk ald ri dette bar nesetet på seter s om peker la-
teralt eller motsatt forhold i til kjøreretningen.
• Fest aldri fast barnesetet på et bilsete som er
utstyrt bare med mavebelt (to-punkts).
• Ikke noe ba rnesete for bi l kan garanter e fullsten dig
sikker het for barnet i tilf elle ulykke, men b ruk av
dette produktet minsker risikoen for ulykke og
død av barnet.
• Et bruk av produktet som ikke er korrekt, øker
risikoen for alvorlige skad er på barnet, ikke b are
i tilfelle ulykke, men også i andre situasjoner:
kontroller alltid at barnesetet er festet korrekt
til setet.
• Bytt de t ut hvis det for et hvi lket som hels t motiv
skulle vise seg at barnesetet er skadet, deformert
eller meget slitt: det kan ha tapt de opprinnelige
sikkerhetskarakteristikkene.
• Gjør ingen modifi sering eller ekstra utstyr på
produk tet uten godkjen nelse av prod usenten. Ikke
sett på tilbehør, reser vedeler eller komponenter
som ikke er levert av produsenten.
• La aldri barnet være ubevoktet i barnesetet for
et hvilket som helst motiv.
• Spenn fast barnet i barnesetet selv under bæring
for å unngå risiko for fall av barnet.
• Det er far lig å sette bar nesetet på en h øy overfl ate
ved bruk utenfor bilen.
• La aldri barnesetet være på bilsetet uten å være festet fast: det kan støte og skade passasjerene.
• Ikke legg noe imellom bilsetet og barnesetet eller
mellom barnesetet og barnet, som ikke er godkjent tilbehør til produktet: i tilfelle ulykke er det
mulig at ikke barnesetet fungerer korrekt.
• I tilfelle bile n settes direk te i solen, råder m an til
å dekke barnesetet.
• Etter en uly kke, selv liten, k an barnese tet få skader
som ikke kan ses med blotte ø ye: derfor må det
byttes ut i alle tilfeller.
• Før man bære r barnesetet m ed hånden, for sikre
de g om at b ar net er f es tet me d be lte ne og a t hå ndtaket er korrekt blokker t i vertikal posisjon.
• Bruk det te barnese tet kun til Chicco sp ortsv ogner
forutsett til hekting for transpor t av barnesete
kombiner t med sportsvogn.
• Forsikre deg om at dette er fes tet korrekt før du
transporterer barnet med barnesete kombiner t
med sportsvogn.
• Br uk i kk e br uk te bar ne se ter : d e ka n h a få tt st ruk tu relle sk ader som ikke ka n ses med blot te øye, men
kompromittere sikkerheten av produk tet.
• Firma Ar tsana fra sier et hvert ans var for uegnet
bruk av produktet.
BRUKSANVISNING
PRODUKTETS KARAKTERISTIKK
Barnesetet for bil både i versjon bare barnesete
og i versjon barnesete med base er godkjent for
“gruppe 0+”, for transport av barn i bil fra fød-
73
Page 74

selen av og opp til 13 kg. Godkjennelsen er av
type “universal”, og derfor kan barnesetet brukes
til alle bilmodeller.
ADVARSEL! “Univers al” betyr at den passer ti l de
fl este, men ikke til alle bilseter.
VIKTIG MEDDELELSE
1. Dette er en “Universal” fastspenningsanordning for barn. Den er godkjent i
overensstemmelse med Vedtekt NR . 44,
forbedringserie 04. Egnet for generelt bruk
i kjøretøyer og passer til de fl este, men ikke
til alle bil seter.
2. Den perfekte tilpassing fi nner sted hvis
kjøret øyskons truktø ren har erkl ært i manual en
for kjøretøyet, at kjøretøyet er forutsett for
installering av “Universal” fastspenningsanordning for barn i denne alderssgruppen.
3. Denne fastspenningsanordningen er blitt
klassifi se rt “U niv ers al ” på gr unn av m ere st rik te kriterier ved godkjenning i forhold til de
modeller som er blitt brukt før, og hvor ikke
følgende meddelelse følger med.
4. Passende kun til kjøretøyer utstyrt med
3-punkts sikkerhetsbelte , statisk eller med
retrak sjon, godkje nt i overensstem melse med
norm UN /ECE NR. 16 ell er andre tils varende
standarder.
5. I tilfelle tvil, ta kontakt enten med fabrikanten av fastspe nningsanordningen eller
forhandleren.
Barnesetet kan også brukes utenfor bilen, kombinert med spor tsvognen eller som lig gestol.
BEGRENSNING AV BRUK
ADVARSEL! Respekter skrupuløst følgende begrensninger av bruket av produktet: i mottatt tilfelle
er ikke sikkerheten garantert.
1. Vekten på barnet må ikke være over 13 kg.
2. Bruk aldri dette barnesetet på et forsete utstyrt
med frontal airbag, men kun hvis den frontale
airbaggen er deaktivert: kontroller med bilfi rmaet
eller le s håndboken for bi len din for muligh eten av
å deaktivere airbaggen.
3. Bruk aldri komfortputen hvis barnet veier over
6 kg.
NØDVENDIGE KRAV PÅ BILSETE OG SIKKE-
Bilsetet kan installeres på passasjersetet ved siden
av sjåføren eller hvilket som helst baksete, men
med følgende begrensning: setet må:
• vendes med kjøreretningen (fi g. 1)
utstyrt med belte med 3 statiske festepunkter
eller med retrak tor (fi g. 2)
RHETSBELTE
Man råder alltid til å installere barnesetet i baksetet på bilen.
ADVARSEL! ALVORLIG FARE! Bruk aldri dette barnesetet på et forsete utstyrt med frontal airbag.
ADVARSEL! Installer aldri barnesetet på et sete som
er utstyrt med bare et mavebelte (fi g. 2A)
REGULERING AV POSISJON
PÅ BELTENE ADVARSEL!
Beltene må alltid tilpasses veksten på barnet.
Før man installerer barnesetet i bilen, må man
tilpasse fastspenningsbeltene korrekt etter høyden
på barnet.
Den korrekte posisjonen av høyden på beltene er
litt under skuldrene på barnet. (fi g. 3). Barnesetet
er utstyrt med 3 høydeposisjoner. (fi g. 4)
Barnesetet er utstyrt med komfortpute som garanterer barnet en korrekt fastspenning og den
ideelle posisjonen for nakke og rygg fra fødselen
av til en vekt på 6 kg.
For å insta llere en komfortp ute, kontroller at be ltene er stukket inn i det nederste hullet.
ADVARSEL: det er den eneste tillatte posisjon ved
bruk av komfortpute (fi g. 5)
Advarsel: for å garantere maksimal sikkerhet av
produktet, må komfortputen fjernes når barnet
har fått en
vekt på 6 kg
For å fl ytte beltene, gjør følgende:
- åpne spennen ved å trykke på den røde knap-
pen (fi g. 6)
- dra ut beltene bakfra og stikk dem inn i hullet
som er mest passende til høyden av barnet (fi g.
7A og 7B)
ADVARSEL! For sikre deg om at b eltene alltid pa sserer mellom posisjonsstangen og skallet.
Beltene må alltid være korrekt spent:
1. Løf t tøyklaf fen ved å holde reg uleringsk nappen
inntrykt og dra i beltene på barnesetet sånn
at de løsner (fi g. 8)
2. åpne spennen ved å trykke på den røde knap-
pen; (fi gur 6).
3. sett i barnet
4. sett de tungene på spennen over hverandre
fi gur 6A
5. stikk inn beg ge tungene i spennen helt til man
hører et “klikk”. (fi g. 6 B) ADVARSEL: stik k aldri inn
bare en tunge i spennen
6. stram sikkerhetsbeltene til barnet, ved å dra i
reguleringsbeltet på midten (fi g. 9)
ADVARSEL: beltene må være stramme, men ikke
for mye. Hvi s dere kan stik ke inn fi ngrene mellom
74
SETTE I BARNET
Page 75

beltet og barnekroppen betyr det at de er korrekt
strammet
POSISJON AV HENDELEN
Hendelen på barnesetet kan reguleres i 4 posisjoner (fi g. 10):
A. Posisj on transpor t i bil (ADVARSEL: de tte er den
eneste posisjonen tillatt under transport i bil).
B. Posisjon ved bæring
C. Posisjon ved bruk som liggestol, gyngestol
eller posisjon for hekting til Chicco sportsvogn
forutsett til dette.
D. Posisjon ved bruk som fast lig gestol.
For å utfø re reguleringe n, trykk s amtidig på knap pene på hendelen (fi g. 11), vri hendelen i utvalgt
posisjon helt til man hører et smekk (clack).
Les nøye paragrafen: NØDVENDIGE KRAV PÅ
BILSETE OG SIKKERHETSBELTE.
Barnesetet, både i versjon med base og uten, må
instal leres kun sånn a t det peker bakover i fo rhold
til kjør eretningen . ADVARSEL! MEGET FARLI G: IKKE
INSTALLER PÅ SET ER UTSTYRT MED AI RBAG, hvis
ikke sistnevnte er deaktivert.
ADVARSEL! Ins taller aldri b arnesetet på e t bilsete
som er utstyrt bare med et mavebelte)
For å installere barnesetet med base på bilsetet,
gjør følgende:
1. hekt ba rnesetet fr a basen ved å dra i hå ndtaket
for hek ting (fi g.12) og løft det s amtidig med håndtaket
2. sett b asen på det utva lgte setet for ins tallering
på samme måte som på fi gur 13 og sett den sl ik at
den er i kontakt med ryggen på bilsetet
3. dra i sik kerhetsb eltet på bilen og he kt det til den
tilsvarende spennen, ved å la den horisontale delen
passere de to bestemte sporene (fi g. 14)
4. kontroller at stabiliseringslåsepinnen er stengt
(fi g. 15) før barnesetet settes på basen.
5. set t b ar nes et et p å ba se n (v en dt m ot sat t i for ho ld
til kjøreretningen) ved å tr ykke den nedover helt
til den hektes fa st (dere hører et “clack” ved hekting) (fi g. 16).
6. kontroller korrekt fasthekting av bar nesetet til
basen ved å prøve å løfte det både fra framsiden
og fra baksiden.
4. ta tak i det diagonale beltet på bilen og la det
passere i det bestemte sporet som sitter bak på
rygglenet på barnesetet (fi g. 17)
PÅ BARNESETET
INSTALLERING AV BARNESETE I BIL
INSTALLERING MED BASE:
ADVARSEL: D IAGONALBELTET I BI LEN MÅ ALLTID
VÆRE I POSISJON SOM VIST PÅ FIG.18: BRUK
ALDRI BARNESETET UTEN Å LA BELTET PASSERE
I DET BESTEMTE SPORET:
DETTE KAN KOMPROMITTERE SIKKERHETEN
ALVORLIG.
5. Stram b eltet så mye som mul ig rundt barn esetet
uten å la for mye beltebånd være til overs, og
forsikre deg om at det ikke er vridd
9. Sett håndtaket i “A” (fi g. 10)
For å ta barnesetet av basen:
dra ut diagonalbeltet fra sporet på rygglenet, sett
tilbake håndtaket i posisjon “B” (fi g. 10), hekt av
barnesetet ved å dra i det bestemte håndtaket
og løft selve barnesetet samtidig med hjelp av
håndtaket.
ADVARSEL! Kontroller ALLTID at bilbeltet er strammet korre kt og at ikke spe nnen på det g jør at beltet
gl ir ut av de b est emt e spo rene på ba sen og at det
ikke kommer i kontakt på selve sporene.
ADVARSEL: LA ALDRI BILBELTET PASSERE
I ANDRE POSISJONER ENN DE SOM ER
FIG. 19
På (fi g. 20) er det vist noen eksempler på installering som ikke er korrekt.
For å installere barnesetet uten base i bilen, gjør
følgende:
1. senk stabiliseringslåsepinnen. (fi g. 21)
1. sett barnesetet på det utvalgte bilsetet
3. dr a i sikker hetsbe ltet på bilen og hek t det fast
i den tilsvarende spennen, ved å la den
horisontale delen på beltet passere i de to
bestemte sporene på barnesetet (fi g. 22);
4. Ta tak i det diagonale beltet på bilen og la det
passere i det bestemte sporet som sitter på baksiden av rygglenet på barnesetet fi g. 23
5. Stram b eltet så mye som mul ig rundt barn esetet
uten å la for mye beltebånd være til overs, og
forsikre deg om at det ikke er vridd. ADVARSEL:
DIAGONALBELTET I BILEN MÅ ALLTID VÆRE I PO SI SJO N SO M V IST PÅ FI G. 24 U ND ER T RA NSP ORT :
BRUK ALDRI BARNESETET UTEN Å LA BELTET
PASSERE I DET BESTEMTE SPORET: DETTE KAN
KOMPROMITTERE SIKKERHETEN ALVORLIG.
6. Sett håndtaket i “A” (fi g. 10)
7. Åpne bilbeltet ved å trykke på spennen, dra ut
beltet fr a det diagonale s poret og fra det h orisontale som sitter på barnesetet for å ta barnesetet
av bilsetet.
Sett håndtaket tilbake i posisjon “B” (fi g. 10).
75
VIST PÅ
INSTALLERING UTEN BASE
Page 76

På fi g. 25 er det vist noen eksempler på installering
som ikke er korrekt.
For å ta barnesetet av basen: gjenta de forrige
operasjonene i motsatt rekkefølge: dra
diagonalbeltet ut av sporet på rygglenet, sett
håndtaket tilbake i posisjon “B” (fi g. 10),
hekt av barnesetet ved å dr a i det bestemte håndtaket og samtidig løfte selve barnesetet
med hjelp av håndtaket.
Barnesetet er utstyr t med solkalesje for å beskytte
barnet mot sol og vind.
Man hekter den lett på og av barnesetet med
to bestemte bajonettskjøter og kan bøyes etter
behag. (fi g. 26)
Når det ik ke blir bruk t i bilen, kan bar nesetet bru kes
som gy ngestol ell er liggest ol. For at den sk al gynge,
sett in n stabiliseri ngslåsepinn en igjen (fi g. 15) og
sett håndtaket i posisjon “B”. (fi g. 10)
Dra ut stabiliseringslåsepinnen (fi g. 21) og sett
hendelen i posisjon “D” (fi g. 10) for å bruke det
på fast posisjon.
Bruk som liggestol er ikke tilrådelig for barn som
allerede kan reise seg opp av seg selv (fra ca. 6
måneder eller som veier 9 kg).
Steng alltid beltene for å unngå risiko for fall.
La aldri barnet være ubevok tet.
Det er farklig å bruke barnesetet på opphøyde
eller skrå overfl ater.
ADARSEL: Før man bærer barnesetet, sett alltid
tilbake og blokker hendelen i vertikal posisjon
“B” (fi g. 10)
ADVARSEL! For b ruk sammen me d sports vognen
henvises det til instruksjoner for sportsvognen
De nye CHICCO sportsvogner er ut styrt med
CLIK CLAK system som har armlener med spesielle anordninger som tillater fastsetting av barnesetet direkte på sportsvognen uten å bruke
andre tilbehør.
• åpne sportsvognen ved å følge instruksjonene
• t a tak i barnese tet med håndtaket o g sett det på
• dra ut de to hekte pinnene fra fra håndtaket ved
BRUK AV SOLKALESJE
FAST ELLER GYNGENDE POSISJON PÅ
i håndboken.
sportsvognen som vist på (fi g. 27).
å dra og vri de to knottene for hekting til spor-
BARNESETET
(BRUKT SOM LIGGESTOL)
VERSJON BARNESETE FOR BIL
+ SPORTSVOGN
tsvognen (fi g. 28)
• vri håndtaket ved å bruke de nedre tastene helt
til det er parallelt med armlenene og helt til de
to låsepinnene blokkerer seg innvendig (trykk ned
fotenden på barnesetet for å blokkere håndtaket
i korrekt posisjon).
- for å hekte av barnesetet på sportsvognen,
rekker det med å trykke på de to røde tastene som
sitter på håndtaket som vist på (fi g. 29)
• løft håndtaket ved å vri det, trykk inn de to låsepinnene som er dradd ut på punkt D og ta
barnesetet av sportsvognen
MERK: fa sthektin g og avhektin g av barneset et kan
gjøres selv med barnet i barnesetet; med vekten av
barne t, kan disse ope rasjonene v ære vanskelige re.
Man anbef aler forsik tighet ved å utfø re operasjo nene som nevnt ovenfor i dette tilfellet.
AVTAKBART FÔR/VASKING
• For å vaske fô ret på barnese tet, åpne belten e og
dra av fôret etter å ha dradd ut de to m etallholderne (fi g. 30) Følg nøye vaskeinstruksjonene
som sitter på selve fôret ved vasking.
• Belte, spe nne og deler av pla st må kun reng jøres
med en fuktig klut. Bruk ikke oppløsninger eller
blekingsmiddel som kan skade dem og gjøre
dem usikre.
1. Barnesetet må installeres ved å følge
skrupuløst instruksjonene som følger med.
2. La aldr i barnet være ub evoktet i barn esetet
av et hviklet som hel st motiv.
3. La ikke bilbeltet passere i andre posisjoner
enn de so m er indikert i dis se instruk sjonene:
dere kompromitterer barnets sikkerhet (eksemple r på installeri ng som ikke er korre kt er
vist på fi g. 20 og 25.
4. Installer barnesetet kun på seter som er
korrekt festet til strukturen på bilen og som
peker for over i bilen. Vær fors iktig og la bø yde
eller dreibare bilseter være godt fastsatt. I
tilfelle ulykker kan de utgjøre en fare.
5. Vær forsiktig med hvordan du installer
ba rnes etet i bil en så nn at du un ngår a t bev egelige sete r eller at bildøre n kommer i kontak t
med dette.
6. Adva rsel: det te bilsetet må IK KE brukes i no e
tilfelle med 2-punkts bilbelte for festing.
7. Ko nt rol le r al lt id a t ik ke b ar ne t åp ne r sp en nen
på sikkerhetsbeltet.
8. Ved bruk m ed base, kontro ller alltid at ba sen
er korrekt festet til bilsetet.
76
AV BARNESETET
MERKNADER: MÅ LESES
FØR REISEN :
Page 77

9. D et må ik ke gj øres noen modi fi sering eller
ekstra utstyr på produktet uiten godkjennelse
av produsenten. Ikke sett på tilbehør, reservedeler eller komponenter so m ikke er levert
av produsenten. Produsenten er fritatt for alt
ansvar ved eventuelle modifi seringer som er
gjort på produktene.
10. Bytt ut barnesetet hvis det for et hvilket
som helst motiv skulle vise seg være skadet,
deformert eller meget slitt: det er mulig at
det ikke har de opprinnelige sikkerhetskarakteristikkene mere.
11. Fôret kan kun by ttes ut med et an net som
er godkjent av produsenten, siden det er en
integrert del av barnesetet for bil. Barnesetet
for bil må aldri brukes uten fôr.
12. Kontroller at beltebåndet ikke er vridd.
Unngå at sis tnevnte eller d eler av barnese tet
blir klemt mellom dørene eller gnisser mot
skarp e punkter. Erstat t det hvis det er sk år på
beltet eller hvis det er øyensynlig frynset.
13. Kontroller at både sikkerhetsbeltet for
barnet og at 3-punktsbeltet på bilen er korrekt s trammet for å gar antere en maks imum
beskyttel se av barnet.
14. Ikke bruk produktet hvis noen deler skulle
være ødelagte eller mangler. Det kan være
farlig.
15. Etter en ulykke, selv liten, kan barnesetet
og beltet få s kader som ik ke kan ses med blot te
øye. Man anbefaler å bytte dem ut.
16 . Ko ntr oll er at d et i kke bli r tr an spo rt er t lø se
gjenstander i bilen, særskilt på hyllen bak i bilen
som kan skade passasjerene i tilfelle ulykke.
17. Ko nt rol le r at all e pa ss as jer en e i bi le n br uke r
sikkerhetsbelte, for sin egen sikkerhet og for
ikke å støte barnet alvorlig i tilfelle ulykke.
18. Hvis bilen har stått i solen under en lengre periode, må setet undersøkes nøye før
du setter barnet i det; noen deler kan være
overopphetede: la det kjølne.
19. Gjør ofte p auser under la nge reiser, barnet
blir fort slitent. Ta aldri ut barnet av barnesetet
av noen so m helst slag s grunn mens bi len er i
rørelse. H vis bar net må stelles, fi nn en sikker
plass og kjør til siden.
20. Bruk ikke brukte bilseter. De kan ha vært
utsatt for meget farlige strukturelle skader
som ikke kan ses med blotte øye.
21. For tidlig fødte barn: som er født før 37
svangerskapsuker kan være uts att for risiko i
barne setet. Diss e nyfødte kan ha p ustevanske ligheter mens de sitter i barnesete for bil. Vi
råder til å henvende dere til deres doktor eller
sykehuspersonale sånn at de kan undersøke
barnet og anbefale hvilket barnesete for bil
eller barnevognkurv for bil som er egnet før
dere kommer ut fra sykehuset.
22. Barnesetet kan ogs å anvendes som tr anspor tmiddel eller l iggestol se lv utenfor bilen.
Se tt ikk e ba rn es ete t på hø ye o ve rfl ater utenfor
bilen som b ord, arbeid sfl ater, senger os v., eller
på ujevne ustabile fl ater for å unngå f all. Bruk
alltid sikkerhetsbeltene.
23. Stoffet p å barnesete t er ikke vanntet t; man
råder derfor til å bruke Chicco tilbehør mot
regn når man bruker sportsvognen
24. Hold pla stposer lang t fra barn for å u nngå
risiko for kvelning.
25. Disse i nstruksj onene må oppbe vares nøye
og være lett tilgjengelige.
26. Firm a ARTSANA fras ier seg et hver t ansvar
ved uegnet bruk av produktet.
For nærmere opplysninger og etterspørsel
etter reservedeler, kontakt Artsana kundeservice :
ARTSANA SPA
via Saldarini Catelli 1
22070 Grandate COMO - ITALY
Kundeservice 0039 031 382000
fax 0039 031 382500
www.chicco.com
77
Page 78

S
AUTO-FIX
BESTÅNDSDEL AR : (Fig. A, B, C, D)
1. Bas
2. Skal
3. Handtag
4. Handtag för lossning
5. Klädsel
6. Komfortkudde
7. S ols kyd d
8. Koppling för solskydd
9. Bältesstyrning för bilens axelbälte (diagonalt
bälte)
10. Bältesstyrningar för bilens höftbälte (hori-
sontalt bälte) på basdelen
10A. Bältesstyrningar för bilens höftbälte (hori-
sontalt bälte) på barnstolen
11. Justeringsbälte
12. Bältenas bälteslås
13. Bälteslåsets låstungor
13A. Tryckknapp för bälteslåsets öppning
14. Knapp för justering av b ältena (under ty gplö-
sen)
15. Bälten
16. Vadderingar för bältena (om de ingår)
17. Slitsar för bältenas genomgång
18. Tryckknappar för handtaget s lutning
19. Ratt för fastsättning på sittvagnen
20. Tryckknapp för lossning från sittvagnen
21. Positioneringsstång
22. Spärr för gungfunktion
23. Etikett för godkännande
24. Etikett för tvättråd med och utan basdel
MYCKET VIKTIGT! SKA
LÄSAS FÖRE ANVÄNDNING
• Läs noga hela bruksanvisningen innan produk-
ten används.
• Följ noga instruktionerna för montering och
installation av produkten. Undvik att någon
använder produkten utan att ha läst instruktionerna.
• Bevara denna bruksanvisning för framtida
bruk.
• Enligt olycksstatistiken är bilens bak säte säkra-
re än framsätet och är alltså att föredra för installationen av barnstolen.
• VARNING! YT TERST FARLIGT! Använd inte
barnstolen på ett framsäte som är försett
med krockkudde framtill. Det är endast möjligt att installera barnstolen på framsätet om
krock kudden framt ill har satts ur f unktion: kon trollera med bilfi rman eller i bruk sanvisningen
för Din bil om möjligheten att sätta krockkudden ur funktion.
• Om barnstolen placeras på framsätet (endast
om det inte fi nns någon krockkudde framtill
eller om krockkudden har satts ur funktion),
råder vi Dig att skjuta sätet bakåt så långt det
går, förenligt med närvaron av andra passagerare på baksätet.
• Använd inte barnstolen på säten som är vända
sidlede s eller i motsat t riktning i förhållande till
körriktningen.
• Spänn inte fast barnstolen på ett bilsäte som
endast är försett med höftbälte (2-punktsbälte).
• Ingen barnstol kan garantera total säkerhet för
barne t i händelse av en o lycka, men anvä ndningen av denna produkt minskar olycksrisken och
dödsrisken för barnet.
• En ej korrekt användning av produkten ökar
risken för att barnet kan skadas allvarligt, inte
endast i händelse av en olycka, utan även i andra situationer: kontrollera alltid att bar nstolen
är korrekts fastspänd på bilsätet.
• Om barnstolen skulle vara skadad, ha deformerats eller vara starkt sliten, ska den ersättas
efters om detta kan medföra att den inte längre
har sina ursprungliga säkerhetsegenskaper.
• Ingen ändring eller tillsats får göras på produkten, utan tillverkarens godkännande. Använd
endast de tillbehör, reser vdelar eller komponenter som levereras av tillverkaren.
• Lämna aldrig barnet utan tillsyn i barnstolen.
• För att undvika risk för fall skall barnet fastspännas vid barnstolen även under transport
för hand.
• Utanför bile n ska barnsto len inte sättas p å höga
ytor.
• Lämna inte barnstolen på bilsätet utan att den
är fastspänd, eftersom den skulle kunna stöta
till och skada passagerarna.
• Lägg inte någonting, som inte är ett tillbehör
som är godkänt för produkten, dels mellan bilsätet och barnstolen, dels mellan barnstolen
och barnet: i händelse av en olycka kan detta
medföra att barnstolen inte fungerar korrekt.
• Om bilen lämnas i solen under en längre tid,
råder vi Dig att täcka över barnstolen.
• Till följd av en olycka, även en lätt olycka, kan
barnstolen utsättas för skador som inte är
synliga med blotta ögat: det är därför nödvändigt att i vilket fall som helst byta ut den.
• Innan barnstolen transp orteras för han d ska Du
försäkra Dig om att barnet är fastspänt med
bältena och att handtaget är korrekt låst i det
vertikala läget.
• För transporten av barnstolen i kombination
med sittvagnen, får denna barnstol endast användas m ed Chicco -sitt vagnar som är fö rsedda
med de avsedda fastsättningssystemen.
• Innan barnet transporteras med barnstolen i
kombination med sittvagnen, ska Du försäkra
78
Page 79

Dig om att den är korrekt fastsatt.
• Använd inte barnstolar s om köpts i andra hand.
De kan ha utsatts för mycket farliga skador på
struk turen som inte är synliga med blotta ögat,
men som kan äventyra produktens säkerhet.
• Företaget Artsana avsäger sig allt ansvar för en
oriktig användning av produkten.
ANVÄNDNINGSINSTRUKTIONER
PRODUKTENS EGENSKAPER
Barnstolen är, både i versionen med endast barnstol och i versionen med barnstol med bas, godkänd för “Grupp 0+”, . Detta innebär att den är
godkänd för transport av barn i bil från födseln
upp till en kroppsvikt på 13 Kg.
Godkännandet är av “universal” typ och således
kan barnstolen användas på alla bilmodeller.
VARNING! “Universal” innebär att den är kompatibel med de fl esta bilsittplatser, men inte
med alla.
VIKTIGT MEDDELANDE
1. Detta är en “Universal” fastspänningsanordning för barn som är godkänd enligt
Standard N°44, rev. serie 04. Den är lämplig
för allmän användning i fordon och är kompatibel med de fl esta bilsittplatser, men inte
med alla.
2. Det är lättare att erhålla en perfekt kompatibilitet i de fall när fordonets tillverkare
uppger i fordonets handbok att fordonet är
förberett för montering av “Universala” fastspännings-anordningar för den aktuella
åldern.
3. Denna fastspänningsanordning har klassifi cerats “Universal” enligt kriterier för godkännande som är strängare i förhållande
till föregående modeller.
4. Den är endast lämplig för användning i
fordon som är försedda med 3 -punktsbälte
som är statiskt eller försett med upprullningsautomatik och godkänt enligt Standarden
UN/ECE Nr. 16 eller andra motsvarande
standarder.
5. I händelse av tvivel, kontakta tillverkaren
för fastspänningsanordningen eller återförsäljaren.
Barnstolen kan även användas utanför bilen,
på ett kombinerat sätt med sittvagn, eller som
vilstol.
BEGRÄSNINGAR VID ANVÄNDNING
VARNING! Respektera noga följande begränsningar vid användning av produkten: i motsatt
fall garanteras inte säkerheten.
1. Barnets kroppsvikt får inte överskrida 13 Kg.
2. Använd inte barnstolen på ett framsäte som
är försett med krockkudde framtill, utan endast
om krockkudden framtill har satts ur funktion:
kontrollera med bilfi rman eller i bruksanvisningen för Din bil beträffande möjligheten att sätta
krockkudden ur funktion.
3. Använd inte komfortkudden om barnets kroppsvikt överskrider 6 Kg.
NÖDVÄNDIGA KRAV PÅ BILSÄTET OCH PÅ
Barnstolen kan monteras på sittplatsen bredvid
föraren eller helst baksätet, men med följande
begränsningar: bilsätet ska vara:
• vänt i körriktningen (fi gur 1)
förset t med ett 3 -pun ktsbälte som ä r statiskt eller försedd med upprullningsautomatik (fi gur 2)
Det rekommenderas att alltid installera barnstolen på bilens baksäte.
VARNING! YTTERST FARLIGT! Använd inte
barnstolen på ett framsäte som är försett med
krockkudde framtill.
VARNING! Installera inte barnstolen på ett bilsäte som endast är försett med höftbälte (fi gur
2A)
OBSERVER A! Bältena ska alltid anpassas till barnets längd.
Innan barnstolen monteras i bilen, skall man justera bältena för barnets fasthållning i den korrekta höjden.
Den korrekta höjden för bältena är något under
barnets axlar (fi gur 3). Barnstolen är försedd
med 3 höjdlägen (fi gur 4)
Barnstolen är försedd med en komfortkudde
som garanterar att barnet innesluts på ett korrekt sä tt och att läge t för hals och r ygg är korrek t
från födseln upp till en kroppsvikt på 6 Kg.
För att installera komfor tkudden ska Du kontrollera att bältena är införda i den understa slit sen.
VARNING : det är det enda läget som är tillåtet
vid användningen av komfortkudden (fi gur 5)
Obser vera : för att gar antera att prod uktens maximala säkerhet ska komfortkudden tas bort när
barnet har uppnått en kroppsvikt på 6 Kg.
För att fl ytta bältena förfar Du på följande sätt:
• öppna bälteslåset genom att trycka på den
röda knappen (fi gur 6)
• dra ut bälte na bakifrån oc h för in dem i den sli ts
som lämpar sig bäst för barnets höjd
(fi gur 7A och 7B).
OBSERVERA! Kontrollera att bältena hela tiden
löper mellan positioneringsstången och skalet.
Bältena ska alltid vara korrekt spända:
79
SÄKERHETSBÄLTET
JUSTERING AV BÄLTENAS LÄGEN
Page 80

PLACERING AV BARNET
1. lyf t tygplöse n, håll juster ingsknappen intryckt
och dra barnstolens bälten så att de blir slaka
(fi gur 8)
2. öppna bälteslåset genom att trycka på den
röda knappen, (fi gur 6)
3. sätt barnet i barnstolen
4. lägg bälteslåsets låstungor ovanpå varandra,
fi gur 6A
5. för in de två låstungorna i bälteslåset tills det
hörs ett ”klick”. (fi gur 6B) VARN ING : för aldrig in
endast en låstunga i bälteslåset
6. spän n barnets säke rhetsbälten g enom att dra i
det avsedda justeringsbältet i mitten (fi gur 9)
VARNING: bältena ska vara sträckta, men inte
för mycket. Om Du kan föra in ett par fi ngrar
mellan bältet och barnets kropp betyder det att
bältena har sträckts på ett korrekt sätt.
Barnstolens handtag kan regleras i 4 lägen (fi gur
10):
A. Läge vid transport i bil (VARNING: detta är
det enda läget som är tillåtet under transport i
bil).
B. Läge vid transport för hand.
C. Läge vid gungfunktion eller läge för fastsättning på Chicco -sittvagn som är försedd med de
avsedda fastsättningssystemen.
D. Fast läge.
För att utföra regleringen trycker Du samtidigt
på knapparna på handtaget (fi gur 11), vrider
handtaget till det valda läget tills Du hör ett
”klick”.
INSTALLATION AV BARNSSTOLEN I BILEN
Läs noga avs nittet : NÖDVÄND IGA KR AV PÅ BILBARNSTOLEN OCH PÅ SÄKERHETSBÄLTET.
Barnstolen, både i versionen med basdel och
i versionen utan basdel, får endast installeras
i motsatt riktning i förhållande till körriktningen. VARNING! YTTERST FARLIGT: SÄTT ALDRIG BARNSTOLEN PÅ EN SITTPLATS MED
KROCKKUDDE, om denna inte har satts ur
funktion.
VARNING! Installera aldrig barnstolen på en sittplats som endast är försedd med höftbälte.
För att installera barnstolen med basdelen på
sittplatsen förfar Du på följande sätt:
1. lossa barnstolen från basdelen genom att dra
det särskilda handtaget för lossning (fi g.12) och
lyft samtidigt.
I BARNSTOLEN
REGLERING AV BARNSTOLENS
HANDTAG
INSTALLATION I BIL AV
BARNSTOLEN MED BASDELEN:
2. placera basdelen på den sittplats som valts
för installationen, rikta den såsom visas i fi gur,
och se här vid till att den kommer i beröring med
bilsätets rygg.
3. dra bilens säkerhetsbälte och haka fast det
på det överensstämmande bälteslåset, genom
att låta höftbältet löpa genom de två särskilda
bältesstyrningar (fi gur 14)
4. innan barnstolen sätts fast på basdelen skall
Du kontrollera at t spärren för gungfunktionen är
stängd (fi gur 15).
5. sätt barnstolen på basdelen (vänd i motsatt
riktn ing i förhålland e till körriktningen) oc h tryck
den nedåt tills inkopplingen sker (det hörs ett
“klick” när den kopplas fast i läge) (fi gur 16).
6. kontrollera att barnstolen har fastkopplats
korrekt genom att försöka att lyfta den både
från den främre och den bakre sidan.
7. grip tag i bilens axelbälte och låt det löpa ge-
nom den särski lda bältessty rningen som fi nns på
baksidan av barnstolens rygg (fi gur 17)
VARNING: BILENS AXELBÄLTE SK ALL ALLTID
VARA I LÄGE T SOM INDIKERA S I FIGUR 18: ANVÄND ALDRIG BARNSTOLEN UTAN ATT LÅTA
BÄLTET LÖPA I DEN AVSEDDA BÄLTESSTYRNINGEN, EFTERSOM DETTA ALLVARLIGT SKULLE
KUNNA ÄVENTYRA SÄKERHETEN.
8. Spän n bältet så mycket so m möjligt runt ba rn-
stolen, utan att lämna något bandöverskott och
försäkra Dig om att det inte har snott sig
9. sätt greppet i “A” (fi gur 10)
För att ta bort barnstolen från basdelen:
dra ut axelbandet från bältesstyrningen på ryggen och fl ytta tillbaks handgreppet i läget “B”
(fi g. 10), lossa barnstolen genom att dra i det
särskilda handtaget och lyft samtidigt barnstolen med hjälp av handgreppet.
VARNING! Efter varje installation skall Du ALLTID kontrollera att bilens bälte har en korrekt
sträckning och att bälteslåset inte tvingar ut
bältet från de avpassade bältesstyrningarna på
basdelen. Kontrollera dessutom att bälteslåset
inte kommer i beröring med bältesstyrningarna.
VARNING: LÅT INTE BILENS BÄLTE LÖPA I ANDRA LÄGEN ÄN DE SOM INDIKERAS I FIGUR
19
I fi g. 20 visas några exempel på oriktig installation.
INSTALLATION I BIL AV
BARNSTOLEN UTAN BASDELEN
För att installera barnstolen utan basdel i bilen
förfar Du på följande sätt:
1. sänk spärren för gungfunktionen. (fi gur 21),
80
Page 81

2. placera barnstolen på den sittplat s i bilen som
valts för monteringen,
3. dra i bilens säkerhetsbälte och haka fast det
i det överensstämmande bälteslåset, genom att
låta höftdelen av bältet (den horisontala delen)
löpa genom de två särskilda bältesstyrningarna
på barnstolen (fi gur 22),
4. grip tag i bilbältets axeldel (den diagonala delen) och låt det löpa i bältesstyrningen som är
belägen på barnstolens rygg fi gur 23,
5. spänn b ältet så mycket som möj ligt runt barn stolen, utan att lämna något bandöverskott och
försäkra Dig om att det inte har snott sig. VARNING: BILENS AXELBÄLTE SKALL ALLTID VARA
I LÄGET SOM INDIKERAS I FIGUREN. ANVÄND
ALDRIG BARNSTOLEN UTAN ATT LÅTA BÄLTET
LÖPA I DEN AVSEDDA BÄLTESST YRNINGEN,
EFTERSOM DETTA ALLVARLIGT SKULLE KUNNA
ÄVENTYRA SÄKERHETEN.
6. Sätt handgreppet i läget “A” (fi gur 10).
7. För att lossa barnstolen från sittplatsen lossar
Du bilens säkerhetsbälte genom att trycka på
bälteslåset, dra ut säkerhetsbältet från axeldelens bältesstyrning och höftdelens bältesstyrning som är belägen på barnstolen.
Flytta tillbaks handgreppet i läget “B” (fi gur 10).
I fi gur 25 visas några e xempel på felak tiga installationer.
För att t a bort barns tolen från bas delen: uppre pa
de föregående operationerna i motsatt riktning:
dra ut bilens axelbälte från bältesstyrningen på
ryggen, fl ytta tillbaks handgreppet i läget “B”
(fi gur 10), lossa barnstolen genom att dra i det
särskilda handtaget och lyft samtidigt barnstolen med hjälp av handgreppet.
HUR SOLSUFFLETTEN ANVÄNDS
Barnstolen är försedd med en suffl ett för att
skydda barnet från sol och blåst.
Den kan lätt sät tas på och tas bor t från barnstolen med hjä lp av två särsk ilda kopplingar oc h den
kan fällas efter behag. (fi gur 26)
FAST LÄGE FÖR BARNSTOLEN
ELLER LÄGE FÖR GUNGFUNKTION
(ANVÄNDNING SOM VILSTOL)
När den inte a nvänds i bilen, k an barnstolen ä ven
användas som gunga eller som vilstol. För att
erhålla gungfunktionen för Du tillbaks spärren
för gungfunktionen (fi gur 15) och sätter handtaget i läget “B”. (fi gur 10)
Om barnstolen skall användas i fast läge, dras
gungans spärranordning ut (fi gur 21) och handtaget sätts i läget “D”. (fi gur 10)
Användning som vilstol rekommenderas inte för
barn som redan kan resa sig på egen hand (upp
till cirka 6 månader eller upp till en kroppsvikt
på 9 Kg.).
För att undvika r isk för att barnet faller, skall bältena alltid spännas fast.
Lämna inte barnet utan tillsyn.
Det är farligt att använda barnstolen på höga
eller lutande ytor.
VARNING: innan barnstolen transporteras skall
handgreppet alltid sättas tillbaks och låsas i vertikalt läge “B” (fi gur 10)
VERSION BILBARNSTOL + SITTVAGN
VARNING! För användning tillsammans med
sittvagnen hänvisas till instruktioner för sittvagnen
De nya CHICCO -sittvagnarna, försedda med
CLIK CLAK - systemet, har armstöd med speciella anordningar som gör det möjligt att sätta fast
barnstolen direkt på sittvagnen, utan att behöva
använda andra tillbehör.
- öppna sittvagnen genom att följa instruktio-
nerna i sittvagnens handbok.
- grip tag i barnstolens handtag och placera den
på sittvagnen, på det sätt som visas i fi gur 27.
- dra ut de två fastsättningsstiften från handta-
get, genom att dra och vrida de två rattarna för
fastsättningen på sittvagnen (fi gur 28).
- vrid han dtaget, med hjälp av de undre k nappar-
na, tills det är parallellt med armstöden och tills
de två kopplingarna låser sig inne i armstöden
(tryck barnstolen nedåt från barnets fotsida för
att låsa handtaget i det korrekta läget).
- för att lossa barnstolen från sittvagnen är det
tillräckligt att trycka på de två röda knapparna
som sitter på handtaget, såsom visas i fi gur 29.
- lyft handtaget genom att vrida det, sätt på
nytt i de två fastsättningsstif ten som dragit s ur i
punkt D och ta bor t barnstolen från sittvagnen.
OBSERVERA: Fastsättning och borttagning kan
även utföras med barnet i barnstolen, men barnets kroppssvikt gör att det hela blir mindre lätthanterligt. Var i detta fall försiktig vid utförandet av de ovan beskrivna förfarandena.
HUR BARNSTOLENS KLÄDSEL SKALL TAS
• Om man vill tvätta barnstolens klädsel, lossas
barnstolens bälten och klädseln dras av efter
att de t vå låsen i metal l har tagits bor t från sina
säten (fi gur 30). Följ n oga de tvättr åd som visas
på etiketten som sitter på klädseln.
• Bälten, bälteslås och delar i plast skall rengöras
med en fuktig duk. Använd inte lösningsmedel
eller blekmedel som kan skada delarna.
81
AV OCH TVÄTTAS
Page 82

VARNING: SKA LÄSAS
1. Barnstolen skall installeras genom att
noga följa de instruktioner som ges.
2. Lämna aldrig barnet utan tillsyn i barnstolen.
3. Låt inte bilbältet löpa i andra lägen än de
som anges i dessa instruktioner, eftersom
detta skulle kunna riskera barnets säkerhet
(exempel på EJ korrekta installationer ges i
fi gur 20 och 25.
4. Installera endast barnstolen på sittplatser
som är korrekt fastsatta på bilens struktur
och som är vända mot fordonets främre del.
Var noga med att inte lämna fällbara eller
roterande sittplatser i bilen slarvigt inkopplade. I händelse av en olycka skulle de kunna utgöra en fara.
5. Var noga med hur Du installerar barnstolen i bilen , för att undvi ka att den kan b eröras
av en rörlig sittplats eller av bildörrren.
6. Varning: denna barnstol får INTE i något
fall användas med bilbälte med två fastsättnings-punkter.
7. Kontrollera alltid att barnet inte öppnar
säkerhetsbältets bälteslås.
8. Vid användning med basdelen, skall Du
alltid kontrollera att basdelen är korrekt fastsatt på bilsätet.
9. Ingen ändring eller tillsats får göras på
produkten som sådan, utan tillverkarens
godkännande. Eventuella ändringar som
utförts på produkten, befriar tillverkaren
från allt ansvar.
10. Om barnstolen, av vilken som helst orsak, skulle visa sig vara skadad, deformerad
eller starkt sliten skall den ersättas, eftersom detta kan medföra att den inte längre
innehar sina ursprungliga säkerhetsegenskaper.
11. Klädseln får endast ersättas med en annan kläd sel som godkänt s av tillverkaren, eftersom den utgör en del av barnstolen som
är väsentlig för helheten. Barnstolen får inte
användas utan klädseln.
12. Kontrollera att bältets band inte har
snott sig. Se till att bältets band eller delar
av barnstolen inte kläms mellan bildörrarna
eller skaver mot vassa punkter. Om bältet
är trasigt eller fransigt på ett påtagligt sätt,
skall det ersättas.
13. Kontrollera att både barnets bälte och
bilens 3 -punktsbälte har en korrekt sträckning, så att barnet garanteras maximalt
skydd.
14. Använd inte produkten om några delar
har gått sönder eller om de fattas, eftersom
FÖRE FÄRDEN:
detta skulle kunna utgöra en fara.
15. Till följd a v en olycka, även e n lätt olycka,
kan barnstolen och bältet utsatts för skador
som inte är synliga med blotta ögat. Det
rekommenderas i detta fall att byta ut dem.
16. Försäkra Dig om att inga föremål som
inte är fastsatta transporteras i bilen, särskilt på d en bakre hyllan , eftersom des sa kan
skada passagerarna i händelse av en olycka.
17. Se till att alla passagerare i fordonet
använder säkerhetsbälte, dels för sin egen
säkerhet och dels för att de, i händelse av
en olycka, skulle kunna stöta till barnet på
ett allvarlig sätt.
18. Om bilen har stått stilla i solen under en
längre tid, skall barnstolen noga inspekteras
innan Du p lacerar barnet i d en, eftersom v issa delar kan ha överhettats: låt den svalna.
19. Gör ofta uppehåll vid längre resor. Barnet blir mycket lätt trött. Inte av något skäl
får barnet tas ut barnstolen medan bilen
är i rörelse. Om barnet behöver uppmärksamhet, Skall Du hitta en säker plats att
stanna på.
20. Använd inte barnstolar som köpts i
andra hand. De skulle kunna ha utsatts för
mycket farliga skador på strukturen som
inte är synliga med blotta ögat.
21. För tidigt födda spädbarn : barn som föds
före 37 veckors graviditet kan utsättas för
risker i barnstolen. Dessa barn kan få andningssvårigheter medan de sitter i barnstolen. Vi råder Dig att kontakta Din läkare eller
sjukhuspersonal, så att de kan bedöma Ditt
barns tillstånd och rekommendera den barnstol el ler liggvag n för bilen som lämp ar sig
bäst, innan Du lämnar sjukhuset.
22. Barnstole n kan anvä ndas som trans portmedel eller som sits även utanför fordonet.
Utanför bilen får barnstolen inte sättas på
höga ytor, såsom bord, arbetsplan, sängar
etc., eller på sluttande eller ostadiga ytor,
för att undvika fall. Använd alltid säkerhetsbältena.
23. Tygerna på barnstolen är inte impregnerade. Dä rför råder vi D ig att använda C hiccos
regnskyddstillbehör.
24. Håll plastpåsarna utom räckhåll för barn,
för att undvika risk för kvävning.
25. Dessa instruktioner skall förvaras omsorgsfullt och vara lättillgängliga.
26. Företaget ARTSANA avsäger sig allt
ansvar för en oriktig användning av produkten.
82
Page 83

För ytterligare informationer och för efterfrågan om reservdelar kontakta Artsana
Kundtjänst:
ARTSANA SPA
via Saldarini Catelli 1
22070 Grandate COMO - ITALY
Kundtjänst 0039 031 382000
fax 0039 031 382500
OMSLAG
www.chicco.com
83
Page 84

PL
AUTO-FIX
Elementy składowe : (Rys. A, B, C, D)
1. Podstawa
2. Korpus
3. Uchwyt
4. Dźwigienka odczepiająca
5. Obicie
6. Poduszka komfort
7. Budka przeciwsłoneczna
8. Zaczep budki przeciwsłonecznej
9. Prowadnica poprzecznego pasa samochodowego
10. Prowadnice poziomego pasa samocho-
dowego na podstawie
10A. Prowadnice poziomego pasa samo-
chodowego na foteliku
11. Pas regulacyjny
12. Sprzączka pasów
13. Kliny sprzączki
13A. Przycisk otwierający sprzączkę
14. Przycisk do regulacji pasów (pod
materiałową osłoną)
15. Pa sy
16. Podkładki pasów (jeśli przewidziane)
17. Otwory, przez które przesuwają się
pasy
18. Przyciski regulujące stopień nachylenia
uchwytu
19. Pokrętło do zaczepu na spacerówce
20. Przycisk odczepiający od spacerówki
21. P ręt pozycyjny
22. Ogranicznik stabilizujący
23. Wszywka homologacyjna
24. Wszywka z instrukcjami montażu z
podstawą i bez podstawy
BARDZO WAŻNE! PROSZĘ
NATYCHMIAST PRZECZYTAĆ
• Przed przystą
produktu, proszę uważnie przeczytać
całą instrukcję.
• W trakcie montażu oraz instalowania
produktu, należy stosować się dokładnie
do dostarczonych instrukcji. Produkt nie
powinien być u żywany przez osoby, które
nie przeczytał y dokładnie instrukcji.
• Zachować niniejszą instrukcję na
przyszłość.
• Zgodnie ze stat ystykami o w ypadkach , tyl-
ne siedzenie s amochodowe j est bezpieczniejsze niż przednie, stąd fotelik po winien
być instalowany właśnie na nim.
• UWAGA! Niezwykle niebezpieczne! Fote-
lik ten nie powinien być nigdy stosowany
na przednim siedzeniu w yposażonym w
czołową poduszkę powietrzną. Fotelik
można zamontować na przednim siedzeniu, jeśli czołowa poduszka powietrzna
została w yłączona: sprawdzić u producenta samochodu lub w instrukcji obsługi
pieniem do użytkowania
Waszego auta, czy poduszka powietrzna
może być wyłączona.
• Jeśli fotelik umieszczany jest na prze-
dnim siedzeniu (przed którym nie ma
czołowej poduszki powietrznej lub została
ona wyłączona), zaleca się cofnąć siedzenie samochodowe jak najbardziej
do tyłu, uważając na siedzących z tyłu
pasażerów.
• Nie używać nigdy tego fotelika na siedze-
niach usta wionych poprzecznie lub tyłem
do kierunku jazdy.
• Nie zapinać nigdy fotelika na siedzeniu
samochodowym wyposażonym w pas
tylko biodrowy (dwupunktowy).
• W razie wypadku sam ochodowego, żaden
fotelik nie jest w stanie zagwarantować
dziecku całkowiteg o bezpieczeństwa, ale
jego użycie zmniejsza ryzyko obrażeń lub
śmierci dziecka.
• Nieprawidłowe użycie produktu zwiększa
ryzyko poważnych obrażeń nie t ylko w
razie w ypadku, ale również w innych
sytuacjach: sprawdzać zawsze, czy fotelik został
siedzenia.
• Jeśli fotelik został uszkodzony, zdeformowany lub mocno zużyty, należy
go wymienić: może on być pozbawiony
pierwotnych cech charakterystycznych
zapewniających jego bezpieczne
użycie.
• Produkt nie powinien być modyfi kowany
lub uzupełniany bez uprzedniej zgody
producenta. Nie stosować akcesoriów,
części zamiennych lub elementów, które
nie zostały dostarczone przez producenta.
• Nie pozostawiać nigdy z jakiegokolwiek
powodu dziecka w foteliku bez opieki.
• Aby uniknąć ryzyka upadku dziecka,
należy zapinać pasy dziecka również w
trakcie przenoszenia fotelika w ręku.
• Używając fotelik poza samochodem, niebezpieczne jest stawiać go na wysokich
powierzchniach.
• Nie pozostawiać nigdy fotelika na siedzeniu samochodow ym, jeśli nie został
on do niego zamocowany: fotelik mógłby
uderzyć lub zranić pasażerów.
• Nie kłaść niczego, o ile nie jest to element
wchodzący w skład akcesoriów zatwierdzonych dla produktu, między siedzeniem samochodowym a fotelikiem ani też
między fotelikiem a dzieckiem: w razie
wypadku fotelik mógłby funkcjonować
nieprawidłowo.
• Jeśli samochód pozostawiany jest przez
długi okres czasu na słońcu, zaleca się
przykryć fotelik.
• W wyniku nawet małego wyp adku samochodowego, fotelik może zostać uszkod-
84
prawidłowo zamocowany do
Page 85

zony w sposób n iewidoczny go łym okiem:
dlatego też należy go wymienić.
• Przed przystąpieniem do przenoszenia
fotelika w ręku, należy upewnić się, czy
dziecko ma zapięt e pa sy o raz c zy u chw yt
został prawidłowo za blokowany w poz ycji
pionowej.
• Użycie tego fotelika w połączeniu ze
spacerówką dozwolone jest tylko i
wyłącznie na wózkach spacerowych
CHICCO wyposażonych w odpowiedni
system zaczepowy.
• Używając fotelika w połączeniu ze
spacerówką, przed umieszczeniem w nim
dziecka, należy upewnić się, czy zosta ł on
prawidłowo umocowany.
• Nie stosować fotelików używanych:
ich struktura może być uszkodzona w
sposób niewidoczny gołym okiem, lecz
uniemożlwiający bezpieczne użycie pro-
duktu.
• Spółka ARTSANA uchyla się od
jakiejkolwiek odpowiedzialnoś
nieprawidłowego użycia produktu.
INSTRUKCJE SPOSOBU UŻYCIA
Charakterystyka produktu
Fotelik, zarówno w wersji t ylko fotelik jak i
w wersji z podstawą, posiada homologację
dla “Grupy 0+”, jest więc zatwierdzony do
przewozu w samochodzie dzieci o wadze
do 13 kg, w tym noworodków.
Homologacja jest z rodzaju “universal”, co
oznacza, że fotelik może być stosowany we
wszystkich typach samochodów.
UWAGA! “Universal” oznacza, że produkt
jest przystosowany do większości, lecz nie
wszystkich siedzeń samochodowych.
WAŻNA INFORMACJA
1. Jest to „Uniwersalny” przyrząd
zabezpieczająco - przytrzymujący
stosowany dla dzieci, posiadający
homologację zgodnie z Przepisem Nr
44 oraz poprawkami z serii 04. Nadaje się on do ogólnego zastosowania
w samochodach i przystosowany jest
do większości - lecz nie wszystkich siedzeń samochodowych.
2. Dokładne przystosowanie jest łatwo
osiągalne wówczas, kiedy producent
samochodu oświadcza w podręczniku
pojazdu, iż w samochodzie przewid-
ziane jest instalowanie “Uniwersalnych” dziecięcych przyrządów
zabezpieczająco - przytrzymujących
dla danej grupy wiekowej.
3. Niniejsz y przyrząd zabezpi eczająco przytrzymujący został
jako “Uni wersalny” zgo dnie z ofi cjalnymi
kryteriami homologacyjnymi znacznie
ci w razie
zakwalifi kowany
bardziej wymagającymi w stosunku do
kryteriów popr zednich modeli, które nie
przytaczają niniejszej informacji.
4. Może on być stosowany tylko i
wyłącznie w pojazdach wyposa żonych
w trzypunktowy pas bezpieczeństwa,
statyczny lub bezwładnościowy,
posiadający homologację zgodnie z
Przepisem UN / ECE Nr 16 lub innymi
równorzędnymi standardami.
5. W razie wątpliwości, należy
skontaktować się z producentem niniejszego przyrządu zabezpieczająco
- przy trzymującego lub z jego
sprzedawcą.
Fotelik może być używany również poza
pojazdem, w połączeniu z wózkiem spacerow ym lub też jako leżaczek.
OGRANICZENIA
DOTYCZĄCE UŻYCIA
UWAGA! Przestrzegać dokładnie poniższych
ograniczeń dotyczących użycia produktu:
w przeciwnym w ypadku nie gwarantuje się
bezpieczeństwa.
Ciężar dziecka nie powinien przekraczać
13 kg.
Fotelik ten nie powinien być nigdy stosowany
na przednim siedzeniu wyposażonym w
czołową poduszkę powietrzną. Instalowa nie
fotelika na przednim siedzeniu możliwe jest
jeśli czołowa poduszka powietrzna może
być wyłączona: sprawdzić u producenta sa-
mochodu lub w instrukcji obsługi Waszego
auta, czy poduszka powietrzna może być
wyłączona.
Nie używać nigdy poduszki komfort, jeśli
dziecko waży ponad 6 kg.
WARUNKI, JAKIE powinno koniecznie
spełniać siedzenie samochodowe oraz pa s
bezpieczeństwa
Fotelik może być instalowany na przednim
siedzeniu pa sażerskim lub na jakimkolwiek
tylnym siedzeniu pod warunkiem, że siedzenie to:
ustawione jest przodem do kierunku jazdy
(rys.1)
- posiada tr zypunkto wy pas bez pieczeństwa,
statyczny lub bezwładnościowy (r ys.2).
Zaleca się instalować zawsze fotelik na tyl-
nym siedzeniu samochodowym.
UWAGA! Niezwykle niebezpieczne! Fotelik ten nie powinien by
na przednim siedzeniu wyposażonym w
czołową poduszkę powietrzną, której nie
można wyłączyć!
UWAGA! Nie instalować nigdy fotelika na
siedzeniu samochodowym wyposażonym
w pas tylko biodrowy (rys. 2A)
85
ć nigdy stosowany
Page 86

REGULACJA POZYCJI PASÓW
UWAGA! Pasy powinny być zawsze przystosowane do wzrostu dziecka.
Przed przystąpieniem do instalowania fotelika w samochodzie, należy
wyregulować na odpowiedniej wysokości
pasy bezpieczeństwa dziecka.
Wysokość pasów jest prawidłowa, jeśli
znajdują się one lekko poniżej poziomu r amion (r ys. 3). Fotelik pr zewiduje 3 wy sokości
pasów (rys. 4).
Fotelik posiada poduszkę komfor t, która
gwarantuje noworodkowi oraz niemowlętom
o wadze do 6 kg prawidłowe przytrzymanie
oraz idealną pozycję szyi i pleców.
Aby zainstalować poduszkę ko mfort, na leży
sprawdzić, czy pasy zostały przeciągnięte
przez najniższy otwór. UWAGA: jest to jedyna poz ycja dozwolona w wyp adku użycia
poduszki komfort (rys. 5)
Uwaga : aby zagwarantować maksymalne
bezpieczeństwo produktu, należy usunąć
poduszkę komfor t jeśli dziecko waży po-
nad 6 kg.
Aby zmienić pozycję pasów, należy wykonać
następuj
ące czynności:
wciskając czerwony przycisk, odpiąć
sprzączkę (rys. 6)
wysunąć od tyłu pasy i wsunąć je do o tw oru
najbardziej przystosowanego do wzrostu
dziecka (r ys. 7A i 7B).
UWAGA! Upewnić się, czy pasy przesuwają
się zawsze między prętem pozycjnym a
korpusem.
Pasy powinny być zawsze prawidłowo
naprężone.
Umieszczanie dziecka
unieść osłonę z materiału i wciskając przycisk regulacyjny pociągnąć pasy fotelika
tak, aby je poluzować (rys. 8)
wciskając czerwony przycisk, odpiąć
sprzączkę; (rysunek 6)
umieścić dziecko w foteliku
nałożyć na siebie dwa kliny sprzączki (rys.
6A)
wsunąć obydwa kliny sprzączki, aż do kiedy
da się usłyszeć
(rys. 6B). UWAGA: nie wsuwać nigdy tylko
jednego klina do sprzączki.
ciągnąc centralny p as regulacyj ny, naprężyć
pasy bezpieczeństwa dziecka (rys.9)
UWAGA: pasy powinny być naprężone, ale
bez przesady. Jeśli możecie wsunąć palce
między pas a ciało dziecka, oznacza to, że
zostały one naprężone prawidłowo.
Pozycje uchwytu fotelika
Uchwyt fotelika daje się regulować i może
on być ustawiony w czterech pozycjach
charakterystyczny “click”
(rys. 10):
A. Pozycja w trakcie jazdy samochodem
(UWAGA: jest to jedyna pozycja dozwolona
podczas przewozu w samochodzie).
B. Pozycja w trakcie przenoszenia w ręku.
C. Pozycja bujanego leżaczka lub pozycja
do montażu na przystosowanej do tego
spacerówce Chicco.
D. Pozycja nieruchomego leżaczka.
Aby wyregulować pozycję uchwytu, należy
wcisnąć jednocześnie znajdujące się na nim
przy ciski (rys. 11) i ustaw ić uchwyt w wybra-
ne j po zy cji , do mo men tu, gd y da się usłyszeć
charakterystyczny odgłos blokady.
INSTALOWANIE FOTELIKA
Przeczyta
powinno koniecznie spełniać siedzenie samochodowe oraz pas bezpieczeństwa.
Fotelik, zarówno w wersji z podstawą jak
i bez niej, powinien być instalowany t ylko
tyłem do kierunku jazdy. UWAGA! Niezwykle
niebezpieczne: nie instalować na siedzeniach wyposażonych w poduszkę powietrzną,
chyba, że została ona wyłączona.
UWAGA! Nie instalować nigdy fotelika na
siedzeniu w yposażonym t ylko w pas biodrowy.
Aby zainstalować na siedzeniu samochodowym fotelik z podst awą, należy wy konać
następujące czynności:
odczepić fotelik od podstawy ciągnąc
do góry dźwigienkę zaczepową (rys. 12)
i jednocześnie unieść go przy pomocy
uchwytu
umieścić podstawę na wybranym siedzeniu
w kierunku przedstawionym na rysunku 13
oraz tak, aby stykała się ona z oparciem
siedzenia samochodowego
pociągnąć samochodowy pas
bezpieczeńst wa i zaczepić go o odpowiednią
sprzączkę, przeciągając poziomą część pasa
przez dwie specjalne prowadnice (rys.14)
przed umieszczeniem fotelika na podstawie,
należy sprawdzić czy został zablokowany
ogranicznik stabilizujący (rys. 15)
umieścić fotelik na podstawie (skierowany
tyłem do kierunku jazdy) dociskając go
do dołu tak aby zaczepił się w niej (da się
usłyszeć charakterystyczny dźwięk zaczepu) (rys. 16)
sprawdzić, czy fotelik został prawidłowo
zaczepi ony w podstawi e próbując go unieść
zarówno od strony przedniej jak i tylnej
chwycić poprzeczny pas samochodowy i
przesunąć go przez specjalną prowadnicę
znajdującą się z tyłu oparcia fotelika (rys.
17).
86
W SAMOCHODZIE
ć uważnie paragraf: Warunki jakiE
INSTALOWANIE Z PODSTAWĄ
Page 87

UWAGA: po dczas jazdy poprzec zny pas samochodowy powinien zawsze znajdować się
w pozycji pokazanej na rys. 18: nie należy
nigdy używać fotelika, Jeśli pas nie został
uprzednio przeciągnięty przez specjalną
prowadnicę: mogłoby to okazać się niebezpieczne.
naprężyć jak najba rdziej pas wokół fotelika,
nie pozostawiając nadmiaru t aśmy i upewnić
się, czy nie jest on zaplątany
ustawić uchw yt w pozycji “A” (rys. 10)
Aby odczepić fotelik od podstawy:
wysunąć pas poprzeczny ze znajdującej
się na oparciu prowadnicy, ustawić
uchwyt w pozycji “B” (rys. 10), odczepić
fotelik pociągając specjalną dźwigienkę i
jednocześnie unieść fotelik przy pomocy
uchwytu.
UWAGA! Po zainstalow an iu fotelika nal eży
ZAWSZE sprawdzić, czy samochodowy pas
bezpieczeństwa jest praw idłowo napr
oraz czy jego sprzączka nie powoduje
wysunięcia się pasa z odpowiednich prowa-
dnic na podstawie i czy nie styka się ona z
tymi prowadnicami.
UWAGA: Nie przeciągać nigdy samochodowego pasa bezpieczeństwa w pozycjach
niezgodnych ze wskazanymi na rys. 19.
Na rys. 20 przedstawiono niektóre prz ykłady
nieprawidłowego zainstalowania.
INSTALOWANIE BEZ PODSTAWY
Aby zainstalować w samochodzie fotelik
bez podstawy, należy wykona ć następujące
czynności:
opuścić ogranicznik stabilizujący (r ys. 21)
umieścić fotelik na wybranym siedzeniu
samochodowym
pociągnąć samochodowy pas
bezpieczeństwa i wpiąć go w odpowiednią
sprzączkę, przeciągając poziomą część pasa
przez dwie specjalne prowadnice fotelika
(rys. 22);
uchwycić poprzeczny, samochodowy pas
bezpieczeństwa i przeciągnąć go przez
specjalną prowadnicę znajdującą się z t yłu
oparcia fotelika rys.23
naprężyć jak najbardziej pas wokół fotelika
nie pozostawiając nadmiaru pasa i upewnić
się, czy nie jest on zaplątany. UWAGA: podczas j azdy poprzec zny, samoch odowy pas
bezpieczeńst wa powinien zawsze znajdować
się w pozycji wskazanej na rys. 24. nie
należy nigdy używać FOTELIKA, JEŚLI pas
nie został uprzednio przeciągnięty przez
specjalną prowadnicę: mogłoby to okazać
się bardzo niebezpieczne.
ustawić uchw yt w pozycji “A” (rys. 10)
aby odczepić fotelik od siedzenia, należy
ężony
87
wcisnąć sprzączkę i odpiąć pas samochodo w y, po cz ym wy sun ąć pas ze znajdujących
się na foteliku prowadnic: poprzecznej oraz
poziomej. Ustawić ponownie uchwyt w
pozycji “B” (r ys. 10).
Na rys. 25 przedstawiono niektóre prz ykłady
nieprawidłowego zainstalowania.
Aby odczepić f otelik od podst awy: pow tórzyć
czynności opisane powyż
odwrotnej kolejności: wysunąć z prowadnicy na oparciu pas poprzeczny, ustawić
uchwyt w pozycji “B” (rys. 10), odczepić
fotelik pociągając specjalną dźwigienkę i
jednocześnie unieść fotelik przy pomocy
uchwytu.
UŻYCIE BUDKI PRZECIWSŁONECZNEJ
Fotelik wyposażony jest w budkę
przeciwsłoneczną chroniącą dziecko przed
słońcem i wiatrem.
Przy pomoc y dwóch specjalnych zaczepów
łatwo ją zaczepić lub odczepić i może być
ona ustawiana w wybranej pozycji (rys.
26).
NIERUCHOMA LUB BUJANA POZYCJA
(FUNKCJA LEŻACZKA)
Kiedy fotelik nie jest używany w samochodzie, może być również stosowany jako bujak
lub leżaczek. Aby się bujał, należy włożyć
na swoje miejsce ogranicznik stabilizujący
(rys. 15) i umieścić uchw yt w pozycji „B”
(rys. 10).
Jeśli pragnie się go użyć w pozycji nieruchomej, należy wyciągnąć ogranicznik
stabilizujący (fi g. 21) i umieścić uchwyt w
pozycji „D” (rys. 10).
Odradza się użycie fotelika jako leżaczka
dla dzieci, które potrafi ą samodzielnie się
unieść (wiek do około 6 miesięcy lub waga
do 9 kg).
Aby uniknąć ry zy ka u pad ku d zie cka , na le ży
zawsze zapinać pasy.
Nie pozostawiać nigdy dziecka bez
opieki.
Użycie fotelika na wysokich lub pochyłych
powierzchniach jest niebezpieczne.
UWAGA: przed przystąpieniem do przenoszenia w ręku fotelika, nal eży zawsze ustawić
i zablokować uchw yt w pozycji pionowej
“B” (rys.10)
WERSJA FOTELIK SAMOCHODOWY
UWAGA! Stosując fotelik w po łączeniu z
wózkiem spacerow ym, należy odnieść
się do instrukcji spacerówki.
+ SPACERÓWKA
ej wykonując je w
FOTELIKA
Page 88

Nowe spacerówki fi rmy CHICCO
wyposażone w system CLIK CLAK
posiadają podłokietniki ze specjalnymi
szczelinami umożliwiającymi zaczepienie Waszego fotelika bezpośrednio na
spacerówce, bez użycia dodatkowych
akcesoriów.
- rozłożyć spacerówkę zgodnie z
załączonymi odnośnymi instrukcjami,
- ująć uchwyt fotelika i umieścić go na
spacerówce, jak pokazano na rys. 27.
- wysunąć z uchwytu dwa sworznie
zaczepowe pociągając i obracając dwa
pokrętła (rys. 28),
- wciskając dolne prz yciski obrócić
uchwyt tak, aby był on równoległy do
podłokietników i wprowadzić zaczepy
pałąka w szczeliny podłokietników
wózka tak, aby został
kowane (docisnąć do dołu fotelik od
strony stóp dziecka w celu zablo kowania
uchwytu w prawidłowej pozycji),
- aby odczepić fotelik od spacerówki
wystarczy wcisnąć dwa czerwone pr-
zyciski znajdujące się na uchwycie,
zgodnie z t ym jak pokazano na rysunku 29,
- unieść uchwyt obracając go, po czym
włożyć dwa sworzni e zaczepowe w yjęte
w punkcie D i zdjąć fotelik ze spacerówki.
UWAGA: czynności zaczepiani a i odczepiania mogą być wykonywane również
wtedy, gdy dziecko znajduje się w foteliku; z ciężarem dziecka powyższe
czynności mogą okazać się jednak
trudniejsze. W takim w ypadku zaleca
się zachowanie ostrożności podczas
wykonywania czynności, o których
powyżej.
Możliwość zdjęcia / uprania obicia
fotelika
Jeśli pragnie się uprać obicie fotelika, należy odpiąć pasy i zdjąć obicie
ąc uprzednio dwa metalowe
wysuwaj
ograniczniki (rys. 30). Piorąc, należy
dokładnie zastosować się do instrukcji
przytoczonych na wszywce obicia.
Pasy, sprzączk a or az p last iko we c zęści
powinny być czyszczone tylko wilgotną
szmatką. Nie używać rozpuszczalników
lub środków wybielających, które
mogłyby je uszkodzić i spowodować
ich nieprawidłowe funkcjonowanie.
PRZESTROGI: proszę PRzeczytać je przed podróżą:
Fotelik powinien być instalowany
stosując się dokładnie do dostarczonych
y w nich zablo-
instrukcji.
Nie pozostawiać nigdy z jakiego
kowiek powodu dziecka w foteliku
bez opieki.
Nie przeciągać samochodowego pasa
bezpieczeństwa w p ozycjach innych niż
te, jakie w skazano w niniejszej i nstrukcji:
zagroziłoby to bezpieczeństwu Waszego dziecka (przykłady nieprawidłowej
instalacji przedstawione są na rys. 20
i 25).
Instalować fotelik t ylko na siedzeniach
prawidłowo umocowanych do struktury
samochodu i zwróconych w kierunku
ruchu pojazdu. Zwrócić uwagę, aby nie
pozostawić składanych lub obrotowych
siedzeń samochodu źle zaczepionych.
W razie w ypadku mogą stanowić one
zagrożenie.
Instalując fotelik w sam ochodzie należy
zwrócić uwagę, aby nie stykało się z
nim ruchome siedzenie lub drzwi
pojazdu.
Uwaga : fotelik ten NIE po winien być nigdy
używany przy zastosowaniu dwupunktowego pasa bezpieczeństwa.
Proszę zawsze sprawdzać, czy
dziecko nie odpina sprzączki pasa
bezpieczeństwa.
Używając fotelika z podstawą należ
zawsze sprawdzać, czy podstawa
została prawidłowo umocowana do
siedzenia samochodowego.
Produk t nie powinien b yć modyfi kowany
lub uzupełniany bez uprzedniej zgody
producenta. Nie stosować akcesoriów,
części zamiennych lub elementów, które
nie zostały dostarczone przez producenta. Ewentualne zmiany naniesione
na produktach zwalniają producenta od
jakiejkolwiek odpowiedzialności.
Jeśli fotelik z jakiegokolwiek powodu
został uszkodzony, zdeformowany lub
mocno zużyty, należy go wymi enić: może
on być pozbawiony pierwotnych cech
charakterystycznych zapewniających
bezpieczeństwo.
Obicie powinno być wymieniane tylko
i wyłącz nie na obi cie zat wi erd zon e przez producenta, jako że stanowi ono
integralną część fotelika samochodowego. Fotelik samochodowy nie powinien
być nigdy używany bez obicia.
Kontrolować, czy taśma pasa nie jest
zaplątana. Należy unikać, aby pas lub
części fotelika były pr zycinane drz wiami
samochodu lub też żeby ocierał
o ostre punkty. Jeśli pas jest pocięty
lub mocno wystrzępiony, należy go
wymienić.
Upewnić się, czy zarówno pas
88
y
y się
Page 89

bezpieczeństwa dziecka jak i t rzypunk-
tow y, samoch odowy pa s bezpieczeństwa
są prawidłowo naprężone w celu za pewnienia maksymalnego bezpieczeństwa
Waszemu dziecku.
Nie należy używać produktu, jeśli
jakiekolwiek jego części są zniszczone
lub ich brak. Może to okazać się niebezpieczne.
W wyniku nawet małego w ypadku samochodowego, fotelik i pas mo gą zost ać
uszkodzone w sposób niewidoczny
gołym okiem. Zaleca się więc ich
wymianę.
Upewnić się, czy nie są przewożone w
samoch odzie przedmiot y nie umocow ane, przede wszystkim na tylniej półce,
które w razie kolizji mogłyby zranić
pasażerów.
Należy upewnić się, czy wszysc y
pasażerowie w samochodzie używają
pasów bezpieczeństwa, co zapewni
bezpieczeństwo im samym jak również
dziecku, które mogliby poważnie
uderzy
ć w razie wypadku.
Jeśli samochód pozostał przez długi
okres cz asu na słońcu, należy dokładnie
przejrzeć fotelik przed ulokowaniem w
nim dziecka; niektóre części mogą być
mocno nagrzane: należy je ochłodzić.
W razie długich podróży należy często
się zatrzymywać. Dziecko bardzo łatwo
się męczy. Z żadnego powodu nie należy
wyjmować dziecka z fotelika podczas
jazdy. Jeśli musicie zająć się Waszym
dzieckiem, znajdźcie najpierw bezpiecz-
ne miejsce po czym zatrzymajcie się.
Nie należy stosować fotelików
używanych. Mogą one przedstawiać
niezwykle niebezpieczne uszkodzenia konstrukcyjne niewidoczne go łym
okiem.
Noworodki wcześniaki: urodzone przed
upływem 37 tygodnia ciąży mogą być
narażone na niebezpieczeństwo w foteliku. Noworodki te siedząc w foteliku
samochodowym mogą mieć trudności
w oddychaniu. Radzimy Wam zwrócić
się do Waszego lekarza lub do persone lu s zpi taln ego , któ rz y zb ada ją Wasze
dziecko i przed opuszczeniem szpitala
polecą odpowiedni fotelik samochodow y
lub wózek przystosowany do przewozu
w samochodzie.
Fotelik może być stosowany jako środek
transportu lub leżaczek również poza
samochodem. Poza pojazdem, w
celu uniknięcia upadków, fotelik nie
powinien być umieszczany na wysokich
płaszczyznach, takich jak stoły, bl at y
robocze, łóżka itp., ani na p łaszczyznach
pochylonych lub niestabilnych. Używać
zawsze pasów bezpieczeństwa.
Tkaniny fotelika nie są nieprzemakalne; dlatego też używając fotelika w
połączeniu ze spacerówką zaleca się
użycie akcesoriów przeciwdeszczow ych
fi rmy Chicco.
Przechowywać plastikowe torby z dala
od dziecka w celu uniknięcia ryzyka
zaduszenia.
Niniejsze instrukcje powinny być starannie przechowy wane i łatwe do znalezienia.
Spółka ARTSANA uchyla się od
jakiejkolwiek odpowiedzialności w razie
nieprawidłowego użycia produktu.
W celu otrzymania dodatkowych informacji oraz złożenia zamówień
dotyczących części zamiennych, należy
skontaktować się z Biurem Obsługi
Klienta Artsana:
Importer:
Baby Collection
ul. Miła 12
05-090 Raszyn Rybie
(22) 720 22 14
Serwis Chicco
ul. Miła 12
05-090 Raszyn Rybie
(22) 716 22 91,
e-mail: serwis@chicco.pl
Strona web: www.chicco.pl
Okładka
www.chicco.com
89
Page 90

H
AUTO-FIX
KOMPONENSEK: (A., B., C., D. ábra)
1. Talpazat
2. Héjazat
3. Fogantyú
4. Kioldó kar
5. Huzat
6. Párna
7. N ap e r n y ő
8. Napernyő rögzítő
9. Mellkasi autóöv sín
10. Mellkasi autóöv sínek az alapon
10A. Mellkasi autó öv sínek a gyermekül é-
sen
11. Szabályzó öv
12. Övcsat
13. Csatnyelvek
13A. Csat nyitógomb
14. Övek szabályzó gombja (textilrátét
alatt)
15. Övek
16. Övbélés (ha mellékelt)
17. Öv vezető lyuk
18. Fogantyú dőlésszög gombok
19. Sétakocsihoz rögzítő tárcsa
20. Sétakocsiról kioldó gomb
21. Vezetőlap
22. Stabilizáló rögzítő
23. Hitelesítési cimke
24. Talpazattal vagy anélküli használathoz
szerelési cimke
NAGYON FONTOS! AZONNAL
• A termék használata előtt fi gyelme-
sen olvassa el az egész használati
utasítást.
• A termék össze- és beszerelésénél gon-
dosan kövesse a használati utasításban
leírtakat. Vigyázzon, nehogy valaki a
kézikönyv ismerete nélkül használja a
terméket.
• A kézikönyvet tegye el későbbi haszná-
latra is.
• A baleseti statisztikák szerint a hátsó
ülés biztonságosabb az első ülésnél,
tehát lehetőleg a hátsóra szerelje be a
gyermekülést.
• FIGYELEM! VESZÉLY! Ezt a gyermekülést
soha ne szerelje frontális légzsákkal
rendelkező első ülésre. Ez csak akkor
lehetséges, ha a frontális légzsákot
üzemen kívül helyezte: érdeklődje
meg az autó gyártójától, illetve nézze
meg a kocsi használati utasításában,
hogy a légzsákot üzemen kívül lehet-
OLVASSA EL
e helyezni.
• Ha a gyermekülést az első ülésre sze-
relte (mert ott nincs légzsák, vagy azt
üzemen kívül helyezte), tanácsos a
kocsiülést a lehető legnagyobb mér-
tékben, a hátsó ülést elfoglalónak is
megfelelően hátratolni.
• Ezt a gyermekü lést nem szabad ha sználni oldalra, vagy a menetiránynak háttal
állított ülésen.
• Soha ne szerelje a gyermekülést egy,
csak (két pontos) hasi övvel rendelkező
ülésre.
• Egy gyermekülés sem garantálja a
baba teljes biztonságát balesetkor,
de a termék használata csökkenti a
balesetveszélyt és a gyermek halálának lehetőségét.
• A termék helytelen használata a gyermek sérülésének a lehetőségét növeli
nemcsak balesetkor, hanem más helyzetekben is: mindig ellenőrizze a gyermekülés helyes felszerelését.
• Ha a gyermekülés bármilyen okból
károsodott, eldeformálódott, vagy nagyon elkopott, cserélje ki: elveszthette
eredeti biztonsági jellemzőit.
• A gyártó beleegyezése nélkül ne módosítsa a terméket, illet ve ne szereljen rá
mást. Nem a gyártó által forgalmazott
tartozékokat, pótalkatrészeket vagy
komponenseket tilos felszerelni.
• A gyermeket semmilyen oknál fogva
ne hagyja felügyelet nélkül a gyermekülésben.
• Ha a gye rmek ülé st kéz zel vis zi, a gy ermeket akkor is rögzítse be, nehogy
kiessen.
• Ha nem szereli az autóba, akkor tilos
a gyermekülést egy magas felületre
támasztani.
• A gyermekülést mindig rögzítve tartsa a kocsiban: ellenkező esetben a
bentülőket megsértheti.
• A gyermekülés és a kocsiülés közé ne
tegyen semmit, amit a gyártó nem
hagyott jóvát: ellenkező esetben balesetkor a gyermekülés nem töltené
be feladatát.
Ha az autót a napon hagyja, akkor
•
tanácsos a gyermekülést letakarni.
• Könnyű balesetkor a gyermekülésben
szabad szemmel nem látható károsodás
eshet: minden esetre cserélje ki.
• A gyermekülés kézi szállítása előtt
győződjön meg arról, hogy a babát az
övekkel bekötötte, és hogy a fogantyú helyesen lett rögzítve függőleges
90
Page 91

helyzetben.
• A “gyermekülés - sétakocsi” kombináció
esetén ezt a gyermekülést kizárólag a
rögzítésre alkalmas Chicco sétakocsin
használhatja.
• Mielőtt a babát a gyermekülés sétakocsi kombinációban szállítaná,
ellenőrizze, hogy helyesen lett-e
bekapcsolva.
• Ne használjon másodkézből kapott
gyermekülést: szabad szemmel nem
észlelhető károk lehetnek a szerkezetében, ezért a termék biztonsága
nem szavatolt.
• Az Artsana vállalat elhárít minden felelősséget a termék nem
rendeltetésszerű használatából származó kárért.
HASZNÁLATI UTASÍTÁS
A TERMÉK JELLEMZŐI
A termék mind a talpazat nélküli, mind
a talpazattal rendelkező gyermekülés
változatban “0+ csoport”-ként van hitelesítve, születéstől 13 kg-os súlyú
gyermekek autóba n történő szállításához.
A hitelesítés “universal” jellegű, tehát
bármilyen autótípusba beszerelhető.
Figyelem! “Universal” azt jelenti, hogy a
legtöbb, de nem mindegyik autóülésre
felszerelhető.
FONTOS FIGYELMEZTETÉS
1. A 44. sz. Szabályzat, 04. sorozat módosítása ezt “Univerzális”
gyermekrögzítőként hitelesíti.
Járművekben általános használatra
alkalmas és ezek legtöbb, de nem
mindegyik ülésével kompatibilis.
2. A tökéletes komp atibilitás ot t áll fenn,
ahol a járműgyártó a leír ásban kijelenti,
hogy a járműbe lehet szerelni “Univerzális” gyermekrögzítőt a megfelelő
korosztályú gyermek számára.
3. Ez a gyermekrögzítő “Univerzális”
besorolást kapott szigorúbb elbírálási
szempontok alapján az előző model-
lekhez képest, melyekhez nincs ilyen
fi gyelmeztetés csatolva.
4. Csak a 16. sz. UN/ECE vagy ezzel
egyenértékű előírás által engedélyezett
sztatikus vagy feltekercselős biztonsági övvel rendelkező járművekben
használható.
5. Ké tel y es eté n kérj e ki a gy ár tó v agy
a kereskedő véleményét.
A gyermekülést az autón kívül is
használhatja: Chicco babakocsival
kombinálva, vagy nyugágyként.
HASZNÁLATI KORLÁTOZÁSOK
FIGYELEM! Gondosan tartsa be az alábbi használati korlátozásokat: ellenkező
esetben a termék biztonsága nem garantált.
1. A gyermek súlya ne haladja meg a 13
kg-ot.
2. A gyermekülést soha ne használja frontális légzsákkal rendelkező első ülésen,
ha a légzsákot előbb nem helyezte üzemen kívül: ellenőrizze a kocsi gyár tójánál,
illetve a kocsi kezelési utasításában,
hogy a légzsákot üzemen kívül lehet-e
helyezni.
3. Soha ne használja a komfortpárnát, ha a
gyermek súlya meghaladja a 6 kg-ot.
A HELYES KOCSIÜLÉS ÉS
Az gyermekülést a kocsi vezető melletti
első ülésére, vagy bármelyik hátsó ülésre beszerelheti, az alábbi korlátozások
betartásával: az autóülés:
- menetirányba nézzen (1.ábra)
- sztatikus rögzítésű 3 pontos, vagy
feltekercselős biztonsági övvel rendelkezzen (2. ábra).
Tanácsos a gyermekülést a kocsi hátsó
ülésére felszerelni.
FIGYELEM! SÚLYOS VESZÉLY! Ezt a gyermekülést soha ne használja az első
ülésen, ha ez frontális légzsákkal rendelkezik.
FIGYELEM! A gyermekülést soha ne
használja egy olyan autóülésen, mely csak
hasi övvel rendelkezik (2A. ábra).
FIGYELEM! Az öveket mindig a gyermek
testmagasságváltozása szerint kell beállítani.
Mielőtt a gyermekülést beszerelné a kocsiba, a gyermekrögzítő öveket megfelelő
magasságba kell állítani.
Az övek megfelelő magassága a baba
vállánál kicsivel alacsonyabban van (3.
ábra). A gyermekülésen 3 magasságfokozat található (4. ábra).
A gyermekülés komfortpárnával rendelkezik, mely a születéstől a 6 kg-os
súly eléréséig a baba helyes rögzítését
és a nyak és hát ideális elhelyezését
91
BIZTONSÁGI ÖV
AZ ÖVEK MAGASSÁGÁNAK
A BEÁLLÍTÁSA
Page 92

biztosítja.
A komfortpárna betételekor ellenőrizze,
hogy az övek a legalacsonyabb lyukon
legyenek átvezetve.
FIGYELEM: ez az egyetlen megengedett
fokozat a komfortpárna használatához
(5. ábra)
Figyelem: a termék maximálisan biztonságos használata érdekében a komfortpárnát vegye ki, miután a baba elér te a
6 kg-os testsúlyt.
Az ö vek áth ely ezé sét az a láb biak szerin t
végezze:
- nyissa ki a csatot a piros gomb me-
gnyomásával (6. ábra)
- az öveket hátulról húzza ki, majd
csúsztassa a gyermek magasságának
megfelelő lyukba (7A. és 7B. ábra).
FIGYELEM! Mindig ellenőrizze, hogy az
övek a vezetőlap és a héj között haladnak-e.
Az övek mindig helyesen legyenek kifeszítve.
A GYERMEK BEHELYEZÉSE
1. emelje fel a textilrátétet, tartsa
lenyomva a szabályzó gombot és a
gyermekülés öveit húzza addig, amíg
meglazulnak (8. ábra)
2. a piros gomb megnyomásával nyissa
ki a csatot (6. ábra)
3. helyezze be a babát
4. tegye egymásra a csat két nyelvét
(6A. ábra)
5. mindkét nyelvet bújtassa a csatba,
ekkor egy kattanást fog hallani (6B. ábra)
FIGYELEM: soha ne helyezzen be csak egy
nyelvet a csatba
6. feszítse meg a gyermek biztonsá-
gi öveit a központi szabályzó öv meghúzásával (9. ábra)
FIGYELEM: az övek ne túlságosan feszesen álljanak. Akkor lettek jól megfeszítve,
ha az ujjait a baba teste és az öv közé
tudja dugni.
A GYERMEKÜLÉS
FOGANTYÚJÁNAK FOKOZATAI
A gyermekülés fogantyúját 4 különböző
fokozatra állíthatja (10. ábra):
A. S zál lít ás k ocs iba n (FI GYEL EM: c sak így
használhatja az autóban szállításra).
B. Szállítás kézben
C. Hintaszékként vagy megfelelő Chicco
babakocsihoz rögzítve
D. Rögzített hintaszék
A szabályozáshoz egyszerre nyomja meg
a fogant yún elhelyezett gombokat (11.
ábra), majd forgassa el a fogantyút a
megfelelő fokozatra, mely elérését egy
kattanás jelzi.
A GYERMEKÜLÉS AUTÓBA
Figyelmesen olvassa el A HELYES KOCSIÜLÉS ÉS BIZTONSÁGI ÖV pontban leírtakat.
A gyermekülés mind alappal rendelkező,
mind anélküli változatát kizárólag a mene tir ánn yal h áttal sza bad fel sze rel ni. FIGYELEM! RENDKÍVÜL VESZÉLYES: SOHA
NE SZERELJE LÉGZSÁKKAL RENDELKEZŐ
ÜLÉSRE, hacsak előbb nem helyezte üzemen kívül a légzsákot.
FIGYELEM! Soha ne szerelje a gyermekülést egy olyan kocsiülésre, mely
csak hasi övvel rendelkezik.
GYERMEKÜLÉS BESZERELÉSE
Az alábbiak szerint végezze el az alappal
rendelkező gyermekülés beszerelését:
1. a gyermekülést akassza le az alapról
a rögzítő kar meghúzásával (12. ábra) és
ezzel egyidejűleg emelje meg a markolatnál fogva
2. helyezze az alapot a kiválasztott kocsiülésre, állítsa a 13. ábrán látható ir ányba
és arra is vigyázzon, hogy az autóülés
hátlapjához simuljon
3. húz za k i az aut óül és b izto nság i öv ét é s
kapcsolja a megfelelő cs atba úgy, h ogy a
vízszintes részt a megfelelő sínen át vezeti
(14. ábra)
4. mielőtt a gyermekülést az alapra
helyezné, ellenőrizze, hogy a stabilizátor
rögzítő be lett-e zárva (15. ábra)
5. a gyermekülést helyezze az alapba
(menetiránynak háttal) és az alapot
nyomja le rögzítésig (egy kattanást kell
hallania) (16. ábra).
6. a megfelelő rögzítést úgy ellenőrizheti,
hogy megpróbálja a gyermekülést mind
elől, mind hátul megemelni.
7. a kocsi mellkasi övét fogja meg és a
gyermekülés hátlapjának hátulján található megfelelő sínen húzza át (17. ábra)
FIGYELEM: AZ AUTÓ MELLKASI ÖVÉT
SZÁLLÍTÁS KÖZBEN MINDIG A 18.
ÁBRA SZERINT KELL ELHELYEZNI: A
GYERMEKÜLÉST SOHA NE HASZNÁLJA
ANÉLKÜL, HOGY A MEGFELELŐ SÍNBE
BÚJTATTA VOLNA:
92
SZERELÉSE
ALAPPAL RENDELKEZŐ
Page 93

ENNEK ELMULASZTÁSA KOMOLYAN
VESZÉLYEZTETNÉ GYERMEKE BIZTONSÁGÁT
8. a lehető legjobban húzza meg az övet a
gyermekülés körül, ne hagyjon felesleges
szalagot és ellenőrizze, hogy ne legyen
megcsavarodva
9. a markolatot állítsa “A” fokozatra (10.
ábra)
A gyermekülés kivétele az alapból:
A hátlapon található sínből húzza ki a
mellkasi övet, a markolatot állítsa “B” fokozatra (10. ábra), a megfelelő fogantyú
meghúzásával és a gyermekülés ezzel
egyidejű felemelésével a fogantyúnál
fogva kapcsolja le a gyermekülést.
FIGYELEM! A gyermekülés beszerelése
után MINDIG ellenőrizze az autóülés
biztonsági övének feszességét és hogy
ennek csatja nem nyomja-e ki az alapon
lévő sínből az övet és hogy nem akadályozza-e a síneket.
FIGYELEM: SOHA NE VEZESSE AZ AUTÓÖVET A 19. ÁBRA ÚTMUTATÁSÁTÓL
ELTÉRŐ HELYZETBE
A 20. ábra néhány helytelen felszerelést
mutat.
BESZERELÉS ALAP NÉLKÜL
Az alábbiak szerint szerelje be az alap
nélküli gyermekülést a kocsiba:
1. nyomja le a stabilizáló rögzítőt (21.
ábra)
2. a gyermekülést helyezze a kiválasztott
kocsiülésre
3. húzza ki az autó biztonsági övét és
kapcsolja a megfelelő csatba úgy, hogy
az öv vízszintes szakaszát a gyermekülés
megfelelő két sínébe bújtatja (22. ábra);
4. Ragadja meg az autó mellkasi övét és
bújtassa át a gyermekülés hátlapjának
hátulján található megfelelő sínen (23.
ábra)
5. az övet a gyermekülés körül a lehető
legjobban feszítse meg és ne hagyjon
felesleges szalagot, valamint azt is
ellenőrizze, hogy ne legyen megcsavarodva. FIGYELEM: AZ AUTÓ MELLKASI
ÖVÉT SZÁLLÍTÁS KÖZBEN MINDIG A 24.
ÁBRA SZERINT KELL TARTANI. SOHA NE
HASZNÁLJA A GYERMEKÜLÉST, HA ELŐBB
AZ ÖVET NEM BÚJTATTA A MEGFELELŐ
SÍNBE: ENNEK ELMULASZTÁSA GYERMEKE
BIZTONSÁGÁT KOMOLYAN
VESZÉLYEZTETI.
6. A markolatot állítsa “A” fokozatra (10.
ábra)
7. A gyermekülést úgy kapcsolhatja le a
kocsiülésről , ho gy a csa t me gny omásá val
kikapcsolja az autó biztonsági övét,
kihúzza az övet a diagonális sínből és
a gyermekülésen található vízszintes
sínből. A fogantyút állítsa vissza “B” fokozatra (10. ábra).
A 25. ábra néhány példát mutat a hely telen beszerelésre.
A gyermekülés levételéhez az alapról:
ismételje meg az eljárást fordított sorrendben:a hátlapon található sínből húzza
ki a mellkasi övet, a markolatot állítsa
vissza “B” fokozatra (10. ábra), kapcsolja
ki a gyermekülést úgy, hogy egyszerre
húzza a meg felelő foganty út és ezzel meg
is emeli a gyermekülést.
A NAPERNYŐ HASZNÁLATA
A gyermekülés olyan napernyővel rendelkezik, mely megvédi a babát a naptól
és az esőtől.
Két rögzítő segítségével gond nélkül a
gyermekülésre szerelhető és dőlésszöge
könnyen beállítható (26. ábra)
A GYERMEKÜLÉS RÖGZÍTETT VAGY
HINTÁZÓ VÁLTOZATA
(ETETŐSZÉK HASZNÁLATA)
Amikor a gyermekülés nincs beszerelve
a kocsiba, akkor hintaszékként, vagy
etetőszékként is használhatja. Mozgatható lesz, ha a stabilizátor rögzítőt
visszateszi (15. ábra) és a fogantyút “B”
fokozatra állítja (10. ábra)
Ha viszont rögzített fokozaton kívánja
használni, akkor húzza ki a stabilizátor
rögzítőt (21. ábra) és a fogantyút állítsa
“D” fokozatra (10. ábra)
Az etetőszékként való használat nem
ajánlott a már egyedül felállni képes
gyermekek számára (kb. 6 hónapos vagy
9 kg-os baba esetén)
A kiesés veszélyének megelőzésére mindig kapcsolja be az öveket.
Soha ne hagyja a babát felügyelet
nélkül.
Veszélyes a gyermekülést magas, illetve
lejtős felületre támasztani.
FIGYEL EM: a gyermekülés szállítá sa előtt a
fogantyút mindig állítsa vissza és rögzítse
függőleges “B” fokozaton (10. ábra)
93
Page 94

TRAVEL SYSTEM:
AUTÓS GYERMEKÜLÉS
+ BABAKOCSI kombinációja
FIGYELEM! A babakocsikkal való együttes használathoz olvassa el a babaakocsi
kezelési utasítását is.
Az új, CLIK CLAK rendszerű CHICCO babakocsik olyan különleges kartámaszba
épített szerkezettel rendelkeznek, amely
segítésével a gyermekülést közvetlenül a
babakocsira rögzítheti és a felhasználónak nincs szüksége egyéb tartozékra.
- a mellékelt kézikönyv útmutatása sze-
rint nyissa ki a babakocsit
- a gyermekülést ragadja meg a fogan-
tyúnál fogva és helyezze a babakocsira
a 27. ábra szerint
- a fogant yúból húzza ki a két
rögzítőcsapot úgy, hogy meghúzza és
elfordítja a babakocsi rögzítő tárcsát
(28. ábra)
- a két alsó gomb segítségével addig
forgassa el a fogantyút, amíg nem áll
párhuzamosan a kartámasszal és amíg
a két rögzítő nem záródik be (a fogantyút helyes fokozatba állításához
a gyermekülést a baba lábánál nyomja
lefelé).
- ha a gyermekülést le kívánja kapcsolni a
babakocsiról, akkor elég, ha a fogant yún
elhelyezett két piros gombot megnyomja,
a 29. ábra szerint.
- a fogant yú felemelésével a D pontban
kihúzott két rögzítőcsapot nyomja be és a
gyermekülést vegye le a babakocsiról.
FIGYELEM: a fel- és leszerelést beültetett babával is elvégezheti, de ebben az
esetben a súly miatt a z eljárást nehezebb
elvégezni. Nagyon vigyázzon, amikor a
fenti műveleteket végzi.
A GYERMEKÜLÉS HUZATÁNAK LE-
VÉTELE/TISZTÍTÁSA
- A gyermekülés huzat ának tisztításához
kapcsolja ki az öveket és miután a két
fémrögzítőt kihúzta a helyéről, vegye le
a huzatot (30. ábra). Tisztításkor gondo san tar tsa be a huzaton található kezelési
utasítás előírásait.
Az övek, a csatok és a műanyag részek tisztításához elég csak egy nedves
kendőt használni. Ne használjon oldószert vagy fehérítőt, mert kárt okoznak
és a gyermekülés nem fog biztonságot
nyújtani.
FIGYELMEZTETÉS: AZ UTAZÁS
1. A gyermekülést az útmutatás pontos betartásával kell beszerelni.
2. A babát semmilyen oknál fogva ne
hagyja a gyermekülésben felügyelet
nélkül.
3. Az autó biztonsági övét kizárólag az itt megadott módon szabad
elhelyezni: ellenkező esetben gyermeke biztonsága nem szavatolt (a 20.
és 25. ábra a HELYTELEN felszerelést
mutatja).
4. Csak olyan autóülésre szerelje a
gyermekülést, amely helyesen lett
rögzítve az autó vázához és az autó
eleje f elé néz. Vigyázzon, nehogy nem rögzített, összecsukható
vagy elfordítható autóülés legyen a
járműben. Balesetkor ez nagyon veszélyes lehet.
5. Vigyázzon arra, hogy a gyermekülést úgy szerelje be az autóba,
hogy ne érjen egy m ozgó üléshez vagy
az ajtóhoz.
6. Figyelem: ezt a gyermekülést soha
NEM szabad használni két pontos
rögzítésű autóövvel.
7. M indig e l l e n őrizze, hogy a baba
nem nyitotta-e ki a biztonsági öv
csatját.
8. Az alappal történő használat esetén
mindig győződjön meg arról, hogy az
alap helyesen lett-e az autóüléshez
rögzítve.
9. A gyártó beleegyezése nélkül semmilyen módosítást vagy kiegészítést
nem szabad eszközölni a terméken.
Kizárólag a gyártótól beszerzett
tartozékot, pótalkatrészt, vagy komponenst szabad felszerelni. A gyártó
elhárít minden felelősséget a termék
esetleges módosításáért.
10. Ha a gyermekülés bármil yen okból
károsodott, eldeformálódott, vagy nagyon elkopott, cserélje ki: elveszthette
eredeti biztonsági jellemzőit.
11. A huzatot kizárólag a gyártó által
javasolt típusra cserélheti ki, mert a
biztonsági gyermekülés szerves
részét képezi. A gyermekülést soha
ne használja huzat nélkül.
12. Ellenőrizze, hogy az övszalag
nincs-e megcsavarodva. Vigyázzon,
nehogy a szalag, illetve a g yermekülés
94
MEGKEZDÉSE
ELŐTT OLVASSA EL:
Page 95

egyes részei az ajtóba csípődjenek,
illetve éles felülethez dörzsölődjenek.
Ha az övön vágást vagy erős ki-
rojtozódást észlel, akkor cserélje ki.
13. Győződjön meg arról, hogy gyermeke biztonsága érdekében mind az
autó három pontos biztonsági öve,
mint a gyermekülés öve megfelelően
ki legyen feszítve.
14. Ne használja a terméket, ha egyes
részei eltörtek vagy hiányoznak. Ez
veszélyes lehet.
15. Könny ű baleset során is a gyermekülésben és az övben szabad
szemmel nem látható kár keletkezhet.
Tanácsos kicserélni őket.
16. Ellenőrizze, hogy az autó bel-
sejében, főleg a hátsó ablakban ne
legyenek rögzítetlen tárgyak, mert
balesetkor a bentülőket megsérthetik.
17. Ell enőrizze, hogy a kocsi minden
utasa bekapcsolta-e a biztonsági
övet, mert balesetkor nekiütközhetnek a babának és súlyos sérülést
okozhatnak.
18. Ha a kocsi hosszú ideig állt
a napon, akkor a baba beültetése előtt gondosan vizsgálja meg a
gyermekülést; egyes részei nagyon
felhevülhetnek: hagyja lehülni.
19. Hosszú út esetén gyakran tartson pihenőt. A gyermekek könnyen
kifáradnak. Semmilyen oknál fogva
ne vegye ki a gyermeket az ülésből
az autó haladása közben. Ha a babának szüksége van valamire, akkor
keressen egy biztonságos helyet és
ott álljon le.
20. Ne szereljen be használt gyermekülést. Szabad szemmel nem
látható, rendkívül veszélyes károk
lehetnek a szerkezetében.
21. Koraszülöttek: a 37 hétnél rövidebb terhesség után született babákat
veszélyes a gyermekülésben szállítani. Ezeknek a babáknak légzési
nehézségei lehetnek a gyermekülésben elhelyezve. Mielőtt elhagyná a
kórházat, forduljon orvosához, illetve
kérje ki a kórház véleményét, hogy
milyen gyermekülést vagy babakocsit
vásároljon.
22. A gyermekülést szállításra
vagy etetőszékként az autón kívül
is használhatja. Ebben az esetben
a gyermekülést ne helyezze ma-
gas támasztófelületre, pl. asztalra,
munkafelületre, ágyra, stb., illetve
lejtős, vagy mozgó felületre, nehogy a baba leessen. Mindig használja
a biztonsági övet.
23. A gyermekülés szövete nem
vízálló; éppen ezért ha a sétakocsival
használja, akkor szerelje fel a Chicco
esernyő-tartozékokat.
24. A műanyagtasakok a gyermekektől
távol tartandók, mert fulladásos halált
okozhatnak.
25. Ezt az útmutatót gondosan tegye
el egy könnyen elérhető helyre.
26. Az ARTSANA vállalat elhárít
minden felelősséget a termék nem
előírás szerinti használatából származó károkért.
Eg yéb i nfo rmác iók ért é s pó talk atr észekért forduljon az Artsana
Vevőszolgálatához:
Magyarország:
M & J (Chicco) Kft.
1555 Budapest 136 Pf. 95.
Tel : 36/1/3 49 6124
Mintabolt: Mammut II harmadik
emelet
Olaszország:
ARTSANA SPA
Via Saldarini Catelli 1
22070 Grandate COMO - OLASZORSZÁG
Vevőszolgálat (Servizio Clienti) 0039
031 382000
Fax 0039 031 382500
FEDŐLAP
www.chicco.com
95
Page 96

HR
AUTO-FIX
DIJELOVI: (Crtež A, B, C, D)
1. Postolje
2. Oklop
3. Ručka
4. Poluga za otpust
5. Navlaka
6. Jastuk za udobnost
7. P omi čni suncobran
8. Spojka pomičnog suncobrana
9. Vodilica poprečnog pojasa vozila
10. Vodilice poprečnog pojasa vozila na
postolju
10A. Vodilice poprečnog pojasa vozila na
naslonjaču
11. Pojas za podešavanje
12. Kopča pojasa
13. Jezičci kopče
13A. Gumb za otvaranje kopče
14. Gumb za podešavanje pojaseva (ispod
platnenog preklopca)
15. Pojasevi
16. Punjenja za pojaseve (ako su
predviđena)
17. Uške za provlačenje pojaseva
18. Gumbi za podešavanje ručke
19. Poluga za uklještenje na kolica
20. Gumb za otpuštanje od kolica
21. Šipka za podešavanje položaja
22. Stabilizacijsko zapriječenje
23. Naljepnica sa ovjerom
24. Naljepnica sa uputama za ugradnju sa
i bez postolja
IZUZETNO VAŽNO!
• Pažljivo i cijelovito pročitati priručnik za
• Prilikom ugradnje i sklapanja proizvo-
• Ovaj priručnik treba sačuvati za buduću
• Po statističkim podacima koji se odnose
• OPREZ! VELIKA OPASNOST! Ovo dječje
ODMAH PROČITATI
uporabu prije primjene proizvoda.
da sav jes no sli jed iti upu te. One mogu ćiti
uporabu proizvoda osobama koje nisu
pročitale upute.
uporabu.
na nezgode, stražnje sjedalo vozila je
sigurnije od prednjega, stoga se smatra
da je sigurnija ugradnja na stražnjem
sjedalu.
sjedalo nesmije biti ugrađeno na prednjem sjedalu opremljenom bo
zračnim jastukom. Moguće je ugraditi
dječje sjedalo na prednje sjedalo vozila
samo ako se prethodno isključi bočni
zračni jastuk: stoga treba provjeriti kod
proizvođačke automobilske kuće ili u
priručniku vašeg vozila, je li moguće
čnim
isključiti zračni jastuk.
• Ako se dječje sjedalo ugrađuje na pre-
dnjem sjedalu vozila (u slučaju ako nema
bočnog zračnog jastuka ili je isključen),
preporučuje se da to sjedalo bude što
je više moguće udaljeno od upravljačke
ploče, kolik o je to spo jiv o sa d rug im p utnicima na stražnjem sjedalu vozila.
• Ovo dječje sjedalo nesmije nikada biti
ugrađeno na sjedala koja su postavljena
bočno ili u suprotnom smjeru od smjera
kretanja vozila.
• Ovo dječje sjedalo nesmije nikada biti
ugrađeno na sjedalo vozila koje je
op reml jen o sa mo t rbuš nim sig urn osn im
pojasom (na dvije uporišne točke).
• Niti jedno dječje sjeda lo n e mo že j amčiti
potpunu sigurnost djeteta u slučaju
nezgode, ali uporaba ovog proizvoda
smanjuje opasnost od ozljeda i smrti
djeteta.
• Nepravilna uporaba dječjeg sjedala
povećava opasnost od ozbiljnih ozljeda djeteta, ne samo u slučaju prometne
nezgode, već i u drugim prilikama: stoga treba uvijek provjeravati je li dječje
sjedalo ispravno uklješteno na sjedalo
vozila.
• U slučaju da dječje sjedalo iz bilo kojeg
razloga bude oštećeno, izobličeno ili jako
istrošeno, treba ga zamijeniti: moguće
je da nema više izvorna sigurnosna
obilježja.
• Proizvod se nesmije mijenjati ili
upotpunjavati, osim ako to nije odobrio proizvođač. Nije dopuštena ugradnja opreme, rezervnih dijelova ili
sastavnih dijelova koje nije isporučio
proizvođač.
• Nemojte nikada, ni iz bilo kojeg razloga,
ostavljati dijete na dječjem sjedalu bez
nadzora.
• Kako bi s e izb jegla op asnos t od pa dova
djeteta, privezati djetetu sigurnosni pojas
dječjeg sjedala čak i prilikom ručnog
prenošenja.
• Prilikom uporabe izvan vozila, opasno
je koristiti dječje sjedalo postavljeno na
uzdignutoj površini.
• Nemojte nikada ostavljati dječje sjedalo
neučvršćeno na sjedalu vozila: moglo bi
udarcem naškoditi i ozljediti putnike.
• Nije dopušteno ula gati nikakve pr edmete,
osim opreme koju je odobrio proizvođač,
između sjedala vozila i dječjeg sjedala ili
dječjeg sjedala i djeteta: naime, u slučaju
prometne nezgode dječje sjedalo ne bi
moglo obaviti svoju zadaću na ispravan
način.
• U slučaju da vozilo mora ostati pod
96
Page 97

suncem, dječje sjedalo je preporučljivo
pokriti.
• Nakon čak i lakše prometne nezgode,
dječje sjedalo može pretrpiti oštećena
koja nisu vidljiva golim okom: u svakom
slučaju treba zamijeniti to dječje sjedalo
jednim novim.
• Prije ručnog prijenosa dječjeg sjedala
provjeriti je li dijete privezano pojasevima i je li ru čka ispravno zapriječena u
okomitom položaju.
• U slučaju primjene dječjeg sjedala zajedno sa kolicima, ovo sjedalo se može
koristiti samo sa onim kolicima Chicco
koja su predviđena za spajanje.
• Prije prenošenja djeteta u dječjem sjedalu
sp oje no m na ko lic a, pr ov jer iti je l i sj eda lo
ispravno uklješteno.
• Nesmiju se koristiti rabljena dječja sjedala: moguće j e da su pre trpi la n evid lji va
oštećenja sklopa koja ugrožavaju sigurnost proizvoda.
• Poduzeće Artsana otklanja svaku odgovornost u slučaju neprimjerene uporabe
ovog proizvoda.
UPUTE ZA UPORABU
ZNAČAJKE PROIZVODA
Sjedalo, kako u verziji samo sjedalo, tako
i u verziji sjedalo sa postoljem, službeno
je namijenjeno ”skupini 0+“. To znači da
je njegova uporaba odobrena ako je riječ
o prijevozu u vozilu novorođene djece do
one koja teže 13 kg.
Službena ovjera je univerzalne vrste, a
to znači da se takvo dječje sjedalo može
ugraditi na svaki model automobila.
OPREZ! ”Universal“ znači da je dječje sjedalo usklađeno sa većinom, ali ne i svim
sjedalima vozila.
VAŽNA NAPOMENA
1. Ova naprava za pridržavanje djeteta
je “univerzalne” vrste i usklađena je sa
pravilom br. 44, ispravke iz skupine
04. Prikladna je za ugradnju opć
u vozila i svojom izradom odgovara
velikoj većini sjedala, ali ne i sjedalima
u svim vrstama vozila.
2. Sav ršenu usklađenost je lakše ostvariti ako je proizvođač u priručniku
za uporabu vozila istaknuo da je
predviđena mogućnost ugradnje
“Univerzalnih” naprava za pridržavanje
prikladnih za određenu dob djeteta.
enito
3. Ova naprava za pridržavanje dje-
teta je klasifi cirana kao “Univerzal-
na” po strožim kriterijima službenog
usklađivanja od onih za prethodne
verzije koje nisu upotpunjene ovom
napomenom.
4. Naprava je prikladna samo za ugradnju u vozila koja imaju sigurnosni
pojas na tri točke, nepomične vrste ili
sa smo tava njem , sl užb eno usk lađen sa
Pravilom UNI/ECE br. 16 ili sa drugim
istovrijednim standardom.
5. U slučaju nedoumice, potražite
savjet proizvođača ove naprave ili
prodavača.
Dječje sjedalo se može koristiti i izvan
vozila, u kombinaciji sa kolicima ili kao
ležaljka.
OGRANIČENJA PRI UPORABI
OPREZ! Savjesno uvažavati ova ograničenja
koja se odnose na uporabu proizvoda: u
suprotnom slučaju nije zajamčena sigurnost.
Težina djeteta nesmije premašiti 13 kg.
Ovo dječje sjedalo nesmije nikada biti
ugrađeno na prednje sjedalo vozila oprem ljeno bočnim zračnim jastukom, osim ako
je bočni zračni jastuk isključen: stoga treba
provjeriti kod proizvođačke automobilske kuće ili u priručniku vašeg vozila, je li
moguće isključiti zrač
Nesmije se nikada koristiti jastuk za udobnost, ako težina djeteta premašuje 6 kg.
POTREBNA SVOJSTVA SJEDALA U VO-
ZILU I SIGURNOSNOG POJASA
Sjedalo može biti ugrađeno na prednjem
suvozačevom sjedalu ili bilo kojem
stražnje m sjedalu vozila, ali tr eba uvažavat i
ova ograničenja:
sjedalo treba biti okrenuto u smjeru kretanja vozila (crtež 1),
sj eda lo m ora bit i op reml jen o si gur nos nim
pojasom na tri uporišne točke, nepomične
vr ste i li sa n apr avom za s mot ava nje (cr te ž
2).
Preporučuje se ugradnja dječjeg sjedala
na stražnje sjedalo vozila.
OPREZ! VELIKA OPASNOST! Ovo dječje
sjedalo se nesmije nikada koristiti na prednjem sjedalu vozila opremljeno m bočnim
zračnim jastukom.
OP RE Z! Sje dalo se n ika da n esmij e ug rad iti
na vozilo koje je opremljeno samo trbušnim
sigurnosnim pojasom (crtež 2A).
97
ni jastuk.
Page 98

PODEŠAVANJE POLOŽAJA
OP REZ! Poj ase vi m ora ju bit i od gov ara jući
u odnosu na rast djeteta.
Prije ugradnje sjedala u vozilo, treba
ispravno podesiti visinu pojaseva koji
pridržavaju dijete.
Ispravna visina pojaseva nalazi se malo
ispod razine ramena (crtež 3). Sjedalo ima
tri položaja visine pojasa (crtež 4).
Sjedalo je opremljeno jastukom za udobnost koje jamči djetetu od rođenja do 6
kg težine, ispravno pridržavanje i savršeni
položaj za vrat i leđa.
Prilikom postavljanja jastuka za udobnost, provjeriti jesu li pojasevi uvučeni u
najnižu ušku.
OPREZ: to je jedini dopušteni položaj
prilikom uporabe jastuka za udobnost
(crtež 5).
Oprez: kako bi se osigurala najveća
moguća sigurnost, ukloniti jastuk za
udobnost nakon što je dijete dostiglo 6
kg težine.
Prilikom pomicanja pojaseva postupiti
ovim slijedom:
pritiskom na crveni gumb, otpustiti kopču
(crtež 6)
sa stražnje strane izvući pojaseve i uvući
ih u ušku koja je najprikladnija u odnosu
na visinu djeteta (crtež 7A i 7B).
OPREZ! Provjeriti jesu li pojasevi uvijek
provučeni između šipke za podešavanje
i oklopa.
Pojasevi moraju uvijek biti ispravno zategnuti.
podignuti platneni preklopac, istovremeno održavajući pritisak na gumbu za
podešavanje i povući pojaseve dječjeg
sjedala, na način da se otpusti njihova
zategnutost (crtež 8)
otvoriti kopču pritiskom na crveni gumb
(crtež 6)
posjesti dijete
postaviti jedan preko drugoga dva jezička
kopče (crtež 6A)
uvući oba jezička kopče sve dok se ne
začuje zvuk ”klik“ (crtež 6B) OP REZ: nikada
se nesmije uvlačiti samo jedan jezičak u
kopču
zategnuti dječje sigurnosne pojaseve, povlačenjem središnjeg pojasa za
podešavanje (crtež 9)
OPREZ: pojasevi trebaju biti zategnuti, ali
ne pre vi še. Ak o mo žet e uv ući prste između
pojasa i tijela djeteta, znači da su pojasevi
odgovarajuće zategnuti.
POJASEVA
POSJEDANJE DJETETA
PODEŠAVANJE RUČKE
Ručka se može podesiti na 4 položaja
(crtež 10):
položaj prikladan za prijevoz u vozilu
(OPREZ: ovaj položaj je jedini dopušten
prilikom prijevoza u vozilu)
položaj prikladan za ručni prijenos
položaj prikladan za ležaljku-njihaljku ili
položaj za spajanje na kolica Chicco koja
su odgovarajuće opremljena
položaj prikladan za nepomičnu ležaljku
Prilikom podešavanja, istovremeno pritisnuti gumbe na ručki (cr tež 11) i zakrenuti
ručku u odabrani položaj sve dok se ne
začuje zvuk okidanja (”klak“).
Pažljivo pročitati poglavlje: NEOPHODNA
SVOJST VA SJEDAL A VOZIL A I SIGURNOSNOG POJASA.
Sjedalo, kako u verziji sa postoljem, tako
i bez, treba biti ugrađeno samo u suprotnom smjeru u odnosu na smjer kretanja
vozila. IZUZETNO OPASNO: NESMIJE SE
UGRADITI NA SJEDALA KOJA SU OPREMLJENA ZRAČNIM JASTUKOM, osim ako taj
nije isključen.
OPREZ! Dječje sjedalo se nikada nesmije
ugrađivati na sjedalo koje je opremljeno
samo trbušnim sigurnosnim pojasom.
Prilikom ugradnje u vozilo dječjeg sjedala sa postoljem, postupiti slijedom ovih
postupaka:
otpustiti sjedalo iz njegovog postolja,
povlačenjem odgovarajuće poluge (crtež
12), istovremeno podižući sjedalo pomoću
ručke
postaviti postolje na odabrano sjedalo
u vozilu, tako da bude usmjereno kako
je prikazano na slici 13, imajući na umu
da mora biti prislonjeno na leđni naslon
sjedala vozila
povući sigurnosni pojas vozila i uvući ga
u odgovarajuću kopču, tako da vodoravni
dio sigurnosnog pojasa prođe kroz dvije
odgovarajuće vodilice (crtež 14).
prije postavljanja dječjeg sjedala na
postolje, provjeriti je li stabilizacijsko
zapriječenje zakočeno (crtež 15)
postaviti sjedalo na njegovo postolje (u
pravcu suprotnom od kretanja vozila) guranjem prema dolje sve dok se ne uklješti
(mora se začuti zvuk okidanja ”klak“, koji
ozna
98
DJEČJEG SJEDALA
UGRADNJA DJEČJEG
SJEDALA U VOZILO
UGRADNJA U VOZILO
SJEDALA SA POSTOLJEM
čava da se je sjedalo učvrstilo) (crtež
Page 99

16)
provjeriti ispravno učvršćenje sjedala na
postolju, na način d a se pok uša pod ign uti
sjedalo povlačenjem sa prednje i stražnje
strane
šakom prihvatiti poprečni sigurnosni pojas
vozila i provući ga kroz odgovarajuću vodili cu k oja se n ala zi na str až njo j st ran i le đnog
naslona dječjeg sjedala (crtež 17)
OPREZ: POPREČNI POJAS U VOZILU T IJEKOM
PRIJEVOZA MOR A UVIJEK BITI U POLOŽAJU
KOJI JE PRIKAZAN NA CRTEŽU 18: DJEČJE
SJEDALO SE NIKADA NESMIJE KORISTITI AKO POJAS NIJE PROVUČEN KROZ
ODGOVARAJUĆU VODILICU. U SUPROT NOM
SLUČAJU, SIGURNOST BI MOGLA BITI OZBILJNO UGROŽENA.
što je više moguće, nategnuti pojas oko
dječjeg sjedala, bez da preostanu dijelovi
trake pojasa, i osvjedočiti se da pojas ne
bude zapetljan.
postaviti ručku u položaj ”A“ (crtež 10)
Prilikom odvajanja dječjeg sjedala od
postolja:
izvući iz vodilice na leđnom naslonu
poprečni sigurnosni pojas vozila, vratiti
ručku u položaj ”B“ (crtež 10), otpustiti
sjedalo povlačenjem odgovarajuće poluge i istovremeno podignuti dječje sjedalo
pomoću ručke.
OPREZ! Nakon ugradnje UVIJEK treba provjeriti ispravnu zategnutost sigurnosnog
pojasa vozila, imajući na umu da kopča
tog pojasa nesmije vršiti pritisak na sam
pojas, jer to dovodi do opasnosti ispadanja
pojasa iz vodilica na postolju, a postoji i
mogućnost da pojas smeta vodilicama.
OPREZ: SIGURNOSNI P OJAS VOZILA NESMIJE
NIKADA BITI POSTAVLJEN U DRUGAČIJE
POLOŽAJE OD ONIH KOJI SU PRIKAZANI
NA CRTEŽU 19.
Na crtežu 20 prikazani su neki primjeri
nepravilne ugradnje.
UGRADNJA BEZ POSTOLJA
Prilikom ugradnje dječjeg sjedala bez postolja na sjedalo u vozilu, postupiti ovim
slijedom:
spustiti stabilizacijsko zapriječ
21)
postaviti dječje sjedalo na odabrano sjedalo u vozilu
povući sigurnosni pojas vozila i uvući ga u
odgovarajuću kopču, na način da vodoravni
dio pojasa bude provučen kroz dvije vodi-
enje (crtež
lice na dječjem sjedalu (crtež 22)
šakom prihvatiti poprečni sigurnosni pojas
vozila i provući ga kroz odgovarajuću vodili cu k oja se n ala zi na str až njo j st ran i le đnog
naslona dječjeg sjedala (crtež 23)
što je više moguće, nategnuti pojas oko
dječjeg sjedala, bez da preostanu dijelovi
trake pojasa, i osvjedočiti se da pojas ne
bude zapetljan. OPREZ: POPREČNI POJAS
U VOZILU TIJEKOM PRIJEVOZA MORA
UVIJEK BITI U POLOŽAJU KOJI JE PRIKAZAN NA CRTEŽU 24: DJEČJE SJEDALO SE
NIKA DA NESMIJE KORIST ITI AKO POJAS NIJ E
PROVUČEN KROZ ODGOVARAJUĆU VODILICU. U SUPROTNOM SLU ČAJU, SIGURNOST
BI MOGLA BITI OZBILJNO UGROŽENA.
postaviti ručku u položaj ”A“ (crtež 10).
prilikom otpuštanja dječjeg sjedala od sjedala vozila, otpustiti pojas vozila pritiskom
na kopču, izvući pojas iz poprečne vodilice
i iz one vodo ravne koja se nalazi na dj ečjem
sjedalu. Ponovno p ostaviti ručku u položaj
”B“ (crtež 10).
Na crtežu 25 prikazani su neki primjeri
nepravilne ugradnje.
Prilikom odvajanja dječjeg sjedala od
postolja ponoviti prethodne postupke
suprotnim redom:
izvući iz vodilice na leđnom naslonu
poprečni sigurnosni pojas vozila, vratiti
ručku u položaj ”B“ (crtež 10), otpustiti
sjedalo povlačenjem odgovarajuće poluge i istovremeno podignuti dječje sjedalo
pomoću ručke.
UPORABA POMIČNOG
Dječje sjedalo je opremljeno pomičnim
suncobranom koji štiti dijete od sunca i
vjetra. Jednostavno se ugrađuje i skida sa
sjedala, pomoću odgovarajućih spojki i
može se po želji nagnuti.
Kada se ne koristi u vozilu, dječje sjedalo
se može koristiti kao njihaljka ili ležaljka.
Kako bi sjedalo postalo pomično, postaviti
stabilizacijsko zapriječenje (crtež 15) i postaviti ručku u položaj ”B“ (crtež 10).
Prilikom uporabe sjedala u nepomičnom
položaju, izvući stabilizacijsko zapriječenje
(crtež 21) i postaviti ručku u položaj ”D“
(crtež 10).
Ne preporučuje se uporaba sjedala kao
ležaljke za djecu koja se već mogu sama
uspraviti (od 6 mjeseca starosti ili 9 kg
99
SUNCOBRANA
NEPOMIČNI I POMIČNI
POLOŽAJ SJEDALA
(UPORABA KAO LEŽALJKA)
Page 100

težine).
Kako bi se izbjegla opasnost od padova,
uvijek treba privezati pojaseve.
Dijete se nikada nesmije ostavljati bez
nadzora.
Opasno je koristiti sjedalo na uzdignutim
ili kosim površinama.
OPREZ: prije prijenosa sjedala, postaviti
i zapriječiti ručku u okomiti položaj ”B“
(crtež 10).
VERZIJA SJEDALO ZA VOZILO
OPREZ! Prilikom uporab e sa kolicima, slijediti upute koje se odnose na kolica.
No va k oli ca C HIC CO o pre mlj ena su su sta vom CLIK CLAK i imaju naslone za ruke
sa posebnim napravama koje omogućuju
neposredno učvršćenje sjedala na kolica,
bez potrebe uporabe dodatne opreme.
otvoriti kolica slijedom uputa iz
priručnika
prihvatiti sjedalo za ručku i postaviti ga na
kolica, kao što je prikazano na crtežu 27
izvući dva zatikača iz ručke, povlačenjem
i okretanjem dvije poluge za spajanje na
kolica (crtež 28)
zakrenuti ručku djelujući na donje tipke,
sve dok ru čk a ne dospije u paralel ni položaj
u odnosu na naslone za ruke i sve dok se
dvije spojnice ne zaustave unutar naslona za ruke (gurnuti sjedalo prema dolje
pridržavajući ga sa strane nogu djeteta,
kako bi se ručka zaustavila u ispravnom
položaju)
prilikom odvajanj a sjedala o d dječjih kolica,
dovoljno je pritisnuti dva crvena gumba
koji se nalaze na ručki, kako prikazuje
crtež 29
podignuti ručku okretanjem, uvući dva kli-
na za učvršćenje koj i su b ili otk lonj eni pod
točkom D i odvojiti sjedalo od kolica
OPREZ: ugradnja i izvlačenje sjedala iz
kolica može se obaviti i ako je dijete u
sjedalu, ali zbog težine djeteta ti zahvati bi mogli biti otežani. U tom slučaju se
preporučuje oprez tijekom obavljanja gore
navedenih zahvata.
SKIDANJE NAVLAKE/PRANJE DJEČ
Ako želite oprati navlaku sjedala, prethodno otpustite pojaseve dječjeg sjedala i
izvucite navlaku nakon otklanjanja dviju
metalnih klinova iz njihovih sjedišta (crtež
30). Prilikom pranja , pažljivo slijedite upute
koje su naznačene na etiketi prišivenoj na
samoj navlaci.
+ KOLICA
SJEDALA
JEG
Pojas, kopča i plastični dijelovi čiste se
pomoću navlažene krpe. Nemojte koristiti
sredstva za rastvaranje ili za izbjeljivanje
koja bi m ogl a ošte tit i te dijel ove i ug rozit i
sigurnost.
PREPORUKE: PROČITATI
PRIJE PUTOVANJA
Prilikom ugradnje dječjeg sjedala,
treba brižljivo slijediti upute koje daje
proizvođač.
Nemojte nikada, iz bilo kojeg razloga,
ostavljati dijete na dječjem sjedalu bez
nadzora.
Nemojte postavljati sigurnosni pojas
vozila u drugačije položaje od onih koji
su naznačeni u ovim uputa ma: ugrozili
biste sigurnost vašeg djeteta (primjeri
NEPRAVILNE ugradnje prikazani su na
crtežima 20 i 21).
Ugradite dječje sjed alo samo na sjeda la
u v ozilu koja s u ispr avno učvršćena na
sklop vozila i postavljena licem prema
prednjem dijelu vozila. Nemojte nikada
ostavljati u vozilu sjedala na preklapanje ili rotirajuća sjedala koja nisu
ispravno učvršćena. U slučaju nesreće
mogla bi pretstavljati opasnost.
Prilikom ugradnje dječjeg sjedala u
vozilo, vodite računa o tome da ne po-
stoji smetnja zbog blizine pomičnih
sjedala ili vrata vozila.
Oprez: ovo dječje sjedalo NESMIJE
biti korišteno u niti jednom slučaju
sa sigurnosnim pojasom vozila koji
je učvršćen na dvije točke.
Uvijek provjeravajte dijete, kako ne
bi otvaralo kopču sigurnosnog pojasa vozila.
Kada koristite postolje, provjerite je
li ispravno učvršćeno na sjedalo vozila.
Proizvod se nesmije mijenjati ili
upotpunjavati, osim ako to nije odobrio proizvođač. Nesmije se ugrađivati
oprema, rezervni dijelovi ili dodaci koje
ne isporučuje proizvođač. Možebitne
izmjene koje je proizvod pretrpio,
aju proizvođača od bilo koje
oslobađ
odgovornosti.
10. Ako dječje sjedalo iz bilo kojeg
razlo ga rezultira oštećeno, izobličeno ili
jako istrošeno, zamijenite ga: moguće
je da nema više izvorna sigurnosna
obilježja.
11. Navlaka dječjeg sjedala je njegov
sastavni dio, stoga može biti zamijenjena samo drugom koja je odo-
100
 Loading...