

Page 1
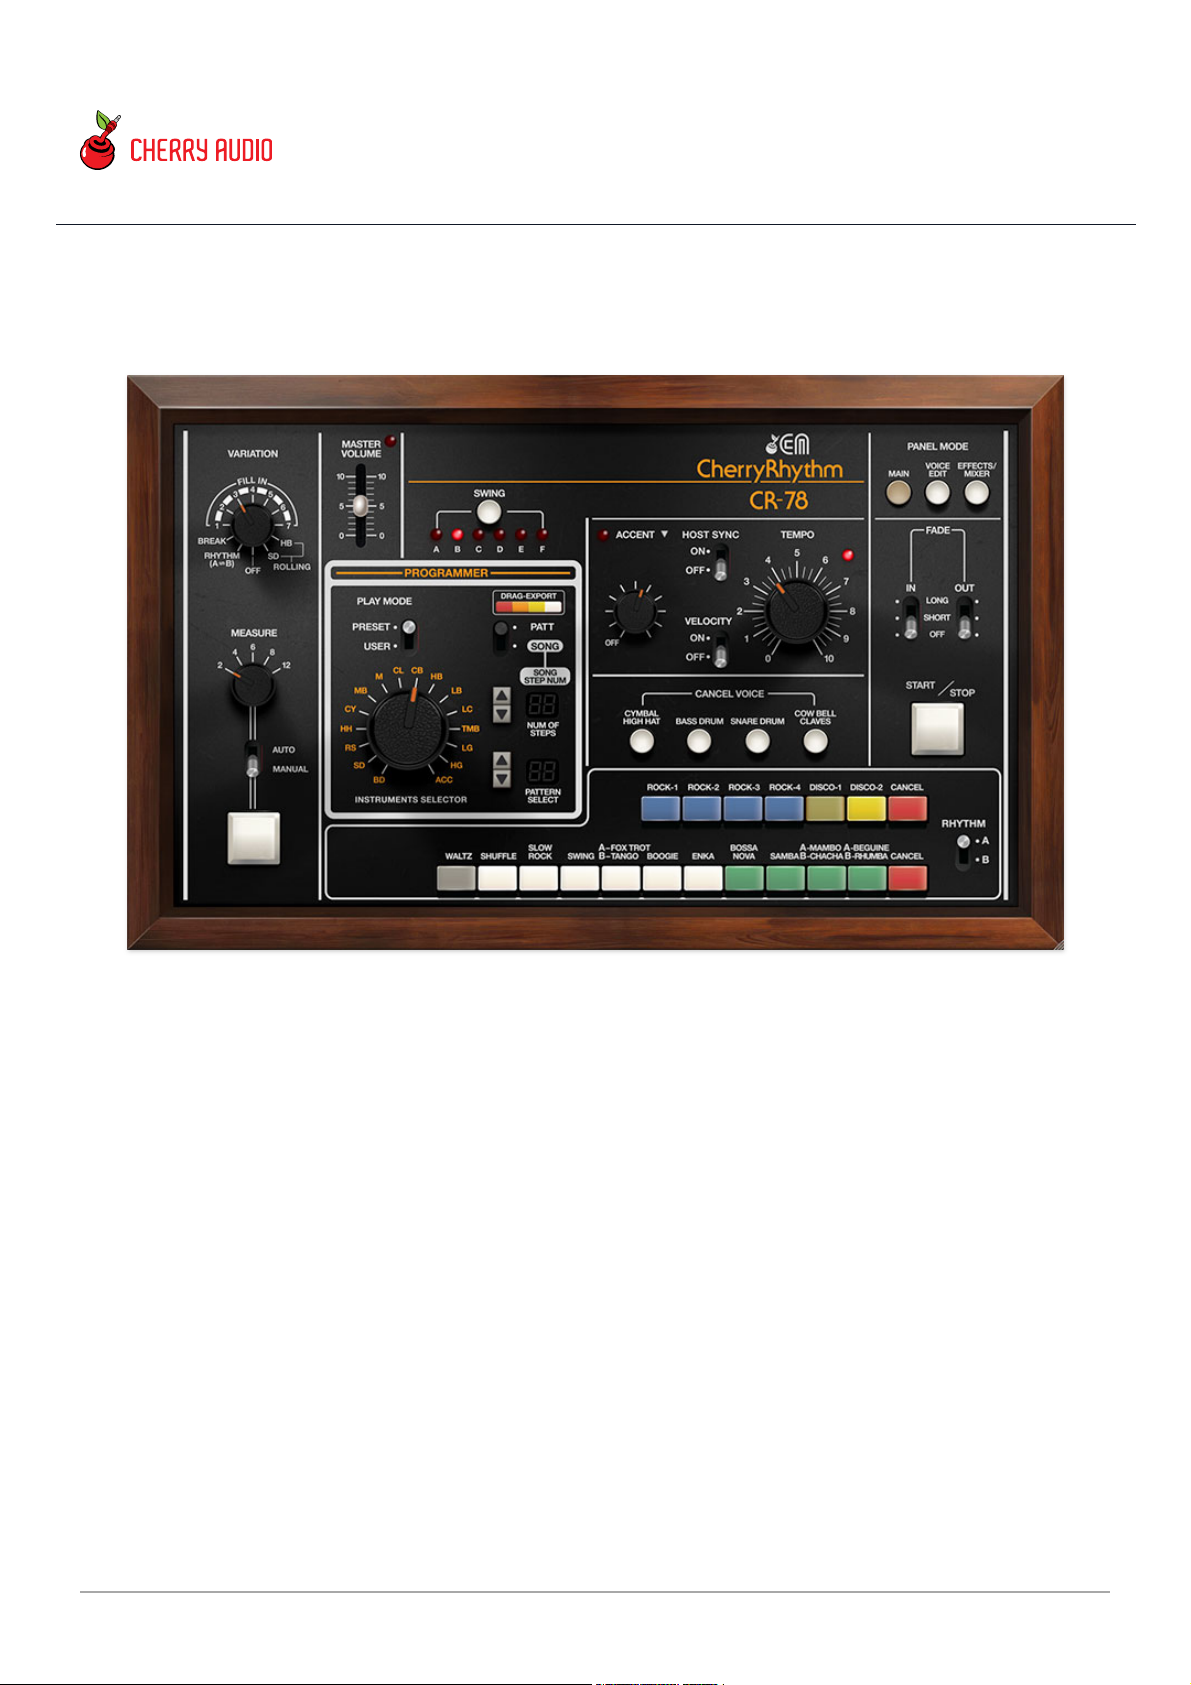
The CR-78 was originally introduced in 1978, and was in incremental but
significant development in the evolution of Roland's classic line of drum
machine. Roland's earliest drum machines appeared in the early 70s under
the "Acetone" banner, and like other drum machines of the era, these were
intended to sit atop the home organs that were all the rage. The CR-78 and
its close cousin, the CR-68, upped the ante with superior analog drum
sounds. More significantly, its onboard microprocessor allowed users to
program and store four custom beats. Though the method for inputting user
patterns was crude and limited, it was a breakthrough for its day, and was
embraced by a laundry list of pro musicians including Ultravox, Phil Collins,
Hall and Oates, Blondie, Orchestral Manoeuvres in the Dark, and more.
Cherry Audio's CR-78 accurately recreates the original unit's punchy analog
drum sounds and includes exact replications of its 34 onboard preset
rhythms. The original CR-78's unique "Cancel Voice" and "Add Voice" controls
CR-78 User Guide
Last updated 2025.02.03
Cherry Audio CR-78 User Guide - 1
Page 2
allowed a surprising degree of flexibility when using the onboard rhythm
patterns - we've included the "Cancel Voice" buttons, and greatly extended
the "Add Voice" capabilities with a full onboard mixer. We've also done away
with the finicky user beat programming and replaced it a familiar x0x-style
button-per-step interface, as well as an easy-to-use song mode for pattern
chaining. The fun "variations" drum fill section has also been reproduced
exactly.
Unlike other sample-based emulations, Cherry's CR-78 uses modeled
synthesis to recreate the classic tones of the original, and makes a quantum
leap forward with fully editable sound parameters, enabling all manner of
subtle-to-unrecognizable sound tweaking. Finally, four onboard effects are
provided, with a uniquely fast and fun "send button" UI for each individual
sound in the mixer section.
Terminology in this manual, so we're all on the same page:
A
pattern
refers to one of the built-in (
Play Mode
set to
Preset
) or user-
created rhythm patterns (
Play Mode
set to
User
). A
beat
refers to a step
number within a rhythm - for example, "beat 1" would be the first step in a
pattern. For clarity, we'll avoid using "beat" to refer an entire rhythm
pattern. (Hopefully Janet Jackson doesn't read this, because "GIMME A
RHYTHM PATTERN!" doesn't roll off the tongue very well.)
Also, italicized text generally refers to a specific control on the front panel,
such as the
Measure
or
Instruments Selector
controls.
Pre-Purchase Demo Mode
If you haven't purchased the full version of CR-78, it will run in demo mode.
All functions will work, but inharmonic tones will occasionally sound (the LED
next to
Demo
in the top toolbar will illuminate when the ugly tones are
sounding). We've also added a handy button to make purchasing easy, so
you've got no excuse! As you might expect, all the demo stuff disappears
once CR-78 is purchased.
Technical Assistance
Cherry Audio's unique online store and automatic updating should make
Cherry Audio CR-78 User Guide - 2
Page 3

operation a smooth experience, but if you run into any issues or have
questions, you can discuss issues online at the Cherry Audio forums.
... or you can communicate directly with one of our beauty pageant-winning
tech support staff at:
https://cherryaudio.kayako.com/
Cherry Audio CR-78 User Guide - 3
Page 4
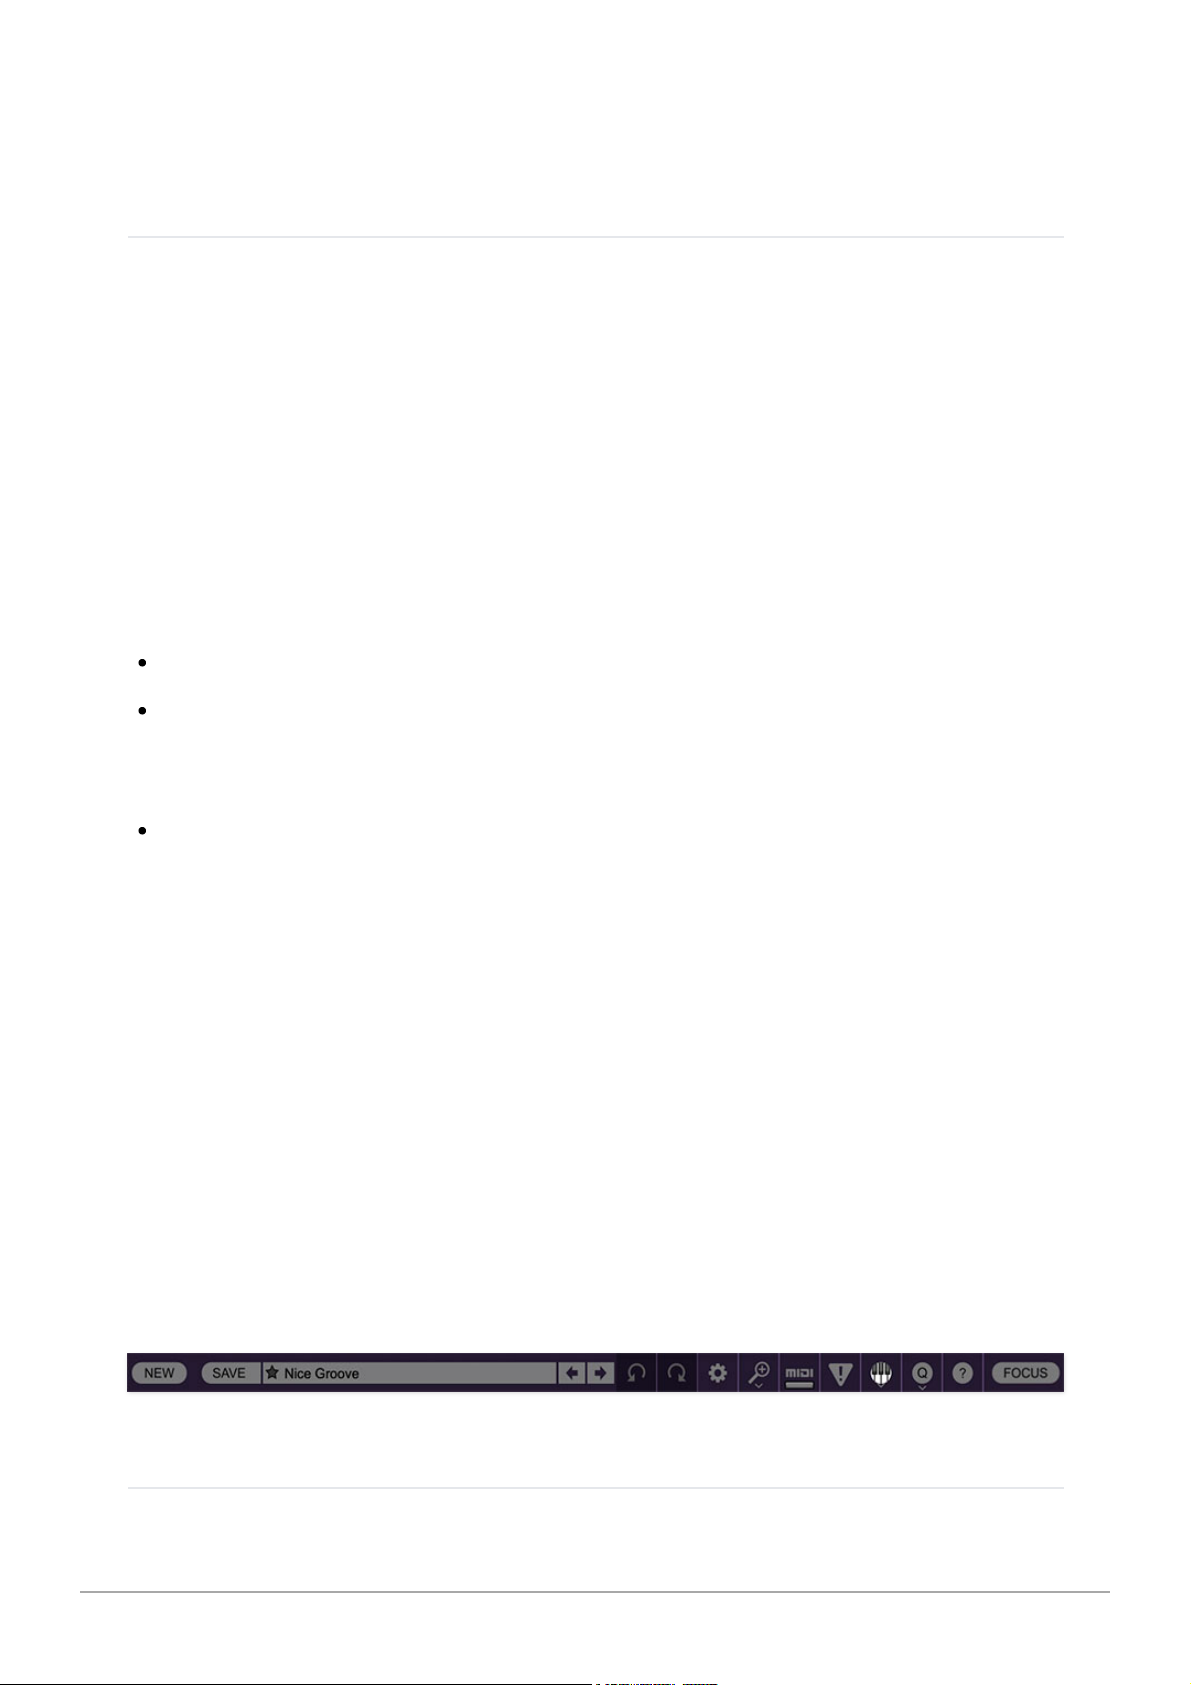
The purple strip at the top of the interface is where you’ll load, save, and
create patch presets. It contains utility functions such as undo/redo, UI zoom,
under-the-hood settings, and more.
Anatomy of a Preset (Important!)
If you've used other Cherry Audio instruments, the patch browser should be
familiar. Since CR-78 is a drum machine with pattern creation and storage
integrated in the main UI, we'll go over the hierarchy of rhythm and sound
storage.
A patch browser preset stores
all
current sound settings and patterns. What
you'll hear when you hit play depends on the current
Play Mode
switch
position, but regardless of the switch position, a patch stores the following:
Global/Panel Mode buttons
The current
Panel Mode
view is saved with a patch.
Main Panel
Play Mode / Preset- The current rhythm button(s) selection
Play Mode / User- A patch includes 98 rhythm patterns. In Pattern mode,
the currently playing pattern is selected using the
Pattern Select
up/down
buttons.
Song Mode- When
Song
mode is selected, a chain of user patterns of up
to 99 steps can be created. A single song is saved with a patch.
All other main panel settings are stored with the exception of
Start/Stop state. Play or stop status is not stored with patches. When a
new patch is selected, CR-78 remains in the current state; that is, if it's
currently playing, it continues to play; if it's stopped, it stays stopped. We did
it this way so users wouldn't have to keep hitting the
Start/Stop
button every
time the pattern was switched.
Voice Edit Panel
All voice edit panel settings are saved with a patch.
Effects/Mixer Panel
All effects and mixer settings are saved with a patch.
Top Toolbar and Preset Browser Controls
Cherry Audio CR-78 User Guide - 4
Page 5
New- Opens a new blank patch. If an unsaved patch is currently open or
you’ve modified an existing saved patch, a dialog asks if you’d like to save
the patch in its current state. This greatly reduces the possibility of losing an
edited unsaved patch.
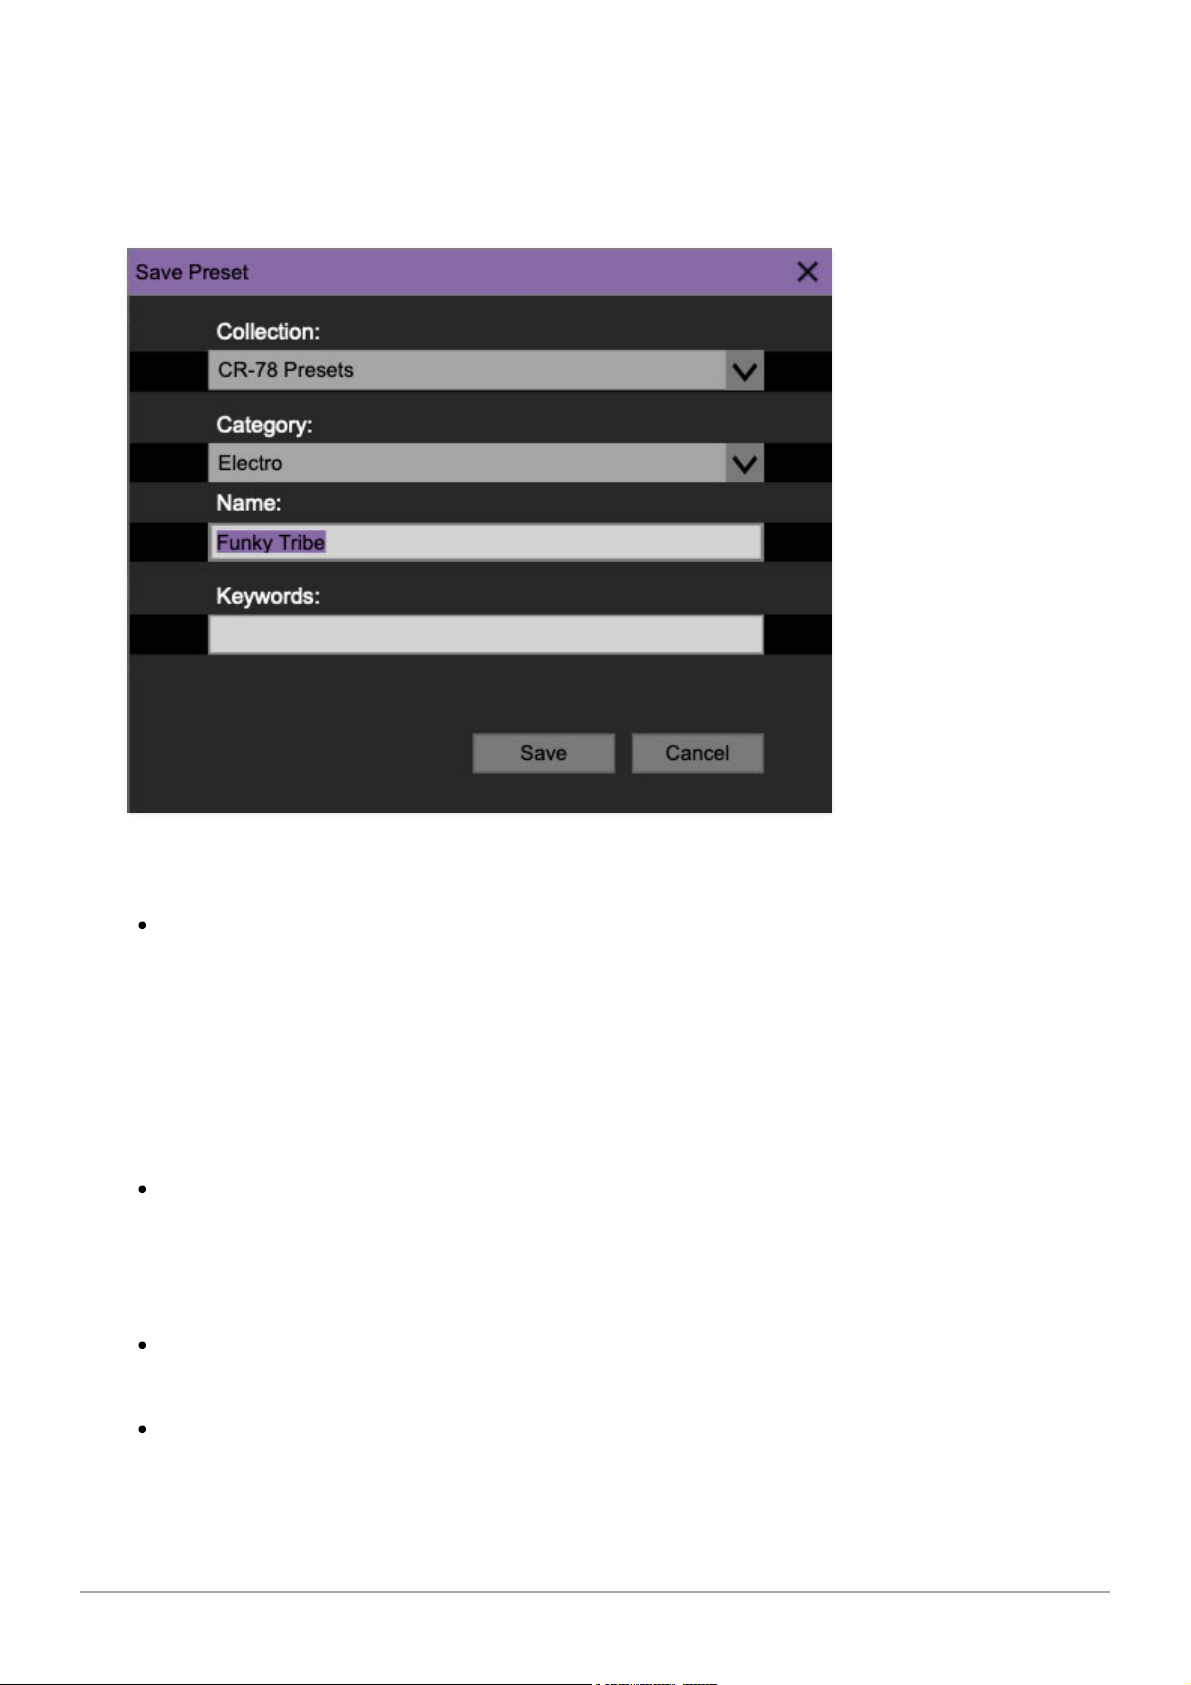
Save- Use this to save patches. There are a couple of levels of hierarchy:
Collection- This is the top level of organization, and contains entire
“sets” of presets. The
CR-78 Presets
are the main included collection. We
also include a
User Presets Collection
for storing your own presets, but
you’re free to create your own collections. To create a new collections,
click in the
Collection
text field (where it says
User Presets
above) and
type a name. User-created sounds can be freely saved to any collection;
we like to keep ‘em separated for organizational purposes.
Categories- Within each
Collection
are a number of sound categories. As
with collections, you’re free to create as many categories as you like. To
create a category, click in the
Category
text field of the
Save
dialog
window and type a new category name.
Patch- A patch is an individual sound. To save a patch, simply type the
name in the
Name
field and click
Save
.
Keywords- You can add descriptive words such as “vintage,” “new wave,”
“boing boom tschak,” etc., to patches to make them appear when terms
Cherry Audio CR-78 User Guide - 5
Page 6
are typed in the
Search
field. Use commas to separate multiple keywords
entries.
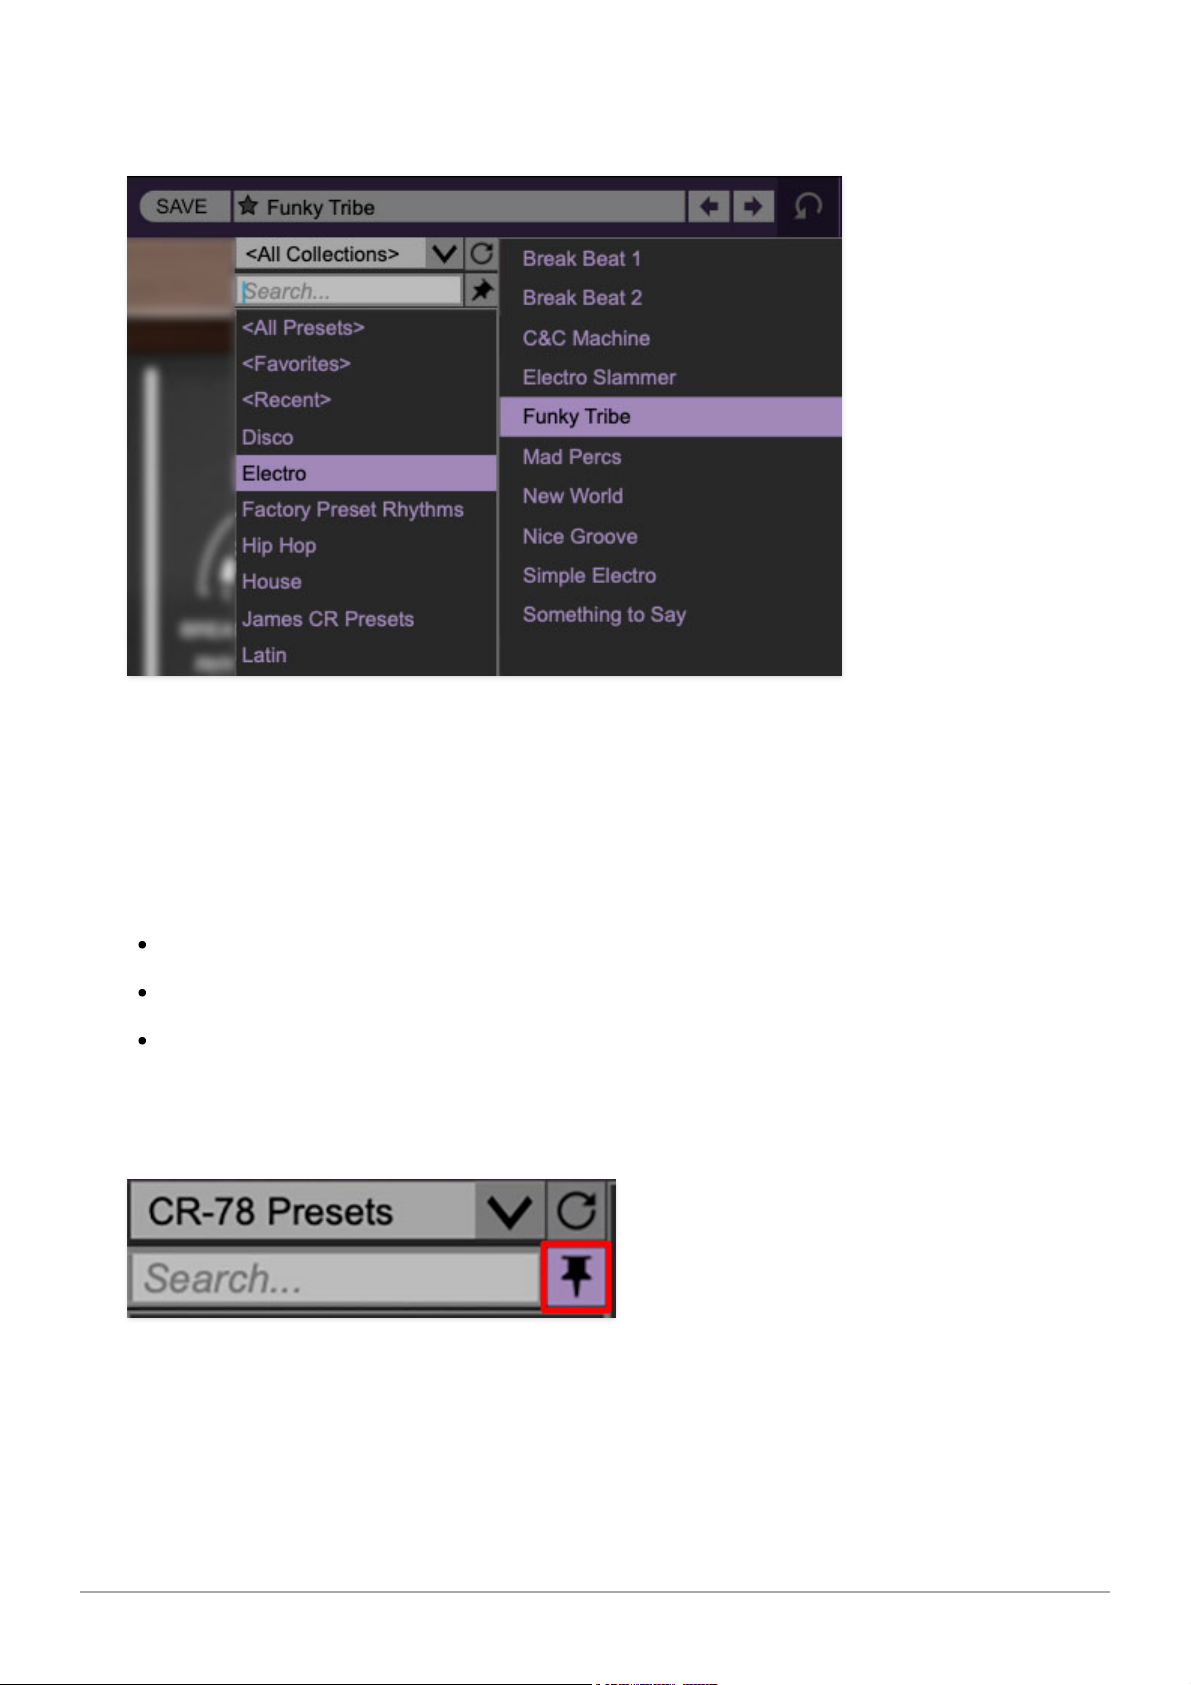
Browsing Patches- Patches can be browsed by clicking the <
Select Preset
>
field. To select a preset collection, click in the area that says <
All
Collections
> or on the downward-facing arrow next to it.
Clicking on the left-side categories narrows down which patches are
displayed.
<All Presets> will show presets from all collections and categories.
<Recent> displays recently used presets.
Refresh- This is the circular arrow button to the right of the downward
arrow; clicking this checks the Cherry Audio server for new or updated
presets.
Pin- Clicking the push-pin icon locks the patch selection list open, allowing
fast and easy browsing and auditioning of patches. Click the icon again to
disable pin mode. when in pin mode, the up and down arrow keys can be
Cherry Audio CR-78 User Guide - 6
Page 7
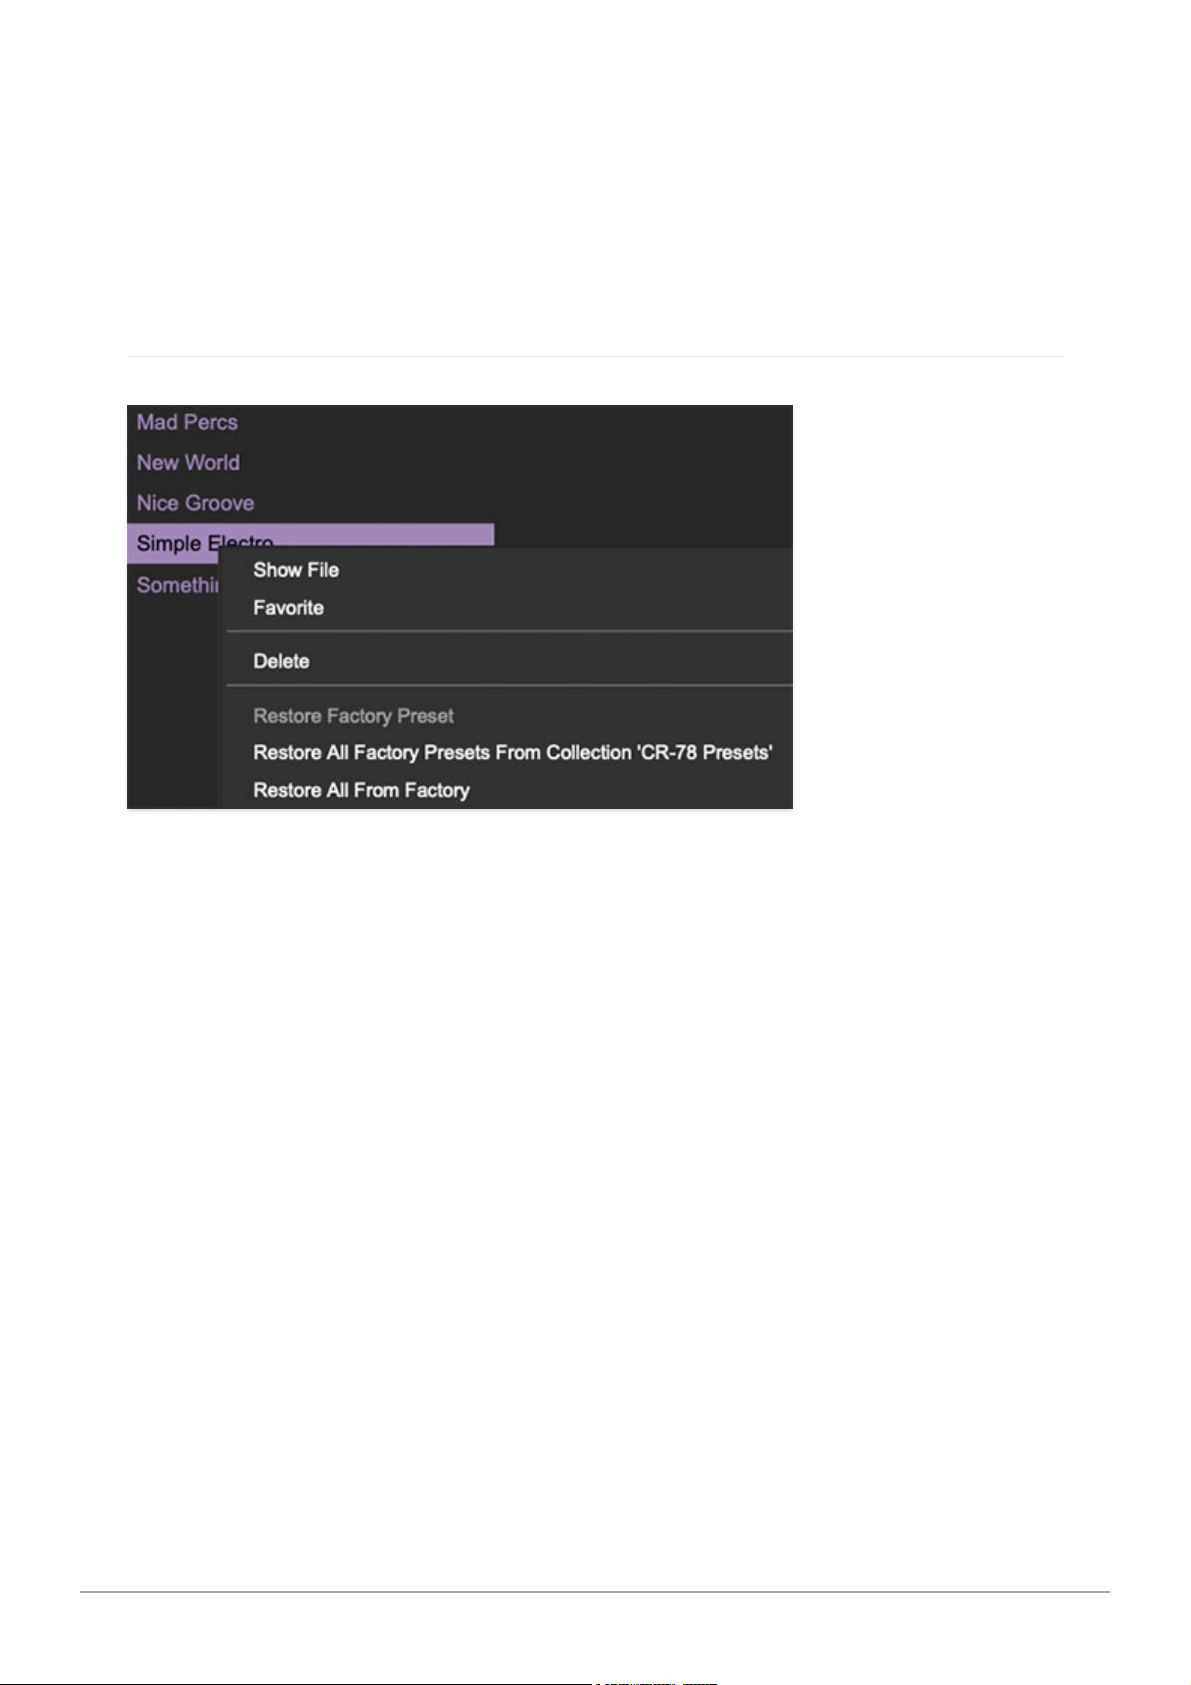
used to select patches. (Thanks to Starship/Phil Bennett for this useful
feature suggestion.)
Preset
- Step Back/Forward Arrows
- These step to the previous or next
preset. macOS [⌘+left/right arrow key] or Windows [CTRL+left/right arrow
key] will navigate through presets back and forth in the currently selected
collection/category.
Preset List Right-Click Functions
Show File- This displays the selected preset in the Mac or Windows folder
containing it. This is useful for backing up or sending a preset file to another
user.
Show In Original Category- Selects the preset within its category, i.e. the
category will highlight in the left preset menu. The
Show In Original Category
command only displays if the preset was selected within the <
All Presets
>,
<
Favorites
>, or <
Recent
> categories.
Favorites- Favorited presets will show in when the <Favorites> category is
selected. A star will display next to the preset name. Right-click on the preset
and reselect
Favorite
to un-favorite it.
Delete- Deletes the selected preset.
Restore Factory Preset- If one of the factory (i.e. not user) patches is
edited and saved, selecting this command restores the patch to its unaltered
"factory" setting. This menu will be grayed-out for user bank patches.
Restore All Factory Presets From 'CR-78 Factory Presets'- If any
patches from the "factory" bank are edited and saved, selecting this
Cherry Audio CR-78 User Guide - 7
Page 8

command restores
all
of them to their unaltered "factory" setting.
Restore All From Factory- If any patches from the "factory" banks are
edited and saved, selecting this command restores
all
of them to their
unaltered "factory" setting.
Importing Presets with drag-and-drop
Presets can be imported singly or en masse (as a single compressed ZIP file)
simply by dragging and dropping from the desktop anywhere on the user
interface.
If a single .*preset file is dragged and dropped, the sound is immediately
loaded and the standard Save Preset dialog appears; this lets you save the
sound to the instrument's preset browser. Note that you don't have to save
the sound to preset browser; if you just want to hear and play the sound,
click the Cancel button in the Save Preset dialog - the sound will still be
loaded.
Compressed zip files containing multiple sounds can also be drag and
dropped onto the UI. This works the same as with single sounds, but instead
of the
Save Preset
dialog, you'll see the
Import Preset Collection
dialog. The
presets will be added as a new collection and available in the categories for
which they were tagged.
Menu Strip Buttons
Undo/Redo- These circular arrows will undo or redo the last action. It
remembers many steps, so if you really loused something up, keep on
clickin'...
Settings- This is where user preferences for user interface, audio interfaces,
user account, and more are configured. See the Settings section for full
information.
Cherry Audio CR-78 User Guide - 8
Page 9
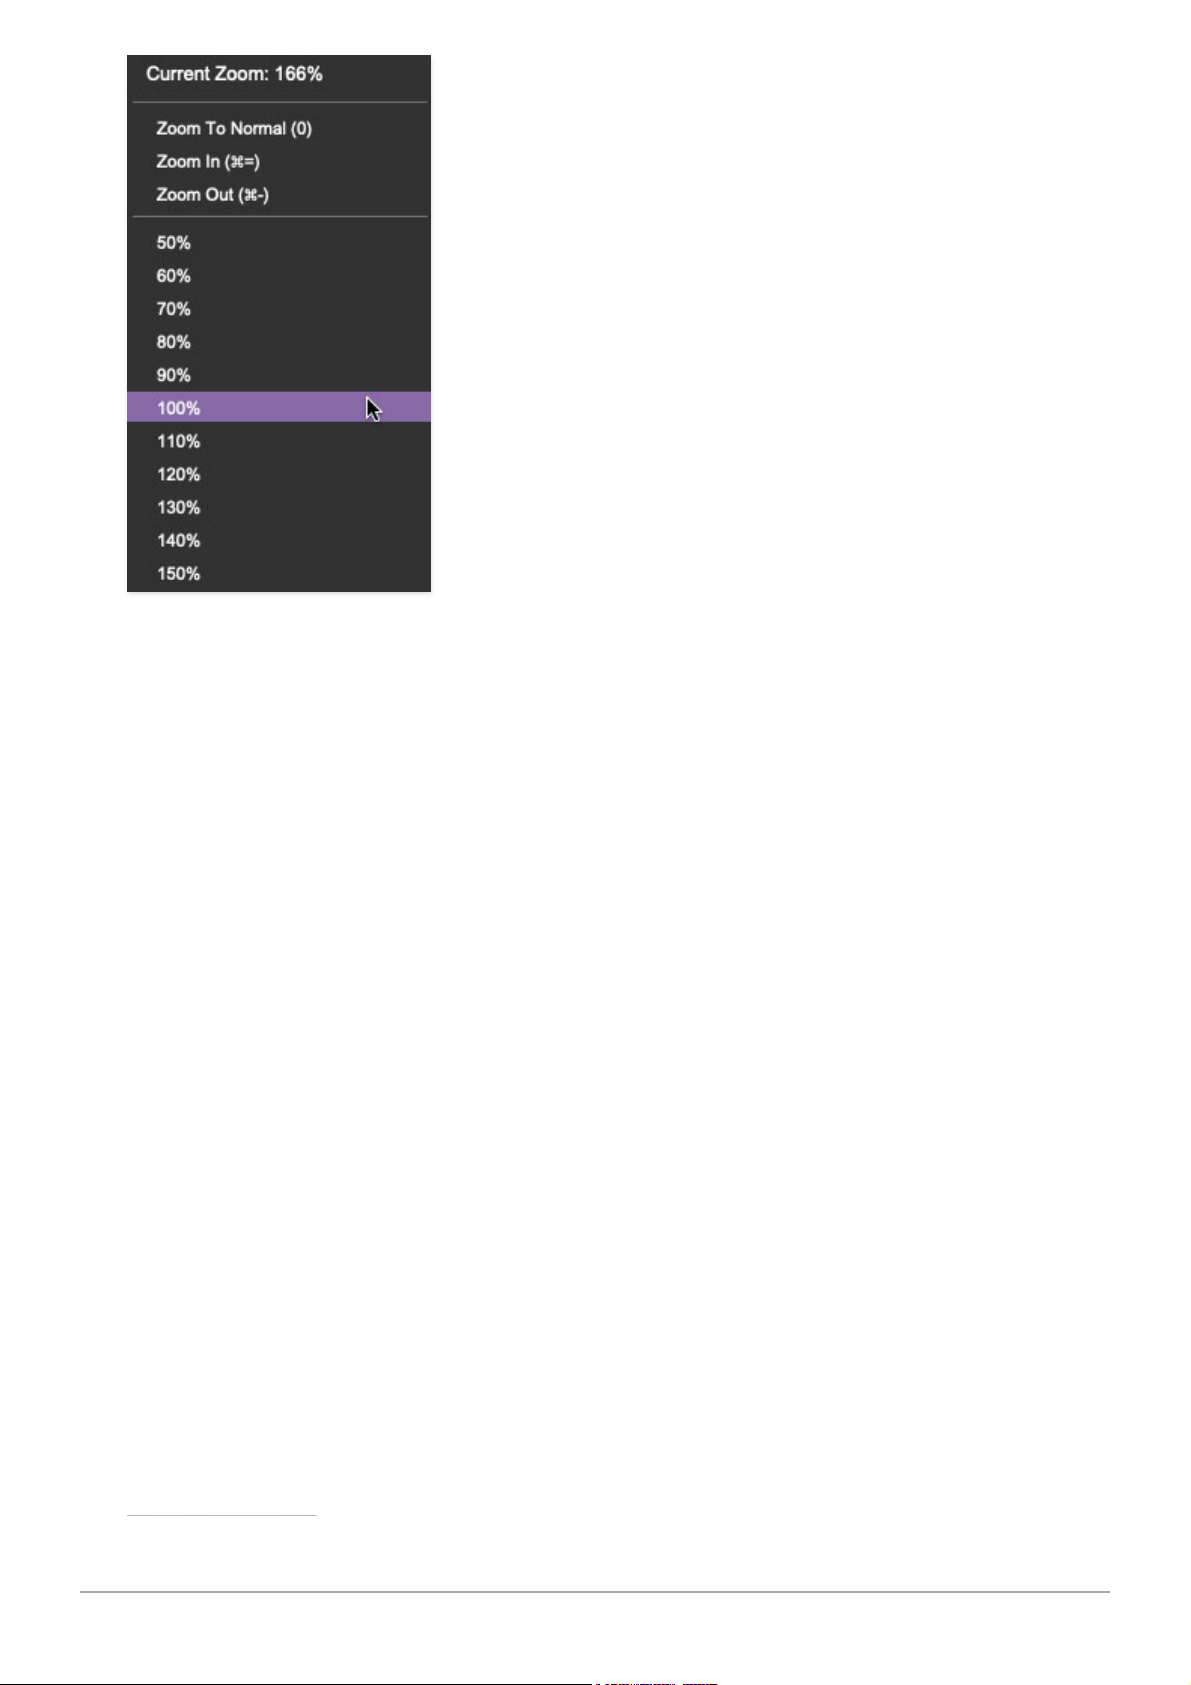
Zoom Magnifying Glass- Click to resize the interface. Selecting
100%
returns the user interface to native size.
MIDI Tab- Opens the MIDI controllers tab for configuring internal and
hardware MIDI controls. See the MIDI Controllers Setup and MIDI Tab
section for full information.
! (MIDI Panic) - Click to send an all-notes-off message in case of, "why
won't this thing stop making noise?!?" stuck-note incidents.
Q (Oversampling Quality)- The Q button sets CR-78's internal
oversampling rate; the higher the setting, the better audio fidelity will be,
with the caveat that more computer processing power will be required.
Internal processing can be set to 1x (same rate as the current sample rate of
the host DAW or in the
Settings>Audio/MIDI
window for the standalone
version) or to 2x, 3x, or 4x the current sample rate. The sample rate is
downsampled at the instrument output stage to match the current host
sample rate.
For example, if the current DAW/instrument sample rate setting is 48 kHz,
and oversampling is set to 2x, CR-78's internal processing runs at 96 kHz,
and is then reduced back to 48kHz at the output stage.
Cherry Audio CR-78 User Guide - 9
Page 10
QWERTY Musical Typing Keyboard- Opens an onscreen keyboard allowing
a standard QWERTY computer keyboard to be used for playing music notes.
For more information, see QWERTY Musical Typing Keyboard (MTK)
section.
? (Help) - Clicking this launches your web browser and opens the help
document you’re currently reading. Which means you're already here...
Focus Button
If you're using a tiny laptop, the user interface can potentially be hard to see.
With this in mind, the
Focus
button conveniently blows up CR-78's view to
roughly twice its normal size within the current window size. Unlike the
Zoom
"magnifying glass" function,
Focus
doesn't affect the current window size. By
default, the patch panel section fills the current window, but the view can be
scrolled vertically and horizontally with a mouse wheel, track pad, or Apple
Mighty Mouse finger-scrolling. Or if you're the last person on earth still using
a single-button mouse, scroll bars will appear at the window edges when in
Focus
mode. (Drop us a line from your AOL email account, 'kay?)
Using
Focus
mode couldn't be easier - just click the
Focus
button the top
menu bar. To return to standard view, click
Reset
.
Cherry Audio CR-78 User Guide - 10
Page 11
CA / CherryRhythm CR-78 logo - Clicking this displays “about”
information, and shows the version number and current registered user ID.
Cherry Audio CR-78 User Guide - 11
Page 12
The Panel Mode buttons in the top corner are CR-78's only global controls;
that is, they're visible regardless of which UI page is currently viewed. They
select the following three panels:
Main- The primary panel containing all the controls of the original hardware
unit, give or take. It's where you'll select which patterns play, the start/stop
button, tempo, accent level, fills, swing, and more.
Cherry Audio CR-78 User Guide - 12
Page 13
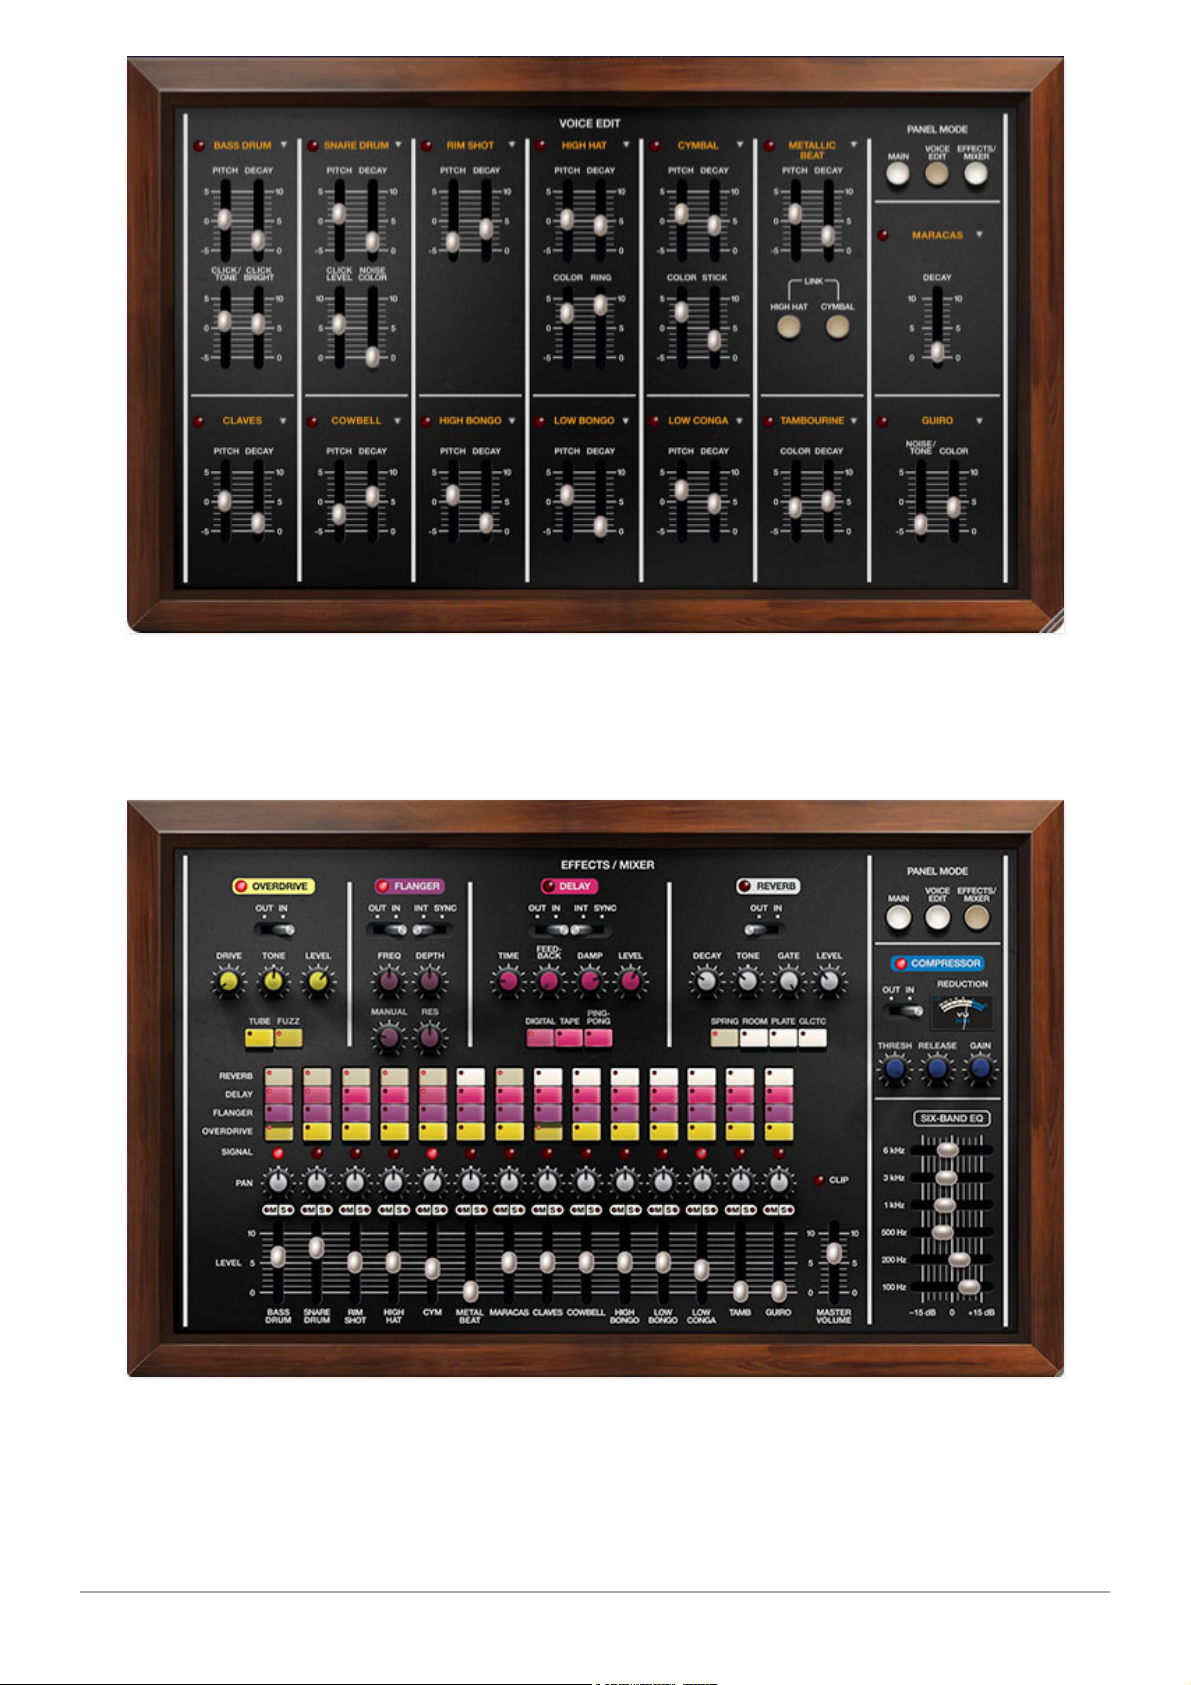
Voice Edit- Unlike the original, Cherry CR-78 allows editing of the voice
parameters of each individual sound. (No samples here, folks!)
Effects/Mixer- CR-78’s effects include overdrive, flanger, delay, and reverb
that can be individually applied to each sound, plus a master compressor and
Cherry Audio CR-78 User Guide - 13
Page 14

six-band EQ. There's also a mixer with pan controls, mute and solo buttons,
signal-present LEDs, and
Master Volume
. Note that the
Master Volume
is the
same as the one on the Main page and moves in sync.
Standalone Version Panel Mode Keyboard
Shortcuts
We've incorporated a few "hard-wired" keyboard shortcuts into the
standalone version only. We skipped them on the DAW version because most
DAWs have their own keyboard shortcuts, and focus (i.e., which one responds
to the keyboard commands) can be finicky.
The QWERTY keyboard 1, 2, and 3 keys select the
Main, Voice Edit
, and
Effects/Mixer
panels respectively - this works for the 1, 2, and 3 keys above
the keyboard and the ones in the keypad. The space bar will start and stop
playback.
Alternatively, you can custom assign additional QWERTY keyboard
shortcuts in the same way MIDI controllers are assigned - right-click
on any control, select
MIDI Learn
, and hit the keyboard key (or hardware
USB/MIDI control) you'd like to assign. We've found that in addition to the
above Panel Mode button shortcuts, it's also useful to assign key shortcuts to
the
Cancel Voice
buttons and the big square Variation/Fill button.
For more information on shortcut key assignment, check out the MIDI
Controllers Setup and The MIDI Tab section.
In the sections that follow, we'll go over each section's controls in
detail.
Cherry Audio CR-78 User Guide - 14
Page 15
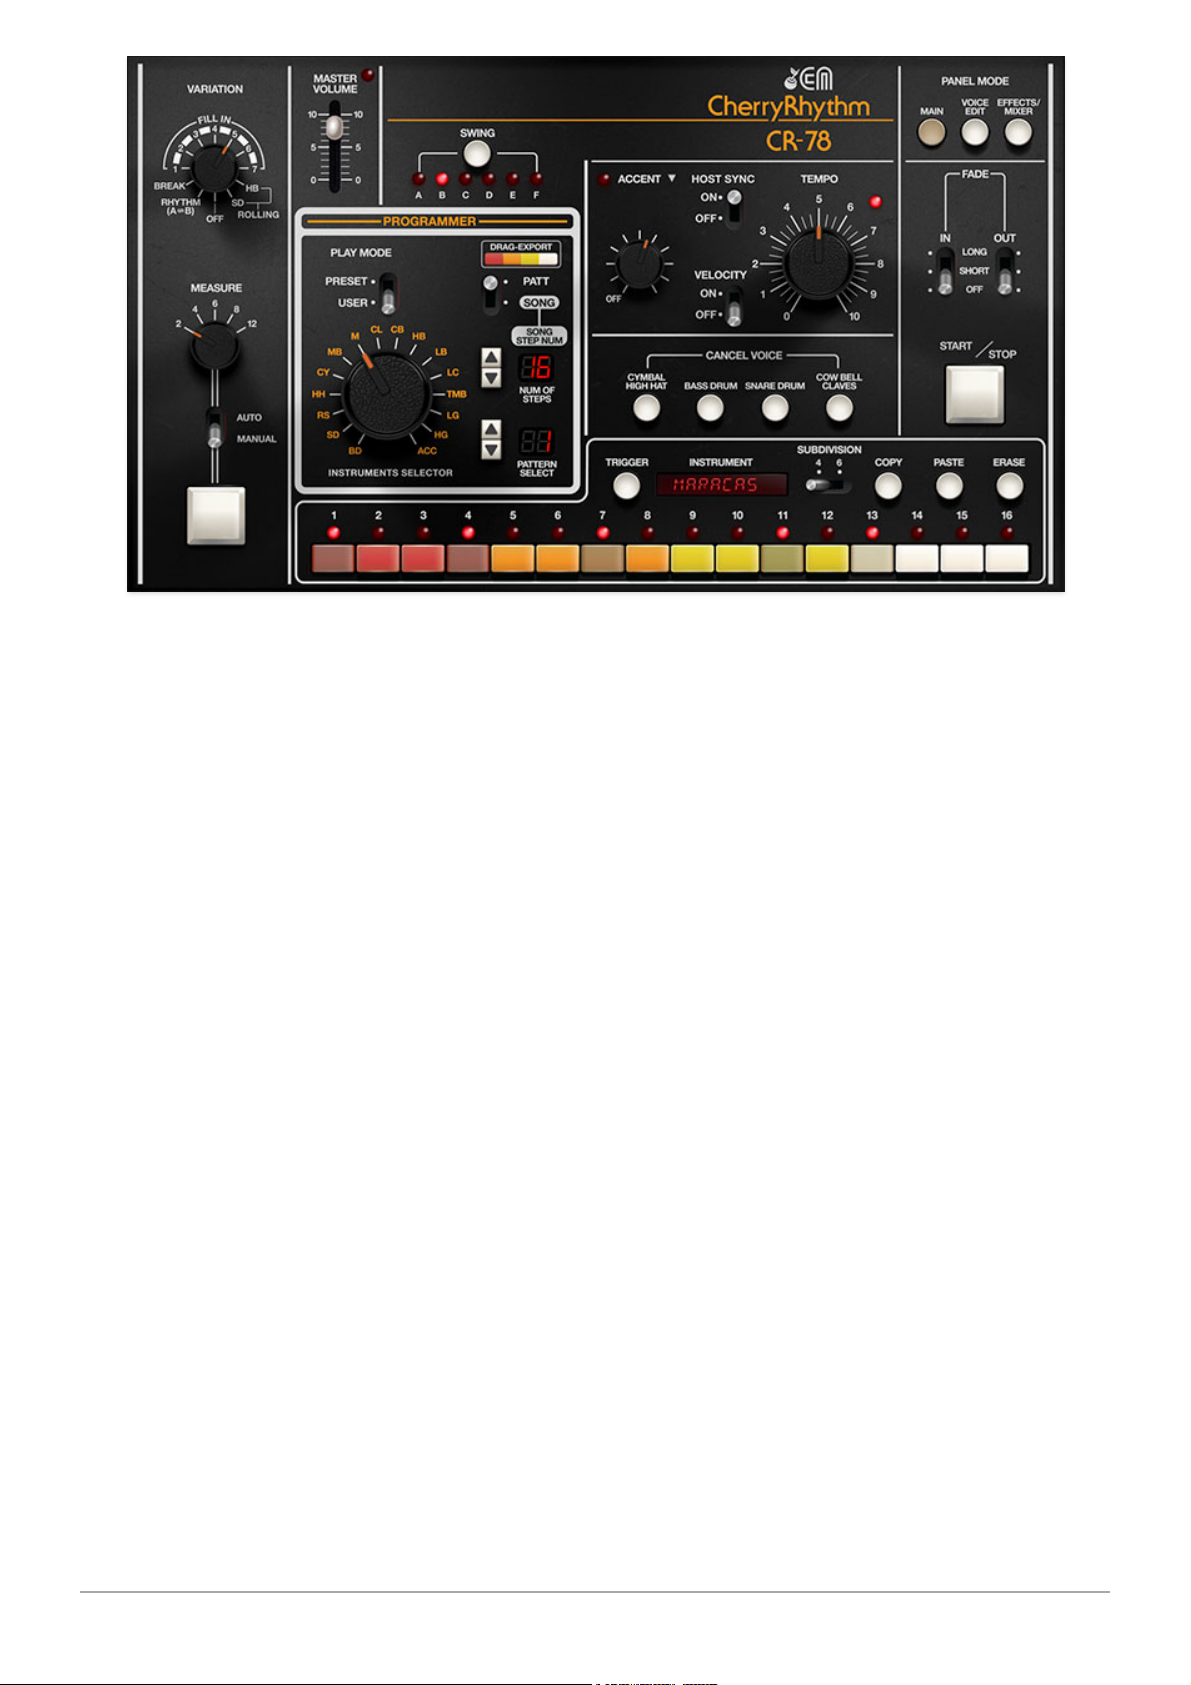
We're going to jump around the panel a little in order to prioritize the most
important information to get you competently jammin' on CR-78. We've
given the
Programmer
section, pattern selection, and Variation sections their
own manual chapters due to the big-ish amount of information about them.
Master Volume and clip LED- Sets the overall instrument volume. Keep
your eye on the
Clip
LED to prevent ugly digital distortion. The
Master
Volume
and clip LED are the same as the Master Volume on the Effects/Mixer
page, just duplicated for convenience.
Swing- When CR-78 is playing a 4/4 16-step beat,
Swing
delays every other
16th note by a by a percentage. If this doesn't ring a bell sonically, think of
Bobby Brown's "Every Little Step" or imagine the ride cymbal in an old jazz
tune... ting, tingtingting, tingtingting... that's swingin' baby!
A few of CR-78's preset rhythms are swung -
Shuffle, Slow Rock, Swing
(duh),
and
Boogie
. Note that the original CR-78 didn't have a swing control; instead
it created swung beats by dividing the bar into 24-step, triplet-based
patterns (as opposed to the "Roland standard" 16-steps). There's no reason
you can't create swung user beats in 24-beat mode (
Subdivision
setting of
6
), but it's it's a little easier to swing a simple 4/4, 16-step rhythm using the
Swing
control.
Getting back to the
Swing
button, CR-78 cycles through each of the settings
when clicked. Each one gets progressively swingy-er. Specifically the
alternating first/second percentages are as follows:
Cherry Audio CR-78 User Guide - 15
Page 16
A
: 50% (straight rhythm - no swing)
B
: 54%
C
: 58%
D
: 62%
E
: 66%
F
: 71% (maximum swing)
These are the "industry-standard" swing percentage offset amounts,
originally established with the Linn LM-1 drum machine. These percentages
weren't arbitrarily chosen - they conform to the available quantization values
of a 48-pulse-per-quarter-note (PPQN) machine. Whack this search link if
you want to geek out on how old-school drum machines and sequencers
break down PPQN timing divisions.
Swing and the Factory Preset Patterns
The
Swing
buttons will affect the factory preset patterns (i.e. Play Mode set
to
Preset
). But keep in mind that since swing affects every other 16th note, it
won't have any audible effect on some of the simpler 8th note-based
patterns (the A versions of
Rock-1, Rock-2
, and
Rock-3
, for example). That's
because these patterns don't have any "alternating 16th" notes to swing,
capiche?
If you'd like the factory patterns to play back in their original state, make
sure to leave the
Swing
control set to A.
Drag-Export
Clicking and dragging the
Drag-Export
button array to a DAW MIDI track
allows the MIDI data of the current user pattern to be exported either to the
desktop as a Standard MIDI file (when using CR-78 in standalone mode or
within a DAW) or to a DAW MIDI track (when using CR-78 within DAW).
For more information on the
Drag Export
function, please see Using CR-78
as a DAW MIDI Sound Module.
Accent knob, LED, and triangle menu- Accent allows selected steps to be
louder than the other for emphasis; the
Accent
knob controls how much
louder accented steps are than the nominal pattern level. Accent steps are
Cherry Audio CR-78 User Guide - 16
Page 17

"built-in" to the preset patterns. For user patterns, accent steps are
programmed like any other instrument by setting the
Instruments Selector
knob to
Acc
when programming. Setting the
Accent
knob to 0 effectively
disables accents.
The LED next to the
Accent
label flashes when accented steps play.
Accent Triangle Menu- The inverted triangle menu accesses couple of
useful functions.
Accent MIDI Note- Sets the incoming MIDI note associated with accent.
This doesn't affect anything when programming CR-78 from the front
panel, but its useful if you're playing from a USB/MIDI controller and/or
recording MIDI notes into a DAW. When the menu is clicked, a submenu
will open showing all MIDI notes from 0-127; simply click one to select.
Reset To Default MIDI Note- Resets the Accent MIDI note to default,
which is MIDI note 40/E2.
Host Sync- Selects between CR-78's onboard clock and tempo control and
external tempo lock from a DAW. The
Tempo
knob will gray out when
Sync
is
set to
Ext
mode.
Host Sync is a global control - that is, its setting isn't stored with presets.
However, DAW projects will remember its current position. More on this in the
DAW mode section below.
Host Sync operates a bit differently depending on whether CR-78 is running
in standalone mode or as a plug-in in a DAW, so paaayz close attention,
please:
Standalone Mode- When running standalone, CR-78 uses its own
internal clock with BPM set by the
Tempo
knob. The
Host Sync
switch
defaults to the Off position and is disabled and dimmed.
DAW Mode- When used in a DAW, the
Host Sync
switch defaults to the
On
position. Start and stop is controlled by the DAW transport, and CR-
78's tempo is locked to the DAW project tempo.
The
Host Sync
switch is global, that is, it's not stored per-preset. This was
done to allow sync while auditioning patterns from our kickass preset
library. The potential downside is that some preset patterns have extreme
tempo settings that might sound wrong or weird at your current DAW
tempo project. However, in addition to "disconnecting" transport and
tempo sync, switching
Host Sync
to the Off position also causes preset
Cherry Audio CR-78 User Guide - 17
Page 18

patterns to play back at their saved tempos, allowing the patterns to be
heard as the programmer intended them.
Velocity- Enabling
Velocity
allows CR-78's sound volumes to respond to MIDI
velocity. This is useful when using a DAW sequencer to control CR-78. The
Velocity
switch has no effect when using the built-in rhythm presets
or user pattern programming.
Tempo knob and LED- When the
Host Sync
switch is set to Off position this
sets the tempo of rhythms over a range of 20-300 BPM. Believe it or not, the
original unit had an even wider range - up to something like 500 BPM, but we
altered it because a large chunk of the knob range was useless (unless
you're doing a
Suicide
tribute band). The LED glows solidly in stop mode, and
flashes quarter notes in play mode - red on the one, and green on all other
beats.
If CR-78 is being used in a DAW, the
Tempo
knob operates differently
dependent on the position of the
Host Sync
switch.
Host Sync / Off- Tempo is independent of the DAW project setting and
the knob works normally.
Host Sync / On- Overall tempo is determined by the DAW project setting.
When
Host Sync
is in the On position, the
Tempo
knob becomes a
multiplier - patterns play in sync with DAW host tempo and the
Tempo
knob divides or multiples the host tempo from 1/4 to 4X of the DAW
project tempo. A setting of 5 = original tempo.
When
Host Sync
is enabled, the
Tempo
knob multiplier position is
not
saved with presets, however, its position will save with the DAW project.
Cancel Voice- These are toggling mute buttons for the
Cymbal/High Hat
,
Bass Drum, Snare Drum
, and
Cow Bell/Clave
voices respectively. They're
particularly useful for exploring variations with factory preset patterns (and
the key to the CR-78 patterns heard in many hit songs). Multiple
Cancel Voice
buttons can be enabled or disabled by clicking and dragging the mouse over
them.
Note that the
Cancel Voice
buttons operate independently of the mute
buttons on the mixer page. If an instrument is inexplicably muted, check the
Cancel Voice
buttons and the mixer mutes.
Fade- This fabulously useful feature allows rhythms to, you guessed it, fade
in and out, respectively, at your choice of two different speeds. The
Fade
function works in
Pattern
and
Song
modes. (Remember that the CR-78's
Cherry Audio CR-78 User Guide - 18
Page 19

original intended market segment was "Mall Organist," not "Diminuitive
Former Prog-Rock Drummer Who Senses Oncoming Things In Air at Night").
Start/Stop- Starts and stops playback of patterns or songs. The QWERTY
keyboard space bar will start and stop CR-78 when running in standalone
mode. It's disabled it in the plug-in version because most DAWs use the
space bar to start and stop the transport.
Cherry Audio CR-78 User Guide - 19
Page 20
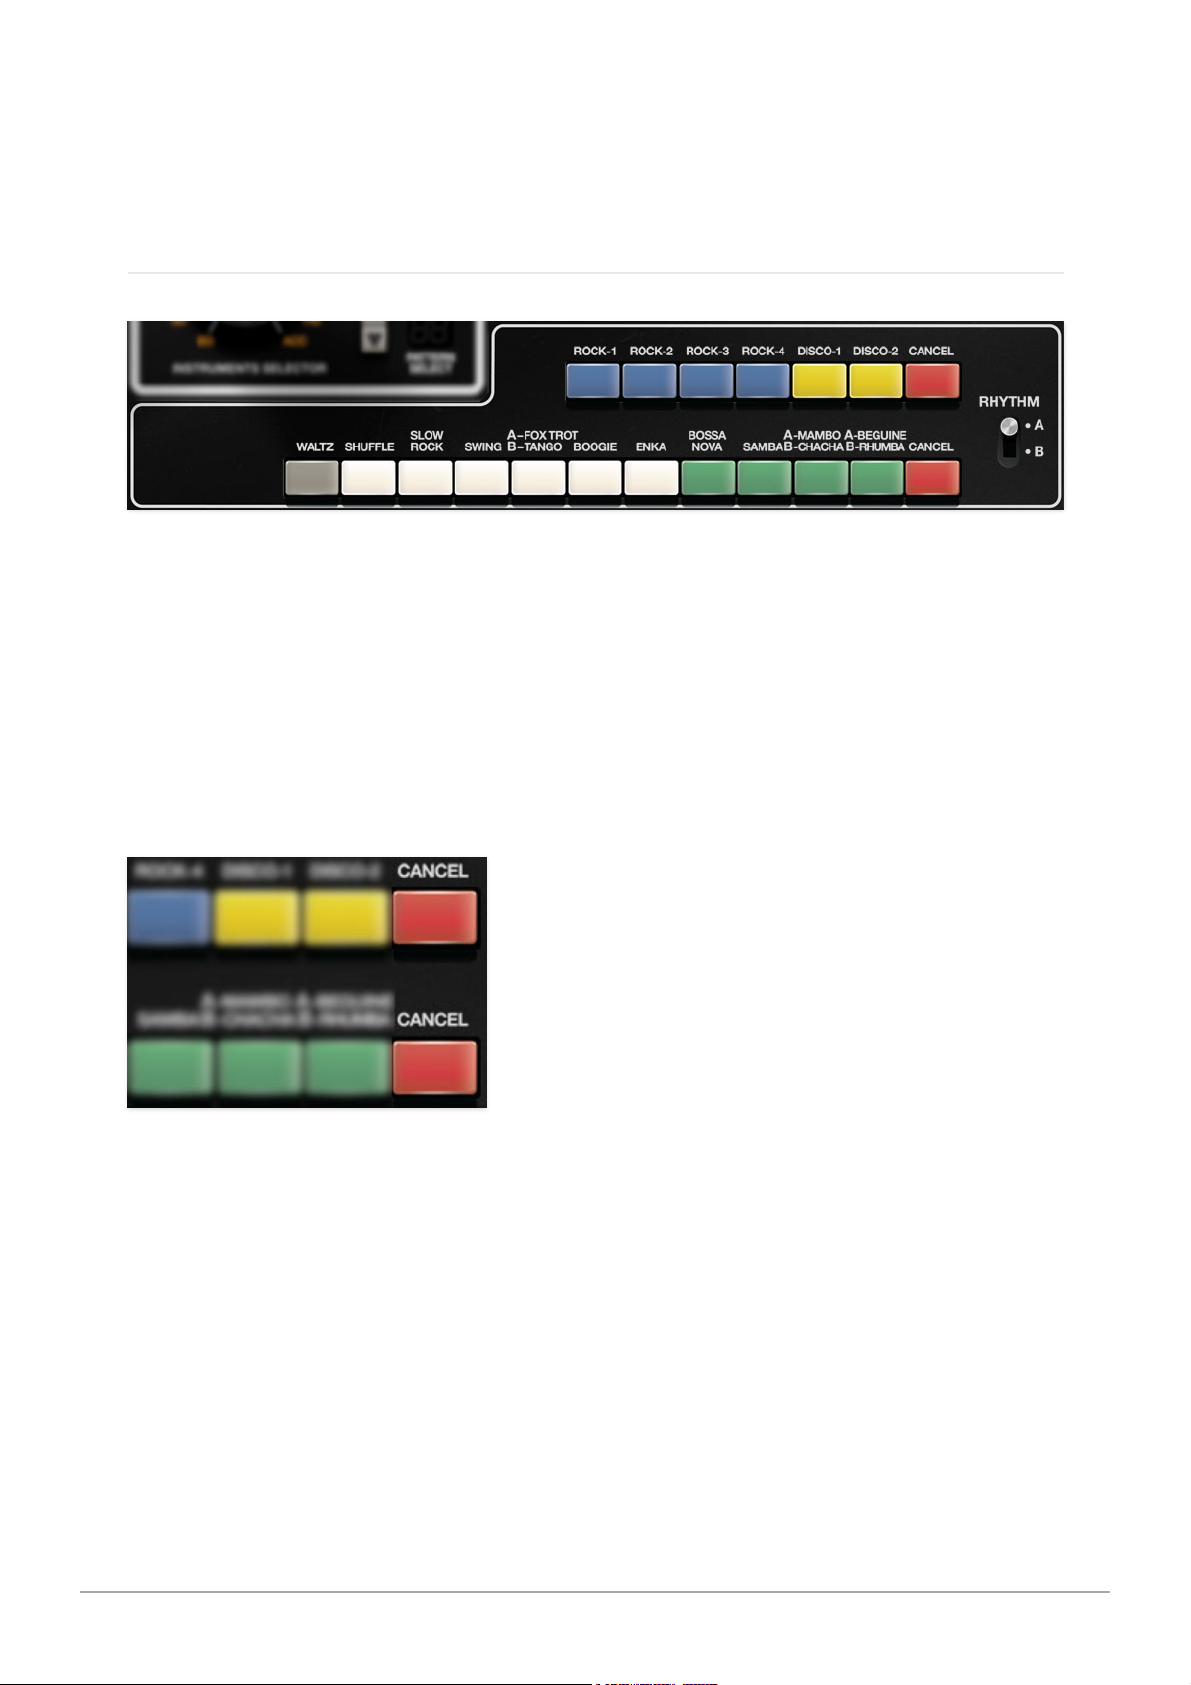
The original CR-78 included 17 preset pattern buttons arranged in two rows,
with a master A/B switch variation switch for a total of 34 preset patterns. It
also allowed users to program their own patterns, albeit in a rather clumsy
fashion - don't worry, we fixed that, but more about that later.
Playing Preset Patterns
To play a preset pattern, make sure the
Play Mode
switch is set to
Preset,
click one of the preset pattern buttons, and press the
Start/Stop
button. If
you're not seeing the multicolored preset buttons,. Note that each button has
two separate variations, selectable via the
Rhythm A/B
switch. Most of the
buttons contain two similar variations; the B version is usually slightly more
complex. A few of the buttons do double-duty with two completely separate
rhythms as indicated on the panel.
Clicking one the red
Cancel
buttons at the end of the row stops the pattern at
the end of the bar. If a new pattern is selected while in play mode, CR-78
waits until the beginning of the next bar to switch patterns.
Don't let the bad-home-organ names fool you - some of the seemingly silly
patterns often become really cool in conjunction with the
Cancel Voice
buttons - for example, Blondie's "
Heart of Glass
" is basically the
Rhumba
pattern with the bass drum and snare muted.
Combining Patterns
Cherry Audio CR-78 User Guide - 20
Page 21
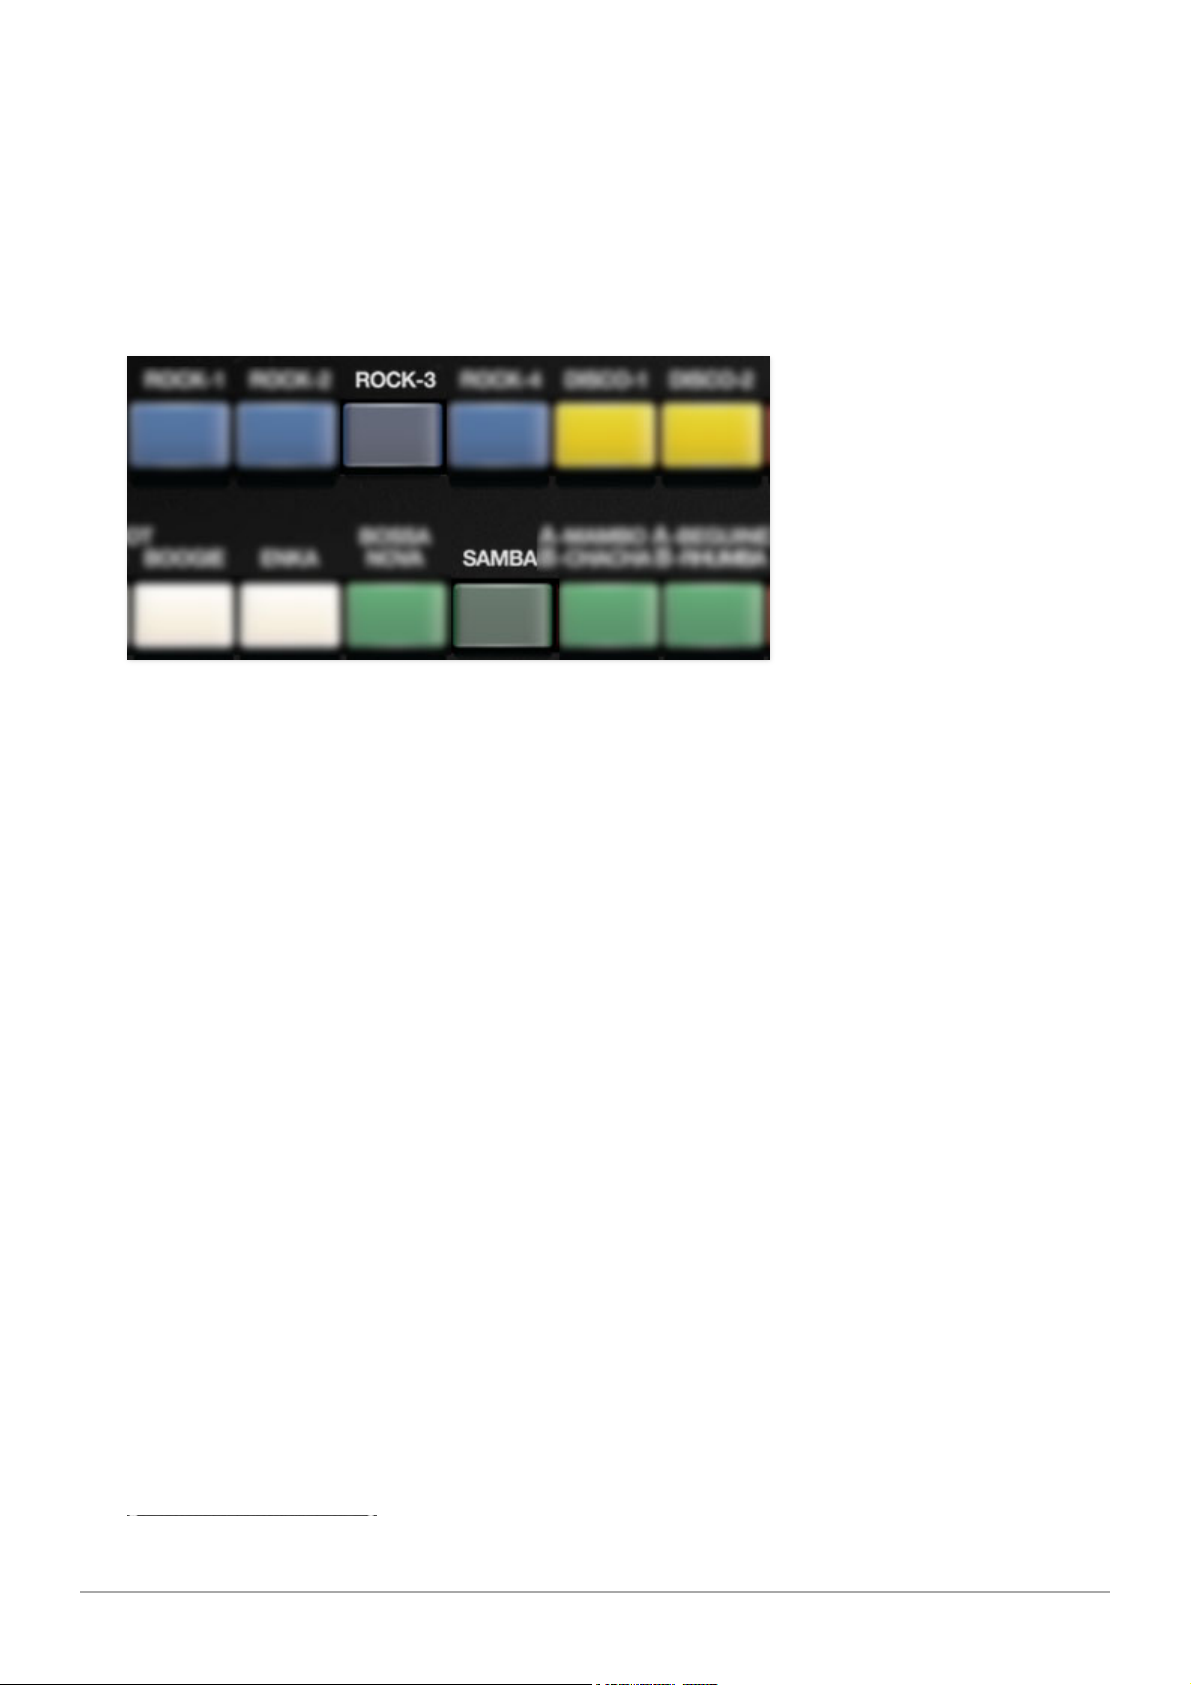
On the original CR-78, you could simultaneously play two beats at once by
pressing a button in each horizontal row. The original unit's mechanical
buttons worked something like an old TV, where pressing one button in a row
caused the currently pressed button to turn off, but with a little coercion, it
was also possible to hit multiple buttons in a single row. This caused the
drum machine equivalent of mixing Big Gulp soda flavors at the 7-Eleven:
sometimes it works out great and sometimes it resulted in a mucky mess.
Two rhythms can be combined with Cherry CR-78 by selecting the first
pattern as usual, then shift-clicking the second one. A pattern can be
canceled by shift-clicking again. Only two patterns can play at once, but
believe us - anything more sounds like the electronic equivalent of Keith
Moon and The Muppets' Animal meeting in a dark (and overly percussive)
alley.
If two patterns are playing, one in the top row and one in the bottom row,
clicking the respective row's
Cancel
button will turn off the pattern playing in
the row at the end of the bar, but the pattern in the other row will continue to
play.
Cherry Audio CR-78 User Guide - 21
Page 22
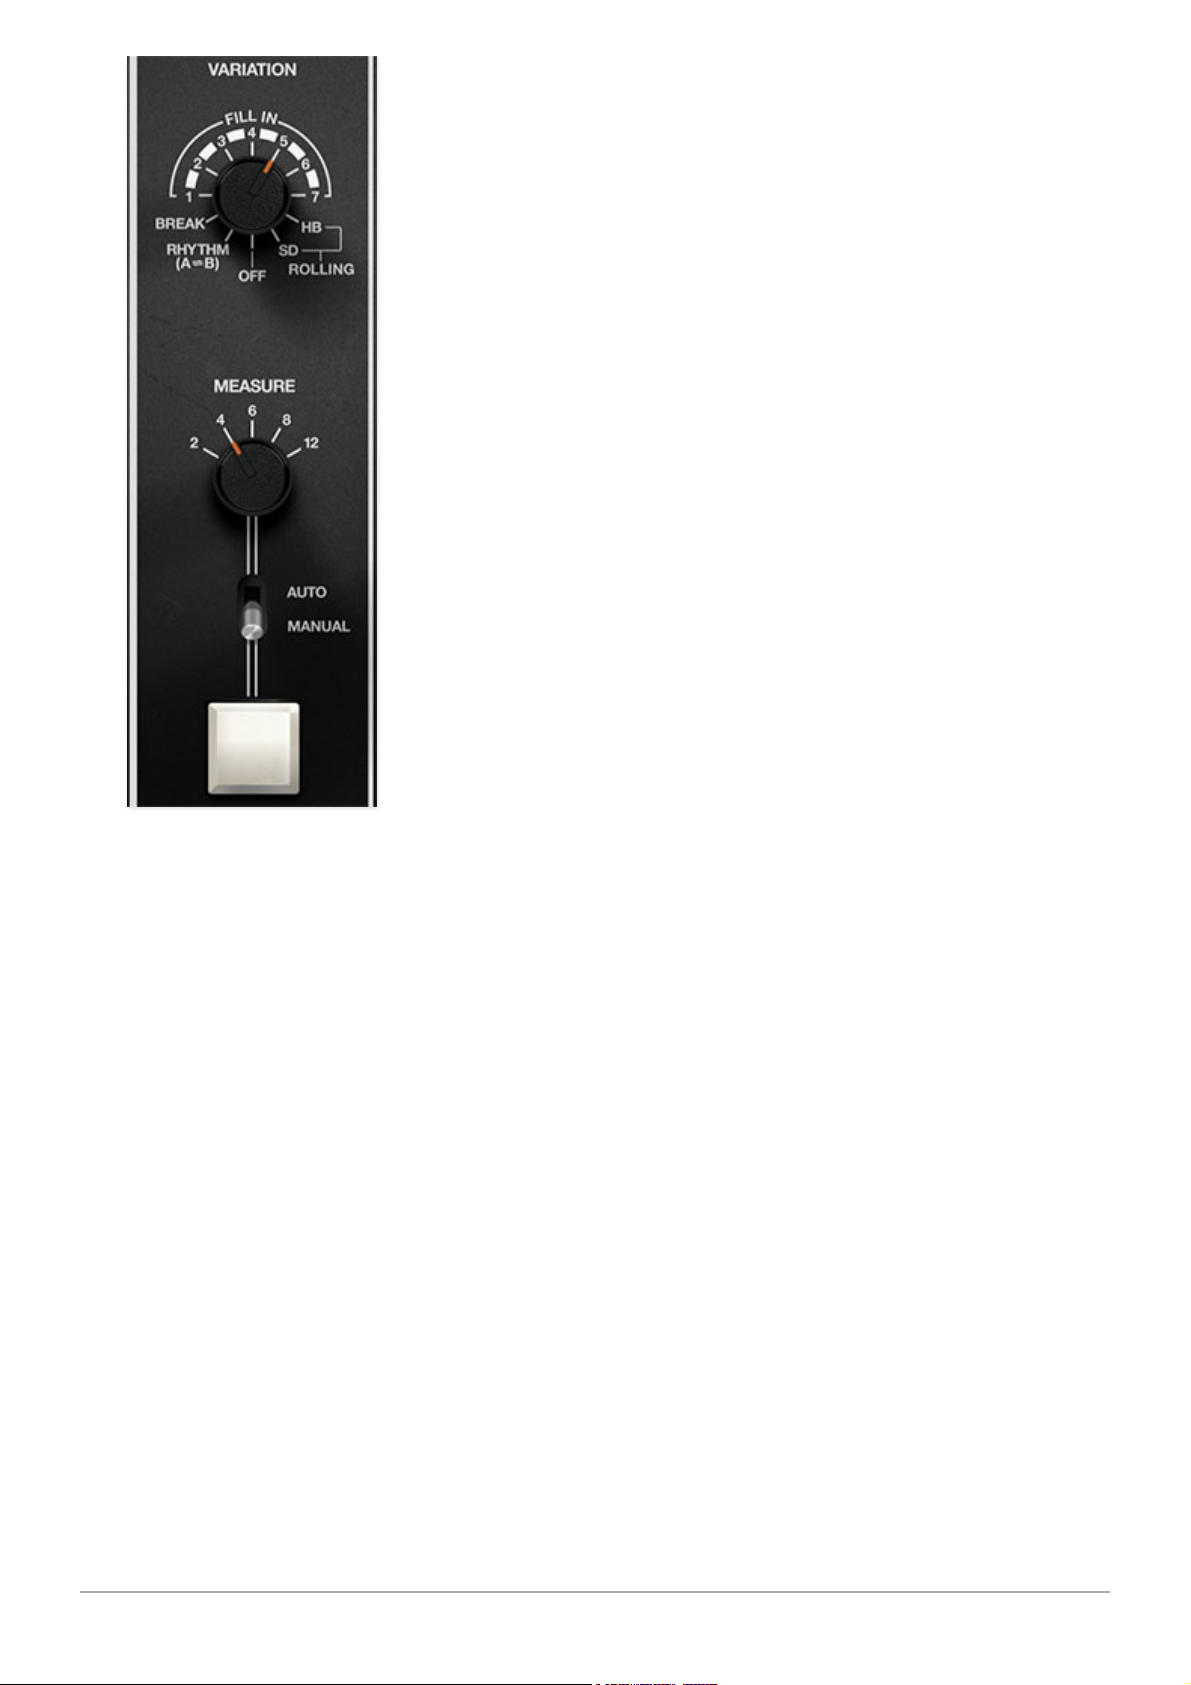
The Variation section adds preprogrammed fills to drum patterns. It helps to
remember that the original CR-series drum machines were mainly intended
as organ-top devices, to keep time while playing a syrupy instrumental
version of The Carpenters "
Top of the World
" or some such. Thus, you might
not use the Variation section fills that often (particularly if you're
programming custom beats), but we've replicated the original CR-78
Variation section exactly, and they're actually kinda fun.
Fill In- The rotary dial selects which drum fill plays. Fills are one-bar in length
(or occur at the end of a bar), and are designed to be compatible with
particular preset patterns (generally because of their inherent time
signatures). So if you decide to use one of the 3/4 fills while playing a 4/4
pattern, you might end up with... jazz (and everyone knows jazz is only for
math teachers and the criminally insane).
IMPORTANTE!
- Variation fills can be used in
Preset
or
User
pattern
play mode - Variations do not work while in
Song
mode. Variation
controls will be dimmed and inactive when
Song
mode is selected.
Cherry Audio CR-78 User Guide - 22
Page 23
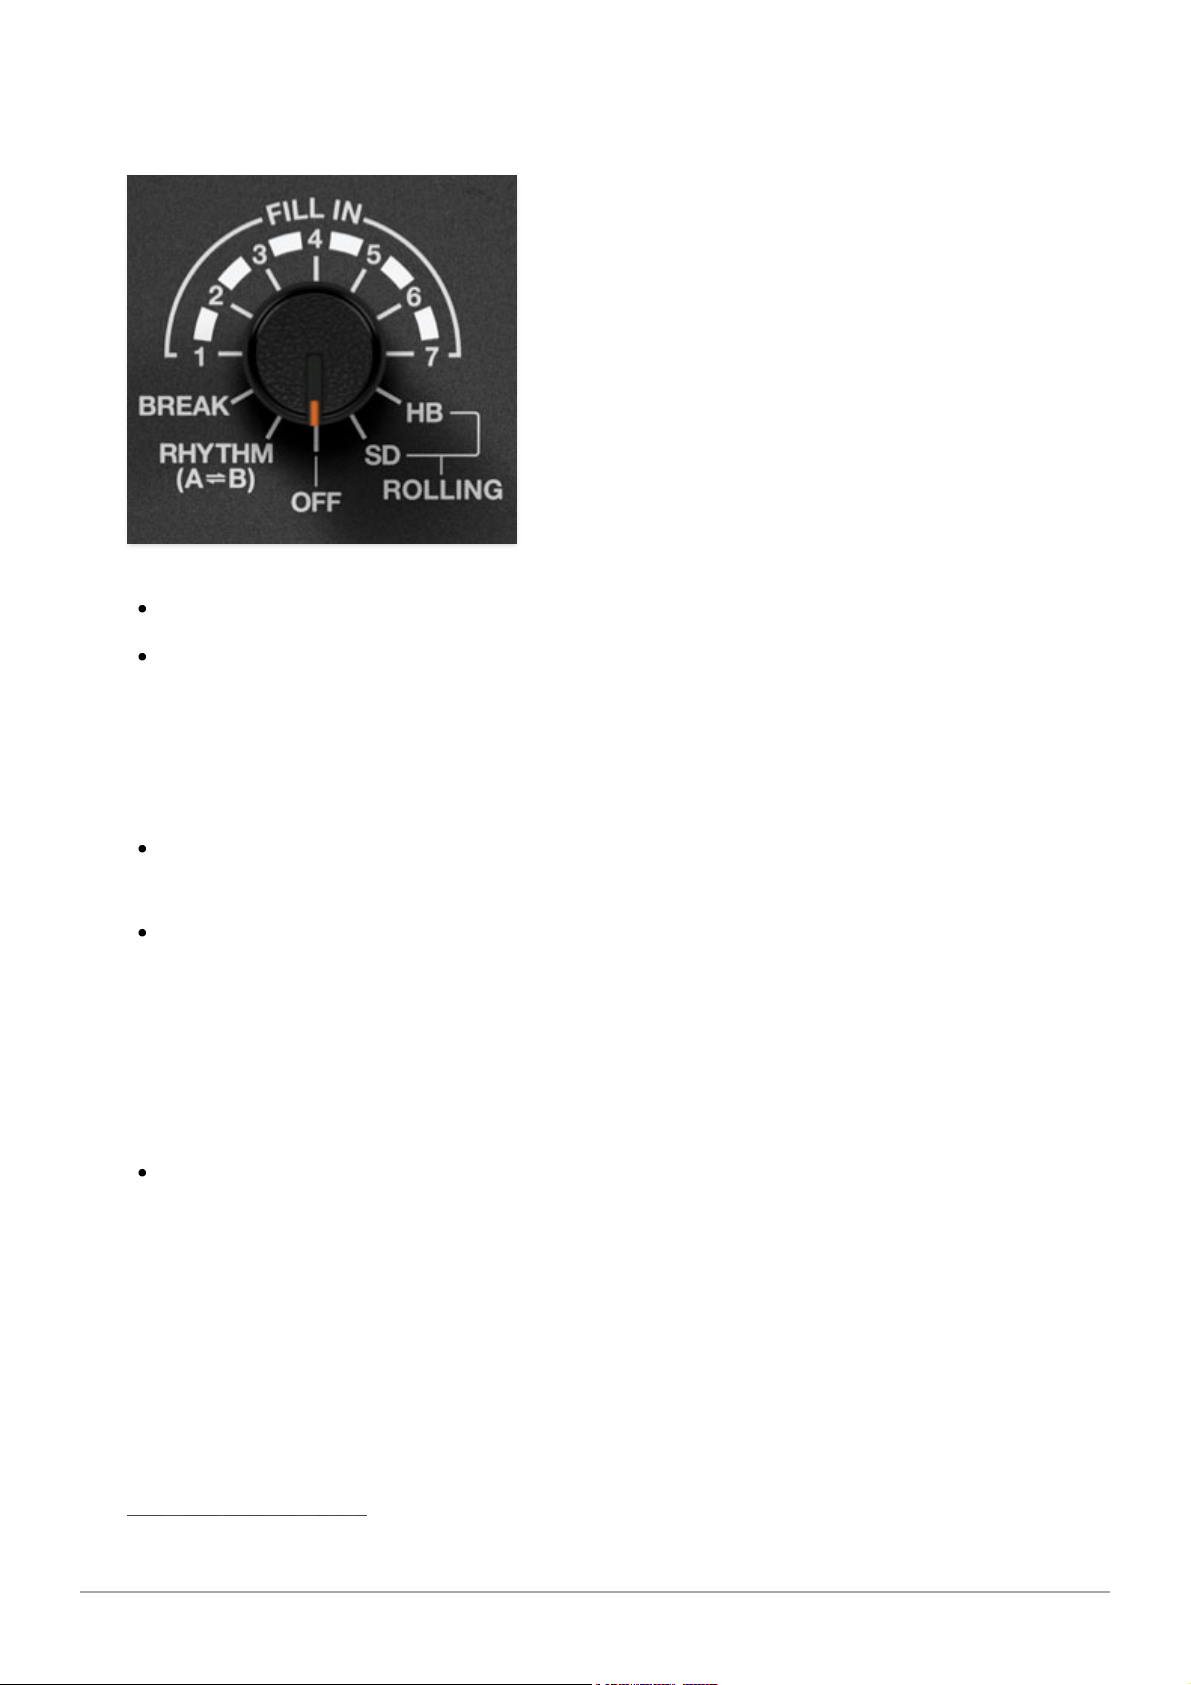
Below we'll go over each one and indicate which preset patterns they play
nicely with:
Off- No fills occur in
Auto
or
Manual
mode.
Rhythm A>B- Remember how each factory preset pattern includes an A
and B variation?
Rhythm A>B
alternates to the opposing version for the
fill bar. If the preset patterns
Rhythm
switch is set to the A position, the
B
variation plays for one bar when the fill is triggered, and vice-versa if the
Rhythm
switch is in the B position.
Break- The first step of the pattern plays and the remaining steps are
silent for one bar.
Fill In 1-7- These are the various one-bar drum fills.
Fill In 1- Intended for use with the
Waltz
preset patterns.
Fill In 2/3- Intended for use with 3/4/swing preset patterns -
Shuffle, Slow
Rock, Swing
, and
Boogie
.
Fill In 4/5/6/7- Intended for use with 4/4 patterns, i.e. all factory preset
patterns other than previously mentioned ones in this section.
Rolling/HB and SD- The "rolling" fills are a little different - these play
in
addition
to the the currently playing pattern. They're actually both the
same, just with different instruments; they play 16th notes for the last two
beats of a pattern using either the high bongo or snare drum sound. (For
you new wave nerds, OMD's "
Enola Gay
" uses the
Rolling HB
fill at two-bar
intervals.)
Cherry Audio CR-78 User Guide - 23
Page 24
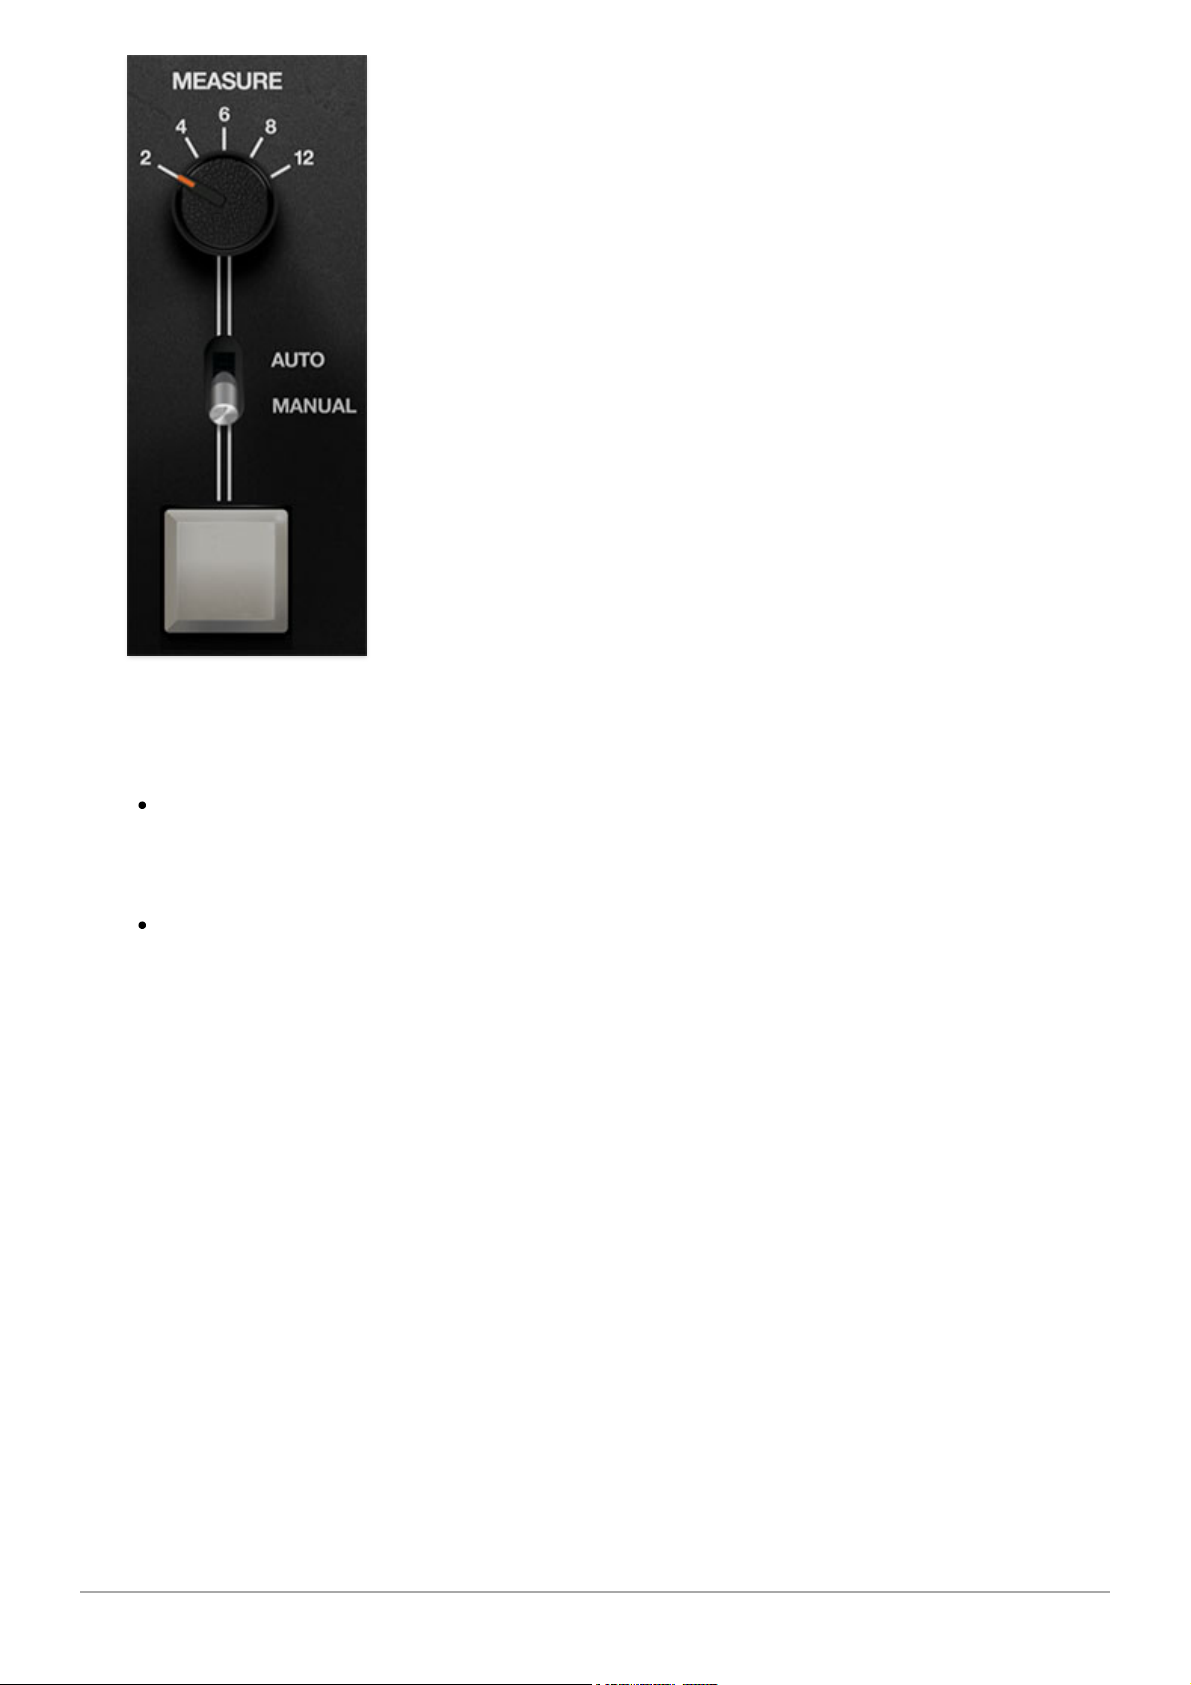
Measure, Auto/Manual mode, and trigger button- These controls
determine when variations play.
Manual mode- A fill occurs on the downbeat of the following bar after
the big white button is clicked. Fills will always begin on the
downbeat of the next bar - they will not occur in the middle of a bar.
Auto mode- Fills occur at the interval defined by the
Measure
knob
setting. Specifically, the fill begins at the top of the bar number selected.
For example, with
Measure
set to 4, the pattern will play through three
times, then the fill plays on the downbeat of the fourth bar.
When
Auto
mode is selected, the manual fill trigger button is dimmed and
inactive.
Cherry Audio CR-78 User Guide - 24
Page 25
In addition to its preset patterns, users could program custom patterns into
the original CR-78- it was one of the first, if not
the
first user-programmable
drum machine. However, it had major limitations: patterns could only consist
of four instruments, only four user patterns could be stored, and the
method(s) for programming them were archaic (the better of the two
methods required buying a now-crazy-rare "write switch" hardware box with
a couple of buttons for programming notes and rests. Don't even ask what
the charlatans of Reverb.com are foisting this gadget for nowadays...).
With that in mind, we abandoned the original programming method, and
implemented custom pattern programming via the familiar TR-808-style 16button interface (or 24 buttons - more on this later).
User Patterns and the Patch Browser
Each saved patch in the browser (purple menu strip at the top) consists of:
99 patterns, selectable with the up/down increment buttons in the
Pattern
Select
selection. (
Patt/Song
switch set to
Patt
)
1 song, i.e. a set of chained patterns. A song can be up to 99 steps. Please
see the next chapter for more information on Song mode.
Creating a User Pattern
Creating your own pattern is super easy. Let's start from scratch... follow
along at home!
• Click the
New
button in the top-left corner.
Cherry Audio CR-78 User Guide - 25
Page 26
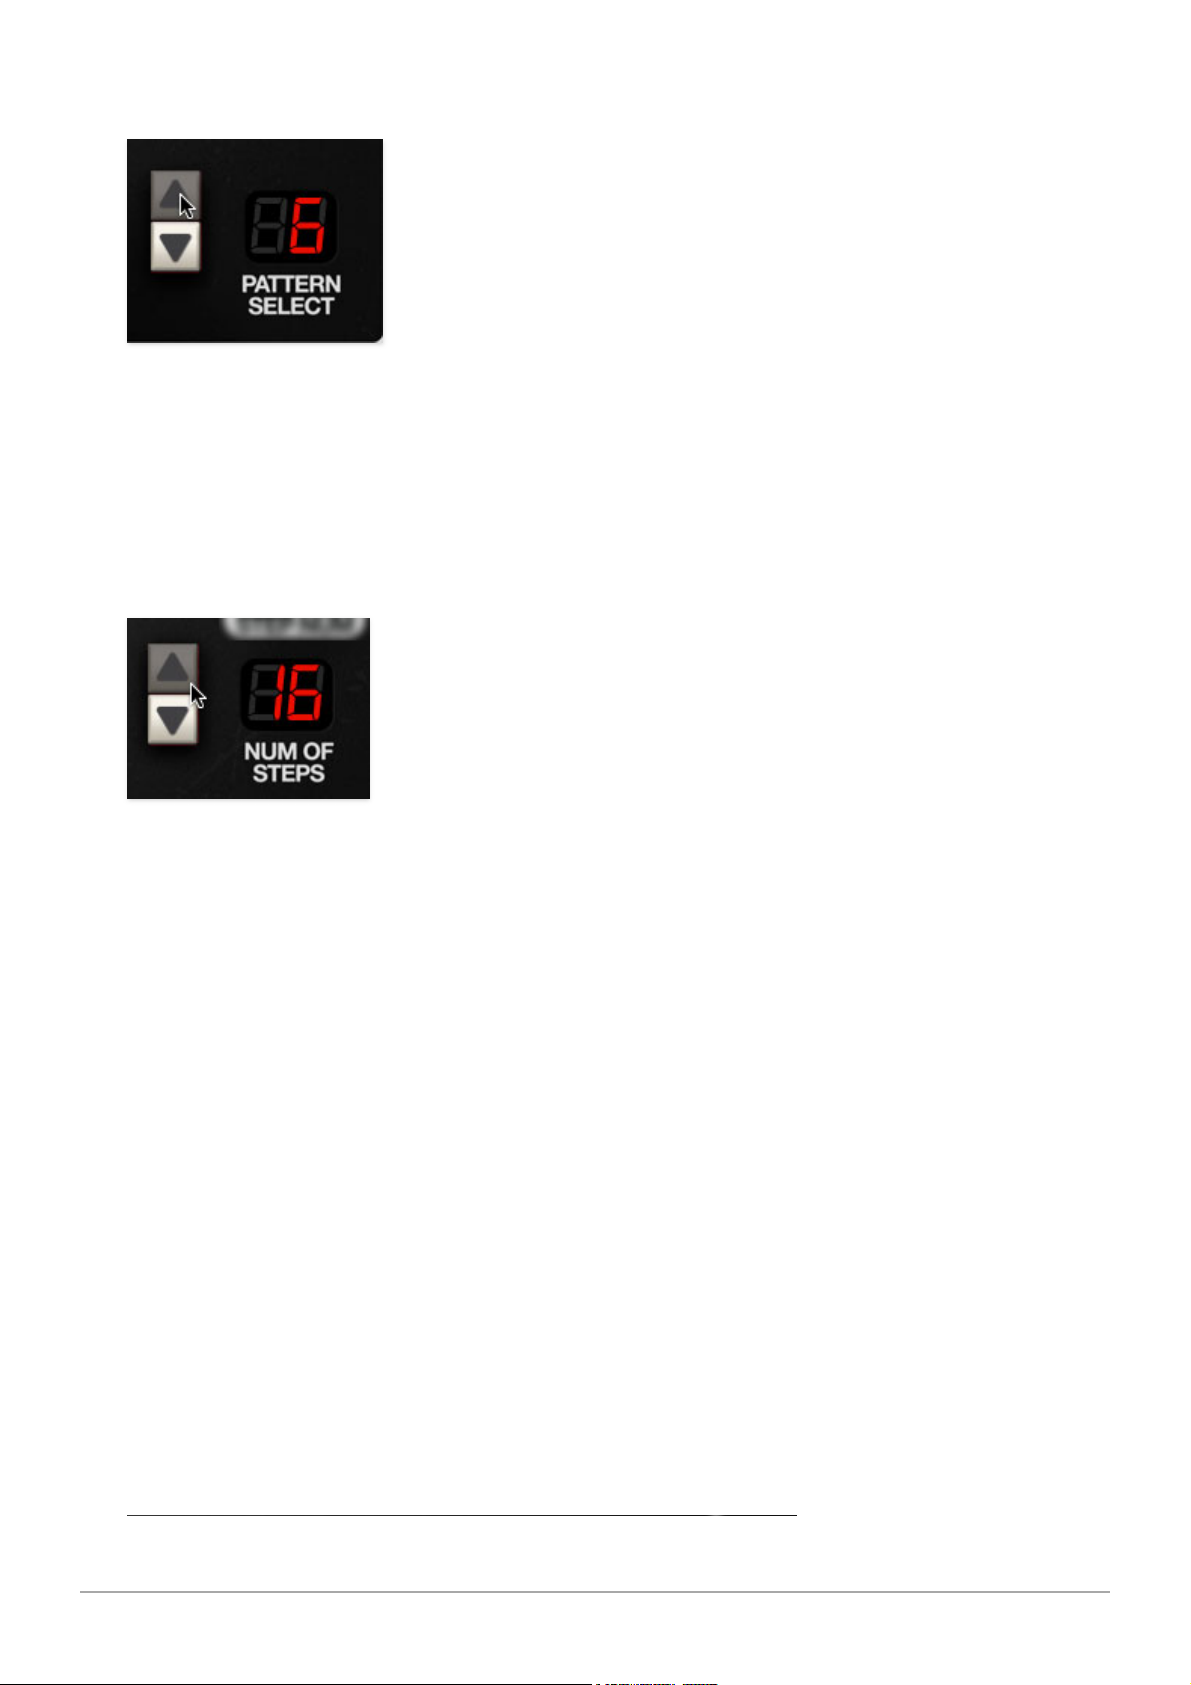
• Set the Programmer section
Play Mode
switch to
User
.
• Using the up/down increment buttons beside the
Pattern Select
display,
choose the number location where you'd like the pattern to reside. If you
don't have any patterns currently programmed, you can leave it set to 1.
(Remember that every saved preset in the patch browser stores its own
unique set of 99 patterns, so you're not going to overwrite anything.)
• Using the up/down increment buttons next to the
Num of Steps
display,
select the number of pattern steps. This determines the pattern step where
the rhythm will loop back to step 1.
If you're creating a standard one-bar pattern, leave this set to 16 (one bar
with 16th-note step resolution). If you're creating a triplet-feel pattern, you
can flip the subdivision switch to the 6 position (one bar with quarter-note
triplet step resolution). Also useful for cover versions of early J-Lo songs (if
you had to write owner's manuals, you'd be making bad jokes too).
Num of Steps
can also be set to any desired length to accommodate odd
time signatures. If you're doing that, we'll assume you and your fellow
Mahavishnu Orchestra tribute bandmates know what you're doing.
Cherry Audio CR-78 User Guide - 26
Page 27
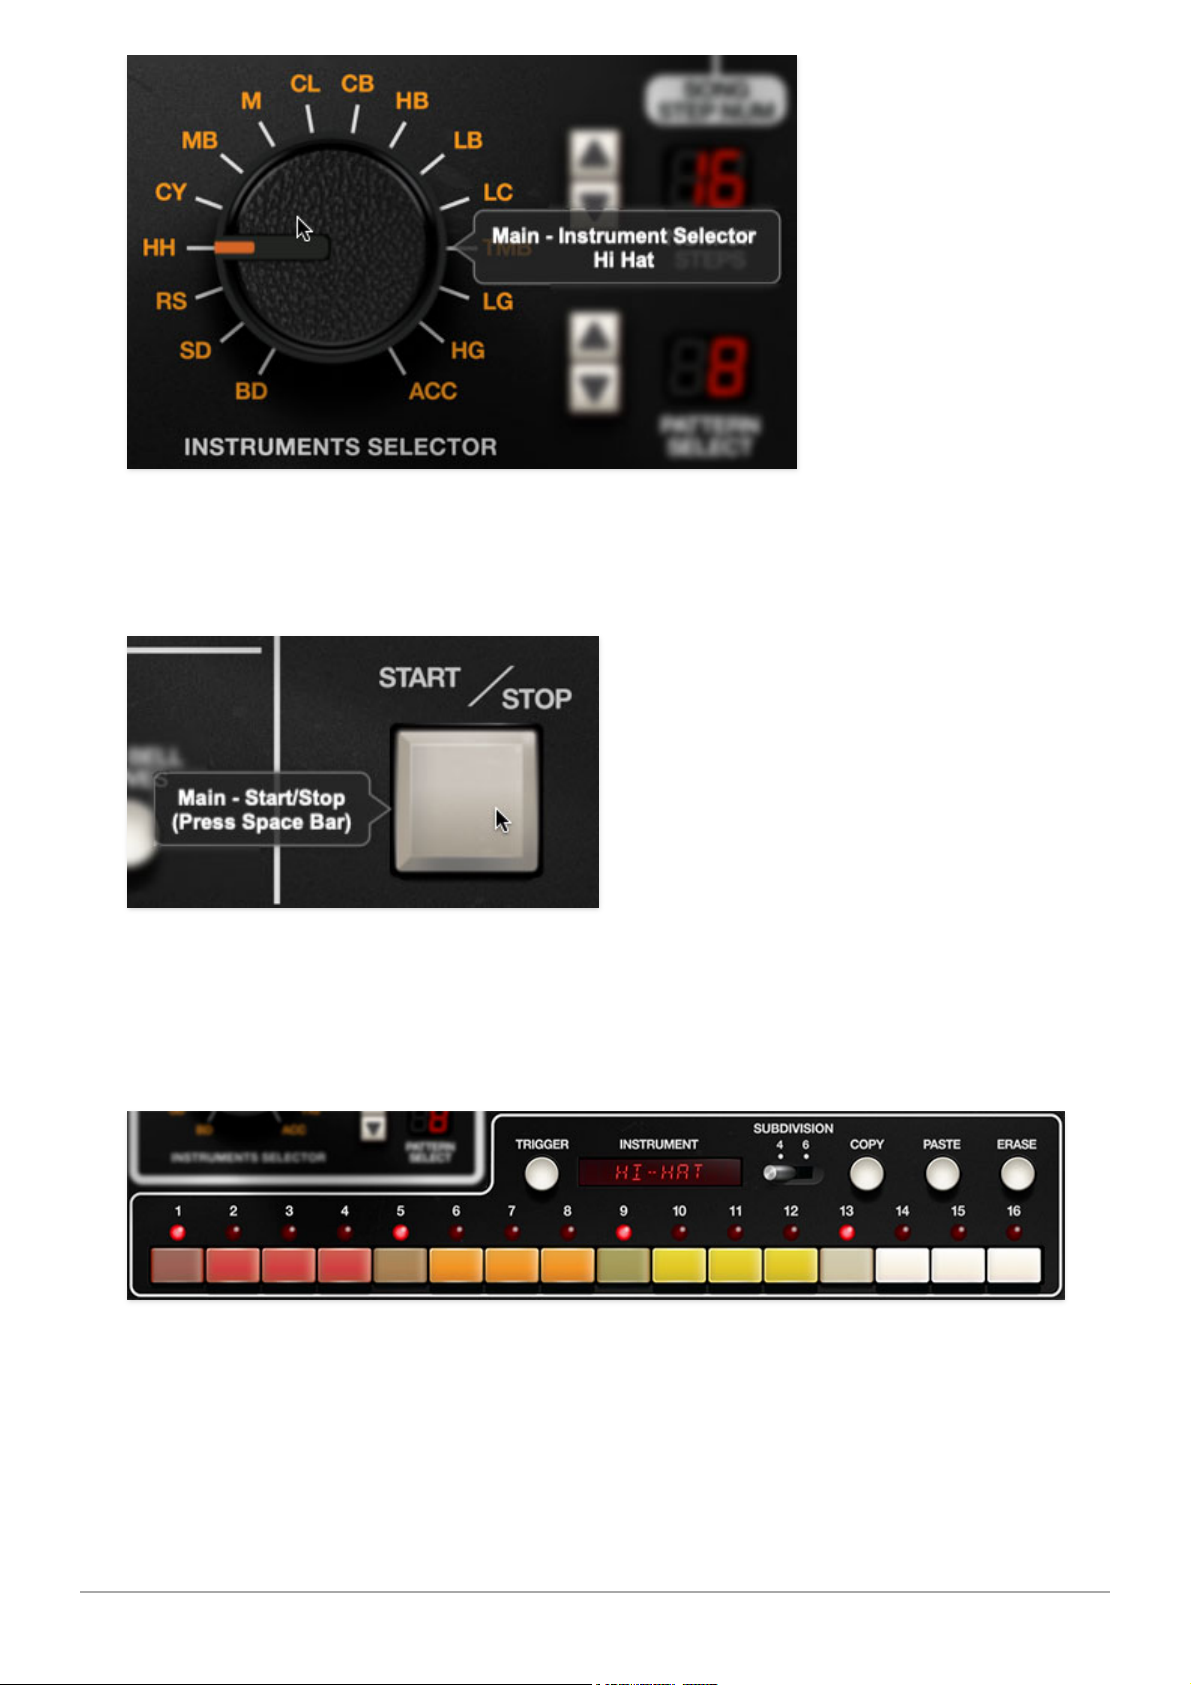
• Using the
Instruments Selector
knob, select the first instrument you'd like
to program.
• Pattern steps can be entered with CR-78 in stop or play mode, but it's more
creative and fun to program patterns while in play mode. Click the
Start/Stop
button to enter play mode.
• Since there isn't an audible "click track" per se, it's best to program a
simple timing reference; the bass drum (BD) or hi-hat (HH) on 1/4 notes
(steps 1, 5, 9, 13) works well. This can easily be altered later when the
rhythm is established.
Cherry Audio CR-78 User Guide - 27
Page 28
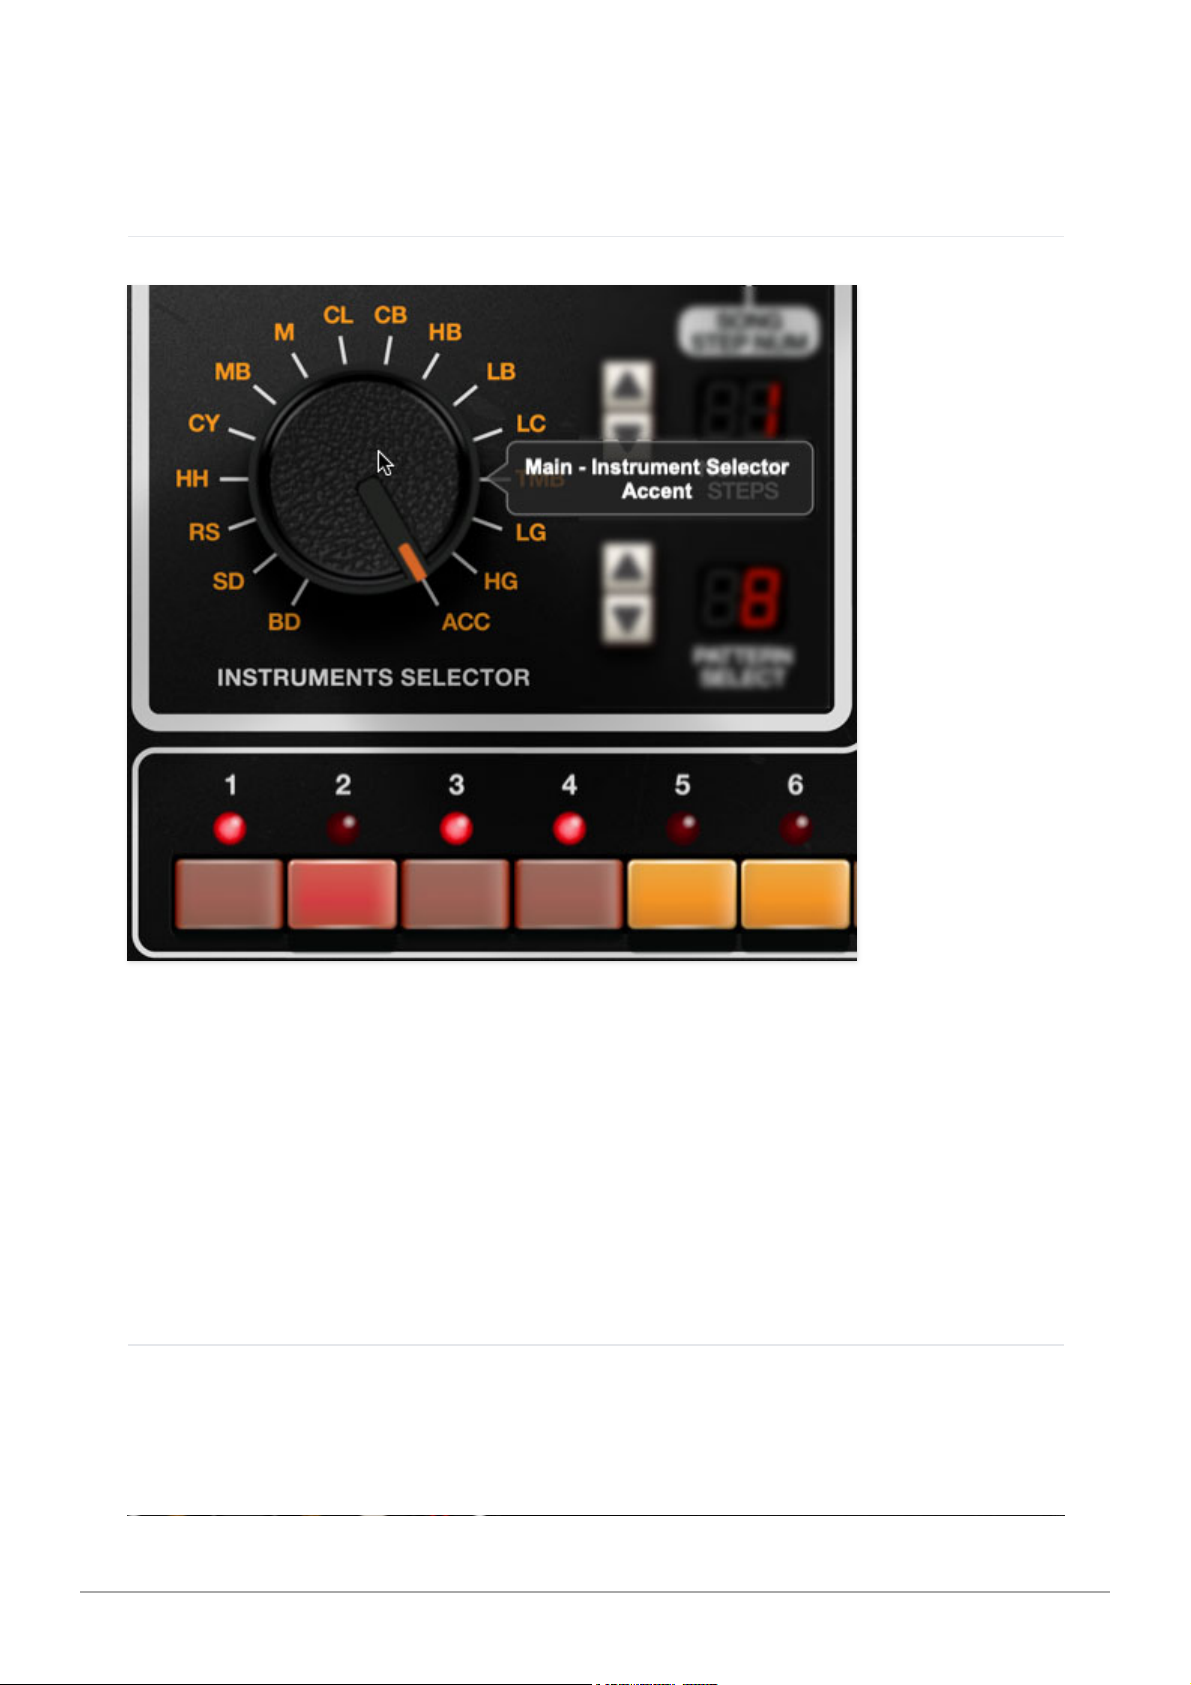
Additional instruments can be added by choosing them with the
Instruments
Selector
and entering steps with the numbered buttons or in real-time with
the
Trigger
button.
Accent Steps
An accented step increases the volume of all instruments on a step by an
amount determined by the Main panel
Accent
knob . Accents are global; i.e.
the volume of
all
instruments on an accented step is increased. Accent steps
are added or deleted like any other instrument by selecting
Acc
with the
Instrument Selector
knob.
The accent controls are fully explained in the Main Panel Controls
chapter.
Step Button Controls
Cherry Audio CR-78 User Guide - 28
Page 29
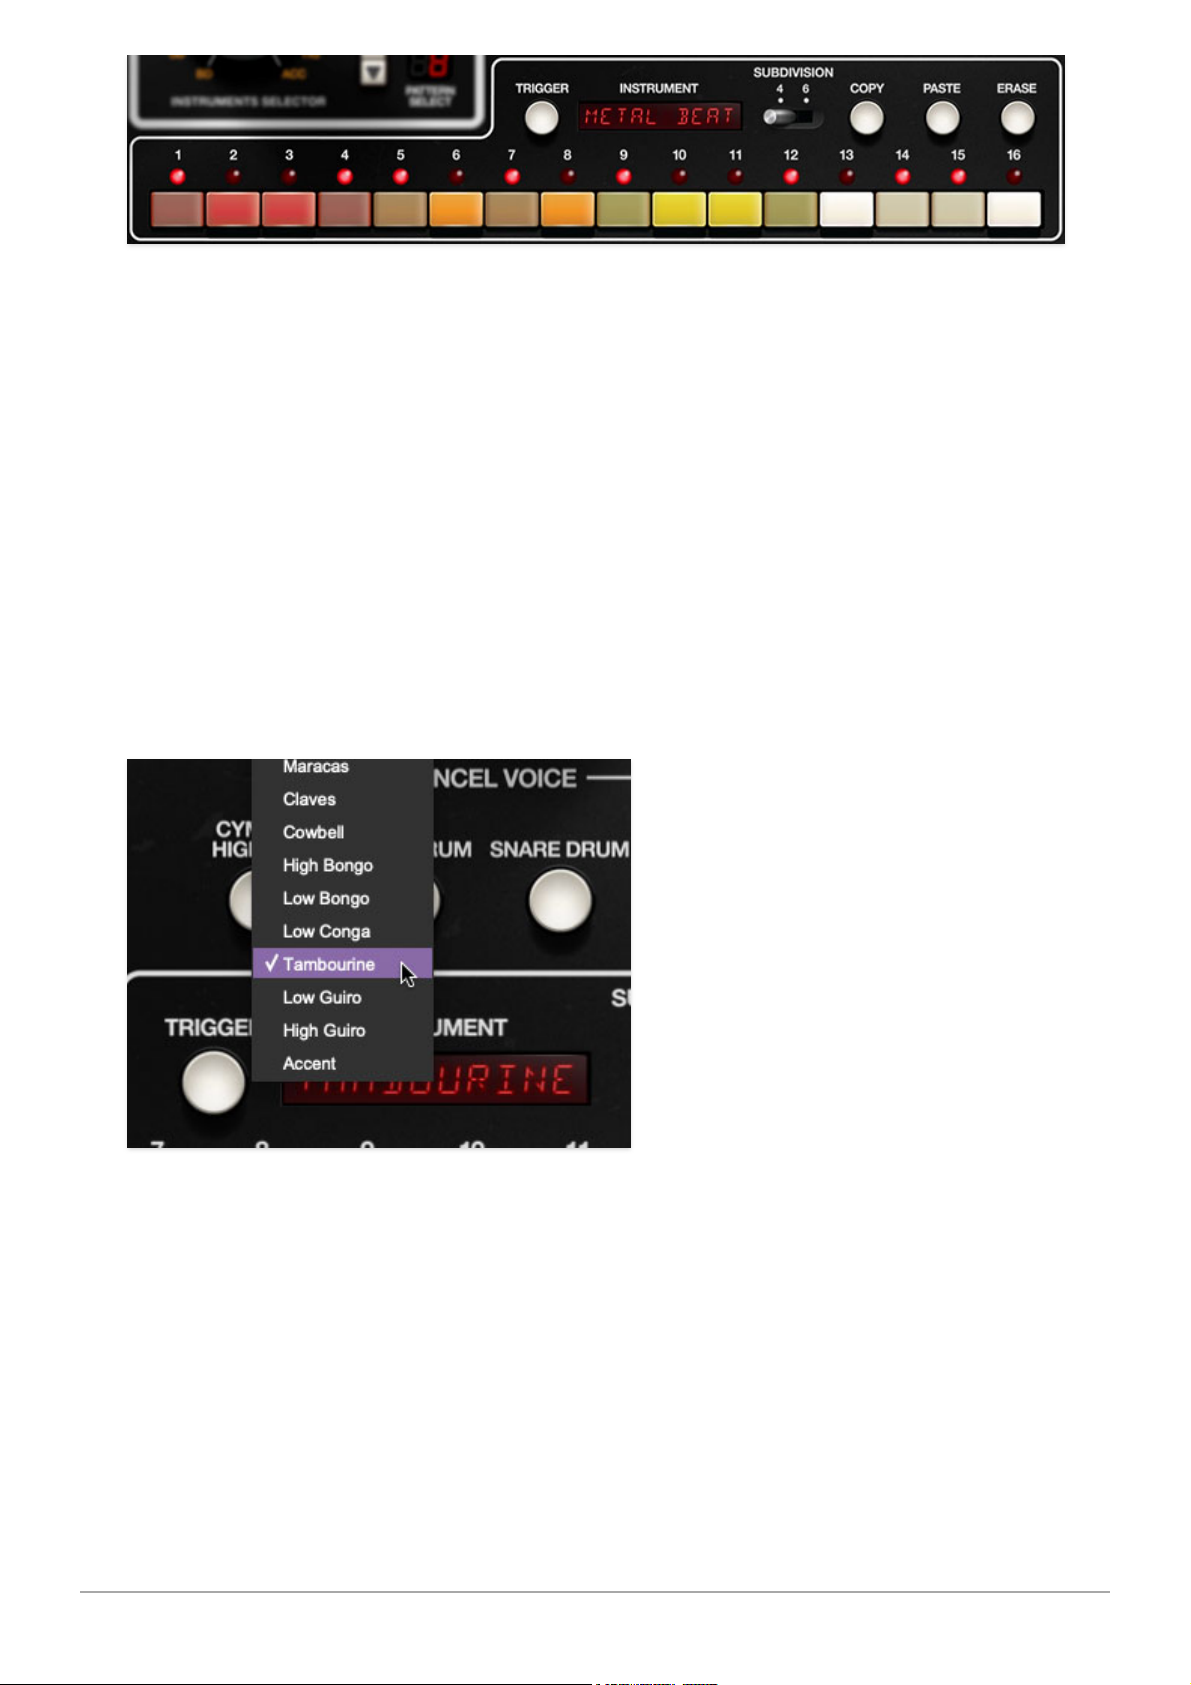
Here we'll cover the details of the controls in the bottom area when the User
Play Mode is selected - there's some important info here, so we don't
recommend skimming this section.
Trigger- This triggers currently selected
Instruments Selector
sound. If a
pattern is currently playing, notes will be entered in the pattern buttons
below, quantized to the nearest pattern step. The
Trigger
button will not
enter pattern notes when in
Song
play mode.
Instrument display window- Indicates the instrument currently selected
with the Instruments Selector dial. Included so you wouldn't need to
remember what CL or
TMB
stands for. (We're pretty sure
TMB
is a rad MTV
show starring that hunky Carson Daly, though.)
The current instrument can also be selected by clicking on the display
window. The Instruments Selector knob will change to the appropriate
position.
Step Buttons- These enable and disables pattern beat steps.
Subdivision- Ok, drum machining is about to get real here. We apologize.
A few of original CR-78 preset rhythms have a triplet or "swung" feel (
Waltz
,
Shuffle, Slow Rock, Swing
, and
Boogie
). That is, they're not 4/4 beats with
Cherry Audio CR-78 User Guide - 29
Page 30
sixteenth-note resolution, and therefore cannot be correctly entered using
the standard one-bar, 16-button classic 808-style interface.
The original CR-78 master clock runs at 24 pulses per quarter note (PPQN) in other words, it can have up to six notes in the space of a quarter note (i.e.,
six sixteenth notes), enabling the triplet/swung patterns mentioned above.
We contemplated the idea of
always
displaying 24 buttons in
User
mode, but
ultimately decided that the eight extra buttons would complicate the
interface when working with standard 16-step 4/4 patterns. The
Subdivision
switch lets you choose, depending on song timing - set it to 4 when creating
16-step 4/4 patterns, or 6 when programming triplet/swung beats.
With that said, because we added a
Swing
button, it is possible to program
simpler 4/4 beats (
Subdivision
switch set to 4) and add a swing feel using the
Swing
button settings, but you'll probably want to take advantage of the
Subdivision 6
setting for full-on triplet-feel patterns (like "
Hold The Line
" by
Toto, because who doesn't love that jam?).
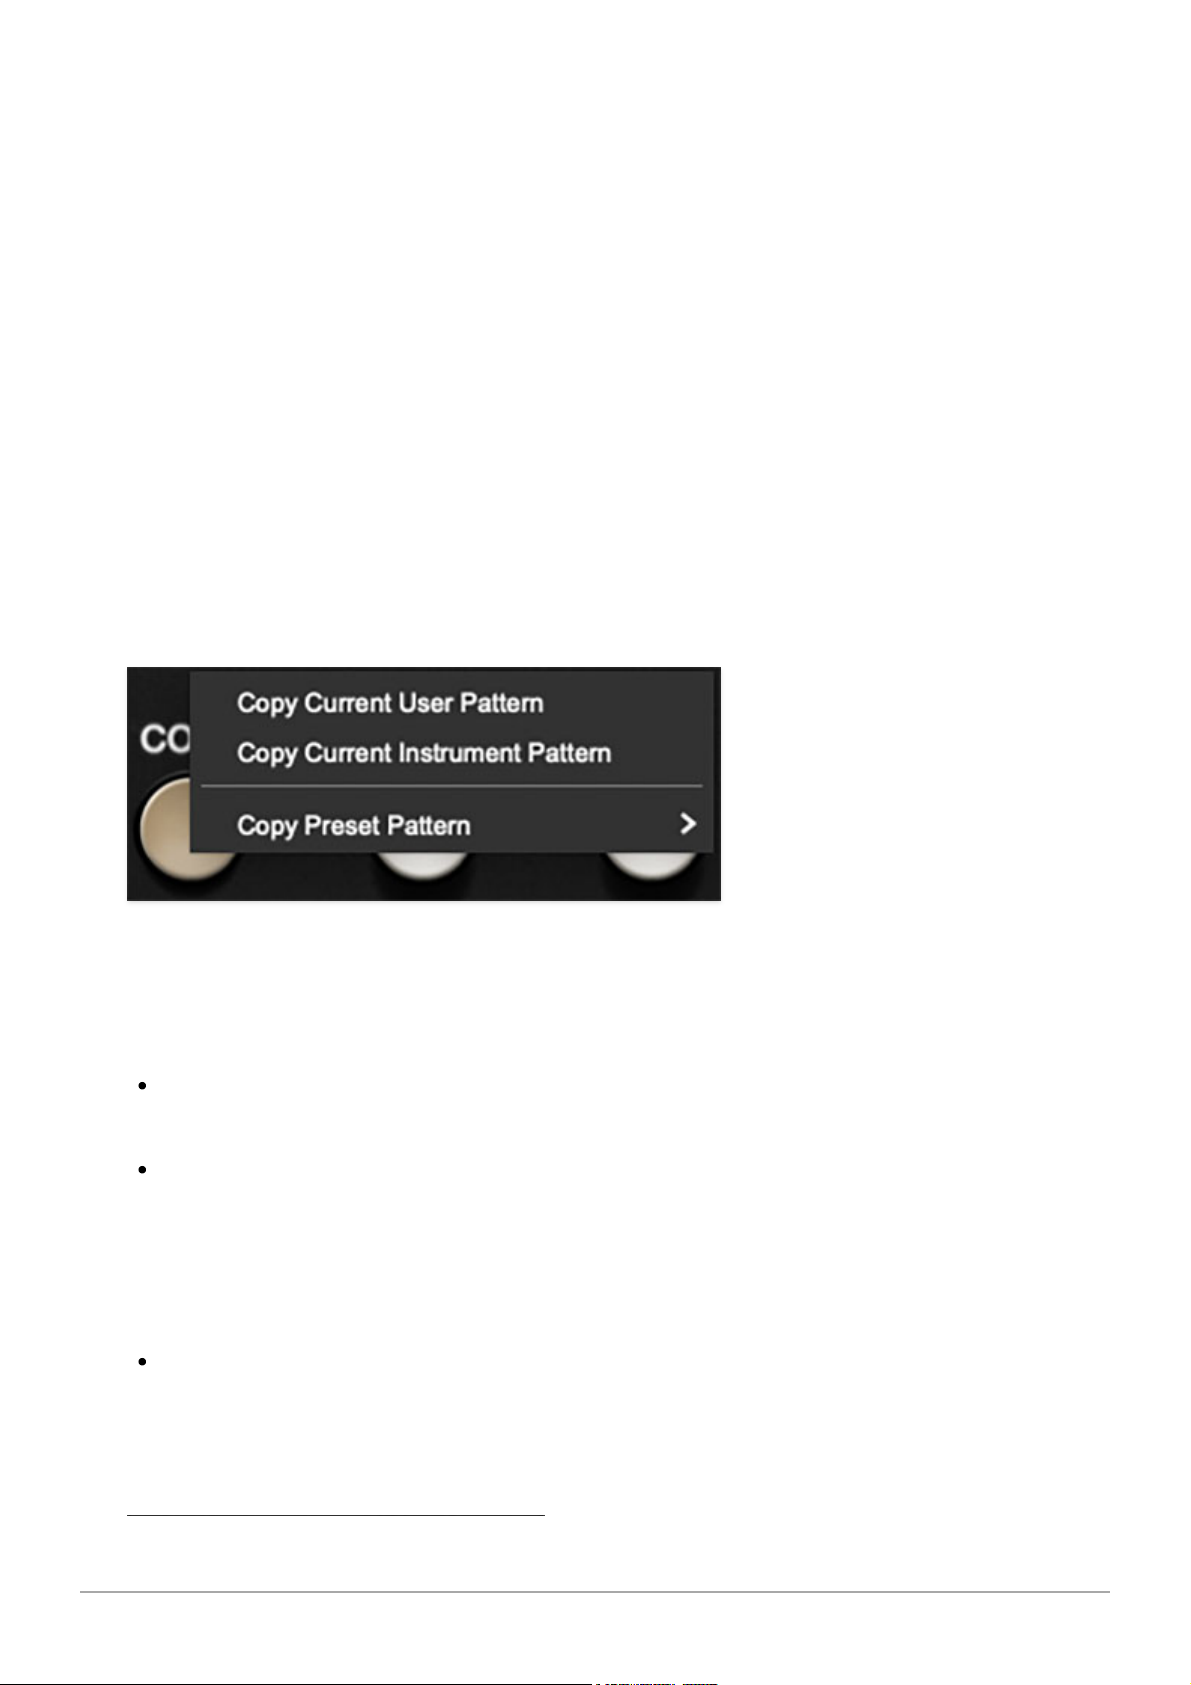
Copy- This allows duplication of entire patterns or single instruments from
one
Pattern Select
number location to another. It's useful if you're
assembling a song and want to create multiple variations of patterns.
Copy Current User Pattern- Copies all instruments of the current user
pattern into CR-78's memory buffer.
Copy Current Instrument Pattern- Copies the steps of the instrument
currently selected with the the
Instruments Selector
knob. This one is
especially nifty because it lets you copy the steps of
any
instrument to
any other instrument (using the
Paste
button
Paste Instrument
command)
in any pattern. It's really useful for "doubling up" instruments.
Copy Preset Pattern- Copies all instruments of the selected factory
pattern into CR-78's memory buffer. This is useful if you'd like to modify
elements of a factory pattern, or use one of them in Song mode.
Cherry Audio CR-78 User Guide - 30
Page 31
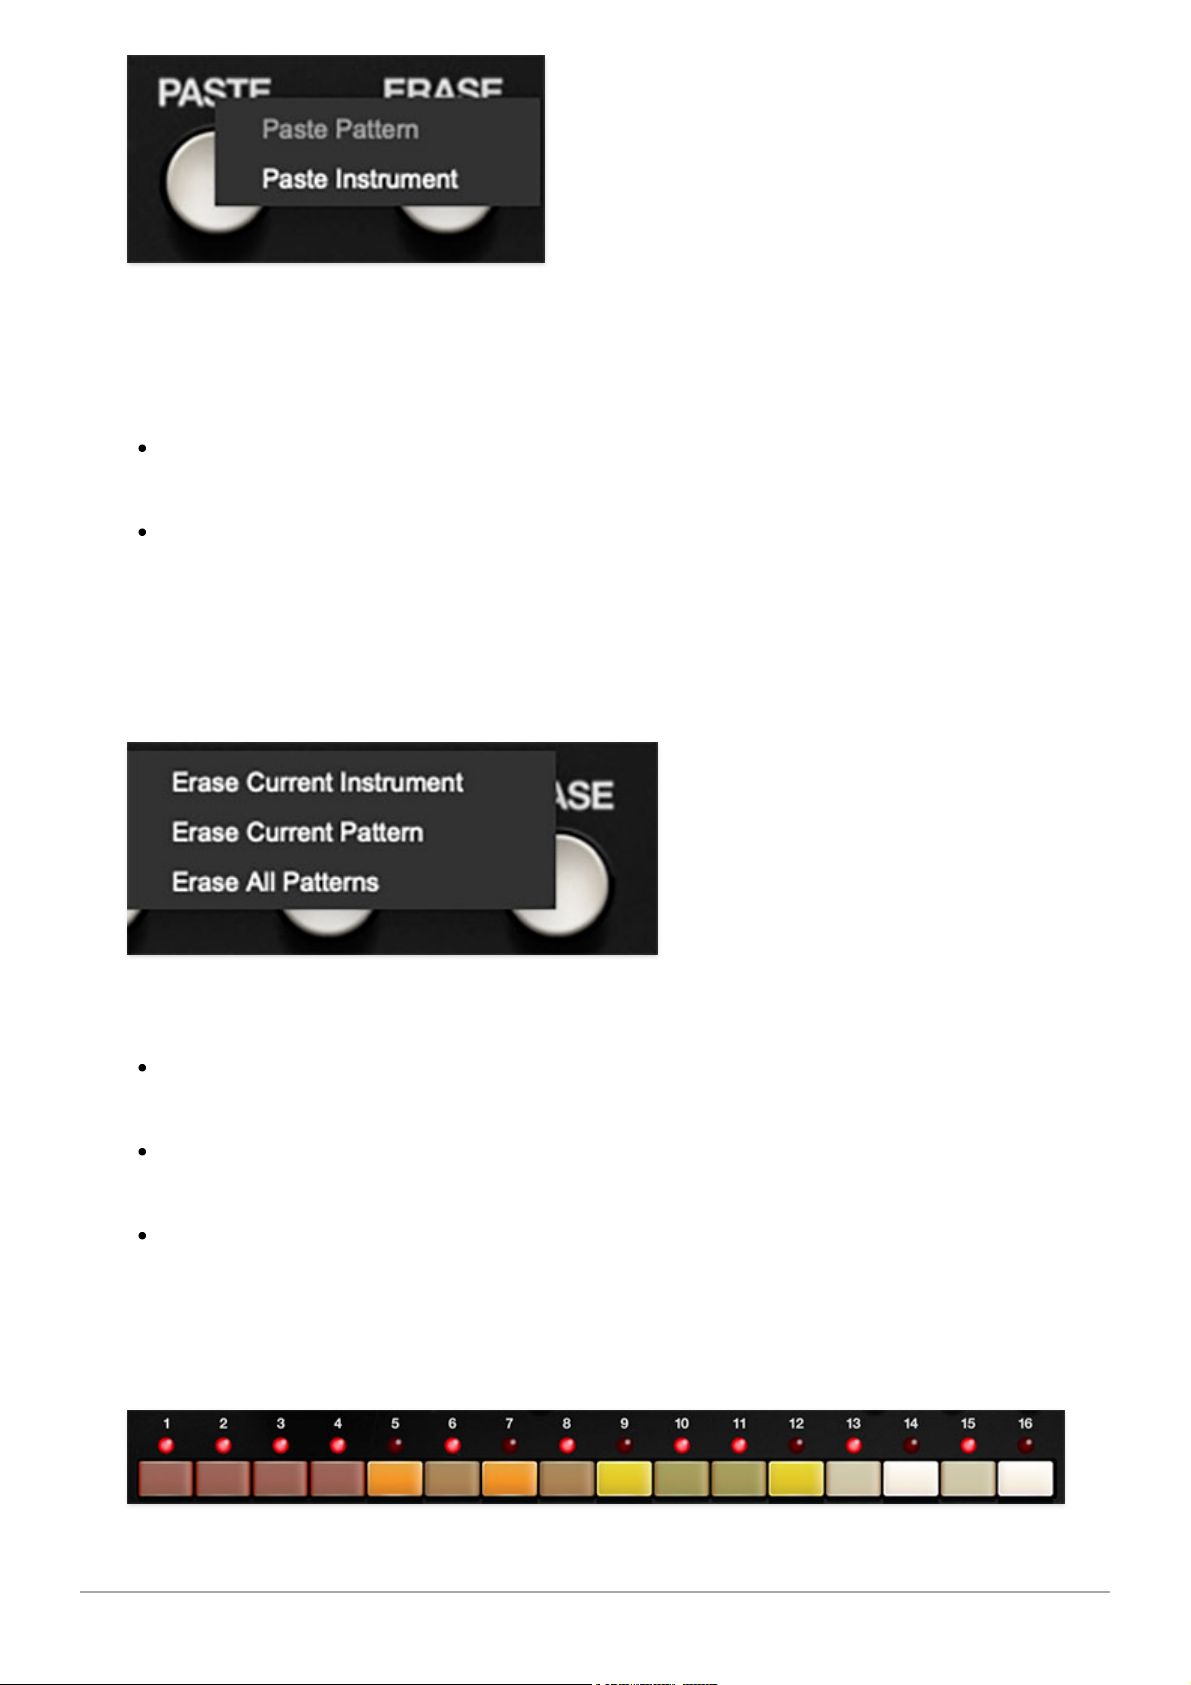
Paste- Allows pasting entire patterns or parts of patterns. Note that pasting
a pattern or single instrument will overwrite the existing pattern or
instrument.
Paste Pattern- Pastes all instruments of the current pattern into the
current pattern location.
Paste Instrument- This pastes a single instrument into the current
pattern location. Use the
Instruments Selector
knob to choose which
instrument will be pasted. Multiple instruments can be pasted by selecting
them consecutively with the
Instruments Selector
knob and repeatedly
pasting.
Erase- This initializes either the entire pattern or individual instruments.
Erase Current Instrument- Disables all steps of the instrument
currently selected with
Instruments Selector
knob.
Erase Current Pattern- Disables all steps for all instruments of the
currently selected pattern.
Erase All Patterns- Disables all steps of all patterns in the current patch
(i.e. the patch selected in the top purple menu strip). Prior to this
operation, CR-78 will display an "
Are You Sure?
" dialog to avert potential
calamity.
Cherry Audio CR-78 User Guide - 31
Page 32

Step Buttons (red/orange/yellow/white)- These enable and disable
individual note steps in a pattern. Toggled buttons have a "pressed down"
appearance, and the LED above will glow.
Multiple adjacent buttons can be enabled or disabled by dragging
the mouse pointer across them - we're particularly fond of the this super-
handy feature. It's also useful for disabling a button row even if some are on
and some are off. And in case you missed it elsewhere, the
Cancel Voice
buttons operate the same way.
Cherry Audio CR-78 User Guide - 32
Page 33
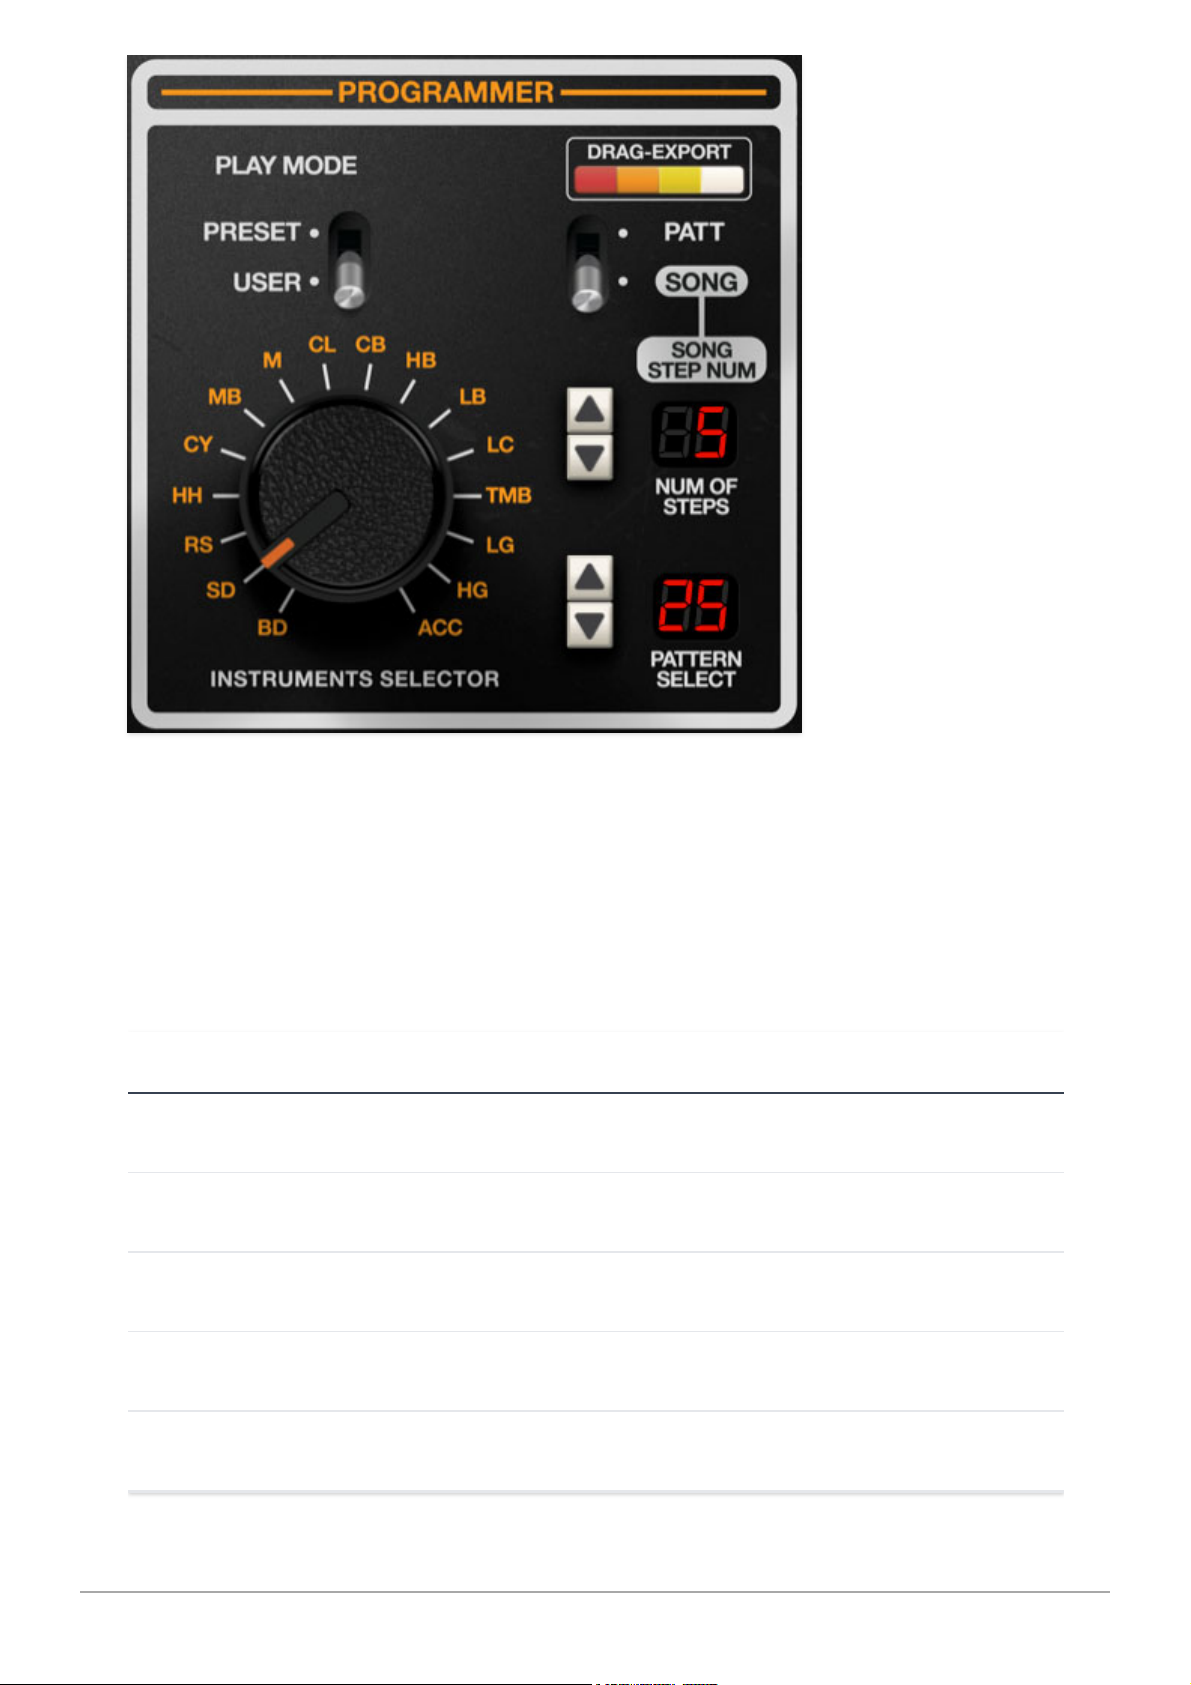
In addition to user pattern programming, Cherry CR-78 also includes a super
easy-to-use song mode. In addition to the 99 user patterns discussed in the
preceding chapter, each saved patch in the browser (purple menu strip at
the top) includes a user-created song, i.e. a set of chained patterns. A song
can be thought of a simple list of patterns to play, that might look something
like this:
SONG STEP NUMBER PATTERN
1 1
2 1
3 3
4 2
5 LP (loop)
Cherry Audio CR-78 User Guide - 33
Page 34
A song can be up to 99 steps long.
Using Song Mode
Song mode can only be used with user-programmed patterns (
Play
Mode
set to
User
). It does not work with the built-in preset patterns. If you'd
like to use one of the preset patterns in a song, the factory patterns can be
easily copied to user pattern locations with the
Copy
and
Paste
buttons,
displayed when
Play Mode
is set to
User
.
At this point, we'll assume you have some user patterns programmed, so
let's create a big CR-78 hit song:
Make sure
Play Mode
is set to User.
Set the
Patt/Song
switch to
Song
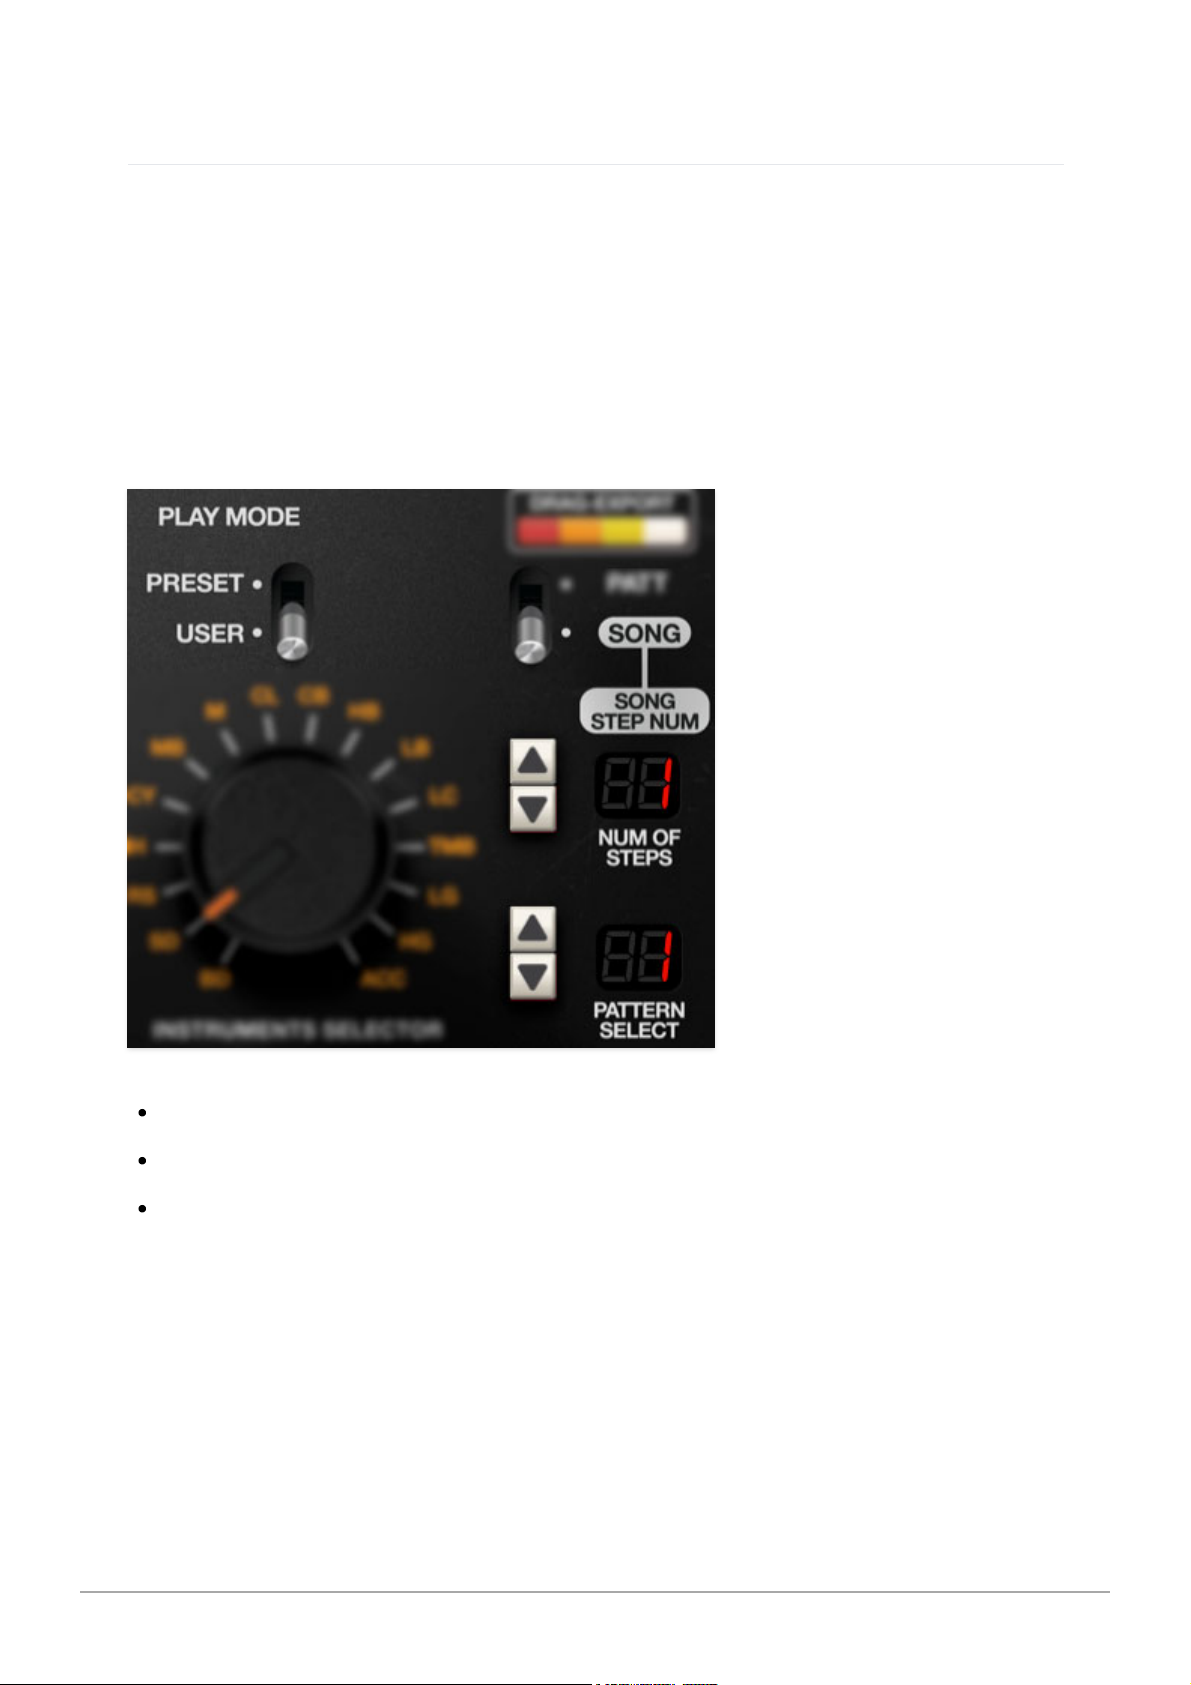
The
Song Step Number
display (top number display) shows the current
song step number; the
Pattern Select
display (bottom number display)
shows the selected pattern number for the step.
Select the desired pattern for step 1 number using up/down buttons
beside the Pattern Select display, then click the up button beside the Song
Step Num display to move onto the next song step. Select the pattern
number for song step 2, repeat...
Cherry Audio CR-78 User Guide - 34
Page 35
Special Song Step Types
Song mode includes the following useful special step types:
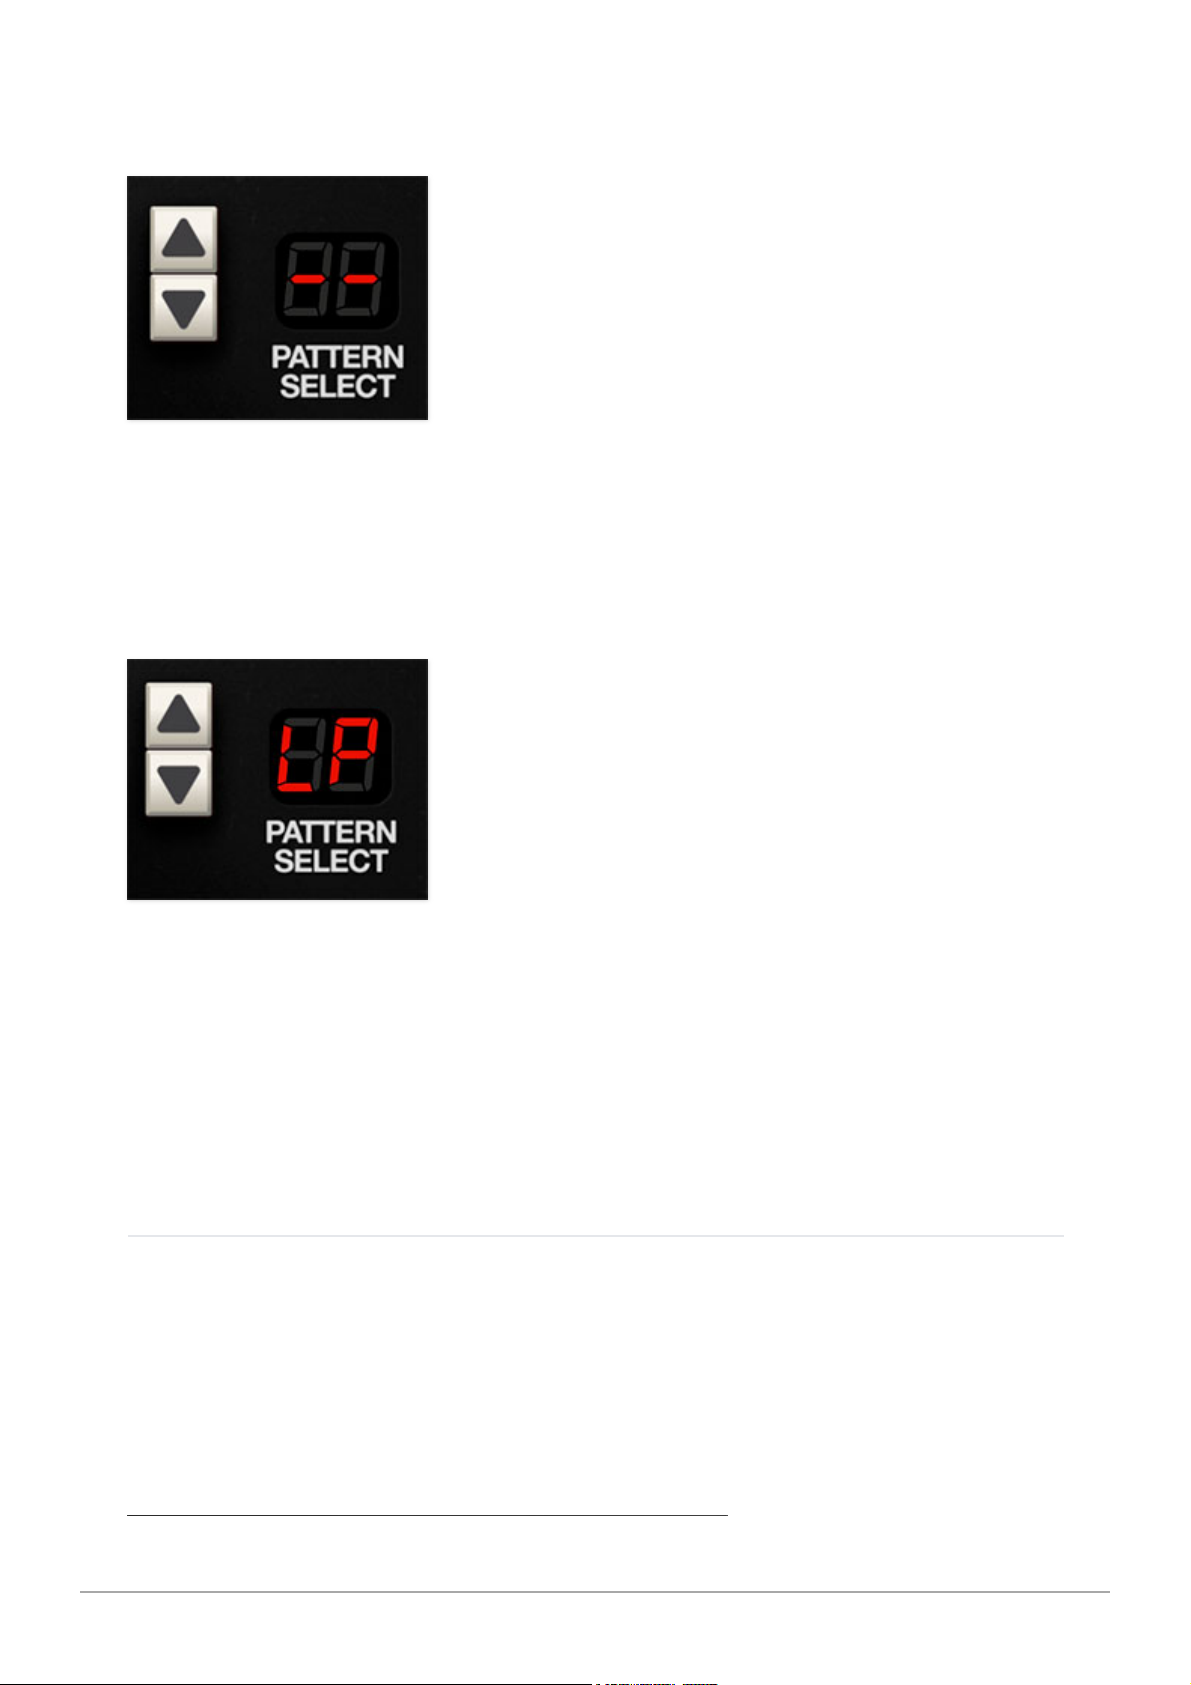
End Step- This stops song playback on the first beat of the bar. The end step
can be selected by clicking the
Pattern Select
down arrow button a single
time when the current selected pattern is 1. It appears as two dashes in the
Pattern Select
display.
Loop Step- Adding a loop step causes the song to jump back to the the
beginning of song step number 1. Note that a loop step has no duration of its
own - that is, the loop occurs immediately at the top of its song step. A loop
step can be selected by clicking the
Pattern Select
down arrow button twice
when the current selected pattern is 1. It appears as LP in the
Pattern Select
display.
Song Playback
Clicking the
Start/Stop
button begins or ends song playback. A song will
always play back from the beginning - you'll see the
Song Step Num
display
reset to step 1.
Playing Back Songs in a DAW
Cherry Audio CR-78 User Guide - 35
Page 36
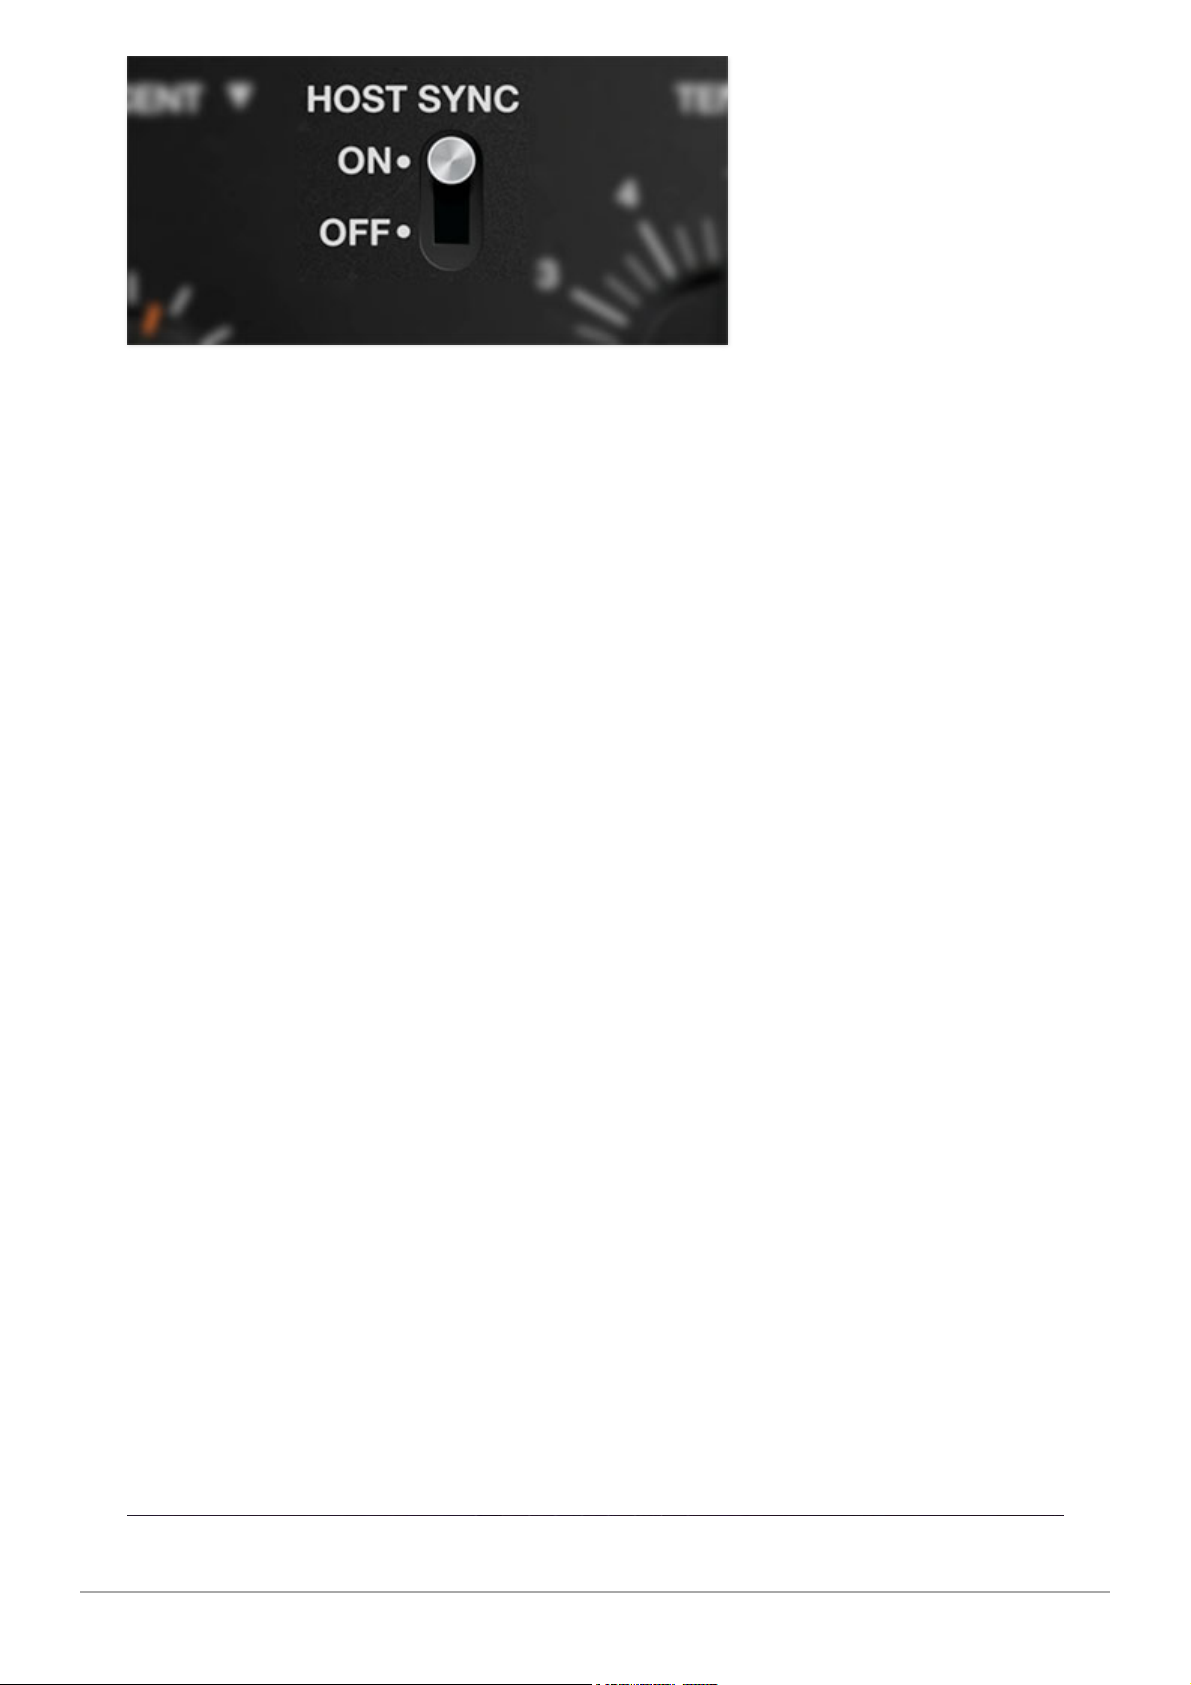
If the
Host Sync
switch is set to Off, CR-78 ignores DAW tempo, that is, it
behaves as an independent entity.
When
Sync
is set to
Ext
, CR-78 will follow the DAW tempo and bar location.
The only caveat to be aware of this your DAW has no way of knowing what
time signatures you've used in CR-78. If all song rhythms are in standard 4/4,
this most likely won't be a problem, but if you're using odd time signatures,
you'll need to manually set your DAW's master time signature track to
accommodate the length of the CR-78's song patterns, otherwise downbeats
won't land on the first beat of bars in your DAW.
Please see the Host Sync section in Main Panel Controls for more
information.
Cherry Audio CR-78 User Guide - 36
Page 37
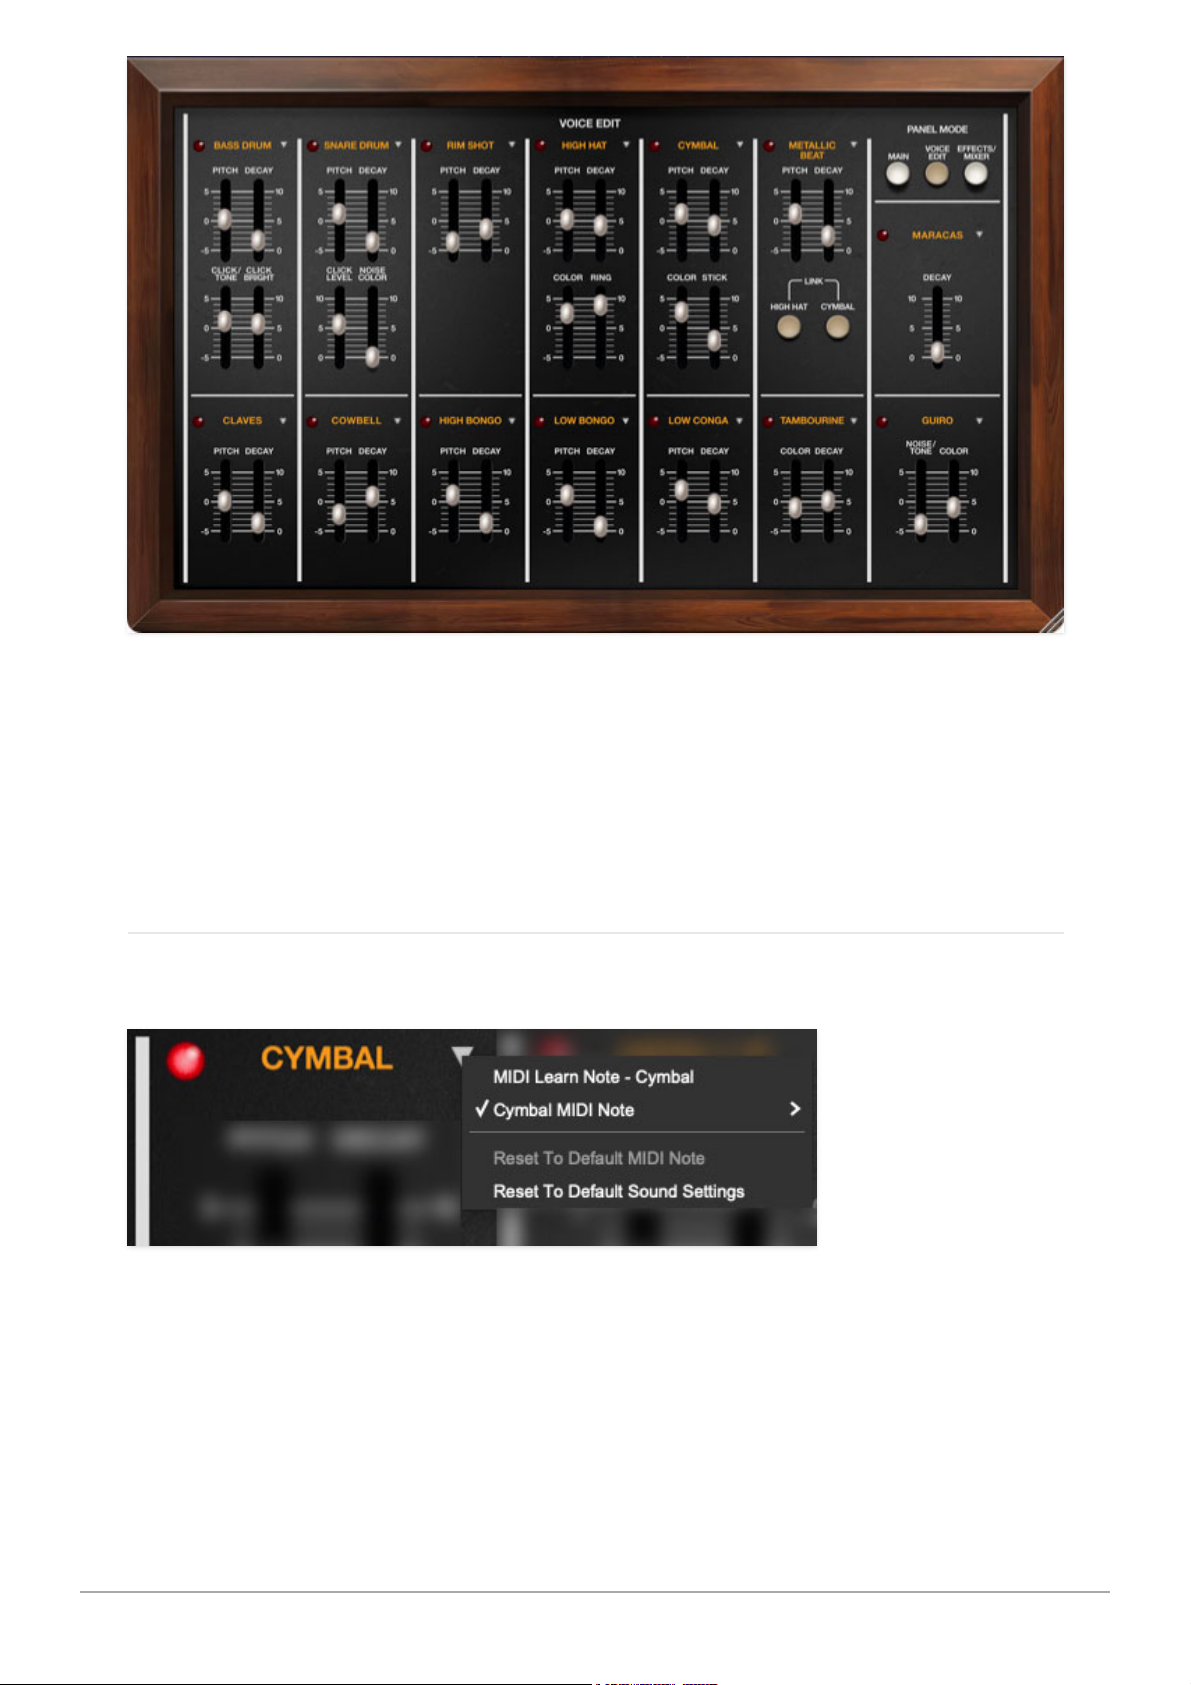
On the original CR-78, the drum voices were fixed and non-editable. Cherry
Audio's CR-78 offers useful parameters that allow subtle or sometimes
extreme modification of the stock sounds. We also included a shortcut to
instantly return to "factory spec" voice parameters, in case you really louse
things up!
Common Voice Edit Parameters
In addition to the parameter sliders, each voice includes:
LED Trigger lamp- These flash momentarily to indicate when a voice is
triggered. If a voice LED flashes but you don't hear anything, make sure its
corresponding
Level
slider isn't set to zero on the
Effects/Mixer
page.
Triangle Menu- The inverted triangle menu accesses couple of important
and useful functions.
Cherry Audio CR-78 User Guide - 37
Page 38

MIDI Learn Note - <
instrument name
>- This enables custom MIDI
note assignment. To assign a MIDI note, select the MIDI Learn Note menu;
the white arrow begins to flash. Strike the MIDI key or button you'd like to
assign. The arrows stops flashing and the note is assigned. Custom note
assignments are saved per patch - they are not a global for all
patches.
<
instrument name
> MIDI Note- This displays a list of all MIDI notes
with the currently assigned note highlighted. The MIDI can be "manually"
reassigned by selecting any note from the popup menu.
Note:
The Guiro voice includes separate
MIDI Learn Note
and
MIDI Note
menus its low and high voices.
Reset To Default MIDI Note- Initializes the instrument to its default
note setting as shown in the Default Voice MIDI Mapping table above.
Please check out the Using CR-78 as a MIDI Sound Module section
for more information on default MIDI note assignments.
Reset To Default Sound Settings- Initializes all voice edit sliders back
to factory sound preset positions.
Individual Voice Edit Parameters
Each voice's parameters are described in the table below. Make sure to scroll
down to the bottom for important info about the how the Metallic Beat
Link
buttons work, plus additional info about the Guiro, which operates slightly
differently from the other instruments.
INSTRUMENT PARAMETER FUNCTION
INSTRUMENT PARAMETER FUNCTION
BASS DRUM Pitch pitch of tonal element
Decay length of sound
Click/Tone tonal/transient element balance
Click
Bright
brightness of transient element
SNARE
DRUM
Pitch pitch of tonal element
Cherry Audio CR-78 User Guide - 38
Page 39

INSTRUMENT PARAMETER FUNCTION
Decay length of sound
Click Level volume of transient element
Noise
Color
highpass filtering of noise element
RIM SHOT Pitch pitch of tonal element
Decay length of sound
HIGH HAT Pitch pitch of tonal element
Decay length of sound
Color low/hi tonal element balance
Ring tonal element amount
CYMBAL Pitch pitch of tonal element
Decay length of sound
Color low/hi tonal element balance
Stick click level
METALLIC
BEAT
Pitch pitch of tonal element
Decay length of sound
Link SEE BELOW FOR EXPLANATION OF LINKING
MARACAS Pitch pitch of tonal element
Cherry Audio CR-78 User Guide - 39
Page 40

CLAVES Pitch pitch of tonal element
Decay length of sound
COWBELL Pitch pitch of tonal element
Decay length of sound
HIGH
BONGO
Pitch pitch of tonal element
Decay length of sound
LOW BONGO Pitch pitch of tonal element
Decay length of sound
LOW CONGA Pitch pitch of tonal element
Decay length of sound
TAMBOURINE Color highpass frequency
Decay length of sound
GUIRO Noise/Tone noise/tonal element balance
Color highpass frequency
SEE BELOW FOR ADDITIONAL GUIRO
INFORMATION
Cherry Audio CR-78 User Guide - 40
Page 41
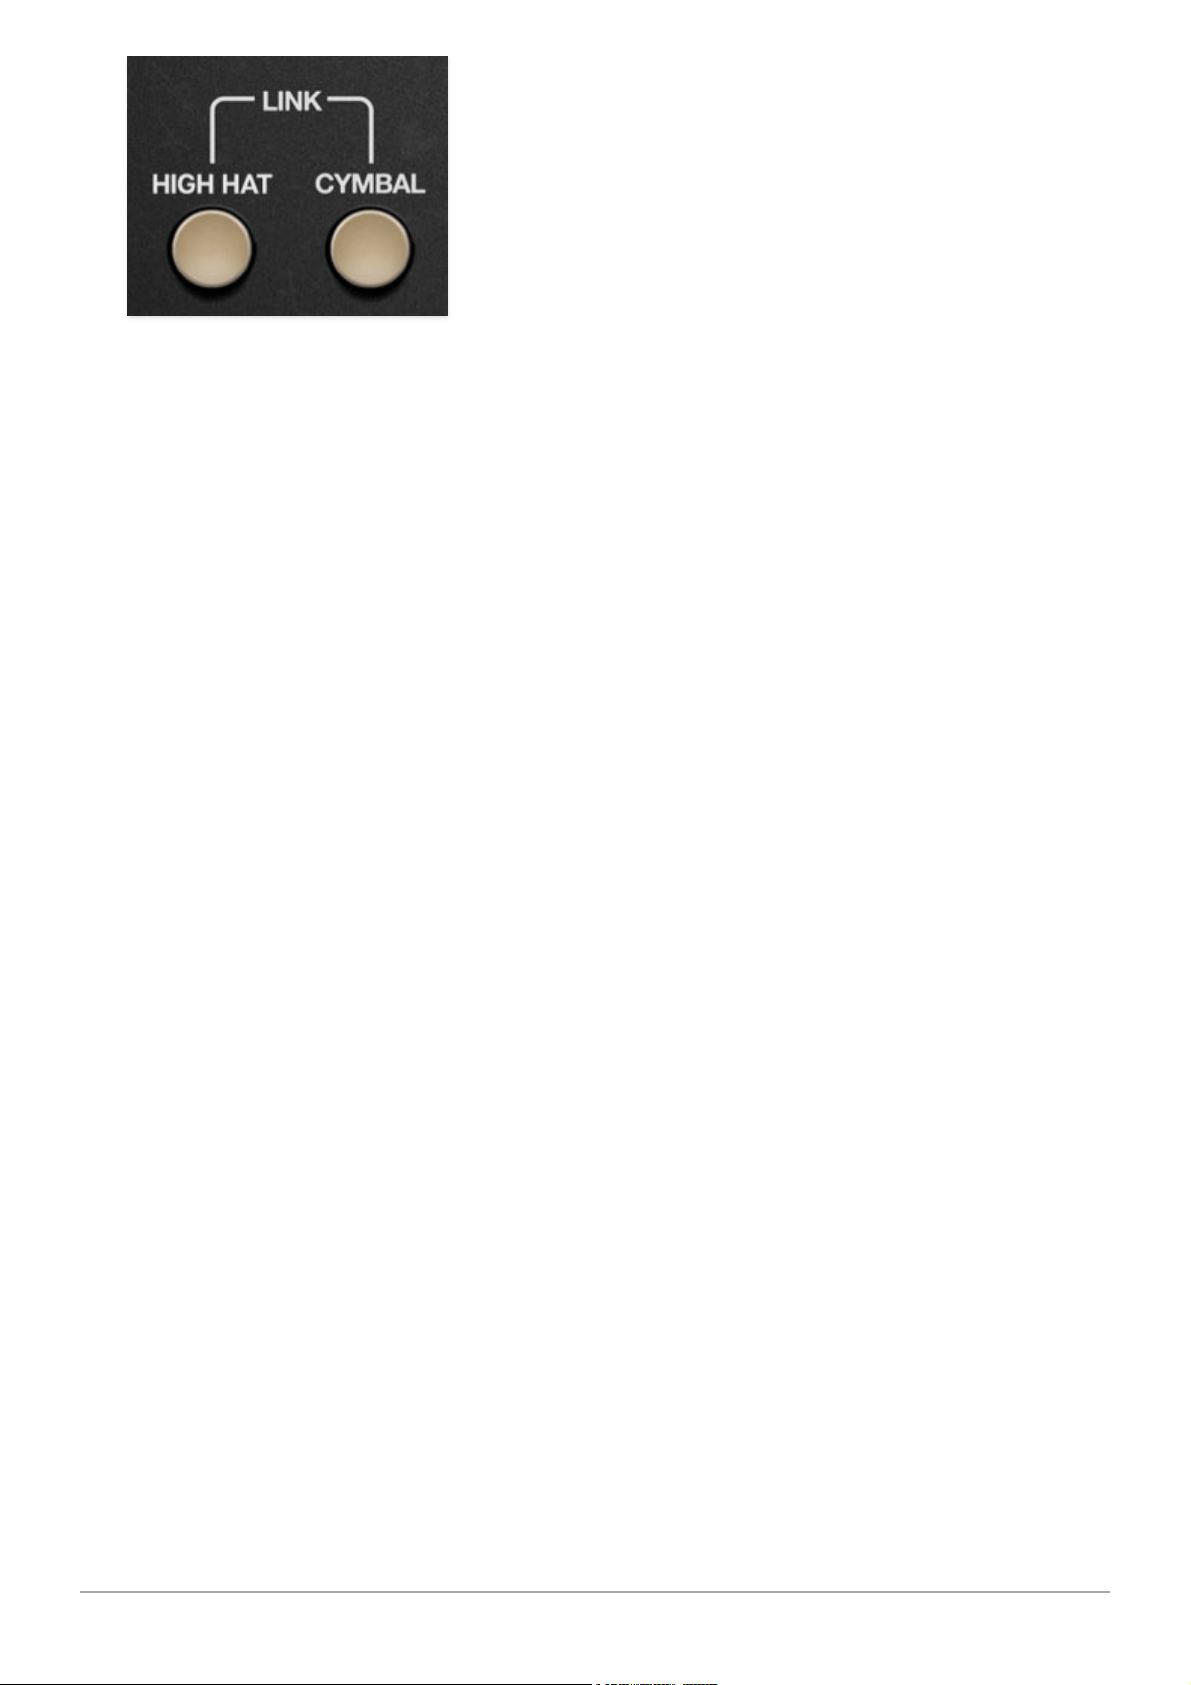
Metallic Beat / Link buttons- Metallic Beat is one of the quirkier and notself-explanatory features of the original CR-78. You can skip ahead a little if
you don't want to delve into the nitty-gritty of vintage Roland synthesis, but
trust us, all of this is relevant to how the
Link
feature works (and it's pretty
interesting stuff anyway):
The later classic Roland analog drum machines (DR-110, TR-606, and TR-808)
created cymbal sounds by combining the outputs of four to six atonally
tuned square waves to create a random array of tonal harmonics, distorted
them (for additional harmonics), then added some white noise, steeply
highpass-filtered the whole mess, and then shaped the amplitude
appropriately - short for high hats, longer for cymbal crashes, etc. (Not
necessarily in that order, due to quirky VCA design, but we're speaking
conceptually here.) The idea of using those atonal square waves was to
approximate a cymbal sound with some tonal characteristics, as opposed to
the non-tonal "swish" of white noise.
CR-78 cymbal synthesis is unique and a bit cruder; the bulk of the cymbal
tones are created with resonant bandpass-filtered white noise. But here's
where the unique part comes in - there's a slider on the front panel of the
original CR-78 labeled
CY HH Metallic Beat
. This uses three square waves,
atonally tuned, distorted, and filtered as described in the previous
paragraph, to add a sharp metallic "clink" tone every time a high hat or
cymbal sounds when the
CY HH Metallic Beat
slider is turned up. We believe
this was intended to mimic the sound of the drum stick striking the ringy,
inside bell area of cymbal. (As opposed to the xOx drum machines that use
the square wave synthesis to create the main body of their sound.)
Stay with us here: raising the
CY HH Metallic Beat
slider on the
original CR-78 layers the metallic beat "clink" any time the high hat
or cymbal sound is heard, with one exception. If the
Cymbal/High Hat
Cancel Voice button is toggled, the metallic beat sound plays steady eighthnotes, regardless of what the cymbal and high hat pattern is currently
playing. We're not sure why the original operates this way, but we think it
Cherry Audio CR-78 User Guide - 41
Page 42

might've been to provide a simple metronome function when the Cancel
Voice button was toggled.
Of course we wanted to accurately replicate the original CR-78 functionality,
so with the two preceding paragraphs in mind, here's how the Metallic
Beat
Link
function works:
The Metallic Beat voice will trigger when either or both of the
High Hat
or
Cymbal
buttons are toggled. Both are on by default, but you'll need to turn
up the
Metal Beat
slider on the
Effects/Mixer
panel to hear it. We set it up
this way to emulate how the original works, i.e. Metallic Beat always playing,
but with its volume slider nominally turned off.
Unlike the original, Metallic Beat can be detached from the high hat and
cymbal voices by disabling the
Link
buttons and programming it into user
patterns like any other instrument. It can even be linked to high hat and
cymbal hits
and
used as its own independent instrument simultaneously
(don't worry, it won't "double trigger" if a hit lands on the same beat as a
cymbal and a user-programmed step).
"Add Voice" Instruments
Similar to the original unit's
CY HH Metallic Beat
front-panel slider and
always-playing-in-the-preset-rhythms implementation, the original included
individual
Add Voice
section sliders for the Tambourine and Guiro
instruments. The idea was that the user could add Tambourine and Guiro for
extra pizazz by raising their respective sliders while any of the preset
rhythms played. In order to correctly replicate this, we recreated the
Tambourine and Guiro programming for the preset patterns, but defaulted
their volume sliders to zero on the
Effects/Mixer
page.
(Because Cherry CR-78 has a mixer panel with volume sliders for every
voice, we've relocated the original unit's
CY HH Metallic Beat, Tambourine
,
and
Guiro
sliders to the
Effects/Mixer
page.)
Tambourine- On original, this always plays straight eighth notes when the
slider is raised. In fact, the eighth notes sound a little funny and
polyrhythmical against the 3/4 factory preset rhythms. Don't ask us, that's
how the original works!
Guiro- There are couple of unique things about the guiro as compared to
other voices:
Unlike all other voices, which sound for the same length of time
regardless of tempo setting, the guiro's duration is tempo dependent specifically, it plays for the exact length of a step, as determined by the
Cherry Audio CR-78 User Guide - 42
Page 43

tempo setting. If the guiro is programmed into multiple consecutive steps,
it will sound continuously (i.e. legato).
Distinct low and high guiro pitches are heard in the preset factory
patterns. We actually split this into two separately programmable
instruments in the step sequencer so users can program the "up" and
"down" notes to their liking. However, there is only one guiro voice under
the hood, and the Voice Edit parameters affect both voices.
Finally, if you are holding out for a guiro 'til the end of the night, then you
are Bonnie Tyler, but instead of singing grandiose Meat Loafian' epics,
you're actually in a Latin band.
Cherry Audio CR-78 User Guide - 43
Page 44
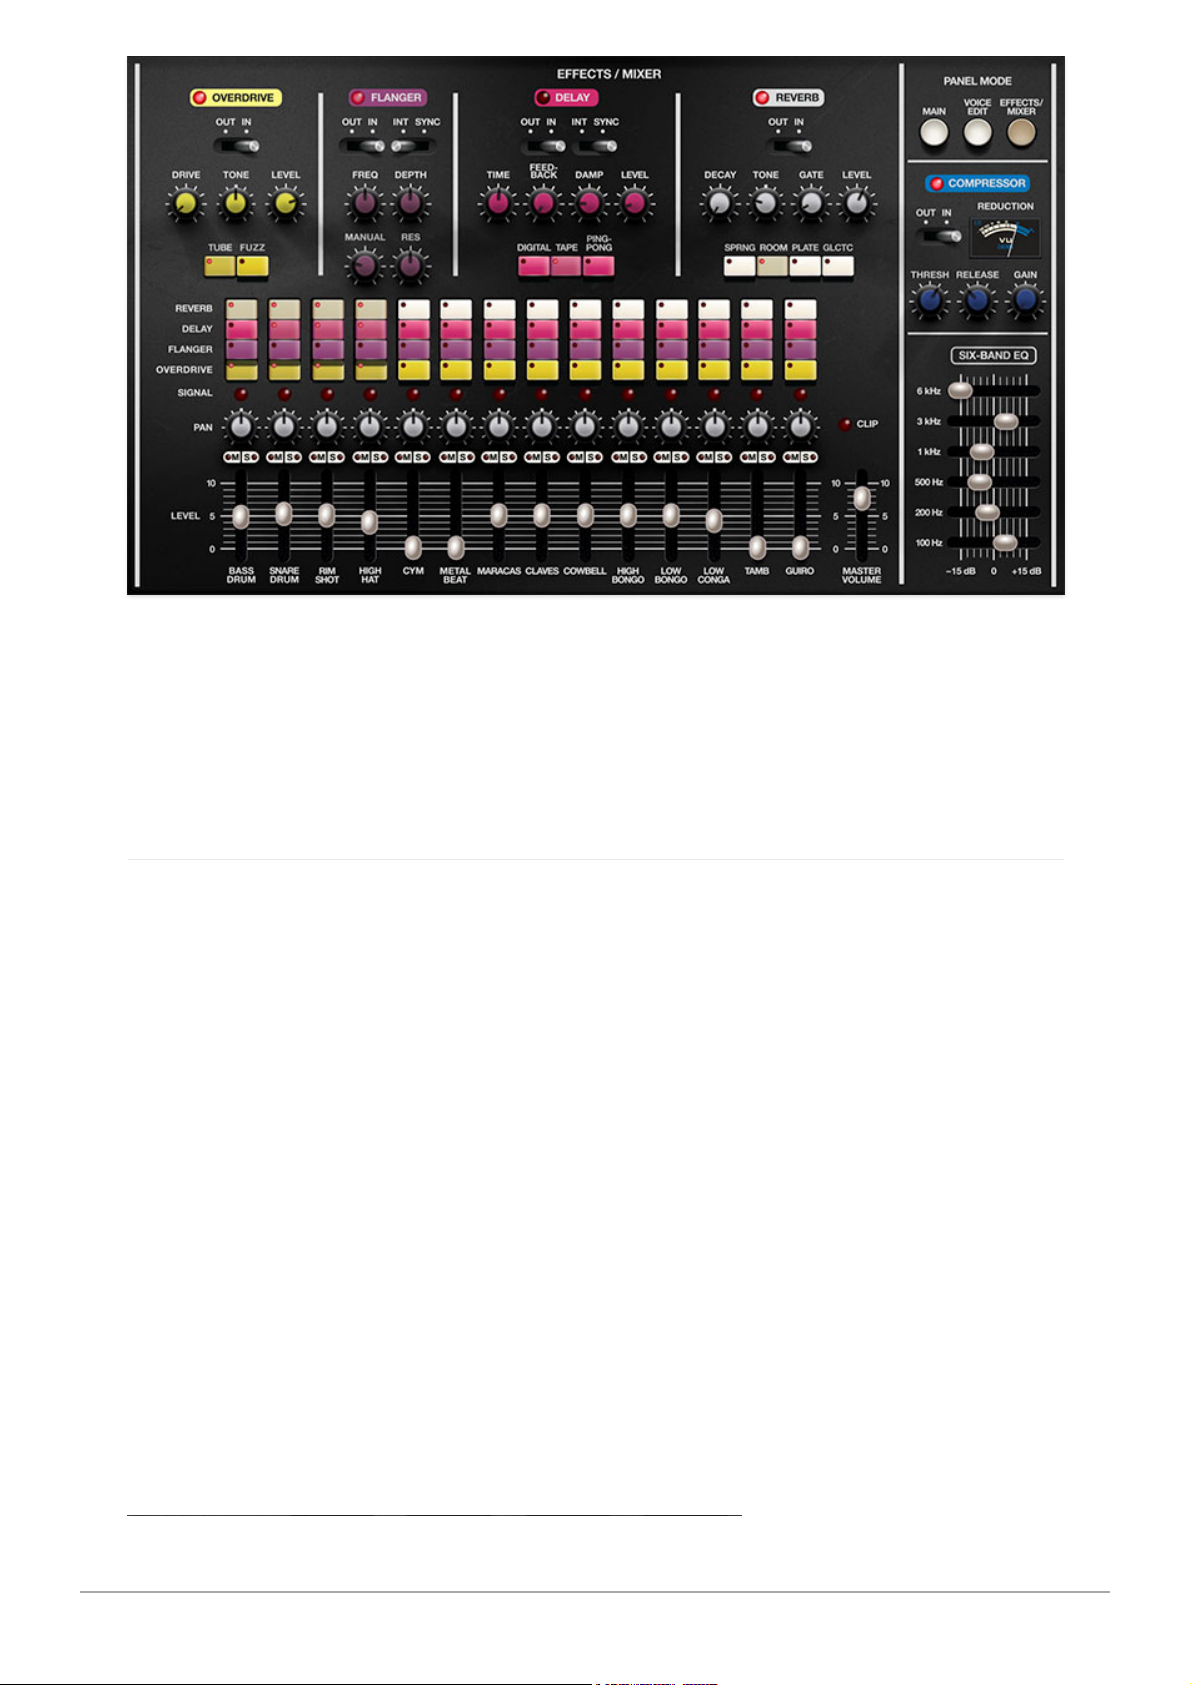
The Effects/Mixer panel contains CR-78's four individual effects, a global
compressor, a six-band EQ, and a mixer with volume, panning, and unique
send buttons that allow easy assignment of effects to individual instruments.
We'll start with the mixer at the bottom and move up through the effects:
Mixer Section
The original CR-78 didn't have a mixer for individual instrument levels.
Cherry CR-78 adds a mixer with individual levels for every instrument. Note
that all mixer parameters are stored with patches, so changing patches
will change levels and other mixer parameters.
Cherry Audio CR-78 User Guide - 44
Page 45
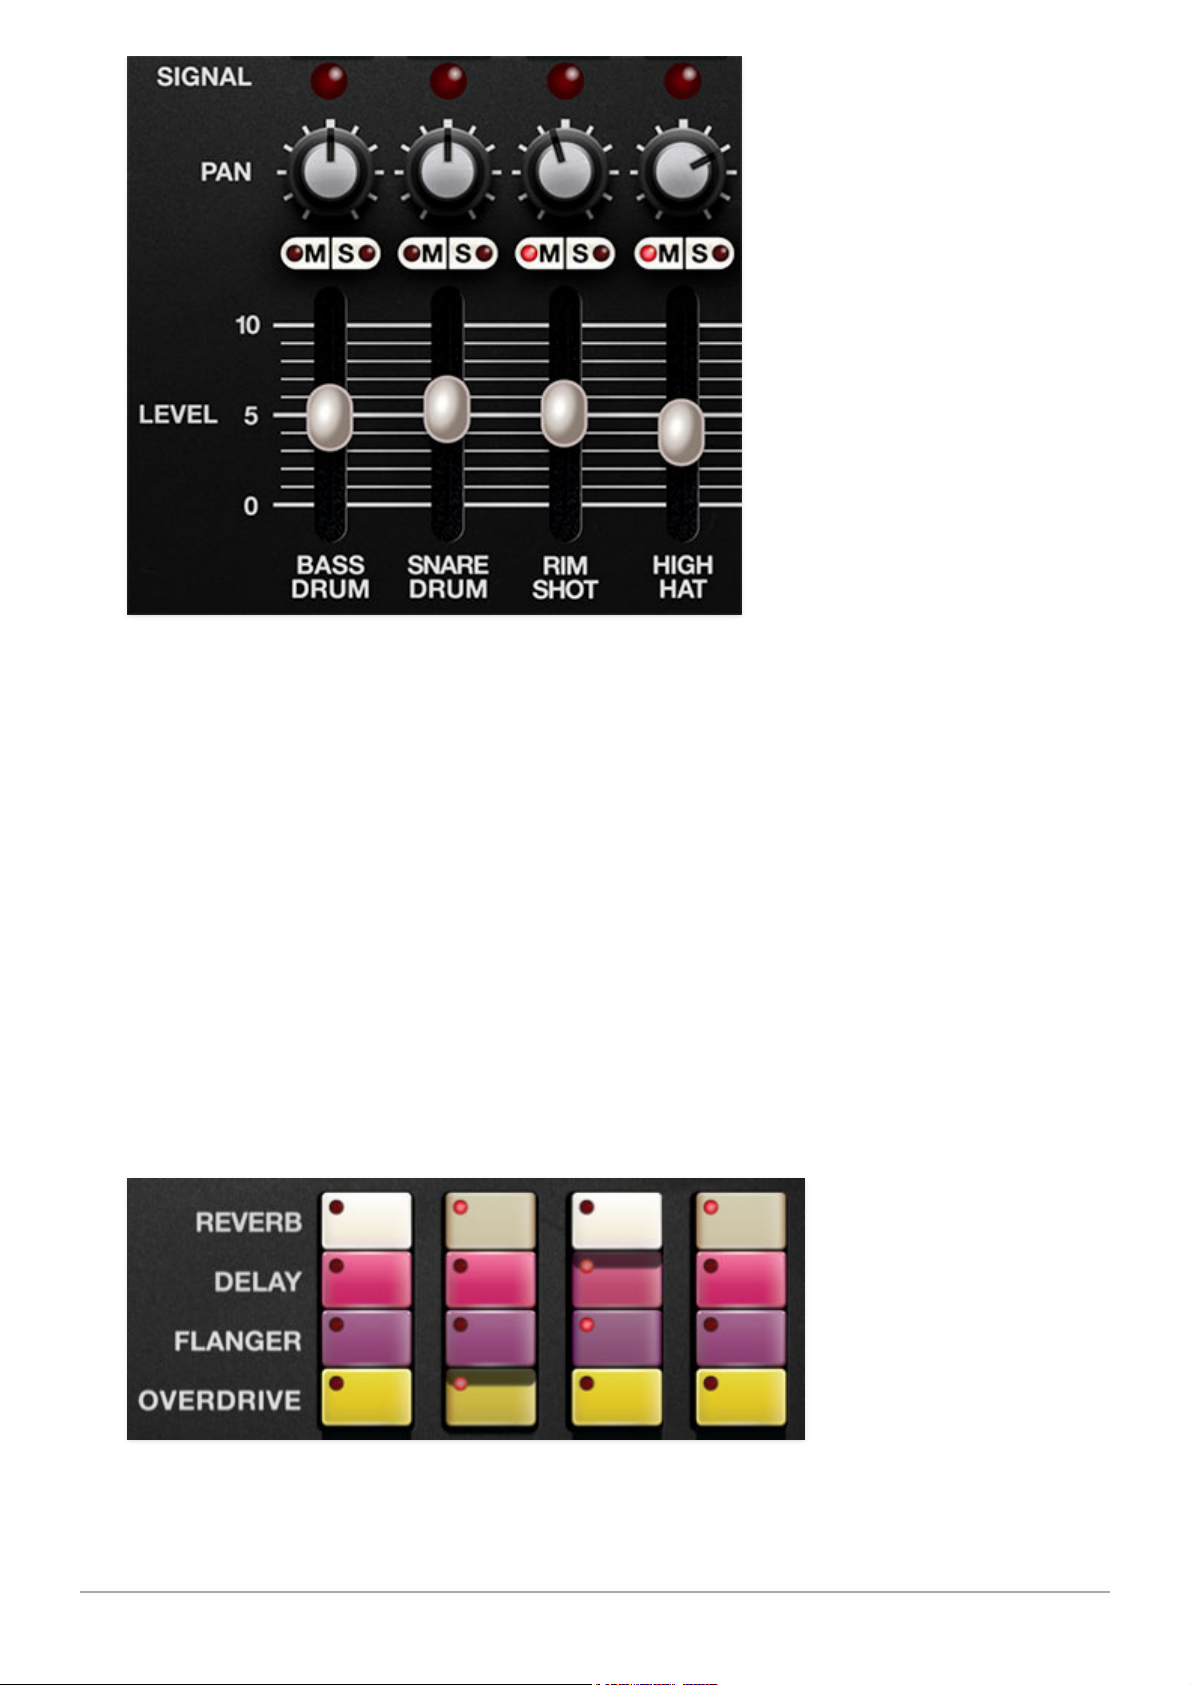
Level- Sets the volume for each individual instrument voice.
Master Volume
sets the total volume. Keep your eye on the
Clip
LED to prevent ugly digital
distortion. (The overdrive and compressor effects are far more musical if
you're seeking that kind of carnage.) The
Master Volume
and clip LED are the
same as the ones on the Main panel, just duplicated for convenience.
M (Mute) / S (Solo) - These are standard mix mute and solo buttons,
respectively. Their LED's will illuminate when engaged, and can be combined
in any fashion. The
Solo
LEDs will flash when engaged - hopefully minimizing
the occurrence of, "why-no-make-noise" scenarios.
Pan- All of CR-78's instruments are inherently mono; the Pan knobs set the
position of the instrument in the stereo field.
Signal LED- These illuminate any time an instrument is triggered.
Cherry Audio CR-78 User Guide - 45
Page 46
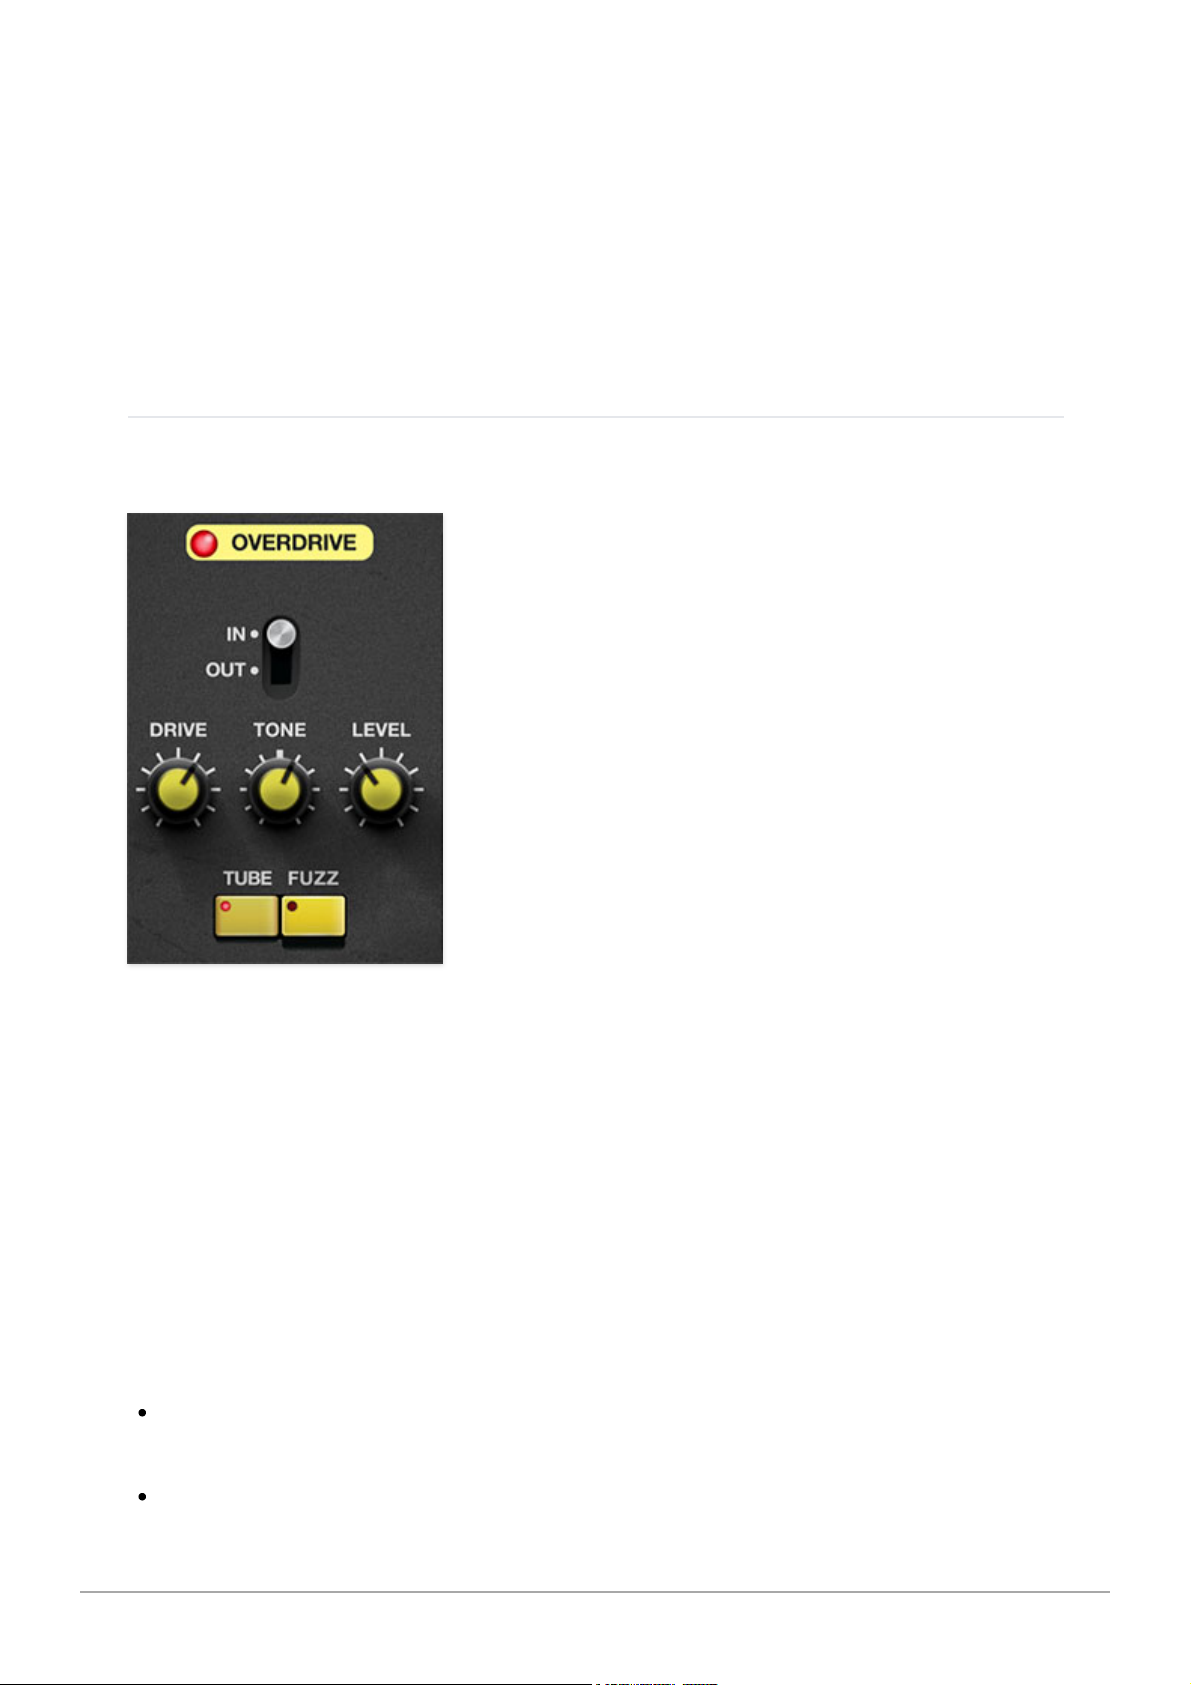
Effects Send Buttons (Overdrive/Flanger/Delay/Reverb)- These toggle
buttons allow CR-78's effects to be applied to individual instruments in any
combination. They operate much like using send knobs to route mixer
channels to effects on bus inserts, but instead of sends level knobs, CR-78
uses buttons that send signal at "full blast." This configuration makes it really
easy to, for example, add distortion to the bass drum, reverb to the snare,
flanging to high hats, etc. We think you'll find that the buttons make it really
fast and fun to use (as opposed to twirling 56 tiny send knobs!).
Effects
Overdrive
In/Out- Enables and disables overdrive effect. The LED in the name tab
indicates current enabled or disabled status.
Drive- Amount of distortion.
Tone- This is a tilt-style EQ; rotating counterclockwise from center increases
bass, rotating clockwise increases treble.
Level- Overall volume; this doesn't affect the amount of distortion. Because
increasing drive amount causes an overall volume increase,
Level
can be
used to balance things out.
Mode buttons- Sets overdrive type.
Tube- This is the mellower distortion mode. Use it to add just little bit of
vintage hair to sounds.
Fuzz- Aggressive and raunchy vintage fuzz tone.
Cherry Audio CR-78 User Guide - 46
Page 47
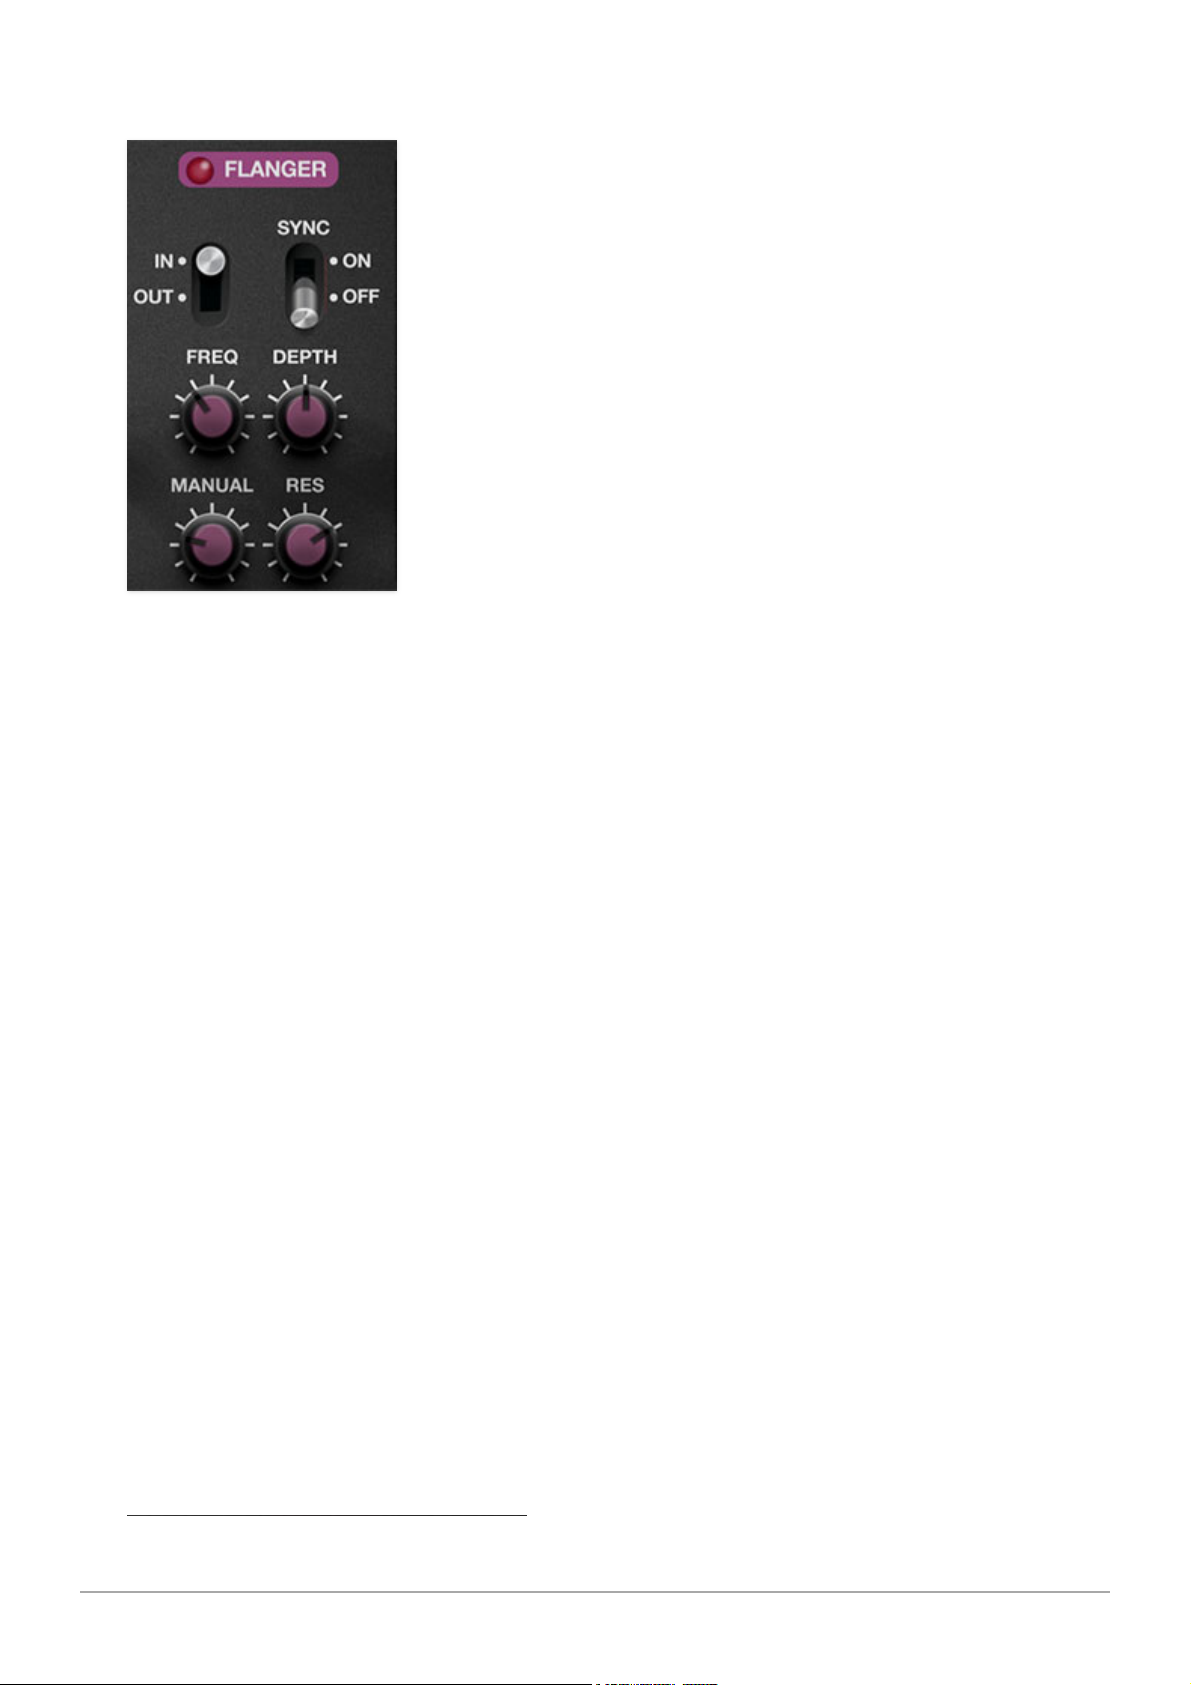
Flanger
In/Out- Enables and disables flanger effect. The LED in the name tab
indicates current enabled or disabled status.
Sync- Engaging the
Sync
switch locks the flanger sweep time to master
tempo. When engaged, the
Freq
knob snaps to note values ranging from
1/64th note triplet to 8 beats.
Sync
mode locks to the Main panel
Tempo
knob setting when using the CR-78 standalone version or the current project
tempo when the plug-in version is used in a DAW.
Freq- Sets the modulation from 0.01-6 Hz speed. The
In/Out
LED flashes at
the current mod rate.
Depth- Sets flange depth, i.e. the amount of modulation.
Manual- Sets the delay time length from 1-13ms. Shorter delay times result
in more of a "jet passby" swoosh, particularly with
Res
at higher settings.
Res (Resonance)- Sets the amount of internal feedback for increased
intensity.
Delay
Cherry Audio CR-78 User Guide - 47
Page 48
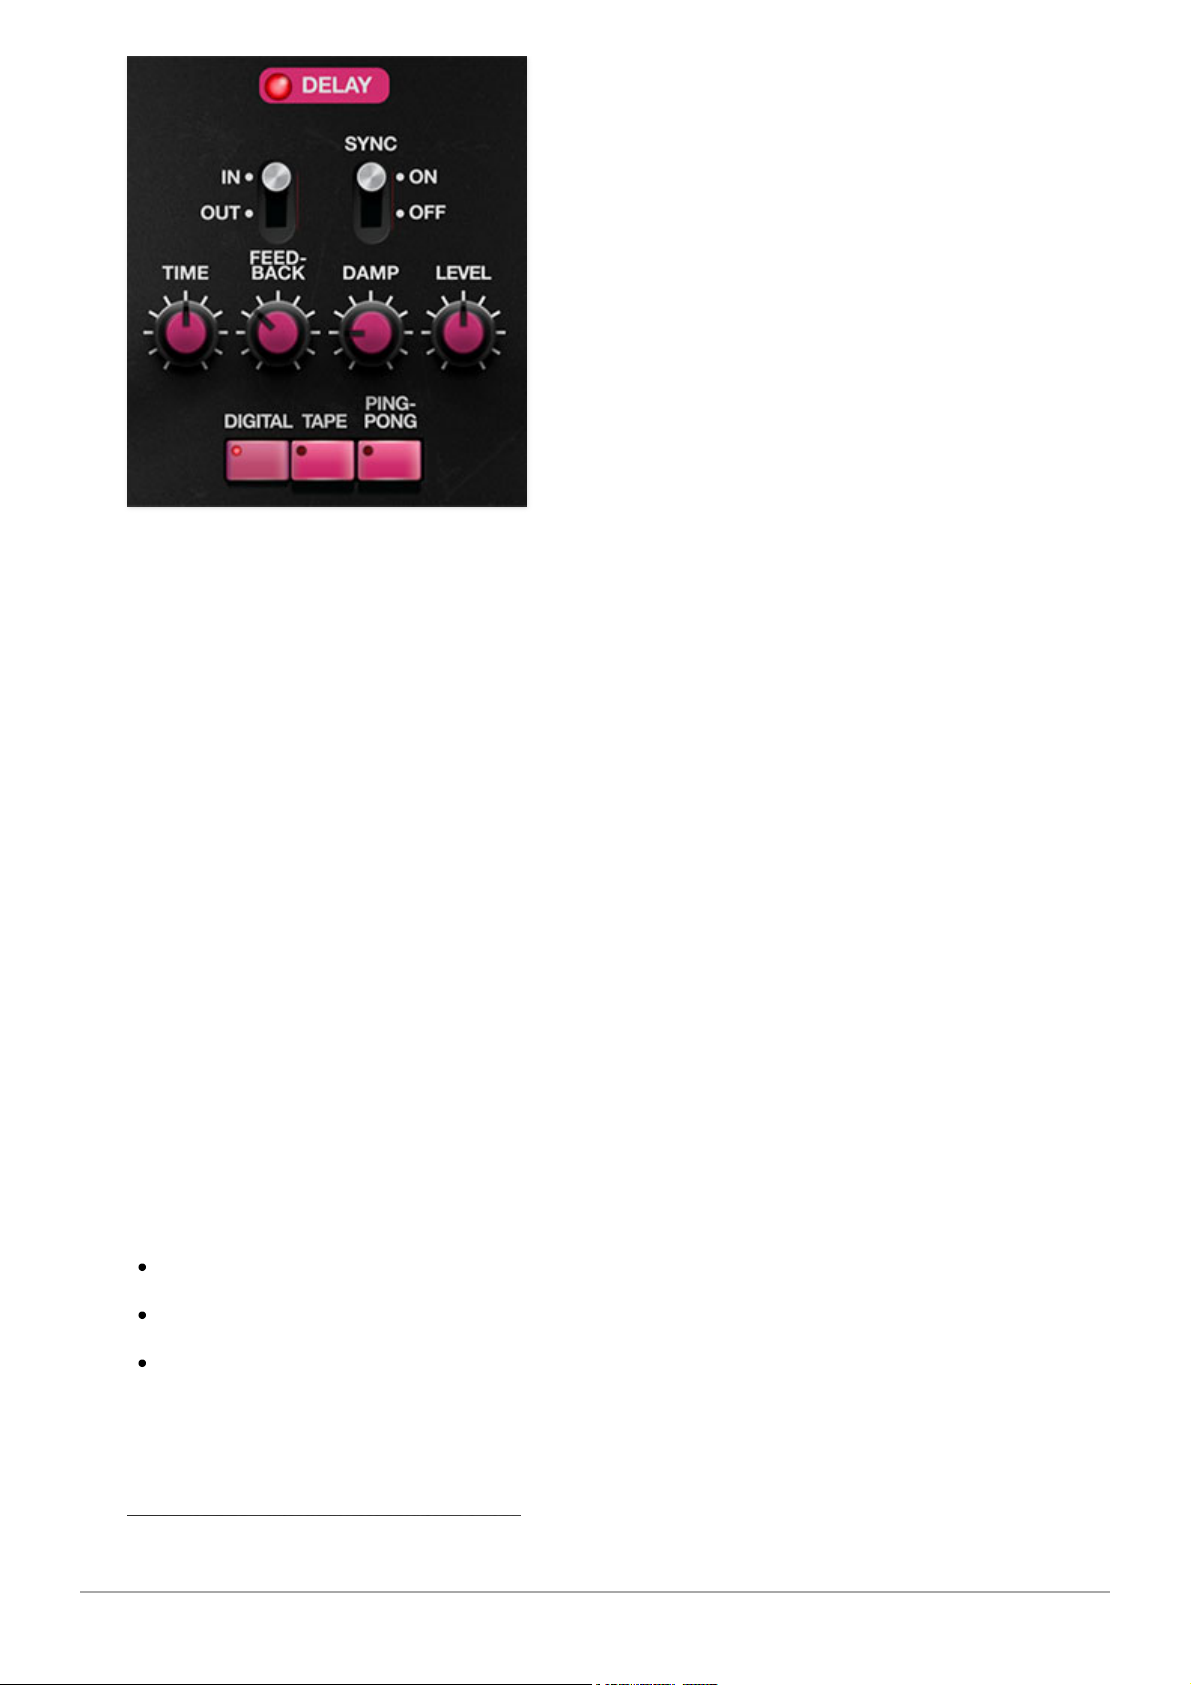
In/Out- Enables and disables delay effect. The LED in the name tab indicates
current enabled or disabled status.
Sync- Engaging the
Sync
switch locks the delay time to master tempo. When
engaged, the
Time
knob snaps to note values ranging from 1/64th note
triplet to 8 beats.
Sync
mode locks to the Main panel
Tempo
knob setting
when using the CR-78 standalone version or the current project tempo when
the plug-in version is used in a DAW.
Time- Sets delay time, from 1 to 2000 ms. If the
Sync
switch is enabled, time
settings snap to synchronized note values. The
In/Out
LED flashes at the
current mod rate.
Feedback- Routes the output to the input for additional repeats. Be careful
at high settings as this can result in runaway feedback madness.
Damp- Attenuates high-frequencies as the knob amount is increased. Not
only does this create more natural sounding decays, it also reduces the
"stacking" effect that occurs with high feedback levels.
Level- Sets the volume of the delay echoes.
Mode buttons- Sets Delay type.
Digital- Clean sounding digital delay.
Tape- Reproduces the effect of a vintage "space echo" tape delay.
Ping-Pong- Echoes alternate between audio channels.
Reverb
Cherry Audio CR-78 User Guide - 48
Page 49
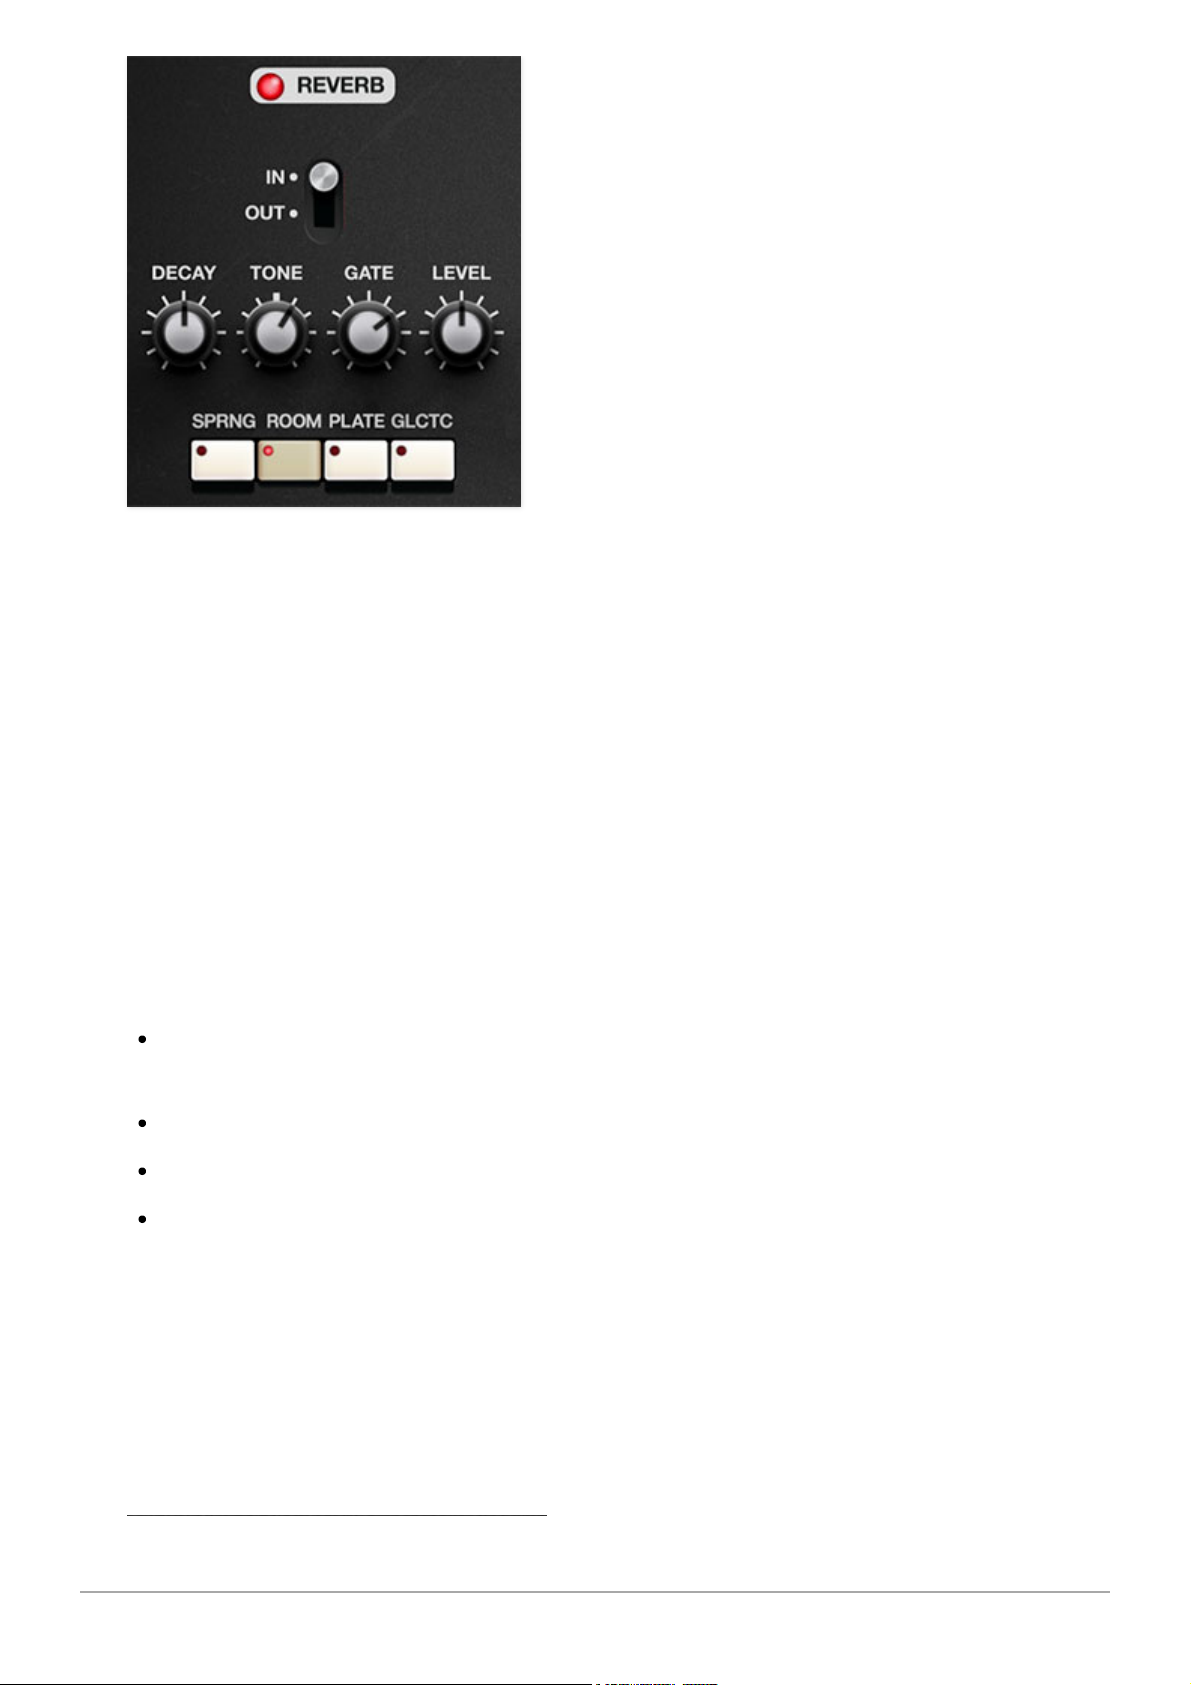
In/Out- Enables and disables reverb effect. The LED in the name tab
indicates current enabled or disabled status.
Decay- Sets the length of reverb release time/size of room.
Tone- This is a tilt-style EQ; rotating counterclockwise from center increases
bass, rotating clockwise increases treble.
Gate- This sets the threshold of the integrated noise gate. At full clockwise
position, the gate effect is disabled. The gate threshold increases as the knob
is rotated counterclockwise. This allows reverb tails to be abruptly chopped
off for the reverb effects that launched a thousand 80s hits!
Level- Sets the volume of wet reverb signal.
Mode buttons- Selects reverb type.
Spring- Recreates mechanical spring-reverb effect often seen (and
kicked) in vintage guitar amps.
Room- Recreates a vintage algorithmic-style medium room verb.
Plate- A medium-to-large studio plate-style algorithm.
Galactic- Cherry Audio's exclusive, giant, spacey reverb.
Compressor
Cherry Audio CR-78 User Guide - 49
Page 50
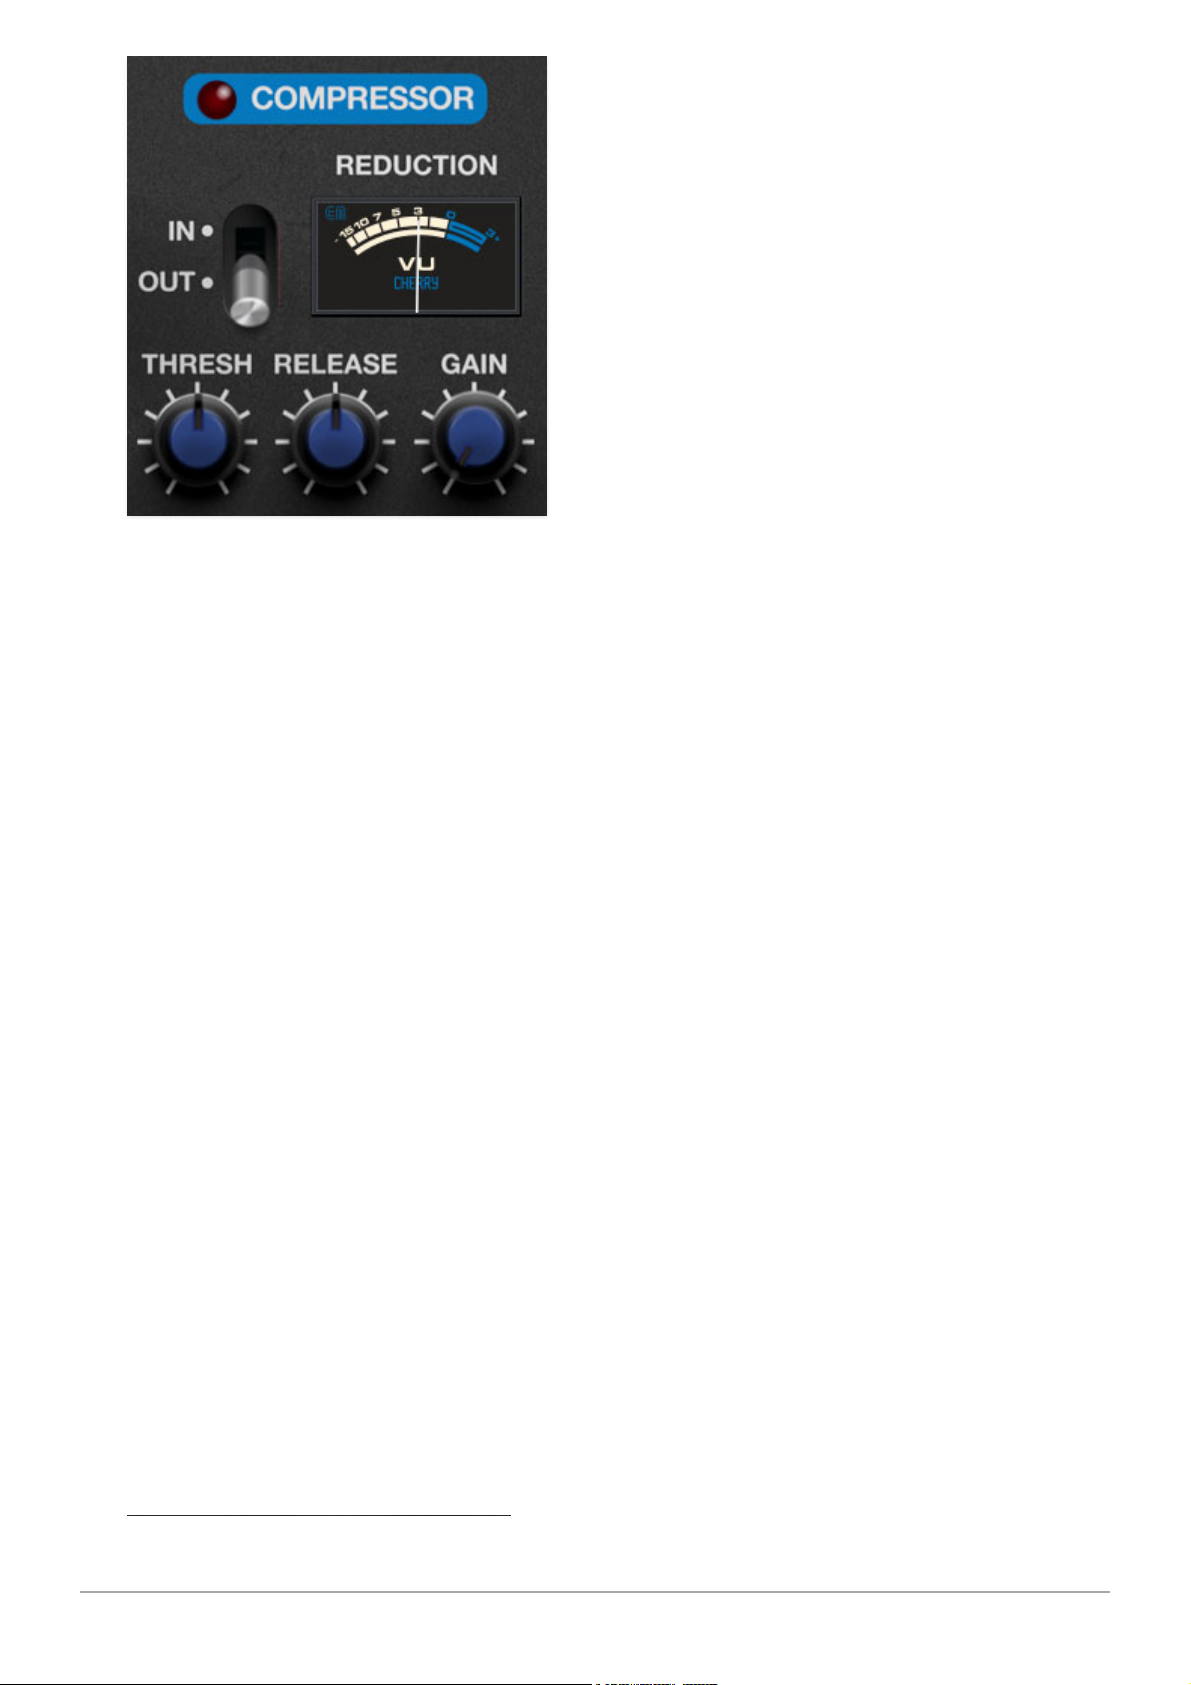
Unlike the other effects the compressor effect is global for the entire
instrument. It's intended to be used like a bus compressor, in order to "glue
together" beats. Though it can be used subtly, the algorithm has a lot of
personality, and can really smash things with low threshold and short release
settings. In purely technical terms, it sounds bitchin'.
In/Out- Enables and disables compressor effect. The LED in the tab
additionally indicates current enabled or disabled status.
Reduction Meter- Shows the amount of compression applied. The needle
nominally sits at zero dB, and moves to the left to indicate how much
compression is occurring.
Thresh (Threshold)- Sets the amount of compression. At full clockwise
position, no compression is applied; greater amounts of compression are
applied as the knob is rotated counterclockwise.
Release- The release knob sets how long it takes for the compressor to
recover or "let go" of the signal. What you need to know is that longer
release times (higher knob setting) are more gentle, and lower release times
(low knob setting) result in more aggressive sounding drums (hooray!).
Gain- The most rudimentary explanation of a compressor is that it levels
signal dynamics by making quiet signals loud, but in reality, it's reducing the
volume of peaks. This results in an overall loss of signal level. The
Gain
knob
introduces "make-up gain" in order to compensate for this loss of level. Its
setting isn't critical, but the
In/Out
switch can be used to set the
Gain
control
by comparing the relative level of un-effected vs. compressed signal.
Six-Band EQ
Cherry Audio CR-78 User Guide - 50
Page 51
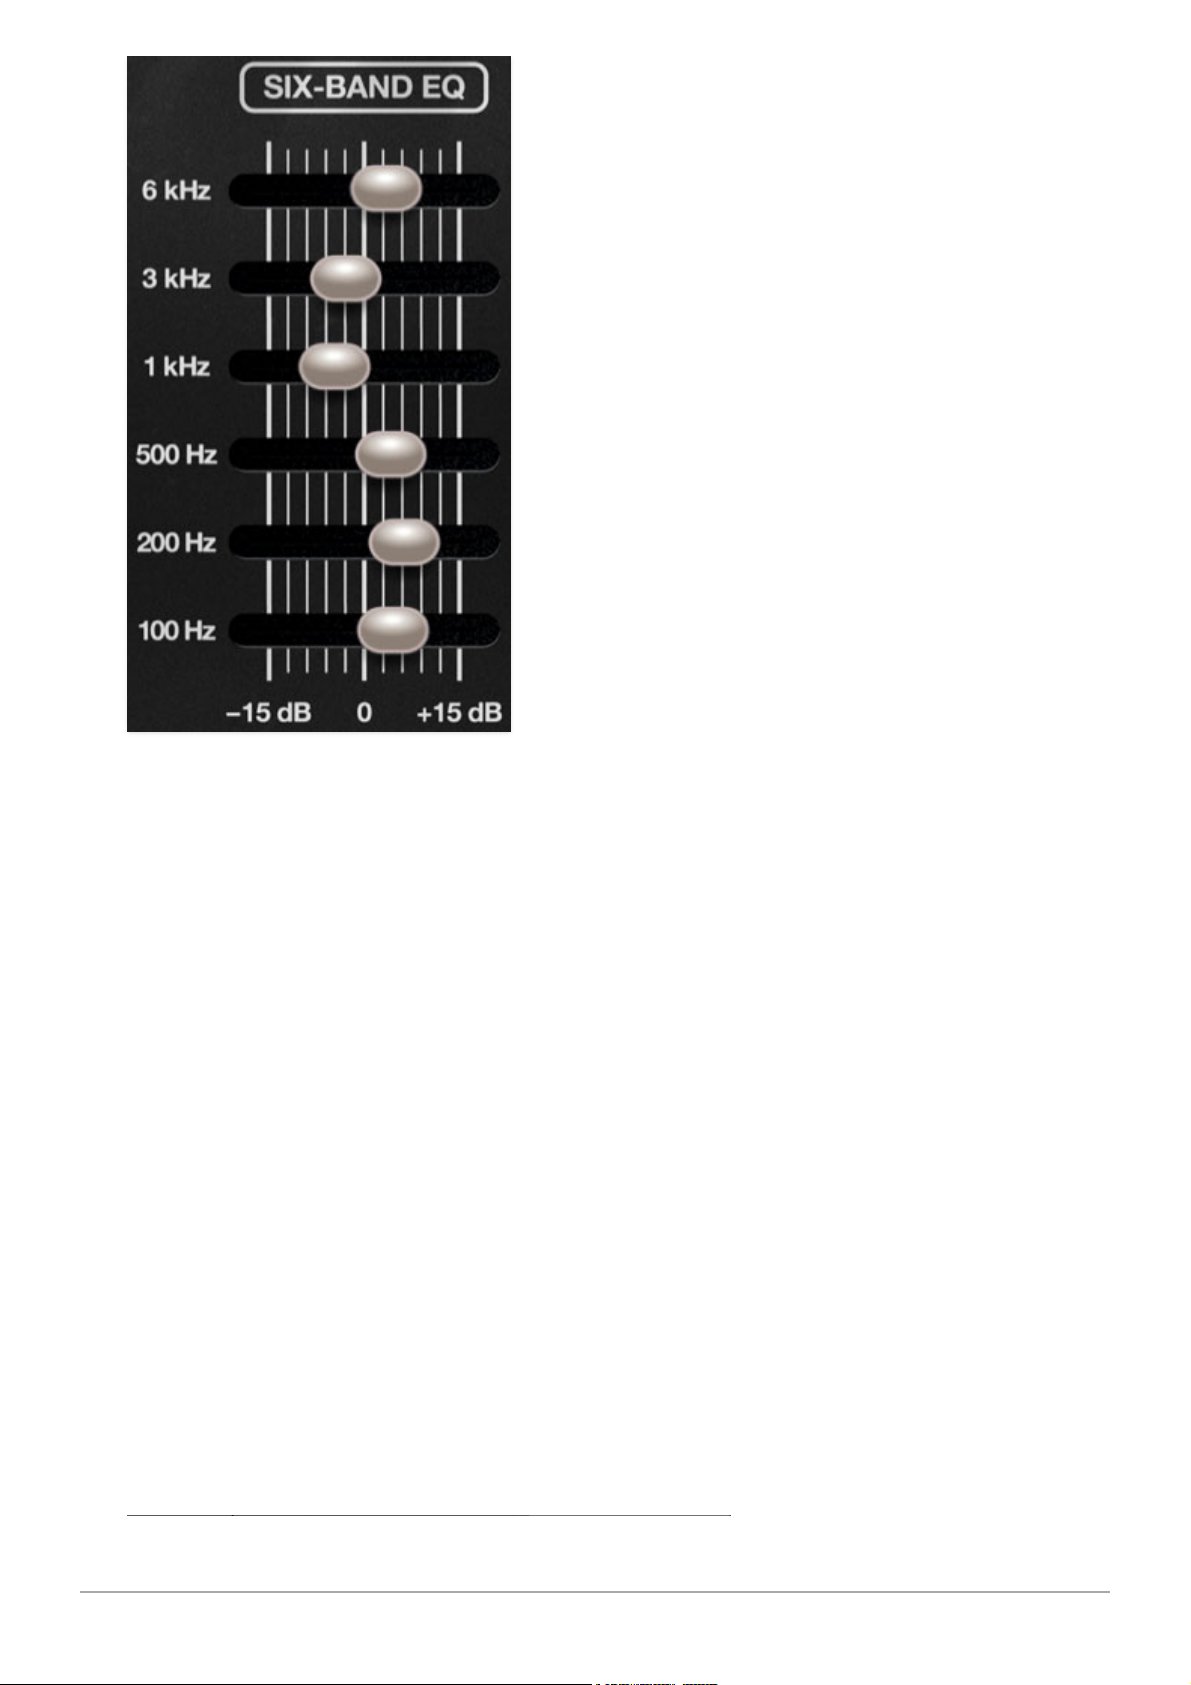
Like the compressor, the six-band EQ globally affects the entire instrument.
Each of its horizontal sliders allows up to +/- 15 dB of gain at the frequencies
displayed on the left side of the sliders. Center position for each band is off you can quickly "zero" a slider by right-clicking and selecting
Return To
Default Value
in the popup menu (this works for any control... in any Cherry
Audio plugin).
Cherry Audio CR-78 User Guide - 51
Page 52
CR-78 can be used in "multi-out" mode, meaning that each instrument sound
can be routed to separate outputs within a DAW virtual mixer. This is useful
for individual panning, using third-party effects plugins, or routing to
separate physical outputs of a multi-output audio interface.
The procedure for configuring multi outs varies depending on which DAW
you're using, so you may need to consult your DAW's owners manual, or find
a YouTube video where some windbag yabs about nothing for six minutes
and explains the actual procedure in the last 12 seconds of the video
(Invariably, this video begins with, "
Hey guys
...").
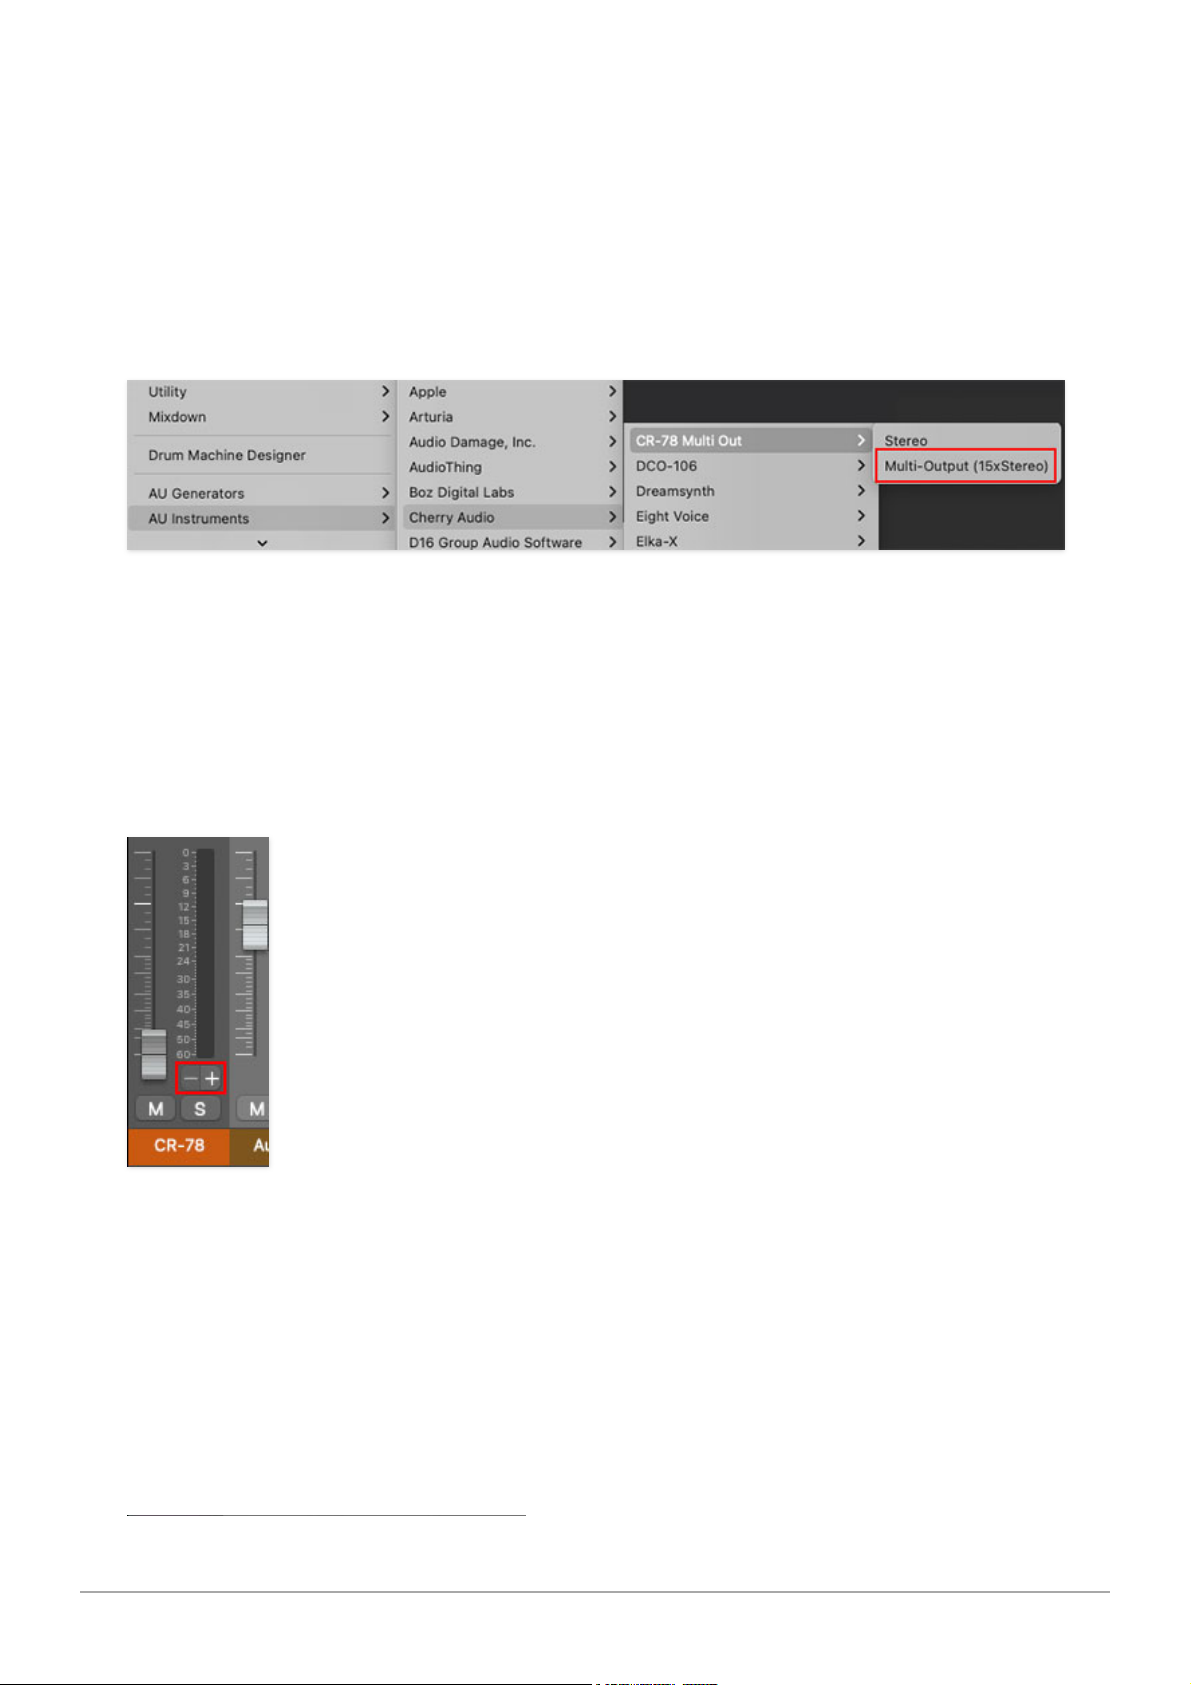
Regardless of which DAW you're using, when loading/opening the
CR-78 instrument plug-in, select the
CR-78 Multi Out
version.
CR-78 Multi Out Configuration
Stereo Mix outputs 1-2 operate exactly the same as the standard stereo
version of CR-78, that is CR-78's onboard mixer section controls and onboard
effects will all operate as usual. We recommend turning the stereo mix
DAW fader (the mixer channel with the CR-78 instrument) down to
Cherry Audio CR-78 User Guide - 52
Page 53

zero when using separate outputs, because mixing the instrument
stereo outs with separate outs can get confusing.
The remaining individual instrument outputs are pre-mixer fader; in
other words, they're unaffected by the onboard mixer's
Level
and
Pan
controls, and CR-78's onboard effects are
not
applied. Though the individual
outs will show as stereo pairs, all of CR-78's individual instruments are
inherently mono.
CR-78 Multi Out's separate outputs are configured as follows:
Cherry Audio CR-78 User Guide - 53
Page 54

STEREO MIX 1-2
BASS DRUM 3-4
SNARE DRUM 5-6
RIM SHOT 7-8
HIGH HAT 9-10
CYMBAL 11-12
METALLIC BEAT 13-14
MARACAS 15-16
CLAVES 17-18
COWBELL 19-20
HIGH BONGO 21-22
LOW BONGO 23-24
LOW CONGA 25-26
TAMBOURINE 27-28
LOW/HIGH GUIRO 29-30
Using CR-78 Multi Out in Logic Pro
Configuring multi out instruments in most DAWs is relatively easy, but it's a
little dicier in Logic. Essentially, you'll need to create mixer auxiliary channel
strips to route separate outputs. An aux mixer channel is the same thing
you'd use when adding a bus effect (for example, if you were routing multiple
sources to a single reverb effect), but instead of setting the aux's input to a
Cherry Audio CR-78 User Guide - 54
Page 55
"bus" selection in its popup menu, you'll set it to one of CR-78's individual
audio outputs.
If you know your way around Logic's mixer, these can be configured
manually, but Logic Track Mixer multi out instrument channel strips have an
easy-to-overlook shortcut that simplifies the process.
For this example, we'll assume you're using the Logic Track Mixer, as
opposed to the old-school Logic Environment Mixer.
Open an instance of CR-78 in a DAW instrument channel; make sure to select
CR-78 Multi Out
.
Open the Track Mixer either by clicking the mixer button in the top left of the
menu strip (this may or may not be present depending on your Logic header
setup), or with the top menu
View>Show Mixer
.
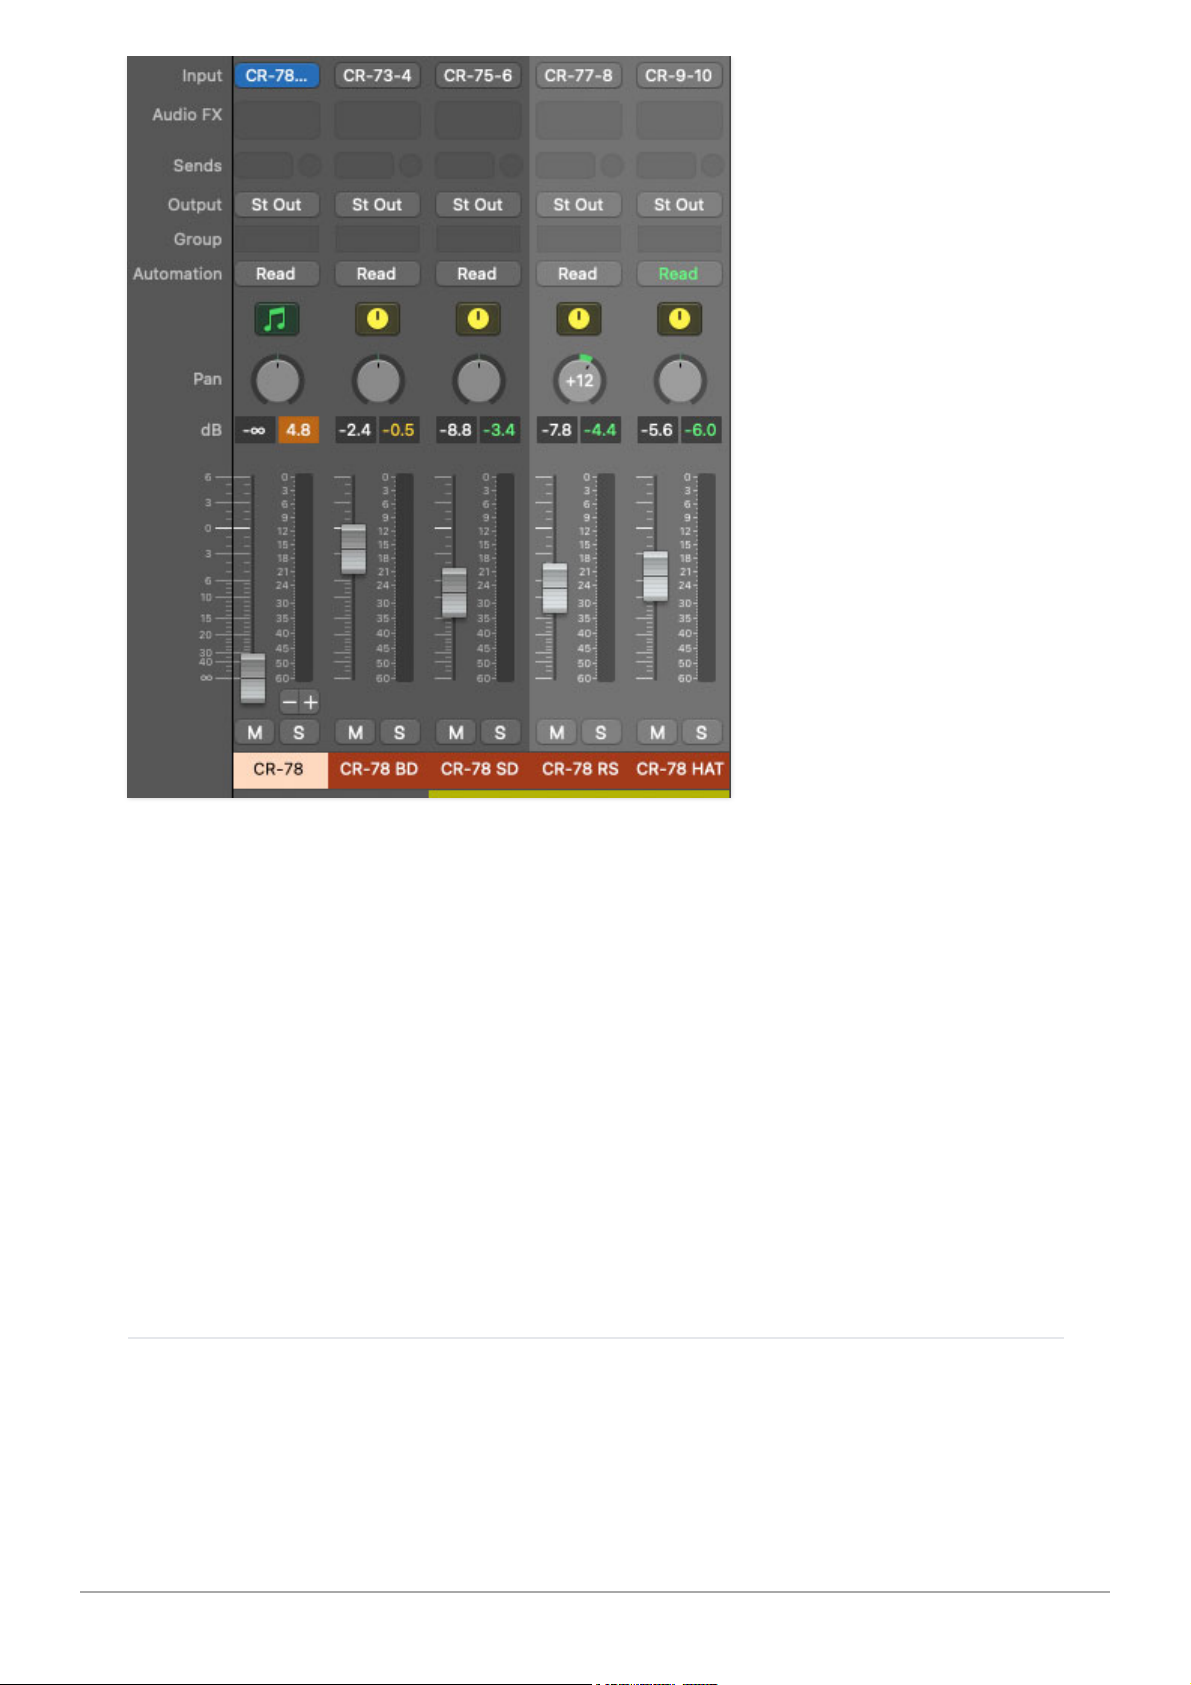
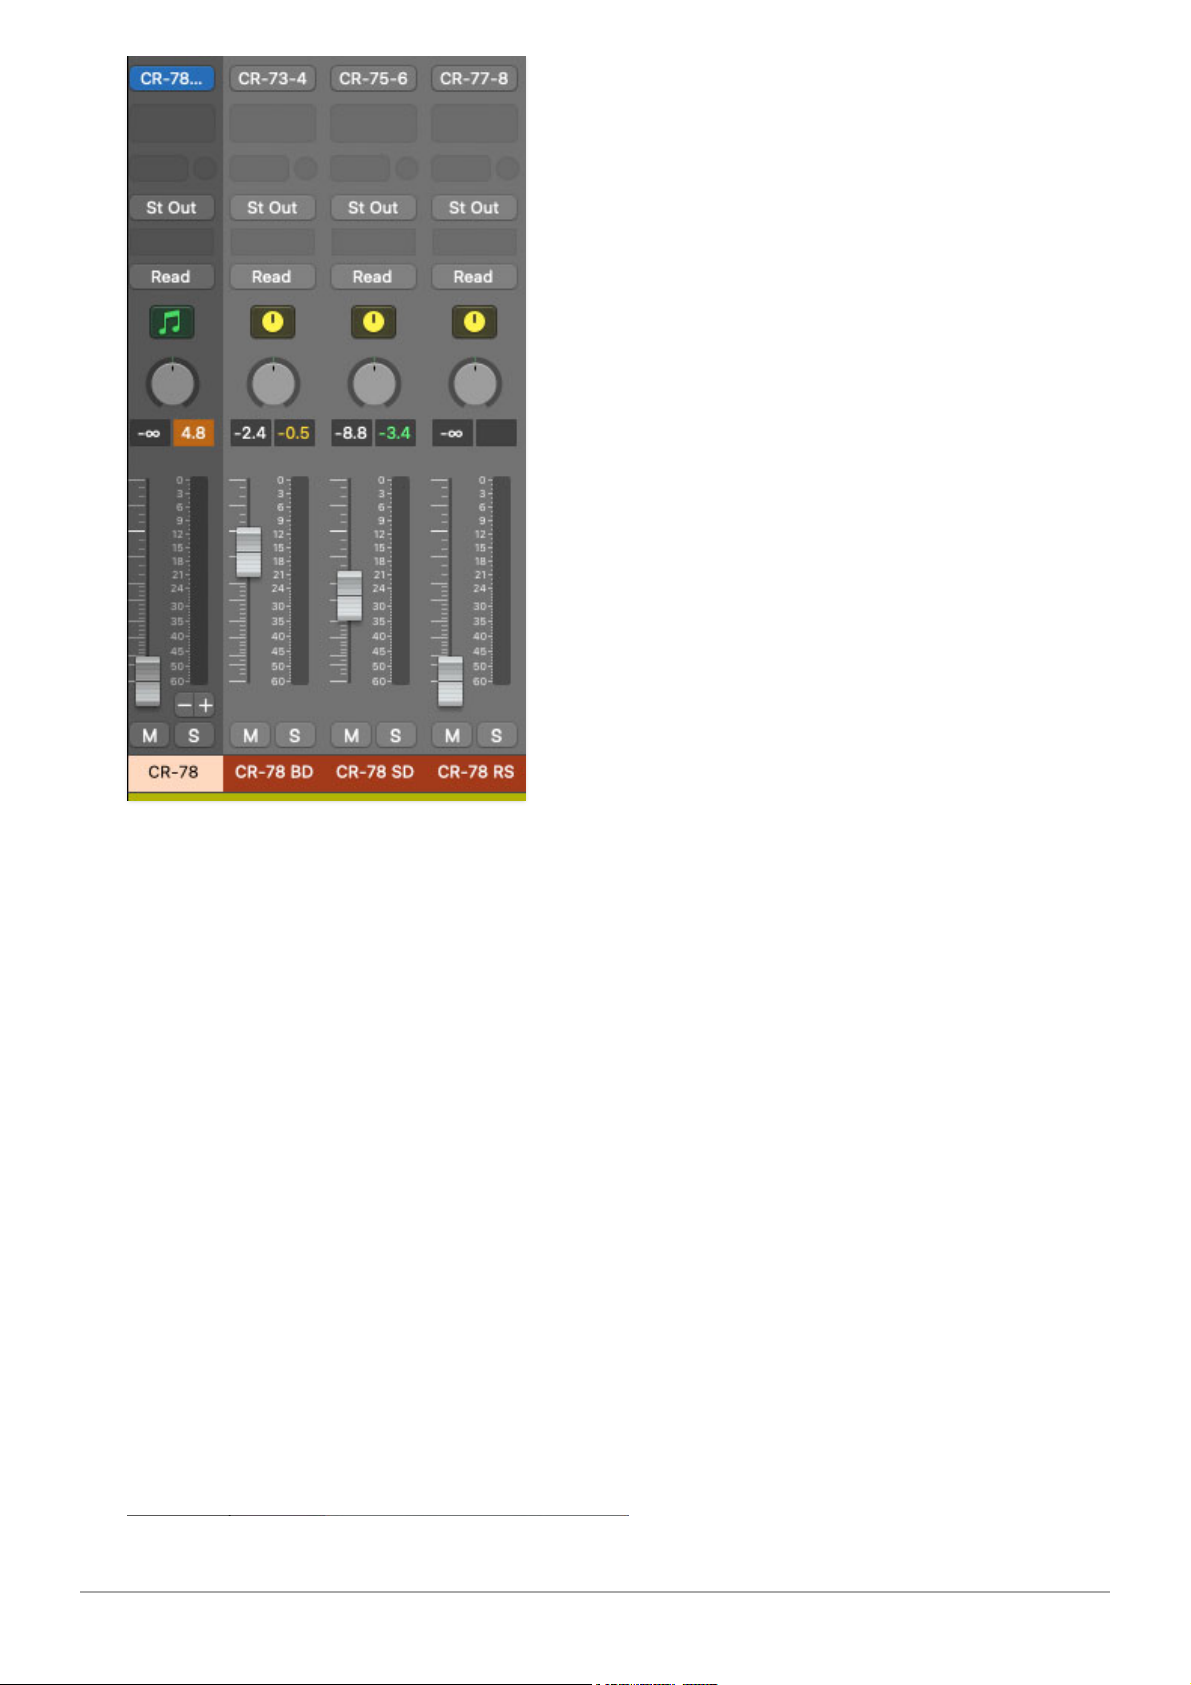
In the main CR-78 instrument mixer channel strip, click the + button beneath
the output meter to add aux channel strips. Repeat this step for each
separate out you'd like to use. It should look like the image below.
The aux channels default names will be something like
Aux 1, Aux 2
, etc.; in
the image below, we've double-clicked and renamed them to match each
instrument out.
Cherry Audio CR-78 User Guide - 55
Page 56
The aux channel strips can now be used to individually set volume and
panning, and third-party effects can be added either to the individual out aux
channel strips, or by inserting effects to additional aux channels and using
the individual out aux channel strip send knobs. This is the most flexible
approach, because it allows independent volume and panning adjustment of
dry and effect signals. Note that the although CR-78's instruments are all
inherently mono, the aux buses will show up in stereo. For best results, we
recommend leaving them in stereo mode (otherwise panning can get kooky).
The aux channel inputs (i.e. instrument outputs) can also be reassigned by
clicking the inputs buttons and selecting a different CR-78 source (i.e.
instrument):
Cherry Audio CR-78 User Guide - 56
Page 57
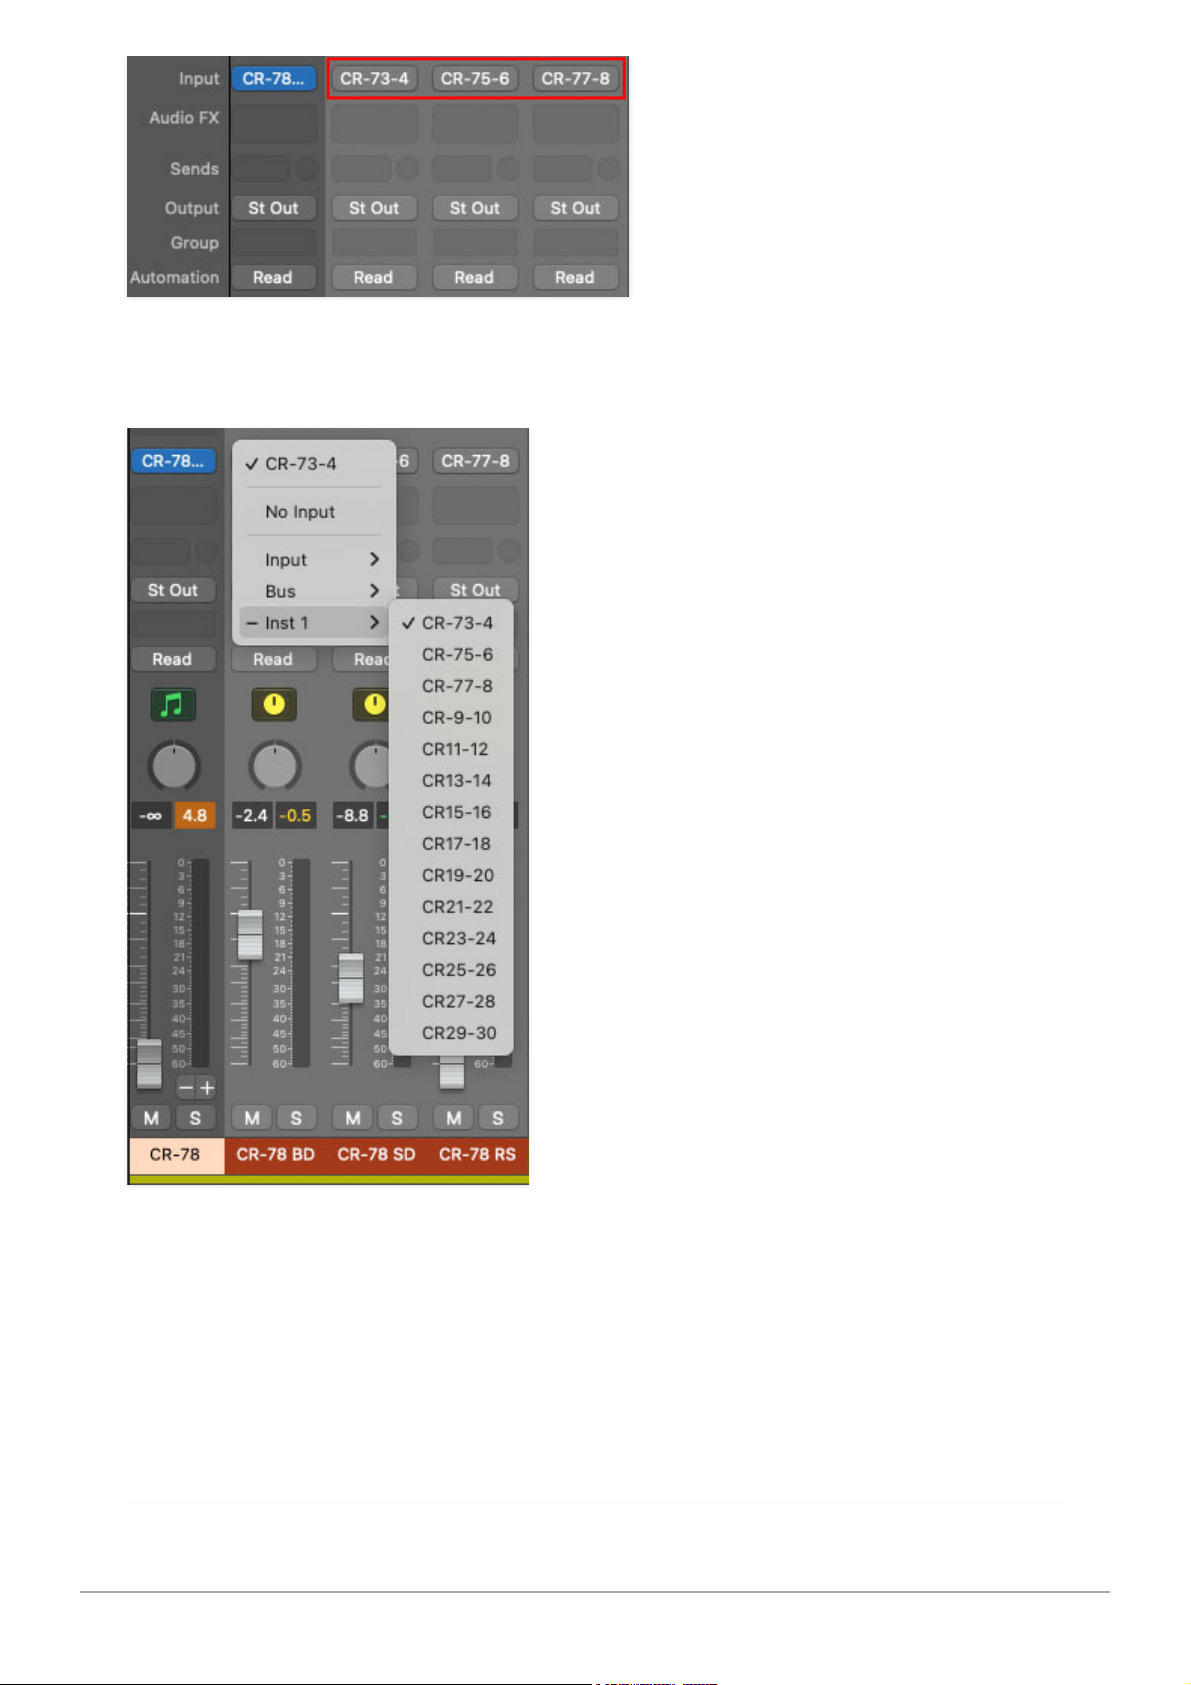
This opens the input popup selector:
We know the names are a little cryptic; unfortunately Logic doesn't allow us
to give them custom names on the programming side. Below is a table
showing each instrument and its seven-character Logic aux in selector name:
Cherry Audio CR-78 User Guide - 57
Page 58

INSTRUMENT LOGIC AUX BUS NAME
BASS DRUM CR-73-4
SNARE DRUM CR-75-6
RIM SHOT CR-77-8
HIGH HAT CR-79-10
CYMBAL CR11-12
METALLIC BEAT CR13-14
MARACAS CR15-16
CLAVES CR17-18
COWBELL CR19-20
HIGH BONGO CR21-22
LOW BONGO CR23-24
LOW CONGA CR25-26
TAMBOURINE CR27-28
LOW/HIGH GUIRO CR29-30
Routing Instruments To Separate Audio
Interface Physical Outputs
Cherry Audio CR-78 User Guide - 58
Page 59
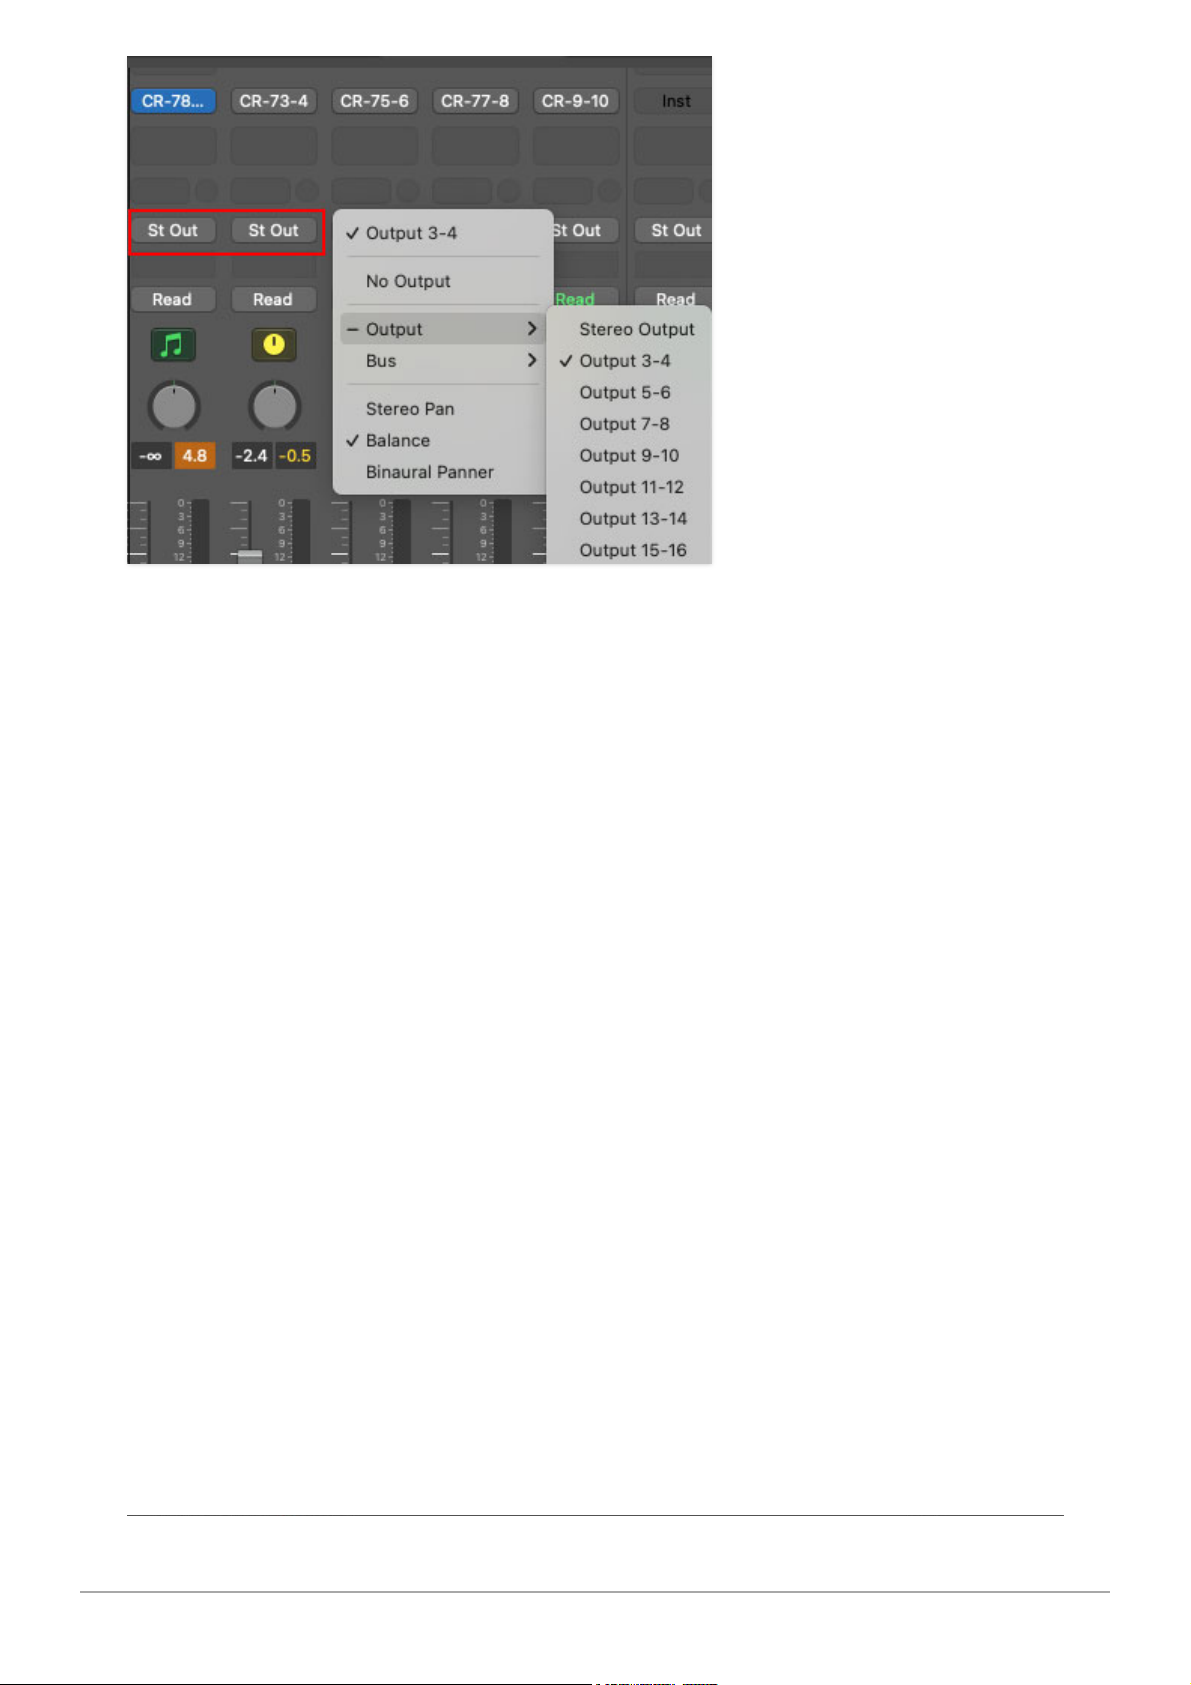
By default, all mixer channels and aux busses sum to Logic's master stereo
outputs. To send CR-78's individual outputs to separate physical outputs on a
multi-out audio interface, click the
Outputs
buttons on the individual out aux
channel strips (these will say
St Out
by default), scroll down, and select the
desired
Output
or
Bus
destination.
Cherry Audio CR-78 User Guide - 59
Page 60
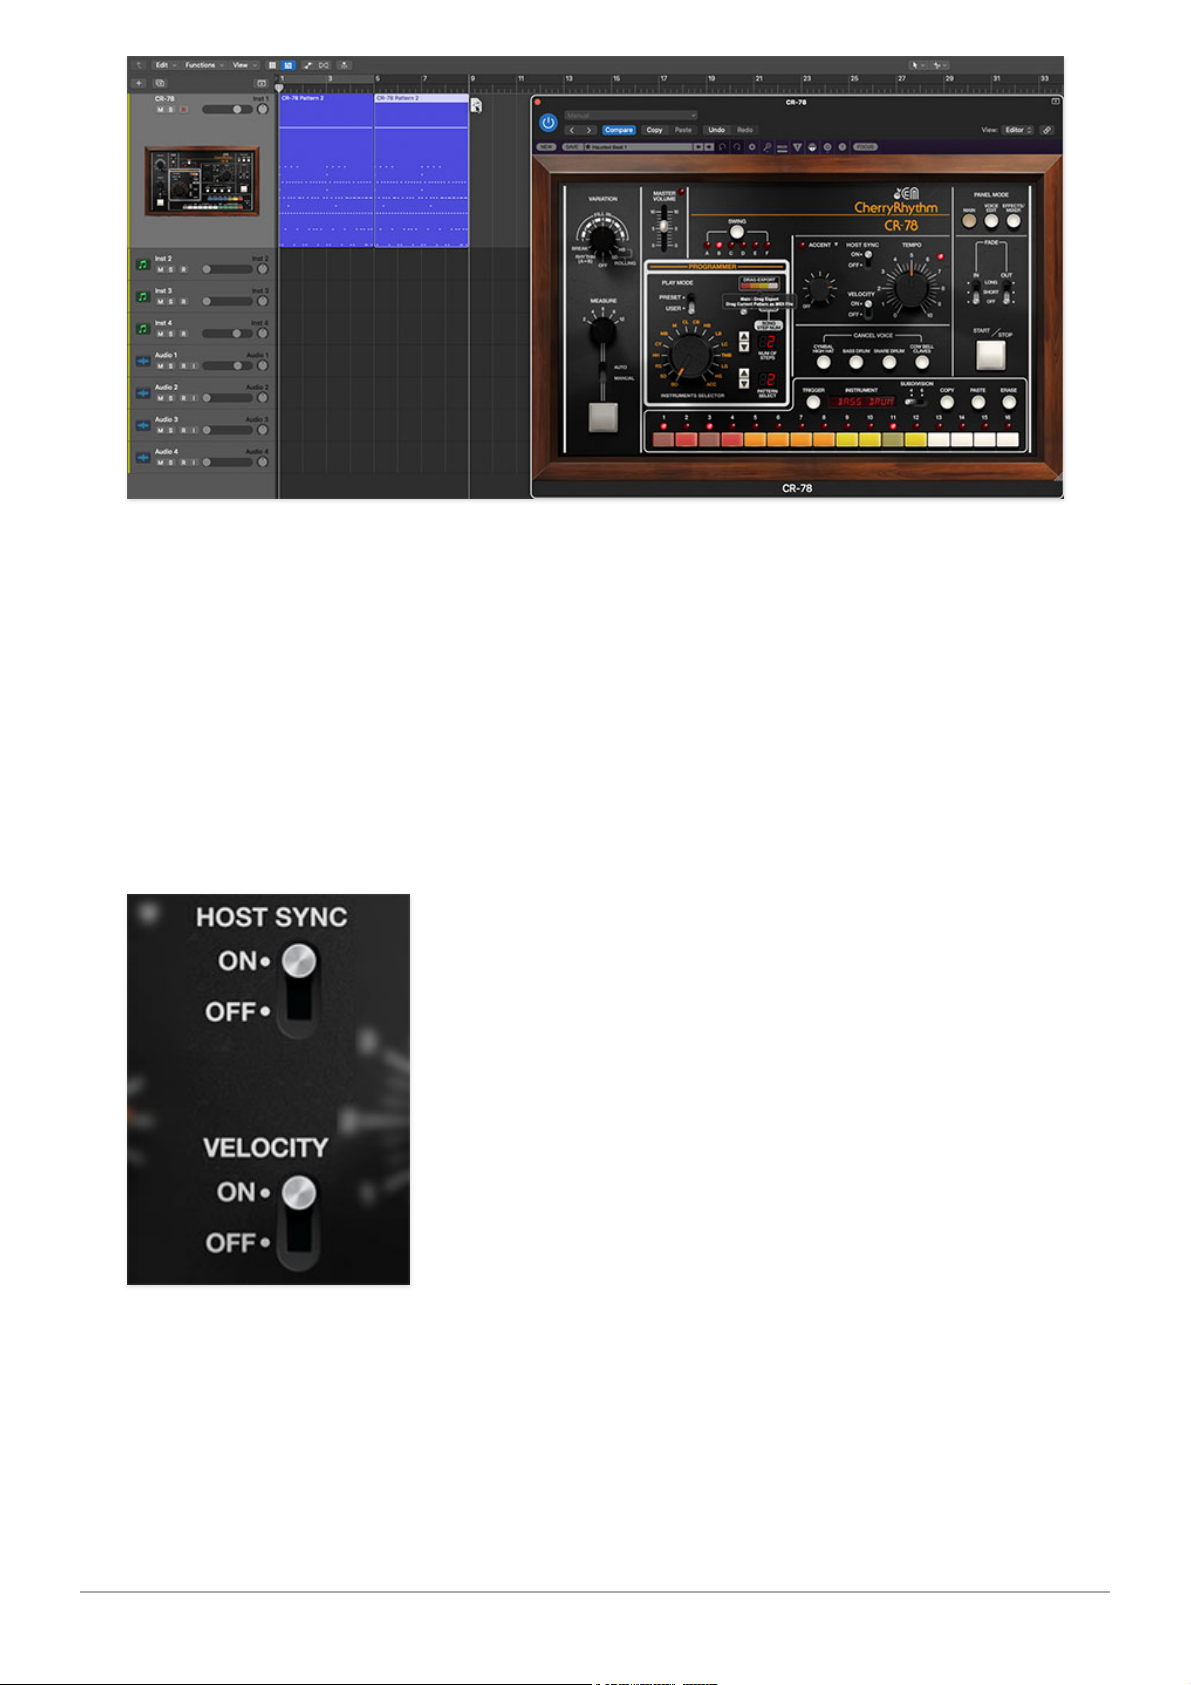
If CR-78 is being used in a DAW, you may want to forego its internal pattern
and song programming and instead use the DAW for programming and
playing MIDI notes. This might be a little less fun than clicking 16 (or 24)
colorful buttons on and off, but it allows far more flexibility in terms of note
placement/quantization and velocity.
No special setup is required as CR-78 always responds to incoming MIDI note
data from a MIDI/USB controller or the DAW itself, but there are a few things
to be aware of.
Host Sync
Make sure that
Host Sync
on the Main panel is set to Off to prevent the
internal pattern sequencer from playing back when DAW play is initiated.
Velocity
Cherry Audio CR-78 User Guide - 60
Page 61

Off- When the
Velocity
switch is in the Off position, all notes will play at
full volume regardless of their velocity values. If the accent note is
currently "playing" (note on), all instrument sounds will play at the
increased volume set with the
Accent
level knob.Use the Off position for
most realistic "old-school" vibe.
On- Setting
Velocity
to On causes notes to respond to the entire velocity
range of 0-127 for fully controllable dynamics.
Transferring CR-78 Patterns to a DAW using
Drag Export
The
Drag Export
function on the
Main
panel makes it really easy to copy
patterns to a DAW. Simply click and drag the
Drag Export
button array to the
desired position in the CR-78 instrument DAW timeline/grid (you can also
drag to your computer's desktop to create Standard MIDI file - pretty cool,
huh?).
Keep in mind that
Drag Export
works for preset and user patterns or entire
songs. It even works properly if two simultaneous preset patterns have been
selected (using SHIFT-click).
When playing back the newly created MIDI clip, make sure to set
Host Sync
to the
Off
position, otherwise the pattern will simultaneously
play from CR-78's sequencer
and
the DAW, and no one wants that kind of
havoc.
Default Voice MIDI Mapping
The onboard instrument default MIDI notes assignments are shown in the
table below. We mostly stuck to Standard MIDI drum mapping, but a few
were changed in order to avoid three octaves jumps for some of the
percussion voices. The good news is that MIDI note assignments are easily
custom editable; more about this below the table.
Cherry Audio CR-78 User Guide - 61
Page 62

INSTRUMENT MIDI NOTE NUMBER KEYBOARD KEY
BASS DRUM 36 C2
SNARE DRUM 38 D2
RIM SHOT 37 C#2
HIGH HAT 42 F#2
CYMBAL 49 C#3
METALLIC BEAT 44 G#2
MARACAS 51 D#3
CLAVES 39 D#2
COWBELL 52 E3
HIGH BONGO 45 A2
LOW BONGO 43 G2
LOW CONGA 41 F2
TAMBOURINE 46 A#2
LOW GUIRO 48 C3
HIGH GUIRO 50 D3
ACCENT* 40 E2
*Accent isn't an instrument per se, but it is triggered and programmed on a
per-step basis like any other instrument. Please see the Main Panel
Cherry Audio CR-78 User Guide - 62
Page 63

Controls section for more information on the Accent function.
CUSTOMIZING MIDI NOTE MAPPING
MIDI note assignments for drum voices can be customized by clicking on the
triangles to the right of the orange instrument names on the Voice Edit page.
The easiest way is to select
MIDI Learn Note - <instrument name>
; the
triangle begins flashing. Tap the note on the keyboard you'd like to assign,
and that's all. Alternatively, select the second menu
<instrument name>
MIDI Note
, and choose the note from the popup menu.
Instrument can be reset to their default MIDI note by (you guessed it)
selecting
Reset to Default MIDI Note
. This is actually handy if you forget the
original mapping note.
Custom MIDI note mappings are individually saved per patch - they
are not globally altered.
Cherry Audio CR-78 User Guide - 63
Page 64
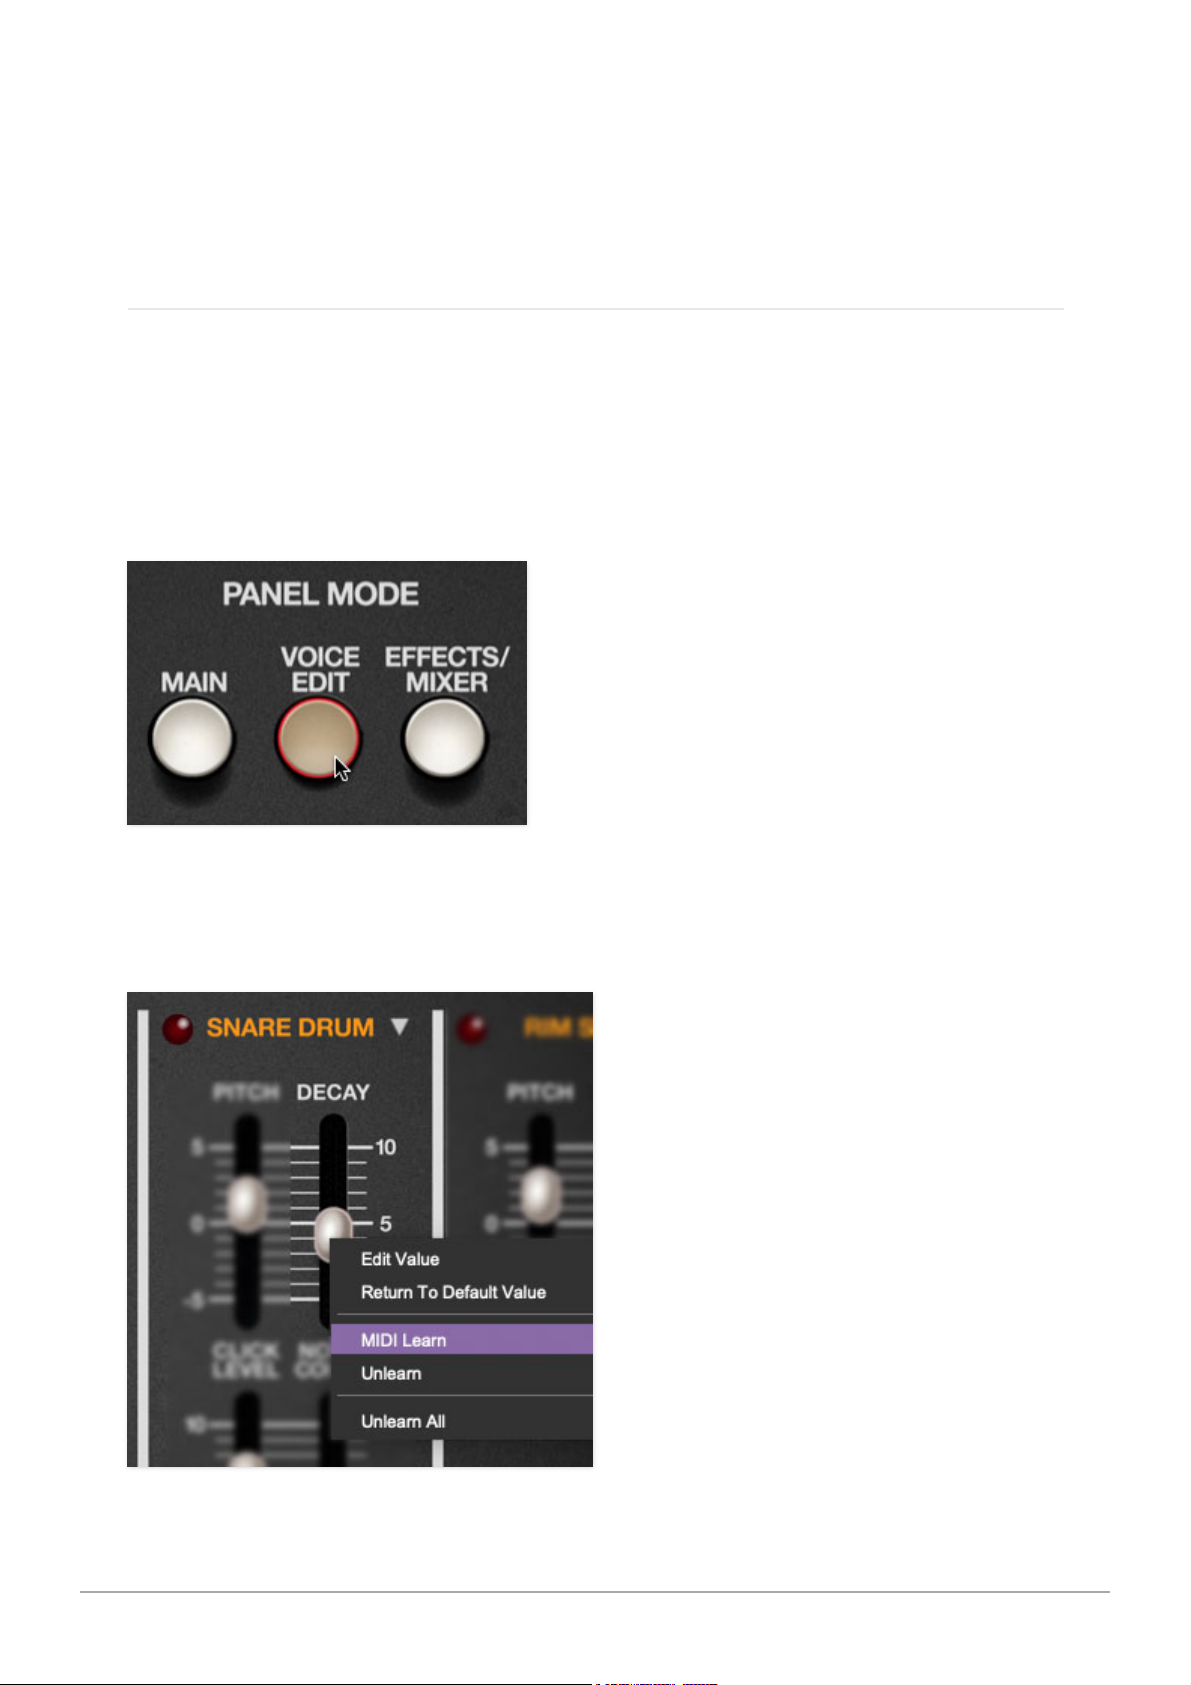
Assigning internal and external hardware controls adds a whole new
dimension of control and musicality to CR-78, and it's really easy to do. The
MIDI Tab is where all controller assignments can be viewed and tweaked.
First we'll show how to assign an external hardware controller to a CR-78
control, then we'll go over all parameters in the MIDI Tab.
Basic External Hardware Control Assignment
This is the quick, "I just want to assign a hardware control right now!,"
section. We recommend reading this whole section to best take advantage of
MIDI control assignments.
In this example, we’ll assign a hardware slider/knob control to the Snare
Drum
Decay
slider on the Voice Edit page.
First, make sure you're on the Voice Edit page by clicking the
Voice Edit
button in the top-right corner.
Cherry Audio CR-78 User Guide - 64
Page 65
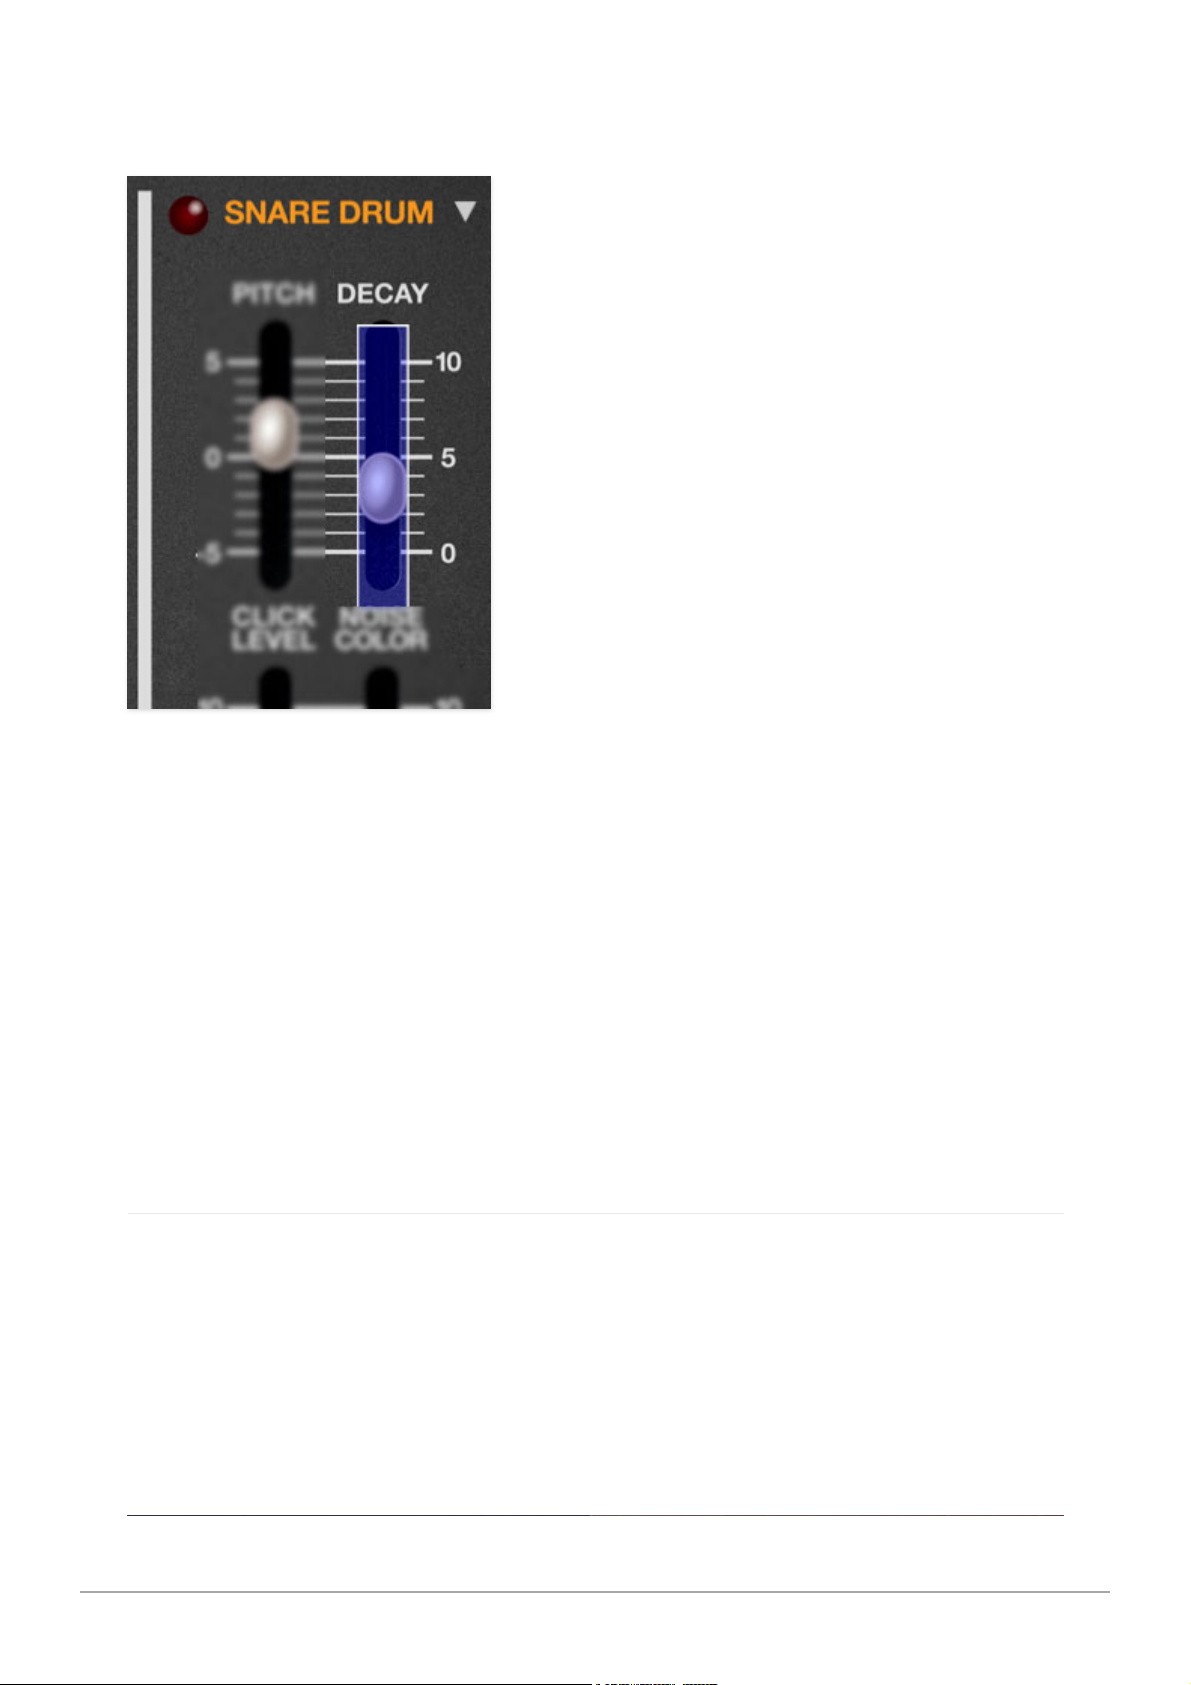
In the Snare Drum section, right-click anywhere on its
Decay
slider, and
select
MIDI Learn
in the popup menu
.
A transparent purple overlay appears over the slider indicating that it's in
learn mode. Now move the desired hardware control device. The purple
overlay disappears and the hardware control will move the
Decay
slider. If
you get cold feet (or accidentally put the wrong control into learn mode),
learn mode can be aborted by right-clicking and selecting
Stop Learning
.
This is the basic procedure for assigning hardware controllers to almost any
control.
Once a MIDI controller has been assigned, in addition to real-time control of
any parameter, you’ll also be able to record and play back controller data
from a DAW.
The MIDI Tab
Cherry Audio CR-78 User Guide - 65
Page 66
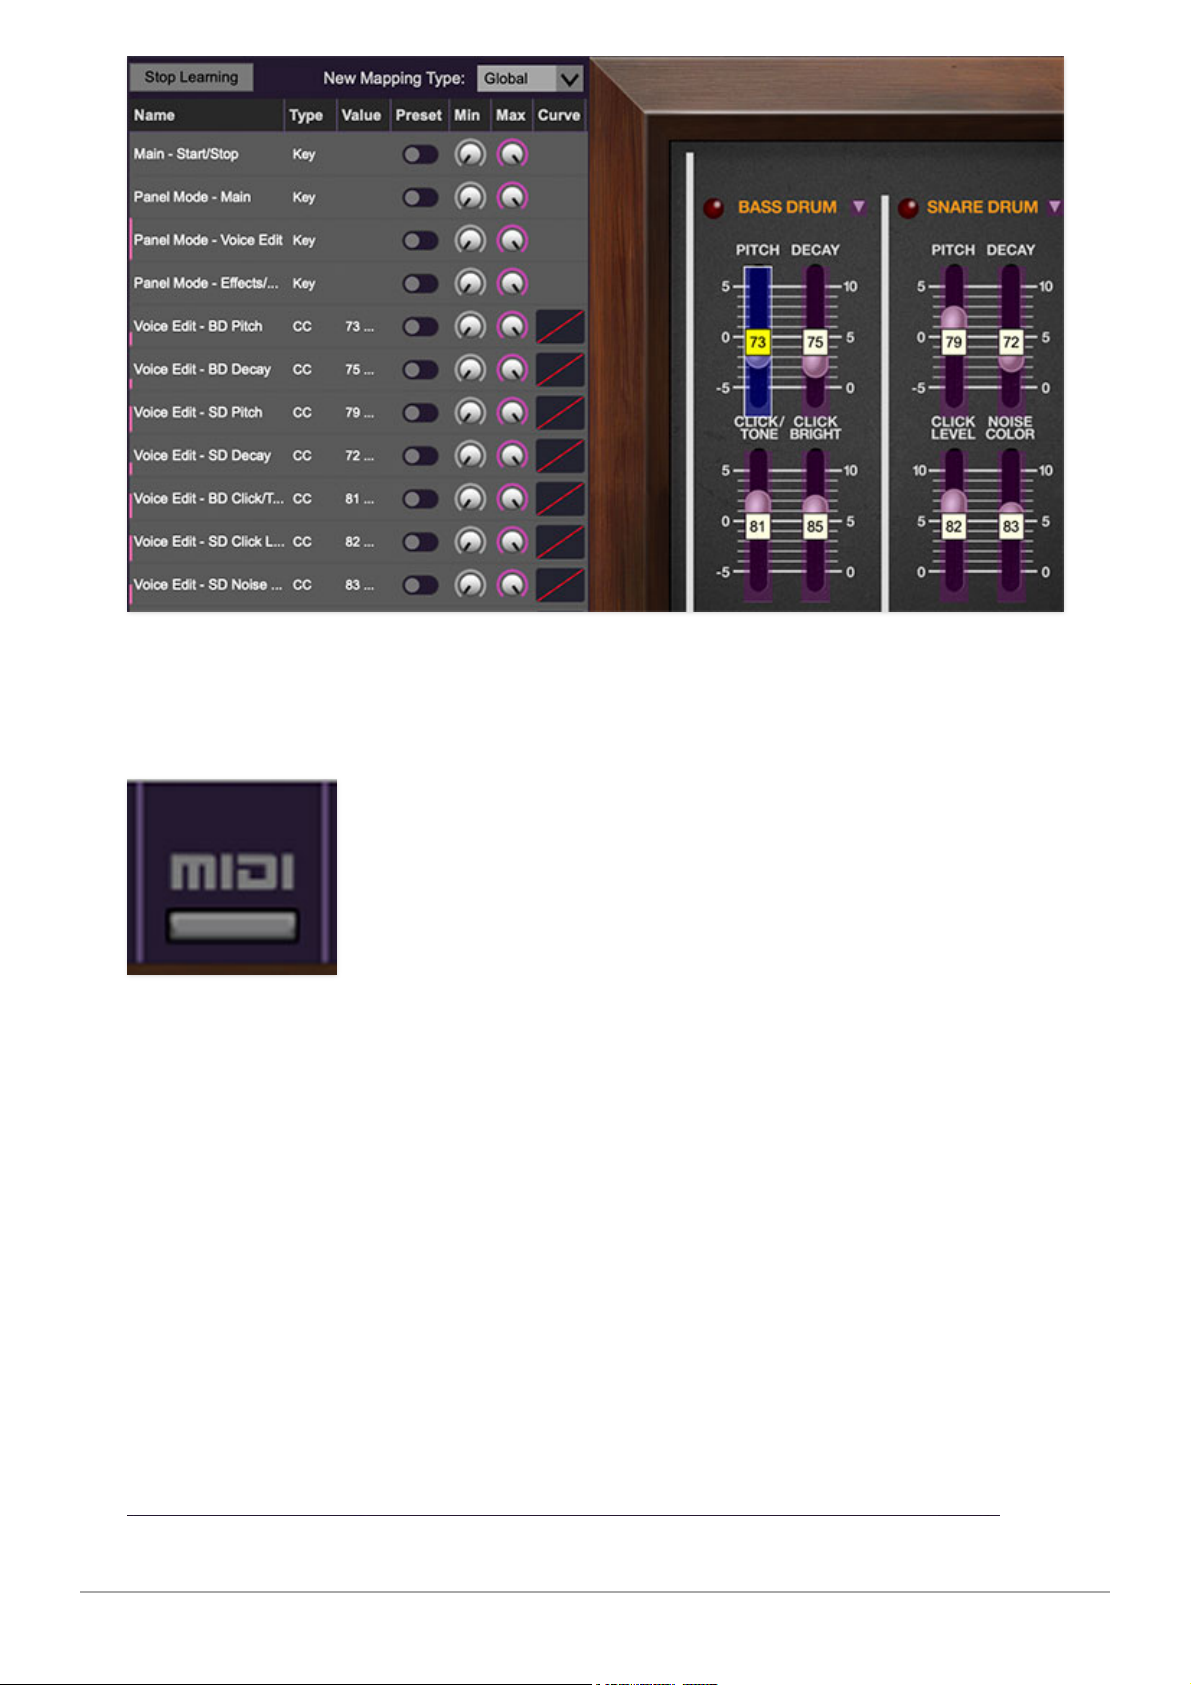
This is command central for all MIDI controller assignments. Here you’ll be
able to fine-tune and see information about all currently assigned controllers.
To view or hide the MIDI Tab, click the
MIDI
button in the purple top toolbar.
Cherry Audio CR-78 User Guide - 66
Page 67
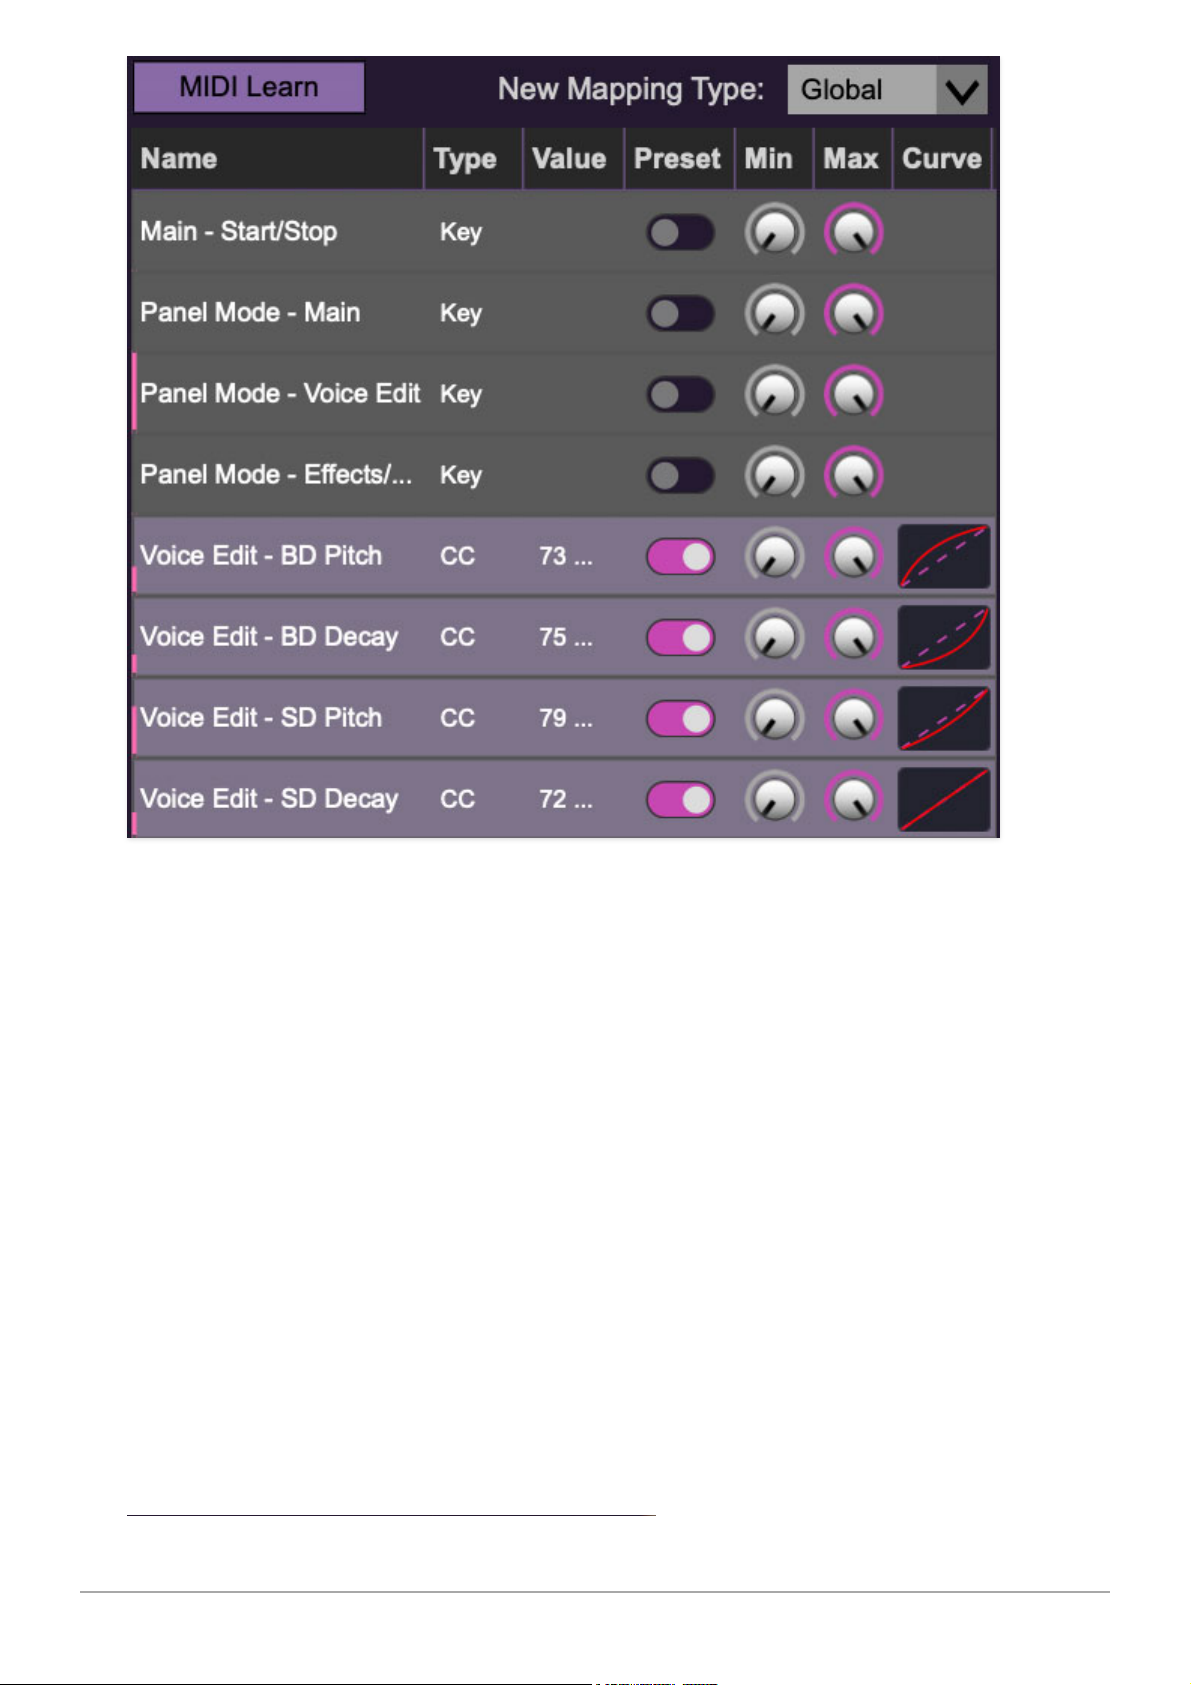
MIDI Learn button- This is almost exactly the same as enabling MIDI learn
mode by right-clicking a control. Click the
MIDI Learn
button to enter learn
mode (all controls turn purple). Unlike right-clicking on specific controls,
where CR-78 automatically exits controller assignment mode, clicking the
MIDI Learn
knob "stays on" to enable assignment of multiple hardware
controls. This is handy for quickly assigning a bunch of sliders or the buttons
of a grid-style controller.
To assign multiple controls, click
MIDI Learn
, click an on-screen control, move
the desired hardware knob or slider, continue clicking and assigning onscreen controllers until all desired controls are assigned, then click
Stop
Learning
to exit learn mode.
Remember that a single hardware knob/slider/button isn't limited to
controlling just one parameter - a single hardware controller can
simultaneously operate as many controls as you'd like.
Cherry Audio CR-78 User Guide - 67
Page 68
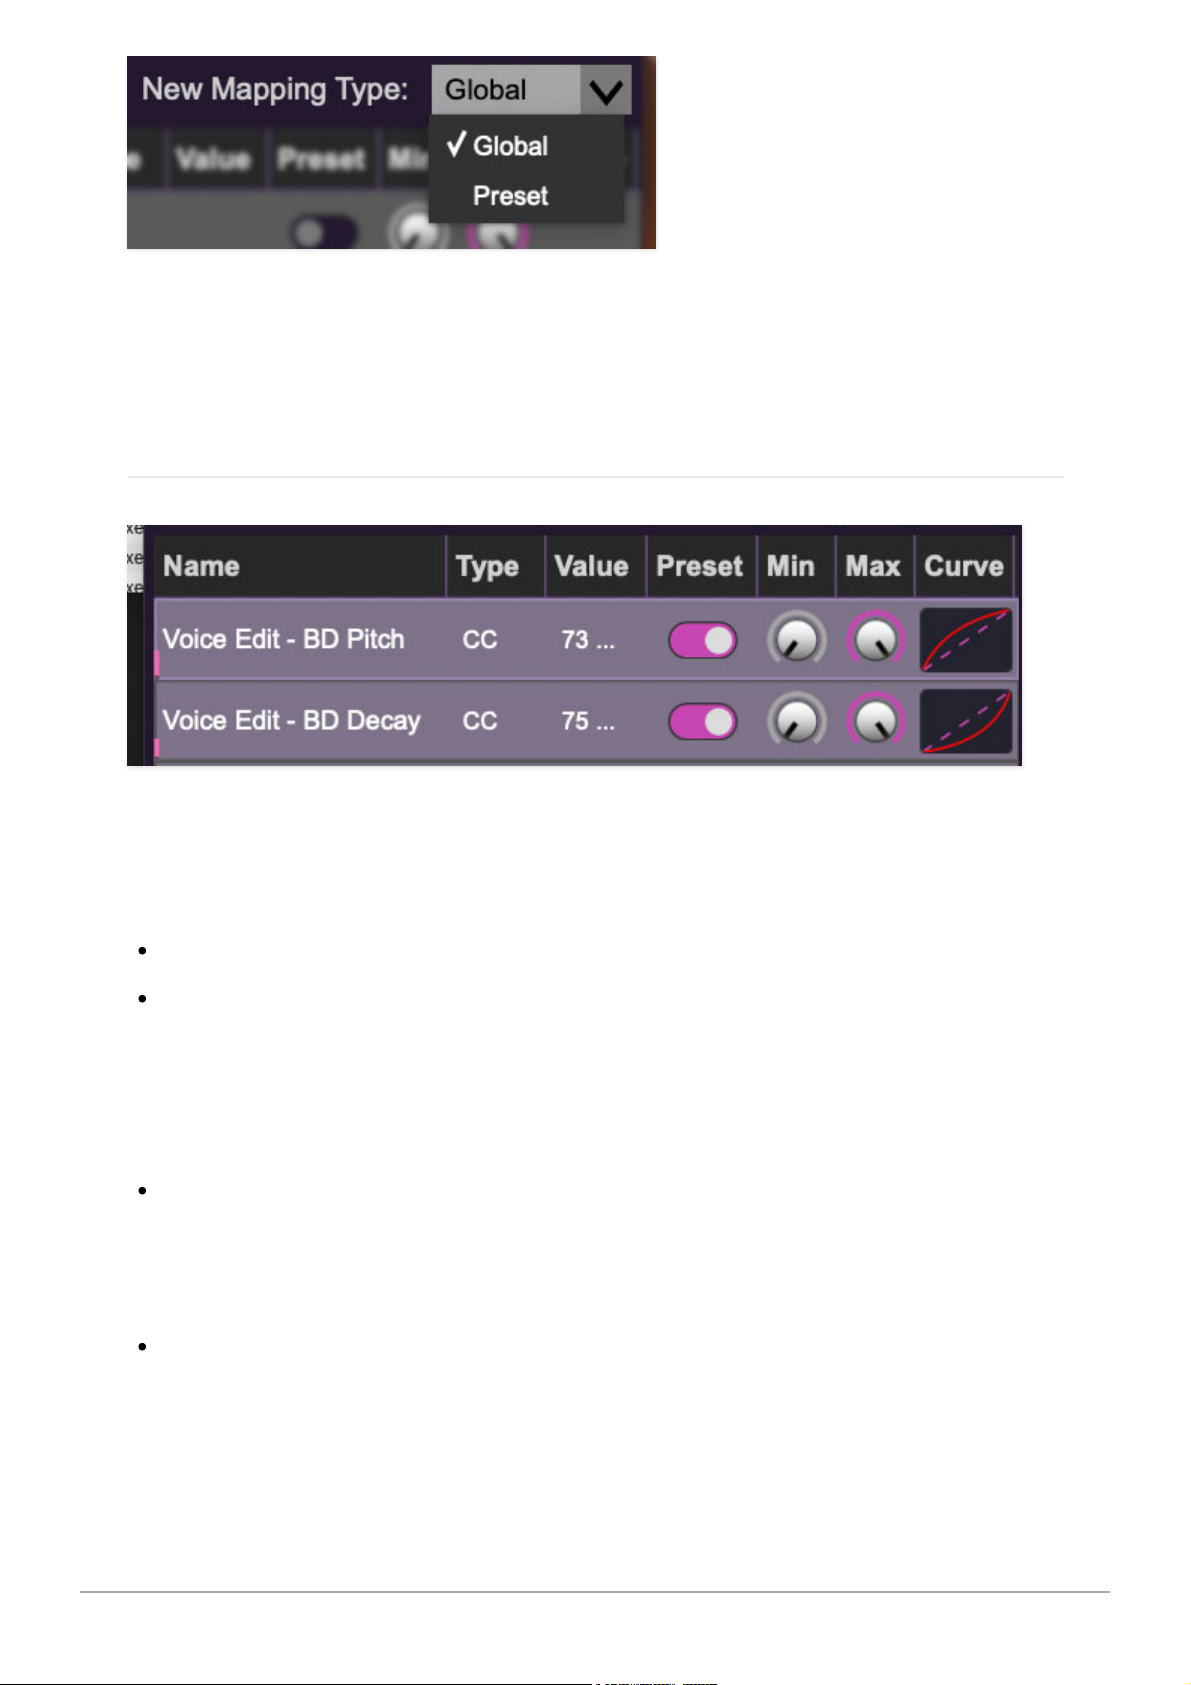
New Mapping Type- This popup menu selects whether newly assigned MIDI
mappings will be global (affects all sounds and doesn't change when
different presets are selected) or saved with individual presets.
MIDI Tab Columns
Name- Displays the name of the parameter being controlled.
Type- There are five possible types of controller automation:
Note- Notes played on a MIDI keyboard controller, expressed as C-1 to G9
CC (MIDI Continuous Controller)- The standard 128 MIDI controller
numbers as defined in the MIDI spec. More specifically, these are the
controllers transmitted by hardware knob and slider controls. MIDI CC’s
can be used to control parameters in real-time or recorded and played
back within DAW software.
MMC (MIDI Machine Control)- The MIDI control protocol for tape
machine-style transport controls. Back in the dark ages, this was used to
control wonky old Tascam and Fostex reel-to-reel monsters, but it's useful
if your MIDI controller has tape-style transport control buttons.
Aftertouch- Besides sounding like a 1981 Melissa Manchester record,
some keyboard controllers transmit controller data when keys are pressed
and released as they're held down. The vast majority of keyboard
controllers with aftertouch transmit "mono" aftertouch only; in other
words, aftertouch data is the sum of all keys to one single data stream.
Cherry Audio CR-78 User Guide - 68
Page 69

Key- This allows keys of the computer QWERTY keyboard to at as button
controls for onscreen controls.
Value-Displays the specific automation controller. In the case of a
Note
this
would show a MIDI note number (C-1 to G9, for a MIDI CC, this would be the
MIDI CC controller number, etc. Clicking on the value opens a pop-up menu
where all values are displayed and can be selected.
Preset-This slider works in conjunction with the
New Mapping Type
menu. In
the left position (gray background), the MIDI mapping is global (affects all
sounds and doesn't change when different presets are selected), in the right
position (lavender background), the MIDI mapping is saved with, and only
affects the current sound preset.
The
Preset
switch is super nifty, because it means MIDI mappings
can easily be set to global or per-preset status at any time. (A lot of
folks asked us for this feature.)
Min- Sets a limit on the lowest value any automation control can set a
mapped controller to. This actually recalibrates the range of the automation
controller to the remaining parameter range.
Max- Sets a limit on the highest value any automation control can set a
mapped controller to. This actually recalibrates the range of the automation
controller to the remaining parameter range.
Super Tricky Min-Max Tricks
- Not only can parameter ranges be limited
via the the
Min
and
Max
knobs, mapped control destinations can be
completely inverted by setting the
Min
knob all the way up and the
Max
knob all the way down (or anywhere in between).
Limiting and inverting parameter ranges with the
Min/Max
controls is
particularly useful when multiplexing a single hardware control to operate
multiple parameters. Along with the
Curve
control, the customization
possibilities are super flexible.
Curve- These allow the customization of how incoming MIDI CC controls
affect the movement of onscreen controls, ranging from exponential to linear
to logarithmic curves.
MIDI Tab Column Configuration Right-Click
Menus
Cherry Audio CR-78 User Guide - 69
Page 70
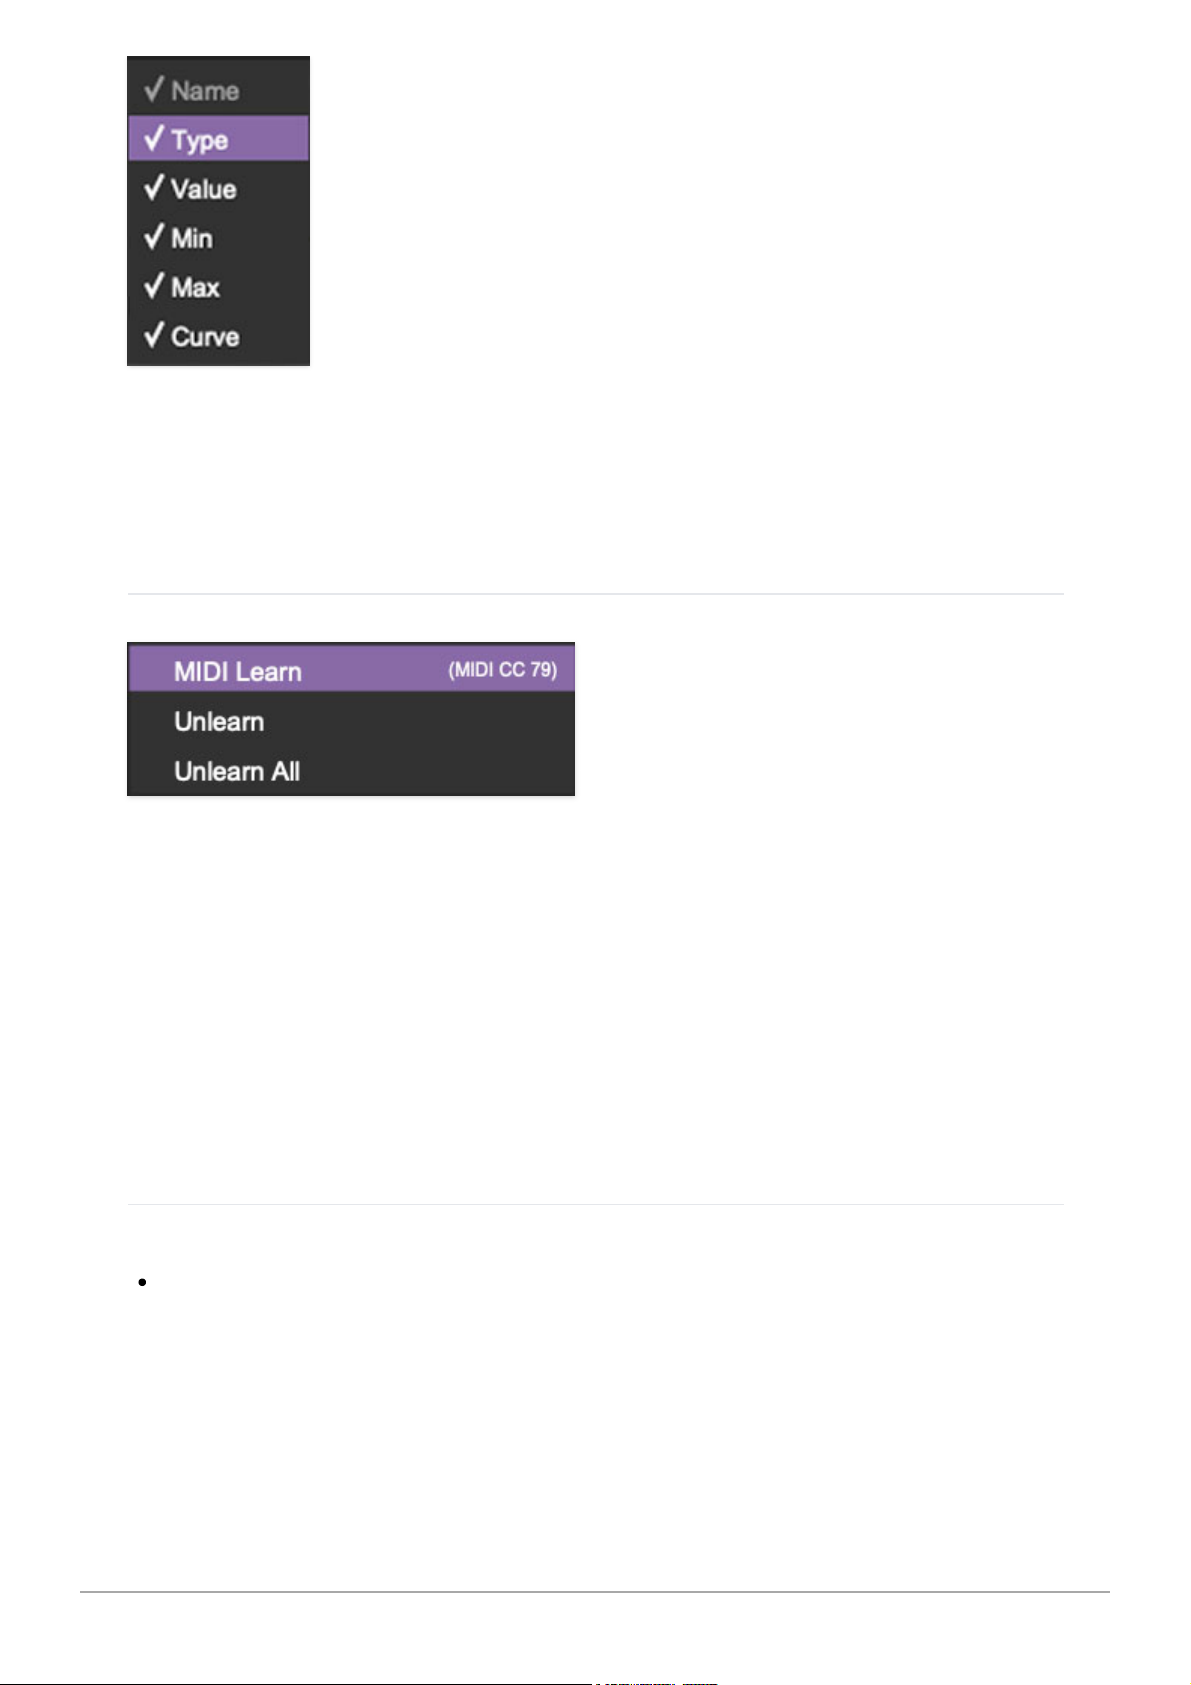
Right-clicking anywhere in the top row (
Name, Type, Value
, etc.) displays the
column configuration menu. Checking/unchecking these allows hiding and
display of each column. This has no effect on assignments.
MIDI Tab Parameters Right-Click
Right-clicking on an assigned parameter opens the menu above.
MIDI Learn- This is used to change the controller assigned to a particular
parameter.
Unlearn- Deletes the selected automation parameter.
Unlearn All-Deletes all controller assignments for the patch. A warning
dialog pops up prior to deletion in order to thwart potential unlearn-related
disasters.
MIDI Controller Suggestions
Following are some MIDI controller assignments we find particularly useful:
Assigning button controllers to the Panel Mode Main, Voice Edit, and
Effects/Mixer select buttons lets you rapidly switch between CR-78's three
UI windows. Though you can use a MIDI/USB controller buttons or
keyboard keys, we like using the keypad 1/2/3 buttons on the computer
QWERTY keyboard. The only caveat to using QWERTY keys is that some
Cherry Audio CR-78 User Guide - 70
Page 71

DAWs get finicky about QWERTY key priority with plugins (and by "some,"
we mean Logic...).
Similar to above, assigning button controllers to the
Cancel Voice
buttons
makes it really easy to experiment with muting instruments.
Assigning the QWERTY keyboard space bar (or any other external
controller button) to the
Start/Stop
button is very useful because it lets
you start and stop patterns without having to return to the Main UI page.
Try assigning a button or any keyboard controller key to the
Trigger
button
when creating patterns in User mode. This is nice, because CR-78
"records" hits into the current pattern while in play mode.
Cherry Audio CR-78 User Guide - 71
Page 72
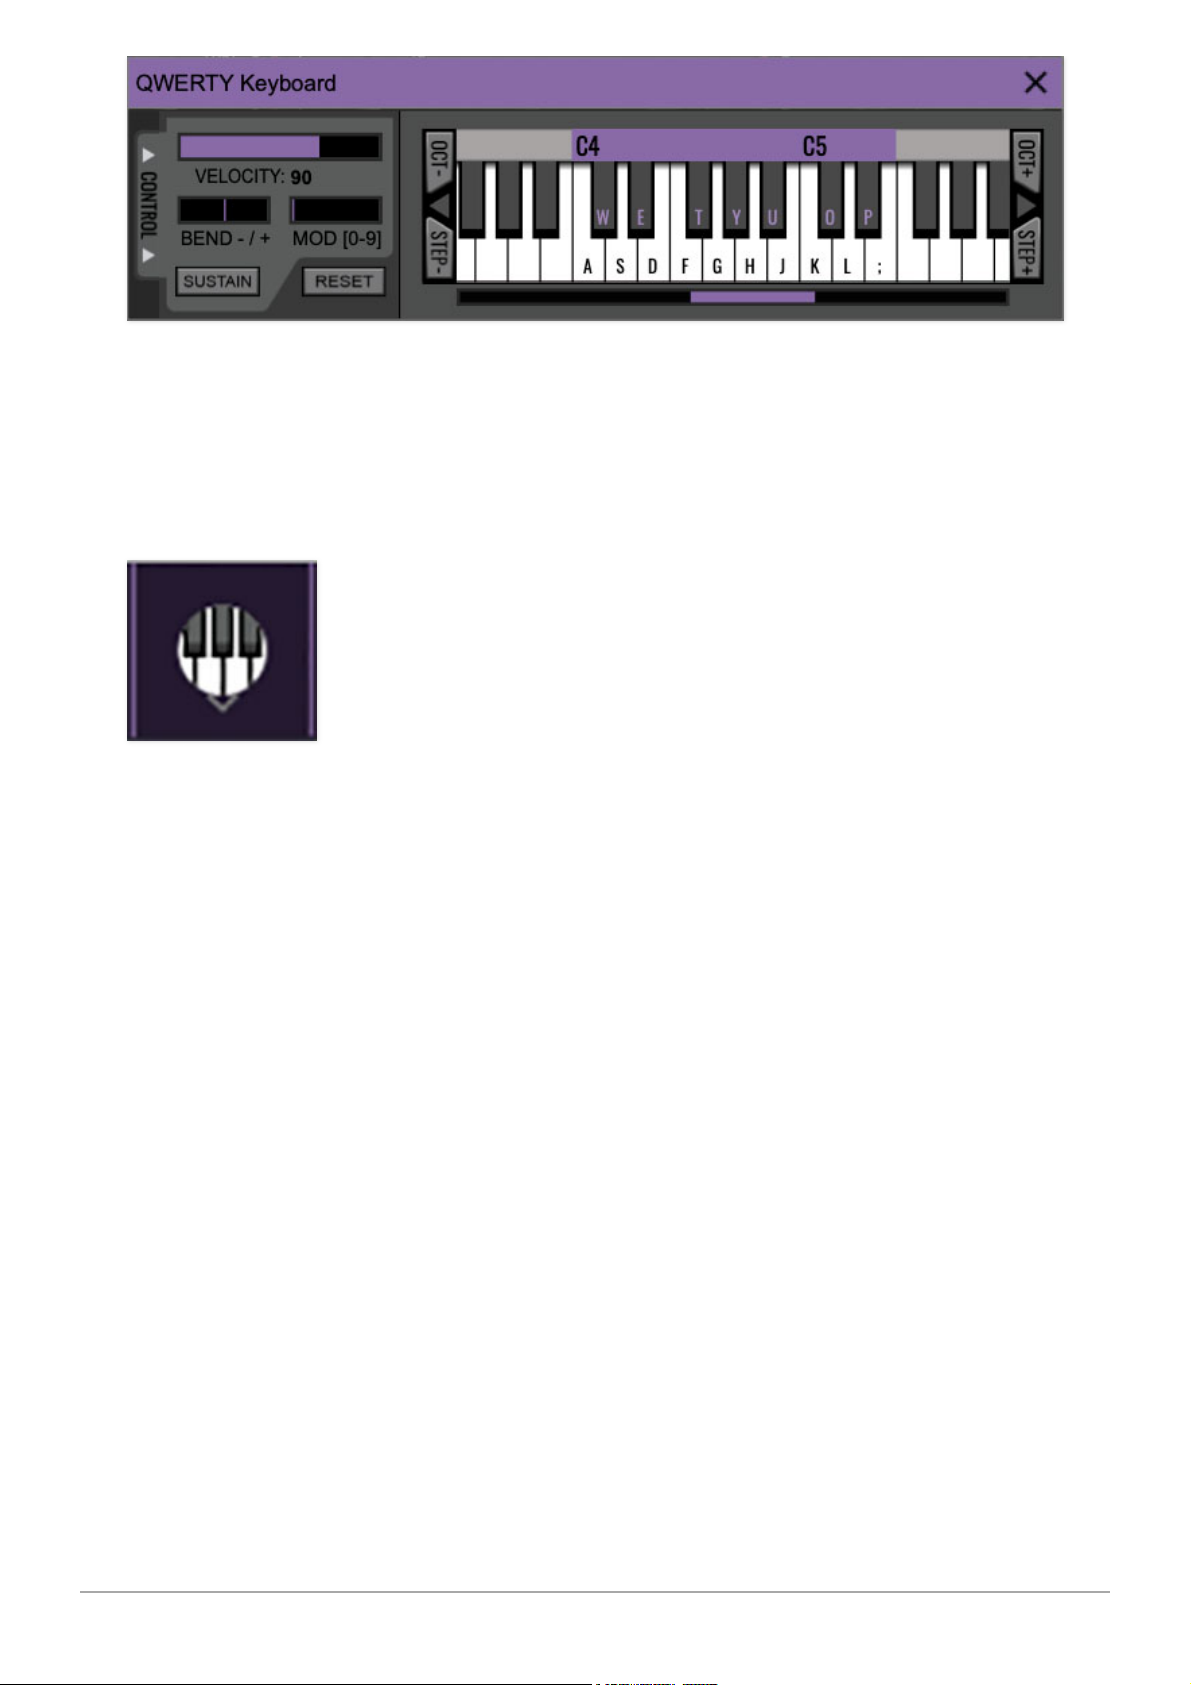
If you don't have a MIDI keyboard attached to your computer, the standard
QWERTY computer keyboard can be used to play notes - we're pretty sure
you've got one of those!We'll refer to this as the "MTK." Following is a list of
MTK keyboard modifiers and functions:
Opening and Closing the MTK - click the the circular keyboard icon in the
top toolbar. To close the MTK, click the keyboard icon in the top toolbar, or
click the X in the top right corner.
Play Notes- To trigger notes, simply press the corresponding computer
keyboard key or mouse click the onscreen keys.
Adjust Currently Visible MTK Range- Slide the purple scroll bar
horizontally to adjust the currently visible keyboard range.
Adjust Overall Visible Keyboard Range- Clicking and dragging the right
edge of the MTL window allows the overall size of the window to be adjusted.
This lets you view more or less of the onscreen keyboard. Note that the MTK
window's borders cannot exceed the overall outside dimensions of the MG-1
Plus window.
Shift Range Up/Down Octave- Click the
OCT-
and
OCT+
buttons at the top
left and right of the onscreen MTK. The current range is displayed above the
keyboard. CR-78's C2-C3 default MIDI note assignments fit perfectly
into the MTK keyboard's default range setting.
Shift Range Up/Down Semitone- Click the
STEP-
and
STEP+
buttons at
the bottom left and right of the onscreen MTK. The current range is displayed
Cherry Audio CR-78 User Guide - 72
Page 73

above the keyboard.
Hide/View Controllers- Clicking
CONTROL
at the far left hides and displays
velocity, bender, mod, and sustain control parameters. Hiding the control
view makes more space available for the keyboard.
Mod Wheel- To add mod wheel modulation, press the number keys from
0-9
(above the character keys) while playing a note. The modulation amount will
vary from none (0) to full modulation (9). Note that modulation will "stick" at
the selected number; to disable modulation, click the 0 key. Mod can also be
engaged by clicking the mouse in the mod bar area. (Mod Wheel doesn't
affect any CR-78 parameters by default, but it can be used as a MIDI control
source for any control. For more information about assigning MIDI controls,
please see MIDI Controllers Setup and The MIDI Tab section.)
Reset- Initializes all MTK parameters including keyboard range and control
parameters.
Cherry Audio CR-78 User Guide - 73
Page 74
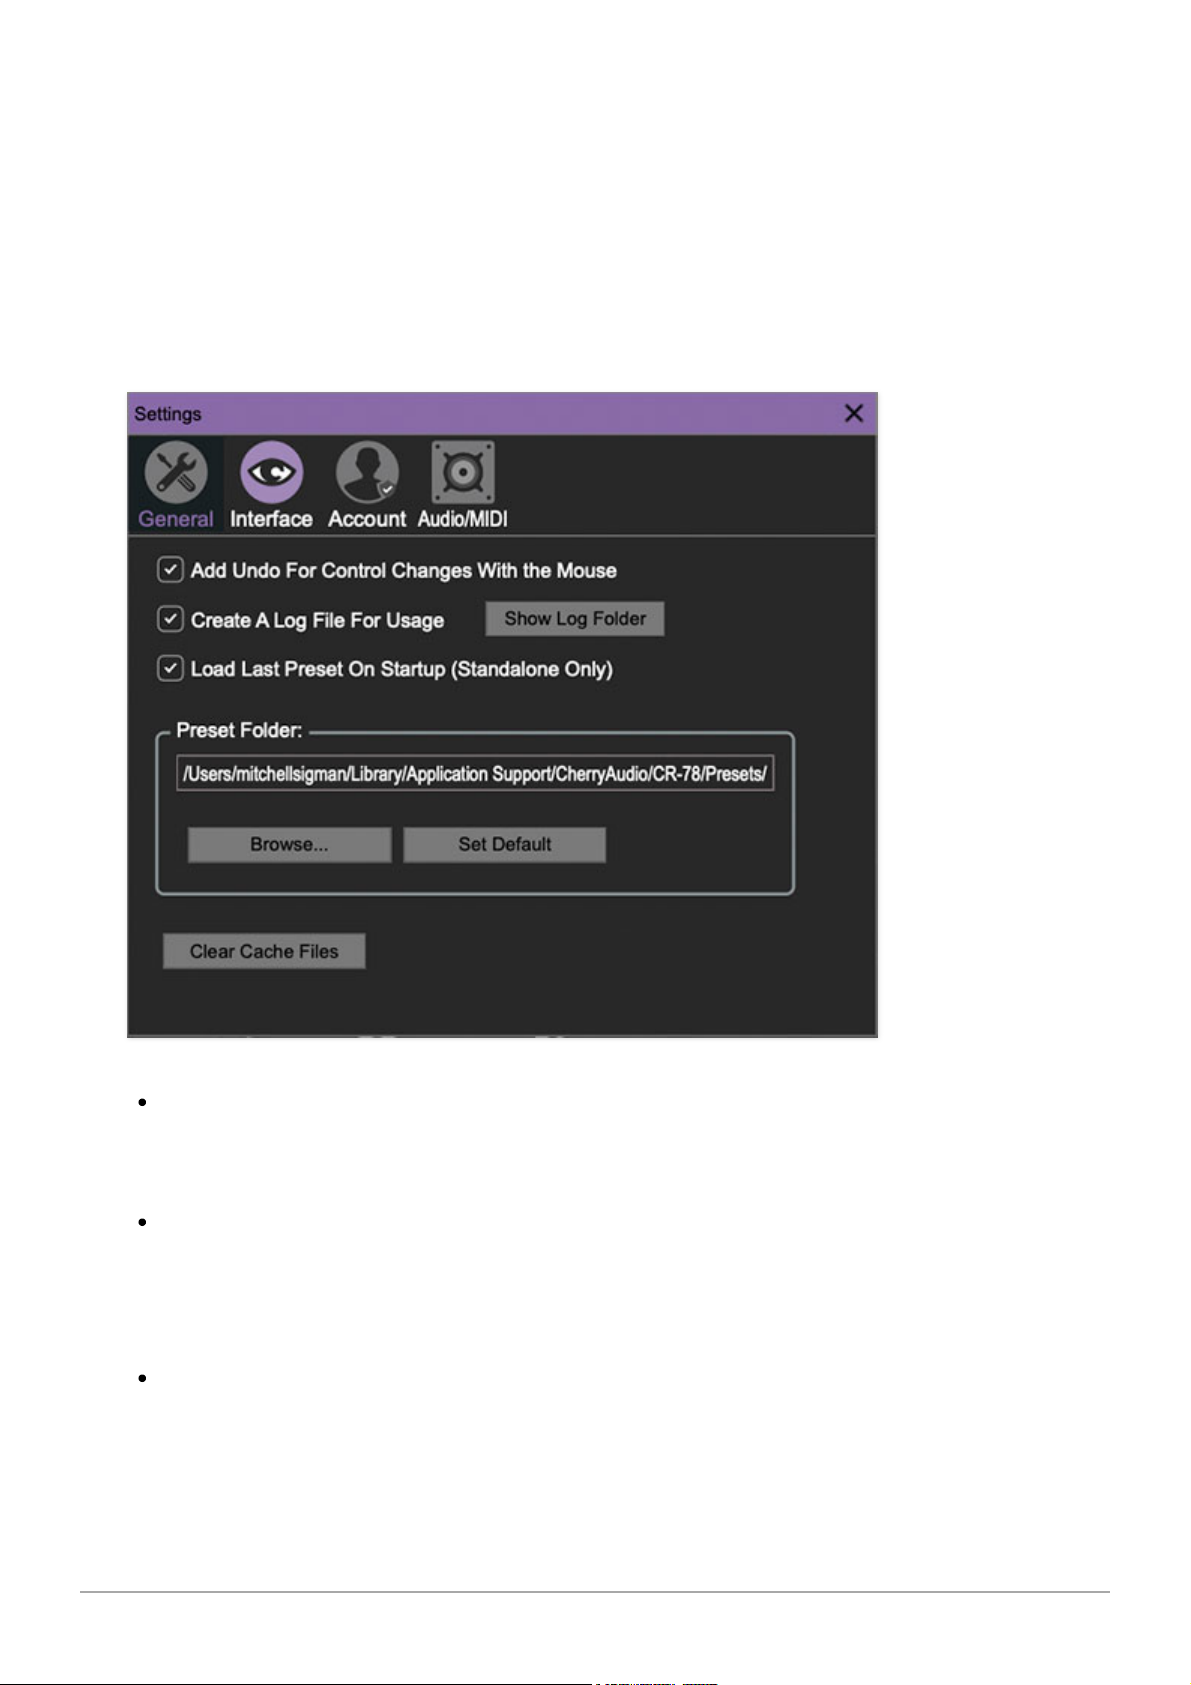
Settings
Clicking the settings gear opens a window with multiple tabs for configuring
various "under-the-hood" settings. These are mostly set-and-forget kind of
parameters - all the controls you'll use frequently are on the Main, Voice Edit,
and Effects/Mixer panels.
General
Add Undo For Control Changes With the Mouse- Enabling this allows
undo of knob/slider/button adjustments. You’ll want this on if you want the
ability to undo all aspects of patch editing and programming.
Create A Log File For Usage- This creates a text doc of all internal and
routines during use. It is mainly intended for our tech staff should you
experience any issues. Clicking
Show Log Folder
opens the folder
containing CR-78 log file docs.
Load Last Preset On Startup (Standalone Only)- Automatically loads
the last preset used when the standalone version is started.
Cherry Audio CR-78 User Guide - 74
Page 75
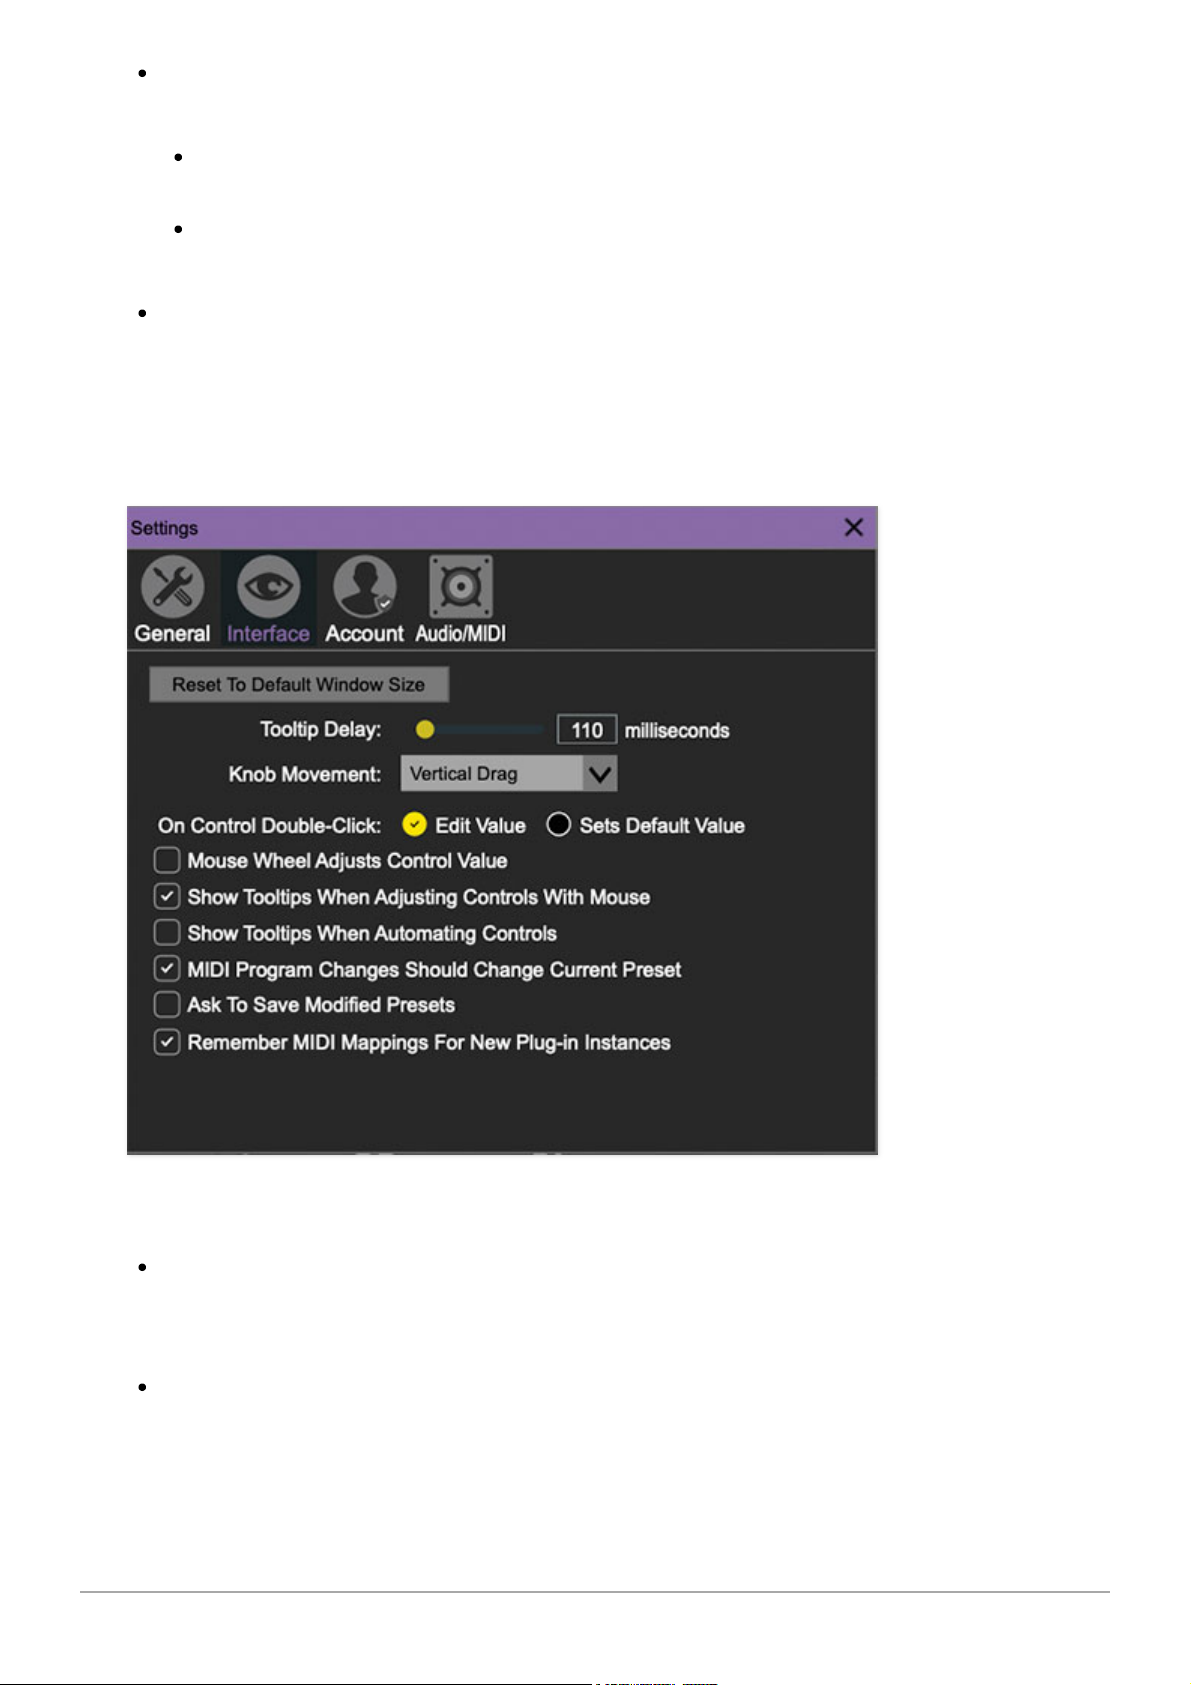
Preset Folder- Displays the current location of sound presets. This can
be changed by clicking and typing in the field.
Browse... - Displays the current location of preset folder in the file
manager.
Set Default- Sets the current displayed
Preset Folder
path as the
default location
Clear Cache Files- Deletes all log files, temporary patches, and the
image cache.
Interface
Allows customization of user interface settings.
Reset To Default Window Size- Resets the workspace to default size.
Use this to reset the window size if the window somehow becomes too
large for your display and can't be resized.
Tooltip Delay- Tooltips are those informative bits of text that pop up
when hovering over a control (go ahead and try it, we’ll wait…). The
Tooltip Delay
setting defines how long you must hover before the tooltip
Cherry Audio CR-78 User Guide - 75
Page 76

pops up. You might want to set it to a faster time than default if you're
one of those highly caffeinated, impatient types (e.g., me).
Knob Movement- Defines how mouse movements relate to turning
onscreen knobs. It defaults to
Vertical Drag
, but can be changed to
Horizontal Drag
, or
Rotary Drag
if you're one those folks that cut their
teeth on the
Steinberg Model E
VST back in 2000.
On Control Double-Click- Defines what happens when the mouse is
double-clicked on a control. If
Edit Value
is selected, an exact number can
be entered by typing the number and hitting [ENTER] or [RETURN]. If
Sets
Default Value
is selected, double-clicking a control resets it to its default
value.
Mouse Wheel Adjusts Control Value- Enabling this lets you adjust
knob, slider, and switch values by moving the mouse wheel. This works
great with a standard mouse wheel, but you'll want to disable it if you're
using an Apple Magic Mouse (which will move the control AND scroll the
window).
Show Tooltips When Adjusting Controls With Mouse- Displays
parameter tooltips/values when the mouse is hovered over a control or as
a control is moved with mouse clicked.
Show Tooltips When Automating Controls- Displays parameter
tooltips/values next to controls any time a control is changed, i.e. if a
control is moved via an assigned MIDI controller or a
Perform
panel knob,
etc.
MIDI Program Changes Should Change Current Preset- Allows MIDI
program change messages to change CR-78 patches.
Ask To Save Modified Presets- This opens a dialog window asking if
you'd like to save changes if a patch has been edited and a new patch is
selected. If you're the type that likes to click through presets and tweak a
control here and there, it can be annoying to have a window pop-up
asking if you'd like to save every time you switch presets - if you're that
person, keep this off.
Remember MIDI Mappings For New Plug-in Instances- When
enabled, all global MIDI Tab controller settings are stored and apply to
new instances.
Account
Cherry Audio CR-78 User Guide - 76
Page 77
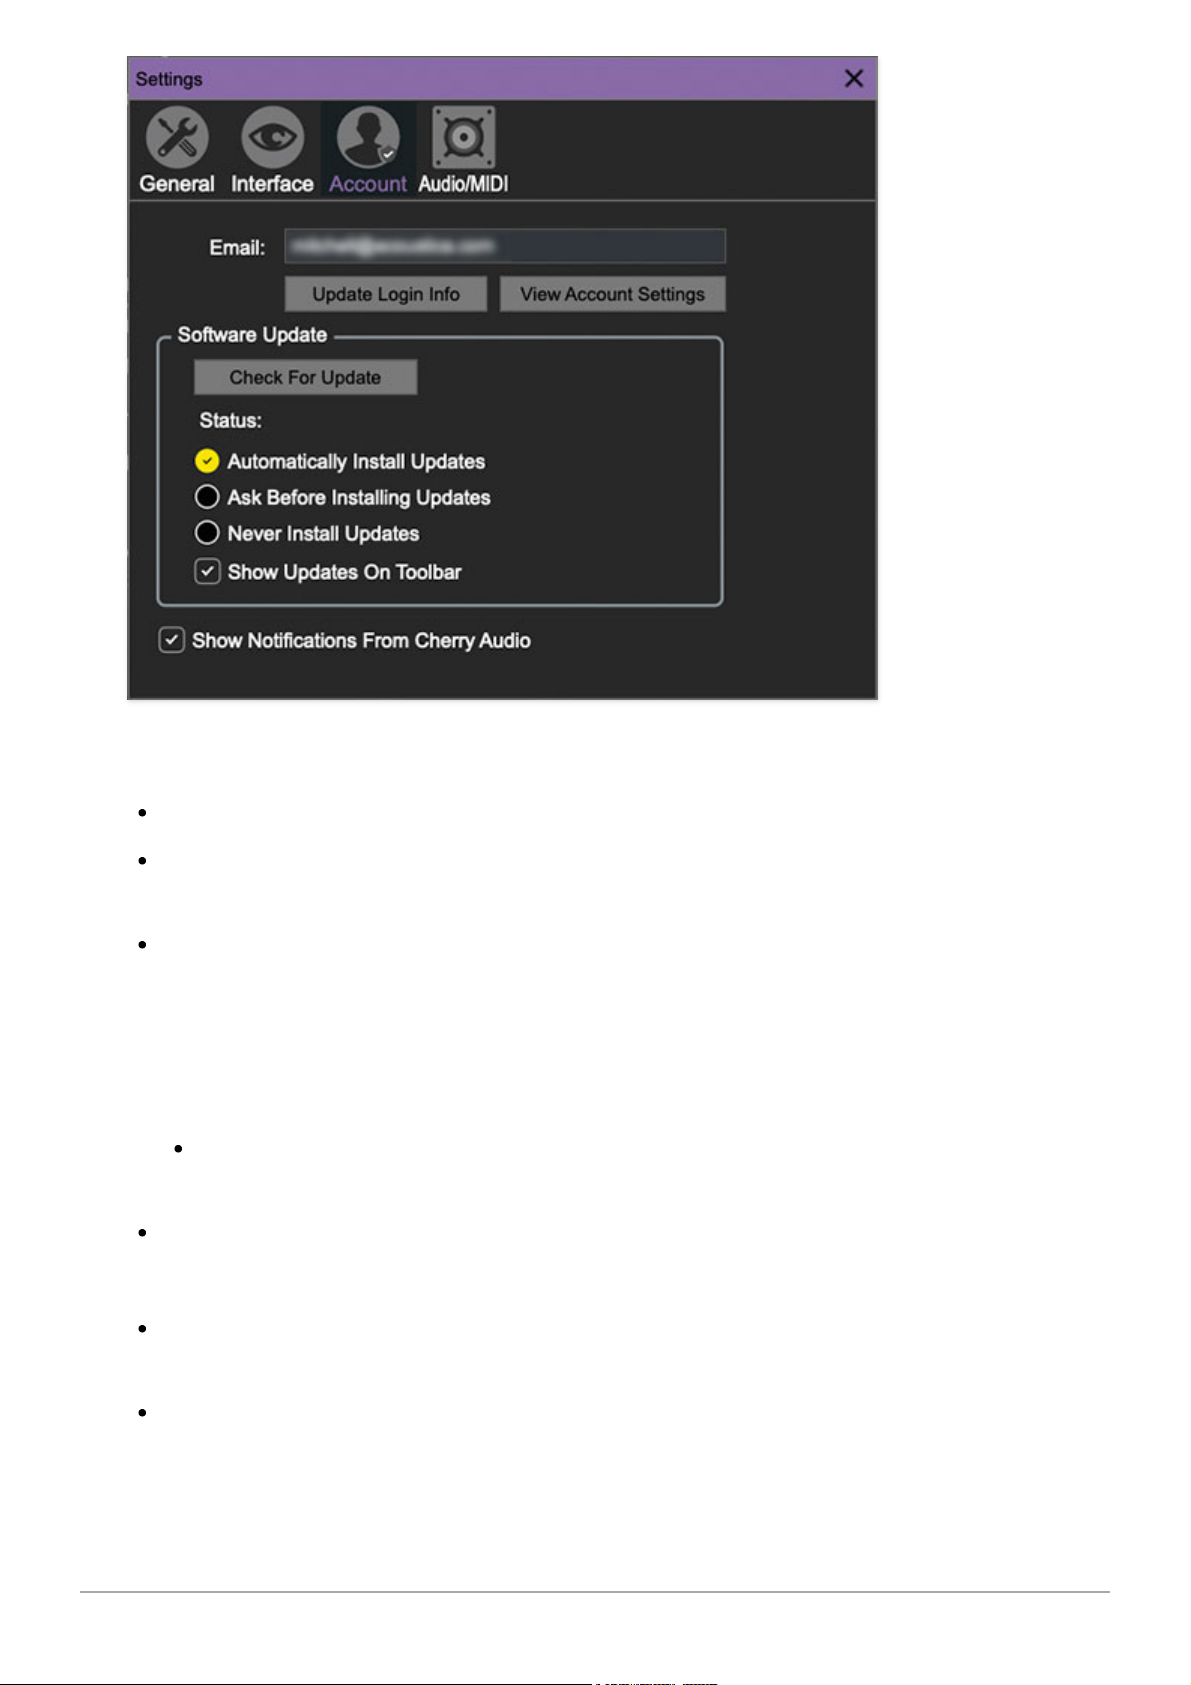
Settings for personal login information and account.
Email- Displays the email address of the current login.
Update Login Info- Clicking this opens the same email and password
login screen you’ll see when initially launching.
View Account Settings- This opens your personal account page on the
Cherry Audio Store website containing information about modules
purchased and more.
Software Update
We often fix bugs and make improvements; below are options defining
how CR-78 handles updates.
Check For Update- Click this to see if an updated version is available.
Status-
Automatically Install Updates- Updates are automatically downloaded
and installed.
Ask Before Installing Updates- By default, updated versions
automatically download when available. Checking this box defeats
automatic updates and will ask if you’d like to install updates when they
Cherry Audio CR-78 User Guide - 77
Page 78
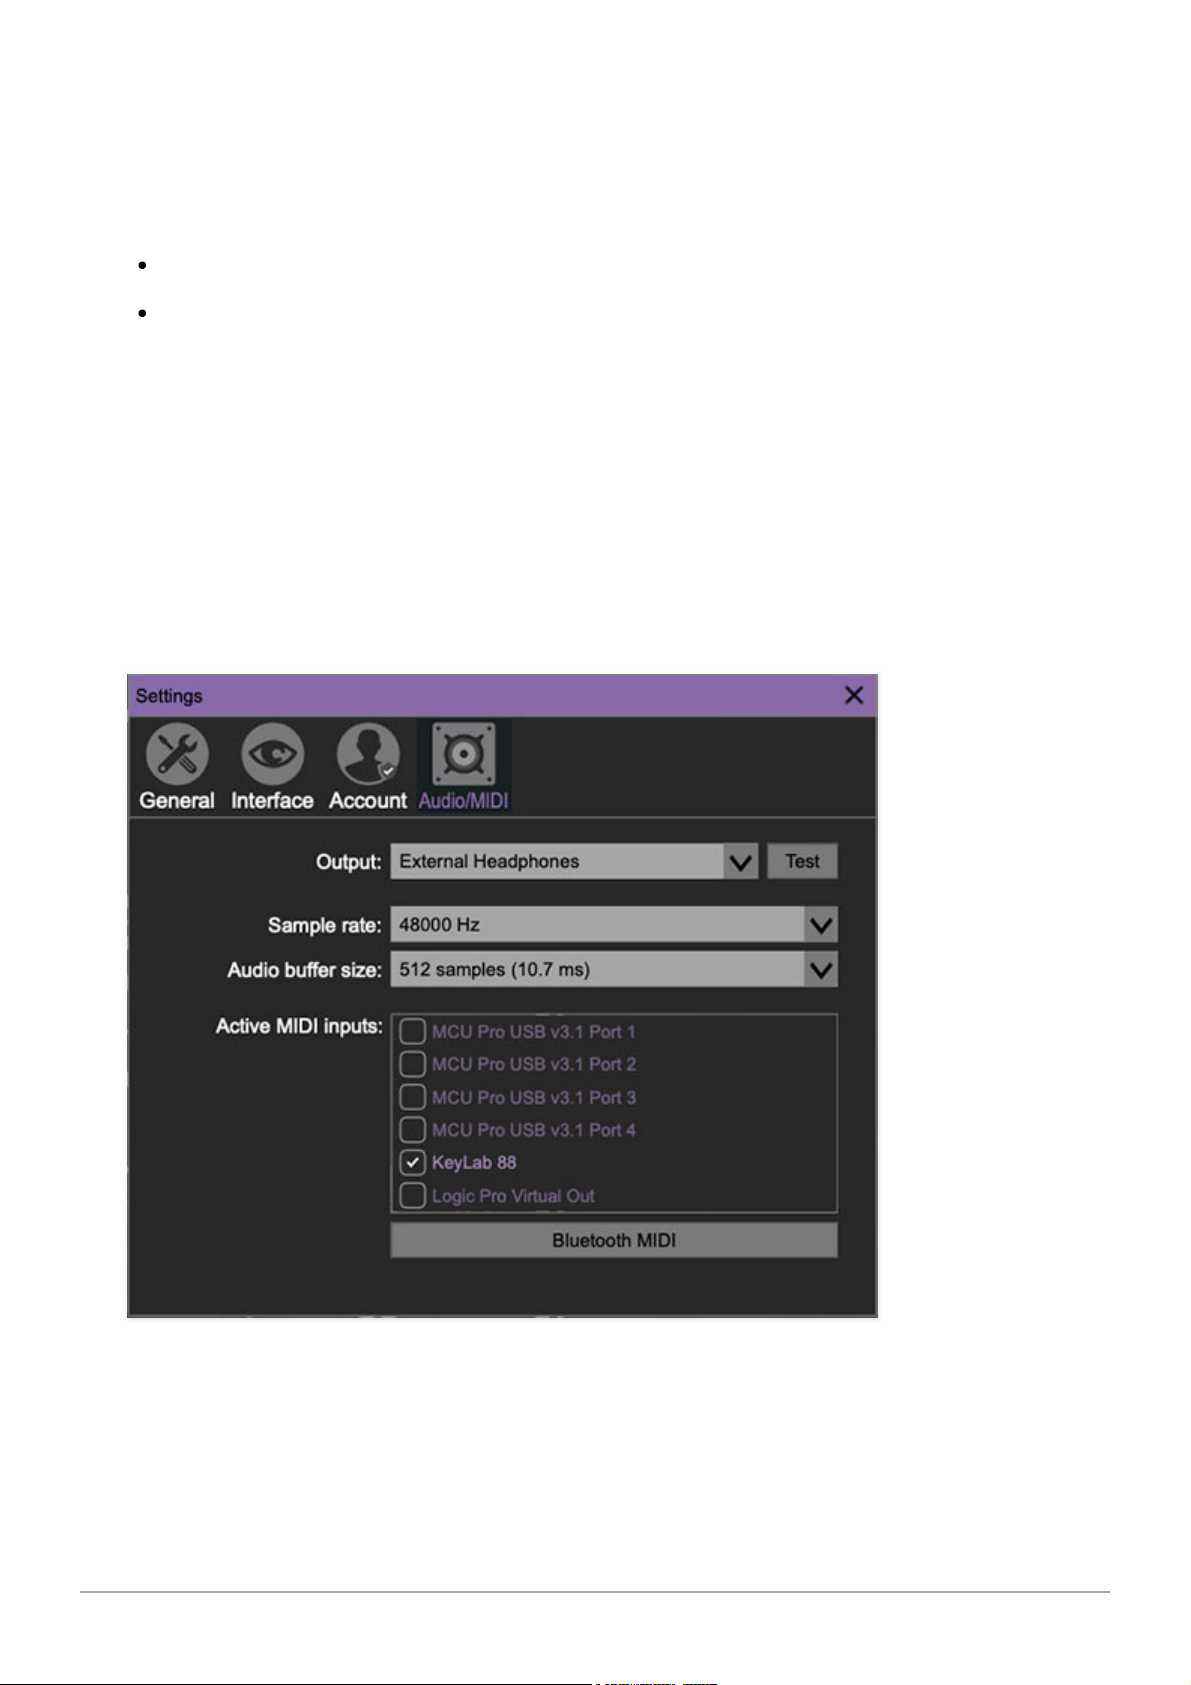
become available.
We’ll never make changes that can potentially “break” existing patches
but we recommend enabling
Ask Before Installing Updates
if you’re using
CR-78 for live performances or other “mission critical” situations.
Never Install Updates- Updates are never automatically installed.
Show Updates On Toolbar- Checking this will display an icon in the
toolbar next to the logo letting you know there's an update available.
Show Notifications From Cherry Audio- We occasionally will fire off inapp advertisements; disabling this checkbox will hide them. We hate
repetitive, annoying ads as much as you, so we don't use this feature too
often.
Audio/MIDI
Not to be confused with the now-defunct audiomidi.com where I used to
work, these are settings for audio and MIDI hardware input and output.
This tab is only visible in the standalone version of CR-78.
Cherry Audio CR-78 User Guide - 78
Page 79

Output- Use this drop-down menu to choose a physical audio output
source. This defaults to
Built-In Line Output
, i.e. your computer’s onboard
system audio, but you’ll get better fidelity with an external professional
audio interface. The biggest audible difference is usually reduced
background noise or hum, but external audio hardware also offers greater
flexibility in terms of number of inputs and outputs and built-in mic or lowlevel instruments pres (i.e. electric guitars). The
Test
button will produce a
sine wave when clicked; this will help with troubleshooting, aka, “WHY
THE HECK ISN’T THIS MAKING ANY NOISE?!?”
Sample Rate- This sets the global sample rate. Lower sample rates offer
better performance, but if you have a fast computer, high sample rates
may offer slightly improved fidelity (at the very least, they'll give you
something to bicker about on gearspace.com).
Audio Buffer Size- As with any digital audio app, this defines
performance vs. note latency, and will largely depend upon computer CPU
speed. A professional external audio interface will almost always exhibit
better performance than “built-in” system audio. Lower settings will result
in less latency (in the form of faster response to notes played), but will
increase the chances of audio gapping or crackling noise.
Active MIDI Inputs- Enable MIDI input sources, i.e. MIDI/USB keyboards,
pad controls, MIDI knob/fader control surfaces, etc. Check boxes to enable
one or more devices. If a MIDI/USB controller isn't working in
standalone mode, make sure the appropriate box is checked here.
(We put this this piece of info
way
at the back of the manual, to make it
extra challenging to figure out why things aren't working.)
Cherry Audio CR-78 User Guide - 79
 Loading...