

Page 1
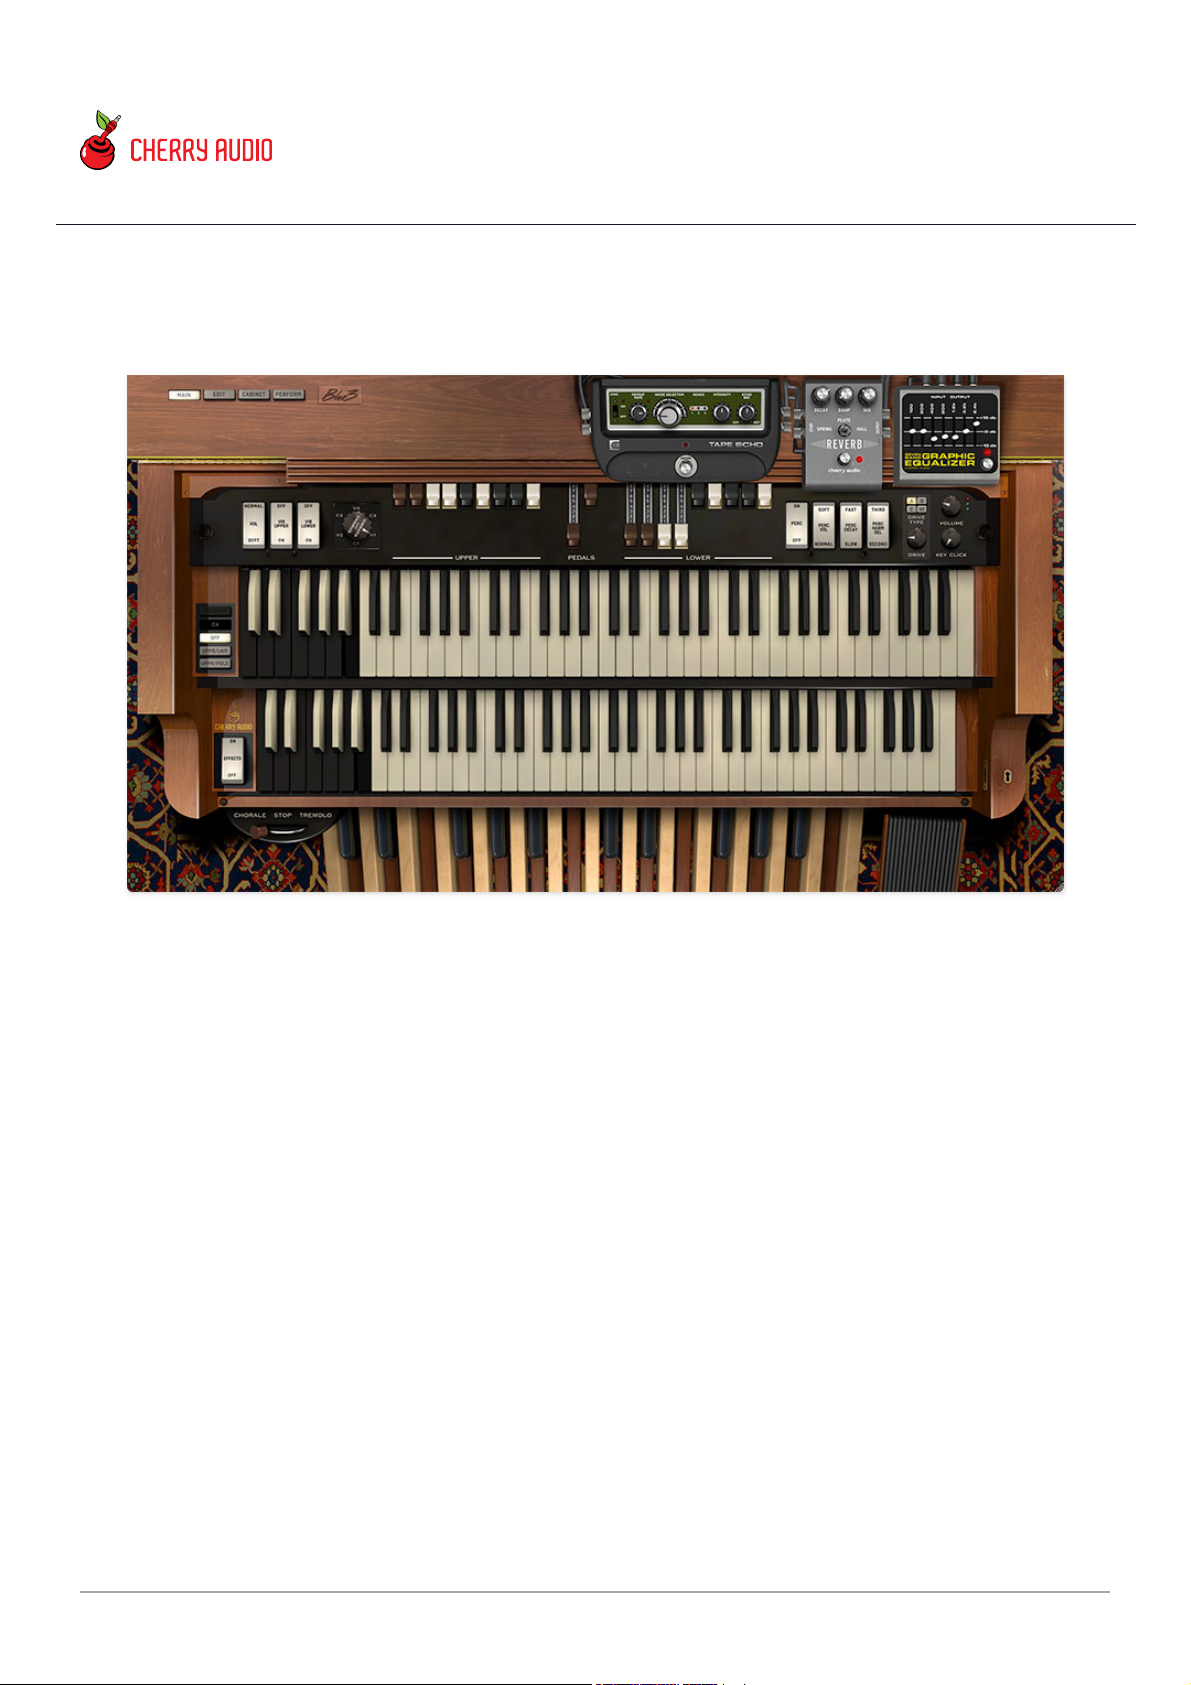
Blue3 is a painstakingly modeled replication of the world-famous B-3, C-3,
and A-100 tonewheel organs that changed the course of blues, jazz, and
rock. If the "Blue3" name sounds familiar, it's because it was created and
sold by GG Audio for years. To cut a long story short, the fine folks at GG
Audio decided it was time to move on, and Cherry Audio has taken over
development of this awesome organ powerhouse.
We couldn't resist giving Blue3 a thorough facelift, but other than removing a
few really esoteric features and adding our really cool effects, the tone
generation and rotary speaker modeling remains exactly the same under the
hood - we didn't tinker with its awesome sound at all.
We were big fans of Blue3's majestic, warm, spot-on classic tonewheel sound
prior to taking on its continued development and we're thrilled to have it to
round out the Cherry Audio instrument line. We hope you'll dig Blue3 as
much as we do!
Blue3 User Guide
Last updated 2024.09.23
Cherry Audio Blue3 User Guide - 1
Page 2
Hey, I just fired up Blue3 in standalone mode
and it doesn't work! What the hey?!?
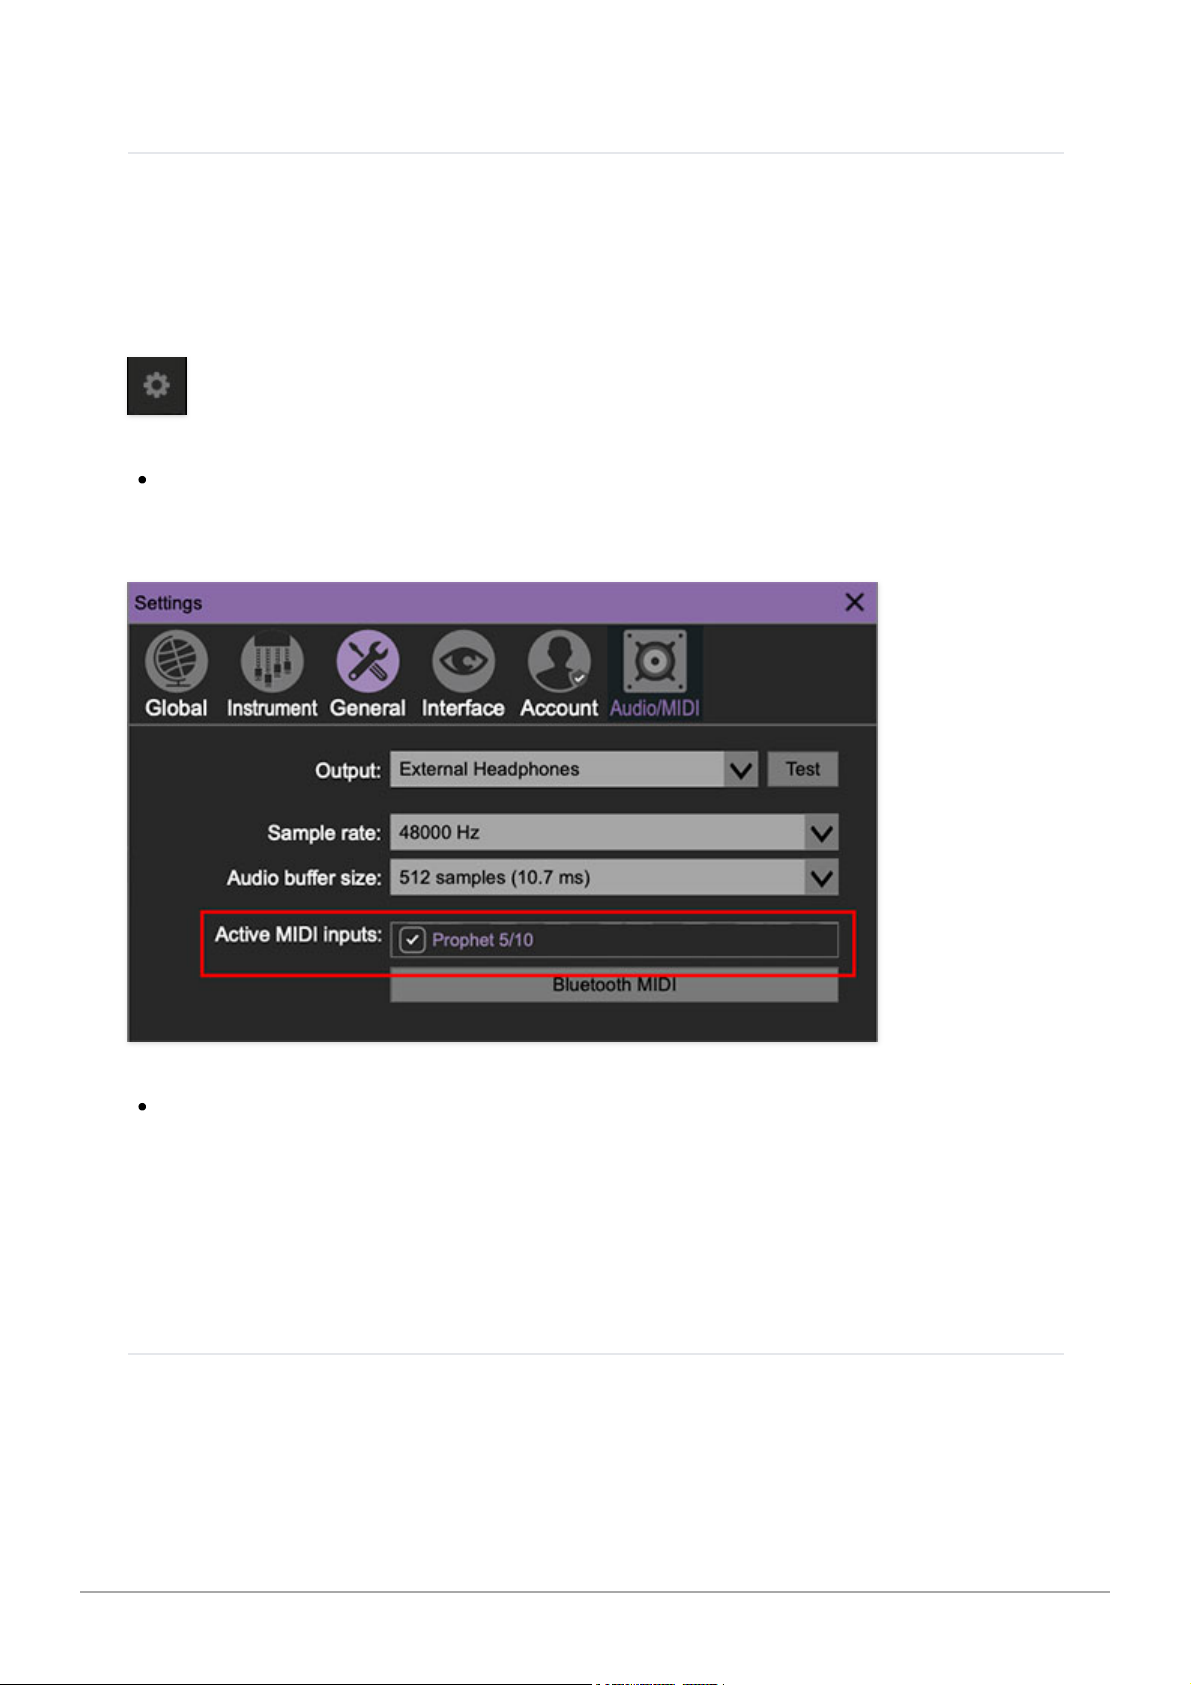
If you just launched the standalone app version of Blue3 (i.e., not a plugin
running in DAW software) and nothing happens when you play keys on your
MIDI/USB controller, it's almost certainly because Blue3 needs to know what
you're trying to play it with. The good news is that it's super easy to fix:
Click the
Settings
gear icon in the purple menu strip at the top of the
screen.
Click the
Audio/MIDI tab
at the top. Now look for the name of your
MIDI/USB controller next to
Active MIDI inputs
and check the box next to
it. If you don't see the name of your controller here, check that the
controller is properly plugged in and powered up. If that doesn't work feel
free to contact our support below.
Technical Assistance
Cherry Audio's unique online store and automatic updating generally makes
operation a smooth experience, but if you run into any issues or have
questions, you can discuss issues online at the Cherry Audio forums at:
Cherry Audio Blue3 User Guide - 2
Page 3

https://forums.cherryaudio.com/
... or you can communicate directly with our friendly tech support staff at:
https://cherryaudio.kayako.com/
Cherry Audio Blue3 User Guide - 3
Page 4
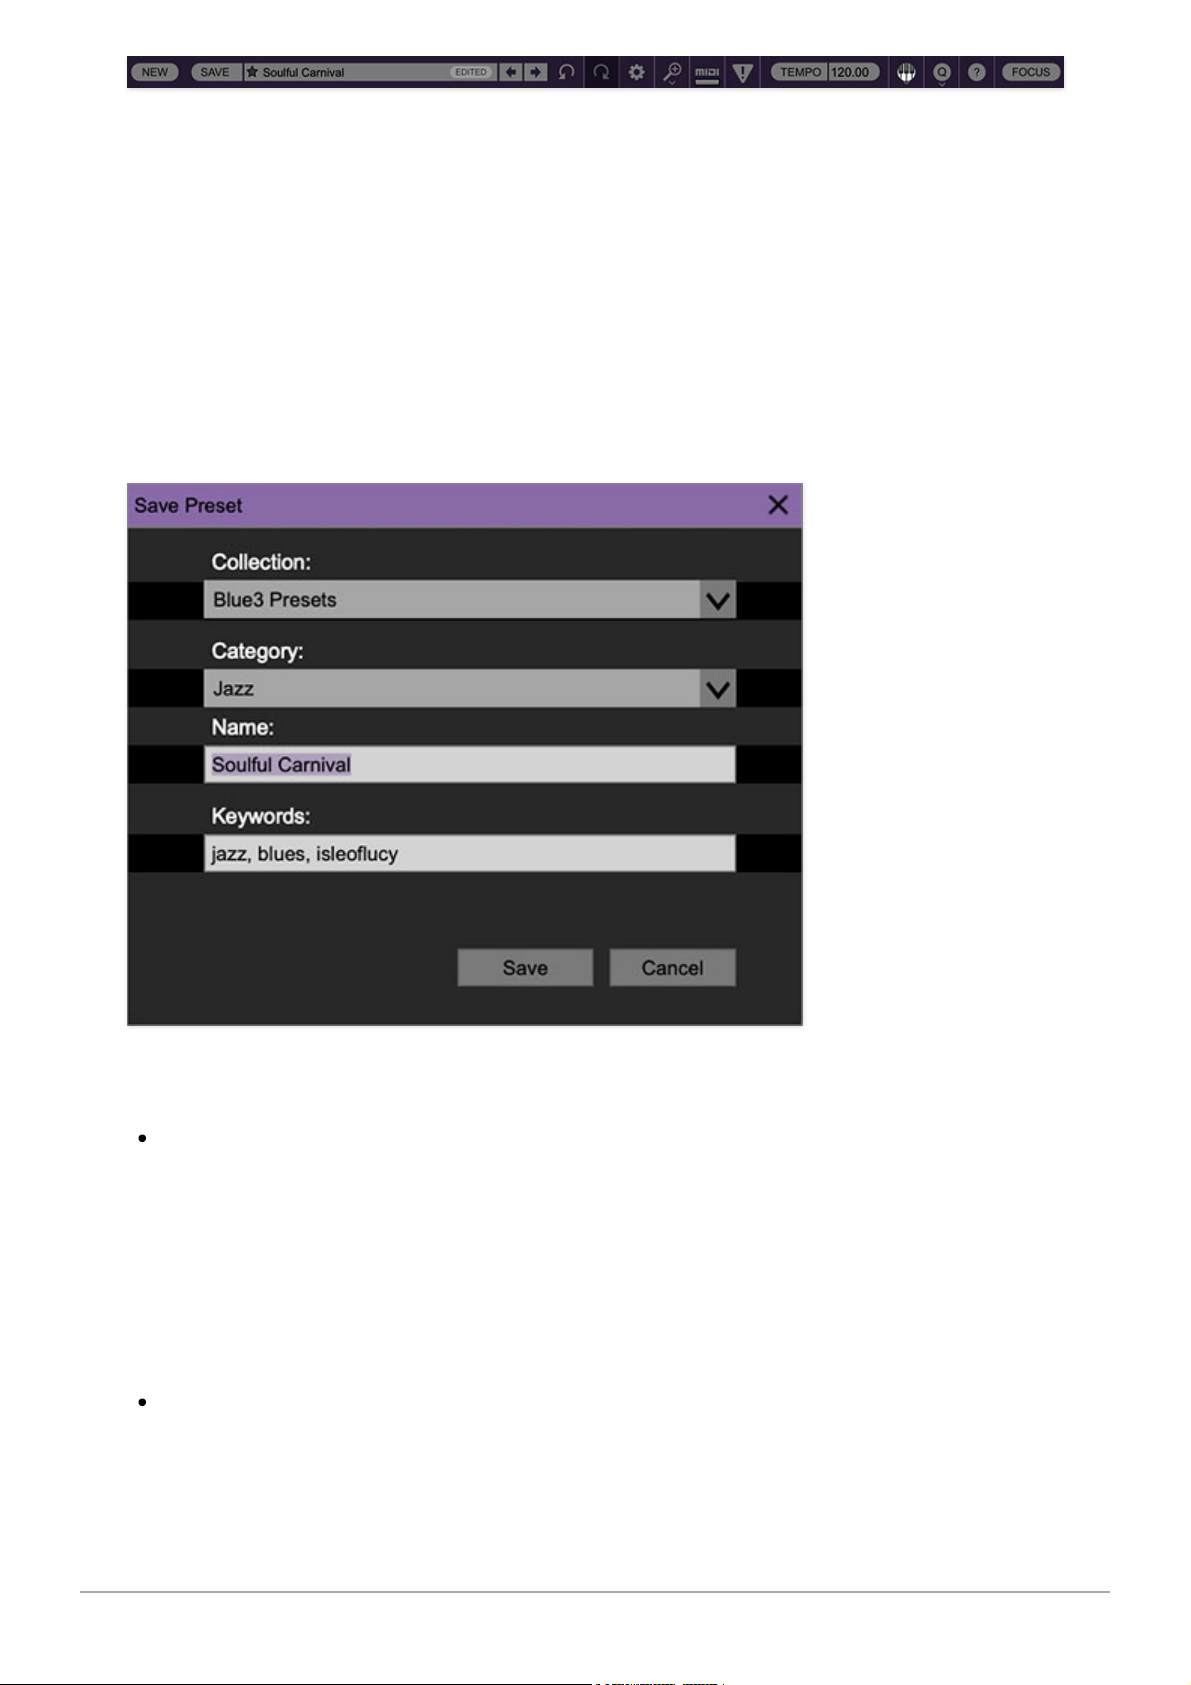
The purple strip at the top of the Blue3 interface is where you’ll load, save,
and create sound presets. It also contains utility functions such as undo/redo,
UI zoom and
Focus
controls, under-the-hood settings, and more. Let’s go over
them:
New- Opens a new blank patch preset. If an unsaved patch is currently open
or you’ve modified an existing saved patch, a dialog asks if you’d like to save
the patch in its current state. This greatly reduces the possibility of losing an
edited unsaved patch.
Save- Use this to save patches. There are a couple of levels of hierarchy:
Collection- This is the top level of organization, and contains entire
“sets” of presets. The
Blue3 Presets
are the main included collection. We
also include a
User Presets Collection
for storing your own presets, but
you’re free to create your own collections. To create a new collections,
click in the
Collection
text field (where it says
User Presets
above) and
type a name. User-created sounds can be freely saved to any collection;
we like to keep ‘em separated for organizational purposes.
Categories- Within each
Collection
are a number of sound categories. As
with collections, you’re free to create as many categories as you like. To
Cherry Audio Blue3 User Guide - 4
Page 5
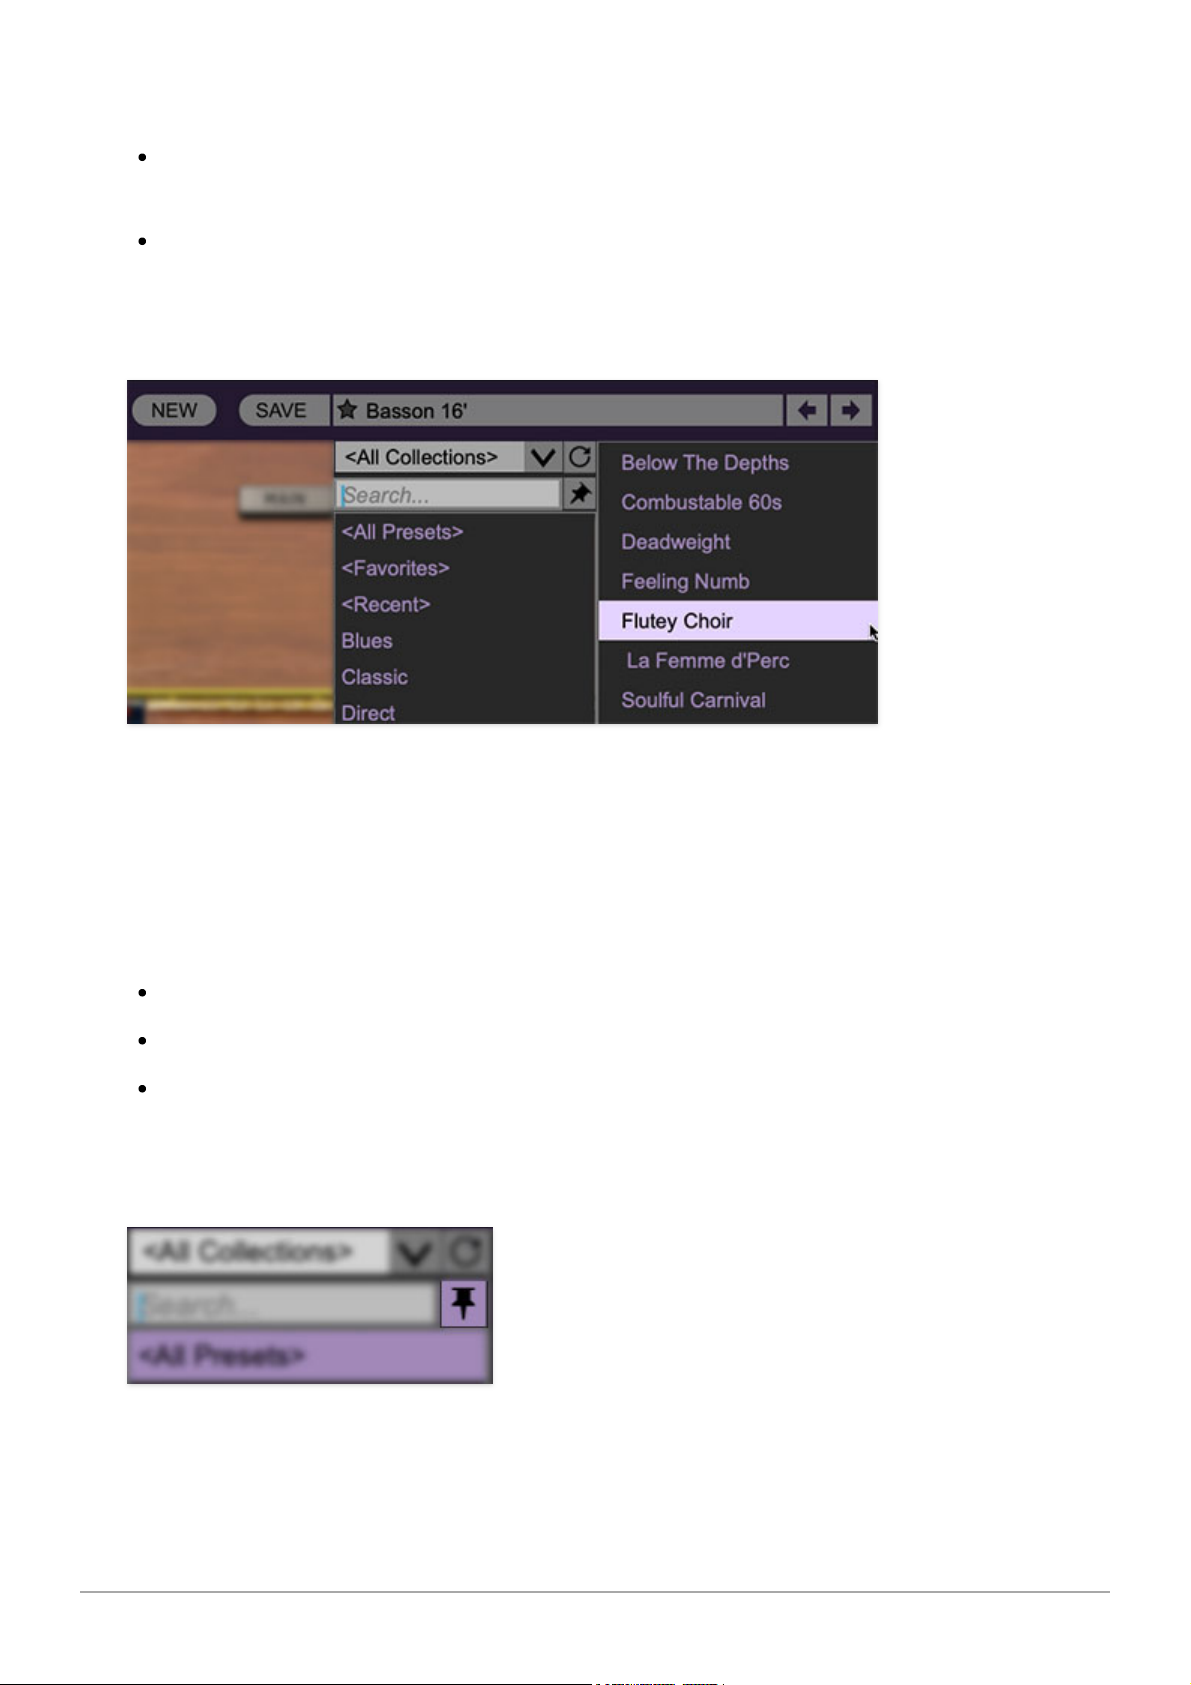
create a category, click in the
Category
text field of the
Save
dialog
window and type a new category name.
Patch- A patch is an individual sound. To save a patch, simply type the
name in the
Name
field and click
Save
.
Keywords- You can add descriptive words such as “cathedral,” “mellow,”
or “bright,” etc., to patches to make them appear when terms are typed
in the
Search
field. Use commas to separate multiple keyword entries.
Browsing Patches- Patches can be browsed by clicking the <
Select Preset
>
field. To select a preset collection, click in the area that says <
All
Collections
> or on the downward-facing arrow next to it.
Clicking on the left-side categories narrows down which patches are
displayed.
<All Presets> will show presets from all collections and categories.
<Recent> displays recently used presets.
Refresh- This is the circular arrow button to the right of the downward
arrow; clicking this checks the Cherry Audio server for new or updated
presets.
Pin- Clicking the push-pin icon locks the patch selection list open, allowing
fast and easy browsing and auditioning of patches. Click the icon again to
Cherry Audio Blue3 User Guide - 5
Page 6

disable pin mode. when in pin mode, the up and down arrow keys can be
used to select patches.
Preset Step Back/Forward horizontal arrows- These step to the previous
or next preset. macOS [⌘+left/right arrow key] or Windows [CTRL+left/right
arrow key] will navigate through presets back and forth in the currently
selected collection/category.
Undo/Redo circular arrows- These undo or redo the last action. It
remembers many steps, so if you really mucked something up, keep on
clickin'...
Settings- This is where user preferences for user interface, audio interfaces,
user account, and more are configured. See the Settings section for full
information.
Importing Presets with drag-and-drop
Presets can be imported singly or en masse (as a single compressed ZIP file)
simply by dragging and dropping from the desktop anywhere on the user
interface.
If a single .*preset file is dragged and dropped, the sound is immediately
loaded and the standard Save Preset dialog appears; this lets you save the
sound to the instrument's preset browser. Note that you don't have to save
the sound to preset browser; if you just want to hear and play the sound,
click the Cancel button in the Save Preset dialog - the sound will still be
loaded.
Compressed zip files containing multiple sounds can also be drag and
dropped onto the UI. This works the same as with single sounds, but instead
of the Save Preset dialog, you'll see the Import Preset Collection dialog. The
presets will be added as a new collection and available in the categories for
which they were tagged.
Zoom Magnifying Glass- Click to resize the Blue3 interface. Selecting
100%
returns the user interface to native size.
MIDI Tab- Opens the MIDI controllers tab for configuring internal and
hardware MIDI controls. See the MIDI Controllers Setup and MIDI Tab
section for full information.
! (MIDI Panic) - Click to send an all-notes-off message in case of, "why
won't this thing stop making noise?!?" stuck-note incidents.
Cherry Audio Blue3 User Guide - 6
Page 7
QWERTY Musical Typing Keyboard- Opens an onscreen keyboard allowing
a standard QWERTY computer keyboard to be used for playing music notes.
For more information, see QWERTY Musical Typing Keyboard (MTK)
section.
Q Oversampling Quality - The Q button sets Blue3's internal oversampling
rate; the higher the setting, the better audio fidelity will be, with the caveat
that more computer processing power will be required.
Internal processing can be set to 1x (same rate as the current sample rate of
the host DAW or in the
Settings>Audio/MIDI
window for the standalone
version) or to 2x, 3x, or 4x the current sample rate. The sample rate is
downsampled at the instrument output stage to match the current host
sample rate.
For example, if the current DAW/instrument sample rate setting is 48 kHz,
and oversampling is set to 2x, Blue3's internal processing runs at 96 kHz,
and is then reduced back to 48kHz at the output stage.
Cherry Audio Blue3 User Guide - 7
Page 8
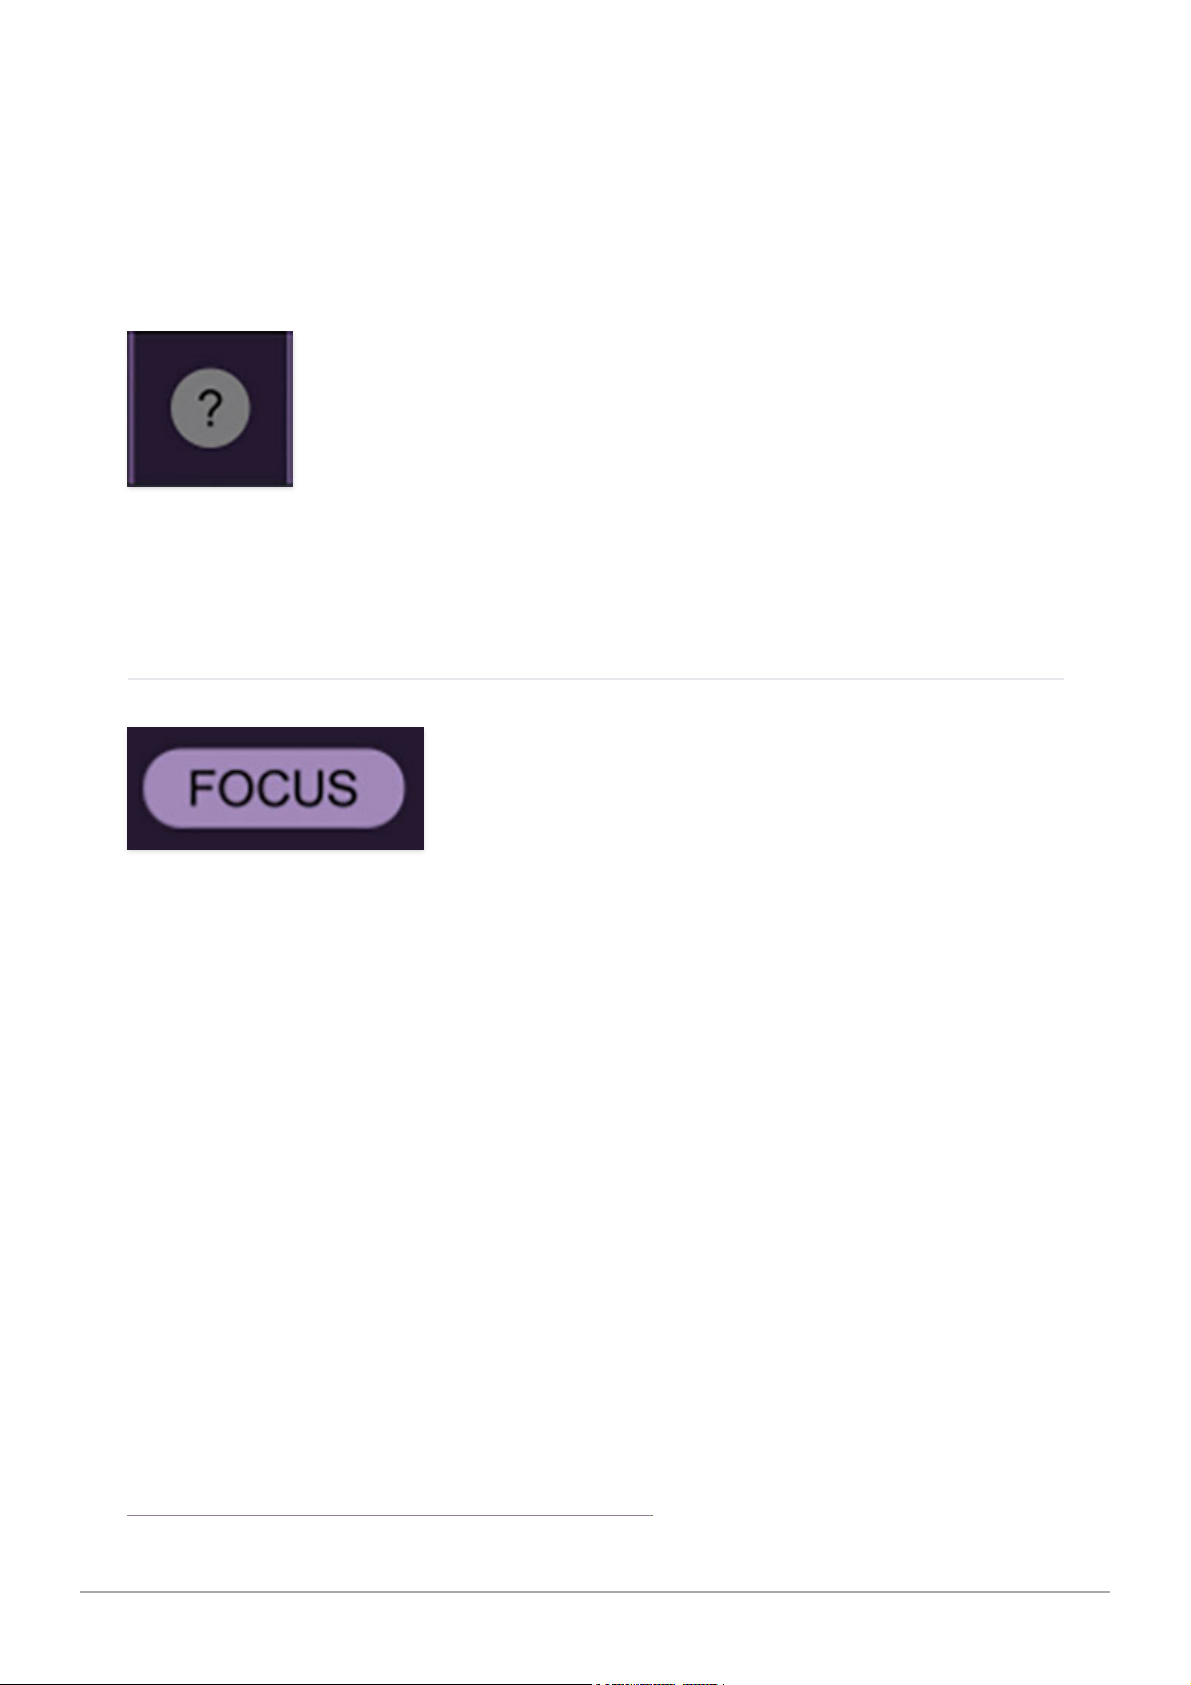
When oversampling is set to any multiple greater than 1x, the Q button
glows yellow.
Dependent on a number of factors (audio system D/A converter
quality, monitor speakers, the nature of the current Blue3 patch,
galaxial bodies alignment, etc.), you may not hear a big difference
with higher settings.
? (Help) - Clicking this launches your web browser and opens this very help
document.
Focus Button
If you're using a tiny laptop, the user interface can potentially be hard to see.
With this in mind, the
Focus
button conveniently blows up Blue3's view to
roughly twice its normal size within the current window size. Unlike the
Zoom
"magnifying glass" function,
Focus
doesn't affect the current window size. By
default, the patch panel section fills the current window, but the view can be
scrolled vertically and horizontally with a mouse wheel, track pad, or Apple
Mighty Mouse finger-scrolling. Or if you're the last person on earth still using
a single-button mouse, scroll bars will appear at the window edges when in
Focus
mode. (also, YOU'VE GOT MAIL!)
Using
Focus
mode couldn't be easier - just click the
Focus
button the top
menu bar, and the recessed panel controls are enlarged and centered. To
return to standard view, click
Reset
.
We included the
Focus
function because it's standard on all Cherry Audio
instruments, but that said, the
PERFORM
page exists for pretty much the
same reason - to make important controls fast and easy to use in smallscreen situations. Just something to keep in mind!
Cherry Audio Blue3 User Guide - 8
Page 9
Blue 3 and Cherry Audio logos- Clicking on the Blue 3 logo (next to the
page select buttons), or the Cherry Audio logo next to the bottom manual
displays “about” information, and shows the version number and current
registered user ID.
Preset List Right-Click Functions
Show File- This displays the selected preset in the Mac or Windows folder
containing it. This is useful for backing up or sending a preset file to another
user.
Show In Original Category- Selects the preset within its category, i.e. the
category will highlight in the left preset menu. The
Show In Original Category
command only displays if the preset was selected within the <
All Presets
>,
<
Favorites
>, or <
Recent
> categories.
Favorites- Favorited presets will show in when the <
Favorites
> category is
selected. A star will display next to the preset name. Right-click on the preset
and reselect
Favorite
to un-favorite it.
Delete- Deletes the selected preset.
Cherry Audio Blue3 User Guide - 9
Page 10

Restore Factory Preset- If one of the factory (i.e. not user) patches is
edited and saved, selecting this command restores the patch to its unaltered
"factory" setting. This menu will be grayed-out for user bank patches.
Restore All Factory Presets From 'Blue3 Presets'- If any patches from
the "factory" Tortoise bank are edited and saved, selecting this command
restores
all
of them to their unaltered "factory" setting.
Restore All From Factory- If any patches from the "factory" banks are
edited and saved, selecting this command restores
all
of them to their
unaltered "factory" setting. At the time of writing, the Blue3 bank mentioned
above is the only factory bank, so this function and the
Restore All Factory
Presets From 'Blue3 Presets'
above have the same effect.
Cherry Audio Blue3 User Guide - 10
Page 11
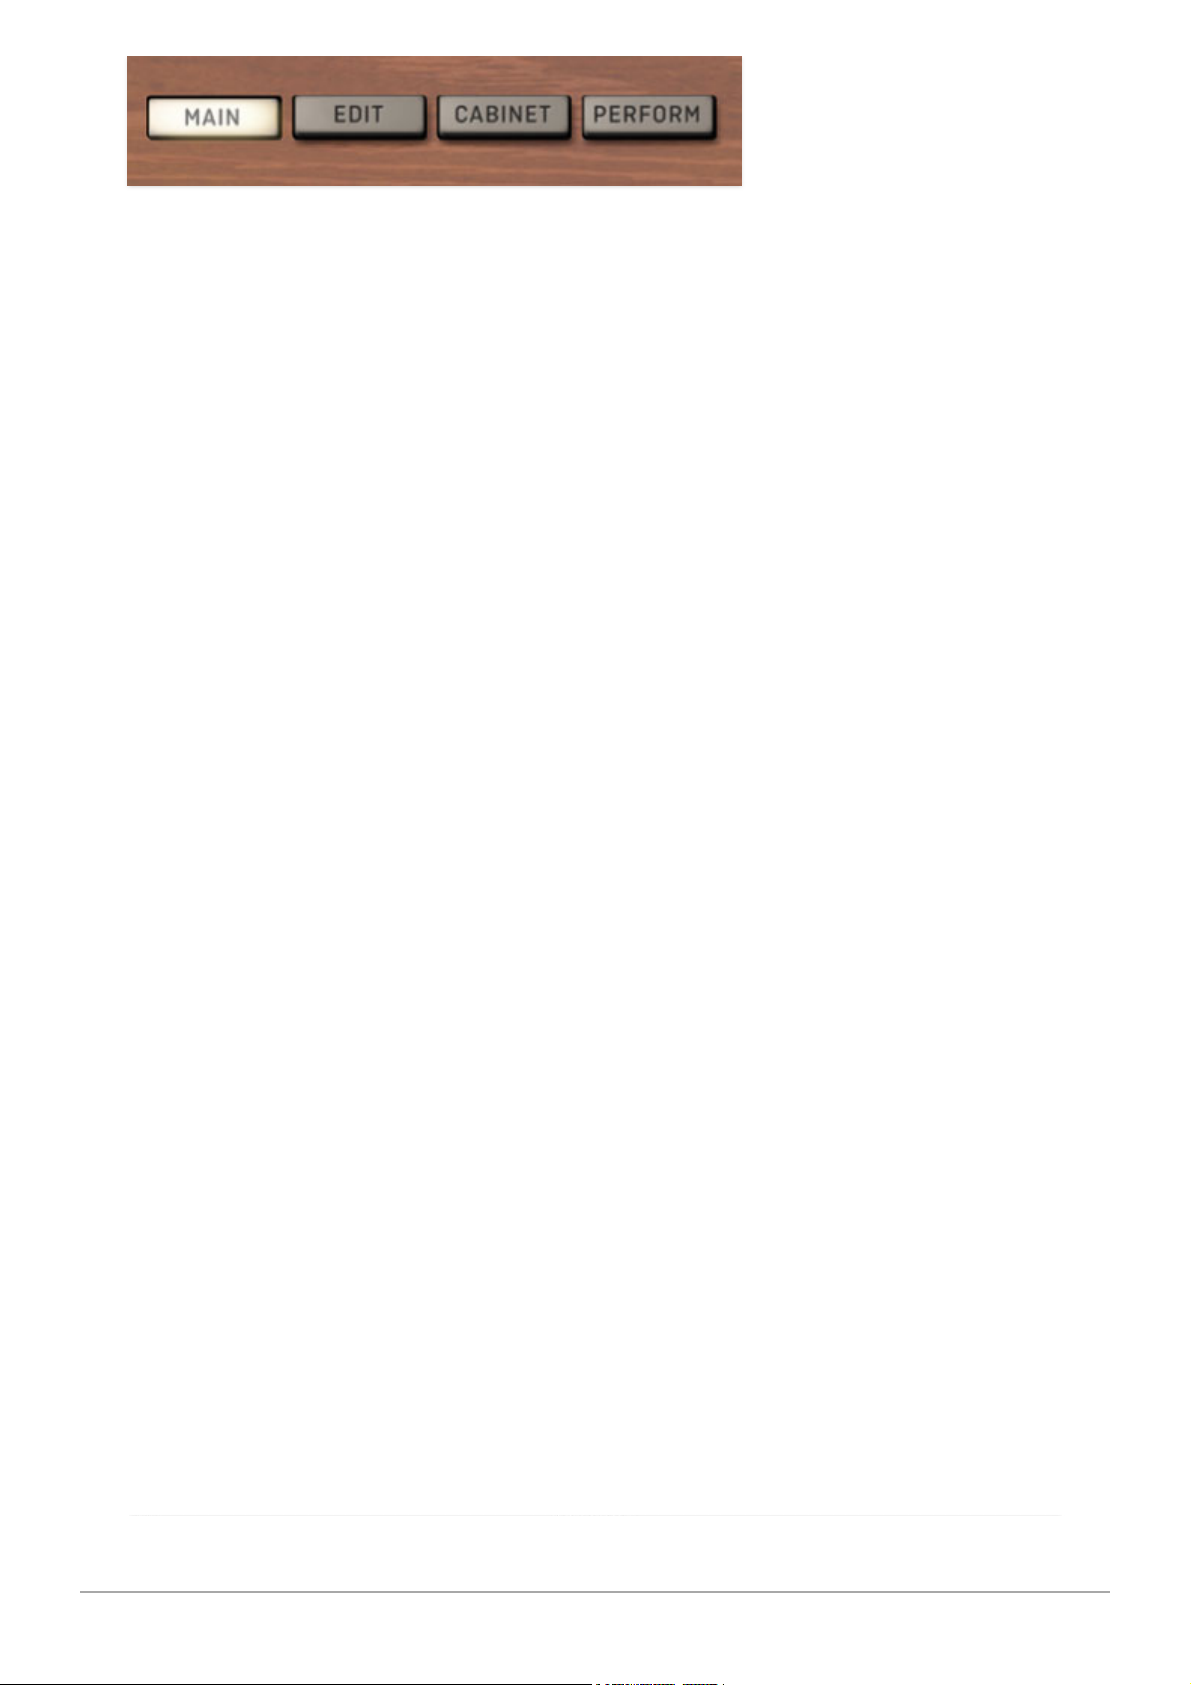
Blue3 has four main screen "pages." These are selected by clicking the
buttons at the top left of the user interface:
MAIN- This is the primary organ view. Here you'll be able to set registrations
for the upper, lower, and pedal drawbars, as well as vibrato/chorus settings,
percussion, key click, rotary speaker speed, overdrive, and keyboard split (for
assigning a single USB/MIDI controller to play both manuals and pedals). The
tape delay, reverb, and graphic EQ stomp boxes can also be shown/hidden
and edited on the
MAIN
page.
EDIT- The
EDIT
page is very similar to
MAIN
, but the drawbars,
vibrato/chorus, key click, and overdrive controls are replaced with "fine
tuning" parameter controls for tonewheels, foldback, pedals, percussion,
vibrato/chorus, condition and more.
CABINET- Sets all parameters related to the rotary speaker cabinet
emulations.
PERFORM- The
PERFORM
page dispenses with most of MAIN page's cool 3D
eye candy, focusing on large versions of the most important controls you'll
need in a studio or live performance environment. It's mainly intended for
use with laptops, where screen real estate is small and valuable.
In the sections that follow, we'll go over each page in detail.
Cherry Audio Blue3 User Guide - 11
Page 12
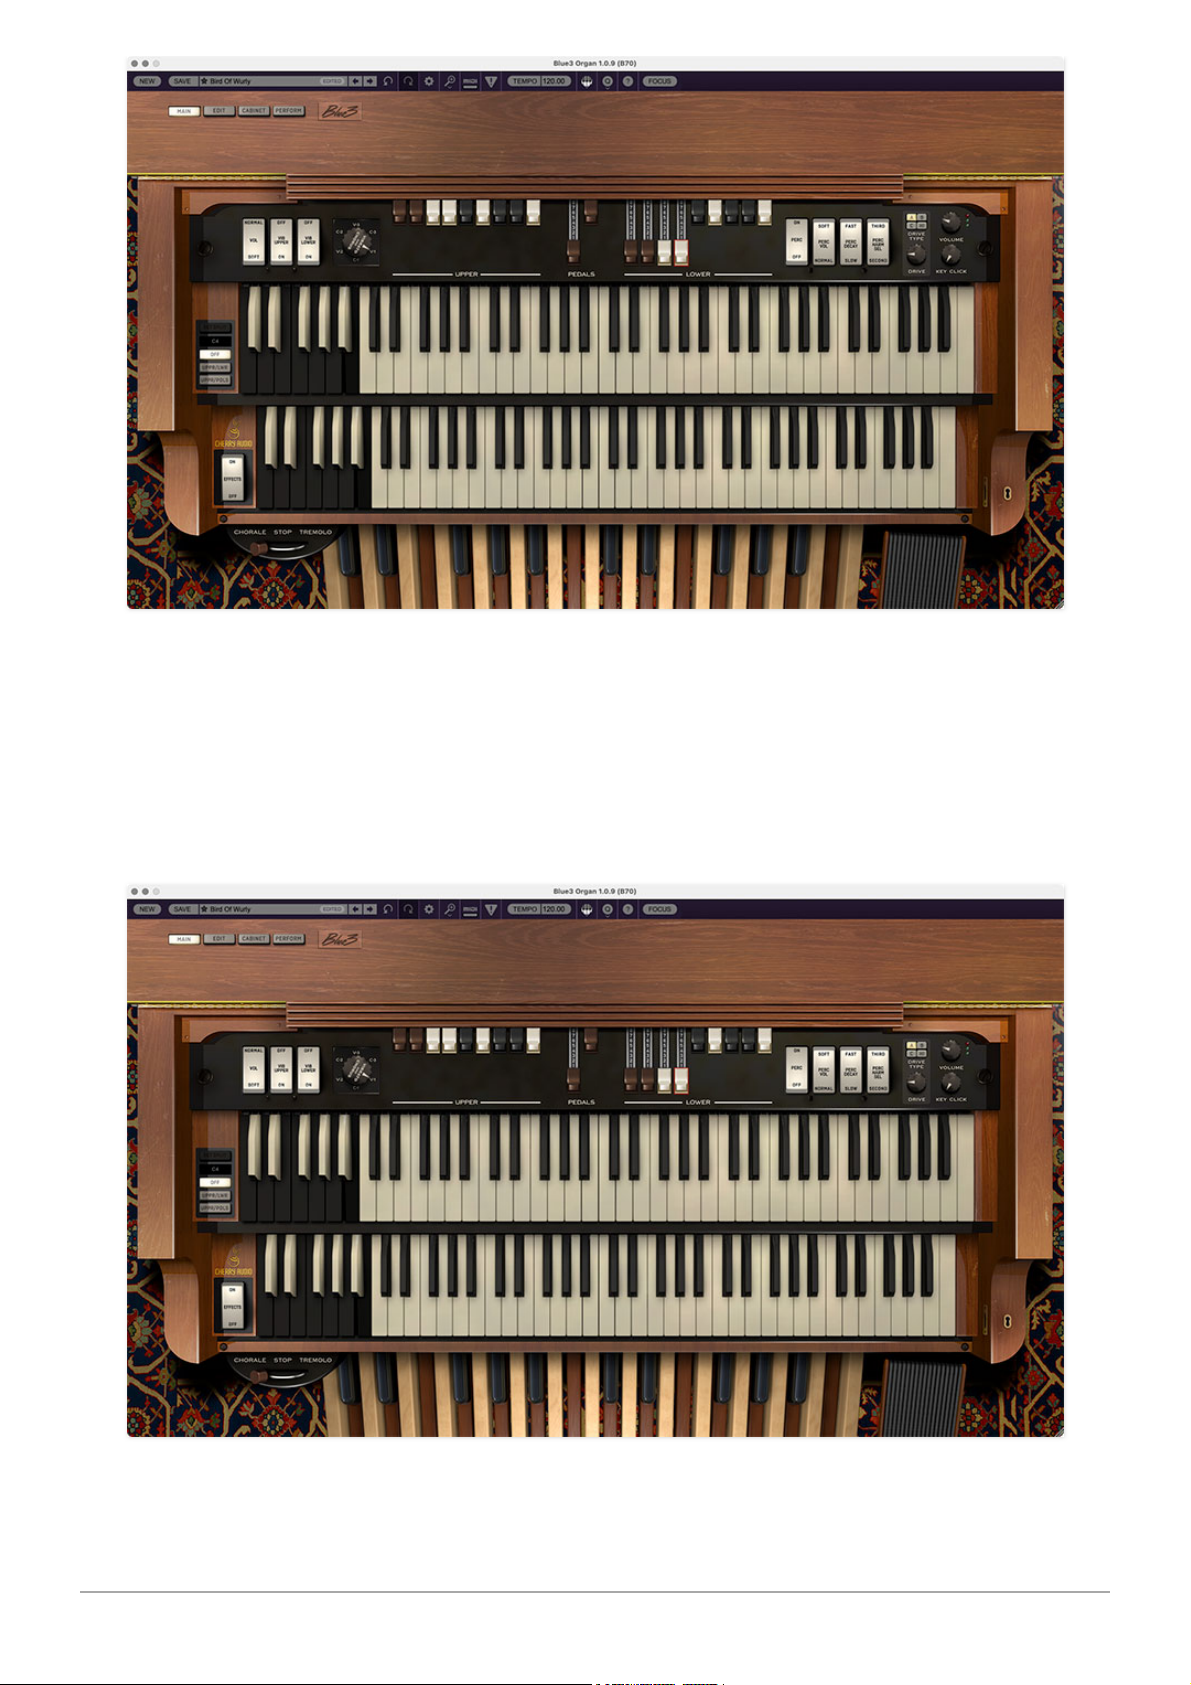
The
MAIN
page is where you'll likely spend most of your time. It includes just
about all the controls you'd encounter on a real tonewheel organ. Click the
MAIN
button at the top left enter
MAIN
view. If the
Effects
tab at the left of
the keyboard is disabled, it'll look like the image above. If the
Effects
tab is
on, the three stomp box effects appear on top of the cabinet:
Cherry Audio Blue3 User Guide - 12
Page 13
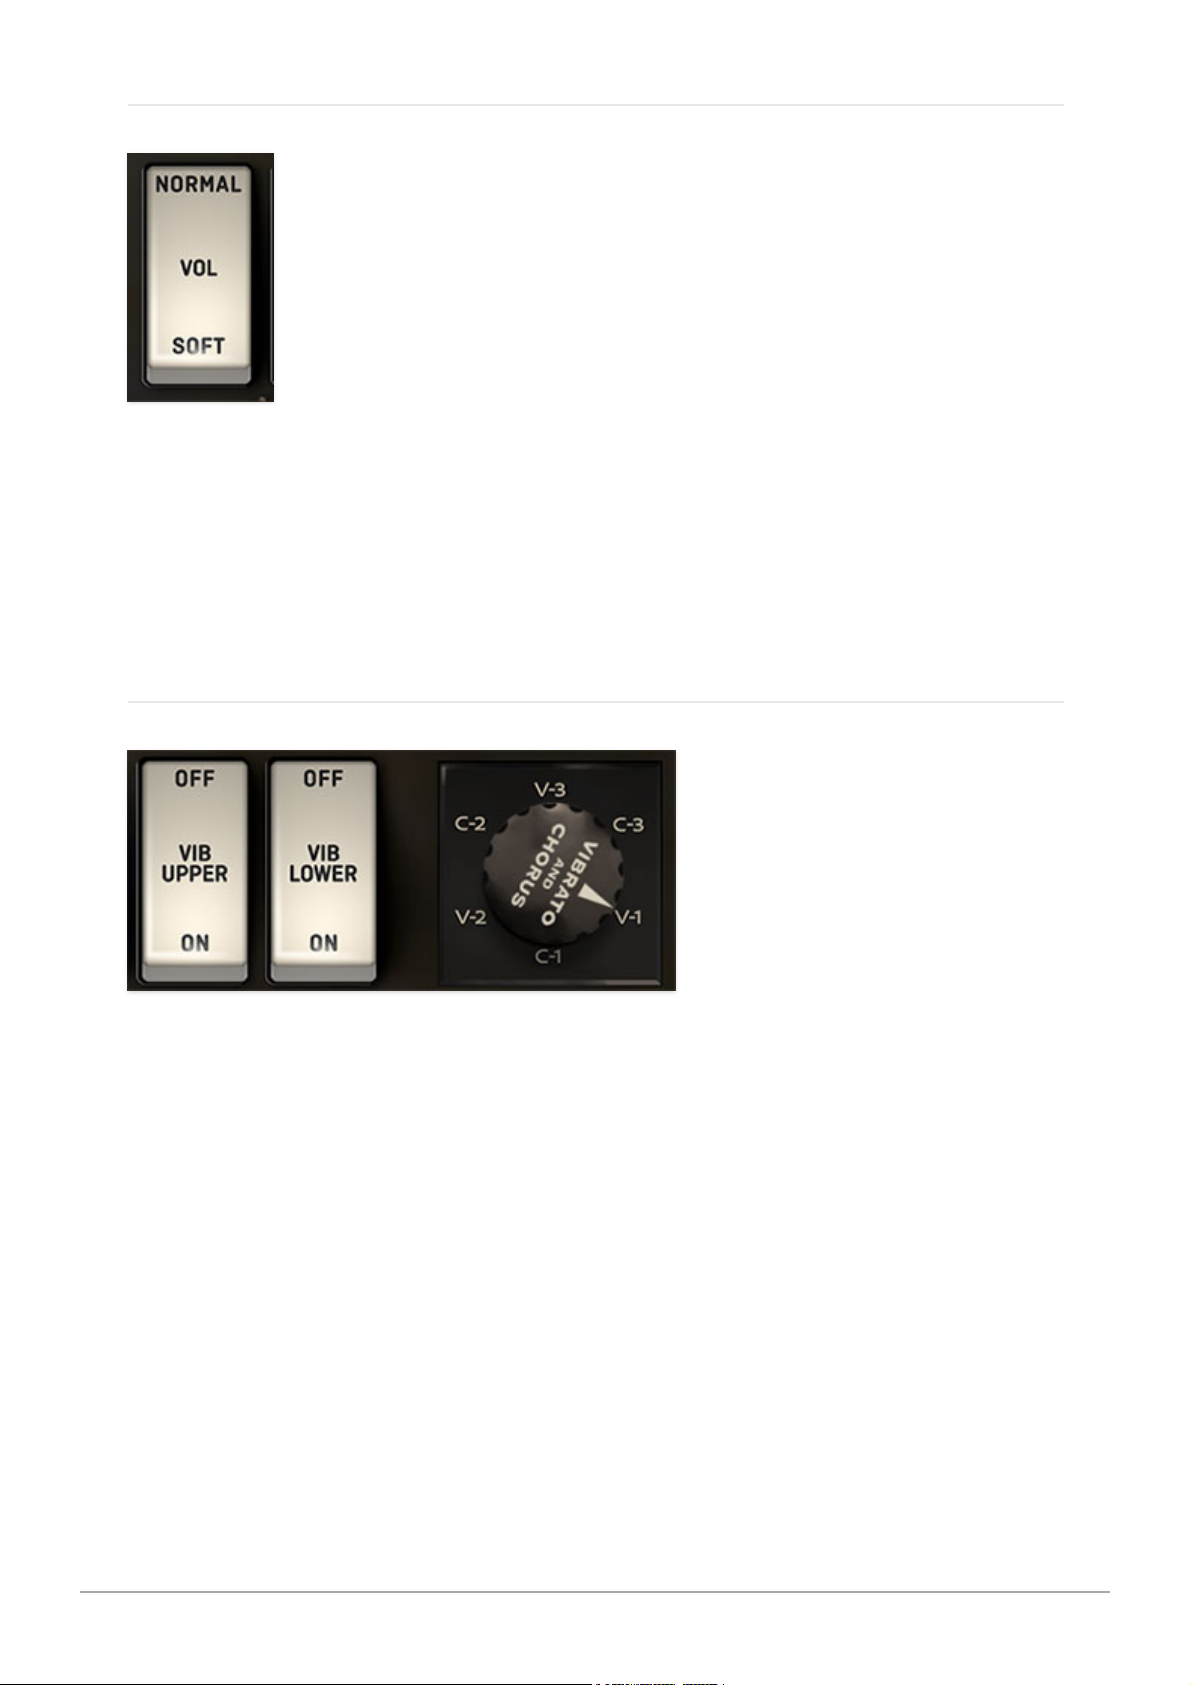
VOLUME
Volume- When set to the
Soft
position, this rocker switch cuts overall volume
by roughly 50%. Obviously you could accomplish the same with the master
Volume
knob at the far right of the panel, but we kept this in for authenticity.
Appropriate when playing Christmas carols at grandma's. Not appropriate for
"Highway Star."
VIBRATO AND CHORUS
The Vibrato and Chorus in a vintage tonewheel organ is not like the vibrato
or chorus effects in guitar amps or stomp boxes. Tonewheel organs included
a unique and somewhat complex "scanner vibrato" circuit that's been super
accurately simulated in Blue3.
Vibrato Lower- Enables and disables vibrato/chorus for the top manual (aka
the
Swell
manual).
Vibrato Upper- Enables and disables vibrato/chorus for the bottom manual
(aka the
Great
manual).
Vibrato and Chorus- Sets the type and depth of the scanner vibrato/chorus
circuit, which adds pitch modulation. The vibrato and chorus are essentially
the same; the difference is that vibrato is the pitch modulated signal only,
Cherry Audio Blue3 User Guide - 13
Page 14
whereas chorus settings mix the "dry" (no pitch modulation) signal with the
pitch-modulated signal.
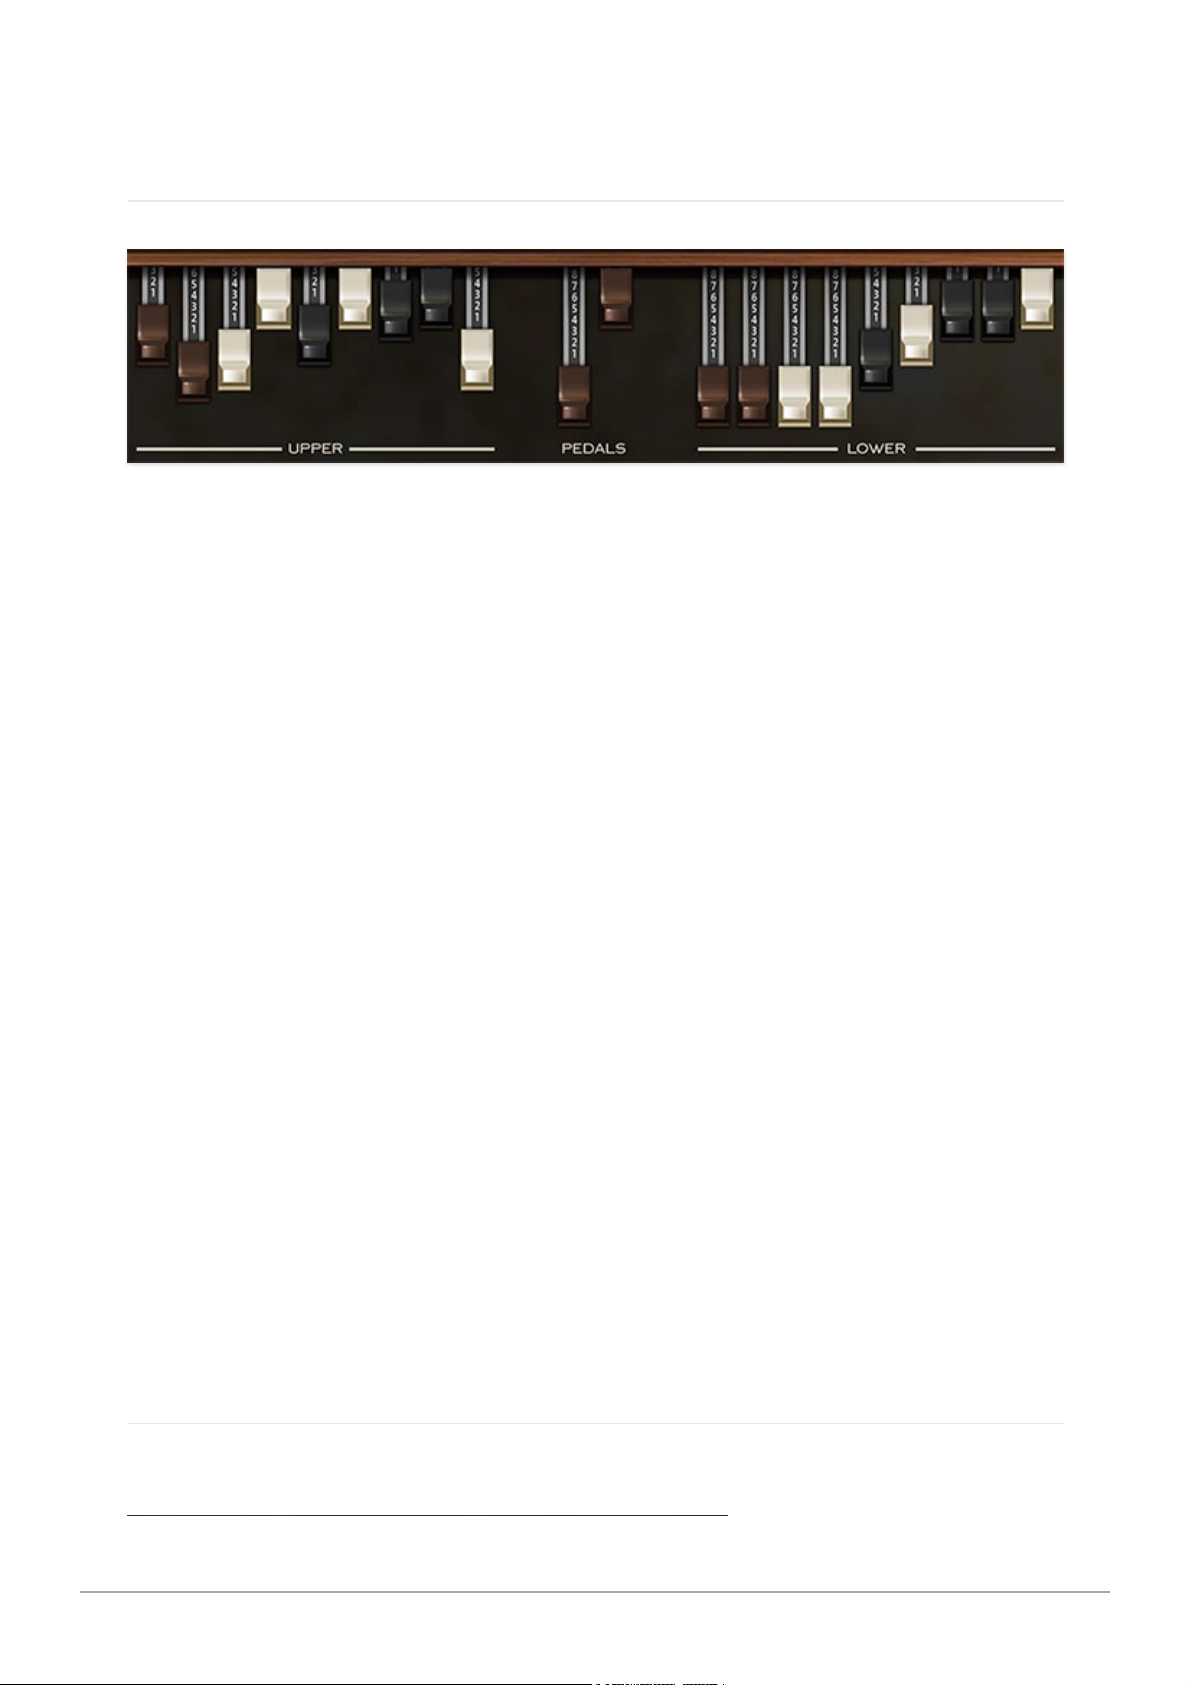
DRAWBARS
Upper, Pedals, and Lower Drawbars- The drawbars set the relative
volumes of nine harmonics, and are the heart of the tonewheel organ sound.
The Upper and the Lower manuals each have nine drawbars, each controlling
a single harmonic from one of the 91 tonewheels. They range in pitch from
16’ to 1' and get louder as they are pulled out. They get their names, in feet,
from pipe organs, where the longest pipes produce the lowest pitches and
the shortest pipes produce the highest pitches. The 8’ drawbar is the
fundamental tone, while the 16’ and 5 1/3’ drawbars produce sub-harmonic
tones.
It’s helpful to think of drawbars in groups of three - lows, mids and highs. If
you want to add shimmer, pull out any of the top three. For more power, pull
out the middle three, etc.
The pedals are far simpler with just two drawbars, 16’ and 8’ covering low
frequencies.
The Upper and Lower manuals actually have two sets of drawbars each: the
A#
set and the B set. These correspond to the inverse keys at the left end of
the keyboard and act like drawbar presets, or more precisely, registrations.
This makes it easy to switch between, for example, a soft comping sound and
a screaming solo sound very quickly.
Tonewheel balance can be fine-tuned, and alternate tonewheel sets may be
selected in the
Tonewheels
section of the
EDIT
page. See the Edit Page
section for more information.
DRAWBAR REGISTRATION PRESETS
Cherry Audio Blue3 User Guide - 14
Page 15
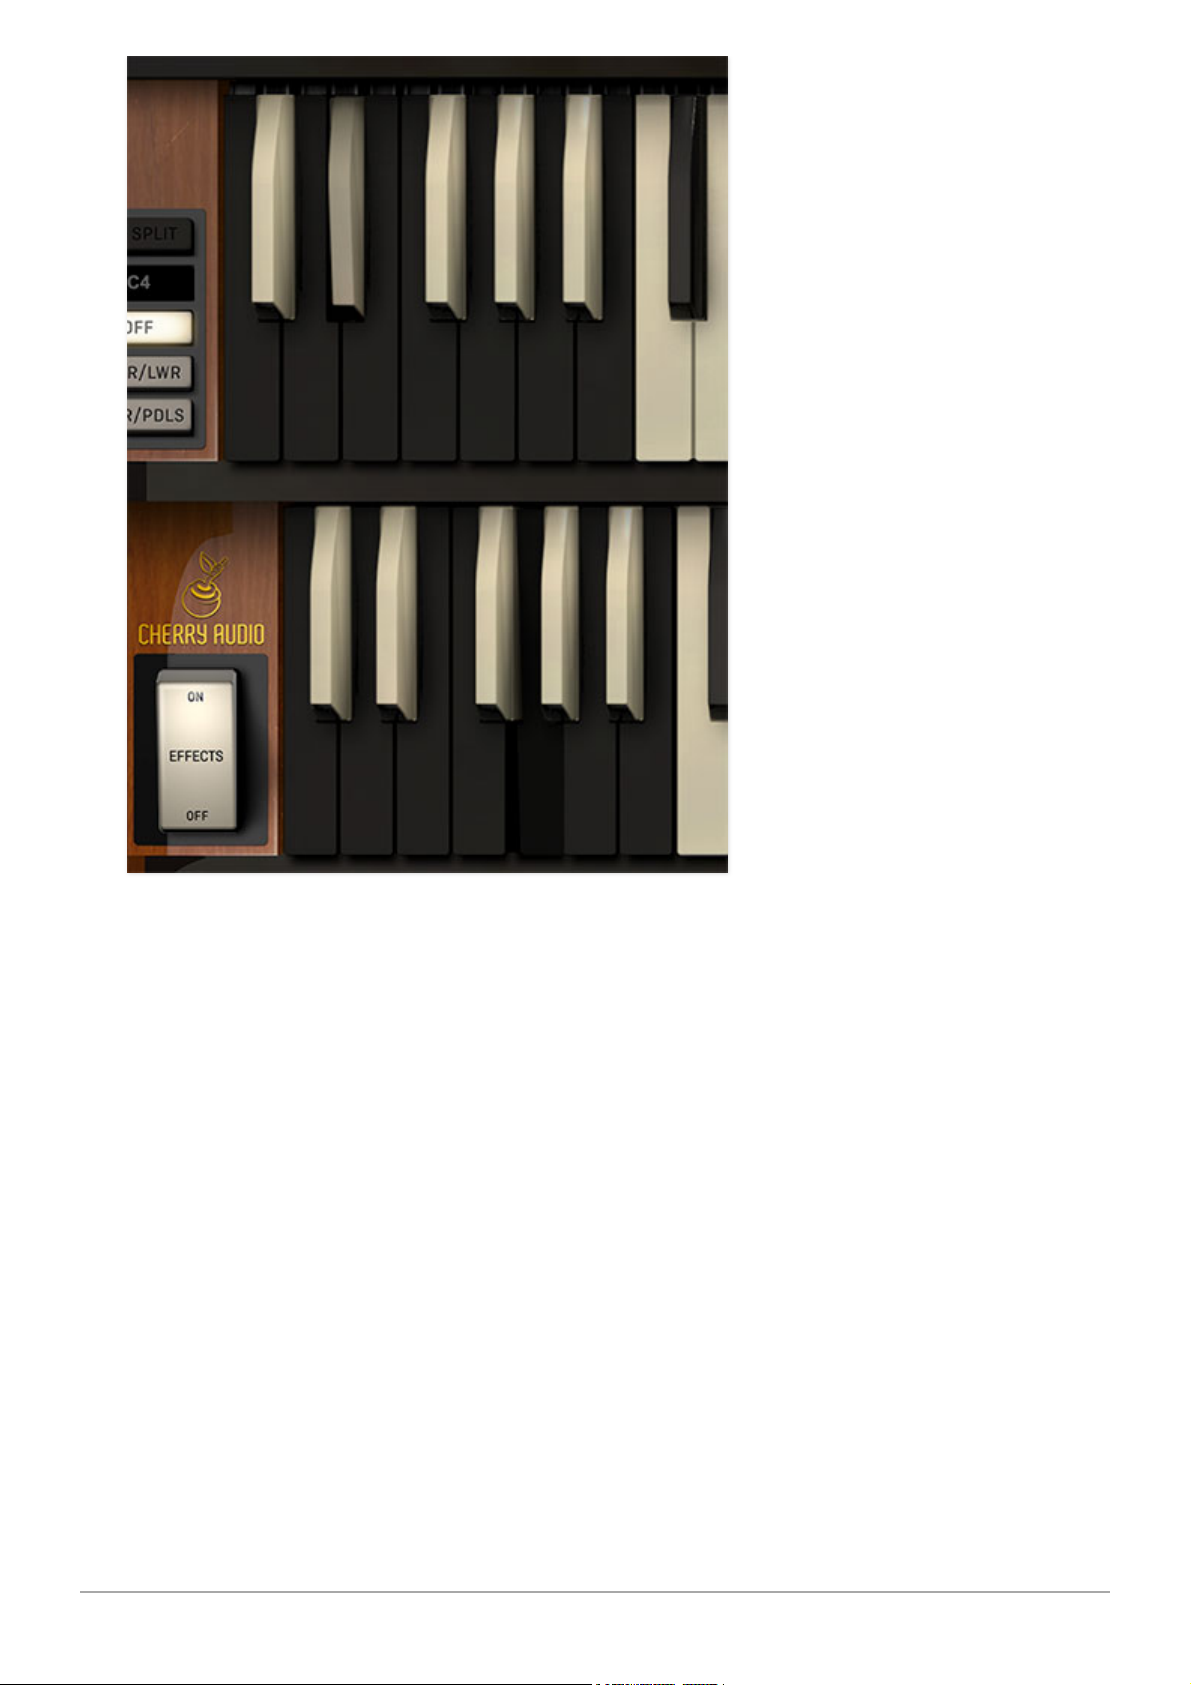
The original B3, C3, and A100 featured a unique system for saving Upper and
Lower drawbar settings (the two Pedal drawbars did not use the preset
system). For each preset, individual drawbar settings were configured by
turning a series of screws inside the organ. This didn't exactly lend itself to
quick patch editing, but cut them some slack - this predated the
microprocessor revolution by four decades!
The Presets are selected using the bottom octave of black keys. Unlike the
original instruments, presets can be saved by simply right-clicking one
of the ten preset keys from C to A. Keep in mind that each manual has
its own independent set of inverted-keyboard presets; in other words, Upper
manual inverted keys always control Upper manual drawbars, and Lower
manual drawbars always control the Lower manual drawbars.
INVERTED KEYB NOTE FUNCTION
C programmable preset location (right-click)
Db programmable preset location (right-click)
Cherry Audio Blue3 User Guide - 15
Page 16

D programmable preset location (right-click)
Eb programmable preset location (right-click)
E programmable preset location (right-click)
F programmable preset location (right-click)
Gb programmable preset location (right-click)
A programmable preset location (right-click)
Bb select "left" virtual drawbar settings
B select "right" virtual drawbar settings
The programmable locations (Db - A keys) are global, that is,
drawbar presets saved on the inverted keys stay the same,
regardless of the currently selected sound in the main instrument
patch browser (the big popup dealie in the top purple menu strip).
The Bb and B keys work a little differently. On a real vintage tonewheel
organ, there are
four
sets of nine drawbars plus two bass drawbars - the
Upper and Lower manual each have two sets of nine drawbars, and the Bb
and B inverted keys select whether the left or right set is currently active.
This allowed a player to have fast access to two different sounds for each
manual. Because most Blue3 users don't have a 42" inch-wide display, and
we didn't want to make the drawbar controls teeny, Blue3 only displays a
single set of drawbars for each manual, and the B and Bb inverted keys
select a "virtual" set of drawbars. In other words, it behaves as if there are
two separate sets of drawbars for each manual, we just don't show both sets.
Unlike the global C - A locations, both Bb and B inverted key
"virtual" drawbar memories are separately stored with each saved
sound preset.
And finally regarding the C key, on an original tonewheel organ, the
bottom C always sets all drawbars of the manual to 0. That is, it shuts off
sound for that manual. We didn't think that was super useful in a modern
virtual instrument, so in Blue3, bottom C is a preset location just like the DbA keys. If you'd like bottom C to reset all drawbars to 0, simply set all the
drawbars for the manual to 0 and right-click the C key to save this
configuration as its preset.
FACTORY DRAWBAR REGISTRATION PRESETS
Remember at the beginning section when we discussed how the inverted
preset keys on original tonewheel organs were semi-permanently
Cherry Audio Blue3 User Guide - 16
Page 17

"programmed" using set screws inside the organ? We've thoughtfully (we are
SO thoughtful) included these factory presets. The table below shows the
names and registrations of the factory presets:
UPPER MANUAL PRESETS
PRESET KEY REGISTRATION DESCRIPTION LOUDNESS
C none Cancel No sound
Db 00 5320 000 Stopped Flute pp
D 00 4432 000 Dulciana ppp
Eb 00 8740 000 French Horn mf
E 00 4544 222 Salicional pp
F 00 5403 000 Flutes 8' & 4' p
Gb 00 4675 300 Oboe mf
G 00 5644 320 Swell Diapason mf
Ab 00 6876 540 Trumpet f
A 32 7645 222 Full Swell ff
Bb Upper Left drawbars No percussion
B Upper Right drawbars With percussion
LOWER MANUAL PRESETS
Cherry Audio Blue3 User Guide - 17
Page 18

PRESET
KEY
REGISTRATION DESCRIPTION LOUDNESS
C none Cancel No sound
Db 00 4545 440 Cello mp
D 00 4423 220 Flute & String mp
Eb 00 7373 430 Clarinet mf
E 00 4544 220
Diapason, Gamba &
Flute
mf
F 00 6644 322 Great without reeds f
Gb 00 5642 200 Open Diapason f
G 00 6845 433 Full Great fff
Ab 00 8030 000 Tibia Clausa f
A 42 7866 244 Full Great with 16' fff
Bb
Upper Left
drawbars
B
Upper Right
drawbars
Reset Factory Preset- If a preset key has been edited, (i.e., a drawbar
registration has been saved via right-click), right-clicking the key and
selecting Reset Factory Preset resets the key to the corresponding
registration in the above table.
MAPPING MIDI CONTROLLERS TO DRAWBAR REGISTRATION PRESETS
Obviously, the bottom octave of a MIDI controller can be used to select the
registration presets, but what if you'd like to assign alternate buttons of a
MIDI/USB controller to select preset keys C-A? Keyboard keys (inverted or
Cherry Audio Blue3 User Guide - 18
Page 19
normal) don't allow the right-click
MIDI Learn
functionality of Blue3's other
controls, but there's an easy workaround.
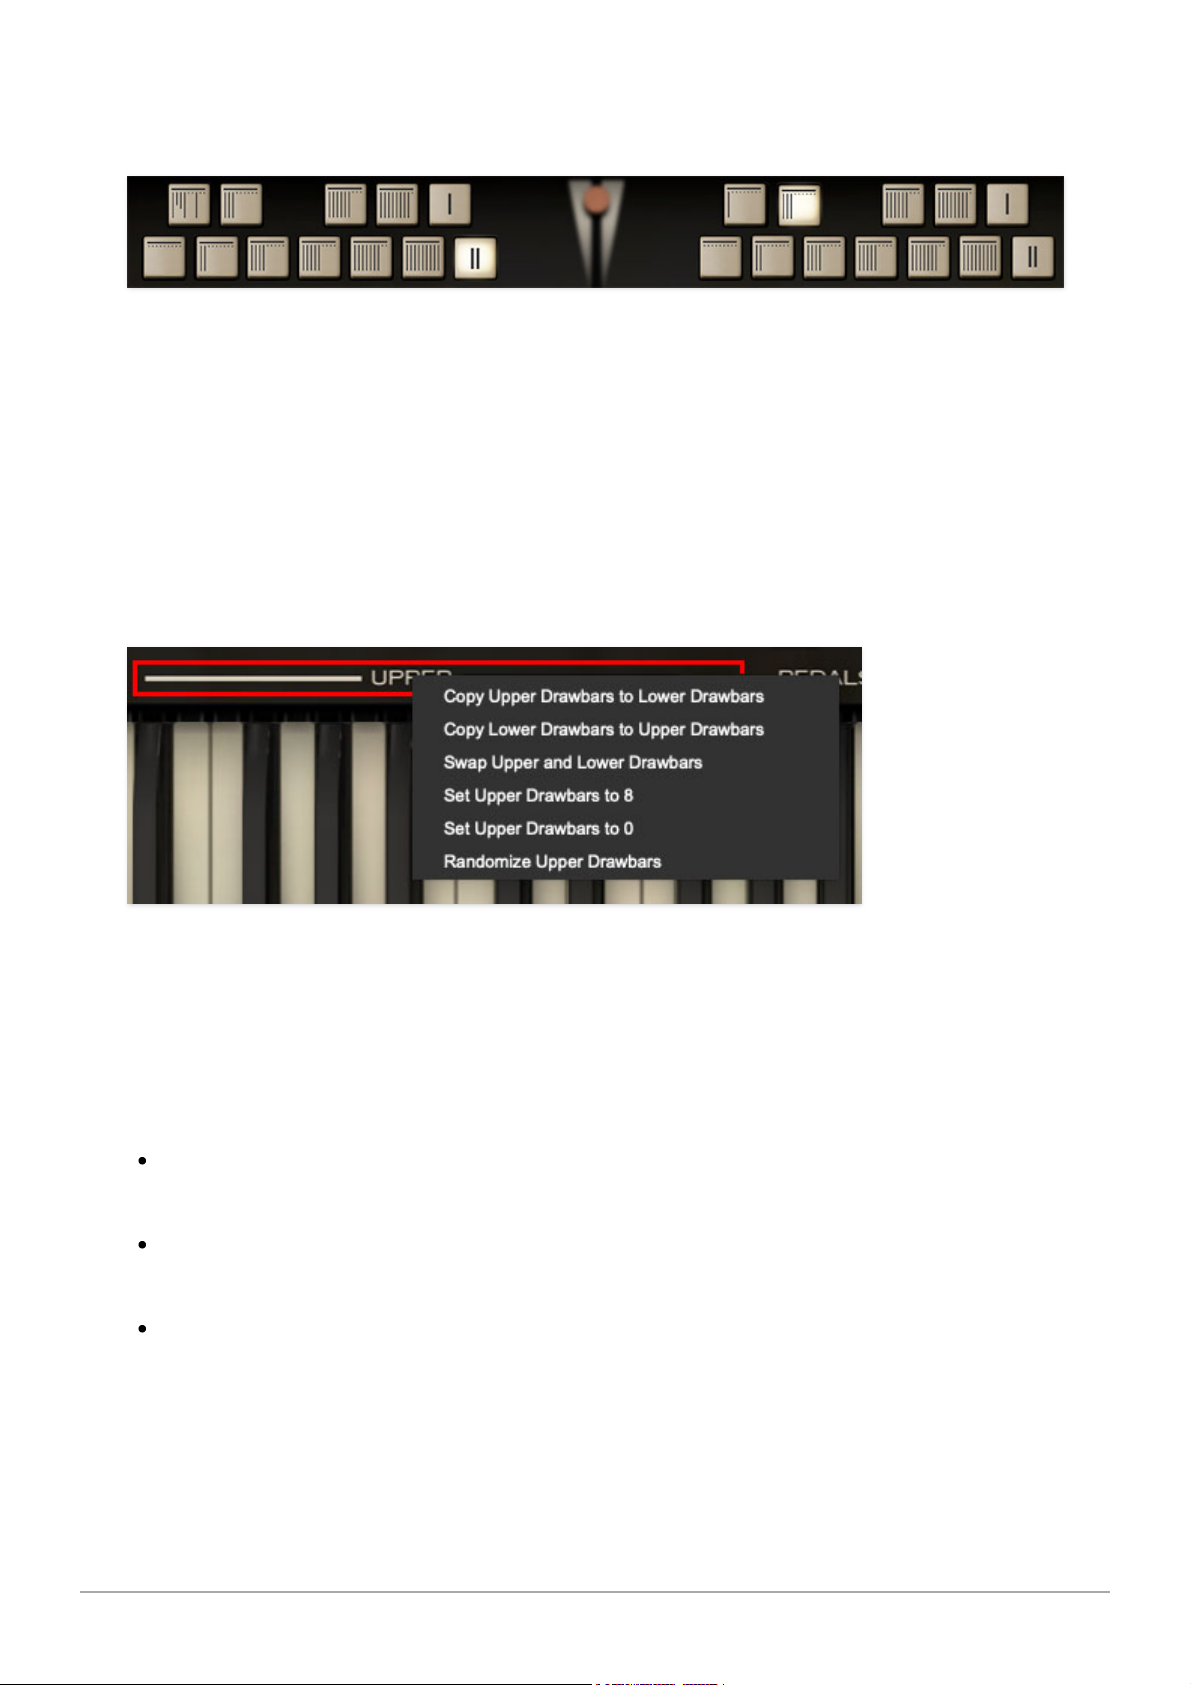
The drawbar registration preset buttons on the
PERFORM
page are standard
control buttons. This means you can right-click and assign a MIDI/USB
hardware control to them like any other button. You can even assign to them
to respond to different keys on a keyboard controller (when in MIDI controller
Learn
mode, instead of pressing a button on your MIDI controller, whack a
key instead).
SUPER-HANDY HIDDEN DRAWBAR UTILITIES MENU
Clicking on
Upper
or
Lower
or the adjacent horizontal lines beneath the
drawbars opens a popup window with useful utilities for copying, reset, and
more. (We generally try not to hide things in the UI, but we didn't want to
ruin the vintage tonewheel organ vibe.) The utility menu options are as
follows:
Copy Upper Drawbars to Lower Drawbars- Duplicates the current
Upper drawbar settings on the Lower Drawbars.
Copy Lower Drawbars to Upper Drawbars- Duplicates the current
Lower drawbar settings on the Upper Drawbars.
Swap Upper and Lower Drawbars- Moves Lower drawbar settings to
the Upper drawbars, and Upper drawbar settings to the Lower drawbars.
You may need to relinquish your keys to the glass bowl on the coffee table
with this option...
Cherry Audio Blue3 User Guide - 19
Page 20
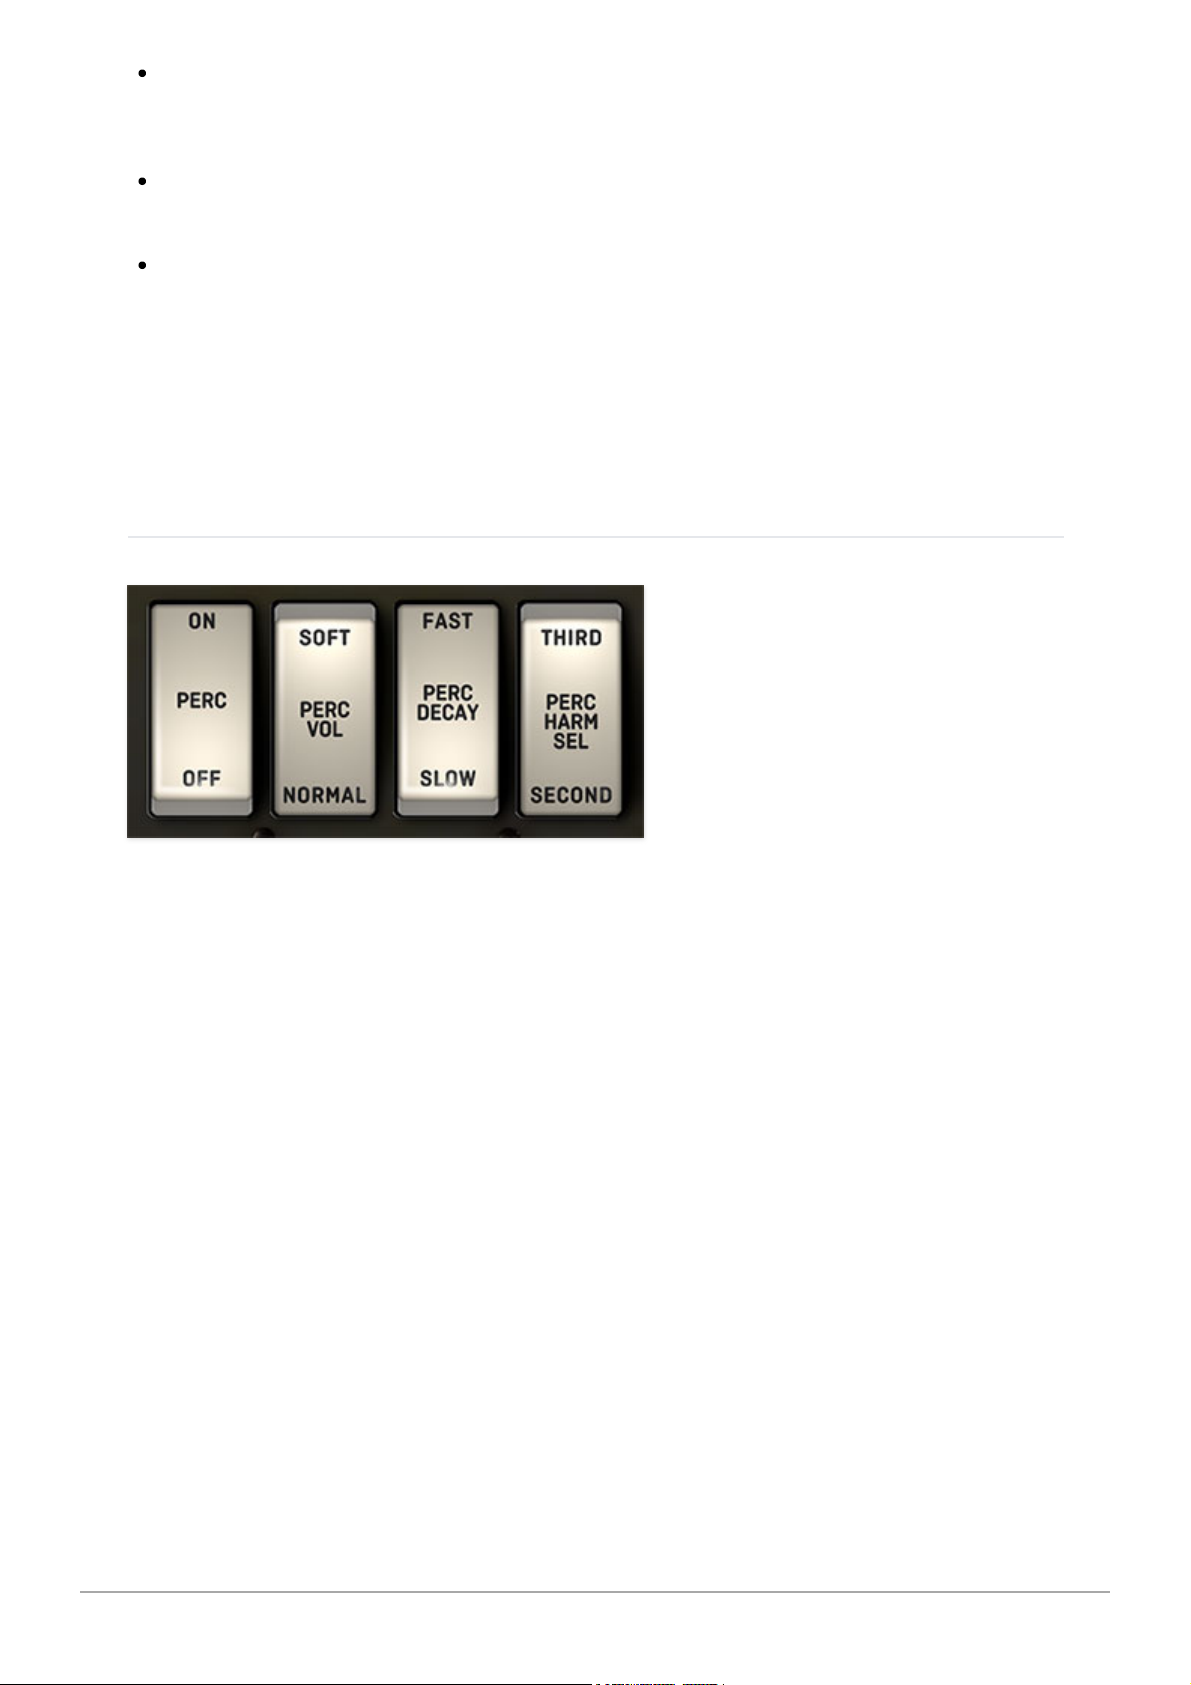
Set Upper/Lower Drawbars to 8- Sets the Upper or Lower drawbars to
"all-out" rock bombast.
Set Upper/Lower Drawbars to 0- Sets the Upper or Lower drawbars to
zero position, effectively disabling sound for the drawbar set.
Randomize Upper/Lower Drawbars- Sets each of the drawbars of the
set to a random value. Perfect for those, "I am overwhelmed by all these
drawbar setting options" scenarios.
Note that Drawbar Utilities menus function the same way on the
PERFORM
page.
PERCUSSION
Percussion on a vintage organ isn't meant to imply a drummer or the 14 guys
banging on stuff in Santana (
unless
one of those guys is Gregg Rolie). Just
like the real thing, the percussion circuit creates a polyphonic but singletrigger short "ping" either a 2nd or 3rd harmonic above the original pitch,
and only sounds for the Upper manual.
A couple of things to remember: Blue3 acts just like the real instrument, so
when you select
Normal
volume, the percussion will be louder but the sound
of the drawbars will be slightly lower as well. Also, the Percussion circuit
“steals” the 1’ drawbar, so you won’t hear the 1’ drawbar when Percussion is
on. The Percussion controls are as follow:
Percussion- Enables Percussion for the top manual.
Percussion Volume- Selects "normal" (loudish) or more subdued percussion
volume.
Percussion Decay- Selects the rate at which percussion decays.
Cherry Audio Blue3 User Guide - 20
Page 21
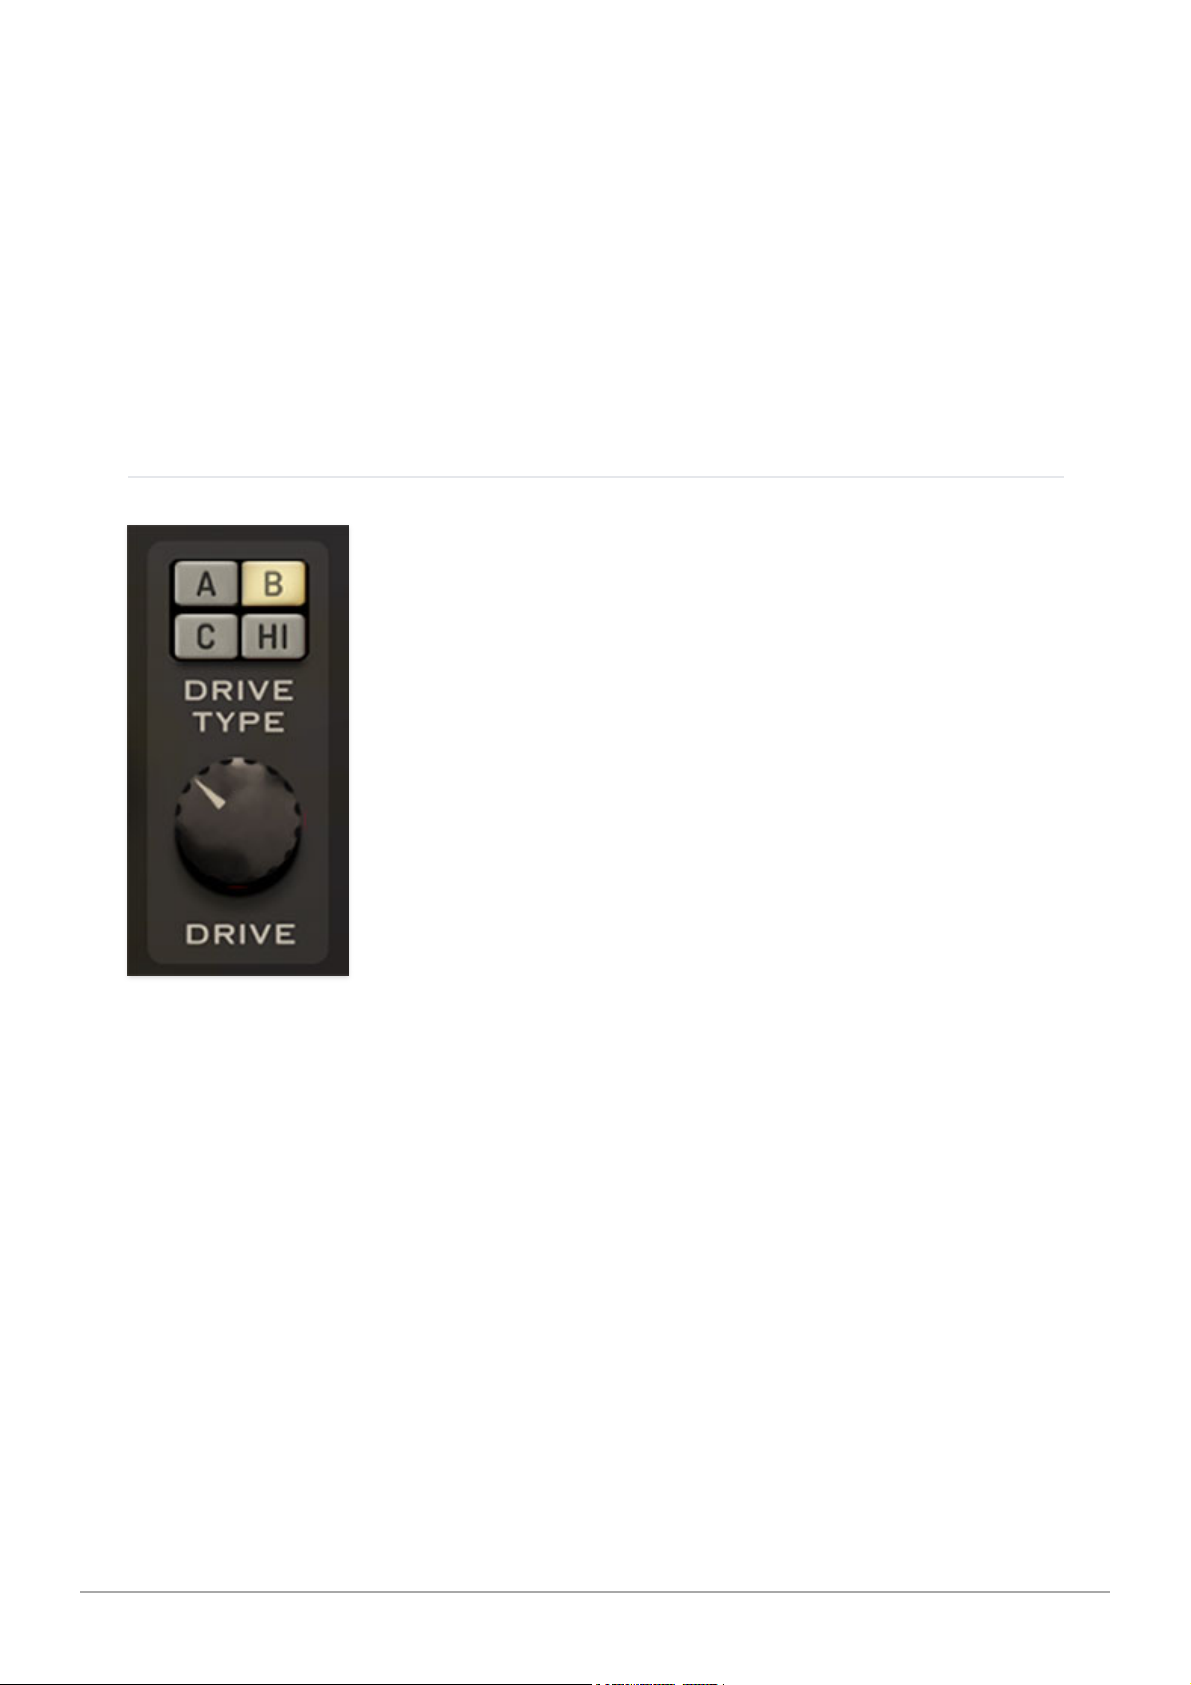
Percussion Harmonic Selector- Selects whether the percussion pitch is
the second or third harmonic above the fundamental.
NOTE(S)
: On the real instrument, Percussion only triggers when using the
B
registration key. You can set Blue3 to work this way or have Percussion
trigger in all registration keys. (To enable this, click the
Settings
gear icon in
the top purple menu strip, select
Instrument
, and enable
Percussion On All
Registrations
.)
Percussion settings can be fine-tuned in the
Percussion
section of the
EDIT
page. For more information, see the Edit Page section.
DRIVE
The combination of the organ’s preamp and a rotary enclosure’s amplifier
create a wonderful growl than many players love. The Drive section offers a
number of overdrive options. Controls are as follows:
Type - Four different tube simulations to choose from for just the right
amount of character.
Types A, B, C are all simulations of the 40-watt amplifier in a 122/147, but
each with a different tube set, with each adding progressively more dirt.
HI
(short for high gain), simulates a 100-watt British guitar amp for this Jon Lord
moments.
NOTE
: Drive type C is very nearly a direct match for overdrive included in
earlier releases of the Blue3 instrument.
Cherry Audio Blue3 User Guide - 21
Page 22
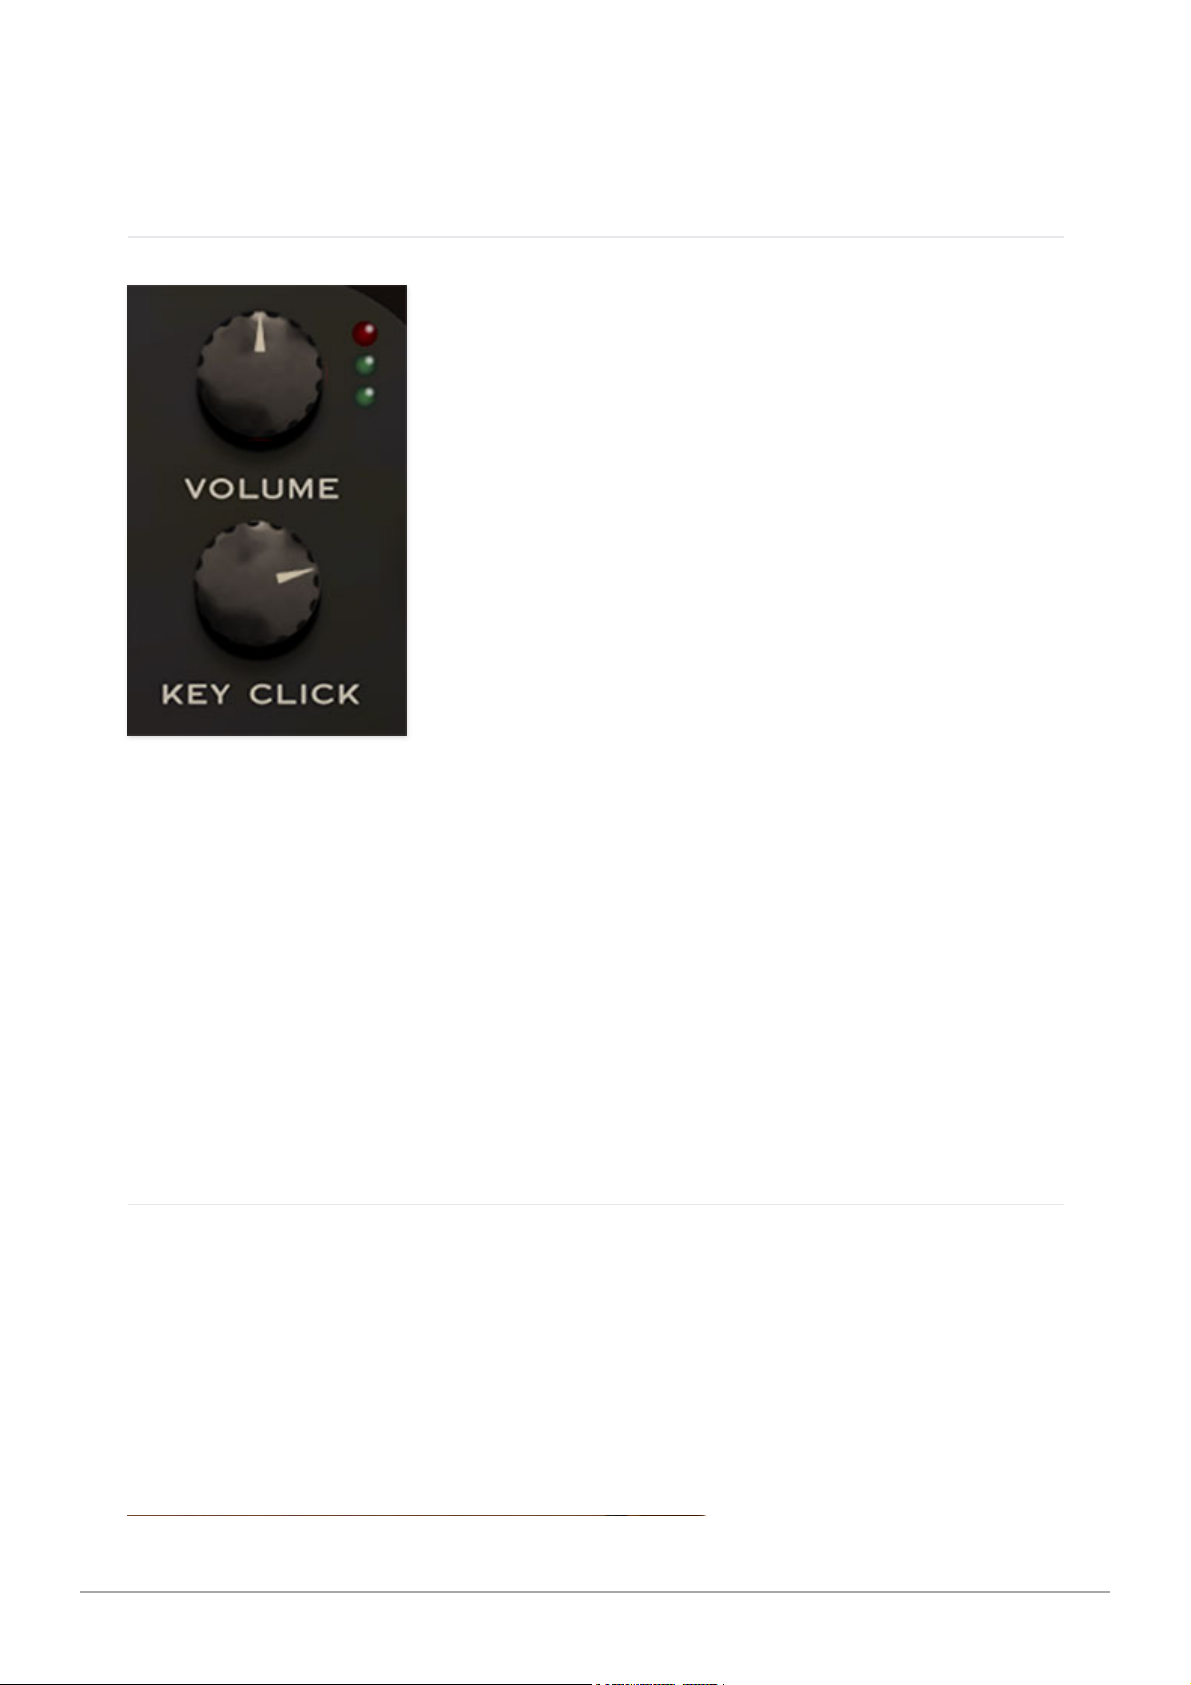
Drive - Sets the amount of saturation. Depending on the type selected, drive
goes from a subtle warmth, to a nice grunge or all the way to screaming/melt
your face off.
VOLUME/KEY CLICK
Volume - Master volume for the entire instrument. You'll want to keep the
output meter in the green - unlike the adjacent drive controls, pushing the
master into the red results in undesirable digital distortion.
Key Click - This sets the level of the inherent (and generally desirable)
electronic "click" noise made when a key is played. Just like a real tonewheel
organ, the click sound
only
occurs when the first note is played and isn't
heard on following notes until all keys are released and a new note is struck.
Key click characteristics can be fine tuned in the Key Click section of the Edit
Page.
EXPRESSION PEDAL
Cherry Audio Blue3 User Guide - 22
Page 23
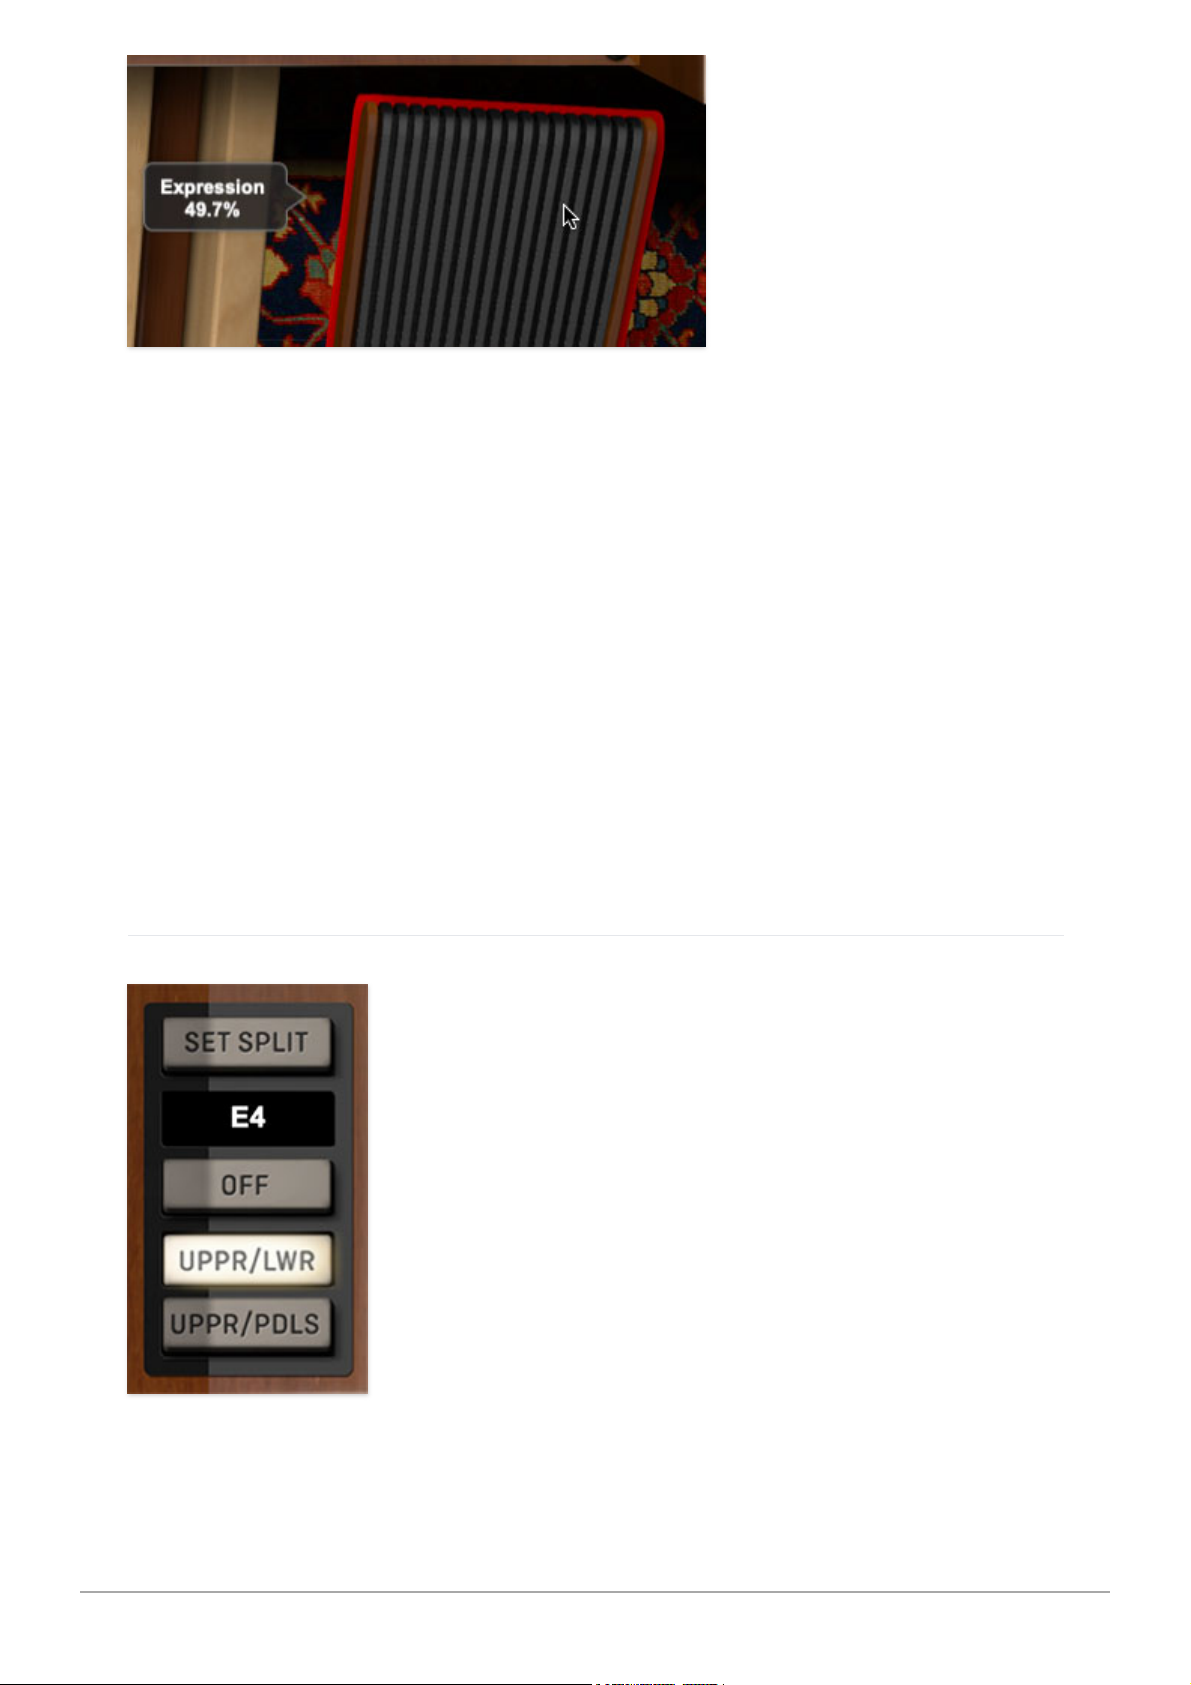
This is the rocker pedal immediately to the right of the foot pedals. On a real
vintage organ, the expression pedal not only controls the volume, but also
affects the overall brightness of the instrument as the pedal gets pushed
further down. Blue3 responds the same way.
Blue 3's expression pedal can be operated either by clicking and dragging
directly on the pedal, or preferably by assigning a hardware volume pedal
controller. As with all hardware controls, assignment is super easy - once you
have a volume pedal plugged into your controller, right-click the volume
pedal, and select MIDI Learn, and move the volume pedal. That's all! Any
other hardware controller (mod wheel, slider, etc.) can be assigned in the
same way. For more information on assigning MIDI controllers, check out the
MIDI Controllers Setup and The MIDI Tab section.
KEYBOARD SPLIT
Keyboard Split allows a USB/MIDI keyboard transmitting on a single MIDI
channel to play a combination of either the lower manual or pedals with the
Cherry Audio Blue3 User Guide - 23
Page 24

left hand, and the upper manual with the right hand. This lets you play both
manuals or the pedals and upper manual using a single MIDI controller.
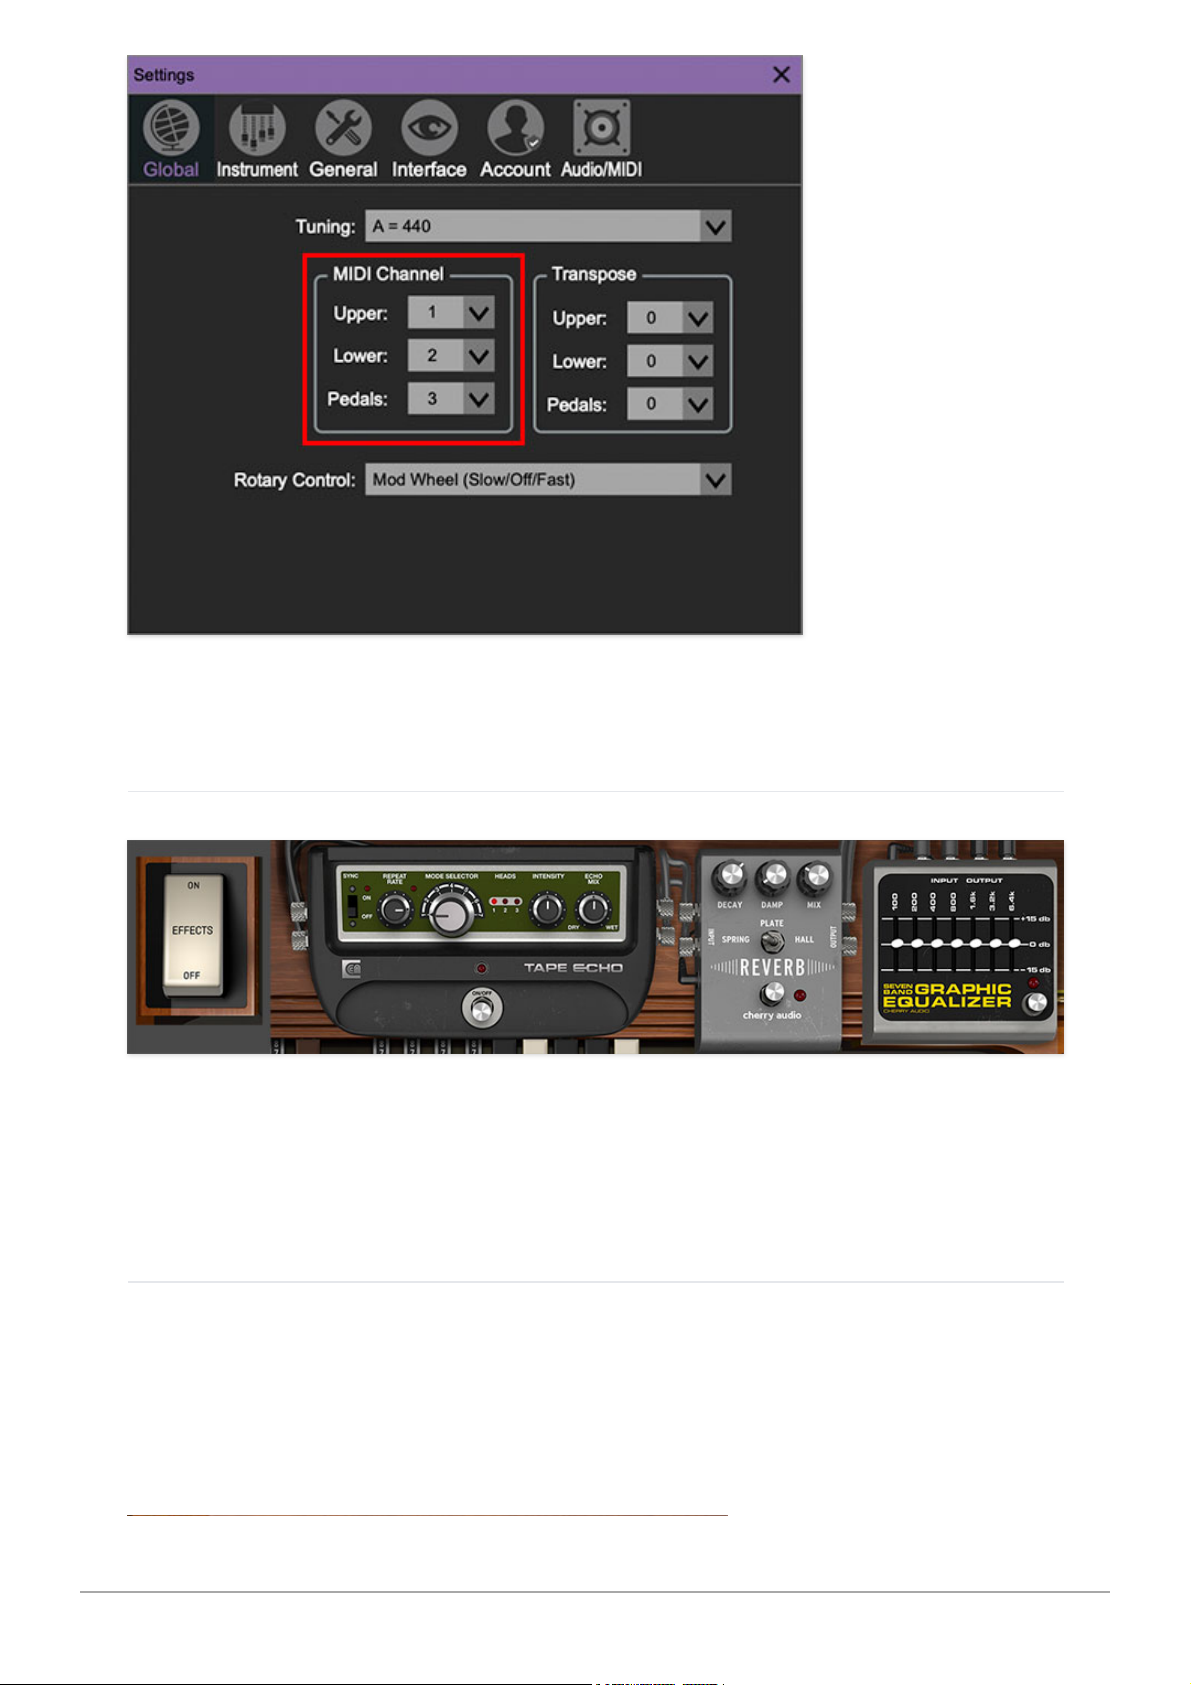
Set Split - To set the split the point, click the
Set Split
button. The button
begins flashing; strike the key on the USB/MIDI controller where you'd like
the split to be. The
Set Split
button will stop flashing and the split is set. The
split note is shown in the display beneath the
Set Split
button. Split point can
also be set by clicking the note display and choosing a note.
SPLIT MODE SELECT BUTTONS
Split Off - Disables keyboard split.
Split Upper/Lower - Upper and Lower manuals will respond on the Upper
manual's currently selected MIDI channel, with the Upper manual responding
to keys above the split point and the Lower manual responding to keys below
the split point.
Split Upper/Pedals - Upper and Pedal manuals will respond on the Upper
manual's currently selected MIDI channel, with the Upper manual responding
to keys above the split point and the Pedal manual responding to keys below
the split point.
NOTE:
Split is always controlled by the the Upper manual MIDI
channel, as defined in the
Global
tab of the
Settings
page. This defaults to
MIDI channel 1; if your USB/MIDI controller keyboard is set to output MIDI
channel 1, you most like won't need to change anything. When split is set to
the Off position, the manuals and pedals are controlled according to the MIDI
channel settings in the
Global
tab of the
Settings
page.
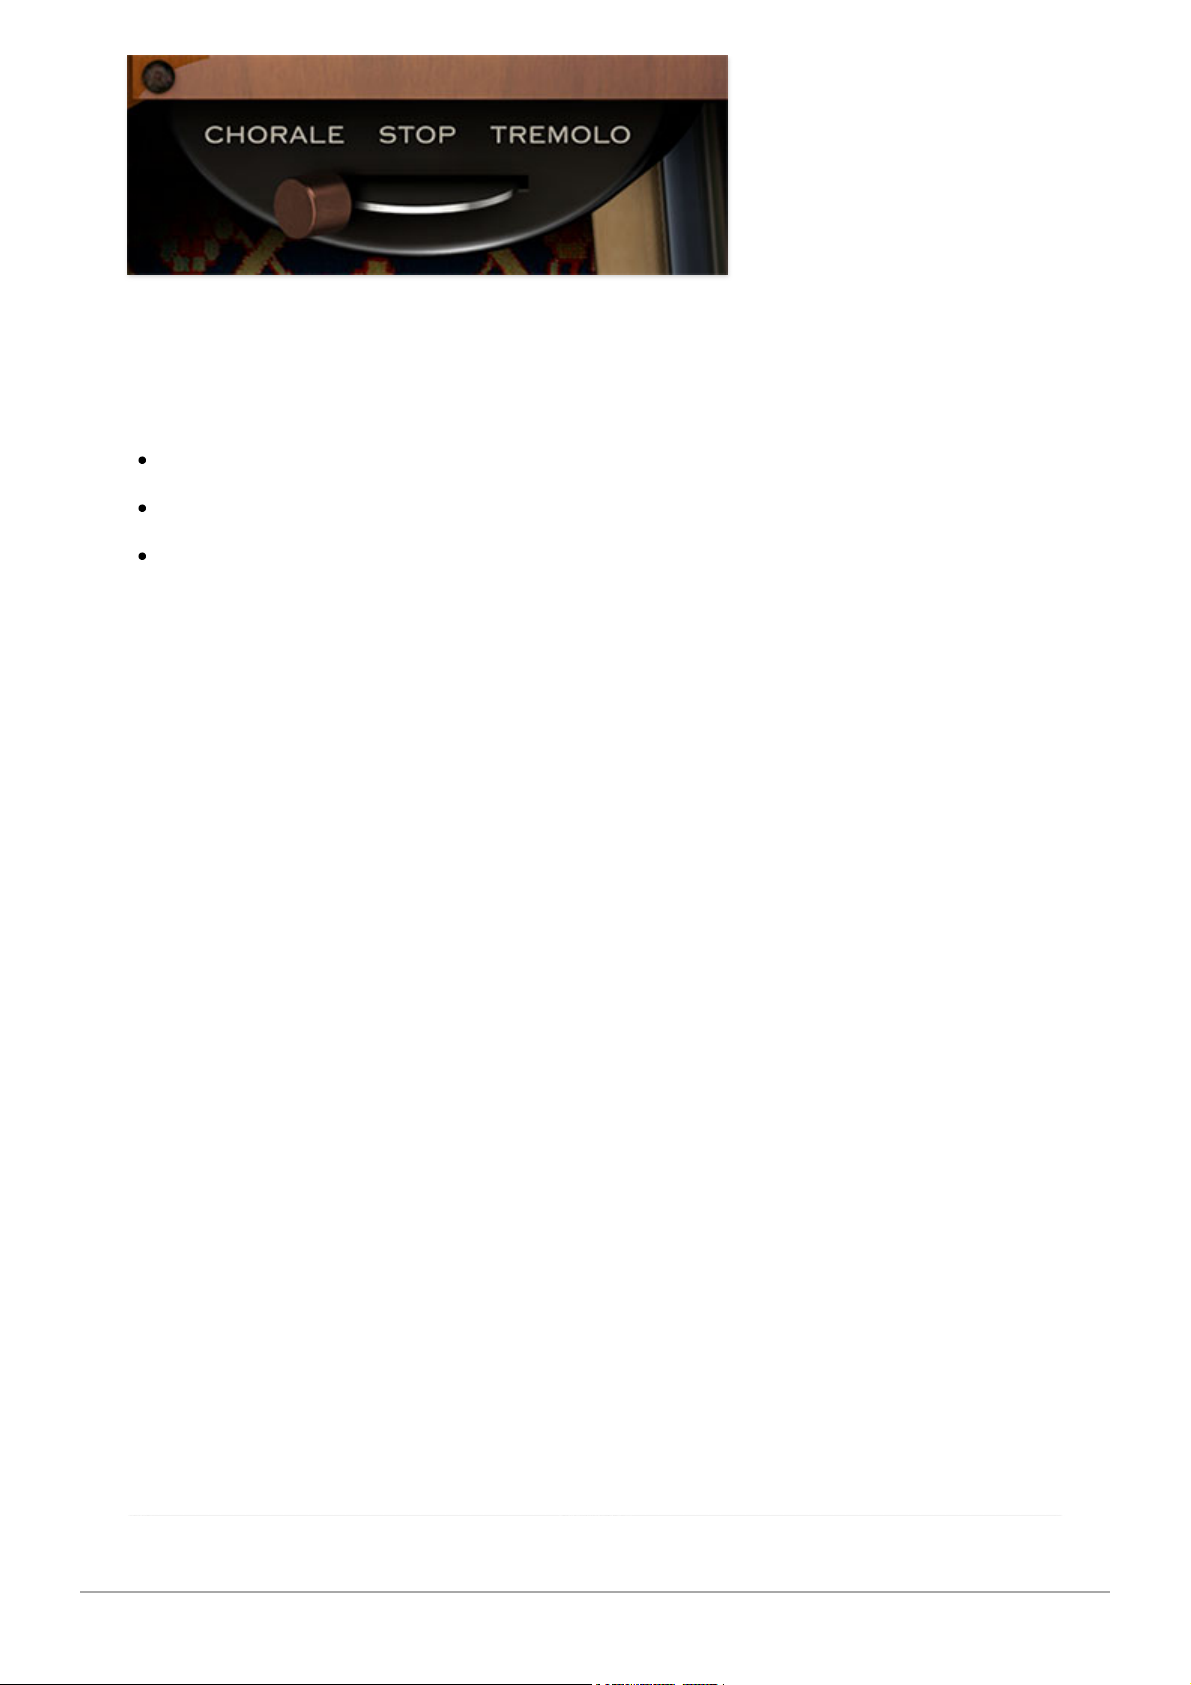
The MIDI channel settings for the Lower manual and Pedals are
unaffected by Split mode, that is, they will continue to be triggered by
their respective MIDI channels regardless of whether Split mode is on or off.
Cherry Audio Blue3 User Guide - 24
Page 25
For more information, please see the Settings section.
EFFECTS
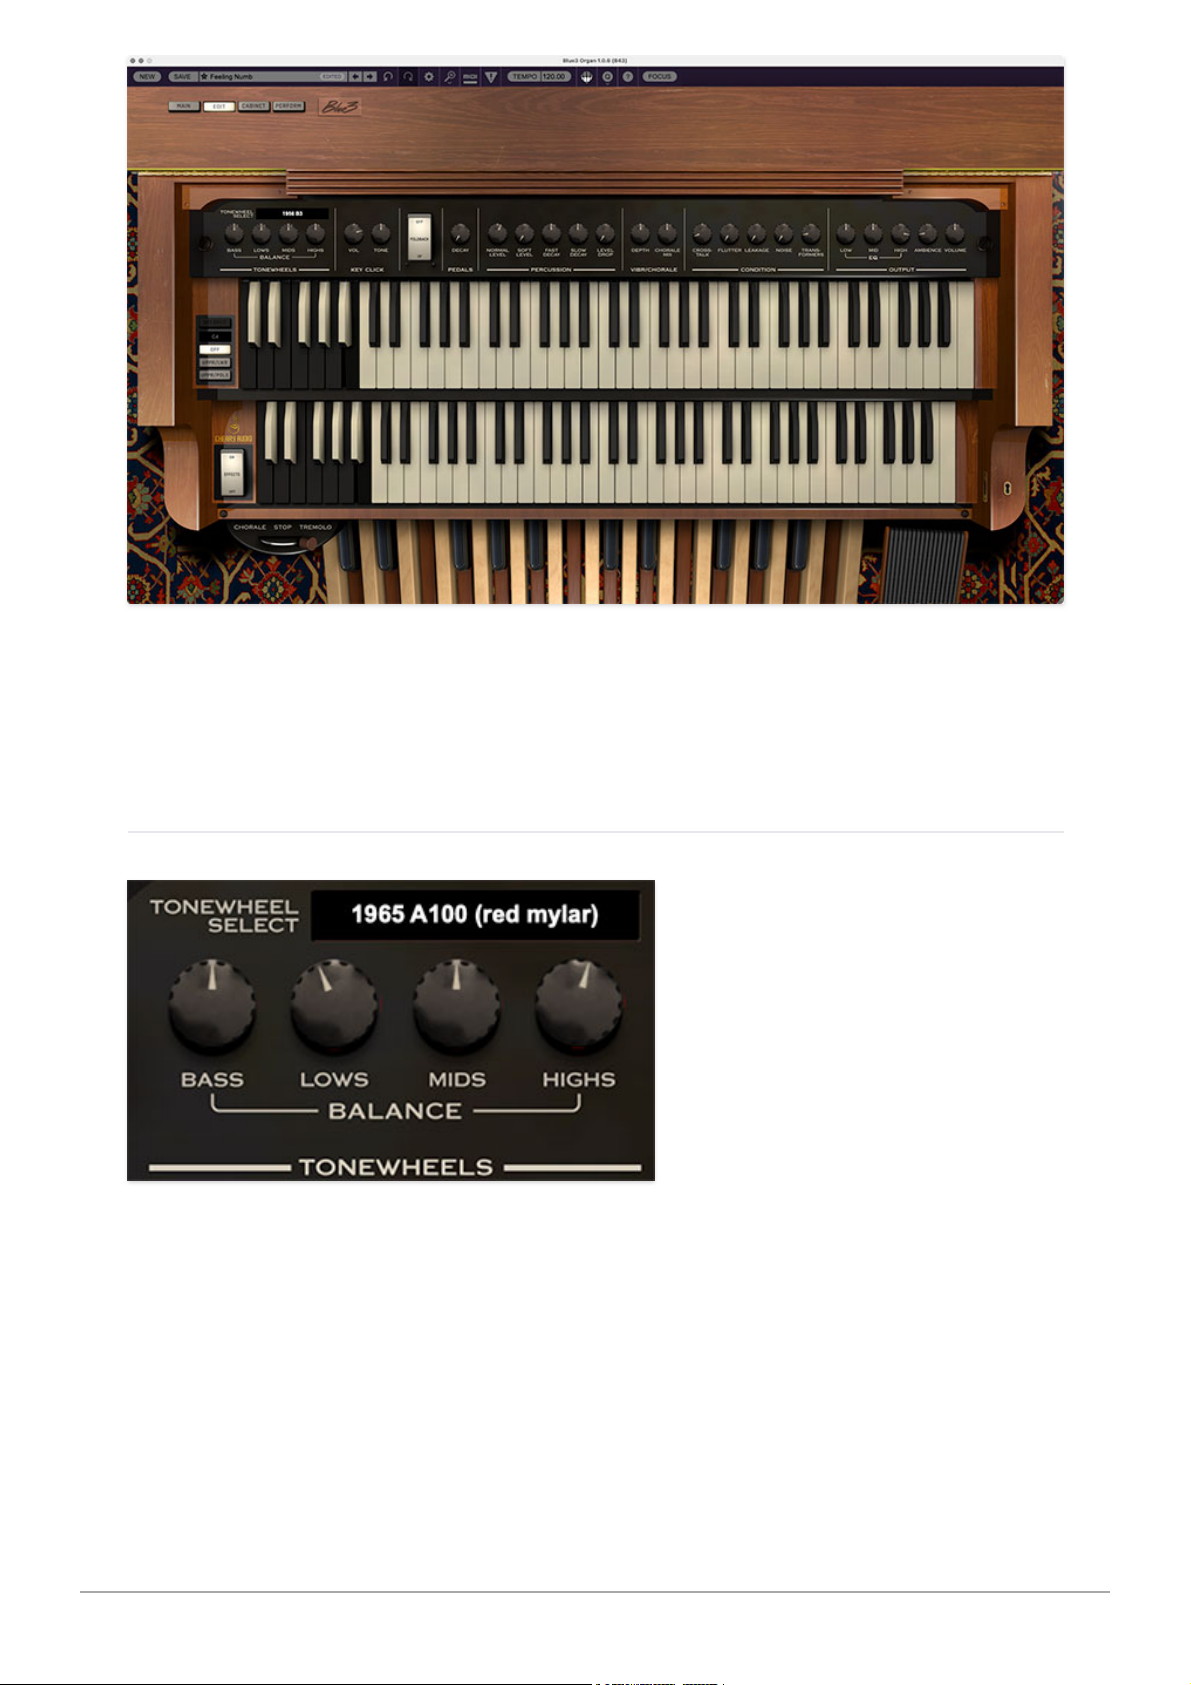
Effects - The Effects tab hides and shows
and
enables and disables the Tape
Echo, Reverb, and Graphic Equalizer effects. Read more about these in the
Stomp Box Effects section.
ROTARY SPEAKER CONTROLLER
Cherry Audio Blue3 User Guide - 25
Page 26
Rotary Speaker Control- The "half-moon" three-position switch, as it's
referred to, controls the famous rotary speaker effect. Its three settings are
as follows:
Chorale- Slow rotation effect.
Stop- No rotation.
Tremolo- Fast rotation effect.
Note that if the currently selected cabinet is
Direct
or
4x12
, the rotary
speaker control won't do anything (because unless you know something we
don't, nothing spins inside a direct box or 4x12 guitar cab).
Full controls for selecting rotary speaker models and parameters are
available on the
CABINET
page. Read more about the rotary speaker
modeling in the Cabinet section.
Cherry Audio Blue3 User Guide - 26
Page 27
The
EDIT
page allows super-fine tweaking of almost every section of Blue3
for immense flexibility. To enter
EDIT
mode, simply click the
EDIT
button at
the top left.
TONEWHEELS
Tonewheel Select- No two vintage tonewheel organs sound alike. They
sound
similar
, but if you put any two organs side by side in a room,
differences are noticeable. One of the main reasons for this are the
tonewheels. Every tonewheel organ has 91 constantly spinning tonewheels
that produce a
somewhat
pure tone and and every time a key is played,
some combination of nine of them is heard, depending on the level of the
Cherry Audio Blue3 User Guide - 27
Page 28
drawbars. However, the output of the tone generators degrades over time,
affected by aging capacitors among other things.
The Blue3 includes 31 sets of tonewheels measured from many actual
tonewheel organs of varying age, model and condition, including B-3, C-3, M3, A-100, L-100, and CV models. Each has their own special character. Sets
marked as
Wax
tend to be older instruments that haven’t had their
capacitors replaced, and tend to sound more mellow. The sets marked
Recapped
are either newer instruments or have had their capacitors replaced
and therefore tend to sound brighter. If you’re looking for a softer sound, try
one of the wax variations. If you’re looking for a screamer, choose one of the
recapped or red mylar sets.
Tonewheel Balance- This adjusts the overall balance of sections of
tonewheels, based on frequency. This is not the same as adjusting the EQ
because each tonewheel is used in multiple key ranges. This adjusts the
levels of the tonewheels smoothly in each range. Note that the Bass
control only affects the Pedal manual.
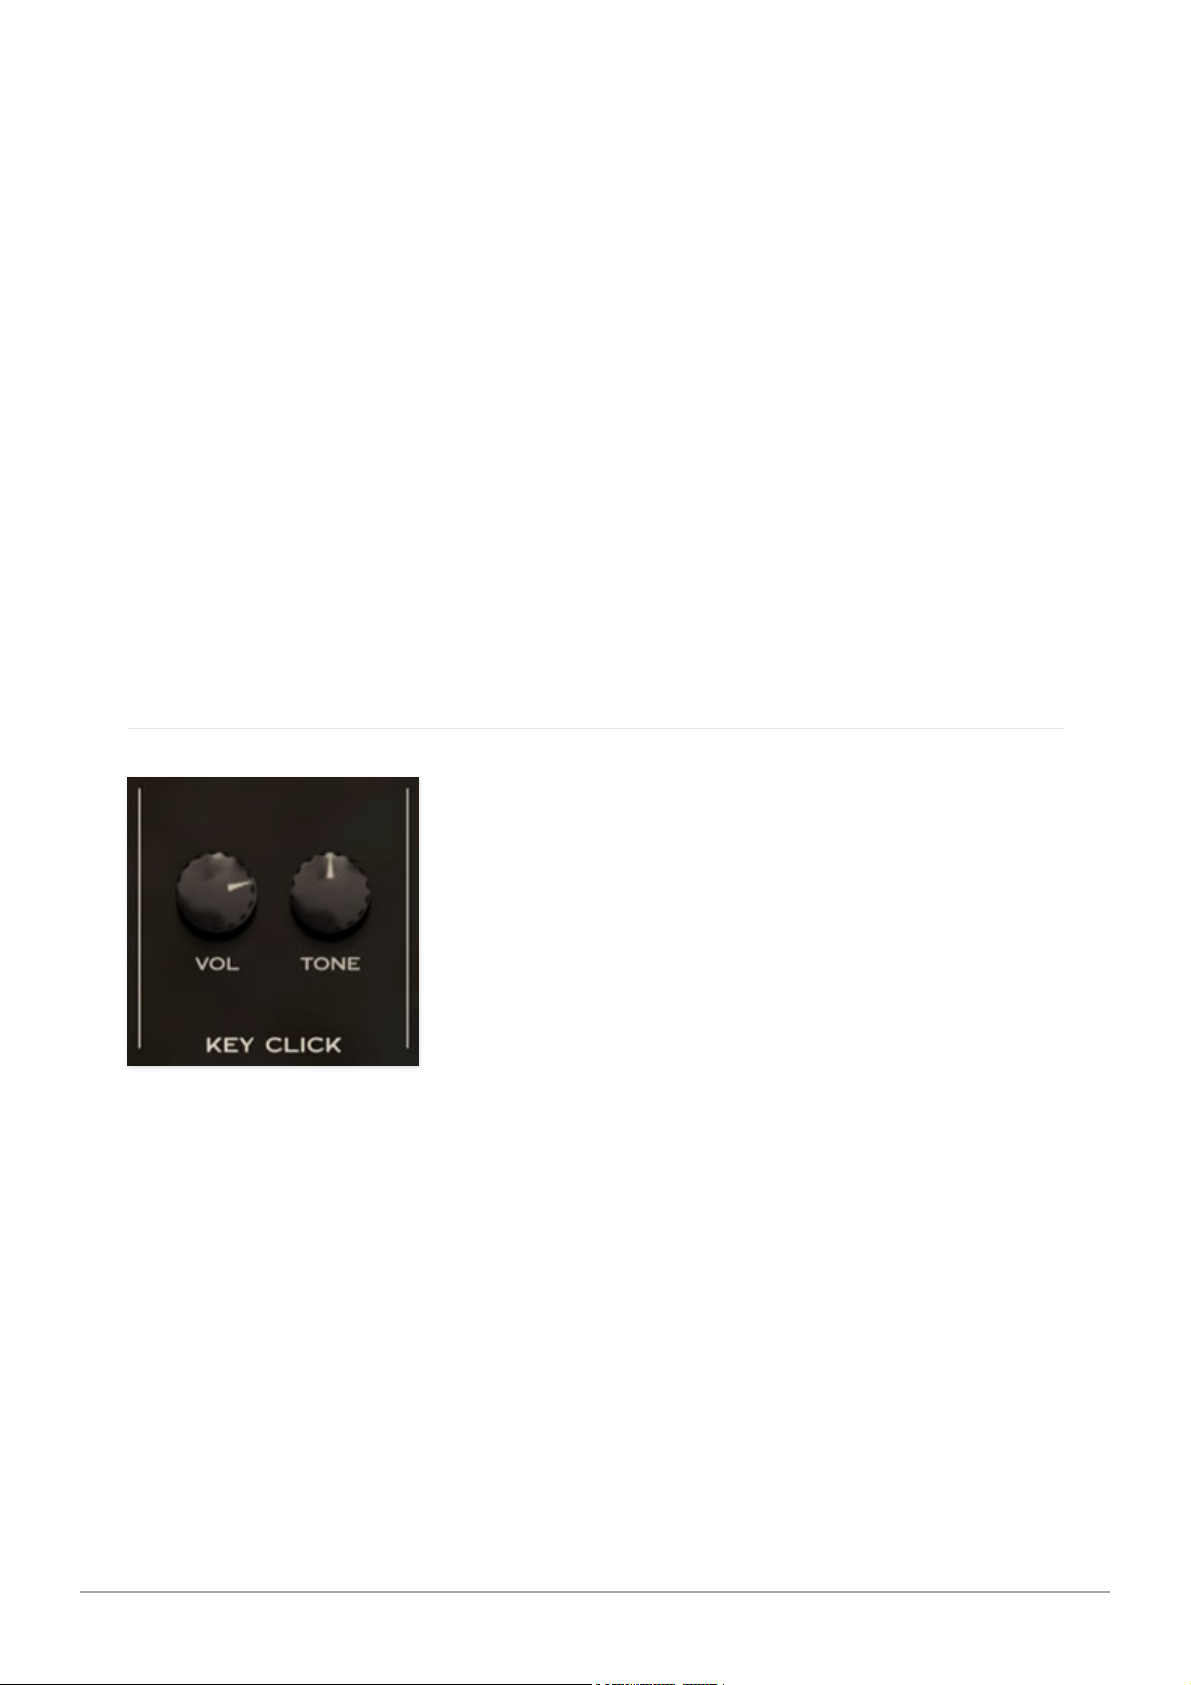
KEY CLICK
When a key is pressed on a vintage tonewheel organ, nine separate key
contacts close at
slightly
different times, making the connection to their
respective tonewheels. Many factors go into the small noise or “click” that’s
created when the key is closed such as dirt, velocity, tonewheel phase and
more.
Volume - Nothing, a little or a lot.
Tone - Adjusts the overall brightness and character of the click. Clockwise is
brighter, while counter-clockwise introduces more DC into the signal and
therefore presents more of a low end thump.
Cherry Audio Blue3 User Guide - 28
Page 29
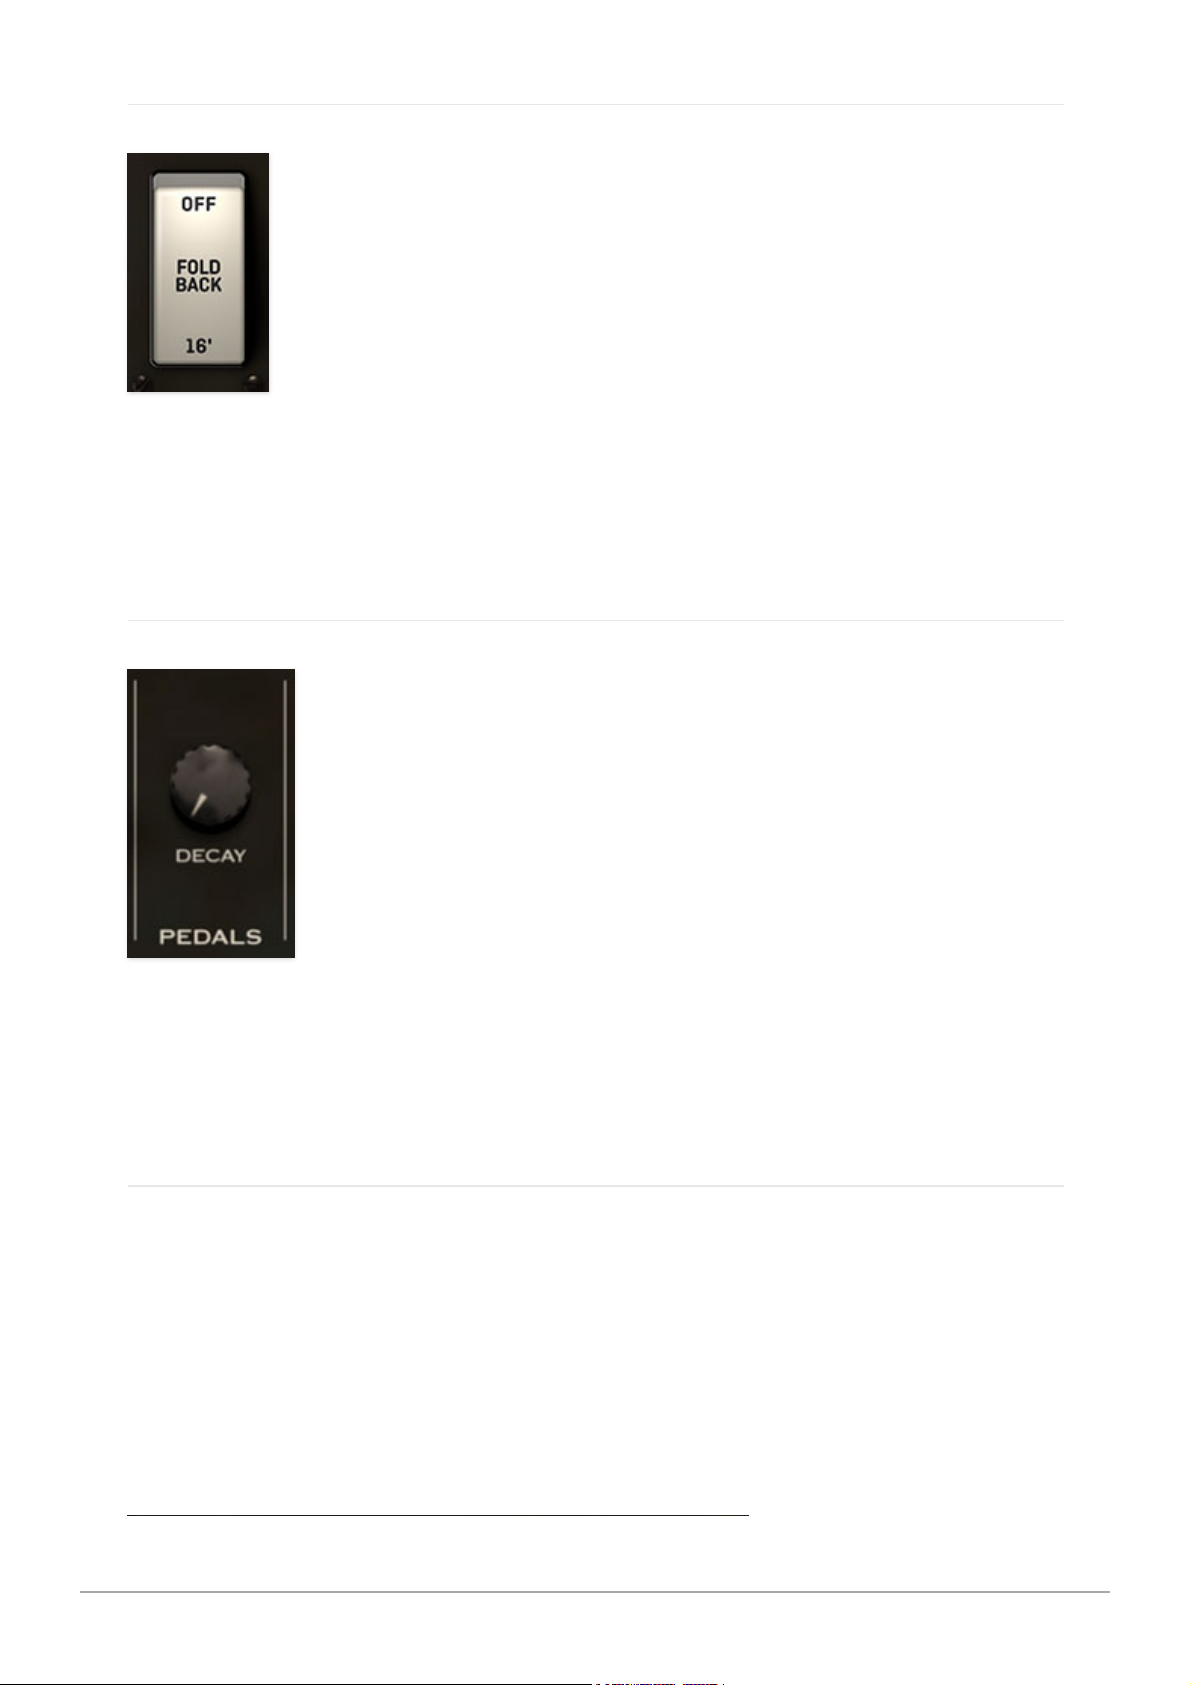
FOLDBACK
16’ - On a B-3/C-3/A-100, the lowest octave for the 16’ drawbar repeats the
octave above so as not to use the pedal tonewheels. Disabling
Foldback
make will make Blue3 sound more like an M- or L-series organ.
PEDALS
Decay - The length of time that it takes for the bass pedals to fade out. A
normal tonewheel organ does not have this ability, but many players like this
to simulate a walking bass style of playing. (The default value is off.)
PERCUSSION
Cherry Audio Blue3 User Guide - 29
Page 30
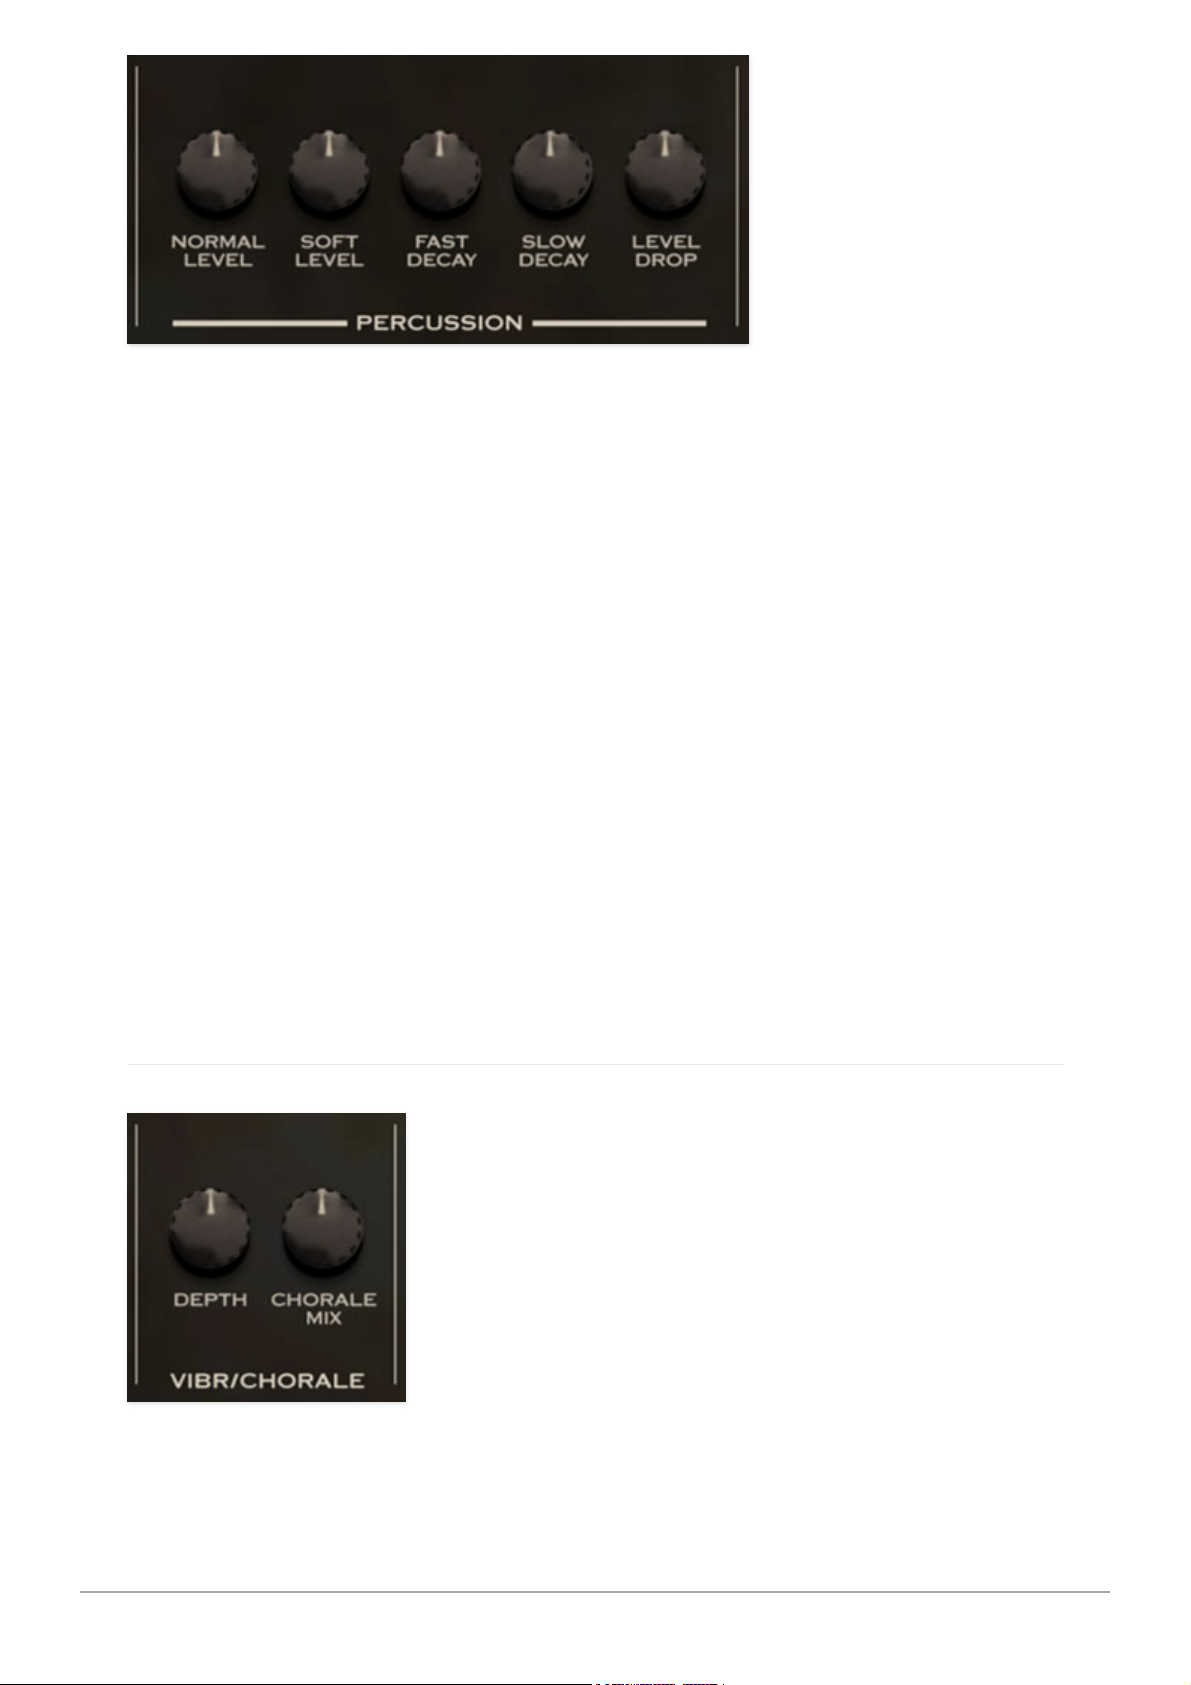
This allows the Percussion tonality to be tweaked to be a little louder or
softer or faster or slower. These controls work in conjunction with the
Percussion
tab settings on the
MAIN
page.
Normal Level - Adjusts the volume of Percussion when the
MAIN
page
Percussion Volume
tab is set to
Normal
.
Soft Level - Adjusts the volume of Percussion when the
MAIN
page
Percussion Volume
tab is set to
Soft
.
Fast Decay - Adjusts the Percussion decay time when the
MAIN
page
Percussion Decay
tab is set to
Fast
.
Slow Decay - Adjusts the Percussion decay time when the
MAIN
page
Percussion Decay
tab is set to
Slow
.
Level Drop - Adjusts the amount the other tonewheels are lowered when i
the
MAIN
page
Percussion Volume
tab is set to
Normal
.
VIBRATO and CHORALE
Cherry Audio Blue3 User Guide - 30
Page 31
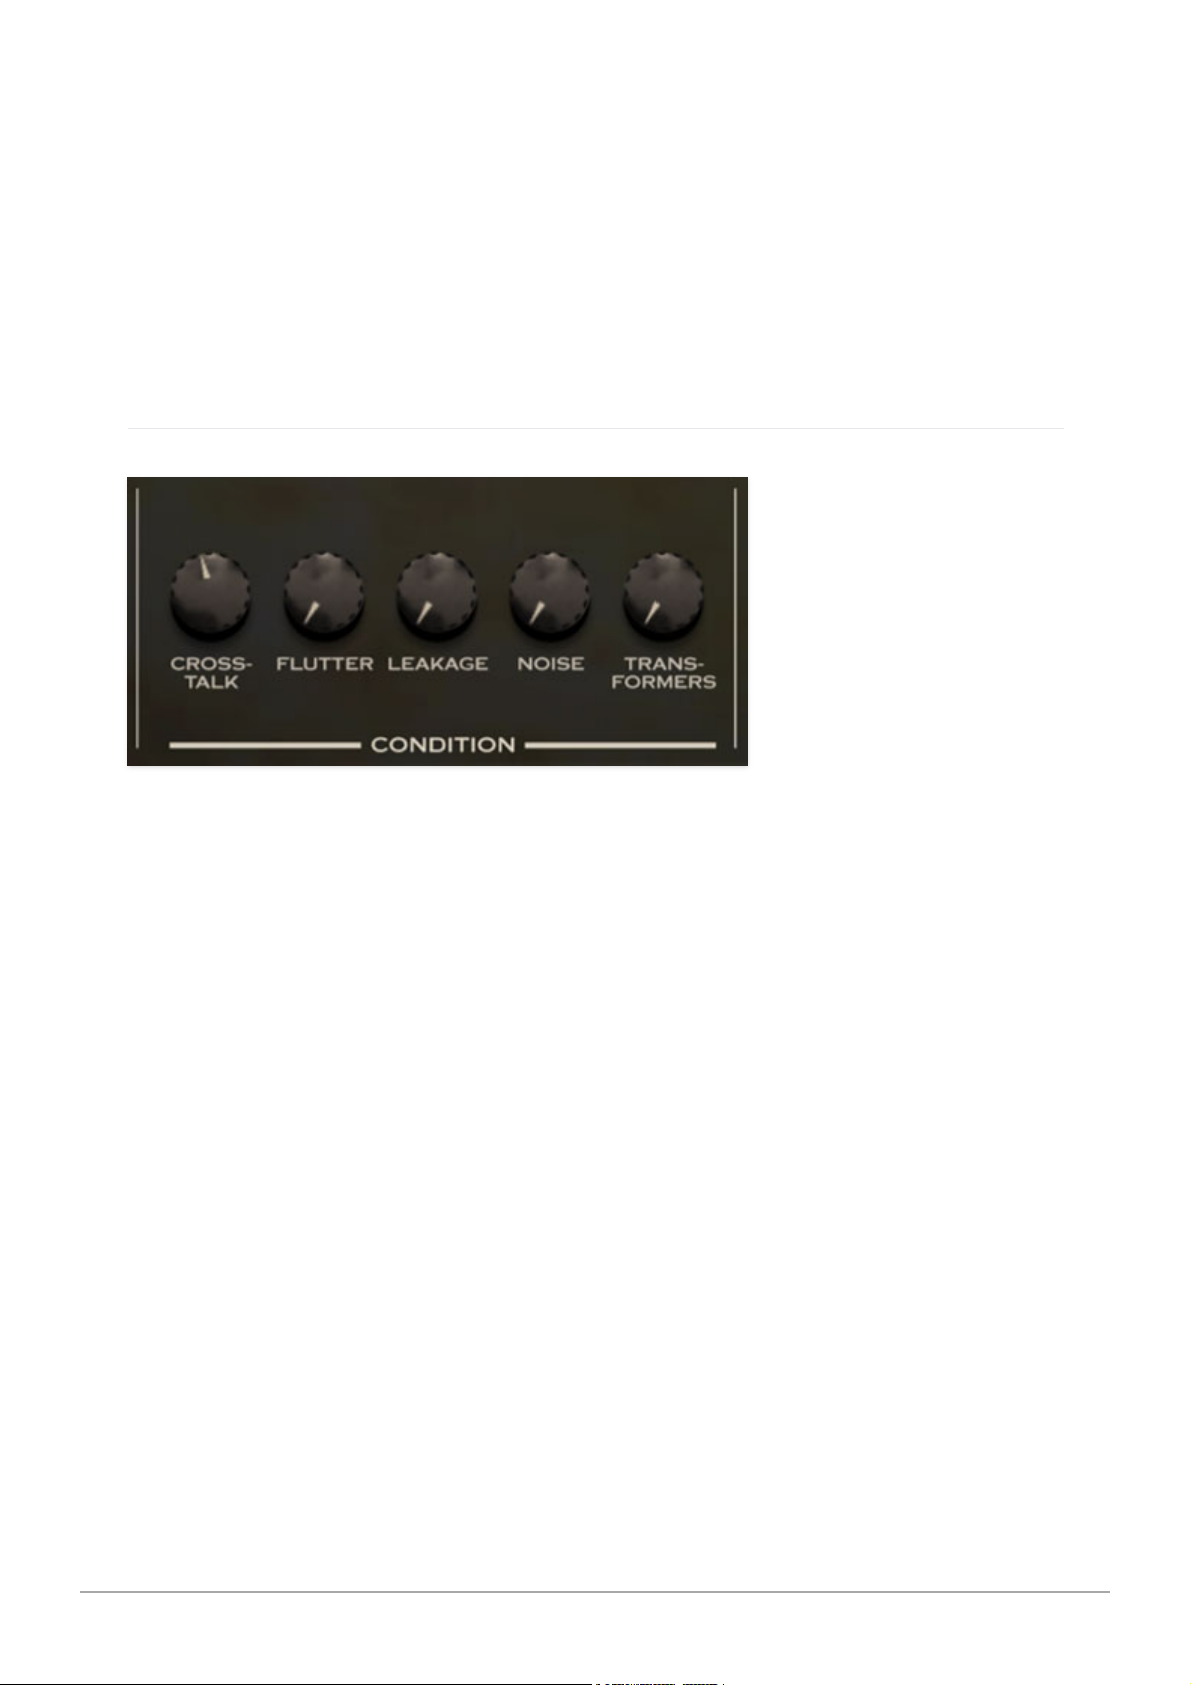
The Vibrato and Chorus in a vintage tonewheel organ is not like the vibrato
or chorus effects in guitar amps or stomp boxes. Tonewheel organs included
a unique and somewhat complex "scanner vibrato" circuit that's been super
accurately simulated in Blue3.
Depth - How much the vibrato/chorus affects the sound.
Chorus Mix - How much of the non-vibrato sound is mixed with the vibrato
sound in Chorus mode.
CONDITION
These controls allow adjustment of the age of the tonewheel organ
simulation. These would be silent in an organ in absolutely pristine condition.
Increasing the amount of these controls for a more authentically "aged"
sounded organ.
Crosstalk - The amount of the neighboring tonewheels’ signal leaking into
the proper tonewheels.
Flutter - Dirt and grime can make the driveshaft slightly out of round,
contributing to a slight vibrato at different frequencies and levels throughout
the instrument.
Leakage - The amount of tonewheels signal leaking through the drawbars
when no notes are played.
Noise - Some power supply hum, amplifier hiss and rotary motor noise.
Transformers - The B3, C3, and A100 models each have two matching
transformers where the drawbar outputs are mixed, one for the upper
manual and one combined for the lower and pedal manuals. This control
Cherry Audio Blue3 User Guide - 31
Page 32
adds saturation/distortion and hysteresis to the signal for a bit of extra
warmth.
OUTPUT
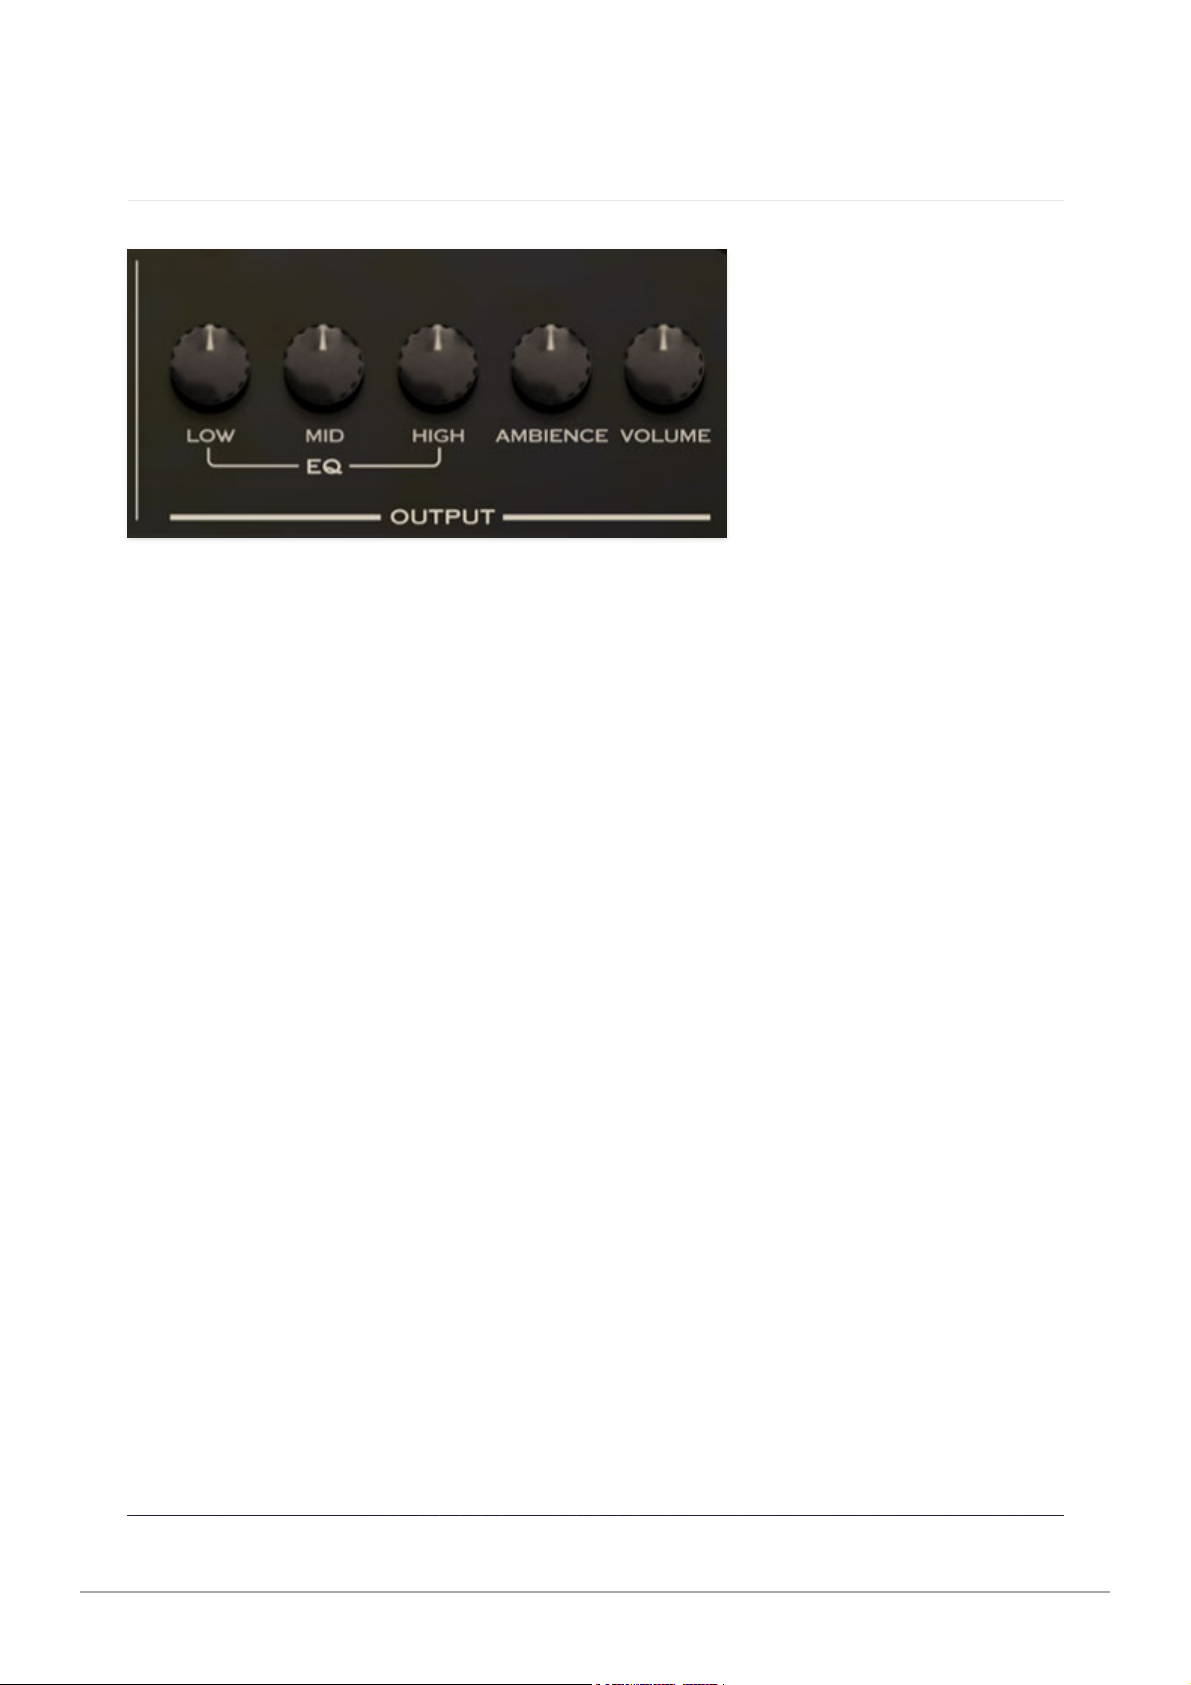
Ambience - Adds some room feel to the output. Not exactly a reverb, this
simulates the energy of a live room.
EQ - Adjusts the lows, mids, and high frequencies of the entire instrument.
Volume - Final output volume.
Cherry Audio Blue3 User Guide - 32
Page 33
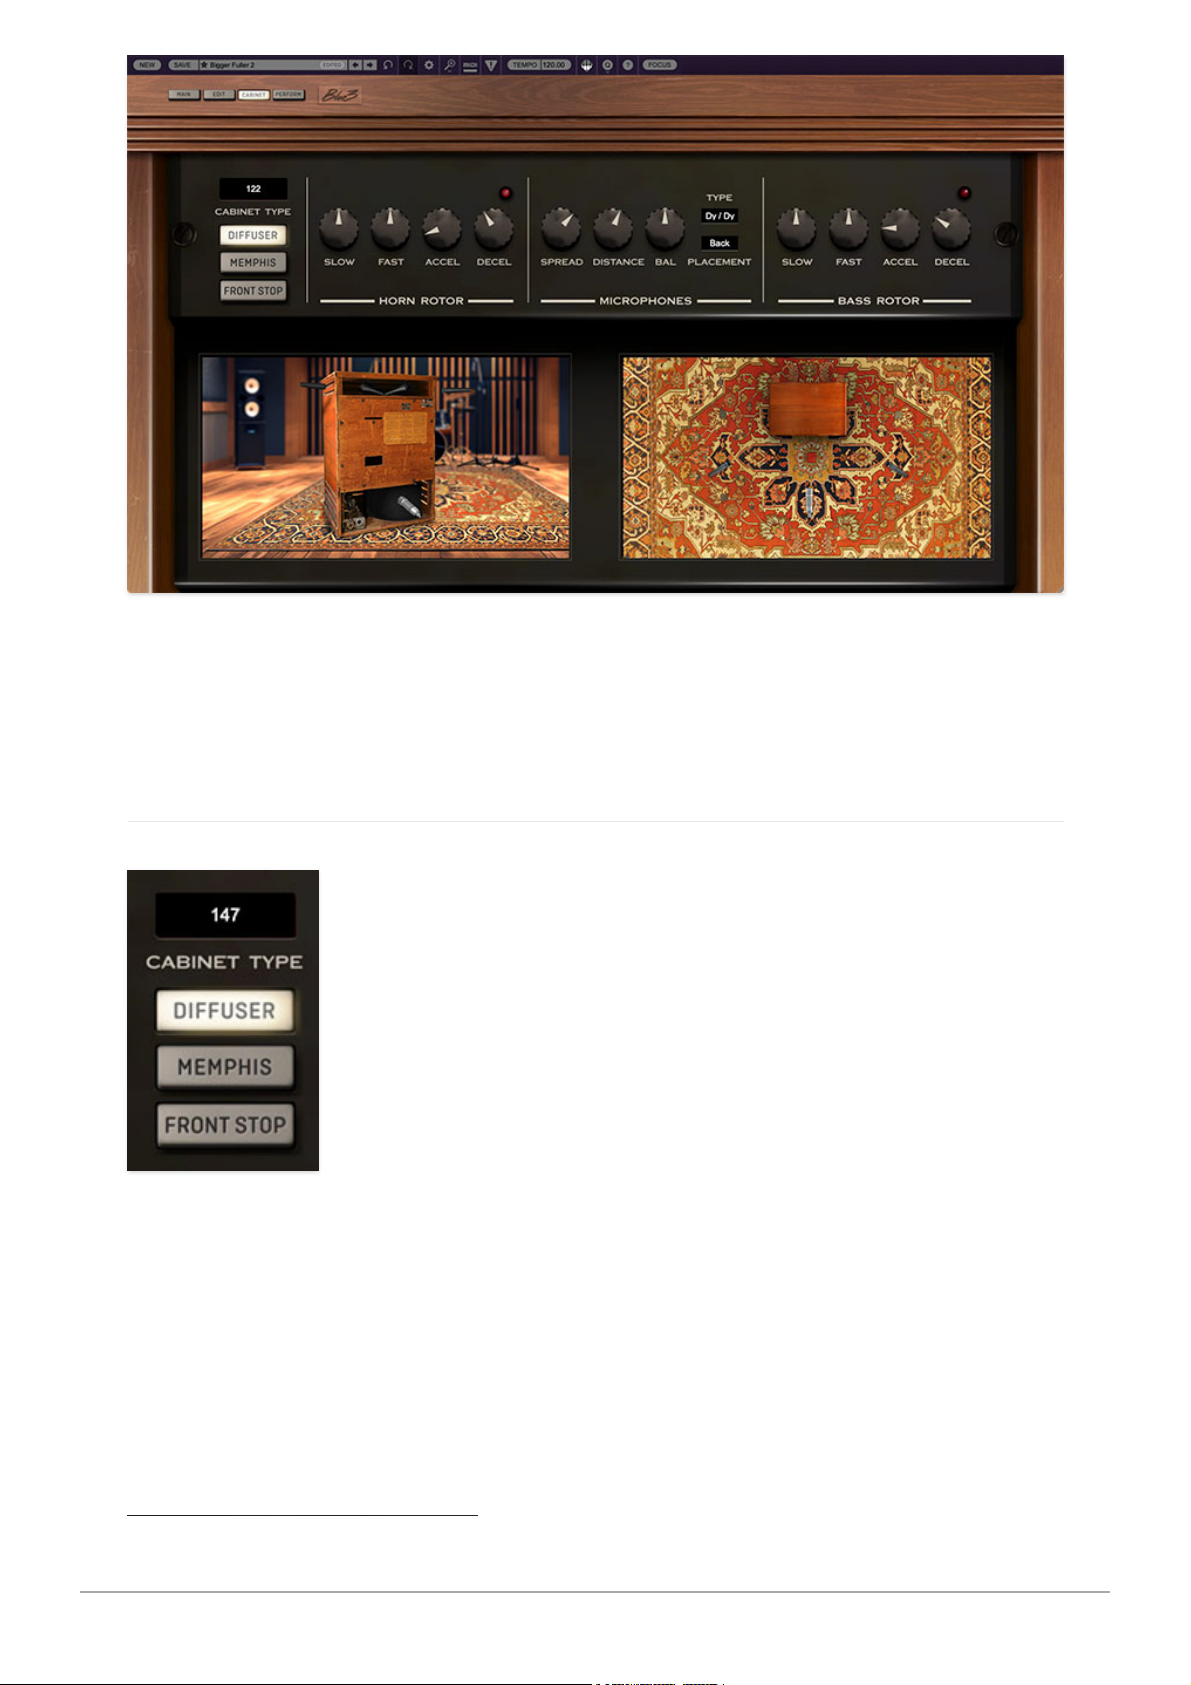
The
CABINET
page allows you to choose and from five different cabs or
"direct" mode. It includes extensive editing capabilities, and it allows
selections of three microphones and their placement.
CABINET TYPE
Use the popup menu at the top to select the desired cab type.
Cherry Audio Blue3 User Guide - 33
Page 34
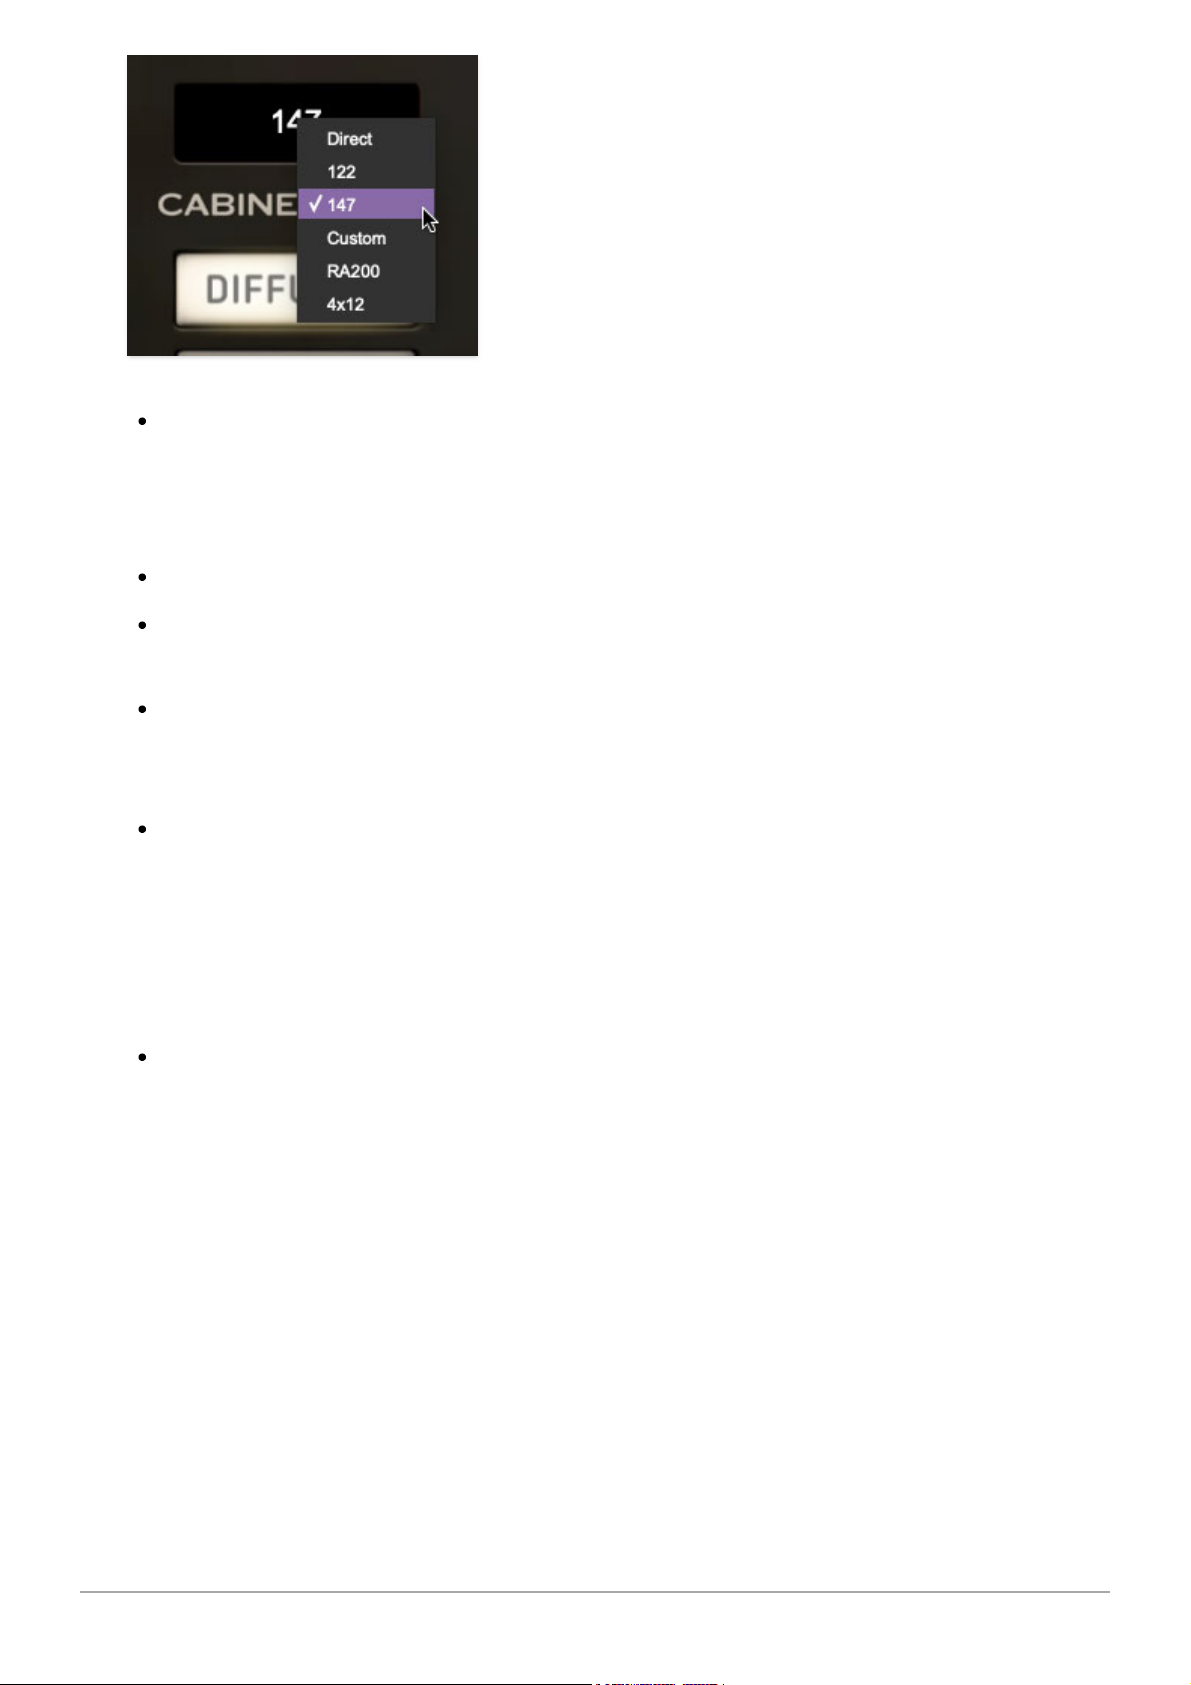
Direct- Turns off the cabinet simulation entirely, useful if you plan to send
the organ signal through your own effects chain or amplifier. The output
signal is taken AFTER the Drive circuit but before the Cabinet and as such
is mono (because no stereo rotating cab).
122- Simulates the warmth and character of a vintage 122 cabinet.
147- Simulates a vintage 147 cabinet. Very similar to a 122 with a slightly
different tone thanks to the unbalanced input circuitry.
Custom- Simulates a customized rotary cabinet with high output drivers
and amplifier. While similar to the classic 122/147 sound, you’ll notice that
it’s a little smoother and has slightly extended low and high end.
RA200- Simulates a rare guitar amplifier made by large Japanese
company that also makes motocycles, and was made famous by David
Gilmour (think "Shine On You Crazy Diamond"). It has three treble
speakers rotating vertically in the top half of the cabinet and four 12”
speakers in the bottom. It’s not the first thing you think of when you say
rotary speaker, but it’s interesting and has a sound all it’s own.
4x12- Simulates a classic rock and roll guitar amp cab with four 12”
speakers. (
NOTE
: no rotary effect with a 4x12 guitar cab. Duh!)
Diffuser- Classic rotary speakers have a diffuser at the mouth of the horn
which smooths out the sound and makes it less directional. Turning off
(removing) the diffuser makes it more directional along with harsher high
end. Some 70s players removed the diffuser to cut through a wall of guitars
better.
Front Stop- Forces the horn and bass rotor to face front when coming to a
stop. Another feature that’s not possible with a standard rotary cabinet.
Memphis - Disconnects the bass rotor from spinning and forces it to face
front.
Cherry Audio Blue3 User Guide - 34
Page 35
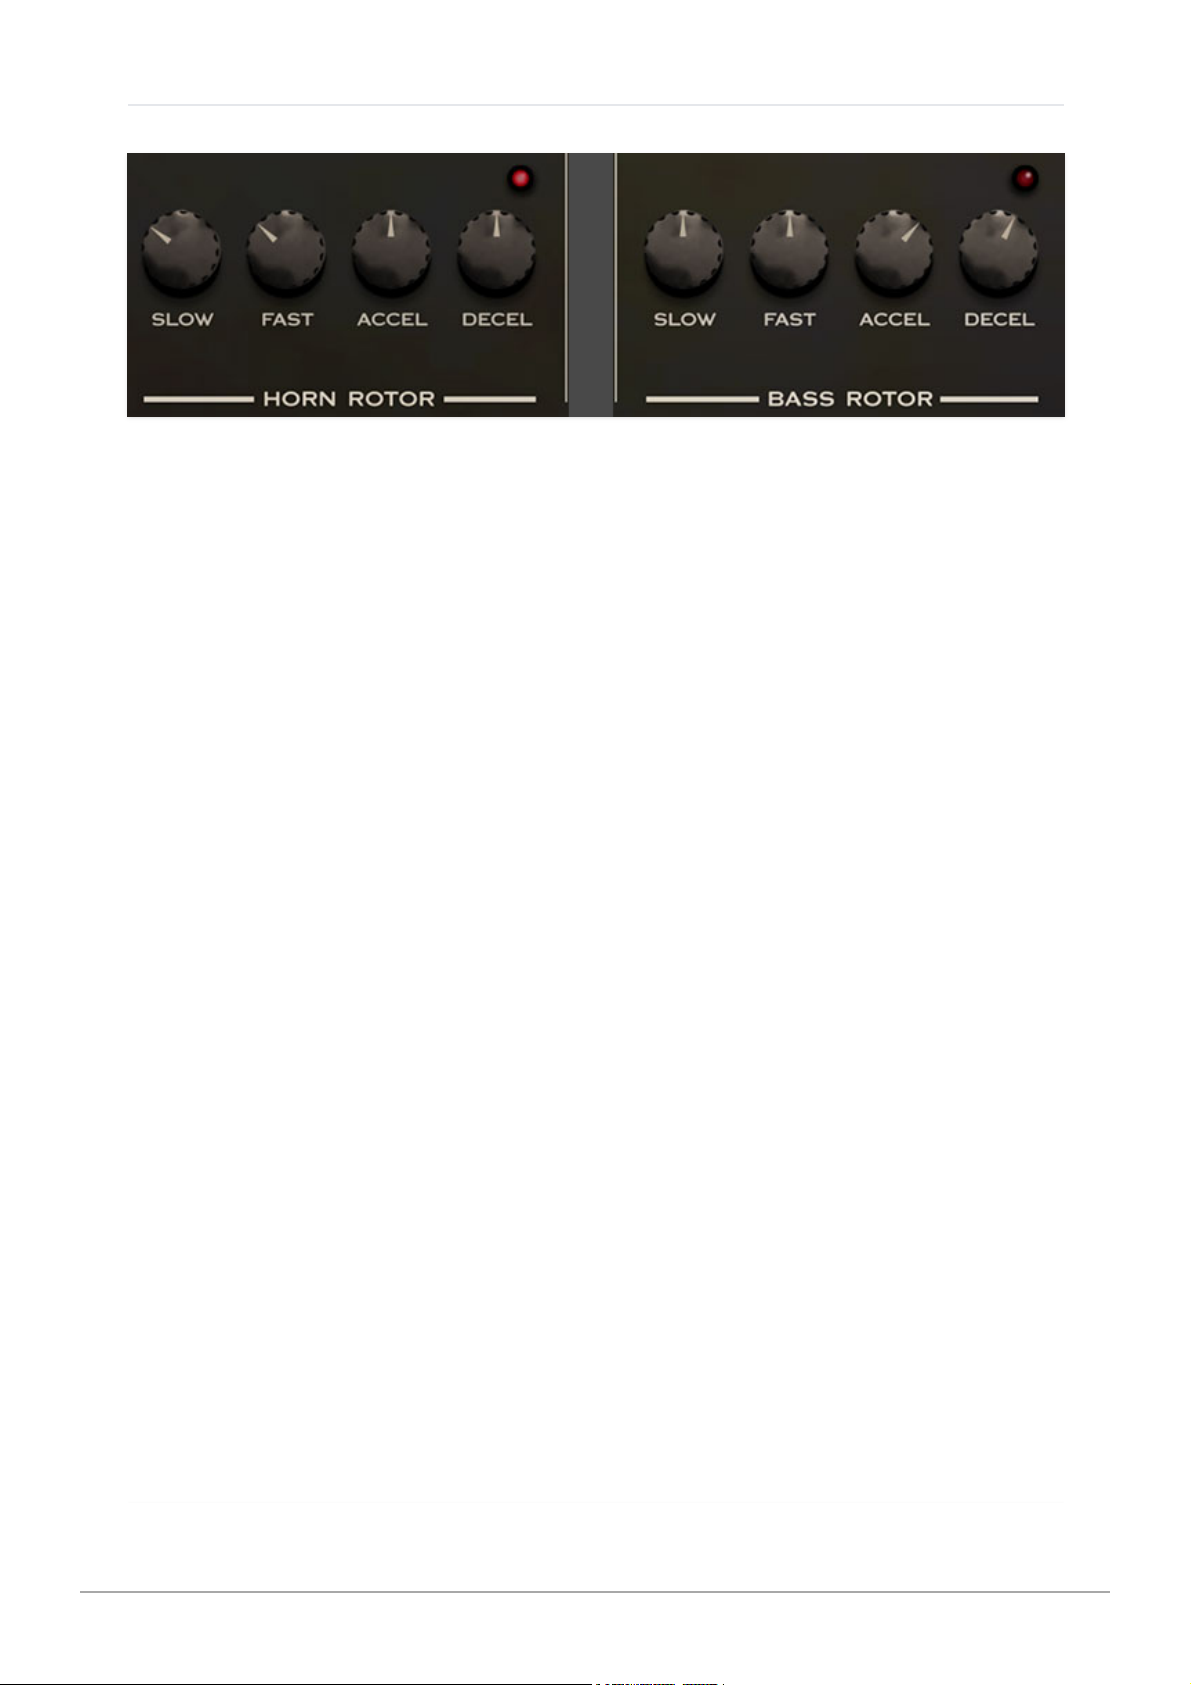
HORN and BASS ROTOR
Some players like their rotary speaker speeds a little slower or faster. Here’s
where you can make your adjustments to your liking.
Slow Speed - Adjusts the speed in slow or “chorale” mode.
Fast Speed - Adjusts the speed in fast or “tremolo” mode.
Acceleration - How fast the horn or bass rotor accelerate to fast mode from
slow or stop.
Deceleration - How fast the horn or bass rotor decelerates from fast mode
to slow or stop.
NOTE FOR RA200:
The Bass Rotor section and Horn Slow are disabled (it
has no bass rotors and its slow horn speed is fixed).
NOTE FOR DIRECT and 4x12:
The Horn and Bass Rotor sections are
disabled (for obvious reasons).
While every rotary speaker’s rotor speeds are slightly different because of
belt wear and other factors, we’ve found that the most realistic speed
settings are with the knobs near center position.
Cherry Audio Blue3 User Guide - 35
Page 36
MINIMUM DEFAULT MAXIMUM
Horn Slow 0.25 Hz 0.75 Hz 1.25 Hz
Horn Fast 3.0 Hz 6.75 Hz 10.5 Hz
Bass Slow 0.25 Hz 0.73 Hz 1.21 Hz
Bass Fast 3.0 Hz 6.4 Hz 9.8 Hz
Horn Acceleration 0.25 secs 1.2 secs 2.15 secs
Horn Deceleration 0.25 secs 1.5 secs 2.75 secs
Bass Acceleration 1.0 secs 6.0 secs 11.0 secs
Bass Deceleration 1.0 secs 4.5 secs 8.0 secs
When in RA-200 mode, the horn speed ranges are as follows:
MINIMUM DEFAULT MAXIMUM
Horn Slow fixed at 0.85 Hz
Horn Fast 1.75 Hz 4.625 Hz 7.5 Hz
MICROPHONES
Cherry Audio Blue3 User Guide - 36
Page 37
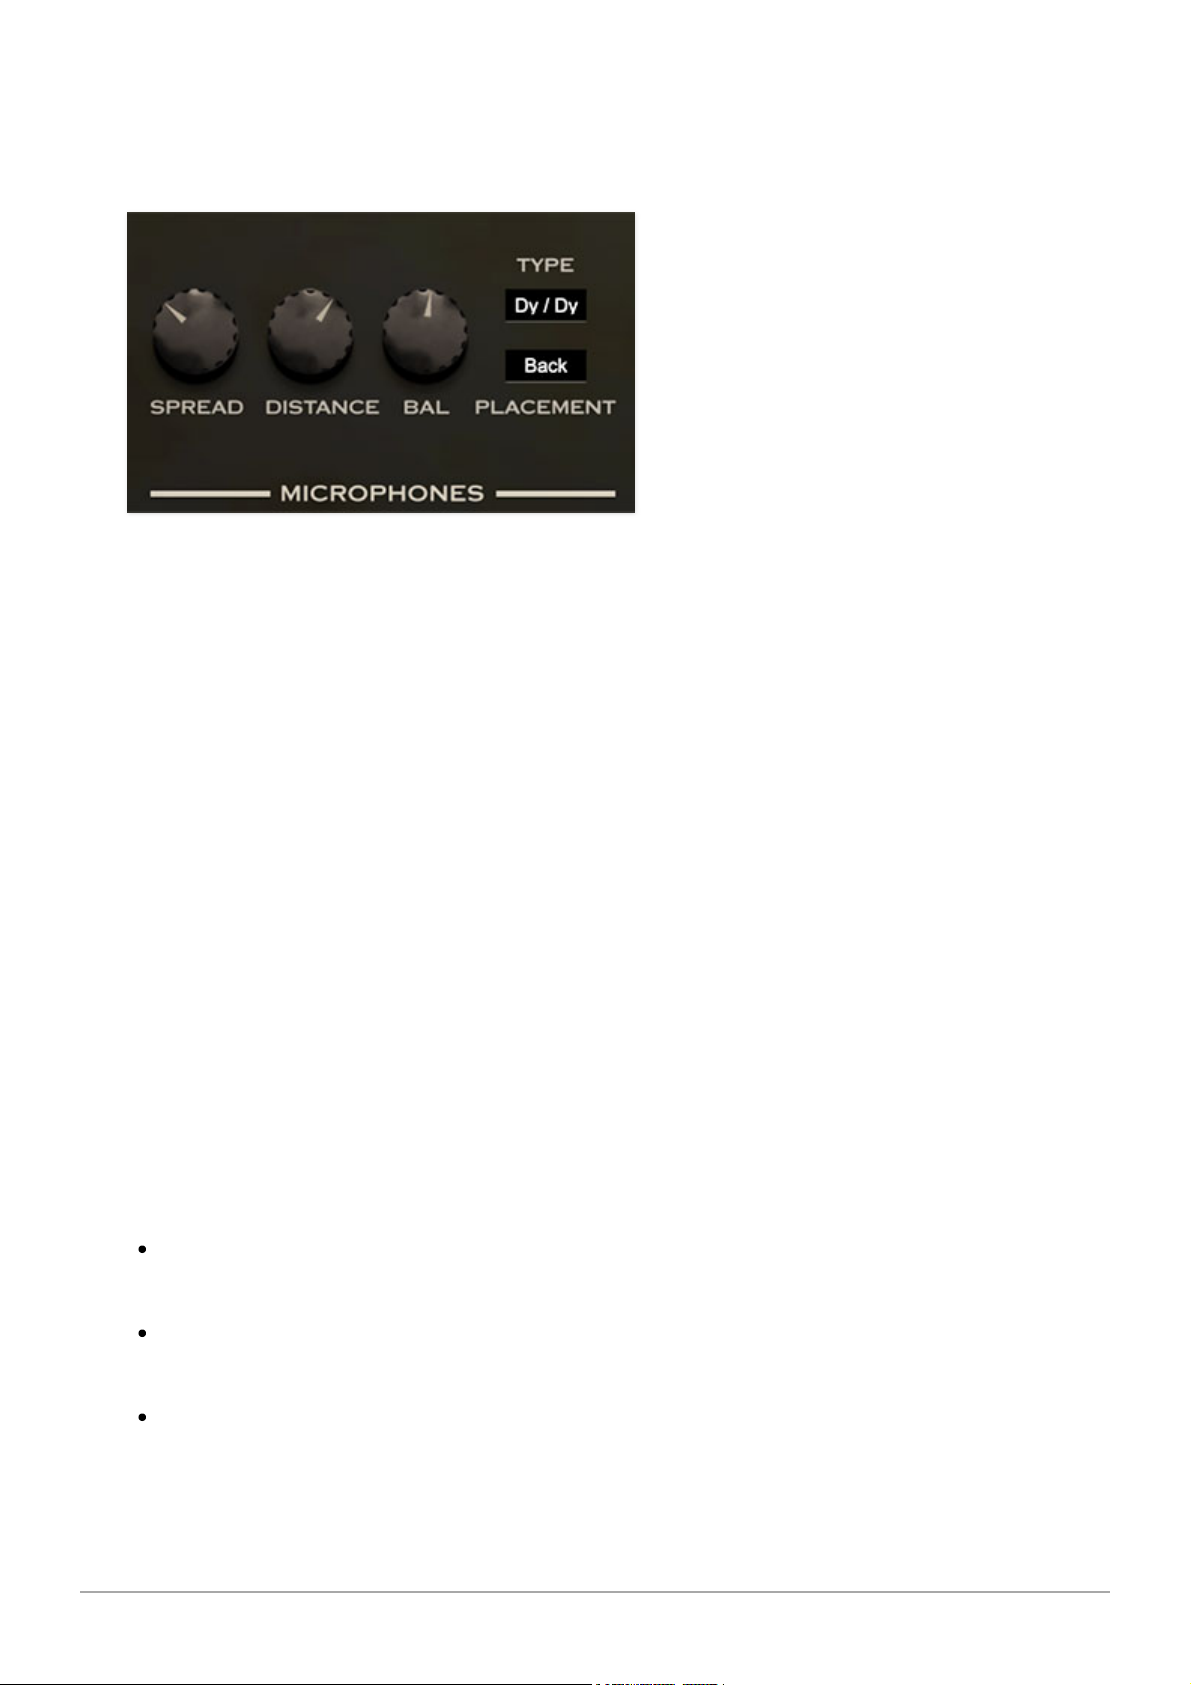
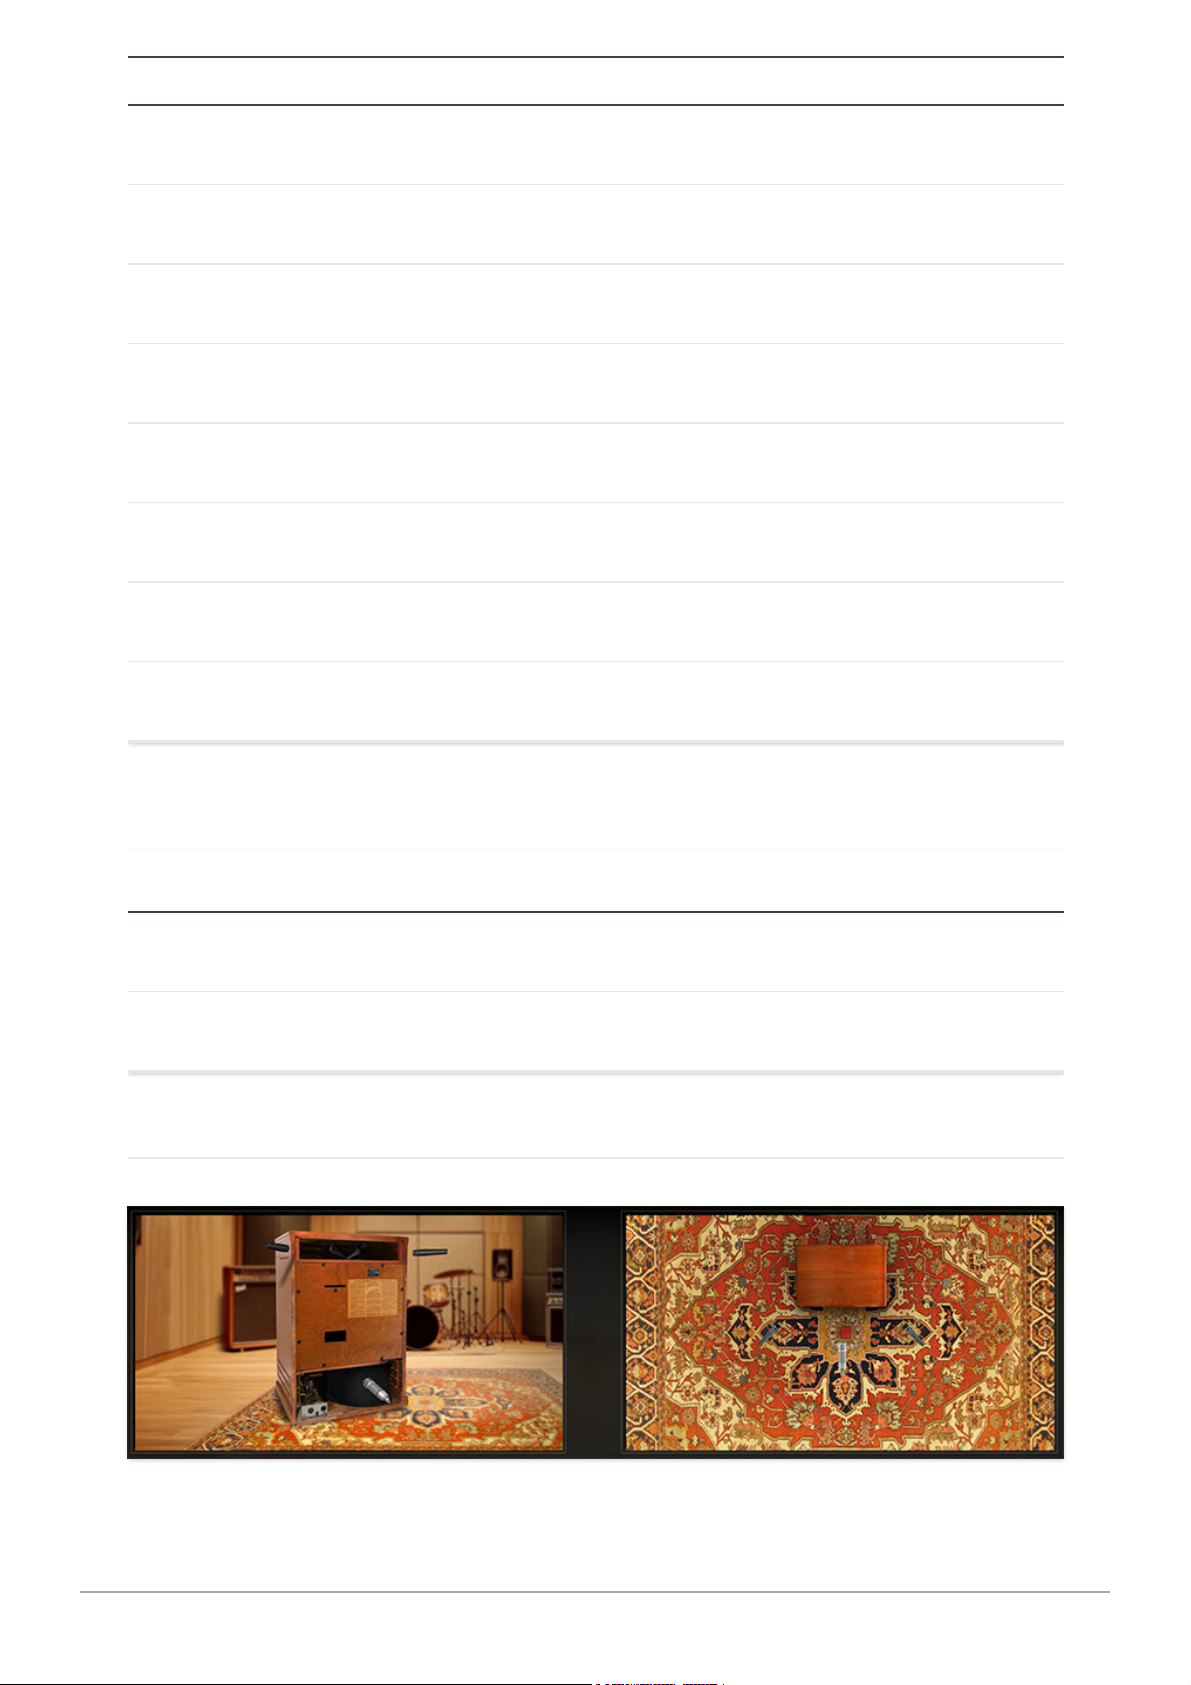
These controls affect how we hear the rotary speaker by virtually moving the
microphones.
Spread
and
Distance
both make a huge difference in the way
we hear the rotary speaker so be sure to experiment with these.
Spread- Sets the spread of the horn mics in degrees. From 0 for a mono
simulation to 45° for a standard micing technique, to 180° for a wide stereo
spread. This adjustment only affects the horn. The bass rotor is miked from
one microphone and is not affected by the
Spread
control. If you desire a
mono output for any reason, set
Spread
to 0. Mic spread can also be set
by dragging horizontally in the front quarter-view cab image.
Distance- Sets how far away the microphones are placed from the rotary
cabinet. The closer they are, the more intense the throbbing is. Further away
softens it. Mic distance can also be set by dragging vertically in the
top view cab image.
Balance- Counterclockwise emphasizes the bass signal and clockwise
increases the horn with straight up being an equal mix of both.
Placement- Controls whether the microphones are placed near the closed
front or the open back of the rotary cabinet. The sound is a little mellower
and woodier from the front, and a bit brighter from the back.
Type- You can choose the type of microphone for the horn and bass rotors
separately to further refine the tone.
D/D (Dynamic on horn, Dynamic on bass) - A fairly standard live sound
arrangement. Strong highs and punchy lows.
C/D (Condenser on horn, Dynamic on bass) - Less biting but extended
highs.
D/C (Dynamic on horn, Condenser on bass)- Extended low end response.
Cherry Audio Blue3 User Guide - 37
Page 38

C/C (Condenser on horn, Condenser on bass)- Extended low end and
smoother, extended highs...more studio-like.
We can’t stress enough what a huge difference the
Spread
and
Distance
controls have on the sounds of the rotary speaker. For live, in-concert
recordings, engineers typically place the mics very close to the rotary
cabinet (in order to minimize bleed from other instruments), thus intensifying
the strobing, particularly at fast speed. For studio recordings, mics are
usually placed a little further back to smooth out the intensity.
Cherry Audio Blue3 User Guide - 38
Page 39
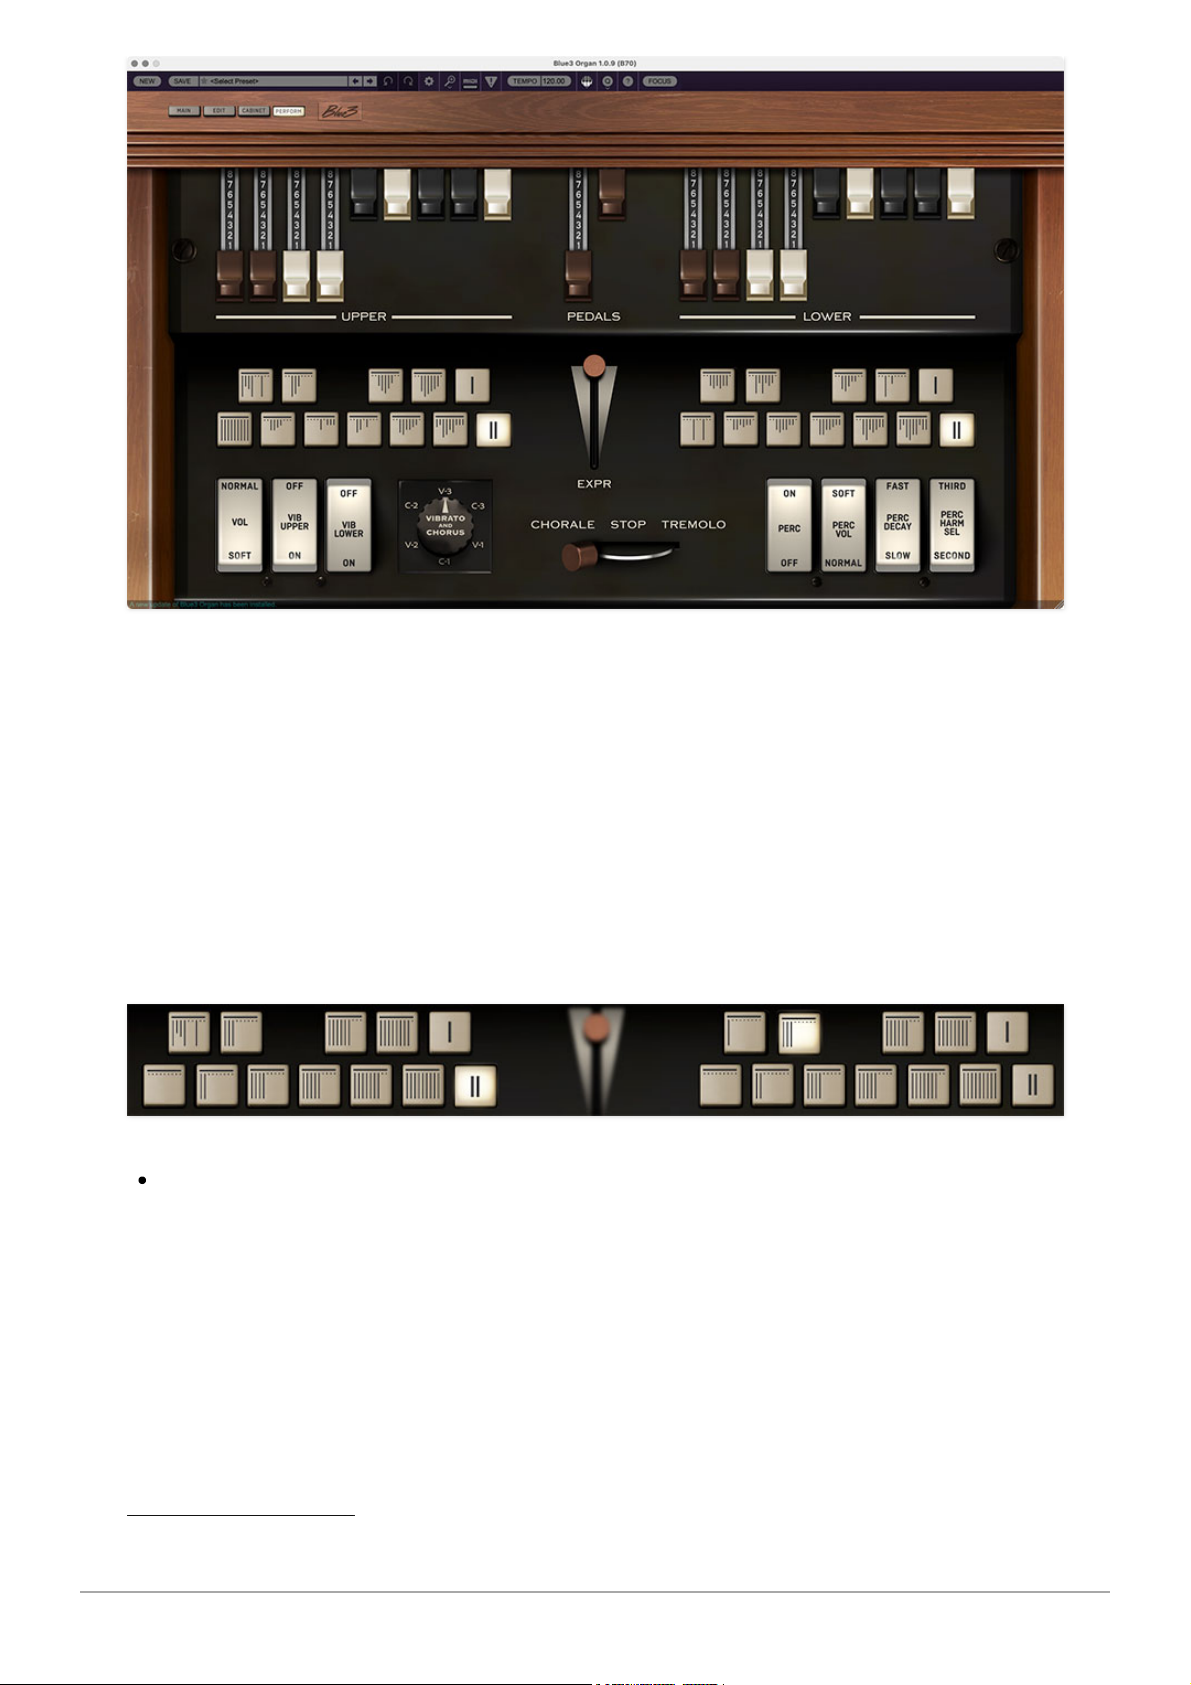
The
PERFORM
page dispenses with most of MAIN page's cool 3D eye candy,
focusing on large versions of the most important controls you'll need in a
studio or live performance situation. It's mainly intended for use with laptops,
where screen real estate is small and valuable.
Other than size, almost all of the
PERFORM
page controls function identically
to the
MAIN
page controls. They do not function independently, they're just a
different (i.e. larger) view. The following controls have a different
appearance:
Instead of using inverted keys of the keyboard, the registration presets
are simply square buttons, arranged in the pattern of one octave of
chromatic notes. They also include handy line symbols indicating the
relative positions of the nine drawbars for that particular preset. Please
see the Drawbar Registration Presets section in the Main Page section for
more info on how these work.
Cherry Audio Blue3 User Guide - 39
Page 40

The expression pedal is a slider in the middle of the page. It operates
exactly the same as the pedal.
Cherry Audio Blue3 User Guide - 40
Page 41
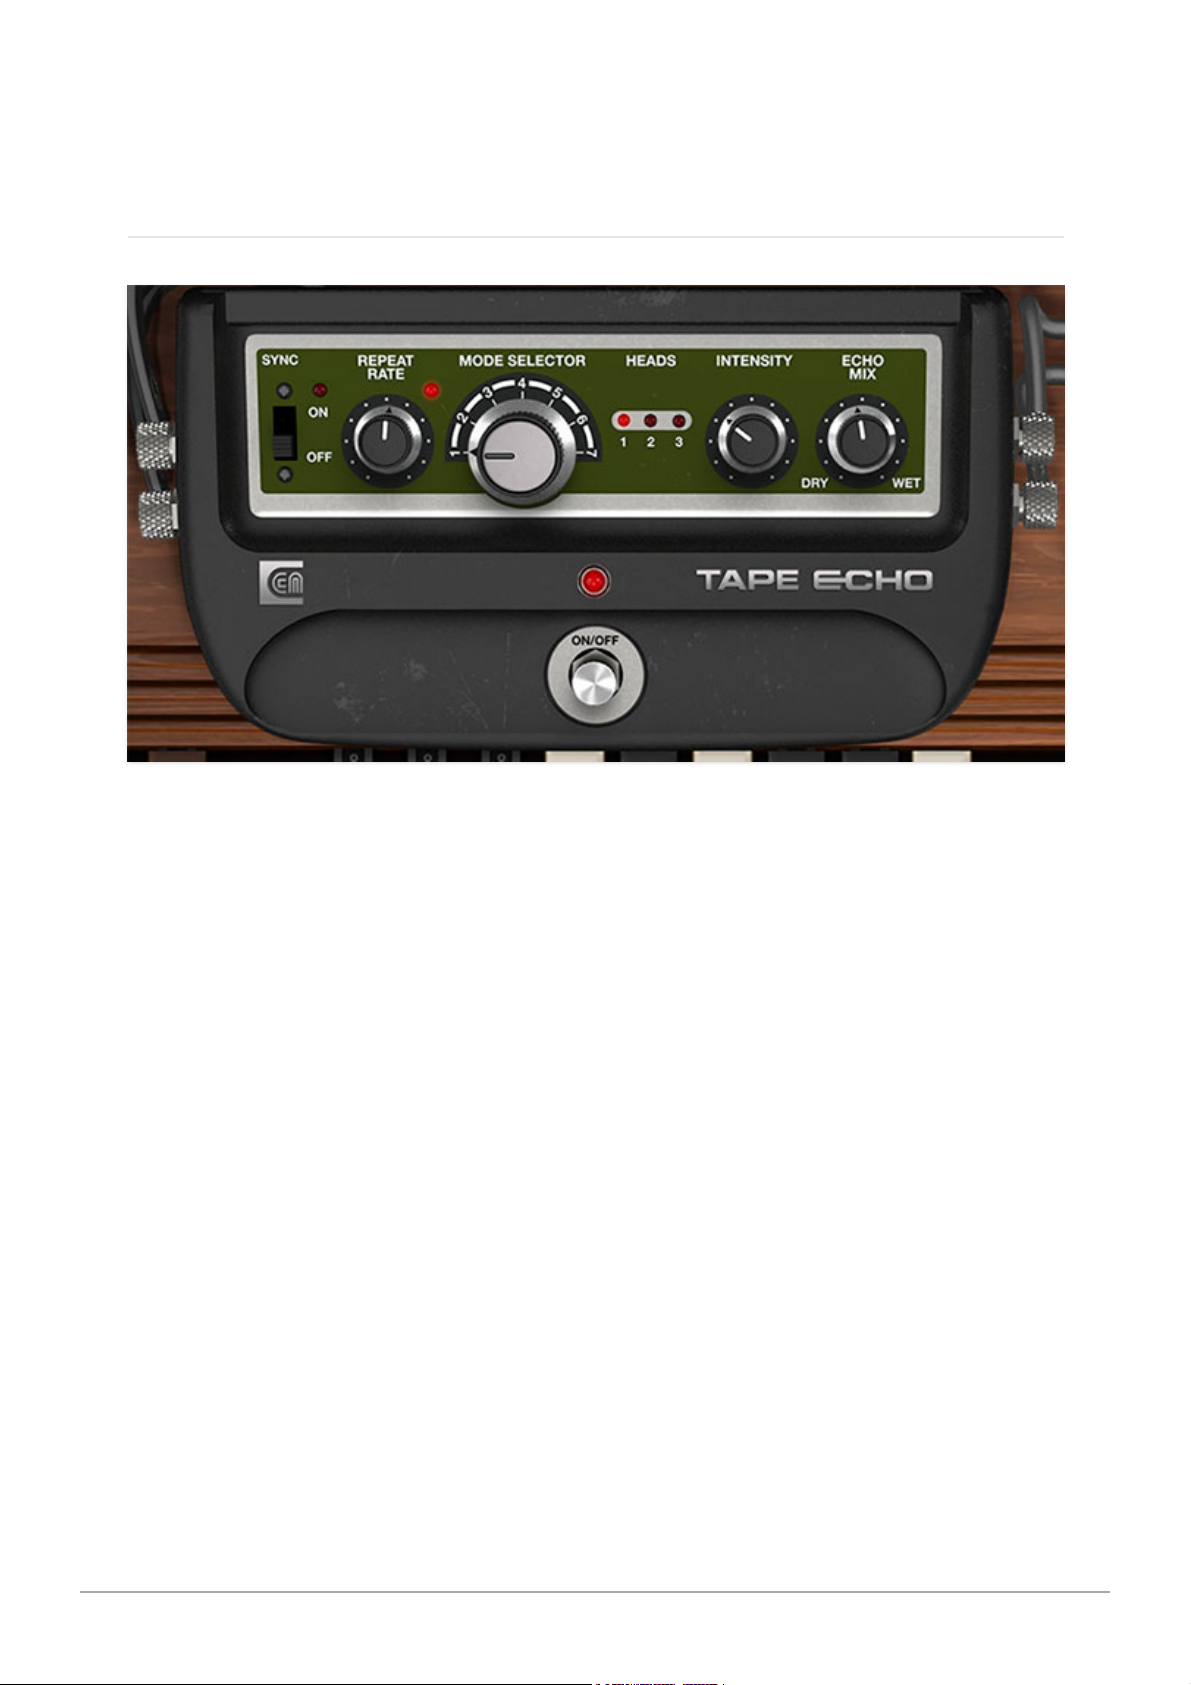
In addition to its integrated overdrive and rotary speaker effects, Blue3 also
features three awesome stomp box-style effects including tape echo, reverb,
and seven-band graphic EQ.
TAPE ECHO
Blue3's Tape Echo section reproduces the effect of a vintage "space echo"
tape echo. Far from being super-pristine, vintage tape echoes have a lovely
limited frequency response, and wow and flutter for a natural thickening
effect. We've also replicated the multiple tape head configurations for
rhythmic effects.
On/Off- Enables and disables the echo effect. Disabling the
Effects
On/Off
tab next to the keyboard will disable all three stomp box effects, but their
on/off status will be retained.
Sync- Engaging the
Sync
button locks the echo time to master tempo. When
engaged, the
Repeat Rate
knob snaps to note values ranging from 1/64th
note triplet to 8 beats.
Sync
mode locks to the tempo in the top toolbar when
using the Blue3 standalone version or the current project tempo when the
plug-in version is used in a DAW.
Repeat Rate- Sets echo time, from 1 to 2000 ms (for head 3, the longest
one). If the
Sync
button is enabled, time settings snap to synchronized note
values. Note that the tooltip (the popup value display you see when turning a
knob) always shows the echo time for head 1. To determine the echo times
for heads 2 and 3, you'll need to multiply that by the values shown in the
Cherry Audio Blue3 User Guide - 41
Page 42

table above - easy! If you stink at math, just click the
Sync
button, and futz
with the
Mode Selector
and
Repeat Rate
knobs and we promise something
fun will happen.
The LED next to the knob flash at head 1's current repeat rate.
Mode Selector and Heads LEDs- Determines what combination of the
three virtual "tape heads" are currently active; the LEDs illuminate to show
the currently active heads. Head 1 is the shortest echo, head 3 is the
longest. The time ratios of the heads are like a vintage Space Echo unit as
follow:
HEAD NUMBER TIME MULTIPLIER
1 base time
2 base time x 1.94
3 base time x 2.85
Intensity- Routes the output to the input for additional repeats, typically
referred to as "feedback." We've carefully modeled the unique feedback
tones that happen with a real tape echo - they sound awesome (try mapping
hardware knob or slider controllers to the
Intensity
and
Repeat Rate
knobs
for echo feedback madness).
Echo Volume- Sets the volume of the echo signal. The dry level is not
affected (this is how the classic Space Echo units operate).
REVERB
Cherry Audio Blue3 User Guide - 42
Page 43
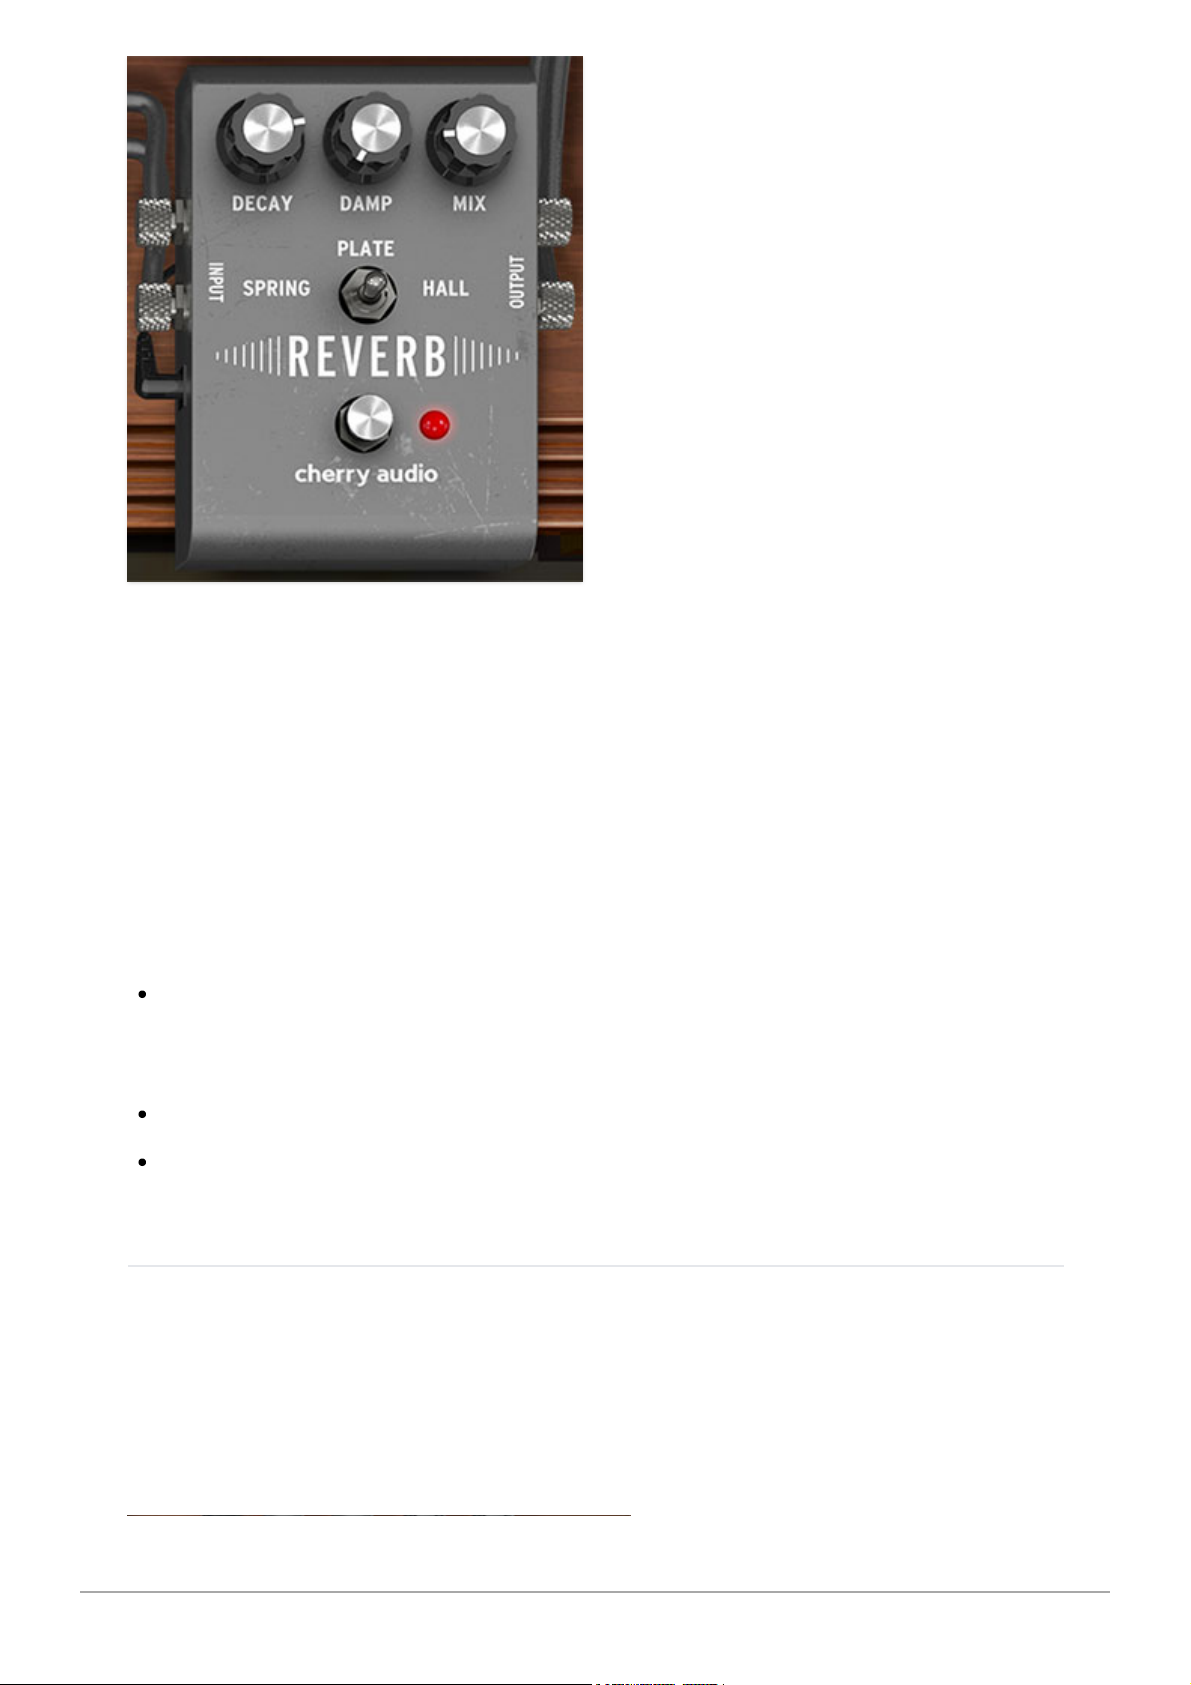
On/Off- Enables and disables the reverb effect. Disabling the
Effects
On/Off
tab next to the keyboard will disable all three stomp box effects, but their
on/off status will be retained.
Decay- Sets the length of reverb release time/size of room.
Damp- A lowpass filter affecting wet reverb signal only. High frequencies are
increasingly attenuated as the setting is decreased.
Mix- Sets the ratio of clean to effected sound.
Mode switch- Allows selection of three different reverb algorithms:
Spring- Recreates mechanical spring-reverb effect often seen (and
kicked) in vintage guitar amps. We don't recommend kicking your
computer.
Plate- A medium-to-large studio plate-style algorithm.
Hall- A flattering, large concert hall-style reverb.
SEVEN-BAND GRAPHIC EQ
Cherry Audio Blue3 User Guide - 43
Page 44
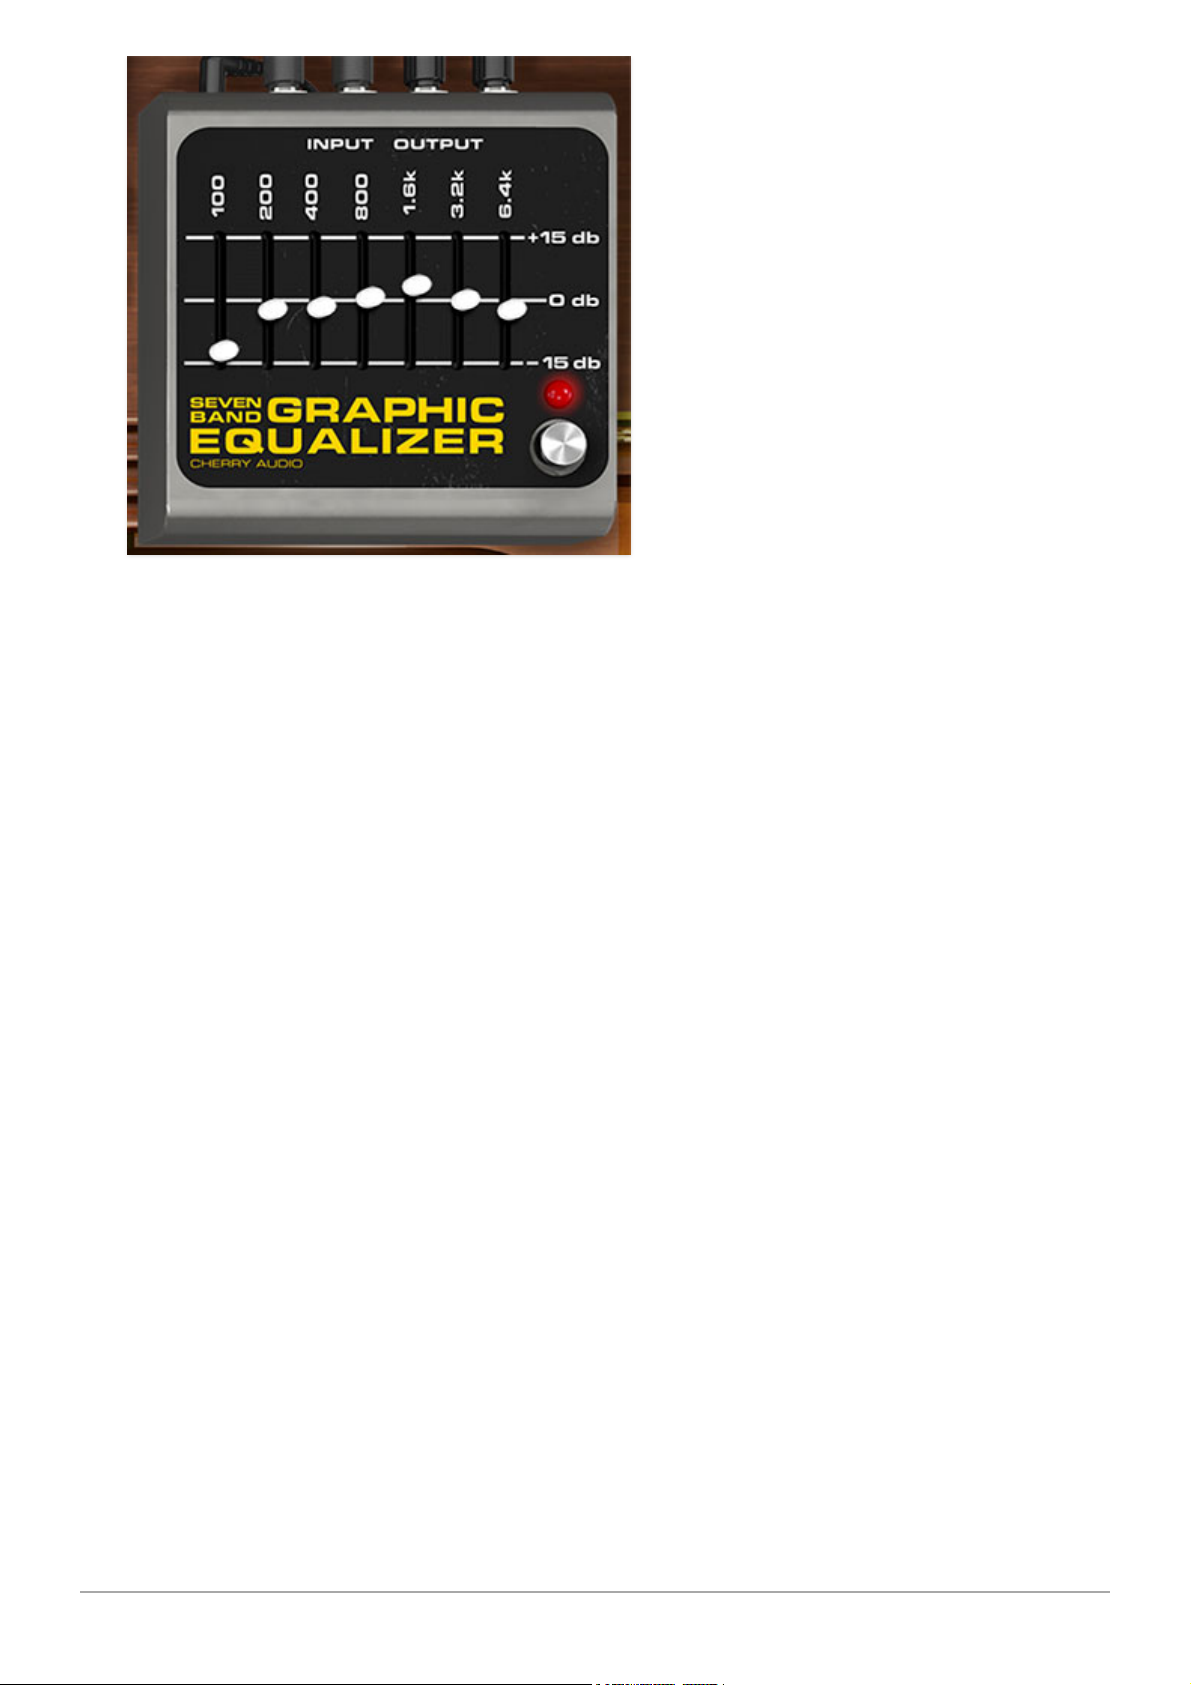
On/Off- Enables and disables the EQ effect. Disabling the
Effects
On/Off tab
next to the keyboard will disable all three stomp box effects, but their on/off
status will be retained.
Boost/Cut sliders- Allows boosting or cutting up to 15 dB at 100, 200, 400,
1600, 3200, and 6400 Hz. The 100 Hz and 6400 Hz bands are shelving; the
remaining bands are peaking with a one-octave bandwidth.
Cherry Audio Blue3 User Guide - 44
Page 45
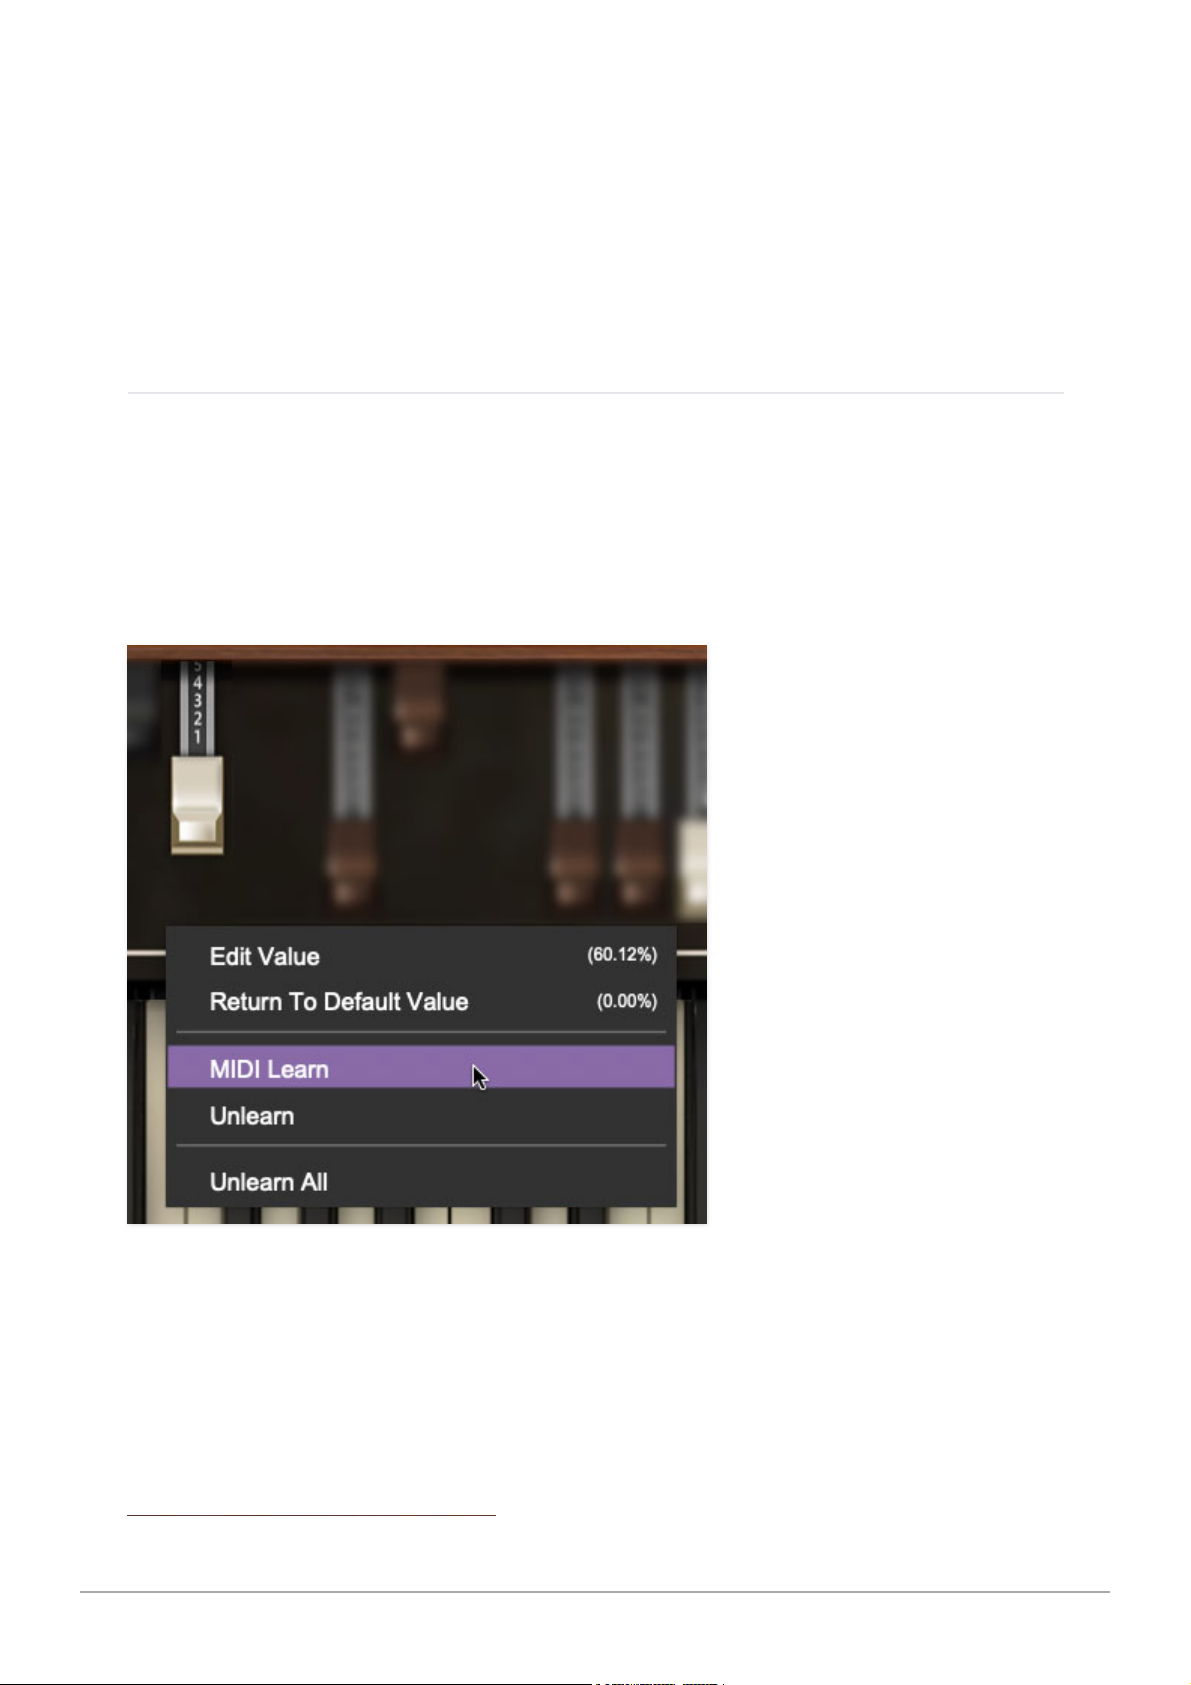
Assigning internal and external hardware controls adds a whole new
dimension of control and musicality to Blue3 sounds, and it's really easy to
do.
The MIDI Tab is where all controller assignments can be viewed and tweaked
(click the MIDI icon in the purple menu strip at the top to view the MIDI tab).
First we'll show how to assign an external hardware controller to a Blue3
control, then we'll go over all parameters in the MIDI Tab.
Assigning a Single External Hardware Control
This is the quick, "I just want to assign a hardware control right now!,"
section. We recommend reading this whole section to best take advantage of
Blue3's MIDI control assignments.
The most likely thing you'll want to do is assign sliders from a USB/MIDI
controller to Blue3's drawbars, so let's being by assigning a single one:
Begin by right-clicking on a drawbar and and selecting
MIDI Learn.
Cherry Audio Blue3 User Guide - 45
Page 46
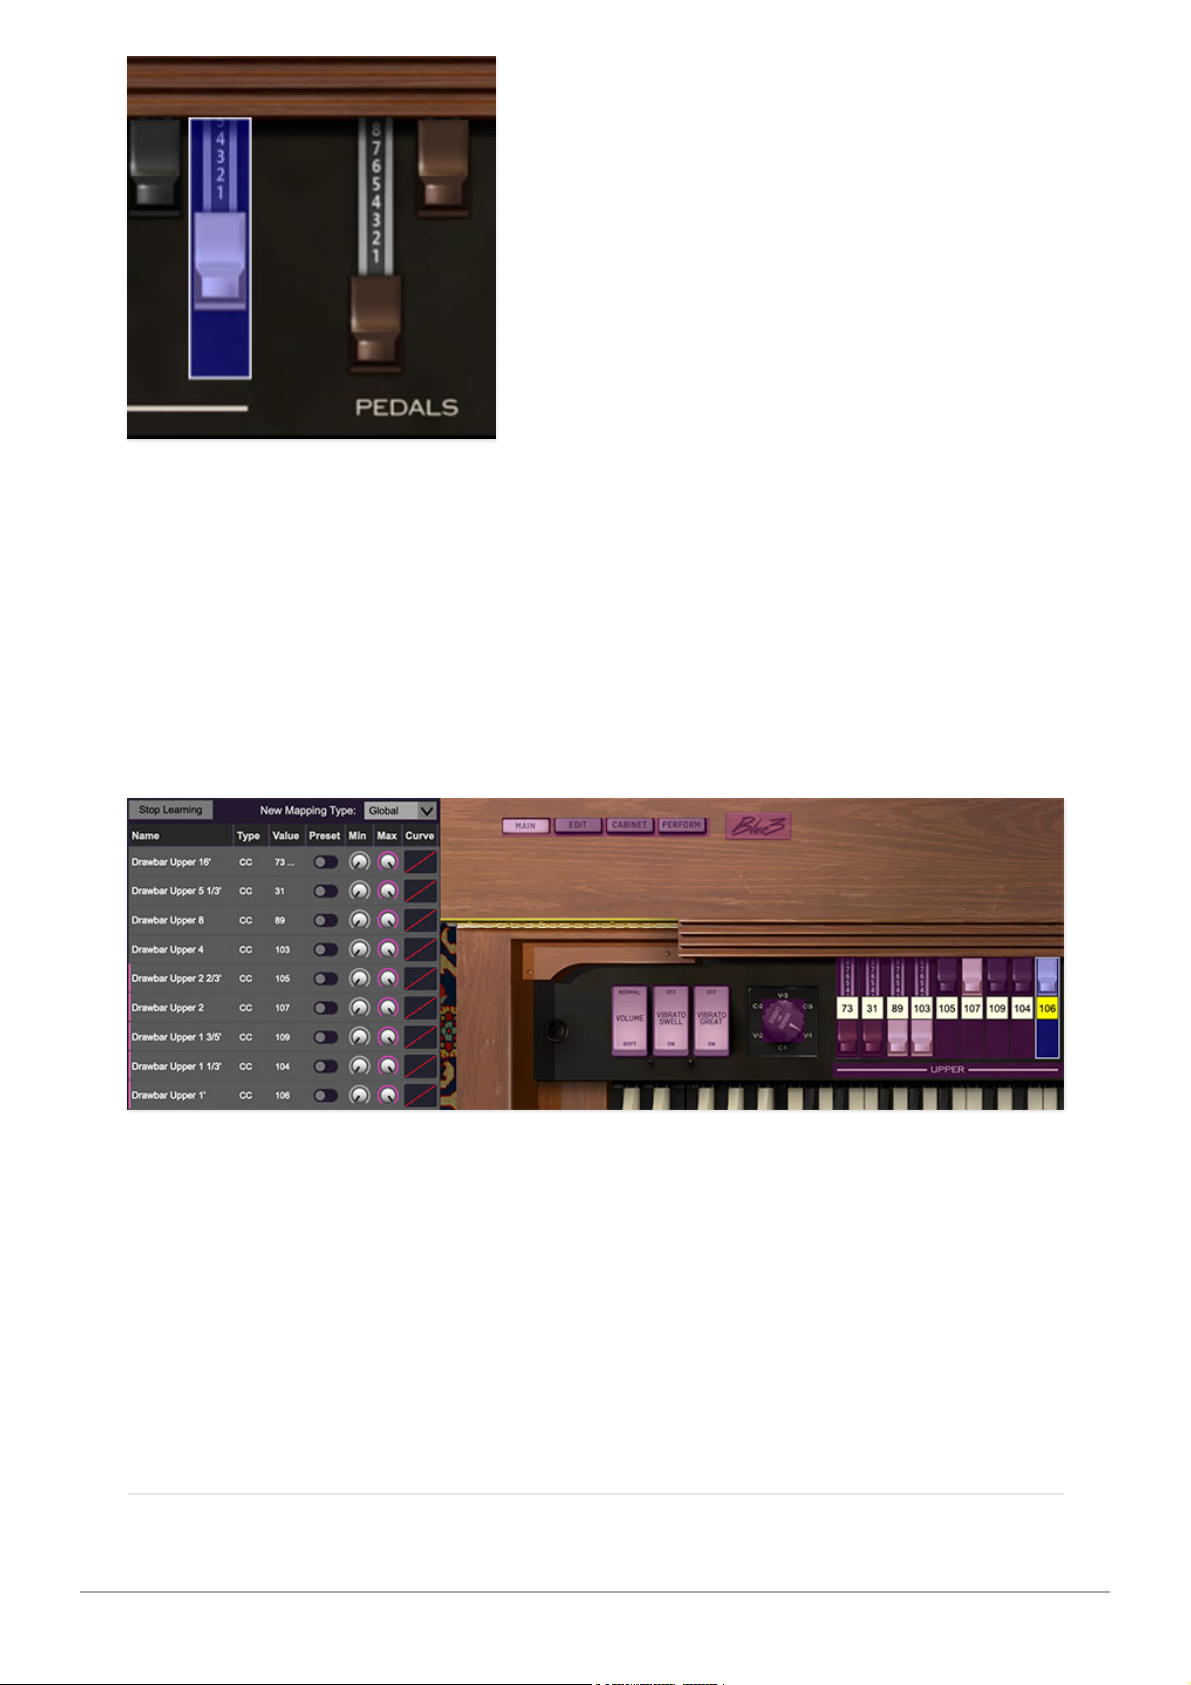
A transparent purple overlay appears over the knob indicating that it's in
learn mode. Now move the desired hardware control device. The blue overlay
disappears and the hardware control will move the onscreen slider. If you get
cold feet (or accidentally put the wrong control into learn mode), learn mode
can be aborted by right-clicking and selecting
Stop Learning
.
This is the basic procedure for assigning hardware controllers to almost any
Blue3 control.
When in MIDI learn mode, previously assigned controller numbers appear in
squares on top of the onscreen control. These indicate the MIDI continuous
controller number of the assigned hardware control (these are also displayed
in the
MIDI
library tab at left).
Once a MIDI controller has been assigned, in addition to real-time control of a
Blue3 parameter, you’ll also be able to record and play back controller data
from a DAW.
The MIDI Tab
Cherry Audio Blue3 User Guide - 46
Page 47
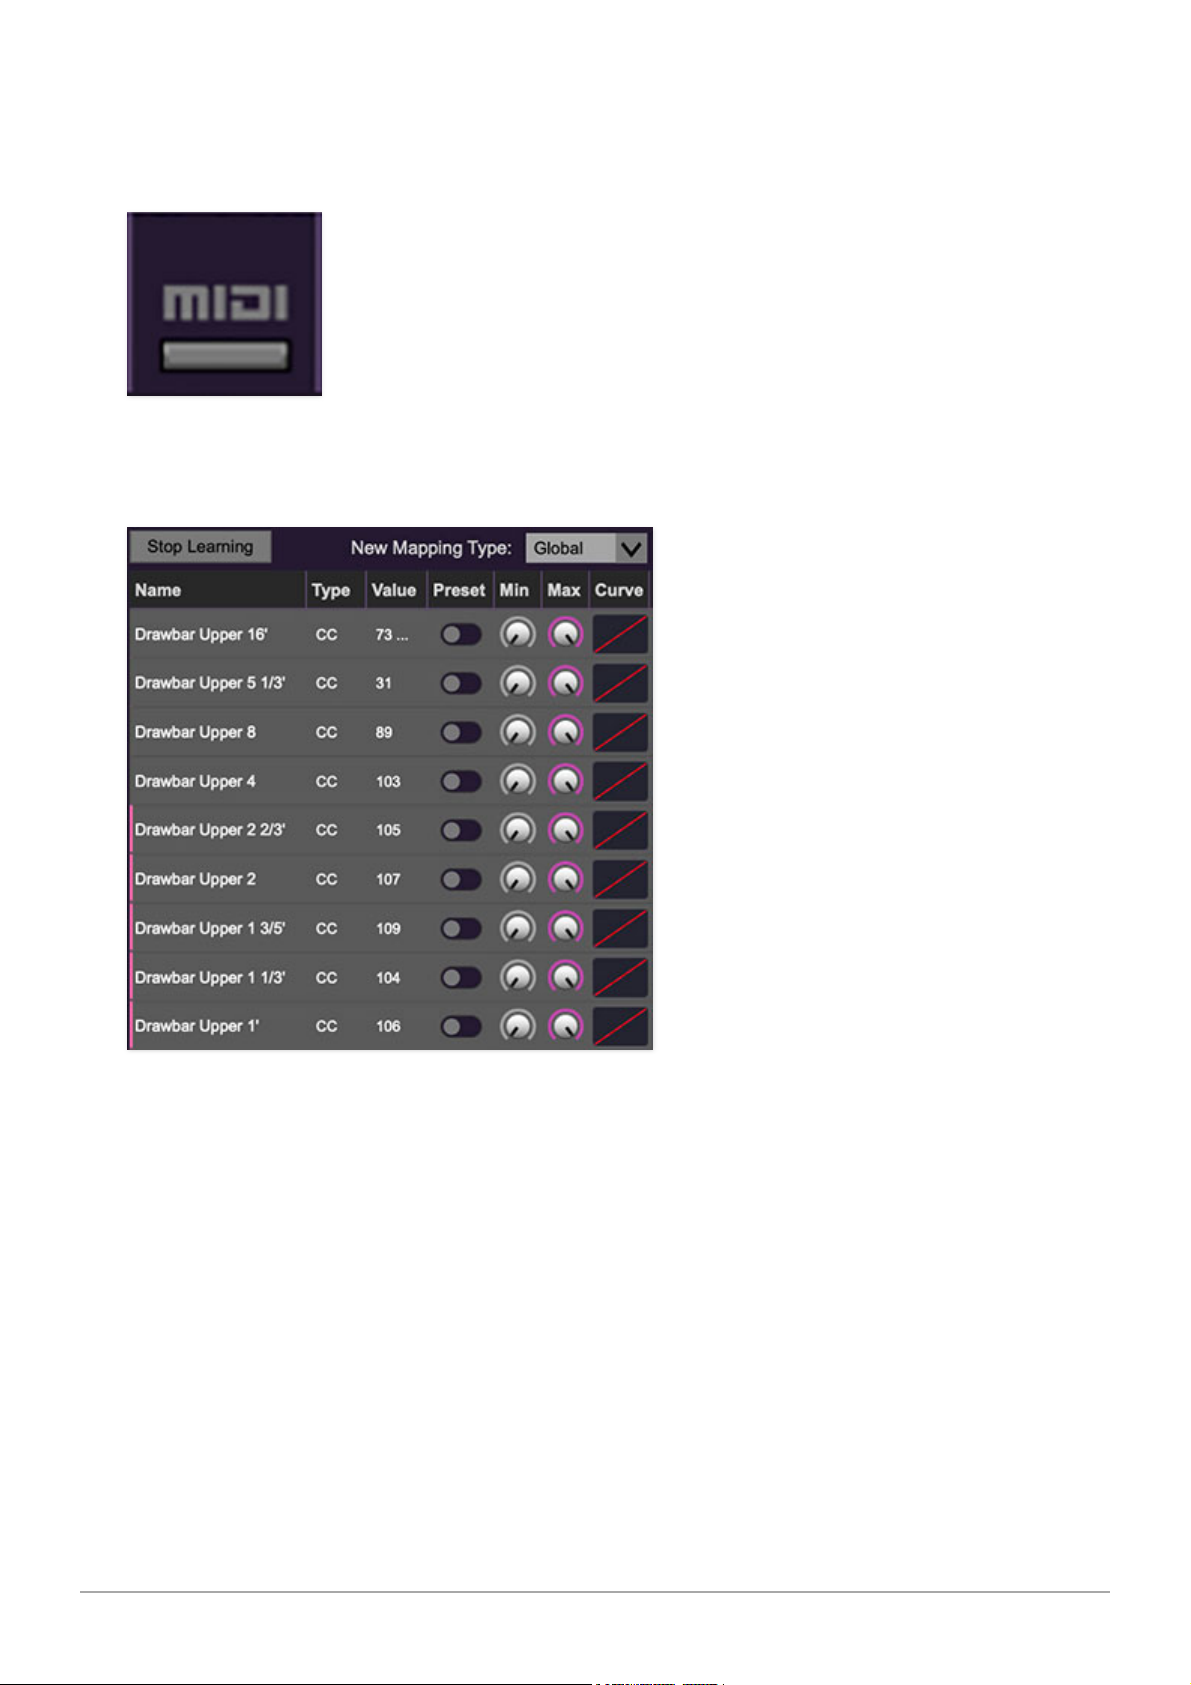
This is command central for all MIDI controller assignments. Here you’ll be
able to see information about all currently assigned controllers and adjust
control ranges.
To view or hide the MIDI Tab, click the
MIDI
button in the top toolbar.
MIDI Learn button- This is almost exactly the same as enabling MIDI learn
mode by right-clicking a control. Click the
MIDI Learn
button to enter learn
mode (all controls turn purple). Unlike right-clicking on specific knobs,
where Blue3 automatically exits controller assignment mode,
clicking the
MIDI Learn
knob "stays on" to enable assignment of
multiple hardware controls. This is particularly handy for quickly
assigning a bunch of sliders to Blue3's drawbars.
To assign multiple controls, click
MIDI Learn
, click an onscreen control, move
the desired hardware knob or slider, continue clicking and assigning onscreen controllers until all desired controls are assigned, then click
Stop
Cherry Audio Blue3 User Guide - 47
Page 48
Learning
to exit learn mode. (And remember, when we stop learning, we stop
growing, and... oh forget it.)
Remember that a single hardware knob/slider/button isn't limited to
controlling just one parameter - a single hardware controller can
simultaneously operate as many controls as you'd like.
New Mapping Type- This popup menu selects whether newly assigned MIDI
mappings will be global (affects all sounds and doesn't change when
different presets are selected) or saved with individual presets.
MIDI Tab Columns
Name- Displays the name of the parameter being controlled.
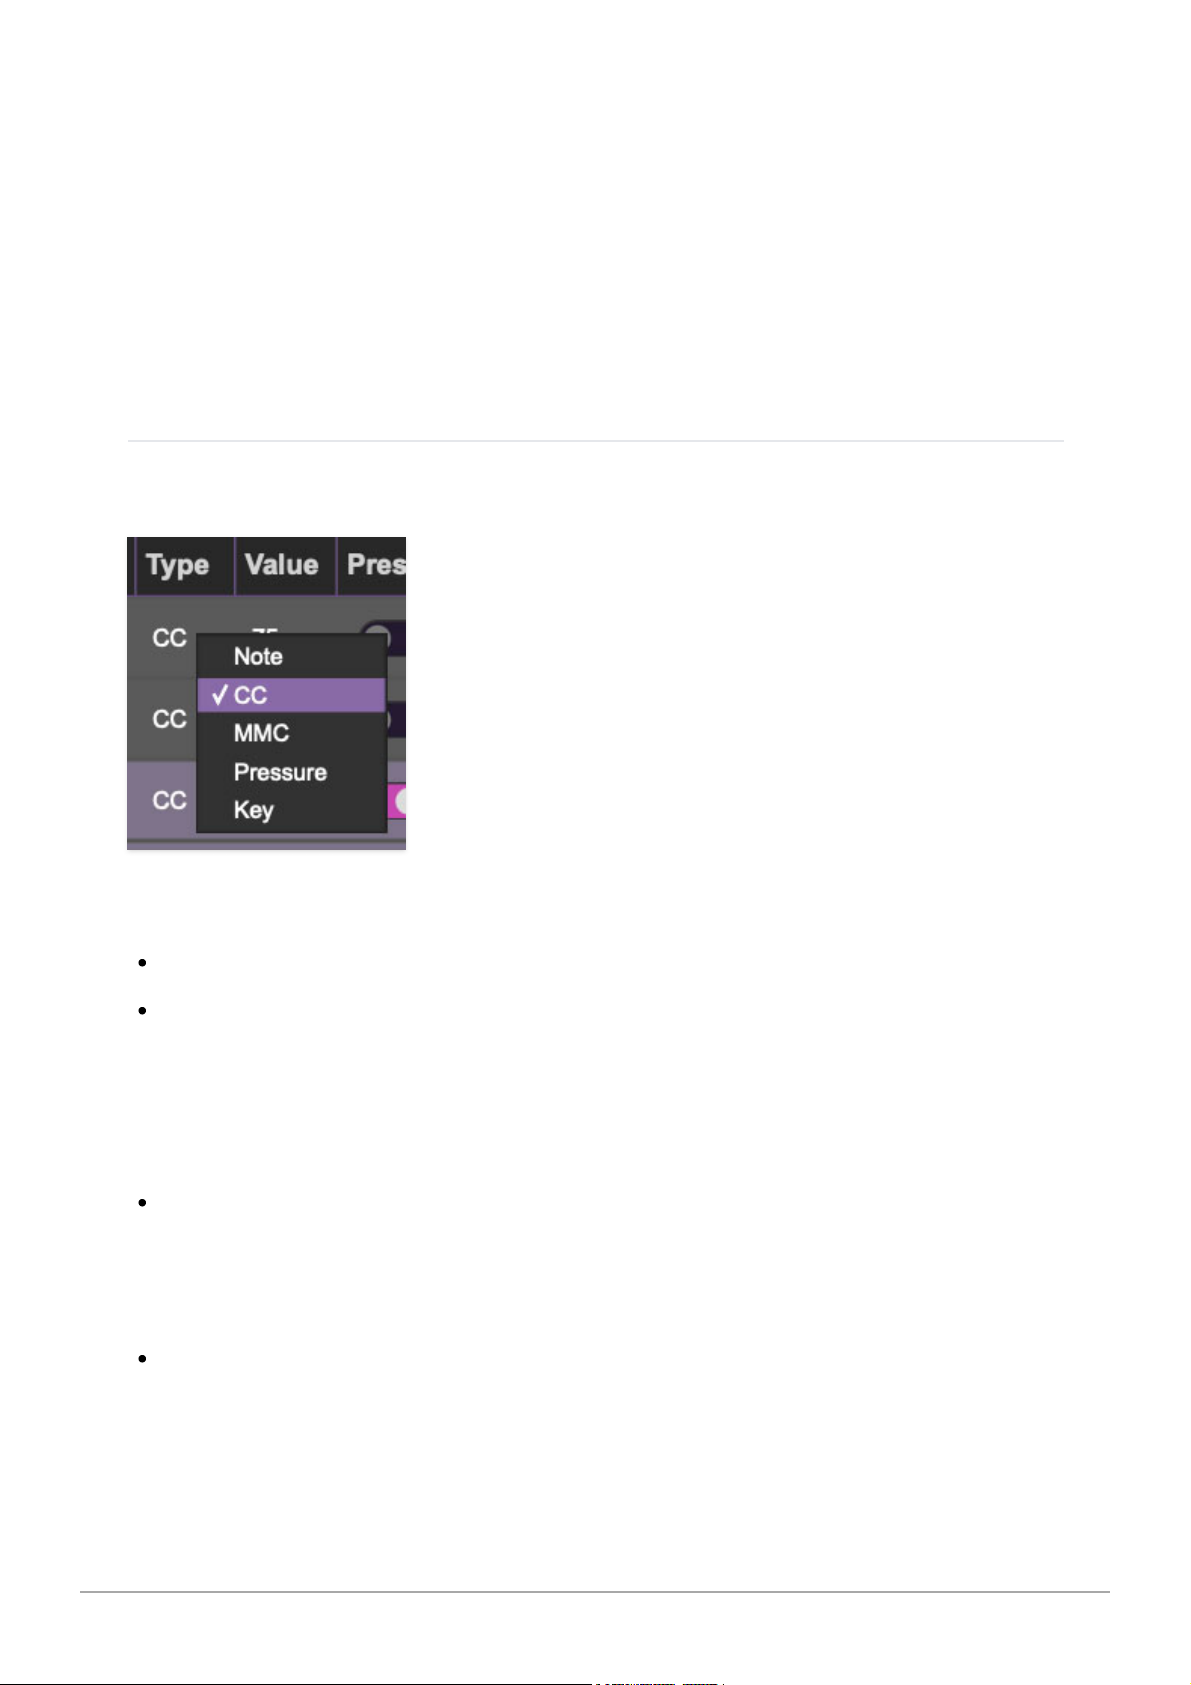
Type- There are five possible types of controller automation in Blue3:
Note- Notes played on a MIDI keyboard controller, expressed as C-1 to G9
CC (MIDI Continuous Controller)- The standard 128 MIDI controller
numbers as defined in the MIDI spec. More specifically, these are the
controllers transmitted by hardware knob and slider controls. MIDI CC’s
can be used to control parameters in real-time or recorded and played
back within DAW software.
MMC (MIDI Machine Control)- The MIDI control protocol for tape
machine-style transport controls. Back in the dark ages, this was used to
control wonky old Tascam and Fostex reel-to-reel monsters, but it's useful
if your MIDI controller has tape-style transport control buttons.
Pressure- Most modern keyboard controllers transmit controller data
when keys are pressed and released as they're held down. The vast
majority of keyboard controllers with aftertouch transmit "mono"
aftertouch only; in other words, aftertouch data is the sum of all keys to
Cherry Audio Blue3 User Guide - 48
Page 49

one single data stream. Note that Blue3 only responds to mono
aftertouch.
Key- This allows keys of the computer QWERTY keyboard to at as button
controls for Blue3's onscreen controls.
Value-Displays the specific automation controller. In the case of a
Note
this
would show a MIDI note number (C-1 to G9, for a MIDI CC, this would be the
MIDI CC controller number, etc. Clicking on the value opens a pop-up menu
where all values are displayed and can be selected.
Preset-This slider works in conjunction with the
New Mapping Type
popup
control. In the left position (gray background), the MIDI mapping is global
(affects all sounds and doesn't change when different presets are selected),
in the right position (lavender background), the MIDI mapping is saved with,
and only affects the current sound preset.
The
Preset
switch is super nifty, because it means that MIDI mappings can
easily be changed to global or per-preset status at any time. (A lot of folks
have asked us for this feature.)
Min- Sets a limit on the lowest value any automation control can set a
mapped controller to. This actually recalibrates the range of the automation
controller to the remaining parameter range.
Max- Sets a limit on the highest value any automation control can set a
mapped controller to. This actually recalibrates the range of the automation
controller to the remaining parameter range.
Super Tricky Min-Max Tricks
- Not only can parameter ranges be limited
via the the
Min
and
Max
knobs, mapped control destinations can be
completely inverted by setting the
Min
knob all the way up and the
Max
knob all the way down (or anywhere in between). If drawbars
controls are working backwards, inverting the control range will
fix this.
Limiting and inverting parameter ranges with the
Min/Max
controls is
particularly useful when multiplexing a single hardware control to operate
multiple parameters. Along with the
Curve
control, the customization
possibilities are super flexible.
Curve- These allow the customization of how incoming MIDI CC controls
affect the movement of Blue3's onscreen controls, ranging from exponential
to linear to logarithmic curves.
Cherry Audio Blue3 User Guide - 49
Page 50
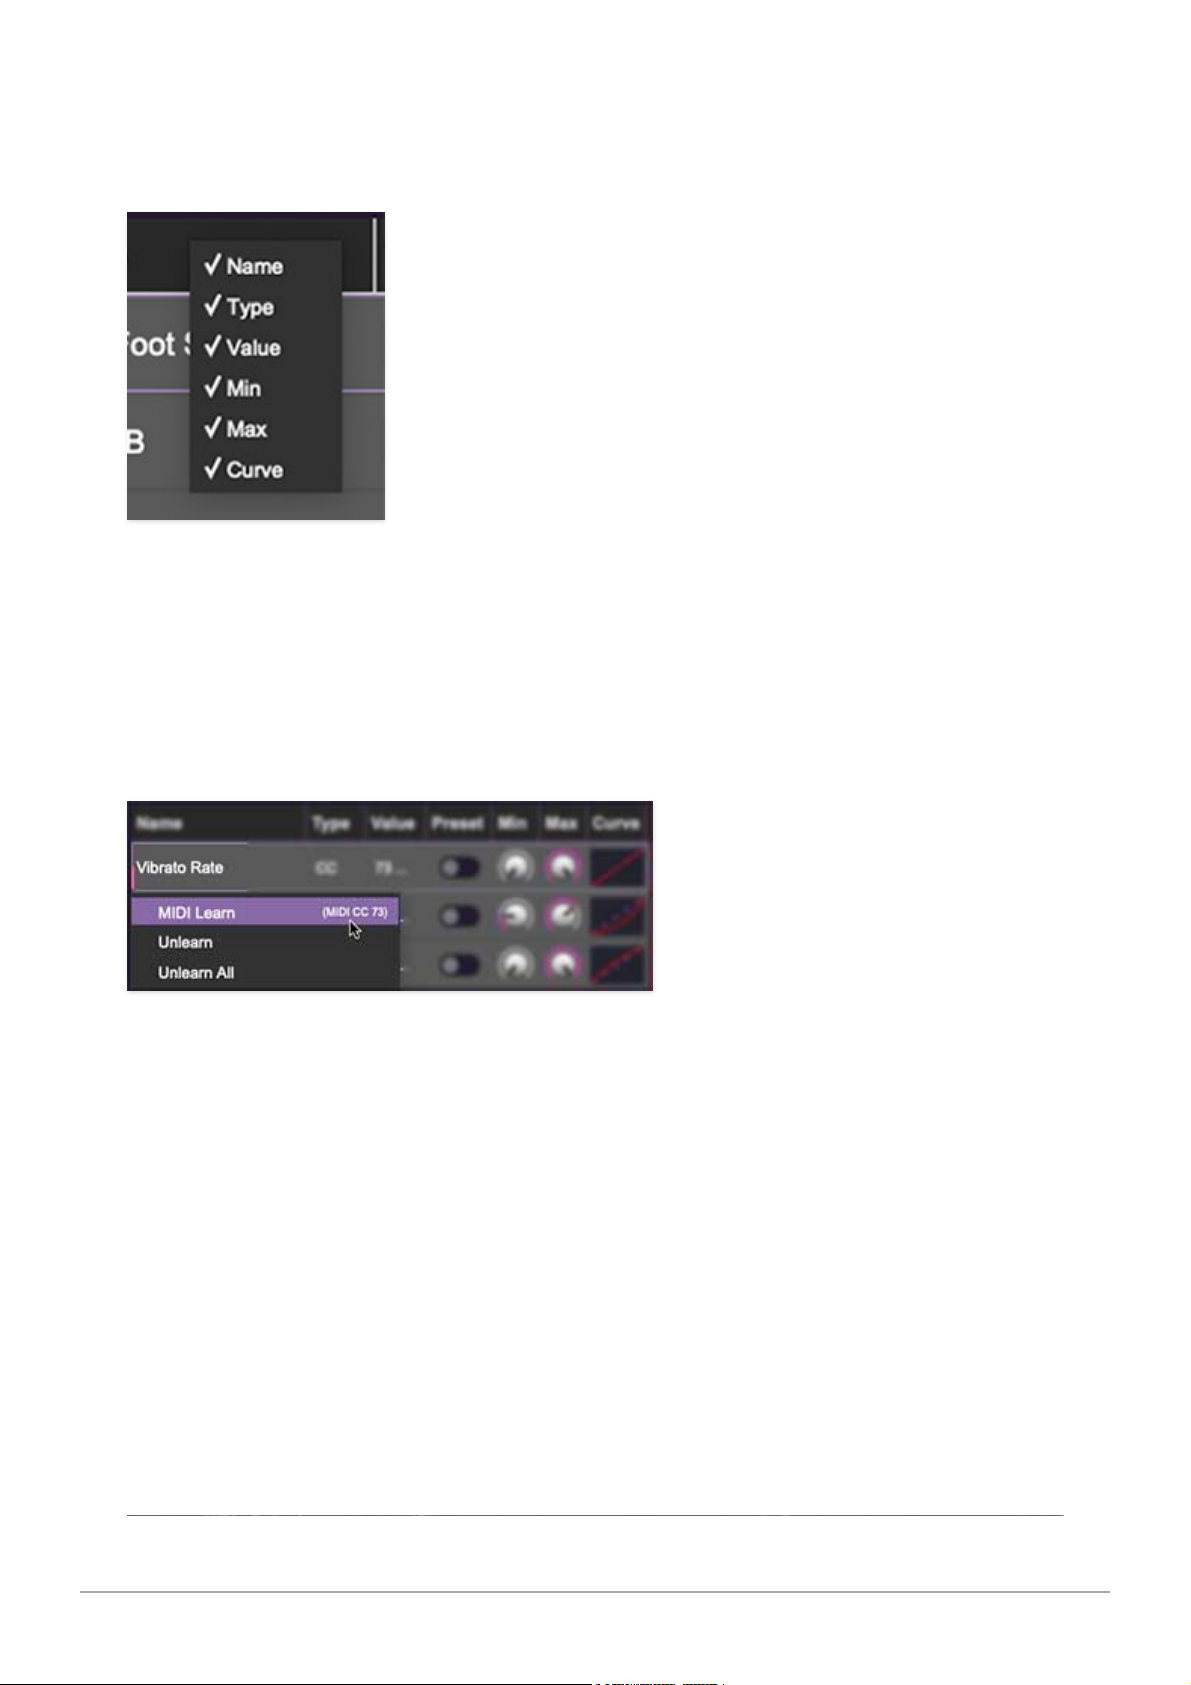
MIDI Tab Column Configuration
Right-Click Menu
Right-clicking anywhere in the top row (
Name, Type, Value
, etc.) displays the
column configuration menu. Checking/unchecking these allows hiding and
display of each column. This has no effect on assignments.
MIDI Tab Parameters Right-Click
Right-clicking on an assigned parameter opens the menu above.
MIDI Learn- This is used to change the controller assigned to a particular
parameter.
Unlearn- Deletes the selected automation parameter.
Unlearn All-Deletes all controller assignments for the patch. Blue3 will
display a warning dialog prior to deletion in order to thwart potential unlearnrelated disasters.
Cherry Audio Blue3 User Guide - 50
Page 51
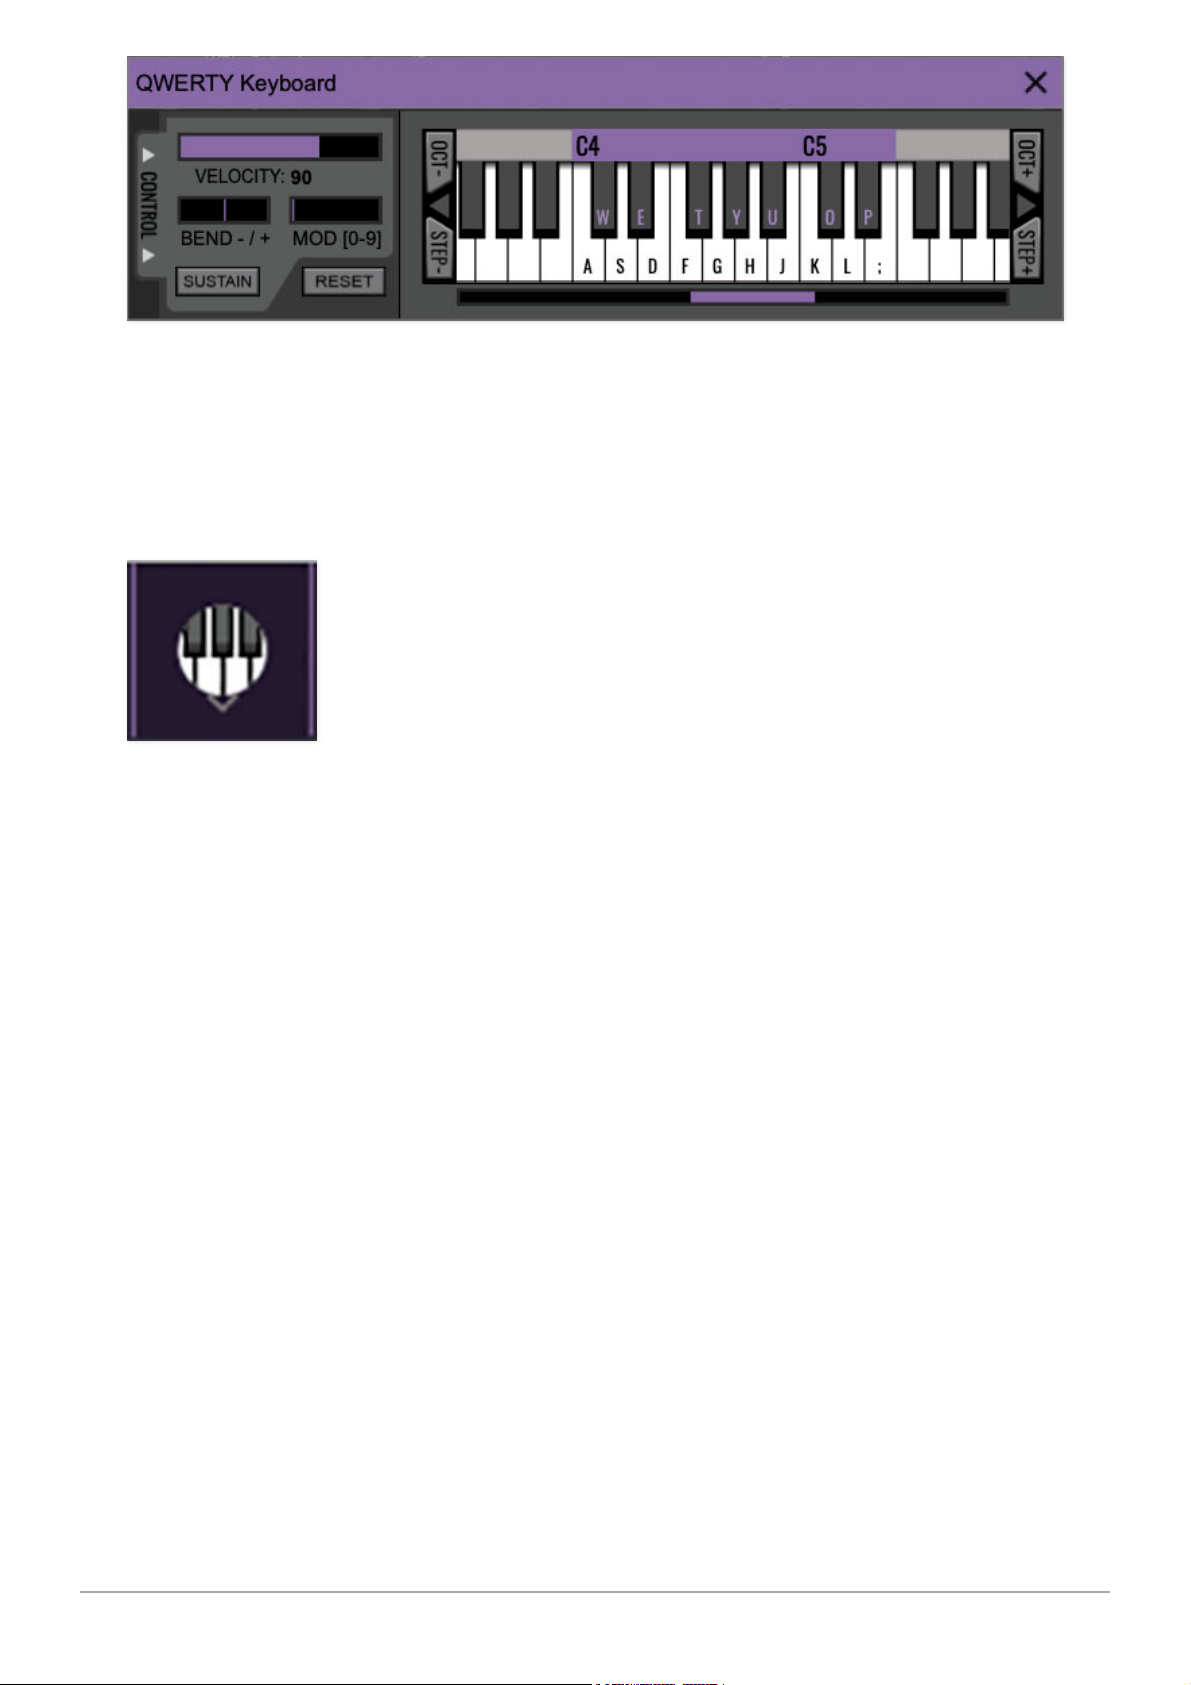
If you don't have a MIDI keyboard attached to your computer, the standard
QWERTY computer keyboard can be used to play notes - we're pretty sure
you've got one of those!We'll refer to this as the "MTK." Following is a list of
MTK keyboard modifiers and functions:
Opening and Closing the MTK - click the the circular keyboard icon in the
top toolbar. To close the MTK, click the keyboard icon in the top toolbar, or
click the X in the top right corner.
Play Notes- To trigger notes, simply press the corresponding computer
keyboard key or mouse click the onscreen keys.
Adjust Currently Visible MTK Range- Slide the purple scroll bar
horizontally to adjust the currently visible keyboard range.
Adjust Overall Visible Keyboard Range- Clicking and dragging the right
edge of the MTK window allows the overall size of the window to be adjusted.
This lets you view more or less of the onscreen keyboard. Note that the MTK
window's borders cannot exceed the overall outside dimensions of the
Wurlybird window.
Shift Range Up/Down Octave- Click the
Oct-
and
Oct+
buttons at the top
left and right of the onscreen MTK. The current range is displayed above the
keyboard.
Shift Range Up/Down Semitone- Click the
Step-
and
Step+
buttons at the
bottom left and right of the onscreen MTK. The current range is displayed
above the keyboard.
Cherry Audio Blue3 User Guide - 51
Page 52

Hide/View Controllers- Clicking
Control
at the far left hides and displays
velocity, bender, mod, and sustain control parameters. Hiding the control
view makes more space available for the keyboard.
Set Note Velocity- Since your computer keys don't respond to velocity this
sets a fixed velocity level for notes played, but not all that important, as the
only Blue3 parameter that responds to velocity is
Key Contact Timing
(in
Settings>Instrument
)... which is a pretty subtle effect that you most likely
won't mess with when thwacking away at notes on your computer keyboard.
Pitch Bend- Hitting the + or - keys while playing a note will bend according
to the range set on the
Settings>Instrument
prefs page. (Settings can be
accessed via the gear icon in the top purple menu strip.)
Mod Wheel- To add mod wheel modulation, press the number keys from
0-9
(above the character keys) while playing a note. The modulation amount will
vary from none (0) to full modulation (9). Note that modulation will "stick" at
the selected number; to disable modulation, click the 0 key. Mod can also be
engaged by clicking the mouse in the mod bar area.
Keep in mind that by default, the mod wheel controller doesn't do anything.
The usual procedure for assigning the mod wheel (or any other external
hardware controller) is to right-click an onscreen control, selecting
MIDI
Learn
, and moving the hardware control. If don't have a hardware USB/MIDI
controller (and if you're using the MTK we'll assume you don't), you can
assign the mod wheel by right-clicking an onscreen control, selecting
MIDI
Learn
, and hitting one of the number keys from
0-9
(above the character
keys).
Sustain- The
Sustain
button mimics the functionality of a standard sustain
pedal. Click the [TAB] key to engage sustain, or [SHIFT]+[TAB] to lock it. The
Sustain
button can also be engaged by mouse clicking it. How the sustain
pedal functions can be set on the
Settings>Instrument
prefs page (i.e.
whether it's globally on or off, and which manuals it affects).
Reset- Initializes all MTK parameters including keyboard range and control
parameters.
Cherry Audio Blue3 User Guide - 52
Page 53
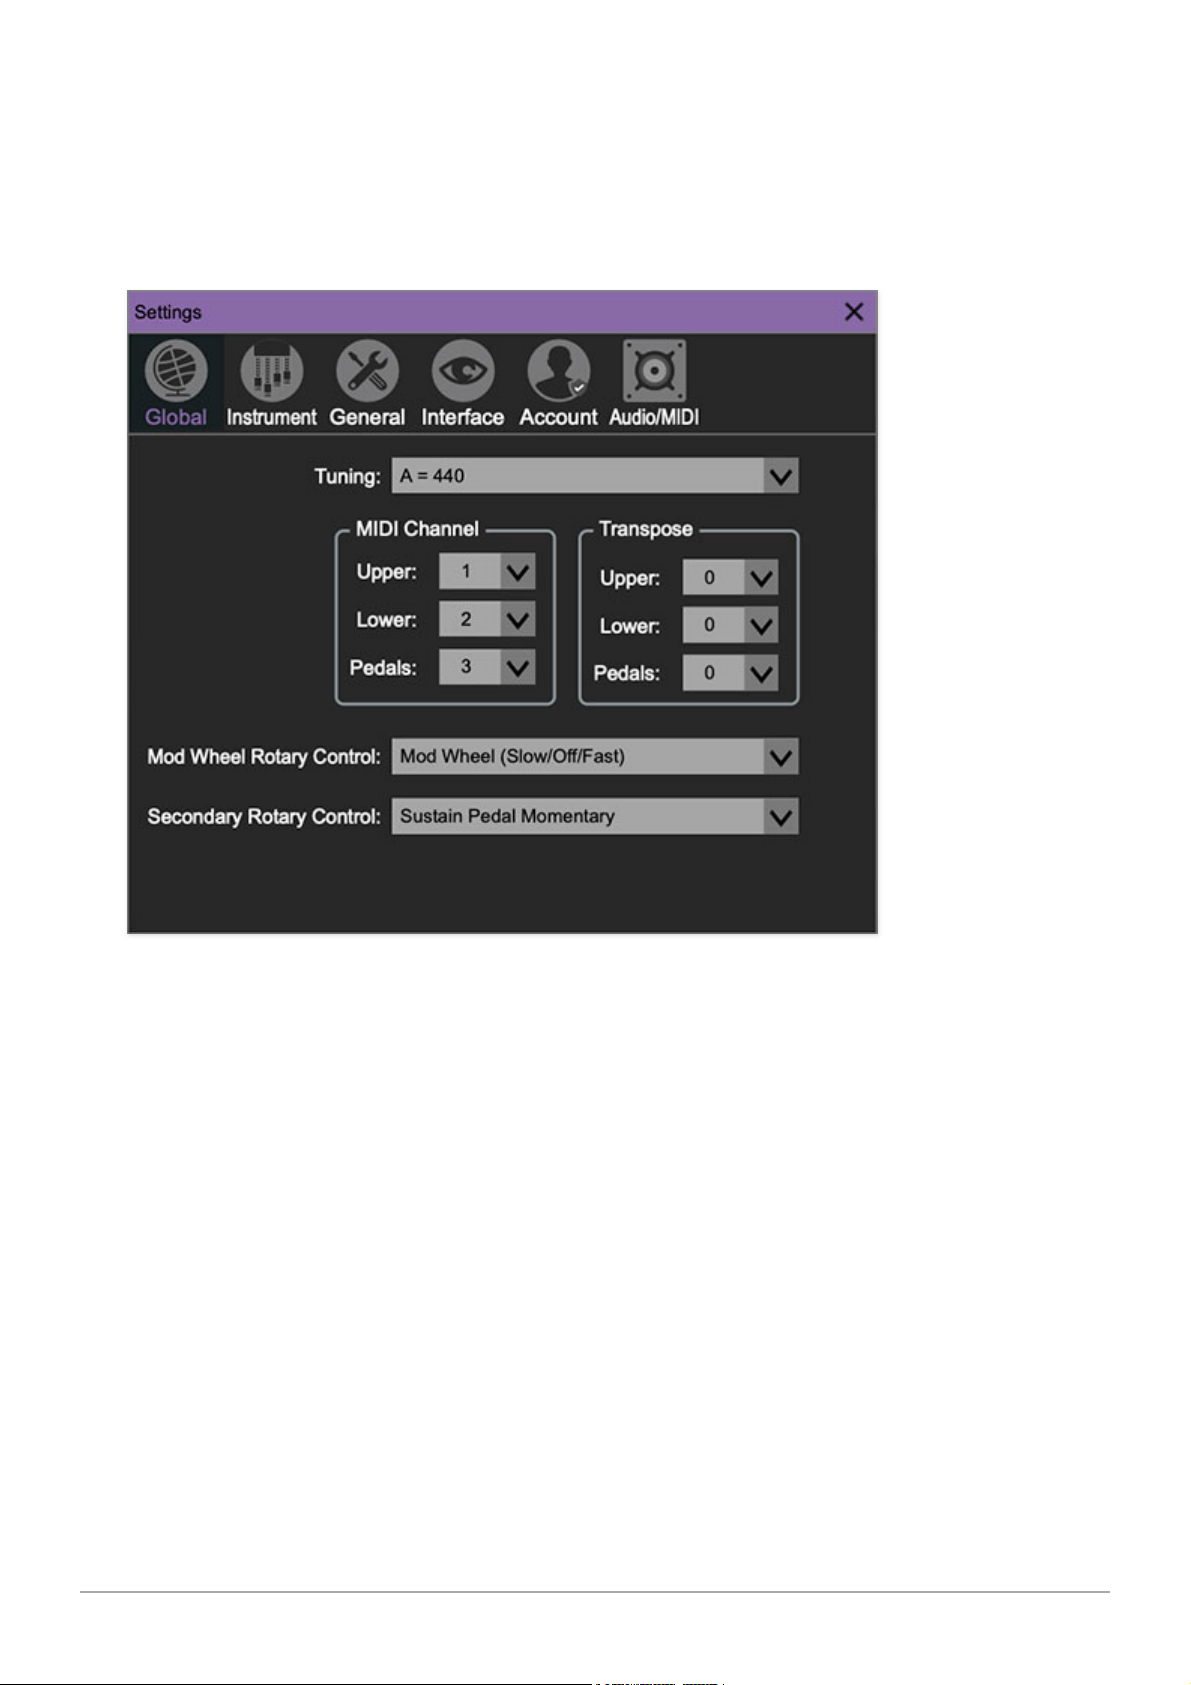
Clicking the settings gear opens a window with multiple tabs for configuring
various "under-the-hood" settings. These are mostly set-and-forget kind of
parameters; everything you'll usually use is in the main UI.
GLOBAL
Tuning- Allows global tuning of Blue3 from A=432 Hz to A=445Hz. Generally
you'll want to leave this at its default concert tuning setting of A=440Hz.
(Unless you're playing with a not-easily-tuned instrument such as a piano,
xylophone, or one of your bandmates is one of those "music sounds better at
A=437 Hz" nitwits.)
MIDI Channel- This lets you set reception MIDI channels for the Upper,
Lower, and Pedal manuals. This is useful if you're using multiple USB/MIDI
controllers. If you're using a single MIDI controller and would like access to
both manuals, or the Upper manual + Pedal manual, we recommend using
the Split function to the left of the Upper manual on the
MAIN
and
EDIT
pages. Split mode always uses the
Upper
MIDI channel; the Lower and Pedals
manuals always respond to the MIDI channels set here regardless of whether
Split is currently active.
Cherry Audio Blue3 User Guide - 53
Page 54
For more info on using Split, please see
Keyboard Split
in the Main Page
section.
Transpose- Allows incoming MIDI data to be independently transposed up or
down two octaves. This is useful for those of you who got suckered into
buying own handy space-saving two-octave keyboard controllers.
Mod Wheel Rotary Control- Defines how the mod wheel controls the "halfmoon" rotary speaker switch at the the bottom left of the keyboard.
Secondary Rotary Control- Defines an additional MIDI hardware controller
for rotary speaker speed control. Take it from us, sustain pedal slow/fast is
super handy in live performance applications (when your left hand has to be
doing something else).
Note that the
Aftertouch Toggle
and
Aftertouch Momentary
selections can be
used with mono or poly aftertouch.
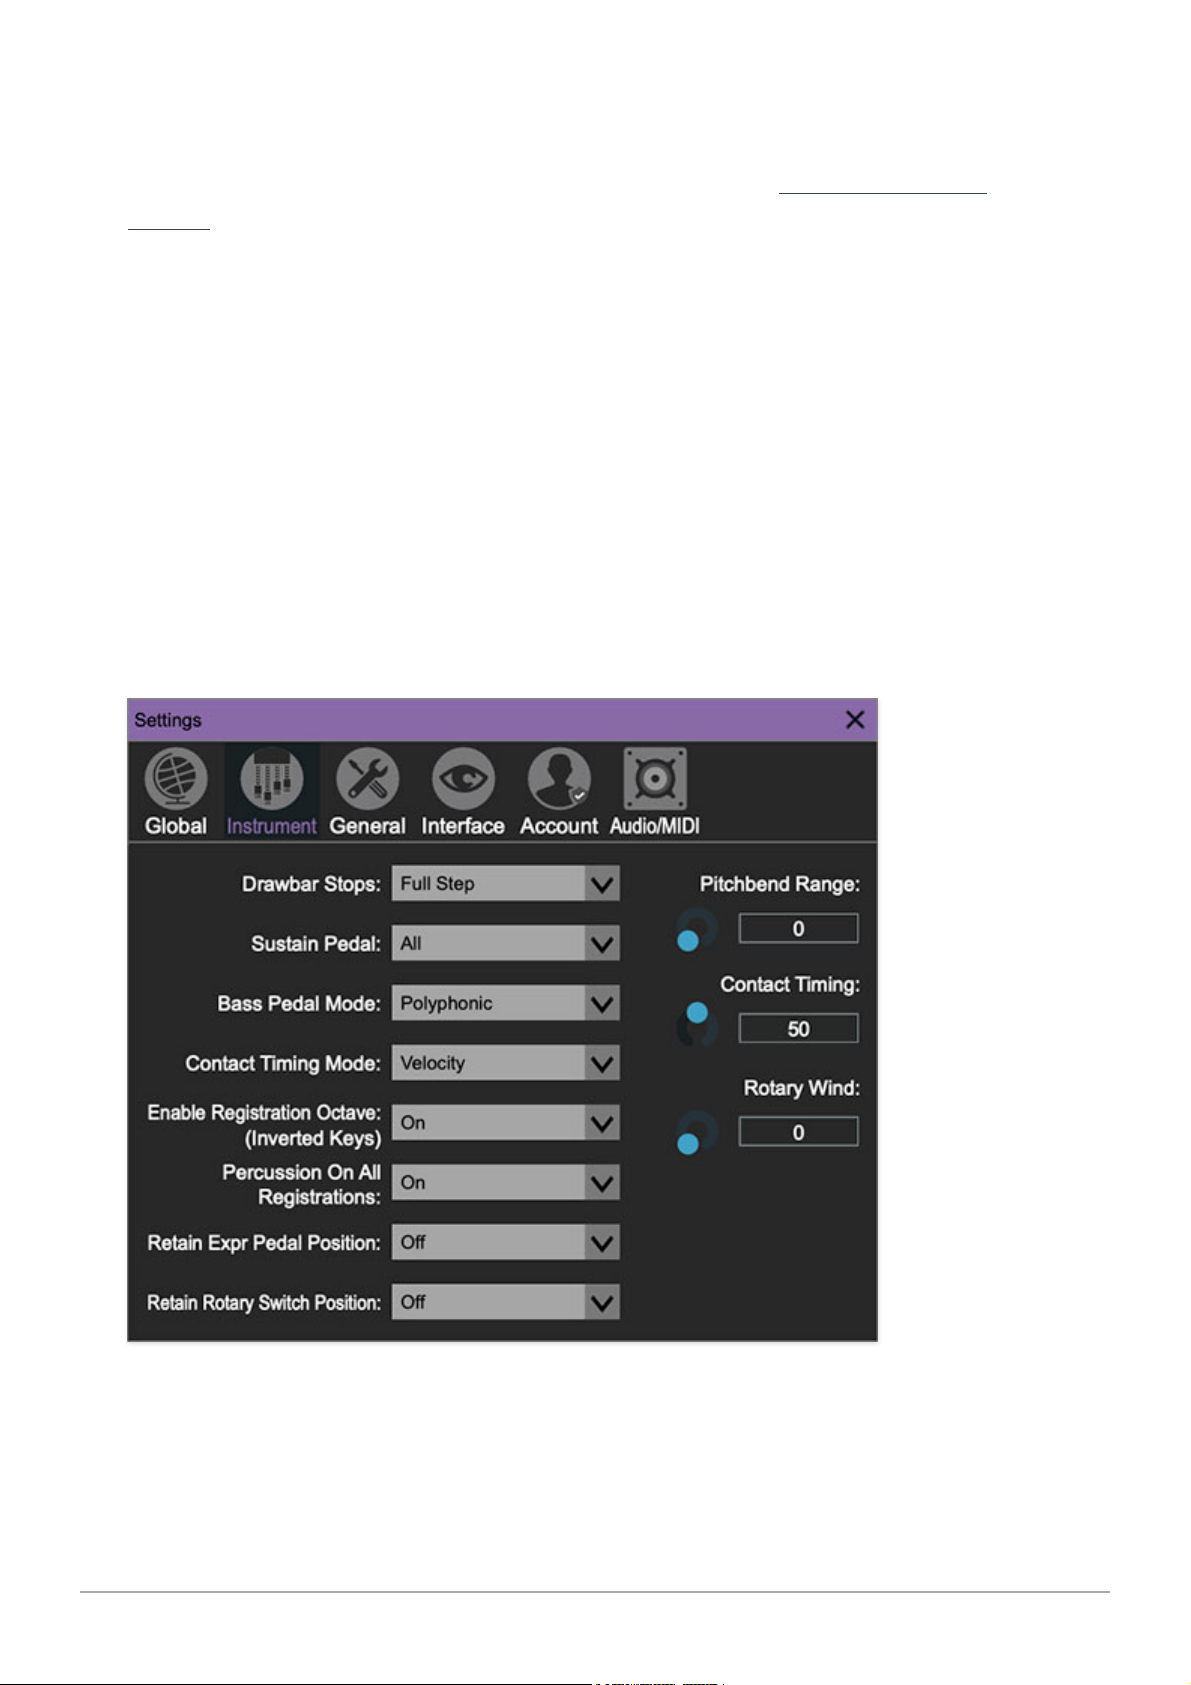
INSTRUMENT
Drawbar Stops- Depending on the model, some vintage organ drawbars
had definitive clicks at each number stop and some don't. Drawbar stops lets
Cherry Audio Blue3 User Guide - 54
Page 55

you select whether the drawbars move in full number steps, half-number
steps, or move continuously.
Pitchbend Range- Blue3 notes can be bent using a pitchbend wheel, just
like a synthesizer. This sets the range from 0 to 12 steps (i.e. an octave).
Sustain Pedal- Allows a hardware sustain pedal to be used to hold notes.
The popup allows assignment to any of the manuals, all three, or none. Note
that sustain pedal functionality is disabled if the sustain pedal is
assigned to control rotary speaker speed (set using the
Rotary Control
parameter in the
Global
tab).
Bass Pedal Mode- Allows the Pedal manual to play monophonically (onenote-at-a-time), polyphonically, or polyphonically with mono release.
Poly/Mono Release
means that only the earliest note played rings when Pedal
manual notes are released - this sounds cleaner if multiple pedal notes are
accidentally played. Keep in mind that Pedal manual release is really only a
concern when the
Decay
knob in the
Pedals
section of the
EDIT
page is
turned up.
Contact Timing Mode/Contact Timing- When set to
Velocity
, the timing
between key contact closures is affected by how fast you play a key, just like
the real thing. In
Fixed
mode, the timing between key contact closures is
always the same. Both modes are scaled by the
Contact Timing
amount
control directly to the right.
Contact Timing: Adjusts the maximum time delay between key contact
closures when pressing a key. This is based on the the MIDI velocity and
affects the sound of the key click.
Enable Registration Octave (Inverted Keys)- This allows you to disable
the bottom-octave black key presets, in case you're a clumsy fool who
unintentionally hits them during live performances (i.e., me).
Rotary Wind Amount- Adjusts the level of wind noise created when the
horn rotors go by the microphones. Fill in your own off-color joke here.
Percussion On All Registrations- A real B3 only plays Percussion when the
B registration on the Upper manual is selected (i.e. percussion doesn't work if
the inverted key B "left side" drawbars are selected). If this is on, Blue3 will
play Percussion on both the Bb and B registrations.
Retain Expression Pedal Position- When turned on, the position of the
expression stays the same when changing presets. In the
Off
setting,
expression pedal position is stored with presets.
Cherry Audio Blue3 User Guide - 55
Page 56
Retain Rotary Switch- When turned on, the position of the rotary speaker
speed switch (at the bottom left of
MAIN
and
EDIT
pages) stays the same
when changing presets. In the
Off
setting, rotary speaker speed switch
setting is stored with presets.
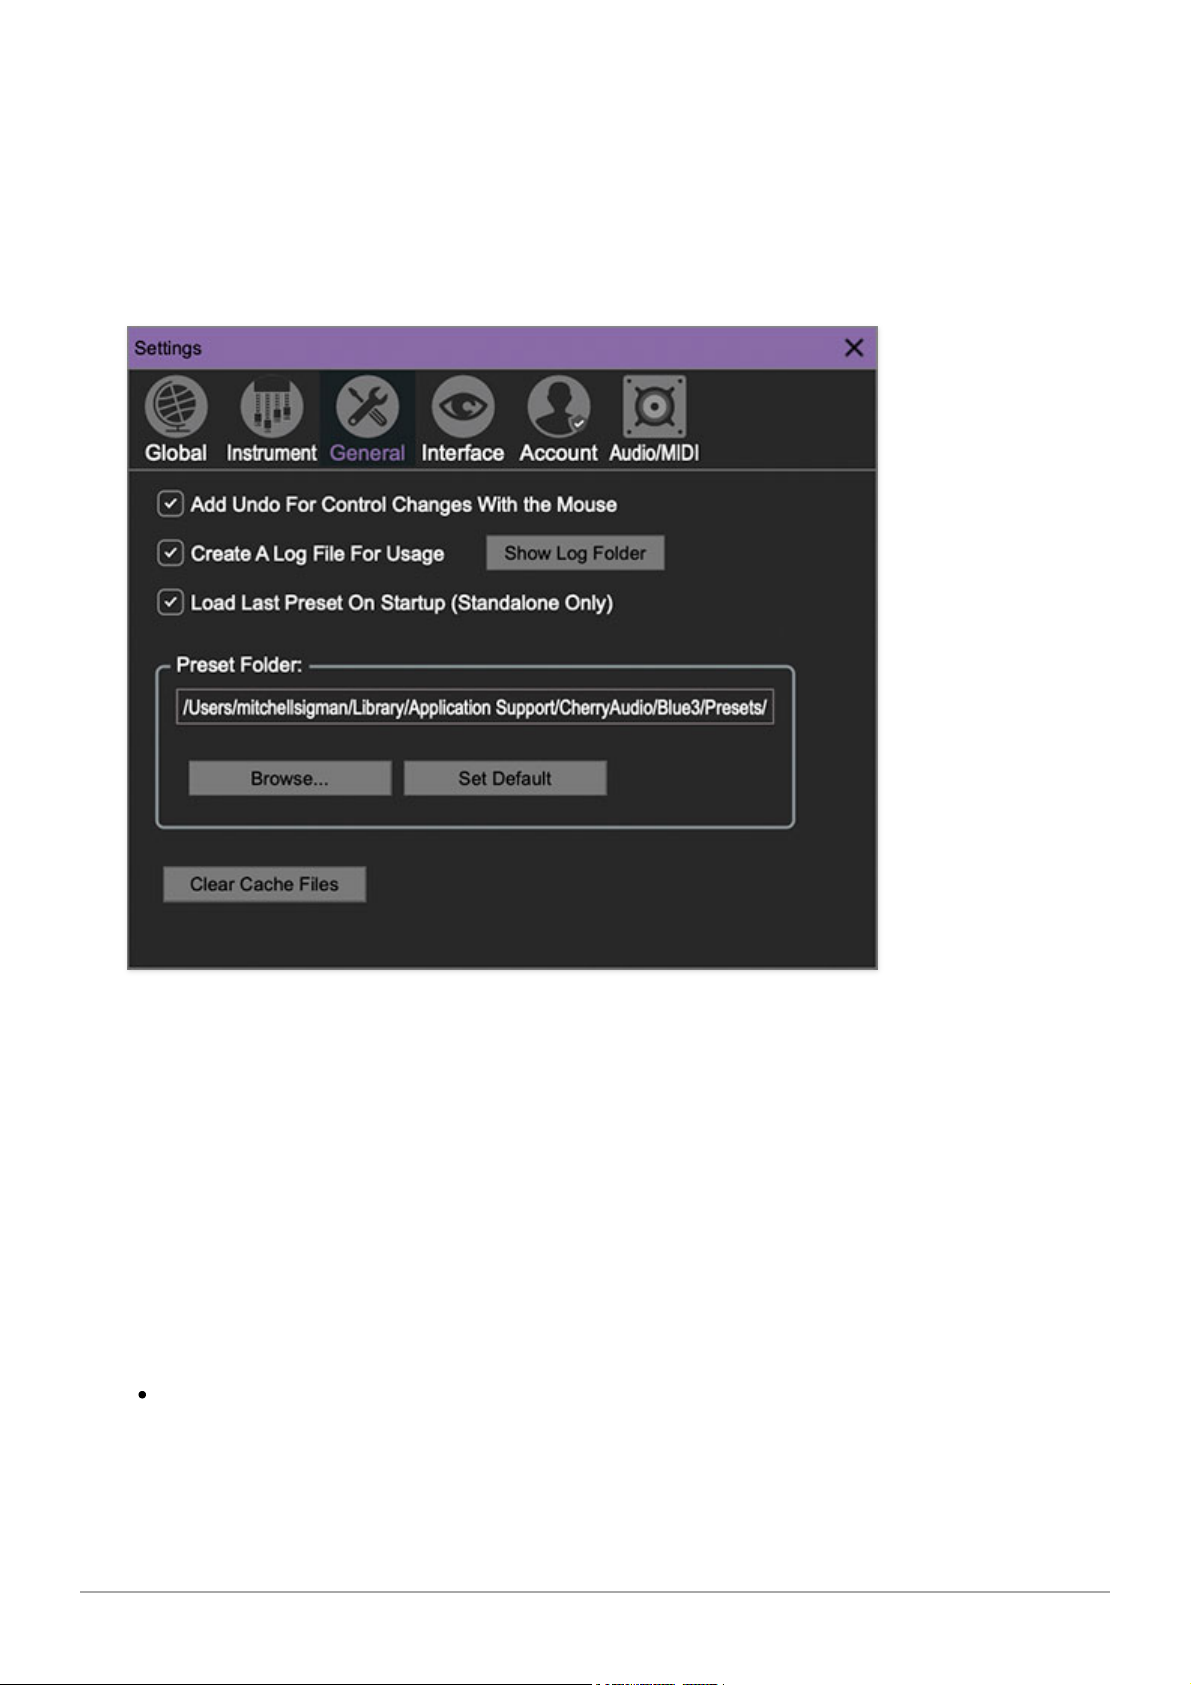
GENERAL
Add Undo For Control Changes With the Mouse- Enabling this allows
undo of knob/slider/button adjustments. You’ll want this on if you want the
ability to undo all aspects of patch editing and programming.
Create A Log File For Usage- This creates a text doc of all of Blue3's
internal and routines during use. It is mainly intended for our tech staff
should you experience any issues. Clicking
Show Log Folder
opens the folder
containing Blue3 log file docs.
Load Last Preset On Startup (Standalone Only)- Automatically loads
the last preset used when Blue3 standalone version is started.
Preset Folder- Displays the current location of Blue3's sound presets.
This can be changed by clicking and typing in the field.
Cherry Audio Blue3 User Guide - 56
Page 57
Browse... - Displays the current location of preset folder in the file
manager.
Set Default- Sets the current displayed
Preset Folder
path as the
default location
Clear Cache Files- Deletes all log files, temporary sounds, and the image
cache.
INTERFACE
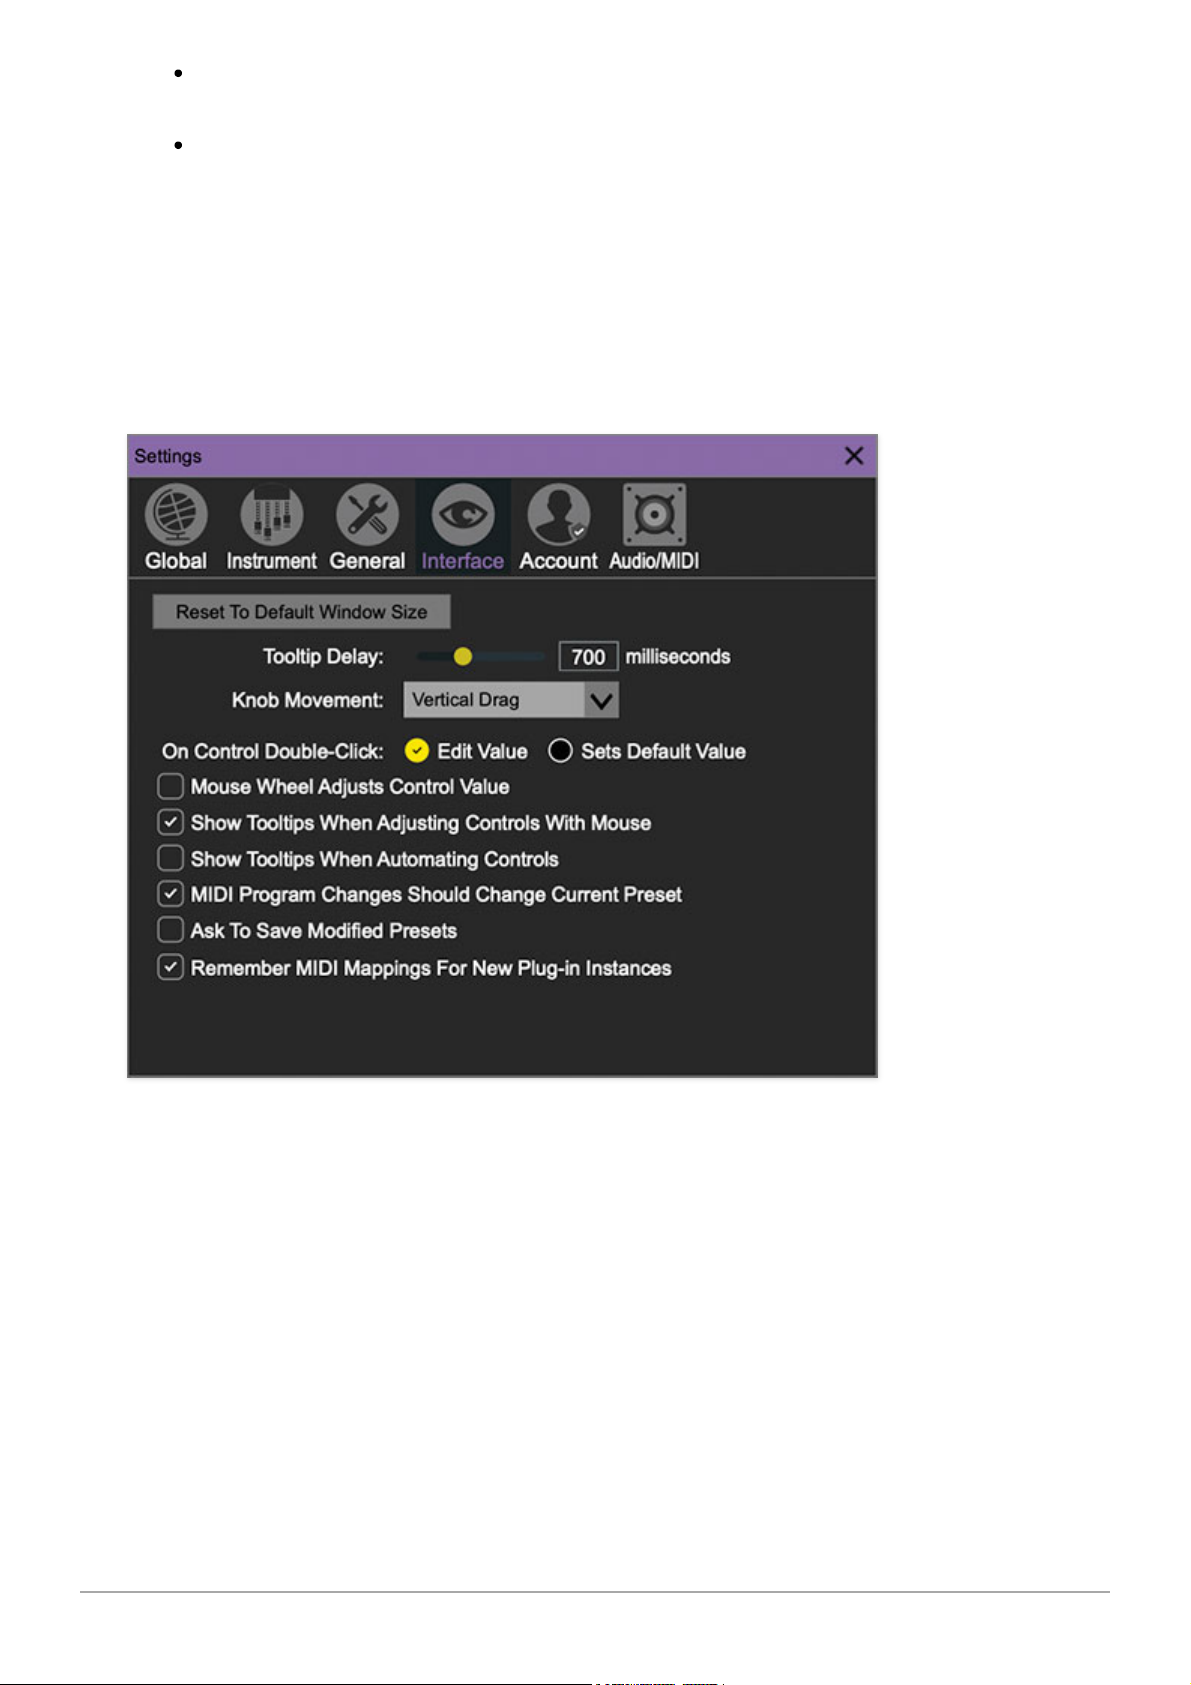
Allows customization of Blue3's user interface settings.
Reset To Default Window Size- Resets the Blue3 workspace to default
size. Use this to reset the window size if the window somehow becomes too
large for your display and can't be resized.
Tooltip Delay- Tooltips are those informative bits of text that pop up when
hovering over a control (go ahead and try it, we’ll wait…). The
Tooltip
Delay
setting defines how long you must hover before the tooltip pops up.
Knob Movement- Defines how mouse movements relate to turning
onscreen knobs. It defaults to
Vertical Drag
, but can be changed to
Cherry Audio Blue3 User Guide - 57
Page 58

Horizontal Drag
, or
Rotary Drag
if you're one those folks that cut their teeth
on the
Steinberg Model E
VST back in 2000.
On Control Double-Click- Defines what happens when the mouse is
double-clicked on a control. If
Edit Value
is selected, an exact number can be
entered by typing the number and hitting [ENTER] or [RETURN]. If
Sets
Default Value
is selected, double-clicking a control resets it to its default
value.
Mouse Wheel Adjusts Control Value- Enabling this lets you adjust knob,
slider, and switch values by moving the mouse wheel. This works great with
a standard mouse wheel, but you'll want to disable it if you're using an Apple
Magic Mouse (which will move the control AND scroll the window).
Show Tooltips When Adjusting Controls With Mouse- Displays
parameter tooltips/values when the mouse is hovered over a control or as a
control is moved with mouse clicked.
Show Tooltips When Automating Controls- Displays parameter
tooltips/values next to controls any time a control is changed, i.e. if a control
is moved via an assigned MIDI controller or a
Perform
panel knob, etc.
MIDI Program Changes Should Change Current Preset- Allows MIDI
program change messages to change Blue3 patches.
Ask To Save Modified Presets- This opens a dialog window asking if you'd
like to save changes if a patch has been edited and a new patch is selected.
If you're the type that likes to click through presets and tweak a control here
and there, it can be annoying to have a window pop-up asking if you'd like to
save every time you switch presets - if you're that person, keep this off.
Remember MIDI Mappings For New Plug-in Instances- When enabled,
Blue3 remembers all MIDI Tab controller settings.
ACCOUNT
Cherry Audio Blue3 User Guide - 58
Page 59
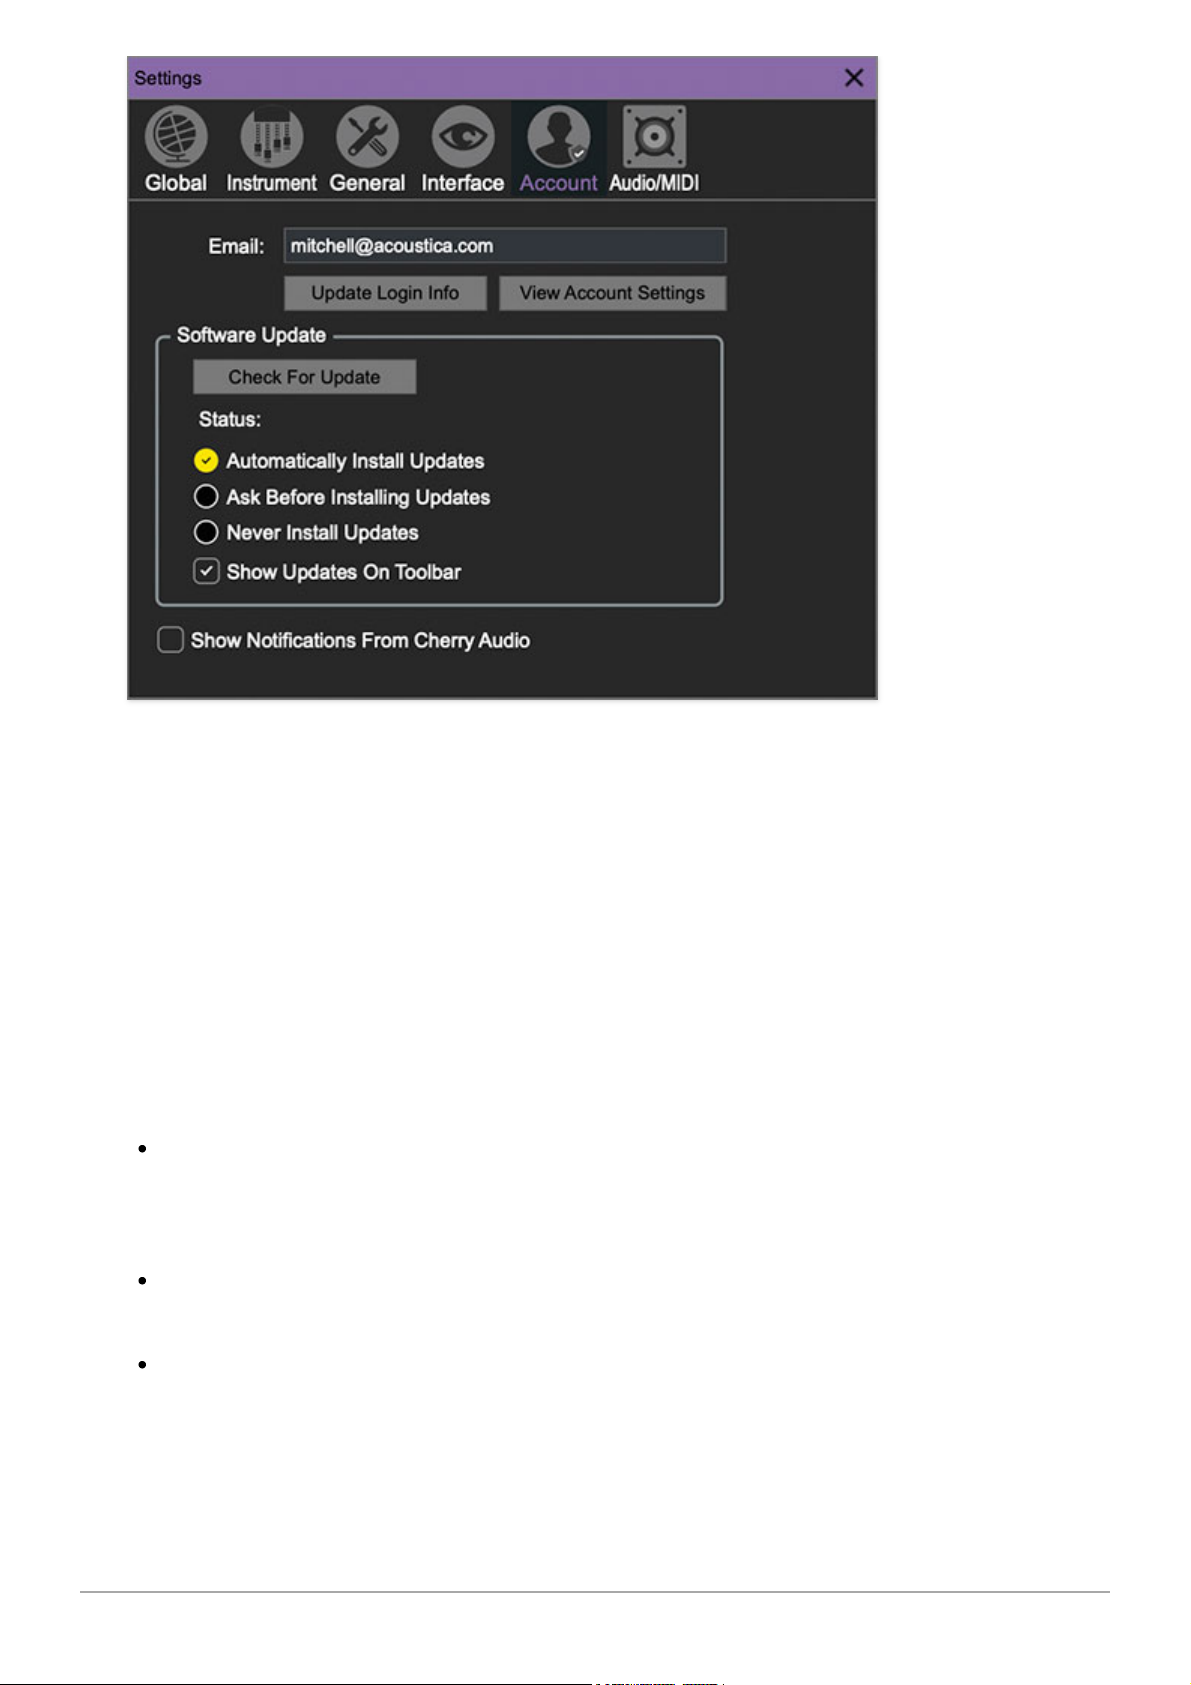
Settings for your personal login information and account.
Email- Displays the email address of the current login.
Update Login Info- Clicking this opens the same email and password login
screen you’ll see when initially launching Blue3.
View Account Settings- This opens your personal account page on the
Cherry Audio Store website containing information about modules purchased
and more.
Software Update- We often fix bugs and make improvements; below are
options defining how Blue3 handles updates.
Check For Update- Click this to see if an updated version of Blue3
available.
Status-
Automatically Install Updates- Updates are automatically downloaded
and installed.
Ask Before Installing Updates- By default, Blue3 automatically
downloads new versions of modules when available. Checking this box
defeats automatic updates and will ask if you’d like to install updates
when they become available.
Cherry Audio Blue3 User Guide - 59
Page 60
We’ll never make changes that can potentially “break” existing patches
but we recommend enabling
Ask Before Installing Updates
if you’re using
Blue3 for live performances or other “mission critical” situations.
Never Install Updates- Blue3 never automatically installs updates.
Show Updates On Toolbar- Checking this will display an icon in the
toolbar next to the logo letting you know there's an update available.
Show Notifications From Cherry Audio- We occasionally will fire off inapp advertisements; disabling this checkbox will hide them. We hate
repetitive, annoying ads as much as you do, so we don't use this feature too
often.
AUDIO/MIDI
Not to be confused with the extinct audiomidi.com where I unfortunately
used to work, these are settings for audio and MIDI hardware input and
output.
The Audio/MIDI tab is only visible in the standalone version of Blue3.
Cherry Audio Blue3 User Guide - 60
Page 61

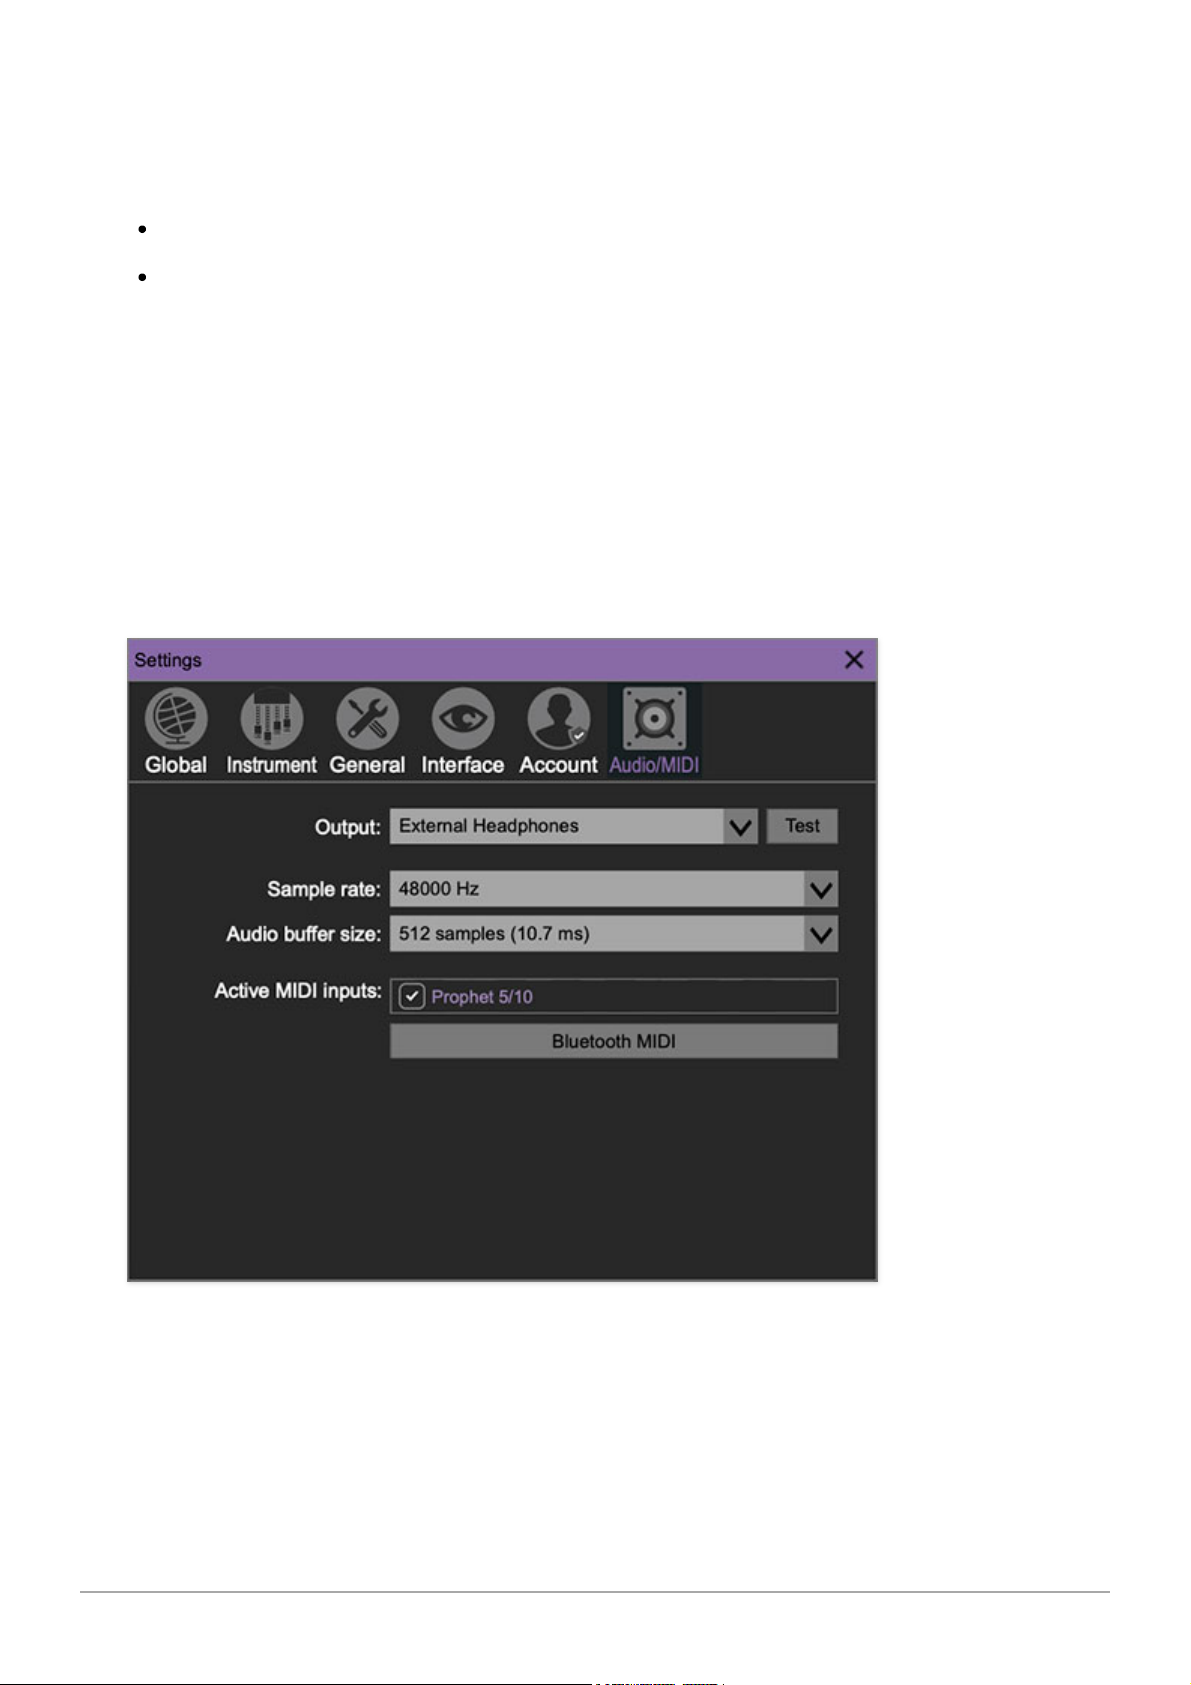
Output- Use this drop-down menu to choose a physical audio output
source. This defaults to
Built-In Line Output
, i.e. your computer’s onboard
system audio, but you’ll get better fidelity with an external professional
audio interface. The biggest audible difference is usually reduced
background noise or hum.
The
Test
button will produce a brief sine wave when clicked; this will help
with troubleshooting, aka, “WHY THE HECK ISN’T THIS MAKING ANY
NOISE?!?”
Sample Rate- This sets Blue3's global sample rate. Lower sample rates
offer better performance, but if you have a fast computer, high sample
rates may offer slightly improved fidelity. (Translation: a fabulous
opportunity to increase CPU overhead, because unlike every other human
on earth,
your
rock and roll-destroyed ears are able to hear frequencies
far beyond 20 kHz.)
Audio Buffer Size- As with any digital audio app, this defines
performance vs. note latency, and will largely depend upon computer CPU
speed. A professional external audio interface will almost always exhibit
better performance than “built-in” system audio. Lower settings will result
in less latency (in the form of faster response to notes played), but will
increase the chances of audio gapping or crackling noise.
Active MIDI Inputs- Enable MIDI input sources, i.e. MIDI/USB keyboards,
pad controls, MIDI knob/fader control surfaces, etc. Check boxes to enable
one or more devices. If a MIDI/USB controller isn't working, make
sure the appropriate box is checked here. We put this this piece of
info
way
in the back of the manual, to make it extra challenging to find
out why things aren't working (not really, just ended up here!).
Cherry Audio Blue3 User Guide - 61
 Loading...