

Page 1
User Manual
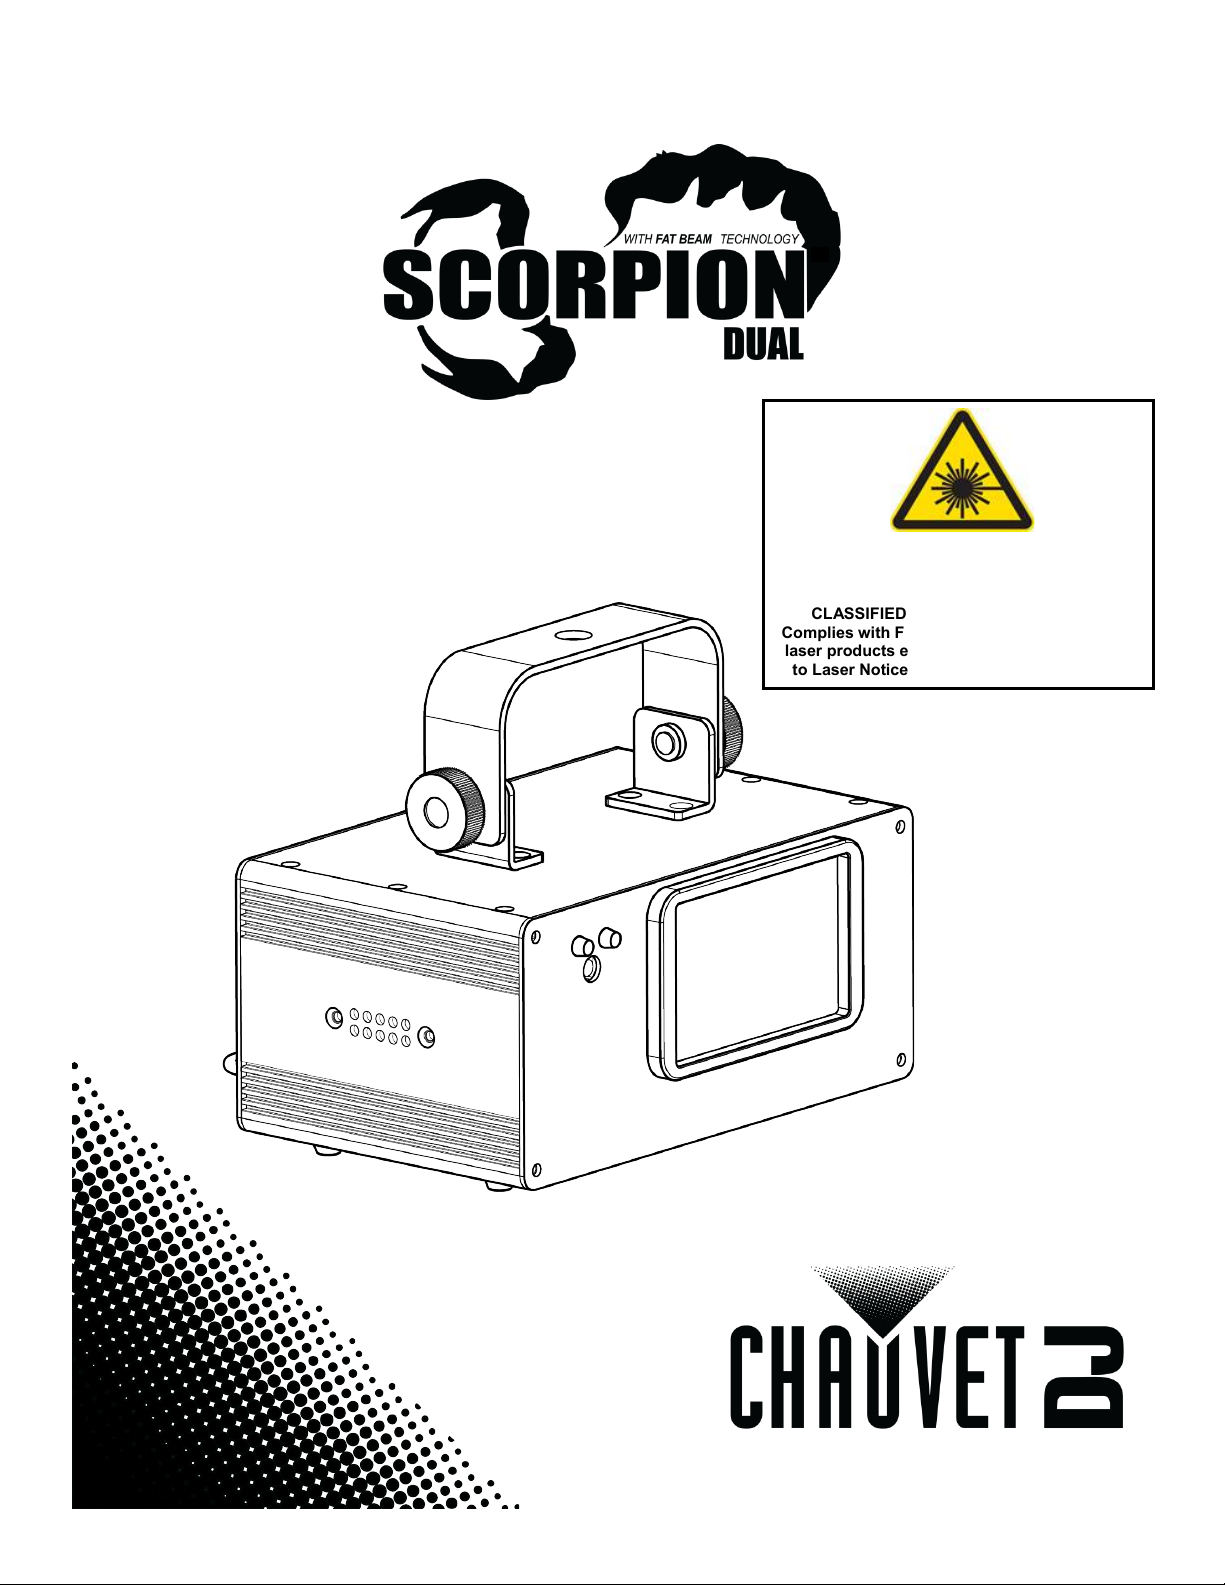
LASER LIGHT
AVOID DIRECT EYE EXPOSURE
to Laser Notice No. 50, dated June 24, 2007.
CLASS 3R LASER PRODUCT
CLASSIFIED PER EN/IEC 60825-1:2007
Complies with FDA performance standards for
laser products except for deviations pursuant
Page 2

TABLE OF CONTENTS
Warranty/Garantía/Garantie .............................................................................................. 5
Limited Warranty .............................................................................................................................. 5
Garantía Limitada ............................................................................................................................. 5
Garantie Limitée ............................................................................................................................... 5
1. Before You Begin .......................................................................................................... 6
What is Included ............................................................................................................................... 6
Unpacking Instructions ..................................................................................................................... 6
Claims ....................................................................................................................................................... 6
Manual Conventions ......................................................................................................................... 6
Symbols ............................................................................................................................................ 6
Disclaimer ......................................................................................................................................... 6
Safety Notes ..................................................................................................................................... 7
Non-Interlocked Housing Warning ............................................................................................................. 8
Laser Safety Notes .................................................................................................................................... 8
Laser Safety Label Reproduction ..................................................................................................... 9
Laser Exposure Warning ........................................................................................................................... 9
Laser Emission Data ........................................................................................................................ 9
Laser Compliance Statement .................................................................................................................... 9
2. Introduction ..................................................................................................................10
Overview ......................................................................................................................................... 10
Dimensions ..................................................................................................................................... 11
3. Setup .............................................................................................................................12
AC Power ....................................................................................................................................... 12
Fuse Replacement .................................................................................................................................. 12
Power Linking .......................................................................................................................................... 13
Mounting ......................................................................................................................................... 14
Orientation ............................................................................................................................................... 14
Rigging .................................................................................................................................................... 14
Proper Usage .......................................................................................................................................... 15
4. Operation ......................................................................................................................16
Control Panel Operation ................................................................................................................. 16
Menu Map ....................................................................................................................................... 16
Configuration (DMX) ....................................................................................................................... 16
Starting Address ...................................................................................................................................... 16
Test Mode................................................................................................................................................ 16
DMX Channel Modes, Assignments, and Values .......................................................................... 17
10-Channel .............................................................................................................................................. 17
Patterns .......................................................................................................................................... 18
Configuration (Standalone) ............................................................................................................ 19
Sound-Active Mode ................................................................................................................................. 19
Sound Sensitivity ..................................................................................................................................... 19
Auto Mode ............................................................................................................................................... 19
Master/Slave Mode .................................................................................................................................. 19
IR Wireless Control .................................................................................................................................. 19
Remote Control .............................................................................................................................. 20
5. Technical Information ..................................................................................................21
Product Maintenance ..................................................................................................................... 21
6. Technical Specifications ..............................................................................................22
Returns .............................................................................................................................23
Page 2 of 64 Scorpion Dual V2 User Manual Rev. 3
Page 3

Contact Us ........................................................................................................................24
1. Antes de Empezar ........................................................................................................25
Qué va Incluido............................................................................................................................... 25
Instrucciones de Desembalaje ....................................................................................................... 25
Reclamaciones ........................................................................................................................................ 25
Convenciones del Manual .............................................................................................................. 25
Símbolos ......................................................................................................................................... 25
Exención de Responsabilidad ........................................................................................................ 25
Notas de Seguridad ........................................................................................................................ 26
Advertencia sobre Carcasa no Cerrada .................................................................................................. 27
Notas de Seguridad sobre Láser ............................................................................................................. 27
Reproducción de la Etiqueta de Seguridad del Láser .................................................................... 29
Advertencia Sobre Exposición al Láser ................................................................................................... 29
Datos de Emisión Láser ................................................................................................................. 29
Declaración de Conformidad Láser ......................................................................................................... 29
2. Introducción .................................................................................................................30
Vista General .................................................................................................................................. 30
Dimensiones ................................................................................................................................... 31
3. Instalación ....................................................................................................................32
Corriente Alterna ............................................................................................................................ 32
Sustitución del Fusible ............................................................................................................................. 32
Alimentación en Cadena ......................................................................................................................... 33
Montaje ........................................................................................................................................... 34
Orientación .............................................................................................................................................. 34
Colocación ............................................................................................................................................... 34
Uso Adecuado ......................................................................................................................................... 35
4. Funcionamiento............................................................................................................36
Manejo del Panel de Control .......................................................................................................... 36
Mapa de Menú................................................................................................................................ 36
Configuración (DMX) ...................................................................................................................... 36
Dirección de Inicio ................................................................................................................................... 36
Modo Prueba ........................................................................................................................................... 36
Modos de Canal, Asignaciones y Valores DMX ............................................................................. 37
10 Canales .............................................................................................................................................. 37
Patrones ......................................................................................................................................... 38
Configuración (Independiente) ....................................................................................................... 39
Modo Activo por Sonido .......................................................................................................................... 39
Sensibilidad al Sonido ............................................................................................................................. 39
Modo Automático ..................................................................................................................................... 39
Modo Maestro/Esclavo ............................................................................................................................ 39
Control Inalámbrico por IR ......................................................................................................................... 39
Control Remoto .............................................................................................................................. 40
5. Información Técnica ....................................................................................................41
Mantenimiento del Producto ........................................................................................................... 41
6. Especificaciones Técnicas ..........................................................................................42
Devoluciones ....................................................................................................................43
Contacto .............................................................................................................................44
1. Avant de Commencer ..................................................................................................45
Ce Qui est Compris ........................................................................................................................ 45
Instructions Relatives au Déballage ............................................................................................... 45
Réclamations ........................................................................................................................................... 45
Conventions de ce Manuel ............................................................................................................. 45
Scorpion Dual V2 User Manual Rev. 3 Page 3 of 64
Page 4

Symboles ........................................................................................................................................ 45
Clause de Non-Responsabilité ....................................................................................................... 45
Consignes de Sécurité ................................................................................................................... 46
Avertissement : Boîtier non Verrouillable ................................................................................................. 47
Consignes de Sécurité Relatives au Laser .............................................................................................. 47
Reproductions des Etiquettes en Matière de Sécurité des Appareils Laser .................................. 49
Avertissement d'Exposition au Laser ....................................................................................................... 49
Données d'Emission Laser ............................................................................................................. 49
Déclaration de Conformité du Laser ........................................................................................................ 49
2. Introduction ..................................................................................................................50
Aperçu ............................................................................................................................................ 50
Dimensions ..................................................................................................................................... 51
3. Configuration ................................................................................................................52
Alimentation CA .............................................................................................................................. 52
Remplacement du Fusible ....................................................................................................................... 52
Branchement d'Alimentation .................................................................................................................... 53
Installation ...................................................................................................................................... 54
Orientation ............................................................................................................................................... 54
Suspension .............................................................................................................................................. 54
Utilisation Adéquate ................................................................................................................................. 55
4. Fonctionnement ...........................................................................................................56
Fonctionnement du Panneau de Commande ................................................................................ 56
Tableau du Menu ........................................................................................................................... 56
Configuration (DMX) ....................................................................................................................... 56
Adresse de Départ ................................................................................................................................... 56
Mode Test................................................................................................................................................ 56
Modes de Canal DMX, Attributions et Valeurs ............................................................................... 57
10 Canaux ............................................................................................................................................... 57
Motifs .............................................................................................................................................. 58
Configuration (Autonome) .............................................................................................................. 59
Mode Son Actif ........................................................................................................................................ 59
Sensibilité Sonore .................................................................................................................................... 59
Mode Auto ............................................................................................................................................... 59
Mode Maître/Esclave ............................................................................................................................... 59
Commande sans Fil IR ............................................................................................................................ 59
Télécommande ............................................................................................................................... 60
5. Informations Techniques .............................................................................................61
Entretien de l'Appareil .................................................................................................................... 61
6. Spécificités Techniques ...............................................................................................62
Renvois .............................................................................................................................63
Nous Contacter ..................................................................................................................64
Page 4 of 64 Scorpion Dual V2 User Manual Rev. 3
Page 5

WARRANTY/GARANTÍA/GARANTIE
Limited Warranty
TERMS AND CONDITIONS PLEASE VISIT OUR
of Ireland, Belgium, the Netherlands, Luxembourg, France,
period specified in, and subject to the exclusions and limitations set forth in the full limited warranty on our website.
le. To exercise rights under
this warranty, you must provide proof of purchase in the form of an original sales receipt from an authorized dealer
that shows the product name and date of purchase. THERE ARE NO OTHER EXPRESS OR IMPLIED
nty gives you specific legal rights. You may also have other rights that vary from state to
state and country to country. This warranty is valid only in the United States, United Kingdom, Republic of Ireland,
ermany and Mexico. For warranty terms in other countries,
Garantía Limitada
PARA VER EL REGISTRO DE GARANTÍA Y LOS TÉRMINOS Y CONDICIONES COMPLETOS, VISITE
Para clientes en Reino Unido, República de Irlanda, Bélgica, Países Bajos, Luxemburgo, Francia y
Chauvet garantiza que este producto estará libre de defectos de material y mano de obra en condiciones de uso
pre a las exclusiones y limitaciones establecidas en la
garantía limitada completa de nuestro sitio web. Esta garantía se concede únicamente al comprador original del
debe proporcionar una
prueba de compra en forma de un recibo de compra original, expedido por un distribuidor autorizado, donde figure
el nombre del producto y la fecha de compra. NO EXISTEN OTRAS GARANTÍAS EXPRESAS NI IMPLÍCITAS.
erechos legales específicos. Es posible que a usted le asistan otros derechos, que
variarán dependiendo del estado o del país. Esta garantía solamente es válida en los Estados Unidos, Reino
ancia, Alemania y México. Para conocer los
Garantie Limitée
VEUILLEZ VISITER NOTRE SITE INTERNET POUR CONSULTER LES MODALITÉES D'ENREGISTREMENT
Bas, du
abrication dans des conditions
normales d'utilisation, pendant la période spécifiée dans la garantie limitée complète consultable sur notre site
Internet et sous réserve des exclusions et limitations qui y sont énoncées. Cette garantie ne s'applique qu'à
'acheteur initial du produit et n'est pas transférable. Pour exercer les droits prévus par cette garantie, vous devez
fournir une preuve d'achat sous la forme d'un reçu de vente original d'un revendeur autorisé qui indique le nom du
hat. IL N'EXISTE AUCUNE AUTRE GARANTIE EXPRESSE OU IMPLICITE. Cette garantie
vous confère des droits légaux spécifique. Vous pouvez également bénéficier d'autres droits qui varient selon les
Uni, en République d'Irlande, en
Bas, au Luxembourg, en France, en Allemagne et au Mexique. Pour connaître les conditions
FOR WARRANTY REGISTRATION AND COMPLETE
WEBSITE.
For Customers in the United States and Mexico: www.chauvetlighting.com/warranty-registration.
For Customers in the United Kingdom, Republic
and Germany: www.chauvetlighting.eu/warranty-registration.
Chauvet warrants that this product shall be free from defects in material and workmanship under normal use, for the
This warranty extends only to the original purchaser of the product and is not transferab
WARRANTIES. This warra
Belgium, the Netherlands, Luxembourg, France, G
please consult your local distributor.
NUESTRO SITIO WEB.
Para clientes en los Estados Unidos y México: www.chauvetlighting.com/warranty-registration.
Alemania: www.chauvetlighting.eu/warranty-registration.
normales, durante el periodo especificado, sujeto siem
producto y no es transferible. Para ejercer los derechos que otorga esta garantía, usted
Esta garantía le otorga d
Unido, República de Irlanda, Bélgica, Países Bajos, Luxemburgo, Fr
términos de garantía en otros países, consulte a su distribuidor local.
DE LA GARANTIE ET LES CONDITIONS GÉNÉRALES COMPLÈTES.
Pour les clients aux États-Unis et au Mexique: www.chauvetlighting.com/warranty-registration.
Pour les clients du Royaume-Uni, de la République d'Irlande, de la Belgique, des Pays-
Luxembourg, de la France et de l'Allemagne: www.chauvetlighting.eu/warranty-registration.
Chauvet garantit que cet appareil est exempt de défauts de matériaux et de f
l
produit et la date d'ac
états et les pays. Cette garantie n'est valable qu'aux États-Unis, au RoyaumeBelgique, aux Paysde garantie dans d'autres pays, veuillez consulter votre revendeur local.
Scorpion Dual V2 User Manual Rev. 3 Page 5 of 64
Page 6

What is
Unpacking
Instructions
included accessories) appear damaged from
missing components or parts, damage not related to shipping,
Manual
Convention
Meaning
1–512
A range of values
50/60
A set of values of which only one can be chosen
Settings
A menu option not to be modified
Menu > Settings
A sequence of menu options to be followed
<ENTER>
A key to be pressed on the product’s control panel
ON
A value to be entered or selected
Symbols
Symbol
Meaning
Critical installation, configuration, or operation information.
damage it, or cause harm to the operator.
Disclaimer
Chauvet believes that the information contained in this manual is accurate in all
respects. However, Chauvet assumes no responsibility and specifically disclaims any
and all liability to any party for any loss, damage or disruption caused by any errors or
omissions in this document, whether such errors or omissions result from negligence,
accident or any other cause. Chauvet reserves the right to revise the content of this
document without any obligation to notify any person or company of such revision,
ever, Chauvet has no obligation to make, and does not commit to make, any such
arks or
trademarks of Chauvet & Sons LLC (d/b/a Chauvet and Chauvet Lighting) in the United
States and other countries. Other company and product names and logos referred to
1. BEFORE YOU BEGIN
Included
Claims
Conventions
• Scorpion Dual V2
• Power Cord
• Hanging Bracket
Carefully unpack the product immediately and check the box to make sure all the parts
are in the package and are in good condition.
If the box or the contents (the product and
shipping or show signs of mishandling, notify the carrier immediately, not Chauvet.
Failure to do so in a timely manner may invalidate your claim with the carrier. In addition,
keep the container and all the packing material for inspection.
For other issues, such as
or concealed damage, file a claim with Chauvet within 7 days of delivery.
• IR Remote
• User Manual
how
revisions. Download the latest version from www.chauvetdj.com.
The works of authorship contained in this manual, including, but not limited to, all design,
text and images are owned by Chauvet.
© Copyright 2018 Chauvet & Sons, LLC. All rights reserved.
Electronically published by Chauvet in the United States of America.
CHAUVET, the Chauvet logo, and Scorpion Dual V2 are registered tradem
herein may be trademarks of their respective companies.
Ignoring this information can cause the product to not work,
Important installation or configuration information. The product
may not function correctly if this information is not used.
Useful information.
Page 6 of 64 Scorpion Dual V2 User Manual Rev. 3
Page 7

Safety Notes
important laser system safety information. Read and
.
laser eye injury and
Do not touch the product’s housing when operating because it may be very hot.
This product is not intended for permanent installation.
disconnect from power via breaker or by unplugging it.
• Avoid direct eye contact with laser light. Never intentionally expose your eyes or
reasons!
The Safety Notes include
understand all instructions before powering on the laser for the first time
Knowing these safety instructions is crucial to avoiding
breaking the law. Keep this User Manual in a safe place for future reference.
STOP AND READ ALL LASER SAFETY DATA
• Lasers can be hazardous and have unique safety considerations. Permanent
eye injury and blindness is possible if lasers are used incorrectly. Pay close
attention to each safety REMARK and WARNING statement in this User
Manual. Read all instructions carefully BEFORE operating this device.
• Always connect the product to a grounded circuit to avoid the risk of electrocution.
• Always disconnect the product from the power source before cleaning or replacing
the fuse.
• Avoid direct eye exposure to the light source while the product is on.
• Make sure the power cord is not crimped or damaged.
• Never disconnect the product from power by pulling or tugging on the cord.
• If mounting the product overhead, always secure to a fastening device using a safety
cable.
• Make sure there are no flammable materials close to the product when operating.
•
•
• Always make sure that the voltage of the outlet to which you are connecting the
product is within the range stated on the decal or rear panel of the product.
• The product is for indoor use only! (IP20) To prevent risk of fire or shock, do not
expose the product to rain or moisture.
• Always install the product in a location with adequate ventilation, at least
20 in (50 cm) from adjacent surfaces.
• Be sure that no ventilation slots on the product’s housing are blocked.
• Never connect the product to a dimmer.
• Make sure to replace the fuse with another of the same type and rating.
• Always use the mounting bracket to carry the product.
• Do not switch the product on/off in short intervals. This will reduce the laser diode life.
• Do not shake this product. Avoid brute force when mounting or operating this product.
• ALWAYS use a safety cable when mounting the product overhead.
• The ambient operating temperature for the laser is 59 °F to 95 °F (15 °C to 35 °C).
Do not operate this product outside this range.
• In the event of a serious operating problem, stop using the product immediately.
• Never try to repair the product. Repairs carried out by unskilled people can lead to
damage or malfunction. Contact the nearest authorized technical assistance center.
• To eliminate wear and improve its lifespan, during periods of non-use completely
others to direct laser light.
• This laser product can potentially cause instant eye injury or blindness if laser light
directly strikes the eyes.
• It is illegal and dangerous to shine this laser into audience areas, where the
audience or other personnel could get direct laser beams or bright reflections into
their eyes.
• It is a U.S. federal offense to shine any laser at aircraft.
• Use of controls, adjustments, or procedures other than those specified in this User
Manual may result in hazardous radiation exposure.
• DO NOT attempt any repairs. Repairs and servicing must be carried out by a
certified technician. Unauthorized modifications are forbidden for safety
Keep this User Manual for future consultation. If transferring ownership of the product,
be sure this document is kept with the laser.
Scorpion Dual V2 User Manual Rev. 3 Page 7 of 64
Page 8
Non-Interlocked
• This unit contains high power laser devices internally.
skin burns, and fires.
Notes
ight is different from any other light sources. The light from this product can
properly. Laser light is
thousands of times more concentrated than light from any other kind of light source. This
y burning the retina (the
Even if you cannot feel “heat” from a laser
beam, it can still potentially injure or blind you or your audience. Even very small
even at long distances. Laser eye
that because laser entertainment products split the laser into hundreds
that the laser beam is scanned out in high speed, that an individual laser
laser
power (Class 3B levels internally) before it splits into multiple beams (Class 3R levels).
without
laser beams always move. Since eye injuries can occur instantly, it is critical
, it
eople can get exposed. This is true
use.
Housing Warning
Laser Safety
• Do not open the laser housing, due to potential exposure to unsafe levels of laser
radiation.
• The laser power levels, accessible if the unit is opened, can cause instant blindness,
STOP AND READ ALL THE LASER SAFETY NOTES BELOW
Laser l
potentially cause eye injury if the product is not set up and used
concentration of light can cause instant eye injuries, primarily b
light-sensitive portion at the back of the eye).
amounts of laser light are potentially hazardous—
injuries can happen faster than you can blink.
DO NOT assume
of beams and
beam is safe for eye exposure. This laser product uses dozens of milliwatts of
Many of the individual beams are potentially hazardous to the eyes.
DO NOT assume that because the laser light is moving, it is safe. Laser light is never
risk, nor do the
to prevent the possibility of ANY direct eye exposure. According to laser safety regulations
is not legal to aim Class 3R lasers into areas where p
even if the laser is aimed below people’s faces, such as on a dance floor.
• Do not operate the laser without first reading and understanding all safety and
technical data in this manual.
• ALWAYS set up and install all laser effects so that all laser light is at least 3 meters
(9.8 feet) above the floor on which people can stand. See the Proper Usage section
of this manual.
• After setup, and prior to public use, test laser to ensure proper function. Do not use if
any defect is detected.
• DO NOT use laser if the laser appears to be emitting only one or two beams, rather
than dozens/hundreds, as this could indicate damage to the diffraction grating optic,
and could allow emission of laser levels higher than Class 3R.
• DO NOT point lasers at people or animals.
• Never look into the laser aperture or laser beams.
• DO NOT point lasers into areas in which people can potentially get exposed, such as
uncontrolled balconies, etc.
• DO NOT point lasers at highly reflective surfaces such as windows, mirrors, and
shiny metal. Even laser reflections can be hazardous.
• Never point a laser at aircraft; this is a U.S. federal offense.
• Never point un-terminated laser beams into the sky.
• Do not expose the output optic (aperture) to harsh cleaning chemicals.
• Do not use the laser if the housing is damaged, open, or if the optics appear
damaged in any way.
• Never open the laser housing. The high laser power levels inside of the protective
housing can start fires or burn skin, and will cause instant eye injury.
• Never leave this product running unattended.
• The operation of a Class 3R laser show is only allowed if the show is controlled by a
skilled and well-trained operator, familiar with the data included in this manual.
• The legal requirements for using laser entertainment products vary from country to
country. The user is responsible for the legal requirements in the location/country of
Page 8 of 64 Scorpion Dual V2 User Manual Rev. 3
CAUTION! DO NOT operate this device in ways not specified in this User Manual. Failure to follow
the instructions will void the warranty, may damage the product, or injure the user or the audience.
CAUTION! This product cannot be discarded with household waste. Contact your local waste
management service for electronic disposal regulations in your area.
Page 9
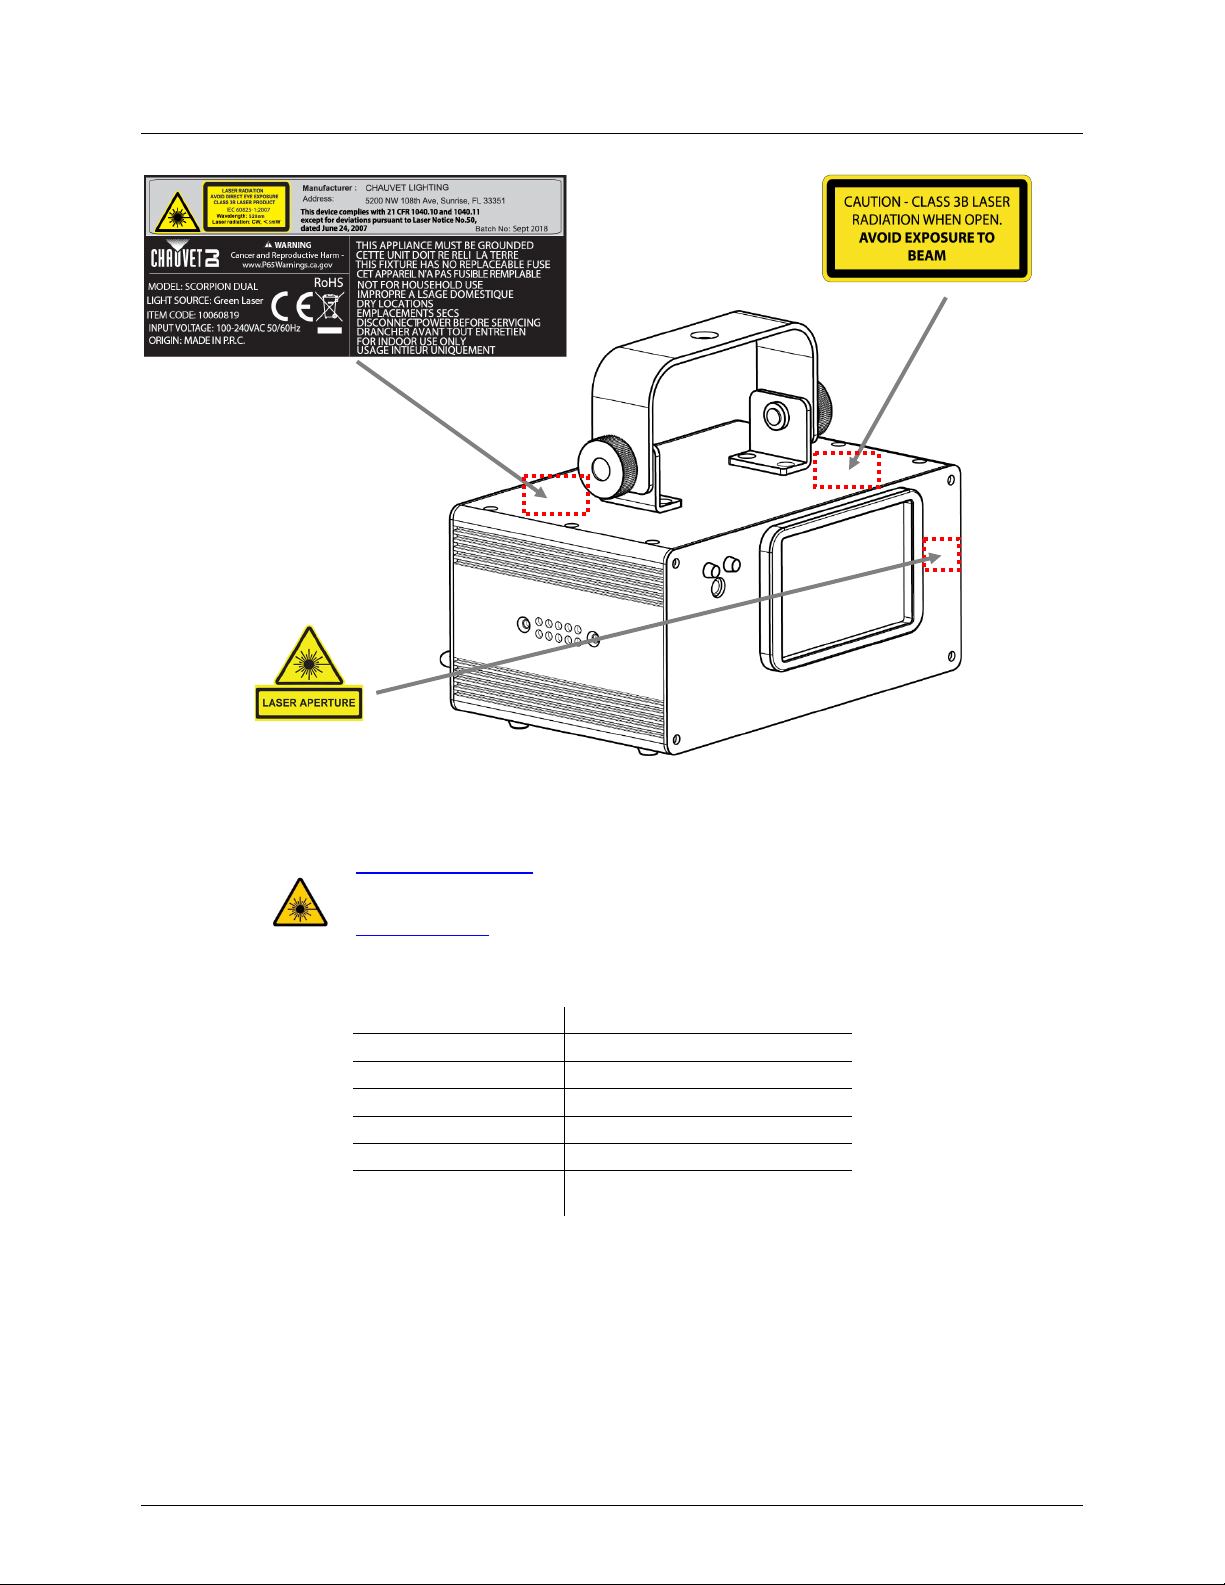
LASER LIGHT AVOID DIRECT EYE EXPOSURE
guidance can be obtained via the International Laser Display Association:
Laser Emission Data
Laser Compliance Statement
Complies with FDA performance standards for laser products except for deviations
keep this product in compliance with laser performance standards.
Laser Safety Label Reproduction
Laser
Exposure
Warning
Further guidelines and safety programs for safe use of lasers can be found in the ANSI
Z136.1 Standard “For Safe Use of Lasers”, available from the Laser Institute of America:
www.laserinstitute.org. Many local governments, corporations, agencies, military, and
others, require all lasers to be used under the guidelines of ANSI Z136.1. Laser Display
www.laserist.org.
Laser Classification Class 3R
Green Laser LD / 520 nm / 50 mW
Beam Diameter <5 mm at aperture
Pulse Data All pulses < 4 Hz (>0.25 sec)
Divergence (each beam) <2 mrad
Divergence (total light) <160 degrees
Laser Power of Each Beam
from Aperture*
*As measured under IEC measurement conditions for classification.
pursuant to Laser Notice No. 50, dated June 24, 2007. No maintenance is required to
<5 mW
Scorpion Dual V2 User Manual Rev. 3 Page 9 of 64
Page 10
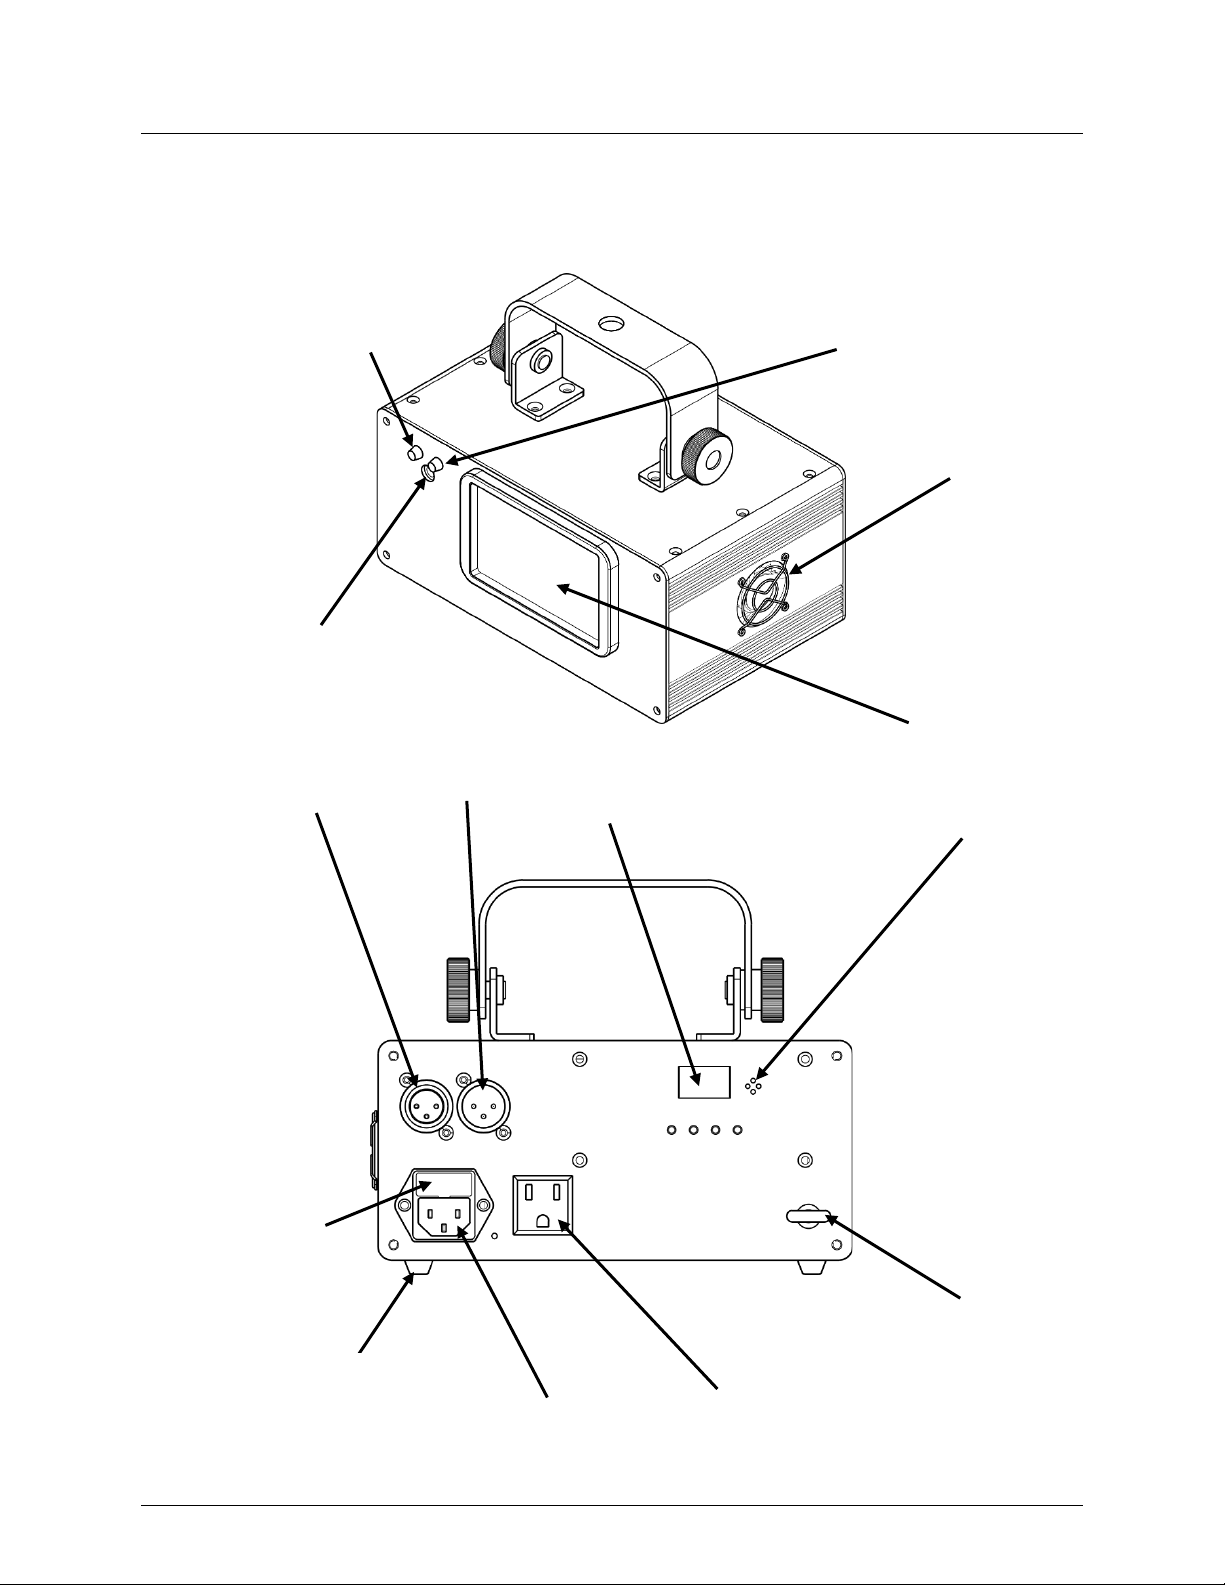
2. INTRODUCTION
Overview
Power Indicator LED
Power In
Display and
DMX In
DMX Out
Microphone
Power Out
Fuse Holder
Safety
Sound Indicator LED
Laser Output
IR Sensor
Cooling Fan
Control Buttons
Page 10 of 64 Scorpion Dual V2 User Manual Rev. 3
Loop
Surface
Supports (x4)
Page 11
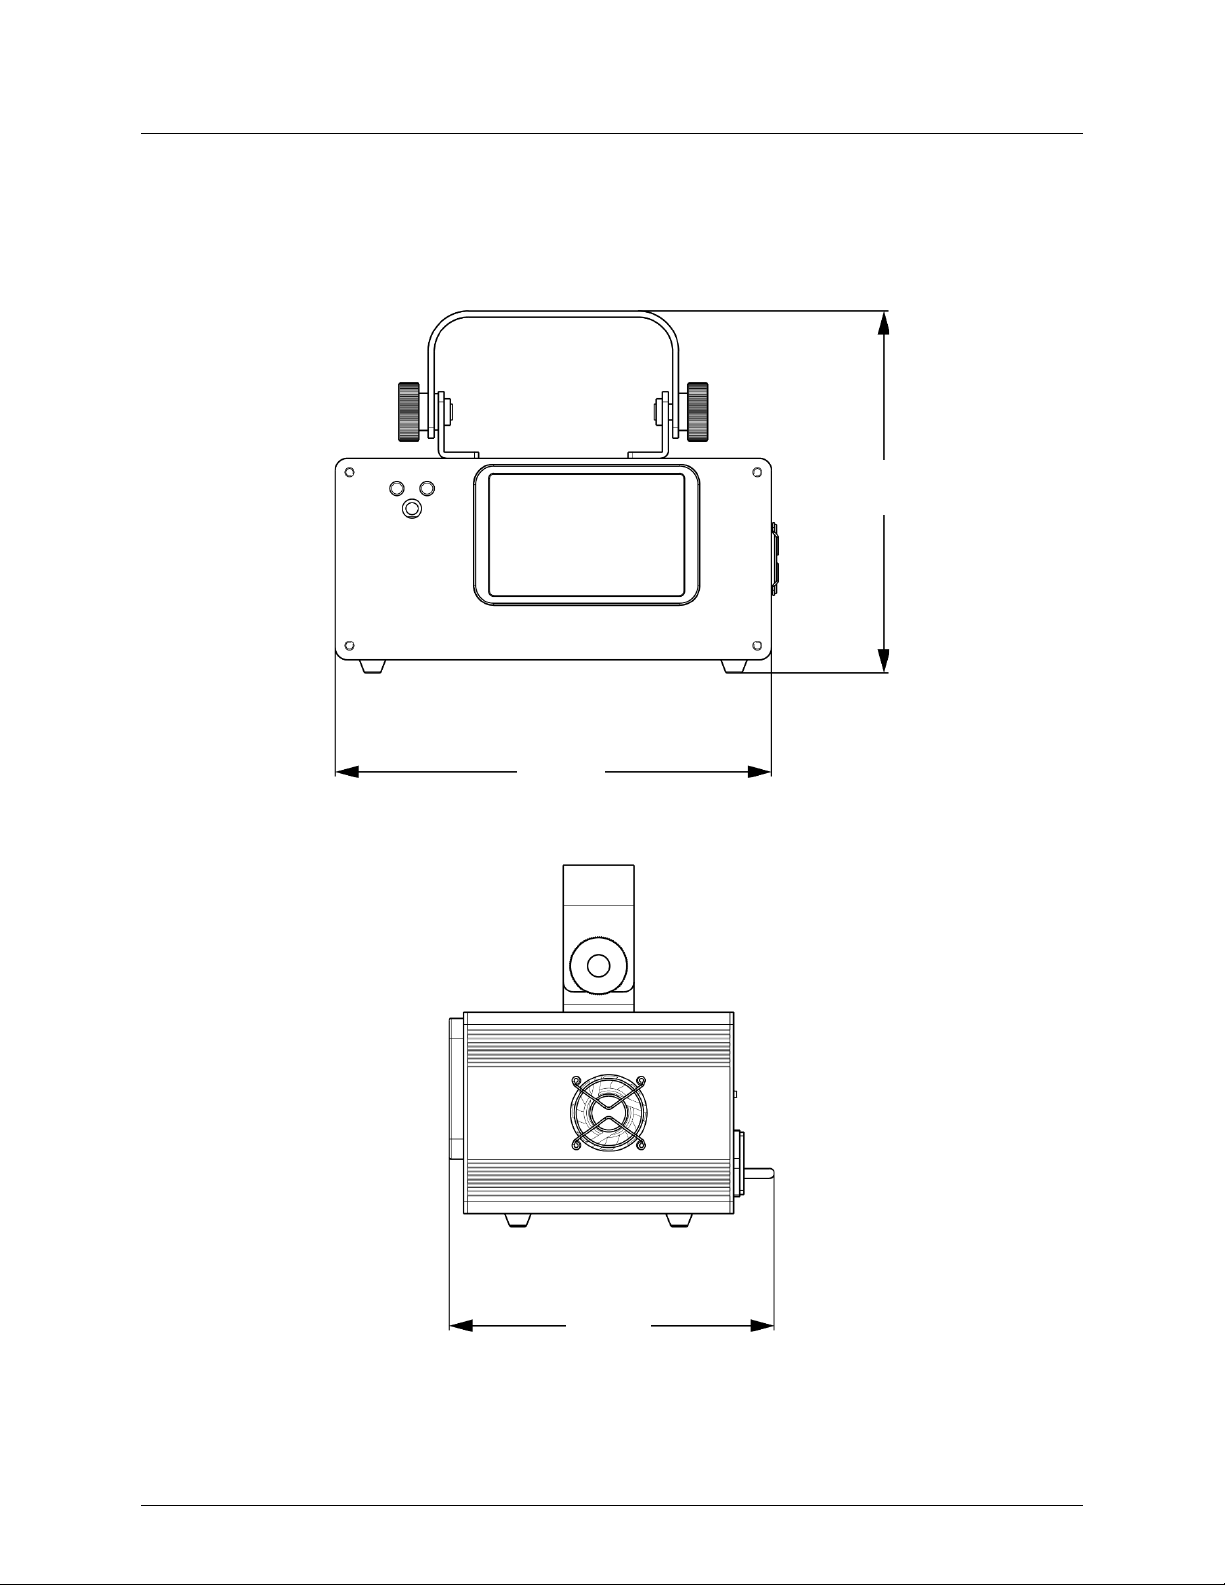
Dimensions
(179.5 mm)
6.3 in
(216 mm)
8.5 in
(161 mm)
7.1 in
Scorpion Dual V2 User Manual Rev. 3 Page 11 of 64
Page 12
AC Power
ranging power supply and it can work with
circuit breaker, power outlet, and
s back panel, or
an appropriate electrical ground to avoid the risk
a rheostat (variable resistor) or dimmer circuit, even
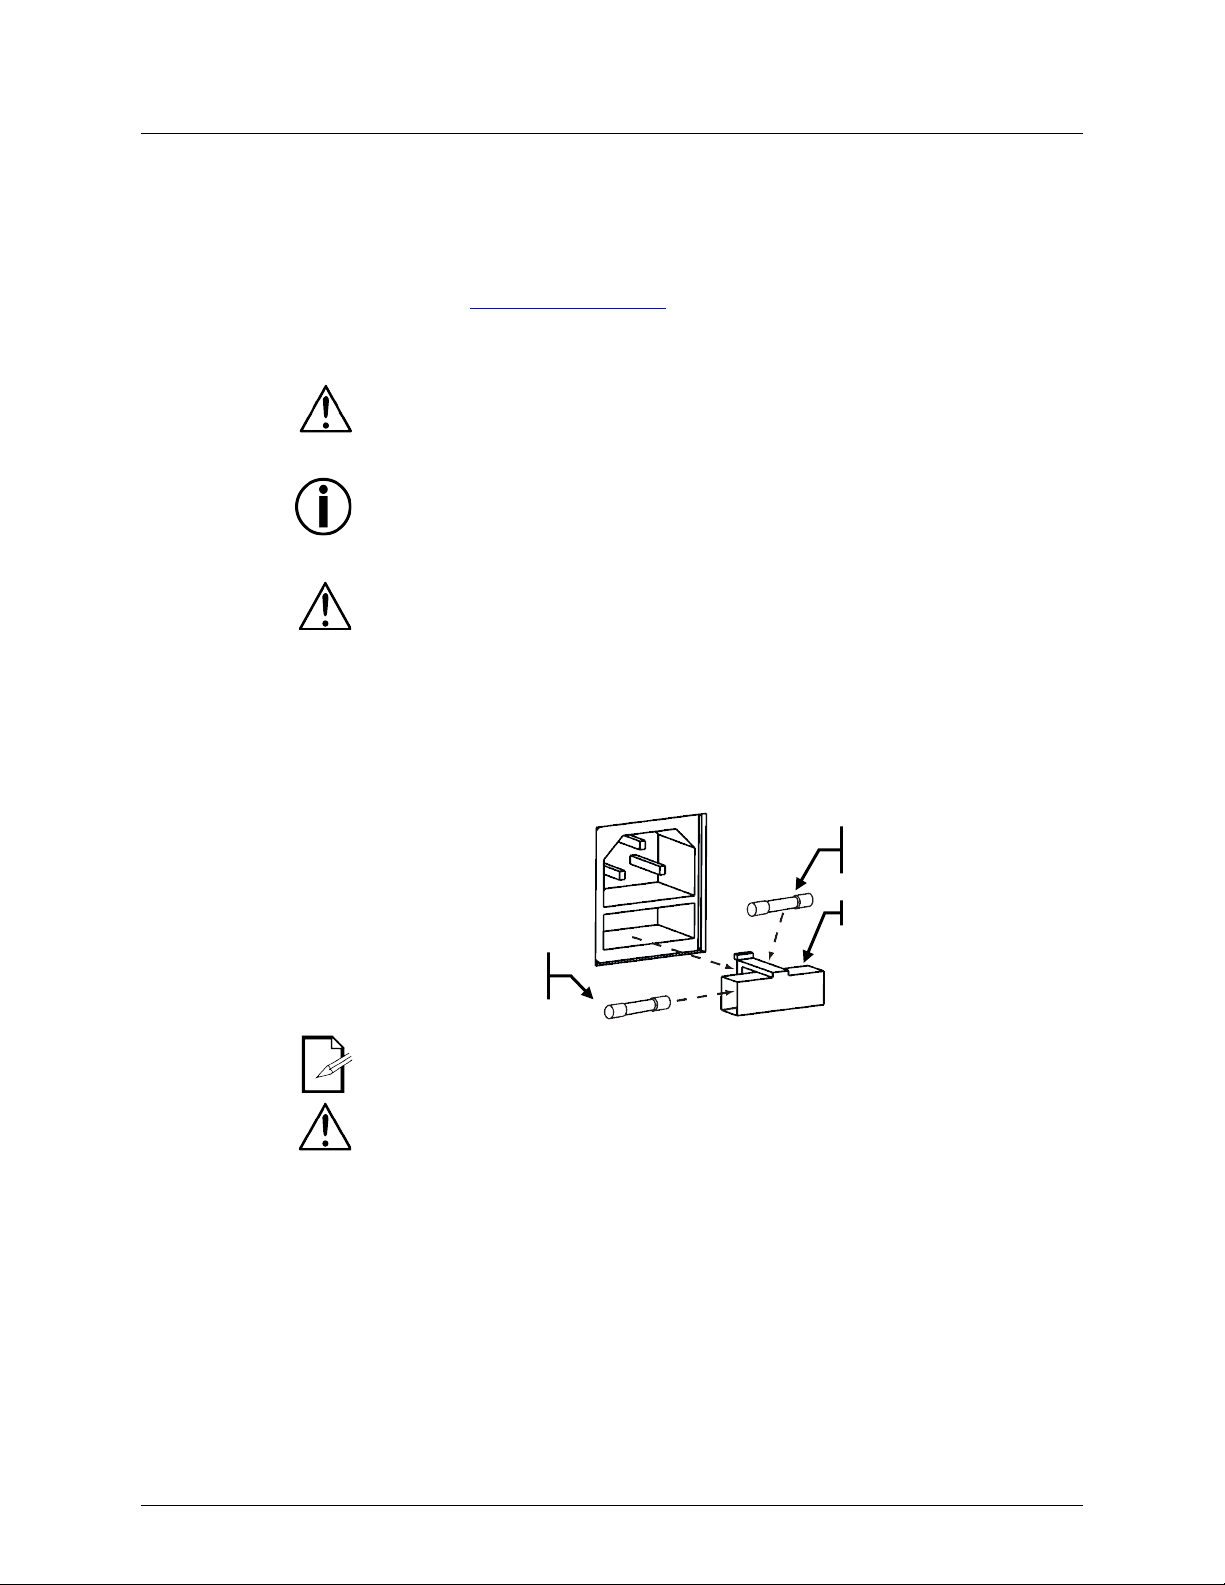
Fuse Replacement
Installed fuse
(held by plastic clip)
Spare fuse holder
(inside safety cap)
Safety cap
3. SETUP
The Scorpion Dual V2 has an external autoan input voltage range of 100 to 240 VAC, 50/60 Hz.
To determine the product’s power requirements (
wiring), use the current value listed on the label affixed to the product’
refer to the Technical Specifications. The listed current rating indicates the product’s
average current draw under normal conditions.
• Always connect the product to a protected circuit (circuit breaker or fuse).
Make sure the product has
of electrocution or fire.
• To eliminate wear and improve its lifespan, during periods of non-use
completely disconnect from power via breaker or by unplugging it.
Never connect the product to
if the rheostat or dimmer channel serves only as a 0 to 100% switch.
Disconnect the product from power before replacing the fuse.
1. Disconnect the product from power.
2. Wedge the tip of a flat-head screwdriver into the slot of the fuse holder.
3. Pry the fuse holder out of the housing.
4. Remove the blown fuse from the holder.
5. Replace with a fuse of the exact same type and rating.
6. Insert the fuse holder back in place and reconnect power.
A spare fuse is not included; however, the safety cap has room for a spare.
Always replace a blown fuse with one of the same type and rating.
Page 12 of 64 Scorpion Dual V2 User Manual Rev. 3
Page 13
Power Linking
of the
ower Linking
The power linking diagram shown above corresponds to the North American
using the product in other markets, you must
distributor as power linking connectors and
1st Product
2nd Product
3rd Product
Additional Products
The product provides power linking via the Edison/IEC outlet located in the back
unit.
P
Diagram
You can power link up to 44 Scorpion Dual V2 units on 120 V or up to 93 units
on 230 V.
version of the product ONLY! If
consult with the local Chauvet
requirements may differ in your country or region.
Scorpion Dual V2 User Manual Rev. 3 Page 13 of 64
Page 14
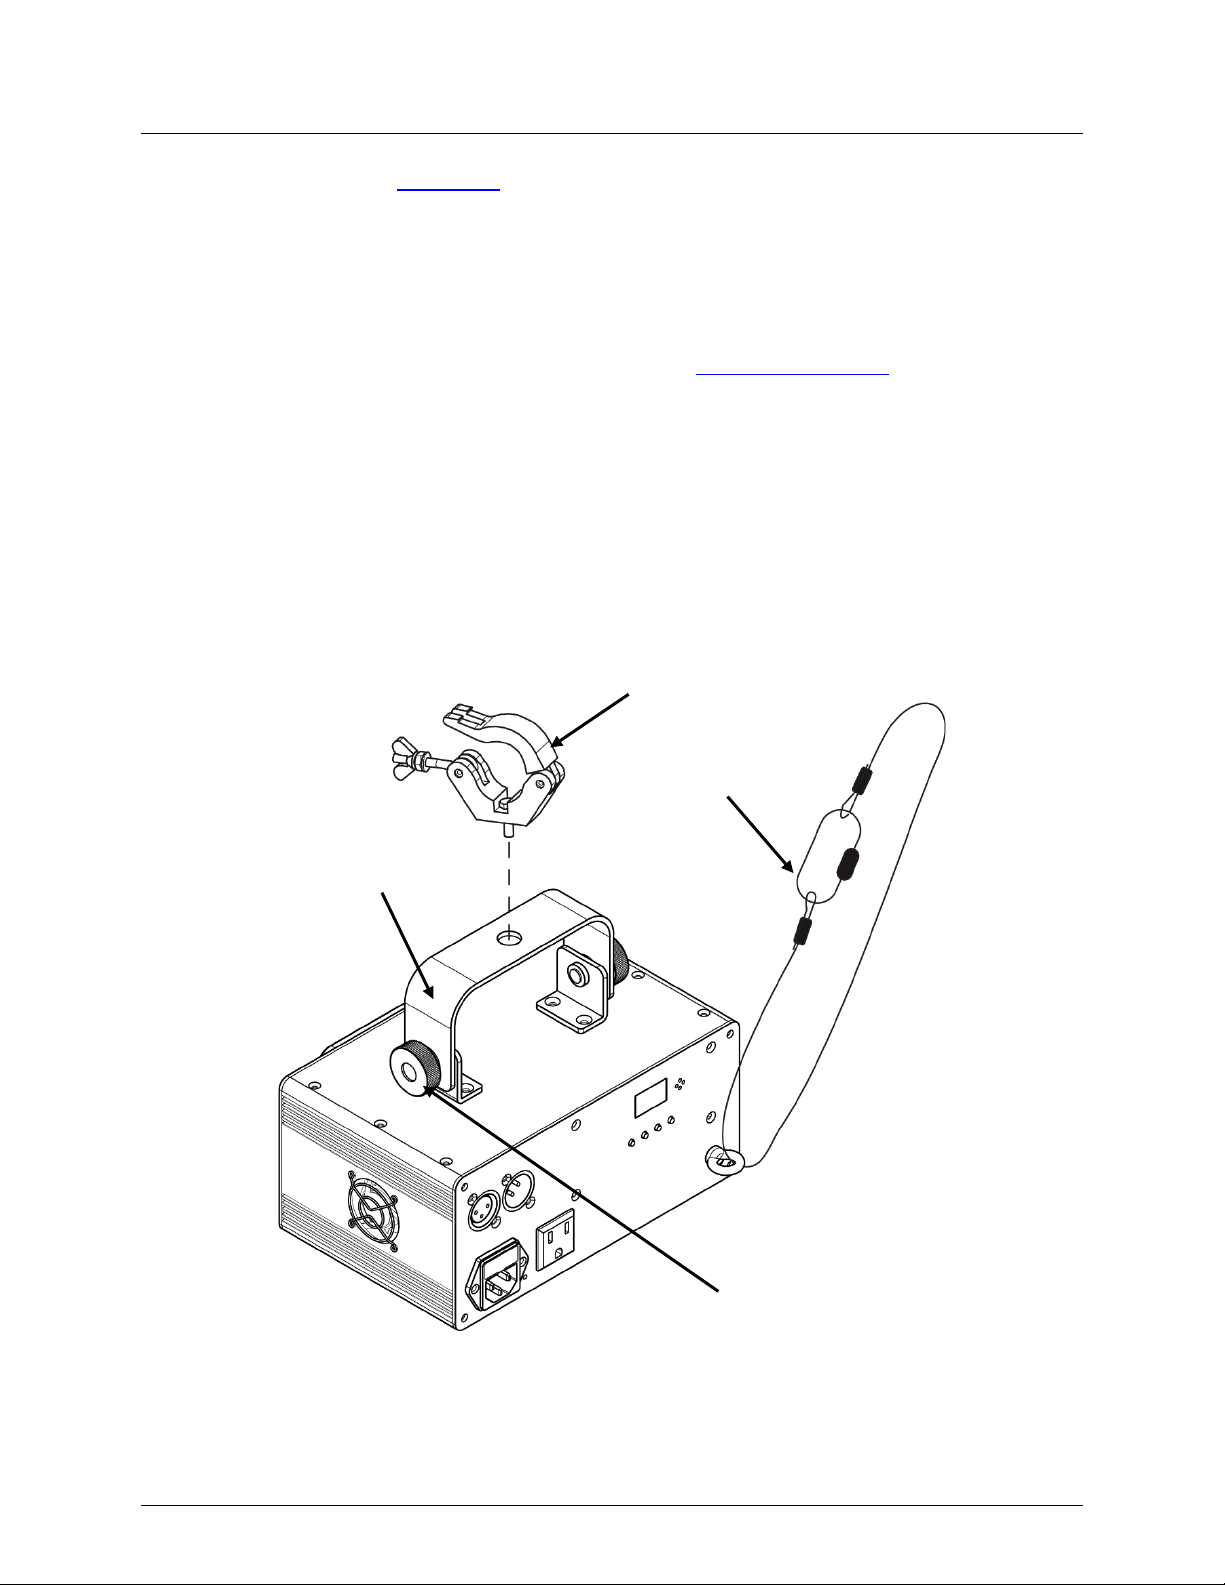
Mounting
, read and follow the safety recommendations indicated in
that includes planning for safe
Rigging
product onto a truss, you should use a mounting clamp of
knobs allow for directional adjustment when aiming the
Mounting Bracket
Before mounting the product
the Safety Notes.
Orientation
The Scorpion Dual V2 must be mounted in a position
laser usage. In addition, make sure adequate ventilation is provided around the product.
• Before deciding on a location for the product, always make sure there is easy access
to the product for maintenance and programming.
• Make sure that the structure or surface onto which you are mounting the product can
support the product’s weight (see the Technical Specifications).
• When mounting the product overhead, always use a safety cable. Mount the product
securely to a rigging point, such as an elevated platform or a truss.
• When rigging the
appropriate weight capacity. The bracketed has a 13-mm hole, which is appropriate
for this purpose.
• The bracket adjustment
product to the desired angle. Only loosen or tighten the bracket knobs manually.
Using tools could damage the knobs.
Mounting Clamp
Safety Cable
Bracket
Adjustment
Knob x2
Page 14 of 64 Scorpion Dual V2 User Manual Rev. 3
Page 15
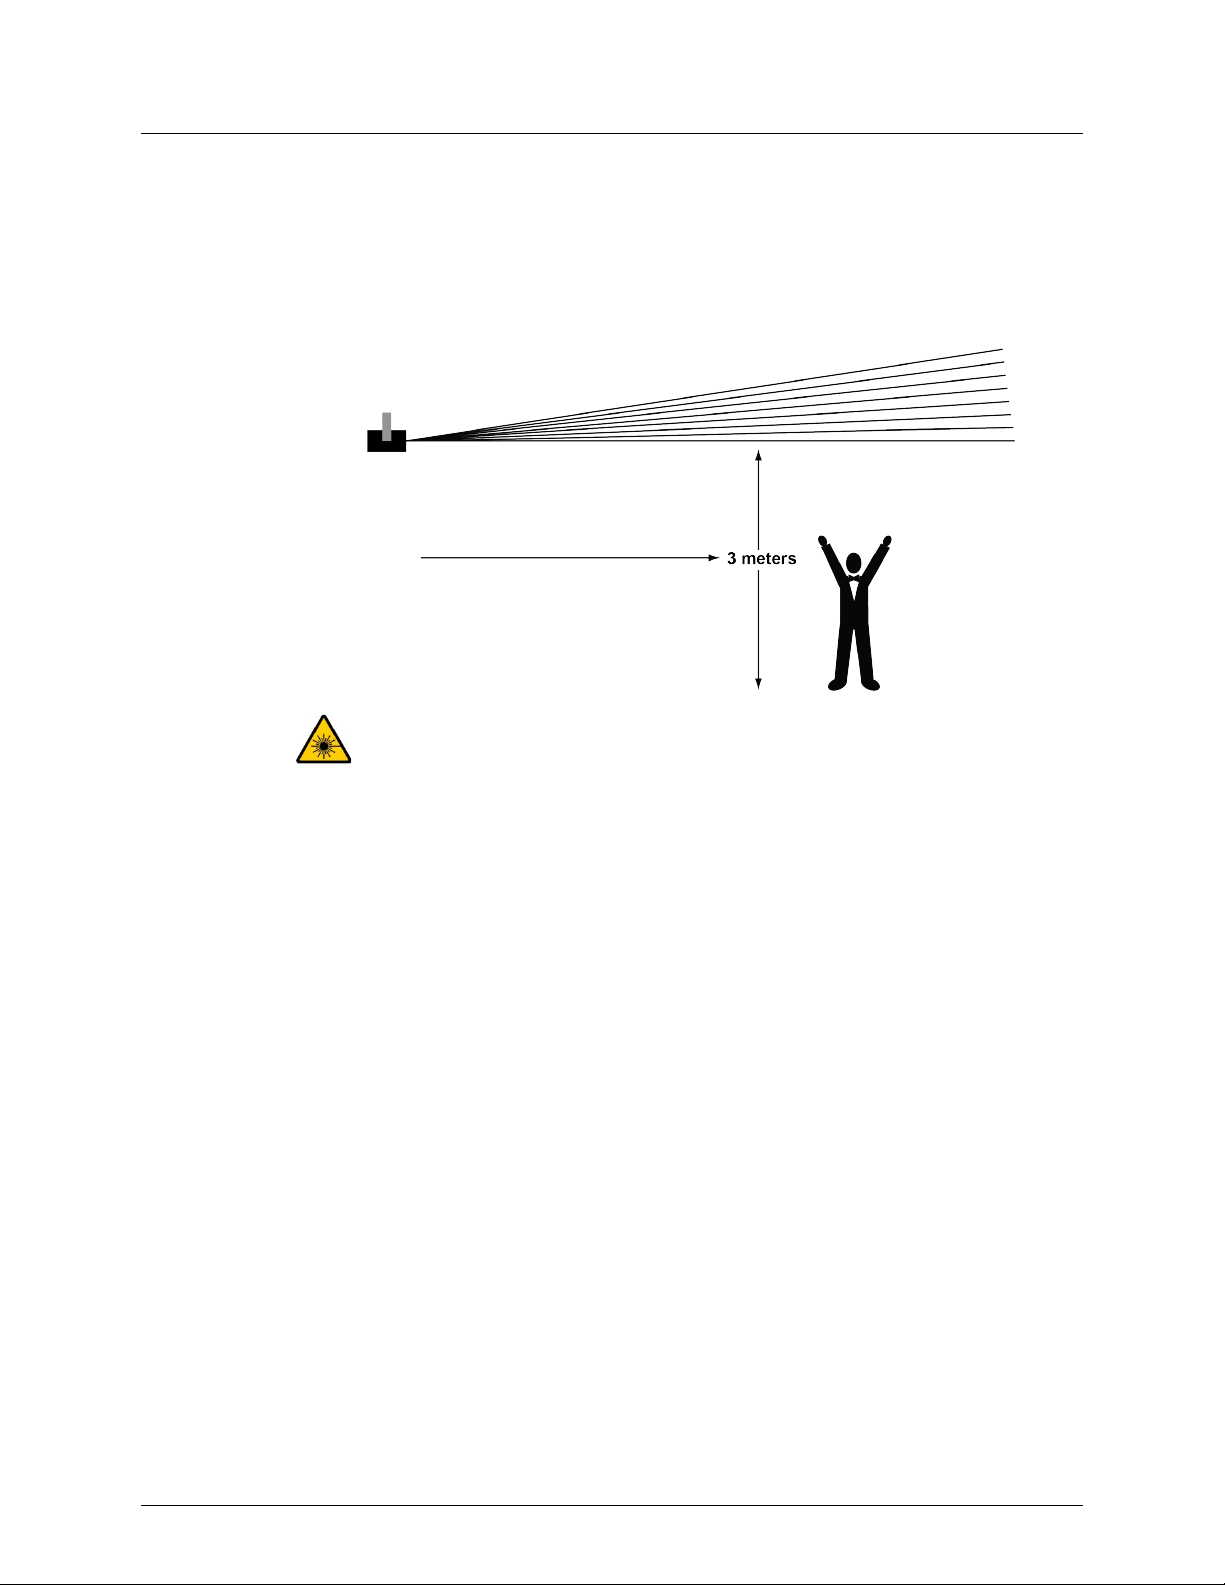
Proper Usage
mounting lighting effect products on steady elevated platforms or sturdy overhead
International laser safety regulations require that laser products must be operated
in the fashion illustrated below, with a minimum of 3 meters (9.8 ft) of vertical
n between the floor and the lowest laser light. Additionally,
3 meters of horizontal separation is required between laser light and audience or
CAUTION! USE OF CONTROLS, ADJUSTMENTS, OR PROCEDURES
MAY RESULT
IN HAZARDOUS RADIATION EXPOSURE.
This product is for overhead mounting only. For safety purposes, Chauvet recommends
supports using suitable hanging clamps. In all cases, use safety cables. Obtain
appropriate mounting hardware from your lighting vendor.
separatio
other public spaces.
OTHER THAN THOSE SPECIFIED IN THIS USER MANUAL
Scorpion Dual V2 User Manual Rev. 3 Page 15 of 64
Page 16

This product is not designed for continual use. Make sure there are regular breaks during operation to maximize the
life of your laser. Always disconnect the Scorpion Dual V2 from power when not in use.
Control Panel
To access the control panel functions, use the four buttons located underneath the
<DOWN>
<ENT>
Menu Map
Mode
Programming Steps
Description
DMX Mode
001–503
Selects DMX starting address
Slave Mode
SLA
Slave mode
Remote Control
rEN
Wireless remote control
Test Mode
tSt
Test pattern
Sound-Active/Auto
Modes
Sou
Sound-Active mode
Aut
Auto mode
Sensitivity
S 0–9
Sound sensitivity control
Configuration
socket on the product.
When selecting a DMX starting address, always consider the number of DMX channels
DMX mode, which defines the
If you are not familiar with the DMX protocol, download the DMX Primer from
3. Press <ENTER>.
4. OPERATION
Operation
(DMX)
display. When the product is on, the LED monitor on the rear panel will show the current
operating mode (standalone or DMX). The product will retain the last saved settings when
powered off.
Button Function
<MENU> Selects an operation mode or backs out of the current menu option
<UP> Scrolls up the list of options or selects a higher value
Scrolls down the list of options or selects a lower value
Activates a menu option or a selected value
Set the product in DMX mode to control with a DMX controller.
1. Connect the product to a suitable power outlet.
2. Turn the product on.
3. Connect a DMX cable from the DMX output of the DMX controller to the DMX input
Starting Address
the selected DMX mode uses. If you choose a starting address that is too high, you could
restrict the access to some of the product’s channels.
The Scorpion Dual V2 uses up to 10 DMX channels in
highest configurable address to 503.
www.chauvetlighting.com.
To select the starting address, do the following:
1. Press <MENU> repeatedly until 001–503 blinks on the display.
2. Use <UP> or <DOWN> to select the starting address.
Test Mode
Activate the laser test pattern as follows.
1. Press <MENU> repeatedly until tSt blinks on the display.
2. Press <ENTER>.
Page 16 of 64 Scorpion Dual V2 User Manual Rev. 3
Page 17
DMX Channel Modes, Assignments, and Values
000 085
171 255
DMX mode (other channels activated)
Sound-Active
000 009
250 255
No function
On 3
Pattern Selection
000 255
Patterns as shown in Patterns table.
000 127
210 255
100%–5%
Zoom in and out
000 127
192 255
Fixed position on y-axis (0 to 359°)
Counter-clockwise rolling, slow to fast
000 127
192 255
Fixed position on x-axis (0 to 359°)
Counter-clockwise rolling, slow to fast
000 127
192 255
Fixed position on z-axis (0 to 359°)
Counter-clockwise rolling, slow to fast
000 127
192 255
Fixed position (128 horizontal points)
Counter-clockwise movement, slow to fast
000 127
192 255
Fixed position (128 vertical points)
Counter-clockwise movement, slow to fast
000 127
210 255
Fast to slow (manual)
Fast to slow, then slow to fast (automatic repeat)
Channel 1 is set to
For automatic operation of lasers using DMX control, be sure Channel 1 is set to
10-Channel
Channel Function Value Setting
1 Control Functions
2 Strobe
4 Zoom
5 Y-Axis Rolling
6 X-Axis Rolling
7 Z-Axis Rolling
8 Pan
9 Tilt
10 Scan Speed
086 170
010 249
128 169
170 209
128 191
128 191
128 191
128 191
128 191
128 169
170 209
Auto program
Slow to fast
Zoom in
Zoom out
Clockwise rolling, slow to fast
Clockwise rolling, slow to fast
Clockwise rolling, slow to fast
Clockwise movement, slow to fast
Clockwise movement, slow to fast
Slow to fast (automatic)
Fast to slow (automatic)
• For manual operation of lasers using DMX control, be sure
DMX mode (000—085).
•
Auto program (086–170).
• Channel 2 must be set to 010–255 for Channel 1 to be operational.
Scorpion Dual V2 User Manual Rev. 3 Page 17 of 64
Page 18
Patterns
Page 18 of 64 Scorpion Dual V2 User Manual Rev. 3
Page 19
Configuration
Never connect a product that is operating in any standalone mode (Auto or
string connected to a DMX controller. Products in
standalone mode may transmit DMX signals that could interfere with the DMX
3. Press <ENTER>.
Sound Sensitivity
noise below the sensitivity setting.
3. Press <ENTER>.
Master/Slave
products (the slaves) without the need of a
mode, while the slaves will be set to operate in Slave mode. Once set and connected,
2. Make the master the first unit in the DMX daisy chain.
Configure all the slave units before connecting the master unit to the DMX
string configured for Master/Slave
operation because the controller may interfere with the signals from the
IR Wireless
2. Press <ENTER>.
(Standalone)
Set the product in one of the standalone modes to control without a DMX controller.
1. Connect the product to a suitable power outlet.
2. Turn the product on.
Sound-Active) to a DMX
signals from the controller.
Sound-Active
Mode
Auto Mode
Mode
To enable the Sound-Active program, do the following:
1. Press <MENu> repeatedly until Sou (Sound-Active) or Aut (Auto) blinks on the
display.
2. Use <UP> or <DOWN> to select Sou.
To set the sound sensitivity, follow the instructions below:
1. Press <MENU> repeatedly until S 0–9 blinks on the display.
2. Use <UP> or <DOWN> to select the desired sound sensitivity.
3. Press <ENTER>.
The product will only respond to low frequencies of music (bass and drums).
The laser will blackout when in Sound-Active mode after 3 seconds of silence or
To enable the auto mode, follow the instructions below:
1. Press <MENU> repeatedly until Sou (Sound-Active) or Aut (Auto) blinks on the
display.
2. Use <UP> or <DOWN> to select Aut.
The Master/Slave mode allows a single Scorpion Dual V2 product (the master) to control
the actions of one or more Scorpion Dual V2
DMX controller. The master will be set to operate in either Auto mode or Sound-Active
the slaves will operate in unison with the master.
Configure the products as indicated below.
Slaves:
1. Press <MODE> repeatedly until SLA shows on the display.
2. Press <ENTER>.
3. Connect the DMX input of the first slave to the DMX output of the master.
4. Connect the DMX input of the subsequent slaves to the DMX output of the previous
slave.
5. Finish setting and connecting all the slaves.
Master unit:
1. Set the master to operate in either Auto mode or Sound-Active mode.
Control
Scorpion Dual V2 User Manual Rev. 3 Page 19 of 64
•
daisy chain.
• Never connect a DMX controller to a DMX
master unit.
• Do not connect more than 31 slave units to the master unit.
To enable IR wireless control, follow the instructions below:
1. Press <MENU> repeatedly until rEN shows on the display.
Page 20
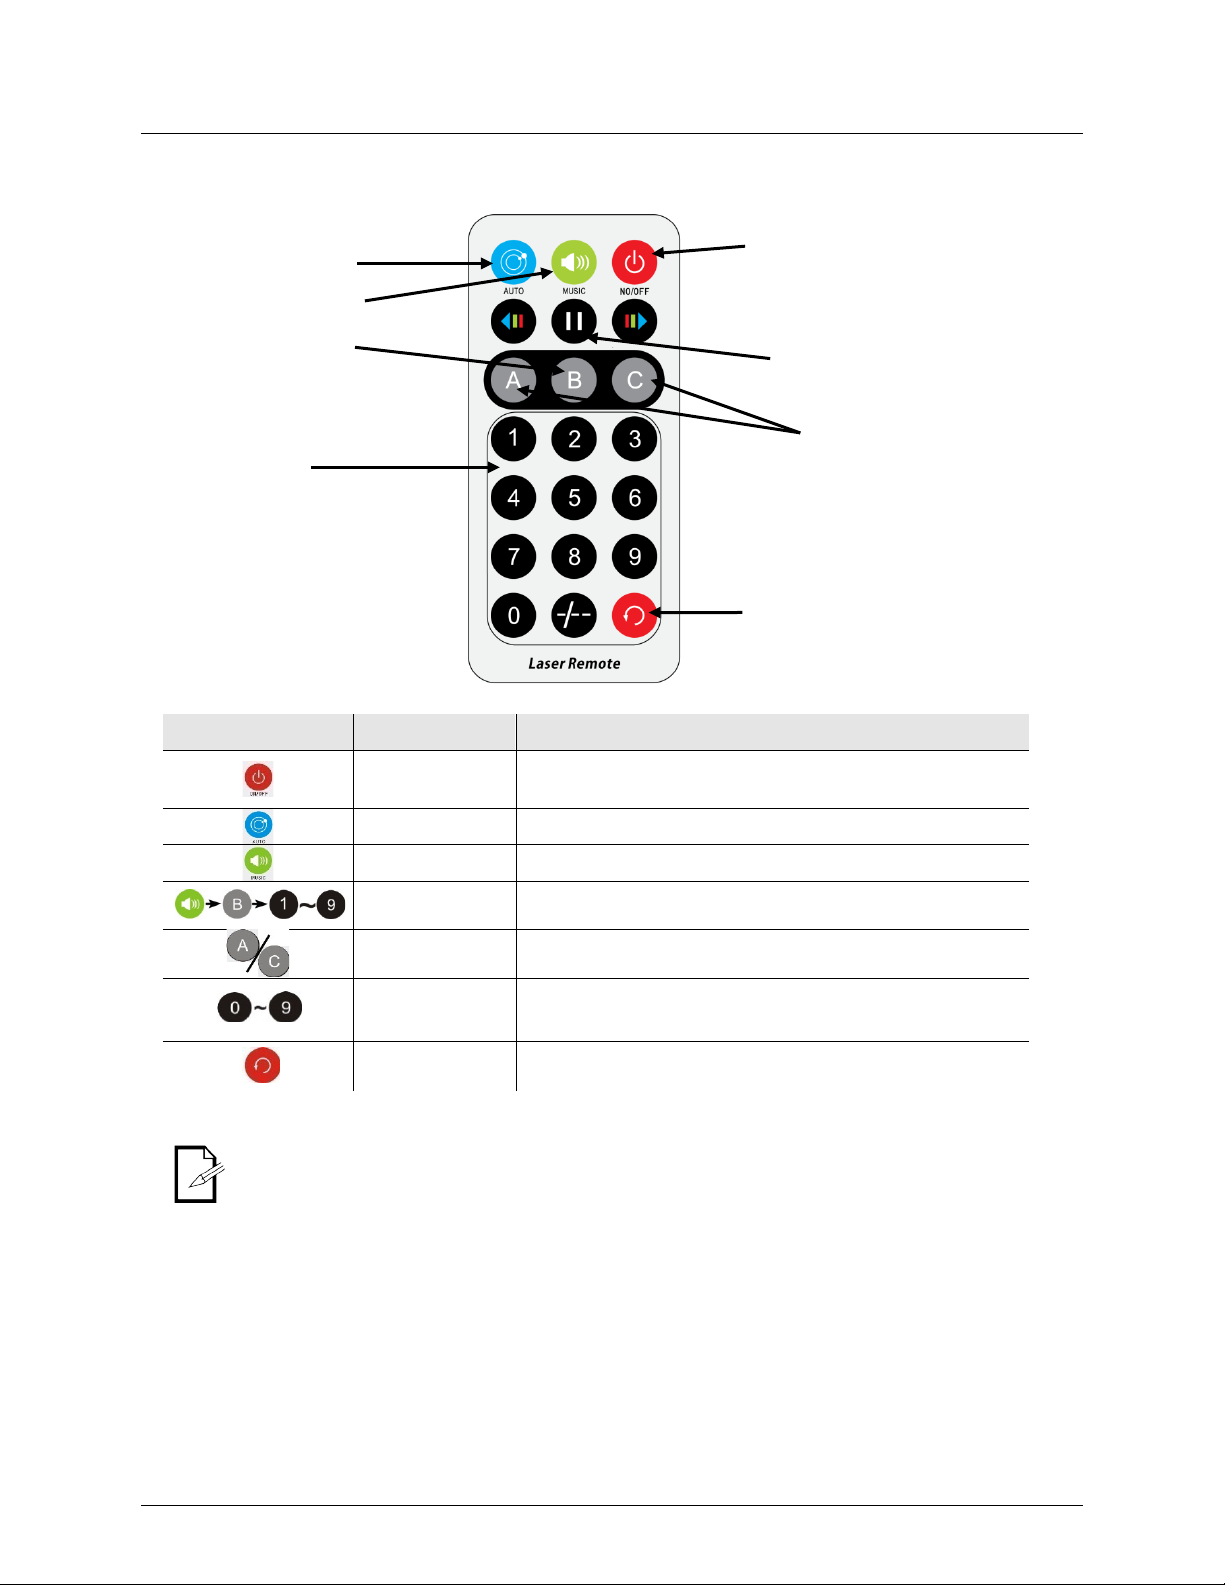
Sound-Active
Mode
Any control or setting on the IR remote will be saved until the system is rebooted. The
Dual V2.
Laser On/Off
Pattern Repeat
Pattern Changing
Effect Pause
Auto Mode
Sound-Active Mode
Patterns
Sound Sensitivity
Remote Control
Button Function Description
•
system will revert to Auto Mode after reboot.
The buttons on the IR remote not listed above are reserved for future use with the Scorpion
•
ON/OFF Turn laser on/off.
Auto Mode Laser runs on built-in auto program
Sound-Active mode. LED Indicator flashes when sound is detected
Sound Sensitivity
Patterns Show and change patterns
Fixed Pattern Choose favorite PATTERN from 1 to 32
Pattern Repeat Last PATTERN and current PATTERN cycle repeats
In Sound-Active mode, press <MUSIC> + <B> + <1> (least sensitive)
to <9> (most sensitive) to adjust sensitivity setting
Page 20 of 64 Scorpion Dual V2 User Manual Rev. 3
Page 21

Product
up reduces light output performance and can cause overheating. To maintain
optimum performance, clean the product at least twice a month.
and environmental conditions contribute to increasing the cleaning
7. Gently polish the glass surface until they are free of haze and lint.
5. TECHNICAL INFORMATION
Dust build-
Maintenance
However, usage
frequency.
To clean the product, follow the instructions below:
1. Unplug the product from power.
2. Wait until the product is at room temperature.
3. Use a vacuum (or dry compressed air) and a soft brush to remove dust collected on
the external surfaces and fan vents.
4. Clean the glass panel (laser aperture) with a mild solution of glass cleaner or
isopropyl alcohol.
5. Apply the solution directly to a soft, lint-free cotton cloth or a lens cleaning tissue.
6. Softly wipe any dirt or grime to the outside edges of the glass.
Always dry the glass surfaces carefully after cleaning them.
Do not spin the fan using compressed air because you could damage it.
Do not open this product for cleaning or servicing.
Scorpion Dual V2 User Manual Rev. 3 Page 21 of 64
Page 22

Dimensions and
Length
Width
Height
Weight
8.5 in (216 mm)
6.3 in (161 mm)
7.1 in (179.5 mm)
3.8 lb (1.7 kg)
Note: Dimensions in inches rounded to the nearest decimal digit.
Power
Input Voltage
Range
Voltage Selection
Switching (internal)
100 to 240 VAC, 50/60 Hz
Auto-ranging
Parameter
120 V, 60 Hz
230 V, 50 Hz
Consumption
20 W
19 W
Operating current
0.2 A
0.1 A
Power linking current (units)
8 A (44 units)
8 A (93 units)
Fuse
T 1 A, 250 V
T 1 A, 250 V
Power I/O
US/Worldwide
UK/Europe
Power input connector
IEC
IEC
Power output connector
Edison
IEC
Power Cord plug
Edison (US)
Local plug
Light Source
Type
Power
Wavelength
Laser (green)
50 mW
520 nm
Photo Optic
Parameter
Pan and Tilt
30°/30° (variable)
Zoom angle
1° to 29°
Thermal
Laser Maximum External Temp
Cooling System
95 °F (35 °C)
Fan-cooled
DMX
I/O Connectors
Connector Type
Channel Range
3-pin XLR
Sockets
10
Ordering
Product Name
Item Code
UPC Code
Scorpion Dual V2
10060819
781462211677
6. TECHNICAL SPECIFICATIONS
Weight
Page 22 of 64 Scorpion Dual V2 User Manual Rev. 3
Page 23

R
If you are located outside the U.S., UK, Ireland, Benelux, France, Germany, or
Mexico, contact your distributor of record and follow their instructions on how to
for contact
Call the corresponding Chauvet Technical Support office and request a Return
Merchandise Authorization (RMA) number before shipping the product. Be prepared to
el number, serial number, and a brief description of the cause for the
al box, and with its original packing and
Clearly label the package with the RMA number. Chauvet will refuse any product
NOT write the RMA number
Before sending the product, clearly write the following information on a piece of paper
sure to pack the product properly. Any shipping damage resulting from inadequate
boxing are
Chauvet reserves the right to use its own discretion to repair or replace returned
In case you need to get support or return a product:
ETURNS
• If you are located in the U.S., contact Chauvet World Headquarters.
• If you are located in the UK or Ireland, contact Chauvet Europe Ltd.
• If you are located in Benelux, contact Chauvet Europe BVBA.
• If you are located in France, contact Chauvet France.
• If you are located in Germany, contact Chauvet Germany.
• If you are located in Mexico, contact Chauvet Mexico.
• If you are located in any other country, DO NOT contact Chauvet. Instead, contact
your local distributor. See www.chauvetdj.com for distributors outside the U.S., UK,
Ireland, Benelux, France, Germany, or Mexico.
return Chauvet products to them. Visit our website www.chauvetdj.com
details.
provide the mod
return.
To submit a service request online, go to www.chauvetdj.com/service-request.
Send the merchandise prepaid, in its origin
accessories. Chauvet will not issue call tags.
returned without an RMA number.
Write the RMA number on a properly affixed label. DO
directly on the box.
and place it inside the box:
• Your name
• Your address
• Your phone number
• RMA number
• A brief description of the problem
Be
packaging will be your responsibility. FedEx packing or doublerecommended.
product(s).
Scorpion Dual V2 User Manual Rev. 3 Page 23 of 64
Page 24

C
General Information
Technical Support
Chauvet World Headquarters
Address: 5200 NW 108th Avenue
Toll free: (800) 762-1084
Voice: (844) 393-7575
Website www.chauvetdj.com
Chauvet Europe Ltd
Address: Unit 1C
Email: UKtech@chauvetlighting.eu
Chauvet Europe BVBA
Address: Stokstraat 18
Email: BNLtech@chauvetlighting.eu
Chauvet France
Address: 3, Rue Ampère
Voice: +33 1 78 85 33 59
Email: FRtech@chauvetlighting.fr
Chauvet Germany
Address: Bruno-Bürgel-Str. 11
Voice: +49 421 62 60 20
Email: DEtech@chauvetlighting.de
Chauvet Mexico
Address: Av. de las Partidas 34-3B
Voice: +52 (728) 690-2010
Email: servicio@chauvet.com.mx
Outside the U.S., U.K., Ireland, Benelux, France, Germany, or Mexico, contact the
our website for contact details
ONTACT
US
Sunrise, FL 33351
Voice: (954) 577-4455
Fax: (954) 929-5560
Brookhill Road Industrial Estate
Pinxton, Nottingham, UK
NG16 6NT
Voice: +44 (0)1773 511115
Fax: +44 (0)1773 511110
9770 Kruishoutem
Belgium
Voice: +32 9 388 93 97
91380 Chilly-Mazarin
France
Fax: (954) 756-8015
Email: chauvetcs@chauvetlighting.com
Website: www.chauvetdj.eu
Website: www.chauvetdj.eu
Website: www.chauvetdj.eu
28759 Bremen
Germany
(Entrance by Calle 2)
Zona Industrial Lerma
Lerma, Mexico C.P. 52000
dealer of record. Follow the instructions to request support or to return a product. Visit
Page 24 of 64 Scorpion Dual V2 User Manual Rev. 3
Website: www.chauvetdj.eu
Website: www.chauvetdj.mx
Page 25

Qué va
Instrucciones
de Desembalaje
Desembale el producto con cuidado inmediatamente y compruebe la caja para
Reclamaciones
Si la caja o el contenido (el producto y los accesorios incluidos) parecen dañados a
causa del transporte o muestran signos de manipulación inadecuada, notifíqueselo
. Si no lo hace oportunamente, puede
quedar invalidada su reclamación al transportista. Además, guarde la caja y todo el
os no relacionados
en el
plazo de 7 días de la entrega.
Convenciones
Convención
Significado
1–512
Un rango de valores
50/60
Un conjunto de valores de los cuales solo se pude escoger uno
Settings
Una opción de menú que no se puede modificar
Menu > Settings
Una secuencia de opciones de menú que ha de seguirse
Una tecla que se tiene que pulsar en el panel de control del
producto
ON
Un valor que se tiene que introducir o seleccionar
Símbolos
Símbolo
Significado
Instalación, configuración o información sobre funcionamiento
producto no funcione, que se averíe, o causar daños al usuario.
Exención de
Chauvet cree que la información contenida en este manual es exacta en todos los
aspectos. Sin embargo, Chauvet no asume responsabilidad alguna, y queda exenta
específicamente de todas y cada una de las responsabilidades y obligaciones, de la
y para con cualquier parte, por pérdida, perjuicio o trastorno causados
por cualquier error u omisión en este documento, tanto si tales errores y omisiones se
deben a negligencia o accidente como a cualquier otra causa. Chauvet se reserva el
isar el contenido de este documento sin ninguna obligación de notificar
dicha revisión a ninguna persona o empresa; sin embargo, Chauvet no está en absoluto
obligado a hacerlo así, ni se compromete a realizar revisión alguna. Descargue la última
Las obras de autoría contenidas en este manual, incluyendo, pero sin limitarse a ellas,
son marcas comerciales o
t y
Chauvet Lighting) en los Estados Unidos y otros países. Otras empresas, nombres de
productos y logotipos a los que se haga referencia aquí pueden ser marcas comerciales
de sus respectivas empresas.
1. ANTES DE EMPEZAR
Incluido
del Manual
• Scorpion Dual V2
• Cable de Alimentación
• Control Remoto por Infrarrojos
• Manual de Usuario
• Soporte para Colgar
asegurarse de que todas las piezas están en el paquete y en buen estado.
inmediatamente al transportista, y no a Chauvet
material de embalaje para su inspección.
Para otras incidencias, como componentes o piezas que falten, dañ
con el transporte o daños no evidentes, presente una reclamación a Chauvet
<ENTER>
Instalación o información de configuración importante. El producto
puede no funcionar correctamente si esta información no se usa.
Información útil.
Responsa-
crítica. Hacer caso omiso de esta información puede hacer que el
bilidad
clase que sean
derecho a rev
versión de www.chauvetdj.com.
todos los dibujos, textos e imágenes, son propiedad de Chauvet.
© Copyright 2018, Chauvet & Sons, LLC. Todos los derechos reservados.
Publicado en formato electrónico por Chauvet en los Estados Unidos de América.
CHAUVET, el logotipo de Chauvet y Scorpion Dual V2
marcas registradas de Chauvet & Sons Inc. (con nombres comerciales Chauve
Scorpion Dual V2 Manual de Usuario Rev. 3 Página 25 de 64
Page 26

Notas de
información importante sobre seguridad del
sistema láser. Lea y comprenda todas las instrucciones antes de encender el
láser por primera vez. Conocer las instrucciones de seguridad es crucial para
nga este manual de
Los láseres pueden ser peligrosos y tienen consideraciones de seguridad
estar muy caliente.
Este producto no está concebido para una instalación permanente.
los periodos en los que no se use.
Las Notas de seguridad incluyen
Seguridad
evitar lesiones oculares y para no infringir la ley. Mante
usuario en un lugar seguro para futuras consultas.
¡DETÉNGASE Y LEA TODOS LOS DATOS DE SEGURIDAD!
•
particulares. Puede producirse lesión ocular permanente y ceguera si los
láseres se usan incorrectamente. Ponga máxima atención a todos los
COMENTARIOS y ADVERTENCIAS de seguridad de este manual de usuario.
Lea atentamente todas las instrucciones ANTES de poner en funcionamiento
este dispositivo.
• Conecte siempre el producto a un circuito con toma de tierra para evitar el riesgo de
electrocución.
• Desconecte siempre el producto de la alimentación antes de limpiarlo o sustitución
del fusible.
• Evite la exposición directa de los ojos a la fuente de luz mientras es producto esté
encendido.
• Asegúrese de que el cable de alimentación no está retorcido ni estropeado.
• Nunca desconecte este producto de la alimentación agarrando o tirando del cable.
• Si monta el producto en alto, asegure siempre a un dispositivo de seguridad usando
cable de seguridad.
• Asegúrese de que no hay materiales inflamables cerca del producto cuando esté en
funcionamiento.
• No toque la carcasa del producto cuando esté en funcionamiento, porque podría
•
• Asegúrese siempre de que la tensión del enchufe al que conecte el producto está en
el rango establecido en el grabado o en el panel posterior del producto.
• ¡El producto es para uso en interiores solamente! (IP20) Para evitar riesgos de
incendio o descarga, no exponga el producto a la lluvia o la humedad.
• Instale siempre el producto en una ubicación con ventilación adecuada, al menos a
20'' (50 cm) de superficies adyacentes.
• Asegúrese de que ninguna ranura de ventilación en la carcasa del producto queda
bloqueada.
• Nunca conecte el producto a un atenuador.
• Asegúrese de reemplazar el fusible por otro del mismo tipo y categoría.
• Use siempre el soporte de montaje para trasladar el producto.
• No Apague/Encienda el producto a intervalos cortos. Esto acortará la vida del diodo
láser.
• NO sacuda este producto. Evite usar la fuerza bruta cuando monte o maneje el
producto.
• Use SIEMPRE un cable de seguridad cuando monte este producto en lo alto.
• La temperatura ambiente operativa para el láser es de 59 °F a 95 °F
(15 °C a 35 °C). No haga funcionar este producto fuera de este rango.
• En caso de un problema grave de funcionamiento, deje de usar el producto
inmediatamente.
• Nunca intente reparar el producto. Las reparaciones llevadas a cabo por personal no
cualificado pueden provocar averías o funcionamiento defectuoso. Póngase en
contacto con el centro de asistencia técnica autorizado más cercano.
• Para evitar un desgaste innecesario y alargar su vida útil, desconecte complemente
el producto de la alimentación, mediante el interruptor o desenchufándolo, durante
Página 26 de 64 Scorpion Dual V2 Manual de Usuario Rev. 3
Page 27

• Evite el contacto directo de los ojos con la luz del láser. Nunca exponga
prohibidas por motivos de seguridad!
Advertencia
sobre Carcasa no
• Esta unidad contiene internamente dispositivos láser de alta potencia.
ceguera instantánea, quemaduras en la piel e incendios.
Notas de
Seguridad sobre
Láser
La luz láser es diferente de cualquier otra fuente de luz. La luz de este producto puede
causar lesión ocular si el producto no se instala y usa adecuadamente. La luz láser es
concentración de luz puede causar lesiones instantáneas en el ojo, fundamentalmente
por quemadura de la retina (la zona sensible a la luz en la parte posterior del ojo).
Aunque usted no pueda sentir el “calor” de un haz de láser, este puede aún
ente lesionar o cegarle a usted o al público. Incluso cantidades de luz láser
muy pequeñas son potencialmente peligrosas, incluso a largas distancias. Las lesiones
esto que porque estos productos recreativos de láser dividan el láser en
cientos de haces, y porque el haz de láser se lance a alta velocidad, es segura la
exposición del ojo a un haz individual de láser. Este producto de láser utiliza docenas de
s de potencia láser (niveles clase 3B internamente) antes de dividirlo en
múltiples haces (niveles clase 3R). Muchos de los haces individuales son
uz láser no está
nunca libre de riesgo, ni aunque el haz se mueva siempre. Puesto que las lesiones oculares
pueden producirse instantáneamente, es crítico prevenir la posibilidad de CUALQUIER
láser, no es legal apuntar
con láseres Clase 3a hacia áreas en las que las personas puedan quedar expuestas. Esto
se aplica incluso si se apunta con el láser por debajo de las caras de la gente, por ejemplo
intencionadamente sus ojos o los de otras personas a la luz directa del láser.
• Este producto láser puede causar lesiones oculares al instante, o ceguera, si la luz
del láser incide directamente en los ojos.
• Es ilegal y peligroso alumbrar con este láser zonas de espectadores en las que el
público u otro personal pueda recibir rayos láser o reflejos de su brillo directamente
en los ojos.
• En los EEUU es un delito federal dirigir cualquier láser hacia un avión.
• El uso de controles, ajustes o procedimientos distintos a los especificados en este
manual de usuario pueden causar exposición peligrosa a la radiación.
• NO intente ninguna reparación. Las reparaciones y la asistencia deben ser llevadas
a cabo por un técnico autorizado. ¡Las modificaciones no autorizadas están
Guarde este manual de usuario para futuras consultas. Si este producto pasa a ser
propiedad de otro usuario, asegúrese de que este documento acompaña al láser.
• No abra la carcasa del láser, debido a la potencial exposición a niveles no seguros
de radiación láser.
Cerrada
• Los niveles de láser a los que se tiene acceso si se abre la unidad pueden causar
DETÉNGASE Y LEA TODAS LAS NOTAS DE SEGURIDAD
SOBRE EL LÁSER SIGUIENTES
miles de veces más concentrada que la luz de cualquier otro tipo de fuente. Esta
potencialm
oculares por láser pueden ocurrir más rápido de lo que se tarda en parpadear.
NO dé por supu
milivatio
potencialmente peligrosos para los ojos.
NO asuma que porque la luz láser está en movimiento, es segura. La l
exposición directa al ojo. Según las disposiciones de seguridad
hacia la pista de baile.
Scorpion Dual V2 Manual de Usuario Rev. 3 Página 27 de 64
Page 28

No ponga en funcionamiento el láser sin primero leer y comprender todos los datos
utilice.
•
técnicos y de seguridad de este manual.
• Ubique e instale todos los efectos láser SIEMPRE de forma que toda la luz láser
está al menos a 3 m (9,8 pies) sobre el nivel del suelo en el que se encuentra la
gente. Vea la sección Uso Adecuado de este manual.
• Después de la instalación, y antes de su uso público, pruebe el láser para
asegurarse de que funciona adecuadamente. No lo use si detecta cualquier defecto.
• NO use el láser si este emite solo uno o dos haces en lugar de docenas/centenares,
pues esto podría indicar una avería en la óptica de la rejilla de difracción, y podría
permitir la emisión de niveles de láser por encima de la Clase 3R.
• NO apunte con láser a personas o animales.
• Nunca mire a la apertura del láser o a los haces de láser.
• NO apunte con el láser hacia áreas en las que las personas pudieran quedar
expuestas, como balcones sin vigilancia, etc.
• NO apunte con láseres a superficies muy reflectantes como ventanas, espejos y
metal pulido. Incluso los reflejos del láser pueden ser peligrosos.
• Nunca apunte con el láser a un avión, pues constituye delito según las leyes de
EE.UU.
• Nunca apunte hacia el cielo con haces láser sueltos.
• No exponga la óptica de salida (apertura) a productos químicos de limpieza
agresivos.
• No use el láser si la carcasa está averiada o abierta, o si la óptica parece dañada de
cualquier modo.
• Nunca abra la carcasa del láser. Los altos niveles de potencia láser dentro de la
carcasa protectora pueden originar incendios o quemaduras en la piel y causarán
lesiones oculares al instante.
• Nunca deje este producto en funcionamiento sin vigilancia.
• El funcionamiento de un láser de espectáculo de Clase 3R solo se permite si el
espectáculo es controlado por un operador experimentado y bien formado,
familiarizado con los datos contenidos en este manual.
• Los requisitos legales para usar productos de láser recreativo varían de un país a
otro. El usuario es responsable de los requisitos legales del lugar/país en que lo
¡CUIDADO! NO ponga en funcionamiento este dispositivo en formas no especificadas en este
manual de usuario. No seguir las instrucciones invalidará la garantía, podría dañar el producto o
lesionar al usuario o al público.
¡CUIDADO! Este producto no se puede tirar con la basura doméstica. Póngase en contacto con el
servicio de recogida para la eliminación de aparatos electrónicos de su zona.
Página 28 de 64 Scorpion Dual V2 Manual de Usuario Rev. 3
Page 29

LUZ LÁSER EVITE LA EXPOSICIÓN DIRECTA AL OJO
. Muchos gobiernos locales,
las directrices de ANSI Z136.1. La guía Laser Display puede obtenerse de la
Datos de Emisión Láser
Declaración de Conformidad Láser
Cumple con los estándares de desempeño de la FDA para productos láser, excepto
estándares de rendimiento láser.
Reproducción de la Etiqueta de Seguridad del Láser
Advertencia
Sobre
Exposición al
Láser
Se pueden encontrar más directrices y programas de seguridad para el uso seguro de
láseres en la Normativa ANSI Z136.1 “Para uso seguro de Láseres”, disponible en el
Laser Institute of America: www.laserinstitute.org
corporaciones, agencias, ejército y otros requieren que todos los láseres se usen bajo
International Laser Display Association: www.laserist.org.
Clasificación Láser Clase IIIa
Láser Verde Medio LD / 520 nm / 50 mW
Diámetro del Haz <5 mm en la apertura
Datos de Pulso Todos los pulsos < 4 Hz (>0.25 s)
Divergencia (cada haz) <2 mrad
Divergencia (luz total) <160 grados
Potencia láser de cada
haz en la apertura*
*Según medida bajo condiciones de medición IEC para clasificación.
por las desviaciones según el Laser Notice No. 50, del 24 de junio de 2007. No es
necesario ningún mantenimiento para que este producto siga cumpliendo los
<5 mW
Scorpion Dual V2 Manual de Usuario Rev. 3 Página 29 de 64
Page 30

2. INTRODUCCIÓN
Vista General
Entrada de
Pantalla y
Entrada
DMX
Salida
DMX
Micrófono
Salida de
Portafusibles
Anilla de
Ventilador
LED Indicador de Alimentación
Salida Láser
LED Indicador de Sonido
Sensor IR
Soportes para
Superficie (x4)
Botones de
Control
Página 30 de 64 Scorpion Dual V2 Manual de Usuario Rev. 3
Alimantación
Alimentación
Seguridad
Page 31

Dimensiones
(179.5 mm)
6,3"
(216 mm)
8,5"
(161 mm)
7,1"
Scorpion Dual V2 Manual de Usuario Rev. 3 Página 31 de 64
Page 32

Corriente
tiene una fuente de alimentación con detección automática que
toma de alimentación y
cableado), use el valor de tensión que aparece en la etiqueta fijada en el panel trasero
. La especificación de corriente
Conecte siempre el producto a un circuito protegido (disyuntor o fusible).
Asegúrese de que el producto tiene una toma de tierra adecuada para evitar
Para evitar un desgaste innecesario y alargar su vida útil, desconecte
complemente el producto de la alimentación, mediante el interruptor o
(resistor variable) o circuito de
atenuación, incluso si el canal del reostato o atenuador sirve solo como
Sustitución del
Fusible
incluye fusible de repuesto; sin embargo, la tapa de seguridad tiene sitio
Fusible instalado
(sujeto con clip de
plástico)
Portafusible de repuesto
(dentro de cubierta de
seguridad)
Cubierta de
seguridad
3. INSTALACIÓN
El Scorpion Dual V2
Alterna
puede funcionar con un rango de tensión de entrada de 100 a 240 VCA, 50/60 Hz.
Para determinar los requerimientos de alimentación (disyuntor,
del producto o consulte estas Especificaciones Técnicas
listada indica el consumo de corriente promedio en condiciones normales.
•
•
Nunca conecte el producto a un reostato
conmutador 0 a 100%.
el riesgo de electrocución o incendio.
desenchufándolo, durante los periodos en los que no se use.
Desconecte el producto de la alimentación antes de sustituir el fusible.
1. Desconecte el producto de la alimentación.
2. Haga cuña con la punta de un destornillador plano en la ranura del portafusibles.
3. Saque el portafusibles de la carcasa.
4. Quite el fusible fundido del soporte.
5. Sustitúyalo con un fusible del mismo tipo y categoría exactamente.
6. Vuelva a colocar el portafusibles en su sitio y conecte de nuevo la alimentación.
No se
para un repuesto.
Sustituya siempre el fusible fundido con uno del mismo tipo y categoría.
Página 32 de 64 Scorpion Dual V2 Manual de Usuario Rev. 3
Page 33

Alimentación en
Cadena
medio del enchufe Edison/IEC
iagrama de
Alimentación en
¡El diagrama de alimentación de cadena que se muestra arriba corresponde SOLO
Norte! Si usa el producto en otros
, pues los
conectores de alimentación en cadena y los requisitos pueden variar en su país o
Productos Adicionales
1er Producto
2o Producto
3er Producto
Este producto proporciona alimentación en cadena por
ubicado en la parte posterior de la unidad.
D
Cadena
Puede encadenar la alimentación de hasta 44 unidades Scorpion Dual V2 a
120 VCA o hasta 93 unidades Scorpion Dual V2 a 230 VCA.
a la versión del producto de América del
mercados, debe consultar con el distribuidor local de Chauvet
región.
Scorpion Dual V2 Manual de Usuario Rev. 3 Página 33 de 64
Page 34

Montaje
Antes de montar el producto, lea y siga las recomendaciones de seguridad indicadas en
para uso seguro de
láser. Además, asegúrese de proporcionar una ventilación adecuada alrededor del
Los mandos de ajuste del soporte permiten el ajuste direccional para dirigir el
producto hacia el ángulo deseado. Apriete y afloje los mandos de soporte
las Notas de Seguridad.
Orientación
El Scorpion Dual V2 se debe montar en un posición preparada
producto.
Colocación
• Antes de decidir una ubicación para el producto, asegúrese siempre de que hay fácil
acceso al producto para su mantenimiento y programación.
• Asegúrese de que la estructura o superficie sobre la que está montando el producto
puede soportar su peso (vea las Especificaciones Técnicas).
• Cuando monte este producto en alto, use siempre un cable de seguridad. Monte el
producto con seguridad a un punto de anclaje, como una plataforma elevada o un
truss.
• Cuando cuelgue el producto de un truss, debe usar una abrazadera de montaje con
la resistencia al peso adecuada. El soporte tiene un agujero de 13 mm, que es
adecuado para este propósito.
•
únicamente con la mano. Usar herramientas podría estropear los mandos.
Abrazadera de Montaje
Soporte de Montaje
Cable de Seguridad
Página 34 de 64 Scorpion Dual V2 Manual de Usuario Rev. 3
Mando de Ajuste
del Soporte x2
Page 35

Uso Adecuado
montar los productos de efectos de iluminación sobre plataformas estables y elevadas,
o en soportes en alto sólidos utilizando abrazaderas apropiadas para colgar. En todos
apropiado de su
Las disposiciones internacionales de seguridad láser precisan que los productos
de láser se manejen de la forma mostrada a continuación, con una separación
luz láser más baja.
Además, se requiere una separación horizontal de 3 metros entre la luz láser y los
¡CUIDADO! EL USO DE CONTROLES, AJUSTES O PROCEDIMIENTOS DISTINTOS
EXPOSICIÓN PELIGROSA A LA RADIACIÓN.
Este producto es para montaje en alto solamente. Por seguridad, Chauvet recomienda
los casos, utilice cables de seguridad. Obtenga el material de fijación
proveedor de iluminación.
vertical mínima de 3 metros (9,8 pies) entre el suelo y la
espectadores u otros espacios públicos.
3 metros
A LOS QUE SE ESPECIFICAN EN ESTE MANUAL DE USUARIO PUEDEN CAUSAR
Scorpion Dual V2 Manual de Usuario Rev. 3 Página 35 de 64
Page 36

Este producto no está diseñado para un uso continuo. Asegúrese de que hace descansos regulares durante su
Manejo del
Panel de
Control
la pantalla. Cuando el producto esté encendido, el monitor LED de la parte posterior
Mapa de Menú
Modo
Pasos de Programación
Descripción
Modo DMX
001–503
Selecciona la dirección de inicio DMX
Modo Esclavo
SLA
Modo Esclavo
Control Remoto
rEN
Mando a distancia inalámbrico
Modo Prueba
tSt
Patrón de prueba
Activo por
Automáticos
Sensibilidad al
Sonido
S 0–9
Control de sensibilidad al sonido
Configuración
DMX del producto.
Dirección de
Cuando seleccione una dirección DMX de inicio, tenga en cuenta siempre el número de
canales DMX que usa el modo seleccionado. Si escoge una dirección de inicio que es
restringiendo el acceso a alguno de los canales del
Si no está familiarizado con el protocolo DMX, descargue el Manual DMX de
3. Pulse <ENTER>.
4. FUNCIONAMIENTO
funcionamiento para maximizar la vida de su láser. Desconecte siempre el Scorpion Dual V2 de la alimentación
cuando no lo use.
Para acceder a las funciones del panel de control, use los cuatro botones ubicados bajo
mostrará el modo de funcionamiento actual (independiente o DMX). El producto
mantendrá la configuración guardada cuando se apagó la última vez.
Botón Función
<MODE>
<UP>
<DOWN>
<ENTER> Activa una opción de menú o valor seleccionado
Selecciona un modo de funcionamiento o regresa a la opción de menú
actual
Se desplaza hacia arriba por la lista de opciones o selecciona un valor
más alto
Se desplaza hacia abajo por la lista de opciones o selecciona un valor
inferior
Sonido/Modos
Configure el producto en modo DMX para controlarlo con un controlador DMX.
(DMX)
Inicio
Modo Prueba
1. Conecte el producto a una toma de corriente adecuada.
2. Encienda el producto.
3. Conecte un cable DMX de la salida DMX del controlador DMX al conector de entrada
demasiado alta, podría estar
producto.
El Scorpion Dual V2 usa hasta 10 canales DMX en modo DMX, lo cual define la dirección
503 como la más alta que se puede configurar.
www.chauvetlighting.com.
Para seleccionar la dirección de inicio, haga lo siguiente:
1. Pulse <MENU> repetidamente hasta que 001–503 parpadee en la pantalla.
2. Utilice <UP> o <DOWN> para seleccionar la dirección de inicio.
Active el patrón de prueba láser de la forma siguiente.
1. Pulse <MENU> repetidamente hasta que tSt parpadee en la pantalla.
2. Pulse <ENTER>.
Sou Modo Activo por Sonido
Aut Modo Automático
Página 36 de 64 Scorpion Dual V2 Manual de Usuario Rev. 3
Page 37

Modos de Canal, Asignaciones y Valores DMX
000 085
171 255
Modo DMX (otros canales activados)
Activo por Sonido
000 009
250 255
Sin función
Encendido
3 Selección de Patrón
000 255
Patrones según la tabla Patrones.
000 127
210 255
100%–5%
Aumentar y disminuir Zoom
000 127
192 255
Posición fija en el eje-Y (0 a 359°)
Rotación en sentido antihorario, lento a rápido
000 127
192 255
Posición fija en el eje-X (0 a 359°)
Rotación en sentido antihorario, lento a rápido
000 127
192 255
Posición fija en el eje-Z (0 a 359°)
Rotación en sentido antihorario, lento a rápido
000 127
192 255
Posición fija (128 puntos horizontales)
Movimiento en sentido antihorario, lento a rápido
000 127
192 255
Posición fija (128 puntos verticales)
Movimiento en sentido antihorario, lento a rápido
000 127
Rápido a lento (manual)
(repetición automática)
10 Canales
Canal Función Valor Configuración
1 Funciones de Control
2 Estroboscopio
4 Zoom
5 Rotación Eje-Y
6 Rotación Eje-X
7 Rotación Eje-Z
8 Desplazamiento Lateral
9 Inclinación
10 Velocidad Escáner
086 170
010 249
128 169
170 209
128 191
128 191
128 191
128 191
128 191
128 169
170 209
210 255
Programa automático
Lento a rápido
Aumentar Zoom
Disminuir Zoom
Rotación en sentido horario, lento a rápido
Rotación en sentido horario, lento a rápido
Rotación en sentido horario, lento a rápido
Movimiento en sentido horario, lento a rápido
Movimiento en sentido horario, lento a rápido
Lento a rápido (automático)
Rápido a lento (automático)
Rápido a lento y luego lento a rápido
• Para manejo manual de láseres usando el control DMX, asegúrese de que el
Canal 1 está configurado en modo DMX (000—085).
• Para manejo automático de láseres usando el control DMX, asegúrese de que el
Canal 1 está configurado en Programa Automático (086—170).
• El Canal 2 debe configurarse en 010–255 para que el Canal 1 funcione.
Scorpion Dual V2 Manual de Usuario Rev. 3 Página 37 de 64
Page 38

Patrones
DMX PATRONES DMX PATRONES DMX PATRONES DMX PATRONES
Página 38 de 64 Scorpion Dual V2 Manual de Usuario Rev. 3
Page 39

Configuración
Configure el producto en uno de los modos independientes para controlarlo sin
Nunca conecte un producto que está funcionando en cualquier modo
independiente (Automático o por Sonido) a una línea DMX conectada a un
controlador DMX. Los productos en modo independiente pueden transmitir
señales DMX que podrían interferir con las señales DMX del controlador.
Activo por
3. Pulse <ENTER>.
Sensibilidad al
• El producto solo responderá a bajas frecuencias en la música
configurado.
Modo Automático
3. Pulse <ENTER>.
Modo
esclavos) sin necesidad de un controlador DMX. El maestro se configurará para
esclavos se configurarán para funcionar en Modo esclavo. Una vez configurados y
2. Ponga el maestro como la primera unidad de la cadena DMX.
Nunca conecte un controlador DMX a una línea DMX configurada para
Control
2. Pulse <ENTER>.
(Independiente)
Modo
Sonido
Sonido
Maestro/Esclavo
controlador DMX.
1. Conecte el producto a una toma de corriente adecuada.
2. Encienda el producto
Para seleccionar el programa Activo por Sonido, haga lo siguiente:
1. Pulse <MENU> repetidamente hasta que aparezca Sou (Activo por Sonido) o
Aut (Automático) en la pantalla.
2. Utilice <UP> o <DOWN> para seleccionar Sou.
Para configurar la sensibilidad al sonido, siga las instrucciones siguientes:
1. Pulse <MENU> repetidamente hasta que S 0–9 parpadee en la pantalla.
2. Utilice <UP> o <DOWN> para seleccionar la sensibilidad al sonido deseada.
3. Pulse <ENTER>.
(graves y percusión).
• En modo Activo por Sonido, el láser se quedará en blackout tras 3
segundos de silencio o con el sonido por debajo del nivel de sensibilidad
Para habilitar el modo automático, siga las instrucciones siguientes:
1. Pulse <MENU> repetidamente hasta que aparezca Sou (Activo por Sonido) o
Aut (Automático) en la pantalla.
2. Utilice <UP> o <DOWN> para seleccionar Aut.
El modo Maestro/Esclavo permite que un solo producto Scorpion Dual V2 (el
maestro), controle las acciones de uno o más productos Scorpion Dual V2 (los
funcionar bien en Modo automático bien en modo Activo por Sonido, mientras que los
conectados, los productos esclavo funcionarán al unísono con el maestro.
Configure los productos como se indica a continuación.
Esclavos:
1. Pulse <MODE> repetidamente hasta que aparezca SLA en la pantalla.
2. Pulse <ENTER>.
3. Conecte la entrada DMX del primer esclavo a la salida DMX del maestro.
4. Conecte la entrada DMX de los siguientes esclavos a la salida DMX del esclavo
precedente.
5. Termine de configurar y conectar todos los esclavos.
Unidad maestro:
Inalámbrico por IR
Scorpion Dual V2 Manual de Usuario Rev. 3 Página 39 de 64
1. Configure el maestro para funcionar en modo Automático o Activo por Sonido.
• Configure todas la unidades esclavo antes de conectar la unidad maestro a
la cadena DMX.
•
funcionamiento Maestro/Esclavo, porque el controlador puede interferir con
las señales de la unidad maestro.
• No conecte más de 31 unidades esclavo a la unidad maestro.
Para habilitar el control inalámbrico por IR, siga las instrucciones siguientes:
1. Pulse <MENU> repetidamente hasta que aparezca rEN en la pantalla.
Page 40

Modo Activo por
Sonido
Modo Activo por Sonido. El LED indicador parpadea cuando detecta
sonido
Cualquier control o configuración en el mando a distancia por IR se guardará hasta que se
Láser On/Off
Repetir Patón
Pausa Efecto
Cambio de
Modo Automático
Modo Activo por Sonido
Patrones
Sensibilidad al Sonido
Control Remoto
Patrón
Botón Función Descripción
•
reinicie el sistema. El sistema regresará al Modo Automático después del reinicio.
•
Los botones del mando a distancia por IR que no figuran arriba están reservados para usos
futuros con el Scorpion Dual V2.
ON/OFF Activa o desactiva el láser.
Modo Automático El láser funciona con el programa automático integrado
Sensibilidad al
Sonido
Patrones Muestra y cambia patrones
Patrón Fijo Escoja su PATRÓN favorito del 1 al 32
Repetir Patrón Repite el ciclo del último PATRÓN y del PATRÓN actual.
En modo Activo por Sonido, pulse <MUSIC> + <B> + <1> (menor
sensibilidad) a <9> (mayor sensibilidad) para ajustar la sensibilidad
Página 40 de 64 Scorpion Dual V2 Manual de Usuario Rev. 3
Page 41

Mantenimiento
El polvo acumulado reduce el rendimiento de la salida de luz y puede provocar
sobrecalentamiento. Para mantener un rendimiento óptimo, limpie el producto al menos
7. Con cuidado, frote la superficie hasta que no quede turbiedad ni pelusas.
5. INFORMACIÓN TÉCNICA
del Producto
dos veces al mes.
Sin embargo, el uso y las condiciones ambientales influyen para un aumento de la
frecuencia de limpieza.
Para limpiar el producto, siga las instrucciones siguientes:
1. Desenchufe el producto de la alimentación.
2. Espere a que el producto esté a temperatura ambiente.
3. Use un aspirador (o aire seco comprimido) y un cepillo suave para quitar el polvo
depositado en las superficies externas y los orificios de aireación de los
ventiladores.
4. Limpie el panel de cristal (apertura del láser) con una solución suave de limpiador
de cristales o alcohol isopropílico.
5. Aplique la solución directamente sobre un paño suave que no deje pelusa o un
paño de limpiar lentes.
6. Con suavidad, quite todo el polvo o suciedad de los bordes externos del cristal.
Seque siempre con cuidado las superficies de cristal después de limpiarlas.
No gire el ventilador usando aire comprimido, puesto que podría estropearlo.
No abra este producto para limpiarlo o repararlo.
Scorpion Dual V2 Manual de Usuario Rev. 3 Página 41 de 64
Page 42

Dimensiones y
Largo
Ancho
Alto
Peso
216 mm (8,5")
161 mm (6,3")
179.5 mm (7,1'')
1,7 kg (3,8 lb)
Nota: Las dimensiones en pulgadas están redondeadas al dígito decimal más próximo.
Alimentación
Tensión de Entrada
Rango
Selección de Tensión
Detección automática
(autorango)
Parámetro
120 V, 60 Hz
230 V, 50 Hz
Consumo
20 W
19 W
Corriente de Funcionamiento
0,2 A
0,1 A
Intensidad de Alimentación en
Cadena (unidades)
Fusible
T 1 A, 250 V
T 1 A, 250 V
E/S Alimentación
US/Mundial
UK/Europa
Conector de Entrada de
Alimentación
Conector de Salida de
Alimentación
Enchufe de Cable de
Alimentación
Fuente de Luz
Tipo
Alimentación
Longitud de Onda
Láser (verde)
50 mW
520 nm
Óptica Foto
Parámetro
Desplazamiento Lateral e
Inclinación
Ángulo de Zoom
1° a 29°
Térmicas
Temp. externa máxima del láser
Sistema de Refrigeración
95 °F (35 °C)
Por ventilador
DMX
Conectores E/S
Tipo de Conector
Rango de Canal
XLR 3 pines
Conectores
10
Pedidos
Nombre de Producto
Código de Pieza
Código UPC
Scorpion Dual V2
10060819
781462211677
6. ESPECIFICACIONES TÉCNICAS
Peso
Conmutación (interna) 100 a 240 VCA, 50/60 Hz
8 A (44 unidades) 8 A (93 unidades)
IEC IEC
Edison IEC
Edison (EE.UU.) Enchufe local
30°/30° (variable)
Página 42 de 64 Scorpion Dual V2 Manual de Usuario Rev. 3
Page 43

D
Si se encuentra fuera de los EE.UU., Reino Unido, Irlanda, Benelux, Francia,
Alemania o México, póngase en contacto con su distribuidor de registro y siga
a ellos los productos Chauvet. Visite
Llame a la oficina de Asistencia Técnica Chauvet correspondiente y pida un número de
(RMA) antes de enviar el producto. Esté
preparado para proporcionar el número de modelo, número de serie y una breve
Envíe la mercancía a portes pagados, en su caja original y con su embalaje y
laramente con el número de RMA. Chauvet rechazará cualquier
Escriba el número de RMA en una etiqueta convenientemente adherida. NO
producto, escriba claramente la siguiente información en una hoja de
Cualquier daño en el
transporte que resulte de un empaquetado inadecuado será responsabilidad suya. Se
Chauvet se reserva el derecho de usar su propio criterio para reparar o
EVOLUCIONES
En caso de que necesite asistencia o devolver un producto:
• Si se encuentra en EE. UU., póngase en contacto con la Oficina Central de
Chauvet.
• Si se encuentra en el Reino Unido o Irlanda, póngase en contacto con Chauvet
Europe Ltd.
• Si se encuentra en Benelux, póngase en contacto con Chauvet Europe BVBA.
• Si se encuentra en Francia, póngase en contacto con Chauvet France.
• Si se encuentra en Alemania, póngase en contacto con Chauvet Germany.
• Si se encuentra en México, póngase en contacto con Chauvet Mexico
• Si se encuentra en cualquier otro país, NO contacte con Chauvet. Contacte con su
distribuidor local. Vea www.chauvetdj.com para distribuidores fuera de EE.UU.,
Reino Unido, Irlanda, Benelux, Francia, Alemania o México.
sus instrucciones sobre cómo devolverle
www.chauvetdj.com para detalles de contacto.
Autorización de Devolución de la mercancía
descripción de la causa de la devolución.
Para enviar una solicitud de servicio en línea, vea www.chauvetdj.com/service-request.
accesorios originales. Chauvet no expedirá etiquetas de devolución.
Etiquete el paquete c
producto devuelto sin un número de RMA.
escriba el número de RMA directamente sobre la caja.
Antes de enviar el
papel y colóquela dentro de la caja:
• Su nombre
• Su dirección
• Su número de teléfono
• Número de RMA
• Una breve descripción del problema
Asegúrese de que empaqueta el producto adecuadamente.
recomienda empaquetado FedEx o de doble caja.
reemplazar productos devueltos.
Scorpion Dual V2 Manual de Usuario Rev. 3 Página 43 de 64
Page 44

C
Chauvet World Headquarters
Dirección: 5200 NW 108th Avenue
Número Gratuito: (800) 762-1084
Voz: (844) 393-7575
Sitio web: www.chauvetdj.com
Chauvet Europe Ltd
Dirección: Unit 1C
Correo electrónico:
Chauvet Europe BVBA
Dirección: Stokstraat 18
Correo electrónico:
Chauvet France
Dirección: 3, Rue Ampère
Voz: +33 1 78 85 33 59
Correo electrónico:
Sitio web: www.chauvetdj.eu
Chauvet Germany
Dirección: Bruno-Bürgel-Str. 11
Voz: +49 421 62 60 20
Correo electrónico:
Sitio web: www.chauvetdj.eu
Chauvet Mexico
Dirección: Av. de las Partidas 34-3B
Voz: +52 (728) 690-2010
Correo electrónico:
Fuera de EE.UU., Reino Unido, Irlanda, Benelux, Francia, Alemania o México,
para devolver un producto. Visita nuestro sitio web para detalles de contacto.
ONTACTO
Información General Servicio Técnico
Sunrise, FL 33351
Voz: (954) 577-4455
Fax: (954) 929-5560
Correo electrónico:
chauvetcs@chauvetlighting.com
Fax: (954) 756-8015
Brookhill Road Industrial Estate
Pinxton, Nottingham, UK
NG16 6NT
Voz: +44 (0)1773 511115
Fax: +44 (0)1773 511110
9770 Kruishoutem
Belgium
Voz: +32 9 388 93 97
91380 Chilly-Mazarin
France
UKtech@chauvetlighting.eu
Sitio web: www.chauvetdj.eu
BNLtech@chauvetlighting.eu
Sitio web: www.chauvetdj.eu
FRtech@chauvetlighting.fr
28759 Bremen
Germany
(Entrada por Calle 2)
Zona Industrial Lerma
Lerma, Mexico C.P. 52000
póngase en contacto con su proveedor. Siga sus instrucciones para pedir soporte o
Página 44 de 64 Scorpion Dual V2 Manual de Usuario Rev. 3
DEtech@chauvetlighting.de
servicio@chauvet.com.mx
Sitio web: www.chauvetdj.mx
Page 45

Ce Qui est
Compris
Lyre de Suspension
• Une Télécommande à Infrarouge
Instructions
Relatives au
Déballage
Déballez l'appareil avec précaution et vérifiez le contenu afin de vous assurer que rien
Si l'emballage ou le contenu (l'appareil et ses accessoires compris) semble avoir été
livraison de pièces ou composants, des
ison ou des vices cachés, veuillez déposer votre
réclamation auprès de Chauvet dans les 7 jours suivant la livraison.
Conventions
Convention
Signification
1—512
Une plage de valeurs
50/60
Un ensemble de valeurs parmi lequel on ne peut en choisir qu'une
Settings
Une option de menu ne pouvant être modifiée
Menu > Settings
Une séquence d'options de menu à suivre
Un bouton sur lequel appuyer sur le panneau de commande de
l'appareil
ON
Une valeur à saisir ou à sélectionner
Symboles
Symbole
Signification
Consignes importantes en matière d'installation, de configuration
dommages. De même, l'utilisateur peut s'en trouver affecté.
Consignes importantes en matière d'installation ou de
ces instructions ne sont pas suivies.
Clause de
Chauvet estime que les informations contenues dans ce manuel sont exactes à tous les
égards. Cependant, Chauvet n'assume aucune responsabilité et décline expressément
causés par des erreurs ou des omissions dans ce document, que ces erreurs ou
quelque personne ou société que ce soit de cette révision. Cependant, Chauvet n'a
aucune obligation de réaliser de telles révision, sans non plus s'engager à les réaliser.
Les œuvres d'auteur contenues dans ce manuel, y compris, mais sans s'y limiter,
sont des marques déposées ou des
roduits et logos mentionnés dans le présent
manuel peuvent être des marques commerciales de leurs sociétés respectives.
1. AVANT DE COMMENCER
• Scorpion Dual V2
• Cordon d'Alimentation
•
ne vous manque et que tout est en bon état.
• Un Manuel d'Utilisation
Réclamations
de ce Manuel
endommagé pendant le transport, ou s'il présente des signes de manipulation sans
précaution, veuillez dès réception en notifier immédiatement le transporteur et non
Chauvet. Ne pas enregistrer votre réclamation auprès du transporteur en temps et en
heure peut entraîner une non validation de celle-ci. De plus, gardez l'emballage et tous
les matériaux d'emballage pour inspection.
Pour tout autre problème comme la nondommages non en rapport avec la livra
<ENTER>
et de fonctionnement. Le non-respect de ces consignes peut
entraîner le non-fonctionnement de l'appareil ou lui causer des
configuration. Le produit peut ne pas fonctionner correctement si
Informations utiles
Non-
Responsabilité
toute responsabilité envers toute partie de toute perte, dommage ou dérangement
omissions résultent d'une négligence, d'un accident ou de toute autre cause. Chauvet se
réserve le droit de réviser le contenu de ce document sans aucune obligation de notifier
Téléchargez la dernière version de ce manuel sur www.chauvetdj.com.
l'ensemble des conceptions, des textes et des images sont la propriété de Chauvet.
© Copyright 2018 Chauvet & Sons, LLC. Tous droits réservés.
Publié électroniquement par Chauvet aux États-Unis.
Manuel d'Utilisation des Scorpion Dual V2 Rév. 3 Page 45 sur 64
CHAUVET, le logo Chauvet et Scorpion Dual V2
marques de Chauvet & Sons LLC. (d/b/a Chauvet et Chauvet Lighting) aux États-Unis et
dans d'autres pays. Les autres noms de p
Page 46

Consignes de
Ce manuel d'utilisation reprend d'importantes informations en matière de
z et assimilez ces consignes avant de
mettre votre unité sous tension pour la première fois. Connaître ces consignes de
sécurité est essentiel car vous éviterez ainsi des blessures oculaires et ne vous
uel dans un endroit sûr pour
CONSIGNES DE SÉCURITÉ EN MATIÈRE DE LASER
Les lasers peuvent s'avérer dangereux et font l'objet de consignes de sécurité
brûlant.
l'alimentation électrique ou en coupant le disjoncteur.
Sécurité
consignes de sécurité des lasers. Lise
trouverez pas en infraction avec la loi. Gardez ce man
référence future.
LISEZ ET ASSIMILEZ IMPÉRATIVEMENT TOUTES LES
•
spécifiques. Une mauvaise utilisation des lasers pourrait entraîner une cécité
totale ou causer des lésions oculaires. Portez une attention particulière aux
libellés portant la mention AVERTISSEMENT ou REMARQUE dans ce manuel
d'utilisation. Lisez et assimilez toutes les consignes AVANT de mettre cet
appareil en marche pour la première fois.
• Connectez toujours l'appareil à un circuit relié à la terre afin d'éviter tout risque
d'électrocution.
• Déconnectez toujours de l'alimentation principale avant de procéder à tout entretien
ou remplacement du fusible.
• Évitez tout contact visuel direct avec la source lumineuse quand cet appareil est en
marche.
• Assurez-vous que le cordon d'alimentation n'est ni tordu ni endommagé.
• Ne débranchez jamais cet appareil en tirant sur le cordon.
• Si vous installez l'appareil en hauteur, utilisez impérativement une élingue de sécurité
pour le sécuriser au dispositif de fixation.
• Ne laissez aucun produit inflammable dans un rayon de 50 cm de l'appareil lorsque
celui-ci fonctionne.
• Ne touchez pas cet appareil lors de son fonctionnement car il pourrait s'avérer
• Cet appareil n'est pas conçu pour être utilisé dans une installation permanente.
• Veillez toujours à ce que la tension de la prise à laquelle vous branchez l'appareil soit
comprise dans la plage indiquée sur l'étiquette ou à l'arrière de l'appareil.
• Cet appareil doit être utilisé en intérieur uniquement ! (IP20). Afin d'éviter tout risque
d'incendie ou décharge électrique, veillez à n'exposer cet appareil ni à la pluie ni à
l'humidité.
• Installez toujours cet appareil dans en endroit bien ventilé, à au moins 20 pouces
(50 cm) des surfaces adjacentes.
• Assurez-vous qu'aucune fente de ventilation sur le boîtier de l'appareil ne soit
obstruée.
• Ne connectez jamais cet appareil à un gradateur.
• Assurez-vous de remplacer le fusible par un autre du même type.
• Transportez ce produit uniquement au moyen de la poignée dont il est doté.
• Mettre l'appareil hors/sous tension à de brefs intervalles est fortement déconseillé. La
durée de vie de la diode laser s'en trouverait fortement réduite.
• Ne secouez pas l'appareil. Évitez tout geste brusque lors de l'installation ou de
Page 46 sur 64 Manuel d'Utilisation des Scorpion Dual V2 Rév. 3
l'utilisation de l'appareil.
• Utilisez TOUJOURS un câble de sécurité lorsque vous montez cet appareil en
hauteur.
• La plage de température ambiante de fonctionnement pour le laser est de
15 °C à 35 °C (59 °F à 95 °F). Ne faites pas fonctionner cet appareil à des
températures en dehors de cette plage.
• En cas de sérieux problèmes de fonctionnement, arrêtez le système immédiatement.
• N'essayez jamais de réparer cet appareil. Toute réparation effectuée par une
personne non qualifiée peut entraîner des dommages ou un fonctionnement erratique
de l'appareil. Mettez-vous en relation avec le centre d'assistance technique autorisé
le plus près de chez vous.
• Durant les périodes de non-utilisation, pour éviter tout usure inutile et pour prolonger
la durée de vie, déconnectez-entièrement l'appareil en le débranchant de
Page 47

• Lumière laser : évitez tout contact direct avec les yeux ! N'exposez jamais
apportée à l'appareil est strictement interdite pour raison de sécurité !
:
Boîtier non
• Cet appareil renferme un laser très puissant.
des brûlures cutanées ou des incendies.
Consignes de
Sécurité
Relatives au
Laser
Avertissement
Verrouillable
intentionnellement directement vos yeux ou ceux d'autres personnes à la lumière du
laser.
• Cet appareil laser peut entraîner une cécité totale ou causer des lésions oculaires
instantanées si le laser entre en contact direct avec les yeux.
• Il est illégal et dangereux de diriger ce laser vers les zones destinées au public,
zones où les yeux des membres du public ou du personnel pourraient être en contact
direct avec les rayons laser ou des réfléchissements lumineux.
• Ne pointez pas de laser sur les avions, ceci est répréhensible par la loi.
• L'utilisation des commandes, réglages ou procédures autres que celles spécifiées ci-
après peut entraîner de dangereuses expositions à des radiations.
• N'essayez JAMAIS de réparer l'appareil vous-même. Les réparations et entretiens
doivent être effectués par un technicien agrée. Toute modification non autorisée
• Conservez ce manuel d'utilisation pour référence future. Si vous étiez amené à
vendre cet appareil à un autre utilisateur, veillez à lui remettre ce manuel également.
• N'ouvrez jamais le boîtier du laser, vous pourriez être exposé à des niveaux
dangereux de radiation laser.
• L'intensité du laser à l'ouverture du boîtier peut entraîner instantanément une cécité,
PRENEZ LE TEMPS DE LIRE ET ASSIMILEZ LES
CONSIGNES DE SÉCURITÉ RELATIVES AU LASER CIDESSOUS
La source de lumière émise d’un laser est très différente de toute autre source de
lumière. La lumière émise par cet appareil peut entraîner des lésions oculaires si celui-ci
n'est pas correctement installé et utilisé. La lumière d'un laser est des milliers de fois
plus concentrée que toute autre source lumineuse. Cette concentration de lumière peut
causer des blessures oculaires instantanées, essentiellement par une brûlure de la
rétine (l’arrière de votre œil contient des cellules extrêmement sensibles à la lumière).
Même si vous ne ressentez pas de « chaleur » provenant du faisceau lumineux, il peut
quand même être à l’origine de blessure ou de cécité, pour vous ou votre public. Une
faible radiation en provenance du faisceau lumineux du laser peut s’avérer
potentiellement dangereuse, même à de longues distances Des blessures oculaires
dues au laser peuvent survenir avant même que vous n’ayez eu le temps de cligner des
yeux.
Il serait ERRONÉ de croire que puisque les appareils laser destinés au divertissement
divisent le faisceau en centaines de faisceaux et que les faisceaux laser sont balayés
rapidement, un faisceau laser individuel est sans danger pour les yeux. Ce laser utilise
des dizaines de milliwatts de puissance (niveaux internes de classe 3B) avant de se
diviser en de multiples faisceaux (niveaux de classe 3R). De nombreux faisceaux
individuels sont potentiellement dangereux pour les yeux.
Il serait également ERRONÉ de croire que puisque la lumière laser est mobile, elle est
inoffensive. L'utilisation des lasers ne se fait jamais sans risque. De plus, gardez à
l'esprit que celle-ci n'est pas toujours mobile. Puisque les blessures oculaires peuvent
apparaitre instantanément, il est indispensable d’empêcher LA MOINDRE exposition
directe des yeux. Selon la réglementation de sécurité relative aux lasers, il est interdit de
diriger des lasers de classe 3R là où le public pourrait être en contact avec ces
faisceaux. Ceci est également valable s’ils sont dirigés en-dessous du visage des gens,
comme sur une piste de danse.
Manuel d'Utilisation des Scorpion Dual V2 Rév. 3 Page 47 sur 64
Page 48

Ne faites pas fonctionner le laser avant d’avoir lu et compris toutes les données
dans lequel il l’utilise.
•
techniques et de sécurité contenues dans ce manuel.
• Veuillez TOUJOURS configurer et installer les effets laser de manière à ce que
leur lumière soit projetée à minimum 3 mètres (9,8 pieds) au-dessus du sol sur
lequel les gens se tiennent. Référez-vous à la section Utilisation Adéquate de
ce manuel.
• Après installation et avant utilisation publique, veuillez tester le laser afin de vous
assurer de son bon fonctionnement. Ne l’utilisez pas si vous détectez un défaut.
• NE l’utilisez PAS non plus si le laser émet uniquement un ou deux faisceaux au lieu
de dizaines ou de centaines, car cela pourrait endommager votre diffraction optique
et permettre l’émission de niveaux de laser plus élevés que de classe R.
• NE pointez PAS le laser sur les gens ou les animaux.
• Ne regardez jamais l’ouverture ou les faisceaux laser.
• NE pointez PAS de lasers dans les endroits où les gens pourraient potentiellement y
être exposés, tels que les balcons, etc.
• NE pointez PAS de laser sur des surfaces hautement réfléchissantes, telles que les
fenêtres, les miroirs ou du métal réverbérant. Même les reflets des lasers peuvent
être dangereux.
• Ne pointez pas de laser sur les avions, ceci est répréhensible par la loi.
• Ne pointez pas des faisceaux de laser très longue portée dans le ciel.
• N’exposez pas la sortie optique (ouverture) à des produits chimiques corrosifs.
• N'utilisez pas le laser si le boîtier est endommagé, ouvert, ou si l'optique semble
endommagée en quoique ce soit.
• N’ouvrez pas le boîtier du laser. La forte intensité du laser à l’intérieur du boîtier de
protection peut entraîner des incendies, des brûlures corporelles ou des blessures
oculaires instantanées.
• Ne laissez jamais l’appareil fonctionner sans surveillance.
• Le fonctionnement d’appareils laser de classe 3R n’est autorisé que s’il est contrôlé
par un utilisateur expérimenté et adéquatement formé, ayant assimilé les données
présentées dans ce manuel.
• Les obligations légales d’utilisation des produits laser pour les loisirs varient de pays
en pays. L’utilisateur est tenu de respecter les obligations légales du pays/de la salle
ATTENTION : n'utilisez PAS cet appareil de manière non indiquée dans ce manuel d'utilisateur. Le
non-respect des instructions entraînera l'annulation de la garantie et peut également endommager
l'appareil ou causer des blessures aussi bien à l'utilisateur qu'au public.
ATTENTION : vous ne pouvez disposer de cet appareil avec les déchets ménagers. Prenez contact
avec votre service régional de gestion des déchets pour connaître les procédures de recyclage des
appareils électroniques de votre zone.
Page 48 sur 64 Manuel d'Utilisation des Scorpion Dual V2 Rév. 3
Page 49

Avertissement
LUMIÈRE LASER, ÉVITEZ L'EXPOSITION DIRECTE AVEC LES YEUX
des lasers en toute sécurité peuvent être consultés dans le texte de la norme ANSI
tre obtenu auprès de l'International Laser Display
Données d'Emission Laser
Déclaration de Conformité du Laser
Conforme aux normes de performance de la FDA pour les produits laser, sauf pour
normes de performances laser.
Reproductions des Etiquettes en Matière de Sécurité des Appareils Laser
d'Exposition au
Laser
Des lignes directrices et programmes de sécurité supplémentaires pour une utilisation
Z136.1 "For Safe Use of Lasers" ("Pour une utilisation des lasers en toute sécurité"),
disponible sur le site www.laserinstitute.org du Laser Institute of America. Une multitude
de gouvernements, grandes entreprises, agences, forces armées et autres, exige que les
utilisateurs d'appareils laser suivent les lignes directrices de la norme ANSI Z136.1. Le
guide des spectacles laser peut ê
Association (l'association internationale du spectacle laser) sur leur site www.laserist.org.
Classification du Laser Classe IIIa
Laser Vert LD / 520 nm / 50 mW
Diamètre de Faisceau <5 mm à l'ouverture
Données d'Impulsion Toute impulsion < 4 Hz (>0.25 s)
Divergence
(chaque faisceau)
Divergence
(éclairage dans son ensemble)
Puissance de laser de chacune
Faisceau depuis ouverture *
* Comme mesuré selon les conditions de mesure CEI pour la classification.
les dérogations conformément à la norme Laser Notice No. 50 du 24 juin 2007.
Aucun entretien n'est nécessaire pour maintenir la conformité de ce produit aux
<2 mrad
<160 °
<5 mW
Manuel d'Utilisation des Scorpion Dual V2 Rév. 3 Page 49 sur 64
Page 50

2. INTRODUCTION
Aperçu
Ventilateur de
Entrée
Écran et
Entrée DMX
Sortie DMX
Microphone
Sortie
d'Alimentation
Portafusibile
Boucle Fermée
Voyant LED d'Alimentation
Sortie Laser
Voyant LED de Son
Capteur IR
Supports de Surface
Refroidissement
Boutons de
Commande
Page 50 sur 64 Manuel d'Utilisation des Scorpion Dual V2 Rév. 3
d'Alimentation
de Sécurité
Page 51

Dimensions
(179.5 mm)
(161 mm)
(216 mm)
8,5 po
6,3 po
7,1 po
Manuel d'Utilisation des Scorpion Dual V2 Rév. 3 Page 51 sur 64
Page 52

Alimentation
circuit, prise
d'alimentation et câblage), consultez la valeur reprise sur l'étiquette apposée sur le
. La capacité
nominale affichée indique la consommation courante de l'appareil dans des conditions
circuit protégé (disjoncteur ou fusible).
vous que l'appareil soit correctement relié à la terre afin d'éviter tout
utilisation, pour éviter tout usure inutile et pour
entièrement l'appareil en le
Ne connectez jamais l'appareil à un rhéostat (résistance variable) ou un circuit
vous servir du rhéostat ou canal de
Remplacement
il existe un compartiment dans
Remplacez toujours un fusible obsolète avec un de même type et même
Placez le fusible
plastique)
Porte-fusible de
rechange
(à l'intérieur de la
capsule de sécurité)
Capsule de
sécurité
3. CONFIGURATION
El Scorpion Dual V2 est doté d'une alimentation universelle prenant en charge toute
tension d'entrée comprise entre 100 et 240 VCA, 50/60 Hz.
CA
Pour déterminer les exigences en puissance de votre appareil (court-
panneau arrière du produit ou référez-vous aux Spécificités Techniques
normales d'utilisation.
• Connectez toujours l'appareil à un
Assurezrisque d'électrocution ou d'incendie.
• Durant les périodes de nonprolonger la durée de vie, déconnectezdébranchant de l'alimentation électrique ou en coupant le disjoncteur.
voileur, même si vous n'avez l'intention de
gradation que comme interrupteur 0 à 100%.
du Fusible
Débranchez l'appareil avant de procéder au remplacement du fusible.
1. Débranchez l'appareil de l'alimentation.
2. Insérez et calez la pointe d'un tournevis à tête plate dans la fente du porte-fusible.
3. En faisant levier, faites-le sortir de son emplacement.
4. Retirez le fusible obsolète du porte-fusible.
5. Remplacez le fusible avec un de même type et même ampérage.
6. Insérez à nouveau le porte-fusible à sa place et rebranchez l'appareil.
(tenu par un clip en
Aucun fusible de rechange n'est inclus, toutefois,
la capsule de sécurité pour en placer un.
ampérage.
Page 52 sur 64 Manuel d'Utilisation des Scorpion Dual V2 Rév. 3
Page 53

Branchement
d'Alimentation
Edison/CEI à l'arrière de
Schéma de
Branchement
en 120 V ou jusqu'à 93
dessus correspond
! En cas d'utilisation
local car les connecteurs d'alimentation et les règles à suivre peuvent être
1er Produit
2e Produit
3e Produit
Produits Supplémentaires
d'Alimentation
Le produit fournit un branchement d'alimentation par la prise
l'appareil.
Vous pouvez relier jusqu'à 44 appareils Scorpion Dual V2
appareils en 230 V.
Le schéma de branchement d'alimentation présenté ciEXCLUSIVEMENT à la version Amérique du Nord du produit
du produit sur d'autres marchés, vous devez consulter le distributeur Chauvet
différents dans votre pays ou votre région.
Manuel d'Utilisation des Scorpion Dual V2 Rév. 3 Page 53 sur 64
Page 54

Installation
Avant d'installer ce produit, lisez, assimilez et suivez les recommandations en matière
garantir l'usage en toute sécurité du
vous que la ventilation de cet appareil puisse s'effectuer de manière
Élingue de Sécurité
Molette de Réglage
Support de Montage
Clip de Fixation
de sécurité reprises dans la section Consignes de Sécurité.
Orientation
Le Scorpion Dual V2 doit être monté de manière à
laser. Assurezadéquate.
Suspension
• Avant de choisir un emplacement pour l'appareil, assurez-vous qu'il soit facile d'y
accéder pour toute opération de maintenance et de programmation.
• Assurez-vous que la structure ou la surface sur laquelle vous installez l'appareil peut
en supporter le poids (voir les Spécificités Techniques).
• Utilisez toujours un câble de sécurité lorsque vous montez cet appareil en hauteur.
Garantissez un montage en toute sécurité de l'appareil en le reliant à un point de
fixation, comme une plateforme en hauteur ou une structure.
• Lors de la suspension de l'appareil à une structure, vous devriez utiliser un clip de
fixation en mesure de supporter la charge nécessaire. La lyre comporte un orifice de
13 mm à cet effet.
• Les molettes de réglage de la fixation permettent d'ajuster la position de l'appareil lors
de son positionnement à l'angle désiré. N'utilisez aucun outil pour relâcher ou
resserrer les molettes de la fixation. En utiliser pourrait endommager les molettes.
de la Lyre x 2
Page 54 sur 64 Manuel d'Utilisation des Scorpion Dual V2 Rév. 3
Page 55

Utilisation
Les réglementations internationales en matière de sécurité des appareils laser
ci soient installés de manière à ce qu'un minimum de 3 mètres
l et la lumière laser la plus basse
projetée. De plus, une séparation de 3 mètres à l'horizontal doit être respectée
entre toute lumière laser émise et les membres du public ou autres espaces
ATTENTION : L'UTILISATION DES COMMANDES, REGLAGES OU PROCEDURES
ENTRAINER DE DANGEREUSES EXPOSITIONS A DES RADIATIONS.
Cet appareil doit être monté en hauteur uniquement. Pour des raisons de sécurité,
Adéquate
Chauvet recommande de monter vos éclairages sur une plateforme élevée stable ou
des supports en hauteur renforcés au moyen de systèmes de suspension adéquats.
Vous devez, dans tous les cas, utiliser des élingues de sécurité. Le matériel de montage
approprié peut être acquis auprès de votre revendeur d'éclairage.
exigent que ceuxde séparation à la verticale existe entre le so
publics.
3 mètres
AUTRES QUE CELLES SPECIFIEES DANS CE MANUEL D'UTILISATION PEUT
Manuel d'Utilisation des Scorpion Dual V2 Rév. 3 Page 55 sur 64
Page 56

Cet appareil ne doit pas fonctionner de manière continue. Afin de maximiser la durée de vie de votre laser, veillez à
Fonctionnement
du Panneau de
sous l'écran. Quand l'appareil est sous tension, le voyant LED sur le panneau arrière
indiquera le mode de fonctionnement sélectionné (autonome ou DMX). Au moment
<ENTER>
Tableau du
Menu
Mode
Étapes de Programmation
Description
Mode DMX
001–503
Sélectionne l'adresse DMX de départ
Mode Esclave
SLA
Mode Esclave
Télécommande
rEN
Télécommande sans fil
Mode Test
tSt
Motif de test
Sou
Mode Son Actif
Aut
Mode Auto
Sensibilité de Son
S 0–9
Réglage de sensibilité de son
Configuration
l’unité.
Adresse de
Pour sélectionner une adresse DMX de départ, prenez toujours en compte le nombre de
canaux DMX que le mode DMX sélectionné utilise. Si vous choisissez une adresse de
utilise jusqu'à 10 canaux DMX en mode DMX, ce qui définit la plus
3. Appuyer sur <ENTER>.
Mode Test
2. Appuyer sur <ENTER>.
4. FONCTIONNEMENT
le mettre en pause régulièrement. Débranchez toujours le Scorpion Dual V2 quand il n'est pas utilisé.
Pour accéder aux fonctions du panneau de commande, utilisez les quatre boutons situés
Commande
Modes Son Actif/Auto
(DMX)
d'éteindre l'appareil, seront enregistrées les dernières configurations enregistrées.
Bouton Fonction
<MENU>
<UP>
<DOWN>
Mettez l'appareil en mode DMX pour permettre la commande depuis le jeu d'orgues.
1. Branchez l'appareil à une prise adéquate.
2. Mettez-le sous tension.
3. Connectez un câble DMX de la sortie DMX du jeu d'orgues DMX à l'entrée DMX sur
Sélection d'un mode de fonctionnement ou de sortie de l'option de
menu en cours
Permet de parcourir vers le haut la liste des options ou de trouver une
valeur supérieure
Permet de parcourir vers le bas la liste des options ou de trouver une
valeur inférieure
Permet d'activer une option de menu ou une valeur sélectionnée.
Départ
départ trop élevée, vous pourriez limiter l'accès à certains des canaux du produit.
Le Scorpion Dual V2
haute adresse configurable comme 503.
Si vous ne connaissez pas bien le protocole DMX, téléchargez le document DMX Primer
sur www.chauvetlighting.com.
Pour sélectionner l'adresse de départ, procéder comme suit :
1. Appuyer plusieurs fois sur <MENU> jusqu'à faire clignoter 001–503 sur l'écran.
2. Utiliser les flèches <UP> ou <DOWN> pour sélectionner l'adresse de départ.
Activer le motif de test de laser comme suit.
1. Appuyer plusieurs fois sur <MENU> jusqu'à faire clignoter tSt sur l'écran.
Page 56 sur 64 Manuel d'Utilisation des Scorpion Dual V2 Rév. 3
Page 57

Modes de Canal DMX, Attributions et Valeurs
Canal Fonction
Valeur
Réglage
000 085
171 255
Mode DMX (autres canaux activés)
Son Actif
000 009
250 255
Aucune fonction
Activé
3
Sélection de Motif
000 255
Les motifs sont indiqués dans le tableau Motifs.
000 127
210 255
100%–5%
Zoom avant et arrière
000 127
192 255
Position fixe sur l'axe y (0 à 359°)
Rotation antihoraire, lent à rapide
000 127
192 255
Position fixe sur l'axe x (0 à 359°)
Rotation antihoraire, lent à rapide
000 127
192 255
Position fixe sur l'axe z (0 à 359°)
Rotation antihoraire, lent à rapide
000 127
192 255
Position fixe (128 points horizontaux)
Mouvement antihoraire, lent à rapide
000 127
192 255
Position fixe (128 points verticaux)
Mouvement antihoraire, lent à rapide
000 127
Rapide à lent (manuel)
(répétition automatique)
Pour l'utilisation manuelle de lasers avec commande DMX, s'assurer que le
Pour l'utilisation automatique de lasers avec commande DMX, s'assurer que le
10 Canaux
1 Fonctions de Commande
2 Éclairs
4 Zoom
5 Rotation Axe Y
6 Rotation Axe X
7 Rotation Axe Z
8 Panoramique
9 Basculement
10 Vitesse de Balayage
086 170
010 249
128 169
170 209
128 191
128 191
128 191
128 191
128 191
128 169
170 209
210 255
Programme Auto
Lent à rapide
Zoom avant
Zoom arrière
Rotation horaire, lent à rapide
Rotation horaire, lent à rapide
Rotation horaire, lent à rapide
Mouvement horaire, lent à rapide
Mouvement horaire, lent à rapide
Lent à rapide (automatique)
Rapide à lent (automatique)
Rapide à lent, puis lent à rapide
•
Canal 1 est réglé en mode DMX (000—085).
•
Canal 1 est réglé en programme auto (086–170).
• Le canal 2 doit être réglé à 010–255 pour que le canal 1 soit opérationnel.
Manuel d'Utilisation des Scorpion Dual V2 Rév. 3 Page 57 sur 64
Page 58

Motifs
DMX MOTIFS DMX MOTIFS DMX MOTIFS DMX MOTIFS
Page 58 sur 64 Manuel d'Utilisation des Scorpion Dual V2 Rév. 3
Page 59

Configuration
Régler le produit dans un des modes autonomes pour le commander sans contrôleur
connecter un produit en fonctionnement en mode autonome
Les produits en mode autonome peuvent transmettre des signaux DMX qui
3. Appuyer sur <ENTER>.
Sensibilité
• Le produit ne répond qu'aux basses fréquences de la musique
réglage de sensibilité.
Mode Auto
3. Appuyer sur <ENTER>.
Mode
(le maître) de
églés et connectés, les esclaves
2. Le maître doit être le premier appareil dans la guirlande DMX.
• Configurer tous les appareils esclaves avant de raccorder l'appareil maître à
• Ne pas raccorder plus de 31 appareils esclaves à l'appareil maître.
Commande
2. Appuyer sur <ENTER>.
(Autonome)
Mode Son Actif
Sonore
DMX.
1. Raccorder le produit à une prise d'alimentation convenable.
2. Allumer le produit.
Ne jamais
quelconque (Son Actif ou Auto) à une chaîne DMX raccordée à un contrôleur DMX.
pourraient interférer avec ceux du contrôleur.
Pour activer le mode Son Actif, procéder comme suit :
1. Appuyer plusieurs fois sur <MENU> jusqu'à faire clignoter Sou (Son Actif) ou Aut
(auto) sur l'écran.
2. Utiliser les flèches <UP> ou <DOWN> pour sélectionner Sou.
Pour régler la sensibilité sonore, procéder comme suit :
1. Appuyer plusieurs fois sur <MENU> jusqu'à faire clignoter S 0–9 sur l'écran.
2. Utiliser les flèches <UP> ou <DOWN> pour sélectionner la sensibilité sonore
voulue.
3. Appuyer sur <ENTER>.
(basses et batteries).
• Le laser s'éteint en mode Son après 3 secondes de silence ou de bruit sous le
Pour activer le mode Auto, procéder comme suit :
1. Appuyer plusieurs fois sur <MENU> jusqu'à faire clignoter Sou (Son Actif) ou Aut
(Auto) sur l'écran.
2. Utiliser les flèches <UP> ou <DOWN> pour sélectionner Aut.
Maître/Esclave
sans Fil IR
Le mode maître/esclave permet à un seul produit Scorpion Dual V2
commander les actions d'un ou plusieurs produits Scorpion Dual V2 (les esclaves) sans
faire appel à un contrôleur DMX. Le maître est réglé pour fonctionner une mode Auto ou
Son Actif, les esclaves en mode Esclave. Une fois r
fonctionnent à l'unisson du maître.
Configurer les produits comme indiqué ci-dessous.
Esclaves :
1. Appuyer plusieurs fois sur <MODE> jusqu'à faire afficher SLA sur l'écran.
2. Appuyer sur <ENTER>.
3. Raccorder l'entrée DMX du premier esclave à la sortie DMX du maître.
4. Raccorder l'entrée DMX des esclaves suivants à la sortie DMX de l'esclave
précédent.
5. Terminer le réglage et le branchement de tous les esclaves.
Appareil maître :
1. Régler le maître pour fonctionner en mode Auto ou Son Actif.
la guirlande DMX.
• Ne jamais raccorder un contrôleur DMX à une chaîne DMX configurée pour un
Pour activer la commande IR sans fil, suivre les instructions ci-dessous :
1. Appuyer plusieurs fois sur <MENU> jusqu'à faire afficher rEN sur l'écran.
fonctionnement en maître/esclave parce que le contrôleur peut interférer avec
les signaux transmis par l'appareil maître.
Manuel d'Utilisation des Scorpion Dual V2 Rév. 3 Page 59 sur 64
Page 60

Toute commande ou réglage de la télécommande IR est enregistré jusqu'au redémarrage du
Allumage/Extinction du Laser
Répétition de Motif
Pause d'Effet
Changement de
Motif
Mode Auto
Mode Son Actif
Motifs
Sensibilité Sonore
Télécommande
Bouton Fonction Description
•
système. Le système revient en mode Auto après redémarrage.
•
Les boutons de la télécommande IR non mentionnés ci-dessus sont réservés pour usage
ultérieur avec le Scorpion Dual V2.
ON/OFF Allumage/extinction du laser.
Mode Auto Fonctionnement du laser sur le mode auto intégré
Mode Son Actif Mode Son Actif. Le voyant LED clignote quand un son est détecté
Sensibilité Sonore
Motifs Affichage et changement de motifs
Motif Fixe Choisir votre MOTIF favori de 1 à 32
Répétition de
Motif
En mode Son Actif, appuyer sur <MUSIC> + <B> + <1> (le moins
sensible) à <9> (le plus sensible) pour régler la sensibilité
Répétition du cycle du dernier MOTIF et du MOTIF en cours
Page 60 sur 64 Manuel d'Utilisation des Scorpion Dual V2 Rév. 3
Page 61

Entretien de
lumière et peut entraîner une surchauffe
de l'appareil. Pour un fonctionnement optimal, nettoyez l'appareil au moins deux fois par
mois. Les conditions environnementales et d'utilisation peuvent toutefois exiger un
7. Polissez en douceur ces surfaces jusqu'à ce que toute peluche ou trace ait disparu.
N'ouvrez PAS cette unité lorsque vous procédez à son nettoyage ou sa révision.
5. INFORMATIONS TECHNIQUES
L'accumulation de poussière réduit la sortie de
l'Appareil
nettoyage plus fréquent.
Pour nettoyer le produit, suivez les instructions comme indiquées ci-après :
1. Mettez l'appareil hors tension.
2. Attendez que celui-ci soit à température de la pièce.
3. Utilisez un aspirateur (ou de l'air comprimé sec) et une brosse douce pour enlever
la poussière accumulée sur les surfaces et ventilations externes.
4. Nettoyez le panneau de verre (ouverture du laser) avec un nettoyant pour vitre ou
de l'alcool isopropylique.
5. Appliquez la solution directement sur un tissu doux en coton non pelucheux ou un
tissu optique.
6. Nettoyez en douceur toute trace de saleté ou d'impureté vers les bords extérieurs
des surfaces en verre.
Assurez-vous de bien sécher toutes les surfaces en verre après les avoir
nettoyées.
Ne faites pas tourner le ventilateur de refroidissement en utilisant de l'air
compressé car vous pourriez l'endommager.
Manuel d'Utilisation des Scorpion Dual V2 Rév. 3 Page 61 sur 64
Page 62

Dimensions et
Longueur
Largeur
Hauteur
Poids
216 mm (8,5 po)
161 mm (6,3 po)
179.5 mm (7,1 po)
1,7 kg (3,8 lb)
À noter : Les dimensions en pouces sont arrondies à la décimale la plus proche.
Alimentation
Tension d'Entrée
Plage
Sélection de Puissance
Commutation (interne)
100 à 240 VCA, 50/60 Hz
Réglage auto
Parameter
120 V, 60 Hz
230 V, 50 Hz
Consommation
20 W
19 W
Courant Cnsommé
0,2 A
0,1 A
Courant de Distribution
d'Alimentation (appareils)
Fusible
T 1 A, 250 V
T 1 A, 250 V
E/S d'Alimentation
US/Monde
RU/Europe
Connecteur d'entrée
d'alimentation
Connecteur de sortie
d'alimentation
Fiche du cordon d'alimentation
Edison (US)
Fiche locale
Source de Lumière
Type
Puissance
Longueur d'Onde
Laser (vert)
50 mW
520 nm
Optique Photo
Paramètre
Panoramique et Basculement
30°/30° (variable)
Angle de Zoom
1° à 29°
Thermique
Température externe
maximum du laser
35 °C (95 °F)
Par Ventilateur
DMX
Connecteurs d'E/S
Type de Connecteur
Plage de Canaux
XLR 3 broches
Prises
10
Commande
Nom du produit
Code article
Code UPC
Scorpion Dual V2
10060819
781462211677
6. SPECIFICITES TECHNIQUES
Poids
8 A (44 appareils) 8 A (93 appareils)
CEI CEI
Edison CEI
Système de Refroidissement
Page 62 sur 64 Manuel d'Utilisation des Scorpion Dual V2 Rév. 3
Page 63

R
Uni, de l'Irlande, du
Benelux, de la France, de l'Allemagne ou du Mexique contactez votre revendeur et
suivez leurs instructions quant à la procédure à suivre pour renvoyer votre
pour trouver leurs
coordonnées.
Téléphonez au centre d'assistance technique de Chauvet correspondant et demandez
pareil. Pour
l'obtenir, il vous sera demandé de fournir le numéro du modèle, le numéro de série ainsi
Vous devez nous retournez la marchandise en port prépayé, dans ses boîte et
emballage d'origine et avec tous ses accessoires. Chauvet ne délivrera pas d'étiquettes
Indiquez lisiblement le NAR sur une étiquette apposée sur le colis. Chauvet refusera la
Inscrivez le NAR sur une étiquette convenablement collée. N'écrivez PAS le NAR
Avant de nous retourner le colis, inscrivez les informations suivantes, de manière lisible,
Veillez à emballer l'appareil de manière adéquate. Vous serez tenu responsable de tout
dommage survenant lors de l'expédition de retour dû à un emballage inadéquat. Nous
Chauvet se réserve le droit, à sa convenance, de réparer ou remplacer tout
Dans le cas où vous avez besoin d'aide ou pour retourner un produit :
ENVOIS
• Si vous résidez aux États-Unis, contactez le siège mondial de Chauvet.
• Si vous vivez au Royaume-Uni ou en Irlande, contactez Chauvet Europe Ltd.
• Si vous vivez au Benelux, contactez Chauvet Europe BVBA.
• Si vous vivez au France, contactez Chauvet France.
• Si vous vivez à l’Allemagne, contactez Chauvet Germany.
• Si vous vivez au Mexique, contactez Chauvet Mexico.
• Si vous résidez n'importe où ailleurs, NE contactez pas Chauvet. Contactez votre
revendeur. Rendez-vous sur www.chauvetdj.com pour découvrir la liste des
revendeurs en dehors des États-Unis, du Royaume-Uni, de l'Irlande, du Benelux,
de la France, de l'Allemagne ou du Mexique.
Si vous résidez en dehors des États-Unis, du Royaume-
appareil. Consultez notre site Web www.chauvetdj.com
un numéro d'autorisation de retour (NAR) avant de nous réexpédier l'ap
qu'une brève description de l'objet du retour.
Pour soumettre une demande de service en ligne, rendez-vous sur :
www.chauvetdj.com/service-request.
de renvoi.
réception de tout appareil pour lequel aucun NAR n'a été demandé.
directement sur le colis.
sur une feuille de papier, que vous placerez à l'intérieur du colis:
• Votre nom
• Votre adresse
• Votre numéro de téléphone
• Le numéro de NAR
• Une courte description du problème
vous recommandons d'utiliser un emballage double ou celui de FedEx.
appareil qui lui est retourné.
Manuel d'Utilisation des Scorpion Dual V2 Rév. 3 Page 63 sur 64
Page 64

N
Chauvet World Headquarters
Adresse : 5200 NW 108th Avenue
N° vert : (800) 762-1084
Téléphone : (844) 393-7575
Site web : www.chauvetdj.com
Chauvet Europe Ltd
Adresse : Unit 1C
E-mail : UKtech@chauvetlighting.eu
Chauvet Europe BVBA
Adresse : Stokstraat 18
E-mail : BNLtech@chauvetlighting.eu
Chauvet France
Adresse : 3, Rue Ampère
Téléphone : +33 1 78 85 33 59
E-mail : FRtech@chauvetlighting.fr
Chauvet Germany
Adresse : Bruno-Bürgel-Str. 11
Téléphone : +49 421 62 60 20
E-mail : DEtech@chauvetlighting.de
Chauvet Mexico
Adresse : Av. de las Partidas 34-3B
Téléphone : +52 (728) 690-2010
E-mail : servicio@chauvet.com.mx
En dehors des États-Unis, du Royaume-Uni, de l'Irlande, du Benelux, de la France,
pour les coordonnées.
OUS
Informations Générales Support Technique
CONTACTER
Sunrise, FL 33351
Téléphone : (954) 577-4455
Télécopie : (954) 929-5560
Brookhill Road Industrial Estate
Pinxton, Nottingham, UK
NG16 6NT
Téléphone : +44 (0)1773 511115
Télécopie : +44 (0)1773 511110
9770 Kruishoutem
Belgium
Téléphone : +32 9 388 93 97
91380 Chilly-Mazarin
France
Télécopie : (954) 756-8015
E-mail : chauvetcs@chauvetlighting.com
Site web : www.chauvetdj.eu
Site web : www.chauvetdj.eu
Site web : www.chauvetdj.eu
28759 Bremen
Germany
(Entrée par la Calle 2)
Zona Industrial Lerma
Lerma, Mexico C.P. 52000
de l'Allemagne ou du Mexique, contactez votre revendeur. Suivez leurs instructions
pour accéder à l'assistance ou pour renvoyer un produit. Consultez notre site web
Page 64 sur 64 Manuel d'Utilisation des Scorpion Dual V2 Rév. 3
Site web : www.chauvetdj.eu
Site web : www.chauvetdj.mx
 Loading...