

Page 1
Quick Reference Guide
Page 2
EN DMX-4 QRG
About This
Guide
product information
User
Disclaimer
Safety Notes
installation, use,
DO N OT allow flammable materials close to the un it while operating.
The voltage of the outlet to which you are connecting this product must be
indoor use only! (IP20) To prevent risk of fire or shock,
unplugging it.
Contact
Outside the U.S., United Kingdom, Ireland, Mexico, or Benelux, contact
rt or return a product. Visit
The DMX-4 Quick Reference Guide (QRG) has basic
such as mounting, menu options, and DMX values. Download the
Manual from www.chauvetlighting.com for more details.
The information and specifications contained in this QRG are subject to
change without notice.
These Safety Notes include important information about
and maintenance.
• This product is not intended for permanent installation.
• ONLY connect this product to a grounded and protected circuit.
• Always disconnect from power before cleaning or replacing the fuse.
• DO NOT look at the light source when the product is on.
• Make sure the power cord is not crimped or damaged.
• Never disconnect this product from power by pulling on the cord.
• When mounting this product overhead, use a safety cable.
•
•
within the range stated on the decal or rear panel of the product.
• This product is for
do not expose this product to rain or moisture.
• Always mount this product in a location with adequate ventilation, at least
20 in (50 cm) from adjacent surfaces.
• Be sure that no ventilation slots on the unit’s housing are blocked.
• Never co nnect this product to a dimmer or rheostat.
• Rep lace the fuse with one of the same type and rating.
• ONLY use the hanging/mounting bracket to carry this product.
• The maximum ambient temperature is 104° F (40° C). Do not operate this
product at higher temperat ures.
• In the event of a serious operating problem, stop using immediately.
• DO NOT open this product. It contains no user-serviceable parts.
• To eliminate unnecessary wear and improve its lifespan, during periods of
non-use completely disconnect the product from power via breaker or by
your distributor to request suppo
www.chauvetlighting.com for contact information.
2
Page 3
DMX-4 QRG EN
What Is
Included
To Begin
and make sure you have received all parts in good
condition. If the box or contents appear damaged, notify the carrier
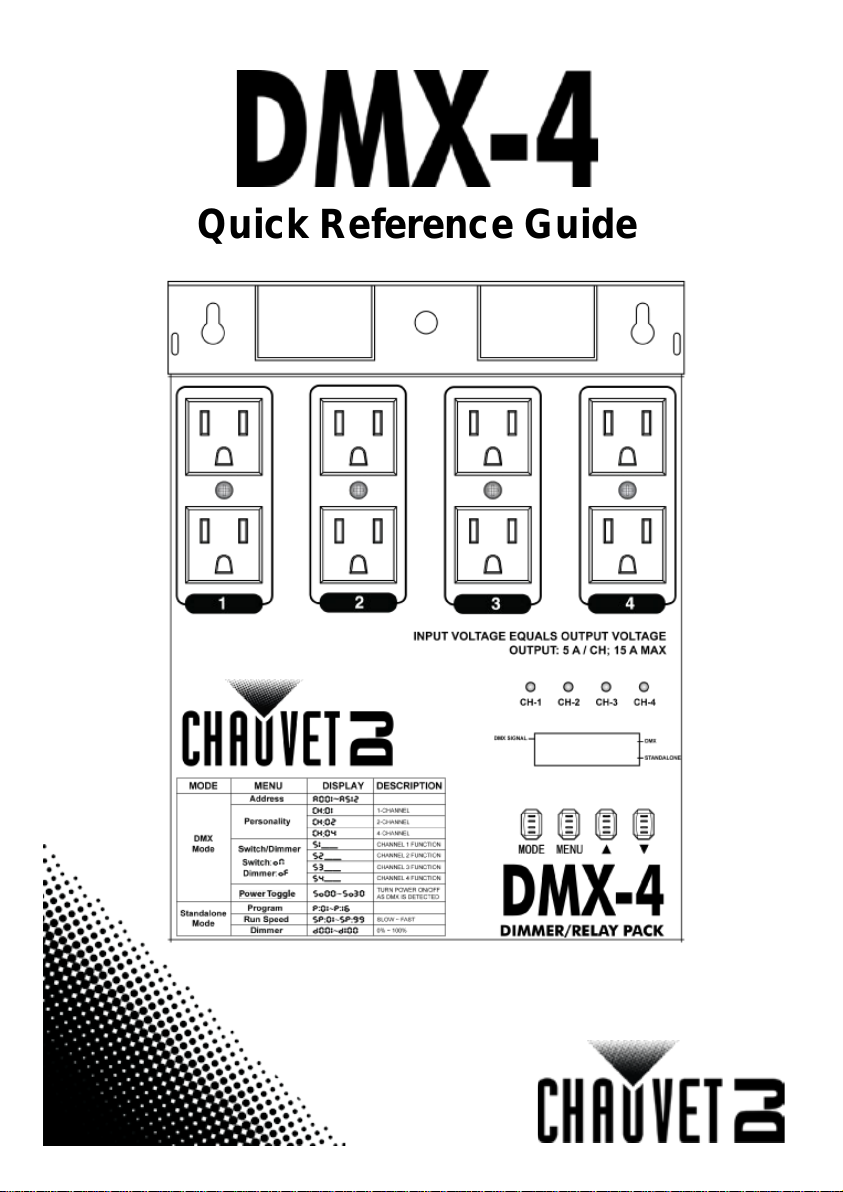
Description
channel dimmer/switch pack optimized for use with LED
Each channel can b e indi vidu ally set as a di mmer or a switch. Fou r
up to 8 products simultaneously. Automated
which offer great
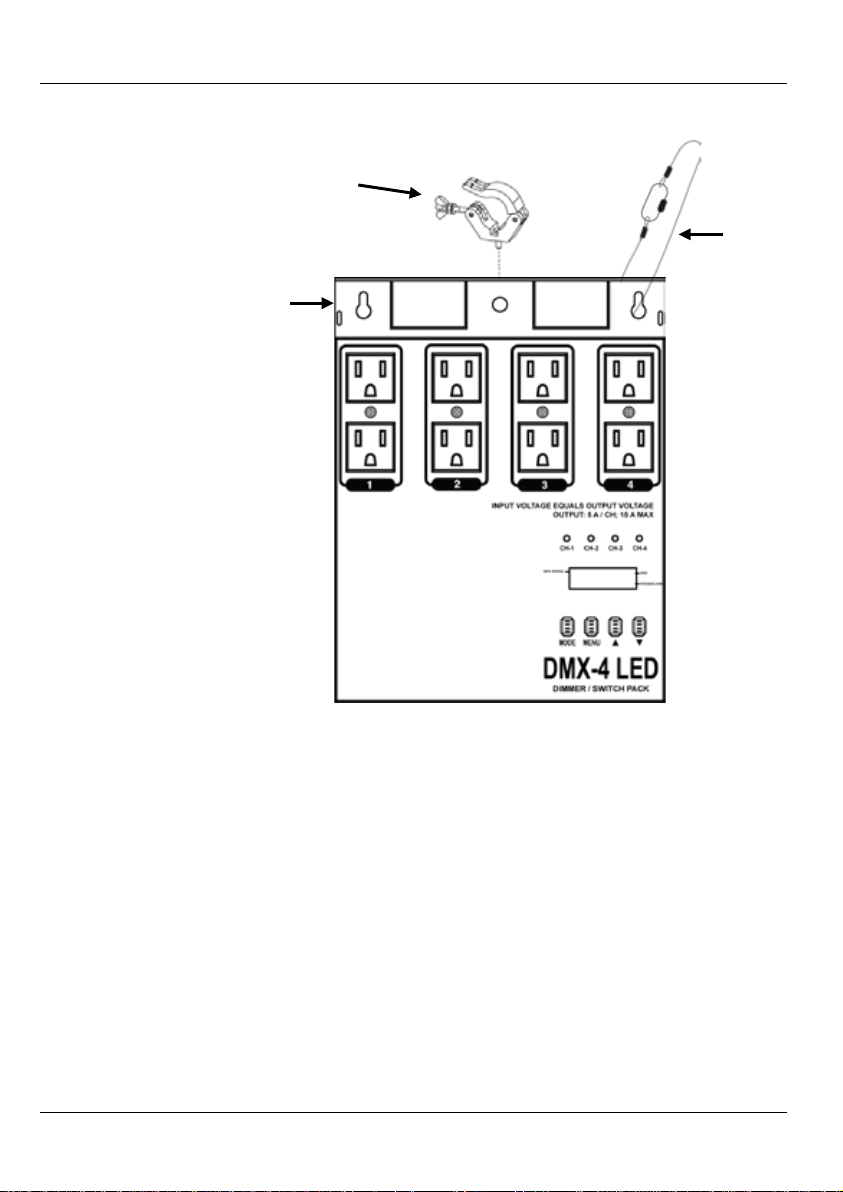
Overview
Power In
Indicators
Fuse holders
(1-4)
DMX Out
DMX In
• DMX-4
• Power Cord
• Warranty Card
• Qu ick Reference Guide
Unpack your DMX-4
immediately, not Chauvet.
The DMX-4 is a 4-
products.
duplex outlets can control
programs have adjustable speeds and dimmer levels,
control without DMX.
Channel
Outputs
(1-4)
LED
Channel
LED
Display
Control
Buttons
Power
Switch
3
Page 4
EN DMX-4 QRG
AC Power
ranging power supply that can work with an input
Fuse
Replacement
This product is equipped with replaceable fuses. Each section has its
Screw the fuse holder cap back in place and reconnect power.
Dimmer/Switch
Connecting a fixture equipped with an electronic (switching) power
supply to a dimmer/switch pack may damage the fixture or make it work
based luminaries
4 must be in Switch mode before
connecting loads of this type to it. Please see the instructions on how to
is in Switch mode before
connecting a load equipped with an electronic power supply to it.
Dimmer or
Switch Mode
methods for controlling the output of the four
Unplug any units from the four output channels.
Repeat steps 5 and 6 to set each of the other channels, if necessary.
This product has an autovoltage range of 100–240 VAC, 50/60 Hz.
own 7 A fuse that runs through the 20 A main power supply.
Disconnect the product from power. 1.
With a #2 Phillips-head screwdriver, unscrew the fuse holder cap 2.
from the housing.
Remove the blown fuse. 3.
Replace with a fuse of the same t ype and rating. 4.
5.
Dimmer/switch packs are primarily intended for lamp-based PAR cans.
Operation
erratically.
The improved DMX-4’s design now allows you to switch on and off loads
equipped with electronic power supplies, such as LEDor laser fixtures. However, the DMX-
set the DMX-4 in Switch mode below.
Always make sure that the DMX-4
Doing otherwise could damage the load.
The DMX-4 is optimized to also operate with LED-based pro d u ct s.
The DMX-4 has two different
channels. To set this via the control panel, do the following.
1.
Connect the DMX-4 to a suitable power outlet. 2.
Turn the product on. 3.
Press <MODE> repeatedly until A001–A512 appears on the display. 4.
Press <MENU> repeatedly until S1__, S2__, S3__, or S4__ appears on 5.
the display. This setting can be set differently for each of the four
channels. Navigate to the desired channel.
Use <p> or <q> to select either __oN (Switch mode) or __oF (Dimmer 6.
mode) for the channel selected in the previous step.
7.
4
Page 5
DMX-4 QRG EN
Mounting
Mounting Clamp
Safety
Cable
Before mounting this product, read the Safety Notes.
Mounting
Bracket
Mounting
Diagram
5
Page 6
EN DMX-4 QRG
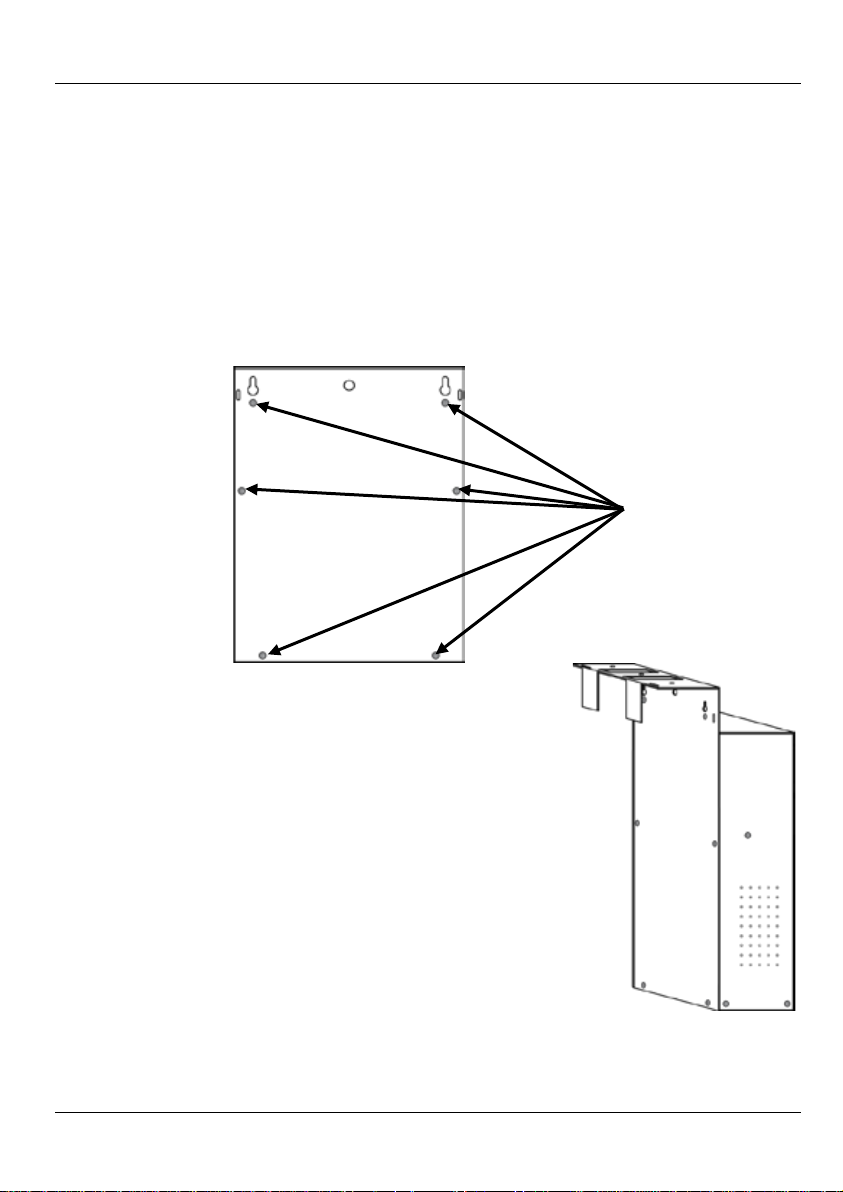
Alternate
Rigging
you are using this product with truss or a lighting stand, there is an
alternate rigging configuration available. This option is ideal for hanging the
Unplug the product from power.
The mounting bracket will now come off. Be careful not to damage
screws
Mounting
Diagram
(Alternate
Configuration)
Alternate Rigging
Back Panel
If
product without using a mounting clamp.
1.
On the back of the product, locate the six Phillips-head screws. 2.
Use a Phillips-head screwdriver to remove these screws. 3.
4.
the internal components of the dimmer, as they are exposed during
this step!
Flip the mounting bracket (back panel) around. 5.
Reattach the panel by securely reinstalling the six Phillips-head 6.
Remove these
six screws
Configuration
6
Page 7
DMX-4 QRG EN
Control Panel
Description
Function
Selects an operation mode or backs out of the current menu
option
<MENU>
Selects a menu option
<p> (UP)
Scrolls up the list of options or selects a higher value
<q> (DOWN)
Scrolls down the list of options or selects a lower value
DMX Linking
DMX serial
Instructions for connecting and configuring this product for
If you are not familiar with DMX,
Starting
Address
To ensure full access to all channels in each DMX mode, the highest
Button
<MODE>
Menu Options
Mode Menu Display Description
DMX Mode
Standalone
Mode
Starting Address A001–A512
CH:01
Personality
Switch/Dimmer
Switch: oN
Dimmer: oF
Power Toggle
Program
Run Speed SP:01–SP:99
Dimmer d000–d100
CH:02
CH:04
S1__
S2__
S3__
S4__
SO00–SO30
P:01–P:16
The DMX-4 can work with a DMX controller when linked by
connections.
DMX operation ar e in the User Manual.
download the DMX Primer from www.chauvetlighting.com.
Selects the DMX starting address
1-Channel mode
2-Channel mode
4-Channel mode
Channel 1 function
Channel 2 function
Channel 3 function
Channel 4 function
Turns power on/off as a DMX signal is
detected. Can assign up to a 30 second
delay.
Automatic programs
Automatic program speeds
Slow to fast
0–100%
recommended DMX address is 509.
7
Page 8
EN DMX-4 QRG
4-Channel
1
Dimmer
000 ó 255
0–100%
2
Dimmer
000 ó 255
0–100%
3
Dimmer
000 ó 255
0–100%
4
Dimmer
000 ó 255
0–100%
2-Channel
1
Dimmer
000 ó 255
Channels 1 + 2, 0–100%
2
Dimmer
000 ó 255
Channels 3 + 4, 0–100%
1-Channel
1
Dimmer
000 ó 255
All four channels, 0–100%
DMX Values
Channel Function Value Setting
Channel Function Value Setting
Channel Function Value Setting
8
Page 9
DMX-4 QRG ES
Acerca de esta
guía
contiene información básica sobre el
producto, como montaj e, opciones d e menú y valores DMX. Desca rgue el manua l de
Exención de
responsabilidad
La información y especificaciones contenidas en esta GRR están sujetas a cambio sin
Notas de
seguridad
Estas notas de seguridad incluyen información importante sobre el montaje, uso y
•
•
•
•
•
•
•
•
inflamab les cerca de la unidad cuando esté
•
caliente.
• La tensión del enchufe al que conecte este producto ha de estar en el rango
•
•
•
•
•
•
•
•
inmediatamente.
•
•
periodos en que no se use.
Contacto
Fuera de EE. UU., R eino Unid o, Irlanda , México o Benelu x póngas e en cont acto con
Visite
La Guía de refer enci a rápid a (GRR) del DMX-4
usuario de www.chauvetlighting.com para una información más detallada.
previo aviso.
mantenimiento.
Este producto no está concebido para una instalación permanente.
Conecte este producto SOLO a un circuito con toma de tierra y protegido.
Desconect e siempre de la alimentación antes de la limpieza o sustituci ón d el
fusible.
NO mire a la fu ente de luz cuando el pr o ducto esté encendido.
Asegúrese de que el cable de alimentación no está retor cido ni estropeado.
Nunca desconecte este producto de la alimentación tirando del cable.
Cuando monte este producto en a lto, use un cable de seguridad.
NO permita la presencia de materiales
en funcionamiento.
NO toque este producto cuando esté en funcionamiento, pues podría estar
establecido en el grabado o en el panel posterior del producto.
¡Este producto es para uso en int er iores solamente! (IP20) Para evitar riesgos de
incendio o descarga, no exponga este producto a la lluvia o la hum edad .
Monte siempre este producto en una ubicación con ventilación adecuada, al
menos a 20 in (50 cm) de superficies adyacentes.
Asegúrese de que ninguna ranura de ventilación en la carcasa de la unidad queda
bloqueada.
Nunca conecte este p r oducto a un atenuador o reostato.
Sustituya el fusible con uno del mismo tipo y categoría.
Use SOLAMENTE los soportes de colgar/montar o las asas para mover este
producto.
La temperatura ambiente máxima es de 104 °F (40 °C). No haga funcionar este
producto a temperaturas más altas.
En caso de un problema grave de funcionamiento, deje de usarlo
NO abra este producto. No contiene piezas reparables por el usuario.
Para evitar un desgaste innecesario y alargar su vida útil, desconecte
completamente el producto mediante el interruptor o desenchufándolo durante
su distribuidor para solicitar asistencia o devolver un producto.
www.chauvetlighting.com para información de contacto.
9
Page 10
ES DMX-4 GRR
Qué va
incluido
Para empezar
4 y asegúrese de que ha recibido todas las partes en
buen estado. Si la caja o los componentes parecen dañados, notifíqueselo
Descripción
4 es un paquete de atenuador/conmutador para usar con productos
LED. Cada canal se puede configurar individualmente como atenuador o
hasta 8 productos
simultáneamente. Los p ro gra mas aut omático s ti enen velo cid ades r egulab les y
Vista general
Entrada de
alimentación
Portafusibles
(1-4)
Salida DMX
Entrada
DMX
• DMX-4
• Cab le de alimentación
• Tarjeta de garantía
• Guía de referencia rápida
Desembale su DMX-
inmediatamente al transportista, no a Chauvet.
El DMX-
como conmutador. Cuatro salidas dobles pueden controlar
niveles de atenuación, lo que proporciona un gran control sin DMX.
Indicadores
Canal LED
Pantalla
LED
Botones
de
control
Interruptor
alimentación
10
Page 11
DMX-4 GRR ES
Corriente
alterna
Este producto ti ene una fuen te de aliment ación co n d etección automática qu e
240 VCA, 50/60
Sustitución del
fusible
Este producto va equipado con fusibles reemplazables. Cada sección tiene su
portafusibles de
la alimentación.
Funcionamiento
del atenuador
paquetes de atenuador/conmutador están pensados
fundamentalmente para focos reflectores de lámpara. Conectar un
equipo equipado con una fuente de alimentación electrónica (de
conmutación) a un paquete de atenuador/conmutador puede dañar el
cargas equipadas con fuentes de alimentación electrónicas, como
4 debe estar en
tes de conectarle cargas de est e tipo. Consulte las
4 en modo Conmutador
4 está en modo Conmutador
antes de conectarle un a carga equipada con fuent e de alimentación
4 está optimizad o para funcionar también con productos
Modo
Atenuador o
Desenchufe todas las unidades de los cuatro canales de salida.
p
es necesario.
puede funcionar con un rango de tensión de entrada de 100–
Hz.
propio fusible de 7 A.
Desconecte el pr oducto de la alimentación. 1.
Con un destornillador P hil lips n.º 2 desator nil le la ta pa del
2.
la carcasa.
Quite el fusible fundido. 3.
Sustitúyalo con un fusible del mismo tipo y categoría. 4.
Vuelva a ator ni llar la tapa del portafusibles en su sitio y conect e de nuevo 5.
Los
/conmutador
aparato o hacer que se comporte de forma irregular.
El diseño mejorado del DMX-4 le permite ahora conectar y descon ectar
luminarias LED o aparat os láser. Si n embargo, el DMX modo Conmutador an
instrucciones sobre cómo configurar el DMXmás abajo.
Asegúrese siempre de que el DMX-
electrónica. Lo contrario podría estropear la carga.
El DMXLED.
El DMX-4 tiene dos métodos diferentes para controlar la salida de los cuatro
canales. Para configurar esto a través del panel de control, haga lo siguiente.
Conmutador
1.
Con ecte el DMX-4 a una toma de corriente adecuada. 2.
Encienda el producto. 3.
Pulse <MODE> repetidamente hasta que aparezca A001–A512 en la 4.
pantalla.
Pulse <MENU> repetidamente hasta que aparezcaS1__, S2__, S3__ o 5.
S4__ en la pantalla. Este ajuste se puede configurar de forma difere nte
para cada uno de los cuat ro canales. Desplácese al canal deseado.
Utilice <
(modo Atenuador) para el canal que haya seleccionado en el paso
anterior.
Repita los pasos 5 y 6 para configurar cada uno de los otros canales, si 7.
> o <q> para seleccionar __oN (modo Conmutador) o __oF 6.
11
Page 12

ES DMX-4 GRR
Montaje
de
montaje
Abrazadera de
montaje
Cable
seguridad
Antes de montar este producto, lea las notas de seguridad.
Diagrama
de
12
Page 13
DMX-4 GRR ES
Montaje
alternativo
Si está utilizando este producto con un truss o un puesto de iluminación,
existe una forma de montaje alternati va. Esta opción es ideal para colgar el
Desenchufe el producto de la alimentación.
tornillos Phillips.
(configuración
Panel posterior
para colgar
1.
En la parte posterior del producto, localice los seis tornillos Phillips. 2.
Utilice un destornillador Phillips para quitar estos tornillos. 3.
Entonces saldrá la abrazadera de montaje. ¡Tenga cuidado para no dañar 4.
los componentes internos del atenuador, ya que quedan expuestos
durante este paso!
Dé l a vuelta a la abrazadera de montaje. 5.
Vuelva a acoplar el panel y déjelo fijo atornillando de nuevo los seis 6.
producto sin usar una abrazadera de montaje.
Quite los seis
tornillos
Diagrama
de montaje
alternativa)
Montaje alternativo
para colgar
13
Page 14
ES DMX-4 GRR
Descripción
del panel de
Función
Selecciona un modo de funcionamiento o regresa a la opción de
menú actual
<MENU>
Selecciona una opción de menú
Se desplaza hacia arriba por la lista de opciones o selecciona un
valor más alto
Se desplaza hacia abajo por la lista de opciones o selecciona un
valor inferior
Enlace DMX
4 puede funcionar con un controlador DMX cuando se enlaza por
conexiones serie DMX. Las instrucciones para conectar y configurar este
producto para funcionamiento DMX están en el manual de usuario. Si no está
al DMX de
Dirección de
inicio
Para asegurarse acceso total a todos los canales en cada modo DMX, la
Botón
<MODE>
control
<p> (UP)
<q> (DOWN)
Opciones de menú
Modo Menú Pantalla Descripción
Direcció n de inicio A001–A512
CH:01
CH:02
CH:04
S1__
S2__
S3__
S4__
SO00–SO30
SP:01–SP:99
Modo DMX
Modo
independiente
Personalidad
Conmutador/Atenuador
Conmutador: oN
Atenuador: oF
Interruptor de encendido
Programa P:01–P:16
Velocidad de ejecución
Atenuador d000–d100
El DMX-
Selecciona la dirección de inicio DMX
Modo de 1 Canales
Modo de 2 Canales
Modo de 4 Canales
Función del canal 1
Función del canal 2
Función del canal 3
Función del canal 4
Enciende/apaga la alimentación si
detecta señal DMX. Puede asignar un
retardo de hasta 30 segundos.
Programas automáticos
Velocidades del programa automático
Lento a rápido
0–100%
familiarizado con DMX, descargue el Manu
www.chauvetlighting.com.
dirección DMX más reco mendable es 509.
14
Page 15

DMX-4 GRR ES
4-Canales
1
Atenuador
000 ó 255
0–100%
2
Atenuador
000 ó 255
0–100%
3
Atenuador
000 ó 255
0–100%
4
Atenuador
000 ó 255
0–100%
2- Canales
1
Atenuador
000 ó 255
Canales 1 + 2, 0–100%
2
Atenuador
000 ó 255
Canales 3 + 4, 0–100%
1- Canales
1
Atenuador
000 ó 255
Los cuatro canales, 0–100%
Valores DMX
Canal Función Valor Configuración
Canal Función Valor Configuración
Canal Función Valor Configuración
15
Page 16

FR DMX-4 MR
À Propos de ce
Manuel
reprend des informations de base
sur cet appareil no tamment en mat ière de montage, d'option s de menu et de
valeurs DMX. Téléchargez le manuel d'utilisation sur
Clause de non-
Responsabilité
Les informations et caractéri sti qu es co nt enu es dans ce manu el so n t sujet tes à
Consignes de
Sécurité
Ces consignes concernant la sécurité reprennent d'importantes informations
• Cet appareil n'est pas conçu pour être utilisé dans une installation permanente.
brûlant.
• La tension de la prise à laquelle vous connectez ce cet appareil doit être
Montez toujours cet appareil dans en e ndroit bien ventilé, à a u moi ns, 20 pouces
réparé par l’utilisateur.
Contact
,
etourner
pour trouver nos
Le Manuel de Référence (MdR) du DMX-4
www.chauvetlighting.com pour de plus amples informations.
changement sans préavis.
en matière d'installation, d'utilisation et de maintenance.
• Connectez UNIQUEMENT ce produit à un circuit protégé et relié à la terre.
• Débranchez toujours cet a ppareil avant de procéder à son nettoyage ou au
remplacement de son fusible.
• Ne regardez PAS la source lumineuse lorsque le produit fonctionne.
• Assurez-vous que le cordon d'alimentation n'est ni tordu ni endommagé.
• Ne débranchez jamais cet appareil en tirant sur le cordon.
• Utilisez TOUJOURS un câble de sécurité lorsque vous montez cet appareil en
hauteur.
• Veillez à ce qu'AUCUNE source inflammable ne se trouve à proximité de
l'unité lors de son fonctionnement.
• Ne touchez PAS cet appareil lors de son fonctionnement car il pourrait s'avérer
comprise dans la plage de tensions reprise sur l'étiquette de l'appareil ou à
l'arrière de ce dernier.
• Cet appareil doit être utilisé en intérieur uniquement! (IP20) Afin d'éviter tout
risque d'incendie ou décharge électrique, veillez à n'exposer cet appareil ni à la
pluie ni à l'humidité.
•
(50 cm) des surface s a djace ntes.
• Assurez-vous qu'aucune fente de ventilation sur le boîtier ne soit obstruée.
• Ne connectez JAMAIS cet appareil ni à un gradateur ni à un rhéostat.
• Remplacez le fusible avec un de même type et même ampérage.
• Transportez/Suspendez ce produit UNIQUEMENT au moyen de la poignée
dont il est doté.
• La température ambiante m aximale supportée par ce pr oduit est de 104° F
(40° C). Ne le faites pas fonctionner à des températures plus élevées.
• En cas de sérieux pro blèmes de foncti onnement, arr êtez le système
immédiatement.
• N’ouvrez PAS ce produit. I l ne c ontient aucun c omposant susceptible d’être
En dehors des États-Unis, du Royaume-Uni et de l’Irlande et Benelux
contactez votre fournisseur si vous avez besoin d'assistance ou de r
votre produit. Consultez le site www.chauvetlighting.com
coordonnées.
16
Page 17

DMX-4 MR FR
Contenu
Préparation
vous que vous avez reçu toutes les pièces
en bon état. Si la boîte et/ou son contenu semble endommagés, contactez
Description
4 est un pack gradateur/commutateur sur 4 canaux optimisé pour
l'utilisation avec les ap pareils LED. Chaq ue canal peut être individ uellement
paramétré en tant que gradateur ou commutateur. Quatre prises doubles
permettent de contrô ler jusqu'à 8 appareils si multanément. Les programmes
niveau de la vitesse et du niveau de
Vue d'ensemble
Entrée
d'alimentation
Portes-fusibles
(1-4)
Sortie DMX
Entrée
DMX
Ecran LED
Boutons
contrôle
d’alimentation
• DMX-4
• Cordon d'alimentation
• Fi che de garantie
• Manuel de référence
Déballez votre DMX-4 et assurez-
immédiatement le transporteur et non pas Chauvet.
Le DMX-
automatisés peuvent être réglés au
gradation, ce qui permet d'effectuer un contrôle aisé sans DMX.
Voyants
LED des
canaux
Commutateur
17
de
Page 18

FR DMX-4 MR
Alimentation
CA
Cet appareil est doté d'une alimentation universelle qui peut prendre en
Remplacement
du fusible
Cet appareil est équipé de fusibles remplaçables. Chaque sect ion est équipée
Remettez en place et vi s sez le capuchon du porte-fusible, puis rebra nc he z .
Fonctionnement
gradateur/
Les packs gradateur/co mmutateur sont prin cipalement conçus pour être
appareil doté
d'une alimentation électronique à commutation connecté à un pack
gradateur/commutateur peut subir des dommages ou fonctionner de
4 vous permet dorénavant d'allumer
et d'éteindre des charges équipées d'alimentations électroniques tels que
des luminaires à base d e LED ou des équ ipements laser. Cepen dant, le
i raccorder des
4 est en mode
commutateur avant de lui raccorder une charge équipée d'une
En cas contraire, la charge peut être
4 est optimisé pour fonctionner également avec des
charge toute tension d'entrée comprise entre 100 et 240 VCA, 50/60 Hz.
de son propre fusible 7 A.
Débranchez l'appareil. 1.
Avec un tournevis à tête cruciforme #2, dévissez le capuchon du porte-2.
fusible du boîtier.
Retirez le fusible grillé. 3.
Remplacez-le par un fusible de même type. 4.
5.
utilisés avec des proj ecteurs PAR à base de lampes. Un
commutateur
manière erratique.
La conception améliorée d u DMX-
DMX-4 doit être en mode commutateur avant de lu
charges de ce type. Veuill ez consult er ci-dessous les instructions pour la
configurati on du D MX-4 en mode commutateur.
Assurez-vous systématiquement que le DMX-
alimentation électronique.
endommagée.
Le DMX-
appareils à base de LED.
18
Page 19

DMX-4 MR FR
Mode
gradateur ou
quatre canaux. Pour faire ce réglage à partir du panneau de commande,
Débranchez tout appareil connecté aux quatre canaux de sortie.
p
nécessaire.
Installation
Schéma de
Pince de fixation
Câble de
Le DMX-4 dispose de deux méthodes différentes pour contrôler la sortie des
commutateur
effectuez les actions suivantes :
1.
Branchez le DMX -4 sur une prise de courant appropriée. 2.
Allumez l'appareil. 3.
Appuyez sur la touche <MODE> de manière répétée jusqu'à ce que 4.
l'affichage indique A001–A512.
Appuyez sur <MENU> de manière répétée jusqu'à ce que l'affichage 5.
indique S1__, S2__, S3__ ou S4__. Ce réglage peut être effectué de
manière différente po ur chacun des quatre canaux. Positionnez-vous sur
le canal souhaité.
Utilisez les touches <
> ou <q> pour sélectionner les valeurs __oN 6.
(mode commutateur) ou __oF (mode gradateur) pour le canal
sélectionné à l'étape précédente.
Répétez les étapes 5 et 6 pour paramétrer chacun des autres canaux si 7.
Veuillez lire les con s ignes de sécurité avant d'installer cet apparei l.
Support de
montage
sécurité
montage
19
Page 20

FR DMX-4 MR
Fixation
alternative
Si vous utilisez cet appareil avec un treillis ou un pied à projecteur, vous
de fixation alternative. Cette option est idéale
Débranchez l'appareil.
endommager les composants internes du gradateur car ils sont exp osés au
Remettez en place le panneau en réinstall ant les 6 vis à tête cruciforme.
Schéma
d'installation
(configuration
alternative)
disposez d'une configuration
pour suspendre l'appareil sans utiliser de pince de fixation.
1.
A l'ar rière de l'appareil, localisez les six vis à tête cruciforme. 2.
Ut ilisez un tournevis cruciforme pour enl ever ces vis. 3.
Le support de fixation peut maintenant s'en lever. Faite attention à ne pas 4.
cours de cette étape !
Ret ournez le support de fixation (panneau arrière). 5.
6.
Enlever ces six vis
Panneau arrière
Configuration de
fixation alternative
20
Page 21

DMX-4 MR FR
Description du
panneau de
commande
Fonction
Permet de sélectionner un mode de fonctionnement ou de sortir
de l'option de menu courante.
<MENU>
Permet de sélectionner une option de menu
Permet de se déplacer vers le haut dans une liste d'options ou
permet de sélectionner une valeur plus haute.
Permet de se déplacer vers le bas dans une liste d'options ou
permet de sélectionner une valeur plus basse.
CH:04
Chaînage DMX
4 peut fonctionner avec un contrôleur DMX lorsqu'il est relié par
des connexions séries DMX. Les instructions pour la connexion et la
configuration de cet appareil pour le fonctionnement en DMX sont indiquées
êtes pas familier avec le protocole
DMX, vous pouvez télécharger l'introduction au DMX à l'adresse
Adresse de
départ
DMX,
<q> (DOWN)
Options du menu
Mode Menu
Adresse de départ A001–A512
Personality
(personnalité)
Switch/Dimmer
DMX Mode
(mode DMX)
Standalone
Mode (mode
autonome)
(commutateur/gradateur)
Switch: oN
Dimmer: oF
Commutateur
d'alimentation
Program (programme) P:01–P:16
Run Speed (vitesse
d'exécution)
Dimmer (gradateur) d000–d100
Le DMX-
Bouton
<MODE>
<p> (UP)
Display
(affichage)
CH:01
CH:02
S1__
S2__
S3__
S4__
SO00–SO30
SP:01–SP:99
Description
Sélectionne l’adresse DMX de départ
Mode 1 canal
Mode 2 canaux
Mode 4 canaux
Fonctionnement du canal 1
Fonctionnement du canal 2
Fonctionnement du canal 3
Fonctionnement du canal 4
Mise sous t ension / hors tens ion si un
signal DMX est détecté ou pas. Il est
possible de configurer un délai jusqu'à 30
secondes.
Programmes automatiqu es
Vitesses de programme automatique
Lent à rapide
0–100%
dans le manuel d'utilisation. Si vous n'
www.chauvetlighting.com.
Pour permettre un accès à l'ensemble des canaux de chaque mode
l'adresse DMX maximale recommandée est 509.
21
Page 22

FR DMX-4 MR
4- canaux
Dimmer
(gradateur)
Dimmer
(gradateur)
Dimmer
(gradateur)
Dimmer
(gradateur)
2- canaux
Dimmer
(gradateur)
Dimmer
(gradateur)
1- canaux
Dimmer
(gradateur)
Valeurs DMX
Canal Fonction Valeur Paramétrage
1
2
3
4
Canal Fonction Valeur Paramétrage
1
2
Canal Fonction Valeur Paramétrage
1
000 ó 255 0–100%
000 ó 255 0–100%
000 ó 255 0–100%
000 ó 255 0–100%
000 ó 255 Canaux 1 + 2, 0–100%
000 ó 255 Canaux 3 + 4, 0–100%
000 ó 255 Tous les quatre canaux, 0 à 100%
22
Page 23

DE DMX-4 SAL
Über diese
-
anleitung
finden Sie die wesentlichen
Werte des
das
Haftungs-
ausschluss
Die in dieser Anleitung aufgeführten Informationen und Spezifikationen können ohne
Sicherheits-
hinweise
•
• Schließen Sie dieses Produkt NUR an einen mit der Erde verbundenen und geschützten
•
•
•
•
•
•
•
•
•
•
•
•
•
•
•
•
•
• Um unnötigen Verschleiß zu vermeiden und die Lebensdauer des Geräts zu verlängern,
Kontakt
Kunden außerhalb der USA, GB, Irland, Mexiko oder Benelux wenden sich an ihren
men oder ein Produkt
In der Schnellanleitung des 4BAR™ Tri USB
Schnell
Produktinformationen, wie etwa über die Montage, Menüoptionen und DMXGeräts. Laden Sie für weiterführende Informationen unter www.chauvetlighting.com
Benutzerhandbuch herunter.
vorherige Ankündigung geändert werden.
Diese Sicherheitshinweise enthalten wichtige Informationen über die Montage,
Verwendung und Wartung des Geräts.
Dieses Produkt eignet sich nicht für eine permanente Installation.
Stromkrei s an.
Trennen Sie das Gerät von der Stro mquelle, bevor Sie es reinigen oder die Sicherung
auswechseln.
NIEMALS in die Lichtquelle schauen, während das Gerät eingeschaltet ist.
Stellen Si e sicher, dass das Netzkabel nicht gequetscht oder beschädig t ist.
Ziehen Sie beim Trennen des Geräts von der Stromversorgung nie am Kabel.
Bei Montage über Kopf immer ein Sic herungsseil verwenden.
KEINE entfla mmbaren Materialien während des Betriebs in der Nähe des Geräts
lagern.
NIEMAL S währ end des Betrie bs d a s G ehäuse berühr en, da dies sehr heiß wird.
Die Spannung der Schukosteckdose, an d ie Sie das Gerät ansch l ießen, muss sich
innerhalb des Spannungsbereiches befinden, der auf dem Hinweisschild oder dem
rückwärtigen Bedienfeld des Geräts angegeben ist .
Dieses Gerät darf nur im Innenbereich verwendet werden. (IP20) Um das Risiko von
Bränden od er el ektrischen Schlägen zu vermeiden, dü r fen Sie das Gerät nicht Regen
oder Feuchtigkeit aussetzen.
Installieren Sie das Gerät an einem Ort mit ausreich en der Belüftung und mit einem
Abstand von 5 0 c m zu den angrenzenden Flächen.
Stellen Si e sicher, dass die Lüftungsöffnungen im Geh äuse des Geräts nicht
verschlossen sind.
Schließen Sie dieses Gerät ni emals an einen Dimmer oder Regelwiderstand an.
Achten Sie beim Auswechseln der Sicherung darauf, den gleichen Typ mit den
gleichen Werten zu verwenden.
Das Gerät NUR an den Hänge-/Befestigungsbügeln oder Griffen tragen.
Die maximal zulässige Umgebun g stemperatur beträ gt 40 °C. Nehmen Sie das Gerä t
nicht bei höheren Temperaturen in Be tr ieb.
Bei ernsthaften Betriebsproblemen stoppen Sie umgehend die Verwendung des Geräts.
Dieses Gerät NICHT öffnen. Die eingebauten Komponenten sind für den Kunden
wartungsfrei.
trennen Sie während längerer Perioden des Nichtgebrauchs das Gerät vom St r o mnetz –
entweder per Trennschalter oder durch Herausziehen des Steckers aus d er Steckdose.
Lieferanten, um den Kundensupport in Anspruch zu neh
zurückzuschicken. Kontaktinformationen finden Sie unter www.chauvetlighting.com.
23
Page 24

DE DMX-4 SAL
Packungsinh
alt
Start
überprüfen Sie, ob Sie all e Teile un b eschädi gt
erhalten haben. Wenn die Verpackung beschädigt ist, benachrichtigen Sie
Beschreibung
-
Pack. Jeder Kanal kann einzeln als Dimmer oder
Ausgänge können bis zu 8 Geräte
gleichzeitig ansteuern. Automatische Programme verfügen über verstellbare
el, wodurch auch ohne DMX eine
Übersicht
Power In
Sicherungshalter
(1-4)
DMX-
Ausgang
DMX-
Eingang
• DMX-4
• Netzkabel
• Garantiekarte
• Schnellanleitung
Packen Sie den DMX -4 aus und
umgehend das Transportunternehmen, nicht jedoch Chauvet.
Der DMX-4 ist ein für eine Verwendung mit LED-Produkten optimiertem 4
Kanal-Dimmer/SwitchSwitch eingestellt werden. 4 Duplex-
Geschwindigkeiten und Dimmungspeg
hervorragende Steu er ung möglich ist.
Kanalaus
gaben
(1-4)
LED-Kanal-
Kennziffern
LED-
Anzeige
Power
Switch
24
Steuerungs-
Tasten
Page 25

DMX-4 SAL DE
Wechselstrom
Dieses Gerät verfügt über ei n Vorschaltgerät , das auto matisch die anli egende
Spannung erkennt, sobald der Netzstecker in die Schukosteckdose gesteckt
wird, und kann mit einer Eingangsspannung von 100~240 V AC, 50/60 Hz
Auswechseln
der Sicherung
Dieses Gerät ist mit aus wechselbaren Sicherungen ausgestattet. Jeder Bereich
Schrauben Sie die Abdeckung der Sicherung wieder ein, und schließen Sie
das Gerät wieder an das Stromnetz an.
Dimmer/
Kannen mit Lampen
bestimmt. Der Anschluss eines mit einem elektronischen Schaltnetzteil
4 können Sie nun mit einem
4 muss sich
Vergewissern Sie sich i mmer, dass vor dem Anschluss ei ner mit einem
4 im
Eine Nicht beachtung kön nte zur Beschädig ung
arbeiten.
ist mit einer eigenen Sicherung von 7 A abgesichert.
Trennen Sie das Gerät vom Stromnetz. 1.
Mit einem Kreuzschlitzschraubendreher Nr. 2 schrauben Sie die 2.
Abdeckung der Sicherung heraus.
Entfernen Sie die durchgebrannte Sicherung. 3.
Achten Sie bei m Ausw echseln der Sicherung darauf, den gl eichen Typ 4.
mit den gleichen Werten zu verwenden.
5.
Dimmer/Switch-Packs sind hauptsächlich für PAR-
Switch-
Betrieb
ausgestatteten Geräts an ein Dimmer/Switch-Pack kann zur Beschädigung
bzw. zu einem unregelmäßig en Betrieb des Geräts führen.
Mit dem verbesserten Design des DMXelektronischen Schaltnetzteil ausgestattete Geräte (Lasten), wie etwa LEDLeuchten oder Lasergeräte, ein- und ausschalten. Der DMXjedoch im Switch-Modus befinden, bevor solche Lasten daran angeschlossen
werden. Hinweise zum Einst ellen d es Switch -Modus beim DMX-4 finden sie
unten.
elektronischen Schaltnetzteil ausgestatteten Last sich der DMXSwitch-Modu s befindet.
der Last führen.
Der DMX-4 wurde außerdem für den Betrieb mit LED-Geräten
optimiert.
25
Page 26

DE DMX-4 SAL
Dimmer- oder
4 kann die Ausgabe der 4 Kanäle auf zwei verschied ene Arten
Trennen Sie alle Geräte vo n den 4 Ausgabekanälen.
anderen Kanäle einzustellen.
Montage
Lesen Sie vor der Montage dieses Geräts in jedem Fall die
Montageansicht
Befestigungsschelle
Sicherheits-
Der DMX-
Switch-
Modus
steuern. Für eine Steuerung über das Bedienfeld gehen Sie wie folgt vor.
1.
Schließen Sie d en DMX-4 an eine geeignete Wandsteckdose an. 2.
Schalten Sie das Gerät ein. 3.
Betätigen Sie wiederholt <MODE>, bis A001–A512angezeigt wird . 4.
Betätigen Sie wiederholt <MENU>, bis S1__, S2__, S3__ oder S4__ 5.
angezeigt wird. Diese Einstellung kann für jeden der 4 Kanäle
unterschiedlich ei ngestellt werden. Navigieren Sie zum gewünschten
Kanal.
Wählen Sie mit <p> oder <q> entweder __oN (Switch-Modus) oder 6.
__oF (Dimmer-Modus) für den im vorherigen Schritt ausgewählten
Kanal.
Wiederholen Sie bei Bedarf die Schritte 5 und 6, um jeden einzelnen der 7.
Sicherheitshinweise.
Montage
Befestigungsbügel
26
kabel
Page 27

DMX-4 SAL DE
Alternative
Aufhängung
Wenn Sie dieses Gerät zusammen mit Traversen oder einem
Beleuchtungsstativ verwenden, steht Ihnen eine alternative Aufhängung zur
Geräts
Tren nen Sie das Gerät vom Stromnetz.
S chrauben Sie die Rückwand mit den 6 Kreuzschlitzschrauben wieder an
(Alternative
Rückwand Rückseite
(Rigging)
ohne Befestigungsschel le.
1.
Auf der Rückseite des Geräts befinden si ch 6 Kreuzschlitzschrauben. 2.
Verwenden Sie zum Entfernen dieser Schrau ben einen 3.
Kreuzschlitzschraubendreher.
Der Befestigungsbügel löst sich nun. Vermeiden Sie eine Beschädigung 4.
der im Inneren des Dimmers befindlichen Komponenten, da diese
während dieses Schrittes offenliegen!
Klappen Sie den Befestigungsbügel (Rückwand) um. 5.
6.
Verfügung. Diese Option ist ideal für die hängende Montage des
Diese 6
Montageansicht
Schrauben
entfernen
Konfiguration)
Konfiguration der
alternativen Aufhängung
27
Page 28

DE DMX-4 SAL
Beschreibung
des
Funktion
Damit wählen Sie einen Betriebsmodus aus oder
aktuellen Menü zurück.
<MENU>
Damit wählen Sie eine Menüoption aus.
Damit navigieren Sie durch die Menüpunkte nach oben und
erhöhen den numerischen Wert der entsprechenden Funktionen.
Damit navigieren Sie durch die Menüpunkte nach unten und
verringern den numerischen Wert der entsprechenden
Funktionen.
DMX-
Controller betrieben werden, wenn eine
Serienschaltung zum Einsatz kommt. Anweisungen zum
Zusammenschluss und der Konfiguration dieses Geräts für den Betrieb im
ht
Eine Einführung" unter
Startadresse
Modus zu
Taste
<MODE>
Bedienfeldes
<p> (UP)
<q> (DOWN)
Menüoptionen
Modus Menü Anzeige Beschreibung
Startadresse A001–A512
CH:01
DMX-Modus
Stand-alone-
Modus
Eigenschaften
Switch/Dimmer
Switch: oN
Dimmer: oF
Power Toggle
Programm
Ablaufgeschwindigkeit SP:01–SP:99
Dimmer d000–d100
CH:02
CH:04
S1__
S2__
S3__
S4__
SO00–SO30
P:01–P:16
Der DMX-4 kann mit einem DMX-
Verbindung
DMX-
DMX-Modus finden Sie im Benutzerhandbuch. Wenn Sie mit DMX nic
vertraut sind, laden Sie "DMX -
www.chauvetlighting.com herunter.
Um einen vollständigen Zugang zu allen Kanälen in jedem DMXgewährleisten, beträgt die höchste empfohlene DMX-Adresse 509.
28
Wählt die DMX-Startadresse aus
1-Kanal-Modus
2-Kanal-Modus
4-Kanal-Modus
Funktion Kanal 1
Funktion Kanal 2
Funktion Kanal 3
Funktion Kanal 4
Damit schalten Sie den Strom ein/aus,
wenn ein DMX-Signal erkannt wurde.
Kann eine Verzögerung von bis zu 30
Sekunden zuordnen.
Auto-Programme
Geschwindigkeit des Auto-Programms
Langsam bis schnell
0–100%
kehren zum
Page 29

DMX-4 SAL DE
4- Kanal
1
Dimmer
000 ó 255
0–100%
2
Dimmer
000 ó 255
0–100%
3
Dimmer
000 ó 255
0–100%
4
Dimmer
000 ó 255
0–100%
2- Kanal
1
Dimmer
000 ó 255
Kanäle 1 + 2, 0 –100 %
2
Dimmer
000 ó 255
Kanäle 3 + 4, 0 –100 %
1- Kanal
1
Dimmer
000 ó 255
Alle 4 Kanäle, 0–100 %
DMX-Werte
Kanal Funktion Wert Einstellung
Kanal Funktion Wert Einstellung
Kanal Funktion Wert Einstellung
29
Page 30

IT DMX-4 GR
Informazioni
sulla Guida
Esclusione di
responsabilità
Le informazioni e le specifiche contenute in questa guida possono essere
Note di
Sicurezza
Le Note di Sicurezza includono informazioni importanti circa il montaggio,
• Questa apparecchiatura non è progettata per installazione permanente.
• Collegare questa unità SOLTANTO ad un circuito dotato di messa a terra e
•
•
•
•
•
•
•
molto calda.
• La tensione della pr e sa a muro cui si collega l'apparecchiatura deve
• Questa apparecchiatura deve essere utilizzata soltanto in in terni (IP20)! Per
•
•
•
•
•
•
•
•
•
con l'interruttore o scollegando il cavo.
Contatti
Per richiedere assisten za o rest ituire l'app arecchiatu ra, al di fuori di Stat i Uniti,
l distributore locale. P er
La Guida Rapida DMX-4 contiene informazioni di base sul prodotto quali
montaggio, opzioni menù e valori DMX. Per maggiori dettagli, scaricar e il
Manuale Utente dal sito www.chauvetlighting.com
modificate senza preavviso.
l'uso e la manutenzione.
protetto.
Prima di effettuare la pulizia o sostituire il fusibile, scollegare sempre
l'unità dall'alimentazione elettrica.
NON guardare la sorgente luminosa quando l'unità è in funzione.
Assicurarsi che il cavo di alimentazione non sia piegato o danneggiato.
Non scollegare mai questa apparecchiatura dall'alimentazione elettrica
tirando il cavo.
Per il montaggio in alto dell'unità utilizzare SEMPRE un cavo di sicurezza.
NON collocare materiale infiammabile vicino all'unità mentre è in
funzione.
NON toccare l'unità durante il funzionamento perché potrebbe essere
trovarsi entro il campo specificato sull'etichetta o sul pannello posteriore.
evitare il rischio di incendio o di folgorazione non esporre
l'apparecchiatura alla pioggia o all'umidità.
Montare sempre l'unità in posizione ben ventilata, ad almeno 50 cm. (20")
da qualsiasi superficie.
Assicurarsi che nessuna apertura di ventilazione dell'un ità sia ostruita.
Non collegare mai ad un dimmer o ad un reostato
Sostituire il fusibile con un altro dello stesso tipo e classe.
Prendere e trasportare l'unità SOLTANTO dalla staffa per il montaggio
sospeso o dalle maniglie.
Massima temperatura ambiente ammessa: 40 °C (104 °F). Non utilizzare
l'unità a temperature s uperiori.
In caso di gravi problemi di funzionamento sospendere immediatamente
l'utilizzo.
NON aprire l'unità. Non contiene parti riparabili dall'utente.
Per evitare un consumo inutile ed aumentare la durata, durante i periodi di
non utilizzo disconnettere completamente il prodotto dall'alimentazione
Regno Unito, Irlan da, Messico o Benelux con tattare i
informazioni sui contatti, visitare il sito Web www.chauvetlighting.com.
30
Page 31

DMX-4 GR IT
Che cosa è
incluso
Per iniziare
4 ed accertarsi di aver ricevuto tutti i componenti integri.
Se l'imballo appare danneggiato, farlo immediatamente presente al
Descrizione
4 è uno switch pack/dimmer a 4 can ali ottimizzato per impiego con
ture a LED. È possibile impostare ogni canale separatamente
come dimmer o switch. Quattro uscite duplex consentono di controllare fino
ad otto apparecchiat ure contemporaneament e. I programmi aut omatici h anno
ono un controllo eccellente
Vista d'insieme
Ingresso
alimentazione
Indicatori di
Portafusibili
(1-4)
Uscita
DMX
Ingresso
DMX
Display a
Uscite
• DMX-4
• Cavo di alimentazione
• Scheda di garanzia
• Guida Rapida
Disimballare DMX-
trasportatore e non a Chauvet.
DMX-
apparecchia
velocità e livelli dimmer regolabili che consent
senza DMX.
canale
(1-4)
canale a
LED
LED
Interruttore di
alimentazione
31
Pulsanti
di
controllo
Page 32

IT DMX-4 GR
Alimentazione
CA
Questa unità è dotata di alimentatore a commutazione automatica con
Sostituzione
fusibile
L'apparecchiatura dispone di fusibili sostituibili. Ogni sezione ha il
elettrica.
Funzionamento
Gli switch pack/dimmer sono destinati principalmente ad impiego con
can con lampade. Collegare un'apparecchiature con alimentatore
ronico (commutatore) ad uno switch pack/dimmer potrebbe
4 consente di attivare e
disattivare apparecchiature equipaggiate con alimentatore elettronico,
illuminazioni a LED o apparecchiature laser. Comunque, prima di
4 sia in
4 in
Prima di collegare apparecchiature con alimentatore elettronico
In caso
Modalità
Scollegare tutte le unità dai quattro canali di uscita.
Se necessario, ripetere i passaggi 5 e 6 per impostare gli altri canali.
tensione in ingresso di 100–240 V CA, 50/60 Hz.
proprio fusibile da 7 A.
Scollegare l'alimentazione elettrica dall'unità. 1.
Con un cacciavite Phillips #2, svitare il cappellotto del portafusibile 2.
dall'alloggiamento.
Rimuovere il fusibile bruciato e 3.
sostituirlo con un altro dello stesso tipo e amperaggio. 4.
Riavvitare il cappellotto del portafusibile e ricollegare l'alimentazione 5.
Dimmer/Switch
Parelett
danneggiarla o pregiudicarne il corretto funzionamento.
La migliorata impostazione tecnica di DMX-
quali
collegare apparecchiature di questo tipo accertarsi che DMXmodalità Switch. Di seguito le istruzioni su come impostare DMXmodalità Switch.
assicurarsi sempre che DMX-4 sia in modalità Switch.
contrario l'apparecchiat ura potrebbe dan negg iarsi.
DMX-4 è ottimizzato per funzio nare con apparecchiature a LED.
DMX-4 controlla l'uscita dei quattro canali in due modi diversi. Per
Dimmer
oppure
Switch
impostarli tramite pannello di controllo procedere come segue.
1.
Collegare DMX-4 ad una presa di corrente adeguata. 2.
Accendere l'unità. 3.
Premere ripetutament e <MODE> fino a visualizzare sul display A001–4.
A512.
Premere ripetutament e <MENU> fino a visualizzare sul display S1__, 5.
S2__, S3__ o S4__. Questa impostazione può essere di ver sa per
ciascuno dei quattro canali. Spostarsi sul canale desiderato,
Utilizzare <p> o <q> per selezionare __oN (modalità Switch) oppure 6.
__oF (modalità Dimmer) per il canale selezionato nel passaggio
precedente.
7.
32
Page 33

DMX-4 GR IT
Montaggio
di
Morsetto di
Cavo di
sicurezza
Staffa di montaggio
Prima di montare l'un ità, leggere le Note di Sicurezza.
montaggio
Schema
montaggio
33
Page 34

IT DMX-4 GR
Installazione
alternativa
apparecchiatura con un traliccio o un supporto per
illuminazione, è possibile un'installazione diversa, ideale per sospenderla
S collegare l'unità dall'alimentazione elettrica.
Riattaccare il pannello avvitando saldamente le sei viti Phillips.
Schema
di montaggio
(installazione
alternativa)
Pannello posterior e
Se si utilizza questa
senza utilizzare un mors etto di montaggio.
1.
Ind ividuare le sei viti a testa Phillips nella parte posteriore. 2.
Svitarle con un giravite Phillips. 3.
La staffa di montaggio si stacca. Fare attenzione a non danneggiare i 4.
componenti interni del dimmer che, in questa fase, rimangono esposti!
Capovolgere la staffa di montaggio (pannello posteriore). 5.
6.
Rimuovere
queste sei viti
34
Installazione
alternativa
Page 35

DMX-4 GR IT
Descrizione
del pannello di
controllo
Funzione
Consente di selezionare la modalità di funzionamento o di
tornare all'opzione di menù corrente.
<MENU>
Consente di selezionare un'opzione di menù
Consente di scorrere l'elenco delle opzioni verso l'alto o di
selezionare un valore più alto
Consente di scorrere l'elenco delle opzioni verso il basso o di
selezionare un valore più basso
Collegamento
4 può funzionare con un controller DMX quando collegato tramite
connessioni seriali DMX. Le istruzioni per il collegamento e la
configurazione di questa unità sono contenute nel Manuale Utente. Se non si
all'indirizzo
Indirizzo iniziale
Per assicurare il co mpleto acce sso a tu tti i canal i in ciascu na modali tà DMX,
Pulsante
<MODE>
<p> (UP)
<q> (DOWN)
Opzioni del menù
Modalità Menù Display Descrizione
Modalità DMX
Modalità stand
alone
Indirizzo iniziale A001–A512
CH:01
Funzione
Switch/Dimmer
Switch: oN
Dimmer: oF
Toggle Potenza
Programma P:01–P:16
Velocità di esecuzione
Dimmer d000–d100
CH:02
CH:04
S1__
S2__
S3__
S4__
SO00–SO30
SP:01–SP:99
Imposta l'indirizzo DMX iniziale
Modalità 1 canale
Modalità 2 canali
Modalità 4 canali
Funzione canale 1
Funzione canale 2
Funzione canale 3
Funzione canale 4
Attiva/disattiva l'alimentazione quando
viene rilevato un segnale DMX. È
possibile assegnare un ritardo fino a 30
secondi.
Programmi automatici
Velocità programmi automatici
Da lento a veloce
0–100%
DMX-
DMX
ha familiarità con il DMX, scaricare DMX Primer
www.chauvetlighting.com.
l'indirizzo maggiorment e r accomandato è 509.
35
Page 36

IT DMX-4 GR
4- Canale
1
Dimmer
000 ó 255
0–100%
2
Dimmer
000 ó 255
0–100%
3
Dimmer
000 ó 255
0–100%
4
Dimmer
000 ó 255
0–100%
2- Canale
1
Dimmer
000 ó 255
Canali 1 + 2, da 0 a 100%
2
Dimmer
000 ó 255
Canali 3 + 4, da 0 a -100%
1- Canale
1
Dimmer
000 ó 255
Tutti e quattro i canali, da 0 a 100%
Valori DMX
Canale Funzione Valore Impostazione
Canale Funzione Valore Impostazione
Canale Funzione Valore Impostazione
36
Page 37

NL DMX-4 BH
Over deze
handleiding
4 Beknopte Handleiding (BH) bevat basisinformatie over het
waarden. Download de
Disclaimer
De informatie en specificaties in deze BH kunnen zonder voorafgaande
Veiligheidsinstructies
Deze veiligheidsinstructies bevatten belangrijke informatie over de installatie,
oende ventilatie, minstens 20 inch
De maximale omgevingstemperatuur bedraagt 40 °C. Gebruik dit product niet bij
door een aardlekschakelaar om te zetten of door het te ontkoppelen
Contact
Van buiten de VS, Verenigd Koninkrijk, Ierland, Mexico of Benelux kunt u
contact opnemen met de distributeur of om ondersteuning vragen dan wel het
voor
De DMXproduct, zoals montage, menu-opties en DMXgebruikershandleiding op www.chauvetlighting.com voor meer informatie.
kennisgeving worden gewijzigd.
het gebruik en het onderhoud.
• Dit product is niet bedoeld voor permanente installatie.
• Sluit dit product UITSLUITEND op een geaard en beveiligd stroomcircuit.
• Haal voor het vervangen van de zekering altijd de stekker van het product uit het
stopcontact.
• KIJK NIET in de lichtbron wanneer het apparaat is ingeschakeld.
• Zorg e rvo or da t he t st ro oms noe r nie t k nik t of bes cha dig d.
• Koppel dit product nooit los van het stopcontact door aan het snoer te trekken.
• Gebruik een veiligheidskabel wanneer het product boven lichaamshoogte wordt
gemonteerd.
• GEEN brandbare materialen in de buurt van de unit tijdens gebruik.
• RAAK het product NIET AAN wanneer het in werking omdat het dan heet zijn.
• De spanning van het stopcontact waarop u dit product aansluit moet binnen het
vermelde bereik op de sticker of achterkant van het product zijn.
• Het product is alleen voor gebruik binnenshuis! (IP20) Om risico op brand of
elektrische schokken te voorkomen, mag dit product niet aan regen of vocht
worden blootgesteld.
• Monteer dit product altijd op een plek met vold
(50 cm) van de aangrenzende oppervlakken.
• Zorg ervoor dat er geen ventilatie-openingen van de behuizing van het product
worden geblokkeerd.
• Sluit dit product nooit aan op een dimmer of een regelweerstand.
• Vervang de zekering met een van hetzelfde type en met dezelfde waarde.
• Gebruik UITSLUITEND de ophang-/montagebeugel of de hendels om dit
product te dragen.
•
hogere temperaturen.
• Stop in het geval van ernstige operationele problemen onmiddellijk met het
gebruik.
• Open het product NIET. Het bevat geen te onderhouden onderdelen.
• Om onnodige slijtage te elimineren en zijn levensduur te ver lengen, gedurende
perioden wanneer het product niet wordt gebruikt, moet u het product afsluiten
product retourneren. Ga naar www.chauvetlighting.com
contactinformatie.
37
Page 38

NL DMX-4 BH
Wat zit
erbij
Beginnen
ontvangen onderdelen in een
goede staat zijn. Indien de doos of inhoud beschadigd blijken, breng dan de
Beschrijving
apparaat/schakelpak ket dat is bepaald voor
producten. Elk kanaal kan afzonderlijk worden
uitgangen kunnen
maximaal 8 producten tegelijkertijd regelen. Geauto matiseerde programma's
er goede
Overzicht
Stroom Aan
LED
meters
Zekering-
(1-4)
DMX Uit
DMX
Aan
Knoppen
• DMX-4
• Stroomkabel
• Garantie kaart
• Snelle verwijzingsgids
Maak uw DMX-4 open en kijk goed na of alle
vervoerder direct op de hoogte, niet Chauvet.
De DMX-4 is een 4-kanalen dim-
het gebruik met LEDingesteld als dim-apparaat of schakelaar. Vier duplex-
hebben instelbare snelheden en dim-niveaus die zonder DMX een ze
regeling bieden.
Kanaal-
uitgangen
(1-4)
Kanaal
Controle-
LED
Display
Stroom
Schakela
houders
38
Regeling
Page 39

DMX-4 BH NL
AC-stroom
een automatisch gespr eide stroomtoevoer die kan werken
Vervanging van
de zekeringen
Dit product is uitgerust met vervangbare zekeringen. Elke sectie he eft zi jn
opnieuw op de stroom aan.
Werking dim-
apparaat/
bussen. De aansluiting van een armatuur met een
ontwerp maakt het nu mogelijk voor u om
belastingen met elektrische s troomvoorziening aan en uit te schakel en zoals
4 moet in de
modus staan voordat belastingen met dit type hierop worden
4 in
Dim- of
4 heeft twee verschillend e methodes om de uitgang van de vier
kanalen te regelen. Om dit via het co ntrolepaneel in te stellen, moet u het
Trek alle eenheden uit de vier uitgangs-kanalen
p
indien noodzakelijk.
Dit product heeft
met een ingang-spanning bereik van 100–240 VAC, 50/60 Hz.
eigen 7 A zekering.
Haal het product van de stroom af. 1.
Schroef het deksel van de zekeringhouder van de behuizing af met een #2 2.
Phillips-kopschroevendraaier
Verwijder de doorgebrande zekering 3.
Vervang deze voor een zekering van het zelfde type en groot te. 4.
Schroef het d eksel van de zekeringhouder terug op de plaats en sluit 5.
Dim-apparaat/schakel-pakketten zijn hoofdzakelijk bedoeld voor op lampgebaseerde PAR-
schakelaar
elektrische stroomvoo rzi eni ng (omschakeling) aan een dim-apparaat/schakelpakket kan de armatuur b es chadigen of onregelmatig laten werken.
Het verbeterde DMX-4 -
LED-verlichting of laser armaturen. Hoe dan ook, de DMXschakelaangesloten. Lees de aanwijzingen op welke manier de DMXonderstaande schakel modus moet worden ingesteld.
Let er altijd op dat de DMX-4 in de s cha kela ar-modus staat voordat een
belasting van el ektri citei t vo orzie n, w ordt aang esl oten. Indie n dit op ee n
andere manier wordt gedaan, kan dit de belasting beschadigen.
De DMX-4 is er ook voor ontworpen om met LED-producten te werken.
De DMX-
schakel-
modus
volgende doen.
1.
Sluit de DMX-4 op een geschikte stroom-uitgang aan. 2.
Zet het product aan. 3.
Druk herhaaldelijk op <MODUS> totdat A001–A512 in het display 4.
verschijnt.
Druk herhaaldelijk op <MENU> totdat S1__, S2__, S3__, or S4__in het 5.
display verschijnt . Deze instelling kan voor elk van de de vier kanalen
verschillend worden ingesteld. Zoek naar het gewenste kanaal.
Druk op <
> of <q> om ofwel __aaN (schakel-modus) te selecteren 6.
of __uiT (dim-modus) voor het kanaal wat in de voorgaande stap is
geselecteerd.
Herhaal de stapp en 5 en 6 om elk van de andere kanalen in te stellen, 7.
39
Page 40

NL DMX-4 BH
Monteren
Montage
grafiek
Montage-beugel
Veiligheids
kabel
Lees eerst de veiligheidsaanwijzingen voordat u dit product monteert.
40
Page 41

DMX-4 BH NL
Alternatieve
Indien u dit product gebruikt met een drager of verlichtingsstandaard, dan is
er een alternatieve regeling voor configuratie beschikbaar. Deze optie is
een montagebeugel te
Trek de stekker van het product eruit.
kopschroeven opnieuw te installeren.
(Alternatieve
Verwijder deze
Steun paneel
regeling
perfect om het product op te hangen zonder
gebruiken.
1.
Op de achterkant van het product moeten de Phillips kop-schroeven 2.
geplaatst worden.
Gebruik een kop-schroevendraaier van Phillips om deze schroeven te 3.
verwijderen.
De mon tage-console zal er nu vanaf gaan. Let er op om niet de interne 4.
componenten van de dimschakelaar te beschadigen omdat deze tijdens
deze stap bloot liggen.
Klap de montage-console (achterpaneel) rondom. 5.
Bevestig het paneel opnieuw door voorzichtig de zes Philipps 6.
zes schroeven
Montage
grafiek
configuratie)
Alternatieve
installatie van
configuratie
41
Page 42

NL DMX-4 BH
Beschrijving
Functie
Selecteert een
optie
<MENU>
Selecteert een menu-optie
Schuift door de lijst met opties omhoog of selecteert een hogere
waarde
Schuift door de lijst met opties omlaag of selecteert een lagere
waarde
DMX-
bedieningsapparaat werken indien deze is
aansluiting. Instructies om dit product voor
bediening aan te sluiten en te configureren, staan in de
, dan moet u de
Start adres
Om er zeker van te zijn dat u volledig toegang te krijgt tot all e kanalen in elke
controlepaneel
Knop
<MODE>
<p> (UP)
bedieningsmodus of gaat uit de huidige menu-
<q> (DOWN)
Menu opties
Modus Menu Display Beschrijving
DMX-modus
Stand-alone
modus
verbinding
Start adres A001–A512
CH:01
Persoonlijkheid
Schakelaar/Dim-apparaat
Schakelaar: AAN
Dim-appara at: UIT
Vermogen Toggle SO00–SO30
Programma P:01–P:16
Loopsnelheid
Dim-apparaat d000–d100
CH:02
CH:04
S1__
S2__
S3__
S4__
SP:01–SP:99
De DMX-4 kan met een DMXverbonden met een DMX serieDMXgebruikershandleiding. Indien u niet bekend bent met DMX
DMX Primer downloaden van www.chauvetlighting.com.
Selecteert een DMX-start adres
1-kanaal-modus
2-kanaal-modus
4-kanaal-modus
Kanaal 1 functie
Kanaal 2 functie
Kanaal 3 functie
Kanaal 4 functie
Zet de stroom aan/uit omdat een DMX-
signaal is gedetecteerd. Kan een
vertraging van maximaal 30 seconden
toewijzen.
Automatische programma's
Automatische programma snelheden
Langzaam naar snel
0-100%
DMX-modus, wordt het hoogste DMC-adres van 509 aanbevolen.
42
Page 43

DMX-4 BH NL
4- kanalen
1
Dim-apparaat
000 ó 255
0–100%
2
Dim-apparaat
000 ó 255
0–100%
3
Dim-apparaat
000 ó 255
0–100%
4
Dim-apparaat
000 ó 255
0–100%
2- kanalen
1
Dim-apparaat
000 ó 255
Kanalen 1 + 2, 0–100%
2
Dim-apparaat
000 ó 255
Kanalen 3 + 4, 0–100%
1- kanalen
1
Dim-apparaat
000 ó 255
Alle vier kanalen, 0–100%
DMX-waardes
Kanaal Functie Waarde Instelling
Kanaal Functie Waarde Instelling
Kanaal Functie Waarde Instelling
43
Page 44

Multi-Language DMX-4 Quick Reference Guide
Contact
USA WORLD HEADQUARTERS
General Information
Technical Support
www.chauvetlighting.com
EUROPE
General Information
Voice: +32 9 388 93 97
Technical Support
www.chauvetlighting.eu
General Information
Fax: +44 (0)1773 511110
Technical Support
MEXICO
General Information
Voice: +52 (728) 285-5000
Technical Support
Outside the U.S., United Kingdom, Ireland, Mexico, or Benelux, contact the dealer
low their instructions to request support or to return a product. Visit
our website for contact details.
Us
Address: 5200 NW 108th Avenue
Sunrise, FL 33351
Voice: (954) 577-4455
Fax: (954) 929-5560
Toll free: (800) 762-1084
Voice: (954) 577-4455 (Press 4)
Fax: (954) 756-8015
Email: tech@chauvetlighting.com
World Wide Web
Address: Stokstraat 18
977 0 Kruishoutem
Belgium
Address: Unit 1C
Bro okhill Road Ind us trial Estate
Pinxton, Nottingham, UK
NG16 6NT
Voice: +44 (0)1773 511115
Address: Av. Sant a Ana 30
Parque Industrial Lerma
Lerma, Mexico C.P. 52000
Email: Eutech@chauvetlighting.eu
World Wide Web
Email: uktech@chauvetlighting.com
World Wide Web
www.chauvetlighting.co.uk
Email: servicio@chauvet.com.mx
World Wide Web www.chauvet.com.mx
of record. Fol
QRG – Rev. 3
DMX-4
© Copyright 2017 CHAUVET
All rights reserved.
Printed in the P. R. C.
44
 Loading...