

Page 1
APPLICATION
This kit includes the MyQ® Control Panel model 41A7928-3 and the
Chamberlain
intended to be installed with Security✚™ Garage Door Openers
manufactured between 1998 and present. The MyQ
compatible with Security✚ 2.0™ Garage Door Openers. DO NOT install
this door control on garage door opener systems controlling one-piece or
swing doors.
®
Internet Gateway model CIGBU. The MyQ® Control Panel is
®
Control Panel is NOT
OVERVIEW
The MyQ® Control Panel offers a quick and convenient way to add
Security✚ 2.0™ and MyQ
opener. MyQ
®
technology uses a 900MHz signal to provide two-way
communication between the garage door opener and MyQ
accessories. When programmed to the Chamberlain
you can monitor and control your garage door from any internet enabled
computer or smartphone. You may program up to 12 Security✚ 2.0™
remote controls, 2 Security✚ 2.0™ keyless entries and a combination of
®
16 MyQ
accessories to the MyQ® control panel. For full compatibility,
see page 4.
®
technology to your existing garage door
®
enabled
®
Internet Gateway
INSTALL THE MyQ® CONTROL PANEL
Install the control panel in place of the existing door control. Due to
power consumption the control panel cannot be used in conjunction with
another wired door control connected to your garage door opener. If an
additional door control is needed, the wireless door control model
41A7773-1 can be programmed to the control panel. To program the
41A7773-1 to the control panel, follow the remote control programming
steps. When in battery back-up mode, any feature using unattended
operation such as Timer-to-Close, closure from a garage door and gate
monitor or remote operation utilizing the Chamberlain
will be disabled.
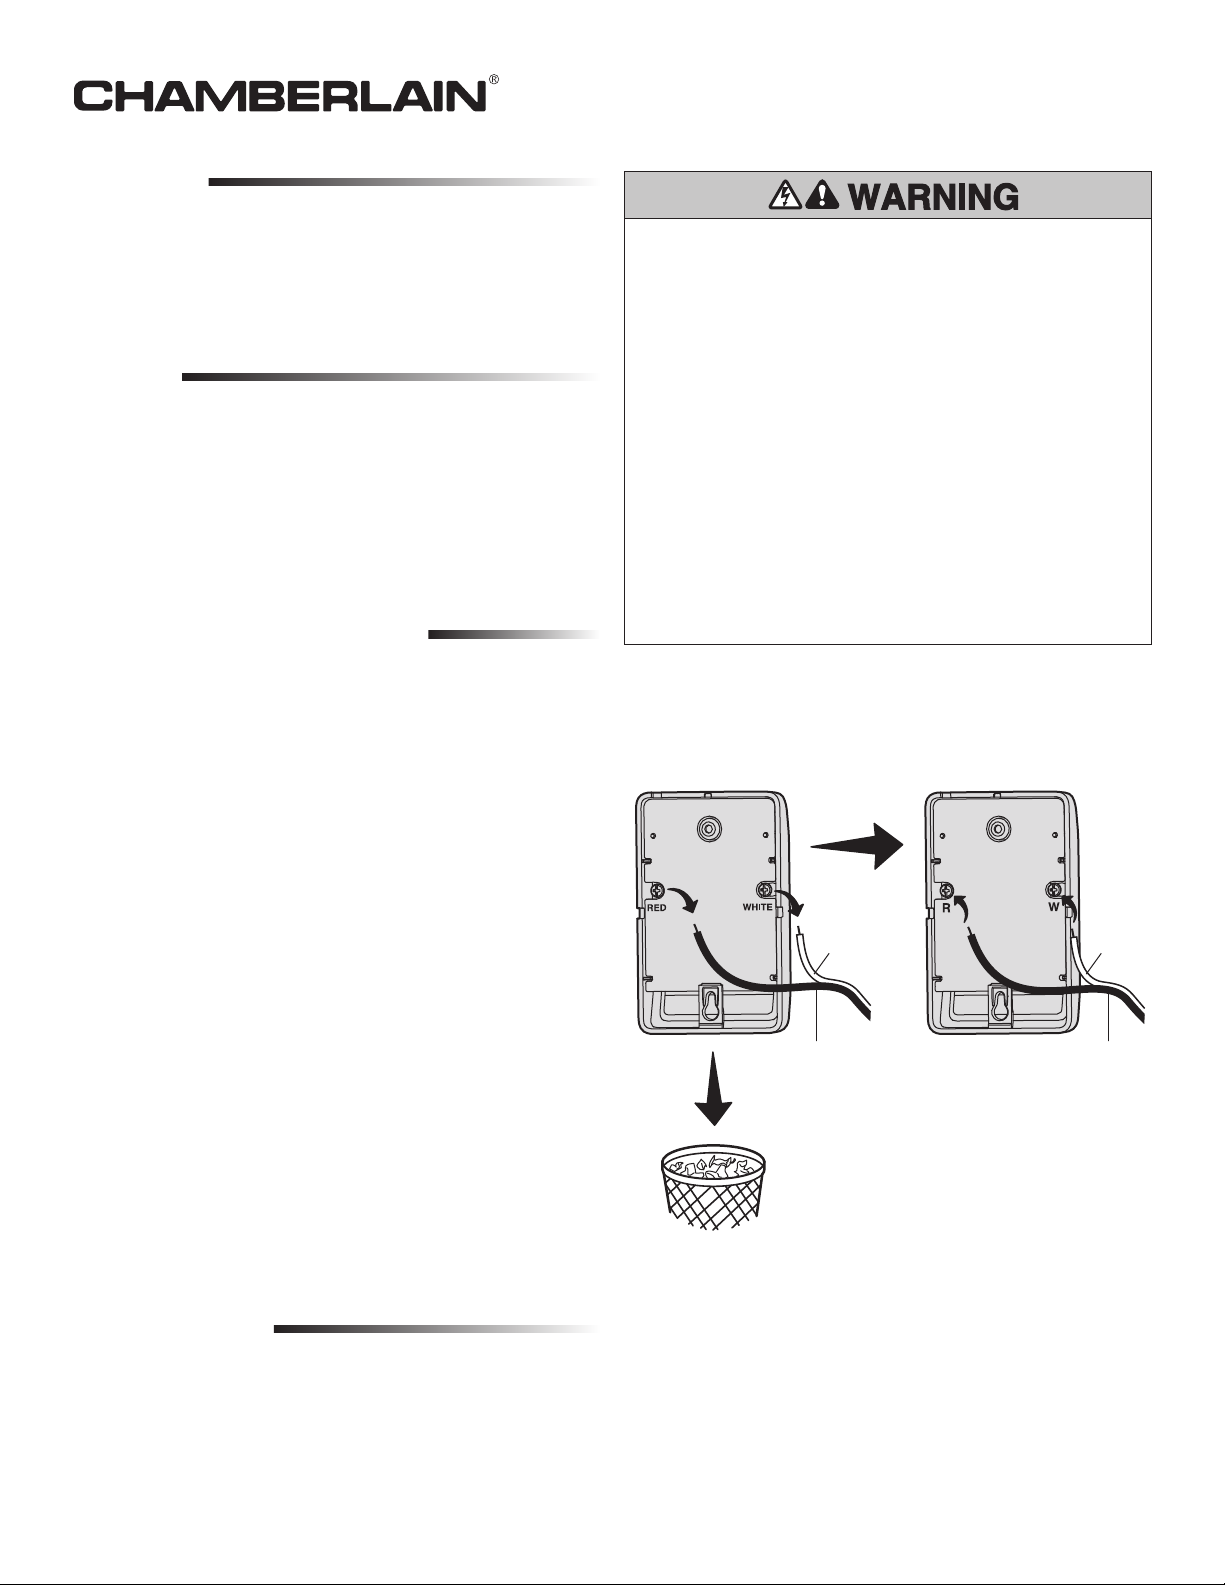
1. Disconnect all electrical and battery power (if applicable) to the
garage door opener.
2. Remove the existing door control from the wall.
3. Note the polarity of the wires connected to the existing door
control.
• Label the wire connected to the RED terminal.
• Label the wire connected to the WHITE terminal.
Disconnect the wires from the existing door control.
®
4. Connect the wires to the new MyQ
Control Panel. Make sure the
polarity is correct.
• Red wire to the R terminal.
• White wire to the W terminal.
5. Mount the control panel to the wall.
6. Reconnect power. The yellow command LED and the red learn LED
will blink quickly for up to 5 minutes as the control panel
recharges. When the control panel is operational, the yellow
command LED will glow steadily.
7. To test the control panel, press the push bar to activate the garage
door opener.
®
Internet Gateway
INTERNET CONNECTIVITY KIT
MODEL CIGCWC
To prevent possible SERIOUS INJURY or DEATH from electrocution:
• Be sure power is NOT connected BEFORE installing door control.
• Connect ONLY to 7-28 VOLT low voltage wires.
To prevent possible SERIOUS INJURY or DEATH from a closing
garage door:
• Install door control within sight of garage door, out of reach of
children at a minimum height of 5 feet (1.5 m), and away from ALL
moving parts of door.
• NEVER permit children to operate or play with door control push
buttons or remote control transmitters.
• Activate door ONLY when it can be seen clearly, is properly
adjusted, and there are no obstructions to door travel.
• ALWAYS keep garage door in sight until completely closed. NEVER
permit anyone to cross path of closing garage door.
• DO NOT install this door control on garage door opener systems
controlling one-piece or swing doors.
To provide an adequate visual alert, the garage door opener light
bulb(s) MUST be a minimum of 40 Watt (or equivalent).
Existing Door Control
Wire from
WHITE
terminal
Wire from
RED terminal
Discard, donate
or recycle
®
Control Panel
MyQ
Connect
WHITE
wire to W
terminal
Connect
RED wire to
R terminal
TROUBLESHOOTING
• If the yellow command LED does not turn on, reverse the wires
connected to the R and W terminals of the control panel. Replace
wire if necessary.
• If yellow and red LEDs are blinking slowly, the control panel is not
compatible with your garage door opener.
• If the yellow and red LEDs are blinking quickly, the control panel is
charging, and may take up to 5 minutes to become operational.
1
Page 2
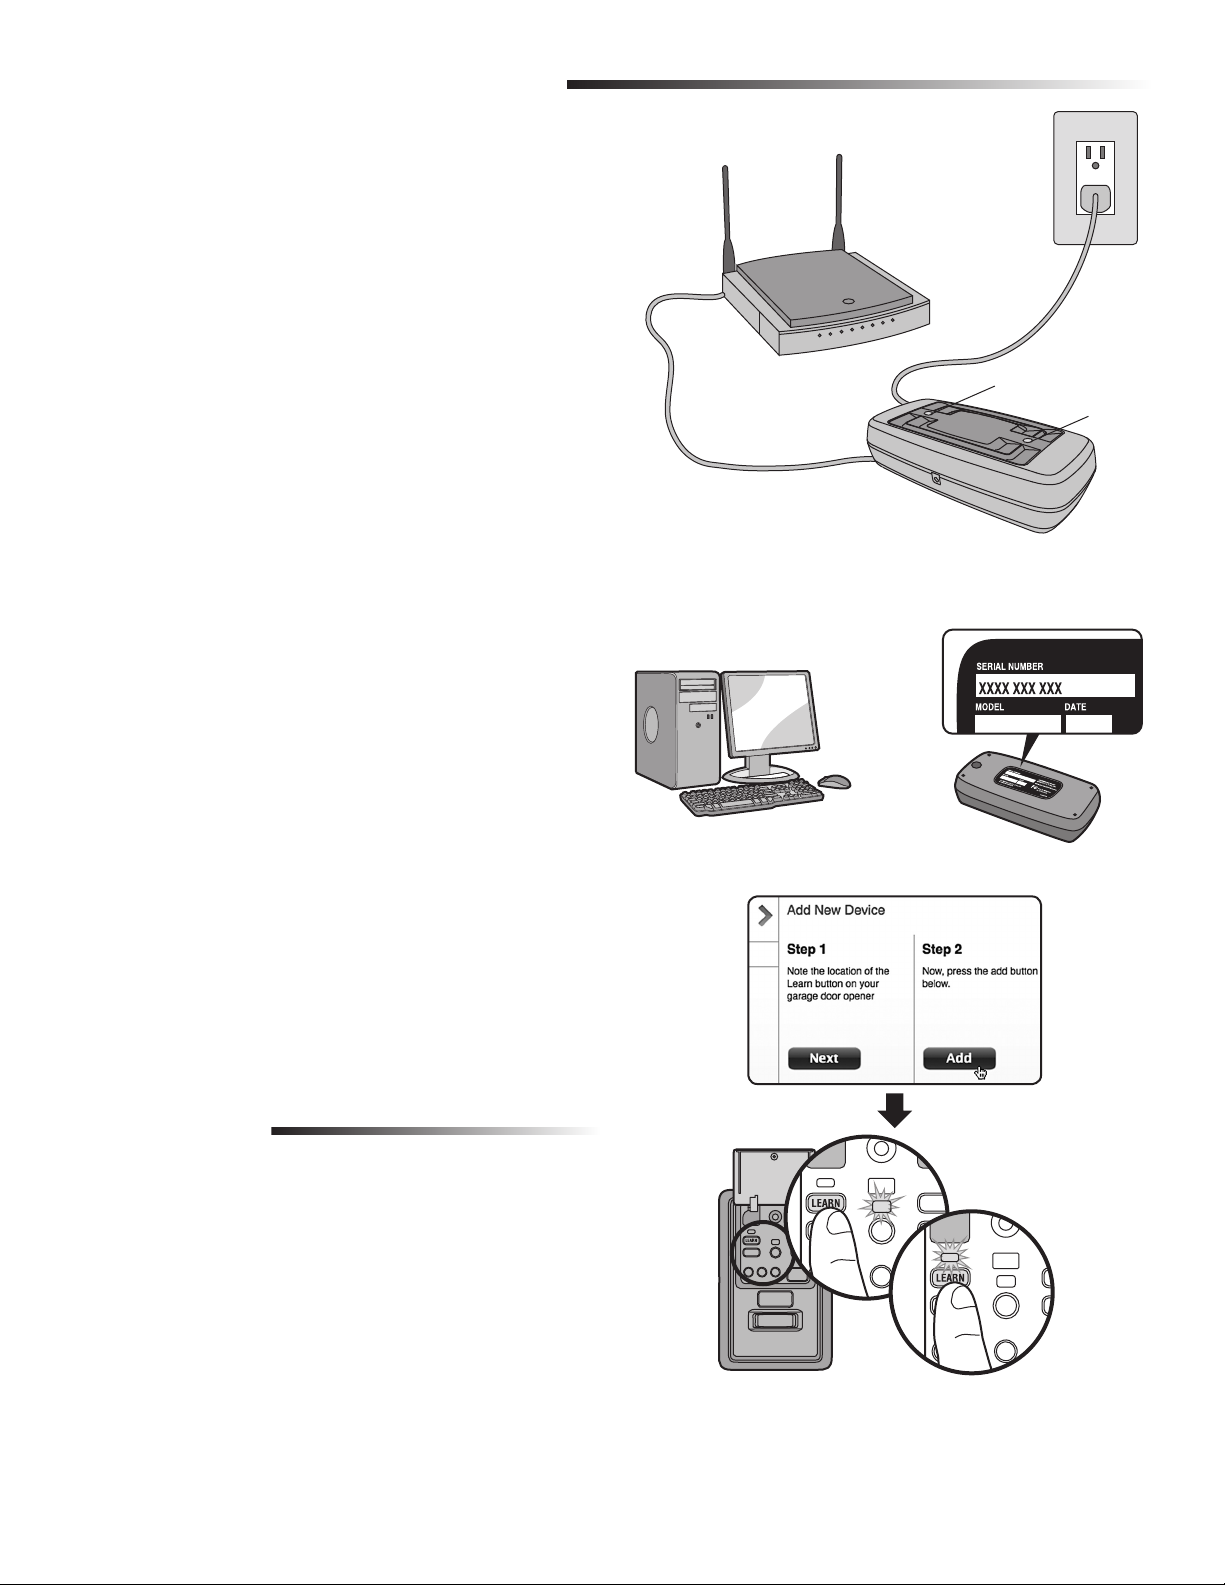
INSTALL THE CHAMBERLAIN® INTERNET GATEWAY
The Chamberlain
door opener from your internet connected computer or smart phone. The
®
Control Panel has been programmed at the factory to the
MyQ
Chamberlain
1 CONNECT THE CHAMBERLAIN® INTERNET GATEWAY
1.1 Connect the Chamberlain® Internet Gateway to a router with the
ethernet cable. If you only have access to a Wi-Fi signal and not a
router, you must use a wireless ethernet adapter (not provided) to
connect to the internet.
1.2 Connect power to the Chamberlain
and green LEDs will blink momentarily and then the blue and green
LEDs will light solid.
2 CREATE AN ACCOUNT
From your computer, go to www.mychamberlain.com and follow the
instructions to create an account. Use a computer for this step; you
cannot create an account from a mobile device.
3 REGISTER THE CHAMBERLAIN® INTERNET GATEWAY
Locate the serial number on the bottom of the Chamberlain® Internet
Gateway. Register the Chamberlain
number. Your garage door opener will appear in the "Places" section of
your account when registration is complete. If the garage door opener
does not appear, follow step 4 below.
4 PROGRAM THE MyQ® CONTROL PANEL TO THE
CHAMBERLAIN® INTERNET GATEWAY
4.1 Click on “Manage Places>Add New Device>Garage Door Opener”
and follow the directions.
4.2 Once you click ADD you have 3 minutes to press the LEARN
button two times on the MyQ
will turn on.
4.3 The red learn LED will turn off when programming is complete.
The blue LED on the Chamberlain
indicate that a device has been programmed. Once the control
panel is programmed, it will appear on your screen and you can
then name the device (e.g., My Control Panel, etc.).
4.4 Click SAVE.
The control panel has now been programmed to the internet gateway and
the garage door can now be controlled from a computer or smartphone.
Follow the same steps to add other MyQ
DOWNLOAD THE SMARTPHONE APP
Visit the app store for your smartphone to download the MyQ® app. With
the app you can monitor and control your garage door opener and MyQ
devices. You can also add or remove other MyQ® accessories.
®
Internet Gateway allows you to control your garage
®
Internet Gateway.
®
Internet Gateway. The blue
®
Internet Gateway with the serial
®
control panel. The red learn LED
®
Internet Gateway will light to
®
devices.
®
1
Router
Green LED
Ethernet
Cable
Chamberlain® Internet Gateway
Power
Adapter
Blue LED
23
www.mychamberlain.com
4
TROUBLESHOOTING
After power up, the LED lights will show the status of the Chamberlain®
Internet Gateway.
• GREEN On Solid – The Chamberlain
address and is connected to the Internet.
• GREEN flashing steadily On & Off – The Chamberlain
Gateway has an IP address, but is not accessing the internet.
Check your router settings and internet connections.
• GREEN Off – The router is not providing an IP address to the
Chamberlain
®
Internet Gateway. Check your router settings and
internet connections.
®
Internet Gateway has an IP
®
Internet
2
Page 3
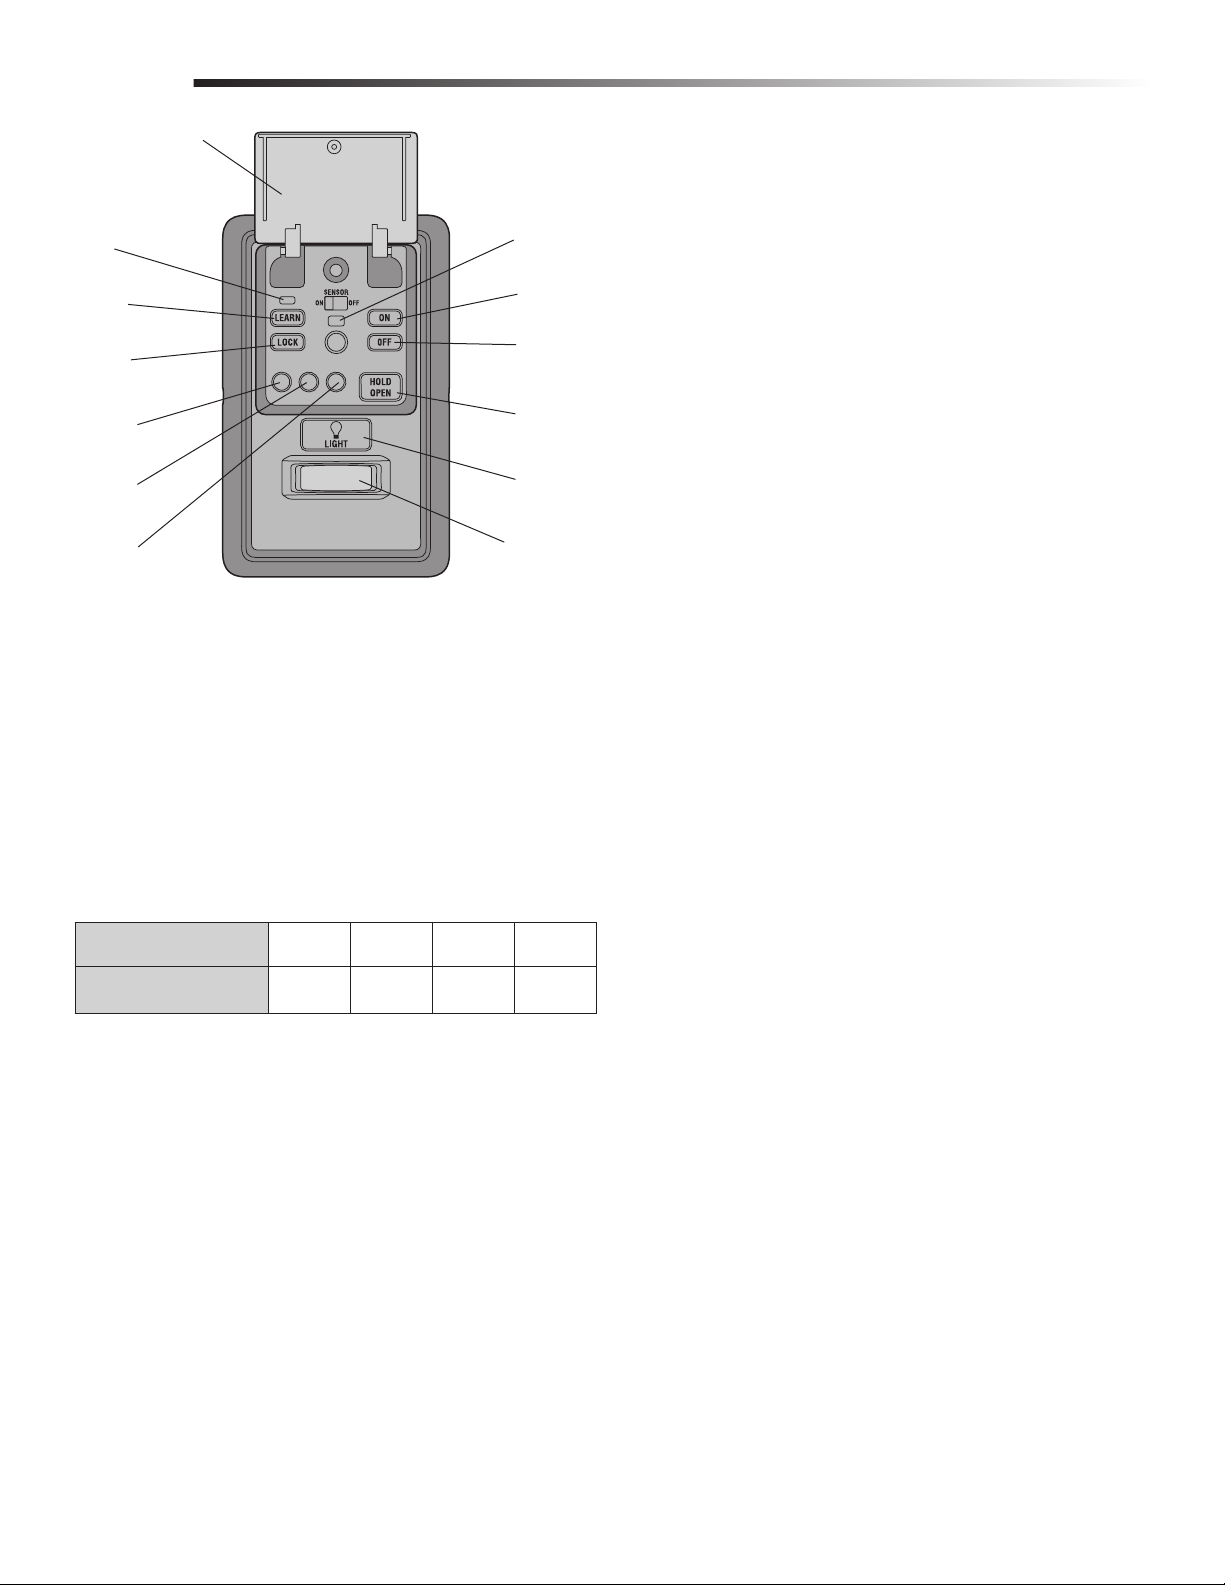
FUNCTIONS
Push Bar (Open)
Learn LED
(Red)
LEARN
button
LOCK
button
1 Minute
TTC LED
5 Minute
TTC LED
10 Minute
TTC LED
Command
LED (yellow)
ON Button
OFF Button
HOLD OPEN
Button
LIGHT
Button
Motion
Sensor
PUSH BAR
Press the push bar to open/close the door.
LIGHTS
Press the LIGHT button to turn the garage door opener lights on or off.
When the lights are turned on they will stay on until the LIGHT button is
pressed again, or until the garage door opener is activated. Once the
garage door opener is activated the lights will turn off after the specified
period of time (the factory setting is 4-1/2 minutes). The LIGHT button
will not control the lights when the door is in motion.
To change the amount of time the garage door opener lights will stay on:
Press and hold the LOCK button until the garage door opener lights flash.
The time interval is indicated by the number of flashes.
NUMBER OF TIMES GARAGE
DOOR OPENER LIGHTS FLASH
TIME THE GARAGE DOOR
OPENER LIGHT STAYS ON
1234
1 ½
Minutes
2 ½
Minutes
3 ½
Minutes
4 ½
Minutes
Light Feature
The lights will turn on when someone enters through the open garage
door and the safety reversing sensor infrared beam is broken.
Activate:
Start with the garage door opener lights on. Press and hold the LIGHT
button until the garage door opener lights turn off, then on again.*
Deactivate:
Press and hold the LIGHT button until the garage door opener lights
turn on, then off again.*
* Approximately 10 seconds
MOTION SENSOR
This feature will automatically turn on the garage door opener lights when
motion is sensed. The lights will come on for the set period of time, then
shut off.
Activate/Deactivate:
Slide the motion sensor switch ON or OFF.
TIMER-TO-CLOSE (TTC)
NOTE: DO NOT install this door control on garage door opener systems
controlling one-piece or swing doors.
The TTC feature automatically closes the door after a specified time
period (1, 5, or 10 minutes). Once the TTC has been set and the door is
open, the LED for the selected close interval will blink and begin to count
down to close the door. The control panel will beep and the garage door
opener lights will flash before closing the door.
The TTC feature will deactivate if the garage door encounters an
obstruction twice; or the safety reversing sensors are incorrectly installed.
The garage door will reverse open and WILL NOT close until the
obstructions are clear or the safety reversing sensors are correctly
installed. When the obstruction has been cleared or the safety reversing
sensors have been aligned, the door will close when the garage door
opener is activated.
Activate:
Press and hold the ON button until one of the TTC LEDs light up. Then
press the ON button again to cycle through the time interval options
(the corresponding TTC LED will light for each time interval). The
garage door opener light bulbs will blink as confirmation.
Deactivate:
Press and hold the OFF button until all TTC LEDs turn off and a beep is
heard from the control panel.
Temporarily hold door open (suspend TTC):
Press and release the HOLD OPEN button. The HOLD OPEN button will
begin to flash. Press the HOLD OPEN button again to resume normal
TTC operation.
LOCK
Activate*:
Press and hold the LOCK button for 2 seconds. The command LED will
flash as long as the lock feature is activated and your handheld remote
control will not operate your door at this time.
Deactivate:
Press and hold the LOCK button again for 2 seconds. The command
LED will stop flashing and normal operation will resume.
®
* Your Chamberlain
keypad will continue to work when LOCK has
been activated.
ERASE DEVICES FROM MEMORY
Erase all remote controls and keyless entries:
1. Press and hold the LEARN button on the control panel until the red
learn LED goes out (approximately 6 seconds). All remote control
and keyless entry codes are now erased. Reprogram any
compatible accessory you wish to use.
NOTE: Erasing remote controls and keyless entries from the control panel
does not erase them from the garage door opener, you need to erase the
memory of the garage door opener separately.
®
Erase all devices (including MyQ
1. Press and hold the LEARN button on the control panel until the red
learn LED goes out (approximately 6 seconds).
2. Immediately press and hold the LEARN button again until the red
learn LED goes out. All codes are now erased. Reprogram any
compatible accessory you wish to use.
enabled accessories):
3
Page 4

PROGRAMMING
A variety of accessories (available separately) can be programmed to the MyQ® Control Panel.
REMOTE CONTROL
MyQ® ENABLED
ACCESSORIES
1. Press the control panel
LEARN button twice, the red
learn LED will turn on.
2. Press the LEARN button on
the MyQ® device.*
1. Press the control panel LEARN
button twice, the red learn LED will
turn on.
2. Press the button on the remote
control that you wish to operate
your garage door.
3. The garage door opener lights will
flash (or two clicks will be heard)
when the code has been
programmed.
LEARN
Button
Model WSLCEV
Remote Light Switch
Light module can be
synchronized with the garage
door opener light bulbs.
KEYLESS ENTRY
1. Press the control panel LEARN button twice, the red
learn LED will turn on.
2. Enter a 4-digit personal identification number (PIN) of
your choice on the keyless entry keypad. Then press
the ENTER button.
3. The garage door opener lights will flash (or two clicks
will be heard) when the code has been programmed.
Command
LED (yellow)
Learn LED (Red)
LEARN Button
Model PILCEV
Remote Light Control
LEARN
Button
Light module can be
synchronized with the
garage door opener
light bulbs.
?? ??
PIN
Model AGDMEV
Garage Door and Gate Monitor
Indicates the status of your garage
door from inside the home and
allows you to close an open garage
door from inside the house.
* MyQ® accessories may be programmed to
the Chamberlain
®
MyQ
programming to the internet gateway refer
to the manual.
®
control panel. For instructions on
Internet Gateway or the
COMPATIBLE ACCESSORIES
SECURITY✚ 2.0™
ACCESSORIES:
Model 950ESTD
1- Button Remote Control
Model 953ETSD
3-Button Remote Control
Model 956EV
3-Button Mini Remote Control
Model 953EV
3-Button Remote Control
Model 940ESTD
Wireless Keyless Entry
Model 940EV
Wireless Keyless Entry
MyQ®
ACCESSORIES:
Model WSLCEV
Remote Light Switch
Model PILCEV
Remote Light Control
Model AGDMEV
Garage Door and Gate Monitor
WARRANTY
ONE YEAR LIMITED WARRANTY
The Chamberlain Group, Inc. warrants to the first consumer purchaser of
this product that is free from defect in materials and/or workmanship for
a period of 1 year from the date of purchase.
FOR SERVICE DIAL OUR TOLL FREE NUMBER:
1-800-528-9131
www.chamberlain.com
NOTICE: To comply with FCC and/or Industry Canada (IC) rules, adjustment or modifi cations of this transceiver
are prohibited. THERE ARE NO USER SERVICEABLE PARTS. Any changes or modifi cations not expressly
approved by the party responsible for compliance could void the user's authority to operate the equipment.
This device complies with Part 15 of the FCC rules and IC RSS-210. Operation is subject to the following
two conditions: (1) this device may not cause harmful interference, and (2) this device must accept any
interference received, including interference that may cause undesired operation.
This Class B digital apparatus complies with Canadian ICES-003.
AVIS: Les règles de la FCC et/ou d’Industrie Canada (IC) interdisent tout ajustement ou toute modifi cation de
ce récepteur. IL N’EXISTE AUCUNE PIÈCE SUSCEPTIBLE D’ÊTRE ENTRETENUE PAR L’UTILISATEUR. Tout
changement ou toute modifi cation non expressément approuvé par la partie responsable de la conformité peut
avoir pour résultat d'annuler l'autorité de l'utilisateur de faire fonctionner l'équipement.
Cet appareil est conforme aux dispositions de la partie 15 du règlement de la FCC et de l'norme IC RSS-210.
Son utilisation est assujettie aux deux conditoins suivantes: (1) ce dispositif ne peut causer des interférences
nuisibles, et (2) ce dispositif doit accepter toute interférence recue, y compris une interférence pouvant causer
un fonctionnement non souhaité.
Cet appareil numerique de la classe B est conforme a la norme NMB-003 du Canada.
4
Page 5

ADVERTENCIAADVERTENCIA
ADVERTENCIA
APLICACIÓN
Este juego incluye el panel de control MyQ® modelo 41A7928-3 y el Chamberlain®
Internet Gateway modelo CIGBU. El panel de control MyQ
instalado con los abre-puertas de garaje Security✚™, fabricados entre 1998 y la
actualidad. El panel de control MyQ
®
NO es compatible con abre-puertas de garaje
Security✚ 2.0™. NO instale este control de puerta en sistemas de abre-puertas de
garaje que controlan puertas de una pieza o de vaivén.
®
está hecho para ser
DESCRIPCIÓN GENERAL
El panel de control MyQ® ofrece una forma rápida y conveniente para añadir
Security✚ 2.0™ y la tecnología MyQ
tecnología MyQ
®
genera una señal de 900 MHz para establecer comunicaciones
bidireccionales entre el abre-puertas de garaje y los accesorios MyQ
Cuando está programado con el Chamberlain
monitorear y controlar la puerta de su garaje desde cualquier computadora o
smartphone habilitado con Internet. Usted puede programar hasta 12 controles
remotos Security✚ 2.0™; 2 accesos con llave digital Security✚ 2.0™ y una
combinación de 16 accesorios MyQ
la información de compatibilidad completa, consulte la página 8.
INSTALE EL PANEL DE CONTROL MyQ
Instale el panel de control en lugar del control de la puerta actual. Debido al
consumo de corriente, el panel de control, no se puede usar junto con otro control
de puerta cableado conectado a su abre-puerta del garaje. Si se necesita un control
de puerta adicional, el modelo inalámbrico del control de puerta 41A7773-1 , se
puede programar con el panel de control. Para programar el 41A7773-1 con el
panel de control, siga los pasos de programación del control remoto. Cuando la
batería se encuentre en modo de reserva, se desactivará cualquier función en
estado pasivo, como el Temporizador de cierre, cerrar desde una puerta de garaje
y el monitoreo de la puerta, u otra operación remota que utilice el Chamberlain
Internet Gateway.
1. Desconecte del abre-puertas la alimentación eléctrica y la batería (si
estuviera usando una).
2. Retire el control de puerta actual de la pared.
3. Observe la polaridad de los cables conectados al control de puerta actual.
• Etiquete el cable conectado al terminal RED (rojo).
• Etiquete el cable conectado al terminal WHITE (blanco).
Desconecte los cables del control de la puerta actual.
4. Conecte los cables al nuevo panel de control MyQ
polaridad sea la correcta.
• Cable rojo al terminal R.
• Cable blanco al terminal W.
5. Monte el panel de control en la pared.
6. Vuelva a conectar la corriente. El LED de comando amarillo y el LED de
programación rojo parpadearán rápidamente por hasta 5 minutos mientras
el panel de control se recarga. Cuando el panel de control esté operativo, el
LED de comando amarillo se encenderá permanentemente.
7. Para propar el panel de control, oprima la barra pulsadora para activar el
abre-puertas del garaje.
®
a su actual abre-puertas de garaje. La
®
®
Internet Gateway, usted puede
®
con el panel de control MyQ®. Para obtener
®
®
. Asegúrese de que la
activados.
®
JUEGO DE CONEXIÓN INTERNET
MODELO CIGCWC
Para evitar posibles ACCIDENTES LESIVOS e incluso MORTALES de
electrocución:
• ANTES de instalar el control verifi car que NO esté conectada la alimentación
la alimentación eléctrica.
• Conectar SOLAMENTE a conductores de 7-28 VOLTIOS.
Para evitar posibles ACCIDENTES LESIVOS e incluso MORTALES durante el
cierre de una puerta de garaje:
• Instalar el control donde la puerta quede a la vista, fuera del alcance de los
niños, a una altura mínima de 5 pies (1.5 m) y alejado de TODAS las partes
móviles de la puerta.
• NO permitir que los niños usen ni jueguen con los botones del control ni con
un control remoto.
• Haga funcionar la puerta SÓLO si la puede ver claramente, si está bien
instalada y si no hay ninguna obstrucción en su recorrido.
• SIEMPRE mantenga a la vista la puerta hasta que esté totalmente cerrada.
NUNCA permita que alguien cruce bajo una puerta de garaje en movimiento.
• NO instale este control de puerta en sistemas de abre-puertas de garaje que
controlan puertas de una pieza o de vaivén.
Para proporcionar una alerta visual adecuada, las bombillas del abre-puerta del
garaje DEBEN ser de un mínimo de 40 vatios (o equivalentes).
Control de la puerta actual
El panel de control MyQ
Cable del
terminal
WHITE
Cable del
terminal RED
Deseche, done
o recicle
®
Conecte el
cable
BLANCO al
terminal W
Conecte el
cable ROJO
al terminal R
SI TIENE ALGÚN PROBLEMA
• Si el LED de comando amarillo no enciende, invierta los cables conectados
• Si los LED amarillo y rojo están destellando lentamente, el panel de control
• Si los LED amarillo y rojo están destellando rápidamente, el panel de
a los terminales R y W del panel de control. Reemplace el cable si es
necesario.
no es compatible con su abre-puerta de garaje.
control se está cargando y puede tomar hasta 5 minutos para que esté
totalmente operativo.
5
Page 6

INSTALE EL CHAMBERLAIN® INTERNET GATEWAY
El Gateway de Internet Chamberlain® le permite controlar el abre-puerta de garje
con una computadora o smartphone conectado a Internet. El Panel de Control
®
MyQ
fue programado de fábrica para interactuar con el Gateway de Internet
Chamberlain
1 CONECTE EL CHAMBERLAIN® INTERNET GATEWAY
1.1 Conecte el Chamberlain® Internet Gateway a un router con el cable de
1.2 Conecte el Chamberlain
2 CREE UNA CUENTA
Desde su computadora, ingrese a www.mychamberlain.com y siga las
instrucciones para crear una cuenta. Utilice una computadora para realizar este
paso; no podrá crear una cuenta desde un dispositivo móvil.
3 REGISTRE EL CHAMBERLAIN® INTERNET GATEWAY
Busque el número de serie en la parte inferior del Gateway de Internet
Chamberlain
su unidad, su abre-puerta de garaje aparecerá en la sección llamada "Places" de
su cuenta. Si el abre-puerta de garaje no apareciera, siga las instrucciones del
paso 4 a continuación.
4 PROGRAME EL PANEL DE CONTROL MyQ® AL CHAMBERLAIN®
INTERNET GATEWAY
4.1. Haga clic en “Administrar lugares >Agregar nuevo dispositivo >Abre-puerta
4.2. Una vez que haga clic en AGREGAR (ADD), tendrá 3 minutos para
4.3. El LED de programación rojo se apagará cuando se haya completado la
4.4 Haga clic en GUARDAR (SAVE).
El panel de control ya ha sido programado a la puerta de enlace a Internet y la
puerta del garaje ya puede ser controlada desde una computadora o smartphone.
Siga los siguientes pasos parar agregar otros dispositivos MyQ
DESCARGAR LA APLICACIÓN PARA SMARTPHONES
Visite la tienda de aplicaciones para su smartphone para descargar la aplicación
MyQ
dispositivos MyQ
®
.
Ethernet. Si solo tiene acceso a una señal Wi-Fi y no a un router, deberá
utilizar un adaptador de red inalámbrico (no incluido) para conectarse
a Internet.
®
Internet Gateway a la corriente. Los LED azul y
verde parpadearán momentáneamente y luego, los LED azul y verde se
iluminará por completo.
®
. Registre el número de serie encontrado. Al finalizar el registro de
del garaje” (“Manage Places>Add New Device>Garage Door Opener”) y
siga las instrucciones.
presionar el botón PROGRAMAR (LEARN) dos veces en el panel de control
®
MyQ
. El LED de programación rojo se encenderá.
programación. El LED azul en el Chamberlain
®
Internet Gateway se
encenderá para indicar que se ha programado un dispositivo. Una vez que
el panel de control esté programado, aparecerá en su pantalla, entonces
podrá ponerle un nombre al dispositivo (p. ej., Mi panel de control, etc.).
®
.
®
. Con la aplicación podrá monitorear y controlar su abre-puertas de garaje y
®
. También podrá agregar o eliminar otros accesorios MyQ®.
1
Router
LED verde
Cable de
Ethernet
Chamberlain® Internet Gateway
Adaptador
eléctrico
LED azul
23
www.mychamberlain.com
4
SI TIENE ALGÚN PROBLEMA
Después de encenderlo, las luces LED mostrarán el estado del Chamberlain®
Internet Gateway.
• Luz VERDE sólida – Indica que el Chamberlain
dirección IP y está conectado a Internet.
• Luz VERDE parpadeante – Indica que el Chamberlain
tiene una dirección IP, pero que no puede acceder a Internet. Revise las
configuraciones de su router y las conexiones a Internet.
• Luz VERDE apagada – Indica que el router no está proporcionando una
dirección IP al Chamberlain
®
Internet Gateway. Revise las configuraciones
de su router y las conexiones a Internet.
®
Internet Gateway tiene una
®
Internet Gateway
6
Page 7

FUNCIONES
Barra de empuje
(abierta)
LED de
programación
(rojo)
Botón
"LEARN"
Botón
"LOCK"
(SEGURO)
LED TTC
1 minuto
LED TTC
5 minutos
LED TTC
10 minutos
LED de
comando
(amarillo)
Botón "ON"
(ACTIVADO)
Botón "OFF"
(DESACTIVADO)
Botón "HOLD
OPEN"
(MANTENER
ABIERTA)
Botón
"LIGHT"
(LUZ)
Sensor de
movimiento
BARRA DE EMPUJE
Presione la barra de empuje para abrir/cerrar la puerta.
LUCES
Oprima el botón "LIGHT" para encender o apagar las luces del abre-puertas de
garaje. Cuando se enciendan las luces, permanecerán así hasta que se oprima de
nuevo el botón "LIGHT" o hasta que se active el abre-puertas de garaje. Una vez
que el abre-puertas de garaje se active, las luces se apagarán después del período
de tiempo especificado (el ajuste de fábrica es de 4-1/2 minutos). El botón "LIGHT"
no controlará las luces cuando la puerta esté en movimiento.
Para cambiar el tiempo que permanecerán encendidas las luces del abre-puertas
de garaje:
Mantenga oprimido el botón "LOCK" hasta que las luces del abre-puertas de garaje
parpadeen. El intervalo de tiempo será indicado por la cantidad de parpadeos.
CANTIDAD DE VECES QUE
PARPADEAN LAS LUCES DEL
ABRE-PUERTAS DE GARAJE
TIEMPO QUE PERMANECEN
ENCENDIDAS LAS LUCES DEL
ABRE-PUERTAS DE GARAJE
1234
1 ½
Minutos
2 ½
Minutos
3 ½
Minutos
4 ½
Minutos
Funcionalidad de las luces
Las luces se encenderán cuando alguien entre por la puerta del garaje abierta y se
interrumpa el haz infrarrojo del sensor de inversión.
Activar:
Comience con las luces del abre-puertas de garaje encendidas. Mantenga
oprimido el botón "LIGHT" hasta que se apaguen las luces del abre-puertas de
garaje; a continuación, enciéndalas de nuevo.*
Desactivar:
Mantenga oprimido el botón "LIGHT" hasta que se enciendan las luces del abre-
puertas de garaje; a continuación, apáguelas de nuevo.*
* Aproximadamente 10 segundos
SENSOR DE MOVIMIENTO
Esta funcionalidad encenderá automáticamente las luces del abre-puertas de garaje
cuando se detecte movimiento. Las luces se encenderán por el período de tiempo
establecido y, a continuación, se apagarán.
Activar/Desactivar:
Deslice el selector del sensor de movimiento hacia ACTIVADO u DESACTIVADO.
TEMPORIZADOR DE CIERRE (TTC)
NOTA: NO instale este control de puerta en sistemas de abre-puertas de garaje que
controlan puertas de una pieza o de vaivén.
La función del TTC cerrará automáticamente la puerta después de un periodo de
tiempo especificado (1, 5 o 10 minutos). Una vez que el TTC se ha configurado y
que la puerta está abierta, el LED del intervalo de cierre seleccionado parpadeará y
comenzará la cuenta regresiva para cerrar la puerta. El panel de control emitirá una
señal sonora y las luces del abre-puertas del garaje parpadearán antes de cerrar la
puerta.
La funcionalidad TTC se desactivará si la puerta del garaje se encuentra dos
obstrucciones secuenciales, o si los sensores de inversión de seguridad están
instalados incorrectamente. La puerta del garaje invertirá su movimiento y se
abrirá y NO se cerrará hasta que se eliminen las obstrucciones o se instalen
correctamente los sensores de inversión de seguridad. Cuando la obstrucción haya
sido eliminada o se hayan alineado los sensores de inversión de seguridad, la
puerta se cerrará al activar el abre-puertas de garaje.
Activar:
Mantenga oprimido el botón "ON" hasta que se encienda uno de los LED del
TTC. A continuación, oprima de nuevo el botón "ON" para desplazarse por las
opciones de intervalos de tiempo (el LED del TTC correspondiente se encenderá
para cada intervalo de tiempo). Los focos de las luces del abre-puertas de
garaje parpadearán a modo de confirmación.
Desactivar:
Mantenga oprimido el botón "OFF" hasta que todos los LED TTC se apaguen y
se oiga un tono proveniente de la panel de control.
Para mantener abierta temporalmente la puerta (suspender el TTC):
Oprima y suelte el botón "HOLD OPEN". Oprima otra vez el botón "HOLD OPEN"
para reanudar la operación normal del TTC.
SEGURO
Activar*:
Mantenga oprimido el botón "LOCK" durante 2 segundos. El LED de comando
parpadeará mientras esté activado el seguro y su control remoto portátil no
operará la puerta en este momento.
Desactivar:
Mantenga oprimido de nuevo el botón "LOCK" durante 2 segundos. El LED de
comando dejará de parpadear y se reanudará la operación normal.
* El teclado de Chamberlain
®
continuará funcionando cuando se active el
BLOQUEO (LOCK).
BORRAR DISPOSITIVOS DE LA MEMORIA
Borrar todos los datos de control remoto y entra sin llave:
1. Mantener oprimido el botón de aprendizaje en el panel de control hasta que
se apague el LED (aproximadamente 6 segundos). Se borrarán todos los
datos almacenados en el control remoto y en la cerradura digital. Volver a
programar todo accesorio que desea usar.
NOTA: Borrar controles remotos y accesos con llave digital del panel de control,
no las borra del abre-puerta del garaje; usted necesita borrar la memoria del
abre-puerta del garaje por separado.
Borrar todos los dispositivos (incluyendo los accesorios MyQ
1. Mantener oprimido el botón de aprendizaje en el panel de control hasta que
se apague el LED (aproximadamente 6 segundos).
2. Inmediatamente pulsar el botón de aprendizaje hasta que el LED se apague.
Ahora todos los códigos estarán borrados Volver a programar todo
accesorio que desea usar.
®
):
7
Page 8

PROGRAMACIÓN
Se puede programar una variedad de accesorios (que se venden por separado) al panel de control MyQ®.
CONTROL REMOTO
1. Presione dos veces el botón
2. Presione el botón del control remoto
3. Las luces del abre-puertas de garaje
ACCESORIOS
ACTIVADOS MyQ
1. Presione dos veces el botón
PROGRAMAR (LEARN) del panel
de control MyQ
programación rojo se encenderá.
2. Presione el botón PROGRAMAR
(LEARN) en el dispositivo MyQ
®
®
; el LED de
PROGRAMAR (LEARN) del panel de
control; el LED de programación rojo se
encenderá.
con el cual desea operar la puerta.
parpadearán (o se escucharán dos clics)
cuando el código quede programado.
®
.*
Botón
PROGRAMAR
(LEARN)
Modelo WSLCEV
Interruptor remoto de
iluminación
El módulo de iluminación se
puede sincronizar con las
bombillas del abre-puerta
del garaje.
LLAVE DIGITAL
1. Presione dos veces el botón PROGRAMAR (LEARN) del panel
2. Escriba un número de cuatro dígitos (PIN) como código
3. Las luces del abre-puertas de garaje parpadearán (o se
LED de comando
(amarillo)
Botón
PROGRAMAR
(LEARN)
de control; el LED de programación rojo se encenderá.
personal de uso en el teclado de acceso con llave digital.
Luego, presione el botón ENTER.
escucharán dos clics) cuando el código quede programado.
LED de
programación
(rojo)
Botón PROGRAMAR
(LEARN)
Modelo PILCEV
Control remoto de
iluminación
El módulo de iluminación se
puede sincronizar con las
bombillas del abre-puerta
del garaje.
* Los accesorios MyQ
programar con Chamberlain
Gateway o con el panel de control MyQ
Para las instrucciones sobre la
programación a la puerta de entrada del
Internet, consulte el manual.
?? ??
PIN
Modelo AGDMEV
Puerta de garaje y monitoreo
de la puerta
Indica el estado de su puerta del
garaje desde el interior de la casa y
le permite cerrar y abrir la puerta del
garaje desde el interior de la casa.
®
se pueden
®
Internet
®
.
ACCESORIOS COMPATIBLES
ACCESORIOS SECURITY✚ 2.0™: ACCESORIOS MyQ®:
Modelo 950ESTD
Control remoto de 1 botón
Modelo 953ETSD
Control remoto de 3 botones
Modelo 956EV
Mini-Control remoto de 3 botones
Modelo 953EV
Control remoto de 3 botones
Modelo 940ESTD
Llave digital inalámbrica
Modelo 940EV
Llave digital inalámbrica
Modelo WSLCEV
Interruptor remoto de iluminación
Modelo PILCEV
Control remoto de iluminación
Modelo AGDMEV
Puerta de garaje y monitoreo
de la puerta
GARANTÍA
UN AÑO DE GARANTÍA LIMITADA
The Chamberlain Group, Inc. garantiza al primer comprador de este producto que
dicho producto está libre de defectos de materiales y/o mano de obra durante un
período de 1 año a partir de la fecha de compra.
MARQUE NUESTRO NÚMERO GRATUITO PARA
RECIBIR SERVICIO:
1-800-528-9131
www.chamberlain.com
AVISO: para cumplir con las normas de la FCC y/o de la IC (Industry Canada), queda prohibido realizar ajustes
o modifi caciones en este receptor y/o transmisor, excepto para cambiar la confi guración del código o para
reemplazar la batería. NO HAY OTRAS PIEZAS QUE EL USUARIO PUEDA REPARAR.
Probado para cumplir con las normas de la FCC para uso en la ofi cina o en el hogar. La operación está
sujeta a las dos condiciones siguientes: (1) este dispositivo no puede causar interferencias perjudiciales y,
(2) este dispositivo debe aceptar cualquier interferencia recibida, incluyendo cualquier interferencia que pueda
ocasionar un funcionamiento no deseado.
Este aparato digital Clase B cumple con la ICES-003 de Canadá.
© 2013, The Chamberlain Group, Inc.
All Rights Reserved
114A4543B Todos los derechos reservados
 Loading...