

Page 1

Paper Writer
E
V-N500
User’s Guide
Be sure to read “Safety
Precautions” inside this
guide before trying to use
your Paper Writer.
Series
Page 2
Google™, the Google logo, Android™ and the Android logo are trademarks or registered
trademarks of Google, Inc.
The Bluetooth wordmark and logo are registered trademarks of Bluetooth SIG, Inc. and
are used by permission granted to Casio Computer as a certifi ed logo user.
SD, SDHC, microSD and microSDHC are trademarks of SD-3C, LLC.
HDMI (High-Defi nition Multimedia Interface) and the HDMI logo are trademarks of
HDMI Licensing, LLC.
FeliCa is a registered trademark of Sony Corporation.
®
Reader® is a trademark or registered trademark of Adobe Systems Incorporated in
Adobe
the U.S. and/or other countries.
All other company names and product names that appear in this document are trademarks
or registered trademarks of the respective companies.
This product uses software licensed under the public licenses such as the GNU General
Public License (GPL) and GNU Lesser General Public License (LGPL). The relevant
conditions apply to this software.
For detailed information on these licenses, go to Settings ⇒ About tablet ⇒ Legal
information ⇒ Open source licenses.
Information in this document is subject to change without advance notice. CASIO Computer Co.,
Ltd. makes no representations or warranties with respect to the contents or use of this manual
and specifi cally disclaims any express or implied warranties of merchantability or fi tness for any
particular purpose.
Page 3

Contents
Chapter 1 Essential Reading .................................................E-5
Safety Precautions .........................................................................................E-6
Operating Precautions .................................................................................E-13
Important ......................................................................................................E-16
After Service ...................................................................................................... E-16
Regulatory Information ................................................................................E-16
Chapter 2 Basic Operation ................................................... E-17
Paper Writer System Confi guration ............................................................E-18
General Guide ...............................................................................................E-20
Loading and Removing the Battery Pack ...................................................E-22
Loading ..............................................................................................................E-23
Removing ........................................................................................................... E-24
Charging the Battery Pack ..........................................................................E-25
Ethernet Cradle/Cradle-type Battery Charger ....................................................E-25
Car Adaptor ........................................................................................................ E-25
Dual Battery Charger ......................................................................................... E-26
AC Adaptor ........................................................................................................E-26
Switching On/Off and Sleep ........................................................................E-27
Switching On......................................................................................................E-27
Switching Off (Shutdown) .................................................................................E-27
Sleep ................................................................................................................... E-27
Initial Settings ...............................................................................................E-28
Unlocking the Screen .........................................................................................E-28
Customization for Job Menu Use.......................................................................E-29
Syncing the Calendar and Contacts ...................................................................E-30
Using the Paper Writer Accessories ...........................................................E-38
Shooting Images .................................................................................................E-38
Viewing Photographed Images .......................................................................... E-44
Using microSD Cards ...................................................................................E-56
Installing.............................................................................................................E-56
Removing ........................................................................................................... E-56
Using SAM Cards .........................................................................................E-58
Installing.............................................................................................................E-58
Removing ........................................................................................................... E-59
E-1
Page 4

Using SIM Cards ...........................................................................................E-60
Installing.............................................................................................................E-60
Removing ........................................................................................................... E-61
Handling SD Memory Cards ........................................................................E-62
Installing.............................................................................................................E-62
Removing ........................................................................................................... E-62
Handling the NFC Reader/Writer ................................................................E-63
Contactless IC Cards .......................................................................................... E-63
RFID Tags .......................................................................................................... E-63
HDMI Connection .........................................................................................E-65
Resetting the Paper Writer ..........................................................................E-66
Chapter 3 Built-in Software ..................................................E-67
Standard Accessories ..................................................................................E-68
Software List ......................................................................................................E-68
Camera ............................................................................................................... E-69
Browser .............................................................................................................. E-70
Mail .................................................................................................................... E-71
Gallery ................................................................................................................ E-72
Music ..................................................................................................................E-74
Clock .................................................................................................................. E-75
Message ..............................................................................................................E-76
User .................................................................................................................... E-77
Calendar ............................................................................................................. E-78
Search ................................................................................................................. E-80
Calculator ........................................................................................................... E-81
Additional Accessories ................................................................................E-82
Software List ......................................................................................................E-82
Adobe Reader .....................................................................................................E-83
Memo Text .........................................................................................................E-85
Memo Paint ........................................................................................................E-86
Job Browser........................................................................................................E-88
Voice Recorder ...................................................................................................E-89
Paper Writer Accessories ............................................................................E-92
Software List ......................................................................................................E-92
Closing Shot ....................................................................................................... E-93
Flipping Shot ...................................................................................................... E-94
Finder ............................................................................................................... E-104
E-2
Page 5

Calendar ........................................................................................................... E-145
Contacts ............................................................................................................E-153
Settings .......................................................................................................E-159
Software List ....................................................................................................E-159
Wireless and Network Settings ........................................................................E-160
Terminal ...........................................................................................................E-161
User Settings .................................................................................................... E-162
System .............................................................................................................. E-163
Operation Support Tools ............................................................................E-165
Software List ....................................................................................................E-165
Job Menu .......................................................................................................... E-166
Login Authentication Setting Tool ...................................................................E-168
Account Edit Tool ............................................................................................E-169
Security Settings ..............................................................................................E-170
Theft Protection................................................................................................E-171
System Operation Tools .............................................................................E-173
Software List ....................................................................................................E-173
File Manager .................................................................................................... E-174
WLAN Tool ..................................................................................................... E-176
Backup Tool .....................................................................................................E-177
Copy Devices ................................................................................................... E-180
Demo Tools .................................................................................................E-181
Software List ....................................................................................................E-181
NFC Demo ....................................................................................................... E-182
Barcode Scanner ..............................................................................................E-183
Chapter 4 Options (Sold Separately) ................................. E-185
Attaching and Removing the System Case..............................................E-186
General Guide .................................................................................................. E-186
Fitting the Paper Writer into the System Case ................................................. E-187
Removing the Paper Writer .............................................................................. E-188
Mounting the Paper Holders ............................................................................ E-188
Removing the Paper Holder ............................................................................. E-189
Using the Digitizer Pen ..............................................................................E-190
General Guide .................................................................................................. E-190
Fitting the Battery ............................................................................................E-190
Using the Digitizer Pen ....................................................................................E-191
Replacing the Pen Tip ......................................................................................E-192
E-3
Page 6

Handling the Hand Belt ..............................................................................E-193
Attaching .......................................................................................................... E-193
Attaching the Neck Strap...........................................................................E-194
Using the Screen Cover .............................................................................E-195
Attaching the Screen Cover .............................................................................E-195
Using the Screen Cover as a Stand (When Taking a Flipping Shot) ............... E-196
Using the Ethernet Cradle (HA-M62IO) ....................................................E-197
General Guide .................................................................................................. E-197
Connecting the Ethernet Cradle Power Supply ................................................ E-199
Using the Cradle-type Battery Charger (HA-M30CHG) ...........................E-202
General Guide .................................................................................................. E-202
Connecting the Cradle-type Battery Charger Power Supply ........................... E-203
Using the Dual Battery Charger (HA-M32DCHG) ....................................E-205
General Guide .................................................................................................. E-205
Charging a Battery Pack...................................................................................E-207
Connecting Multiple Dual Battery Chargers....................................................E-208
Using the AC Adaptor (AD-S36120A-N) ....................................................E-210
Chapter 5 Specifi cations .................................................... E-211
V-N500 Paper Writer Specifi cations..........................................................E-212
Optional (Separately Sold) Accessory Specifi cations .............................E-218
Ethernet Cradle (HA-M62IO) .......................................................................... E-218
Cradle-type Battery Charger (HA-M30CHG) .................................................E-219
Dual Battery Charger (HA-M32DCHG) .......................................................... E-219
Car Adaptor (HA-M37CAC) ...........................................................................E-220
AC Adaptor (AD-S36120A-N) ........................................................................E-220
AC Adaptor (AD-S90190C-N5) ...................................................................... E-220
Battery Pack (HA-M20BAT) ...........................................................................E-220
Chapter 6 Appendix ............................................................ E-221
Open Source Licenses ...............................................................................E-222
Apps That Use Licenses ...................................................................................E-222
License Text List .........................................................................................E-223
OpenCV Release 2.4 ........................................................................................E-223
libjpeg Version 6b ............................................................................................ E-224
libtiff Version 1.5 ............................................................................................. E-233
libpng Version 1.2.5 .........................................................................................E-235
ZLIB/LIBPNG License .................................................................................... E-238
Apache License Version 2.0 ............................................................................. E-239
E-4
Page 7

Chapter 1
Essential Reading
E-5
Page 8
Safety Precautions
Congratulations upon your selection of this CASIO product. Be sure to read the
following Safety Precautions before trying to use it for the fi rst time.
Your neglect or avoidance of the warning and caution statements in the
subsequent pages causes the danger of fi re, electric shock, malfunction and
damage on the goods as well as personal injury.
Markings and Symbols
The following are the meanings of the markings and symbols used in these Safety
Precautions.
Danger
Warning
Caution
A diagonal line indicates something you should not do. The symbol shown
•
here indicates you should not try to take the unit apart.
A black circle indicates something you should do. The symbol shown here
•
indicates you should unplug the unit from the wall outlet.
This symbol indicates information that, if ignored or applied
incorrectly, creates the danger of death or serious personal injury.
This symbol indicates information that, if ignored or applied
incorrectly, creates the possibility of death or serious personal
injury.
This symbol indicates information that, if ignored or applied
incorrectly, creates the possibility of personal injury or property
damage.
Disassembly and Modifi cation
Never try to disassemble or modify the Paper Writer and its options including
•
battery pack and battery in any way.
Abnormal Conditions
Should the Paper Writer and/or its options including battery pack and battery
•
become hot or start to emit smoke or a strange odor, immediately turn off
the power and contact your dealer or distributor whom you purchased the
product from, or an authorized CASIO service provider.
Warning
E-6
Page 9

Warning
Dust and Moisture
Though the Paper Writer is dustproof and splashproof, accessories such
•
as the system case and optional battery pack are not. Keep loose metal
objects and containers fi lled with liquid away from your Paper Writer and
the system case and optional accessories. Note also that you should never
handle the Paper Writer, system case or optional accessories while your
hands are wet.
Warning
Interference with the Operation of Other Equipment
(Using Wireless Data Communication)
Keep your Paper Writer at least 22 centimeters (811/16") away from anyone
•
wearing a pacemaker. Radio waves emitted by the Paper Writer can affect
the operation of a pacemaker.
Before the use in aircraft, be sure to consult with cabin crew for interference
•
the Paper Writer emits.
Before the use in medical facility, be sure to consult with the facility
•
management or the manufacture of a specifi c medical equipment that the
Paper Writer may interfere with.
Do not use the Paper Writer nearby gas pump or chemical tank or any other
•
places fl ammable or explosive.
Foreign Objects
Take care to ensure that metals or combustible objects are not inserted into
•
the openings of the Paper Writer or its options, and not to allow moisture to
get inside of them.
Do not attach aluminum stickers or other objects made using metal to the
•
back of the V-N500. Doing so could cause the Paper Writer to overheat or
catch fi re, resulting in damage and burns or other injuries.
Take care not to trap foreign objects between the V-N500 and the Ethernet
•
Cradle. Doing so could cause the Paper Writer to overheat or catch fi re,
resulting in burns.
Caution
E-7
Page 10
Location
Install the cradle properly on a fl at and stable surface so that it cannot fall
•
down onto fl oor.
LCD Screen
Never apply strong pressure to the screen or subject it to strong impact.
•
Doing so can crack the LCD Screen.
Avoiding Traffi c Accidents
Never use the Paper Writer while operating a motor vehicle. Park your
•
vehicle in a safe place before performing any operation.
Never locate the Paper Writer where it might interfere with proper operation
•
of the vehicle.
Locate connecting cables as instructed by the manual, avoiding locations
•
that can interfere with driving operations.
Car Battery Power
Should the Car Adaptor become damaged, replace it immediately with a
•
new Car Adaptor.
Using in Vehicle
Always disconnect the Car Adaptor when you get out of the car. Failing to
•
do so could drain the car battery.
Note that using the Car Adaptor for long periods while the car engine is
•
turned off will drain the car battery.
Do not handle the Car Adaptor with wet hands.
•
Caution
Warning
Caution
E-8
When using the Paper Writer in a car fi tted with airbags (SRS airbags),
•
never place the Paper Writer on the airbag cover or in any location that
could interfere with airbag operation.
Do not leave the Paper Writer in vehicle for a long period of time.
•
Page 11
Lithium Polymer Battery Pack
Never use the Paper Writer and its option including the battery pack and
•
battery next to open fl ame, near a stove, or any other area exposed to high
heat, or leave them for a long period of time in a vehicle parked in direct
sunlight.
Never use the battery pack with any device other than the Paper Writer.
•
Never dispose of the battery pack by incinerating it or otherwise expose it
•
to heat.
Never transport or store the battery pack together with metal objects that
•
may result in shorting positive (+) and negative (–) terminals of the battery
pack. Be sure to place the battery pack in its case whenever transporting or
storing it.
Never throw the battery pack or otherwise subject it to strong impact.
•
Never pierce the battery pack with nails, hit it with a hammer, or step on it.
•
Use only the specifi ed battery charger to charge the battery pack.
•
Never place the battery pack in a microwave oven or any other high-voltage
•
device.
If the amount of time period the battery pack can serve becomes
•
considerably short even after it has been fully charged for the specifi ed time
period, stop using it.
Should the battery pack start to leak or emit a strange odor, immediately
•
move it away from any fl ame nearby. Leaking battery fl uid is combustible.
Should fl uid from the battery pack accidentally get into your eyes or on the
•
skin, do not rub it. Immediately rinse it off with clean tap water and then
consult a physician.
Danger
Warning
Caution
Replace only with the same type of battery pack recommended by CASIO.
•
Dispose of used battery packs according to the local regulation.
Keep the battery pack out of the reach of small children.
•
E-9
Page 12
Power Supply / AC Adaptor
Do not use the Paper Writer at a voltage other than the specifi ed voltage. Also,
•
do not connect the Paper Writer to a multi-plug power strip.
Never modify, sharply bend, twist, or pull on the power cord.
•
Never use a detergent to clean AC adaptor and its power cable, especially on the
•
plug and the jack.
When using the battery chargers and the cradles, be sure to use the respective
•
AC adaptors.
Only use the power cord provided. Also, do not use the bundled power cord
•
with any other equipment.
Never pull on the power cord when unplugging it. Always hold the plug when
•
unplugging it from the wall outlet.
Never touch the plug while your hands are wet.
•
Be sure to unplug the power cord from the wall outlet before cleaning the
•
battery chargers and the cradles.
Unplug the power cord from the wall outlet whenever leaving the battery
•
chargers and the cradles unattended for a long period.
The housing of the AC adaptor can become warm during normal use.
•
At least once a year, unplug the AC adaptor from the wall outlet and clean any
•
dust that builds up between the prongs of the plug.
Dust built up between the prongs can lead to the danger of fi re.
•
Do not suspend the AC adaptor while using it. The weight could cause internal
•
damage in the DC jack.
Warning
Caution
Backup of All Important Data
Note that CASIO Computer Co., Ltd. shall not be held liable to you or any
•
third party for any damages or loss caused by deletion or corruption of data
due to use of the Paper Writer, malfunction or repair of the Paper Writer or its
peripherals, or due to the batteries going dead.
The Paper Writer employs electronic memory to store data, which means that
•
memory contents can be corrupted or deleted if power is interrupted due to the
batteries going dead or incorrect battery replacement procedures. Data cannot be
recovered once it is lost or corrupted. Be sure to make backup of all important data.
One way to do this is to use the separately sold cradles to transfer data to a computer.
E-10
Caution
Page 13
Alkaline Battery Handling Precautions (for the Digitizer Pen)
Danger
Since there is the risk of blindness and other serious disorders when alkaline
•
battery fl uid enters the eyes, seek medical treatment immediately after
adequately fl ushing the eyes with a large amount of tap water or other clean
water without rubbing.
Warning
Do not dispose of batteries in open fl ames or allow them to be heated,
•
disassembled or modifi ed. This results in the risk of damaging insulation
and safety valves or causes the batteries to leak fl uid, overheat or rupture.
Do not reverse the (+) and (–) poles of the batteries. This results in the risk
•
of abnormal reactions during charging or short-circuiting, or causes the
batteries to leak fl uid, overheating or rupture.
Store batteries in a location out of the reach of small children. In the
•
case a battery should happen to be swallowed, seek medical treatment
immediately.
In the case of having ingested alkaline battery fl uid, gargle immediately and
•
seek medical treatment.
Since there is the risk of injury to the skin in the case alkaline battery fl uid
•
has come in contact with the skin or clothing, immediately rinse off with a
large amount of tap water or other clean water.
Do not allow the (+) and (–) poles of alkaline batteries to come in contact
•
with wires or other metal objects, and do not carry or store them together
with metal necklaces, hair pins and so on. This results in the risk of the
batteries short-circuiting resulting in the fl ow of excess current and causing
the batteries to leak fl uid, overheat or rupture.
Do not use a new battery with an old battery that has already been used or
•
use different types of batteries. Differences in properties results in the risk
of the batteries leaking fl uid, overheating or rupturing.
These batteries are not designed to be recharged. Recharging results in the
•
risk of damage to insulation and internal structure causing the batteries to
leak fl uid, overheat or rupture.
Do not remove or damage the battery outer label. This results in the risk of
•
the batteries short-circuiting, leaking fl uid, overheating or rupturing.
Do not subject the batteries to strong impacts resulting from dropping or
•
throwing. This results in the risk of the batteries leaking fl uid, overheating
or rupturing.
Do not allow the batteries to be deformed or damaged. This results in the
•
risk of damage to the insulation and safety valve causing the batteries to
leak fl uid, overheat or rupture.
E-11
Page 14
Caution
Promptly remove worn out batteries from the device. Allowing worn out
•
batteries to remain installed in the device for a long period of time results in
the risk of the generation of gas from the batteries causing the batteries to
leak fl uid, overheat or rupture.
Remove the batteries from the device when not using for a long period of
•
time. Failure to do so results in the risk of the generation of gas from the
batteries causing the batteries to leak fl uid and damage the device.
Do not attempt to solder the batteries directly. This results in the risk of heat
•
damaging the insulation and safety valve causing the batteries to leak fl uid,
overheat or rupture.
Do not use or place the batteries in a location subject to high temperatures
•
such as locations of intense direct sunlight or in an automobile on a hot
day. This results in the risk of the batteries leaking fl uid, overheating or
rupturing.
Insulate the ends of the batteries by covering with tape and so on when
•
storing or disposing. Allowing the batteries to contact other batteries or
metal objects results in the risk of the batteries leaking fl uid, overheating or
rupturing.
Do not allow the batteries to become wet. This results in the risk of the
•
batteries overheating.
Avoid storing batteries in locations subject to direct sunlight, high
•
temperature or high humidity. This results in the risk of the batteries leaking
fl uid. In addition, there is also the risk of reduced battery performance and
shorter battery life.
Please dispose of batteries in the proper manner in accordance with the
•
rules and regulations of your local community.
System Case
Beware Magnetism
Magnets are used in part of the Paper Writer. Note the following:
•
•
E-12
Caution
Do not keep magnetic cards (cash cards, credit cards or prepaid cards, etc.)
or magnetic storage media (fl oppy disks, etc.) near or against the Paper
Writer. Doing so could result in the loss of recorded content.
Attaching metal objects such as thumbtacks, pins, cutter blades or staples
could result in unforeseen injury. Always check that there are no attached
foreign objects when using the Paper Writer.
Page 15

Operating Precautions
Your Paper Writer and its options are precision. Improper operation or rough handling
can cause problems with data storage and other problems. Note and observe the
following precautions to ensure proper operation.
Do not leave dead battery pack in the Paper Writer for a long period.
•
Dead battery pack can leak, leading to malfunction and damage to the Paper Writer.
Stop or avoid using the Paper Writer and its options in areas and conditions
•
subject to the following.
— Large amounts of static electricity
— Extreme heat or cold or humidity
— Sudden temperature change
— Large amount of dust
— After large amount of rain or water falls on the Paper Writer
— Pressing the screen or buttons with excessive force when using in the rain
Always use your fi nger or the dedicated Digitizer Pen when using the touch
•
panel. The use of implements other than your fi nger or the dedicated Digitizer
Pen could damage the touch panel and/or cause malfunctions.
Do not use the Digitizer Pen when your hands are wet.
•
Do not use volatile chemical substances such as thinners, benzene or toiletries to
•
clean the Paper Writer.
When the Paper Writer is dirty, wipe it clean with a soft, dry cloth. Rubbing with
excessive force could scratch the display.
The power-supply terminals and charging terminals should be cleaned from
•
time to time using an implement such as a dry cotton bud.
Soiling on the terminals may cause connection defects.
Take care when using chemicals.
•
Applying thinners, gasoline, kerosene, solvents or oils, or substances such as cleaners,
adhesives, paints, medications or toiletries that contain those materials, to the plastic
case or cover may cause discoloration or other damage.
Allowing the communication/power supply terminals become wet can cause
•
an electric shock or fi re. In addition, if the terminals become soiled, contact
may be impaired resulting in poor charging. This may also prevent successful
communication. For reasons of safety and maintaining charging battery pack(s)
in optimum condition, clean the communication/power supply terminals by
wiping with a dry cloth or cotton swab after disconnecting the AC adaptor.
E-13
Page 16

Take care not to trap objects such as magnetic cards, magnetic recording media
•
or precision equipment between the V-N500 and the Ethernet Cradle, and do not
bring such objects too close to the Paper Writer and cradle.
Bringing magnetic cards or other magnetic recording media too close could result
in important data being erased due to the effects of magnetism. Precision equipment
(wristwatches, etc.) should also not be placed close to the Paper Writer or cradle as it
could be damaged as a result.
Dead Pixels
•
The LCD panel employed in this product uses high precision and substantial number
of components which commonly cause a small number of the pixels not to light or
to remain lit all the time. This is due to the characteristics of LCD panel yield in
accuracy over 99.99% and permissible.
802.11a/n Restrictions:
•
— This product is for indoor use only when using channels 36, 40, 44, 48, 52, 56, 60,
or 64 (5150-5350 MHz).
— To ensure compliance with local regulations, be sure to select the country in which
the access point is installed.
Lithium Polymer Battery Pack
•
Each lithium polymer battery pack has its life. The life span heavily depends on how
the battery pack is charged or stored which may cause deterioration of the battery
pack to shorten the life span if it is handled improperly. Note the tips below to make
the battery pack last long.
— Be sure to charge the battery pack before using it if the battery pack is used for the
fi rst time or if it has not been used for a long period of time.
When charging the battery pack, continue charging until the charge LED lights
green (fully charged).
— If the battery pack is repeatedly charged, the life span becomes short. To avoid the
repetition of charging the battery pack, be sure that the remaining capacity is low
before you start charging.
— Be sure to charge the battery pack in recommended temperature range. The
temperature range is dependant on device you use to charge including battery
chargers and Paper Writers. Refer to the respective user guides. Charging
the battery pack in a temperature outside of the recommended range causes
deterioration.
— When used at low temperatures, the battery pack has a reduced capacity and will
supply power for shorter time.
The life span of the battery pack is also shortened.
— Charging the battery pack while the battery pack itself is freeze including inside
causes deterioration. Be sure to resume an ordinary room temperature on the
battery pack and then leave it unattended for approximately one hour before
charging.
E-14
Page 17

— After charging the battery pack, if the performance of the battery pack does not
show any recovery, it is a sign of ending the life. Replace it with a new battery
pack.
— Avoid the battery pack with a full of the capacity to store for a long period of
time. If you need to store it for a long period, be sure that the remaining capacity
is 30 to 50 percent and to store in a moderate low temperature. This can reduce
deterioration.
— The battery pack gradually deteriorates over time. In particular, storing (or using)
the fully charged battery pack at high temperatures tends to accelerate battery pack
deterioration.
Adobe Reader
•
This Paper Writer comes pre-loaded with Adobe Reader from Adobe Systems
Incorporated.
CASIO has verifi ed the operation of Adobe Reader on this Paper Writer, but does not
guarantee all operations of Adobe Reader for the customer.
Refer to http://www.adobe.com/support/reader/ for information on using Adobe
Reader and problems with that product.
Barcode Scanner
•
This Paper Writer comes pre-loaded with “Barcode Scanner”, comprising barcode
scanning demo samples based on the ZXing library.
CASIO has verifi ed the operation of Barcode Scanner on this Paper Writer, but does
not guarantee all operations of Barcode Scanner for the customer.
The ZXing library is publicly available at the following website:
http://code.google.com/p/zxing/
E-15
Page 18
Important
0984
0984
This guide does not include any information about programming procedures. See the
•
applicable separate documentation for information about the procedures.
After Service
Should this product ever malfunction, contact your original retailer providing
•
information about the product name, the date you purchased it, and details about the
problem.
Regulatory Information
V-N500-E, V-N500-GE
Products are for distribution within
all member states of the EU.
0984
HA-M62IO, HA-M30CHG
Products are for distribution within
all member states of the EU.
Optional models HA-M32DCHG and HA-M20BAT are in conformity with the Council
Directive 2004/108/EC.
Manufacturer:
CASIO COMPUTER CO., LTD.
6-2, Hon-machi 1-chome, Shibuya-ku, Tokyo 151-8543, Japan
Representative within the European Union:
CASIO EUROPE GmbH
Casio-Platz 1, 22848 Norderstedt, Germany
The modifi cation of the software for controlling RF radiation of WLAN, Bluetooth and NFC/
RF-ID is prohibited.
0984
E-16
Page 19

Chapter 2
Basic Operation
E-17
Page 20
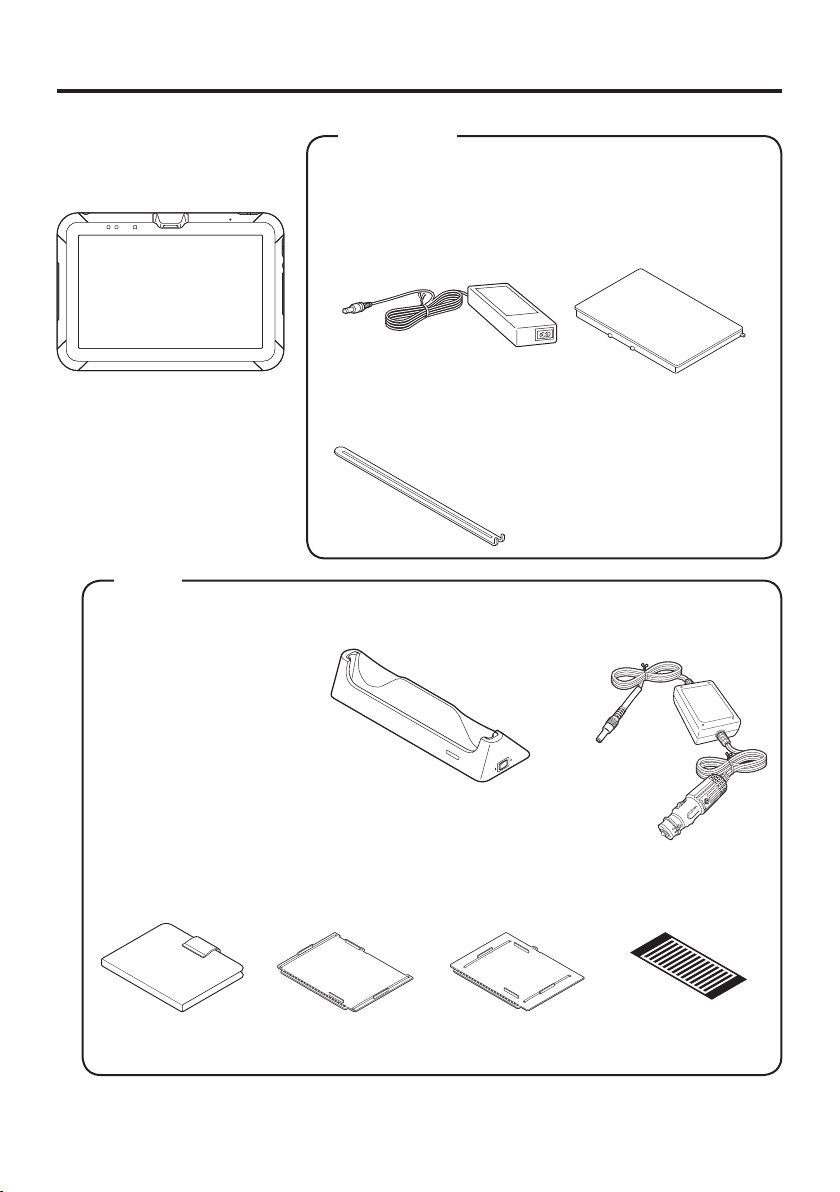
Paper Writer System Confi guration
Bundled Items
Please check the items in the box before using the Paper
V-N500 Series
V-N500 Series
Writer for the fi rst time.
Paper Writer
AC Adaptor
AD-S36120A
Power Cord
AC-CORD-EU
Battery Pack
HA-M20BAT
Options
Ethernet Cradle
HA-M62IO
Cradle-type
Battery Charger
HA-M30CHG
System Case
HA-M99CAS
microSD Card Removal Tool
The illustration shows the
Ethernet Cradle (HA-M62IO).
Paper Holder
(for B5 sheets)
Paper Holder
(for A5 sheets)
User’s Guide
Calibration Sheet
(for Screen Cover)
Car Adaptor
HA-M37CAC
Calibration
Sheet (small)
The paper holders (both sizes) and the calibration sheet (small) are included with the
system case.
For the latest options list, refer to the ON-LINE manual available at
http://www.casio-intl.com/asia-mea/en/pa/usersguide/
E-18
Page 21
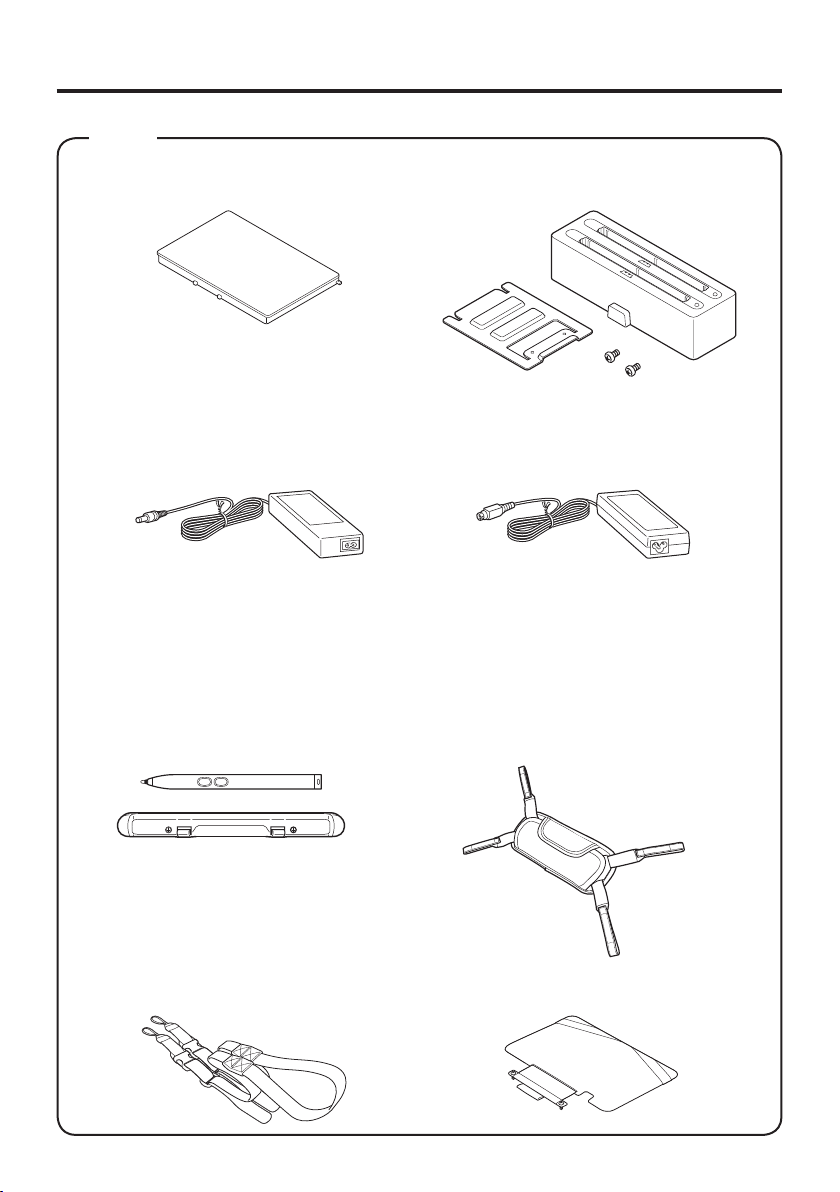
Options
Battery Pack
HA-M20BAT
Dual Battery Charger
HA-M32DCHG
AC Adaptor for V-N500/
Ethernet Cradle/
Cradle-type Battery Charger
AD-S36120A-N
Power Cord for Europe
Power Cord for North America
Power Cord for Taiwan
Power Cord for Korea
Power Cord for Australia
Digitizer Pen
HA-M96PEN
Neck Strap
HA-M97ST
AC Adaptor for
Dual Battery Charger
AD-S90190C-N5
AC-CORD-EU/AC-CORD2-EU
AC-CORD-US/AC-CORD2-US
AC-CORD-TW/AC-CORD2-TW
AC-CORD-KR/AC-CORD2-KR
AC-CORD-AU/AC-CORD2-AU
Hand Belt
HA-M95HB
Screen Cover
HA-M98DC
E-19
Page 22
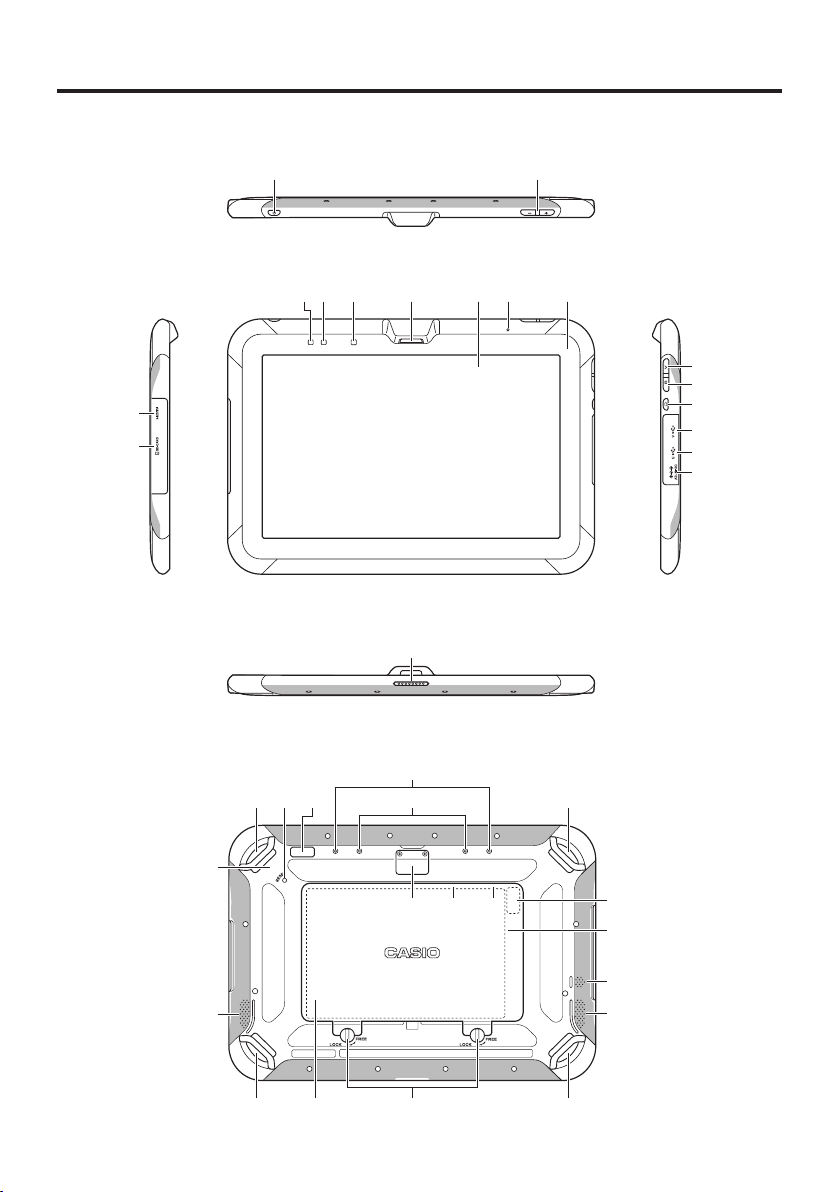
General Guide
Left RightFront
3
4
To p
1 2
56 7 8 9 1110
12
13
14
15
16
17
Bottom
18
E-20
Back
22
19 19
20 21
11
31
19 32 33 19
23
24 25 26
27
28
29
30
Page 23

1 Power Button (→ E-27) 18 Communication/Power Supply Terminal
2 Volume Button 19 Mount for System Case (→ E-187),
Hand Belt (→ E-193) or Strap (→
E-194)
3 mini HDMI Port (→ E-65) 20 Reset Switch (→ E-66)
4 SD Card Slot (→ E-62) 21 Rear Camera
5 Charge LED (→ E-25, 201, 204, 210) 22 Mounting Holes for Screen Cover
(→ E-195)
6 Notifi cation LED 23 Mounting Holes for Pen Holder
(→ E-190)
7 Light Sensor
Automatically adjusts the display backlight
brightness to suit the ambient brightness.
24 Extension Port
8 Front Camera 25 SAM Card Slot (→ E-58)
Located in the Battery Pack Compartment.
9 Display (Touch Panel) 26 SIM Card Slot (→ E-60)
(V-N500-GE only)
Located in the Battery Pack Compartment.
10 Microphone 27 Setup button
Sets the Paper Writer operating parameters.
11 NFC Reader (→ E-63)
12 Function Button A
This button allows you to use an application.
13 Function Button B
This button allows you to use an application.
14 Screen Lock Button
Press to lock or unlock the screen.
For use by managers. Should not be changed
in normal use.
28 microSD Card Slot (→ E-56)
Located in the Battery Pack Compartment.
29 Buzzer
30 Speaker (L)
15 USB A Port 31 Speaker (R)
16 USB Mini-B Port
Cannot be used when the Paper Writer is
fi tted into the optional Ethernet Cradle (HAM62IO).
32 Battery Pack Cover (→ E-23)
17 DC Jack (→ E-25, 26, 210) 33 Battery Pack Cover Lock Switches
(→ E-23)
E-21
Page 24

Loading and Removing the Battery Pack
Your Paper Writer uses two types of battery: a battery pack and a memory backup
battery.
The battery pack is used to power normal operations and to store data, while the
memory backup battery provides the power required to maintain memory contents
when the battery pack power is unable to supply power for some reason.
Use the battery pack (HA-M20BAT) as the main power source.
The backup battery is installed inside of the Paper Writer.
This guide uses the following terms to refer to the batteries.
Battery Pack:
Backup Battery: Built-in battery for memory backup
When the battery pack power goes low, immediately charge it or replace it with a
charged battery pack.
You can use the Dual Battery Charger, the Cradle-type Battery Charger, the Ethernet Cradle,
the Car Adaptor, or the AC adaptor to charge a battery pack installed in the Paper Writer. See
the relevant sections in this guide for the respective options about how to use.
Important!
Always keep backup of all important data!
The battery pack powers normal operation and also provides power required to
•
maintain memory contents, while the backup battery provides backup power to
maintain memory contents. Because of this, you should not remove the battery
pack if the backup battery is dead. Removing the battery pack while the backup
battery is dead causes data in the memory to be corrupted or lost. Note that
once data is lost it cannot be recovered. Always keep backup of all important
data.
The charge of a battery pack when you purchase it may be depleted due to
•
testing at the factory or natural discharge during shipment and storage. Be sure
to charge the battery pack before you use it.
The life of a battery pack is limited, and charging a battery pack causes it to
•
gradually lose its ability to maintain the charge. If your battery pack seems to
require charging very frequently, it probably means it is time to purchase a new one.
If a battery pack is used past the end of its service life, it may swell up in size. In
•
such a case, replace the battery pack with a new one.
You can select the item to be backed up (memory or clock).
•
At shipment from the factory, this option is set to “Priority is given to the
memory” as the default.
If the backup battery is fully charged, it will maintain the content of the Paper
Writer’s memory (RAM) and continue to run the clock for approximately 10
hours when the main battery pack is removed.
If “Priority is given to the clock” is selected, it will maintain the content of the
Paper Writer’s memory (RAM) for 10 minutes and will continue to run the
clock for 72 hours.
It takes 8 hours with the main battery pack installed in the Paper Writer for the
•
backup battery to be charged fully.
To check the remaining charge in the backup battery, go to Settings ⇒ Backup
•
Battery.
E-22
Rechargeable battery pack (HA-M20BAT) for normal operations and data
storage
Page 25
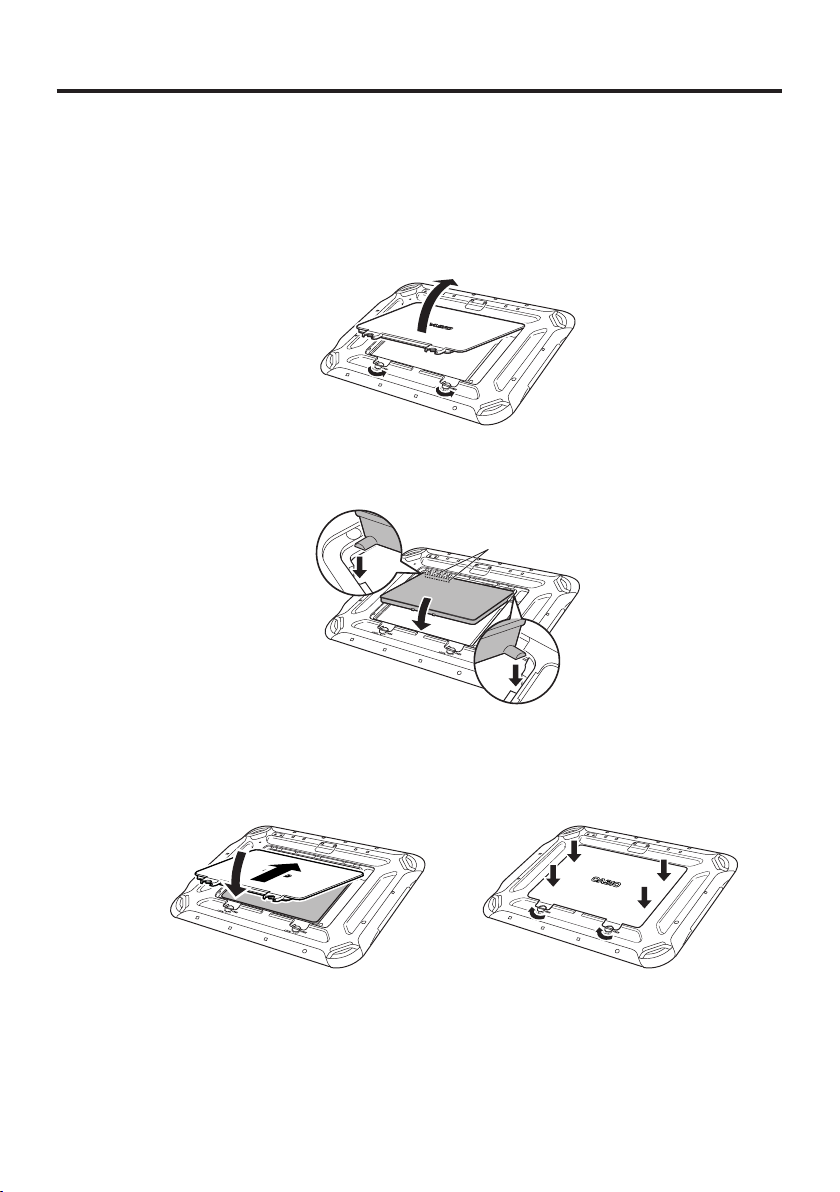
Loading
1. Turn the Paper Writer upside down. If the hand belt is fi tted to the Paper Writer,
unclip it (see E-193).
2. Slide the left and right lock switches for the battery pack cover to the “FREE”
position, and then remove the battery pack cover.
3. Load the battery pack with the printed side of the label facing upwards, fi tting the
lugs on the battery pack into the slots in the Paper Writer so that the terminals in the
battery socket and Paper Writer are aligned.
Terminals
4. Put back the battery pack cover in the compartment as shown in the illustration (a).
Move the lock switches on the battery pack cover back to the “LOCK” position.
Securely close the battery pack cover by pushing it fi rmly as shown in the illustration
(b).
(a)
(b)
E-23
Page 26
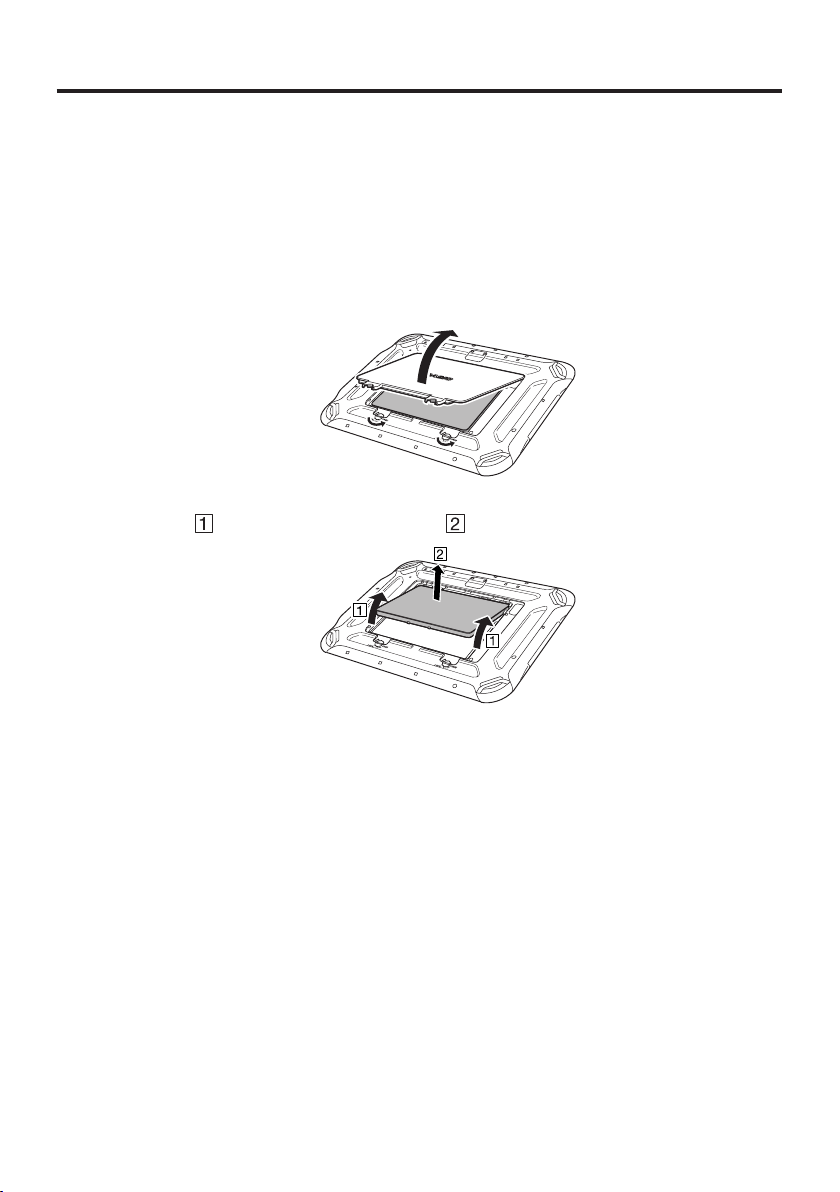
Removing
1. Make sure that the power on the Paper Writer has been switched off.
If the power is still on, hold down the power button to switch off (see E-27).
2. Turn the Paper Writer upside down. If the hand belt is fi tted to the Paper Writer,
unclip it (see E-193).
3. Slide the left and right lock switches for the battery pack cover to the “FREE”
position, and then remove the battery pack cover.
4. As shown in the illustration, grip the lip at the sides of the battery pack with your
E-24
fi ngers (
Important!
Battery pack replacement should be carried out without delay.
•
If the battery pack is left out of the Paper Writer for more than about 10
•
minutes, data stored in the Paper Writer’s internal memory (RAM) may be lost
so that the Paper Writer resets when it is next started up.
When the battery pack is removed, do not connect the AC adaptor or Car
•
Adaptor to the Paper Writer, and do not place Paper Writer in the Ethernet
Cradle or Cradle-type Battery Charger. Doing so may cause data stored in the
Paper Writer’s internal memory (RAM) to be lost so that the Paper Writer
resets when it is next started up.
When the battery pack is removed, plugging in the AC adapter will not turn the
•
Paper Writer on.
Never try to use other type of battery than the ones that are specifi ed for this
•
product.
After you have closed the battery pack cover, turn the lock switches fully to the
•
“LOCK” position. The Paper Writer cannot be switched on until the switches
are turned to the “LOCK” position.
If the battery pack cover is not closed securely, the product may not be fully
•
splashproof.
) and lift out the battery pack ( ).
Page 27
Charging the Battery Pack
Battery pack installed in the Paper Writer can be charged using either cradle, battery
charger or AC adaptor. Battery charge condition can be monitored with charge LED on
the Paper Writer. Multiple battery packs can also be charged simultaneously using Dual
Battery Charger.
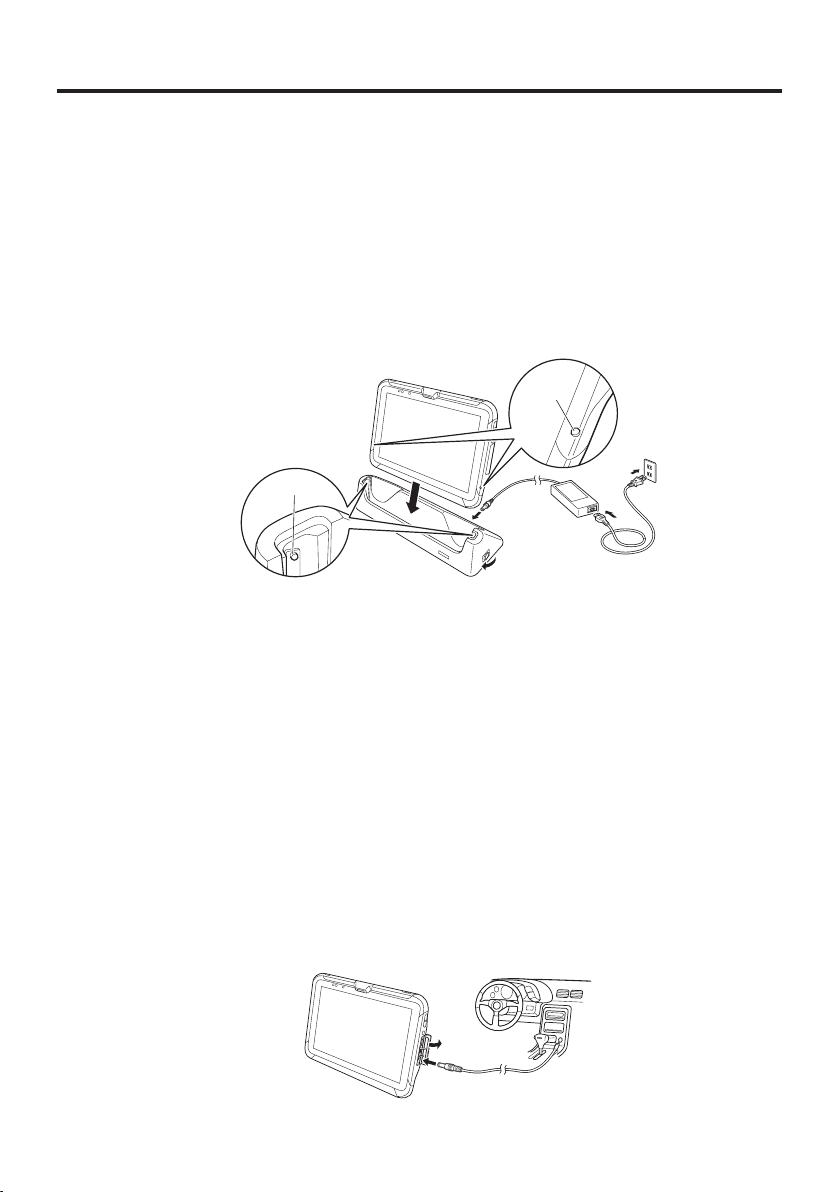
Ethernet Cradle/Cradle-type Battery Charger
If the Paper Writer is fi tted to the system case (see E-186), remove it from the case
beforehand.
Align the mount holes in the Paper Writer with the mount hooks on the cradle and fi t
the Paper Writer into the cradle.
Hole
Hook
Status of Charge LED on V-N500:
■
Orange: Charging (battery level at 6% or more)
Red: Battery level down to 0-5%
(until a level of 5%, Paper Writer will not start up)
Battery pack error
Blinking red: Standby due to being outside the temperature range for charging
Green: Charging complete
* If, after 30 minutes or more at normal temperature, you plug the AC adaptor in again
and the charge LED is still red or off, there is a fault. Immediately stop using the
product and contact the dealer or distributor where you purchased the product, or an
authorized CASIO service provider.
* If the remaining battery change is 5% or less when the AC adaptor is connected
correctly, the charge LED turns off for approximately 0.5 seconds and then lights red.
(charging begins when the temperature is within the charging temperature range)
Car Adaptor
Plug in the Car Adaptor to the cigarette lighter socket in vehicle.
Status of Charge LED on V-N500:
■
Refer to “Ethernet Cradle/Cradle-type Battery Charger” above.
E-25
Page 28
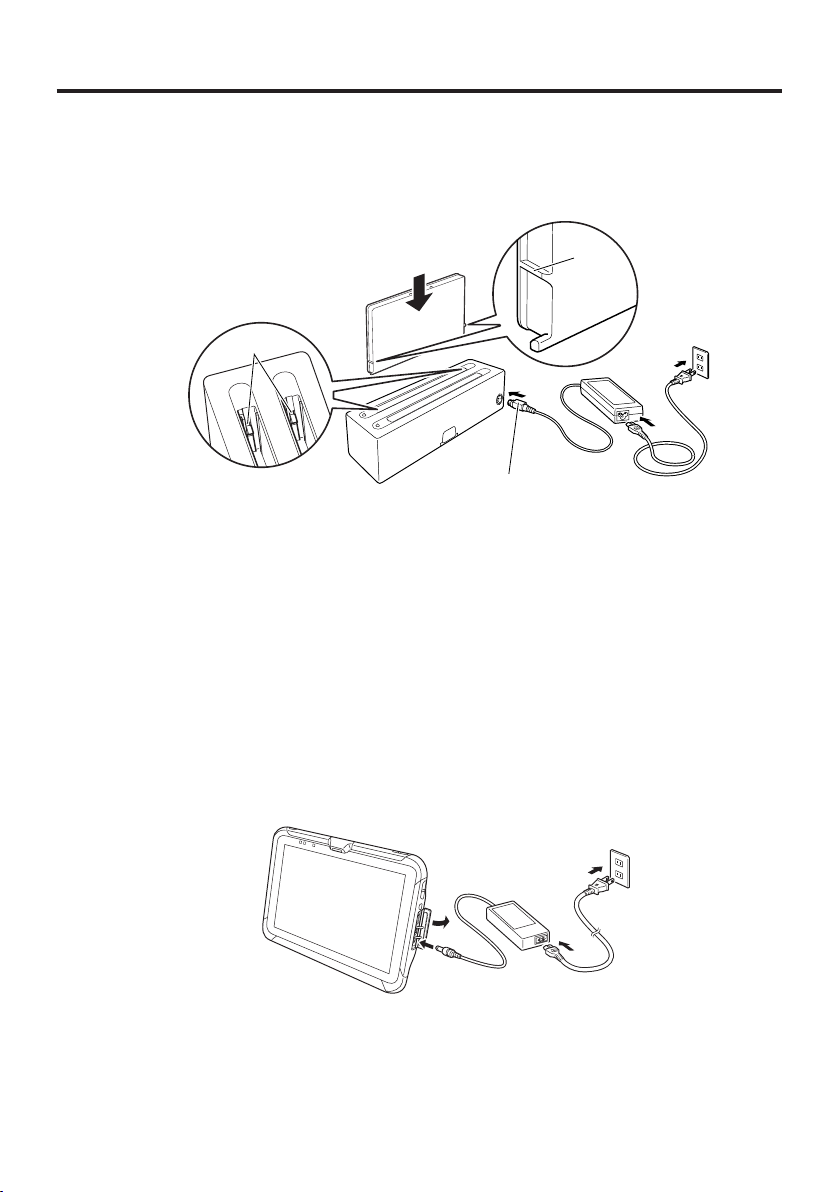
Dual Battery Charger
Push the battery pack in until the mount hooks on the charger engage the mount lugs on
the battery.
Lug
Hook
With the engraved side upwards,
push the connector fi rmly into the
jack until it clicks into place.
You can connect up to three Dual Battery Chargers. See E-208 for the connection method.
Status of Charge Indicator LED
■
Off: Not charging
Orange: Charging
Red: Battery pack problem or standby due to the surrounding temperature
being beyond the specifi ed temperature range (Approximately 0°- 40°C)
(charging resumes when the temperature reaches the range.)
Green: Charging complete
AC Adaptor
Status of Charge LED on V-N500:
■
Refer to “Ethernet Cradle/Cradle-type Battery Charger” on the previous page.
E-26
Page 29

Switching On/Off and Sleep
Switching On
1. Hold down the power button until the notifi cation LED lights green (approx. 1 sec.).
The startup screen appears.
•
The screen shown differs depending on the device settings.
•
If the Paper Writer is left unused for a set time while switched on, it automatically
•
switches to sleep mode.
Important!
Even with the AC adaptor connected, if the level of battery charge is 5% or less
•
the charge LED turns red and the Paper Writer does not start up when you hold
down the power button.
Once the battery charge rises to 6% or more, the LED turns orange and the
Paper Writer automatically starts up.
Switching Off (Shutdown)
1. Hold down the power button for more than 2 seconds until “Power off” is displayed.
2. Tap “OK”.
Note
In the power off state, the Paper Writer’s operation is fully stopped.
•
Switch the power off if the Paper Writer is left unused for a long time.
•
The Paper Writer will restart if it is connected to an external power supply, such
•
as the AC adaptor or cradle.
Sleep
1. Press the power button while the Paper Writer is switched on.
Note
In sleep mode, the display is off but the Paper Writer is operating.
•
The operation mode is maintained. When you switch on the power, you can use
•
the Paper Writer immediately.
E-27
Page 30
Initial Settings
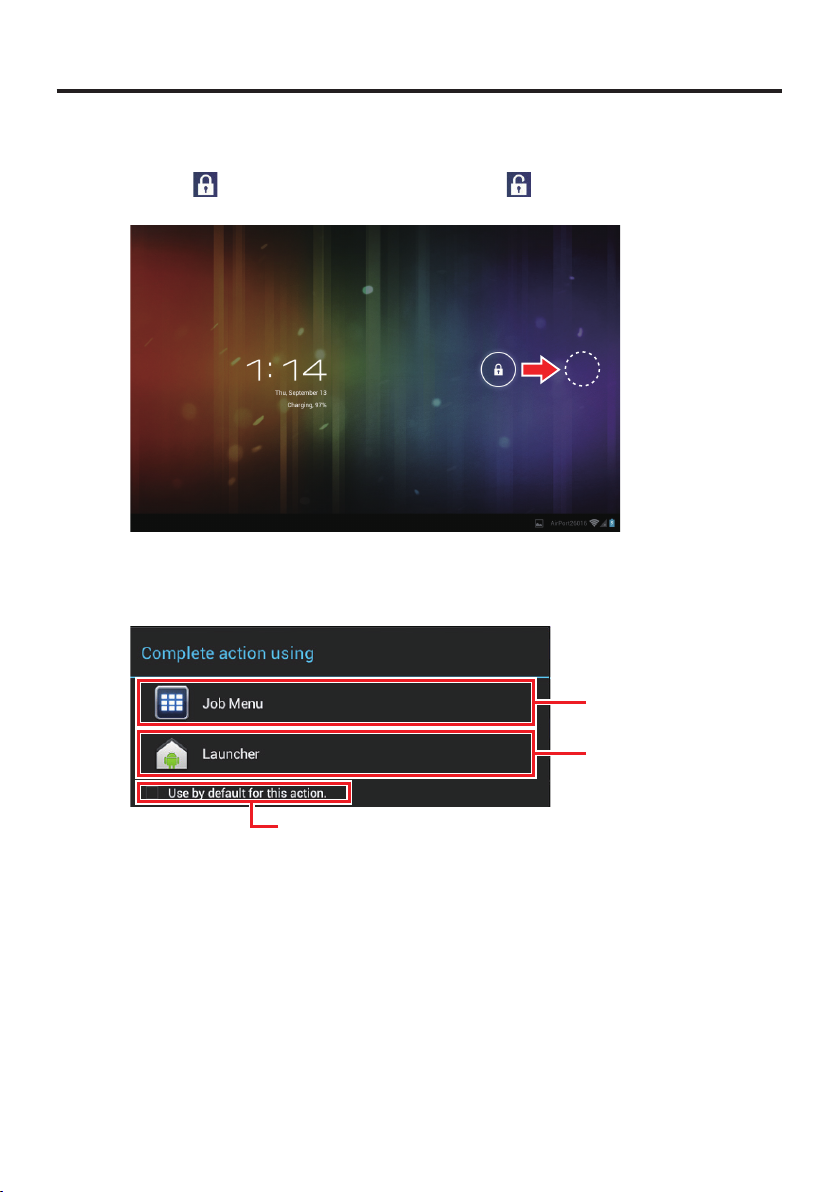
Unlocking the Screen
1. Touch [ ] in the startup screen and drag it to [ ] that appears on the right to
unlock the screen.
At shipment, the default menu shown below appears.
Make a selection based on the operation you actually want to perform.
E-28
Job Menu
Android standard
Tick this box to always apply the above setting
when you press Home.
Page 31

Customization for Job Menu Use
To access Job Menu, you must fi rst customize the Paper Writer as follows:
1. Build the menu to suit the operation. See “Job Menu” (E-166) for information on
building the menu.
2. Specify “None” as the security level for the Settings screen.
E-29
Page 32

Syncing the Calendar and Contacts
To sync with your Google account, you must confi gure your settings as shown below.
You must also set up an account with Google beforehand. (Google is the only host
service.)
Setting up Syncing
■
1 Go to “Accounts & sync” in the Settings screen and select “ADD ACCOUNT”.
2 In the “Add an account” window, select “Sync Calendar and Contacts”.
E-30
Page 33
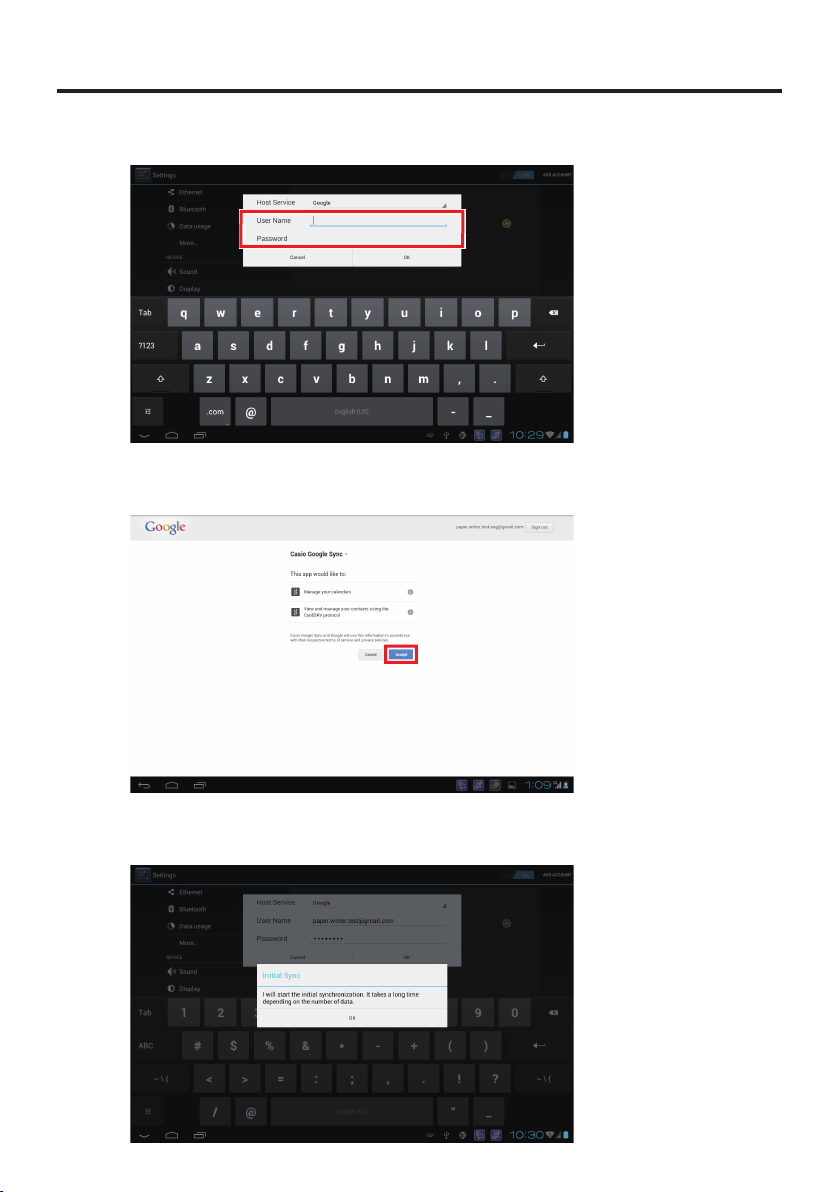
3 Enter your user name and password for the Google account you want to sync.
4 In the next window, touch “Accept”.
5 Click “OK” in the “Initial Sync” window to start initial synchronization.
E-31
Page 34

Sync Settings
■
1 In “Accounts & sync” in the Settings screen, select the account you want to confi gure
for syncing.
2 Select “Account settings” in “Sync settings”.
E-32
Page 35

3 In the “Settings” screen, set the sync frequency and the days to sync in the Calendar.
4 You can specify a sync frequency of every 6 hours, every day, or every 7 days. In
addition to the frequency specifi ed here, whenever the Calendar and Contacts are
modifi ed on the Paper Writer, they are each synchronized by uploading data from the
Paper Writer and downloading data from the server.
E-33
Page 36

5 You can specify 7, 30, 60 or 180 days as the extent to which data is synced back into
the past and ahead into the future.
Stopping Syncing
■
1 To stop syncing, clear the “Sync Calendar” and “Sync Contacts” checkboxes
respectively in “Sync settings”.
E-34
Page 37

Removing an account
■
1 To remove an account, select “Remove account” in “Sync settings”. This erases all
the data stored in the Paper Writer for that account.
Sync now
■
1 In “Sync settings”, select “Sync now” to begin synchronization.
E-35
Page 38

2 Selecting “Sync now” in the Paper Writer or Calendar will also begin calendar data
synchronization.
Important!
● Specifi cation differences from Google standard synchronization
The operation of synchronization using CalDAV and CardDAV differs from Google
standard synchronization in the following respects:
All contact phone number types that are not “Mobile”, “Work”, “Home”, “Work
•
Fax”, “Home Fax”, “Pager” or “Custom” revert to “Other” when synced.
Contact group information is not synced. Contacts set as groups are stored as not
•
being grouped. However, if group information has already been set, the group
information is not cleared.
Merged information for contacts is not synced. Contacts that have been merged are
•
stored as separate contacts. However, if merged information has already been set,
the merged information is not cleared.
“Internet call” items for contacts are not synced. However, if an “Internet call” has
•
already been stored, it is not deleted.
The “Reading Aid” set on the Paper Writer for each Contact is not synced.
•
Where “Custom” is set for a Contact's “Address”, it changes to “Other” when
•
synced.
The “Date” set for a Contact's “Birthday” is only synced when the year is entered.
•
If you have set multiple “Birthdays” for a Contact, all birthdays other than the last
•
“Birthday” set are deleted when the data is synced.
The attendee comments that can be set when people are invited to a scheduled
•
event in the Calendar are not synced.
E-36
Page 39

If a repeating scheduled event in the Calendar has been changed to individual
•
events, the information for the repeating scheduled event is not synced. As a result,
if the repeating scheduled event is deleted, the scheduled events that were changed
to individual events are not deleted and remain in the Calendar.
Data is not synced if you only change the “Notifi cation” for a scheduled event in
•
the Calendar on the Google server.
If you delete all the “Notifi cations” for scheduled events in the Calendar on
•
the Paper Writer and then sync the data, the notifi cations revert to the “Default
notifi cation method” on the Google server.
If multiple calendars are used for one account and a scheduled event is added to a
•
sub-calendar, that event is also added to the main calendar.
Note that the following items are also excluded from Google standard
synchronization:
The “Custom fi elds” that can be added to Contacts on the Google server
•
The “File format” that can be added to Contacts on the Google server
•
The “Color” settings for each Calendar scheduled event
•
● If you modify a scheduled event or Contact that is on the Paper Writer and on
the Google server
If you modify a scheduled event or contact that is on both the Paper Writer and the
Google server, the data on the server takes precedence. The modifi ed content on the
Paper Writer is deleted.
E-37
Page 40
Using the Paper Writer Accessories
This section explains the basic operation procedures and functions offered by the Paper
Writer accessories. For details of the settings and functions, refer to “Paper Writer
Accessories” (E-92) in Chapter 3, “Built-in Software”.
Shooting Images
The Paper Writer features two shooting modes: the Closing Shot function and Flipping
Shot function.
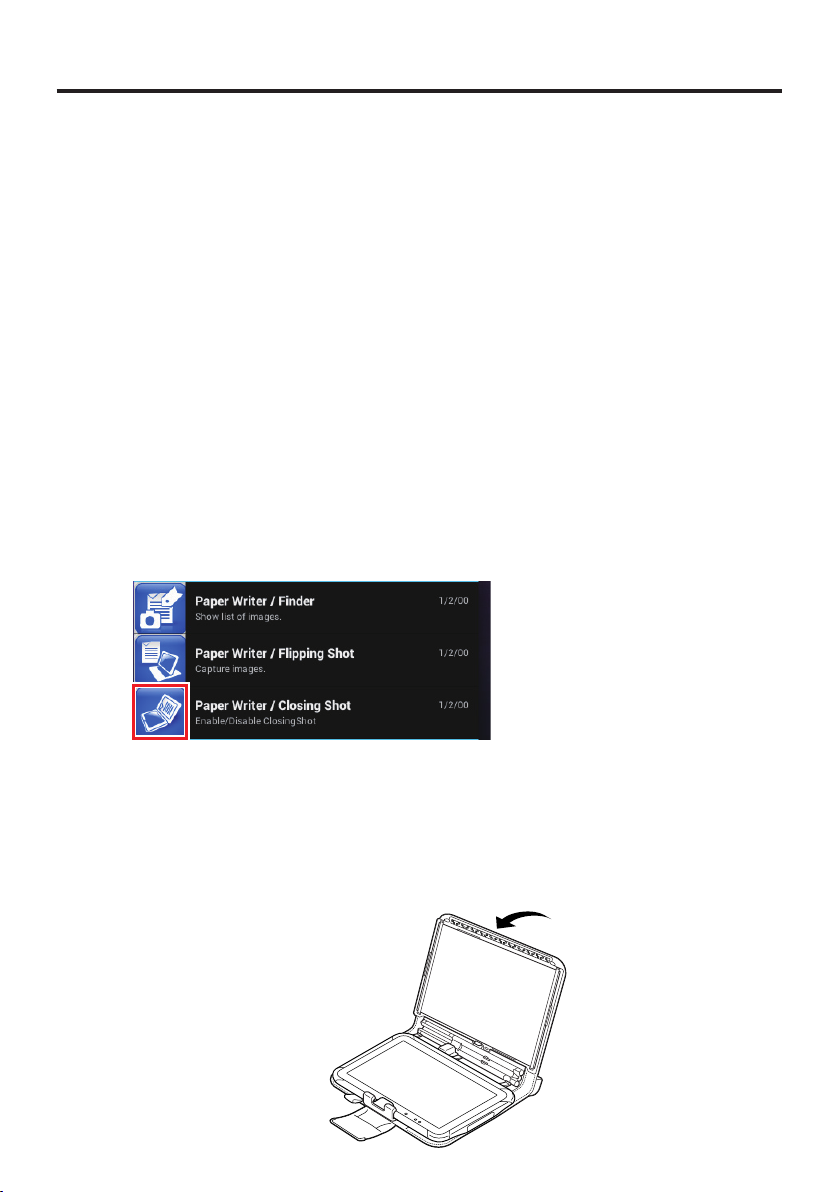
“Closing Shot” photographs information written on paper set in the paper holder.
Closing shots can be taken automatically simply by closing the system case.
“Flipping Shot” photographs information written on paper that is not set in the paper
holder. If you are using a notebook, this mode allows you to photograph multiple pages
consecutively simply by fl ipping through the pages. This mode can also be used to
photograph business cards and capture rear camera images.
Closing shot
■
1. Mount the paper holder in the system case (see E-188).
2. Tap the status bar in the bottom-right of the screen and then tap the Closing Shot icon
in the pop-up menu to enable photography mode.
3. Write some text on the paper set in the paper holder.
4. Lift up the paper holder side of the case and fold it closed towards the display.
When the angle to the display is approximately 110°, the case stops slightly at that
•
point and the information written on the paper is imported as an image.
When you open the system case, the Finder starts up and you can then edit the image
•
and its attached information.
E-38
Page 41

Note
Settings menu options such as the paper size can be displayed by tapping the
•
setting icon in the Flipping Shot main screen.
Important!
Closing shots can only be taken when the paper holder is used.
•
With B5 paper, areas at the corners of the page cannot be
•
photographed.
Flipping shots
■
If the paper holder is mounted on the system case, remove it.
1. Set up the Paper Writer on the system case as shown in the fi gure and fi x the angle of
the Paper Writer using the stoppers.
To ensure that it does not impede shooting, use the magnet to attach the case fastener
to the back of the case.
<Correct angle when using the system case>
<Example><Example>
➀➁➂
You can shoot images using the screen cover as a stand.
•
<Correct angle when using the screen cover>
(Rear)(Front)
Important!
To take a Flipping Shot, fi x the Paper Writer in the angle shown in the “(Rear)” fi gure.
•
The shot cannot be taken correctly if the Paper Writer is at the wrong angle.
The Paper Writer will not be at the correct angle if the pen is inserted into the
•
pen holder.
When taking a Flipping Shot, fi rst take the pen out of the pen holder.
With A4 or B5 paper, areas* at the corners of the page cannot be photographed.
•
* Refer to <Example> in “Closing shot” to see the areas.
E-39
Page 42
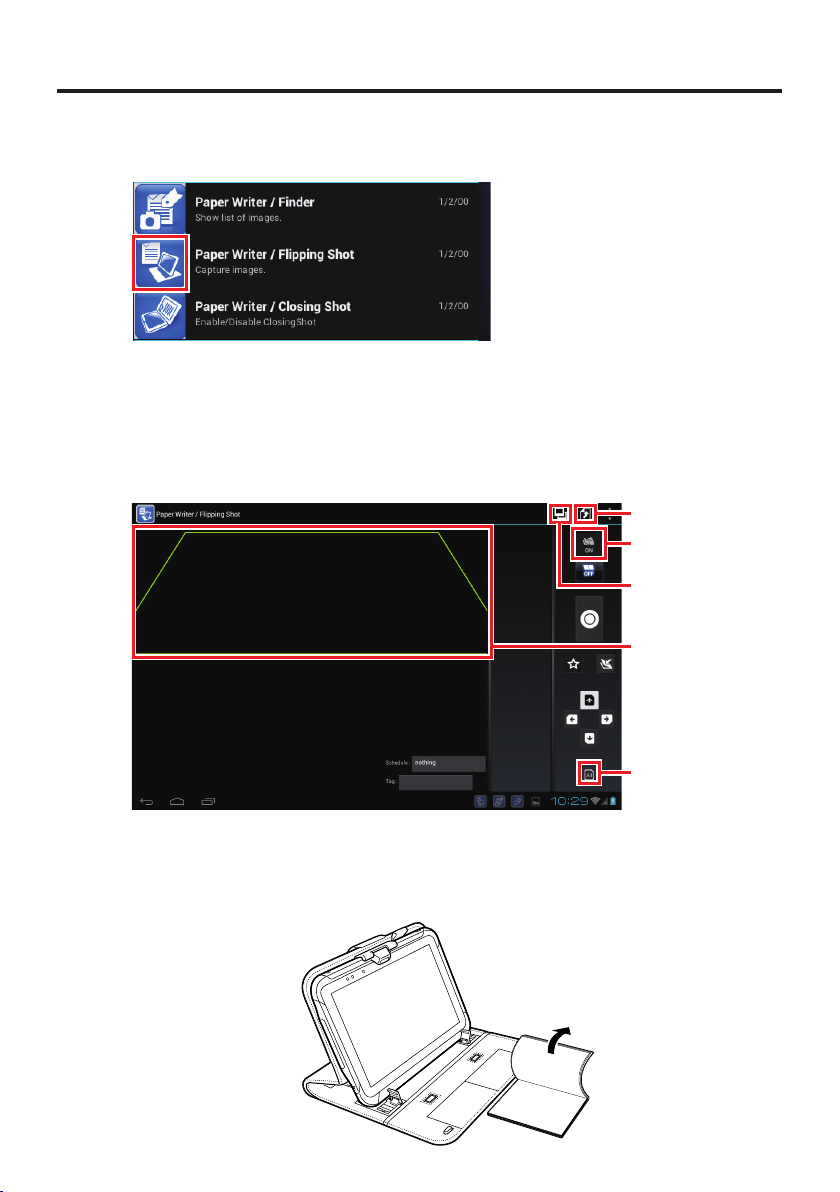
2. Tap the status bar in the bottom-right of the screen and tap the Flipping Shot icon in
the pop-up menu to set the Paper Writer to photography mode.
Important!
The order in which the icons appear may differ.
•
3. Select the paper size and then adjust the paper position so that it fi ts inside the paper
alignment guide (trapezoidal frame) shown on the display. Touch (Flipping Shot)
“ON”.
Exit
(Flipping Shot) ON
Camera/Gallery
Paper alignment
guide
4. Flip the paper in any direction.
The information written on the paper is imported as an image.
•
When you touch the Exit icon, the Finder starts up and you can then edit the image
•
and its attached information.
E-40
Paper size
selection
Page 43

Flipping shot — capturing business cards
■
<Using the system case>
1. Using steps 1 and 2 in “Flipping shots”, set the Paper Writer to photography mode
and choose “BC” in the paper size selection.
2. Set the business card in the business-card capture position in the case. Touch (Flipping
shot) “ON”.
The information on the business card is imported as an image.
•
When you touch the Exit icon, the Finder starts up and you can then edit the image
•
and its attached information.
Note
You can capture up to 2 business cards at the same time.
•
You can also use Contacts to import the information on the captured business
•
card into the address book as text data.
<Using the screen cover>
1. Using steps 1 and 2 in “Flipping shots”, set the Paper Writer to photography mode
and choose “BC” in the paper size selection.
2. Position the business card so that it fi ts inside the business card alignment guide
(trapezoidal frame) shown on the display. Touch (Flipping Shot) “ON”.
Business card
alignment guide
E-41
Page 44

The information on the business card is imported as an image.
•
When you touch the Exit icon, the Finder starts up and you can then edit the image
•
and its attached information.
Note
You can only capture 1 business card at a time.
•
You can also use Contacts to import the information on the captured business
•
card into the address book as text data.
Flipping shots — rear camera
■
You can import images shot using the rear camera by applying perspective correction.
1. In the “Flipping Shot” photography screen, touch the Camera/Gallery icon.
2. Touch the camera icon to switch to photography mode.
Camera
E-42
Page 45
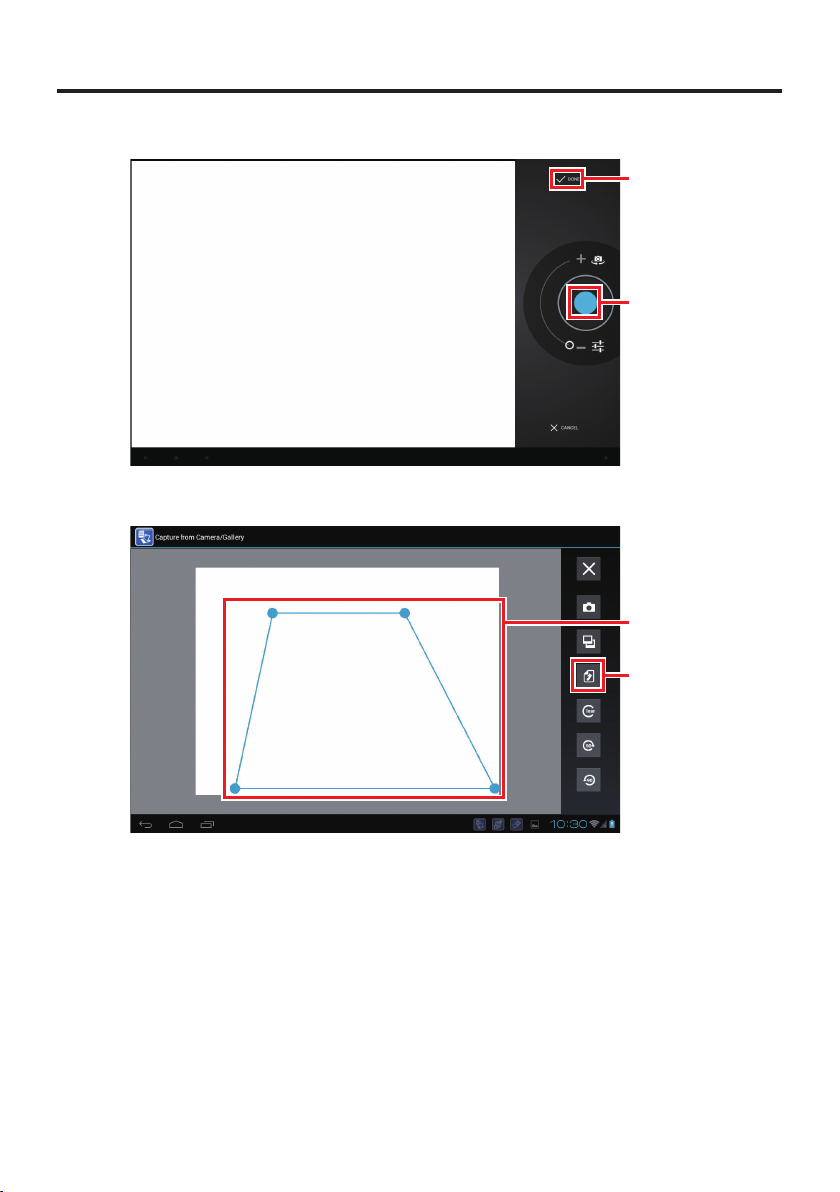
3. Touch the shutter button to take the photo and then touch “DONE”.
DONE (displayed
after shooting)
Shutter button
4. Drag the corners of the image cropping guide (blue frame) to specify the cropping
range, and then touch the Import icon.
Image cropping
guide
Import
Perspective correction is applied to the content enclosed by the image cropping guide
•
and a rectangular image is imported. The “Flipping Shot” photography screen then
reappears.
5. When you touch the Exit icon, the Finder starts up and you can then edit the image
and its attached information.
E-43
Page 46
Note
4 points are detected automatically.
•
If you are photographing a square object and you don’t shoot the object with all
•
4 corners inside the screen, 4 points are not detected. If the photographed object
completely fi lls the screen, the points will be detected well.
If the 4 points cannot be detected, you can align the image manually.
•
Viewing Photographed Images
Displaying the list screen
■
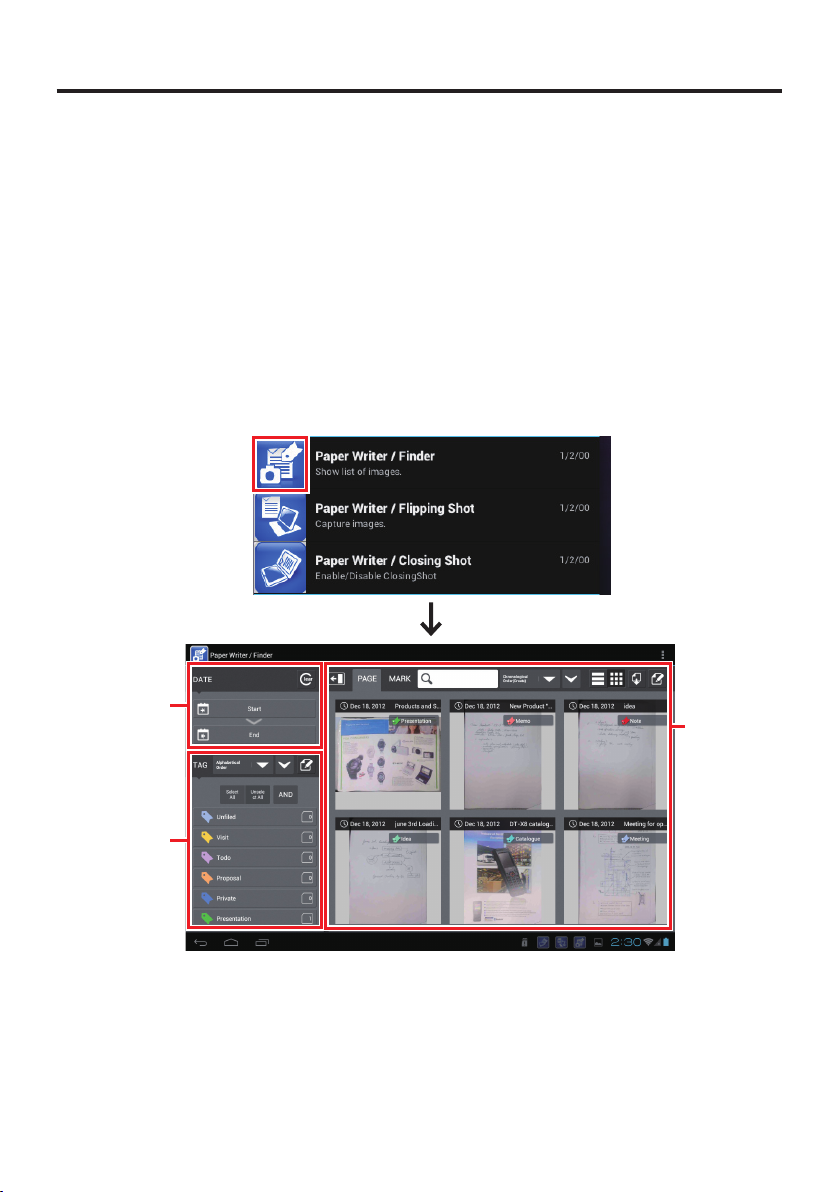
1. Tap the status bar in the bottom-right of the screen and then tap the icon in the pop-up
menu to launch the Finder.
DATE pane
Page
information
pane
E-44
TAG pane
Note
You can fi lter images by specifying a date, tag or mark.
•
You can also create bookmarks for individual images or combinations of fi lter
•
conditions.
Page 47
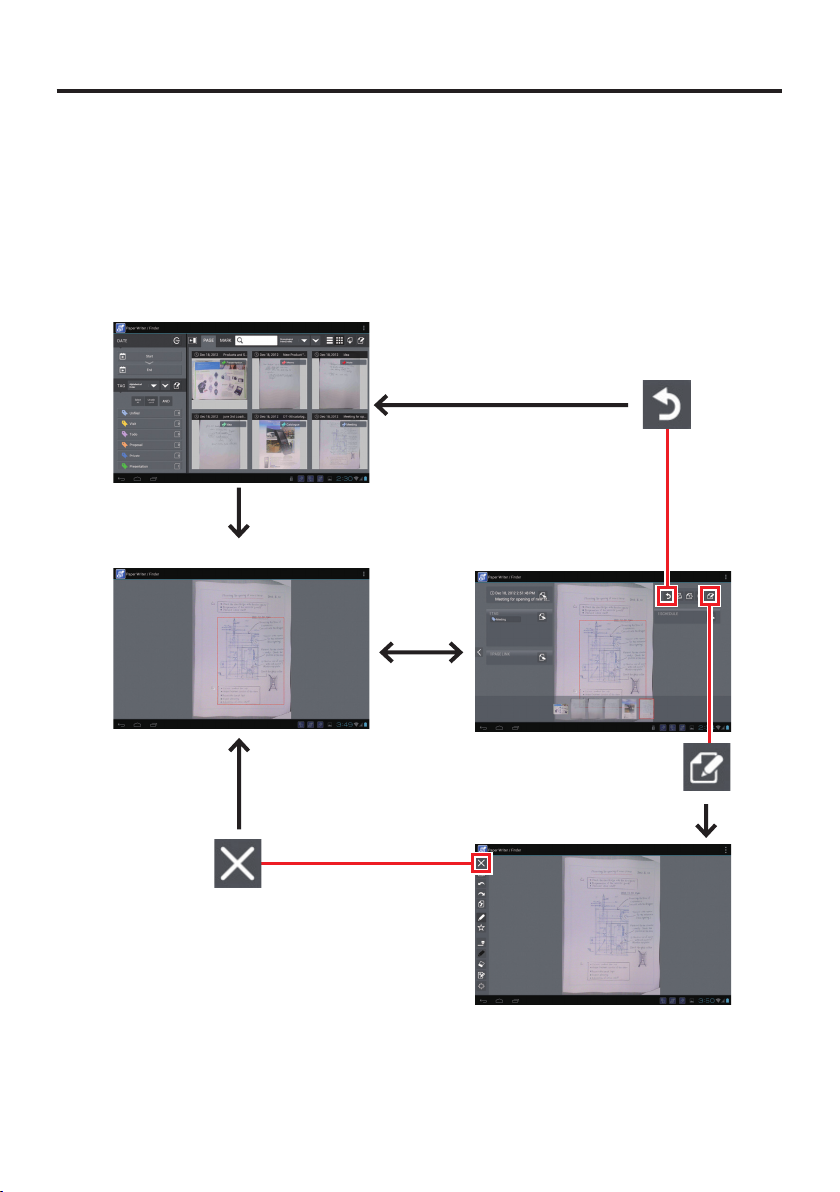
Switching between screens
■
Tapping an image to select it in the page list screen opens the page display screen (fullpage display). Tapping again toggles page details display on and off.
Touch the Back icon in the page details display screen to return to the page list screen.
Touching the Edit icon in the page details display screen opens the page edit screen.
Touch the Back icon in the page edit screen to go back to the page display screen.
Page list screen
Back
Ta p
Page display screen (full-page display)
Back
Page details display
screen
Ta p
Edit
Page edit screen
E-45
Page 48

Filtering by date
■
If you specify a starting date and ending date in the DATE pane in the page list screen,
a list of images shot during that period is displayed. Touch “Clear” to cancel fi ltering by
date.
Clear
Filtering by tag
■
If you tap a tag to select it in the TAG pane in the page list screen, a list of images with
that tag is displayed.
You can select multiple tags. When selecting multiple tags, touch “AND/OR” to specify
an AND condition or an OR condition.
Touch “Unselect All” to cancel fi ltering by tag.
E-46
Selected
Page 49

Deleting photographed images
■
Use this procedure to delete images you no longer need from the page list screen.
1. Touch the Edit icon and then touch the Delete page icon.
Edit
Delete page
2. Tap the image to be deleted to place a checkmark in the image and then touch “OK”.
OK
3. The page delete screen appears. Touch “OK” to delete the image.
E-47
Page 50

Useful Functions
Handwritten mark recognition
■
By writing a predetermined mark on handwritten documents, you can import the
documents using recognition of the mark and its associated area. You can also search
and manage images by the type of mark.
The 5 types of mark are as follows:
/ /#/$/
Write the mark at least 1 character
away from the corresponding area.
Recognizes the text up to
the next space between
lines ( a gap roughly 1.5
times the size of the mark)
as the marked area
If there is an outline drawn
around the text, a rectangle
that encloses that entire
outline is recognized as the
marked area.
E-48
Note
Marks between 5 and 25 mm in size can be recognized.
•
To be recognized, the mark must be positioned in the left half of the paper, at
•
least 15 mm out from the left edge.
The mark and its associated area are displayed digitally in the image. The
•
position and size of a marked area can be changed in the page edit screen in the
Finder.
Set the meanings of marks in the Finder settings screen.
•
Important!
Marks are not recognized when a business card is captured.
•
See “Notes on marks and area descriptions” (E-50).
•
Page 51

Running commands
■
If you write predetermined command marks in a handwritten document, the commands
will be automatically executed when the document is imported.
The 3 types of mark are as follows:
@/T/∞
There are 2 commands:
Send mail: Launches the mailer with the image saved as an attachment during
•
importing.
Trimming and mail: Launches the mailer with the cropped area of the image saved as
•
an attachment during importing.
Note
Set the commands associated with marks in the Finder settings screen.
•
Important!
Command execution is only enabled for closing shots. Commands do not run
•
with fl ipping shots.
See “Notes on marks and area descriptions” (E-50).
•
E-49
Page 52

Notes on marks and area descriptions
■
●
Marks and areas
Write marks a distance of 1-2 characters from the area to be marked. If the mark is
•
too close to or too far from the area, it will not be recognized correctly.
A mark that is too close to the area will not be recognized as a mark.
A mark that is too far from the area will be recognized as a mark, but the area will not
be recognized correctly.
Write so that lines of text are as horizontal as possible.
•
If the space between lines is 1.5 lines or more, each line will be recognized as a
•
separate area.
If the text is written in a notebook with ruled lines, try as much as possible not to
•
overwrite the ruled lines.
If you overwrite a ruled line, the ruled line may be recognized as part of the text so
that the recognized area expands to include the ruled line.
●
Describing marks
As far as possible, write marks so that they are always the same width and height.
•
The standard for the spacing between the mark and the area, and between lines, is the
mark size.
If the mark is overly tall or wide, the mark size will be diffi cult to ascertain, so its
spacing from the area will also be diffi cult to identify.
If a mark is written in a notebook with ruled lines, write the mark so that it does not
•
touch the ruled lines.
If the mark extends over a ruled line, the ruled line may be assumed to be part of the
mark, in which case the mark may not be recognized or may be taken to be a different
mark.
E-50
●
Precautions when shooting
Always try to ensure that the object is vertically and horizontally aligned.
•
Page 53

●
Writing tips for the marks
Ensure that each part is the same length (see Fig. 2).
•
Ensure that each line passes through the center (see Fig. 3).
•
Fig. 1 : Sample Fig. 2 : Fig. 3 : Off-center
#
Write the symbol carefully so the 2 horizontal lines and the 2 vertical lines are
•
parallel. Curved or angled lines will cause a recognition error (see Fig. 5, 6).
Write the 2 horizontal lines so that they are horizontal or angled up to the right.
•
Angling the lines down to the right will cause a recognition error.
Where lines extend outwards, ensure that they extend uniformly in the 4 directions (see
•
Fig. 6).
Fig. 4 #: Sample Fig. 5 #: Curved Fig. 6 #: Curved
E-51
Page 54

$
Write the “S” part of the symbol so that the line is drawn as smooth curves. Dollar
•
symbols drawn with straight lines are frequently misrecognized as “#” (see Fig. 8).
Draw the vertical line so that is down the middle of the “S” and is straight up and
•
down. An angled line will cause a recognition error (see Fig. 9).
Fig. 7 $: Sample Fig. 8 $: Straight
Write this symbol carefully without a strong upstroke to ensure that it does not look
•
lines used
Fig. 9 $: Angled
like a checkmark. If this symbol is drawn with a strong upstroke, the image may well
become blurred or fuzzy.
People tend to draw this mark small with long vertical stroke, but it should be drawn
•
clearly as a full-size (large) character.
T
Ensure that the horizontal and vertical lines are touching. Lines that cross or that are
•
not touching will cause recognition errors.
Draw the vertical and horizontal components correctly. (Do not angle the lines or
•
draw the character italicized.)
∞
Draw this mark as 2 connected circles side-by-side.
•
E-52
Page 55

Adding tags
■
Adding tags (keywords) to images provides an easy way to search and manage them.
1. In the page list screen, touch the Edit icon and then touch the Add Tag icon.
Edit
Delete Tag
Add Tag
2. Tap the image to which the tag will be added to place a checkmark in the image and
then touch “OK”.
OK
3. The tag edit screen appears.
E-53
Page 56

4. Touch ▼ to select a tag from the list and then touch “OK” to add the tag.
Note
In both fl ipping shots and closing shots, tags are automatically added when the
•
shot is taken.
To delete a tag, touch “Delete Tag” in step 1 above and then touch the screen
•
followed by the tag to select the tag. Then touch “OK”. Touch “OK” in the delete
tag screen to delete the tag.
Editing images
■
You can use your fi nger or the Digitizer Pen to add freehand lines or text to an image.
1. Open the page edit screen.
Store
Append
Line thickness
Line color
Digitizer Pen
2. Touch the Append icon and select the line thickness and line color.
3. Touch the Digitizer Pen icon to select whether to use the Digitizer Pen.
4. Touch the screen to draw a line.
5. Touching the Store icon saves the edited image and returns to the page display screen.
E-54
Page 57

Linking to the Calendar or address book
■
You can link imported images to the Calendar or the address book.
In the menu display screen, use the Edit icon in the related schedule area to retrieve
schedule information from the Calendar. If there are participants stored in the schedule,
the address information for those participants is retrieved.
Edit
Related schedule
area
Note
You can also call up associated images from the Calendar or address book.
•
E-55
Page 58

Using microSD Cards
This Paper Writer supports microSD cards.
The card slot is located in the battery pack compartment (see E-20, 21). Remove the
battery pack before inserting or removing a card.
Refer to pages 22 to 24 for information on “Loading and Removing the Battery Pack”.
Install (or remove) a card according to the procedure described below.
Installing
1. Make sure that the power on the Paper Writer has been switched off. If the power is
still on, hold down the power button to switch off (see E-27).
2. Remove the battery pack.
3. Check that the card is the right way up and facing in the right direction, then match it
to the correct printed icon and push it all the way into the slot.
Turn the card so that rear side (with the terminals) faces upwards and then push the
•
card in fully until it clicks into place.
4. Load the battery pack.
Removing
1. Make sure that the power on the Paper Writer has been switched off. If the power is
still on, hold down the power button to switch off (see E-27).
2. Remove the battery pack.
E-56
Page 59

3. Press on the card slightly ( ).
The card is pushed out (
If you have diffi culty removing the card, use the microSD card removal tool
•
provided. As shown in the illustration, hook the end of the tool under the projection
on the card to pull the card out.
4. Pull out the card and load the battery pack.
).
Important!
A card must be inserted with the top and bottom properly aligned and in the
•
proper direction. Attempt in inserting it with an excessive force in incorrect
orientation can risk damage to the card and slot.
Touching the connectors or IC area when installing the card could result in
•
damage to the card through soiling or an electrostatic charge.
The battery pack will not be able to be properly installed if the card is not
•
properly installed. Reinstall the card properly if this happens.
Since data recorded in the Paper Writer may be lost if the battery pack is
•
removed for more than 10 minutes, complete the installation (or removing) of a
card within 10 minutes.
Never turn off the power or remove a card from the slot while the card is being
•
accessed. Doing so can damage the card or data in the card.
Do not drop the card or lose it.
•
E-57
Page 60
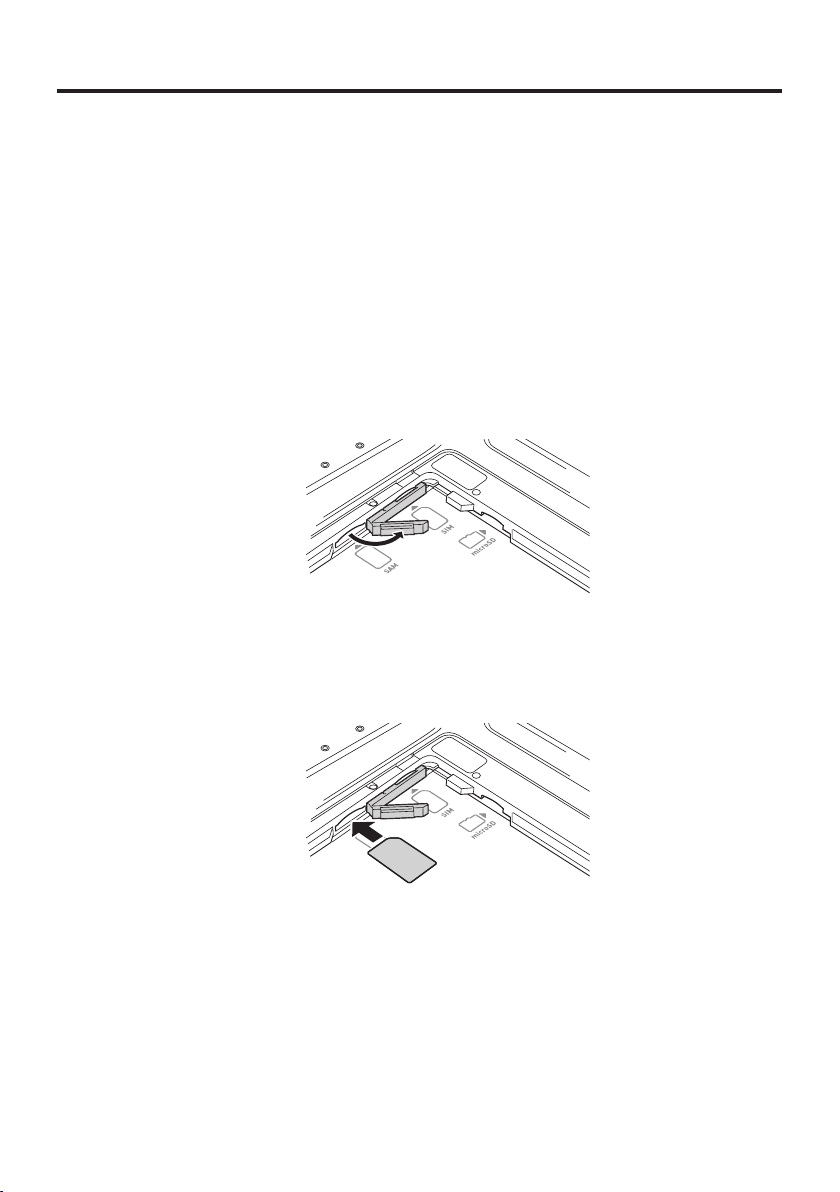
Using SAM Cards
This Paper Writer supports SAM cards.
The card slot is located in the battery pack compartment (see E-20, 21). Remove the
battery pack before inserting or removing a card.
Refer to pages 22 to 24 for information on “Loading and Removing the Battery Pack”.
Install (or remove) a card according to the procedure described below.
Installing
1. Make sure that the power on the Paper Writer has been switched off. If the power is
still on, hold down the power button to switch off (see E-27).
2. Remove the battery pack.
3. Open the supporting cover.
4. Check that the card is the right way up and facing in the right direction, then match it
to the correct printed icon and push it into the slot.
Insert the card so that the notch is on the front right corner.
•
5. Close the supporting cover and push the inserted card just above the cover.
Push the card in fully until it clicks into place.
•
6. Load the battery pack.
E-58
Page 61
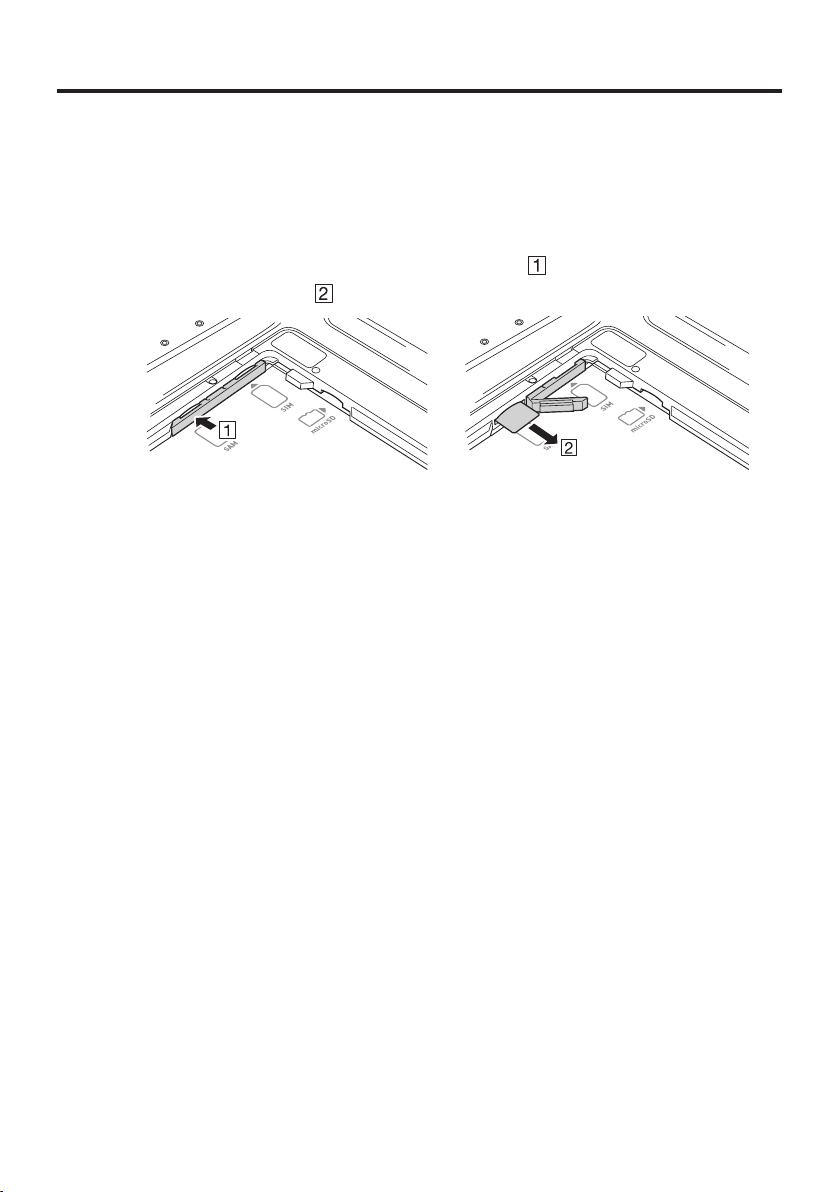
Removing
1. Make sure that the power on the Paper Writer has been switched off. If the power is
still on, hold down the power button to switch off (see E-27).
2. Remove the battery pack.
3.Gently push the card in above the supporting cover (
The card is pushed out (
4. Pull the card out and close the supporting cover.
5. Load the battery pack.
).
Important!
A card must be inserted with the top and bottom properly aligned and in the
•
proper direction. Attempt in inserting it with an excessive force in incorrect
orientation can risk damage to the card and slot.
Touching the connectors or IC area when installing the card could result in
•
damage to the card through soiling or an electrostatic charge.
The battery pack will not be able to be properly installed if the card is not
•
properly installed. Reinstall the card properly if this happens.
Since data recorded in the Paper Writer may be lost if the battery pack is
•
removed for more than 10 minutes, complete the installation (or removing) of a
card within 10 minutes.
Never turn off the power or remove a card from the slot while the card is being
•
accessed. Doing so can damage the card or data in the card.
Do not drop the card or lose it.
•
).
E-59
Page 62

Using SIM Cards
This Paper Writer supports SIM cards.
SIM cards may not be supported by some models. See E-21 for information on
compatible models.
The card slot is located in the battery pack compartment (see E-20, 21). Remove the
battery pack before inserting or removing a card.
Refer to pages 22 to 24 for information on “Loading and Removing the Battery Pack”.
Install (or remove) a card according to the procedure described below.
Installing
1. Make sure that the power on the Paper Writer has been switched off. If the power is
still on, hold down the power button to switch off (see E-27).
2. Remove the battery pack.
3. Open the supporting cover.
4. Check that the card is the right way up and facing in the right direction, then match it
to the correct printed icon and push it into the slot.
Insert the card so that the notch is on the front right corner.
•
5. Close the supporting cover and push the inserted card just above the cover.
Push the card in fully until it clicks into place.
•
6. Load the battery pack.
E-60
Page 63

Removing
1. Make sure that the power on the Paper Writer has been switched off. If the power is
still on, hold down the power button to switch off (see E-27).
2. Remove the battery pack.
3.Gently push the card in above the supporting cover (
The card is pushed out (
4. Pull the card out and close the supporting cover.
5. Load the battery pack.
).
Important!
A card must be inserted with the top and bottom properly aligned and in the
•
proper direction. Attempt in inserting it with an excessive force in incorrect
orientation can risk damage to the card and slot.
Touching the connectors or IC area when installing the card could result in
•
damage to the card through soiling or an electrostatic charge.
The battery pack will not be able to be properly installed if the card is not
•
properly installed. Reinstall the card properly if this happens.
Since data recorded in the Paper Writer may be lost if the battery pack is
•
removed for more than 10 minutes, complete the installation (or removing) of a
card within 10 minutes.
Never turn off the power or remove a card from the slot while the card is being
•
accessed. Doing so can damage the card or data in the card.
Do not drop the card or lose it.
•
).
E-61
Page 64
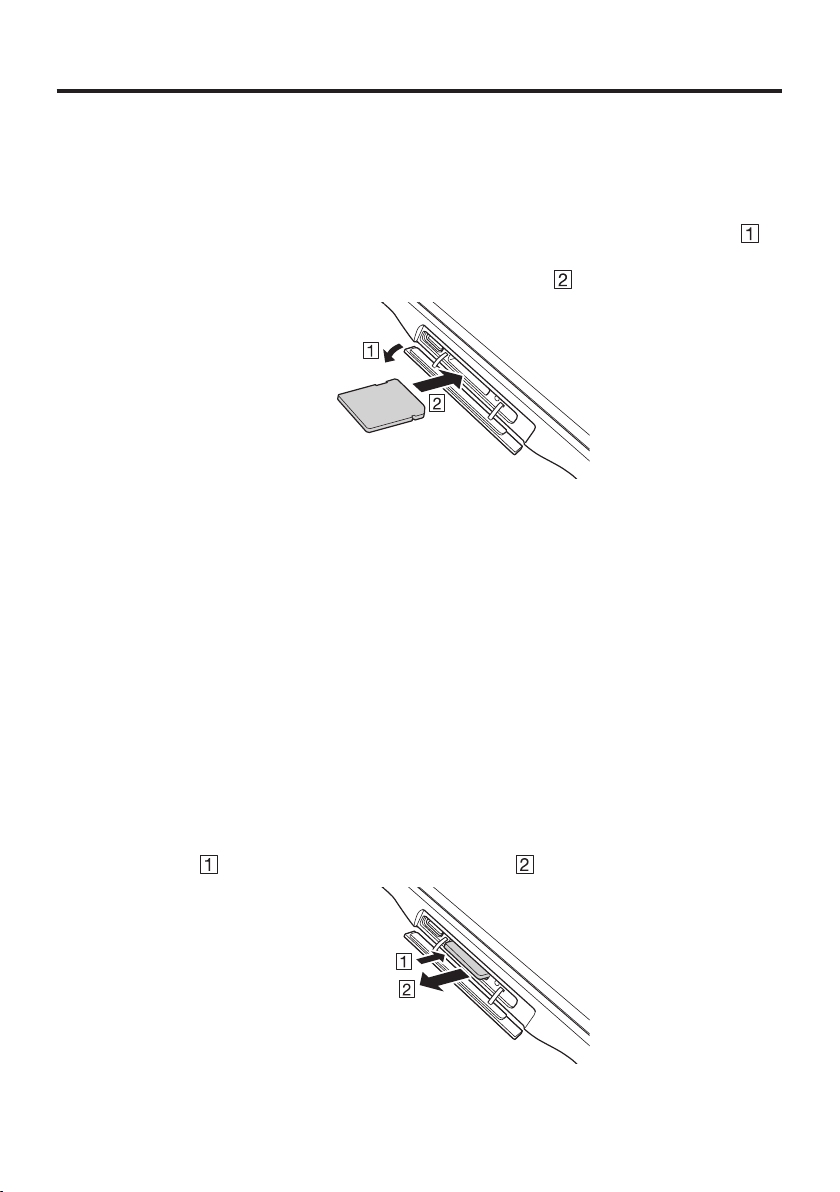
Handling SD Memory Cards
SD memory card can be installed in the SD memory card slot on the Paper Writer.
Install (or remove) an SD memory card according to the procedure described below.
Installing
1. Open the cover of the SD memory card slot on the left side of the Paper Writer ( )
and insert an SD memory card all the way in until the top of the SD memory card
aligns with the entrance of the slot of the Paper Writer (
2. Close the cover of the SD memory card slot.
Important!
An SD memory card must be inserted with the top and bottom properly aligned
•
and in the proper direction. Attempt in inserting it with an excessive force in
incorrect orientation can risk damage to the connectors and slot.
Never turn off the power or remove an SD memory card from the slot while the
•
card is being accessed. Doing so can damage the SD memory card or data in the
card.
The Paper Writer cannot access the SD memory card while the cover of the SD
•
memory card slot is open. Always close the cover.
Do not drop the card or lose it.
•
).
Removing
1. Open the cover of the SD memory card slot and press on the SD memory card
slightly (
2. Pull out the SD memory card and close the cover of the SD memory card slot.
E-62
). The SD memory card is pushed out ( ).
Page 65

Handling the NFC Reader/Writer
NFC is a type of RFID (Radio Frequency Identifi cation) technology that allows the data
in a device to be read simply by holding the device up to an NFC reader.
It can be used to read RFID tags used for controlling goods as well as contactless IC
cards used in applications such as employee identifi cation. RFID tags and contactless
IC cards can be read from either the front or the back of the Paper Writer.
Contactless IC Cards
1. Hold the contactless IC card up so that it is parallel with the Paper Writer’s reader
portion.
Otherwise, you can hold the Paper Writer up to the card.
RFID Tags
1. Hold the Paper Writer up so that the reader portion is parallel with the RFID tag.
E-63
Page 66

Important!
Both contactless IC cards and RFID tags
The NFC employs a low power radio wave which does not require regulatory
•
station license.
Frequency band used by the NFC is 13.56 MHz. Secure a suffi cient space
•
between V-N500 and other reader/writer located in the vicinity. Make sure also
that a radio station employs the same frequency band does not locate near by
prior to using V-N500.
Read a contactless IC card or RFID tag by holding the Paper Writer so that the
•
reader portion is fl ush against the card or tag.
When holding up the Paper Writer, take care not to strike the reader portion
•
against the card or tag.
If the card or tag cannot be read, try moving the Paper Writer back and forth or
•
side to side.
Contactless IC cards
Metal objects near a contactless IC card will interfere with successful reading.
•
Take the card out of a wallet if the wallet is with metal object before applying it
to the reader portion.
The card may not be read correctly if it is overlapped by one or more other
•
cards.
Always keep the Paper Writer away from your body when reading cards. Avoid
•
facing the Paper Writer towards your body while using it.
E-64
RFID tags
Metal objects near an RFID tag will interfere with successful reading. Move the
•
tag away from any nearby metal objects or use a tag designed for use with metal.
The tag may not be read correctly if it is overlapped by one or more other
•
tags. Set up the Paper Writer so that tags can be kept completely apart during
reading.
Page 67

HDMI Connection
HDMI-compatible external devices can be connected to the Paper Writer using a thirdparty HDMI cable.
1. Make sure that the power on the Paper Writer has been switched off. If the power is
still on, hold down the power button to switch off (see E-27).
2. Open the mini HDMI port cover on the left side of the Paper Writer and connect the
external device using a third-party HDMI cable.
HDMI mini-connector
Important!
Always turn the Paper Writer off when connecting or disconnecting the cable.
•
The settings for the connected external device should be as stipulated in the
•
instruction manual for that device.
E-65
Page 68

Resetting the Paper Writer
Resetting the Paper Writer is the same as resetting a PC. Performing a reset causes all
unsaved RAM data to be lost that are in mid-course of inputting and editing, but data
and settings that are already stored in the FlashROM should be unaffected.
Perform a reset to restore normal operation whenever the Paper Writer operates
abnormally due to misoperation or some other reason.
Use a pointed implement such as a mechanical pencil (with the lead retracted) to
press the reset switch on the back of the V-N500.
This starts the reset operation.
Do not use a toothpick or pencil or other sharp object whose tip may break off the
*
reset switch.
E-66
Page 69

Chapter 3
Built-in Software
E-67
Page 70

Standard Accessories
Software List
Icon Software
Camera
Browser
Email
Gallery
Music
Clock
Messaging
E-68
People
Calendar
Search
Calculator
Page 71

Camera
Shoots still images and movies.
Switch between rear camera and front camera
➀
Shutter
➁
Settings
➂
Zoom in/out
➃
Shoot panorama images
➄
Shoot video
➅
Shoot still images
➆
➀
➁
➂
➃
➄
➅
➆
■
Settings
You can use Settings to select the following modes for shooting images:
Flash mode, white balance, exposure, photography mode, camera settings
E-69
Page 72
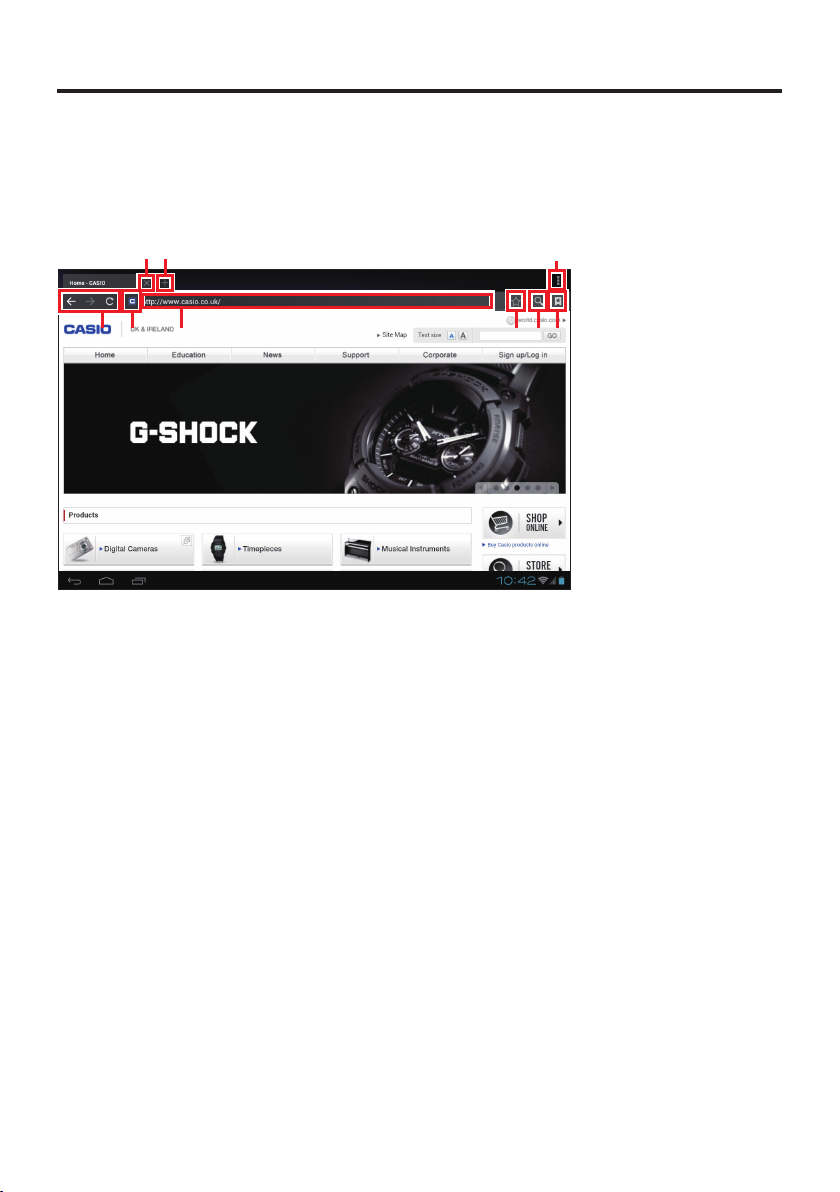
Browser
You can use the Browser to view web pages, just as you do on a computer.
There is also the Job Browser app loaded onto the Paper Writer.
➀➁
➃➄ ➅ ➆➇➈
Close tab
➀
Open new tab
➁
Show Menu
➂
Go to next/previous page
➃
Reload page
➄
Display/Enter URL
➅
Add bookmark
➆
Search
➇
Bookmarks list
➈
➂
■
Show menu
In the menu display, you can confi gure settings such as the following browser operations:
Reload (Stop), Next, New Tab, New Secret Tab, Share Page, Search in Page, Request
Desktop Site, Save for Reading Online, Page Info., Settings
■
Go to next/previous page
Moves to the next or previous page.
E-70
Page 73

Mail
Sends and receives email.
Mail sorting folders
➀
Compose new email
➁
Search
➂
Send/Receive
➃
Settings
➄
➁ ➂➀➃➄
■
Search
Searches through your received email for any that match the specifi ed keyword.
■
Send/Receive
Sends and receives email.
■
Settings
Use this to set your preferences for using email, including confi guring your account
information, setting the frequency of email reception, setting up notifi cations and
confi guring your server settings.
E-71
Page 74

Gallery
Allows you to view and organize your still images and movies.
In the initial screen, images are tiled according to the sort categories.
➀ ➁ ➂
Camera
3
Camera
4
Camera
5
➃
Sort category
➀
Launch Camera app
➁
Show menu
➂
Groupings for each sort category displayed as tiles.
➃
■
Sort category
You can use this to sort the images displayed any of the following categories:
Albums, Location, Time, People, Tags
■
Show menu
In the menu display, you can confi gure settings such as the following gallery operations:
Select Album (select group), Use Offl ine, Update, Settings
E-72
Page 75

When you select a still image, the selected image appears in full-screen display.
➂ ➃➀ ➁
➄
Return to list
➀
Share
➁
Delete
➂
Show menu
➃
Show list of images in group
➄
■
Share
You can use the following functions to share images:
Bluetooth, Email
■
Show menu
The menu display allows you to confi gure the following settings for displaying and editing
images:
Slideshow, Edit, Trimming, Store, Details
E-73
Page 76

Music
Plays audio fi les.
➀ ➁ ➂ ➃ ➄
Artists
➀
Albums
➁
Songs
➂
Playlists
➃
Now playing
➄
■
Artists
Displays a list of the saved tracks for each artist.
If no artist information is registered, “Unknown artist” is displayed.
■
Albums
Displays a list of the saved tracks on each album.
■
Songs
Displays a list of saved tracks.
■
Playlists
Displays a list of grouped tracks (playlists).
■
Now playing
Displays the track currently being played.
E-74
Page 77

Clock
Allows you to confi gure the date/time display and set the alarm.
➀
Set alarm
➀
E-75
Page 78

Message
This is the Short Message Service (SMS) app.
This service is available on WAN models.
Compose new message
➀
Search
➁
Settings
➂
➁ ➂➀
■
Search
Searches through your messages for those that match the specifi ed keyword.
■
Settings
Use this to set your preferences for using SMS, including how messages are saved,
confi guring message reception and sending, and your settings for notifi cations.
E-76
Page 79

User
Use this to manage street and email addresses.
➀
Select display category
➀
Search
➁
Add new
➂
Edit current info.
➃
Show menu
➄
■
Select display category
Use this to select one of the following as the items to be displayed:
Groups, All, Favorites
➄➃➂➁
■
Show menu
Use the menu to specify any of the following operations for your information on people.
Share, Delete, Show contact info., Import/Export, Account
E-77
Page 80

Calendar
You can use the Calendar to manage your schedule and to store or check events.
The layout below shows the screen for the single-day display.
➀
Select display mode
➀
Show today
➁
Make a plan
➂
Show menu
➃
■
Show menu
Use the menu to select any of the following calendar operations:
Update, Search, Show/Hide controls, Settings
➃➂➁
E-78
Page 81

The layout below shows the screen for the one-week display.
The layout below shows the screen for the one-month display.
E-79
Page 82
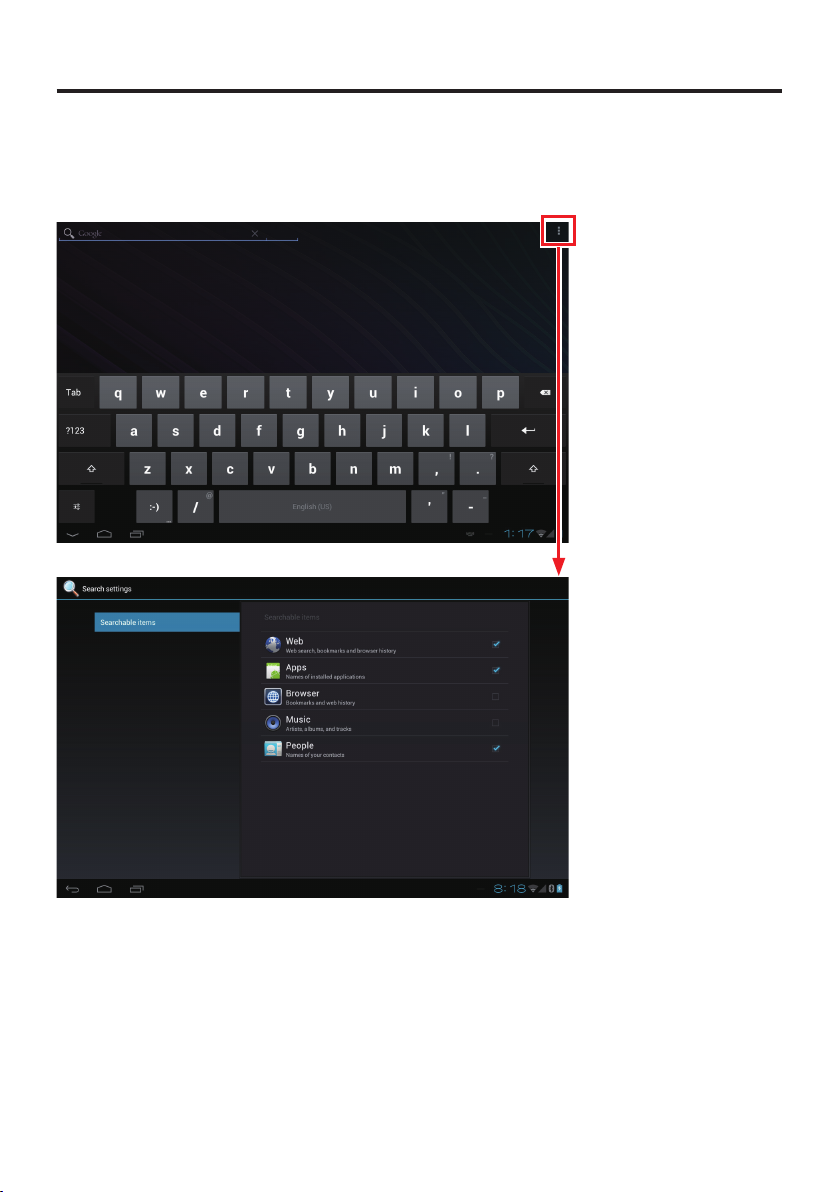
Search
Searches on the web or in the Paper Writer.
Items checked in the search settings will be searched.
E-80
Page 83

Calculator
Allows you to carry out arithmetic or scientifi c calculations.
Backspace
➀
➀
E-81
Page 84

Additional Accessories
Software List
Icon Software
Adobe Reader
MemoText
MemoPaint
Job Browser
Voice Recorder
E-82
Page 85

Adobe Reader
Allows you to view PDF documents.
When you select a PDF document in File Manager, this software is used to display the
document.
➀
Home screen
➀
Display mode
➁
Edit
➂
Share
➃
Search text
➄
Slide bar
➅
➄➃➂➁
➅
■
Home screen
The Home screen shows the following menu items when you select a document to view:
Open Recent File, Document List, What’s New
■
Display mode
The display modes allow you to select any of the following ways of viewing a document:
Continuous, Single-Page, Text Wrapping, Auto
E-83
Page 86

■
Edit
In documents that permit editing, you can carry out the following editing tasks:
Comments, Highlights, Strikethrough, Underscore, Add text, Freehand drawing,
Signature
■
Share
You can use the following functions to share documents:
Bluetooth, Email, Send for signing
■
Slide bar
You can move a page by sliding the bar.
E-84
Page 87
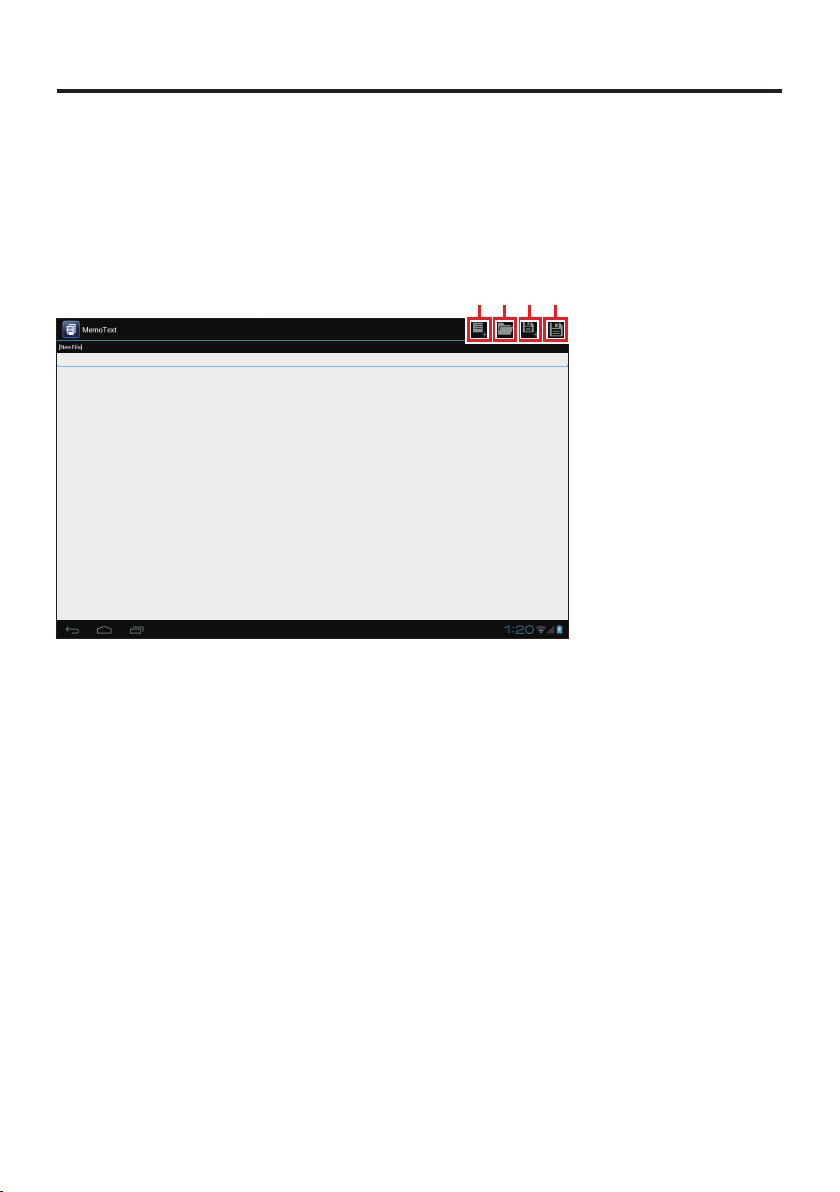
Memo Text
Provides display and editing functions for text memos.
When you select a text document in File Manager, this software is used to display the
document.
You can also launch this app and then use “Open File” to select and display any text fi le.
➂ ➃➁➀
New
➀
Open fi le
➁
Save as
➂
Save
➃
E-85
Page 88
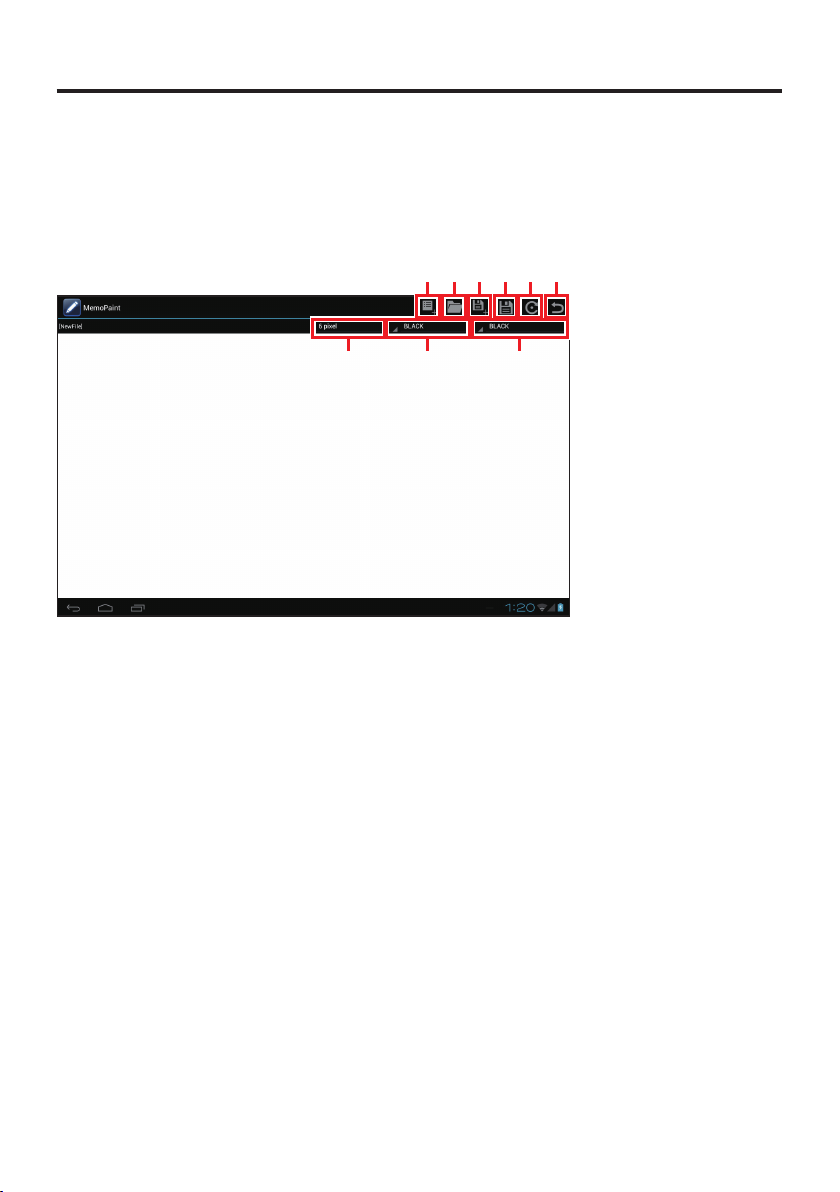
Memo Paint
Provides display and editing functions for handwritten (image format) memos.
You can also launch this app and then use “Open File” to select and display any image (PNG or
JPG).
➄➀ ➁ ➂ ➃ ➅
➈➇➆
New
➀
Open fi le
➁
Save as
➂
Save
➃
Rotate image
➄
Undo
➅
Line thickness
➆
Line color for fi ngerpainting
➇
Line color for Digitizer Pen
➈
■
Rotate image
Rotates the displayed image 90° clockwise.
■
Undo
Cancels the last operation performed.
This allows you to undo just the last action you took.
E-86
Page 89

■
Line thickness
Specifi es one of the following as the line thickness:
1, 2, 4, 6, 8, 10, 20 or 30 pixels
■
Line color for fi ngerpainting
Specifi es one of the following as the line color for fi ngerpainting:
Black, blue, cyan, gray, green, red, magenta, yellow, white
■
Line color for Digitizer Pen
Specifi es one of the following as the line color for the Digitizer Pen:
Black, blue, cyan, gray, green, red, magenta, yellow, white
E-87
Page 90

Job Browser
The Job Browser is separate from the standard Android browser and allows you to limit the
standard browser functions.
Unlike the standard browser, you can apply the following limitations:
• Restrict displayed items
Prevents the user from accessing displayed buttons and the address bar.
• Specify browsed domains
Restricts the hosts that can be browsed.
• Priority specifi cation
The settings in the settings fi le take priority over the settings specifi ed in the Job Browser
settings screen.
Apart from the restrictions, the Job Browser is identical to the standard Android browser.
Sample setting: Where the browsed site is restricted to “www.casio.com”
If a URL other than www.casio.com is entered (“www.google.com” in this screenshot),
a pop-up (Toast) warning message appears and access to the site is blocked.
Enter URL
E-88
Connection disabled warning
Page 91

Voice Recorder
Provides recording and playback functions for voice memos.
Screen at startup
Show playback list
➀
Record
➁
Screen during recording
➀
➁
➂
➂
Stop
E-89
Page 92
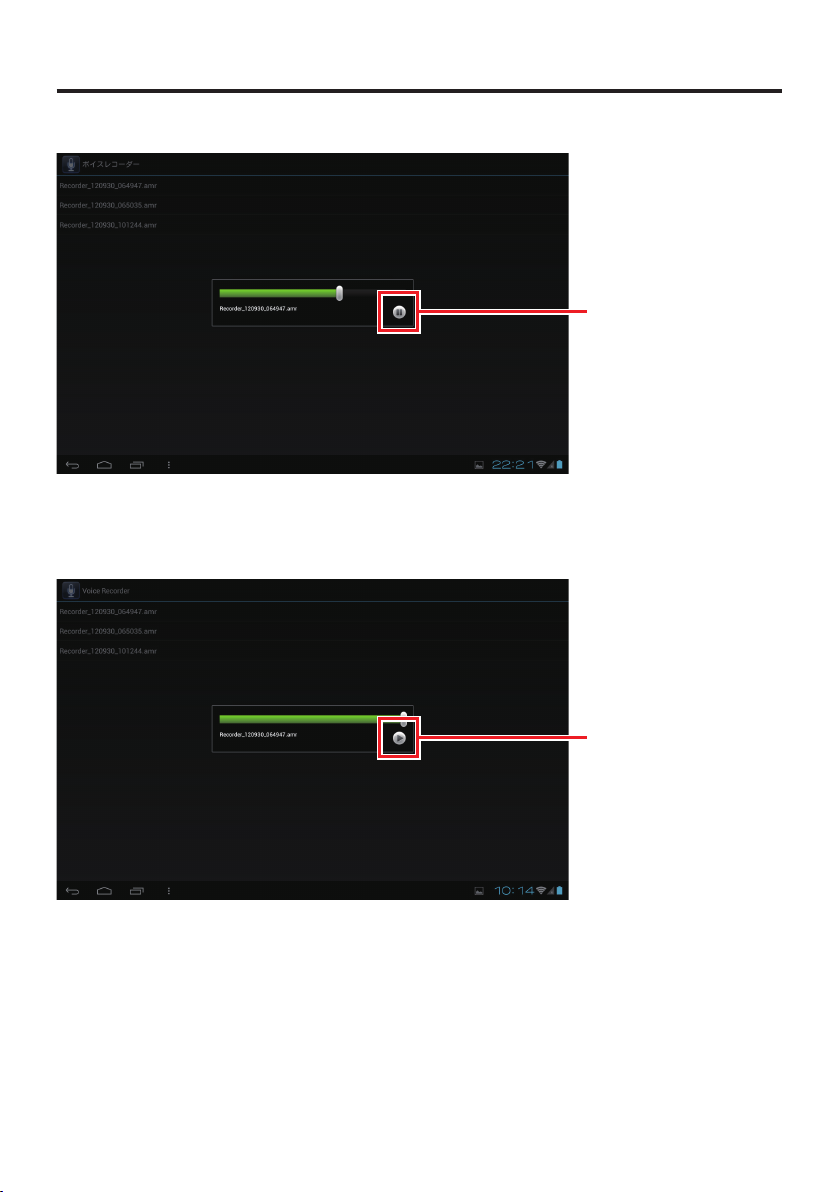
Screen during playback
Pause
➃
Screen when playback ends
➃
Play
➄
E-90
➄
Page 93

■
Show playback list
Shows a list of the data recorded so far.
Files are saved in the “Recorder_YYMMDD_HHMMSS.amr” format.
➀
During recording, the Show Playback List button
■
Record
Recording starts when you press the Record button
To stop recording, press the Stop button ➂.
■
Playback
When you select a fi le from the playback list, the selected audio fi le is played.
To pause playback, press the Pause button ➃.
When playback ends, the Pause button ➃ changes to the Play button ➄.
To play the fi le again, press the Play button ➄.
changes to the Stop button ➂.
➁
.
E-91
Page 94

Paper Writer Accessories
Software List
Icon Software
Closing Shot
Flipping Shot
Finder
Calendar
Contacts
E-92
Page 95

Closing Shot
A closing shot photographs information written on paper set in the paper holder.
After a shot is taken, the Finder automatically starts up and the image can be viewed, edited,
printed and confi gured.
1
1
Preview
Note
Settings menu options such as the paper size can be displayed by tapping the setting
•
icon in the Flipping Shot main screen.
E-93
Page 96

Flipping Shot
Use fl ipping shots to photograph business cards or information written in a notebook or similar
document.
You can use this mode to import images shot with the rear camera and images in the Gallery.
When you exit the Flipping Shot function, the Finder automatically starts up and the image can
be viewed, edited, printed and confi gured.
[Key Screens]
Main screen Setting screen (Flipping Shot)
Camera/Gallery screen
Setting screen (Closing Shot)
Note
The Closing Shot setting screen is not displayed when the screen cover is used.
•
E-94
Page 97

[Flipping Shot — Main screen]
1234
1
Paper alignment guide
2
Camera/Gallery
3
Exit
4
Setting
5
(Flipping Shot) ON/OFF
6
Manual shooting
7
Mark recognition on/off
8
Facing pages on/off
9
Paper direction
:
Paper size
A
Related schedule, tags
B
Photographed image thumbnail display
5
6
8
7
9
:BA
E-95
Page 98

Camera/Gallery
■
Jumps to the Camera/Gallery screen.
Exit
■
Exits the Flipping Shot function. If any images have been shot, the Finder automatically
starts up.
Setting
■
Jumps to the setting screen.
(Flipping Shot) ON/OFF
■
Enables/Disables the Flipping Shot function.
Manual shooting
■
Enables you to shoot images at any time, regardless of whether Flipping Shot is ON or OFF.
Mark recognition on/off
■
Enables/Disables mark recognition.
Facing pages on/off
■
Specifi es whether the notebook being used has facing pages.
If the facing pages setting is selected, the photographed image is split into 2 pages and
saved.
Paper direction
■
Tap the arrow to set the paper direction.
After the shot is taken, the image is rotated so that the direction of the arrow is upwards.
Related schedule, tags
■
Displays information on related schedules and tags added by the auto tagging function.
Tapping this icon opens a pop-up menu that can be used to change the details.
Note
• You can enable or disable the auto tagging function in the setting screen.
• You can edit the rules for auto tagging in the TAG pane of the Finder page list screen.
E-96
Page 99

Photographed image thumbnail display
■
Displays thumbnails for the photographed images. If you hold your fi nger against an image,
a pop-up menu appears from which you can delete, re-shoot or enlarge the image.
E-97
Page 100

[Flipping Shot — Camera/Gallery screen]
1
1
Image cropping guide
2
Cancel
3
Camera
4
Gallery
5
Import
6
Clear
7
Rotate 90° clockwise
8
Rotate 90° counterclockwise
2
3
4
5
6
7
8
Image cropping guide
■
Automatically recognizes an image and displays the area to be cropped as a trapezoid.
You can change the area to be cropped by dragging the corners of the trapezoid around.
E-98
 Loading...