

Page 1
PAGE
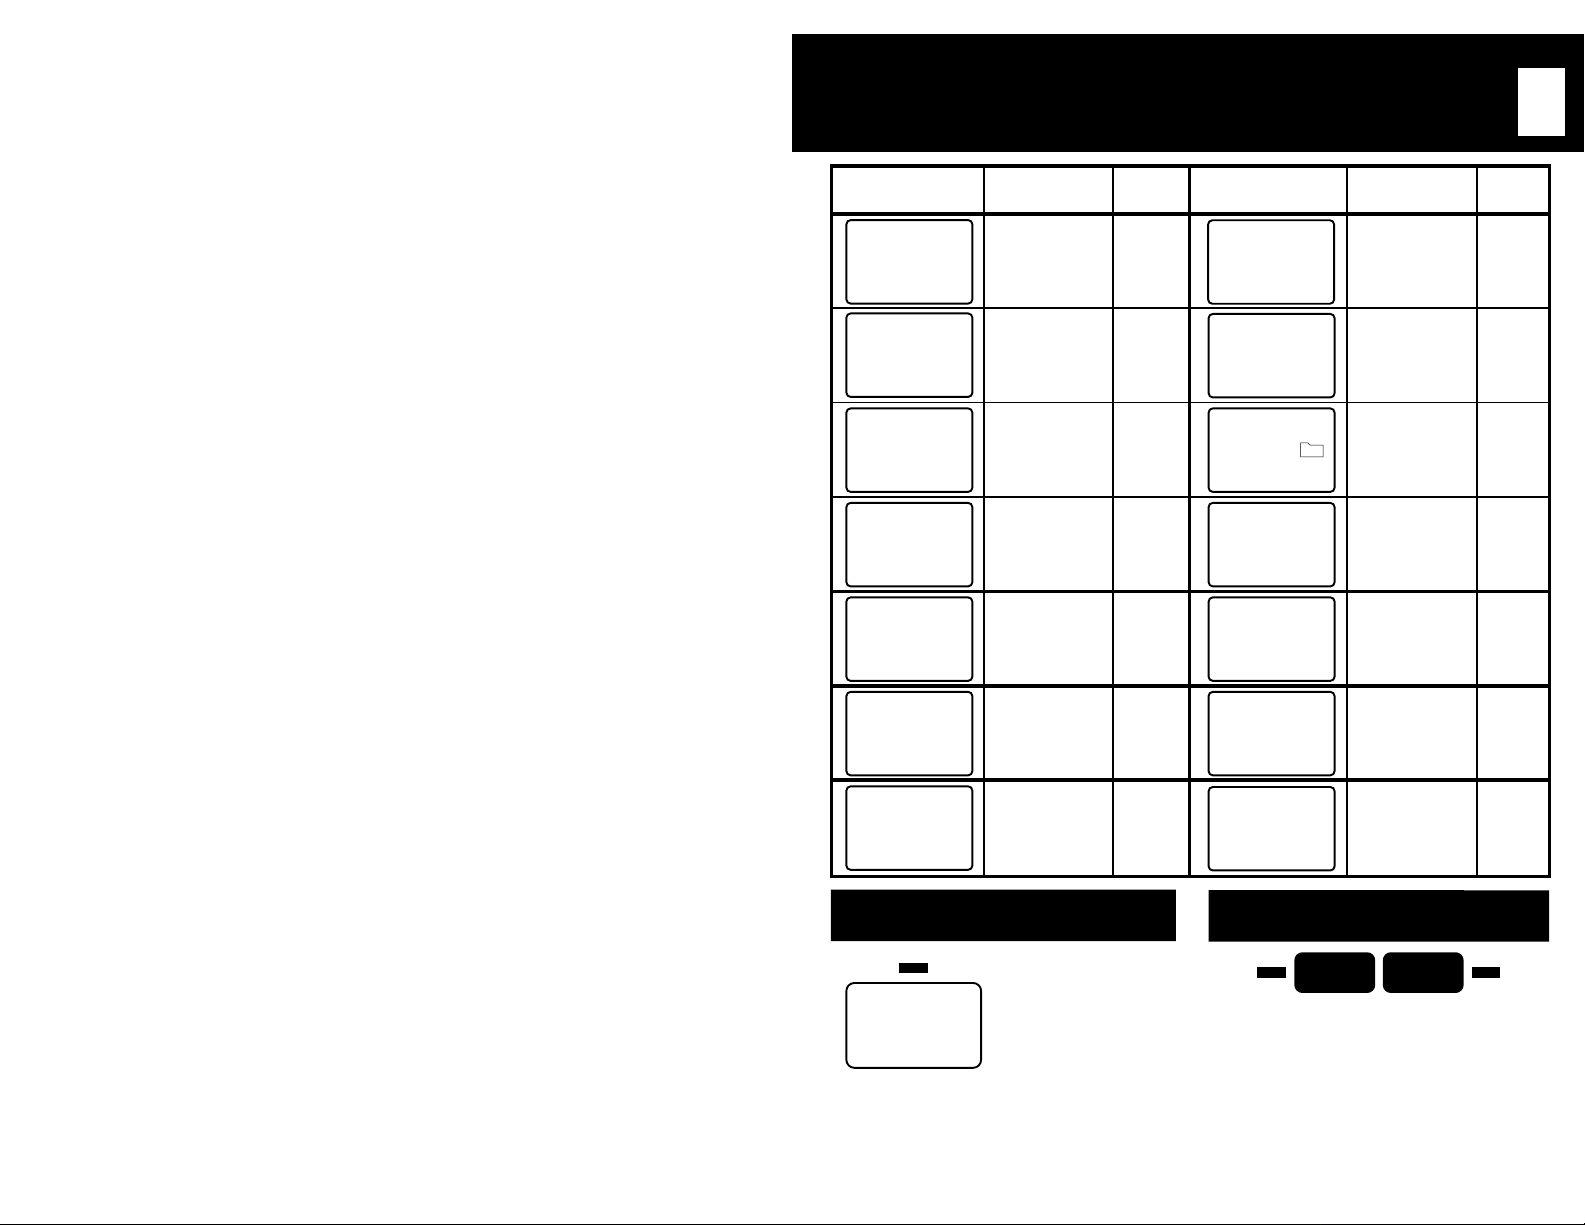
LCD DISPLAYS & INDICATORS
Display PageDescription
GREETING 1
1- 0
LINE 1 LINE 2
GREETING 1 2
1:45
LINE 1 LINE 2
GREETING 1 2
SCREEN OFF
PM
Only
Off
6 25
GREETING 1 2
End of Message
End
LINE 1 LINE 2
GREETING 1
2
LINE 1
GREETING 1 2
12:00
LINE 1 LINE 2
GREETING 1
ERASE
AM
Playback
Erase Individual
Messages
Programming &
Record Greetings
Hd
LINE 2
9Announce
16Call Screening
21Code Set
10-11,
13-15
14
7-9
17-18Hold a Call
Display PageDescription
GREETING 1 2
Line 1 and 2
1:45
PM
LINE 1 LINE 2
GREETING 1 2
12 3
LINE 1 LINE 2
GREETING 1 2
1:45
LINE 1 LINE 2
GREETING 1 2
FILE
PM
PAU
LINE 1 LINE 2
GREETING 1 2
2 3
LINE 1 LINE 2 RECORDING
GREETING 1 2
SAVE
End
LINE 1 LINE 2
GREETING 1 2
1:45
PM
LINE 1 LINE 2
On/Off
Message Count
for Each Line
Message File
Messages
Stored
Playback
Recording
Messages,
Memos,
Greetings, etc.
Save All
Messages
Setting
Time/Day
Stamp
1
5
10
15
12Pause Message
7, 20
13
6
MESSAGE INDICATORS
1. OFF = off
2. ON (solid light) =
PLAY/PAUSE
1
On, no messages
3. Quick flashing =
New messages
4. Slow flashing =
Played and saved
messages
FEATURE I
LINE-IN USE INDICATORS
LINE 1 LINE 2
SPEAKERPHONE
1. Solid Green = Speakerphone in use
2. Flashing Green = On hold
3. Solid Red = Extension phone in use or on
hold
Page 2

PAGE
PAGE
2
IMPORTANT FEATURE INFOR MATION
DIGITAL GREETING AND INCOMING MESSAGES
Greetings and incoming messages are recorded on a digital chip - reducing mechanical
components and increasing reliability. The TA-180 allows a total of 28 minutes of combined
recording time for greetings, incoming messages, recorded memos and recorded conversations.
Your all digital answering machine pr ovides you with the following advantages:
1. Permanent Message Protection - does not require a battery during a power failure to maintain
greetings, recorded messages and remote code.
2. Reliability. There are no moving parts to break. The use of electronic components effectively
increases the life of your machine.
3. Operational Ease. There is no tape to rewind or entangle. You no longer have to worry about
replacing worn or damaged tapes.
4. Instant Access
accessed instantly for playback. In addition, other features such as Variable Speed
Playback
machines.
NOTE:
■ The audio quality of digitally recorded incoming messages and greetings may be subtly different than incoming
messages and greetings recorded on a microcassette machine.
TM
to Messages. All messages are recorded digitally and therefore can be
TM
, Skip & Repeat and Selective Save & Erase are only possible on all digital
VOICE ASSISTED OPERATION
A synthesized voice confirms machine functions and commands when operating and
programming the TA-180 at the machine.
MULTIFUNCTIONAL DISPLAY
The Display shows:
■ the time (if no messages are recorded)
■ the number of messages received on each line
■ active line for answering machine
■ machine status: recording, announce only mode, etc.
■ greeting mode
■ message file icon (if messages are transferred)
■ save and erase indicators
GREETING 1 2
12:43
LINE 1 LINE 2
SCREEN OFF
PM
FILE
VOICE TIME/DAY/LINE STAMP
During message playback at the machine or via remote operation, a synthesized voice announces
the time, day and the line for each message.
ONE-TOUCH CONTROLS
Many of the features of the TA-180 are activated by pressing a single button. There are no
complicated instructions to remember.
REMOTE OPERATION WITH VOICE MENU
Use the programmable 3-digit remote access code to operate the TA-180 remotely from most
touchtone and cellular phones.
3
ONE- OR TWO-LINE ANSWERING MACHINE
The TA-180 answers one or two phone lines and shows the message count for each line in the
digital display. For total user control, the answering machine for each line can be turned on or off
independently.
TWO GREETINGS
Record one or two greetings, one for each line, or one for both lines. Greetings of unlimited
length can be recorded up to the maximum recording capacity of the TA-180. This allows you to
record lengthy detailed outgoing messages for your callers if you desire.
MESSAGE FILE
Message File offers a convenient way to store important messages, long messages or to separate
messages for business, personal use or for other users.
SHORT BURST/CELLULAR COMPATIBLE
This answering machine is compatible with short burst phones such as pay phones, car phones
and other cellular phones. You can use a short burst phone to access the unit in remote
operation.
SIMULTANEOUS ANSWERING OF BOTH LINES
If either line is in use on the Speakerphone or busy recording a message, a special message will
be announced to the calling party on the other line to indicate the busy status of the TA-180. The
second calling party will hear , “
This message will be repeated every ten seconds until the first line is no longer in use. The
greeting will play and the second calling party can then record a message.
Hello. Thank you for calling. Your call will be answered shortly.
”
Page 3
PAGE
PAGE
4
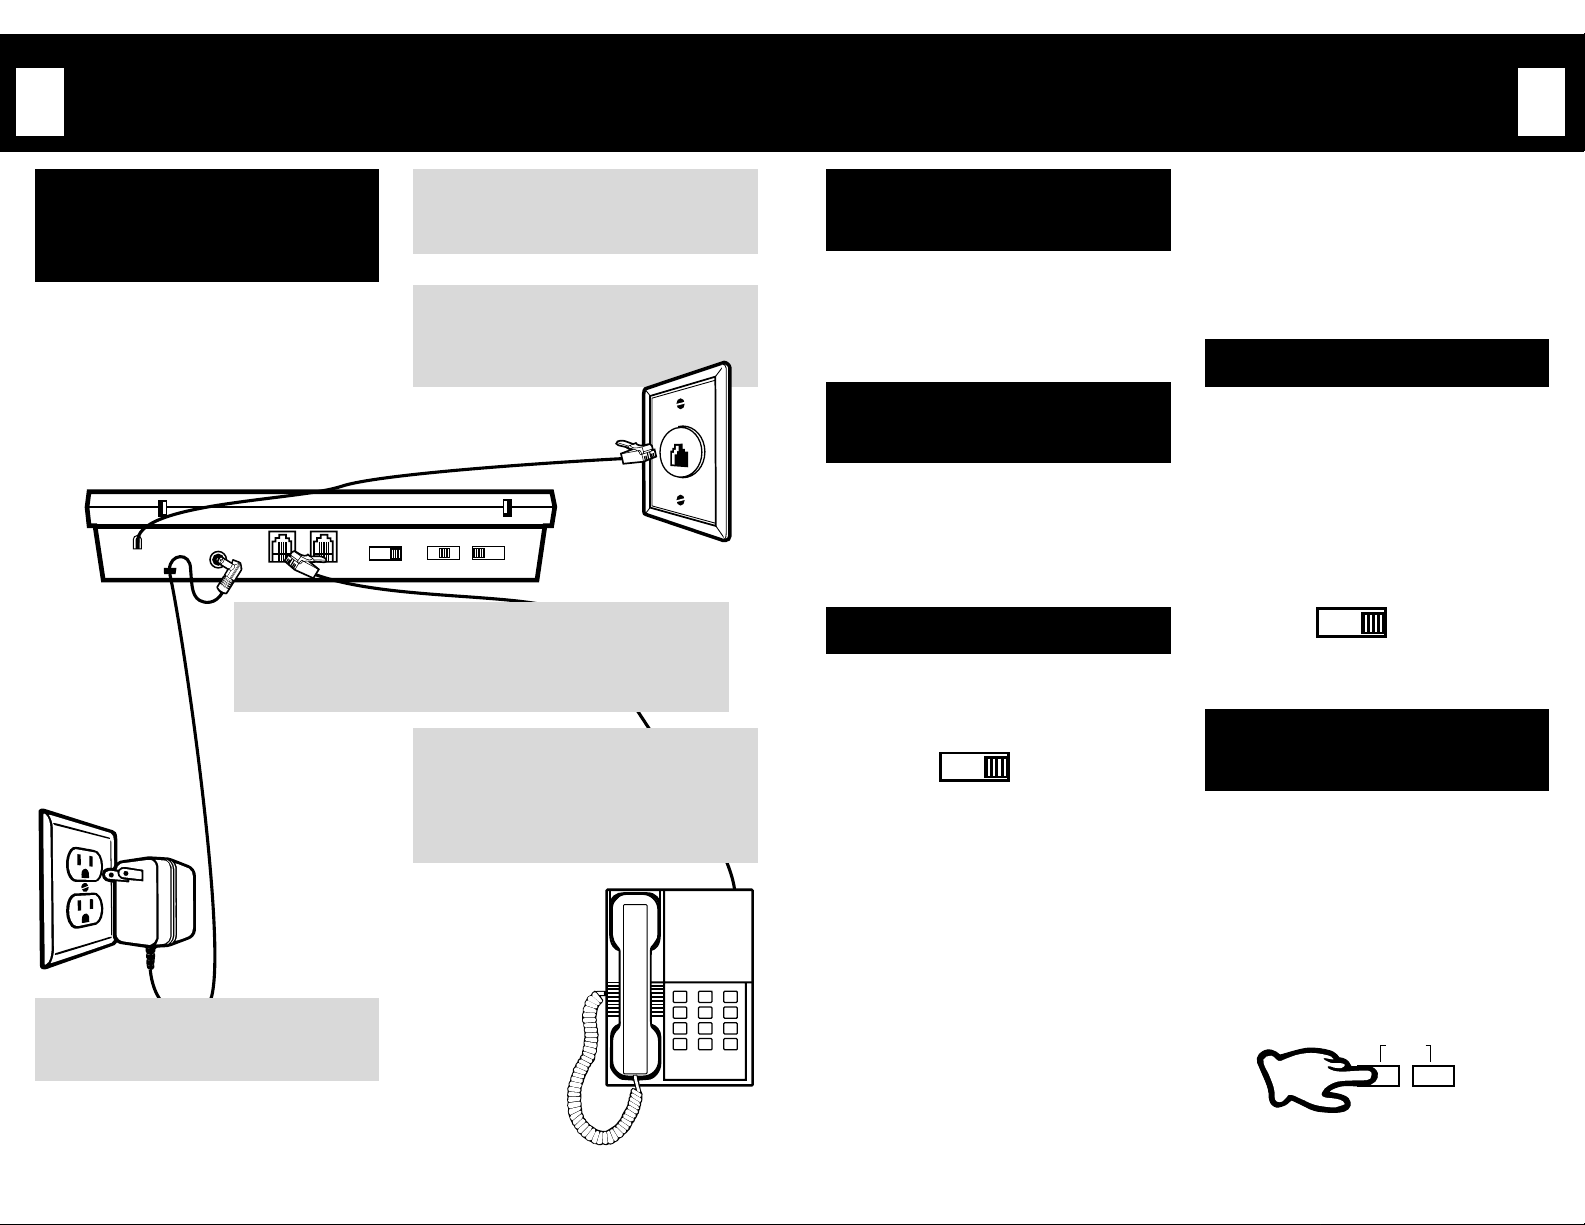
INITIAL SETUP
INSTALLATION FOR
CONNECTING TO A SINGLE
TWO-LINE WALL JACK
The TA-180 is designed to work with your
existing telephone wiring, whether you have
one or two telephone lines, or one or two wall
jacks.
The drawings and instructions on this page
describe the most common 2-line connection
which connects your answering machine to
two telephone lines using a single jack (RJ14).
LINE 2
WALL
JACK
RJ11
RJ11
USE ONLY WITH CPMI
LINE 1 & 2
OR LINE 1
ADAPTOR M/N-75
Plug the AC ADAPTER into an
ELECTRICAL WALL OUTLET. The
5
indicators and display will flash.
TO
TELEPHONE
Connect the AC ADAPTER PLUG into the AC ADAPTER
OUTLET on the back of the unit. Loop the AC ADAPTER
3
CORD through the AC ADAPTER CORD HOLDER to prevent
accidental disconnection and messages from being erased.
2X
CONNECTION
MODE
WALL
JACK
RJ14
If needed, set the WALL JACK
CONNECTION SWITCH (located on
1
the back of the unit) to “1 X RJ14.”
Plug the TELEPHONE CORD that is
attached to the back of the unit into
2
your RJ14 TWO-LINE TELEPHONE
WALL JACK.
1X
OFF LO HI
RING VOL
TS 2 4
RINGS
Connect your two-line telephone to
the jack on the back of the unit labeled
4
“TO TELEPHONE.”
NOTE:
■ If you connect a single-line telephone, it will
only operate Line 1.
ABC2DEF
1
GHI4JKL5MNO
TUV
PRS
8
7
0
*
5
CONNECTING TO TWO
SINGLE-LINE WALL JACKS
If you have two separate wall jacks for two
telephone lines, you may connect them to the
TA-180 with two telephone cords.
Refer to page 27 for connection instructions.
CONNECTING TWO
SINGLE-LINE TELEPHONES
If you wish to use single line telephones, you
may connect them to each wall jack to allow
2-line telephone capability.
Refer to page 28 for connection instructions.
RING SELECT
The RING SELECT SWITCH is located on the
back of the unit. The unit is shipped with this
switch set to “4.” Set it to 2, 4 or TS
(tollsaver) according to the following:
TS 2 4
RINGS
1. When set to “2” the answering machine
answers calls on the second or third ring.
2. When set to “4” the answering machine
answers calls on the fourth or fifth ring.
3. When set to “TS” (tollsaver) the answering
machine helps eliminate unnecessary toll
charges by letting you know if there are
3
6
WXY
9
#
any new messages before it answers.
When you call in to retrieve messages in
remote operation, the TA-180:
■ Answers on the second or third ring
if there are new messages.
■ Answers on the fourth or fifth ring if
there are no new messages.
When you call your machine to retrieve
messages in remote operation, you will
know there are no new messages if the
unit does not answer by the third ring.
Hang up before the fourth ring to avoid an
unnecessary toll charge.
RINGER VOLUME
The RINGER VOLUME SWITCH (located on
the back of the unit) controls the ringer
volumes for incoming calls on both lines. The
RINGER VOLUME SWITCH is factory preset to
“HI.” Each line has a unique ringer sound to
allow you to differentiate the two lines.
HI = Loud
LO = Suppressed volume
OFF = The ringers are turned off.
OFF LO HI
RING VOL
ANSWERING MACHINE
ON/OFF FOR EACH LINE
Press
ON/OFF
or Line 2 to turn the answering machine on
and off, independently by line. The display,
clock and speakerphone will continue to
operate even if the answering machine is off,
but the machine will not play greetings or
record messages. The red MESSAGE
INDICATOR will light and “LINE 1” and/or
“LINE 2” will appear in the display for each
answering machine line that is turned on.
(under the lid) for Line 1 and/
LINE 1
ON/OFF
ANNC
Page 4

PAGE
PAGE
6
TIME/DAY STAMP
SET VOICE
TIME/DAY STAMP
During message playback, a synthesized voice
will announce the current time and day of the
week. T o set the current time and day of the
week:
TIME SET
Press
You will hear:
1
Press
SKIP/+
the correct day is announced.
2
REPEAT
Press
TIME SET
hour. “12: ”
3
and you will hear:
(under the lid).
TIME
CHECK
SET
or
REPEAT/-
SKIP
again to set the
will flash in the display
Enter hour.
Sunday
until
Saturday
Press
TIME SET
minutes.
5
display.
Press
6
REPEAT/-
Press
day and time will be announced and
7
time set is complete.
NOTES:
■ If the time and day have not been set, all messages
will be stamped with “
■ When experiencing a power failure, the TA-180 will
maintain the clock function
After 20 minutes, the clock reverts to the factory
default setting of Sunday, 12:00 a.m., and “12:00 AM”
will flash in the display. All other stored information
including greetings and incoming messages, remote
access code, and other machine settings will be saved
and normal operation will resume when power is
restored.
SKIP/+
TIME SET
again to set the
“ :00 ” will flash in the
Enter
minute.
to advance or
to reverse the minutes.
again to end. The
Saturday,
4:32 p.m.
Sunday 12:00 a.m
for up to 20 minutes.
.”
RECORDING GREETINGS
You can record one or two greetings and use
one of three greeting modes as discussed on
page 8.
RECORD GREETING 1
Adjust the
CONTROL
1
the halfway point.
Press
the lid). You will hear:
2
GREETING
RECORD SELECT
CHECK
Press
VOLUME
to about
GREETING RECORD
Press one for
greeting one. Press
two for greeting two.
PLAY/PAUSE 1
.
(under
3
PLAY/PAUSE
1
Record new
greeting one.
When “RECORDING”
display, begin speaking clearly, 6-8"
4
away from the microphone (lower
right corner of machine). Your
greeting must be at least 3 seconds
long or the pre-recorded greeting,
Please record a message after the
“
tone
,” will play.
GREETING 1
12:45
LINE 1 LINE 2
Press
to end the recording. Your recorded
5
greeting will automatically replay.
NOTES:
■ The volume control does not affect the volume of the
greeting that is played to callers over the phone line. It
controls only the volume of messages played back,
greeting check and the caller’s voice when using the
speakerphone.
■ The TA-180 indicates if no greeting has been recorded
for Greeting 1 or Greeting 2 by flashing the “1” or “2”
in the display.
PM
RECORDING
GREETING RECORD
flashes in the
again
7
Press
SKIP/+
REPEAT/-
4
hour setting will appear in the display.
GREETING 1 2
4:00
to advance or
to reverse the hour . The
PM
TIME CHECK
In addition to the display clock, a synthesized
voice announces the time and day. Press
TIME CHECK
the current time and day setting. If the time
and day are not set,
be announced.
(under the lid.) You will hear
“Sunday 12:00 a.m.”
TIME
CHECK
SET
will
CALL SCREEN
PLAYBACK
SPEED
CONV
REPEAT
MEMO
SKIP
CODE
TIME
SET
GREETING
RECORD SELECTSET/CHECKCHECK
LINE 1
ON/OFFCHECK
LINE 2
ANNC
ON/OFFANNC
RECORD
NEW
ONLY
ERASE
FLASH
PLAY/PAUSE
1 & 2
SAVE
HOLD
MESSAGE
FILE
PLAY/PAUSE
1
TWO LINE ● ALL DIGITAL
PLAY/PAUSE
LINE 1 LINE 2
SPEAKERPHONE
2
MIC
GREETING 2
To record Greeting 2, repeat
steps 1-5 above with the
exception of pressing
PAUSE 2
in step 3.
PLAY/
Page 5
PAGE
PAGE
8
PROGRAMMING & RECORDING
CHECK GREETINGS
You can listen to any of your recorded
greetings anytime.
GREETING CHECK
Press
the lid). You will hear:
1
GREETING
RECORD SELECT
Press
PAUSE 2
2
greeting. Your greeting will be
replayed.
NOTES:
■ The TA-180 indicates if no greeting has been recorded
for Greeting 1 or Greeting 2 by flashing “1” or “2” in
the display.
■ If no greeting is recorded, you will hear: “
one (two)
after the tone,
CHECK
Press one for greeting
one, press two for
PLAY/PAUSE 1
to select the desired
PLAY/PAUSE
.” Callers will hear “
” if no greeting is recorded.
Record new message
(under
greeting two.
or
PLAY/
1
No greeting
SELECT GREETING MODE
The greeting mode in the TA-180 is pre-set to
“Greeting Mode 1.” The TA-180 has three
greeting modes:
Greeting Mode 1:
Greeting 1 answers Line 1,
Greeting 1 answers Line 2
Greeting Mode 2:
Greeting 2 answers Line 1,
Greeting 2 answers Line 2
Greeting Mode 3:
Greeting 1 answers Line 1,
Greeting 2 answers Line 2
CHANGING
THE GREETING MODE
Press
GREETING SELECT
until the display shows the correct greeting
mode. Each time you press
SELECT
mode. An audio message will confirm each
mode as it is selected.
, you will change to the next greeting
GREETING
RECORD SELECT
CHECK
(under the lid)
GREETING
GREETINGS (CONT.)
GREETING MODE 1
This mode plays Greeting 1 to both lines.
GREETING 1
GREETING MODE 2
This mode plays Greeting 2 to both lines.
GREETING 2
GREETING MODE 3
This mode sets the TA-180 to deliver a
different greeting for each line. One common
application of this mode is to use Greeting 1
for your personal callers and Greeting 2 for
your business callers or another person in the
home or office.
PRE-RECORDED GREETING
If greetings are not recorded, the caller will
hear the following pre-recorded message on
both lines: “
tone.
Please record a message after the
”
GREETING 1 2
9
ANNOUNCE ONLY FOR
EACH LINE
The Announce Only feature allows you to
provide callers with information, such as
business hours of operation when you do not
want to receive recorded messages. The
machine will play a greeting but will not
record incoming messages.
Press
ANNC
(announce only) under
the lid for Line 1 or Line 2. You will
1
hear a beep and “1-“ or “2-“ will
appear in the display to indicate that
announce only is activated for Line 1
and/or Line 2.
LINE 1
ON/OFF
NOTES:
■ The clock display will not appear when announce only
■ Memos and conversations can still be recorded at the
■ It is recommended that you inform callers in your
ANNC
1- 0
LINE 1 LINE 2
is activated on either line, but the TA-180 will maintain
the internal clock.
machine when announce only is activated on either
line or both lines.
greeting that the unit will not record messages.
DEACTIVATE
ANNOUNCE ONLY
GREETING
RECORD SELECT
Press
ANNC
LINE 1
ON/OFFCHECK
LINE 2
ON/OFFANNC
ANNC
BYPASS GREETING
Frequent callers can skip your greeting when
they call to leave a message. Instruct them to
#
press
during the greeting.
on their touchtone keypad any time
will hear a beep. “1-“ or “2-“
1
disappear from the display and the
message count for each line will
reappear if messages are recorded.
(under the lid) and you
will
Page 6
PAGE
PAGE
10
PLAYING MESSAGES
MESSAGE INDICATORS
The TA-180 has a red MESSAGE INDICATOR
for each line. Each MESSAGE INDICATOR has
four settings:
1. OFF = The TA-180 machine is off.
2. ON (solid light) = The machine is on for
line 1 or 2 and there are no new or saved
messages for that line.
3. Quick flashing = New messages have been
received and not yet played for that line.
4. Slow flashing = Messages have been
played and saved for that line.
PLAY/PAUSE
2
NOTE:
■ The MESSAGE INDICATORS do not indicate messages
that may be stored in Message File. When messages
are stored in Message File, the message file icon will
appear in the display.
PLAY NEW MESSAGES
BY LINE
The digital display shows the total number of
messages received on each line (not including
messages stored in Message File). The
MESSAGE INDICATORS flash quickly to alert
you that new messages have been received
and not yet played.
GREETING 1 2
4 3
LINE 1 LINE 2
To listen to only
specific line, press
1
will hear:
new messages for a
NEW ONLY
NEW
ONLY
Press 1 or 2.
. You
Press
2
PLAY/PAUSE 1
PAUSE 2
. You will hear either:
PLAY/PAUSE
or
PLAY/
1
Four new line
one messages.
New message one.
Tuesday, 3:45 p.m.
After the end of the last message,
“End” will appear in the display for
3
several seconds and you will hear:
GREETING 1 2
OR
No new
messages.
Hi, this is Sue.
I was calling...
End of
messages
.
End
LINE 1 LINE 2
NOTES:
■ If the time and day have not been set, all messages
will be stamped with “
■ TA-180 will not answer calls during message
playback. The LINE 1 or LINE 2 SPEAKERPHONE
INDICATOR will intermittently flash red indicating an
incoming call. You may answer calls with
SPEAKERPHONE. All messages are saved.
■ Pressing
■ If Line 1 message count exceeds 19 messages,
NEW
ONLY
NEW ONLY
play all new messages starting with Line 1, then Line
2, in the order they were received.
“OVER” will be displayed.
PLAY/PAUSE
1 & 2
Sunday 12:00 a.m
and then
PLAY/PAUSE 1&2
PLAY/PAUSE
1
.”
PLAY/PAUSE
2
will
PLAY ALL MESSAGES -
BOTH LINES COMBINED
The MESSAGE INDICATORS will either flash
slowly when messages have been played and
saved or flash quickly to indicate that new
messages have been received. The total
number of new and saved messages for each
line (not including Message File) will appear
above LINE 1 and LINE 2 in the display.
Press
PLAY/PAUSE 1&2
all new and saved messages for both
1
lines. You will hear either:
PLAY/PAUSE
1 & 2
OR
No
messages.
All messages are played in the order
received starting with Line 1 messages.
2
The line will be announced once before
playing all messages on each line and
each message will be identified by
number , time and day.
After the end of the last message,
“End” will appear in the display for
3
several seconds
and you will hear:
one messages.
Message one.
Monday, 1:34 p.m.
Four line
Hi Mike, I’m
calling to
End of
messages.
to replay
PLAY MESSAGES
LINE BY LINE
The MESSAGE INDICATORS will either flash
slowly when messages have been played and
saved or flash quickly to indicate that new
messages have been received. The total
number of new and saved messages for each
line (not including Message File) will appear
above LINE 1 and LINE 2 in the display.
Press either
PLAY/PAUSE 2
1
saved messages for each line
separately. You will hear either:
PLAY/PAUSE
1
No
messages.
...
All messages for Line 1 or Line 2 are
played in the order received and the
2
individual message number is
displayed during playback. The line will
be announced once before playing all
messages and each message will be
identified by number , time and day.
After the end of the last message,
“End” will appear in the display for
3
several seconds and you will hear:
PLAY/PAUSE 1
to play all new and
Six line one messages.
OR
Message one.
Monday, 1:34 p.m.
or
Hi Mike, I’m
calling to
End of
messages
11
...”
.
Page 7

PAGE
PAGE
12
PLAYING MESSAGES (CONT.)
REPEAT
You can repeat a message.
REPEA T
Press
playback to replay the message. The
1
message number will be announced
and the message will replay.
during message
REPEAT
SKIP BACKWARD
Skip backward - message by message.
REPEA T
Press
a previous message. The message
1
number will be announced and the
message you skipped to will play.
Press
REPEAT
want to skip back to a previous
2
message.
twice to skip back to
REPEAT
twice every time you
SKIP FORWARD
You can skip forward through messages.
Press
SKIP
while the message plays
to forward to the next message. The
1
message number will be announced
and the next message will play.
SKIP
PAUSE MESSAGE
PLAYBACK
You can temporarily pause message playback
up to 5 minutes while operating any
for
playback button.
PLAY/PAUSE 1&2, PLAY/
Press
PAUSE 1
1
which corresponds to the line(s) you
are playing. “PAU” will flash in the
display to indicate the TA-180 is
pausing message playback.
You have two options during pause:
, or
PLAY/PAUSE 2
NEW
ONLY
PAU
Press the same playback button again
PLAY/PAUSE 1&2, PLAY/PAUSE
(
1
, or
2
PLAY/PAUSE 2
listening to the message.
OR
Leave
the TA-180 in pause mode. It will
automatically reset to answer calls
2
after 5 minutes. All messages will be
saved.
NOTE:
■ TA-180 will not answer calls in the pause mode. The
ringer will be disabled, but the LINE 1 or LINE 2
SPEAKERPHONE INDICATOR will intermittently flash
indicating an incoming call. You may answer calls
with the speakerphone and cancel pause and
playback.
) to resume
PLAY/PAUSE
1
VARIABLE SPEED
PLAYBACK
Variable Speed Playback
your messages 50% faster or 50% slower
than normal. You can switch between slow,
fast or normal speed during message
playback of any message including Message
File.
Slow Playback:
From normal playback, press
SPEED
message 50% slower than normal.
Fast playback:
From normal playback, press
SPEED
message 50% faster than normal.
Normal Playback:
To return to normal playback speed from
slow playback mode, press
SPEED
playback from fast playback mode, press
PLAYBACK SPEED
PLAYBACK
CALL SCREEN
▼▼
. The TA-180 will play your
▼
▼▼
▲▲
The TA-180 will play your
▲
▲▲
▲▲
once. To return to normal
▲
▲▲
SPEED
CONV
PLAYBACK
SPEED
REPEAT
TM
TM
allows you to play
PLAYBACK
PLAYBACK
PLA YBACK
▼▼
once.
▼
▼▼
MEMO
SKIP
NEW
ONLY
ERASE
FLASH
AUTOMATIC SAVE
If you do not press SAVE/HOLD or ERASE/
FLASH while listening to messages or after
playing them, the TA-180 will automatically
save all messages. You will hear, “
Messages
appear in the display for each line.
.” The total message count will
End of
SAVE ALL MESSAGES
If you wish to manually save all messages (for
example, if you wish to cancel erase of
individual messages), press
within seven seconds after hearing “
messages
You will hear a beep and “SAVE” will appear in
the display for several seconds to confirm that
messages have been saved. The total message
count will appear in the display for each line
and you will hear, “
PLAY/PAUSE
1 & 2
SAVE
HOLD
” or after pressing ERASE/FLASH.
Save messages
SAVE
HOLD
MESSAGE
FILE
PLAY/PAUSE
1
LINE 1 LINE 2
SPEAKERPHONE
SAVE/HOLD
End of
.”
GREETING 1 2
SAVE
End
LINE 1
PLAY/PAUSE
2
MIC
13
Page 8

PAGE
PAGE
14
ERASING MESSAGES
ERASE INDIVIDUAL
MESSAGES
You can selectively erase specific messages
during playback.
Press
ERASE/FLASH
to a specific message. You will hear a
1
beep, “ERASE ” will flash in the
display, and the individual message
will be deleted seven seconds after
hearing:
ERASE
GREETING 1 2
FLASH
If you change your mind and decide to save
the message:
Press
the message or within seven seconds
1
after hearing “
SAVE
HOLD
PLAY/PAUSE
NEW
ONLY
ERASE
FLASH
1 & 2
SAVE
HOLD
2
LINE 2
SAVE/HOLD
End of messages
MESSAGE
PLAY/PAUSE
while listening
End of
messages.
ERASE
while listening to
FILE
PLAY/PAUSE
1
LINE 1 LINE 2
SPEAKERPHONE
MESSAGE FILE STORAGE
Message File offers a convenient way to store
ERASE ALL MESSAGES
Press
ERASE/FLASH
seconds of seeing “End” in the display
1
and hearing “
erase all messages for LINE 1
2. You will hear a beep and “ERASE ”
will appear in the display for several
seconds to confirm messages were
erased.
If you change your mind and decide to save
all messages for that line:
Press
seconds after pressing
1
You will hear a beep and “SAVE” will
appear in the display for several
.”
2
seconds to confirm messages were
saved.
MIC
End of messages
ERASE
FLASH
SAVE/HOLD
SAVE
HOLD
NOTE:
■ When playing
and Line 2 (PLAY/PAUSE 1&2),
pressing
“
End of messages
messages from both lines.
within seven
messages.
within seven
ERASE/FLASH
all messages for Line 1
ERASE/FLASH
after hearing
“ will erase all
” to
or LINE
Erase
.
important messages, long messages or to
separate messages for business, personal use
or for other users.
FORWARD MESSAGE TO
MESSAGE FILE
You may store any recorded message, memo
or conversation in Message File. T o store a
recorded message into Message File:
NEW ONLY, PLAY/PAUSE
Press
1&2
,
1
2
MESSAGE
FILE
PLAY/PAUSE 1
PAUSE 2
messages.
Press
message playback. You will hear a
beep and the message will be
forwarded to Message File. The
Message File icon will flash in the
display. The TA-180 will automatically
jump to the next message and
continue message playback.
to playback your
MESSAGE FILE
GREETING 1 2
12:47
LINE 1 LINE 2
NOTE:
■ If a message is forwarded to Message File and
is pressed at the end of message playback, a copy of
the forwarded message will be saved in Line 1 or Line
2
and in Message File.
, or
PLAY/
PLAY/PAUSE
1
during
FILE
PM
SAVE
PLAY ALL MESSAGES IN
MESSAGE FILE
The Message File icon (a file folder shape) will
appear in the display if messages are stored in
this location. When playing messages in
Message File, you can utilize all the convenient
playback features such as: Skip/Repeat, Variable
Speed Playback
To playback messages in Message File:
Press
number of messages stored in
1
Message File will appear briefly and all
messages stored in this location will
be played. You will hear:
MESSAGE
FILE
messages.
Messages are played in the order
received and the individual Message
2
File number is displayed during
playback.
After the end of the last message,
“End” will appear in the display for
3
several seconds and
you will hear:
T o: SKIP/REPEAT messages in Message File,
refer to page 12
PAUSE messages in Message File, by
pressing
resume playback.
VARIABLE SPEED PLAYBACK
in Message File, refer to page 13
SAVE/ERASE messages in Message File,
refer to pages 13 & 14
TM
, and Selective Save and Erase.
MESSAGE FILE
Play message file.
Message one.
Wednesday , 1:34 p.m.
OR
No
MESSAGE FILE
. Press it again to
. The
Hi Mike, I’m
messages.
TM
15
calling...
End of
messages
Page 9

PAGE
PAGE
16
CALL SCREENING & SPEAKER PHONE
CALL SCREENING
Call Screening allows you to hear who is
calling before you decide to speak with the
caller. The CALL SCREEN button turns call
screening on or off. When Call Screening is
off, “SCREEN OFF”
When Call Screening is on and a call comes
in, you will hear the greeting and the caller
leaving a message through the speaker .
If you wish to speak with the caller:
Press
SPEAKERPHONE
1
call for a hands-free conversation.
OR
Select
two-line telephone connected to the
1
TA-180.
If you do not wish to speak with the caller, the
TA-180 continues recording the caller ’s
message.
appears in the display.
LINE 1
or
LINE 2
to answer the
LINE 1 LINE 2
SPEAKERPHONE
LINE 1
or
LINE 2
on the
CALL SCREENING OFF
To turn call screening off, press
SCREEN
.
GREETING 1 2
CALL SCREEN
CALL
2 1
LINE 1 LINE 2
■ SCREEN OFF appears in the display .
■ Your phone will ring and the TA-180 will
answer the call, but you will
caller leaving a message through the
speaker.
not hear the
SCREEN OFF
ANSWERING A CALL
DURING PLAYBACK
If you receive an incoming call during
LINE 1
or
message playback, press
SPEAKERPHONE
up any extension phone and speak with the
caller . Message playback will stop and all
messages will be saved automatically.
to answer the call or pick
LINE 2
USING THE 2-LINE
SPEAKERPHONE TO
ANSWER A CALL
The speakerphone allows you to answer calls
and work while talking, hands-free.
Press
LINE 1
or
LINE 2
SPEAKERPHONE
1
receive a call. The SPEAKERPHONE
INDICATOR will light solid green.
LINE 1 LINE 2
SPEAKERPHONE
Begin speaking 2-3 feet from the
microphone.
2
Press
LINE 1
3
SPEAKERPHONE
finish speaking to hang up.
Speakerphone Helpful Hints:
■One person at a time should speak
while using the speakerphone.
■Reduce or eliminate background noise
such as radio or television.
■Do not use an extension phone and
speakerphone at the same time.
or
when you
LINE 2
after you
HOLD CALL
You may place a call on hold while using the
speakerphone.
To place a call on hold while using the Line 1
or Line 2 speakerphone:
Press
SAVE/HOLD
IN USE INDICATOR will start to blink.
1
SAVE
HOLD
GREETING 1 2
. The green LINE
Hd
LINE 1 LINE 2
Move to another room and pick up any
extension phone on the same line as
2
the call. The TA-180 will automatically
take the call off hold.
ERASE
FLASH
SAVE
HOLD
RELEASING HOLD
Press
LINE 1
SPEAKERPHONE
1
off hold.
OR
Pick up any extension phone on the
same line.
1
The SPEAKERPHONE INDICATOR will
light solid green if the speakerphone is
2
used or light solid red if an extension
phone is used.
NOTE:
■ Any call left on hold for 5 minutes will be
automatically disconnected.
LINE 1 LINE 2
SPEAKERPHONE
or
LINE 2
to take the call
LINE 1 LINE 2
SPEAKERPHONE
17
MIC
Page 10

PAGE
PAGE
18
SPEAKERPHONE (CONT.)
FLASH/CALL WAITING
If you subscribe to a call waiting service and
you receive another call while using the
speakerphone:
Press
ERASE/FLASH
second call and automatically place
1
the original caller on hold.
ERASE
FLASH
Press
ERASE/FLASH
return to the first call. You can switch
2
between the two calls until one of the
callers hangs-up.
NOTE:
■ FLASH may also be used on a business phone system
(CENTREX, PBX) for transferring calls to other
extensions.
to answer the
again to
ANSWERING THE
2ND LINE WHILE USING
LINE 1 SPEAKERPHONE
You may answer the 2nd line using the
speakerphone by placing the 1st caller on
hold. For example, to answer a Line 2 call
during a Line 1 speakerphone conversation:
SAVE/HOLD
Press
caller on hold.
1
SAVE
HOLD
Press
LINE 2 SPEAKERPHONE
to answer the 2nd line.
2
LINE 1 LINE 2
SPEAKERPHONE
If you wish to return to the Line 1 call:
Press
SAVE/HOLD
Line 2 call on hold.
1
LINE 1 SPEAKERPHONE
Press
to automatically release the hold and
2
speak with the Line 1 caller .
NOTES:
■ You must press
before answering a call on the other line.
■ You may pick up any extension phone on the same
line to release the hold. The TA-180 will automatically
release the hold, allowing you to speak with the caller.
■ The second line will not ring while you are using the
first line speakerphone, but the LINE 2
SPEAKERPHONE INDICATOR will flash red.
SAVE/HOLD
to place the 1st
GREETING 1 2
Hd
LINE 1 LINE 2
to place the
to place a call on hold
SWITCH FROM
SPEAKERPHONE TO AN
EXTENSION PHONE
While using the speakerphone:
Press
SAVE/HOLD
caller on hold.
1
SAVE
HOLD
Pick up the extension phone, and
begin speaking.
2
The LINE 1 (LINE 2) SPEAKERPHONE
INDICATOR will blink green to indicate
3
the line is holding and then light solid
red to indicate an extension phone in
use.
LINE 1 LINE 2
SPEAKERPHONE
to place the
19
SWITCH FROM AN
EXTENSION PHONE TO
SPEAKERPHONE
While using an extension phone:
Press
LINE 1 OR LINE 2
SPEAKERPHONE
1
LINE 2) SPEAKERPHONE INDICATOR
will change from solid red to solid
green to indicate SPEAKERPHONE in
use.
LINE 1 LINE 2
SPEAKERPHONE
Hang up the extension phone and
begin speaking.
2
NOTE:
■ If you use the speakerphone
at the same time, you may hear a howling noise.
Lower the volume on the TA-180 to eliminate the
noise.
. The LINE 1 (or
and an extension phone
EXTENSION PHONE
PICK UP
If the TA-180 has answered a call, Extension
Phone Pick Up allows you to stop the
answering machine from any extension phone
(connected to the same line) and speak with
the caller without having to go to the machine
to turn it off.
Answer the call on the correct line.
1
The TA-180 automatically stops playing
the greeting or recording an incoming
2
message and allows you to speak with
the caller .
Page 11

PAGE
MEMO & CONVERSATION RECORD
20
REMOTE OPERATION
PAGE
21
RECORD A MEMO
Use memo record to leave a memo for
yourself, another household member or an
associate.
To record a memo:
MEMO
Press
action and you will hear:
1
CONV
PLAY/PAUSE 1
Press
2
PAUSE 2
the memo.
PLAY/PAUSE
. A beep confirms your
MEMO
to select where to store
Record a new
Press one
or two.
or
PLAY/
message.
2
When “RECORDING” flashes in the
display, begin speaking 6-8" away
3
from the microphone located on the
bottom right. A memo can be
recorded up to 5 minutes in length.
GREETING 1 2
14 3
LINE 1 LINE 2
Press
MEMO
recording. The memo is recorded in
4
order with other incoming messages
and is stamped with the time and day.
RECORDING
again to stop
RECORD A CONVERSATION
Record all or portions of important telephone
calls using the speakerphone.
NOTE: In certain areas, it is unlawful and may
lead to criminal penalties to record any
telephone conversation without prior consent
of all parties.
To recor d a conversation:
Adujst the VOLUME SLIDE CONTROL
to the midpoint.
1
Press
CONV
any time during a
speakerphone
2
conversation.
A beep confirms
your action.
When “RECORDING”
display, the TA-180 automatically
3
begins recording the telephone
conversation on the line being used.
To stop recording, press
Recorded conversations are stamped
4
with the time and day that they were
recorded.
NOTE:
■ You must press LINE 1 or LINE 2 SPEAKERPHONE to
disconnect the TA-180 from the line after recording a
conversation.
CONV
appears in the
CONV
again.
PLAY, S AVE, & ERASE
MEMOS OR
CONVERSATIONS
Recorded memos and conversations are
played along with the incoming messages in
the order in which they were recorded. All
playback control features are available as with
other recorded messages.
Many features of the TA-180 are accessible
from a remote telephone. You can use remote
operation from most touchtone or cellular
phones to retrieve, replay, erase and save
messages. Additionally, you may record new
greetings, change the greeting mode, record
messages, play message file messages while
remotely accessing your machine.
REMOTE ACCESS CODE
The TA-180 allows you to program a
personalized 3-digit access code. This greatly
reduces the chances that callers can access
your TA-180 2-line answering machine
remotely.
Your 3-digit remote access code allows you to
access the unit when you are away from your
home or office.
SETTING REMOTE
ACCESS CODE
The TA-180 is shipped with the code set to “12-3.” To change your 3-digit remote access
code:
CODE SET/CHECK
Press
the lid). The current 3-digit code will
1
appear in the display and you will
hear:
CODE
SET/CHECK
Press
CODE SET/CHECK
within five seconds to enter the
2
programming mode. You will hear:
Press code set
for new code.
(under
1 2 3.
again
Set code
digit one.
Press
SKIP
or
REPEAT
first digit of the remote access code.
3
SKIP
GREETING 1 2
to select the
6 23
Press
CODE SET/CHECK
You will hear:
4
Press
SKIP
or
second digit of the remote access code.
5
SKIP
Set code
digit two
REPEAT
GREETING 1 2
to select the
6 53
Press
CODE SET/CHECK
You will hear:
6
Press
SKIP
third digit of the remote access code.
7
REPEAT
Set code
digit three
or
REPEAT
GREETING 1 2
to select the
6 52
Press
CODE SET/CHECK
Your newly programmed code will be
8
announced and appear in the display
for several seconds before resuming
normal operation.
again.
.
again.
.
again.
Page 12

PAGE
PAGE
22
REMOTE OPERATION (CONT.)
CHECK REMOTE
ACCESS CODE
Press
CODE SET/CHECK
once to check your remote
the lid)
1
access code. You will hear your
personalized remote access code:
CODE
SET/CHECK
(under
Six, four,
BYPASS GREETING
You can skip your greeting when calling in
remotely to check messages. Press
touchtone keypad during the greeting.
#
REMOTE MESSAGE
RETRIEVAL
Call your answering machine from
most cellular phones, pay phones, or
1
touchtone phones. The TA-180 is
short-burst compatible and will
recognize the short duration tones
emitted from touchtone and cellular
phones.
Enter your
ACCESS CODE
2
the beep.
3-DIGIT REMOTE
immediately after
eight
#
on the
23
Depending on the number of new
messages, you will hear:
3
Four new line one messages.
New message one.
Sunday 12:00 a.m.
Hi, Kathy. I called to…
Three new line
.
4
NOTES:
■ You may hang up at any time and the TA-180 will
■ Line 1 messages are played first when accessing the
OR
No new
messages.
The TA-180 will playback Line 1 new
messages followed by Line 2 new
messages. After new messages have
played, you will hear, “
messages
will play. Select a remote option or
hang up.
automatically save all messages, unless you have
already erased them.
TA-180 remotely unless there are no messages
recorded in Line 1.
.” The remote voice menu
SKIP BACKWARD
You can skip backwards to listen to previous
messages.
❋❋
Press
previous messages during playback.
1
twice to skip back to
❋
❋❋
2
Note:
■ You cannot skip backward once “
announced.
two messages.
New message one.
Sunday 2:15 p.m.
Hello, this is…
End of
1
❋
End of Messages
” is
You can skip forward through messages.
1
NOTE:
■ You cannot skip backward once “
Replay all messages from a remote location
after new messages have been automatically
played back.
1
2
NOTE:
■ Enter
■ Line 1 messages are played first when accessing the
SKIP FORWARD
#
to forward to the next
Press
message.
#
announced.
REPLAY ALL MESSAGES
1
on the telephone keypad after
Press
hearing “
the remote voice menu. You will hear:
All saved messages will play in order
or message receipt, starting with Line
1 messages, then Line 2 messages.
You may select another option or
hang up and the TA-180 will
automatically save all messages.
0
to the beginning of the voice menu.
TA-180 remotely unless there are no messages
recorded in Line 1.
End of messages ”
1
at any time during the remote menu to return
End of messages”
or during
“
Line one messages.
Message one.
Sunday 12:00 a.m
is
.”
SAVE ALL MESSAGES
MANUALLY
If you do not erase individual messages
during playback, the TA-180 will automatically
save them when you hang up.
If you erase
change your mind, deciding to save
messages:
1
all messages (3 key) and then
2
on the telephone keypad after
Press
hearing “
the remote voice menu.
End of messages ”
or during
ABC
2
All messages will be saved in Line 1
and 2 unless you have erased
2
individual messages during playback.
Select another option or hang up.
NOTE:
■ Enter
0
at any time during the remote menu to
return to the beginning of the voice menu.
REMOTE VOICE MENU
Quick Reference Chart
Enter 1 to REPLAY.
Enter
2
to SAVE.
Enter
3
to ERASE.
Enter
4
to RECORD MESSAGE.*
Enter
5
to RECORD NEW GREETING.*
Enter
6
to SELECT GREETING.
Enter
7
to PLAY MESSAGE FILE.
Enter
0
at any time during the remote
menu to RETURN TO THE BEGINNING
of the voice menu.
* You must enter “0” to stop recording and
return to voice menu.
Cut along the dotted line for a
wallet sized remote access guide.
✄
Page 13

PAGE
JKL
5
PAGE
24
REMOTE OPERATION (CONT.)
ERASE ALL MESSAGES
Erase all messages remotely.
3
on the telephone keypad after
Press
hearing “
1
the remote voice menu. All messages
will be erased.
End of messages ”
or during
DEF
3
NOTE:
■ If the voice menu continues playing after you enter
the 3 key from a remote phone, press
all messages. If the voice menu returns to option 1
after pressing 3, all messages will be erased.
■ Enter
0
at any time during the remote menu to return
to the beginning of the voice menu.
■ If erase is selected (3 key), all Line 1
messages will be erased. Message File messages
will be saved.
3
again to erase
and Line 2
ERASE INDIVIDUAL
MESSAGES
Erase specific messages during remote
playback.
3
Press the
phone while listening to a specific
1
message. The message will be deleted
immediately after you hear “
messages
If you change your mind and decide to save
the message:
Press the
seconds after pressing the 3 key
1
(erase) and before the end of the
same message.
key on your touchtone
End of
.“
DEF
3
2
key (save) at least two
ABC
2
OR
Skip backwards (press
to the message that you want to save
1
before you hear “
and press the
message that you want to save.
2
❋
Selective erase will be canceled and
the individual message will be saved.
2
❋❋
key twice)
❋
❋❋
End of messages
key during the
”
ABC
2
RECORD A MESSAGE
During remote operation, you can record a
message.
Press
4
on the telephone keypad after
hearing “
1
the remote voice menu to leave a
message or reminder for yourself or
another person
using your
answering machine.
The TA-180 confirms your action by
saying, “
2
Record your message immediately
after pressing 4.
VERY IMPORTANT: Enter
immediately when finished recording.
3
Messages are recorded and played
back as new messages. The TA-180
stops recording and returns to the
remote menu.
Choose another
option or hang up.
NOTE:
■ Enter
return to the beginning of the voice menu.
■ Messages are recorded and stored on the line used to
access the TA-180 remotely.
End of messages”
or during
GHI
4
Record new message.
0
OPER
0
0
at any time during the remote menu to
”
RECORD A NEW GREETING
During remote operation, you can record a
new greeting 1 or new greeting 2.
Press
5
on the telephone keypad after
hearing “
1
the remote voice menu. You will hear:
Press
You will hear:
2
Record a new greeting after the beep.
3
VERY IMPORTANT: Enter
finished. The TA-180 stops recording
4
and returns to the remote menu.
Choose another option or hang up.
NOTE:
■ Enter
0
to the beginning of the voice menu.
End of messages”
greeting one. Press
two for greeting two.
1
or 2 on the keypad.
or during
Press one for
Record new
greeting 1 (2).
1
0
when
OPER
0
at any time during the remote menu to return
SELECT GREETING MODE
To change the current greeting mode:
Press
6
on the telephone keypad after
hearing “
1
the remote voice menu. This will
change the
the
You will hear: “
one. Greeting one to line two
2
NOTE:
■ Enter
0
to the beginning of the voice menu.
End of messages ”
current greeting mode to
next greeting mode.
Greeting one to line
at any time during the remote menu to return
or during
MNO
.”
PLAY MESSAGE FILE
Play all stored messages in message file.
7
on the telephone keypad
Press
after hearing “
1
during the remote voice menu. All
message file messages will be played
in order they were received.
NOTE:
■ Enter
0
at any time during the remote menu to return
to the beginning of the voice menu.
End of messages”
PRS
7
25
6
or
Page 14

PAGE
PAGE
26
REMOTE OPERATION (CONT.)
FORWARD MESSAGES TO
MESSAGE FILE
Forward individual messages to Message File.
Press
7
during message playback.
The message will be automatically
1
transferred to message file and you
will hear a double beep to confirm the
message transfer .
PRS
7
The next message will play
immediately after the double beep.
2
NOTE:
■ Enter
0
at any time during the remote menu to return
to the beginning of the voice menu.
MESSAGE RETRIEVAL
WHEN MEMORY IS FULL
If the TA-180’s memory is full, you will hear
your greeting followed by “
Please erase messages.
T o retrieve messages remotely when the
TA-180’s memory is full:
Enter your
ACCESS CODE
1
the beep.
To allow room for additional incoming
messages, it is advisable to:
Erase all messages by pressing
the keypad after you hear “
2
messages.
3-DIGIT REMOTE
“
Memory is full.
”
immediately after
End of
DEF
3
OTHER CONNECTIONS
OR
Erase a few individual messages by
3
2
pressing
during message playback.
DEF
3
Follow the instructions on page 22 for
remote message retrieval.
3
NOTE:
■ The TA-180 will automatically disconnect if you
attempt to record a message or record a new greeting
when memory is full.
REMOTE TURN-ON
If you left your home or office without turning
on your TA-180, you can turn the machine on
to answer Line 1, Line 2 or both lines.
Call in on the line you want answered
(for example Line 1) and let the phone
1
ring 15 times or more. The answering
machine will turn on. You will hear
your greeting and a beep confirming
that the Line 1 answering machine is
on. Callers can now leave messages
on Line 1.
OR
If you want to turn on the TA-180 on
your other line, hang up and call Line
1
2 and let the phone ring 15 times or
more.
3
on
You can now enter your remote access
code and use any of the remote
2
features or simply hang up.
This TA-180 is designed to answer one or two telephone lines. If you have two separate telephone
numbers, they will be wired in one of two ways:
■ Two telephone numbers and two separate jacks (RJ11’s)- one for each line.
■ Two telephone numbers and one jack (RJ14)- one for both lines.
Determine which installation you have and refer to the correct page for installation instructions.
An RJ14 jack and a two-line telephone: Follow the instructions on page 4.
An RJ11 jack and a single-line telephone: Follow the instructions below left.
Two RJ11 jacks and a two-line telephone: Follow the instructions below right.
Two RJ11 jacks and two single line telephones: Follow the instructions on page 28.
CONNECTING THE TA-180
TO ONE TELEPHONE
LINE ONLY
You can use the TA-180 to answer only one
telephone line with an RJ11 (single line) jack
or an RJ14 (two-line) jack.
Set the CONNECTION MODE SWITCH
(located on the back of the unit) to
1
“WALL JACK 1 X RJ14.”
WALL
JACK
2X
RJ11
CONNECTION
Plug the telephone cord attached to the
back of the unit into the available
2
telephone wall jack.
Plug a single line telephone into the
jack on the back of the unit labeled,
3
“TO TELEPHONE.” The answering
machine is set to answer Line 1 only.
Continue setting up by following the
INSTALLATION INSTRUCTIONS on
4
page 4.
MODE
WALL
JACK
1X
RJ14
CONNECTING THE TA-180
TO TWO SINGLE LINE
JACKS (RJ11) AND
A TWO-LINE TELEPHONE
Set the CONNECTION MODE SWITCH
(located on the back of the unit) to “
1
WALL JACK 2 X RJ11.”
WALL
JACK
2X
RJ11
CONNECTION
Plug the telephone cord attached to
the back of the unit into the Line 1
2
wall jack.
Plug one end of the modular telephone
cord (included in this package) into the
3
jack on the back of the unit labeled
“LINE 2 RJ11.” Plug the other end into
the telephone wall jack for Line 2.
Plug a two-line telephone into the jack
on the back of the unit labeled, “TO
4
TELEPHONE.”
Continue setting up by following the
INSTALLATION INSTRUCTIONS on
5
page 4.
MODE
WALL
JACK
1X
RJ14
27
Page 15

PAGE
PAGE
28
ADDITIONAL INFORMATION
CONNECTING THE TA-180
TO TWO SINGLE LINE
JACKS (RJ11) AND TWO
SINGLE LINE TELEPHONES
Set the CONNECTION MODE SWITCH
(located on the back of the unit) to
1
“WALL JACK 2 X RJ11.”
WALL
JACK
2X
RJ11
CONNECTION
Plug a “T-adapter” (available from
CASIO PHONEMATE’s Parts
2
Department or many retail outlets) into
each telephone wall jack.
Plug the telephone cord attached to
the back of the unit into the T-adapter
3
connected to the Line 1 wall jack.
Plug a single line telephone into the
T-adapter connected to the Line 1 wall
4
jack. (Alternatively, you may plug a
single-line telephone directly into the
jack on the back of the unit labeled
“TO TELEPHONE.” This avoids the
need for a T-adapter at the Line 1 wall
jack for Line 1.)
Plug one end of the modular telephone
cord (included in this package) into
5
the jack on the back of the unit labeled
“LINE 2 RJ11.” Plug the other end into
the T-adapter connected to the
telephone wall jack for Line 2.
MODE
WALL
JACK
1X
RJ14
Plug another single line telephone
into the T-adapter connected to the
6
Line 2 wall jack.
Continue setting up by following the
INSTALLATION INSTRUCTIONS on
7
page 4.
MULTI-LINE INSTALLATION
Installations with more than two lines, such as
business phone systems, may require a
separate RJ11 jack for answering machines.
Please contact your telephone equipment
provider for additional information.
You can use the TA-180 as an extension
phone on a business phone system, but some
systems will require that you install an A+A1
Adapter to light the in-use indicator on the
receptionist’s console. See the accessory
order form on the last page of this owner’s
guide to order an A+A1 Adapter.
CLEANING THE TA-180
CAUTION: Disconnect the TA-180 from the
power outlet before cleaning.
Use only a damp cloth or moist sponge to
clean the plastic cabinet. A mild soap, like
dishwashing detergent, will help remove
grease or oil. Do not spray cleaners directly
onto the unit. Cleaners should only be used on
the plastic surfaces.
LIMITED WARRANTY
IMPORTANT!
SALES SLIP OR EVIDENCE OF PURCHASE DATE REQUIRED
This limited warranty gives you specific legal rights; you may also have other rights which vary from
state to state.
The limited warranty is extended only to the original consumer of a CASIO PHONEMATE product and
is valid only with respect to consumers within the United States of America and Canada. Subject to
the following conditions, should this product prove defective by reason of improper workmanship of
material:
During the period of one (1) year from the date of original purchase, CASIO PHONEMATE will repair
or, at its option, replace the product without charge for parts or labor. If CASIO PHONEMATE elects to
replace the product, such replacement may be accomplished with a factory-reconditioned unit.
This limited warranty does not apply: (a) to any product damaged by accident, misuse, improper line
voltage, lightning, fire, water, or other acts of nature, (b) if the product is altered or repaired by
anyone other than CASIO PHONEMATE, INC. or one of its authorized warranty stations or if the FCCapproved connector plugs are removed. This limited warranty does not cover tapes or broken or
marred cabinets.
Except to the extent prohibited by applicable law, all implied warranties made by CASIO PHONEMATE
in connection with this product are limited in duration to a period of one (1) year from the date of
original purchase, and no warranties, whether expressed or implied, shall apply to this product after
said period.
Should this product prove defective in workmanship or material, the consumer’s sole remedies shall
be such repair or replacement as is hereinabove provided. Under no circumstances shall CASIO
PHONEMATE be liable for any loss or damage, direct, consequential, or incidental arising out of the
use of or inability to use this product.
Some states do not allow limitations on how long an implied warranty lasts or the exclusion or
limitation of incidental or consequential damages, so the above limitations or exclusion may not apply
to you.
In order to obtain warranty service, you must provide evidence of purchase date. For your convenience, keep the dealer’s dated bill of sale or delivery ticket as evidence of the purchase date.
Before returning or exchanging your product,
call CASIO PHONEMATE’s HelpLine at
(310) 320-9810.
If you live in an area that is highly susceptible to electrical storms, you may want to purchase a
Lightning Arrestor. The Lightning Arrestor attaches to your answering machine and if lightning causes
a surge through your phone line, the arrestor will help suppress the surge of electricity which may
cause damage to your unit.
To purchase your Lightning Arrestor, use the attached Accessory Order Form or call CASIO
PHONEMATE’s Parts Department toll free: 1-800-322-9995.
FACTORY
SERVICE
CENTERS
CASIO PHONEMATE, INC.
Attn: Service Center
20665 Manhattan Place
Torrance, CA 90501
(310) 328-6453
CASIO PHONEMATE, INC.
Attn: Service Center
8805 Kelso Drive
Baltimore, MD 21221
(410) 391-0974
29
Page 16

PAGE
PAGE
30
TROUBLESHOOTING
Recorded messages are cut off.
The TA-180 is designed to disconnect from
the line after a caller stops talking. Calls may
be cut off if a 5 second pause is detected, if
the caller does not speak loud enough, or if
the message is less than four seconds.
The TA-180 will also stop recording when a
call is answered with the speakerphone or
extension phone.
The TA-180 does not respond when you
enter your remote access code during the
greeting.
Try re-entering the correct code after the
tone.
Between messages there is an operator
recording or a beep and dial tone.
The caller has hung up without leaving a
message.
You have more than two telephone
numbers and are experiencing difficulty.
See MUL TI-LINE INSTALLATION, page 28.
There is no sound during playback.
Check and adjust the volume control.
Calls on hold are disconnected.
The call placed on hold may have exceeded
five minutes in length. Please review the
HOLD section on page 17.
Unit rings but does not answer calls.
Make sure the TA-180 is turned on. See the
ON/OFF section on page 5.
All messages are stamped with “
12:00 a.m
Program time and date. See SET VOICE
TIME/DAY STAMP on page 6.
.”
Sunday,
The unit does not automatically stop
playing the greeting or recording a
message when you pick up an extension
phone.
Briefly press and release the hook-switch
on the extension phone.
Messages were not erased after
playback.
If you want all messages to be erased,
ERASE/FLASH
press
of seeing “End” in the display and hearing
End of messages
“
The MESSAGE INDICATOR flashes rapidly.
If you are installing your TA-180 for the first
time, or you have experienced a power
failure, make sure that your unit is
connected to a telephone line. Then press
PLAY/PAUSE 1
operation.
The unit does not record incoming
messages.
1. Memory may be full, please see page 14
on erasing individual messages.
2. Announce only mode may be activated.
If announce only is ON, the machine will
play the greeting, but will not record
incoming messages. Please see page 9.
3. The volume may be too low for you to
hear the greeting and the caller’s
message.
4. The machine may have been accidentally
turned OFF. If the machine is turned OFF,
indicator lights will not be lit.
5. The caller may have hung up within 4
seconds of the machine answering a
call, and therefore the TA-180 will not
record a message.
within seven seconds
.”
or 2 to restore machine
6. In certain situations, your local
telephone company may transmit signals
that are recorded by your machine
without any associated message.
7. No calls were actually received by the
TA-180.
Greeting sounds garbled or difficult to
hear.
Strictly follow the guidelines for recording
your greeting:
1. Speak loudly and clearly about 7 inches
from the base unit microphone.
2. Avoid any background noise.
3. Greeting should be recorded using the
voice of only one person.
Part of the greeting is cut off.
Long pauses in your greeting (more than 2
seconds) can cause the machine to stop
recording. Record a new greeting.
There is a high pitched sound during call
screening.
This is feedback. Turn the volume down.
After several attempts the TA-180 will not
operate properly.
To reset the TA-180, hold down the LINE 1
or LINE 2 ON/OFF button (under lid) while
simultaneously reinserting the AC Adapter
Plug into the back of the unit until a beep is
heard (about 3 seconds). The AC Adaptor
must be plugged into the wall. All saved
messages, greetings, the Time/Day Stamp
and machine settings will be deleted. Rerecord the greetings, set the Time/Day
Stamp and reset any other machine
settings.
31
If this action does not remedy the problem,
call the CASIO PHONEMATE Helpline. CASIO
PHONEMATE’s Helpline staff can often
resolve problems and will recommend
repair service when needed.
Unless you live close to a CASIO
PHONEMATE Service Center, you may be
required to mail a product to CASIO
PHONEMATE for repair. To mail the product
to the service center you should:
1. Package the unit in its original box or a
comparable package.
2. Include a clear and specific explanation
of the problem.
3. Include your name, address, and phone
number.
4. Provide a legible photocopy of the dated
store receipt for warranty purposes.
FACTORY SERVICE CENTERS
CASIO PHONEMATE, INC.
Attn: Service Center
20665 Manhattan Place
Torrance, CA 90501
(310) 328-6453
CASIO PHONEMATE, INC.
Attn: Service Center
8805 Kelso Drive
Baltimore, MD 21221
(410) 391-0974
Should you have additional questions,
please call CASIO PHONEMATE's Helpline,
from 8 a.m. to 4 p.m. (Pacific Time), at
(310) 320-9810 for assistance.
Page 17

PAGE
32
FCC REQUIREMENTS
USER INSTRUCTIONS
ACCESSORIES
PAGE
33
1. This equipment complies with Part 68 of the FCC rules. On the bottom of this equipment is a label
that contains, among other information, the FCC registration number and Ringer Equivalence
Number (REN) for this equipment. If requested, provide this information to your telephone
company.
2. The REN is useful to determine the quantity of devices you may connect to your telephone line and
still have all of those devices ring when your number is called. In most, but not all areas, the sum
of the RENs of all devices should not exceed five (5.0). To be certain of the number of devices you
may connect to your line, as determined by the REN, you should call your local telephone
company to determine the maximum REN for your calling area.
3. If your answering machine causes harm to the telephone network, the telephone company may
discontinue your service temporarily. If possible, they will notify you in advance. But if advance
notice is not practical, you will be notified as soon as possible. You will be advised of your right to
file a complaint with the FCC.
4. Your telephone company may make changes in its facilities, equipment, operations, or procedures
that could affect the proper operation of your equipment. If they do, you will be given advance
notice so as to give you an opportunity to maintain uninterrupted service.
5. If there is a problem with this unit, the telephone company may ask you to disconnect this
equipment from the network until the problem has been corrected or you are sure that the
equipment is not malfunctioning.
6. Repairs can only be made by the manufacturer or an authorized service agency. Unauthorized
repairs void registration and warranty. Contact seller or manufacturer for details of permissible
user-performed routine repairs, and where and how to have other than routine repairs made.
7. This equipment may not be used on coin service provided by the telephone company. Connection
to party lines is subject to state tariffs. (Contact your state public utility commission or corporation
commission for information.)
Jack: RJ11 Ringer Equivalence: See bottom/underside of the TA-180 unit.
CASIO PHONEMATE, Inc. 20665 Manhattan Place, Torrance, CA 90501
NOTE: This equipment has been tested and found to comply with the limits for a Class B digital device,
pursuant to Part 15 of the FCC Rules. These limits are designed to provide reasonable protection
against harmful interference in a residential installation. This equipment generates, uses, and can
radiate radio frequency energy and, if not installed and used in accordance with the instructions, may
cause harmful interference to radio communications. However, there is no guarantee that interference
will not occur in a particular installation. If this equipment does cause harmful interference to radio or
television reception, which can be determined by turning the equipment off and on, the user is
encouraged to try to correct the interference by one or more of the following measures:
● Reorient or relocate the receiving antenna.
● Increase the separation between the equipment and receiver.
● Connect the equipment into an outlet on a circuit different from that to which the receiver is
connected.
● Consult the dealer or an experienced radio/TV technician for help.
Any changes made by the user not approved by CASIO PHONEMATE can void the user’s authority to
operate the equipment. This product is hearing aid compatible.
To order accessories for your TA-180 answering machine, simply cut out this order form,
fill in the appropriate information and send it with payment (check, money order or credit
card information) to: CASIO PHONEMATE Parts Department, 8805 Kelso Drive, Baltimore,
MD 21221or Call: 1-800-322-9995 for credit card orders.
Description
Lightning Arrestor - Helps protect telephone
devices from damage caused by lightning
strikes to the telephone line.
areas prone to electrical storms.
AC Adapter - For Model TA-180.
Modular Duplex T-Adapter - Converts a single
modular telephone jack to a double jack.
Modular Two Line T-Adapter - Splits one RJ14
two line jack into two RJ11 single line jacks.
A+A1 Light Control - When using the TA-180
answering machine with a business phone
system, this accessory enables the in-use
indicator at a receptionist's console to light
when the phone is off-hook.
Enclosed is my check/money order
for the total amount.
Recommended for
Part No. Price Qty. Total
2700140 $19.95
1601086 $13.50
2700156 $5.95
2700135 $5.95
2701180 $6.95
Subtotal
CA & MD residents add
Please charge my credit card.
VISA
Expiration Date
Name __________________________________________________________________________
Street Address___________________________________________________________________
City _______________________________________ State _________ Zip Code ____________
Signature______________________________________ Telephone ________________________
Please fill in the quantity and total price of the items that you are requesting. Figure the total and send a check or
money order for the proper amount. We do not accept C.O.D. orders. Allow 15 working days for delivery. Prices
subject to change without notice. Returns subject to 20% restocking charge upon approval.
MasterCard
Card No.
applicable sales tax
All orders add shipping
and handling
Total
$3.50
Page 18

PAGE
PAGE
34
EASY TO USE
OWNER'S
GUIDE
TA-180 2-LINE DIGITAL
ANSWERING MACHINE
WITH SPEAKERPHONE
35
CASIO PHONEMATE, INC.
20665 Manhattan Place
Torrance, CA 90501
Internet website address:
http://www.casiophonemate.com
M1S1 5/98
Printed in Malaysia
Page 19

PAGE
(pag
)
IMPORTANT SAFETY INSTRUCTIONS
36
TA-180 FEATURES
PAGE
37
INSTALLATION INSTRUCTIONS
1. Never install telephone wiring during a lightning storm.
2. Never install telephone jacks in wet locations unless the jack is specifically designed for wet locations.
3. Never touch uninsulated telephone wires or terminals unless the telephone line has been disconnected at the
network interface.
4. Use caution when installing or modifying telephone lines.
SAFETY PRECAUTIONS
When using your telephone equipment, basic safety precautions should always be followed to reduce the risk of
fire, electric shock and injury to persons, including the following:
1. Read and understand all instructions.
2. Follow all warnings and instructions marked on the product.
3. Unplug this product from the wall outlet before cleaning. Do not use liquid cleaners or aerosol cleaners. Use
a damp cloth for cleaning.
4. Do not use this product near water: for example, near a bath tub, wash bowl, kitchen sink or laundry tub, in a
wet basement, or near a swimming pool.
5. Do not place this product on an unstable cart, stand, or table. The product may fall, causing serious product
damage.
6. Slots and openings in the cabinet and the back or bottom are provided for ventilation. To protect it from
overheating, these openings must not be blocked or covered by placing the product on the bed, sofa, rug, or
other similar surface. This product should never be placed near or over a radiator or heat register. This
product should not be placed in an enclosed environment unless proper ventilation is provided.
7. Do not allow anything to rest on the power cord. Do not locate this product where the cord will be abused by
animals or persons walking on it.
8. Do not overload wall outlets and extension cords as this can result in the risk of fire or electric shock.
9. Never push objects of any kind into this product through cabinet slots as they may touch dangerous voltage
points or short out parts that could result in a risk of fire or electric shock. Never spill liquid of any kind on
the product.
10. To reduce the risk of electric shock, do not disassemble this product. Take it to a qualified serviceperson
when service or repair work is required. Opening or removing covers may expose you to dangerous voltages
or other risks. Incorrect re-assembly can cause electric shock when the appliance is subsequently used.
11. Unplug this product from the wall outlet and refer servicing to qualified service personnel under the following
conditions:
A. When the power supply cord or plug is damaged or frayed.
B. If liquid has been spilled into the product.
C. If the product has been exposed to rain or water.
D. If the product does not operate normally by following the operating instructions. Adjust only those
controls, that are covered by the operating instructions because improper adjustment of other controls
may result in damage and will often require extensive work by a qualified technician to restore the
product to normal operation.
E. If the product has been dropped or the cabinet has been damaged.
F. If the product exhibits a distinct change in performance.
12. Avoid using a telephone (other than a cordless type) during an electrical storm. There may be a remote risk
of electric shock from lightning.
13. Do not use the telephone to report a gas leak while near the leak.
SAVE THESE INSTRUCTIONS
Ring Select Switch (page 5)
Ringer Volume Switch (page 5)
Wall Jack Connection
Switch (page 4-5, 27-28)
CALL SCREEN
PLAYBACK
SPEED
REPEAT
Skip
(page 6, 12)
Repeat (page 6, 12)
Variable Speed Playback
(page 13)
Call Screening On/Off (page 16)
MEMO
CONV
SKIP
TM
Time Set (page 6)
Time Check
(page 6)
TIME
SET
Play New Messages
(page 10, 12, 15)
Memo Record (page 20)
Conversation Record
Greeting Record (page 7)
Code Set/
Check
(page 21)
CODE
NEW
ONLY
ERASE
FLASH
Play Messages Line 1 & 2
(page 11-12, 15)
Erase (page 14)
Flash (page 18)
GREETING
RECORD SELECTSET/CHECKCHECK
PLAY/PAUSE
1 & 2
SAVE
HOLD
Play/Pause Messages
(page 7-8, 10-12, 15, 20)
Save (page 13-14)
Hold (page 17-19)
e 20
Greeting Check (page 8)
Greeting Select (page 8)
Line 1 On/Off (page 5)
Announce Only, Line 1
(page 9)
LINE 1
ON/OFFCHECK
TWO LINE ● ALL DIGITAL
MESSAGE
FILE
PLAY/PAUSE
1
Line 1 In-Use
Indicator (page 16-19)
Message Indicators (page 10)
PLAY/PAUSE
2
LINE 1 LINE 2
SPEAKERPHONE
Speakerphone
(page 16-19)
Line 2 In-Use
Indicator
(page 16-19)
Message File (page 15)
Microphone (page 7, 20)
Volume Control (page 7)
Line 2 On/Off
(page 5)
LINE 2
ANNC
ON/OFFANNC
Announce
Only, Line 2
(page 9)
MIC
Page 20

PAGE
38
TABLE OF CONTENTS
Important Safety Instructions
LCD Display and Indicators .....1
Important Feature
Information .........................2
INITIAL SETUP
Installation for Connecting to
a Single 2-Line Wall Jack ....4
Connecting Two Single-Line
Wall Jacks ...........................5
Connecting Two Single-Line
Telephones..........................5
Ring Select/Tollsaver Switch ...5
Ringer Volume .........................5
Answering Machine
On/Off for Each Line ............5
Set Voice Time/Day Stamp......6
Time Check ..............................6
PROGRAMMING
AND RECORDING
GREETINGS
Record Greeting 1 ...................7
Record Greeting 2 ...................7
Check Greetings ......................8
Select Greeting Mode ..............8
Changing the Greeting Mode...8
Pre-Recorded Greeting............9
Bypass Greeting ......................9
Announce Only for Each Line ..9
Deactivate Announce Only.......9
PLAYING MESSAGES
Message Indicators ............... 1 0
Play New Messages by Line ..10
Play All Messages - Both Lines
Combined ..........................11
Play Messages Line by Line ..11
Repeat ...................................12
Skip Backward.......................12
Skip Forward .........................12
Pause Message Playback ......12
Variable Speed Playback
Automatic Save .....................13
Save All Messages ................13
TM
13
........
Erase Individual Messages....14
Erase All Messages ...............14
MESSAGE FILE
STORAGE
Forward Messages to
Message File ......................15
Play All Messages in
Message File ......................15
CALL SCREENING
AND 2-LINE
SPEAKERPHONE
Call Screening .......................16
Call Screening Off..................16
Answering a Call During
Playback............................16
Using the 2-Line Speakerphone
to Answer a Call ................16
Hold Call................................17
Releasing Hold ......................17
Flash/Call Waiting..................18
Answering the 2nd Line
While Using Line 1
Speakerphone ...................18
Switch From Speakerphone to
Extension Phone ...............19
Switch From Extension Phone
to Speakerphone ............... 19
Extension Phone Pick Up ......19
MEMO &
CONVERSATION
RECORD
Record a Memo.....................20
Record a Conversation ..........20
Play, Save and Erase Memos or
Conversations ...................20
REMOTE OPERATION
Remote Access Code ............21
Setting the Remote Access
Code ..................................21
Check the Remote Access
Code ..................................22
Bypass Greeting .................... 2 2
Remote Message Retrieval....22
Skip Backwards .....................22
Skip Forward .........................2 3
Replay All Messages .............23
Save All Messages Manually .23
Quick Reference Chart...........23
Erase All Messages ...............24
Erase Individual Messages .... 2 4
Record a Message.................24
Record a New Greeting .........2 5
Select Greeting Mode ............25
Play Message File..................2 5
Forward Messages to Message
File.....................................26
Message Retrieval When
Memory is Full ..................26
Remote Turn On ....................26
ADDITIONAL
INFORMATION
Other Connection Set-Ups.....27
Connecting the TA-180 to One
Telephone Line Only..........27
Connecting the TA-180 to Two
Single-Line Jacks and a Two-
Line Telephone ..................27
Connecting the TA-180 to Two
Single Line Jacks and Two
Single Line Telephones......28
Multi-Line Installation ...........2 8
Cleaning the TA-180..............28
Limited Warranty...................29
Troubleshooting ....................30
FCC Requirements.................32
Accessories ...........................33
 Loading...