

Page 1

SF-3990
User’s Guide
RCA500238-1
E
Page 2

GUIDELINES LAID DOWN BY FCC RULES FOR USE OF THIS UNIT
IN THE U.S.A. (not applicable to other areas).
This equipment has been tested and found to comply with the limits for a
Class B digital device, pursuant to Part 15 of the FCC Rules. These limits
are designed to provide reasonable protection against harmful interference in a residential installation. This equipment generates, uses and
can radiate radio frequency energy and, if not installed and used in accordance with the instructions, may cause harmful interference to radio
communications. However, there is no guarantee that interference will
not occur in a particular installation. If this equipment does cause harmful interference to radio or television reception, which can be determined
by turning the equipment off and on, the user is encouraged to try to
correct the interference by one or more of the following measures:
• Reorient or relocate the receiving antenna.
• Increase the separation between the equipment and receiver.
• Connect the equipment into an outlet on a circuit different from that
to which the receiver is connected.
• Consult the dealer or an experienced radio/TV technician for help.
Caution: Changes or modification to the product not expressly approved
by CASIO could void the user’s authority to operate the product.
NOTICE
Page 3

English
Congratulations on your selection of this CASIO product! Be sure to keep
this manual in a safe place for future reference when necessary.
E-1
Page 4

Contents
Read this first! ........................................................................................ E-3
Timekeeping Function ............................................................................ E-5
Alarm Function ....................................................................................... E-8
Inputting Characters .............................................................................. E-9
Recalling Data ..................................................................................... E-15
Editing Data ......................................................................................... E-15
Secret Memory Area ............................................................................ E-16
Conversion Mode ................................................................................. E-17
Memory Capacity Screen .................................................................... E-21
Calculator Mode ................................................................................... E-22
About the Power Supply ...................................................................... E-23
Messages ............................................................................................ E-25
World Time City Table .......................................................................... E-26
Storage Capacity ................................................................................. E-27
Specifications ....................................................................................... E-27
E-2
Page 5
Read this first!
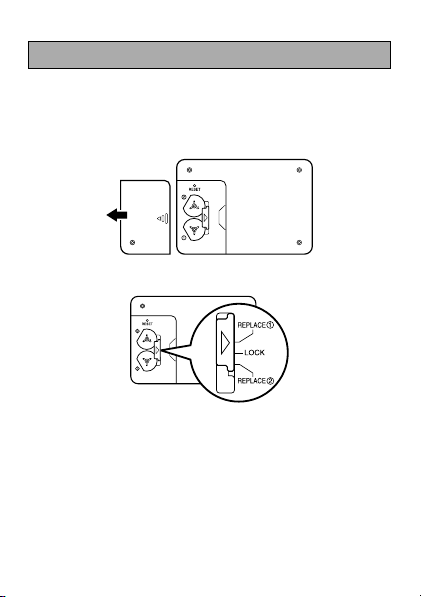
Before using the unit for the first time
Use the following procedure to load batteries and reset the unit before using
it for the first time.
1. Slide the battery compartment cover in the direction indicated by the arrow.
2. Slide the battery switch to the “REPLACE 1” setting.
3. Load the new battery into the battery compartment, making sure that the
positive (+) side of the new battery is facing up (so you can see it).
4. Slide the battery switch to the “REPLACE 2” setting and repeat step 3
for the other battery.
• Be sure to load two new CR2032 batteries only. Never mix an old battery
with a new one.
5. Slide the battery switch to the “LOCK” setting.
E-3
Page 6

6. Press the RESET button. “RESET? Y/N” appears on the display.
The reset message appears in one of the six languages shown below.
RESET Message
ENGLISH RESET? Y/N START? Y/N
GERMAN RÜCKST.? J/N START? Y/N
FRENCH REINIT? O/N COMMENC? O/N
ITALIAN AZZER? S/N INIZI? S/N
SPANISH ¿REP.? S/N ¿INICIO? S/N
PORTUGUESE REPOSIC? S/N COMEÇA? S/N
7. Use H or J to select “Y” and then press ENTER. This causes “START?
Y/N” to appear on the display.
8. Use H or J to select “Y” and then press ENTER.
••
• Initial settings after RESET
••
Home Time Zone: New York (NYC)
Home Time: 12:00 AM, January 1, 2002
World Time 1: London (LON)
World Time 2: Tokyo (TYO)
12/24-Hour Setting: 12-hour
9. Replace the battery compartment cover.
Keep written copies of important data.
CASIO COMPUTER CO., LTD. assumes no responsibility for any damage or
loss caused by deletion of data as a result of malfunction, repairs, or removal of both batteries.
Important Precautions
• Keep away from direct flame.
• Keep away from heat: direct sunlight, near heaters, etc.
• Never try to disassemble the unit.
• Clean exterior only with a soft cloth moistened in a weak solution of a mild
neutral detergent and water.
• Items described in this manual are subject to change without notice.
• CASIO COMPUTER CO., LTD. assumes no responsibility for any loss or
claims by third parties which may arise from the use of this product.
E-4
Page 7

About the Low Battery Message
Replace the batteries as soon as possible after the “LOW BAT!” message
appears. Pressing ON after replacing batteries causes the Home Time screen
to appear. Set the current time and date you want.
• When battery power is low, the “LOW BAT!” message will appear after you
press ON, OFF, TEL, SCHEDULE, ANNIVERSARY, MEMO, TO DO,
CLOCK, CONVERSION, or CAL. If you continue to operate the unit with-
out battery replacement, power will switch off automatically.
• The Daily Alarm, Schedule Alarm will not operate while battery power is low.
To adjust display contrast
1. Press FUNC to select CONTRAST, and then press ENTER.
2. Press J to increase contrast (making the figures on the display darker)
or H to decrease it (making the figures lighter).
3. Press TEL, SCHEDULE, ANNIVERSARY, MEMO, TO DO , CLOCK, CON-
VERSION, CAL, or ESC.
To select the system language (English, French, Spanish,
German, Italian, Portuguese)
1. Press TEL to enter the Telephone Directory Mode.
2. Press FUNC to select LANGUAGE, and then press ENTER.
3. Use K or L to select a language. Press ENTER when the language
you want to use is displayed.
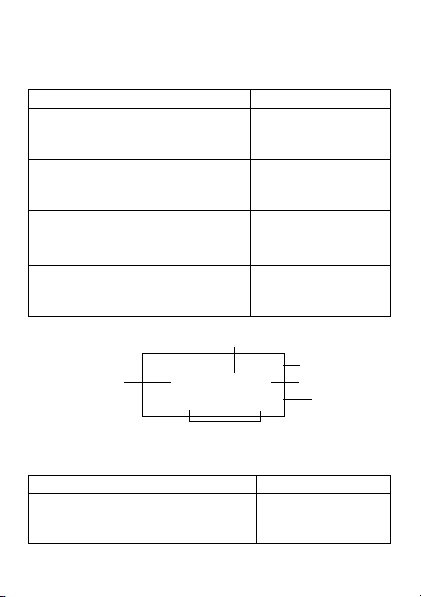
Timekeeping Function
Each press of CLOCK changes between the Home Time, World Time 1,
World Time 2, and Alarm.
To change the World Time city
Use CLOCK to display the World Time and press FUNC to select TIMEZONE.
Then press ENTER and use K and L to scroll through the cities.
City Code
Year
Press ENTER when the city you want to use is displayed.
Month
L
ON?
2
74-1
Time(HH-MM SS)
111300
52
P
Date
AM/PM indicator
E-5
Day of the week
N
OM
7
--
Page 8
To set the Home Time city
HOME
DEW
1
A
02
0-21
5
1300
2
--
N
YC?
DEW
1
A
22
0-21
5
1300
2
--
HKG?
DEW
1
P
320-1
5
1300
2
--
HOME
DEW
1
P
420-1
5
1300
2
--
HOME
DEW
1
P
020-1
5
1300
2
--
Example
City: HKG (Hong Kong)
Key Operation Display
CLOCK
FUNC ENTER
• Select TIMEZONE.
K / L
• Scroll through city names until HKG
appears.
ENTER
To set the Home Time
Year
Example
Date: 2003-11-17 (November 17, 2003); Time: 9:45 AM
CLOCK
E-6
Key Operation Display
Month
HOME
2
Time(HH-MM SS)
1300
-040-1
5
DEW
1
P
Day of the week
Date
AM/PM indicator
Page 9
Key Operation Display
HOME
N
OM
7
A
004-9
5
1113002--
HK
G
1
P
0-10
5
010300_--
HK
G
7
A
4-90
_
111300--
2
EDIT
20031117 AM/PM 0945
• Each press of AM/PM toggles between
AM (A) and PM (P). AM is indicated on the
display by “A”, while PM is indicated by “P”.
ENTER
• This resets the seconds to 00.
• Be sure to input leading zeros when necessary.
• Use the following to specify noon and midnight.
12-hour format 12 PM 12 AM
24-hour format 12 00
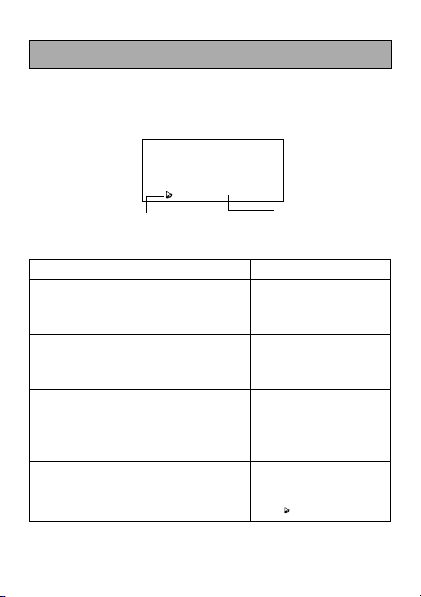
To switch between Standard Time and Daylight Saving Time
Press DST while your Home Time or the World Time is displayed to toggle
between Standard Time and Daylight Saving Time.
• You must make separate settings for Home Time and World Time.
To switch between 12-hour and 24-hour format
1. Display the Home Time or the World Time.
2. Press 12/24 to change between 12-hour and 24-hour timekeeping.
Noon Midnight
HOME
2
111300
--
014-01
5
N
OM
7
A
DST indicator
E-7
Page 10
Alarm Function
A
LARME
MIT
A
0-
2
_
0
A
LARMEMI
T
P
0-80
_
A
LARMEMI
T
P
0-8
5
• The alarm sounds for 20 seconds when the alarm time is reached.
• To stop the alarm when it is sounding, press any key.
To set the alarm time
A
LAR
MEMIT
A
0-210
Alarm ON/OFF indicator
Example
8:05 PM
CLOCK CLOCK CLOCK
EDIT
0805 AM/PM
• Each press of AM/PM toggles between
ENTER
This causes the alarm indicator to appear.
E-8
Key Operation Display
AM (A) and PM (P). AM is indicated on
the display by “A”, while PM is indicated
by “P”.
Current alarm time
setting
A
LARMEMI
0-210
T
A
Page 11

To turn alarms on and off
1. Press FUNC to display the function menu.
2. Select “SOUND”, and then press ENTER.
3. Press K and L to change between displays as shown below, and H
and J to select “Д (on) or “×” (off).
DAILML
AY
J
J
(Daily Alarm Status)
KEY
J
J
SCHEMLA
D
4. Press ENTER to return to the previous screen.
(Key Input Tone Status)
(Schedule Alarm Status)
Inputting Characters
• You can input alpha-characters, numbers or symbols while the cursor is in
the top line of the display (text area). Only numbers can be input while the
cursor is in the second and third line (number area).
• Press CAPS to toggle the keyboard between upper-case and lower-case.
The “CAPS” indicator is on the display during upper-case input.
• To input a symbol, press SHIFT (so the “SHIFT” indicator is on the display)
and then press the key for the symbol you want to input. Press the SYM-
BOL button. Use K and L to display the symbol you want, and then
press the applicable number key to select the symbol and input it.
• To input a return, press B.
• To input a special character, press CODE so the “CODE” indicator is dis-
played. Next, press the key for the accent you want to input, and then
press the key for the character. This inputs the accent and character combination.
E-9
Page 12

• While in the number area, press – to input a hyphen.
W
ORK
?_F
AX?_C
E
LL?
_
• To input a space, press SPACE.
• To change a character, use H and J to move the cursor and then input
the new character.
To input Telephone Directory data
• Name/Company: 72 characters; Home (Tel. No.):24 digits; Work (Tel No.)
24 digits; Fax number: 24 digits; Cell phone number: 24 digits; E-mail
address: 36 characters; URL: 36 characters; Address: 72 characters; Free:
64 characters
Example
NAME/COMPANY: CASIO
Home:045-012-3456; Work: 045-012-7890; Fax: 045-987-6543;
Cell Phone: 045-654-3210; e-mail address: abcd@xyz.com;
URL: www.casio.com
Key Operation Display
N
TEL
CASIO ENTER
045-012-3456 ENTER
045-012-7890 ENTER
045-987-6543 ENTER
E-10
AME/YNAPMOC
HOME
_
?
Page 13

Key Operation Display
F
REE?
D
ESC
R?NOITP
I
CASI
O
56
089710-
52
-
4-
20-5
40
40
31
045-654-3210 ENTER
CAPS ABCD SHIFT
@XYZ.COM ENTER
WWW.CASIO.COM
ENTER
CAPS TOKYO SPACE
JAPAN ENTER
ENGINEER ENTER
• Data is automatically sorted into alphabetical sequence according to the
names.
To change the FILE NAME
1. Press TEL to display the initial Telephone Directory screen.
2. Press FUNC to select FILE NAME, and then press ENTER.
• FILE NAME can be up to 12 characters long.
3. After making the changes you want, press ENTER to store them.
To input Schedule data
• Up to 119 characters per data item.
Example
Meeting on December 5, 2003 from 2 PM
Key Operation Display
SCHEDULE
E-MA
I?L
L?
UR
ADDRE?
SS
E-11
Page 14

Key Operation Display
MEETIG
N
5
P
-200
2
13002--
D
ATE
/?
EMI
T
5
A
-
2
_
0
5
0213002--
D
ESC
R?NOITP
IDATE
/?
EMI
T
7
A
-210
5
111300_--
S
CHED?ML
A
A
-
____
MEETING ENTER
20031205
0200 AM/PM ENTER
• Each press of AM/PM toggles between
AM (A) and PM (P). AM is indicated on
the display by “A”, while PM is indicated
by “P”.
0130 ENTER
• If you do not want to set an alarm for the
appointment, press ENTER without
inputting a time.
• Schedule data is sorted by date and time.
• This unit also has a Schedule Alarm, which you can turn on and off (see
“To turn alarms on and off” on page E-9). If the Schedule Alarm is turned
on, an alarm sounds when the current time reaches the start time of
Schedule Keeper data that comes first chronologically. Note that the details
of the Schedule Keeper data are displayed when the Schedule Alarm
sounds.
To input Anniversary data
• Up to 120 Character per data item.
Example
X MAS DAY 12-25
ANNIVERSARY
E-12
Key Operation Display
Page 15

Key Operation Display
MM/DD
?
1010-
X
MASYAD
522
1-
M
EMO?
J
ODY_YADB
J
ODYYADB
X MAS SPACE DAY ENTER
1225 ENTER
• Anniversary data is sorted by date.
To input Memo data
• Up to 120 characters per data item.
Example
JODY BDAY (Jody’s birthday), 10-5 (October 5)
MEMO
JODY SPACE BDAY
B 10-5 ENTER
• Memo data is not sorted.
Key Operation Display
E-13
Page 16

To input To Do data
DOWH?TA
CA
LL_LLI
B
W
HEN
?
1010300
2
_
--
CA
LL LLI
B
6-1-00213
• Up to 119 characters per data item.
Example
CALL BILL, 11-6 (November 6)
TO DO
CALL SPACE BILL
(The check box appears automatically.)
ENTER
• The current date appears automatically.
20031106 ENTER
• Pressing ENTER again toggles the sta-
• To Do data is sorted from uncheck data to checked data by date.
DATE STAMP
To input the date, press SHIFT and then press CODE. The date stamp can
be used during text data input.
E-14
Key Operation Display
tus of the check box between checked
and unchecked.
Page 17

Recalling Data
The indicators K and L on the screen indicate that data exists above or
below the displayed data. Use K and L to scroll the screen and view the
other data.
• Indicators on the left side of the Telephone Directory screen show what
kind of data is currently displayed. The display indicators are: “HOME”
(home telephone), “WORK” (work telephone), “FAX” (fax number), “CELL”
(cell phone number), “E-mail” (e-mail number), and “ADD” (address).
• When scrolling Telephone Directory data, pressing ‘ first shows the name
entry along with the home and work telephone numbers. Each press of
K or L scrolls through the fax number, cell phone number, e-mail address
and other entries.
••
• Scroll Search
••
1. Use TEL, SCHEDULE, ANNIVERSARY, MEMO, or TO DO to enter the
mode (Telephone Directory, Schedule Keeper, Memo, To Do) that contains the data you want.
2. Use ‘ to scroll down, “ to scroll up. Hold down to scroll at high speed.
••
• Initial Character Search
••
1. Use TEL, SCHEDULE, ANNIVERSARY, MEMO, or TO DO to enter the
mode (Telephone Directory, Schedule Keeper, Memo, To Do) that contains
the data you want.
2. Input the initial characters of the data you want.
3. Press “ or ‘ to start the search.
4. If you get more than one, you can scroll.
Editing Data
To edit data
1. Recall data and press EDIT.
2. Input data as you normally would.
3. After inputting the data you want, press ENTER to store it.
E-15
Page 18

Deleting Data
N
AME/YNAPMOCNEWP?SS
A
____
To delete a single item
1. Press “ or ‘ to recall an item.
2. Press FUNC to select ITEM DEL, and then press ENTER.
3. Press ENTER to delete the recalled item, or press ESC to abor t.
To delete all data in a particular mode
1. Press TEL, SCHEDULE, ANNIVERSARY, MEMO, or TODO to enter the
mode that contains the data you want to delete.
2. Press FUNC to select ALL DEL, then press ENTER.
3. Press ENTER to delete all the data in the mode, or press ESC to abort.
Secret Memory Area
Important!
If you forget your password, you will have to RESET and delete everything in
memory!
To register a password
Example
Password: 0123
TEL
SECRET
0123 ENTER
•
0123 ENTER
E-16
Key Operation Display
Your password can be up to 4 numbers long.
R
E-TYEP
N
AME
____
/
C
YNAPMO
Page 19

• Once you are in the secret memory area (indicated by C), you can input,
C
URR
ENO
CYC
NUS
D
←→
0
recall, edit, and delete data, and change between the Telephone Directory, Schedule Keeper, Memo and To Do just as you do in the normal
(non-secret) memory area.
To enter the secret memory area
1. While in the Telephone Directory, Schedule, Anniversary, Memo, or To
Do mode, press SECRET.
2. Input the current password and press ENTER. If the password is not
correct, the error message will appear on the display and then return to
password input step.
To exit the secret memory area
Press SECRET to exit the secret memory area.
To change the password
1. While in the Secret Memory area, press FUNC a number of times until
“PASS EDIT” is displayed.
2. Press ENTER.
3. Change to the new password and press ENTER to store.
Conversion Mode
Your Digital Diary has two conversion modes, one for currency conversion
and one for metric conversion.
To enter the Currency Conversion Mode
Key Operation Display
CONVERSION
ENTER
E-17
Page 20

To enter the Metric Conversion Mode
M
ETRINO
CC
-20
yd←→m
0-20
Key Operation Display
CONVERSION CONVERSION
ENTER
Using the Currency Conversion Mode
You can use the Currency Conversion Mode to convert between various
currencies. The calculator comes preset with the default currency names
listed below. You can use the default currency names as they are, or you can
change to other currency names. You can also change the exchange rate
whenever you want.
1. USD ↔
2. USD ↔ JPY
3. C1 ↔ C2
4. C1 ↔ C3
5. C2 ↔ C3
Note
• Conversion No. 5 will be automatically set when No.3 & 4 have been reg-
istered. The currency name and exchange rate of No.5 are changed automatically.
E-18
Page 21

To perform a currency conversion
U
SD←→
010
U
SD→
011
U
SD←→
0101
U
SD←→
0
Example 1
To convert $100 to euros.
CONVERSION ENTER 100
J
• Press J or H to convert back.
Example 2
To convert
CONVERSION ENTER 100
H
• Each press of H or J converts the dis-
To change the currency name and rate
To setup a conversion from euros to pounds at a rate of 1.7125.
CONVERSION ENTER
Key Operation Display
100 to US dollars.
Key Operation Display
played value.
Key Operation Display
U
SD←
990090909
E-19
Page 22

Key Operation Display
EDIT SPACE SPACE SPACE £* ENTER
* To select the £ (pound) symbol, press the
SYMBOL button. Use K and L to
display the £ (pound) symbol, and then
press the applicable number key to
select it.
1.7125 ENTER
• This stores the input value in memory.
Note
• You can input up to five characters for the currency name and 10 digits for
the exchange rate.
Using the Metric Conversion Mode
All conversion values in the Metric Conversion Mode are preset as shown
below. You cannot change them.
Conversion Displayed Units Conversion Formula
yards ↔ meters yd : m 1 : 0.9144
feet ↔ meters ft : m 1 : 0.3048
inches ↔ centimeters in : cm 1 : 2.54
Kilometers ↔ miles km : mi 1.6093 : 1
kilograms ↔ pounds kg : lb 0.4536: 1
grams ↔ ounces g : oz 28.35 : 1
Celsius ↔ Fahrenheit °C : °F 1 : 1.8 * °C+32
liters ↔ UK gallons l : galUK 4.546 : 1
liters ↔ US gallons l : galUS 3.785 : 1
E-20
£
←→
1
1
£
←→
0
Page 23

To perform metric conversion
yd←→m
0
←→
82→2
8←→8
2←2–2
To convert 28 degrees Celsius to Fahrenheit
CONVERSION CONVERSION ENTER
Press L 6 times, then input 28
• Use K and L to search the desired
J
H
Press H again to convert °F to °C
Key Operation Display
conversion.
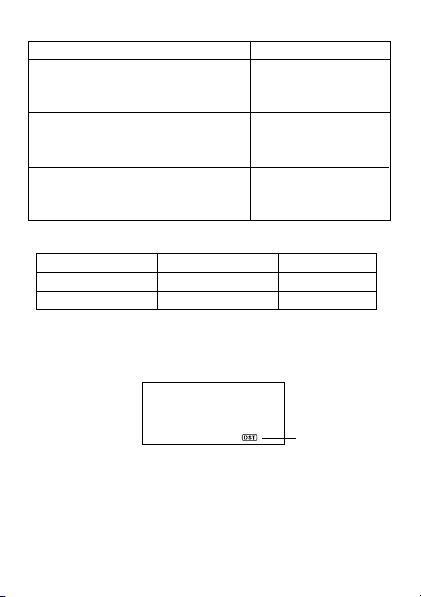
Memory Capacity Screen
1. While in the Telephone Directory, Schedule, Anniversary, Memo, or To
Do mode, press FUNC to select MEMORY.
2. Press ENTER to display the memory capacity screen.
USED
• Press ESC to exit the memory capacity screen.
%
8
Percentage of
memory used
E-21
Page 24

Calculator Mode
Press CAL to enter the Calculator Mode.
■ Calculation Examples
Examples Operation Display
53 +123 − 63 = 53
963 × (23 − 56) = 23
(56 ×3 − 89) ÷ 5.2 + 63 = 56
w56e963u − 31779.
e3w89r5.2q63u 78.19230769
123456 × 741852 = 123456
2 ×(−3) = 2
12 + 23 = 23qq12u K + 35.
45 + 23 = 45u K + 68.
7 −5.6 = 5.6ww7u K − 1.4
2 −5.6 = 2u K − − 3.6
2.3 × 12 = 12ee2.3u K × 27.6
4.5 × 12 = 4.5u K × 54.
45 ÷ 9.6 = 9.6rr45u K ÷ 4.6875
78 ÷ 9.6 = 78u K ÷ 8.125
12% of 1500 1500
Percentage of 660 660
against 880
15% add-on of 2500 2500e15tq 2875.
25% discount of 3500 3500
E-22
a 0.
q125 (Error) + 125.
C123 + 123.
w63u 113.
e741852u E 9.158608051
C 9.158608051
a 0.
e3;u −6.
e12t 180.
r880t 75.
e25tw 2625.
Page 25

What will the selling
price and profit be when
the purchasing price of
an item is $480 and the
profit rate to the selling
price is 25%?
If you made $80 last week
and $100 this week, what
is the percent increase?
80 × 9 = 720
−)50× 6 = 300
20 × 3 = 60
480
480q25t 640.
w 160.
100w80t 25.
a•80e9| M 720.
50e6} M 300.
e3| M 60.
20
ª M 480.
(Profit)
About the Power Supply
Caution
• All data stored in memory is lost if you remove both batteries at the same
time.
• Replace the batteries at least once every 2 years, no matter how much
you use the unit.
• Be sure that you keep a separate copy of all important data that you store
in the unit.
To replace the batteries
1. Press OFF to switch power OFF.
2. Slide the battery compartment cover in the direction indicated by the arrow.
E-23
Page 26

3. Slide the battery switch to the “REPLACE 1” setting.
Insert a thin, pointed object into (A) and remove the old battery.
(A)
Caution
Be sure to remove only one battery at a time. Otherwise, you will lose
all data stored in memory.
4. Replace the old battery with a new one, making sure that the positive (+)
side of the new battery is facing up (so you can see it).
5. Slide the battery switch to the “REPLACE 2” setting and repeat step 4
for the other battery.
• Be sure to load two new CR2032 batteries at the same time . Never mix an
old battery with a new one.
6. Slide the battery switch to the “LOCK” setting.
7. Replace the battery compartment cover.
Battery Precautions
• Keep + side of each battery facing up (so you can see it).
• Keep batteries out of the reach of small children. If swallowed, consult
with a physician immediately.
The batteries that come with this unit discharge slightly during shipment
and storage. Because of this, they may require replacement sooner than
the normal expected battery life.
E-24
Page 27

Messages
Message Remarks
BUSY... • Data processing is being performed.
NOT FOUND! • No data in memory matches your
PASS? • Your operation requires entry into the
LOW BAT! • Battery power is low. Replace the batteries.
specification.
secret memory area. Input the password.
E-25
Page 28

World Time City Table
Time
Difference
E-26
Code City Name Other Cities in Zone
– 11
– 10 HNL HONOLULU
– 09 ANC ANCHORAGE
– 08 LAX LOS ANGELES Seattle, Las Vegas
SFO SAN FRANCISCO
– 07 DEN DENVER El Paso
– 06 MEX MEXICO CITY Dallas, Houston, Chicago
– 05 NYC NEW YORK Washington D.C., Boston,
LIM LIMA Montreal
– 04 CCS CARACAS Santiago
– 03 RIO RIO DE JANEIRO Buenos Aires
– 02
– 01
+ 00 LON LONDON Greenwich Mean Time
+ 01 PAR PARIS Madr id, Amsterdam
ROM ROME
+ 02 CAI CAIRO Helsinki, Beirut, Jerusalem
ATH ATHENS
IST ISTANBUL
+ 03 MOW MOSCOW Kuwait, Nairobi
+ 3:30 THR TEHRAN
+ 04 DXB DUBAI Abu Dhabi
+ 4:30 KBL KABUL
+ 05 MLE MALE
+ 5:30 DEL DELHI Mumbai, Calcutta, Colombo
+ 06 DAC DHAKA
+ 07 BKK BANGKOK Jakarta, Hanoi
+ 08 HKG HONG KONG Taipei, Singapore, Manila
BJS BEIJING
DPS DENPASAR
+ 09 TYO TOKYO Seoul, Pyongyang
+ 9:30 ADL ADELAIDE Darwin
+ 10 SYD SYDNEY
GUM GUAM
+ 11:00 NOU NOUMEA
+ 12:00 AKL AUCKLAND Wellington
Page 29

Storage Capacity
Telephone: 3,900 records under the following conditions
NAME/COMPANY: 10 characters
HOME: 10 digits
WORK: 10 digits
Schedule: 3,100 records under the following conditions
DESCRIPTION: 20 characters
Alarm: On
Memo: 5,200 records under the following conditions
To Do: 4,300 characters under the following conditions
Anniversary: 4,600 records under the following conditions
One appointment per day
MEMO: 20 characters
DO WHAT: 20 characters
DESCRIPTION: 20 characters
Specifications
Model: SF-3990
Memory capacity: 128 KB
Power supply: 2 lithium batter ies (CR2032)
Power consumption: 0.02 W
Battery life:
Approximately 2 years under the following test conditions:
Unit turned on one hour each day.
Auto Power Off: Approximately 6 minutes after last key operation
Ambient temperature range: 0˚C~40˚C (32˚F~104˚F)
Dimensions: Folded: 13.9 (H) × 145 (W) × 91 (D) mm
Weight: Approximately 120g (4.2 oz) including batteries
9
/16 " (H) × 511/16 " (W) × 39/16 " (D))
(
Unfolded: 10.3 (H) × 145 (W) × 178 (D) mm
3
/8 " (H) × 511/16 " (W) × 7 " (D))
(
E-27
Page 30

CASIO ELECTRONICS CO., LTD.
Unit 6, 1000 North Circular Road
London NW2 7JD, U.K.
Page 31

CASIO COMPUTER CO., LTD.
6-2, Hon-machi 1-chome
Shibuya-ku, Tokyo 151-8543, Japan
 Loading...