

Page 1
Screen Receiver
for fx-CG Series
ClassPad 330 PLUS
ClassPad II
E
(for Windows®, for Macintosh)
User’s Guide
CASIO Worldwide Education Website
http://edu.casio.com
CASIO EDUCATIONAL FORUM
http://edu.casio.com/forum/
Page 2
Getting Started
About Screen Receiver k
Screen Receiver provides the following functions.•
Display of calculator screen images on a computer connected via a USB cable -
Real-time display of calculation operation results -
Zooming of display contents -
Capture of screen contents -
Copy and paste of captured screen images to other applications -
Storage of captured screen images as image files -
Printing of captured screen images -
Using This Manual k
The procedures in this manual assume that you are already familiar with the following standard •
computer operations.
Menu operations using the mouse, including: clicking, double-clicking, dragging, etc.•
Text input using the keyboard -
Icon operations, general window operations, etc. -
If you are not familiar with these types of operations, refer to the user documentation for your computer.
The explanations in this manual cover both Windows and Mac OS. Most of the screen shots are •
from Windows XP, but operational procedures are virtually identical for both Windows and Mac
OS.
Note that the actual appearance of the screen that appears when using this software depends •
on your computer system setup and on the operating system you are using.
Screen shots shown in this User’s Guide are intended for illustrative purposes only. The actual •
text and values that appear on display may differ from the examples shown in this User’s Guide.
This manual explains Screen Receiver operations using a CASIO fx-CG Series calculator. •
Screen Receiver operations are identical when using a ClassPad 330 PLUS/ClassPad
II.
E-1
Page 3
System Requirements k
Windows
Operating Systems:
Windows XP Home Edition, Windows XP Professional (32-bit), Windows Vista
bit), Windows 7 (32-bit/64-bit), Windows 8 (32-bit/64-bit)
Your hardware configuration needs higher than functionalities that operating system
recommends.
Computer: Computer with one of the Windows operating systems pre-installed (Excluding
computers with an upgraded operating system and self-built computers.)
Disk Space: 100MB for installation and uninstall
Note: Actual requirements and product functionality may vary based on your system
configuration and operating system.
Other: USB port for direct connection. Do not connect via a USB hub.
Video adapter and display must support resolution of XGA (1024×768) or higher, 16
bit or higher system color.
®
Internet Explorer
6.0 or later.
CD-ROM drive.
Adobe® Reader® 6.0 or later.
Mac OS
Operating Systems:
Mac OS X 10.5, Mac OS X 10.6, Mac OS X 10.7, Mac OS X 10.8
Your hardware configuration needs higher than functionalities that operating system
recommends.
®
Computer: Intel
Processer
Computer with one of the Macintosh operating systems pre-installed (Excluding
computers with an upgraded operating system.)
Disk Space: 100MB for installation and uninstall
®
(32-
Note: Actual requirements and product functionality may vary based on your system
configuration and operating system.
Other: USB port for direct connection. Do not connect via a USB hub.
Video adapter and display must support resolution of XGA (1024×768) or higher.
For Retina display, use of the Low Resolution mode is recommended.
Safari 3.0 or later.
CD-ROM drive.
Note
Windows, Windows Vista and Internet Explorer are registered trademarks or trademarks of •
Microsoft Corporation in the United States and /or other countries.
Mac, Mac OS, Macintosh, Safari and Retina are registered trademarks or trademarks of Apple •
Inc. in the United States and/or other countries.
Intel is a registered trademark or trademark of Intel Corporation in the United States and/or •
other countries.
Adobe and Reader are either registered trademarks or trademarks of Adobe Systems •
Incorporated in the United States and/or other countries.
Company and product names used herein are trademarks of their respective owners. •
Note that trademark ™ and registered trademark •
guide.
®
are not used within the text of this user’s
E-2
Page 4
Contents
1. Installing and Uninstalling Screen Receiver ........................................... 4
2. Screen Configuration ................................................................................6
Menu Bar ............................................................................................................................9
Status Bar .........................................................................................................................13
3. Using Screen Receiver ............................................................................ 14
3-1 Establishing a Connection between Screen Receiver and a Calcualtor ...................14
3-2 Calculation Operation Precaution ..............................................................................17
3-3 Capturing the Calculator Screen ................................................................................17
3-4 Making a Captured Data Window Active ...................................................................18
3-5 Copying Captured Data Window Contents to the Clipboard .....................................18
3-6 Saving Captured Data ................................................................................................18
3-7 Auto File Save.............................................................................................................19
3-8 Resizing a Screen Image ...........................................................................................19
3-9 Using a Floating Calculator Screen (Windows only) .................................................21
3-10 Print ing ......................................................................................................................22
3-11 Shortcut Menu ..........................................................................................................24
4. Tool Options Dialog Box .........................................................................25
4-1 File Save Settings ......................................................................................................25
4-2 Capture Settings .........................................................................................................25
5. Error Message Table ................................................................................ 26
E-3
Page 5
1. Installing and Uninstalling Screen Receiver
This section explains how to install and uninstall Screen Receiver.
To install Screen Receiver
Note
Do not install Screen Receiver into a folder that is used by other software.•
1. Place the CD-ROM into your computer’s CD-ROM drive.
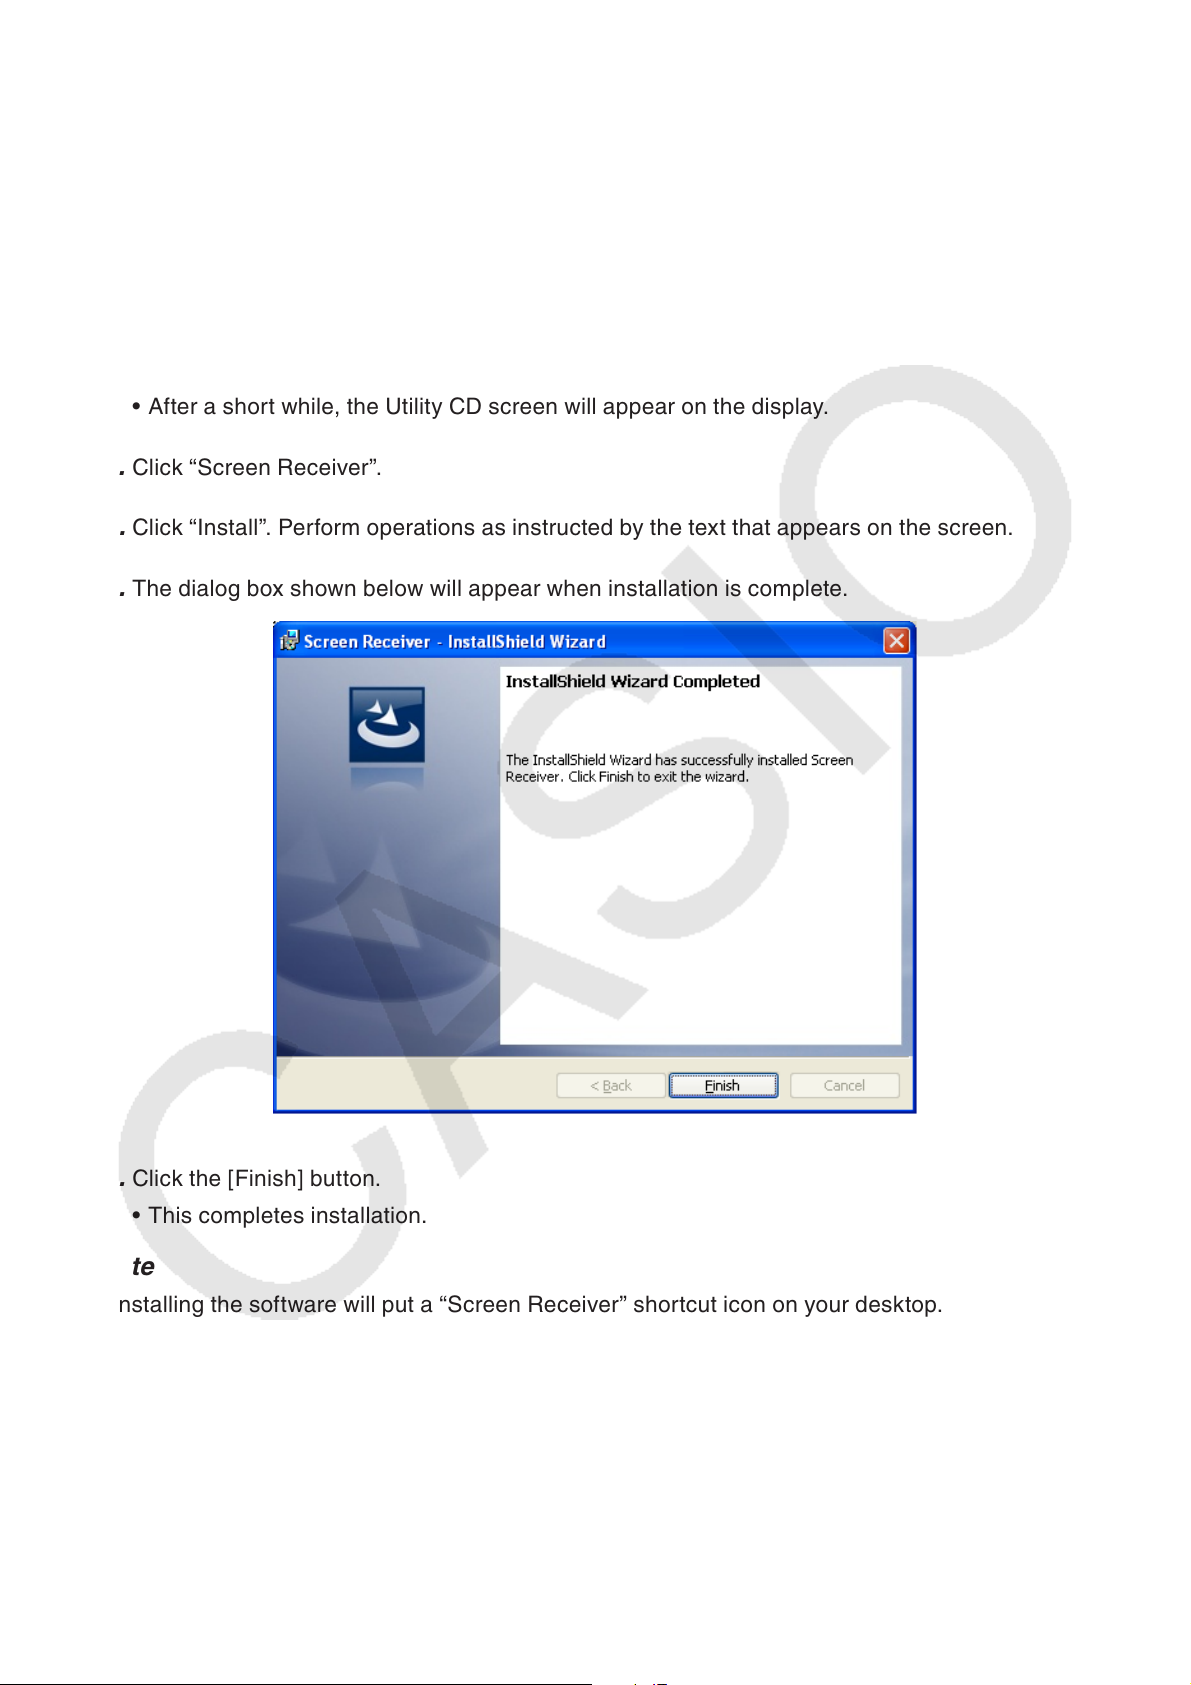
After a short while, the Utility CD screen will appear on the display.•
2. Click “Screen Receiver”.
3. Click “Install”. Perform operations as instructed by the text that appears on the screen.
4. The dialog box shown below will appear when installation is complete.
5. Click the [Finish] button.
This completes installation.•
Note
Installing the software will put a “Screen Receiver” shortcut icon on your desktop.•
E-4
Page 6

To uninstall Screen Receiver
Windows
1. Display the Windows Control Panel.
2. Click [Add/Remove Program].
3. On the list of applications that appears, select “Screen Receiver”.
4. Click the [Add/Remove] button.
This will display the program maintenance wizard.•
5. Click the [Yes] button.
This completes the uninstall operation.•
Mac OS
1. Move Screen Receiver(.app) to the Trash folder.
2. From the menu, select [Finder] and then [Empty Trash].
To start up Screen Receiver
1. Windows: On your computer’s desktop, double-click the “Screen Receiver” icon.
Mac OS: In the “Applications” - “CASIO” folder, double-click “Screen Receiver”.
Windows: You could also start up the application by clicking [Start] - [Program] - [CASIO] - •
[Screen Receiver] - [Screen Receiver].
Windows
Mac OS
E-5
Page 7
2. Screen Configuration
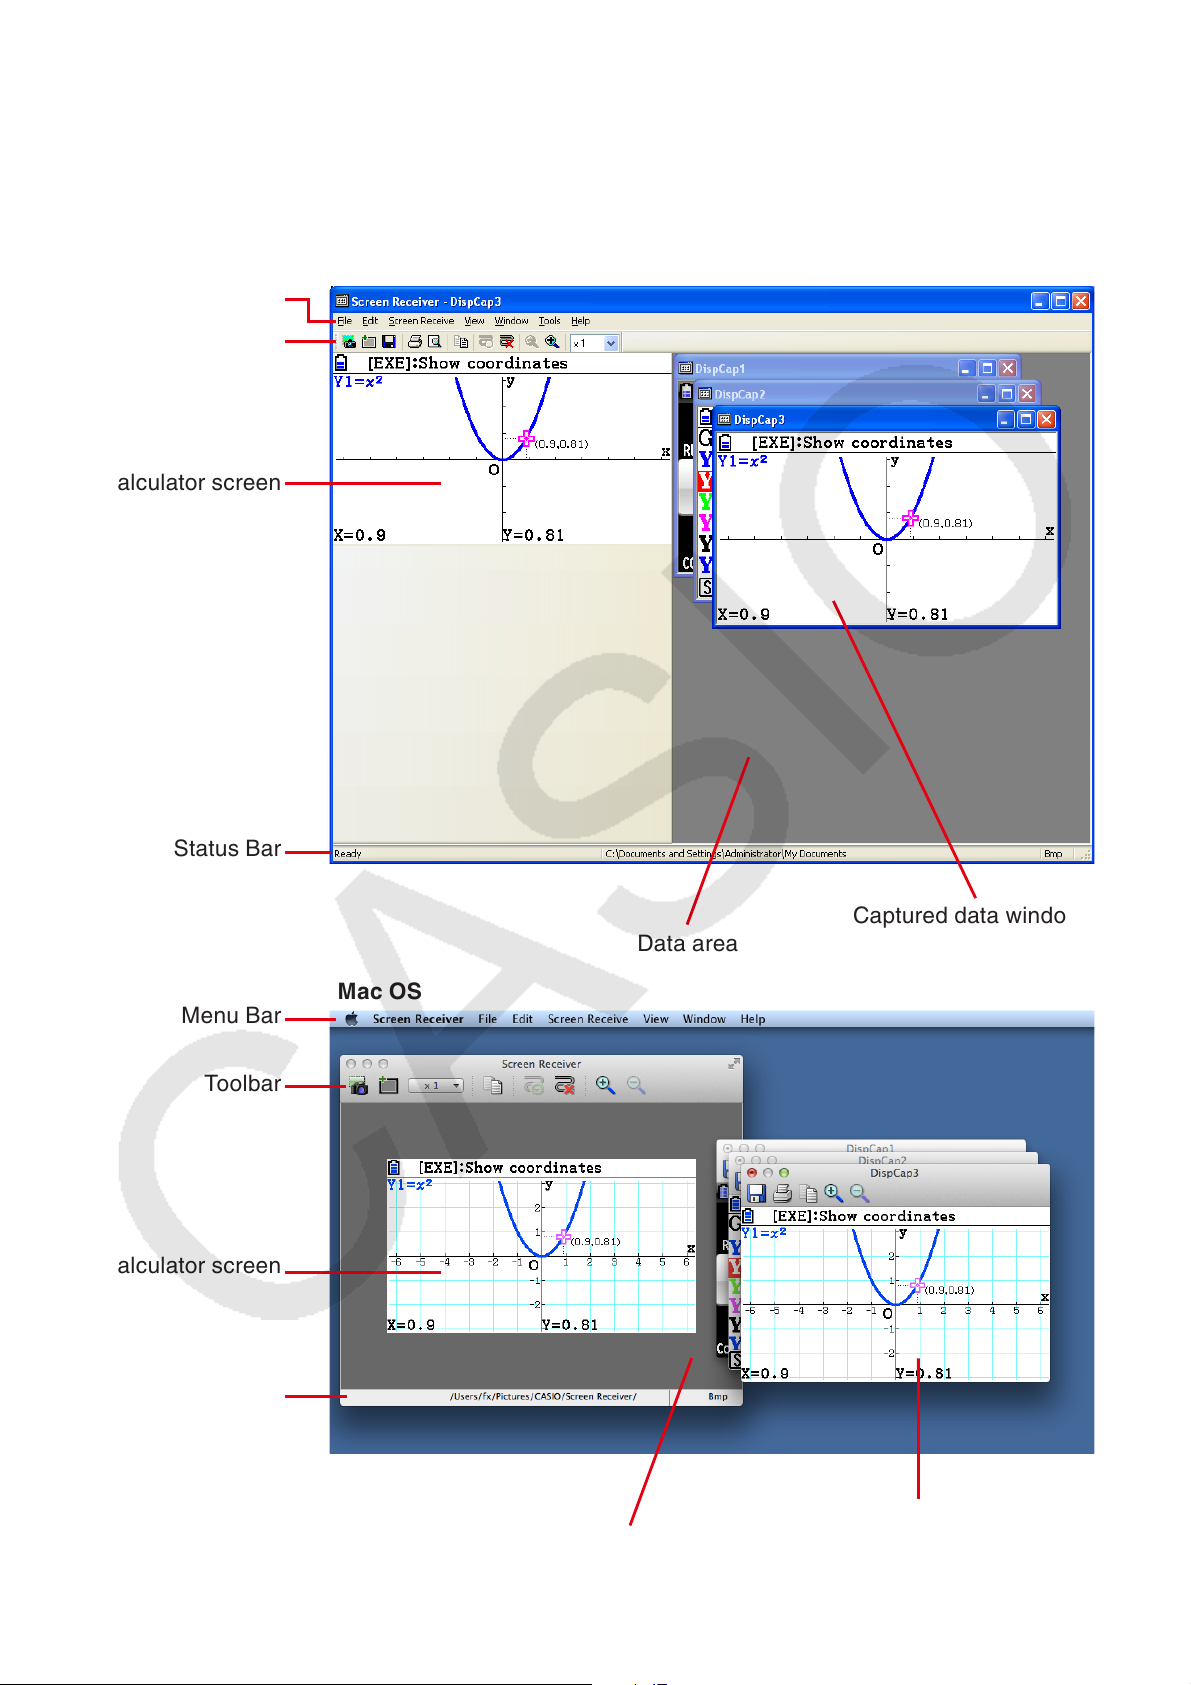
The following shows the Screen Receiver screen.
When connected to a CASIO fx-CG Series calculator k
Windows
Menu Bar
Tool b ar
Calculator screen
Status Bar
Menu Bar
Tool b ar
Calculator screen
Status Bar
Captured data windows
Data area
Mac OS
Data area
E-6
Captured data windows
Page 8
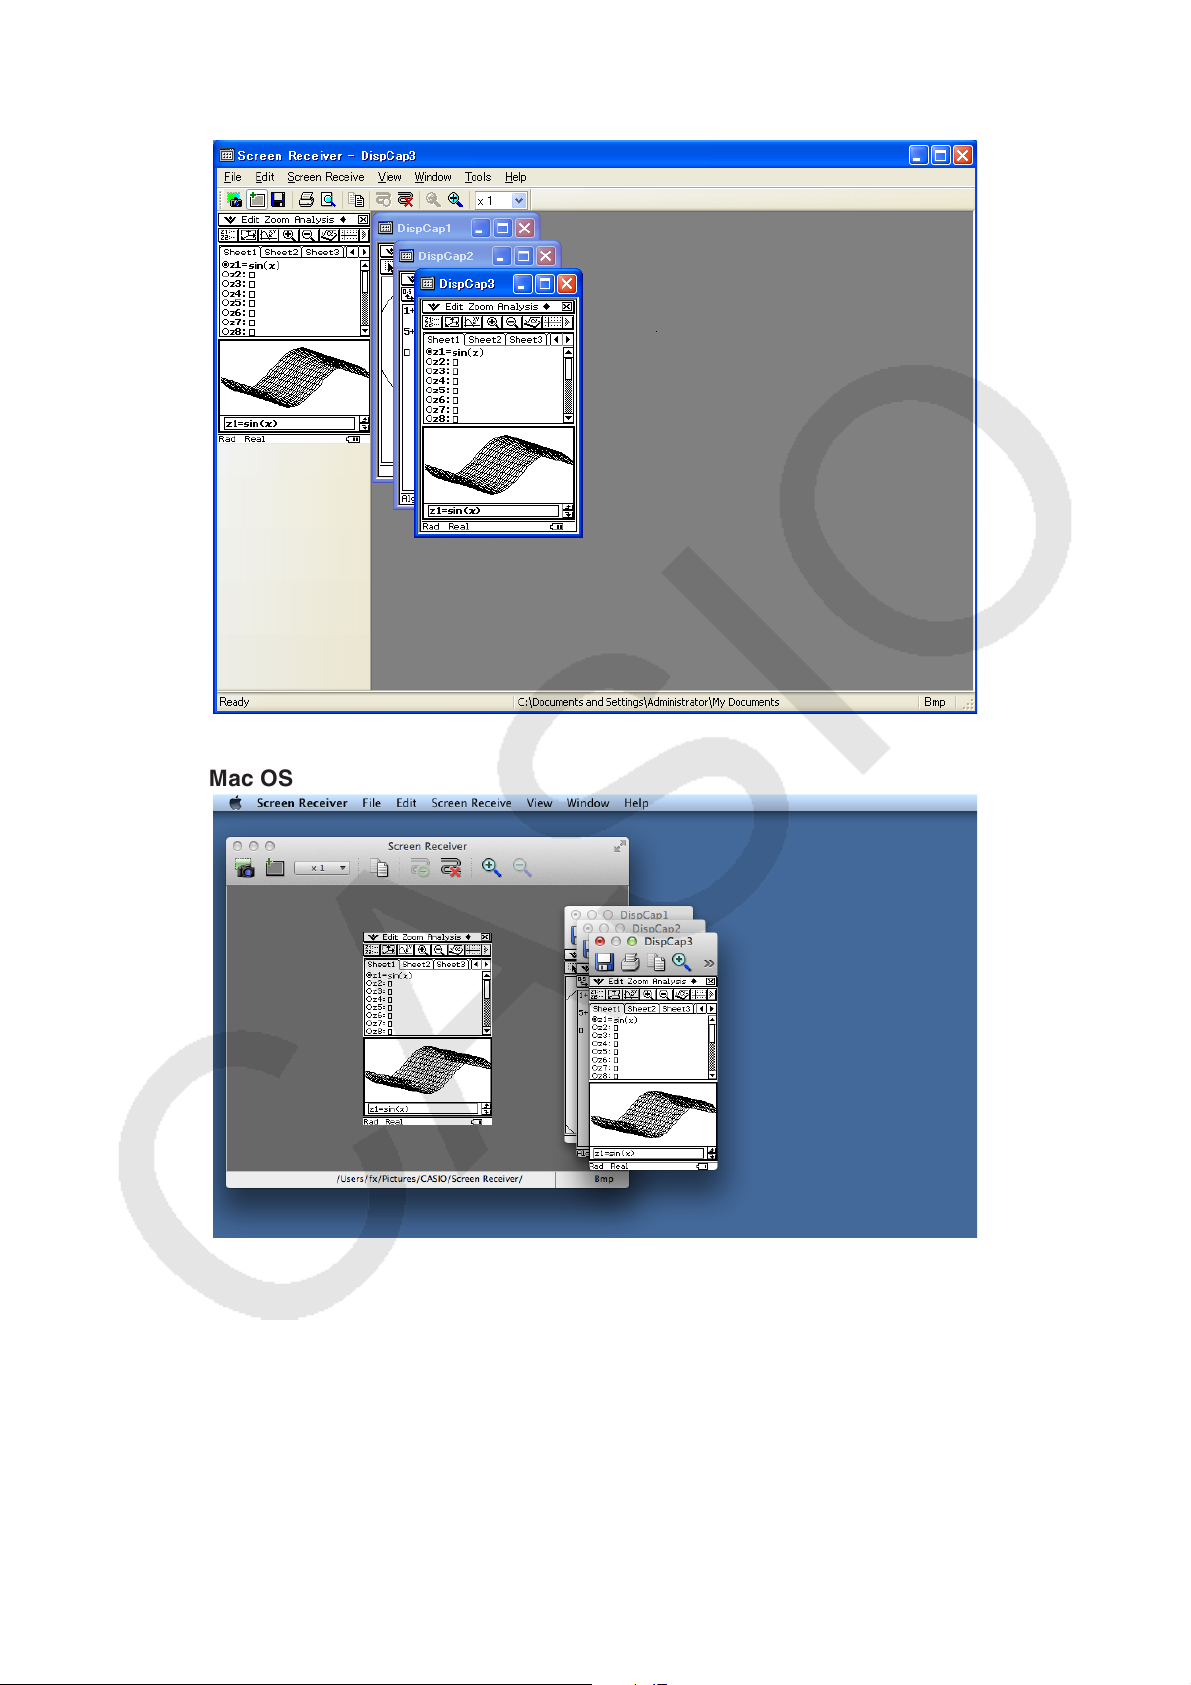
When connected to ClassPad 330 PLUS k
Windows
Mac OS
E-7
Page 9
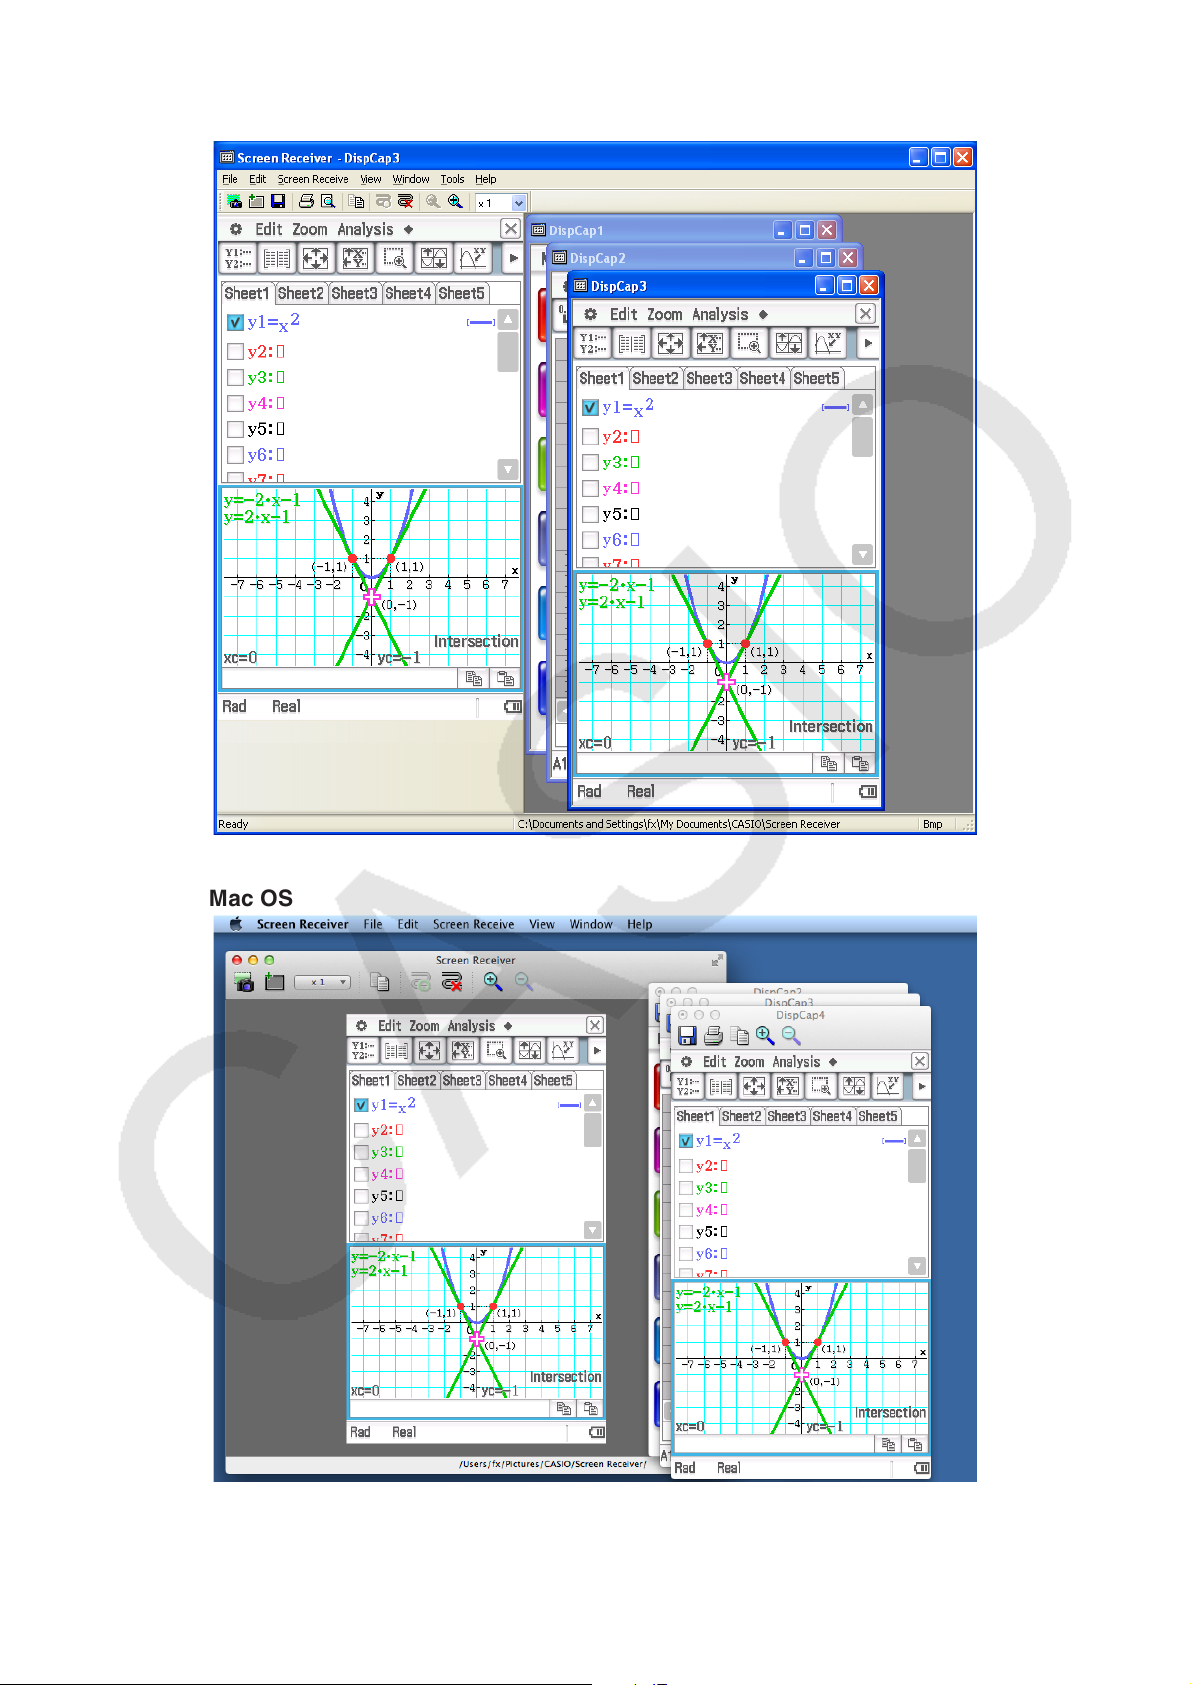
When connected to ClassPad k II
Windows
Mac OS
E-8
Page 10

Menu Bar
This section explains the Screen Receiver menu bar.•
If a menu command can also be executed by clicking a toolbar button, the applicable toolbar •
button is also provided.
File Menu k
Menu
Toolbar
Button
Description
Close Closes the active captured data window.
Capture Screen
Save
Save As
Captures the calculator screen. Each capture adds a capture
screen to the captured data area.
Saves the contents of the active data capture window,
overwriting the existing data.
Saves the contents of the active data capture window under
a new file name.
Print Prints the contents of the active captured data window.
Print Preview*
1
Displays a preview of the print image.
Print Setup Displays the print setup dialog box.
Exit*
2
Exits Screen Receiver.
1
Windows only
*
*2 Mac OS: On the [Screen Receiver] menu, selected [Quit Screen Receiver].
E-9
Page 11

Edit Menu k
Copy
Screen Receive Menu k
Start
Stop
Menu
Menu
Toolbar
Button
Toolbar
Button
Description
Copies the contents of the active captured data window to
the clipboard.
Description
Establishes a connection between Screen Receiver and
calculator and displays the calculator screen contents.
Terminates the connection between Screen Receiver and the
calculator.
E-10
Page 12

View Menu k
Menu Submenu
Reduce
Expand
Zoom × 1
× 2
× 3
Toolbar Toggles display of the toolbar on and off.
Status Bar Toggles display of the status bar on and off.
Toolbar
Button
Description
Reduces the size of contents of the active captured
data window.
Expands the size of the contents of the active
captured data window.
Displays the contents of the active captured data
window in its actual size.
Displays the contents of the active captured data
window as 2X its actual size.
Displays the contents of the active captured data
window as 3X its actual size.
E-11
Page 13

Window Menu k
Captured data
Menu Description
Cascade Stacks captured data windows.
Tile Horizontal*
Tile Vertical*
1
1
Lines up captured data windows horizontally.
Lines up captured data windows vertically.
Arrange Icons Displays captured data windows as icons.
Close All Closes the all captured data windows.
(Captured data) Shows the names of the displayed captured data.
1
Windows only
*
Tools Menu (Windows only) k
Menu Description
1
Options*
1
Mac OS: On the [Screen Receiver] menu, selected [Preferences...].
*
Displays a dialog box for configuring optional settings.
E-12
Page 14

Help Menu k
Menu Description
Manual Displays the Screen Receiver User’s Guide.
License Displays the end user license agreement.
About*
1
Mac OS: On the [Screen Receiver] menu, selected [About Screen Receiver].
*
1
Displays version information.
Status Bar
12 3
1 Help text is displayed here (Windows only).
2 Folder where captured data is stored
3 File name extension of captured data files
E-13
Page 15

3. Using Screen Receiver
3-1 Establishing a Connection between Screen Receiver
and a Calcualtor
Important!
Do not connect the calculator to the computer before starting up Screen Receiver. Start up •
Screen Receiver first.
1. Start up Screen Receiver.
2. Use the USB cable that comes with the calculator to connect it to your computer.
This will display the dialog box shown below.•
fx-CG Series ClassPad 330 PLUS
ClassPad
II
3. fx-CG Series:
For Windows Vista, Windows 7, Windows 8 user: press 2.
For Windows XP user: press 3.
For Mac OS user: press 2.
ClassPad 330 PLUS/ClassPad
For Windows Vista, Windows 7, Windows 8 user: tap [Screen Receiver], or press the 2 key.
For Windows XP user: tap [Screen Receiver(XP)], or press the 3 key.
For Mac OS user: tap [Screen Receiver], or press the 2 key.
This will display the dialog box shown below.•
II:
fx-CG Series ClassPad 330 PLUS
ClassPad
E-14
II
Page 16

USB Connection Precautions •
A USB connection between the calculator and a computer may be terminated automatically
if the computer enters a power save mode, sleep mode, or any other standby state. If this
happens, disconnect and then reconnect the USB cable.
Windows XP Users •
If this is the first time you are connecting the calculator to your computer, use the following
procedure to install the USB driver.
3-1. Connecting the calculator to a computer running Windows XP causes the screen shown
below to appear on your computer display.
Select “No, not
this time”.
3-2. Select “Install the software automatically (Recommended)” and then click [Next].
E-15
Page 17

3-3. Though a message appears to let you know that the software has not passed the
“Windows Logo Test”, there is no need for concern. Simply click [Continue Anyway] and
proceed with installation.
3-4. Click [Finish].
4. fx-CG Series: Press J.
ClassPad 330 PLUS/ClassPad
This automatically establishes a connection between Screen Receiver and the calculator, •
and displays the calculator screen on the Screen Receiver window. Wait until the calculator
screen appears on the Screen Receiver window before performing any calculator operation.
Windows
Calculator screen Calculator screen
II: Tap [OK].
Mac OS
5. Perform the operations you want on the calculator.
The calculator screen displayed by Screen Receiver will change in real time as you perform •
operations on the calculator.
6. To terminate the connection between Screen Receiver and calculator, click .
7. Disconnect the USB cable from the computer and calculator.
Note
If the connection between Screen Receiver and the calculator terminates for some reason, click •
to reconnect.
E-16
Page 18

3-2 Calculation Operation Precaution
The way figures are drawn and the cursor moves on the Screen Receiver screen may not •
exactly match what appears on the calculator screen.
Attention Windows Vista, Windows 7 and Windows 8 users •
The calculator does not support the operations below while there is a connection between the
calculator and Screen Receiver.
File delete Folder create or rename Backup Optimization Reset operations (Add-In, Storage Memory, Add-In&Storage, Main&Storage, Initialize All, Language File)
Screen Receiver will not display the calculator screen while the calculator is performing a file
save operation. The calculator screen will appear after the file save is complete.
3-3 Capturing the Calculator Screen
1. Perform the required operation on the calculator to display the screen you want to capture.
2. Click .
This displays the captured data.•
Captured data
3. Repeat steps 1 and 2 to capture other screens, if you want.
Note
You can put a frame around the captured data by clicking • . Each click toggles between
framed and unframed data. For more information, see “4-2 Capture Settings” (page E-25).
E-17
Page 19
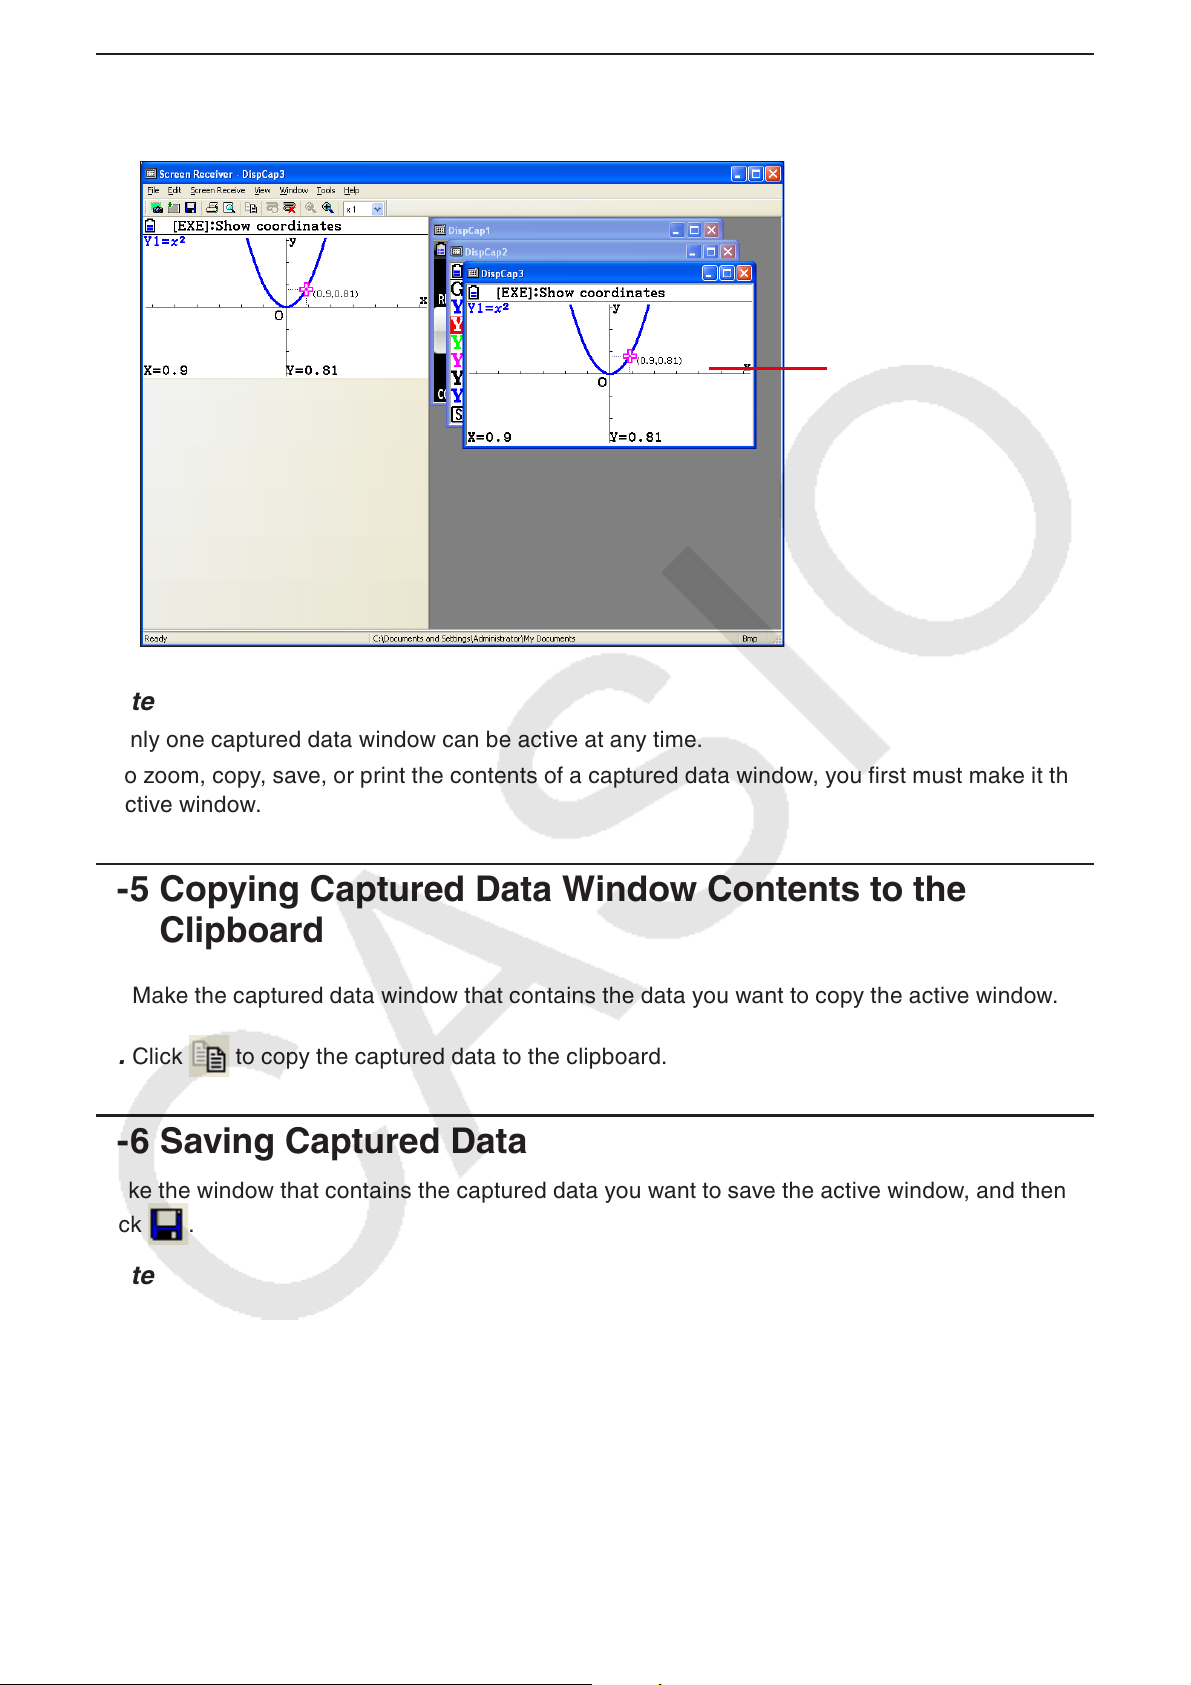
3-4 Making a Captured Data Window Active
Clicking a captured data window makes it the active window.
Active captured data
Note
Only one captured data window can be active at any time.•
To zoom, copy, save, or print the contents of a captured data window, you first must make it the •
active window.
3-5 Copying Captured Data Window Contents to the
Clipboard
1. Make the captured data window that contains the data you want to copy the active window.
2. Click to copy the captured data to the clipboard.
3-6 Saving Captured Data
Make the window that contains the captured data you want to save the active window, and then
click .
Note
Saved captured data is automatically assigned a file name of the following format: DispCapXX. •
XXX.
The file format (bmp, jpg, png) and storage folder are in accordance with the settings described •
under “4-1 File Save Settings” (page E-25).
You can use the [Save As] command on the [File] menu to save the file under a different name.•
E-18
Page 20
3-7 Auto File Save
Attempting to exit Screen Receiver while there is unsaved captured data will cause the dialog box
shown below to appear.
1
2
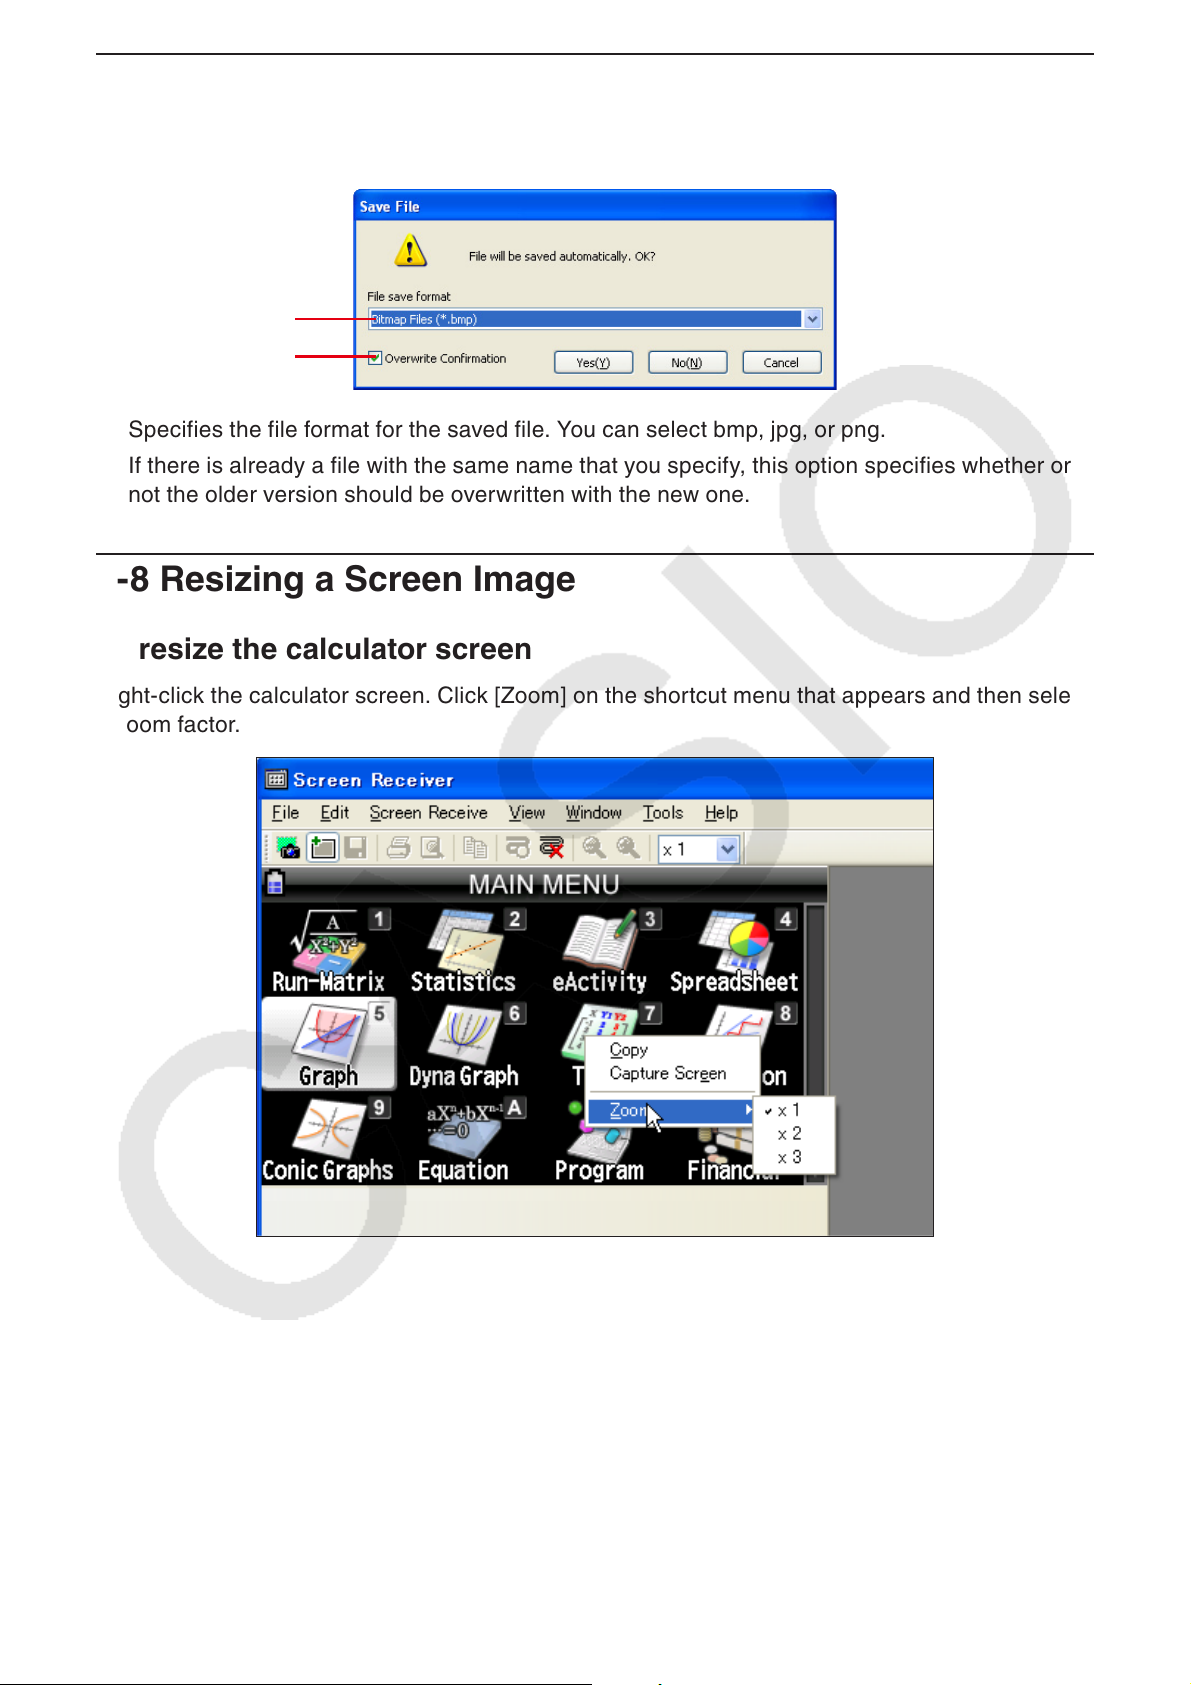
1 Specifies the file format for the saved file. You can select bmp, jpg, or png.
2 If there is already a file with the same name that you specify, this option specifies whether or
not the older version should be overwritten with the new one.
3-8 Resizing a Screen Image
To resize the calculator screen
Right-click the calculator screen. Click [Zoom] on the shortcut menu that appears and then select
a zoom factor.
E-19
Page 21

To resize the calculator screen when capturing it
On the toolbar, click the down arrow button of the zoom box. On the menu that appears, select a
zoom factor.
Zoom menu
To resize captured data
Make the window that contains the captured data you want to resize the active window, and then
click or . You can select one of three sizes.
→
←
You also can resize by selecting a zoom factor with the [Zoom] command on the [View] menu.
→
←
E-20
Page 22
3-9 Using a Floating Calculator Screen (Windows only)
You can display the calculator screen in its own window that is separate from the Screen
Receiver window.
To make the calculator screen a floating screen
1. Double-click the calculator screen.
2. Drag the calculator screen to the location you want, either inside or outside of the Screen
Receiver window.
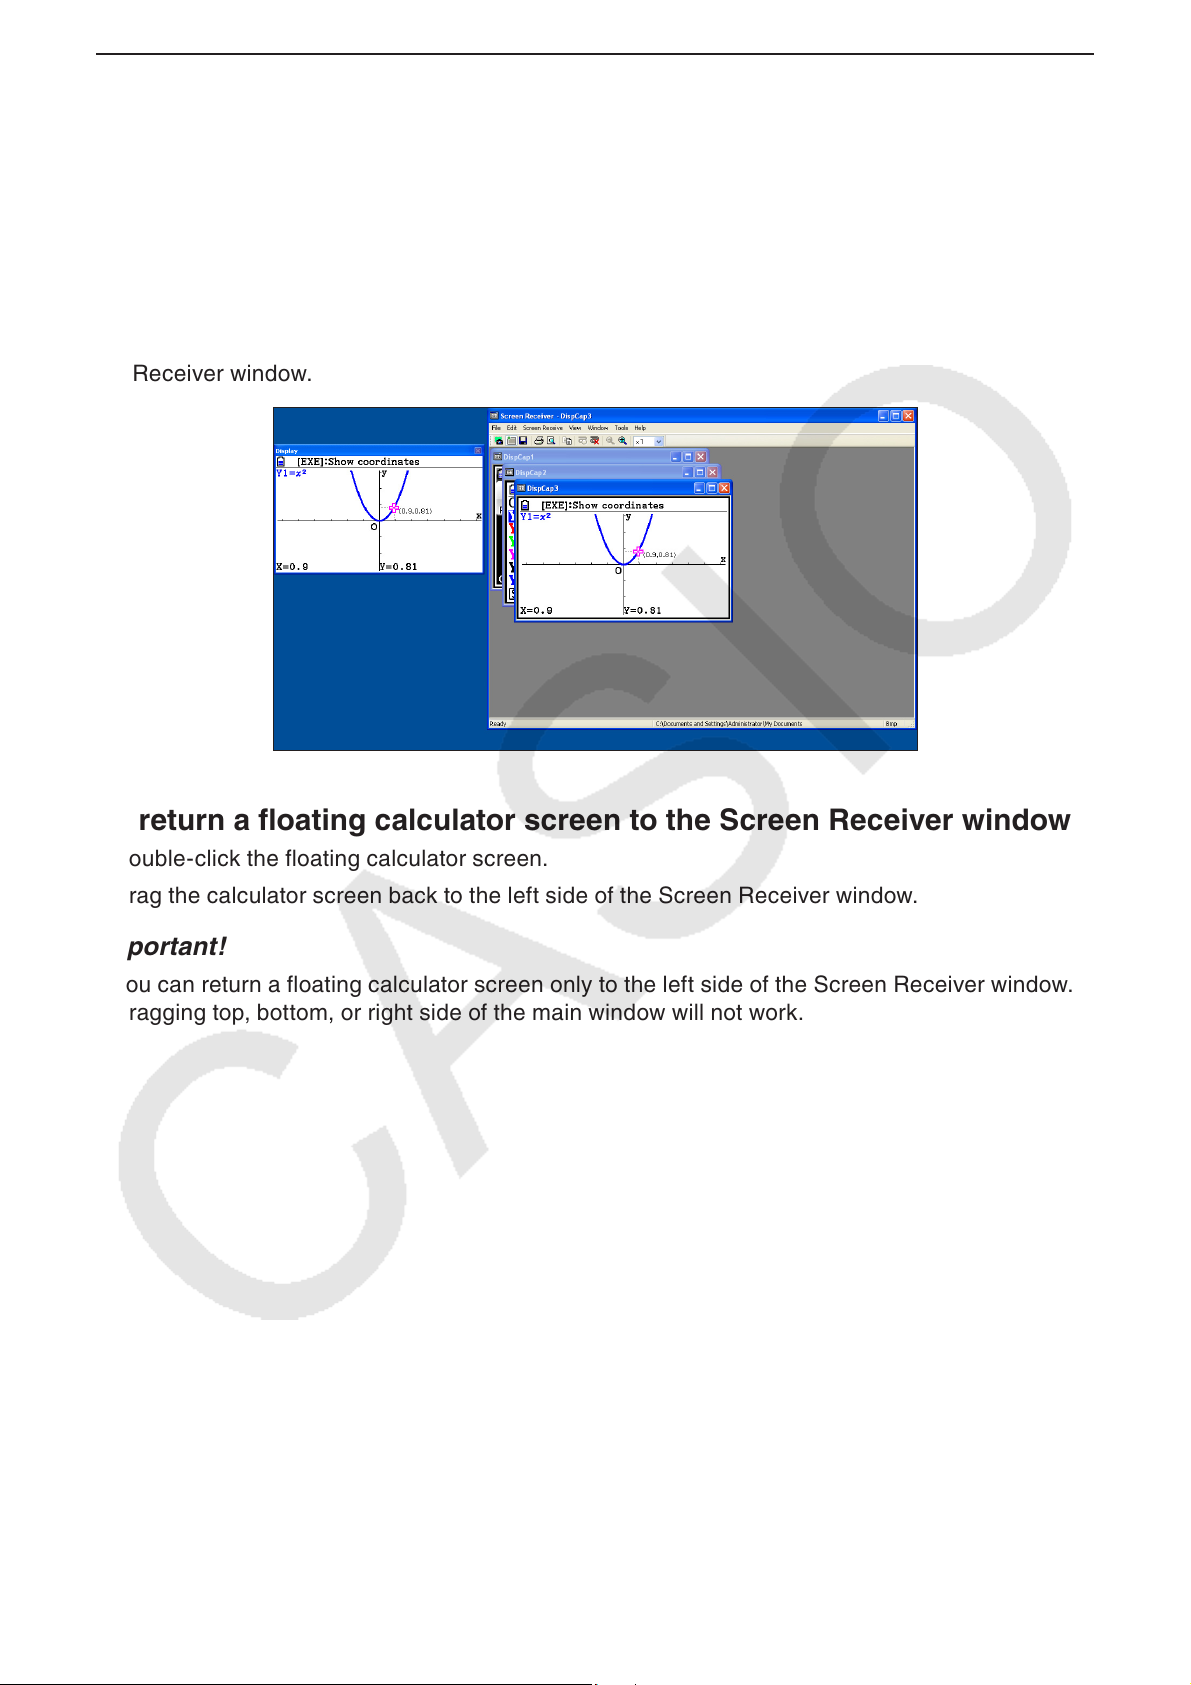
To return a floating calculator screen to the Screen Receiver window
Double-click the floating calculator screen. -
Drag the calculator screen back to the left side of the Screen Receiver window. -
Important!
You can return a floating calculator screen only to the left side of the Screen Receiver window. •
Dragging top, bottom, or right side of the main window will not work.
E-21
Page 23
3-10 Printing
You can print the contents of a captured data window, if you want.•
1. Make the captured data window that contains the data you want to print the active window.
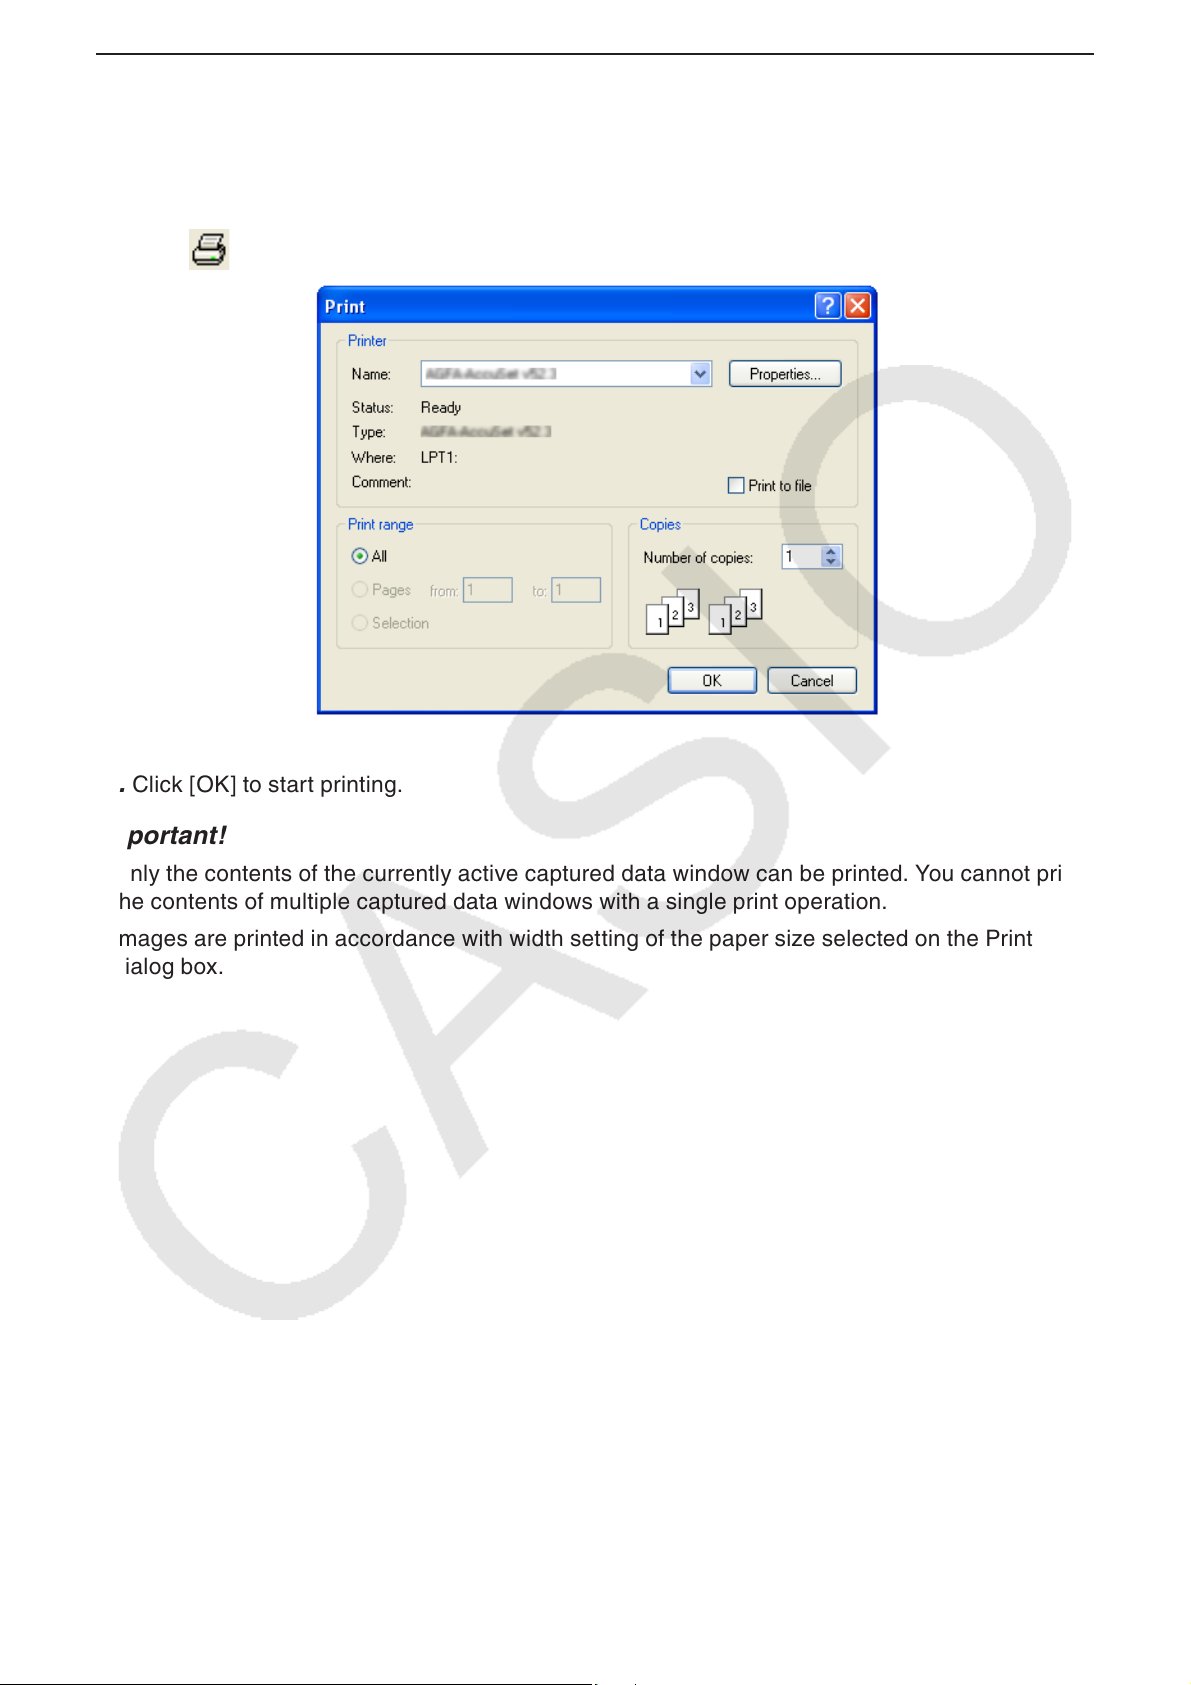
2. Click . This will display the Print dialog box.
3. Click [OK] to start printing.
Important!
Only the contents of the currently active captured data window can be printed. You cannot print •
the contents of multiple captured data windows with a single print operation.
Images are printed in accordance with width setting of the paper size selected on the Print •
dialog box.
E-22
Page 24
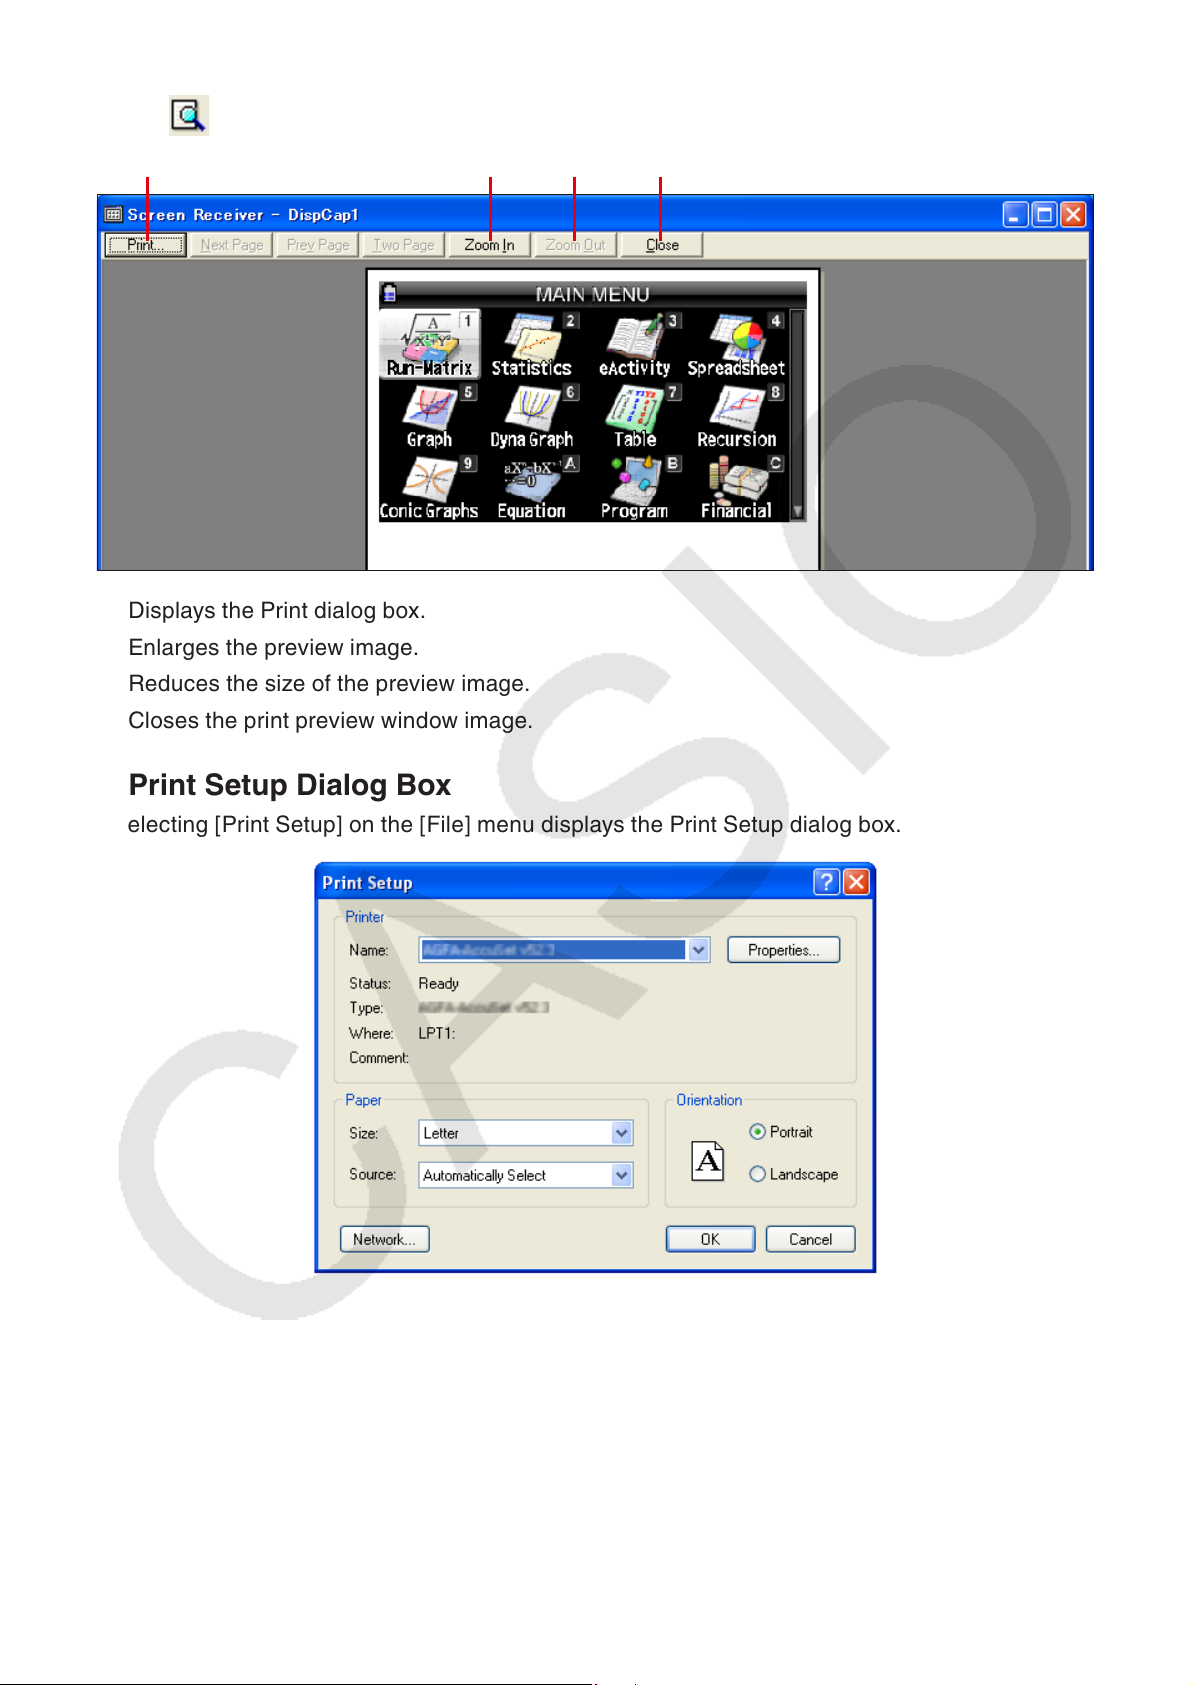
Print Preview (Windows only) k
Click • to display the print preview window.
1 2 3 4
1 Displays the Print dialog box.
2 Enlarges the preview image.
3 Reduces the size of the preview image.
4 Closes the print preview window image.
Print Setup Dialog Box k
Selecting [Print Setup] on the [File] menu displays the Print Setup dialog box.•
E-23
Page 25
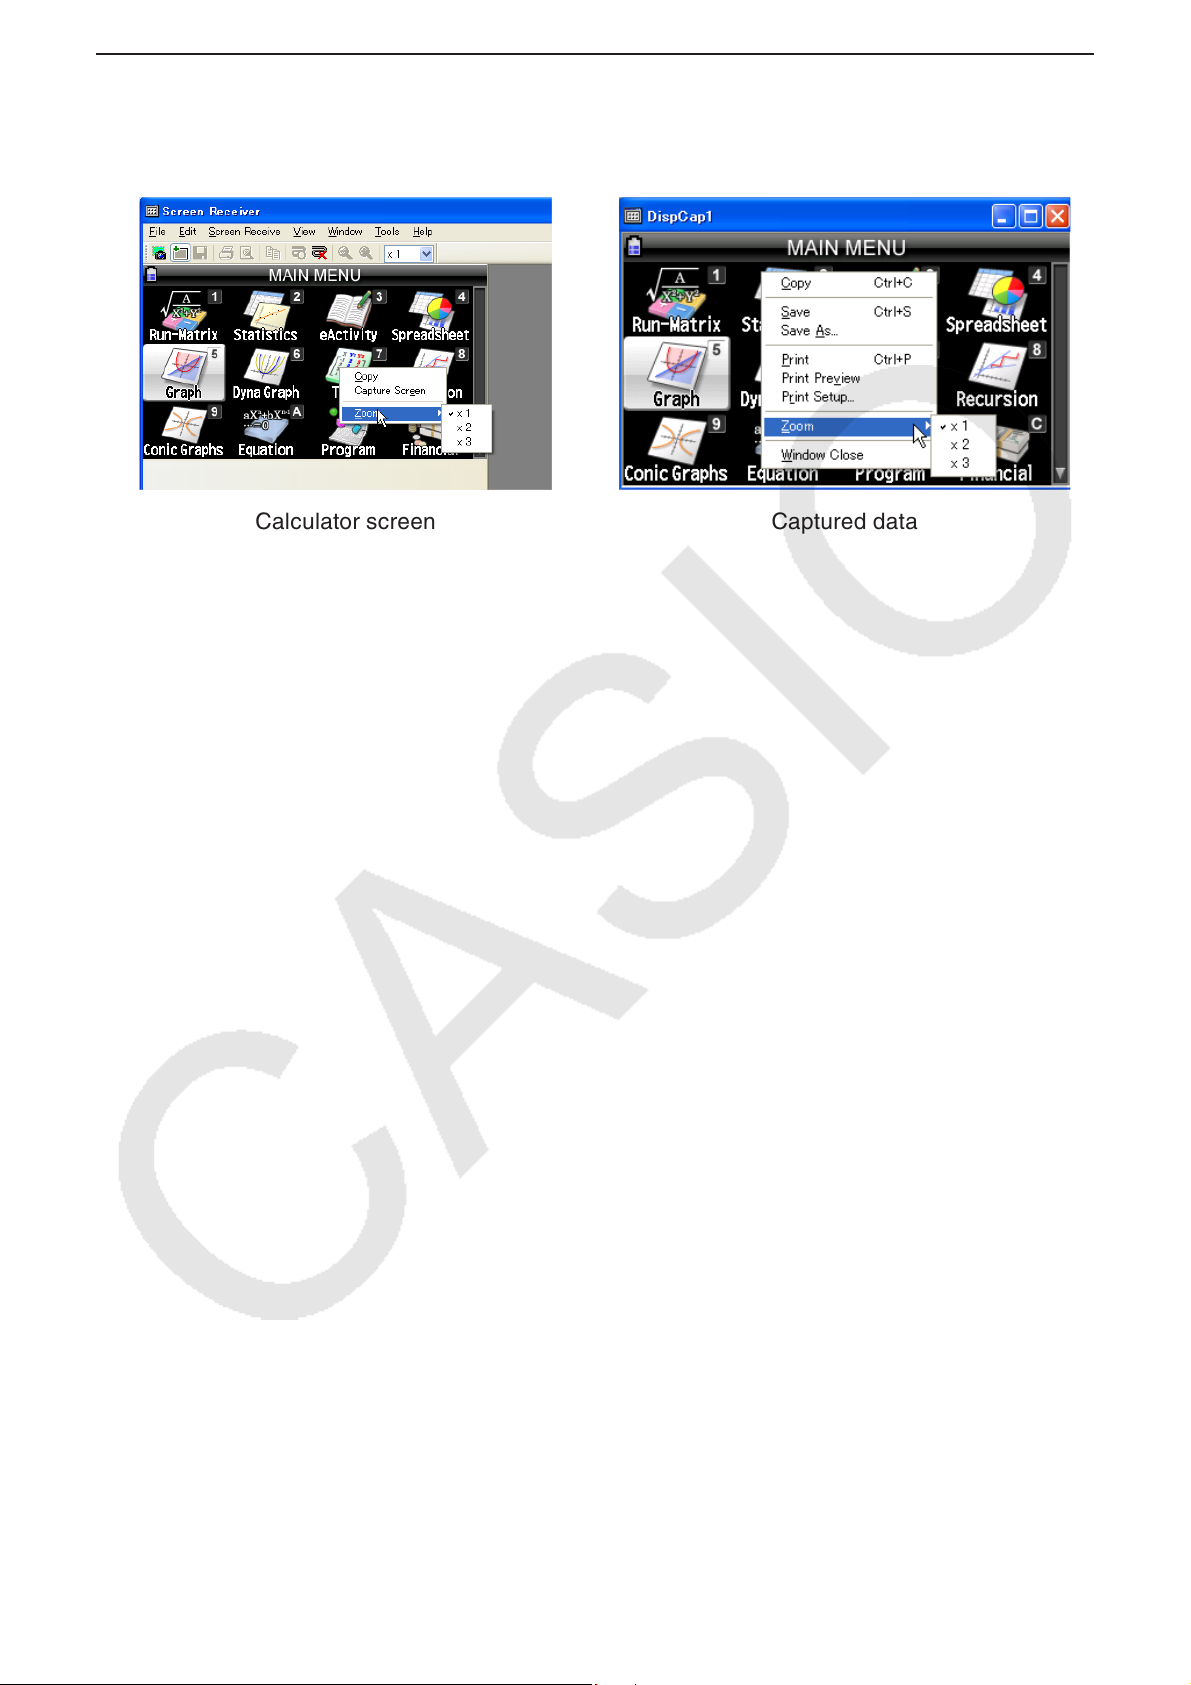
3-11 Shortcut Menu
On the calculator screen or captured data window, right-clicking with your mouse (Windows) or
performing a control+click (Mac OS) will cause the shortcut menu shown below to appear.
Calculator screen
Captured data
E-24
Page 26

4. Tool Options Dialog Box
4-1 File Save Settings
1
2
1 File name extension of captured data files
2 Storage folder
4-2 Capture Settings
1
2
1 Specifies unframed captured screen images
2 Specifies framed captured screen images, and frame thickness.
Captured data example
Unframed
E-25
Framed
Page 27

5. Error Message Table
Message Description Required Action
A problem occurred while
writing file <file name>.
The disk being written to may
be damaged or may not exist.
Check the disk and try again.
A problem occurred while
launching the manual (***.pdf)
viewer.
Download the viewer from the
site below and reinstall it.
http://get.adobe.com/reader/
otherversions/
The path and/or filename
exceeds the maximum length
allowed by your Windows*
operating system.
A connection could not be
established.
Either the calculator is not
connected or the connected
calculator is not in the Screen
Receiver Mode.
Correct the problem and try
again.
For details, select the
following on the menu bar:
Help - Manual, or refer to the
Screen Receiver user’s guide.
A problem occurred while
writing to a disk.
A problem occurred during
manual viewer startup.
The number of letters in
the path or file name you
specified exceeds the
allowable limit.
You started a data
communication operation
while the USB cable was not
connected.
Check the disk for data
corruption and confirm that
the disk exists. Then try
again.
Download and install a new
viewer from
http://get.adobe.com/reader/
otherversions/ .
Shorten the specified path or
file name.
Check for proper connection
of the calculator to the
computer. Then try again.
See “3. Using Screen
Receiver” for details.
A problem occurred during
communication.
Disconnect the USB cable,
check the setup of the
calculator, and try again.
For details, select the
following on the menu bar:
Help - Manual, or refer to the
Screen Receiver user’s guide.
Some problem occurred
during data communication.
Disconnect the USB cable
and check the setup of the
calculation. Then try again.
See “3. Using Screen
Receiver” for details.
E-26
Page 28

Message Description Required Action
The image could not be sent
from the calculator.
(1) Try pressing a key on the
calculator.
(2) Check to make sure that
the calculator is in the
Screen Receiver Mode.
If the screen is not sent after
you perform the above steps,
disconnect the USB cable
and check the calculator
setup. Next, reconnect and
try again.
For details, select the
following on the menu bar:
Help - Manual, or refer to the
Screen Receiver user’s guide.
The connection has been
broken for some reason and
is being restored.
If data communication does
not resume after some
time, perform the operation
described below.
Try pressing a key on the
calculator. If the screen is
not sent after you perform
the above steps, disconnect
the USB cable and check
the calculator setup. Next,
reconnect and try again.
For details, select the
following on the menu bar:
Help - Manual, or refer to the
Screen Receiver user’s guide.
The calculator screen image
cannot be sent for some
reason.
—
Follow the steps that are
shown on the display and try
again.
See “3. Using Screen
Receiver” for details.
Follow the steps that are
shown on the display and try
again.
The application is already
running.
Another user may already be
using the application.
* Mac OS: Macintosh
Another user is running
Screen Receiver.
E-27
Wait until the other user shuts
down Screen Receiver.
Page 29

CASIO COMPUTER CO., LTD.
6-2, Hon-machi 1-chome
Shibuya-ku, Tokyo 151-8543, Japan
© 2013 CASIO COMPUTER CO., LTD.
SA1302-A
 Loading...