

Page 1
EN/ES
CTX3000-ES-1A
USER’S GUIDE
Safety Precautions
Before trying to use the Digital Keyboard, be sure to read the separate “Safety Precautions”.
Please keep all information for future reference.
GUÍA DEL USUARIO
Precauciones de seguridad
Antes de intentar usar el teclado digital, asegúrese de leer las “Precauciones de seguridad” separadas.
Guarde toda la información para futuras consultas.
About Music Score data
You can use a computer to download music score data from the CASIO Website. For more information, visit the
URL below.
http://world.casio.com/
Acerca de los datos de partituras
Puede utilizar un PC para descargar los datos de partituras desde el sitio web de CASIO. Para obtener más
información, visite la siguiente URL.
http://world.casio.com/
CT
-
X5000
CT
-
X3000
Page 2
English
NOTICE
Declaration of Conformity According to EU Directive
• Any reproduction of the contents of this manual, either in part or its entirety, is prohibited. Except for your own, personal
use, any other use of the contents of this manual without the consent of CASIO is prohibited under copyright laws.
• IN NO EVENT SHALL CASIO BE LIABLE FOR ANY DAMAGES WHATSOEVER (INCLUDING, WITHOUT LIMITATION,
DAMAGES FOR LOSS OF PROFITS, BUSINESS INTERRUPTION, LOSS OF INFORMATION) ARISING OUT OF THE
USE OF OR INABILITY TO USE THIS MANUAL OR PRODUCT, EVEN IF CASIO HAS BEEN ADVISED OF THE
POSSIBILITY OF SUCH DAMAGES.
• The contents of this manual are subject to change without notice.
• The actual appearance of the product may be different from that shown in the illustrations in this User’s Guide.
• Company and product names used in this manual may be registered trademarks of others.
This equipment has been tested and found to comply with the limits for a Class B digital device, pursuant to Part 15 of the
FCC Rules. These limits are designed to provide reasonable protection against harmful interference in a residential
installation. This equipment generates, uses and can radiate radio frequency energy and, if not installed and used in
accordance with the instructions, may cause harmful interference to radio communications. However, there is no guarantee
that interference will not occur in a particular installation. If this equipment does cause harmful interference to radio or
television reception, which can be determined by turning the equipment off and on, the user is encouraged to try to correct
the interference by one or more of the following measures:
• Reorient or relocate the receiving antenna.
• Increase the separation between the equipment and receiver.
• Connect the equipment into an outlet on a circuit different from that to which the receiver is connected.
• Consult the dealer or an experienced radio/TV technician for help.
FCC CAUTION
Changes or modifications not expressly approved by the party responsible for compliance could void the user’s authority to
operate the equipment.
Declaration of Conformity
Model Number: CT-X5000/CT-X3000
Trade Name: CASIO COMPUTER CO., LTD.
Responsible party: CASIO AMERICA, INC.
Address: 570 MT. PLEASANT AVENUE, DOVER, NEW JERSEY 07801
Telephone number: 973-361-5400
This device complies with Part 15 of the FCC Rules, Operation is subject to the following two conditions:
(1) This device may not cause harmful interference, and (2) this device must accept any interference received, including
interference that may cause undesired operation.
Important!
Please note the following important information before using this product.
• Before using the AD-E24250LW/AD-A12150LW Adaptor to power the unit, be sure to check the AC Adaptor for any damage
first. Carefully check the power cord for breakage, cuts, exposed wire and other serious damage. Never let children use an AC
adaptor that is seriously damaged.
• The product is not intended for children under 3 years.
• Use only CASIO AD-E24250LW/AD-A12150LW adaptor.
• The AC adaptor is not a toy.
• Be sure to disconnect the AC adaptor before cleaning the product.
CT-X3000 only
• Never attempt to recharge batteries.
• Do not use rechargeable batteries.
• Never mix old batteries with new ones.
• Use recommended batteries or equivalent types.
• Always make sure that positive (+) and negative (–) poles are facing correctly as indicated near the battery compartment.
• Replace batteries as soon as possible after any sign they are getting weak.
• Do not short-circuit the battery terminals.
Manufacturer:
CASIO COMPUTER CO., LTD.
6-2, Hon-machi 1-chome, Shibuya-ku, Tokyo 151-8543, Japan
Responsible within the European Union:
Casio Europe GmbH
Casio-Platz 1, 22848 Norderstedt, Germany
www.casio-europe.com
EN-1
Page 3
Contents
General Guide EN-4
Preparing the Music Stand . . . . . . . . . . . . . . . . . . . EN-7
Returning the Digital Keyboard to
Its Factory Default Settings . . . . . . . . . . . . . . . . . EN-7
Playing a Built-in Song or a Song on a
USB Flash Drive (Song Bank Mode) EN-38
Selecting a Built-in Song for Playback . . . . . . . . . .EN-38
Looping Playback of Specific Song
Measures (A-B Repeat). . . . . . . . . . . . . . . . . . . .EN-39
Playing Back with One Hand’s Part Muted. . . . . . .EN-40
Playing Back a Song from a USB Flash Drive . . . .EN-41
Preparing a Power Supply EN-8
Using the AC Adaptor . . . . . . . . . . . . . . . . . . . . . . . EN-8
CT-X3000: Using Batteries . . . . . . . . . . . . . . . . . . . EN-9
Turning Power On or Off. . . . . . . . . . . . . . . . . . . . . EN-9
Adjusting Display Contrast . . . . . . . . . . . . . . . . . . EN-10
Connecting to Audio Equipment EN-11
Digital Keyboard Audio Output . . . . . . . . . . . . . . . EN-11
Using Headphones . . . . . . . . . . . . . . . . . . . . . . . . EN-11
Outputting Keyboard Notes to
Audio Equipment . . . . . . . . . . . . . . . . . . . . . . . . EN-12
Playing an External Device
from the Digital Keyboard . . . . . . . . . . . . . . . . . EN-13
CT-X5000: Outputting Sound
from a Microphone. . . . . . . . . . . . . . . . . . . . . . . EN-13
Operations Common to All Modes EN-14
About this manual . . . . . . . . . . . . . . . . . . . . . . . . . EN-14
Numeric Input . . . . . . . . . . . . . . . . . . . . . . . . . . . . EN-14
Other Functions of bm Number Keys . . . . . . . . . . EN-14
4 CATEGORY Button. . . . . . . . . . . . . . . . . . . . . EN-15
Text Character Input . . . . . . . . . . . . . . . . . . . . . . . EN-15
FUNCTION Indicator. . . . . . . . . . . . . . . . . . . . . . . EN-16
Listening to Demo Play EN-17
Playing on the Keyboard EN-18
Selecting a Tone . . . . . . . . . . . . . . . . . . . . . . . . . . EN-18
Sounding Multiple Tones (Layer and Split) . . . . . . EN-19
Selecting an Effect for a Tone
(Reverb, Chorus, Delay) . . . . . . . . . . . . . . . . . . EN-22
Using Equalization . . . . . . . . . . . . . . . . . . . . . . . . EN-25
Using the Metronome . . . . . . . . . . . . . . . . . . . . . . EN-27
Sounding Arpeggio Phrases Automatically
(Arpeggiator) . . . . . . . . . . . . . . . . . . . . . . . . . . . EN-27
Changing Keyboard Response to
Touch Pressure (Touch Response). . . . . . . . . . EN-29
Controlling Sounds EN-29
Using a Pedal . . . . . . . . . . . . . . . . . . . . . . . . . . . . EN-29
Sustain . . . . . . . . . . . . . . . . . . . . . . . . . . . . . . . . . EN-32
Sliding Smoothly Between Pitches
(Portamento) . . . . . . . . . . . . . . . . . . . . . . . . . . . EN-32
Using the Pitch Bend Wheel . . . . . . . . . . . . . . . . . EN-32
CT-X5000: dt MODULATION/
ASSIGNABLE button . . . . . . . . . . . . . . . . . . . . . EN-33
Changing the Pitch in Semitone Steps
(Transpose) . . . . . . . . . . . . . . . . . . . . . . . . . . . . EN-35
Changing the Pitch of Each Part in
Octave Units (Octave Shift) . . . . . . . . . . . . . . . . EN-35
Performing Master Digital Keyboard and
Individual Part Pitch Adjustment . . . . . . . . . . . . EN-36
Selecting a Scale . . . . . . . . . . . . . . . . . . . . . . . . . EN-37
Playing Back an Audio File on a
USB Flash Drive (Audio Mode) EN-42
Using Auto Accompaniment (Rhythm Mode) EN-43
Selecting a Rhythm. . . . . . . . . . . . . . . . . . . . . . . . .EN-43
Using Auto Accompaniment . . . . . . . . . . . . . . . . . .EN-44
Changing Auto Accompaniment Speed (Tempo) . .EN-45
Creating a Song with an Auto Accompaniment
(Accompaniment Pattern) . . . . . . . . . . . . . . . . . .EN-46
Starting and Stopping Auto Accompaniment
with the Accompaniment Keyboard
(Synchro Start, Synchro Stop). . . . . . . . . . . . . . .EN-47
Changing Accompaniment Keyboard Settings . . . .EN-48
Advanced Split Settings . . . . . . . . . . . . . . . . . . . . .EN-50
Using Recommended Tones and Tempos
(One-Touch Presets). . . . . . . . . . . . . . . . . . . . . .EN-51
Adding Harmony to Melody Notes
(Auto Harmonize) . . . . . . . . . . . . . . . . . . . . . . . .EN-52
Using Music Presets EN-53
Using Phrase Pads EN-54
Changing to Another Phrase Set . . . . . . . . . . . . . .EN-54
Starting and Stopping Phrase Playback . . . . . . . . .EN-54
Configuring Phrase Playback Setups . . . . . . . . . . .EN-55
Recording a Phrase . . . . . . . . . . . . . . . . . . . . . . . .EN-56
Configuring Phrase Recording Settings . . . . . . . . .EN-57
Managing Phrase Sets . . . . . . . . . . . . . . . . . . . . . .EN-58
Editing a Phrase . . . . . . . . . . . . . . . . . . . . . . . . . . .EN-59
Muting Specific Parts (Part Mode) EN-61
Turning a Part On or Off . . . . . . . . . . . . . . . . . . . . .EN-61
Part On/Off Function Part Groups . . . . . . . . . . . . .EN-62
Using the Mixer EN-63
Mixer Operation . . . . . . . . . . . . . . . . . . . . . . . . . . .EN-63
List of Parts for Each Mixer Part Group . . . . . . . . .EN-64
Advanced Mixer Settings . . . . . . . . . . . . . . . . . . . .EN-65
Registering and Restoring a Setup
(Registration) EN-66
Registering a Setup . . . . . . . . . . . . . . . . . . . . . . . .EN-66
Recalling a Registered Setup . . . . . . . . . . . . . . . . .EN-68
Using a Pedal to Cycle Through Multiple Setups
(Registration Sequence) . . . . . . . . . . . . . . . . . . .EN-69
Editing a Tone (User Tones) EN-70
Creating a User Tone . . . . . . . . . . . . . . . . . . . . . . .EN-70
Tone Editing Item List. . . . . . . . . . . . . . . . . . . . . . .EN-73
EN-2
Page 4
Contents
Creating an Auto Accompaniment
(User Rhythm) EN-75
Creating and Editing a User Rhythm. . . . . . . . . . . EN-76
User Rhythm Part Playback Settings . . . . . . . . . . EN-85
Operations Affecting All the Accompaniment
Patterns in a Rhythm . . . . . . . . . . . . . . . . . . . . . EN-87
Using the MIDI Recorder to Record EN-89
Starting a Recording . . . . . . . . . . . . . . . . . . . . . . . EN-90
Recording Keyboard Play . . . . . . . . . . . . . . . . . . . EN-91
Re-recording Part of a Recorded Track
(Overdubbing, Punch-in Recording) . . . . . . . . . EN-95
Playing Back a Recorded Song . . . . . . . . . . . . . . EN-96
Copying a Recorded Song, Deleting a
Recorded Song or Track . . . . . . . . . . . . . . . . . . EN-97
Song Editing Mode . . . . . . . . . . . . . . . . . . . . . . . . EN-98
Editing an Entire Song in Measure Units
(Song Editing) . . . . . . . . . . . . . . . . . . . . . . . . . . EN-98
Editing a Recorded Song in Track Units . . . . . . . . EN-99
Editing a Track of a Recorded Song in
Measure Units . . . . . . . . . . . . . . . . . . . . . . . . . EN-101
Editing a Recorded Song in Event Units
(Event Editor). . . . . . . . . . . . . . . . . . . . . . . . . . EN-103
Inputting Notes and Chords One-by-one
(Step Input) . . . . . . . . . . . . . . . . . . . . . . . . . . . EN-106
Recorded Song Mixer Settings . . . . . . . . . . . . . . EN-109
Configuring Function Settings EN-110
Examination Mode . . . . . . . . . . . . . . . . . . . . . . . EN-116
Batch Deleting Data from
Digital Keyboard Memory. . . . . . . . . . . . . . . . . EN-116
Reference EN-124
Troubleshooting . . . . . . . . . . . . . . . . . . . . . . . . . .EN-124
Error Messages . . . . . . . . . . . . . . . . . . . . . . . . . .EN-126
Specifications . . . . . . . . . . . . . . . . . . . . . . . . . . . .EN-127
DSP Effect List . . . . . . . . . . . . . . . . . . . . . . . . . . .EN-129
Digital Keyboard Sound Source Configuration
and MIDI Channel Assignment . . . . . . . . . . . . .EN-141
Operating Precautions . . . . . . . . . . . . . . . . . . . . .EN-143
Appendix A-1
Song List. . . . . . . . . . . . . . . . . . . . . . . . . . . . . . . . . . . A-1
Fingering Guide . . . . . . . . . . . . . . . . . . . . . . . . . . . . . A-2
Chord Example List . . . . . . . . . . . . . . . . . . . . . . . . . . A-4
Block Diagram . . . . . . . . . . . . . . . . . . . . . . . . . . . . . . A-5
MIDI Implementation Chart
USB Flash Drive EN-117
Connecting a USB Flash Drive to and
Detaching It from the Digital Keyboard . . . . . . EN-117
Formatting a USB Flash Drive . . . . . . . . . . . . . . EN-118
USB Flash Drive Operations. . . . . . . . . . . . . . . . EN-119
Using a Computer to Copy General Song
Data to a USB Flash Drive. . . . . . . . . . . . . . . . EN-121
Connecting a Computer EN-122
Connecting a Computer . . . . . . . . . . . . . . . . . . . EN-122
MIDI Settings. . . . . . . . . . . . . . . . . . . . . . . . . . . . EN-123
Transferring Data Between
the Digital Keyboard and a Computer . . . . . . . EN-123
Included Accessories
● Music Stand
● Leaflets
• Safety Precautions
• Appendix
• Other (Warranty, etc.)
Items included as accessories are subject to change without notice.
Separately Available Accessories
• You can get information about accessories that
are separately for this product from the CASIO
catalog available from your retailer, and from the
CASIO website at the following URL.
http://world.casio.com/
EN-3
Page 5
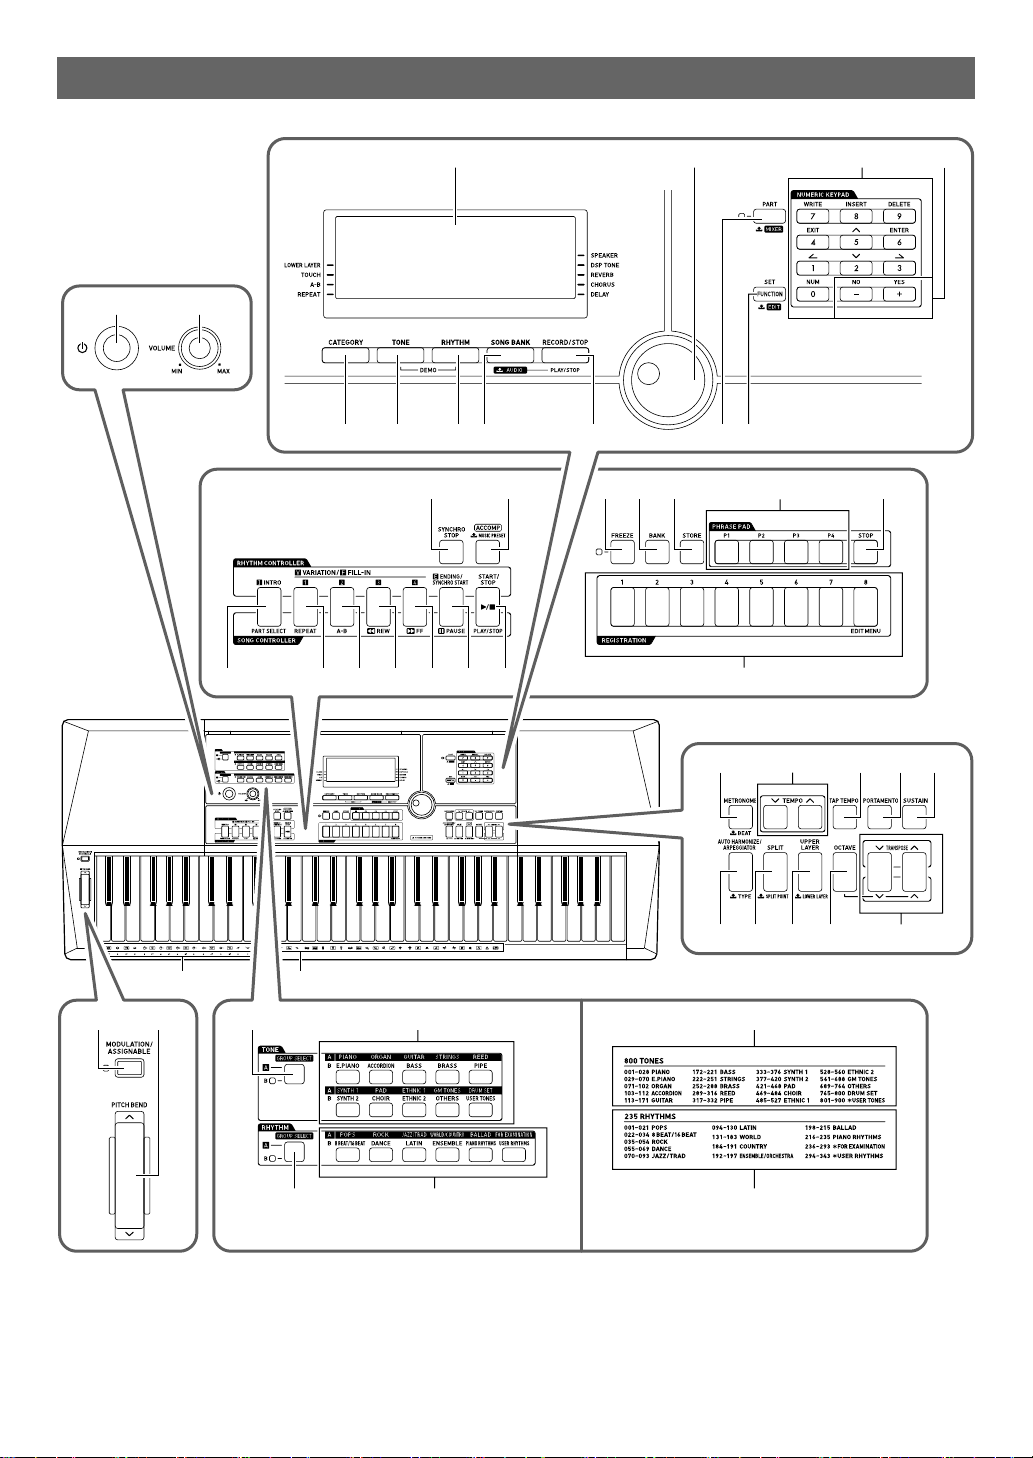
General Guide
CT-X5000 CT-X3000
1 2
3 bl
4 5 67
bo bp bq br bs bt ck
bk98
bm bn
cq
crcm cp
dk
dl
dt ek
dm dnct
cocncl
cs
do dp dq dr
ds
emel
eo
en
eq
en
eo
ep
• All of the illustrations in this manual show the CT-X5000.
• Some of the button names shown here include the $ mark. This indicates that you need to long-press the button to perform its
operation.
EN-4
Page 6

• This manual uses the numbers and names below to refer to buttons, keys, and controllers.
1 P (Power) button
2 VOLUME knob
cr STOP button
cs REGISTRATION buttons
General Guide
3 Display
4 CATEGORY button
5 TONE button
6 RHYTHM button
7 SONG BANK, $AUDIO button
8 RECORD/STOP, AUDIO PLAY/STOP button
9 PART, $MIXER button
bk FUNCTION, SET, $EDIT button
bl Dial
bm Number keys
bn [–], [+] keys
bo INTRO, PART SELECT button
bp VARIATION/FILL-IN 1, REPEAT button
bq VARIATION/FILL-IN 2, A-B button
br VARIATION/FILL-IN 3, sREW button
bs VARIATION/FILL-IN 4, dFF button
bt ENDING/SYNCHRO START, kPAUSE button
ck START/STOP, PLAY/STOP button
cl SYNCHRO STOP button
cm ACCOMP, $MUSIC PRESET button
cn FREEZE button
co BANK button
cp STORE button
ct METRONOME, $BEAT button
dk TEMPO buttons
dl TAP TEMPO button
dm PORTAMENTO button
dn SUSTAIN button
do AUTO HARMONIZE/ARPEGGIATOR,
$TYPE button
dp SPLIT, $SPLIT POINT button
dq UPPER LAYER, $LOWER LAYER button
dr OCTAVE button
ds TRANSPOSE buttons
dt MODULATION/ASSIGNABLE button
(CT-X5000 only)
ek PITCH BEND wheel
el CHORD root names
em Percussion instrument list
CT-X5000
en TONE GROUP SELECT button
eo TONE Category buttons
ep RHYTHM GROUP SELECT button
eq RHYTHM Category buttons
CT-X3000
en Tone list
cq PHRASE
PAD bu
ttons
eo Rhythm list
EN-5
Page 7
General Guide
eser
fk fl fm fn fo fp fqet
CT-X5000
fk fn fo fp fq
CT-X3000
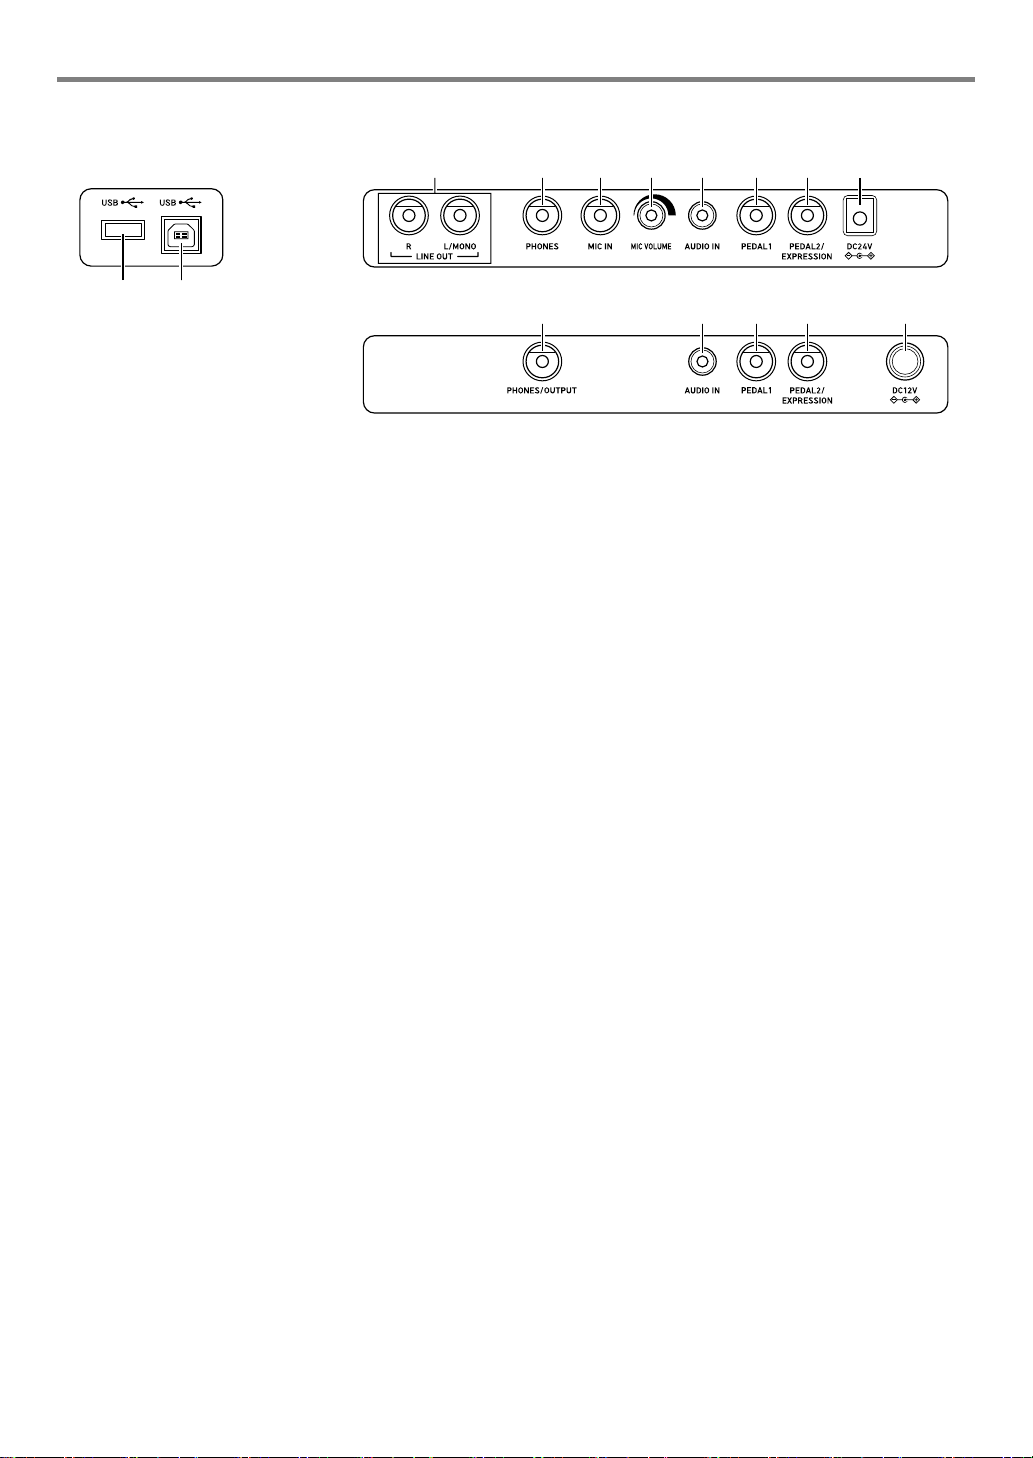
■ Back
er USB flash drive port
es USB port
et LINE OUT R, L/MONO jacks (CT-X5000 only)
fk CT-X5000: PHONES jack
CT-X3000: PHONES/OUTPUT jack*
fl MIC IN jack (CT-X5000 only)
fm MIC VOLUME knob (CT-X5000 only)
fn AUDIO IN jack
fo PEDAL1 jack
fp PEDAL2/EXPRESSION jack
fq CT-X5000: DC 24V terminal
CT-X3000: DC 12V terminal
* In this manual, this jack is referred to as the fk PHONES jack.
EN-6
Page 8
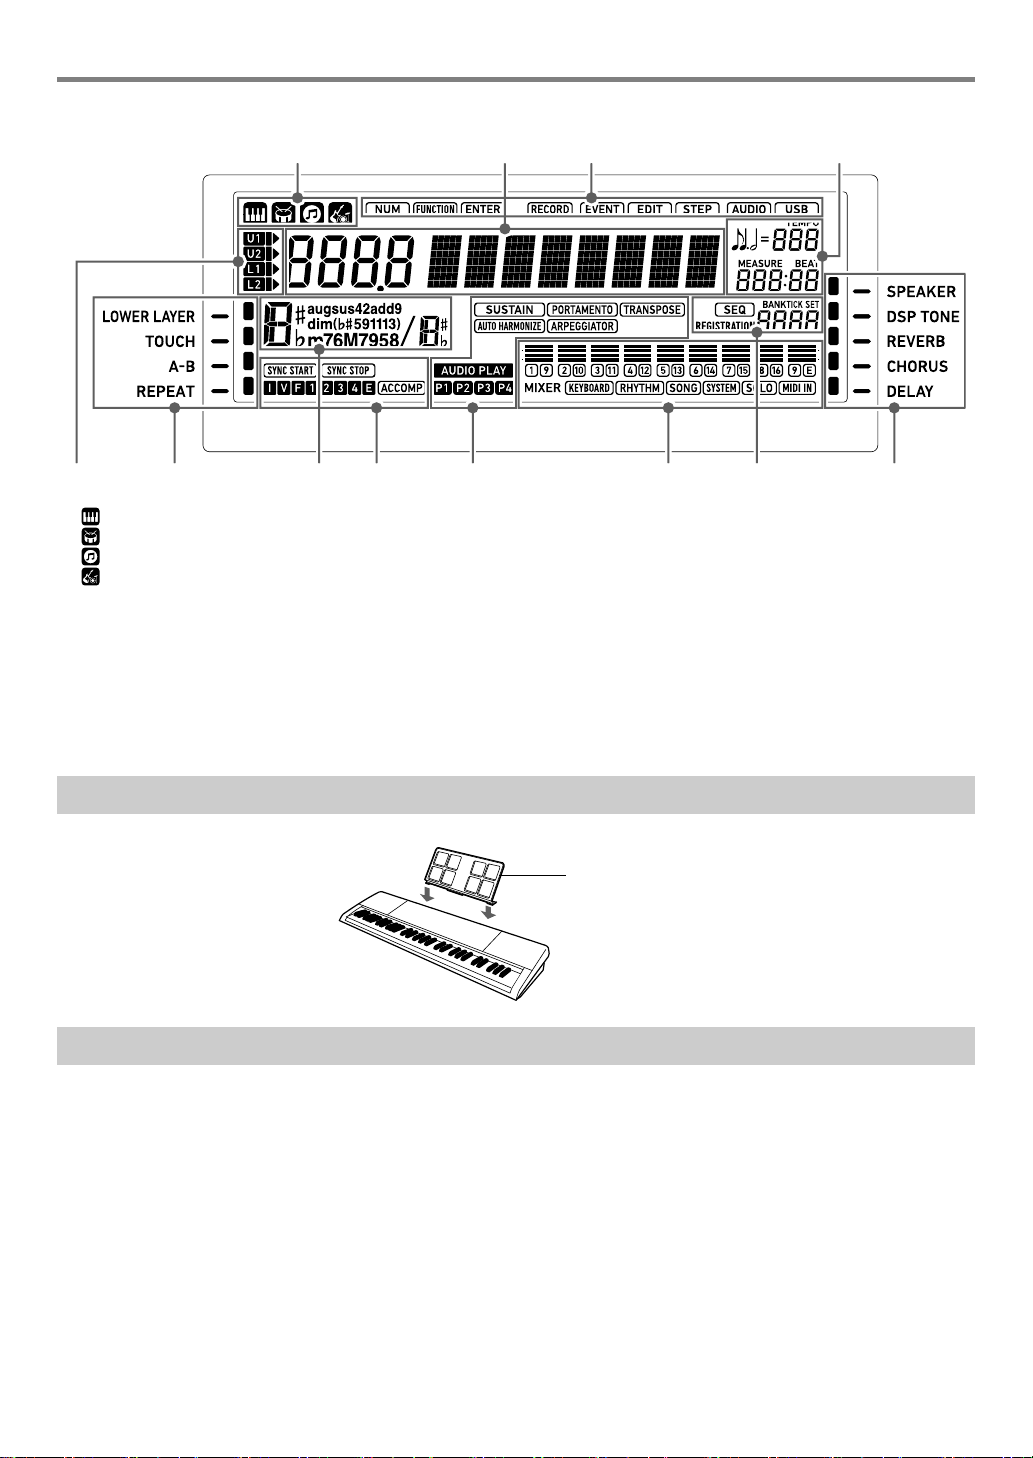
■ Display
*
** *
Music stand
Tone indicator
Rhythm indicator
Song Bank indicator
Music Preset indicator
Number/setting value display (left), name display (right)
Tempo, measure, beat
Keyboard part indicators
Chord name
Auto Accompaniment indicators
Mixer info display area
Registration display, event edit display
* Other Indicators
General Guide
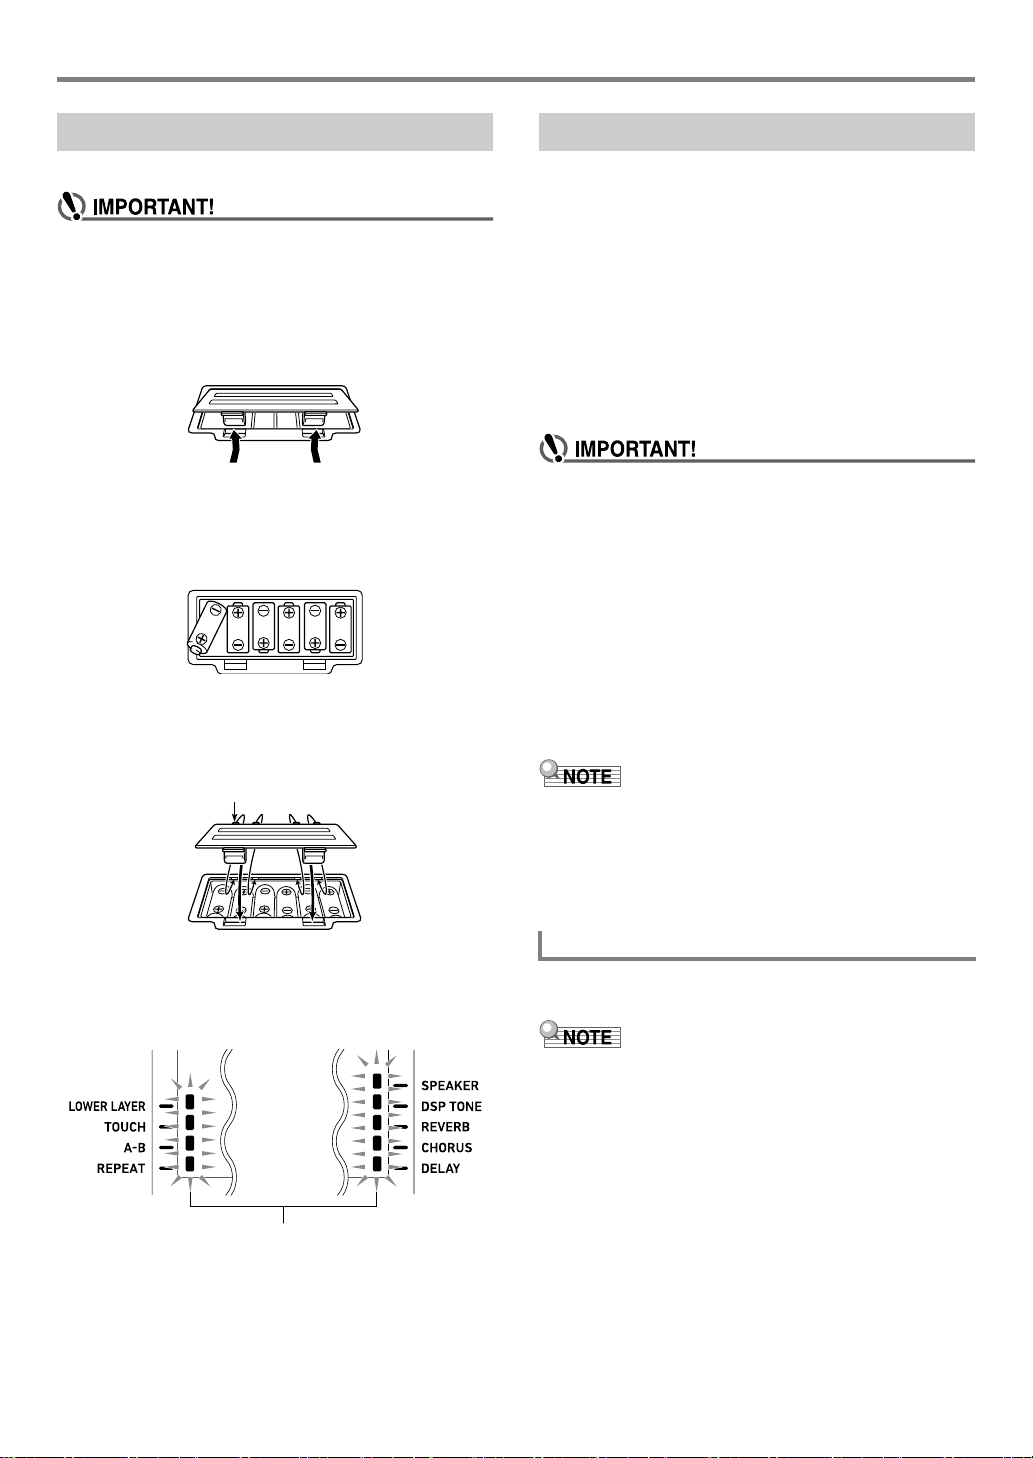
Preparing the Music Stand
Returning the Digital Keyboard to Its Factory Default Settings
There are two ways to reset the Digital Keyboard to its default settings: a “setting reset” that initializes settings only without deleting
data, and a “factory reset” that initializes settings and deletes all data, returning the Digital Keyboard to the state it was in when it
left the factory.
For details, see “Batch Deleting Data from Digital Keyboard Memory” (page EN-116).
EN-7
Page 9

Preparing a Power Supply
Household power outlet
AC adaptor
fq DC 24V
Power cord
Household power outlet
AC adaptor
fq DC 12V
Power cord
Your Digital Keyboard uses an AC adaptor for power.
• Though the CT-X3000 supports battery operation, use of
an AC adaptor is generally recommended.
Using the AC Adaptor
Make sure that you use only the AC adaptor specified for this
Digital Keyboard. Use of a different type of AC adaptor can
cause malfunction.
CT-X5000: Connecting the AC Adaptor
Specified AC Adaptor: AD-E24250LW
(JEITA Standard plug)
CT-X3000: Connecting the AC Adaptor
Specified AC Adaptor: AD-A12150LW
(JEITA Standard plug)
• Never connect the AC adaptor (JEITA Standard, with
unified polarity plug) that comes with this Digital
Keyboard to any other device besides this Digital
Keyboard. Doing so creates the risk of malfunction.
• Be sure to turn off Digital Keyboard power before
connecting or disconnecting the AC adaptor.
• The AC adaptor will become warm to the touch after
very long use. This is normal and does not indicate
malfunction.
• Note the following important precautions to avoid
damage to the power cord.
During Use
• Never pull on the cord with excessive force.
• Never repeatedly pull on the cord.
• Never twist the cord at the base of the plug or connector.
During Movement
• Before moving the Digital Keyboard, be sure to unplug
the AC adaptor from the power outlet.
During Storage
• Loop and bundle the power cord, but never wind it
around the AC adaptor.
• Never insert metal, pencils, or any other objects into
the product’s DC24V (CT-X5000) or DC12V (CT-X3000)
terminal. Doing so creates the risk of accident.
• Do not try to use the power cord that comes with the
product with another device.
• Use the AC adaptor so its label surface is pointed
downwards. The AC adaptor becomes prone to
emitting electromagnetic waves when the label surface
is facing upwards.
• Plug the AC adaptor into a power outlet that is close to
the Digital Keyboard. This lets you immediately unplug
from the power outlet should any problem occur.
• The AC adaptor is intended for indoor use only. Do not
leave it in a location where it can become wet. Also, do
not place a vase or any other container of liquid on the
AC adaptor.
• Make sure that the AC adaptor does not become
covered with a newspaper, table cloth, curtain, or any
other type of fabric.
• If you do not plan to use the Digital Keyboard for a long
time, unplug the AC adaptor from the power outlet.
• The AC adaptor cannot be repaired. If your AC adaptor
malfunctions or becomes damaged, you need to
purchase a new one.
• AC Adaptor Usage Environment
Temperature: 0 to 40°C
Humidify: 10% to 90%RH
• Output Polarity: &
EN-8
Page 10
Preparing a Power Supply
Tabs
Low battery indicators (flash)
CT-X3000: Using Batteries
You can use six D-size batteries for power.
• Be sure to turn off power before loading batteries.
• It is up to you to prepare six commercially available
batteries. Do not use oxyride batteries or any other
nickel based batteries.
1.
Open the battery cover on the bottom of the
Digital Keyboard.
2.
Load six D-size batteries into the battery
compartment.
• Make sure the positive + and negative - ends of the
batteries are facing as shown in the illustration.
3.
Insert the tabs of the battery cover into the
holes on the side of the battery compartment,
and close the cover.
Turning Power On or Off
1.
Connect the Digital Keyboard to a power
supply.
• See “Using the AC Adaptor” (page EN-8) or
“CT-X3000: Using Batteries” (page EN-9).
2.
Press 1P (power) to turn on power.
•Use 2 VOLUME to adjust volume.
3.
To turn off power, hold down 1P (power)
again.
The message “Bye” will appear on the display and then
power will turn off.
• If you press 1P (power) only lightly, the display will
light up momentarily but power will not turn on. This
does not indicate malfunction. Press 1P (power)
firmly and completely to turn on power.
• Turning off the Digital Keyboard causes most current
settings to be cleared. While Auto Resume function
(page EN-10) is turned on, most settings are retained
even when power is turned off.
• Never try to perform any operation while the “Wait...”
or “Bye” message is displayed. The “Wait...” or “Bye”
message indicates that an internal data save operation
is being performed. Turning off the Digital Keyboard
can cause Digital Keyboard data to be deleted or
become corrupted.
■ Low Battery Indication
The indicators shown below start to flash to let you know
when battery power is low. Replace the batteries with new
ones.
• Pressing 1P (power) to turn off power actually puts the
Digital Keyboard into a standby state. Minute amounts of
current continue to flow within the Digital Keyboard in the
standby state. If you do not plan to use the Digital Keyboard
for a long time or if there is a lightning storm in your area,
be sure to unplug the AC adaptor from the power outlet.
Auto Power Off
If you do not perform any operation on the Digital Keyboard
for about 30 minutes, power will turn off automatically.
• You can disable Auto Power Off to ensure that power is not
turned off automatically during a concert, etc.
Perform the procedure under “To configure function
settings with the bk FUNCTION button” (page EN-110)
and disable the following setting: Other (Other) 3 Auto
Power Off (AutoOff) (page EN-115).
EN-9
Page 11
Preparing a Power Supply
Contrast
Current setting value
Auto Resume
While Auto Resume is turned on, the current settings of the
items described below are retained even when power is
turned off (as long as power continues to be supplied to the
Digital Keyboard, and power is turned off normally by pressing
1P (power) or by triggering of Auto Power Off).
● Current settings of the items below
Tone (UPPER 1, LOWER 1, UPPER 2, LOWER 2),
Rhythm, Song number, Music Preset number, Tempo,
Transpose, Octave Shift, [ACCOMP] indicator displayed/
not displayed status
● On/off status of the functions below
Split, Layer, Portamento, Sustain, Auto Harmonize or
Arpeggiator, CT-X5000: Modulation/Assignable*
Mode
2
● Function setting*
● Mixer (page EN-63) setting status
● CT-X5000: Category selection, tone and rhythm
category selection status, last selected tone/rhythm in
each tone/rhythm category
*1 When the setting configured with the following operation is
“2 Toggle”: MODULATION/ASSIGNABLE (Mod/Asgn) 3
Button operation (Btn Act) (page EN-112).
*2 Including Reverb, Chorus, Delay, and other effect settings
included in the function settings.
The next time power is turned on, the Digital Keyboard is
returned to its setup state when power was last turned off.
Perform the procedure under “To configure function settings
with the bk FUNCTION button” (page EN-110) and turn on
Auto Resume: Other (Other) 3 Auto Resume (AtResume)
(page EN-115).
(page EN-110) status
1
, Part
Adjusting Display Contrast
1.
Press bk FUNCTION.
2.
Press the [1] (V) bm number key to display
“Other”.
Other
3.
Press the [6] (ENTER) bm number key.
4.
Use the [1] (V) and [3] (W) bm number keys
to display “Contrast”.
5.
Use bn [–] and [+] or the bl dial to change the
setting value.
6.
When the setting is the way you want, longpress the [4] (EXIT) bm number key to exit the
setting screen.
• Regardless of Auto Resume is on or off, the settings of the
items below, which are included in function settings (page
EN-110), are retained even when power is turned off (as
long as power continues to be supplied to the Digital
Keyboard, and power is turned off normally by pressing
1P (power) or by triggering of Auto Power Off).
Equalizer, Tuning, Registration Memory Freeze Target,
Pedal 2 type, Expression pedal calibration, Tap rhythm
start, Examination Mode, Display contrast
• Auto Resume does not restore the status of the setting
items below.
Note value setting, Phrase recording setting, Synchro
standby, Audio Mode file selection and playback state.
EN-10
Page 12
Connecting to Audio
Lights
fk PHONES jack
(Stereo standard jack (6.3mm))
Equipment
Digital Keyboard Audio Output
Your Digital Keyboard outputs audio from its built-in speakers
and/or the PHONES jack. (CT-X5000: Also outputs audio
from the LINE OUT jacks.)
• There will be an indicator mark next to [SPEAKER] while
built-in speaker output is enabled.
Using Headphones
Using headphones normally cuts off* output from the built-in
speakers, which means you can practice playing even late at
night without disturbing others.
* When the following setting is disabled (Off): Speakers
(Speaker) 3 Enabled when PHONES connected
(PhoneSpk) (page EN-115).
• There will be no indicator mark next to [SPEAKER] while
built-in speaker output is disabled.
Built-in speaker output is disabled in the cases described
below.
– When there is a plug in the PHONES jack.*
– When the following setting is disabled (Off): Speakers
(Speaker) 3 Speaker on/off (Enabled) (page EN-115).
• The Digital Keyboard automatically adjusts the sound to
make it suitable for headphones (or, in the case of the CTX5000, the LINE OUT jacks) while speaker output is
disabled, and for speakers while speaker output is enabled.
* When the following setting is disabled (Off): Speakers
(Speaker) 3 Enabled when PHONES connected
(PhoneSpk) (page EN-115).
• If there is no sound output even though there is an
indicator mark next to [SPEAKER], check the current
settings of the 2 VOLUME knob and/or volume
related settings.
To enable and disable speaker output
Perform the procedure under “To configure function settings
with the bk FUNCTION button” (page EN-110) and configure
the following setting: Speakers (Speaker) 3 Speaker on/off
(Enabled) (page EN-115).
• Before connecting headphones, be sure to use
2 VOLUME to turn the volume down to a low level.
After connecting, you can adjust the volume to the
level you want.
• Do not listen to very high volume output over
headphones for long period. Doing so creates the risk
of hearing damage.
• If you are using headphones that require an adaptor
plug, make sure you do not leave the adaptor plugged
in when removing the headphones.
• Headphones do not come with the Digital Keyboard. Use
commercially available headphones. See page EN-3 for
information about options.
To output from the speakers while
headphones are connected
Perform the procedure under “To configure function settings
with the bk FUNCTION button” (page EN-110) and enable
the following setting: Speakers (Speaker) 3 Enabled when
PHONES connected (PhoneSpk) (page EN-115). This will
leave speaker output enabled even if there is a plug in the
PHONES jack.
EN-11
Page 13
Connecting to Audio Equipment
fk PHONES jack (Stereo standard jack (6.3mm))
Stereo standard plug
Audio equipment, amplifier,
etc.
INPUT 1
INPUT 2
Guitar amplifier
Keyboard amplifier, etc.
RIGHT (Red)
LEFT (White)
Pin plugs
Audio amplifier AUX IN jacks, etc.
Standard jack (6.3mm)
et LINE OUT jacks
(Standard jack (6.3mm))
Outputting Keyboard Notes to
Audio Equipment
You can connect audio equipment or a music amplifier to the
Digital Keyboard and then play through external speakers for
more powerful volume and better sound quality.
• Turn off the external device when making connections.
After connecting, turn down the Digital Keyboard and
external device volume levels whenever turning power
on or off.
• After connecting, turn on the Digital Keyboard and then
the external device.
• If keyboard notes sound distorted when they are
sounded from external audio equipment, lower the
Digital Keyboard’s volume setting.
To connect an external device to the Digital
Keyboard’s PHONES jack
Connection requires commercially available connecting cords,
supplied by you.
• The connecting cords should have a stereo standard plug
on one end and a plug that matches the configuration of the
external device on the other end.
CT-X5000: To connect an external device to
the Digital Keyboard’s LINE OUT jacks
Connection requires commercially available connecting cords,
supplied by you.
■ Connecting to Audio Equipment (Figure )
Use commercially available cables to connect the external
audio equipment to the Digital Keyboard’s LINE OUT jacks as
shown in Figure
sound, while LINE OUT L/MONO jack output is left channel
sound. It is up to you to purchase connecting cables like the
ones shown in the illustration for connection of audio
equipment. Normally in this configuration you must set the
audio equipment’s input selector to the setting that specifies
the terminal (such as AUX IN) to which the Digital Keyboard is
connected.
. LINE OUT R jack output is right channel
EN-12
■ Connecting to a Musical Instrument Amplifier
(Figure
Use commercially available cables to connect the amplifier to
the Digital Keyboard’s LINE OUT jacks as shown in Figure
. LINE OUT R jack output is right channel sound, while
LINE OUT L/MONO jack output is left channel sound.
Connecting to the LINE OUT L/MONO jack only outputs a
mixture of both channels. It is up to you to purchase a
connecting cable like the one shown in the illustration for
connection of the amplifier.
)
Page 14
Connecting to Audio Equipment
Stereo mini plug
fn AUDIO IN jack (Stereo mini jack (3.5mm))
Portable audio player, etc.
fl MIC IN jack (Standard jack (6.3mm))
fm MIC VOLUME knob
Playing an External Device from
the Digital Keyboard
Connection requires commercially available connecting cords,
supplied by you.
• The connecting cords should have a stereo mini plug on
one end and a plug that matches the configuration of the
external device on the other end.
• Turn off the Digital Keyboard when making
connections. After connecting, turn down the Digital
Keyboard and external device volume levels whenever
turning power on or off.
• After connecting, turn on the external device and then
the Digital Keyboard.
• If notes from an external device that are played on the
Digital Keyboard sound distorted, lower the volume
setting of the external device.
Center Cancel (Vocal Cut)
Enabling Vocal Cut cuts (mutes or minimizes) the vocal in the
sound being input from the AUDIO IN jack. Note that this
function cancels the sound in the center position of the audio,
which may (depending on how the original audio was mixed)
end up canceling something else other than the vocal part.
How vocal cut is performed depends on the sound being
input.
Perform the procedure under “To configure function settings
with the bk FUNCTION button” (page EN-110) and configure
the following setting: Other (Other) 3 Audio In Center Cancel
(AIn CCan) (page EN-115).
CT-X5000: Outputting Sound from
a Microphone
You can connect a commercially available microphone* to the
MIC IN jack and output the sound from the microphone
thorough the Digital Keyboard’s speakers.
* Use a dynamic microphone.
You can adjust the volume level of microphone input with
fm MIC VOLUME. Microphone volume control is
independent from overall keyboard volume.
• Before connecting a microphone, make sure that the
Digital Keyboard and microphone are turned off.
• Before connecting, set both 2 VOLUME and fm MIC
VOLUME to low levels. Adjust volume settings to
appropriate levels after connecting the microphone.
Microphone Settings
You can use the Mixer to make individual adjustments to the
reverb, chorus, and delay effects that are applied to
microphone input.
See “Using the Mixer” (page EN-63).
• Digital Keyboard built-in effects (reverb, chorus, delay,
DSP) are not applied to AUDIO IN jack input.
EN-13
Page 15
Operations Common to All
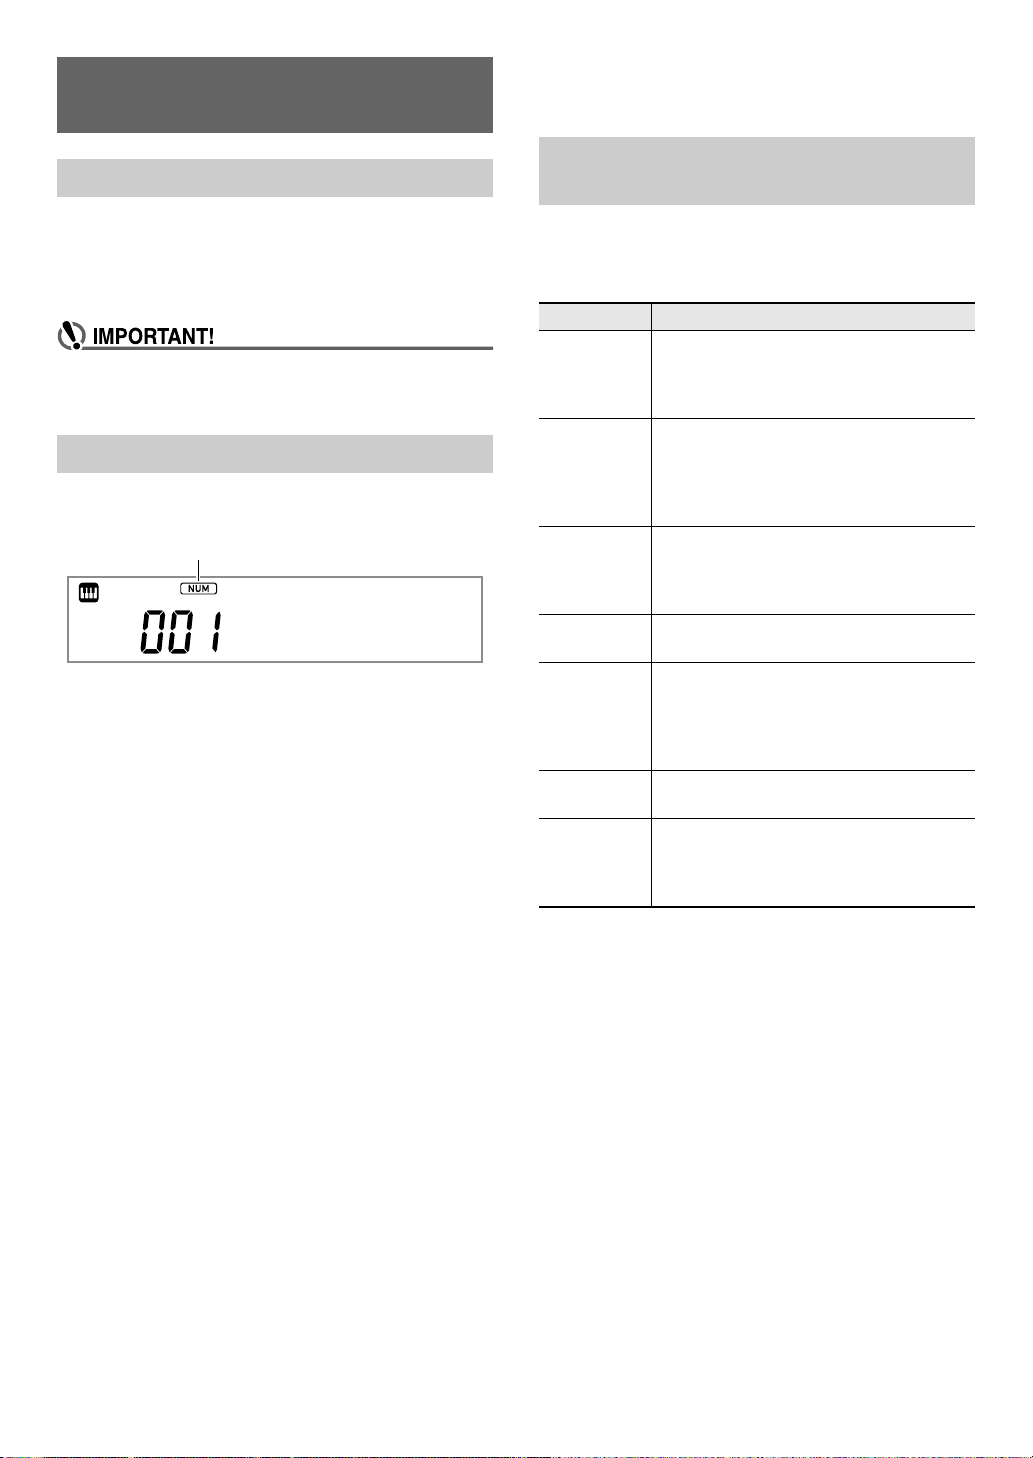
[NUM] indicator
Modes
About this manual
Unless otherwise specifically noted, all of the procedures in
this manual assume that the Digital Keyboard is in its initial
power on state (immediately after you turn on power). If you
run into problems with a procedure, turn keyboard power off
and back on, and then try performing the procedure again.
• Note that turning off Digital Keyboard power during a
procedure causes any pending unsaved data to be
deleted.
Numeric Input
The [NUM] indicator on the display means that numeric input
is enabled.
StagePno
Use the procedures below to input tone numbers, setting
values, etc.
■ Using the bm Number Keys
When entering a number or value, input all the required digits.
The number of digits you need to input depends on what you
are inputting. For example, to input the tone number 015 (all
three digits required), input the following: [0] 3 [1] 3 [5]. In
this case, the numbers being input flash until you input the
final 5. The input value is registered (and 015 is displayed
without flashing) after you input all of the required digits.
• The range of allowable input values depends on what you
are inputting. If you attempt to input a value that is outside
an allowable range, the value will change to the value
within the range that is closest to the one you input.
• To specify a value without inputting a leading zero, enter
the desired value and then press bk FUNCTION. For
example, when inputting a three-digit tone number, the
following operation would result in input of tone number
010: [1] 3 [0] 3 bk FUNCTION.
• To discard input without finalizing it, long-press [4] (EXIT)
bm number key.
■ Using the bl Dial
You can also change a displayed number or value by rotating
the dial.
Other Functions of bm Number
Keys
The table below describes other functions that the bm number
keys perform while the [NUM] indicator is not displayed. Some
keys also perform operations that are specific to certain
functions.
Key Main Function
[0] (NUM) Pressing this key while a setting item is one
that allows input of a value is displayed will
enable numeric input ([NUM] indicator
displayed).
[1] (V)
[3] (W)
[2] (w)
[5] (q)
[4] (EXIT) With certain functions, pressing this key will
[6] (ENTER) This key operation is enabled while the
[7] (WRITE) Press this key to save a user tone (page
[8] (INSERT)
[9] (DELETE)
Use these keys while a setting menu is
displayed to switch between menu items.
With some functions, these keys are used to
switch between parts in order to configure
part settings.
Use these keys to switch between setting
items in the Mixer Mode (page EN-63) and
when editing MIDI Recorder events (page
EN-103).
exit the function.
[ENTER] indicator is displayed. Pressing [6]
(ENTER) executes the currently displayed
menu item, and goes to the applicable submenu or executes some operation.
EN-70) or user rhythm (page EN-75).
Use these keys during text input (page
EN-15) to insert or delete characters.
[9] (DELETE) is also used when editing
MIDI recorder events (page EN-103).
■ Using the bn [–] and [+] Keys
• Pressing [–] reduces the currently displayed number or
value by one, while [+] increases it by one. Holding down
either button will sequentially increase or decrease the
displayed number or value until you release the button.
Pressing both buttons at the same time will return the
number or value to its initial default or recommended
setting.
• If input of a negative value is allowed, pressing [–] while the
value is flashing on the display will add a minus sign (–) to
the left of the value. Pressing [+] while a value is flashing
changes back to a positive value.
EN-14
Page 16
Operations Common to All Modes
Category number Category name
Cursor (flashing)
4 CATEGORY Button
The many tones of the Digital Keyboard are divided into 20
categories to help make it possible for you to find a particular
tone quickly and easily. You can use the 4 CATEGORY
button to select the last tone you selected in a category.
Under initial default settings, pressing 4 CATEGORY will
select the first tone in a category.
• The example below shows how to select a tone using
4 CATEGORY. Rhythms, songs, and music presets are
also divided into categories, and you can also use the
4 CATEGORY button to scroll between them.
To switch between tone categories
1.
Press 5 TONE.
This displays (tone indicator). You can select a tone
while the tone indicator is displayed.
2.
Press 4 CATEGORY.
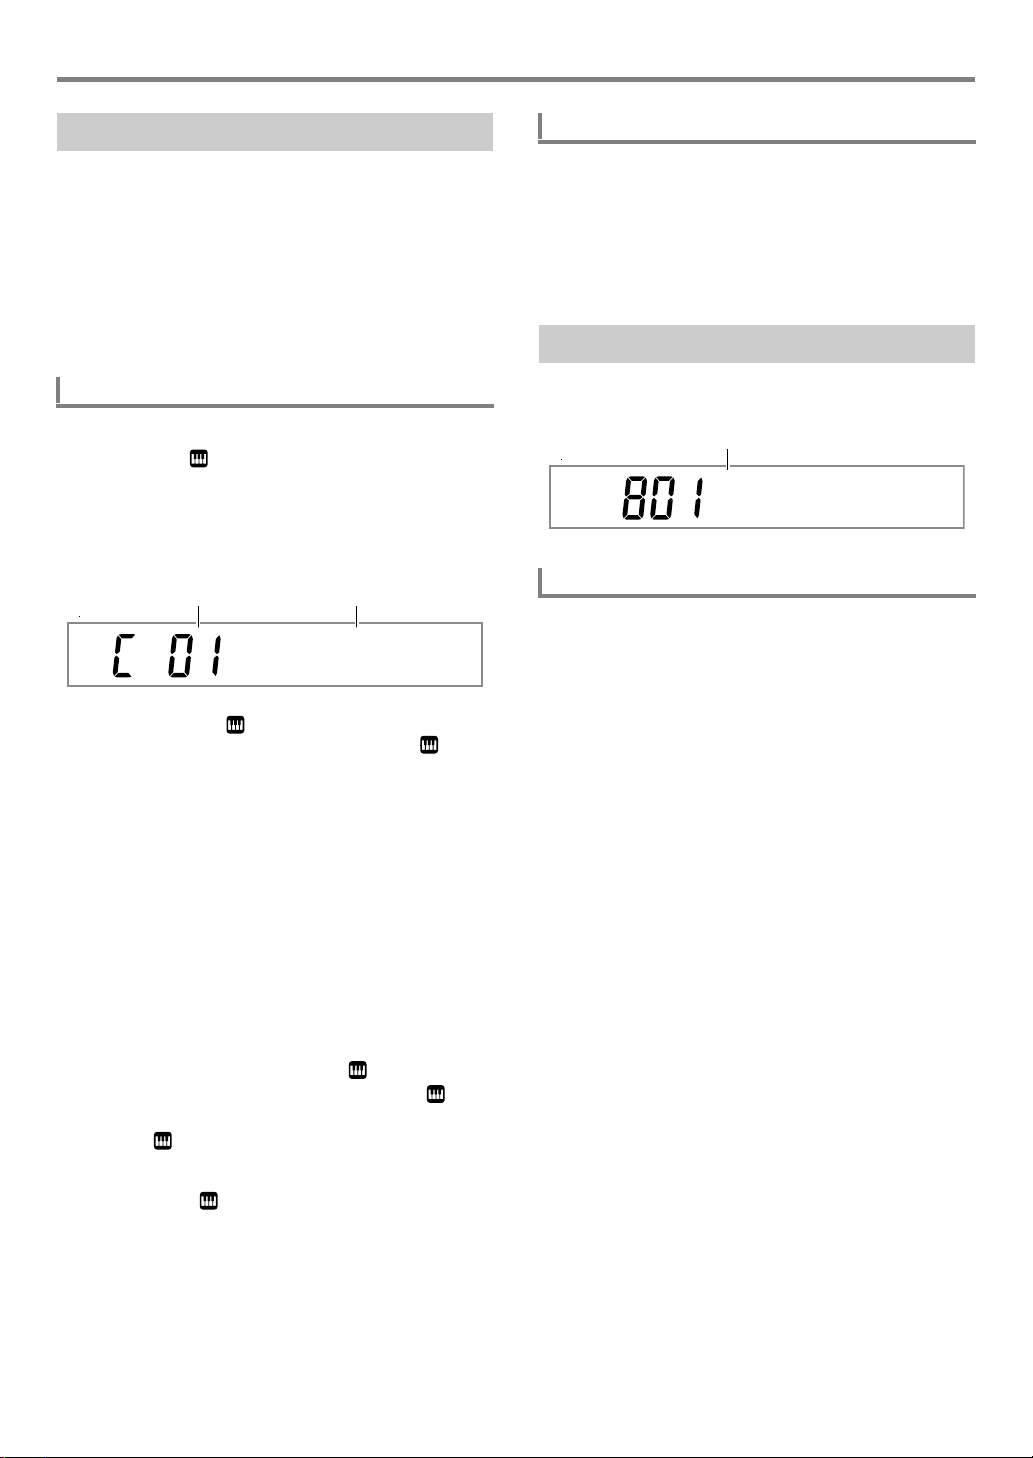
This displays the letter “C”, followed by the currently
selected category number and name for a few seconds.
Piano
• After a few seconds, the tone number and tone name
will appear, and will start to flash. You can select
tones only within the current category while is
flashing. (See step 4.)
To navigate between categories
1.
Press 5 TONE.
2.
While a tone name is displayed, hold down
4 CATEGORY as you press bn [–] or [+].
[–] jumps to the first tone in the category before the one
where the displayed tone is located, while [+] jumps to
the first tone in the next category.
Text Character Input
Use the procedures below to input user data names and other
text.
No Na
To insert characters
1.
Use the [1] (V) and [3] (W) bm number keys
to move the cursor to the position where you
want to insert a character.
2.
Press the [8] (INSERT) bm number key.
• This inserts “A” at the cursor position.
me
3.
While “C” is displayed, press 4 CATEGORY
to advance to the next category.
This displays the next category number and name.
• The category tone that was last selected when exited a
category (the first category tone under initial default
settings) will be selected first when you re-enter it.
• You can also use bn [–] (back) and [+] (forward) in
place of 4 CATEGORY to scroll between categories.
• Pressing bn [–] and [+] at the same time will jump to
Category 1, and select the tone that was selected the
last time you exited Category 1.
4.
To select tones only within the currently
displayed category, wait until starts to
flash, or press bk FUNCTION to make
flash.
• While is flashing, use bn [–] or [+], or the bl dial to
scroll through the tones of currently selected category.
• To select a tone in another category, press 5 TONE.
This causes to stop flashing.
EN-15
Page 17
Operations Common to All Modes
9
J
T
'
8
I
S
_
`
7
H
R
&
~
6
G
Q
S
@
5
F
P
Z
}
4
E
O
Y
{
3
D
N
X
^
2
C
M
W
-
1
B
L
V
)
0
A
K
U
(
3
=
G
Q
[
e
o
y
)
2
<
F
P
Z
d
n
x
(
1
;
E
O
Y
c
m
w
'
0
:
D
N
X
b
l
v
&
/
9
C
M
W
a
k
u
%
.
8
B
L
V
`
j
t
$
-
7
A
K
U
_
i
s
}
#
6
@
J
T
^
h
r
|
"
5
?
I
S
]
g
q
{
!
+
4
>
H
R
'
f
p
z
Displayed
Setting value number Setting item name
To modify characters
1.
Use the [1] (V) and [3] (W) bm number keys
to move the cursor to the position of the
character you want to change.
2.
Use bn [–] and [+] to change the character.
• Repeat steps 1 and 2 as required.
• Input of the characters shown in the table below is
supported when saving a file to a USB flash drive.
• If you input a similarity symbol ( ), it will be displayed
as a right arrow (3).
• Input of the characters shown in the table below is
supported when saving a file to Digital Keyboard
memory.
~
FUNCTION Indicator
The [FUNCTION] indicator is displayed or flashes when you
perform a Digital Keyboard function setting (page EN-110) or
other special setting operation. The meanings of the text that
appears along with a displayed or flashing [FUNCTION]
indicator are described below.
Displayed Setting item name displayed.*
Flashing Setting of the currently displayed setting item
displayed.
* Only while a setting item that is a function setting is
displayed.
The example below shows how the [FUNCTION] indicator is
displayed.
Example: To configure the Touch Response
setting
1.
Press bk FUNCTION.
2.
Press the [3] (W) bm number key a number of
times until “Touch” (Touch Response) is
displayed.
“Touch” is a setting item name, so the [FUNCTION]
indicator appears.
To delete characters
1.
Use the [1] (V) and [3] (W) bm number keys
to move the cursor to the position of the
character you want to delete.
2.
Press the [9] (DELETE) bm number key.
EN-16
Touch
Page 18
3.
Flashing
Light
Setting value number Setting value
Use bn [–] and [+] or the bl dial to change the
Touch Response setting value.
This operation scrolls through the available Touch
Response settings: Off, Light, Normal, and Heavy. Since
these are Touch Response settings, the [FUNCTION]
indicator flashes while they are displayed.
4.
To return to the setting item display, press
bk FUNCTION.
This displays the [FUNCTION] indicator.
5.
When the setting is the way you want, longpress the [4] (EXIT) bm number key to exit the
setting screen.
This causes the [FUNCTION] indicator to disappear.
Listening to Demo Play
1.
Press 5 TONE and 6 RHYTHM at the same
time.
This causes (song bank indicator) to flash on the
display and start play of the three demo songs.
• During demo play, you can use bn [–] and [+] to jump
to the beginning of the previous or next song.
• Demo song play will repeat until you perform the
operation in step 2 below.
2.
To stop demo play, press ck PLAY/STOP or
5 TONE and 6 RHYTHM at the same time.
This causes the (song bank indicator) to disappear.
• If Auto Power Off is enabled, power will turn off
automatically after about 30 minutes of non-operation, even
if demo play is being performed. You can disable Auto
Power Off, if you want. Perform the procedure under “To
configure function settings with the bk FUNCTION button”
(page EN-110) and disable the following setting: Other
(Other) 3 Auto Power Off (AutoOff) (page EN-115).
EN-17
Page 19
Playing on the Keyboard
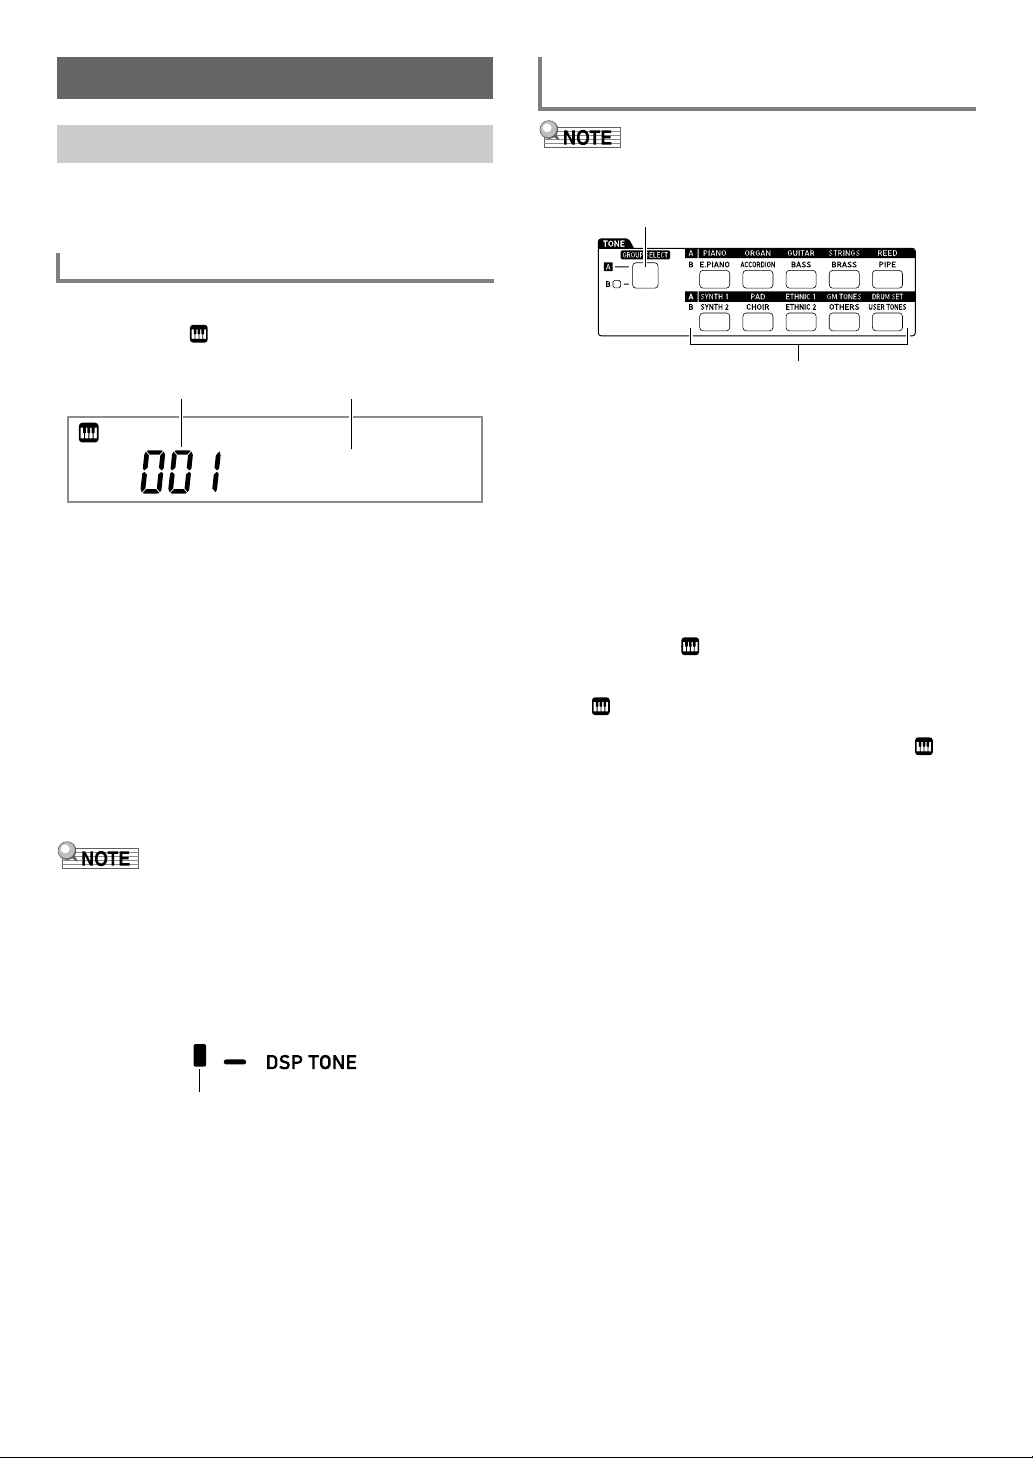
Tone number Tone name
Displayed
en TONE GROUP SELECT button
eo TONE Category buttons
CT-X5000: To use the TONE Category
buttons to select a category
Selecting a Tone
Your Digital Keyboard comes with a large collection of tones.
Select a tone and play something on the keyboard to see
what it sounds like.
To select a tone
1.
Press 5 TONE.
This displays (tone indicator). You can select a tone
while the tone indicator is displayed.
StagePno
2.
Use the bm number keys, bn [–] and [+], or the
bl dial to select the number of the tone you
want to assign to keyboard play.
• See “Numeric Input” (page EN-14) for information
about how to specify a number.
• Tones are divided into categories. You can easily find
the tone you want by going to the piano category,
organ category, etc. For more information, see
“4 CATEGORY Button” (page EN-15).
• For details about tone categories and types, refer to
the separate “Appendix”.
3.
Play something on the keyboard to hear what
your selected tone sounds like.
• Selecting a tone that is in a drum set category causes
various percussion instruments to be assigned to keyboard
keys.
• You can use the eo TONE Category buttons to quickly and
easily navigate between categories.
Tone categories are divided between two groups: Group A
(L) and Group B (M). Which category (group) a eo TONE
Category button selects depends on whether or not the
indicator lamp to the left of en TONE GROUP SELECT is lit.
1.
Press the en TONE GROUP SELECT button to
toggle between category Group A (indicator
lamp unlit) and Group B (indicator lamp lit).
2.
To select a category, press its eo TONE
Category button.
• This causes (tone indicator) to flash on the display.
• Pressing a eo TONE Category button will select the
last selected tone in the corresponding category. While
(tone indicator) is flashing, you can select one of
the tones included in the category. To exit category
tone selection, press 5 TONE. This causes to
stop flashing.
3.
Use the bm number keys, bn [–] and [+], or the
bl dial to select the number of the tone you
want to assign to keyboard play.
■ DSP Tones
The Digital Keyboard has a number of “DSP tones”, which are
tones with special effects. There will be an indicator mark next
to [DSP TONE] while a DSP tone is selected.
EN-18
Page 20
Playing on the Keyboard
LOWER 1 UPPER 1
UPPER 2
(UPPER LAYER)
LOWER 2
(LOWER LAYER)
U1 (UPPER 1) indicator
U2 (UPPER 2) indicator
L1 (LOWER 1) indicator
L2 (LOWER 2) indicator
Displayed
Sounding Multiple Tones (Layer
and Split)
You can split the keyboard into left and right area and assign
different tones to each area, and also layer two tones to play
at the same time. Split and layer can be used at the same
time, which means that you perform with up to four keyboard
parts (UPPER 1, LOWER 1, UPPER 2, LOWER 2) at the
same time as shown in the illustration below.
■ Keyboard Part Indicators
You can determine the current split/layer status by checking
the keyboard part indicators in the upper left corner of the
display. The keyboard parts whose indicators are shown will
sound when you play on the keyboard.
To split the keyboard between two tones
(Split)
1.
After confirming that the part indicator in the
upper left corner of the display looks like
, select a tone.
• This will be the UPPER 1 part tone.
2.
Press dp SPLIT.
• This will display the [L1] indicator, and will move to
the right of the [L1]. This indicates you can select the
LOWER 1 part tone.
3.
Select the tone you want to assign to
LOWER 1.
4.
Play something on the keyboard.
• For information about how to change the tone
assigned to each part, see “To change the tones
assigned to each split/layer part” (page EN-21).
• You can adjust the volume level, effect intensity, and other
settings for each part. For details, see “Using the Mixer”
(page EN-63).
• If you use DSP tones for multiple parts, tone effects will be
removed and tone quality may change.
5.
To cancel a split (return the entire keyboard to
the UPPER 1 part), press dp SPLIT.
This causes the [L1] indicator to disappear.
EN-19
Page 21
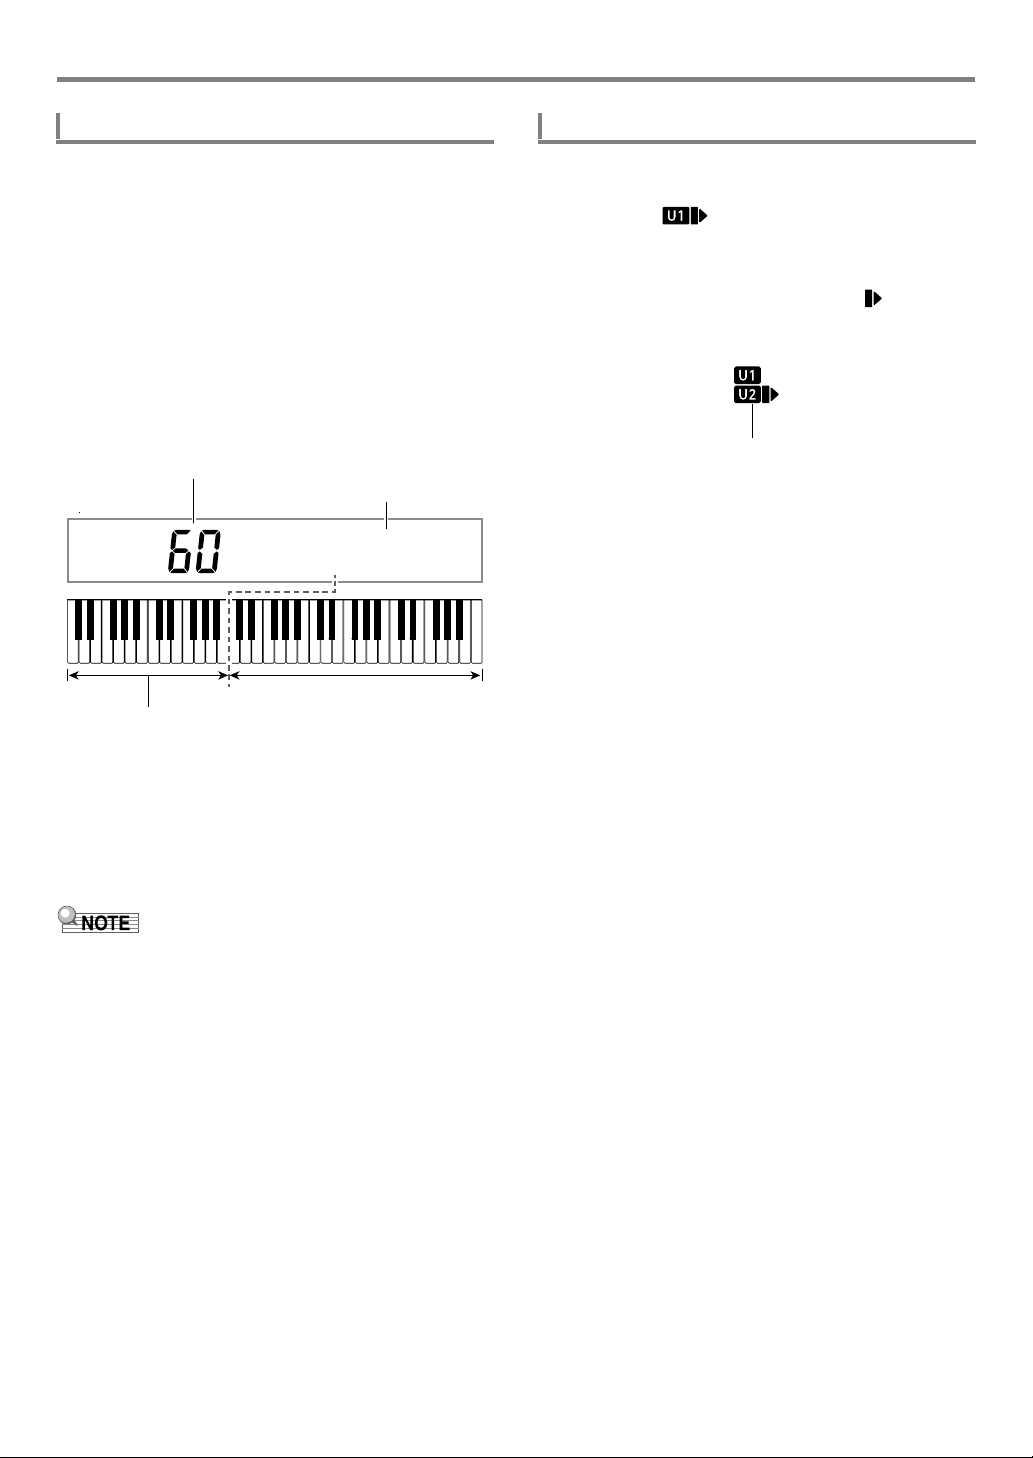
Playing on the Keyboard
Split point note number
LOWER part keyboard (or accompaniment keyboard)
Split point note name
UPPER part keyboard
Displayed
To move the keyboard split point
1.
Hold down dp SPLIT until “Split Pt” is
displayed.
2.
Use bn [–] and [+] or the bl dial to specify the
name of the note (the lowest note of the
desired UPPER part) where you want the split
point to be.
• You can also specify the split point by holding down
dp SPLIT and pressing the key where you want the
split point to be.
• This displays the specified current split point as shown
below.
Example: After C4 was specified as the split point
B3 I C4
• The LOWER part keyboard specified by this operation
is also used as an accompaniment keyboard (page
EN-44).
To layer two tones
1.
After confirming that the keyboard part
indicator in the upper left corner of the display
looks like , select a tone.
• This will be the UPPER 1 part tone.
2.
Press dq UPPER LAYER.
• This will display the [U2] indicator, and will move to
the right of the [U2]. This indicates you can select the
UPPER 2 part tone.
3.
Select the tone you want to assign to UPPER 2.
4.
Play something on the keyboard.
• For information about how to change the tone
assigned to each part, see “To change the tones
assigned to each split/layer part” (page EN-21).
• Here, pressing dp SPLIT will enable use of the
UPPER 1 and UPPER 2 layered tones, in addition to
the LOWER 1 part created with the keyboard split.
5.
To cancel a layer (return the entire keyboard to
the UPPER 1 part), press dq UPPER LAYER.
This causes the [U2] indicator to disappear.
3.
When the setting is the way you want, longpress the [4] (EXIT) bm number key to exit the
setting screen.
• Specifying a split point puts the LOWER part keyboard and
the accompaniment keyboard in the same area. You can
also specify different areas for these two keyboards. You
can also configure a setting so the LOWER part tone does
not sound in the area where the LOWER part keyboard and
accompaniment keyboard overlap. For details, see the
“Advanced Split Settings” (page EN-50).
EN-20
Page 22
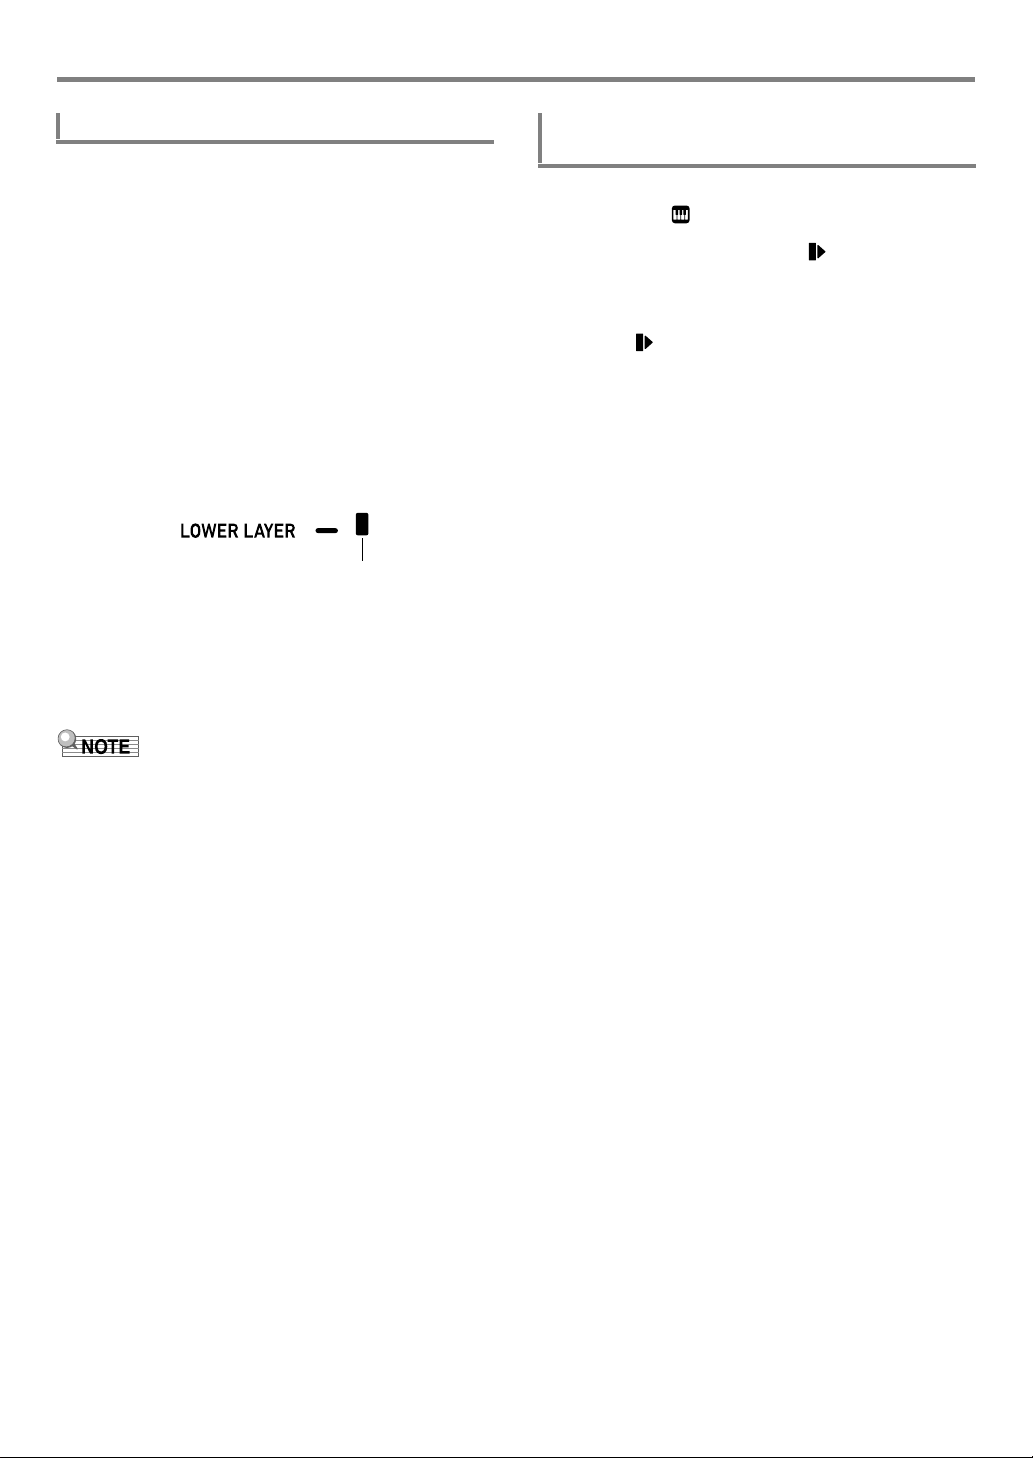
Playing on the Keyboard
Displayed
To use split and layer together
1.
Perform steps 1 through 3 under “To split the
keyboard between two tones (Split)” (page
EN-19).
2.
Perform the procedure below to layer two
UPPER part tones.
(1) Press dq UPPER LAYER and confirm that the [U2]
indicator is displayed.
(2) Select the tone you want to assign to UPPER 2.
3.
Perform the procedure below to layer two
LOWER part tones.
(1) Long-press dq UPPER LAYER until the [L2]
indicator appears.
This displays an indicator mark next to [LOWER
LAYER].
(2) Select the tone you want to assign to LOWER 2.
4.
Play something on the keyboard.
• For information about how to change the tone
assigned to each part, see “To change the tones
assigned to each split/layer part” (page EN-21).
To change the tones assigned to each split/
layer part
1.
Press 5 TONE.
This displays (tone indicator).
2.
Long-press 5 TONE until moves to the
right of the keyboard part indicator (page
EN-19).
• Repeat this operation as many times as required to
move to the right of the keyboard part indicator
(U1, U2, L1, L2) of the part (UPPER 1, LOWER 1,
UPPER 2, LOWER 2) whose tone setting you want to
change.
3.
Change the tone of the keyboard part you
selected in step 2.
• Repeat steps 2 and 3 above for each of the keyboard
parts whose tone setting you want to change.
• When using split and layer together, the UPPER 2 part is
called the “upper layer”, while the LOWER 2 part is called
the “lower layer”.
• To disable the upper layer only after performing steps 1
through 3 of the procedure above, press dq UPPER
LAYER and confirm that the [U2] indicator is not displayed.
To disable the lower layer only, long-press dq UPPER
LAYER (LOWER LAYER) until the [L2] indicator
disappears ([LOWER LAYER] indicator mark also
disappears).
• There will be an indicator mark next to [LOWER LAYER]
while the lower layer is enabled, regardless of whether the
keyboard is split. The mark disappears when the lower
layer is disabled.
• Pressing dp SPLIT after performing steps 1 through 3
above disables the split, so the [L1] and [L2] indicators
disappear, and the keyboard becomes layered with the
UPPER parts (UPPER 1 and UPPER 2) only.
EN-21
Page 23
Playing on the Keyboard
Reverb
Current setting value
Current setting value
Current setting value
Selecting an Effect for a Tone
(Reverb, Chorus, Delay)
Your Digital Keyboard includes reverb, chorus, and delay
effects, which you can use to enhance the sound of tones.
● Reverb (REVERB)
Reverb simulates ambient spaces, such as a room or hall.
● Chorus (CHORUS)
Chorus adds a rich, shimmering quality to a sound. This digital
keyboard applies a preset chorus setting that is suitable for
each tone.
● Delay (DELAY)
Delay stores a sound and repeats it periodically with a slight
delay before each repeat, which creates an echo effect. Delay
is different from reverb, which creates a reverberation effect.
This digital keyboard applies a preset delay setting that is
suitable for each tone.
• You can determine the current enabled/disabled status of
each effect by checking the indicator marks on the right
side of the display.
3.
Use bn [–] and [+] or the bl dial to change the
setting value.
• For information about the reverb types that correspond
to each setting value, see the “Reverb Effect List”
(page EN-23).
4.
Use the [1] (V) and [3] (W) bm number keys
to display “Chorus”.
Cho r u s
5.
Use bn [–] and [+] or the bl dial to change the
setting value.
• For information about the chorus types that
correspond to each setting value, see the “Chorus
Effect List” (page EN-24).
6.
Use the [1] (V) and [3] (W) bm number keys
to display “Delay”.
• Preset chorus effect and delay effects are applied to each
tone even when there is no indicator mark next to
[CHORUS] and [DELAY].
• You can adjust how tone effects are applied to each part.
For details, see “Using the Mixer” (page EN-63). The
setting items that are used for adjustment correspond to the
following: Reverb Send, Chorus Send, Delay Send (see
“Advanced Mixer Settings” on page EN-65).
To select a digital effect
• The procedure below explains how to select the reverb
(steps 2 and 3), chorus (4 and 5), and delay (6 and 7)
settings. You can skip any of the steps for any effect whose
settings you don’t need to change.
1.
Press bk FUNCTION.
2.
Use the [1] (V) and [3] (W) bm number keys
to display “Reverb”.
De l a
7.
Use bn [–] and [+] or the bl dial to change the
setting value.
• For information about the delay types that correspond
to each setting value, see the “Delay Effect List”
(EN-24).
8.
When the setting is the way you want, longpress the [4] (EXIT) bm number key to exit the
setting screen.
y
EN-22
Page 24
Playing on the Keyboard
Reverb Effect List
■ CT-X5000
Setting
Value
1Off Off
2 Room 1 Room 1
3 Room 2 Room 2
4 Room 3 Room 3
5 Room 4 Room 4
6 Room 5 Room 5
7 Room 6 Room 6
8 Room 7 Room 7
9 Room 8 Room 8
10 Room 9 Room 9
11 Large Room 1 L.Room 1
12 Large Room 2 L.Room 2
13 Hall 1 Hall 1
14 Hall 2 Hall 2
15 Hall 3 Hall 3
16 Hall 4 Hall 4
17 Hall 5 Hall 5
18 Hall 6 Hall 6
19 Hall 7 Hall 7
20 Hall 8 Hall 8
21 Hall 9 Hall 9
22 Stadium 1 Stadium1
23 Stadium 2 Stadium2
24 Stadium 3 Stadium3
25 Plate 1 Plate 1
26 Plate 2 Plate 2
27 Plate 3 Plate 3
28 Delay Delay
29 Pan Delay PanDelay
30 Long Delay 1 L.Delay1
31 Long Delay 2 L.Delay2
32 Church Church
33 Cathedral Cathedrl
Setting Type Display
■ CT-X3000
Setting
Value
1Off Off
2 Room 1 Room 1
3 Room 2 Room 2
4 Room 3 Room 3
5 Room 4 Room 4
6 Room 5 Room 5
7 Large Room1 L.Room 1
8 Large Room2 L.Room 2
9 Hall 1 Hall 1
10 Hall 2 Hall 2
11 Hall 3 Hall 3
12 Hall 4 Hall 4
13 Hall 5 Hall 5
14 Hall 6 Hall 6
15 Stadium 1 Stadium1
16 Stadium 2 Stadium2
17 Stadium 3 Stadium3
18 Plate 1 Plate 1
19 Plate 2 Plate 2
20 Delay Delay
21 Pan Delay PanDelay
22 Long Delay 1 L.Delay1
23 Long Delay 2 L.Delay2
24 Church Church
25 Cathedral Cathedrl
Setting Type Display
EN-23
Page 25
Playing on the Keyboard
Chorus Effect List
■ CT-X5000
Setting
Value
1 Tone * Tone
2 Chorus 1 Chorus 1
3 Chorus 2 Chorus 2
4 Chorus 3 Chorus 3
5 Chorus 4 Chorus 4
6 FB Chorus FBChorus
7 Soft Chorus Soft C
8 Bright Chorus Bright C
9 Deep Chorus Deep C
10 Flanger 1 Flanger1
11 Flanger 2 Flanger2
12 Flanger 3 Flanger3
13 Flanger 4 Flanger4
14 Short Delay 1 S.Delay1
15 Short Delay 2 S.Delay2
16 Short Delay 3 S.Delay3
17 Short Delay 4 S.Delay4
■ CT-X3000
Setting
Value
1 Tone * Tone
2 Chorus 1 Chorus 1
3 Chorus 2 Chorus 2
4 Chorus 3 Chorus 3
5 Chorus 4 Chorus 4
6 FB Chorus FBChorus
7 Deep Chorus Deep C
8 Flanger 1 Flanger1
9 Flanger 2 Flanger2
10 Flanger 3 Flanger3
11 Flanger 4 Flanger4
12 Short Delay 1 S.Delay1
13 Short Delay 2 S.Delay2
* Though selecting setting value 1 (Tone) causes the
indicator mark next to [CHORUS] to disappear, preset
chorus effects are applied to each tone.
Setting Type Display
Setting Type Display
Delay Effect List
■ CT-X5000
Setting
Value
1 Tone * Tone
2 Short 1 Short 1
3 Short 2 Short 2
4Echo Echo
5 Tempo Sync Short TSync S
6 Tempo Sync Middle TSync M
7 Tempo Sync Long TSync L
8 Ambience Ambience
9Mid 1 Mid 1
10 Mid 2 Mid 2
11 Long 1 Long 1
12 Long 2 Long 2
13 Mid Pan Mid Pan
14 Long Pan 1 LongPan1
15 Long Pan 2 LongPan2
16 Long Pan 3 LongPan3
17 Short Single ShrtSngl
18 Mid Single Mid Sngl
19 Long Single LongSngl
20 Long Double Long Dbl
21 Long Triple LongTrpl
Setting Type Display
EN-24
Page 26
Playing on the Keyboard
■ CT-X3000
Setting
Value
1 Tone * Tone
2 Short 1 Short 1
3 Short 2 Short 2
4Echo Echo
5 Tempo Sync Short TSync S
6 Tempo Sync Middle TSync M
7 Tempo Sync Long TSync L
8 Ambience Ambience
9 Mid 1 Mid 1
10 Mid 2 Mid 2
11 Long 1 Long 1
12 Long 2 Long 2
13 Mid Pan Mid Pan
14 Long Pan 1 LongPan1
15 Long Pan 2 LongPan2
16 Long Pan 3 LongPan3
* Though selecting setting value 1 (Tone) causes the
indicator mark next to [DELAY] to disappear, preset delay
effects are applied to each tone.
Setting Type Display
Using Equalization
You can use equalization to select from among presets that
boost or cut specific frequency ranges.
The CT-X5000 also includes a four-band equalizer that allows
user-configured settings (User Equalizer).
To select an equalization setting
1.
Press bk FUNCTION.
2.
Use the [1] (V) and [3] (W) bm number keys
to display “Equalizr”.
3.
Use bn [–] and [+] or the bl dial to change the
setting value.
• The settings that correspond to each of the setting
values are described below.
Setting
Value
1 Standard Standard setting
2 Bass + Boosts the low range.
3 Treble + Boosts the high range.
4 Loudness Boosts everything.
5 Mellow Creates a soft feeling.
6 Bright Creates a bright feeling.
7Rock
8 Dance
9Jazz
10 Classic
11 User
Display Description
Creates a sound optimized for
rock music.
Creates a sound optimized for
dance music.
Creates a sound optimized for
jazz music.
Creates a sound optimized for
classical music.
CT-X5000: Applies User
Equalizer settings.
4.
When the setting is the way you want, longpress the [4] (EXIT) bm number key to exit the
setting screen.
EN-25
Page 27
Playing on the Keyboard
CT-X5000: To configure User Equalizer
settings
1.
Press bk FUNCTION.
2.
Use the [1] (V) and [3] (W) bm number keys
to display “User EQ”, and then press [6]
(ENTER).
3.
Configure settings for reach frequency range.
(1) Use the [1] (V) and [3] (W) bm number keys to
display the menu of the range you want to adjust.
To adjust this range: Display this:
Low-range (50 Hz to 800 Hz) EQ Low
Mid-range 1 (100 Hz to 8 kHz) EQ Mid1
Mid-range 2 (100 Hz to 8 kHz) EQ Mid2
High-range (2 kHz to 16 kHz) EQ High
(2) Press [6] (ENTER).
• This automatically changes the “Equalizr” setting
to “User”. See “To select an equalization setting”
(page EN-25).
(3) Use the [1] (V) and [3] (W) keys to display “***
Freq” (Center Frequency) or “*** Gain” (Gain).
What appears in place of “***” in the above menu
items depends on the frequency range being
equalized.
(4) Use bn [–] and [+] or the bl dial to change the
setting value.
For details about setting values and their settings,
see the “User Equalizer Setting List” below.
(5) Press the [4] (EXIT) bm number key.
(6) Repeat steps (1) through (5) as required to configure
the settings of other frequency ranges.
4.
Configure input level and output level settings
as required.
(1) Use the [1] (V) and [3] (W) bm number keys to
display “Input Lv” (Input Level), and then use bn [–]
and [+] or the bl dial to change the setting value.
(2) Use the [1] (V) and [3] (W) keys to display
“OutputLv” (Output Level), and then use bn [–] and
[+] or the bl dial to change the setting value.
5.
When the setting is the way you want, longpress the [4] (EXIT) bm number key to exit the
setting screen.
■ User Equalizer Setting List
Setting Item Display Settings
Low-range EQ Low
Center Frequency Low Freq 1 to 13 *
Gain Low Gain –12 to 12
Mid-range 1 EQ Mid1
Center Frequency Mid1Freq 1 to 20 *
Gain Mid1Gain –12 to 12
Mid-range 2 EQ Mid2
Center Frequency Mid2Freq 1 to 20 *
Gain Mid2Gain –12 to 12
High-range EQ High
Center Frequency HighFreq 1 to 10 *
Gain HighGain –12 to 12
Input Level Input Lv 0 to 127
Output Level OutputLv 0 to 127
*1 Setting values 1 through 13 (A in the table below)
correspond to center frequencies 50 Hz to 800 Hz (B in the
table below).
A 1 2 3 4 5
B 50Hz 63Hz 80Hz 100Hz 125Hz
A 6 7 8 9 10
B 160Hz 200Hz 250Hz 315Hz 400Hz
A 11 12 13
B 500Hz 630Hz 800Hz
*2 Setting values 1 through 20 (A in the table below)
correspond to center frequencies 100Hz to 8.0kHz (B in
the table below).
A 1 2 3 4 5
B 100Hz 125Hz 160Hz 200Hz 250Hz
A 6 7 8 9 10
B 315Hz 400Hz 500Hz 630Hz 800Hz
A 11 12 13 14 15
B 1.0kHz 1.3kHz 1.6kHz 2.0kHz 2.5kHz
A 16 17 18 19 20
B 3.2kHz 4.0kHz 5.0kHz 6.3kHz 8.0kHz
*3 Setting values 1 through 10 (A in the table below)
correspond to center frequencies 2.0kHz to 16kHz (B in
the table below).
A 1 2 3 4 5
B 2.0kHz 2.5kHz 3.2kHz 4.0kHz 5.0kHz
A 6 7 8 9 10
B 6.0kHz 8.0kHz 10kHz 13kHz 16kHz
1
2
2
3
EN-26
Page 28
Playing on the Keyboard
8
Note Value
Measure
Tempo
Beat
Displayed
Using the Metronome
The metronome sounds a regular tone to mark time. Use the
metronome when you want to practice playing at a regular
tempo.
To start or stop the metronome
1.
Specify the time signature.
• You can specify a time signature numerator (0 to 16)
and denominator (4 or 8).
(1) Hold down ct METRONOME until “BeatNume” is
displayed.
(2) Use bn [–] and [+] or the bl dial to change the time
signature numerator setting value within the range of
0 to 16 (Default: 4).
Setting
Value
2 to 16 Specifies numerator from 2 to 16. An accent
sounds on the first beat only.
1 All beats accented.
0 All beats unaccented.
(3) Use the [1] (V) and [3] (W) bm number keys to
display “BeatDeno”.
(4) Use bn [–] and [+] to specify the time signature
denominator.
• The setting value 1 is (quarter note beats),
while setting value 2 is (eighth note beats).
(5) Press the [4] (EXIT) bm number key.
2.
Use the dk TEMPO [w] and [q] buttons to
change the tempo setting.
• For information about the tempo setting, see
“Changing Auto Accompaniment Speed (Tempo)”
(page EN-45).
Accent
*
4
*
To adjust the balance between metronome
and keyboard volume
Perform the procedure under “To configure function settings
with the bk FUNCTION button” (page EN-110) and configure
the following setting: Metronome (Metronom) 3 Metronome
Volume (Volume) (page EN-115).
Sounding Arpeggio Phrases
Automatically (Arpeggiator)
With the arpeggiator, you can play various arpeggios and
other phrases automatically by simply pressing keys on the
keyboard. You can select from a number of different arpeggio
options, including playing arpeggios from a chord, playing
various phrases automatically, and more.
• A single button is used to control the arpeggiator and auto
harmonize (page EN-52). Because of this, auto harmonize
cannot be used while the arpeggiator is in use.
To turn on the arpeggiator
1.
Press do AUTO HARMONIZE/
ARPEGGIATOR and confirm that the
[ARPEGGIATOR] indicator is displayed.
• Playing a chord or single notes on the keyboard will
play back the currently selected arpeggio.
3.
Press ct METRONOME.
This starts the metronome. The number of measures
since the metronome was started is indicated in the
upper right corner of the display.
• Depending on what you specified in step 1 of the
procedure, the displayed note value (page EN-45) is
either 2 (quarter note beats) or 6 (eighth note beats).
4.
To stop the metronome, press
ct METRONOME again.
EN-27
Page 29
Playing on the Keyboard
2.
To turn the arpeggiator off, press do AUTO
HARMONIZE/ARPEGGIATOR.
This causes the [ARPEGGIATOR] indicator to disappear.
• If the [AUTO HARMONIZE] indicator is displayed
instead of the [ARPEGGIATOR] in step 1 of the above
procedure, you will need to change the function
assigned to the button.
Perform the procedure under “To configure function
settings with the bk FUNCTION button” (page EN-110)
and select “2 Arpeg.” for the following setting: Auto
Harmonize/Arpeggiator (AHar/Arp) 3 AUTO
HARMONIZE/ARPEGGIATOR button assignment
(BtnAsign) (page EN-112).
• Use the following procedure when you want an arpeggio
pattern to keep playing after you release the keyboard
keys.
Perform the procedure under “To configure function
settings with the bk FUNCTION button” (page EN-110)
and enable the following setting: Auto Harmonize/
Arpeggiator (AHar/Arp) 3 Arpeggiator Hold (ArpegHld)
(page EN-112).
• While you are using split (page EN-19), you can use the
UPPER 1 part or LOWER 1 part to sound the arpeggiator.
Perform the procedure under “To configure function
settings with the bk FUNCTION button” (page EN-110)
and change the following setting: Auto Harmonize/
Arpeggiator (AHar/Arp) 3 Arpeggiator Part (ArpegPart)
(page EN-112).
To select an arpeggiator type
1.
Perform the procedure under “To turn on the
arpeggiator” and confirm that the
[ARPEGGIATOR] indicator is displayed.
2.
Long-press do AUTO HARMONIZE/
ARPEGGIATOR until the [FUNCTION] indicator
flashes on the display.
This displays the currently selected arpeggiator type
number and name.
3.
Use bn [–] and [+] or the bl dial to display the
arpeggiator type you want to select.
• While the arpeggiator type is displayed, long-pressing
do AUTO HARMONIZE/ARPEGGIATOR will select
the tone that is recommended for the displayed type.
• For details about arpeggiator types, refer to the
separate “Appendix”.
4.
When the setting is the way you want, longpress the [4] (EXIT) bm number key to exit the
setting screen.
EN-28
Page 30
Changing Keyboard Response to
Pedal jacks
Touch Pressure (Touch
Response)
Touch Response alters tone volume in accordance with
keyboard pressure (speed). This provides you some of the
same expressivity you get on an acoustic piano.
To change Touch Response sensitivity
1.
Press bk FUNCTION.
2.
Use the [1] (V) and [3] (W) bm number keys
to display “Touch”.
3.
Use bn [–] and [+] or the bl dial to change the
setting value.
• The table below shows setting values and their
corresponding Touch Response sensitivity.
Setting
Value
01 Off (Off) Touch Response is turned off.
02 Light (Light) Strong sound, even with light
03 Normal
04 Heavy
• There is an indicator mark next to [TOUCH] while the
4.
When the setting is the way you want, longpress the [4] (EXIT) bm number key to exit the
setting screen.
Sensitivity
(Display)
Sound volume is fixed,
regardless of key press speed.
pressure
Normal Touch Response
(Normal)
Normal sound, even with strong
(Heavy)
touch setting is something other than off.
pressure
Description
Controlling Sounds
Using a Pedal
Connecting a pedal lets you perform pedal operations that
add various effects during your performances. You can use a
pedal to start and stop Auto Accompaniment and Song Bank
(page EN-38) song play.
• A pedal unit does not come with the Digital Keyboard.
Purchase one separately from your retailer. See page EN-3
for information about options.
• You can also use a pedal to switch the Digital Keyboard
registration setup. For details, see “Using a Pedal to Cycle
Through Multiple Setups (Registration Sequence)” (page
EN-69).
Connecting a Pedal
Depending on the type of operation you want the pedal to
perform, connect the pedal’s cable either to the Digital
Keyboard’s fo PEDAL1 jack or fp PEDAL2/
EXPRESSION jack.
• You can connect a CASIO sustain pedal (“Separately
Available Accessories”, page EN-3) to the fo PEDAL1
jack. The fp PEDAL2/EXPRESSION jack can be used to
connect a CASIO sustain pedal or a commercially available
expression pedal.
• If you use the fp PEDAL2/EXPRESSION jack to
connect a commercially available expression pedal,
you will need to specify the polarity type of the pedal
and also calibrate the pedal before you use it.
To do this, perform the procedure under “To connect a
pedal to the fp PEDAL2/EXPRESSION jack” (page
EN-30).
EN-29
Page 31

Controlling Sounds
To connect a pedal to the fo PEDAL1 jack
1.
Connect a pedal to the fo PEDAL1 jack.
2.
Press bk FUNCTION.
3.
Use the [1] (V) and [3] (W) bm number keys
to display “Cntrller”, and then press [6]
(ENTER).
4.
Use the [1] (V) and [3] (W) keys to display
“Pedal”, and then press [6] (ENTER).
This displays “Pd1Efect”. This is the Pedal 1 function
selection mode.
5.
Use bn [–] and [+] or the bl dial to change the
setting value.
• For details about the function that is assigned by each
setting value, refer to the “Pedal Function List” below.
Y Pedal Function List
Setting
Value
1Sustain
2 Sostenuto
3 Soft (Soft) Slightly lowers and softens
4 Rhythm/Song
Function
(Display)
(Sustain)
(Sostenut)
(Rhy/Song)
Description
Sustains notes played while the
pedal is depressed, even if the
keyboard key is subsequently
released.
Organ and other tones that are
sustained as long as keyboard
key are depressed continue to
sound as long as the pedal is
depressed.
Only the notes of the keys that
are depressed when the pedal
is pressed are sustained, even
if the keyboard keys are
released, until the pedal is
released.
notes played while the pedal is
depressed.
Starts or stops Auto
Accompaniment or song
playback.
7.
When the setting is the way you want, longpress the [4] (EXIT) bm number key to exit the
setting screen.
* See “Sounding Multiple Tones (Layer and Split)” (page
EN-19).
To connect a pedal to the fp PEDAL2/
EXPRESSION jack
1.
Connect a pedal to the fp PEDAL2/
EXPRESSION jack.
2.
Press bk FUNCTION.
3.
Use the [1] (V) and [3] (W) bm number keys
to display “Cntrller”, and then press [6]
(ENTER).
4.
Use the [1] (V) and [3] (W) keys to display
“Pedal”, and then press [6] (ENTER).
5.
Use the [1] (V) and [3] (W) keys to display
“Pd2 Type”.
6.
Use bn [–] and [+] or the bl dial to change the
setting value.
To use this type of pedal: Select this setting:
Foot switch pedal 1 Foot Sw
Expression pedal (Type 1 polarity*) 2 ExpType1
Expression pedal (Type 2 polarity*) 3 ExpType2
* For details, see “Connectable Expression Pedals” (page
EN-31).
• If a pedal does not work correctly after configuring
settings, it could mean that the connected pedal is not
compatible with the “Pd2 Type” setting above. Try
changing the “Pd2 Type” to a different setting and see
if this results in correct operation.
6.
Turn pedal effects on or off for each keyboard
part* as required.
(1) Use the [1] (V) and [3] (W) bm number keys to
display “Pd1Enabl”.
(2) Press the [6] (ENTER) bm number key.
(3) Use the [1] (V) and [3] (W) keys to display the
part whose setting you want to change.
(4) Use bn [–] and [+] to switch between on and off.
• The pedal effect is applied to parts that are turned
on, and not applied to parts that are turned off.
• The Auto Harmonize (page EN-52) sound
depends on the UPPER 1 part setting.
EN-30
Page 32

Controlling Sounds
Exp. Pedal Type 1
Exp. Pedal Type 2*
7.
Depending on the selected pedal type, perform
one of the operations below.
Y Foot Switch Pedal
Select the pedal effect.
(1) Use the [1] (V) and [3] (W) bm number keys to
display “Pd2Efect”.
(2) Use bn [–] and [+] or the bl dial to change the
setting value.
• For details about pedal effects that correspond to
each setting value, see the “Pedal Function List”
(page EN-30).
Y Expression Pedal
Before using an expression pedal, first calibrate it.
(1) Use the [1] (V) and [3] (W) bm number keys to
display “ExPCalib”, and then press [6] (ENTER).
This displays “Sure?”
(2) Press bn [+] (YES) to start adjustment or bn [–] (NO)
to cancel the adjustment operation.
(3) While “Highest” is displayed, depress the pedal and
press [6] (ENTER).
(4) While “Lowest” is displayed, release the pedal and
press [6] (ENTER).
• The message “Complete” will appear when the
operation is complete.
8.
Turn pedal effects on or off for each keyboard
part as required.
• Perform step 6 under “To connect a pedal to the
fo PEDAL1 jack” (page EN-30). Note, however, that
you should display “Pd2Enabl” in step (1).
■ Connectable Expression Pedals
You can connect a commercially available expression pedal
that satisfies the specifications below to the fp PEDAL2/
EXPRESSION jack. Use of a pedal whose operation has
been confirmed (see below) is recommended.
• Maximum resistance value: 10kΩ±20% to 50kΩ±20%
• Note that pedal polarity depends on the manufacturer. To
configure the pedal polarity type setting, perform the
procedure under “To connect a pedal to the fp PEDAL2/
EXPRESSION jack” (page EN-30).
* Operation Confirmed Pedals
Roland EV-5 (Set minimum volume to 0.)
KURZWEIL CC-1
FATAR VP-25, VP-26
9.
When the setting is the way you want, longpress the [4] (EXIT) bm number key to exit the
setting screen.
EN-31
Page 33

Controlling Sounds
Displayed
Displayed
Sustain
Sustain extends the reverberation of a note to produce rich
resonance.
1.
Press dn SUSTAIN.
This displays the [SUSTAIN] indicator.
• The sustain effect (note sustained even after the key is
released) is applied to notes played on the keyboard
while the [SUSTAIN] indicator is displayed.
2.
To disable sustain, press dn SUSTAIN and
confirm that the [SUSTAIN] indicator
disappears.
• You can configure settings for the keyboard tones of each
part that control how the sustain effect is applied. Perform
the procedure under “To configure function settings with the
bk FUNCTION button” (page EN-110) and configure the
following setting: Controller (Cntrller) 3 Sustain (Sustain)
(page EN-111).
Sliding Smoothly Between
Pitches (Portamento)
Using the Pitch Bend Wheel
You can use the pitch bend wheel to slide the pitch of notes
smoothly upwards and downwards. This capability makes it
possible to reproduce saxophone and electric guitar choking
effects.
1.
While playing a note on the
keyboard, rotate the ek PITCH
BEND wheel on the left of the
keyboard upwards or
downwards.
The amount the note bends depends on
how much you rotate the pitch bend
wheel.
• Do not touch the wheel as you turn on
the keyboard.
• You also can configure pitch bend wheel operation by
specifying the amount of pitch change at maximum rotation
in either direction. Perform the procedure under “To
configure function settings with the bk FUNCTION button”
(page EN-110) and configure the following setting:
Controller (Cntrller) 3 Pitch Bend (PitchBnd) 3 Pitch
Bend Range (Range) (page EN-111).
Portamento makes it possible to slide smoothly between
notes as is done with string and woodwind instruments.
1.
Press dm PORTAMENTO.
This displays the [PORTAMENTO] indicator.
• While the above indicator is displayed, sequentially
pressing two keyboard keys causes the first pitch to
slide smoothly into the next.
2.
To disable portamento, press
dm PORTAMENTO and confirm that the
[PORTAMENTO] indicator is not displayed.
• You can configure settings for the keyboard tones of each
part that control the speed of the slide between pitches
when dm PORTAMENTO is pressed. Perform the
procedure under “To configure function settings with the
bk FUNCTION button” (page EN-110) and configure the
following setting: Controller (Cntrller) 3 Portamento
(Portamnt) (page EN-111).
EN-32
Page 34

CT-X5000: dt MODULATION/
Lit
ASSIGNABLE button
You can use the dt MODULATION/ASSIGNABLE button
to apply vibrato to notes (default setting). You can also
change the function of the button so it change how DSP
effects are applied to tones.
To apply vibrato to notes
• The procedure below assumes that the Digital Keyboard is
configured with initial default settings.
1.
Hold down dt MODULATION/ASSIGNABLE.
The button’s indicator lamp remains lit while the button is
depressed.
• Vibrato is applied keyboard plays while the indicator is
lit.
2.
To disable the effect, release the button.
This causes the button’s indicator lamp to go out.
Controlling Sounds
4.
Use bn [–] and [+] to select the
dt MODULATION/ASSIGNABLE operation.
To select this operation:
Enable the function assigned to the
button only while the button is pressed.
Toggle the function between enabled
and disabled each time the button is
pressed.
• The indicator lamp to the left of the button is lit when
the assigned function is enabled, and unlit when it is
disabled.
5.
When the setting is the way you want, longpress the [4] (EXIT) bm number key to exit the
setting screen.
Select this
setting value:
1 Moment
2 Toggle
To change the function assigned to
dt MODULATION/ASSIGNABLE
1.
Perform steps 1, 2, and 3 under “To change the
operation performed when dt MODULATION/
ASSIGNABLE is pressed” (page EN-33).
2.
Use the [1] (V) and [3] (W) bm number keys
to display “Btn Func”.
• You can change the intensity of the vibrato effect while the
indicator lamp is lit. Perform the procedure under “To
configure function settings with the bk FUNCTION button”
(page EN-110) and configure the following setting:
Controller (Cntrller) 3 MODULATION/ASSIGNABLE
(Mod/Asgn) 3 Value when modulation is on (ModValue)
(page EN-111).
To change the operation performed when
dt MODULATION/ASSIGNABLE is pressed
1.
Press bk FUNCTION.
2.
Use the [1] (V) and [3] (W) bm number keys
to display “Cntrller”, and then press [6]
(ENTER).
3.
Use the [1] (V) and [3] (W) keys to display
“Mod/Asgn”, and then press [6] (ENTER).
This displays “Btn Act”.
3.
Use bn [–] and [+] to change the function
assigned to dt MODULATION/ASSIGNABLE.
To change to this function:
Vibrato 1 Mod
Change how DSP effects are applied to
tones in accordance with user settings.*
* For information about the setting operation see “To change
how DSP effects applied when dt MODULATION/
ASSIGNABLE is pressed” (page EN-34).
4.
When the setting is the way you want, longpress the [4] (EXIT) bm number key to exit the
setting screen.
Select this
setting value:
2DSP
EN-33
Page 35

Controlling Sounds
Module number DSP module name
EQ Ga i n
Parameter number Parameter name
To specify the keyboard part to which an
effect is applied when dt MODULATION/
ASSIGNABLE is pressed
1.
Perform steps 1, 2, and 3 under “To change the
operation performed when dt MODULATION/
ASSIGNABLE is pressed” (page EN-33).
2.
Use the [1] (V) and [3] (W) bm number keys
to display “PartEnbl”, and then press [6]
(ENTER).
3.
Use the [1] (V) and [3] (W) keys to display
the part whose setting you want to change.
4.
Use the bn [–] and [+] to switch between on
and off.
• The effect is applied to parts that are turned on, and
not applied to parts that are turned off.
5.
When the setting is the way you want, longpress the [4] (EXIT) bm number key to exit the
setting screen.
• For details about keyboard parts, see “Sounding Multiple
Tones (Layer and Split)” (page EN-19).
To change how DSP effects applied when
dt MODULATION/ASSIGNABLE is pressed
5.
Use bn [–] and [+] or the bl dial to specify a
DSP module.
6.
Use the [1] (V) and [3] (W) bm number keys
to display “DSPParam” (the target DSP
parameter).
This displays the name of the first parameter of the DSP
module you selected in step 5.
7.
Use bn [–] and [+] or the bl dial to display the
parameter you want to change when
dt MODULATION/ASSIGNABLE is pressed.
8.
Use the [1] (V) and [3] (W) keys to display
“DSPValue” (value when DSP is turned on).
9.
Use bn [–] and [+] or the bl dial to change the
setting value applied when dt MODULATION/
ASSIGNABLE is pressed.
10.
When the setting is the way you want, longpress the [4] (EXIT) bm number key to exit the
setting screen.
• The DSP module registered with the procedure below are
elements of this Digital Keyboard’s DSP effect. For details
about DSP effect configuration and parameters, see “DSP
Editing” (page EN-71).
1.
Perform steps 1, 2, and 3 under “To change the
operation performed when dt MODULATION/
ASSIGNABLE is pressed” (page EN-33).
2.
Use the [1] (V) and [3] (W) bm number keys
to display “Btn Func”.
3.
Use bn [–] and [+] to change the setting to
“2 DSP”.
4.
Use the [1] (V) and [3] (W) keys to display
“DSPModle” (the target DSP module).
This displays a DSP module name.
M
on1B EQ
• The assigned DSP modules depend on the tone. To check
the DSP modules for each tone, perform the procedure
under “To use DSP editing to edit an effect” (page EN-71).
EN-34
Page 36

Controlling Sounds
Displayed
Changing the Pitch in Semitone
Steps (Transpose)
The transpose feature lets you raise or lower the overall pitch
of the Digital Keyboard in semitone steps. You can use this
feature to adjust keyboard pitch to a key that better matches a
vocalist, another musical instrument, etc.
To change the pitch in semitone units
1.
Press the ds TRANSPOSE [w] or [q] button.
This displays “Trans.”
• You can change the pitch of the keyboard within the
range of –12 to 00 to +12.
• While “Trans.” is displayed, you can use the bm
number keys, bn [–] and [+], or the bl dial to change
the setting value.
• Pressing bk FUNCTION or not performing an
operation for some time causes “Trans.” to disappear.
• The [TRANSPOSE] indicator will be displayed while the
transpose setting is something other than 0 (zero).
To configure the octave shift amount setting
for each part
1.
Press dr OCTAVE.
U1 Oc t .
Number of octaves shifted. 0 (zero) indicates no
shifting, 1 indicates one octave up, and –1 indicates
one octave down. You can specify a value in the
range of –3 to +3.
Keyboard part. For details about keyboard parts and
how they are indicated, see “Keyboard Part
Indicators” (page EN-19).
Indicates the octave shift setting screen.
2.
Use the [1] (V) and [3] (W) bm number keys
to select the keyboard part you want to octave
shift.
3.
Use bn [–] and [+] to octave shift the keyboard
part you selected in step 2.
Changing the Pitch of Each Part
in Octave Units (Octave Shift)
Octave Shift lets you raise or lower the pitch of the keyboard
in octave units. You can configure individual octave shift
settings for each of the keyboard parts* (UPPER 1,
LOWER 1, UPPER 2, LOWER 2).
• You can also specify the number of octaves to shift for each
part.
• With Quick Octave Shift, you can quickly shift octaves in
accordance with settings that are pre-configured for a part.
* See “Sounding Multiple Tones (Layer and Split)” (page
EN-19).
• The Octave Shift setting changes automatically when some
tones are selected. For details, refer to the “Octave Shift”
column of the tone list in the separate “Appendix”.
• The Auto Harmonize (page EN-52) sound depends on the
UPPER 1 part setting.
U2 Oc t .
4.
Repeat steps 2 and 3 to octave shift other parts
as required.
5.
To exit the procedure and return to the state
the Digital Keyboard was in before step 1 of
this procedure, press dr OCTAVE or the [4]
(EXIT) bm number key.
EN-35
Page 37

Controlling Sounds
To use Quick Octave Shift
1.
While holding down dr OCTAVE, press the
ds TRANSPOSE [w] or [q] button.
• Pressing [w] shifts the specified keyboard parts one
octave down, while [q] shifts one octave up.
• Use the Quick Octave Shift keyboard part selection
procedure below to select the parts that are affected
by a Quick Octave Shift operation.
To select Quick Octave Shift keyboard parts
1.
Press dr OCTAVE.
This displays “U1 Oct.”
2.
Use the [1] (V) and [3] (W) bm number keys
to display “Btn Trgt”, and then press [6]
(ENTER).
This displays “U1OctBtn”.
3.
Use the [1] (V) and [3] (W) keys to display
the part whose setting you want to change.
4.
Use the bn [–] and [+] to switch between on
and off.
• Selecting on causes the keyboard part’s octave to be
shifted by the Quick Octave Shift operation under “To
use Quick Octave Shift” (page EN-36).
Performing Master Digital
Keyboard and Individual Part
Pitch Adjustment
Use the procedure below to perform master Digital Keyboard
pitch adjustment. When making adjustments, the A4 note (A
above middle C) is the tuning standard.
To fine tune a pitch (Tuning)
1.
Press bk FUNCTION.
2.
Use the [1] (V) and [3] (W) bm number keys
to display “Tune”, and then press [6] (ENTER).
This displays “MstrTune”.
3.
Use the bm number keys, bn [–] and [+], or the
bl dial to change the setting value.
• The setting range is 415.5 to 465.9 Hz (Default: 440.0
Hz).
• Use the bm number keys to input integers.
• You can use bn [–] and [+] or the bl dial to change
the frequency in 0.1Hz steps
4.
When the setting is the way you want, longpress the [4] (EXIT) bm number key to exit the
setting screen.
5.
Repeat steps 3 and 4 as required for other
parts.
6.
When the setting is the way you want, longpress the [4] (EXIT) bm number key to exit the
setting screen.
To fine tune the pitch of each keyboard part
(Part Coarse Tuning, Part Fine Tuning)
When using layer and split, you can individually fine-tune the
pitch of each part (UPPER 1, LOWER 1, UPPER 2,
LOWER 2).
Perform the procedure under “To configure function settings
with the bk FUNCTION button” (page EN-110) and configure
the following settings: Tuning (Tune) 3 Part Coarse Tune
(PrtCoars) and Part Fine Tune (Prt Fine) (page EN-113).
• Part coarse tuning changes the pitch in semitone steps,
while part fine tuning adjusts pitch in cent units.
• The Auto Harmonize (page EN-52) sound depends on the
UPPER 1 part setting.
EN-36
Page 38

Controlling Sounds
Selecting a Scale
You can select from among 17 different scales, including
those that a suitable for classical music of specific eras,
Arabian music, etc.
■ Scale List
No. Scale name Display
01 Equal Temperament Equal
02 Pure Major PureMajr
03 Pure Minor PureMinr
04 Pythagorean Pythagor
05 Kirnberger 3 Kirnbrg3
06 Werckmeister Wercmeis
07 Mean-Tone MeanTone
08 Rast Rast
09 Bayati Bayati
10 Hijaz Hijaz
11 Saba Saba
12 Dashti Dashti
13 Chahargah Chaharga
14 Segah Segah
15 Gurjari Todi GujrTodi
16 Chandrakauns Cndrkuns
17 Charukeshi Carukesi
• You can fine tune the pitch of each note of the scale (from
C to B) in one-cent units. After selecting one of the preset
scales, you can modify its tuning as desired. For details,
see “To fine tune a scale (Scale Fine Tuning)” (page
EN-37).
• You can fix the scale of Auto Accompaniment as equal
temperament, regardless of the currently selected scale. To
do so, use the procedure under “To change the scale
setting used for Auto Accompaniments” to turn off the
Accompaniment Scale (AcompScl) setting (page EN-38).
To select the temperament of keyboard play
1.
Press bk FUNCTION.
2.
Use the [1] (V) and [3] (W) bm number keys
to display “Scale”, and then press [6] (ENTER).
This displays “Type”.
3.
Use bn [–] and [+] or the bl dial to change the
setting value.
• For details about the scales that corresponds to each
setting value, see the “Scale List” (page EN-37).
4.
Press the [3] (W) bm number key to display
“Root”.
5.
Use bn [–] and [+] or the bl dial to select the
root note.
6.
When the setting is the way you want, longpress the [4] (EXIT) bm number key to exit the
setting screen.
To fine tune a scale (Scale Fine Tuning)
1.
Perform steps 1 and 2 under “To select the
temperament of keyboard play” (page EN-37).
2.
Use the [1] (V) and [3] (W) bm number keys
to display “FineTune”, and then press [6]
(ENTER).
This displays “C Tune”.
3.
You can fine tune the pitch of each individual
note in the scale.
(1) Use the [1] (V) and [3] (W) keys to display the
name of the note (C to B) whose pitch you want to
fine tune.
(2) Use bn [–] and [+] or the bl dial to fine-tune the
pitch of the currently displayed note.
• You can change pitch within a range of –99 to +99
cents.
(3) Repeat steps (1) and (2) as many times as
necessary to fine tune the pitches of the notes you
want.
4.
When the setting is the way you want, longpress the [4] (EXIT) bm number key to exit the
setting screen.
EN-37
Page 39

To change the scale setting used for Auto
Sa i n t sGo
Song number Song name
Accompaniments
1.
Perform steps 1 and 2 under “To select the
temperament of keyboard play” (page EN-37).
2.
Use the [1] (V) and [3] (W) bm number keys
to display “AcompScl”.
3.
Use bn [–] and [+] to turn the setting on or off.
On: The scale selected by the procedure under “To
select the temperament of keyboard play” is also applied
to Auto Accompaniment.
Off: The scale of Auto Accompaniment is always equal
temperament.
4.
When the setting is the way you want, longpress the [4] (EXIT) bm number key to exit the
setting screen.
Playing a Built-in Song or a
Song on a USB Flash Drive
(Song Bank Mode)
Your Digital Keyboard comes with 30 built-in songs.* You can
use built-in songs for listening enjoyment, or you can mute the
part of one hand of the piano part and play along for practice.
You can also connect a USB flash drive to the Digital
Keyboard and use the same operations as those for built-in
songs to play general music MIDI files (SMF).
* With this Digital Keyboard, the term “song” is used to refer
to a musical piece.
Selecting a Built-in Song for
Playback
To select a single built-in song for playback
1.
Press 7 SONG BANK.
This displays (song bank indicator) and enters the
Song Bank Mode.
2.
Use the bm number keys, bn [–] and [+], or the
bl dial to select a song number.
• See “Numeric Input” (page EN-14) for information
about how to specify a number.
• See page A-1 for a list of songs.
• This operation automatically changes the beat setting of the
metronome (page EN-27) to the beat of the selected song.
Even if the beat of a song is outside the allowable setting
range of the metronome, it is still applied as the metronome
setting.
• Selecting some songs will initially cause “Lod” to be
displayed for TEMPO (see the illustration under step 3).
This indicates that data is being loaded.
EN-38
Page 40

Playing a Built-in Song or a Song on a USB Flash Drive (Song Bank Mode)
Note Value
Measure
Tempo
Beat
Indicator goes out when repeat is turned off.
Start End
These measures are repeated.
3.
Press ck PLAY/STOP.
• This starts song playback. The playback tempo,
current measure, and current beat are shown in the
upper right corner of the display.
• The operations below are supported during song
playback.
To perform this operation: Do this:
Stop a song part way
through.
Pause or unpause a song. Press btk PAUSE.
Change the song playback
speed.
Jump to the beginning of the
next measure.
Fast forward the song Hold down bsdFF.
Jump to the beginning of the
previous measure.
Fast reverse the song Hold down brsREW.
• While a song is playing back, you can play along on
the keyboard using the tone (including split and layer
tones) that was selected before song playback was
started.
4.
To stop song playback, press ck PLAY/STOP.
• The song plays in a continuous loop (repeat on) until
you press ck PLAY/STOP. To turn off repeat, press
bp REPEAT and confirm that there is no indicator
mark next to [REPEAT].
Press ck PLAY/STOP.
Press the dk TEMPO [w]
or [q] button.
Press bsdFF.
Press brsREW.
To select a tone for keyboard play in the
Song Bank mode
1.
In the Song Bank mode, press 5 TONE.
This displays (tone indicator). (song bank
indicator) will also remain on the display.
2.
Use the bm number keys, bn [–] and [+], or the
bl dial to select the number of the tone you
want to assign to keyboard play.
• While is displayed, you can perform the split and/or
layer tone selection operation. For more information,
see “Selecting a Tone” (page EN-18).
• To change a tone number you selected using the procedure
above, press 7 SONG BANK. This causes to
disappear, leaving only displayed.
To adjust the balance between song and
keyboard volume
Perform the procedure under “To configure function settings
with the bk FUNCTION button” (page EN-110) and configure
the following setting: Song Volume (Song Vol) (page EN-113).
Looping Playback of Specific
Song Measures (A-B Repeat)
To loop a range of measures in a song, you need to specify
the start measure and end measure of the section you want to
repeat.
To loop a specific phrase
1.
If there is no indicator mark next to [REPEAT],
press bp REPEAT to display it.
2.
Perform steps 1, 2, and 3 under “To select a
single built-in song for playback” (page EN-38)
to start song playback.
EN-39
Page 41

Playing a Built-in Song or a Song on a USB Flash Drive (Song Bank Mode)
Flashing
Displayed
Both-hand playback
Right hand muted
Left hand muted
Both hands muted
Both-hand playback
Right hand muted
Left hand muted
Both hands muted
3.
When playback reaches the beginning of the
section you want to loop, press bq A-B.
This will make the beginning of the measure that is
playing when you press bq A-B the beginning of the
loop, and cause the indicator mark next to [A-B] to start
to flash.
4.
When playback reaches the end of the section
you want to repeat, press bq A-B again.
This will make the end of the measure that is playing
when you press bq A-B the end of the loop, and cause
the indicator mark next to [A-B] to stop flashing.
4.
Use bo PART SELECT to select a part to
practice.
• Each press of bo PART SELECT causes the
indicators below to appear or disappear in accordance
with the type of song that is selected.
Y Song with One Left-hand and One Right-hand Part
Y Song with Chord Accompaniment on the Left-hand
Side and Melody on the Right-hand Side
5.
To return to normal playback, press bq A-B.
This causes the indicator mark next to [A-B] to disappear.
Playing Back with One Hand’s
Part Muted
You can mute one of the hand parts of a song for playback.
Then you can practice by playing the muted part on the
keyboard. The following types of songs can be used for such
practice: built-in songs,* or CMF format (one type of CASIO
MIDI file) songs* stored on a USB flash drive.
* These songs have part channel information (page EN-41).
To play back with one hand’s part muted
1.
Press 7 SONG BANK.
2.
Use the bm number keys, bn [–] and [+], or the
bl dial to select a song number.
3.
Press ck PLAY/STOP to start song playback.
5.
To stop song playback, press ck PLAY/STOP.
EN-40
Page 42

Playing a Built-in Song or a Song on a USB Flash Drive (Song Bank Mode)
■ Part Channel Information
In built-in songs and CMF format songs, parts where left-hand
play is recorded and parts where right-hand play is recorded
are separate. These songs have “part channel information”,
which is information that controls to which Digital Keyboard
parts left-hand and right-hand play should be assigned.
The part channel information contained in built-in songs and
general CMF format songs is described below.
Song Type
Normal piano song with
one tone for both hands
Song with Auto
Accompaniment for the
left-hand part and melody
for the right-hand part
Though standard MIDI files (SMF format) stored on a USB
flash drive can also be played back by the Digital Keyboard,
such files do not have part channel information. Use the
procedure below to specify whether the right-hand part or lefthand part should be muted when bo PART SELECT is
pressed for playback of such a file.
Left Hand
Part:
Part 3 of
SONG SOLO
Part Group
Part 1 through
8 of RHYTHM
Part Group
Right-hand
Part
Part 4 of
SONG SOLO
Part Group
Part 4 of
SONG SOLO
Part Group
To specify a part channel
Perform the procedure under “To configure function settings
with the bk FUNCTION button” (page EN-110) and change
the part channel settings: Other (Other) 3 Right Hand
(Melody) Part Channel (PartR Ch), Left Hand Part Channel
(PartL Ch) (page EN-115).
• The above setting is applied only for playback of a song
that does not have part channel information. When a song
has part channel information, this setting is ignored and the
part channel information is given priority.
Playing Back a Song from a USB
Flash Drive
You can use the same operations as those for built-in songs
to play back MIDI files* stored in the MUSICDAT folder on a
USB flash drive. For information about the procedure for
saving a MIDI file to a USB flash drive, see “Using a Computer
to Copy General Song Data to a USB Flash Drive” (page
EN-121).
* Standard MIDI files (SMF format 0/1) and CASIO MIDI files
(CMF format)
To play back a song from a USB flash drive
1.
Insert the USB flash drive into the Digital
Keyboard’s USB flash drive port.
• When you perform a USB flash drive operation or turn
on the Digital Keyboard while a USB flash drive is
plugged in, the Digital Keyboard initially needs to
perform a “mounting” sequence to prepare for data
exchange with the USB flash drive. Digital Keyboard
operations may be momentarily disabled while a
mounting sequence is being performed. The [USB]
indicator will flash on the display while the USB flash
drive is being mounted. It may take up to 10 or 20
seconds or even longer for a USB flash drive to be
mounted. Do not attempt to perform any operation on
the Digital Keyboard while a mounting sequence is in
progress. A USB flash drive needs to be mounted
each time it is connected to the Digital Keyboard.
2.
Perform the procedure under “To select a
single built-in song for playback” (page EN-38).
• Song numbers are assigned automatically in
sequence to MIDI files on the USB flash drive. The
files are sorted on their file names, and the first MIDI
file is assigned song number 41.
EN-41
Page 43

Playing Back an Audio File
Displayed
Abso l u t e
Song number File name
Displayed
on a USB Flash Drive (Audio
Mode)
You can use your Digital Keyboard to play back audio files
(WAV format, 44.1 kHz 16bit) stored in the MUSICDAT folder
on a USB flash drive. For information about the procedure for
saving an audio file to a USB flash drive, see “Using a
Computer to Copy General Song Data to a USB Flash Drive”
(page EN-121).
• While audio file playback is in progress, you can perform
normal keyboard play, and you can use layer, split
operations.
• For information about handling USB flash drives, see “USB
Flash Drive” (page EN-117).
To play back an audio file
1.
Plug a USB flash drive where a supported
audio file is stored into the Digital Keyboard’s
USB port.
2.
Long-press 7 SONG BANK (AUDIO) until the
[AUDIO] indicator appears.
This means that the Digital Keyboard is in the Audio Mode
and is standing by for audio file playback.
5.
To stop playback, press 8 AUDIO PLAY/
STOP.
This causes the [AUDIO PLAY] indicator to disappear.
6.
To exit the Audio Mode, press 7 SONG BANK
(AUDIO).
This causes the [AUDIO] indicator to disappear.
• Playback of an audio file continues even if you exit the
Audio Mode. In this case as well, press 8 AUDIO PLAY/
STOP to stop playback.
• You can loop playback of an audio file. Perform the
procedure under “To configure function settings with the
bk FUNCTION button” (page EN-110) and turn on the
repeat setting: Audio Playback (AudioPly) 3 Audio
playback looping (Repeat) (page EN-114).
To adjust the balance between audio file
playback and keyboard volume
Perform the procedure under “To configure function settings
with the bk FUNCTION button” (page EN-110) and change
the volume setting: Audio Playback (AudioPly) 3 Audio
playback volume (Volume) (page EN-114).
Center Cancel (Vocal Cut)
Enabling Vocal Cut mutes or minimizes the vocal part in the
audio file playback. Note that this function cancels the sound
in the center position of the audio, which may (depending on
how the original audio was mixed) end up canceling
something else other than the vocal part. How vocal cut is
performed depends on the sound being input.
Perform the procedure under “To configure function settings
with the bk FUNCTION button” (page EN-110) and change
the Center Cancel setting: Audio Playback (AudioPly) 3
Audio playback Center Cancel (C Cancel) (page EN-114).
• Song numbers are assigned automatically in
sequence to audio files on the USB flash drive.
3.
Use the bm number keys, bn [–] and [+], or the
bl dial to select the number of the audio file
you want to play back.
4.
To start playback, press 8 AUDIO PLAY/
STOP.
This displays [AUDIO PLAY] indicator.
• The operations below are supported during playback.
To perform this operation: Press this button:
Skip to the next file bn [+]
Skip to the previous file bn [–]
EN-42
Page 44

Using Auto Accompaniment
Rhythm number Rhythm name
ep RHYTHM GROUP SELECT button
eq RHYTHM Category buttons
(Rhythm Mode)
With Auto Accompaniment, simply select the accompaniment
rhythm you want and the matching accompaniment (bass,
guitar, and other instruments) will sound automatically when
you play a chord with your left hand. It’s like having your own
personal backup group along with you wherever you go.
You can edit built-in rhythms and produce original Auto
Accompaniments (user rhythms) and save them in memory.
For details, see “Creating an Auto Accompaniment (User
Rhythm)” (page EN-75).
CT-X5000: To use the RHYTHM Category
buttons to select a category
• You can use the eq RHYTHM Category buttons to quickly
and easily navigate between categories.
Selecting a Rhythm
To select a rhythm
1.
Press 6 RHYTHM.
This displays (rhythm indicator) and enters the
Rhythm Mode.
Strt 8Bt
2.
Use the bm number keys, bn [–] and [+], or the
bl dial to select a rhythm number.
• See “Numeric Input” (page EN-14) for information
about how to specify a number.
• Rhythms are divided into multiple categories, and are
arranged for quick and easy navigation between
categories. For more information, see
“4 CATEGORY Button” (page EN-15).
• For details about rhythm categories and types, refer to
the separate “Appendix”.
Rhythm categories are divided between two groups: Group
A (L) and Group B (M). Which category (group) a
eq RHYTHM Category button selects depends on whether
or not the indicator lamp to the left of ep RHYTHM
GROUP SELECT is lit.
1.
Press the ep RHYTHM GROUP SELECT
button to toggle between category Group A
(indicator lamp unlit) and Group B (indicator
lamp lit).
2.
To select a category, press its eq RHYTHM
Category button.
• This causes (rhythm indicator) to flash on the
display.
• Pressing a eq RHYTHM Category button will select
the last selected rhythm in the corresponding category.
While is flashing, you can select one of the
rhythms included in the category. To exit category
rhythm selection, press 6 RHYTHM. This causes
to stop flashing.
3.
Use the bm number keys, bn [–] and [+], or the
bl dial to select the number of the rhythm you
want to sound.
• This operation automatically changes the beat setting of the
metronome (page EN-27) to the beat of the selected
rhythm. Even if the beat of a rhythm is outside the allowable
setting range of the metronome, it is still applied as the
metronome setting.
3.
Press ck START/STOP to start play of the
selected rhythm.
• This starts Auto Accompaniment with rhythm (drum
and percussion) only. To stop rhythm play, press
ck START/STOP again.
EN-43
Page 45

Using Auto Accompaniment (Rhythm Mode)
Displayed
Flashing
Accompaniment keyboard
UPPER part keyboard
Measure
Tempo
Beat
Using Auto Accompaniment
To play an Auto Accompaniment
1.
Use the procedure under “Selecting a Rhythm”
(page EN-43) to select the rhythm you want to
sound.
2.
Press cm ACCOMP and confirm that the
[ACCOMP] indicator is displayed.
• For details about this indicator, see “Auto
Accompaniment Parts and the ACCOMP Indicator”
(page EN-45).
3.
Press bt ENDING/SYNCHRO START.
• This enters synchro start standby (page EN-47).
4.
Play the chord you want on the
accompaniment keyboard.
Auto Accompaniment will start playing when you play the
chord.
Example: Play a C chord (C-E-G).
5.
Use the dk TEMPO [w] and [q] buttons to
change the tempo setting.
• You can also configure the tempo setting before
starting Auto Accompaniment.
• For information about the tempo setting, see
“Changing Auto Accompaniment Speed (Tempo)”
(page EN-45).
6.
Play other chords with your left hand as you
play the melody with your right hand.
• You can use “CASIO CHORD” or other simplified
chord fingering modes to play chords. See “To select a
chord fingering mode” (page EN-49).
• You can change the accompaniment using buttons
bp VARIATION/FILL-IN 1 to bs VARIATION/
FILL-IN 4. See “Creating a Song with an Auto
Accompaniment (Accompaniment Pattern)” (page
EN-46).
7.
To stop Auto Accompaniment, press
ck START/STOP.
• Pressing bt ENDING/SYNCHRO START instead of
ck START/STOP will play an ending pattern before
stopping the Auto Accompaniment. See “Creating a
Song with an Auto Accompaniment (Accompaniment
Pattern)” (page EN-46).
• With the above procedure, you finger chords to be played
by the Auto Accompaniment. You also can use music
presets to sound Auto Accompaniment using a chord
progression based on the music genre you want to perform,
without inputting chords. For details, see “Using Music
Presets” (page EN-53).
EN-44
Page 46

Using Auto Accompaniment (Rhythm Mode)
Note value Tempo value
TE
M
PO
Current setting value
■ Auto Accompaniment Parts and the ACCOMP
Indicator
The Digital Keyboard’s Auto Accompaniment sounds up to
eight parts (Drums, Percussion, Bass, Chords 1 to 5)
simultaneously. The [ACCOMP] indicator indicates whether
only percussion parts (Drums, Percussion) will sound, or all
accompaniment parts will sound. Each press of
cm ACCOMP toggles the [ACCOMP] indicator between
displayed and not displayed.
• When the [ACCOMP] indicator is not displayed, only the
rhythm (drum and percussion) of the accompaniment
pattern sounds.
• When the [ACCOMP] indicator is displayed, bass, chords,
and other parts sound in accordance with the chord played
on the accompaniment keyboard.
• You can use the procedure under “Muting Specific Parts
(Part Mode)” (page EN-61) to quickly and easily mute or
unmute multiple parts.
• You can also make fine-adjustments to the volume, effect
level, and other settings for each part. For details, see
“Using the Mixer” (page EN-63).
To adjust the balance between Auto
Accompaniment and keyboard volume
Perform the procedure under “To configure function settings
with the bk FUNCTION button” (page EN-110) and configure
the following setting: Auto Accompaniment volume
(AcompVol) (page EN-113).
Changing Auto Accompaniment
Speed (Tempo)
There are two ways to change the tempo.
• Specifying a beats-per-minute value
• Tapping a beat with the dl TAP TEMPO button (tap input)
Note Value Indicator and Tempo Value
The current tempo value setting is always displayed in the
upper right corner of the display.
The tempo value is always shown in combination with a note
value. The example above indicates 120 quarter note beats
per minute.
To specify a tempo value
1.
Change the note value as required.
• See “To change the displayed note value” below.
2.
Use the dk TEMPO [w] and [q] buttons to
change the tempo setting.
• The allowable tempo value setting range depends on
the currently displayed note value as shown in the
table below.
Note Value Tempo Value Range
Quarter note (2) 20 to 255
Eighth note (6) 40 to 510
Half note (1) 10 to 128
Dotted quarter note (2.) 13 to 170
• When the note value is a quarter note, the tempo value
corresponds to the actual number of beats per minute.
When the note value is an eighth note the number of
beats per minute is twice that of the tempo value.
When the note value is a half note, the number of
beats is half that of the tempo value.
EN-45
Page 47

Using Auto Accompaniment (Rhythm Mode)
Indicator displayed while Variation 2 is sounding
Indicator displayed while Fill-In 1 is sounding
To change the displayed note value
1.
Long-press dl TAP TEMPO until the
displayed note value changes.
• Each long-press of dl TAP TEMPO cycles through
the note value settings in the sequence shown below.
Quarter note (2) Eighth note (6)
Dotted quarter note (2.) Half note (1)
To set the tempo by tapping a beat
1.
Tap dl TAP TEMPO multiple times at as
steady a beat as possible.
This will set a tempo that is as close as possible to the
timing of the beat you tap.
• It helps to use this method to specify the approximate
tempo in combination with a procedure like the one
under “To specify a tempo value” (page EN-45).
• A tempo value that is input using this method has no
relation to the currently displayed note value. Depending on
the rhythm selected with the above operation, a quarter
note or eighth note tempo value is input.
Creating a Song with an Auto
Accompaniment (Accompaniment
Pattern)
Generally, the progress of a musical piece starts with an intro,
transitions to verses that are interspersed with interludes and
other changes, and then returns to the main theme before
reaching an ending. The Digital Keyboard’s Auto
Accompaniment function provides a selection of
accompaniment patterns that are suited to the progress of a
musical composition.
Accompaniment Patterns
This section describes the different types of accompaniment
patterns of the Auto Accompaniment function.
■ Variations (Four Types)
This is an accompaniment pattern that can be used in the
verse or chorus of a piece. A variation repeats anywhere from
one measure to multiple measures.
To play a variation
Press one of the VARIATION/FILL-IN buttons (bp to bs).
This sounds the variation accompaniment pattern assigned to
the button that is pressed.
To start rhythm play with the dl TAP
TEMPO button
You can configure settings to automatically start rhythm play
when you specify a tempo using the procedure under “To set
the tempo by tapping a beat” above.
To do so, perform the procedure under “To configure function
settings with the bk FUNCTION button” (page EN-110) and
enable the following setting: Other (Other) 3 Tap rhythm
start (Tap Rhy) (page EN-115).
• Pressing ck START/STOP sounds the Variation 1
pattern.
■ Fill-Ins (Four Types)
These accompaniment patterns are used to insert short oneor two-measure fill-ins into a piece. When a fill-in button is
pressed, the fill-in will start immediately, or on the first beat
after one measure or two measures, and then return to the
original variation accompaniment pattern.
To play a fill-in
While Variation 1 is sounding, press bp VARIATION/FILL-
IN 1. If a different variation (2, 3, 4) is sounding, press the
button (bq, br, bs) that corresponds to it.
EN-46
Page 48

Using Auto Accompaniment (Rhythm Mode)
Indicator displayed while Intro is sounding
Indicator displayed while Ending is sounding
Flashing
■ Intro (One Type)
This is an accompaniment pattern that can be used at the
beginning of a piece. After a multiple-measure intro
accompaniment pattern sounds, accompaniment transition to
Variation 1.
To play an intro
Press bo INTRO.
To change the variation played following the intro
While an intro is sounding, press the button for the variation
you want to sound (bq VARIATION/FILL-IN 2,
br VARIATION/FILL-IN 3, bs VARIATION/FILL-IN 4)
after the intro is complete.
■ Ending (One Type)
This is an accompaniment pattern that can be used at the end
of a piece. After a multiple-measure ending sounds, Auto
Accompaniment ends.
To play an ending
While an Auto Accompaniment is sounding, press
bt ENDING/SYNCHRO START.
Starting and Stopping Auto
Accompaniment with the
Accompaniment Keyboard
(Synchro Start, Synchro Stop)
You can configure settings so Auto Accompaniment starts as
soon as you play a chord on the accompaniment keyboard
(synchro start) and stops as soon as you release all of the
keys on the accompaniment keyboard (synchro stop).
To use Synchro Start to start Auto
Accompaniment play
1.
Press bt ENDING/SYNCHRO START.
This enters synchro start standby, and causes the
[SYNC START] indicator and indicator to flash.
• If you want to start with an intro, press bo INTRO
here. This causes the indicator to flash.
• If you want to start with a particular variation, press the
button for the variation you want to start with
(bq VARIATION/FILL-IN 2, br VARIATION/FILL-
IN 3, bs VARIATION/FILL-IN 4). The indicator
and a number indicator (1 to 4) that corresponds to the
button you press flash on the display.
2.
Play the chord you want on the
accompaniment keyboard.
This starts Auto Accompaniment.
• To exit synchro start standby, press bt ENDING/
SYNCHRO START.
EN-47
Page 49

Using Auto Accompaniment (Rhythm Mode)
Displayed
A
C
C
DE F F
#
E
#
G
AB
B
C
C
DE F
E
#
A
C
C
DE F F
#
E
#
G
AB
B
C
C
DE F
E
#
A
C
C
DE F F
#
E
#
G
AB
B
C
C
DE F
E
#
A
C
C
DE F F
#
E
#
G
AB
B
C
C
DE F
E
#
To use Synchro Stop to stop Auto
Accompaniment play
1.
Press cl SYNCHRO STOP.
This enters synchro stop standby.
2.
While Auto Accompaniment is sounding,
release all of the accompaniment keyboard
keys at the point where you want it to stop.
This stops Auto Accompaniment.
• The Digital Keyboard automatically enters synchro
start standby at this time.
• To exit synchro stop standby, press cl SYNCHRO STOP.
Changing Accompaniment
Keyboard Settings
Selecting a Chord Input Mode
You can select from among the following six chord input
modes.
• CASIO CHORD
•FINGERED1
•FINGERED2
• FINGERED ON BASS
• FINGERED ASSIST
• FULL RANGE CHORD
For details, see “To select a chord fingering mode” (page
EN-49).
■ CASIO CHORD
With CASIO CHORD, you can use simplified fingerings to
play the four types of chords described below.
Chord Type
Major Chords
Pressing a single accompaniment area key in the CASIO
CHORD mode will play the major chord whose name is
marked above the key. All of the accompaniment area keys
that are marked with the same chord name play exactly the
same chord.
Example: C (C Major)
Minor Chords
To play a minor chord, press the accompaniment area key
that corresponds to the major chord, while also pressing one
other accompaniment area key to the right.
Example: Cm (C Minor)
Seventh Chords
To play a seventh chord, press the accompaniment area key
that corresponds to the major chord, while also pressing two
other accompaniment area keys to the right.
Example: C7 (C Seventh)
Minor Seventh Chords
To play a minor seventh chord, press the accompaniment
area key that corresponds to the major chord, while also
pressing three other accompaniment area keys to the right.
Example: Cm7 (C Minor Seventh)
EN-48
• When playing a minor, seventh, or minor seventh chord, it
makes no different whether the additional keys you press
are black or white.
Page 50

Using Auto Accompaniment (Rhythm Mode)
A
C
C
DE F F
#
E
#
G
AB
B
C
C
DE F
E
#
A
C
C
DE F F
#
E
#
G
AB
B
C
C
DE F
E
#
A
C
C
DE F F
#
E
#
G
AB
B
C
C
DE F
E
#
Accompaniment keyboard
UPPER part keyboard
Split Point
Accompaniment
keyboard
■ FINGERED
With these input modes, you play chords on the
accompaniment keyboard using their normal chord fingerings.
Some chord forms are abbreviated, and can be fingered with
one or two keys.
See page A-2 for information about chords that are supported
and how they are fingered on the keyboard.
● FINGERED 1
Play the component notes of the chord on the keyboard.
● FINGERED 2
Unlike FINGERED 1, 6th input is not possible. m7 or m7
input.
● FINGERED ON BASS
Unlike FINGERED 1, allows input of fraction chords with the
lowest keyboard note as the bass note.
● FINGERED ASSIST
Produces an effect that is different from FINGERED 1 when
two or three keys are pressed. Pressing a root key and any
white key to the left of the root key plays a seventh chord,
while a black key plays a minor chord. Pressing both a white
and black key together plays a minor seventh chord.
In addition to FINGERED 1, you can also use the methods
below to play the three types of chords described below.
Chord Type
Minor Chords
To play a minor chord, press the accompaniment keyboard
key that specifies the major chord, while also adding the
closest black key to the left of the major chord key.
Example: Cm (C Minor)
b
5
is
To select a chord fingering mode
1.
Press bk FUNCTION.
2.
Use the [1] (V) and [3] (W) bm number keys
to display “ChordMod”.
3.
Use bn [–] and [+] or the bl dial to change the
setting value.
• The table below shows the relationship between
setting values and chord fingering modes.
Setting
value
1 CASIO CHORD CASIO Cd
2 FINGERED 1 Fingerd1
3 FINGERED 2 Fingerd2
4 FINGERED ON BASS FgOnBass
5 FINGERED ASSIST FgAssist
6 FULL RANGE CHORD FulRange
• The accompaniment keyboard ranges for each chord
fingering mode is shown in the illustration below. The
split point (page EN-20) shown in the illustration is the
initial default split point.
Y FULL RANGE CHORD
Y Not FULL RANGE CHORD
Chord Fingering Modes Display
Seventh Chords
To play a seventh chord, press the accompaniment
keyboard key that specifies the major chord, while also
adding the closest white key to the left of the major chord
key.
Example: C7 (C Seventh)
Minor Seventh Chords
To play a minor seventh chord, press the accompaniment
keyboard key that specifies the major chord, while also
adding the closest white and black keys to the left of the
major chord key.
Example: Cm7 (C Minor Seventh)
■ FULL RANGE CHORD
With this mode, you can use the full area of the keyboard to
play chords and the melody.
See page A-2 for information about chords that are supported.
4.
When the setting is the way you want, longpress the [4] (EXIT) bm number key to exit the
setting screen.
EN-49
Page 51

Using Auto Accompaniment (Rhythm Mode)
UPPER part keyboard
Split Point
LOWER part keyboard
UPPER part keyboard
Lower Point
LOWER part keyboard
Accompaniment
keyboard
UPPER part keyboard
Chord Point
LOWER part keyboard
Accompaniment
keyboard
Lower point note number
Lower point note name
Accompaniment Keyboard Range Setting
Specifying a split point (page EN-20) puts the LOWER part
keyboard and the accompaniment keyboard in the same area.
You can also specify different areas for each of these two
keyboards. You can also configure a setting so the LOWER
part tone does not sound in the area where the LOWER part
keyboard and accompaniment keyboard overlap. For details,
see the “Advanced Split Settings” (page EN-50).
Advanced Split Settings
Your Digital Keyboard can be split into three areas: an
UPPER part keyboard, a LOWER part keyboard, and an
accompaniment keyboard.
You can specify a split point (page EN-20) as shown in the
illustration below.
● Chord Point
The illustration below shows a keyboard with a chord point
specified. The LOWER part keyboard range is not affected in
this case.
• While the Chord Input Priority Mode (page EN-51) is turned
on, the LOWER part tone does not sound in the area where
the LOWER part keyboard and accompaniment keyboard
overlap.
To specify the lower point
1.
Hold down dp SPLIT until “Split Pt” is
displayed.
You can specify a lower point and a chord point, to assign
different areas as a LOWER part keyboard and an
accompaniment keyboard.
● Lower Point
Specifying the lower limit of the UPPER part keyboard results
in a configuration like the one shown below. The
accompaniment keyboard range is not affected in this case.
2.
Use the [1] (V) and [3] (W) bm number keys
to display “Lower Pt”.
3.
Use bn [–] and [+] or the bl dial to specify the
note name of the lower point note (the lower
limit of the UPPER part keyboard).
B3 I C4
• You can also specify the lower point by holding down
dp SPLIT and pressing the keyboard key where you
want the lower point to be.
• You cannot specify a lower point that is lower than (to
the left of) the chord point. If you do, the chord point
will be forced to be the same key as the lower point.
4.
When the setting is the way you want, longpress the [4] (EXIT) bm number key to exit the
setting screen.
EN-50
Page 52

Using Auto Accompaniment (Rhythm Mode)
Chord point note number
Chord point note name
To specify the chord point
1.
Hold down dp SPLIT until “Split Pt” is
displayed.
2.
Use the [1] (V) and [3] (W) bm number keys
to display “Chord Pt”.
3.
Use bn [–] and [+] or the bl dial to specify the
note name of the chord point (page EN-50).
B3 I C4
• You can also specify the chord point by holding down
dp SPLIT and pressing the keyboard key where you
want the chord point to be.
• You cannot specify a chord point that is higher than (to
the right of) the chord point. If you do, the lower point
will be forced to be the same key as the chord point.
4.
When the setting is the way you want, longpress the [4] (EXIT) bm number key to exit the
setting screen.
To turn the Chord Input Priority Mode on or
off
1.
Hold down dp SPLIT until “Split Pt” is
displayed.
2.
Use the [1] (V) and [3] (W) bm number keys
to display “CdPrior”.
3.
Use bn [–] and [+] to switch the Chord Input
Priority Mode between on and off.
• While Chord Input Priority Mode is turned on, the
LOWER part tone does not sound in the area where
the LOWER part keyboard and accompaniment
keyboard overlap.
4.
When the setting is the way you want, longpress the [4] (EXIT) bm number key to exit the
setting screen.
Using Recommended Tones and
Tempos (One-Touch Presets)
One-Touch Preset gives you one-touch access to tone and
tempo settings that go well with the currently selected Auto
Accompaniment rhythm pattern.
1.
Hold down 6 RHYTHM until the tone name is
displayed.
This automatically applies the One-Touch Preset settings
in accordance with the rhythm pattern that is currently
selected.
2.
Play a chord on the keyboard.
This immediately starts Auto Accompaniment.
EN-51
Page 53

Using Auto Accompaniment (Rhythm Mode)
Displayed
Adding Harmony to Melody Notes
(Auto Harmonize)
Auto Harmonize lets you add harmony to melody notes you
play with your right hand for more melodic depth. You can
select any one of 12 Auto Harmonize types.
• A single button is used to control auto harmonize and the
arpeggiator (page EN-27). Because of this, the arpeggiator
cannot be used while auto harmonize is in use.
To turn on Auto Harmonize
1.
Press do AUTO HARMONIZE/
ARPEGGIATOR and confirm that the [AUTO
HARMONIZE] indicator is displayed.
• Fingering a chord on the accompaniment keyboard as
you play the melody on the UPPER part keyboard will
add chords to your melody play.
2.
To turn Auto Harmonize off, press do AUTO
HARMONIZE/ARPEGGIATOR.
This causes the [AUTO HARMONIZE] indicator to
disappear.
• If the [ARPEGGIATOR] indicator is displayed instead of
the [AUTO HARMONIZE] indicator in step 1 of the
above procedure, you will need to change the function
assigned to the button.
Perform the procedure under “To configure function
settings with the bk FUNCTION button” (page EN-110)
and select “1 A.Har.” for the following setting: Auto
Harmonize/Arpeggiator (AHar/Arp) 3 AUTO
HARMONIZE/ARPEGGIATOR button assignment
(BtnAsign) (page EN-112).
4.
When the setting is the way you want, longpress the [4] (EXIT) bm number key to exit the
setting screen.
■ Auto Harmonize Type List
Type
number
Type Name Description
01 Duet 1 Adds close (separated by 2 to 4
degrees) 1-note harmony below
the melody note.
02 Duet 2 Adds open (separated by more
than 4 to 6 degrees) 1-note
harmony below the melody note.
03 Country Adds country style harmony.
04 Octave Adds the note from the next lower
octave.
05 5th Adds the fifth degree note.
06 3-Way Open Adds 2-note open harmony, for a
total of three notes.
07 3-Way Close Adds 2-note close harmony, for a
total of three notes.
08 Strings Adds harmony that is optimal for
strings.
09 4-Way Open Adds 3-note open harmony, for a
total of four notes.
10 4-Way Close Adds 3-note close harmony, for a
total of four notes.
11 Block Adds block chord notes.
12 Big Band Adds big band style harmony.
To select the Auto Harmonize type
1.
Perform the procedure under “To turn on Auto
Harmonize” and confirm that the [AUTO
HARMONIZE] indicator is displayed.
2.
Long-press do AUTO HARMONIZE/
ARPEGGIATOR until the [FUNCTION] indicator
flashes on the display.
This displays the currently selected auto harmonize
number and name.
3.
Use bn [–] and [+] or the bl dial to specify the
auto harmonize type.
• For details about types, see “Auto Harmonize Type
List” (page EN-52).
EN-52
Page 54

Using Music Presets
Music preset number
Music preset name
Music Presets are a collection of setups with chord
progression data. With the touch of a button you can recall
one of 310 presets that include tone, rhythm, and other setting
data, along with Auto Accompaniment chord progressions, all
of which are combined to match specific musical genres and
melodies.
For details about music preset categories and types, refer to
the separate “Appendix”.
To perform using a music preset
1.
Press 6 RHYTHM.
2.
Long-press cm ACCOMP until the [ACCOMP]
indicator starts to flash.
So f t Po
p
• With some music presets, selecting a number in step 3
causes the [SYNC START] indicator to start to flash,
indicating that the Digital Keyboard is in synchro start
standby (page EN-47). If this happens, Auto
Accompaniment can be started by playing something on
the keyboard instead of pressing ck START/STOP. For
information about operations that can be performed while in
synchro start standby, see step 1 under “To use Synchro
Start to start Auto Accompaniment play” (page EN-47).
• The accompaniment pattern operations (page EN-46) can
be used during a performance with a music preset.
• The operations below cannot be used during play that
employs a music preset.
– Rhythm setting change (page EN-43)
– Synchro stop (page EN-48)
– Registration (page EN-66)
To change the key of a chord progression
Perform the procedure under “To configure function settings
with the bk FUNCTION button” (page EN-110) and configure
the following setting: Other (Other) 3 Music preset key
change (MP Key) (page EN-115).
• The flashing [ACCOMP] indicator indicates that the
Digital Keyboard is in the Music Preset Mode.
3.
Use the bm number keys, bn [–] and [+], or the
bl dial to select a music preset number.
This changes the displayed music preset name. At the
same time, settings are recalled for the tone, rhythm,
chord progression, and data that matches the genre or
melody indicated by the name.
• See “Numeric Input” (page EN-14) for information
about how to specify a number.
• Music presets are divided into nine categories. You
can easily find the music preset you want by going to
the dance category, classic category, etc. For more
information, see “4 CATEGORY Button” (page
EN-15).
4.
Press ck START/STOP or bo INTRO.
This starts Auto Accompaniment play in accordance with
the preset chord progression.
5.
Play along on the keyboard with the Auto
Accompaniment.
6.
To stop Auto Accompaniment, press
ck START/STOP or bt ENDING/SYNCHRO
START.
7.
To exit the Music Preset Mode, press
cm ACCOMP.
• At this time the tone and rhythm settings configured by
the Music Preset Mode remain in effect.
Settings Changed by Music Preset
Each selection of a music preset automatically changes the
Digital Keyboard settings below. Changed settings are
maintained even after the Music Preset Mode is exited.
• Tempo
• Layer (on/off)
• Split (on/off)
• Synchro start
• do AUTO HARMONIZE/ARPEGGIATOR button
assignment
• Auto Harmonize (on/off, type)
• Arpeggiator (on/off, type)
• Arpeggiator Hold (on/off)
• Tone number (UPPER 1, LOWER 1, UPPER 2, LOWER 2
parts)
• Octave Shift (UPPER 1, LOWER 1, UPPER 2, LOWER 2
parts)
• Reverb, Chorus, Delay (on/off, type)
EN-53
Page 55

Using Phrase Pads
Displayed
Displayed
Not displayed
Short phrases can be recorded and assigned to each of the
four phrase pads. Pressing a pad will loop playback its
recorded phrase. You can sound phrases individually, or you
can sound multiple phrases at the same time.
The explanations in this section refer to phrases assigned to
the phrase pads as Phrase 1 through Phrase 4.
■ Phrase Sets and Phrase Storage Locations
A group of four phrases assigned to the four phrase pads are
called a “phrase set”. There are 25 phrase sets numbered 1
through 25, which means that up to 100 phrases (25 phrase
sets with 4 phrases each) can be stored as user phrases.
When you record a phrase, you specify a storage location
using a phrase set number (1 to 25) and a phrase number 1 to
4.
Changing to Another Phrase Set
You can use the procedure below to change the phrase set
currently assigned to the phrase pads to another set.
Starting and Stopping Phrase
Playback
Before playing back a phrase, you must first change to the
phrase set where the phrase is located if it is not already
assigned to the phrase pads. For details, see “Changing to
Another Phrase Set” (page EN-54).
To start and stop phrase playback
1.
Press one of the phrase pads. For example,
press cq PHRASE PAD [P1].
This starts playback of Phrase 1 and displays the [P1]
indicator.
2.
Press a different phrase pad. For example,
press cq PHRASE PAD [P3].
This starts playback of Phrase 3, and plays Phrase 1 and
Phrase 3 at the same time. In addition to the [P1]
indicator, the [P3] indicator also appears.
To change the phrase set
1.
Press bk FUNCTION.
2.
Use the [1] (V) and [3] (W) bm number keys
to display “Phr Pad”, and then press [6]
(ENTER).
This displays “Phr Set”. You can select a phrase set
number at this time.
3.
Use bn [–] and [+] or the bl dial to select a
phrase set number.
4.
When the setting is the way you want, longpress the [4] (EXIT) bm number key to exit the
setting screen.
3.
To stop playback of only one of the phrases,
hold down cr STOP and press the
cq PHRASE PAD where the phrase you want
to stop is assigned.
For example, holding down cr STOP and pressing
cq PHRASE PAD [P1] will stop playback of Phrase 1
and allow Phrase 3 to continue sounding. The [P1]
indicator disappears at this time.
4.
To stop phrase playback while a single phrase
is playing, press cr STOP.
• You can also stop phrase playback by performing the
same operation as that in step 3.
• Pressing the pad of a phrase that is playing back will restart
the phrase from the beginning.
EN-54
Page 56

Using Phrase Pads
Flashing
To stop playback of all phrases
1.
To stop phrase playback while a multiple
phrases are playing, press cr STOP.
To synchronize phrase playback with Auto
Accompaniment
• The procedure below starts phrase playback and, at the
same time, starts Auto Accompaniment in accordance with
the operation (pressing ck START/STOP or bo INTRO,
etc.) performed in step 2.
1.
While holding down bt ENDING/SYNCHRO
START, press the phrase pad (for example,
cq PHRASE PAD [P1]) whose phrase you want
to start playing along with Auto
Accompaniment.
• If you want playback of multiple phrases to start
simultaneously, repeat the above operation for the
other phrases as well.
• To cancel phrase and Auto Accompaniment
simultaneous start standby, hold down bt ENDING/
SYNCHRO START as you press the phrase pad you
want to cancel.
2.
Press ck START/STOP to start Auto
Accompaniment.
This simultaneously starts Auto Accompaniment and
phrase playback.
Configuring Phrase Playback
Setups
Phrase playback setups control how the phrase assigned to a
phrase pad (1 to 4) plays when you press the pad. The setups
you configure here are recorded to the corresponding pad.
To configure a phrase playback setup
1.
Specify the phrase pad whose playback setup
you want to configure.
(1) Press bk FUNCTION and confirm that the
[FUNCTION] indicator is displayed.
(2) Use the [1] (V) and [3] (W) bm number keys to
display “Phr Pad”, and then press [6] (ENTER). This
displays “Phr Set”.
(3) Use the [1] (V) and [3] (W) keys to specify the
phrase pad (Pad 1 to Pad 4) whose playback setup
you want to configure, and then press [6] (ENTER).
2.
Use the [1] (V) and [3] (W) keys to select the
item whose setting you want to change.
• For information about setting items, see “Phrase
Playback Setup Items” below.
3.
Use bn [–] and [+] or the bl dial to change the
setting.
• Repeat steps 2 and 3 for each of the items whose
setting you want to configure.
4.
When the setup is the way you want, longpress the [4] (EXIT) bm number key to exit the
setting screen.
EN-55
Page 57

Using Phrase Pads
Flashing Flashing
Phrase Playback Setup Items
Setup Item
(Display)
Looped playback
(Loop)
Key shift
(KeyShift)
Timing Sync
(TimingSy)
Chord Sync
(ChordSyn)
Break Point
(Break Pt)
Description Settings
Specifies whether or not to
perform loop playback.
Off: Plays the phrase all the
way through and then stops.
On: Loops the phrase.
Changes the playback pitch
in semitone units. A lower
setting value lowers the
playback pitch, while a
higher setting value raises
the pitch.
Specifies whether playback
timing and speed when a
phrase pad is pressed
should be synced with a
previously playing Auto
Accompaniment, phrase, or
song recorded with the MIDI
recorder.
Off: No syncing.
Beat: Forces correction of
deviation in beat units.
Measure: Forces correction
of deviation in measure
units.
Enabling this function
automatically adjusts the
pitch of the phrase in
accordance with the chords
of an Auto Accompaniment
that is playing.
Important!
Note that Chord Sync can be
applied to a phrase recorded
in C Major only. Play and
record the phrase in C Major
and assign it to the
applicable pad. Next, turn on
Chord Sync for the pad.
This setting is applied while
Chord Sync is turned on. It
specifies a note key, from C
to B, as the point at which
the phrase notes drop one
octave.
On, Off
–24 to 24
Off, Beat,
Measure
On, Off
C to B
Recording a Phrase
A phrase is created by recording notes played manually on
the keyboard. You can record up to 16 measures for a phrase.
As with playback, recording also loops back to the first
measure when the end of the number of measures specified
for the phrase is reached. You can add notes while listening to
playback of previously recorded content.
To record a phrase
1.
Select the tone you want to use for phrase
recording.
• See “Selecting a Tone” (page EN-18).
• You cannot use layer or split when recording a phrase.
• If you want to change mixer settings, perform the
procedure under “To configure mixer settings” (page
EN-63). To configure mixer settings of the phrase to be
recorded, select the UPPER 1 part of the KEYBOARD
part group for setting configuration, and then configure
settings as required.
2.
Press bk FUNCTION.
3.
Use the [1] (V) and [3] (W) bm number keys
to display “Phr Pad”, and then press [6]
(ENTER).
This displays “Phr Set”.
4.
Use the bn [–] and [+], or the bl dial to select
the phrase set number you want to use for
phrase recording.
5.
Press 8 RECORD/STOP.
This enters record standby and causes the [RECORD]
indicator to flash. Also, the [P1] indicator will be flashing.
• The indicators ([P2] through [P4]) of the phrase pads
that have phrases recorded will appear on the display.
• The [P1] indicator flashes even if there is already a
phrase recorded to the P1 phrase pad. You can
determine whether or not there is a phrase recorded to
the P1 phrase pad by pressing any cq PHRASE PAD
button other than [P1] in step 6. If the [P1] indicator is
displayed, it means there is a phrase recorded. If the
indicator is not displayed, it means nothing is recorded
to the P1 phrase pad.
EN-56
6.
Press a cq PHRASE PAD button ([P1] to [P4])
to specify the phrase number of the recording
destination.
• This causes the indicator of the pad you press (P1 to
P4) to flash on the display.
Page 58

7.
Measure Beat
To start recording, press ck PLAY/STOP or
play something on the keyboard.
Playing on the keyboard automatically starts recording.
This displays the [RECORD] indicator.
• The number of measures and beats are counted up in
the upper right corner of the display. When the final
beat of the length (number of measures)* specified for
the phrase being edited is reached, the count restarts
from 001:01.
* For information about the number of measure setting,
see “Configuring Phrase Recording Settings” below.
8.
Timing in accordance with the MEASURE and
BEAT values on the display, play something on
the keyboard when required.
• What you record will play back when the display
returns to the measure and beat where it was
recorded. You can overdub the recording as many
times as you like while listening to the playback.
• Playback while recording is in progress is sound
produced by the KEYBOARD part group’s Part 6
(Phrase Pad 1) to Part 9 (Phrase Pad 4). If you want to
the change the mixer settings for playback during
phrase recording, select the part of pad currently being
recorded as the target for the operation under “To
configure mixer settings” (page EN-63).
9.
When you are finished recording, press
8 RECORD/STOP.
This causes the [RECORD] indicator to disappear.
Using Phrase Pads
Configuring Phrase Recording
Settings
If you change phrase recording settings, those settings will be
in effect for the subsequent recording operation as well.
Change the recording settings as required when recording a
new phrase.
To configure phrase recording settings
1.
Press bk FUNCTION.
2.
Use the [1] (V) and [3] (W) bm number keys
to display “Phr Pad”, and then press [6]
(ENTER).
This displays “Phr Set”.
3.
Press 8 RECORD/STOP.
This causes the [RECORD] indicator to flash.
4.
Long-press 8 RECORD/STOP until “Length”
is displayed.
• This enters the phrase recording setting mode.
5.
Use the [1] (V) and [3] (W) keys to select the
item whose setting you want to change.
• For information about setting items, see “Phrase
Recording Setting Items” (page EN-58).
6.
When all the settings are the way you want,
press 8 RECORD/STOP.
This causes the [RECORD] indicator to disappear.
EN-57
Page 59

Using Phrase Pads
Phrase Recording Setting Items
Item Name
(Display)
Number of
measures
(Length)
Quantize
(Quantize)
Metronome
(Metronom)
Pre-count
(Precount)
Specifies the length (number of
measures) of the phrase to be
recorded.
Specify either recording of notes
in the timing they are played on
the keyboard or automatic
alignment of notes based on a
note value. Selecting a setting
other than “Off” displays a note
value (4: quarter note, d: dotted
note, t: triplets).
Specifies whether or not the
metronome should sound during
recording.
Specifies whether or not to
sound a pre-count when
recording.
Description Settings
1 to 16
Off, 4, 8,
16, 32,
4d, 8d,
16d, 32d,
4t, 8t, 16t,
32t
On, Off
On, Off
Managing Phrase Sets
You can use the procedures in this section to copy and delete
phrase sets.
To delete a phrase set
1.
Perform the procedure 1 through 3 under “To
change the phrase set” (page EN-54) to select
the number of the phrase set you want to
delete.
2.
Long-press 8 RECORD/STOP until “Copy” is
displayed.
3.
Use the [1] (V) and [3] (W) bm number keys
to display “Clear”, and then press [6] (ENTER).
This displays “Sure?”
4.
Press bn [+] (YES) to delete or bn [–] (NO) to
cancel the delete operation.
• Pressing bn [+] (YES) displays the message “Wait...”
(operation in progress). Do not perform any operation
while this message is displayed. “Complete” is
displayed after the operation is complete.
5.
To exit the operation, long-press the [4] (EXIT)
bm number key.
To copy a phrase set
1.
Perform the procedure 1 through 3 under “To
change the phrase set” (page EN-54) to select
the number of the phrase set you want to copy.
2.
Long-press 8 RECORD/STOP until “Copy” is
displayed.
3.
Press the [6] (ENTER) bm number key.
This displays “Phr Set” and stands by for selection of the
copy destination.
4.
Use bn [–] and [+] or the bl dial to select the
copy destination phrase set number.
• Be sure to specify an empty area as the copy
destination.
5.
Press [6] (ENTER).
This displays “Sure?”
6.
Press bn [+] (YES) to execute or bn [–] (NO) to
cancel.
• Pressing bn [+] (YES) displays the message “Wait...”
(operation in progress). Do not perform any operation
while this message is displayed. “Complete” appears
after the operation is complete.
7.
To exit the operation, long-press the [4] (EXIT)
bm number key.
EN-58
Page 60

Using Phrase Pads
Displayed
Editing a Phrase
You can use the procedures in this section to edit individual
phrases. You can delete or copy a phrase, and configure
quantize, key shift, and mixer settings.
• Quantize automatically corrects the timing of recorded
notes to match a note value being used as the quantize
reference.
• Key shift offsets the pitch of recorded sounds in semitone
steps.
To edit a phrase, enter the phrase editing mode.
To enter the Phrase Editing mode
1.
Press bk FUNCTION.
2.
Use the [1] (V) and [3] (W) bm number keys
to display “Phr Pad”, and then press [6]
(ENTER).
This displays “Phr Set”.
3.
Use bn [–] and [+] or the bl dial to select the
number of the phrase set that includes the
phrase you want to edit.
4.
Long-press bk FUNCTION until the [EDIT]
indicator appears.
• This enters the phrase editing mode. “Clear” will
appear at this time.
To delete a phrase
1.
Use the procedure under “To enter the Phrase
Editing mode” (page EN-59) to enter the Phrase
Editing mode.
To copy a phrase
1.
Use the procedure under “To enter the Phrase
Editing mode” (page EN-59) to enter the Phrase
Editing mode.
2.
Use the [1] (V) and [3] (W) bm number keys
to display “Copy”, and then press [6] (ENTER).
This displays “Src Set”.
3.
Use bn [–] and [+] or the bl dial to specify the
number of the phrase set that contains copy
source phrase, and then press [6] (ENTER).
This displays “SrcPhr 1” and causes the [P1] indicator to
flash on the display.
4.
Use bn [–] and [+] or the bl dial to specify the
copy source phrase number, and then press [6]
(ENTER).
This displays “DstPhr 1” and causes the [P1] indicator to
flash on the display.
5.
Use bn [–] and [+] or the bl dial to select the
copy destination phrase number, and then
press [6] (ENTER).
This displays “Sure?”
6.
Press bn [+] (YES) to execute or bn [–] (NO) to
cancel.
• Pressing bn [+] (YES) displays the message “Wait...”
(operation in progress). Do not perform any operation
while this message is displayed. “Complete” is
displayed after the operation is complete.
7.
To exit the operation, long-press the [4] (EXIT)
bm number key.
2.
Press the [6] (ENTER) bm number key.
This displays “Phrase 1” and causes the [P1] indicator to
flash on the display.
3.
Use bn [–] and [+] or the bl dial to select the
number of the phrase you want to delete, and
then press [6] (ENTER).
This displays “Sure?”
4.
Press bn [+] (YES) to execute or bn [–] (NO) to
cancel.
• Pressing bn [+] (YES) displays the message “Wait...”
(operation in progress). Do not perform any operation
while this message is on the display. “Complete” is
displayed after the operation is complete.
5.
To exit the operation, long-press the [4] (EXIT)
bm number key.
EN-59
Page 61

Using Phrase Pads
To delete all data from a phrase except note
events
7.
To exit the operation, long-press the [4] (EXIT)
bm number key.
1.
Use the procedure under “To enter the Phrase
Editing mode” (page EN-59) to enter the Phrase
Editing mode.
2.
Use the [1] (V) and [3] (W) bm number keys
to display “Other Clr”, and then press [6]
(ENTER).
This displays “Sure?”
3.
Press bn [+] (YES) to execute or bn [–] (NO) to
cancel.
• Pressing bn [+] (YES) displays the message “Wait...”
(operation in progress). Do not perform any operation
while this message is displayed. “Complete” is
displayed after the operation is complete.
4.
To exit the operation, long-press the [4] (EXIT)
bm number key.
To quantize a phrase
1.
Use the procedure under “To enter the Phrase
Editing mode” (page EN-59) to enter the Phrase
Editing mode.
2.
Use the [1] (V) and [3] (W) bm number keys
to display “Quantize”, and then press [6]
(ENTER).
This displays “Phrase 1” and causes the [P1] indicator to
flash on the display.
3.
Use bn [–] and [+] or the bl dial to select the
number of the phrase you want to quantize,
and then press [6] (ENTER).
This displays “Value”.
To key shift a phrase
1.
Use the procedure under “To enter the Phrase
Editing mode” (page EN-59) to enter the Phrase
Editing mode.
2.
Use the [1] (V) and [3] (W) bm number keys
to display “KeyShift”, and then press [6]
(ENTER).
This displays “Phrase 1” and causes the [P1] indicator to
flash on the display.
3.
Use bn [–] and [+] or the bl dial to select the
number of the phrase you want to key shift,
and then press [6] (ENTER).
This displays “Value”.
4.
Use bn [–] and [+] or the bl dial to specify the
key shift setting value.
• You can specify a value in the range of –24 to 24.
Lowering the setting value by one lowers the pitch by
one semitone, while raising the value raises the pitch.
5.
Press [6] (ENTER).
This displays “Sure?”
6.
Press bn [+] (YES) to execute or bn [–] (NO) to
cancel.
• Pressing bn [+] (YES) displays the message “Wait...”
(operation in progress). Do not perform any operation
while this message is displayed. “Complete” is
displayed after the operation is complete.
7.
To exit the operation, long-press the [4] (EXIT)
bm number key.
4.
Use bn [–] and [+] or the bl dial to select the
note value to be used as the quantize reference
note.
Display Description
4, 8, 16, 32 Quarter note, eighth note, sixteenth note,
thirty-second note
4d, 8d, 16d, 32d Dotted notes
4t, 8t, 16t, 32t Triplet notes
5.
Press [6] (ENTER).
This displays “Sure?”
6.
Press bn [+] (YES) to execute or bn [–] (NO) to
cancel.
• Pressing bn [+] (YES) displays the message “Wait...”
(operation in progress). Do not perform any operation
while this message is displayed. “Complete” is
displayed after the operation is complete.
EN-60
Page 62

To configure phrase mixer settings
Lit
1.
Use the procedure under “To enter the Phrase
Editing mode” (page EN-59) to enter the Phrase
Editing mode.
2.
Long-press 9 PART (MIXER) until the
[MIXER] indicator appears.
This displays the [KEYBOARD] indicator and mixer
part indicator.
• Mixer part indicators through correspond to
phrase numbers 1 through 4.
3.
Use the [1] (V) and [3] (W) bm number keys
to select the phrase whose mixer settings you
want to configure.
4.
Use the [2] (w) and [5] (q) bm number keys to
display the menu item you want to change.
• Initial default setting values are indicated by an
asterisk (*).
Item Name
(Display)
Tone (Tone) Changes the phrase
Volume
(Volume)
Pan (Pan) Adjusts the stereo
Reverb Send
(Rev Send)
Chorus Send
(Cho Send)
Delay Send
(Dly Send)
Description Settings
tone.
Adjusts the phrase
volume level.
position of the phrase. 0
indicates the center,
while a smaller value
shifts to the left and a
larger value shifts to the
right.
Specifies how much
reverb is applied to the
selected part.
Specifies how much
chorus is applied to the
selected part.
Specifies how much
delay is applied to the
selected part.
0 to 900
0 to 100* to 127
–64 to 0* to 63
0 to 40* to 127
0* to 127
0* to 127
Muting Specific Parts (Part
Mode)
Your Digital Keyboard produces Auto Accompaniment and
keyboard play notes using multiple parts. You can use the
part on/off function to easily mute and unmute one or more
parts. For example, you can mute all parts except for the
drum, percussion, and bass parts of the Auto
Accompaniment.
Turning a Part On or Off
The example below shows how to turn each Auto
Accompaniment part on or off. If you perform this operation
while an Auto Accompaniment is sounding, you can compare
what the accompaniment sounds like with and without the
part.
To turn each part on or off
1.
Press 9 PART.
This causes the indicator lamp to the left of the button to
light (Part Mode).
This displays the name of the currently selected part
group.
Keyboa rd
• For details about part groups, see “Part On/Off
Function Part Groups” (page EN-62).
5.
Use bn [–] and [+] or the bl dial to change the
setting value.
6.
To exit the operation, long-press the [4] (EXIT)
bm number key.
EN-61
Page 63

Muting Specific Parts (Part Mode)
Mixer Part Indicators
(Turned on parts displayed.)
[RHYTHM] indicator displayed
2.
Use bn [–] and [+] to select the part group of
the part you want to turn on or off.
• For example, display the [RHYTHM] indicator. While
the [RHYTHM] indicator is displayed, you can turn
each Auto Accompaniment part on or off. The mixer
part indicator numbers that correspond to the currently
sounding Auto Accompaniment will be shown on the
display.
• For information about the mixer part indicator numbers
and their parts, see “List of Parts for Each Mixer Part
Group” (page EN-64).
3.
To turn a part on or off, press the bm number
key that corresponds to the part number.
• For example, each press of the [2] bm number key
toggles the drum part between off ( indicator not
displayed) and on ( indicator displayed).
• The SONG SOLO and MIDI IN part groups have 16
parts, and only eight parts (1 to 8, or 9 to 16) are
displayed at a time. While parts 9 through 16 are
displayed, first subtract 8 from the part number. Next,
press the bm number key that corresponds to the
result. For part , for example, press the [8] bm
number key.
Part On/Off Function Part Groups
Besides the Auto Accompaniment in the explanation above,
the Digital Keyboard also uses other parts in order to generate
sounds for manual keyboard play, song playback, and MIDI
message input from external devices. The part on/off function
divides these parts into multiple part groups.
■ Part Group and Indicator List
Part Group Name
(Indicator)
Keyboard play
(KEYBOARD)
Auto Accompaniment
(RHYTHM)
Song System
(SONG SYSTEM)
Song Solo (SONG SOLO) Song bank song and MIDI
MIDI Input (MIDI IN) MIDI IN parts
Microphone input (E*) Microphone input part
* is displayed on the right end of the mixer part indicators.
Mixer part indicator is displayed while microphone input
is turned on.
• For information about the parts in each part group and their
corresponding mixer part indicator numbers, see “List of
Parts for Each Mixer Part Group” (page EN-64).
Hand play, Phrase Pads 1 to 4,
and Auto Harmonize parts
Auto Accompaniment parts
MIDI recorder system track
parts (Part configuration same
as KEYBOARD.)
recorder solo track parts
Description
4.
To exit the Part mode, press 9 PART.
• Part on/off settings are maintained even if you exit the
Part Mode.
EN-62
Page 64

Using the Mixer
Level meter
Part group indicator (displayed)
Mixer info display area
Mixer part indicator
[MIXER] indicator (displayed)
Current setting value Setting item name
Your Digital Keyboard produces Auto Accompaniment and
keyboard play notes using multiple parts. You can use the
mixer function to make fine-adjustments to the volume, effect
level, and other settings for each of these parts.
• You can quickly and easily mute and unmute parts. For
details, see “Muting Specific Parts (Part Mode)” (page
EN-61).
Mixer Operation
To configure mixer settings
1.
Long press 9 PART (MIXER) until the [MIXER]
indicator appears.
This causes the mixer info display area to change as
shown in the example below.
• The [MIXER] indicator on the display indicates that the
Digital Keyboard is in the Mixer Mode.
• The displayed part group indicator ([KEYBOARD] in
this example) indicates the KEYBOARD part group
(hand-played performance part) currently being
affected by mixer operations. The flashing mixer part
indicator ( in this example) indicates the part
(UPPER 1 part in the case of the KEYBOARD part
group) whose setting is currently being configured. For
details about part groups and parts, see “List of Parts
for Each Mixer Part Group” (page EN-64).
2.
Select the part group whose mixer settings you
want to configure.
(1) Press 9 PART and confirm that the indicator lamp
to the left of the button is lit.
(2) Use bn [–] and [+] to select the part group whose
settings you want to configure.
To select this part group: Displays this indicator:
KEYBOARD Part Group KEYBOARD
RHYTHM Part Group RHYTHM
SONG SYSTEM Part Group SONG and SYSTEM
SONG SOLO Part Group SONG and SOLO
MIDI IN Part Group MIDI IN
External Part Group
(Microphone Input)
*1 is displayed on the right end of the mixer part
indicators. Mixer part indicator is also displayed
at this time.
(3) After selecting a part group, press 9 PART and
confirm that the indicator lamp to the left of the button
is unlit.
3.
Use the [1] (V) and [3] (W) bm number keys
to select the part whose settings you want to
configure with the mixer.
• Pressing [3] (W) while the rightmost part is selected
or [1] (V) while the leftmost part is selected will scroll
to another part group.*
*2 Pressing [3] (W) while Part 8 of the SONG SOLO or
MIDI IN part group is selected changes to display of
parts 9 to 16 of the same part group. Pressing [1]
(V) while Part 9 is selected changes to display of
parts 1 to 8.
• You can use the bm number keys to quickly select
parts. See “To select parts with the bm number keys”
(page EN-64).
4.
Use the [2] (w) and [5] (q) bm number keys to
select the item whose setting you want to
configure.
1
E*
2
Vo l u
This displays a level meter of each part setting value for
the currently selected setting item.
• For details about setting items, see the “Advanced
Mixer Settings” (page EN-65).
5.
Use bn [–] and [+] or the bl dial to change the
setting value.
m
e
EN-63
Page 65

Using the Mixer
6.
To exit the Mixer mode, press the [4] (EXIT) bm
number key.
• The displayed, flashing, and not displayed status of mixer
part indicators depends on the part on/off status in the Part
Mode. For details, see “Muting Specific Parts (Part Mode)”
(page EN-61).
To select parts with the bm number keys
1.
Perform steps 1 and 2 under “To configure
mixer settings” (page EN-63) to select the part
group whose mixer settings you want to
configure.
2.
Press 9 PART.
This causes the indicator lamp to the left of the button to
light (Part Mode in the Mixer Mode).
3.
To select a part, press the bm number key that
corresponds to the part number.
• For part , for example, press the [2] bm number
key.
• The SONG SOLO and MIDI IN part groups have 16
parts, and only eight parts (1 to 8, or 9 to 16) are
displayed at a time. While parts 9 through 16 are
displayed, first subtract 8 from the part number. Next,
press the bm number key that corresponds to the
result. For part , for example, press the [8] bm
number key.
4.
To exit the Part mode, press 9 PART.
This causes the indicator lamp to the left of the button to
go out.
List of Parts for Each Mixer Part
Group
The tables below show Mixer Mode part groups and the parts
included in each group.
● KEYBOARD Part Group
This is the hand-played performance part, and it includes Auto
Harmonize and phrase pads.
Part Number Corresponding Part
1 UPPER 1
2 UPPER 2
3LOWER1
4LOWER2
5 Auto Harmonize
6 Phrase Pad 1
7 Phrase Pad 2
8 Phrase Pad 3
9 Phrase Pad 4
● RHYTHM Part Group
Auto Accompaniment parts.
Part Number Corresponding Part
1 Percussion
2Drums
3Bass
4 Chord 1
5 Chord 2
6 Chord 3
7 Chord 4
8 Chord 5
EN-64
Page 66

Using the Mixer
● SONG SYSTEM Part Group
These are the parts of the system track in songs recorded
with the MIDI recorder.
Part Number Corresponding Part
1 UPPER 1
2 UPPER 2
3LOWER1
4LOWER2
5 Auto Harmonize
6 Phrase Pad 1
7 Phrase Pad 2
8 Phrase Pad 3
9 Phrase Pad 4
● SONG SOLO Part Group
These are the parts of song bank songs and the solo track in
songs recorded with the MIDI recorder.
Part Number Corresponding Part
1 to 8 Song Part 1 to Part 8
9 to 16 Song Part 9 to Part 16
● MIDI IN Part Group
MIDI receive parts.
Part Number Corresponding Part
1 to 8 MIDI Receive Part 1 to Part 8
9 to 16 MIDI Receive Part 9 to Part 16
● External Part Group
Microphone input.
Part Number Corresponding Part
1 Microphone input
Advanced Mixer Settings
Setting Items for Each Part Group
Initial default setting values are indicated by an asterisk (*).
Item Name
(Display)
Part on/off
1
2
*
(Part)*
Volume
(Volume)
Pan (Pan)*
Reverb Send
(Rev Send)
Chorus Send
(Cho Send)
Delay Send
(Dly Send)
*1 The level indicators of all the parts for which this setting is
turned on are displayed, while all the parts for which it is
turned off are not displayed.
*2 While this setting item is displayed, you can sound only the
selected part, if you want. See “To sound only a selected
part” (page EN-66).
*3 The pan setting status is indicated by the level indicators
as shown below. The indicator on the far left is included to
show all of the segments only.
3
Description Settings
Specifies on/off for the
selected part.
Adjusts the volume level
of the selected part.
Specifies the stereo pan
position of each part. 0
indicates the center,
while a smaller value
shifts to the left and a
larger value shifts to the
right.
Specifies how much
reverb is applied to the
selected part.
Specifies how much
chorus is applied to the
selected part.
Specifies how much
delay is applied to the
selected part.
On*, Off
0 to 100* to 127
–64 to 0* to 63
0 to 40* to 127
0* to 127
0* to 127
(All Segments) Negative Value 0 Positive Value
EN-65
Page 67

To sound only a selected part
Flashing
co
cs
1.
Perform steps 1 through 4 under “To configure
mixer settings” (page EN-63).
2.
To sound only the part whose setting is being
configured, press the [6] (ENTER) bm number
key.
This causes the mixer part indicator of the part whose
setting is being configured and the level indicator above it
to flash.
• This enables sounding of the part whose setting is
being configured, and disables sounding of all other
parts.
3.
To re-enable the other parts, press [6] (ENTER)
again.
• Using the [1] (V) and [3] (W) bm number keys to
change to another part will re-enable the other parts.
Registering and Restoring a
Setup (Registration)
You can use the registration function to register the setup of
the Digital Keyboard (tone, rhythm, and other settings), and
later recall it whenever you want. You can register a different
setup for each one of the songs you play, and instantly setup
the keyboard accordingly during your performances.
■ Setup Storage Locations
Setup registrations are stored in memory locations that are
divided into 16 banks. Each bank has eight storage areas,
which means you can register up to 128 (16 banks × 8 areas)
setups.
• Use the co BANK button to specify a bank.
• Specify an area using the cs REGISTRATION buttons ([1]
to [8]).
EN-66
Area 1
Bank 1 Setup 1-1
Bank 2 Setup 2-1
.
.
Bank 16 Setup 16-1
.
.
…
…
…
…
Area 8
Setup 1-8
Setup 2-8
.
.
Setup 16-8
Registering a Setup
Registration Setting Items
Setting items that can be registered are shown below.
● Keyboard Play
• Tone number (UPPER 1, LOWER 1, UPPER 2, LOWER 2
parts)
• Layer (on/off)
• Split (on/off)
• Reverb, Chorus, Delay (on/off, type)
● Note Control
• Transpose
• Octave Shift (UPPER 1, LOWER 1, UPPER 2, LOWER 2
parts)
• Touch Response setting status
• Pedal 1 and Pedal 2 effects (Pedal 2 type is not recorded)
• Scale, scale fine tune, part fine tune, part coarse tune
• dn SUSTAIN button (on/off, setting mode)
• dm PORTAMENTO button (on/off, setting mode)
• CT-X5000: dt MODULATION/ASSIGNABLE button (on/
off, setting mode)
● Split Settings
• Split Point
• Lower Point
• Chord Point
Page 68

Registering and Restoring a Setup (Registration)
Bank number
Bank number Area number
● Auto Accompaniment
• Rhythm Number
• ACCOMP on/off ([ACCOMP] indicator displayed/not
displayed status)
• Tempo, Note value display setting
• Chord Fingering Mode
• Synchro start
• Auto Accompaniment volume
● AUTO HARMONIZE/ARPEGGIATOR
• do AUTO HARMONIZE/ARPEGGIATOR button
assignment
• Auto Harmonize (on/off, type)
• Arpeggiator (on/off, type)
• Arpeggiator Hold (on/off)
● Phrase Pad
• Phrase set number
• Phrase playback setups
● Mixer
• Part on/off setting
• Volume, Pan, Reverb send, Chorus send, Delay send
settings
To register a setup
• Specifying a bank and area that already has data stored
to it in the procedure below causes the recorded data
to be deleted. For information about banks and areas,
see “Setup Storage Locations” (page EN-66).
1.
Set up the Digital Keyboard with the tone,
rhythm and other settings to suit the song you
will play.
2.
Use co BANK to select the bank where you
want to store the registration.
• Each press of co BANK cycles through the bank
numbers.
• During the approximately three seconds that the
[BANK] indicator is flashing after you press co BANK,
you can use bn [–] and [+] or the bl dial to select a
bank number.
3.
While holding down cp STORE, press one of
the cs REGISTRATION buttons ([1] to [8]) to
select the area you want to specify as the
registration destination.
Pressing the two buttons registers the current Digital
Keyboard setup to the bank and area you specified in
steps 2 and 3.
EN-67
Page 69

Registering and Restoring a Setup (Registration)
Bank number
Bank number
Area number
Recalling a Registered Setup
To recall a setup
1.
As required, press cn FREEZE to toggle the
freeze function between on and off.
• The indicator lamp is lit when the function is on, and
unlit when it is off.
• For details about the freeze function, see “Freeze
Function” below.
2.
Use co BANK to select the bank that contains
the setup you want to recall.
3.
Press one of the cs REGISTRATION buttons
([1] to [8]) to select the area whose setup you
want to recall.
This causes the Digital Keyboard’s settings to change in
accordance with the setup you recalled.
Freeze Function
Recalling a registered setup normally overwrites all of the
settings shown under “Registration Setting Items” (page
EN-66).
You can also use the freeze function to specify particular
settings that should not be overwritten when a setup
registration is recalled.
Perform the procedure under “To configure function settings
with the bk FUNCTION button” (page EN-110) and enable or
disable the items on each sub-menu that appears when you
perform the following operation: Registration Memory (Reg
Mem) 3 Registration Memory Freeze Target (RMFrzTgt)
(page EN-114).
Setting items that can be specified are shown below.
Display
Rhythm Rhythm Number
Tempo Tempo
Tone Tone number
Split Pt Split Point
AHar/Arp Auto Harmonize/Arpeggiator
Trans. Transpose
Scale Scales
Touch Touch Response
Effect Effect type (Reverb, Chorus, Delay on/
PartTune Coarse Tune, Fine Tune
Phr Pad Phrase Pad
Cntrller Setting items included under Controller
Setting that is not changed when a
setup is recalled
off)
(Cntrller) in the “Function Setting Item
List” (page EN-111).
EN-68
• Under initial default settings, Rhythm and Tempo are on
while all other settings are off.
Page 70

Using a Pedal to Cycle Through
Displayed
Multiple Setups (Registration
Sequence)
Each press of the pedal cycles through the currently selected
bank’s registrations (setups) in area number sequence.
To play with a Registration Sequence
1.
Press bk FUNCTION.
2.
Use the [1] (V) and [3] (W) bm number keys
to display “Reg Mem” (Registration Memory),
and then press [6] (ENTER).
3.
Use the [1] (V) and [3] (W) keys to display
“Reg Seq” (Registration sequence).
4.
Use bn [–] and [+] to select the pedal jack that
will be used for the registration sequence
operation.
To select this pedal jack: Display this:
fo PEDAL1 jack Pedal1
fp PEDAL2/EXPRESSION jack Pedal2
(Turn off registration function) Off
Registering and Restoring a Setup (Registration)
8.
After you are finished recalling the registration
setups using the pedal, perform steps 1
through 5 to turn off the registration sequence
function.
This causes the [SEQ] indicator to disappear.
• This displays the [SEQ] indicator, which indicates that
the registration sequence function is enabled.
• The purpose of the pedal connected to the jack
selected here is registration setup recall only. Normal
pedal functions (functions assigned to the pedal with
the “Using a Pedal” operation, page EN-29) cannot be
used.
5.
When the setting is the way you want, longpress the [4] (EXIT) bm number key to exit the
setting screen.
6.
Connect a sustain pedal (see “Separately
Available Accessories”, page EN-3) to the jack
you selected in step 4.
7.
At the point when you want to recall the
registration setup, press the pedal.
• Each press of the pedal cycles through the currently
selected bank’s registration setups in sequence from
Area 1.
• Pressing the pedal while the Area 8 setup is recalled
cycles back to the Area 1 setup.
EN-69
Page 71

Editing a Tone (User Tones)
Displayed
Current setting value Editing item name
Tone number Tone name
You can edit a built-in tone to create a user tone, and save up
to 100 user tones for later recall.
■ Saving to an External Device
User tones can be saved to a USB flash drive or a computer.
For details, see “To save Digital Keyboard data to a USB flash
drive” (page EN-119) and “Transferring Data Between the
Digital Keyboard and a Computer” (page EN-123).
Creating a User Tone
To edit a tone
1.
Select the tone you want to edit.
• Be sure to select the UPPER 1 part tone (page
EN-19). The UPPER 1 part tone will be the tone being
edited.
• You cannot select a drum set tone for editing.
2.
Long-press bk FUNCTION until the [EDIT]
indicator appears.
• This enters the Tone Editing Mode and displays the
tone editing screen.
5.
Repeat steps 3 and 4 above for each of the
editing items you want to change.
• You can sound the tone you are editing by playing
something on the keyboard. This means you can
immediately check to see how your edits are affecting
the tone.
6.
To save the edited tone, press the [7] (WRITE)
bm number key.
• If the tone you are editing is a user tone, the message
“Replace?” will appear here. Press bn [+] (YES) to
replace the original tone data with the new data, or bn
[–] (NO) to save the new data without replacing the
original data.
• The message “Wait...” remains on the display while
the tone save operation is being performed. Do not
perform any operation while this message is on the
display. “Complete” appears on the display after the
operation is complete.
7.
To exit the Tone Editing Mode, long-press the
[4] (EXIT) bm number key.
This causes the [EDIT] indicator to disappear.
• If you performed any editing after executing the
operation in step 6, the message “Exit?” will be
displayed here. To save the edited data and exit the
Editing Mode, press bn [+] (YES). To continue editing,
press bn [–] (NO).
• If you are saving the data as a new user tone, the save
destination tone number will be the lowest one in
memory that currently does not have any data stored.
The newly saved user tone will be selected after this
operation is complete.
Atk.Ti
• For details about editable parameters, see the “Tone
Editing Item List” (page EN-73).
3.
Use the [1] (V) and [3] (W) bm number keys
to display the editing item you want to modify.
• If the [ENTER] indicator is displayed, press [6]
(ENTER) to enter the sub-menu and then use the [1]
(V) and [3] (W) keys to display the editing item you
want to modify.
• To return to a main menu from a sub-menu, press the
[4] (EXIT) bm number key.
• Using the “DSP Edit” editing item, you can configure
precise DSP effects for a tone using a wide variety of
parameters. For details about the configuration of
Digital Keyboard DSP effects and an overview of DSP
editing, see “DSP Editing” (page EN-71). For details
about the DSP editing operation, see “To use DSP
editing to edit an effect” (page EN-71).
4.
Use bn [–] and [+] or the bl dial to change the
setting value.
m
e
No Na
• If there is no data stored for a user tone number, “No Data”
will be displayed for the tone name. If there is data stored,
“No Name” will be displayed. For information about
renaming, see “To rename a user tone” (page EN-72).
m
e
EN-70
Page 72

DSP Editing
Module
Bypass
Module number DSP module name
A DSP (Digital Signal Processor) is a type of effect that is
connected between the sound source and output. DSP types
are equalizer, tremolo, limiter, wah, etc. Many of the built-in
tones of your Digital Keyboard are preset with DSPs that are
suited for each tone. Such tones are called “DSP tones”.
The tone editing function of the Digital Keyboard includes a
DSP Edit setting item for editing DSPs. The Digital Keyboard
DSPs that can be edited using DSP Edit are configured as
shown below.
Editing a Tone (User Tones)
6.
Use the [1] (V) and [3] (W) bm number keys
to select the DSP module whose parameters
you want to change.
• What appears here is the DSP module name. For
details about DSP modules, see “DSP Module List”
(page EN-129).
M
ono 3EQ
Sound Source Output
DSP
• A DSP consists of one or more DSP modules (“Module” in
the above illustration).
• Your Digital Keyboard comes with hundreds of preset
DSPs. For DSP editing, you can start with a preset DSP
that is one assigned to a built-in tone, or a DSP that is
provided especially for DSP editing.
• The number of DSP modules and the type of each module
(equalizer, limiter, wah, etc.) are different for each DSP.
To perform DSP editing, you first select a preset DSP and
then edit its parameters in accordance with the DSP
module(s).
For details about the DSP modules and the parameters of
each DSP module, see “DSP Effect List” (page EN-129).
To use DSP editing to edit an effect
1.
Perform steps 1 and 2 under “To edit a tone”
(page EN-70).
2.
Use the [1] (V) and [3] (W) bm number keys
to display “DSP Edit”, and then press [6]
(ENTER).
This displays “On/Off”.
• If the DSP you selected in step 5 has one DSP
module, the display will not change if you press [1]
(V) or [3] (W). Check the DSP module name and
then proceed to step 7.
7.
Press the [6] (ENTER) bm number key.
This displays “Bypass”.
8.
Use the [1] (V) and [3] (W) bm number keys
to display the parameter whose setting you
want to change.
• For details about parameters whose settings can be
configured for each DSP module, see “DSP Parameter
List” (page EN-130).
9.
Use bn [–] and [+] or the bl dial to change the
setting value.
10.
Repeat steps 8 and 9 as required to configure
settings of other parameters.
11.
Press the [4] (EXIT) bm number key.
12.
Repeat steps 6 through 11 as required to
configure settings of DSP modules.
13.
Perform step 6 and 7 under “To edit a tone”
(page EN-70).
3.
If the setting is turned off, press bn [–] or [+] to
turn it on.
4.
Press [3] (W) to display “DSP Num”.
5.
To select the DSP to be edited, use bn [–] and
[+] or the bl dial to specify the DSP number (1
to 900), and then press [6] (ENTER).
• See the “DSP number” item in the “Tone Editing Item
List” (page EN-73).
EN-71
Page 73

Editing a Tone (User Tones)
To rename a user tone
1.
Select the user tone you want to rename.
2.
Hold down 8 RECORD/STOP until
“ToneName” appears.
3.
Press the [6] (ENTER) bm number key.
This displays the renaming screen.
4.
Input the new name.
• See “Text Character Input” (page EN-15) for
information about how to enter text.
5.
Press [6] (ENTER).
This displays “Sure?”
6.
Press bn [+] (YES) to execute the rename
operation or bn [–] (NO) to cancel.
7.
To exit the operation, press the [4] (EXIT) bm
number key.
To copy a user tone
1.
Select the user tone you want to copy.
2.
Hold down 8 RECORD/STOP until
“ToneName” appears.
To delete a user tone
1.
Select the user tone you want to delete.
2.
Hold down 8 RECORD/STOP until
“ToneName” appears.
3.
Use the [1] (V) and [3] (W) bm number keys
to display “ToneClr”, and then press [6]
(ENTER).
This displays “Sure?”
4.
Press bn [+] (YES) to delete or bn [–] (NO) to
cancel the delete operation.
5.
To exit the operation, press the [4] (EXIT) bm
number key.
3.
Use the [1] (V) and [3] (W) bm number keys
to display “ToneCopy”, and then press [6]
(ENTER).
4.
Use bn [–] and [+], or the bl dial to select the
copy destination tone number and then press
[6] (ENTER).
This displays “Sure?”
• If there is already a user tone stored at the tone
number you specified as the copy destination, the
message “Replace?” will appear.
5.
Press bn [+] (YES) to execute the copy
operation or bn [–] (NO) to cancel.
• The message “Wait...” remains on the display while
the copy operation is being performed. Do not perform
any operation while this message is on the display.
“Complete” appears on the display after the operation
is complete.
6.
To exit the operation, press the [4] (EXIT) bm
number key.
EN-72
Page 74

Editing a Tone (User Tones)
Key pressed Key released
Note ends
Time
A : Attack time
R : Release time
Volume
Setting Description Waveform
Sin Sine wave
Tri Triangle wave
Saw Sawtooth wave
Sqr Square wave
Tone Editing Item List
Item Name Display Description Settings
Attack Time Atk.Time Adjusts the time after a key is pressed from when the note
starts to sound until it reaches maximum volume. A larger
value specifies a slower attack.
AR
0 to 127
Release Time Rel.Time Adjusts how long notes linger after keyboard keys are
released. A larger values specifies a longer release.
Cutoff Frequency Cutoff F Adjusts timbre by attenuating the components of a note’s
frequency characteristics that are higher than a certain
frequency (cutoff frequency). A larger value specifies a
brighter, harder sound, while a lower value specifies a
mellower, softer sound.
Resonance Resonance Adjusts the gain of harmonic tones in the vicinity of the cutoff
frequency specified above. A larger value creates a more
unusual sound.
Vibrato Vibrato Sub-menu of vibrato setting items.
Vibrato Type Vib.Type Selects the vibrato waveform. Sin, Tri, Saw,
Vibrato Depth VibDepth Specifies the depth of vibrato. 0 to 127
Vibrato Rate Vib.Rate Adjusts the speed of vibrato. 0 to 127
Vibrato Delay VibDelay Adjusts the time until vibrato starts after a note is sounded. 0 to 127
Octave Shift OctShift Shifts the pitch upwards or downwards in octave steps. –3 to 0 to 3
Volume Volume Specifies the volume level of a tone. A larger value sets a
higher volume level.
0 to 127
0 to 127
0 to 127
Sqr
0 to 127
EN-73
Page 75

Editing a Tone (User Tones)
Item Name Display Description Settings
Velocity Sense VelSense Specifies how much the tone and/or volume should be
affected by keyboard touch (pressure). A larger positive value
specifies more brightness and greater volume as keyboard
touch becomes stronger. A larger negative value specifies
more softness and less volume as keyboard touch becomes
stronger. A value of 0 specifies no change in accordance with
keyboard touch.
Reverb Send Rev.Send Specifies how much reverb is applied to a tone. 0 to 127
Chorus Send Cho.Send Specifies how much chorus is applied to a tone. 0 to 127
Delay Send Dly.Send Specifies how much delay is applied to a tone. 0 to 127
DSP Edit DSP Edit Sub-menu of DSP effect setting items.
On, Off On/Off On: DSP effect applied to the tone.
Off: DSP effect not applied to the tone.
DSP number DSP Num Selects a preset DSP when applying a DSP effect.
• Built-in tone numbers 1 through 800 include tones with
DSP (DSP tones). Only a DSP tone can be specified here,
and other (non-DSP) tones cannot be specified.
• Numbers 801 through 900 are for DSP editing only. For
details, refer to the “DSP List” in the separate “Appendix”.
DSP Module 1 *
1
Sub-menu for configuring setting of DSP modules included in the selected
DSP.
Bypass Bypass On: Bypass this DSP module.
Off: Enable this DSP module.
(Depends on the DSP module.*
DSP Module 2 and
beyond *
3
1
*
2
)
Sub-menu for configuring setting of DSP modules included in the selected
DSP.
(Same as the Module 1 parameters.)
–64 to 0 to 63
On, Off
1 to 900
On, Off
*1 Shows the name (Compressor, Limiter, Enhancer, etc.) of the DSP module. For details about DSP modules, see “DSP Module
List” (page EN-129).
*2 The number of parameters that can be configured and their details depend on the DSP module. For details, see “DSP
Parameter List” (page EN-130).
*3 Not displayed when the DSP selected for editing has only one DSP module. When there are multiple DSP modules included in
a DSP, a sub-menu will appears for each of them.
EN-74
Page 76

Creating an Auto
Rhythm
[V]: Variation, [F]: Fill-in, [ I ]: Intro, [E]: Ending
Accompaniment Pattern
[V1] to [V4]
Accompaniment Pattern
[F1] to [F4]
Percussion Percussion
Drums Drums
Bass Bass
Chords 1 to 5 Chords 1 to 5
Accompaniment Pattern
[I]
Accompaniment Pattern
[E]
Percussion Percussion
Drums Drums
Bass Bass
Chords 1 to 5 Chords 1 to 5
Accompaniment
(User Rhythm)
You can create accompaniment patterns that sound while
using the Digital Keyboard’s Auto Accompaniment function
and store them as user rhythms.
The storage locations and the number of rhythms that can be
stored depend on the Digital Keyboard model.
CT-X5000: Rhythm numbers 294 to 393 (up to 100 rhythms)
CT-X3000: Rhythm numbers 294 to 343 (up to 50 rhythms)
■ Saving to an External Device
User rhythms can be saved to a USB flash drive or a
computer. For details, see “To save Digital Keyboard data to a
USB flash drive” (page EN-119) and “Transferring Data
Between the Digital Keyboard and a Computer” (page
EN-123).
Rhythm Configurations
The structure of each rhythm is as shown below.
Creating a User Rhythm
● Creating an Accompaniment with All New Parts
You can record each part of an accompaniment pattern, if you
want.
Percussion Empty Recorded Recorded
Drums
Bass
Chord 1
• The “Empty” blocks in the above illustration are special
memory areas (user areas) for editing, and one is provided
for each part. After you record something to a block, it
becomes “Recorded”.
● Editing an Existing Accompaniment Pattern*
You can use the accompaniment pattern of an existing rhythm
as a base and add new recordings of keyboard play to empty
parts. Note that this operation is possible for variations and fillins only.*
Percussion Fixed Empty Recorded
Drums Fixed Fixed Fixed
Bass Fixed Fixed Fixed
Chord 1 Fixed Fixed Fixed
• In the above illustration, “Fixed” indicates rhythm data that
must be used as it is. It cannot be edited by you.
*1 Built-in rhythm or previously-saved user rhythm
*2 This operation is not supported for an existing intro or
ending. You can make all parts empty and create a new
pattern from scratch.
● Copying and Editing the Accompaniment Pattern of an
Existing Rhythm
You can copy the accompaniment pattern of an existing
rhythm to a user area and then edit the copied data.
Percussion Fixed Copy Edited
Drums Fixed
Bass Fixed
Chord 1 Fixed
Empty Empty Recorded
Empty Empty Empty
Empty Empty Empty
…
2
…
…
…
…
Copy Copy
Copy Copy
Copy Copy
…
…
…
1
…
…
…
…
Each rhythm includes 10 accompaniment patterns, and each
accompaniment pattern is made up of eight parts. To create a
single user rhythm from scratch, you need to record eight
parts of each of the 10 accompaniment patterns. You can also
use a built-in rhythm as a base, and replace parts of it with
new recordings, or you can copy and edit accompaniment
patterns, if you want.
• For details about accompaniment patterns, see
“Accompaniment Patterns” (page EN-46).
Data Recordable to Each Part
You can record keyboard play (note data) and pitch bend
wheel operations to an accompaniment pattern part.
• In the above illustration, “Copy” and “Edited” are both the
same status as “Recorded”.
• You can add notes and delete unwanted notes in real time
while listening to playback of the copied data.
In addition to the operations described above, you can keep
all of the accompaniment pattern parts of an existing rhythm
“Fixed”, change just the mixer settings, and save the result as
a user rhythm.
EN-75
Page 77

Creating an Auto Accompaniment (User Rhythm)
Displayed
Creating and Editing a User
Rhythm
• For information about the mixer part indicator numbers and
the part of each accompaniment pattern in the procedure
below, see “RHYTHM Part Group” under “List of Parts for
Each Mixer Part Group” (page EN-64).
To create a totally new rhythm and save it
• You can copy the accompaniment pattern of an existing
rhythm to a user area and then edit (add and delete) notes
recorded in each part. You can copy an entire
accompaniment pattern (step 3 below) or copy a particular
part only (step 5 below). Refer to each of these procedures
as required.
1.
Select a user rhythm where there is no data
stored.
• See “Selecting a Rhythm” (page EN-43).
• “No Data” is displayed for the rhythm name while a
user rhythm where there is no data stored is selected.
2.
Long-press bk FUNCTION until the [EDIT]
indicator appears.
• This enters the Rhythm Editing Mode and displays the
rhythm editing screen.
• indicators will be flashing on the display. This
indicates that Variation 1 of the accompaniment
pattern is selected for editing.
• “Drum” is displayed for the part to be edited.
3.
Select the accompaniment pattern to be edited.
To select this: Press this button:
Intro bo INTRO
Ending bt ENDING/SYNCHRO START
Variation 1 to 4,
Fill-in 1 to 4
* Each press of the button toggles between Variation and Fill-
in.
• The indicator for the currently selected
accompaniment pattern (page EN-46) will flash.
• At this point, you could copy an existing
accompaniment pattern to a user area. See “To copy
an existing accompaniment pattern for editing” (page
EN-82).
4.
Specify the number of measure and the time
bp VARIATION/FILL-IN 1 to
bs VARIATION/FILL-IN 4*
signature of the accompaniment pattern you
want to create.
(1) Press cs REGISTRATION [8] (EDIT MENU).
(2) Use the [1] (V) and [3] (W) bm number keys to
display “Element”, and then press [6] (ENTER).
(3) Use the [1] (V) and [3] (W) keys to display
“Measure”, and then use bn [–] and [+], or the bl
dial to change the setting value.
Accompaniment Pattern Settings
Intro, Ending 01 to 16
Variation 01 to 16
Fill-in 01 to 02
(4) Use the [1] (V) and [3] (W) keys to display “Beat”
(time signature), and then use bn [–] and [+], or the
bl dial to change the setting value (Setting Ranges:
2/4 to 8/4, 2/8 to 16/8).
(5) Press the [4] (EXIT) bm number key.
EN-76
Page 78

5.
Flashing
When the part being edited is a drum part
Select the part to be edited.
(1) Press 9 PART and confirm that the lamp to the left
of the button is lit.
(2) Use the bm number keys [1] through [8] to select the
part to be edited.
To select this part: Press this number key:
Percussion [1]
Drums [2]
Bass [3]
Chord 1 to Chord 5 [4] to [8]
• This displays the mixer part indicator that
corresponds to the selected part to flash.
(3) Press 9 PART and confirm that the lamp to the left
of the button is unlit.
• At this point, you could copy a part in an existing
rhythm to a user area (except when the
accompaniment pattern is an intro or ending). See
“To copy an existing rhythm part for editing” (page
EN-83).
6.
Configure the tone and octave shift settings of
the part, if you want.
(1) Select the tone you want to use for part recording.
See “Selecting a Tone” (page EN-18).
• Only drum set tones can be selected for Drums
and Percussion parts. Drum set sounds cannot be
selected for the bass and the Chord 1 through
Chord 5 parts.
(2) Configure the part’s octave shift setting.
While holding down dr OCTAVE, press the
ds TRANSPOSE [q] or [w] button.
(3) If there are recorded parts (the accompaniment
pattern of an existing rhythm, copied part, or part
recorded by performing the procedure up to step 10
at least once), pressing ck START/STOP here
starts looped playback of all the available recorded
parts. This means you can monitor the effects of your
settings as you configure them.
(4) If there are recorded parts, pressing the [6] (ENTER)
bm number key will play back only the notes of the
part being edited.
• This displays only the mixer part indicator of the
part being edited, and causes the level indicator
above it to flash.
Creating an Auto Accompaniment (User Rhythm)
7.
Configure playback settings of the part being
edited as desired.
• See “To configure the playback settings of a user
rhythm part” (page EN-85).
8.
Record keyboard play for the part being edited.
• See “To record keyboard play to each part” (page
EN-80).
9.
Configure the mixer settings of the part being
edited as desired.
• See “To configure mixer settings of a part being
edited” (page EN-82).
10.
Perform steps 5 through 9 for all parts.
11.
Perform steps 3 through 10 for all
accompaniment patterns.
12.
Save the edited rhythm using the procedure
under “To save a user rhythm” (page EN-84).
• To exit the above state, press [6] (ENTER) again or
select another part.
EN-77
Page 79

Creating an Auto Accompaniment (User Rhythm)
Displayed
To edit an existing rhythm and save it
• When editing the accompaniment pattern of an existing
rhythm, you can perform new recording operations for each
of the following parts: Variations 1 through 4 and Fill-ins 1
through 4. In the case of intro and ending, you need to first
clear all parts and then record new parts.
• You can copy the accompaniment pattern of an existing
rhythm to a user area and then edit (add and delete) notes
recorded in each part. You can copy an entire
accompaniment pattern (step 3 below) or copy a particular
part only (step 5 below). Refer to each of these procedures
as required.
1.
Select the built-in rhythm or previously-saved
user rhythm you want to edit.
• See “Selecting a Rhythm” (page EN-43).
2.
Long-press bk FUNCTION until the [EDIT]
indicator appears.
• This enters the Rhythm Editing Mode and displays the
rhythm editing screen.
• This causes the indicator to flash. This
indicates that Variation 1 of the accompaniment
pattern is selected for editing.
• “Drum” is displayed for the part to be edited.
3.
Select the accompaniment pattern to be edited.
To select this: Press this button:
Intro bo INTRO
Ending bt ENDING/SYNCHRO START
Variation 1 to 4,
Fill-in 1 to 4
* Each press of the button toggles between Variation and Fill-
in.
• The indicator for the currently selected
accompaniment pattern (page EN-46) will flash.
• At this point, you could copy an existing
accompaniment pattern to a user area. See “To copy
an existing accompaniment pattern for editing” (page
EN-82).
bp VARIATION/FILL-IN 1 to
bs VARIATION/FILL-IN 4*
4.
Depending on the accompaniment pattern you
selected, perform one of the operations below.
Y If you selected Variation 1 to 4 or Fill-in 1 to 4
Advance directly to step 5.
Y If you selected Intro or Ending
Clear all the parts of the accompaniment pattern.
(1) Perform steps 2 through 4 under “To batch clear the
recorded data in all parts included in a single
accompaniment pattern” (page EN-84).
(2) Use the [1] (V) and [3] (W) bm number keys to
display “Measure”, and then use bn [–] and [+], or
the bl dial to change the setting value.
Accompaniment Pattern Settings
Intro, Ending 01 to 16
Variation 01 to 16
Fill-in 01 to 02
(3) Use the [1] (V) and [3] (W) keys to display “Beat”
(time signature), and then use bn [–] and [+], or the
bl dial to change the setting value (Setting Ranges:
2/4 to 8/4, 2/8 to 16/8).
(4) Press the [4] (EXIT) bm number key.
5.
Select the part to be edited
(1) Press 9 PART and confirm that the lamp to the left
of the button is lit.
(2) Use the bm number keys [1] through [8] to select the
part to be edited.
To select this part: Press this number key:
Percussion [1]
Drums [2]
Bass [3]
Chord 1 to Chord 5 [4] to [8]
• This displays the mixer part indicator that
corresponds to the selected part to flash.
(3) Press 9 PART and confirm that the lamp to the left
of the button is unlit.
• At this point, you could copy a part in an existing
rhythm to a user area (except when the
accompaniment pattern is an intro or ending). See
“To copy an existing rhythm part for editing” (page
EN-83).
EN-78
Page 80

6.
Flashing
When the part being edited is a drum part
Configure the tone and octave shift settings of
the part, if you want.
(1) Select the tone you want to use for part recording.
See “Selecting a Tone” (page EN-18).
• Only drum set tones can be selected for Drums
and Percussion parts. Drum set sounds cannot be
selected for the bass and the Chord 1 through
Chord 5 parts.
(2) Configure the part’s octave shift setting.
While holding down dr OCTAVE, press the
ds TRANSPOSE [q] or [w] button.
(3) Pressing ck START/STOP here starts looped
playback of all the parts of the accompaniment
pattern you are currently editing. This means you can
monitor the effects of your settings as you configure
them.
(4) If there are recorded parts, pressing the [6] (ENTER)
bm number key will play back only the notes of the
part being edited.
• This displays only the mixer part indicator of the
part being edited, and causes the level indicator
above it to flash.
Creating an Auto Accompaniment (User Rhythm)
To configure only the mixer settings of an
existing rhythm and save it
1.
Select the built-in rhythm or previously-saved
user rhythm you want to edit.
• See “Selecting a Rhythm” (page EN-43).
2.
Long-press bk FUNCTION until the [EDIT]
indicator appears.
3.
Perform step 3 under “To edit an existing
rhythm and save it” (page EN-78).
4.
Perform step 5 under “To edit an existing
rhythm and save it” (page EN-78).
5.
Perform the procedure under “To configure
mixer settings of a part being edited” (page
EN-82).
6.
Perform steps 4 and 5 for all parts whose mixer
settings you want to configure.
7.
Perform steps 3 through 6 for all
accompaniment patterns whose mixer settings
you want to configure.
• To exit the above state, press [6] (ENTER) again
or select another part.
7.
Configure playback settings of the part being
edited as desired.
• See “To configure the playback settings of a user
rhythm part” (page EN-85).
8.
Record keyboard play for the part being edited.
• See “To record keyboard play to each part” (page
EN-80).
9.
Configure the mixer settings of the part being
edited as desired.
• See “To configure mixer settings of a part being
edited” (page EN-82).
10.
Perform steps 5 through 9 for all parts.
11.
Perform steps 3 through 10 for all
accompaniment patterns.
12.
Save the edited rhythm using the procedure
under “To save a user rhythm” (page EN-84).
8.
Save the edited rhythm using the procedure
under “To save a user rhythm” (page EN-84).
EN-79
Page 81

Creating an Auto Accompaniment (User Rhythm)
Flashing
Displayed
Measure Beat
To record keyboard play to each part
• The operation shown here is performed as the steps of the
procedures below.
– Step 8 under “To create a totally new rhythm and save it”
(page EN-76)
– Step 8 under “To edit an existing rhythm and save it”
(page EN-78)
1.
Press 8 RECORD/STOP.
This enters recording standby and displays “Recorded”
or “Empty”.
If “Fixed” is displayed here, it means that the currently
selected part cannot be recorded. After a few seconds,
the display will return to what was shown before you
pressed 8 RECORD/STOP.
• For details about these indicators, see “Part Data
Status Indicators” (page EN-81).
• To exit recording standby, press 8 RECORD/STOP.
This causes the [RECORD] indicator to disappear.
3.
Practice what you will play as required.
• To sound the parts of the accompaniment pattern and
practice what you plan to play on the keyboard before
actually recording it, perform the procedure below.
(1) Long-press cm ACCOMP until the [ACCOMP]
indicator starts to flash.
This enters the Rehearsal Mode.
• The Rehearsal Mode causes the keyboard to
operate the same way as it does during recording,
without recording anything.
(2) Press ck START/STOP.
This plays back data that is already recorded to each
part of the accompaniment pattern.
• The bass part and chord parts 1 through 5 play in
the key of C Major. The key and the chord types
do not change even if you play something on the
accompaniment keyboard.
(3) Play on the keyboard in time with the playback.
Keyboard play will sound using the tone you selected
before entering recording standby.
(4) To exit the Rehearsal Mode, long-press
cm ACCOMP until the [ACCOMP] indicator
disappears from the display.
4.
To start recording, press ck START/STOP.
2.
Configure recording settings as desired.
• The settings of recording items that you configured in
the past will still be in effect. Items you have not
changed will be configured with their default settings.
For details about setting items, see the “User Rhythm
Recording Settings” (page EN-81).
• To configure settings, perform the steps below.
(1) Long-press 8 RECORD/STOP until “Quantize”
appears.
(2) Use the [1] (V) and [3] (W) bm number keys to
display the menu for the changes you want to make.
(3) Use bn [–] and [+] or the bl dial to change the
setting value.
(4) When settings are the way you want, press the
8 RECORD/STOP again.
• The message “Record..” also appears.
• The number of measures and beats are counted up in
the upper right corner of the display. When the final
beat of the length (number of measures) specified for
the accompaniment pattern is reached, the count
restarts from 001:01.
EN-80
Page 82

5.
Timing in accordance with the “MEASURE”
and “BEAT” values on the display, play
something on the keyboard when required.
• ek PITCH BEND wheel operations are also included
in the recording.
• What you record will play back when the display
returns to the measure and beat where it was
recorded.
• To delete specific recorded notes, hold down
cs REGISTRATION [2]. When playback reaches the
note you want to delete, press the keyboard key that
corresponds to the note to be deleted. Holding down
cs REGISTRATION [2] along with one or more
keyboard keys while playback is being performed will
delete all of the notes that correspond to the keyboard
keys as they played while the button and keys are held
down.
• Until you perform step 6 below, you can layer
keyboard notes and delete recorded notes as many
times as you like.
6.
When you are finished recording, press
8 RECORD/STOP.
This causes the [RECORD] indicator to disappear.
• Pressing ck START/STOP starts looped playback of
recorded data.
• To try normal keyboard play with recorded data as
back up (with the keyboard part tone and not the
recorded part tone), long-press 5 TONE. This will
display part indicator in the upper left corner of
the display. This displays the name of the tone
assigned to the keyboard and enables play of that tone
on the keyboard.
■ Part Data Status Indicators
The table below explains the status indicators for parts being
edited on the rhythm editing screen.
This indicator: Means this:
Fixed (Fixed Data) Data that was recalled from a built-in
Recorded
(Recorded Data)
Empty (No Data) User area where nothing is recorded.
rhythm or a previously stored user
rhythm, not user area data. Real-time
recording of keyboard notes is not
allowed. The only editing operation
supported is configuring mixer settings.
Already recorded editable user area
data. Mixer settings and real-time
recording of keyboard notes are
possible with this status.
Mixer settings and real-time recording
of keyboard notes are possible with
this status.
Creating an Auto Accompaniment (User Rhythm)
■ User Rhythm Recording Settings
Initial default setting values are indicated by an asterisk (*).
Item Name
(Display)
Quantize
(Quantize)
Precount
(Precount)
Play Chord
(PlayChrd)
Metronome
(Metronom)
Specify either recording of notes
in the timing they are played on
the keyboard or automatic
alignment of notes based on a
note value. Selecting a setting
other than “Off” displays a note
value (4: quarter note, d: dotted
note, t: triplets).
Specifies whether a precount
should sound before recording
starts after ck START/STOP is
pressed in recording standby.
Selecting “1” sounds a onemeasure precount, while “2”
sounds a two-measure precount.
Selecting “Off” turns off the
precount, so recording starts as
soon as ck START/STOP or a
keyboard key is pressed.
Starting recording of an
accompaniment pattern starts
repeat playback of all the parts of
the pattern, except for the part
being recorded. During such
repeat playback, you can use
this setting to specify the chord
type to be used for playback by
bass and chord parts. Available
settings are “C” (C major), “C7”
(C 7th), and “Cm” (C minor).
Selecting “Off” turns off bass and
chord part notes.
Specifies whether or not the
metronome should sound during
recording.
Description Settings
Off*, 4, 8,
16, 32, 4d,
8d, 16d,
32d, 4t, 8t,
16t, 32t
Off, 1*, 2
Off, C*,
C7, Cm
On, Off*
EN-81
Page 83

Creating an Auto Accompaniment (User Rhythm)
To configure mixer settings of a part being
edited
• The operation shown here is performed as the steps of the
procedures below.
– Step 9 under “To create a totally new rhythm and save it”
(page EN-76)
– Step 9 under “To edit an existing rhythm and save it”
(page EN-78)
– Step 5 under “To configure only the mixer settings of an
existing rhythm and save it” (page EN-79)
1.
Long-press 9 PART (MIXER) until the
[MIXER] indicator appears.
This displays the tone number and tone name of the part
being edited.
2.
Use the [2] (w) and [5] (q) bm number keys to
display the menu item you want to change.
• Initial default setting values are indicated by an
asterisk (*).
Item Name
(Display)
Part On/Off
(Part)
Part tone
(Tone)
Volume
(Volume)
Pan (Pan) Specifies the stereo pan
Reverb Send
(Rev Send)
Chorus Send
(Cho Send)
Delay Send
(Dly Send)
*1 Only drum set tones can be selected for Drums and
Percussion parts. Drum set sounds cannot be selected for
the bass and the Chord 1 through Chord 5 parts.
3.
Use bn [–] and [+] or the bl dial to change the
setting value.
4.
When mixer settings are the way you want,
press the [4] (EXIT) bm number key.
Description Settings
Specifies on/off for the
selected part.
Specifies the tone of the
selected part.
Adjusts the volume level of
the selected part.
position of the selected
part. 0 indicates the center,
while a smaller value shifts
to the left and a larger
value shifts to the right.
Specifies how much reverb
is applied to the selected
part.
Specifies how much
chorus is applied to the
selected part.
Specifies how much delay
is applied to the selected
part.
On*, Off
1
*
0 to 127*
–64 to 0* to 63
0 to 40* to 127
0* to 127
0* to 127
To copy an existing accompaniment pattern
for editing
1.
In the Rhythm Editing Mode, select the copy
destination accompaniment pattern.
• Perform steps 1 to 3 under “To create a totally new
rhythm and save it” (page EN-76), or steps 1 to 3
under “To edit an existing rhythm and save it” (page
EN-78).
2.
Press cs REGISTRATION [1].
This displays “Element”.
3.
Press the [6] (ENTER) bm number key.
This displays the currently selected rhythm number and
rhythm name.
4.
Use bn [–] and [+], or the bl dial to select the
number of the rhythm you want to use as the
source of the accompaniment pattern copy
operation.
5.
Select the accompaniment pattern you want to
use as the copy source.
The indicator for the currently selected accompaniment
pattern (page EN-46) will flash.
To select this: Press this button:
Intro bo INTRO
Ending bt ENDING/SYNCHRO START
Variation 1 to 4,
Fill-in 1 to 4
* Each press of the button toggles between Variation and Fill-
in.
• Select an intro when the copy destination is an intro, or
an ending when the copy destination is an ending.
• When the copy destination is Variation 1 to 4, select
any one of Variation 1 to 4.
• When the copy destination is Fill-in 1 to 4, select any
one of Fill-in 1 to 4.
• Pressing ck START/STOP here starts looped
playback of the accompaniment pattern you selected
as the copy source.
6.
To execute the copy operation, press [6]
(ENTER).
This displays “Sure?”
7.
Press bn [+] (YES) to execute the copy
operation or bn [–] (NO) to cancel.
• The message “Wait...” remains on the display while
the copy operation is being performed. Do not perform
any operation while this message is on the display.
“Complete” appears on the display after the operation
is complete.
bp VARIATION/FILL-IN 1 to
bs VARIATION/FILL-IN 4*
EN-82
Page 84

To copy an existing rhythm part for editing
• You cannot copy parts included in an intro or an
ending.
1.
In the Rhythm Editing Mode, select the copy
destination part.
• Perform steps 1 to 5 under “To create a totally new
rhythm and save it” (page EN-76), or steps 1 to 5
under “To edit an existing rhythm and save it” (page
EN-78).
2.
Press cs REGISTRATION [1].
This displays “Element”.
3.
Use the [1] (V) and [3] (W) bm number keys
to display “Part”, and then press [6] (ENTER).
This displays the currently selected rhythm number and
rhythm name.
4.
Use bn [–] and [+], or the bl dial to select the
number of the rhythm you want to use as the
source of the accompaniment pattern copy
operation.
5.
Select the accompaniment pattern that
includes the part you want to use as the copy
source.
The indicator for the currently selected accompaniment
pattern (page EN-46) will flash.
To select this: Press this button:
Variation 1 to 4,
Fill-in 1 to 4
* Each press of the button toggles between Variation and Fill-
in.
bp VARIATION/FILL-IN 1 to
bs VARIATION/FILL-IN 4*
Creating an Auto Accompaniment (User Rhythm)
6.
Select the part you want to use as the copy
source.
(1) Press 9 PART and confirm that the lamp to the left
of the button is lit.
(2) Use the bm number keys [1] through [8] to select the
part to be copied.
To select this part: Press this number key:
Percussion [1]
Drums [2]
Bass [3]
Chord 1 to Chord 5 [4] to [8]
(3) Press 9 PART and confirm that the lamp to the left
of the button is unlit.
• Pressing ck START/STOP here starts looped
playback of only the part you selected as the copy
source.
7.
To execute the copy operation, press [6]
(ENTER).
This displays “Sure?”
8.
Press bn [+] (YES) to execute the copy
operation or bn [–] (NO) to cancel.
• The message “Wait...” remains on the display while
the copy operation is being performed. Do not perform
any operation while this message is on the display.
“Complete” appears on the display after the operation
is complete.
EN-83
Page 85

Creating an Auto Accompaniment (User Rhythm)
Rhythm number Rhythm name
To batch clear the recorded data in all parts
included in a single accompaniment pattern
1.
In the Rhythm Editing Mode, select the
accompaniment pattern whose parts you want
to batch clear.
• Perform steps 1 to 3 under “To edit an existing rhythm
and save it” (page EN-78).
2.
Press cs REGISTRATION [2].
This displays “Element”.
3.
Press the [6] (ENTER) bm number key.
This displays “Sure?”
4.
Press bn [+] (YES) to execute the clear
operation or bn [–] (NO) to cancel.
• This clears all the parts in the selected
accompaniment pattern.
To clear the recorded data in a particular part
included in a single accompaniment pattern
• You cannot clear parts of an intro or an ending.
1.
In the Rhythm Editing Mode, select the part you
want to clear.
• Perform steps 1 to 5 under “To edit an existing rhythm
and save it” (page EN-78).
2.
Press cs REGISTRATION [2].
This displays “Element”.
3.
Use the [1] (V) and [3] (W) bm number keys
to display “Part”, and then press [6] (ENTER).
This displays “Sure?”
To save a user rhythm
• The operation shown here is performed as the steps of the
procedures below.
– Step 12 under “To create a totally new rhythm and save
it” (page EN-76)
– Step 12 under “To edit an existing rhythm and save it”
(page EN-78)
– Step 8 under “To configure only the mixer settings of an
existing rhythm and save it” (page EN-79)
1.
Press the [7] (WRITE) bm number key.
• If the rhythm you are editing is a user rhythm, the
message “Replace?” will appear here. Press bn [+]
(YES) to replace the original rhythm data with the new
rhythm data. To save the data as a new rhythm, press
bn [–] (NO).
• The message “Wait...” remains on the display while
the rhythm save operation is being performed. Do not
perform any operation while this message is on the
display. “Complete” appears on the display after the
operation is complete.
2.
To exit the Rhythm Editing Mode, long-press
the [4] (EXIT) bm number key.
This causes the [EDIT] indicator to disappear.
• If you performed any editing after executing the
operation in step 1, the message “Exit?” will be
displayed here. To save the edited data and exit the
Rhythm Editing Mode, press bn [+] (YES). To continue
editing, press bn [–] (NO).
• If you are saving the data as a new user rhythm, the
save destination rhythm number will be the lowest one
in memory that currently does not have any data
stored. The newly saved user rhythm will be selected
after this operation is complete.
4.
Press bn [+] (YES) to execute the clear
operation or bn [–] (NO) to cancel.
• This clears the selected part.
EN-84
No Na
• If there is no data stored for a user rhythm number, “No
Data” will be displayed for the rhythm name. If there is data
stored, “No Name” will be displayed. For information about
renaming, see “To rename a user rhythm” (page EN-88).
me
Page 86

User Rhythm Part Playback
Settings
To configure the playback settings of a user
rhythm part
• The operation shown here is performed as the steps of the
procedures below.
– Step 7 under “To create a totally new rhythm and save it”
(page EN-76)
– Step 7 under “To edit an existing rhythm and save it”
(page EN-78)
1.
Press cs REGISTRATION [8] (EDIT MENU).
2.
Use the [1] (V) and [3] (W) bm number keys
to display “PartEdit”, and then press [6]
(ENTER).
3.
Use the [1] (V) and [3] (W) keys to display
the menu item you want to change.
Creating an Auto Accompaniment (User Rhythm)
4.
Use bn [–] and [+] or the bl dial to change the
setting value.
• Menu items and setting ranges are shown below.
Item Name (Display) Settings
Chord Conversion Table (Table) 01 to 19
Break Point (Break Pt) C to B
Invert (Invert) On, Off, 7th
Retrigger (Retrig.) On, Off
Bend Range (BndRng) 00 to 12
• For details about each item, see the “User Rhythm
Part Playback Setting Details” (page EN-86).
5.
Press the [4] (EXIT) bm number key.
EN-85
Page 87

Creating an Auto Accompaniment (User Rhythm)
User Rhythm Part Playback Setting Details
■ Chord conversion table (Table)
Recording of each accompaniment pattern is normally performed using C major (root of C, major type). When playing an Auto
Accompaniment, you can use a root other than C and a chord type other than major, if you want. This is accomplished by using a
“chord conversion table” to convert the C major recorded data to another root and/or chord type. Regardless of what root or chord
type you specify, the currently selected chord table is used to make corrections to suit the instrument parts and the type of music
being played in order to ensure musically natural accompaniment.
With this parameter, you can select from among the 19 types of chord conversion tables listed below.
Number Table Name *
01 Bass Basic *
02 Bass f-root *
03 Bass 7th *
04 Bass 7th f-root *
05 Chord Basic *
06 Chord Var2 *
07 Chord Var3 *
08 Chord Var4 *
09 Chord 7th *
10 Chord Minor *
11 Phrase *
12 Chord Minor *
13 Chord Minor f-root *
14 Penta Phrase *
15 Intro n-minor *
16 Intro m-minor *
17 Intro h-minor *
18 Intro no Change *
19 Intro dorian *
*1 Accompaniment Pattern
*2 For Variation and Fill-in
*3 For Intro and Ending
1
2
2
Parts Description
Bass Normally used for a bass part.
Bass Variation of number 01. Always makes the first note the root note
when changing chords.
2
Bass Used for a bass part recorded with a 7th chord.
2
Bass Variation of number 03. Always makes the first note the root note
when changing chords.
2
Chord Normally used for a chord part.
2
Chord Used for a chord part that has a tension chord.
2
Chord When a 7th chord is specified while playing, the 5th note is
converted to a 7th note. In the case of C7, for example, G becomes
Bb.
2
Chord Variation of number 05 (Chord Basic).
2
Chord Used for a chord part recorded with a 7th chord.
2
Chord Used for a chord part recorded with a minor chord.
2
Chord Used for the chord part to which a phrase (such as a major scale)
was recorded.
2
Bass Used for a bass part recorded with a minor chord.
2
Bass Variation of number 12. Always makes the first note the root note
when changing chords.
2
Chord Used for a chord part recorded with a pentatonic scale phrase.
3
Bass/chord When a minor chord is specified while playing, converts to a natural
minor.
3
Bass/chord When a minor chord is specified while playing, converts to a melodic
minor (ascending).
3
Bass/chord When a minor chord is specified while playing, converts to a
harmonic minor.
3
Bass/chord Recording of original as-is, with no minor/major conversion in
accordance with chord specified while playing.
3
Bass/chord When a minor chord is specified while playing, converts to a dorian
scale.
EN-86
Page 88

Creating an Auto Accompaniment (User Rhythm)
■ Break Point (Break Pt)
This parameter specifies the key, from C to B, that is the point
at which Auto Accompaniment bass and chord notes drop one
octave.
For example when F is specified as the break point, a C major
chord recorded as C3E3G3 (CEG) becomes D3F
raised one note each) when D is fingered on the chord
keyboard, E3G
fingered, and F2A2C3 (FAC dropped one octave) when F is
fingered.
#
3B3 (EG#B raised one note each) when E is
#
3A3 (DF#A
■ Inversion (Invert)
This parameter specifies whether or not chords during Auto
Accompaniment play should mirror inverted forms of the
original chord (EGC and GCE for CEG).
For example, let’s say that the original recorded C major
chord is CEG and an F chord is fingered on the chord
keyboard. If “Off” is selected for this setting, the chord will be
directly converted to FAC. If “On” (or “7th”) is selected, the
chord will be converted to CFA, which is the inverted form that
is nearest to CEG. The transition of chord notes during
playback when “On” (or “7th”) is selected is smaller, so
accompaniment sounds more natural.
Note that you should select “7th” in place of “On” only if “C7”
was specified for the “PlayChrd” setting* when recording the
accompaniment pattern and if you selected “09 (Chord 7th)”
for the chord conversion table.
* For information about “PlayChrd”, see the “User Rhythm
Recording Settings” (page EN-81).
• When selecting “On” (or “7th”) for this setting, make sure
that you select “C” for the “Break Point” (Break Pt) setting.
■ Retrigger (Retrig.)
This parameter specifies how accompaniment pattern play is
affected by a chord change that occurs part way through a
pattern. When “On” is selected, the pattern “retriggers,” which
causes the currently playing note to change to the
corresponding note of the newly fingered chord. When “Off” is
selected, a chord change causes the currently sounding note
to be cut off, and the next note of the pattern of the newly
fingered chord to be played.
■ Bend Range (BndRng)
This parameter specifies the bend range for pitch bend wheel
operation in semitone steps.
Operations Affecting All the
Accompaniment Patterns in a
Rhythm
To configure mixer settings for a rhythm
1.
While editing a rhythm in the Rhythm Editing
Mode, press cs REGISTRATION [8] (EDIT
MENU).
2.
Use the [1] (V) and [3] (W) bm number keys
to display “Rhy Edit”, and then press [6]
(ENTER).
This displays “Volume”.
3.
Use the [1] (V) and [3] (W) keys to display
the menu item you want to change.
Item Name
(Display)
Volume
(Volume)
Reverb Type
(Reverb)
Chorus Type
(Chorus)
Delay Type
(Delay)
*1 See “Reverb Effect List” (page EN-23).
*2 See “Chorus Effect List” (page EN-24).
*3 See “Delay Effect List” (page EN-24).
4.
Use bn [–] and [+] or the bl dial to change the
setting value.
5.
Press the [4] (EXIT) bm number key.
Description Settings
Adjusts the overall rhythm
volume.
Specifies the reverb type to
be applied to the entire
rhythm.
Specifies the chorus type to
be applied to the entire
rhythm.
Specifies the delay type to
be applied to the entire
rhythm.
0 to 127
1
*
2
*
3
*
EN-87
Page 89

Creating an Auto Accompaniment (User Rhythm)
To batch clear data recorded in all the
accompaniment patterns of a rhythm
1.
Perform steps 1 and 2 under “To configure
mixer settings for a rhythm” (page EN-87).
2.
Use the [1] (V) and [3] (W) bm number keys
to display “All Clear”, and then press [6]
(ENTER).
This displays “Sure?”
3.
Press bn [+] (YES) to execute the batch clear
operation or bn [–] (NO) to cancel.
4.
Press the [4] (EXIT) bm number key.
To rename a user rhythm
1.
Select the user rhythm you want to rename.
2.
Hold down 8 RECORD/STOP until “Rhy
Name” appears.
3.
Press the [6] (ENTER) bm number key.
This displays the renaming screen.
4.
Input the new name.
• See “Text Character Input” (page EN-15) for
information about how to enter text.
To copy a user rhythm
1.
Select the user rhythm you want to copy.
2.
Hold down 8 RECORD/STOP until “Rhy
Name” appears.
3.
Use the [1] (V) and [3] (W) bm number keys
to display “Rhy Copy”, and then press [6]
(ENTER).
4.
Use bn [–] and [+], or the bl dial to select the
copy destination rhythm number and then
press [6] (ENTER).
This displays “Sure?”
• If there is already a user rhythm stored at the rhythm
number you specified as the copy destination, the
message “Replace?” will appear.
5.
Press bn [+] (YES) to execute the copy
operation or bn [–] (NO) to cancel.
• The message “Wait...” remains on the display while
the copy operation is being performed. Do not perform
any operation while this message is on the display.
“Complete” appears on the display after the operation
is complete.
6.
To exit the operation, press the [4] (EXIT) bm
number key.
5.
Press [6] (ENTER).
This displays “Sure?”
6.
Press bn [+] (YES) to execute the rename
operation or bn [–] (NO) to cancel.
7.
To exit the operation, press the [4] (EXIT) bm
number key.
To delete a user rhythm
1.
Select the user rhythm you want to delete.
2.
Hold down 8 RECORD/STOP until “Rhy
Name” appears.
3.
Use the [1] (V) and [3] (W) bm number keys
to display “Rhy Clr”, and then press [6]
(ENTER).
This displays “Sure?”
4.
Press bn [+] (YES) to delete or bn [–] (NO) to
cancel the delete operation.
5.
To exit the operation, press the [4] (EXIT) bm
number key.
EN-88
Page 90

Using the MIDI Recorder to
Record
You can use the MIDI recorder for real-time recording of your
Digital Keyboard play.
• You can record up to 10 songs in Digital Keyboard memory.
Recorded content is saved in Song Bank song numbers 31
to 40 (user songs).
• One song can have up to 999 measures, or a total of
approximately 40,000 notes in all of its tracks. Recording
stops automatically when either of these limits is reached.
• You can play along with a recorded song on the keyboard.
• CASIO COMPUTER CO., LTD. takes no responsibility
for any damages, lost profits, or claims by third parties
arising from the deletion of recorded data due to
malfunction, repair, or for any other reason.
■ MIDI Recorder
Keyboard performance information is recorded as MIDI data*
to a system track or 16 solo tracks (storage areas for
keyboard performance data) in Digital Keyboard memory.
• Keyboard performance information (keyboard keys press/
release, touch pressure, etc.) is recorded as MIDI data.
• The size of MIDI data is much smaller when compared with
audio data, making it easier to edit later on a computer, etc.
• The MIDI recorder sounds the Digital Keyboard’s sound
source based on recorded MIDI data.
* MIDI
MIDI is short for “Musical Instrument Digital Interface”. It is a
universal standard that makes it possible for musical
instruments, computers, and other devices to exchange
performance information (keyboard key press/release, touch
pressure, etc.) regardless of manufacturer. Performance data
in this case is called “MIDI data”.
■ Recording Track and Recorded Data
● System Track
Records operations of the various different performance
functions of the Digital Keyboard, including Auto
Accompaniment, phrase pads, layer, split, etc.
● Solo Tracks 1 to 16
Record keyboard play using one tone (UPPER 1).
These tracks can be overdubbed as shown below.
System Recording Recorded Recorded
Solo 1 Empty
Solo 2 Empty Empty
…
Solo 16 Empty Empty Recording
The data recorded to each track is shown below.
This type
of track:
System
Track
Solo Tracks Keyboard play, tone number (UPPER 1),
…
Records this:
Keyboard play, tone number (UPPER 1,
UPPER 2, LOWER 1, LOWER 2), rhythm
number, tempo, time signature, rhythm
controller operations, chord specification,
phrase pad operations, Auto Accompaniment
volume, effect settings (reverb, chorus, delay),
layer, split, auto harmonize/arpeggiator play,
scale settings (preset scale type and root,
scale fine tune, Auto Accompaniment scale
on/off setting), part fine tune, part coarse tune,
octave shift setting, pedal operations, pitch
bend wheel operations, bend range setting,
mixer settings, PORTAMENT button
operations, SUSTAIN button operations
CT-X5000: MODULATION/ASSIGNABLE
button operations (vibrato, DSP parameter
setting)
arpeggiator play, octave shift setting, pedal
operations, pitch bend wheel operations, bend
range setting, part fine tune, part coarse tune,
mixer settings, PORTAMENT button
operations, SUSTAIN button operations
CT-X5000: MODULATION/ASSIGNABLE
button operations (vibrato, DSP parameter
setting)
Recording Recorded
…
Recorded
…
■ Saving to an External Device
Songs recorded with the MIDI recorder can be saved to a
USB flash drive or a computer. For details, see “To save
Digital Keyboard data to a USB flash drive” (page EN-119)
and “Transferring Data Between the Digital Keyboard and a
Computer” (page EN-123).
EN-89
Page 91

Using the MIDI Recorder to Record
Starting a Recording
Recording can be stared from either of the modes below.
● Rhythm Mode
Press 8 RECORD/STOP and then play something on the
keyboard to start recording. This makes it quick and easy to
start recording to the system track.
● Song Bank Mode
After first selecting a recording destination song number,
press 8 RECORD/STOP to start recording.
Note that what happens when you press 8 RECORD/
STOP depends on which of the above modes you are in. Try
performing the operations below before you start to record.
When starting from the Rhythm Mode
1.
Press 6 RHYTHM to enter the Rhythm Mode.
2.
Press 8 RECORD/STOP.
This enters recording standby and causes the
[RECORD] indicator to flash.
• You can select a rhythm and tone.
• Recording starts when you play something on the
keyboard. Pressing ck START/STOP starts the
rhythm and recording at the same time.
3.
Long-press 8 RECORD/STOP.
This displays the recording setting screen and displays
“RecTrkSy”.
The [RECORD] indicator continues to flash.
• Pressing ck START/STOP starts recording, but does
not start rhythm play. Use this method to start
recording when you want to insert rests at the
beginning.
• On this screen, you can configure recording settings,
such as the recording destination track, etc.
When starting from the Song Bank Mode
1.
Press 7 SONG BANK to enter the Song Bank
Mode.
2.
Use the bm number keys, bn [–] and [+], or the
bl dial to select a song number from 31 to 40
(user recording).
3.
Press 8 RECORD/STOP.
This displays the recording setting screen and displays
“RecTrkSy”.
• This is the same display as the one that appears on
step 3 under “When starting from the Rhythm Mode”
above.
4.
Press 8 RECORD/STOP again.
This enters recording standby.
• This is the same display as the one that appears on
step 2 under “When starting from the Rhythm Mode”
above.
• Here, long-press 8 RECORD/STOP to return to the
recording setting screen.
5.
To exit recording standby, press 8 RECORD/
STOP again.
This causes the [RECORD] indicator to disappear.
4.
Press 8 RECORD/STOP.
This returns to recording standby.
5.
To exit recording standby, press 8 RECORD/
STOP.
This causes the [RECORD] indicator to disappear.
• Recording using this operation automatically selects
the lowest song number (31 to 40) that does not have
anything recorded to it yet as the recording
destination.
EN-90
Page 92

Recording Keyboard Play
Flashing
Displayed
Displayed
Measure Beat
• The [RECORD] indicator will start to flash during recording
when the number of remaining note count is 100 or lower.
When there are no more remaining notes, recording stops
automatically and the [RECORD] indicator disappears.
• To make a new recording by selecting the recording
destination song number first, see “To change the recording
destination song number during recording standby” (page
EN-94).
• You can configure settings to sound a pre-count before
recording starts or the metronome while recording is in
progress. See “To sound a pre-count or the metronome”
(page EN-94).
• You can exit recording standby at any time ([RECORD]
indicator flashing) by pressing 8 RECORD/STOP once
or twice so the [RECORD] indicator is not displayed.
To record a new system track
1.
Press 6 RHYTHM.
2.
Specify the tempo to use at the start of
recording.
• See “Changing Auto Accompaniment Speed (Tempo)”
(page EN-45).
3.
Select the rhythm and tone you want to use at
the start of recording.
• See “Selecting a Rhythm” (page EN-43) and
“Selecting a Tone” (page EN-18).
• If you want to change mixer settings of each of the
system track parts, perform the procedure under “To
configure mixer settings” (page EN-63). Configure the
mixer settings of each part of the KEYBOARD part
group.
• Layer and split settings, as well as other settings are
also recorded. For details about recorded data, see
“Recording Track and Recorded Data” (page EN-89).
Using the MIDI Recorder to Record
5.
Playing on the keyboard automatically starts
recording.
• Pressing ck START/STOP starts the rhythm and
recording at the same time.
• While recording is in progress, the number of
measures since recording started is indicated in the
upper right corner of the display.
6.
When you are finished recording, press
8 RECORD/STOP.
This causes the [RECORD] indicator to disappear.
• Pressing ck PLAY/STOP will play back the recorded
data.
• Recording using the above operation automatically selects
the lowest song number (31 to 40) that does not have
anything recorded to it yet as the recording destination.
4.
Press 8 RECORD/STOP.
This enters recording standby.
• The [SONG] and [SYSTEM] indicators are also
displayed at this time, and the mixer part indicators
( to ) all start to flash. This indicates that the
system track is the recording target.
EN-91
Page 93

Using the MIDI Recorder to Record
Flashing
Displayed
Displayed
Displayed
To record a new solo track
1.
Specify the tempo to use at the start of
recording.
• See “Changing Auto Accompaniment Speed (Tempo)”
(page EN-45).
2.
Select the tone you want to use at the start of
recording.
• See “Selecting a Tone” (page EN-18).
• You cannot use layer or split when recording.
• If you want to change mixer settings of solo track being
recorded, perform the procedure under “To configure
mixer settings” (page EN-63). Configure the mixer
settings of the UPPER 1 part of the KEYBOARD part
group.
• For details about data recorded to the solo track, see
“Recording Track and Recorded Data” (page EN-89).
3.
Press 8 RECORD/STOP.
This enters recording standby.
• The [SONG] and [SYSTEM] indicators are also
displayed at this time, and mixer part indicators to
all start to flash. This indicates that the system
track is the recording target.
4.
Select the solo track to which you want to
record.
(1) Long-press 8 RECORD/STOP.
• This displays the recording setting screen that you
can use to select the recording target track.
Rec Tr kS
• “RecTrkSy” indicates that the current recording
target track is the system track.
(2) Use bn [–] and [+], or the bl dial to display the
[SONG] and [SOLO] indicators, and select the solo
track to which you want to record.
Rec Tr k 1
• “RecTrk” indicates that the current recording target
track is a solo track, and the number is the track
number.
• At this time, the corresponding mixer part number
( to ) also flashes.
(3) Press 8 RECORD/STOP to return to recording
standby.
• To insert a rest at the beginning of the recording,
press ck START/STOP in place of
8 RECORD/STOP. This starts recording and
inserts rests until you play something on the
keyboard.
y
EN-92
5.
Playing on the keyboard automatically starts
recording.
6.
When you are finished recording, press
8 RECORD/STOP.
This causes the [RECORD] indicator to disappear.
• Pressing ck PLAY/STOP will play back the recorded
data.
Page 94

To overdub another solo track while playing
Flashing
Displayed
back recorded tracks
1.
Press 7 SONG BANK.
2.
Use the bm number keys, bn [–] and [+], or the
bl dial to select the number of the song you
want to overdub.
• Select a user recording song that has at least one
track recorded.
3.
Select the tone you want to use at the start of
recording.
(1) Press 5 TONE.
(2) Use the bm number keys, bn [–] and [+], or the bl
dial to select the number of the tone.
• You cannot use layer or split when recording.
• For details about data recorded to the solo track,
see “Recording Track and Recorded Data” (page
EN-89).
4.
Press 8 RECORD/STOP.
This enters recording standby.
Using the MIDI Recorder to Record
7.
Playing on the keyboard automatically starts
recording.
Starting playback of a recorded track simultaneously
starts recording to the track you selected in step 5.
8.
When you are finished recording, press
8 RECORD/STOP.
This causes the [RECORD] indicator to disappear.
• Pressing ck PLAY/STOP will play back the recorded
data.
9.
Repeat steps 3 through 8 above for each of the
tracks you want to overdub.
• At this time, “RecTrkSy” is displayed along with the
[SONG] and [SYSTEM] indicators. Also, mixer part
indicators to all start to flash. This indicates
that the system track is the recording target.
5.
Use bn [–] and [+], or the bl dial to display the
[SONG] and [SOLO] indicators, and select the
solo track to which you want to record.
• While the [SONG] and [SOLO] indicators are
displayed, mixer part indicators to indicate the
status of the solo tracks. A displayed indicator means
that a solo track is recorded, while a flashing indicator
means that the solo track is the recording target.
• Selecting a track that is already recorded causes the
current data of that track to be overwritten by the new
recording.
6.
Press 8 RECORD/STOP to enter recording
standby.
• To insert a rest at the beginning of the recording, press
ck START/STOP in place of 8 RECORD/STOP.
Starting playback of another track that is already
recorded simultaneously starts recording and inserts
rests until you play something on the keyboard.
EN-93
Page 95

Using the MIDI Recorder to Record
To change the recording destination song
number during recording standby
1.
Press 8 RECORD/STOP.
• If you started the operation from the Rhythm Mode,
this enters recording standby. Advance to step 2.
• If you started the operation from the Song Bank Mode,
the Digital Keyboard will display the recording setting
screen, so step 2 is not necessary. Proceed to step 3.
• For information about the recording standby and
recording setting screen, see “Starting a Recording”
(page EN-90).
2.
Long-press 8 RECORD/STOP.
This displays the recording setting screen and displays
“RecTrkSy”.
Rec Tr kS
3.
Use the [1] (V) and [3] (W) bm number keys
to display “MltRec 1”.
M
l t R e c 1
4.
Use bn [–] and [+], or the bl dial to select the
number of the song to which you want to
record.
5.
Press 8 RECORD/STOP.
This exits the recording setting screen and returns to
recording standby.
y
To sound a pre-count or the metronome
1.
Press 8 RECORD/STOP.
• If you started the operation from the Rhythm Mode,
this enters recording standby. Advance to step 2.
• If you started the operation from the Song Bank Mode,
the Digital Keyboard will display the recording setting
screen, so step 2 is not necessary. Proceed to step 3.
• For information about the recording standby and
recording setting screen, see “Starting a Recording”
(page EN-90).
2.
Long-press 8 RECORD/STOP.
This displays the recording setting screen and displays
“RecTrkSy”.
3.
Use the [1] (V) and [3] (W) bm number keys
to display the menu item whose setting you
want to change.
• Initial default setting values are indicated by an
asterisk (*).
Item Name
(Display)
Precount
(Precount)
Metronome
(Metronom)
Description Settings
Specifies whether or not to
sound a pre-count before
recording starts after you
press ck START/STOP
while in recording standby.
On: Sounds a one-measure
pre-count.
Off: Recording starts as
soon as you press
ck START/STOP or play
something on the keyboard,
without sounding a precount.
On: Sounds the metronome
while recording.
Off: Disables the
metronome.
On, Off*
On, Off*
EN-94
4.
Use bn [–] and [+] to change the setting.
5.
Press 8 RECORD/STOP.
This exits recording setting screen and returns to
recording standby.
Page 96

Re-recording Part of a Recorded
Track (Overdubbing, Punch-in
Recording)
The recording operations described in the table below can be
performed on a recorded track.
Overdub
Recording
Punch-in
Recording
Use fast forward and fast reverse to navigate to the location
where you want to start overdubbing or punch-in recording,
and then start recording. If you know the start point and end
point of the section you want to re-record, you can also play
back the song and start performing at the desired location.
To perform overdubbing or punch-in
recording
1.
Press 7 SONG BANK.
2.
Use the bm number keys, bn [–] and [+], or the
bl dial to select the number of the song that
contains the track where you want to perform
overdubbing or punch-in recording.
3.
Press 8 RECORD/STOP.
This displays the recording setting screen and causes
the [RECORD] indicator to flash.
4.
Use the [1] (V) and [3] (W) bm number keys
to display “Rec Type”.
5.
Use bn [–] and [+] or the bl dial to display
either of the settings below.
To perform this operation: Display this:
Overdub Recording Over Dub
Punch-in Recording Punch In
Records by adding performance data to a
recorded track, without deleting the
previously recorded data.
Used for re-recording of specific parts of a
song to correct errors, etc.
Using the MIDI Recorder to Record
6.
Press ck PLAY/STOP.
This starts song playback.
• To stop the overdub recording/punch-in recording
operation, press ck PLAY/STOP again. This will
cause the [RECORD] indicator to disappear from the
display.
7.
Use bsdFF and brsREW to navigate to
the location from which you want to start
recording.
•Use btk PAUSE to pause or unpause song
playback.
• After step 8, playing something on the keyboard in
step 9 will start recording. After determining the point
where you want to start recording, navigate to a
location just before it, and then advance to step 9.
8.
Press cm ACCOMP.
This causes “MEASURE” and “BEAT” to flash at high
speed in the upper right corner of the display. If playback
is paused, it becomes unpaused at this time.
• If you are recording to the system track, rhythm
operation buttons become enabled at this time.
9.
Use one of the operations below to start
recording.
• Play something on the keyboard.
• If you are performing punch-in recording, you can also
start recording by pressing cp STORE. In this case,
rests are inserted at the beginning of the song until you
start playing something on the keyboard.
This will cause the “MEASURE” and “BEAT” indicators to
stop flashing. The [RECORD] indicator also appears.
10.
When you are finished recording, press
8 RECORD/STOP.
This causes the [RECORD] indicator to disappear.
This causes “MEASURE” and “BEAT” to flash in the
upper right corner of the display.
• If you want to change mixer settings while recording,
perform the procedure under “To configure mixer settings”
(page EN-63). When recording to the system track,
configure the mixer settings of each part of the SONG
SYSTEM part group. When recording to a solo track,
configure the mixer settings of the corresponding part of the
SONG SOLO part group. (For example, when recording to
Solo Track 3, configure the mixer settings of Part 3 of the
SONG SOLO part group.)
EN-95
Page 97

Using the MIDI Recorder to Record
Current setting Setting name (Indicates system track)
To specify the recording start point and end
point, and then perform overdubbing or
punch-in recording
1.
Perform the procedure under “Looping
Playback of Specific Song Measures (A-B
Repeat)” (page EN-39).
• When performing the procedure, select the number of
the song that contains the track where you want to
perform overdubbing or punch-in recording.
2.
Perform steps 3 to 7 under “To perform
overdubbing or punch-in recording” (page
EN-95).
3.
Press cm ACCOMP.
This causes “MEASURE” and “BEAT” to flash at high
speed in the upper right corner of the display.
4.
Recording will start automatically when
playback reaches the start of the section you
specified in step 1.
This will cause the “MEASURE” and “BEAT” indicators to
stop flashing. The [RECORD] indicator also appears.
• Play the required notes on the keyboard.
5.
When playback reaches the end of the
specified section, the [RECORD] indicator will
disappear and recording will stop
automatically.
Playing Back a Recorded Song
To play back a recorded song
1.
Press 7 SONG BANK.
2.
Use the bm number keys, bn [–] and [+], or the
bl dial to select the song number of a
recorded song.
• Select the song you want to playback from among
song numbers 31 to 40 (MltRec 1 to MltRec 10).
To mute specific tracks
1.
Press 7 SONG BANK.
2.
Use the bm number keys, bn [–] and [+], or the
bl dial to select the song number of a
recorded song.
3.
Press bo PART SELECT.
This displays “TrSyMute”.
TrSyM
4.
Use the [1] (V) and [3] (W) bm number keys
to select the track you want to mute.
5.
Use bn [–] or [+] to mute or unmute the track
you selected in step 4.
• Pressing bn [+] mutes the track, while bn [–] unmutes
the track.
6.
Repeat steps 4 and 5 as required for other
tracks.
7.
Press the [4] (EXIT) bm number key.
8.
Press ck PLAY/STOP.
• This starts song playback in accordance with the track
mute/unmute settings you configured.
9.
To stop song playback, press ck PLAY/STOP.
• You can perform overdub recording while some tracks
are muted. After performing the operation above,
perform the procedure starting from step 3 under “To
overdub another solo track while playing back
recorded tracks” (page EN-93).
ute
3.
Press ck PLAY/STOP.
This starts song playback.
• Operations that are supported during playback are
almost the same as those for built-in song playback
(with some exceptions). See “Playing a Built-in Song
or a Song on a USB Flash Drive (Song Bank Mode)”
(page EN-38).
EN-96
Page 98

Using the MIDI Recorder to Record
Copying a Recorded Song,
Deleting a Recorded Song or
Track
To copy a recorded song
1.
Press 7 SONG BANK.
2.
Use the bm number keys, bn [–] and [+], or the
bl dial to select the number of the song you
want to copy.
3.
Hold down 8 RECORD/STOP until “Song
Clr” appears.
4.
Use the [1] (V) and [3] (W) bm number keys
to display “SongCopy”, and then press [6]
(ENTER).
5.
Use bn [–] and [+], or the bl dial to select the
copy destination song number and then press
[6] (ENTER).
This displays “Sure?”
• If there is already a user recording stored at the song
number you specified as the copy destination, the
message “Replace?” will appear.
6.
Press bn [+] (YES) to execute the copy
operation or bn [–] (NO) to cancel.
• The message “Wait...” remains on the display while
the copy operation is being performed. Do not perform
any operation while this message is on the display.
“Complete” appears on the display after the operation
is complete.
7.
To exit the operation, press the [4] (EXIT) bm
number key.
To delete a recorded song
1.
Press 7 SONG BANK.
2.
Use the bm number keys, bn [–] and [+], or the
bl dial to select the number of the song you
want to delete.
3.
Hold down 8 RECORD/STOP until “Song
Clr” appears.
4.
Press the [6] (ENTER) bm number key.
This displays “Sure?”
5.
Press bn [+] (YES) to delete or bn [–] (NO) to
cancel the delete operation.
6.
To exit the operation, press the [4] (EXIT) bm
number key.
To delete a specific track from a recorded
song
1.
Press 7 SONG BANK.
2.
Use the bm number keys, bn [–] and [+], or the
bl dial to select the number of the song that
contains the track you want to delete.
3.
Hold down 8 RECORD/STOP until “Song
Clr” appears.
4.
Use the [1] (V) and [3] (W) bm number keys
to display “Trk Clr”.
5.
Use bn [–] and [+], or the bl dial to select the
track you want to delete.
6.
Press the [6] (ENTER) bm number key.
This displays “Sure?”
7.
Press bn [+] (YES) to delete or bn [–] (NO) to
cancel the delete operation.
8.
Repeat steps 5 through 7 above for each of the
tracks you want to delete.
9.
To exit the operation, press the [4] (EXIT) bm
number key.
EN-97
Page 99

Using the MIDI Recorder to Record
Displayed
Song Editing Mode
Enter the Song Editing Mode to perform the operations below.
• Editing an entire song in measure units (page EN-98)
• Editing a recorded song in track units (page EN-99)
• Editing a track of a recorded song in measure units (page
EN-101)
• Editing a recorded song in event units (page EN-103)
• Inputting notes and chords one-by-one (page EN-106)
• Recorded song mixer settings (page EN-109)
To enter the Song Editing Mode
1.
Press 7 SONG BANK.
2.
Use the bm number keys, bn [–] and [+], or the
bl dial to select the number of the song you
want to edit.
3.
Long-press bk FUNCTION until the [EDIT]
indicator appears.
• This enters the Song Editing Mode and “Song”
appears on the display.
To exit the Song Editing Mode operation
• Perform the operation below at the end of Song Editing
Mode operation.
1.
Press bn [+] (YES) to execute the Song Editing
Mode operation, or bn [–] (NO) to cancel.
• Pressing bn [+] (YES) displays the message “Wait...”
(operation in progress). Do not perform any operation
while this message is on the display. “Complete”
appears on the display after the operation is complete.
Editing an Entire Song in Measure
Units (Song Editing)
Use the procedure below to edit an entire song (all of the
tracks included in the song) in measure units.
• In the procedure below, you specify a start measure (Point
A or simply Point), and an end measure (Point B). The
section specified by the procedure under “Looping
Playback of Specific Song Measures (A-B Repeat)” (page
EN-39) is used as the initial default for these settings.
To delete an entire song in measure units
1.
Perform the procedure under “To enter the
Song Editing Mode” (page EN-98).
2.
Press the [6] (ENTER) bm number key.
This displays “Clear”.
3.
Press [6] (ENTER) again.
This displays “Point A”.
4.
Use bn [–] and [+], or the bl dial to select the
number of the first measure of the range you
want to delete, and then press [6] (ENTER).
This displays “Point B”.
5.
Use bn [–] and [+], or the bl dial to select the
number of the last measure of the range you
want to delete, and then press [6] (ENTER).
This displays “Sure?”
6.
Perform the procedure under “To exit the Song
Editing Mode operation” (page EN-98).
2.
To exit the Song Editing Mode, long-press the
[4] (EXIT) bm number key.
EN-98
Page 100

Using the MIDI Recorder to Record
To copy an entire song in measure units and
insert them into a specified location of the
same song
1.
Perform the procedure under “To enter the
Song Editing Mode” (page EN-98).
2.
Press the [6] (ENTER) bm number key.
This displays “Clear”.
3.
Use the [1] (V) and [3] (W) bm number keys
to display “Copy”, and then press [6] (ENTER).
This displays “Point A”.
4.
Use bn [–] and [+], or the bl dial to select the
number of the first measure of the range you
want to copy, and then press [6] (ENTER).
This displays “Point B”.
5.
Use bn [–] and [+], or the bl dial to select the
number of the last measure of the range you
want to copy, and then press [6] (ENTER).
This displays “DstPoint”.
6.
Use bn [–] and [+], or the bl dial to select the
number of the first measure of the copy
destination, and then press [6] (ENTER).
This displays “Sure?”
Editing a Recorded Song in Track
Units
The editing operations in this section affect an entire track in a
recorded song.
To delete a specified track
1.
Perform the procedure under “To enter the
Song Editing Mode” (page EN-98).
2.
Use the [1] (V) and [3] (W) bm number keys
to display “WholeTrk”, and then press [6]
(ENTER).
This displays “Clear”.
3.
Press [6] (ENTER) again.
This displays “Trk Sy”
4.
Use bn [–] and [+] or the bl dial to specify the
target track, and then press [6] (ENTER).
This displays “Sure?”
5.
Perform the procedure under “To exit the Song
Editing Mode operation” (page EN-98).
7.
Perform the procedure under “To exit the Song
Editing Mode operation” (page EN-98).
To insert blank measures at a specified
location in a song
1.
Perform the procedure under “To enter the
Song Editing Mode” (page EN-98).
2.
Press the [6] (ENTER) bm number key.
This displays “Clear”.
3.
Use the [1] (V) and [3] (W) bm number keys
to display “Insert”, and then press [6] (ENTER).
This displays “Point”.
4.
Use bn [–] and [+], or the bl dial to select the
measure from which you want to insert blank
measures, and then press [6] (ENTER).
This displays “Length”.
5.
Use bn [–] and [+], or the bl dial to specify the
number of blank measures you want to insert,
and then press [6] (ENTER).
This displays “Sure?”
6.
Perform the procedure under “To exit the Song
Editing Mode operation” (page EN-98).
EN-99
 Loading...