

Page 1
EN
CTS300-E-2B
USER’S GUIDE
CT
-
S300
Cove
r
Preparing a Power Supply Turning Power On or Off Connecting Headphones
(Sold Separately)
Selecting a Musical
Instrument Tone
Changing the Pitch in
Semitone Steps (Transpose)
Fine Tuning Pitch (Tuning) Using the SUSTAIN Button
Connecting a Pedal
(Sold Separately)
Saving and Loading
Instrument Settings
(MY SETUP)
Playing with a Rhythm
Backing
Playing a Built-in Song Playing in the Dance Music
Mode
Linking with a Smart Device
(APP Function)
Configuring Function Settings
Using a Dance Music Voice
Page 2
Included and Optional Accessories
• Any reproduction of the contents of this manual, either in part or its entirety, is prohibited. Except for your own, personal
use, any other use of the contents of this manual without the consent of CASIO is prohibited under copyright laws.
• IN NO EVENT SHALL CASIO BE LIABLE FOR ANY DAMAGES WHATSOEVER (INCLUDING, WITHOUT LIMITATION,
DAMAGES FOR LOSS OF PROFITS, BUSINESS INTERRUPTION, LOSS OF INFORMATION) ARISING OUT OF THE
USE OF OR INABILITY TO USE THIS MANUAL OR PRODUCT, EVEN IF CASIO HAS BEEN ADVISED OF THE
POSSIBILITY OF SUCH DAMAGES.
• The contents of this manual are subject to change without notice.
• The actual appearance of the product may be different from that shown in the illustrations in this User’s Guide.
• Company and product names used in this manual may be registered trademarks of others.
Use only accessories that are specified for use with this Digital Keyboard.
Use of unauthorized accessories creates the risk of fire, electric shock, and personal injury.
• You can get information about accessories that are sold separately for this product from the CASIO catalog available from
your retailer, and from the CASIO website at the URL or QR code below.
https://support.casio.com/global/en/emi/manual/CT-S300/
About Music Score data
You can download music score data as a PDF file from the CASIO website, which you can access using the URL or QR code
below. You will then be able to view music scores on your smart device. You can jump from the PDF file table of contents directly
to the music score you want, and you can print out scores as needed.
https://support.casio.com/global/en/emi/manual/CT-S300/
EN-1
Page 3
Contents
General Guide EN-3
Getting Ready to Play EN-4
Preparing a Power Supply . . . . . . . . . . . . . . . . . . . EN-4
Preparing the Music Stand . . . . . . . . . . . . . . . . . . . EN-5
Connecting Headphones (Sold Separately) . . . . . . EN-6
Connecting a Pedal (Sold Separately) . . . . . . . . . . EN-6
Operations Common to All Modes EN-6
Display Screen Contents. . . . . . . . . . . . . . . . . . . . . EN-6
HOME Button . . . . . . . . . . . . . . . . . . . . . . . . . . . . . EN-6
3 Buttons. . . . . . . . . . . . . . . . . . . . . . . . . . . . . . . . . EN-7
Dial Operations . . . . . . . . . . . . . . . . . . . . . . . . . . . . EN-7
Playing on the Keyboard EN-7
Turning Power On or Off. . . . . . . . . . . . . . . . . . . . . EN-7
Adjusting the Volume Level. . . . . . . . . . . . . . . . . . . EN-8
Using the Metronome . . . . . . . . . . . . . . . . . . . . . . . EN-9
Listening to Demo Play . . . . . . . . . . . . . . . . . . . . . EN-10
Controlling the Sound of a Performance EN-10
Selecting a Musical Instrument Tone . . . . . . . . . . EN-10
Changing Keyboard Response to Touch
Pressure (Touch Response) . . . . . . . . . . . . . . . EN-11
Using a Pedal . . . . . . . . . . . . . . . . . . . . . . . . . . . . EN-11
Using the Pitch Bend Wheel . . . . . . . . . . . . . . . . . EN-12
Using the SUSTAIN Button. . . . . . . . . . . . . . . . . . EN-12
Adding Reverb to Notes . . . . . . . . . . . . . . . . . . . . EN-12
Changing the Pitch in Semitone Steps
(Transpose) . . . . . . . . . . . . . . . . . . . . . . . . . . . . EN-13
Fine Tuning Pitch (Tuning) . . . . . . . . . . . . . . . . . . EN-13
Saving and Loading Instrument Settings
(MY SETUP) EN-14
Saving to MY SETUP . . . . . . . . . . . . . . . . . . . . . . EN-14
Recalling From MY SETUP. . . . . . . . . . . . . . . . . . EN-15
Playing a Built-in Song EN-16
Songs . . . . . . . . . . . . . . . . . . . . . . . . . . . . . . . . . . EN-16
Selecting a Song to Play. . . . . . . . . . . . . . . . . . . . EN-16
Assigning the Song Tone to the Keyboard
(Tone Sync) . . . . . . . . . . . . . . . . . . . . . . . . . . . . EN-18
Practicing a Song Part . . . . . . . . . . . . . . . . . . . . . EN-18
Sounding a Count in Time with a Song. . . . . . . . . EN-19
Playing in the Dance Music Mode EN-20
Dance Music Mode . . . . . . . . . . . . . . . . . . . . . . . . EN-20
Playing Dance Music. . . . . . . . . . . . . . . . . . . . . . . EN-21
Using the Recommended Tone . . . . . . . . . . . . . . EN-23
Using a Dance Music Voice . . . . . . . . . . . . . . . . . EN-23
Using Effects. . . . . . . . . . . . . . . . . . . . . . . . . . . . . EN-23
Building Performance Tension . . . . . . . . . . . . . . . EN-24
Playing with a Rhythm Backing EN-24
Rhythm . . . . . . . . . . . . . . . . . . . . . . . . . . . . . . . . . .EN-24
Playing a Rhythm . . . . . . . . . . . . . . . . . . . . . . . . . .EN-24
Using Recommended Rhythm Settings . . . . . . . . .EN-26
Changing the Rhythm Pattern . . . . . . . . . . . . . . . .EN-26
Inserting a Fill-in Phrase . . . . . . . . . . . . . . . . . . . . .EN-27
Fingering a Chord to Play a Rhythm
Accompaniment. . . . . . . . . . . . . . . . . . . . . . . . . .EN-27
Inserting an Intro or an Ending . . . . . . . . . . . . . . . .EN-29
Connecting with External Devices EN-30
Linking with a Smart Device (APP Function) . . . . .EN-30
Connecting to a computer and Using MIDI. . . . . . .EN-31
Connecting with Audio Equipment . . . . . . . . . . . . .EN-32
Configuring Function Settings EN-33
Configuring Settings . . . . . . . . . . . . . . . . . . . . . . . .EN-33
Setting Item List . . . . . . . . . . . . . . . . . . . . . . . . . . .EN-33
Reference EN-36
Troubleshooting . . . . . . . . . . . . . . . . . . . . . . . . . . .EN-36
Product Specifications . . . . . . . . . . . . . . . . . . . . . .EN-37
Tone List. . . . . . . . . . . . . . . . . . . . . . . . . . . . . . . . .EN-40
Drum Assignment List. . . . . . . . . . . . . . . . . . . . . . .EN-43
Song List. . . . . . . . . . . . . . . . . . . . . . . . . . . . . . . . .EN-44
Dance Music Mode List . . . . . . . . . . . . . . . . . . . . .EN-44
Rhythm List. . . . . . . . . . . . . . . . . . . . . . . . . . . . . . .EN-45
Fingering Guide . . . . . . . . . . . . . . . . . . . . . . . . . . .EN-46
Chord Example List . . . . . . . . . . . . . . . . . . . . . . . .EN-47
MIDI Implementation Chart
EN-2
Page 4
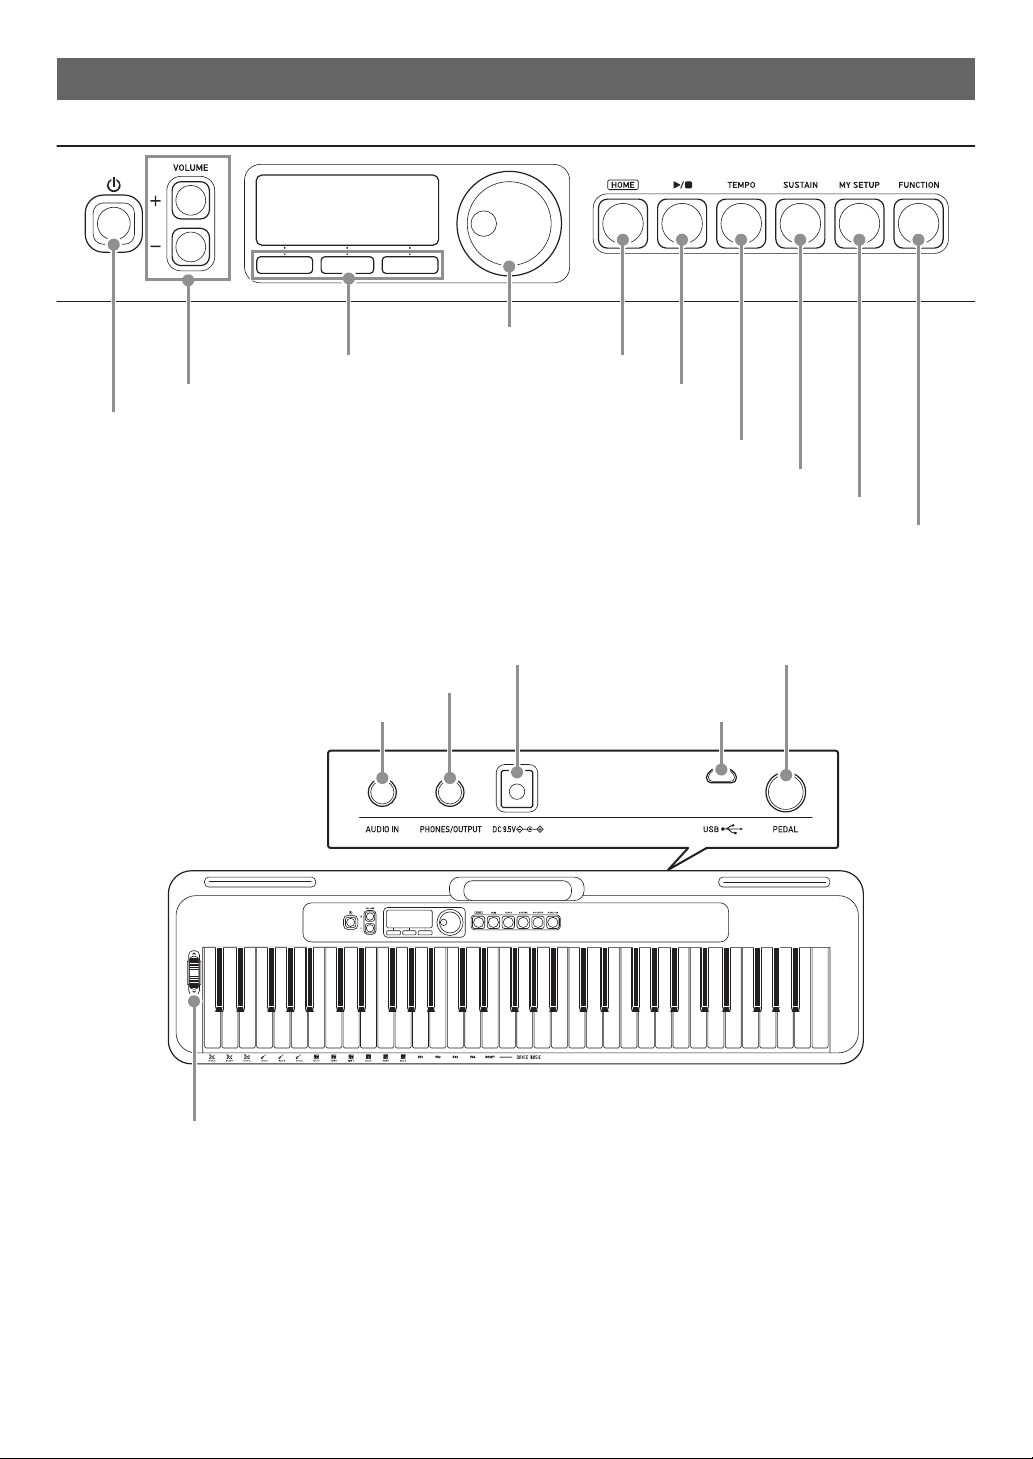
General Guide
P(Power) button ☞EN-7
VOLUME buttons ☞EN-8
3 buttons ☞EN-7
Dial ☞EN-7
HOME button ☞EN-6
a (Start/Stop) button ☞EN-9, 16, 24
TEMPO button ☞EN-9, 17, 22, 25
SUSTAIN button ☞EN-12
MY SETUP button ☞EN-14
FUNCTION button ☞EN-33
DC 9.5V terminal ☞EN-4
PHONES/OUTPUT jack ☞EN-6, 32
AUDIO IN jack ☞EN-32
PEDAL jack ☞EN-6
USB port ☞EN-31
Pitch bend wheel ☞EN-12
■ Front Panel
■ Back
• The numbers to the right of the ☞ symbol are reference page numbers.
EN-3
Page 5
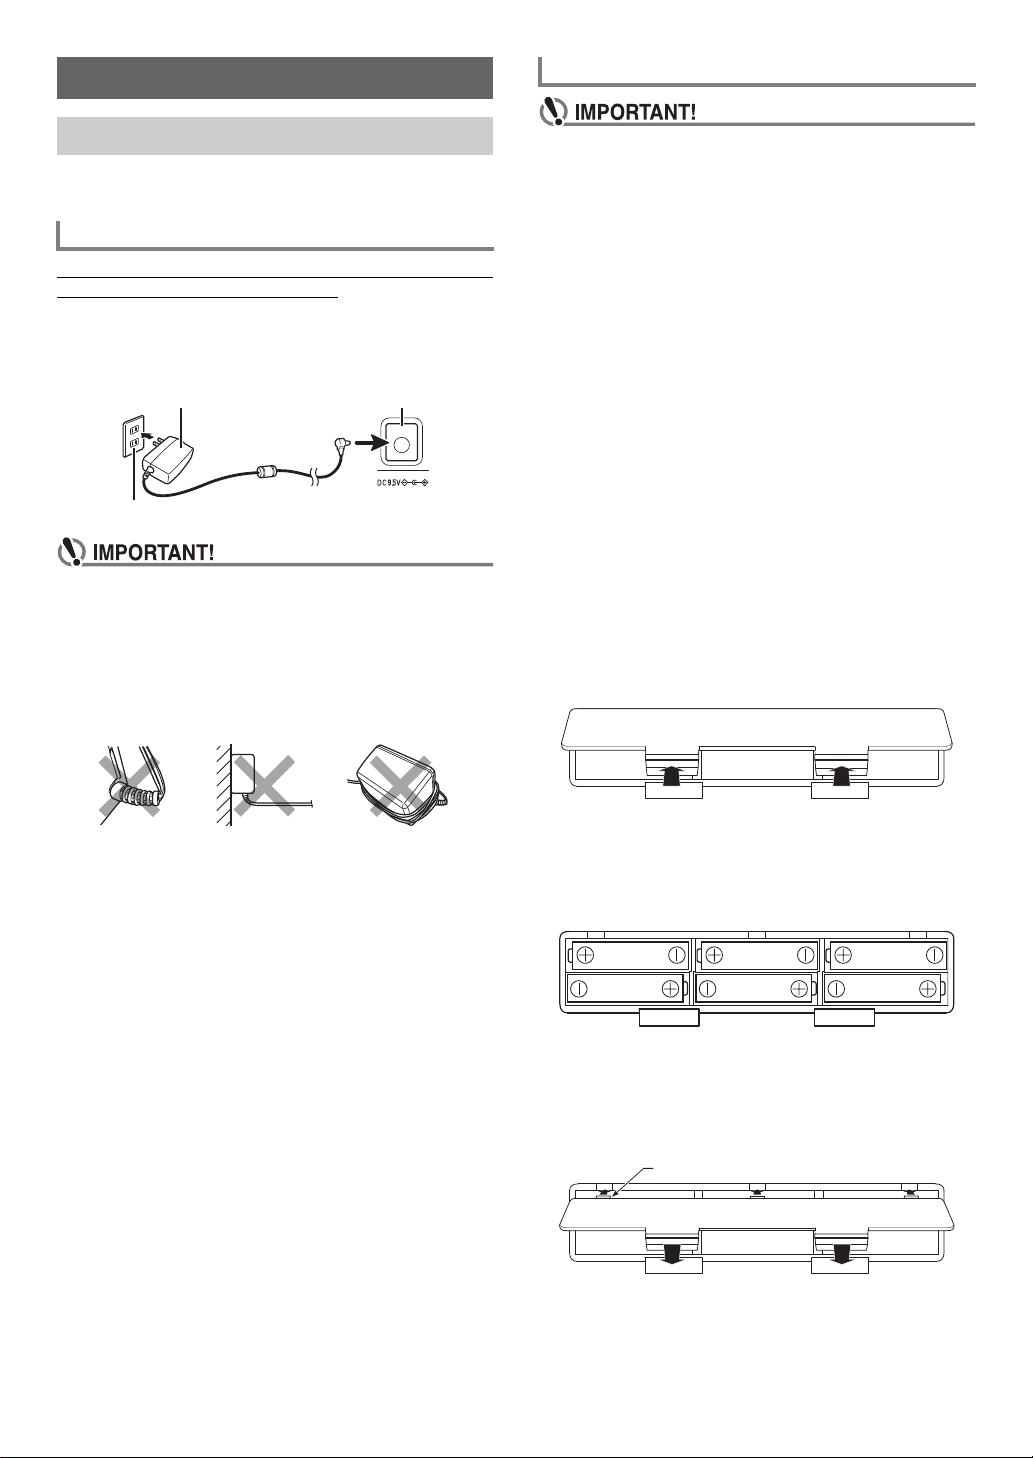
Getting Ready to Play
AC adaptor DC 9.5V terminal
Household power outlet
Tab
Using Batteries for Power
Preparing a Power Supply
Though either an AC adaptor or batteries can be used for
power, use of AC adaptor power is normally recommended.
Using the AC Adaptor
Use only the AC adaptor (JEITA Standard with unified polarity
plug) specified for this Digital Keyboard. Use of a different
type of AC adaptor can cause malfunction.
AC Adaptor Type: AD-E95100L
(JEITA Standard plug)
• Be sure to turn off Digital Keyboard power before
connecting or disconnecting the AC adaptor.
• The AC adaptor becomes warm to the touch after very
long use. This is normal and does not indicate
malfunction.
• To prevent breaking of the wire, take care to avoid
putting any type of load on the power cord.
No twisting No pulling No wrapping
• Be sure to turn off power before loading batteries.
• Use commercially available AA-size alkaline batteries
or AA-size rechargeable nickel metal hydride batteries.
• Low battery power can cause abnormal operation. If
this happens, replace batteries with new ones. If you
are using rechargeable batteries, charge them.
■ Batteries
Note the precautions below when using rechargeable
batteries.
• Use Panasonic Group AA-size eneloop rechargeable
batteries.
Do not use any other type of batteries.
• Use only the specified charger to charge batteries.
• Rechargeable batteries must be removed from the product
for charging.
• For information about using eneloop batteries or their
specified charger, be sure to read the user documentation
and precautions that come with each item, and use them
only as directed.
Be sure to replace batteries at least once a year, even if there
is no indication of low battery power. Dead rechargeable
batteries (eneloop) in particular may deteriorate if they are left
in the product. Remove rechargeable batteries from the
product as soon as possible after they go dead.
1.
Open the battery cover on the back of the
Digital Keyboard.
• Never insert metal, pencils, or any other objects into
the DC 9.5V terminal. Doing so creates the risk of
accident.
EN-4
2.
Load six AA-size batteries into the battery
compartment.
Load batteries with their positive (+) and negative (–)
ends facing correctly.
3.
Insert the tabs of the battery cover into the
holes, and close the cover.
• Configure the setting below to specify the type of
batteries you loaded.
Page 6
Getting Ready to Play
Battery icon (not flashing)
Battery icon (flashing)
Music stand
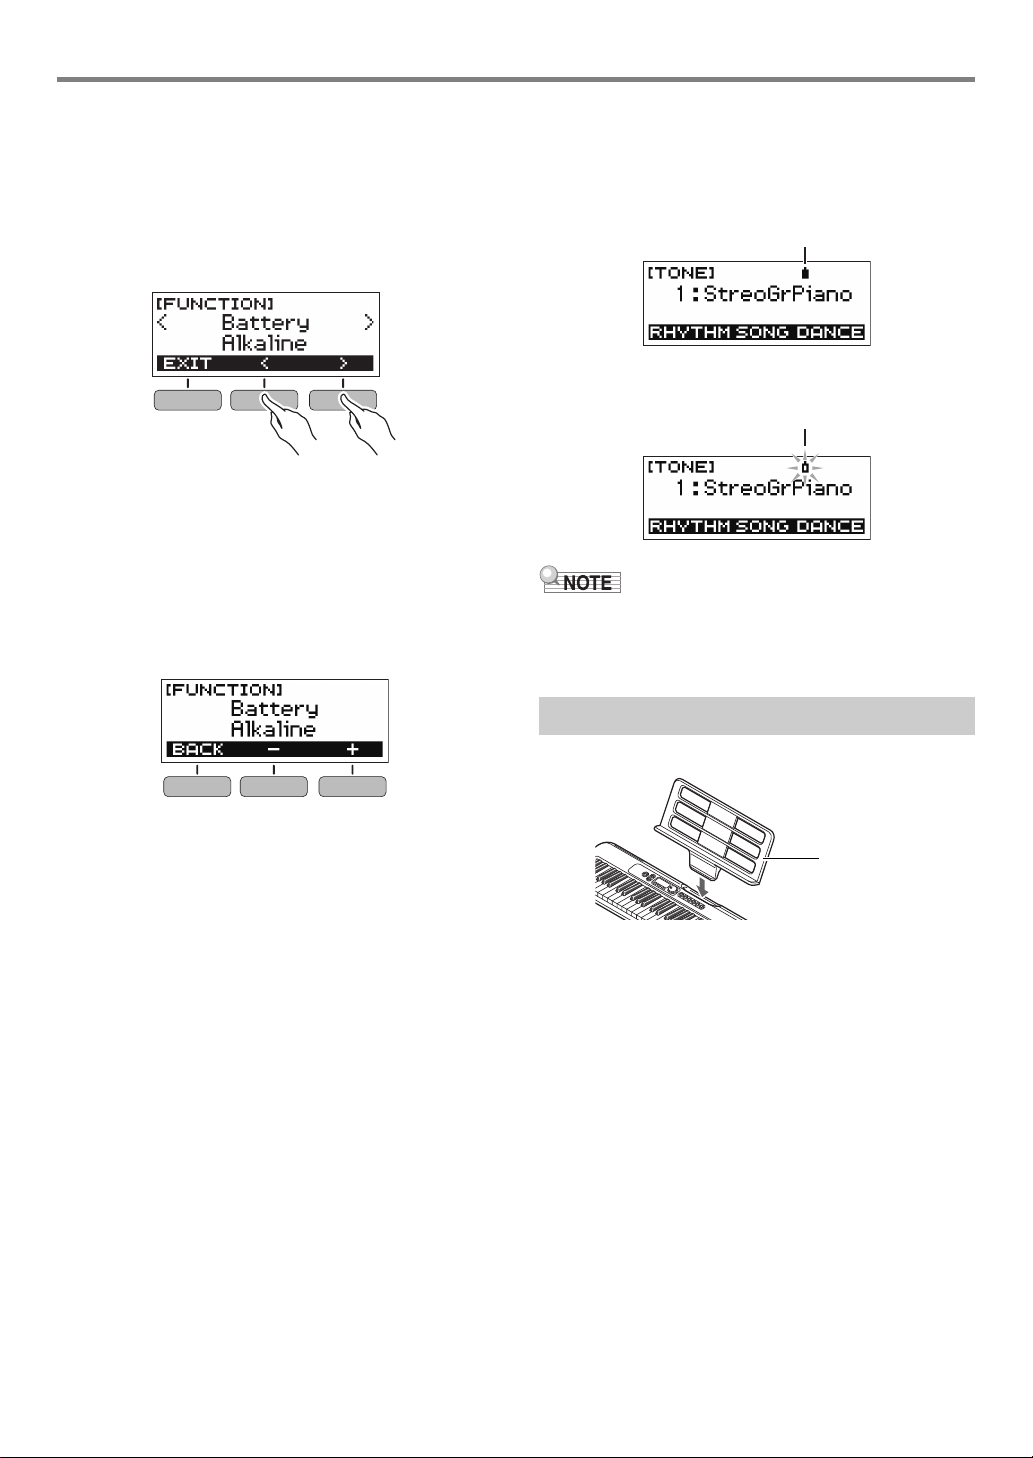
■ Configuring the Battery Type Setting
1.
Press FUNCTION.
This displays the [FUNCTION] screen.
2.
Use the U and I buttons to select “Battery”.
• To go back to the previous screen, press the EXIT
button.
3.
Rotate the dial to select “Alkaline” (alkaline
batteries) or “Ni-MH” (rechargeable nickel
metal hydride batteries).
• After you rotate the dial once to select an option, you
also will be able to change the selection using the –
and + buttons.
• To go back to the previous screen, press the BACK
button.
■ Battery Level Indicator
A battery icon appears on the display as shown below to let
you know when battery power is getting low.
Low Battery Power
Battery Replacement Required
• Low battery power may cause notes to become distorted,
or other problems.
• You can conserve battery power by using headphones and
by reducing the volume level.
4.
Press FUNCTION to exit the setting screen.
Preparing the Music Stand
Insert the music stand into the handle of the Digital Keyboard.
EN-5
Page 7
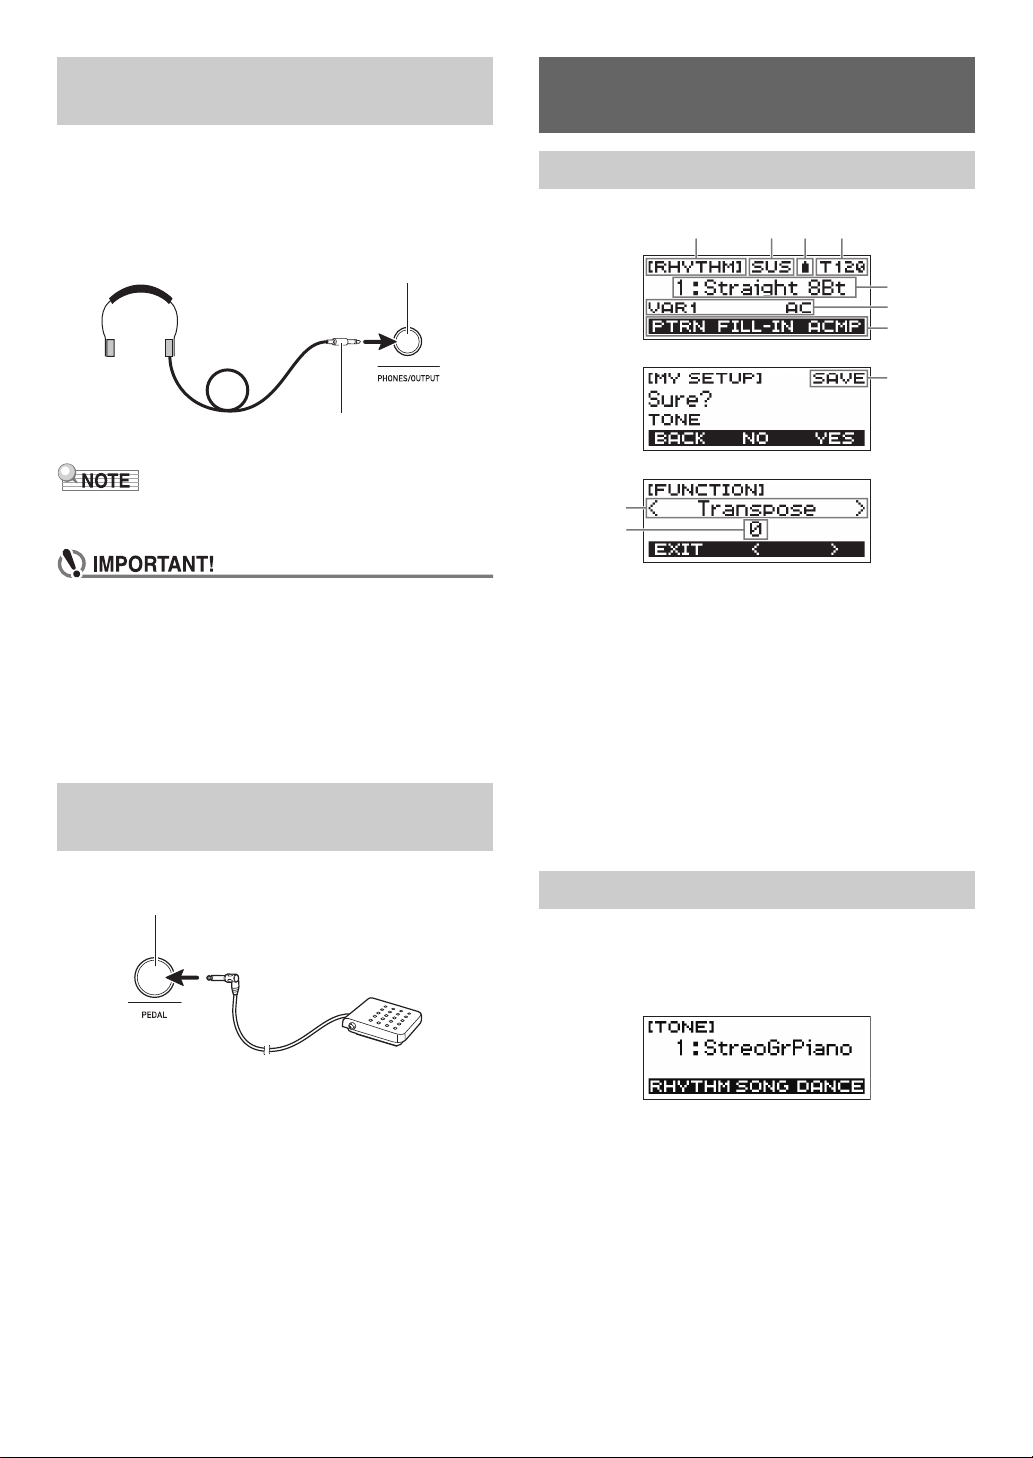
Connecting Headphones (Sold
PHONES/OUTPUT jack
(3.5mm stereo mini jack)
Stereo mini plug
PEDAL jack (6.3mm standard jack)
Pedal (sold separately)
(1
Separately)
Plugging in headphones cuts off output from the built-in
speakers, which means you can practice playing even late at
night without disturbing others.
• Be sure to turn down the Digital Keyboard volume level
before connecting headphones.
• Headphones do not come with the Digital Keyboard.
• Use separately sold or commercially available headphones.
Operations Common to All Modes
Display Screen Contents
• Do not listen to output over headphones at very high
volume levels for long periods. Doing so creates the
risk of hearing damage.
• If the plug of the headphones does not match the
PHONES/OUTPUT jack, use a commercially available
adapter plug.
• If you are using headphones that require an adapter
plug, make sure you do not leave the adapter plugged
in when removing the headphones.
Connecting a Pedal (Sold Separately)
To use a pedal, connect it to the PEDAL jack.
Function name
Sustain
Battery icon
Tempo
Current setting
Status
3 button functions
Sub-function name
Setting item
Current setting
For information about how to adjust display contrast, see
“Configuring Function Settings” (page EN-33).
HOME Button
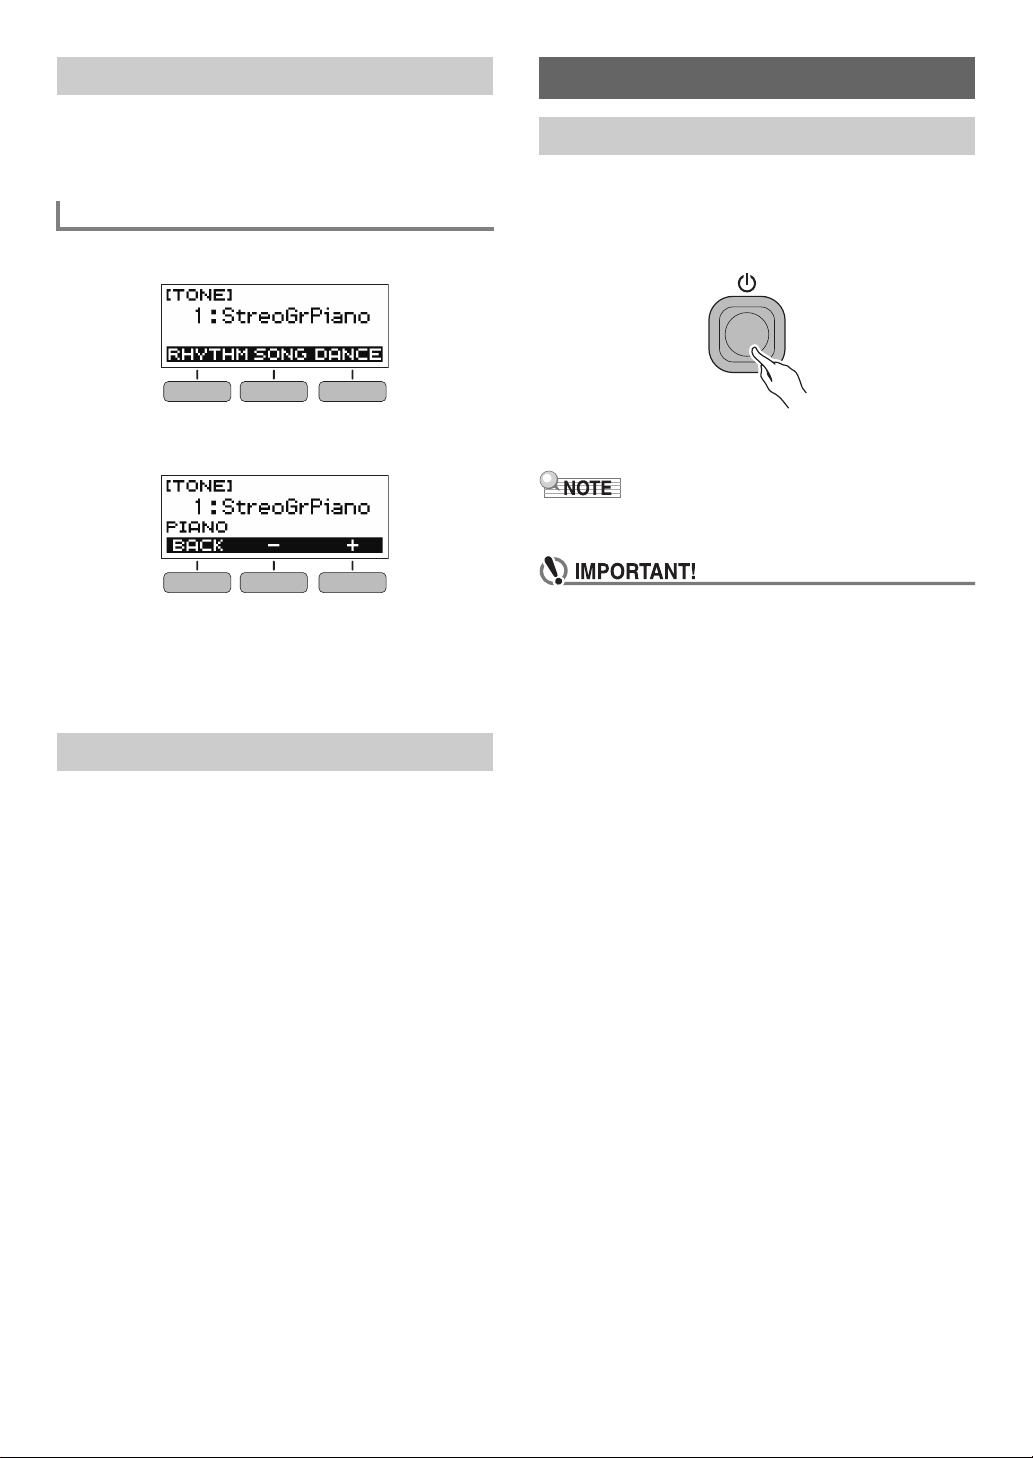
Pressing HOME will display the [TONE] screen, which you
can use to select a tone. This is the home screen. You can
use the home screen to select the instrument type and to
configure various settings.
EN-6
Page 8
3 Buttons
Operations assigned to the three buttons along the bottom of
the display change according to the setting you are
configuring. Operations currently assigned to the three
buttons are indicated by labels above the buttons.
3 Button Examples
■ Home Screen (Tone Selection Screen)
■ Setting Screen
• Holding down the – or + button when selecting a number or
value will scroll through settings at high speed.
• To return a number or value to its initial default or
recommended setting, press the – and + buttons at the
same time.
Dial Operations
Rotate the dial to change a number (tone number, etc.) or
value (tempo value, etc.)
Playing on the Keyboard
Turning Power On or Off
1.
Press P (Power).
This turns on power.
• To turn off power, hold down P (Power) until the
display goes blank.
2.
Play something on the keyboard.
• Do not touch the pitch bend wheel as you turn on the
keyboard.
• Turning off power normally causes the tone and
rhythm number and other settings to return to their
initial defaults. However, the settings below are
remembered.
− MIDI Out Channel
− MIDI Out Octave Shift
− MIDI Out Velocity
− Startup volume level
− MY SETUP Startup
− Auto Power Off
− Battery type
− LCD contrast
EN-7
Page 9
Playing on the Keyboard
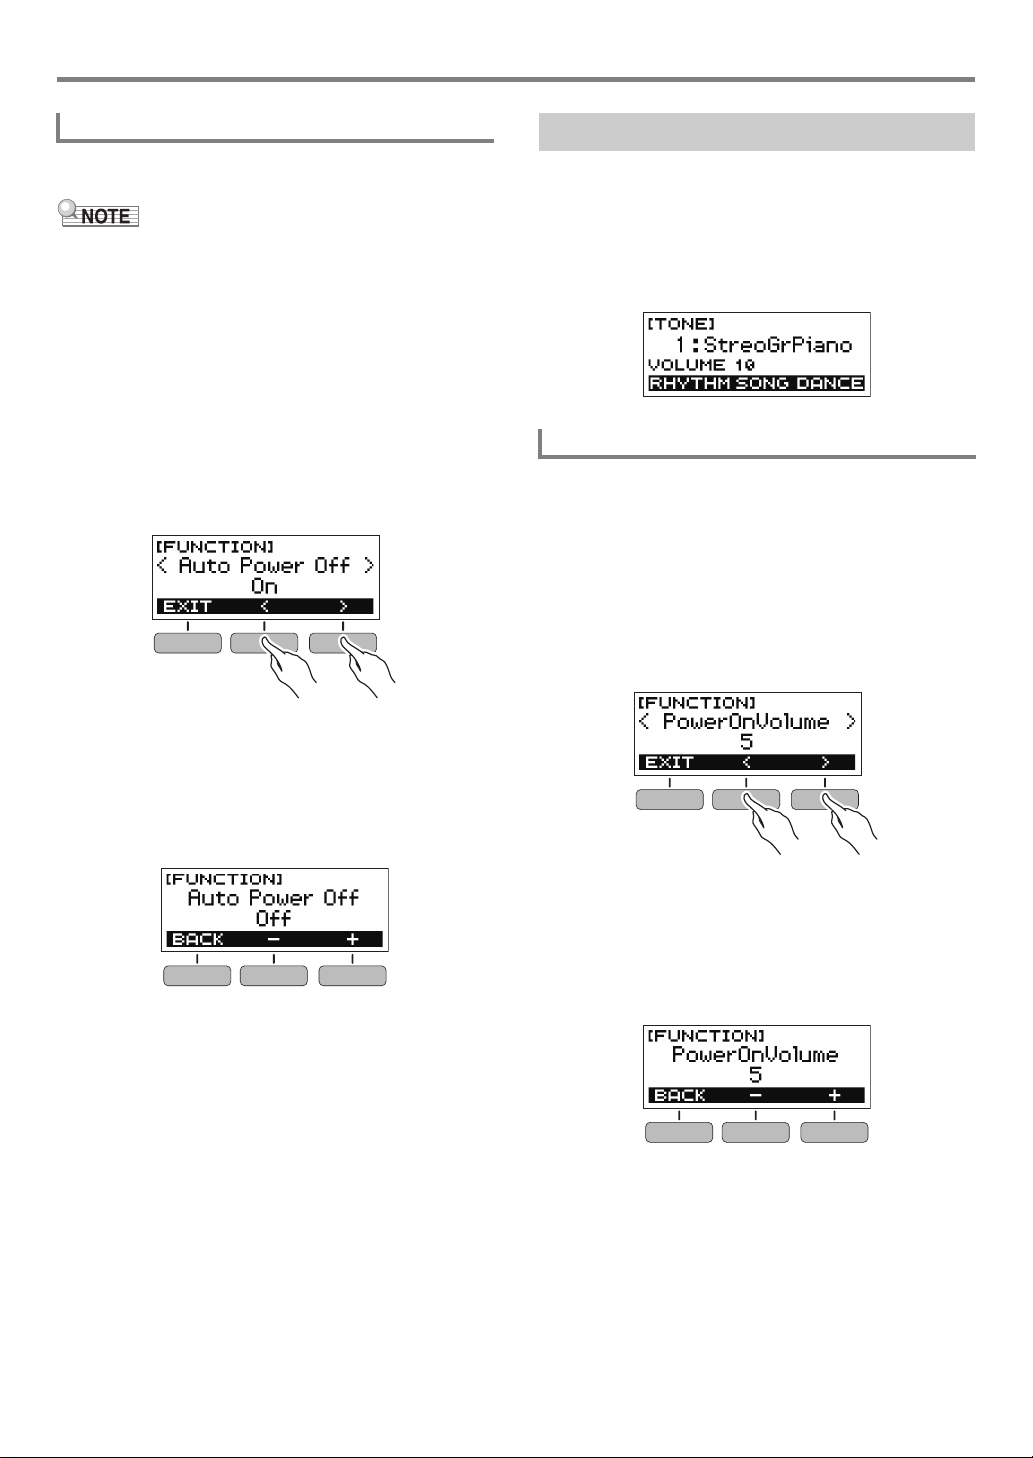
Auto Power Off
While Auto Power Off is enabled, Digital Keyboard power will
turn off automatically after about 30 minutes of non-operation.
• Auto Power Off is disabled while a song is playing and
while the APP function is being used.
■ Disabling Auto Power Off
You can disable Auto Power Off to ensure that power does
not turn off automatically during a concert, etc.
1.
Press FUNCTION.
This displays the [FUNCTION] screen.
2.
Use the U and I buttons to select “Auto Power
Off”.
• To go back to the previous screen, press the EXIT
button.
Adjusting the Volume Level
1.
Use the VOLUME + and – buttons to adjust the
volume level.
This will change the volume level and cause the current
volume level value to appear momentarily on the display.
• The setting range is 0 to 10.
• Holding down either button scrolls the setting value.
Specifying the Power On Volume Level
You can use the procedure below to specify the volume level
that is applied when the Digital Keyboard is turned on.
1.
Press FUNCTION.
This displays the [FUNCTION] screen.
2.
Use the U and I buttons to select
“PowerOnVolume”.
• To go back to the previous screen, press the EXIT
button.
3.
Rotate the dial to the left to select “Off”.
• After you rotate the dial once to select an option, you
also will be able to change the selection using the –
and + buttons.
• To go back to the previous screen, press the BACK
button.
4.
Press FUNCTION to exit the setting screen.
3.
Rotate the dial to select the volume level.
• After you rotate the dial once to select an option, you
also will be able to change the selection using the –
and + buttons.
• To go back to the previous screen, press the BACK
button.
4.
Press FUNCTION to exit the setting screen.
EN-8
Page 10
Playing on the Keyboard
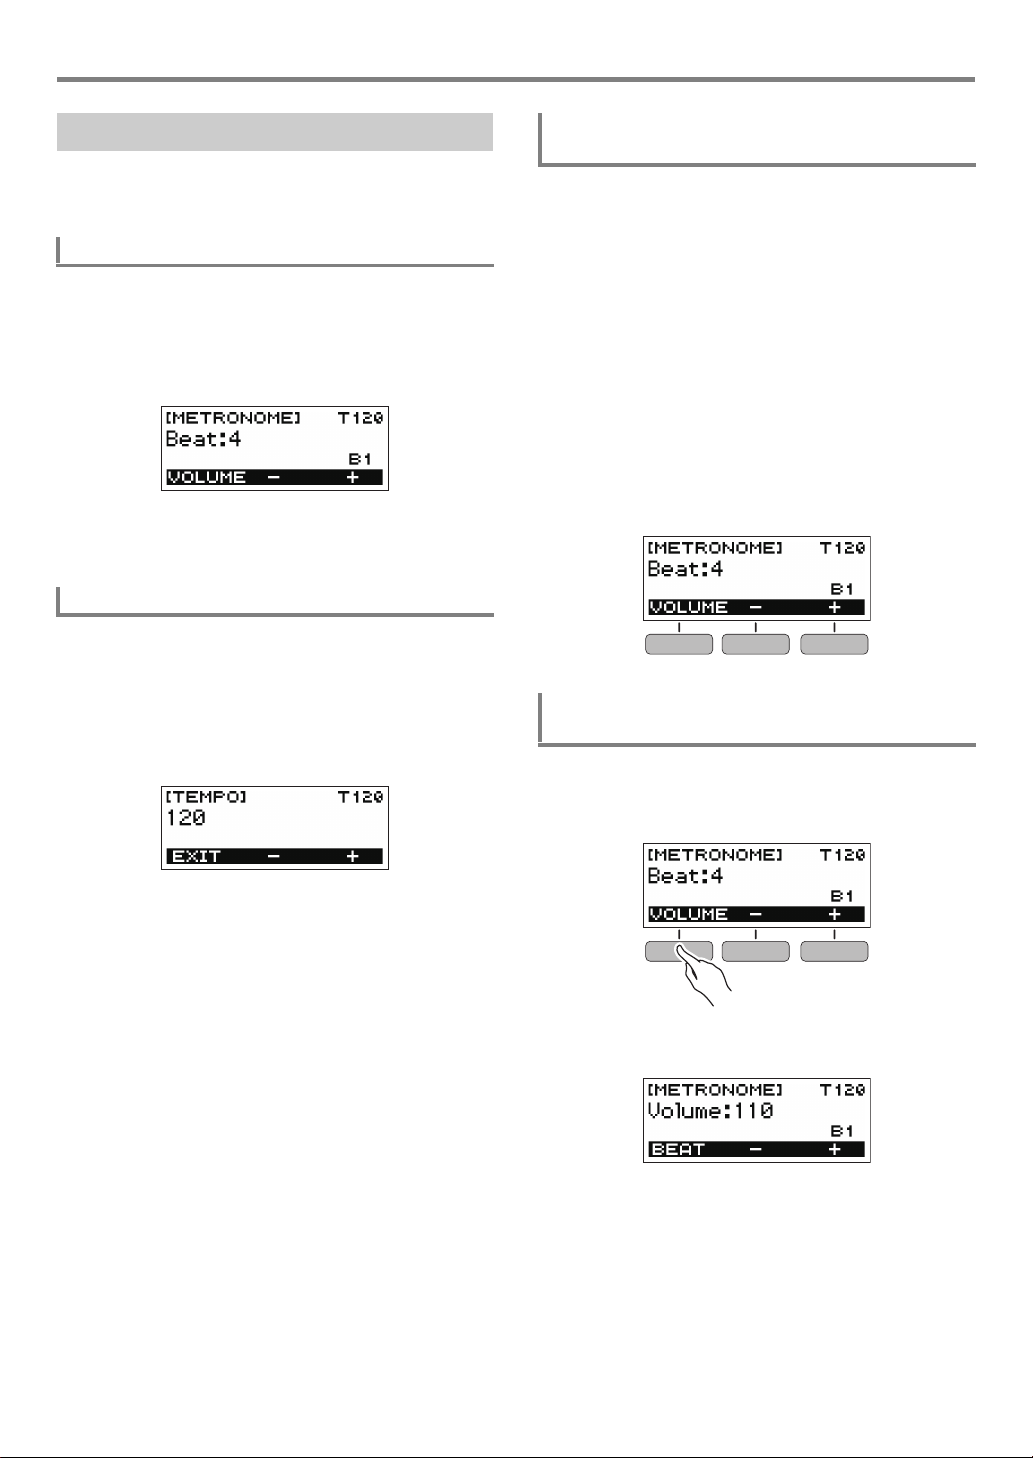
Using the Metronome
The metronome lets you play and practice along with a steady
beat to help keep you on tempo. You can also set a tempo
that is suitable for your practice.
Start/Stop
1.
Press HOME.
This displays the home screen.
2.
Press a.
This starts the metronome.
3.
Press a again to stop the metronome and
return to the home screen.
Changing the Metronome Tempo
Use the procedure below to change the tempo of the
metronome.
1.
Start the metronome.
2.
Press TEMPO.
This displays the [TEMPO] screen.
Specifying the Metronome Sound and Beats
Per Measure
You can use the procedure below to configure a setting that
sounds a chime on the first beat of each measure, and a click
for the remaining beats.
• Available settings are Off, or a value of 1 to 16 beats.
1.
Start the metronome.
2.
Rotate the dial or use the – and + buttons to
specify the number of beats per measure.
• Selecting “Off” disables the chime and sounds a click
for all beats. Use this setting when you want to
practice without worrying about the first beat of each
measure.
• To return the setting to its initial default, press the –
and + buttons at the same time.
• To display the metronome volume level setting screen,
press VOLUME (3 buttons).
Changing the Metronome Sound Volume
Level
1.
Start the metronome.
3.
Rotate the dial or use the – and + buttons to
change the tempo value.
• You can specify a tempo value in the range of 20 to
255.
• To return the setting to its initial default, press the –
and + buttons at the same time.
• To return to the [METRONOME] screen, press the
EXIT button.
2.
Press VOLUME (3 buttons).
This displays the metronome volume level setting
screen.
3.
Rotate the dial or use the – and + buttons to
change the volume value.
• You can specify a volume value from 0 to 127.
• To return the setting to its initial default, press the –
and + buttons at the same time.
• To display the beat setting screen, press the BEAT
button.
EN-9
Page 11
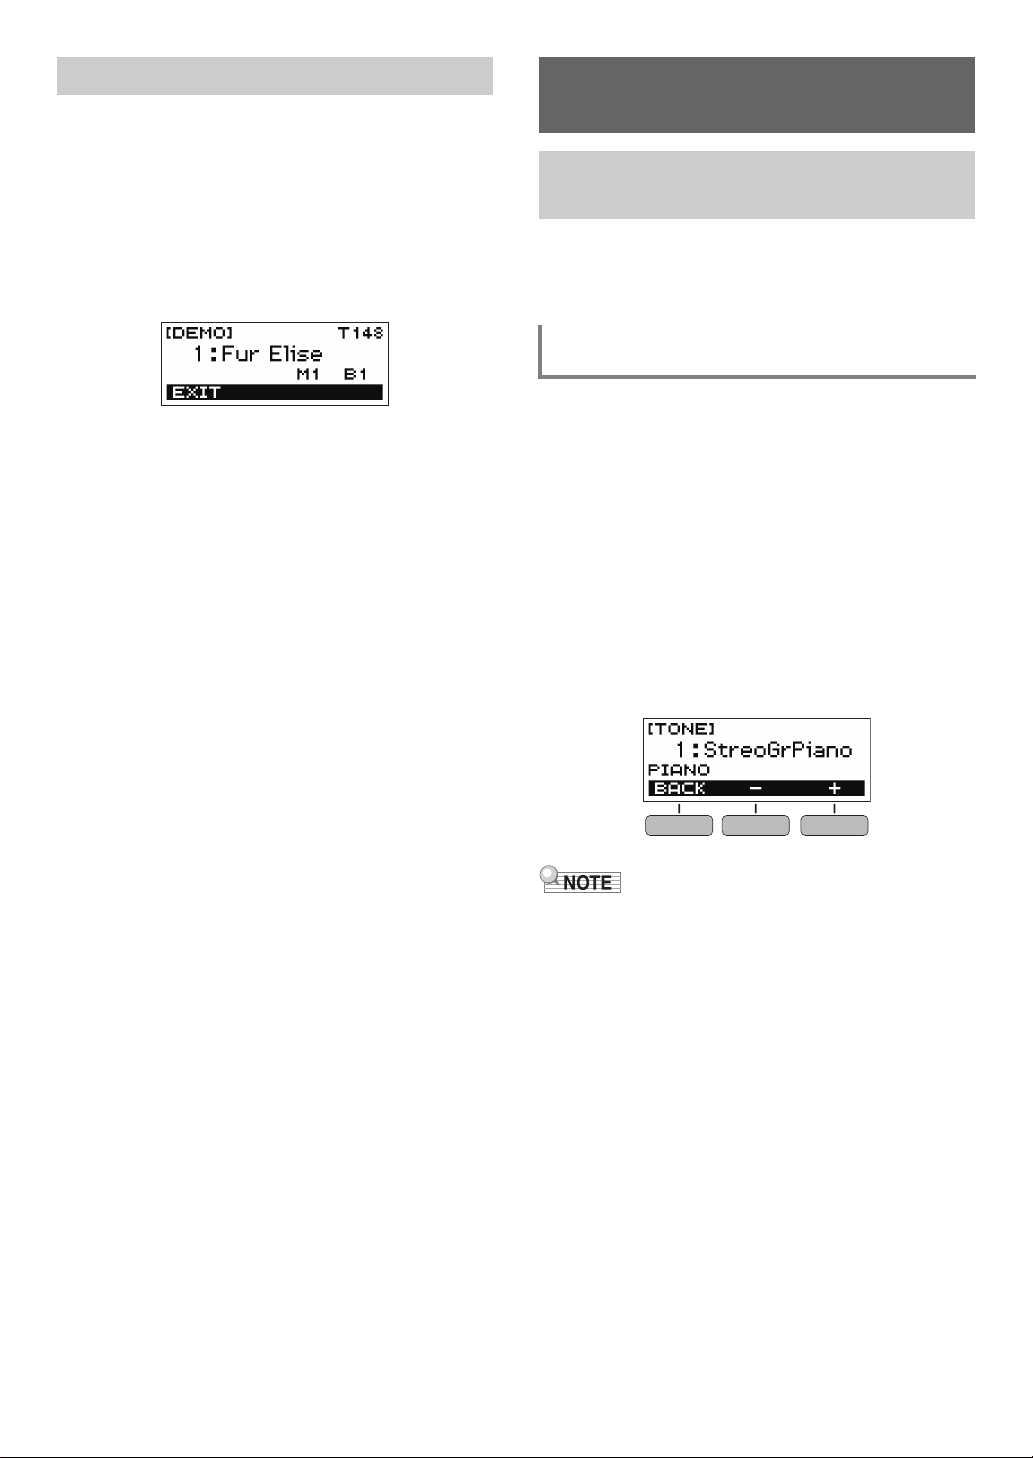
Listening to Demo Play
You can use Demo Play to play built-in songs in sequence.
1.
While holding down TEMPO, press a.
This displays the [DEMO] screen and starts song number
“1”.
• The display shows the number and name of the
current song.
• For a list of song titles, see the “Song List” (page
EN-44).
• To return to the home screen, press the EXIT button.
2.
To change from the current song to another
one, rotate the dial.
This starts Demo Play of the song you selected.
• After you rotate the dial once to select an option, you
also will be able to change the selection using the –
and + buttons.
• To go back to the previous screen, press the BACK
button.
3.
To exit Demo Play, press the EXIT button or
a.
Controlling the Sound of a Performance
Selecting a Musical Instrument Tone
Your Digital Keyboard lets you select tones for a wide variety
of musical instrument sounds, including violin, flute, orchestra,
and more. Even the same song sounds different when the
instrument type is changed.
Selecting an Instrument Tone for Keyboard
Play
1.
Press HOME.
This displays the home screen.
2.
Rotate the dial to select a tone.
The selected tone number and instrument name will
appear on the display.
• For tone information, see the “Tone List” (page
EN-40).
• After you rotate the dial once to select an option, you
also will be able to change the selection using the –
and + buttons.
• To return to the first tone in the tone list, press – and +
at the same time.
• To go back to the previous screen, press the BACK
button.
• Selecting a drum set tone causes various percussion
instruments to be assigned to keyboard keys.
EN-10
Page 12
Controlling the Sound of a Performance
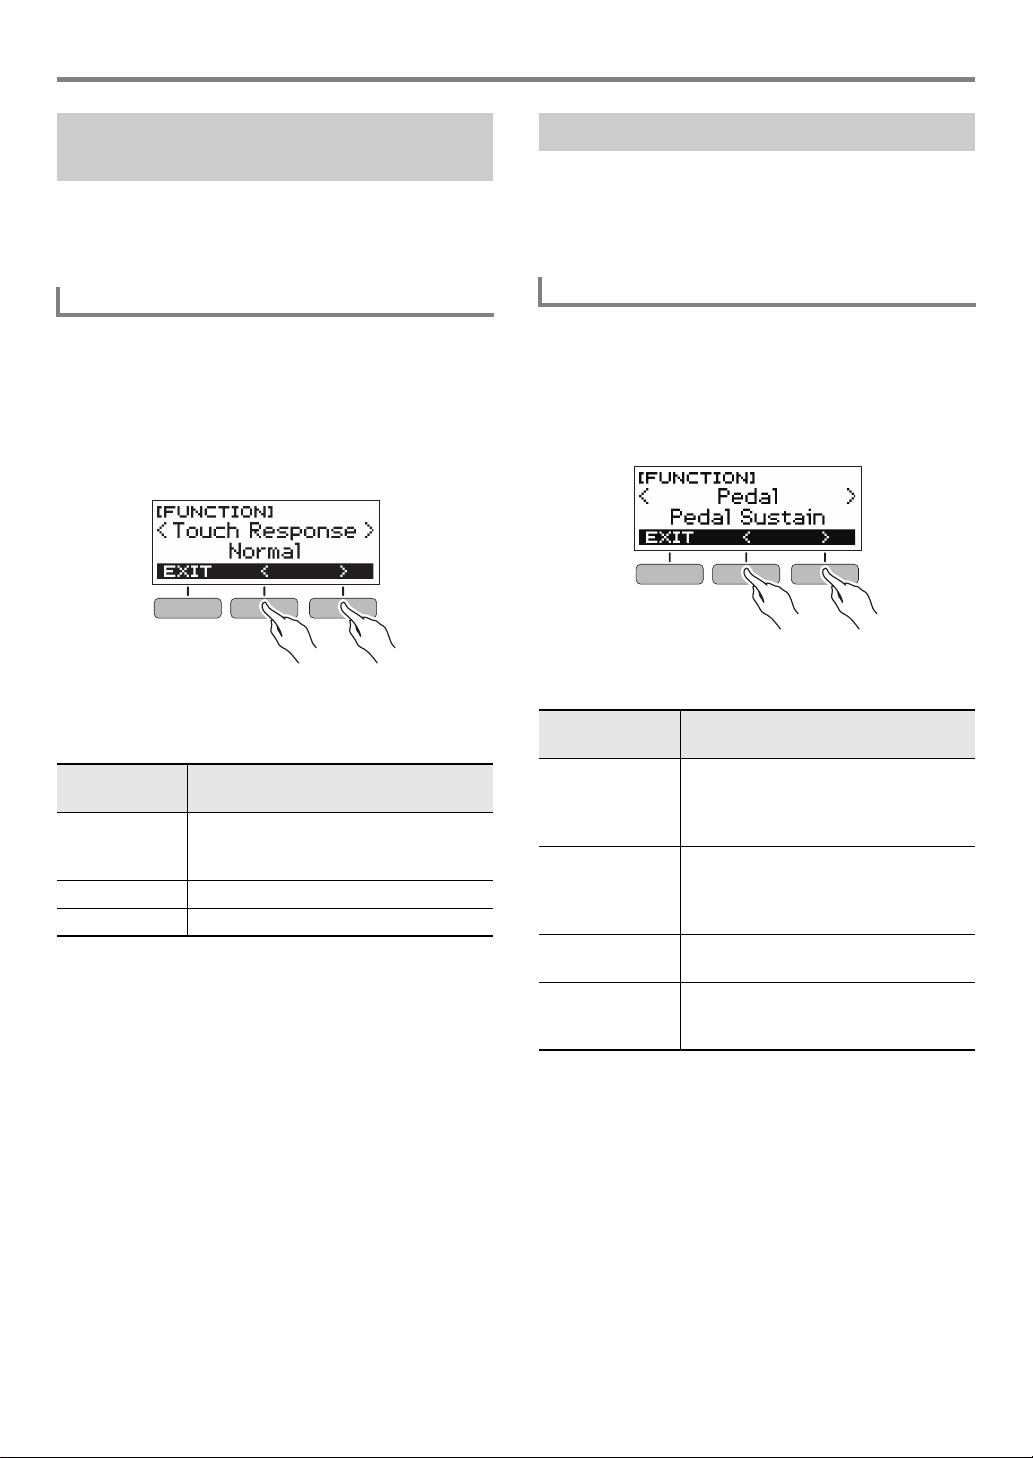
Changing Keyboard Response to Touch Pressure (Touch Response)
Touch Response alters tone volume in accordance with
keyboard pressure (press velocity). This provides you some of
the same expression capabilities you get on an acoustic
piano.
Changing Touch Response Sensitivity
1.
Press FUNCTION.
This displays the [FUNCTION] screen.
2.
Use the U and I buttons to select “Touch
Response”.
• To go back to the previous screen, press the EXIT
button.
3.
Rotate the dial to change the setting.
Touch Response settings are described in the table
below.
Setting
(Display Text)
Off (Off) Touch Response disabled. Sound
Light (Light) Strong sound even with light pressure.
Normal (Normal) Normal Touch Response.
• After you rotate the dial once to select an option, you
also will be able to change the selection using the –
and + buttons.
• To return the setting to its initial default, press the –
and + buttons at the same time.
• To go back to the previous screen, press the BACK
button.
4.
Press FUNCTION to exit the setting screen.
Description
volume is fixed, regardless of key press
velocity.
Using a Pedal
A pedal can be used to change notes while playing. Under
initial default settings, sustain is assigned to the pedal, so it
can be used as a damper pedal.
• A pedal unit does not come with the Digital Keyboard.
Purchase one separately from your retailer.
Selecting the Pedal Effect
1.
Press FUNCTION.
This displays the [FUNCTION] screen.
2.
Use the U and I buttons to select “Pedal”.
• To go back to the previous screen, press the EXIT
button.
3.
Rotate the dial to select a pedal effect type.
The following shows the available pedal effects.
Setting
(Display Text)
Pedal Sustain
(Pedal Sustain)
Sostenuto
(Sostenuto)
Soft (Soft) Pressing the pedal and playing notes
Start/Stop
(Start/Stop)
• After you rotate the dial once to select an option, you
also will be able to change the selection using the –
and + buttons.
• To return the setting to its initial default, press the –
and + buttons at the same time.
• To go back to the previous screen, press the BACK
button.
Description
Playing notes while the pedal is
depressed causes the notes to be
sustained, even if the keyboard keys
are released.
Playing notes and then pressing the
pedal before the keyboard keys are
released causes the notes to be
sustained.
causes the notes to be slightly softened.
The pedal has the same functions as
the a button. It can be used to start
and stop the metronome or rhythm play.
EN-11
Page 13
Controlling the Sound of a Performance
Using the Pitch Bend Wheel
You can use the pitch bend wheel to smoothly slide the pitch
of notes you are playing upwards and downwards. This
capability makes it possible to reproduce electric guitar
choking and saxophone note bending effects.
1.
While playing a note on the
keyboard with your right hand,
rotate the pitch bend wheel
upwards or downwards with your
left hand.
The amount the note bends depends on
how much you rotate the pitch bend
wheel.
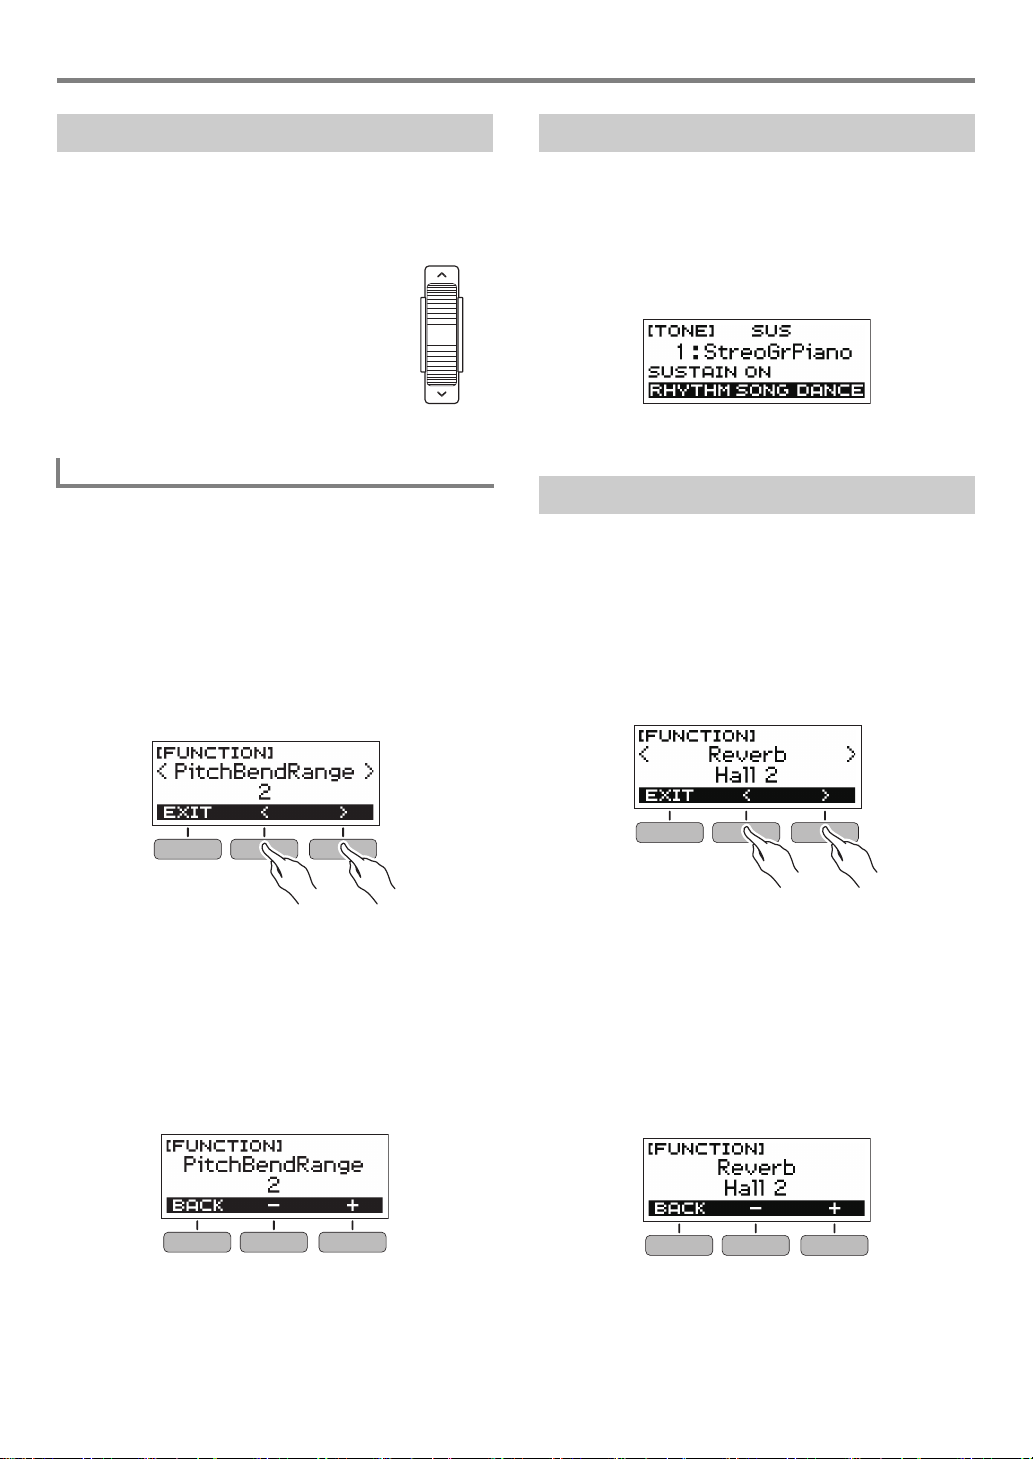
Specifying the Pitch Bend Range
You can specify, in semitone units, how much the pitch
changes when the pitch bend wheel is at maximum rotation in
either direction.
1.
Press FUNCTION.
This displays the [FUNCTION] screen.
2.
Use the U and I buttons to select
“PitchBendRange”.
• To go back to the previous screen, press the EXIT
button.
Using the SUSTAIN Button
While sustain is enabled, notes are sustained longer when
keyboard keys are released.
1.
Press SUSTAIN.
This momentarily displays “SUSTAIN ON”.
• “SUS” at the top of the display indicates that sustain is
enabled.
2.
To disable sustain, press SUSTAIN again.
Adding Reverb to Notes
You can use the procedure below to add reverb to the notes
you play.
1.
Press FUNCTION.
This displays the [FUNCTION] screen.
2.
Use the U and I buttons to select “Reverb”.
• To go back to the previous screen, press the EXIT
button.
3.
Rotate the dial to set the pitch bend range.
• You can specify a pitch bend range of 0 to 12.
• After you rotate the dial once to select an option, you
also will be able to change the selection using the –
and + buttons.
• To return the setting to its initial default, press the –
and + buttons at the same time.
• To go back to the previous screen, press the BACK
button.
4.
Press FUNCTION to exit the setting screen.
EN-12
3.
Rotate the dial to select the reverb type.
Available reverb type settings are: Off, Room 1 to 4, Hall
1 to 4, and Stadium 1 and 2.
• After you rotate the dial once to select an option, you
also will be able to change the selection using the –
and + buttons.
• To return the setting to its initial default, press the –
and + buttons at the same time.
• To go back to the previous screen, press the BACK
button.
Page 14
Controlling the Sound of a Performance
A4
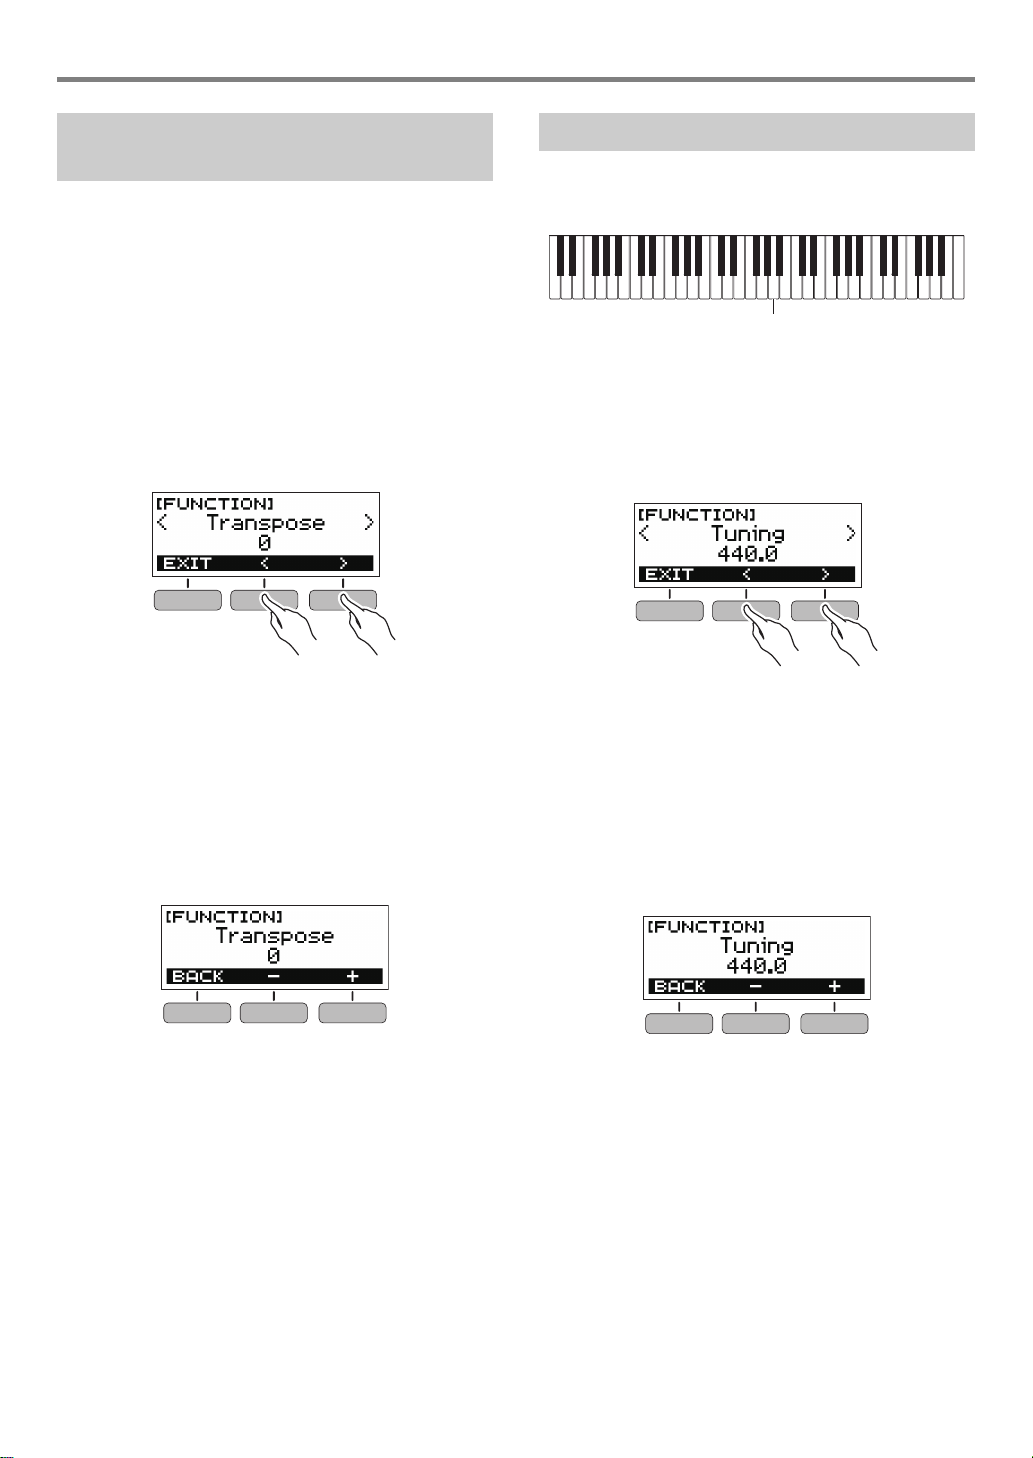
Changing the Pitch in Semitone Steps (Transpose)
Transpose lets you raise or lower the overall pitch of the
Digital Keyboard in semitone steps. You can use this feature
to raise or lower the Digital Keyboard’s key to make it easier
to play a piece written in a difficult key, or to adjust to a key
that better matches a vocalist, another musical instrument,
etc.
1.
Press FUNCTION.
This displays the [FUNCTION] screen.
2.
Use the U and I buttons to select
“Transpose”.
• To go back to the previous screen, press the EXIT
button.
3.
Rotate the dial to change the transpose value.
• The setting range is one octave up (+12 semitones)
and down (–12 semitones).
• After you rotate the dial once to select an option, you
also will be able to change the selection using the –
and + buttons.
• To return the setting to its initial default, press the –
and + buttons at the same time.
• To go back to the previous screen, press the BACK
button.
Fine Tuning Pitch (Tuning)
You can use the procedure below to adjust the overall pitch of
the Digital Keyboard by changing the frequency of A4 in 0.1Hz
units.
1.
Press FUNCTION.
This displays the [FUNCTION] screen.
2.
Use the U and I buttons to select “Tuning”.
• To go back to the previous screen, press the EXIT
button.
3.
Rotate the dial to fine tune the pitch.
• You can specify a frequency in the range of 415.5 to
465.9 Hz.
• After you rotate the dial once to select an option, you
also will be able to change the selection using the –
and + buttons.
• To return the setting to its initial default, press the –
and + buttons at the same time.
• To go back to the previous screen, press the BACK
button.
EN-13
Page 15
Saving and Loading Instrument Settings (MY SETUP)
You can use MY SETUP to save the setup (tone, rhythm, and
other settings) of the Digital Keyboard. You can recall a saved
setup when you need it to perform a particular song, etc.
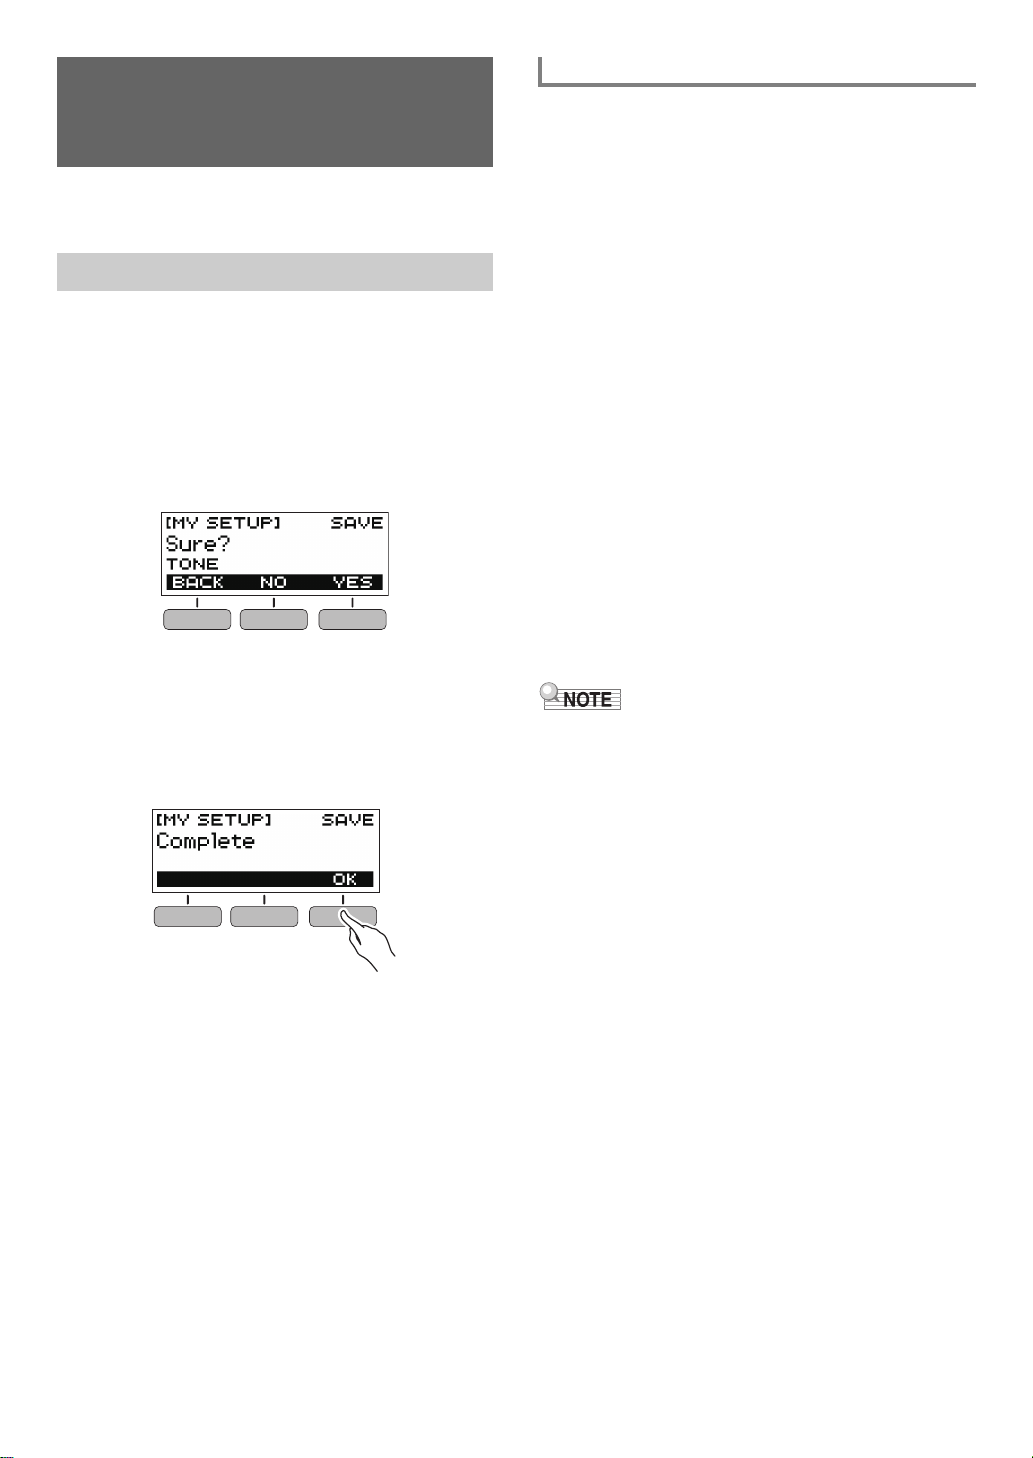
Saving to MY SETUP
1.
Press MY SETUP.
This displays the [MY SETUP] screen.
2.
Press the SAVE button.
This causes “Sure?” to appear on the display. The name
of the main setting (TONE, RHYTHM, SONG, DANCE
MUSIC) also appears.
• To go back to the previous screen, press the BACK
button.
3.
Press the YES button.
This saves the current setup to MY SETUP.
4.
When “Complete” appears on the display,
press the OK button.
This completes the save operation.
Savable Settings
You can use MY SETUP to save the items below.
• The function you are using (Tone, Rhythm, Song, Dance
Music)
• Tempo
• Tone number
• Metronome beat
• Metronome volume level
•Sustain
• Rhythm number
• Patterns
• FILL-IN
•Accomp
• Song number
• Practice part
• Count
• Tone sync
• Dance Music number
• Dance Music voice
• Transpose
• Touch Response
• Reverb
• Pedal
• Pitch bend range
•Intro/Ending
• Chord fingering mode
• Rhythm volume level
• Song volume level
• Dance Music volume level
• Tuning
• If tone sync is enabled when you save settings with MY
SETUP, recalling from MY SETUP will apply the tone sync
reverb setting, even if you changed the reverb setting to
something else before saving to MY SETUP.
EN-14
Page 16
Saving and Loading Instrument Settings (MY SETUP)
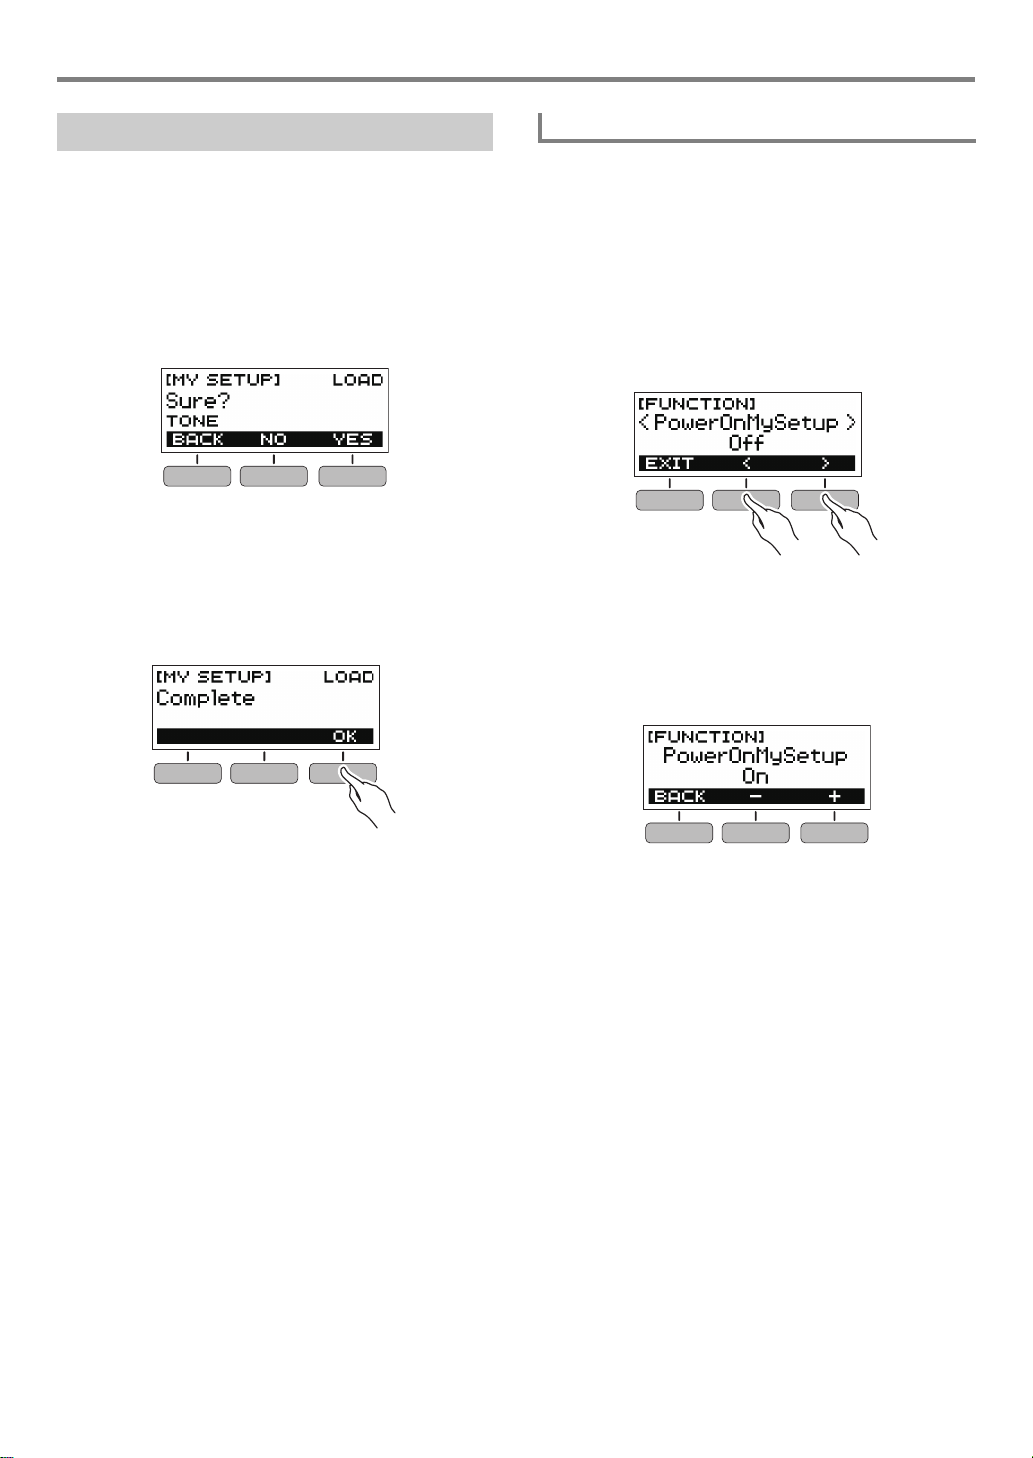
Recalling From MY SETUP
1.
Press MY SETUP.
This displays the [MY SETUP] screen.
2.
Press the LOAD button.
This causes “Sure?” to appear on the display. The name
of the main setting (TONE, RHYTHM, SONG, DANCE
MUSIC) also appears.
• To go back to the previous screen, press the BACK
button.
3.
Press the YES button.
This recalls the saved settings.
4.
When “Complete” appears on the display,
press the OK button.
This completes the recall operation.
Enabling MY SETUP Power On
Use the procedure below to enable MY SETUP power on,
which causes the MY SETUP settings to be applied whenever
the Digital Keyboard is turned on.
1.
Press FUNCTION.
This displays the [FUNCTION] screen.
2.
Use the U and I buttons to select
“PowerOnMySetup”.
• To go back to the previous screen, press the EXIT
button.
3.
Rotate the dial to the right to select “On”.
• After you rotate the dial once to select an option, you
also will be able to change the selection using the –
and + buttons.
• To go back to the previous screen, press the BACK
button.
EN-15
4.
Press FUNCTION to exit the setting screen.
Page 17

Playing a Built-in Song
Songs
With this Digital Keyboard, the term “song” is used to refer to a
musical piece. You can listen to the built-in songs for your
own enjoyment, or you can play along with them for practice.
Selecting a Song to Play
Starting or Stopping Song Play
1.
Press HOME.
This displays the home screen.
2.
Press the SONG button.
This displays the currently selected song number and
song title.
3.
Rotate the dial to select a song.
• After you rotate the dial once to select an option, you
also will be able to change the selection using the –
and + buttons.
• To go back to the previous screen, press the BACK
button.
Skip Forward and Skip Back
Use the operations in this section to perform skip forward and
skip back operations.
■ Skip Forward
While a song is playing, press the FF button to skip forward.
• Pressing the FF button once skips forward one measure,
while holding it down skips forward until it is released.
■ Skip Back
While a song is playing, press the REW button to skip back.
• Pressing the REW button once skips back one measure,
while holding it down skips back until it is released.
4.
Press a to start the song.
This causes the current measure number and beat
number to appear on the display.
• If the song includes chord information, a chord will also
appear on the display.
5.
To stop the song, press a again.
• Displaying the [SONG] screen while the metronome is
sounding or a rhythm or Dance Music is playing will cause
the ongoing operation to stop.
EN-16
Page 18

Playing a Built-in Song
Changing a Song’s Tempo (Speed) Adjusting the Song Volume Level
You can use the procedure below to change the tempo
(speed) and slow down playback to practice difficult
passages, etc.
1.
While the [SONG] screen is displayed, select
the song whose tempo you want to change and
then press TEMPO.
This displays the [TEMPO] screen.
2.
Rotate the dial to change the tempo setting.
• You can specify a tempo value in the range of 20 to
255.
• You can also use the – and + buttons to change the
setting. Press the – button to make the tempo slower
or the + button to make it faster. Holding down either
button scrolls the setting value.
• To return to the recommended setting for the current
song, press – and + at the same time.
• Changing the song number will also return the song to
its recommended tempo.
• To go back to the previous screen, press the EXIT
button.
Use the procedure below to adjust the balance between the
volume levels of song play and what you play on the
keyboard.
1.
Press FUNCTION.
This displays the [FUNCTION] screen.
2.
Use the U and I buttons to select “Song
Volume”.
• To go back to the previous screen, press the EXIT
button.
3.
Rotate the dial to adjust the volume level.
• You can specify a volume value from 0 to 127.
• After you rotate the dial once to select an option, you
also will be able to change the selection using the –
and + buttons.
• To return the setting to its initial default, press the –
and + buttons at the same time.
• To go back to the previous screen, press the BACK
button.
EN-17
4.
Press FUNCTION to exit the setting screen.
Page 19

Playing a Built-in Song
Right-hand part off
Left-hand part off
Both parts muted
Both hand parts on
Changing the Keyboard Tone While a Song is
Playing
1.
While a song is playing, press HOME.
The selected tone number and instrument name will
appear on the display.
2.
Rotate the dial to select a tone.
• For tone information, see the “Tone List” (page
EN-40).
• After you rotate the dial once to select an option, you
also will be able to change the selection using the –
and + buttons.
• To return to the first tone in the tone list, press – and +
at the same time.
• To go back to the previous screen, press the BACK
button.
Assigning the Song Tone to the Keyboard (Tone Sync)
Practicing a Song Part
You can turn off the right-hand part or the left-hand part of a
song you are playing and practice along with the remaining
part. Use this when you feel that a song is initially too difficult
for you to play with both hands at the same time.
1.
While a song is playing or stopped, press the
PART button.
Each press of the PART button cycles through the
settings shown below.
Use the procedure below to assign the song tone to the
keyboard so you can play along.
1.
While a song is playing or stopped, long-press
FUNCTION.
This momentarily displays “RECOMMENDED” and
assigns the song tone to the keyboard.
2.
Play along with the song.
• Tone sync also applies the song’s reverb setting to
keyboard play.
• Changing the tone setting or to another song will
automatically disable tone sync.
EN-18
Page 20

Playing a Built-in Song
Sounding a Count in Time with a Song
You can configure count settings to sound a count in time with
a song and to sound a pre-count before a song starts.
Sounding a Count
1.
While the song stopped, press the COUNT
button.
Press the button a number of times until “CNT” appears
on the display.
2.
Press a to start the song.
A count sounds as the song is played back.
• To turn off the count, stop the song and then press the
COUNT button a number of times until “CNT”
disappears from the display.
Sounding a Pre-count
1.
While the song stopped, press the COUNT
button.
Press the button a number of times until “PRE” appears
on the display.
2.
Press a to start the song.
This sounds a pre-count that helps you determine when
to start playing along.
• To turn off the pre-count, stop the song and then press
the COUNT button a number of times until “PRE”
disappears from the display.
• While the pre-count is enabled, the beat is not displayed
while a song is playing.
• While a count is sounding, the beat is not displayed while a
song is playing.
EN-19
Page 21

Playing in the Dance Music Mode
Melody/voice keyboard
E4 (Middle E)
Switch keyboard
Drum
A
PITCH DOWN
PITCH UP
CHANGE
ROLL
FILTER
GATE
ENDING
DrumBDrumCBassABassBBassCSyn1ASyn1BSyn1CSyn2ASyn2BSyn2
C
FX1 FX2 FX3 FX4
Auto Tension Builder Switches
Drum part Bass part
Pattern Phrase Switches
Synth 1 parts Synth 2 parts
Effect Switches
Track Reset Switch
Pattern Phrase Switches
These keys switch the pattern phrase and turn pattern
phrases on or off.
There are four parts: Drum, Bass, Synth 1 and Synth 2, and
three different pattern phrases can be assigned to each.
Effect Switches
While an Effect Switch key is depressed, the corresponding
effect is applied to the entire song. (Using Effects, page
EN-23)
Track Reset Switch
Pressing this key while a song is playing returns to the
beginning of the current phrase.
Auto Tension Builder Switches
These keyboard keys can be used to apply build-up effects
that are characteristic of dance music. (Building
Performance Tension, page EN-24)
Dance Music Mode
In the Dance Music Mode, you can create dance music by combining and playing multiple types of pattern phrases, and by
applying effects. Pattern phrases of each part can be combined, making it possible to enjoy dance music like a DJ.
Entering the Dance Music Mode (page EN-21) changes the functions of the keyboard keys as shown below.
Switch Keyboard Functions
The keys of the left-half switch keyboard have the functions below.
EN-20
Page 22

Melody/Voice Keyboard Functions
C7F4
Shout Voice
Sing Voice
The right-side melody/voice keyboard can be used to play a
melody along with pattern play, and, with the Voice Function,
to sound voices. (Using a Dance Music Voice, page EN-23)
Shout Voice
Pressing a keyboard key while the Dance Music Voice setting
is enabled sounds a voice that is characteristic of dance
music.
Sing Voice
Pressing a keyboard key while the Dance Music Voice setting
is enabled sounds a voice that resembles singing.
• Sing Voice continues to sound the voice until the keyboard
key is released.
Playing Dance Music
Playing in the Dance Music Mode
3.
Rotate the dial to select a song.
• After you rotate the dial once to select an option, you
also will be able to change the selection using the –
and + buttons.
• To return to the first Dance Music number, press the –
and + buttons at the same time.
• To go back to the previous screen, press the BACK
button.
• For a list of patterns, see the “Dance Music Mode List”
(page EN-44).
• Changing the pattern normally changes the tempo to the
setting assigned to each pattern.
4.
Press a pattern phrase bass part key to start
bass part play. Next, layer phrases in the
following sequence: Drum Part, Synth 1 Part,
Synth 2 Part.
This starts the Bass Part pattern followed by the other
parts being sequentially added to create an exciting
build-up.
1.
Press HOME.
This displays the home screen.
2.
Press the DANCE button.
This displays the currently selected Dance Music number
and pattern name.
• Entering the Dance Music Mode while the metronome is
sounding or while a rhythm is playing will cause the ongoing
operation to stop.
• You can also start or stop pattern play by pressing a.
5.
Play while trying out different combinations by
changing phrases of parts, and by adding or
removing parts.
• Use the Effect Switches and Auto Tension Builder
Switches to change patterns.
• Pressing a keyboard key that corresponds to a pattern
phrase that is currently sounding stops the phrase.
EN-21
Page 23

Changing the Dance Music Tempo
You can use the tempo setting operation to change the tempo
of pattern play.
1.
In the Dance Music Mode, select the pattern
whose tempo you want to change and then
press TEMPO.
This displays the [TEMPO] screen.
2.
Rotate the dial to change the tempo setting.
• You can specify a tempo value in the range of 20 to
255.
• You can also use the – and + buttons to change the
setting. Press the – button to make the tempo slower
or the + button to make it faster. Holding down either
button scrolls the setting value.
• To return to the recommended setting, press – and +
at the same time.
• Changing the Dance Music number will also return the
pattern to its recommended tempo.
• To go back to the previous screen, press the EXIT
button.
Playing in the Dance Music Mode
3.
Rotate the dial to adjust the Dance Music
volume level.
• You can specify a volume value from 0 to 127.
• After you rotate the dial once to select an option, you
also will be able to change the selection using the –
and + buttons.
• To return the setting to its initial default, press the –
and + buttons at the same time.
• To go back to the previous screen, press the BACK
button.
4.
Press FUNCTION to exit the setting screen.
Changing the Keyboard Tone While Dance
Music is Playing
1.
While Dance Music is playing, press HOME.
The selected tone number and instrument name will
appear on the display.
Changing the Dance Music Volume Level
1.
Press FUNCTION.
This displays the [FUNCTION] screen.
2.
Use the U and I buttons to select “Dance
Volume”.
• To go back to the previous screen, press the EXIT
button.
2.
Rotate the dial to select a tone.
• For tone information, see the “Tone List” (page
EN-40).
• After you rotate the dial once to select an option, you
also will be able to change the selection using the –
and + buttons.
• To return to the first tone in the tone list, press – and +
at the same time.
• To go back to the previous screen, press the BACK
button.
• If you change the tone setting while the Dance Music Voice
setting (page EN-23) is enabled, the tone will not change
until you disable the Dance Music Voice setting.
EN-22
Page 24

Playing in the Dance Music Mode
Using the Recommended Tone
1.
In the Dance Music Mode, long-press
FUNCTION.
This momentarily displays “RECOMMENDED” and
assigns the tone recommended for the currently selected
pattern.
• If you change the tone setting while the Dance Music Voice
setting is enabled, the tone will not change until you disable
the Dance Music Voice setting.
Using a Dance Music Voice
1.
In the Dance Music Mode, press the VOICE
button.
This causes “VOICE” to appear, which indicates that the
Melody/Voice Keyboard has been changed from Melody
Tone to Voice Tone.
• To return to the Melody Tone, press the VOICE button
again.
Using Effects
Pressing an Effect Switch key during pattern play applies one
of the effects described below to the entire song.
Keyboard Key Function Effect, Description
1
FX1 MOD LPF*
FX2 MOD HPF*
FX3 FLANGER Applies an undulating surge
FX4 LO-FI Reduces the resolution of
*1 Modulation Low Pass Filter
*2 Modulation High Pass Filter
• The display shows the applicable function name while an
effect is being applied.
• An effect is applied as long as its keyboard key is
depressed, and stops being applied when the key is
released.
• The application manner of MOD LPF and MOD HPF
changes with the tempo.
• Effects are applied to overall pattern play, and cannot be
applied to individual parts.
Cuts the high-range
frequencies of the sound.
2
Cuts the low-range
frequencies of the sound.
effect to the sound.
the sound.
• Dance Music voices are not affected by Transpose and
Sustain settings.
EN-23
Page 25

Building Performance Tension
While pattern play is in progress, you can use the build-up
function to apply dance music effects and build up tension.
Function
Name
PITCH Each press of a keyboard key
CHANGE Instantly changes the pattern
ROLL Cuts out part of a song, repeats
FILTER Applies effects that make notes
GATE Applies an effect that finely
ENDING Ends the current song while
*1 Depending on the part, some pattern phrases are not
changed.
*2 How an effect is applied changes randomly with each
keyboard key press. Effects are applied for a fixed amount
of time.
*3 While Dance Music Voice is enabled, automatically plays
back the effect along with the Voice Tone.
Description Remarks
1
changes the overall pitch of the
song. Pressing the PITCH
DOWN key lowers the pitch in
semitone units, while PITCH UP
raises the pitch in semitone units.
phrase of the current song.
it, and applies fine performance
effects.
darker (by cutting high-range
frequencies) or brighter (by
cutting low-range frequencies).
chops a song.
applying various effects.
*
1
*
2
*
3
*
2
*
3
*
2
*
3
*
2
*
3
*
Playing with a Rhythm Backing
You can use the procedures in this section to select the
rhythm you want, and then automatically play
accompaniments to suit it simply by playing chords with your
left hand. It’s like having a personal backup group along with
you wherever you go.
• Auto Accompaniments are made up of the parts
(instruments) below.
– Rhythm (percussion)
– Bass (bass instruments)
– Harmony (other instruments)
You can have only the rhythm part play, or you can have all
three parts play at the same time.
Rhythm
The rhythm part is the foundation of each Auto
Accompaniment. Your Digital Keyboard comes with a variety
of built-in rhythms, including 8-beat and waltz. Use the
procedure below to play the basic rhythm part.
Playing a Rhythm
1.
Press HOME.
This displays the home screen.
2.
Press the RHYTHM button.
This displays the [RHYTHM] screen, which shows the
currently selected rhythm number and name.
• Build-up execution timing is the beat immediately after a
keyboard key is pressed.
• Though effects and build-up functions can be used at the
same time, the effect currently being executed may stop.
• The display shows the applicable function name while a
build-up function is being used.
• If the ENDING effect is used, Dance Music play stops after
the effect is complete.
• If the pattern phrase is changed while the ENDING effect is
being applied, play of only the newly selected part
continues without stopping after the effect is complete.
• Changing the rhythm while the metronome is sounding, or
while song or Dance Music Mode play is in progress will
cause the ongoing operation to stop.
3.
Rotate the dial to select a rhythm.
This causes the category name to appear on the display.
• For information about rhythm types, see the “Rhythm
List” (page EN-45).
• After you rotate the dial once to select an option, you
also will be able to change the selection using the –
and + buttons.
• To go back to the previous screen, press the BACK
button.
EN-24
Page 26

4.
Press a.
This starts the rhythm and displays the beat.
5.
To stop the rhythm, press a again.
Changing the Tempo of a Rhythm
Use the procedure below to change tempo to a speed that
suits you.
1.
On the [RHYTHM] screen, select the name of
the rhythm whose tempo you want to change
and then press TEMPO.
This displays the [TEMPO] screen.
2.
Rotate the dial to change the tempo setting.
• You can specify a tempo value in the range of 20 to
255.
• You can also use the – and + buttons to change the
setting. Press the – button to make the tempo slower
or the + button to make it faster. Holding down either
button scrolls the setting value.
• To return to the recommended setting, press – and +
at the same time.
• To go back to the previous screen, press the EXIT
button.
Playing with a Rhythm Backing
Changing the Volume Level of a Rhythm
Use the procedure below to adjust the balance between the
volume levels of keyboard play and the rhythm.
1.
Press FUNCTION.
This displays the [FUNCTION] screen.
2.
Use the U and I buttons to select “Rhythm
Volume”.
• To go back to the previous screen, press the EXIT
button.
3.
Rotate the dial to adjust the rhythm volume
level.
• You can specify a volume value from 0 to 127.
• After you rotate the dial once to select an option, you
also will be able to change the selection using the –
and + buttons.
• To return the setting to its initial default, press the –
and + buttons at the same time.
• To go back to the previous screen, press the BACK
button.
EN-25
4.
Press FUNCTION to exit the setting screen.
Page 27

Playing with a Rhythm Backing
Changing the Keyboard Tone While a
Rhythm is Playing
1.
While a rhythm is playing, press HOME.
The selected tone number and instrument name will
appear on the display.
2.
Rotate the dial to select a tone.
• For tone information, see the “Tone List” (page
EN-40).
• After you rotate the dial once to select an option, you
also will be able to change the selection using the –
and + buttons.
• To return to the first tone in the tone list, press – and +
at the same time.
• To go back to the previous screen, press the BACK
button.
Using Recommended Rhythm Settings
Changing the Rhythm Pattern
You can use the procedure below to add liveliness to your
rhythm pattern by playing intro and ending patterns, fill-in
patterns, and variations of basic rhythm patterns.
Each Auto Accompaniment pattern has a basic “normal
pattern” as well as a “variation pattern”. This lets you play a
pattern that is different from the Normal Pattern.
1.
In the Rhythm Mode, press the PTRN button.
This causes “VAR2” to appear on the display.
• Press the PTRN button again to return to the “VAR1”
screen.
2.
Press a.
This starts the rhythm for the pattern you selected.
• If you press the PTRN button while a rhythm is playing,
the pattern will change from the beginning of the
following measure.
You can use the procedure below to use tone, and tempo
settings that are most suitable for a particular rhythm pattern.
1.
On the [RHYTHM] screen, select a rhythm
name and then long-press FUNCTION.
This momentarily displays “RECOMMENDED” and
configures the recommended rhythm settings.
EN-26
Page 28

Playing with a Rhythm Backing
Accompaniment keyboard
Inserting a Fill-in Phrase Fingering a Chord to Play a
A “fill-in” is a short phrase played where you want to change
the mood of a piece. A fill-in pattern can be used to create a
link between two melodies or as an accent.
1.
While a rhythm is playing, press the PTRN
button and then select a pattern.
2.
Press the FILL-IN button.
With some patterns, the fill-in continues until the end of
the measure where it is inserted. FILL is displayed while
a fill-in is playing.
• To continue the fill-in into the next measure, keep the
FILL-IN button depressed.
• Pressing the FILL-IN button while a rhythm is stopped
will insert the fill-in and cause it to be played as soon
as rhythm play is started. In this case, pressing the
FILL-IN button again before starting rhythm play will
remove the fill-in.
Rhythm Accompaniment
Playing a chord with your left hand automatically adds bass
and harmony accompaniment parts to the currently selected
rhythm. It is just like having your own personal back up group
on call.
1.
In the Rhythm Mode, press the ACMP button.
This causes “AC” to appear on the display and enables
chord fingering with the accompaniment (left-side)
keyboard.
2.
Press a to start the rhythm.
3.
Play something on the accompaniment
keyboard.
This will sound the bass, harmony, and other non-rhythm
part instruments.
• Playing a chord while rhythm play is stopped will cause
rhythm and accompaniment to start at the same time.
4.
Play other chords with your left hand as you
play the melody with your right hand.
5.
Press the ACMP button again to stop the
accompaniment.
EN-27
Page 29

Playing with a Rhythm Backing
Accompaniment keyboard
A
C
C
DE F F
#
b
E#G
b
AB
B
b
C
C
DE F
E
#
b
A
C
C
DE F F
#
b
E#G
b
AB
B
b
C
C
DE F
E
#
b
Selecting a Chord Fingering Mode
You can select from among the six chord fingering modes
below.
• CASIO CHORD
•FINGERED1
•FINGERED2
• FINGERED ON BASS
• FINGERED ASSIST
• FULL RANGE CHORD
1.
Press FUNCTION.
This displays the [FUNCTION] screen.
2.
Use the U and I buttons to select “Chord
Mode”.
• To go back to the previous screen, press the EXIT
button.
3.
Rotate the dial to select a chord fingering
mode.
• After you rotate the dial once to select an option, you
also will be able to change the selection using the –
and + buttons.
• To go back to the previous screen, press the BACK
button.
■ CASIO CHORD
With CASIO CHORD, you can use simplified fingerings to
play the four types of chords described below.
Chord Type Example
Major Chords
Letters above the accompaniment
keyboard indicate the name of the
chord assigned to each key.
Accompaniment keyboard keys
marked with the same chord name
play exactly the same chord.
Minor Chords
Press the key that corresponds to the
major chord, while also pressing one
other accompaniment area key to the
right.
Seventh Chords
Press the key that corresponds to the
major chord, while also pressing two
other accompaniment area keys to
the right.
Minor Seventh Chords
Press the key that corresponds to the
major chord, while also pressing
three other accompaniment area
keys to the right.
C (C Major)
E#G
#
E
DE F
A
C
B
C
AB
#
DE F F
C
C
b
b
b
b
Cm (C Minor)
C7 (C Seventh)
Cm7
(C Minor Seventh)
b
b
b
b
E#G
#
E
DE F
A
C
B
C
AB
#
DE F F
C
C
• When playing a minor, seventh, or minor seventh chord on
the accompaniment keyboard, it makes no difference
whether the additional keys you press are black or white.
EN-28
Page 30

Playing with a Rhythm Backing
Accompaniment keyboard
Accompaniment Keyboard/Melody Keyboard
■ FINGERED
With this chord fingering mode, you play chords on the
accompaniment keyboard using their normal chord fingerings.
Note that some chords can also be formed using abbreviated
fingerings of one or two keys. For information about the types
of chords you can finger and their fingerings, see the
“Fingering Guide” (page EN-46).
● FINGERED 1
Play the component notes of the chord on the keyboard.
● FINGERED 2
Unlike FINGERED 1, 6th input is not possible with this mode.
● FINGERED ON BASS
Play the component notes of the chord on the keyboard. This
mode allows input of fraction chords with the lowest keyboard
note as the base note.
● FINGERED ASSIST
In addition to FINGERED 1 input, you can also use the
fingerings below to play the three chord types.
Minor Chords
(Cm)
Seventh Chords
(C7)
Minor Seventh
Chords (Cm7)
One keyboard key for the base note and
the nearest black key to the left.
One keyboard key for the base note and
the nearest white key to the left.
One keyboard key for the base note and
the nearest black key and white key to
the left.
Inserting an Intro or an Ending
Use the procedure below to insert an intro or ending pattern of
a few measures.
1.
In the Rhythm Mode, long-press the ACMP
button.
This momentarily displays “INTRO/ENDING ON” and
then “INTRO>V1” as the current pattern.
• To disable INTRO/ENDING and display “INTRO/
ENDING OFF”, long-press the ACMP button again.
2.
To change the pattern, press the PTRN button.
Each press of the PTRN button cycles the setting in the
following sequence: “INTRO>V1”, “INTRO>V2”, “V1”,
“V2”.
• “INTRO>V1” and “INTRO>V2” are patterns with intros.
• “V1” and “V2” are short for “VAR1” and “VAR2”.
■ FULL RANGE CHORD
With this chord fingering mode, you can use the full range of
the keyboard to play chords and the melody.
EN-29
3.
Press a to start rhythm play.
If you selected a pattern with an intro, play starts with the
intro and then the pattern starts to sound after the intro is
complete.
• Instead of pressing a to start rhythm play, you can
also press the ACMP button to display the “AC”
indicator. In this case, playing a chord will start the
intro with the accompaniment.
• To stop an intro and switch to pattern play, press the
PTRN button.
• Note that you cannot select “INTRO>V1” or
“INTRO>V2” while rhythm play is in progress.
4.
At the point where you want to sound the
ending, press a.
This will cause “ENDING” to appear on the display. The
ending will play and then the rhythm will stop.
Page 31

■ Configuring [FUNCTION] Screen Settings
1.
Press FUNCTION.
This displays the [FUNCTION] screen.
2.
Use the U and I buttons to select “Intro/
Ending”.
• To go back to the previous screen, press the EXIT
button.
3.
Rotate the dial to select “On”.
• You can also use the – and + buttons to change the
setting. Pressing the – button selects “Off”, while the +
button selects “On”.
• To go back to the previous screen, press the BACK
button.
Connecting with External Devices
Linking with a Smart Device (APP Function)
You can use the APP function to connect the Digital Keyboard
with a phone, tablet or other smart device and perform the
operations described below.
• Use the Digital Keyboard sound source to sound music
data played using an app on the smart device.
• Use the lesson functions of an app on the smart device,
playing notes on the Digital Keyboard keyboard.
• Configure the settings on your smart device (Airplane
Mode, etc.) to disable data communication.
• When connecting a smart device to the Digital
Keyboard, do not connect both a USB cable and an
audio cable at the same time.
4.
Press FUNCTION to exit the setting screen.
■ Downloading the Smart Device App
Download the Chordana Play from the CASIO website and
install it on the smart device.
https://support.casio.com/global/en/emi/manual/CT-S300/
EN-30
Page 32

■ Linking the Digital Keyboard with a Smart Device
Micro-B connector
Digital Keyboard USB port (Micro-B)
Smart Device
Connecting with External Devices
1.
Referring to “Downloading the Smart Device
App” (page EN-30), install the app on the smart
device.
2.
Use a commercially available USB cable to
connect the smart device USB port to the
Digital Keyboard USB port.
• After connecting the smart device to the Digital
Keyboard, use the smart device app to perform
operations. For details about operations, refer to the
user documentation of the app.
Connecting to a computer and Using MIDI
You can connect the Digital Keyboard to a computer and
exchange MIDI data between them. You can record Digital
Keyboard play using computer music software, and use the
Digital Keyboard to play data sent to it from the computer.
■ Minimum Computer System Requirements
The following shows the minimum computer system
requirements for sending and receiving MIDI data. Check to
make sure that your computer complies with these
requirements before connecting the Digital Keyboard to it.
● Supported Operating Systems
Windows 7*
Windows 8.1*
Windows 10*
macOS (OS X / Mac OS X) 10.7, 10.8, 10.9, 10.10, 10.11,
10.12, 10.13, 10.14, 10.15
*1 Windows 7 (32-bit, 64-bit)
*2 Windows 8.1 (32-bit, 64-bit)
*3 Windows 10 (32-bit, 64-bit)
1
2
3
• For the latest news about supported operating systems,
visit the website at the URL or QR code below.
https://support.casio.com/global/en/emi/manual/CT-S300/
■ Connecting to a Computer
• Incorrect connections can make data exchange
impossible. Be sure to follow the steps of the
procedure below.
1.
Turn off the Digital Keyboard and then start up
your computer.
• Do not start up the music software on your computer
yet!
2.
Use a commercially available USB cable to
connect the Digital Keyboard to your
computer.
• Use a USB 2.0 or 1.1 A-MicroB connector type USB
cable that supports data communication.
3.
Turn on the Digital Keyboard.
• If this is the first time you are connecting, the driver
required to transfer data will automatically be installed
on your computer.
4.
Start up commercially available music software
on your computer.
5.
Use the settings of your computer’s
commercially available music software to
select “CASIO USB-MIDI” as the MIDI device.
• For information about how to select the MIDI device,
refer to the user documentation that comes with the
music software you are using.
● USB Port
• Never connect the Digital Keyboard to a computer
running an operating system that is not one of those
above. Doing so can cause malfunction of the
computer.
B
• Be sure to turn on the Digital Keyboard before starting
up your computer’s music software.
• Data send/receive cannot be performed while a song is
playing (page EN-16).
EN-31
Page 33

Connecting with External Devices
Digital Keyboard PHONES/OUTPUT jack (3.5mm stereo mini jack)
Stereo mini plug
Audio equipment, amplifier,
etc.
Stereo mini plug (3-pole)
Digital Keyboard AUDIO IN jack (3.5mm stereo mini jack)
Portable audio player, etc.
• Once you are able to connect successfully, you can leave
the USB cable connected when you turn off your computer
and/or Digital Keyboard.
• For detailed specifications and connections that apply to
MIDI data communication by this Digital Keyboard, see the
latest support information provided on the website at the
URL or QR code below.
https://support.casio.com/global/en/emi/manual/CT-S300/
■ Configuring MIDI Settings
For information about the MIDI settings below, refer to the
“Setting Item List” (page EN-33).
• MIDI Out Channel
• MIDI Out Octave Shift
• MIDI Out Velocity
• Local Control
Connecting with Audio Equipment
You can connect the Digital Keyboard to a commercially
available stereo system or amplifier, or to a recording device.
You can also use the Digital Keyboard to sound output from a
portable audio player or another device, and use that as
backing for your keyboard play.
■ Sounding Digital Keyboard Output on an
External Device
Connection requires commercially available connecting cords,
supplied by you.
• The connecting cord should have a stereo mini plug on one
end and a plug that matches the configuration of the input
jack of the external device on the other end.
• Turn off the external device and the Digital Keyboard
before connecting them. Before turning power on or
off, turn down the volume level of the Digital Keyboard
and external devices.
• After connecting, turn on the Digital Keyboard first and
then the external device.
• If Digital Keyboard notes are distorted when they are
sounded on an external audio device, lower the Digital
Keyboard’s volume level.
■ Sounding Input From an External Device on the
Digital Keyboard
Connection requires commercially available connecting cords,
supplied by you.
• The connecting cord should have a stereo mini plug (3pole) on one end for connection to the Digital Keyboard and
a plug that matches the configuration of the output jack of
external device on the other end.
• When sounding input from an external device with the
Digital Keyboard, use the external device controls to adjust
the volume level. In this case, you cannot adjust the volume
level on the Digital Keyboard.
• Turn off the Digital Keyboard before connecting.
Before turning power on or off, turn down the volume
level of the Digital Keyboard and external devices.
• After connecting, turn on the external device and then
the Digital Keyboard.
• If external device notes sounded by the Digital
Keyboard are distorted, lower the external device’s
volume level.
EN-32
Page 34

Configuring Function Settings
Configuring Settings
Use the procedure below to configure settings.
1.
Press FUNCTION.
This displays the [FUNCTION] screen.
2.
Use the U and I buttons to select a setting item.
• To go back to the previous screen, press the EXIT button.
3.
Rotate the dial to change the setting.
• After you rotate the dial once to select an option, you also will be able to change the selection using the – and + buttons.
• To go back to the previous screen, press the BACK button.
4.
Press FUNCTION to exit the setting screen.
Setting Item List
Function Name Description Display Name Setting Options
Transpose Raises or lowers the overall pitch in semitone steps. You
can use this feature to raise or lower the key of the
keyboard to make it easier to play a piece written in a
difficult key, or to adjust to a key that better matches a
vocalist, another musical instrument, etc.
Touch Response Specifies how volume changes in accordance with how
strongly keyboard keys are pressed.
Reverb Specifies the type of reverb to be applied. Reverb Off, Room 1, Room 2,
Pedal Assigns a damper function to a pedal. The pedal can be
used to sustain notes and to apply other effects during
performances.
Pitch bend range Adjusts, in semitone units, how much the pitch changes
when the pitch bend wheel is at maximum rotation.
Intro/Ending Assigns an intro that sounds when a rhythm starts or an
ending when the rhythm is stopped.
Chord Mode Specifies the chord fingering mode. Chord Mode CASIO Chord, Fingered 1,
Rhythm volume Adjusts the rhythm volume level. Rhythm Volume 0 to 127
Song volume Adjusts the song volume level. Song Volume 0 to 127
Dance Music
volume level
Tuning Fine tunes the overall pitch of the Digital Keyboard by
MIDI Out Channel Specifies the channel to output MIDI messages. MIDI Out Ch 1 to 16
Adjusts the dance music volume level. Dance Volume 0 to 127
changing the frequency of A4 in 0.1Hz units.
Transpose –12 to 0 to +12
Touch Response Off, Light, Normal
Room 3, Room 4, Hall 1,
Hall 2, Hall 3, Hall 4,
Stadium 1, Stadium 2
Pedal Pedal Sustain, Sostenuto,
Soft, Start/Stop
PitchBendRange 0 to 12
Intro/Ending Off, On
Fingered 2, Fingered on
Bass, Fingered Assist, Full
Range Chord
Tuning 415.5 to 440.0 to 465.9
EN-33
Page 35

Configuring Function Settings
Function Name Description Display Name Setting Options
MIDI Out Octave
Shift
MIDI Out Velocity Specifies the velocity of the note on message for MIDI
Power On Volume
Level
MY SETUP Power OnWhen enabled, automatically configures MY SETUP
Local Control When enabled, mutes notes when something is played
Auto Power Off Enables/disable Auto Power Off. Auto Power Off Off, On
Batteries Specifies the type of batteries being used. Battery Alkaline, Ni-MH
LCD Contrast Adjusts display contrast. LCD Contrast 1 to 12
Initialize Returns all settings to their factory defaults. Initialize
Version
Information
• Turning power off and back on again returns tone and other settings to their initial defaults (page EN-7).
• The settings below are retained even when power is turned off.
− MIDI Out Channel
− MIDI Out Octave Shift
− MIDI Out Velocity
− Startup volume level
− MY SETUP Startup
− Auto Power Off
− Battery type
− LCD contrast
Specifies, in octave units, the note message key number
for MIDI Out.
Out.
Specifies the power on volume level. PowerOnVolume 1 to 10
settings when the Digital Keyboard is turned on.
on the Digital Keyboard.
Shows version information. Version
MIDIOutOctShift –3 to 0 to +3
MIDIOutVelocity Off, 1 to 127
PowerOnMySetup Off, On
Local Control Off, On
EN-34
Page 36

Configuring Function Settings
Returning Settings to Their Initial Factory
Defaults
1.
Press FUNCTION.
This displays the [FUNCTION] screen.
2.
Use the U and I buttons to select “Initialize”.
3.
Press the ENTER button.
This causes “Sure?” to appear on the display.
4.
Press the YES button.
After initialization is complete, the message “GOING TO
RESTART” appears on the display for a few seconds,
and then the Digital Keyboard restarts.
Checking Version Information
1.
Press FUNCTION.
This displays the [FUNCTION] screen.
2.
Use the U and I buttons to select “Version”.
This displays version information.
• To go back to the previous screen, press the EXIT
button.
3.
Press FUNCTION to exit.
EN-35
Page 37

Reference
Troubleshooting
Symptom Required Action
Included Accessories
I can’t find included items during unpacking. Carefully check inside all of the packing materials.
Power Requirements
Power does not turn on. • Check the AC adaptor or make sure that the batteries are facing correctly
(page EN-4).
• Replace the batteries with new ones. Or use AC adaptor power (page
EN-4).
The Digital Keyboard suddenly turns off after
outputting a loud sound.
The Digital Keyboard suddenly powers down
after about 30 minutes.
Display
The display keeps going dark or keeps
flickering.
Screen contents are visible only from a fixed
angle.
Sound
Nothing happens when I press a keyboard
key.
Nothing happens or notes do not play
normally when I play on the accompaniment
(left-side) keyboard.
Nothing happens when I start an Auto
Accompaniment.
Nothing happens when I start playing a
song’s Auto Accompaniment.
The metronome does not sound. • Check and adjust the metronome volume level (page EN-9).
Notes keep sounding, without stopping. • Try turning the Digital Keyboard off and then back on again (page EN-7) to
Some notes are cut off while they are
playing.
The volume level or tone setting I configured
has changed.
Replace the batteries with new ones. Or use AC adaptor power (page EN-4).
Disable Auto Power Off (page EN-8).
Replace the batteries with new ones. Or use AC adaptor power (page EN-4).
This is due to Digital Keyboard’s production limitations. It does not indicate
malfunction.
• Adjust the volume level (page EN-8).
• Check if something is plugged into the PHONES/OUTPUT jack on the
back of the Digital Keyboard.
• Try turning the Digital Keyboard off and then back on again (page EN-7) to
initialize settings.
Press the ACMP button to disable chord input with the accompaniment
keyboard (page EN-27).
• With rhythms 76 and 77, nothing will sound if you do not play a chord on the
keyboard. Try playing a chord (page EN-27).
• Check and adjust the rhythm volume level (page EN-25).
• Try turning the Digital Keyboard off and then back on again (page EN-7) to
initialize settings.
• It takes a little time after you press the button until the song starts to play.
Wait for the song to start.
• Check and adjust the song volume level (page EN-17).
• Try turning the Digital Keyboard off and then back on again (page EN-7) to
initialize settings.
• Try turning the Digital Keyboard off and then back on again (page EN-7) to
initialize settings.
initialize settings.
• Replace the batteries with new ones. Or use AC adaptor power (page
EN-4).
Notes are cut off whenever the number of notes being sounded exceeds the
maximum polyphony value of 48 (24 for some tones). This does not indicate
malfunction.
• Adjust the volume level (page EN-8).
• Try turning the Digital Keyboard off and then back on again (page EN-7) to
initialize settings.
• Replace the batteries with new ones. Or use AC adaptor power (page
EN-4).
EN-36
Page 38

Symptom Required Action
With certain volume levels and tones, the
sound of notes played in one keyboard
range will sound different from those played
in another keyboard range.
With some tones, octaves do not change at
the far ends of the keyboard.
The pitch of the notes does not match other
accompanying instruments or notes sound
strange when played along with other
instruments.
The reverb of notes seems to change
suddenly.
Connecting to a computer
I can’t perform MIDI data transfers. • Check to make sure that the USB cable is connected to the Digital
This is due to system limitations and does not indicate malfunction.
This is due to system limitations and does not indicate malfunction.
• Check and adjust the transpose setting (page EN-13) and tuning setting
(page EN-13).
• Try turning the Digital Keyboard off and then back on again (page EN-7) to
initialize settings.
• Check and adjust the reverb setting (page EN-12).
• Try turning the Digital Keyboard off and then back on again (page EN-7) to
initialize settings.
Keyboard and computer, and that the correct device is selected with your
computer’s music software (page EN-31).
• Turn off the Digital Keyboard and then exit the music software on your
computer. Next, turn the Digital Keyboard back on and then restart the
music software on your computer.
Reference
Product Specifications
Model CT-S300
Keyboard 61 keys
Touch Response 2 levels, Off
Maximum Polyphony 48 notes
Tones
Preset Tones 400 preset tones (1 stereo piano tone)
Effects Reverb (10 types, Off)
Metronome
Beat Off, 1 to 16 beats
Tempo 20 to 255
Song Bank
Preset Songs 60 songs
Part Off Left hand, right hand, both hands
Auto Accompaniment
Preset Rhythms 77 types
One Touch Presets 77 types
Other INTRO, ENDING; chord input mode switching
Dance Music Mode
Preset Patterns 50 types; Dance Music effects
Demo Play Looped play of all built-in Song Bank songs (60 songs)
Function Volume Adjustment Metronome, Rhythm, Song, Dance Music
Other Functions
Transpose ±1 octave (–12 to 0 to +12 semitones)
Tuning A4 = 415.5 to 465.9 Hz (Initial Default: 440.0 Hz)
Pitch Bend Wheel 0 to 12 semitones
MIDI 16 multi-timbre received, GM Level 1 standard
APP function
Supported Devices iOS, Android (USB terminal connection)
EN-37
Page 39

Jacks
USB Port Micro-B
PEDAL jack Standard jack (6.3mm) (Pedal sustain, sostenuto, soft, start/stop)
PHONES/OUTPUT jack Stereo mini jack (3.5mm)
AUDIO IN jack Stereo mini jack (3.5mm)
Input impedance: 10 kΩ, Input sensitivity: 200 mV
AC adaptor terminal 9.5V DC
Power Requirements 2-Way Power
Batteries 6 AA-size alkaline batteries or AA-size rechargeable nickel metal hydride batteries
Continuous operation Approximately 19 hours (alkaline batteries), approximately 15 hours (rechargeable nickel
metal hydride batteries)*
Actual battery life may be shorter depending on battery type, performance style, or operation
environment.
AC Adaptor AD-E95100L (JEITA Standard, with unified polarity plug)
Auto Power Off After approximately 30 minutes of non-operation, Can be disabled.
Speakers 13cm × 6cm (oval) × 2 (Output: 2.5W + 2.5W)
Power Consumption 9.5V = 5.5W
Dimensions 93.0 (W) × 25.6 (D) × 7.3 (H) cm (36 5/8 × 10 1/16 × 2 7/8 inch)
Weight Approximately 3.3kg (7.3 lbs) (Excluding batteries)
* Measured values while using eneloop batteries.
eneloop is a trademark of Panasonic Corporation.
• Specifications and designs are subject to change without notice.
Reference
EN-38
Page 40

Reference
AC Adaptor Handling Precautions
Model: AD-E95100L
1. Read these instructions.
2. Keep these instructions on hand.
3. Heed all warnings.
4. Follow all instructions.
5. Do not use this product near water.
6. Clean only with a dry cloth.
7. Do not install near radiators, heat registers, stoves, or any other source of heat (including amplifiers).
8. Use only attachments and accessories specified by the manufacturer.
9. Refer all servicing to qualified service personnel. Servicing is required after any of the following occurs: when the product
is damaged, when the power supply cord or plug is damaged, when liquid is spilled into the product, when a foreign
object falls into the product, when the product is exposed to rain or moisture, when the product does not operate
normally, when the product is dropped.
10. Do not allow the product to be exposed to dripping or splashing liquid. Do not place any object containing liquid on the
product.
11. Do not allow the electrical load output to exceed the label rating.
12. Make sure the surrounding area is dry before plugging into a power source.
13. Make sure the product is oriented correctly.
14. Unplug the product during lightning storms or when you do not plan to use it for a long time.
15. Do not allow product ventilation openings to become blocked. Install the product in accordance with the manufacturer’s
instructions.
16. Take care the power cord is located where it will not be stepped upon or bent severely, particularly in locations close to
plugs and convenience receptacles, and in locations where it exits from the product.
17. The AC adaptor should be plugged into a power outlet as close to the product as possible to allow immediate
disconnection of the plug in case of emergency.
The symbol below is an alert indicating un-insulated hazardous voltage inside the product’s enclosure, which may be
sufficient to constitute the risk of electric shock to users.
’
The symbol below is an alert indicating the presence of important operating and maintenance (servicing) instructions in the
documentation that accompanies the product.
*
EN-39
Page 41

Tone List
Reference
No. Tone Name
PIANO
1 STEREO GRAND PIANO 0 2
2 GRAND PIANO 0 1
3 BRIGHT PIANO 1 2
4 MODERN PIANO 1 3
5 DANCE PIANO 1 1
6 MELLOW PIANO 0 3
7 STRINGS PIANO 0 8
8 HONKY-TONK 3 2
9 OCTAVE PIANO 3 9
10 BASS/PIANO 0 9
11 ELEC.GRAND PIANO 2 2
12 MODERN E.G.PIANO 2 3
13 HARPSICHORD 6 2
14 HARPSICHORD & STRINGS 6 1
ELECTRIC PIANO
15 ELEC.PIANO 4 2
16 FM E.PIANO 5 5
17 60’S E.PIANO 4 5
18 CHORUS E.PIANO 1 4 9
19 CHORUS E.PIANO 2 4 6
20 MODERN E.PIANO 5 2
21 SOFT E.PIANO 4 8
22 SYNTH-STR.E.PIANO 4 3
23 CLEAN E.PIANO 4 4
24 CLAVI 1 7 2
25 CLAVI 2 7 3
26 SOFT CLAVI 7 1
27 DETUNE CLAVI 7 8
28 SEQUENCE CLAVI 7 9
CHROMATIC PERC.
29 VIBR APHONE 1 11 2
30 VIBRAPHONE 2 11 1
31 SOFT VIBRAPHONE 1 11 3
32 SOFT VIBRAPHONE 2 11 4
33 MARIMBA 12 2
34 SOFT MARIMBA 12 1
35 CELESTA 1 8 2
36 CELESTA 2 8 1
37 GLOCKENSPIEL 9 2
38 MUSIC BOX 1 10 2
39 MUSIC BOX 2 10 1
40 XYLOPHONE 13 2
41 TUBULAR BELL 14 2
42 DULCIMER 15 2
ORGAN
43 DRAWBAR ORGAN 1 16 2
44 DRAWBAR ORGAN 2 16 1
45 PERC.ORGAN 1 17 2
46 PERC.ORGAN 2 17 3
47 ELEC.ORGAN 1 16 8
48 ELEC.ORGAN 2 16 4
49 JAZZ ORGAN 1 17 4
50 JAZZ ORGAN 2 17 6
51 ROCK ORGAN 1 18 2
52 ROCK ORGAN 2 18 1
53 FULL DRAWBAR 16 9
54 CLICK ORGAN 18 7
55 8’ORGAN 17 5
56 CHURCH ORGAN 1 19 2
57 CHURCH ORGAN 2 19 3
58 CHAPEL ORGAN 19 8
59 THEATER ORGAN 19 6
60 REE D ORGAN 20 2
61 ACCORDION 21 2
62 BANDONEON 23 2
63 HARMONICA 1 22 2
64 HARMONICA 2 22 8
GUITAR
65 NYLON STR.GUITAR 24 2
Program
Change
Bank
Select
MSB
No. Tone Name
66 STEEL STR.GUITAR 25 2
67 12 STR.GUITAR 25 8
68 CHORUS STEEL GT 25 9
69 JAZZ GUITAR 26 2
70 OCT.JAZZ GUITAR 26 8
71 CLEAN GUITAR 1 27 2
72 CLEAN GUITAR 2 27 1
73 MUTE GUITAR 28 2
74 OVERDRIVE GUITAR 29 2
75 DISTORTION GUITAR 30 2
76 POWER DIST.GUITAR 30 5
77 FEEDBACK GUITAR 31 8
78 DIST.GUITAR & BASS 30 6
BASS
79 ACOUSTIC BASS 32 2
80 FINGERED BASS 33 2
81 PICKED BASS 34 2
82 FRETLESS BASS 35 2
83 SLAP BASS 37 2
84 SAW SYNTH-BASS 38 2
85 SQUARE SYNTH-BASS 39 2
86 DIGI ROCK BASS 39 1
87 TRANCE BASS 38 4
88 SINE BASS 39 6
STR/ORCHESTRA
89 VIOLIN 40 2
90 SLOW VIOLIN 40 8
91 VIOLA 41 2
92 CELLO 42 2
93 SLOW CELLO 42 1
94 CONTRABASS 43 2
95 VIOLIN & CELLO 40 3
96 CELLO SECTION 42 4
97 PIZZICATO STRINGS 45 2
98 HARP 1 46 2
99 HARP 2 46 1
100 CHORUS HARP 46 8
ENSEMBLE
101 STRINGS 48 2
102 SLOW STRINGS 49 2
103 WIDE STRINGS 48 16
104 CHAMBER 48 3
105 OCTAVE STRINGS 48 32
106 STRINGS SFZ 48 8
107 TREMOLO STRINGS 49 1
108 FLUTE & STRINGS 49 3
109 CHOIR STRINGS 52 3
110 SYNTH-STRINGS 1 50 2
111 SYNTH-STRINGS 2 51 2
112 SYNTH-STRINGS 3 51 3
113 FAST SYNTH-STRINGS 50 3
114 CHOIR AAHS 52 2
115 VOICE DOO 53 2
116 SYNTH-VOICE 54 2
117 SYNTH-VOICE PAD 54 8
118 CHORUS SYNTH-VOICE 54 9
119 ORCHESTRA HIT 1 55 2
120 ORCHESTRA HIT 2 55 1
BRASS
121 TRUMPET 56 2
122 MELLOW TRUMPET 56 8
123 TRUMPET SFZ 56 1
124 TROMBONE 57 2
125 TUBA 58 2
126 MUTE TRUMPET 59 2
127 FRENCH HORN 60 2
128 FRENCH HORN SECTION 60 1
129 BRASS 61 2
130 BRASS SECTION 1 61 3
131 BRASS SECTION 2 61 6
Program
Change
Bank
Select
MSB
EN-40
Page 42

Reference
No. Tone Name
132 BRASS SECTION 3 61 7
133 MELLOW BRASS 61 1
134 HARD BRASS 61 5
135 BRASS SFZ 61 8
136 BRASS & STRINGS 61 4
137 SYNTH-BRASS 1 62 2
138 SYNTH-BRASS 2 63 2
139 ANALOG SYNTH-BRASS 1 62 8
140 ANALOG SYNTH-BRASS 2 62 9
REED/PIPE
141 ALTO SAX 1 65 1
142 ALTO SAX 2 65 2
143 HARD A.SAX 65 3
144 BREATHY A.SAX 65 8
145 TENOR SAX 66 1
146 SOPRANO SAX 1 64 2
147 SOPRANO SAX 2 64 1
148 BARITONE SAX 1 67 2
149 BARITONE SAX 2 67 1
150 SAX SECTION 65 9
151 CLARINET 71 2
152 OBOE 68 2
153 SOLO OBOE 68 4
154 BASSOON 70 5
155 FLUTE 1 73 2
156 FLUTE 2 73 1
157 PURE FLUTE 73 8
158 PICCOLO 72 2
159 RECORDER 74 2
160 PAN FLUTE 75 2
161 BOTTLE BLOW 1 76 2
162 BOTTLE BLOW 2 76 1
163 WHISTLE 78 2
164 OCARINA 79 2
165 FLUTE & OBOE 73 3
SYNTH-LEAD
166 SQUARE LEAD 1 80 2
167 SQUARE LEAD 2 80 3
168 SQUARE LEAD 3 80 1
169 SAW LEAD 1 81 2
170 SAW LEAD 2 81 1
171 SAW LEAD 3 81 5
172 MELLOW SAW LEAD 81 8
173 SQUARE PULSE LEAD 80 5
174 SEQUENCE SAW 81 9
175 SEQUENCE SINE 80 9
176 SINE LEAD 80 8
177 SS LEAD 81 3
178 SEQUENCE SQUARE 80 7
179 SEQUENCE PULSE 80 16
180 SLOW SAW LEAD 81 4
181 CALLIOPE 82 2
182 VENT LEAD 82 5
183 VENT SYNTH 82 1
184 CHIFF LEAD 83 2
185 SEQUENCE LEAD 1 83 5
186 SEQUENCE LEAD 2 83 3
187 VOICE LEAD 85 2
188 DISTORTION LEAD 84 8
189 CHARANG 84 2
190 CHURCH LEAD 85 4
191 SYNTH-VOICE LEAD 85 7
192 FIFTH LEAD 86 4
193 FIFTH SAW LEAD 86 2
194 FIFTH SQUARE LEAD 86 3
195 FIFTH SEQUENCE 86 1
196 BASS+LEAD 87 2
197 DANCE SQUARE LEAD 80 48
198 DANCE SYNC SQUARE LEAD 80 49
199 DANCE SAW LEAD 81 48
200 DANCE SYNC SAW LEAD 81 49
201 DANCE POLY SAW LEAD 81 50
202 DANCE SAW BASS 87 48
Program
Change
Bank
Select
MSB
No. Tone Name
SYNTH-PAD
203 FANTASY 1 88 2
204 FANTASY 2 88 3
205 WARM VOX 89 8
206 WARM PAD 89 2
207 SINE PAD 89 3
208 SOFT PAD 89 4
209 OLD TAPE PAD 89 6
210 POLYSYNTH 1 90 2
211 POLYSYNTH 2 90 1
212 POLY SAW 90 8
213 SPACE CHOIR 91 1
214 HEAVEN 91 2
215 SQUARE PAD 92 1
216 BOWED PAD 92 2
217 GLASS PAD 92 3
218 ETHNIC PAD 93 2
219 HARD METAL PAD 93 4
220 CHORUS PAD 94 1
221 HALO PAD 94 2
222 SWEEP PAD 95 2
223 RAIN DROP 96 2
224 SPACE VOICE 97 1
225 SOUND TRACK 1 97 2
226 SOUND TRACK 2 97 3
227 RAVE 97 8
228 CRYSTAL 98 2
229 CHORAL BELL 98 16
230 CELESTA PAD 99 1
231 ATMOSPHERE 99 2
232 BRIGHT BELL PAD 100 1
233 BRIGHTNESS 100 2
234 GOBLIN 101 2
235 ECHO PAD 102 2
236 ECHO DROP 102 3
237 POLY DROP 102 4
238 STAR THEME 103 2
239 SPACE PAD 103 8
240 DANCE SAW PAD 90 48
241 DANCE SQUARE PAD 1 90 49
242 DANCE SQUARE PAD 2 90 50
INDIAN
243 SITAR 1 104 2
244 SITAR 2 104 3
245 TANPURA 1 104 32
246 TANPURA 2 104 33
247 HARMONIUM 1 20 32
248 HARMONIUM 2 20 33
249 SHANAI 1 111 2
250 SHANAI 2 111 3
251 SANTUR 1 15 3
252 SANTUR 2 15 4
253 TABLA 116 16
ETHNIC
254 YANG QIN 1 15 8
255 YANG QIN 2 15 9
256 DI ZI 72 16
257 ZHENG 107 1
258 SHENG 109 8
259 SUO NA 111 32
260 XIAO 77 32
261 PI PA 105 32
262 BANJO 105 2
263 THUMB PIANO 108 2
264 STEEL DRUMS 114 2
265 RABAB 105 8
266 KOTO 107 2
GM TONES
267 GM PIANO 1 0 0
268 GM PIANO 2 1 0
269 GM PIANO 3 2 0
270 GM HONKY-TONK 3 0
271 GM E.PIANO 1 4 0
Program
Change
Bank
Select
MSB
EN-41
Page 43

Reference
No. Tone Name
272 GM E.PIANO 2 5 0
273 GM HARPSICHORD 6 0
274 GM CLAVI 7 0
275 GM CELESTA 8 0
276 GM GLOCKENSPIEL 9 0
277 GM MUSIC BOX 10 0
278 GM VIBRAPHONE 11 0
279 GM MARIMBA 12 0
280 GM XYLOPHONE 13 0
281 GM TUBULAR BELL 14 0
282 GM DULCIMER 15 0
283 GM ORGAN 1 16 0
284 GM ORGAN 2 17 0
285 GM ORGAN 3 18 0
286 GM PIPE ORGAN 19 0
287 GM REED ORGAN 20 0
288 GM ACCORDION 21 0
289 GM HARMONICA 22 0
290 GM BANDONEON 23 0
291 GM NYLON STR.GUITAR 24 0
292 GM STEEL STR.GUITAR 25 0
293 GM JAZZ GUITAR 26 0
294 GM CLEAN GUITAR 27 0
295 GM MUTE GUITAR 28 0
296 GM OVERDRIVE GUITAR 29 0
297 GM DISTORTION GUITAR 30 0
298 GM GUITAR HARMONICS 31 0
299 GM ACOUSTIC BASS 32 0
300 GM FINGERED BASS 33 0
301 GM PICKED BASS 34 0
302 GM FRETLESS BASS 35 0
303 GM SLAP BASS 1 36 0
304 GM SLAP BASS 2 37 0
305 GM SYNTH-BASS 1 38 0
306 GM SYNTH-BASS 2 39 0
307 GM VIOLIN 40 0
308 GM VIOLA 41 0
309 GM CELLO 42 0
310 GM CONTRABASS 43 0
311 GM TREMOLO STRINGS 44 0
312 GM PIZZICATO 45 0
313 GM HARP 46 0
314 GM TIMPANI 47 0
315 GM STRINGS 1 48 0
316 GM STRINGS 2 49 0
317 GM SYNTH-STRINGS 1 50 0
318 GM SYNTH-STRINGS 2 51 0
319 GM CHOIR AAHS 52 0
320 GM VOICE DOO 53 0
321 GM SYNTH-VOICE 54 0
322 GM ORCHESTRA HIT 55 0
323 GM TRUMPET 56 0
324 GM TROMBONE 57 0
325 GM TUBA 58 0
326 GM MUTE TRUMPET 59 0
327 GM FRENCH HORN 60 0
328 GM BRASS 61 0
329 GM SYNTH-BRASS 1 62 0
330 GM SYNTH-BRASS 2 63 0
331 GM SOPRANO SAX 64 0
332 GM ALTO SAX 65 0
333 GM TENOR SAX 66 0
334 GM BARITONE SAX 67 0
335 GM OBOE 68 0
336 GM ENGLISH HORN 69 0
337 GM BASSOON 70 0
338 GM CLARINET 71 0
339 GM PICCOLO 72 0
340 GM FLUTE 73 0
341 GM RECORDER 74 0
342 GM PAN FLUTE 75 0
343 GM BOTTLE BLOW 76 0
344 GM SHAKUHACHI 77 0
Program
Change
Bank
Select
MSB
No. Tone Name
345 GM WHISTLE 78 0
346 GM OCARINA 79 0
347 GM SQUARE LEAD 80 0
348 GM SAW LEAD 81 0
349 GM CALLIOPE 82 0
350 GM CHIFF LEAD 83 0
351 GM CHARANG 84 0
352 GM VOICE LEAD 85 0
353 GM FIFTH LEAD 86 0
354 GM BASS+LEAD 87 0
355 GM FANTASY 88 0
356 GM WARM PAD 89 0
357 GM POLYSYNTH 90 0
358 GM SPACE CHOIR 91 0
359 GM BOWED GLASS 92 0
360 GM METAL PAD 93 0
361 GM HALO PAD 94 0
362 GM SWEEP PAD 95 0
363 GM RAIN DROP 96 0
364 GM SOUND TRACK 97 0
365 GM CRYSTAL 98 0
366 GM ATMOSPHERE 99 0
367 GM BRIGHTNESS 100 0
368 GM GOBLINS 101 0
369 GM ECHOES 102 0
370 GM SF 103 0
371 GM SITAR 104 0
372 GM BANJO 105 0
373 GM SHAMISEN 106 0
374 GM KOTO 107 0
375 GM THUMB PIANO 108 0
376 GM BAGPIPE 109 0
377 GM FIDDLE 110 0
378 GM SHANAI 111 0
379 GM TINKLE BELL 112 0
380 GM AGOGO 113 0
381 GM STEEL DRUMS 114 0
382 GM WOOD BLOCK 115 0
383 GM TAIKO 116 0
384 GM MELODIC TOM 117 0
385 GM SYNTH-DRUM 118 0
386 GM REVERSE CYMBAL 119 0
387 GM GUITAR FRET NOISE 120 0
388 GM BREATH NOISE 121 0
389 GM SEASHORE 122 0
390 GM BIRD 123 0
391 GM TELEPHONE 124 0
392 GM HELICOPTER 125 0
393 GM APPLAUSE 126 0
394 GM GUNSHOT 127 0
DRUM SET
395 STANDARD SET 1 0 120
396 STANDARD SET 2 1 120
397 DANCE SET 29 120
398 BRUSH SET 40 120
399 ORCHESTRA SET 48 120
400 INDIAN SET 49 120
Program
Change
Bank
Select
MSB
EN-42
Page 44

Drum Assignment List
STANDARD SET 1 STANDARD SET 2
C-1
D-1
E-1
F-1
G-1
A-1
B-1
C0
D0
E0
F0
G0
A0
B0
C1
D1
E1
F1
G1
A1
B1
C2
D2
E2
F2
G2
A2
B2
C3
D3
E3
F3
G3
A3
B3
C4
D4
E4
F4
G4
A4
B4
C5
D5
E5
F5
G5
A5
B5
C6
D6
E6
F6
G6
A6
B6
C7
D7
E7
F7
G7
A7
B7
C8
D8
E8
F8
G8
A8
B8
C9
D9
E9
F9
G9
C-1
E-1
F-1
A-1
B-1
C0
E0
F0
A0
B0
C
1
E1
F1
A1
B1
C2
E2
F2
A2
B2
C3
E3
F3
A3
B3
C4
E4
F4
A4
B4
C5
E5
F5
A5
B5
C6
E6
F6
A6
B6
C7
E7
F7
A7
B
7
C8
E8
F8
A8
B8
C9
E9
F9
BRUSH SETDANCE SET
DRUMS SET NAME
ORCHESTRA SET INDIAN SET
0
1
2
3
4
5
6
7
8
9
10
11
12
13
14
15
16
17
18
19
20
21
22
23
24
25
26
27
28
29
30
31
32
33
34
35
36
37
38
39
40
41
42
43
44
45
46
47
48
49
50
51
52
53
54
55
56
57
58
59
60
61
62
63
64
65
66
67
68
69
70
71
72
73
74
75
76
77
78
79
80
81
82
83
84
85
86
87
88
89
90
91
92
93
94
95
96
97
98
99
100
101
102
103
104
105
106
107
108
109
110
111
112
113
114
115
116
117
118
119
120
121
122
123
124
125
126
127
Xiao Luo
Bang Gu
Applause
Metronome Click
Metronome Bell
Standard Kick 2
Standard Kick 1
Side Stick
Standard Snare 1
Standard Hand Clap
Standard Snare 2
Low Tom 2
Closed Hi-Hat
Low Tom 1
Pedal Hi-Hat
Mid Tom 2
Open Hi-Hat
Mid Tom 1
High Tom 2
Crash Cymbal 1
High Tom 1
Ride Cymbal 1
Chinese Cymbal
Ride Bell
Tambourine
Splash Cymbal
Cowbell
Crash Cymbal 2
Vibraslap
Ride Cymbal 2
High Bongo
Low Bongo
Mute High Conga
Open High Conga
Open Low Conga
High Timbale
Low Timbale
High Agogo
Low Agogo
Cabasa
Maracas
Short High Whistle
Long Low Whistle
Short Guiro
Long Guiro
Claves
High Wood Block
Low Wood Block
Mute Cuica
Open Cuica
Mute Triangle
Open Triangle
Shaker
Cheer Short
Cheer
Cheer Long
Cheer Fade Out
Explotion 1
Explotion 2
Room Kick 2
Room Kick 1
Room Snare 1
Room Snare 2
Power Kick 2
Power Kick 1
Power Snare 1
Power Hand Clap
Power Snare 2
Synth Kick 2
Synth Kick 1
Synth Snare 1
Synth Hand Clap
Synth Snare 2
Synth Low Tom 2
Synth Low Tom 1
Synth Mid Tom 2
Synth Mid Tom 1
Synth High Tom 2
Synth High Tom 1
Dance Kick 1
Dance Kick 2
Dance Q
Dance Snare 1
Dance Clap
Dance Snare 2
HipHop Close Hat
Noise Rise
HipHop Open Hat
Brush Kick 2
Brush Kick 1
Brush Snare 1
Brush Slap
Brush Snare 2
Brush Low Tom 2
Brush Low Tom 1
Brush Mid Tom 2
Brush Mid Tom 1
Brush High Tom 2
Brush High Tom 1
Closed Hi-Hat
Pedal Hi-Hat
Open Hi-Hat
Ride Cymbal
Timpani F
Timpani F#
Timpani G
Timpani G#
Timpani A
Timpani A#
Timpani B
Timpani C+
Timpani C#+
Timpani D+
Timpani D#+
Timpani E+
Timpani F+
Tab la Ge
Tab la Ka
Tab la Te
Tab l a Na
Tab la Tun
Key Note No.
Reference
•“” indicates a key is assigned the same tones as it is for STANDARD SET 1.
EN-43
Page 45

Reference
Song List
No. Title
PIANO/CLASSICS
1 FÜR ELISE
2 VALSE op.64 no.1 “PETIT CHIEN”
3 TURKISH MARCH (MOZART)
4TRÄUMEREI
5 ETUDE op.10 no.3 “CHANSON DE L’ADIEU”
6 LIEBESTRÄUME no.3
7 NOCTURNE op.9 no.2 (CHOPIN)
8 CANON (PACHELBEL)
9 MARY HAD A LITTLE LAMB
10 LE CYGNE FROM “LE CARNAVAL DES ANIMAUX”
11 AIR FROM “SUITE no.3”
12 SPRING FROM “THE FOUR SEASONS”
13 HUNGARIAN DANCES no.5
14 MINUET IN G MAJOR
15 GAVOTTE (GOSSEC)
16 ARABESQUE (BURGMÜLLER)
17 DECK THE HALL
18 ODE TO JOY
19 AVE MARIA (GOUNOD)
20 PRELUDE op.28 no.7 (CHOPIN)
21 GOING HOME FROM “FROM THE NEW WORLD”
22 SONATA op.27 no.2 “MOONLIGHT” 1st Mov.
23 THE ENTERTAINER
24 FRÖHLICHER LANDMANN
25 LA CHEVALERESQUE
26 JESUS BLEIBET MEINE FREUDE
27 MARCH FROM “THE NUTCRACKER”
28 CHANSON DU TOREADOR FROM “CARMEN”
29 INVENTIONEN no.1
30 PRAELUDIUM no.1 (J.S.BACH)
EVENT
31 SILENT NIGHT
32 JINGLE BELLS
33 WE WISH YOU A MERRY CHRISTMAS
34 JOY TO THE WORLD
35 O CHRISTMAS TREE
WORLD
36 WHEN THE SAINTS GO MARCHING IN
37 GREENSLEEVES
38 ANNIE LAURIE
39 AMAZING GRACE
40 TWINKLE TWINKLE LITTLE STAR
41 GRANDFATHER’S CLOCK
42 ON TOP OF OLD SMOKEY
43 COME BIRDS
44 DID YOU EVER SEE A LASSIE?
45 DANNY BOY
46 MY BONNIE
47 HOME SWEET HOME
48 AURA LEE
49 ALOHA OE
50 LONDON BRIDGE
51 UNDER THE SPREADING CHESTNUT TREE
52 SIPPIN’ CIDER THROUGH A STRAW
53 BEAUTIFUL DREAMER
54 MY DARLING CLEMENTINE
55 LITTLE BROWN JUG
56 YANKEE DOODLE
57 I’VE BEEN WORKING ON THE RAILROAD
58 OH! SUSANNA
59 TURKEY IN THE STRAW
60 FURUSATO
Dance Music Mode List
No. Pattern Name
EDM
1 ELECTRO DANCE 1
2 ELECTRO DANCE 2
3 ELECTRO DANCE 3
4 BIG BEAT TECHNO 1
5 BIG BEAT TECHNO 2
6 SPEED SHUFFLE 1
7 SPEED SHUFFLE 2
8 POP TRANCE 1
9 POP TRANCE 2
10 SLOW SOUL 1
11 DIGITAL SHUFFLE 1
12 DIGITAL SHUFFLE 2
13 POWER POP 1
14 POWER POP 2
15 POWER POP 3
16 NEO TRANCE 1
17 NEO TRANCE 2
18 HARD SHUFFLE 1
19 HARD SHUFFLE 2
20 ELECTRO BOUNCE 1
21 ELECTRO BOUNCE 2
22 POWER ELECTRO 1
23 POWER ELECTRO 2
24 ACID DANCE
25 POWER DANCE 1
26 POWER DANCE 2
27 FUTURE DANCE
28 DANCE RAGGA
29 ACID ELECTRO 1
30 ACID ELECTRO 2
31 HARD ELECTRO
32 ACID TECHNO 1
33 ACID TECHNO 2
34 FANTASTIC DANCE
35 FUTURE POP
HOUSE
36 ELECTRIC POP
37 DIGITAL SHUFFLE 3
38 POP DANCE 1
39 POP DANCE 2
40 FUTURE HOUSE 1
41 FUTURE HOUSE 2
42 SPEED HOUSE 1
43 SPEED HOUSE 2
44 URBAN DANCE 1
45 URBAN DANCE 2
HIP-HOP
46 DEEP SOUL 1
47 DEEP SOUL 2
48 SLOW SOUL 2
49 ELECTRO BOUNCE 3
50 ELECTRO RAGGA
EN-44
Page 46

Rhythm List
Reference
No. Rhythm name
8 BEAT
1 STRAIGHT 8 BEAT
2 8 BEAT
16 BEAT
3 16 BEAT
4 16 BEAT SHUFFLE 1
5 16 BEAT SHUFFLE 2
BALLAD
6 MODERN BALLAD
7 16 BEAT BALLAD
8 POP BALLAD
9 6/8 BALLAD
DANCE
10 EDM 1
11 EDM 2
12 DISCO POP
13 MODERN R&B
POPS
14 POP
15 POP ROCK
16 60’s SOUL
ROCK
17 STRAIGHT ROCK
18 SHUFFLE ROCK
19 SLOW ROCK
20 ROCK WALTZ
JAZZ
21 BIG BAND
22 SLOW SWING
23 JAZZ WALTZ
24 FOX TROT
EUROPEAN
25 POLKA
26 WALTZ 1
27 SLOW WALTZ
28 VIENNESE WALTZ
29 FRENCH WALTZ
30 TANGO
31 MARCH 1
32 MARCH 2
LATIN
33 BOSSA NOVA
34 SAMBA
35 MAMBO
36 RHUMBA
37 CHA-CHA-CHA
38 MERENGUE
39 BOLERO
40 SALSA
41 REGGAE
42 POP REGGAE
43 SKA
44 CUMBIA
INDIAN
45 BHANGRA
46 DADRA
47 GARBA
48 KEHARWA
49 TEEN TAAL
50 DANDIYA
No. Rhythm name
51 BHAJAN
52 INDIAN POP 1
53 INDIAN POP 2
54 INDIAN POP 3
55 INDIAN POP 4
56 QAWWALI
57 KERALA
58 RAJASTHANI
WORLD
AMERICAN
59 COUNTRY BALLAD
60 BLUEGRASS
61 DIXIE
62 TEX-MEX
63 FAST GOSPEL
64 HAWAIIAN
EASTERN EUROPEAN
65 RUSSIAN CHANSON
ARABIC
66 ADANI
CHINESE
67 JIANGNAN
68 DONGBEIYANGGE
69 JINGJU
70 HUANGMEIXI
71 MIAOZU
72 XINJIANG
INDONESIAN
73 DANGDUT
VARIOUS
74 CHRISTMAS WALTZ
75 STRING QUARTET
PIANO RHYTHMS
76 ARPEGGIO
77 WALTZ 2
EN-45
Page 47

Fingering Guide
C
Cm
Cdim
Caug
*3
C
5
Csus4
*3
Csus2
*3
C7
CmM7
Cdim7
*3
C6 *1
*3
Cm6 *2
*3
CaugM7
CdimM7
Caug7
Cm7
*3
CM7
Cm7
5
*3
CM7
5
C7sus4
C7
5
*3
*4*4*4
*4
*4
*4
*4
Cmadd9
C69
*3
Cm69
*3
Cadd9
C
C
D
C
F
C
F
C
GCA
C
A
C
Gm
C
AmCBm
C
Ddim
C
Fdim
C
FM7CAM7CFm7
5
C
Gdim
C
AdimCBdim
C
A7
C
F7
C
Fm7
C
B
C
CmCDmCFm
C
zzzzz zz z z z
Bm
C
zz zz zz z
Am
C
Fm
C
zzzzz zz
Gm7
C
Aadd9
C
zz z z
G7
C
zz
Cdim
C
Fdim
C
Adim
C
■ FINGERED 1, FINGERED 2 Chords
Reference
*1 With FINGERED 2, interpreted as Am7.
*2 With FINGERED 2, interpreted as Am7
*3 Inverted form not supported in some cases.
*4 These fingerings are special fingerings for Digital
Keyboard chord input, and so they are not suitable for
normal keyboard play.
b
5
.
■ FINGERED ON BASS, FULL RANGE CHORD
In addition to the chords that can be fingered with
FINGERED 1 and FINGERED 2, the chords below also are
recognized.
• With FINGERED ON BASS, the lowest note fingered is
interpreted as the base note. Inverted forms are not
supported.
• With FULL RANGE CHORD, when the lowest note fingered
is a certain distance from the neighboring note, the chord is
interpreted as a fraction chord.
• Unlike FINGERED 1, 2, and FINGERED ON BASS, FULL
RANGE CHORD requires pressing of at least three keys to
form a chord.
EN-46
Page 48

Chord Example List
*2
*1
M
m
dim
aug
sus4
sus2
7
m7
M7
m7
5
7
5
7sus4
add9
madd9
mM7
dim7
69
6
m6
FCC
/(D
)
D
(
D
)
/E
E
Reference
*1 Root *2 Chord Type
• Since the chord input range is limited, this model may not support some of the chords shown above.
EN-47
Page 49

Reference
*2
*1
M
m
dim
aug
sus4
sus2
7
m7
M7
m7
5
7
5
7sus4
add9
madd9
mM7
dim7
69
6
m6
(
A
)
/B
BF/(G
)
G
(
G
)
/A
A
*1 Root *2 Chord Type
• Since the chord input range is limited, this model may not support some of the chords shown above.
EN-48
Page 50

Function Transmitted Recognized Remarks
Basic
Channel
1
1 - 16
1 - 16
1 - 16
Default
Changed
Note
Number
0 - 127
0 - 127
*
1
0 - 127
True voice
After
Touch
Control
Change
X
X
X
O
Pitch Bender
OO
Key’s
Ch’s
Velocity
O
9nH v = 1 - 127
X
9nH v = 0, 8nH v =
**
O 9nH v = 1 - 127
X 8nH v = 64
Note ON
Note OFF
Mode
Mode 3
X
Mode 3
X
Default
Messages
Altered
015
6, 38
7
1011646566
Bank select
Modulation
Portamento Time
Data entry LSB/MSB
Volume
Pan
Expression
Hold 1
Portamento Switch
Sostenuto
Model: CT-S300 Version : 1.0
O
X
XOXXXOX
O
*
2
*3*
3
OOOOOOOOO
O
*
2
**: no relation
MIDI Implementation Chart
Page 51

Program
Change
True #
Exclusive
O
*
2
O
*
2
System
Common
XXX
XXX
Song Pos
Song Sel
Tune
Aux
Messages
Remarks
XXXXX
X
O
OXO
O
X
All sound off
Reset all controller
Local ON/OFF
All notes OFF
Active Sense
System Reset
System
Real Time
X
X
X
X
Clock
Commands
67717273748491
100, 101
Soft pedal
Filter resonance
Release time
Attack time
Brightness
Portamento Control
Reverb send level
RPN LSB/MSB
Mode 1 : OMNI ON, POLY
Mode 3 : OMNI OFF, POLY
Mode 2 : OMNI ON, MONO
Mode 4 : OMNI OFF, MONO
O : Yes
X : No
OXO
XXX
X
O
*
3
*
2
OOOOOOO
O
*
2
OO
0 - 127
*1: Depends on tone.
https://support.casio.com/global/en/emi/manual/CT-S300/
*2: For details about RPN and system exclusive messages, see MIDI Implementation at
*3: In accordance with pedal effect setting.
Page 52

MA2001-B
 Loading...