


CASELLA MEASUREMENT
Regent House,
Wolseley Road,
Kempston,
Bedford,
MK42 7JY, U.K.
Phone: +44 (0) 1234 844 100
Fax: +44 (0) 1234 841 490
E-mail: info@casellacel.com
Web: www.casellameasurement.com
User Manual
CEL-63x Environmental &
Occupational Noise Meter
HB3356-03
User Manual

CEL-63x Environmental & Occupational Noise Meter
Contents
Contents ...................................................................................................................................... 2
1 Introduction ................................................................................................................... 5
1.1 Structure of this User Manual .......................................................................................... 5
Colour coding .................................................................................................................... 6
1.2 Safety ................................................................................................................................ 7
2 Features ........................................................................................................................ 9
3 Quick reference ........................................................................................................... 10
3.1 Powering the instrument ................................................................................................ 10
Battery supply ................................................................................................................. 10
How to fit new batteries ................................................................................................. 10
Mains DC supply .............................................................................................................. 11
USB supply ....................................................................................................................... 11
Battery condition indicator .............................................................................................. 11
3.2 Using the controls........................................................................................................... 12
Soft keys .......................................................................................................................... 12
Navigation keys ............................................................................................................... 12
Run/Stop key ................................................................................................................... 12
3.3 Set the time and date .................................................................................................... 13
3.4 Calibrating the instrument .............................................................................................. 13
3.5 Making a measurement run ............................................................................................ 16
Measurement view .......................................................................................................... 16
Measurement controls ..................................................................................................... 18
Measurement data sets ................................................................................................... 21
4 Detailed description .................................................................................................... 24
4.1 Microphone and pre-amplifier ........................................................................................ 24
4.2 User controls ................................................................................................................... 24
Soft keys .......................................................................................................................... 24
Navigation keys ............................................................................................................... 25
Run/Stop key ................................................................................................................... 25
4.3 Screen groups ................................................................................................................. 25
Switch-on ......................................................................................................................... 26
Status .............................................................................................................................. 27
2 Casella CEL

CEL-63x Environmental & Occupational Noise Meter
Measurement stop screen ............................................................................................... 27
Calibration mode ............................................................................................................. 29
Measurement run screens ............................................................................................... 31
Menu screens .................................................................................................................. 33
USB connect mode .......................................................................................................... 47
4.4 Measurement views ........................................................................................................ 48
User settings.................................................................................................................... 48
Measurement functions ................................................................................................... 50
4.5 Connections .................................................................................................................... 55
Power input port ............................................................................................................. 55
Mini B USB port .............................................................................................................. 55
AC and DC output port ................................................................................................... 56
5 Mode Selection (SLM, Online, NNR) ............................................................................ 57
5.1 General ............................................................................................................................ 57
5.2 SLM Mode ....................................................................................................................... 57
5.3 Online Mode ................................................................................................................... 57
5.4 NNR Mode ....................................................................................................................... 57
6 Specifications .............................................................................................................. 59
6.1 General ............................................................................................................................ 59
6.2 Standards ........................................................................................................................ 59
6.3 Measurement range ........................................................................................................ 60
6.4 RMS frequency weightings ............................................................................................. 60
6.5 Octave and 1/3-Octave measurement ............................................................................. 60
6.6 Peak measurement ......................................................................................................... 60
6.7 RMS detector .................................................................................................................. 60
6.8 Noise floor ...................................................................................................................... 60
6.9 Frequency response ........................................................................................................ 60
6.10 Time weightings .............................................................................................................. 61
6.11 Correction filters ............................................................................................................. 61
6.12 Reference direction ......................................................................................................... 61
6.13 Reference conditions ...................................................................................................... 61
6.14 Operating environmental conditions .............................................................................. 61
6.15 Effects of temperature .................................................................................................... 61
6.16 Effects of humidity .......................................................................................................... 61
3 Casella CEL

CEL-63x Environmental & Occupational Noise Meter
6.17 Storage environmental conditions ................................................................................. 61
6.18 Microphones ................................................................................................................... 62
6.19 Calibration ....................................................................................................................... 62
6.20 Power supply .................................................................................................................. 62
6.21 Internal clock .................................................................................................................. 62
6.22 Languages ....................................................................................................................... 62
6.23 Electromagnetic compatibility ........................................................................................ 63
6.24 Effects of AC power frequency fields ............................................................................. 63
6.25 Tripod mounting ............................................................................................................. 63
6.26 Display ............................................................................................................................ 63
6.27 Memory ........................................................................................................................... 63
6.28 Connectivity .................................................................................................................... 63
6.29 Available data sets ......................................................................................................... 64
6.30 Physical ........................................................................................................................... 67
7 Care and maintenance ................................................................................................. 68
8 Servicing and Warranty arrangements ........................................................................ 69
8.1 Inspection and test ......................................................................................................... 69
8.2 Lifetime Warranty Terms and Conditions ....................................................................... 69
8.3 Repairs ............................................................................................................................ 70
8.4 User servicing .................................................................................................................. 71
9 Glossary ...................................................................................................................... 72
10 Additional information ................................................................................................. 75
10.1 Sound calibrators – Level corrections ............................................................................ 78
10.2 Response characteristics ................................................................................................ 79
10.3 Data and Protocols for Online Mode ............................................................................. 83
4 Casella CEL

CEL-63x Environmental & Occupational Noise Meter
1 Introduction
The CEL-63x series is a family of noise meters (where „x‟ is a digit that indicates
the model variant – see Figure 14 on page 59). These are powerful
measurement tools to support a wide range of industrial, health and safety, and
environmental noise measurement requirements.
For a breakdown of the different models and their functionality, refer to
section 6 Specifications beginning on page 59.
The CEL-63x instrument uses the latest digital signal processing technology to
provide a full range of functions, including integrating and real-time octave and
1/3-octave band analysis.
The CEL-63x instrument uses a colour TFT screen to show a range of
information, including operating menus and messages, warnings, and the
results of measurements. The screen is clear and easy to read under all ambient
lighting conditions, including total darkness.
Measurements captured by the CEL-63x instrument conform to international
standards for acoustic measurement. The measurements are saved
automatically in high-capacity internal Flash memory. You can transfer the
measurement results to a PC where you can manage the results and create
reports by using the Casella insight data management software.
Audio recording is available on all CEL-63X models. Audio notes are available
on all models to allow annotation of measurements. On CEL-632 and CEL-633
models, audio can be stored with data markers or for events triggered by a
specific parameter e.g. Leq.
1.1 Structure of this User Manual
The structure of this User Manual is designed to help you find the information
and instructions you need to complete a task easily. Refer to section 3 Quick
reference on page 10 for instructions to use the CEL-63x instrument.
If you need more information about any of the CEL-63x instrument‟s controls,
screens and features, then you should read the section 244 called Detailed
description, which begins on page 24.
To help you find the information you need quickly in the electronic version of
this User Manual, it includes „clickable‟ links. The links appear as blue
underlined text. You can also click the names of chapters and sections in the
bookmark panel, and in the table of contents, to jump to that part of the
manual.
5 Casella CEL
CEL-63x Environmental & Occupational Noise Meter
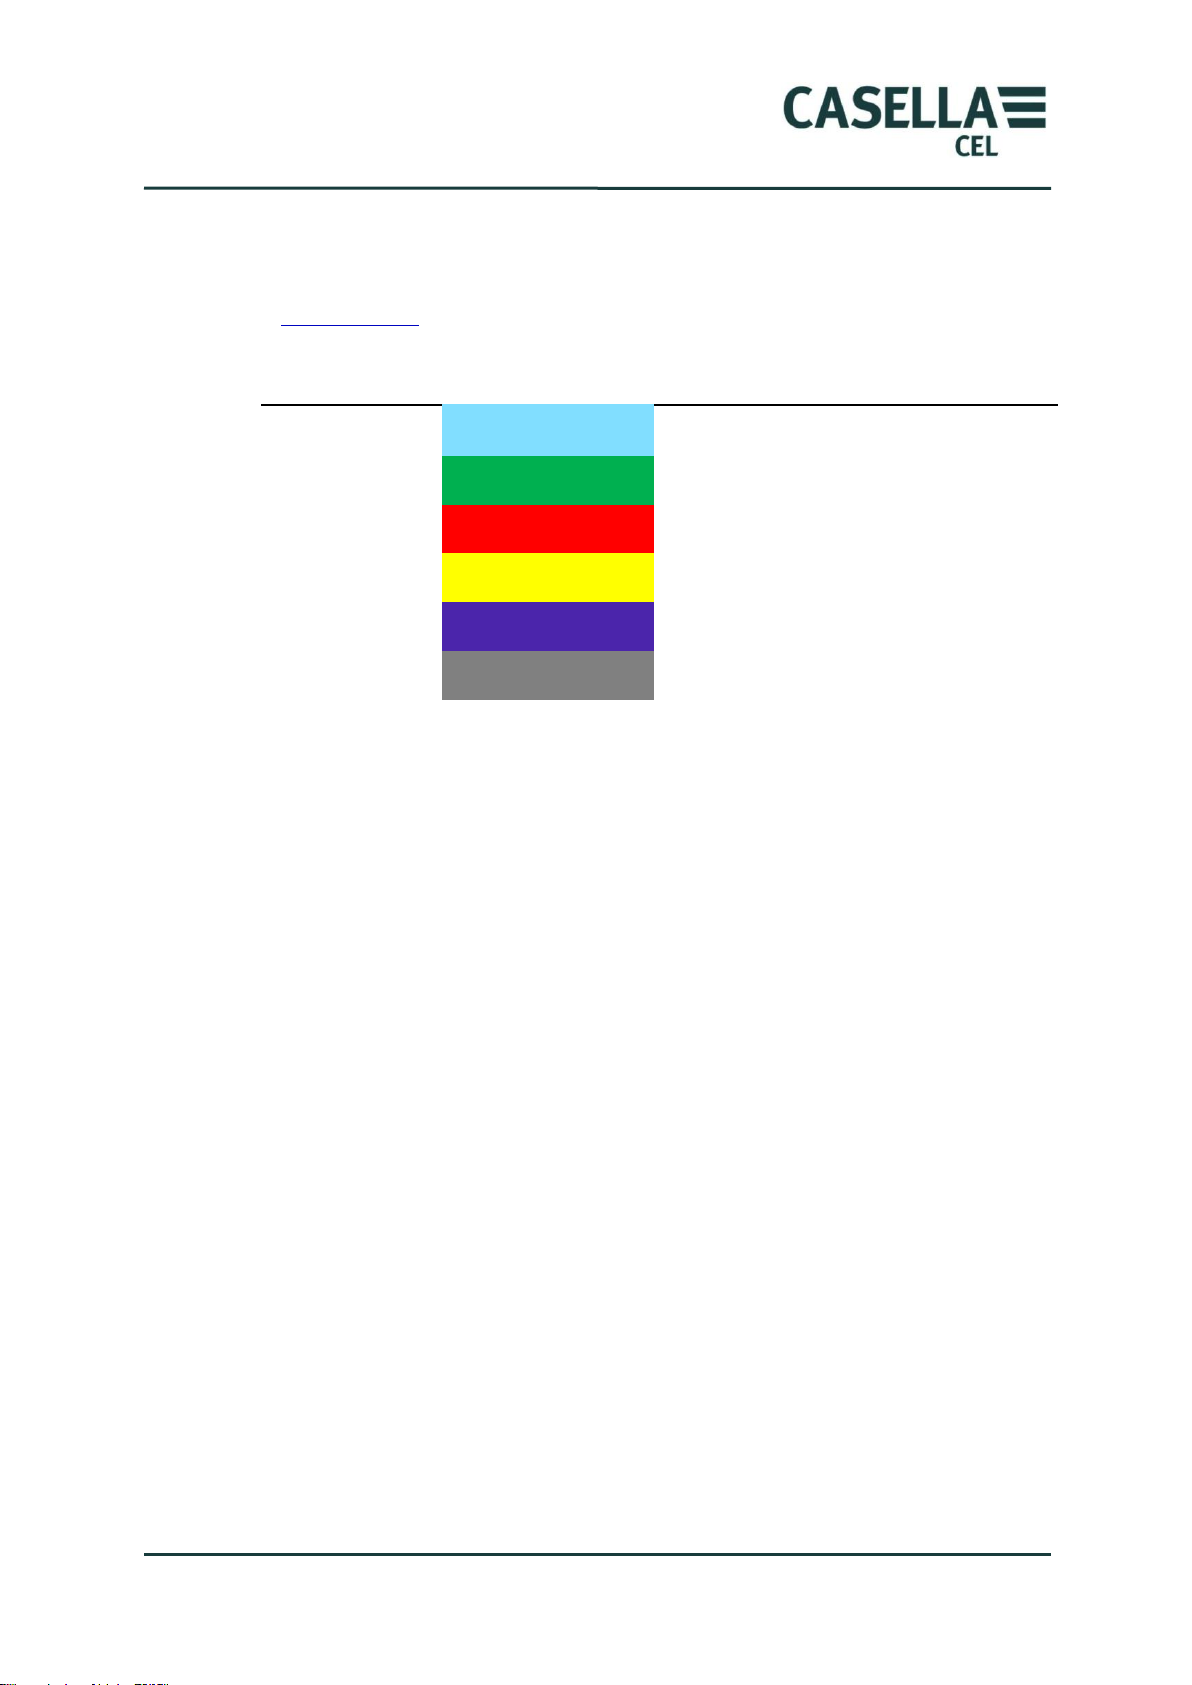
This colour…
indicates…
Cyan
Memory results screens
Green
Measurement run screens
Red
Measurement stop screens
Yellow
Calibration mode
Blue
Menu screens
Grey
USB connection mode
Colour coding
The CEL-63x instrument‟s screens use a colour code to help you identify their
purpose quickly. This manual uses the same colour codes. Refer to section 4.3
“Screen groups” beginning on page 25 for more information.
6 Casella CEL
CEL-63x Environmental & Occupational Noise Meter
WARNING
Always be aware of the risks in the environment where you are working.
The CEL-63x instrument is NOT intrinsically safe. DO NOT use it in an
atmosphere where explosive vapours or dusts might exist.
Wear approved ear defenders when making measurements in noisy
environments.
Wear approved protective clothing and footwear suitable for the environment
where you are making measurements.
Always follow local safety regulations, and be aware of risks in the area where
you are working.
CAUTION
Use the CEL-63x instrument only as instructed in this User Manual. Do not use the
instrument for any purposes for which it has not been designed.
CAUTION
The CEL-63x is a precision instrument. Always handle it with care.
Do not use the CEL-63x instrument if it has been damaged. Refer to section 8 Servicing
and Warranty arrangements on page 69 for instructions to follow if the instrument has
been damaged or has developed a fault.
1.2 Safety
The CEL-63x instrument does not present a safety risk when you use it as
instructed in this User Manual. However, it is possible that the environment
where you use the instrument may present a safety risk, and you must ALWAYS
follow correct, safe working practices.
7 Casella CEL

CEL-63x Environmental & Occupational Noise Meter
CAUTION
The CEL-63x instrument can operate from a battery power supply.
Use only batteries of the correct type, and do not mix battery types in the
instrument. Refer to “Battery supply” on page 10 for advice about battery types.
Do not try to charge non-rechargeable batteries.
Do not leave discharged batteries in the CEL-63x instrument.
Install new batteries as a complete set. Do not fit batteries that have a mixed
state of charge. Refer to “How to fit new batteries” on page 10 for instructions to
install batteries.
Remove all batteries from the CEL-63x instrument if you will not use the
instrument for a long time.
Always follow local regulations to dispose of used batteries.
CAUTION
The CEL-63x instrument is not waterproof. Do not immerse the instrument in water or
use it in the rain.
8 Casella CEL
CEL-63x Environmental & Occupational Noise Meter
When you attach the pre-amplifier to the instrument, make certain the
red dot faces towards the front of the instrument.
2 Features
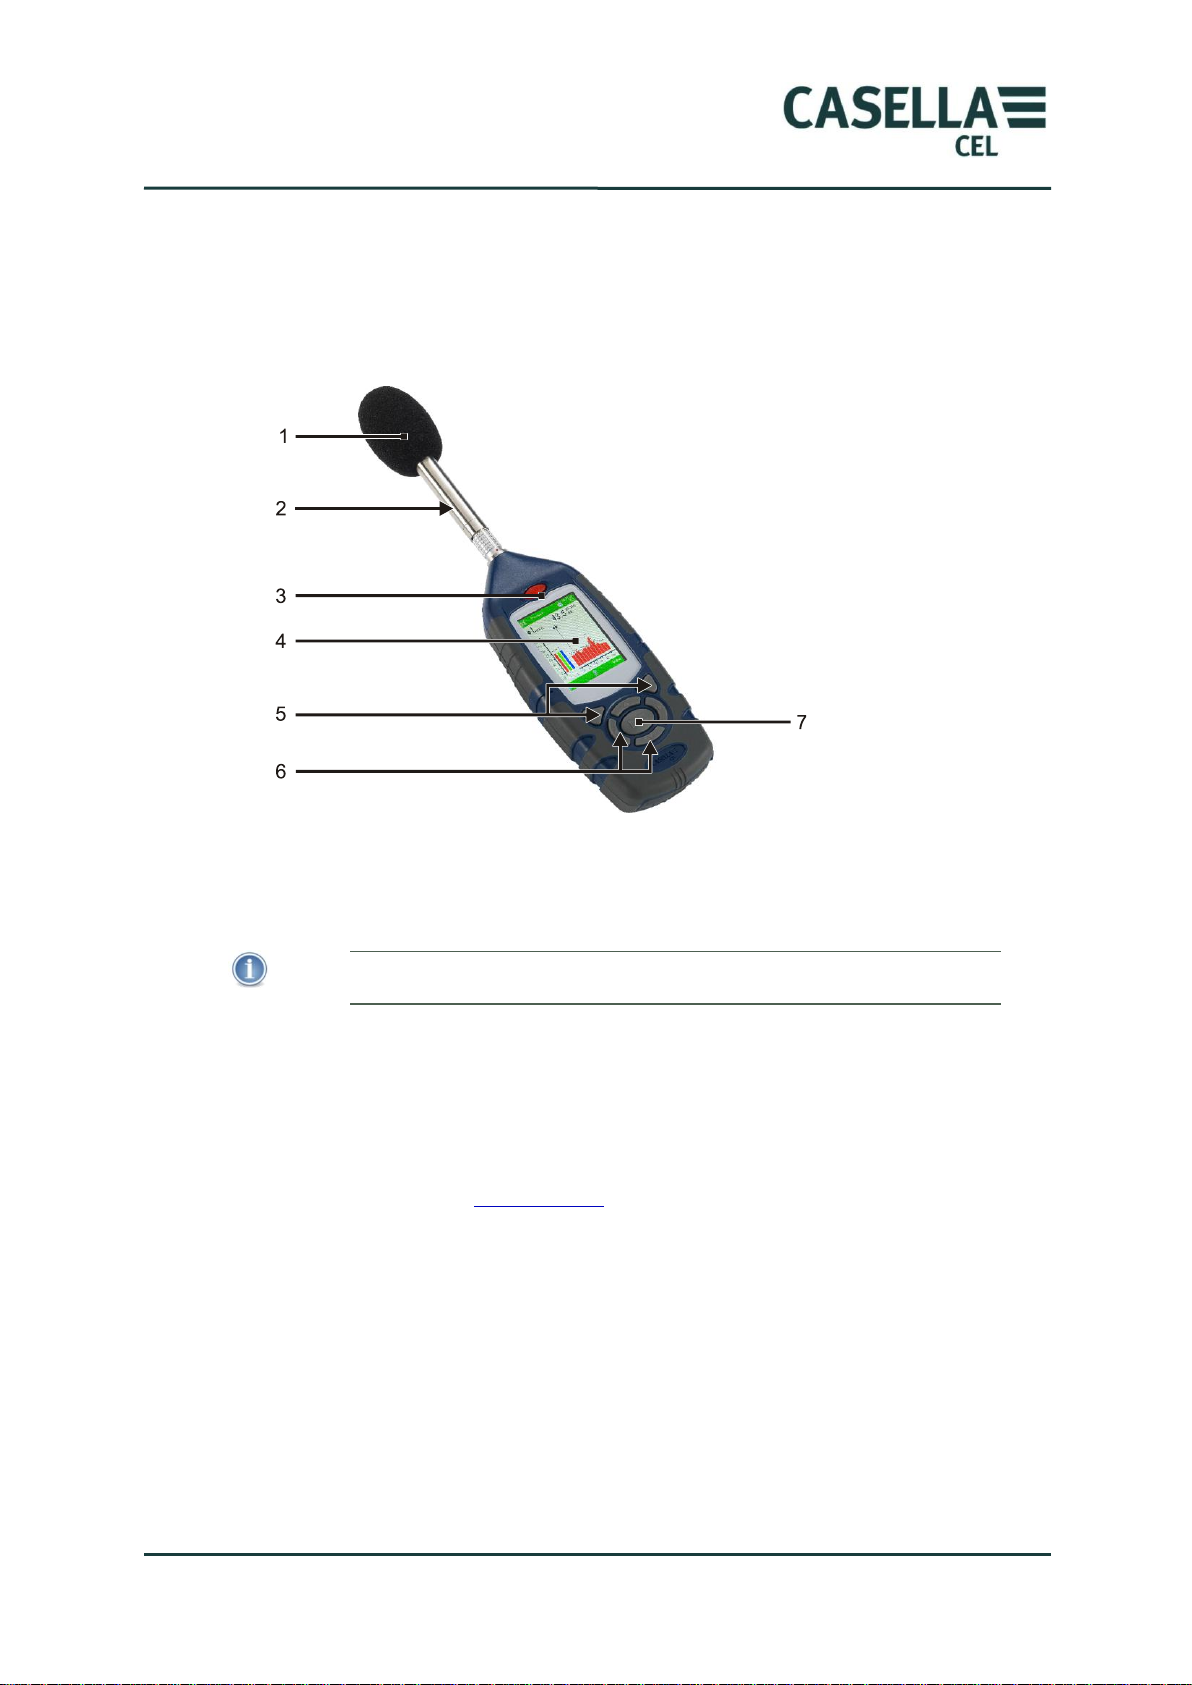
Figure 1 shows the main features of the CEL-63x instrument. Refer to Figure 1
when you perform the tasks and instructions in this User Manual.
Figure 1. Main features of the CEL-63x sound level meter
1. Windshield (to cover the removable microphone)
2. Pre-amplifier (removable – pull the knurled body of the pre-amplifier
connector away from the instrument body)
3. ON/OFF key
4. Display screen
5. Soft keys
6. Navigation keys
7. Run/Stop key
Refer to section 4.2 “User controls” on page 24 for a description of the Soft
keys, of the Navigation keys, and of the Run/Stop key.
9 Casella CEL

CEL-63x Environmental & Occupational Noise Meter
IMPORTANT
To save power when operating on batteries, the CEL-63x instrument switches OFF
automatically if no measurement run is in progress and there is no key-press activity
for five minutes.
You should operate the instrument on a mains DC power supply if you must leave it
unattended while making an extended measurement run. The instrument does NOT
switch off automatically when it operates from a mains DC supply.
3 Quick reference
3.1 Powering the instrument
The options for powering the instrument are as follows:
Batteries
12 V DC adaptor (part number -PC18)
USB connection (part number -CMC51)
Battery supply
You can use alkaline or rechargeable AA batteries to operate the instrument. Do
not use a mixture of alkaline and rechargeable batteries at the same time.
The operating time that you can expect from a fully charged or new set of
batteries depends on the battery capacity and whether you use the instrument‟s
backlight. Environmental conditions such as the ambient temperature also
affect battery life. See section 6 “Specifications” beginning on page 59 for some
typical battery life examples.
You should also carry a spare set of batteries.
How to fit new batteries
Before you begin:
Read the caution notice about Batteries on page 8.
You should check that the batteries have adequate battery life before you begin
a measurement. Replacement batteries should be new or fully charged.
10 Casella CEL

CEL-63x Environmental & Occupational Noise Meter
NOTE
The CEL-63x instrument disconnects the internal batteries when you connect a mains
DC supply to it. The batteries do not recharge when you operate the instrument from
a DC supply.
If you use rechargeable batteries with the CEL-63x instrument, you must use an
external battery charger of the correct type to charge the batteries. Follow the
charging instructions supplied by the battery manufacturer to charge the batteries.
Fitting the batteries
You do not need any special tools to fit new batteries to the instrument.
1. If necessary, press and hold the ON/OFF key to switch the instrument
OFF.
2. Remove the three exhausted batteries from the battery compartment.
3. Fit fully-charged batteries into the battery compartment, observing the
polarity markings.
4. Press and release the ON/OFF key, and check the battery symbol shows
the batteries have a good charge.
Mains DC supply
If you need to operate the instrument for a long period, you should operate the
instrument from a mains DC power supply if possible. The use of AA batteries is
also recommended in case of power interruption.
The instrument DOES NOT include a mains DC supply as standard. Please
obtain and use an optional Casella power supply (part number -PC18).
USB supply
When you connect the instrument to a PC through a USB cable, the instrument
receives power to operate at 5 V DC from the PC. There is no need to use a
mains DC power supply to operate the CEL-63x instrument when you connect it
to a PC.
Battery condition indicator
When the CEL-63x instrument receives power from a mains DC power supply
or from a USB port on a PC, the battery condition symbol on the instrument‟s
screen always shows a fully charged battery condition, even if the batteries are
not fully charged.
11 Casella CEL
CEL-63x Environmental & Occupational Noise Meter
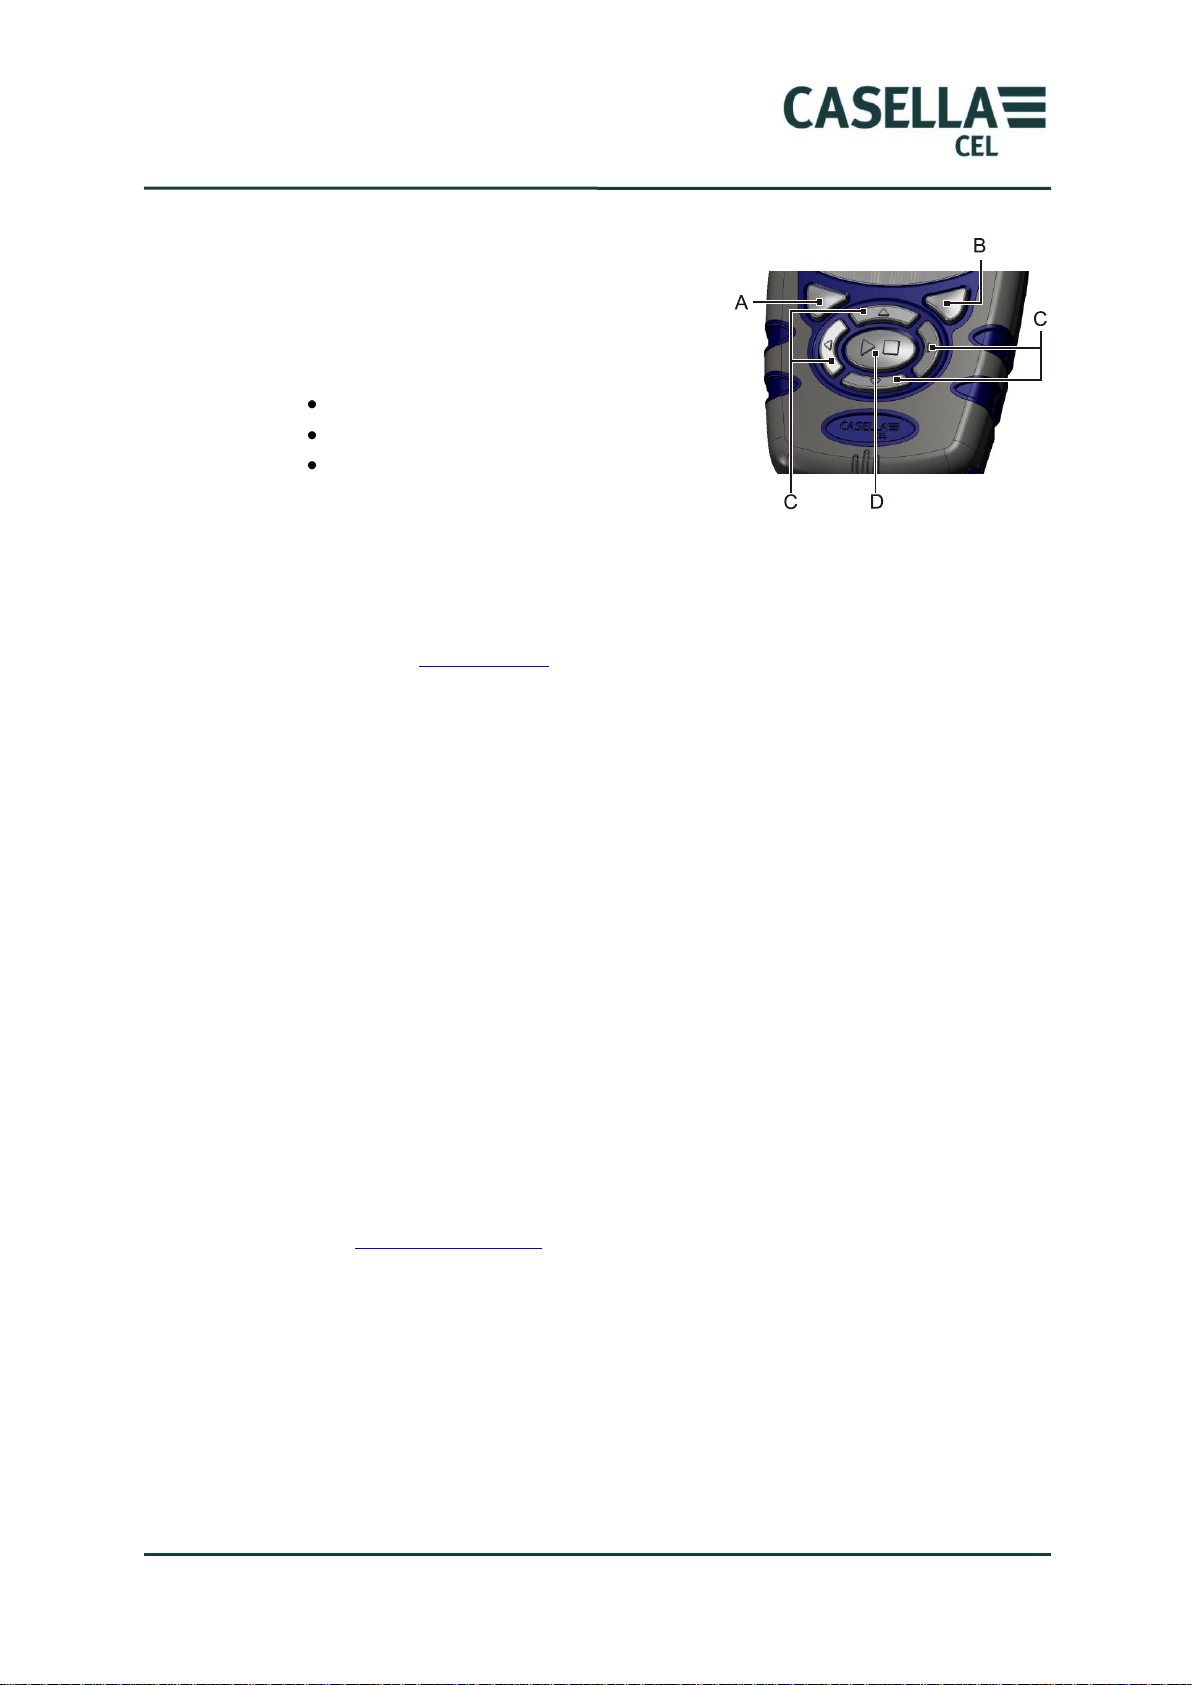
3.2 Using the controls
The CEL-63x instrument is designed to allow
easy operation. The instrument has only
seven (7) control keys, shown on the right.
These are as follows:
The Soft keys (A and B).
The Navigation keys (C) .
The Run/Stop key (D) .
The instrument is small in size, and it is
usually possible to hold and operate it using only one hand. For safety, you can
attach a wrist strap near the bottom of the instrument.
The simple descriptions below show the purpose of the user control keys. Refer
to Section 4.2 “User controls” on page 24 for a full description of the user
controls.
Soft keys
The Soft keys A and B allow you to select between the two options showing at
the bottom of the screen. These two options change, depending on which screen
is showing on the instrument‟s display.
Navigation keys
The four Navigation keys allow you to select items on the main part of the
screen. Press the , , or Navigation key to change to the next selection
in the direction of the arrow.
Run/Stop key
The Run/Stop key allows you to start and to stop a Run.
Press the key when the instrument is in the Stop mode to start the Run.
Refer to Measurement stop on page 27 for information about the Stop mode.
Press the key during a Run to stop the Run.
12 Casella CEL
CEL-63x Environmental & Occupational Noise Meter
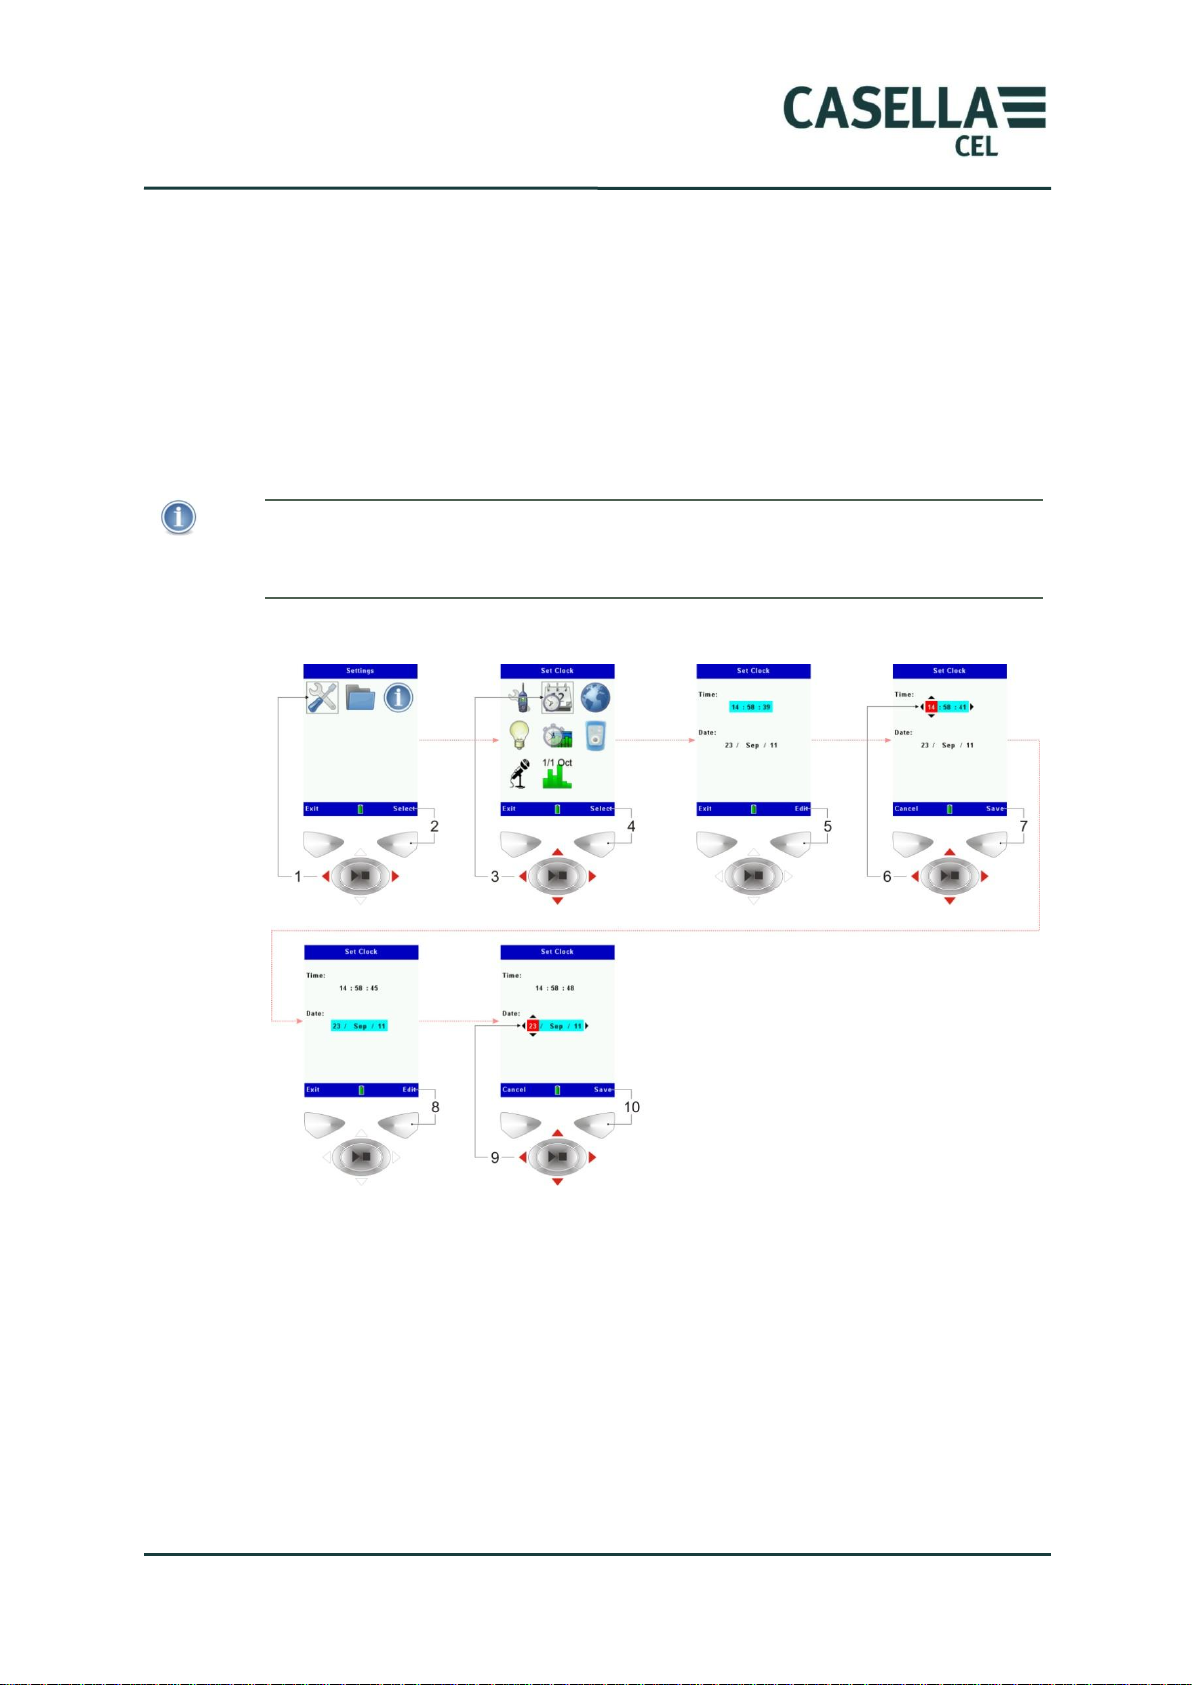
NOTE
You can set the instrument‟s clock to the exact time by setting the hour and the minute,
and then pressing the Save Soft key when the second hand of a reference clock
reaches the start of the minute.
3.3 Set the time and date
Follow the steps below to set the clock.
1. Press and release the ON/OFF key to switch the instrument ON.
2. Wait approximately 10 seconds until the instrument‟s initialization
screen changes to the Status screen.
3. Press the Menu Soft key to see the instrument‟s Settings menu.
4. Follow the instruction steps shown in Figure 2 to set the time and the
date.
Figure 2. Setting the time and date
3.4 Calibrating the instrument
The CEL-63x is a precision measuring instrument. You should calibrate it
before each measurement run and again after each measurement run so that
you can be certain its measurements are accurate.
To calibrate the instrument you will need a suitable calibrator that generates a
1 kHz reference tone. Depending on the type of calibrator, the reference tone
can have a nominal sound pressure level of either 94 dB or 114 dB. Check the
information supplied by the calibrator manufacturer to find the exact sound
pressure level that the calibrator generates.
13 Casella CEL

CEL-63x Environmental & Occupational Noise Meter
NOTE
It might be necessary to change the calibration reference level so that it includes the
pressure-to-free field correction applicable to the fitted microphone. For Casella
microphones, and assuming a 114.0 dB nominal calibrator pressure, the reference
level should be as follows:
• CEL-251 or CEL-252 = 114.0 dB (if using windshield)
• CEL-251 or CEL-252 = 113.9 dB (without windshield)
Each measurement run stores both the before-run and the after-run calibration
results, including any changes in the calibration. This confirms the absolute
accuracy of the measurement.
1. Remove the windshield from the CEL-63x instrument‟s microphone.
2. Press and release the ON/OFF key to switch the instrument ON.
3. Wait approximately 10 seconds until the instrument‟s initialization
screen changes to the Status screen.
4. Press the Menu Soft key to see the instrument‟s Settings menu.
5. Follow the instruction steps shown in Figure 3 to set the instrument‟s
calibration reference level so that it is the same as the sound pressure
level that the calibrator generates.
Figure 3. Setting the instruments calibration reference level
6. Save and exit to the Measurement screen.
7. Gently fit the calibrator to the instrument‟s microphone and press it into
position as shown in Figure 4.
14 Casella CEL

CEL-63x Environmental & Occupational Noise Meter
NOTE
Calibration mode operates only in Stop mode (when the instrument shows red screen
bars). It does not operate while a run is active.
Figure 4. Instrument calibration
8. Press the ON/OFF key on the calibrator (item 1 in Figure 4) to switch
the calibrator ON.
The CEL-63x instrument selects the calibration screen automatically
when it detects a stable 1 kHz calibration tone.
9. Follow the instruction steps in Figure 4 to complete the calibration and
save the results.
Note that the calibration takes typically less than 10 seconds to complete
and for the screen to display the word “PASSED”.
10. Press the Exit soft key on the instrument.
11. Press and hold the ON/OFF key on the calibrator to switch the
calibrator OFF.
12. Remove the calibrator from the instrument‟s microphone, and re-fit the
microphone‟s windshield.
You have now calibrated the CEL-63x instrument and made it ready for a
measurement run.
15 Casella CEL

CEL-63x Environmental & Occupational Noise Meter
3.5 Making a measurement run
The CEL-63x instrument measures, calculates and records all noise functions
simultaneously during a measurement. In this manner it removes the need for
critical set up of the instrument before any measurement.
Measurement runs can be recorded as cumulative or periodic data sets, as well
as a fast profile time history. For an explanation of these modes, refer to
“Measurement data sets” beginning on page 21.
Measurement view
The measurement view simply defines which functions you view on the
instrument‟s screen, either while making a measurement or while reviewing
measurements recorded previously.
The instrument has a wide range of measurement view options that you can
choose. The individual types of instrument in the CEL-63x range offer different
views. Refer to section 6 Specifications beginning on page 59 for more
information.
There are four fixed views that meet international requirements for
workplace noise measurements. You can review the functions displayed
for each of these fixed views, but you cannot change them.
There are two fixed views for environmental noise measurements. These
views display the functions that are commonly reported for
environmental measurements. You can review the functions for each of
these fixed views, but you cannot change them.
There are two user-defined views that allow you to review and change
the measurement functions.
Use the Navigation keys to select one of the measurement view options, and
press the right-hand Soft key to set the measurement view. The screen shows
the word “Active” next to the measurement view you have set.
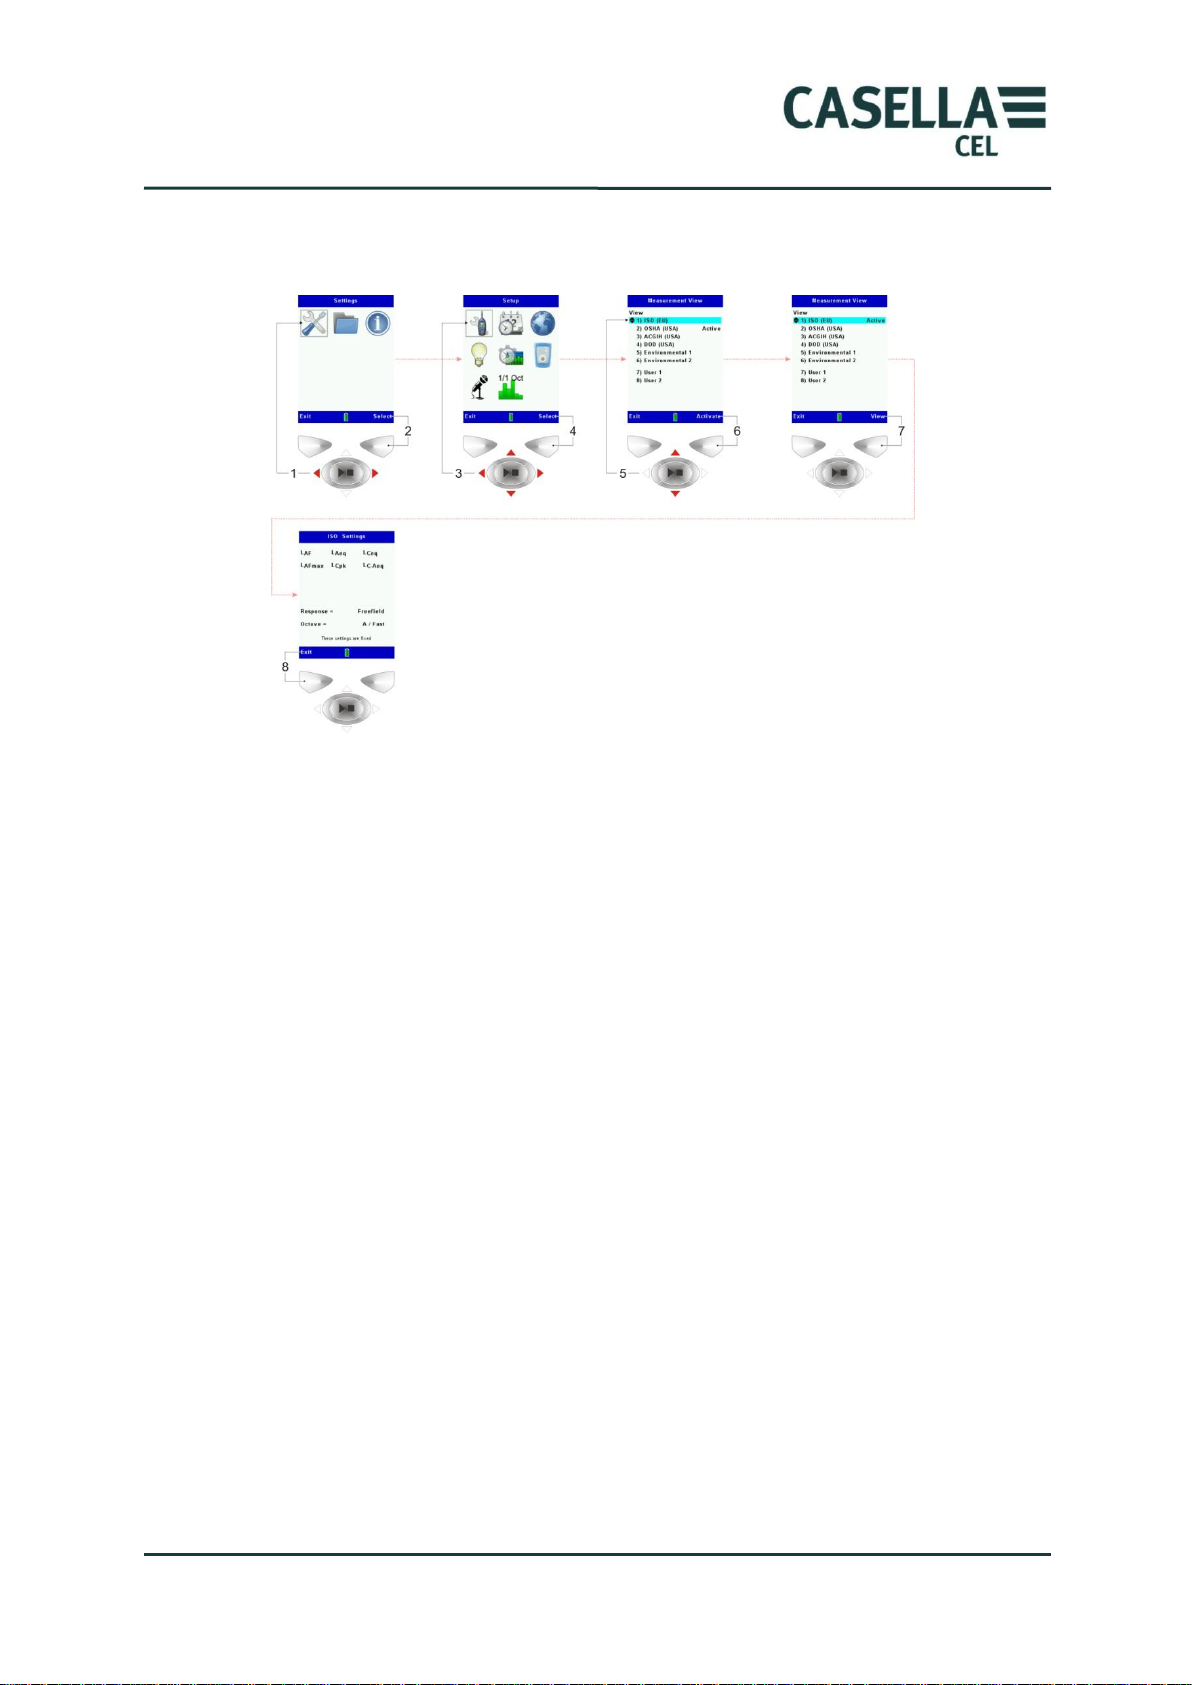
Figure 5 on page 17 explains how to select a fixed measurement view and how to
review the functions for the selected measurement view.
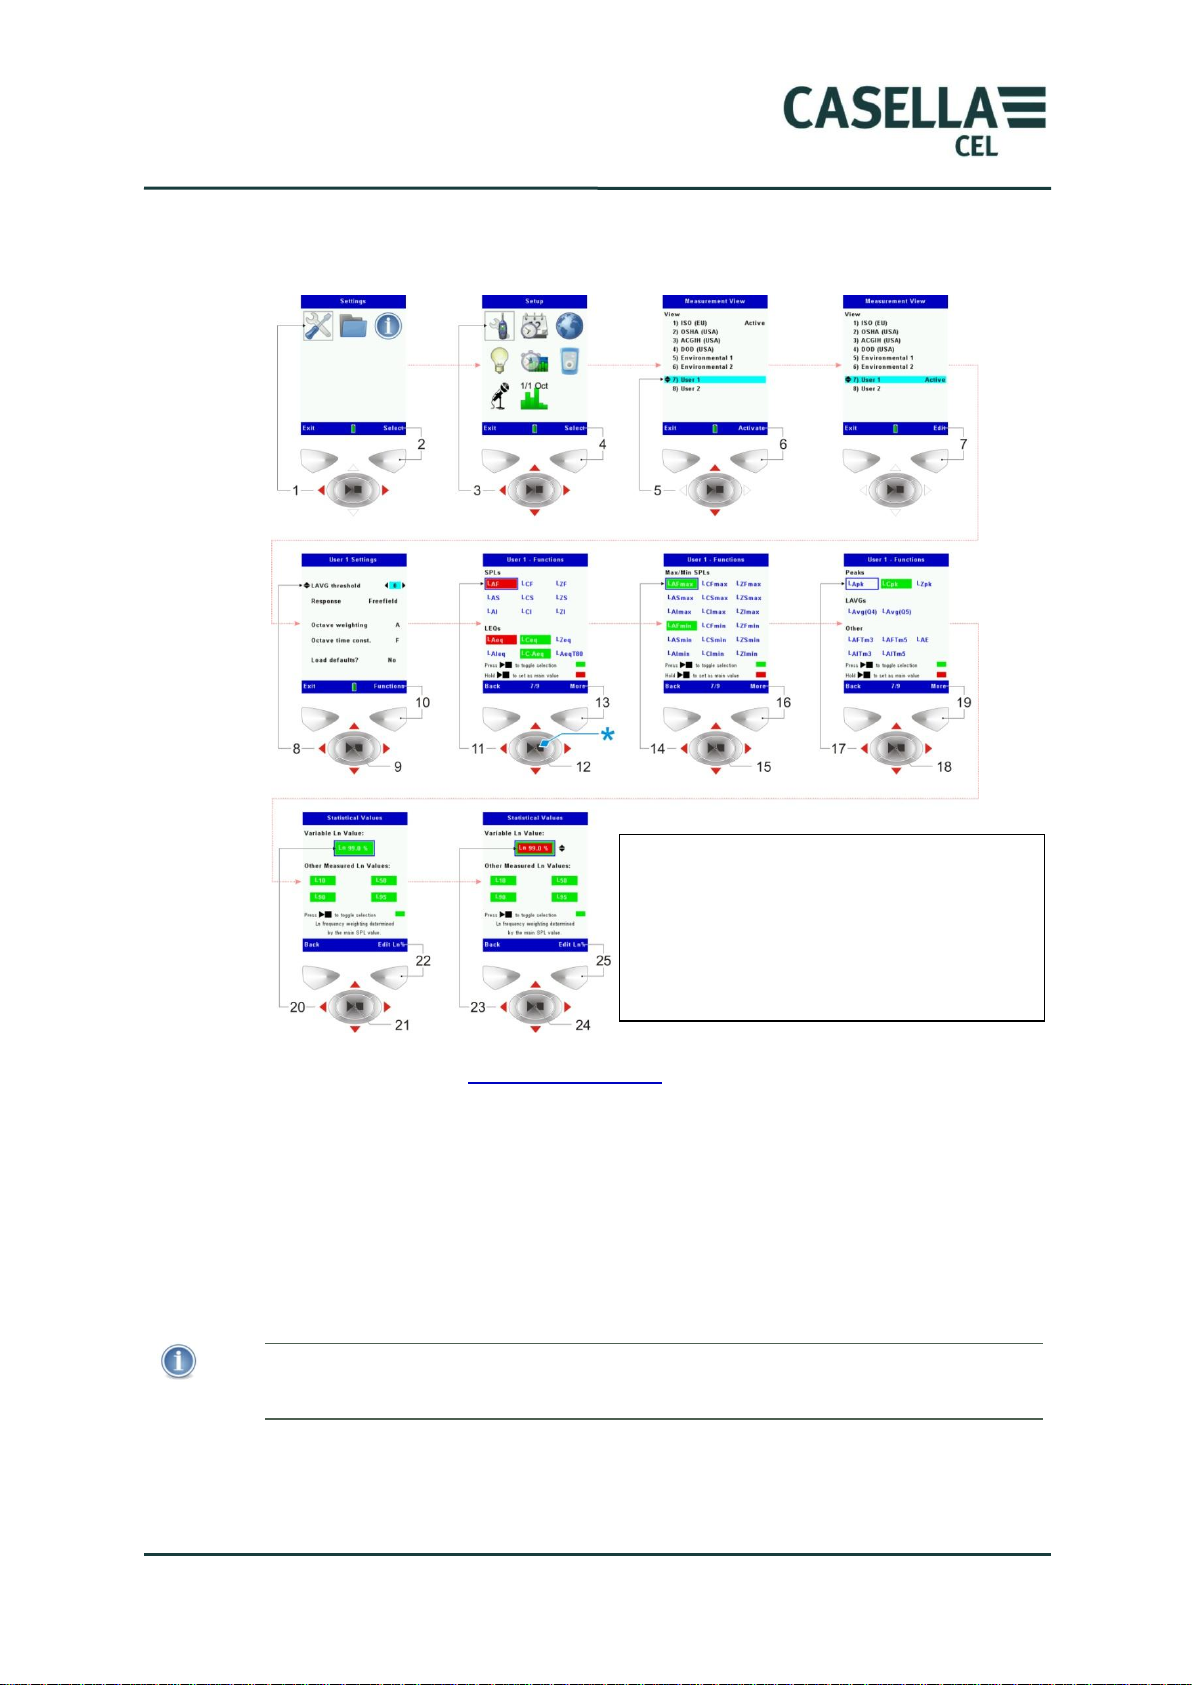
Figure 6 on page 18 explains how to select a user-defined measurement view
and how to review and change the functions that it uses.
16 Casella CEL
CEL-63x Environmental & Occupational Noise Meter
Fixed measurement view
Figure 5. Set a fixed measurement view
17 Casella CEL
CEL-63x Environmental & Occupational Noise Meter
NOTE
For measurement runs that have a long duration, you should use a mains DC power
supply to operate the instrument.
* Press the Run/Stop control key at
step 12 to select or deselect the chosen
function.
Press and hold the key to set the main
SPL value that is displayed in the stop
mode.
User-defined measurement view
Figure 6. Set a user-defined measurement view
Refer to Section 4.4 Measurement views on page 48 for a description of the
User 1 and User 2 settings that you can use.
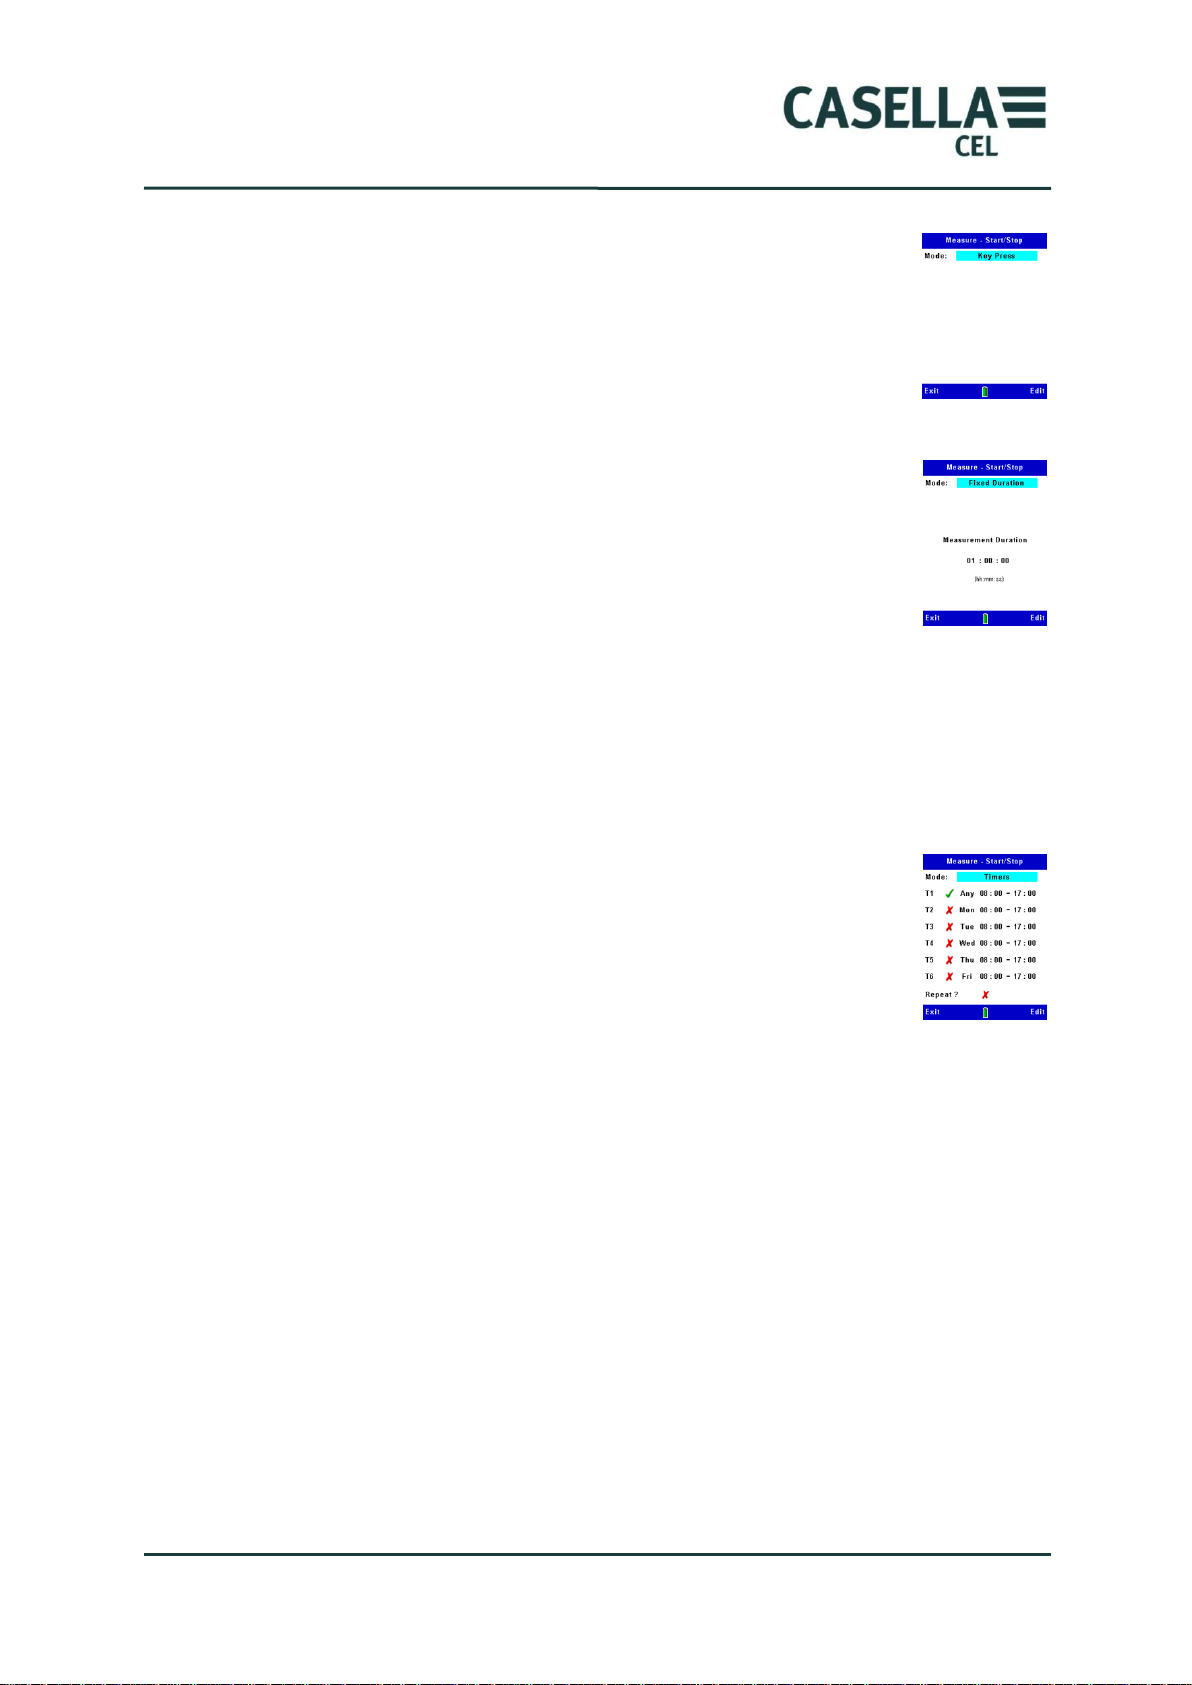
Measurement controls
These settings control how the instrument starts and stops each measurement
run. You can choose among three options.
Figure 7 explains how to select each of the timed operation modes.
18 Casella CEL
CEL-63x Environmental & Occupational Noise Meter
Key press
The key press mode allows you to start and stop each
measurement run by pressing the Run/Stop key.
This „manual control‟ of the instrument is useful when you do
not know the duration of a measurement run.
Fixed duration
The fixed duration mode allows you to set the duration of a run.
You can set the duration in steps of one second, in the range
00:00:00 to 24:00:00 (HH:MM:SS).
You must press the Run/Stop key to start the run manually, but
the instrument will stop the run automatically after the duration
you have set. If necessary, press the Run/Stop key to stop the run early.
The fixed duration mode is useful if you need to make a single measurement
run where you know the duration but you do not know the exact time when the
measurement run must start.
Timers
The timers mode allows you to set the day of the week and the
time when a run starts and stops. You can set the instrument to
start and stop one or more runs on different days and at different
times.
You can set the pattern of runs to occur only once, or you can set
the pattern of runs to repeat on the same days and at the same times each week.
When you use the timers mode you must leave the instrument switched ON
from the start of the first run until after the end of the last run. You must
therefore operate the instrument from a mains DC power supply so that the
measurement runs occur without interruption.
This timer mode is especially useful when the instrument is used together with
the environmental kit case. This enclosure supports a higher capacity battery
for short- to medium-term environmental measurements.
19 Casella CEL

CEL-63x Environmental & Occupational Noise Meter
Figure 7. Measurement controls
20 Casella CEL

CEL-63x Environmental & Occupational Noise Meter
Measurement data sets
The data sets option controls how the CEL-63x instrument records
measurements during a run. There are two options that you can choose.
Cumulative measurements.
Periodic measurements.
Both options can be used with Profile recording.
Figure 8. Measurement data sets
Cumulative measurements
A cumulative measurement produces
a single set of results for the entire
measurement duration.
When you use the CEL-63x instrument in cumulative measurement mode, the
start and stop times depend on whether you have selected Key press, Fixed
duration or Timers for the instrument.
21 Casella CEL

CEL-63x Environmental & Occupational Noise Meter
NOTE
When used with periodic recording, the profile interval can only be set to a subinterval of the cumulative measurement duration to produce an exact number of
profile samples per period.
The cumulative data set alone does not provide time history
information. To include time history information for the
measurement, you can enable Profile recording.
Profile recording
A profile recording consists of a series
of fast measurements made at the
same time as a cumulative
measurement.
The profile recording supports a more limited set of functions, including L
L
, L
AIeq
Cpk
, L
AFmax
, L
ASmax
, L
, and optional Ln% statistics (Broadband Fast
AImax
Aeq
A-weighted Lns only).
When you use profile recording, you can set the interval of each of the profile
measurements to one of the following:
OFF
100ms, 1, 2, 5, 10, 15, 20, 30 or 60 seconds
2, 5, 10, 15, 20, 30 or 60 minutes
Periodic measurements
Periodic measurements allow the total measurement duration to
be divided into separate fixed time intervals. In Periodic mode, a
full set of results is stored at the end of each time interval,
whereas in Cumulative mode a single full set of results is stored
at the end of the measurement run.
,
In effect, the original full set of cumulative results is captured at periodic
measurement intervals.
Figure 9. Repeating cumulative and profile data sets
22 Casella CEL

CEL-63x Environmental & Occupational Noise Meter
To select the Periodic data capture mode, set the Data Sets Mode control to
Periodic, and then select the Periodic Interval. The Periodic Interval is the
time from the start of one period to the start of the next period. You can set the
Periodic Interval to one of the following:
1, 2, 5, 10, 15, 20, 30 or 60 minutes
2, 4, 6, 8, 12 or 24 hours
Synchronise time
The Synchronise Time option synchronises both the periodic and the profile
times to the actual time. For example, if a periodic time is 1 hour and a run
starts at 09:18 with this option enabled, then the first period finishes at 10:00.
The second and all subsequent periods start on the whole hour.
The profile measurements are similarly synchronised to the period interval.
If the Synchronise Time option is disabled, then in this example the first
period continues to 10:18; the second period continues to 11:18, and so on.
You can also synchronise runs by using the timers, by starting and ending runs
on whole time period intervals. This synchronises both the periodic and the
profile measurements.
23 Casella CEL
CEL-63x Environmental & Occupational Noise Meter
NOTE
For High range measurements above 140dB a special microphone (-MIC1) and
adaptor (-MPA1) can be used. See page 56.
4 Detailed description
4.1 Microphone and pre-amplifier
The CEL-63x instrument has a removable ½-inch (12.7 mm) microphone. This
is a pre-polarised microphone that uses a permanently charged material in its
construction.
The instrument is supplied with a windshield. The windshield provides
protection from wind and from minor mechanical damage. The windshield
should always be fitted to the microphone.
There are two classes of microphone available, which have different
sensitivities.
The Class 1 microphone (CEL-251) has 50 mV/Pa sensitivity
The Class 2 microphone (CEL-252) has 30 mV/Pa sensitivity
4.2 User controls
Soft keys
The Soft keys select between the two options showing at the bottom of the
screen. These two options change, depending on which screen is showing on the
instrument‟s display. Therefore, the Soft keys can have different functions,
depending on which screen the instrument is showing.
Usually, you must press the Soft key on the right to select a function, and you
must press the Soft key on the left to exit a screen or cancel a function.
Press the Soft key for the option that you need to select that option.
24 Casella CEL

CEL-63x Environmental & Occupational Noise Meter
Navigation keys
The four Navigation keys allow you to select items on the main part of the
screen. Press the , , or Navigation key to change to the next selection
in the direction of the cursor arrow.
Run/Stop key
The Run/Stop key allows you to start and to stop a run.
Press the key when the instrument is in the Stop mode to start the run.
Refer to Measurement stop on page 27 for information about the Stop mode.
Press the key during a run to stop the run.
4.3 Screen groups
The CEL-63x instrument has groups of screens that allow you to set up and
operate the instrument, and to see the results of the instrument‟s
measurements. The screens have colour-coded bars at their top and bottom
edges, to help you identify which screen group they belong to. Refer to Colour
coding on page 6 and Figure 10 below for the colour codes.
Note that the contents of some screens may vary, depending on the model of
instrument you are using.
Figure 10. Screen groups
Each screen group includes one or more separate screens.
Figure 10 shows how the screen groups relate to each other. Click any of the
groups shown in Figure 10 to read a description of that group.
25 Casella CEL

CEL-63x Environmental & Occupational Noise Meter
NOTE
This screen also provides access to system tools. These tools enable the internal
memory to be reformatted, allow setting the memory to be read/write from the
connected PC, and allow setting the AC output on the bottom socket to output the low
or high part of the dynamic range.
NOTE
The system tools also allow selection of either 140 dB or 165 dB full-scale modes. On
CEL-632 and CEL-633 three different modes (SLM, Online and NNR) may be set.
Please refer to Mode Selection (SLM, Online, NNR) on page 57 for descriptions of
these modes. (For standard operations use SLM mode).
Switch-on
The CEL-63x instrument shows an introduction screen after you switch the
instrument ON. The introduction screen shows the following information about
the instrument:
The model number of the instrument (for example, CEL-63x).
The instrument‟s serial number.
The firmware version that is operating inside the instrument.
User-defined details, for example the user‟s name. These details must be
set up by using the Casella insight data management software PC
software, and then transferring them to the instrument.
Write the serial number and the firmware version number in a safe location.
You should give this information to the service agent if the instrument develops
a fault.
26 Casella CEL
CEL-63x Environmental & Occupational Noise Meter
Status
The Status screen shows the following information about the instrument‟s
current operating condition:
The current date and time.
Runs free
Percentage of memory free
The battery voltage. Refer to “Battery supply” on page 10 for more
information about battery types.
The type of microphone response field the instrument is using.
The pre-defined setup used by the instrument.
Serial Number
Firmware Version
You cannot make changes to the displayed setting.
Measurement stop screen
The measurement stop screens show the current instantaneous sound pressure
level. Different screen views include the following:
The Octave screen.
The Graph screen.
Select the View option to toggle between the two screens.
Select the Menu option to use the setup screens. Refer to Menu screens on
page 33 for instructions to use the setup screens.
27 Casella CEL

CEL-63x Environmental & Occupational Noise Meter
Octave and 1/3-Octaves
The Octave and 1/3 -Octave screen includes an octave spectrum
graph showing instantaneous and maximum noise levels for
each filter band, plus A, C and Z broadband measurements.
Short lines above the individual bars show the maximum
measurements for each filter band.
You can use the navigation cursor keys to select individual bars on the screen.
The screen shows the following measurements digitally:
The centre frequency of the selected octave, for example 2 kHz.
The sound pressure level (dB) of the measurement in the selected
octave.
The functions used for the measurement, for example L
AF
.
Graph
The Graph screen shows a single line graph using a vertical scale
of noise level and a horizontal scale of time.
The bar moves up and down to show the noise level, and the
graph scrolls to the left to show noise level over time.
Overload
An arrow pointing upwards near the top right-hand corner of the screen
shows that an overload noise level that exceeds the instrument‟s measurement
range has occurred.
If this occurs, the measurement values shown will be incorrect, and you may
need to consider the validity of any measurements made.
28 Casella CEL

CEL-63x Environmental & Occupational Noise Meter
IMPORTANT
You must make sure the instrument is set to use the same calibration reference level
as the calibrator. Refer to the calibrator‟s manual for this information, and refer to
Calibration reference level on page 39 for instructions to change the instrument‟s
setup.
Calibration mode
The CEL-63x instrument changes automatically from Stop mode to Calibration
mode when it detects a stable 1 kHz calibration tone.
The Calibrate mode has two separate screens.
The Start calibration screen.
The Calibration progress screen.
Start calibration
The Start calibration screen shows the setting for calibration
reference level, and the level of calibration tone that the
instrument is measuring.
The Start calibration screen has two options:
- The green tick symbol allows you to start the calibration process.
- The red cross symbol allows you to exit the Calibration mode.
Calibration progress
After you start the calibration process, the Calibration progress
screen shows a horizontal progress bar and the level of
calibration tone that the instrument is measuring.
After the calibration process finishes, this screen shows whether
the calibration has passed or failed.
When the calibration passes, it is saved automatically.
29 Casella CEL

CEL-63x Environmental & Occupational Noise Meter
If the calibration fails, this indicates a technical problem with either the
instrument or the calibrator. The basic checks to try if the calibration fails are
as follows:
Check that the microphone and calibrator are fitted correctly.
Inspect the microphone and the calibrator‟s cavity for signs of damage.
Check that the calibration level is set correctly.
If the instrument persists in failing calibration, contact Casella CEL for advice.
Press Exit to exit the Calibration mode without saving the new calibration.
30 Casella CEL

CEL-63x Environmental & Occupational Noise Meter
Measurement run screens
The CEL-63x instrument captures measurements when it operates in the Run
mode. The functions displayed depend on settings defined by the Measurement
View in the instrument‟s setup. Refer to Setup on page 33 for instructions to
change the instrument‟s setup.
The Run mode has six types of screen.
The Main screen.
The Ln‟s screen.
The Qctave and 1/3-Octave screens.
The Values screen.
The Graph screen.
The Marker screen.
All the measurement run screens show the Run number, and the Run duration.
Each screen also has a pause control and a View option.
Select the View option on each screen to change from one screen to the next.
Main screen
The Main screen shows measured function values numerically
and as a series of bars against a vertical scale.
Ln’s screen
The Ln‟s screen shows statistical Ln measurements for the run.
Depending on model refer to Statistical values on page 54
Qctave and 1/3-Octave screens
The Octave and 1/3-Octave screens show measurements for the
octave or 1/3-octave spectrum bands and A, C, Z values.
You can use the navigation keys to select individual bars on the
screen. The screen shows the following measurements digitally:
The centre frequency of the selected octave, for example 2 kHz.
The sound pressure level (dB) of the measurement in the selected
octave.
The name of the measurement function, for example L
31 Casella CEL
Aeq
.

CEL-63x Environmental & Occupational Noise Meter
NOTE
On CEL-632 and CEL-633 models, audio recording (if selected) will occur together with
a separate „event‟ measurement when a marker key is pressed. Refer to Audio
Recording on page 40 for details on this feature.
Values screen
The Values screen shows a list of the centre frequencies for each
octave or 1/3-octave, and columns of measurements (for
example to show L
Aeq
, L
) for each of the centre frequencies.
AFmax
Depending on instrument model additional frequency bands and
statistical values may be viewed by using the navigation keys to
scroll the display.
Graph screen
The Graph screen shows a graph of the CEL-63x instrument‟s
measurements taken over a period of time. The graph has a
horizontal scale of time, and a vertical scale of sound pressure
level (dB).
The more recent measurements are to the right of the graph.
The graph scrolls slowly to the left during the Run. Measurements that are
older than the displayed time span disappear at the left end of the graph.
The Graph screen also shows measurements digitally using different functions.
Marker screen
The Marker screen allows you to tag noise data with a specific
identity using one of four markers. For example, you can tag the
data to identify it as noise from an aircraft or from a road
vehicle.
Back erase
By pressing Pause when cumulative measurements are being made, „back erase‟
becomes available. The back erase option allows you to remove up to the last
10 seconds of noise data from the cumulative result. Note that if the
measurement has not been running for 10 seconds, back erase will erase up to
the start of the measurement.
The functions viewed on this screen can be changed.
32 Casella CEL

CEL-63x Environmental & Occupational Noise Meter
Menu screens
The CEL-63x instrument‟s Menu mode has three options:
The Settings option allows you to change the
instrument‟s setup.
The Memory results option allows you to view
information stored in the instrument‟s internal memory.
The Instrument status option displays the instrument‟s current
operating status.
Settings
There are seven main options in the Settings screen:
Setup allows you to set the measurement view or to
create user-defined measurement views.
Set Clock allows you to set the date and time, or to
change the date and time settings.
Language allows you to set the language used for the
instrument‟s screens.
Backlight allows you to set the duration and level of backlight
illumination.
Measurement Control allows you to set the method used to start and
stop measurements, and allows you to set whether you are measuring
Cumulative or Periodic data sets.
Calibration reference level allows you to set the instrument to use the
correct sound pressure level for the calibrator.
Audio Recording allows the audio to be recorded for audio notes (all
models), for markers and events (CEL-632 & CEL-633), as well as the
pre-trigger and quality of audio recording.
Meter Mode allows you to select either octave or ⅓-octave
measurements on B & C models.
Setup
The CEL-63x instrument has up to six fixed measurement views, and two userdefined measurement views.
Measurement View
This screen allows you to set a fixed measurement view or a
user-defined measurement view.
The fixed measurement views have functions that are defined to
meet national regulations. You cannot change these functions.
This screen shows the measurement view that is active, and allows you to select
a different measurement view.
33 Casella CEL

CEL-63x Environmental & Occupational Noise Meter
User function
Range
Average sound pressure level
(L
Avg
) threshold
0 dB or 70 dB to 90 dB
Sound field response
Freefield Random
Octave weighting
A, C or Z.
Octave time constant
F (fast), S (slow)
Sound pressure level (SPL)
LAF LCF L
ZF
LAS LCS L
ZS
LAI LCI LZI
Equivalent continuous sound
pressure level Leq
L
Aeq
L
Ceq
L
Zeq
L
AIeq
LC – LA L
AeqT80
Maximum and minimum
sound pressure level
L
AFmax
L
CFmax
L
ZFmax
L
ASmax
L
CSmax
L
ZSmax
L
AImax
L
CImax
L
ZImax
L
AFmin
L
CFmin
L
ZFmin
L
ASmin
L
CSmin
L
ZSmin
L
AImin
L
CImin
L
ZImin
Peak sound pressure level
L
Apk
L
Cpk
L
Zpk
Average sound pressure level
with exchange rate Q
L
Avg(Q4)
L
Avg(Q5)
Other measurements (refer to
Measurement views on page
48)
L
AF(Tm3)
L
AF(Tm5)
LAE
L
AI(Tm3)
L
AI(Tm5)
Statistical functions (Ln)
L10 L50 L90
L95 Ln variable
Environmental indices
LDN LDEN CNEL
User settings
The table below lists the functions that you can change in a user-defined
measurement view. This table also shows the range of each setting. Refer to
section 4.4 Measurement views on page 48 for an explanation of the User 1 and
User 2 settings.
Table 1. User settings
34 Casella CEL

CEL-63x Environmental & Occupational Noise Meter
Set Clock
The CEL-63x instrument has an internal clock, which allows the
instrument to record the date and time of each measurement.
The Set Clock screen allows you to set the date and the time, and
to change the settings when necessary.
Language
The CEL-63x instrument can display the screens using any of
nine languages. When you change this setting, the instrument
also changes the format used to display some information, for
example the date.
The language options are as follows:
UK English.
US English (when using this, only the date format changes).
Brazilian Portuguese.
French.
German.
Italian.
Portuguese.
Spanish.
Chinese.
Backlight
The CEL-63x instrument has a display backlight. The backlight
allows you to use the instrument in poor ambient lighting
conditions, or in darkness.
The Backlight screen allows you to change the following
backlight‟s settings:
Set the backlight permanently ON, or set the backlight to come on after
a key press.
Set how long the backlight remains ON after a key press.
Set the brightness level of the backlight.
Measurement Control
The measurement setup allows you to set the measurement start and stop
modes, and to set the measurement capture mode.
35 Casella CEL

CEL-63x Environmental & Occupational Noise Meter
IMPORTANT
Note that the CEL-63x instrument stops capturing measurements, saves the current
measurement results, and then shuts down if the battery charge fails during operation.
Make sure the batteries have sufficient charge to allow continuous operation for the full
measurement period.
For long measurement periods, consider operating the instrument using a mains power
supply. Refer to section 3.1 Powering the instrument on page 10 for information about
power supply options.
Measurement start and stop modes
There are three methods available to start and stop the CEL-63x instrument‟s
measurements.
Start and stop measurements by pressing a key.
The instrument starts to capture measurements when
you press the Run/Stop key, and continues to capture
measurements until you press the key again.
Fixed duration measurements.
In the fixed duration measurement mode, the instrument
starts to capture measurements when you press the
Run / Stop control key key. It continues to capture
measurements for the period set by this screen.
Timer measurements.
The CEL-63x instrument can start and stop
measurements automatically on preset days and times.
You can set different start and end times for each day of
the week, and you can set the instrument to capture measurements
during more than one period on each day. You can also set the
instrument to capture measurements for the same time period on every
day. Press the Run/Stop key to set the standby mode until the start of
the run.
Timers
When the Run/Stop key is pressed to start a timed sequence of runs, the CEL63x instrument finds the first enabled timer starting from T1 and waits until the
start day and time defined by that timer. The instrument then performs the run.
On completion of the run, the instrument then finds the next enabled timer
T2 to T6 and waits for the indicated start day and time.
36 Casella CEL

CEL-63x Environmental & Occupational Noise Meter
NOTE
Event measurements are taken as well as the measurements above and are set-up
independently. Please see Event setup on page 38 for a detailed description.
When the instrument has cycled through all six timers, it either stops the run
sequence or, if the Repeat option is enabled, it repeats the sequence
continuously from the beginning.
The timers can be set to run on a specific day of the week at a specific time
(7-day timer), or to start on any day of the week at a specific time (24-hour
timer).
The start time for a timer can be the same as the end time for the previous timer
so that, unlike some meters, the CEL-63x does NOT require a number of
seconds when noise is not measured between runs to perform housekeeping
operations.
Data sets
The measurement data sets option sets how the CEL-63x
instrument captures measurements over a period of time.
You can set the instrument to capture measurements during a
single run. These are called cumulative measurements.
You can set the instrument to capture repeated measurements to
create a periodic time history.
The storage interval that L
is stored for events is also selected
Aeq
on this screen, either 10ms, 100ms, or 1 second.
Figure 11. Cumulative measurements and Periodic Time History
Figure 11 shows three examples of cumulative measurement runs and periodic
time histories.
37 Casella CEL

CEL-63x Environmental & Occupational Noise Meter
1. This example is a single cumulative measurement run as a dark blue
line. The duration of the run is set by the Measurement start and stop
modes. You can use the screens in the Memory results to see the
captured measurements as a graph or as values. The measurements are
stored in memory and can be transferred to a computer by USB.
2. This example is a single cumulative measurement (shown as a dark blue
line) together with a profile channel (shown as a light blue line).
The profile channel consists of a series of many measurements captured
at the same time as the single cumulative measurement. You can set the
profile interval from one second to 60 minutes.
3. This example shows periodic data sets as a series of dark blue lines, and
the profile channels that go with the periodic data sets as light blue
lines.
The Casella insight data management software is used to combine and graph
the periodic data.
Event setup
There are different methods to start and stop the CEL-63x events.
Level Triggered Events.
Level events are triggered when a sound level function
exceeds user defined thresholds for a user defined time.
External Triggered Events.
External events are triggered via an external signal from
an external button or a line. The normal mode of
operation for this is in Noise Nuisance Recorder (NNR)
mode.
Level Events
Level events allow the meter to capture loud or quiet periods of measurement
where a user can set a start event dB threshold and onset time in seconds as
well as an end event dB threshold and off time number of seconds.
Parameter
Level trigger events can be triggered from a choice of parameters:
LAF, LAS, L
38 Casella CEL
Aeq
, L
ceq
, L
zeq
, L
Zpeak
, L
Cpeak

CEL-63x Environmental & Occupational Noise Meter
Event Start
Selections that can be made to the onset time (s), the threshold criteria (<, >=)
and the threshold level (dB). Therefore the dB level of the parameter (e.g. L
Aeq
)
needs to be meet the threshold criteria (e.g. >=) continuously for the duration
of the onset time (in seconds) for an event to start and the data to be captured.
Two criteria can be set:
• „less than‟ (<)
• „greater or equal to‟ (>=)
Event Stop
Events are stopped using the same method as above. However, the threshold
criteria (<, >=) is reversed automatically.
Note: if the „start‟ and „stop‟ dB thresholds are close together then noise levels
hovering around the levels could trigger multiple events in a short space of
time. Ideally the „start‟ and „stop‟ dB threshold levels should be separated as
much as possible to prevent capture of unwanted and/or an excessive number
of events. Care should be taken to select the appropriate onset and offset to
ensure spurious events are not captured.
External Events
The external events will start with a press of an external button (Part of the
NNR Kit) will cause the meter to record an event for the minimum event time
set either by extending an event in progress or starting a new event.
When the external button is pressed then an external event in progress won‟t
finish until the user set maximum time. The recording will continue until either
the maximum time (up to 15 mins) is reached or if the minimum time (absolute
0 seconds) is reached from the time the button was pressed.
Calibration reference level
The calibration reference level screen allows you to set the
CEL-63x instrument to use the same sound pressure level as the
calibrator.
Documents supplied with the calibrator should tell you what
sound pressure level it delivers at the 1 kHz reference tone. This
will be in the range 93 dB to 95 dB, or in the range 113 dB to 115 dB.
This screen allows you to set the instrument to the same calibration level, to an
accuracy ±0.1 dB.
39 Casella CEL

CEL-63x Environmental & Occupational Noise Meter
Audio Recording
There are five main options in the Settings screen:
Audio Notes allows you to speak into the microphone to
record verbal details about a measurement run.
For Markers allows you to select one of 4 markers which
will start a marker record and a marker event depending
on the model.
For Events allows you to enabled or disabled audio capture for level and
external triggered events.
Quality allows you to set the audio capture to either high or low quality.
Pre-trigger allows up to 10 seconds of audio to be recorded prior to the
start of an event.
Audio Notes
Audio notes are always recorded in low quality and will record between 2 and
120 seconds of notes for each run. When the record key is pressed then a
minimum of 2 seconds of audio will be saved and the audio will continue being
saved up to the time the button is released.
Audio notes can be recorded before a run or any time after a run is completed
(within the memory results, Record Audio Note on page 44). If audio notes for
a run already exist then a warning is displayed and they can be overwritten by
the new audio note.
If a user has selected to do audio notes before a run then when
starting a run the meter will display the audio notes screen where
a user can record audio notes or skip to immediately start the
run. If the memory is low (i.e. 90% or more full) then audio
notes before a run are skipped. Likewise if start stop timers have
been set to start the run in the future then again audio notes are
skipped. Before run audio notes are only recorded for the first run in a
sequence. Audio notes can always be recorded for any run after the run has
been completed even if the memory is low providing the memory is NOT
actually full.
For Markers
Marker record on all CEL-63X models:
This will store when the marker key has been pressed, see
Marker screen page 32.
Marker event on CEL-632 and CEL-633 models:
When a marker key is pressed then audio is stored (as described above) and
additional event noise parameters are also stored for the duration the marker
key is pressed. This is the same data as for triggered events, see Event setup.
40 Casella CEL

CEL-63x Environmental & Occupational Noise Meter
NOTE
If Pause is ON or a Level or External event is in Progress when the marker key is
pressed then ONLY a marker record is produced.
NOTE
When pressing Pause and Back-erase, this also will create Pause and back-erase
marker records which show when these actions were performed and will be displayed
on insight data management software.
NOTE
An audio file is NOT saved for an event if there is NOT more than 2 seconds of audio.
NOTE
Multiple audio files cannot be recorded simultaneously, so if the audio is already being
recorded for a marker, any event will be disabled until the Marker key is released.
NOTE
High quality requires 3 times the amount of memory so if audio is likely to be stored for
a long duration, use low quality where possible.
NOTE
Multiple audio files cannot be recorded simultaneously, so the audio recorded for pretrigger may be shorter than the set time if, for example a marker has been stored just
prior to the start of an event.
For Events
The meter will capture up to the first 910 seconds of audio for an event. If a pre-
trigger is set then the audio will be saved from before the event started and will
continue until the event ends or in the case of level events it will continue until
the end of the stop event time after the event. This allows 10 seconds of pretrigger plus 15 minutes of event recording. When the 910 seconds (15 minutes
and 10 seconds) of audio is captured then the audio file is completed and the
meter will continue to capture the event data up to the maximum 24 hour event
time.
Quality
The CEL-63X stores standard WAV audio files. A user can set audio capture to
be high quality (24,000 samples a second at 8bit resolution) or low quality
(8,000 samples per second at 8bit resolution). For applications where audio is
being stored for noise source identification and voice note storage, low quality
is more than adequate. Low quality is suitable for signals up to 4kHz, for
signals where audio likely to be above 4kHz, use high quality. High quality will
store all audio up to 12 kHz. Audio files are stored up to 110dB. Above this level
sound may be distorted.
Pre-trigger
This applies to markers, level events and externally triggered events. Therefore,
the instrument is continuously storing the audio to a temporary memory but
discarding it unless needed for an event or marker.
41 Casella CEL

CEL-63x Environmental & Occupational Noise Meter
Octave
1/3-Octave
Lower
cutoff
frequency
(Hz)
Centre
frequency
(Hz)
Upper
cutoff
frequency
(Hz)
Lower
cutoff
frequency
(Hz)
Centre
frequency
(Hz)
Upper
cutoff
frequency
(Hz)
22
31.5
44
22.4
28.2
35.5
25
31.5
40
28.2
35.5
44.7
44
63
88
44.7
56.2
70.8
50
63
80
56.2
70.8
89.1
88
125
177
89.1
112
141
100
125
160
112
141
178
177
250
355
178
224
282
200
250
315
224
282
355
355
500
710
355
447
562
400
500
630
447
562
708
710
1000
1420
708
891
1122
800
1000
1250
891
1122
1413
1420
2000
2840
1413
1778
2239
1600
2000
2500
1778
2239
2818
2840
4000
5680
2818
3548
4467
3150
4000
5000
3548
4467
5623
5680
8000
11360
5623
7079
8913
6300
8000
10000
7079
8913
11220
11360
16000
22720
11220
14130
17780
12220
16000
20000
14130
17780
22390
Meter Mode
The Meter Mode option allows you to set whether the CEL-63x
instrument displays measurements octave or ⅓-octave frequency
bands.
Table 2 below lists the octave and ⅓-octave centre frequencies,
and the upper and lower frequencies of each band.
Table 2. Octave band frequencies
42 Casella CEL

CEL-63x Environmental & Occupational Noise Meter
NOTE
Measurements that have an audio file stored will have a headphone symbol to show
audio files are present.
IMPORTANT
Note that the functions displayed on the View results screens are those that you define
in the current measurement setup. You can use the View results screens to review any
measurement function.
Memory results
The CEL-63x instrument has 2 GB of memory that is available to
store the results of the instrument‟s measurements.
The Results memory stores all measurements made when the
CEL-63x instrument operates in the measurement run mode.
The first screen shows the dates of the runs stored, and how
many runs are stored for each date. You can select any date in the
list to view a list of the runs stored for the selected date.
The daily results screen shows a list of results, identified by their
Run ID numbers, stored from a single day of measurements.
Each entry in the list shows the time when the run started, and the run‟s
duration.
The screen always lists the runs with the newest at the top.
You can select one of the runs to see the summary and the details for that run. A
series of screens shows information about the run‟s measurements. A graph
icon shows that the run includes a profile time history. Refer to Data sets on
page 37 for an explanation of the periodic time history.
There are five options available when you select a run:
View results
Delete
Record Audio Notes
Event Data & Audio
Printing - Only available when printer -CMC73 is connected.
View results
The View results screens allow you to see the results of
measurement runs that are stored in the CEL-63x instrument‟s
memory.
43 Casella CEL

CEL-63x Environmental & Occupational Noise Meter
NOTE
If an audio note is already present this will overwrite the existing audio note. A warning
will be displayed accordingly if this is the case.
NOTE
If you are using the printer for the first time with the CEL-63x, refer to “Printer set-up”
on page 46 before you start.
Delete
The Delete screen allows you to delete a single run after you
select it, or you can delete all runs stored in the instrument.
You can confirm or cancel the command to delete the runs, but
you cannot restore a run after you delete it.
Record Audio Note
This allows audio notes to be added to a measurement if they
were not added when the measurements was started. Press and
hold the record key to record an audio note.
Event Data & Audio
This allows audio playback of any of the audio files associated
with a measurement from any markers and events where audio
was stored.
During playback the output volume can be adjusted by pressing
the up or down cursor. The right soft key will take the playback to
the beginning. Stop and Start by pressing stop/start. Up or down will step
through the audio files except when the audio files is being played.
Printing
The CEL-63x has two different methods of printing measurement results using
a 3-inch thermal printer (-CMC73). Print Report prints a measurement run
report, and Print Screen prints a copy of any of the result screens. Both
options print in the currently selected language.
While the printer (-CMC73) is connected to the CEL-63x instrument and is
switched on then a Printer icon is displayed on the Memory results screen.
Select this Printer icon to display the Print Report options for the current run
and to print the report, or follow the instructions in “Print Screens” on page 45
to print some screens.
Print Report
Select the Printer icon to display the Print Report Options screen.
44 Casella CEL

CEL-63x Environmental & Occupational Noise Meter
NOTE
The functions printed in the report (and displayed on the results screens) are those that
are defined in the current measurement setup. The printing of octave and 1/3-octave
results can use considerable amounts of printer paper, especially if a number of
different periods are printed.
Up to five functions are printed for each set of frequency bands, so if Octave Leq + Max
is enabled then selecting more than three Ln functions in the current measurement
setup will require two sets of frequency bands to be printed, using more paper.
Disabling both Octave options above just prints a broadband set of results.
This screen has the following options:
Own Logo – This option prints a stored user logo before the report (see
later for details).
Octave L
+ Max – If narrowband results are stored this gives the
eq
option to print the Leq and Max for each octave or 1/3-octave band.
Octave Ln’s – If narrowband Ln‟s are stored and some Ln‟s are
currently selected this gives the option to print those Ln values for each
octave or 1/3-octave band.
Period 0010 – 0020 / 0075 – If the run stores two or more period
results then the user can select to print the results for up to 25 periods at
a time. In this example periods 10 to 20 are printed from the set of 75
period results stored.
Print Report – When this option is selected, pressing the Print key
prints the report. Pressing Exit or switching the printer off stops any
current printing.
The printed report includes the optional user logo; the run start date and
time and duration; and the instrument setup and calibration data. This is
followed by the cumulative or period broadband and narrowband results
and then by the Location, Operator and Signature fields which can be filled
in by the user.
Print Screens
This mode captures the current result screen and prints a graphical copy of this
screen to the printer.
While displaying the Memory results screen, select the View icon (instead of the
Printer icon) and use the keys to select each screen of the current runs results.
Press the Run/Stop key when you want to print the current screen.
This printing format is particularly useful when displaying octave or 1/3-octave
results when the graphical bar graph of the spectrum can be printed for any of
the selected narrow band functions.
45 Casella CEL

CEL-63x Environmental & Occupational Noise Meter
NOTE
Refer to the User and Programming manuals for the -CMC73 on the CD which is
supplied with the printer for details on setting the dip switches and the RS232 protocol.
NOTE
If it is required to print Chinese reports then the printer must be loaded with the
GB2132 Chinese character set. Contact the printer supplier or Casella CEL for details.
Any mix of print reports and result screens can be printed.
Printer set-up
It is necessary to set up the printer (-CMC73) before using it for the first time.
The -CMC73 printer dip switches SW1, SW2, SW3 and SW4 should ALL be in
the OFF position, which selects the following options:
Wide paper roll (78 mm)
ESC/POS mode
Hardware handshaking
Normal operation
The -CMC73 uses the following RS232 settings when used with a CEL-63x:
115200 baud
8 data
2 stop bits
no parity.
This printer should be loaded with 78 mm thermal paper and connected to the
CEL-63x using Casella CEL cable (Casella CEL part number 196137B) which
connects to the RS232 cable supplied with the printer.
If the printer does not print anything sensible, then perform a test print and
ensure the above RS232 protocol is selected (see the -CMC73 User Manual for
details).
Adding your own Logo to print reports
It is possible to add your own logo to personalise reports. These can be any size
up to 127 dots wide × 248 dots high. This feature can be used to add a company
logo or to have extra fixed text or symbols. For example, if you wanted to add
details of the weather then a box titled Weather could be printed with the report
and the user could then write in the weather by hand.
The logo is downloaded and kept in the printer flash memory using the LOGO
MANAGER IBM PC software which is on the CD disc supplied with the printer.
If the Own Logo option is enabled in the print report options then this logo
will be automatically printed at the start of the report.
46 Casella CEL

CEL-63x Environmental & Occupational Noise Meter
IMPORTANT
The CEL-63x instrument stores measurements as binary files. You must use the
optional insight software, supplied by Casella CEL, to read these files.
CAUTION
Always use the Safely Remove Hardware icon in the Notification Area of the PC‟s
taskbar to disconnect the CEL-63x.
Instrument status
Select the Status option in Menu mode to see information about
the instrument‟s status. This is the same screen that the
instrument shows after you switch the instrument ON.
Refer to Status on page 27 for a description of the Status screen.
USB connect mode
The CEL-63x instrument has a mini USB port that allows you to
connect the instrument to a PC running Windows® XP or
Windows® Vista or Windows® 7.
When the instrument detects that it is connected to a PC, the
instrument displays an option to stop any run that is currently
active. The instrument then switches to Active USB mode. You should use the
insight program supplied by Casella to download results to the PC. See “Mini B
USB port” on page 55 for information about the connection.
The PC recognises the instrument as a removable drive, and identifies it by an
available drive letter, for example J:.
47 Casella CEL

CEL-63x Environmental & Occupational Noise Meter
4.4 Measurement views
User settings
The CEL-63x instrument has two measurement views that are available for
user-defined settings. These measurement views are called User 1 and User 2.
Refer to “User-defined measurement view” on page 18 for instructions to use
these settings.
When you select one of the user-defined views, you can change the following
settings:
Microphone response
L
Octave weighting
Octave time constant
Measurement functions
threshold
Avg
Microphone response
The setting options are for a Random or for a Free field microphone
response.
True random field and free-field conditions do not exist in normal
environments. The response patterns measured are close approximations to the
theoretical measurements under the defined conditions.
Random field
A random-field microphone response is often necessary to conform to US
regulations.
A random-field response is where sound energy is distributed uniformly
throughout the space being measured.
Free field
A free-field microphone response is generally necessary to conform to
regulations throughout the European Union.
A free-field response is where sound propagates directly from a source to a
microphone without any form of obstruction.
48 Casella CEL

CEL-63x Environmental & Occupational Noise Meter
NOTE
Whichever setting you use for octave weighting, the CEL-63x instrument only stores
Z-weighted measurements. This allows you to transfer measurements to a PC for postprocessing to A or C weighting using the Casella „insight‟ software.
Refer to “Mini B USB port” on page 55 for information about connecting the instrument
to a PC.
L
threshold
Avg
The L
threshold can be set in the range 0 dB or 70 dB to 90 dB.
Avg
This threshold is used in the calculation of the average sound level (L
the measurement period (equivalent to Leq). L
is a function used in OSHA
Avg
Avg
) over
measurements.
Normally, the term L
is used when the exchange rate Q is some value other
Avg
than 3, for example when making measurements for the OSHA Hearing
Conservation Amendment with Q = 5. The threshold value is used during
calculation of L
, where any levels below the threshold are not included.
Avg
Example:
Assume the threshold level is set to 80 dB and the exchange rate is 5 dB (Q = 5).
In this case, if you made a one-hour measurement in an environment where the
noise levels varied between 50 dB and 70 dB, the sound level would never
exceed the threshold so the instrument would record no value for the L
However, if the sound level exceeds the 80 dB threshold for only a few seconds,
only these seconds contribute to the L
, producing a result of approximately
Avg
40 dB. This result is much lower than the actual ambient sound levels in the
measured environment.
Avg
.
Octave weighting
The setting options are for A, C or Z weighting
This is the octave weighting used to display octave or ⅓-octave band results.
A weighting is the usual method of adjusting the measured sound
pressure level so that the measurements represent the frequency
response of the human ear.
C weighting applies only a relatively small correction to very high and
low frequencies. C weighting represents how the human ear responds at
very high noise levels.
Z weighting does not include any frequency correction to the sound
pressure levels, so that the response is effectively „flat‟.
49 Casella CEL

CEL-63x Environmental & Occupational Noise Meter
Octave time constant
The setting options are for F (Fast) or S (Slow) octave time constant.
This setting defines the time weighting used to display octave or ⅓-octave band
results, and how quickly the CEL-63x instrument responds to changes in sound
pressure level.
Most measurements are made using the Fast octave time constant. When using
this setting, the instrument applies a ⅛-second (125 ms) time constant to the
sound pressure level.
Fast measurements are identified by using the subscript „F‟, for example LAF
shows the sound pressure level using A weighting and the Fast octave time
constant.
When you set the instrument to use the Slow octave time constant, it applies a
1-second time constant to the sound pressure level.
Slow measurements are identified by using the subscript „S‟, for example LAS.
Measurement functions
You can select up to nine measurement functions for each user-defined
measurement view. The bottom of the screen has a counter to show how many
functions you have selected, for example “7/9”.
50 Casella CEL

CEL-63x Environmental & Occupational Noise Meter
Figure 12. User-defined measurement view
The CEL-63x instrument has four screens that show the functions available for
selection.
1. The first screen shows Sound Pressure Levels (SPLs) and Equivalent
Continuous Sound Pressure Levels (Leqs).
2. The second screen shows Maximum and Minimum SPLs.
3. The third screen shows Peaks, averages (L
4. The fourth screen shows Statistical Values (L
s) and other functions.
Avg
).
n
51 Casella CEL

CEL-63x Environmental & Occupational Noise Meter
SPL and Leq
SPL
The function highlighted in red is the main SPL (instantaneous
sound pressure level) that is currently selected. This is the SPL
value shown on the screens when the instrument is in
Measurement stop or in Measurement run mode.
The functions highlighted in green are the other functions that
are selected for display during a measurement run.
You can select other SPL functions by using the Navigation keys and then press
the Run/Stop key to add the selected function to the user-defined
measurement view.
You can select an SPL function and hold the Run/Stop key pressed for one
second to set the selected function as the main SPL.
You can also select any non-SPL function. Keep the Run/Stop key pressed for
one second to set the selected function as the main run function. This will then
be displayed using a larger font during a run.
The CEL-63x instrument allows you to store statistical information, Ln, about
the instrument‟s measurements. The recorded Ln values include A, C and Z
weightings. Refer to Statistical values on page 54 for an explanation of the
statistical functions. The Ln values are ALWAYS calculated using the Fast octave
time constant.
Leq
Leq is the equivalent continuous sound pressure level. It is an average of the
total sound energy measured over a specified period of time. It represents the
level of a steady, continuous noise that has the same total energy as the real
varying noise measured over the same period.
The functions highlighted in green are the other functions that are selected for
display during a measurement run.
The Leq subscript identifies the frequency weighting used when calculating the
Leq function, for example L
is the C-weighted Leq.
Ceq
52 Casella CEL

CEL-63x Environmental & Occupational Noise Meter
Other functions listed under Leq are as follows:
L
is an integrating A-weighted measurement of impulse Leq.
AIeq
Integrated measurements provide an Leq measurement that assesses
exposure to noise levels, and are used in the calculation of the personal
noise exposure LEP as defined by ISO 1999.
L
– LA is a measurement that is used in the HML method, where
C
separate values for high, medium and low frequencies provide a better
estimate.
L
is an A-weighted measurement of Leq that has a threshold setting
AeqT80
of 80 dB. This is used for ACGIH in the USA only.
Maximum and Minimum SPLs
This screen allows you to select among the available maximum
and minimum SPL functions.
The subscripted letters identify the frequency weighting and the
time constant to be used for the measurement, and whether the
measurement is a maximum or a minimum.
Peaks, L
and other functions
Avg
Peaks
The Peaks functions are L
These functions record the peak levels of noise using A, C and Z
weighting.
L
Avg
L
is the time-averaged noise level with an applied exchange rate, measured
Avg
during the run. The two options are to use exchange rates Q5 (5 dB) or Q4
(4 dB).
APk
, L
CPk
and L
ZPk
.
Other functions
L
is the A-weighted exposure level (previously known as SEL). It is the
AE
sound pressure level that would contain the same amount of energy in
one second that the actual noise has during the whole measurement
period.
L
Tm3
and L
functions are Taktmaximal A-weighted fast or impulse
Tm5
measurements.
Taktmaximal measurements are specified in German noise standards
(the DIN standard). They integrate noise over a 3 second or a 5 second
53 Casella CEL

CEL-63x Environmental & Occupational Noise Meter
period and produce an average level that assumes the highest level was
present for the entire 3 or 5 second period.
Statistical values
The statistical functions L10, L50, L90 and L95 show the sound
pressure levels that are exceeded for 10 %, 50 %, 90 % and 95 %
of the measurement period respectively. For example, the
measurement L10 is the level exceeded for 10 % of the
measurement time and L90 is the level exceeded for 90 % of the
measurement time.
The CEL-63x instrument also provides a user-defined, variable statistical
measurement.
54 Casella CEL

CEL-63x Environmental & Occupational Noise Meter
CAUTION
You must make certain the DC power input ground is kept isolated from any signal
ground.
4.5 Connections
All connections to the CEL-63x instrument are made through three ports
behind a hinged panel at the bottom of the instrument.
Figure 13. Connection ports
1. Power input port
2. Mini B USB port
3. AC and DC output port
Power input port
The power input port allows you to connect a DC power supply to operate the
instrument.
You must use a 2.1 mm DC plug that has the positive supply connected to the
centre receptacle.
Refer to “Mains DC supply” on page 11 for information about the requirements
of a suitable mains DC power supply for use with the CEL-63x instrument.
Mini B USB port
The mini B USB port allows you to connect the CEL-63x instrument to PC.
When you connect the instrument to a PC, the instrument appears as a
removable disk drive in Windows Explorer.
The Casella insight data management software is available from Casella CEL.
You must use this program to download measurements directly from the
instrument without using Windows Explorer. The insight software includes
55 Casella CEL

CEL-63x Environmental & Occupational Noise Meter
analysis and graphing tools, which you can use to analyse and view
measurement runs.
Contact Casella CEL for more information about the insight program.
AC and DC output port
The AC and DC output port is a 2.5 mm stereo jack. It has two functions:
The tip connection (1) provides an
AC output from the instrument.
You can use this output for remote
monitoring, and for providing a
signal to a separate recording
device or headphone amplifier.
The AC output level is
approximately 0.4 Vrms full scale, which corresponds to a sound
pressure level of 96 dB with AC Low Output selected (refer to the note
on page 26 for more information). The output impedance is
approximately 2.2 kΩ. The AC output corresponds to the Z-weighted
response of the instrument.
If you use the AC output, you should make certain the load impedance is
as high as possible, and you should use a co-axial cable of length 0.5 m
to 10 m.
The ring connection (2) provides a DC output voltage that is
proportional to the measured sound pressure level. The DC output
voltage is scaled linearly at 0.01 V/dB with a maximum value of 1.4 V
DC, which represents 140 dB.
The output impedance is approximately 2.2 kΩ. The DC output
corresponds to the A-weighted fast time response of the instrument.
If you use the DC output, you should make certain the load impedance is
as high as possible.
The signal ground for the AC output and for the DC output is on the barrel
connection (3). The signal ground must be isolated from the ground connection
of the DC power input when you use a mains DC supply.
High-level noise measurements
The CEL-63x instrument may be used to measure sound pressure levels up to
165 dB when used in conjunction with microphone -MIC1. To set the
instrument to the 140 dB or the 165 dB full-scale measurement mode, refer to
the System Tools menu (see the note on page 26).
56 Casella CEL

CEL-63x Environmental & Occupational Noise Meter
5 Mode Selection (SLM, Online, NNR)
5.1 General
Changes to the mode of operation for the CEL-63X instruments are made
within the system tools menu upon instrument start up. See page 26.
5.2 SLM Mode
This is the default mode of operation. In the system tools menu a user can select
either SLM, Online or NRR mode. In SLM mode a user has manual or timed
control over when runs start using the keys and timer menus.
5.3 Online Mode
In online mode the meter will output period and profile records during a run to
the RS232 port (a socket shared with the USB). Two cables are required either
196137B (Printer Cable) or 196138B (PC Cable). In online mode runs will
automatically start when the meter is powered up.
Period and profile data is automatically outputted in ASCII format that can be
captured with PC applications such as Hyperterminal.
The following parameters are fixed in Online mode and while Online mode is
selected then these parameters cannot be changed.
a) Event and Marker Audio capture are both disabled.
b) Event Profiles are disabled
c) External events are disabled.
d) Period mode is always selected
Please see section 10.3 for details on the data and protocols used in online
mode.
5.4 NNR Mode
Noise Nuisance Recorder (NNR) mode is used within the Stealth
Nuisance Kit. On power up of the instrument, NNR mode automatically steps
through certain screens to enable a quick start up.
TM
Noise
This is designed to simplify noisy neighbour applications. While NRR mode is
selected then the following settings are forced on.
1. External events are enabled
2. Event audio capture for events is enabled using the currently selected high or
low quality
57 Casella CEL

CEL-63x Environmental & Occupational Noise Meter
3. 10 seconds pre-trigger is set.
4. Capture of Voice notes before a run are enabled.
In this mode when the meter is switched on then the CEL-63X automatically
enters calibration mode. If a calibration is not done after 30 seconds this will
time out then the meter will switch to allow Audio notes to be recorded. Again
this will time out after 30 seconds and automatically start a measurement so if
no keys are pressed during the power on sequence then the meter will start a
run after just over a minute.
This mode is designed to be used with a StealthTM Noise Nuisance Record Kit.
Whenever the button on the kit is pressed then an external event is started or
extended (see external event details above). The LED will flash to show the
event audio is being saved. When the maximum event time is reached then the
LED is switched off. If memory is low then during an event the LED will be
continuously lit to show an event is in progress but the event audio is NOT
being recorded. When the LED is off then an event is NOT in progress.
At the end of a NRR run the user is prompted to do an after-run calibration.
Note: if memory is low or an NRR run is delayed using the start/stop timers or
the NRR run is not the first run in a sequence of runs then the voice notes
option is skipped. Voice notes can however always be added after the run is
completed.
58 Casella CEL

CEL-63x Environmental & Occupational Noise Meter
6 Specifications
6.1 General
The CEL-63x family is a range of instruments that support different firmware
functionality. Figure 14 below shows the functionality of the models in the
range.
Figure 14. CEL-63x instrument functionality
6.2 Standards
The CEL-63x instrument provides SPL, Integrating and Octave band noise
measurements compliant with the following international standards:
59 Casella CEL
IEC 61672-1: 2002-5 (Electro-Acoustics – Sound Level Meters) Group
„X‟ instruments. Performance of Class 1 or 2 as relevant to the
instrument model.
IEC 60651: 1979, IEC 60804: 2000, ANSI S1.4 1983, ANSI
S1.43-1997(R2007)
1/1 Octave and 1/3 Octave Filters comply with EN61260: 1996, Class 0
and ANSI S1.11 1986, Order-3 Type 0C.

CEL-63x Environmental & Occupational Noise Meter
6.3 Measurement range
Single measurement range up to 140.2 dB(A) RMS and 143.3 dB(C) peak.
Linearity range from 10 dB above noise floor.
When used with the high range microphones (-MIC1) the maximum RMS
ranges is up to 165.0 dB(A).
6.4 RMS frequency weightings
A, C and Z filter weightings satisfying IEC 61672-1: 2002 Class 1.
6.5 Octave and 1/3-Octave measurement
Octave: Real-time 11 bands with centre frequencies from 16 Hz to
16 kHz.
1/3-Octave: Real-time 33 bands with centre frequencies from 12.5 Hz to
20 kHz.
The displayed spectrum can be pre-weighted with A, C or Z.
Z-weighted octaves are stored only to be post-weighted in insight software.
6.6 Peak measurement
A-, C- or Z-weighted from 65.0 dB to 143.3 dB.
6.7 RMS detector
Digitally-derived true root-mean-square (RMS) detection, 0.1 dB display
resolution.
6.8 Noise floor
Total inherent noise including microphone thermal noise at 20 °C:
<20 dB (A) Class 1
<24 dB (A) Class 2
Electrical noise floor <17.5 dB (A).
6.9 Frequency response
6 Hz to 20 kHz (lower and upper 3 dB frequencies).
Digital sampling rate 67.2 kHz.
Overall Class 1 and Class 2 frequency response compliant with
IEC 61672-1: 2002
60 Casella CEL

CEL-63x Environmental & Occupational Noise Meter
6.10 Time weightings
Fast (F), Slow (S) and Impulse (I) according to IEC 61672-1: 2002.
6.11 Correction filters
Built-in correction filter for random incidence sound pressure fields.
6.12 Reference direction
For free-field measurements the reference direction is perpendicular to the
microphone diaphragm.
6.13 Reference conditions
23 °C air temperature
50 % relative humidity (RH)
101.325 kPa atmospheric pressure
Nominal reference level = 114.0 dB at 1 kHz
6.14 Operating environmental conditions
Humidity 5 % to 90 % RH non-condensing
Temperature –10 °C to +50 °C (Class 1)
0 °C to +40 °C (Class 2)
Pressure 65 kPa to 108 kPa
6.15 Effects of temperature
Electrical stability of the instrument <±0.2 dB over the range –10 °C to +50 °C
6.16 Effects of humidity
Less than ±0.5 dB over the range 25 % to 90 % RH (non-condensing) relative to
the value under reference conditions.
6.17 Storage environmental conditions
Humidity 0 % to 90 % RH non-condensing
Temperature –20 °C to +60 °C
Pressure 65 kPa to 108 kPa
61 Casella CEL

CEL-63x Environmental & Occupational Noise Meter
6.18 Microphones
CEL-251 ½-inch Class 1, 50 mV/Pa pre-polarised back electret
CEL-252 ½-inch Class 2, 30 mV/Pa pre-polarised back electret
Microphones use a separate pre-amplifier CEL-495.
-MIC1 High-range ¼-inch microphone, 2.8 mV/Pa pre polarised
back electret.
-MPA1 ½-inch to ¼-inch adaptor
6.19 Calibration
Auto-calibration by application of a 1 kHz calibrator tone, nominal level 114 dB
or 94 dB ±1 dB.
Auto-calibrated to a user-specified reference level with recording of date, time
and offset.
6.20 Power supply
External DC Optional -PC18 12 V DC universal power supply adaptor
Batteries Three AA alkaline or rechargeable cells.
Battery life Typically better than 8 hours in broadband mode with
6.21 Internal clock
Date and time accuracy better than ±2 seconds per day.
6.22 Languages
English (default) English (US) (date/time format) Spanish
French German Italian Portuguese
Chinese Brazilian Portuguese
available from Casella CEL.
Supply voltage 12 V DC
Supply current 170 mA continuous rating
2.1 mm power connector
backlight continuously on at low intensity. High levels of
backlight intensity reduce the battery life.
Typically 12 hours measurement time with backlight OFF.
62 Casella CEL

CEL-63x Environmental & Occupational Noise Meter
6.23 Electromagnetic compatibility
The instrument is designed and tested to comply with the following EMC and
ESD standards:
IEC 61000-4-2 Testing and Measuring Techniques – Electrostatic
discharge immunity tests.
IEC 61000-6-2 Generic standards – Immunity for industrial
environments.
6.24 Effects of AC power frequency fields
Less than ±0.5 dB change from 74 dBA 925 Hz reference level when subjected
to 160 A/m AC magnetic field at 50 Hz and 60 Hz.
6.25 Tripod mounting
Socket to mount on standard ¼-inch (Whitworth) camera tripod thread.
6.26 Display
320 × 240 pixels transmissive colour TFT, update period 0.5 seconds.
6.27 Memory
Micro SD 2 GB non-volatile internal memory.
Maximum capacity: Limited to either:
6.28 Connectivity
Refer to Figure 13.
USB Mini B (-CMC51) to download to Casella insight data
1. 999 individual runs, or
2. 400 separate runs of 24 hours duration with
1 minute periods and 1 second profiles. (Excluding
event and audio data)
3. 999 events per run
4. 999 audio files per day
5. 20 hours of audio recording in high quality mode,
60 hours in low quality mode.
management software.
AC output 2.5 mm stereo jack (barrel ground, tip AC output) provided
for remote monitoring or recording, PC WAV file recording or
headphone applications.
Approximately 0.4 Vrms full-scale output corresponding to
96 dB. Output impedance is approximately 2.2 kΩ. Load
63 Casella CEL

CEL-63x Environmental & Occupational Noise Meter
impedance should be as high as possible, and a coaxial
connection cable of between 0.5 metres and 10 metres length
should be used.
The AC output corresponds to the Z-weighted response of the
instrument.
DC output 2.5 mm stereo jack (barrel ground, ring DC output) provided
for chart recorders, loggers and so on. Some offset and scaling
is necessary on the measuring system for accurate
measurements.
Approximately 1.4 V DC full-scale output corresponding to
140 dB. Output impedance is approximately 2.2 kΩ. Load
impedance should be as high as possible.
The DC output corresponds to the A-weighted, fast time
response of the instrument.
Note that the DC power input ground must be kept isolated
6.29 Available data sets
A) Broadband Cumulative and Periodic Results
For each complete measurement run the instrument stores the following:
Run start Date and Time
Run duration
Run overload time
Run pause times
Run Id
Instrument serial number
Current measurement setup data
The Last calibration before run started results
The First calibration after end of run results
The Overload and Battery fail flags
The Environmental indices LDN, LDEN, CNEL
from any signal ground.
In periodic mode the following set of results is produced for each of the period
intervals during a run.
In cumulative mode the following single set of results is produced covering the
whole run.
64 Casella CEL

CEL-63x Environmental & Occupational Noise Meter
Sound pressure levels (SPL)
o L
o L
o L
o L
o L
o L
o L
o L
o L
Note that the SPLs are displayed but are NOT stored.
AF
CF
ZF
AS
CS
ZS
AI
CI
ZI
Equivalent continuous sound pressure levels (L
o L
o L
o L
o L
o L
o L
Aeq
Ceq
Zeq
AIeq
– LA
C
AeqT80
)
eq
Maximum and minimum sound pressure levels
o L
o L
o L
o L
o L
o L
o L
o L
o L
AFmax
CFmax
ZFmax
ASmax
CSmax
ZSmax
AImax
CImax
ZImax
L
L
L
L
L
L
L
L
L
AFmin
CFmin
ZFmin
ASmin
CSmin
ZSmin
AImin
CImin
ZImin
Maximum and Minimum times
The time for each of the 18 maximum and minimum sound pressure
levels is stored to 1 second resolution
Peak sound pressure level
o L
o L
o L
Apk
Cpk
Zpk
Peak times
The time for each of the three peak levels is stored to 1 second
resolution
65 Casella CEL

CEL-63x Environmental & Occupational Noise Meter
Average sound pressure level with exchange rate Q
o L
o L
each with threshold 0 dB or 70 to 90 dB
Other measurements
o L
o L
o L
o L
o L
Statistical parameters (L
o L
o L
o L
Event Data
o L
Other Data
o Start period time
o Period duration
o Period overload time
o Period Pause and Back erase time
o Period Overload and Battery fail flags
Avg(Q4)
Avg(Q5)
AF(Tm3)
AF(Tm5)
AI(Tm3)
AI(Tm5)
AE
, L
AF10
, L
CF10
, L
ZF10
, LAE, L
AEQ
AF50
CF50
ZF50
, L
, L
, L
AFmin
AF90
CF90
ZF90
, L
, L
n
, L
, L
)
AF95
CF95
ZF95
AFmax
, L
AFvariable
, L
CFvariable
, L
ZF variable
, L
Cpeak
B) Octave and 1/3-Octave Cumulative and Periodic results
In addition to all the broadband results listed above, the instrument can also
produce the following results for each of the octave or 1/3-octave bands:
L
L
L
Zeq
Ceq
Aeq
, L
, L
, L
ZFmax
CFmax
AFmax
, L
, L
, L
ZSMax
CSMax
ASMax
, L
, L
, L
ZF10
CF10
AF10
, L
, L
, L
ZF50
CF50
AF50
, L
, L
, L
ZF90
CF90
AF90
, L
, L
, L
ZF95
CF95
AF95
, L
, L
CFvariable
, L
ZFvariable
AFvariable
Only LZF are stored. The Casella insight data management software allows
calculations for LA and LC.
C) Profile Results
For each profile interval the following results are produced:
Broadband L
Profile start time
Overload and battery fail flags
66 Casella CEL
Aeq
, L
AIeq
, L
AFmax
, L
ASmax
, L
AImax
. L
CPEAK

CEL-63x Environmental & Occupational Noise Meter
The above results can be viewed on the instrument or by using insight,
and different results can be viewed even after the run has finished by
changing the measurement view.
The following settings CANNOT be changed after the run has
completed. Therefore it is important to set them correctly BEFORE you
start the measurement run:
1. Microphone response (random or free-field)
2. L
Avg
threshold
3. Ln variable percentile
D) Marker Record Results
This produces a file of events where each event is either one of four markers or
a Pause or a back-erase event. The Start time, duration and type of event is
stored for every event during each measurement run.
Casella insight can show these records on graphs of the measurement results.
Measurement run duration
In manual Cumulative mode a run will end automatically after 24 hours.
In manual Periodic mode a run will end at midnight and a new run will start
again automatically immediately to produce a set of results for each day. This
sequence can continue for up to 400 days if the instrument is left running
indefinitely.
When using the Delay or Timer measurement controls, the cumulative or
periodic run will continue for up to 24 hours under control of the delay or
timers.
6.30 Physical
Dimensions 71.5 mm wide
Weight 0.332 kg with batteries
230.0 mm high
31.0 mm deep
(Dimensions include microphone and removable preamplifier CEL-495)
0.254 kg without batteries
67 Casella CEL

CEL-63x Environmental & Occupational Noise Meter
7 Care and maintenance
Use a clean, slightly damp cloth to wipe the outside of the CEL-63x
instrument. Do not use abrasive, caustic or solvent materials to clean
the instrument.
Check the condition of the battery compartment when you fit batteries
to the instrument. Check for signs of corrosion and arrange any repairs
necessary.
Remove the batteries from the instrument if it will not be used for a long
period of time (more than one month).
Do not allow the instrument to become wet, or to be exposed to extreme
levels of dust, heat or cold.
68 Casella CEL

CEL-63x Environmental & Occupational Noise Meter
8 Servicing and Warranty arrangements
8.1 Inspection and test
To make certain the CEL-63x instrument conforms to its published
specification, the instrument is tested thoroughly and its accuracy is verified
before shipment from the factory. All technical information about each
individual instrument is filed under the instrument‟s serial number, which you
should include in any correspondence concerning this instrument.
8.2 Lifetime Warranty Terms and Conditions
This warranty provided by the manufacturer does not adversely affect the
statutory rights of the purchaser against the seller and gives remedies in
addition to those against the seller under the contract of sale.
Casella CEL warrants for the products stated below of their manufacture:
1. 24 months, from the date of invoice to the original purchaser.
2. Thereafter for the production lifetime of the product subject to regular
calibration as detailed below.
Casella CEL undertakes that each new product supplied thereon by Casella CEL
as original equipment will be free from defect in material or workmanship
according to the state of the art under normal use and service for the
production lifetime of the product. The warranty is valid for the original
purchaser of the product.
Products covered by the Casella CEL Lifetime Warranty are: CEL-24X Series
Sound Level Meters, CEL-35X Series dBadge Noise Dosimeters, CEL-6XX
Series Sound Level Meters, TUFF Personal Air Sampling Pumps. Note: „X‟
denotes the product variant. Includes Intrinsically Safe models where
available.
The warranty applies to free of charge repair of the product by Casella CEL.
Casella CEL at its discretion may elect to agree with the owner a value for part
exchange of the product in case the parts and labour cost of the repair exceeds
the economic value of the product.
The Lifetime Warranty is valid for the following components of the product:
• Printed circuit boards
• Cases
• Displays
• Interfaces/keypads
• Pump assemblies
• Internal sensors
69 Casella CEL

CEL-63x Environmental & Occupational Noise Meter
The warranty excludes the following components of the product or aspects of
damage:
• Batteries (except back-up batteries)
• Microphones
• Cables and accessories of the product
• Damage caused by battery acid leakage
• Severe pump contamination
• Damage caused either accidentally or maliciously
The warranty starts with the date of invoice by Casella CEL.
Regular calibration: in order to continue the warranty past the original 2 years
the product must be returned to Casella CEL or an authorised service centre on
a yearly basis for calibration. Failure to do this will invalidate the lifetime
warranty. The product must be returned within 30 days of either the expiry of
the 24 month initial warranty and/or the date of invoice of the last calibration.
Casella CEL is a brand name of IDEAL INDUSTRIES LIMITED, a company
registered with company number 01824671 whose registered office is at
Whitebrook Park, Lower Cookham Road, Maidenhead, Berkshire SL6 8XY t/a
Casella CEL whose principal place of business is at Regent House, Wolseley
Road, Kempston, Bedford MK42 7JY.
8.3 Repairs
The manufacturer undertakes to put right any defect in the instrument that is
attributable to a fault in its design or assembly and which becomes apparent
during the warranty period.
To take advantage of this warranty, the instrument must be returned, carriage
paid, to the manufacturer‟s factory or accredited agent, where the necessary
repairs will be performed.
To obtain repair under warranty, the instrument should be packed in its
original packing or an equivalent and returned to Casella CEL‟s local agent, or
in the case of UK domestic sales, to the Casella CEL Service Department at
Bedford. Please include the following information:
Instrument type(s)
Serial number(s)
Firmware version number(s)
Customer name and address
Contact name and telephone number
Details of any PC and software involved, including version number(s)
The reason for returning the equipment, with a detailed description of
the fault and a list of any error messages that might have been displayed
70 Casella CEL

CEL-63x Environmental & Occupational Noise Meter
NOTE
Any stored data should be downloaded before sending the unit for service, because it
may be deleted during service. Also, any customer set-up should be noted, because
these may be changed or reset during service.
The necessary adjustments or repairs will be performed and the instrument
returned to you as soon as possible.
After the warranty has expired (except on approved accounts), service work is
undertaken against quotations and all packing and transit costs are charged
extra.
8.4 User servicing
There are no user-serviceable components inside the CEL-63x instrument.
DO NOT open the instrument to attempt repairs. You will cancel the warranty if
you attempt to open the instrument for any reason.
If you suspect the instrument has developed a fault, contact your local
Casella CEL agent to arrange for service and repair.
71 Casella CEL

CEL-63x Environmental & Occupational Noise Meter
Acoustic calibrator
An instrument that provides a reference noise source with
a standard level and frequency. It is used to calibrate and
the check the performance of sound level meters and
noise dosimeters.
decibel (dB)
The standard unit for measuring sound level and noise
exposure.
dB(A)
A-weighted sound level in decibels.
A-weighted measurements are shown by using the
subscript „A‟.
A standard weighting of audible frequencies designed to
imitate the response of the human ear to noise.
dB(C)
C-weighted sound level in decibels.
C-weighted measurements are shown by using the
subscript „C‟.
C-weighting is a weighting used in the Control of Noise at
Work Regulations, and applies only a relatively small
correction to very loud noise sources.
dB(Z)
Z-weighted sound level in decibels.
Z-weighting applies no weighting to the frequency of
measurement. It is a raw measurement of sound level
across the complete frequency range of the instrument.
Fast time
weighting
A standard time weighting applied to measurements.
Most measurements are made using the Fast time
weighting. When using this setting, the instrument
applies a ⅛-second (125 ms) time constant when
calculating the sound pressure level.
Fast measurements are identified by using the subscript
„F‟.
Impulsive time
weighting
A standard time weighting applied to measurements.
When using this setting, the instrument applies a 35 ms
9 Glossary
The following list defines some of the acoustic terms that you can find in this
User Manual. For additional information, contact Casella CEL or your local
agent.
72 Casella CEL

CEL-63x Environmental & Occupational Noise Meter
time constant to rising signals and a 1500 ms time
constant to decaying signals when calculating a sound
pressure level.
The Impulse Time Constant was traditionally used to
display an impulsive type noise, allowing the maximum
levels to be more easily seen on a changing display.
Impulsive measurements are identified by using the
subscript „I‟.
L
AE
A-weighted
exposure level
The level that would contain the same amount of energy
in one second as the actual noise has during the whole
measurement period.
L
Aeq
A-weighted
equivalent
continuous sound
energy level
(also L
Ceq
, L
Zeq
)
The A-weighted (also C-weighted, Z-weighted) steady
level that would contain the same amount of noise energy
as in the actual noise, effectively giving an average level
over the measurement period.
Following the ISO procedures, doubling the energy results
in a 3 dB change in the Leq. This is denoted by the
exchange rate Q=3.
Example
If the noise level in a factory were a constant 85 dB and
the measurement period were 4 hours, the L
Aeq
would be
85 dB(A).
The calculation of L
Aeq
does not use a threshold as in the
calculation of L
Avg
, except for the L
Aeq
(T80) function
defined for the ACGIH standard.
LAF
(also LAS and LAI)
The A-weighted sound pressure level measured using fast
time weighting (also with Slow and Impulse time
weighting).
L
ASmax
(also L
AFmax
and L
AImax
)
The maximum A-weighted sound level measured using
slow time weighting (also with Fast and Impulse time
weighting).
L
Avg
Average sound
level
The average sound level over the measurement period is a
function used in OSHA measurements and is equivalent
to Leq.
Normally this term is used when the exchange rate Q is
some value other than 3, such as for measurements used
for the OSHA Hearing Conservation Amendment with
Q=5.
73 Casella CEL

CEL-63x Environmental & Occupational Noise Meter
Example
A Threshold value is used during the calculation of L
Avg
,
where any levels below the threshold are not included. For
example, assume the threshold level is set to 80 dB and
the exchange rate is 5 dB (Q = 5). If a one hour
measurement were taken in an environment where the
noise levels vary between 50 dB and 70 dB, the sound
level would never exceed the Threshold and the
instrument would record no value for the L
Avg
.
However, if the sound level exceeds the 80 dB Threshold
for only a few seconds, only these seconds contribute to
the L
Avg
, giving a level of approximately 40 dB, which is
much lower than the actual ambient sound levels in the
measured environment.
L
Cpk
(also L
Cpk
, L
Zpk
)
The peak C-weighted (also A-weighted or Z-weighted)
sound level.
Peak
The maximum level in dB reached by the sound pressure
at any instant during a measurement period. The CEL-63x
instrument can measure the peak sound pressure using A,
C or Z weighting.
Peak is the true peak of the pressure wave, which you
should not confuse with the highest sound pressure level
(which is called L
max
).
Slow time
weighting
A standard time weighting applied to measurements.
When using this setting, the instrument applies a 1 second
time constant when calculating sound pressure levels.
Slow measurements are identified by using the subscript
„S‟.
SPL
The sound pressure level. This is the basic physical
measure of noise and is normally expressed in dB.
Threshold
The sound pressure level below which sound
measurements are excluded from the calculation.
74 Casella CEL

CEL-63x Environmental & Occupational Noise Meter
Frequency
Without wind
screen
With wind
screen
Without wind
screen
With wind
screen
Expanded
uncertainty of
corrections at 95 %
probability (k=2)
Bruel & Kjear 4226
calibrator
Bruel & Kjear UA0033
electrostatic actuator
Hz
dB
dB
dB
dB
dB
31.5
-0.1
-0.1
-0.1
-0.1
0.2
63
-0.2
-0.2
-0.2
-0.2
0.2
125
-0.2
-0.2
-0.2
-0.2
0.2
250
-0.2
-0.2
-0.2
-0.2
0.2
500
-0.2
-0.2
-0.2
-0.2
0.2
1000 0 0.1 0 0.1
0.2
2000
0.3
0.7
0.3
0.7
0.3
4000
0.7
1.4
0.8
1.5
0.3
8000
2.8
2.5
3.1
2.8
0.4
12500
5.3
4.1
6.2
5.0
0.6
16000
6.4
4.5
7.8
5.9
0.6
10 Additional information
The following additional information relates to testing under IEC 61672-1:2002
section 9.3 of the standard.
1. Reference sound pressure level
The reference sound pressure level can be selected to 94 dB or 114 dB.
2. Reference level range
The CEL-63x instrument has a single measurement range of 0 dB to 140 dB.
3. Microphone reference point
The microphone reference point is the centre of the microphone‟s diaphragm.
The 0° reference direction is perpendicular to the microphone‟s diaphragm.
4. Acoustical frequency response testing
Table 3 shows the pressure to free-field correction data for the CEL-251
microphone used for periodic testing.
Table 3. Pressure to 0° free-field corrections
75 Casella CEL

CEL-63x Environmental & Occupational Noise Meter
Weighting
31.5 Hz
1 kHz
4 kHz
8 kHz
12.5 kHz
A
30 to 100
30 to 140
30 to 141
30 to 138
30 to 134
C
32 to 137
32 to 140
32 to139
32 to 136
32 to 132
Z
38 to 140
38 to 140
38 to 140
38 to 140
38 to 140
C Peak
65 to 140
65 to 143
65 to 142
65 to 139
65 to 135
Weighting
Electrical
Typical dB
Electrical
Max dB
Microphone
Thermal dB
Combined
Typical dB
Combined
Max dB
A
15.0
17.5
16.0
18.5
20.0
C
18.0
21.0
16.8
20.6
23.0
Z
24.0
26.5
16.8
25.0
27.0
5. Linear operating range
Table 4 shows the lower and upper limits of the linear operating ranges for
electrical input or when using a CEL-251 microphone.
You should add 10 dB to the lower limit shown in this table when using a
CEL-252 microphone.
Table 4. Linear operating range
6. Linearity measurements starting point
The starting point for measuring linearity errors is 114 dB.
7. Electrical input
The input device to apply electrical signals to the pre-amplifier is a series
18 pF ±5 % capacitor. You can use the CEL-516-2 line input adaptor for this
purpose. The electrical self-generated noise can be measured with the supplied
shorting plug attached to the CEL-516-2.
8. Self-generated noise
Self-generated noise is a combination of microphone thermal noise and the
instrument‟s electrical noise. Table 5 shows the self-generated noise levels for a
range of conditions.
Table 5. Self-generated noise using a type CEL-251 microphone
Note that the CEL-252 microphone has a typical thermal noise level of
20 dB(A). When using the CEL-252 microphone, the combined typical and
maximum noise levels will be 3 dB to 4 dB higher than the values shown in the
table above.
76 Casella CEL

CEL-63x Environmental & Occupational Noise Meter
9. Highest level
Using the microphones CEL-251 and CEL-252, the highest sound pressure level
that the CEL-63x instrument has been designed to measure is 140 dB. These
microphones have a nominal sensitivity of 50 mV/Pa.
The highest peak-to-peak voltage that can be applied safely to the preamplifier‟s input through the CEL-516-2 line input adaptor is 28.5 V.
For high-range instruments using the CEL-259 ¼-inch high-range microphone
and CEL-259/A ½-inch to ¼-inch adaptor, the highest sound pressure level
that can be measured is 165 db.
10. Power supply voltage range
The CEL-63x instrument can be powered from three internally-fitted AA
batteries, or from an external 12 V DC supply through a 2.1 mm connector (tip
is positive). The instrument can also be powered from a 5 V DC supply through
a USB connection to a PC.
The DC supply range is 9 V to 14 V
The USB supply range is 4.5 V to 5.5 V
When operating from internal AA batteries, the battery voltage range must be
from 3 V to 5 V.
A battery condition symbol on the instrument‟s screen flashes a warning
when the battery voltage falls to 3.3 V or lower.
The instrument stops the current run and turns OFF when the batteries
have discharged to 3.0 V. This is to make certain the instrument does
not make data measurements that will not meet the requirements of
IEC 61672.
11. Display device
The display device displays the complete linear operating range.
12. Environmental stabilisation time
The typical time taken for the CEL-63x instrument to stabilise after sudden
changes in the environmental conditions is as follows:
5 minutes after a 10 °C change in temperature
5 minutes after a 30 % change in humidity (non-condensing)
15 seconds after a 5 kPa change in ambient pressure
77 Casella CEL

CEL-63x Environmental & Occupational Noise Meter
Calibrator
Calibration Level
Correction no Wind
Screen
Calibration Level
Correction with
Wind Screen
IEC 60942
Casella CEL-110/1
-0.1dB
0.0dB
Type 1
Casella CEL-110/2
-0.1dB
0.0dB
Type 2
Bruel & Kjear 4231
-0.1dB
0.0dB
Type 1 approved
Cirrus CR:515
-0.1dB
0.0dB
Type 1 approved
13. Electric field strength greater than 10 V/m
The CEL-63x instrument has not been tested for field strengths greater than
10 V/m.
14. EMC emissions
When tested, emissions from the CEL-63x instrument were no greater in one
plane or in any mode of operation than another.
15. EMC susceptibility
The CEL-63x instrument has a slightly higher
susceptibility with the Y direction facing the radiating
antenna.
X is the direction of the microphone
Y is the direction to either side of the case
Z is the direction perpendicular to the surface of
the display
10.1 Sound calibrators – Level corrections
Sound level calibrators apply sound pressure to a microphone in a closed cavity.
The microphone‟s response in a free field to a 1 kHz tone will be slightly
different from that of a pressure field. Also, some calibrators are affected by the
physical size of the microphone changing the volume of the calibrator‟s cavity.
The wind screen has an effect on the free-field response at 1 kHz. However, this
can be compensated during calibration.
Table 6. Calibration corrections for the CEL-251 and CEL-252
microphones
Examples
The CEL-63x instrument can be calibrated at a nominal level of 94 dB or
114 dB, depending on the type of calibrator used.
If you use a CEL-120/1 or CEL-120/2 calibrator and the certified output
from the calibrator is 113.98 dB, and you intend to use the instrument
78 Casella CEL

CEL-63x Environmental & Occupational Noise Meter
Nominal
Frequency
Actual
Frequency
0 Degree
Free Field
Response
0 Degree
Free Field
Corrections
Effect of
Wind Screen
0 Degree
Free Field
Response
with wind
Screen
0 Degree
Free Field
Corrections
with Wind
Screen
Expanded
uncertainty
of
Corrections
(k=2)
Hz
Hz
dB
dB
dB
dB
dB
dB
250
251.19
-0.2
0.2
0.0
-0.2
0.2
0.16
315
316.23
-0.2
0.2
0.0
-0.2
0.2
0.16
400
398.11
-0.2
0.2
0.0
-0.2
0.2
0.16
500
501.19
-0.2
0.2
0.0
-0.2
0.2
0.16
630
630.96
-0.1
0.1
0.0
-0.1
0.1
0.17
800
794.33
-0.1
0.1
0.0
-0.1
0.1
0.18
1000
1000.00
-0.1
0.1
0.1
0.0
0.0
0.19
1250
1258.92
0.0
0.0
0.1
0.1
-0.1
0.19
1600
1584.89
0.0
0.0
0.2
0.2
-0.2
0.20
2000
1995.26
0.0
0.0
0.2
0.2
-0.2
0.21
2240
2238.72
-0.1
0.1
0.3
0.2
-0.2
0.21
2500
2511.88
-0.2
0.2
0.4
0.2
-0.2
0.21
2800
2818.38
-0.1
0.1
0.4
0.3
-0.3
0.22
3150
3162.27
0.0
0.0
0.5
0.5
-0.5
0.22
3550
3548.13
0.1
-0.1
0.5
0.6
-0.6
0.23
4000
3981.07
-0.2
0.2
0.6
0.4
-0.4
0.23
4500
4466.83
-0.1
0.1
0.6
0.5
-0.5
0.25
5000
5011.86
-0.1
0.1
0.6
0.5
-0.5
0.26
5600
5623.40
-0.3
0.3
0.5
0.2
-0.2
0.28
6300
6309.56
0.1
-0.1
0.4
0.5
-0.5
0.29
7100
7079.45
-0.3
0.3
0.2
-0.1
0.1
0.32
8000
7943.27
0.0
0.0
0.0
0.0
0.0
0.35
8500
8413.94
-0.1
0.1
-0.1
-0.2
0.2
0.38
9000
8912.49
0.0
0.0
-0.1
-0.1
0.1
0.41
9500
9440.59
-0.1
0.1
-0.2
-0.3
0.3
0.44
without the wind screen, then you must set the calibration level to
113.88 dB. You must round this value to 113.9 dB.
o Calibrator level 113.98 dB
o Correction –0.1 dB
o Calibration level 113.88 dB rounded to 113.9 dB
If you use a Cirrus CR:515 calibrator and the certified output from the
calibrator is 94.04 dB, and you intend to use the instrument with the
wind screen fitted, then you must set the calibration level to 94.04 dB.
You must round this value to 94.0 dB.
o Calibrator level 94.04 dB
o Correction 0.0 dB
o Calibration level 94.04 dB, rounded to 94.0 dB
Refer to section 3.4 “Calibrating the instrument” on page 13 for instructions to
set the calibration level and calibrate the instrument.
10.2 Response characteristics
Table 7. Casella CEL-63X with CEL-251 Microphone Free Field response with and
without Wind Screen
79 Casella CEL

CEL-63x Environmental & Occupational Noise Meter
Nominal
Frequency
Actual
Frequency
0 Degree
Free Field
Response
0 Degree
Free Field
Corrections
Effect of
Wind Screen
0 Degree
Free Field
Response
with wind
Screen
0 Degree
Free Field
Corrections
with Wind
Screen
Expanded
uncertainty
of
Corrections
(k=2)
Hz
Hz
dB
dB
dB
dB
dB
dB
10000
9999.98
0.0
0.0
-0.3
-0.3
0.3
0.46
10600
10592.52
0.0
0.0
-0.4
-0.4
0.4
0.48
11200
11220.16
0.0
0.0
-0.5
-0.5
0.5
0.50
11800
11885.00
0.1
-0.1
-0.7
-0.6
0.6
0.52
12500
12589.23
0.0
0.0
-0.8
-0.8
0.8
0.53
13200
13335.19
-0.1
0.1
-1.0
-1.1
1.1
0.55
14000
14125.35
-0.1
0.1
-1.2
-1.3
1.3
0.57
15000
14962.33
-0.1
0.1
-1.3
-1.4
1.4
0.59
16000
15848.90
-0.1
0.1
-1.4
-1.5
1.5
0.60
17000
16788.00
0.0
0.0
-1.7
-1.7
1.7
0.60
18000
17782.76
0.0
0.0
-1.9
-1.9
1.9
0.60
19000
18836.45
0.0
0.0
-2.0
-2.0
2.0
0.60
20000
19952.58
0.0
0.0
-2.1
-2.1
2.1
0.60
1. Corrections below 250Hz are 0.0dB
80 Casella CEL

CEL-63x Environmental & Occupational Noise Meter
Nominal
Frequency
(Hz)
Actual
Frequency
(Hz)
0
Deg
10
Deg
20
Deg
30
Deg
40
Deg
50
Deg
60
Deg
70
Deg
80
Deg
90
Deg
100
Deg
110
Deg
120
Deg
130
Deg
140
Deg
150
Deg
250
250.32
0.03
0.01
0.00
-0.01
-0.02
-0.03
-0.04
-0.02
-0.03
-0.19
-0.14
-0.11
-0.09
-0.18
-0.19
-0.11
500
500.65
0.02
0.02
0.09
0.12
0.10
0.12
0.12
0.11
0.10
0.09
0.03
-0.04
-0.07
-0.09
-0.07
-0.06
630
629.85
0.01
0.02
0.12
0.17
0.16
0.18
0.19
0.18
0.17
0.20
0.13
0.03
-0.04
-0.04
-0.02
-0.02
800
799.42
0.01
0.01
0.10
0.15
0.14
0.17
0.18
0.19
0.20
0.23
0.19
0.09
-0.02
-0.04
-0.03
-0.02
1000
1001.29
0.01
0.01
-0.03
-0.02
-0.02
-0.01
0.01
0.02
0.06
0.08
0.11
0.05
-0.08
-0.17
-0.19
-0.14
1250
1248.93
0.01
0.02
-0.15
-0.22
-0.25
-0.26
-0.27
-0.26
-0.21
-0.18
-0.09
-0.06
-0.18
-0.34
-0.42
-0.37
1600
1598.84
0.01
0.03
-0.02
-0.11
-0.22
-0.32
-0.39
-0.45
-0.44
-0.40
-0.33
-0.17
-0.17
-0.36
-0.57
-0.55
2000
1999.90
0.02
0.04
0.14
0.13
0.03
-0.11
-0.27
-0.45
-0.58
-0.61
-0.59
-0.47
0.25
-0.31
-0.63
-0.74
2240
2239.45
0.02
0.03
0.12
0.17
0.16
0.07
-0.08
-0.30
-0.51
-0.62
-0.60
-0.58
-0.31
-0.19
-0.52
-0.76
2500
2500.54
0.02
0.02
-0.09
-0.05
0.05
0.09
0.02
-0.18
-0.42
-0.67
-0.59
-0.67
-0.48
-0.16
-0.44
-0.83
2800
2799.32
0.02
0.00
-0.30
-0.44
-0.40
-0.26
-0.14
-0.21
-0.44
-0.83
-0.79
-0.77
-0.82
-0.39
-0.54
-1.07
3150
3149.23
0.01
0.00
-0.01
0.25
-0.61
-0.72
-0.53
-0.37
-0.47
-0.83
-1.23
-0.84
-1.08
-0.76
-0.68
-1.36
3550
3550.29
0.01
0.03
0.11
0.10
-0.24
-0.81
-1.14
-0.98
-0.72
-0.95
-1.73
-1.36
-1.27
-1.26
-0.91
-1.63
4000
3999.79
0.01
0.00
-0.29
-0.28
-0.07
-0.11
-0.63
-1.19
-0.92
-0.80
-1.22
-1.85
-1.01
-1.41
-0.81
-1.36
4500
4500.44
0.01
-0.04
0.04
-0.24
-0.58
-0.49
-0.44
-0.99
-1.55
-1.09
-1.53
-2.05
-1.55
-1.54
-1.40
-1.60
5000
5001.09
0.02
0.00
-0.34
-0.51
-0.83
-1.19
-1.18
-1.23
-2.02
-2.10
-1.81
-2.37
-2.82
-1.87
-2.15
-2.05
5600
5601.32
0.01
-0.02
0.17
0.04
-0.29
-0.70
-1.05
-0.99
-1.29
-2.17
-1.68
-2.33
-2.62
-1.65
-2.35
-1.49
6300
6301.15
0.01
-0.02
-0.41
-0.77
-0.89
-0.92
-1.52
-2.12
-1.81
-2.64
-2.57
-2.43
-3.24
-3.39
-2.89
-2.38
7100
7100.57
0.01
-0.05
-0.43
-0.49
-0.88
-1.68
-1.54
-2.21
-2.75
-2.59
-3.83
-3.28
-4.13
-3.48
-2.50
-3.32
8000
7999.58
0.01
-0.01
-0.15
-0.48
-1.14
-1.43
-2.27
-2.21
-3.28
-3.27
-4.64
-3.44
-4.15
-4.19
-3.55
-4.00
8500
8500.23
0.01
-0.07
-0.36
-0.60
-1.00
-1.47
-1.91
-2.71
-2.70
-3.69
-4.22
-4.26
-4.55
-5.33
-4.10
-3.73
9000
9000.88
0.01
-0.05
-0.30
-0.79
-1.36
-2.00
-2.27
-3.38
-3.08
-5.09
-4.17
-5.59
-4.78
-5.64
-5.26
-4.29
9500
9498.83
0.00
-0.06
-0.30
-0.62
-1.14
-1.80
-2.27
-2.82
-3.48
-4.53
-4.04
-5.64
-4.19
-5.88
-4.93
-4.62
10000
9999.48
0.01
-0.11
-0.45
-0.90
-1.58
-2.11
-3.06
-3.23
-4.56
-4.65
-4.72
-6.91
-4.85
-6.39
-5.05
-5.12
10600
10599.72
0.00
-0.05
-0.25
-0.72
-1.35
-2.09
-2.58
-3.33
-4.59
-4.18
-5.10
-6.67
-5.47
-6.65
-5.87
-4.89
11200
11199.96
-0.02
-0.13
-0.61
-1.02
-1.77
-2.61
-3.23
-4.43
-4.53
-5.26
-7.01
-6.81
-6.83
-7.04
-6.50
-5.69
11800
11800.20
-0.02
-0.12
-0.25
-0.75
-1.55
-2.27
-3.08
-3.72
-4.36
-5.78
-7.44
-6.20
-6.97
-7.58
-7.27
-6.39
12500
12500.02
0.00
-0.13
-0.65
-1.24
-2.02
-2.95
-3.81
-4.56
-5.76
-7.34
-7.99
-6.91
-8.86
-7.51
-8.91
-7.87
Table 8. CEL-63X with CEL-251 Microphone directional response (dB) relative to
zero degrees (Orientation of CEL-63X - Display at 0 degrees relative to ground)
Maximum expanded uncertainty of above data with 95% probability (k=2)
500 Hz to 1 kHz 0.3 dB
>1 kHz to 4 kHz 0.5 dB
>4 kHz to 8 kHz 1.0 dB
>8 kHz to 12.5 kHz 1.5 dB
81 Casella CEL

CEL-63x Environmental & Occupational Noise Meter
Nominal
Frequency
(Hz)
Actual
Frequency
(Hz)
0
Deg
10
Deg
20
Deg
30
Deg
40
Deg
50
Deg
60
Deg
70
Deg
80
Deg
90
Deg
100
Deg
110
Deg
120
Deg
130
Deg
140
Deg
150
Deg
250
250.32
0.04
-0.02
0.03
-0.07
0.01
0.00
-0.02
0.10
0.13
0.14
0.29
0.27
0.63
0.65
0.74
-0.03
500
500.65
0.03
0.02
0.05
0.02
0.03
0.02
0.07
0.19
0.25
0.35
0.35
0.53
0.69
0.77
0.76
0.13
630
629.85
0.02
0.03
0.05
0.03
0.02
0.01
0.06
0.15
0.22
0.33
0.32
0.50
0.54
0.60
0.58
0.11
800
799.42
0.02
0.02
0.04
0.01
-0.01
-0.03
0.00
0.07
0.14
0.25
0.26
0.40
0.31
0.30
0.28
0.04
1000
1001.29
0.02
0.02
0.03
0.00
-0.03
-0.07
-0.08
-0.04
0.01
0.11
0.18
0.24
0.04
-0.08
-0.11
-0.08
1250
1248.93
0.03
0.03
0.04
0.01
-0.04
-0.09
-0.15
-0.20
-0.17
-0.07
0.03
0.04
-0.21
-0.44
-0.53
-0.20
1600
1598.84
0.04
0.04
0.06
0.03
-0.03
-0.09
-0.23
-0.38
-0.44
-0.38
-0.20
-0.19
-0.16
-0.42
-0.69
-0.42
2000
1999.90
0.04
0.04
0.06
0.05
0.02
-0.01
-0.17
-0.38
-0.59
-0.64
-0.50
-0.38
0.20
0.23
-0.25
-0.66
2240
2239.45
0.04
0.02
0.04
0.04
0.03
0.04
-0.08
-0.24
-0.50
-0.66
-0.66
-0.49
0.13
0.48
-0.06
-0.77
2500
2500.54
0.03
0.00
-0.01
-0.05
-0.05
0.00
-0.06
-0.11
-0.33
-0.60
-0.80
-0.66
-0.44
0.35
-0.15
-0.91
2800
2799.32
0.02
-0.02
-0.08
-0.19
-0.26
-0.24
-0.26
-0.21
-0.26
-0.55
-0.95
-0.90
-1.39
-0.19
-0.39
-1.15
3150
3149.23
0.01
-0.01
-0.08
-0.28
-0.49
-0.63
-0.76
-0.72
-0.54
-0.67
-1.08
-1.18
-1.58
-0.65
-0.17
-1.53
3550
3550.29
0.02
0.02
0.03
-0.10
-0.30
-0.60
-1.01
-1.24
-1.07
-0.82
-1.00
-1.56
-0.85
-1.16
0.35
-1.57
4000
3999.79
0.02
0.00
0.00
-0.03
0.02
-0.02
-0.36
-0.83
-1.14
-0.85
-0.81
-1.43
-1.35
-2.08
-0.34
-0.72
4500
4500.44
0.02
-0.01
-0.15
-0.42
-0.60
-0.58
-0.61
-0.95
-1.40
-1.51
-1.28
-1.33
-2.33
-1.08
-1.45
-0.66
5000
5001.09
0.02
0.01
-0.04
-0.26
-0.66
-1.03
-1.18
-1.18
-1.72
-2.05
-1.55
-1.98
-2.33
-1.70
-2.28
-0.75
5600
5601.32
0.01
-0.03
-0.13
-0.24
-0.25
-0.48
-1.15
-1.33
-1.28
-1.98
-2.08
-1.72
-2.15
-2.51
-2.53
-0.30
6300
6301.15
0.01
-0.01
-0.11
-0.47
-0.97
-1.19
-1.23
-2.06
-2.25
-2.20
-2.97
-2.60
-2.58
-3.47
-2.47
-1.23
7100
7100.57
0.01
-0.05
-0.29
-0.56
-0.59
-0.96
-1.76
-1.77
-2.56
-2.51
-3.08
-3.64
-3.59
-2.69
-2.74
-3.00
8000
7999.58
0.03
-0.04
-0.12
-0.26
-0.78
-1.39
-1.52
-2.22
-2.70
-3.35
-2.98
-4.00
-3.78
-3.79
-3.99
-3.46
8500
8500.23
0.02
-0.06
-0.37
-0.79
-0.92
-1.45
-2.19
-2.75
-2.95
-3.98
-3.51
-4.57
-3.78
-4.17
-4.36
-3.55
9000
9000.88
0.02
-0.02
-0.12
-0.61
-1.30
-1.50
-2.15
-2.64
-3.49
-3.81
-4.08
-4.90
-4.62
-4.19
-4.92
-4.37
9500
9498.83
0.03
-0.07
-0.30
-0.49
-1.02
-1.74
-2.14
-2.85
-3.85
-3.82
-4.56
-5.34
-5.22
-5.82
-4.97
-5.24
10000
9999.48
0.05
-0.02
-0.33
-0.90
-1.20
-1.83
-2.50
-3.42
-3.89
-4.29
-5.52
-4.82
-5.92
-5.30
-6.17
-5.15
10600
10599.72
0.06
-0.02
-0.17
-0.53
-1.38
-1.73
-2.63
-3.21
-4.04
-4.83
-5.46
-5.37
-6.24
-6.24
-6.61
-5.14
11200
11199.96
0.00
-0.06
-0.39
-0.90
-1.30
-2.32
-2.74
-3.57
-4.52
-5.47
-5.59
-5.65
-6.65
-5.67
-6.37
-6.44
11800
11800.20
-0.08
-0.08
-0.25
-0.94
-1.64
-2.39
-2.89
-3.87
-5.01
-5.21
-5.50
-6.25
-7.68
-5.93
-7.46
-8.48
12500
12500.02
0.04
-0.07
-0.41
-0.91
-1.62
-2.32
-3.36
-4.27
-5.10
-5.95
-6.64
-8.39
-7.76
-7.51
-7.39
-6.99
Table 9. CEL-63X with CEL-251 Microphone directional response (dB) relative to
zero degrees (Orientation of CEL-63X - Display at 90 degrees relative to ground)
Maximum expanded uncertainty of above data with 95% probability (k=2)
500 Hz to 1 kHz 0.3 dB
>1 kHz to 4 kHz 0.5 dB
>4 kHz to 8 kHz 1.0 dB
>8 kHz to 12.5 kHz 1.5 dB
82 Casella CEL

CEL-63x Environmental & Occupational Noise Meter
NOTE
When Online mode is enabled then External Events are automatically disabled (as
the bottom socket is not available as its used for RS232 output). Also Event Audio
and Event Profiles are automatically disabled. Level and Marker events can still be
enabled to give event records without event audio or event profiles and voice notes
can still be created.
NOTE
Do not select Environmental 2 setup unless using with the MAM (Multi Agent
Monitor).
10.3 Data and Protocols for Online Mode
The feature is available in all variants (A, B or C) of the CEL-632 and CEL-633
instruments running in broadband. Octave or 1/3 Octave band. When Online
mode is enabled and the Measurement Mode is correctly set for Online mode,
every time the CEL-63x is switched on it will automatically start a run and try to
output the results to RS232 (providing a USB host is NOT connected). If the
Casella CEL-63x RS232 cable (part no: 196138B) is not connected or the receive
has paused output using handshaking then the Online mode will buffer the
results until the cable is connected and handshaking has stopped pausing the
output. The CEL-63x can buffer at least 24 hours worth of RS232 profile and
period results (up to 10MBytes of ASCII data). Apart from the automatic start
of a run and output of results to RS232 the meter will perform as normal so
runs can be stopped, started and calibrated etc.
Online Mode can optionally output just Period results, just Profile Results or
both Period and Profile results allowing output from once a second to once a
day. The run will also store the period, profile and marker files to memory as
normal so even if some results may be lost from the real time output then there
is always a backup of all the results from the real time output which can be
accessed using the Casella insight data management software. The CEL-63x can
store up to 400 days worth of runs, providing power is maintained then the
system can run without intervention for over a year and all the time be
outputting results over the RS232.
A) To set Periods Only
1. Enable Output Periods (in the Online Menu above)
2. If Octave or third octave L
(in the Online Menu above)
3. In Measurement Control – Date Sets menu then Select:-
Set the required Periodic Interval.
Set Profile Interval: OFF
4. In the Setup – Measurement view select the setup to determine which
period functions are output. The Octave Z, C or A weighting applied to
the octave and 1/3 octave L
L
can be output for each band
Aeq
83 Casella CEL
are required then Select 1/1, 1/3 Octave Leq
eqs
is also selected here so that L
eqs
Zeq
or L
Ceq
or

CEL-63x Environmental & Occupational Noise Meter
NOTE
RS232 Output is also paused when the CEL-63x does not get a valid RXD RS232
level from the receiver TXD line so there MUST be a valid RS232 level on this line
from the receiver even when handshaking is set to None. Removing the cable will
also pause the RS232 output. The CEL-63x Rs232 interface has 32 byte buffers so
when the handshaking pauses the output then up to 32 further bytes can be
transmitting before the pause actually occurs.
B) To set Profiles Only
1. Disable Output Periods (in the Online Menu above)
2. In Measurement Control – Date Sets menu then select :-
Set the required Periodic Interval.
Set required Profile Interval.
Set the Profile functions required
C) To set Both Periods and Profiles
This is same as A) except in step 3) then set the required Interval to the
required time and set the Profile functions required
Baud Rate:-
Set the required RS232 baud rate for transmitting and receiving data (1200,
2400, 4800, 9600, 19200, 38400, 57600 or 115,200 baud).
Handshake:-
This can be set to None, Hardware or XON / XOFF. The receiving device can
pause and then continue the CEL-63x RS232 output using handshaking. The
CEL-63x can always buffer over 24 hours worth of readings (i.e. up to 10Mbytes
of results) so a receiver using handshaking could pause the RS232 output for a
few seconds or even a day without losing any data. If the profile times and
period times are set to longer intervals then the meter can buffer many days or
even weeks of output.
Hardware:-
This uses the DTR RS232 signal from the receiving device on pin 4 of the 9way
Female D type connector. When this line is 0v or less then output is Paused
and when at 3.3v or higher then output resumes.
XON / XOFF:-
This uses software handshaking. The Receiver sends a XOFF character (ASCII
19) to pause the RS232 output and XON character (ASCII 17) to resume output.
84 Casella CEL

CEL-63x Environmental & Occupational Noise Meter
NOTE
Online Mode will ONLY operate when the Meter is in Periodic mode. (i.e. Periodic
mode is set in the Measurement Control- Data Sets Menu). If Cumulative mode is
selected then Online Mode will be ignored as if it had been disabled.
Output Periods:-
This gives the option to Output Period Results or not (see below).
1/1 Octave,
1/3 Octave Leq If the meter is a „B‟ or „C‟ variant and Output Period results is
selected this allows a period Leq of each octave or 1/3 octave
frequency to be output with the period results.
Online Mode:-
This enables or disables Online mode.
Results Output:-
Normal Results Output:-
All Results lines are output in ASCII and are terminated with a carriage return
and then linefeed character.
The general output format is
<line type>,YYYY-MM-DD,HH:MM:SS,descriptor1,value1,descriptor2,value2..
CRLF
Where CRLF is the 2 characters Carriage return (ASCII 13) followed by line feed
(ASCII 10) .
Normal Profile Result (output every 1 second to 1 hour):-
This outputs 1 line of results to RS232 every profile interval. These are the same
profile results which are stored on SD card and can be output to Casella insight.
This outputs the 6 fixed functions L
the Profile time is set to 1 minute or more and the Profile functions Ln option is
selected and the meter is a CEL-633A/B/C then the 6 fixed functions are
followed by 5 Ln values using the current Z, C or A weighting. These are always
Fast time weighted so if the Current broadband weighting is „C‟ then L
L
, L
CF90
CF95
, L
are output (where nn.n is the user selected Ln percentile).
CFnn.n
Aeq
, L
AIeq
, L
AFmax
, L
ASMax
, L
AImax
and L
Cpeak
CF10
, L
. If
CF50
,
If Ln‟s are not output then 6 functions are output in a single line e.g.
<PRF>,2010-06-
02,23:19:45,L
70.2,L
85 Casella CEL
Cpeak
Aeq
,103.2
,60.3,L
AIeq
,61.9,L
AFmax
,69.2,L
ASmax
,68.4,L
AImax
,

CEL-63x Environmental & Occupational Noise Meter
NOTE
If the profile interval is set to 100ms then Normal Online mode will output a 1 second
profile to the RS232 output but save a 100ms profile to memory during the run.
NOTE
The Instantaneous SPL function (eg LAF) is never output. In Normal online mode.
NOTE
All Broadband Period function values are in dBs and all functions except LC-Aeq in
the range 0.0 dB to 199.9dB and LC-Aeq has a range -5.0 to 199.9dB.
If Ln‟s are also output then 5 functions are output immediately after the L
103.2 above to give 11 functions in total e.g.
L
AF10
, 64.5, L
AF50
, 63.2, L
AF90
, 45.7, L
AF99.9
, 32.4
The date and time output is the date and time when that profile started.
CPeak
,
Normal Period Result (output every 1 minute to 24 hours):-
If Period output is enabled then at the end of every period the meter will output
a broadband Period result line. If the 1/1,1/3 Octave Leq is enabled and the
meter has octave or third octave filters then an Octave Period result line is then
also output with 11 x Octave band L
output with 33 x 1/3 octave L
. If two lines are output then the dates and times
eqs
will be identical and is the date and time of the start of the period that was
measured.
or a third octave Period result line is
eqs
Broadband Period Result line:-
This is in format:-
<PER>YYYY-MM-DD, HH:MM:SS, function1, value1, function2, value2…
functionN, valueN
The broadband functions are those selected in the current Setup- View (These
are the same functions which are displayed when recalling completed runs to
the CEL-63x LCD). Between 1 and 9 functions can be selected as well as 0 to 5
Ln functions giving up to 14 functions in total e.g.
<PER>,2010-05-07,15:23:45,L
AFmax
,102.4,L
AFmin
,34.3,L
C-Aeq
,-5.0,L
AF90
,65.4
86 Casella CEL

CEL-63x Environmental & Occupational Noise Meter
NOTE
„Environmental 2‟ setup should be selected when used with the Multi Agent Monitor
(MAM), see MAM operator instructions for further details.
Octave or 1/3 Octave Period Result line :-
If the 1/1, 1/3 Octave Leq is enabled and the meter has octave or third octave
filters then an Octave Period result line is output with 11 x Octave band L
third octave Period result line is output with 33 x 1/3 octave L
eqs
.
These are in format:-
<1/1 OCT LwEQ>, YYYY-MM-DD, HH:MM:SS, freq1, value1, freq2,
value2…freq11, value11
<1/3 OCT LwEQ>, YYYY-MM-DD, HH:MM:SS, freq1, value1, freq2,
value2….freq33, value33
eqs
or a
Where LwEQ = L
<1/1 OCT L
>, 2010-05-07, 15:23:45, 16Hz, 32.4, 32Hz, 67.2......... 16 KHz,
Ceq
ZEQ,LCEQ
or L
depending on the setup octave weighting e.g.
AEQ
54.2
<1/3 OCT L
>, 2010-05-07, 15:23:45, 12.5Hz, 32.3, 16Hz, 43.2.... 20 KHz,
Ceq
32.7
RS232 Data Format
The online mode uses 1 start bit, 8 data and 2 Stop bits with NO parity with a
baud-rate between 1200 and 115,200. Ensure that the receiver is set to the same
baud-rate and data format.
The Comma Delimited ASCII data format can be directly input into a standard
terminal emulation program (e.g. Microsoft HyperTerminal) and can be saved
as a standard text file which can be exported to most spread sheets e.g. excel.
87 Casella CEL
 Loading...