

Casella CEL CEL-62X User Manual

CEL-600 SERIES SOUND LEVEL METER
CASELLA CEL
Regent House,
Wolseley Road,
Kempston,
Bedford,
MK42 7JY, U.K.
Phone: +44 (0) 1234 844 100
Fax: +44 (0) 1234 841 490
E-mail: info@casellacel.com
Web: www.casellacel.com
August 2009
HB3340-02
OPERATOR’S MANUAL
CASELLA U SA
17 Old Nashua Road,
# 15, Amherst,
NH 03031,
U.S.A.
Toll Free: +1 (800) 366 2966
Fax: +1 (603) 672 8053
E-mail: info@casellaUSA.com
Web: www.casellaUSA.com
CASELLA ESPANA S.A.
Polígono Európolis
Calle C, nº4B
28230 Las Rozas - Madrid
Spain
Phone: + 34 91 640 75 19
Fax: + 34 91 636 01 96
E-mail: online@casella-es.com
Web: www.casella-es.com
CASELLA CHINA(中国)
CASELLA CHINA(中国)
地址
地址
北京东城区东方广场W1座911室
北京东城区东方广场W1座911室
邮编: 100738
邮编: 100738
电话: 0086 10 85183141
电话: 0086 10 85183141
传真: 0086 10 85183143
传真: 0086 10 85183143
电子邮件: info@casellameasurement.cn
电子邮件:
网址: www.casellachina.cn
info@casellameasurement.cn
网址: www.casellachina.cn

Casella CEL Limited 2

TABLE OF CONTENTS
SECTION TITLE PAGE
1 Introduction 4
2 Instrument Features 4
3 Operation 7
3 A Switch On 7
3 B Setting Screens 8
3 C Date & Time Screens 11
3 D Set Language 12
3 E Set Backlight 12
3 F Set Run Duration 14
3 G Calibration ref Level 15
3 H View Memory Results 16
3 I Delete Memory results 17
3 J Run Screens 18
3 K Instrument Calibration 19
3 L Extracting Data 20
3 M System Tools 21
4 Storage 21
5 Low and High Level Sound 21
6 Specifications 23
7 Servicing and Warranty Arrangements 28
8 Appendix A - Glossary of Terms 29
9 Appendix B - Additional information 31
Casella CEL Limited 3

1. INTRODUCTION
CEL-600 Series is a range of Sound Level Meters been designed to meet the
demands of worldwide industrial health and safety professionals as well as general
noise measurement applications. The instrument encompasses functionality from
basic sound level measurement to integrating and real-time octave band analysis.
The CEL-600 instrument is based on the very latest digital signal processing
technology and has a crisp, vibrant colour TFT LCD display. This precision
instrument is designed to bring your noise measurements up to date giving confident
and reliable performance fully compliant with international standards.
Data is stored in a .csv format, compliant with MS Office applications, and through
the USB connection, the .csv files can be copied to a PC without the need for any
propriety software packages.
Back to
Index
2. INSTRUMENT FEATURES
The CEL-62X Sound Level Meter comprises of several variants, where the ‘X’
represents a number which determines the model variant and subsequent features.
Subsequent letters denote the frequency analysis capability, ‘A’ for broadband, ‘B’ for
1/1 octave band and ‘C’ for 1/3 octave, e.g CEL-620C.
CEL-620
An integrating meter providing A, C, and Z frequency weightings, Fast Slow and
Impulse time weightings with cumulative storage and PC connectivity functions. A
single measurement range of 140dB RMS is standard. Simultaneous L
values are measured for use in the HML selection of hearing protection method. L
is available with a selectable threshold. This model is available in Class 1 or Class 2
accuracy standards.
CEL-621
Additional parameters are added for the measurement of environmental noise.
Statistical parameters (Ln%) are available and can be altered to suit specific
environmental legislation.
Frequency Analysis
Models providing ‘Integrating’ functionality combined with addition of 1/1 Octave
bands (B model) or both 1/1 Octave and 1/3 Octave bands (C model) analysis. This
instrument is designed to satisfy the demands of all industrial noise at work
applications. Octave results may be displayed graphically or in numerical form and
can be A, C or Z frequency weighted. Advanced DSP processing provides fast
parallel processing of Octave results from 16Hz to 16kHz, or 1/3 Octave results from
12.5Hz to 20kHz. This model is available in Class 1 or Class 2.
and L
Aeq
Ceq
avg
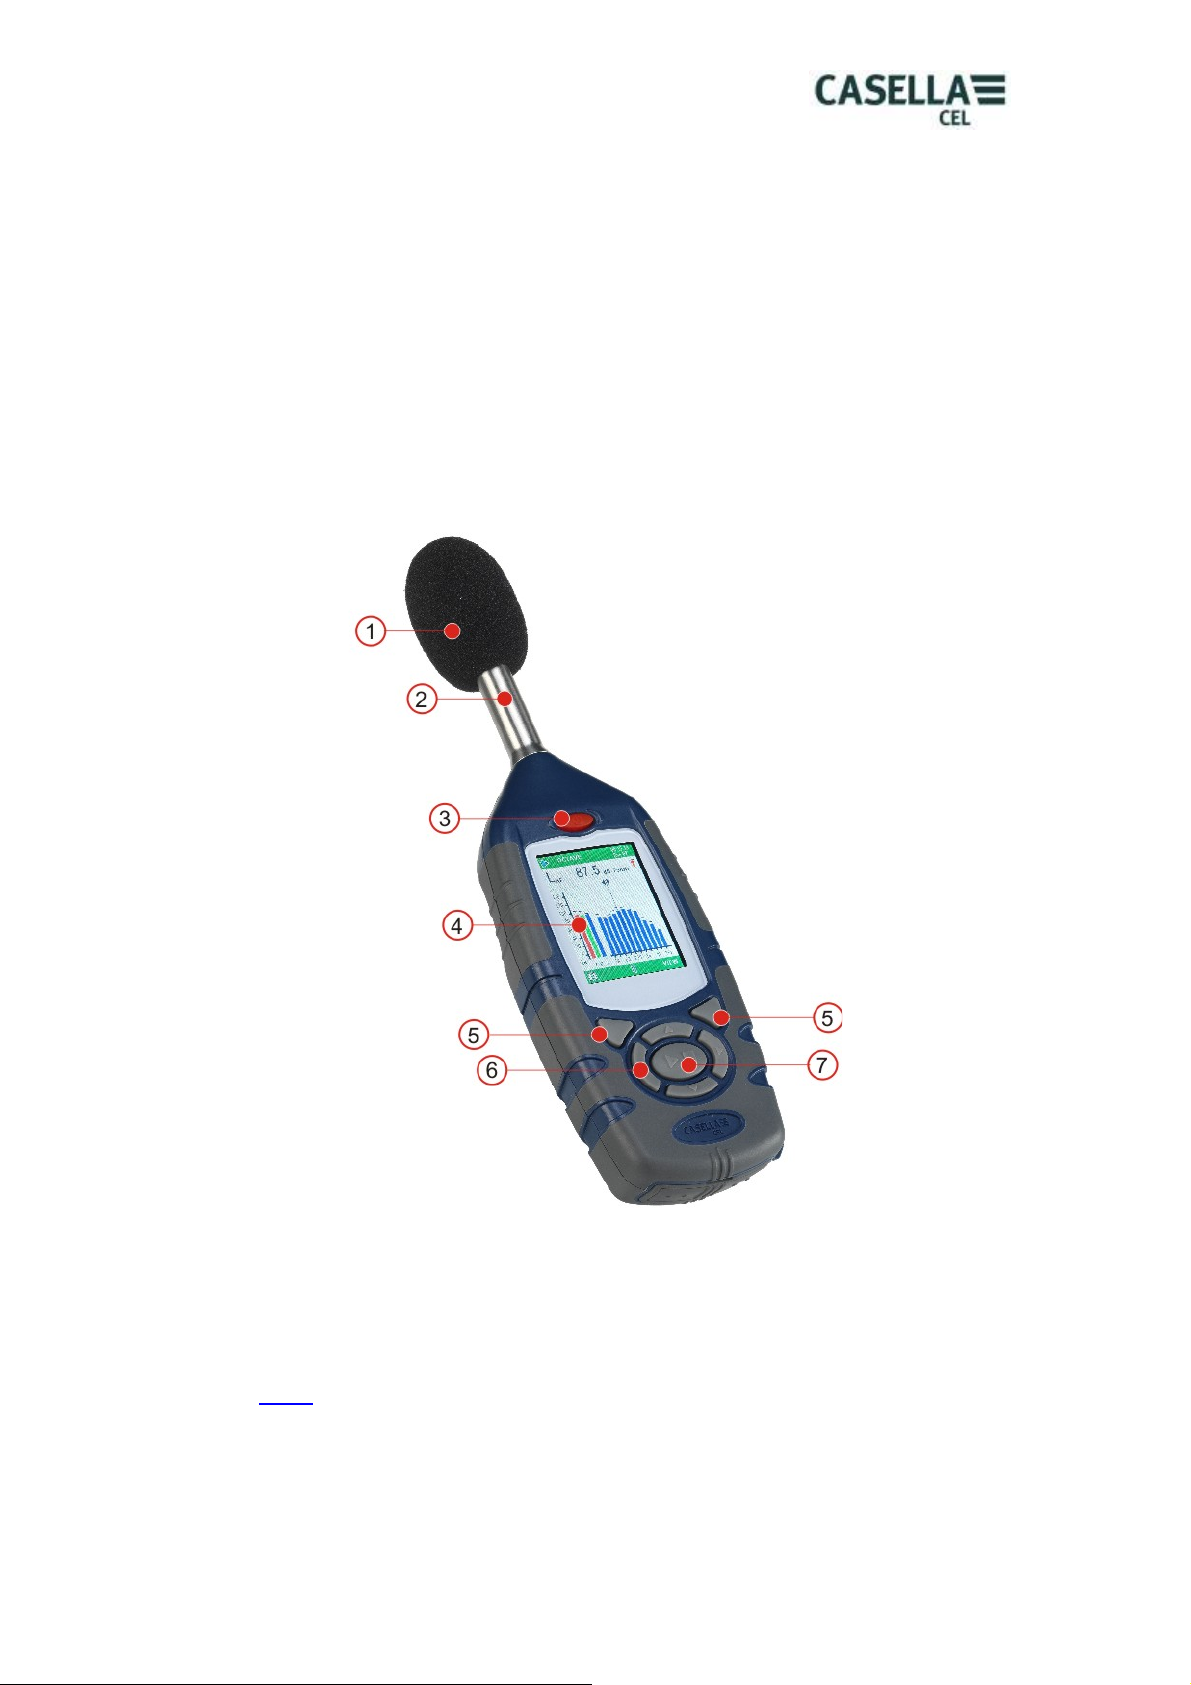
DESCRIPTION (Refer to Figure 1)
The CEL-62X has a compact, ergonomic and robust ‘rubber grip’ case design that
sits the instrument comfortably in the hand when not mounted on a tripod. The ½”
microphone (under windshield 1) can be removed from the fixed preamplifier (2). The
windshleid (1) should be used to cover and protect the microphone at all times.
When the instrument is switched ON (3) it will run through its own software
initialisation and then default to a Stop mode (Red Bar) screen.
Casella CEL Limited 4
To navigate within a screen use the Cursor Keys (6). Not all the screens have
navigable fields on the display. To navigate from one screen to another, use the Soft
Keys (5). To start a ‘run’ (measurement), press the Start key (7); to stop the run
press the same key again.
The instrument has a single measurement range to 140dB (RMS) and 143.3dB (C)
peak. No range adjustment is needed which greatly simplifies operation.
The CEL-62X can be ‘explored’ just like a USB memory device and the data files of
the individual measurements are saved in a .CSV (Comma Separated Variable)
format that is compatible with MS Office applications. This means that no software
needs to be installed onto a PC to retrieve the data.
The CEL-62X measures all the required parameters simultaneously with the required
frequency and time weighting.
1 – Windshield (covering removable microphone), 2 – Fixed Pre-amplifier,
3 – ON/OFF Key, 4 – Display, 5 – Soft Keys, 6 – Navigation Cursor Keys,
7 – Run/Stop Key.
Figure 1 CEL-62X Series
Back to
Casella CEL Limited 5
Index
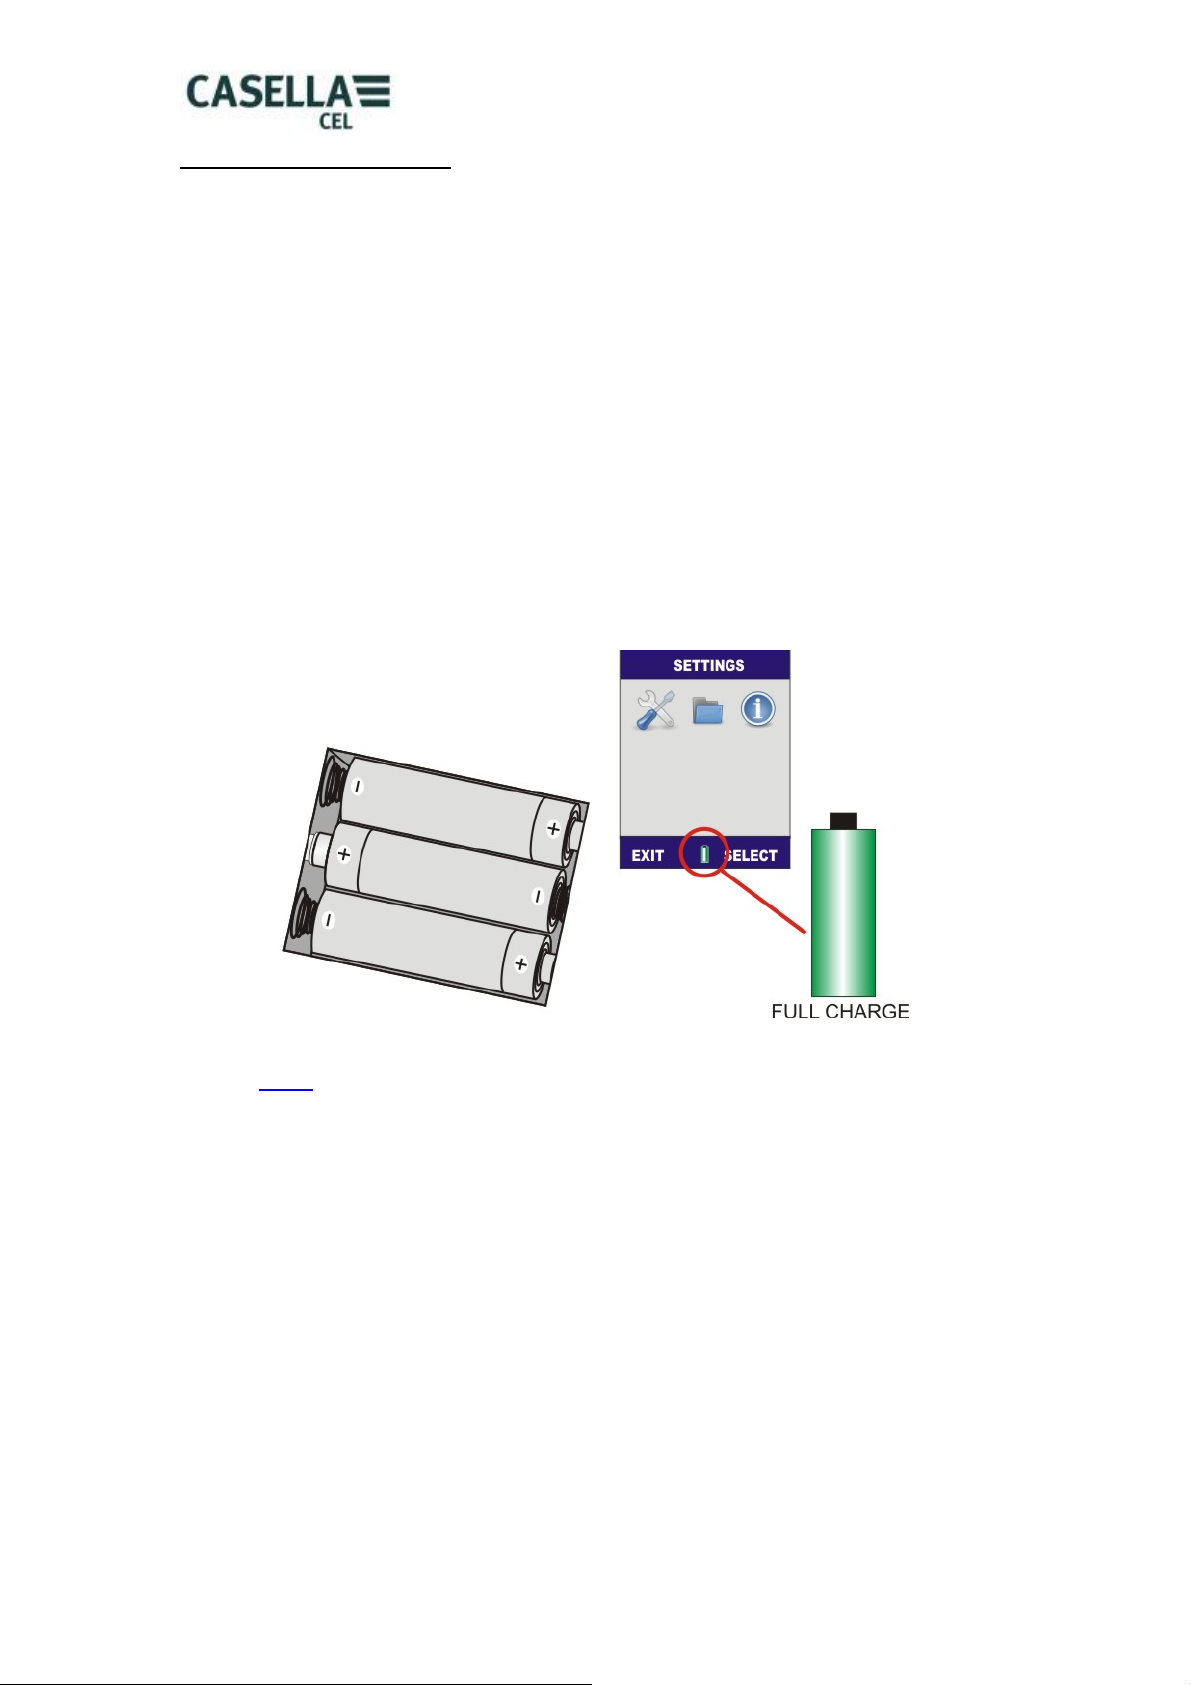
BATTERY INSTALLATION (Refer to Figure 2)
CAUTION: The batteries can be zinc carbon, alkaline or rechargeable. Do not
mix battery types.
The CEL-62X Instrument requires three AA batteries. Remove the battery
compartment cover. Check correct polarity. Fit the batteries. Refit the battery cover.
Press and release the ON/OFF Key. Check the battery condition symbol shows the
battery has a good charge.
Note: For long term tests, where the batteries may become exhausted, use a 12VDC
supply to power the CEL-62X. The 12VDC can be plugged in at any time and will be
automatically used instead of the batteries. When downloading data to a PC the
CEL-62X can be powered by the USB connection. The 12VDC or USB connection
will not re-charge batteries. With 12VDC or USB connected the battery condition
symbol will show full charge and not the actual condition of any installed batteries.
To extend battery life, if the CEL-62X is not making a measurement run and there are
no key presses, the instrument will automatically turn off after a period of 5 minutes.
This auto power off facility is disabled when the CEL-62X is powered from 12VDC or
USB. The auto power off facility is independent of the backlight time settings – see
paragraph E – Set Backlight below.
Back to
Figure 2 Battery Charge Indicator and Battery Installation.
Index
Casella CEL Limited 6

3. OPERATION
A. SWITCH ON the CEL-62X INSTRUMENT (Refer to Figure 3)
Press the red power key to switch the instrument on (see Figure 1). The instrument
software screens have been designed with colour coded top and bottom bars to
enable the user to know at a glance which part of the firmware (operating system) is
currently being accessed.
Colour coding is as follows:
RED – Stop screens. These screens are displayed when the instrument has
completed initialisation after power-up, as well as prior to taking a measurement run.
BLUE – Setting screens. These screens are used to set up the instrument correctly
and includes settings such as date and time, language and backlight.
LIGHT BLUE – Memory Results screens. This is where the results from
measurement runs are viewed.
GREEN – Run screens. These screens show a measurement run is in progress.
Measured values are stored in the Memory Results.
YELLOW – Calibration screen. This screen is automatically displayed upon
application of a 1kHz Acoustic Calibrator. This is where the instrument is calibrated
prior to a run.
This is a precision instrument and should be calibrated before use to ensure
accurate measurements.
Also care should be taken that the operator does not unduly affect the sound field.
Ideally the instrument should be mounted on a sturdy tripod with the microphone
perpendicular to the source of the sound to be measured – the operator should be as
far behind the instrument as possible. If the instrument is to be hand held, then the
arm of the operator should be stretched out as far as possible to minimise reflections
from the operator’s body. Refer to Appendix B for the affects of the instrument on the
sound field.
CEL- 62XA – When the instrument is powered up, the initialisation screen will be
displayed first, followed by the Graph screen in the STOP mode (red bars). Press the
MENU Key (A) to access the MENU screen.
CEL- 62XB or CEL-62XC – When the instrument is powered up, the initialisation
screen will be displayed first, followed by the Octave (or 1/3 Octave on C models)
screen in the STOP mode (red bars). Press VIEW to see the Graph screen. Press
the MENU Key (A) to access the MENU screen.
The instrument is ready to make measurement immediately after the initialisation
screen has been displayed (approximately 10 seconds after switch ON).
Casella CEL Limited 7
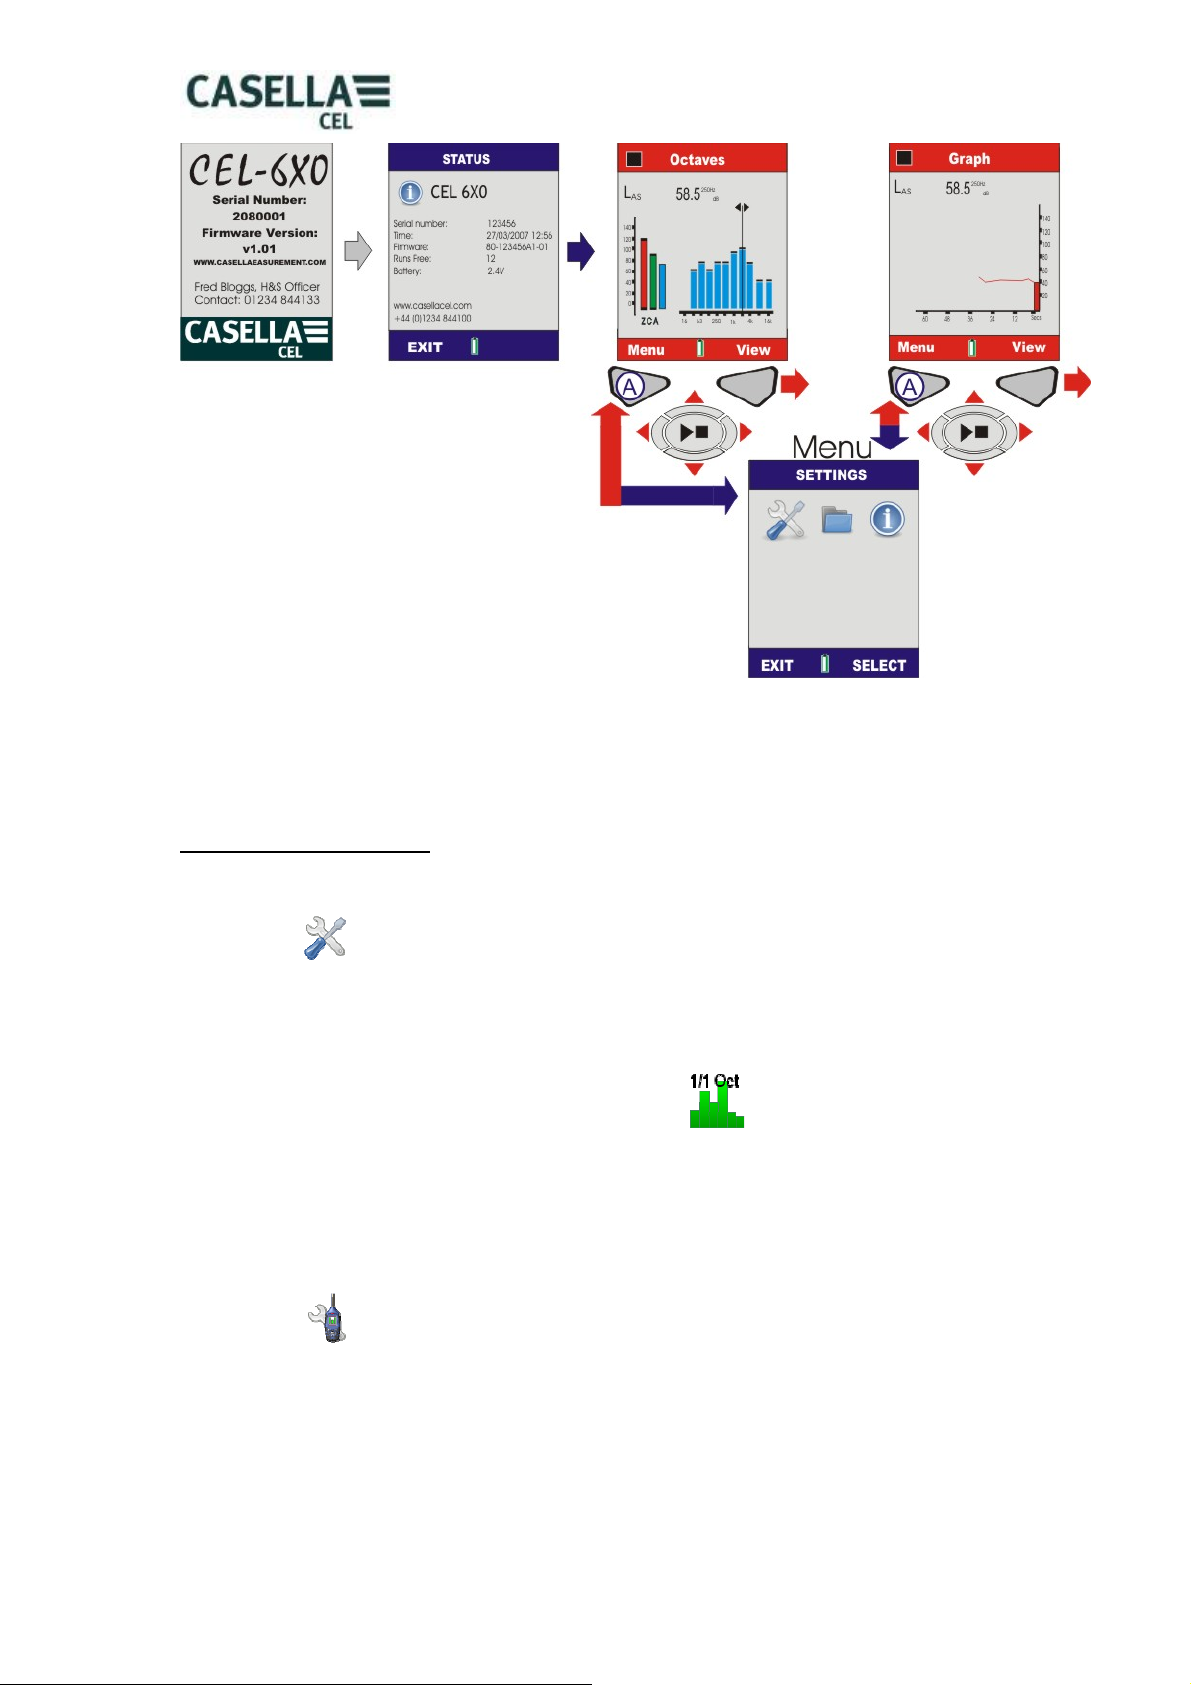
Figure 3 Switch ON the CEL-62X
B. SETTINGS SCREENS (Refer to Figure 4)
Note: Press EXIT (A) at any time to go back to the previous screen.
SETTINGS
The Settings menu allows configuration of instrument setup, time/date, language,
backlight, run duration timer and calibration level.
Use Cursors (C) to select the Settings icon (1) and press Select (B).
CHANGING FROM 1/1 OCTAVE TO 1/3 OCTAVE
CEL-62XC models have both 1/1 octave and 1/3 octave functionality. In order to
change between 1/1 octave and 1/3 octave Use cursors (C) to select the Octave icon
(3) and press Select (B). Use cursors (C) to select either 1/1 octave or 1/3 octave
and press Select (B) to exit.
Note: This option is only available on 1/3 octave CEL-62XC models.
62X SETUP
This menu allows selection of the parameters to be viewed during a measurement
run. Note that regardless of the measurement view selected, all parameters will be
stored simultaneously and can be viewed via a PC. Use cursors (C) to highlight 600
SETUP icon and press (B).
Casella CEL Limited 8
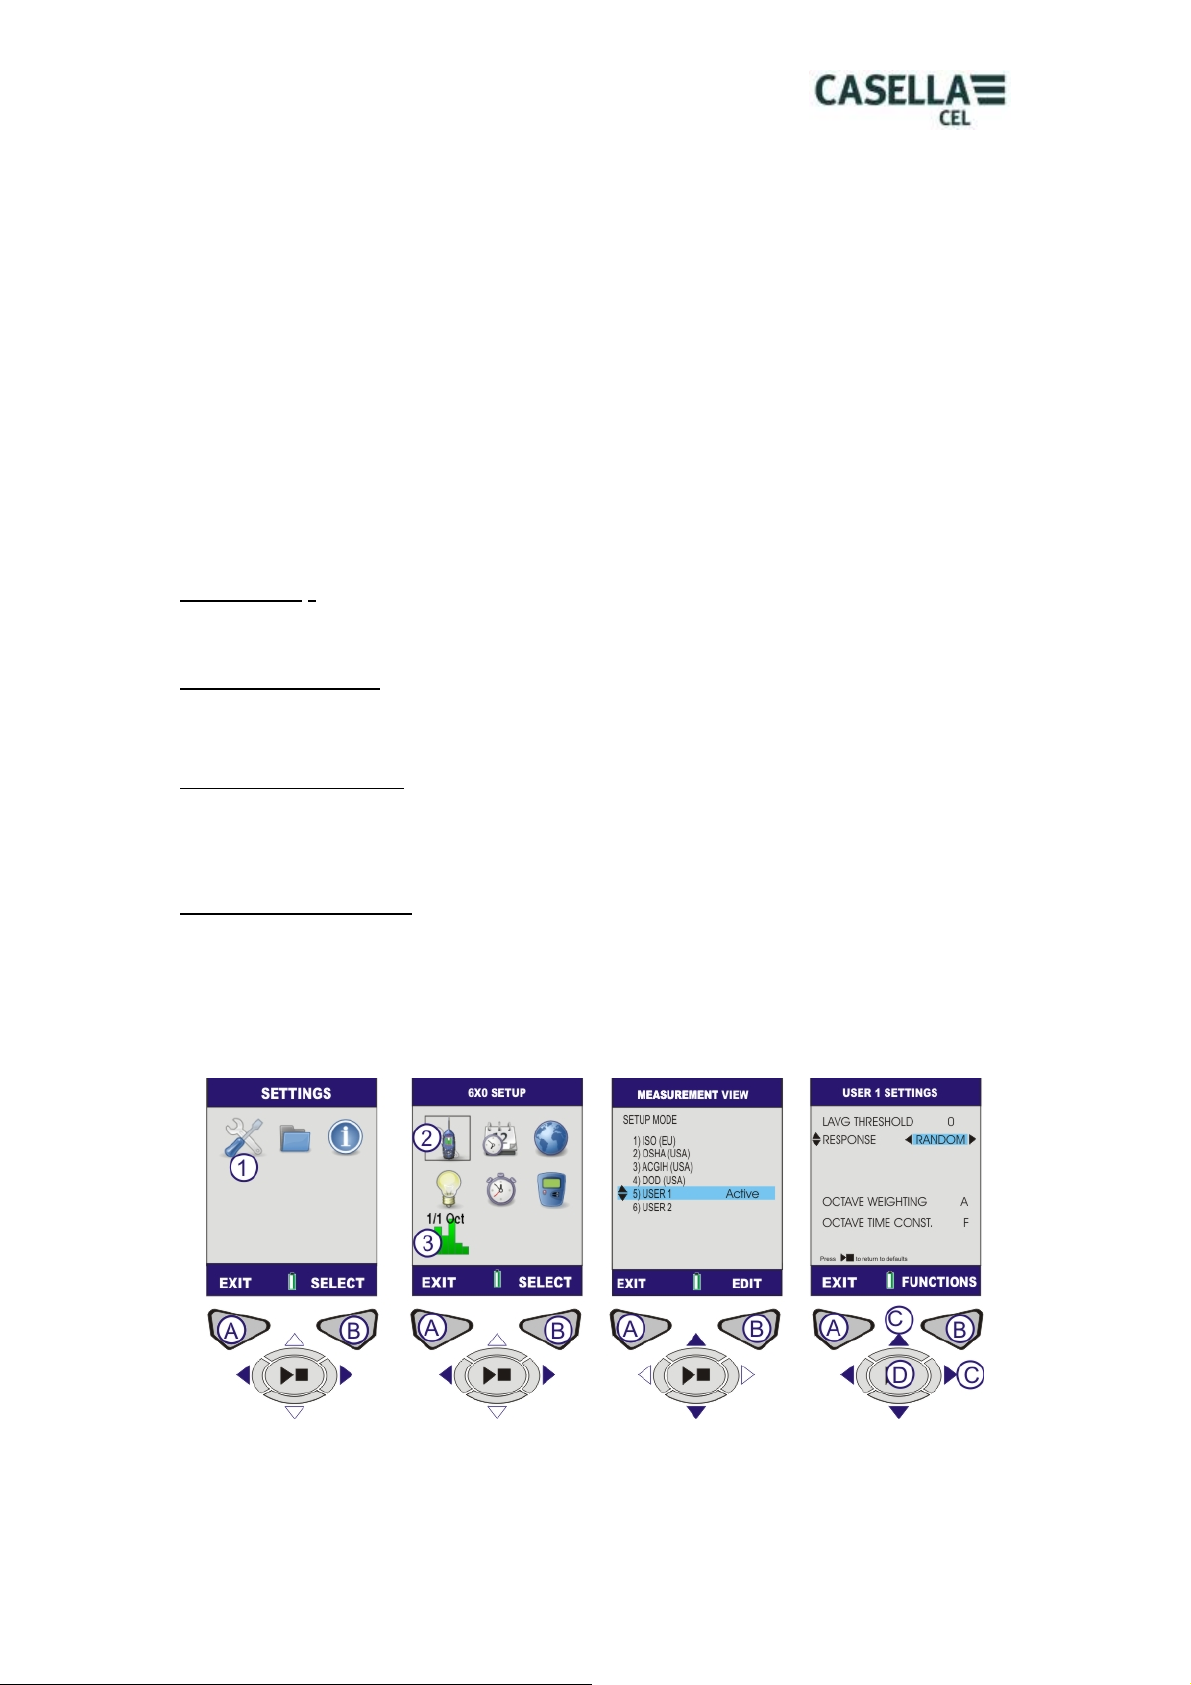
MEASUREMENT VIEW.
Predefined views are available to satisfy measurements for international workplace
noise legislation. Use the cursor keys (C) to select the required view and press (B) to
activate the measurement view. The Measurement View with the word ACTIVE next
to it will be used for measurement runs. To view the details press View (B).
On CEL-621 units, two fixed environmental views are available which provide
additional statistical parameters (L
) and parameters unique to workplace noise are
n%
removed.
USER 1 AND 2 SETTINGS.
Two customiseable views are available in which measurement weightings and
paramaters can be set. When one of these views is Active by pressing the (B) key,
press (B) again to edit the view. Left right cursor keys are used to make changes
and up/down cursor keys are used to move to the next field. On this screen you can
define the following:
RESPONSE (Random/Freefield)
Random microphone response is typically used to conform to US legislation for
workplace noise whereas Freefield is used throughout the EU.
LAVG THRESHOLD (70-90dB)
The threshold is used for the calculation of L
, which is the level at which all noise
AVG
below is ignored. Note with threshold set to zero the threshold is off.
OCTAVE WEIGHTING (A, C or Z)
The frequency weighting used to display 1/1 or 1/3 octave band results. Note that
regardless of the settings selected, Z weighted measurements are stored so the data
can be post-processed on a PC to C or A weighting.
OCTAVE TIME CONST (F or S).
The time weighting used to display 1/1 or 1/3 octave band results. Regardless of the
selection, both time weightings are stored simultaneously for L
weightings of Fast (F) or Slow (S) do not apply to L
measurements.
eq
results. Time
MAX
Press (D) to restore defaults. Press (B) to open the Functions screens for the
selected ‘User 1 View’.
Figure 4 Setting Options (Sheet 1)
Casella CEL Limited 9

USER 1 AND 2 MEASUREMENT PARAMETERS
The Functions screens allow the Operator to select up to nine functions for the
measurement ’run’. A counter replaces the battery level indicator at the foot of the
screen. The counter displays the number of parameters selected.
Press the Functions key (B) and use the cursor keys (C) to navigate
up/down/left/right.
The first screen shows Sound Pressure Level (SPL) and L
displayed during a measurement run are highlighted in green.
The Main SPL value is highlighted in red, which is the SPL value shown in Stop and
Run modes. To select the Main value press and hold the Run/Stop key (D) until the
parameter is highlighted in red.
Other parameters can be added. Navigate to the appropriate parameter that is to be
added. A rectangle indicates the selected parameter. Press the Run/Stop key (D) to
select the parameter. The parameter is highlighted green to show it is selected.
Repeat for any subsequent parameters that need to be selected and access the
additional screen by pressing the More key (B). Press Back (A) to exit and any
changes will be automatically saved.
The CEL-621 will have an additional screen to adjust the stored statistical data.
Within these setups, L
the L
values can be varied to any percentage between 0.1 and 99.9%.
n
values can be switched on and off as required and one of
n%
values. The parameters
eq
Figure 4 Settings Options (Sheet 2)
Casella CEL Limited 10

C. DATE AND TIME SCREENS (Refer to Figure 5)
SETTINGS
From the Menu select the Settings icon (1) and press (B) to select.
SET CLOCK
Use the cursors (C) to select the Set Clock icon and press (B) to select.
SET TIME
The screen will be displayed with the Time highlighted. To set the time press Edit (B).
The hour will be highlighted. Adjust the hour setting use the Up/Down cursors. Press
the cursor key (C) to highlight the minutes. Adjust the minutes setting use the
Up/Down keys. Press the cursor key (C) to highlight to the seconds. Adjust the
seconds setting use the Up/Down keys. When the correct time has been set, press
Save (B).
SET DATE
Press Cursor Key (C) to move the highlight to the date. Press Edit (B) The day will be
highlighted. Change the day setting use the Up/Down keys. Press the cursor key (C)
to highlight the month. Adjust the month setting use the Up/Down keys. Press the
cursor key (C) to highlight to the year. Change the year setting use the Up/Down
keys. When the correct time has been set, press Save (B).
CLOCK SET. The time and date is now set. Press EXIT to go back to the Set Clock
screen.
Figure 5 Set Date and Time
Casella CEL Limited 11
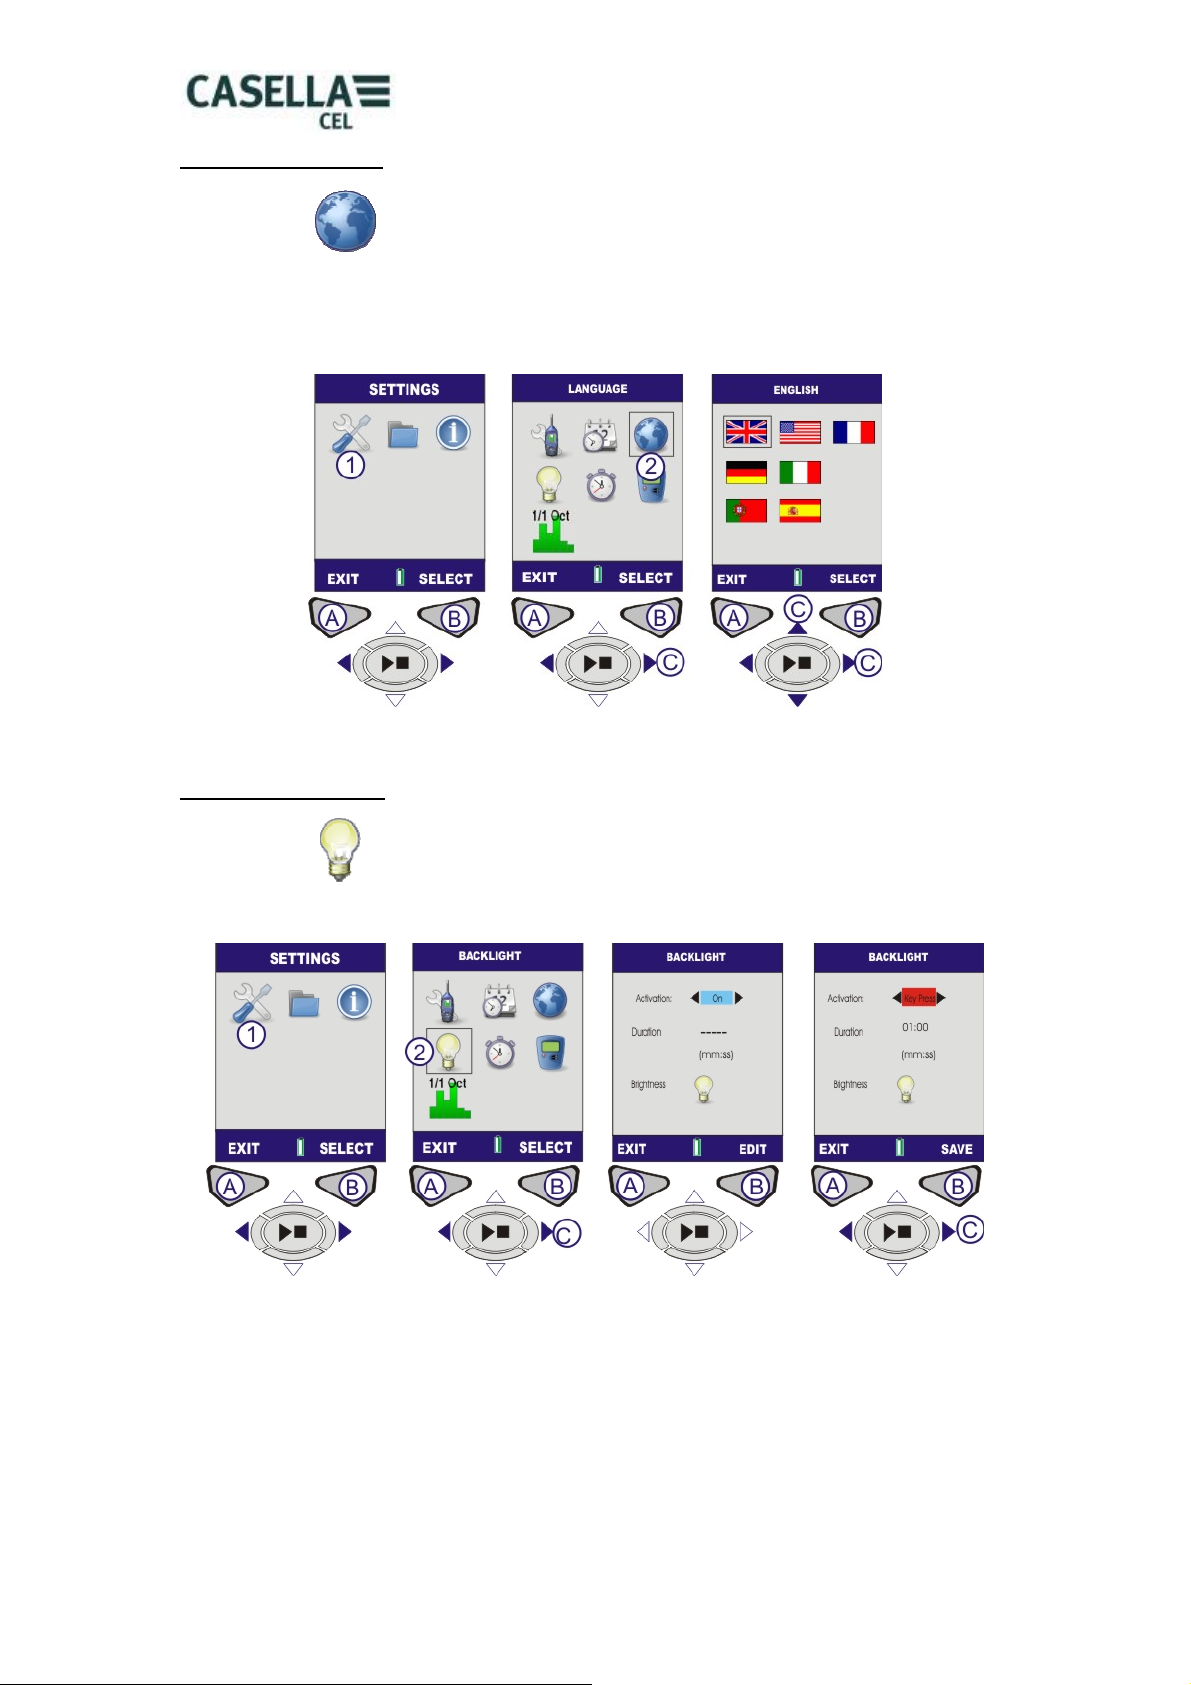
D. SET LANGUAGE (Refer to Figure 6)
LANGUAGE
From the Menu select Settings (1). Use the cursor keys (C) to navigate to the World
icon (2). Press Select (B).
Use cursors (C) to select the desired language and press (B) to select. Press Exit
(A) when finished.
Figure 6 Set Language
E. SET BACKLIGHT (Refer to Figure 7)
BACKLIGHT
From the Menu select Settings (1). Use the cursor keys (C) to navigate to the
Backlight icon (2). Press Select (B).
Figure 7 Set Backlight (Sheet 1)
ACTIVATION. The screen will be displayed with the Activation symbol highlighted. To
set the Activation mode press Edit (B). Use the cursor keys (C) to toggle between the
following backlight modes:
KEYPRESS- The backlight stays on for a set Duration following any key press.
ON- Backlight remains on continuously. If the ON option is selected the Duration
setting will be disabled.
Casella CEL Limited 12
 Loading...