

CEL-440 & CEL-480
SOUND LEVEL METERS
Operators Handbook
060279/HB-07
August 2002
CASELLA CEL
Regent House
Wolseley Road
Kempston
Bedford
MK42 7JY, U.K.
Phone: +44 (0) 1234 844 100
Fax: +44 (0) 1234 841 490
E-mail: info@casellacel.com
Web: www.casellacel.com
CASELLA USA
Tech Park
17 Old Nashua Road
Box 15
Amherst
NH 03031, U.S.A.
Toll Free: +1 800 366 2966
Fax: +1 603 672 8053
E-mail: info@casellausa.com
Web: www.casellausa.com

Contents
Page 2 - CEL-440/480 Operators Handbook

Contents
Warnings !
LOAD BATTERIES following the instructions given in
Section 1.3. Make sure they are inserted in the orientations
shown inside the battery compartment .
A single cell installed with the wrong polarity may still allow
the instrument to function, but will cause overheating
severe enough to rupture a cell, with consequent risk to the
operator and damage to the instrument.
DO NOT REMOVE the protective grid from Type 1
microphone capsules as this will expose the diaphragm,
which is extremely vulnerable to damage.
UNDER NO CIRCUMSTANCES should these instruments be
cleaned using a solvent based cleaner.
Repairs of damage caused by a failure to observe these
warnings will NOT be covered by the normal warranty
conditions.
Notes !
The CEL-440 and CEL-480 are supplied complete with Type 1 or Type 2
Electret Microphones and have no need of a 200 V polarizing supply.
Therefore no such supply is available and it is safe to ignore the 200 V
polarising supply warnings shown on CEL-250 or MK 250 microphone
packaging.
Throughout this book, display screens that are available only on a
CEL-480 will be shown with a dashed - - - - outline.
CEL-440/480 Operators Handbook - Page 3

Contents
Improvements Introduced with V 2.0 Firmware
New Measurement Features:
1. The ability to perform “broadband” logging measurements in a
selected octave or third octave band.
This allows users of narrow band instruments to restrict broadband measurement to any available frequency band, and log data
for all selected broadband parameters.
New Timer Features - CEL-480 only
2. A seventh set of Delay Timers.
This allows a different set of timers to be selected for each day
of the week.
3. A Repeat function for the Delay Timer.
This allows a week’s settings to be used up to 999 times.
Improved Display Features:
4. The number of tests the instrument has to perform is shown
during the self test routine so the user knows when it has got to
the end with no problems.
5. An indication of the last used setup during the startup procedure.
6. An additional line on menus showing the selection number and
the total number of choices available.
During a run, this line is inhibited to indicate that the items are not
changeable.
7. The option to store data or re-start the measurement when
is pressed at the end of each run.
8. Storage and print out of the last TWO sets of calibration data on
the default hard copy.
This allows the pre- and post-measurement calibrations to be
recorded.
9. The ability for scrolling to wrap-round when inspecting period data
stored on a CEL- 480.
10. The spectrum is left on screen when a narrow band frequency
scan finishes so the user can inspect it without having to recall it
from memory.
11. The ability to store Histogram data in the meter from the SETUP/
FUNCTIONS menu.
Page 4 - CEL-440/480 Operators Handbook

Contents
Contents
Chapter ................... Page
1. INTRODUCTION . . . . . . . . . . . . . . . . . . 7
1.1 Display & Keys .................... 7
1.2 Quick Edit ....................... 9
1.3 Install Microphone, Preamplifier & Batteries .... 10
1.4 Switch Instrument ON/OFF ............. 11
1.5 Description ..................... 12
1.6 CEL-440 Sound Level Meters ............ 14
1.7 CEL-480 Sound Level Meter ............ 16
1.8 Instrument Power Supplies ............. 16
1.9 dB21 & dB22 SoundTrack Software ........ 17
2. PRELIMINARY OPERATIONS . . . . . . . . . . . . 19
2.1 Select Instrument Configuration (Language,
Microphone Response Etc.) ............. 19
2.2 Perform Acoustic Calibration Check ........ 21
3. SELECT MEASUREMENT MODE & SETUP . . . . . 25
3.1 Select Measurement Mode
(Bandwidth & CEL-480 Run Timing) ........ 25
3.2 Select Measurement Setup
(Factory- or User-Prepared Setups) ......... 28
3.2.1 Select Broadband Measurement Setup ....... 28
3.2.2 Select Narrow Band Measurement Setup ..... 33
4. OPERATION . . . . . . . . . . . . . . . . . . . . 37
4.1 Measurement .................... 37
4.1.1 Starting Measurement ............... 37
4.1.2 Broadband Measurement .............. 38
4.1.3 Narrow Band Measurement ............ 41
4.2 Recall Stored Data & Print Hard Copy ........ 44
4.3 Delete Stored Data ................. 48
4.4. Format Memory ................... 49
4.5 Use With Tape and DAT Recorders
(Including Calibration For Line Input) ........ 50
4.5.1 Recording ...................... 51
CEL-440/480 Operators Handbook - Page 5

Contents
Chapter ................... Page
4.5.2 Replay ........................ 52
5. SPECIFICATION . . . . . . . . . . . . . . . . . . 55
5.1 CEL-440 ....................... 55
5.2 CEL-480 ....................... 61
5.3 Filter Scanning ................... 62
5.4 Compliance ................... 66
6. PARTS & WARRANTY . . . . . . . . . . . . . . 67
6.1 Schedule of Parts .................. 67
6.2 Instrument Servicing & Warranty .......... 68
Getting Started
The following steps are suggested to get your CEL-440 or CEL-480
started.
1. Refer to Sections 1.1 and 1.2 to learn what is shown on the
display and how to use the Quick Edit function.
2. Install the microphone, preamplifier and batteries according to
Section 1.3.
3. Switch the instrument ON and follow the preliminary messages
as described in Section 1.4.
The messages indicate the instrument type and version.
4. Check “Hints for using Menus” between Chapters 1 and 2.
5. Select the display language and microphone response according
to Section 2.1.
6. Perform an acoustic calibration check as detailed in Section 2.2.
7. Select a bandwidth, run timing and pre-set measurement set-up
according to Chapter 3.
8. Start measurement and data logging as described in Section 4.1.
9. Recall stored data (and print) it according to Section 4.2.
10. Record data on a tape or DAT recorder and replay it as described
in Section 4.5.
Page 6 - CEL-440/480 Operators Handbook
Introduction
1. INTRODUCTION
Please read Sections 1.1 to 1.4 before commencing measurement. For a
quick introduction to instrument operations, Chapter 4 may be used as a
tutorial.
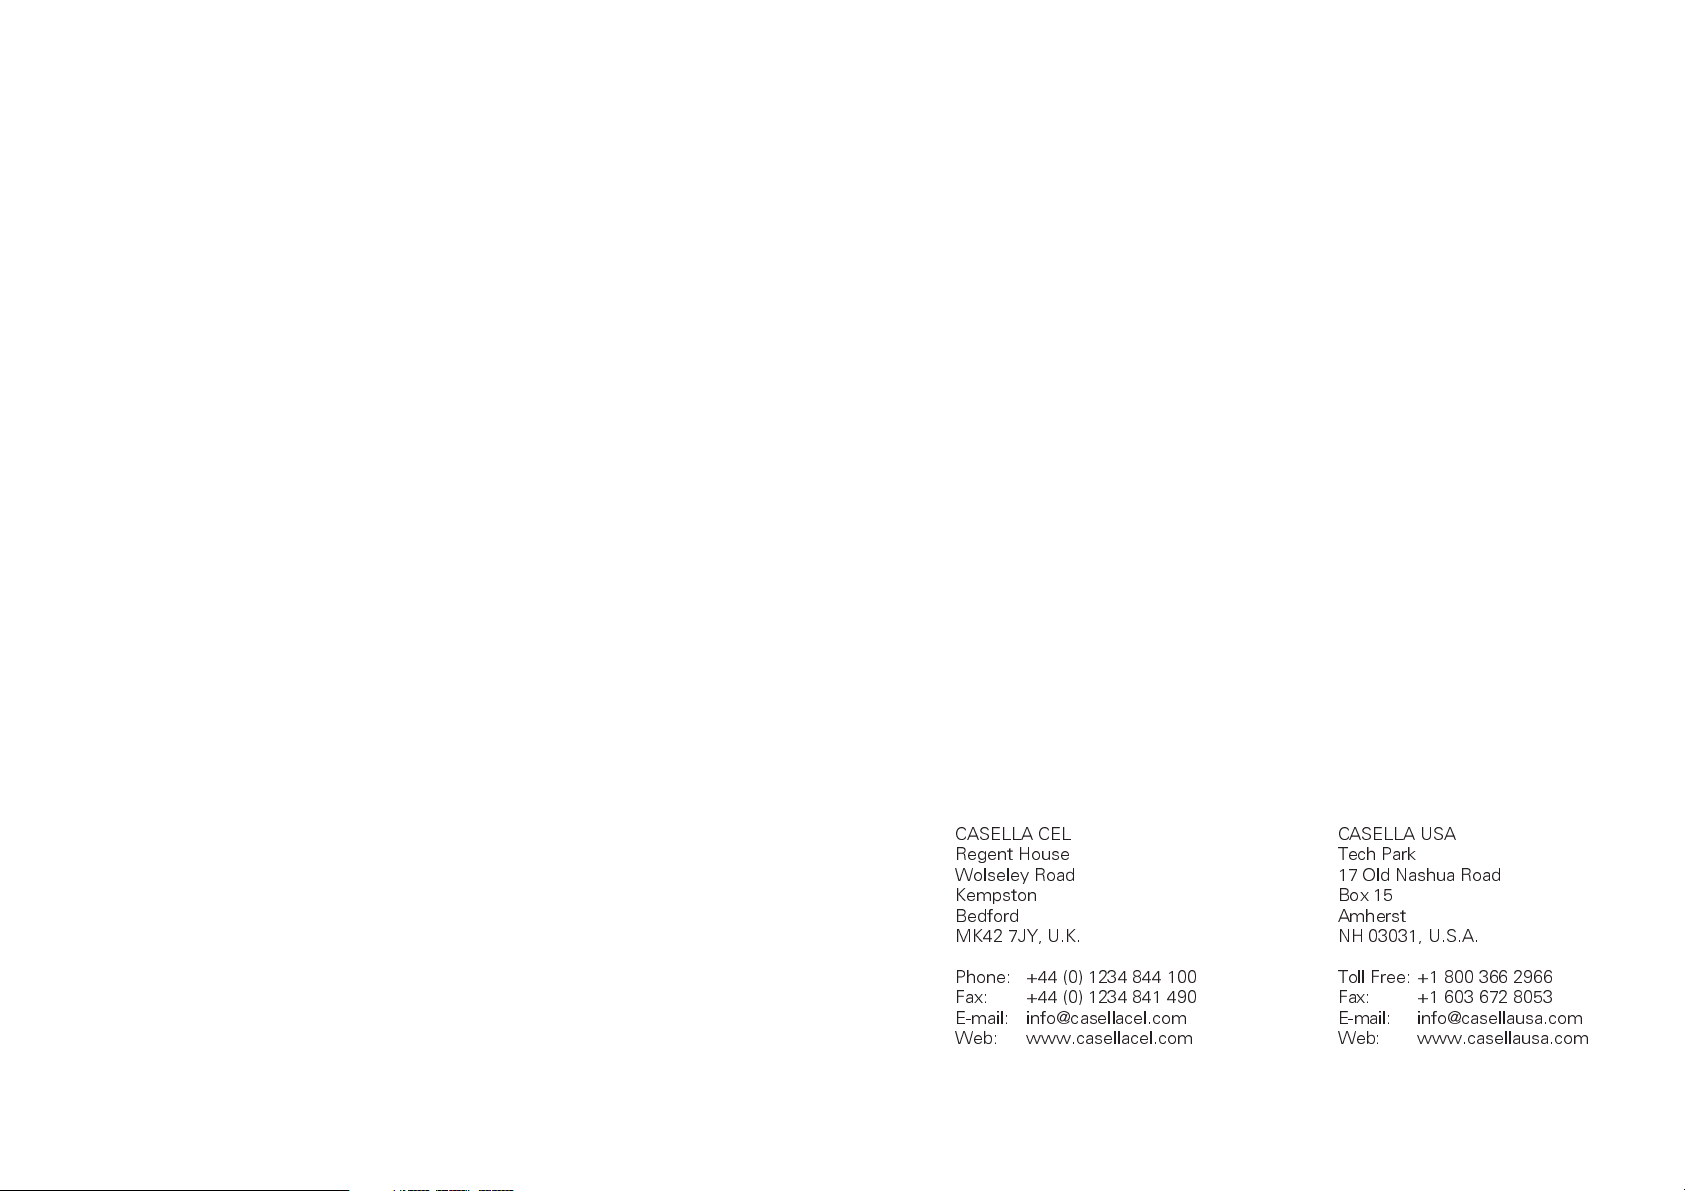
1.1 Display & Keys
Stop /Run /Pause indicator
(Instrument is in Run mode)
ØØØØ Ø:1Ø
L
AS
73.8dB
L
ASmx
LL
65.4dB 69.9dB
ASmn Zpk
30 100
L
Aeq
dB
69.4dB
Period number
Battery condition
Principal parameter
Principal level
Run-Time elapsed
Bandwidth
Icons showing active keys
Measurement/
Instrument information
Icon showing active (cursor) key
Analog display of SPL
Icon showing active (cursor) key
980014
MENU
DATA
Figure 1: Display & Key Identities
(Further icons may be shown during operation)
Switches instrument On/Off
Changes menu (=operating mode)
Enables Quick Edit function
Operates display back light
Move cursor (=select options)
Stops a measurement
Accesses stored data
Starts/Pauses/Restarts a
Measurement run
CEL-440/480 Operators Handbook - Page 7

Introduction
The broadband screen in Figure 1 shows one principal and four
subordinate parameters, where the principal parameter is a level as
identified below.
Frequency Weighting
Level
L
AS
The following frequency weightings may be shown:
A-, C- and Z- (Linear) weighted, where Linear (Z) weighting 20 Hz
to 20 kHz meets the tolerances of IEC 60651.
The following time weightings and other identities may be shown.
S Slow.
F Fast.
Time Weighting
I Impulse.
pk Peak.
mx Maximum.
mn Minimum.
eq Equivalent continuous level.
AV Average level.
Tm3 Taktmaximal 3 sek.
Tm5 Taktmaximal 5 sek.
EP,v L
TWAv Time Weighted Average is the normalised time
N Percentile sound level.
AE Sound exposure level.
based noise dose normalised to a user
eq
specified period of hours and minutes.
When the period is specified as 8 hours, this
measurement unit will be shown as EP,d.
averaged sound pressure level with the selected
frequency and time weighting that represents
the total average of a persons workplace noise
exposure averaged over a user specified period
of hours and minutes.
This unit of measurement is specified in the
USA: OSHA standard 1910-95 published in 1983.
When the period is specified as 8 hours, this
measurement unit will be shown as TWA.
980018
Page 8 - CEL-440/480 Operators Handbook
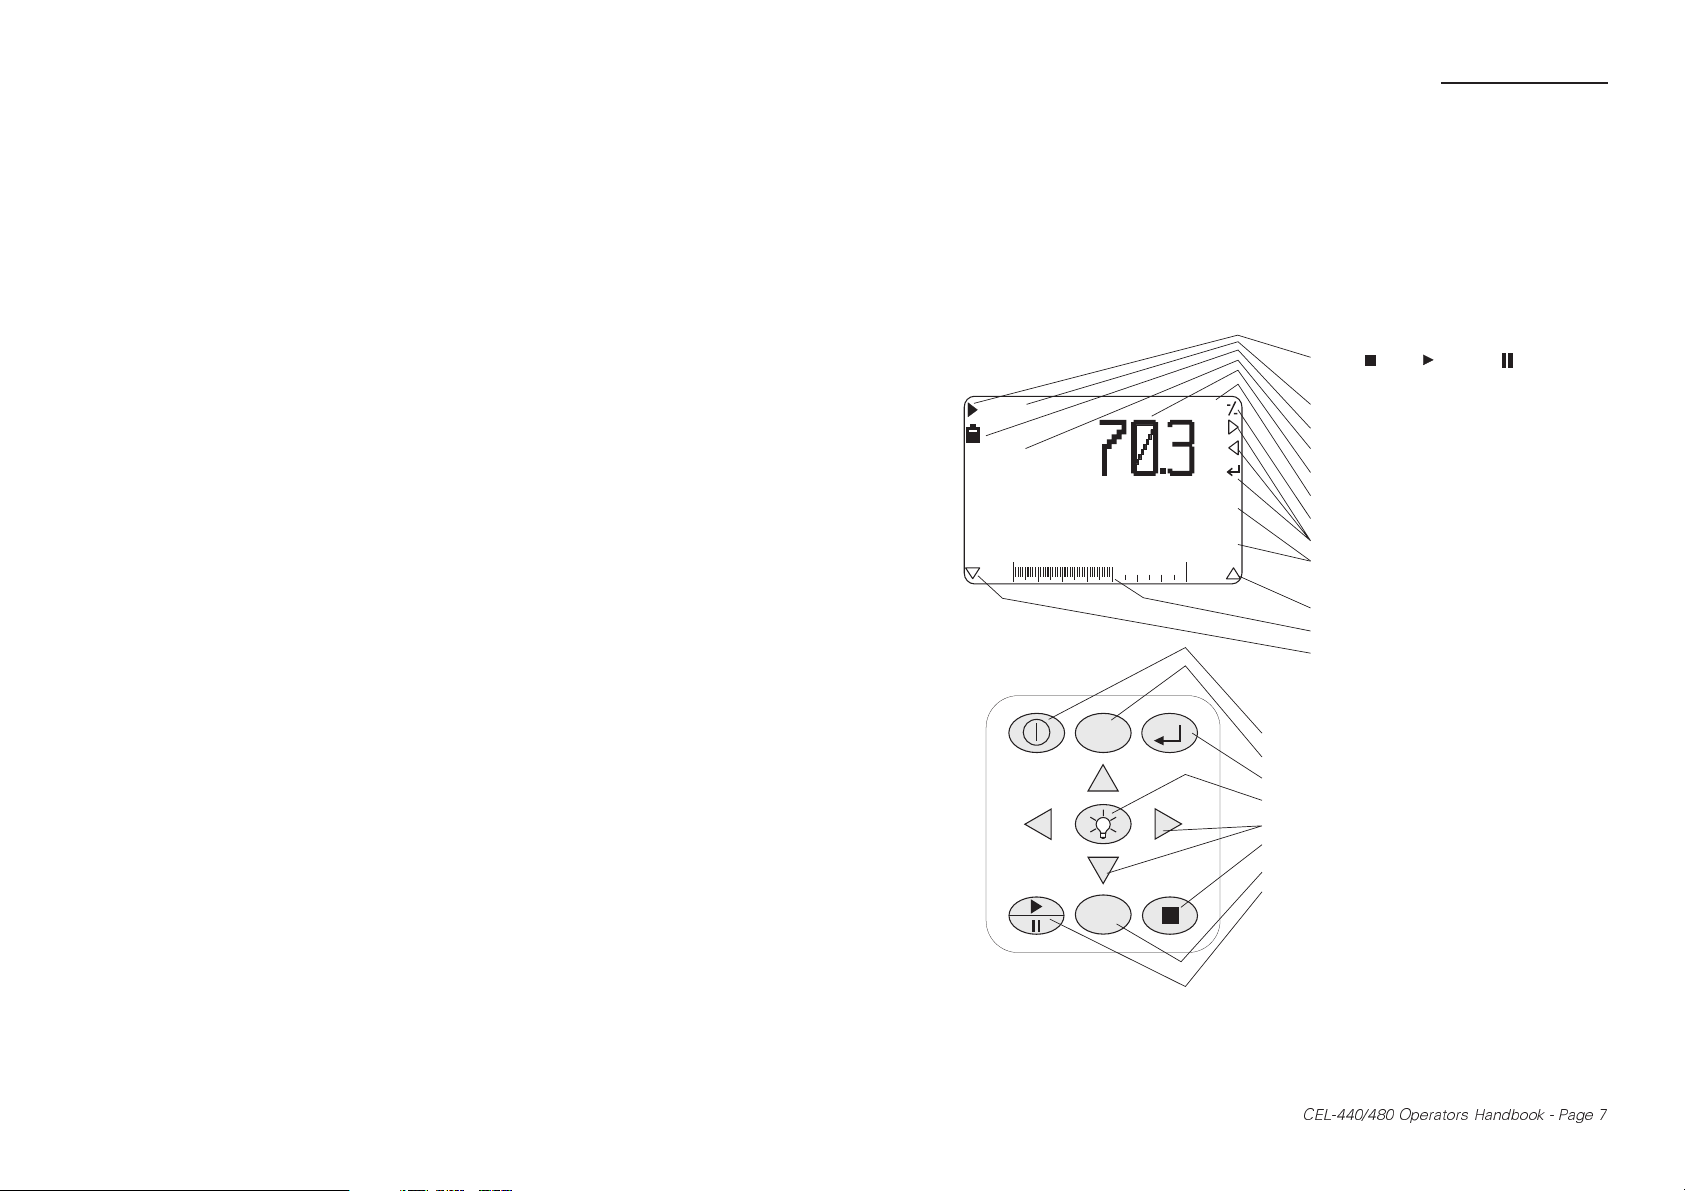
A
L
AS
Introduction
Stop
dB
100
Quick Edit
dB
100
Stop
dB
100
Run
dB
64.8dB
100
Press
Press
Press
980015
Change
Setting
30
L
AS
30
Highlight Parameter To Select It
L
CF
L
Cpk
L
CFmx
30
Other Parameters Will Have Changed
ØØØØ Ø:1Ø
L
ASmx
73.8dB
L
Cpk
L
CFmx
All Parameter Levels Are Shown In Run Mode
Figure 2: Quick edit functions
30
L
CFmn
L
Ceq
L
72.1dB 68.6dB
CFmn
L
Ceq
1.2 Quick Edit
All control functions for the CEL-440 and CEL-480 are accessed via menu
displays. In addition a powerful Quick Edit facility can be invoked by
the key to allow measurement parameters and settings to be
changed quickly and easily on screen. Figure 2 shows how the quick edit
function enables the cursor keys to edit the current settings.
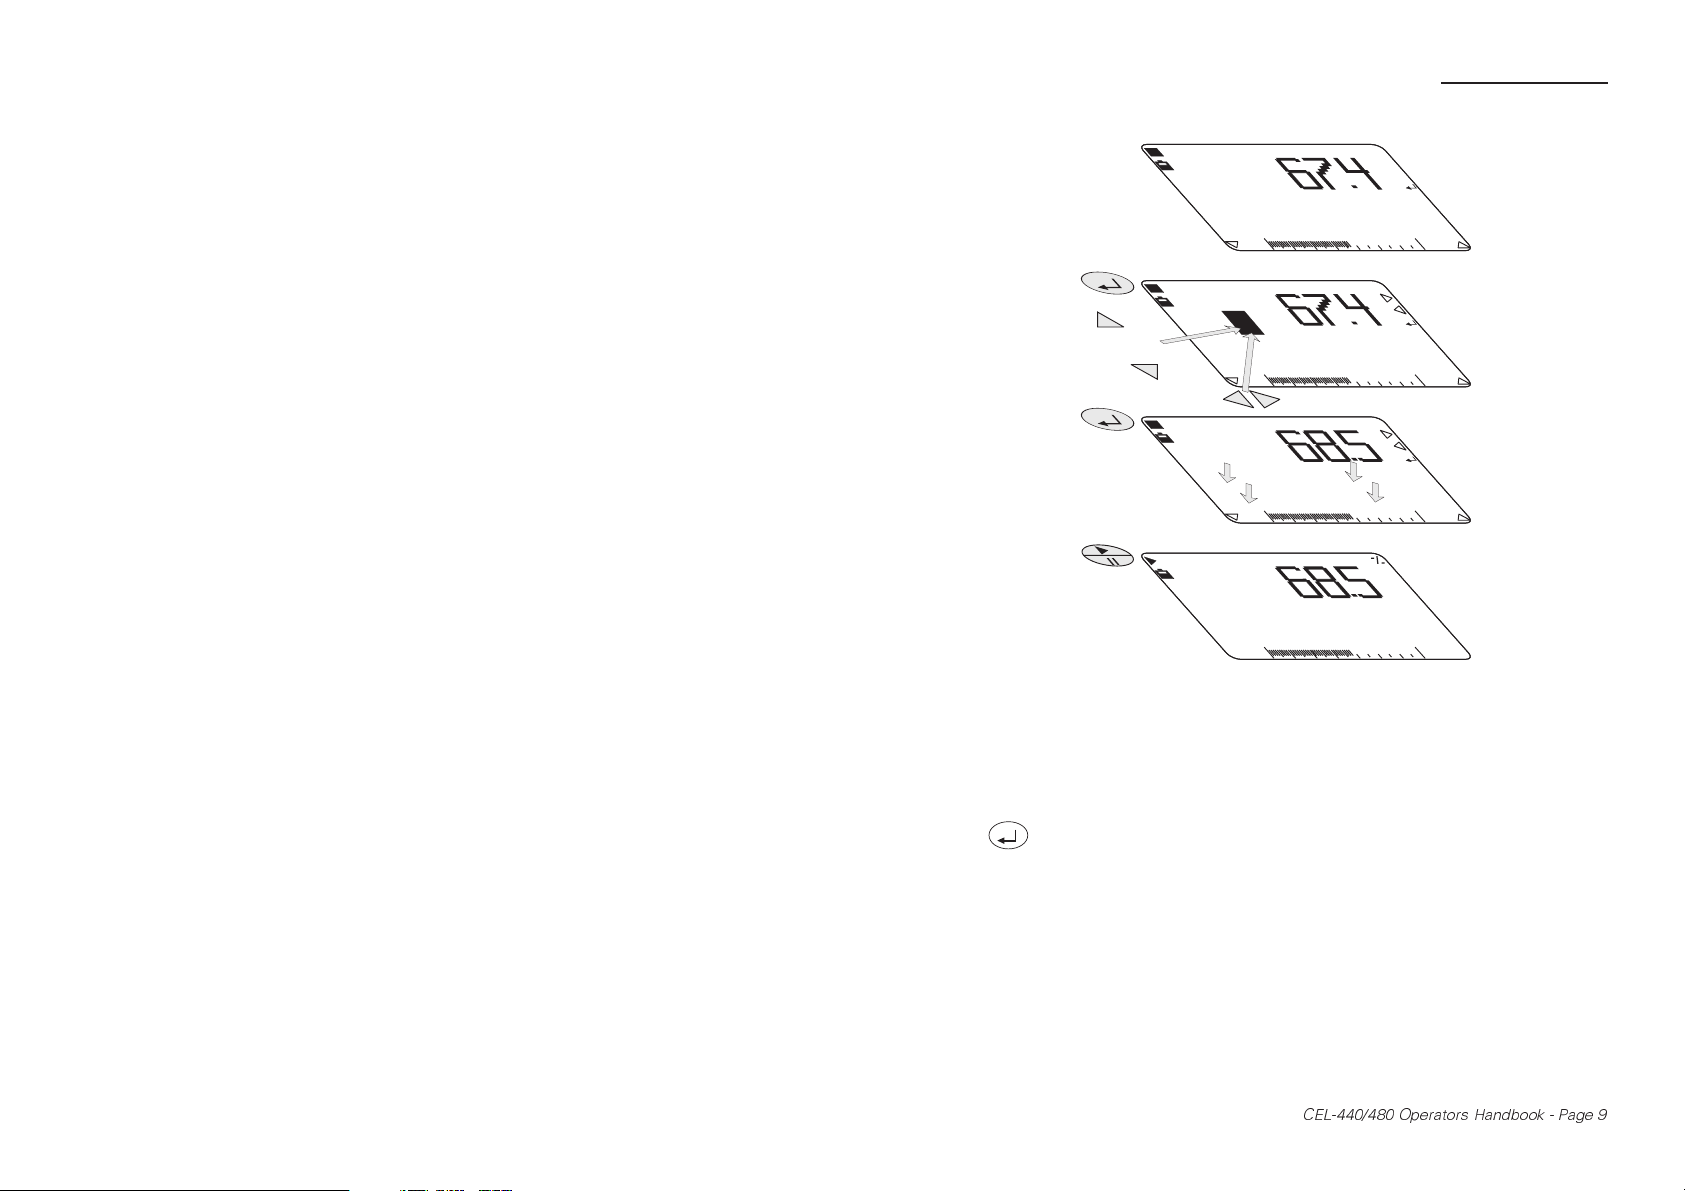
1.3 Install Microphone, Preamplifier
& Batteries
With the instrument switched OFF, insert the connector on the
microphone/preamplifier unit into the socket in the cone at the top of the
CEL-440/480 Operators Handbook - Page 9
Introduction
instrument body. Face the red dot on the preamplifier to the front of the
instrument so that the key engages in a keyway in the socket to ensure
correct pin connection.
Serial Number Label
980016
Tripod Bush (1/4" Whit.)
Figure 3: Battery orientation
One cell installed with wrong polarity may still
allow the instrument to function, but can
cause overheating severe enough to rupture a
cell and damage the instrument.
preamplifier unit from the
instrument, pull on the
knurled sleeve.)
batteries (AA or equivalent)
into the battery
compartment in the rear of
the instrument (Figure 3).
inserted in the orientations
shown inside the
compartment.
(To disconnect the
Load four new 1.5 V
Make sure they are
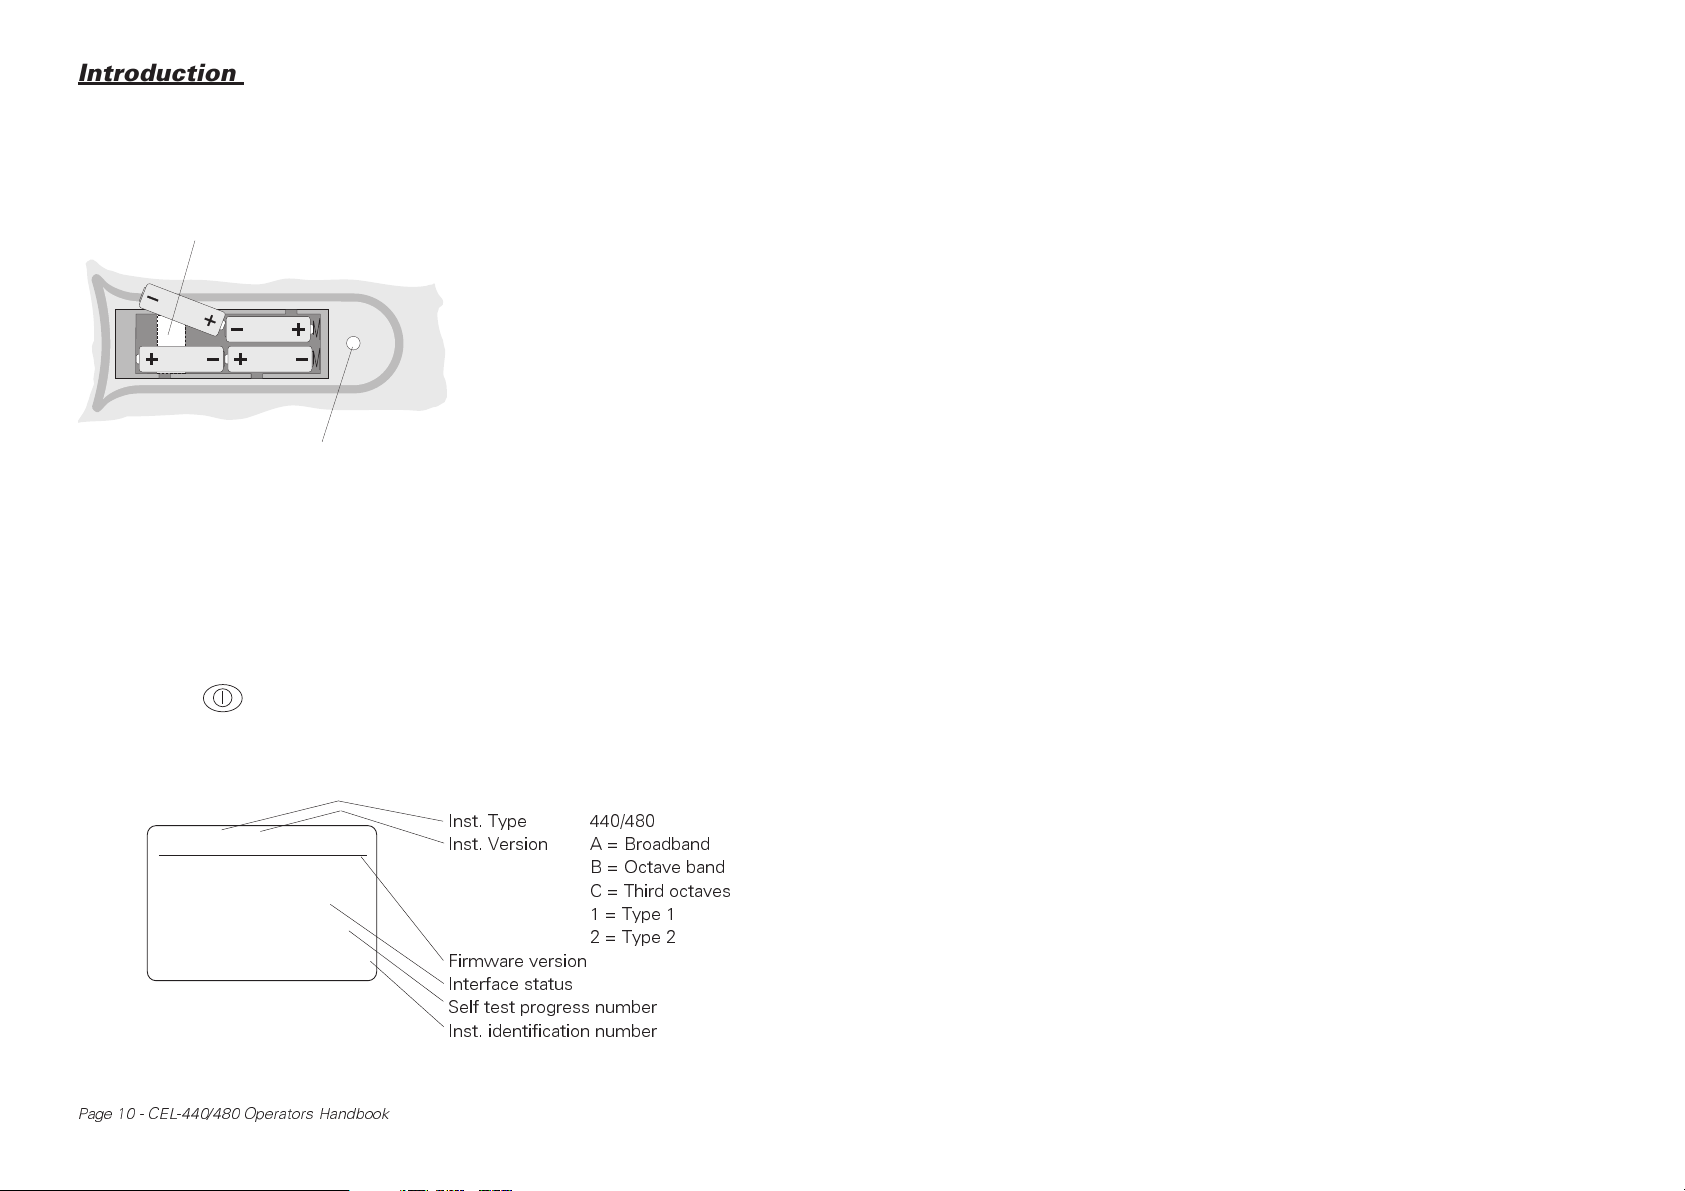
1.4 Switch Instrument ON/OFF
1. Press to switch the instrument ON.
Early firmware may briefly show the last used screen if it has only
recently been switched OFF.
Inst. Type 440/480
CEL48ØA.1 vNN.NN
Preamp
I/O
Test
ID:
p-01
Page 10 - CEL-440/480 Operators Handbook
Type 1
None
16/1Ø
NNNNNN
Inst. Version A = Broadband
Firmware version
Interface status
Self test progress number
Inst. identification number
B = Octave band
C = Third octaves
1 = Type 1
2 = Type 2
Introduction
The instrument starts a series of self tests during which it
indicates the instrument type, firmware version, preamplifier
type and interface status.
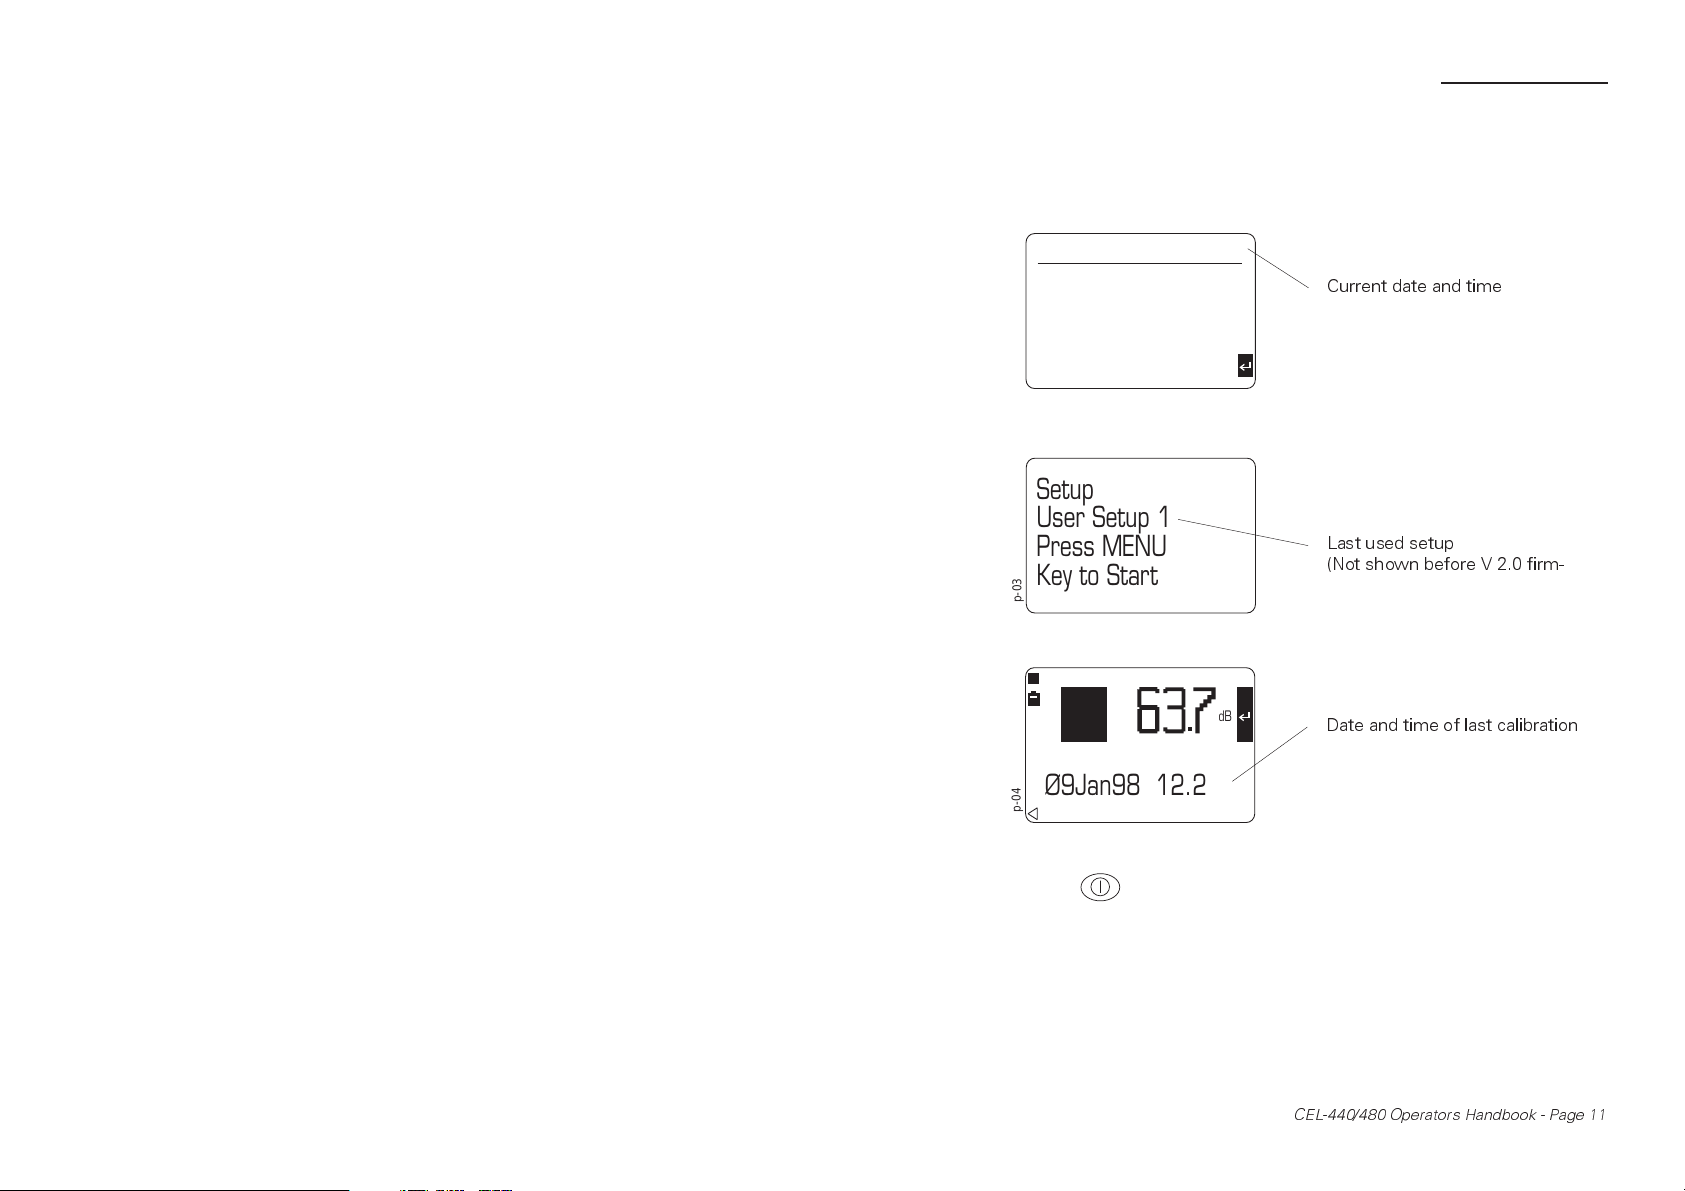
13Jan98 1Ø:54:42
512Kb
1%
2
Format
p-02
At the end of the self test sequence, the instrument displays
memory information and battery voltage,
Memory
Full
Runs
Current date and time
Setup
User Setup 1
Press MENU
Key to Start
p-03
followed by the identity of the last used setup.
Last used setup
(Not shown before V 2.0 firm-
L
ZF
dB
Date and time of last calibration
Last Cal.
Ø9Jan98 12.22
p-04
Finally it enters calibration check mode (described in Chapter 2).
2. Press to switch the instrument OFF when all measurement,
setup and data recall operations are finished.
1.5 Description
Both the CEL-440 and CEL-480 Sound Level Meters are available as
Type 1 or Type 2 instruments to give an ability to make comprehensive
CEL-440/480 Operators Handbook - Page 11

Introduction
sound level measurements. The main difference between the CEL-440
and the CEL-480 is the additional timing facility built into the CEL-480.
This allows the instrument to operate with delayed run start and stop
times and for narrow band models to make repeated frequency scans.
Versions of both
instruments are available for
broadband measurement,
broadband plus octave band
measurement and
broadband, octave band and
third-octave band
measurement. Frequency
bands are scanned
sequentially, with scanning
controlled manually or
automatically.
To simplify
operation, frequently used
measurement setups can be
stored for re-use. The setup
memory can accommodate
one factory setup and up to
four user specified setups for each bandwidth.
Simple procedures allow a measurement setup to be selected
and the instrument to make the required measurements and save them
automatically in separate data memories for each bandwidth.
Data stored in the memory can be recalled to the display for
inspection, so that the operator can confirm that the results are valid
before leaving the test site. When the instrument is connected to a
Centronics printer, results can be printed out in a preset report format
together with the setup data.
The instruments can be operated and deliver adequate results
without the need for other equipment, beyond an acoustic calibrator. All
operations can be controlled via the instrument keypad and simple menu
options. Figure 4 shows the basic arrangement of the menu structure.
However, the instruments become even more versatile when
their measurement and setup data is downloaded to a PC using the
Type 1 and Type 2 Measurement
Broadband, Octave Band and Third
Octave Band versions
Simultaneous measurement of up to 13
parameters in broadband mode
Simultaneous measurement of up to 3
parameters in narrow band mode
All broadband parameters can be
measured in a selected narrow band
1
Quick Edit function for immediate
parameter change
One factory setup and up to four user
specified setups stored for each
bandwidth
Up to two profiles can be attached to
each measurement (CEL-480 only)
Note 1: Not available before V 2.0 firmware.
Page 12 - CEL-440/480 Operators Handbook
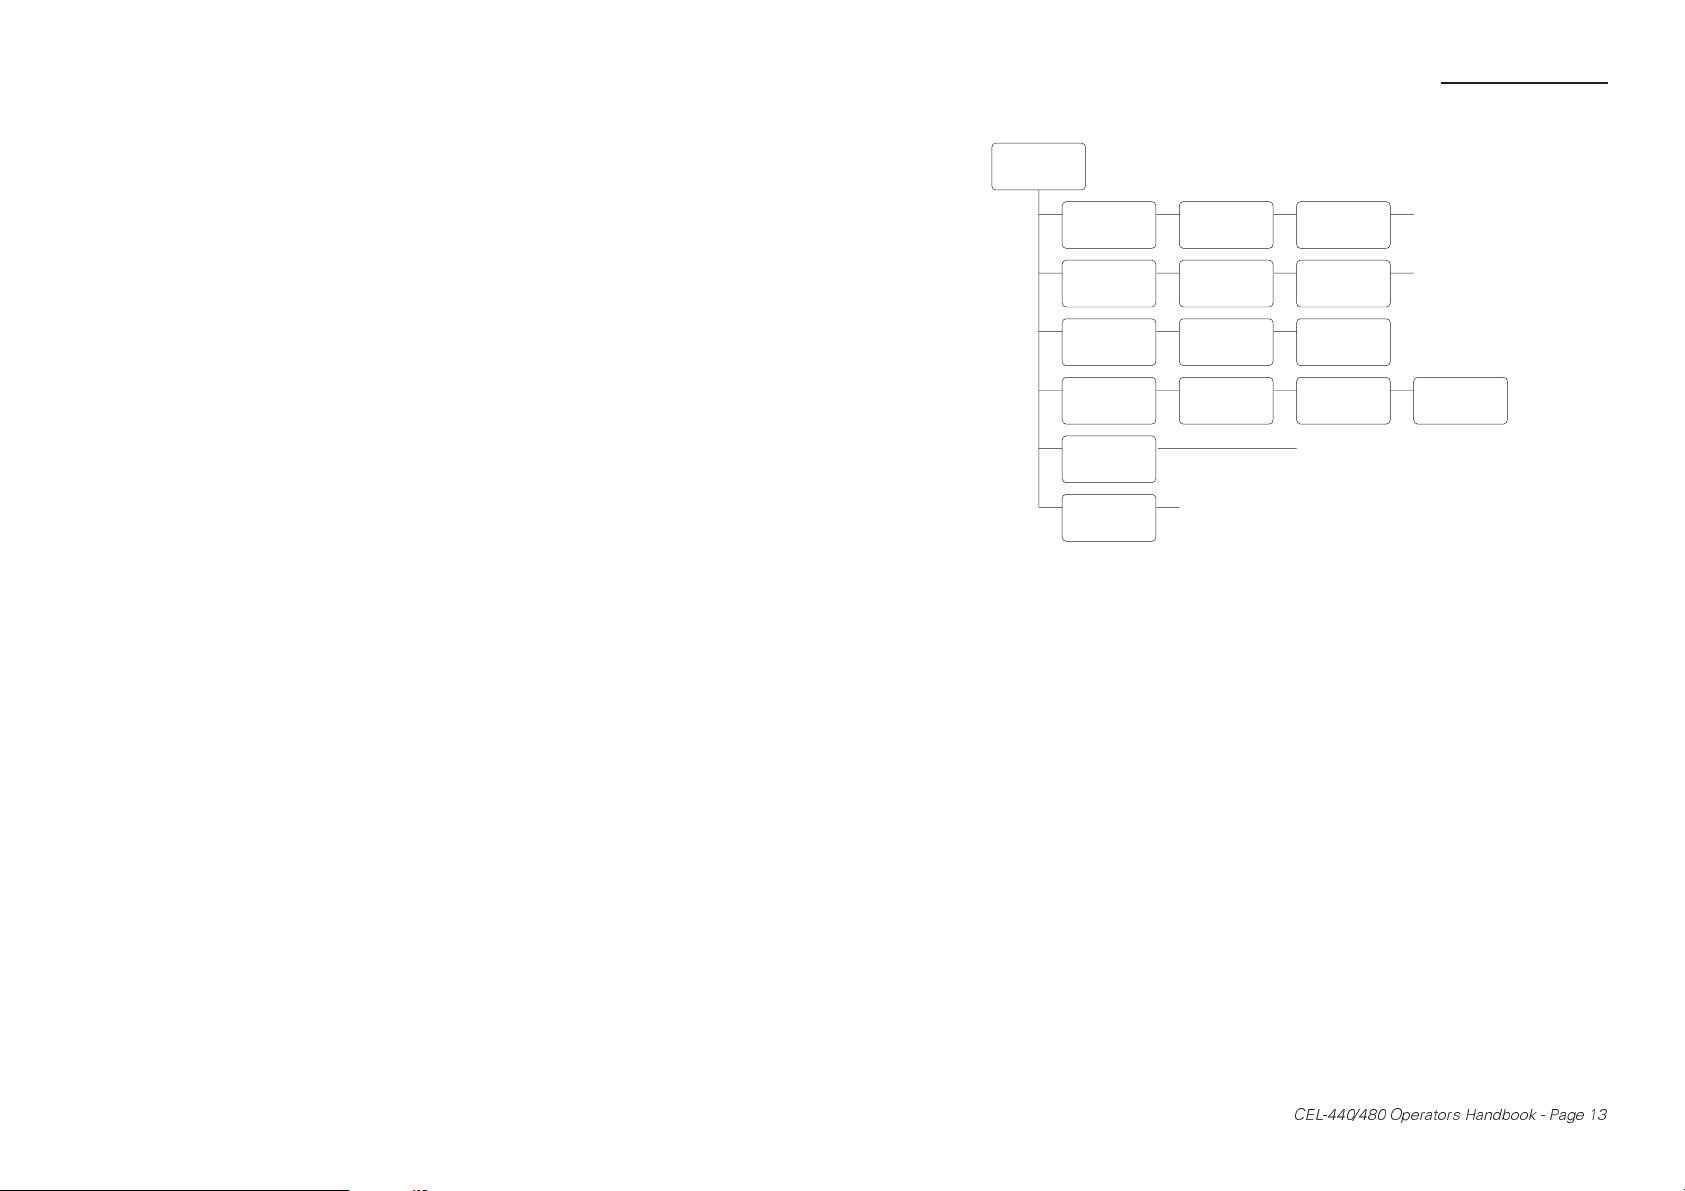
Main Menu
80043
g
Introduction
Measure
Mode
Setup
Calibration
Memory
Configure
Status
9
Set
Bandwidth
Select
Setup
Select
Input
View/
Delete
Date & Time
Memory Use
Battery Volta
Set
Timers
Set
Parameters
Calibrate
Select
Directory
PC Communications
Language
Backlight
Time & Date
Microphone Response
e
Run Timer
Delay Timers
SLM Parameters
Measurement Period
Functions
Dose Parameters
Profiles
Select
Data
Figure 4: Simplified menu structure
(Some of these options may not be available on all versions)
CEL-6726 dB21 or CEL-6727 dB22 Windows™ based software. This
software has the facilities expected of fully featured Windows™
packages offering post processing, cut and paste between applications
and comprehensive word processing capabilities. In addition, dB22 has
extensive on screen graphing facilities
These instruments are constructed to withstand some of the
toughest industrial conditions with cases formed from a
polyester/polycarbonate material used, giving them a high resistance to
damage. Data integrity is further protected by use of robust electret
microphones.
1.6 CEL-440 Sound Level Meters
The CEL-440 is ideal for on-site noise surveys and can also monitor
personal noise exposure in accordance with European ISO or USA OSHA
and DOD standards. The following weightings can be set:
RMS: A, C, Z (see section 1.1) weightings,
Peak: C, Z weightings,
CEL-440/480 Operators Handbook - Page 13
Introduction
Time: F (fast), S (slow), I (impulse),
Q: 3, 4, 5, 6 energy conversion factor.
Broadband models can measure all of the following parameters
simul-taneously.
L
AF
L
AFmx
L
AFmn
L
Aeq
L
AIeq
L
Zpk
L
AE
L
EP,v
L
Tm3
L
Tm5
L
AFNN.N
TWA
L
Avg
v
Sound level, with current weightings (A and F
are shown),
Maximum level, with current weightings,
Minimum level, with current weightings,
Equivalent continuous level, with current
frequency weighting,
Equivalent continuous level, with impulse
weighting,
Linear peak,
Sound exposure level (sometimes known as SEL),
Noise dose normalised to a user selected
(variable) period of hours and minutes,
When the period is set to 8 hours, this will be
shown as L
EP,d
.
Cumulative average of fast weighted maximum
values taken over 3 s periods (Taktmaximal 3),
Cumulative average of fast weighted maximum
values taken over 5 s periods (Taktmaximal 5),
Five percentile values using current weightings
with values between 0.0% and 99.9% that can
be set by the user,
Time Weighted Average is the normalised time
averaged sound pressure level with the selected
frequency and time weighting that represents
the total L
of a person’s workplace noise
Avg
exposure averaged over a user selected
(variable) period of hours and minutes.
This unit is specified in the USA: OSHA standard
1910-95 published in 1983. When the period is
set to 8 hours, the unit will be shown as TWA.
Average level over the measurement period.
Narrow band models can measure and scan the following parameters
simultaneously.
Page 14 - CEL-440/480 Operators Handbook

Introduction
L
AF
L
AFmx
L
Aeq
All sound level measurement parameters can be set from the keypad
and there are seven overlapping measurement ranges at 10 dB steps
between 10-80 dB and 70-140 dB.
Sound level, with current weightings (A and F
are shown),
Maximum level, with current weightings,
Equivalent continuous level, with current
frequency weighting.
1.7 CEL-480 Sound Level Meter
The CEL-480 is recommended for detailed measurements as, in addition
to the CEL-440 capabilities described above, it features automatic run
timing and scanning facilities controlled by the built-in clock. This allows
it to operate with user preset run durations or start and stop times.
There are time-history recording capabilities that allow up to two
profiles to be saved with each result set in a separate profile store.
Sampling periods can be specified between 1 second and 1 hour, while
profile storage is in excess of 200 000 data points.
1.8 Instrument Power Supplies
All of these instruments are powered by a set of of four standard AA size
batteries located in a compartment in the back of the instrument case,
and it is recommended that alkaline IEC Type LR6 be used.
Rechargeable nickel cadmium batteries may also be employed,
but will give a shorter operating life. Zinc carbon batteries are NOT
recommended. If there is doubt whether the batteries will be able to
power the instrument for the start and stop times set, or when
measurements are needed over long periods, the instrument can be
powered directly from an external 12 V DC supply without the need to
remove the internal batteries.
DAMAGE to the instrument will occur if an
external power supply exceeds 14 V DC. The
nominal external supply is 12 V DC.
CEL-440/480 Operators Handbook - Page 15

Introduction
External power for the instrument is supplied via a 2.1 mm co-axial 2-line
D.C. connector in the bottom of the instrument case. Terminal polarity is
+12 V DC on the tip and 0 V DC ground on the sleeve.
A Casella CEL Universal Power Supply (-PC18) may be used to
power the instruments from nominal 110-240 V 50/60 Hz mains supplies.
To prevent loss of data should an external power supply be interrupted
for any reason during measurement, it is recommended that a usable set
of batteries be kept in the instrument.
In general, download all important data and remove the batteries
from the instruments when they are to be out of use for some time.
Note that when an instrument is returned to battery operation
after being powered from an external supply, either: switch the
instrument OFF then ON again, or: disconnect ALL devices from the DC
input socket, in order to avoid additional discharging of the internal
batteries.
The instrument contains a built in Lithium battery to maintain
stored data and setups for periods while the main batteries are absent.
1.9 dB21 & dB22 SoundTrack Software
The CEL-6726 dB21 and CEL-6727 dB22 Software enable data collected
by the CEL-440 and CEL-480 to be downloaded to a PC for storage,
manipulation and the production of reports. Data can be exported in
ASCII format to proprietary word processing software, while profile and
statistical data can be exported as tab-delimited text files suitable for use
with spreadsheets such as Lotus 123™ (Release 2 or later) and MS
Excel™.
In general, dB22 offers similar manipulation and reporting
capabilities to dB21, with the addition of on-screen graphing and
reporting facilities.
dB21/22 software offer NO ON-LINE CONTROL.
dB21 software offers NO GRAPHICAL
capabilities; any graphing that may be required
must be accomplished within a spreadsheet.
®
The dB21 and dB22 Software runs under MS Windows
advantage of the control facilities offered by the environment, so that
once installed, users with a modest knowledge of Windows will find
Page 16 - CEL-440/480 Operators Handbook
taking

Introduction
many operations are performed almost instinctively with a minimum of
learning time.
Downloading is performed under the control of the PC. Data
from each of the measurement runs in the analyser is transferred as a
series of associated datafiles together with a note file in which
comments and information can be written. Once downloaded, the user
can display the following information:
¤ Run summary for each run,
¤ Data file,
¤ Up to two profiles for each run,
¤ Notepad for user-entered notes.
CEL-440/480 Operators Handbook - Page 17
Introduction
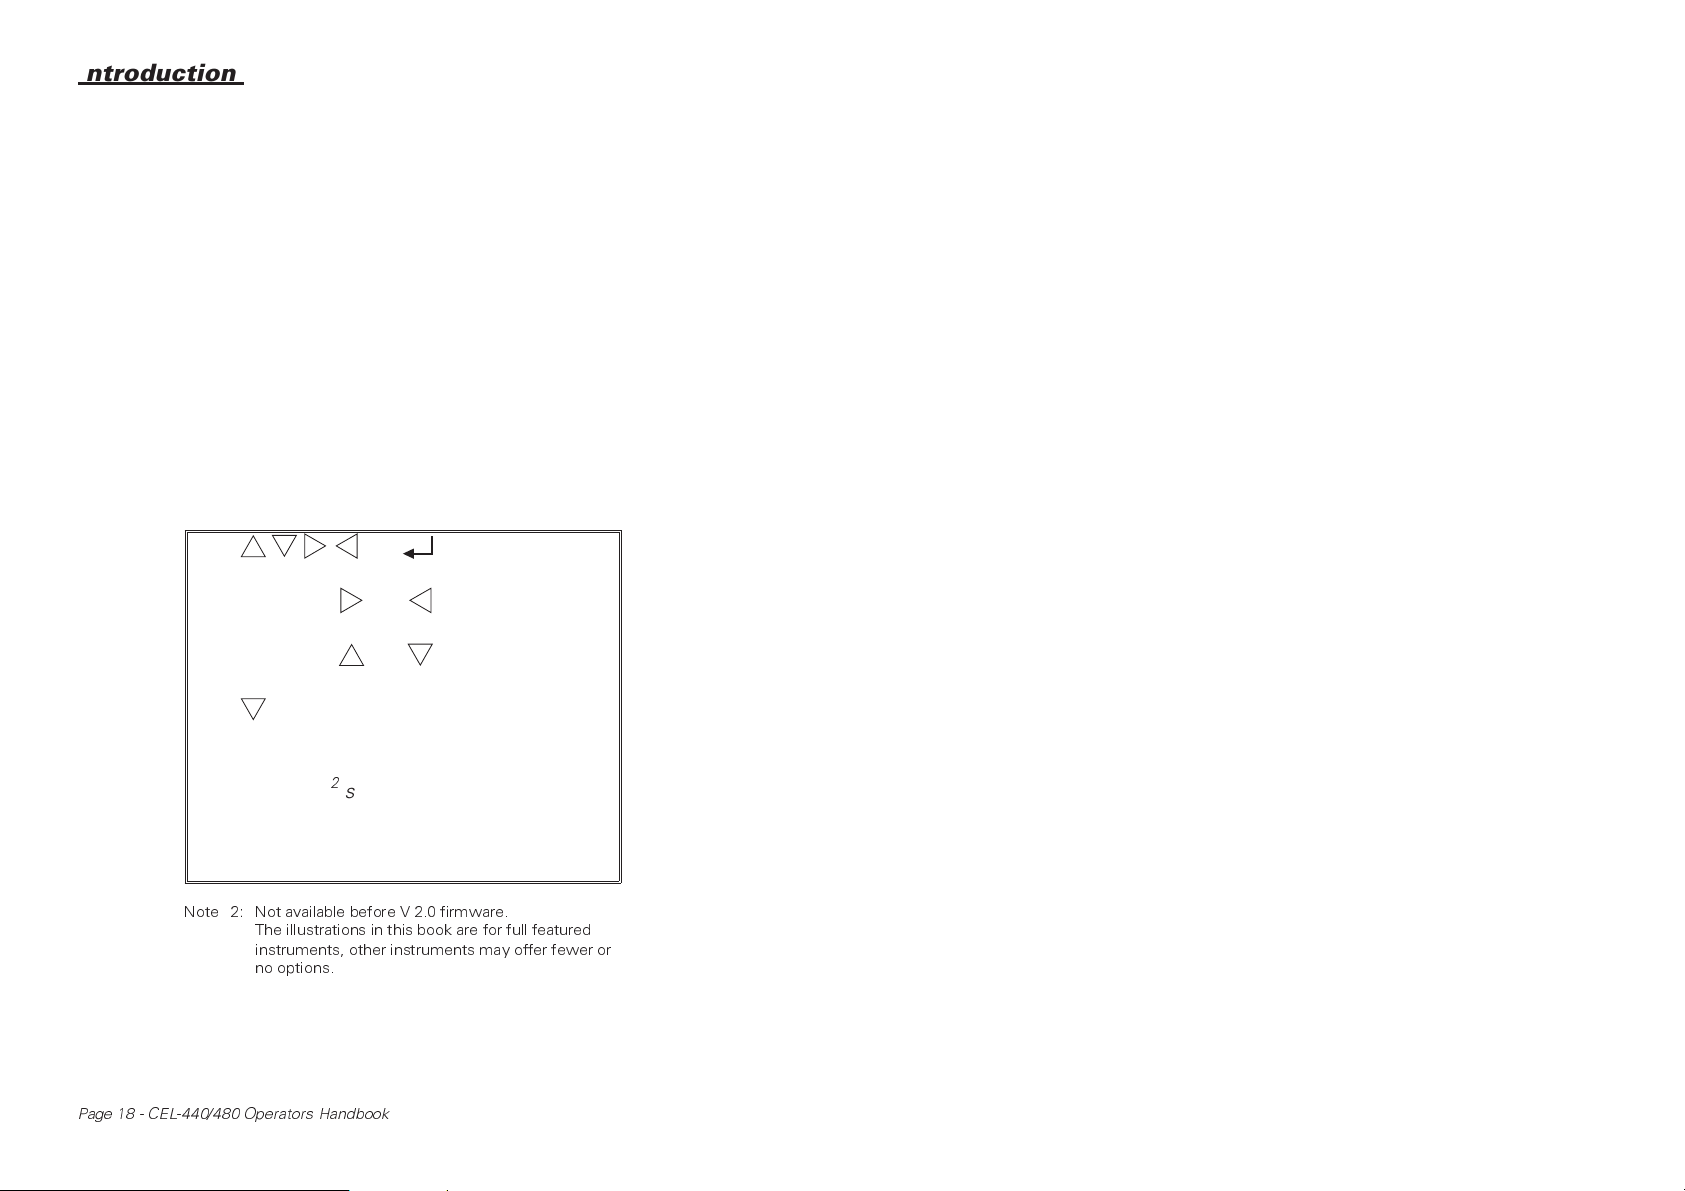
1. and displayed on a
2. In general, and keys move the
3. In general, and keys change the
4. at the bottom of a menu list indicates
5. An indication such as 3/5 at the bottom
6. Settings left highlighted on a menu
Hints For Using Menus
menu show which option keys are active.
reverse video cursor from field to field.
entry in the cursor field.
there may be further options.
2
of a menu
selected from 5 available.
screen become the active options.
shows that option 3 has been
Note 2: Not available before V 2.0 firmware.
Page 18 - CEL-440/480 Operators Handbook
The illustrations in this book are for full featured
instruments, other instruments may offer fewer or
no options.
Setup
Preliminary Operations
2. PRELIMINARY OPERATIONS
2.1 Select Instrument Configuration
(Language, Microphone Response Etc.)
Select the language in which the instrument will present menu options.
This should be the first operation so that the displays and options will be
understood.
Similarly, to get the most accurate results, these instruments
must be operated with a known microphone directional response and be
calibrated for this response.
When the language and microphone response are known to be
correct for the proposed measurement task, go directly to Section 6
Calibration Check.
European IEC standards require measurements to be performed
with microphones that have a Free Field response, while the U.S.A.
ANSI standards require Random Incidence microphones. The
microphone response is set via the same Configuration menu.
Normally, these more permanent characteristics will need to be
set only once, as the instrument will store the settings and use them the
next time it is switched on.
Proceed as follows.
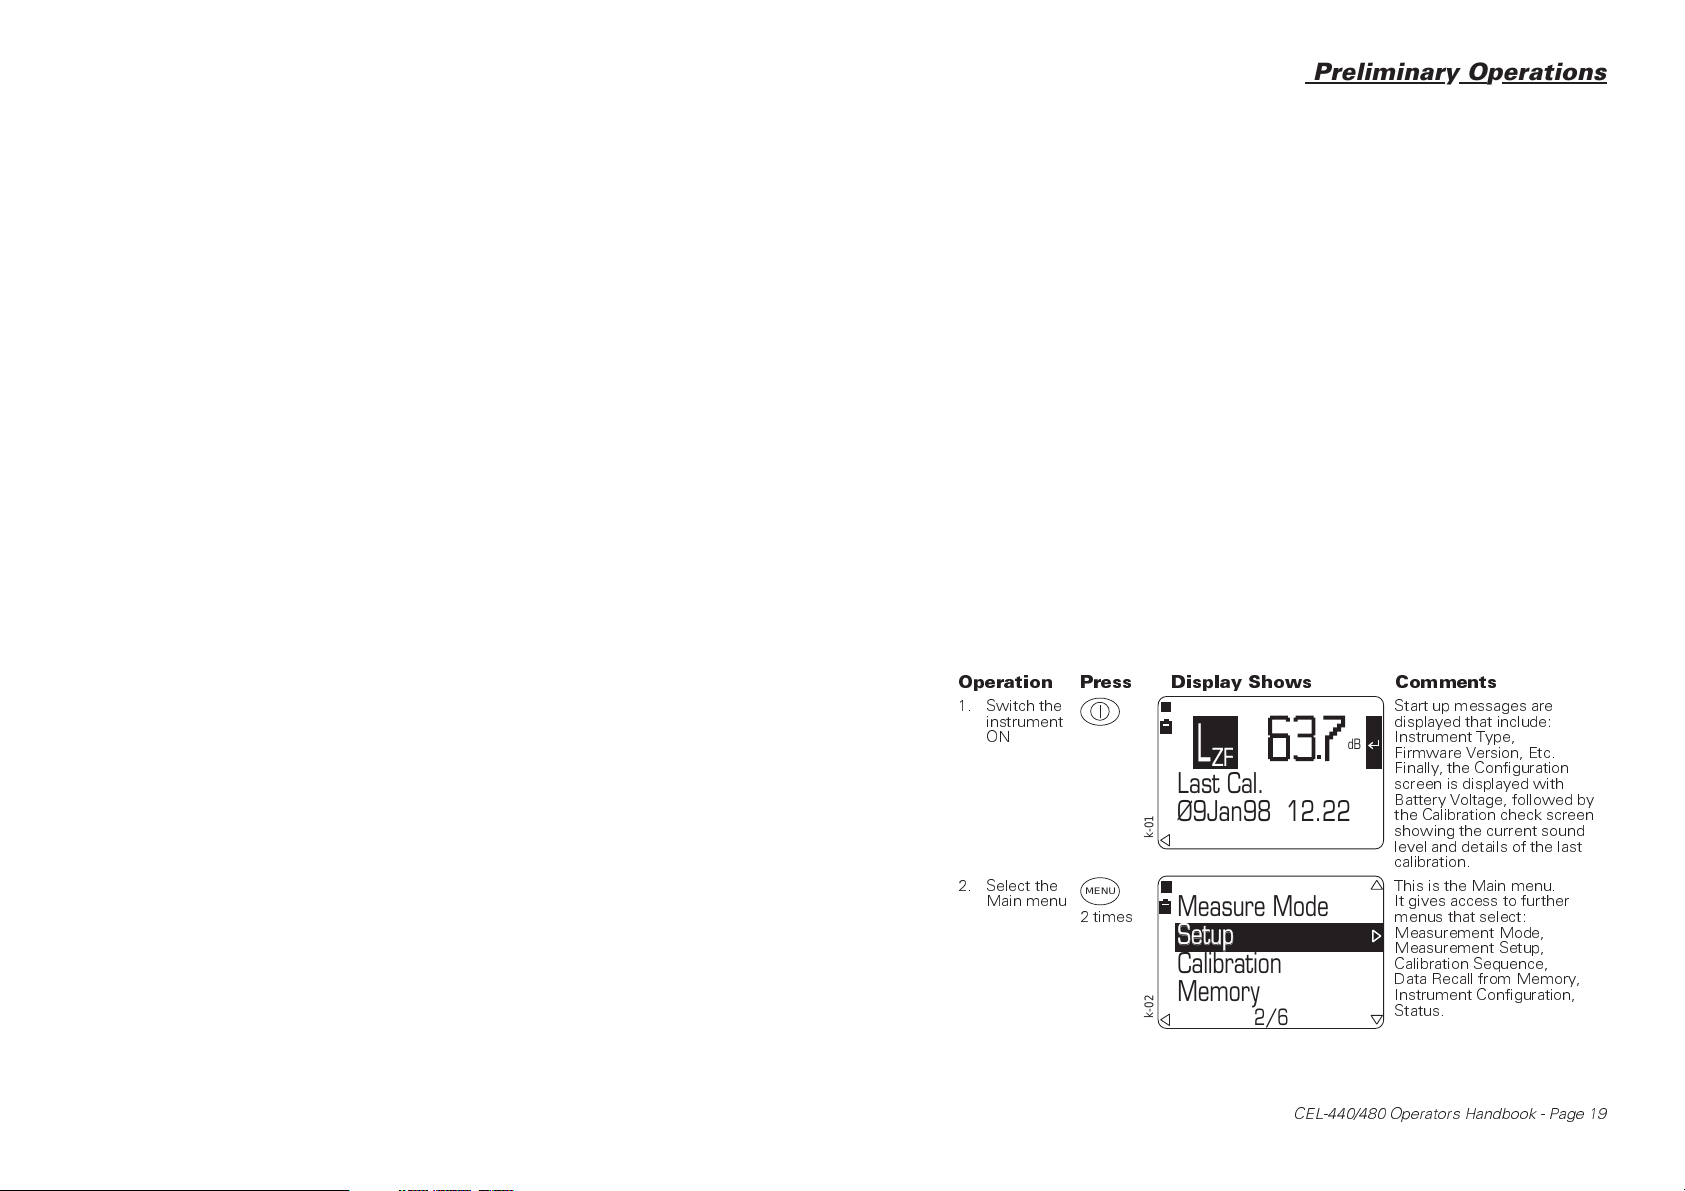
Operation Press Display Shows Comments
1. Switch the
instrument
ON
2. Select the
Main menu
MENU
2 times
L
ZF
Last Cal.
Ø9Jan98 12.22
k-01
Measure Mode
Setup
Calibration
Memory
k-02
2/6
Start up messages are
displayed that include:
Instrument Type,
dB
Firmware Version, Etc.
Finally, the Configuration
screen is displayed with
Battery Voltage, followed by
the Calibration check screen
showing the current sound
level and details of the last
calibration.
This is the Main menu.
It gives access to further
menus that select:
Measurement Mode,
Measurement Setup,
Calibration Sequence,
Data Recall from Memory,
Instrument Configuration,
Status.
CEL-440/480 Operators Handbook - Page 19

Français
Preliminary Operations
Operation Press Display Shows Comments
3. Select the
Configure
option
or
Setup
Move the reverse video
cursor to the required line.
Calibration
Memory
Configure
4. Move to
the
Configure
menu
5. Select the
Language
option
k-03
RS232 Comms
Language
Backlight
Time & Date
k-04
or
RS232 Comms
5/6
1/5
This menu allows the
following items to be set:
RS232 Communication Baud
rates from 1200 to 19200,
Menu Language,
Backlighting Durations of 1,
5, 10, 15, 30 s or OFF,
Instrument Time & Date,
Microphone Response Free
Field or Random.
Move the reverse video
cursor to the required line.
Language
Backlight
Time & Date
6. Move to
the
Language
menu
7. Select the
required
language
k-05
English
Français
Deutsch
Italiano
k-06
or
English
Français
Deutsch
2/5
1/5
This menu allows the
following languages to be
selected for menu
presentation:
English,
Français,
Deutsch,
Italiano,
Español.
The highlighted language
will be used for menu
presentation.
This setting will also be
stored and used next time
the instrument is switched
on.
Italiano
k-07
2/5
Press to return to the
Configuration menu.
Page 20 - CEL-440/480 Operators Handbook
Preliminary Operations
Operation Press Display Shows Comments
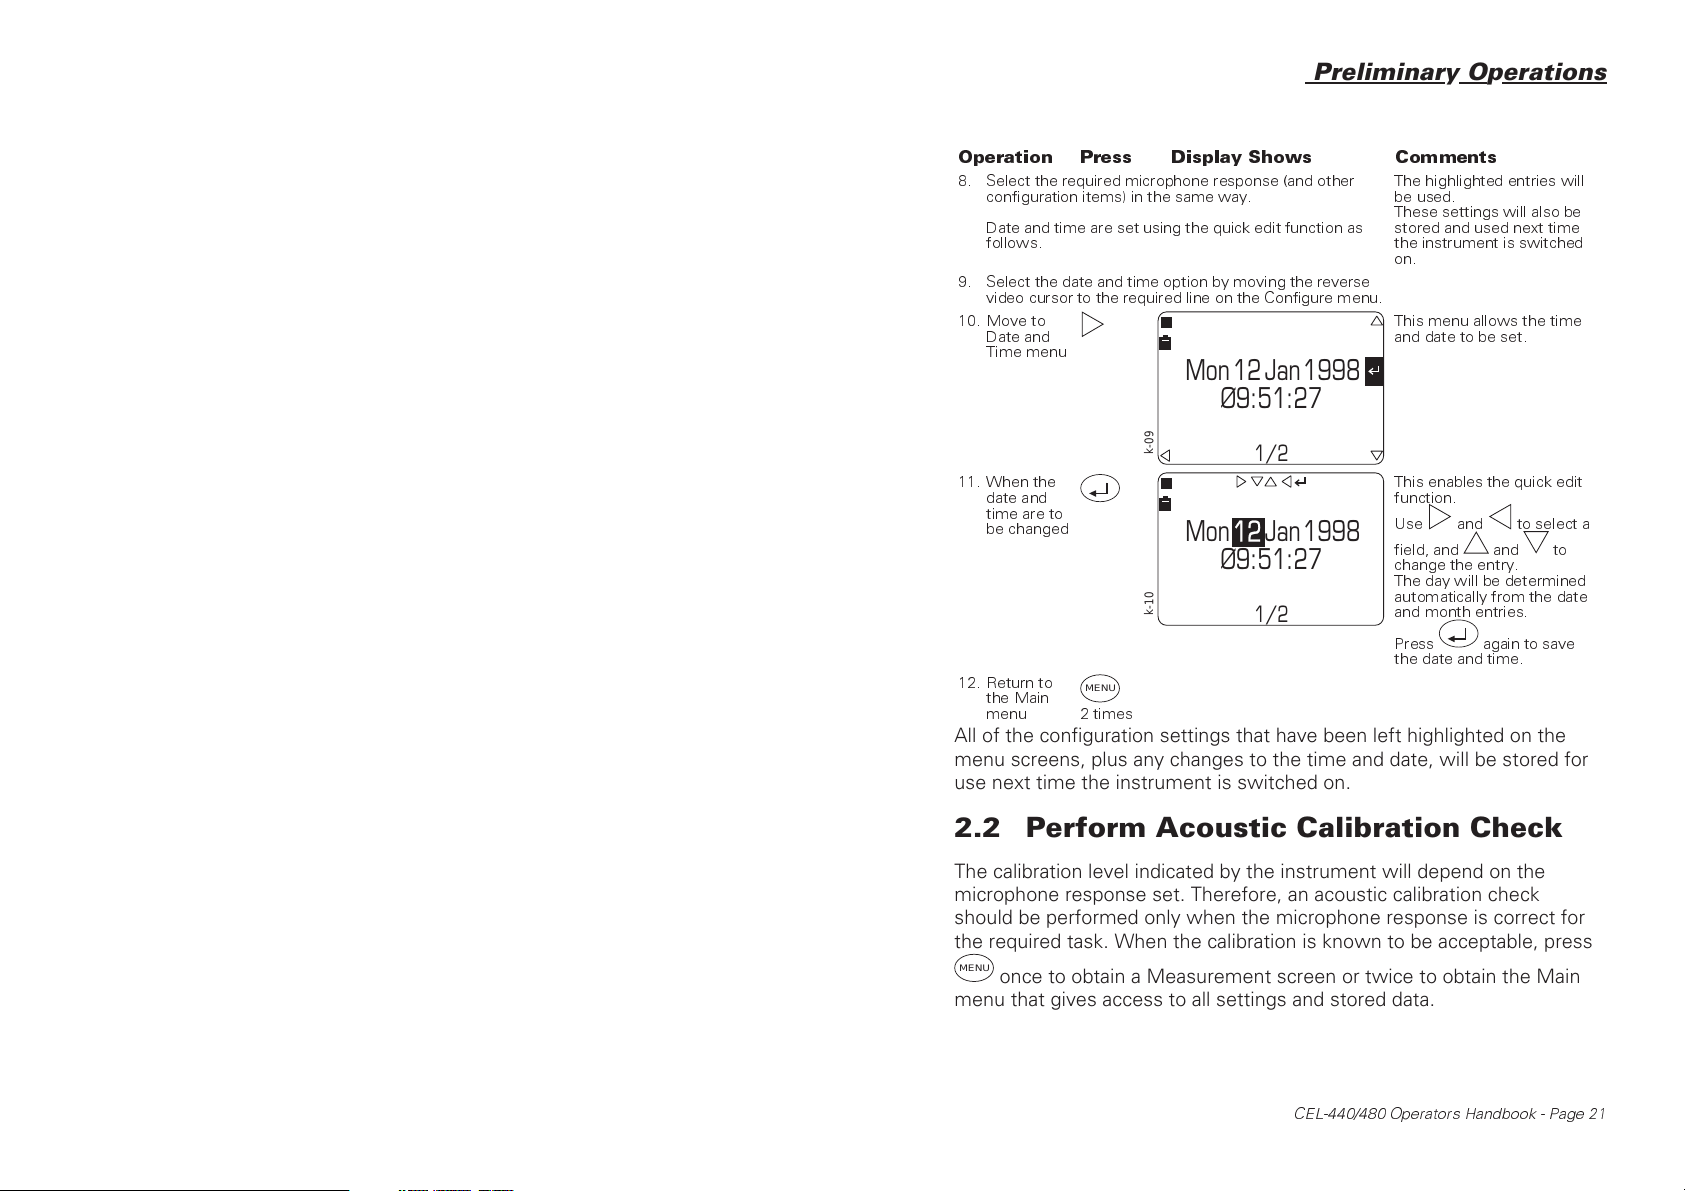
8. Select the required microphone response (and other
configuration items) in the same way.
Date and time are set using the quick edit function as
follows.
9. Select the date and time option by moving the reverse
video cursor to the required line on the Configure menu.
10. Move to
Date and
Time menu
12
Jan
Mon 1998
The highlighted entries will
be used.
These settings will also be
stored and used next time
the instrument is switched
on.
This menu allows the time
and date to be set.
Ø9:51:27
11. When the
date and
time are to
be changed
12. Return to
the Main
menu
k-09
Mon 1998
k-10
MENU
2 times
1/2
Jan
12
Ø9:51:27
1/2
This enables the quick edit
function.
Use and to select a
field, and and to
change the entry.
The day will be determined
automatically from the date
and month entries.
Press again to save
the date and time.
All of the configuration settings that have been left highlighted on the
menu screens, plus any changes to the time and date, will be stored for
use next time the instrument is switched on.
2.2 Perform Acoustic Calibration Check
The calibration level indicated by the instrument will depend on the
microphone response set. Therefore, an acoustic calibration check
should be performed only when the microphone response is correct for
the required task. When the calibration is known to be acceptable, press
MENU
once to obtain a Measurement screen or twice to obtain the Main
menu that gives access to all settings and stored data.
CEL-440/480 Operators Handbook - Page 21

9
1
M
Preliminary Operations
It is recommended that an acoustic calibration check
be performed both before and after a measurement run.
Perform the calibration check on the sound level meter using a
CEL-284/2 (Class 1) Calibrator for instruments with Type 1 accuracy and
a CEL-282 (Class 2) for Type 2 instruments. These calibrators provide a
nominal level of 114.0 dB at 1 kHz. However, the exact value to which
the instrument must be calibrated will depend on the microphone type in
use, the microphone response and local atmospheric conditions.
DO NOT remove the protective metal grid from
Type 1 microphones.
With a Type 1
instrument (i.e. 1/2"
microphone), fit the
CEL-284/2 Calibrator
directly on to the
microphone, making sure it
is pushed firmly into
contact with the shoulder in
the calibrator cavity
(Figure 5).
With a Type 2
instrument (i.e. 1/4"
microphone), fit the
CEL-4725 Coupler, supplied
with the calibrator, into the
cavity of the CEL-282 (or CEL-284/2) Calibrator making sure it is pushed
firmly into contact with the shoulder in the calibrator cavity (Figure 5).
Then fit the calibrator complete with coupler on to the instrument
microphone, again ensuring that it is pushed firmly into contact with the
shoulder in the coupler cavity.
DO NOT lay the sound level meter and calibrator on a
horizontal surface during calibration, as the combined
weight will cause the microphone to move inside the
calibrator cavity and produce an incorrect level.
Support the sound level meter and calibrator in an upright
position. To aid removal, the coupler flange does not fit tightly against
the calibrator housing.
Calibrator
Boss
/2"
icrophone
Shoulder
'O'Ring
1/4"Microphone&
PreamplifierUnit
80017
Microphone
Coupler
Figure 5: Fitting the acoustic calibrator
Page 22 - CEL-440/480 Operators Handbook

Preliminary Operations
A Calibration screen is displayed at the end of the start up
sequence and this will be the normal entry to the calibration check.
However, after making changes to the instrument configuration as
described above, or after performing some other operation, the
Calibration screen can be obtained via the Calibration option on the Main
menu followed by the Microphone Option on the Calibration Menu.
When the Calibration screen shows a “Scale ... ” line instead of
“Last Cal”, the last calibration was performed via line input. Use the
Calibration and Microphone options as described above.
Calibrate the instrument as follows.
Operation Press Display Shows Comments
1. Start with
the
Last Cal.
screen
L
ZF
This is the Calibration Check
screen.
It shows the current sound
dB
level and details of the last
calibration.
Last Cal.
Ø9Jan98 12.22
c-01
2. Switch the
Calibrator
ON
L
ZF
Last Cal.
This is the level produced by
the calibrator.
The Calibration levels for the
dB
CEL Type 1 and Type 2
microphones and for Free
Field and Random response
are shown in Table 1.
Ø9Jan98 12.22
c-02
3. When the
level
shown is
incorrect
for the
current
microphone
and
response
4. Adjust the
display to
show the
correct
level for
the
microphone
and
response
and
L
ZF
Last Cal.
Ø9Jan98 12.22
c-03
L
ZF
Last Cal.
Ø9Jan98 12.22
c-04
This enables the quick edit
function.
dB
More than one key press
may be required to give a
visible change in level.
dB
CEL-440/480 Operators Handbook - Page 23

Preliminary Operations
Operation Press Display Shows Comments
5. Save the
new
Calibration
setting
L
ZF
The settings are stored as
the current calibration
dB
Last Cal.
13Jan98 11.Ø7
c-05
When the calibration check is complete, press once to obtain a
Measurement screen or twice to obtain the Main menu that gives
access to all settings and stored data.
MENU
3
.
Table 1: Calibration Levels
Accuracy Microphone
Type
Directional
Response of
4
Acoustic
Calibrator
Microphone
Type 1
Instruments
Type 2
Instruments
Note 3: Firmware V 2.0 introduced the ability to include settings from the
Note 4: These levels may also be subject to further correction as follows:
(a) When a traceable calibration certificate is available for the acoustic calibrator
(b) To compensate for atmospheric conditions as described in the calibrator
CEL-250 Free Field (IEC) CEL-284/2 114.0 dB
Random Incidence (ANSI) CEL-284/2 113.8 dB
CEL-485 Free Field (IEC) CEL-282
Random Incidence (ANSI) CEL-282
calibration together with settings saved from the calibration made before the run
when a hard copy of the run is printed. This allows calibration settings from both
before and after a run to be included in the printout from the run.
Earlier firmware printed (and included) only the calibration settings current at the
start of (i.e. before) the run.
When no calibration has been performed after a run, the current settings printed
will be the same as those from before the run.
However, if data from a run is printed some time after the run was stored and the
instrument has been re-calibrated in between, the hard copy will include the most
recent calibration settings as current.
and/or the sound level meter.
instructions.
CEL-284/2
CEL-284/2
Calibration
Level
113.6 dB
113.6 dB
current
Page 24 - CEL-440/480 Operators Handbook

Select Mode & Setup
3. SELECT MEASUREMENT MODE
& SETUP
3.1 Select Measurement Mode
(Bandwidth & CEL-480 Run Timing)
The measurement mode specifies the bandwidth that is to be used for
measurement. Note that broadband versions of the CEL-440 have no
measurement mode option, see step 2.
With a CEL-480, measurement mode also specifies how
measurements will be timed as follows.
Timers Off Manually timed. This allows the user to start and
stop a measurement run whenever they want.
Duration Run for a predetermined duration after pressing
the run key. This can be used to time a work
shift, or to measure some particularly noisy
operation with a known work cycle.
Sync timer Run for a predetermined duration that is
synchronized to start at the same time as the
next measurement period, which is set via the
Setup menu. This method is suggested when
precisely timed measurements are required.
Delay Timer Run with preset start and stop times. This allows
the instrument to start and stop up to seven
accurately timed measurement runs while
unattended. In this way, different measuring
times can be set for each day of the week with
the option of repeating them over a period of
several weeks.
Each time is set as Day:Hour:Minute, so that
delays can be set up to a month ahead. Set the
Day to 00, to use this as a 24 hour timer.
Once set, timer settings become valid for all measurement modes (i.e.
for all bandwidths and all setups).
Display screens that are available only for a CEL-480 are shown
with a dashed ----line.
Select measurement mode as follows.
Note 5: Before V 2.0 firmware, six timed measurements only with no repeat option.
5
CEL-440/480 Operators Handbook - Page 25

Sync Timer
Select Mode & Setup
Operation Press Display Shows Comments
1. Start with
the
Main menu
Measure Mode
Setup
Calibration
This is the Main menu
screen.
Broadband CEL-440
instruments have no
Measure Mode (bandwidth
selection) option.
Memory
s-01
2. Select the
Measure
Mode
option
and
Measure Mode
Setup
Calibration
Memory
s-02
3. Move to
the
Measure
Mode
menu
Single Band
Octaves
Third Octaves
s-03
4. When a
CEL-480 is
being
used, if
required
move to
the Timers
menu
5. If required
select
Duration
Timer from
Timers
menu
Note 6: Before V 2.0 firmware, 6 timed measurements only, with no repeat option.
followed
by
Timers Off
Duration Timer
Delay Timer
s-04
Sync Timer X
Duration ----
s-05
2/6
1/6
2/3
1/3
1/2
Move the reverse video
cursor to the required line.
Broadband CEL-440
instruments have no
Measure Mode (bandwidth
selection) option, while
broadband CEL-480
instruments go to Step 4 for
timer settings.
This menu allows any of the
available bandwidths to be
selected.
The highlighted setting will
be used. This setting will
also be stored and used the
next time the instrument is
switched on.
Earlier versions showed
Broadband instead of Single
Band
The Timers menu allows the
following CEL-480 run timer
functions to be set:
Timers ON/OFF,
Run Duration Timer with or
without Synchronization to
the measurement periods,
Use of up to seven
Delayed Run Start and Stop
times that may be repeated
up to 999 times.
These options control the
run duration.
The Synchronization Timer
may be used together with
the Duration Timer.
When the Duration setting is
used alone, the run starts
immediately is
6
sets of
Page 26 - CEL-440/480 Operators Handbook
Repeat
Select Mode & Setup
Operation Press Display Shows Comments
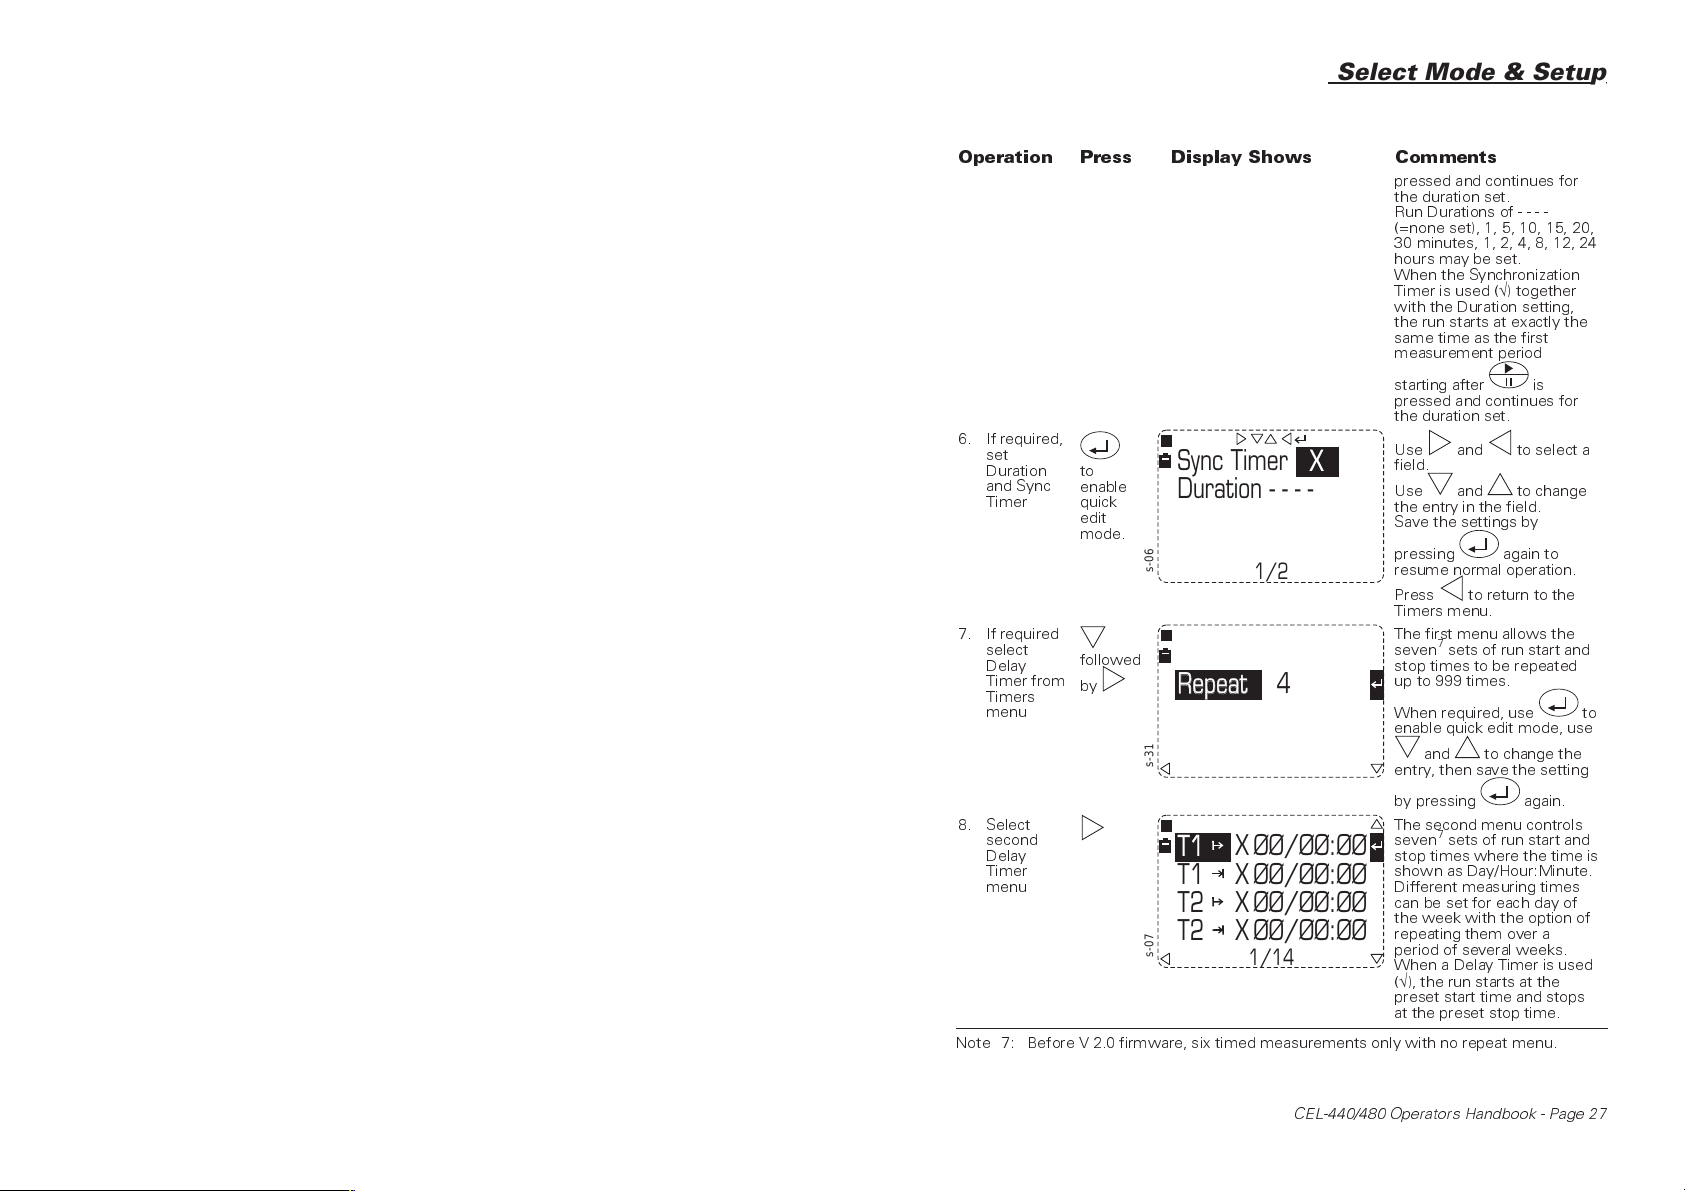
pressed and continues for
the duration set.
Run Durations of----
(=none set), 1, 5, 10, 15, 20,
30 minutes, 1, 2, 4, 8, 12, 24
hours may be set.
When the Synchronization
Timer is used (√) together
with the Duration setting,
the run starts at exactly the
same time as the first
measurement period
starting after is
pressed and continues for
the duration set.
6. If required,
set
Duration
and Sync
Timer
7. If required
select
Delay
Timer from
Timers
menu
8. Select
second
Delay
Timer
menu
Note 7: Before V 2.0 firmware, six timed measurements only with no repeat menu.
to
enable
quick
edit
mode.
followed
by
Sync Timer X
Duration ----
s-06
1/2
Repeat 4
s-31
T1 X ØØ/ØØ:ØØ
T1 X
T2 X
T2 X
s-07
ØØ/ØØ:ØØ
ØØ/ØØ:ØØ
ØØ/ØØ:ØØ
1/14
Use and to select a
field.
Use and to change
the entry in the field.
Save the settings by
pressing again to
resume normal operation.
Press to return to the
Timers menu.
The first menu allows the
7
sets of run start and
seven
stop times to be repeated
up to 999 times.
When required, use to
enable quick edit mode, use
and to change the
entry, then save the setting
by pressing again.
The second menu controls
7
sets of run start and
seven
stop times where the time is
shown as Day/Hour:Minute.
Different measuring times
can be set for each day of
the week with the option of
repeating them over a
period of several weeks.
When a Delay Timer is used
(√), the run starts at the
preset start time and stops
at the preset stop time.
CEL-440/480 Operators Handbook - Page 27

Select Mode & Setup
Operation Press Display Shows Comments
9. If required,
set the
Delay Timer
to
enable
quick
edit
mode
T1 X ØØ/ØØ:ØØ
T1 X
T2 X
T2 X
s-08
ØØ/ØØ:ØØ
ØØ/ØØ:ØØ
ØØ/ØØ:ØØ
1/14
Use and to select a
field.
Use and to change
the entry in the field.
Save the settings by
pressing again to
resume normal operation.
Press to return to the
Timers menu.
When the required measurement mode and timer settings have been
selected, press once to obtain a Measurement screen or twice to
MENU
obtain the Main menu that gives access to all settings and stored data.
3.2 Select Measurement Setup
(Factory- or User-Prepared Setups)
The Setup specifies the particular parameters that are to be measured.
Selection procedures for broadband and narrow band measurements
differ, as a wider choice of parameters is available for broadband, while
several frequency band scanning options are available for narrow band. A
factory configured setup and up to four user setups can be stored for
each available bandwidth.
Firmware version 2.0 introduced the facility for all broadband
measurement parameters to be obtained from a single narrowband,
provided octave or third octave band are available.
In addition, the CEL-480 can make measurements at specified
time intervals and store period noise data and exceedance (L
and profiles. Display screens that are available only for a CEL-480 are
shown with a dashed ----line.
) values
n
3.2.1 Select Broadband Measurement Setup
The factory setup for single band (broadband8) measurement contains a
set of standard parameters selected for general purpose use.
User setups contain parameters that have been selected to
perform some particular task and are saved under a user setup identity.
Changes to user setups are saved for re-use, however any changes to
Note 8: Before V 2.0 firmware, Single Band was identified as Broadband.
Page 28 - CEL-440/480 Operators Handbook

Single Band
Select Mode & Setup
the factory setup will be lost and the standard settings offered each time
the instrument is re-started. Select and save single band setups as follows.
Operation Press Display Shows Comments
1. Select
Single
Band
Measure-
ment as
detailed in
Section 3.1
2. Display the
Main
menu, then
select
Setup
then
Single Band
Octaves
Third Octaves
s-09
1/3
Measure Mode
Setup
When the Single Band
option is highlighted, it will
be the bandwidth used.
This is the Main menu
screen with the reverse
video cursor highlighting the
Setup option.
Calibration
Memory
s-10
3. Move to
the Setup
selection
menu
Factory Setup
User Setup 1
User Setup 2
User Setup 3
s-11
4. Select a
setup and
move to
the Setup
Screen
and
then
Mode
SLM Response
Functions
Dose Results
s-12
5. If required
(and
available),
select
Mode
fromSetup
menu
Note 9: Introduced with V 2.0 firmware. Not available with broadband-only instruments.
followed
by
Broadband
Octaves
Third Octaves
s-32
2/6
2/5
1/5
1/3
This menu allows any of the
available setups to be
selected.
The highlighted setting will
be used.
This setting will also be
stored and used the next
time the instrument is
switched on.
This screen allows the
following parameters to be
selected:
9
(measurement
Mode
bandwidth),
SLM weightings,
Measurement Functions,
Dose parameters,
Period measurement on or
off (CEL-480 only).
On instruments with narrow
band measurement facilities,
this screen
single band measurement
bandwidth to be selected
(broadband, octave band or
third octave band) and a
single frequency band
chosen from those available.
9
allows the
CEL-440/480 Operators Handbook - Page 29

Select Mode & Setup
Operation Press Display Shows Comments
6. If required
change the
measure-
ment
bandwidth
and
Broadband
Octaves
The following options may
be available.
Broadband,
Octave,
Third Octave.
Third Octaves
7. If required
inspect the
selected
frequency
8. If required
change the
selected
frequency
9. Save the
settings
10. If required
select SLM
Response
from Setup
screen
to
enable
quick
edit
mode
to
leave
quick
edit
mode
followed
by
s-33
2/3
1KHz
Octave
s-34
1KHz
(Octave)
s-35
5ØØHz
(Octave)
s-36
RMS Weight A
Time Weight F
Peak Weight Z
Exchange Q 3
s-13
1/4
The following options may
be available.
Broadband:
Octave:
32, 64, 125, 250, 500 Hz,
1, 2, 4, 8 kHz bands,
Third Octave:
25, 32, 40, 50, 64, 80, 100,
125, 160, 200, 250, 320,
400, 500, 640, 800 Hz,
1, 1.25, 1.6, 2, 2.5, 3.2, 4, 5,
6.4, 8, 10, 12.5 kHz bands.
Use and to change
the entry in the field.
The settings will be saved.
Single band measurement
screens will now identify the
selected narrow band
bandwidth.
Press to return to the
Setup screen.
This screen allows the
following weightings to be
set:
RMS:A,C,Z,
Time: F, S, I,
Peak: C, Z,
Q: 3, 4, 5, 6.
Page 30 - CEL-440/480 Operators Handbook

Select Mode & Setup
Operation Press Display Shows Comments
11. If required,
change the
weightings
12. If required
select
measure-
ment
Functions
from Setup
screen
13. If required,
change the
functions
to
enable
quick
edit
mode
followed
by
to
enable
quick
edit
mode
RMS Weight A
Time Weight F
Peak Weight Z
Exchange Q 3
s-14
s-15
s-16
L
AFmx
LLL
AFmn
L
Aeq
LL
Zpk
LL
AFmx
LLL
AFmn
L
Aeq
LL
Zpk
1/4
1/14
1/14
Use and to select a
field.
Use and to change
the entry in the field.
Save the settings by
pressing again to
resume normal operation.
Press to return to the
Setup screen.
This screen allows the
following measurement
functions to be specified
(√=enabled, X =disabled)
using the weightings set in
step 6 above:
L
AFmx
L
AFmn
L
Aeq
L
Zpk
L
AE
L
EP,v
L
Tm3
Histogram
When the dose
normalisation time is set to
8 hours (step 10) L
be identified as L
(Similarly, when the TWA
normalisation time is set to
8 hours, the unit will be
identified as TWA.)
Any L
value between 0.0
AF
and 99.9 can be set.
Use and to select a
field.
Use and to change
the entry in the field.
Save the settings by
pressing again to
resume normal operation.
Press to return to the
Setup screen.
10
L
Tm5
L
AF10.0
L
AF50.0
L
AF90.0
L
AF95.0
L
AF99.0
EP,d
EP,v
will
V
Note 10: Although included on the display, this feature was first enabled at V 2.0 firmware.
CEL-440/480 Operators Handbook - Page 31
7Ø
Select Mode & Setup
Operation Press Display Shows Comments
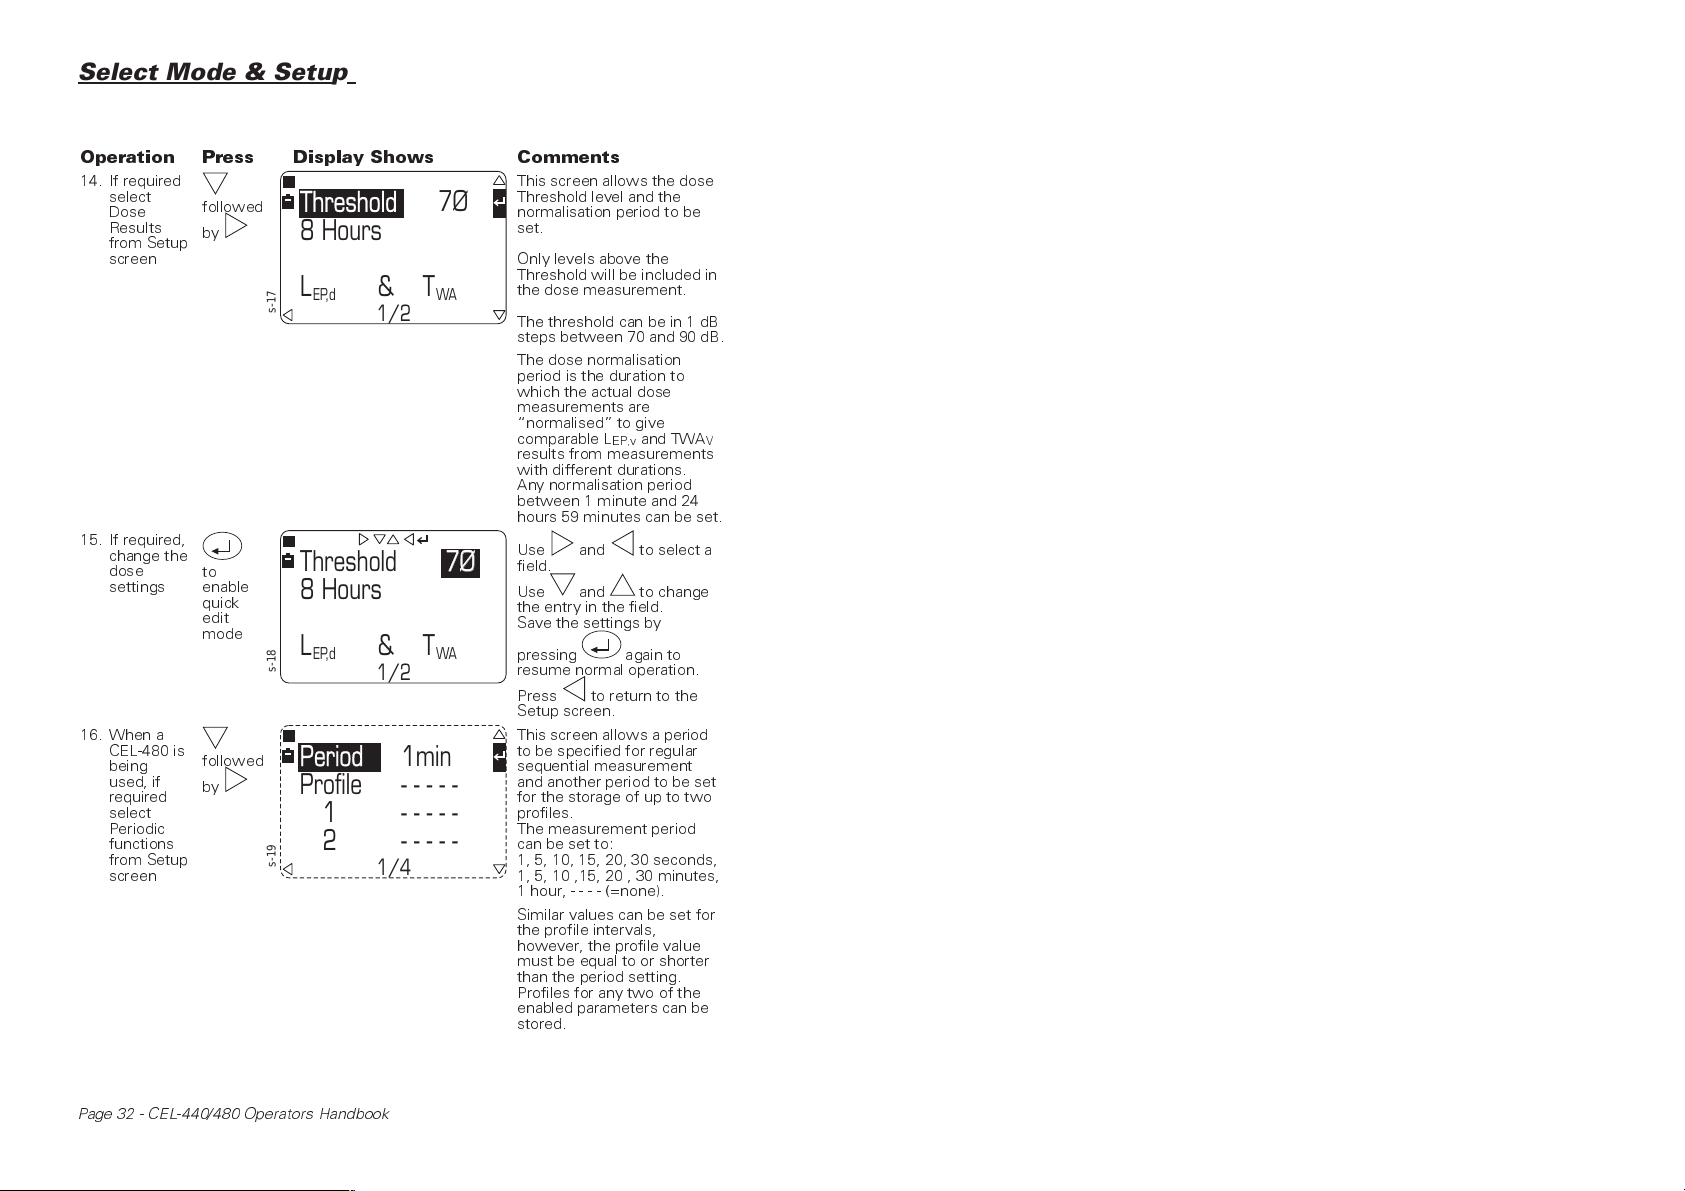
14. If required
select
Dose
Results
from Setup
screen
15. If required,
change the
dose
settings
16. When a
CEL-480 is
being
used, if
required
select
Periodic
functions
from Setup
screen
followed
by
to
enable
quick
edit
mode
followed
by
Threshold
8 Hours
L
EP,d
s-17
1/2
Threshold
8 Hours
L
EP,d
s-18
1/2
Period 1min
Profile -----
1
2
s-19
-----
-----
1/4
T&
T&
7Ø
WA
7Ø
WA
This screen allows the dose
Threshold level and the
normalisation period to be
set.
Only levels above the
Threshold will be included in
the dose measurement.
The threshold can be in 1 dB
steps between 70 and 90 dB.
The dose normalisation
period is the duration to
which the actual dose
measurements are
normalised to give
comparable L
results from measurements
with different durations.
Any normalisation period
between 1 minute and 24
hours 59 minutes can be set.
Use and to select a
field.
Use and to change
the entry in the field.
Save the settings by
pressing again to
resume normal operation.
Press to return to the
Setup screen.
This screen allows a period
to be specified for regular
sequential measurement
and another period to be set
for the storage of up to two
profiles.
The measurement period
can be set to:
1, 5, 10, 15, 20, 30 seconds,
1, 5, 10 ,15, 20 , 30 minutes,
1 hour, - - - - (=none).
Similar values can be set for
the profile intervals,
however, the profile value
must be equal to or shorter
than the period setting.
Profiles for any two of the
enabled parameters can be
stored.
EP,v
and TWA
V
Page 32 - CEL-440/480 Operators Handbook

Select Mode & Setup
Operation Press Display Shows Comments
17. If required,
change the
period
settings
to
enable
quick
edit
mode
Period 1min
Profile -----
1
2
s-20
-----
-----
1/4
When the required single band setup has been selected, press
once to obtain the Broadband Measurement screen or twice to obtain
the Main menu that gives access to all settings and stored data.
3.2.2 Select Narrow Band Measurement Setup
The factory setup for narrow band measurement contains a standard set
of parameters selected for general purpose use. Octave and third octave
setups have the same parameter selections that are selected in a similar
way.
User setups contain parameters that have been selected to
perform some particular task and are saved under a user setup identity.
Changes to user setups are saved for re-use. However any changes to
the factory setup will be lost and the standard settings offered each time
the instrument is re-started.
The following frequency band scanning modes are available.
Manual Bands are scanned manually with the user
judging when the level is stable in a band.
(This is the factory setting.)
Auto Bands are scanned automatically with the level
in a band judged stable according to the criteria
included under Specification.
Timed Bands are scanned automatically with the level
in a band allowed to stabilize over user selected
preset periods between 5 and 60 seconds.
The timed setting shows how many bands are to
be scanned.
Repeat On the CEL-480 only, both Auto and Timed
scanning can be repeated automatically at user
Use and to select a
field.
Use and to change
the entry in the field.
Save the settings by
pressing again to
resume normal operation.
Press to return to the
Setup screen.
MENU
CEL-440/480 Operators Handbook - Page 33
Select Mode & Setup
selected preset intervals between 0 minutes and
1 hour.
When using timed scanning, make sure the repeat time is greater than
the number of channels to be scanned multiplied by the stabilization
time, otherwise some bands will not have been scanned before the scan
re-starts for the next repeat period.
For example, the maximum of 30 bands x 10 s would require a
repeat time greater than 5 minutes.
Select and save narrow band setups as follows.
Operation Press Display Shows Comments
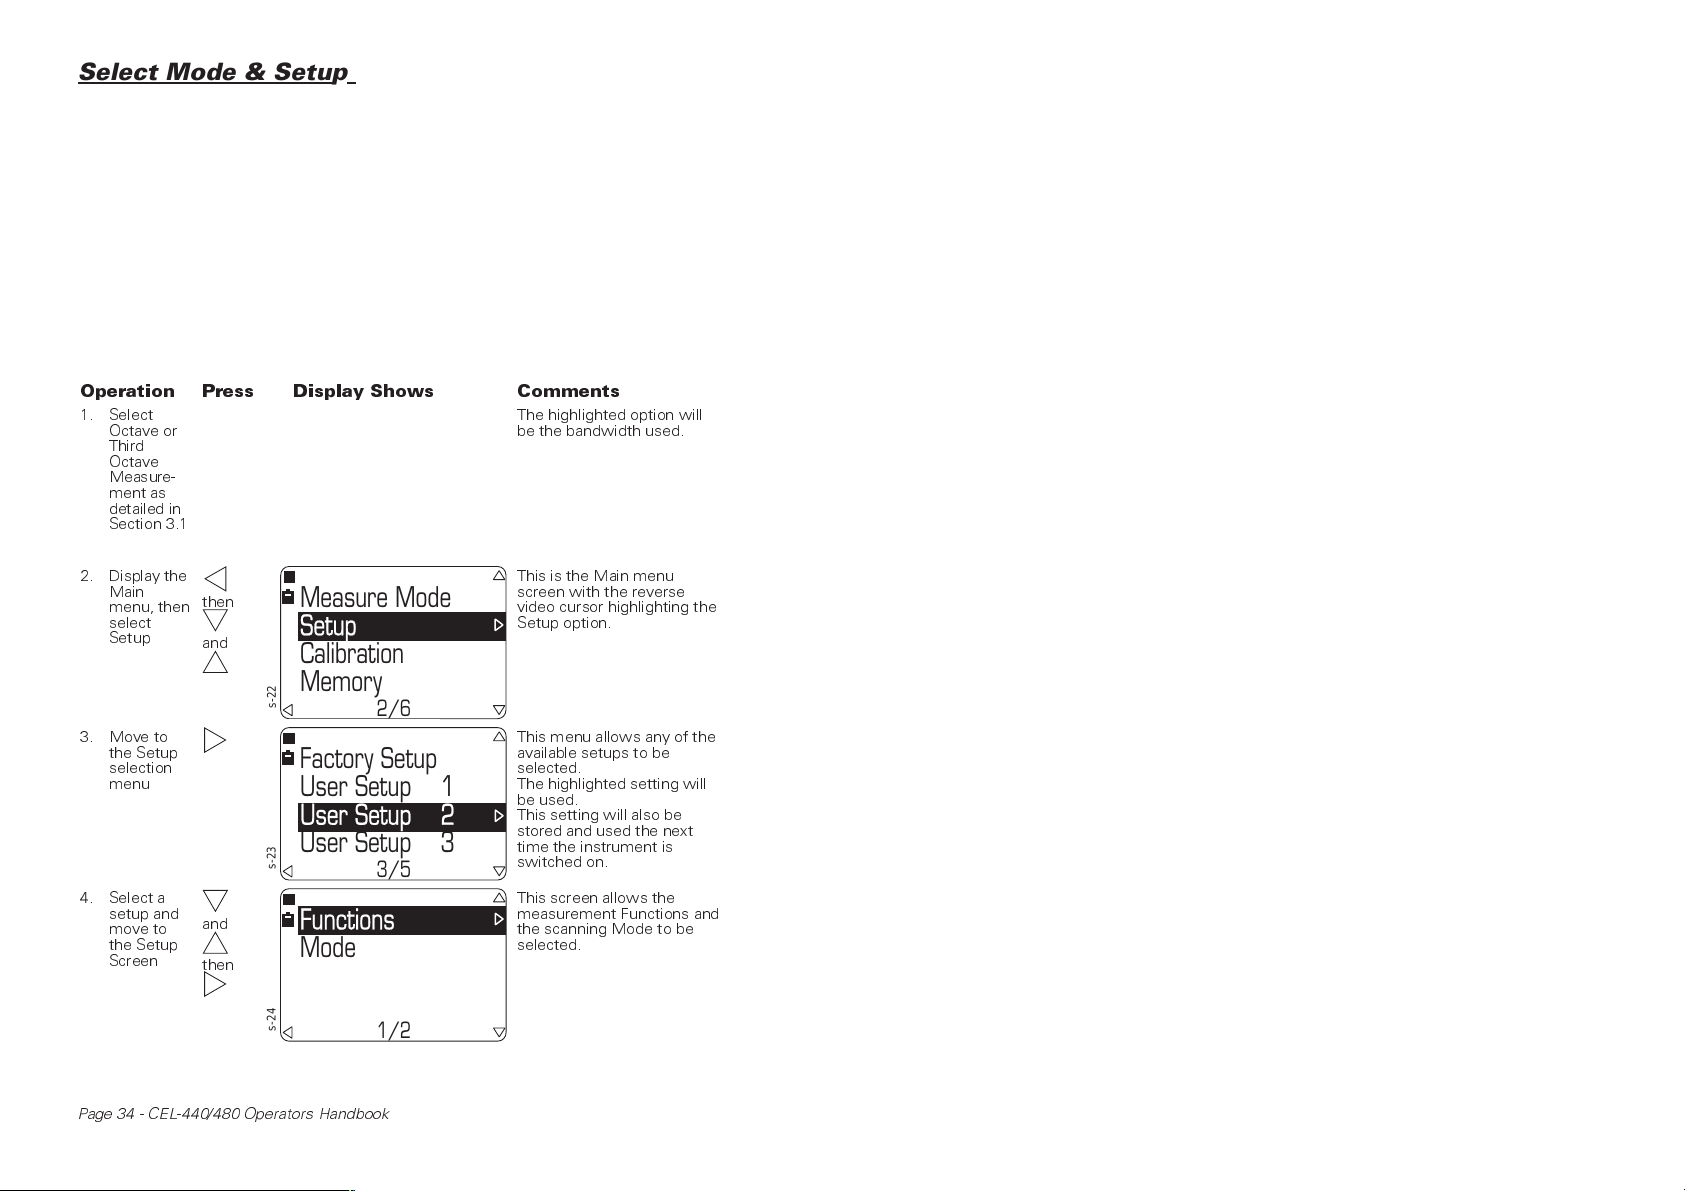
1. Select
Octave or
Third
Octave
Measure-
ment as
detailed in
Section 3.1
The highlighted option will
be the bandwidth used.
2. Display the
Main
menu, then
select
Setup
then
and
Measure Mode
Setup
Calibration
Memory
s-22
3. Move to
the Setup
selection
menu
Factory Setup
User Setup 1
User Setup 2
User Setup 3
s-23
4. Select a
setup and
move to
the Setup
Screen
Page 34 - CEL-440/480 Operators Handbook
and
then
Functions
Mode
s-24
2/6
3/5
1/2
This is the Main menu
screen with the reverse
video cursor highlighting the
Setup option.
This menu allows any of the
available setups to be
selected.
The highlighted setting will
be used.
This setting will also be
stored and used the next
time the instrument is
switched on.
This screen allows the
measurement Functions and
the scanning Mode to be
selected.
Select Mode & Setup
Operation Press Display Shows Comments
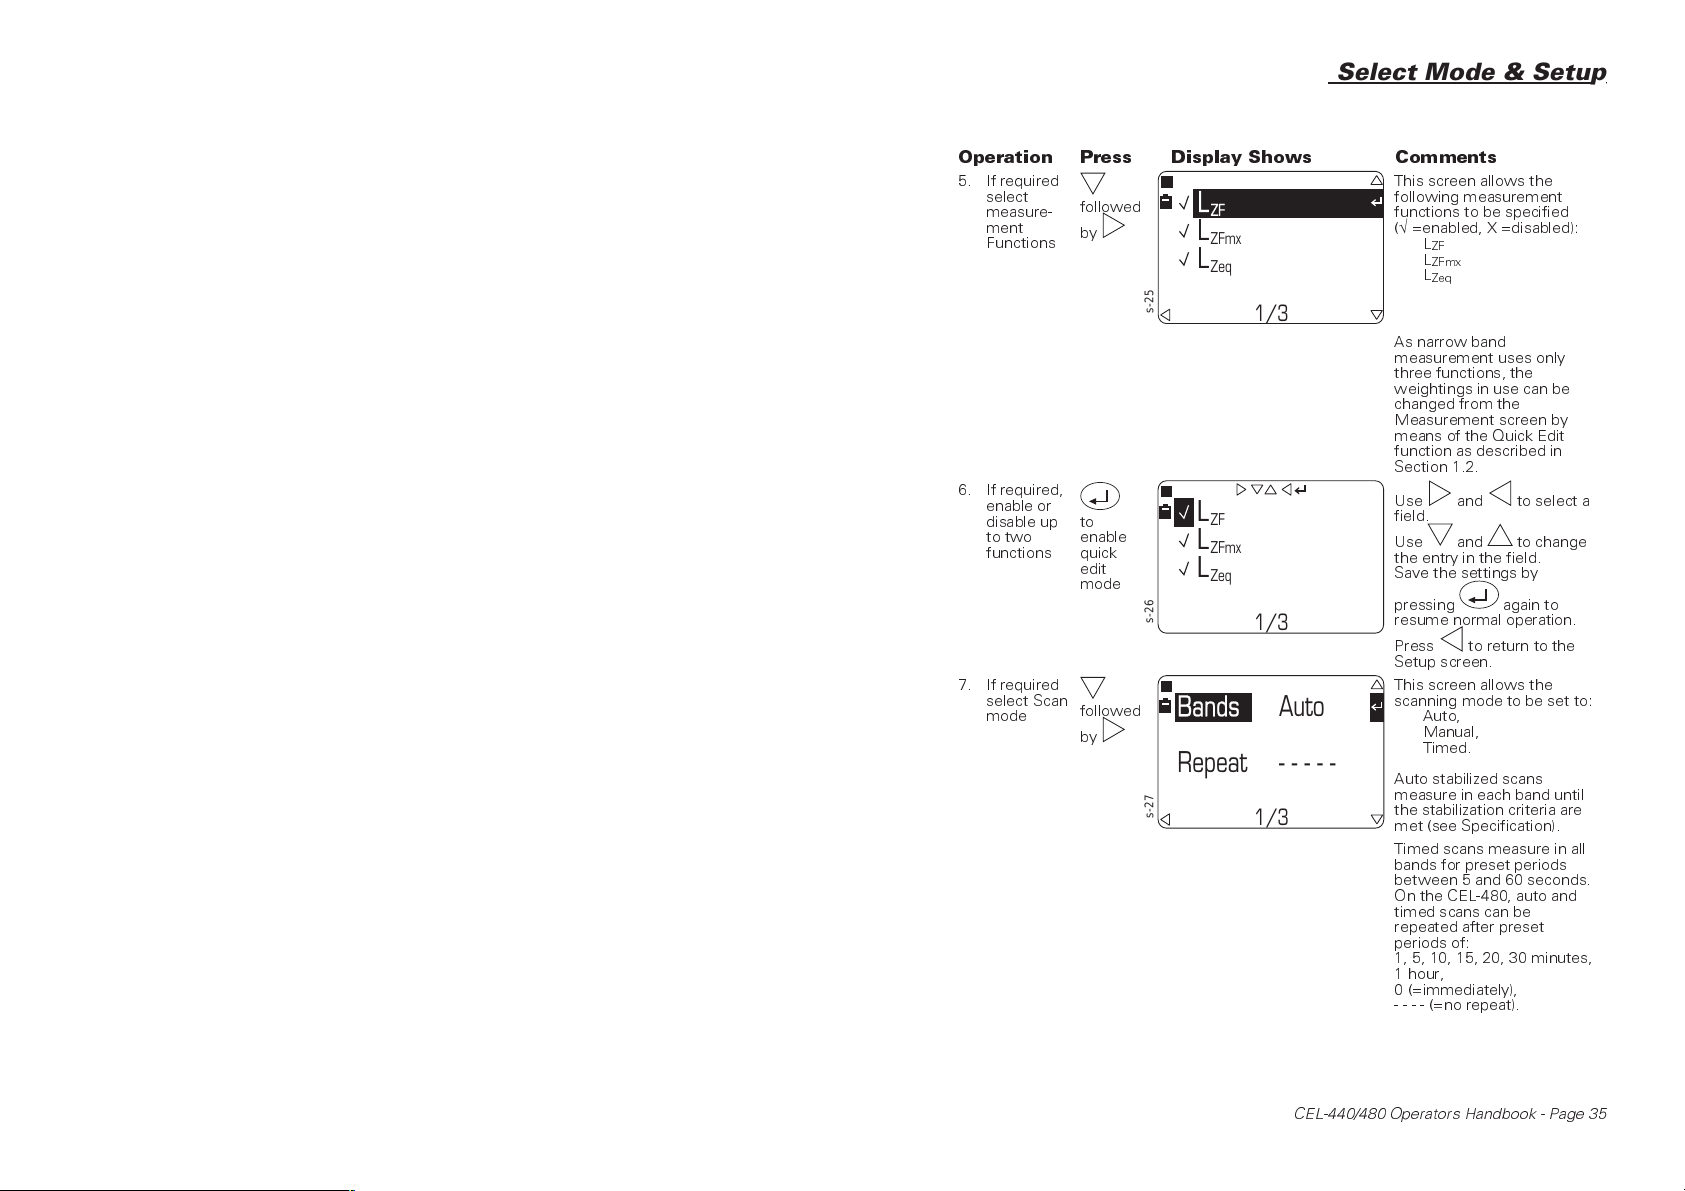
5. If required
select
measure-
ment
Functions
6. If required,
enable or
disable up
to two
functions
7. If required
select Scan
mode
followed
by
to
enable
quick
edit
mode
followed
by
L
ZF
LLL
ZFmx
L
Zeq
s-25
s-26
LL
LLL
L
1/3
ZF
ZFmx
Zeq
1/3
Bands Auto
Repeat -----
s-27
1/3
This screen allows the
following measurement
functions to be specified
(√=enabled, X =disabled):
L
ZF
L
ZFmx
L
Zeq
As narrow band
measurement uses only
three functions, the
weightings in use can be
changed from the
Measurement screen by
means of the Quick Edit
function as described in
Section 1.2.
Use and to select a
field.
Use and to change
the entry in the field.
Save the settings by
pressing again to
resume normal operation.
Press to return to the
Setup screen.
This screen allows the
scanning mode to be set to:
Auto,
Manual,
Timed.
Auto stabilized scans
measure in each band until
the stabilization criteria are
met (see Specification).
Timed scans measure in all
bands for preset periods
between 5 and 60 seconds.
On the CEL-480, auto and
timed scans can be
repeated after preset
periods of:
1, 5, 10, 15, 20, 30 minutes,
1 hour,
0 (=immediately),
- - - - (=no repeat).
CEL-440/480 Operators Handbook - Page 35

Select Mode & Setup
Operation Press Display Shows Comments
8. If required,
change the
dose
settings
to
enable
quick
edit
mode
Bands Auto
Repeat -----
s-28
1/3
When the required narrow band setup has been selected, press
once to obtain the Narrow Band Measurement screen or twice to obtain
the Main menu that gives access to all settings and stored data.
Use and to select a
field.
Use and to change
the entry in the field.
Save the settings by
pressing again to
resume normal operation.
Press to return to the
Setup screen.
MENU
Page 36 - CEL-440/480 Operators Handbook

Operation
4. OPERATION
4.1 Measurement
With the instrument configured, calibrated, measurement parameters
specified and timers set as described in the preceding chapters perform
measurements as described in this chapter.
Alternatively, this chapter may also be used as a tutorial to give
an idea of how the instrument functions by accepting the currently
elected measurement parameters and the last saved calibration.
4.1.1 Starting Measurement
Operation Press Display Shows Comments
1. Switch the
instrument
ON
L
ZF
Last Cal.
Ø9Jan98 12.22
m-01
2. If required perform a Calibration Check (described in Chapter 2) or go directly to step 3
3. Move to
Measure-
ment, i.e.
accept the
Last
Calibration
4. When the
Measure-
ment
screen
looks like
this
L
AF
L
AFmx
LL
AFmn Zpk
m-02
30 100
L
Aeq
Start up messages are
displayed that include:
Instrument Type,
dB
Firmware Version, Etc.,
Finally, Calibration check
mode is displayed showing
current sound level and
details of the last calibration.
A Stop screen will be
shown, where indicates
stop mode and the
instrument operates with
the last used measurement
setup (or the setup just
selected according to the
previous chapters).
The last setup used was
broadband.
When broadband
dB
measurement is required,
follow the instructions given
in Section 4.1.2.
When narrow band
measurement with B and C
models is required, change
the bandwidth to
narrowband as described in
Section 3.1, then proceed to
Section 4.1.3.
CEL-440/480 Operators Handbook - Page 37

Operation
Operation Press Display Shows Comments
5. When the
Measure-
ment
screen
looks like
this
m-03
100
L
Z
I
80
60
40
Z73.6
500
12532AZ
2k
4.1.2 Broadband Measurement
Operation Press Display Shows Comments
1. Start from
the
Broadband
Measure-
ment
screen
2. If required,
change the
broadband
measure-
ment range
to accom-
modate
expected
levels
3. Start a
measure-
ment run
(i.e. store
data)
and
L
AF
L
AFmx
LL
AFmn Zpk
m-02
30 100
L
AF
L
AFmx
LL
AFmn Zpk
m-04
20 90
ØØØØ
L
AF
72.7dB
L
AFmx
LL
63.2dB 9Ø.1dB
AFmn Zpk
m-05
20 90
L
L
L
Aeq
Aeq
Aeq
67.4dB
The last setup used was
narrow band.
dB
When narrow band
measurement with B and C
models is required, follow
the instructions given in
Section 4.1.3.
When broadband
measurement is required,
8k
change the bandwidth to
broadband as described in
Section 3.1, then proceed
from Section 4.1.2.
Continue broadband
measurement.
dB
The current range is shown
on the analog display.
dB
Ø:1Ø
dB
and operate on the
instrument range in a Stop
screen.
All measurement, recall and
setup operations for the
setup commence from this
screen.
shows a run is now in
progress.
If CEL-480 periods are
disabled or a CEL-440 is
being used, the time since
the start of the current run is
shown at the top right.
If CEL-480 periods are
enabled, the number of
completed periods is shown
at the top left of the screen
and the time since the start
of the current period at the
top right.
Page 38 - CEL-440/480 Operators Handbook
Operation
Operation Press Display Shows Comments
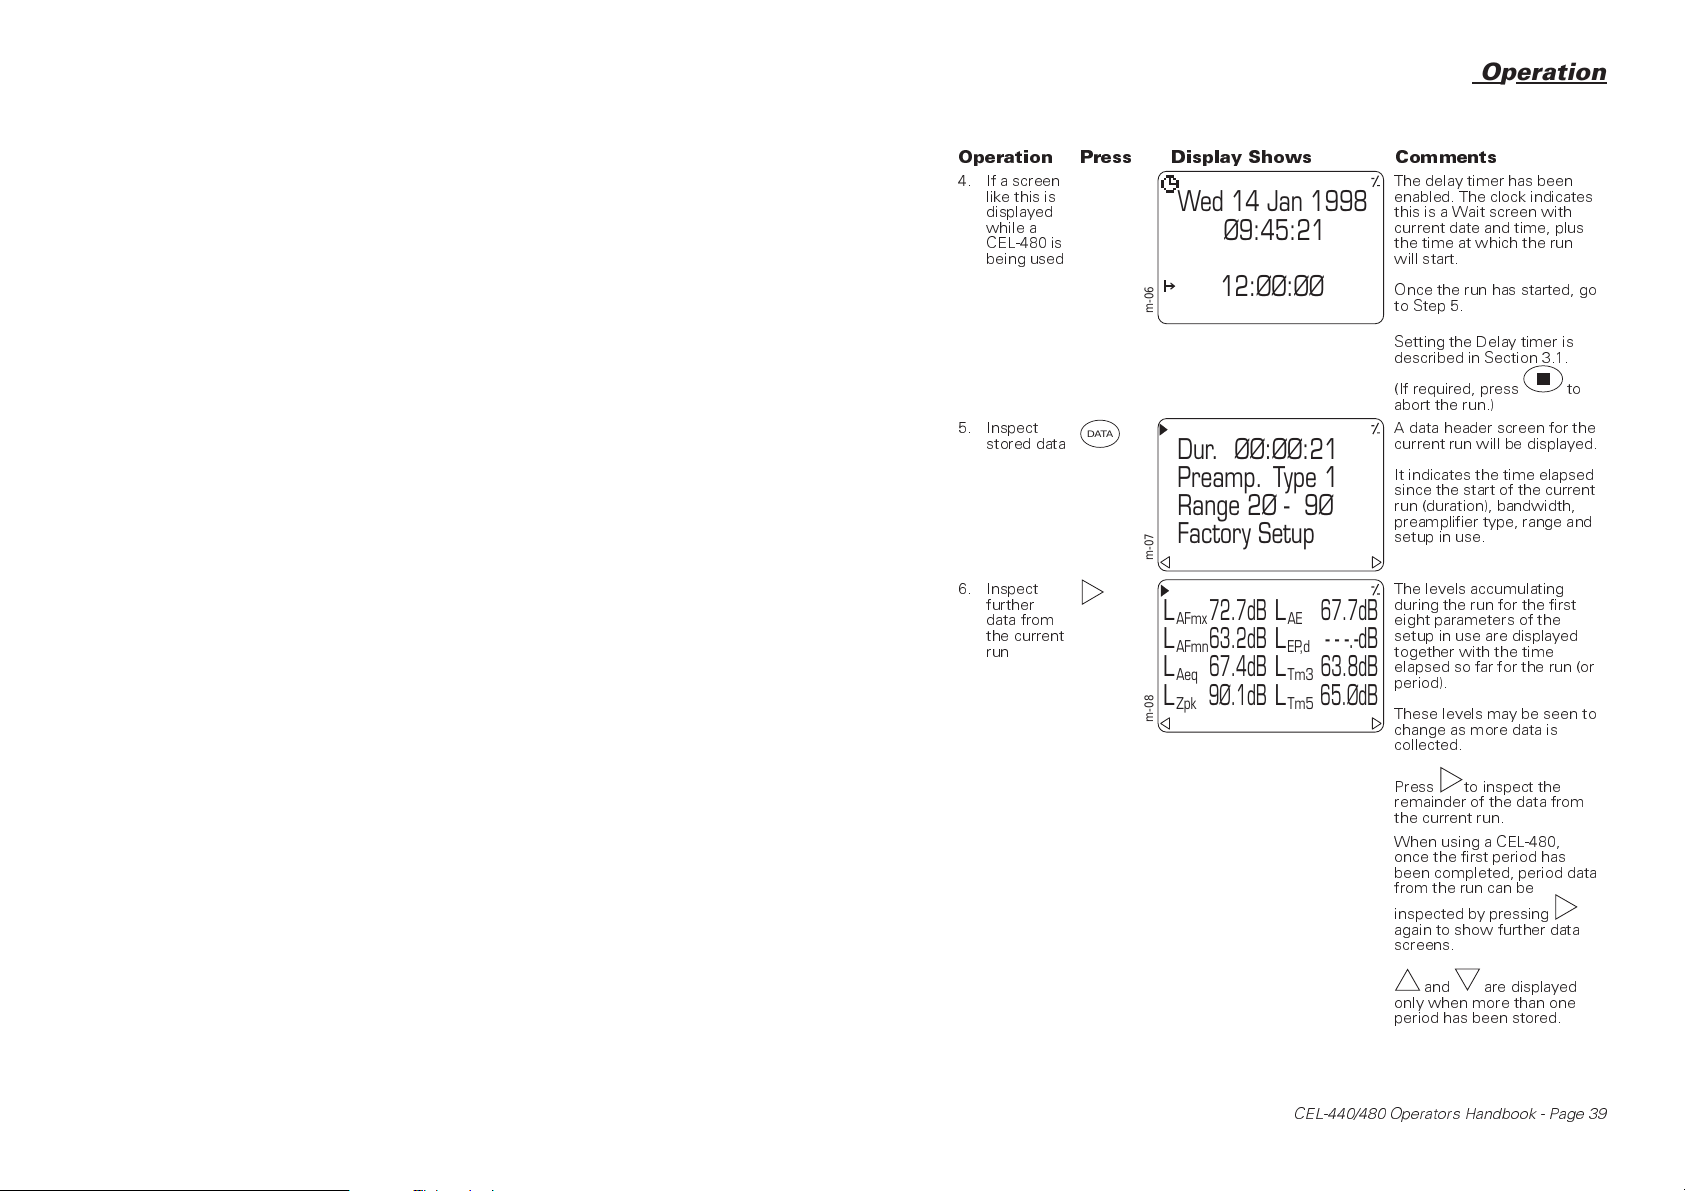
4. If a screen
like this is
displayed
while a
CEL-480 is
being used
5. Inspect
stored data
6. Inspect
further
data from
the current
run
DATA
Wed 14 Jan 1998
Ø9:45:21
12:ØØ:ØØ
m-06
ØØ:ØØ:21
Dur.
Preamp.
Type 1
Range 2Ø -9Ø
Factory Setup
m-07
72.7dB
L
L
L
L
m-08
AFmx
AFmn
Aeq
Zpk
63.2dB
67.4dB
9Ø.1dB
67.7dB
AE
L
EP,d
LL63.8dB
Tm3
L
65.ØdB
Tm5
- - -.-dB
The delay timer has been
enabled. The clock indicates
this is a Wait screen with
current date and time, plus
the time at which the run
will start.
Once the run has started, go
to Step 5.
Setting the Delay timer is
described in Section 3.1.
(If required, press to
abort the run.)
A data header screen for the
current run will be displayed.
It indicates the time elapsed
since the start of the current
run (duration), bandwidth,
preamplifier type, range and
setup in use.
The levels accumulating
during the run for the first
eight parameters of the
setup in use are displayed
together with the time
elapsed so far for the run (or
period).
These levels may be seen to
change as more data is
collected.
Press to inspect the
remainder of the data from
the current run.
When using a CEL-480,
once the first period has
been completed, period data
from the run can be
inspected by pressing
again to show further data
screens.
and are displayed
only when more than one
period has been stored.
CEL-440/480 Operators Handbook - Page 39
Stop Run
Operation
Operation Press Display Shows Comments
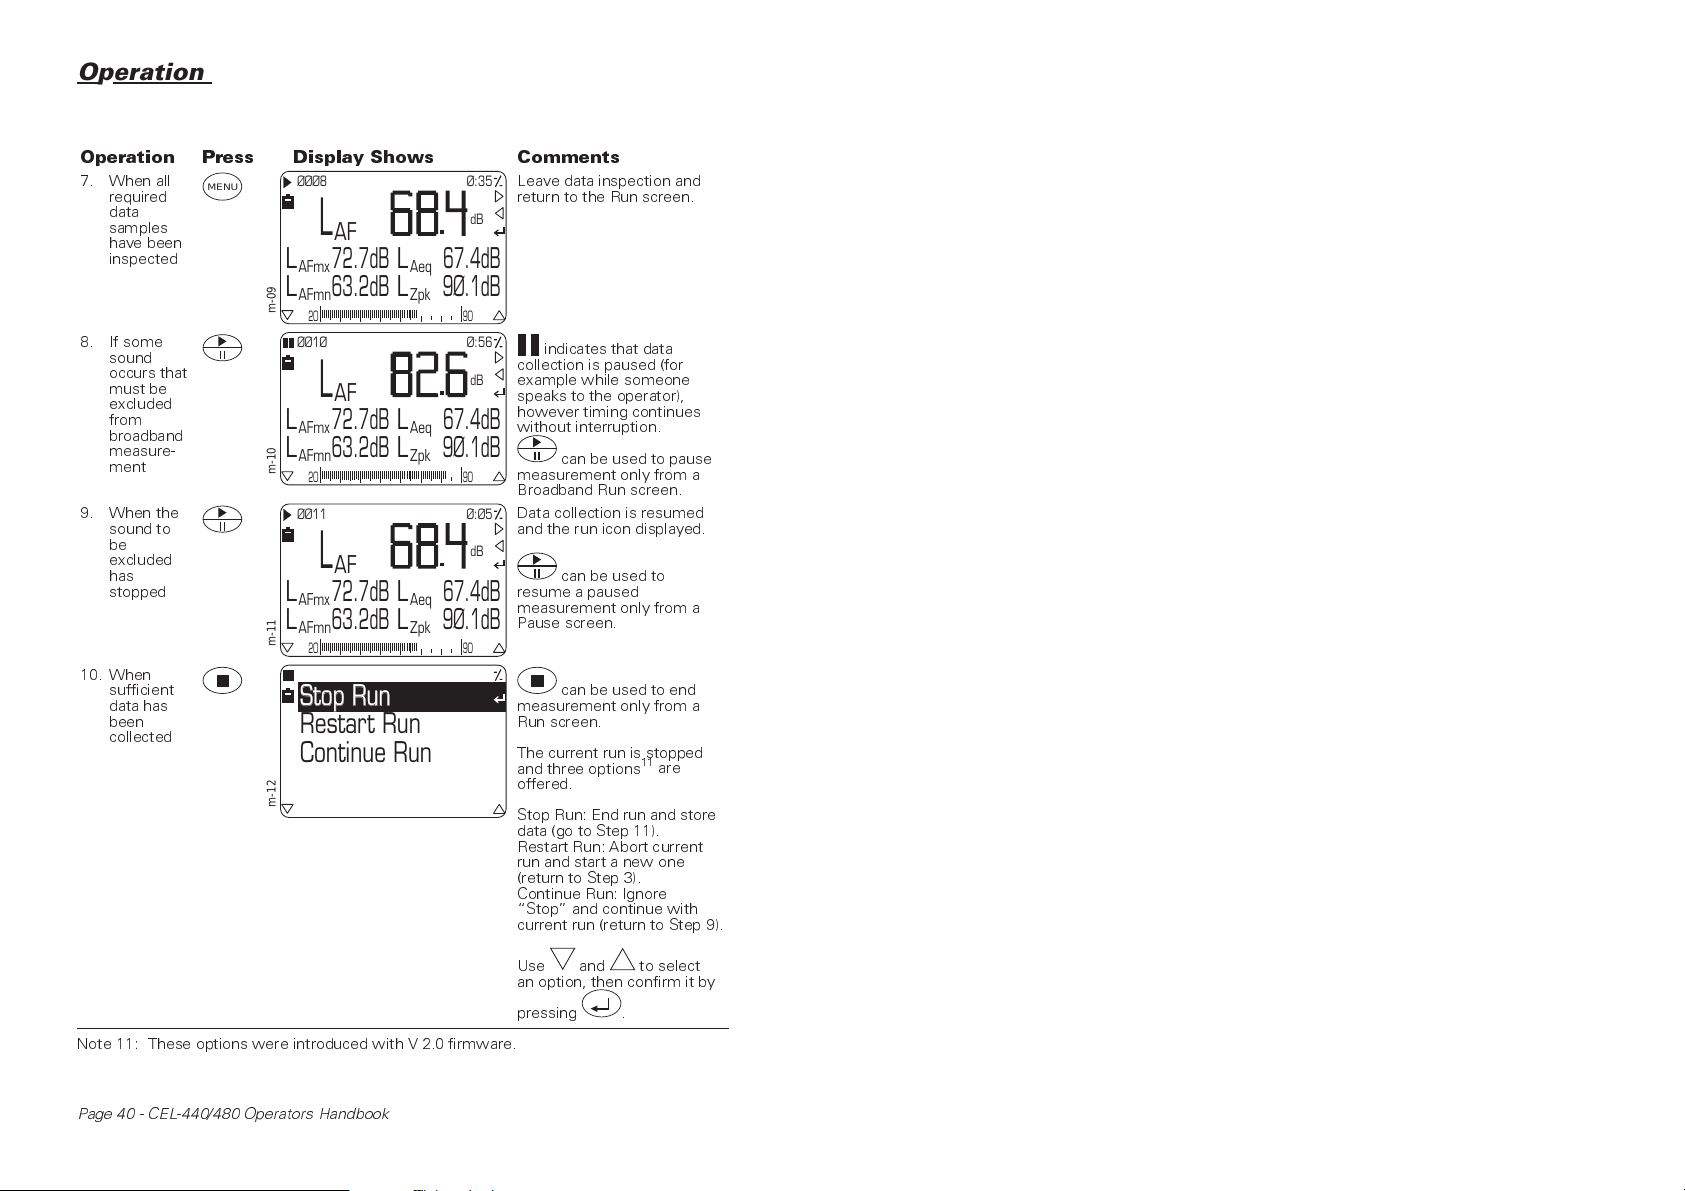
7. When all
required
data
samples
have been
inspected
8. If some
sound
occurs that
must be
excluded
from
broadband
measure-
ment
9. When the
sound to
be
excluded
has
stopped
10. When
sufficient
data has
been
collected
MENU
ØØØ8
L
AF
72.7dB
L
AFmx
LL
63.2dB 9Ø.1dB
AFmn Zpk
m-09
20 90
ØØ1Ø
L
AF
72.7dB
L
AFmx
LL
63.2dB 9Ø.1dB
AFmn Zpk
m-10
20 90
ØØ11
L
AF
72.7dB
L
AFmx
LL
63.2dB 9Ø.1dB
AFmn Zpk
m-11
20 90
L
L
L
Aeq
Aeq
Aeq
67.4dB
67.4dB
67.4dB
Stop Run
Restart Run
Continue Run
m-12
Leave data inspection and
Ø:35
return to the Run screen.
dB
Ø:56
dB
Ø:Ø5
dB
indicates that data
collection is paused (for
example while someone
speaks to the operator),
however timing continues
without interruption.
can be used to pause
measurement only from a
Broadband Run screen.
Data collection is resumed
and the run icon displayed.
can be used to
resume a paused
measurement only from a
Pause screen.
can be used to end
measurement only from a
Run screen.
The current run is stopped
and three options
offered.
Stop Run: End run and store
data (go to Step 11).
Restart Run: Abort current
run and start a new one
(return to Step 3).
Continue Run: Ignore
Stop and continue with
current run (return to Step 9).
11
are
Note 11: These options were introduced with V 2.0 firmware.
Page 40 - CEL-440/480 Operators Handbook
Use and to select
an option, then confirm it by
pressing .
Operation Press Display Shows Comments
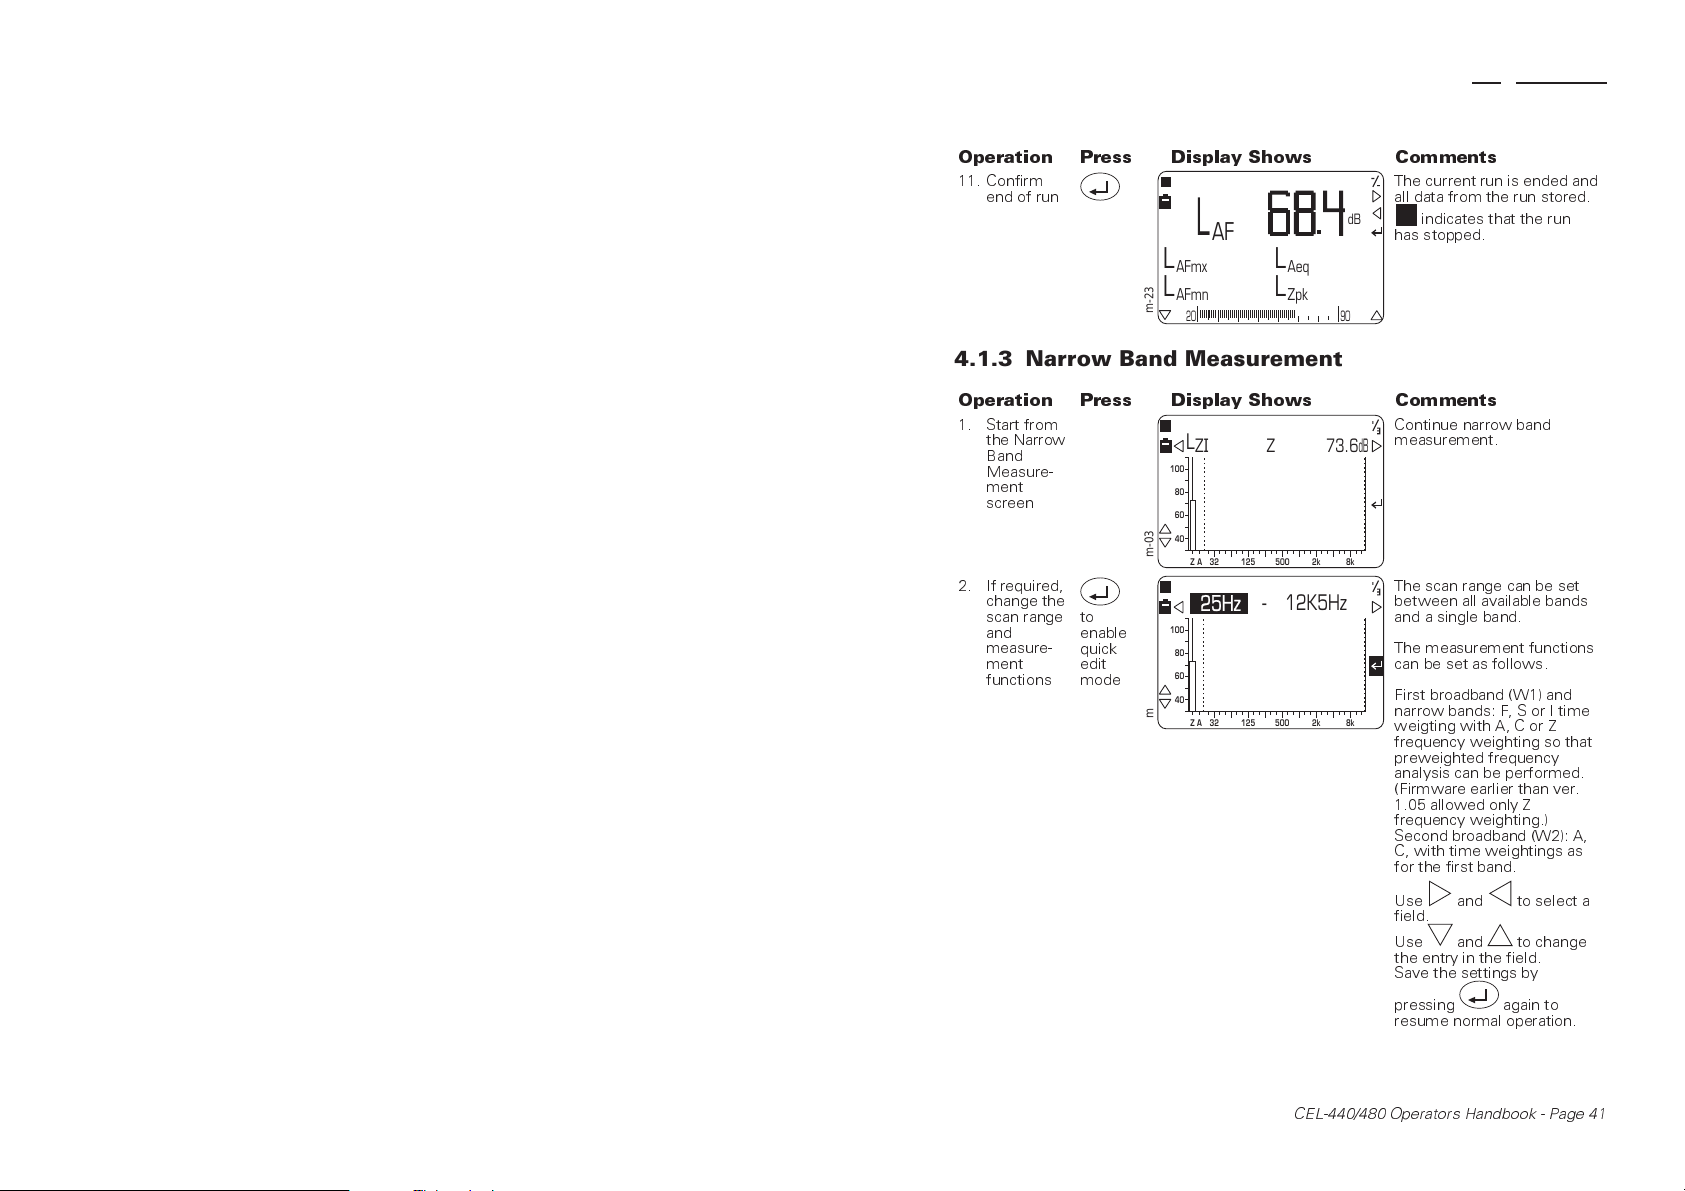
11. Confirm
end of run
L
AF
L
AFmx
LL
AFmn Zpk
m-23
20 90
L
Aeq
The current run is ended and
all data from the run stored.
dB
indicates that the run
has stopped.
4.1.3 Narrow Band Measurement
Operation Press Display Shows Comments
1. Start from
the Narrow
Band
Measure-
ment
screen
2. If required,
change the
scan range
and
measure-
ment
functions
to
enable
quick
edit
mode
m-03
m-13
L
100
80
60
40
100
80
60
40
Z
I
25Hz 12K5Hz-
Z73.6
500
12532AZ
12532AZ
500
2k
2k
Continue narrow band
measurement.
dB
8k
The scan range can be set
between all available bands
and a single band.
The measurement functions
can be set as follows.
First broadband (W1) and
narrow bands: F, S or I time
8k
weigting with A, C or Z
frequency weighting so that
preweighted frequency
analysis can be performed.
(Firmware earlier than ver.
1.05 allowed only Z
frequency weighting.)
Second broadband (W2): A,
C, with time weightings as
for the first band.
Use and to select a
field.
Use and to change
the entry in the field.
Save the settings by
pressing again to
resume normal operation.
Operation
CEL-440/480 Operators Handbook - Page 41

Operation
Operation Press Display Shows Comments
3. If required,
change the
narrowband
measure-
ment range
to accom-
modate
expected
levels
4. Start a
measure-
ment run
(i.e. scan
frequencies
and store
data)
5. If a screen
like this is
displayed
while a
CEL-480 is
being used
and
L
Z
I
80
60
40
20
m-14
AZ
ØØØØ Ø:1Ø
L
Z
I
80
60
40
20
m-15
AZ
Z73.6
500
12532
2k
25Hz 43.6
500
12532
2k
Wed 14 Jan 1998
Ø9:45:21
12:ØØ:ØØ
m-06
The current range is shown
on the analog display.
dB
and operate on the
instrument range in a Stop
screen.
All measurement, recall and
8k
setup operations for the
setup commence from this
screen.
dB
8k
shows that a run is in
progress.
When an auto stabilized or
timed scanning setup is in
use, the cursor waits a short
time before stepping
through the bands.
A CEL-480 scan may repeat
several times.
The time elapsed since the
start of the scan is shown at
the top right of the display.
Go to Step 8.
(If required, press to
stop the scan. The three
options described in Section
4.1.2, Step 10 will be
offered.)
The delay timer has been
enabled. The clock indicates
this is a Wait screen with
current date and time, plus
the time at which the run
will start.
Once the run has started, go
to to Step 9.
Setting the Delay timer is
described in Section 3.1.
(If required, press to
abort the run.)
Page 42 - CEL-440/480 Operators Handbook

Operation
Operation Press Display Shows Comments
6. When a
screen like
this is
shown
7. Scan
through
the
frequency
bands
manually
8. When all
available
bands have
been
scanned
9. Inspect
data stored
during the
current
narrowband
run
10. Inspect
further
stored data
suf-
ficient
times
DATA
L
Z
I
80
60
40
20
m-16
AZ
L
Z
I
80
60
40
20
m-17
AZ
L
Z
I
80
60
40
20
m-24
AZ
Dur.
Preamp.
Z73.6
12532
A68.3
12532
Z73.6
12532
ØØ:ØØ:36
Type 1
Range 2Ø -9Ø
Factory Setup
m-18
L
Z
I
80
60
40
20
m-19
12532
AZ
500
500
500
500
2k
2k
2k
1Ø:32:2Ø
2k
Ø:1Ø
dB
8k
Ø:17
dB
8k
dB
8k
8k
shows that a run is in
progress.
If the cursor does not move
and is displayed, this
setup must be scanned
manually.
The time elapsed since the
start of the current run is
shown at the top right of the
display.
Continue from Step 7.
Press to step to the
next band each time
appears on the screen to
indicate that the level in the
current band has stabilised.
The instrument stores levels
from all available bands and
leaves the last spectrum on
screen while showing the
current level.
Instruments using firmware
earlier than V2.0 return
automatically to the Stop
screen.
A data header screen for the
most recently saved run will
be displayed.
It indicates the time elapsed
since the start of the run
(duration), bandwidth,
preamplifier type, range and
setup in use.
This screen shows the
spectrum saved for the first
measurement parameter (in
this example L
).
Z
I
CEL-440/480 Operators Handbook - Page 43

Operation
Operation Press Display Shows Comments
11. Inspect
further
stored data
12. Enable
inspection
of
individual
frequency
bands
13. Inspect
individual
frequency
bands
14. When all
required
data
samples
have been
inspected
and
MENU
m-20
m-21
m-22
m-14
80
60
40
20
80
60
40
20
80
60
40
20
80
60
40
20
L
Z
AZ
L
Z
AZ
L
ZImx
AZ
L
Z
AZ
Imx
12532
Imx
12532
100Hz 66.4
12532
I
12532
1Ø:32:2Ø
500
2k
1Ø:32:2Ø
Z76.3
500
2k
1Ø:32:2Ø
500
2k
Z73.6
500
2k
This screen shows the
spectrum saved for the next
measurement parameter (in
this example L
and may be used to
inspect other data screens
saved for the run.
8k
On spectrum screens,
individual bands may now
dB
be scanned manually by
means of and .
The selected band is
indicated by a line cursor.
8k
The band centre frequency
is shown at the top centre
dB
of the screen, with the level
in the band to the right.
8k
Leave data inspection and
return to the relevant Stop
dB
screen.
8k
ZImx
).
4.2 Recall Stored Data & Print Hard Copy
Data stored in the instrument can be recalled to the display for
inspection. This allows the operator to check the quality of results before
leaving the test site. In addition, a data set from any stored run can be
printed on a Centronics compatible printer.
Connect the printer as shown in Figure 6 and set it On-Line.
can be used to display a Header screen for the most recently saved run.
Page 44 - CEL-440/480 Operators Handbook
DATA

Measure Mode
View Current
Operation
C6672 (0.5 m)
Active Printer
Interface
Centronics Printer
73.8dB
LLL
69.4dB
ASmxASAeq
LL
65.4dB 69.9dB
ASmn Zpk
CEL-440
CEL-480
C6724/2
Output
Cable
(2m)
Figure 6: Printer connection
Continue from Step 6 below. To display data from any stored run,
proceed as follows.
Operation Press Display Shows Comments
1. Start from
the Main
menu
2. Select the
Memory
option
Measure Mode
Setup
Calibration
Memory
r-01
or
Measure Mode
1/6
This is the Main menu.
It gives access to further
menus that select:
Measurement Mode,
Measurement Setup,
Calibration Sequence,
Data Recall from Memory,
Instrument Configuration.
Move the reverse video
cursor to the required line.
Setup
Calibration
Memory
3. Move to
the
Memory
menu
r-02
View Current
View All
Delete Current
4/6
On this menu, current
refers to the current
bandwidth.
Bandwidth is selected via
the Measure Mode option
as described in Section 3.1.
Delete All
r-03
1/4
980030
CEL-440/480 Operators Handbook - Page 45

11:Ø9:55
Operation
Operation Press Display Shows Comments
4. Move to
the list of
run Dates
for the
specified
bandwidth
and select
the
required
date
5. Move to
the list of
Runs and
select a run
6. View the
Header for
the
required
run
7. If required,
print a hard
copy of the
run data
followed
by
or
followed
by
or
Wed 7 Jan1998
Fri
Tue
Thu
r-04
9 Jan1998
13 Jan1998
15 Jan1998
14:37:Ø61
15 Jan1998
Tue
Ø8:59:27 1
11:Ø9:55
r-05
12:45:Ø91
ØØ:ØØ:21
Dur.
Preamp.
Type 1
Range 2Ø -9Ø
Factory Setup
r-06
ØØ:ØØ:21
Dur.
Preamp.
Type 1
Range 2Ø -9Ø
Factory Setup
r-06
%MEM
This menu shows the dates
on which all runs with the
specified bandwidth were
saved (i.e. a specified
bandwith or all available
bandwidths).
This is a directory of all runs
stored on the specified date
with the required bandwidth.
1
indicates that overload
has occurred during the run.
shows that a printer
is on-line.
To print a hard copy, go to
Step 7.
To view data from a
broadband run, go to
Step 11.
To view data from a narrow
band run, go to Step 12.
Information from the run will
be printed as hard copy that
includes the following:
Header,
Calibration valid at start of
run,
Current calibration (see
Section 2.2),
Run data.
When a CEL-480 run with
multiple periods (or scans) is
being inspected, an
additional screen will be
displayed. Go to Step 8.
Page 46 - CEL-440/480 Operators Handbook
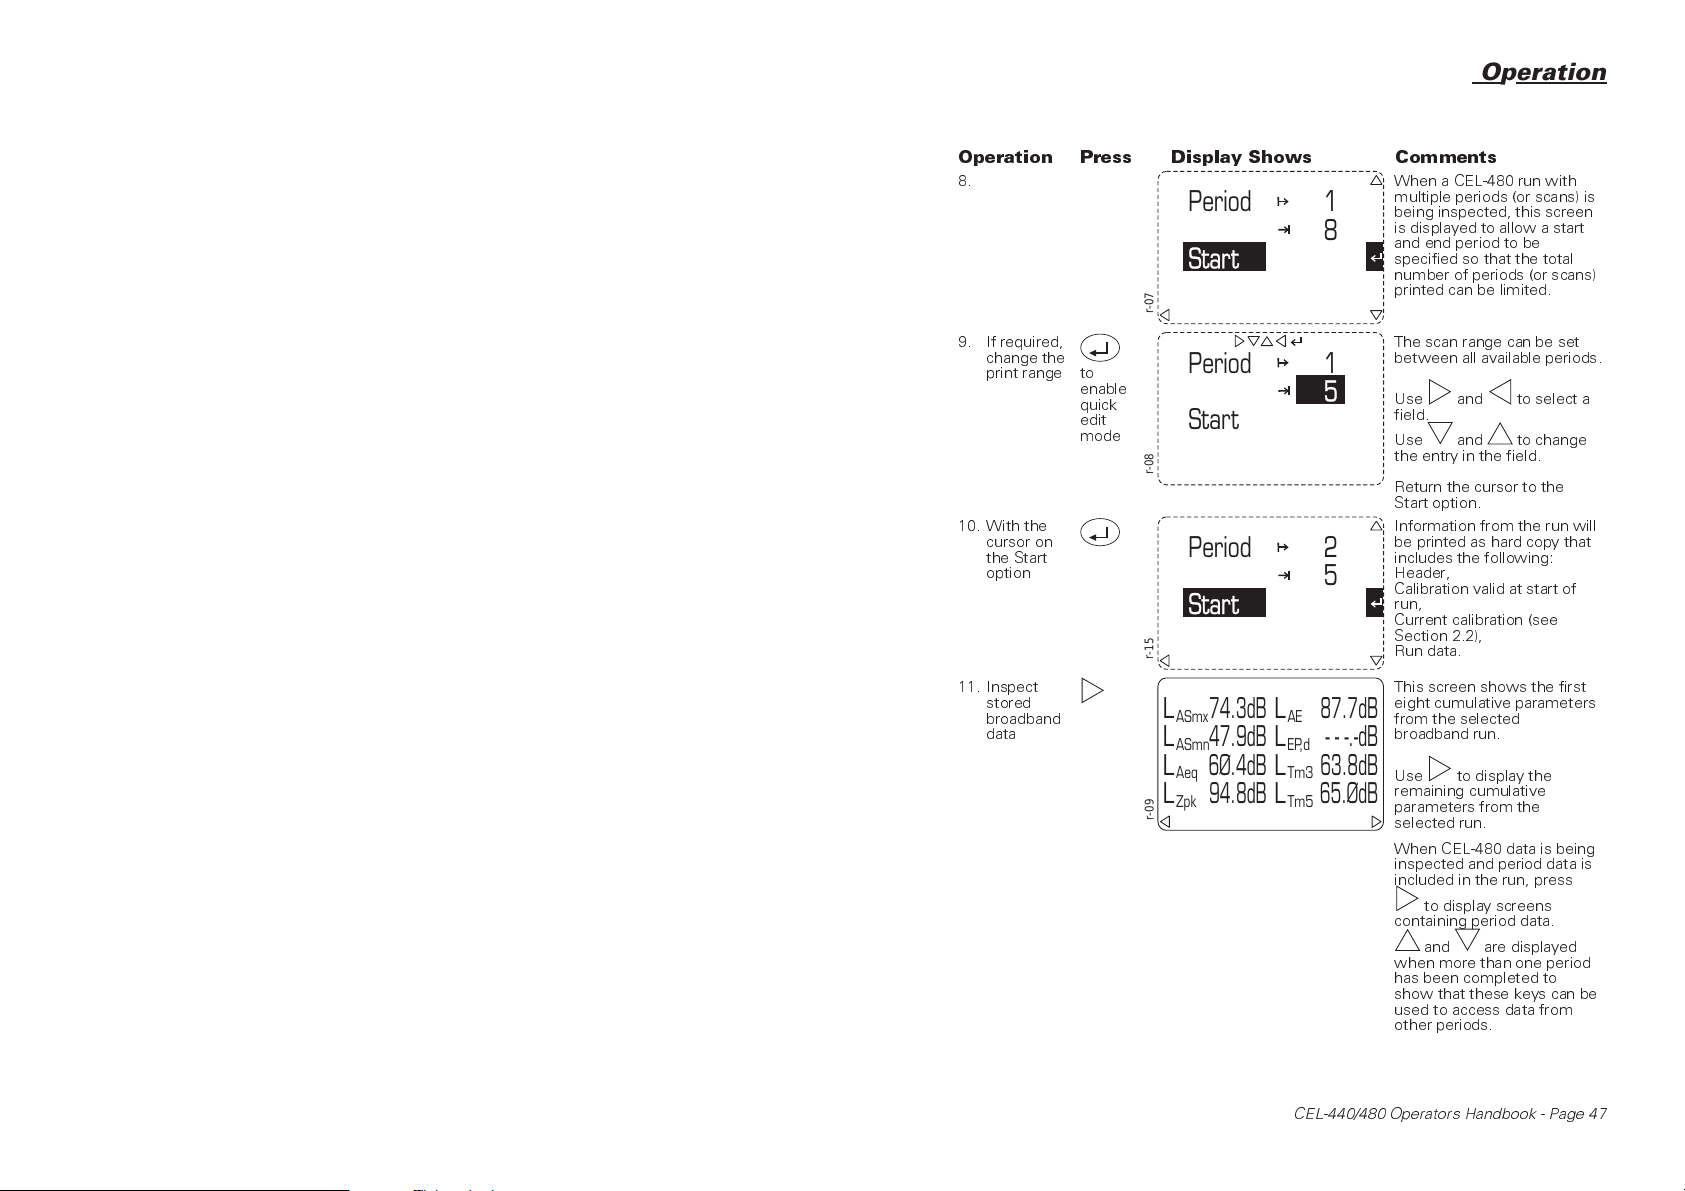
Operation
Operation Press Display Shows Comments
8. When a CEL-480 run with
Period
1
8
Start
No
r-07
9. If required,
change the
print range
to
enable
quick
edit
mode
Period
Start
1
5
No
r-08
10. With the
cursor on
the Start
option
Period
2
5
Start
No
r-15
11. Inspect
stored
broadband
data
r-09
L
ASmx
L
ASmn
L
Aeq
L
Zpk
74.3dB
47.9dB
6Ø.4dB
94.8dB
AE
L
EP,d
LL63.8dB
Tm3
L
Tm5
87.7dB
- - -.-dB
65.ØdB
multiple periods (or scans) is
being inspected, this screen
is displayed to allow a start
and end period to be
specified so that the total
number of periods (or scans)
printed can be limited.
The scan range can be set
between all available periods.
Use and to select a
field.
Use and to change
the entry in the field.
Return the cursor to the
Start option.
Information from the run will
be printed as hard copy that
includes the following:
Header,
Calibration valid at start of
run,
Current calibration (see
Section 2.2),
Run data.
This screen shows the first
eight cumulative parameters
from the selected
broadband run.
Use to display the
remaining cumulative
parameters from the
selected run.
When CEL-480 data is being
inspected and period data is
included in the run, press
to display screens
containing period data.
and are displayed
when more than one period
has been completed to
show that these keys can be
used to access data from
other periods.
CEL-440/480 Operators Handbook - Page 47

Measure Mode
Operation
Operation Press Display Shows Comments
12. Inspect
stored
narrow
band data
r-10
500
11:ØØ:22ØØØ5
2k
L
ZF
80
60
40
20
12532
AZ
This screen shows the
scanned spectrum from the
selected narrow band run.
Use to display the other
parameters from the
selected run.
8k
Press then use
and to scan the
band levels manually.
Press to cancel.
When CEL-480 data is being
inspected and more than
one scan is included, press
and to display data
from the other scans.
4.3 Delete Stored Data
Unwanted data stored in the instrument can be deleted to make room
for new data. Proceed as follows.
Operation Press Display Shows Comments
1. Start from
the Main
menu
2. Select the
Memory
option
Measure Mode
Setup
Calibration
Memory
r-01
or
Measure Mode
1/6
This is the Main menu.
It gives access to further
menus that select:
Measurement Mode,
Measurement Setup,
Calibration Sequence,
Data Recall from Memory,
Instrument Configuration.
Move the reverse video
cursor to the required line.
Setup
Calibration
Memory
r-02
4/6
Page 48 - CEL-440/480 Operators Handbook

11:14:15
Operation
Operation Press Display Shows Comments
3. Move to
the
Memory
menu
4. Move to
the list of
run Dates
for the
specified
bandwidth
and select
the
required
date
5. Move to
the list of
Runs and
select a run
6. When all
required
runs have
been
marked
followed
by
or
followed
by
or
View Current
View All
Delete Current
Delete All
r-11
3/4
1
3
Wed 7 Jan1998
9 Jan1998
13 Jan1998
15 Jan1998
1
3
3
14:41:28 1
15 Jan1998
3
Ø9:15:Ø71
3
11:14:15
3
14:15:Ø41
1
3
r-12
r-13
Fri
Tue
Thu
1
Tue
1
1
1
2Delete
Runs
Sure ?
Yes No
r-14
%MEM
On this menu, current
refers to the current
bandwidth.
Bandwidth is selected via
the Measure Mode option
as described in Section 3.1.
This menu shows the dates
on which all runs with the
specified bandwidth were
saved (i.e. a specified
bandwith or all available
bandwidths).
Use to tick dates
where all runs for the day
are to be removed, or go to
Step 5 to delete individual
runs.
This is a directory of all runs
stored on the specified date
with the required bandwidth.
Use to tick individual
runs that are to be removed.
1
This screen asks for
confirmation that the
marked runs are to be
deleted.
Use and to select
Yes or No.
Confirm with
4.4. Format Memory
Formatting the memory (strictly re-formatting) is a global operation that
deletes all stored data (runs) and all user setups from every available
bandwidth.
CEL-440/480 Operators Handbook - Page 49
Operation
Use this option with great caution !
The option to format the instrument memory is displayed on the
final Self Test screen.
Proceed as follows.
Operation Press Display Shows Comments
1. Start from
the final
Self Test
screen.
2. When
format is
required
13Jan98 1Ø:54:42
512Kb
1%
2
Format
f-01
Memory
Full
Runs
WARNING
Delete All Runs
and User Setups
No Yes
f-02
This screen offers the
Format option.
Perform Step 2 before the
option is replaced by the
Battery Voltage line and the
calibration or menu screens.
This screen asks for
confirmation.
Use and to select
Yes or No, then confirm
with .
4.5 Use With Tape and DAT Recorders
(Including Calibration For Line Input)
The sound level meters can be connected to a DAT or tape recorder and
function as an accurately calibrated input system.
This enables the measured sound (or vibration) levels to be
recorded for further calculation and analysis.
When recording, connect the recorder to the OUT Phono
jack-socket in the bottom of the sound level meter (Figure 6). This socket
supplies an unconditioned AC signal with a maximum level of 0.5 V RMS.
When replaying, insert the recorded signal via the IN Phono
jack-socket shown in Figure 7. Suitable signals from other sources may
also be inserted for measurement or analysis in this way.
If an electrical calibration of the instrument using the microphone
substitution method is required, insert the calibration signal via a
CEL-516 Line Input Adaptor (or the earlier CEL-216) screwed in to a
CEL-495 Preamplifier in place of the Type 1 microphone (which may also
Page 50 - CEL-440/480 Operators Handbook

Operation
2.1 mm Coaxial
DC Power
Phono Jack
Socket
AC line Out
OUT IN
Miniature 8-way DIN
Interface Socket
Phono Jack
Socket
AC line In
980037
Figure 7: Bottom panel of the instrument
be used with a Type 2 instrument), then perform an acoustic calibration
as described in Section 2.2.
4.5.1 Recording
The following guide lines are suggested for recording sound (or vibration
signals).
1. Use a CEL-284/2 or CEL-282 Calibrator to perform an acoustic
calibration check of the sound level meter.
The sound level meter should indicate the correct level for the
microphone type and response, as described in Section 3.2.
2. Connect the input of the recorder to the instrument OUT terminal.
3. Select broadband L
measure mode on the sound level meter.
ZF
4. Use the 50 - 120 dB measurement range.
5. Switch the recorder ON and start it operating in record mode.
6. For accurately repeatable recordings, adjust the Record Level
control on the recorder until the calibrator signal gives a reading
of -6 dB on the tape recorder VU meter.
Using this level means that the top of the recording range on the
tape (= 0 VU) occurs in the same place as overload (120 dB) on
CEL-440/480 Operators Handbook - Page 51

Operation
this range of the sound level meter and ensures the maximum
dynamic range for recording.
7. Record about 30 seconds of the calibration signal.
A calibration signal with a known level is inserted via the sound
level meter and recorded, so that when replayed, it gives an
indication of the record/replay characteristics of the tape.
When the recorded material is to be used for frequency analysis,
it may also be useful to calibrate each tape individually by
recording signals produced by a suitable generator at the
analyser filter band centre frequencies and then replaying them
through the relevant bands.
8. Switch the calibrator OFF and remove it from the microphone.
When the VU reading is estimated (which it usually must be at
these levels), repeatability from one series of recordings to
another may suffer. Therefore, either keep the Record Level
control in the same position for ALL recordings, or perform a
new calibration for EACH series of measurements.
9. Without touching the Record Level on the recorder, if required,
change the measurement range of the instrument to
accommodate the noise (or vibration) signal.
10. Make a note of the range used for measurement.
11. Proceed with recording the noise (or vibration) signal.
4.5.2 Replay
The following guide lines are suggested for replaying sound or vibration
signals.
1. Start from the sound level meter Line Input Calibration screen
(see Section 2.2).
Broadband L
the sound level meter.
2. Connect the recorder output to the instrument IN terminal.
3. Switch the recorder to replay mode.
Page 52 - CEL-440/480 Operators Handbook
measure mode will be selected automatically by
ZF

Operation
4. Replay the recorded calibration signal.
5. Adjust the Replay Level control on the recorder so that the sound
level meter display indicates the calibration level for the
microphone and response used.
6. Stop the recorder.
The system is now calibrated to replay at accurately determined
levels with the calibration signal near the top of the input range,
which gives the widest possible replay dynamic range. However,
the instrument measurement range may need to be adjusted so
that the display scale gives a correct indication of the recorded
values.
L
ZF
Scale 5Ø-12Ø
dB
dB
Date and time of last calibration
Ø9Jan98 12.22
k-20
7. Press to enter quick edit mode.
8. Use and to select the measurement range that was noted
for the measurement.
9. Press again to confirm the calibration and any scale change.
The instrument replay scale now matches the scale used for
the recording so that the levels indicated by the display will be
correct.
10. Press to display the measurement screen, then replay the
MENU
recorded material and perform any measurements and analysis
required.
CEL-440/480 Operators Handbook - Page 53

Operation
Page 54 - CEL-440/480 Operators Handbook

5. SPECIFICATION
5.1 CEL-440
Instrument Standards:
Sound Level Meter to IEC 60651: 1979 Type 1
relevant.
Integrating Averaging Sound Level Meter to IEC 60804:
2000 Type 1 & Type 2 as relevant.
Sound Level Meter to ANSI S1.4: 1997 Type S(1) & Type S(2)
as relevant.
IEC 60651 and IEC 60804 Standards:
The sound level at which the sound level meter conforms to
specifications of clause 12 of IEC 60651 is 74 dB.
The tests as specified in 12.5.2.6 and 12.5.4.4 of IEC 60651
were carried out with the following cables and accessories:
Instrument Cable
CEL-440 CEL-480 C6620/2
CEL-440 CEL-480 C6623/2
CEL-440 CEL-480 C6621/2
The configuration for the normal mode of operation is specified
with the microphone connected via the standard preamplifier and
the following instrument parameters selected.
Frequency weighting: A-weighted sound pressure level,
Time Constant: Fast,
Measurement Range: 70-140 dB.
Electromagnetic and Electrostatic compatibility:
There is no degradation in performance or loss of functionality
following the application of electrostatic discharges.
The approved configuration for reference orientation as viewed
by the operator is with the instrument in a horizontal position
facing the noise source where the receiver of the
electromagnetic field replaces the noise source.
Specification
I & Type 2I as
CEL-440/480 Operators Handbook - Page 55

Specification
All settings and orientations of the instrument have similar
radio-frequency emissions. These radio-frequency emissions are
within the specified limits of this standard.
All modes of operation and connecting device configurations
have similar immunity to power and radio frequency fields.
Time Weightings:
S, F and
RMS Frequency Weightings:
A, C and Z (LIN, 0 dB) - select only one at a time.
A and C weightings according to ANSI S1.4 and IEC 60651.
Z (LIN) weighting 20 Hz to 20 kHz to the tolerances of |EC 60651
weightings for the appropriate Type of instrument (1 or 2).
Peak Frequency Weightings:
C and Z (LIN as above) - select only one at a time.
Amplitude Weighting:
Selection of Q=3 plus one from Q=4, 5, 6 or none.
Dynamic Range:
70 dB.
Measurement Ranges:
70-140, 60-130, 50-120, 40-110, 30-100, 20-90, 10-80 dB.
Pulse Range:
60 dB Type 1, 50 dB Type 2.
Parameters Measured:
L, L
5 LN% values that are user selectable from 0.0 to 99.9%.
Menu Languages:
English, French, German, Spanish, Italian.
Measurement Setups:
Last used configuration saved for each mode.
I according to IEC 60651 - select only one at a time.
eq,LI
eq,LAE,LAV,Lmx,Lmn,Lpk,LTm3,LTm5
,TWA,L
ep,d
Page 56 - CEL-440/480 Operators Handbook

Specification
Linearity Ranges dB - Type 1:
Meter
Range
70 - 140 69 - 144 70 - 120 70 - 140 103 - 143
60 - 130 59 - 134 60 - 110 60 - 130 93 - 133
50 - 120 49 - 124 50 - 100 50 - 120 83 - 123
40 - 110 39 - 114 40 - 90 40 - 110 73 - 113
30 - 100 29 - 104 A-wtg 32 - 80
20 - 90 19 - 94 A-wtg 32 - 70
10 - 80 9 - 84 A-wtg 32 - 60
Linearity Ranges dB - Type 2:
Meter
Range
70 - 140 69 - 144 70 - 126 70 - 140 103 - 143
60 - 130 59 - 134 60 - 116 60 - 130 93 - 133
50 - 120 49 - 124 50 - 106 50 - 120 83 - 123
40 - 110 39 - 114 40 - 96 40 - 110 73 - 113
30 - 100 29 - 104 A-wtg 35 - 86
20 - 90 19 - 94 A-wtg 35 - 76
10 - 80 9 - 84 A-wtg 35 - 66
Display
Range
Primary
Indicator Range
IEC 60651 &
ANSI S1.4
Linearity
Range
IEC 60804
(4 kHz)
Peak
Range
(1 kHz)
C-wtg 32 - 80
Z-wtg 36 - 80
C-wtg 32 - 70
Z-wtg 36 - 70
C-wtg 32 - 60
Primary indicator range allows for a crest factor of 10.
On the 10, 20 and 30 dB ranges, the lowest readings are limited by the
self-generated noise of the instrument.
Display
Range
Z-wtg 36 - 60
Primary
Indicator Range
IEC 60651 &
ANSI S1.4
32 - 100
32 - 100
36 - 100
32-90
32-90
36-90
32-80
32-80
36-80
Linearity
Range
IEC 60804
(4 kHz)
63 - 103
63 - 103
63 - 103
53-93
53-93
53-93
43-83
43-83
43-83
Peak
Range
(1 kHz)
C-wtg 35 - 86
Z-wtg 38 - 86
C-wtg 35 - 76
Z-wtg 38 - 76
C-wtg 35 - 66
Primary indicator range allows for a crest factor of 5.
On the 10, 20 and 30 dB ranges, the lowest readings are limited by the
self-generated noise of the instrument.
Z-wtg 38 - 66
35 - 100
35 - 100
38 - 100
35-90
35-90
38-90
35-80
35-80
38-80
63 - 103
63 - 103
63 - 103
53 - 93
53 - 93
53 - 93
43 - 83
43 - 83
43 - 83
CEL-440/480 Operators Handbook - Page 57

Specification
Filters:
Octave Filter:
Order 6, Type 3-D, optional range per ANSI S1.11 1986,
Class 2 to IEC 1260: 1995,
9 bands with centres from 31.5 Hz to 8 kHz (B and C models).
Third-octave Filter:
Order 6, Type 3-D, optional range per ANSI S1.11 1986,
Class 2 to IEC 1260: 1995,
28 bands with centres from 25 Hz to 12.5 kHz (C models).
Calibration:
Direct for Type 1 microphone (CEL-250).
Direct for Type 2 microphone/preamplifier unit (CEL-485).
Calibration Reference Conditions:
60 - 130 dB measurement range,
o
20
C air temperature,
65% Relative Humidity,
101.325 kPa atmospheric pressure.
114.0 dB at 1 kHz Nominal reference level.
Reference direction of incidence for all microphones is perpendicular to the front face (diaphragm surface) of the microphone.
No cable correction is required for microphone cables up to 10 m
when calibration is performed with the C6716 or C6717 Cables
fitted.
Alternative Calibration:
Suitable for direct line input from tape recorder with direct
scaling to suit recorded range.
Calendar & Clock:
Date and time accuracy better than 5 sec per day.
Data Storage:
Cumulative data set of overall values for all runs.
Broad Band Data Storage:
Manual storage of 999 complete sets of results.
Page 58 - CEL-440/480 Operators Handbook

Narrow Band Data Storage:
Manual storage of 999 octave or 1/3 oct sets of results with
choice of:
Auto scanning of frequency bands with measurement and step
on each time the current band has stabilised,
Timed scanning with a predetermined time for each band that
can be set between 5 and 60 s,
Manual scanning of bands with saving of band data at each step.
Only 1 spectrum can be captured per run as the CEL-440 has
no auto repeat mode.
The memory can save a mixture of full octave and 1/3 octave
measurements. (L, L
mx,Leq
The number of bands scanned can be set between all available
and a single band.
Data Recall:
Stored results can be recalled to the display (even while a
measurement is in progress).
Data sets can be downloaded to a Centronics printer to give a
preformatted hard copy.
Data can be downloaded according to RS 232 standards to a PC
for further manipulation under the control of dB 21 or dB 22.
Outputs and Inputs:
AC output signal for tape recording or headphone.
0.5 V RMS Maximum with minimum load impedance 22 kΩ.
AC input signal for analysis inserted via a line input terminal in
the bottom panel.
0.5 V RMS Maximum with maximum source impedance 22 kΩ,
or AC input signal inserted via a CEL-516 Input Adaptor, 10 V
RMS Maximum with maximum source impedance 100 kΩ.
Effect of Temperature:
Accuracy better than ±0.5 dB over the range -10 to +50
when corrected as indicated here.
Specification
result during measurement).
o
C
CEL-440/480 Operators Handbook - Page 59

Specification
The temperature correction to be applied for CEL-250 and
MK 250 Type 1 microphones:
Corrected level = Actual level - 0.02 (t - 20)
Where t is temperature
The temperature correction to be applied for CEL-485 Type 2
microphone/preamplifier unit is applied automatically by the
preamplifier.
Storage range: -20 to +60
Effects of Humidity:
Less than 0.5 dB over the range 30 to 90% relative humidity
(provided there is no condensation), relative to the value at
65% RH and 40
Storage range: 0 to 90%RH in the absence of condensation.
Effects of Magnetic Fields:
Less than 3 dB(A) above the minimum valid reading when tested
according to IEC 60651 clause 8.4 at 50 Hz.
Effects of Vibration:
Less than 6 dB when tested according to IEC 60651 clause 8.3.
Effect of Operator:
Negligible on free field measurements when standing more than
2 m behind the SLM.
Tripod mounting:
Socket to mount on standard 1/4" camera tripod thread.
Battery Life:
At least 14 hours in broad band mode when using LR6 battery.
External Power:
9 to 14 V DC at typical 150 mA.
The batteries may safely be left in the instrument while it is
operating from an external supply. Remove the batteries when
the instrument is to be out of service for some time. A built in
lithium battery will maintain stored data and set ups.
o
C.
o
C.
o
C.
Page 60 - CEL-440/480 Operators Handbook

Specification
Note that when an instrument is returned to battery operation
after being powered from an external supply, either switch the
instrument OFF then ON again, or disconnect ALL devices from
the DC input socket, in order to avoid additional discharging of
the internal batteries.
Dimensions:
340 x 100 x 40 mm (13.5 x 4 x 1.5 in),
500 gm (17.5 oz) excluding batteries.
5.2 CEL-480
In addition to those listed above for the CEL-440, the CEL-480 has the
following features.
Calendar & Clock:
12 preset cumulative measurement runs times from:
1m, 5m, 10m, 15m, 20m, 30m, 1h, 2h, 4h, 8h, 12, 24h.
Fixed Integration Periods:
1, 5, 10, 15, 20, 30 s, 1, 5, 10, 15, 20, 30 mins, and 1 hour.
Runs always start on a whole second, so start, end and duration
times do not have to be all displayed to 1/100 second to match.
SPL is always being measured except while in Wait mode when
there is 5 minutes or more before the start of a run.
Fixed Measurement Durations:
1, 5, 10, 15, 20, 30 mins, 1, 2, 4, 8, 12 and 24 hour.
Delay Start/Stop Times:
7 user selectable by date and time to nearest minute.
(Before V 2.0 firmware: 6 start and stop times.)
Broad Band Storage Capability:
999 runs, each with up to 9999 periods plus profiles up to a
maximum of 245 000 total results.
CEL-440/480 Operators Handbook - Page 61

Specification
Narrow Band Storage Capability:
999 runs, each with up to 9999 octaves or third octaves band
scans in each run up to a maximum of 16 000 octave results and
7 200 third octave results with all frequency bands measured.
No profiles are stored for narrow band.
Stored Parameters:
L, L
mx,Leq
storage of up to all 3 spectra if selected by user.
Also stores L, L
either A or C.
Profile:
User set intervals of: 1, 5, 10, 15, 20, 30, 60 s, 1, 5, 10, 15, 20,
30 min, 1 hour.
Up to two profiles from: L
L
Tm5,LN
Profile times must be less than or equal to the period times.
L
Tm3
of 3 seconds.
Digital Control:
From PC to change setup, perform in-house testing for service
and recall, and to control operation of the meter’s measurements.
per band simultaneously in narrow band mode with
mx,Leq
for two broadband weightings Z and
mx,Lmn,Leq,LI
.
not available for period times that are not integer multiples
eq,LAV,Lpk,LTm3
,
5.3 Filter Scanning
The operation of the sequential measurement of filter bands in the
CEL-440 and CEL-480 may be effected in two ways.
For both methods, the starting band in the scan may be preset to
any available band in the instrument, similarly the final band to be
measured can also be preset. The only restriction is that the start band
must be lower in frequency than the final band.
The first method enables the user to select a fixed measurement
interval for all measured bands ranging from 5 seconds to 1 minute in 1
second increments.
Page 62 - CEL-440/480 Operators Handbook
Specification
Once scanning has been started, each band will be measured in
turn for the preset duration, with the resultant L, L
mx,Leq
the period saved in the store. The instrument then steps on to the next
band automatically and, after a suitable wait for the filter to stabilise,
starts the process of measurement again until all bands have been
measured. After measurement is completed, the results may be
examined on screen or downloaded as required.
The second method performs a self-timed autoscan. This
operates differently in that the length of time during which each filter
band is measured will be determined by how steady the readings in the
band are. The measuring process is the same as for the fixed interval
method, but the meter looks for a steady L
value, and as soon as the
eq
criteria defined for “steady” are detected, it stores this level and
immediately steps on to the next band.
Depending on the nature of the signal being analysed, the auto
scanned method may make for rapid stepping through all bands, possibly
noticeably quicker than the fixed interval method, however if the signal is
fluctuating considerably, it may take longer. This method is likely to
produce the most reliable reading of band levels when having equal time
period measurements is not of importance.
The criteria for concluding a band measurement and stepping on
to the next band are threefold.
at the end of
1. The last 4 readings of L
must all be within 0.1 dB of each other.
eq
2. The last 4 readings of Leq must all be within 0.5 dB of each other
and have successively increased and decreased, or vice-versa,
within ±1 dB (e.g. the second reading is higher than the first,
but the third reading is lower than the second and the fourth is
higher than the third).
3. The measurement has lasted for the maximum period set for the
band.
Note: Measurement of Leqinternally in the CEL-440 and CEL-480 occurs and
accumulates every 10 mSec. It is these readings that are used for satisfying
criteria 1 and 2. The internal computation is made to better than 0.01 dB.
Criteria 1 and 2 ensure that a steady or near steady reading has been
reached and provided the signal continues as in the immediate past, the
reading is the best L
value that will be obtained.
eq
CEL-440/480 Operators Handbook - Page 63
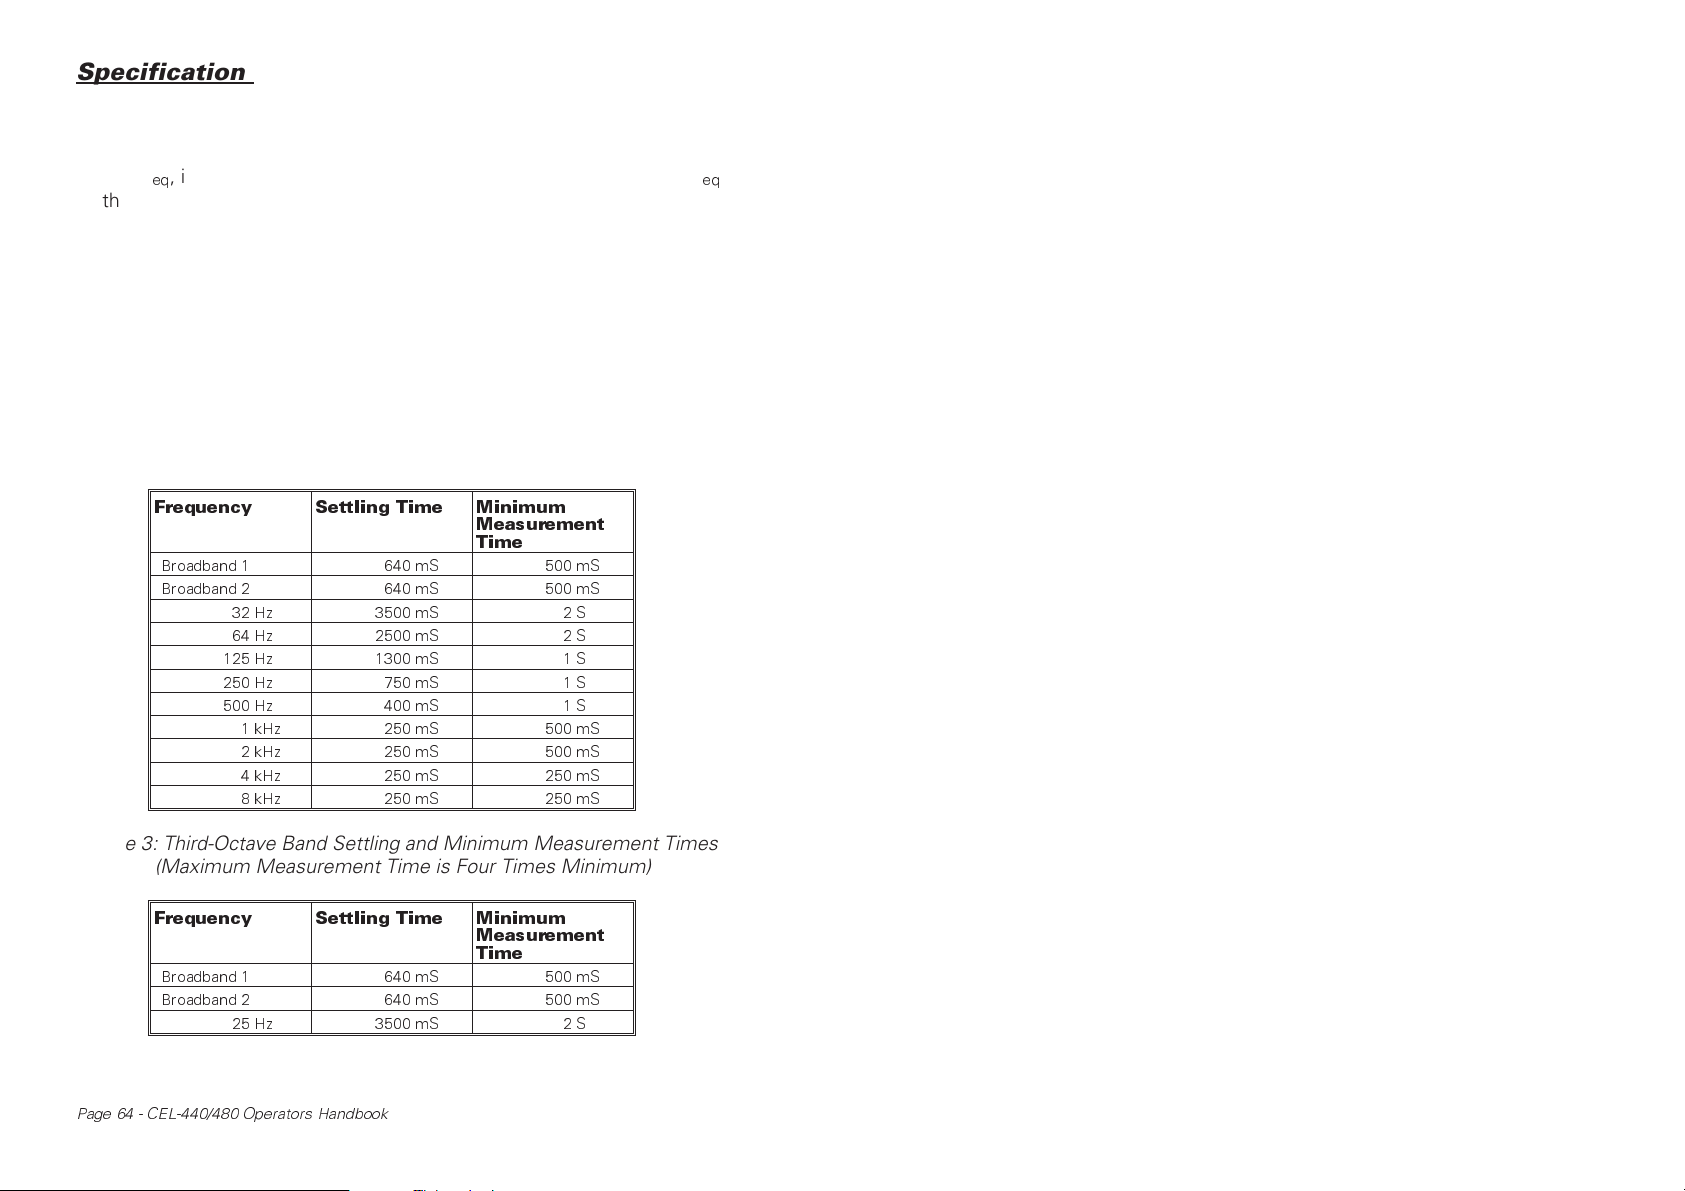
Specification
Criteria 3 ensures that even when the meter is unable to reach a
steady L
as the source permits, without measuring for extremely lengthy periods.
seconds for all octaves installed, and about 60 seconds for all third
octaves installed. Scanning times can be shortened by restricting the
number of bands to be measured.
adequate reading in the band are factory set in the meter and are listed
below. The maximum measurement time per band for Criterion 3 is
always fixed at 4 times the minimum measurement time.
, it will have measured for long enough to have as good an L
eq
Using a typical pink noise source, autoscans take around 20
A settling time for each band plus a minimum time to obtain an
Table 2: Octave Band Settling and Minimum Measurement Times
(Maximum Measurement Time is Four Times Minimum)
eq
Frequency Settling Time Minimum
Broadband 1 640 mS 500 mS
Broadband 2 640 mS 500 mS
32 Hz 3500 mS 2 S
64 Hz 2500 mS 2 S
125 Hz 1300 mS 1 S
250 Hz 750 mS 1 S
500 Hz 400 mS 1 S
1 kHz 250 mS 500 mS
2 kHz 250 mS 500 mS
4 kHz 250 mS 250 mS
8 kHz 250 mS 250 mS
Measurement
Time
Table 3: Third-Octave Band Settling and Minimum Measurement Times
(Maximum Measurement Time is Four Times Minimum)
Frequency Settling Time Minimum
Broadband 1 640 mS 500 mS
Broadband 2 640 mS 500 mS
25 Hz 3500 mS 2 S
Measurement
Time
Page 64 - CEL-440/480 Operators Handbook

Specification
Frequency Settling Time Minimum
Measurement
Time
32 Hz 3500 mS 2 S
40 Hz 3500 mS 2 S
50 Hz 2500 mS 2 S
64 Hz 2500 mS 2 S
80 Hz 2500 mS 2 S
100 Hz 1300 mS 1 S
125 Hz 1300 mS 1 S
160 Hz 1300 mS 1 S
200 Hz 750 mS 1 S
250 Hz 750 mS 1 S
320 Hz 750 mS 1 S
400 Hz 400 mS 1 S
500 Hz 400 mS 1 S
640 Hz 400 mS 1 S
800 Hz 250 mS 500 mS
1 kHz 250 mS 500 mS
1 .25 kHz 250 mS 500 mS
1.6 kHz 250 mS 500 mS
2 kHz 250 mS 500 mS
2.5 kHz 250 mS 500 mS
3.2 kHz 250 mS 250 mS
4 kHz 250 mS 250 mS
5 kHz 250 mS 250 mS
6.4 kHz 250 mS 250 mS
8 kHz 250 mS 250 mS
10 kHz 250 mS 250 mS
12.5 kHz 250 mS 250 mS
CEL-440/480 Operators Handbook - Page 65

Specification
5.4 Compliance
The CEL-440 and CEL-480 Sound Level Meters comply with the EMC
Directive 89/336/EEC of the European Union. They have been tested
according to the standard delivery schedule and comply with the
following standards.
EN 50081-1 : 1992, EN 50081-2 : 1993: Generic emission
standards for residential, commercial, light industry and industrial
environments.
EN 50082-1 : 1992, EN 50082-2 : 1995: Generic immunity
standards (for both RF fields and electrostatic discharge) for residential,
commercial, light industry and industrial environments.
Page 66 - CEL-440/480 Operators Handbook

Parts & Warranty
6. PARTS & WARRANTY
6.1 Schedule of Parts
A complete CEL-440 Sound Level Meter consists of:
CEL-440 Sound Level Meter,
Plus as applicable:
CEL-250 Type 1
CEL-495 Type 1 Preamplifier,
or CEL-485 Type 2
Assembly.
The following additional items are also included:
016004 (4 off) Alkaline-Manganese Battery 1.5 V (IEC LR6),
060279 CEL-440/480 Operator’s Handbook.
A complete CEL-480 Sound Level Meter consists of:
CEL-480 Sound Level Meter,
Plus as applicable:
CEL-250 Type 1
CEL-495 Type 1 Preamplifier,
or CEL-485 Type 2
Assembly.
The following additional items are also included:
CEL-6726 dB21 Download Software on a single 3
floppy disk,
C6724 Communications Cable to PC,
016004 (4 off) Alkaline-Manganese Battery 1.5 V (IEC LR6),
060279 CEL-440/480 Operators Handbook,
060311 dB21/dB22 Users Handbook.
When the instrument is delivered, check that all of these items have
been supplied.
The following standard accessories may be ordered separately.
CEL-2962 Windshield for Type 1 Microphones,
CEL-4672 Windshield for Type 2 Microphones,
CEL-282 Acoustic Calibrator Class 2L (Includes CEL-4725
Microphone Adaptor),
CEL-284/2 Acoustic Calibrator Class 1L (Includes CEL-4725
Microphone Adaptor),
C6724 Communication Cable to PC,
1
/2“ Electret Microphone (or MK 250),
1
/4“ Electret Microphone and Preamplifier
1
/2“ Electret Microphone (or MK 250),
1
/4“ Electret Microphone and Preamplifier
1
⁄2"
CEL-440/480 Operators Handbook - Page 67

Parts & Warranty
C6672 Active Printer Cable to Centronics printer
(Requires C6724 Cable).
6.2 Instrument Servicing & Warranty
To ensure its conformity with the specification, this instrument is
thoroughly inspected and it’s accuracy verified prior to dispatch. All
technical information is filed under the instrument serial number, which
should, therefore, be quoted in any correspondence.
The manufacturers undertake to rectify any defect in the
instrument that is directly attributable to faulty design or assembly, and
which becomes apparent during the warranty period. In order to take
advantage of this warranty, the instrument must be returned, carriage
paid, to the manufacturer’s factory or accredited agent, where necessary
repairs will be carried out.
The warranty period runs for 12 months from the date of receipt
of goods, with exceptions on certain specialised components supplied by
other manufacturers which may be warranted for shorter or longer
periods by their actual manufacturers. In all such cases, the benefit of
these undertakings will be passed on to the user.
CASELLA CEL liability is limited to items of their own
manufacture, and they do not accept liability for any loss resulting from
the operation or interpretation of the results from this equipment.
To obtain repair under warranty, the instrument should be
packed and returned in it’s original packing or an equivalent either to
CASELLA CEL’s local agent, or in the case of domestic sales, to the
CASELLA CEL Service Department at Bedford. Please include the
following information:
Instrument Type(s), Serial Number(s) and Firmware Version
Number(s),
Customer name and address,
Contact name and phone number,
Details of any PC and Software involved, including Version
Number(s),
Reason for returning the equipment with a detailed description
of the fault,
List of any error messages that may have been displayed.
Page 68 - CEL-440/480 Operators Handbook

Parts & Warranty
The necessary adjustments or repairs will be carried out, and the
instrument returned as soon as possible.
A comprehensive Instrument Calibration Maintenance
Agreement (ICMA) scheme is available to extend the initial warranty
period of this instrument. At the end of the first warranty period, it is
recommended that the equipment be returned to the Service and
Verification Department at Bedford, where it will be inspected and
entered into the ICMA scheme as required. The warranty will then be
extended for the period stated on the individual schedule. Please contact
your local CASELLA CEL agent for full details of this service.
After the warranty has expired (except on approved accounts)
service work is undertaken against quotations, and all packing and transit
costs are charged extra.
CEL instrumentation and software is designed, manufactured, and serviced by:
CASELLA CEL LIMITED
and
CASELLA CEL INC.
CASELLA Group Companies
CEL-440/480 Operators Handbook - Page 69

Parts & Warranty
Page 70 - CEL-440/480 Operators Handbook
 Loading...