


Introduction
t
l
T
t
w
T
g
w
l
T
l
g
W
w
A
t
l
T
t
w
T
g
w
T
g
W
w
A
In a few simple steps, this guide will get you up and
running making noise measurements. We want you to ge
dB
the best performance from your CEL-35X
and recommend that for advanced information you refer
to the instruction manual.
adge system
Charging
Charge the CEL-35X dB
provided. During charging the red LED will flash. Ensure
dB
adge has enough charge for the required
the
measurement duration by looking at the screen, which wil
show the run time available for the current charge held in
the battery. The LED will turn blue when charging is
complete. Charging from flat will take approximately 90
minutes:
CHARGING
27
adge by using the charger
FULL
Hrs
32
Hrs
Switching the CEL-35X On/Off
Press the Left (‘L’) key to switch the CEL-35X on. The
CEL-35X will run through a start up sequence as shown
below.
CASELLA
CeL-350
he first screen displays the model number and the
firmware version. The next screen shows user defined tex
hich is configured using dB35 software.
V1.01
JOE BLOGGS
CONSULTANTS
CEL-352 displayed on
dB
adge ‘Plus’ model
The dBadge can be switched off by holding down the ‘L’
key for 3 seconds.
23 JUL 05
DISPLAY MODE
ISO
Press ‘L’ to select either ISO
(Europe) or OSHA (USA).
Press ‘R’ to confirm.
Switch on the CEL-110 calibrator. The
automatically recognise a calibration tone is present and
enter the calibration mode, showing the screen below.
dB
adge will
13:45:03
Exposure alarm (Blue LED),
he final screen displays the current time and date. This is
dB
automatically set by the software when the
connected to a PC. It is recommended that prior to usin
dB
adge units for the first time, they are connected to a
the
PC so that the time is set correctly. The dBadge screen will
then display data from the last run. See section on
reviewing measurement data.
Configuring the dBadge
By pressing and holding the right (‘R’) key down during the
start up sequence the configuration menu can be accessed.
Pressing the ‘L’ key will make the changes to the current
settings, and the ‘R’ key will confirm the changes and move
on to the next screen. The screens are shown below, once
the final screen has been confirmed by pressing the ‘R’
dB
button, the
CONTRAST
adge will return to standard operation.
Screen contrast, press ‘L’ to
adjust, ‘R’ to confirm
changes.
Menu language, press ‘L’ to
change and ‘R’ to confirm.
adge is
CLEAR MEMORY
NO
If the memory is to be cleared, a second screen appears
for confirmation. Change the option to ‘Yes’ by pressin
the ‘L’ key, then press ‘R’ to confirm deletion.
Fitting and Removing the Windshield
It is recommended the windshield is fitted to the dBadge
unit when in use. This provides protection and will
prevent air movement from affecting the measurements.
hen fitting or removing the windshield always hold the
black plastic ring at the base of the windshield. Locate the
tabs into the holes then gently twist clockwise to lock.
For calibration of the
calibrator, the windshield will need to be removed.
Simply twist the black plastic ring at the base of the
indshield anticlockwise then lift the windshield off.
DO NOT use the foam to twist the windshield on and
off.
press ‘L’ to enable or disable.
Press ‘R’ to confirm. Refer to
manual for details.
llows the memory to be
cleared, press ‘L’ to change
display to ‘Yes’, then press
‘R’ to confirm.
dB
adge with a CEL-110 acoustic
Calibration
To calibrate the dBadge, place the CEL-110 acoustic
calibrator over the microphone as shown below. Be
dB
careful to push the calibrator straight onto the
ithout twisting, this ensures the screw on microphone is
not loosened or over tightened.
adge
Press the ‘R’ key to confirm that you wish to calibrate. The
dB
adge will take a few seconds to automatically adjust to
the required level of 114.0dB.
CALIBRATING
Once calibration is completed a ‘CAL OK’ message wil
dB
appear. The
level then returns to the default screens.
adge stores the calibration date, time and
CAL. OK
114.0
dB,
Starting a Measurement
o start a measurement, press and hold both keys for 3
seconds. During a measurement run the symbol wil
be displayed in the top left of the screen to show a
measurement is being taken.
Press
For advice on fitting the
refer to manual.
dB
adge to an individual, please
Press
Introduction
In a few simple steps, this guide will get you up and
running making noise measurements. We want you to ge
the best performance from your CEL-35X
and recommend that for advanced information you refer
to the instruction manual.
dB
Charging
Charge the CEL-35X dB
provided. During charging the red LED will flash. Ensure
dB
adge has enough charge for the required
the
measurement duration by looking at the screen, which wil
show the run time available for the current charge held in
the battery. The LED will turn blue when charging is
complete. Charging from flat will take approximately 90
minutes:
CHARGING
27
adge by using the charger
FULL
Hrs
Switching the CEL-35X On/Off
Press the Left (‘L’) key to switch the CEL-35X on. The
CEL-35X will run through a start up sequence as shown
below.
CASELLA
CeL-350
he first screen displays the model number and the
firmware version. The next screen shows user defined tex
hich is configured using dB35 software.
V1.01
JOE BLOGGS
CONSULTANTS
CEL-352 displayed on
dB
adge ‘Plus’ model
adge system
32
Hrs
The dBadge can be switched off by holding down the ‘L’
key for 3 seconds.
23 JUL 05
DISPLAY MODE
ISO
Press ‘L’ to select either ISO
(Europe) or OSHA (USA).
Press ‘R’ to confirm.
Switch on the CEL-110 calibrator. The
automatically recognise a calibration tone is present and
enter the calibration mode, showing the screen below.
dB
adge will
13:45:03
Exposure alarm (Blue LED),
he final screen displays the current time and date. This is
dB
automatically set by the software when the
connected to a PC. It is recommended that prior to usin
dB
adge units for the first time, they are connected to a
the
PC so that the time is set correctly. The
then display data from the last run. See section on
reviewing measurement data.
dB
Configuring the dBadge
By pressing and holding the right (‘R’) key down during the
start up sequence the configuration menu can be accessed.
Pressing the ‘L’ key will make the changes to the current
settings, and the ‘R’ key will confirm the changes and move
on to the next screen. The screens are shown below, once
the final screen has been confirmed by pressing the ‘R’
dB
button, the
CONTRAST
adge will return to standard operation.
Screen contrast, press ‘L’ to
adjust, ‘R’ to confirm
changes.
Menu language, press ‘L’ to
change and ‘R’ to confirm.
adge is
adge screen will
CLEAR MEMORY
NO
If the memory is to be cleared, a second screen appears
for confirmation. Change the option to ‘Yes’ by pressin
the ‘L’ key, then press ‘R’ to confirm deletion.
Fitting and Removing the Windshield
It is recommended the windshield is fitted to the dBadge
unit when in use. This provides protection and will
prevent air movement from affecting the measurements.
hen fitting or removing the windshield always hold the
black plastic ring at the base of the windshield. Locate the
tabs into the holes then gently twist clockwise to lock.
For calibration of the
calibrator, the windshield will need to be removed.
Simply twist the black plastic ring at the base of the
indshield anticlockwise then lift the windshield off.
DO NOT use the foam to twist the windshield on and
off.
press ‘L’ to enable or disable.
Press ‘R’ to confirm. Refer to
manual for details.
llows the memory to be
cleared, press ‘L’ to change
display to ‘Yes’, then press
‘R’ to confirm.
dB
adge with a CEL-110 acoustic
Calibration
To calibrate the dBadge, place the CEL-110 acoustic
calibrator over the microphone as shown below. Be
dB
careful to push the calibrator straight onto the
ithout twisting, this ensures the screw on microphone is
not loosened or over tightened.
adge
Press the ‘R’ key to confirm that you wish to calibrate. The
dB
adge will take a few seconds to automatically adjust to
the required level of 114.0dB.
CALIBRATING
Once calibration is completed a ‘CAL OK’ message will
dB
appear. The
level then returns to the default screens.
adge stores the calibration date, time and
CAL. OK
114.0
dB,
Starting a Measurement
o start a measurement, press and hold both keys for 3
seconds. During a measurement run the symbol will
be displayed in the top left of the screen to show a
measurement is being taken.
Press
For advice on fitting the
refer to manual.
dB
adge to an individual, please
Press
A
W
W
A
W
The screen will then cycle between the dB level and
W
A
T
T
W
A
W
W
A
W
W
A
T
T
W
duration and the memory/battery status.
15
MEMORY
145
Hrs
Hrs
LAF 112.3
dB
DUR 07:45:12
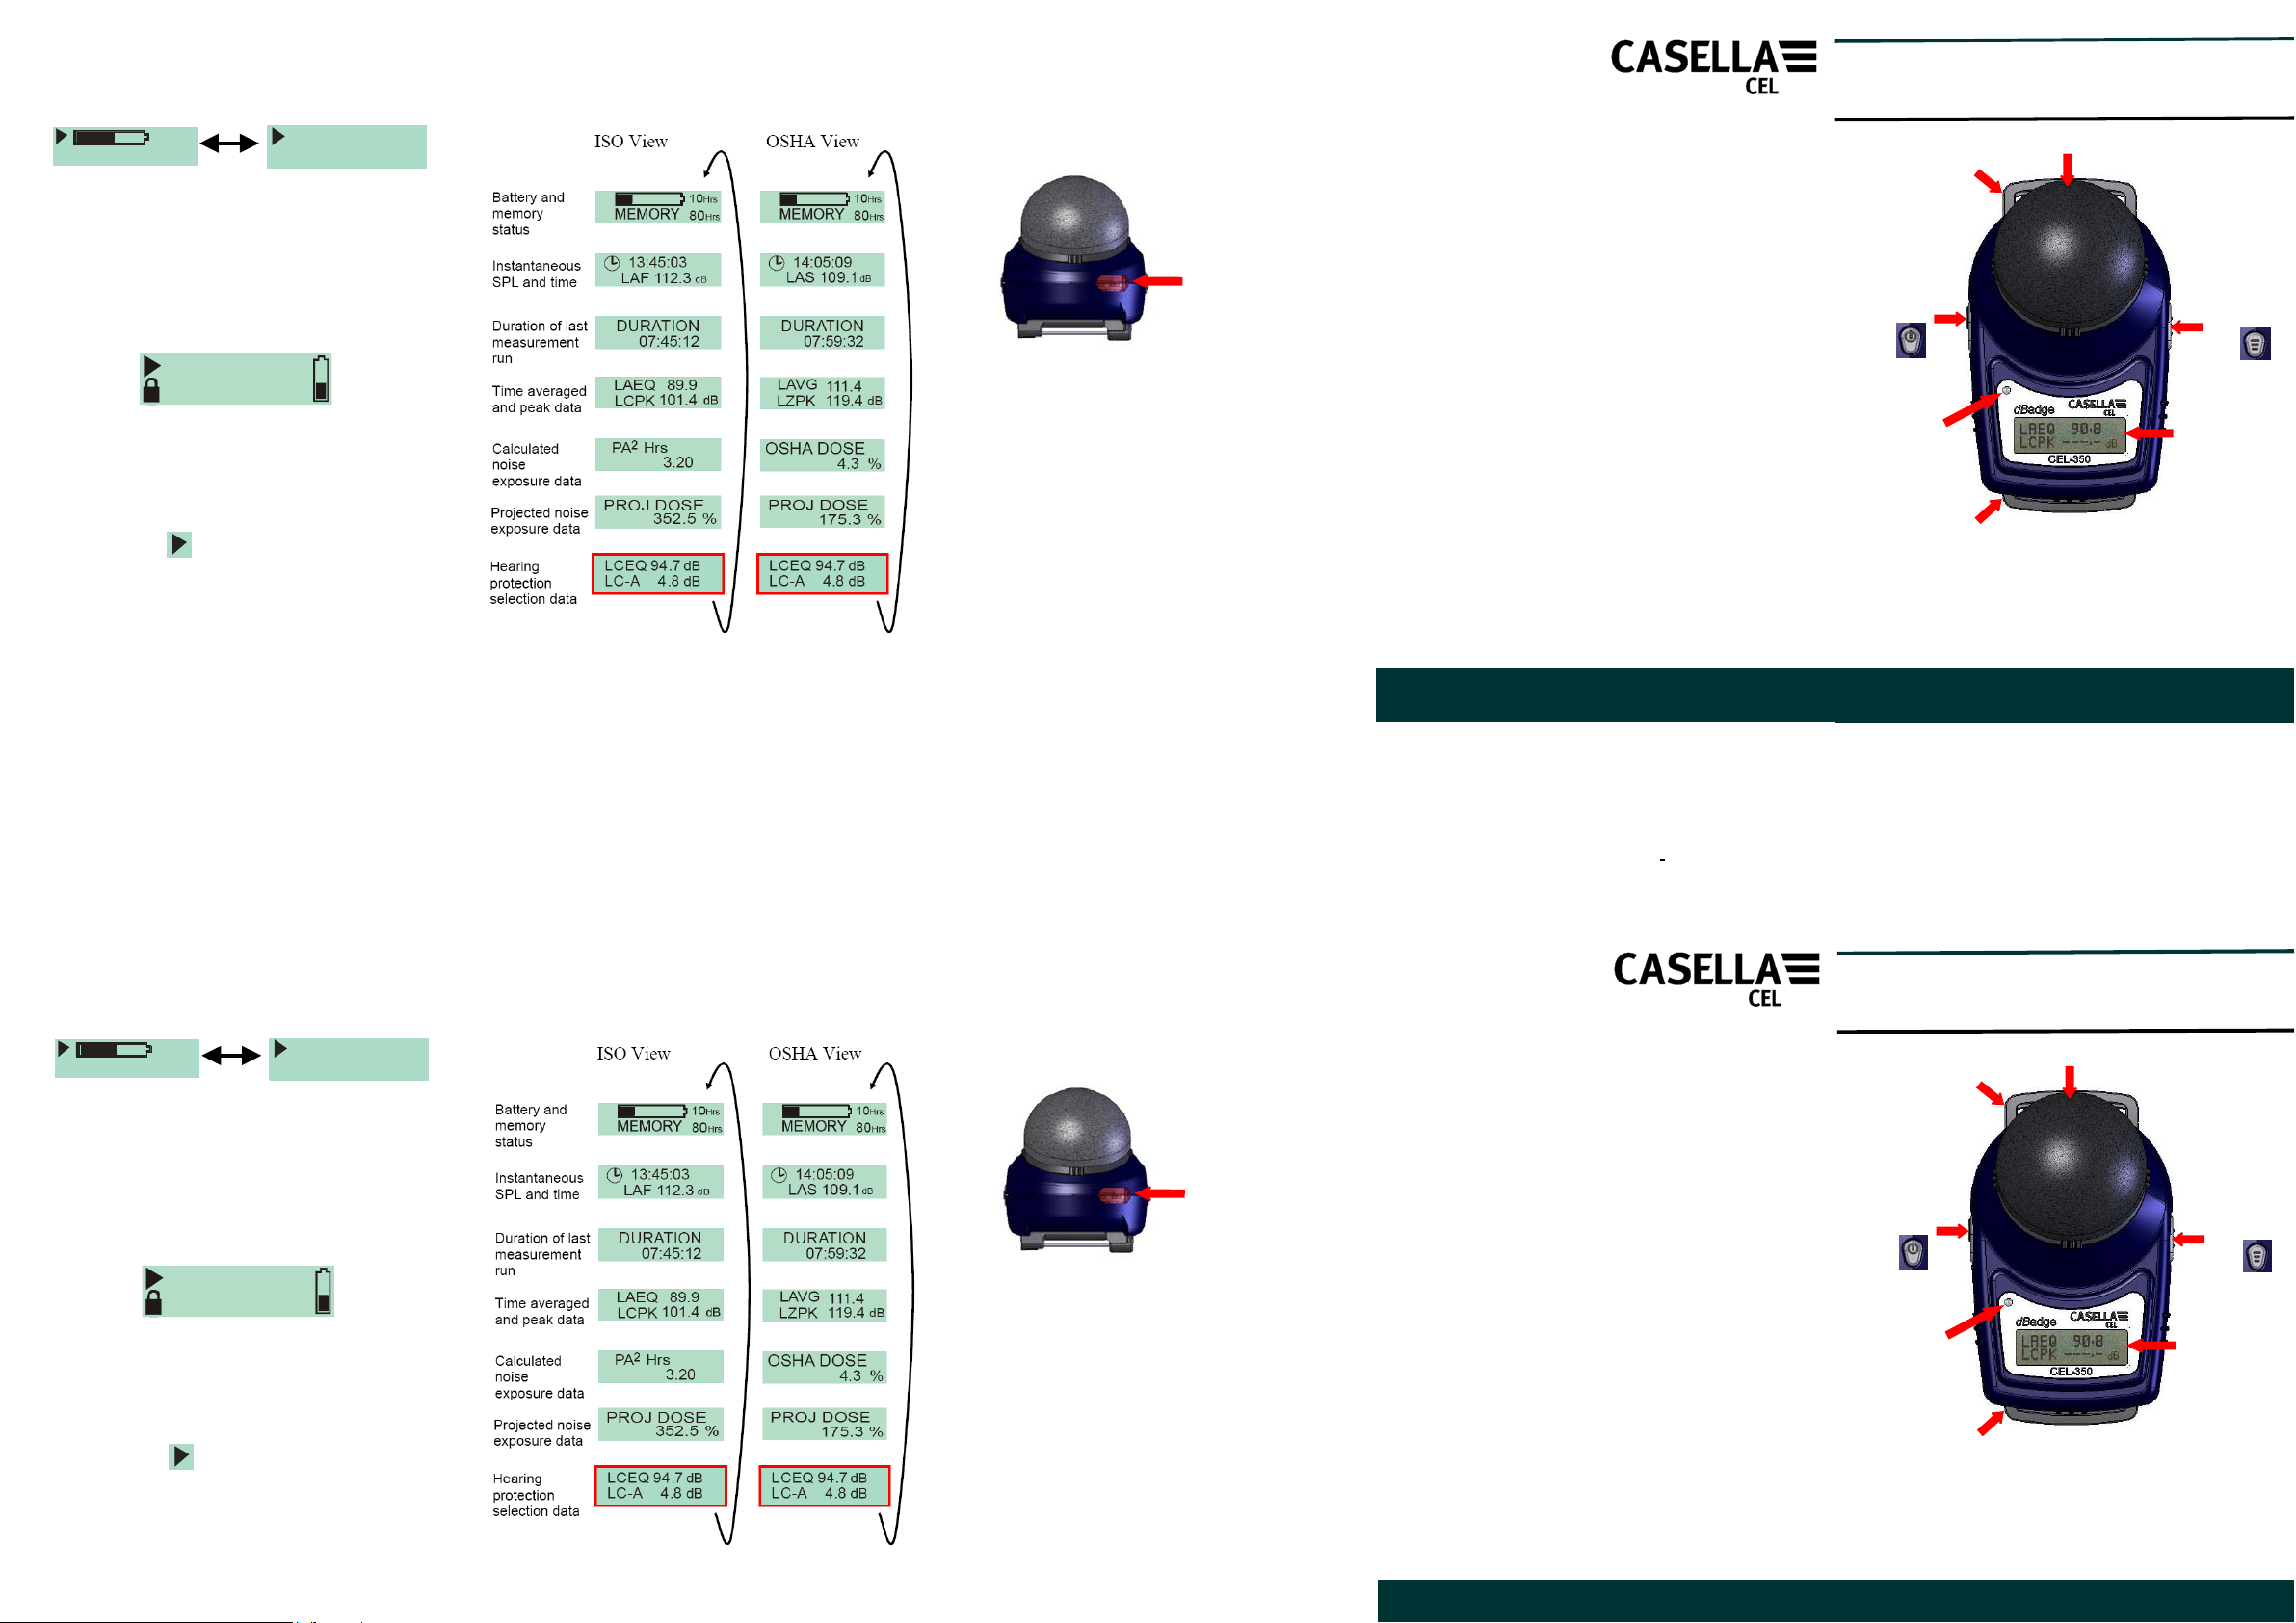
Locking the Keys
Keys can be locked during a measurement run to prevent
tampering and also to prevent dB levels being displayed.
hilst holding the ‘R’ key down, press the ‘L’ key 3 times
to lock the keys.
padlock symbol appears on screen, as shown below.
DURA TION
07:55:12
o unlock the keys simply repeat the procedure described
above.
Stopping a Measurement
o stop the measurement, hold both keys down for 3
seconds until the symbol disappears. Once stopped,
dB
adge will display the data from the last measurement
the
run.
Reviewing Measurement Data
hen the dBadge is not measuring, the screen will cycle
through data from the previous measurement run. The
data displayed will depend on the configuration of the
dBadge, either ISO or OSHA data. The data shown is
displayed below. By pressing the ‘R’ key on any of these
screens, the display will freeze for 5 seconds before
resuming.
Items outlined in red available on CEL-352 dBadge ‘Plus’
only.
Downloading Data to PC
Ensure the infra-red download adaptor (193200B) is
connected to the USB port of your PC Start the dB35
software on the PC, then hold the infra-red port on the
dB
adge facing, and near to the infra-red adaptor.
Infra-red
Port
dB
dB35 will detect when a
automatically download the unit’s data to your PC, clear
the memory and reset the time on the
adge is within range, and will
dB
adge.
Error Messages
If any error messages occur during the procedures
described in this field guide, please refer to the
troubleshooting section in the instruction manual for the
dB
adge.
flashing red LED will indicate either a low battery or
memory.
Mounting Clips
Please refer to main manual for changing dBadge clips as
placing the incorrect screw in the hole can cause damage to
dB
adge.
the
Casella CEL
Regent House,
olseley Road,
Kempston,
Bedford,
MK42 7JY,
United Kingdom,
Phone: +44 (0) 1234 844 100,
Fax: +44 (0) 1234 841 490,
E-mail: info@casellacel.com
eb: www.casellacel.com
Casella USA
17 Old Nashua Road #15,
mherst,
NH 03031,
U.S.A.
Toll Free: +1 800 366 2966
Fax: +1 603 672 8053
E-mail: info@casellaUSA.com
eb: www.casellaUSA.com
CEL-35X
HB3324-04
August 2008
www.casellacel.com Think Environment Think Casella
dB
adge
FIELD GUIDE for CEL-35X dBadge
Personal Noise Exposure Meter
Mounting
Clip
Left (‘L’)
Key
Red and
Blue Status
LEDs
Mounting
Clip
The CEL-35X dBadge consists of the instrument body,
microphone, windshield and mounting kit. The CEL-35X
represents either the CEL-350
dB
adge ‘Plus’.
www.casellacel.com Think Environment Think Casella
Windshield
Consult main manual for
safety information on using
dB
Right (‘R’)
Key
Display
Intrinsically Safe models
adge or the CEL-352
The screen will then cycle between the dB level and
duration and the memory/battery status.
15
MEMORY
145
Hrs
Hrs
LAF 112.3
DUR 07:45:12
Locking the Keys
Keys can be locked during a measurement run to prevent
tampering and also to prevent dB levels being displayed.
hilst holding the ‘R’ key down, press the ‘L’ key 3 times
to lock the keys.
padlock symbol appears on screen, as shown below.
DURA TION
07:55:12
o unlock the keys simply repeat the procedure described
above.
Stopping a Measurement
o stop the measurement, hold both keys down for 3
seconds until the symbol disappears. Once stopped,
dB
adge will display the data from the last measurement
the
run.
Reviewing Measurement Data
hen the dBadge is not measuring, the screen will cycle
through data from the previous measurement run. The
data displayed will depend on the configuration of the
dBadge, either ISO or OSHA data. The data shown is
displayed below. By pressing the ‘R’ key on any of these
screens, the display will freeze for 5 seconds before
resuming.
dB
Items outlined in red available on CEL-352 dBadge ‘Plus’
only.
Downloading Data to PC
Ensure the infra-red download adaptor (193200B) is
connected to the USB port of your PC Start the dB35
software on the PC, then hold the infra-red port on the
dB
adge facing, and near to the infra-red adaptor.
Infra-red
Port
dB35 will detect when a dBadge is within range, and will
automatically download the unit’s data to your PC, clear
dB
the memory and reset the time on the
adge.
Error Messages
If any error messages occur during the procedures
described in this field guide, please refer to the
troubleshooting section in the instruction manual for the
dB
adge.
flashing red LED will indicate either a low battery or
memory.
Mounting Clips
Please refer to main manual for changing dBadge clips as
placing the incorrect screw in the hole can cause damage to
dB
adge.
the
Casella CEL
Regent House,
olseley Road,
Kempston,
Bedford,
MK42 7JY,
United Kingdom,
Phone: +44 (0) 1234 844 100,
Fax: +44 (0) 1234 841 490,
E-mail: info@casellacel.com
eb: www.casellacel.com
Casella USA
17 Old Nashua Road #15,
mherst,
NH 03031,
U.S.A.
Toll Free: +1 800 366 2966
Fax: +1 603 672 8053
E-mail: info@casellaUSA.com
eb: www.casellaUSA.com
CEL-35X
HB3324-04
August 2008
www.casellacel.com Think Environment Think Casella
dB
adge
FIELD GUIDE for CEL-35X dBadge
Personal Noise Exposure Meter
Mounting
Clip
Left (‘L’)
Key
Red and
Blue Status
LEDs
Mounting
Clip
The CEL-35X dBadge consists of the instrument body,
microphone, windshield and mounting kit. The CEL-35X
represents either the CEL-350
dB
adge ‘Plus’.
www.casellacel.com Think Environment Think Casella
Windshield
Consult main manual for
safety information on using
dB
Right (‘R’)
Key
Display
Intrinsically Safe models
adge or the CEL-352
 Loading...