


CEL-200 SERIES DIGITAL SOUND
LEVEL METERS
Go to
Preface
CASELLA C EL
Regent House
Wolsley Road
Kempston
Bedford
MK42
7JY, U. K.
Phone: +44 (0) 1234 844 100
Fax:
+44 (0) 1234 841 490
E-mail:
info@casellameasurement.com
Web :
www.casellameasurement.com
HB3348-01
OPERATOR’S MANUAL
CASELLA USA
17 Old Nashua Ro ad,
# 15, Am h er st
NH 03031
USA
Toll
Fr ee: +1 (800) 366
2966
Fax: +1 (603) 672 8053
E-mail:
info@c asellaUS A.com
Web : www.casella USA.com
CASELLA ESPANA S.A.
Polígono Európolis
Calle C, nº4B
28230 Las Rozas - Madrid
Spain
Phone: + 34 91 640 75 19
Fax: + 34 91 636 01 96
E-mail:
online@ casel la- es. com
Web : www.casella-es.com
CASELLA CHINA(中国)
地址
北京东城区东方广场W1座911室
邮编: 100738
电话: 0086 10 85183141
传真: 0086 10 85183143
电子邮件:
info@casellameasurement.cn
网址: www.casellachina.cn

PREFACE
Back to Cover
1. MANUAL CONVENTIONS
This section of the manual details the priority of Warnings, Cautions and Notes that
may apply throughout this manual.
2.
INTRODUCTION
This section of the manual gives a brief overview of the equipment.
PREPARATION FOR USE
3.
This section of the manual describes the first steps to using the CEL-200 Series
Digital Sound Level Meter.
4.
GENERAL OPERATION
This section of the manual describes the basic operating procedures.
CALIBRATION
5.
This section of the manual details the Calibration method.
6.
INSTRUMENT SETTINGS
This section of the manual describes the how to use the Instrument Settings.
7.
CONFIGURATION MENU
This section of the manual describes how to make changes to three specific settings.
TIME AND DATE (CEL-242/246 ONLY)
8.
This screen displays the time and date.
9.
MEMORY DELETION (CEL-242/246 ONLY)
This section details how to delete all loggings from the instrument memory.
SET TIME AND DATE (CEL-242/246 ONLY)
10.
This section details how to set the time and date.
11.
SWITCH OFF
This section of the manual describes the shut down procedure.
12. EQUIPMENT SPECIFICATION
This section of the manual gives the Specifications and Characteristics for the CEL200 Series Digital Sound Level Meter.
13. SERVICE AND WARRANTY
This section of the manual explains Casella’s after sales policy on the instruments
covered in this manual.
14.
ENVIRONMENTAL CONSIDERATIONS
This section of the manual stipulates the environmental policies Casella have
committed to for the manufacture of instruments.
15. DECLARATION OF CONFORMITY
This section shows the declaration of conformity for the CEL-200 series instrument.
2

1. MANUAL CONVENTIONS
PRIORITY ONE
PERSONAL SAFETY.
When a WARNING is included in the text, the WARNING will always precede the text
it applies to.
WARNING: Indicates personal injury will result if proper precautions are not
followed.
PRIORITY TWO
EQUIPMENT PROTECTION.
A CAUTION will always precede the text it applies to.
CAUTION: Indicates equipment damage can result, if proper precautions are not
taken.
Note(s). Notes usually follow the text to which they apply. Notes can contain advice,
hints, extra information and explanations.
Back to
Index
3
2. INTRODUCTION CEL-240, 242, 244 and CEL-246
Congratulations on your purchase of a CEL-200 Series Digital Sound Level Meter,
subsequently referred to as the ‘instrument’.
perform accurate noise measurements through a wide range. It is a comp letely
digital sound level meter, designed for stable, reliable performance, fully compli ant
with in tern ation al sound level meter standards.
This instruction manual is to help you get the most benefit from your CEL-200
Series Digital
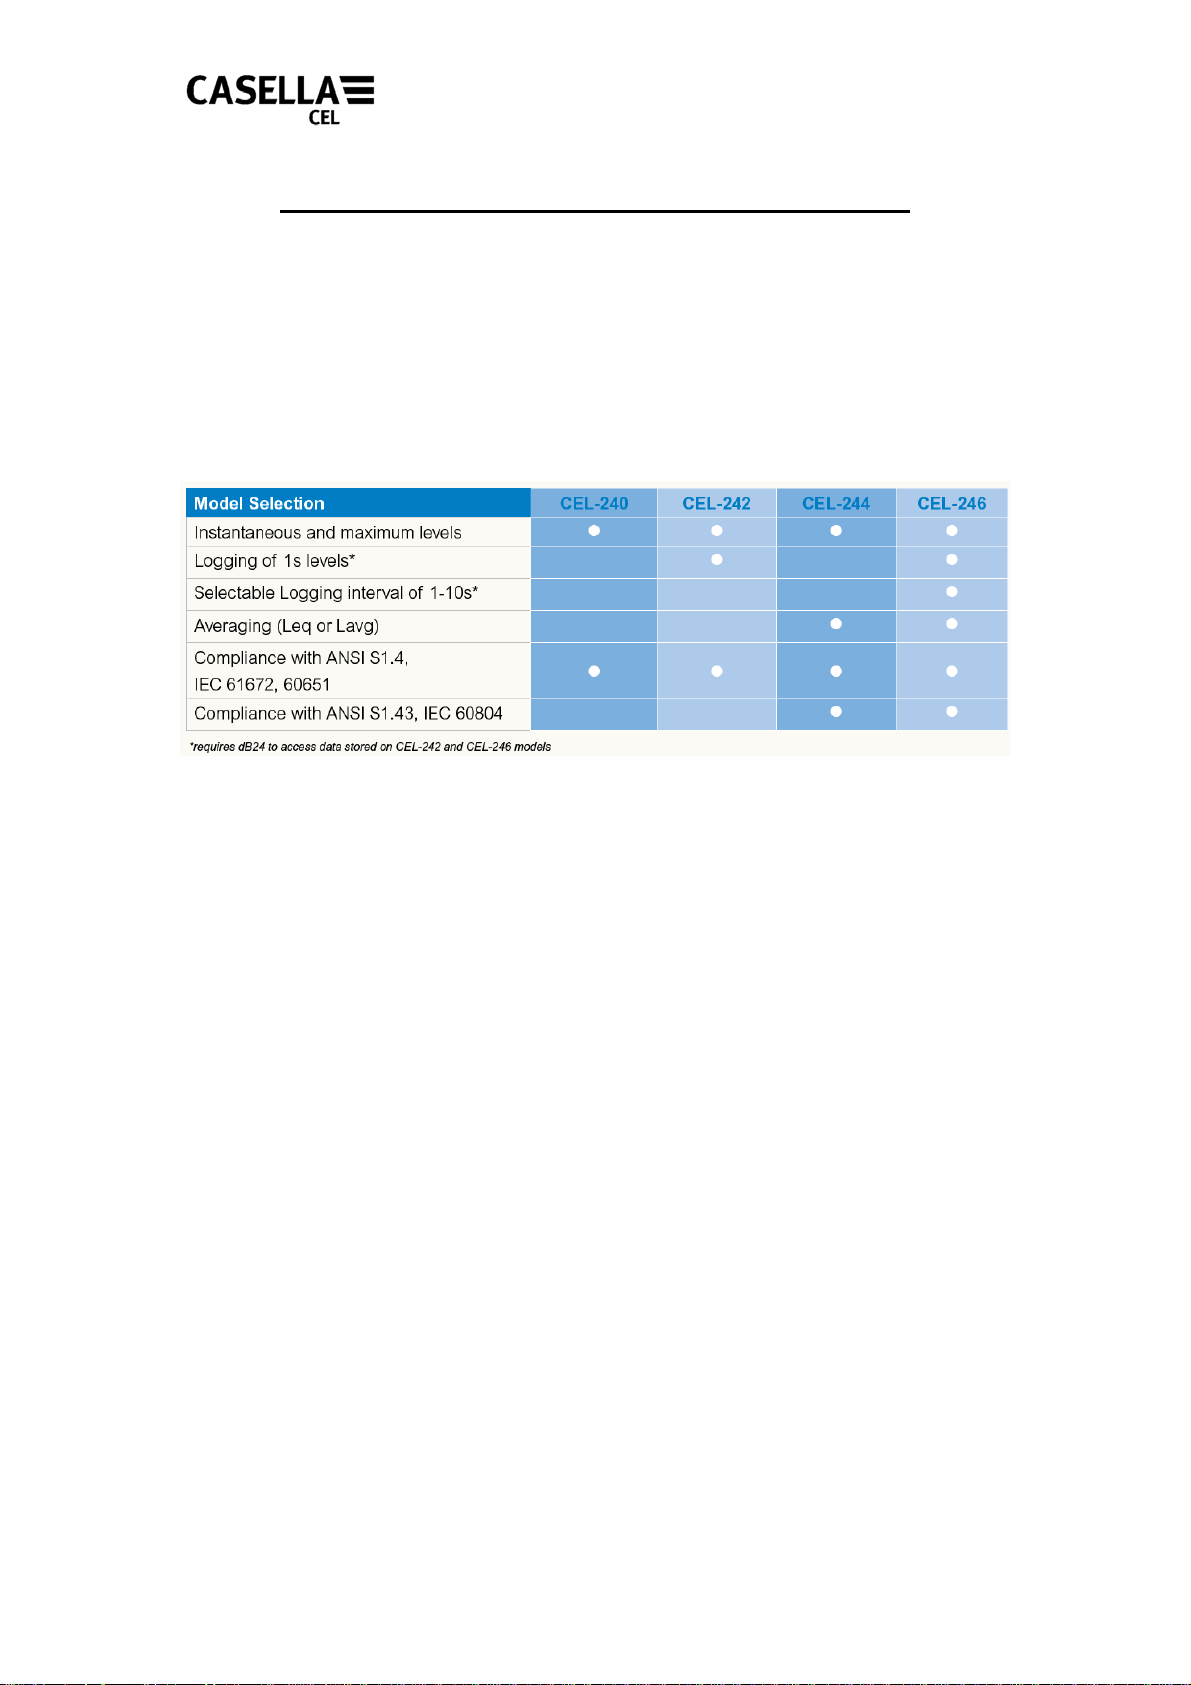
The CEL-200 Series range comprises of 4 models, the features are summarised in the table
below.
Sound Level Meter and to ensure accurate noise measurements.
The instrument has been designed to
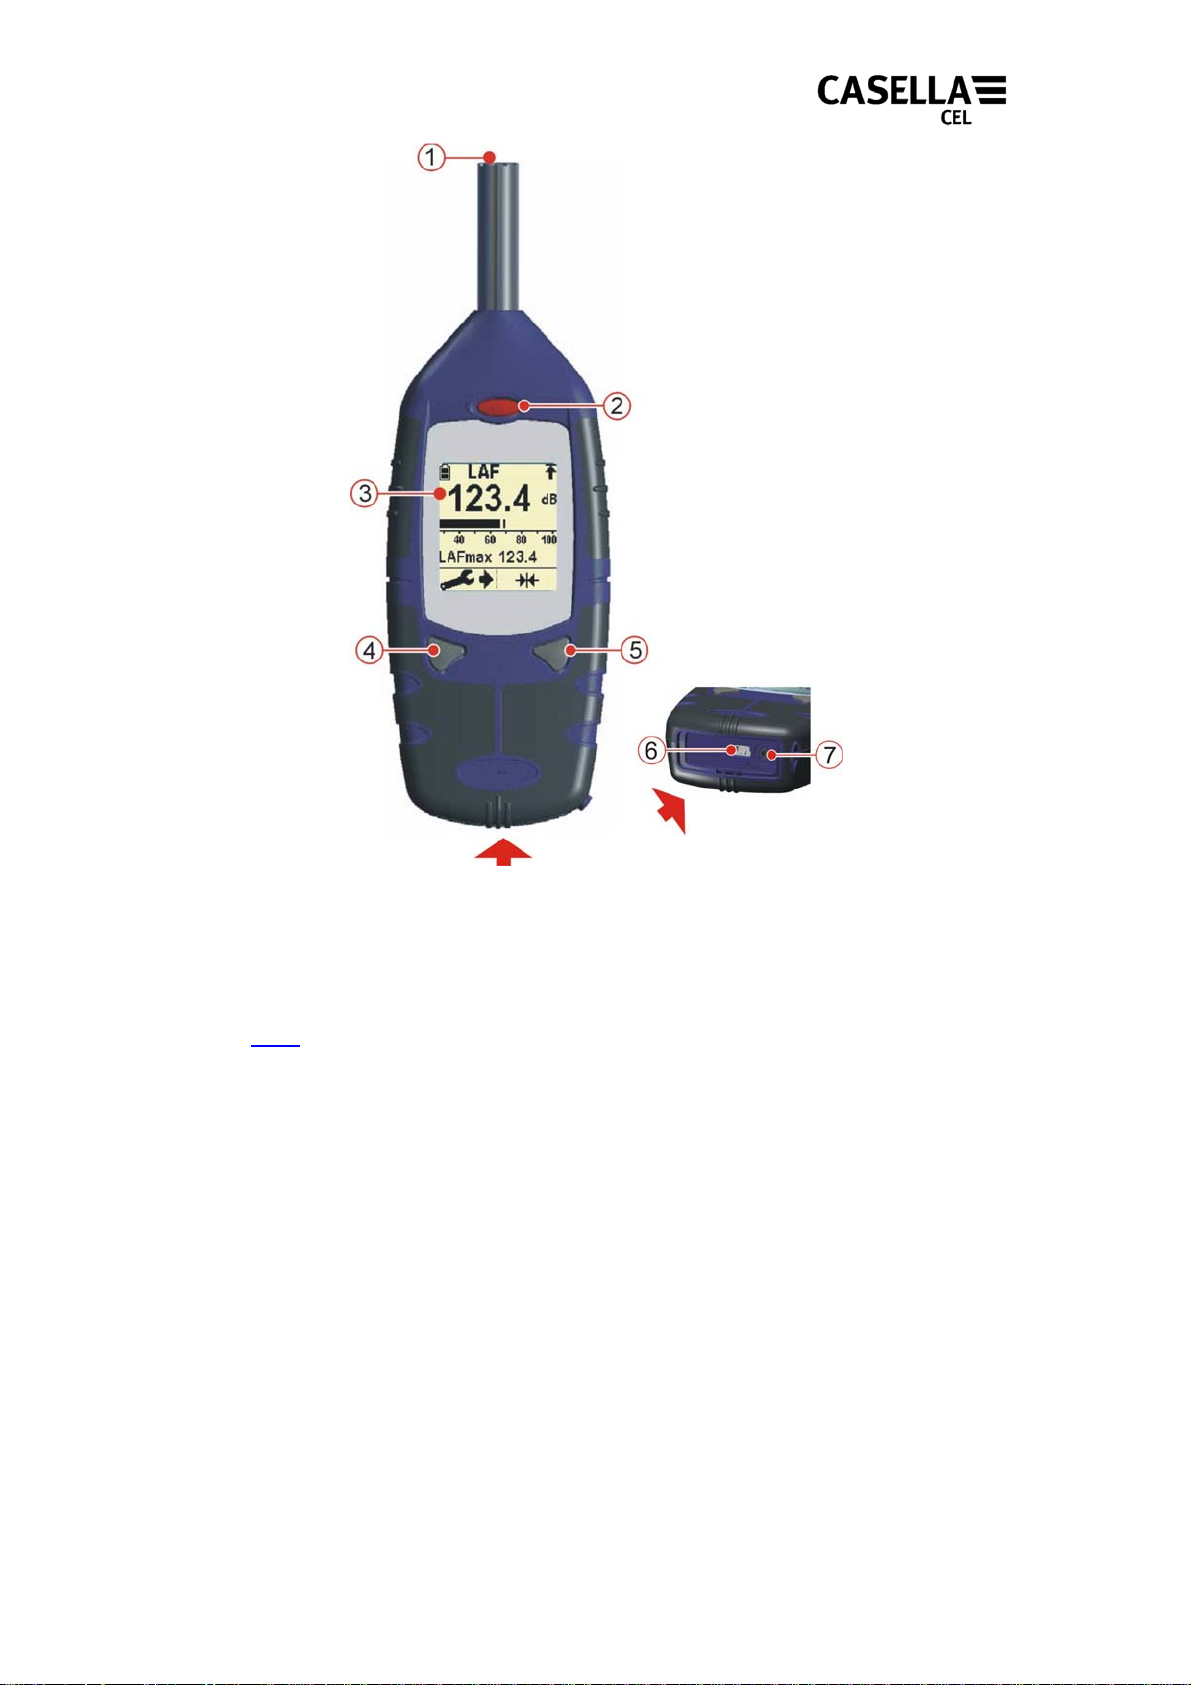
The instrument is illustrated in Figure 1.
4
Back to
Figure 1 CEL-200 Series Digital Sound Level Meter
1. Microphone. 2. Power ON / OFF key. 3. Display. 4. Left Key. 5. Right Key.
6. USB PC Output. 7.
Auxiliary socket (2.5mm Stereo)
.
Index
5
3. PREPARATION FOR USE
PROCEDURE (Refer to Figure 2)
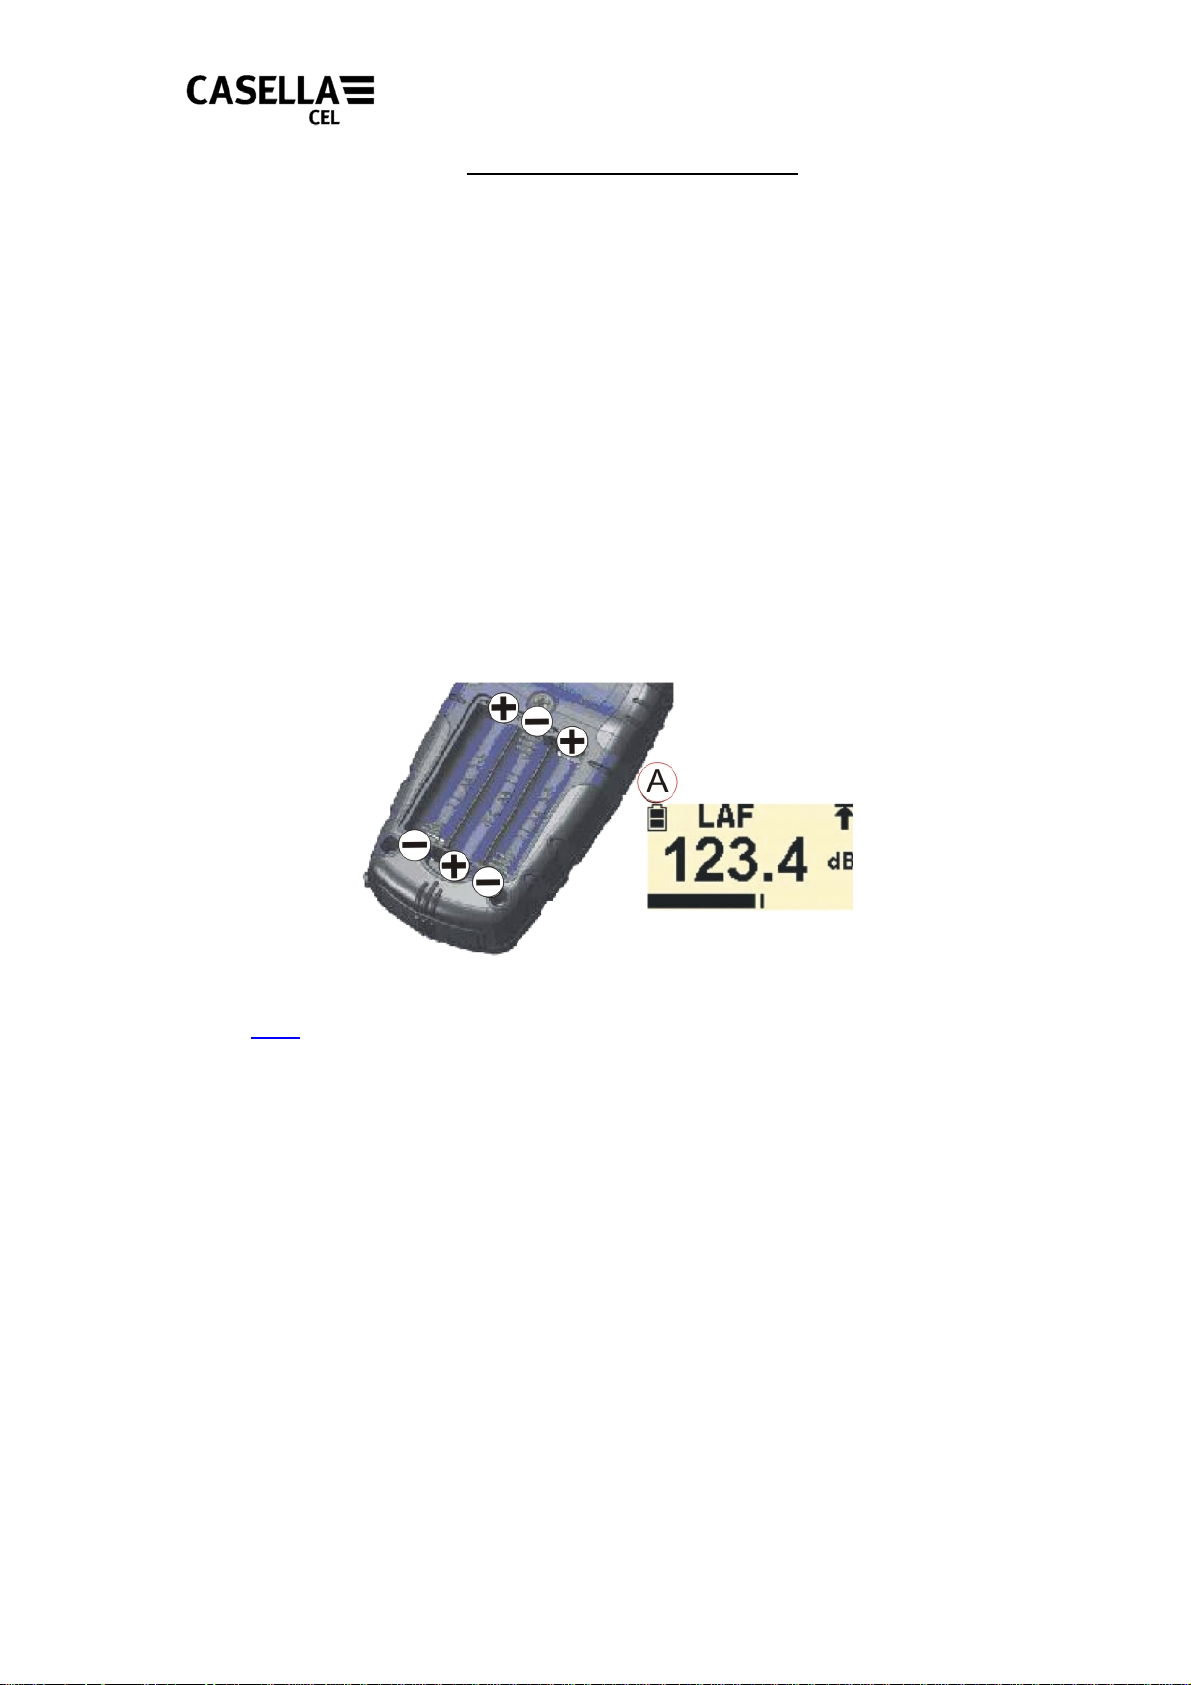
1. Open the Battery Cover.
2. Check the battery compartment is clean and dry.
3. Fit three new AA Alkaline (or
battery compartment.
4. Close the Battery Cover.
Notes:
If there is evidence of leakage from previously installed batteries, contact Casella
at the address given in Contact Details before using the instrument.
Caution:
Do not mix battery types.
Always
low to prevent the instrument switching OFF while in use.
fit new batteries when the battery ind icator (A) shows battery strength is
NiMH) batteries according to the polarity in the
Back to Index
Figure 2 Preparations for Use
6
4. GENERAL OPERATION
1. Press and release the Power ON/OFF key to switch ON
initiation the screen will display the firmware version
5 of the firmware)
Measurement screen. (Refer to Figure 3).
and the serial number (such as 0108121) followed by the Main
(e.g. V035-05 indicates issue
Note: During power-up, CEL-242 and CEL-246 models will display time/date and
memory settings as described in
Section 8. If you do not wish to alter these settings
on CEL-242/246 models do not press any keys and the instrument will proceed to the
main measurement shown below.
2. If the instrument requires calibration, refer to
CALIBRATION for details.
3. Fit the windshield over the microphone before attempting any measurement.
. During the software
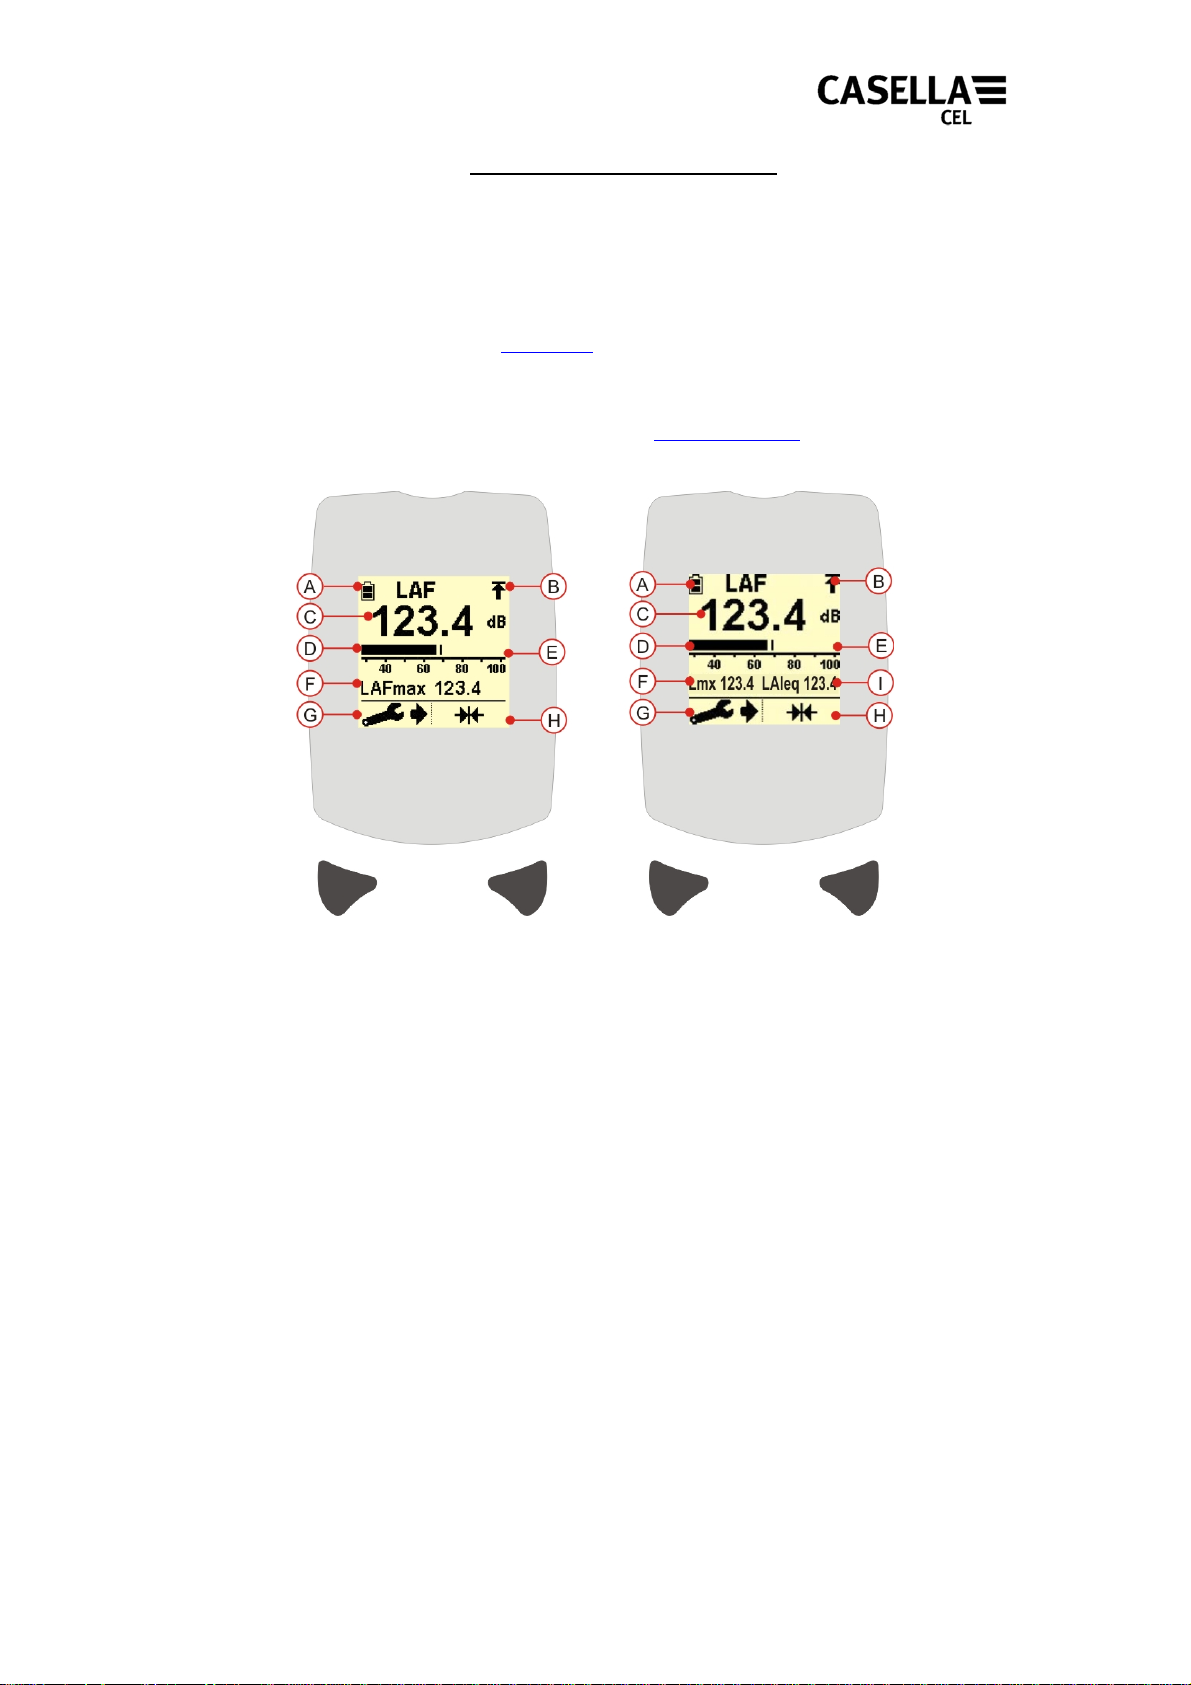
CEL-240/242 CEL-244/246
A. – Battery Indicator. B. – Over Range Indicator. C. – Sound Pressure Level.
D. Analogue Display Bar. E. Measurement Scale. F. Maximum Sound Pressure Level.
G. Instrument Settings. H. Reset. I. Average Sound Pressure Level.
Figure 3 Main Measurement Screen
7
 Loading...