

Page 1

Supplement
NMPJ Ver. 1.1 User’s Manual
Networked Multi-Projection
Setup and Instructions
Networked Multi-Projection
Overview
Operation in Each Mode
Functions
ENG
Page 2

Table of Contents
Safety Instructions........................ 4
Federal Communication Commission
Notice ...................................................... 4
Canadian Radio Interference
Regulations ............................................ 4
Open Source Software ................. 7
Networked Multi-Projection
Overview...................................9
Introduction to Networked Multi-
Projection .................................... 10
Installation ................................... 12
System Requirements ......................... 12
Installation ............................................ 13
Uninstallation .............................. 15
From Startup to Shutdown......... 19
Operation in Each Mode........25
Using the Projector in Direct
Mode............................................. 26
Procedure ............................................. 26
Direct Mode Window............................ 28
Using the Projector in Meeting
Mode............................................. 30
Creating a Session............................... 30
Joining a Session ................................ 35
Meeting Mode Window ........................ 36
Using the Projector in Classroom
Mode............................................. 38
Leading a New Session ....................... 38
Joining an Existing Session ............... 42
Classroom Mode Window (Starting a
Session) ................................................ 44
Classroom Mode Window (Joining a
Session) ................................................ 46
Using the Projector in Broadcast
Mode............................................. 48
Procedure ............................................. 48
Broadcast Mode Window .................... 50
Using the Projector Selection
Menu ............................................. 56
Projector Selection Menu.................... 56
Using Layout Functions .............60
Completing Software Projection
Settings ........................................66
Reducing Windows to a Compact
Size ...............................................68
Split-Screen Display With Non-
Network Sources ......................... 69
Tips for Better Networked
Projection..................................... 70
Restrictions..................................71
Functions................................53
Using the Session Selection
Menu............................................. 54
Session Selection Menu...................... 54
Finding Sessions ................................. 55
2
Page 3
Use of this manual
This manual does not provide the detailed description of basic operation and
functions for computer, web browser, projector and network. For instructions
about each piece of equipment or software, please refer to the respective
manual.
Trademarks
Ethernet is a registered trademark of Xerox Corporation. Microsoft, Windows,
Windows Vista, Windows 7 and Windows 8 are registered trademarks of
Microsoft Corporation in the United States and other countries. Internet
Explorer is a registered trademark of Microsoft Corporation. JavaScript is a
registered trademark or trademark of Oracle Corporation and its subsidiaries
and affiliates in the United States and other countries.
Mac, Mac OS and Macintosh are registered trademarks of Apple, Inc. in the
USA and other countries. PowerPC is a registered trademark of IBM
Corporation. Intel Core is a registered trademark of Intel Corporation in the
USA and other countries.
Other product or brand names in this manual are registered trademarks or
trademarks of their respective owners.
* Unauthorized use of a part or whole of the contents in this manual is
prohibited.
* The contents of this manual are subject to change without notice.
Symbols Used in This Manual
Meanings of the symbols used in this manual are as follows.
A precaution about operation or restriction is given here.
Indicates supplemental information to note in use.
3
Page 4

Safety Instructions
Federal Communication Commission Notice
Multimedia Projector, Model: WUX6000
This device complies with Part 15 of the FCC Rules. Operation is subject to the
following two conditions:
(1) This device may not cause harmful interference, and
(2) this device must accept any interference received, including interference that
may cause undesired operation.
Note: This equipment has been tested and found to comply with the limits for a
Class B digital device, pursuant to Part 15 of the FCC Rules. These limits are
designed to provide reasonable protection against harmful interference in a
residential installation. This equipment generates, uses and can radiate radio
frequency energy and, if not installed and used in accordance with the
instructions, may cause harmful interference to radio communications. However,
there is no guarantee that interference will not occur in a particular installation. If
this equipment does cause harmful interference to radio or television reception,
which can be determined by turning the equipment off and on, the user is
encouraged to try to correct the interference by one or more of the following
measures:
• Reorient or relocate the receiving antenna.
• Increase the separation between the equipment and receiver.
• Connect the equipment into an outlet on a circuit different from that to which the
receiver is connected.
• Consult the dealer or an experienced radio / TV technician for help.
The cable with a ferrite core provided with the projector must be used with this
equipment in order to comply with Class B limits in Subpart B of Part 15 of the
FCC rules.
Use of a shielded cable is required to comply with class B limits in Subpart B of
Part 15 of FCC Rules.
Do not make any changes or modifications to the equipment unless otherwise
specified in the instructions. If such changes or modifications should be made,
you could be required to stop operation of the equipment.
Canon U.S.A. Inc.
One Canon Park, Melville, New York 11747, U.S.A.
Tel No. (631) 330-5000
4
Page 5
Safety Instructions
CAUTION IN USING THE PROJECTOR VIA
NETWORKS
• When you find a problem with the projector, remove the power cable immediately
and inspect the unit. Using the projector with failure may cause fire or other
accidents.
• If you remotely use the projector via networks, carry out a safety check regularly
and take particular care to its environment. Incorrect installation may cause fire or
other accidents.
Caution in using network function
• We assume no responsibility for the loss or damage of data, or damage of the
computer caused by using this projector. Making back-up copies of valuable data
in your computer is recommended.
Safety instructions
Please read and understand all instructions thoroughly before using.
Safety Instructions
About safety symbols
The following symbols are used in this manual to alert you to important safety
information. Always observe the instructions to reduce the risk of injury and
property damage.
Indicates a potentially hazardous situation which, if not avoided,
may cause death or serious injury.
Indicates a potentially hazardous situation which, if not avoided,
may cause minor or moderate injury.
5
Page 6
Safety Instructions
Safety information
Always mount and operate the product in accordance with the safety instructions
specified by the projector and peripheral equipment makers.
• Do not attempt to disassemble or service the product yourself. Doing so may
result in a fire, an electric shock, or product damage.
• If the projector emits a strange odor, or makes a strange noise, immediately
turn the power and peripheral equipment off, unplug these devices, and
contact your dealer.
• Do not drop the projector or subject it to strong shocks. Doing so may result
in damage to the internal parts, an electric shock, a fire, or product damage.
• Do not touch the projector with wet hands when the power cord plugs of the
projector or peripheral equipment inserted into the electrical outlet.
Otherwise, an electric shock may result.
6
Page 7

Open Source Software
The NMPJ software incorporates third-party software modules. For details, refer to
the “Third-Party Software” PDF file on the included installation CD-ROM, in
[thirdparty_software] > [NMPJ] > [LICENSE]. Each module’s license conditions are
also available in the same folder.
NO WARRANTY
BECAUSE THE PROGRAM IS LICENSED FREE OF CHARGE, THERE IS NO
WARRANTY FOR THE PROGRAM, TO THE EXTENT PERMITTED BY
APPLICABLE LAW. EXCEPT WHEN OTHERWISE STATED IN WRITING THE
COPYRIGHT HOLDERS AND/OR OTHER PARTIES PROVIDE THE PROGRAM
“AS IS” WITHOUT WARRANTY OF ANY KIND, EITHER EXPRESSED OR
IMPLIED, INCLUDING, BUT NOT LIMITED TO, THE IMPLIED WARRANTIES OF
MERCHANTABILITY AND FITNESS FOR A PARTICULAR PURPOSE. THE
ENTIRE RISK AS TO THE QUALITY AND PERFORMANCE OF THE PROGRAM
IS WITH YOU. SHOULD THE PROGRAM PROVE DEFECTIVE, YOU ASSUME
THE COST OF ALL NECESSARY SERVICING, REPAIR OR CORRECTION.
IN NO EVENT UNLESS REQUIRED BY APPLICABLE LAW OR AGREED TO IN
WRITING WILL ANY COPYRIGHT HOLDER, OR ANY OTHER PARTY WHO MAY
MODIFY AND/OR REDISTRIBUTE THE PROGRAM AS PERMITTED ABOVE, BE
LIABLE TO YOU FOR DAMAGES, INCLUDING ANY GENERAL, SPECIAL,
INCIDENTAL OR CONSEQUENTIAL DAMAGES ARISING OUT OF THE USE OR
INABILITY TO USE THE PROGRAM (INCLUDING BUT NOT LIMITED TO LOSS
OF DATA OR DATA BEING RENDERED INACCURATE OR LOSSES SUSTAINED
BY YOU OR THIRD PARTIES OR A FAILURE OF THE PROGRAM TO OPERATE
WITH ANY OTHER PROGRAMS), EVEN IF SUCH HOLDER OR OTHER PARTY
HAS BEEN ADVISED OF THE POSSIBILITY OF SUCH DAMAGES.
Open Source Software
NO SUPPORT
Canon Inc., and all its subsidiaries or its dealers do not make any support service
regarding the source code. Canon Inc., and all its subsidiaries or its dealers shall
not respond to any questions or enquiries, from you or any other customers,
regarding the source code.
7
Page 8

8
Page 9

Networked MultiProjection
Overview
Networked Multi-Projection Overview
Operation in Each Mode
Functions
9
Page 10
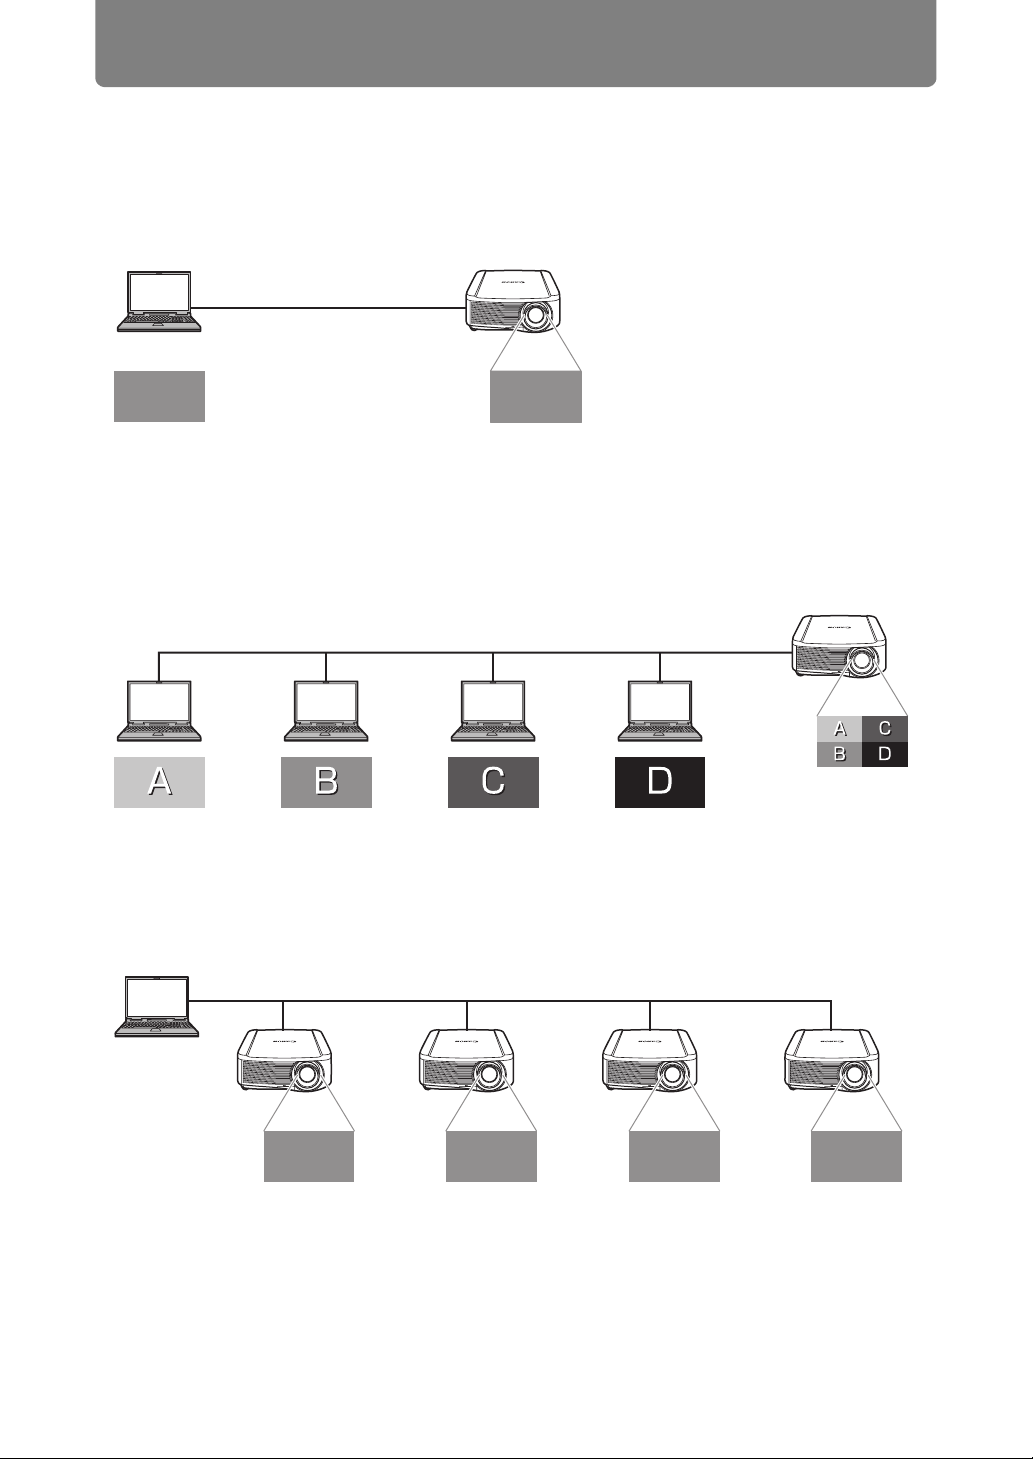
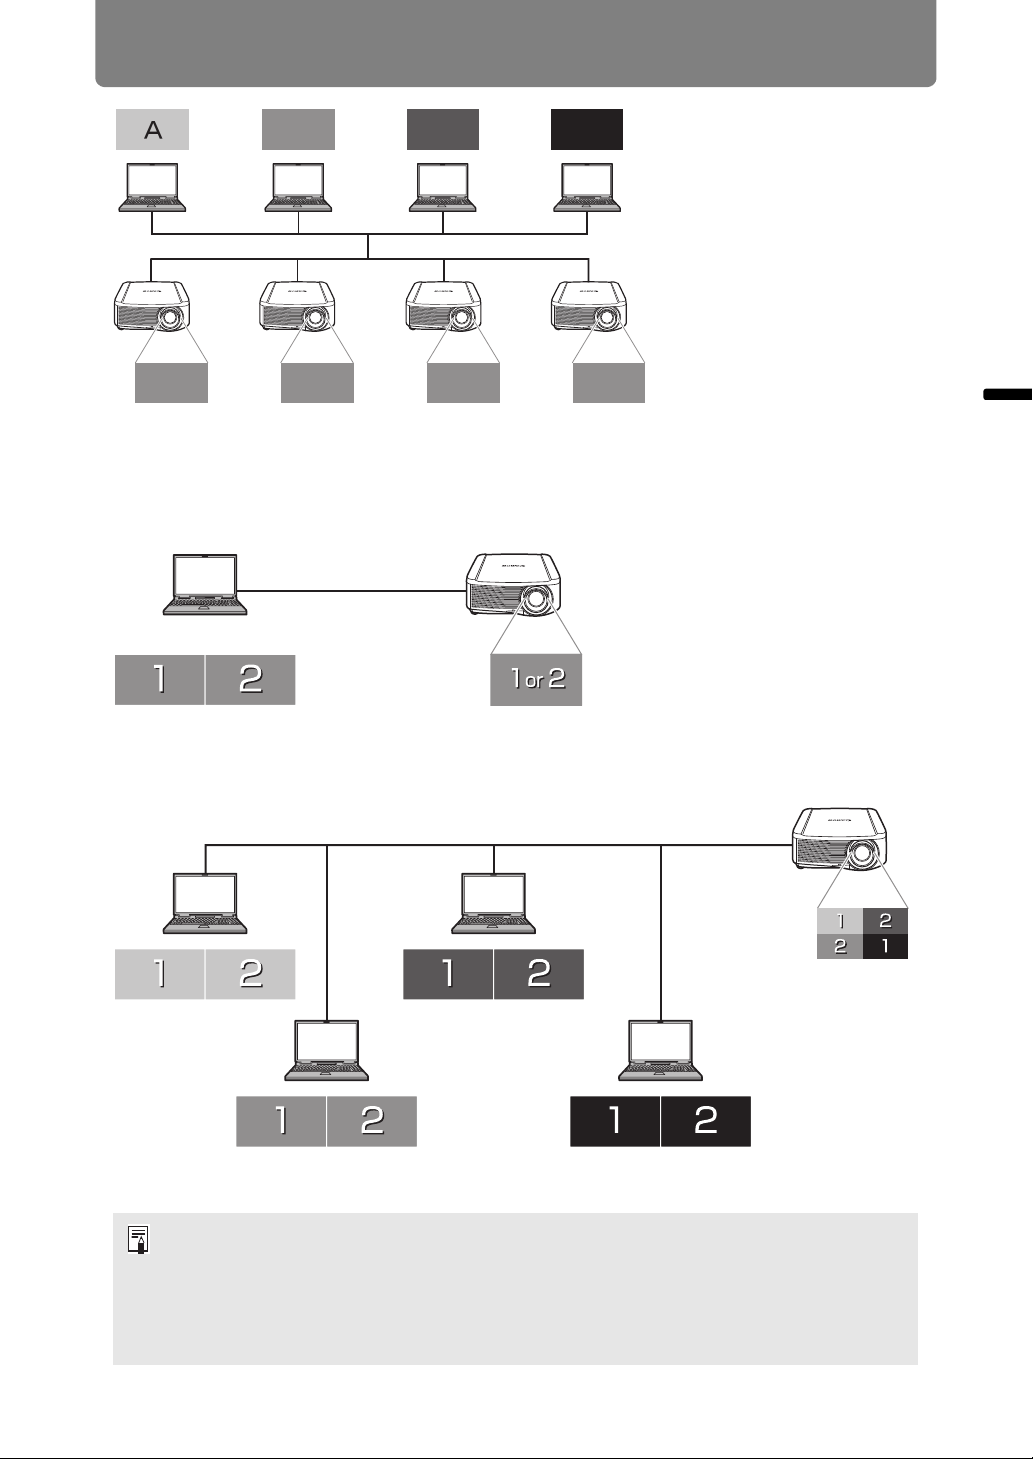
Introduction to Networked Multi-Projection
Networked Multi-Projection (NMPJ) is a projector function enabling projection of
computer screens over a local network.
■ Projection Over a Network
Using this software, you can link multiple computers and multiple projectors, for a
variety of projection scenarios.
LAN
Links computers and projectors via a network connection.
• Direct Mode
■ Split-Screen Projection of Multiple Images
Images from multiple computers can be projected at once, with the images
projected in separate areas of a single screen.
LAN
Projection of multiple computer screens in split-screen display.
• Meeting Mode, Classroom Mode
■ Projection of an Image from Multiple Projectors at Once
Images from a single computer can be projected from multiple projectors at once.
LAN
Projection of one computer screen from multiple projectors.
• Meeting Mode, Classroom Mode, Broadcast Mode
10
Page 11
Introduction to Networked Multi-Projection
A
㧭
$
mong multiple computers in a network, projection of one computer screen from multiple projectors.
• Classroom Mode, Meeting Mode
$
.#0
$
%
$
&
$
For multi-monitor computers, you can project either the primary or secondary monitor.
■ Selecting the Projection Monitor
LAN
Networked Multi-Projection Overview
Select the primary or secondary monitor for projection
• Direct Mode, Meeting Mode, Classroom Mode, Broadcast Mode
For each computer, you can select the monitor to project.
LAN
Select the primary or secondary monitor of each computer
• Classroom Mode
• With some computers, it may not be possible to switch between projection of the
primary and secondary monitor.
• Software responsiveness may decline when many computers and projectors are
connected over the network.
• For computers that support three or more monitors, the monitor used for projection
varies depending on the model of computer.
11
Page 12

Installation
To use the NMPJ function, you must install the NMPJ software (hereafter, “the
software”) on the computers to be used.
Instructions in this manual are for installation in a Windows 7 environment.
System Requirements
Software system requirements are as follows.
CPU Core 2 Duo P8600, 2.4 GHz or higher (32- or 64-bit)
Memory 1 GB or more
HDD 32 GB or more
Monitor Resolution: 1024x768 dots or more
Cannot be installed on computers without a minimum resolution of
1024x768. Additionally, operation is not ensured if the resolution is
switched to less than 1024x768 after installation.
Operating System
Windows Vista (Business) SP2
Windows 7 (Home/Professional/Ultimate) SP1
Windows 8 (Pro)
Windows 8.1 (Pro)
* Windows Vista compatibility is limited to 32-bit editions.
* Both 32- and 64-bit editions of Windows 7 and later are supported.
• Operation is not ensured in other operating systems or editions.
• Menus are in English in all cases, except in Japanese and Simplified
Chinese versions of the software.
• Operation is not ensured in operating systems other than English,
Japanese, or Simplified Chinese OSes.
Network In TCP/IP network environments, projectors can be connected to
computers via the following LAN connections.
Wired LAN (1000BASE-T, 100BASE-TX)
• Although the software also supports computer-projector
communication over a router, operation is only ensured over one
router hop. Additionally, to use Broadcast mode (P48) with projectors
in other subnets, the router must support IPv4 multicast routing. Note
that the router must be set up to route multicast addresses used by
the software.
• If you are using an Aero style in Windows, this message may be
displayed: “Do you want to change the color scheme to improve
performance?”
Magnification Display magnification:
Cannot be installed on computers with display magnification set
higher than 200%.
12
Page 13
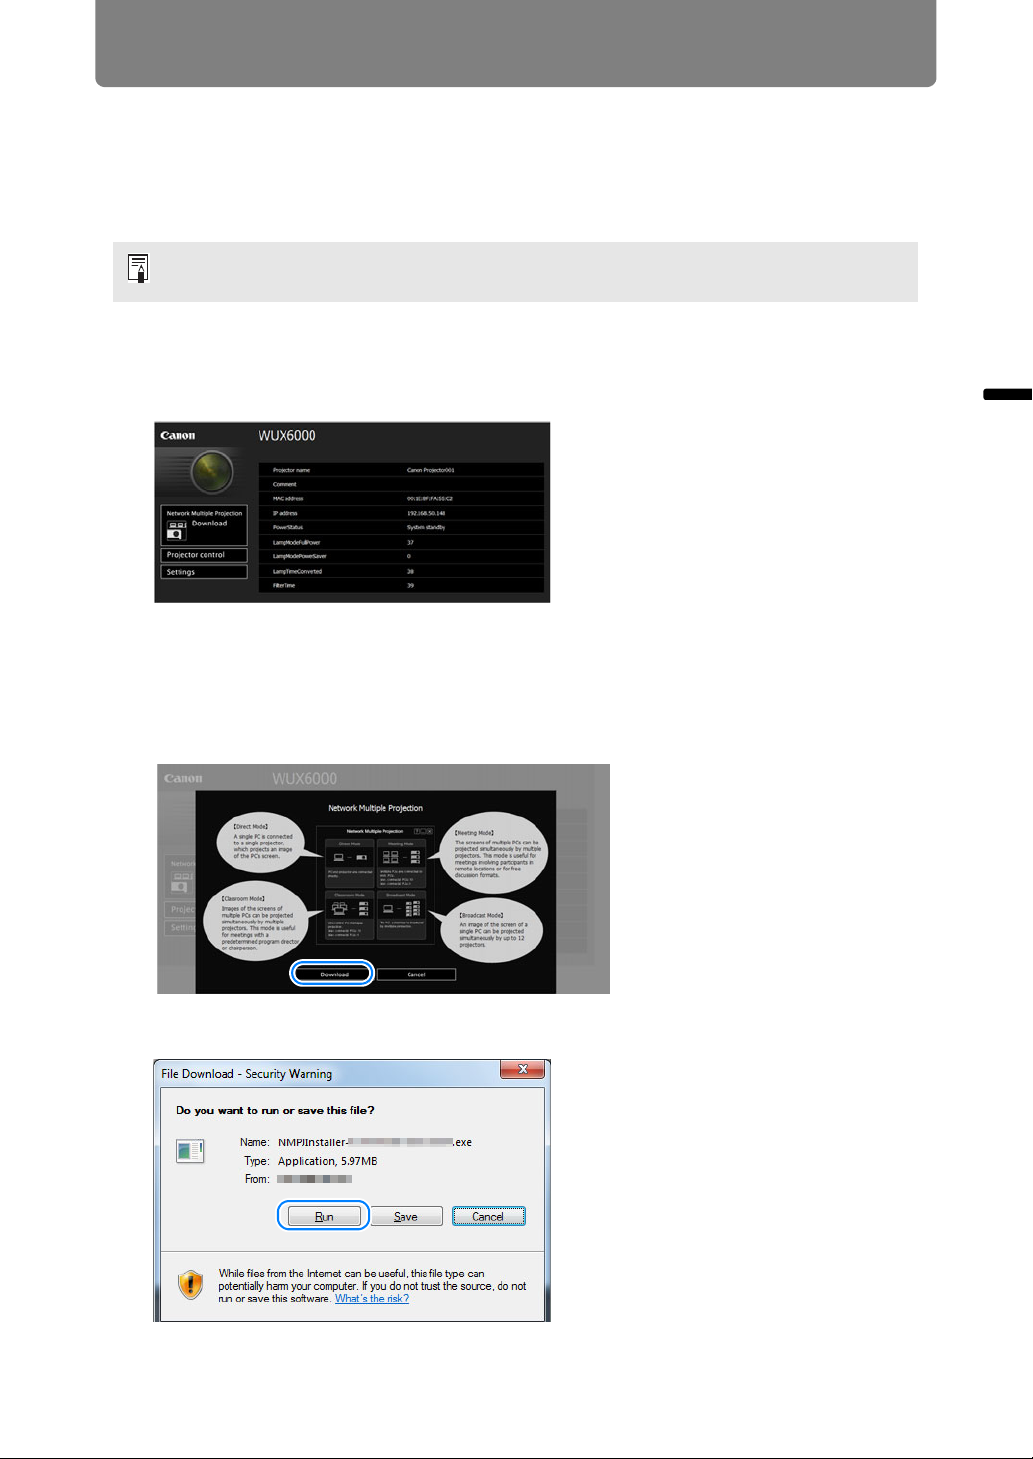
Installation
Installation
The software is stored in the projector’s internal memory. To install it on a computer,
use a web browser on the computer to access the projector and download the
software.
For instructions on connecting the projector to a network, refer to the projector user’s
manual.
1 On the computer, start a web browser and connect to the projector.
For instructions on accessing the projector’s web screen from a browser, refer
to the projector user’s manual.
For instructions on checking the projector’s IP address, refer to the projector
user’s manual.
Networked Multi-Projection Overview
2 Click [Network Multiple Projection Download].
3 Click [Download].
4 When a confirmation message is displayed, click [Run].
13
Page 14
Installation
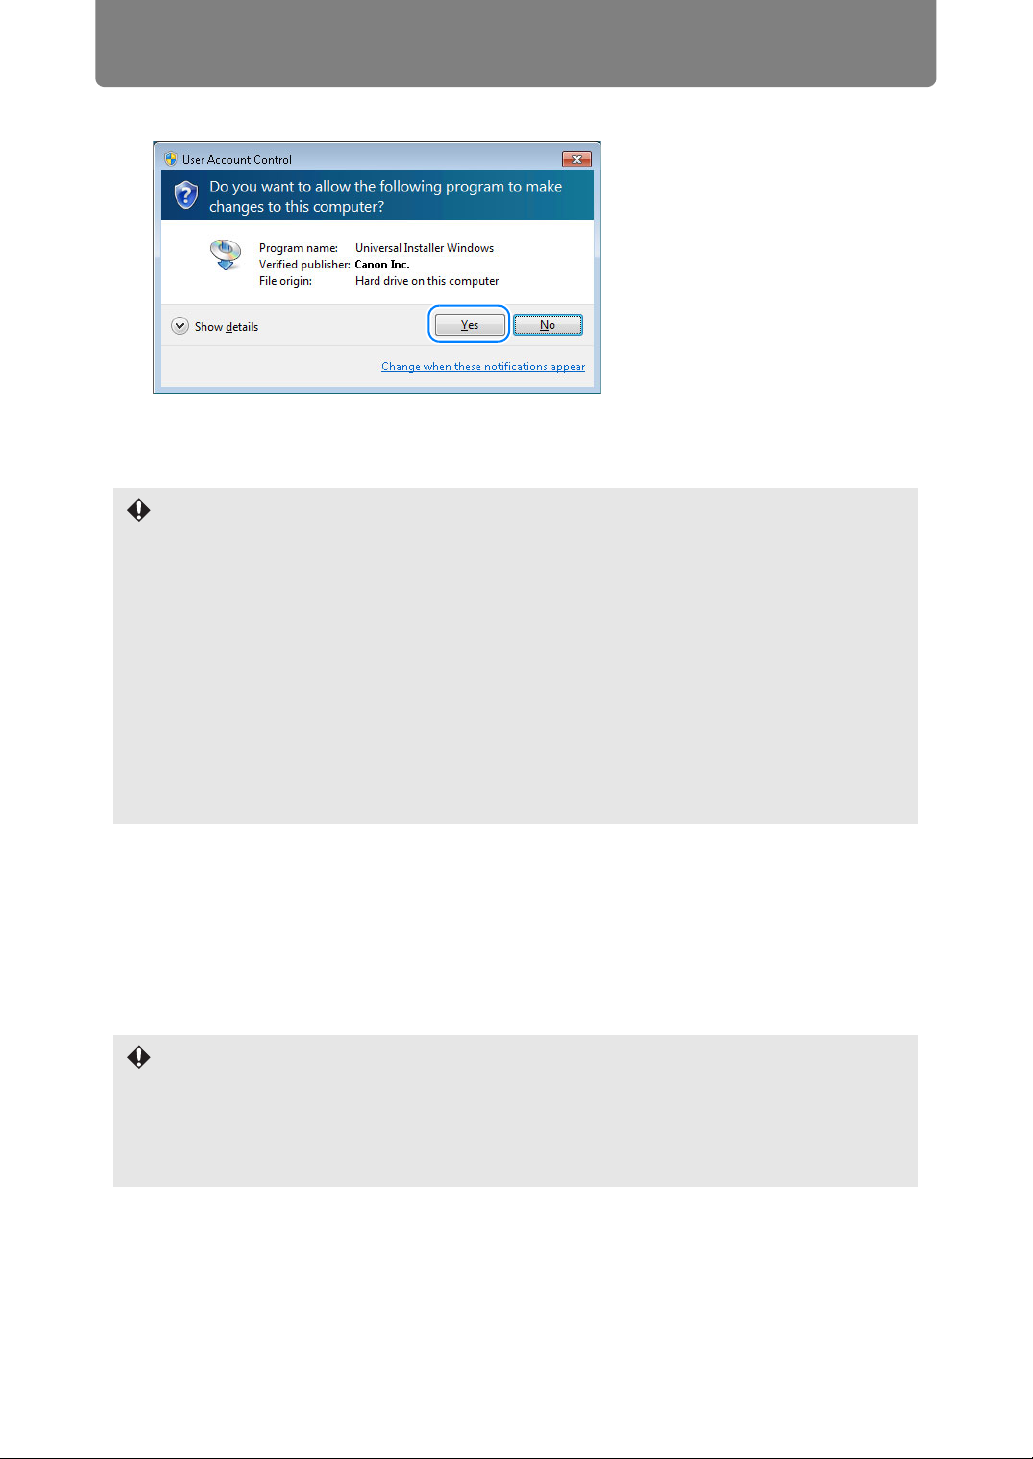
5 If a [User Account Control] message is displayed, click [Yes].
6 Next, follow the instructions displayed to complete the installation
process.
• Confirmation or warning messages may be displayed during installation or
uninstallation.
These messages request administrator credentials from the current user. If you are
logged in as a user with administrator credentials, click [Yes] (or [Continue]) to
continue.
• Depending on the software, you may not be able to continue without administrator
credentials. If you are logged in as a standard user, switch to an administrator account
and try again.
• You may need to restart the computer to complete the installation process. If restarting
is requested, be sure to restart the computer.
• The software cannot be installed when the following setting is used in Windows 8.1.
Control Panel > All Control Panel Items > Display > “Let me choose one scaling level
for all my displays” selected > “Extra Large - 200%” selected.
Install the software using a setting other than “Extra Large - 200%.”
■ Updating the Software
If the version of the software installed is older than a version available on a
projector, you can update it by following the normal installation procedure.
During the installation process, the version available is compared to the version
installed, and if it is newer, the current version is overwritten as the new version is
installed. If overwriting is not necessary, the installation process ends.
Software Versions
The version of the software stored on the projector’s internal memory is 1.1.
• Any projectors purchased previously may have been shipped with version 1.0 of the
software stored internally.
• The software will automatically detect if a newer version of the software is available on
a projector. In this case, a message is displayed to notify you.
14
Page 15
Uninstallation
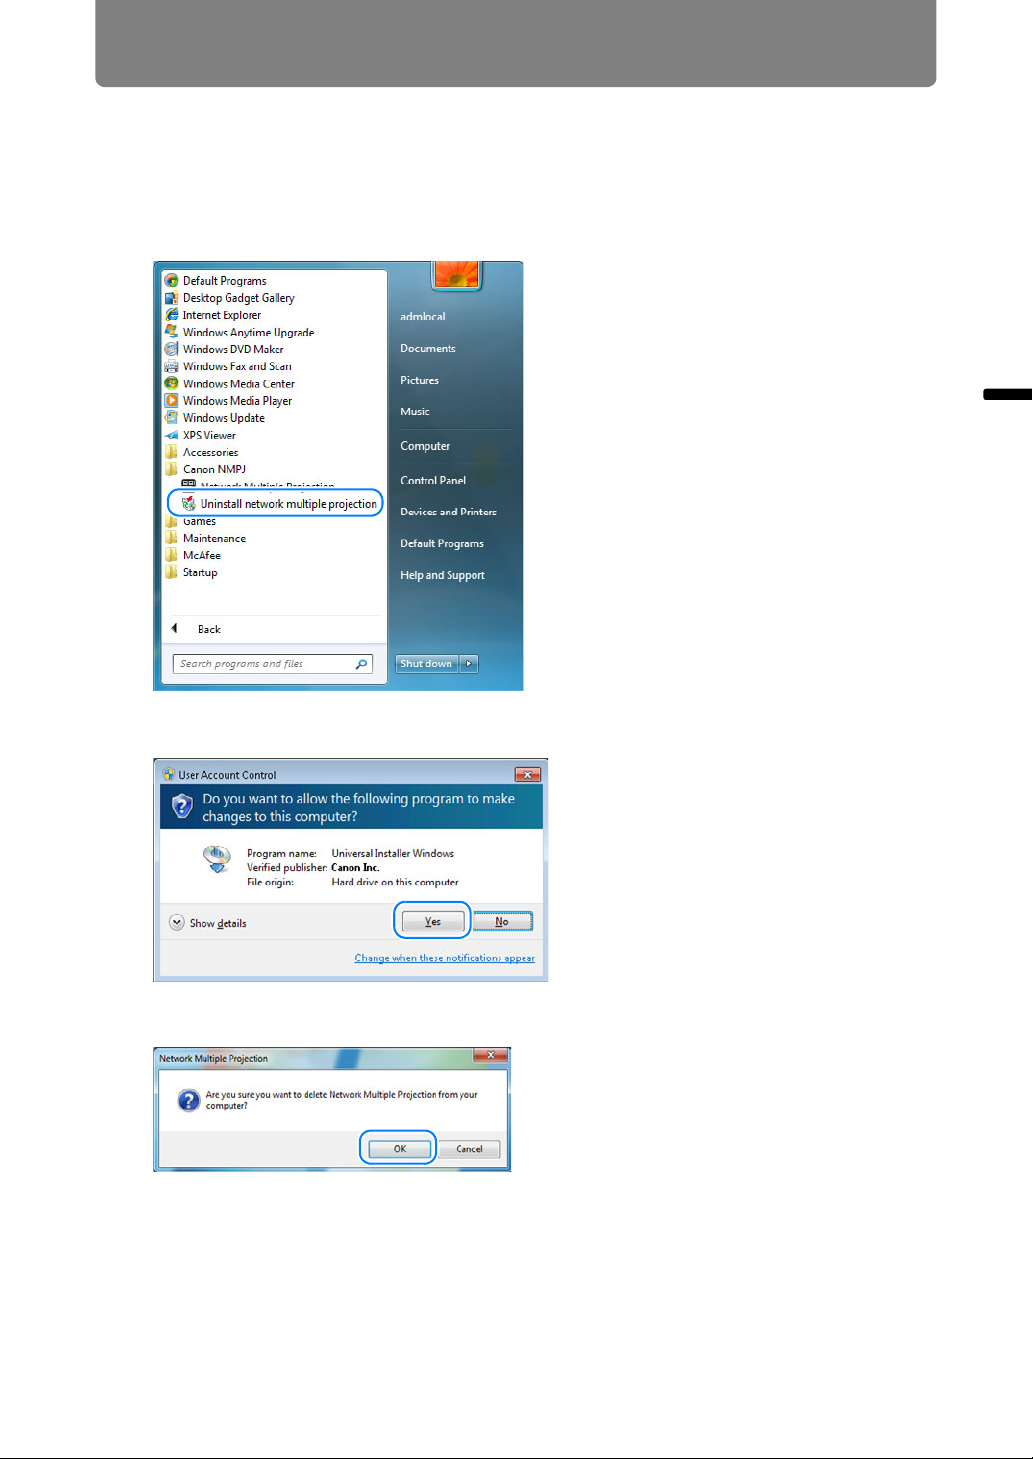
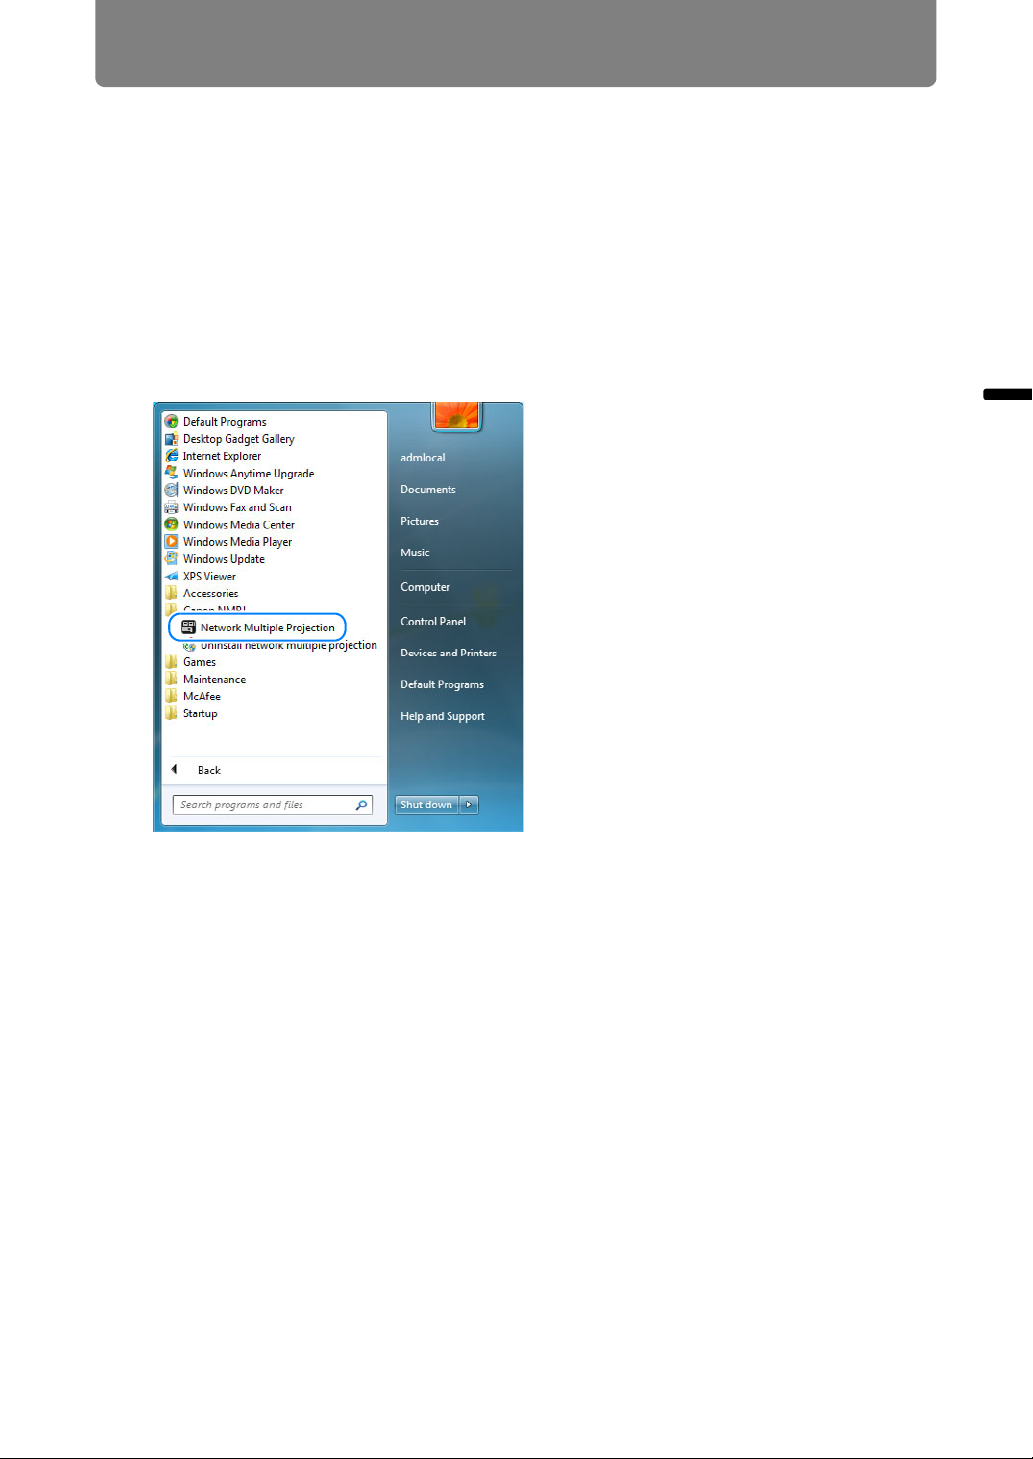
■ Windows 7 or Earlier
These instructions are for uninstallation in Windows 7 or earlier versions of
Windows.
1 Select [Start] > [All Programs] > [Canon NMPJ] > [Uninstall network
multiple projection].
Networked Multi-Projection Overview
2 If a [User Account Control] message is displayed, click [Yes].
3 After the confirmation message is displayed, click [OK].
15
Page 16
Uninstallation
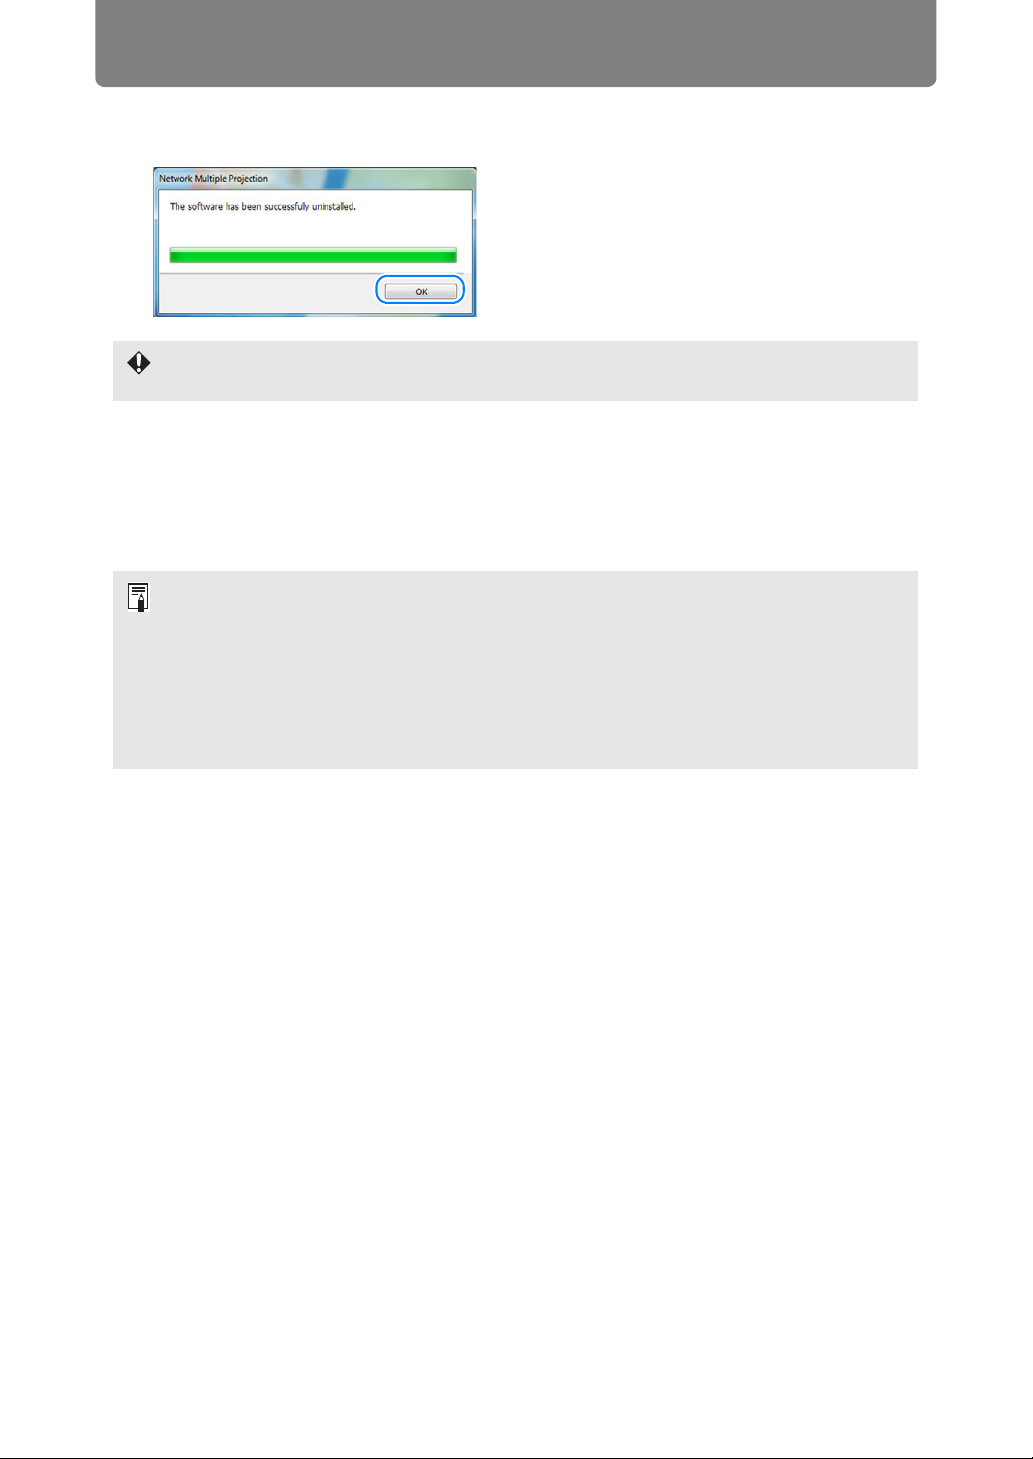
4 After uninstallation is finished, click [OK] when the confirmation message
is displayed.
You may need to restart the computer to complete the uninstallation process. If restarting
is requested, always restart the computer.
5 Delete the following folder manually.
Windows Vista
C:\Users\<User Name>\AppData\Local\Canon\NMPJ
Windows 7
C:\Users\<User Name>\AppData\Local\Canon\NMPJ
These files are hidden. To view hidden files, follow these steps.
Windows Vista
To view hidden files in Windows Explorer, select [Folder options] > [View] > [Show hidden
files, folders, and drives].
Windows 7
In Windows Explorer, select [Tools] > [Folder Options] > [View] > [Show hidden files,
folders, and drives].
16
Page 17
Uninstallation
■ Windows 8 or Later
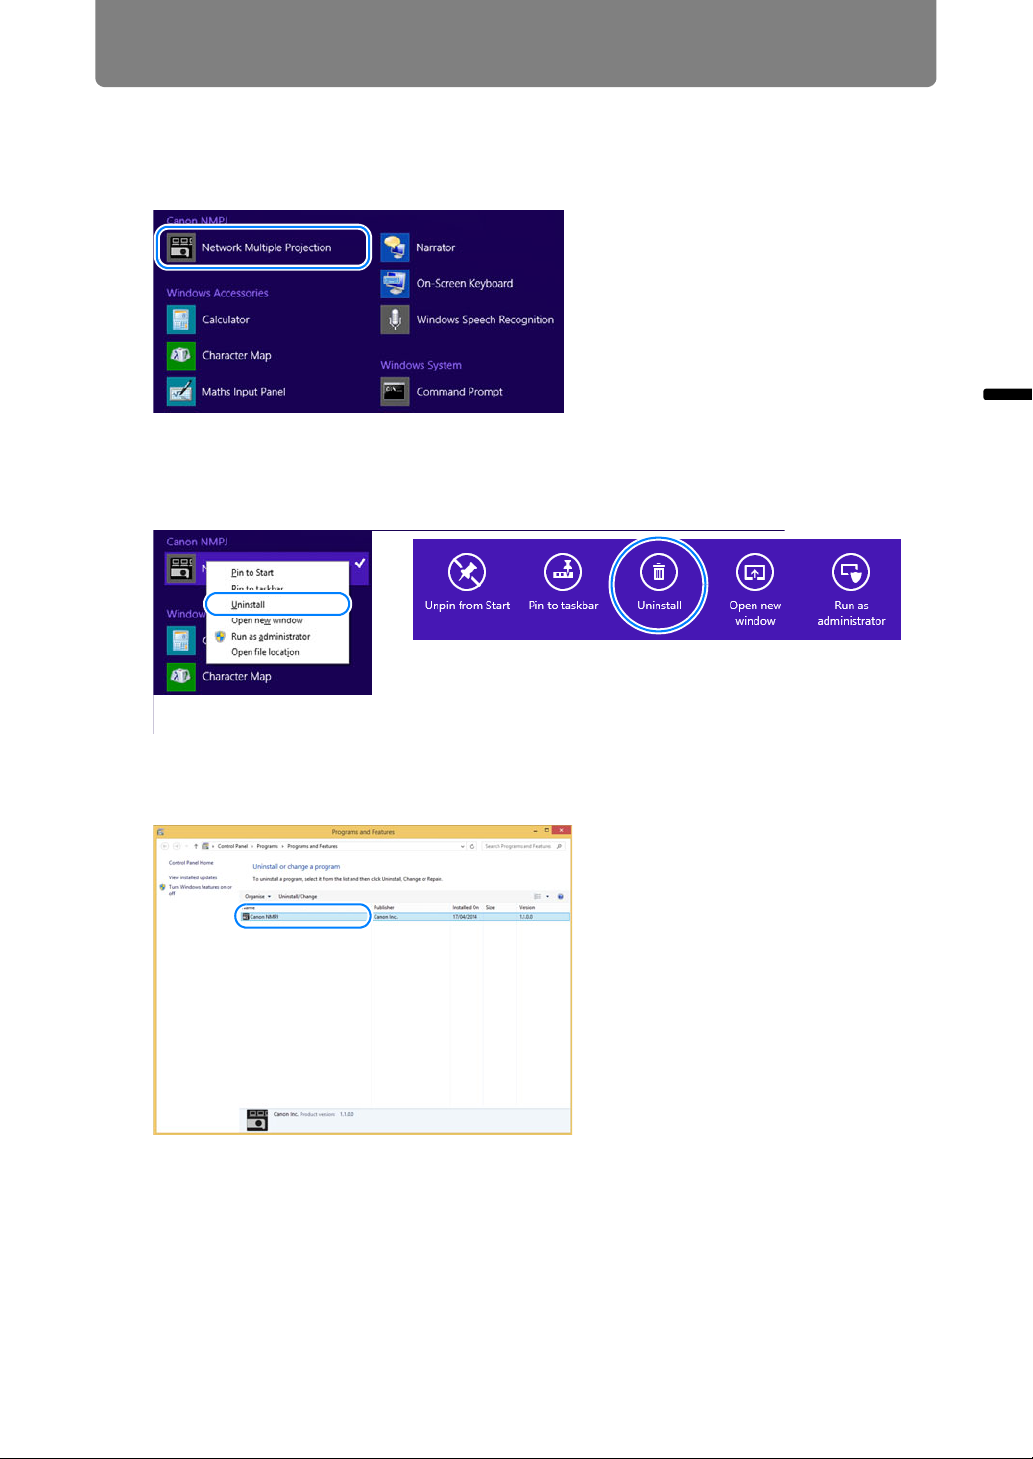
These instructions are for uninstallation in Windows 8 or later versions of Windows.
1 On the [Apps] screen, right-click the [Canon NMPJ] application icon.
2 In the menu displayed at the bottom of the [Apps] screen, click
[Uninstall]. Otherwise, click [Uninstall] in the app bar and then [Uninstall]
again on the screen displayed next.
Networked Multi-Projection Overview
Windows 8/8.1
Windows 8.1 Update
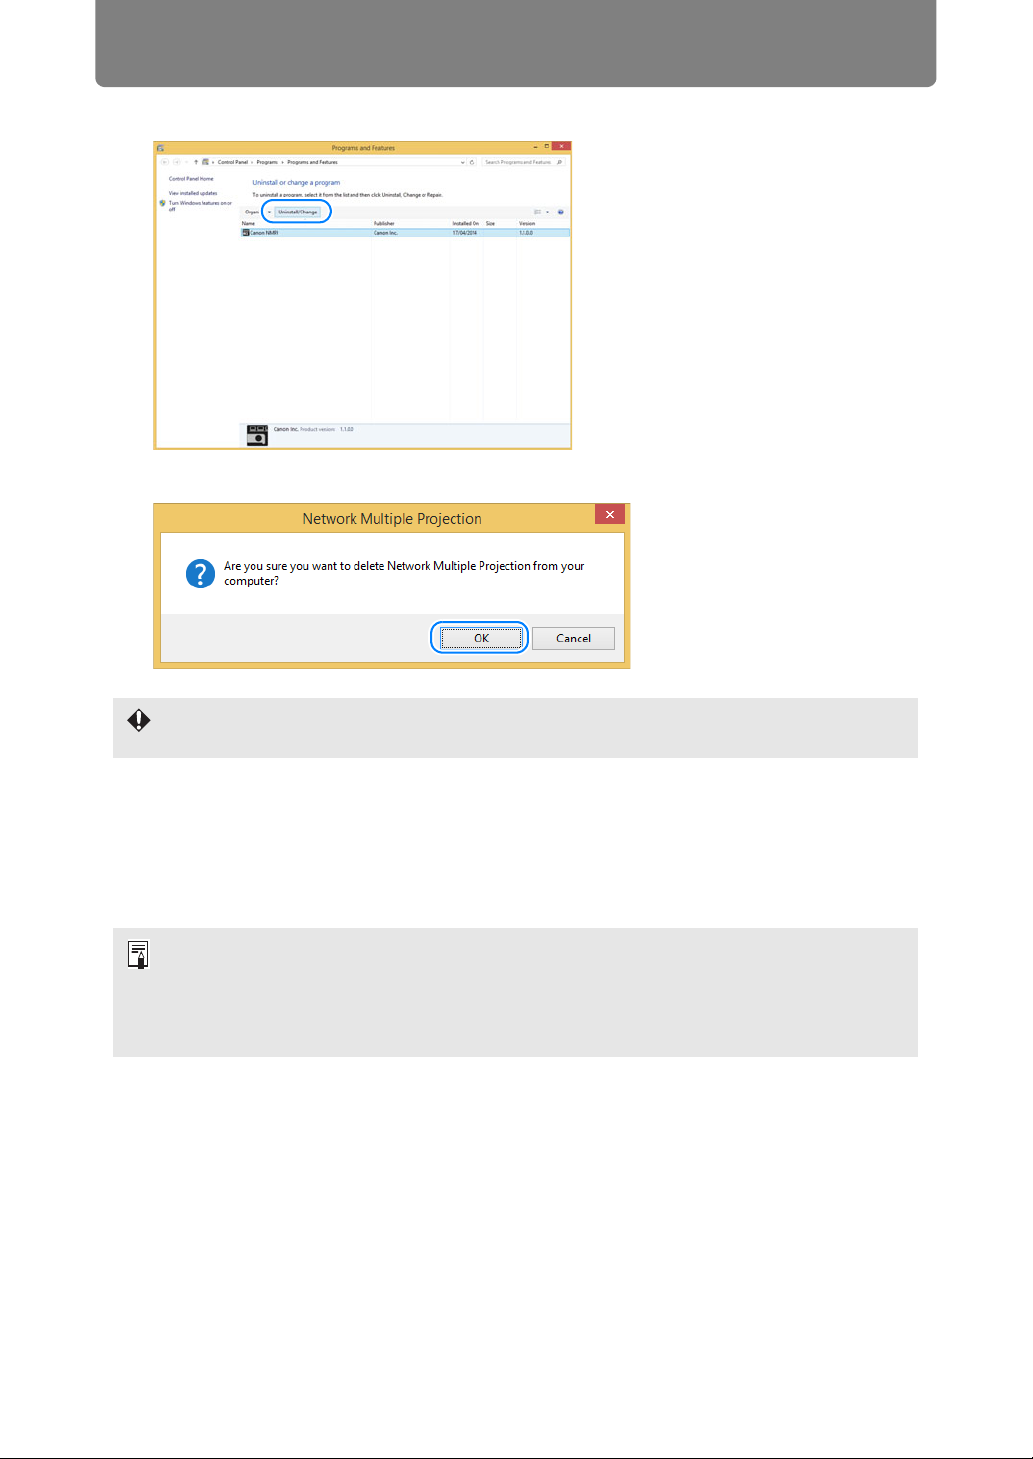
3 In the [Programs and Features] screen that is displayed, select [Canon
NMPJ].
17
Page 18
Uninstallation
4 Select [Uninstall/Change].
5 After the confirmation message is displayed, click [OK].
You may need to restart the computer to complete the uninstallation process. If restarting
is requested, always restart the computer.
6 Delete the following folder manually.
Windows 8
C:\Users\<User Name>\AppData\Local\Canon\NMPJ
Windows 8.1
C:\Users\<User Name>\AppData\Local\Canon\NMPJ
These files are hidden. To view hidden files, follow these steps.
Windows 8 or later
In Windows Explorer, select [Tools] > [Folder Options] > [View] > [Show hidden files,
folders, and drives].
18
Page 19
From Startup to Shutdown
The procedure from software startup to shutdown is as follows. Example windows
shown here are from Direct mode.
(Windows 8 or Later)
1 Select [Start] > [Apps] > [Canon NMPJ] > [Network Multiple Projection].
(Windows 7 or Earlier)
1 Select [Start] > [All Programs] > [Canon NMPJ] > [Network Multiple
Projection].
Networked Multi-Projection Overview
19
Page 20
From Startup to Shutdown
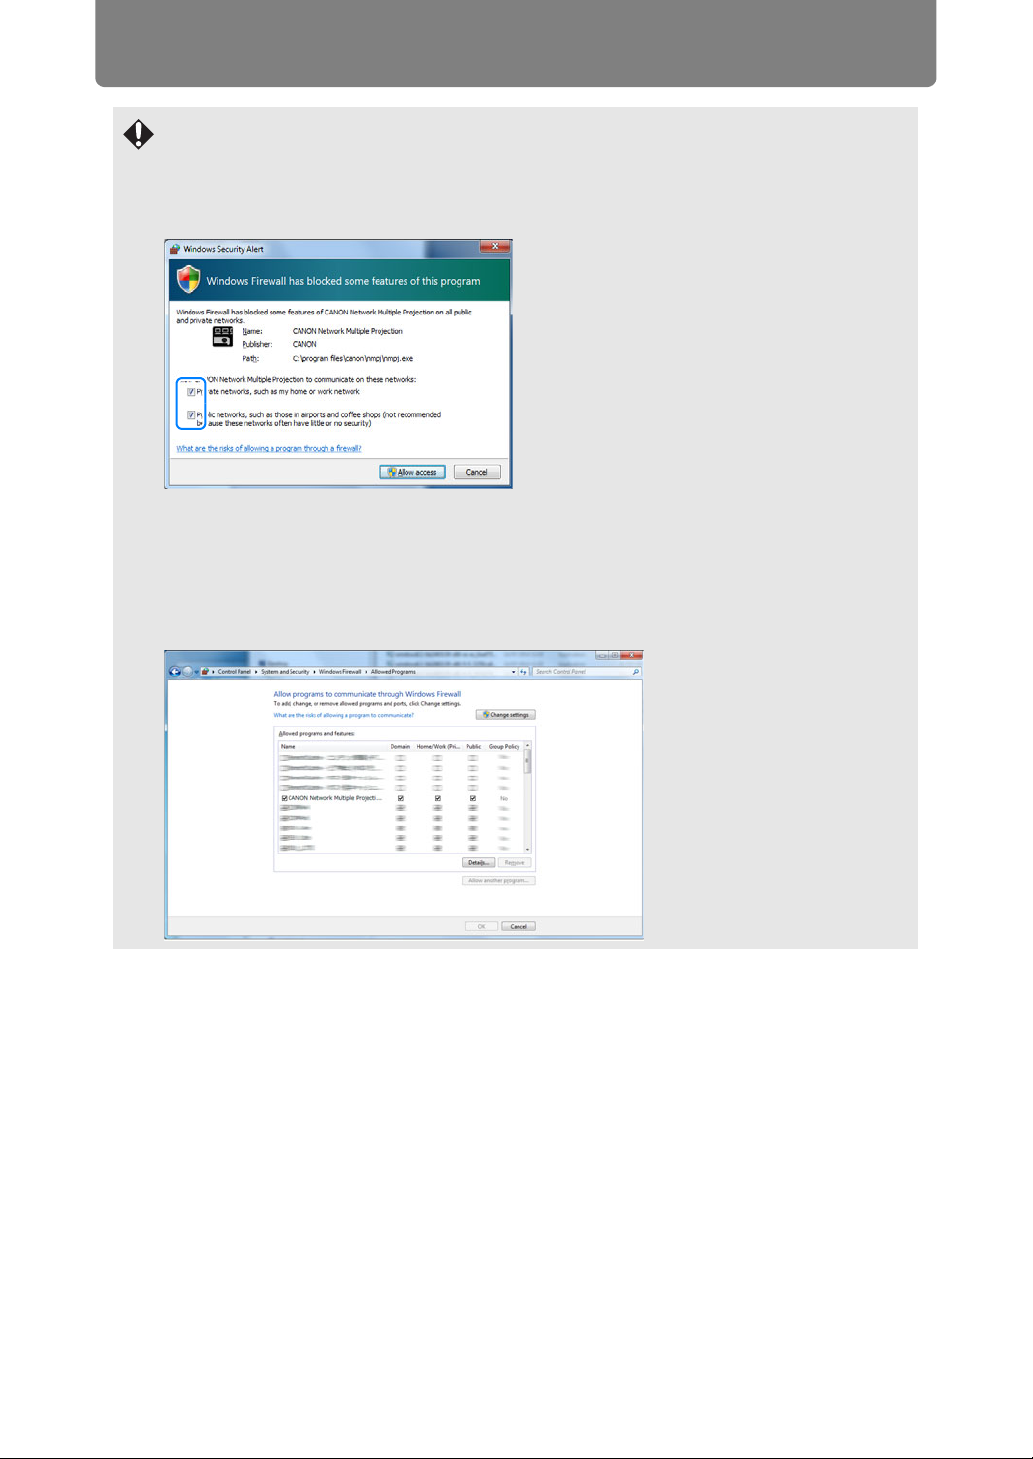
Windows Firewall
The following alert may be displayed the first time you start the software, depending on
your Windows Firewall settings.
To enable communication with projectors, select all check boxes and click the [Allow
access].
To change the settings after closing the alert, open the [Start] menu and select [Control
Panel] > [System and Security] > [Windows Firewall] > [Allow an app through Windows
Firewall].
Select [CANON Network Multiple Projection] in the list of allowed apps and features, and
then select each check box.
20
Page 21
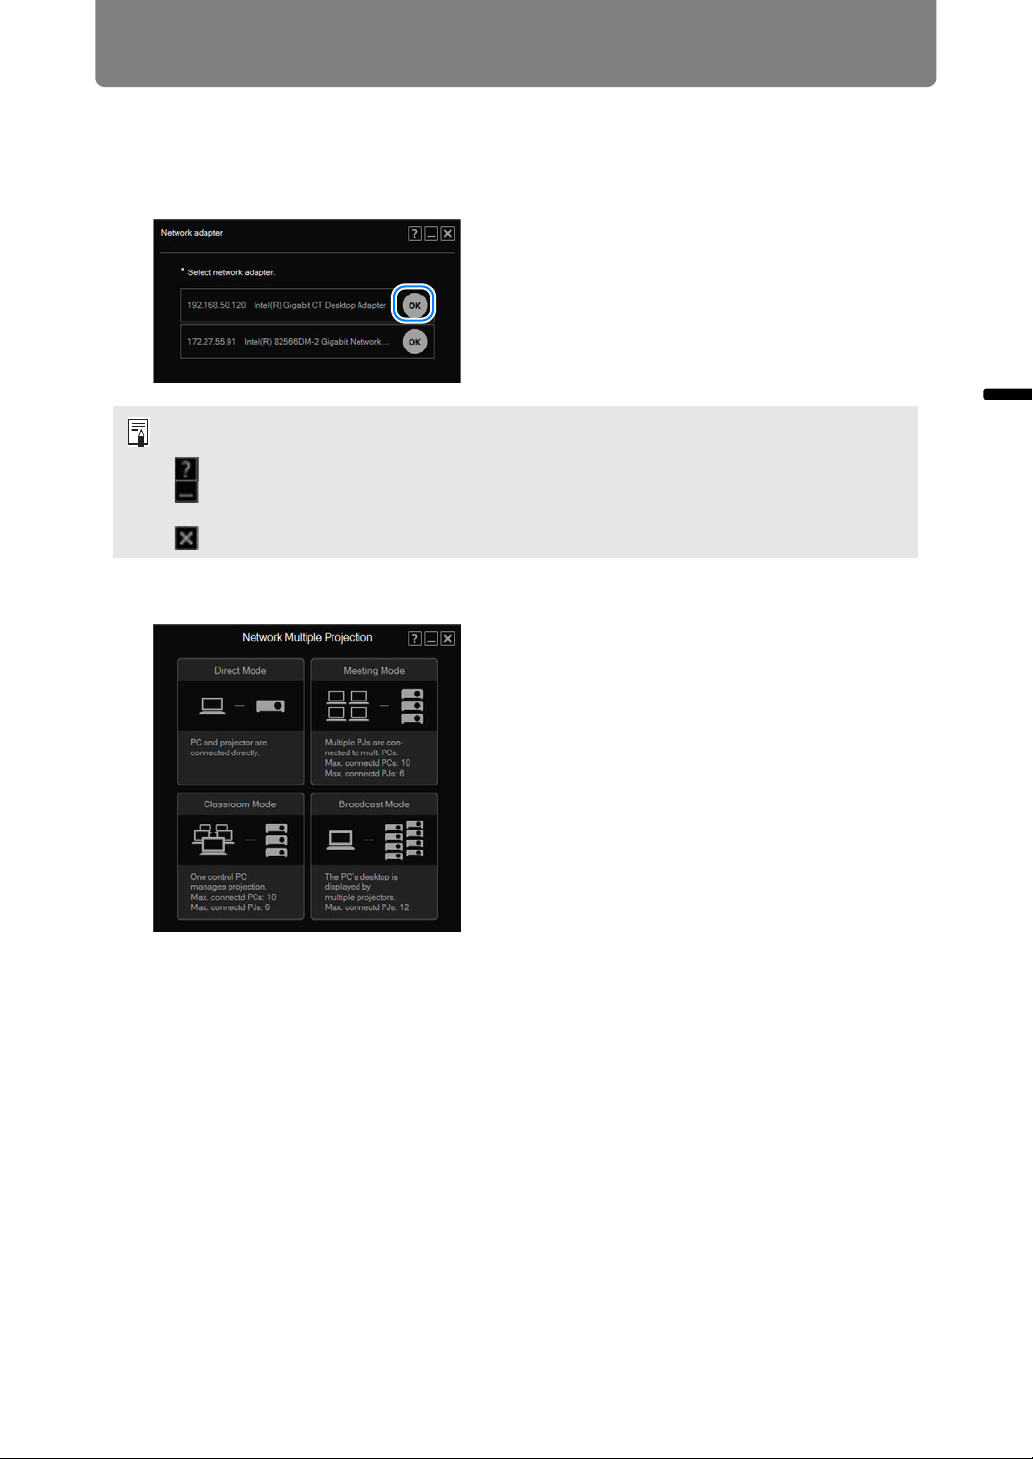
From Startup to Shutdown
2 If the computer is equipped with multiple network adapters, or if one
network adapter has been assigned multiple IP addresses (IP aliases), a
selection screen is displayed. Click [OK] next to the desired network
adapter.
The same three buttons are shown in the upper right of this window and subsequent
windows. (Additional buttons are shown on some windows.)
[ ] View software help.
[ ] Minimize the window to the taskbar. To view the window again, click the taskbar
icon.
[ ] Close the window.
3 On the mode selection window, click the desired mode.
(1)
(3)
(1) Direct Mode
When one computer is connected to one projector. (P28)
(2)
(4)
Networked Multi-Projection Overview
(2) Meeting Mode
When multiple computers are connected to multiple projectors. Useful when
showing multiple computer screens during meetings or other events. (P36)
(3) Classroom Mode
When multiple computers are connected to multiple projectors. Gives a single
computer (in the role of presenter) control over which computer screen and
which projector is used for projection. (P44)
21
Page 22
From Startup to Shutdown
(4) Broadcast Mode
When a single computer is connected to multiple projectors. Useful when
multiple projectors are installed at various positions in an auditorium to project
the same image. (P50)
4 Depending on the mode, you can create, join, or select a projection
session.
5 Click [Start projecting].
Click [Start projecting] on the window to start projection.
6 To stop projection, click [Stop projecting].
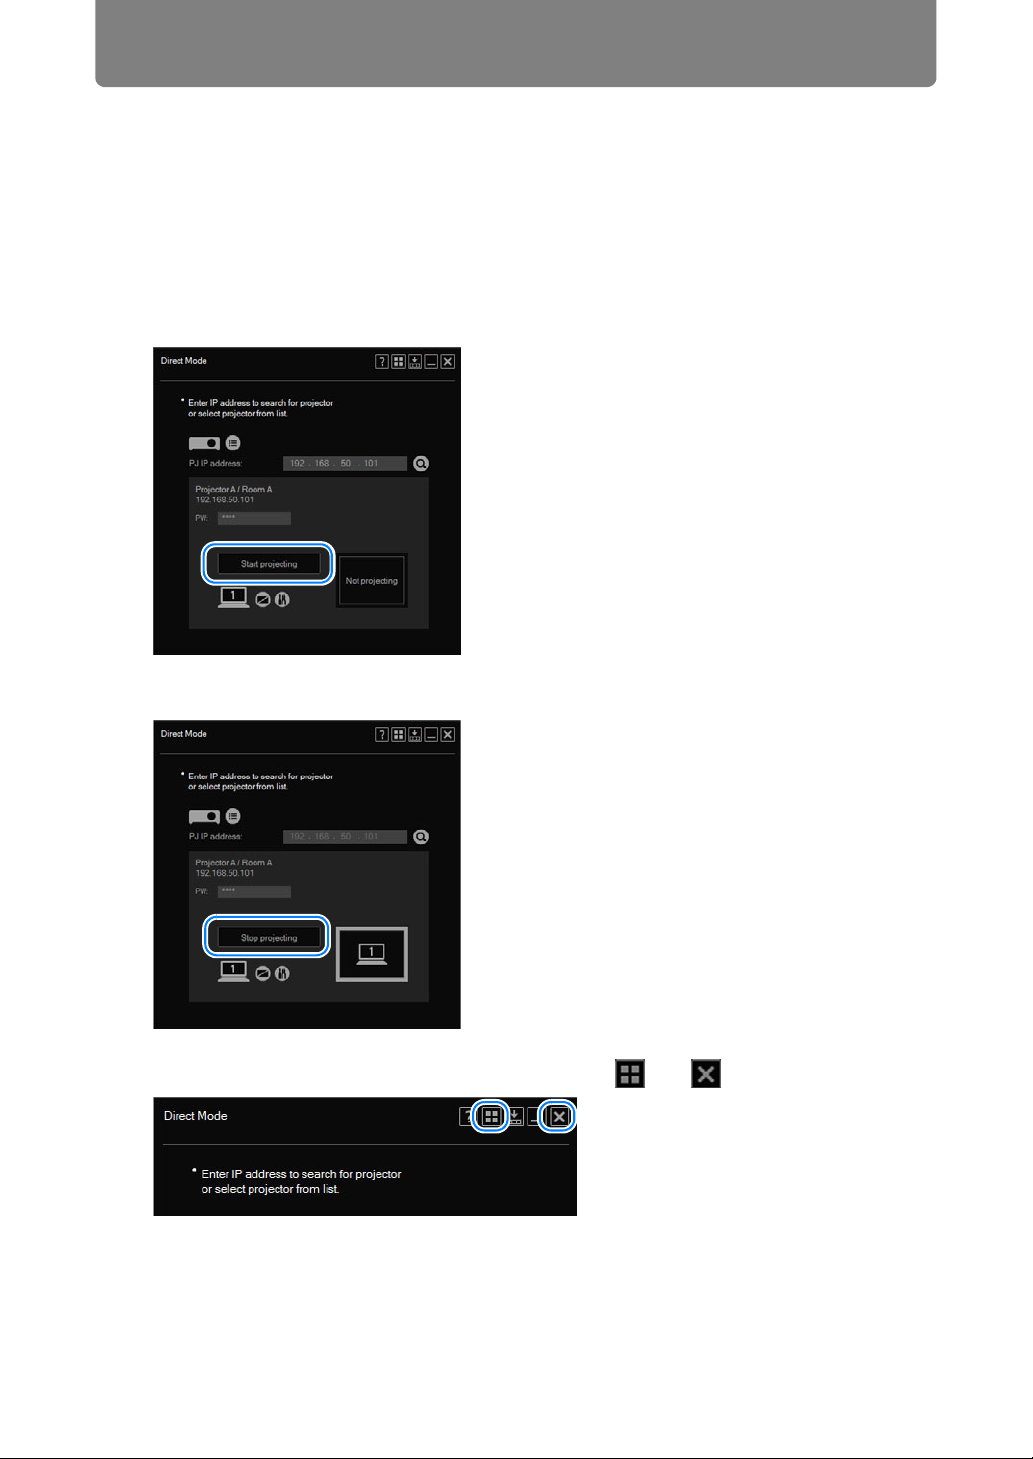
7 To return to the mode selection menu, click or in the upper right.
22
Page 23

From Startup to Shutdown
8 After a confirmation message is displayed, click [Return to menu].
9 To exit the software, click in the upper right of the mode selection
menu.
Networked Multi-Projection Overview
■ Projection Sessions
A session consists of all the computers and projectors used in projection.
In Meeting and Classroom modes, the first user must create a session for the
computers and projectors involved. Other users join the session by selecting it from
a list of sessions. In Broadcast mode, users can create a session automatically by
selecting a projector.
23
Page 24

24
Page 25

Operation in Each Mode
Networked Multi-Projection
Overview
Operation in Each Mode
25
Functions
Page 26

Using the Projector in Direct Mode
In this mode, one computer is connected to one projector over the network.
Procedure
1 In the mode selection menu, select [Direct Mode].
2 The Direct Mode window is displayed. Click .
To connect to projectors in another subnet, enter the projector’s IP address in the [PJ IP
address] field and click .
26
Page 27

Using the Projector in Direct Mode
3 The projector selection menu is displayed. Click the projector to connect
to.
For details on the projector selection menu, refer to “Using the Projector Selection Menu”
(P56).
4 The Direct Mode window is displayed again. Click [Start projecting].
The computer screen is now projected.
• If the [NMPJ Password] setting has been configured on the projector’s settings screen,
enter the password. For details on NMPJ passwords, refer to the projector user’s
manual.
• To stop projection, click [Stop projecting].
• A Busy icon ( ) indicates that the projector is not available, whether it is off, in use
by other computers, or unavailable for other reasons. The Busy icon ( ) is not
updated automatically. To view updated projector status, select or search for projectors
again.
Operation in Each Mode
27
Page 28

Using the Projector in Direct Mode
Direct Mode Window
(1)(2)(3)(4)(5)
(6)
(9)
(10)
(11)
(1) Help
View software help.
(12)
(13) (14) (15)
(7)
(8)
(2) Back to mode selection
Return to the mode selection menu.
(3) Compact display
View the window at a compact size. (P68)
(4) Minimize
Minimize the window to the taskbar. To view the window again, click the
taskbar icon.
(5) Exit
Return to the mode selection menu.
(6) Projector list
View a list of projectors.
28
Page 29

Using the Projector in Direct Mode
(7) IP address
To connect to projectors in another subnet, enter the projector’s IP address
here and click (8).
(8) Find projectors
Find the projector with the IP address entered in (7). Results of projector
searching are shown in (9).
(9) Projector information
Indicates the projector name, notes, and the IP address of the projector
selected in the list or found after searching by IP address.
(10) Password
Passwords for projectors on which [NMPJ Password] on the projector’s
settings screen has been configured must be entered here before projection.
For details on NMPJ passwords, refer to the projector user’s manual.
(11) Start
Start projection by the selected projector. During projection, this button is
labeled [Stop projecting] and can be clicked to stop projection.
(12) Switch primary/secondary monitor
A number is shown here only when secondary monitor connectivity is activated
on the computer. Clicking the number will switch between the primary and
secondary monitor.
Operation in Each Mode
(13) Blank the projector
Pause projection. Click again to resume projection.
(14) Settings
Display the settings window. (P66)
(15) Projection status
Indicates the projection status.
29
Page 30

Using the Projector in Meeting Mode
In meeting mode, multiple computers are connected to multiple projectors. This
mode is intended for group meetings where multiple computers are used. Up to ten
computers and six projectors can be connected.
Creating a Session
1 In the mode selection menu, select [Meeting Mode].
2 The session selection menu is displayed. Click [New].
3 The projector selection menu is displayed. In the list of projectors at left,
click the projector to connect to.
You can select up to 6 projectors. Selected projectors are listed at right.
30
Page 31

Using the Projector in Meeting Mode
• If the [NMPJ Password] setting has been configured on the projector’s settings screen,
the password is now requested. Enter the password. For details on NMPJ passwords,
refer to the projector user’s manual.
• To clear a selected projector, click in the upper right of that projector listing.
• For details on the projector selection menu, refer to “Using the Projector Selection
Menu” (P56).
4 Click [Next].
5 A window for creating the session is displayed. Specify a session name,
password, nickname, backward compatibility, and desktop (primary or
secondary monitor for projection), and then click [OK].
Operation in Each Mode
31
Page 32

Using the Projector in Meeting Mode
• If you choose to set a session password, other users must enter that password to join
the session. To set a password, click [Set] and enter the password.
• In the backward compatibility setting, specify session compatibility.
Although specifying [ON] enables projectors or computers running NMPJ V1.0 to join
the session, some features (such as voice functions and PbyP) will not be available.
Specifying [OFF] will restrict session compatibility and available functions to those of
the projector selected when the session was created.
In this case, when only projectors compatible with NMPJ V1.1 are selected, projectors
or computers running NMPJ V1.0 cannot join the session, but all NMPJ V1.1 functions
will be available.
Otherwise, if some projectors running NMPJ V1.0 are included, projectors or
computers running NMPJ V1.0 can join the session, but features such as voice
functions and PbyP will not be available.
• Desktop selection is only available with computers that have dual monitor support.
6 The Meeting Mode window is displayed. Select a projector to control from
the pull-down list.
7 In the list at right, select a computer to use with your designated
projector. Drag the computer to a desired position in the layout area.
You can arrange up to four computers as desired in the layout area.
32
Page 33

Using the Projector in Meeting Mode
8 Drag the computers for use in projection in the layout area to rearrange
them, as needed.
During projection, screens of each computer will be arranged according to their
position in the layout area.
9 Click [Start projecting].
Images are now projected from the computers in the layout area.
• To stop projection, click [Stop projecting].
• To rearrange the layout during projection, click [Start projecting] again. Note that if you
simply rearrange the layout, the new layout will not be applied to projection.
10
To end the session, click or in the upper right.
Operation in Each Mode
33
Page 34

Using the Projector in Meeting Mode
11
The following confirmation message is displayed. To end the entire
session, click [Close]. To leave the session, click [Exit].
Return to the mode selection menu.
[Exit] is not shown unless other computers are connected.
34
Page 35

Using the Projector in Meeting Mode
Joining a Session
1 In the mode selection menu, select [Meeting Mode].
2 The session selection menu is displayed. Click [Enter] next to the session
to join.
To join a session in another subnet, click and enter the projector’s IP address to
locate the projector. The software will search for sessions in the other subnet. For details,
refer to “Using the Session Selection Menu” (P54).
3 A session login window is displayed. Specify the session password, your
nickname, and desktop (primary or secondary monitor for display), and
then click [OK].
Desktop selection is only available with computers that have dual monitor support.
4 The Meeting Mode window is displayed. Next, follow the instructions
starting with step 6 in “Creating a Session” (P30).
Operation in Each Mode
35
Page 36

Using the Projector in Meeting Mode
Meeting Mode Window
(1) (2) (3) (4) (5)
(6)
(11)
(12)
(13)
(7)
(8)
(9)
(10)
(15)
(16)
(14)
(1) Help
View software help.
(2) Back to mode selection
Return to the mode selection menu.
(3) Compact display
View the window at a compact size. (P68)
(4) Minimize
Minimize the window to the taskbar. To view the window again, click the
taskbar icon.
(5) Exit
Return to the mode selection menu.
(6) Projector list
View a list of projectors.
36
Page 37

Using the Projector in Meeting Mode
(7) Projector pull-down list
Lists connected projectors. Your actions on this screen apply to the projector
selected here.
(8) Computers
Lists connected computers. To prepare computers for projection, drag them to
the layout area. Your own computer is listed first.
In , the computer’s display position is indicated by a white square.
(9) Blank the computer
Pause projection from the computer. Click again to resume projection.
(10) Settings
Display the setting window. (P66)
(11) Layout area
Drag computers to this area to assign their projection position.
(12) Computers in layout area
Computers here can be dragged to rearrange them. A number is shown here
only when secondary monitor connectivity is activated on the computer.
Clicking the number will switch between the primary and secondary monitor.
(13) Blank the projector
Pause projection from the projector. Click again to resume projection.
Operation in Each Mode
(14) View information
Project information needed by other users to join the session. The IP address
projected is used by one of the projectors in the session.
(15) Start/stop projection
Start projection by the selected projector. During projection, this button is
labeled [Stop projecting] and can be clicked to stop projection.
(16) Acquire screen layout
Indicates the layout of the selected projectors.
[Acquire screen layout] is not available when [ALL] is selected in the projector pull-down
list (P37).
37
Page 38

Using the Projector in Classroom Mode
In classroom mode, multiple computers are connected to multiple projectors. A
single computer in the role of presenter can control which computer screen
(whether one’s own or another participant’s) and which projector is used for
projection. Up to ten computers and six projectors can be connected.
Leading a New Session
1 In the mode selection menu, select [Classroom Mode].
2 The session selection menu is displayed. Click [New].
3 The projector selection menu is displayed. In the list of projectors at left,
click the projector to connect to.
You can select up to 6 projectors. Selected projectors are listed at right.
38
Page 39

Using the Projector in Classroom Mode
• If the [NMPJ Password] setting has been configured on the projector’s settings screen,
the password is now requested. Enter the password. For details on NMPJ passwords,
refer to the projector user’s manual.
• To clear a selected projector, click in the upper right of the projector listing.
• For details on the projector selection menu, refer to “Using the Projector Selection
Menu” (P56).
4 Click [Next].
5 A window for creating the session is displayed. Specify a session name,
password, nickname, backward compatibility, and desktop (primary or
secondary monitor for projection), and then click [OK].
Operation in Each Mode
39
Page 40

Using the Projector in Classroom Mode
• If you choose to set a session password, other users must enter that password to join
the session. To set a password, click [Set] and enter the password.
• In the backward compatibility setting, specify session compatibility.
Although specifying [ON] enables projectors or computers running NMPJ V1.0 to join
the session, some features (such as voice functions and PbyP) will not be available.
Specifying [OFF] will restrict session compatibility and available functions to those of
the projector selected when the session was created.
In this case, when only projectors compatible with NMPJ V1.1 are selected, projectors
or computers running NMPJ V1.0 cannot join the session, but all NMPJ V1.1 functions
will be available.
Otherwise, if some projectors running NMPJ V1.0 are included, projectors or
computers running NMPJ V1.0 can join the session, but features such as voice
functions and PbyP will not be available.
• Desktop selection is only available with computers that have dual monitor support.
6 The Classroom Mode window is displayed. Select a projector to control
from the pull-down list.
7 In the list at right, select a computer to use with your designated
projector. Drag the computer to a desired position in the layout area.
You can arrange up to four computers as desired in the layout area.
40
Page 41

Using the Projector in Classroom Mode
8 Drag the computers for use in projection in the layout area to rearrange
them, as needed.
During projection, screens of each computer will be arranged according to their
position in the layout area.
9 Click [Start projecting].
Images are now projected from the computers in the layout area.
• To stop projection, click [Stop projecting].
• To rearrange the layout during projection, click [Start projecting] again. Note that if you
simply rearrange the layout, the new layout will not be applied to projection.
10
To end the session, click or in the upper right.
11 The following confirmation message is displayed. Click [Close].
Operation in Each Mode
Return to the mode selection menu.
41
Page 42

Using the Projector in Classroom Mode
Joining an Existing Session
1 In the mode selection menu, select [Classroom Mode].
2 The session selection menu is displayed. Click [Enter] next to the session
to join.
To join a session in another subnet, click and enter the projector’s IP address to find
the projector. The software will search for sessions in the other subnet. For details, refer
to “Using the Session Selection Menu” (P54).
3 A session login window is displayed. Specify the session password, your
nickname, and desktop (primary or secondary monitor for display), and
then click [OK].
Desktop selection is only available with computers that have dual monitor support.
42
Page 43

Using the Projector in Classroom Mode
4 The Classroom Mode window (for joining a session) is displayed. Users
joining sessions cannot change the projection layout or start or stop
projection.
5 To end the session, click or in the upper right.
6 The following confirmation message is displayed. Click [Exit].
Return to the mode selection menu.
Operation in Each Mode
43
Page 44

Using the Projector in Classroom Mode
Classroom Mode Window (Starting a Session)
(1)
(2) (3) (4) (5)
(6)
(11)
(12)
(7)
(8)
(9)
(10)
(15)
(16)
(13) (14)
(1) Help
View software help.
(2) Back to mode selection
Return to the mode selection menu.
(3) Compact display
View the window at a compact size. (P68)
(4) Minimize
Minimize the window to the taskbar. To view the window again, click the
taskbar icon.
(5) Exit
Return to the mode selection menu.
(6) Projector list
View a list of projectors.
44
Page 45

Using the Projector in Classroom Mode
(7) Projector pull-down list
Lists connected projectors. Your actions on this window apply to the projector
selected here.
(8) Computers
Lists connected computers. To prepare computers for projection, drag them to
the layout area. Your own computer is listed first.
In , the computer’s display position is indicated by a white square.
(9) Blank the computer
Pause projection from the computer. Click again to resume projection.
(10) Settings
Display the setting window. (P66)
(11) Layout area
Drag computers to this area to assign their projection position.
(12) Computers in layout area
Computers here can be dragged to rearrange them. A number is shown here
only when secondary monitor connectivity is activated on the computer.
Clicking the number will switch between the primary and secondary monitor.
(13) Blank the projector
Pause projection from the projector. Click again to resume projection.
Operation in Each Mode
(14) View information
Project information needed by other users to join the session. The IP address
projected is used by one of the projectors in the session.
(15) Start/stop projection
Start projecting by the selected projector. During projection, this button is
labeled [Stop projecting] and can be clicked to stop projection.
(16) Acquire screen layout
Indicates the layout of the selected projectors.
[Acquire screen layout] is not available when [ALL] is selected in the projector pull-down
list.
45
Page 46

Using the Projector in Classroom Mode
Classroom Mode Window (Joining a Session)
(1) (2) (3) (4) (5)
(6)
(7)
(8)
(9)
(1) Help
View software help.
(2) Back to mode selection
Return to the mode selection menu.
(3) Compact display
View the window at a compact size. (P68)
(4) Minimize
Minimize the window to the taskbar. To view the window again, click the
taskbar icon.
(5) Exit
Return to the mode selection menu.
(6) Projector pull-down list
Lists connected projectors. Your actions on this window apply to the projector
selected here.
(11)(10)
46
Page 47

Using the Projector in Classroom Mode
(7) Layout area
Lists computers selected for projection.
(8) Projection status
Indicates the projection status.
(9) Computer
A number is shown here only when secondary monitor connectivity is activated
on the computer you are using. Clicking the number will switch between the
primary and secondary monitor.
(10) Blank the computer
Pause projection from the computer. Click again to resume projection.
(11) Settings
Display the setting window. (P66)
Operation in Each Mode
47
Page 48

Using the Projector in Broadcast Mode
In Broadcast Mode, a single computer is connected to up to 12 projectors.
Before projecting from projectors in other subnets in Broadcast Mode, you must configure
the router’s multicast routing settings. For details, ask your network administrator.
Procedure
1 In the mode selection menu, select [Broadcast Mode].
2 The projector selection menu is displayed. In the list of projectors at left,
click the projector to connect to.
You can select up to 12 projectors. Selected projectors are listed at right.
• If the [NMPJ Password] setting has been configured on the projector’s settings screen,
the password is now requested. Enter the password. For details on NMPJ passwords,
refer to the projector user’s manual.
• To clear a selected projector, click in the upper right of that projector listing.
• For details on the projector selection menu, refer to “Using the Projector Selection
Menu” (P56).
48
Page 49

Using the Projector in Broadcast Mode
3 Click [Next].
4 The Broadcast Mode window is displayed. Click [Start projecting].
The computer screen is now projected.
To stop projection, click [Stop projecting].
5 To end the session, click or in the upper right.
6 The following confirmation message is displayed. Click [Close].
Return to the mode selection menu.
Operation in Each Mode
49
Page 50

Using the Projector in Broadcast Mode
Broadcast Mode Window
(6)
(7)
(1) (2) (3) (4) (5)
(8) (9) (10) (11)
(1) Help
View software help.
(2) Back to mode selection
Return to the mode selection menu.
(3) Compact display
View the window at a compact size. (P68)
(4) Minimize
Minimize the window to the taskbar. To view the window again, click the
taskbar icon.
(5) Exit
Return to the mode selection menu.
(6) Projector list
View a list of projectors.
50
Page 51

Using the Projector in Broadcast Mode
(7) Projection status
Shows the projected image status.
(8) Switch primary/secondary monitor
A number is shown here only when secondary monitor connectivity is activated
on the computer you are using. Clicking the number will switch between the
primary and secondary monitor.
(9) Blank the projector
Pause projection. Click again to resume projection.
(10) Settings
Display the setting window. (P66)
(11) Start/stop projection
Start projection by the selected projector. During projection, this button is
labeled [Stop projecting] and can be clicked to stop projection.
Operation in Each Mode
51
Page 52

52
Page 53

Functions
Networked Multi-Projection
Overview
Operation in Each Mode
53
Functions
Page 54

Using the Session Selection Menu
Session Selection Menu
(1) (2) (3) (4)
(5)
(7)
(1) Help
View software help.
(6)
(8)
(2) Back to mode selection
Return to the mode selection menu.
(3) Minimize
Minimize the window to the taskbar. To view the window again, click the
taskbar icon.
(4) Exit
Return to the mode selection menu.
(5) [New]
Start a new session. (P30)
(6) Find session
Find sessions of projectors in another subnet. (P55)
(7) Session list
Lists the sessions detected. Information shown here includes the session
name, creation date, creator nickname, and number of computers and
projectors involved.
54
Page 55

Using the Session Selection Menu
(8) [Enter]
Join the session. (P35)
Finding Sessions
You can find sessions from the session selection menu.
1 In the session selection menu, click .
2 The search window is displayed. Enter the IP address of a projector in the
session to join, and then click to find the projector. Once sessions
are found, they are listed.
Functions
55
Page 56

Using the Projector Selection Menu
Projector Selection Menu
■ Other than Direct mode ■ Direct mode selected
(1) (2) (3) (4) (5) (6)
(7)
(1) Find projectors
Find projectors in another subnet. (P57)
(2) Sort
Change the sort order of the projector list. (P59)
(2) (6)(7)
(8)
(3) Help
View software help.
(4) Back to mode selection
Return to the mode selection menu.
(5) Minimize
Minimize the window to the taskbar. To view the window again, click the
taskbar icon.
(6) Exit
Return to the mode selection menu.
56
Page 57

Using the Projector Selection Menu
(7) Projector list
Projectors are listed here. Information shown here includes the projector
name, notes, and the IP address.
A message is displayed if you click a projector that is not available, whether it
is off, in use by other computers, or unavailable for other reasons.
Clicking a listed projector will select it for use in the session, and it will be
shown in the field at right. Selected projectors are indicated by gray text.
Projectors you have selected
are indicated by gray text.
Projectors not selected
A message is displayed if you
click a projector that is off or
in use by other computers.
(8) List of projectors used in the session
Projectors selected in the list at left are shown here.
To remove projectors from this list, click .
■ Finding Projectors
To find projectors in other subnets, do the following in the projector selection menu.
1 In the projector selection menu, click .
2 The search window is displayed. Enter the projector’s IP address, and
then click .
Functions
57
Page 58

Using the Projector Selection Menu
3 Once the projector is found, click [OK].
The selected projector is now added to the projector list.
■ Selecting Password-Protected Projectors
Selecting a password-protected projector will display a password input screen.
Enter the correct password and click [OK].
An error is indicated on the password input screen if you enter an incorrect password, or
if no password is entered.
■ Using the Favorites Function
You can register commonly used projectors as favorites.
Favorite projectors are listed first when you click the button (sort by favorites).
Up to five projectors can be registered as favorites.
To register a projector as a favorite, click the Favorites icon in the projector
selection menu.
The projector is now registered as a favorite, and a star is displayed in the
Favorites column.
58
Page 59

Using the Projector Selection Menu
■ Resorting the Projector List
You can change the sort order of projector information by clicking the sort buttons.
List by projector name.
List by notes.
List favorite projectors first.
■ Turning Projectors On
A message is displayed if you click a projector that is currently off in the projector
selection menu. (These projectors cannot be selected for projection.)
You can turn them on by clicking [Access Projector] to display the projector web
screen and switching the power on.
Use the web screen for subsequent operations. For web screen instructions, refer
to the projector user’s manual.
Once you turn a projector on, you can select it for other operations.
Functions
59
Page 60

Using Layout Functions
■ Switching Projectors Used for the Layout
On the layout window, you can set up the projection layout.
To choose a different projector for the layout, select it from the projector pull-down
list.
■ Controlling all Projectors at Once
To set up the projection layout for all projectors at once, select [ALL] in the projector
pull-down menu.
■ Projecting from Multiple Projectors (Multi-Projection)
In Meeting and Classroom Modes, separate images from multiple projectors can be
projected together. This is called “multi-projection.” On the layout window for
Meeting or Classroom Modes, you can set up the projection layout for each
projector used.
1 On the layout window for Meeting or Classroom Modes, specify the
projection layout for each projector.
In the layout area, drag the computer to use in projection, and then click [Start
projecting] to start projection.
60
Page 61

Using Layout Functions
2 In the pull-down list, select another projector to use.
3 Repeat steps 1 and 2 to set up the computers to use in projection from all
projectors.
■ Switching the Primary/Secondary Monitor
Using the software, you can switch between projection from the primary or
secondary monitor.
If your computer has dual monitor support, the computer icons are labeled with
numbers. The primary monitor is labeled “1,” and the secondary one, “2.”
To switch the monitor used for projection, click the icon of computers shown with a
number.
■ Temporarily Enlarge Images
During display from multiple computers, you can enlarge projection from one of the
computers. To enlarge the display, place the cursor over the computer in the layout
area, click in the upper left, and then click [Start projecting]. The image from
the selected computer is now projected in full-screen mode.
To cancel the enlarged display, place the cursor over the computer in the layout
area again. Click in the upper left, and then click [Start projecting].
Functions
61
Page 62

Using Layout Functions
■ Projecting Session Information
You can project session information needed by other users to join a session, such
as the session name and projector IP address. To project session information, click
. To cancel display, click again.
■ Fully Blanking Projection
Blanking refers to temporarily stopping projection from computers, so that no image
is projected. To blank projection, click . To cancel blanking and return to normal
projection, click again.
Direct Mode window
Meeting Mode window
62
Page 63

Classroom Mode window (starting a session)
Using Layout Functions
Broadcast Mode window
Functions
63
Page 64

Using Layout Functions
■ Blanking Projection from Your Computer
In Meeting and Classroom Modes, you can blank projection your computer alone.
To blank projection from your computer, click in the computer list. To cancel
blanking and return to normal projection, click again.
Meeting Mode window
Classroom Mode window (joining a session)
64
Page 65

Using Layout Functions
■ Checking for Computers That Join or Leave Sessions
In Meeting and Classroom Modes, computer users can join or leave sessions as
needed. Computers joining a session are added to the computers listed on the
layout window.
Similarly, computers leaving a session are removed from the list of computers.
65
Functions
Page 66

Completing Software Projection Settings
Software settings can be configured to specify the image quality of computer
projection, user nicknames, and other details.
1 Click next to the computer icon.
2 The settings window is displayed. Complete each setting as needed, and
then click [OK].
Available settings are as follows. (Types of settings vary slightly by mode.)
When setting windows are displayed while layout windows are minimized to the taskbar,
some information may be cut off.
Picture qual setting Select one of the following options, depending on your
preferred image quality and frame rate.
High : Projects at a lower frame rate while
emphasizing image quality. Select this
mode if lower image quality is not
acceptable.
Medium : Projection with image quality and frame
rate balanced.
Low : Projects at lower image quality to maintain
a high frame rate. Select this mode to
reduce the network bandwidth used for
projection.
Real On : Projection matching the computer display
resolution. Available under the following
conditions.
When projecting from a single computer—
or during projection from multiple
computers, when projecting an enlarged
image from one computer—at a display
resolution lower than the projector
resolution.
Off : Automatically adjust the projection size to
match the projector screen size.
66
Page 67

Completing Software Projection Settings
Projection type Normal : Although some windows cannot be
projected, the cursor on the computer
monitor will not flash.
Advanced : Most windows can be projected, but the
cursor on the computer monitor will flash.
(Only the cursor on the computer monitor
will flash, not the cursor in projected
images.)
Sound Specify audio transfer. This item is not displayed for
sessions that include projectors or computers running
NMPJ V1.0.
On : Images displayed on the computer are
transferred with accompanying sounds to
the projector. This sound is produced by
the projector showing the images at the
same time as the images.
This function is available when projecting
from a single computer, or during
projection from multiple computers, when
projecting an enlarged image from one
computer.
Although sound also stops when
projection is blanked from the NMPJ
software, sound does not stop when
projection is blanked from a projector, by
activating the blanking function.
Volume is automatically adjusted by the
NMPJ software.
Off : Sounds are not transferred. Audio output
from the projector is stopped.
Nickname Nickname specified when creating or joining sessions.
Cannot be changed during sessions. This option is not
shown in Direct or Broadcast Modes.
Multicast address The multicast address used in Broadcast Mode can
be changed. Use this setting to change the multicast
address if it conflicts with that of other network
equipment. This option is only shown in Broadcast
Mode.
Functions
67
Page 68

Reducing Windows to a Compact Size
A compact version of windows in all modes is available, showing only the minimum
buttons and information needed.
1 Click .
The window is now reduced to a compact size.
The title bar is no longer displayed when the cursor is away from the window, which
makes the window even more compact.
2 To revert to original size, click .
68
Page 69

Split-Screen Display With Non-Network Sources
Split-screen display combining images transferred over a network with other input
signals (HDMI, digital or analog computer, or component signals) is supported.
Network input cannot be combined with USB input for split-screen display.
When a session includes projectors or computers running NMPJ V1.0, nothing is
projected on the screen for the network source, because no signal is received.
Network sources can be used for both sides of split-screen display. For details on
split-screen display, refer to the projector user’s manual.
Split-screen display is only available when the screen is evenly divided on the left
and right, not with 70:30 or 30:70 layouts.
Even when only one projector is used for split-screen display with images
transferred from this software, image quality is automatically set to [Low] (to
maintain transfer speed) and cannot be changed.
However, the image quality setting itself, on the setting screen, is not changed. The
original image quality is restored once you finish with split-screen display.
69
Functions
Page 70

Tips for Better Networked Projection
■ Avoid Exceeding Connection Limits
The maximum number of computers and projectors that can be connected varies
by mode. When this limit would be exceeded, it is not possible to add computers or
projectors to a session. Thus, if the total number of computer users requesting to
join a session at the same time would exceed the limit, their requests may be
denied. In this case, an error message is displayed on the computers that could not
join the session.
Similarly, if the total number of projectors users attempt to add to a session at the
same time would exceed the limit, their requests may be denied. In this case, a
message is displayed on computers that could not add projectors, indicating that
the projector list has been updated.
■ When Removing the Only Projector Listed
In Meeting, Classroom, and Broadcast modes, projectors can also be added or
removed after sessions are created. However, a confirmation message is displayed
if you attempt to remove the last connected projector in a session, which would
leave no projectors in the session.
■ Operation if Devices Are Disconnected
If the connection is lost (for example, if a LAN cable is accidentally disconnected),
the affected computer or projector leaves the session. Disconnection of essential
computers or projectors will terminate a session.
For example, in Classroom Mode, disconnection of the presenter’s computer will
terminate the session.
■ If Projectors Cannot Be Detected
If projectors cannot be detected or no image is displayed (except for the cursor)
when you are attempting to connect to projectors in other subnets in Broadcast
Mode, make sure the router supports multicast routing. Routers that do not support
IPv4 multicast routing cannot be used to connect to projectors in other subnets in
Broadcast Mode. Note that the router must be set up to route multicast addresses
used by the software.
In Broadcast Mode, the following message is displayed if no signal is received from
computers for 30 seconds. The projector IP address and name are not identified.
70
Page 71

Restrictions
■ Router Connections
Although the software can also link computers and projectors over a network via a
router, operation is only ensured over one router hop. Note that before projecting
from projectors in other subnets in Broadcast Mode, you must configure the router’s
multicast routing settings. For details, ask your network administrator.
■ Security Dialog Box Projection
The software cannot be used to project the Windows Security dialog box, normally
accessed by pressing Ctrl+Alt+Del.
■ Screen Capture Software
It may not be possible to start the software while software that restricts screen
captures is running.
■ Animated Cursors
Animation of animated cursors is not projected.
■ Alternative Cursors
Cursors used by some software may not be projected correctly. In this case, an
arrow pointer is projected.
■ Projection Restrictions
Some windows and icons displayed on computers cannot be projected. Although
switching the projection type to advanced will enable projection of more elements,
not all elements can be projected even in this case.
Projected images may not always match the computer screens.
■ Network Bandwidth
Some network conditions may cause a delay in projection. The source may also be
disconnected, if the connection is unstable.
■ Projection through Firewalls
Some software functions may not be available in environments where Windows
Firewall or other software restricting network communication are installed.
■ Software Display
Software display may be distorted if you have adjusted the screen resolution in
Windows.
Functions
71
Page 72

Restrictions
■ Sound
• A valid playback device (default device) is required when the software starts up. If
no such device is found, no sound will be produced.
• Sound may skip, or audio and video playback may be out of sync in some cases,
due to computer settings or performance, or network conditions.
• In the following cases, no sound will be produced. To restore audio output, you
must restart the software.
• The playback device is deactivated when the software starts up
• The playback device is disconnected when the software starts up
• Playback device settings were changed
• The playback device was switched to another device
• The system has entered sleep or hibernation mode
■ Images
Video projection may not be as smooth as playback on the computer monitor in
some cases, due to computer settings or performance, or network conditions.
72
Page 73

CANON INC.
30-2, Shimomaruko 3-chome, Ohta-ku, Tokyo
146-8501, Japan
U.S.A.
CANON U.S.A. INC.
One Canon Park, Melville, New York 11747,
U.S.A.
For all inquires concerning this product, call toll
free in the U.S. 1-800-OK-CANON
CANADA
CANON CANADA INC. HEADQUARTERS
6390 Dixie Road, Mississauga, Ontario L5T
1P7, Canada
CANON CANADA INC. MONTREAL
BRANCH
5990, Côte-de-Liesse, Montréal Québec H4T
1V7, Canada
CANON CANADA INC. CALGARY OFFICE
2828, 16th Street, N.E. Calgary, Alberta T2E
7K7, Canada
For all inquiries concerning this product, call
toll free in Canada
1-800-OK-CANON
CANON PORTUGAL S.A.
Rua Alfredo da Silva, 14 Alfragide 2610-016
Amadora, Portugal
CANON Belgium N.V. / S.A.
Berkenlaan 3, 1831 Diegem (Mechelen),
Belgium
CANON Netherland NV
Neptunusstraat 1, 2132 JA Hoofddorp, The
Netherlands
CANON LUXEMBOURG S.A.
Rue des Joncs 21, L-1818 Howald,
Luxembourg
CANON DANMARK A / S
Knud Hoejgaards Vej 1 DK-2860 Soeborg,
Danmark
CANON OY
Huopalahdentie 24 PL 1 00351 Helsinki,
Finland
CANON SVENSKA AB
Gustav III:s Boulevard 26 169 88 Solna,
Sweden
CANON NORGE as
Hallagerbakken 110, Postboks 33, Holmlia,
1201 Oslo, Norway
EUROPE, AFRICA & MIDDLE EAST
CANON EUROPE LTD.
3 The Square, Stockley Park, Uxbridge,
Middlesex, UB11 1ET United Kingdom
CANON EUROPA N.V.
Bovenkerkerweg 59, 1185 XB Amstelveen,
The Netherlands
CANON FRANCE S.A.S
17, quai du President Paul Doumer, 92414
Courbevoie Cedex, France
CANON UK LTD.
Woodhatch Reigate Surrey RH2 8BF, United
Kingdom
CANON DEUTSCHLAND GmbH
Europark Fichtenhain A10, 47807 Krefeld,
Germany
CANON ITALIA S.p.A.
Via Milano 8 I-20097 San Donato Milanese,
Milano, Italy
CANON Schweiz AG
Geschäftsbereich Wiederverkauf,
Industriestrasse 12, CH-8305 Dietlikon,
Switzerland
CANON GMBH
Zetschegasse 11, A-1230 Wien, Austria
CANON España, S.A.
Av. De Europa, 6 Alcobendas 28108 Madrid,
Spain
CENTRAL & SOUTH AMERICA
CANON LATIN AMERICA, INC.
703 Waterford Way, Ste. 400 Miami, FL 33126,
U.S.A.
ASIA
CANON (China) Co., Ltd.
15F Jinbao Building No.89 Jinbao Street,
Dongcheng District, Beijing 100005, China
CANON HONGKONG CO., LTD.
19 / F., The Metropolis Tower, 10 Metropolis
Drive, Hunghom, Kowloon, Hong Kong
CANON SINGAPORE PTE. LTD.
1 HarbourFront Avenue, #04-01 Keppel Bay
Tower, Singapore 098632
CANON KOREA CONSUMER IMAGING INC.
Canon BS Tower 5F, #168-12 Samseongdong, Gangnam-gu, Seoul, Korea
OCEANIA
CANON AUSTRALIA PTY. LTD.
1 Thomas Holt Drive, North Ryde, N.S.W.
2113, Australia
CANON NEW ZEALAND LTD.
Akoranga Business Park, Akoranga Drive,
Northcote, Auckland, New Zealand
©CANON INC.2014
 Loading...