

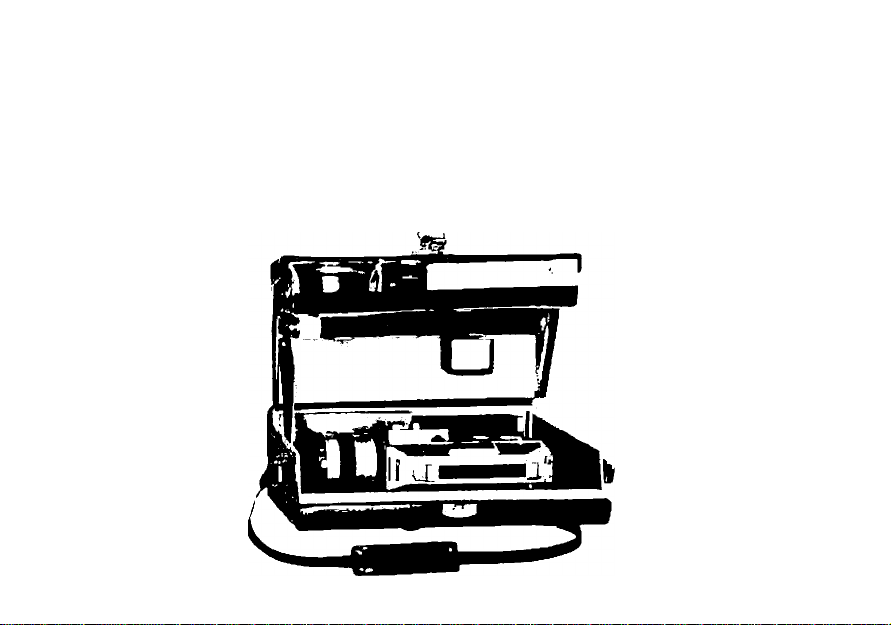
Page 1

Page 2

TECHNICAL DATA
Type : 8mm movie camera using Super 8 film
cartridge. Frame size, 4x5.4mm.
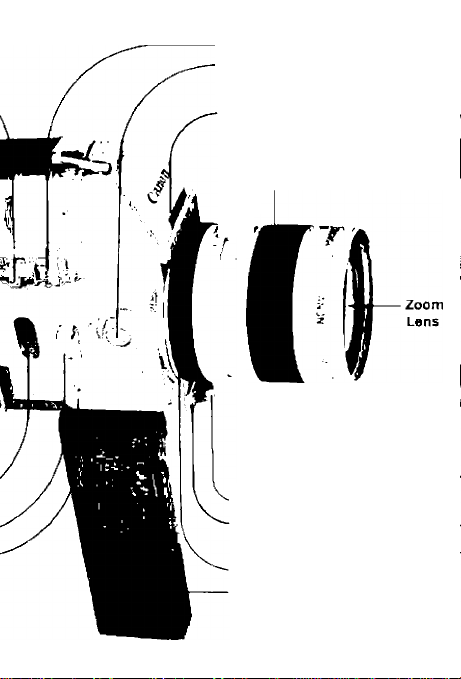
Lens: FI.4 with zooming range of 7.5 —60mm.
18-element in 13-component composition. Inner
diameter, 58mm. Outer diameter, 60mm.
Coated in amber, magenta, purple or multilayer
coating.
Viewfinder: Single-lens reflex type, combined
with built-in prism screen rangefinder. Contains
aperture scale, improper exposure indicators,
film ending indicator. Eyepiece adjustable with
shutter device for preventing rear light entering
viewfinder.
EE Mechanism : Automatic aperture setting cou
pled to film speed and filming speed. Aim the
camera at the subject for correct exposure.
Exposure Meter: Through-the-lens system CdS
meter measures the light passing through the
taking lens. Powered by two 1.3 v M20 (#625)
mercury batteries.
Light Measuring Range: The entire scale be
tween ASA 250 f/1.4 at 12 fps and ASA 16 f/22
at 24 fps.
Film Speed : Automatically set with insertion of
film cartridge. With tungsten type film, ASA
25-250. With daylight type film, ASA 16-160.
CCA Filter : Built in. Corrects colors of tungsten
type film in daylight use. Automatically cancell
ed on insertion of daylight type film cartridge or
manually from outside.
Page 3

Filming Speeds : 12. 18. 24fps and single frame.
Shutter Release : Three-way switch (safety lock,
running position, remote control and running
lock position) and shutter lever.
Release Sockets: For remote control, single
frame and continuous running photography.
operation is possible by releasingTIie EE mecha-
nism. Fade-ins and Tfde-outs are possible with
the aperture control ring.
Power System : Film drive and power zooming
operated by two micromotors. Entire zooming
is done in 6 — 9 seconds.
Power Source : Four 1.5v oenlight (size AA) bat
teries loaded iriside the hand grip. "Sufficient
power for 10 cartridges of ^Im under normaf
temperature.
Battery Tester : Built in. Indicates power levels
of mercury and penlight batteries.
Manual Zooming: Performed by manual zoom
ing lever. Revolving angle of 100°.
Footage Counter: Counts up to 50 feet. Auto
matically resets when side cover is opened.
Film Transport Indicator: For checking film
advancement.
Hand Grip: Folding type containing film-drive
battery chamber.
Size: 237x107x63mm (9%"x4i/4"x2i/2")
Weight: l,720g(3lb. 12% oz.)
Subject to alterations.
Page 4
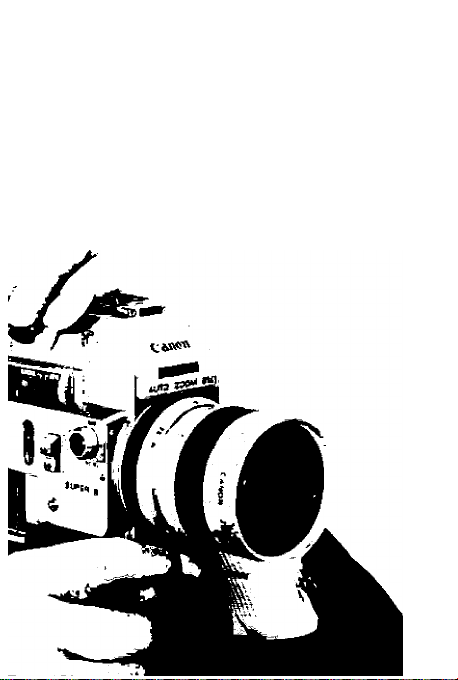
We are highly gratified that you have selected the Canon Auto Zoom 814—a wise choice
that promises you many delightful years of photographic experiences.
Canon is recognized the world over as the foremost pioneer in the development of
photographic equipment of the highest quality and performance.
Whether it is for the home, laboratory, or traveling, make the most of your opportunities.
A whole new world of home movie enjoyment will be opened to you !
Page 5
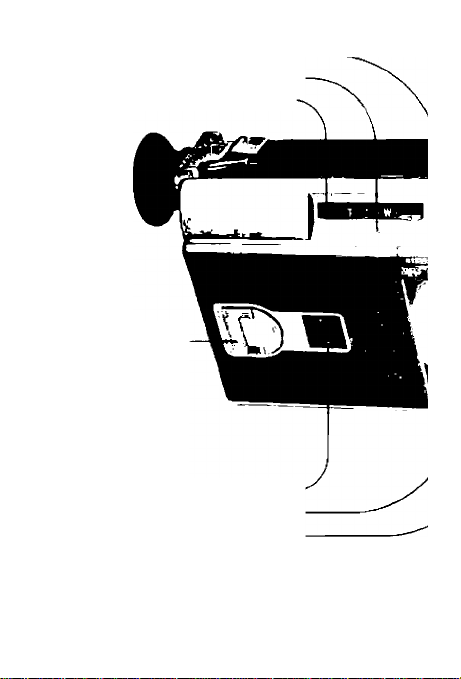
Auto-Manual Switch-
Film Plane Indicator-
Power Zooming Switch-
Side Cover Latch
Film Type Window-
CCA Filter Switch-
Grip Locking Lever-
Release Socket for Single Frame-
Page 6
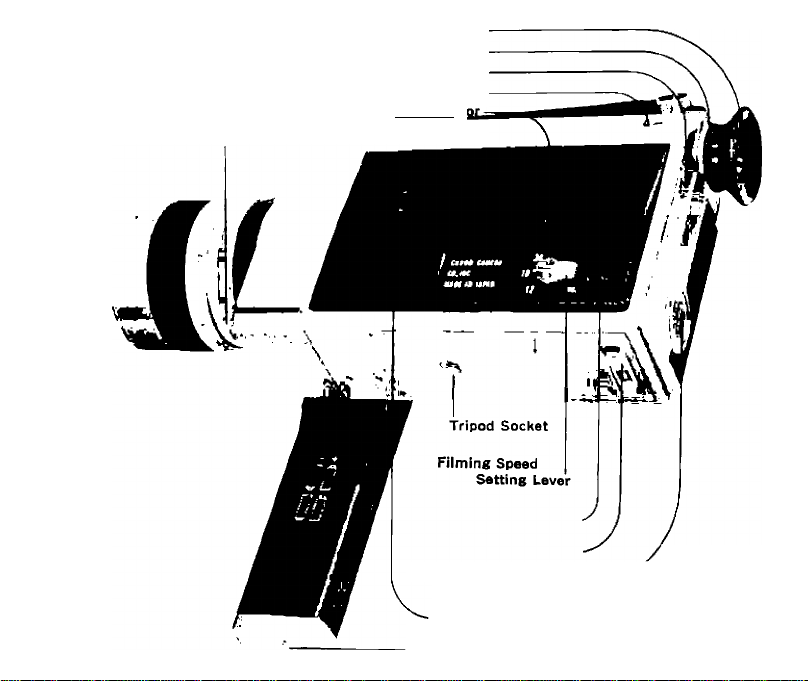
Aperture Control Ring
Three-Way (OFF-R-RC-RL)
Switch
Illuminating Window for
Aperture Scale
Focusing Ring
iVro
Shutter Lever
Release Socket for
Continuous Running
Manual Zooming Ring
Folding-Type Hand Grip with
Penlight Battery Chamber
Page 7
Manual Zooming Lever
Eyepiece-
Eyepiece Adjustment Ring-
Socket for Remote Control Cord '
Eyepiece Shutter Switch-
Film Transport indicat
Battery Tester Window-
Battery Test Buttons-
Footage Counter-
■ Mercury Battery Chamber
-Fanlight Battery Chamber Cover
Page 8
CANON CINE PROJECTOR S-400
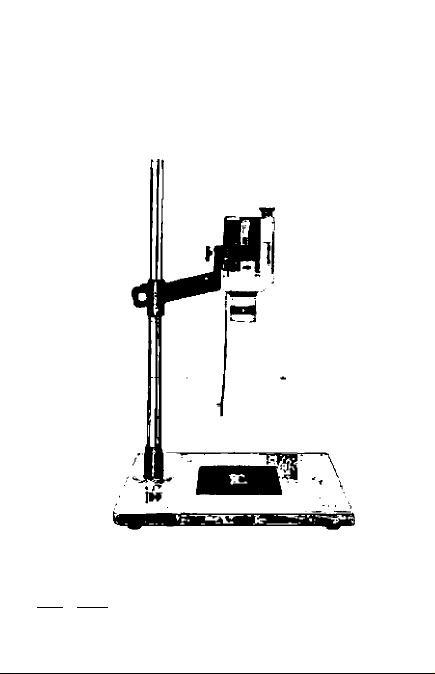
Titling Set
Used for titling, ciose-up photography, copy work
and single frame photography. Consists of stan
chion, carrying arm, metai fasteners and case.
Canon Chestpod
Remote Control Switch
Lens Hood S-60
Canon Release
Carrying Case
Page 9
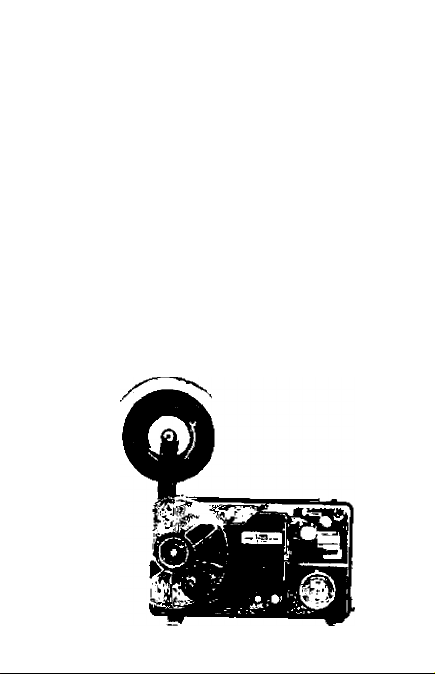
Canon Cine Projector S-400 is the newest and
highest quality movie projector. It can automatical
ly load and rewind all 8mm films —Super 8, Single
8 and regular 8mm films up to 400feet.
Operation is very simple. Just insert the film end
into the projector, turn the switch, and the film
will run completely through and rewind with no
need for resetting or touching any other switches.
The Cine Projector S-400 has a fast 17 —28mm
F1.3 zoom lens, 8v 50w mirror lamp, adjustable
projecting speeds including slow motion. This pro
jector can be used in any country as it has a choice
of seven different voltages from 100 to 240 v.
Size: 333 x169 x155mm (1' 1 i/s" x 6%" x ei/g")
Weight: 5.2kg (11 lb. 7%oz.)
Page 10

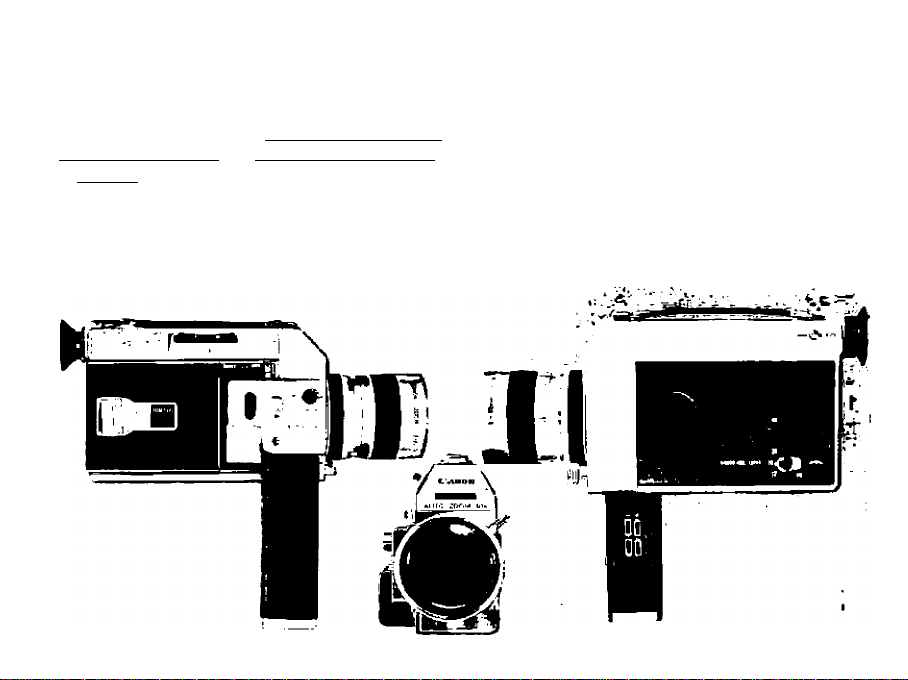
MAIN FEATURES OF CANON AUTO ZOOM 814
Eight-Times Zooming on Large Picture Area
The Canon Auto Zoom 814 is the latest 8mm
movie camera that can bring out the qualities of
the Super 8 film to their highest degree. Picture
area of the Super 8 film is 50% larger than regu
lar 8mm film. This film has superb reproduction
qualitiesclosely approachingthatofa 16mm movie.
The combination of the lens speed of F 1.4 and
1 : 8 zoom ratio is one of the most outstanding
in the world. The Auto Zoom 814, capable of
complete zooming from wide-angle to ultra-tele
photo, is an ideal movie camera to take along on
picnics, mountain climbing and overseas trips.
Easy Film Loading
Just slip in the entire Super 8 cartridge which
holds a continuous 50-foot length of film. No
threading or re-loading are necessary. The film
speed is automatically set when the cartridge is
slipped into the camera.
Built-in CCA Filter
A CCA filter, for converting the color temperature
of tungsten type film used in daylight, has been
built into the optical system. When shooting
under artificial light, the filter can be canceled by
the CCA filter switch. When using daylight type
film from the beginning, the filter is automatically
canceled with the insertion of the cartridge.
Power Zooming and Film Drive
Four 1.5v penlight batteries power the high per
formance built-in micromotors. Especially, power
zooming gives tpe 1 S zoom ratio its greatest
effectiveness and brings variation into yo_iir
TTL Type Electric Eye
The electric eye accurately measures the light
according to the angle-of-view of the lens, regard
less of the zooming range, because of the TTL
system in which the CdS meter is positioned on
the back side of the lens system. The TTL system
also eliminates the necessity of exposure factor
compensation when using filters.
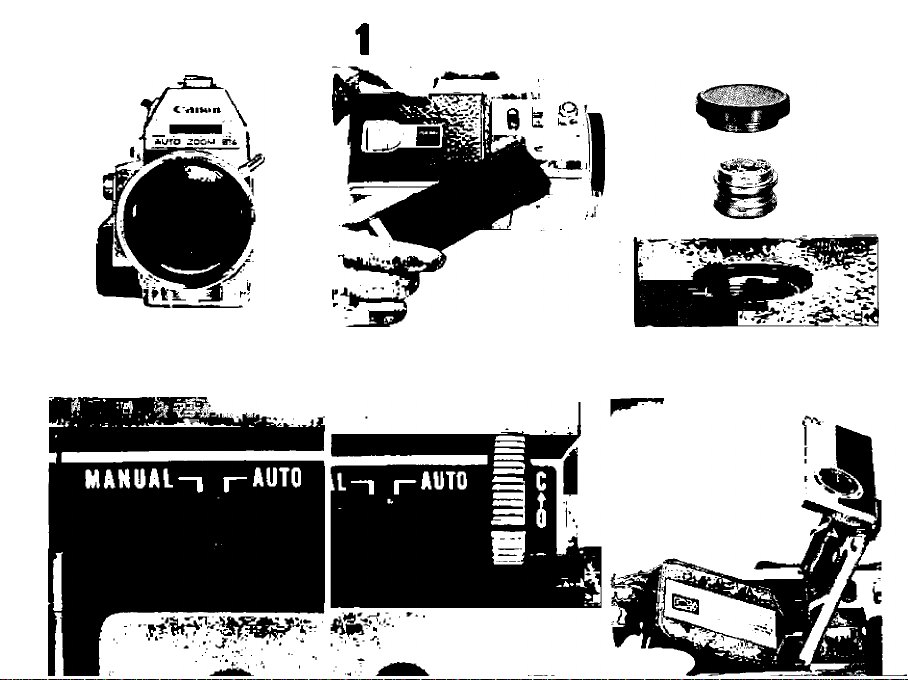
Photography by Manual Operation
The aperture can be operated manually by shift
ing the auto-manual switch to "MANUAL”. Fadeins and fade-outs are possible by the aperture con
trol ring. And with the combined use of an NO
filter, fade time can be adjusted.
The Auto Zoom 814 is also equipped with other
features necessary for advanced 8mm movie mak
ing, such as, running lock, remote control and
footage counter. Filming speeds include 12, 18
and 24 fps and single frame.
Page 11
BASIC STEPS IN PHOTOGRAPHY
BY ELECTRIC EYE OPERATION
Stand up the tiand grip.
Load the batteries.
a. For exposure meter; Two 1,3 v
if625 mercury batteries.
Set tlie auto-rnanual switch aL Set the black line on the aperture
“AUTO”. control ring at ”0” position,
4
Insert a Super 8 film cartridge,
Page 12
b. For film drive: Four penlight
batteries.
c. Check the capac
ity of the batteries
for film drive.
Adjust the eyepiece,
a. Open the eyepiece
shutter.
b. Make adjustment by
turning the eyepiece ad
justment ring.
Set the filming speed at "18
Remove the lens cap
Set the three-way switch at "R".
Page 13
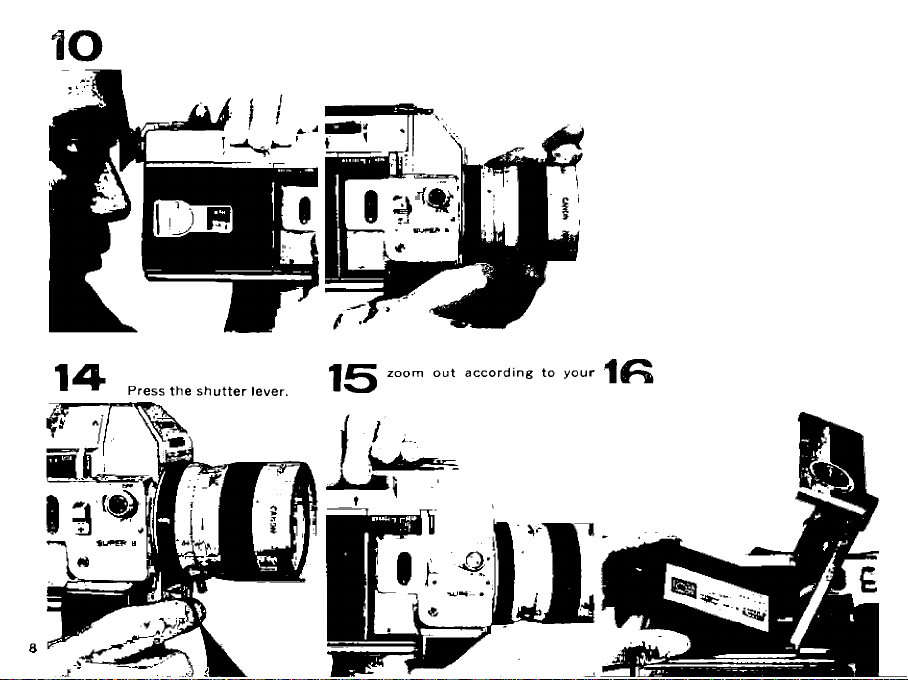
Hold the camera and look
through the viewfinder.
Set the focus at maximum
magnification (telephotoX
1
Decide the composition of the
picture by turning the zoom
lens.
During shooting, zoom in and
needs.
Take out the cartridge after
the entire film has been ex
posed.
Page 14
Check the position of the ex
13
posure meter needle.
C ■ 16 • 8|- 4 ■ 2
Turn the three-way switch to
"OFF".
page
Aperture Adjusting Mechanism 29
Fading Techniques 30
Controliing the Working Range of the Eiectric Eye 32
Photography by Manuai Aperture Operation 32
Shooting with Artificial Light 33
Three-Way (OFF-R-RC-RL) Switch 34
Single Frame Photography and Continuous Running 35
Eyepiece Shutter 35
Panning 36
Proper Care of the Camera 36
Accessories 37
Canon Cine Projector S-400 39
It is Important for you to thoroughly know and to get accustomed
to handling the Canon Auto Zoom 814, ^ase read this
instruction bookJet_careti^ly,_£nd master the manipulatons of
the various parts completely before~TrigirTiri'g the_fi].rn_-C_artridge
into the_ camera. If you are thoroughly versed in the correct
handling of this movie camera, you can get the maximum
performance, such as fade in, fade-out and zooming, out of
the Canon Auto Zoom 814 to your greatest satisfaction
SUPER 8
Page 15
г
HANDUI^G THE SOPER 8 CARTRIDGE AND PHOTOGRAPHY
The Super 8 film cartridge is loaded with
50-foot length of film. There is no need for
flipping over the cartridge in reverse direction
halfway through the film. With one cartridge of
film you can shoot for approximately .T minutes
20 seconds .
Send the exposed film to an authorized de
veloping laboratory. It will be returned to
you wound on a reel so that immediate projection
is possible
The film is of the reversal typ^in which the
positive is obtained. Therefore, the latitude
is narrower than negative film. This means you
must be especially careful of the expos^^wheji
photographing with manually operated aperture
10
Page 16
HOW TO USE THE HAND GRIP
When the hand grip is stood up it is automatical
ly locked. When folding, keep pressing the grip
locking lever upwards and swing the hand grip
back. The hand grip also serves as a film-drive
battery chamber.
- p.
Page 17
Page 18

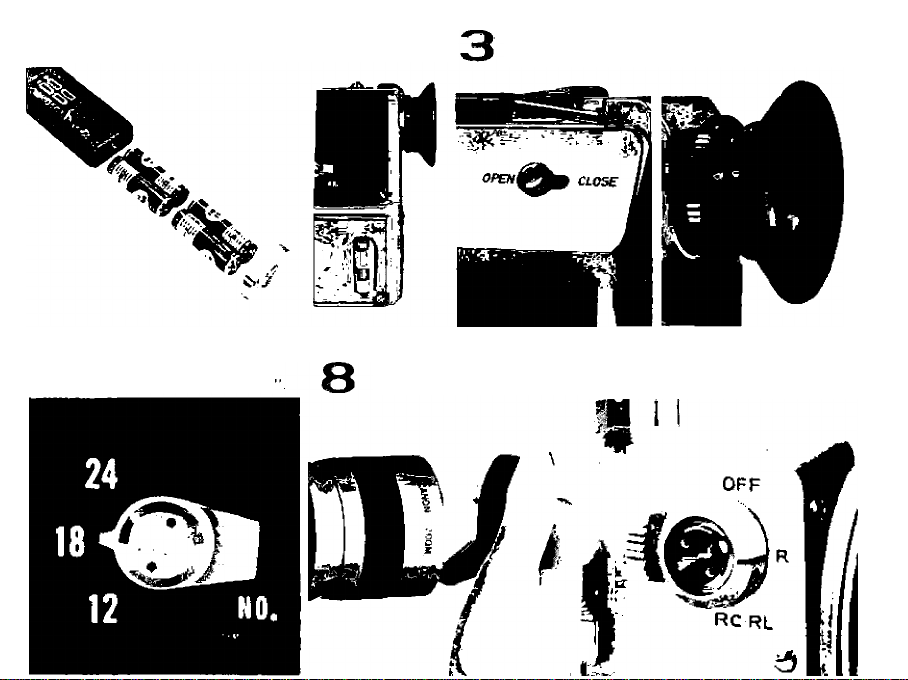
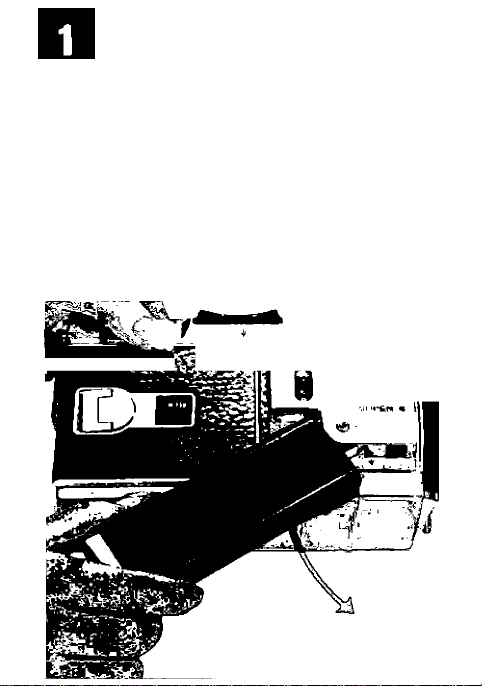
LOADING OF BATTERIES
Mercury Batteries for Electric Eye
Before using your new camera, load it with
the two mercury batteries packed in a separate
enveiope. If the batteries are not inserted, the
electric eye will not function.
1- Remove the coyer of the mamirv hatferv
'eha.rnber by turning it to the left.
2. Wipe the batteries clean, and then insert them
with the central contact sides facing inwards.
3. Screw in the cover by turning it to the right.
#Use two 1.3v M20 (f625) batteries of the same
12
Page 19

make —equivalent to Mallory RM-625R, Eveready
E625N, Burgess Hg-625R or National H-D.
^Before inserting the mercury batteries into the
camera, wipe all poles clean of all fingerprints or
stains wifFTa driTc]oth. Uncleitj;! poles may cause
corrosion and damage the contact points of the
camera.
*Be sure the mercury batteries are inserted in
the correct direction by referring to the diagram-
otherwise. the electric eye will not function pro-
perly.
Page 20

*When not usifip the camera, keep the three-way
switch at “OFF".
# Be sure to replace the two mercury batteries
simultaneously. Life of the mercury batteries In
continuous use is aonroximately one year
Penlight Batteries for Film Drive
b
and Power Zoom
Remove the battery magazine chamber cover
by turning the screw to the left Insert the penlight
batteries according to the insertion diagram
without mistaking the ( + ) and ( —) poles.
# Use four 1 5 V pe nlight (size A A) batteries —equiv
alent to Mallory M 15P and Eveready (815.
* Be sure to replace the four penlight batteries
simultaneously.
Checking the Power Level of
C
Batteries
After the batteries have been loaded, check the
power level of the batteries by pressing the bat
terv test buttons at the bottom of the camera.
Page 21

The white button is for checking the mercury bat
teries, and the red button is tor the penliKht
batteries. Set the three-way switch at "R”, press
a button and check the position of the needle
seen in the battery tester window If the needle
is in the blue zone, the batteries have sufficient
power level. Otherwise, replace the batteries
i>lf the needle points to th^ white zone,_the^
penlight batteries have power level for 12 and
18 fps only
12 and ISfps only
EYEPIECE ADJUSTMEfVST
Loosen the eyepiece adjustment ring by turning
it to the left. Aim the camera in the direction
of a bright subject and then look into the view
finder. Turn the Rveniece and adjust it so that
the aperture scale and the lines of the prism
screen can be clearly seen. Then tighten the
[ eyepiece adjustment ring
14
Page 22

SET THE AUTO-MANUAL
SWITCH AT “AUTO”
For EE operation, set the auto manual switch at
"AUTO”.
#The electric eye will not tunction when the
switch is set at "MANUAL".
MANUAL-1 r
Page 23

SET THE APERTURE CONTROL RING AT “0”
Turn the aperture control ring and set the black
line at "0".
# Refer to pp. 29 — 32 for other uses of the aper
ture control ring.
15
Page 24

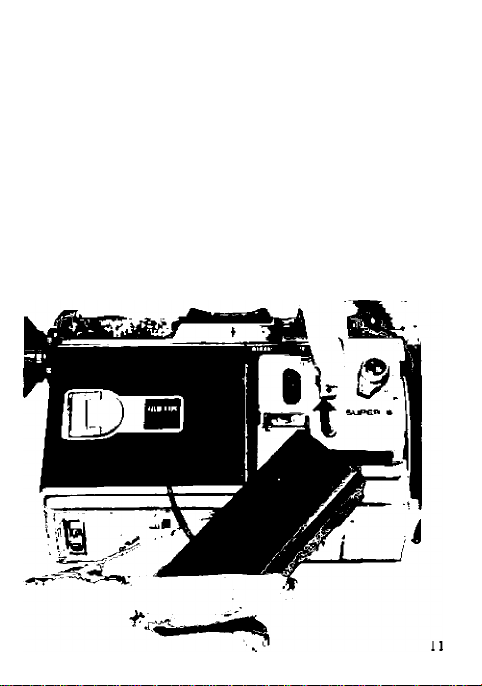
LOADING OF FILM CARTRIDGE
Set the CCA filter switch so that the "sun"
mark can be seen.
CCA filter is in position.
1. Lift the side cover latch, turn it to the left, and
open the side cover.
2. Slide the Super b film cartridge in towards the
front of the camera, with the label side facing
upwards, and then set it into position bv liehtiv
pressing down on it.
3. Press down the side cover and turn the side
cover latch to the right until It stops.
___________________________
It indicates that the
16
Page 25

Set the three-way switch at "R'*. Press the
shutter lever for confirming film advance.
b
If a film winding sound is heard and the white dot
in the film transport indicator revolves, it means
the car
Page 26

The film speed is automatically set with the
insertion of the cartridge. The following film
cartridge can be used:
Tungsten type; ASA 25, 32, 40, 50, 64, 80,
100, 125, 160, 200, 250.
Daylight type : ASA 16, 20, 25, 32, 40, 50,
64, 80, 100, 125, 160.
Page 27

The footage counter tells you how many feet
of film you have exposed. The footage
d
counter automatically resets to "0” when the side
cover is opened
OFF
Page 28
SETTING OF FILMING SPEED
18 fps is the standard Super 8 filming speed,
turn the filming speed setting lever and set it at
the desired speed.
If a movie has been shot at 18 fps and
projected at 18 fps, it can be observed most
a
naturally.
The filming speed of 24 fps is 1.3times faster
than 1 fa tps and gives a slightly slower mrition
effect. The exposure time is also shortened. 24 fps
Ts~used when making standard sound film, when
extending zooming
blurring during panning.
The filming speed of 12fos sliehtlv quick
C
_ens the movements projected on the screen,
and the exposure timn is ipnpthnnRd 12 fps is
used^ when shooting dark indoors or when stress
ing the movements of the subject.
_____
time or for prevention of
%
24 fps
18 fps (Standard)
12 fps
Page 29
REMOVE THE LENS CAP
Page 30

TURN THE THREE-WAY
SWITCH TO "R”
SUPER 8
Page 31
10
LOOK INTO THE VIEWFINDER
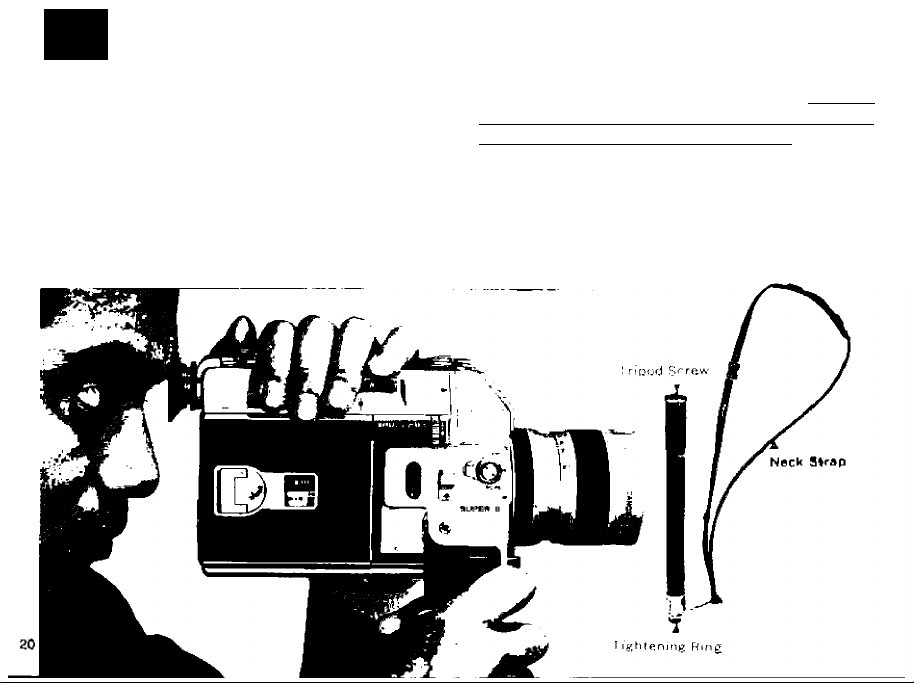
Holding the Camera
Hold the hand grip with the right hand and
a
place the forefinger on the shutter lever. Zoom
ing, focusing and -manual aperture adjustments are
performed with the left hand
The camera should be held steady, especially when
shooting in telephoto or when zooming. For best
results, use a separately available Canon Chestpod
or a tripod and cable release when possible.
#Be sure the eyepiece shutter switch is set at
"OPEN". Otherwise, you will not be able to see
anything inside the viewfinder.
Page 32

Canon Chestpod
The Canon Chestpod is used for increasing
b
the stability of the camera and preventing blur
ring.
With the use of its leg and neck strap the Chestpod
firmly holds the camera against the upper part
of your body. The Chestpod is especially effective
when zooming and shooting in telephoto
Page 33

Page 34

____
Adjust the focus by turning the focusing ring so
that the subject can be seen most clearly through
the prism screen rangefinder
The aligned image can be seen more accurately
and easily the longer the focal length of the lens.
Therefore, even when you wish to shoot at low
magnification (wide-angle), it is advisable to first
focus at maximum m.?Jini.fl!r.3tiQn (t^ephotoj and
then return to low magnifjMtioji and^shoot. The
focal point does not change during zoomine.
f——-r--
FOCUSING
22
Page 35

Dut of focus
Page 36

12
The viewfinder of Canon Auto Zoom 814 is of the
single-lens reflex type, and so there is no parallax.
Thus, the picture area seen through the viewfinder
is exactly what will be exposed on the film. The
image seen through the viewfinder will change in
magnification and the picture area will also change
DECIDE THE COMPOSITION
1
Page 37

by turning the zooming ring. The size of the
subject can be decided by zooming.
23
Page 38

13
a
of the exposure meter needle inside the viewfinder.
Press the shutter lever if the needle is pointing
inside the range of the aperture scale.
b
marks on both sides of the aperture scale.
C
the lighting must be increased.
CHECK THE EXPOSURE METER NEEDLE
Before pressing the shutter lever aim the
camera at the subject and check the position
Exposure with the electric eye is improper
if the needle is pointing to either of the red
lf the needle is pointing to the mark on the
right side it means under-exposure, and so
TSjfo-
if the needle is pointing to the mark on the
left side it means over-exposure, and so a
d
neutral density filter must be attached to restrict,
the light intensity.
#Be sure that the three-way switch is set at “R”.
Otherwise, the meter needle will not move.
iZl
Over-exposure
(Use ND filter)
24
C. 16 • 8 I ■ 4 -2
Proper exposure
C 16 • 8
Under-exposure
(Increase the lighting)
Page 39

14
PRESS THE SHUTTER LEVER
Page 40
25
Page 41

ZOOMING
_ Power Zooming
Press the power zooming switch for smooth
and regulated zoom effects. Zooming towards
telephoto is obtained by pressing “T” and towards
wide-angle by pressing “W. The entire range of
zooming time is 6 to 9 seconds.
Page 42

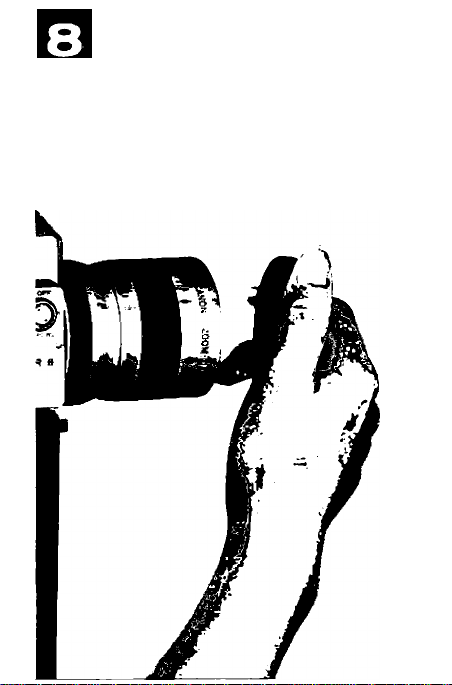
Manual Zooming
When you wish to zoom faster or slower than
b
at regular speed, or when you want to decide the
size of the subject in the picture area, turn the
zoom lens by using the manual zoom lever,
#The viewfinder magnification is life size vWien
the focal distance is 12mm
Page 43

2?
Page 44

16
a
tridge. The cartridge contains a 50-foot length of
film.
UNLOADING OF FILM CARTRIDGE
stop shooting when the footage counter
reaches “50", and take out the film car
Filrn Ending Indicator
b
heen enmpletely expnserl or the cartridge is unload
ed.
The aperture scale in the viewfinder is color
less while there is still unexposed film in the
! when the film has
C ■ 16 8|- 4 • 2
C ■ 16 • 8|- 4 • 2
28
Page 45

APERTURE ADJUSTING MECHANISM
By turning the aperture control ring the following
functions can be performed :
1. In EE operation, the maximum aperture open
ing can be controlled and the aperture can be
closed completely.
2. In manual operation, the aperture can be controiled and closed completely.
By utilizing these functions, special effects such
as fading, high-key or low-key can be incorporated
into your movie making.
In EE Operation "AUTO"
In Manual Operation "MANUAL"
EE operation at “O” position.
C Control the aperture opening
Q by turning towards “C” side.
S
C Aperture is completely closed
when fully turned to “C" side.
Full aperture opening at “O”
Q position.
y
^ Manually set by turning
—I Q towards "C” side.
C Aperture is completely closed
t]
when fully turned to “C” side.
EE functions in the entire range of
aperture stop.
EE functions only at a smaller aper
ture opening than the aperture stop
Indicated by the needle.
The needle points to "C" (the red
mark on the left side).
The needle points to the red mark
on the right side
The needle indicates the aperture
stop.
/ J
The needle points to “C" (the red 29
mark on the left side).
Page 46

FADING TECHNIQUES
With Canon Auto Zoom 814, you can perform
fading techniques in either EE or manual opera
tions by turning the aperture control ring. Fadings
are used to show the elapse of time or a change
in scene, for instance, when the scene on the
stage changes at the end of a theme
Fade-In
First set the orange line on the aperture control
ring at "C" and gradually bring the ring down As
Page 47

the jing reached the bottom, i. e.. when the black
line on the ring reaches "0", the aperture takes
over for proper exposure.
Fade-Out
Gradually close the aperture by turning up the
aperture control ring to the “C” side whiie shoot
ing. The picture gradually fades as there is pro
gressive under-exposure until there is no exposure
at all. The picture will completely fade-out as the
ring reaches the top and the aperture is completely
closed.
^Fading times of 1 — 1.5 sec. for a fast changing
scene, and 2 — 3 sec. for a slower changing scene
are advisable
Page 48

Page 49

Use ND Filter Under Bright Conditions
The use of a neutral density filter is recomrnende^under very bfigTit conditicris or under excess
light. Under these conditions, the aperture will
close down to f/16 or f/22, and it makes very little
difference with the completely closed aperture, and
so fadings will be performed too rapidly. If the
light intensity is lowered, with the use of the ND
filter, the aperture opening or closing can be per
formed more slowly and smoothly Canon ND
filters are available in two types, 4X and 8X
Page 50

CONTROLLING THE WORKING RANGE OF ELECTRIC EYE
In EE operation, the working range of the electric
eye can be controlled so as to perform panning
effectively under conditions of extremely bright
and dark contrast. The darkness of the dark part
is more emphasized while giving the proper ex
posure on the bright part. It is ideal for panning
in a dark room with a spotlighted subject or for
panning when including a counter-light part.
By turning the aperture control ring towards “C"
the electric eye can be controlled to function only
on the smaller aperture opening side than the set
aperture stop. For instance, if the aperture is set
at f/4, the electric eye will function only on the
smaller aperture opening side than f/4, i.e., f/4f/22.
PHOTOGRAPHY BY MANUAL
APERTURE OPERATION
Photography by manual operation is possible by
setting the auto-manual switch at “MANUAL". In
manual operation, any desired aperture stop can
be set by turning the aperture control ring while
looking at the aperture scale inside the viewfinder.
Use this method when shooting against the light
or when you wish [to stress high key or low-key^
effects
Page 51

SHOOTING WITH ARTIFICIAL LIGHT
«— Your Canon Auto Zoom 814 has a built in
a Color Conversion A (CCA) filter so that you
can use tungsten type color film, for example,
Kodachrome II Type A [KA-HI, under daylight
cdh'gifTohsT WhTn shootine under artificial light,
push the CCA filter switch downwards so that
the^ "Bulb" m^rk appears“ and the CCA filter is
released from the optical system. In this case,
shooting under ordinary bulbs (bulbs that are not
blue) becomes possible
'U
:i I
Page 52

When using daylight type color film, the CCA
filter is automatically cancelled by inserting
the cartridge and you can shoot under daylight
without any switching being made. However, when
using daylight type color film under artificial light,
a blue bulb must be used or a Color Conversion B
(CCB) filter must be attached in front of the lens
when ordinary bulbs are used
#When using daylight type film, the CCA filter
switch is so designed that it cannot be pushed
downwards so that the “bulb" mark appears
33
Page 53

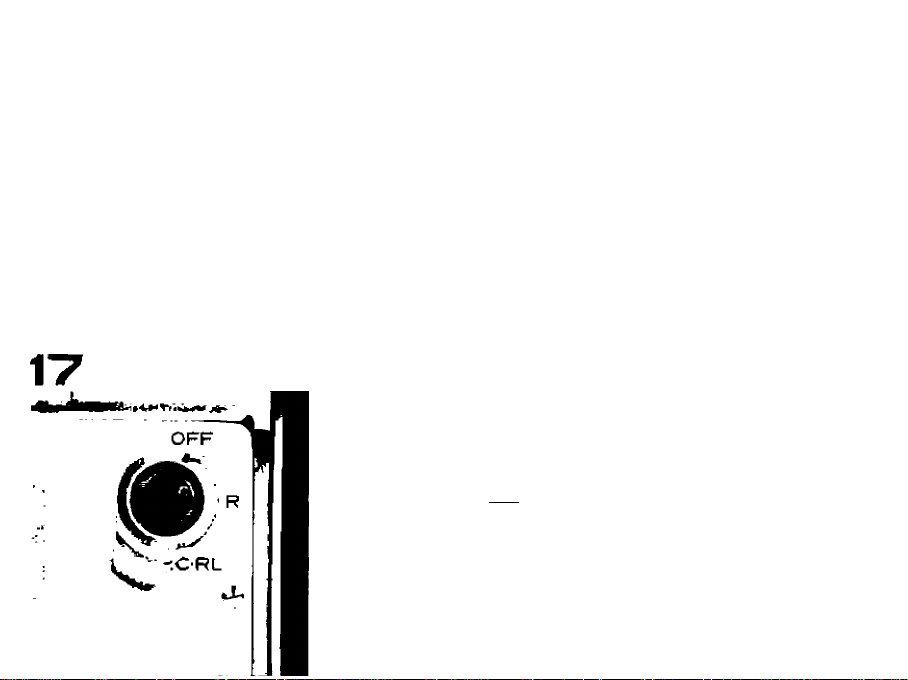
THREE-WAY SWITCH
The three-way switch has three positions of “OFF",
“R"and “RC-RL".
1. “OFF” is the position where the power circuit
is cut off and the exposure meter, power zoom
and shutter release do not function.
2. “R’’ is where the power circuit is switched on
3. “RC-RL” is where the running lock and remote
control function.
Sk Running Lock
When the three-way switch is turned from
“R” to “RC-RL”, while pressing the shutter lever,
the lever becomes locked for continued running
until the switch is returned to “R" position allow
ing the lever to pop out, stopping the camera
Page 54

Remote Control
b
1. Set the three-way switch at "OFF”.
2 Insert the remote control cord into the socket
for remote control cord
3 Turn the three-way switch to "RC-RL” while
pressing the shutter lever,
4 Push the knob on the remote control switch in
the direction of the arrow The camera will
start to run until the knob on the remote control
switch is returned to its former position.
Page 55

SINGLE FRAME PHOTOGRAPHY
AND CONTINUOUS RUNNING
Release Socket for Single Frame
Single frame photography is performed by setting
the three-way switch at “R”, and by inserting the
cable release into the release socket for single
frame. Set the filming speed setting lever at
12fps
Release Socket for Continuous Running
You can use the release socket for continuous
running, copy work, titling or when the camera is
used on a tripod.
12 10.
Page 56

EYEPIECE SHUTTER
^ sure to set the eyepiece shutter at "CLOSE" jo
prevent reverse incoming light when the eye is
not against tFe eyepiece during such photography
as pamTihgT^sThgle frame and titling. Otherwise,
direct
reverse direction through the optical system of
the viewfinder, and cause ghost images^ the film
the eyepiece, flow in
OPEN
'CLOSE
' 35
Page 57

PANNING
Panning is employed when shooting a scene from
one position to another by moving the camera
around horizontally to make a continuous shot
over a wide area in one saquence.
# Do not mqye_jthe camera -ton rapidly in any
direction, particularly vertically. Use of a tripod
is recommended^
^Panning shots are usually started from subjects
of less importance and move on to the most
important subject where it ends by running the
film longer on the last sequence.
36
Page 58
PROPER CARE OF THE CAMERA
1. Do not put fingerprints and other stains on the
zoom lens. Wipe gently with silicon cloth when
removing stains and use a blower for removing
dust.
2 It is important that the aperture section, through
which the film passes, always be kept clean by
blowing the dust away with a blower. Do not
use anything hard such as a metal brush.
3 Keep the camera away from moisture, heat and
dust when storing. Do not keep camphor or
naphthalene near the camera.
4. Be sure to set the three-way switch at "OFF”
when putting the camera into its case.
5. When the camera is not to be used for a pro
longed period of time, remove the batteries and
keep them in a dry place.
Page 59

ACCESSORIES
58mm Close-Up Lenses 450 and 240
Close-up lenses are used when titling copying
documents and when photographing plants and
insects. 450 and 240 indicate the distance in
millimeter from the tip of the lens to the subject
when the distance scaie of the close-up lenses are
set at infinity.
#When using a close-up lens the depth-of-field
TjiK
Focal Length
Distance Scale
Distance from Film
Plane to Subject
Picture Area
oo
609mm
'.2')
339 x251mm
{i'uh"x9h")
50mm Close-Uo Lens 450
7 5mm 60mm
l 2m 14
475 mm
224 X 166 mm
609 mm
t2''
45 X 33 mm
ar/' ■ w
becomes shallow. Therefore, close the aperture
down to smaller than f/8.
4 Do not use a close-up lens at high magnification
(telephoto), unless for special effects, because the
depth-of-field becomes shallower.
#When the focal length is set at 60mm, you can
obtain the same effect as that of attaching a close-
up lens at a shooting distance of 1.2m.
58mm Close-Up Lens 240
1 2m (4')
475mm 394 mm
30 a Z2mm
l^ifi "x Ji":
179> 132mm
7 5 mm
1 2m i4'
353 mm
138 < 102mm
i5^« " ^4!-*")
CO
J94mm
d'3>i'")
24 x 17mm
C>i 6" x\" )
60mm
Filters
The various 58mm screw-in type filters are avail
able for the Canon Auto Zoom 814. Being a TTL
Type
1. '# uv
o
^ Y3
{■) 0 X Darkens blue, increases yellow and red oerceptibly. Good for contrasts, espectally in distant landscapes.
O R 1
O G 1
ND4
ND 8
• SKYLIGHT
• CCA 4
• CCA 8
• CCB 4
# CCB Ll2eouiiir ]
O ror black and white filrr
Absorbs Only ultra-violet r#ys. EspecisNy effective at seaslda and high mountains. Recommended for use
in color photography
Increases contrast of monochrome film. Enhances clouds, darkening the blue sky Brightens red and yellow.
MdNes strong contrasts May also be used with infrared film
Prevents red from turning radically into white. Lightens faces and sky appropriately, and reflecls the light
ness of fresh greenery.
ND 4 reduces light volume by 1/4, ND 6 by 1/6. No effects on the reproduction of colors of color film.
Acts to harmonize the blue sky and shade
for use with dayhght type film under the cloud.
Fpr use with lur^gsten type film under the morning sun or aunset.
For use with dayligfit type film under the morning sun or sunset.
For use with dayMgM Type film under tungsten light
f For color film.
exposure system camera, any type of filter can be
used without regard to the exposure factor.
Filter Characteristics
1.2m (4')
353 mm
d'U i")
18x I3mm
37
 Loading...