

Page 1

User Guide
Page 2

Table of Contents
Table of Contents
Table of Contents .......................................................................................................... 2
Getting Started ............................................................................................................ 28
Reading the Manual .............................................................................................................. 29
Setting Up .......................................................................................................................................................... 29
Using the Software ........................................................................................................................................... 29
Running a Shoot ............................................................................................................................................... 30
Troubleshooting ................................................................................................................................................ 30
Reference ......................................................................................................................................................... 30
Looking for Something Specific? .................................................................................................................... 30
Want to Print the Manual? .............................................................................................................................. 30
Installing Studio Solution ......................................................................................................... 30
Supported Operating Systems ........................................................................................................................ 30
Recommended Operating Requirements .................................................................................................... 30
Before Installation ............................................................................................................................................. 31
Installation ......................................................................................................................................................... 31
Running Studio Solution ......................................................................................................... 32
Supported CD/DVD Software ......................................................................................................................... 32
Supported File Formats .................................................................................................................................... 32
Logging In ......................................................................................................................................................... 32
Setting an Admin Password............................................................................................................................. 32
Logging Into Your Online Account ................................................................................................................. 33
Logging In as an Employee ............................................................................................................................. 33
2
Page 3

Table of Contents
Overview ...................................................................................................................... 34
Manage Studio ....................................................................................................................... 34
Home ................................................................................................................................................................. 34
Calendar ........................................................................................................................................................... 34
Customers ......................................................................................................................................................... 35
Employees ......................................................................................................................................................... 35
Vendors ............................................................................................................................................................. 35
Products ............................................................................................................................................................ 35
Printers ............................................................................................................................................................... 35
Cameras............................................................................................................................................................ 35
Reports .............................................................................................................................................................. 35
Options .............................................................................................................................................................. 35
Photo Library ........................................................................................................................... 35
Catalog Menu .................................................................................................................................................. 36
Photo Viewer .................................................................................................................................................... 36
Shopping Cart .................................................................................................................................................. 36
Photo Data........................................................................................................................................................ 36
Photo Workshop ...................................................................................................................... 36
Enhance ............................................................................................................................................................ 37
Correct/Picture Style ........................................................................................................................................ 37
Color Balance ................................................................................................................................................... 37
Drop Out ........................................................................................................................................................... 37
View ................................................................................................................................................................... 37
Orders ....................................................................................................................................... 37
3
Page 4

Table of Contents
Client Presentation ................................................................................................................. 38
Setting Software Options ............................................................................................ 39
Studio Information .................................................................................................................. 39
General Settings ..................................................................................................................... 40
Application Local Settings ............................................................................................................................... 40
Application Shared Settings ............................................................................................................................ 41
Application General Settings .......................................................................................................................... 41
Fulfillment Options ............................................................................................................................................ 44
Image Preview Settings ................................................................................................................................... 44
Spell Checker Settings ..................................................................................................................................... 45
PhotoReflect Account ........................................................................................................... 46
Labtricity Account .................................................................................................................. 46
System Properties .................................................................................................................... 46
Calibrate Monitor ................................................................................................................... 47
Setting Up Your Network ............................................................................................. 48
Typical Networks ..................................................................................................................... 48
Single Computer Studios ................................................................................................................................. 48
Onsite Studios ................................................................................................................................................... 49
Small Studios ..................................................................................................................................................... 49
Large Studios..................................................................................................................................................... 49
Your Network ........................................................................................................................... 50
Setting Up a Single Computer......................................................................................................................... 50
Setting Up a Server Computer ........................................................................................................................ 51
Viewing and Managing Client Stations ......................................................................................................... 53
4
Page 5

Table of Contents
Setting Up a Client Computer ......................................................................................................................... 54
Connecting Printers ................................................................................................................ 55
Setting Up a Canon Printer with Direct Connectivity ................................................................................... 56
Setting Up a Canon or Windows Printer ......................................................................................................... 57
Setting Up a Raster Printer ............................................................................................................................... 58
Managing Connected Printers ....................................................................................................................... 59
Connecting Cameras ............................................................................................................ 59
Setting Up a Tethered Camera ...................................................................................................................... 60
Setting Up a WiFi Camera ............................................................................................................................... 60
Setting Up a Hot Folder .................................................................................................................................... 61
Importing without a Camera .......................................................................................................................... 62
Setting Filename Options ................................................................................................................................ 62
Setting Up Your Products ............................................................................................ 63
Creating Products .................................................................................................................. 63
Creating a Package Group ............................................................................................................................ 63
Editing a Package Group ............................................................................................................................... 64
Adding Packages ............................................................................................................................................ 64
Editing a Package ............................................................................................................................................ 65
Creating a Product .......................................................................................................................................... 65
Editing a Product .............................................................................................................................................. 66
Adding Digital Delivery Products .................................................................................................................... 67
Adding Services ...................................................................................................................... 74
Adding a Local Service ................................................................................................................................... 74
Adding a Lab Service ...................................................................................................................................... 75
5
Page 6

Table of Contents
Editing a Service ............................................................................................................................................... 75
Managing Templates ............................................................................................................. 75
Viewing Templates ........................................................................................................................................... 75
Adding Groups ................................................................................................................................................. 77
Removing Groups ............................................................................................................................................ 77
Editing Groups .................................................................................................................................................. 77
Setting a Default Group .................................................................................................................................. 78
Creating Templates ......................................................................................................................................... 78
Importing Templates ........................................................................................................................................ 78
Deleting Templates .......................................................................................................................................... 78
Editing Templates ............................................................................................................................................. 78
Shipping Options ..................................................................................................................... 79
Setting Up the Default Group ......................................................................................................................... 79
Adding a Shipping Group ............................................................................................................................... 80
Editing a Shipping Item .................................................................................................................................... 80
Handling Cost ................................................................................................................................................... 80
Tax Information ....................................................................................................................... 80
Local Order Sales Tax ....................................................................................................................................... 80
Shipping and Handling Tax ............................................................................................................................. 81
Setting Up Your Studio ................................................................................................ 82
Vendors and Inventory .......................................................................................................... 82
Adding a Vendor ............................................................................................................................................. 82
Editing a Vendor ............................................................................................................................................... 82
Adding an Inventory Item ............................................................................................................................... 83
6
Page 7

Table of Contents
Updating Used Inventory ................................................................................................................................. 84
Employee Setup ...................................................................................................................... 84
Adding a User Role........................................................................................................................................... 85
Editing User Roles .............................................................................................................................................. 85
Permissions ........................................................................................................................................................ 85
Suggested Role Setups .................................................................................................................................... 87
Adding an Employee ....................................................................................................................................... 87
Editing an Employee ........................................................................................................................................ 88
Import and Export File ...................................................................................................................................... 88
Customer Setup ...................................................................................................................... 88
Adding a Customer ......................................................................................................................................... 88
Editing a Customer ........................................................................................................................................... 89
Import and Export File ...................................................................................................................................... 89
Using Studio Solution ................................................................................................... 90
Basic Studio Functions ............................................................................................................ 90
Title Bar .............................................................................................................................................................. 90
User .................................................................................................................................................................... 90
Back and Forward ............................................................................................................................................ 90
Search ............................................................................................................................................................... 91
Studio Tabs ........................................................................................................................................................ 91
Help.................................................................................................................................................................... 91
Status Bar ........................................................................................................................................................... 91
Software Tabs ................................................................................................................................................... 92
Home Page ............................................................................................................................. 92
7
Page 8

Table of Contents
Viewing Dates ................................................................................................................................................... 92
Editing a Booking or Task ................................................................................................................................. 93
Calendar .................................................................................................................................. 93
Viewing Modes ................................................................................................................................................. 94
Tasks and Events Calendar ............................................................................................................................. 94
Adding a Booking ............................................................................................................................................ 95
Adding a Task ................................................................................................................................................... 96
Adding a Call ................................................................................................................................................... 97
Using the Schedules Calendar ........................................................................................................................ 98
Adding Notes to Calendar Items .................................................................................................................... 99
Moving, Editing, and Deleting Calendar Items ........................................................................................... 100
Customers .............................................................................................................................. 100
Customer Details ............................................................................................................................................ 100
Adding a Customer ....................................................................................................................................... 102
Editing a Customer ......................................................................................................................................... 102
Adding a Booking .......................................................................................................................................... 102
Adding a Note ................................................................................................................................................ 103
Adding a Call ................................................................................................................................................. 104
Employees ............................................................................................................................. 105
Checking In and Out ..................................................................................................................................... 105
Employee Details ............................................................................................................................................ 106
Editing an Employee ...................................................................................................................................... 106
Adding a Task ................................................................................................................................................. 107
Adding a Note ................................................................................................................................................ 107
8
Page 9

Table of Contents
Adding a Shift ................................................................................................................................................. 107
Printing a Schedule ........................................................................................................................................ 108
Reports ................................................................................................................................... 109
Employee Activity .......................................................................................................................................... 110
Employee Activity Export ............................................................................................................................... 110
Employee Export ............................................................................................................................................ 110
Employee Schedules ..................................................................................................................................... 111
Employee Schedules Export .......................................................................................................................... 111
Event Categories ............................................................................................................................................ 111
Employee Categories Export ........................................................................................................................ 111
Orders Summary Export ................................................................................................................................. 111
Package Export .............................................................................................................................................. 111
Package and Products.................................................................................................................................. 111
Products Export ............................................................................................................................................... 112
Sales by Package ........................................................................................................................................... 112
Session Trends ................................................................................................................................................. 112
Tasks by Type Export ....................................................................................................................................... 112
Using the Photo Library ............................................................................................. 113
Navigating the Photo Library .............................................................................................. 113
Using the Catalog Menu ..................................................................................................... 113
Sorting and Viewing Catalogs ...................................................................................................................... 114
Finding a Catalog .......................................................................................................................................... 115
Adding Catalogs ............................................................................................................................................ 115
Viewing Catalog Info ..................................................................................................................................... 116
9
Page 10

Table of Contents
Editing Catalog Info ....................................................................................................................................... 116
Removing Catalogs ....................................................................................................................................... 117
Adding a Photo Group to a Catalog .......................................................................................................... 117
Publishing Catalogs ........................................................................................................................................ 118
Unpublishing Catalogs ................................................................................................................................... 118
Batch Publishing and Unpublishing Catalogs ............................................................................................. 119
Archiving Catalogs ........................................................................................................................................ 119
Unarchiving Catalogs .................................................................................................................................... 120
Setting Photo Numbers .................................................................................................................................. 120
Photo Paths ..................................................................................................................................................... 121
Using the Photo Viewer ........................................................................................................ 122
Sorting and Viewing Photos .......................................................................................................................... 122
Thumbnail Size ................................................................................................................................................ 124
Adding a Photo .............................................................................................................................................. 124
Importing Photos from a Camera................................................................................................................. 125
Importing Photos from a Camera Card ....................................................................................................... 125
Finding a Photo .............................................................................................................................................. 126
Renaming Photos ........................................................................................................................................... 126
Adding Photographer Notes ......................................................................................................................... 126
Removing Photos ........................................................................................................................................... 126
Hiding Photos from Publishing ....................................................................................................................... 127
Rating Photos .................................................................................................................................................. 127
Adding Service Notes .................................................................................................................................... 128
Editing Shipping Info ....................................................................................................................................... 128
10
Page 11

Table of Contents
Photo Paths ..................................................................................................................................................... 128
Viewing Photo Properties .............................................................................................................................. 129
Showing Photo Histograms and Data .......................................................................................................... 130
Saving Attributes ............................................................................................................................................. 130
Applying Attributes ......................................................................................................................................... 131
Editing Custom Attributes .............................................................................................................................. 132
Orienting Photos ............................................................................................................................................. 132
Enhancing Photos .......................................................................................................................................... 133
Previewing Photos .......................................................................................................................................... 133
Publishing Photos ............................................................................................................................................ 133
Un-Publishing Photos ...................................................................................................................................... 133
Batch Publishing and Un-Publishing Events ................................................................................................. 134
Copying Photos .............................................................................................................................................. 134
Creating Batch Orders ................................................................................................................................... 134
Proofing Photos ............................................................................................................................................... 136
Creating a Custom Proof Sheet .................................................................................................................... 138
Using the Shopping Cart ...................................................................................................... 139
Showing and Hiding the Cart ........................................................................................................................ 139
Navigating the Cart ....................................................................................................................................... 139
Showing and Hiding Prices ............................................................................................................................ 140
Viewing Package Groups ............................................................................................................................. 140
Changing Package Groups .......................................................................................................................... 140
Adding an Item to the Cart .......................................................................................................................... 140
Adding Items with the Keypad ..................................................................................................................... 141
11
Page 12

Table of Contents
Adding an A La Carte Item to the Cart ....................................................................................................... 141
Placing an Order ............................................................................................................................................ 142
Saving an Order ............................................................................................................................................. 142
Replacing an Item ......................................................................................................................................... 143
Removing a Single Item ................................................................................................................................. 143
Removing a Package .................................................................................................................................... 143
Clearing the Order ......................................................................................................................................... 143
Changing Cropping for an Item ................................................................................................................... 143
Adding or Subtracting Copies of Packages ................................................................................................ 143
Adding Services to an Item ........................................................................................................................... 144
Changing Media for an Item ........................................................................................................................ 144
Changing Print Commands for an Item ....................................................................................................... 144
Editing Shipping Info ....................................................................................................................................... 144
Photo Paths ..................................................................................................................................................... 145
Using the Orders Workspace ................................................................................... 146
Navigating the Orders Workspace .................................................................................... 146
Viewing Orders ...................................................................................................................... 147
Sorting Orders ................................................................................................................................................. 147
Finding Orders ................................................................................................................................................. 148
Viewing Older Orders ..................................................................................................................................... 148
Refreshing the Order List ................................................................................................................................ 148
Viewing Order Information ............................................................................................................................ 148
Printing Orders ....................................................................................................................... 149
Printing an Order ............................................................................................................................................ 149
12
Page 13

Table of Contents
Printing an Order to CD ................................................................................................................................. 149
Reprinting Orders ............................................................................................................................................ 150
Viewing the Print Queue ................................................................................................................................ 150
Using Auto Print ............................................................................................................................................... 150
Managing Orders ................................................................................................................. 151
Marking Orders Shipped ................................................................................................................................ 151
Cancelling Orders .......................................................................................................................................... 151
Deleting Orders............................................................................................................................................... 151
Batching and Unbatching Orders ................................................................................................................ 151
Printing an Order Proof .................................................................................................................................. 152
Printing an Order Form ................................................................................................................................... 153
Printing a Simple Receipt ............................................................................................................................... 153
Editing & Proofing an Order ................................................................................................ 154
Navigating while Editing & Proofing ............................................................................................................. 154
Auto Editing Orders ........................................................................................................................................ 155
Viewing Photos ............................................................................................................................................... 155
Orienting Photos ............................................................................................................................................. 156
Saving and Applying Attributes .................................................................................................................... 156
Changing Order Properties ........................................................................................................................... 156
Undoing and Redoing Changes .................................................................................................................. 157
Saving Orders.................................................................................................................................................. 157
Printing Orders ................................................................................................................................................ 157
Using Presentation Mode.......................................................................................... 158
Opening the Photo Library and Photo Workshop ............................................................ 159
13
Page 14

Table of Contents
Navigating in Presentation Mode ...................................................................................... 159
Viewing Photos in Presentation Mode ............................................................................... 159
Viewing Individual Photos ............................................................................................................................. 159
Viewing Multiple Photos................................................................................................................................. 160
Viewing Photo Information ............................................................................................................................ 160
Viewing High Quality Previews ...................................................................................................................... 160
Managing Photos in Presentation Mode .......................................................................... 160
Changing the Aspect Ratio .......................................................................................................................... 160
Sorting Photos ................................................................................................................................................. 161
Rating Photos .................................................................................................................................................. 161
Orienting Photos ............................................................................................................................................. 161
Adding Services .............................................................................................................................................. 162
Comparing Photos ......................................................................................................................................... 162
Playing Background Music ............................................................................................................................ 163
Using the Shopping Cart ...................................................................................................... 163
Running a Slideshow ............................................................................................................ 164
Using the Photo Workshop........................................................................................ 165
Navigating the Photo Workshop ........................................................................................ 165
Viewing Photos ..................................................................................................................... 166
Viewing Modes ............................................................................................................................................... 166
Viewing Fullscreen .......................................................................................................................................... 166
Viewing a Slideshow ...................................................................................................................................... 167
Viewing without Tools ..................................................................................................................................... 167
Viewing Front and Back ................................................................................................................................ 167
14
Page 15

Table of Contents
Viewing High Quality Previews ...................................................................................................................... 167
Viewing with a Printer Profile ......................................................................................................................... 167
Viewing and Setting Aspect Ratios .............................................................................................................. 167
Viewing Guides .............................................................................................................................................. 169
Clearing Photos from the Workspace .......................................................................................................... 169
Sorting Photos ................................................................................................................................................. 169
Finding Photos................................................................................................................................................. 170
Refreshing Photos ........................................................................................................................................... 170
Showing Photo Information ................................................................................................. 171
Showing and Setting Photo Numbers .......................................................................................................... 171
Showing Photo Icons ...................................................................................................................................... 171
Showing and Setting Photo Ratings ............................................................................................................. 171
Showing and Setting Filenames .................................................................................................................... 172
Showing and Copying Photo Paths ............................................................................................................. 172
Showing and Setting Info Tooltips ................................................................................................................. 173
Showing Photo Properties .............................................................................................................................. 173
Showing Photo Histograms and Data .......................................................................................................... 173
Importing Photos ................................................................................................................... 173
Importing a Photo .......................................................................................................................................... 174
Using Quick Import ......................................................................................................................................... 175
Importing Photos from a Camera................................................................................................................. 176
Creating a Catalog ....................................................................................................................................... 177
Creating a Photo Group ............................................................................................................................... 177
Managing Photos ................................................................................................................. 178
15
Page 16

Table of Contents
Selecting Photos ............................................................................................................................................. 178
Applying and Saving Attributes .................................................................................................................... 178
Applying Services ........................................................................................................................................... 178
Orienting Photos ............................................................................................................................................. 179
Editing Shipping Info ....................................................................................................................................... 179
Removing Photos ........................................................................................................................................... 179
Saving Changes and Photos......................................................................................................................... 179
Editing Photos ........................................................................................................................ 180
Using the Shopping Cart ...................................................................................................... 180
Using Toolsets in the Photo Workshop ..................................................................... 181
Using the Basic Toolset ......................................................................................................... 181
Saving Changes ............................................................................................................................................. 182
Moving a Photo .............................................................................................................................................. 182
Scaling a Photo .............................................................................................................................................. 182
Orienting a Photo ........................................................................................................................................... 183
Zooming .......................................................................................................................................................... 184
Using the Enhance Toolset .................................................................................................. 185
Saving Changes ............................................................................................................................................. 186
Retouching a Photo ....................................................................................................................................... 186
Applying Colors .............................................................................................................................................. 187
Adding a Frame ............................................................................................................................................. 187
Adding a Texture ............................................................................................................................................ 187
Applying a Border .......................................................................................................................................... 188
Using Basic Border Functions ......................................................................................................................... 189
16
Page 17

Table of Contents
Switching between Borders in the Current Group ...................................................................................... 189
Setting the Border Group and Directory ...................................................................................................... 189
Adding and Editing Border Text .................................................................................................................... 190
Editing Borders ................................................................................................................................................ 190
Saving Borders ................................................................................................................................................ 192
Cropping Photos ............................................................................................................................................ 192
Creating a Composite Sheet ........................................................................................................................ 192
Adjusting Focus ............................................................................................................................................... 193
Applying a Vignette ....................................................................................................................................... 193
Using the Correct Toolset ..................................................................................................... 194
Saving Changes ............................................................................................................................................. 195
Steps to Correcting ........................................................................................................................................ 195
Saving Attributes ............................................................................................................................................. 195
Adjusting Contrast .......................................................................................................................................... 195
Adjusting Exposure ......................................................................................................................................... 196
Adjusting Shadows ......................................................................................................................................... 196
Adjusting Color ............................................................................................................................................... 196
Adjusting Tone ................................................................................................................................................ 197
Adjusting Redeye ........................................................................................................................................... 197
Using EOS Picture Styles Toolset .......................................................................................... 198
Adjusting EOS Picture Styles........................................................................................................................... 198
Standard ......................................................................................................................................................... 198
Portrait ............................................................................................................................................................. 198
Landscape ...................................................................................................................................................... 198
17
Page 18

Table of Contents
Neutral ............................................................................................................................................................. 199
Faithful ............................................................................................................................................................. 199
Monochrome .................................................................................................................................................. 199
Customization of Picture Styles ..................................................................................................................... 199
Adjusting Contrast .......................................................................................................................................... 200
Adjusting Exposure ......................................................................................................................................... 200
Adjusting Sharpness ....................................................................................................................................... 200
Adjusting Saturation ....................................................................................................................................... 201
Adjusting Color Tone ...................................................................................................................................... 201
Adjusting Filter Effect ...................................................................................................................................... 201
Adjusting Tone Effect ..................................................................................................................................... 202
Using the Color Balance Toolset ......................................................................................... 202
Saving Changes ............................................................................................................................................. 203
Using Preset Color Balances .......................................................................................................................... 203
Applying Attributes ......................................................................................................................................... 203
Manually Adjusting Color Balance ............................................................................................................... 204
Automatically Adjusting Color Balance ....................................................................................................... 204
Selecting a Color Profile ................................................................................................................................ 205
Using the Drop Out Toolset .................................................................................................. 205
Saving Changes ............................................................................................................................................. 206
Applying Borders ............................................................................................................................................ 206
Selecting the Chroma Key Backdrop .......................................................................................................... 206
Applying Presets ............................................................................................................................................. 206
Adjusting Hue Percent ................................................................................................................................... 207
18
Page 19

Table of Contents
Adjusting Shadows ......................................................................................................................................... 207
Adjusting Threshold ........................................................................................................................................ 208
Adjusting Protection ....................................................................................................................................... 208
Using the Border Workshop ...................................................................................... 209
Navigating the Border Workshop ....................................................................................... 209
Viewing in the Border Workshop ........................................................................................ 210
Viewing Front or Back .................................................................................................................................... 210
Selecting Items ............................................................................................................................................... 210
Panning within the Border ............................................................................................................................. 210
Zooming In ...................................................................................................................................................... 210
Viewing at Page Size ..................................................................................................................................... 211
Viewing at Actual Size ................................................................................................................................... 211
Viewing and Editing Border Properties ......................................................................................................... 211
Viewing and Editing Item Properties ............................................................................................................ 212
Viewing the Using the Border Items List ........................................................................................................ 212
Viewing and Using the Grid........................................................................................................................... 213
Viewing Test Photos ........................................................................................................................................ 214
Viewing Test Forms ......................................................................................................................................... 214
Editing Items in the Border Workshop ................................................................................ 214
Basic Editing Tools ........................................................................................................................................... 214
Editing Border Font ......................................................................................................................................... 215
Filling and Fitting the Page ............................................................................................................................ 215
Making Items the Same ................................................................................................................................. 215
Centering Items .............................................................................................................................................. 216
19
Page 20

Table of Contents
Aligning Items ................................................................................................................................................. 216
Spacing Items ................................................................................................................................................. 217
Changing Item Order .................................................................................................................................... 218
Rotating Items ................................................................................................................................................. 218
Hiding Items .................................................................................................................................................... 219
Locking Items .................................................................................................................................................. 219
Linking Items .................................................................................................................................................... 219
Saving Changes and Borders ....................................................................................................................... 220
Adding Border Items ............................................................................................................ 220
Selecting Position and Size ............................................................................................................................ 220
Adding a Photo Item ..................................................................................................................................... 221
Adding a Multiple Photo Item ....................................................................................................................... 222
Adding a Graphic Item ................................................................................................................................. 223
Adding Text ..................................................................................................................................................... 224
Adding an Effect ............................................................................................................................................ 225
Adding a Custom Shape ............................................................................................................................... 226
Adding a Line ................................................................................................................................................. 227
Adding a Barcode ......................................................................................................................................... 227
Using Photo Queries ............................................................................................................. 228
Using the Retouch Workshop ................................................................................... 230
Navigating the Retouch Workshop ................................................................................... 230
Panning ........................................................................................................................................................... 231
Zooming In ...................................................................................................................................................... 231
Fitting the Page .............................................................................................................................................. 231
20
Page 21

Table of Contents
Viewing at Actual Size ................................................................................................................................... 231
Before Retouching ............................................................................................................... 231
Applying and Removing ............................................................................................................................... 231
Saving Retouches........................................................................................................................................... 232
Understanding the Retouch Settings ................................................................................. 232
Opacity ........................................................................................................................................................... 232
Choose Source ............................................................................................................................................... 232
Size ................................................................................................................................................................... 232
Feather ............................................................................................................................................................ 232
Flow .................................................................................................................................................................. 232
Healing Effect ................................................................................................................................................. 233
Color ................................................................................................................................................................ 233
Amount............................................................................................................................................................ 233
Radius .............................................................................................................................................................. 233
RGB .................................................................................................................................................................. 233
Eyedropper ..................................................................................................................................................... 233
Contrast ........................................................................................................................................................... 233
Brightness......................................................................................................................................................... 233
Using the Retouch Methods ................................................................................................ 233
Brush ................................................................................................................................................................. 234
Lasso ................................................................................................................................................................ 234
Poly Lasso ........................................................................................................................................................ 234
Rectangle ....................................................................................................................................................... 234
Oval ................................................................................................................................................................. 234
21
Page 22

Table of Contents
Fill All ................................................................................................................................................................ 234
Clear All ........................................................................................................................................................... 234
Using the Retouch Tools ....................................................................................................... 234
Clone ............................................................................................................................................................... 235
Blemish ............................................................................................................................................................. 235
Paint ................................................................................................................................................................. 235
Dodge ............................................................................................................................................................. 235
Burn .................................................................................................................................................................. 235
Sharpen ........................................................................................................................................................... 235
Blur ................................................................................................................................................................... 235
Color Saturation.............................................................................................................................................. 235
Color Balance ................................................................................................................................................. 235
Color Accents ................................................................................................................................................. 236
Redeye ............................................................................................................................................................ 236
Running a Shoot ........................................................................................................ 237
Adding a Customer .............................................................................................................. 237
Creating a Booking .............................................................................................................. 239
Setting Up Your Camera ...................................................................................................... 241
Setting Up a Tethered Camera .................................................................................................................... 241
Setting Up a WiFi Camera ............................................................................................................................. 242
Starting the Shoot ................................................................................................................. 243
Capturing and Importing Photos ....................................................................................... 244
Live View ......................................................................................................................................................... 245
Importing Photos ............................................................................................................................................ 246
22
Page 23

Table of Contents
Retouching Photos ............................................................................................................... 247
Presenting Photos ................................................................................................................. 247
Creating an Order ................................................................................................................ 249
Adding Items to the Cart ............................................................................................................................... 250
Placing the Order ........................................................................................................................................... 251
Printing an Order................................................................................................................... 252
More Information .................................................................................................................. 253
Advanced Border Workshop ................................................................................... 254
Border Workshop Menu ....................................................................................................... 255
Front & Back Tab ............................................................................................................................................ 256
Add .................................................................................................................................................................. 258
Edit ................................................................................................................................................................... 266
Options ............................................................................................................................................................ 266
Setting Border Properties .......................................................................................... 270
Using the Border Items List ........................................................................................ 272
Adding Photo Placeholders ................................................................................................ 272
Transparency Options .................................................................................................................................... 274
Movement Options ........................................................................................................................................ 276
Advanced Options ........................................................................................................................................ 277
Size and Position ............................................................................................................................................. 278
Add Multiple Photos ............................................................................................................. 279
Photo Queries ................................................................................................................................................. 280
Image Cell Settings ........................................................................................................................................ 282
Photo Labels ................................................................................................................................................... 283
23
Page 24

Table of Contents
Composite Options ........................................................................................................................................ 283
Composite Size and Position ......................................................................................................................... 283
Adding a Border Graphic.................................................................................................... 284
Transparency Options .................................................................................................................................... 284
Movement Options ........................................................................................................................................ 284
Advanced Options ........................................................................................................................................ 285
Size and Position ............................................................................................................................................. 285
Adding Text ........................................................................................................................... 286
Attribute Options ............................................................................................................................................ 286
Movement Options ........................................................................................................................................ 286
Vertical Alignment Options ........................................................................................................................... 286
Character and line Spacing ......................................................................................................................... 287
Advanced Options ........................................................................................................................................ 287
Size and Position ............................................................................................................................................. 287
Adding an Effect .................................................................................................................. 288
Transparency Options .................................................................................................................................... 289
Movement Options ........................................................................................................................................ 291
Advanced Options ........................................................................................................................................ 291
Other Options ................................................................................................................................................. 291
Size and Position ............................................................................................................................................. 291
Editing a Text Object’s Font ................................................................................................ 292
Adjusting the Page Layout .................................................................................................. 292
Fill & Fit Tool ..................................................................................................................................................... 292
Make Same Tool ............................................................................................................................................. 293
24
Page 25

Table of Contents
Center Tool...................................................................................................................................................... 293
Align Tool ......................................................................................................................................................... 293
Space Tool ...................................................................................................................................................... 294
Order Tool........................................................................................................................................................ 294
Rotate Tool ...................................................................................................................................................... 295
Select ............................................................................................................................................................... 295
Pan ................................................................................................................................................................... 296
Zoom ................................................................................................................................................................ 296
Fit to Page ....................................................................................................................................................... 296
Actual Size 100% ............................................................................................................................................. 296
Testing Variable Text fields ....................................................................................... 297
Using the Photo and graphic Object Query .................................................................... 297
Graphic Variables .......................................................................................................................................... 297
Query Variables .............................................................................................................................................. 298
Troubleshooting ......................................................................................................... 300
Common Status Bar Errors ................................................................................................... 300
Print Queue Problem ...................................................................................................................................... 300
File Server Problem ......................................................................................................................................... 300
Camera Not Detected .................................................................................................................................. 301
Can’t Connect to a Server or Client Station .................................................................... 301
Hardware Problems ....................................................................................................................................... 301
Permissions ...................................................................................................................................................... 301
Testing the Server ........................................................................................................................................... 302
Testing the Clients ........................................................................................................................................... 303
25
Page 26

Table of Contents
Can’t Detect a Printer or Camera ..................................................................................... 303
Hardware Problems ....................................................................................................................................... 304
Canon Printer Help ......................................................................................................................................... 304
Canon Camera Help ..................................................................................................................................... 305
Can’t Connect to the Database ....................................................................................... 305
Can’t Access the Photos Folder ......................................................................................... 306
Can’t Find a Portrait Session................................................................................................ 306
Can’t Send Orders to Print .................................................................................................. 307
Reference .................................................................................................................. 308
Photo Library Reference ...................................................................................................... 309
Top Catalog Menu ......................................................................................................................................... 310
Top Photo Viewer Menu ................................................................................................................................ 312
Bottom Catalog Menu ................................................................................................................................... 314
Bottom Photo Viewer Menu .......................................................................................................................... 315
Right-clicking a Catalog ................................................................................................................................ 316
Right-clicking a Photo .................................................................................................................................... 318
Shopping Cart Reference ................................................................................................... 320
Hiding and Showing Data and the Cart ...................................................................................................... 320
Shopping Cart Options .................................................................................................................................. 320
Right-clicking an Item in the Shopping Cart................................................................................................ 321
Orders Workspace Reference ............................................................................................ 322
Top Menu ........................................................................................................................................................ 323
Bottom Menu .................................................................................................................................................. 323
Right-clicking an Order .................................................................................................................................. 324
26
Page 27

Table of Contents
Presentation Mode Reference ........................................................................................... 325
Top Menu ........................................................................................................................................................ 325
Photo Workshop Reference ................................................................................................ 328
Top Menu ........................................................................................................................................................ 329
Catalog Menu ................................................................................................................................................ 331
Right-clicking a Photo .................................................................................................................................... 333
Border Workshop Reference ............................................................................................... 334
Top Menu ........................................................................................................................................................ 335
Left Toolbar ..................................................................................................................................................... 336
Right Toolbar ................................................................................................................................................... 337
Right-clicking an Item .................................................................................................................................... 337
Shortcut Keys and Special Text ............................................................................... 339
Orders Workspace Shortcut Keys ....................................................................................... 339
Retouch Workshop Shortcut Keys ...................................................................................... 340
Photo Library Shortcut Keys ................................................................................................. 341
Slideshow Shortcut Keys ....................................................................................................... 343
Presentation Mode Shortcut Keys ...................................................................................... 344
Photo Workshop Shortcut Keys ........................................................................................... 346
Border Workshop Shortcut Keys .......................................................................................... 349
Home Shortcut Keys ............................................................................................................. 350
Inserting Special Text ............................................................................................................ 351
Index .......................................................................................................................... 359
27
Page 28

Getting Started
Getting Started
Studio Solution software combines the operations and functions of a professional
working photo studio into a single, easy to use and automated software.
Historically, for the smooth operation of a working photo studio, many different pieces
of software would be required to cover all of the steps between the times when a client
is booked, all the way through to when the finished order is delivered.
Studio Solution brings all studio tasks together into a single, easy to use software that
can manage a complete professional studio workflow regardless of the company's size.
Because of the scalable design of Studio Solution, it can operate stand-alone on a
single laptop computer on location, or it can easily run over a large network managing
multiple workstations in various locations.
Studio Solution uses all of Canon's advanced imaging technologies "under the hood" to
ensure that the image quality being produced at every step in the shooting, processing
and printing process is up to the highest industry standard.
Rather than a studio owner or manager thinking about their camera, their computers
and their printers as separate tools, Studio Solution integrates their individual operations
effortlessly so that everything operates as a single unit.
The following are some of Studio Solution's useful features:
Consistently superior image quality throughout the workflow
Canon CR2 RAW workflow
Access and permissions for all studio operations, Administrators can control
which employees have access to individual parts of the software
Scalable to any size studio operation
Included product support web links
Management of all calendar, employee and customer databases
Keeps track of customer family relations and birthdays
Reporting
28
Page 29

Getting Started
Create pricing, packages and templates
Wireless FTP capture
Tethered capture
Quick import via memory card or disk
Image archiving
Speedy creation of professional proof sheets and online galleries
Unique borders, templates and composites. Apply graphic templates turning
photos into profitable products.
Unique slide shows.
Nesting and load sharing
Built in Canon printer color management
Retouch photos in the Studio Solution retouch module or Adobe Photoshop.
Integrated Picture Styles for RAW editing
Send orders electronically to professional labs with Labtricity.
Green screen shooting and editing
Reading the Manual
We’re here to help. The manual is designed not just to tell you where buttons are
located, but with tutorials on how to perform every necessary task within the software.
Although you can easily move around the manual with links, depending on your
experience with the software you might want to jump ahead right away.
Setting Up
Start at the beginning. We’ll guide you through setting up your studio, piece by piece,
in the right order. No jumping around or missing important options. Click here to start
setting up.
Using the Software
If you don’t need to worry about setting things up, you can jump ahead and start
learning about using the software. Click here to start using the software.
29
Page 30

Getting Started
Running a Shoot
If you’re only concerned with the steps necessary to run a shoot, start to finish, jump
ahead to the tutorial. Click here to run a shoot.
Troubleshooting
Click here to troubleshoot.
Reference
If you’re looking for detailed screenshots, button descriptions, or shortcut keys, check
the reference guides. Click here for reference material. If you’re looking for a list of
shortcut keys, click here instead.
Looking for Something Specific?
Try looking in the Table of Contents or the Index. To view a permanent and collapsible
Table of Contents to the left of this manual, select View > Navigation Panels >
Bookmarks from the PDF menu. Just click on a heading to jump to that section.
Want to Print the Manual?
The manual is a considerable size, but you can print it if you want a physical copy.
Simply select File > Print from the PDF menu, or press CTRL – P as a hotkey.
Installing Studio Solution
Supported Operating Systems
Studio Solution is supported on Windows XP, Vista and Windows 7. You can run the
software on any Mac OS that supports Boot Camp. For more information on running
Boot Camp, go to Apple’s support page.
Recommended Operating Requirements
Pentium 4, Celeron 1.8GHz or AMD equivalent
Microsoft Windows XP, Vista, or Windows 7 with all installed service packs
1 GB RAM
30
Page 31

Getting Started
80 GB hard drive (or more depending on storage requirements)
SVGA monitor (24-bit color at 1024x768 resolution)
CD-ROM and CD-RW
USB connectivity
Microsoft Internet Explorer 5.0 or above
Before Installation
If you will be running Studio Solution over a network, you must be logged into Windows
as an Administrator during installation. This is only for installation purposes, and
afterwards the software can be used without connectivity problems by any user, if they
have permission to access Shared folders.
Note: Please make sure the dongle is not installed on the computer prior to installing the
software.
Installation
To install Studio Solution:
1. Insert the disc into the computer CD drive.
2. Setup will automatically start the installation process.
3. If a security window appears, select to Run the install.
4. The InstallShield Wizard will begin:
a. Select Next to begin the installation.
b. Read and accept the terms in the License Agreement.
c. Select Change to select a location to install Studio Solution.
i. The default location is C:\Program
Files\Studio Solution\
d. Select Install to begin the installation.
31
Page 32

Getting Started
e. The installation will set up basic database information for the software. This
may take a few minutes.
5. The InstallShield Wizard will complete. Studio Solution is installed!
Running Studio Solution
Before running Studio Solution, you must have the USB protection key plugged into a
USB port and verified. If the key is not working or connected to the computer, you will
not be able to start the software.
If you installed Studio Solution into the default directory, you can open it by double
clicking the Studio Solution icon from your Desktop or from the Start Menu at Start Menu
> Programs > Studio Solution.
Supported CD/DVD Software
When using Windows XP or Vista, the software will automatically use the CD authorizing
capabilities of the operating system.
Supported File Formats
The following file formats are supported:
.crw (Canon)
.cr2 (Canon)
.tif
..bmp
.jpg
.psd (Adobe)
.png
Logging In
The first time you activate the software, you will automatically login as Admin, with
access to every part of the software. As the Administrator, you have the option to set
up the rights and privileges for other Studio Solution users.
Setting an Admin Password
The first thing you should do after logging in is set a password to protect your
Administrative settings.
32
Page 33

Getting Started
To set a password for the Administrator:
1. Start the software with the USB protection
key installed.
2. Ensure you are in the Manage Studio
tab.
3. Select Logout, located at the very top
right of the software.
4. You will be returned to the login screen.
5. Select to login as Admin with no
password.
6. Select the Manage Studio tab then select the Employees sub-tab.
7. Select Admin then select Edit Employee located at the lower left corner of the
page.
8. Input a password then select Save.
9. Your password is now set.
Logging Into Your Online Account
If you have an ExpressDigital PhotoReflect account, you can set the software to log into
it automatically. First, you will need to set your PhotoReflect options here. Once they are
set, you can select to Automatically log in to Online Account at the login screen to
connect to your PhotoReflect and Labtricity accounts upon login. The user logging in
must have access to these accounts to use this feature.
Logging In as an Employee
To log in as an employee, they must first have an employee account. The password, if
required, can be set when the employee is created. The employee’s access and
permissions in the software is dependent upon the rights assigned to them. Learn more
about setting up employees here.
33
Page 34

Overview
Overview
Studio Solution is divided into five tabs to easily manage your photography studio. These
tabs are located at the bottom of the software screen.
Manage Studio contains all of the day to day studio operation option such as
Calendars, Products, Printers, Cameras, and other general settings for the software.
The Photo Library is for organizing and managing your photos and albums.
The Photo Workshop is for editing and retouching your photos.
The Orders tab is for managing and printing all orders.
Client Presentation is a customer-friendly way of running the software while your
customer watches, appearing as a kiosk for presenting and ordering photos.
Manage Studio
Here you will take care of all daily business, such as adding events, customers,
employees, and setting products, services, and settings. The tabs at the top of the
screen will manage different aspects of your studio.
Home
This is your home page. Here you will see all bookings and tasks available for a
scheduled date.
Calendar
This is your studio calendar. You can add bookings, tasks, or calls for specific times and
dates. These will show up on your homepage. You can also schedule and view
employee schedules and rooms here.
34
Page 35

Overview
Customers
Here you will add, view, or edit customer information. This is where their contact
information will be stored in the software.
Employees
Here you will add and register employees of your studio. You can assign events to them,
control their access to the software, and keep records of their actions.
Vendors
Here you will add and monitor vendors and inventory for your studio operations.
Products
Here you will add and edit your products, services, templates, packages, and prices,
including shipping and tax costs.
Printers
This is your printer configuration page. Add, edit, or troubleshoot printers here.
Cameras
This is your camera configuration page. Add, edit, or troubleshoot cameras here.
Reports
Here you will view, export and print various reports, including event, sales, employee,
and trend information.
Options
This is your settings page. Here you will manage all software options.
Photo Library
Here you will store, organize, and manage all photos and catalogs. The library is divided
into three sections, appearing in the software from left to right: Catalog Menu, Catalog
Viewer, Shopping Cart or Photo Data with Histogram.
35
Page 36

Overview
Catalog Menu
This is where you will create, organize, publish, and archive your photo catalogs.
General headings are available upon installation but can be changed at any time.
Selecting a catalog here will determine which photos appear in the Catalog Viewer.
Photo Viewer
This is where you will review, orient, and organize photos within a catalog. You can add,
retouch, and order individual photos here.
Shopping Cart
This is where you will select packages and photos for purchase. Any created package
groups and products will be available here.
Photo Data
This is where you will be able to view a histogram for any image and add tags to a
photo or catalog.
Photo Workshop
Here you will touch up, edit, or manipulate your photos before sending them to print. All
of the changes made here will be saved as a new file. Your original photo file will
remain unaffected. There are five different tabs located at the bottom of the screen to
provide editing: Enhance, Correct (or Picture Style when working with Canon RAW files),
Color Balance, Drop Out, and View.
36
Page 37

Overview
Enhance
This is for adding borders, text, and retouching your photos.
Correct/Picture Style
This is for adjusting light options such as shadows, brightness, and exposure. Canon
Picture Styles, will be made available when Canon RAW files are selected for editing.
Color Balance
This is for selecting or setting a color profile and adjusting white balance.
Drop Out
This is for editing and applying green-screen effects.
View
This is what the photo will look like if printed as is.
Orders
Here you will view, manage, and print all orders created in the Shopping Cart. There are
three tabs: New Orders, Pending Orders, and Completed Orders. Order details appear
below the queues.
37
Page 38

Overview
Client Presentation
This option will only become available within the Photo Library and Photo Workshop,
and will change the appearance of the software into a customer-friendly presentation
tool, complete with ratings, comparisons, music, and a slideshow. The Shopping Cart
will be available during this mode for creating orders.
38
Page 39

Setting Up: Software Options
Setting Software Options
Before using the software you will need to set many of the basic software options. Let’s
start with the most basic functions.
Find and select the Manage Studio tab at the bottom of the software.
Studio Information
Find these options in Manage Studio > Options > Studio Information.
The first step is entering
your studio information.
Enter your studio name,
address, and contact
information and click
Save. This information will
be used automatically in
other parts of the
software.
39
Page 40

Setting Up: Software Options
General Settings
Find these options in Manage Studio > Options > General Settings.
Select a heading to change the software options. Below is a list and description of
each header and its options.
Application Local Settings
These settings apply only to this computer.
Station: Select a unique name for this computer. This will allow you to identify
specific actions performed on or by this computer by recognizing the Station
name. Your computer name, as displayed in Windows, can be used as a default.
Archive Path: Select or browse to a location to archive past events. Archiving will
remove the events from the software while keeping them handy in case you
ever need them again. You can also archive to a disc if your computer supports
it; select Test Compatibility to check if your computer can write information to a
CD. If not, you will need to save the data to another location then write with
other software.
Backup Path: Select or browse to a location if you would like to make a backup
archive to a second drive or location on your network.
Restore: Browse to your previously archived events to bring them back into the
software.
Note: Your Archive and Restore path must be set to the same location.
40
Page 41

Setting Up: Software Options
Application Shared Settings
These settings apply to all computers on a networked system.
Caption Logo Path: Set your logo to appear at the top of the screen during
Presentation Mode. The height cannot exceed 32 pixels and the width cannot
exceed 600 pixels.
File Management: Select an option for storing catalogs: none, by day, by week,
by month. All catalogs during the selected time period will be stored in the same
folder.
Application General Settings
Set the general options for the software. A checkmark indicates the option is activated.
Many of the options are activated upon installation as the default.
Allow text to be added on the fly to images and borders in the Photo Workshop:
while editing photos in the workshop you will be able to quickly add an empty
text box and format it independently of the image and any borders.
Automatically delete an event after it is archived to disc: after archiving an
event to a backup location, the event will be automatically removed from the
software without a warning prompt.
Fill package with current photo when adding to cart: if you have a photo
selected and add a package to the cart, the package will be automatically
populated with that photo. Normally, the package will be blank and you will
need to click and drag photos into the package slots.
Show the „Desktop‟ in the library to browse folders: your computer desktop will
appear in the catalog list in the Photo Library, so that you can easily browse to
and add photos from locations on your computer without exiting the software.
Enable auto-orientation of captured images if supported: the software will try to
decide if photos you take are meant to be portraits or landscapes.
View a large preview of your photos on a second monitor: this option is only
available if you have a second monitor or Canon projector attached to your
computer. Any time you select a photo in the Photo Library, the second monitor
will display the photo full-screen with a black background.
41
Page 42

Setting Up: Software Options
Use the numeric keypad as shortcut keys for color correcting photos: the
numeric keypad will be used in the Photo Workshop for basic color correction
functions.
Ignore preview thumbnails embedded in images: the software uses preview
thumbnails for storing edits, but other software will not recognize these files
properly and the images you see in Studio Solution will not have the full edits
when printed or published. If you routinely use different software to edit and
retouch photos, select this option.
Always show the import photos confirmation dialog when importing files: this
prompts you for confirmation when selecting ―Import All‖ from Add
Photo>Import.
Always show the quick import confirmation dialog when importing photos: if you
are using quick import, this prompts the user for confirmation when importing
photos.
Always show the burn to disk confirmation dialog when burning files or catalogs:
this prompts you for confirmation when burning information to disk.
Always show the hide photos confirmation dialog when hiding photos: this
prompts you for confirmation when hiding photos from the catalog.
Allow borders to be edited from the Photo Workshop: select to allow imported
borders to be locked or editable in the workshop.
Select an image format when using another program to edit images:
.bmp .jpg .png .tif
Select Template Marketplace options:
Display template marketplace on the Choose Border dialog in the Photo
Workshop: when selecting a template in the workshop, you can browse,
purchase, and download online templates.
Purchased Template Download Dialog: select one of the following options:
o Always show the dialog when a template downloads.
o Do not show the dialog and do not add purchased templates to the
current border group.
o Do not show the dialog and always add purchased templates to the
current border group.
42
Page 43

Setting Up: Software Options
Select Shopping Cart options:
Show Service Notes as a branch of the Shopping Cart‟s Tree: you can select items
in the shopping cart and add, edit, or delete service notes.
Show Print Commands and Media in the Shopping Cart menu: you can select
items in the shopping cart and add, edit, or delete print commands and print
media settings.
Select Color Management options:
Use Monitor Color Profiles: set the default Windows color profile for photo display
in both the Photo Library and the Photo Workshop.
Working Space: select one of the following color profiles:
o sRGB ColorSpace
o Adobe RGB (1998) - Default
o ProPhoto RGB
Select options for Prompts and Warnings:
Allow free packages without warning: when you add a package with no cost to
the shopping cart, you will not be reminded that the package is free.
Prompt for Administrator password when accessing program settings: if you are
not logged in as Admin and attempt to change the software settings, you will be
prompted for the Admin password in order to continue.
Prompt for copies when adding packages to cart: if you routinely add more than
one copy of a package to the shopping cart at a time, select this option to
prompt you for a number of packages each time you add one to the cart.
Prompt for copies for Quick Print packages: if you routinely print more than one
copy of a package using quick print, select this option to prompt you for a
number of packages to print each time you use quick print.
Display quick print warning message: you will be prompted for confirmation
when using quick print, to avoid accidentally printing items.
43
Page 44

Setting Up: Software Options
Fulfillment Options
These options affect customer orders.
Automatically print orders containing locally fulfilled items: this option works with
the auto-print function in the Orders tab, and will automatically print all placed
orders that you fulfill in house. This option is enabled by default.
Add default back print information to each order: enable this option to specify
and print text on the back of all photos. This option is only available for larger
printers with back print capability.
To enable back print text:
1. Select Add default back print information to each order.
2. Select Edit Back Print Info.
3. A window appears. Select Store suggested back print text in each order.
4. Enter the text you would like to appear. Select Insert special text to add
information such as date/time, names, photo numbers, copyright symbols,
etc.
Add the default package to the shopping cart: enable this option to
automatically add your default package to every order made.
Shipping Settings: select a default shipping method for all orders you fulfill locally,
and enable Ship all orders back to the company address to have all printed
orders mailed back to you.
Print to Disc Settings: use this to write order information to disc for fulfillment at a
lab using Labtricity. The studio must have these products configured the same
way as the receiving lab. Select Test Compatibility to see if your computer
supports internal disc writing and can automatically burn the information to a
CD.
Image Preview Settings
These options affect preview files.
Enable Preview Files: Preview files are reduced-size versions of your photos that
will load and edit faster than the digital negatives. The Image Preview Setting,
found in General Settings, is for previews generated for images under Desktop
and My Computer, on the Photo Library page. Image previews for orders are
44
Page 45
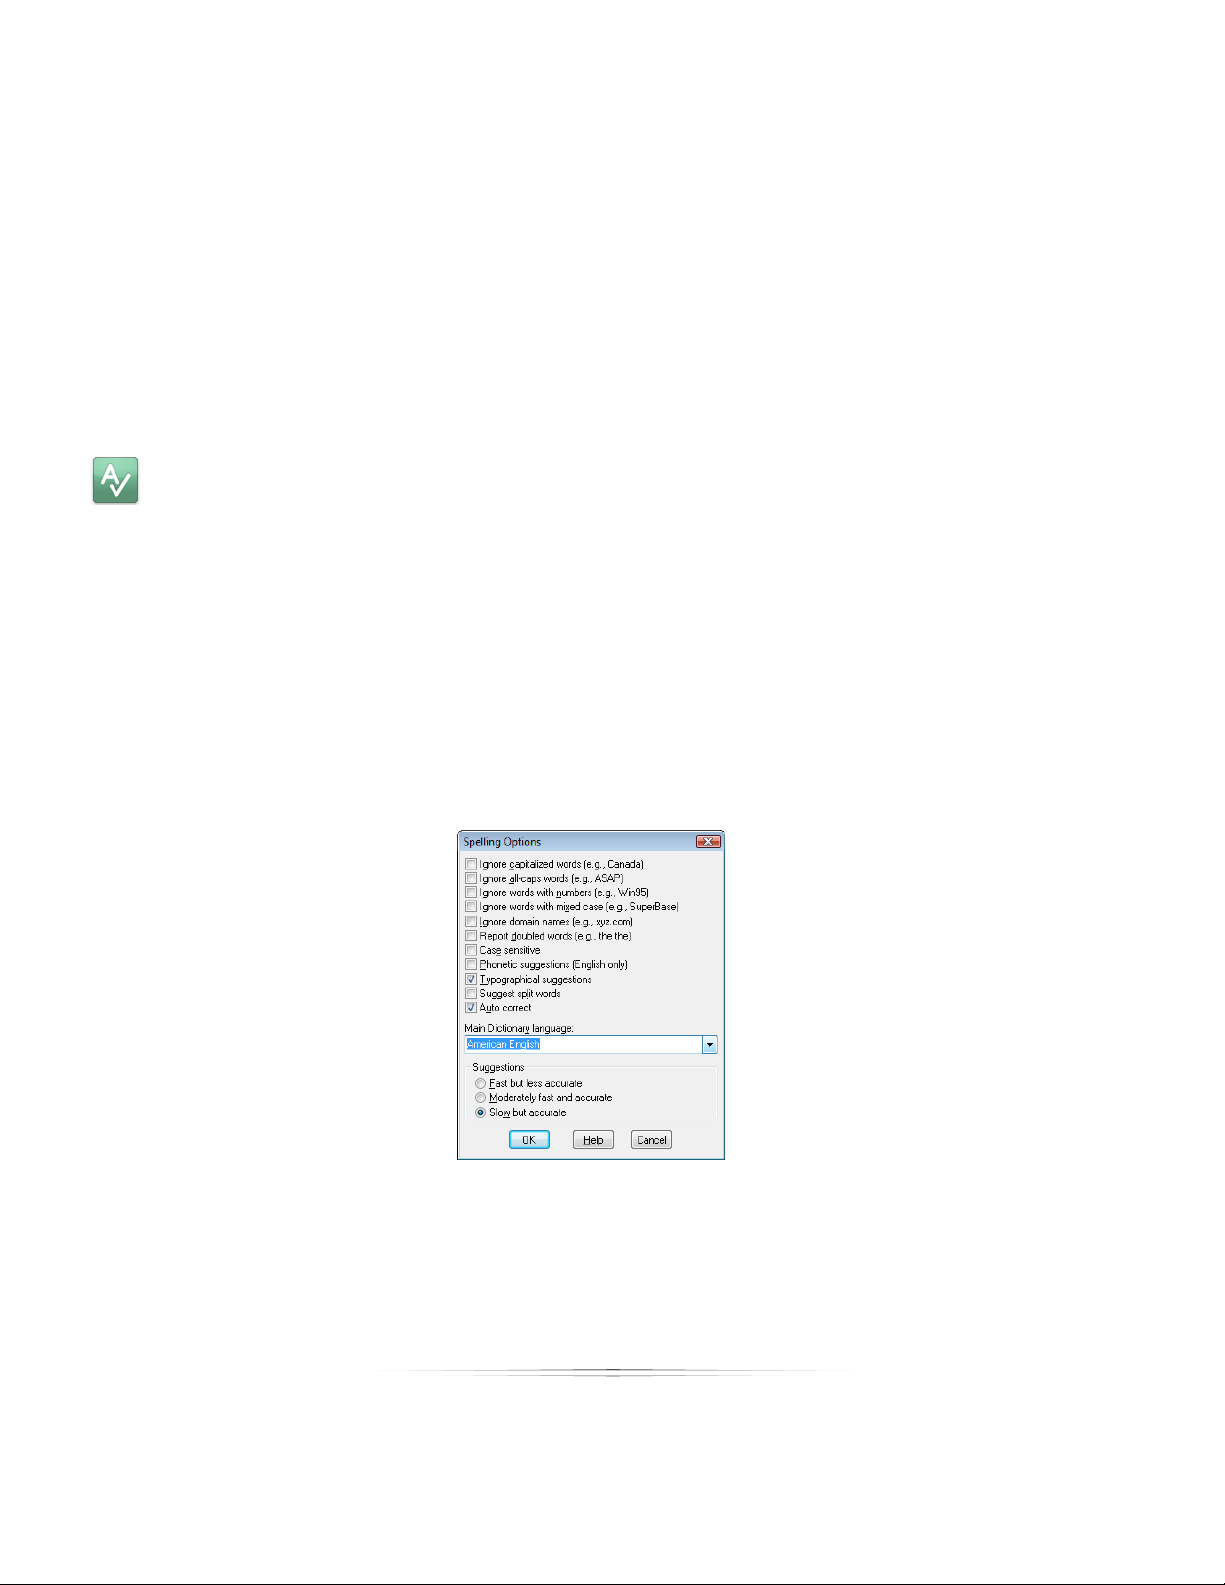
Setting Up: Software Options
placed in the folder with the images. These previews are found in the X:drive.
The default location is C:\ProgramData\ExpressDigital\Common\CachePV.‖
Select a new path if desired.
Preview Cleaning: it is not necessary to keep preview files for catalogs that are
no longer being used. The default settings will keep the files for two weeks. Select
a different time period if desired and a time of day to start purging. Select
Cleanup Older Previews to instantly purge the computer of preview files that
exceed the time frame, or select Delete All Previews to instantly purge the
computer of all preview files.
Spell Checker Settings
These options determine how the Spell Checker will correct comment and description
text fields in the software.
Enable Automatic Spell Checking: enable this if you want to perform an
automatic spell check before saving your information.
Apply spell check to street address fields: enable this if you want spell check to
confirm the spelling of your entries in the street address field.
Options: these settings determine the correction levels for your spell checker
Dictionaries: this setting allows you to add or delete words used by your
dictionary.
45
Page 46

Setting Up: Software Options
PhotoReflect Account
PhotoReflect.com is an online storefront for uploading and selling photos. You simply set
your packages, products, and publish photos through Studio Solution to your site –
where customers will automatically be notified and able to purchase photos from your
studio 24/7. Find PhotoReflect options in Manage Studio > Options > PhotoReflect
Account.
Select Login Now to login into your PhotoReflect account. Once logged in, you can
manage all of your account information, set up web products and pricing, manage
your online portfolio, promotions, and view automatically generated reports of your
sales and orders.
Select Sign Up to make an account within the software. This requires an internet
connection.
Labtricity Account
Labtricity is a network of labs that makes ordering professional lab prints and services
easy. Once you create an account you can send orders to any Labtricity-enabled lab,
where they will print and mail the photos back to you or ship them directly to your
customers. Find Labtricity options in Manage Studio > Options > Labtricity Account.
Select Login Now to log into your Labtricity account. Once logged in, you can manage
all your account information, select labs, set up lab products and services, and view all
current lab orders.
Select Sign Up to create an account within the software. This requires an internet
connection.
System Properties
Find this information in Manage Studio > Options > System Properties.
This is a list of the computer properties, including used and free space, local paths,
detected cameras and printers, and software versions. This is information is helpful when
diagnosing any computer related problem.
46
Page 47

Setting Up: Software Options
Calibrate Monitor
Calibration of your monitor is a vital step in managing the quality of your work in your
studio. You can perform a monitor calibration using X-Rite Eye-One Match Software in
Manage Studio> Options > Calibrate Monitor.
Note: You must have the Eye-One Match Software and hardware installed on your
computer before you can use this feature.
47
Page 48

Setting Up: Your Network
Setting Up Your Network
This software can be used in a network environment, with multiple stations for capturing,
selling, enhancing, and printing. All of the information from each computer can be
shared on a simple Windows network, making it easy to switch between stations without
worrying about losing data.
This chapter will guide you through getting all of your computers, printers, and cameras
on a network and talking to each other.
Typical Networks
You will first need to determine what kind of network you wish to run. Below is a
compilation of common network setups for different studios. If you already know which
kind of network you plan to use, feel free to skip down to Your Network.
Single Computer Studios
A typical single computer studio includes one of the following setups:
Most of these setups will do their printing through any number of local printers to fulfill
orders. Both tethered and un-tethered cameras can be used in any setup. Tethered
cameras will import quickly and automatically, but require you to be close to the
system; un-tethered cameras will require an import step, but work best for mobile
shoots.
48
Page 49

Setting Up: Your Network
Onsite Studios
A typical onsite studio includes one of the following setups:
These setups deliver prints on demand. Use local printers for smaller prints onsite and
send larger prints back to your studio. The computer in this setup works as a preview
and order station, while cameras can be tethered or un-tethered at the station, or
roaming around with photographers and manually imported later during the event.
Small Studios
A typical small studio includes one of these setups:
If one computer station is not enough, the software can
be used with any number of stations, all capable of
previewing and selling any photos on the server station.
The server and client stations will be connected through
a simple Windows network. Orders can be printed
locally.
Large Studios
A typical large studio includes this setup:
With a large customer base, you can set up even more
presentation and sales stations, all connected to several
different capture stations. These will all connect and sync
with the server station, allowing all the client stations to work
simultaneously with updated photos and data.
49
Page 50
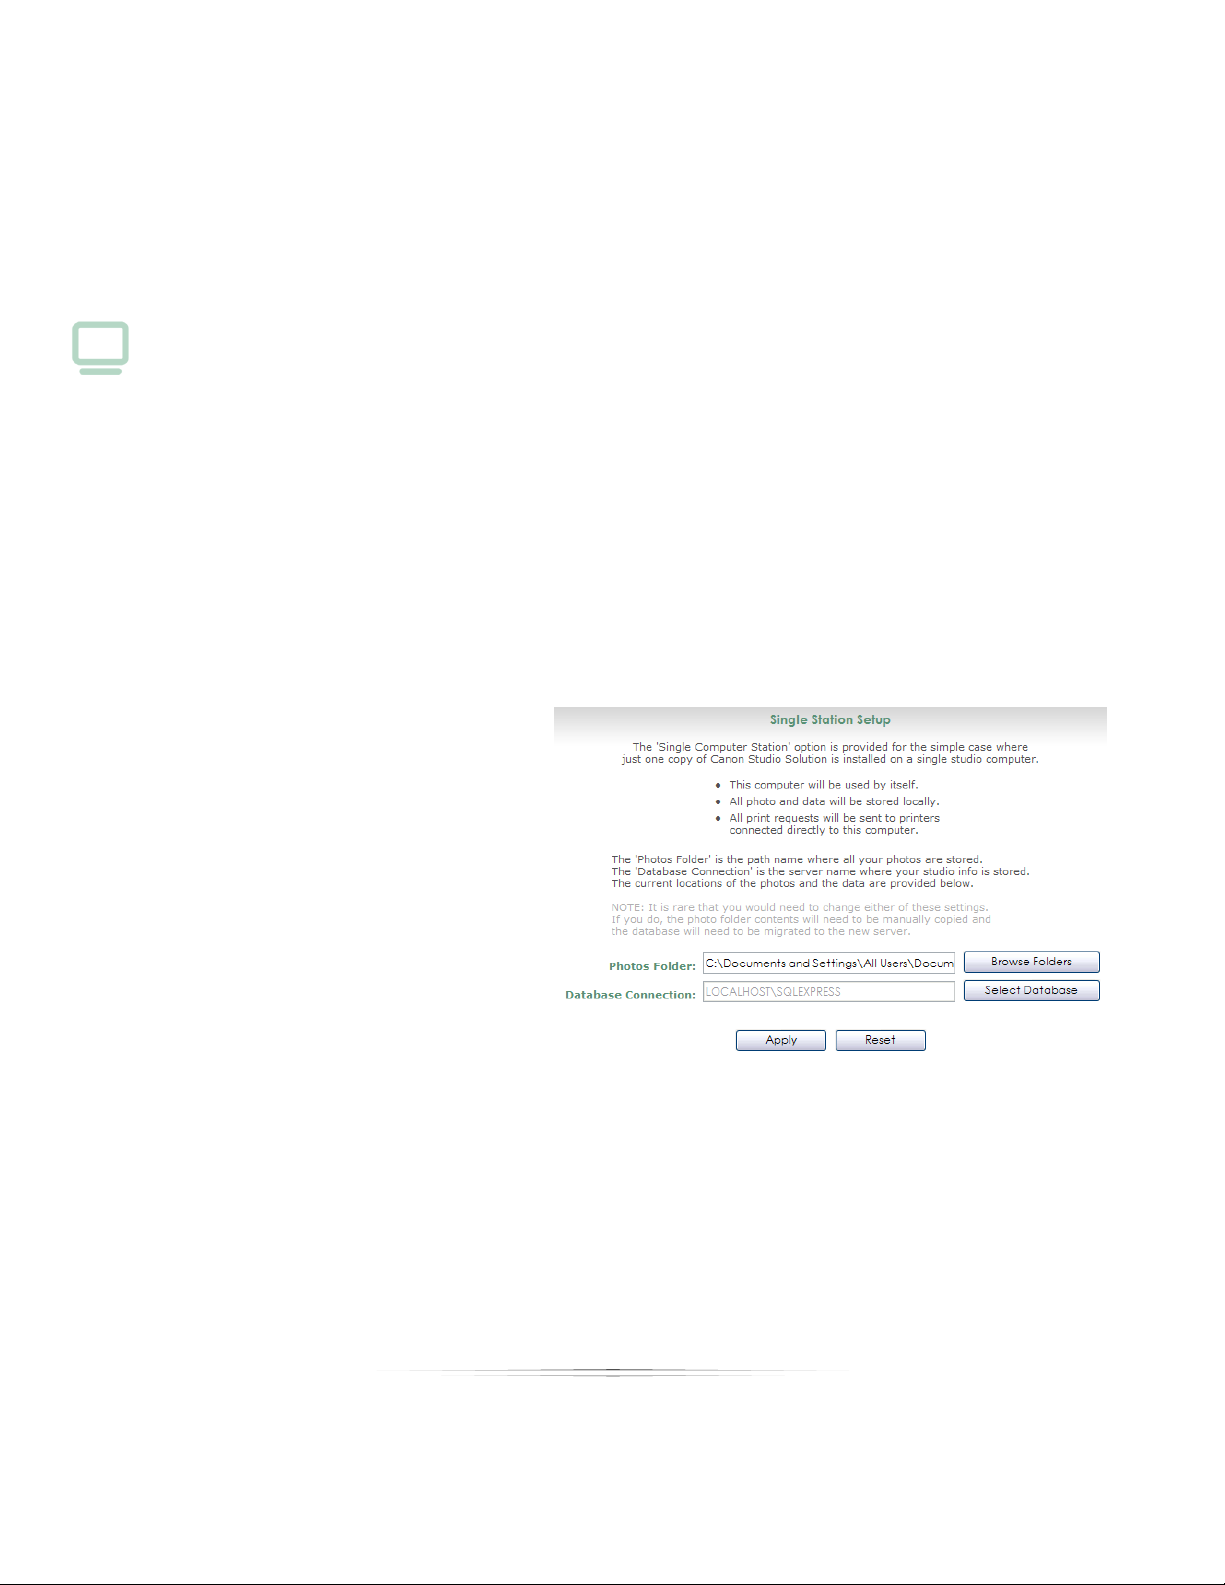
Setting Up: Your Network
Your Network
Now that you understand the logic, it’s time to set up your own network.
Find these options in Manage Studio > Options > Network Options.
Setting Up a Single Computer
A single computer setup means you are running one copy of the software on one
computer. The setup requires the installation of the USB dongle. This is the default upon
installation. A single computer environment means that:
This computer will be used by itself.
All photos and data will be stored locally or on an attached external HD or RAID.
All print requests will be sent to printers connected directly to this computer.
To set up a Single Computer network:
1. Click Single Computer on the
left side of the screen so that
a check appears.
2. Select a Photos Folder. This is
automatically selected and it
is rare that you would need
to change it. If you do so, you
will need to manually copy
the existing folder contents.
3. Select a Database
Connection. This is also
automatically selected. If you
change it, the database will need to be migrated to the new location.
4. Select Apply.
50
Page 51

Setting Up: Your Network
Setting Up a Server Computer
A server computer is necessary if you are running the software on more than one
computer.
Note: A dongle must be attached to the server computer to activate the network.
The server computer will contain all of the photos and data, and will share them with
the client computers.
Note: The server computer must be configured before the client computers.
A server computer means:
A computer will be used, as a server, on a network.
All photos and data will be stored locally on this computer.
Printers are directly connected to this station.
Clients can access the photos stored in this station.
Clients can access data stored in this station.
Clients can send print requests to this station.
To set this computer as the Server Computer:
1. Click Server Computer on the left side of the screen so that a check appears.
2. Select a Photos Folder. This is automatically selected and it is rare that you would
need to change it. If you do so, you will need to manually copy the existing
folder contents.
3. Select a Database. This is also automatically selected. If you change it, the
database will need to be migrated to the new location.
51
Page 52

Setting Up: Your Network
4. Notice the Server Name, IP Address, and Workgroup. When setting up a client,
you will need to confirm these identifiers to ensure you are connected to the
correct server.
5. You will need to enable file sharing in Windows so that the client stations can
access the photos and data on this computer. Select Enable File Sharing.
a. For Windows XP: Follow the Network Setup Wizard to enable file sharing on
your network. You will need to restart your computer before this takes
effect.
b. For Windows Vista: The Network and Sharing Center window appears. Turn
On the following options: Network discovery, File sharing, Public folder
sharing, and Printer sharing. Select X to exit this window when finished.
c. You may also want to disable User Account Control (UAC) in Vista to
eliminate recurring password and permission prompts. To do this:
i. Open the Control Panel and under User Account and Family
Safety, select Add or remove user accounts.
ii. Select Go to the main User Accounts page and select Change
security settings.
iii. Click to unselect the box next to Use UAC to help protect your
computer.
iv. Select OK. UAC is now disabled.
6. You will need to share the photo folder in Windows so that the client stations can
access the photos on this computer. Select Share Photo Folder.
52
Page 53

Setting Up: Your Network
a. For Windows XP: Select the Sharing tab, and select Share this folder on the
network. The Share Name should be Photos. Select Allow network users to
change my files. Select Apply. Select OK.
b. For Windows Vista: Once you have enabled File Sharing, the Photos folder
is automatically shared as a subfolder. If you wish to share the folder
manually, you can disable sharing of public folders and enable sharing
specifically on your photos folder only by right-clicking on it and selecting
Share and allowing all users on your network.
7. If you are running a firewall on this computer, you will need to disable it to allow
database sharing. Select Disable Firewall.
a. For Windows XP: The Windows Firewall window appears. Select to turn the
firewall off, or to enable Studio Solution as an exception. To do this, select
the Exceptions tab and select Add Program. Select Studio Solution and
select OK.
b. For Windows Vista: The Windows Firewall window appears. Select to turn
the firewall off, or to enable Studio Solution as an exception. To do this,
select the Exceptions tab and select Add Program. Select Studio Solution
and select OK.
8. Select Apply.
Viewing and Managing Client Stations
If you are on the Server Station, you can view all clients attached as Stations to the
Server.
To view all clients:
1. Select Server Computer from the left side of the screen so that a check appears.
2. Select View Clients from the bottom of the server screen.
3. A window appears showing a list of all connected clients.
a. The clients are listed by Workstation name and type (client or server).
b. The Jobs column shows all current print jobs for each client.
c. The Status column shows all current print jobs sent from each client station.
Select a command at the top of the window to manage clients:
53
Page 54

Setting Up: Your Network
Restart: restart the printing process for all clients.
Stop: stop the printing process for all clients.
Power Off: turn off the print server.
Setting Up a Client Computer
A client computer is necessary if you are running the software on more than one
computer. The client can access all of the photos and data on the server computer
and is typically used as a sales station, capture station, retouch station or reception
station. The Server Computer must be set up before the Client Computers. A client
computer means that:
This computer will be used on a network.
All photos and data will be stored on the server computer.
All print requests will be sent to the server computer.
To set up a Client Computer:
1. Click Client Computer on the left side of the screen so that a check appears.
2. Verify that the Server Name, IP Address, and Workgroup are pointed at the
correct server.
3. The default is to automatically detect the server computer. If you wish to
connect to the server computer manually, select Manually specify the computer
name of the server computer and enter the computer address.
4. Select Test Server to test the connection. If the connection fails, you will need to
check your network connections and settings.
5. If all connections are working, select Apply.
6. Check the Print Server Status, Server Photos Folder, and Database Connection.
These should all show Connected. If they show Not Connected, return to Setting
Up a Server Computer and follow the steps in the section. If the connection still
fails, you will need to check your network connections and settings.
54
Page 55

Setting Up: Your Network
7. Your Client Computer has been set up successfully.
8. Repeat Steps 1 – 7 on all other client stations.
Connecting Printers
Now that we’ve finished with basic settings and have the network up and running, it’s
time to connect and add any printers that you’ll be using. Find printer options in
Manage Studio > Printers.
Printers should be directly connected to the server station or through a network hub, so
that each client can communicate with the server and use the printer. If you are using
a single computer setup, connect the printers directly to your computer or through a
network hub.
There are many different types of printers you can use with the software:
Canon Pixma Pro (9000 & 9500
Mark I and II)
Canon IPF Series (5100, 6100,
6200, 8100, 9100)
If you have installed the proper printer driver and have the printer connected via USB,
the software will automatically recognize it. If a printer is not automatically detected,
select [Add] for that printer type and select your printer from a list. If the printer does not
appear in the list, please confirm the printer’s detection within the Windows operating
system.
Any Windows Printer
Raster File Printer
55
Page 56

Setting Up: Your Network
Setting Up a Canon Printer with Direct Connectivity
Some Canon printers have direct connectivity with the software. You’ll only need to
plug it in, turn it on, and attach it to the computer. The software will instantly recognize it
and set it up, no drivers are necessary, when connected directly via USB.
The following Canon printers support direct connectivity:
Pixma Pro 9000, 9500 Mark I and II IPF 5100, 6100, 6200, 8100, 9100
To add and set up a Canon printer with direct connectivity via USB:
1. Attach the printer to the computer.
2. The printer will be automatically detected and added to the Canon printers list. If
it is not automatically detected, select [Add Canon Printer] and select your
printer from the list.
3. Select [Setup] to the right of the printer. A window appears.
4. There are four tabs of options: Main, Roll-sizes, Sheet-sizes, and Margin Text.
a. Main:
i. Select Enable this printer to activate the printer. This is turned on by
default.
ii. Select a Paper Source, Roll Width, Media Type, Media Rule, and
whether to auto-cut and allow borderless printing.
iii. Select Advanced Printing Preferences for the Windows printing
preferences.
b. Roll-sizes:
i. Select New to add a new roll-size. Select width, arrangements,
color profile, and offsets.
ii. Select a roll-size and select Edit to modify an existing roll-size. Edit
width, arrangements, color profile, and offsets.
iii. Select Reset List to set the list to printer defaults.
iv. Select Delete to delete a roll-size.
c. Sheet-sizes:
i. Select a sheet-size and select Edit to modify an existing sheet setup.
Select width, height, media, arrangements, and a color profile.
56
Page 57

ii. Select Delete to delete a sheet-size.
iii. Select Reset List to set the list to printer defaults.
d. Margin Text:
i. Select Control options for if and when to print margin text.
ii. Enter text to appear on lines 1 and 2 at left, center, and right
justification.
iii. Select Insert Special Text to enter pre-made text for customers,
dates, packages, and other information.
iv. Select Restore Default Text to set the text to printer defaults.
5. Select OK to save printer settings.
Setting Up a Canon or Windows Printer
Setting Up: Your Network
The steps for adding a Canon and Windows printer are the same, except some Canon
printers will be automatically detected and added to the list.
To add and set up a Canon or Windows printer:
1. Attach the printer to the computer.
2. The printer will be automatically detected and added to the Canon or Windows
Printers list. If your printer is not automatically detected, select [Add Printer using
standard Windows Driver] and select your printer from the list.
3. Select [Setup] to the right of the printer. A window appears.
4. Select Properties to set up basic Windows printing preferences.
5. Select Advanced to set advanced options:
a. Media & Profile:
i. Select Use a color profile for this device and browse to a color
profile location if you want to use a specific color profile.
ii. Select Media Rules and the corresponding media to sent specific
items to specific printers.
iii. Set the Bleed amount in pixels and select if you want to Apply
bleed on wallets & arrangements.
57
Page 58

Setting Up: Your Network
b. Margin Text:
i. Select Control options for if and when to print margin text.
ii. Enter text to appear on lines 1 and 2 at left, center, and right
justification.
iii. Select Insert Special Text to enter pre-made text for customers,
dates, packages, and other information.
iv. Select Restore Default Text to set the text to printer defaults.
6. Select OK.
7. Select a Page Size.
8. Select Arrangements for that page size: use Quick Setup to quickly add or delete
print sizes of one type. Select OK when finished.
9. Select OK to save printer settings.
Setting Up a Raster Printer
A raster image printer will output each print as an image file on your computer. The
image file size and type can be specified for output. This is especially useful when you
want to modify the image size and output as another file type.
To add and set up a raster printer:
1. Select [Add Raster Printer]. A window appears.
2. Select the print size of this image printer.
3. Select Options:
a. Confirm or change the print size.
b. Select Enabled to activate this image printer.
c. Select Copy Settings to copy the settings from another raster printer.
d. Select Orientation options.
e. Select the Print Area and Bleed options.
f. Select the Output Folder, output File Type, Filename Format, and the
filename and variable to start with.
58
Page 59

4. Select Media & Profile:
a. Select Use a color profile for this device and browse to a color profile
location if you want to use a specific color profile.
b. Select Media Rules and the corresponding media to sent specific items to
specific printers.
5. Select Margin Text:
a. Select Control options for if and when to print margin text.
b. Enter text to appear on lines 1 and 2 at left, center, and right justification.
c. Select Insert Special Text to enter pre-made text for customers, dates,
packages, and other information.
d. Select Restore Default Text to set the text to printer defaults.
6. Select OK to save printer settings.
Managing Connected Printers
Setting Up: Your Network
If you need to edit the settings of any connected printer, simply return to the printers
tab and select [Setup] for the printer you want to edit. Follow the steps for that printer
from the guides above.
Note: Printer settings are not accessible via a Client Station. Since printers are
connected to the Server Computer, they are only accessible via the Server.
Connecting Cameras
The software is almost ready to use, you just need to determine how photos will be
captured and imported. Find the camera settings in Manage Studio > Cameras.
Photos can be captured and brought into the software in a number of ways:
Tethered Camera: the camera will be directly
connected to the software through a USB or
Firewire cable. Each time you take a photo, it
will appear instantly in the software.
WiFi Camera: the camera will wirelessly
transmit photos to the software as they are
59
Page 60
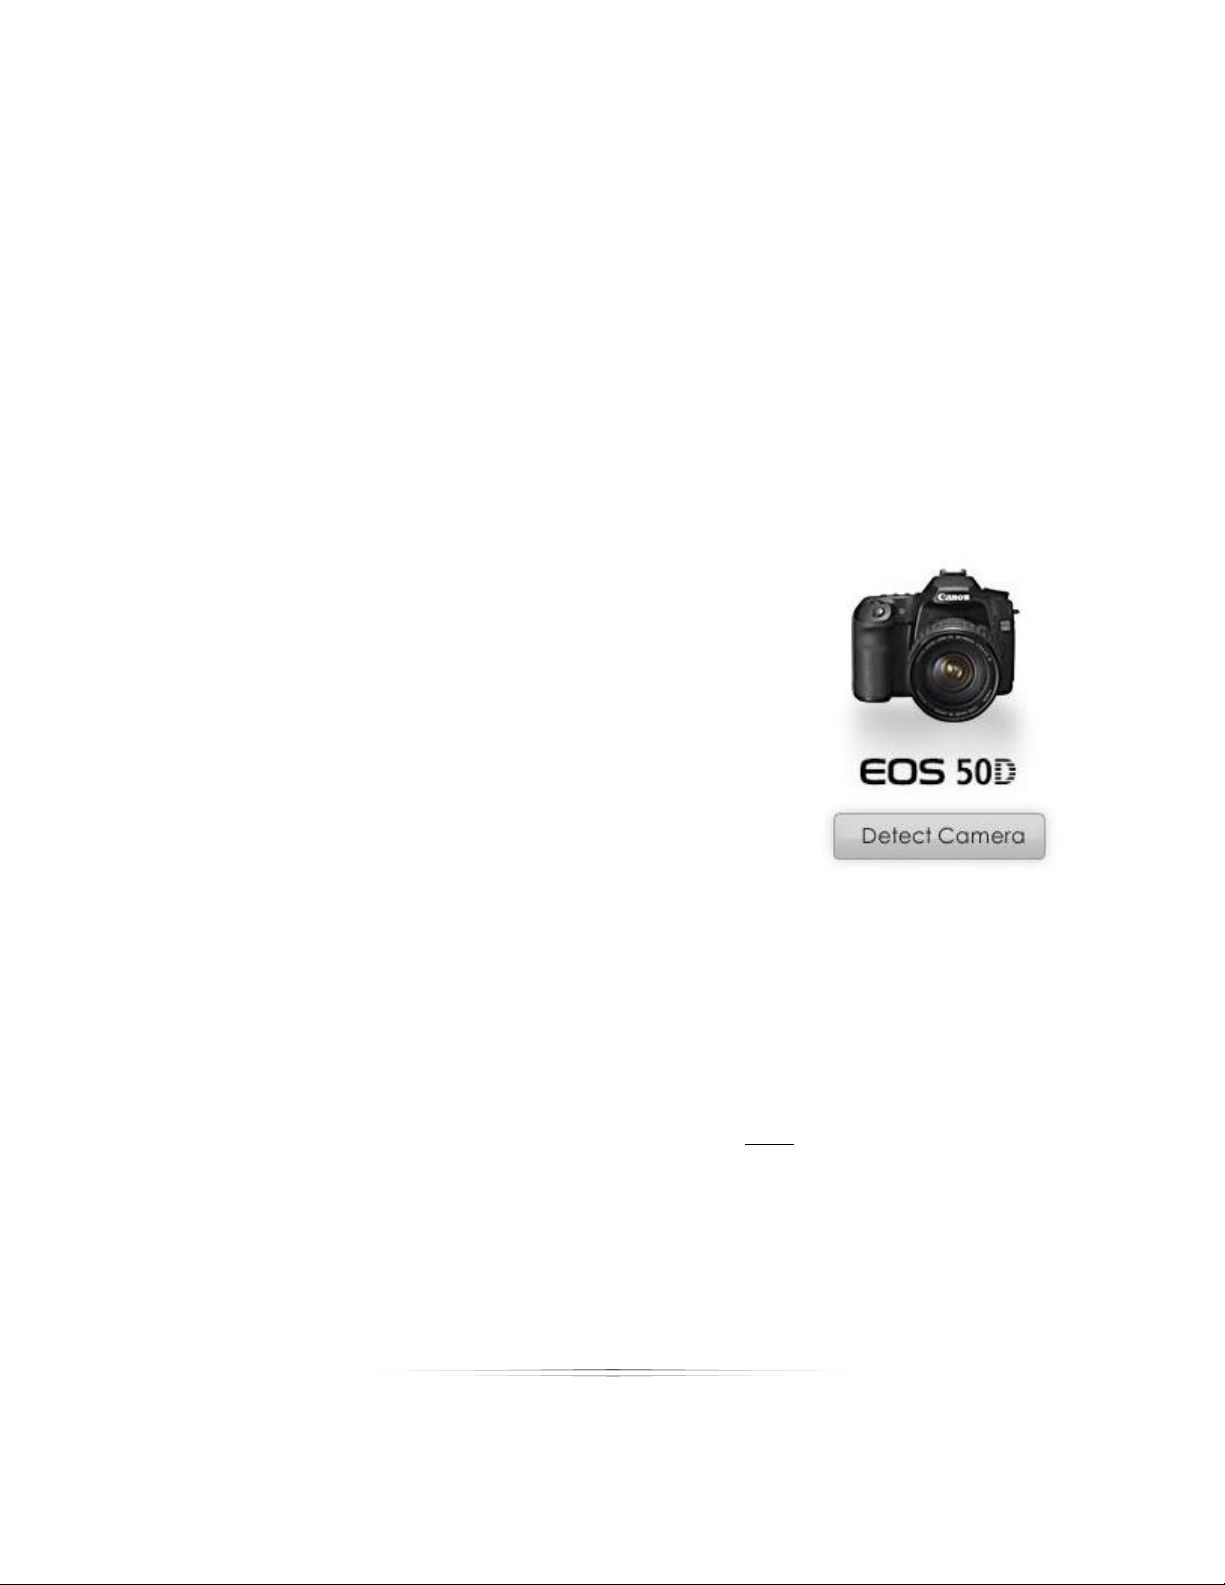
Setting Up: Your Network
captured. If you roam out of range of the network, all new photos will be
transmitted when you return.
Hot Folder Camera: a hot folder is a folder on your computer that is continuously
sending any new photos from that folder straight to the software. Set a hot folder
if your camera (or cameras) are importing photos to a specific folder.
No Camera: no camera will be connected. All photos will need to be manually
imported from Compact Flash, file folders, or external drives.
Setting Up a Tethered Camera
Any professional Canon compatible cameras can shoot and send photos directly to
the software while connected through a USB or Firewire cable.
To set up your tethered camera:
1. Select Tethered Camera from the left side of the
software under Select Camera Type.
2. Connect the camera to the computer with a USB
or Firewire cable.
3. Turn the camera on.
4. Wait for Windows to detect the camera and
prepare it for use.
5. If the software does not detect the camera and
display it on the left side of the software, select Detect Camera.
6. The camera name will appear in the status bar at the bottom left of the
software, and at the top center of the Cameras page.
7. Your camera is now ready to shoot tethered.
While you are using a tethered camera, you can press SPACE on your keyboard to
automatically capture and import photos into the Photo Library or Photo Workshop. For
a detailed guide of capturing and importing photos, go here.
Setting Up a WiFi Camera
The software can receive photos wirelessly from any Canon Wireless File Transmitter
(WFT) using an FTP server. You will need to have a wireless internet connection set up on
your computer to use a WiFi camera.
60
Page 61

Setting Up: Your Network
To set up your WiFi camera:
Select WiFi Camera from the left side of the software under
Select Camera Type.
1. Make sure the Canon WFT is connected to your
camera.
2. Turn the camera on.
3. Use the WFT connection wizard through the camera
menu. For more details on finding the WFT wizard, refer to the camera manual.
4. Select FTP as the communication method in the camera wizard.
5. Enter your wireless network & router settings in the camera wizard.
6. Once the FTP Server settings appear on your camera, enter the FTP Address and
FTP Port listed on the Cameras page in the software. You must have Auto-Detect
Address checked for this option.
7. Once Login Method appears on your camera, use either ―Anonymous‖ or match
the username and password that you entered on the Cameras page. You must
have Anonymous Username checked to login anonymously without a password.
8. Once Target Folder appears on your camera, select Root Folder.
9. Complete the Wizard.
10. Your WiFi camera is now ready.
A WiFi camera is essentially a tethered camera without a cable. While you are using a
WiFi camera, you can press SPACE on your keyboard to automatically capture and
import photos into the Photo Library or Photo Workshop. For a detailed guide of
capturing and importing photos, go here.
Setting Up a Hot Folder
You can set up a folder to automatically import all new photos added to that folder.
The software will continuously monitor this folder for any photos added by you or a
camera.
To set up a hot folder:
1. In Local Folder, browse to or type in the folder to monitor.
61
Page 62

Setting Up: Your Network
2. You can automatically backup every photo to another directory for
safekeeping. If you want to backup your hot folder photos, browse to or type in
the backup location in Backup Folder.
3. Select Apply.
Importing without a Camera
To import without a camera, you will need to connect the camera picture card,
external drive, or browse to the folder containing the photos and manually import
them. Go here for more information on importing photos.
Setting Filename Options
Regardless of how you import photos, you can set the software to generate new
filenames for all photos you import. Find these options in Manage Studio > Cameras,
and select Changed File Naming Options from the middle of the screen.
Select a bubble to set new photo filenames. The following filename options are
available:
Automatic: the unique filenames will be based off the day and time or the
Filmbar number. You can add a prefix for the filenames in the textbox. An
example of your format will appear.
Note: The Filmbar is displayed on the left side of the Photo Workshop window when
Single is selected at the upper left hand corner of the window. The Filmbar number is
the number displayed under the image.
Numbered: the unique filenames will be numbered, starting incrementally from
the starting number you specify. You can add a prefix for the filenames in the
textbox. An example of your format will appear.
Customer Driven: the unique filenames will be based off the customer ID and
one of the following: date and time, picture number, or picture name. Select to
Show the filename dialog for every picture taken if you want to view filename
info for imported photos.
62
Page 63

Setting Up: Your Products
Setting Up Your Products
Now that the general options are set and your network is working, it’s time to set up
some products and prices.
Creating Products
Find these options in Manage Studio > Products > Packages and Prices. This is where you
will create and edit all packages, products, and prices for your studio.
Products are structured like this: package groups will contain individual packages, and
each package will contain individual products.
Note: Make sure all client stations are closed prior to making any changes to Packages
and Prices. The clients will automatically update upon launch.
Creating a Package Group
Package groups are convenient for holding a number of packages and products
specific to an event. By creating multiple package groups you can switch between the
offered groups depending on your event, removing unnecessary packages and clutter
from the Shopping Cart.
To create a new package group:
1. Select + Add New Group from the tabs near the top of the Products window. A
prompt will appear.
2. Type in new group name for this package group.
3. If you want to copy an existing package group, select Copy of and select the
group you wish to copy from the dropdown menu.
63
Page 64

Setting Up: Your Products
4. If you want this package to be available online through your PhotoReflect site,
select Allow this package to be used with your online storefront. You must be
logged into your PhotoReflect account for this selection to be active.
5. If you want to have the option of quickly adding last-minute print items to orders
in the Shopping Cart, select to show the Add Lab Print Items and/or the Add
Local Print Items options.
6. Select OK.
7. You will be prompted to add package item to this group. Select the type and
quantities of the items you would like to offer to your customers. Select Cancel to
add packages later, or read the following sections.
Editing a Package Group
To edit a package group, select Edit Package Group near the bottom of the window to
change the selected package group settings. To delete a package group, select
Delete Package Group to remove it. You must always have at least one package
group available for use.
Adding Packages
Packages are subgroups of package groups that can contain any number of individual
items, for sale for one total price.
To create a package:
1. Select the package group you wish to add the package to.
2. Select Add Product from the options near the bottom of the Products window. A
prompt appears.
3. Enter a package name and a price. This is the total price of every product
included in the package.
4. Select Discount Pricing if you want to create a volume discount. Volume
discounts encourage your customers to purchase more pictures per order. Use
64
Page 65

Setting Up: Your Products
Add, Edit, and Remove to adjust volume discounts and set prices. The largest
discount for an order will always be applied automatically.
5. Select A la Carte Package if you want to allow purchase of individual products
within this package.
6. Select Quick Print if you want to print this package immediately upon purchase.
7. Select High Priority if you want to print this package before other orders in the
queue.
8. Select OK.
Editing a Package
To edit a package, select [Edit Product] near the top of the window and change the
selected package settings. To delete a package, select [Remove Product] to remove
the selected package. Select Expand All or Collapse All to see every item and
package included in the selected package group.
Creating a Product
Products are individual items that are included in a package. You can select the
number of prints, printing media, any special print commands, templates, and services
to be automatically applied to a product.
To add a Product:
1. Select both the package group and the package you wish to add the product
to.
2. Expand the package by selecting the down-arrow to the left of the package
name.
3. Select [Add Item]. A prompt appears.
4. Select Fulfiller to determine who will print the item. You can choose to fulfill the
item yourself (Local Print), or log into your Labtricity account and select a lab to
fulfill the item. If you select a lab, the product list will only show items they offer.
5. Select Print Group to filter the list to a particular print size.
6. Click on an item to add it to your package. Use the arrows under Count to select
the number of prints.
65
Page 66

Setting Up: Your Products
7. If you wish to add additional items to the package, click on another item and
select the number of prints. There is no limit to the number of items you may add.
Select Clear Quantities to reset the list and start over.
8. When finished, select OK.
Editing a Product
Once you have created a product, it will appear in your selected package with a list of
possible commands and preferences. Select [Edit Item] to change the product name,
price, size, fulfillment, or any of the options from the list below. Select [Remove Item] to
delete it.
Click on any available link to quickly add or edit a product feature:
Fulfillment: Select where the product will be printed (local or lab). This option can
only be changed by selecting [Edit Item].
Media and Print Commands: Select to add or edit the type of printing material or
special printing commands.
Template: Select to assign a template with this product. Templates can be
graphics, layouts, overlays, or text.
To associate a template with this product:
1. Select Always use a border for this package item.
2. Select Choose. A window appears.
3. The top of the window includes all borders currently in the software, while
the bottom shows borders for sale from the online Template Marketplace.
Use the tabs and arrow keys to navigate and select a border, then select
OK.
4. The Border Name and description field is automatically populated.
66
Page 67

Setting Up: Your Products
5. Select the Tile Layout for how the border appears: once, tiled with the
same photo, or tiled for use with different photos.
6. Select the Orientation: best fit, landscape, or portrait.
7. Select the Placement.
8. If you want to add or edit text, select Use default border text. Select Edit
Default Border Text to view and enter new text. A template must have text
included for this option to be available.
9. Select OK.
10. This template will always be automatically applied to this product.
Services: Select to add or remove existing services to a product. You must have
created services for options to be available.
Adding Digital Delivery Products
A Digital Delivery Product lets a photographer select an entire catalog or specific
photos in a catalog and within just a few clicks, send the images to CD/DVD or file.
Preview thumbnails,
Watermarks, slideshows complete with music, and any additional files can be added to
the digital media.
In order to sell your digital media, you need to set up a package to add to your
package groups. This will allow you to easily add a Digital Media option to your
shopping cart for a CD you will be creating locally. The Digital Delivery Product can be
assigned as its own package or added as an additional item to an existing package.
To add as a Package:
1. Select Add Product.
2. Assign the package a unique name and price.
3. Select OK to save.
4. Select the new package and select [Add Item].
5. Select Digital Delivery Products from the Print Group dropdown list.
6. To customize this product, select [Edit Item] to change any of the
components
67
Page 68

Setting Up: Your Products
There are four components for creating a digital delivery product: General, Slideshow,
Extra Files and Summary. ―General‖ is the general options settings for the digital output,
such as where the media will be sent, the media format, and media size. The
―Slideshow‖ component allows you to export an interactive slideshow with the media,
complete with music and promotional logos/images. The ―Extra Files‖ component
allows you to export any additional files to the media, such as music or text files.
―Summary‖ is a quick list of all the features available, and allows you to remove or
change options.
General
The first page within the Digital Delivery Wizard is the General component. The Format
page contains all the vital information necessary for exporting your digital media. There
are four options on the Format page: ―Destination Information,‖ ―Photo Format,‖
―Image Size,‖ and ―Advanced Options.‖
Destination Information: Destination Information is where you set the location for
the exported media. Click the drop-down box to select a destination. Selecting
―<Browse Folder>‖ will let you search your computer for a folder or drive. You can
choose a folder on your computer or network, a storage device, or choose to
copy the files to a CD or DVD. If you choose a CD or DVD, make sure you have a
disc in the drive before attempting to burn the media.
68
Page 69

Setting Up: Your Products
Photo Format: Photo Format is where you set how the images will be copied.
There are three options: Permanently apply attributes, Copy the images, or
Convert the images to another format while copying.
o Permanently apply attributes will save all of your current changes in the
Photo Workshop, but will combine all the layers and copy the images as
one single image layer.
o Copying the images will keep all layers intact, and copy the files exactly
as they are in Studio Solution.
o Converting the images to another format while copying will only convert
the format of the images on the new media, the originals will remain in
their current format, unchanged. If you choose ―Convert the images to
another format while copying‖ you will be able to click the drop-down
box and select an image format. If you do not select an option from the
list, the images will be copied as .JPG files. The other available formats
are: Windows Bitmap (.BMP), ZSoft (.PCX), Photoshop (.PSD), Portable Net
Graphics (.PNG), Targa (.TGA), Tagged Image File (.TIF).
Photo Size: Photo Size determines the dimensions in pixels of the copied photos.
There are four size options: Preview Size (smallest size, approx: 640x480 pixels),
Medium Size (approx 1280x800 pixels), Full Size (largest size, full resolution), and
Custom Size. To enter a size, click on the drop-down menu under “Choose the
size of images you would like to save for the customer” and select one of the
options.‖
If you choose a custom size, the ―Width‖ and ―Height‖ boxes will become
available. Use the arrow keys to increase each dimension by 1 pixel, or click the
text field and type in a number. Custom sizes will not automatically keep an
aspect ratio. If you enter a width or height that does not keep the current aspect
ratio of the images, Studio Solution will fit the larger dimension to the picture and
crop out any parts of the shorter side that are beyond the specified dimensions.
Advanced Options: Advanced Options will allow you to add a watermark to the
copied images. Watermarks are semi-transparent graphics, repeated over the
picture to deter image theft and unauthorized copies of the original picture. To add
a watermark to the copied images, check the box next to “Would you like to add a
watermark to these images?” Uncheck the box to disable this option.
69
Page 70
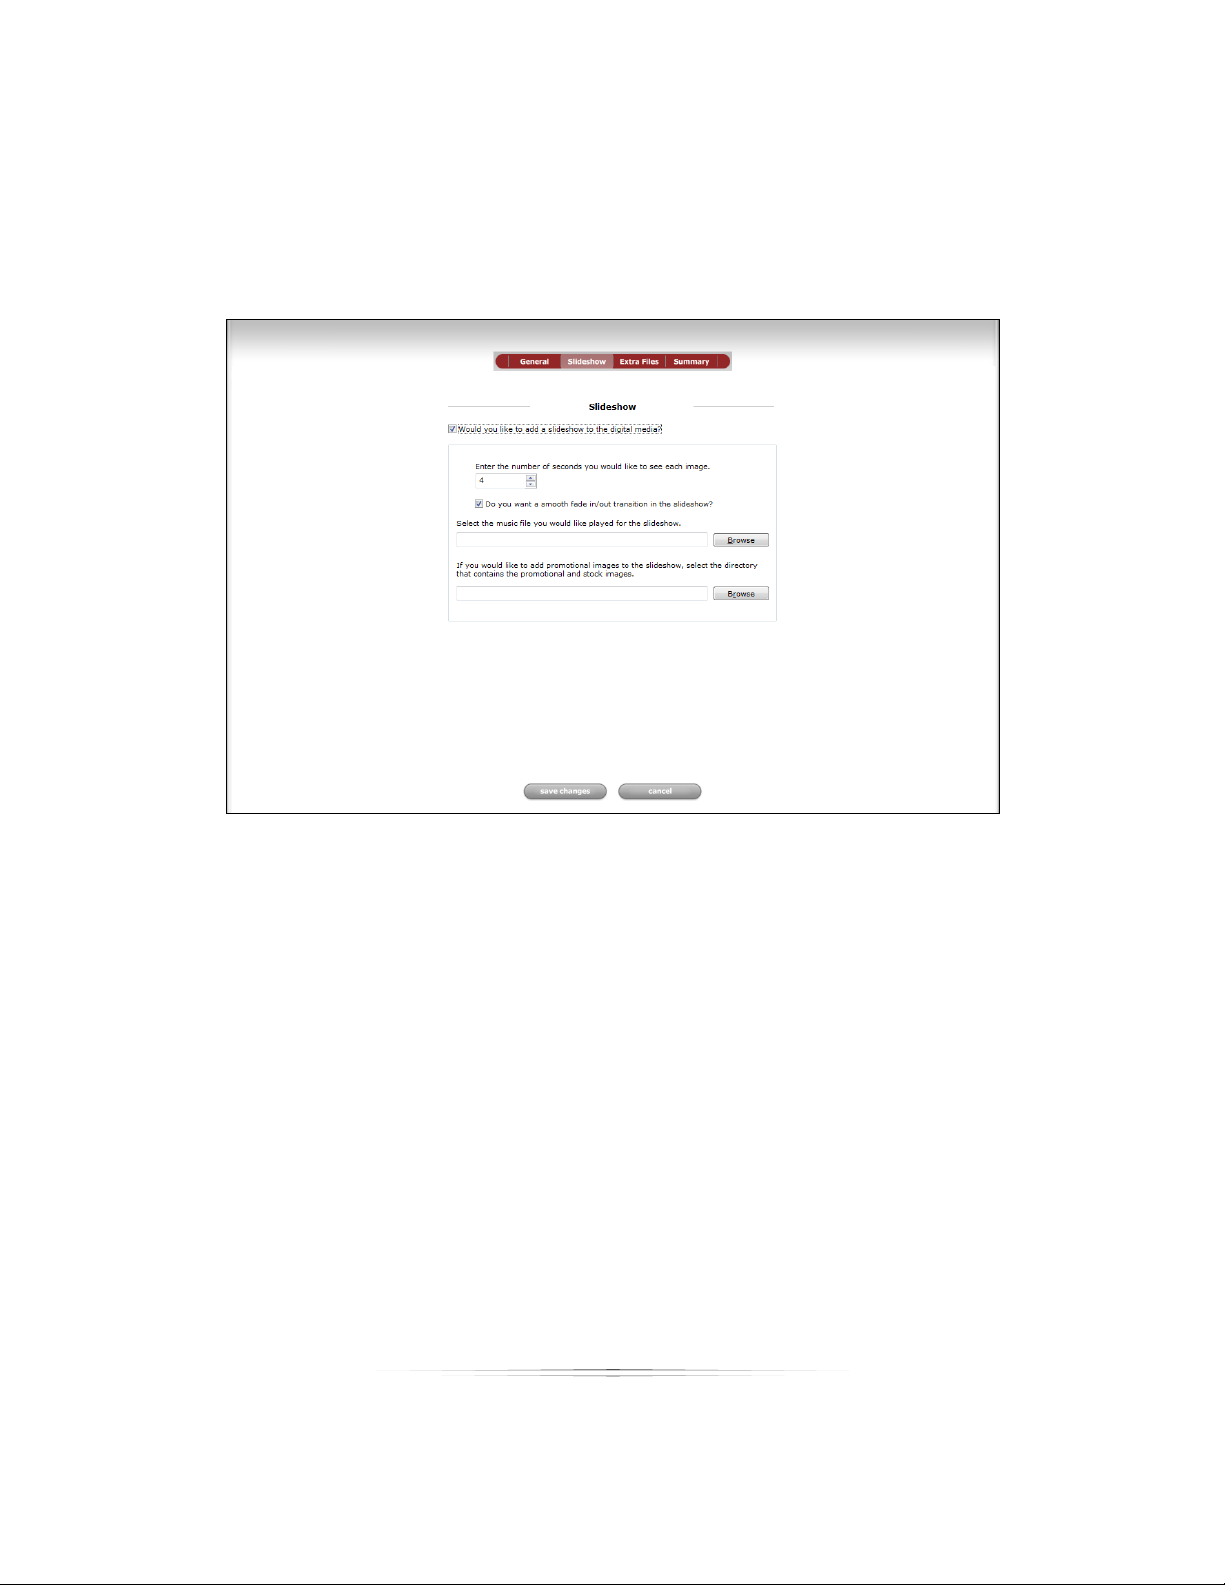
Setting Up: Your Products
Slideshow
The second page in the Digital Delivery Wizard is the Slideshow component. It is possible
to export a slideshow of all the photos along with the photos themselves. You can also
add music and promotional images to the slideshow.
To enable a slideshow for the digital media, click the ―Slideshow‖ tab at the top of the
Digital Delivery Wizard window, and check the box next to ―Would you like to add a
slideshow to the digital media?‖ Un-checking this box will disable the slideshow option.
The Slideshow page has four options after enabling the slideshow:
To enter the number of seconds for each photo to be shown before switching to
the next, click the number and type in the desired number of seconds, or use the
arrow keys to increase or decrease seconds by one.
To enable smooth fades between photos, check the box next to “Do you want a
smooth fade in/out transition in the slideshow?” If the option is enabled, each
photo will slowly fade to black, and the next will fade in from black. If the option
is disabled, the slideshow will instantly jump from photo to photo when the time
has elapsed.
70
Page 71

Setting Up: Your Products
To add a music file to the slideshow, click the “Browse” button under “Select the
music file you would like played for the slideshow.” Select the file on your
computer, network, or drive that you would like in the slideshow, and click ―OK.‖
Leaving this field blank means no music will be played during the slideshow.
To add promotional images to the slideshow, click the “Browse” button under “If
you would like to add promotional images to the slideshow select the directory
that contains the promotional and stock photos.” Select the directory or folder on
your computer, network, or drive that contains your stock or promotional images,
and click ―OK.‖ Now when a slideshow is viewed, the promotional images you
selected will be shown in the slideshow in between transitions from photos.
Leaving this field blank means no promotional or stock images will be shown
during the slideshow.
Extra Files
The third page of the Digital Delivery Wizard is the Extra Files step. This step allows you to
add any additional files to the digital media. For instance, you could attach stock
71
Page 72

Setting Up: Your Products
images of templates you can provide, or a price list, or even a copy of the customer’s
receipt.
To add extra files to your digital media, click the box next to “Would you like to add
additional files to the digital media?” The second option will now become available.
First, place all of the desired files into one folder. Everything in this folder will be added
as an extra file. You do not need to include the photo files in this folder, they will be
exported separately. Once you have moved all of your desired files into one folder,
type the folder location into the empty field or click the browse button to locate it, and
click ―OK.‖
Summary
The fourth and final page of the Digital Delivery Wizard is the Summary step. This step
shows a list of all the options you chose in the first three steps and gives you the
opportunity to check and change them.
The Summary page is made up of links. There are four headings, one for each section of
the Digital Delivery Wizard: General, Slideshow, Extra Files, and Summary. Clicking on
one of these headings, or any of the links under it, will take you back to that page of
the wizard and allow you to change every option on the page.
72
Page 73

Setting Up: Your Products
Notice that the links below each heading include each specific option you have
already selected. You can quickly scan the choices you have made without returning
to every page of the wizard to check them.
The Digital Delivery Wizard saves these settings for all future digital media. Whenever
you start the Digital Delivery Wizard, the Summary page will always contain the options
used for burning the last digital media. This allows you to quickly start the wizard, click
on the Summary page, and burn the media immediately if you want the same options
selected as last time. If you need to change the location, a watermark, or the music,
just click the appropriate link, change it, and return to the Summary page to burn the
media. This will save you a lot of time, since you do not need to complete the entire
wizard every time you need to create digital media.
73
Page 74

Setting Up: Your Products
Adding Services
Now that you’ve created some products, let’s move on to other product-related
options. A service is any kind of retouching or editing in addition to normal photo
editing, such as removing stray hairs or erasing braces.
Services may be added to any product or order. Each service has a cost that will be
included in the order total. Find service options in Manage Studio > Products > Studio
Services.
Studio services will appear in a list with the description, your price, the lab wholesale
price, and printing information. You will need to determine the service, the cost, and if it
will be a pre-print or post-print process.
Note: Make sure all client stations are closed prior to making any changes to Studio
Services. The clients will automatically update upon launch.
Adding a Local Service
A local service is something you will provide for the customer on your own time without
the use of a lab.
To add a local service:
Select Add Local Service.
1. Select a service from the list or create a new service.
2. Select a pre-print or post-process service.
3. Select a price.
4. Select OK.
74
Page 75

Setting Up: Your Products
Adding a Lab Service
A lab service will be provided by one of your Labtricity labs. Each lab will offer different
services at different prices. You will see the lab’s wholesale cost so that you may mark
up appropriately.
To add a lab service:
1. Select Add Lab Service.
2. Select a lab from the dropdown box.
3. Select a service from the available list.
4. Select OK.
Editing a Service
Select Edit or Remove in the Studio Services list to modify or delete an existing service.
Managing Templates
Templates are borders, backgrounds, text, overlays, or composites to be applied to
products. We’ve already covered assigning templates as you create products, so now
we’ll worry about managing groups and organizing existing templates. Find these
options in Manage Studio > Products > Templates and Composites.
Viewing Templates
Directly under the Studio tabs you will find a list of template tabs. Each tab includes
multiple templates of that type. Templates are organized in groups, and those groups
contain all related subgroups. For example: Sample Borders is a group containing
several subgroups, such as sports, composites, and holidays.
Use the < and > arrows to the left of the template tabs to jump back or forward within
the template tabs, and click on a specific title to view template of that type. The left-
75
Page 76
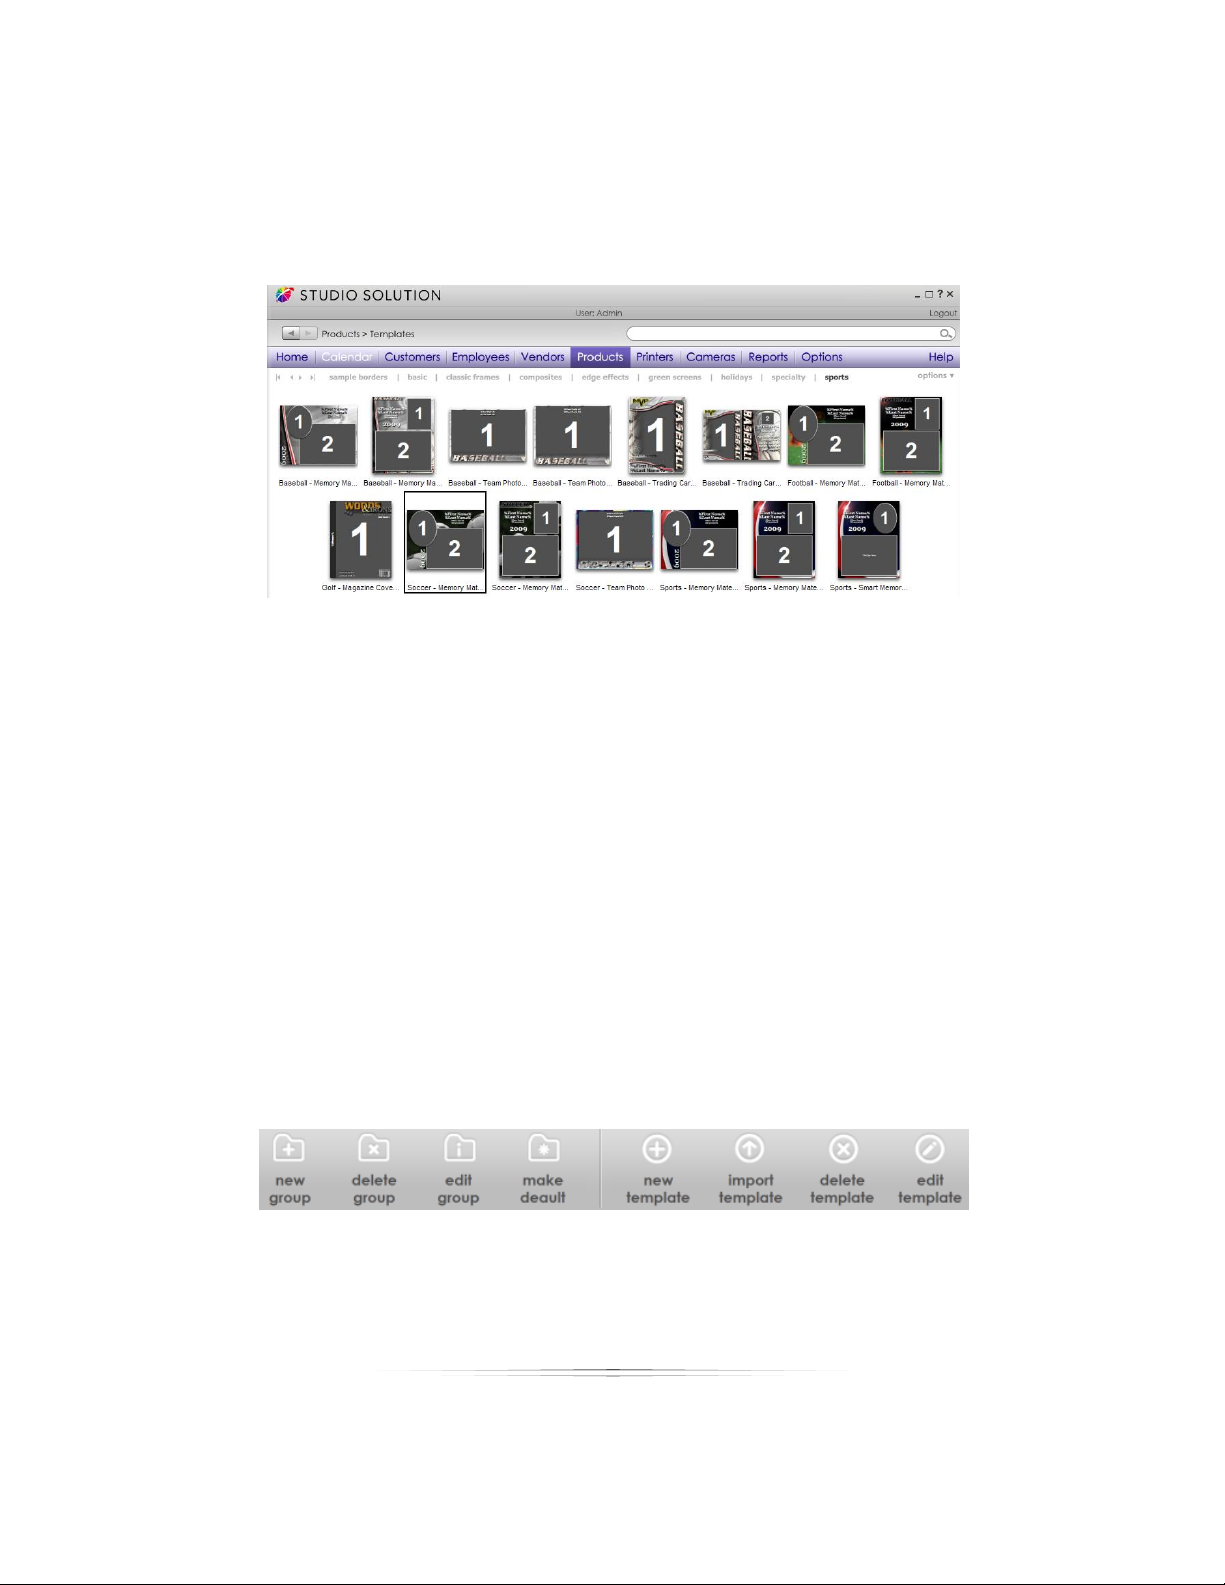
Setting Up: Your Products
most template title is the current group you are viewing; all group titles to the right are
subgroups of that group.
For advanced viewing options, select Options from the top right of the window:
Change Group: select a different group to view the templates of that group.
Show File Description: select this to list the file description beneath each
template.
View Border Thumbnails or View Border List: select thumbnails to view miniature
previews of the template, or select list to view a vertical list of file descriptions.
View Border Info: select a template and select this option to view the filename,
path, file size, creation date, and file description of your selected template.
Thumbnail Size: select to change the size of the template thumbnails.
List: select any template subgroup to view the templates of that group.
76
Page 77

Setting Up: Your Products
Adding Groups
To add a new group:
1. Select New Group from the bottom of the software.
2. Select to create a Top Level group that will contain subgroups, or to create a
Subgroup that will be added to the current group.
3. Select a name for the group.
4. Select OK.
Removing Groups
To delete the group you are currently viewing:
1. Select the group you want to remove.
2. Select Delete Group from the bottom of the software.
3. Select to delete the current top level group, or to delete the current subgroup
you are viewing.
4. Select the name of the group you wish to delete.
Editing Groups
To rename a group:
1. Select the group you want to rename.
2. Select Edit Group from the bottom of the software.
3. Select to rename the current top level group, or to rename the current subgroup
you are viewing.
4. Select the name of the group you wish to rename.
77
Page 78

Setting Up: Your Products
Setting a Default Group
The default template group will open automatically when you want to select a border
in any other part of the software. To set a default group, select a group and select
Make Default from the bottom of the software.
Creating Templates
You can create your own templates in the Border Workshop, detailed here. Select New
Template to automatically open the workshop and start creating a template.
Importing Templates
You can import any templates you have downloaded or created into the software.
To import a template:
1. Select the group and subgroup you want to add the templates to.
2. Select Import Template from the bottom of the software.
3. Browse to the location of the templates.
4. Select individual templates and select Add Selected to import them.
5. Select Add All to import all templates in this location.
6. Select Add All Subdirectories to import all templates in this location and in any
folders and subdirectories of this location.
Deleting Templates
Select an individual template and select Delete Template from the bottom of the
software to remove it from this group. The file will not be deleted.
Editing Templates
To edit an existing template in the Border Workshop, select an individual template and
select Edit Template from the bottom of the software. The template will open in the
workshop, where you can edit and save your changes.
78
Page 79

Setting Up: Your Products
Shipping Options
You will need to set up shipping options for different methods and for shipping to
different countries. This is where you will create and edit all shipping methods, groups,
and prices. Find these options in Manage Studio > Products > Shipping Options.
Note: Make sure all client stations are closed prior to making any changes to Shipping
Options. The clients will automatically update upon launch.
Setting Up the Default Group
A default shipping group is created automatically. To customize a shipping group:
1. Set a Handling Cost for each shipment. This
is your basic cost for packaging and
shipping and does not include the actual
mailing costs.
2. Select [Add Country] to set your shipping
rules for a particular country, or copy your
shipping rules from an existing country.
3. Select Add Shipping to add a shipping
method and price. A prompt appears.
4. Select from Pickup, Standard, Priority, 2
5. If you wish to charge a different price for orders over a specific amount, enter
that amount in the top box and your adjusted price in the bottom box. A new
rule must be created for each price you wish to charge.
6. Select Add.
nd
Day, or Overnight.
79
Page 80

Setting Up: Your Products
Adding a Shipping Group
Shipping groups make it easy to apply a different set of shipping rules for different
events. For instance, you would probably charge more for shipping wedding photos
than for studio portrait photos; simply create two identical shipping methods with
different prices in different groups and associate the desired shipping group with a
particular event, without needing to edit or return to this settings page.
Select [Add Group] to create a new shipping group. Follow the steps above to
customize it.
Editing a Shipping Item
To edit or remove a shipping group, country, or shipping method, select the [Edit] or
[Delete] options on the right.
Handling Cost
Handling costs are optional fees that can be charge to each order. A single cost will be
applied to all orders.
To add a Handling Cost, enter an amount then select [Save Handling] at the bottom of
the page.
Tax Information
You will need to set up tax information for your studio. Find these options in Manage
Studio > Products > Tax Information.
Note: Make sure all client stations are closed prior to making any changes to Tax
Information. The clients will automatically update upon launch.
Local Order Sales Tax
If you wish to automatically charge sales tax for orders created on this computer, enter
the sales tax rate.
80
Page 81

Setting Up: Your Products
Shipping and Handling Tax
Most states and provinces charge sales tax on shipping and handling. By default, the
software will charge sales tax on shipping and handling.
Note: You must check the box if you do not want to charge the local tax rate for
shipping and handling on your local orders.
81
Page 82

Setting Up: Your Studio
Setting Up Your Studio
Now that the software is set up and you have products ready to go, it’s time to prepare
your studio for business. We’ll start by adding users, vendors, and customers to your
database.
Vendors and Inventory
Running a studio can require a lot of materials. Setting up your vendors and inventory
will help you keep track of all your supplies and usage. Find these options in Manage
Studio > Vendors.
Adding a Vendor
Keeping a list of vendors in the software will make it easy to reorder supplies. Find these
options in Manage Studio > Vendors > Setup Vendors.
To add a vendor:
1. Select New Vendor.
2. Enter a Vendor Name and Account Number.
3. Enter Contact Details.
4. Select Save Vendor.
Editing a Vendor
All vendors are listed by name with a contact name and phone number. Click on an
existing vendor name to view the information. Select Delete Vendor from the
information screen to remove it.
82
Page 83

Setting Up: Your Studio
Adding an Inventory Item
Keeping track of your inventory will reduce costs and ensure that you never run out of
an item. Find these options in Manage Studio > Vendors > View Inventory On Hand.
To add an inventory item:
1. Select New Item.
2. Enter the Item Name and Description.
3. Select a Vendor from your list of vendors. If you need to set up vendors, scroll up
to the previous section.
4. Enter the Vendor SKU. This is the vendor’s serial or product number they use to
keep track of their products.
5. Select an Inventory Type or select [Add Type] to create a new one, such as
Paper or Ink.
6. Enter your current quantity.
7. Enter the item cost.
8. Enter the purchase date manually or select the calendar button and choose a
date.
9. Select Save Item.
Inventory items are listed by name, SKU, quantity purchased, quantity on hand, cost,
and purchase date. Click an item name to return to the information page and edit or
delete it.
83
Page 84
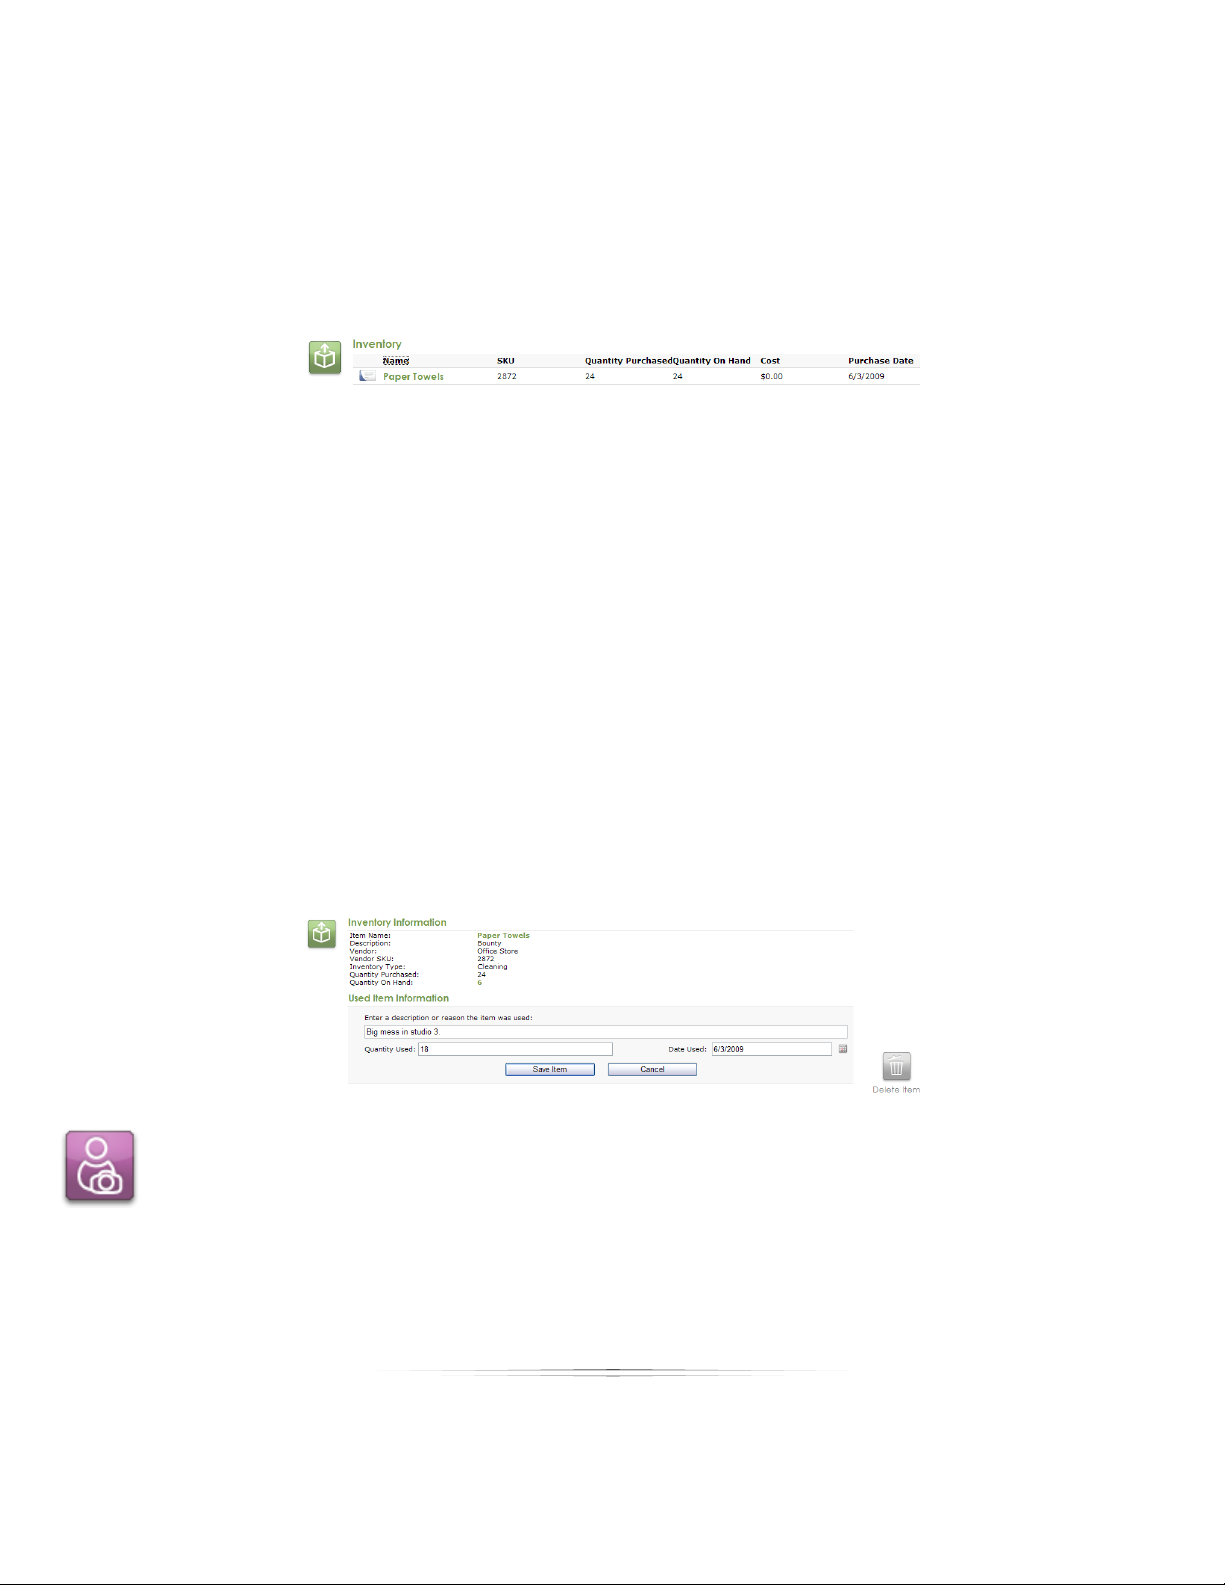
Setting Up: Your Studio
Updating Used Inventory
It is important to keep track of each used item to ensure that your inventory is accurate.
Find these options in Manage Studio > Vendors > View Used Inventory.
To update your used inventory:
1. Select Enter Used Item, or click an item name from the list.
2. Select an inventory item. Check the SKU to verify you have the right one.
3. The new window will show all information for the item.
4. Enter a reason for using the item.
5. Enter the quantity used.
6. Enter the use date manually or select the calendar button and choose a date.
7. Select Save Item.
Your current inventory will update automatically with your total, used, and remaining
items.
Employee Setup
Any person using the software can be set up as an employee. This will allow the
Administrator to manage the time of every employee. Each employee can have their
own login, schedule, permissions, and can be assigned tasks and bookings.
84
Page 85

Setting Up: Your Studio
Find the employee options in Manage Studio > Employees.
Adding a User Role
We will begin with creating user roles, because each employee will need to be
assigned one during the employee creation process. User roles determine which parts
of the software the employee can access. For instance, a manager will probably be
given access to every part of the software, while an entry-level sales or photographer
will probably not be given access to system settings, inventory, or networking options.
To add a user role:
1. Select Edit Roles from the right side of the window.
2. A list appears of existing user roles. Select one of these roles to edit, or select New
Role to add one.
3. Enter or edit the Role Name.
4. Set the permissions to determine which features of the software this employee
can access. Check the list below for more details on each feature.
5. Select Save Role.
Editing User Roles
Click an existing role to edit, rename, or delete it.
Permissions
Here is a list of all user role features. Check a permission to allow that role to use the
feature:
Schedule View: has access to view the Calendar tab.
Customers View: has access to view the Customers tab.
Employee View: has access to view the Employees tab and check in/out.
Vendor View: has access to view and use the Vendors tab.
85
Page 86

Setting Up: Your Studio
Products View: has access to view and use the Products tab.
Printers View: has access to view and use the Printers tab.
Cameras View: has access to view and use the Cameras tab.
Reports View: has access to view and use the Reports tab.
Options View: has access to view and edit the Options tab.
Photo Library: has access to view and edit items in the Photo Library.
Photo Workshop: has access to view and edit items in the Photo Workshop.
Orders: has access to view and edit orders in the Orders tab.
Add Task: has access to add and assign tasks.
Edit Task: has access to edit existing tasks.
Delete Task: has access to delete tasks.
Add Customer: has access to create new customers.
Edit Customer: has access to edit existing customers.
Delete Customer: has access to delete existing customers. Note: This role should
be limited to the Administrator.
Add Employee: has access to create new employees. Note: This role should be
limited to the Administrator.
Edit Employee: has access to edit existing employees. Note: This role should be
limited to the Administrator.
Delete Employee: has access to delete existing employees. Note: This role should
be limited to the Administrator.
Create, Edit, & Delete Role: has access to create, edit and delete roles. Note: This
role should be limited to the Administrator.
Add Note: has access to creating notes for bookings, customers, and employees.
Edit Note: has access to editing existing notes for bookings, customers, and
employees.
Delete Note: has access to delete existing notes for bookings, customers, and
employees.
Online: has access to PhotoReflect options.
Labtricity: has access to Labtricity options.
86
Page 87

Setting Up: Your Studio
Suggested Role Setups
The following are examples of how the roles should be assigned:
Administrator: The studio administrator should have all of the permissions
checked. If a password was not assigned when the software was first installed, it
should be created and saved before adding other employees.
Manager: The manager role can be assigned all permissions with the exception
of Edit Employee and Create, Edit, & Delete Role. These permissions should be
left to the studio administrator.
Photographer: The photographer role can be assigned all permissions with the
exception of Add Employee, Edit Employee, Delete Employee and Create, Edit,
& Delete Role.
Sales: A Sales role can be given all permissions with the exception of any
management related tasks.
These roles are only suggestions and can be named and assigned any permission that
can work in your studio.
Adding an Employee
Now that we have created or updated a user role, we can add some employees to
your studio. From Manage Studio > Employees, you can view a list of all existing
employees, their roles, schedules and an option to sign them in. Let’s start with creating
an employee.
To add an employee:
1. Select New Employee from the right side of the window.
2. Enter the employee’s name, an employee ID or internal username, and an
optional password they will use to check in and out of the software.
3. Select a Studio Role for the employee. Select [Edit Roles] to edit or create a new
role, following the steps in the previous section.
4. Select a status for this employee. Select [Add Status] to create a new one.
5. Enter the employee contact information.
6. Select Save.
87
Page 88

Setting Up: Your Studio
You will be taken back to the employee list. Click on an employee’s name to see the
employee details. Here you will find the employee’s home page, complete with
contact information, notes, schedule, and all assigned tasks. You will learn more about
these options later.
Editing an Employee
Select an employee’s name from the list to enter their home page. Select Edit
Employee from the bottom of the window to edit any employee information or assign
them a different role. Select Delete Employee to remove them.
Import and Export File
Information from an external program, in either .csv or .txt format, can be imported in
the software. This can make the setup faster to complete.
Once the employee setup has been completed, you should export the data for
backup purposes. The file can also be used by other external programs as well.
Customer Setup
You can store any number of customers in the software, whether they are active,
inactive, or a lead for a future shoot. Find the customer options in Manage Studio >
Customers.
Adding a Customer
Customers are listed here alphabetically (by last name) with a contact phone number
and email.
To add a new customer:
1. Select New Customer from the right side of the window.
2. Enter the customer name, address, and contact information.
88
Page 89

Setting Up: Your Studio
3. Enter the customer status. Select [Add Status] to create a new one.
4. Select [Add Family Member] if you want to associate relatives of the customer
with this account. Enter the relative information and select Add Family Member.
5. Select Save Customer.
You will be taken back to the customer list. Here you will find the customer’s home
page, complete with all bookings, calls, notes, and orders. You will learn more about
these options later.
Note: Duplicate customers can be created. Make sure you enter all the pertinent
information (middle name, email address, etc.) to differentiate the customers.
Editing a Customer
Click on a customer’s name to see the customer details. Select Edit Customer from the
bottom of the window to edit any customer information. Select Delete Customer to
remove them.
Import and Export File
Information from an external program, in either .csv or .txt format, can be imported in
the software. This can make the setup faster to complete.
Once the customer setup has been completed, you can export the data for backup
purposes. The file can also be used by other external programs as well.
89
Page 90

Using: Your Studio
Using Studio Solution
Now that we’ve set up the software, your products, and added customers and
employees, it’s time to get to work. We’ll start with basic functions and navigating
around the studio.
Find and select the Manage Studio tab at the bottom of the software.
Basic Studio Functions
Although there are many different windows within the studio, these functions are always
available.
Title Bar
The title bar is located at the very top of the software, and includes various resizing
controls and information.
Select Studio Solution to bring up the standard Windows menu, where you can
move, resize, logout, and exit the software.
Select _ or [ ] or X to resize or exit the software.
Select ? to see the software version.
User
Centered directly below the title bar is the current employee’s username and their role.
Select Logout to log into the software as a different user.
Back and Forward
Your current software location is found to the left, above the studio tabs. Your current
location will be displayed here. If you are editing a specific vendor’s information, your
location might appear as Vendors > Setup Vendors > Vendor #1, for example.
Select the < and > arrows to navigate back and forward through your previously
viewed windows.
90
Page 91

Using: Your Studio
Search
Directly above the studio tabs is a large text field with a magnifying glass. This is your
search function.
To search for an item:
1. Type the full or partial name of anything you wish to search for into the text field.
2. Hit Enter on your keyboard or click the magnifying glass.
3. The search results page will appear. Items here are organized by type, name,
and details.
4. Click on your desired name to go navigate to that item’s details page.
5. If you want to narrow the search by date, select a search period from the right
side of the window. If you choose Custom, type or select dates from the
calendar and select Apply Now.
6. If you want to narrow the search by type, select an item type from the right side
of the window. Item types include: All Types, Bookings, Tasks, Calls, Customers,
Employees, and Photos.
Studio Tabs
These tabs take you to different parts of the software.
Help
This brings up the user guide.
Status Bar
Below the studio window, to the left of the software tabs is the status bar. The status bar
will alert you to current processes in the software. Learn more about the status bar here.
91
Page 92
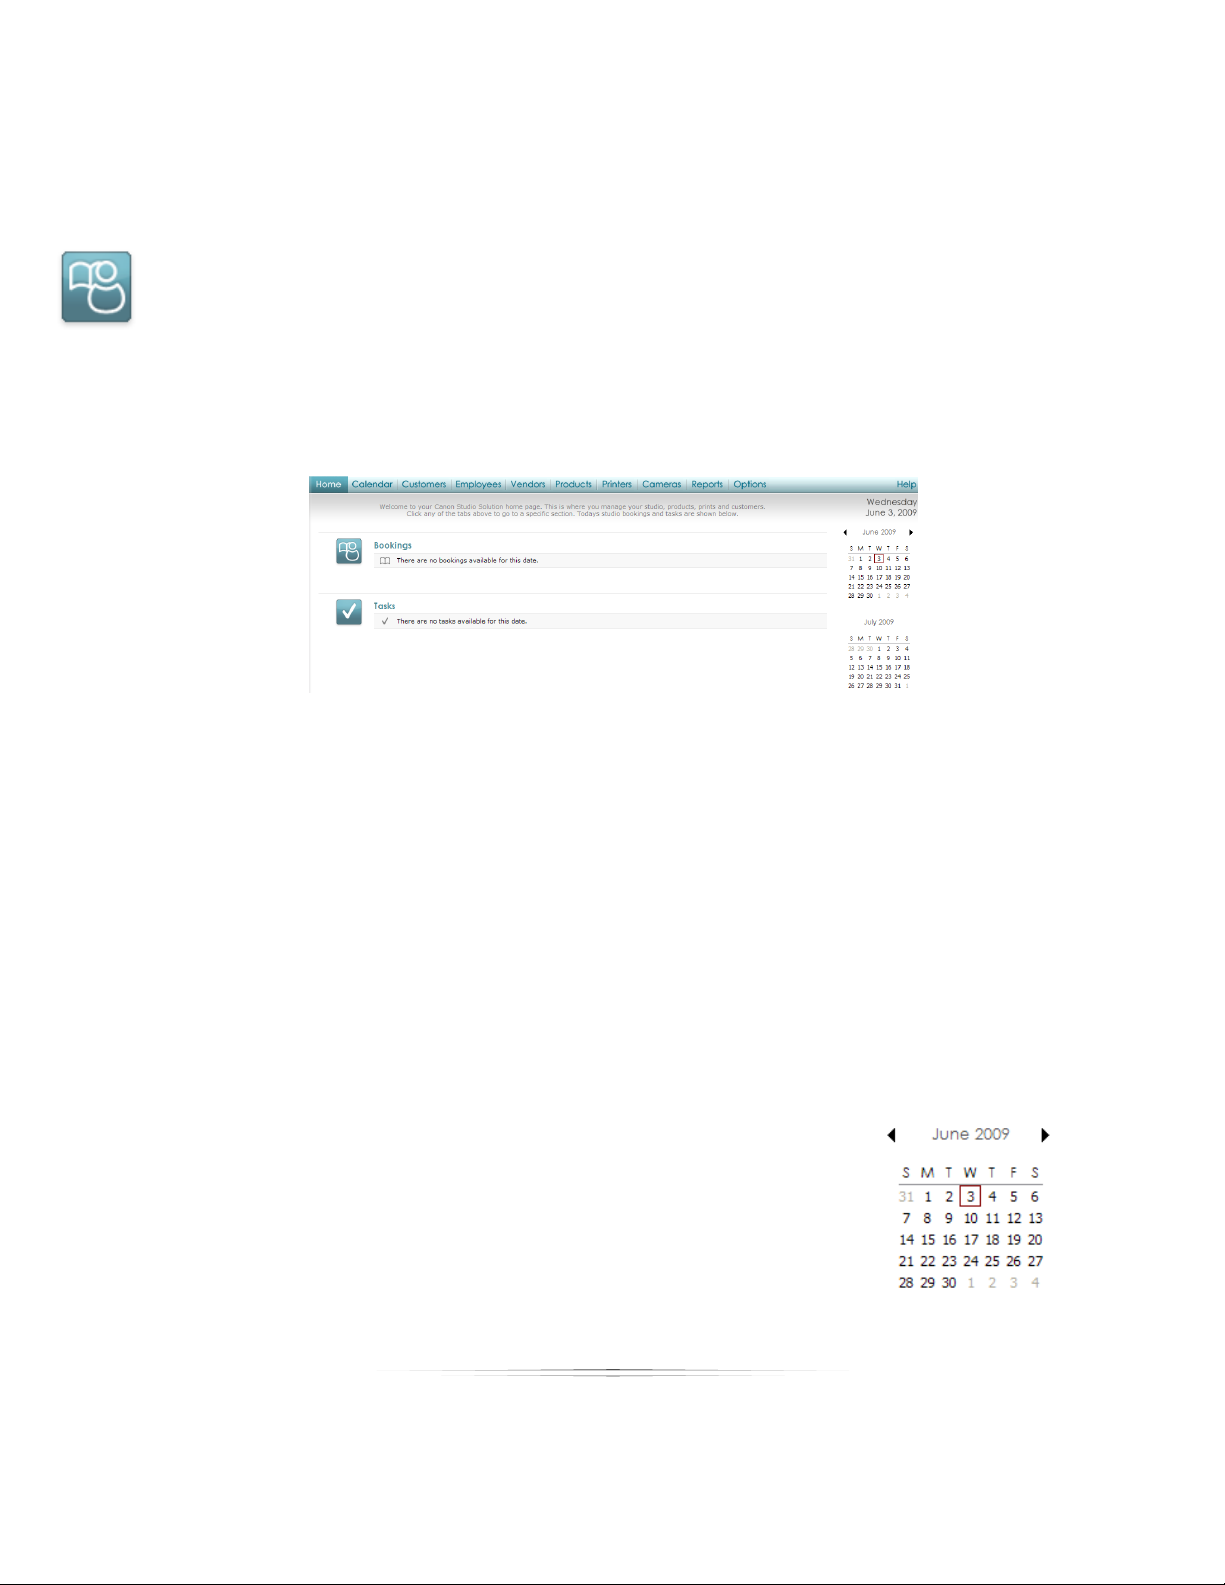
Using: Your Studio
Software Tabs
These tabs take you outside the studio to different parts of the software.
Home Page
Find your home page by clicking the Home button in the studio tabs. Your home page
gives you a quick view of all bookings and tasks for the selected day.
Bookings will be listed by customer name, date and time, and with a brief description of
the job.
Tasks will be listed by the employee assigned and a brief description of the task.
Viewing Dates
You can view your current information for any day by navigating the small calendars on
the home page and clicking on a date.
Select the < and > arrows to change months.
You can view all of the information for multiple days:
Click and hold the left mouse button and drag the cursor to
select any number of consecutive days.
Select and hold CTRL and click individual days to select any
number of inconsecutive days.
92
Page 93
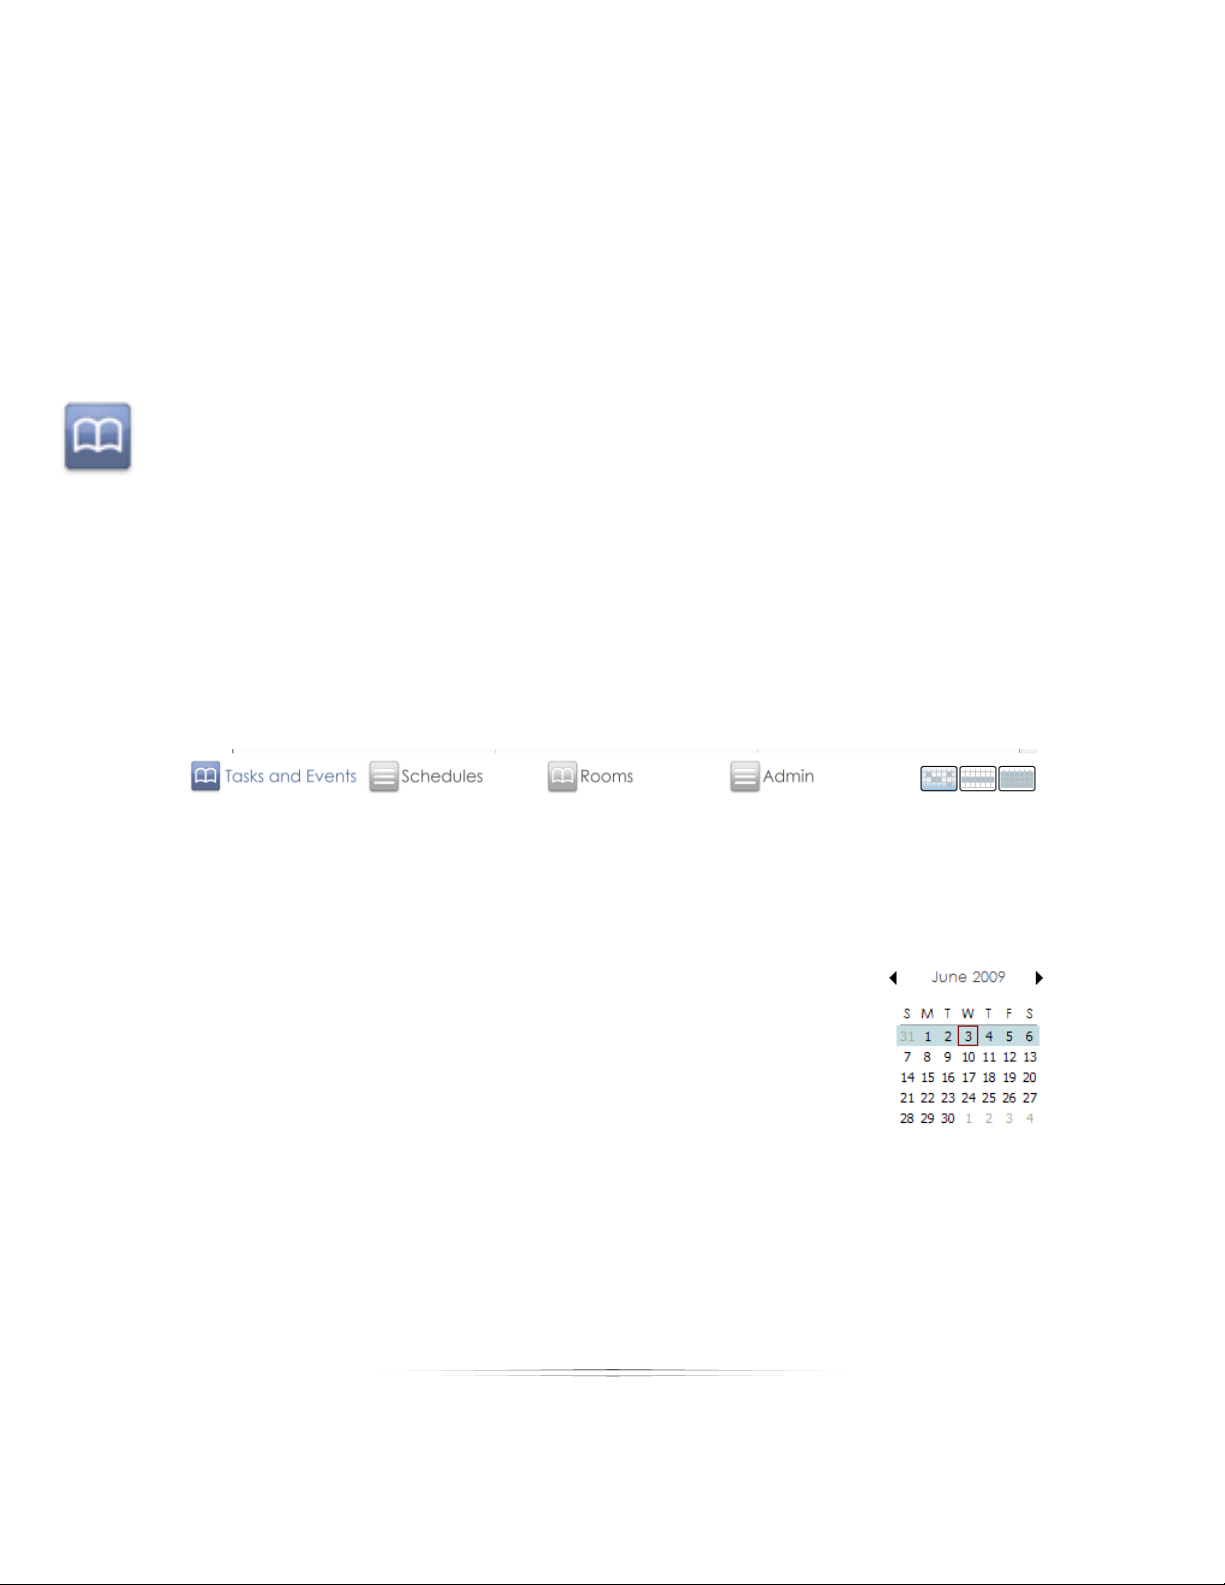
Using: Your Studio
Select and hold SHIFT and click individual days to select any number of
consecutive days.
Editing a Booking or Task
View and edit any booking or task that appears on your home page by clicking on the
name of the event. You will be taken to the appropriate booking, task, or call creation
page. Here you can edit, delete, or add notes to the event.
Calendar
Your calendar will help you schedule and keep track of every single booking, task and
call for your studio. Find your calendar by clicking the Calendar button in the studio
tabs.
There are four different calendars: Tasks and Events, Schedules, Rooms and Employee.
Tasks and Events show all actions, whether it’s a portrait shoot, cleaning a studio, or
making a confirmation call to a customer. Schedules show all employee shifts for that
time period.
Rooms will provide you with a detailed schedule for each room in your studio. The
Employee view will provide you with a detailed schedule for each employee of your
studio. Use the small calendars near the right of the window to navigate dates.
Select the < and > arrows above the calendar view to change the
week or month.
Select the • to automatically go to the current day and
week or month.
93
Page 94

Using: Your Studio
Viewing Modes
The calendar has three viewing modes: day, week, and month. To change the viewing
mode, select the day, week, or month buttons, located to the right below the
calendar.
Viewing by Day: This will show the selected day (or days, if you selected more
than one) with an hour-by-hour schedule. The current date (or dates) will appear
above the large calendar view.
Viewing by Week: This will show a full week, listing all bookings, tasks, and calls.
Viewing by Month: This will show a full month, listing the top few bookings, tasks,
and calls. A … will appear in a calendar day if other events exist. You will need to
switch to viewing by month or day to see all events for that day.
Viewing by Custom: Select and hold CTRL and click the mouse button to select
any number of days from the small calendar located on the right side of the
screen. The calendar will display these days.
Tasks and Events Calendar
Select the Tasks and Events button from the bottom of the window to access this
calendar. This calendar shows all of your current bookings, tasks, and calls for the studio.
If you are viewing your tasks and events by day, the day will be divided into three
columns:
Bookings: View and manage all bookings for the day. Using this view will expand
details of the booking, showing a
description and estimated
duration.
Tasks: View and manage all
employee tasks for the day,
including details and estimated
duration.
Calls: View and manage all calls
and confirmations for the day.
94
Page 95

Using: Your Studio
There is no limit to the number of bookings, tasks, or calls you can have at the same
time or overlapping the same times. They will appear next to each other in the column.
Adding a Booking
A booking is any type of photo shoot with a customer. This is a concrete event with a
date, time, and assigned employee.
To add a booking from the calendar:
1. Make sure you are in the Tasks and Events calendar, not the Schedule.
2. Double-click any day; you can change this in the next step. If you are viewing by
day, you must click in the Booking column.
3. Select a customer from the dropdown box.
a. If you want to search for an existing customer, select Search. Type in part
of the customer information in the Find box, select the criteria to search
for in the ―From‖ dropdown box, and select Search. You can also organize
the list of customers by clicking on a header to sort. When you have found
the customer, double-click the name or select it and select OK.
b. If you need to add or edit an existing customer, read the previous section
on setting up customers.
4. Choose a date, starting time, and end time for the event.
5. Enter a name for the event. You must enter a name before saving the booking.
6. Enter a description for the event. This is optional.
7. Update or add a status to the event. Examples: booked, completed, complete,
no-show.
8. Choose or add a room for the event.
9. If you want to automatically add a confirmation call for this event to your
calendar, select Add a reminder call to the calendar for this booking. This call will
appear on the calendar schedule 24 hours prior to the event.
10. If you want to make the booking a recurring event, select Recurring Options to
setup the event.
11. Assign an employee (or multiple employees) to the event.
12. Select Save Booking.
95
Page 96

Using: Your Studio
13. The booking will now appear on your Tasks and Events calendar on the specified
date and time.
Adding a Task
A task is any maintenance, job, or reminder for an employee of your studio, or just the
studio itself. Tasks can only be added from the calendar while viewing by day.
To add a task from the calendar:
1. Make sure you are in the Tasks and Events calendar, not the Schedule.
2. Select to View by day.
3. Double-click any time in any day in the Tasks column; you change this in the next
step. You must double-click in the Tasks column while viewing by day.
4. Choose a date, starting time, and end time for the task.
5. Enter a name for the task. You must enter a name.
6. Enter a description for the task. This is optional.
7. Update or add a status to the task. Examples: assigned, completed.
8. If you want to automatically add a Reminder for this task to your calendar, select
the checkbox next to Reminder then set the reminder time from the dropdown
list. This reminder will appear on the prior to the assigned time.
9. If you want to make the task a recurring event, select Recurring Options to setup
the task.
96
Page 97

Using: Your Studio
10. Assign an employee (or multiple employees) to the task. If you need to add or
edit an existing employee, read the previous section on setting up employees.
11. Select Save Task.
12. The task will now appear on your Tasks and Events calendar on the specified
date and time.
Adding a Call
Note: Calls can only be added from the calendar while viewing by day.
To add a call from the calendar:
1. Make sure you are in the Tasks and Events calendar, not the Schedule.
2. Select to View by day.
3. Double-click any time in any day in the Calls column; you change the actual
time and date next. You must double-click in the Calls column while viewing by
day.
4. Select a customer from the dropdown box.
a. If you want to search for an existing customer, select Search. Type in part
of the customer information in the Find box, select the criteria to search
for in the ―From” dropdown box, and select Search. You can also organize
the list of customers by clicking on a header to sort. When you have found
the customer, double-click the name or select it and select OK.
b. If you need to add or edit an existing customer, read the previous section
on setting up customers.
5. Choose a date and time for the call.
97
Page 98
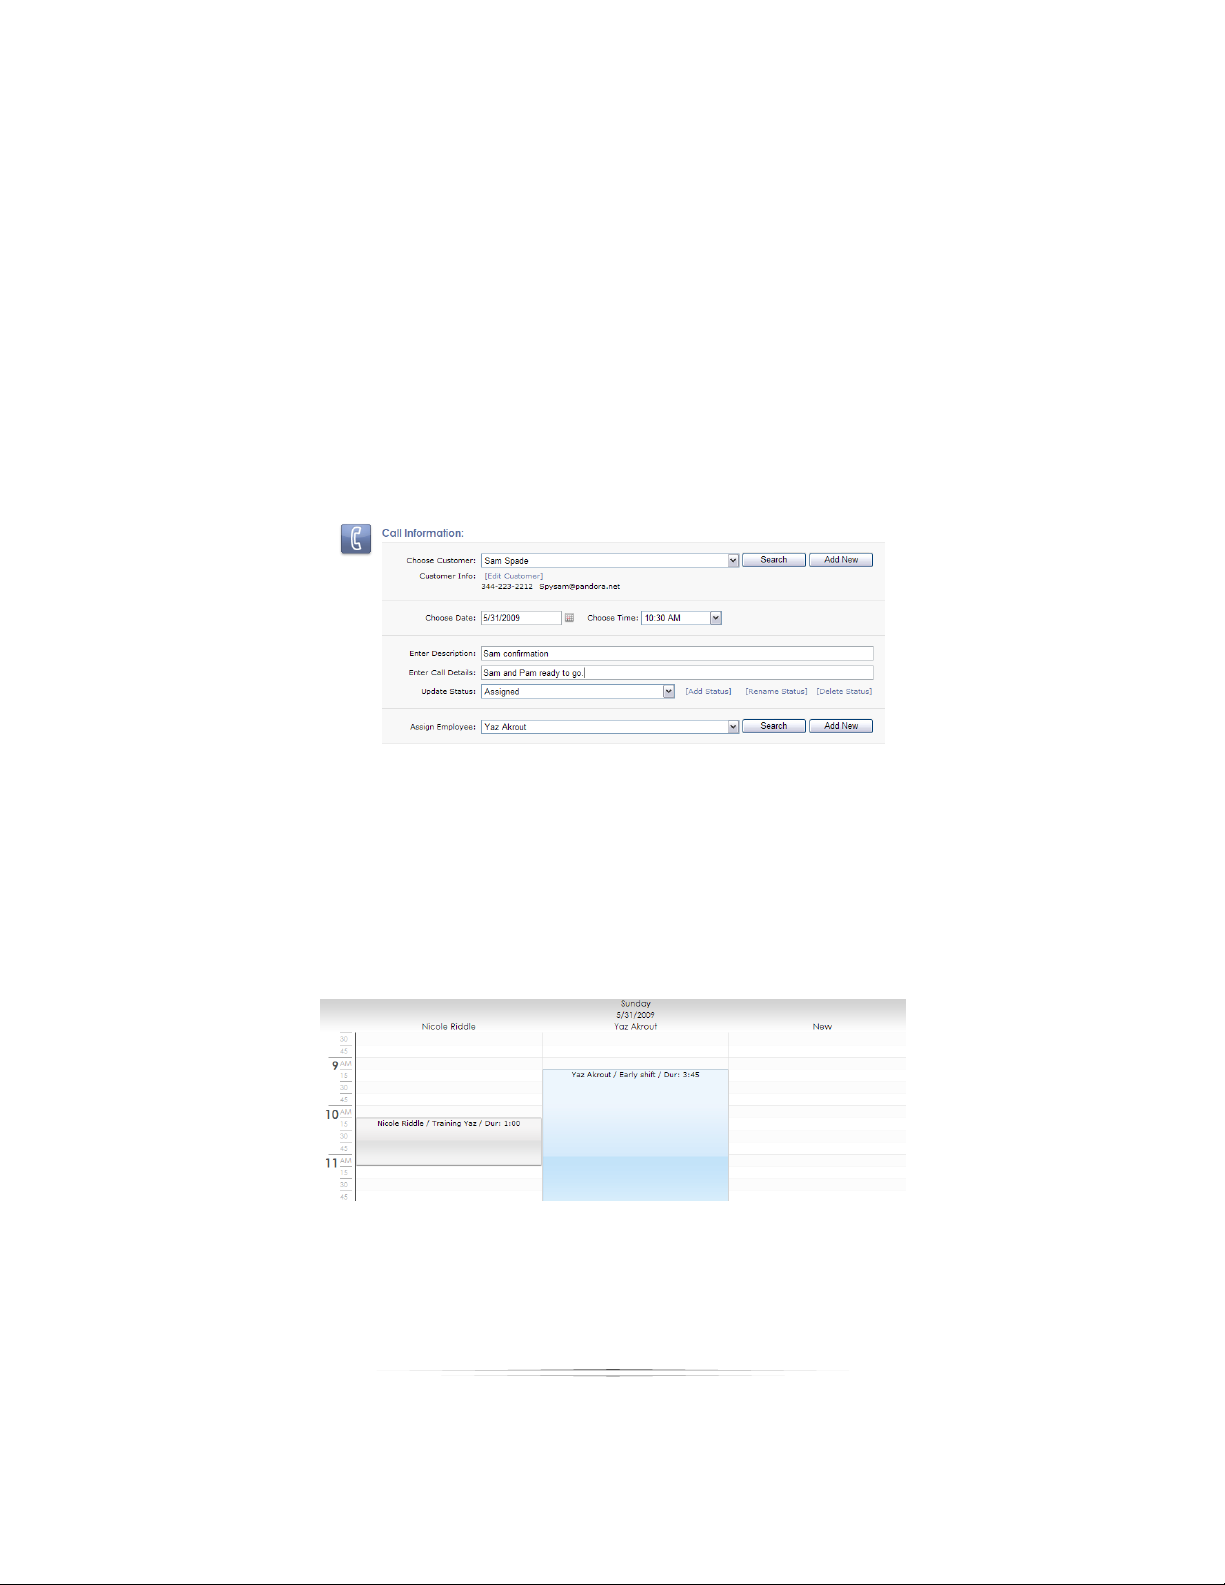
Using: Your Studio
6. Enter a name for the call. You must enter a name.
7. Enter details for the call. This is optional.
8. Update or add a status to the call. Examples: assigned, call again, complete.
9. Assign an employee to the call. If you need to add or edit an existing employee,
read the previous section on setting up employees.
10. Select Save Call.
11. The call will now appear on your Tasks and Events calendar on the specified
date and time.
Using the Schedules Calendar
Select the Schedules button from the bottom of the window to access this calendar.
This calendar shows all of your employee schedules.
If you are viewing your tasks and events by day, the day will be divided into as many
columns as employees that are scheduled that day.
To schedule an employee:
1. Make sure you are in the Schedules calendar.
98
Page 99

Using: Your Studio
2. Double-click on any day.
3. Choose an employee from the dropdown box.
a. If you want to search for an existing employee, select Search. Type in part
of the employee information in the Find box, select the criteria to search
for in the “From” dropdown box, and select Search. You can also organize
the list of employees by clicking on a header to sort. When you have
found the employee, double-click the name or select it and select OK.
4. Choose a date, start time, and end time for the shift.
5. Enter a name for the shift. You must enter a name.
6. Enter comments for the shift.
7. Update or add a status to the shift. Examples: assigned, accepted, completed or
missed.
8. Select Save Schedule.
9. The shift will now appear on the Schedules calendar on the specified date and
time.
Adding Notes to Calendar Items
Once an item has been added to a calendar, you can add, edit, or view notes
associated with it.
To add a note to a calendar item:
1. Double-click the item to enter the details page.
2. Select Add Note to the right of the details.
3. Type a note and select Save Note.
4. You can also view and remove existing notes, listed by date and time. Select
[Remove] to delete a note.
99
Page 100

Using: Your Studio
Moving, Editing, and Deleting Calendar Items
Once an item has been added to either the Tasks and Events or Schedule calendars,
you can move, edit, or delete it.
To quickly move a calendar item, click and hold the left mouse button and drag the
item to a different time or date. You can also move an item by double-clicking it and
editing the date and time from the details page.
To edit a calendar item, double-click it and enter the details page. Here you can edit
any options for the item.
To delete a calendar item, double-click it and enter the details page. Select the Delete
Item button to the right of the details.
Customers
The Customers tab will keep track of all your past, current, and possible future
customers.
After selecting the tab, a list of customers will appear, alphabetized by last name, with
a phone number and email address.
Clicking a customer’s email link will open a new message to them in your default
email program.
Clicking on a customer’s name will take you to the details page for that
customer.
Customer Details
This is your customer’s home page. It keeps track of all their booking and order info, and
is where you can view and manage general info, bookings, notes, and calls. The right
100
 Loading...