

Canon Speedlite 220EX User Manual
COPY
INSTRUCTION MANUAL
MODE D’EMPLOI
MANUAL DE INSTRUCCIONES
EnglishFrançaisEspañol
COPY
English

Thank you for purchasing a Canon product.
COPY
The Canon Speedlite 220EX is a compact flash unit automatically
compatible with E-TTL II, E-TTL, and TTL autoflash.
Read this instruction manual while also referring to your
camera’s instruction manual.
Before using the Speedlite, read this instruction manual and your camera’s
instruction manual to familiarize yourself with the Speedlite operations.
The basic operation is as easy as with normal AE shooting.
When the 220EX is attached to an EOS camera, almost all automatic
exposure control for flash photography is handled by the camera.
Although the 220EX is an external flash unit, it works automatically and
seamlessly just like the camera’s built-in flash.
It is automatically compatible with the camera’s flash metering
mode (E-TTL ll, E-TTL, or TTL).
The camera controls the Speedlite automatically in the following flash metering
modes:
1. E-TTL II autoflash (evaluative flash metering with preflash reading/lens
distance information)
2. E-TTL autoflash (evaluative flash metering with preflash reading)
3. TTL autoflash (off-the-film metering for real-time flash metering)
Regarding the camera’s available flash metering modes, refer to the
“External Speedlite” specification in the “Specifications” of your
camera’s instruction manual.
The camera instruction manual’s chapter on flash photography will refer
to cameras having 1 and 2 above as a Type-A camera (compatible
with E-TTL II or E-TTL). And cameras having 3 (compatible with only
with TTL) are called Type-B cameras.
* This instruction manual assumes that you are using the Speedlite with a
Typ e- A came ra .
For Type-B cameras, see page 4.
2

Contents
COPY
Conventions Used in this Manual ..................................... 4
Nomenclature...................................................................... 5
Installing the Batteries ....................................................... 6
Attaching to the Camera .................................................... 7
Turn on the Power Switch.................................................. 8
Fully Automatic Flash Shooting ........................................ 9
Automatic Flash in Each Shooting Mode ....................... 10
7 FE Lock...................................................................... 11
F High-Speed Sync......................................................... 11
Troubleshooting Guide .................................................... 12
Specifications ................................................................... 13
3
Conventions Used in this Manual
COPY
The operation procedures in this instruction manual assume that both
the camera and Speedlite’s power switches are ON.
Icons are used in the text to indicate the respective buttons and
settings. They match the same icons found on the camera and
Speedlite.
The (1) / (3) icons indicate that the respective function remains
in effect for 8 sec. or 16 sec.
Reference page numbers are indicated by (p.**).
This instruction manual uses the following alert symbols:
: The Caution symbol indicates a warning to prevent shooting
problems.
: The Note symbol gives supplemental information.
Using a Type-B Camera
With a Type-B camera, TTL autoflash will be used for flash photography. FE
lock and high-speed sync (FP flash) cannot be used. If the <a> lamp
on the 220EX (see the next page) does not light, it means the camera is
Type B.
4
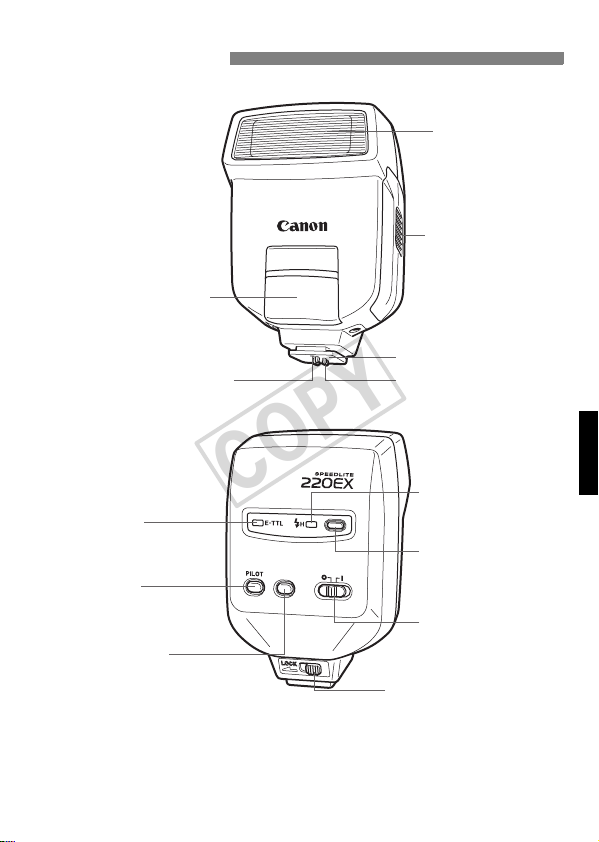
Nomenclature
COPY
*AF-assist beam emitter
Locking pin (p.7)
Flash head
Battery compartment
cover (p.6)
Mounting foot (p.7)
Contacts (p.7)
<a>
E-TTL lamp (Red) (p.8)
<J>
Pilot lamp (Red)/
Test firing button (p.8)
Flash exposure
confirmation lamp
(Green) (p.9)
* The 220EX’s AF-assist beam is compatible with only the EOS camera’s center
AF point.
The effective range of the flash is approx. 0.7 - 5 m / 2.3 - 16.4 ft.
<F>
High-speed sync
lamp (p.11)
<F>
High-speed sync
(FP flash) button (p.11)
Power switch (p.8)
L : Power OFF
K : Power ON
Mounting foot’s
lock lever (p.7)
5

Installing the Batteries
COPY
Use four size-AA batteries.
Open the cover.
1
Slide the battery compartment cover
as shown by the arrow, then flip up
the edge.
Insert the batteries.
2
Make sure the + and - battery
contacts are properly oriented as
shown in the compartment.
Close the cover.
3
Push down the cover and slide it
back.
Recycling Time and Flash Count
Battery Type Recycling Time Flash Count
Size-AA alkaline batteries Approx. 0.1 - 4.5 sec. Approx. 250 - 1700
Based on a new set of batteries and Canon’s testing standards.
To avoid overheating and degrading the flash head, do not fire more than
20 continuous flashes. After 20 continuous flashes, allow a rest time of at
least 10 min.
Use a new set of four batteries of the same brand. When replacing the
batteries, replace all four at one time.
Using size-AA batteries other than the alkaline type may cause improper
battery contact due to the irregular shape of the battery contacts.
Size-AA Ni-MH or lithium batteries can also be used.
6
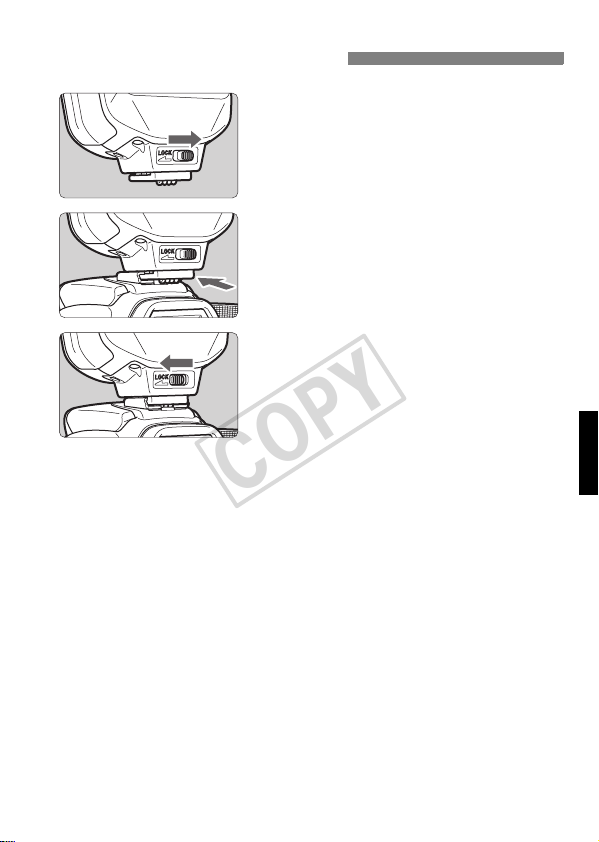
Attaching to the Camera
COPY
Slide the lever to the right.
1
Attach the Speedlite.
2
Slip the Speedlite’s mounting foot into
the camera’s hot shoe all the way.
Secure the Speedlite.
3
Slide the mounting foot’s lock lever to
the left. The locking pin will then
protrude to secure the Speedlite to
the camera.
To detach the Speedlite, slide the
mounting foot’s lock lever to the right
and detach.
7

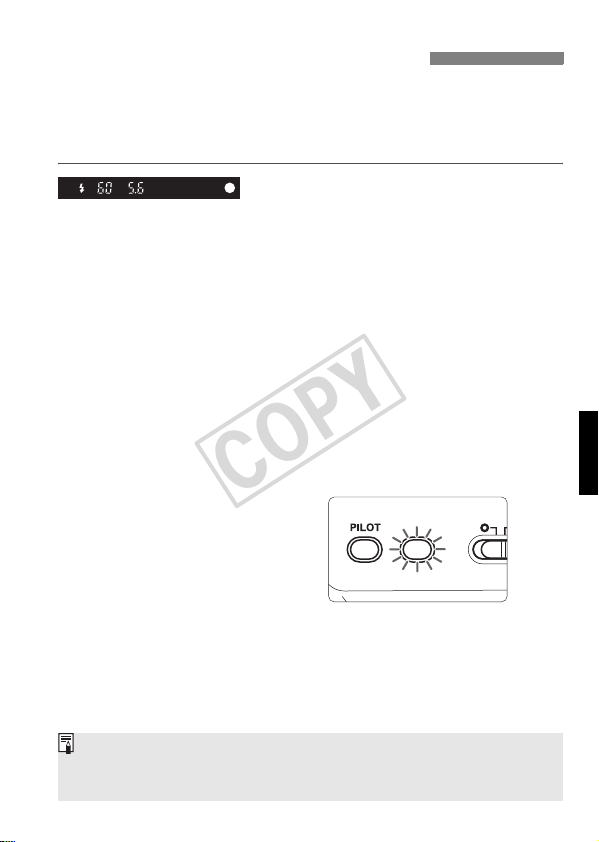
Turn on the Power Switch
COPY
Turn on the power switch.
1
Set the power switch to <K>. The
flash will then start recycling.
X The <a> lamp will light.
Check that the flash is ready.
2
When the flash is ready, the
<J> lamp will light.
To fire a test flash, press the test firing
button (pilot lamp).
About Auto Power Off
To save battery power, the power will turn off automatically after 90 sec.
of idle use. To turn on the Speedlite again, press the camera’s shutter
button halfway.
A test flash cannot be fired while the camera’s operation timer 4 or 0 is
active.
8
Fully Automatic Flash Shooting
COPY
When the camera’s shooting mode is set to <U> (Full Auto) or <V>
(Program AE), E-TTL II/E-TTL fully automatic flash photography will be
enabled, making it as easy as normal AE shooting in the <U> or <V>
mode.
Focus the subject.
1
Press the shutter button halfway to
focus.
X The shutter speed and aperture will
be displayed in the viewfinder.
Check that the <Q> icon is lit in the
viewfinder.
Take the picture.
2
X Right before the shot is taken, a
preflash is fired, then the main flash is
fired.
X If a standard flash exposure was
obtained, the flash exposure
confirmation lamp will light for about 2
sec.
If the flash exposure confirmation lamp does not light, move closer to the
subject and take the picture again. With a digital camera, you can also
increase the camera’s ISO speed.
9
Automatic Flash in Each Shooting Mode
COPY
Just set the camera’s shooting mode to <X> (shutter-priority AE),
<W> (aperture-priority AE), or <O> (manual exposure), and you can
use E-TTL II/E-TTL autoflash.
Select this mode when you want to set the shutter speed manually.
The camera will then automatically set the aperture matching the
shutter speed (30 sec. - 1/X* sec.) to obtain a standard exposure.
X
If the aperture display blinks, it means that the background
exposure will be underexposed or overexposed. Adjust the shutter
speed until the aperture display stops blinking.
Select this mode when you want to set the aperture manually.
The camera will then automatically set the shutter speed (30 sec. - 1/
X* sec.) matching the aperture to obtain a standard exposure.
If the background is dark like a night scene, a slow sync speed will be
used to obtain a standard exposure of both the main subject and
background. Standard exposure of the main subject is obtained with
the flash, while a standard exposure of the background is obtained
W
with a slow shutter speed.
Since a slow shutter speed will be used for low-light scenes, using
a tripod is recommended.
If the shutter speed display blinks, it means that the background
exposure will be underexposed or overexposed. Adjust the
aperture until the shutter speed display stops blinking.
Select this mode if you want to set both the shutter speed and aperture
manually.
O
Standard exposure of the main subject is obtained with the flash. The
exposure of the background is obtained with the shutter speed (buLb,
30 sec. - 1/X* sec.) and aperture combination you set.
* 1/X sec. is the camera’s maximum flash sync speed.
In the <Z> or <Y> mode, the result will be the same as shooting in the
<V> (Program AE) mode.
10
7 FE Lock
COPY
FE (flash exposure) lock locks the correct flash exposure reading for any part of
the scene. After focusing the subject, you press the camera’s <7> button.
Press the <7> button. (3)
Aim the subject at the center of the
viewfinder and press the <
X The Speedlite will fire a preflash and
the required flash output for the
subject is retained in memory.
The FEL display will be shown in the viewfinder for 0.5 sec.
Each time you press the <7> button, a preflash will be fired and the
FE lock will be set again.
If the camera does not have a <7> button, press the <P> button.
If the subject is too far away and underexposure will result, the <Q> icon
will blink in the viewfinder. Move closer to the subject and try the FE lock
again.
If the subject is too small, FE lock might not be very effective.
7
> button.
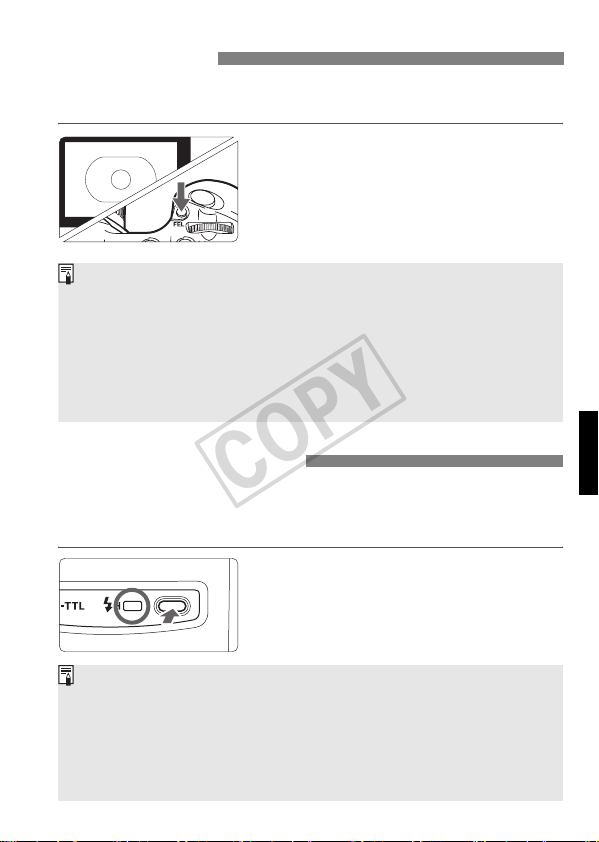
F High-Speed Sync
With high-speed sync (FP flash), the flash can synchronize with all
shutter speeds. This is convenient when you want to use aperture
priority for fill-flash portraits.
Press the <F> button and the
<F> lamp will light.
In the viewfinder, check that the <F>
icon is lit.
If the flash exposure confirmation lamp does not light, move closer to the
subject and take the picture again. With a digital camera, you can also
increase the camera’s ISO speed.
If the shutter speed is slower than the maximum flash sync speed, <F>
will not be displayed in the viewfinder.
With high-speed sync, the faster the shutter speed, the shorter the flash
range will become.
11

Troubleshooting Guide
COPY
The flash does not fire.
• The batteries are installed in the wrong orientation.
Install the batteries in the correct orientation. (p.6)
• The batteries are exhausted.
If the flash recycling time takes 30 sec. or longer until the pilot
lamp lights, replace the batteries. (p.6)
• The Speedlite is not attached securely to the camera.
Attach the Speedlite’s mounting foot securely to the camera. (p.7)
• The electrical contacts of the Speedlite and camera are dirty.
Clean the contacts. (p.7)
The power turns off by itself.
• After 90 sec. of idle operation, auto power off took effect.
Press the shutter button halfway or press the test firing button.
(p.8)
The bottom of the picture looks dark.
• The subject is too close to the camera.
Keep at least 0.7 m/2.3 ft away from the subject.
The flash exposure becomes underexposed or overexposed.
• There was a highly reflective object (glass window, etc.) in the
picture.
Use FE lock. (p.11)
• You used high-speed sync.
Since high-speed sync makes the effective flash range shorter,
check the Guide No. and set the shutter speed. (p.11)
The picture is really blurred.
• The shooting mode was set to <W>, and the scene was dark.
Use a tripod or set the shooting mode to <V>. (p.10)
12

Specifications
COPY
•Type
Type: On-camera, E-TTL II/E-TTL/TTL autoflash Speedlite
Compatible cameras: Type-A EOS cameras (E-TTL II/E-TTL autoflash)
Guide No.: 22/72 (ISO 100, in meters/feet)
Maximum flash coverage: EF28mm lens
Flash duration: 1.4 ms or shorter
• Exposure Control
Exposure Control Type: E-TTL II/E-TTL/TTL autoflash
Flash range: Normal flash: Approx. 0.7 - 15.7 m / 2.3 - 51.5 ft.
(With EF50mm f/1.4 lens, High-speed sync: Approx. 0.7 - 7.6 m / 2.3 - 24.9 ft.
at ISO 100) (at 1/250 sec.)
FE lock: Enabled with FE lock button
High-speed sync: Provided
Flash exposure confirmation:
• Flash Recycling
Recycling time/
Flash ready indicator: Approx. 0.1 - 4.5 sec. / Pilot lamp lights
• AF-Assist Beam
Compatible AF point: Center AF point only
Effective range: Approx. 0.7 - 5 m / 2.3 - 16.4 ft.
• Power Source
Power source: Four size-AA alkaline batteries
Battery life: Approx. 250 - 1700 flashes
Power saving: Power off after 90 sec. of idle operation
•
Dimensions
•Weight Approx. 160 g / 5.6 oz. (excluding batteries)
(W x H x D):
Type-B EOS cameras (TTL autoflash)
Flash exposure confirmation lamp lights
65 x 92 x 61.3 mm / 2.6 x 3.6 x 2.4 in.
All the specifications above are based on Canon’s testing standards.
The camera’s specifications and external appearance are subject to change
without notice.
13

This device complies with Part 15 of the FCC Rules. Operation is subject to the
COPY
following two conditions: (1) This device may not cause harmful interference,
and (2) this device must accept any interference received, including
interference that may cause undesired operation.
Do not make any changes or modifications to the equipment unless otherwise
specified in the instructions. If such changes or modifications should be made,
you could be required to stop operation of the equipment.
This equipment has been tested and found to comply with the limits for a class
B digital device, pursuant to part 15 of the FCC Rules. These limits are
designed to provide reasonable protection against harmful interference in a
residential installation. This equipment generates, uses and can radiate radio
frequency energy and, if not installed and used in accordance with the
instructions, may cause harmful interference to radio communications.
However, there is no guarantee that interference will not occur in a particular
installation. If this equipment does cause harmful interference to radio or
television reception, which can be determined by turning the equipment off and
on, the user is encouraged to try to correct the interference by one or more of
the following measures:
• Reorient or relocate the receiving antenna.
• Increase the separation between the equipment and receiver.
• Consult the dealer or an experienced radio/TV technician for help.
This Class B digital apparatus complies with Canadian ICES-003.
Cet appareil numérique de la classe B est conforme à la norme NMB-003 du
Canada.
14
 Loading...