

E
E
English Edition
INSTRUCTIONS
Thank you for purchasing a Canon product.
The Canon Speedlite 550EX is a powerful, high-output flash unit featuring ETTL (Evaluative-Through-The-Lens) autoflash control. It can be used as an oncamera Speedlite or as a master or slave unit in a wireless, multi-Speedlite
system.
When used with Type-A cameras (listed below), the 550EX obtains natural-looking flash pictures by balancing the flash output and existing light. The 550EX
also enables high-speed sync (FP or Focal-Plane flash), FE (Flash Exposure)
lock, FEB (Flash Exposure Bracketing), bounce flash and area AF-assist.
When used with Type-B cameras (listed below), the 550EX works as a TTL
autoflash unit.
With Type-B cameras, some 550EX features are not available. Refer to the
tables below to check your camera type and the features available.
This Instructions booklet has separate sections for Type-A and Type-B cameras. Read the section which applies to your camera.
Type-A Camera E-TTL
Type-B Camera TTL All other EOS cameras.
550EX Features Available with EOS Cameras
Features With Type-A Cameras With Type-B Cameras
E-TTL autoflash control ? X
High-speed sync (FP flash) ? X
FE lock ? X
FEB ??
Wireless, multi-Speedlite E-TTL ? X
EOS-1D, 1V, 3, D60, D30, ELAN 7/7E, 30/33, 50/50 E, ELAN ll/ELAN ll E,
300/REBEL 2000, 500N/REBEL G, 3000N/66/REBEL XSN, IX, IX 7/IX Lite
?: Available X: Not available
Key to Symbols
: Warning for preventing camera or Speedlite malfunction.
: Supplementary notes for basic operation.
: Helpful tip for Speedlite operation or picture taking.
• Keep this Instructions booklet handy for future reference.
2

Conventions Used in this Booklet
The Instructions are divided into separate sections for Type-A and Type-B
cameras. If you have a Type-A camera, see pages 10 to 76 and 112 to
125. If you have a Type-B camera, see pages 10 to 22 and 77 to 125.
● The Speedlite operation procedures assume that the Speedlite 550EX
has been turned on with its main switch. Before proceeding, turn on
the main switch.
● The camera and Speedlite’s buttons and dials and their settings are
indicated by icons in the Instructions. The name of each button and
dial can be found in “Nomenclature” on page 6. Icons for camera
modes are also used. They are as follows:
: Full Auto
P
Av
Tv
M
: Program AE
: Aperture-priority AE
: Shutter speed-priority AE
: Manual
● The icon indicates a simple explanation of a relevant Custom
Function. For details, see “Custom Functions” on page 112. The
Custom Function explanations assume that the default Custom
Function settings are in effect.
3

Contents
Before You Start
Basic Flash
Photography
Advanced Flash
Photography
Nomenclature .........................................6
1. Installing Batteries..........................10
2. External Power Sources ................12
3. Attachment to Camera ...................13
4. Wireless Selector ...........................14
5. Main Switch....................................16
1. Using Flash in Full Auto Mode .......24
2. Using Flash in
Other Camera Modes ....................26
1. High-Speed Sync
(FP Flash) ......................................32
2. FE Lock..........................................34
3. Flash Exposure
Compensation................................36
Wireless Flash
For Type-A Cameras
Photography
Basic Flash
Photography
Advanced Flash
Photography
Wireless Flash
For Type-B Cameras
Photography
[1] Wireless System Setup and Testing ...52
1.
Setting the 550EX as the Master Unit
2. Setting the 550EX as a Slave Unit........53
3. Setting the Master/Slave Channel ........54
4. Setting the Slave ID..............................56
5. Master Flash ON/OFF ..........................57
6. Wireless Flash Range...........................58
1. Using Flash in Full Auto Mode .......78
2. Using Flash in
Other Camera Modes ....................80
1. Flash Exposure Compensation......86
2. FEB
3. Bounce Flash .................................90
[1] Wireless System Setup and Testing...100
1.
Setting the 550EX as the Master Unit
2. Setting the 550EX as a Slave Unit......100
3. Setting the Master/Slave Channel ......101
4. Setting the Slave ID............................103
5. Master Flash ON/OFF ........................104
6. Wireless Flash Range.........................105
(Flash Exposure Bracketing)
....52
......88
....100
4

• For Type-A cameras, see pages 10 to 76 and 112 to 125.
• For Type-B cameras, see pages 10 to 22 and 77 to 125.
6. Pilot Lamp and Test Firing..........17
7. Flash Exposure Confirmation .....18
8. Using the Zoom Button and
Wide Panel .................................18
9. Flash Mode.................................21
(1) Av: Aperture-Priority AE and
E-TTL Autoflash..........................27
(2)
Tv: Shutter Speed-Priority AE and
E-TTL Autoflash
..........................29
4. FEB
(Flash Exposure Bracketing) ......38
5. Bounce Flash..............................40
6. Close-Distance Flash
Photography ...............................43
[2] Wireless E-TTL Autoflash ....60
1. Wireless E-TTL Autoflash
With Flash Ratio OFF .......................60
2. Wireless E-TTL Autoflash
With Flash Ratio ON .........................63
[3] Wireless Manual Flash ....71
1. Wireless Manual Flash
With Uniform Flash Output ...............71
10. Setting the Film Speed ...............21
11. LCD Panel Illumination ...............21
12. AF-Assist Beam..........................22
Automatic Reversion to Default
Settings.......................................22
(3) M: Manual Exposure and
E-TTL Autoflash..........................30
7. Manual Flash Mode ....................44
8. Stroboscopic Flash .....................46
9. Second-Curtain
Synchronization ..........................49
10. Modeling Flash ...........................50
2. Wireless Manual Flash
With Varied Flash Output..................72
[4] Wireless Stroboscopic Flash ....73
[5] Manual or Stroboscopic Flash
With a Slave Unit ....74
1. Setting Manual Flash
With a Slave Unit ..............................74
2.
Stroboscopic Flash With a Slave Unit
...75
(1) Av: Aperture-Priority AE and
E-TTL Autoflash..........................81
(2)
Tv: Shutter Speed-Priority AE and
E-TTL Autoflash
..........................83
4. Close-Distance
Flash Photography .....................92
5. Manual Flash Mode ....................93
[2] Wireless Manual Flash ...107
1. Wireless Manual Flash
With Uniform Flash Output .............107
2.
Wireless Manual Flash With Varied Flash Output
[3] Wireless Stroboscopic Flash ...109
[4] Manual or Stroboscopic Flash
With a Slave Unit ...110
..108
(3) M: Manual Exposure and
E-TTL Autoflash..........................84
6. Stroboscopic Flash .....................95
7.
Second-Curtain Synchronization
...98
1. Manual Flash With a Slave Unit......110
2.
Stroboscopic Flash With a Slave Unit
...111
Custom Functions ...........................112
Canon Speedlite 550EX System.....114
Troubleshooting Guide....................116
Specifications..................................118
5
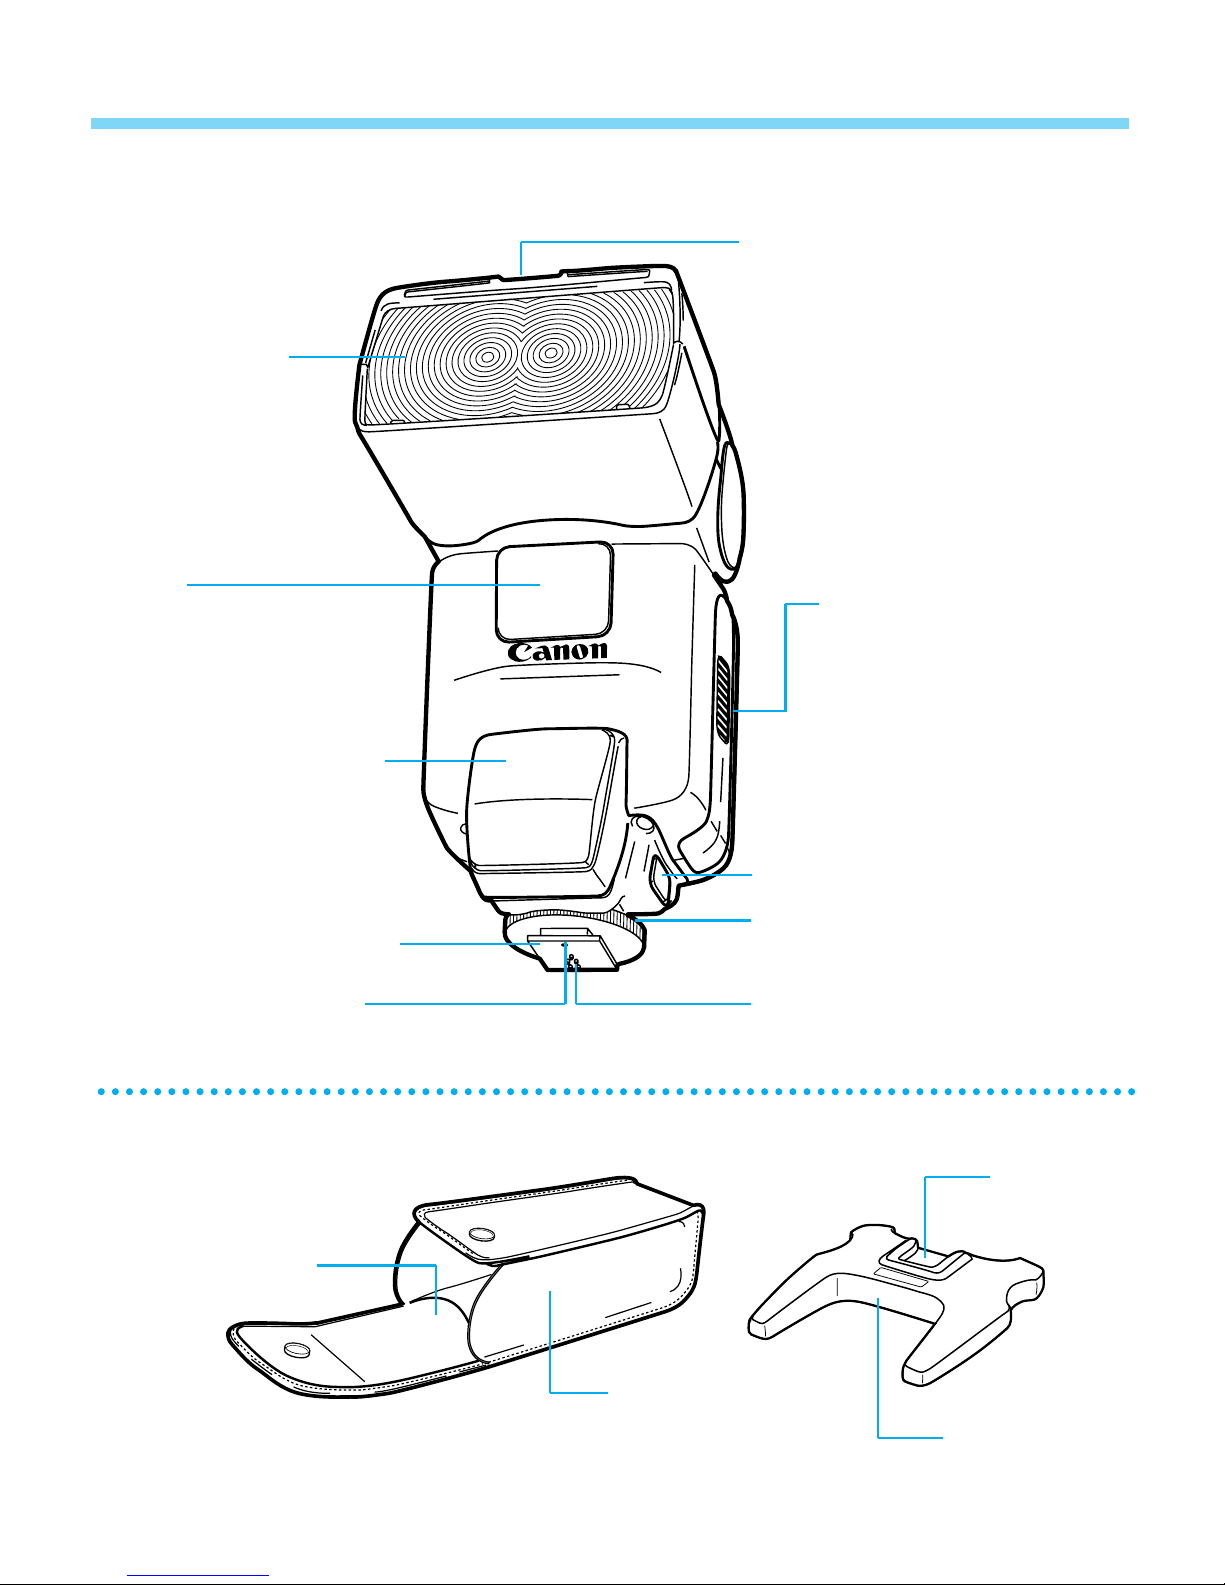
Nomenclature
● Front
Flash head and
transmitter
Built-in Wide Panel (retracted)
(page 20, 42)
Sensor
AF-assist beam emitter
(page 22)
Mounting foot (page 13)
Locking pin (page 13)
Battery compartment
cover (page 10)
*The battery
compartment has a
switch to display the
distance in feet or
meters on the LCD
panel.
External power source socket
Locking collar (page 13)
Electrical contacts
Mini stand pocket
6
Shoe
Case
Mini stand
● Rear
PUSH
PUSH
Nomenclature
< >Horizontal bounce release
button (page 40, 90)
When these two
buttons are pressed
simultaneously, the
setting changes in the
following loop:
(Off)
* < > Decrement
button
* < > Increment
button
* < > LCD panel
illumination button
(page 21)
Custom Function
setting button(page 112)
LCD panel
< > Vertical bounce
release button
(page 40, 90)
* < > Select/
Set button
< > Zoom
button (page 18)
< > Flash
mode and slave
setting button
(page 21, 74, 112)
< > Pilot
lamp/Test firing
button/Wireless slave
SE cancel button
(page 17, 59, 107)
Flash exposure confirmation
lamp (page 18)
Buttons marked with an asterisk remain active for 8 sec. after the button is released. LCD
panel illumination with the < > button remains on for 12 sec.
Main switch (page 16)
: Turns off the power.
: Turns on the power.
SE
: Turns on the power and
enables the SE mode.
Wireless selector (page 14)
< > : For operation as an on-
camera Speedlite.
< > : For operation as a
wireless master unit.
< > : For operation as a
wireless slave unit.
7
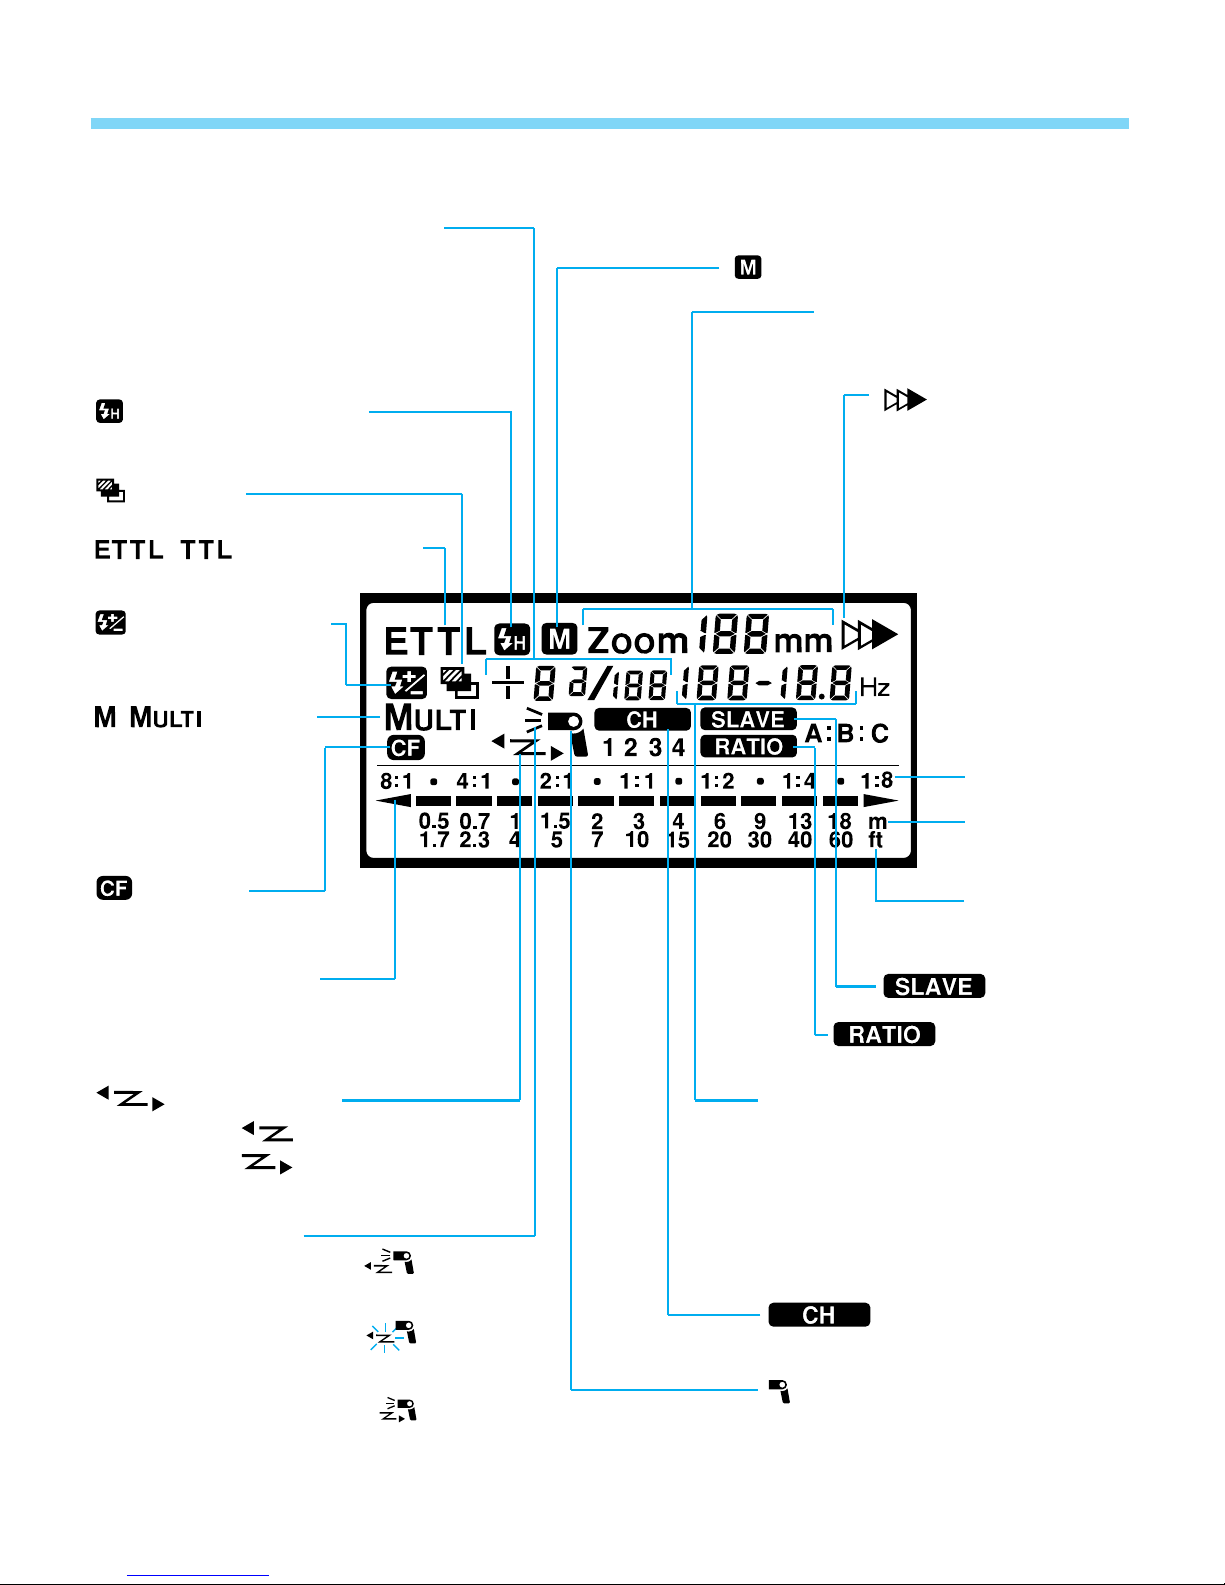
● LCD Panel
/
Manual flash output display
Flash exposure
compensation display
Flash exposure
bracketing (FEB) display
Nomenclature
Manual zoom icon
Zoom and focal length
coverage display
High-speed sync
(FP flash) icon
FEB icon
/ Autoflash icon
Flash exposure
compensation icon
Manual
flash icon Multi
(stroboscopic)
flash icon
Custom
Function icon
Flash range scale
Flash ratio scale
Second-curtain
flash sync icon
Flash ratio
Distance
unit (meters)
Distance
unit (feet)
Slave icon
Flash ratio icon
Wireless icon
Master :
Slave :
Flash mode icon
Master flash ON :
Master flash OFF :
Slave flash :
8
Aperture display
FEB status display
Stroboscopic flash count and
frequency display
Custom Function display
Channel icon
Flash mode icon
(Blinks when flash head is
tilted down 7°)

Before You Start
This chapter is for preparing the Speedlite 550EX for actual operation.
9
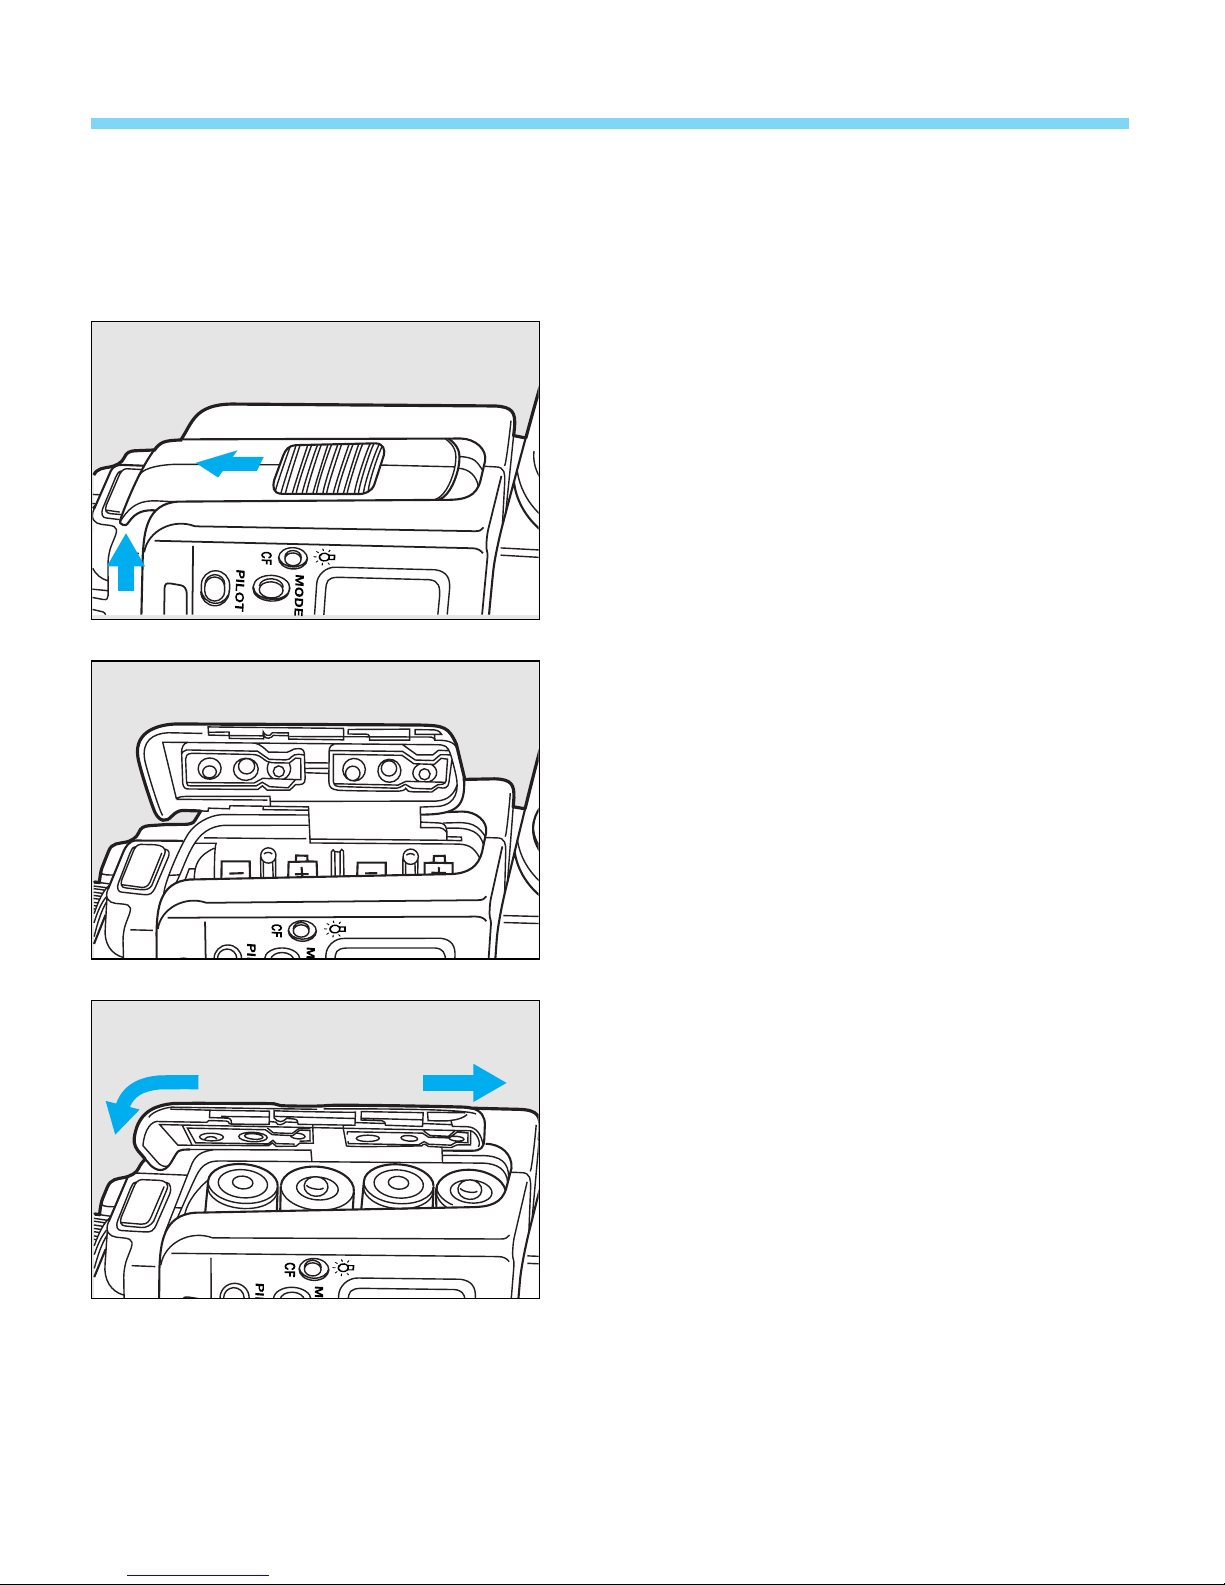
1. Installing Batteries
Speedlite 550EX requires one of the following two types of batteries:
(1) Size-AA alkaline batteries × 4
(2) Size-AA nickel-hydride batteries × 4
Slide the battery compartment cover
1
as shown by the arrow and flip it up.
1
2
1
2
Insert the batteries with the + and –
2
contacts oriented as shown in the
battery compartment.
Close the battery compartment cover
3
as shown in the figure.
10
Installing Batteries
•
Use four new batteries of the same type. When replacing batteries, replace
all four batteries at one time.
• Size-AA lithium batteries can also be used.
• Although non-alkaline, manganese batteries may also be used, the number
of flashes will be less.
• Remove the batteries when the 550EX will not be used for an extended
period.
• In low temperatures, take two sets of batteries and keep one set warm in a
pocket, etc., and use the batteries alternately.
•
To prevent faulty connections, make sure the battery contacts are clean. If
necessary, use a clean cloth to wipe the battery contacts.
• In the case of size-AA nickel-hydride and size-AA lithium batteries, the shape
of the contacts is not standardized. Be sure that the batteries are compatible
with the flash unit before buying.
Recharging Time and Available Flashes
Battery Type
Size-AA alkaline
batteries
• The minimum recycling time applies in the E-TTL or TTL mode while the maximum recycling time
applies in the manual or full-output (1/1) mode.
• The minimum flash count applies in the manual or full-output (1/1) mode while the maximum
flash count applies in the E-TTL or TTL mode.
• The above specifications are based on Canon’s testing standards.
• Using size-AA nickel-hydride batteries will yield only about 70 to 80 percent of the flashes (1550
mAh at full output) obtainable with size-AA alkaline batteries. The recycling time will also be
about half the time with size-AA alkaline batteries.
Quick Flash Normal Flash
Approx. 0.1 - 4 sec. Approx. 0.1 - 8 sec. Approx. 100 to 700
Recharging Time
Available Flashes
11
2. External Power Sources
Speedlite 550EX can use any of the following two external power sources.
For details, refer to the Instructions of the respective external power source.
(1) Transistor Pack E
Uses Canon Battery Magazine TP (six size-C alkaline batteries) or Ni-Cd
Pack TP.
(2) Compact Battery Pack CP-E2
Uses six size-AA alkaline or nickel-hydride batteries.
Size-AA lithium batteries can also be used.
Recharging Time and Available Flashes
Internal
Power
Sources
External
Power
Sources
Power Source
Size-AA alkaline batteries × 4 Approx. 0.1 - 4 Approx. 0.1 - 8 Approx. 100 - 700
Transistor Pack E (Ni-Cd Pack TP) Approx. 0.1 - 1.5 Approx. 0.1 - 3
Transistor Pack E
(Size-C alkaline batteries)
Compact Battery Pack CP-E2
(Size-AA alkaline batteries)
• While High-Voltage Pack E315’s main switch is still on, do not clean the connector
plug with water or a metal pin and do not touch the plug.
• Even when an external power source is used, batteries must be installed in the 550EX
to power the internal circuitry.
• The 550EX uses both the internal and external power sources to recharge the flash.
Therefore, the internal power source may become exhausted sooner than the external
power source. For prolonged flash photography, keep a spare set of batteries handy
for the internal power source.
Recharging Time (sec.)
Quick Flash Normal Flash
Approx. 0.1 - 2 Approx. 0.1 - 5
Approx. 0.1 - 1.5 Approx. 0.1 - 5
Available Flashes
Approx. 300 - 1800
Approx. 350 - 2200
Approx. 350 - 2200
12
3. Attaching the Speedlite to the Camera
Loosen the locking collar by turning it
1
as shown by the arrow.
Slip the Speedlite’s mounting foot
2
into the camera’s hot shoe until it
stops.
Turn the locking collar as shown by
3
the arrow and tighten. (The mounting
foot’s locking pin will extend into the
hot shoe.)
• To detach the Speedlite, turn the locking
collar in the opposite direction until it stops.
(The locking pin retracts into the mounting
foot.)
Although the hot shoe on the EOS 650, EOS 620, EOS 750, and EOS 850 does not have
a locking pin hole, Speedlite 550EX can still be mounted on these cameras.
13

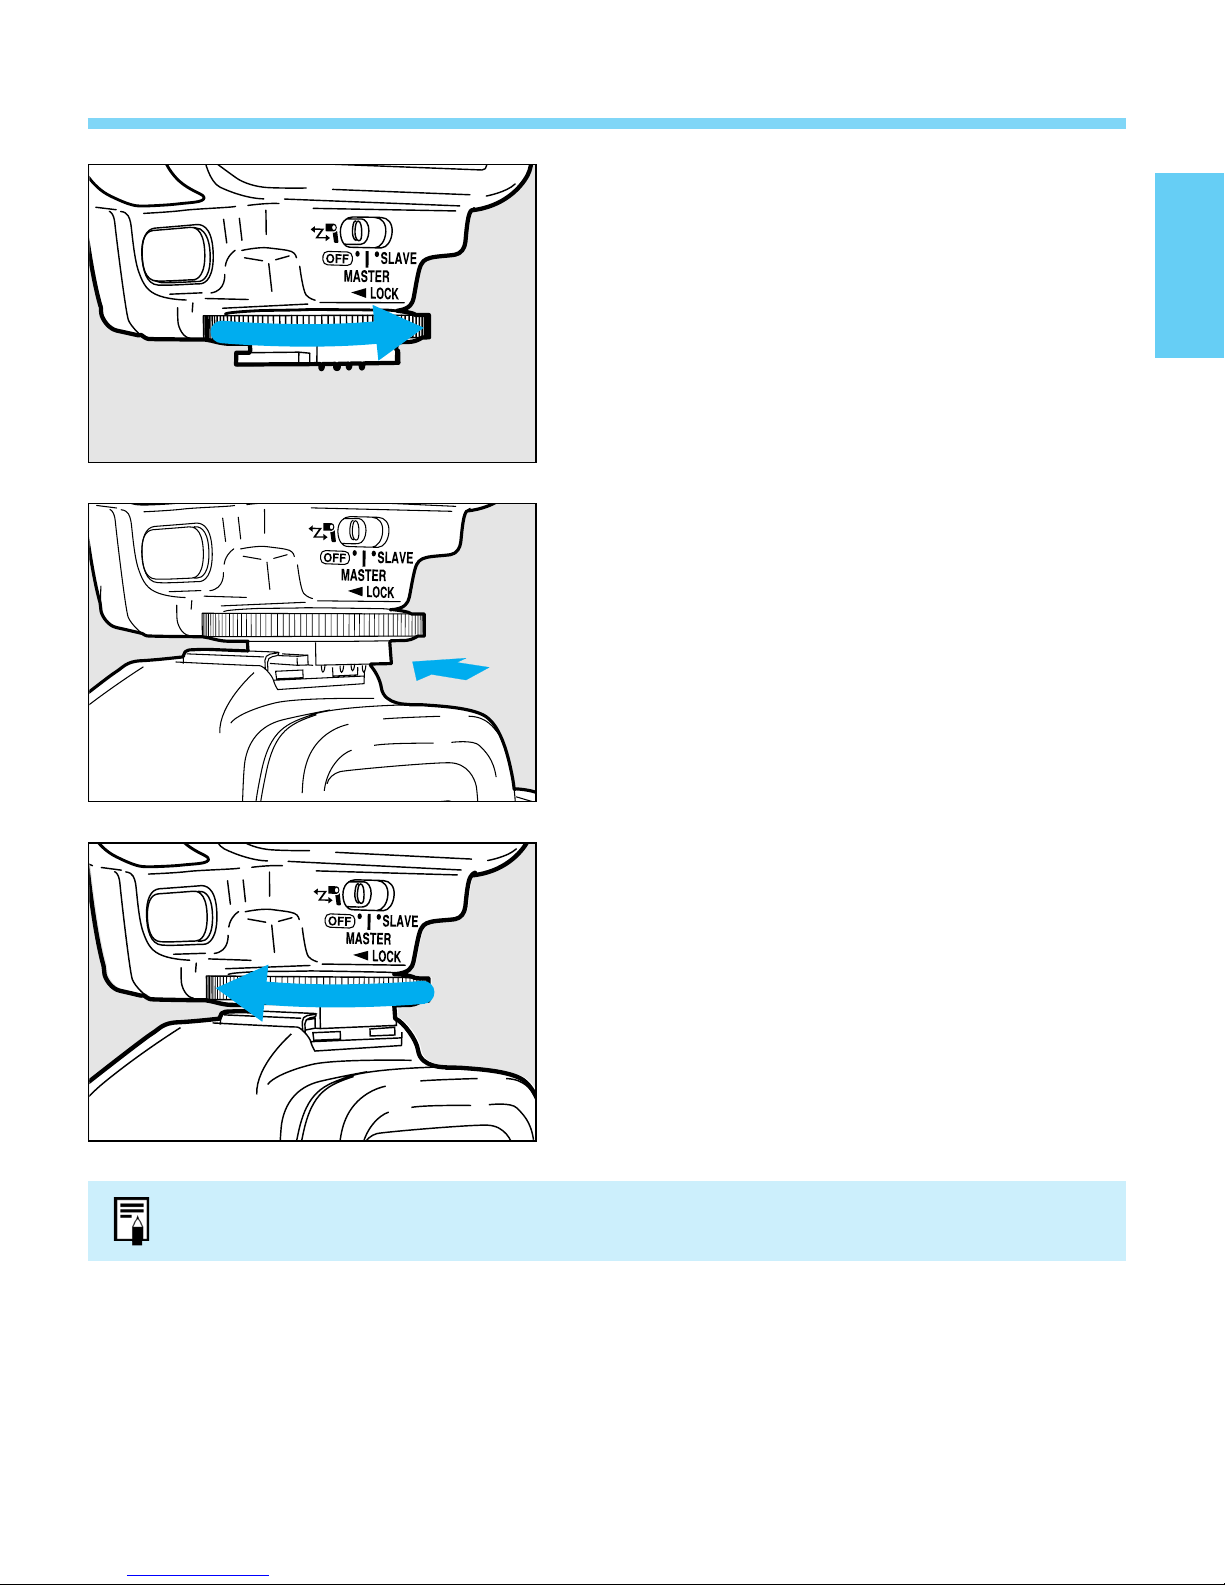
4. Wireless Selector
The wireless selector has three settings as shown below.
Set to OFF to use the 550EX as a
normal, on-camera Speedlite.
Set to MASTER to use the 550EX as the
master unit in a wireless, multi-Speedlite
system.
Set to SLAVE to use the 550EX as a
slave unit in a wireless, multi-Speedlite
system.
14

Wireless Selector
If the 550EX is to be used as a normal, on-camera Speedlite but the wireless selector
has been set to or , the following applies:
: If master flash ON has also been set, it will be the same as using the
Speedlite at the wireless selector’s OFF setting. If master flash OFF has
been set, a picture cannot be taken.
: It will be the same as using the Speedlite at the wireless selector’s OFF
setting. However, when the camera’s exposure meter turns off 6 sec. after
the shutter button is pressed, the 550EX will be a slave unit.
• If the wireless selector is set to and master flash OFF has been set, the
flash will not fire. (see page 57)
• When the wireless selector is set to or , the flash coverage is set
automatically to . The Guide No. decreases as a result.
15
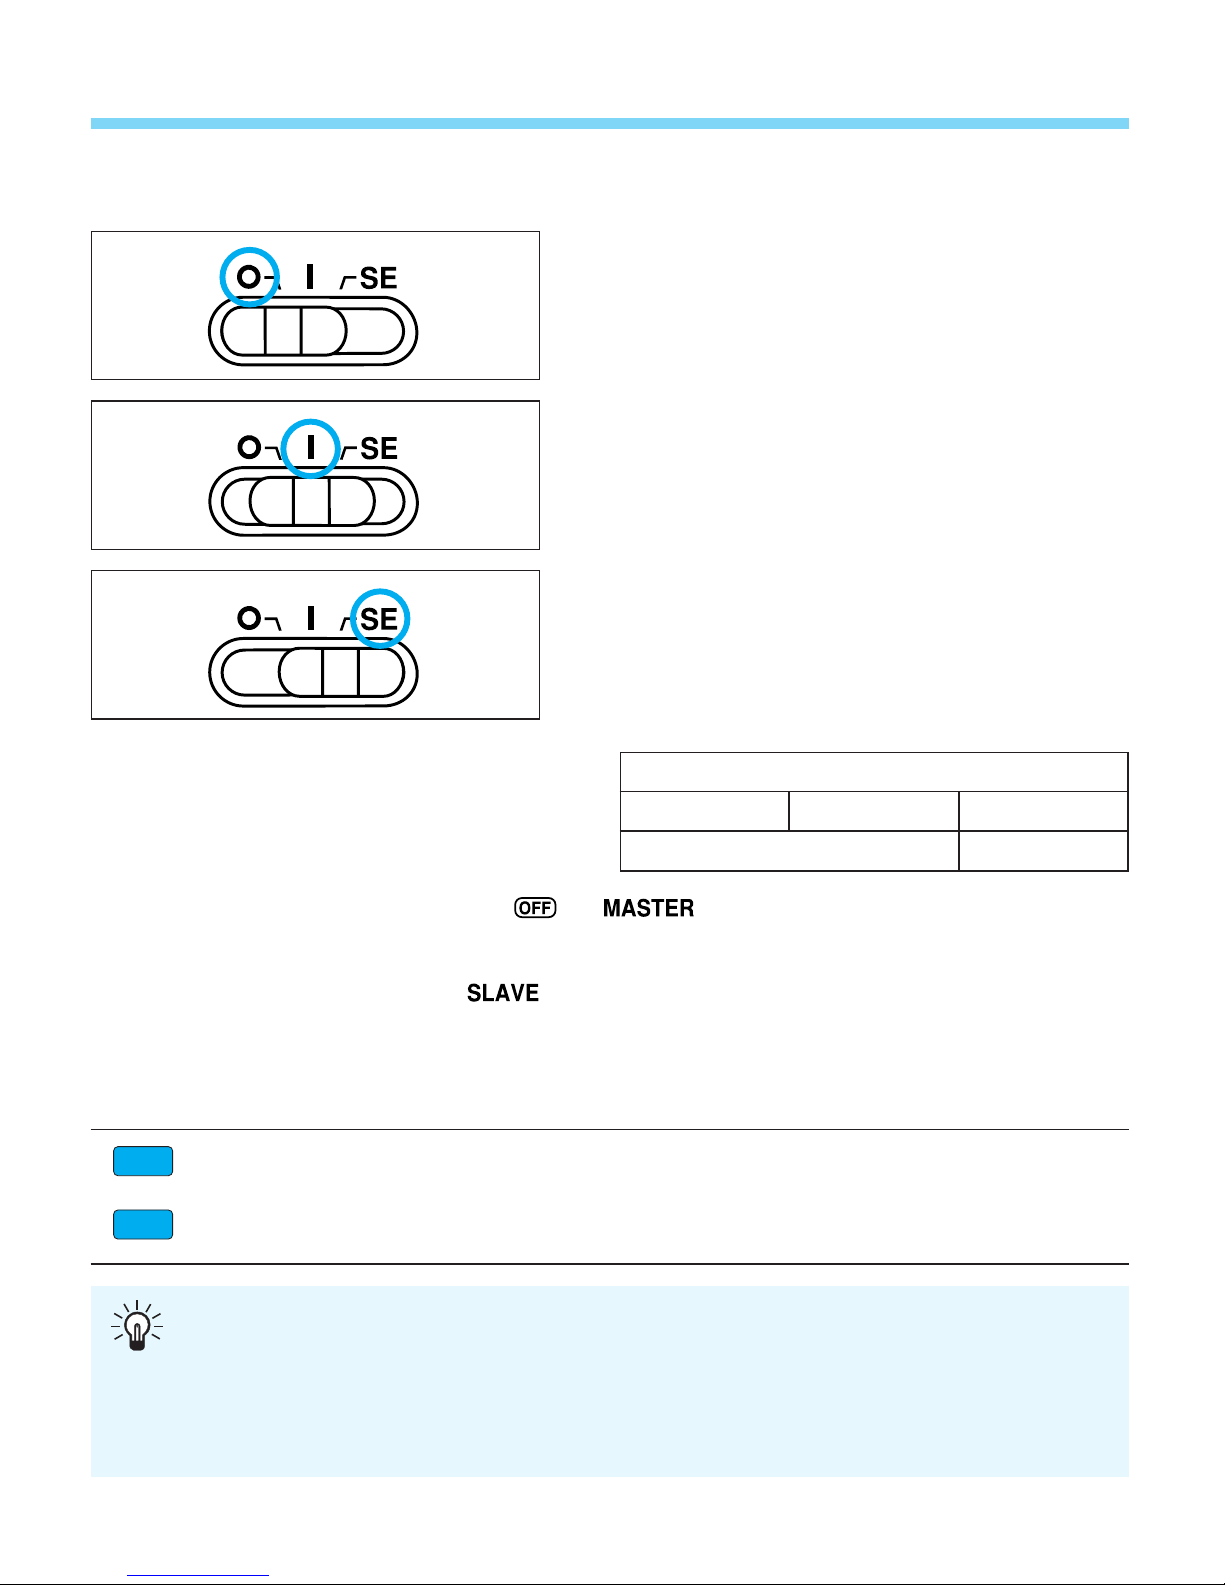
5. Main Switch
CF
CF
The main switch has three settings as shown below.
Turns off the power.
Turns on the power.
Turns on the power and enables the SE
mode.
• The SE (Save Energy) mode turns off the
Speedlite automatically after a period of non-use
as indicated in the following table.
Wireless Selector Setting
OFF MASTER SLAVE
90 sec. 60 min.
• When the wireless selector is set to or and the SE mode takes effect, the LCD
panel display turns off. To cancel the SE mode, either press the camera’s shutter button halfway
or press the Speedlite’s test firing button. The Speedlite will then turn on again.
SE
• If the wireless selector is set to and the SE mode takes effect,
LCD panel. If the time limit (1 hour or 8 hours) for turning on the Speedlite again (SE mode
SE
cancellation) elapses,
main switch off and on again to turn it on again.
Custom Function CF-4 can alter the time it takes before the slave unit enters the SE
mode. See page 113.
Custom Function CF-5 can alter the time limit for the master unit to be able to cancel
the slave unit’s SE mode. See page 113.
turns off on the LCD panel. In this case, you must turn the Speedlite’s
is displayed on the
Memory feature
The Speedlite’s current mode, zoom setting, flash exposure compensation setting, etc.,
are retained in memory even after the Speedlite is turned off. When the Speedlite is
turned on again, all the settings remain effective. When replacing the batteries, the
settings stored in memory can still be retained if the new batteries are installed within one
minute.
16
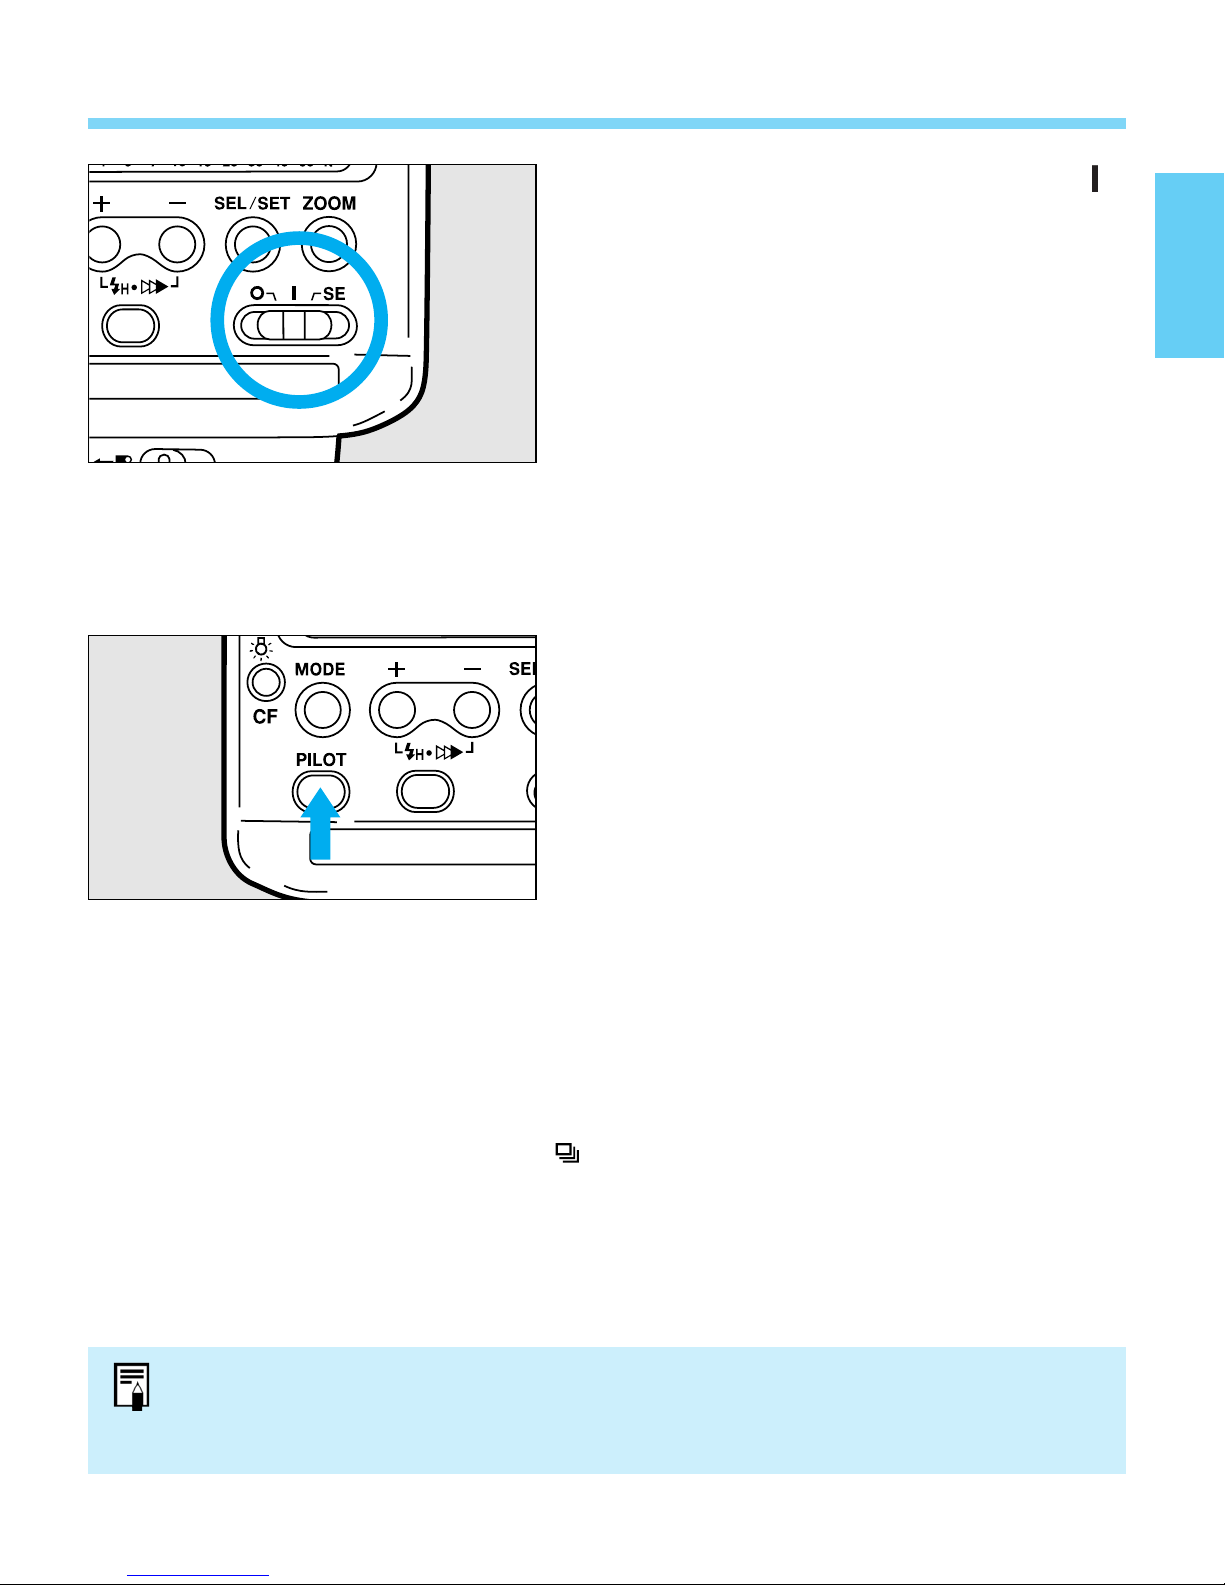
6. Pilot Lamp and Test Firing
Set the Speedlite’s main switch to .
1
• The flash will start charging. When the flash
is ready, the pilot lamp lights.
● Red pilot lamp
When the flash is fully charged, the pilot
lamp lights in red. For normal use, confirm
that the pilot lamp is red before taking the
picture.
● Yellow pilot lamp
When the camera is set for single shooting, a
yellow pilot lamp indicates a less-than-full
charge which enables a quick flash (see
description below). For close subjects which
do not require full-output flash, quick flash
shortens the recharging time.
To test the Speedlite, press the pilot
2
lamp (test firing button) to fire a test
flash.
● About Quick Flash
With the quick-flash feature, you can fire a flash even before the flash is fully charged. When the
pilot lamp is yellow, a quick flash can be fired. The Guide No. for a quick flash is 1/2 to 1/16 that of a
normal flash. For details, see page 121.
Quick flash cannot be fired in the following cases:
• When the Speedlite is used with a Type-B camera.
• The camera is set to continuous shooting .
• FEB is used.
• In the manual flash mode or stroboscopic flash mode with the output set to 1/1 and 1/2.
• In the stroboscopic flash mode.
• When TTL Hot Shoe Adapter 3 is used with the Speedlite.
• When Custom Function CF-3 is set to 1 (TTL autoflash).
• The Speedlite cannot be test fired during the 6 sec. after you press the camera’s
shutter button halfway (while exposure metering is active).
• If the Speedlite is in the SE mode, pressing the test firing button turns on the
Speedlite.
17
7. Flash Exposure Confirmation
When a correct flash exposure has been
obtained, the flash exposure
confirmation lamp on the back of the
Speedlite lights in yellow-green for 3 sec.
If the flash exposure confirmation lamp
does not light after the flash fires, the
picture may have been underexposed.
Move closer to the subject and try again.
8. Using the Zoom Button and Wide Panel
The Speedlite’s flash head zooms
automatically to provide adequate flash
coverage for the current lens focal
length. The Speedlite can provide
adequate flash coverage for 24mm to
105mm lens focal lengths. If a zoom lens
is zoomed, the flash head also zooms to
suit the lens focal length. The flash
head’s zoom setting can also be set
manually.
The Speedlite’s built-in wide panel
provides flash coverage for 17mm wideangle lenses.
18
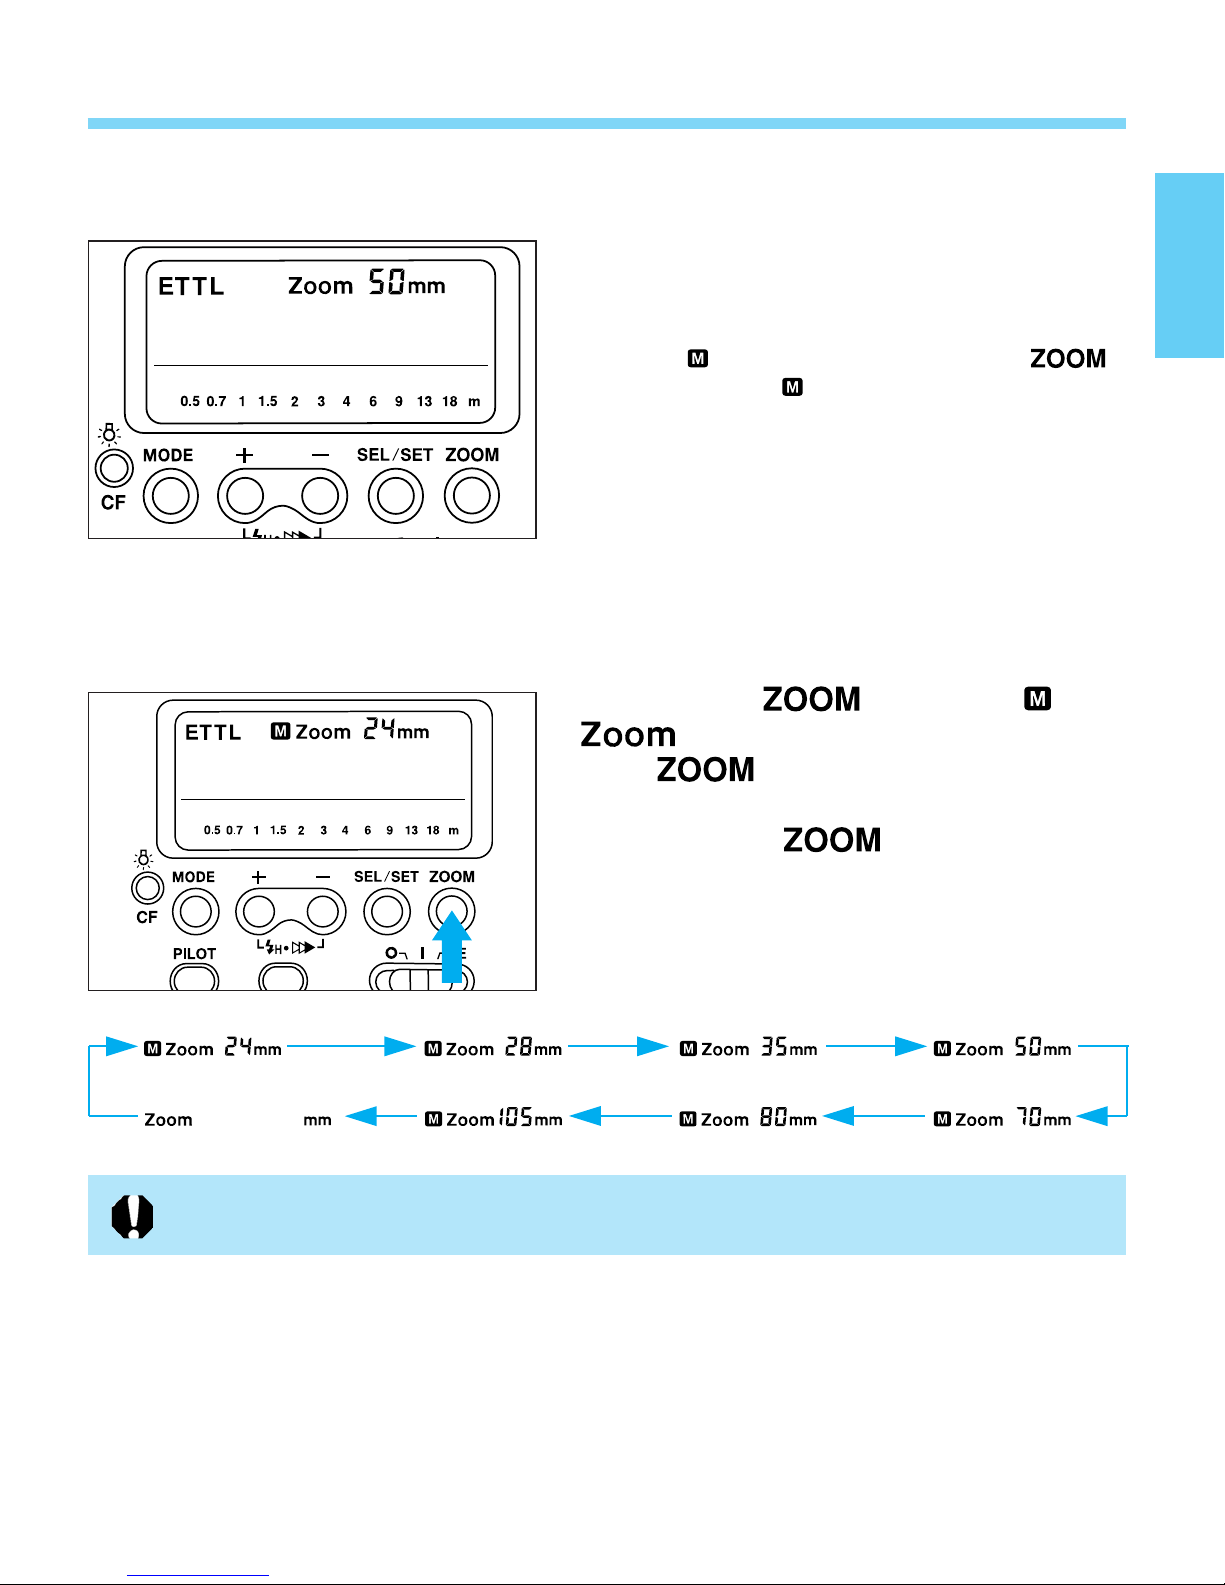
Using the Zoom Button and Wide Panel
● Automatic Flash Head Zooming
Turn on the camera.
1
Turn on the Speedlite.
2
• If is displayed, press the < >
button until turns off.
Press the camera’s shutter button
3
halfway. The current lens focal length
will appear on the Speedlite’s LCD
panel.
● Manual Flash Head Zooming
Press the < > button. and
will be displayed. Keep pressing
the < > button until the desired
zoom setting (focal length) appears.
Pressing the < > button changes
the zoom setting in the loop shown
below.
(Automatic )
If the zoom setting is a focal length longer than the actual lens focal length, the light will
fall off along the periphery of the picture.
19
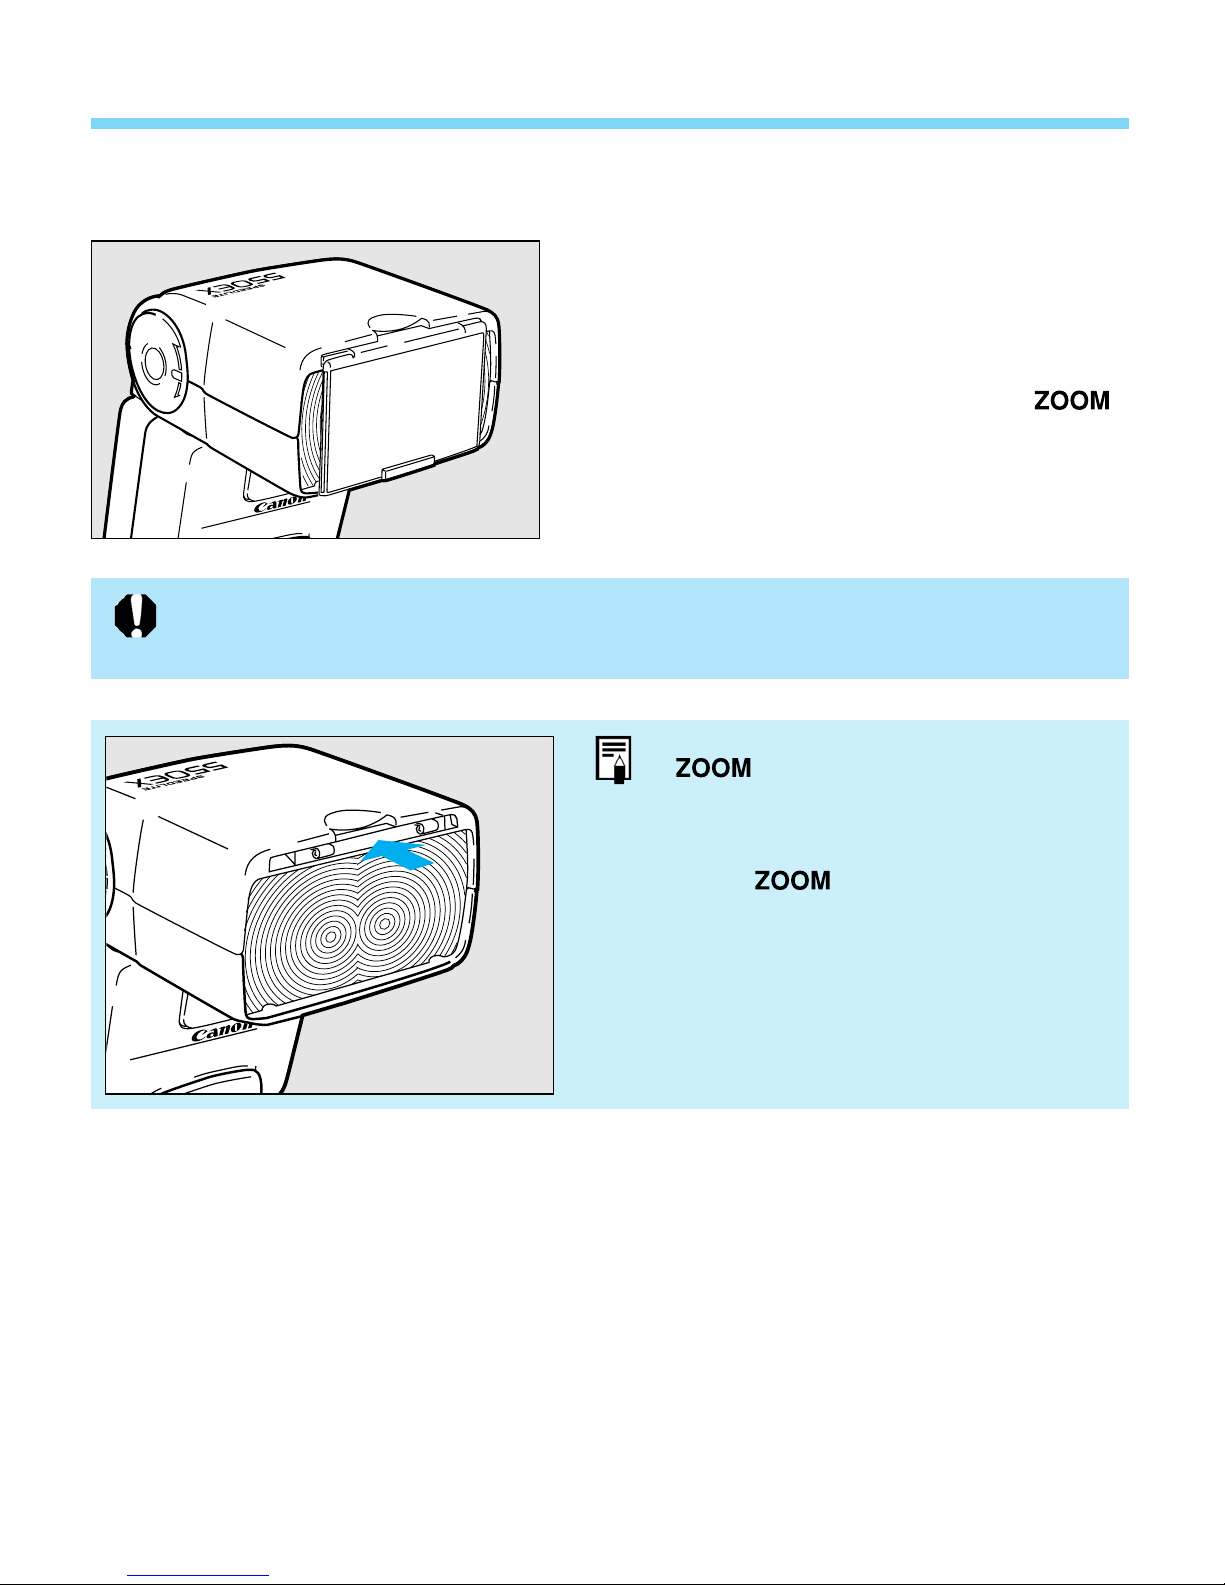
Using the Zoom Button and Wide Panel
PUSH
● Using the Wide Panel
Pull out the built-in wide panel and flip it
down to cover the flash head. The flash
head’s zoom setting will be set to 17mm
automatically.
• Using the wide panel disables the < >
button.
• Use the wide panel with flash head at the normal
or 7° downward tilt position.
• If the built-in wide panel is used and the flash head is turned or tilted for bounce flash,
the flash result may look uneven. The LCD panel display will blink as a warning.
• Do not pull out the wide panel too hard. Otherwise, the wide panel may come off.
If the wide panel comes off, the
< > button will not work. If this
happens, follow the procedure below.
• Use your finger to push in the panel as
shown by the arrow.
• The < > button will work again,
but the entire LCD panel display will
keep blinking. Take the Speedlite to the
nearest Canon Service Center for
repair.
20
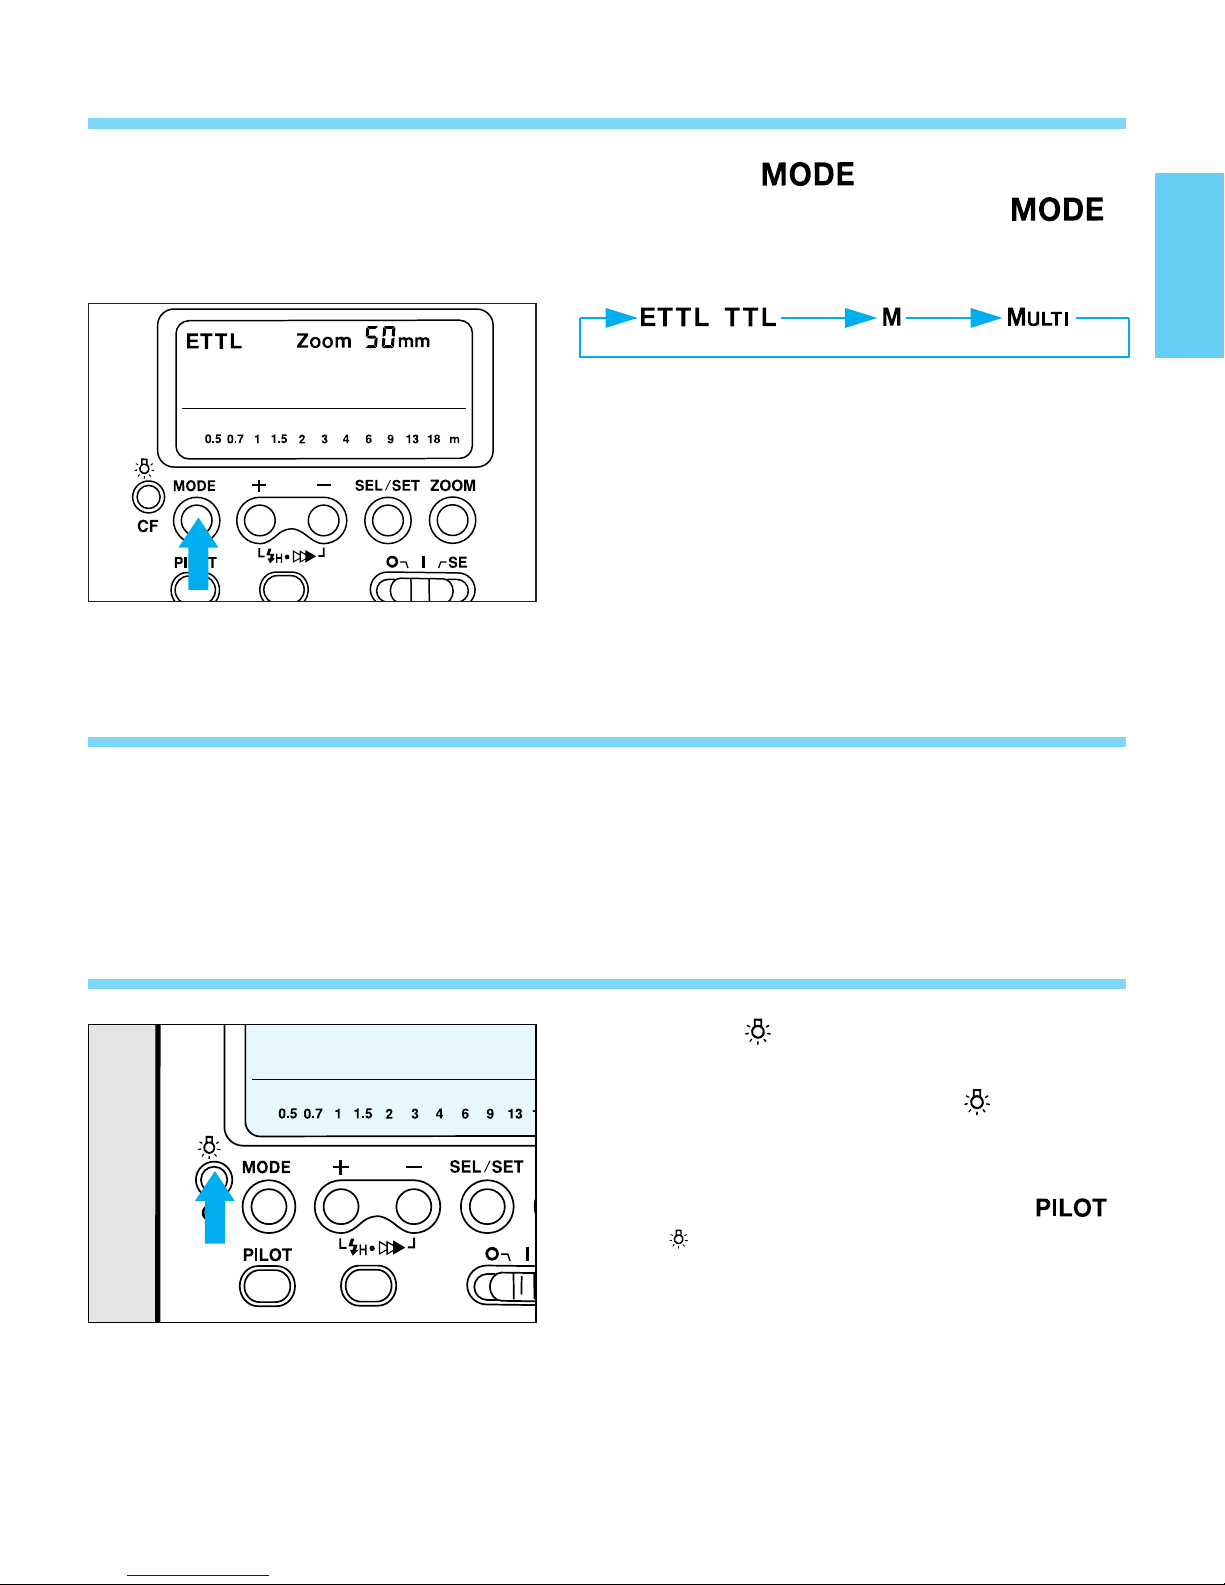
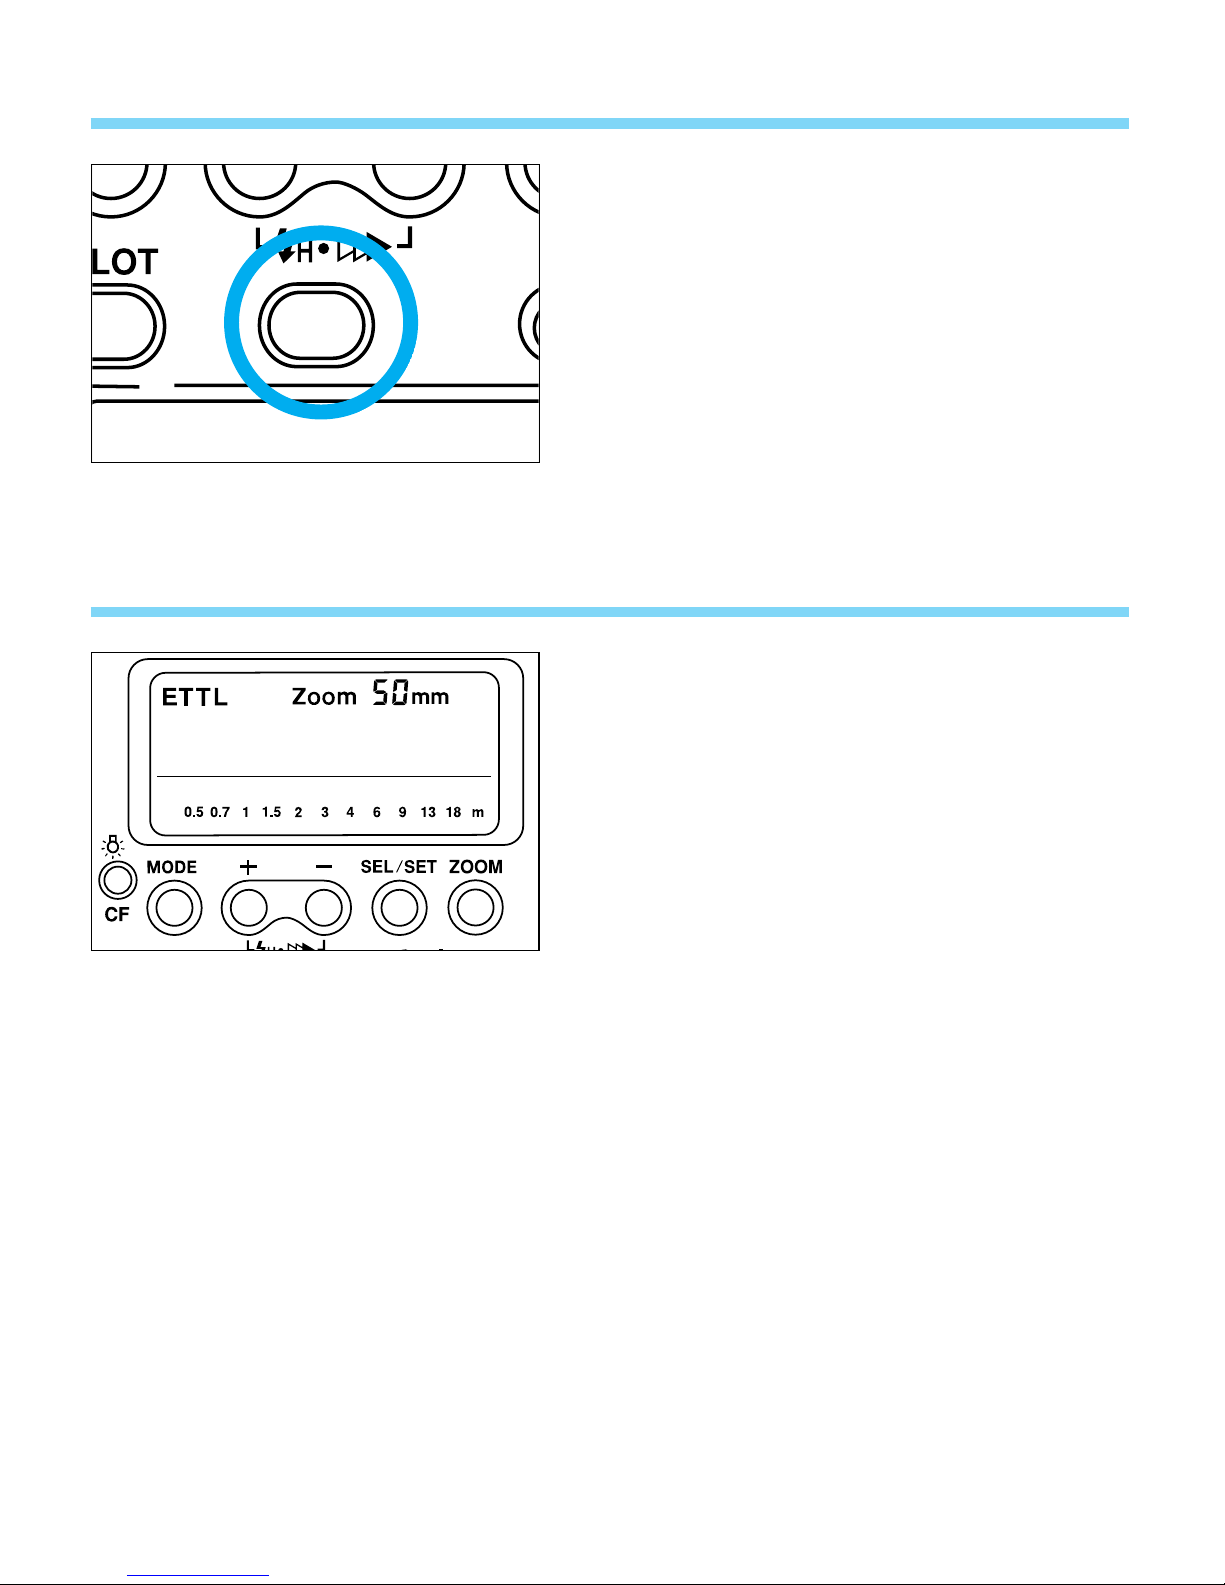
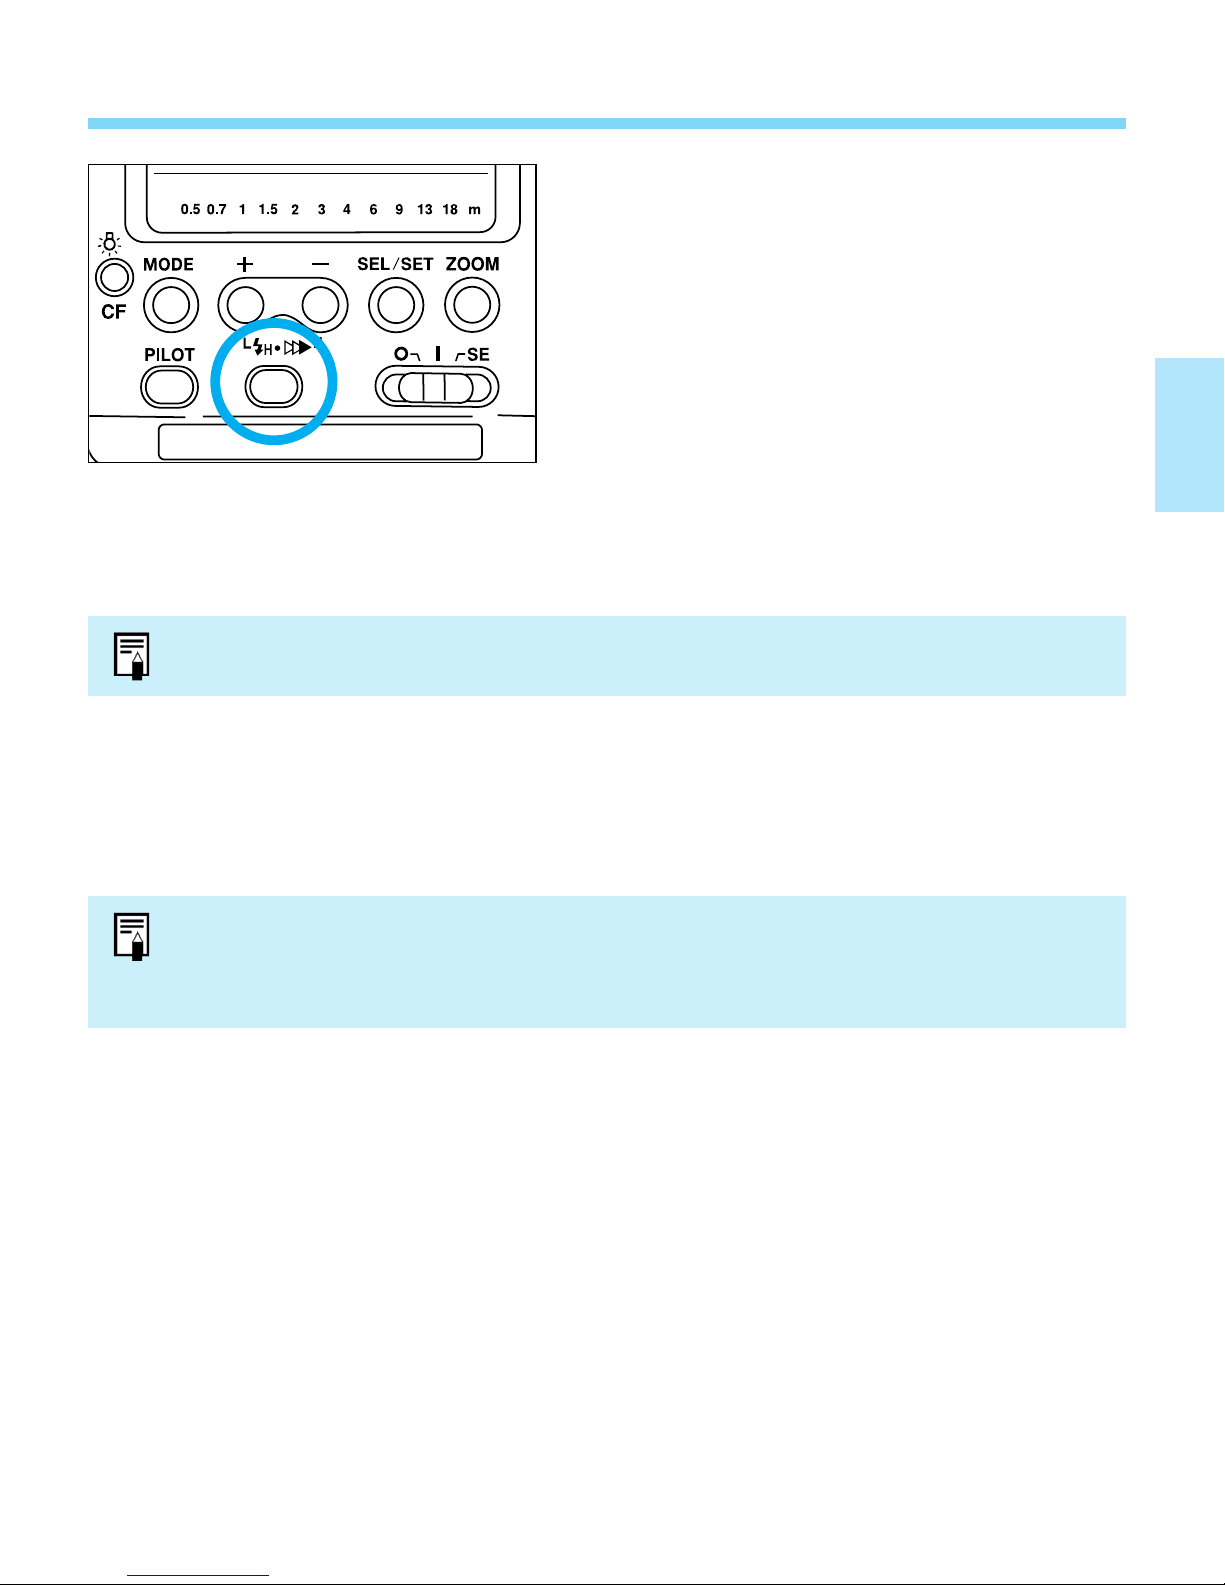
9. Flash Mode
The following flash modes can be set with the < > button: E-TTL (or
TTL) autoflash, manual flash, and stroboscopic flash. Pressing the < >
button changes the flash mode in the following loop:
/
10. Setting the Film Speed
The film speed is set automatically according to the film speed set with the
camera.
11. LCD Panel Illumination
Press the < > button to illuminate the
LCD panel for 12 sec. To turn off the
illumination, press the < > button
again.
• The illumination stays on longer than 12 sec. if
you press any button other than the < >
and < > buttons.
21

12. AF-Assist Beam
Position Effective Range
Center Approx. 0.6 - 10 m / 2 - 33 ft.
Periphery Approx. 0.6 - 5 m / 2 - 16.4 ft.
In low-light or low-contrast situations, the
Speedlite emits the AF-assist beam
automatically to assist autofocusing. The
AF-assist beam is compatible with the
AF of all EOS cameras. The AF-assist
beam is effective with 28mm and longer
lenses. Its effective range in darkness is
indicated in the table below. See page
123 for details on when the AF-assist
beam is emitted.
Automatic Reversion to Default Settings
When Speedlite 550EX is attached to an
EOS camera equipped with a < >
button, pressing the < > button
resets the Speedlite’s settings (except
the Custom Functions) to its default
settings
E-TTL autoflash*
As a Normal
Speedlite
As a
Wireless
Master
Unit
(All related settings are canceled.)
Auto zoom
E-TTL autoflash*
(All related settings are canceled.)
Master flash ON
No flash ratio setting
22
* With the EOS-1N and EOS-1, TTL autoflash takes
effect.
For Type-A Cameras
Basic Flash Photography
When the Speedlite 550EX is attached to a Type-A camera such as the EOS3, you can take flash pictures with E-TTL autoflash as easily as normal
autoexposure (AE) pictures.
As with evaluative metering, the E-TTL autoflash system uses a multi-zone
sensor. A preflash is fired for evaluative flash metering and the reading is
stored in memory. Since E-TTL autoflash is linked to the active focusing point,
the flash exposure is highly accurate. The result is a natural-looking flash
picture with excellent balance between the flash light and ambient light.
• This section assumes that the Speedlite 550EX is used with a Type-A camera.
• Before proceeding, first turn on the EOS-3 and the 550EX.
• Set the 550EX’s wireless selector to OFF.
• For EOS-3 operations, refer to the EOS-3 Instructions.
23
1. Using Flash in Full Auto Mode
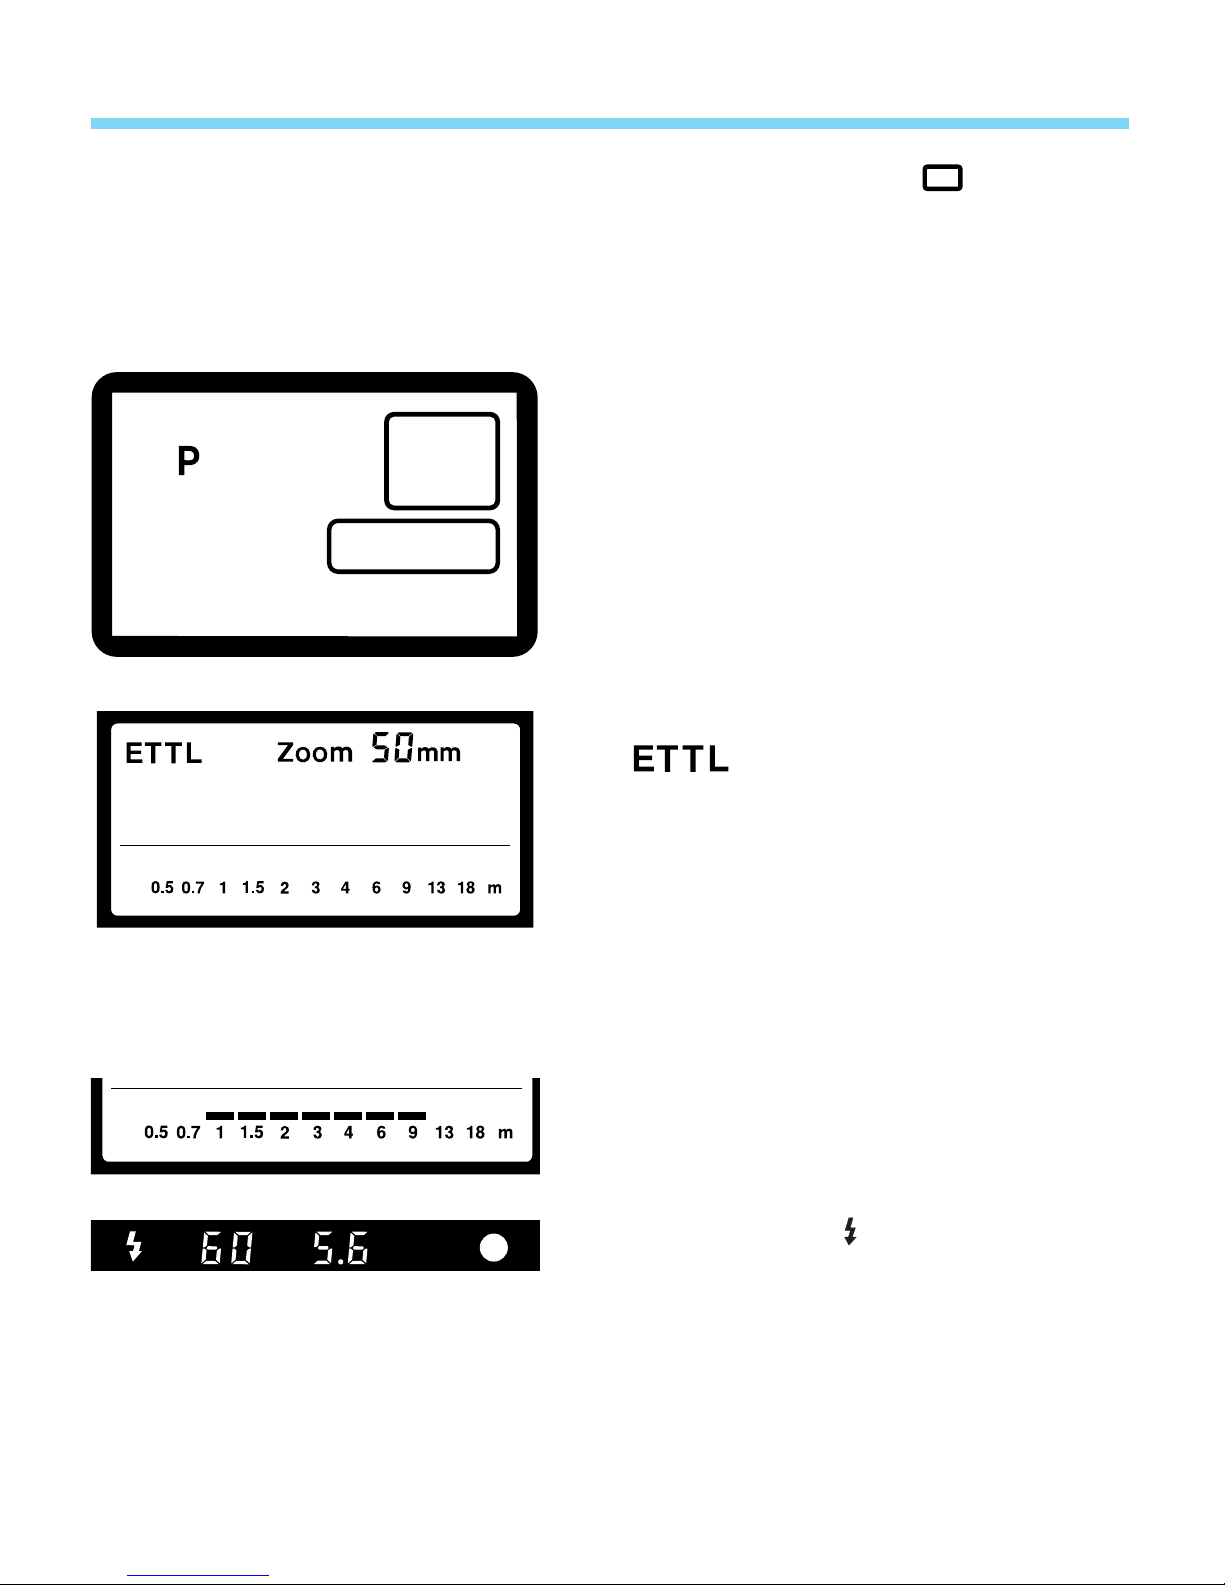
Set the camera’s picture-taking mode to P(Program AE) or (Full Auto).
Flash photography will then be as easy as normal AE photography. The
camera sets the aperture and shutter speed automatically to suit a wide
variety of lighting conditions including outdoor fill flash. The E-TTL autoflash
system sets the flash exposure automatically.
Set the camera’s picture-taking mode
1
to
P
.
Set the 550EX’s flash mode to
2
Focus the subject.
.
3
• The shutter speed and aperture will be
displayed in the viewfinder.
• The shutter speed will be set automatically at
1/60 sec. or faster (up to the top sync
speed). The aperture is also set at the same
time.
Check that the subject is within the
4
flash range displayed on the 550EX’s
LCD panel.
Check that the icon is displayed in
5
the viewfinder, then take the picture.
24
• A preflash is fired immediately before shutter
release and the main flash. The subject’s
meter reading is obtained with the preflash
and used to set the output of the main flash.
An optimum flash exposure is thereby
obtained.
Using Flash in Full Auto Mode
After the flash fires, check that the
6
flash exposure confirmation lamp
lights.
When a correct flash exposure has
been obtained, the flash exposure
confirmation lamp lights for about 3
sec. If the lamp does not light, the
flash may have been insufficient,
resulting in underexposure. In such a
case, check that the pilot lamp is red,
then move closer to the subject and
take the picture again.
• The preflash is fired to obtain an evaluative flash meter reading.
• The main flash illuminates the subject for the actual picture.
● Fill Flash
Fill flash can be used outdoors in daylight to supplement existing light. It can
soften shadow areas of the subject or illuminate a backlit subject.
When fill flash is used, the flash exposure level is reduced automatically so that the
subject’s illumination by the flash balances well with the background’s ambient light.
Instead of having a properly-exposed subject and an underexposed background, both
the subject and background are exposed correctly for a natural-looking flash picture.
25
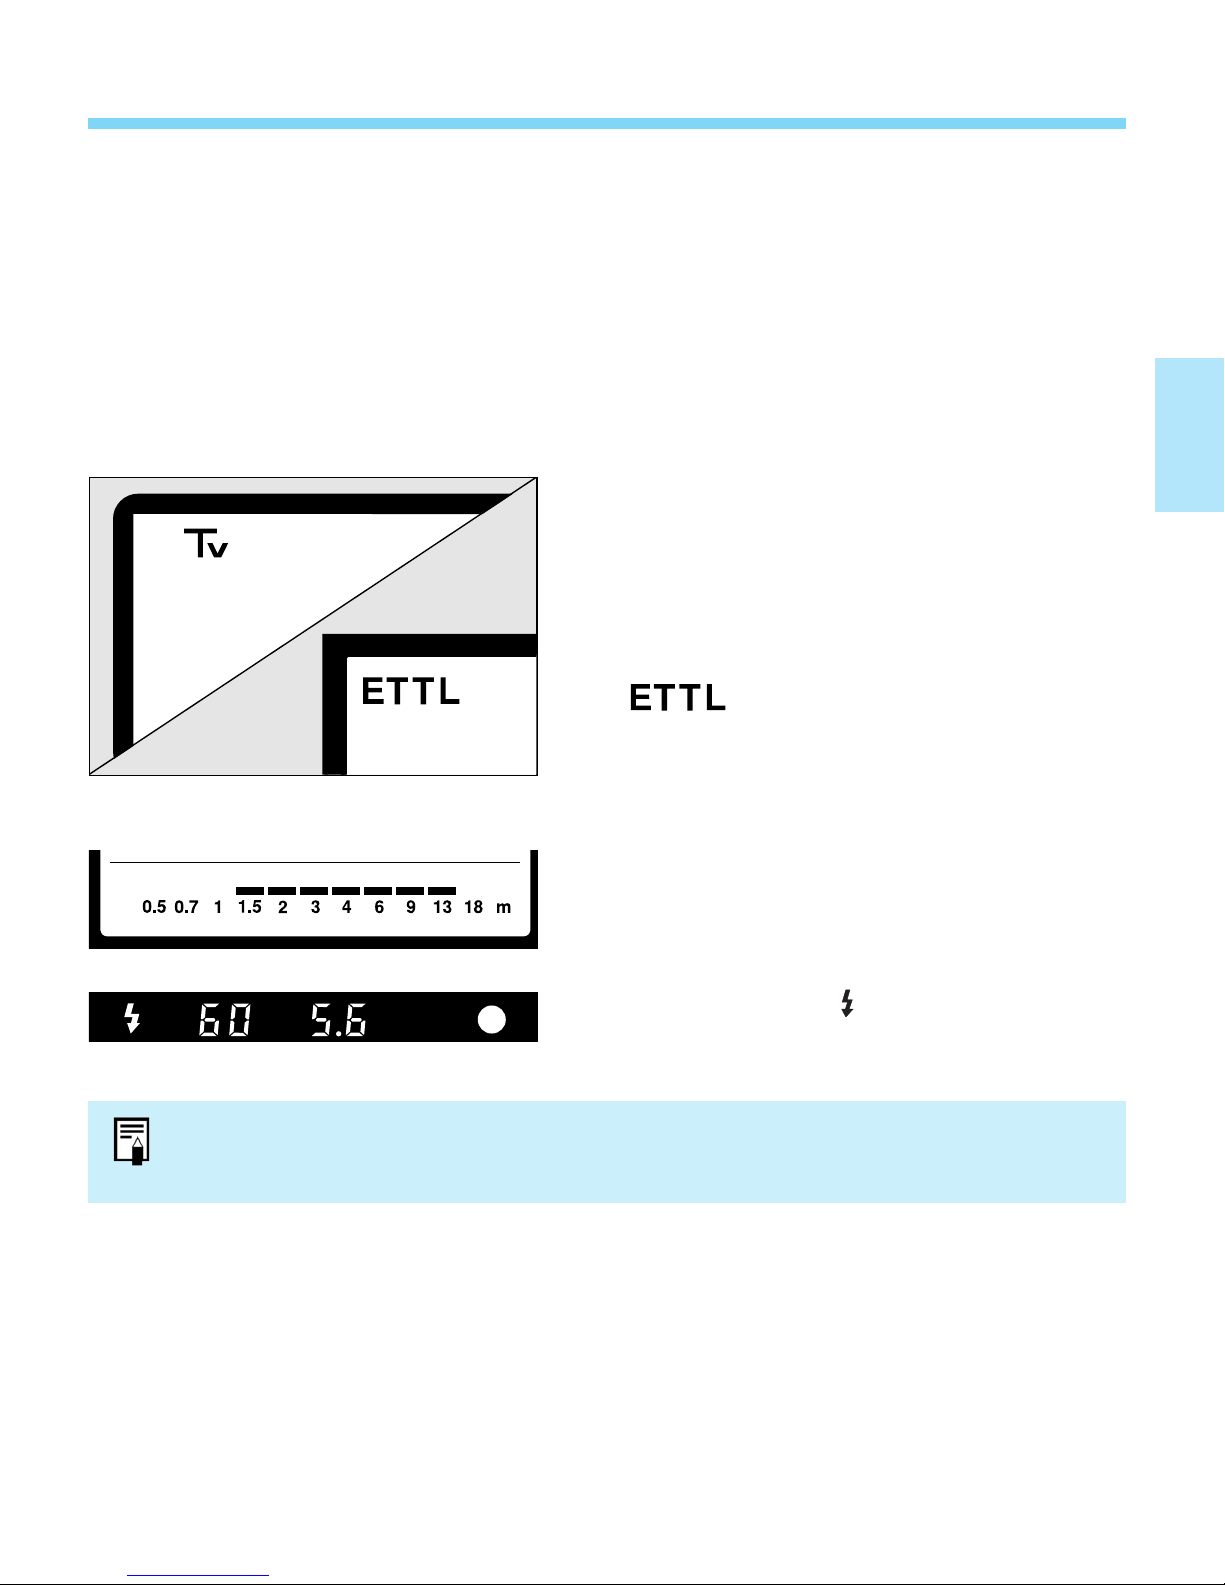
2. Using Flash in Other Camera Modes
Flash photography is also automatic in the other picture-taking modes. In the
Av
(aperture-priority AE), Tv(shutter speed-priority AE), and Mmodes, the
E-TTL autoflash system sets the flash exposure automatically. The camera
sets the necessary shutter speed (in the Av mode), aperture (in the Tv mode),
or flash output (in the M mode). Flash photography is as easy as normal AE
picture-taking.
Shutter Speed and Aperture Settings for Picture-Taking Modes
Camera Mode Shutter Speed Flash Aperture
Av
Tv
M
• Manually set: You set it yourself.
• Automatically set: Set automatically by the camera.
• 1/X sec.: Maximum sync speed. (see page 124)
• When the shutter button is pressed completely, a preflash fires to obtain an evaluative flash
meter reading for setting the optimum output of the main flash.
• The background’s exposure is set with the shutter speed and aperture combination.
• If the camera is set to the mode (Full Auto), the shutter speed and aperture will be
set in the same way as in the
• If the
using the
DEP
P
Automatically set (30 sec. - 1/X sec.) Manually set
Manually set (30 sec. - 1/X sec.) Automatically set
Manually set (bulb, 30 sec. - 1/X sec.) Manually set
P
mode (Program AE).
mode (depth-of-field AE) is used with the 550EX, it will be the same as
mode (Program AE).
26
Using Flash in Other Camera Modes
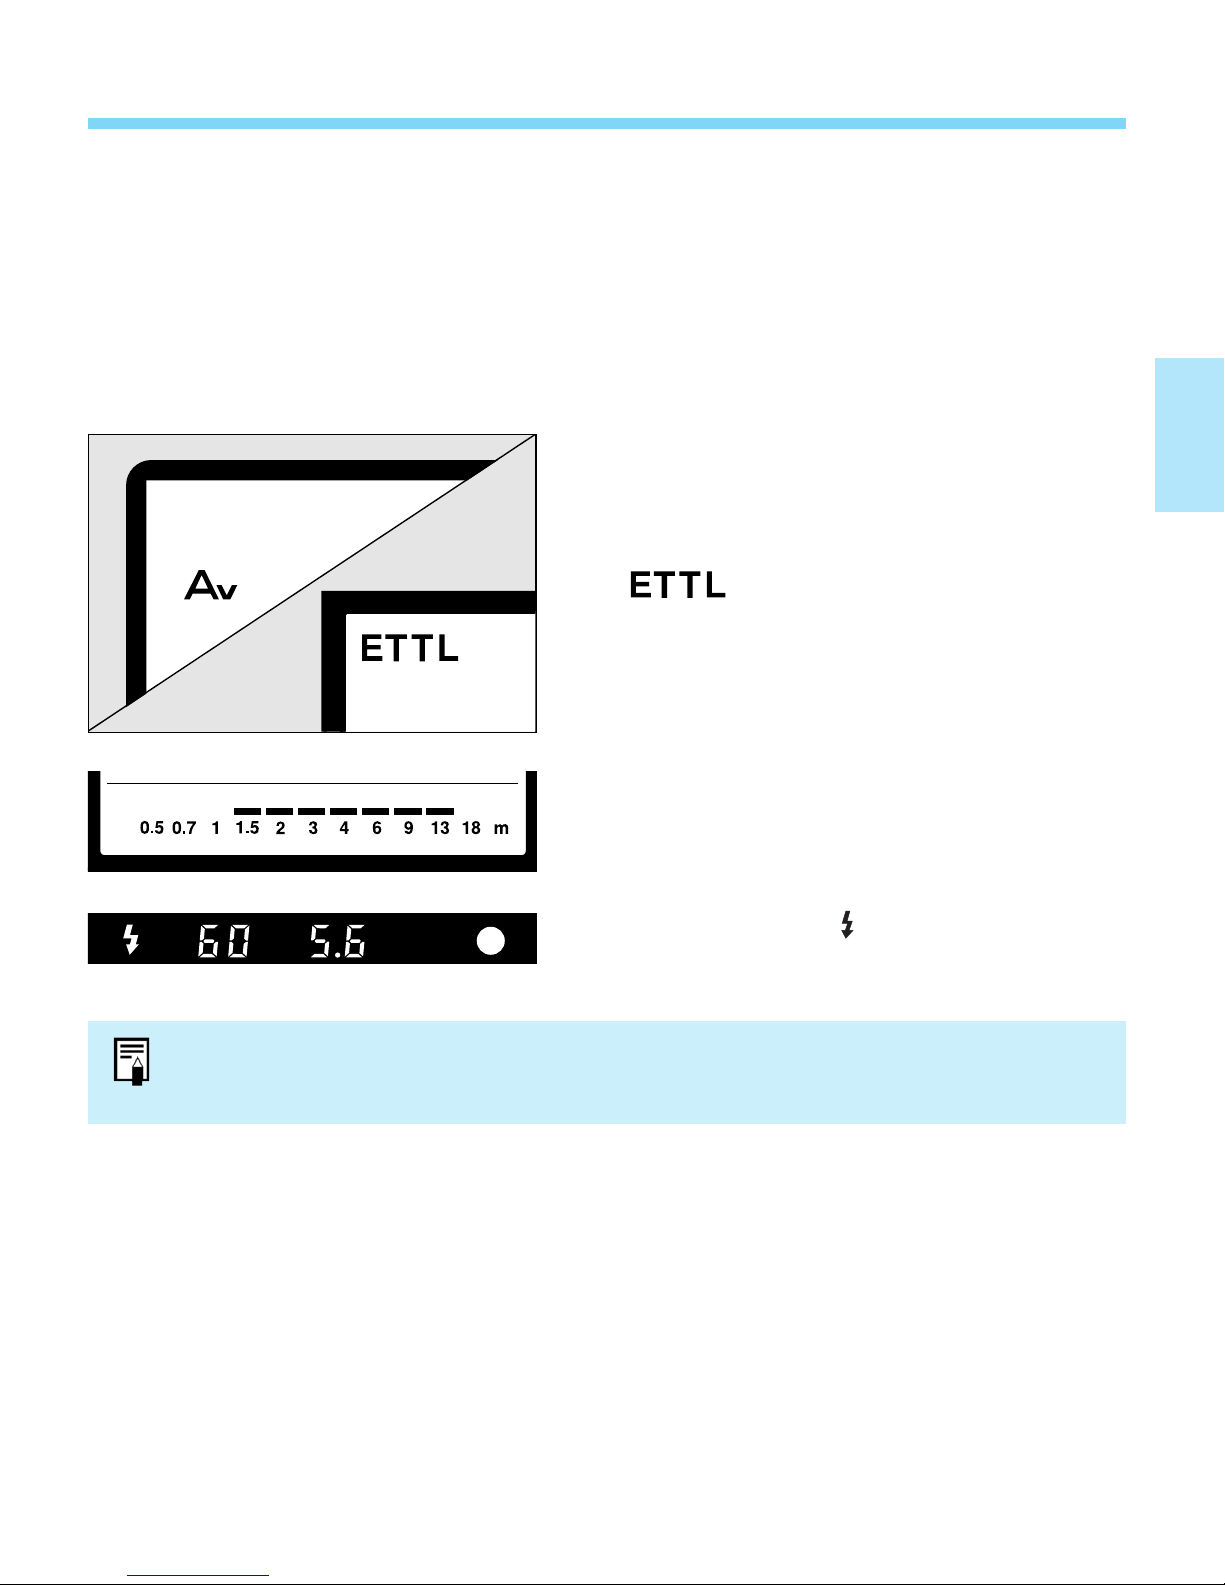
(1) Av: Aperture-Priority AE and E-TTL Autoflash
This mode is effective for controlling the depth of field in your flash pictures.
You can also obtain a balanced exposure between the subject and
background. You set the aperture and the camera sets the shutter speed
automatically to obtain a correct exposure for the background. The E-TTL
autoflash system obtains the proper exposure based on the aperture you set.
Set the camera’s picture-taking mode
1
to
Av
.
Set the 550EX’s flash mode to
2
Focus the subject.
.
3
Check that the subject distance is
4
within the flash range displayed on
the 550EX’s LCD panel.
Check that the icon is displayed in
5
the viewfinder, then take the picture.
If the top sync speed display blinks, the background will be overexposed. And if the 30”
shutter speed display blinks, the background will be underexposed. In such cases,
change the aperture until the shutter speed display stops blinking.
27

Using Flash in Other Camera Modes
● Balanced Flash Exposures
In low-light situations, the exposure level can be balanced between the
subject and background by using a slow sync speed. You can obtain
balanced flash exposures automatically by setting the camera’s picture-taking
mode to
Av
. The camera then sets the sync speed automatically to suit the
background. Using a tripod is recommended to prevent camera shake.
Balanced flash exposure.
• To disable automatic balanced flash exposures, set the camera's picture-taking mode
to M. You can then set the desired shutter speed and aperture manually. See page
30.
Based on the shutter speed and aperture you set, the E-TTL autoflash system
controls the flash exposure automatically.
• If you are using the Canon EF 135mm f/2.8 soft focus lens on your camera without a
tripod, setting the shutter speed and aperture manually is most effective for obtaining
soft-focus effects. Follow the procedure below.
1) Set an aperture near the maximum aperture.
2) Set the minimum shutter speed required to prevent camera shake.
3) Check that the flash has recharged, then take the picture.
Flash exposure in the Full Auto mode.
• To obtain balanced flash exposures in the Tvmode, set the shutter speed until the
meter reading indicates a correct exposure.
• To obtain balanced flash exposures in the
aperture until the meter reading indicates a correct exposure.
• Under flourescent lighting, the photo may have a greenish cast. And under tungsten
lighting, the photo may have an orange cast.
28
M
mode, set the shutter speed and
Using Flash in Other Camera Modes
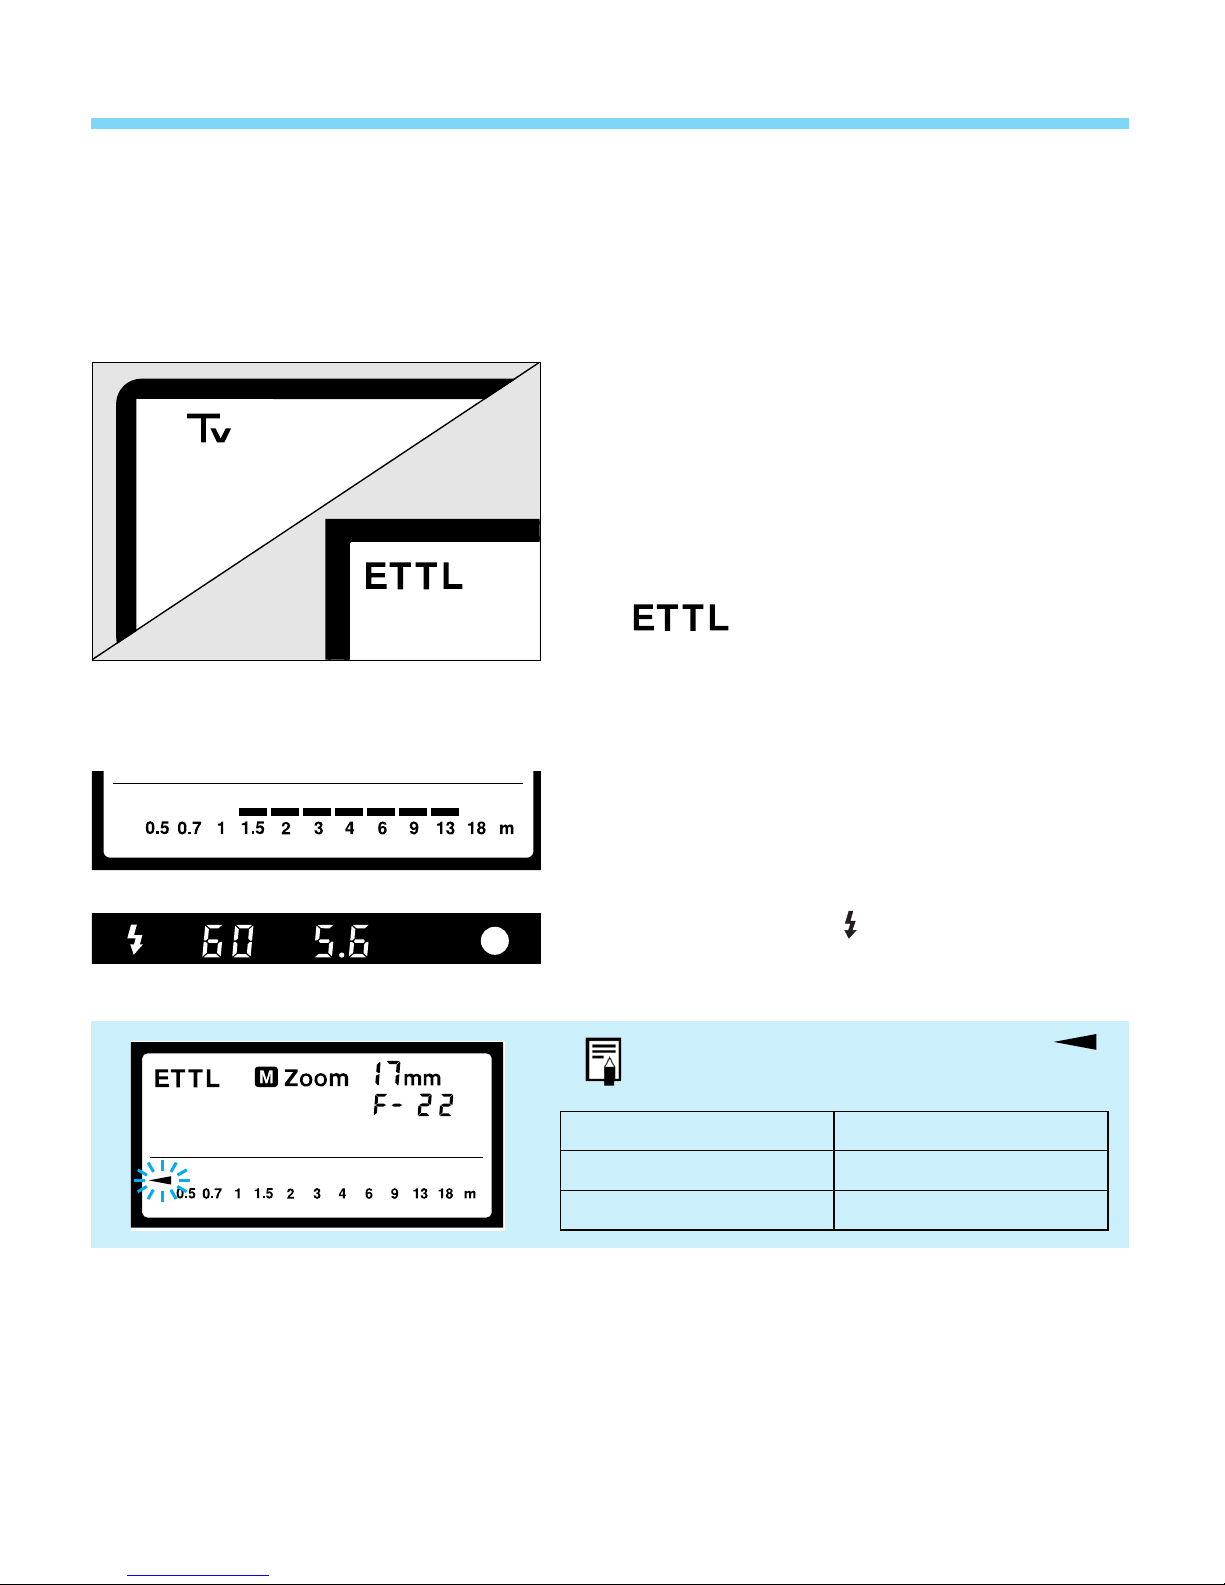
(2) Tv: Shutter Speed-Priority AE and E-TTL
Autoflash
By selecting the shutter speed, you can obtain various effects with flash. You
can set the shutter speed from 30 sec. to the top sync speed. The camera
then sets the aperture automatically to obtain a correct exposure for the
background. The E-TTL autoflash system controls the flash exposure based
on the camera-selected aperture.
Set the camera’s picture-taking mode
1
to
Tv
and set the desired shutter
speed anywhere from 30 sec. to the
top sync speed.
Set the 550EX’s flash mode to
2
.
Focus the subject.
3
Check that the subject distance is
4
within the flash range displayed on
the 550EX’s LCD panel.
Check that the icon is displayed in
5
the viewfinder, then take the picture.
If the aperture display blinks, the background may turn out overexposed or
underexposed. In such a case, change the shutter speed until the aperture display stops
blinking.
29
Using Flash in Other Camera Modes
(3) M: Manual Exposure and E-TTL Autoflash
In this mode, you set both the shutter speed and aperture. The E-TTL
autoflash system controls the flash exposure based on the the aperture you
set.
Set the camera’s picture-taking mode
1
to
M
and set the desired aperture
and shutter speed anywhere from 30
sec. to the top sync speed. You can
also use
Set the 550EX’s flash mode to
2
Focus the subject.
buLb
.
.
3
Check that the subject distance is
4
within the flash range displayed on
the 550EX’s LCD panel.
Check that the icon is displayed in
5
the viewfinder, then take the picture.
If the flash ranges below apply, the
icon will blink on the left end of the scale.
30
Zoom Setting Flash Range
17-28mm 0.5 m / 1.6 ft or shorter
35mm and longer 0.7 m / 2.3 ft or shorter
 Loading...