


Thank you for purchasing a Canon product.
The Canon Speedlite 420EX is an autozoom flash unit equipped with a
wireless sensor for E-TTL wireless autoflash.
* E-TTL stands for Evaluative-Through-The-Lens.
The features available with Speedlite 420EX depend on the EOS camera.
Refer to the table below to identify your camera type.
This instruction booklet has separate chapters for Type-A and Type-B EOS
cameras. After reading the first chapter applicable to both camera types,
read the respective sections that apply to your camera.
EOS-10, 1V,
Type-A
Type-B Camera
Camera
E-TIL
TTL
ELAN II/ELANIIE,
.
SOON/REBELG,3000N/66/REBEL XSN,
All other EOS cameras other than the above.
Available 420EX Features with EOS Cameras
Feature
E-TTL autoflash
TTL
autoflash
High-speed sync (FP flash)
FE lock
E-TIL
wireless
autoflash
with
mUltiple
Speedlites
3,060,030,
SO/SOE,
With
Type-A Cameras
ELAN 7/7E, 30/33,
REBEL 2000/300,
0:
Available
With
0 X
X 0
0 X
0
0
Key to Symbols
oThe Caution symbol alerts you to actions to prevent flash
photography problems.
IX,IX7/IX Lite
X:
Not available.
Type-B Cameras
X
X
[i] The Note symbol gives additional information for basic operations.
~8-:
The Light bulb symbol offers helpful tips for operating the
...
~'
Speedlite or for taking pictures.
Keep this instruction booklet handy for future reference.
2
Conventions Used in
this
Booklet .
This instruction booklet
Type-B cameras. If
30 and 39 to 53.
If you .have a Type-B camera, read pages 9 to 16 and
• The operation procedures in this instruction booklet assume
that the main (power) switch on the camera
been turned on. Be sure to turn on the main switch before
proceeding.
• The icons in
and dials and their settings. The icons in the text are the same
ones found on the camera and Speedlite. For the name of the
button
icons for the camera's picture-taking modes are also used:
or
the
dial, see "Nomenclature" on page
has
separate chapters for Type-A and
you
have a
text indicate the camera and 420EX's buttons
Type-A
camera, read pages
31
to 53.
and
420EX has
8.
The following
Hto
o :Full Auto
p : Program AE
Av
Tv
: Aperture-priority AE
: Shutter speed-priority AE
M : Manual
• The (016) icon indicates that the respective function remains in
effect
• Reference page numbers are indicated in parentheses as
follows: (-7page
for 16sec. after the relevant button is released.
.)
3
Conventions Usedinthis Booklet. 3
Nomenclature 6
Installing the Batteries 10
Mounting the Speedlite 12
Wireless Selector 13
Main Switch 14
High-Speed Sync (FP Flash) Switch 14
Pilot Lamp and Test Firing 15
Flash Exposure Confirmation 15
Flash Coverage 16
AF-Assist Beam 16
in
Flash
Flash
Full Auto Mode 18
in
Other Picture-Taking Modes 20
High-Speed Sync (FP Flash) 25
FE
Lock 27
Second-Curtain Synchronization 29
Modeling Flash 30
4
Flash
Flash
in
Full Auto Mode 32
in
Other Picture-Taking Modes 34
Contents
4(Advan.c.ed(
Bounce Flash 40
Flash Exposure Compensation
Multi-Speedlite System .42
Troubleshooting Guide .48
Major Specifications .49
••.
FI·.~sb·i·l?hotographYi
••
(F()r
•.
Type.A.iand····.B
··Cllmeras)
39
.41
4
5
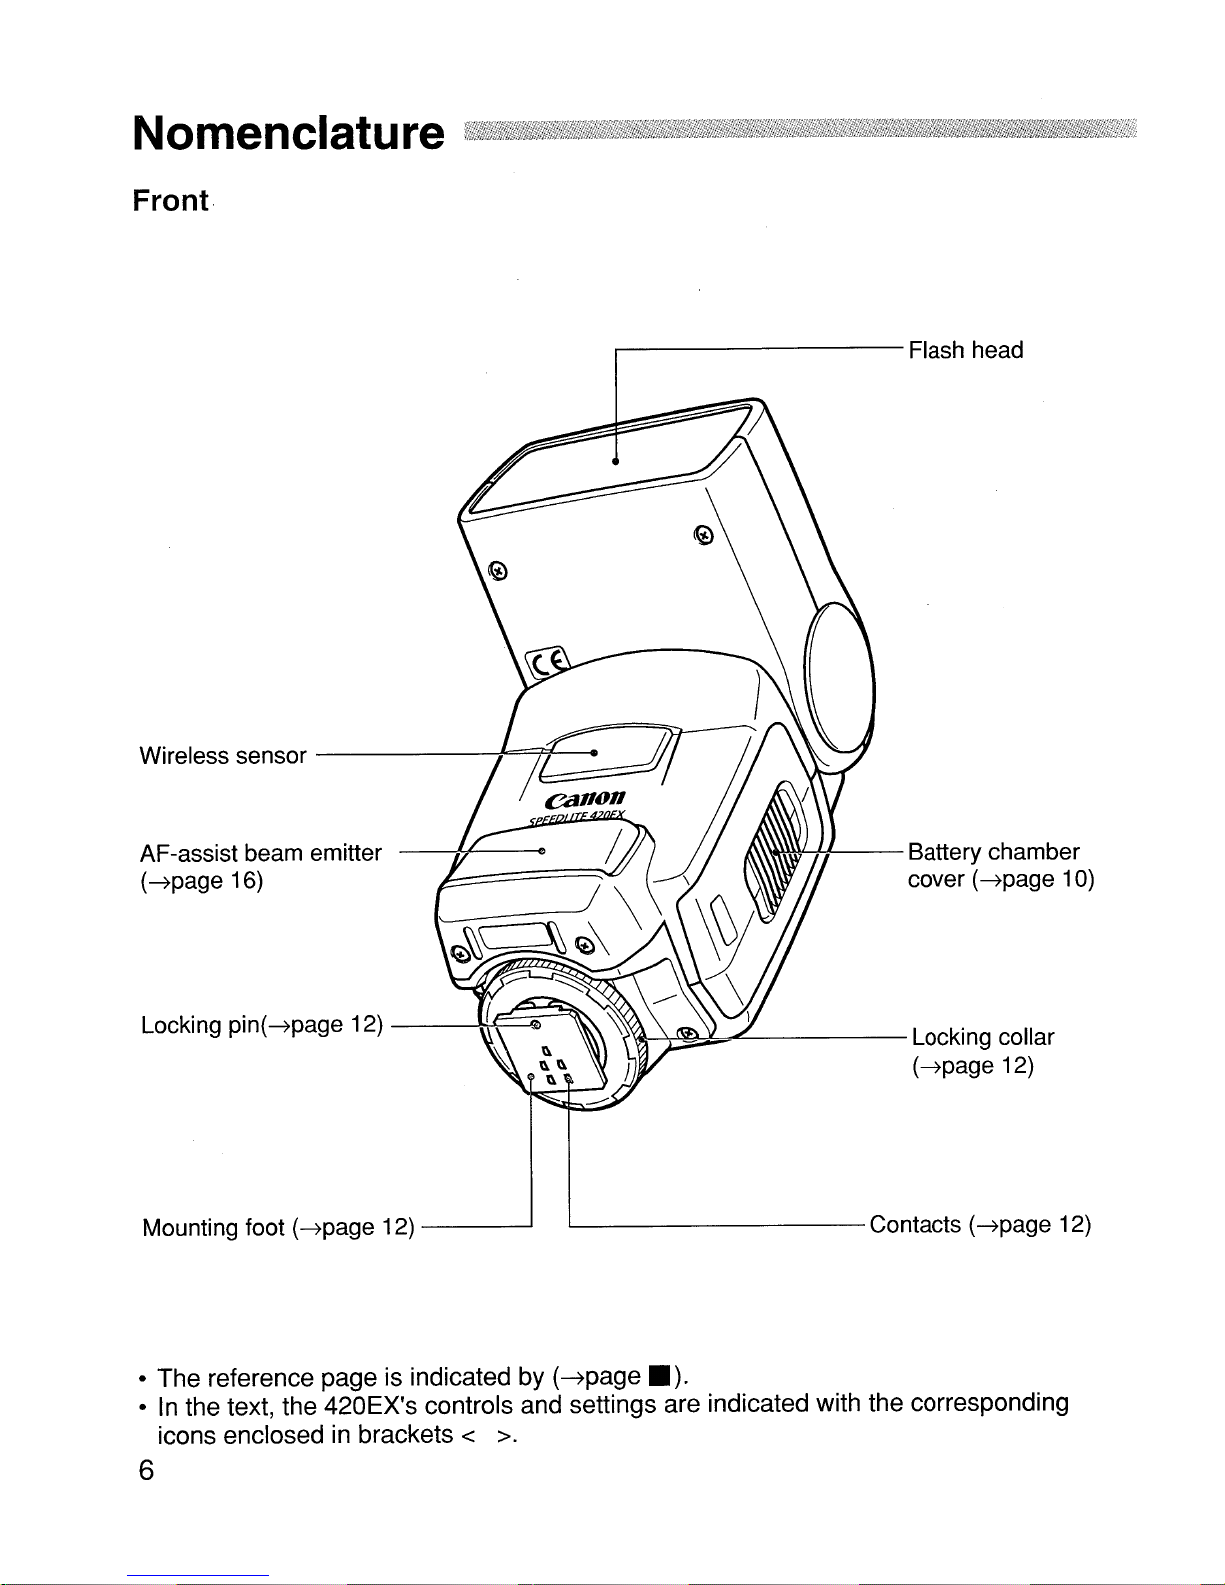
Nomenclature
Front
Wireless sensor
AF-assist beam emitter
(~page
16)
-------1'==;<'=1--
--1'7--_
.---------
¥---f-f--
Flash head
Battery chamber
cover
(---7page
10)
Locking
Mounting foot
pin(~page
(---7page
12)
--J(~~~
12) ......J
• The reference pageisindicated
•Inthe text, the 420EX's controls and settings are indicated with the corresponding
in
icons enclosed
brackets < >.
6
'-----------
by
(~page
('&-~~~-----
.).
Locking collar
(~page
Contacts
12)
(~page
12)

Back
Nomenclature
<lpUSHI>
Horizontal bounce
release button
E-
TTL indicator
(~page
<~H>
High-speed sync
switch
(~page
14)
<PILOT>
Pilot lamp I
Test firing button
40)
---------,
-------t---,
E-TTL
:
~
,=========5~O~70~1~05~
(FP
flash) •.,
----+\--------1ffl
.~mIEl=--___;:;:;__-~
(~page
15)----""~~~~~~--::~5:.p
<8>
Upward bounce release
button
~5
• • ..-!-+-+--+-++---Autozoom position
(~page
indicators
r~
;1)1
OFF.,
rON
~~~ltll-Main
switch
(~page
<OFF>: Turns off the power.
<ON>:
Turnsonthe power.
40)
(~page
16)
14)
Flash exposure confirmation
lamp
(~page
15)
< GROUP>
10)
Slave group (SLAVE
button
(~page
43)
---------'
-----'
<
'------Wireless
CH.
>Channel button
selector
(~page
(~page
43)
42)
7
This chapter helps you prepare for flash
photography with the 420EX.
BeforeYou Start
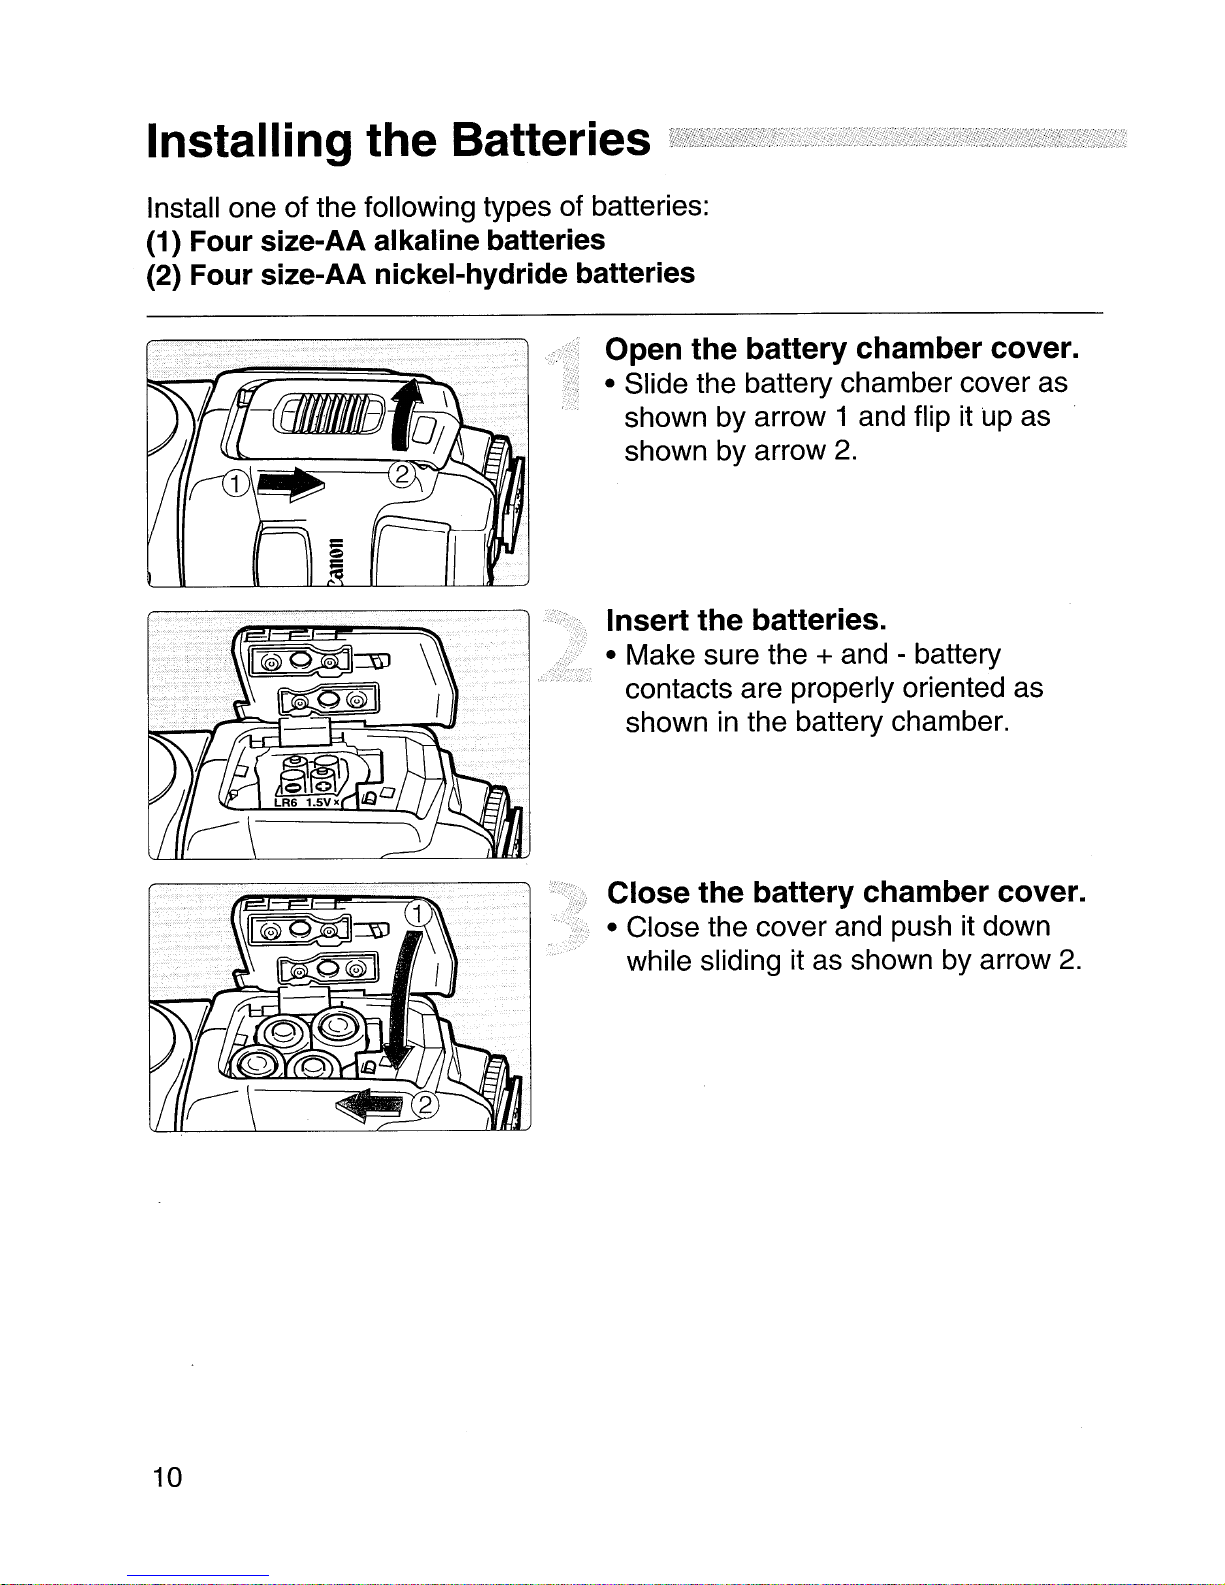
Installing the Batteries
Install one of the following types of batteries:
(1) Four size-AA alkaline batteries
(2) Four size-AA nickel-hydride batteries
Open
• Slide the battery chamber cover as
shown by arrow 1 and flip it up as
shown by arrow
the battery chamber cover.
2.
Insert the batteries.
• Make sure the + and - battery
contacts are properly oriented as
showninthe battery chamber.
Close the battery chamber cover.
• Close the cover and push it down
while sliding it as shown by arrow
2.
10
Installing the Batteries
[J]
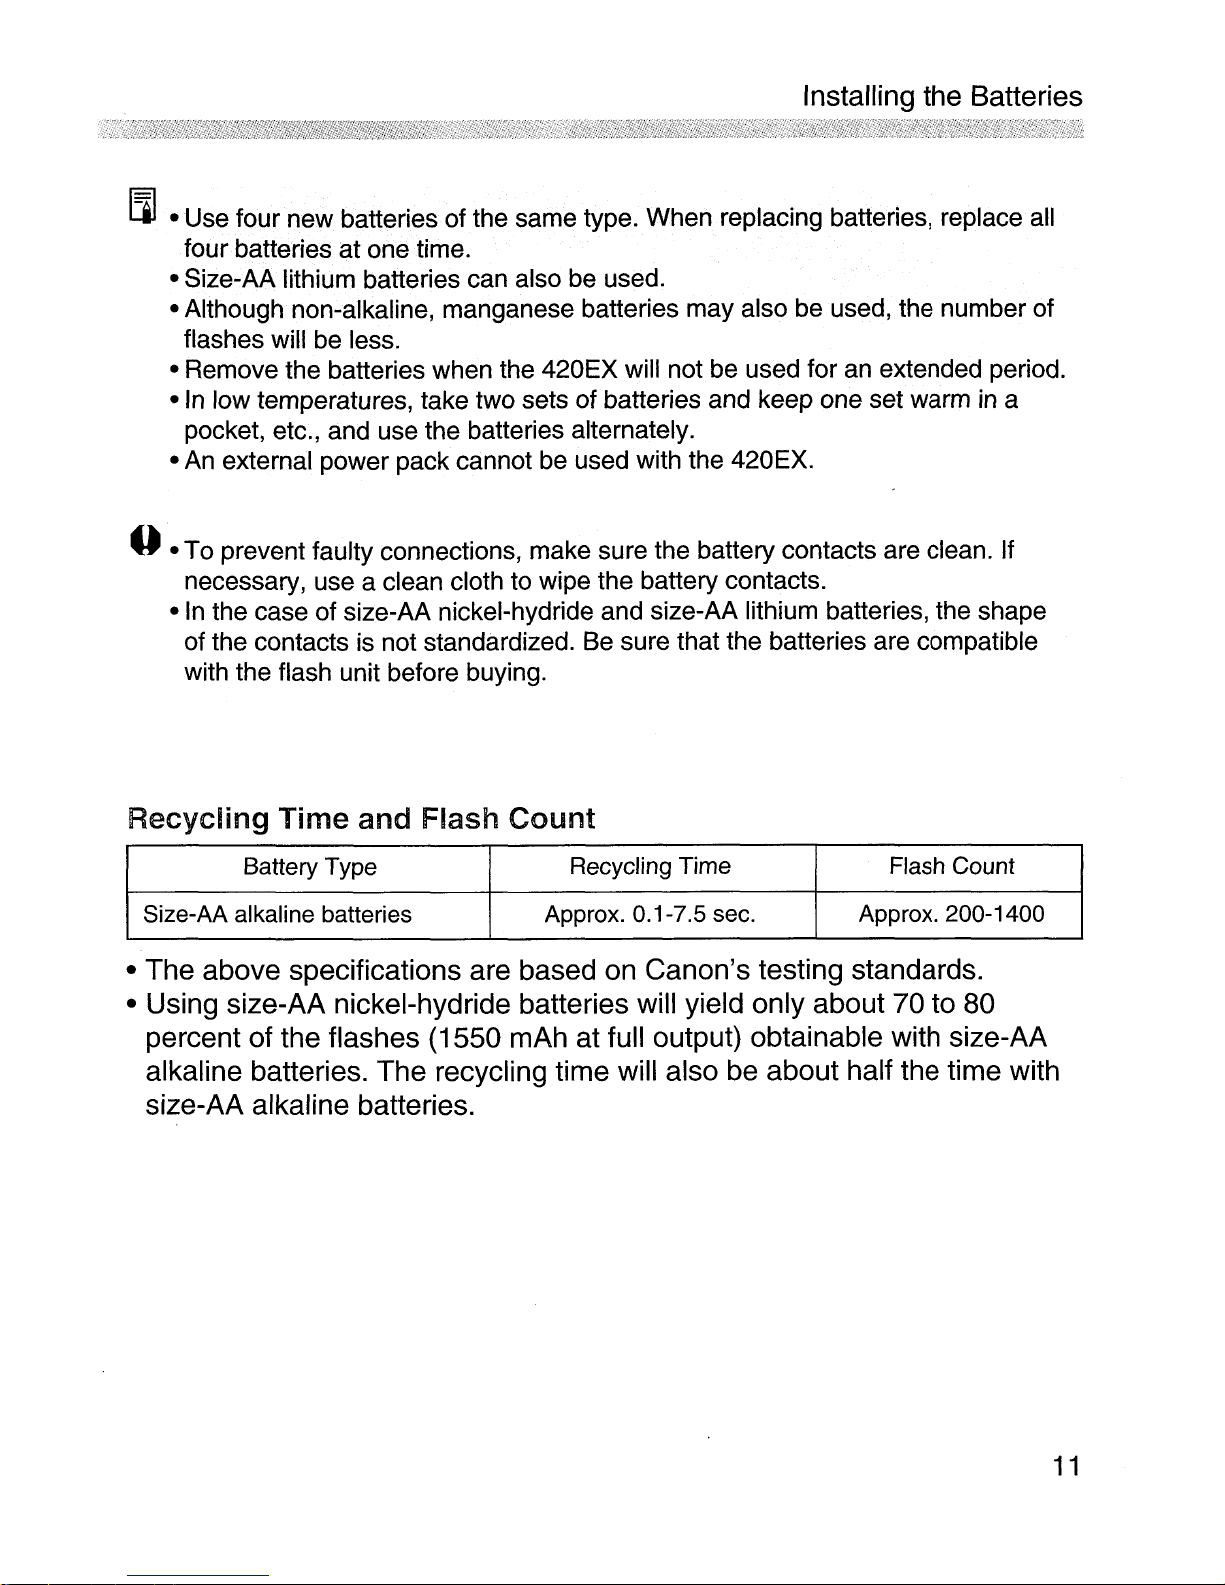
•Use four new batteries of the same type. When replacing batteries, replace all
four batteries at one time.
• Size-AA lithium batteries can also be used.
• Although non-alkaline, manganese batteries may also be used, the number of
flashes will be less.
• Remove the batteries when the 420EX will not be used for an extended period.
·In
low temperatures, take two sets ofbatteries and keep one set warmina
pocket, etc., and use the batteries alternately.
•
An
external power pack cannot be used with the 420EX.
--
• To prevent faulty connections, make sure the battery contacts are clean. If
necessary, use a clean cloth to wipe the battery contacts.
·In
the case of size-AA nickel-hydride and size-AA lithium batteries, the shape
of the contacts is not standardized. Be sure that the batteries are compatible
with the flash unit before buying.
Recycling
Size-AA alkaline batteries
Time
Battery Type
and Flash
Count
Recycling Time Flash Count
Approx. 0.1-7.5 sec. Approx.200-1400
• The above specifications are based on Canon's testing standards.
• Using size-AA nickel-hydride batteries will yield only about 70 to 80
percent of the flashes (1550 mAh at full output) obtainable with size-AA
alkaline batteries. The recycling time will also be about half the time with
size-AA alkaline batteries.
11
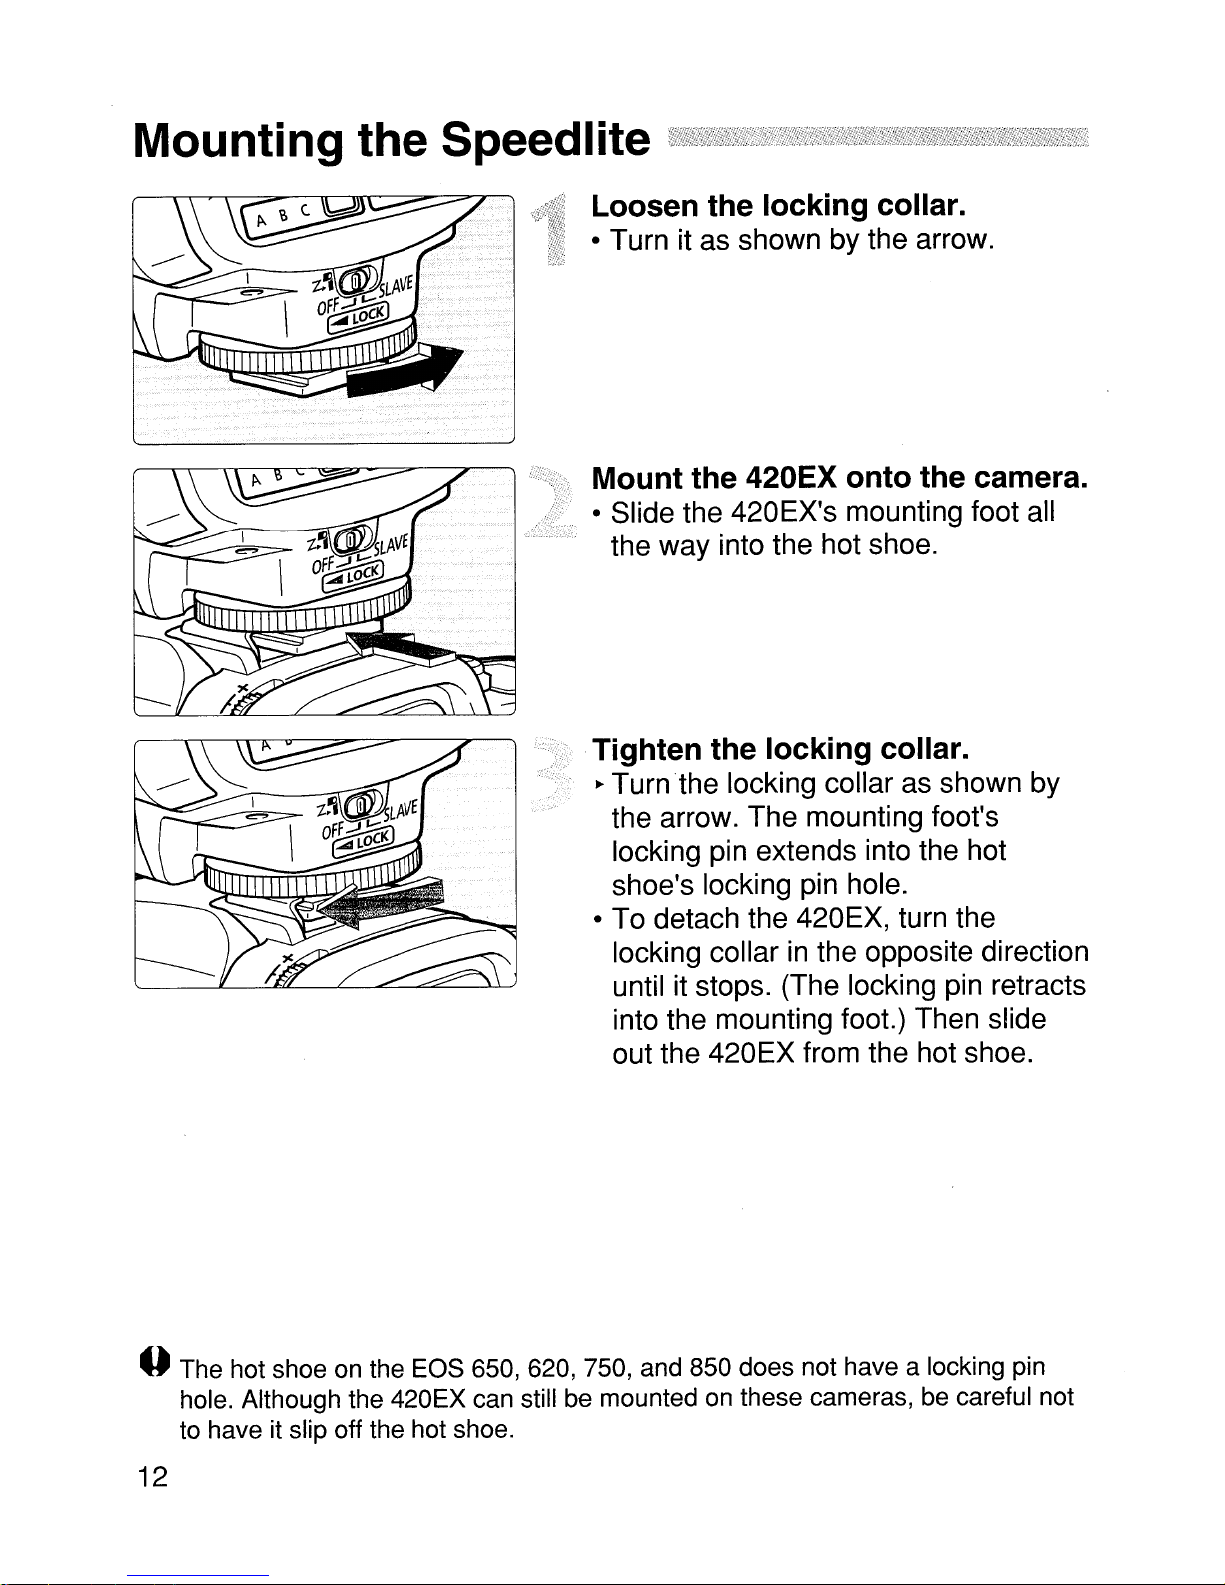
Mounting the Speed
lite
Loosen the locking collar.
• Turn it as shown by the arrow.
Mount the 420EX onto the camera.
• Slide the 420EX's mounting foot all
the way into the hot shoe.
Tighten the locking collar.
~
Turn the locking collar as shown by
the arrow. The mounting foot's
locking pin extends into the hot
shoe's locking pin hole.
• To detach the 420EX, turn the
locking collar
until it stops. (The locking pin retracts
into the mounting foot.) Then slide
out the 420EX from the hot shoe.
in
the opposite direction
..
The hot shoe on the EOS
hole. Although the 420EX can still be mounted on these cameras, be careful not
to have it slip off the hot shoe.
12
650,620,750,
and 850 does not have a locking pin
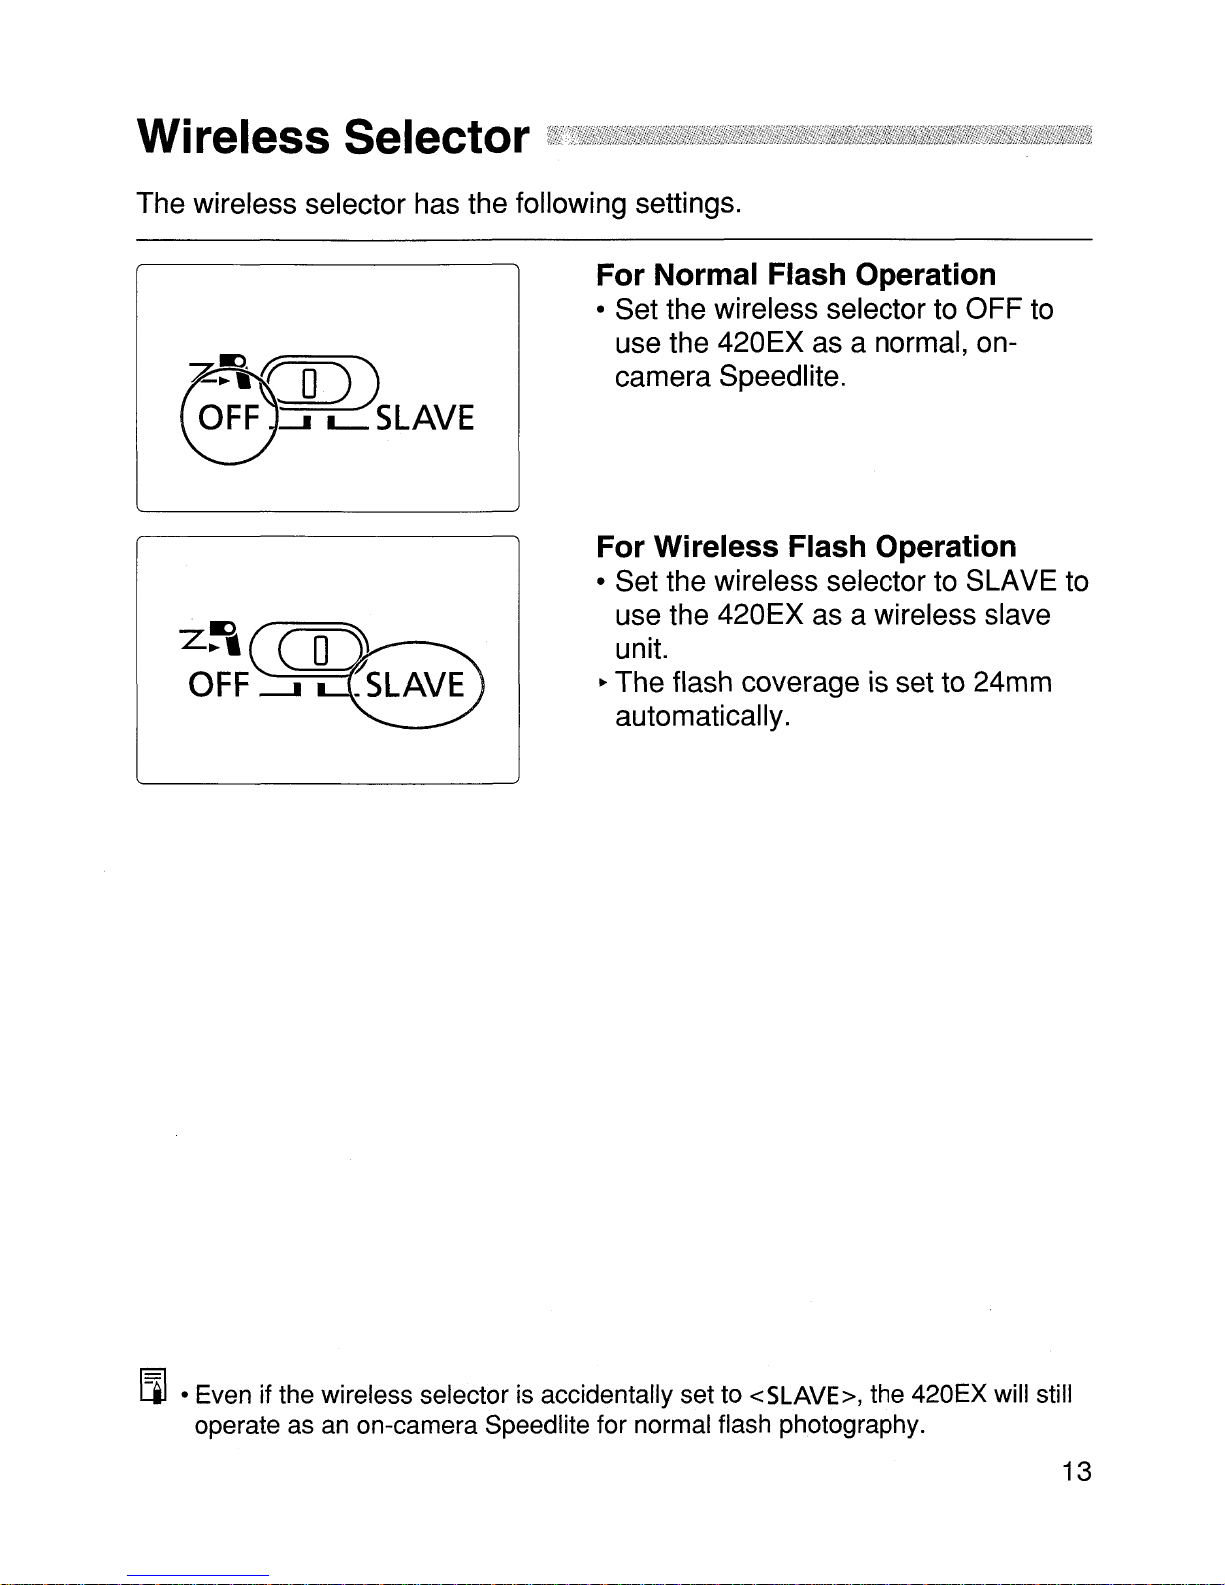
The wireless selector has the following settings.
For Normal Flash Operation
• Set the wireless selector to OFF to
use the 420EX as a normal, on-
camera Speedlite.
@O))
OFF
~
L.-OSLAVE
For Wireless Flash Operation
• Set the wireless selector to SLAVE to
use the 420EX as a wireless slave
unit.
~
The flash coverage is set to 24mm
automatically.
I:&l
•Even if the wireless selector is accidentally set to
operate as an on-camera Speedlite for normal flash photography.
<SLAVE>,
the 420EX will still
13
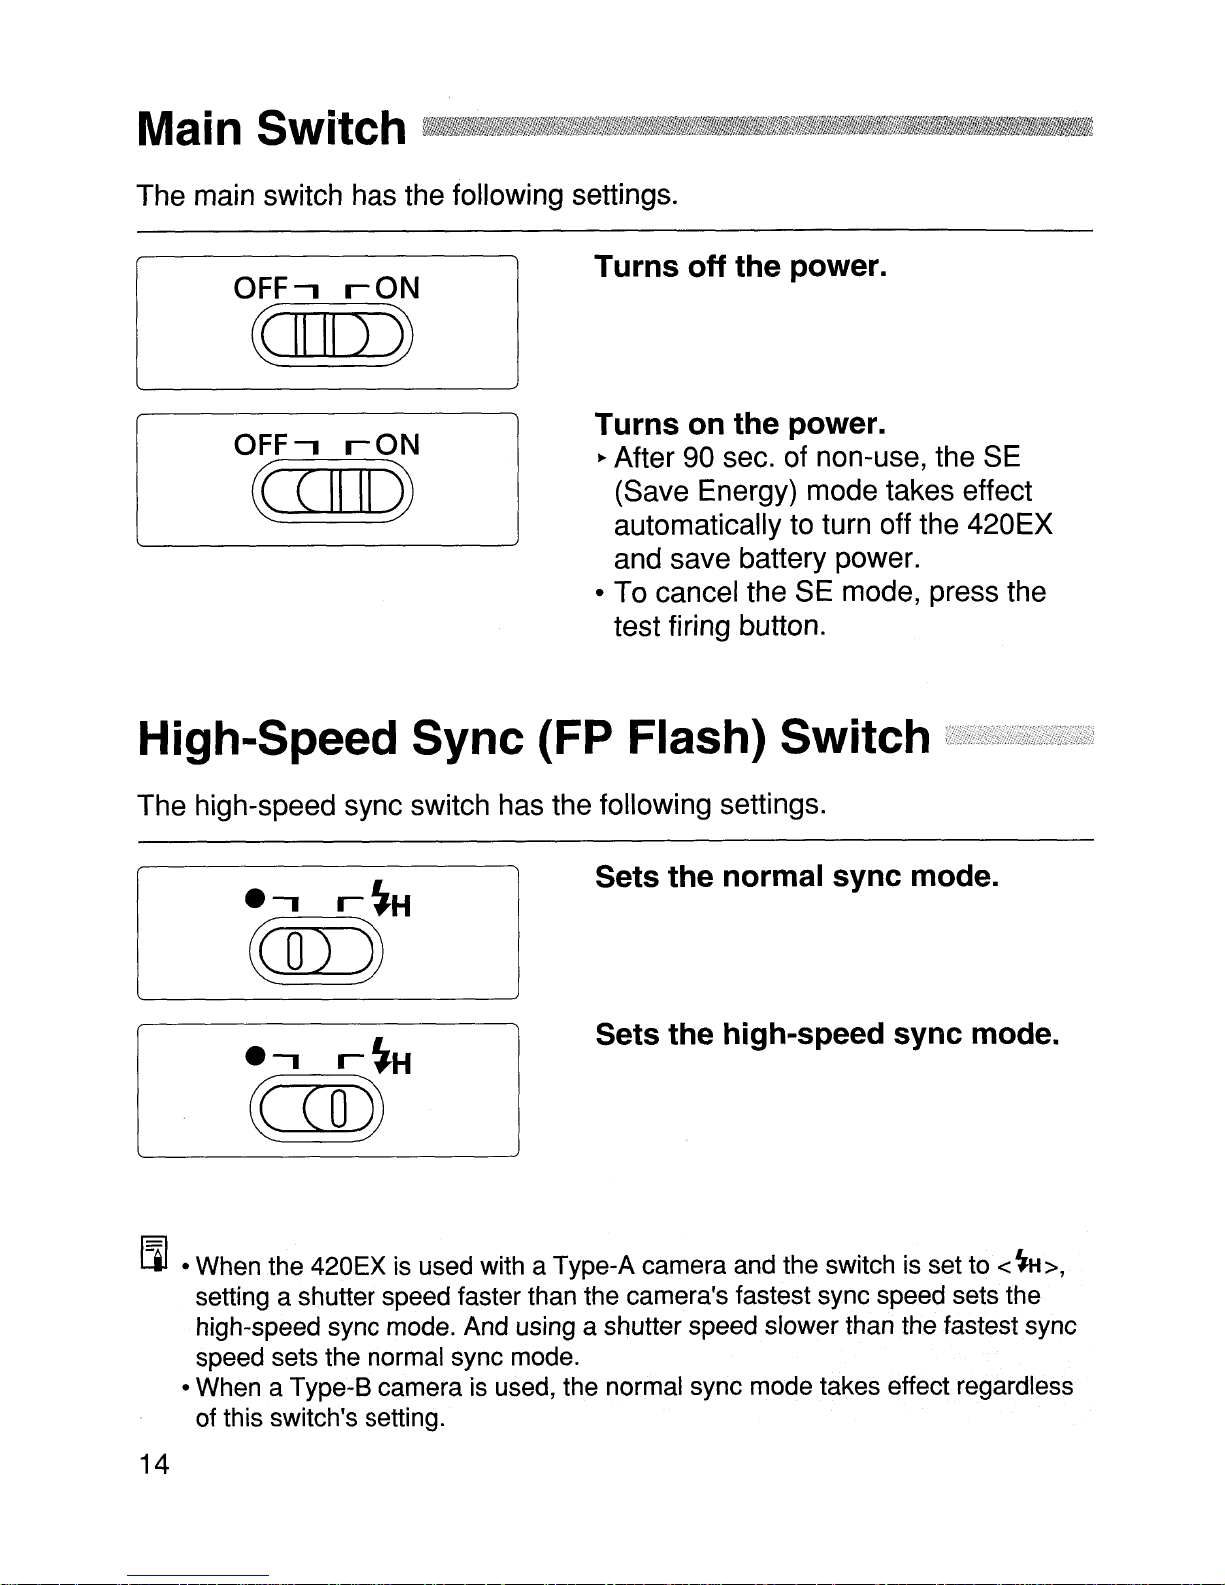
The main switch has the following settings.
Turns off the power.
OFF...,
rON
OTIU
OFF...,
rON
ttJ[IQ)
The high-speed sync switch has the following settings.
Turns on the power.
~
After 90 sec. of non-use, the SE
(Save Energy) mode takes effect
automatically to turn off the 420EX
and save battery power.
• To cancel the SE mode, press the
test firing button.
Sets the normal sync mode.
Eil
•When the 420EX is used with a Type-A camera and the switch is set to
setting a shutter speed faster than the camera's fastest sync speed sets the
high-speed sync mode. And using a shutter speed slower than the fastest sync
speed sets the normal sync mode.
• When a Type-B camera is used, the normal sync mode takes effectregardless
of this switch's setting.
14
Sets the high-speed sync mode.
<~H>,
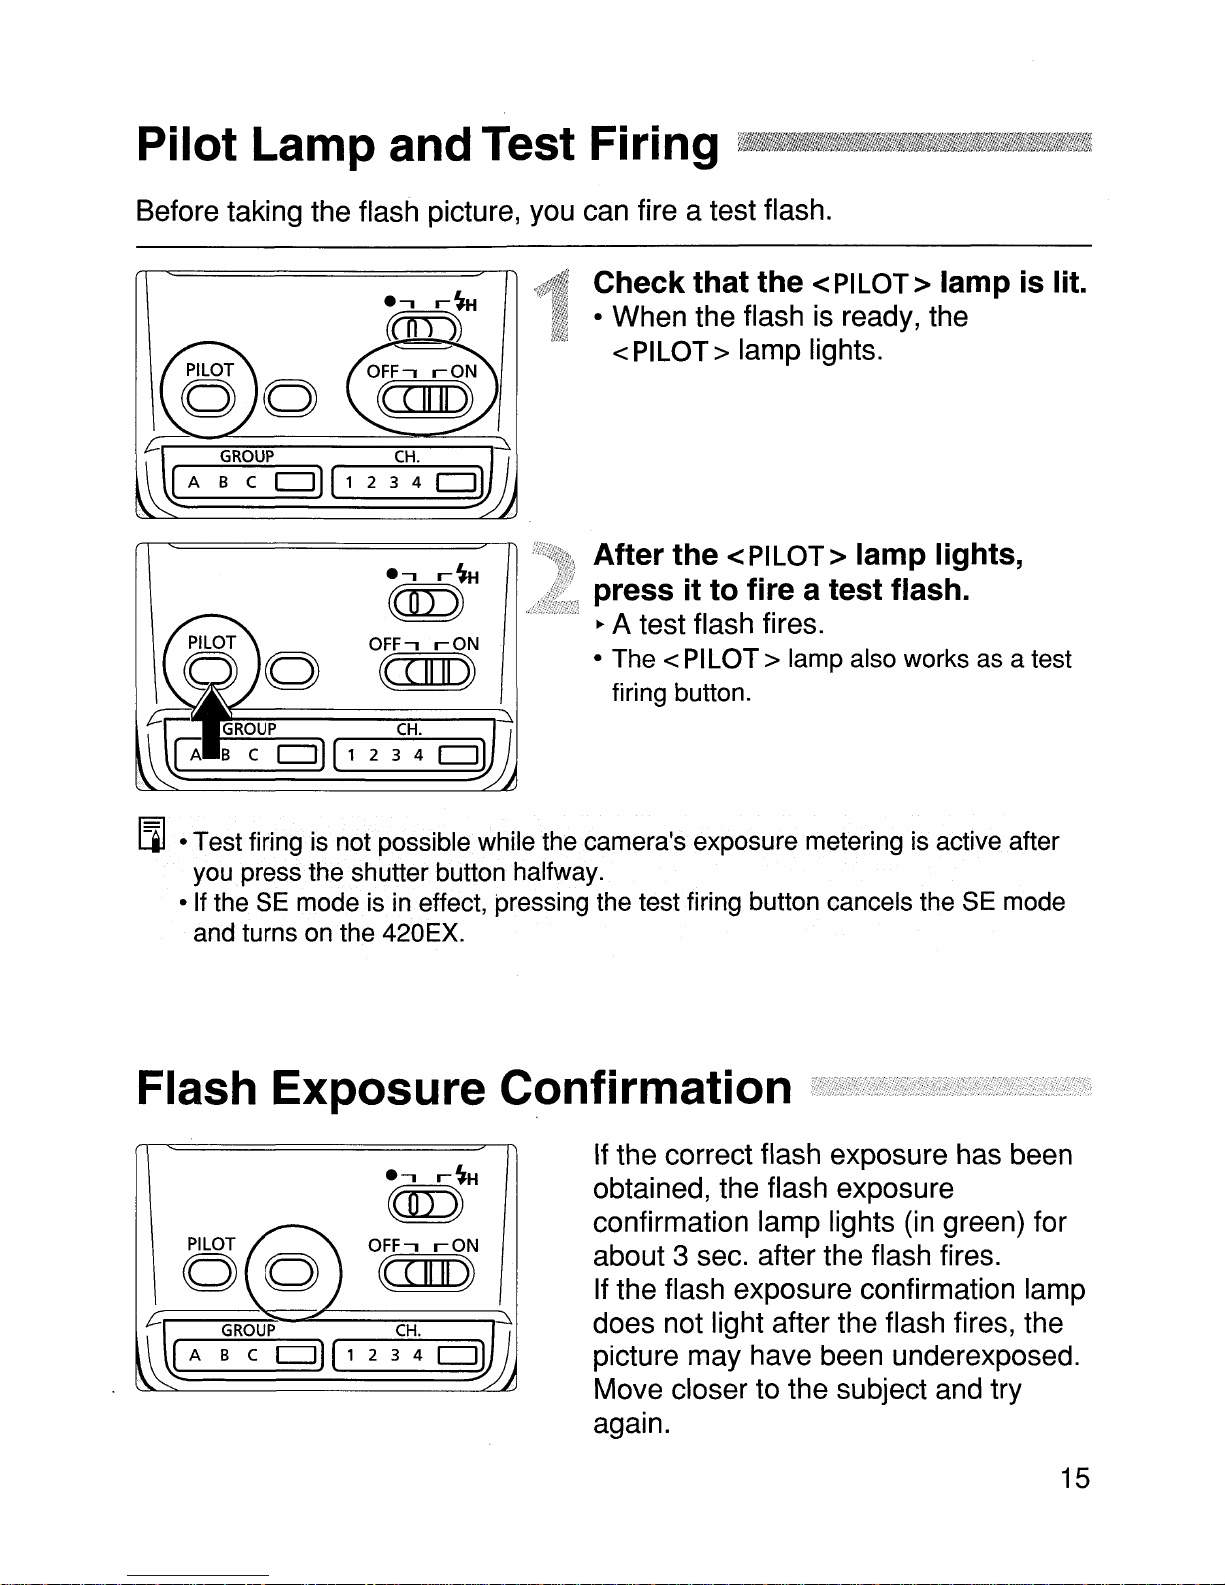
Before taking the flash picture, you can fire a test flash.
GROUP
B C
0][
CH.
1 2 3 4
.,
@)
OFF,
0]
r~
~
rON
ann
[lI
•
Test
firing is not possible while the camera's exposure metering is active after
you press the shutler button halfway.
•
If
the SE mode is in effect, pressing the test firing button cancels the SE mode
and turns on the 420EX.
Check
• When the flash is ready, the
<PILOT> lamp lights.
After
pressitto
~
A test flash fires.
• The <
firing button.
that
the
PI
the
<
PI
LOT> lamp
<
PI
LOT> lamp lights,
fireatest
LOT> lamp also works as a test
flash.
is
lit.
Flash Exposure Confirmation
.,
~[)j
OFF,
ann
GROUP
B C
0)
(1 2 3 4
CH.
r~
rON
0]
If the correct flash exposure has been
obtained, the flash exposure
confirmation lamp lights (in green) for
about 3 sec. after the flash fires.
If the flash exposure confirmation lamp
does not light after the flash fires, the
picture may have been underexposed.
Move closer to the subject and try
again.
15
The 42DEX's flash head zooms automatically to provide adequate flash
coverage for the lens focal length
24mm to 1
indicator on the Speedlite lights.
Whensuit the focal length you zoom to.
(--.;;;.•
D5mm
a zoom lens is used, the flash coverage changes automatically to
.:..:E-T;..;.;TL~
focal lengths. The corresponding autozoom position
)
in
use. Flash coverage is provided for the
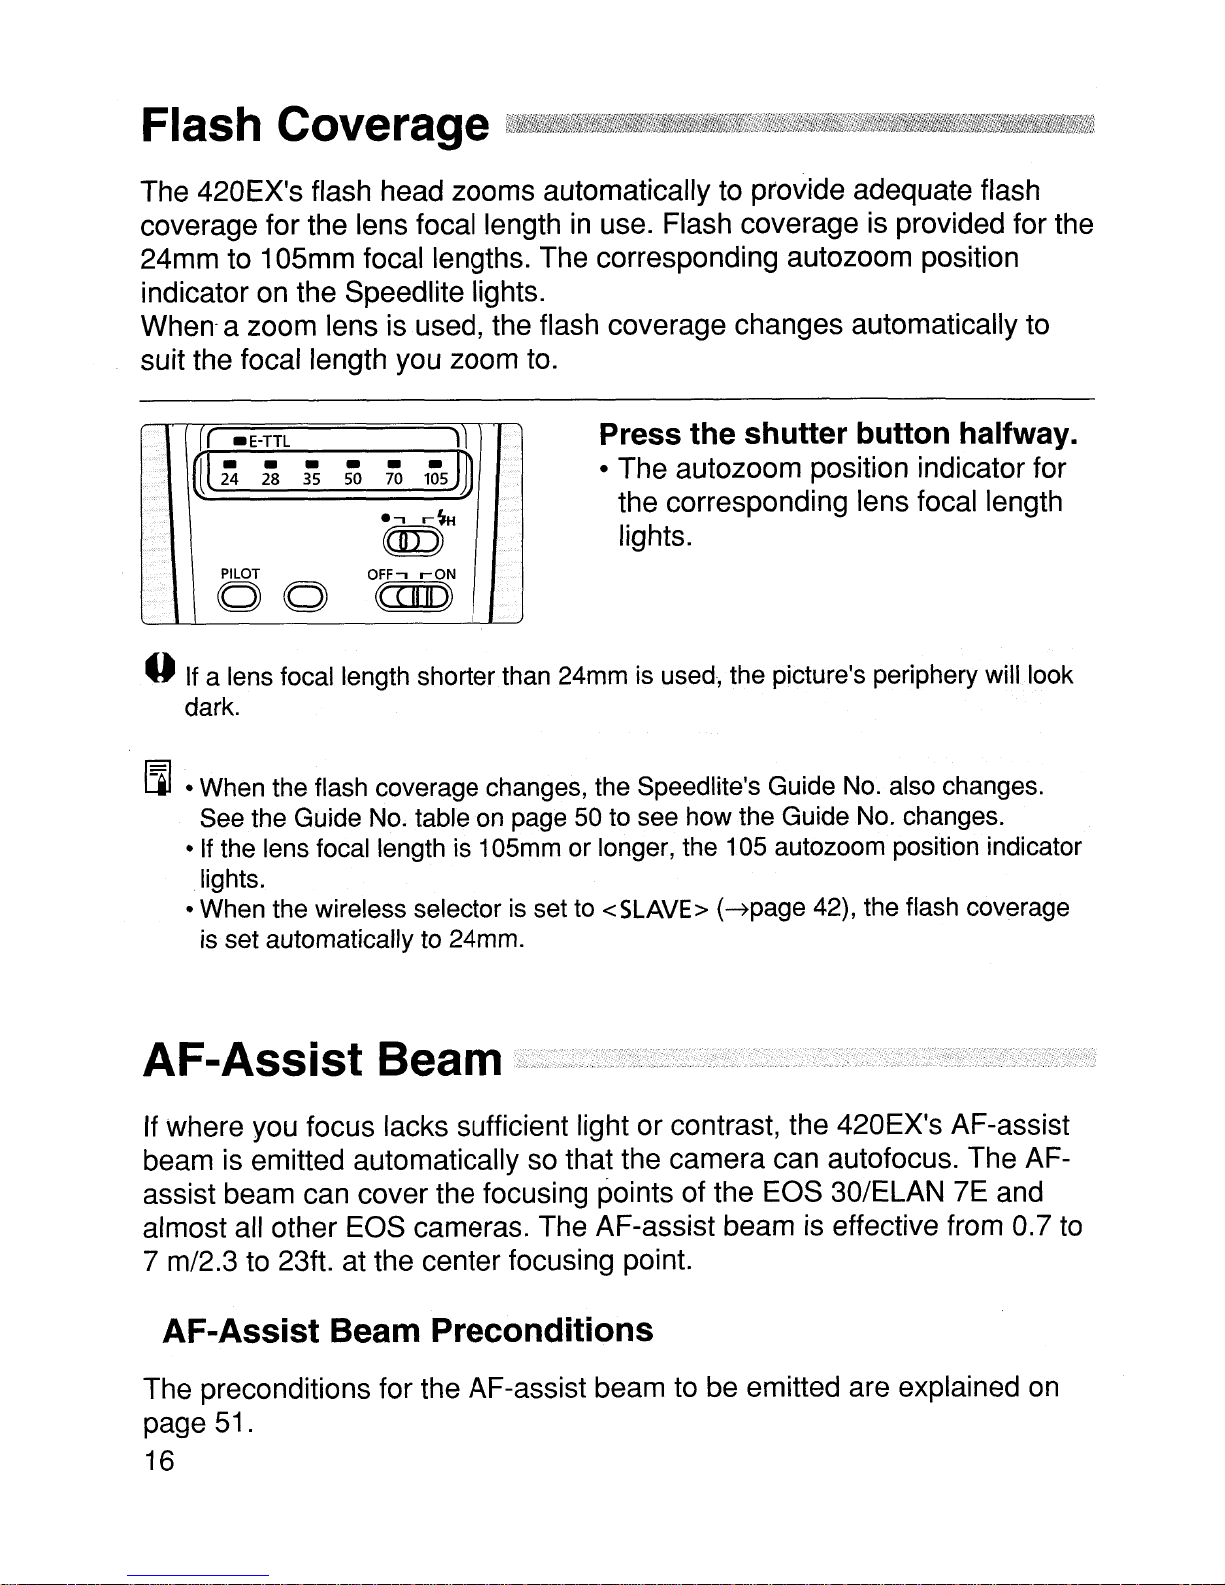
Press the shutter button halfway.
@
~ ~ ~ ~
~
.,
1'::5
r~
m
W))
PILOT
00
..
If a lens focal length shorter.than 24mm is used, the picture's periphery will look
dark.
III
·When the flash coverage changes, the Speedlite's Guide No. also changes.
See the Guide No. table on page 50 to see how the Guide No. changes.
• If the lens focal length is 105mm or longer, the
.lights.
• When the wireless selector is set to
is set automatically to 24mm.
OFF,
rON
am
• The autozoom position indicator for
the corresponding lens focal length
lights.
t05
autozoom position indicator
<SLAVE>
(---7page
42), the flash coverage
If where you focus lacks sufficient light or contrast, the 42DEX's AF-assist
beam is emitted automatically so that the camera can autofocus. The AFassist beam can
almost all other EOS cameras. The AF-assist beam
7 m/2.3 to 23ft. at the center focusing point.
cover the focusing points of the EOS 3D/ELAN 7E and
AF-Assist Beam Preconditions
The preconditions for the AF-assist beam to be emitted are explained on
page 51.
16
is
effective from
D.7
to

When the 42DEX is mounted on a TypeA camera such as the EOS 3D/ELAN
lE,
usingE-TTL autoflash
easy as normal autoexposure (AE).
E-
TTL autoflash uses the camera's
multi-zone metering sensor for highly
precise flash exposure control. A
preflash
metering and the reading is used to
determine the main flash output. The
result is a flash picture with excellent
balance between the flash illumination
and ambient light.
is
fired for evaluative flash
i,s
just as
Easy Flash Photography
(ForType-A Cameras)
EiI
•This section uses the EOS 30/ELAN 7E as the sample Type-A camera.
on
• Before proceeding, first turn
• Set the 420EX's wireless selector to
• For EOS 30/ELAN 7E operation,s, refer to the EOS 30/ELAN 7E instruction
booklet.
the main switch on the camera and 420EX.
<
OFF
>.
With the 420EX attached to a Type-A camera set to <0 > (Full Auto) or
<P>
(Program AE), flash photography will be fully automatic and as easy
as normal AE photography without flash. The camera sets the shutter
speed and aperture automatically to suit the lighting situation, whether it is
dark or daylight (fill flash). E-TTL autoflash thereby sets the flash exposure
automatically.
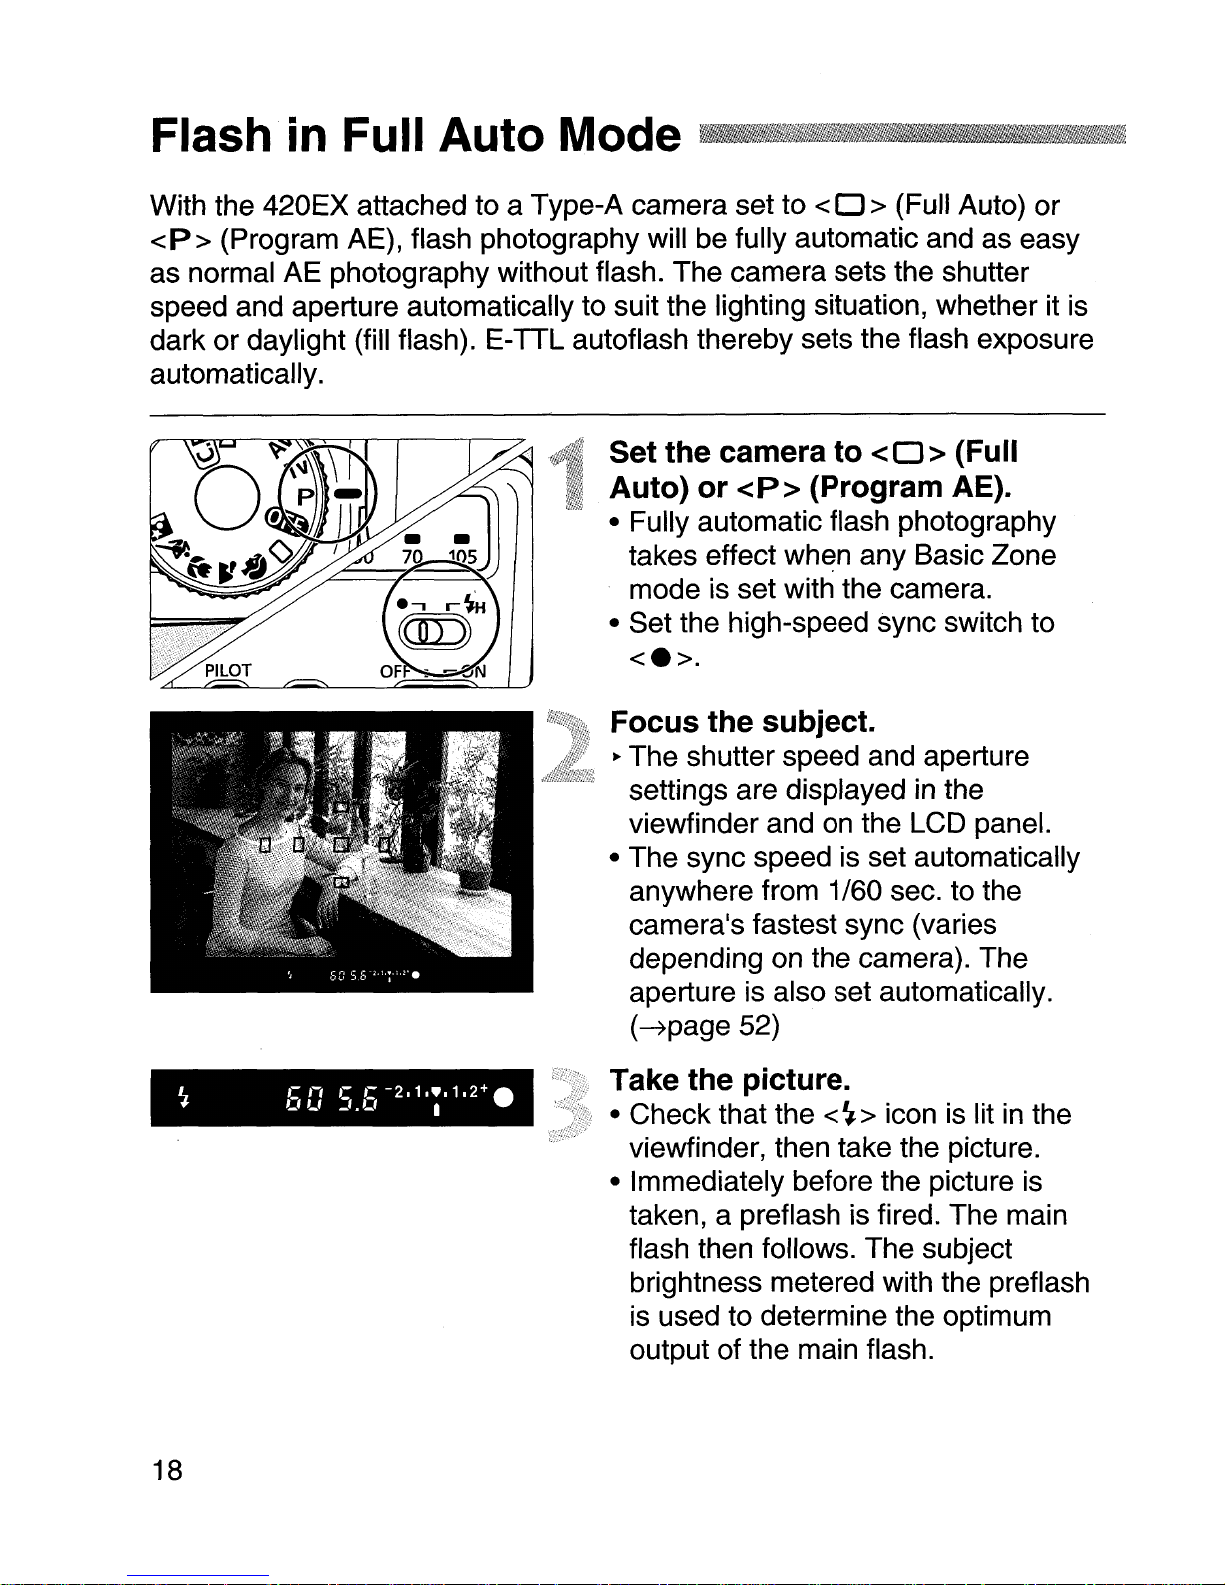
Set the camera to < 0 > (Full
Auto) or
<P > (Program AE).
• Fully automatic flash photography
takes effect when any Basic Zone
mode is set with the camera.
• Set the high-speed sync switch to
<e>.
Focus the subject.
,:..,~The shutter speed and aperture
/""
settings are displayedinthe
viewfinder and on the LCD panel.
• The sync speed is set automatically
anywhere from
camera1s
fastest sync (varies
depending on the camera). The
aperture is also set automatically.
(-7page 52)
1/60 sec. to the
18
Take the picture.
• Check that the <
viewfinder, then take the picture.
• Immediately before the picture
taken, a preflash is fired. The main
flash then follows. The subject
brightness metered with the preflash
is used to determine the optimum
output of the main flash.
~
> icon is lit in the
is
 Loading...