

Laser Beam Printer
User's Guide
User's Guide

Contents
Tu r ning the Printer On/Off . . . . . . . . . . . . . . . . . . . . . . . . . . . . . . . . . . . . . . . . . . 3
Tu r ning On the Printer. . . . . . . . . . . . . . . . . . . . . . . . . . . . . . . . . . . . . . . . . . . . . . . . . . . 3
Tu r ning Off the Printer. . . . . . . . . . . . . . . . . . . . . . . . . . . . . . . . . . . . . . . . . . . . . . . . . . . 4
Online and Offline . . . . . . . . . . . . . . . . . . . . . . . . . . . . . . . . . . . . . . . . . . . . . . . . 7
Placing the Printer Online . . . . . . . . . . . . . . . . . . . . . . . . . . . . . . . . . . . . . . . . . . . . . . . . 7
Placing the Printer Offline . . . . . . . . . . . . . . . . . . . . . . . . . . . . . . . . . . . . . . . . . . . . . . . . 8
Paper Requirements . . . . . . . . . . . . . . . . . . . . . . . . . . . . . . . . . . . . . . . . . . . . . . 9
Paper Size. . . . . . . . . . . . . . . . . . . . . . . . . . . . . . . . . . . . . . . . . . . . . . . . . . . . . . . . . . . . 9
Paper Type . . . . . . . . . . . . . . . . . . . . . . . . . . . . . . . . . . . . . . . . . . . . . . . . . . . . . . . . . . 11
Printable Area . . . . . . . . . . . . . . . . . . . . . . . . . . . . . . . . . . . . . . . . . . . . . . . . . . . . . . . . 16
Plain Paper, Heavy Paper, Transparencies, Labels, and Coated Paper . . . . . . . . . . . .16
Postcard/Reply Postcard/4 on 1 Postcard . . . . . . . . . . . . . . . . . . . . . . . . . . . . . . . . . . .17
Envelope . . . . . . . . . . . . . . . . . . . . . . . . . . . . . . . . . . . . . . . . . . . . . . . . . . . . . . . . . . . .17
Paper Which Requires Attention Before Use . . . . . . . . . . . . . . . . . . . . . . . . . . . . . . . . 18
Paper Capacity of Paper Source. . . . . . . . . . . . . . . . . . . . . . . . . . . . . . . . . . . . . . . . . . 19
Paper Capacity of the Output Tray . . . . . . . . . . . . . . . . . . . . . . . . . . . . . . . . . . . . . . . . 20
Loading Standard Size Paper (Other Than Postcards and Envelopes) . . . . . . . 21
Loading Standard Size Paper in Cassette 1 . . . . . . . . . . . . . . . . . . . . . . . . . . . . . . . . . 21
Loading Paper in the Paper Cassette . . . . . . . . . . . . . . . . . . . . . . . . . . . . . . . . . . . . . .21
Specifying the Settings for the Paper Cassette . . . . . . . . . . . . . . . . . . . . . . . . . . . . . . .25
Registering the Paper Type . . . . . . . . . . . . . . . . . . . . . . . . . . . . . . . . . . . . . . . . . . . . . .26
Loading Standard Size Paper in Cassette 2, 3, or 4 . . . . . . . . . . . . . . . . . . . . . . . . . . . 28
Loading Paper in the Paper Cassette . . . . . . . . . . . . . . . . . . . . . . . . . . . . . . . . . . . . . .29
Specifying the Settings for the Paper Cassette . . . . . . . . . . . . . . . . . . . . . . . . . . . . . . .33
Registering the Paper Type . . . . . . . . . . . . . . . . . . . . . . . . . . . . . . . . . . . . . . . . . . . . . .34
Loading Standard Size Paper (Other Than Postcards and Envelopes) in the Multi-purpose Tray
Loading Paper in the Multi-purpose Tray . . . . . . . . . . . . . . . . . . . . . . . . . . . . . . . . . . . .37
Registering the Paper Size . . . . . . . . . . . . . . . . . . . . . . . . . . . . . . . . . . . . . . . . . . . . . . .42
Registering the Paper Type . . . . . . . . . . . . . . . . . . . . . . . . . . . . . . . . . . . . . . . . . . . . . .43
Loading Postcards . . . . . . . . . . . . . . . . . . . . . . . . . . . . . . . . . . . . . . . . . . . . . . . 45
Loading Postcards in the Multi-purpose Tray . . . . . . . . . . . . . . . . . . . . . . . . . . . . . . . . .47
Registering the Paper Size . . . . . . . . . . . . . . . . . . . . . . . . . . . . . . . . . . . . . . . . . . . . . . .50
Registering the Paper Type . . . . . . . . . . . . . . . . . . . . . . . . . . . . . . . . . . . . . . . . . . . . . .51
Loading Envelopes . . . . . . . . . . . . . . . . . . . . . . . . . . . . . . . . . . . . . . . . . . . . . . . 53
Loading Envelopes in the Multi-purpose Tray . . . . . . . . . . . . . . . . . . . . . . . . . . . . . . . .55
Registering the Paper Size . . . . . . . . . . . . . . . . . . . . . . . . . . . . . . . . . . . . . . . . . . . . . . .59
Registering the Paper Type . . . . . . . . . . . . . . . . . . . . . . . . . . . . . . . . . . . . . . . . . . . . . .60
. . . 36
1

2
Loading Custom Size Paper (Non-Standard Size Paper) or Long-size Paper . . 63
Loading Custom Size Paper in Cassette 1 . . . . . . . . . . . . . . . . . . . . . . . . . . . . . . . . . 63
Loading Custom Size Paper in the Paper Cassette . . . . . . . . . . . . . . . . . . . . . . . . . . . 63
Registering the Loading Orientation . . . . . . . . . . . . . . . . . . . . . . . . . . . . . . . . . . . . . . . 67
Registering the Paper Type . . . . . . . . . . . . . . . . . . . . . . . . . . . . . . . . . . . . . . . . . . . . . . 68
Registering a Custom Paper Size . . . . . . . . . . . . . . . . . . . . . . . . . . . . . . . . . . . . . . . . . 70
Loading Custom Size Paper in Cassette 2, 3, or 4 . . . . . . . . . . . . . . . . . . . . . . . . . . . 70
Loading Custom Size Paper in the Paper Cassette . . . . . . . . . . . . . . . . . . . . . . . . . . . 71
Registering the Loading Orientation . . . . . . . . . . . . . . . . . . . . . . . . . . . . . . . . . . . . . . . 75
Registering the Paper Type . . . . . . . . . . . . . . . . . . . . . . . . . . . . . . . . . . . . . . . . . . . . . . 76
Registering a Custom Paper Size . . . . . . . . . . . . . . . . . . . . . . . . . . . . . . . . . . . . . . . . . 77
Loading Custom Size Paper or Long-size Paper in the Multi-purpose Tray . . . . . . . . . 78
Loading Custom Size Paper or Long-size Paper in the Multi-purpose Tray . . . . . . . . . 79
Registering the Loading Orientation . . . . . . . . . . . . . . . . . . . . . . . . . . . . . . . . . . . . . . . 84
Registering the Paper Type . . . . . . . . . . . . . . . . . . . . . . . . . . . . . . . . . . . . . . . . . . . . . . 85
Registering a Custom Paper Size . . . . . . . . . . . . . . . . . . . . . . . . . . . . . . . . . . . . . . . . . 87
Paper Loading Orientation . . . . . . . . . . . . . . . . . . . . . . . . . . . . . . . . . . . . . . . . . 88
Paper Jams . . . . . . . . . . . . . . . . . . . . . . . . . . . . . . . . . . . . . . . . . . . . . . . . . . . . 90
Precautions When Removing Jammed Paper . . . . . . . . . . . . . . . . . . . . . . . . . . . . . . . 91
Clearing Paper Jams (MP Tray Area). . . . . . . . . . . . . . . . . . . . . . . . . . . . . . . . . . . . . . 94
Clearing Paper Jams (Output Area, Right Cover Area, Duplex Unit Area, or Cassette 1/2/3/4 Area)
Clearing Paper Jams (Cassette 2/3 Cover Area). . . . . . . . . . . . . . . . . . . . . . . . . . . . 100
Checking Paper Jams in the Paper Cassette . . . . . . . . . . . . . . . . . . . . . . . . . . . . . . . 104
. . . . 95
Replacing the Toner Cartridges . . . . . . . . . . . . . . . . . . . . . . . . . . . . . . . . . . . . 107
When a Message Appears. . . . . . . . . . . . . . . . . . . . . . . . . . . . . . . . . . . . . . . . . . . . . 107
Precautions when Replacing Toner Cartridges . . . . . . . . . . . . . . . . . . . . . . . . . . . . . 109
Replacing Toner Cartridges . . . . . . . . . . . . . . . . . . . . . . . . . . . . . . . . . . . . . . . . . . . . 110
Canceling a Job . . . . . . . . . . . . . . . . . . . . . . . . . . . . . . . . . . . . . . . . . . . . . . . . 119
Confirming the Printer Features . . . . . . . . . . . . . . . . . . . . . . . . . . . . . . . . . . . . 121
Service Call Display . . . . . . . . . . . . . . . . . . . . . . . . . . . . . . . . . . . . . . . . . . . . . 123
If a Fixing Unit Error Is Displayed. . . . . . . . . . . . . . . . . . . . . . . . . . . . . . . . . . . . . . . . 124
If a Service Error or the Message "Power OFF and ON" Is Displayed. . . . . . . . . . . . 125
Message List . . . . . . . . . . . . . . . . . . . . . . . . . . . . . . . . . . . . . . . . . . . . . . . . . . 127
Turning the Printer On/Off
Turning On the Printer
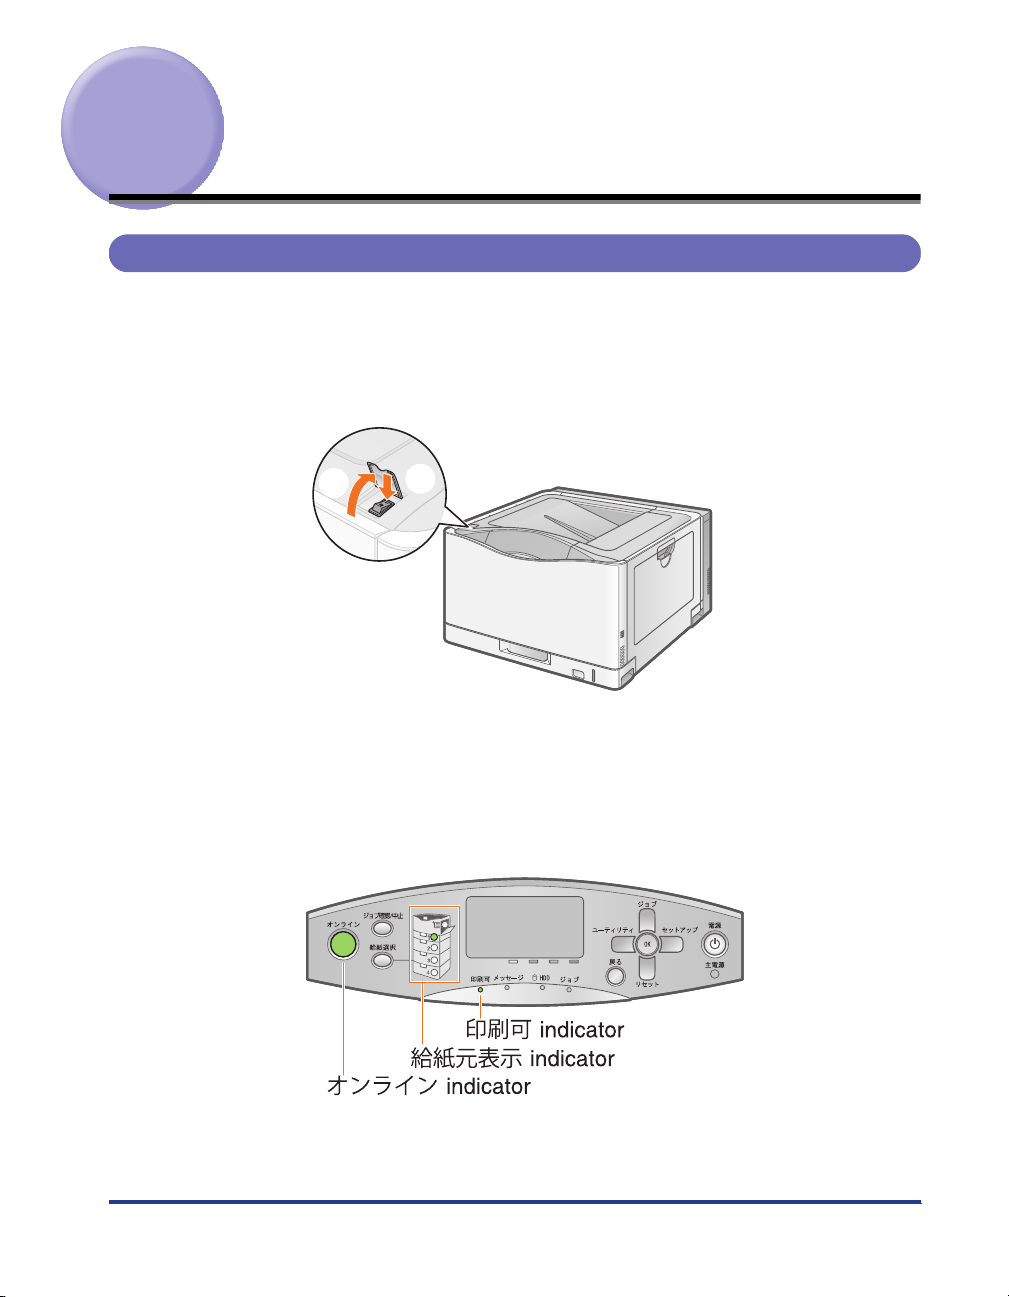
Turn the printer on.
1
(1) Open the power switch cover.
(2) Press "I" of the power switch.
(1)
The printer initiates a self-diagnostic test on the printer unit and optional
accessories.
If the self-diagnostic test result is normal
The
印刷可
indicator (green) are turned on, and then the printer is ready to print.
(2)
indicator (green),
オンライン
indicator (green), and
給紙元表示
3
IMPORTANT
Do not turn the printer on immediately after turning it off.
If you want to cycle the power of the printer, wait at least 10 seconds before turning
it on again.
If an error message appears in the display on the control panel
See "Message List," on p. 127.
When turning on the printer for the first time after installing the printer and
paper feeder
Read the following instructions.
Do not load paper in the paper cassette.
Make sure that the packing materials of the paper cassette are removed.
Turning Off the Printer
Check that the printer is not performing the following
1
operations.
Printing
While the printer is running a self-diagnostic test immediately after turning the
power on
While the
When any of the following messages appears
- <
- <
- <Initializing NVRAM...>
ジョブ
起動中です。
キャリブレーション中です。
indicator is on
>
>
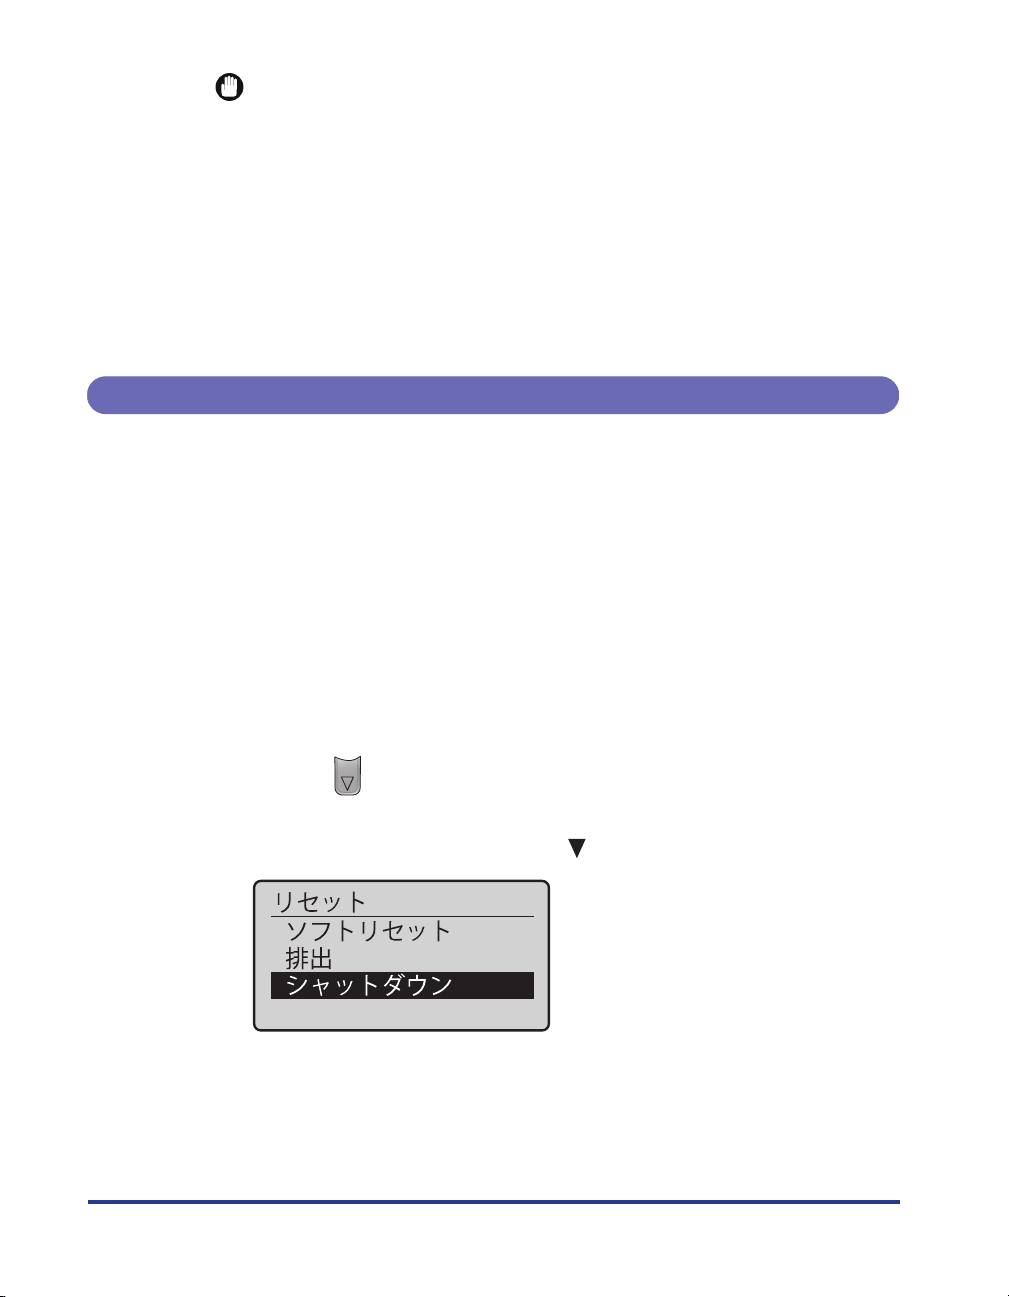
2
Press [ ] (
3
Select [
4
シシシシャャャャッッッットトトトダダダダウウウウンン
リリリリセセセセッッッットト
).
トト
] using [ ], and then press [OK].
ンン

IMPORTANT
If you perform a shutdown when a secured print job is in the hard disk
LBP9600C
The message <
If you want to execute a shutdown, perform a soft reset to delete the job, and then
perform a shutdown again.
If you do not want to execute a shutdown, press [ ] (
NOTE
When you are using WSD printing
The shutdown notifies the computer that the printer is turned off.
実行できませんでした。
> appears.
オンライン
).
4
Select [
The process to turn the printer off is performed, and the messages <
> and <
す。
appear.
5
Confirm the message.
When the printer is ready to be turned off, the message appears.
] using [ ], and then press [OK].
いい
ははははいい
シャットダウン実行中です。通知があるまで主電源を切らないでください
実行中で
>
5
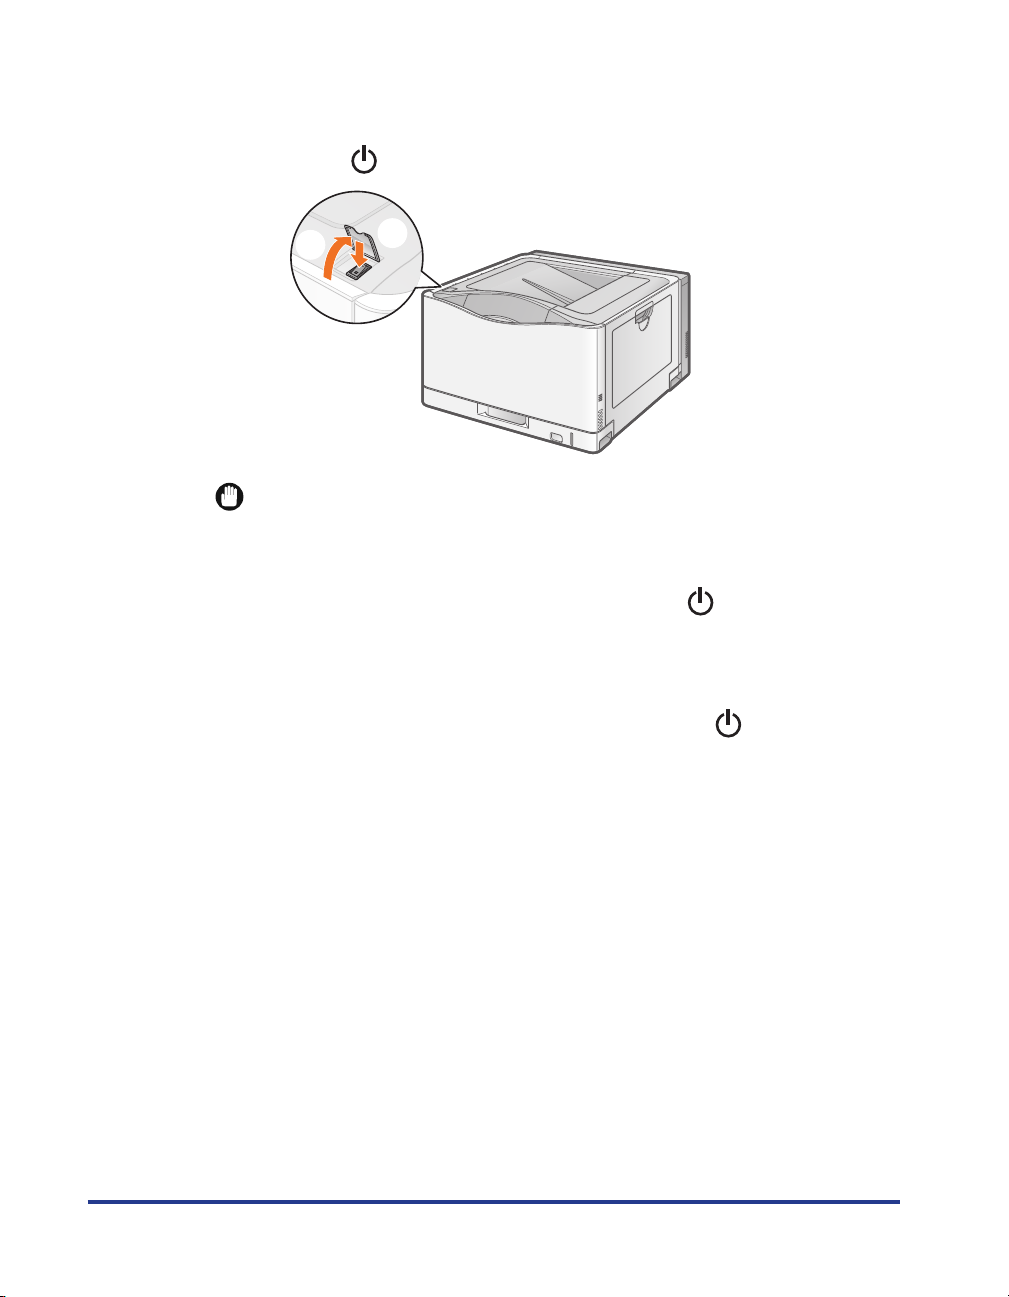
Turn the printer off.
6
(1) Open the power switch cover.
(2) Press " " of the power switch.
(1)
IMPORTANT
Precautions when turning off the printer
If you turn the printer off, all print data remaining in the printer memory will be
erased.
Power consumption when the power is off (when " " is pressed)
Even if the power of the printer is turned off, power is consumed only slightly while
the power plug is inserted into the AC power outlet.
To cut the power consumption completely, unplug the power plug from the AC
power outlet.
If the printer is not turned off immediately even after " " of the power
switch is pressed
The printer is cooling down the inside and stopping the printer processes.
Please wait a moment.
(2)
6
Online and Offline
When the printer can receive data from the computer and print the data, the printer
is in the state of "Online", and when the printer is disconnected with the computer
and cannot receive data, the printer is in the state of "Offline".
To perform the settings for each menu using the control panel, switch the printer
status as follows.
: The status that you can enter the menu
: The status that you cannot enter the menu
When the printer is online
セットアップ
給紙選択
リセット
ジョブ
ユーティリティ
* The
Menu *
Menu
Menu
Menu
Menu
ユーザメンテナンス
options cannot be specified when the printer is online.
Placing the Printer Online
When printing from the computer, the printer has to be online.
If not, place the printer online using the following procedure.
ンン
Press [ ] (
1
The
オンライン
IMPORTANT
If you cannot place the printer online
If an error is occurring in the printer, the printer does not come online.
Eliminate the cause of the error before you place the printer online.
オオオオンンンンラララライイイインン
indicator turns on, and the printer is online.
).
When the printer is offline
NOTE
About the
During Power Save Mode, the
online.
オオオオンンンンラララライイイインン
ンン
indicator during Power Save Mode
オンライン
indicator is off even when the printer is
7

Placing the Printer Offline
To configure the printer so that it does not receive data from the computer or
specify the settings for all the items in the
using the following procedure.
ンン
1
Press [ ] (
オンライン
The
IMPORTANT
About the automatic online function
The printer comes online automatically if left in the offline state for five minutes or
longer.
If an error is occurring in the printer, however, the printer does not come online
automatically.
オオオオンンンンラララライイイインン
indicator goes off, and the printer is offline.
).
セットアップ
menu, place the printer offline
8
Paper Requirements
Paper Size
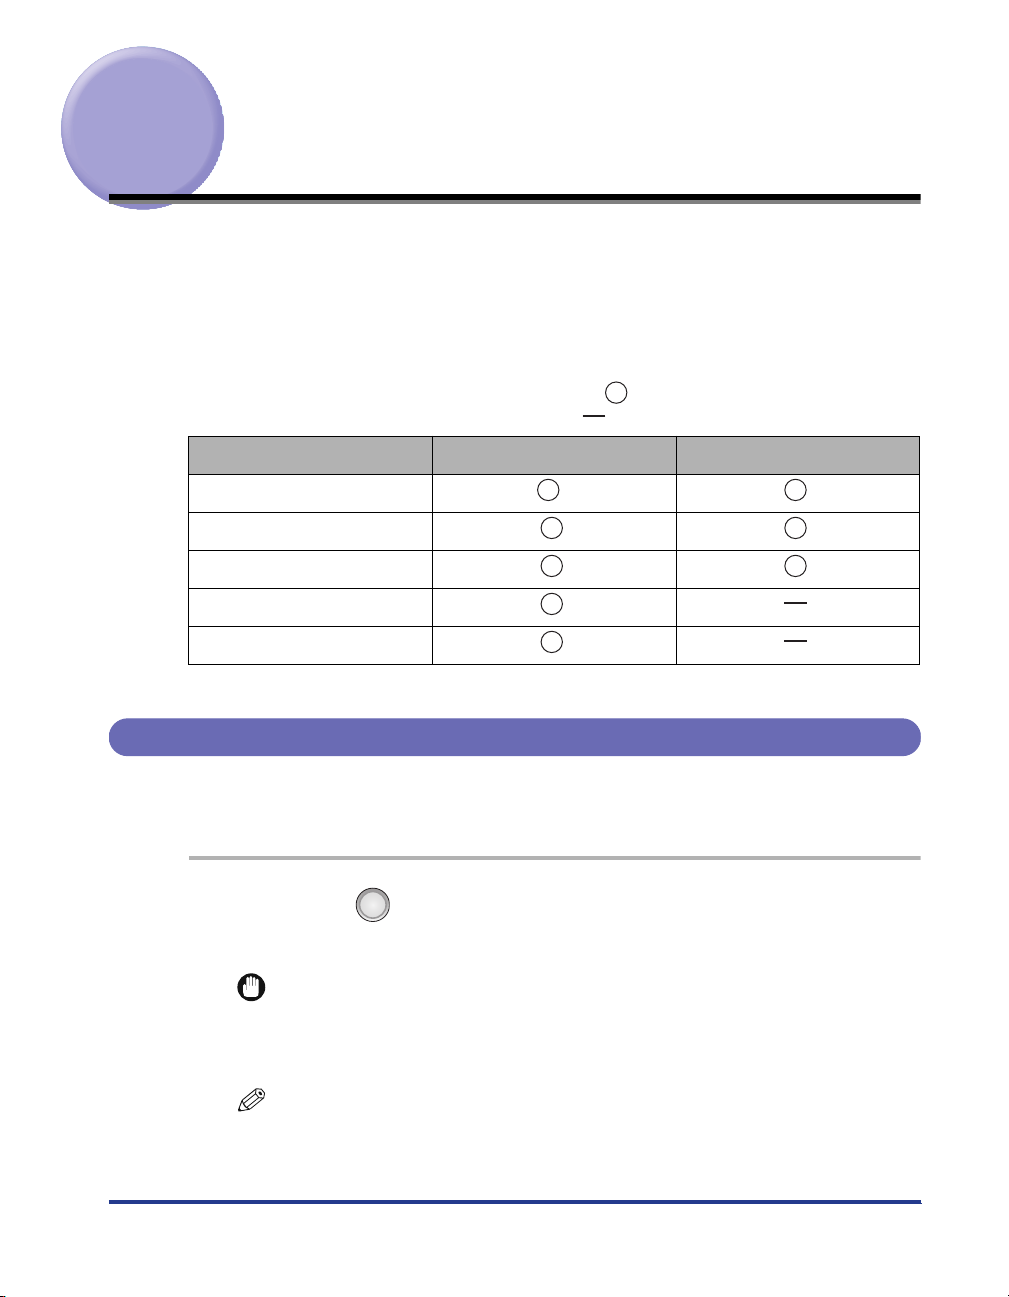
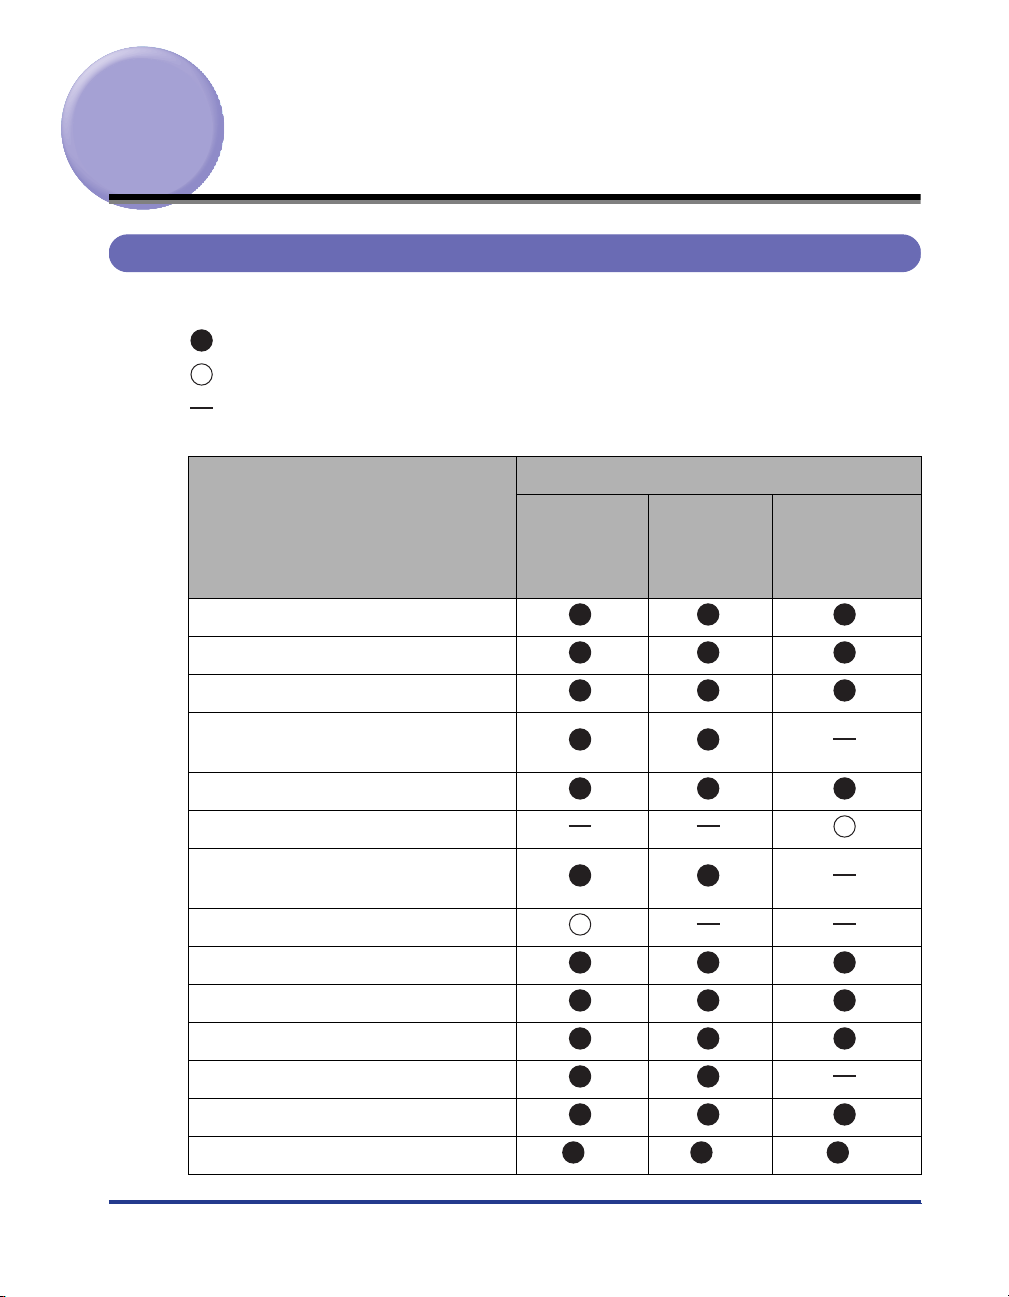
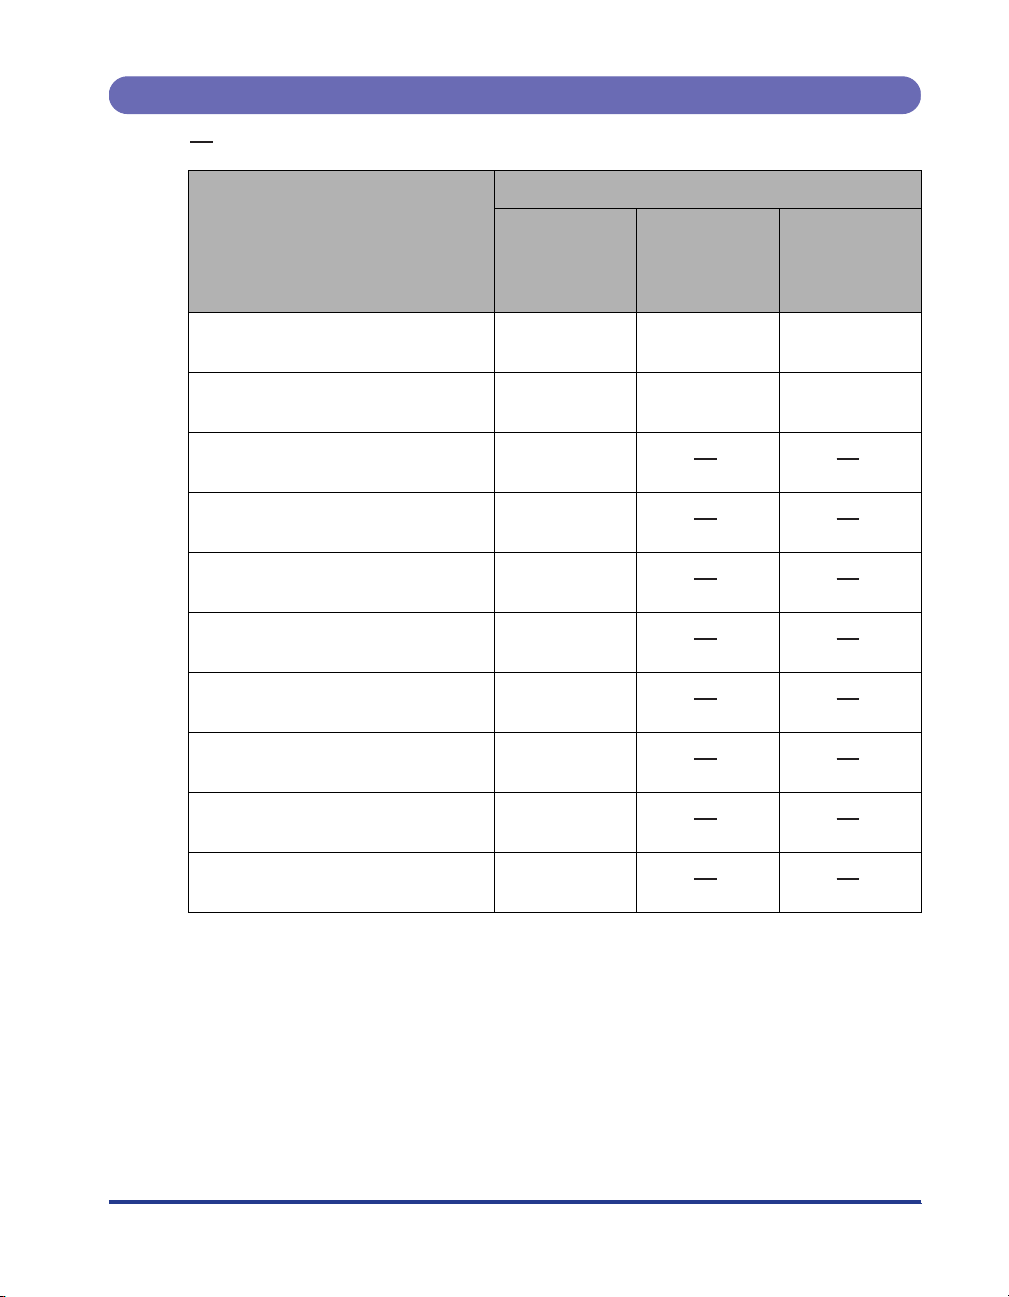
The following shows the paper sizes that can be used with this printer.
: The paper is available for 1-sided printing and automatic 2-sided printing.
: The paper is available for only 1-sided printing.
: The paper cannot be used for printing.
Paper Source
Paper Size
(short edge x long edge)
A3 (297.0 mm x 420.0 mm)
B4 (257.0 mm x 364.0 mm)
A4 Portrait*
A4 Landscape*
2
(210.0 mm x 297.0 mm)
3
(210.0 mm x 297.0
mm)
B5 Portrait*
A5 Portrait*
A5 Landscape*
2
(182.0 mm x 257.0 mm)
2
(148.0 mm x 210.0 mm)
3
(148.0 mm x 210.0
mm)
12 x 18 (12.00 in. x 18.00 in.)
Ledger (11.00 in. x 17.00 in.)
Legal (8.50 in. x 14.00 in.)
Letter Portrait*
Letter Landscape*
Executive Portrait*
2
(8.50 in. x 11.00 in.)
3
(8.50 in. x 11.00 in.)
2
(7.25 in. x 10.50 in.)
Custom paper size Portrait*
Multi-purpose
Tray
Cassette 1
Cassette 2,
Cassette 3*
Cassette 4*
1
,
1
(Optional)
2
4
5
*
*
7
*
8
*
9
*
9

†
Paper Source
Paper Size
(short edge x long edge)
Multi-purpose
Tray
Cassette 1
Cassette 2,
Cassette 3*
Cassette 4*
(Optional)
3
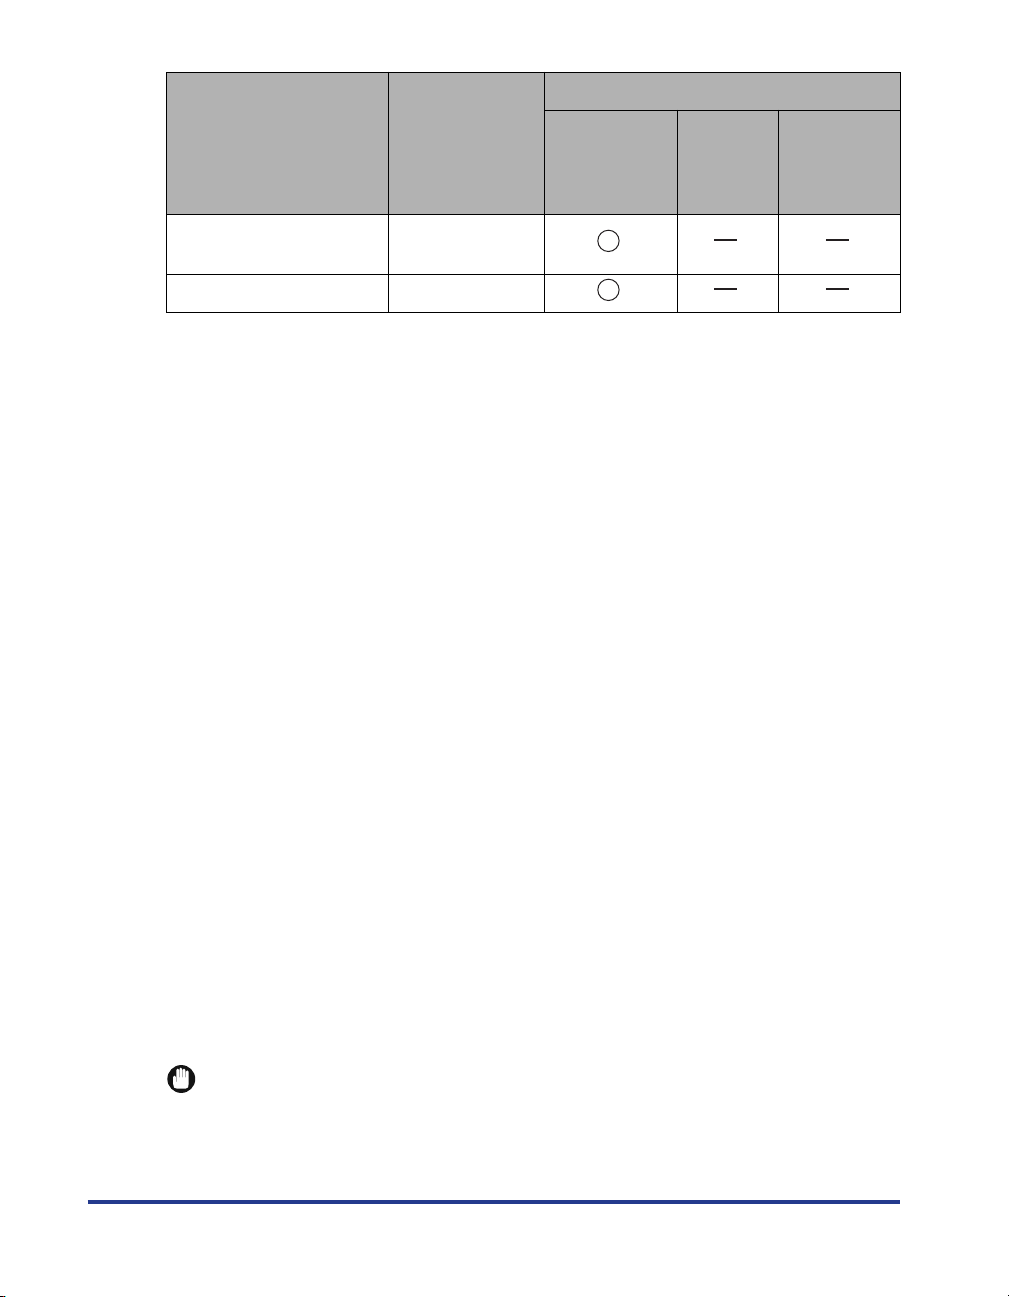
Custom paper size Landscape*
6
*
Long size *
Postcard Landscape*
3
(100.0 mm x
10
*
13
11
*
12
*
148.0 mm)
Reply postcard Landscape*
3
(148.0 mm
x 200.0 mm)
4 on 1 postcard Portrait*
2
(200.0 mm x
296.0 mm)
Envelope
YOUNAGA No. 3 Landscape*
3
(120.0
mm x 235.0 mm)
NAGAGATA No. 3 Landscape*
3
(120.0 mm x 235.0 mm)
KAKUGATA No. 2 Landscape*
3
(240.0 mm x 332.0 mm)
1
*
Cassette 3 and Cassette 4 can be used only for LBP9600C.
2
*
Portrait: The short edges of the paper are parallel to the front side of the printer.
3
*
Landscape: The long edges of the paper are parallel to the front side of the printer.
4
*
Can be loaded only when the LIPS LX printer driver is used.
5
*
Automatic 2-sided printing can be performed on the custom size paper whose short edges are 148.0 to 297.0 mm
and long edges are 182.0 to 297.0 mm.
6
Automatic 2-sided printing can be performed on the custom size paper whose short edges are 148.0 to 297.0 mm
*
and long edges are 182.0 to 450.0 mm.
7
*
The custom size paper whose short edges are 127.0 to 297.0 mm and long edges are 127.0 to 297.0 mm can be
loaded.
8
*
The custom size paper whose short edges are 182.0 to 297.0 mm and long edges are 182.0 to 297.0 mm can be
loaded.
9
*
The custom size paper whose short edges are 148.0 to 297.0 mm and long edges are 210.0 to 297.0 mm can be
loaded.
10
*
The custom size paper whose short edges are 76.2 to 320.0 mm and long edges are 127.0 to 457.2 mm can be
loaded.
When the paper whose short edges are more than 312 mm is used, however, streaks may appear on both sides of
the paper.
11
The custom size paper whose short edges are 148.0 to 297.0 mm and long edges are 182.0 to 431.8 mm can be
*
loaded.
The paper whose short edges are 100.0 to 147.9 mm can be loaded by using the optional small size paper
adjuster.
12
The custom size paper whose short edges are 210.0 to 297.0 mm and long edges are 210.0 to 431.8 mm can be
*
loaded.
13
*
The long-size paper whose short edges are 210.0 to 297.0 mm and long edges are 457.3 to 1,200.0 mm can be
loaded.
1
,
1
10

IMPORTANT
About print speed
The print speed may drop depending on the settings for the paper size, paper type,
orientation, and number of copies.
When continuously printing paper whose width is 279.4 mm (Letter size) or less, the
print speed may drop gradually.
Printing speed drops in the following cases.
- When printing is performed with [
スーパーファイン(1200 dpi)
- When printing is performed on paper whose width is more than 300 mm
Paper Type
The following shows the paper types that can be used with this printer.
: The paper is available for 1-sided printing and automatic 2-sided printing.
: The paper is available for only 1-sided printing.
: The paper cannot be used for printing.
] in [
解像度
] selected
Paper Type
2
2
2
2
2
2
Plain
paper
Heavy
paper
75 to 90 g/m
60 to 74 g/m
*2
91 to 105 g/m
106 to 128 g/m
129 to 163 g/m
164 to 216 g/m
Tr ansparency
(black-and-white printing
only)
Label [
Coated paper
100 to 129 g/m
130 to 160 g/m
161 to 220 g/m
2
2
2
カカカカセセセセッッッットトトトNN
[
NN
((((NNNN====1111、、、、2222、、、、3333、、
4444))))用用用用紙紙紙紙種種種種類類
the
類類
]*
セセセセッッッットトトトアアアアッッッッププ
Menu
]
[
普通紙
[
ラフ紙
[
普通紙 L
[
普通紙 H
[
ラフ紙
[
厚紙 1
[
厚紙 2
[
厚紙 3
[
OHP フィルム
ラベル用紙
[
コート紙 1
[
コート紙 2
[
コート紙 3
3
]*
]
]
3
]*
]
]
]
]
]
]
]
、、
1
in
Multi-purpose
ププ
]
Paper Source
Cassette 2,
Tray
Cassette 1
Cassette 3*
Cassette 4*
1
,
1
(Optional)
11
Paper Type
カカカカセセセセッッッットトトトNN
[
NN
((((NNNN====1111、、、、2222、、、、3333、、
4444))))用用用用紙紙紙紙種種種種類類
the
類類
]* 1 in
セセセセッッッットトトトアアアアッッッッププ
Menu
、、
Multi-purpose
ププ
Tray
Paper Source
Cassette 1
Cassette 2,
Cassette 3*
Cassette 4*
(Optional)
1
,
1
Postcard/Reply postcard/
4 on 1 postcard
Envelope [
1
*
Cassette 3 and Cassette 4 can be used only for LBP9600C.
2
*
Recycled paper can be used as plain paper.
3
*
Specify [
paper (75 to 105 g/m
Plain paper
] for this item when a paper jam occurs or when you want to improve the fixation on printing coarse
ラフ紙
2
) with [
普通紙
This printer can print plain paper (60 to 105 g/m
Standard paper size: A3, B4, A4, B5, A5, 12 x 18, Ledger (11 x 17), Legal, Letter,
はがき
[
封筒
] or [
]
]
普通紙 H
] selected.
†
†
†
2
) of the following sizes.
Executive
Custom paper size: Short edges 76.2 to 320.0 mm; Long edges 127.0 to 457.2 mm
Long size: Short edges 210.0 to 297.0 mm; Long edges 457.3 to 1,200.0 mm
The following plain paper is available for automatic 2-sided printing.
- A3, B4, A4, B5, A5, Ledger (11 x 17), Legal, Letter, or Executive size paper
- Custom size paper whose short edges are 148.0 to 297.0 mm and long edges are
182.0 to 450.0 mm
Recycled paper can be used as plain paper.
Heavy paper
This printer can print heavy paper (106 to 216 g/m
2
) of the following sizes.
12
Standard paper size: A3, B4, A4, B5, A5, 12 x 18, Ledger (11 x 17), Legal, Letter,
Executive
Custom paper size: Short edges 76.2 to 320.0 mm; Long edges 127.0 to 457.2 mm
Long size: Short edges 210.0 to 297.0 mm; Long edges 457.3 to 1,200.0 mm
The following heavy paper (106 to 163 g/m
2
) is available for automatic 2-sided printing.
- A3, B4, A4, B5, A5, Ledger (11 x 17), Legal, Letter, or Executive size paper
- Custom size paper whose short edges are 148.0 to 297.0 mm and long edges are
182.0 to 450.0 mm
IMPORTANT
About print speed
The print speed drops when printing on heavy paper.

Transparency
This printer can print A4 and Letter size transparencies.
IMPORTANT
Precautions when using transparencies
Tr ansparencies can only be printed in black and white.
Thoroughly fan the transparencies before loading them as they may stick to each other.
Ta ke care not to mark or stain the printing surface of the transparencies with
fingerprints, dust, or oil.
The print speed drops when printing on transparencies.
Label
This printer can print labels of the following sizes.
However, it is recommended to use A4 or Letter size labels for the optimum print quality.
Standard paper size: A3, B4, A4, B5, A5, 12 x 18, Ledger (11 x 17), Legal, Letter,
Executive
Custom paper size: Short edges 76.2 to 320.0 mm; Long edges 127.0 to 457.2 mm
Long size: Short edges 210.0 to 297.0 mm; Long edges 457.3 to 1,200.0 mm
IMPORTANT
Precautions when using labels
Using the following types of labels may result in paper jams that are difficult to clear or
may result in damage to the printer.
-Peeled labels or partly used labels
- Coated labels that are easily peeled off from the backing sheet
- Labels with uneven adhesive
The print speed drops when printing labels.
NOTE
When printing labels
Depending on the label type, the output paper may curl excessively. In this case, perform
printing using either of the following methods.
Taking out one sheet at a time each time it is output
Changing the loading orientation of the labels before printing
- If the labels curl when they are loaded in portrait orientation, load them in landscape
orientation.
- If the labels curl when they are loaded in landscape orientation, load them in portrait
orientation.
Coated paper
This printer can print coated paper (100 to 220 g/m
2
) of the following sizes.
However, it is recommended to use A3, A4, or Letter size coated paper for the optimum
print quality.
Standard paper size: A3, B4, A4, B5, A5, 12 x 18, Ledger (11 x 17), Legal, Letter,
Executive
Custom paper size: Short edges 76.2 to 320.0 mm; Long edges 127.0 to 457.2 mm
Long size: Short edges 210.0 to 297.0 mm; Long edges 457.3 to 1,200.0 mm
13

The following coated paper (100 to 160 g/m
A3, B4, A4, B5, A5, Ledger (11 x 17), Legal, Letter, or Executive size paper
Custom size paper whose short edges are 148.0 to 297.0 mm and long edges are 182.0
to 450.0 mm
2
) is available for automatic 2-sided printing.
14 †
IMPORTANT
Precautions when using coated paper
The print speed drops when printing on coated paper.
Postcard
This printer can print postcards, reply postcards, and 4 on 1 postcards.
IMPORTANT
Precautions when using postcards
Using the following types of postcard may deteriorate print quality or result in paper
jams.
- Inappropriate size postcards other than Postcard, Reply postcard, and 4 on 1
postcard
- Creased reply postcard
-Postcards and reply postcards for ink jet printers
If the postcards are curled, flatten the curls by warping them in the opposite direction
before loading them.
The print speed drops when printing on postcards.
Envelope
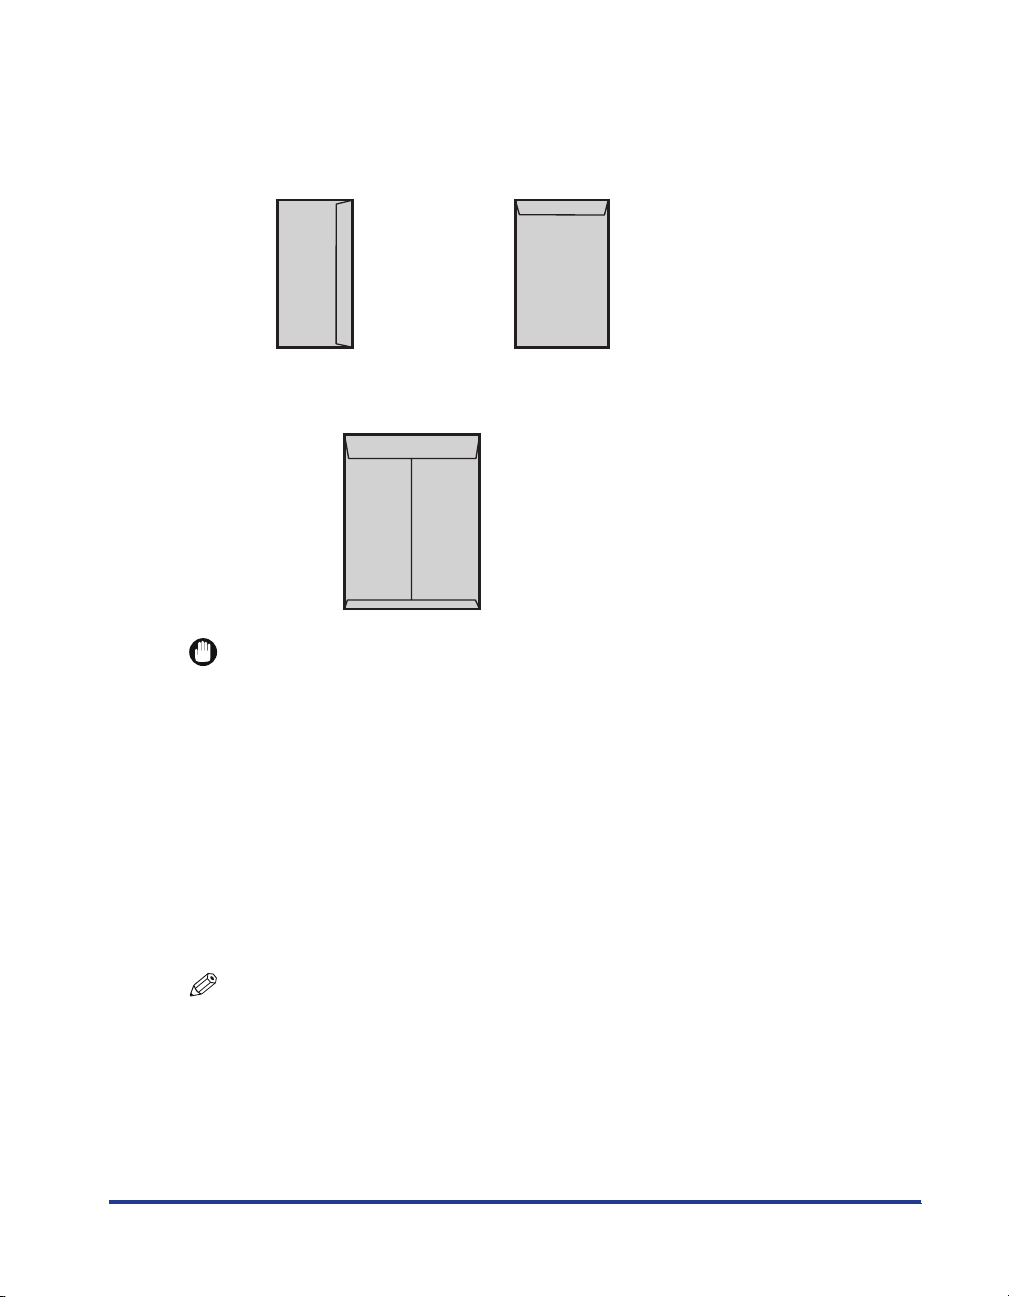
This printer can print the following envelopes.
YOUNAGA No. 3
(120 mm x 235 mm )
NAGAGATA No. 3
(120 mm x 235 mm)
KAKUGATA No. 2
(240 mm x 332 mm)
IMPORTANT
Precautions when using envelopes
Using the following types of envelopes may result in paper jams that are difficult to clear
or may result in damage to the printer.
-Envelopes with fasteners or snaps
-Envelopes with address windows
-Envelopes with adhesive on the surface
-Wrinkled or creased envelopes
-Poorly manufactured envelopes in which the glued parts are uneven
- Irregularly-shaped envelopes
Before loading envelopes, flatten the stack of envelopes to release any remaining air,
and press the fold lines along the edges tight.
Do not print on the reverse side (glued side) of envelopes.
The print speed drops when printing on envelopes.
NOTE
When printing on envelopes
They may become creased.
15
†
†
Printable Area
NOTE
If you want to extend the printable area
Specify the following settings in the printer driver.
1. Click [Finishing Details] in the [Finishing] sheet.
2. Select the [Print with Upper Left of Sheet as Starting Point] check box.
The edges of the printout may be partly missing depending on the property of the
document to be printed.
If the paper width exceeds 315 mm
The right and left margins increase respectively as follows.
Paper width
315 mm 5 mm
316 mm 5.5 mm
317 mm 6 mm
318 mm 6.5 mm
319 mm 7 mm
320 mm 7.5 mm
The right and left margins may not be even.
Margin
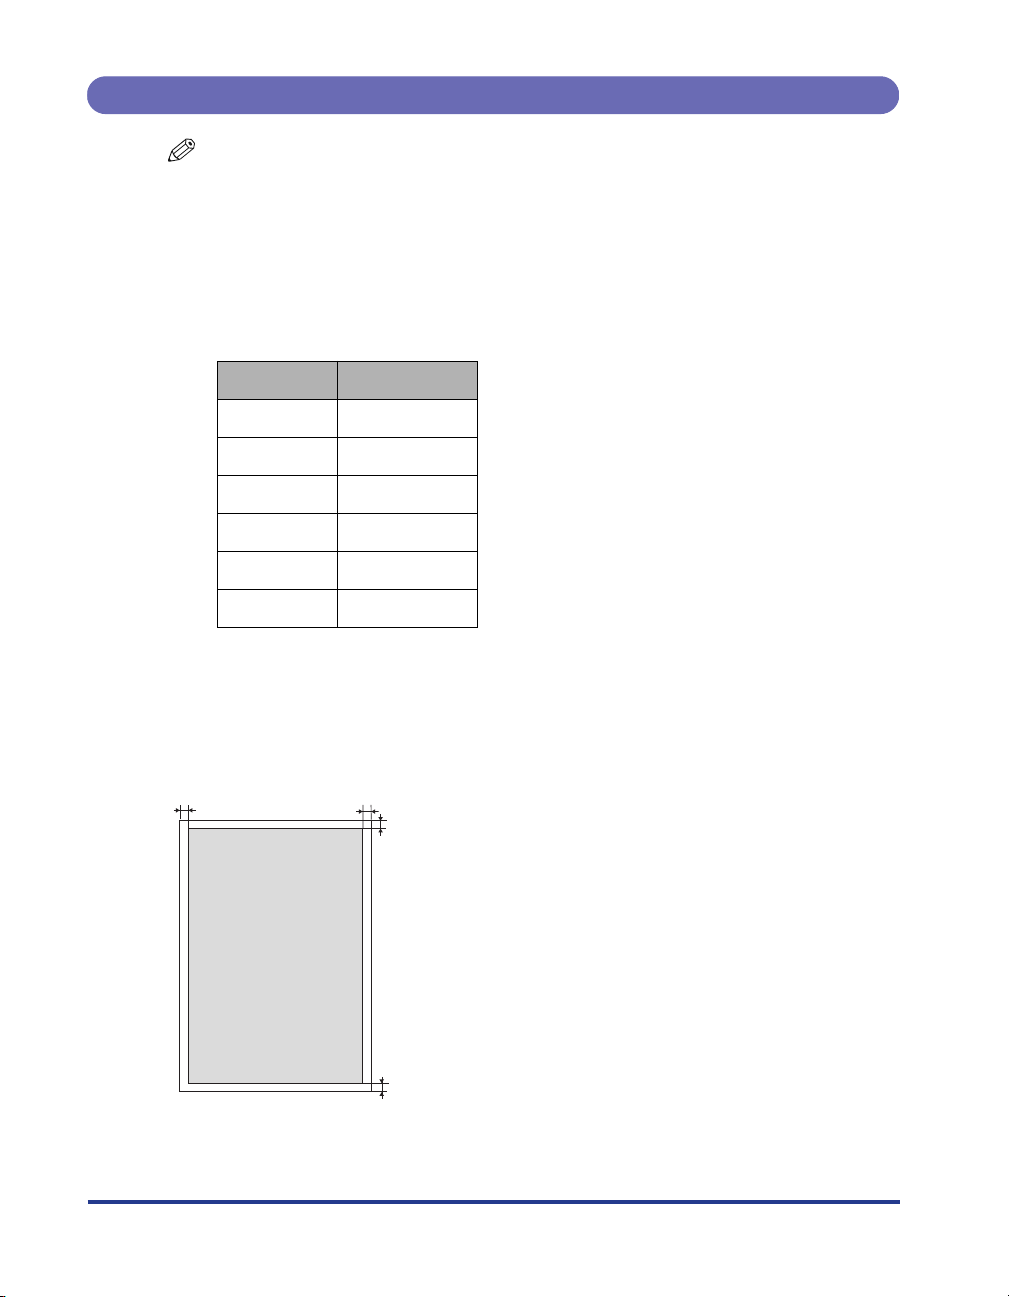
Plain Paper, Heavy Paper, Transparencies, Labels, and Coated Paper
You can print in the area up to 5 mm of the edges of the paper.
5 mm5 mm
5 mm
16
5 mm
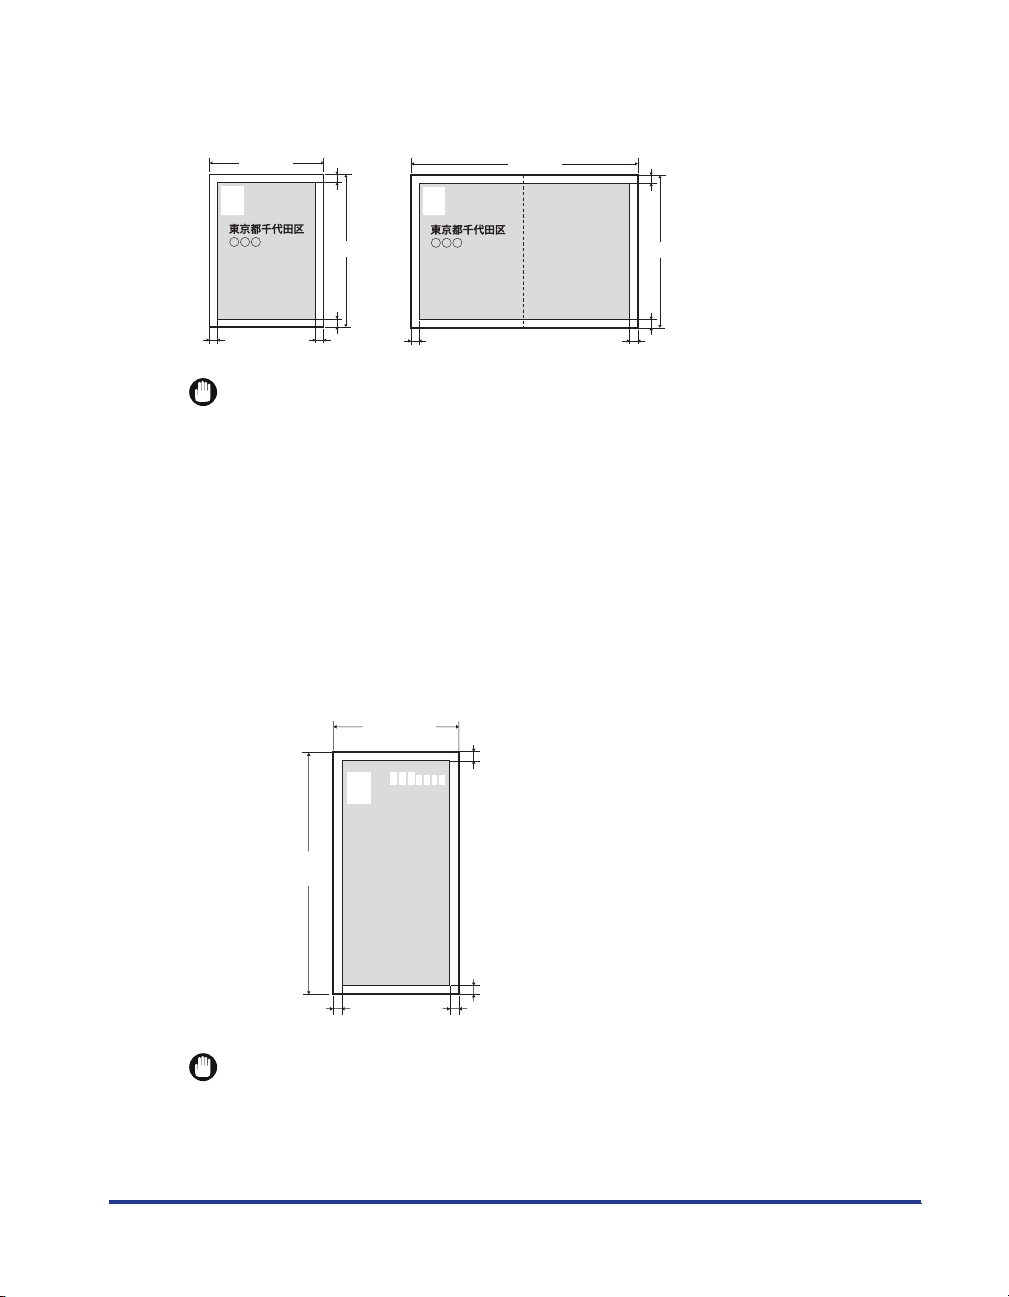
Postcard/Reply Postcard/4 on 1 Postcard
You can print in the area up to 5 mm of the edges of the postcards.
100 mm
123-4567
5 mm
148 mm
5 mm
5 mm5 mm
123-4567
200 mm
5 mm
148 mm
5 mm
5 mm5 mm
IMPORTANT
When printing on postcards
It is recommended that you configure the document to print the data smaller than the
printable area.
When printing data in the entire printable area, you may not be able to obtain the
optimum print quality.
Envelope
This printer can print on the following area.
You may have to change the printable area before printing, depending on the
application you use.
(Sample: YOUNAGA No. 3/NAGAGATA No. 3)
120 mm
10 mm
235 mm
10 mm
10 mm10 mm
IMPORTANT
When a part of the printed zip code is missing
Specify the following settings in the printer driver.
1. Click [Finishing Details] in the [Finishing] sheet.
2. Select the [Print with Upper Left of Sheet as Starting Point] check box.
17

Paper Which Requires Attention Before Use
Using the following types of paper may cause influence to the printout results or
printer in some cases.
Paper That Was Stored Poorly
Creased or folded paper
To rn or damaged paper
Wrinkled paper
Curled paper
Wet or moist paper
Paper with rough edges
Irregularly-shaped paper
Paper with Holes or Perforations
Paper with binding holes
Paper with perforations
Paper with Adhesive or a Special Coating
Heat-sensitive paper
Paper with adhesive
Carbon paper
Treated color paper
Specially coated paper (coated paper for ink jet printers, etc.)
18
Previously Printed Paper
Paper that has already been printed by a copy machine or another printer (The reverse
side of the paper is also not usable. Using the multi-purpose tray, however, you can
perform 2-sided printing manually on the other side of paper previously printed by this
printer. You cannot print on the printed side again.)
Paper That Is Difficult for Toner to Adhere to
Paper with rough surfaces
Paper containing thick fibers
Paper with an extremely rough or smooth surface
Paper that is thicker or thinner than the specified usable paper
See "Paper Type," on p. 11.
IMPORTANT
About paper with staples, clips, ribbons or tape
This kind of paper may result in the printer malfunction or damage to the printer.
About paper that contains ink that melts, burns, evaporates or emits harmful
gases at or lower than the heating temperature of the fixing unit
This kind of paper may result in the printer malfunction or damage to the printer.
Paper Capacity of Paper Source
: The paper source cannot be used.
Paper Source
Paper Type
Plain paper (Ex. 64 g/m
Heavy paper (Ex. 128 g/m
Heavy paper (Ex. 163 g/m
2
)
2
)
2
)
Tr ansparency (black-and-white
printing only)
Label
Coated paper
Postcard
Reply postcard
Multi-purpose
Tray
Approx. 100
sheets
Approx. 80
sheets
Approx. 50
sheets
Approx. 50
sheets
Approx. 40
sheets
Approx. 50
sheets
Approx. 50
sheets
Approx. 50
sheets
Cassette 1
Approx. 250
sheets
Approx. 200
sheets
Cassette 2,
Cassette 3*,
Cassette 4*
(Optional)
Approx. 550
sheets
Approx. 400
sheets
4 on 1 postcard
Envelope
* Cassette 3 and Cassette 4 can be used only for LBP9600C.
Approx. 50
sheets
Approx. 10
sheets
19
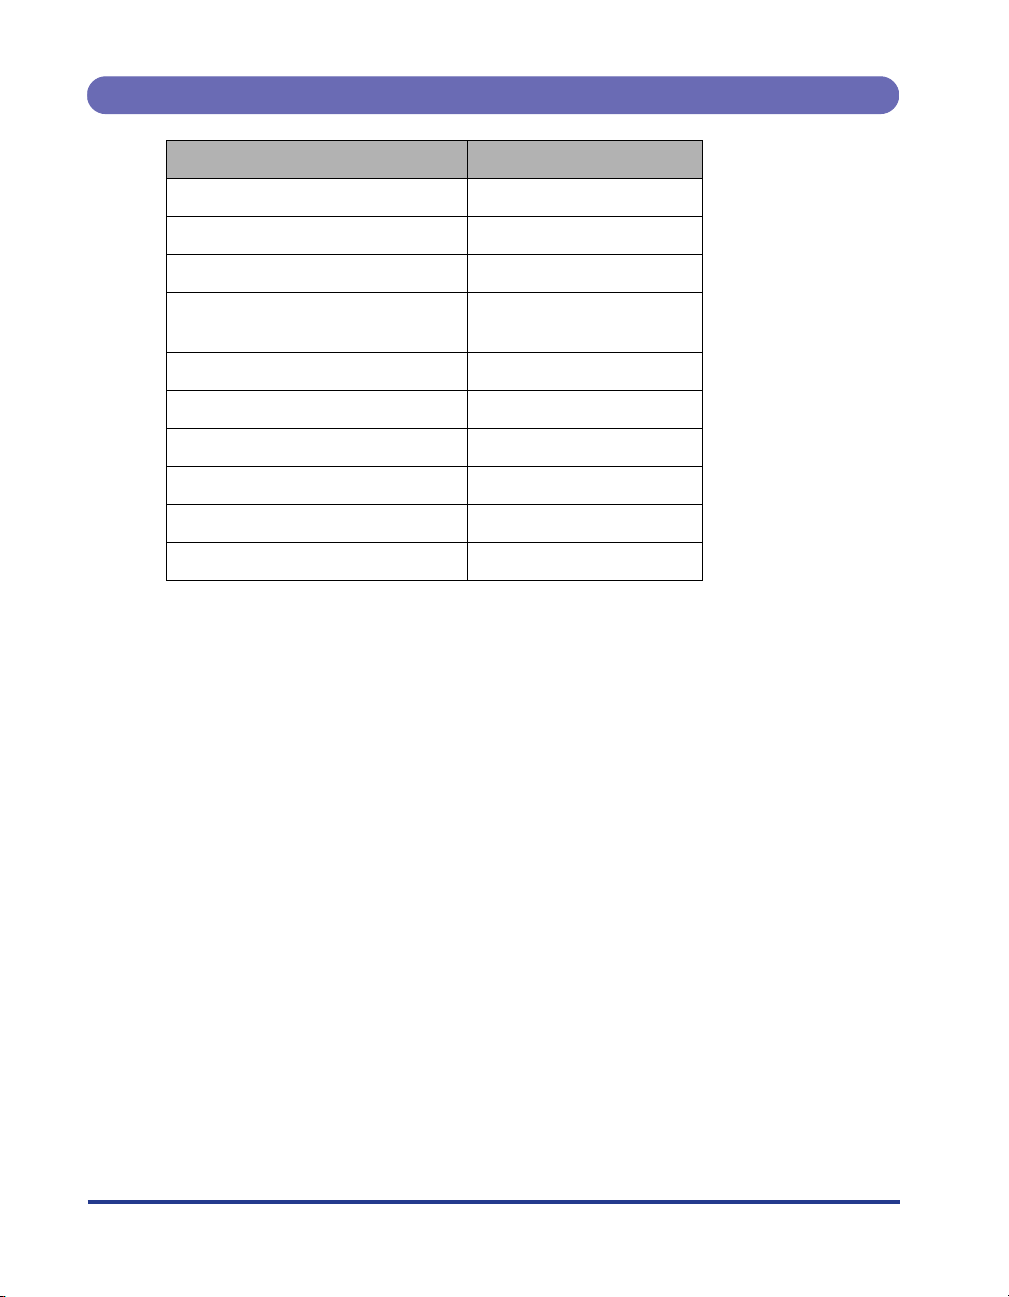
Paper Capacity of the Output Tray
Paper Type Paper Capacity*
Plain paper (Ex. 64 g/m2) Approx. 250 sheets*
1
2
Heavy paper (Ex. 128 g/m2) Approx. 100 sheets
Heavy paper (Ex. 163 g/m
Tr ansparency (black-and-white
printing only)
2
) Approx. 40 sheets
Approx. 50 sheets
Label Approx. 40 sheets
Coated paper Approx. 50 sheets
Postcard Approx. 50 sheets
Reply postcard Approx. 50 sheets
4 on 1 postcard Approx. 50 sheets
Envelope Approx. 10 sheets
*1Actual paper capacity varies depending on the installation environment or paper type.
2
*
When the paper size is Legal, the paper capacity is approximately 150 sheets.
20

Loading Standard Size Paper (Other Than Postcards and Envelopes)
Loading Standard Size Paper in Cassette 1
The following standard size paper can be loaded in the supplied paper cassette
(Cassette 1).
Paper Type Paper Size
A3 (297.0 mm x 420.0 mm)
B4 (257.0 mm x 364.0 mm)
A4 (210.0 mm x 297.0 mm)
2
Plain paper (60 to 105 g/m
Heavy paper (106 to 128 g/m
IMPORTANT
Detailed information about usable paper
See "Paper Requirements," on p. 9.
)
B5 (182.0 mm x 257.0 mm)
A5 (148.0 mm x 210.0 mm)
2
)
Ledger (11.00 in. x 17.00 in.)
Legal (8.50 in. x 14.00 in.)
Letter (8.50 in. x 11.00 in.)
Executive (7.25 in. x 10.50 in.)
Loading Paper in the Paper Cassette
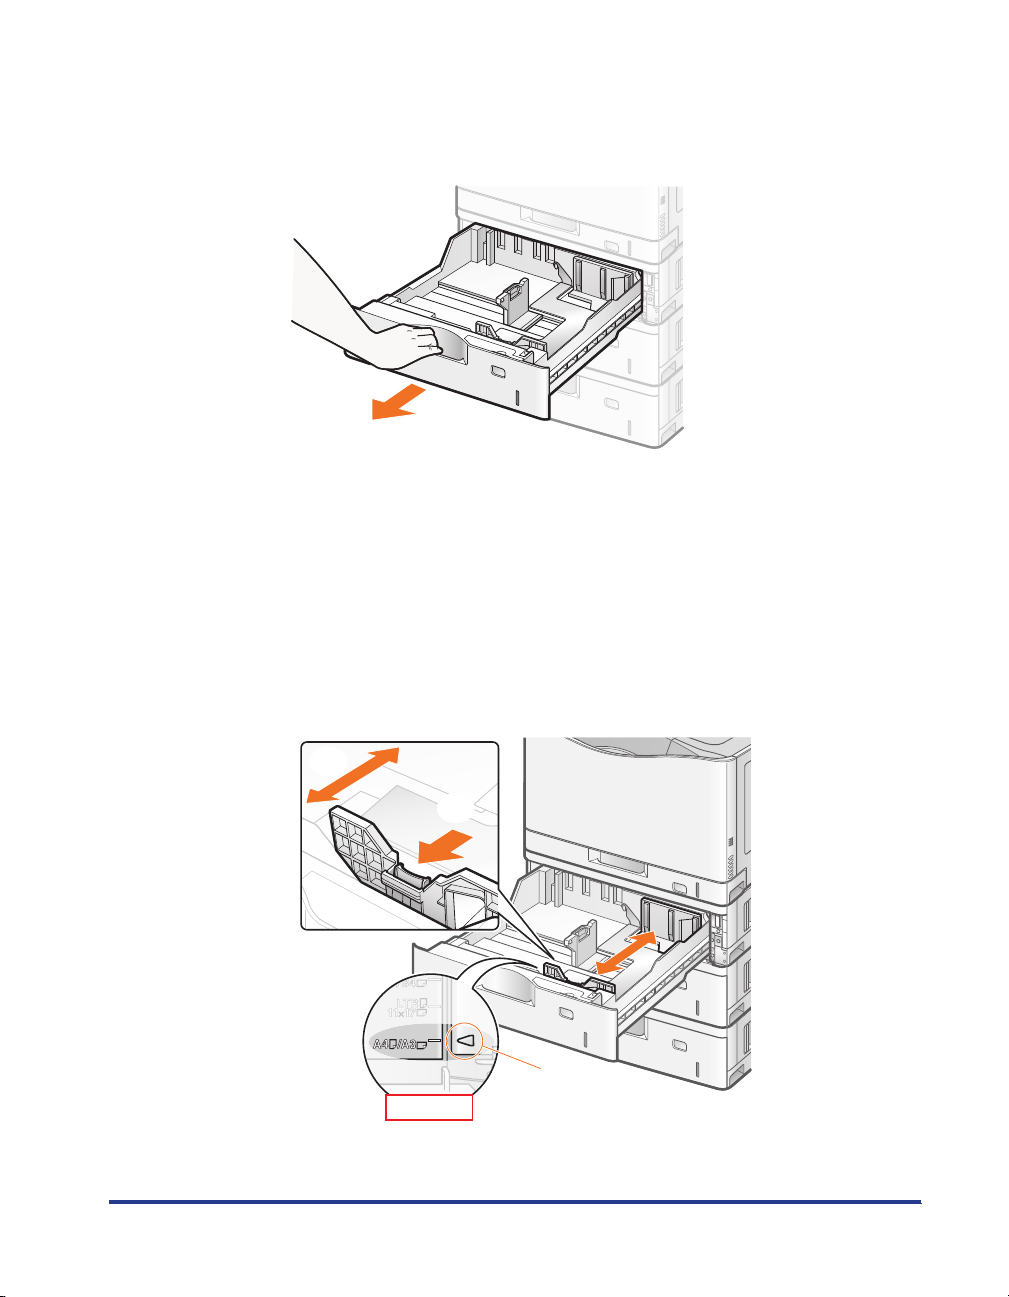
1
Pull out the paper cassette until it stops.
21
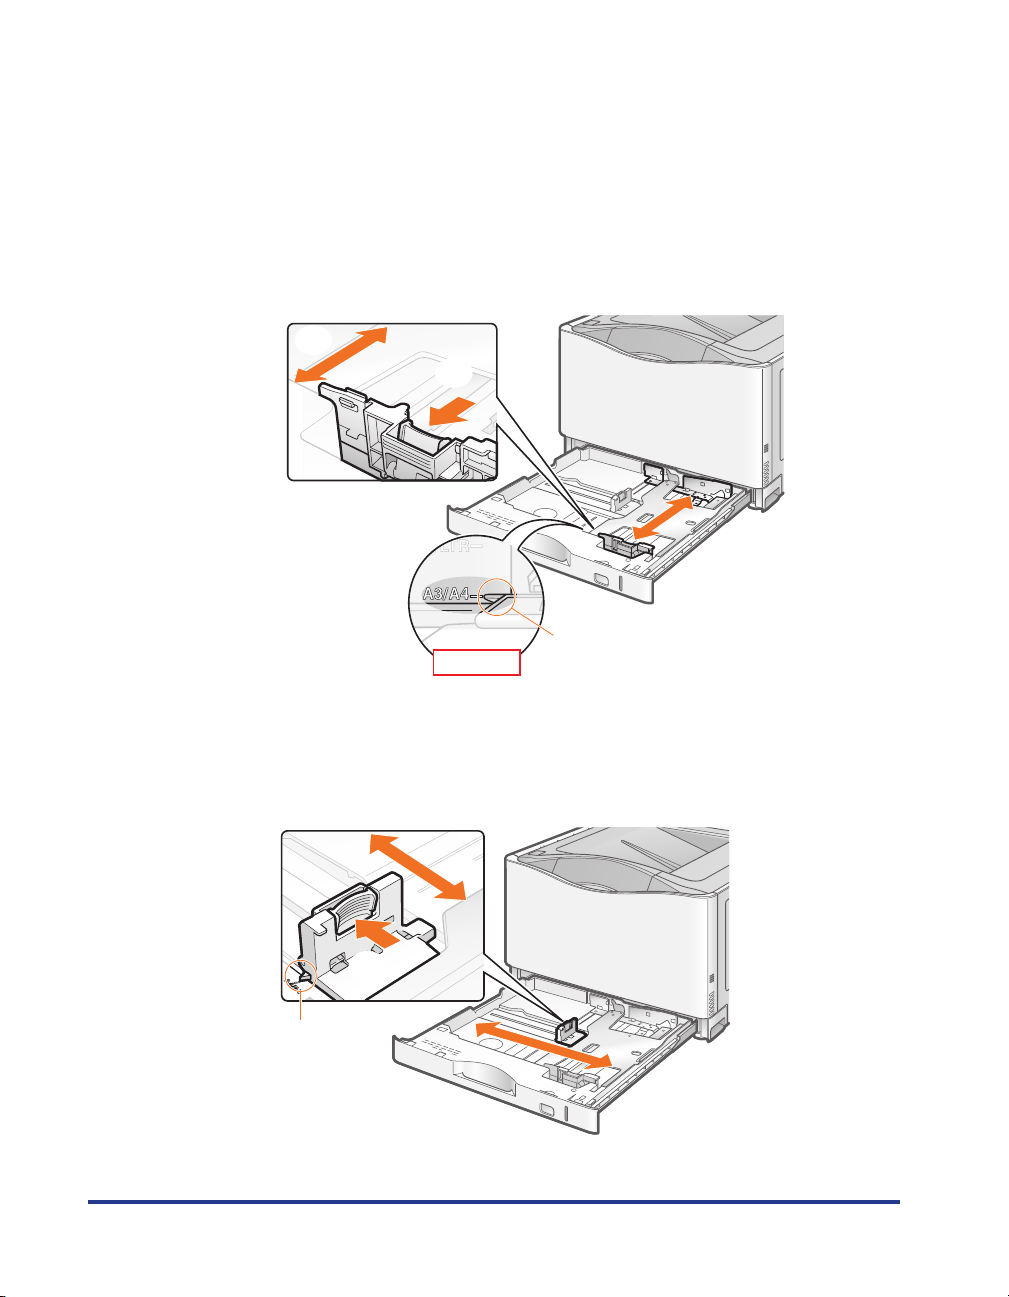
2
Slide the paper guides to the position of the size of the paper
to be loaded.
Slide the side paper guides.
(1) Hold the lock release lever.
(2) Slide the paper guides to the position of the size of the paper to be loaded.
† Align the position of (A) with the size mark of the paper to be loaded.
† The side paper guides move together.
(2)
(1)
(A)
Top Vi ew
22
Slide the rear paper guide.
(1) Hold the lock release lever.
(2) Slide the paper guide to the position of the size of the paper to be loaded.
† Align the position of (A) with the size mark of the paper to be loaded.
(2)
(1)
(A)
NOTE
Size abbreviation on the paper guides
Paper Size Paper Guide
Ledger 11 x 17
Legal LGL
Letter LTR
Executive EXEC
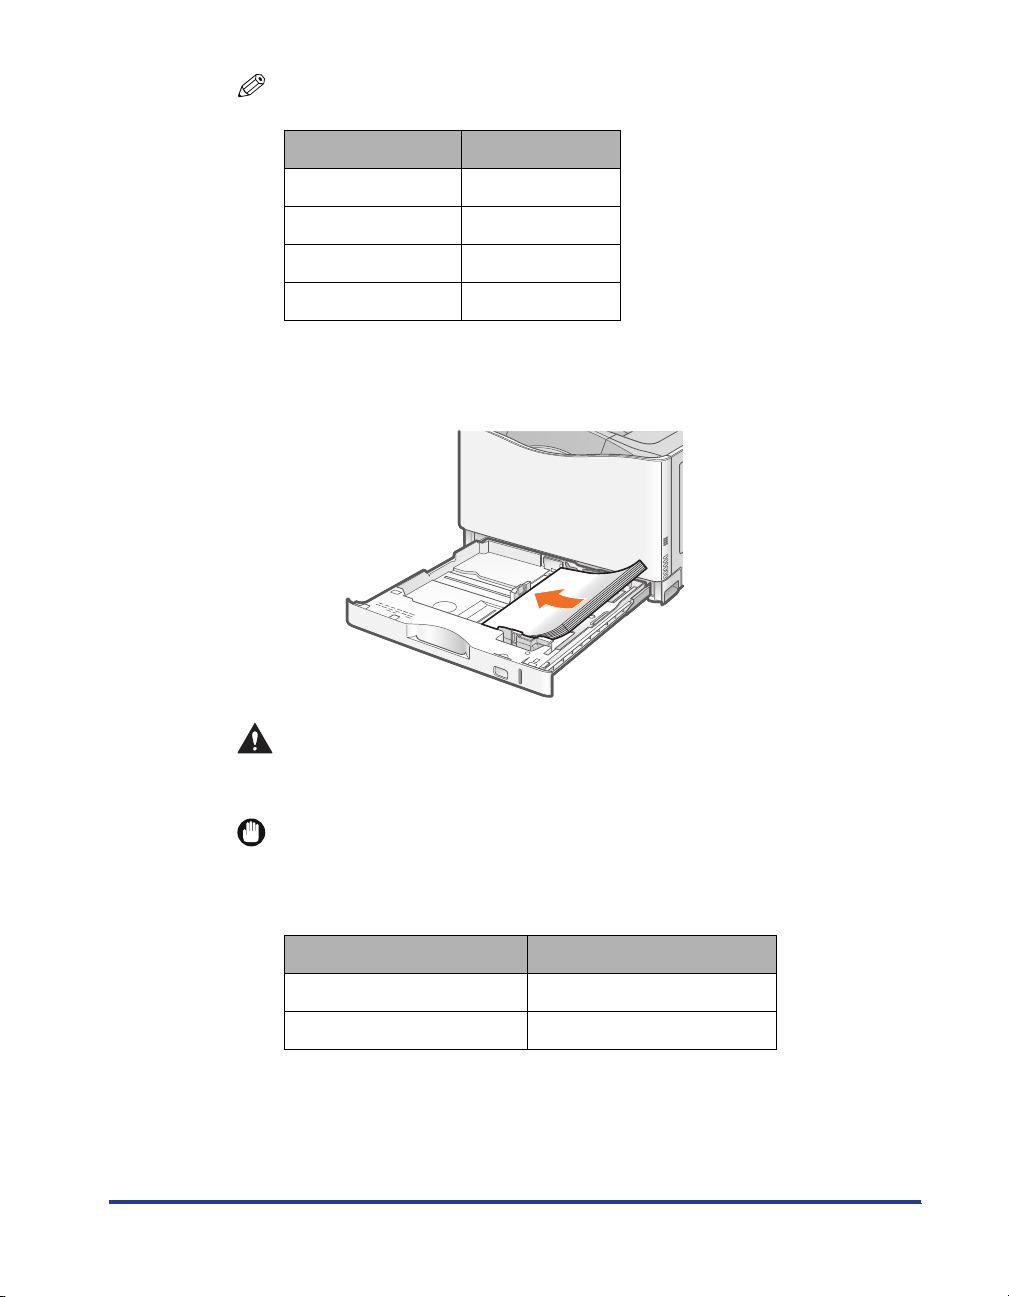
3
Load paper so that the edges of the paper stack are aligned
with the rear paper guide.
CAUTION
Be careful when handling paper.
Handle paper carefully not to cut your hands with the edges of the paper.
IMPORTANT
Be sure to check the position of the paper guides.
If the paper guide is set at a wrong position, this may result in misfeeds.
Paper cassette capacity
Paper Type Paper Capacity
Plain paper (Ex. 64 g/m
Heavy paper (Ex. 128 g/m2) Approx. 200 sheets
When using paper that has been poorly cut
If you use paper that has been poorly cut, multiple sheets of paper may be fed at
once. In this case, fan the paper thoroughly, and then align the edges of the stack
properly on a hard, flat surface.
2
) Approx. 250 sheets
23
NOTE
When printing paper with a letterhead or logo
See "Paper Loading Orientation" (p. 88) and load the paper in the proper
orientation.
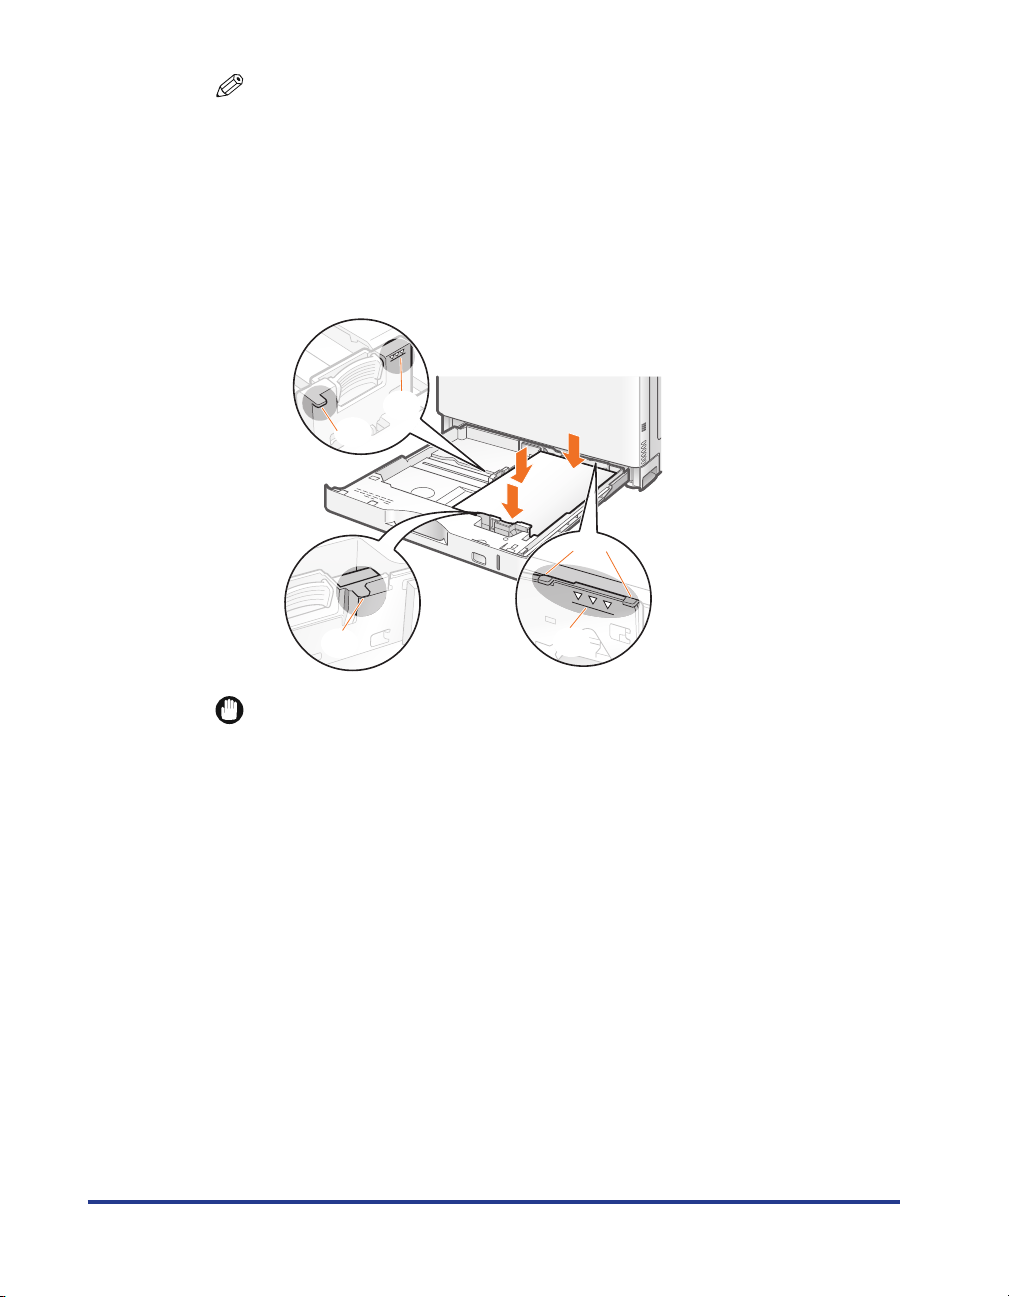
4
Hold down the paper, then set it under the hooks (A) on the
paper guides.
Make sure that the paper stack does not exceed the load limit mark lines (B).
(B)
(A)
(A)
(A)
IMPORTANT
Adjust the paper guides to the correct positions.
Slide the side paper guides and rear paper guide until they touch the paper stack.
Do not load the paper stack which exceeds the load limit mark lines.
Be sure that the paper stack does not exceed the load limit mark lines. If the paper
stack exceeds the load limit mark lines, this may result in misfeeds.
(B)
24

5
Insert the paper size indicator.
(1) Take out the paper size indicator.
(2) Attach a paper size label.
(3) Insert the paper size indicator.
(1)
(2)
(3)
6
Insert the paper cassette into the printer.
Push it into the printer firmly.
CAUTION
Precautions when setting the paper cassette
Be careful not to catch your fingers.
Specifying the Settings for the Paper Cassette
This printer's paper cassette is configured to automatically detect the paper size by
default. Therefore, you do not need to change the settings for the paper cassette.
However, you need to change the settings in the following cases.
When loading standard size paper again after using custom size paper
When you want to specify [
] which does not check the paper size.
フリー
25
IMPORTANT
ーー
Precautions when specifying [
The printer performs printing without checking the paper settings in the printer driver.
Make sure that the paper specified in the printer driver matches that loaded in the paper
cassette before using the printer.
フフフフリリリリーー
]
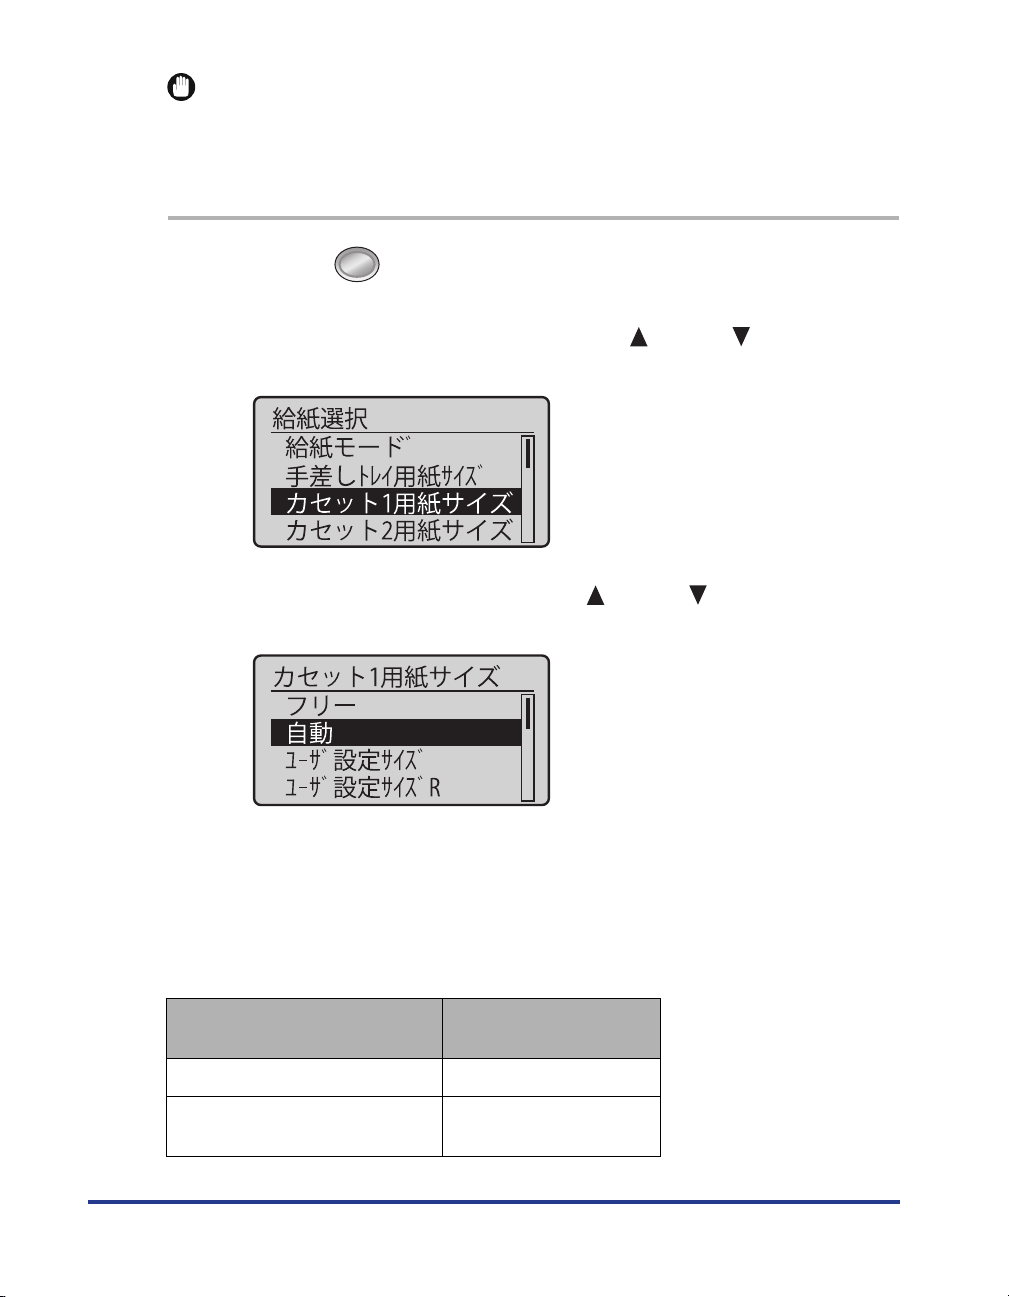
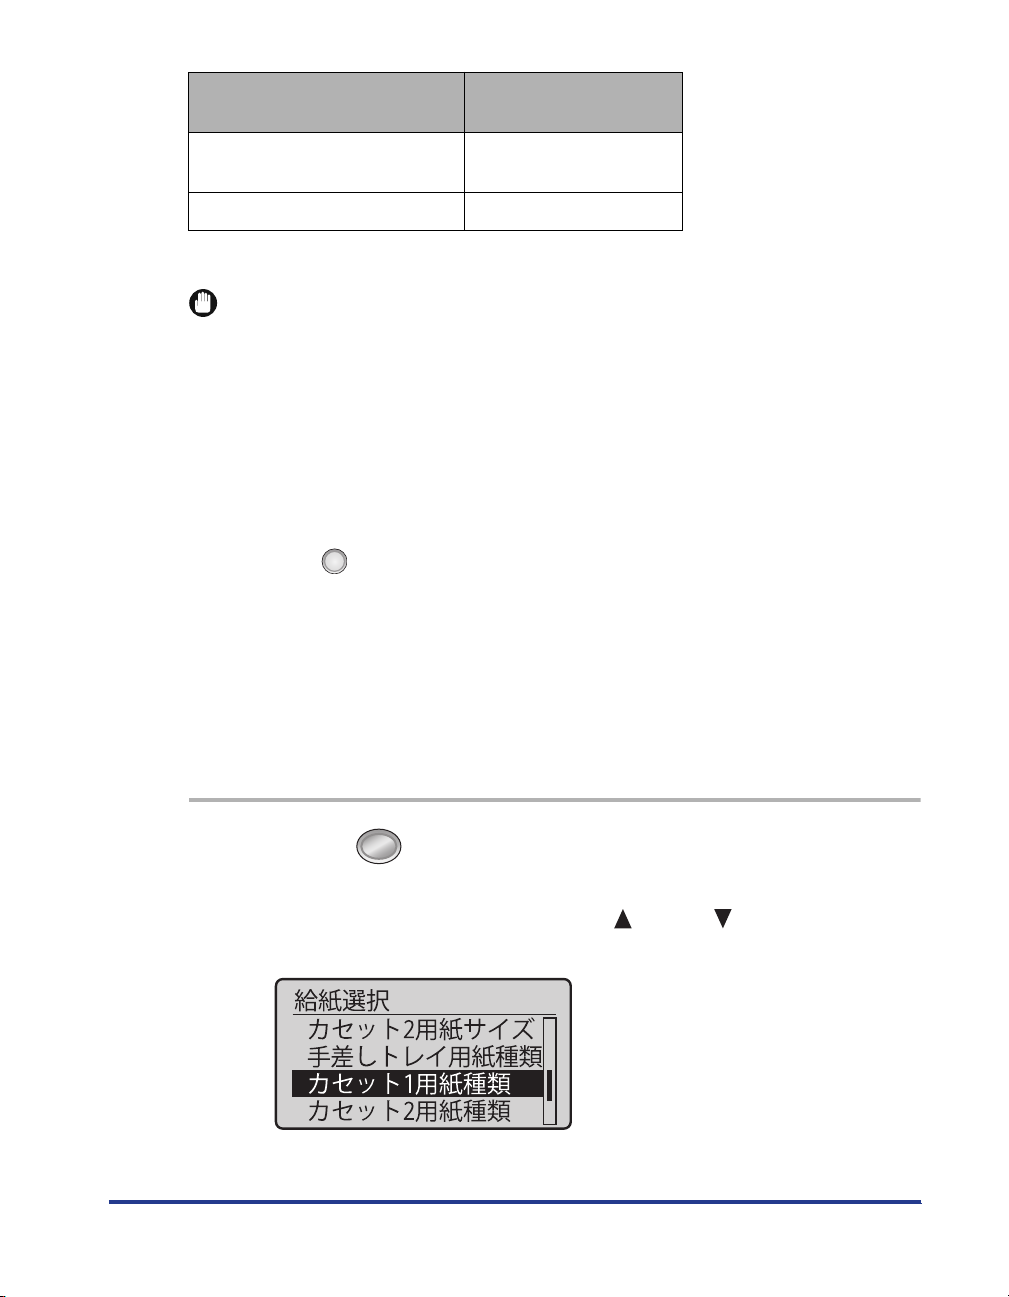
1
Press [ ] (
Select [
2
press [OK].
3
Select [
[OK].
The paper cassette setting is specified.
).
択択
給給給給紙紙紙紙選選選選択択
カカカカセセセセッッッットトトト1111用用用用紙紙紙紙ササササイイイイズズ
動動
] or [
自自自自動動
フフフフリリリリーー
ズズ
ーー
] using [ ] and [ ], and then press
] using [ ] and [ ], and then
26
Registering the Paper Type
Specify [
カセット1用紙種類
paper.
Paper to Be Used
Plain paper (60 to 74 g/m
Plain paper (75 to 90 g/m
] using the control panel according to the type of the loaded
2
)[
2
)
カカカカセセセセッッッットトトト1111用用用用紙紙紙紙種種種種類類
[
セセセセッッッットトトトアアアアッッッッププ
the
普通紙 L
[
普通紙
[
ラフ紙
]
]*
ププ
]
類類
] in
Menu
Paper to Be Used
カカカカセセセセッッッットトトト1111用用用用紙紙紙紙種種種種類類
[
セセセセッッッットトトトアアアアッッッッププ
the
ププ
類類
] in
Menu
Plain paper (91 to 105 g/m
Heavy paper (106 to 128 g/m
* Specify [
paper (75 to 105 g/m
] for this item when a paper jam occurs or when you want to improve the fixation on printing coarse
ラフ紙
2
) with [
普通紙
2
)
2
)[
] or [
[
普通紙 H
[
ラフ紙
厚紙 1
普通紙 H
]
]*
]
] selected.
IMPORTANT
Be sure to match the type of the loaded paper.
If the setting for the paper type is different from that of the loaded paper, this may result in
crucial damage to the printer.
Be sure to match the setting in the printer driver.
Normally, you do not need to change the settings for the printer driver because the
default setting for [Paper Type] in the printer driver is set to [Printer Default].
If you want to change the settings for the printer driver, match the setting and [
] in the control panel.
紙種類
If they do not match, the message <
In this case, the setting for [
pressing [ ] (
オンライン
カセット 1 用紙種類
), allowing you to continue printing.
以下の用紙をセット
> appears.
] is changed to that in the printer driver by
For users who do not use the printer driver
When you are printing from an operating system on which you cannot use the printer
driver (such as MS-DOS and UNIX), match the setting for [
デフォルト用紙種類
type of the loaded paper.
ーー
When [
フフフフリリリリーー
] is specified
The printer performs printing without checking the paper settings in the printer driver.
Make sure that the paper specified in the printer driver matches that loaded in the paper
cassette before using the printer.
カセット1用
] and the
1
Press [ ] (
Select [
2
[OK].
択択
給給給給紙紙紙紙選選選選択択
カカカカセセセセッッッットトトト1111用用用用紙紙紙紙種種種種類類
類類
).
] using [ ] and [ ], and then press
27

Select a paper type using [ ] and [ ], and then press [OK].
3
The paper type for the paper cassette is specified.
†
Before printing
Specify the following settings.
Before printing from the printer driver for Windows or Macintosh
Specify the paper size and paper type in the printer driver before printing.
Before printing from the BMLinkS printer driver
See "User's Manual" for the BMLinkS printer driver.
Before printing from DOS, UNIX, or other operating systems
Specify [
デフォルト用紙サイズ
] and [
デフォルト用紙種類
].
Loading Standard Size Paper in Cassette 2, 3, or 4
The following standard size paper can be loaded in the paper cassette of the
optional paper feeder (Cassette 2, 3, or 4).
28
Cassette 3 and Cassette 4 can be used only for LBP9600C.
Paper Type
A3 (297.0 mm x 420.0 mm)
B4 (257.0 mm x 364.0 mm)
A4 (210.0 mm x 297.0 mm)
Plain paper (60 to 105 g/m
Heavy paper (106 to 128 g/m
IMPORTANT
Detailed information about usable paper
See "Paper Requirements," on p. 9.
2
)
B5 (182.0 mm x 257.0 mm)
A5 (148.0 mm x 210.0 mm)
2
)
Ledger (11.00 in. x 17.00 in.)
Legal (8.50 in. x 14.00 in.)
Letter (8.50 in. x 11.00 in.)
Executive (7.25 in. x 10.50 in.)
Paper Size
Loading Paper in the Paper Cassette
Pull out the paper cassette until it stops.
1
2
Slide the paper guides to the position of the size of the paper
to be loaded.
Slide the side paper guides.
(1) Hold the lock release lever.
(2) Slide the paper guides to the position of the size of the paper to be loaded.
Align the position of (A) with the size mark of the paper to be loaded.
The side paper guides move together.
†
†
(2)
(1)
(A)
Top Vi ew
29
 Loading...