

Page 1
ENGLISH
Software Starter Guide
Software Starter Guide
(For the Canon Digital Camera Solution Disk Version 11)
PowerShot G3
PowerShot S45
PowerShot S230 DIGITAL ELPH / DIGITAL IXUS v
CDI-E071
3
Windows / Macintosh
CDI-E071-010 XXXXCHXX © 2002 CANON INC. PRINTED IN JAPAN
You must install the sofware bundled on the Canon Digital Camera Solution Disk
before connecting the camera to the computer
• This guide explains how to install the software programs and briefly
introduces their functions and operating procedures. For more detailed
explanations, see the Help menu for each program.
• Please read the software license agreement in this guide before using the
software. By using the software, you agree to be bound by the terms of
the agreement.
Windows
Macintosh
Page 2

SAFETY PRECAUTIONS
The precautions noted within this guide are intended to instruct you in the safe and
correct use of the products and to prevent injuries or damage to yourself, other
persons and property. Please read and ensure that you understand them before
proceeding to other sections of the guide.
Warnings
This symbol indicates topics that could lead to death or serious
injury if ignored or handled incorrectly.
Warning
• Do not play the supplied CD-ROM(s) in any CD player that does not support data
CD-ROMs. Playing the CD-ROM(s) in an audio CD player (music player) could
damage the speakers. It is also possible to suffer from hearing loss from listening
with headphones to the loud sounds of a CD-ROM played on a music CD player.
Disclaimer
• While every effort has been made to ensure that the information contained in this guide is
accurate and complete, no liability can be accepted for any errors or omissions. Canon
reserves the right to change the specifications of the hardware and software described
herein at any time without prior notice.
• No part of this guide may be reproduced, transmitted, transcribed, stored in a retrieval
system, or translated into any language in any form, by any means, without the prior written
permission of Canon.
• Canon makes no warranties for damages resulting from corrupted or lost data due to a
mistaken operation or malfunction of the camera, the software, the CompactFlash™ cards
(CF cards), personal computers, peripheral devices, or use of non-Canon CF cards.
Trademark Acknowledgments
• Canon and PowerShot are trademarks of Canon Inc.
• ArcSoft, the ArcSoft logo, ArcSoft PhotoImpression and ArcSoft VideoImpression are
trademarks or registered trademarks of ArcSoft, Inc.
• Adobe is a trademark of Adobe Systems Incorporated.
• CompactFlash is a trademark of SanDisk Corporation.
• iBook and iMac are trademarks of Apple Computer, Inc.
• Macintosh, PowerBook, Power Macintosh and QuickTime are trademarks of Apple Computer
Inc., registered in the United States and other countries.
• Microsoft, Windows and Windows logo are either registered trademarks or trademarks of
Microsoft Corporation in the United States and/ or other countries.
• Netscape and Netscape Navigator are trademarks or registered trademarks of Netscape
Communications Corporation in the United States and other countries. Netscape
Communicator is a trademark of Netscape Communications Corporation.
• Other names and products not mentioned above may be registered trademarks or trademarks
of their respective companies.
Copyright © 2002 Canon Inc. All rights reserved.
Page 3

READ CAREFULLY BEFORE USING
Canon Software License Agreement
IMPORTANT - READ THIS AGREEMENT BEFORE USING THE SOFTWARE ON THE CD-ROM IN THIS
BOX. BY USING THE SOFTWARE, YOU AGREE TO BE BOUND BY THE TERMS OF THIS AGREEMENT.
This is a license agreement (the “Agreement”) between you and Canon Inc. (“Canon”).
IF YOU DO NOT AGREE TO THE TERMS AND CONDITIONS OF THIS AGREEMENT, DO NOT USE THE
SOFTWARE PROGRAM ON THE CD-ROM (INCLUDING ALL SOUND AND IMAGE DATA) AND THE USER
MANUAL IN THIS BOX (COLLECTIVELY, THE “SOFTWARE”) AND PROMPTLY RETURN THE SOFTWARE
TO YOUR POINT OF PURCHASE FOR A REFUND.
In consideration of the right to use the SOFTWARE, you agree to abide by the terms and conditions
of this Agreement.
1. LICENSE: Canon grants you the personal, non-exclusive right to use the SOFTWARE only on a single
computer. You may physically transfer the SOFTWARE from one computer to another provided that the
SOFTWARE is used on only one computer at a time. You shall not install or use the SOFTWARE on a
network, multiple CPU, multiple site arrangement, or any other hardware configuration where the
SOFTWARE is accessible to more than one CPU or to more than one user.
With respect to the sound and image data (“Data”) contained in the Software, which are to be
downloaded to the applicable Canon digital camera product, Canon grants you a personal, non-exclusive
license to use the Data on a single Canon digital camera product only.
YOU SHALL NOT ASSIGN, SUBLICENSE, RENT, LEASE, LOAN, CONVEY OR OTHERWISE USE,
TRANSFER, COPY, TRANSLATE, CONVERT TO ANOTHER PROGRAMMING LANGUAGE, ALTER,
MODIFY, DECOMPILE OR DISASSEMBLE THE SOFTWARE, IN WHOLE OR IN PART, EXCEPT AS
EXPRESSLY PROVIDED IN THIS AGREEMENT.
2. BACK-UP COPY: You may make one copy of the SOFTWARE solely for back-up purposes, or copy the
SOFTWARE onto the permanent storage device (e.g. a hard disk) of your computer and retain the original
for back-up purposes. Any other copying of the SOFTWARE is a violation of this Agreement. You must
reproduce and include the copyright notice on the back-up copy.
3. SUPPORT AND UPDATES: Neither Canon, nor its subsidiaries, dealers or distributors will be responsible
for providing maintenance or support for use of the SOFTWARE. No updates, fixes or support will be
made available for the SOFTWARE.
4. LIMITED WARRANTY AND LIMITATION OF LIABILITY: It is your responsibility to choose, maintain and
match the hardware and software components of your computer system. Thus Canon does not
guarantee uninterrupted service or correction of errors or that the functions or performance of the
SOFTWARE will meet your requirements. THE SOFTWARE IS LICENSED ON AN “AS IS” BASIS AND
WITHOUT WARRANTY OR CONDITION OF ANY KIND. The CD-ROM storing the SOFTWARE is warranted
only against defective material under normal use for a period of ninety (90) days after purchase from an
authorized Canon dealer as evidenced by your sales receipt. Your sole remedy for a defective CD-ROM
shall be replacement of the same without charge when returned by you at your expense to your point of
purchase and proven to be defective upon inspection. The Replacement CD-ROM will be warranted for
the remainder of the original ninety (90) day warranty period of the defective CD-ROM. The limited
warranty does not apply if the failure of the CD-ROM resulted from accident, abuse or misapplication of
the SOFTWARE and shall not extend to anyone other than the original user of the SOFTWARE.
EXCEPT AS SPECIFICALLY SET FORTH IN THIS PARAGRAPH 4, CANON, CANON’S SUBSIDIARIES,
DISTRIBUTORS AND DEALERS DISCLAIM ALL WARRANTIES, OR CONDITIONS, EXPRESS OR
IMPLIED, INCLUDING ANY WARRANTY OR CONDITION OF MERCHANTABILITY OR FITNESS FOR A
PARTICULAR PURPOSE, WITH RESPECT TO THE SOFTWARE.
NEITHER CANON NOR ANY OF CANON’S SUBSIDIARIES, DISTRIBUTORS OR DEALERS IS LIABLE
FOR ANY DAMAGES HOWSOEVER CAUSED, INCLUDING WITHOUT LIMITATION, DIRECT,
CONSEQUENTIAL OR INCIDENTAL LOSS OR DAMAGE INCLUDING LOSS OF PROFITS, EXPENSE OR
INCONVENIENCE HOWSOEVER CAUSED OR ARISING OUT OF THE SOFTWARE OR THE USE
THEREOF.
i
Page 4

ii
NEITHER CANON, NOR ANY OF CANON’S SUBSIDIARIES, DISTRIBUTORS OR DEALERS SHALL
HAVE ANY OBLIGATION TO INDEMNIFY YOU AGAINST ANY CLAIM OR SUIT BROUGHT BY A
THIRD PARTY ALLEGING THAT THE SOFTWARE OR THE USE THEREOF INFRINGES ANY
INTELLECTUAL PROPERTY OF SUCH THIRD PARTY.
SOME STATES, PROVINCES OR LEGAL JURISDICTIONS DO NOT ALLOW THE EXCLUSION OF
IMPLIED WARRANTIES, OR THE LIMITATION OR EXCLUSION OF LIABILITY FOR INCIDENTAL OR
CONSEQUENTIAL DAMAGES, OR PERSONAL INJURY OR DEATH RESULTING FROM NEGLIGENCE
ON THE PART OF THE SELLER, SO THE ABOVE DISCLAIMERS AND EXCLUSIONS MAY NOT APPLY
TO YOU.
5. TERM: This Agreement is effective upon your using the SOFTWARE and remains in effect until expiration
of all copyright interests in the SOFTWARE unless earlier terminated. You may terminate this Agreement
by destroying the SOFTWARE. This Agreement will also terminate without notice to you if you fail to
comply with any of the terms of this Agreement and you must then promptly return the SOFTWARE. In
addition, Canon may enforce its other legal rights.
6. U.S. GOVERNMENT RESTRICTED RIGHTS NOTICE:
The SOFTWARE is a “commercial item,” as that term is defined at 48 C.F.R. 2.101 (Oct 1995), consisting
of “commercial computer software” and “commercial computer software documentation,” as such
terms are used in 48 C.F.R. 12.212 (Sept 1995). Consistent with 48 C.F.R. 12.212 and 48 C.F.R.
227.7202-1 through 227.72024 (June 1995), all U.S. Government End Users shall acquire the SOFTWARE
with only those rights set forth herein. Manufacturer is Canon Inc./30-2, Shimomaruko 3-chome, Ohta-
ku, Tokyo 146-8501, Japan.
7. EXPORT RESTRICTIONS: You agree to comply with all export laws and restrictions and regulations of
the country involved, and not to export or re-export, directly or indirectly, the SOFTWARE in violation of
any such laws and restrictions and regulations, or without all necessary approvals.
8. SEVERABILITY:
In the event that any provision of this Agreement is declared or found to be illegal by any court or tribunal
of competent jurisdiction, such provision shall be null and void with respect to the jurisdiction of that
court or tribunal and all the remaining provisions of this Agreement shall remain in full force and effect.
9. CONTROLLING LAW: The terms of this Agreement as it relates to purchases of the Software in the
United States of America shall be governed and construed in all respects in accordance with the laws and
regulations of the State of New York, without reference to choice of law principles. The terms of this
Agreement as it relates to purchases of the Software in Canada shall be governed by the laws of the
province of Ontario.
10. OWNERSHIP: All rights, including but not limited to copyrights and trade secret rights, to the
SOFTWARE belong to Canon, its affiliated corporations and third party licensors. Your use of the
SOFTWARE is subject to the laws of the United States, and Canada, and other applicable copyright and
trademark laws, and nothing in this Agreement constitutes a waiver of the rights of Canon, its affiliated
corporations and third party licensors under such laws. You only own the CD-ROM media in which the
Software is stored. Except as expressly provided herein, no license or right, express or implied, is hereby
conveyed or granted by Canon to you for any intellectual property of Canon. Nothing contained in
Paragraph 1 shall be construed to give Canon any ownership rights in any images, graphics or textual
material that you save in connection with the Software.
You may not modify, remove or delete any or all copyright notices (i) which are contained in the Software,
including any copy thereof, and (ii) which are on the original CD-ROM and on the medium of a back-up
copy made pursuant to Section 2 above.
11. ACKNOWLEDGEMENT: BY USING THE SOFTWARE, YOU ACKNOWLEDGE THAT YOU HAVE READ
THIS AGREEMENT, UNDERSTOOD IT, AND AGREE TO BE BOUND BY ITS TERMS AND
CONDITIONS. YOU ALSO AGREE THAT THIS AGREEMENT IS THE COMPLETE AND EXCLUSIVE
STATEMENT OF AGREEMENT BETWEEN YOU AND CANON CONCERNING THE SUBJECT MATTER
HEREOF AND SUPERSEDES ALL PROPOSALS OR PRIOR AGREEMENTS, VERBAL OR WRITTEN, AND
ANY OTHER COMMUNICATIONS BETWEEN THE PARTIES RELATING TO THE SUBJECT MATTER
HEREOF. NO AMENDMENT TO THIS AGREEMENT SHALL BE EFFECTIVE UNLESS SIGNED BY A
DULY AUTHORIZED OFFICER OF CANON.
Page 5

Read This First
(Windows / Macintosh)
Overview of Image Downloading Preparations ............... 2
List of Things to Prepare ....................................................... 2
Steps to Follow .................................................................... 2
Compatibility Charts for Each Operating System and the
Bundled Software .............................................................. 4
What Can Be Accomplished with the Software ................ 6
Canon Digital Camera Solution Disk ..................................... 6
Adobe Photoshop LE CD-ROM ........................................... 11
ArcSoft Camera Suite 2.0 CD-ROM .................................... 11
ArcSoft Camera Suite 1.2 CD-ROM .................................... 11
Camera and Software Compatibility ................................... 12
About the Other Manuals ................................................ 13
System Requirements ...................................................... 15
Windows .......................................................................... 15
Macintosh ......................................................................... 16
The explanations in this guide use Windows XP and Mac OS 9.2
procedures and screen shots. If you are using another operating system,
the procedures and screen shots may vary slightly in some instances.
Windows / Macintosh
Page 6

2
Overview of Image Downloading Preparations
This section provides first-time users of digital cameras with an overview of the
procedures for downloading images from the camera to a computer.
• Do not connect the camera to a computer before installing the
software. Connecting the camera before the software is installed will
prevent the software from installing correctly. Follow each of the steps
below in order.
○○○○○○○○○○○○○○○○○○○○○○○○○○○○○○○○○○○○○○○○
List of Things to Prepare
• Camera and computer
• Canon Digital Camera Solution Disk provided with the camera
• USB cable (use the cable provided with the camera)
○○○○○○○○○○○○○○○○○○○○○○○○○○○○○○○○○○○○○○○○
Steps to Follow
Communication
Setting: Normal
1. Check to see that the camera’s
[Communication] setting is set to
[Normal] and shut off the camera.
[Normal] is the default setting.
2. Set the Canon Digital Camera
Solution Disk in the CD-ROM drive.
3. Install the software from the disk.
Page 7

4. Eject the Solution Disk from the CD-
ROM drive.
5. Connect the camera to the computer
using the USB cable.
Windows* : The Event dialog will automatically display.
Mac OS 8.6–9.2 : ImageBrowser will start and open
the ImageBrowser Automation Wizard.
Mac OS X : Double-click the [Canon ImageBrowser] icon
on the desktop.
3
Windows / Macintosh
* With Windows XP, the Event dialog does not appear the first time the camera is
connected after computer start-up.
For downloading instructions, see the following.
Windows: Downloading and Printing Images with ZoomBrowser EX (p. 30).
Macintosh: Downloading and Printing Images with ImageBrowser (p. 67).
Page 8

4
Compatibility Charts for Each Operating
System and the Bundled Software
The list of software programs distributed with each camera varies between camera
models. Check the chart below to see which programs are available for your camera
and compatible with your computer’s operating system.
• Programs Supplied with All Models
The following programs are supplied on the Canon Digital Camera Solution Disk.
Compatible Operating System
Program
98 Me 2000
ZoomBrowser EX
ImageBrowser
TWAIN Driver
WIA Driver
USB Mounter
File Viewer Utility
PhotoRecord
PhotoStitch
RemoteCapture
CP-100/CP-10 Printer Driver
1. Mac OS 9.0-9.2 only.
2. To convert a RAW image on a computer running Mac OS X, start File Viewer Utility
in the Classic environment.
•
-
Windows
•
-
-
•
-
•
•
•
•
•
Macintosh
OS 8.6-9.2
•
-
-
•
1
*
•
•
OS XXP
-
•
-
-
-
2
*
-
-
•
•
•
• PowerShot G3
The following program is supplied on the Adobe Photoshop LE CD-ROM.
Compatible Operating System
Program
98 Me 2000
Adobe Photoshop LE
Windows
Macintosh
OS 8.6-9.2
OS XXP
••
-
• PowerShot S45
The following programs are supplied on the ArcSoft Camera Suite 2.0 CD-ROM.
Compatible Operating System
Program
98 Me 2000
ArcSoft PhotoStudio
ArcSoft VideoImpression
Windows
•
•
Macintosh
OS 8.6-9.2
OS XXP
•
•
Page 9

5
• PowerShot S230 DIGITAL ELPH / DIGITAL IXUS v
The following programs are supplied on the ArcSoft Camera Suite 1.2 CD-ROM.
Compatible Operating System
Program
98 Me 2000
ArcSoft PhotoImpression
ArcSoft VideoImpression
Windows
OS 8.6-9.2
•
•
3
Macintosh
OS XXP
•
•
Windows / Macintosh
Page 10

6
What Can Be Accomplished with the Software
This topic introduces the main features of the software programs contained on the
CD-ROMs.
○○○○○○○○○○○○○○○○○○○○○○○○○○○○○○○○○○○○○○○○
Canon Digital Camera Solution Disk
Some camera models do not support some of the software functions. Please
check the Camera and Software Compatibility chart to confirm the compatibility
of your camera. (p. 12)
• Downloading Camera Images to Your Computer
ZoomBrowser EX (Windows)/ImageBrowser (Macintosh)
You can start either of these programs and display the camera images automatically
simply by connecting the digital camera to the computer’s USB port. Download the
camera’s still images or movies by selecting the thumbnails (tiny images) shown on
the computer display.
TWAIN Driver (Windows)
This driver for Windows 98 and Windows 2000 loads camera images into TWAIN-
compliant programs, such as Adobe Photoshop LE, ArcSoft PhotoStudio, ArcSoft
PhotoImpression and ArcSoft VideoImpression.
WIA Driver (Windows)
This driver for Windows Me and Windows XP starts the Scanners and Cameras
Wizard to automatically download camera images to the computer. It also allows you
to copy camera images using standard file copying procedures in Windows Explorer
(but it cannot upload computer files to the camera).
USB Mounter (Macintosh)
This program for Macintosh makes your camera appear on your computer as a card
reader so that you can download from the camera as if you were copying images
from a card reader.
Page 11
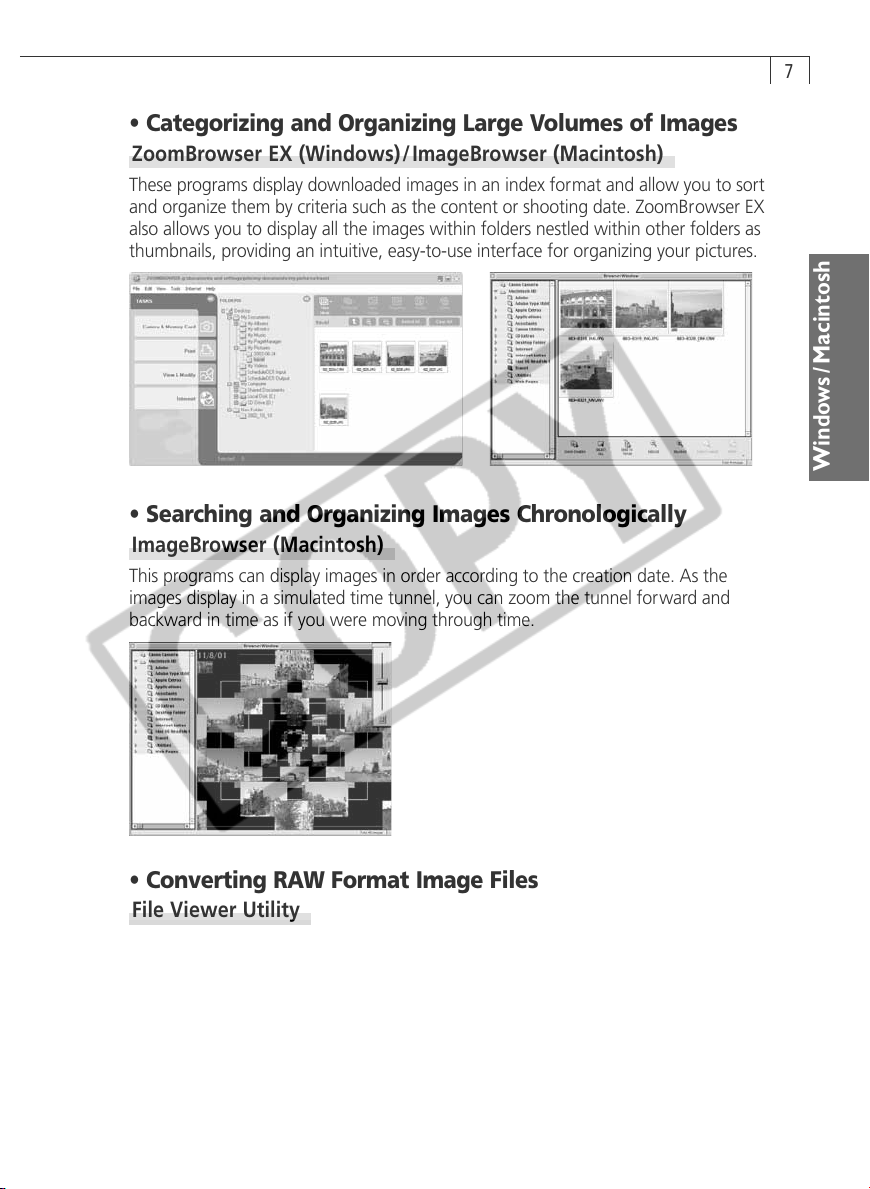
• Categorizing and Organizing Large Volumes of Images
ZoomBrowser EX (Windows)/ImageBrowser (Macintosh)
These programs display downloaded images in an index format and allow you to sort
and organize them by criteria such as the content or shooting date. ZoomBrowser EX
also allows you to display all the images within folders nestled within other folders as
thumbnails, providing an intuitive, easy-to-use interface for organizing your pictures.
• Searching and Organizing Images Chronologically
ImageBrowser (Macintosh)
This programs can display images in order according to the creation date. As the
images display in a simulated time tunnel, you can zoom the tunnel forward and
backward in time as if you were moving through time.
7
Windows / Macintosh
• Converting RAW Format Image Files
File Viewer Utility
This program converts RAW images that have been downloaded to a computer into
standard image file formats, such as the TIFF (8 bit/channel or 16 bit/channel) and
JPEG formats. ZoomBrowser EX and ImageBrowser use this utility when you convert
RAW images from within them.
Page 12
8
• Creating Mail Attachments from Images
ZoomBrowser EX (Windows)/ImageBrowser (Macintosh)
These programs can start your email program* and send images as file attachments
to it. Since the file size and compression rate can be controlled, you can reduce large
image files to sizes small enough for easy transmission.
* The automatic start of email programs is only supported by Windows and the email
programs must be enabled as MAPI clients.
• Programs for Uploading New Start-Up Images and Start-Up
Sounds to the Camera
ZoomBrowser EX (Windows)/ImageBrowser (Macintosh)
These programs can add various camera settings such as start-up images, start-up
sounds and shutter sounds - collectively called the My Camera Settings - that have
been saved onto the computer.
Page 13

• Laying Out and Printing Images
PhotoRecord (Windows)/ImageBrowser (Macintosh)
These programs permit you to add backgrounds and borders (Windows only), as well
as titles and comments, and print out the images. You can enjoy preparing prints of
your images appearing as if they were pasted into a photo album. Naturally, you can
also use them to make artistic single-image layouts.
9
Windows / Macintosh
• Programs for Printing Indexes
PhotoRecord (Windows)/ImageBrowser (Macintosh)
These programs can output an index of the computer or camera’s image thumbnails
(tiny versions) to a printer.
• Programs for Printing Photo Cards and Adhesive Labels
with Card Photo Printer CP-100/CP-10
PhotoRecord (Windows)/ImageBrowser (Macintosh)
These programs can output your original photo cards with added text or designs
when you connect a Card Photo Printer CP-100 or Card Photo Printer CP-10 (both
sold separately) with interface cable PIF-100 (sold separately)* to the computer. They
can also print out adhesive labels (8-label sheets) with the same photo or different
photos on each label.
* Not sold in some regions.
Page 14
10
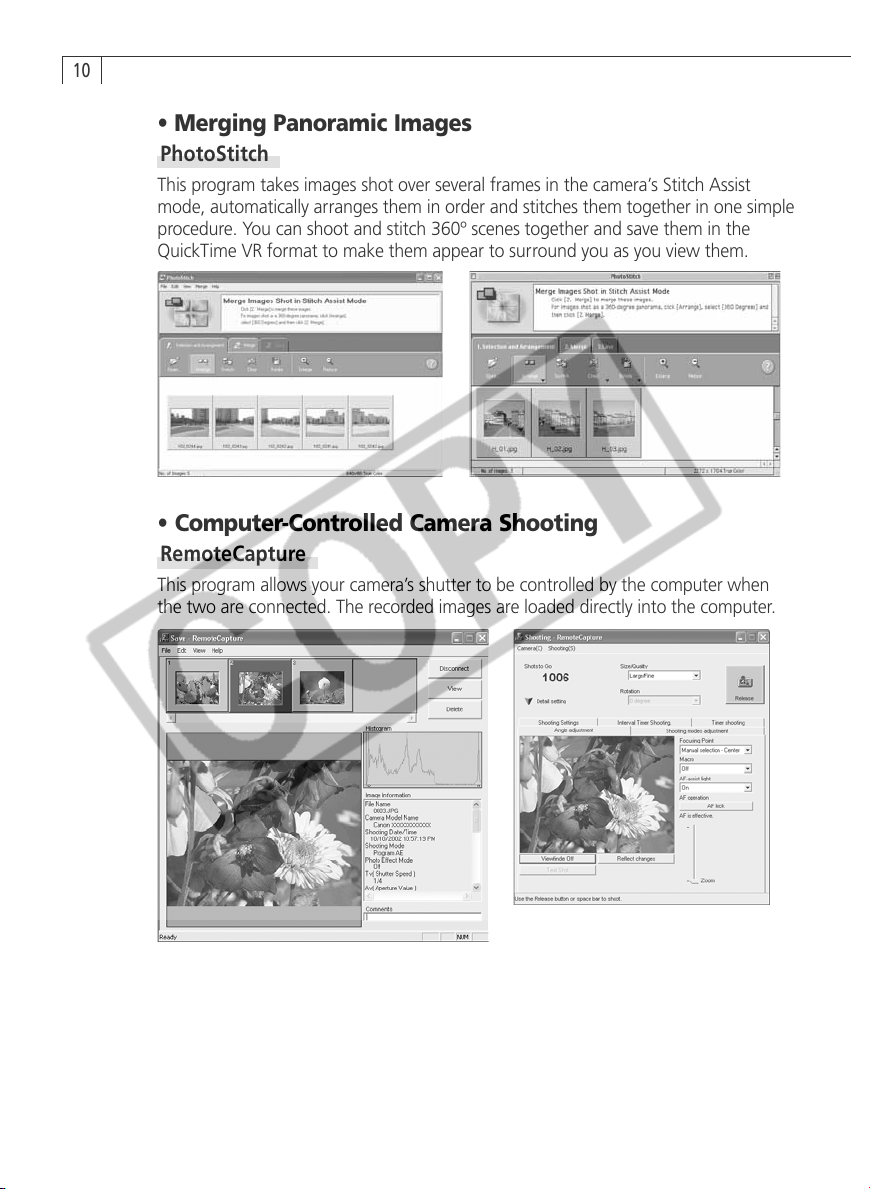
• Merging Panoramic Images
PhotoStitch
This program takes images shot over several frames in the camera’s Stitch Assist
mode, automatically arranges them in order and stitches them together in one simple
procedure. You can shoot and stitch 360º scenes together and save them in the
QuickTime VR format to make them appear to surround you as you view them.
• Computer-Controlled Camera Shooting
RemoteCapture
This program allows your camera’s shutter to be controlled by the computer when
the two are connected. The recorded images are loaded directly into the computer.
Depending on your camera model,
the screen may slightly differ.
Page 15
○○○○○○○○○○○○○○○○○○○○○○○○○○○○○○○○○○○○○○○○
Adobe Photoshop LE CD-ROM
This CD-ROM is distributed with PowerShot G3 digital cameras.
• Special Effects and Image Editing for Various Purposes
Adobe Photoshop LE
This program can be used to correct colors or brightness levels, apply special effects,
and edit and print images. Photoshop LE is a limited edition of Adobe Systems Inc.’s
popular Photoshop program, the standard for image editing programs.
○○○○○○○○○○○○○○○○○○○○○○○○○○○○○○○○○○○○○○○○
ArcSoft Camera Suite 2.0 CD-ROM
This CD-ROM is distributed with PowerShot S45 digital cameras.
• Special Effects and Image Editing for Various Purposes
ArcSoft PhotoStudio
This program can be used to correct colors or brightness levels, apply special effects,
and edit and print images. ArcSoft PhotoStudio is Arcsoft, Inc.’s high-performance,
user-friendly image editing program.
• Programs for Editing Stills and Movies
ArcSoft VideoImpression
This program provides simple procedures for compiling a movie from multiple clips or
stills and for editing out unwanted frames from movies.
11
Windows / Macintosh
○○○○○○○○○○○○○○○○○○○○○○○○○○○○○○○○○○○○○○○○
ArcSoft Camera Suite 1.2 CD-ROM
This CD-ROM is distributed with PowerShot S230 DIGITAL ELPH/DIGITAL IXUS v
digital cameras.
• Special Effects and Image Editing for Various Purposes
ArcSoft PhotoImpression
This program can be used to apply special effects, and edit and print images in simple
steps. It can also be used to create postcards and calendars.
• Programs for Editing Stills and Movies
ArcSoft VideoImpression
This program provides simple procedures for compiling a movie from multiple clips or
stills and for editing out unwanted frames from movies.
3
Page 16

12
○○○○○○○○○○○○○○○○○○○○○○○○○○○○○○○○○○○○○○○○
Camera and Software Compatibility
The Canon Digital Camera Solution Disk contains a number of software programs
and drivers. Check the chart below for the compatibility of your particular camera
model with each program’s special functions.
Model
3
Function
Software
PowerShot G3
PowerShot S45
DIGITAL IXUS v
PowerShot S230 DIGITAL ELPH
ZoomBrowser EX
Downloading
Camera Images
TWAIN Driver
●
●
●
●
ImageBrowser
Downloading
Movies
Using the Camera
as a Read-Only
Card Reader
RAW Image
Conversion
ZoomBrowser EX
ImageBrowser
USB Mounter
(Macintosh only)
File Viewer Utility
●
●
●
●
●
●
●
●
-
●
●
**
-
Merging Images
Shot in Stitch
PhotoStitch
●
●
●
●
Assist Mode
Shooting from
the Computer
Add start-up
images or sounds
to camera (My
Camera Settings)
RemoteCapture
ZoomBrowser EX
ImageBrowser
●
●
●
●
●
-
●
-
* Although the PowerShot S230 DIGITAL ELPH/DIGITAL IXUS v3 cannot shoot images in
the RAW format, RAW images shot with other Canon cameras can be converted with
the bundled software.
Page 17

About the Other Manuals
ZoomBrowser EX, ImageBrowser and the Card Photo Printer CP-100/CP-10 printer
driver are distributed with user manuals that describe their features and operating
methods in more detail. Please read the respective manual according to the
guidelines below.
• Adobe Acrobat Reader must be installed to read the PDF format
manuals described below. If you do not have this program, read How
to Install Adobe Acrobat Reader on the next page.
• ZoomBrowser EX Software User Guide
• ImageBrowser Software User Guide
These PDF format manuals are available on the Canon website. Use your browser
program to download these manuals from the following URL:
http://www.canon.co.jp/Imaging/information-e.html
• Card Photo Printer CP-100/CP-10 Printer Driver User Guide
This PDF format manual is for the separately sold Card Photo Printer CP-100 or Card
Photo Printer CP-10. It is contained on the Canon Digital Camera Solution Disk. The
following procedures can be used to read the manual.
13
Windows / Macintosh
Windows
1. Place the Canon Digital Camera Solution Disk in the CD-ROM drive.
The installer dialog will open.
2. In the installer dialog, click [Using the Software] followed by [CP-100/CP-10 Printer
Driver].
The Card Photo Printer CP-100/CP-10 Printer Driver User Guide will display.
• If the installer dialog does not display automatically, open the [Readme] and
[English] folders on the CD-ROM and double-click the [CP.PDF] file.
Macintosh
1. Place the Canon Digital Camera Solution Disk in the CD-ROM drive.
2. Double-click the [Mac OS 8/9] or [Mac OS X] folder icon in the CD-ROM window,
followed by the [Canon Digital Camera Installer] icon.
The installer dialog will open.
3. In the installer dialog, click [Using the Software] followed by [CP-100/CP-10 Printer
Driver].
The Card Photo Printer CP-100/CP-10 Printer Driver User Guide will display.
Page 18

14
How to Install Adobe Acrobat Reader
• Windows
1. Place the Canon Digital Camera Solution Disk in the CD-ROM drive.
2. Open the [Readme], [English] and [Acrobat] folders.
3. Double-click the [ar405eng.exe] file to start the installer.
Follow the onscreen instructions to install Adobe Acrobat Reader.
• Macintosh
1. Place the Canon Digital Camera Solution Disk in the CD-ROM drive.
2. Open the [Readme], [English] and [Acrobat] folders.
3. Double-click the [Reader Installer] file to start the installer. Follow the onscreen
instructions to install Adobe Acrobat Reader.
Page 19
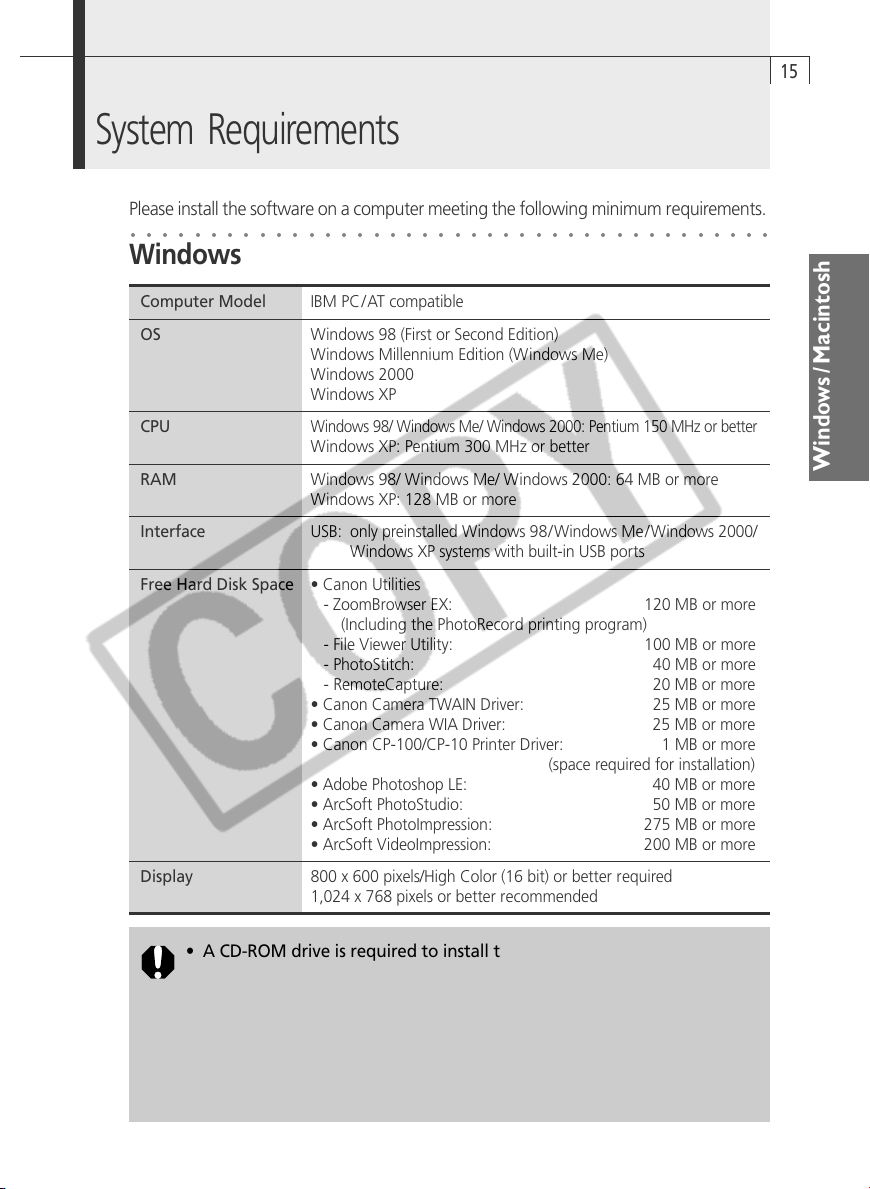
System Requirements
Please install the software on a computer meeting the following minimum requirements.
○○○○○○○○○○○○○○○○○○○○○○○○○○○○○○○○○○○○○○○○
Windows
Computer Model IBM PC/AT compatible
OS Windows 98 (First or Second Edition)
CPU
RAM Windows 98/ Windows Me/ Windows 2000: 64 MB or more
Interface USB: only preinstalled Windows 98/ Windows Me / Windows 2000/
Free Hard Disk Space • Canon Utilities
Display 800 x 600 pixels/High Color (16 bit) or better required
Windows Millennium Edition (Windows Me)
Windows 2000
Windows XP
Windows 98/ Windows Me/ Windows 2000: Pentium 150 MHz or better
Windows XP: Pentium 300 MHz or better
Windows XP: 128 MB or more
Windows XP systems with built-in USB ports
- ZoomBrowser EX: 120 MB or more
(Including the PhotoRecord printing program)
- File Viewer Utility: 100 MB or more
- PhotoStitch: 40 MB or more
- RemoteCapture: 20 MB or more
• Canon Camera TWAIN Driver: 25 MB or more
• Canon Camera WIA Driver: 25 MB or more
• Canon CP-100/CP-10 Printer Driver: 1 MB or more
(space required for installation)
• Adobe Photoshop LE: 40 MB or more
• ArcSoft PhotoStudio: 50 MB or more
• ArcSoft PhotoImpression: 275 MB or more
• ArcSoft VideoImpression: 200 MB or more
1,024 x 768 pixels or better recommended
15
Windows / Macintosh
• A CD-ROM drive is required to install the software.
• QuickTime 3.0 or a higher version is required to play the camera’s
movies or save images merged with PhotoStitch in the QuickTime VR
format. QuickTime is included on the Canon Digital Camera Solution
Disk.
• A sound card is required to play movie audio tracks.
• All procedures performed with a connection to a USB 2.0 compliant
board are not guaranteed.
Page 20
16
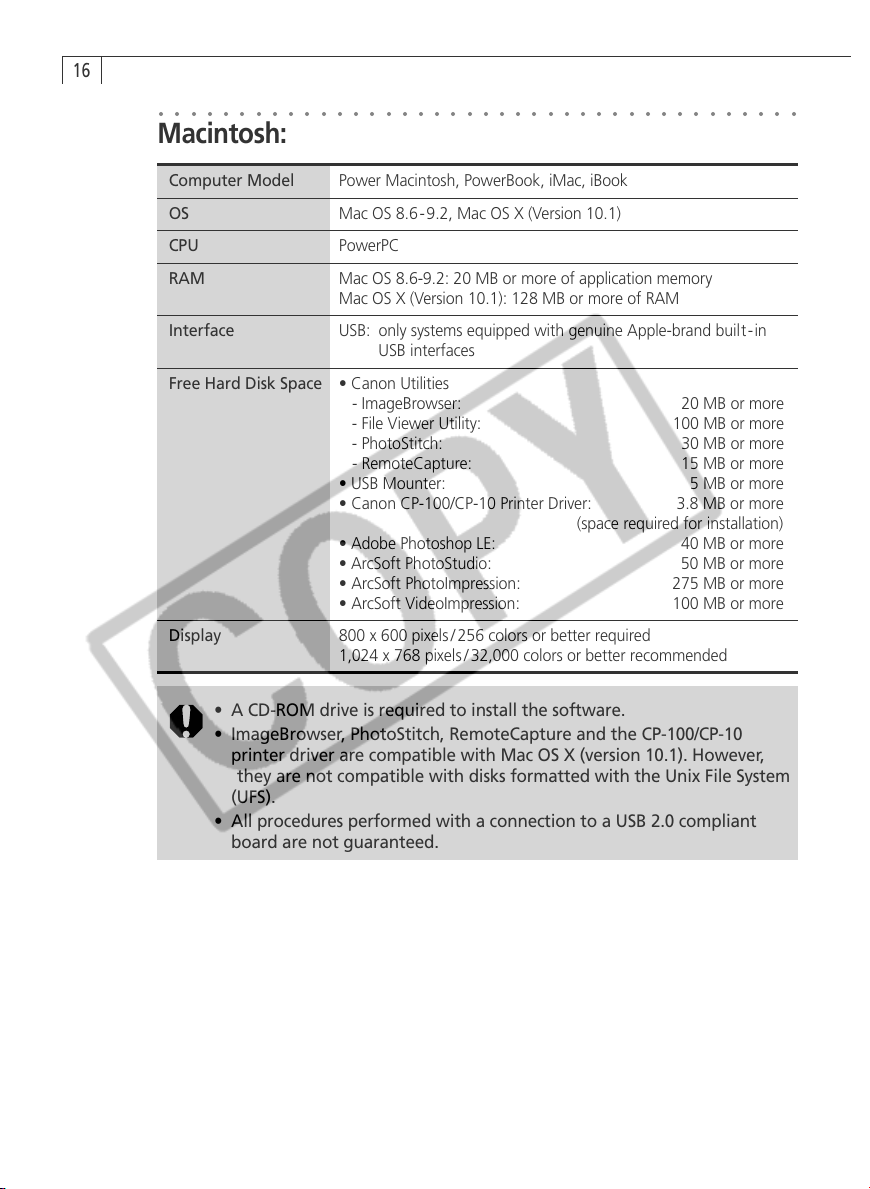
○○○○○○○○○○○○○○○○○○○○○○○○○○○○○○○○○○○○○○○○
Macintosh:
Computer Model Power Macintosh, PowerBook, iMac, iBook
OS Mac OS 8.6-9.2, Mac OS X (Version 10.1)
CPU PowerPC
RAM Mac OS 8.6-9.2: 20 MB or more of application memory
Mac OS X (Version 10.1): 128 MB or more of RAM
Interface USB: only systems equipped with genuine Apple-brand built- in
USB interfaces
Free Hard Disk Space • Canon Utilities
- ImageBrowser: 20 MB or more
- File Viewer Utility: 100 MB or more
- PhotoStitch: 30 MB or more
- RemoteCapture: 15 MB or more
• USB Mounter: 5 MB or more
• Canon CP-100/CP-10 Printer Driver: 3.8 MB or more
(space required for installation)
• Adobe Photoshop LE: 40 MB or more
• ArcSoft PhotoStudio: 50 MB or more
• ArcSoft PhotoImpression: 275 MB or more
• ArcSoft VideoImpression: 100 MB or more
Display 800 x 600 pixels / 256 colors or better required
1,024 x 768 pixels / 32,000 colors or better recommended
• A CD-ROM drive is required to install the software.
• ImageBrowser, PhotoStitch, RemoteCapture and the CP-100/CP-10
printer driver are compatible with Mac OS X (version 10.1). However,
they are not compatible with disks formatted with the Unix File System
(UFS).
• All procedures performed with a connection to a USB 2.0 compliant
board are not guaranteed.
Page 21
Using the Software on the
Windows Platform
Installing the Software .............................................................. 18
Installing from the Canon Digital Camera Solution Disk ............ 18
Installing Adobe Photoshop LE ................................................ 22
Installing Arcsoft Camera Suite 2.0.......................................... 22
Installing Arcsoft Camera Suite 1.2.......................................... 22
Installing the Printer Driver for Card Photo Printer CP-100/CP-10 (Sold Separately) .
Uninstalling the Software ....................................................... 23
Installing the TWAIN Driver/WIA Driver ................................... 24
Connecting the Camera to a Computer .................................. 25
Troubleshooting the TWAIN Driver/WIA Driver Installation ........ 27
Uninstalling the TWAIN Driver/WIA Driver................................ 28
Downloading and Printing Images with ZoomBrowser EX ...........
Starting ZoomBrowser EX ....................................................... 30
Downloading and Saving Images from the Camera .................. 34
Printing Images ...................................................................... 35
Adjusting Image Quality and Printing (Exif 2.2 Compliant) ........ 37
ZoomBrowser EX Features ........................................................ 38
Camera Window ................................................................... 38
Main Window ........................................................................ 40
Converting RAW Format Images ............................................. 42
Replaying Movies ................................................................... 45
Merging Panoramic Images with PhotoStitch ........................... 46
Shooting with RemoteCapture ............................................... 47
Downloading Images with TWAIN-Compliant Software
(Windows 98/Windows 2000) ......................................................
Downloading Images with Adobe Photoshop LE ...................... 52
Downloading Images with ArcSoft PhotoStudio ....................... 53
Downloading Images with ArcSoft PhotoImpression ................ 53
Downloading Images with the WIA Driver (Windows Me/Windows XP) ...
Downloading with the Scanner and Camera Wizard ................ 55
Downloading with Windows Explorer ..................................... 57
Downloading with the File Dialog ........................................... 58
Easy Downloading Method for Windows XP ........................... 59
22
30
52
55
Windows
Page 22

18
Installing the Software
○○○○○○○○○○○○○○○○○○○○○○○○○○○○○○○○○○○○○○○○
Installing from the Canon Digital Camera Solution Disk
Before you attach the camera to the computer with the USB cable for the
first time, you must install the appropriate driver from the Canon Digital
Camera Solution Disk listed below onto the computer.
Windows 98/Windows 2000: TWAIN Driver
Windows Me/Windows XP: WIA Driver
Installation Precautions
• If you are using Windows Me or Windows XP, there are several limitations to the
use of the WIA Driver. Before you install it, please read WIA Driver Installation
Precautions (p. 24).
• Users of Windows 2000 and Windows XP Professional must first log in as
an Administrator (computer system administrator) to install programs.
These instructions show Windows XP screen shots. They may slightly differ from the
screens that appear on your computer according to your operating system.
Close any programs that are running.
1.
Place the Canon Digital Camera Solution Disk in the computer’s CD-ROM drive.
2.
• The installer panel will display automatically.
• If the installer panel does not appear automatically, use the following
procedures to display it.
Windows XP
1. Select [My Computer] from the [Start] menu.
2. Right-click the CD-ROM icon and select [Open].
3. Double-click the [Setup.exe]
Windows 2000, Windows Me, Windows 98
1. Double-click the [My Computer] icon on the desktop.
2. Right-click the CD-ROM icon and select [Open].
3. Double-click the [Setup.exe]
(If the “.exe” extension does not show, see the computer’s manual for
instructions on showing file name extensions.)
icon.
icon.
Page 23
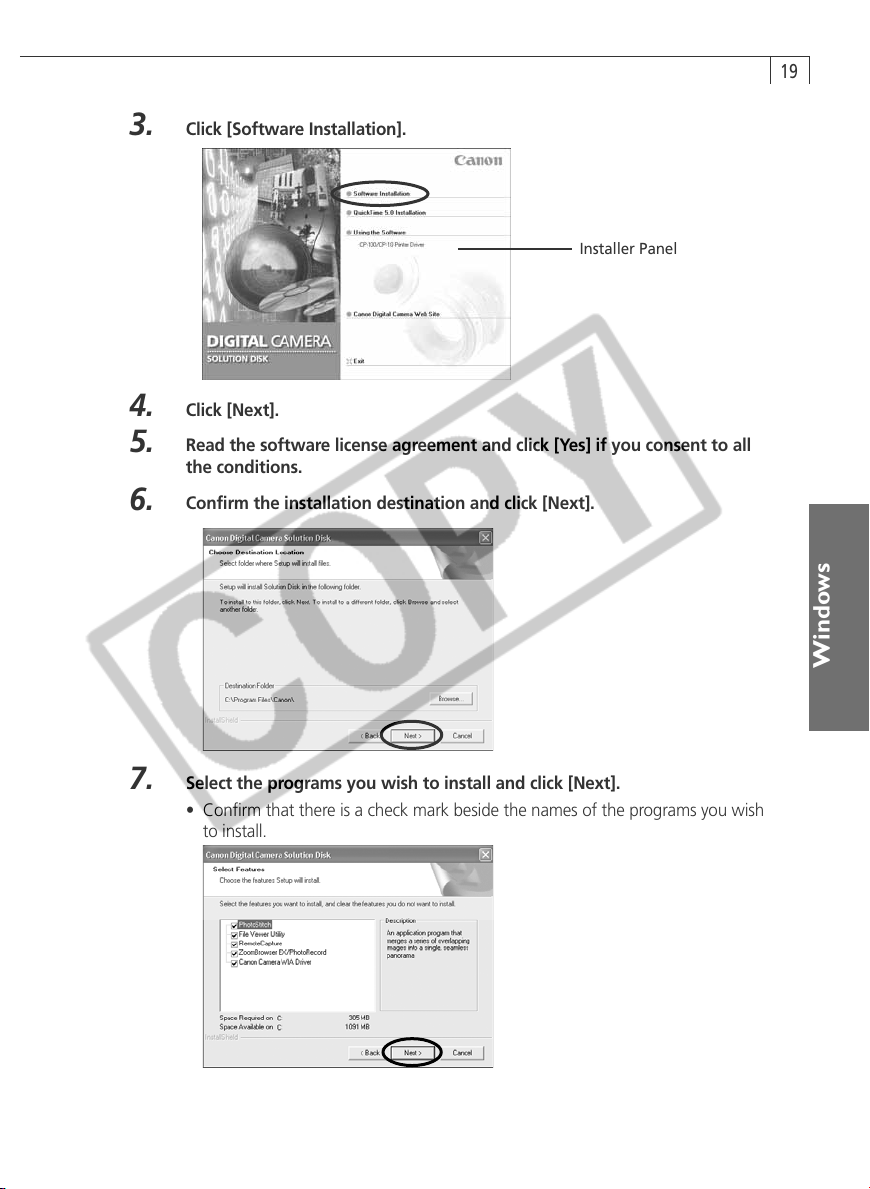
Click [Software Installation].
3.
Installer Panel
Click [Next].
4.
Read the software license agreement and click [Yes] if you consent to all
5.
the conditions.
Confirm the installation destination and click [Next].
6.
19
Select the programs you wish to install and click [Next].
7.
• Confirm that there is a check mark beside the names of the programs you wish
to install.
Windows
Page 24
20
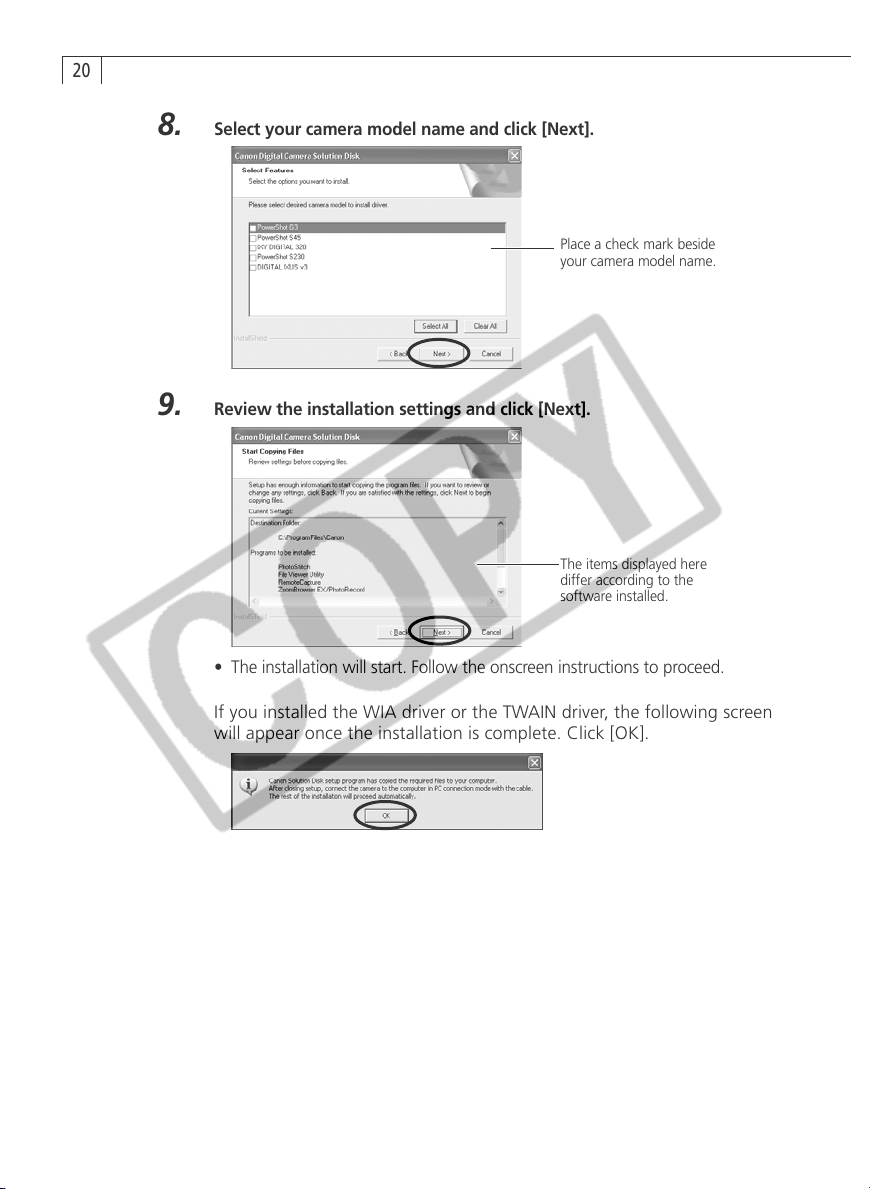
Select your camera model name and click [Next].
8.
Review the installation settings and click [Next].
9.
Place a check mark beside
your camera model name.
The items displayed here
differ according to the
software installed.
• The installation will start. Follow the onscreen instructions to proceed.
If you installed the WIA driver or the TWAIN driver, the following screen
will appear once the installation is complete. Click [OK].
Page 25
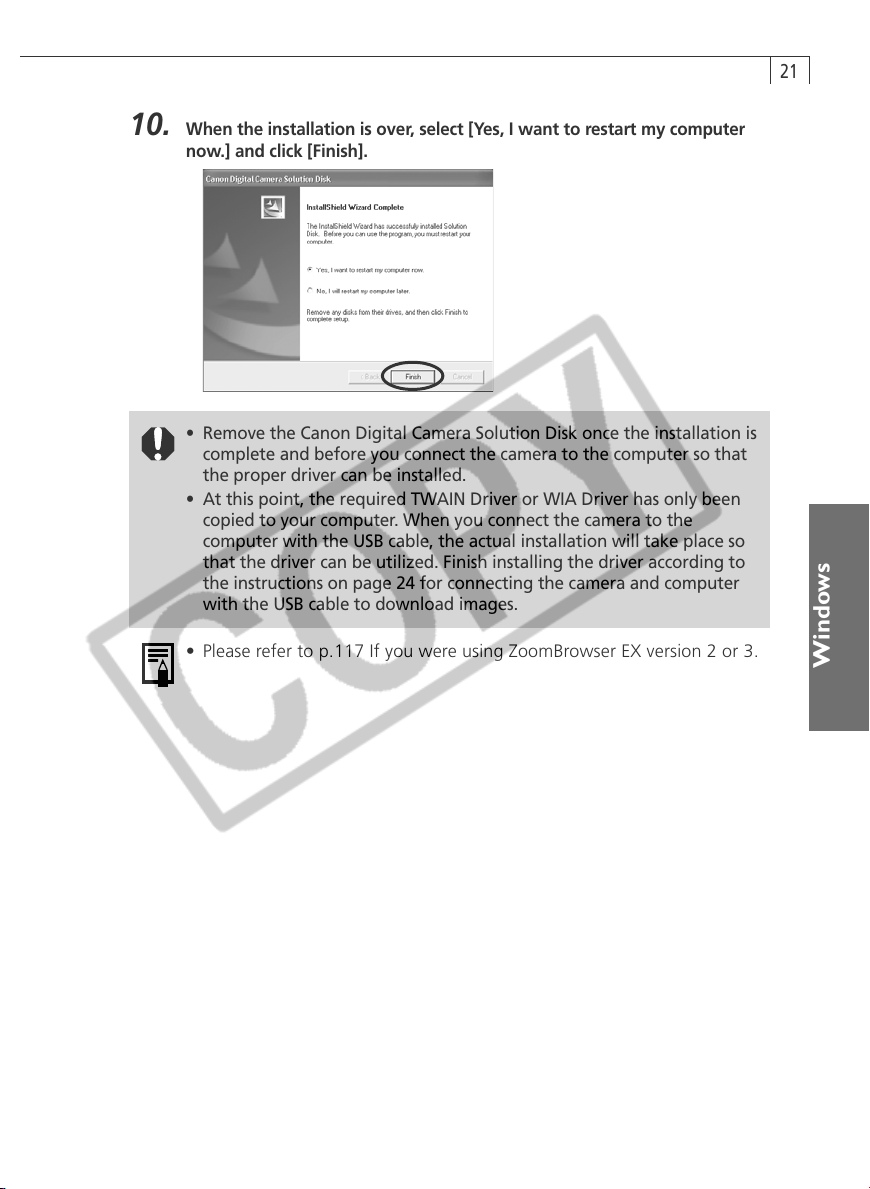
When the installation is over, select [Yes, I want to restart my computer
10.
now.] and click [Finish].
• Remove the Canon Digital Camera Solution Disk once the installation is
complete and before you connect the camera to the computer so that
the proper driver can be installed.
• At this point, the required TWAIN Driver or WIA Driver has only been
copied to your computer. When you connect the camera to the
computer with the USB cable, the actual installation will take place so
that the driver can be utilized. Finish installing the driver according to
the instructions on page 24 for connecting the camera and computer
with the USB cable to download images.
21
• Please refer to p.117 If you were using ZoomBrowser EX version 2 or 3.
Windows
Page 26

22
○○○○○○○○○○○○○○○○○○○○○○○○○○○○○○○○○○○○○○○○
Installing Adobe Photoshop LE
The Adobe Photoshop LE CD-ROM is distributed with PowerShot G3 digital cameras.
1. Place the Adobe Photoshop LE CD-ROM in the drive.
2. Click the [Start] menu, select [My Computer], right-click the CD-ROM icon and
select [Open]. Double-click the [Photosle] icon, the [English] and [Photosle] folders,
and the [Setup.exe]
• You are required to input a serial number when installing Adobe
Photoshop LE. Use [SDM501B4164785-650], or the serial number on the
CD-ROM case if one is listed there.
○○○○○○○○○○○○○○○○○○○○○○○○○○○○○○○○○○○○○○○○
icon. Follow the onscreen messages to proceed.
Installing ArcSoft Camera Suite 2.0
The ArcSoft Camera Suite CD-ROM is distributed with PowerShot S45 digital cameras.
1. Place the ArcSoft Camera Suite CD-ROM in the drive.
2. Click the [Start] menu, select [My Computer], right-click the CD-ROM icon and
select [Open]. Double-click the [ARCSOFT] and [Setup.exe]
icons. Follow the
onscreen messages to install PhotoStudio and VideoImpression.
○○○○○○○○○○○○○○○○○○○○○○○○○○○○○○○○○○○○○○○○
Installing ArcSoft Camera Suite 1.2
The ArcSoft Camera Suite CD-ROM is distributed with PowerShot S230 DIGITAL ELPH/
DIGITAL IXUS v
1. Place the ArcSoft Camera Suite CD-ROM in the drive.
2. Click the [Start] menu, select [My Computer], right-click the CD-ROM icon and
select [Open]. Double-click the [ARCSOFT] and [Setup.exe]
onscreen messages to install PhotoImpression and VideoImpression.
3
digital cameras.
icons. Follow the
○○○○○○○○○○○○○○○○○○○○○○○○○○○○○○○○○○○○○○○○
Installing the Printer Driver for Card Photo Printer CP-
100/CP-10 (Sold Separately)
The driver for Card Photo Printer CP-100 or Card Photo Printer CP-10 (both sold
separately) must be installed to print from one of these printers connected* to a
computer. For installation instructions, please see the Card Photo Printer CP-100/CP-
10 Printer Driver User Guide contained as a PDF file on the Canon Digital Camera
Solution Disk (p. 13).
* Interface Cable PIF-100 (sold separately)** is required to connect Card Photo Printer
CP-100/CP-10 to a computer.
** Not sold in some regions.
Page 27

○○○○○○○○○○○○○○○○○○○○○○○○○○○○○○○○○○○○○○○○
Uninstalling the Software
The procedures for uninstalling the software are only required when you
wish to delete the programs from your computer or when reinstallation is
required to fix corrupted files.
Uninstalling the Software
The following explanation uses the procedures for removing ZoomBrowser EX as an
example for removing other programs as well.
Click the Windows [Start] menu and select [All Programs], [Canon Utilities],
1.
[ZoomBrowser EX] and [ZoomBrowser EX Uninstall].
The uninstall utility will start and remove ZoomBrowser EX.
23
• You can remove other programs with the same procedures. However,
with PhotoRecord, click the Windows [Start] menu and select [All
Programs], [Canon PhotoRecord] and [PhotoRecord uninstall].
• You can uninstall Adobe Photoshop LE by clicking the [Start] menu and
selecting [All Programs], followed by [Adobe], [Photoshop Limited
Edition] and [Uninstall Photoshop Limited Edition].
• You can uninstall ArcSoft PhotoStudio, ArcSoft PhotoImpression and
ArcSoft VideoImpression by clicking the [Start] menu and selecting [All
Programs], [ArcSoft Camera Suite] and [Uninstall].
• Please see Uninstalling the TWAIN Driver/WIA Driver (p. 28) for
instructions for removing this software.
Uninstalling the Card Photo Printer CP-100/CP-10 Printer Driver
For instructions to delete the printer driver, please see the Card Photo Printer CP-100/
CP-10 Printer Driver User Guide contained as a PDF file on the Canon Digital Camera
Solution Disk (p. 13).
Windows
Page 28

24
Installing the TWAIN Driver / WIA Driver
• Be very careful to follow the steps below in order to install the driver
software.
1. Install one of the following drivers from the Canon Digital Camera
Solution Disk (p. 18).
Windows 98 / Windows 2000: TWAIN Driver
Windows Me / Windows XP: WIA Driver
- Copy the required files to your computer.
2. Connect the camera to the computer with the USB cable.
- Complete the steps required to install the driver and then close the installer.
• The installation procedures may vary between Windows versions.
WIA Driver Installation Precautions
• You can install the WIA Driver if you are using Windows Me or Windows XP. In
addition, you should read the “WIA Driver Limitations” below before installing
the driver.
WIA Driver Limitations
• When you have set the WIA Driver to start a particular application program when
you connect the camera, the program may cause an error message similar to the
following to appear: “TWAIN data source not found. Reinstall the scanner
software.” If this happens, select [WIA-camera model] in the application program
as the TWAIN device. Your camera model name will appear in place of the
“camera model” in the brackets above.
TWAIN Driver
• TWAIN Driver is the driver software for USB connections to Windows 98
and Windows 2000 only. It is the software required to load images into
TWAIN-compliant application programs, such as Adobe Photoshop LE,
ArcSoft PhotoStudio, ArcSoft PhotoImpression and ArcSoft
VideoImpression. Since it is not a stand-alone program, you must always
use it by starting it from within a TWAIN-compliant program.
WIA Driver
• WIA Driver is the driver software for USB connections to Windows Me
and Windows XP only. When you connect the camera to a computer with
a USB cable, the Scanners and Cameras Wizard will open automatically to
assist with downloading. This driver also allows you to use Windows
Explorer to display the camera’s thumbnail (tiny) images on the computer
and download images with standard file copying procedures.
Page 29

○○○○○○○○○○○○○○○○○○○○○○○○○○○○○○○○○○○○○○○○
Connecting the Camera to a Computer
Connection Precautions
• Do not connect the camera to the computer until you have installed the
software from the Canon Digital Camera Solution Disk.
• Use the USB cable to attach the camera directly to a USB port on the computer,
not through a USB hub. The connection may not operate correctly through a USB
hub.
• The connection may not operate correctly if you are using other USB devices,
excluding USB mice or keyboards, at the same time as the camera. If this occurs,
disconnect the other devices from the computer and try reconnecting the
camera.
• Do not connect two or more cameras to the same computer via the USB
interface. The connections may not operate correctly.
• You are recommended to power the camera from a household power source (AC
adapter) when connecting to a computer.
• Never allow the computer to go into sleep (standby) mode while a
camera is connected via the USB interface. If it does happen, never
disconnect the USB cable. Try to awaken the computer with the camera
in the connected state. Some computers will not awaken properly if
you disconnect the camera while they are in sleep (standby) mode.
Please refer to your computer manual for instructions regarding the
sleep (standby) mode.
25
Windows
Confirm that the bundled software is already completely installed on the
1.
computer. (This step is only required the first time.)
Confirm that the camera’s [Communication] setting is set to [Normal] and
2
shut off the camera power.
• You must select the [Normal] option when you are using the software from the
Canon Digital Camera Solution Disk to download images from the camera. See
the Camera User Guide for the settings procedures.
Attach the supplied USB cable to the computer’s USB port and the
3.
camera’s DIGITAL terminal.
• You do not need to turn off the computer for this procedure. Refer to the
computer’s manual for the location of the USB ports. See the Camera User
Guide for instructions for attaching the cable.
Set the mode switch to Replay mode and turn the camera on. (PowerShot
4.
S230 DIGITAL ELPH/DIGITAL IXUS v
• You do not have to power up the PowerShot G3 or PowerShot S45 models.
See the following pages for the next steps.
3
only).
Page 30
26
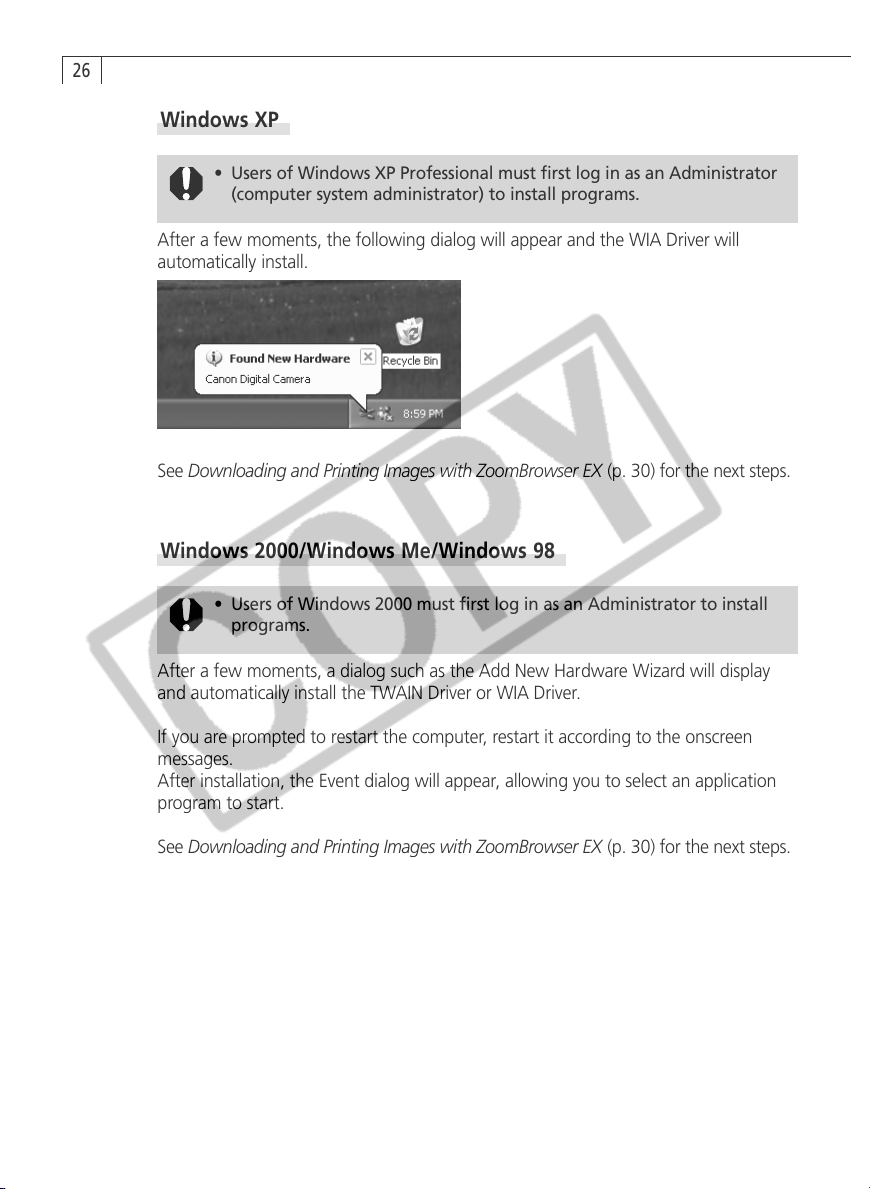
Windows XP
• Users of Windows XP Professional must first log in as an Administrator
(computer system administrator) to install programs.
After a few moments, the following dialog will appear and the WIA Driver will
automatically install.
See Downloading and Printing Images with ZoomBrowser EX (p. 30) for the next steps.
Windows 2000/Windows Me/Windows 98
• Users of Windows 2000 must first log in as an Administrator to install
programs.
After a few moments, a dialog such as the Add New Hardware Wizard will display
and automatically install the TWAIN Driver or WIA Driver.
If you are prompted to restart the computer, restart it according to the onscreen
messages.
After installation, the Event dialog will appear, allowing you to select an application
program to start.
See Downloading and Printing Images with ZoomBrowser EX (p. 30) for the next steps.
Page 31

○○○○○○○○○○○○○○○○○○○○○○○○○○○○○○○○○○○○○○○○
Troubleshooting the TWAIN Driver / WIA Driver Installation
First, Check the Following
1. Does your computer comply with these requirements?
Does the system have a built-in USB port and did it come with Windows 98 (First
or Second Edition), Windows Me, Windows 2000, or Windows XP preinstalled?
(The USB interface is not supported for systems not complying with the above
conditions.)
2. Is the camera correctly connected to the computer?
See the Camera User Guide for connection instructions.
3. Is the camera’s [Communication] setting set to [Normal]?
See the Camera User Guide for instructions to set the communication setting.
4. Is the battery charge sufficient?
You should use a household power source to power the camera when it is
connected to a computer.
• If the Problem Lies in the Above
The Add New Hardware Wizard (in Windows 2000, the New Hardware Found
Wizard) may display. If that happens, click [Cancel] to close it. Then disconnect the
camera from the computer before reinstalling the USB Driver according to the
procedures in Installing the TWAIN Driver / WIA Driver (p. 24).
• If the Problem Is Not Mentioned Above
If the USB Driver is not correctly installed, it is possible that Windows is not
recognizing the USB Driver. Uninstall the USB Driver according to the instructions on
page 28 before reinstalling it according to the instructions in Installing the TWAIN
Driver / WIA Driver (p. 24).
27
Windows
Page 32

28
○○○○○○○○○○○○○○○○○○○○○○○○○○○○○○○○○○○○○○○○
Uninstalling the TWAIN Driver/WIA Driver
You can uninstall the TWAIN Driver (Windows 98 / Windows 2000) or the WIA Driver
(Windows Me / Windows XP) with the following procedures.
Use these uninstall procedures when the USB driver is no longer necessary or
when it does not work properly. Images cannot be downloaded once the
driver has been uninstalled.
Attach the supplied USB cable to the computer’s USB port and the
1.
camera’s Digital Terminal. Prepare the camera for communication with the
computer.
• For USB cable connection instructions, see Connecting the Camera to a
Computer (p. 25).
• A dialog allowing you to select which application program to start will display.
Click the [Cancel] button.
2.
• If ZoomBrowser is started, close it.
Windows XP: click the [Start] menu and select [Control Panel], followed by
3.
[Printers and Other Hardware].
• For other operating systems, click the [Start] menu and select [Settings],
followed by [Control Panel].
Double-click the [Scanners and Cameras] icon or folder.
4.
Page 33

Delete the name or icon of your camera model in the [Scanners and
5.
Cameras] folder in Windows Me or Windows XP, or the [Scanners and
Cameras Properties] list in Windows 98 or Windows 2000.
Your camera model name will
appear here.
• If your camera model name does not appear here, see the Troubleshooting
section (p. 110).
Windows Me/Windows XP
Select the icon for your camera model, right-click the mouse and select [Delete].
Windows 98/Windows 2000
Select your camera model name and click [Remove].
29
Click the [Start] menu and select [Programs] or [All Programs], followed by
6.
[Canon Utilities], [
Driver], and [TWAIN Driver Uninstall] or [WIA Driver Uninstall].
• The content of the underlined items will vary according to your camera model
as follows.
- PowerShot G3: [PowerShot G3 TWAIN Driver] or [PowerShot G3 WIA
Driver], [TWAIN Driver Uninstall] or [WIA Driver Uninstall].
- PowerShot S45: [PowerShot S45 TWAIN Driver] or [PowerShot S45 WIA
Driver], [TWAIN Driver Uninstall] or [WIA Driver Uninstall].
- PowerShot S230 DIGITAL ELPH/DIGITAL IXUS v
S230, IXUS v3 TWAIN Driver] or [IXY 320, PowerShot S230, IXUS v3 WIA
Driver], [TWAIN Driver Uninstall] or [WIA Driver Uninstall].
• The uninstall process will start.
After it concludes, perform the following procedures before you connect
the camera to the computer to download images.
1. Reinstall the driver.
2. Connect the camera to the computer with the USB cable.
Digital Camera TWAIN Driver] or [Digital Camera WIA
3
: [IXY 320, PowerShot
Windows
Page 34

30
Downloading and Printing Images with ZoomBrowser EX
This topic briefly explains how to use ZoomBrowser EX to perform a range of
operations from downloading the camera’s images to printing them.
If the Continue Connection Confirmation Message Displays
• A message asking whether you wish to remain connected may appear when the
power-saving function is set to [On], the camera and computer are connected via
the USB interface, and the connection is idle for a set period of time (usually about
5 minutes). If the connection remains idle, the camera will disconnect after
approximately 1 minute.
Please see the Camera User Guide for information on what to do if the camera
powers down because of the power-saving function.
○○○○○○○○○○○○○○○○○○○○○○○○○○○○○○○○○○○○○○○○
Starting ZoomBrowser EX
Camera to Computer Connection
Attach the supplied USB cable to the computer’s USB port and the camera’s
1.
Digital Terminal. Prepare the camera for communication with the computer.
• For USB cable connection instructions, see Connecting the Camera to a
Computer (p. 25).
• After a moment, the Event dialog will display and allow you to select an
application program to start.
Your camera model name
will appear here.
If this screen does not appear (with Windows XP, it never appears the first
time the camera is connected after computer start-up), please refer to
steps 2 and 3 of page 32.
Page 35

Select [Canon ZoomBrowser EX] and click [OK].
2.
• ZoomBrowser EX will start and open the Camera Window, displaying the
camera images as thumbnails (tiny versions) (p. 34).
• If a camera and CF card reader are connected at the same time, a dialog
allowing you to select the camera model will display. Confirm that your camera
model name is displayed and click [OK].
CF Card Reader/PC Card Reader Connection
Insert the CF card into the CF card reader or PC card reader.
1.
• Use a separately sold PC card adapter (PCMCIA adapter) if required.
• See the manual for the PC card reader for its connection and handling
instructions.
31
Windows
Insert the CF card into an adapter if required
Insert the loaded adapter into the slot
Page 36

32
Start ZoomBrowser EX.
2.
• Double-click the [ZoomBrowser EX] icon on the desktop.
Click [Camera & Memory Card] and [Browse & Download Images].
3.
• This will display the Camera window. The images on the CF card will display in
the Camera window as thumbnails (p. 34).
If multiple PC card readers loaded with CF cards are connected or if a
camera and a PC card reader are connected, a selection dialog will appear
before the Camera window opens. Select one of the devices to proceed.
Page 37

CF Card Folder Structure and File Names
The images on a CF card are placed in subfolders named [xxxCANON], where the
“xxx” represents a number from 100 to 998, within the [DCIM] folder.
IMG_xxxx.JPG (JPEG format images)
DCIM
MISC
xxxCANON
CANONMSC
The folder created when DPOF settings are set.
It holds the DPOF settings files.
* Files with the THM extension are the thumbnail image files for the camera’s index
replay mode.
** Each successive file shot in Stitch Assist mode is assigned a letter starting from
“A,” which is inserted as the third digit in the name. i.e. [STA_0001.JPG],
[STB_0002.JPG], [STC_0003.JPG] ...
CRW_xxxx.CRW (RAW format images)
CRW_xxxx.THM*
STx_xxxx.JPG** (Stitch Assist mode images)
MVI_xxxx.AVI (Movies)
MVI_xxxx.THM*
SND_xxxx.WAV (Sound annotation)
The folder that holds the settings files for images in
the DCIM folder.
33
• The “xxxx” in file names represent four-digit numbers.
• All folders except the “xxxCANON” folders contain image settings files. Do not
open or delete them.
Windows
Page 38

34
○○○○○○○○○○○○○○○○○○○○○○○○○○○○○○○○○○○○○○○○
Downloading and Saving Images from the Camera
Select the images you wish to download from the Camera window and
1.
click [Download image].
• Click images to select them. You can select multiple images by clicking on
successive images. To deselect an image, click it again.
Thumbnail“RAW” displays on RAW images.
A Download Settings dialog allowing you to select the image destination
folder will display.
• If you are downloading images previously selected with the camera’s
[Transfer Order] setting, click [Select] and select [Select Send Mark].
The movie icon displays
on movie thumbnails.
Make sure the settings are appropriate and click [OK]. (For details, see
2.
Download Settings Window p. 39)
At this point the Camera window will close and the main window will
open. The downloaded images will appear in the main window.
Page 39

○○○○○○○○○○○○○○○○○○○○○○○○○○○○○○○○○○○○○○○○
Printing Images
Select the image(s) you wish to print.
1.
• Click images to select them. You can select multiple images by clicking on
successive images. To deselect an image, click it again.
• Movie images cannot be printed.
Click [Print] and select [Layout Print].
2.
35
• A dialog allowing you to select the type of information that will be printed with
the image will display.
Place a check mark beside the items (Comment, File Name and Date and
3.
Time options) that you wish included in the print and click [Finish].
Windows
Page 40

36
• Please note that you can attach a comment to an image by selecting an image
in the ZoomBrowser EX window, selecting [Properties] and typing a comment.
• The PhotoRecord printing program will start and display the PhotoRecord Print
Modes dialog.
Select a print mode and click [Next].
4.
• For the purposes of this example, please select [Artwork/Layout album].
• When you select the “Artwork/Layout album” option, you can resize or
reposition images freely for printing. The other print modes allow you to
do such things as tile the images for printing or arrange them for
printing on Canon perforated paper.
In the next dialog, set the paper size and other settings and click [Next].
5.
In the last dialog, select [Automatic layout] and click [Finish].
6.
• The PhotoRecord window will display.
If you wish to change the layout, set the printing settings in the
7.
PhotoRecord window.
Click the PhotoRecord [Print] button.
8.
• The Print dialog will display.
Click [Print] to start printing.
9.
• When you click the [Print] button after having selected images and
select [Index Print] from the displayed menu then perform the
procedures in step 3 of page 35, the Index Print Settings dialog will
display. Set the desired thumbnail size and paper size, then click [Print]
to start printing the index.
Page 41

37
○○○○○○○○○○○○○○○○○○○○○○○○○○○○○○○○○○○○○○○○
Adjusting Image Quality and Printing (Exif 2.2 Compliant)
The PhotoRecord utility features functions that allow you to print images with image
quality adjustments and also supports the Exif 2.2 standard (or Exif Print). This
function automatically selects optimal image correction settings to produce better
prints.
Right-click an image you wish to print and select [Clip/Correct Photo].
1.
Place a check mark beside [Exif Print] or [Auto Photo Perfect] and click
2.
[Close].
The selected image will be corrected.
• Images shot with cameras complying with the Exif 2.2 standard incorporate
shooting settings information, such as the shooting conditions and scene
mode, along with the image data. The Exif Print adjustment protocol uses this
information to correct the image quality more accurately to reflect the shooting
settings.
Windows
Page 42

38
ZoomBrowser EX Features
This topic introduces additional, convenient ZoomBrowser EX features.
○○○○○○○○○○○○○○○○○○○○○○○○○○○○○○○○○○○○○○○○
Camera Window
This section provides a brief introduction of the names and functions of the Camera
window parts.
Task Buttons
Task Buttons
Select a procedure you wish to carry out from those below.
The images from the camera (or CF
card) display here.
Function Buttons
• Download Image Button
Downloads selected images to the computer.
• Print Button
Automatically starts the printing process after downloading the selected images to
the computer.
• View as Slideshow Button
Automatically starts a slide show after downloading the selected images to the
computer.
• Connect to Internet Button
Automatically attaches the selected images to a mail message after downloading
them to the computer.
Function Buttons
These buttons perform the following functions on the selected images.
• Set Button
Adjusts the settings for connecting to cameras.
• Select Button
Selects images.
Page 43

• Deselect Button
Deselects images.
• Rotate Button
Rotates selected images.
• Delete Button
Deletes images from the camera.
• Properties Button
Displays the image information for the selected image.
• Help Button
Displays help topics.
Download Settings Window
The following window will display when you download images from the Camera
window.
Selects the folder to which
transferred images are saved.
To create a new folder within the
folder specified above, select
[Create new folder] and set a
name for it.
39
Windows
If the [Designate prefix of image to
be saved] option does not have a
check mark, the file name will be
in the format [100-0001.JPG]. If a
check mark is placed here, the file
name is in the format
[name+0001.JPG].
About Image Rotation During Downloading
The camera has a feature that rotates images shot with the camera on end to the
correct orientation when it is replayed. When you download JPEG images that have
been rotated automatically (if the [Auto Rotate] function is set to [On]) or manually by
the camera, or that have been rotated in the Camera window, two images are saved
onto the computer, the pre-rotation image and the post-rotation image. (This setting
can be changed in the [Rotation] tab in ZoomBrowser EX’s main window’s
[Preference] option in the [Tool] menu.) RAW images, however, are only downloaded
with one image in the correct viewing orientation and the rotation information is
retained with the image.
Page 44

40
○○○○○○○○○○○○○○○○○○○○○○○○○○○○○○○○○○○○○○○○
Main Window
ZoomBrowser EX’s main window features various buttons and an image display area.
This section introduces the names and functions of the various window parts.
Folders Area
Select image folders here. As in
Windows Explorer, you can view
the contents of the folders.
Task Buttons
Task Buttons
Select a procedure you wish to carry out from those below. When you click a button,
an additional menu of functions will display.
Function Buttons
Browser Area
Displays the images contained in the
folder selected in the Folders area.
Double-clicking an image shows it
at a larger size.
• Camera & Memory Card Button
Use this to display the Camera window. Clicking this button opens the menu with
options such as [Browse and Download Images], [Upload Images], [My Camera
Settings] and [Remote Shooting].
• Print Button
Use this to print an image. Clicking this button opens the menu with options such as
[Layout Print] and [Index Print].
• View & Modify Button
Use this to view or edit images. Clicking this button opens the menu with options such
as [View as a Slide Show], [Process RAW Images], [Edit Image] and [Stitch Photos].
• Internet Button
Use this button to attach an image to an e-mail message. Clicking this button opens
the menu with the [Email Images] option.
Page 45

Function Buttons
The following functions can be performed on images selected in the Browser Area.
• View Mode Button
Switches between the Zoom Mode and Scroll Mode to suit your requirements.
Zoom Mode
When a folder has been created within a folder, this mode can be used to display
all the images within the nestled folder. Selecting the magnifying glass (+ or –)
then clicking within a folder or on an image in the Browser Area changes the size
at which an image is displayed or the folder level. You can also zoom up by
double-clicking an empty part of the Browser Area or the tab of a folder name.
Scroll Mode
Displays the images in the selected folder only at a large, easy-to-view size. When
there are more images than can fit in the Browser Area, scroll bars appear at the
right of the Browser Area. When a folder has been created within a folder, it
shows in the higher-level folder as a folder icon only.
• Thumbnail Size Button (Scroll mode only)
Selects the size at which images are displayed in the Browser Area.
• View Image Button
Displays the selected image in the Viewer window.
• Properties Button
Displays information for the selected image as follows.
41
You can change the file name or
comment.
Switch between images with this
button when more than one
image is selected.
If you select an image in the Browser Area while the Properties window is open, the
information in the window switches to the contents of the selected image.
• Rotate Button
Rotates selected images.
• Delete Button
Deletes selected images.
Windows
Page 46

42
○○○○○○○○○○○○○○○○○○○○○○○○○○○○○○○○○○○○○○○○
Converting RAW Format Images
Please check whether or not your camera model supports this function (p. 12).
The RAW image file format records image data as captured by the camera’s image
sensor without further processing by the camera. Although the data is compressed
when recorded, the original data can be completely restored without any loss of
quality. Moreover, the RAW format is extremely compact, creating files approximately
one-quarter the size* of uncompressed files (RGB TIFF). However, RAW images
cannot be opened by standard image editing programs unless they are first
converted.
“Conversion” involves generating high-quality RGB signals from the RAW format
files. If you start File Viewer Utility from ZoomBrowser EX, you can adjust the
attributes of the original data before conversion to retain the degree of image quality
appropriate to your purposes. The result is high-quality images. In contrast, image
data recorded in the RGB TIFF and other standard uncompressed file formats is
irrevocably processed in the camera and again in the application program when you
change the file attributes, which reduces the image quality.
* As measured by standard Canon test conditions.
• Please see the Camera User Guide to learn how to shoot RAW images.
Converting RAW Images with File Viewer Utility
We will start File Viewer Utility from within ZoomBrowser EX and convert RAW
images.
Select a RAW image.
1.
• Select a RAW image in the Browser Area of ZoomBrowser EX.
Click [View & Modify] and select [Process RAW Images] from the displayed
2.
menu.
• The following window will display.
Page 47

• File Viewer Utility Components
43
Preferences Button
Use this button to select
image transfer applications.
You can also use it to adjust
RAW image processing
settings.
This section displays
when a camera
model is selected in
the Model-specific
Processing Mode List
Box and selects RAW
images.
Display Mode List Box
Selects the thumbnail or
preview display mode.
Save Button
Converts and saves the
image.
Selection Button
Selects the method for selecting
images.
Comment Box
A description of up to 60 characters can be input
here.
Display Size List Box
Selects the size at which
images display.
Buttons for selecting images.
Help Button
Displays help topics.
Version Information
Button
Displays the program
version information.
Displays a histogram
(distribution of
brightness data) for the
image.
Displays the image
information here.
Model-specific Processing Mode List Box
Selects the model of camera in use.
Windows
Click this button and then
a white portion of an
image to automatically
adjust the white balance
to that color.
Adjusts white
balance settings.
Adjusts the
sharpness.
Adjusts image
contrast.
Sets the Photo
Effect mode.
Adjusts image color
saturation.
Page 48

44
• The following screen will appear on top of File Viewer Utility. Select the name of
your camera and click [OK]. (First time connection only)
Select the name of your camera from File Viewer Utility’s model-specific
3.
processing list box.
Step 3 refers to this box.
Adjust the image quality as required.
4.
Select [Save File] from the [File] menu and select [Convert and save in file].
5.
• The Save File dialog appears.
Select a file destination and a file format for the image you wish to process.
6.
• Images can be saved in the JPEG format or in the TIFF format.
Click [OK].
7.
• Processing starts and the image is saved onto the computer.
Page 49

○○○○○○○○○○○○○○○○○○○○○○○○○○○○○○○○○○○○○○○○
Replaying Movies
When you double-click an image with a movie icon in the Browser Display Area,
QuickTime Player will start and replay the movie.
• If QuickTime 3.0 or a later version is not already installed, install the
QuickTime program from the Canon Digital Camera Solution Disk. Place
the disk in the CD-ROM drive and click [QuickTime Installation] in the
installer panel. (p. 19).
Double-click an image with a movie icon.
1.
• QuickTime Player will start.
Click the play button in QuickTime Player.
2.
• The movie will replay.
45
Play Button
• Do not double-click a movie file (.AVI extension) in the Windows
Explorer to play it. That will start Windows Media Player, which may
not support this file type. To replay movies, start QuickTime Player first
and open the file from within the program.
Windows
Page 50

46
○○○○○○○○○○○○○○○○○○○○○○○○○○○○○○○○○○○○○○○○
Merging Panoramic Images with PhotoStitch
To Merge Images Registered in ZoomBrowser EX
You can merge a series of overlapping images into a single, seamless panorama.
Select the images in the Browser Area, click the [View & Modify] button,
1.
followed by the [Stitch Photos] button to start PhotoStitch.
Follow the instructions in the guidance window to merge the images.
2.
• Please refer to the PhotoStitch Help menu for more details.
• Images shot in Stitch Assist mode with a wide converter, teleconverter or close-
up lens cannot be merged accurately.
Follow the instructions
to merge the images.
Images Shot in Stitch Assist Mode
PhotoStitch automatically arranges images shot with the camera’s Stitch Assist mode
in their correct order and orientation, making it easy to merge them. Stitch Assist
mode images appear in the Camera window as shown below.
Stitch Assist mode images have a blue
stitch mark. Click the stitch mark to start
PhotoStitch and merge the image series.
Please see the Camera User Guide to learn how to shoot in Stitch Assist mode.
Page 51

○○○○○○○○○○○○○○○○○○○○○○○○○○○○○○○○○○○○○○○
Shooting with RemoteCapture
RemoteCapture allows you to control the camera’s shutter remotely from the
computer to shoot still images when the camera is connected to the computer.
• You can also save images directly to the computer by pressing the
camera’s shutter button. However, other buttons and switches on the
camera, including the zoom, will not operate with a transmission in
progress.
• You may notice that the interval between the shutter release and
activation is slightly longer when RemoteCapture is used to shoot than
when the camera is used in the normal fashion.
• Images shot with RemoteCapture are automatically saved to the folder
selected in ZoomBrowser EX.
• Save-RemoteCapture Window
47
Thumbnail View
Displays thumbnails of all the images
shot after RemoteCapture is started.
Image Display Area
Displays the image selected in the Thumbnail View.
Connect/Disconnect Button
Click here to open a connection to the
camera and display the RemoteCapture
Shooting window. It will change to the
Disconnect button while a connection is
open. Click it to close the connection.
View Button
Select an image in the Thumbnail View
and click here to display it in the Image
Display Area.
Delete Button
Select an image in the Thumbnail View
and click here to delete it. Since it is
deleted from the computer too, ensure
that you have the correct image.
Histogram
Check the distribution of brightness
data here.
Image Information
Check the image settings here.
Comments
Add a comment about the image here.
Windows
Page 52

48
• Shooting-RemoteCapture Window
Recordable Image Counter
Displays the number of images that will
fit onto the computer or CF card in the
camera.
Viewfinder Display
Click the [Viewfinder On]
button while a connection
to the camera is open to
display the image appearing
in the camera’s viewfinder.
The exposure and focus are
locked at that point. Click
the [Reflect Changes]
button if the distance to the
subject or the brightness
changes to update the
focus and exposure settings.
Viewfinder On/Off
Button
Turns the viewfinder
display on or off.
Reflect changes Button
Updates the settings.
Release Button
Click here to release
the camera’s shutter
and record the image.
Recorded images are
automatically saved to
the computer.
Set the basic camera
settings here.
Slide this to zoom the
camera in or out.
PowerShot S230 DIGITAL ELPH/DIGITAL IXUS v
3
• When the Viewfinder is displayed, it will automatically turn off 1 minute after it
was turned on, or after a picture is taken. If this happens, you can display the
Viewfinder again by clicking the [Viewfinder On] button. However, if the camera
body temperature becomes too high, the Viewfinder will not display for some time.
• When the Viewfinder is displayed, the camera’s LCD monitor will not display. In
addition, the camera’s LCD monitor and the Video OUT settings cannot be
selected in RemoteCapture.
Page 53

Shooting
Attach the supplied USB cable to the computer’s USB port and the camera’s
1.
DIGITAL terminal. Prepare the camera for communication with the computer.
• For USB cable connection instructions, see Connecting the Camera to a
Computer (p. 25).
- PowerShot S45: open the lens cover after connecting.
- PowerShot G3: remove the lens cap after connecting.
3
- PowerShot S230 DIGITAL ELPH/DIGITAL IXUS v
Replay mode and then turn on the power.
The Event dialog will display, allowing you to select which application to
start. Select [Canon ZoomBrowser EX] and click [OK]. When the
ZoomBrowser EX Camera window displays, close this window. This will
display ZoomBrowser EX’s main window.
Click [Camera & Memory Card] and select [Remote Shooting] from the
2.
displayed menu.
• RemoteCapture will start and the “Connect to Camera?” prompt will display.
Click [Connect].
3.
• The Shooting-RemoteCapture window will display.
Set the Size/Quality, Flash and Rotation settings.
4.
• If you are shooting with the camera on end to either the right or left at 90°,
you can set the [Rotation] setting to either [90 degree Left] or [90 degree Right]
to have the image rotated when it is shot and saved. However, when the
camera’s [Auto Rotate] function is set to [On], the Rotation setting is not
available. To change the destination of the saved image, see Changing the Save
Location and Other Preferences (p. 51).
Click [Detail setting].
5.
• The full-view Shooting-RemoteCapture window will display.
Click [Viewfinder On] and view the image in the upper portion of the
6.
Shooting-RemoteCapture window.
• Change the settings if required. To update any changes made in the Detail
settings window, click the [Reflect changes] button.
Click the [Release] button.
7.
• The image will record and be automatically saved to the computer. You can also
release the shutter by pressing the camera’s shutter button directly or pressing
the space bar on the computer keyboard.
: set the mode switch to
49
Windows
Page 54

50
Interval Timer Shooting
You can shoot a specified number of frames at set intervals.
In the Shooting-RemoteCapture window, click the [Interval Timer Shooting]
1.
tab.
• The Interval Timer Shooting dialog will display.
Set the number of frames and the interval value and click [Start].
2.
• RemoteCapture will start Interval Timer shooting, capturing the specified
number of frames at the specified interval. You can set the time interval
between 5 seconds to 60 minutes and you can capture up to the number of
recordable frames displayed in the RemoteCapture Shooting window (to a
maximum of 9999 frames).
Timer Shooting
You can use the timer feature to shoot after a specified number of seconds.
In the Shooting-RemoteCapture window, click the [Interval Timer Shooting]
1.
tab.
• The Timer Shooting dialog will display.
Set the delay in seconds and click [Start].
2.
• RemoteCapture will start timer shooting, recording an image after the specified
delay. You can specify a delay from 2 to 30 seconds.
Precautions for Shooting with RemoteCapture
• If your computer is set to go into standby mode, there is no guarantee that
RemoteCapture will continue to function after the computer enters standby mode.
Always turn off the standby function before you start shooting with
RemoteCapture.
• Please note that the camera will not be able to shoot at the specified interval if it is
shorter than the time required to transmit the data and save it to the computer.
Page 55

Changing the Save Location and Other Preferences
You can change where and how image files are saved.
In the save RemoteCapture window, click the [File] menu and select
1.
[Preferences].
• The Preferences dialog will display.
Select the way images are saved and the folder to which they are saved
2.
and click [OK].
• Preferences Dialog
Click an option to determine whether images are
saved to the camera’s CF card as well as the
computer. If you select [Computer only], you can
shoot without a CF card in the camera or continue
to record images after the CF card is full.
Input a root name for the image files here. If you
input “Capture”, for example, the first image will
be named [Capture_00001.jpg] and successive
images will automatically be assigned a name
that is one number higher than the last.
Select a folder where images will be saved.
51
Select the drive on the computer where images
will be saved.
How to Display the Subject in the Camera’s LCD Monitor
You can view the subject you are shooting in the camera’s LCD monitor.
1. In the Shooting-RemoteCapture window, click the [Camera] menu and select
[Camera Display Settings].
The Camera Display Settings dialog will display.
2. Select [Camera LCD monitor] and click [OK].
3. In the Shooting window, click the [Viewfinder On] button.
If you select [Video Out terminal] instead, you can view the subject on a TV set.
Please see the Camera User Guide to learn how to connect to a TV.
Printing an Index of the Thumbnail Images
If you select images in the Thumbnail View area of Save-RemoteCapture window,
you can print them in an index like a contact sheet.
1. Select the images, click the [File] menu and select [Print Index].
The file name and shooting date are printed along with each image in the index,
providing a convenient record and means of checking your images.
Windows
Page 56

52
Downloading Images with TWAIN-Compliant Software
(Windows 98/Windows 2000)
This section explains how to download images with Adobe Photoshop LE, ArcSoft
PhotoStudio and ArcSoft PhotoImpression once you have connected the camera to a
computer. For more detailed instructions, please see the respective manual for each
program or its help menu.
• These procedures are for Windows 98 and Windows 2000 only. They
will not work with Windows Me or Windows XP.
• The TWAIN Driver must be properly installed on your computer to
download images with any of these programs. For installation
instructions, see Installing the TWAIN Driver/WIA Driver (p. 24).
• Only JPEG format image files can be downloaded using the TWAIN
Driver. Use ZoomBrowser EX to download RAW images or movies.
○○○○○○○○○○○○○○○○○○○○○○○○○○○○○○○○○○○○○○○○
Downloading Images with Adobe Photoshop LE
Starting the TWAIN Driver from within Adobe Photoshop LE
Attach the supplied USB cable to the computer’s USB port and the
1.
camera’s DIGITAL terminal. Prepare the camera for communication with
the computer.
• For USB cable connection instructions, see Connecting the Camera to a
Computer (p. 25).
• A dialog allowing you to select which application program to start will display.
Select [Photoshop] and click [OK].
2.
• Adobe Photoshop LE will start.
Click the [File] menu in Adobe Photoshop LE and select [Import], followed
3.
by [Select TWAIN_32 Source].
Select your camera model name and click [Select].
4.
Click the [File] menu and select [Import], followed by [TWAIN_32].
5.
• The TWAIN Driver will start (p 54).
Page 57

○○○○○○○○○○○○○○○○○○○○○○○○○○○○○○○○○○○○○○○○
Downloading Images with ArcSoft PhotoStudio
Starting the TWAIN Driver from within ArcSoft PhotoStudio
Attach the supplied USB cable to the computer’s USB port and the
1.
camera’s DIGITAL terminal. Prepare the camera for communication with
the computer.
• For USB cable connection instructions, see Connecting the Camera to a
Computer (p. 25).
• A dialog allowing you to select which application program to start will display.
Click [Cancel].
2.
Click the Windows [Start] menu and select [Program], [Arcsoft Camera
3.
Suite] and [PhotoStudio 5].
• PhotoStudio will start.
Click the [File] menu in ArcSoft PhotoStudio and choose [Select Source…].
4.
Select your camera model name and click [OK].
5.
Click the [File] menu and select [Acquire…].
6.
• The TWAIN Driver will start (p. 54).
○○○○○○○○○○○○○○○○○○○○○○○○○○○○○○○○○○○○○○○○
Downloading Images with ArcSoft PhotoImpression
53
Windows
Starting the TWAIN Driver from within PhotoImpression
Attach the supplied USB cable to the computer’s USB port and the camera’s
1.
Digital Terminal. Prepare the camera for communication with the computer.
• For USB cable connection instructions, see Connecting the Camera to a
Computer (p. 25).
• A dialog allowing you to select which application program to start will display.
Click [Cancel].
2.
Click the Windows [Start] menu and select [Program], [ArcSoft Camera
3.
Suite] and [PhotoImpression 4].
• PhotoImpression will start.
Click the [Camera/Scanner] button at the bottom left of the
4.
PhotoImpression window.
Page 58

54
Select your camera model from the [Select Source] list.
5.
Click the button.
6.
• The TWAIN Driver will start.
Loading Images from the Camera with the TWAIN Driver
• The TWAIN Driver can display still images only. To download movies to
a computer, start ZoomBrowser EX.
• TWAIN Driver Window
Select images for downloading, click the [File] menu and select [Transfer Image].
1.
• You can also download images by double-clicking them.
2.
Click (close box).
• Depending on the software you are using, the TWAIN driver may close
automatically. In this case, there is no need to click the close box.
• The downloaded image(s) will appear in the application program’s window. To
save the downloaded image, click the [File] menu and select [Save]. Input a file
name and adjust the file destination or format as required.
Page 59

Downloading Images with the WIA Driver
(Windows Me/Windows XP)
If you are using Windows Me or Windows XP (and installed the WIA Driver), you have
the following alternatives for downloading images to the computer.
○○○○○○○○○○○○○○○○○○○○○○○○○○○○○○○○○○○○○○○○
Downloading with the Scanner and Camera Wizard
Follow the Wizard’s step-by-step instructions to download images to the computer.
When you download RAW images, they are automatically converted and saved in the
Windows BMP format.
Attach the supplied USB cable to the computer’s USB port and the
1.
camera’s Digital Terminal.
• For USB cable connection instructions, see Connecting the Camera to a
Computer (p. 25).
• If the Event dialog, which allows you to select an application to start, appears (p. 30),
select [Microsoft Scanner and Camera Wizard] and click [OK].
• The Scanner and Camera Wizard window will open.
• If the dialog that allows you to select an application to start does not appear,
select [All Programs] from the [start] menu and select [Accessories] and [Scanner
and Camera Wizard].
Click the [Next] button.
2.
Select the image(s) to be downloaded and click the [Next] button.
3.
• At first, all the images are already selected (they all have a checkmark). If you do
not need to download certain images, remove the checkmark from those images.
55
Windows
Page 60

56
Specify a file name prefix and destination for the image files.
4.
Specify a file name here.
Specify the folder that will
become the file destination.
Click [Next].
5.
• The images will start downloading to the computer.
Select [Nothing, I’m finished working with these pictures] and click [Next].
6.
Click [Finish].
7.
• This concludes the download.
Page 61

○○○○○○○○○○○○○○○○○○○○○○○○○○○○○○○○○○○○○○○○
Downloading with Windows Explorer
Images can be downloaded to the computer with Windows Explorer just as you
would copy any other file. RAW images can also be downloaded this way.
Attach the supplied USB cable to the computer’s USB port and the
1.
camera’s Digital Terminal.
• For USB cable connection instructions, see Connecting the Camera to a
Computer (p. 25).
• If the Event dialog, which allows you to select an application to start (p. 30), or if the
Scanner and Camera Wizard appear, click [Cancel].
Start Windows Explorer and select your camera’s icon in it.
2.
• The camera’s images will display as thumbnails.
Copy images to a folder on the hard disk using standard Explorer file
3.
copying procedures.
• Copy by Specifying a Folder
Select an image in the Explorer window, right-click the mouse, select [Save] and
specify a folder. The image and its thumbnail will be downloaded to the
specified location.
• Copy by Dragging and Dropping
Select an image in the Explorer window, drag it to the target folder and drop it.
This will download the image and its thumbnail. In Windows Me, RAW image
files converted and downloaded in this manner will have the “CRW” file name
extension removed but retain the remainder of the original file name. For
example, [CRW_0001.CRW] on the CF card will become [CRW_0001] on the
computer. In Windows XP, RAW images are saved with their original file name.
57
Windows
Converting RAW Images in Windows Explorer
You can convert a RAW image by right-clicking it and selecting [Convert], to start
File Viewer Utility. See Converting RAW Format Images for instructions (p. 42).
Page 62

58
○○○○○○○○○○○○○○○○○○○○○○○○○○○○○○○○○○○○○○○○
Downloading with the File Dialog
You can select an image with the Open dialog, load it into the program and save it to
the computer. This topic explains how to load images using ArcSoft PhotoStudio.
• RAW images will not show in the Open dialog. Accordingly, RAW
images cannot be downloaded with this method.
Attach the supplied USB cable to the computer’s USB port and the
1.
camera’s Digital Terminal.
• For USB cable connection instructions, see Connecting the Camera to a
Computer (p. 25).
• If the Event dialog, which allows you to select an application to start (p. 30), or if the
Scanner and Camera Wizard appear, click [Cancel].
Start an application
2.
• For these instructions, we will use Arcsoft PhotoStudio as an example.
3.
Click the (Acquire) button.
• The camera images are displayed.
Select the images to be downloaded to the computer and click [Get Pictures].
4.
• The images are downloaded to the computer.
• Using the following procedures to change the save destination of the images.
1. Select [Select source] from the [File] menu.
2. Click [Options] and change the save destination using [Destination Path]
in the screen that appears.
Page 63

Easy Downloading Method for Windows XP
If you are running Windows XP, you can view the camera images and download them
to your computer by simply connecting the camera to your computer with the USB
cable if you set the camera’s communication setting*
driver is not required.)
*1The communication settings for downloading images to a computer can be set
with the camera. There are two communication settings: [Normal] and [PTP].
[Normal] is the default setting.
2
Picture Transfer Protocol
*
Images cannot be downloaded with the PTP mode if you are running any OS
other than Windows XP. Also, difficulties may be encountered when trying to
download certain types of images. If this happens, set the camera’s
communication setting to [Normal] and use the software bundled on the Canon
Digital Camera Solution Disk to download the images. For more information,
please read the supplied “Picture Transfer Protocol (PTP) Mode” leaflet.
Set the camera’s [Communication] setting to [PTP].
1.
• See your Camera User Guide for instructions.
Attach the supplied USB cable to the computer’s USB port and the
2.
camera’s DIGITAL terminal. Prepare the camera for communication with
the computer.
• For USB cable connection instructions, see Connecting the Camera to a
Computer (p. 25).
• If the Event dialog for selecting an application to start appears, select [Microsoft
Scanner and Camera Wizard] and click [OK].
Please note that the camera-computer connection is not possible if you select
another application.
• The Scanner and Camera Wizard window will open.
1
to [PTP]*2. (The installation of a
59
Windows
Page 64

60
Click [Next].
3.
• The camera images will display in the window.
Select images to download to the computer and click [Next].
4.
Initially, all images are selected for downloading (a check mark appears
beside each image). Click to remove the check mark of any image you do
not wish to download.
Specify a file name prefix and destination for the image files.
5.
Specify a file name here.
Specify the folder that will
become the file destination.
Click [Next].
6.
• The images will start downloading to the computer.
Select [Nothing, I’m finished working with these pictures] and click [Next].
7.
Click [Finish].
8.
• This concludes the download.
• To download images using the applications on the Canon Digital
Camera Solution Disk, such as ZoomBrowser EX or File Viewer Utility,
you must reset the camera’s [Communication] setting to [Normal]. These
applications cannot be used with the PTP mode.
Page 65

Using the Software on the
Macintosh Platform
Installing the Software .................................................... 62
Installing from the Canon Digital Camera Solution Disk ....... 62
Installing Adobe Photoshop LE ........................................... 63
Installing Arcsoft Camera Suite 2.0 ..................................... 64
Installing Arcsoft Camera Suite 1.2 ..................................... 64
Installing the Card Photo Printer CP-100/CP-10 Printer Driver ... 65
Uninstalling the Software .................................................... 65
Connecting the Camera ................................................... 66
Connecting the Camera to a Computer .............................. 66
Downloading and Printing Images with ImageBrowser .... 67
Starting ImageBrowser ........................................................ 67
The ImageBrowser Camera Window .................................... 72
Downloading and Saving Images from the Camera ............... 73
Printing Images .................................................................. 75
ImageBrowser Features .................................................... 77
Adjusting Image Quality and Printing (Exif 2.2 Compliant) .... 77
Converting RAW Format Images ......................................... 79
Replaying Movies ............................................................... 82
Merging Panoramic Images with PhotoStitch ........................ 83
Shooting with RemoteCapture ............................................ 84
Downloading Images with the USB Mounter
(Compatible with Mac OS 9.0 - 9.2 only)
Enabling the USB Mounter .................................................. 89
Downloading Images .......................................................... 90
Easy Downloading Method for Mac OS X ....................... 91
............................
89
Macintosh
Page 66

62
Installing the Software
○○○○○○○○○○○○○○○○○○○○○○○○○○○○○○○○○○○○○○○○
Installing from the Canon Digital Camera Solution Disk
Mac OS 8.6-9.2
Close any programs that are running.
1.
Place the Canon Digital Camera Solution Disk in the computer’s CD-ROM drive.
2.
Double-click the CD-ROM icon, followed by the [Mac OS 8/9] and [Canon
3.
Digital Camera Installer] icons.
• The installer panel will display.
Click [Digital Camera Software Installation].
4.
Installer Panel
Follow the onscreen instructions to proceed with the installation.
5.
After the installation is complete, restart the computer as prompted.
6.
Mac OS X
Close any programs that are running.
1.
Set the Canon Digital Camera Solution Disk in the computer’s CD-ROM
2.
drive.
Double-click the CD-ROM icon, followed by the [Mac OS X] and [Canon
3.
Digital Camera Installer] icons.
• The installer panel will display.
Page 67

Click [Digital Camera Software Installation].
4.
Installer Panel
Follow the onscreen instructions to complete the installation.
5.
• File Viewer Utility is required to convert and save RAW images. However,
it cannot be installed onto Mac OS X. To install it, switch to OS 9.1- 9.2
and restart the computer. Then double-click the CD-ROM icon, followed
by the [Mac OS 8/9] folder and the [Canon Digital Camera Installer]
icons to install the program.
○○○○○○○○○○○○○○○○○○○○○○○○○○○○○○○○○○○○○○○○
Installing Adobe Photoshop LE
The Adobe Photoshop LE CD-ROM is distributed with PowerShot G3 digital cameras.
63
• For detailed installation instructions, double-click the Adobe Photoshop
LE CD-ROM icon, followed by the [English] folder and the [Install] file.
Close any programs that are running.
1.
Place the Adobe Photoshop LE disk in the CD-ROM drive.
2.
Double-click the CD-ROM icon, followed by the [English] and [Adobe
3.
Photoshop 5.0 LE] folders and the [Install Photoshop LE] icon.
• The installation will start.
• A product serial number is required to install Adobe Photoshop LE. You
may use either [SDM501B4164785-650] or the number listed on the CDROM case if there is one.
Macintosh
Page 68

64
○○○○○○○○○○○○○○○○○○○○○○○○○○○○○○○○○○○○○○○○
Installing Arcsoft Camera Suite 2.0
The Arcsoft Camera Suite CD-ROM is distributed with PowerShot S45 digital cameras.
Installing ArcSoft PhotoStudio
Close any programs that are running.
1.
Place the Arcsoft Camera Suite disk in the CD-ROM drive.
2.
Double-click the CD-ROM icon, followed by the [PhotoStudio 4] folder, the
3.
[English] folder and the [PhotoStudio Installer] icon.
• Installation will start. Follow the onscreen messages to proceed with the
installation.
Click the [Quit] button when a message tells you that the installation is
4
complete.
Continue by installing ArcSoft VideoImpression.
Installing ArcSoft VideoImpression
Double-click the [VideoImpression 1.6] folder within the CD-ROM,
1.
followed by the [English] folder and the [VideoImpression Installer] icon.
• Installation will start. Follow the onscreen messages to proceed with the
installation.
Restart the computer when the installation is complete.
2.
This concludes the process for installing ArcSoft PhotoStudio and ArcSoft
VideoImpression
○○○○○○○○○○○○○○○○○○○○○○○○○○○○○○○○○○○○○○○○
Installing Arcsoft Camera Suite 1.2
The Arcsoft Camera Suite CD-ROM is distributed with PowerShot S230 DIGITAL ELPH/
DIGITAL IXUS v
Installing ArcSoft PhotoImpression
3
digital cameras.
Close any programs that are running.
1.
Place the Arcsoft Camera Suite disk in the CD-ROM drive.
2.
Double-click the CD-ROM icon, followed by the [PhotoImpression 4]
3.
folder, the [English] folder and the [PhotoImpression Installer] icon.
• Installation will start. Follow the onscreen messages to proceed with the
installation.
Click the [Quit] button when a message tells you that the installation is
4
complete.
Continue by installing ArcSoft VideoImpression.
Page 69

Installing ArcSoft VideoImpression
Double-click the [VideoImpression 1.6] folder within the CD-ROM,
1.
followed by the [English] folder and the [VideoImpression Installer] icon.
• Installation will start. Follow the onscreen messages to proceed with the
installation.
Restart the computer when the installation is complete.
2.
This concludes the process for installing ArcSoft PhotoImpression and ArcSoft
VideoImpression.
○○○○○○○○○○○○○○○○○○○○○○○○○○○○○○○○○○○○○○○○
Installing the Card Photo Printer CP-100/CP-10 Printer Driver
The driver for Card Photo Printer CP-100/CP-10 (sold separately) must be installed to
print from a CP-100/CP-10 connected to the computer.* For installation instructions,
please see the Card Photo Printer CP-100/CP-10 Printer Driver User Guide contained
on the Canon Digital Camera Solution Disk as a PDF file (p. 13).
* Interface Cable PIF-100 (sold separately)** is required to connect the Card Photo
Printer CP-10 to a computer.
** Not sold in some regions.
○○○○○○○○○○○○○○○○○○○○○○○○○○○○○○○○○○○○○○○○
Uninstalling the Software
65
The procedures for uninstalling the software are only required when you
wish to delete the programs from your computer or when reinstallation is
required to fix corrupted files.
Uninstalling Application Programs
To uninstall a program, move its folder to the Trash and empty the Trash.
• If the program folders contain subfolders into which images have been
saved, be careful not to accidentally delete those subfolders.
Uninstalling USB Mounter
For instructions to uninstall USB Mounter, open the [Mac OS 8/9] folder, the [Readme]
folder, followed by the [English] folder and [Mounter ReadMe] file on the Canon
Digital Camera Solution Disk.
Uninstalling the Card Photo Printer CP-100/CP-10 Printer Driver
For instructions to delete the printer driver, please see the Card Photo Printer CP-100/
CP-10 Printer Driver User Guide contained on the Canon Digital Camera Solution Disk
as a PDF file (p. 13).
Macintosh
Page 70

66
Connecting the Camera
Connection Precautions
• Use the USB cable to attach the camera directly to a USB port on the computer,
not through a USB hub. The connection may not operate correctly through a
USB hub.
• The connection may not operate correctly if you are using other USB devices,
excluding USB mice or keyboards, at the same time as the camera. If this occurs,
disconnect the other devices from the computer and try reconnecting the
camera.
• Do not connect two or more cameras to the same computer via the USB
interface. The connections may not operate correctly.
• You are recommended to power the camera from a household power source
(AC adapter) when connecting to a computer.
• Never allow the computer to go into sleep mode while a camera is
connected via the USB interface. If it does happen, never disconnect
the USB cable. Try to awaken the computer with the camera in the
connected state. Some computers will not awaken properly if you
disconnect the camera while they are in sleep mode. Please refer to
your computer manual for instructions regarding the sleep mode.
○○○○○○○○○○○○○○○○○○○○○○○○○○○○○○○○○○○○○○○○
Connecting the Camera to a Computer
Confirm that the bundled software is already completely installed on the
1.
computer. (This step is only required the first time.)
Confirm that the camera’s [Communication] mode is set to [Normal] and
2.
shut off the camera power.
• You must select the [Normal] option when you are using the software from the
Canon Digital Camera Solution Disk to download images from the camera. See
the Camera User Guide for the procedures for adjusting this setting.
Attach the supplied USB cable to the computer’s USB port and the
3.
camera’s DIGITAL terminal.
• You do not need to turn off the computer for this procedure. Refer to the
computer’s manual for the location of the USB ports. See the Camera User
Guide for instructions for attaching the cable.
Set the mode switch to Replay mode and turn the camera on. (PowerShot
4.
S230 DIGITAL ELPH/DIGITAL IXUS v
• You do not have to power up the PowerShot G3 or PowerShot S45 models.
3
only).
Page 71

Downloading and Printing Images with ImageBrowser
This topic briefly explains how to use ImageBrowser to perform a range of operations
from downloading the camera’s images to printing them.
If the Continue Connection Confirmation Message Displays
• A message asking whether you wish to remain connected may appear when the
auto power down function is set to [On], the camera and computer are
connected via the USB interface, and the connection is idle for a set period of
time (usually about 5 minutes). If the connection remains idle, the camera will
disconnect after approximately 1 minute.
Please see the Camera User Guide for information on what to do if the camera
powers down because of the power-saving function.
○○○○○○○○○○○○○○○○○○○○○○○○○○○○○○○○○○○○○○○○
Starting ImageBrowser
USB Port Connection (Mac OS 8.6 - 9.2)
Attach the supplied USB cable to the computer’s USB port and the camera’s
1.
Digital Terminal. Prepare the camera for communication with the computer.
• For USB cable connection instructions, see Connecting the Camera to a
Computer (p. 66).
• ImageBrowser will start and open the ImageBrowser Automation Wizard
dialog.
Confirm that [Display Images] is selected and click the [OK] button.
2.
67
Confirm that this
option is selected.
• The Communication Settings dialog will display. This dialog only appears the
first time the camera is connected.
Macintosh
Page 72

68
Confirm that [USB port] and your camera model name are selected and
3.
click the [Set] button.
Your camera model name
will appear here.
• The Camera Window will open and display the camera images as thumbnails
(tiny versions) (p. 72).
• In the ImageBrowser Automation Wizard dialog, you can select the
action that is carried out after ImageBrowser starts.
What to Do the Next Time ImageBrowser is Started
• A dialog with the previously selected automated settings will display the next
time you start ImageBrowser. To use these settings unchanged, click the [Start]
button. To do nothing, click [Cancel]. To change the settings, click [Settings
change].
To change the settings, click [Settings
Change] and select the desired action
in the ImageBrowser Automation
Wizard dialog.
Page 73

How to Set ImageBrowser to Not Start Automatically
1. Click the Apple menu and select [Control Panels] and [Canon ImageBrowser
Auto Launch].
The Settings for USB Connection dialog will display.
2. Click [The application program below will start] to clear the check mark.
3. Click the close box
ImageBrowser will cease to start automatically thereafter.
Click here to close the dialog.
Clear the check mark here to stop
ImageBrowser from starting
automatically.
at the upper left to close the dialog.
USB Port Connection (Mac OS X)
Attach the supplied USB cable to the computer’s USB port and the
1.
camera’s DIGITAL Terminal. Prepare the camera for communication with
the computer.
• For USB cable connection instructions, see Connecting the Camera to a
Computer (p. 66).
Double-click the [Canon ImageBrowser] icon on the desktop.
2.
69
• If the Canon ImageBrowser icon does not appear on the desktop, double-click
the [Canon Utilities] folder on the drive on which the program was installed,
followed by the [ImageBrowser] folder and [ImageBrowser] icon.
Click [Canon Camera] in the Explorer View section.
3.
• The Communication Settings dialog will display.
Macintosh
Page 74

70
Confirm that [USB Port] and your camera model name are selected and
4.
click the [Set] button.
Your camera model name and the
USB port number (i.e. @1) will
display here.
This dialog will only appear for the first connection.
The Camera window will open and display the camera images as
thumbnails (tiny versions) (p. 72).
CF Card Reader/ PC Card Reader Connection
Insert the CF card into the CF card reader or PC card reader.
1.
• Use a PC card adapter (PCMCIA adapter) if required.
See the manual for the PC card reader for its handling instructions.
Insert the CF card into
an adapter if required
Insert the loaded adapter into the slot
Page 75

Start ImageBrowser.
2.
• Double-click the [Canon ImageBrowser] icon on the desktop.
Mac OS 8.6 - 9.2 Mac OS X
• If the icon does not appear on the desktop, double-click the folder in which you
installed the program, followed by the [Canon Utilities] and [ImageBrowser]
folders and the [ImageBrowser] file.
Double-click the [DCIM] folder in the Explorer View Section.
3.
• The images from the CF card will display as thumbnails in the Camera window
(p. 72).
Mac OS 8.6 - 9.2 Mac OS X
Explorer View
Section
71
See CF Card Folder Structure and File Names for information on these
topics (p. 33).
Macintosh
Page 76

72
○○○○○○○○○○○○○○○○○○○○○○○○○○○○○○○○○○○○○○○○
The ImageBrowser Camera Window
When a connection is opened to a CF card in a camera or a reader, the card’s images
display as thumbnails in the Camera window.
Your camera model name will appear here.
An image of the connected camera or
CF card will display here.
Setup Options Button
Set various camera
settings (see inset
below).
Delete Button
Delete selected
images.
Download Button
Load the selected images onto the computer (p. 73).
Thumbnail
Upload Button
Copy images from the computer onto
the CF card in the camera or reader.
How to Check and Change Various Camera Settings
You can adjust the date, time and owner settings in the Camera Settings dialog using
the computer when the camera is connected. You can also check the battery charge
and remaining memory capacity.
1. Click the [Setup Options] button and select [Camera Settings] from the displayed
menu.
2. Check or change the settings.
Input a camera owner name here (up to 31
characters).
Set the date and time here.
Click this button to synchronize the camera to
the computer’s date and time settings.
Check the battery charge here.
Click this to format the CF card in the camera.
Check the remaining memory capacity here.
Page 77

○○○○○○○○○○○○○○○○○○○○○○○○○○○○○○○○○○○○○○○○
Downloading and Saving Images from the Camera
With Mac OS 8.6-9.2, select [Macintosh HD] in the Explorer View Section.
1.
With Mac OS X, select the [your name] subfolder of the [Users] folder in
the startup disk.
Mac OS 8.6 - 9.2 Mac OS X
Explorer View
Section
Create a new folder for saving images from the camera.
2.
• Click the [File] menu and select [New Folder]. A folder with the name
“Untitled” will be created. Click it to change the folder name as you wish.
73
In the Explorer View Section, click the newly created folder.
3.
Mac OS 8.6 - 9.2 Mac OS X
Macintosh
Page 78

74
Select images in the Camera window and click the [Download] button.
4.
• Click a thumbnail to select it.
Thumbnail “RAW” displays
on RAW images.
The movie icon displays
on movie thumbnails.
Downloaded images are saved to the computer and appear in the Browser
area.
• You can also download images to the computer by dragging them from the Camera
window and dropping them on the Browser area or the Explorer View Section.
“RAW” displays on
RAW images.
Browser area
The movie icon
displays on movie
thumbnails.
Explorer View Section
To disconnect the camera, click the close box (Mac OS 8.6-9.2) or the red close box
(Mac OS X) at the upper left of the Camera window. The Camera window will close.
Page 79

○○○○○○○○○○○○○○○○○○○○○○○○○○○○○○○○○○○○○○○○
Printing Images
Select the image(s) you wish to print.
1.
• Movie images cannot be printed.
Click the [Print] button and select [Layout printing] from the displayed
2.
menu.
Layout Options Window
75
• The [Canon perforated paper printing] option can not be selected with Mac OS X.
In the Layout Options window, select the desired layout and click the
3.
[Next] button.
• Select the [Custom layout printing] option for the purposes of this example.
• The Custom Layout printing option in the Layout Options window allows
you to freely change the size and position of the images for printing. The
other options allow you to print an index or print onto Canon perforated
paper.
Print Window
Macintosh
Page 80

76
In the next window, select a paper size and click the [OK] button.
4.
• The Layout Options window will close and the Print window will open, allowing
you to change the layout and printing settings.
• The settings available in Step 4 will vary according to the type of layout
selected in Step 3.
Adjust the page layout in the Print window if you wish.
5.
Click the [Print] button in the Print window.
6.
• The Print dialog will display.
Click [OK] to start printing.
7.
• Print Window
When the Custom layout printing option is selected in the Layout Options window,
you can freely change the size and position of the images for printing.
Edit the Page Title
Open the [Edit] menu and
select [Edit Header].
Change the
Image Size
Drag the border
to resize the
image.
Change the Layout
Drag the images to
change the layout.
Change the default
number of images
printed per page.
Rotate the selected
image.
Reset the layout.
Add Text
Open the [Edit] menu and
select [Add Text].
Add Captions to Images
Click the image and then
the [Edit] menu and select
[Edit Caption].
Displays the Layout Options
window.
Display the Print dialog.
Page 81

ImageBrowser Features
This topic introduces additional, convenient ImageBrowser features.
○○○○○○○○○○○○○○○○○○○○○○○○○○○○○○○○○○○○○○○○
Adjusting Image Quality and Printing (Exif 2.2 Compliant)
ImageBrowser features functions that allow you to print images with image quality
adjustments. ImageBrowser also supports the Exif 2.2 standard (or Exif Print).
• Images shot with cameras complying with the Exif 2.2 standard
incorporate shooting settings information, such as the shooting
conditions and scene mode, along with the image data. The Exif Print
adjustment protocol uses this information to correct the image quality
more accurately to reflect the shooting settings.
• When printing from ImageBrowser, the image quality adjustment settings
are active for all images.
Mac OS 8.6–9.2
Click the [Edit] menu in ImageBrowser and select [Preferences].
1.
In the Preferences window, select [Print], set the image quality settings
2.
and click [OK].
77
See Printing Images for the next steps (p. 75).
3.
A check mark must be placed here to
automatically correct the image quality.
Select this option to automatically correct
images shot with Exif 2.2 compliant
cameras and other images.
Select this option to automatically correct
only images shot with Exif 2.2 compliant
cameras.
Macintosh
Page 82

78
Mac OS X
Click the [ImageBrowser] menu in ImageBrowser and select [Preferences].
1.
In the Preferences window, select [Print], set the image quality settings
2.
and click [OK].
A check mark must be placed here to
automatically correct the image quality.
Select this option to automatically correct
images shot with Exif 2.2 compliant
cameras and other images.
Select this option to automatically correct
only images shot with Exif 2.2 compliant
cameras.
See Printing Images for the next steps (p. 75).
3.
Page 83

○○○○○○○○○○○○○○○○○○○○○○○○○○○○○○○○○○○○○○○○
Converting RAW Format Images
Please check whether or not your camera model supports this function (p. 12).
The RAW image file format records image data as captured by the camera’s image
sensor without further processing by the camera. Although the data is compressed
when recorded, the original data can be completely restored without any loss of quality.
Moreover, the RAW format is extremely compact, creating files approximately one-
quarter the size* of uncompressed files (RGB TIFF). However, RAW images cannot be
opened by standard image editing programs unless they are first converted.
Conversion involves generating high-quality RGB signals from the RAW format files.
If you start File Viewer Utility from ImageBrowser, you can adjust the attributes of the
original data before conversion to retain the degree of image quality appropriate to
your purposes. The result is high-quality images. In contrast, image data recorded in
the RGB TIFF and other standard uncompressed file formats is irrevocably processed in
the camera and again by an application program when you change the file attributes,
which reduces the image quality.
* As measured by standard Canon test conditions.
• Please see the Camera User Guide to learn how to shoot RAW images.
ImageBrowser can convert RAW images for display and printing, but it can only
convert them with the original shooting settings. To adjust the settings during
conversion, install and use File Viewer Utility.
79
Mac OS X
• File Viewer Utility cannot be installed onto Mac OS X. To install it, switch
to OS to 9.1-9.2 and restart the computer. Then double-click the CD-
ROM icon, followed by the [Mac OS 8 / 9] folder and the [Canon Digital
Camera Installer] folders to install the program.
• File Viewer Utility runs in the Classic system environment. Accordingly,
when you select the [File] menu in ImageBrowser and select [RAW
image processing], the computer will run the Classic environment and
then File Viewer Utility will start.
Select a RAW image to be converted from ImageBrowser’s Browser Area.
1.
From the [File] menu, select [RAW image processing].
2.
• File Viewer Utility will start and the images selected in ImageBrowser will display.
Macintosh
Page 84

80
• The following screen will appear on top of File Viewer Utility. Select the name of
your camera and click [OK]. (First time connection only)
Select the name of your camera from File Viewer Utility’s model specific
3.
processing list box.
Step 3 refers to this box.
Adjust the image quality as required.
4.
Select [Save File] from the [File] menu and select [Convert and save in file].
5.
• The Save File dialog appears.
Select a file destination and a file format for the image you wish to process.
6.
• Images can be saved in the JPEG format or in the TIFF format.
Click [OK].
7.
• Processing starts and the image is saved onto the computer.
Page 85

• File Viewer Utility Components
81
Preferences Button
Use this button to select
image transfer applications.
You can also use it to adjust
RAW image processing
settings.
This section displays when
a camera model is selected
in the Model-specific
Processing Mode List Box
and selects RAW images.
Save Button
Converts and saves the image.
Selection Button
Selects the method for
selecting images.
Buttons for selecting images.
Comment Box
A description of up to 60 characters can be input
here.
Display Size List Box
Selects the size at which
images display.
Display Mode List Box
Selects the thumbnail or
preview display mode.
Model-specific Processing Mode List Box
Selects the model of camera in use.
Version Information
Button
Displays the programs
version information.
Displays a histogram
(distribution of brightness
data) for the image.
Displays the image
information here.
Clicking this button and then a
white portion of an image
automatically adjusts the white
balance to that color.
Adjusts white
balance settings.
Adjusts image
sharpness.
Adjusts image
contrast.
Sets the Photo
Effect mode.
Adjusts image color
saturation.
Macintosh
Page 86

82
○○○○○○○○○○○○○○○○○○○○○○○○○○○○○○○○○○○○○○○○
Replaying Movies
When you double-click an image with a movie icon in the Browser Window,
QuickTime Player will start and replay the movie.
Double-click an image with a movie icon.
1.
• QuickTime Player will start.
Click the play button in QuickTime Player.
2.
• The movie will replay.
Play Button
Page 87

○○○○○○○○○○○○○○○○○○○○○○○○○○○○○○○○○○○○○○○○
Merging Panoramic Images with PhotoStitch
To Merge Images Registered in ImageBrowser
You can merge a series of overlapping images into a single, seamless panorama.
Select the images in the Browser Window, click the [Edit] menu and select
1.
[PhotoStitch] to start the program.
Follow the instructions in the guidance window to merge the images.
2.
• Please refer to the PhotoStitch Help menu for more details.
• Images shot in Stitch Assist mode with a wide converter, teleconverter or close-
up lens cannot be merged accurately.
Mac OS 8.6 - 9.2 Mac OS X
Follow the instructions
to merge the images.
Images Shot in Stitch Assist Mode
PhotoStitch automatically arranges images shot with the camera’s Stitch Assist mode
in their correct order and orientation, making it easy to merge them. Stitch Assist
mode images appear in the Camera window as shown below.
83
Stitch Assist mode images have a green
stitch mark. Click the stitch mark to start
PhotoStitch and merge the image series.
Please see the Camera User Guide to learn how to shoot in Stitch Assist mode.
Macintosh
Page 88

84
○○○○○○○○○○○○○○○○○○○○○○○○○○○○○○○○○○○○○○○○
Shooting with RemoteCapture
RemoteCapture will start if you click the [Edit] menu in ImageBrowser and select
[RemoteCapture] when the camera is connected to the computer via a USB interface.
RemoteCapture lets you control the camera’s shutter remotely from the computer to
shoot still images.
• You can also save images directly to the computer by pressing the
camera’s shutter button. However, other buttons and switches on the
camera, including the zoom, will not operate with a transmission in
progress.
• You may notice that the interval between the shutter release and activation is
slightly longer when RemoteCapture is used to shoot than when the camera
is used in the normal fashion.
• Images shot with RemoteCapture are automatically saved to the folder
selected in ImageBrowser.
• You cannot use RemoteCapture when the USB Mounter is running (p. 89).
• Save-RemoteCapture Window
Thumbnail View
Displays thumbnails of all the images
shot after RemoteCapture is started.
Connect/Disconnect Button
Click here to open a connection to the camera and
display the RemoteCapture Shooting window. It will
change to the Disconnect button while a connection
is open. Click it to close the connection.
View Button
Select an image in the Thumbnail View and click
here to display it in the Image Display Area.
Delete Button
Select an image in the Thumbnail View and click here
to delete it. Since it is deleted from the computer too,
ensure that you have the correct image.
Check the distribution of brightness data here.
Image Display Area
Displays the image selected in the Thumbnail View.
Check the image settings here.
Add a comment about the image here.
Page 89

• Shooting-RemoteCapture Window
Recordable Image Counter
Displays the number of images
that will fit onto the computer
or CF card in the camera.
Viewfinder Display
If you click the [Viewfinder On]
button while a connection to
the camera is open, the image
appearing in the camera’s
viewfinder will appear in this
area. The focus and exposure
do not update unless you click
the [AF/AE Reset] button if the
distance to the subject or the
lighting changes.
Viewfinder On/Off Button
Turns the viewfinder display on or off.
Release Button
Click here to release the camera’s
shutter and record the image.
Recorded images are automatically
saved to the computer.
Set the basic camera settings here.
Slide this to zoom the
camera in or out.
Reflect Changes Button
Updates the settings.
85
PowerShot S230 DIGITAL ELPH / DIGITAL IXUS v
3
• When the Viewfinder is displayed, it will automatically turn off 1 minute after it was
turned on, or after a picture is taken. If this happens, you can display the Viewfinder
again by clicking the [Viewfinder On] button. However, if the camera body
temperature becomes too high, the Viewfinder will not display for some time.
• When the Viewfinder is displayed, the camera’s LCD monitor will not display. In
addition, the camera’s LCD monitor and the Video OUT settings cannot be selected
in RemoteCapture.
Macintosh
Page 90

86
Shooting
Attach the supplied USB cable to the computer’s USB port and the
1.
camera’s Digital Terminal. Prepare the camera for communication with the
computer.
• For USB cable connection instructions, see Connecting the Camera to a
Computer (p. 66).
• PowerShot S45: open the lens cover after connecting.
• PowerShot G3: remove the lens cap after connecting.
• PowerShot S230 DIGITAL ELPH/DIGITAL IXUS v
mode and then turn on the power.
• ImageBrowser will start and open the ImageBrowser Automation wizard.
Click the [Settings Change] button.
2.
Select [Launch RemoteCapture] and click the [OK] button.
3.
• RemoteCapture will start and display the “Connect to Camera?” dialog.
• If ImageBrowser is already running, click the [Edit] menu and select
[RemoteCapture] to start RemoteCapture.
Click [Connect].
4.
• Shooting-RemoteCapture window will display.
Set the Size/Quality and Rotate settings.
5.
• If you turn the camera on either side to shoot, you can rotate the recorded
image 90º either way when it is saved by selecting [90 degree left] or [90
degree right] in the [Rotation] settings section. However, when the camera’s
[Auto Rotate] is set to [On], the Rotation setting is not available. To change
where the image is saved, see Changing the Save Location and Other
Preferences (p. 88).
Click [Detail setting].
6.
• The full-view Shooting-Remote Capture window appears.
If you click the [Viewfinder On], you can check the image composition in the
7.
upper portion of the Shooting- RemoteCapture window.
• Change the settings if required. To update any changes made in the Detail
Settings window, click the [Reflect changes] button.
Click the [Release] button.
8.
• The image will record and be automatically saved to the computer. You can also
release the shutter by pressing the camera’s shutter button directly or by
pressing the space bar on the computer keyboard.
3
: set the mode switch to Replay
Page 91

Interval Timer Shooting
You can shoot a specified number of frames at set intervals.
In the Save-RemoteCapture window or Shooting- RemoteCapture
1.
window, click the [File] menu and select [Interval Timer Shooting].
• The Interval Timer Shooting dialog will display.
Set the number of frames and the interval value and click [OK].
2.
• RemoteCapture will start Interval shooting, capturing the specified number of frames
at the specified interval. An interval between 5 seconds and 60 minutes can be
specified. You can capture up to the number of recordable frames displayed in the
Shooting-RemoteCapture window (to a maximum of 9999 frames).
Timer Shooting
You can use the timer feature to shoot after a specified number of seconds.
In the Save-RemoteCapture window or Shooting- RemoteCapture
1.
window, click the [File] menu and select [Timer Shooting].
• The Timer Shooting dialog will display.
Set the delay in seconds and click [OK].
2.
• RemoteCapture will start timer shooting, recording an image after the specified
delay. You can specify a delay from 2 to 30 seconds.
87
Precautions when Shooting with RemoteCapture
• If your computer is set to go into sleep mode, there is no guarantee that
RemoteCapture will continue to function after the computer enters sleep mode.
Always turn off the sleep function before you start shooting with
RemoteCapture.
• Please note that the camera will not be able to shoot at the specified interval if it is
shorter than the time required to transmit the data and save it on the computer.
Macintosh
Page 92

88
Changing the Save Location and Other Preferences
You can change where and how image files are saved.
In the Save-RemoteCapture window or Shooting- RemoteCapture
1.
window, click the [File] menu and select [Preferences].
The Preferences dialog will display.
Select the way images are saved and the folder to which they are saved
2.
and click [OK].
• Preferences Dialog
Click an option to determine whether
images are saved to the camera’s CF
card as well as the computer. If you
select [Computer only], you can shoot
without a CF card in the camera or
continue to record images after the
CF card is full.
Input a root name here. If you input
“Capture”, for example, the first
image will be named
[Capture_00001.jpg] and successive
images will automatically be
assigned a name one digit higher
than the last.
Select a folder for saving images.
How to Display the Subject in the Camera’s LCD Monitor
You can view the subject you are shooting in the camera’s LCD monitor.
1. In the Shooting-RemoteCapture window, click the [File] menu and select
[Camera Display Settings].
The Camera Settings dialog will display.
2. Select [Camera’s LCD monitor] and click [OK].
3. In the Shooting window, click the [Viewfinder On] button.
If you select [Video Out Terminal] instead, you can view the subject on a TV. Please
see the Camera User Guide to learn how to connect to a TV.
Printing an Index of the Thumbnail Images
If you select images in the Thumbnail View area of Save-RemoteCapture window,
you can print them in an index like a contact sheet.
1. Select the images, click the [File] menu and select [Print Index].
The file name and shooting date are printed along with each image in the index,
providing a convenient record and means of checking your images.
Page 93

89
Downloading Images with the USB Mounter
(Compatible with Mac OS 9.0 - 9.2 only)
The USB Mounter is a driver that allows images on a CF card in a camera to be
displayed on the computer screen as if the camera were a drive or a connected card
reader. Images can be downloaded to the computer with the same procedures used
to copy images from a card reader.
• To enable the USB Mounter, the camera must be handled as if it were a
drive like a card reader. Consequently, the following cannot be
performed while the USB Mounter is running.
- ImageBrowser cannot be automatically started when the USB
connection is opened.
- You cannot use ImageBrowser to adjust camera settings.
- You cannot shoot with RemoteCapture.
- In addition, images cannot be deleted from the camera and the
computer images cannot be uploaded to the camera.
○○○○○○○○○○○○○○○○○○○○○○○○○○○○○○○○○○○○○○○○
Enabling the USB Mounter
To download images with the USB Mounter, first enable it with the following procedures.
Select [Control Panels] from the Apple menu and [Canon USB Camera
1.
Driver].
• The Canon USB Camera Driver control panel will display.
Select [Card Reader Mode] and
2.
close the control panel.
• A dialog prompting you to restart
the computer will display.
Click [Yes] to restart the computer.
3.
• The USB Mounter will be enabled.
How to Disable the USB Mounter
Disable the USB Mounter when you need to upload images to the camera or shoot
with RemoteCapture.
1. Select [Control Panels] from the Apple menu
The Canon USB Camera Driver control panel will display.
2. Select [Camera Mode] and close the control panel.
After you restart the computer, the USB Mounter will be disabled.
and [Canon USB Camera Driver].
Click here to close it.
Macintosh
Page 94

90
○○○○○○○○○○○○○○○○○○○○○○○○○○○○○○○○○○○○○○○○
Downloading Images
Attach the supplied USB cable to the computer’s USB port and the
1.
camera’s Digital Terminal.
• For USB cable connection instructions, see Connecting the Camera to a
Computer (p. 66).
• The camera icon will display on the desktop.
Double-click the camera icon.
2.
Camera Icon
Your camera model name will appear here.
Select the folder containing the images.
3.
• The images on the CF card will display as file icons.
• Please see page 33 for a description of the CF card folder structure and file names.
Copy images to the computer’s hard disk using standard file copying
4.
procedures.
• Select images and drag and drop them onto the target folder on the computer
to download them.
• Never turn off the power or detach the USB cable while copying. The
equipment may not operate correctly.
How to Download Images from ImageBrowser while the USB Mounter is Enabled
When the USB Mounter is enabled, use the card reader downloading procedures for
ImageBrowser to download from the camera. See CF Card Reader/ PC Card Reader
Connection (p. 70).
Page 95

91
Easy Downloading Method for Mac OS X
If you are running Mac OS X (version 10.1 or later), you can view the camera images
and download them to your computer by simply connecting the camera to your
computer with the USB cable if you set the camera’s communication setting
2
*
. (The installation of a driver is not required.)
[PTP]
1
*
The communication settings for downloading images to a computer can be set with
the camera. There are two communication settings: [Normal] and [PTP]. [Normal] is
the default setting.
2
*
Picture Transfer Protocol
Images cannot be download with the PTP mode if you are running any OS other
than Mac OS X. Also, difficulties may be encountered when trying to download
certain types of images. If this happens, set the camera’s communication setting
to [Normal] and use the software bundled of the Canon Digital Camera Solution
Disk to downloard the images. For more information, please read the supplied
“Picture Transfer Protocol (PTP) Mode” leaflet.
Set the camera’s [Communication] setting to [PTP].
1.
• See your Camera User Guide for instructions.
Attach the supplied USB cable to the computer’s USB port and the
2.
camera’s DIGITAL terminal. Prepare the camera for communication with
the computer.
• For USB cable connection instructions, see Connecting the Camera to a
Computer (p. 66).
• ImageCapture will start automatically. ImageCapture is a program distributed
with Mac OS X. It automatically recognizes a digital camera connected to the
computer and allows you to view thumbnails of the camera images, rotate
them and delete them.
Select the file destination and processing method and click [Download
3.
Some...] or [Download All].
1
*
to
Macintosh
Page 96

92
You have now downloaded the images to the computer. When the images
have been downloaded, the destination folder will open.
• To download images using the applications bundled on the Canon Digital
Camera Solution Disk, such as ImageBrowser, you must reset the camera’s
[Communication] setting to [Normal]. These applications cannot be used with
PTP mode.
Page 97

Using the My Camera Settings
(Windows / Macintosh)
My Camera Settings ......................................................... 94
Windows .......................................................................... 94
Macintosh ....................................................................... 102
Windows / Macintosh
Page 98

94
My Camera Settings
The start-up image, start-up sound, shutter sound, operating sounds, and self-timer
sound are called the My Camera Settings. You can add your favorite images and
sounds from your computer to the My Camera Settings in the camera. This topic
explains how to upload the My Camera Settings saved onto your computer to the
camera. To perform this function, use ZoomBrowser EX for Windows and
ImageBrowser for Macintosh.
Please check whether or not your camera model supports this function. (p. 12).
○○○○○○○○○○○○○○○○○○○○○○○○○○○○○○○○○○○○○○○○
Windows
Displaying the My Camera Window
To save the My Camera Settings to the camera, you use the My Camera window. The
following explains the procedures for displaying the My Camera window.
The Camera Window will open after you have connected the camera to
1.
the computer and started ZoomBrowser EX.
For starting instructions for ZoomBrowser EX, see Starting ZoomBrowser EX
(p. 30).
Click [Set] in the Camera window, followed by [My Camera] in the pop-up
2.
menu.
Alternatively, you can click [Camera & Memory Card] in the main window
of ZoomBrowser EX, followed by [My Camera Settings] to display the My
Camera window.
The My Camera window will display.
• ZoomBrowser EX already contains several pre-recorded My Camera Settings
items. You can check these items with the My Camera window.
Page 99

• The My Camera Window
Tabs
Click here to switch
between adjusting the
settings individually or in
themed sets. If the [Set
individually] tab is
selected, the Data Type
can also be selected.
Displays the list of My
Camera Settings files
saved onto the computer.
95
Play Button
Click here to play sounds recorded onto the camera.
Displays the My Camera
Settings in the camera.
Delete Button
Click here to delete a setting
from the Camera list.
Add File Button
Click here to add a file as
one of the My Camera
Settings to the My
Computer list.
Play Button
Click here to play the
selected sound setting.
• You can add new data to the My Camera window. See Adding New
Data to the My Camera Window (p. 98).
Delete Button
Click here to delete a
setting from the My
Computer list.
Create Sound Button
Click here to create a sound
file for use as the start-up
sound, shutter sound,
operating sounds, or self-
timer sound.
Windows / Macintosh
Page 100

96
Saving the Data to the Camera
You can save the My Camera Settings displayed in the My Camera window to the
camera.
• My Camera Settings files can be added individually or in [Theme] sets.
With the Theme sets, each file shares a common theme. The “Animal”
theme, for example, features an animal in the start-up image and
animals calls in each of the sound files.
• Settings that do not appear in the My Computer list of the My Camera
window cannot be saved to the camera.
• Do not detach the USB cable, turn the camera power off or disconnect
the camera from the computer while the My Camera Settings are
being saved to the camera or the settings from the camera are being
saved to the computer.
Confirm that the [Setup as a theme] tab is selected in the My Camera
1.
window.
• To save the settings individually, select the [Set individually] tab and select the
setting type in the [Data Type] list box.
Select the settings file you wish to save to the camera from the My
2.
Computer list.
• If you are working in the [Setup as a theme] tab, the thumbnail (tiny version) of
the start-up image will display to the right and the sound files will play in the
order of start-up sound, shutter sound, operating sounds and self-timer sound.
Select the setting from the Camera list that you would like to change and
3.
click [Save to Camera].
• This concludes the process of saving the My Camera settings to the camera.
• The Camera list setting will change to the selected file. If a setting for this
category has previously been saved to the camera, it will be overwritten.
• The names of the prepared files for the various My Camera Settings
themes all begin with the same root name, such as “Animal~.” For
example, the start-up image that starts with “Animal~” shows an
animal picture while the similarly named sound files feature animal
sounds.
Repeat steps 1-3 to replace all the settings you wish to add to the camera.
4.
• To use this data on the camera, change the start-up image and sound settings
on the camera itself. Please see the Camera User Guide for these instructions.
 Loading...