

Page 1

Installing Your Multifunction
to Your Network for the First Time
PIXMA MP860
Macintosh OS
Preparing to Connect My Multifunction to My Network .............................................................. 2
Network Requirements .......................................................................................................... 2
Important Information You Need Before Adding Your Multifunction ....................................... 3
Preparing Your Multifunction ..................................................................................................... 4
Downloading & Installing the Drivers ......................................................................................... 6
Download the Driver .............................................................................................................. 6
Installing The Driver. ............................................................................................................. 7
Adding the Machine ............................................................................................................. 16
Page 2
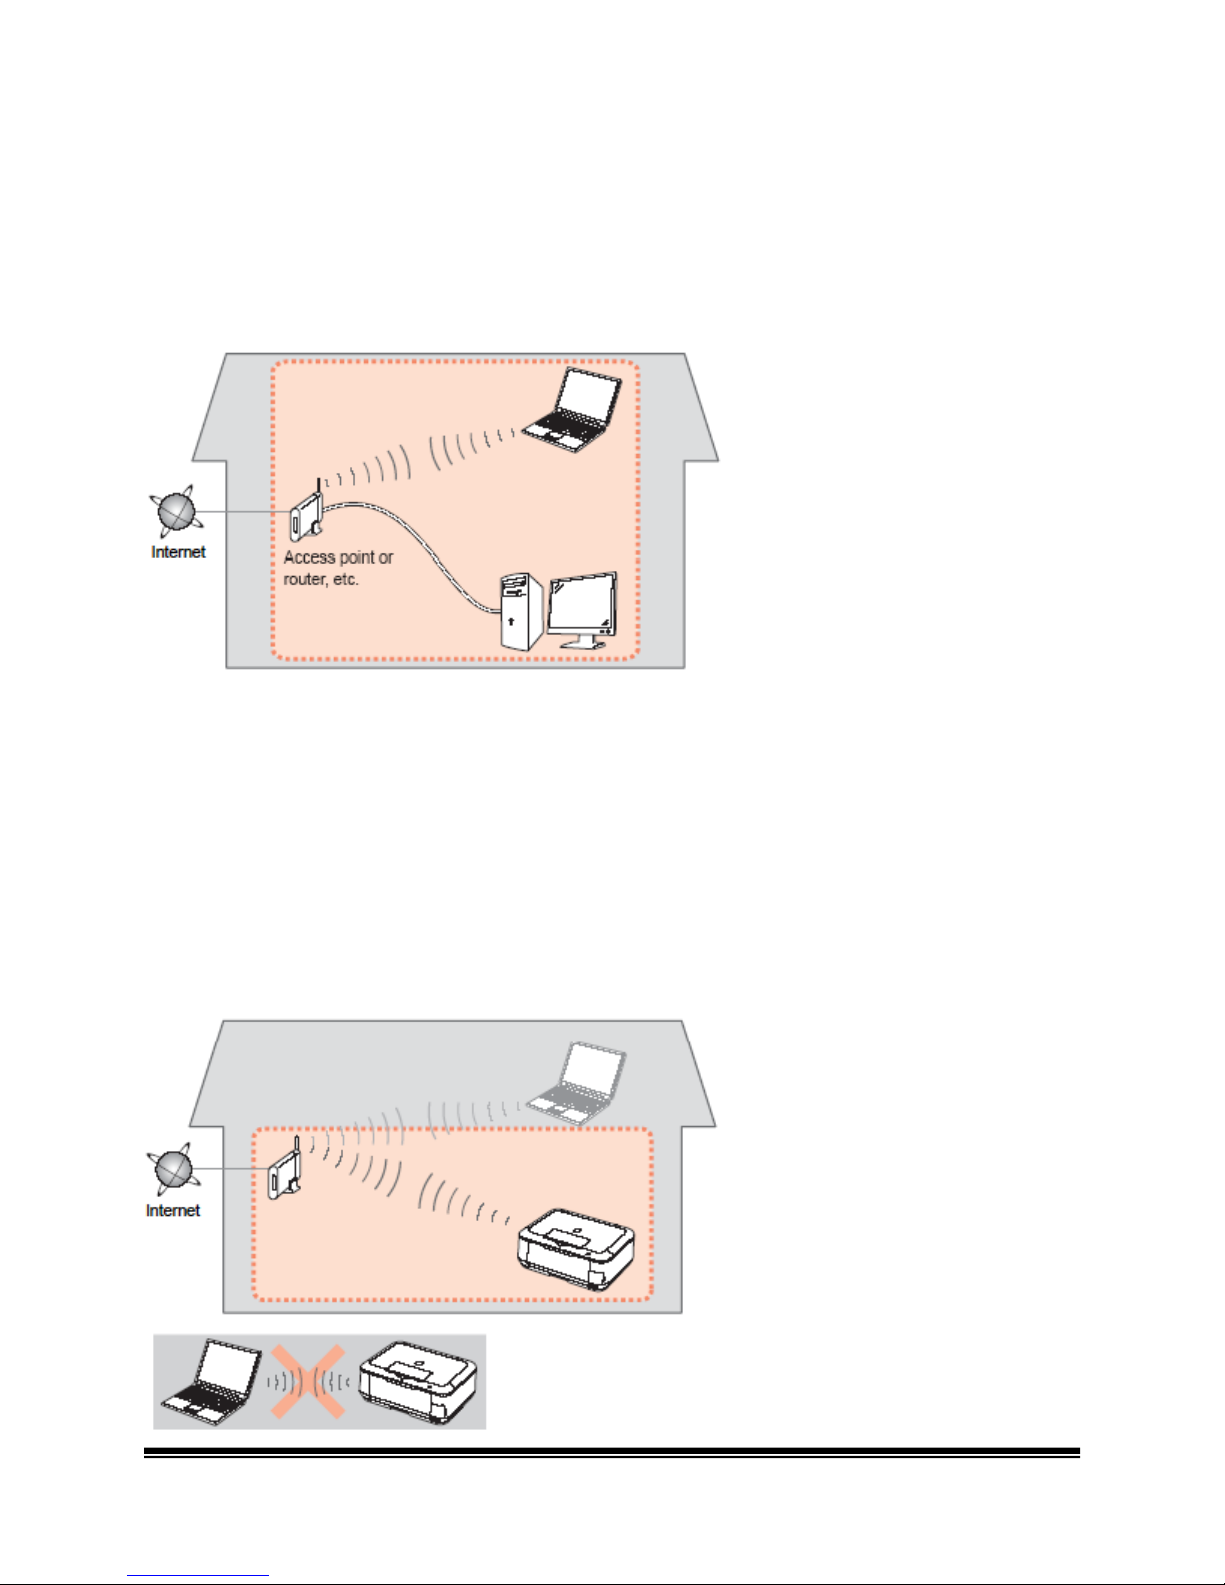
Preparing to Connect My Multifunction to My Network
Network Requirements
Before connecting the machine to the network, make sure that configuration of the computer
and access point or router is complete, and that the computer is connected to the network.
Notes on Network Connection
• The configuration, router functions, setup procedures and security setting s of the
network device vary depending on your system environment For detail Is, refer to your
device's instruction manual or contact its manufacturer.
• The machine cannot be used over a wireless and wired connection at the same time.
Wireless Connection
Connect to your network environment over a wireless connection
Page 2
Page 3

An "Ad-hoc connection," which establishes a direct connection to the computer over a wireless
connection without using an access point, is not supported.
Be sure to prepare an access point
Important Information You Need Before Adding Your Multifunction
The following information is required to connect to your access point or router.
• Access Point Name/Network Name:
Also referred to as SSID. A name to identify the specific access point.
• Network Key:
Also referred to as encryption key, WEP key or VVPANVPA2 passphrase, Pre-Shared
key.
A password required to set to prevent unauthorized access to communication.
Check your access point or route for the following information, and then write it down.
NOTE: For details on how to check the following info rmation, refer to the manual of your access
point or router, or contact its manufacturer.
Page 3
Page 4
Preparing Your Multifunction
Note: The procedures below are for Wireless LAN setups not using the VVPS (Wi-Fi Protected
Setup) or WCN (Windows Connect Now) setup methods.
At this point the USB cable should not be connected between the computer and printer.
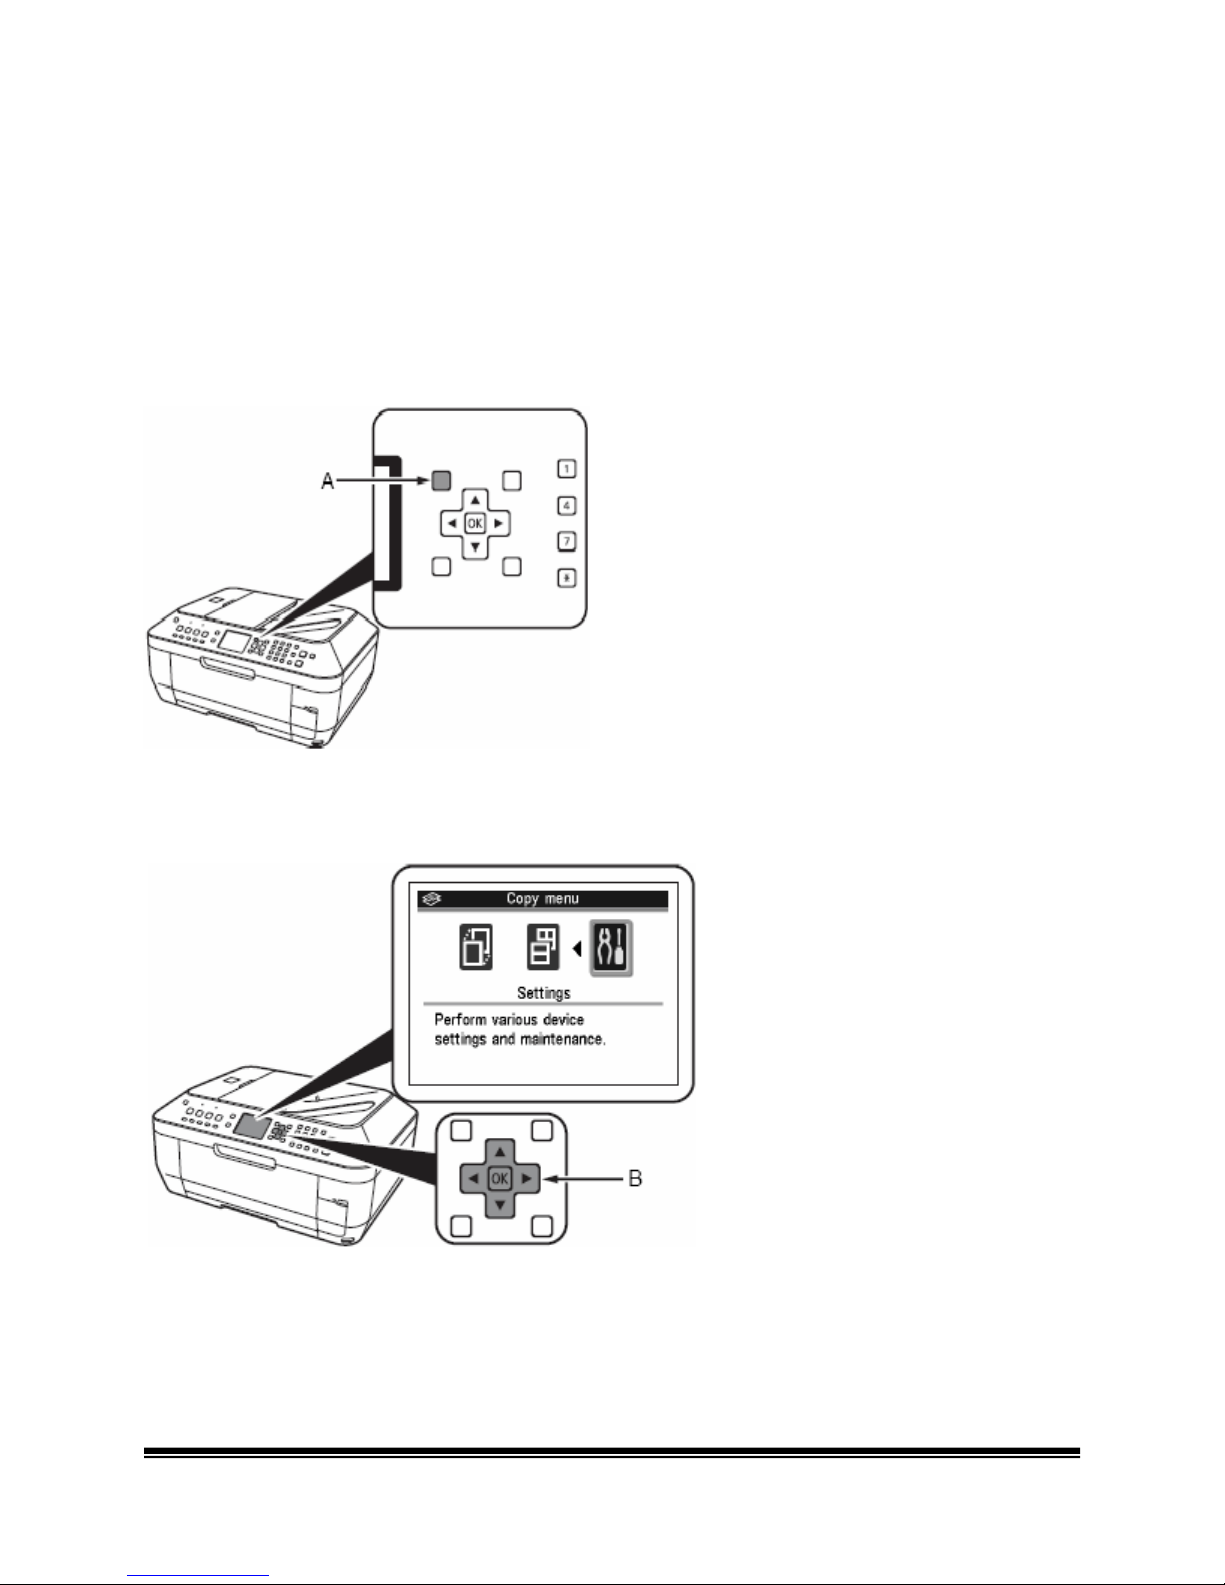
Step One
Press the Menu button (A)
Step Two
Use the or button to select Settings, then press the OK button.
Page 4
Page 5

Step Three
Select Device settings, then press the OK button.
.
Step Four
Select LAN settings, then press the OK button.
Step Five
Select Change wireless I wired, then press the OK button.
Step Six
Select Wireless LAN active, then press the OK button.
Step Seven
Press the On button to turn
off
the printer. Connect the USB cable to the printer and computer.
Page 5
Page 6
Downloading & Installing the Drivers
Download the Driver
To use the machine by connecting it to a computer, software including the drivers needs to be
copied (installed) to the computer's hard disk The installation process takes about 20 minutes
(The installation time varies depending on the computer environment or the number of
applications to be installed.)
Step One
Go to the Canon Canada Sup por t Home Page
Click here to go to the Canon Canada Support Home Page
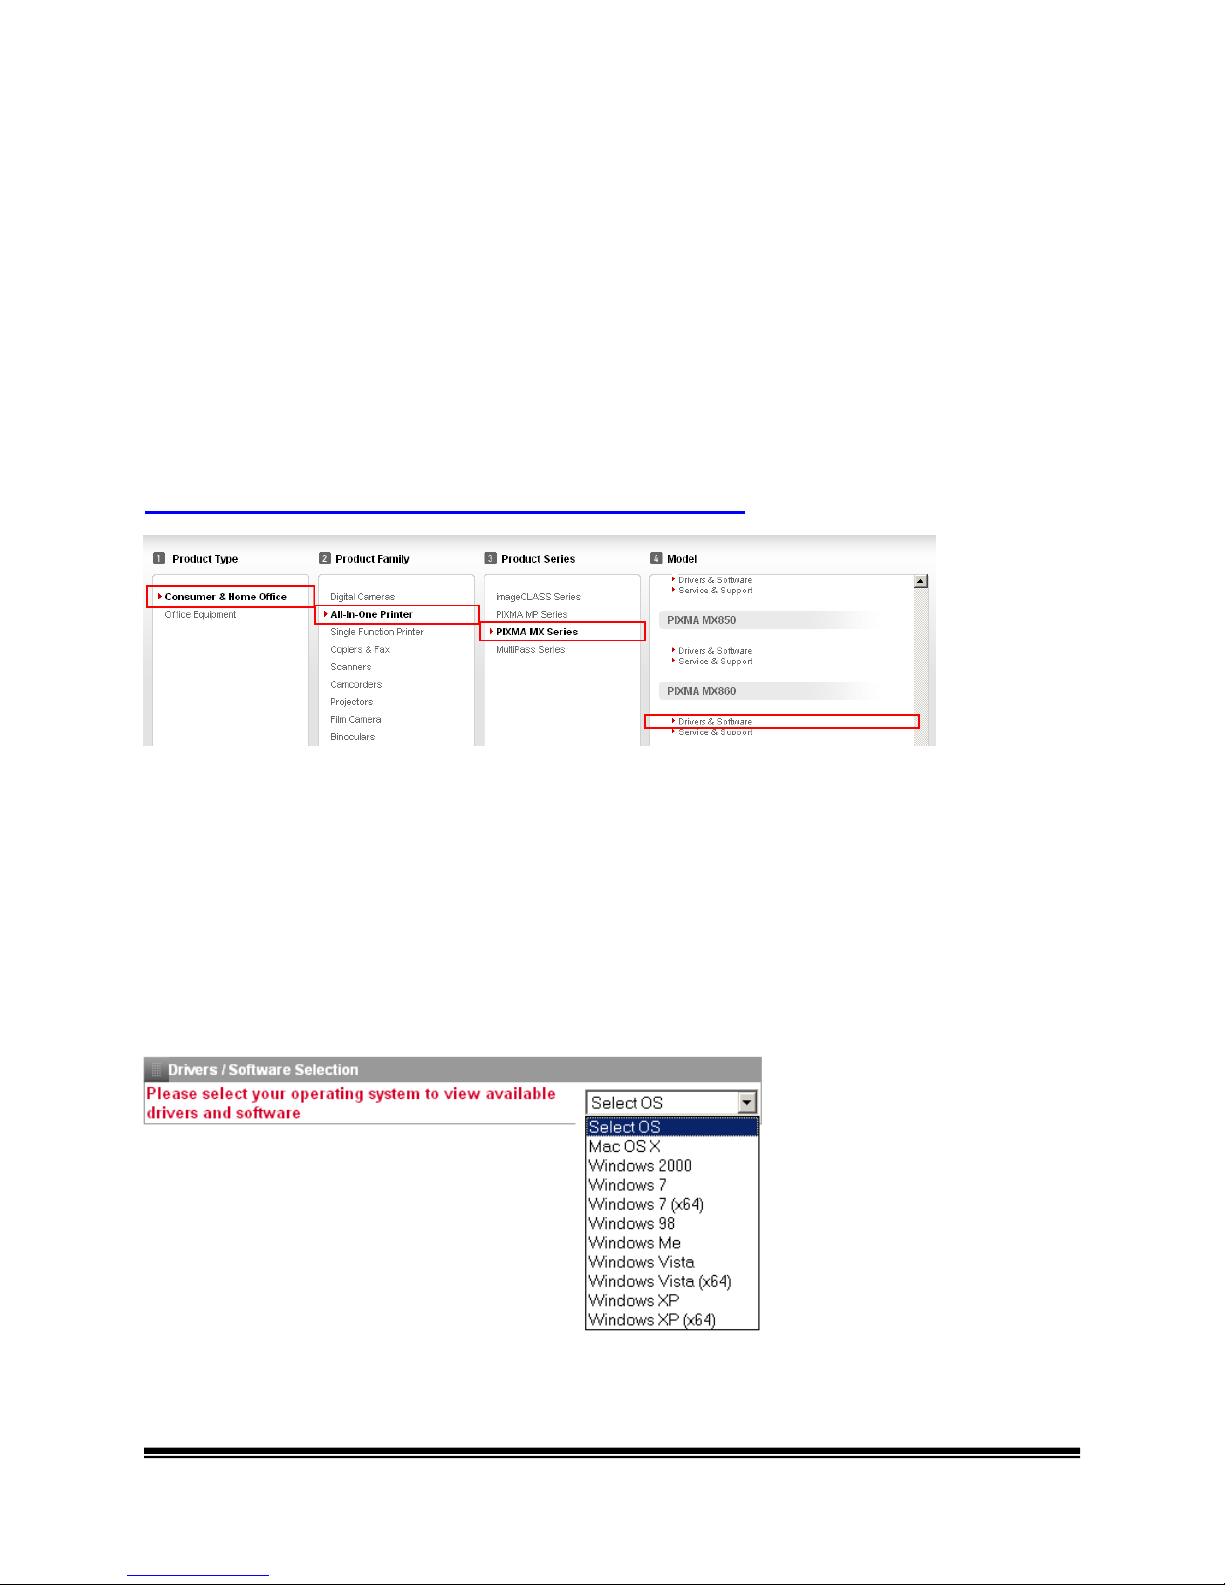
Step Two
Select Consumer & Home Office in the Product Type menu dropdown, All-In-One Printe r in
the Product Family, PIXMA MX Series in the Product Series and click on the Drivers &
Software link for your model.
Step Three
In the Drivers I Software Selection section, select your operating system in the Select OS
dropdown menu.
Please 5elect ,0Uf operotinv "stem to
view •••
Page 6
Page 7
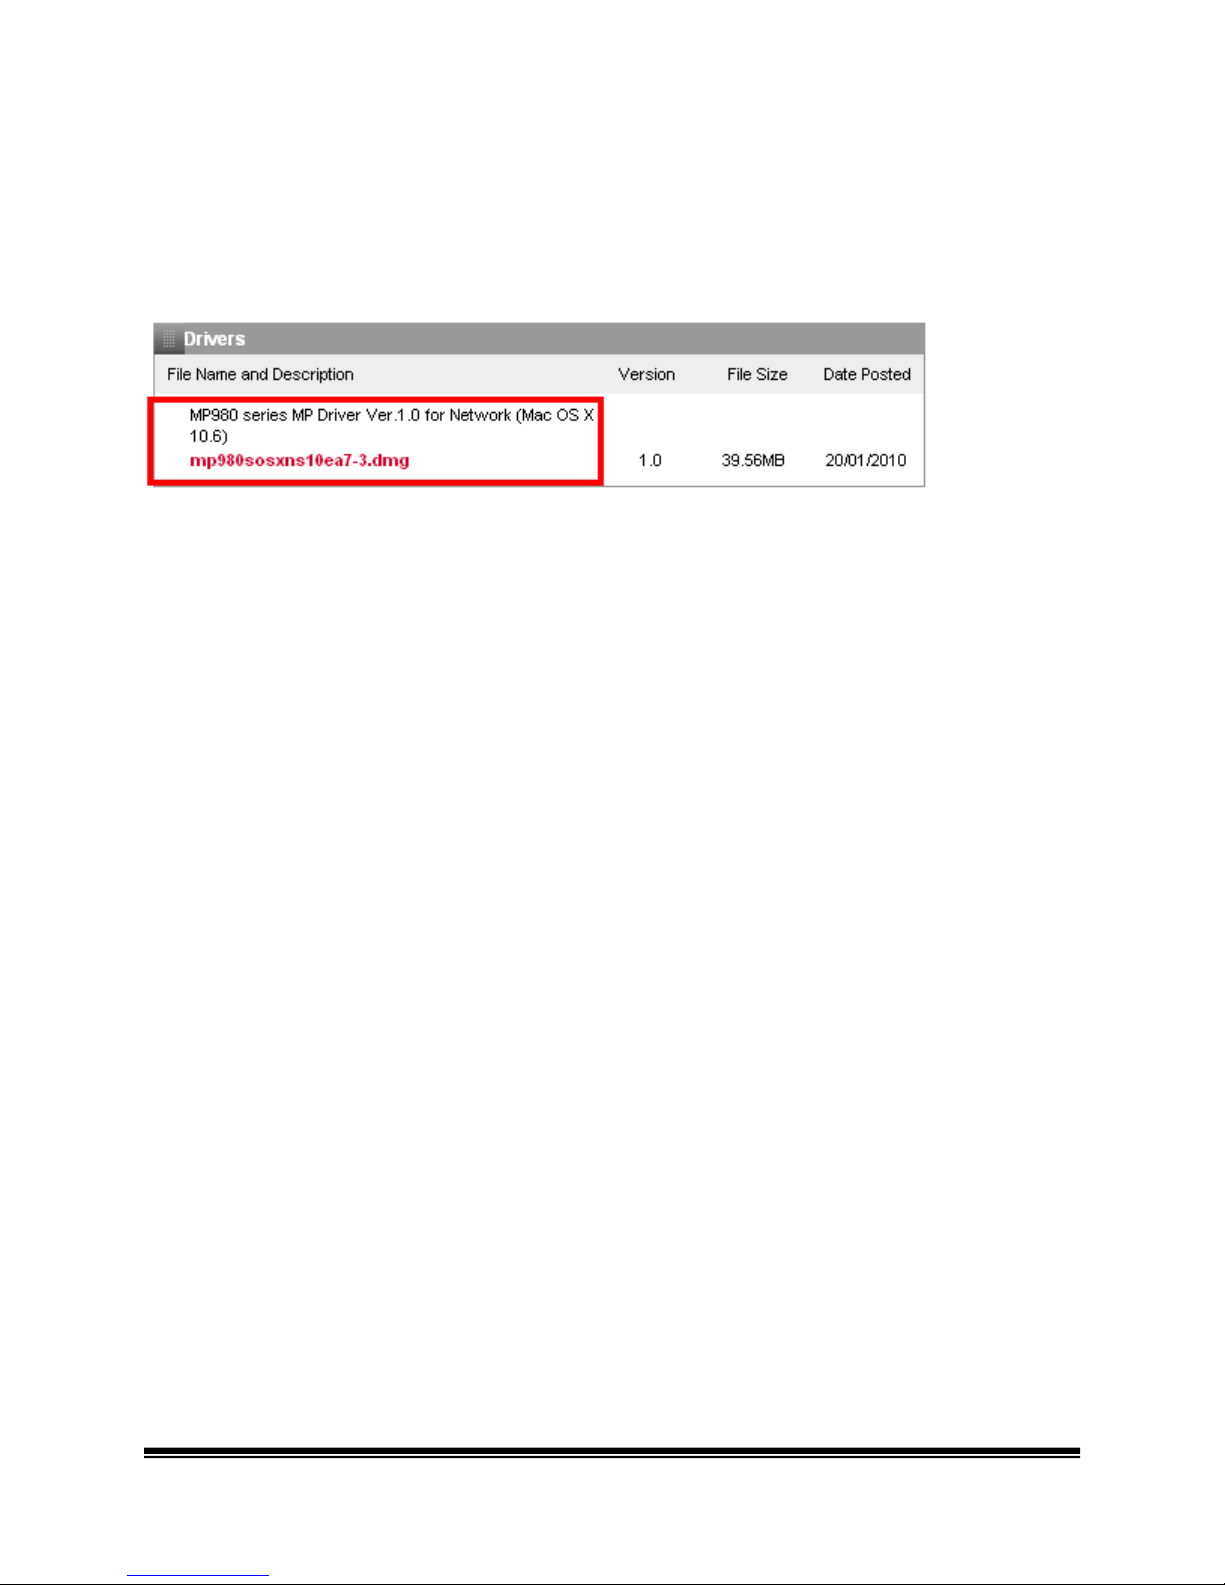
Step Four
In the Drivers section, click the link* (red printing) for the MP Driver.
*Name varied by model. Example shows MP980.
Step Five
On the next screen, read the information and instructions and click I Agree - Begin Download
Once the file has been downloaded, double-click it to begin the installat ion process
IMPORTANT:
• Quit all running applications before installation.
• Log on as the administrator (or a member of the Administrators group).
• Do not switch users during the installation process.
• Internet connection may be required during the installation Connection fees apply.
• It may be necessary to restart your computer during the installation process. Follow the
on-screen instructions. The installation resumes once your computer has restarted.
If the firewall function of your security software is turned on, a warning message may appear
that Canon software is attempting to access the network. If such a warning message
appears, set the security software to always allow access.
Once the file has been downloaded, double-click it to begin the installation process
Installing The Driver
Step One
A. Connect one end of the USB cable to the computer and the other to the machine.
B. Make sure the machine is turned on.
Page 7
Page 8
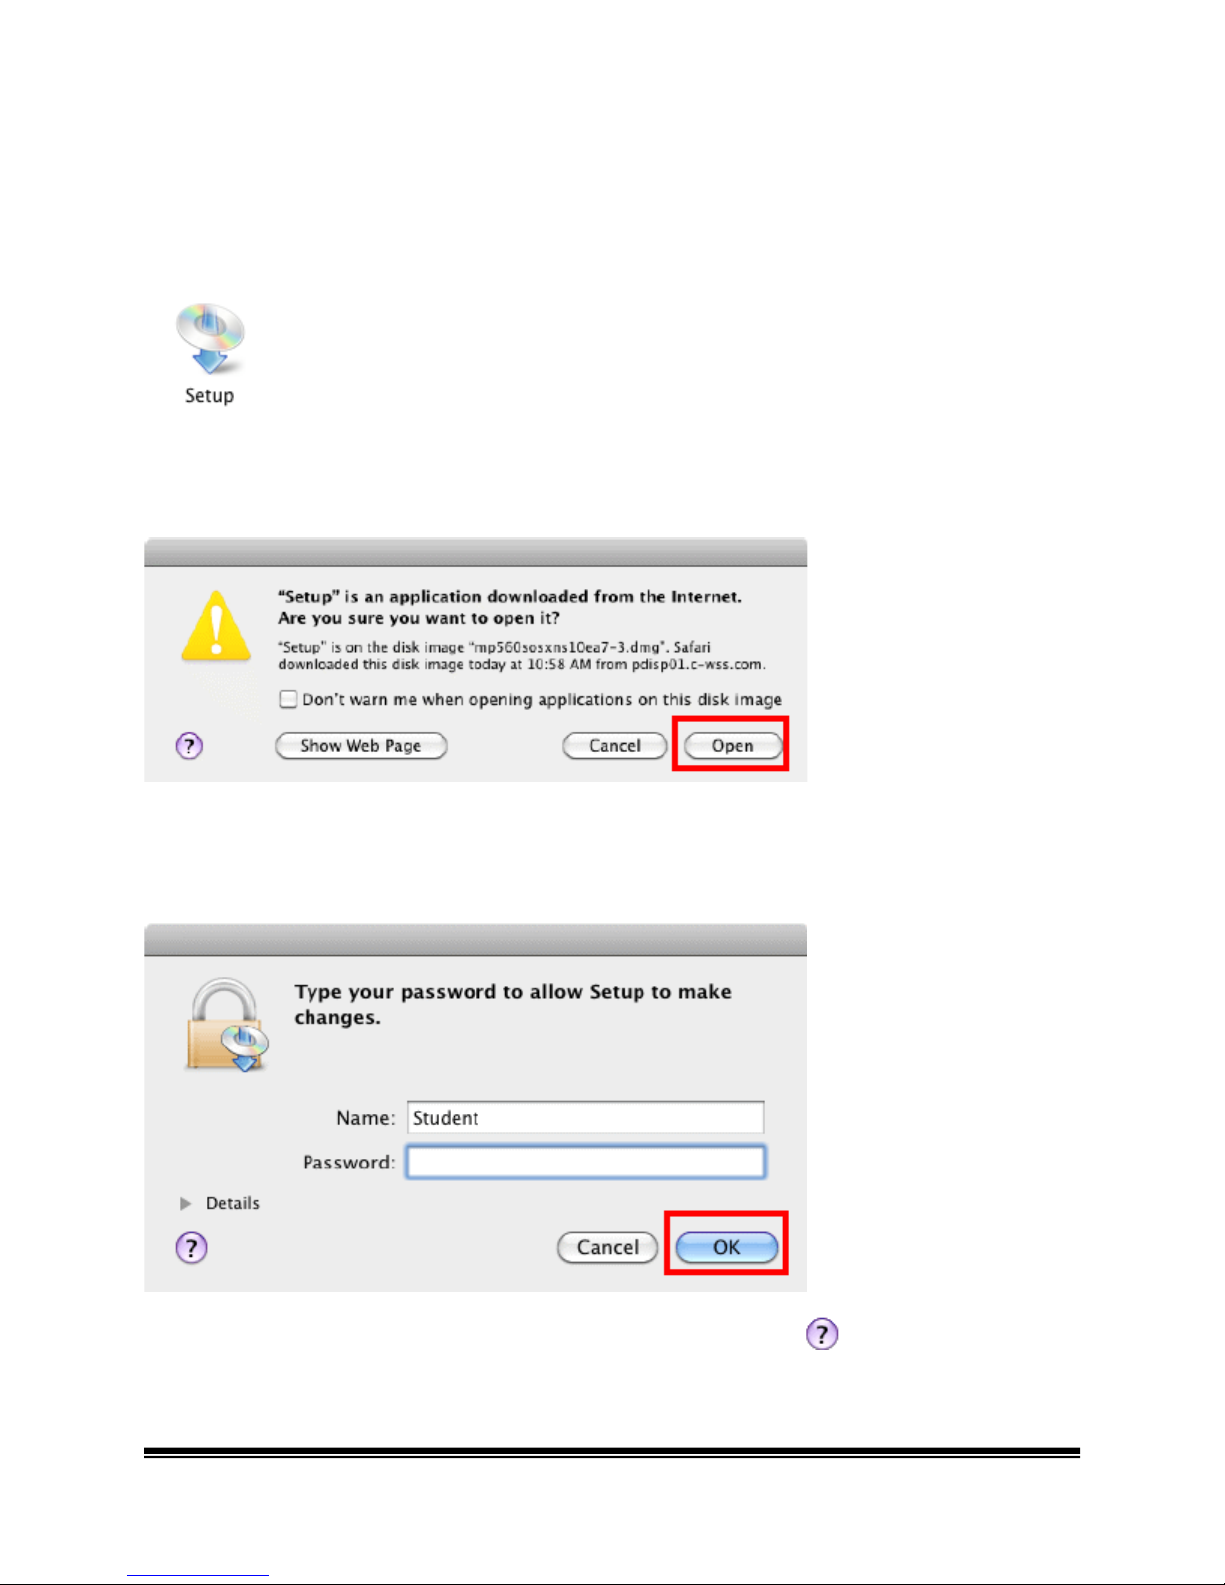
Step Two
Double-click the Setup icon
Step Three
If the following message appears, click Open
Step Four
Enter your administrator name and password. Click OK.
If you do not know your administrator name or password, click Help , then follow the onscreen instructions.
Page 8
Page 9
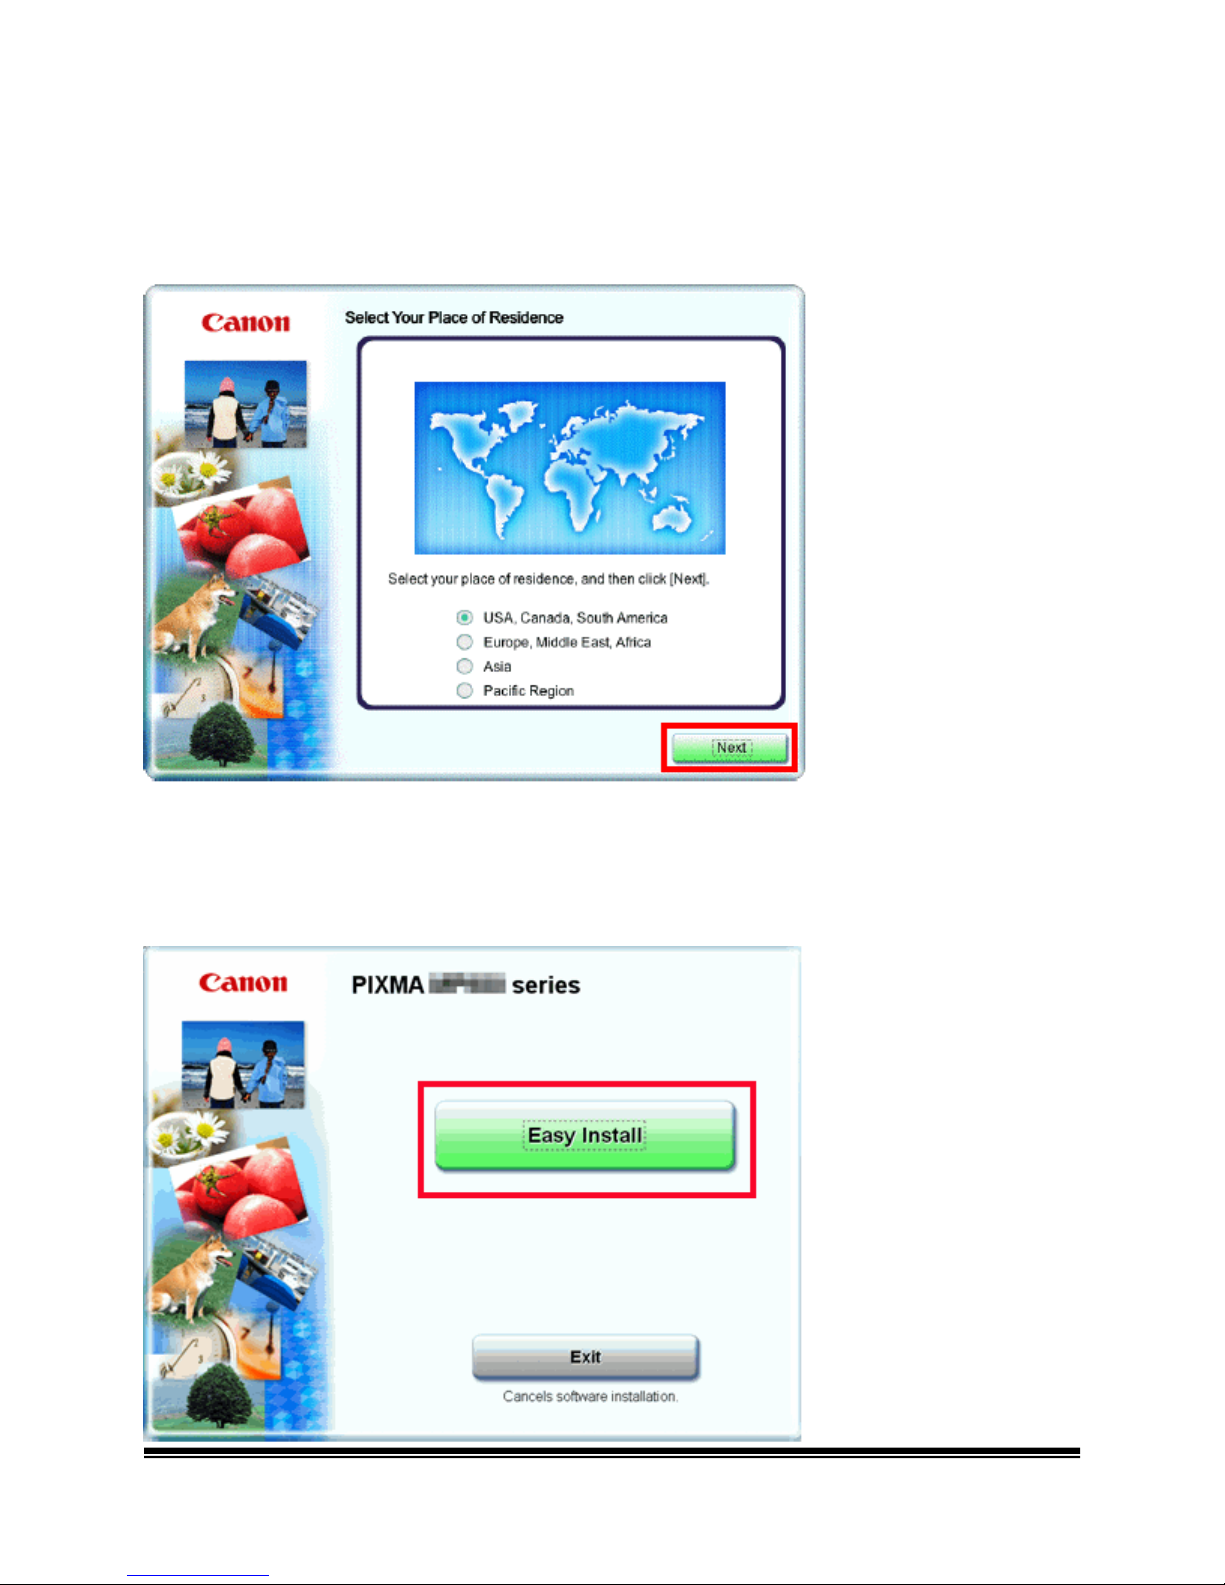
Step Five
Select the place of residence. Click Next.
Step Six
Click Easy Install.
Page 9
Page 10
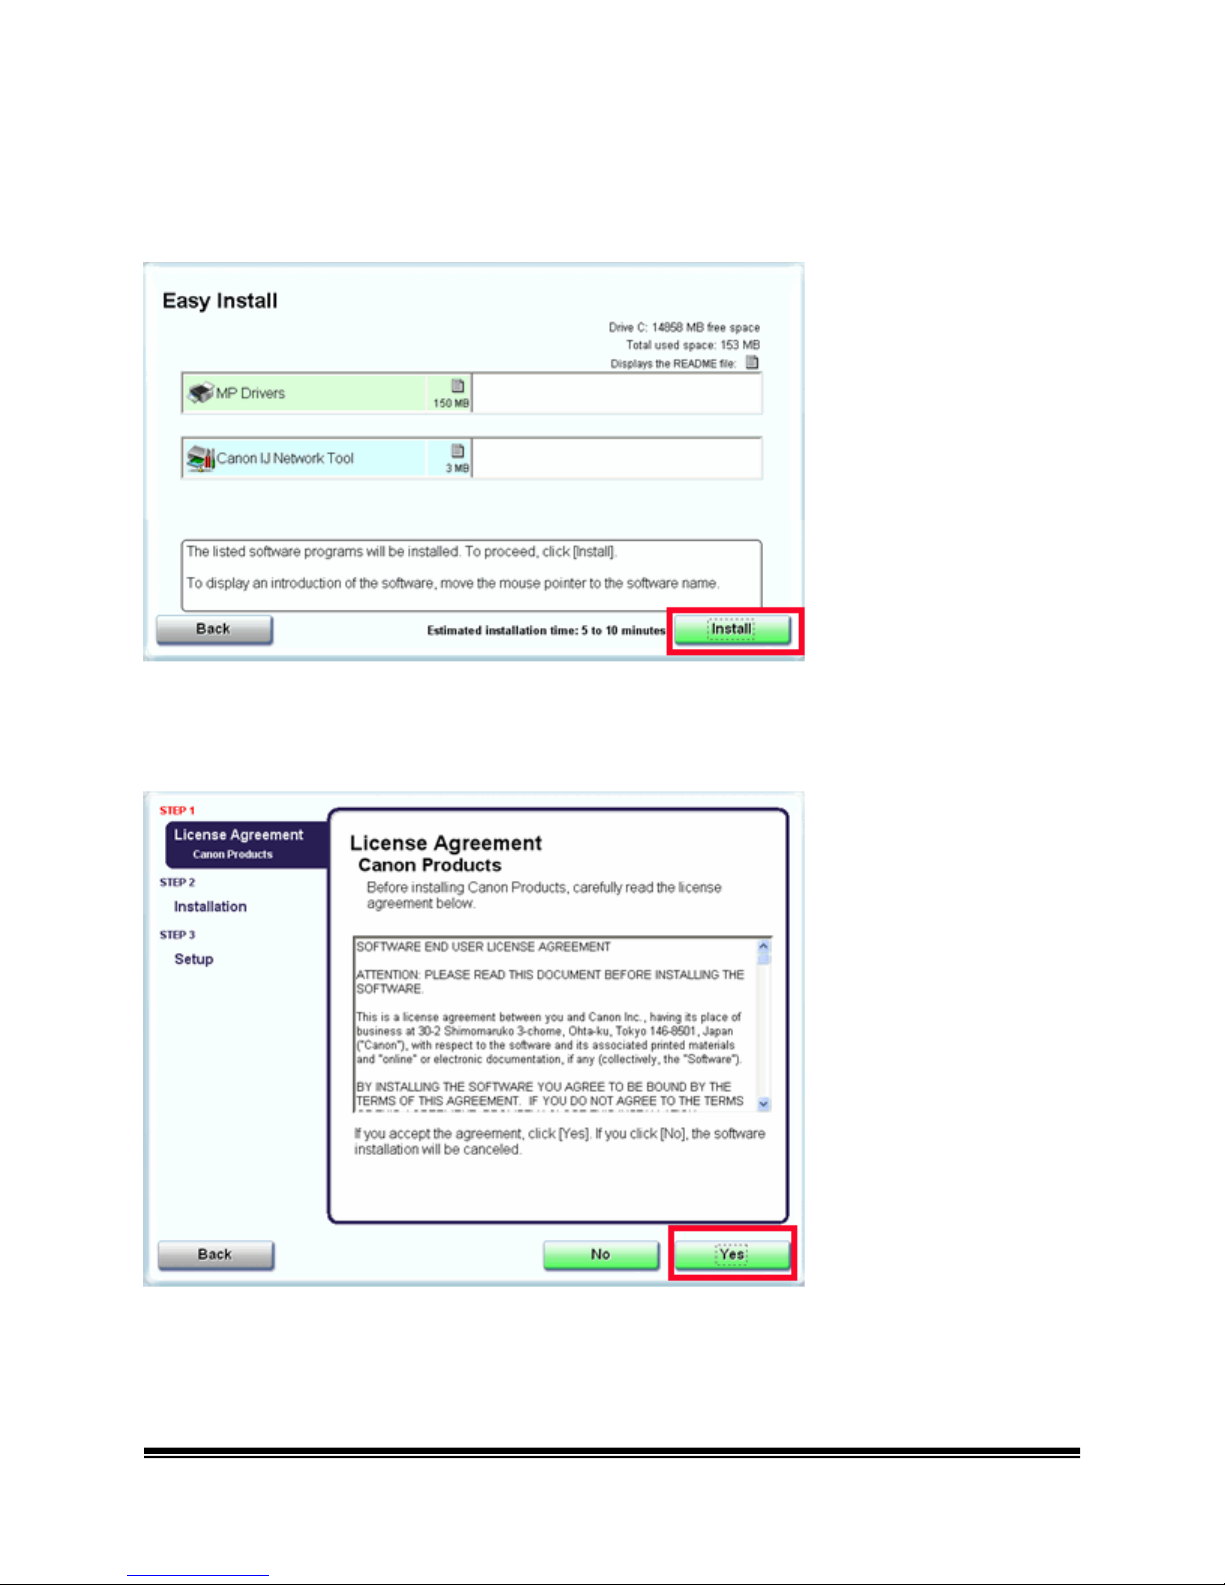
Step Seven
Click Install.
Step Eight
Read the License Agreement screen carefully and click Yes.
Installation starts.
Page 10
Page 11
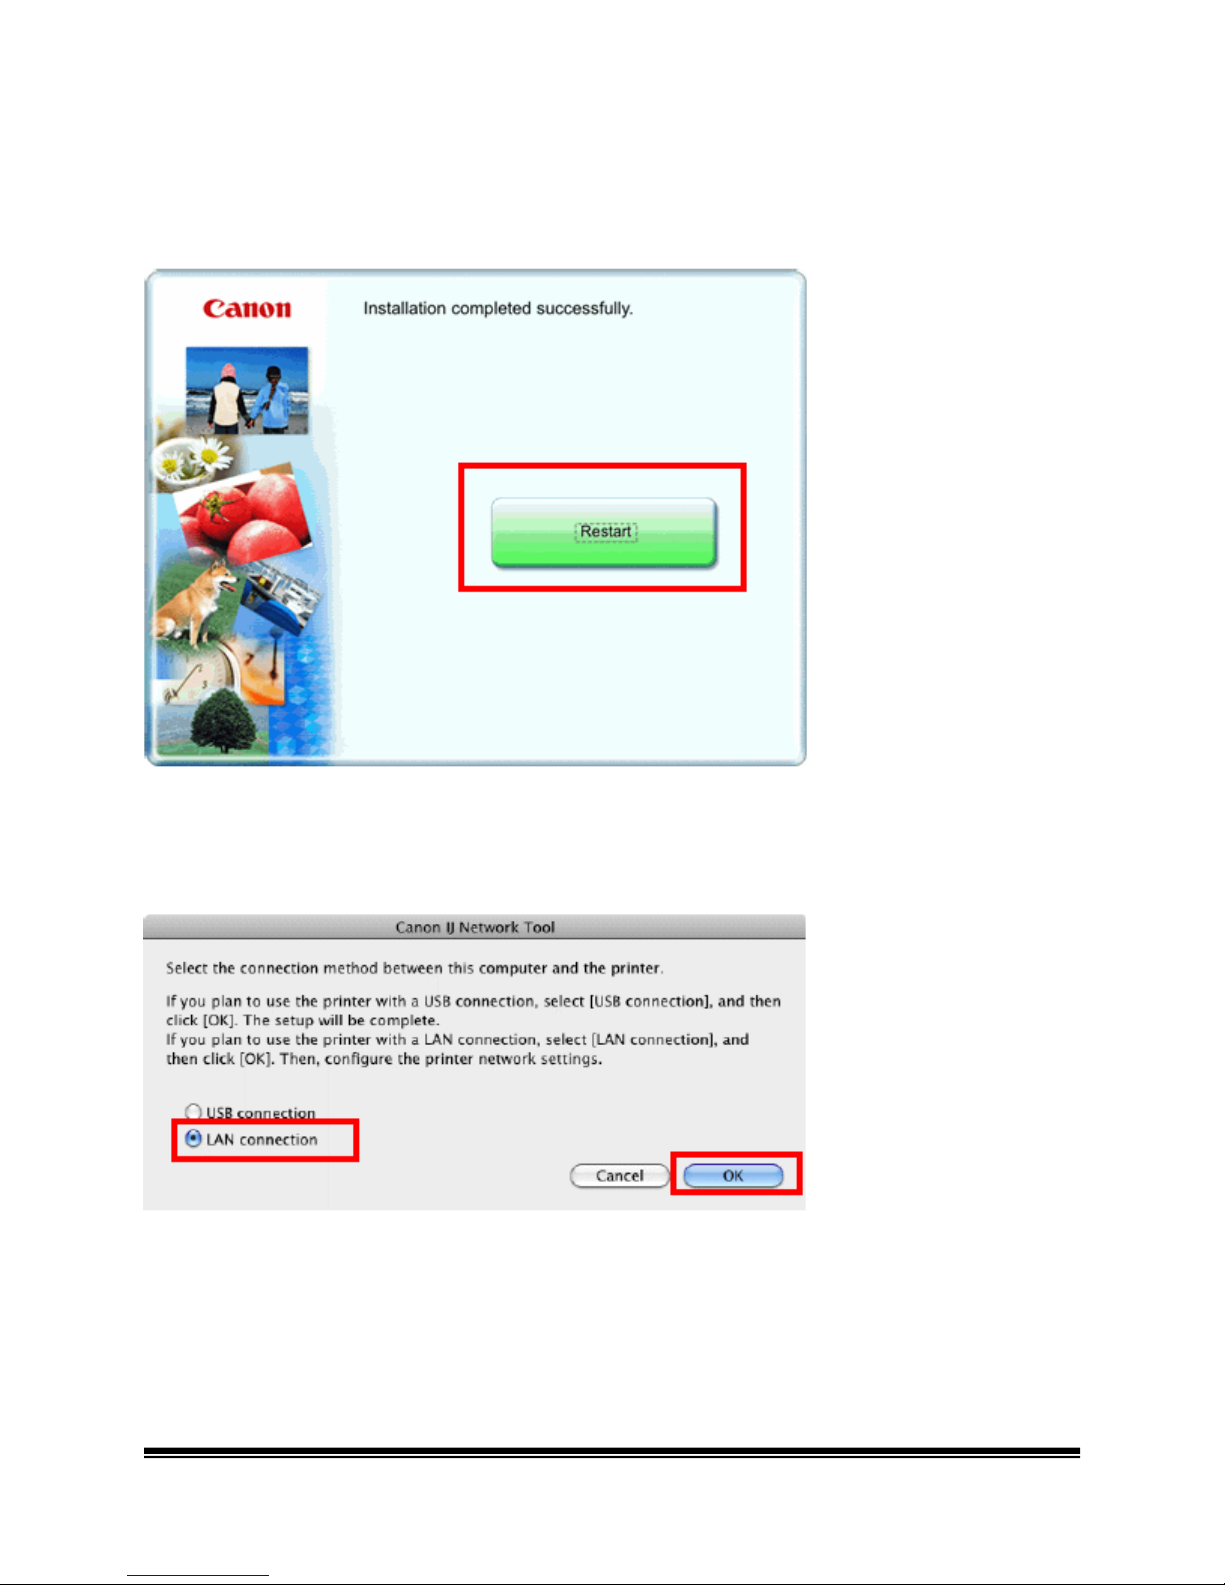
Step Nine
Click Restart.
Step Ten
After the computer restarts, select LAN connection and click OK.
If the Setup Preparations dialog box appears, confirm that preparation is complete and click
OK.
Page 11
Page 12
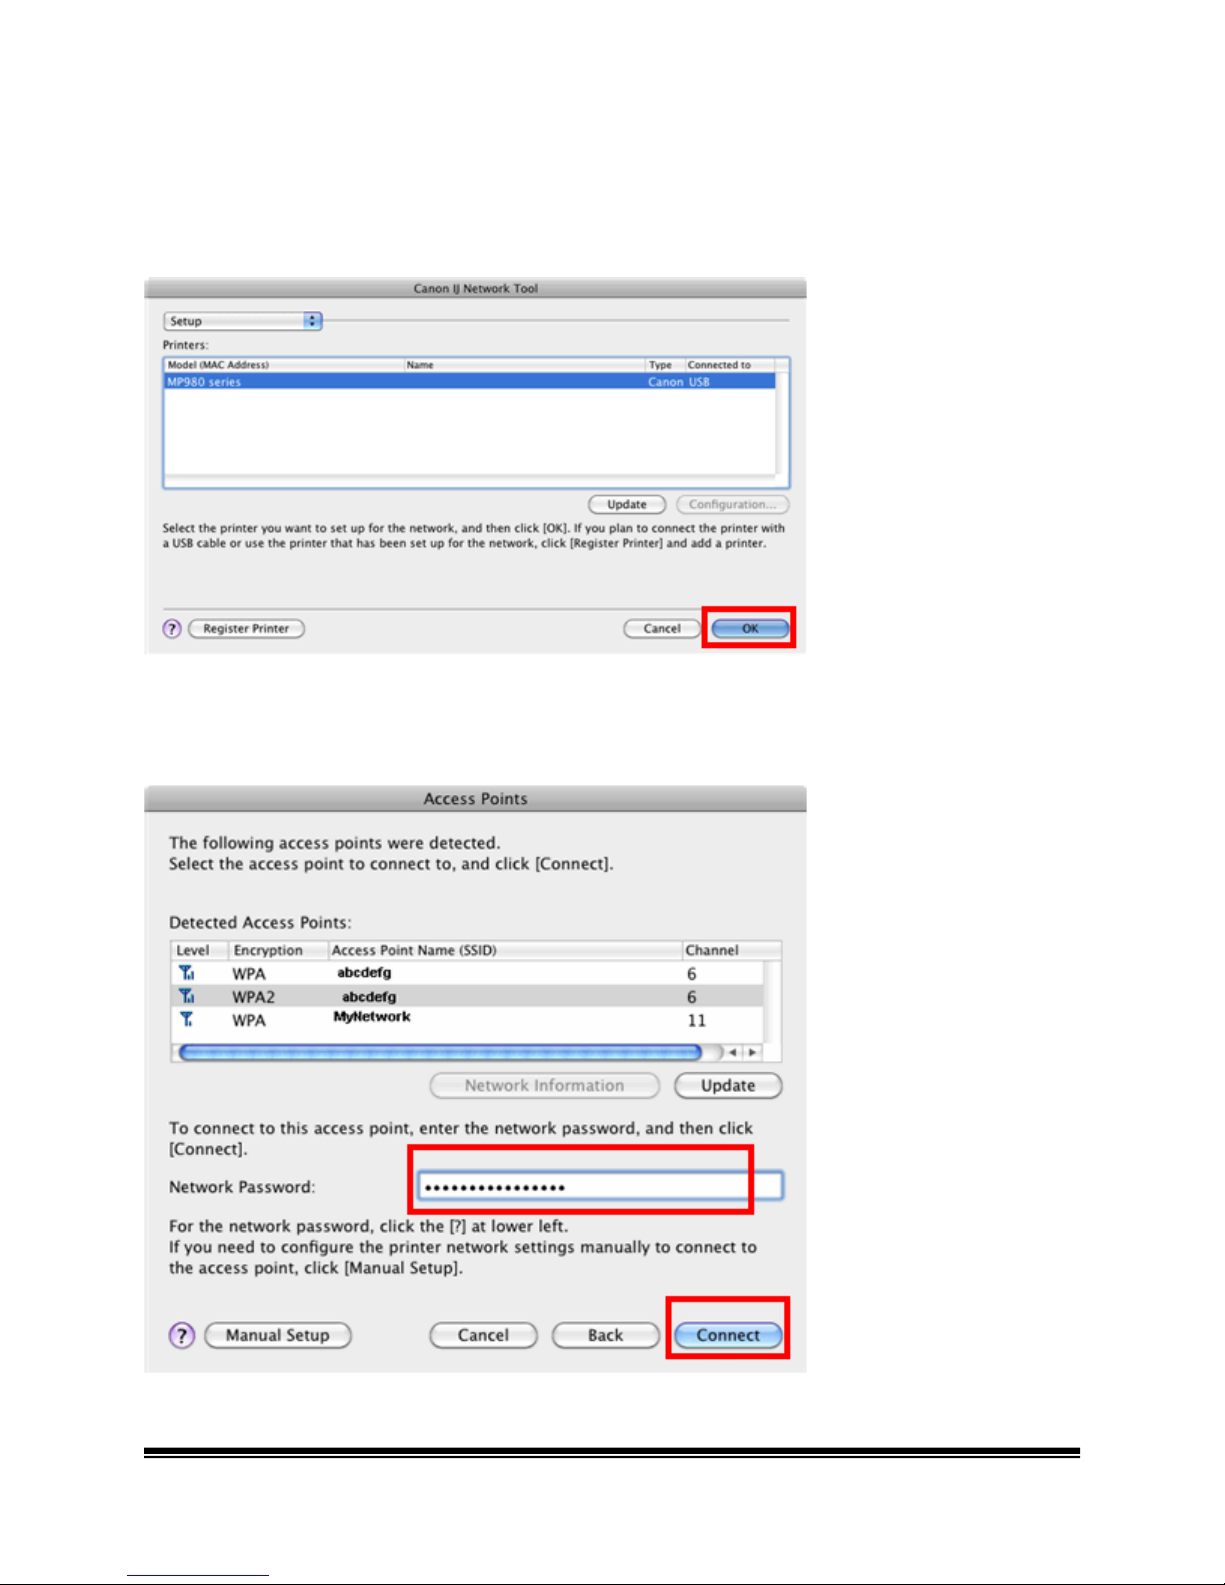
Step Eleven
Select the printer to be used on the network and click OK.
Step Twelve
When the Access Points screen appears, select an access point to use, enter the Network
password or key then click Connect.
Page 12
Page 13
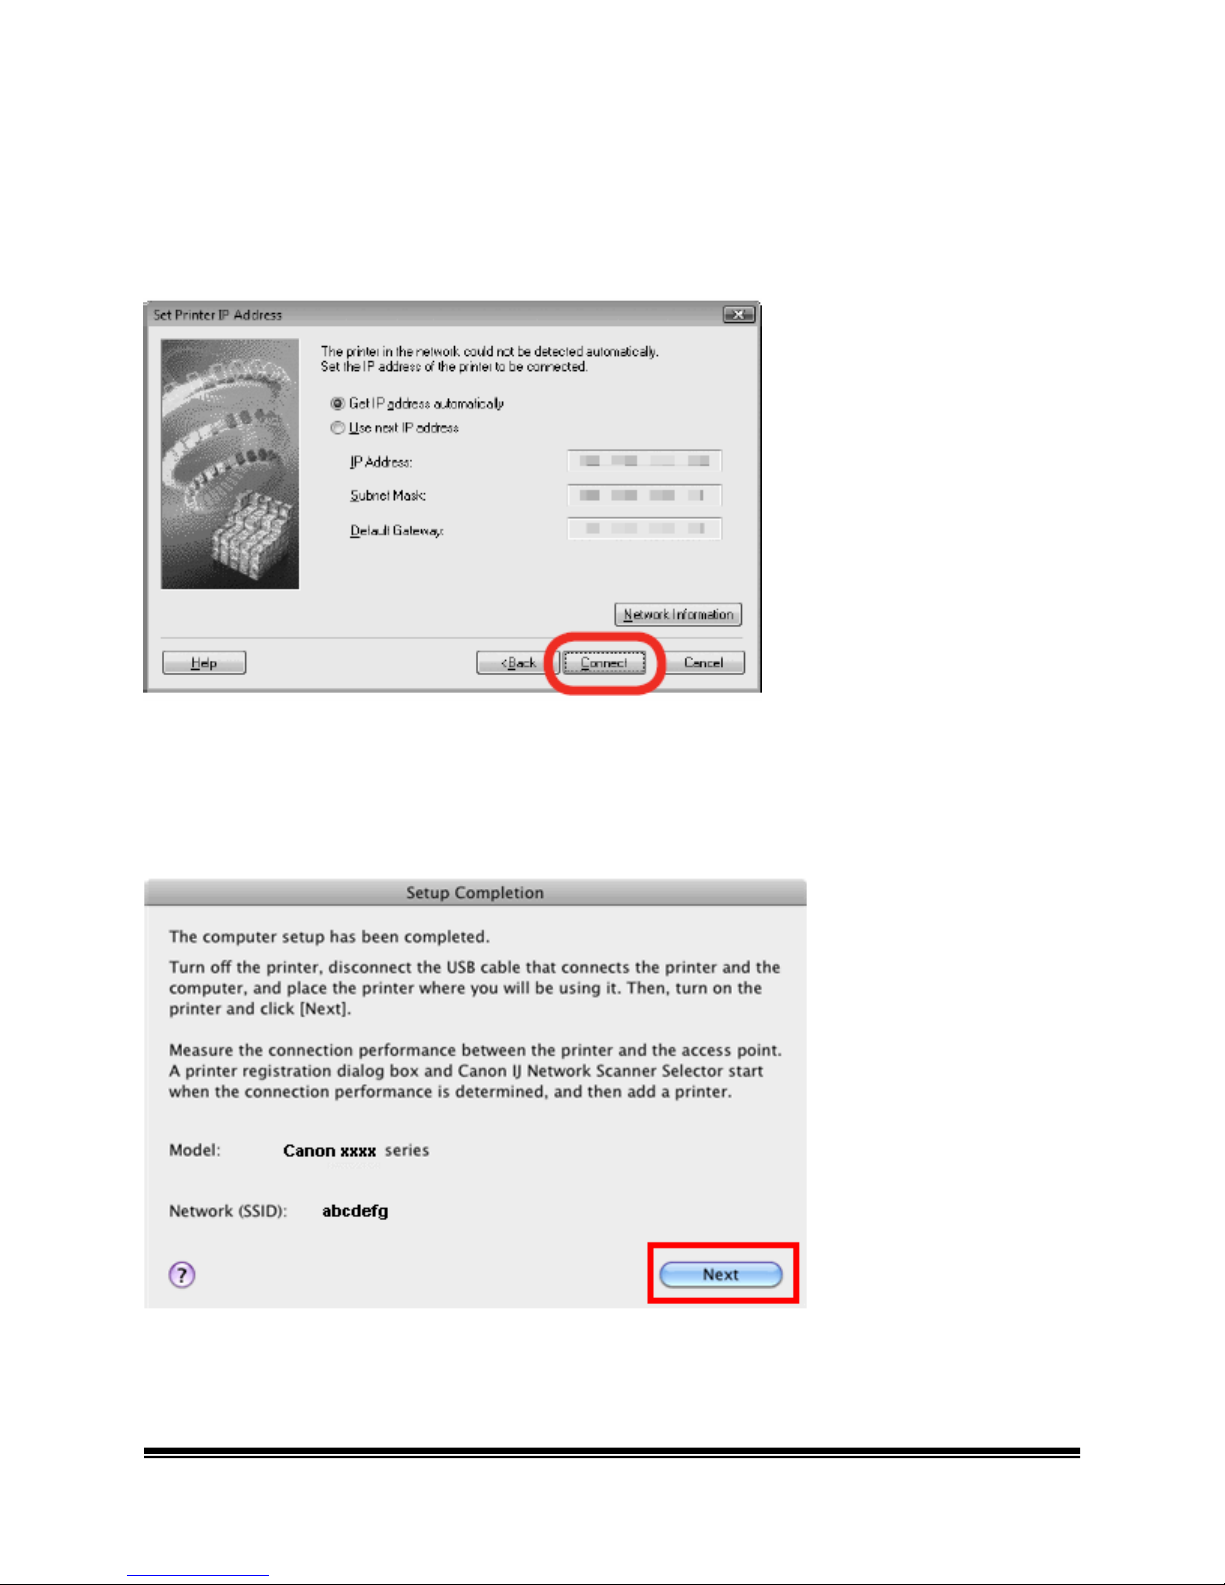
When an access point is d et ect ed aut omatically, the Access Points screen does not appear.
Step Thirteen
When the Set Printer IP Address screen appears, confirm the contents, then click Connect.;
If the machine is detected automatically, the Set Printer IP Address screen does not appear
Step Fourteen
When the Setup Completion dialog box appears, remove the USB cable, then click Next .
Page 13
Page 14
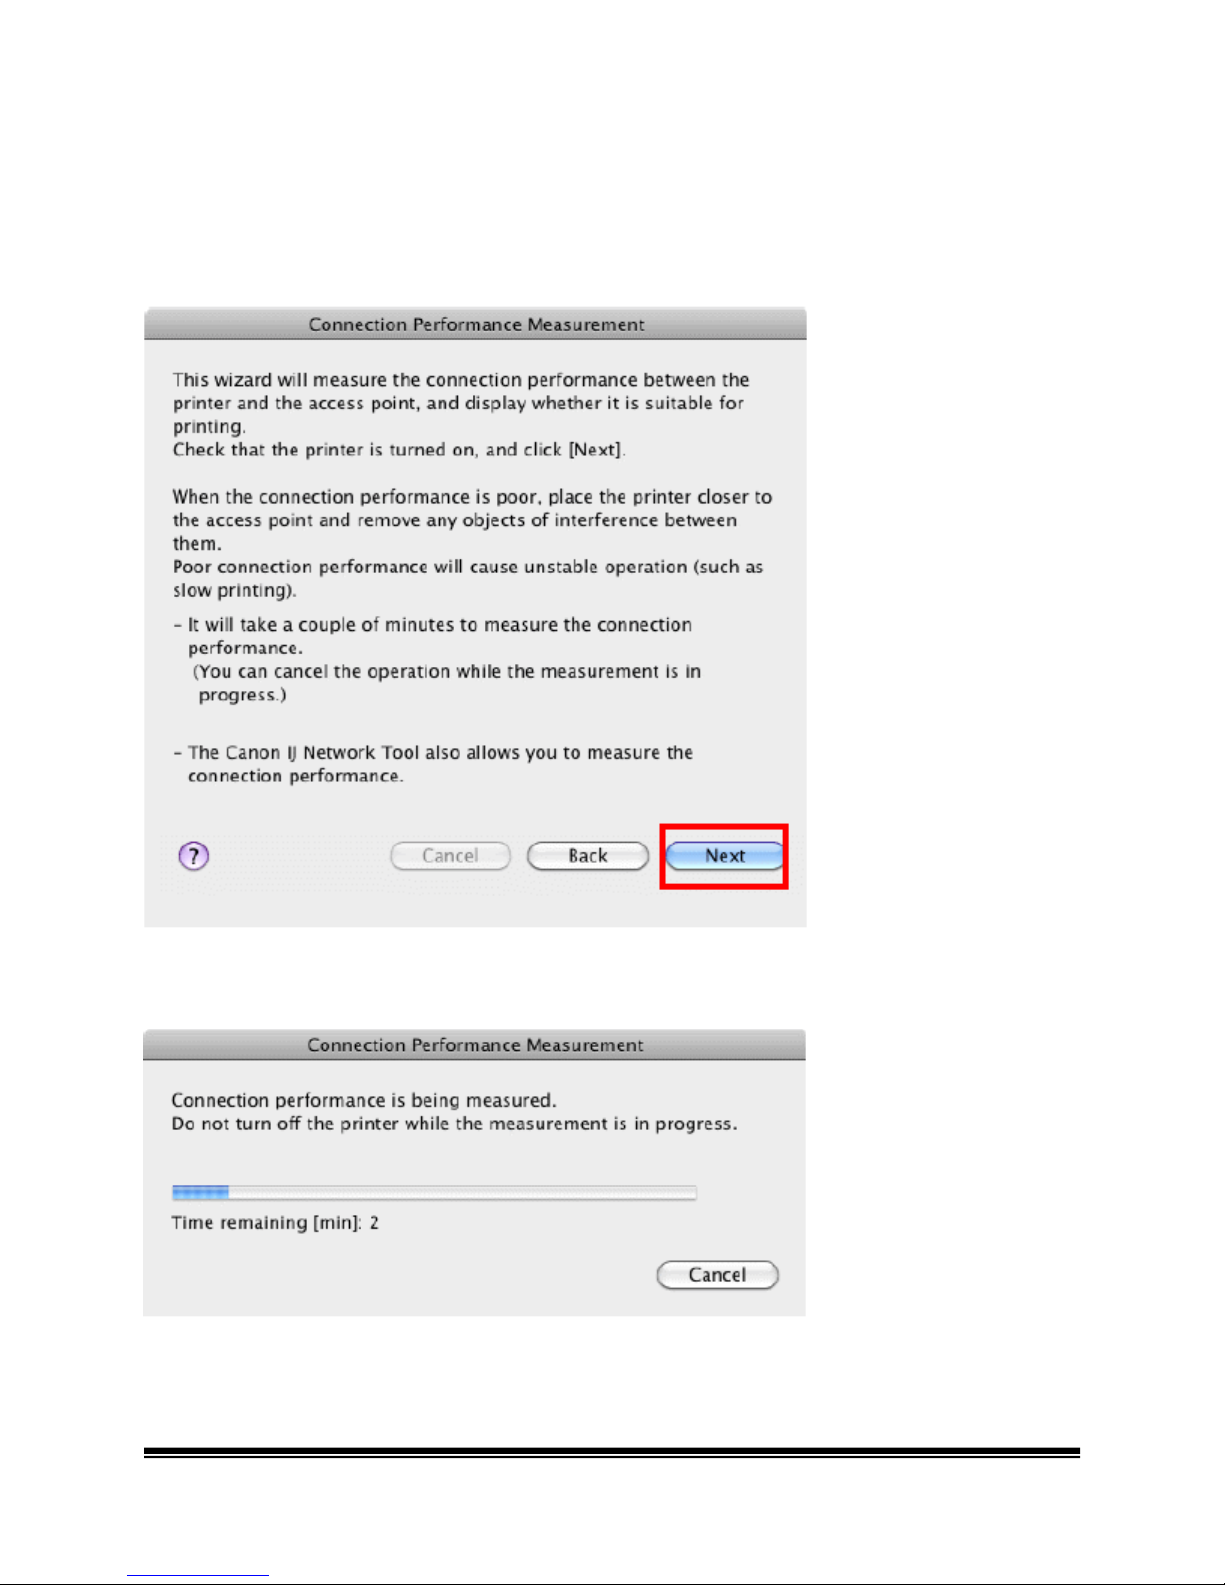
Step Fifteen
On the Connection Performance Measurement dialog box, click Next.
Measuring of the communication status starts, an d the results are displayed.
Note: Measuring takes a few minutes. Measuring can be cancelled by clicking Cancel. You
also examine the detailed status of the communication link after setup by using the Canon IJ
Network Tool.
Page 14
Page 15
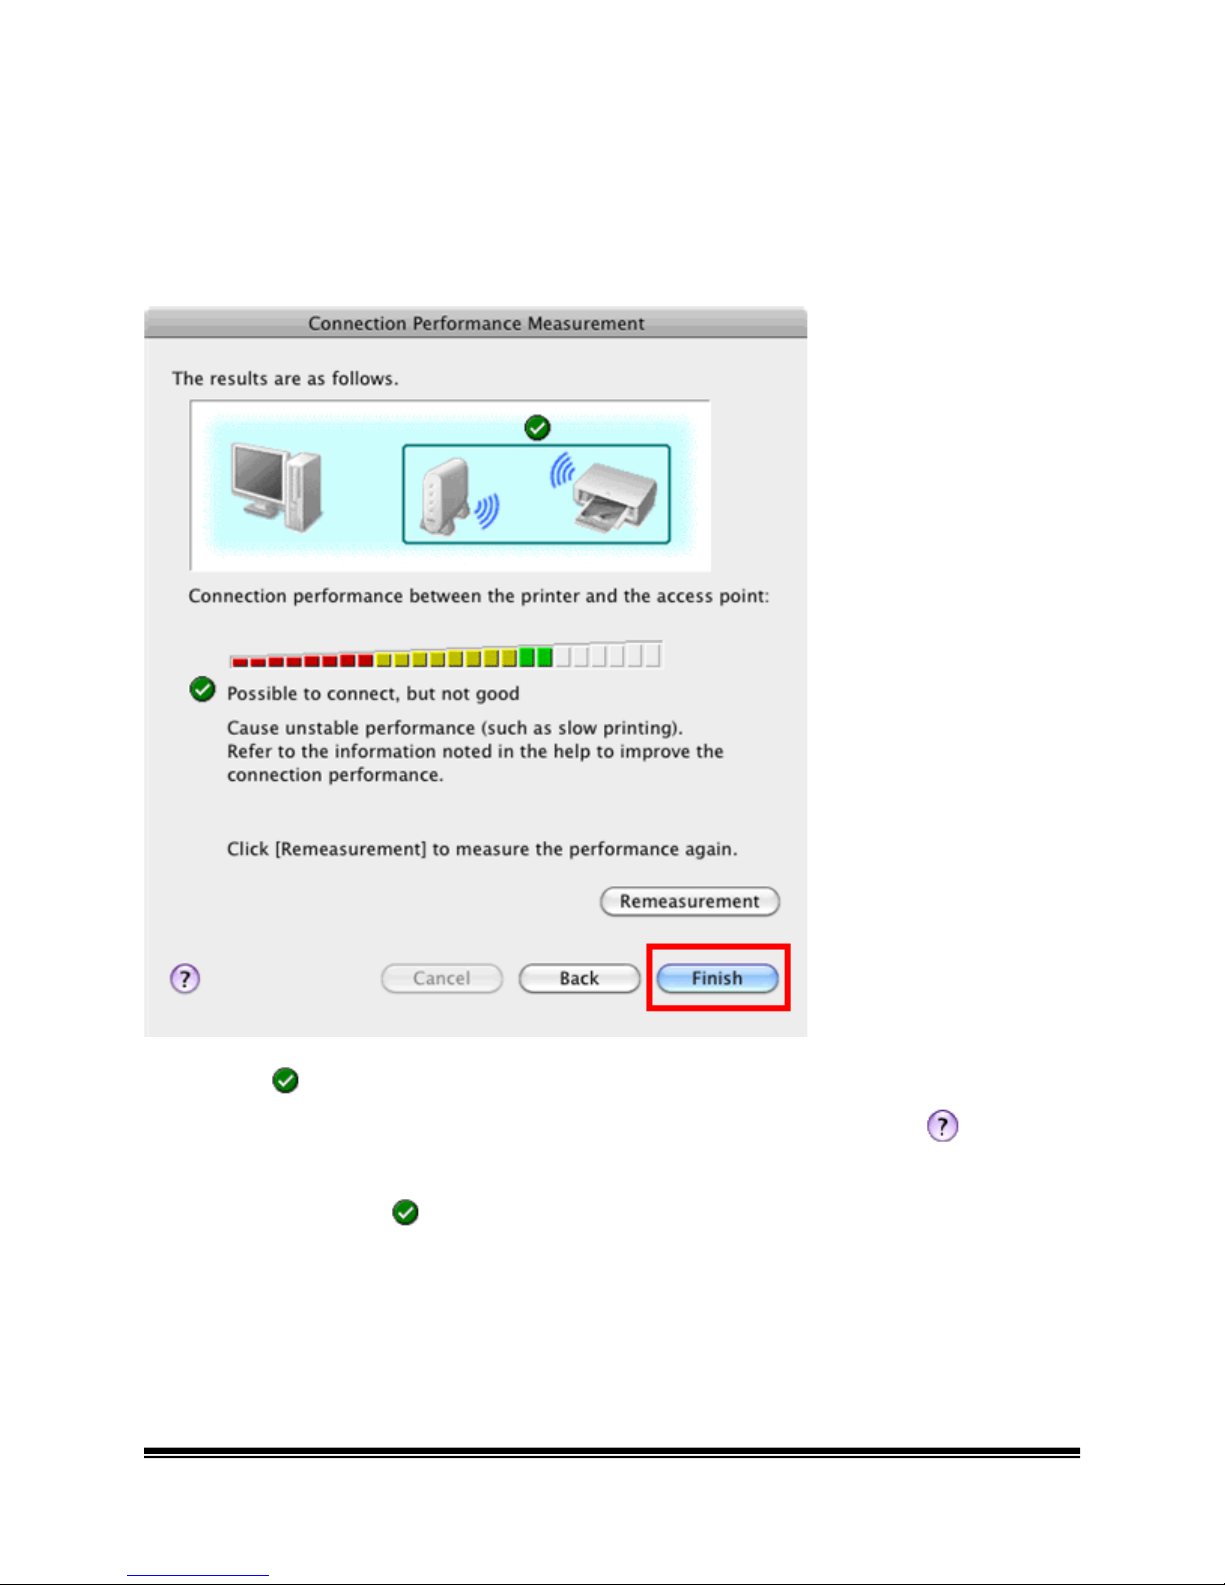
Step Sixteen
Confirm the measurement results, then click Finish.
Ensure that is displayed in Connection performance between the printer and the access
point.
The Printer Setup Utility and Canon IJ Network Scanner Selector wil l s tart up.
If any symbol other than is displayed, refer to displayed comments and Help for
improving the status of communication link.
To check whether the new location is better, click Remeasurement. Measurement of the
communication status is performed again.
When any message on Overall network performance appears in the measurement results,
rearrange the printer and other network devices following the instructions on the screen.
Page 15
Page 16
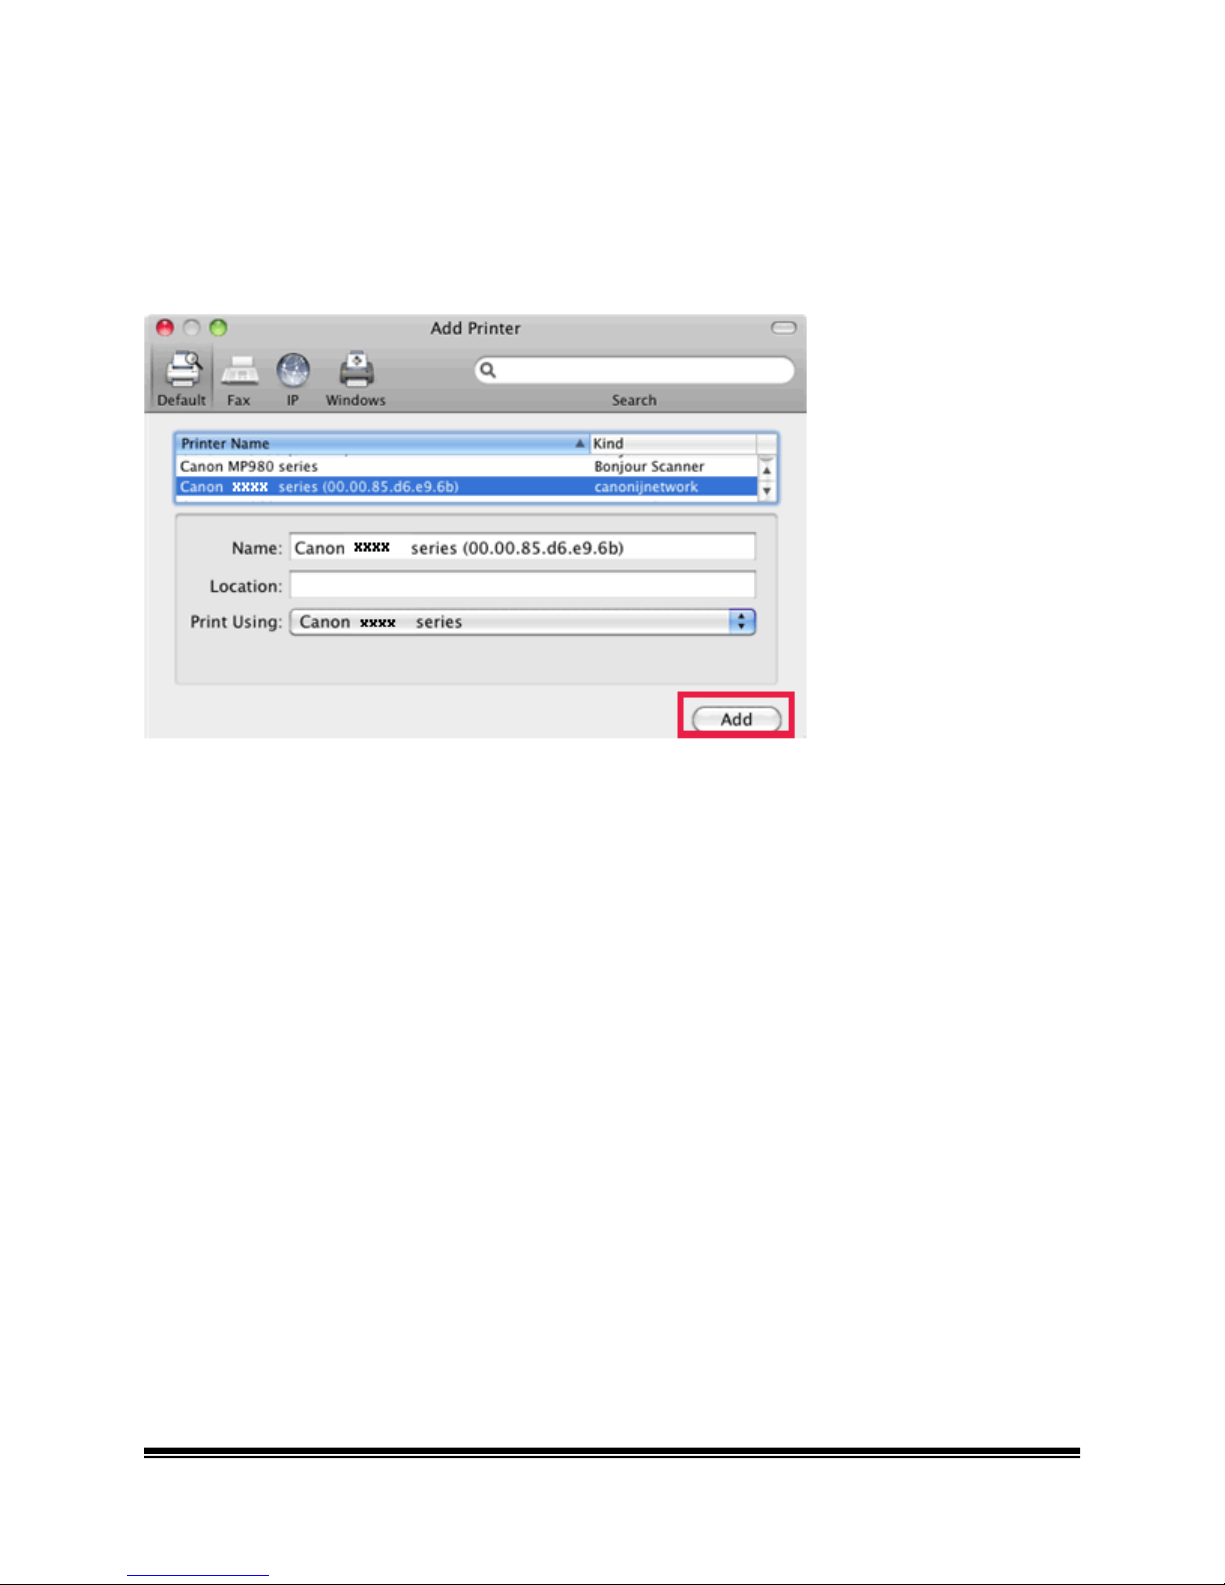
Adding the Machine
Wait for a while, then select Canon xxxx series ('xxxx' re fers to model) and clic k Add.
NOTE:
• The alphanumeric string after Canon xx/x series is the machine's MAC address.
• If the machine has not been detected, make sure of the following.
ο The machine is turned on.
ο The firewall function of any security software is turned off.
ο The computer is connected to the access point.
ο The machine is not set to use access control (MAC address filtering).
Page 16
Page 17
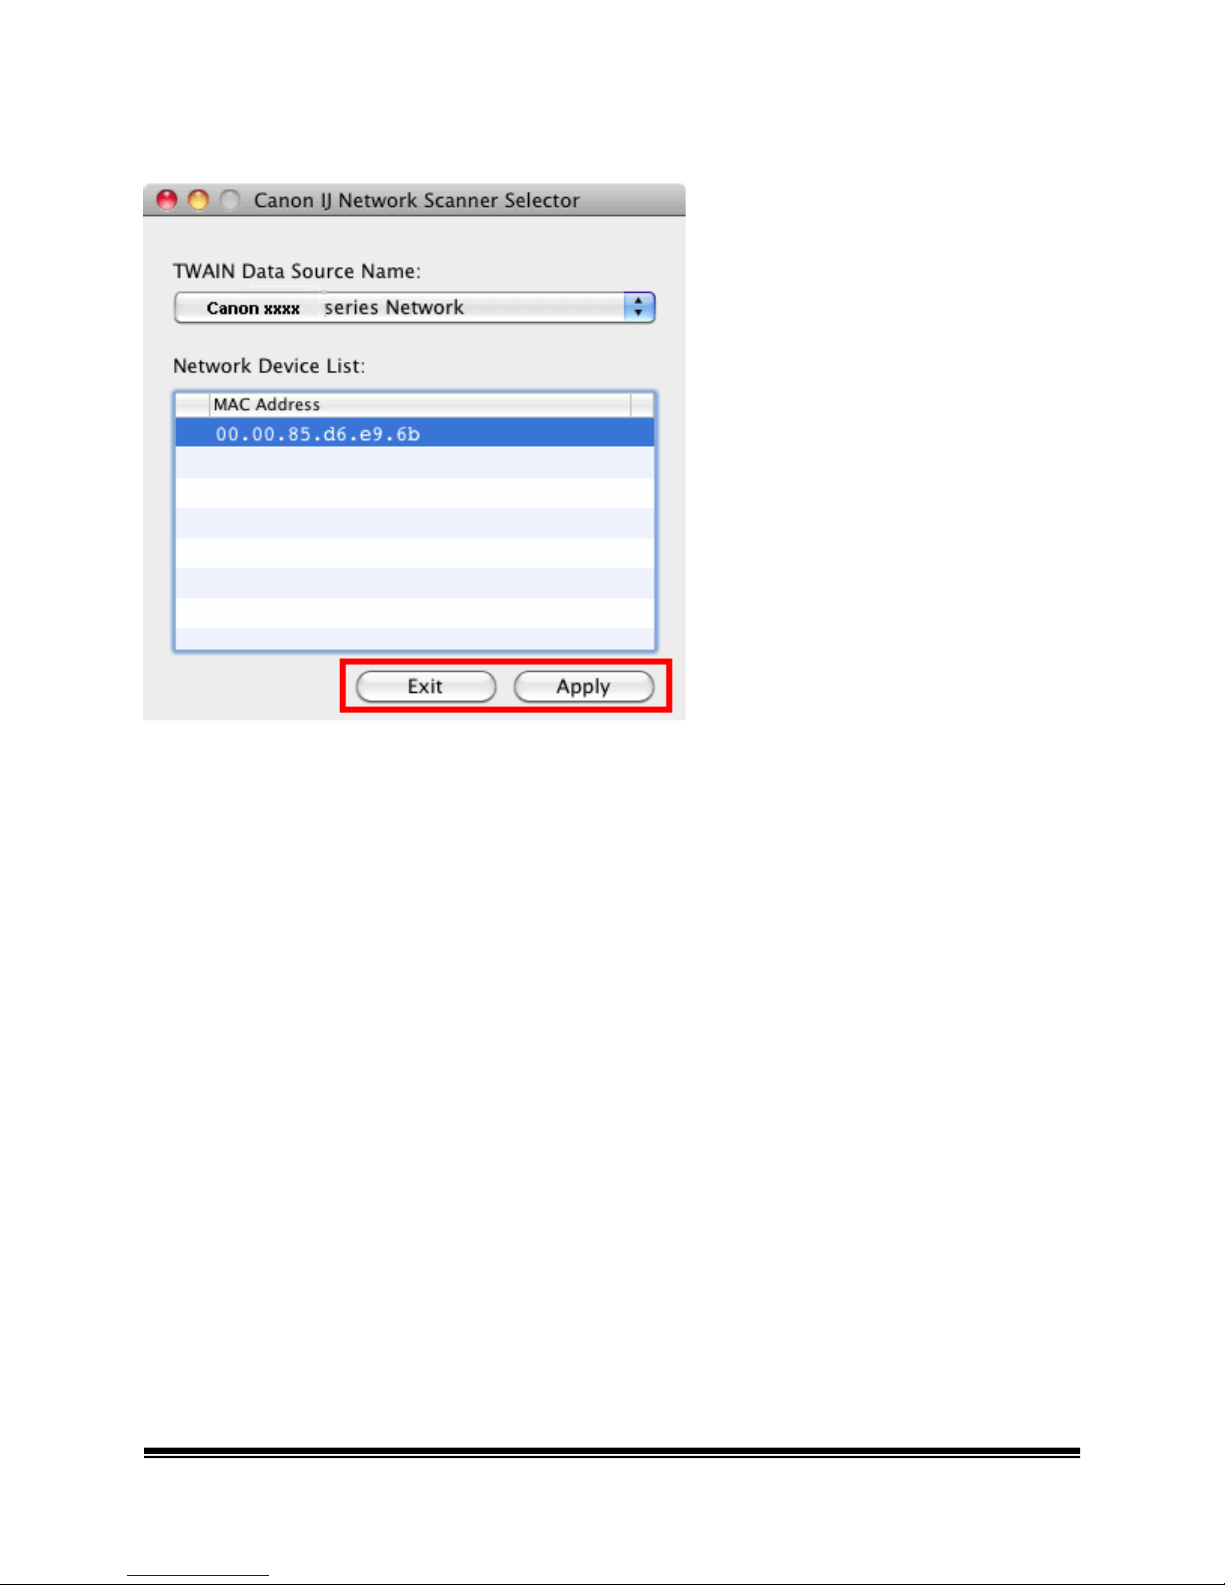
On the Canon IJ Network Scanner Selector screen, select Canon xxxx series Network
('xxxx' refers to model) in TWAIN Data Source Name and the MAC address of the machine in
Network Device List, then click Apply to use the machine as a scanner.
Confirm that a check mark is displayed, then click Exit to close the dialog box.
Installation is completed.
Page 17
 Loading...