

Canon PIXMA mg6150 Getting Started
Getting Started
Démarrage
Inbetriebnahme
Guida Rapida
ENGLISH
FRANÇAIS
DEUTSCH
ITALIANO
Make sure to read this manual before using the machine. Please keep it in hand for future reference.
Veillez à lire ce manuel avant d’utiliser la machine. Conservez-le à portée de main an de pouvoir vous y reporter ultérieurement.
Bitte lesen Sie dieses Handbuch vor der Verwendung des Geräts. Bewahren Sie es so auf, dass Sie es bei Bedarf zur Hand haben.
Leggere questo manuale prima di utilizzare la stampante. Tenerlo a portato di mano per consultarlo all’occorrenza.

Symbols Used in This
■
Document
Prohibited actions.
Symboles utilisés dans ce
■
document
Actions interdites.
In diesem Dokument
■
verwendete Symbole
Unzulässige Aktionen.
Simboli utilizzati in questo
■
documento
Azioni proibite.
Instructions including important
information.
In this guide, Windows 7 operating system is
•
referred to as Windows 7 and Windows Vista
operating system as Windows Vista.
In this guide, the screens are based on
•
Windows 7 Home Premium and Mac OS X
v.10.6.x. (Unless noted otherwise, the screens
are those of Windows 7.)
Microsoft is a registered trademark of Microsoft
•
Corporation.
Windows is a trademark or registered trademark
•
of Microsoft Corporation in the U.S. and/or other
countries.
Windows Vista is a trademark or registered
•
trademark of Microsoft Corporation in the U.S.
and/or other countries.
Internet Explorer is a trademark or registered
•
trademark of Microsoft Corporation in the U.S.
and/or other countries.
Macintosh, Mac, and AirPort are trademarks
•
of Apple Inc., registered in the U.S. and other
countries.
Bonjour is a trademark of Apple Inc., registered
•
in the U.S. and other countries.
Instructions comportant des
informations importantes.
Dans ce guide, le système d’exploitation
•
Windows 7 est appelé Windows 7 et le système
d’exploitation Windows Vista est appelé
Windows Vista.
Dans ce guide, les captures d’écran ont été
•
prises sous Windows 7 Édition Familiale
Premium et Mac OS X v.10.6.x. (Sauf mention
contraire, les écrans sont ceux de Windows 7.)
Microsoft est une marque déposée de Microsoft
•
Corporation.
Windows est une marque ou une marque
•
déposée de Microsoft Corporation aux États-
Unis et/ou dans d’autres pays.
Windows Vista est une marque ou une marque
•
déposée de Microsoft Corporation aux États-
Unis et/ou dans d’autres pays.
Internet Explorer est une marque ou une
•
marque déposée de Microsoft Corporation aux
États-Unis et/ou dans d’autres pays.
Macintosh, Mac et AirPort sont des marques
•
d’Apple Inc., déposées aux États-Unis et/ou
dans d’autres pays.
Bonjour est une marque d’Apple Inc., déposée
•
aux États-Unis et/ou dans d’autres pays.
Anweisungen, die wichtige
Informationen beinhalten.
In diesem Handbuch wird das Betriebssystem
•
Windows 7 als Windows 7 bezeichnet, das
Betriebssystem Windows Vista als Windows
Vista.
Die Bildschirme in diesem Handbuch beziehen
•
sich auf das Betriebssystem Windows 7 Home
Premium und Mac OS X 10.6.x. (Sofern
nicht anders angegeben beziehen sich die
Bildschirme auf Windows 7.)
Microsoft ist eine eingetragene Marke von
•
Microsoft Corporation.
Windows ist eine Marke oder eingetragene
•
Marke von Microsoft Corporation in den
Vereinigten Staaten und/oder anderen Ländern.
Windows Vista ist eine Marke oder eingetragene
•
Marke von Microsoft Corporation in den
Vereinigten Staaten und/oder anderen Ländern.
Internet Explorer ist eine Marke oder
•
eingetragene Marke von Microsoft Corporation
in den Vereinigten Staaten und/oder anderen
Ländern.
Macintosh, Mac und AirPort sind Marken von
•
Apple Inc., eingetragen in den Vereinigten
Staaten und anderen Ländern.
Bonjour ist eine Marke von Apple Inc.,
•
eingetragen in den Vereinigten Staaten und
anderen Ländern.
Istruzioni che includono
informazioni importanti.
In questo manuale, il sistema operativo
•
Windows 7 viene denominato Windows 7
e il sistema operativo Windows Vista viene
denominato Windows Vista.
In questo manuale, le schermate si basano
•
su Windows 7 Home Premium e Mac OS
X v.10.6.x. Se non specicato altrimenti, le
schermate si riferiscono a Windows 7.
Microsoft è un marchio registrato di Microsoft
•
Corporation.
Windows è un marchio o un marchio registrato
•
di Microsoft Corporation negli Stati Uniti e/o in
altri paesi.
Windows Vista è un marchio o un marchio
•
registrato di Microsoft Corporation negli Stati
Uniti e/o in altri paesi.
Internet Explorer è un marchio o un marchio
•
registrato di Microsoft Corporation negli Stati
Uniti e/o in altri paesi.
Macintosh, Mac e AirPort sono marchi di Apple
•
Inc., registrati negli Stati Uniti e in altri paesi.
Bonjour è un marchio di Apple Inc., registrato
•
negli Stati Uniti e in altri paesi.
Model Number: K10360 (MG6150)
Référence du modèle : K10360 (MG6150)
Modellnummer: K10360 (MG6150)
Codice modello: K10360 (MG6150)
On-screen manuals can be viewed on a computer. They are included on the Setup CD-ROM and are installed during the software installation. For some languages parts of the manual may be displayed in
English. For details on opening the on-screen manuals, refer to page 68.
Les manuels en ligne peuvent être visualisés sur un ordinateur. Ils figurent sur le CD-ROM d’installation et sont installés en même temps que le logiciel. Il est possible que, pour certaines langues, des
parties du manuel s’affichent en anglais. Pour plus d’informations sur l’ouverture des manuels en ligne, reportez-vous à la page 68.
Die Online-Handbücher können auf einem Computer angezeigt werden. Sie sind auf der Installations-CD-ROM (Setup CD-ROM) enthalten und werden zusammen mit der Software installiert. In einigen
Sprachen werden Teile des Handbuchs in Englisch angezeigt. Nähere Informationen zum Öffnen der Online-Handbücher finden Sie auf Seite 68.
I manuali a video possono essere visualizzati su un computer. Tali manuali sono inclusi nel CD-ROM di installazione (Setup CD-ROM) e vengono installati durante l’installazione del software. È possibile
che parti del manuale per alcune lingue vengano visualizzate in lingua inglese. Per ulteriori informazioni sull'apertura dei manuali a video, consultare la pagina 68.
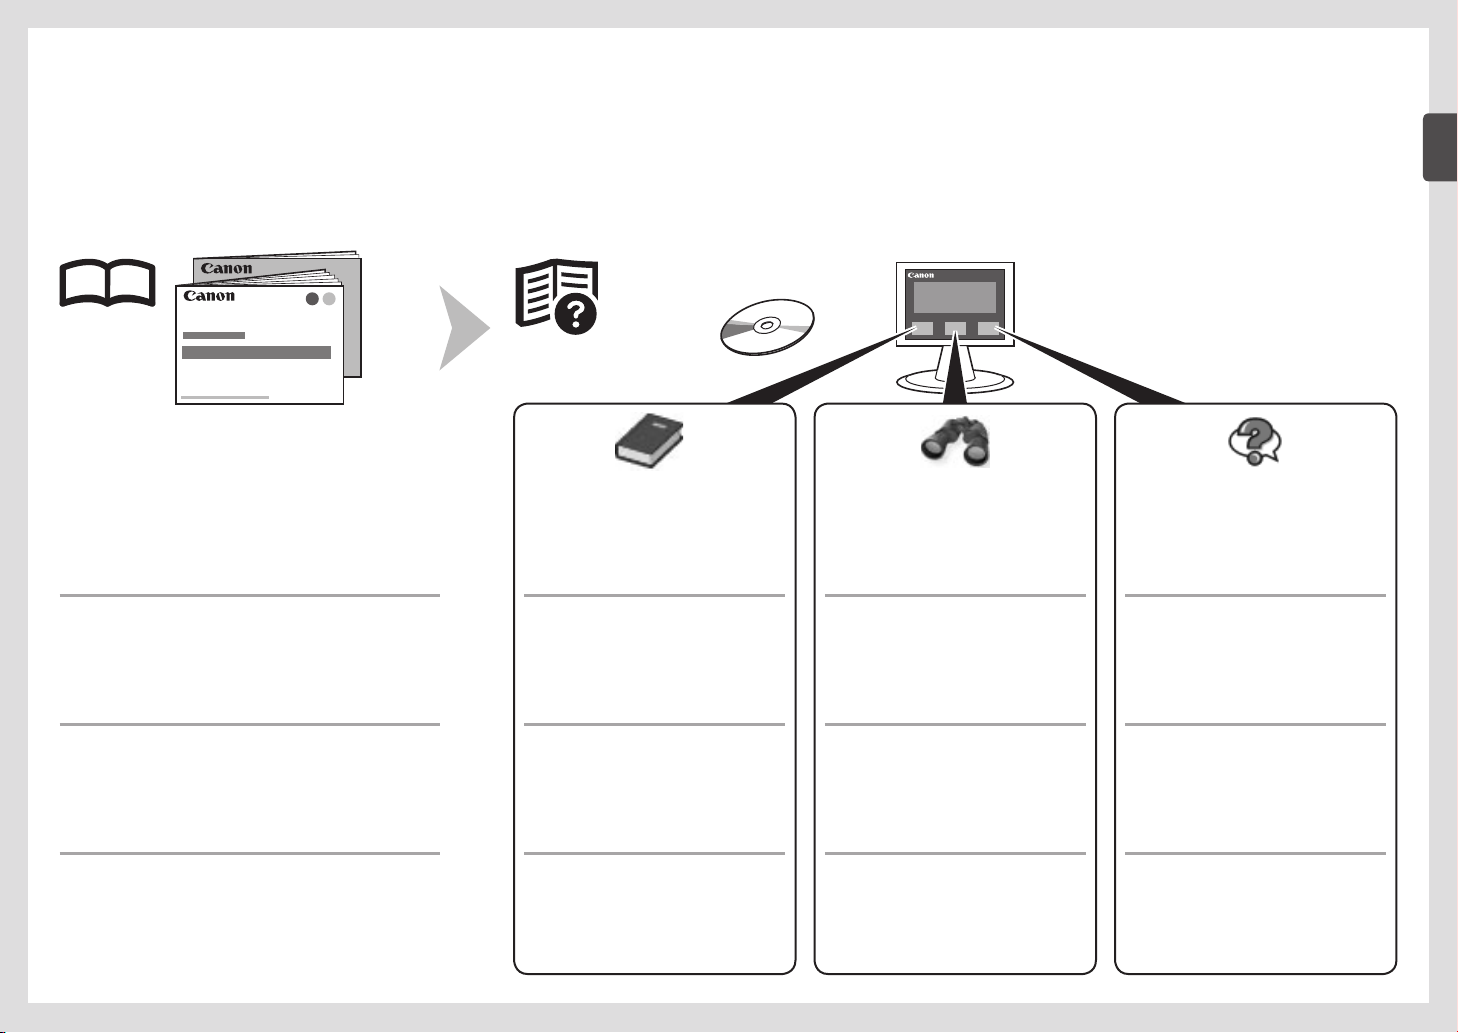
Getting Started
•
(this manual)
Network Setup Tr o u b l e s h o o t i n g •
Describes how to set up and use your machine.
Démarrage
•
(ce manuel)
Guide de dépannage réseau •
Explique comment installer et utiliser la machine.
Describes basic operations and media,
and gives an introduction to other
functions available.
Guide d’utilisation
de base
Explique le fonctionnement de base et les
supports, et présente les autres fonctions
disponibles.
Advanced Guide Tr o u b l e s h o o t i n gBasic Guide
Describes various operating procedures
to make full use of machine.
Guide d’utilisation
avancée
Présente diverses procédures permettant
d’exploiter au mieux la machine.
Describes troubleshooting tips for
problems you may encounter when using
the machine.
Dépannage
Fournit des solutions de dépannage
face aux problèmes que vous pouvez
rencontrer en utilisant la machine.
Inbetriebnahme
•
(dieses Handbuch)
Netzwerk-
•
Fehlerbehebungshandbuch
Beschreibt, wie das Gerät eingerichtet und verwendet wird.
Guida Rapida
•
(questo manuale)
Guida alla risoluzione dei
•
problemi di rete
Vengono descritti l’impostazione e l’utilizzo del dispositivo.
Beschreibt die grundlegende Bedienung
sowie Medien und stellt weitere
verfügbare Funktionen vor.
Descrive le operazioni di base e i supporti
e offre un’introduzione delle altre funzioni
disponibili.
Erweitertes Handbuch FehlersucheBasishandbuch
Beschreibt verschiedene Verfahren zur
Bedienung des Geräts, damit Sie dessen
Funktionalität vollständig nutzen können.
Guida AvanzataGuida Base
Descrive le diverse procedure operative
che consentono di utilizzare la stampante
in modo efcace.
Erläutert Fehlerbehebungstipps für
Probleme, die beim Umgang mit dem
Gerät auftreten können.
Risoluzione dei
problemi
Vengono forniti suggerimenti per la
risoluzione dei problemi che possono
vericarsi durante l’utilizzo della stampante.
1

Contents■
Sommaire■
Inhalt■
Sommario■
1 Preparation P.5
2 Install the Print Head P.10
3 Install the Ink Tanks P.14
4 Align the Print Head P.18
5 Load Paper P.20
6 Select Connection Method P.24
7 Install the Software (USB Connection)
P.26
8 Wireless Setup P.35
Wireless Setup Using Easy Setup P.37
Wireless Setup Using WPS (Wi-Fi Protected
Setup) P.42
Wireless Setup Using WCN (Windows
Connect Now) P.45
9 Wired Setup P.47
10 Install the Software (Network
Connection) P.51
Install the Software P.52
Registration (Macintosh) P.59
Information P.63
11 Use from Additional Computers P.67
12 Try Using the Machine P.68
Print Photos from a Memory Card P.70
Try Copying P.73
Print Photos from a Computer P.75
13 Specications P.77
1 Préparation P.5
2 Installation de la tête d’impression P.10
3 Installation des cartouches d’encre P.14
4 Alignement de la tête d’impression P.18
5 Chargement du papier P.20
6 Sélection de la méthode de connexion
P.24
7 Installation du logiciel (connexion USB)
P.26
8 Conguration sans l P.35
Conguration sans l à l’aide de Conguration
facile P.37
Conguration sans l à l’aide de WPS (Wi-Fi
Protected Setup) P.42
Conguration sans l à l’aide de WCN
(Windows Connect Now) P.45
9 Conguration laire P.47
10 Installation du logiciel (connexion
réseau) P.51
Installation du logiciel P.52
Enregistrement (Macintosh) P.59
Informations P.63
11 Utilisation de la machine sur d’autres
ordinateurs P.67
12 Essai d’utilisation de la machine P.68
Impression de photos depuis une carte mémoire
P.70
Première copie P.73
Impression de photos depuis un ordinateur P.75
13 Spécications P.78
1 Vorbereitung S. 5
2 Einbauen des Druckkopfs S. 10
3 Einsetzen der Tintenpatronen S. 14
4 Ausrichten des Druckkopfs S. 18
5 Einlegen von Papier S. 20
6 Auswählen der Verbindungsmethode
S. 24
7 Installieren der Software (USB-
Verbindung) S. 26
8 Drahtlose Einstellungen S. 35
Drahtlose Einstellungen mit Einfache
Einrichtung (Easy Setup) S. 37
Drahtlose Einstellungen mit WPS (Wi-Fi
Protected Setup) S. 42
Drahtlose Einstellungen mit WCN (Windows
Connect Now) S. 45
9 Kabeleinstellungen S. 47
10 Installieren der Software
(Netzwerkverbindung) S. 51
Installieren der Software S. 52
Registrierung (Macintosh) S. 59
Informationen S. 63
11 Nutzung mit zusätzlichen Computern
S. 67
12 Testen Sie das Gerät S. 68
Drucken von Fotos von einer Speicherkarte
S. 70
Kopieren S.73
Drucken von Fotos von einem Computer S. 75
13 Technische Daten S. 79
1 Preparazione P.5
2 Installazione della testina di stampa P.10
3 Installazione dei serbatoi d'inchiostro P.14
4 Allineamento della testina di stampa P.18
5 Caricamento della carta P.20
6 Selezione del metodo di connessione
P.24
7 Installazione del software (Connessione
USB) P.26
8 Impostazione wireless P.35
Impostazione wireless con Impost. facile
(Easy Setup) P.37
Impostazione wireless con WPS (Wi-Fi
Protected Setup) P.42
Impostazione wireless con WCN (Windows
Connect Now) P.45
9 Impostazione cablata P.47
10 Installazione del software (Connessione
di rete) P.51
Installazione del software P.52
Registrazione (Macintosh) P.59
Informazioni P.63
11 Utilizzo della stampante da altri
computer P.67
12 Utilizzo della stampante P.68
Stampa di foto da una scheda di memoria P.70
Esecuzione di una copia P.73
Stampa di foto da un computer P.75
13 Speciche P.80
2
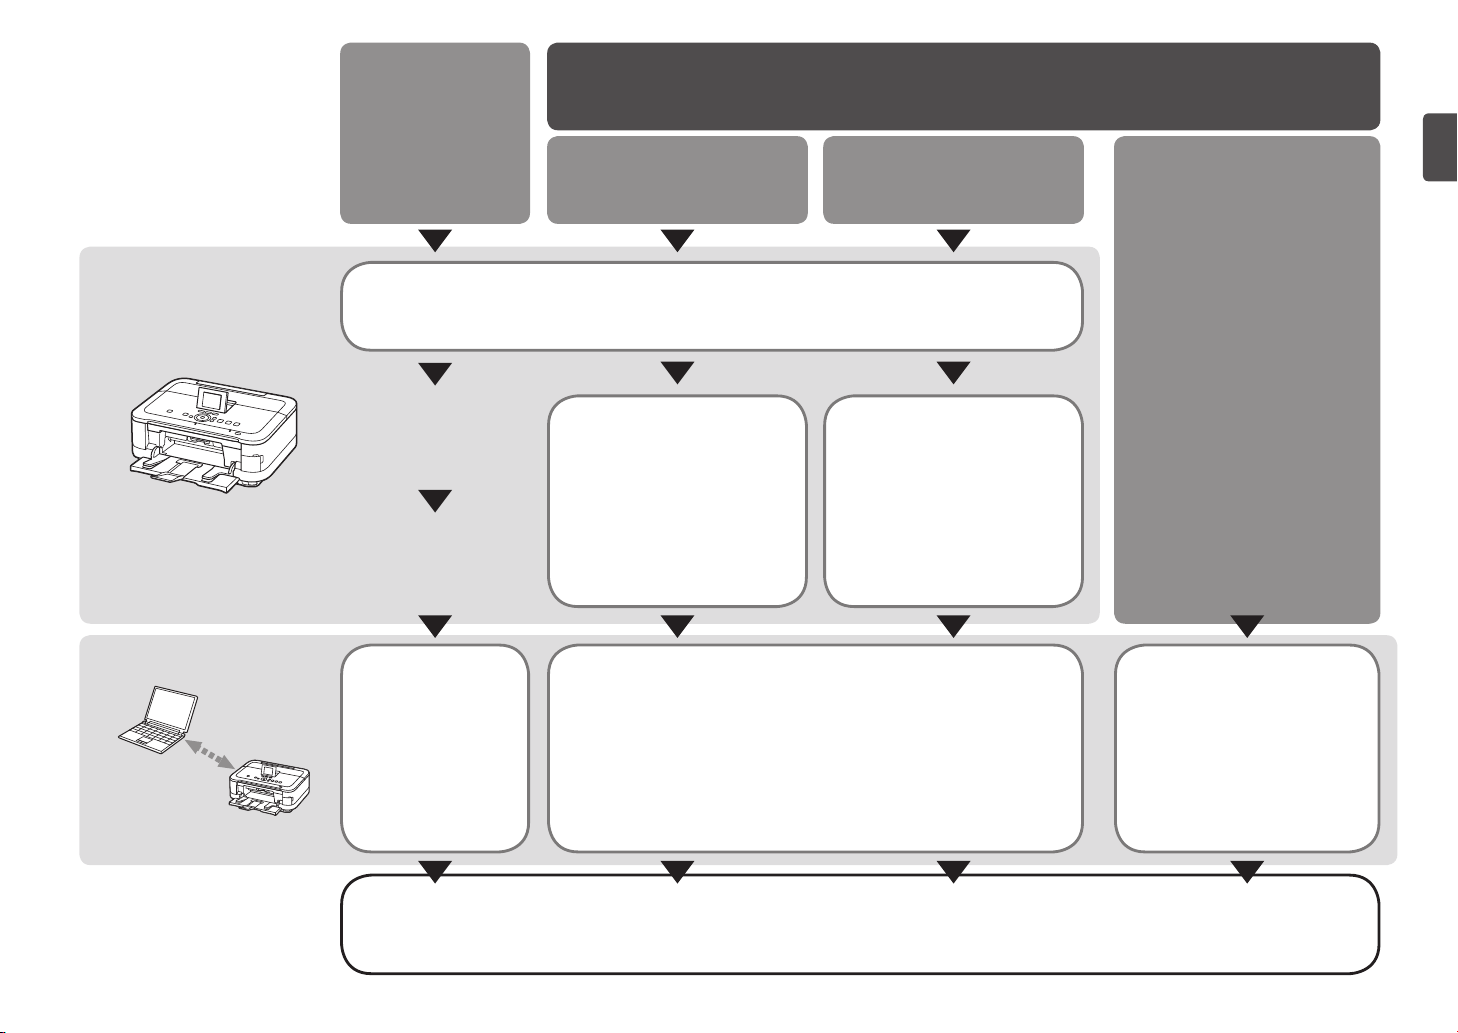
Machine Installation
■
Flow
Procédure d’installa-
■
tion de la machine
Ablauf der Installation
■
des Geräts
Procedimento di installa-
■
zione della stampante
USB Connection
Connexion USB
USB-Verbindung
Connessione USB
Wireless Connection
Connexion sans l
Drahtlose Verbindung
Connessione wireless
Network Connection
Connexion réseau
Netzwerkverbindung
Connessione di rete
Wired Connection
Connexion laire
Kabelverbindung
Connessione cablata
Using from Additional
Computers
(when the machine is already
connected to the network and you
want to add computers from which
to use the machine)
Machine Preparation
Préparation de la machine
Vorbereitung des Geräts
Preparazione della stampante
Machine Wireless Setup
Conguration sans l de la
machine
Drahtlose Einstellungen
Impostazione wireless della
stampante
Software Installation
Installation du
logiciel
Softwareinstallation
Installazione del
software
P.24 – 34
Software Installation
Installation du logiciel
Softwareinstallation
Installazione del software
P.24 – 25, 35 – 46
P.4 – 23
Machine Wired Setup
Conguration laire de la
machine
Einrichtung für
Kabelverbindung
Impostazione cablata della
stampante
P.24 – 25, 47 – 50
P.51 – 66
Utilisation de la machine sur
d’autres ordinateurs
(si la machine est déjà connectée
au réseau et que vous voulez
ajouter des ordinateurs à partir
desquels utiliser la machine)
Nutzung mit zusätzlichen
Computern
(falls das Gerät bereits mit dem
Netzwerk verbunden ist und
weitere Computer zur Nutzung des
Geräts hinzugefügt werden sollen)
Utilizzo della stampante da
altri computer
(quando la stampante è già
connessa alla rete e si desidera
aggiungere computer dai quali
utilizzarla)
Software Installation
Installation du logiciel
Softwareinstallation
Installazione del software
P.67, 51 – 66
Installation Complete
Fin de l’installation
Installation abgeschlossen
Installazione completata
Try Using the Machine
Essai d’utilisation de la machine
Testen Sie das Gerät
Utilizzo della stampante
P.68 – 76
3
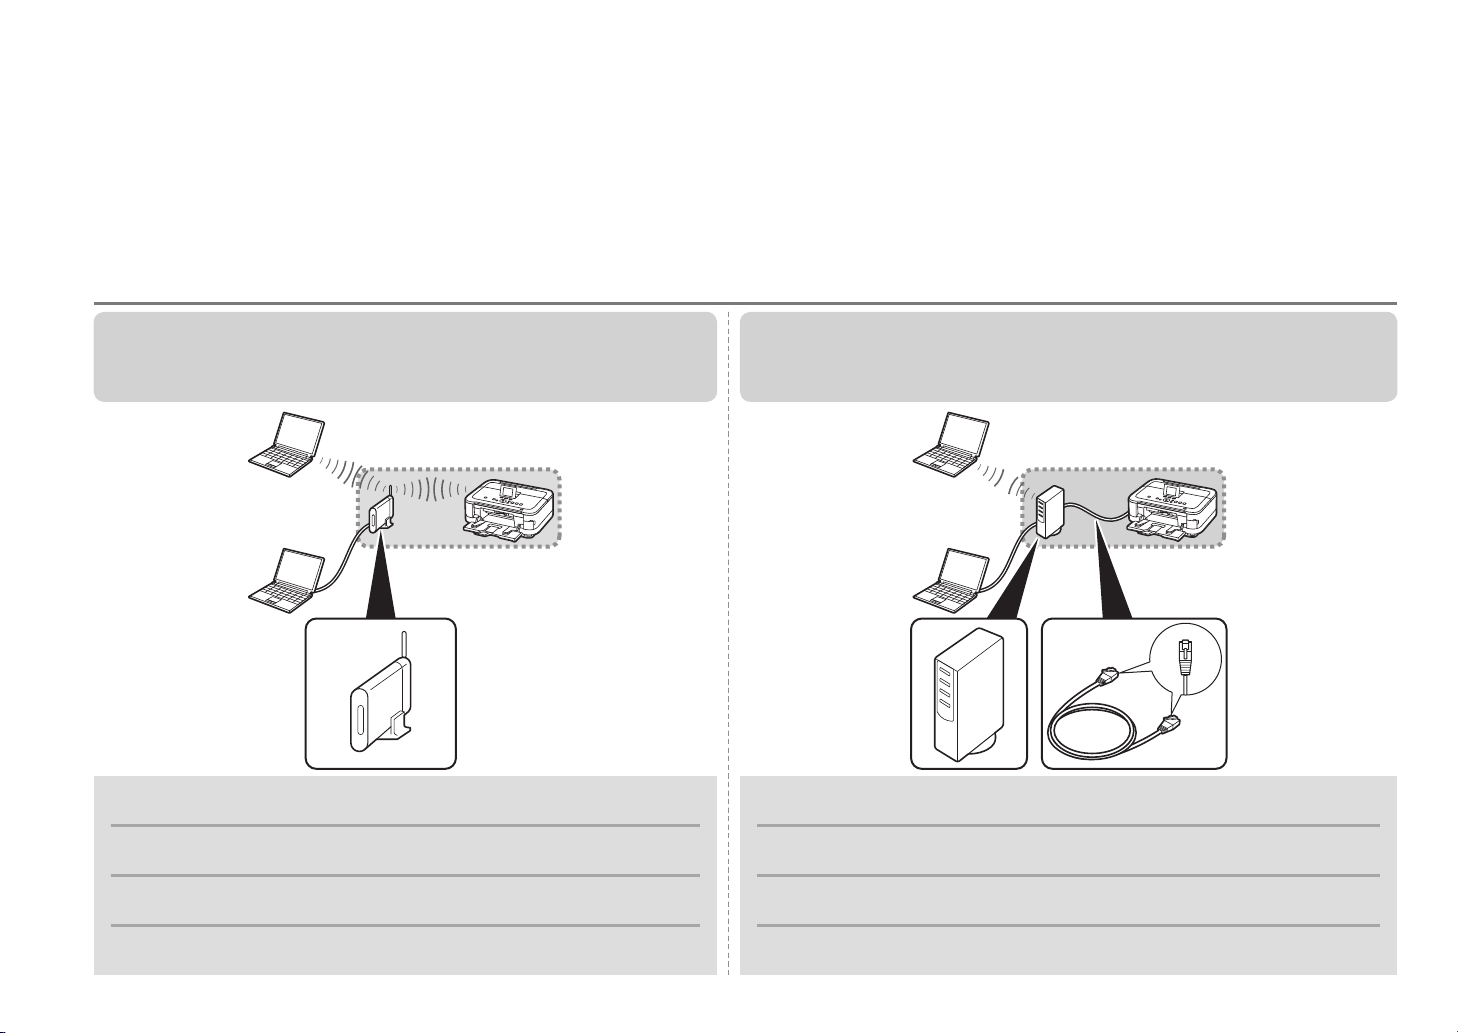
Devices Required for Wireless/Wired Connection■
Périphériques requis pour une connexion sans l/laire■
Erforderliche Geräte für drahtlose/Kabelverbindung■
Dispositivi necessari per la connessione wireless/cablata■
When using the machine over a wireless/wired connection, the following devices are required depending on the connection method.
Lorsque vous utilisez la machine via une connexion sans l/laire, les dispositifs suivants sont requis selon la méthode de connexion.
Wird das Gerät über eine drahtlose/Kabelverbindung verwendet, sind je nach Verbindungsmethode folgende Geräte erforderlich.
Quando si utilizza la stampante su una connessione wireless/cablata, è necessario disporre dei seguenti dispositivi a seconda del metodo di connessione.
Wireless Connection
Connexion sans l Connexion laire
Drahtlose Verbindung Kabelverbindung
Connessione wireless Connessione cablata
Access point or wireless router
Point d’accès ou routeur
sans l
Zugriffspunkt oder WLANRouter
Punto di accesso e router
wireless
A commercial access point or router that supports IEEE802.11b/g/n is required.
Un point d’accès ou un routeur vendu dans le commerce prenant en charge
IEEE802.11b/g/n est requis.
Es wird ein im Handel erhältlicher Zugriffspunkt oder Router benötigt, der
IEEE802.11b/g/n unterstützt.
È necessario un punto di accesso commerciale o un router che supporti
IEEE802.11b/g/n.
4
Wired Connection
Ethernet cable
Router, etc.
Routeur, etc.
Router usw.
Router e cosi via
Câble Ethernet
Ethernet-Kabel
Cavo Ethernet
A commercial network device (router, etc.) and Ethernet cable are required.
Un périphérique réseau (routeur, etc.) et un câble Ethernet vendus dans le
commerce sont requis.
Ein handelsübliches Netzwerkgerät (Router usw.) und Ethernet-Kabel werden
benötigt.
È necessario utilizzare una periferica di rete commerciale (Router e cosi via)
e un cavo Ethernet.
1
1
A
Preparation
Préparation
Vorbereitung
Preparazione
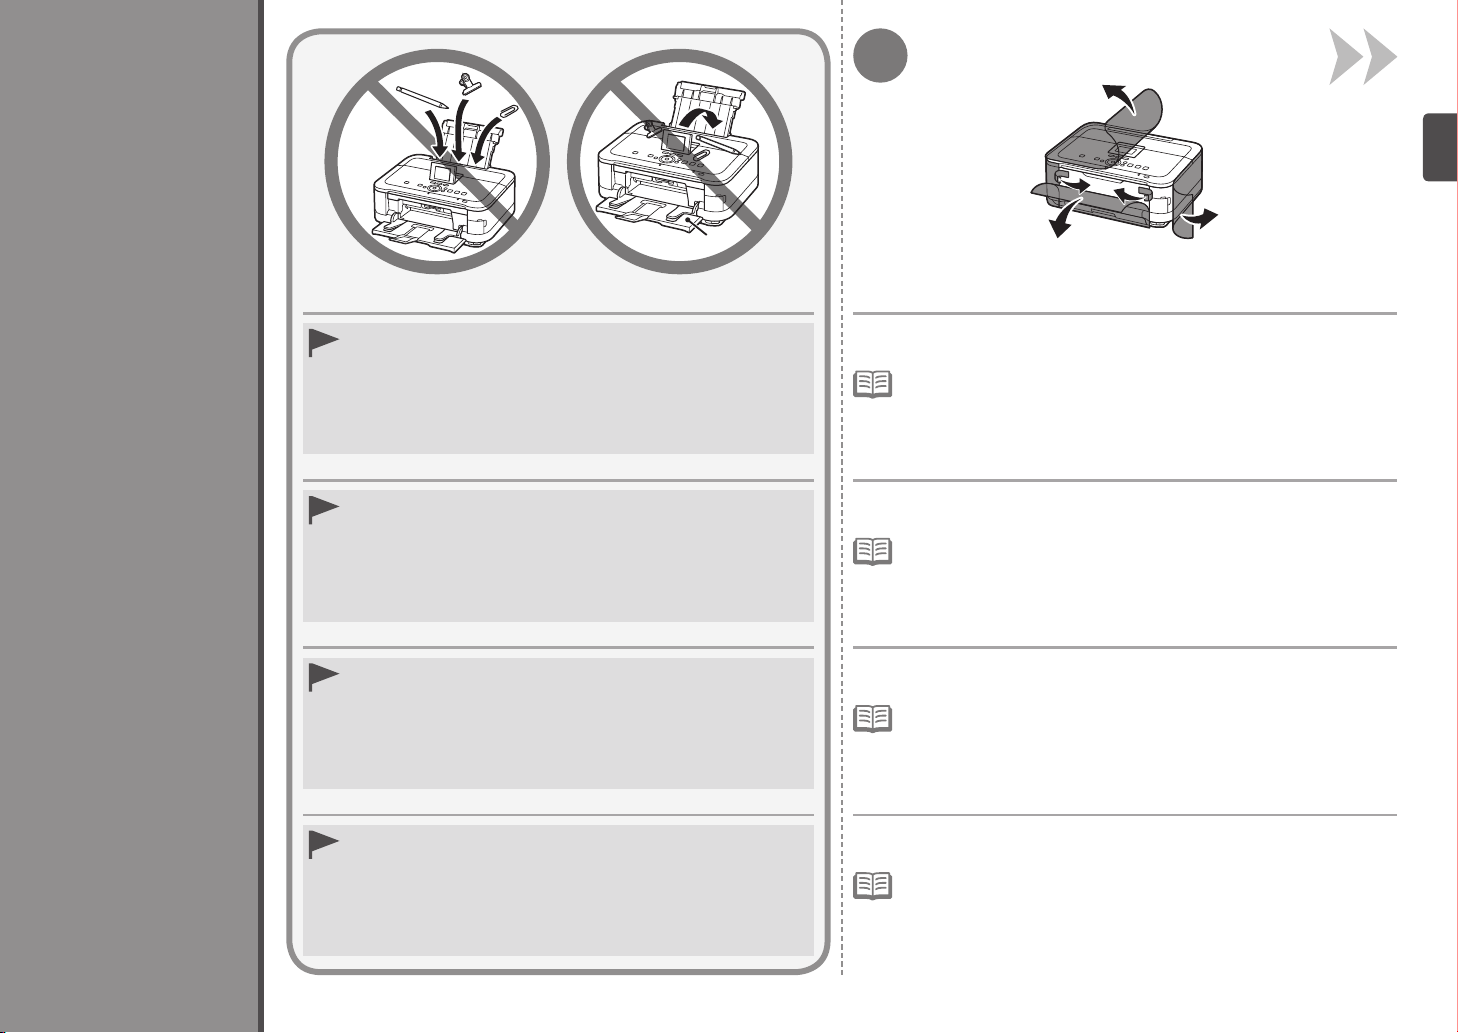
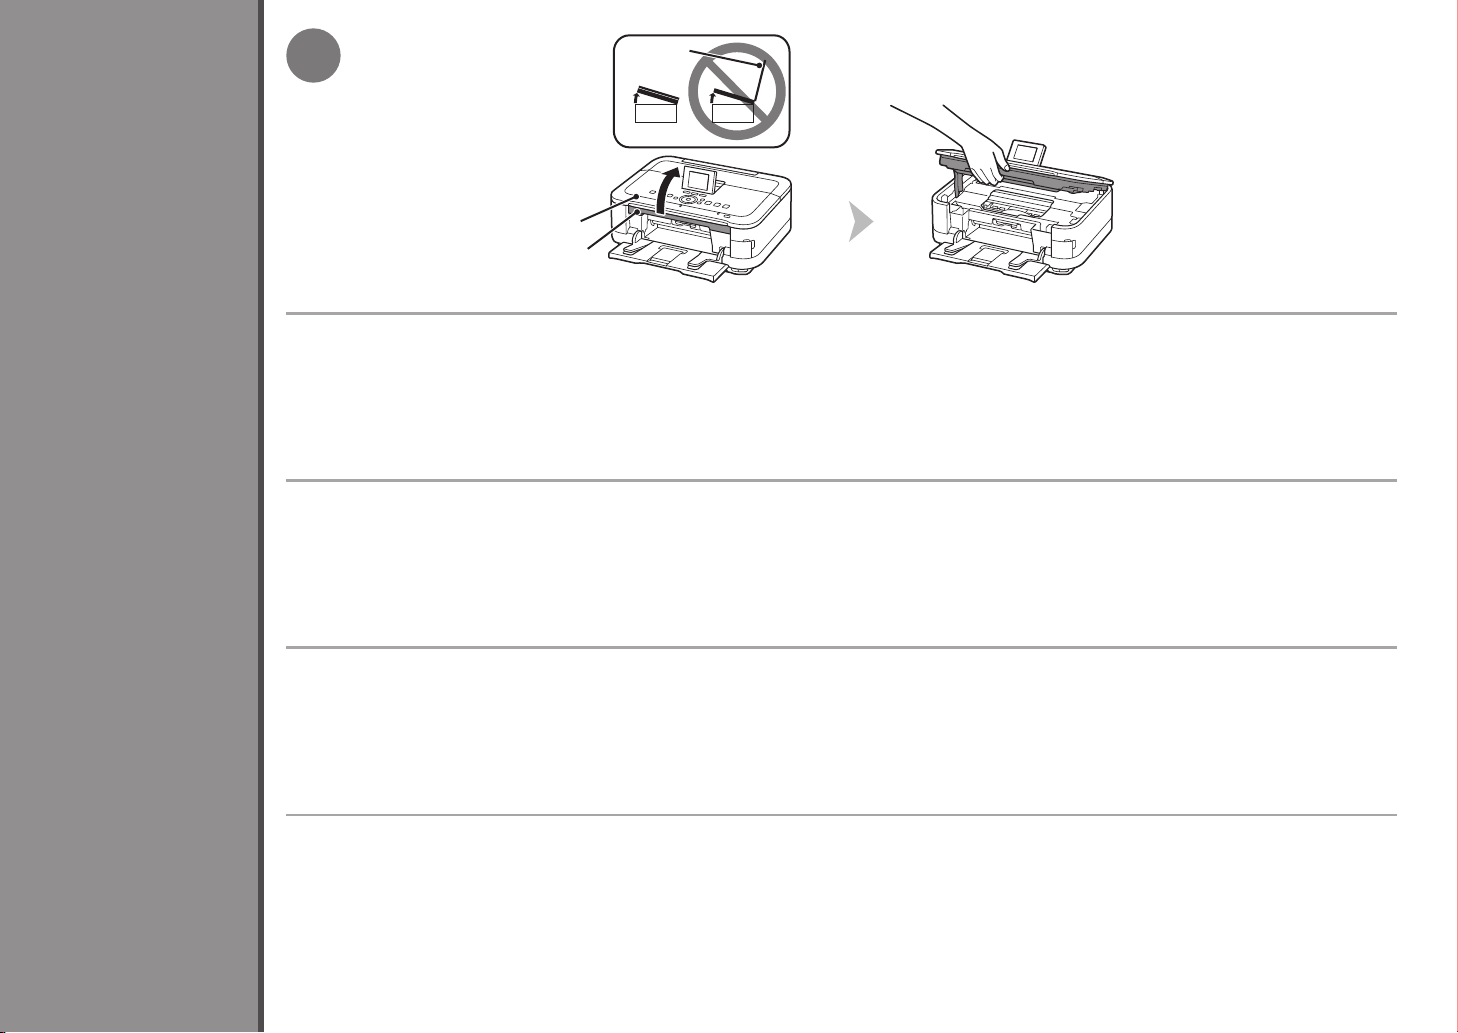
Do not install the machine where an object may fall on it. In addition,
•
do not place any object on the top of the machine. It may fall into the
machine when opening covers, resulting in malfunction.
Paper Output Tray (A) automatically opens when printing starts. Do not
•
place anything in front of the Paper Output Tray.
N’installez pas la machine dans un endroit présentant un risque de
•
chute d’objet sur la machine. En outre, ne placez aucun objet sur le
dessus de la machine. L’objet risquerait de tomber dans la machine
à l’ouverture du capot et de provoquer un dysfonctionnement.
Le bac de sortie papier (A) s’ouvre automatiquement au démarrage
•
de l’impression. Ne posez rien devant le bac de sortie papier.
Stellen Sie das Gerät nicht an Standorten auf, an denen Gegenstände
•
darauf fallen können. Legen Sie keine Gegenstände auf das Gerät. Sie
können in das Gerät fallen, wenn Sie die Abdeckungen öffnen, was zu
einer Fehlfunktion führen würde.
Das Papierausgabefach (A) wird automatisch geöffnet, wenn der
•
Druckvorgang beginnt. Legen Sie keine Gegenstände vor das
Papierausgabefach.
Non installare la stampante in una posizione su cui potrebbero
•
cadere degli oggetti. Inoltre, non collocare oggetti sopra la macchina.
Potrebbero cadere all’interno della macchina durante l’apertura dei
coperchi, con conseguente malfunzionamento.
Il vassoio di uscita della carta (A) si apre automaticamente all’avvio
•
della stampa. Non collocare nessun oggetto davanti al vassoio di
uscita della carta.
Remove all orange tape and protective materials from the inside and
outside of the machine.
The tape and protective materials may differ in shape and position from what
•
they actually are.
Retirez l’intégralité du ruban orange et du plastique de protection
présents à l’intérieur et sur l’extérieur de la machine.
La forme et la position réelles du ruban et du plastique de protection
•
peuvent varier.
Entfernen Sie alle orangefarbenen Klebebänder und das
Schutzmaterial innen und außen am Gerät.
Klebebänder und Schutzmaterial können in Form und Position von der
•
tatsächlichen Anwendung abweichen.
Rimuovere il nastro arancione e tutti i materiali protettivi dalla parte
interna ed esterna della stampante.
La forma e la posizione del nastro e dei materiali protettivi potrebbero essere
•
diverse da quelle effettive.
5
2
A
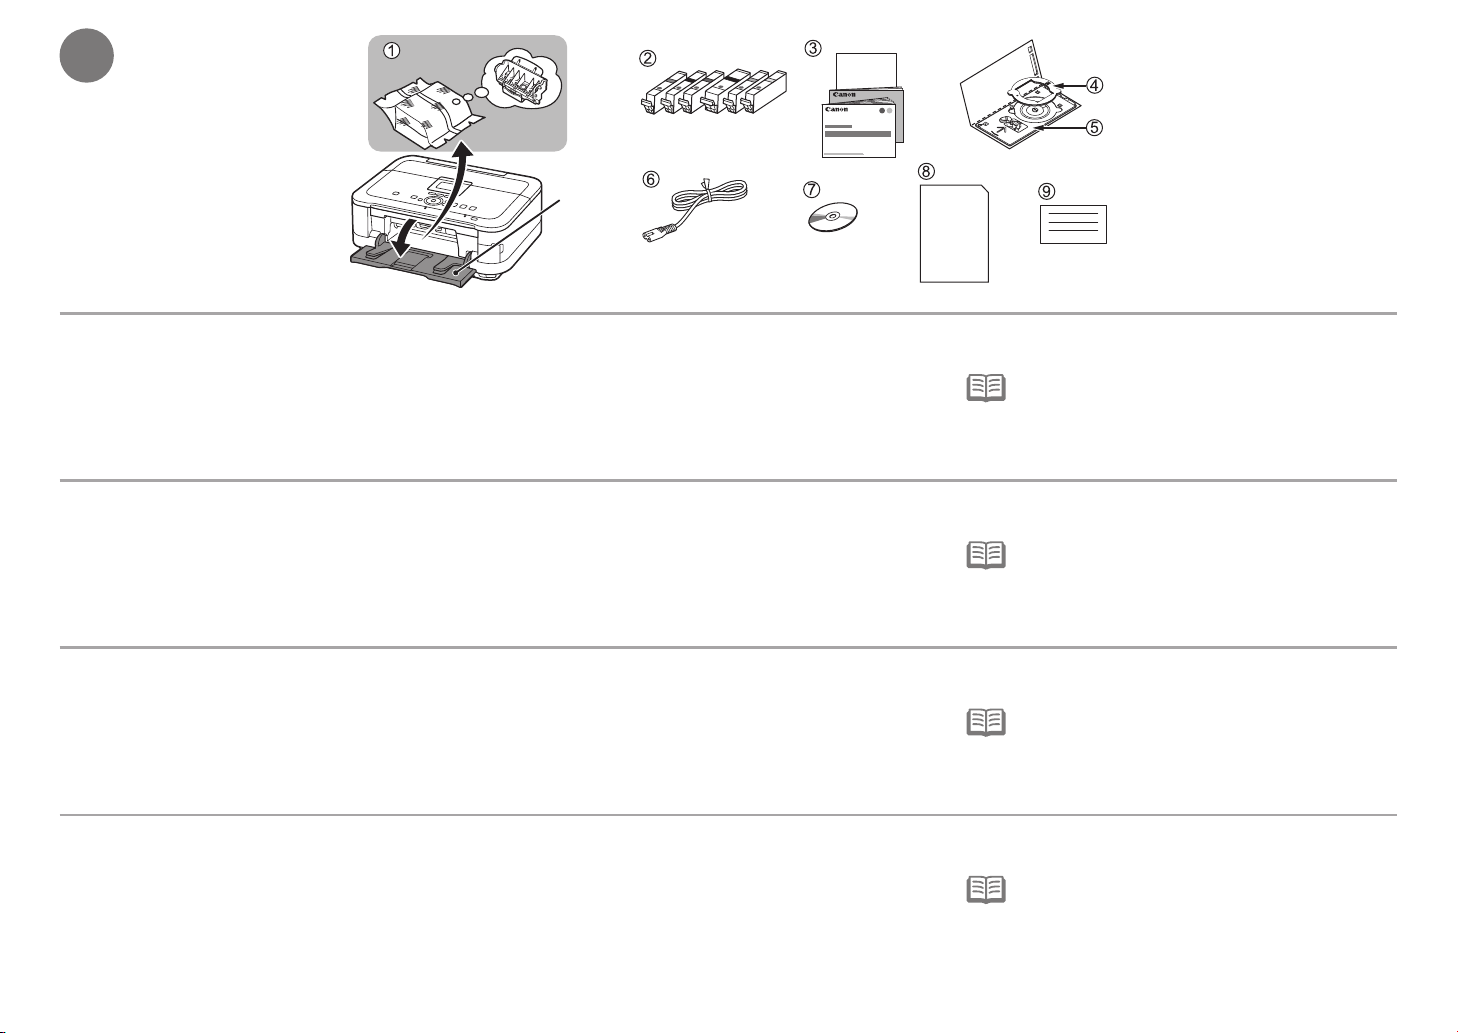
Make sure all the following items are supplied.
Some accessories (1) are stored within the Paper Output Tray (A). Open the Paper Output Tray to remove them.
1. Print Head
2. Ink tanks (6: M, BK, GY, PGBK, C, Y)
3. Manuals
4. 8 cm disc adapter
5. Disc tray
Vérifiez que vous avez bien reçu tous les éléments suivants.
Certains accessoires (1) sont stockés dans le bac de sortie papier (A). Ouvrez le bac de sortie papier pour les enlever.
1. Tête d’impression
2. Cartouches d’encre (6 : M, BK, GY, PGBK, C, Y)
3. Manuels
4. Adaptateur disque 8 cm
5. Bac disque
6. Power cord
7. Setup CD-ROM (containing the drivers, applications and on-screen manuals)
8. Matte Photo Paper MP-101 (for Automatic Print Head Alignment)
9. Other documents
6. Cordon d’alimentation
7. CD-ROM d’installation (contient les pilotes, les applications et les manuels
en ligne)
8. Papier Photo Mat MP-101 (pour l'alignement automatique de la tête
d’impression)
9. Autres documents
A USB cable is necessary to connect the machine with
•
your computer (USB connection only).
Un câble USB est nécessaire pour brancher la machine
•
à votre ordinateur (connexion USB uniquement).
Vergewissern Sie sich, dass alle unten gezeigten Gegenstände in der Verpackung enthalten sind.
Einige der Zubehörkomponenten (1) befinden sich im Papierausgabefach (A). Öffnen Sie das Papierausgabefach, und nehmen Sie sie heraus.
1. Druckkopf
2. Tintenpatronen (6 Stück: M, BK, GY, PGBK,
C, Y)
3. Handbücher
4. 8-cm-CD-Adapter
5. CD-Fach
6. Netzkabel
7. Installations-CD-ROM (Setup CD-ROM) (mit Treibern, Anwendungen und
Online-Handbüchern)
8. Fotopapier Matt (Matte Photo Paper) MP-101 (für die automatische
Druckkopfausrichtung)
9. Weitere Dokumente
Assicurarsi che siano presenti i seguenti elementi.
Alcuni accessori (1) si trovano all’interno del vassoio di uscita della carta (A). Aprire il vassoio di uscita della carta per rimuoverli.
1. Testina di stampa
2. Serbatoi d’inchiostro (6: M, BK, GY, PGBK, C, Y)
3. Manuali
4. Adattatore per dischi da 8 cm
5. Vassoio disco
6. Cavo di alimentazione
7. CD-ROM di installazione (Setup CD-ROM) (contenente driver, applicazioni e
manuali a video)
8. Carta Fotografica Opaca (Matte Photo Paper) MP-101 (per l’allineamento
automatico della testina di stampa)
9. Altri documenti
6
Um das Gerät mit Ihrem Computer zu verbinden,
•
benötigen Sie ein USB-Kabel (nur USB-Verbindung).
Per collegare la stampante al computer, è necessario un
•
cavo USB (solo connessioni USB).
3 4
B
C
5
E
D
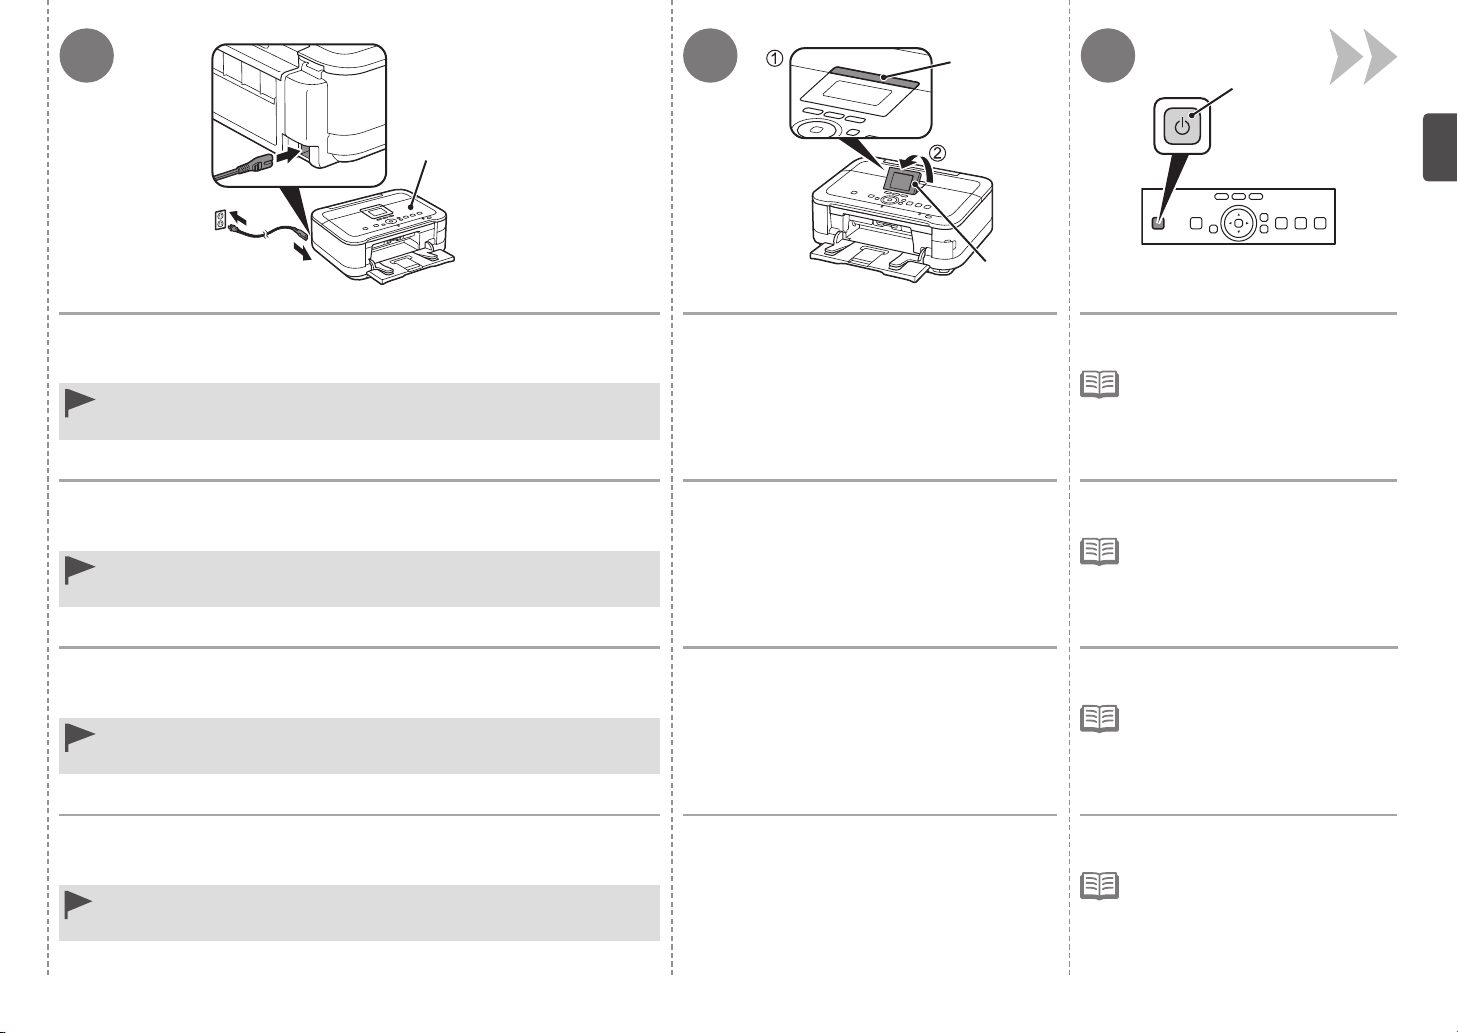
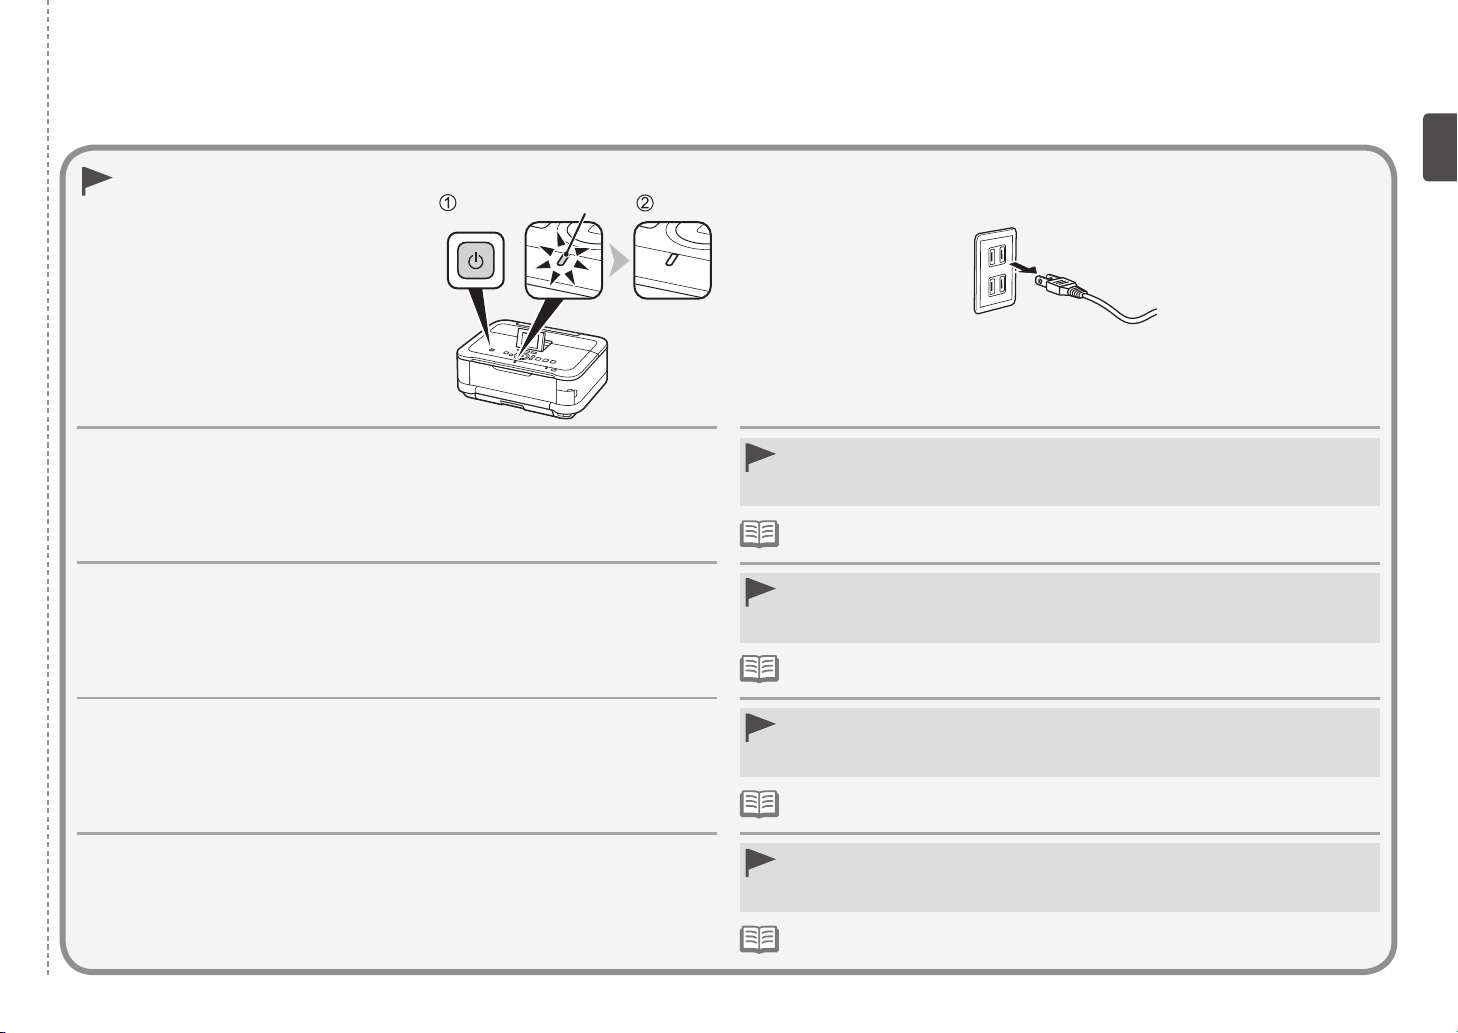
Insert the power cord into the connector on the left side at the back of the
machine and into the wall outlet firmly.
Do NOT connect the USB cable or Ethernet cable at this stage.
•
Make sure that the Document Cover (B) is closed.
•
Insérez fermement le cordon d’alimentation dans le connecteur à l’arrière
de la machine, sur le côté gauche, et dans la prise secteur.
Ne branchez PAS le câble USB ou Ethernet à ce stade.
•
Vériez que le couvercle du scanner (B) est fermé.
•
Schließen Sie das Netzkabel am Netzkabelanschluss links auf der Rückseite
des Geräts an, und stecken Sie das andere Ende in die Steckdose.
Schließen Sie das USB- oder Ethernet-Kabel noch nicht an.
•
Der Vorlagendeckel (B) muss geschlossen sein.
•
Inserire il cavo di alimentazione nel connettore sulla parte posteriore
sinistra della macchina e nella presa a muro.
NON collegare il cavo USB o Ethernet in questa fase.
•
Assicurarsi che il coperchio dei documenti (B) sia chiuso.
•
Press the LCD open button (C) (1), then adjust
the LCD (Liquid Crystal Display) (D) to a
comfortable viewing angle (2).
Appuyez sur le bouton d’ouverture de l’écran
LCD (C) (1), puis réglez l’écran LCD (Liquid
Crystal Display) (D) selon un angle qui vous
permet de le regarder confortablement (2).
Drücken Sie die Taste LCD öffnen (C) (1), und
stellen Sie die LCD-Anzeige (Liquid Crystal
Display) (D) auf einen für Sie angenehmen
Betrachtungswinkel ein (2).
Premere il pulsante Apri LCD (LCD open) (C)
(1), , quindi regolare l’angolazione del display
LCD (Liquid Crystal Display) (D) in base alle
proprie necessità.
Press the ON button (E).
The machine may make some operating
•
noises. This is normal operation.
It takes about 4 seconds for the ON
•
button to work after the power cord is
plugged in.
Appuyez sur le bouton MARCHE (ON)
(E).
L’appareil émet des bruits de
•
fonctionnement. Ceci est normal.
•
Il faut environ 4 secondes pour que
le bouton MARCHE (ON) réagisse
après le branchement du cordon
d’alimentation.
Drücken Sie die Taste EIN (ON) (E).
Das Gerät gibt unter Umständen
•
Betriebsgeräusche aus. Dies ist
völlig normal.
Es dauert ca. 4 Sekunden, bis die
•
Taste EIN (ON) nach Anschluss des
Netzkabels funktioniert.
Premere il pulsante ON (E).
La stampante potrebbe emettere rumori
•
durante il funzionamento. Tali rumori
fanno parte del normale funzionamento.
Il pulsante ON si accende circa
•
4 secondi dopo il collegamento del
cavo di alimentazione.
7
6 7
F
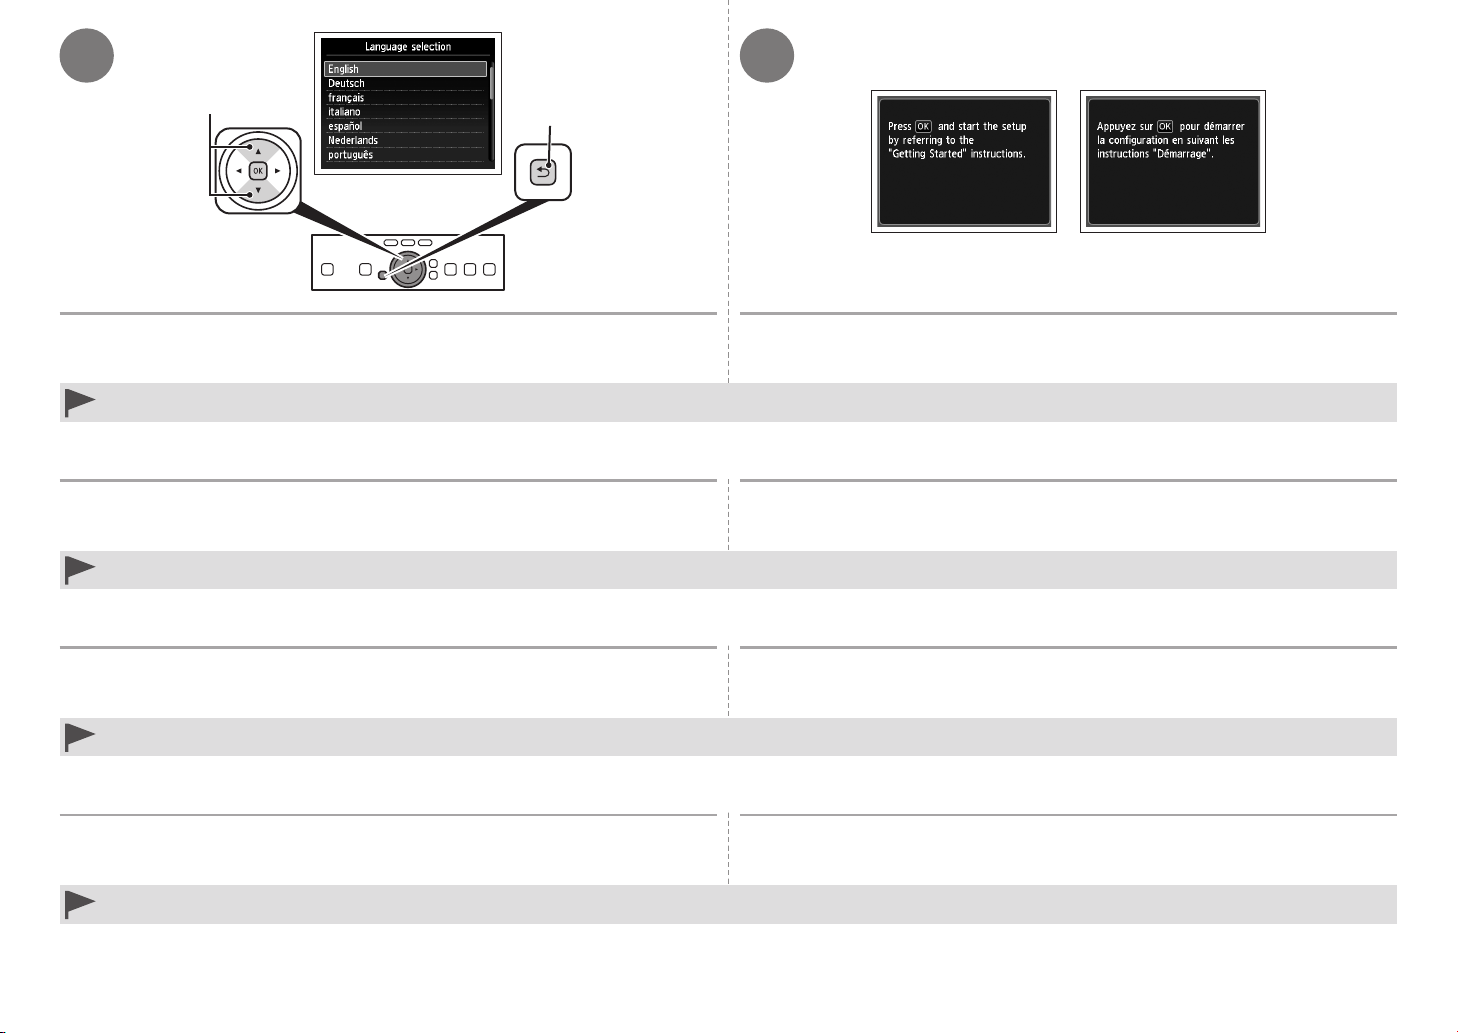
Use the { or } button (F) on the Operation Panel to select the language for the
LCD, then touch the OK button.
If an unintended language is displayed on the LCD, touch the Back button (G) to return to the Language selection screen. •
Utilisez le bouton { ou } (F) du panneau de contrôle pour sélectionner la langue
de l’écran LCD, puis appuyez sur le bouton OK.
Si vous voulez changer la langue d’afchage de l’écran LCD, appuyez sur le bouton Précédent (Back) (G) pour revenir à l’écran Sélection de langue (Language selection).•
Wählen Sie mit der Taste { oder } (F) auf dem Bedienfeld die Sprache für die
LCD-Anzeige aus, und drücken Sie anschließend die Taste OK.
G
When the above screen is displayed, touch the OK button and go to the next step.
Lorsque l’écran ci-dessus est affiché, appuyez sur le bouton OK et passez
à l'étape suivante.
Wenn der oben dargestellte Bildschirm angezeigt wird, drücken Sie die Taste OK,
und fahren Sie mit dem nächsten Schritt fort.
Wenn die falsche Sprache auf der LCD-Anzeige angezeigt wird, drücken Sie die Taste Zurück (Back) (G), um zum Bildschirm Sprachenauswahl (Language selection) zurückzukehren.•
Premere il pulsante { o } (F) sul pannello dei comandi per selezionare la lingua
del display LCD, quindi toccare il pulsante OK.
Se sul display LCD viene visualizzata una lingua diversa da quella desiderata, toccare il pulsante Indietro (Back) (G) per tornare alla schermata Selezione lingua (Language selection). •
8
Quando viene visualizzata la schermata mostrata sopra, toccare il OK e andare al
passaggio successivo.
When it is necessary to turn off the
machine
Lorsqu’il est nécessaire de mettre
la machine hors tension
Wenn das Gerät ausgeschaltet
werden muss
Se è necessario spegnere la
stampante
H
Be sure to follow the procedure below.
1. Press the
2. Make sure that the
Operating noise may continue for up to 25 seconds until the machine turns off.
Veillez à suivre la procédure ci-dessous.
1. Appuyez sur le bouton
2. Vériez que le voyant
Le bruit de fonctionnement peut rester audible jusqu’à 25 secondes, jusqu’à ce que la machine
soit hors tension.
Gehen Sie bitte wie nachfolgend beschrieben vor.
1. Drücken Sie die Taste
2. Vergewissern Sie sich, dass die
Die Betriebsgeräusche können bis zu 25 Sekunden andauern, bis sich das Gerät ausschaltet.
Attenersi alla procedura illustrata di seguito.
1. Premere il pulsante
2. Assicurarsi che la spia
La stampante potrebbe continuare a emettere il rumore di quando è in funzione per massimo
25 secondi, poi si spegne.
ON button to turn off the machine.
POWER lamp (H) is not lit.
MARCHE (ON) pour mettre la machine hors tension.
ALIMENTATION (POWER) (H) est éteint.
EIN (ON), um das Gerät auszuschalten.
POWER-Anzeige (H) nicht leuchtet.
ON per spegnere la stampante.
ALIMENTAZIONE (POWER) (H) sia spenta.
When removing the power plug, make sure that the POWER lamp is not lit before removing
•
the plug. Removing the power plug while the POWER lamp lights up or ashes may cause
drying and clogging of the Print Head, resulting in poor printing.
The specication of the power cord differs for each country or region. •
Avant de retirer la che d’alimentation électrique, vériez que le voyant ALIMENTATION
•
(POWER) est éteint. Si vous retirez la che d’alimentation électrique alors que le voyant
ALIMENTATION (POWER) est allumé ou clignote, la tête d’impression risque de sécher et
de se boucher, provoquant une mauvaise qualité d’impression.
Les caractéristiques techniques du cordon d’alimentation varient suivant le pays ou la région.•
Vergewissern Sie sich vor dem Ausstecken des Netzsteckers, dass die POWER-Anzeige
•
nicht leuchtet. Stecken Sie den Netzstecker aus, während die POWER-Anzeige leuchtet
oder blinkt, kann der Druckkopf austrocknen und verstopfen, wodurch sich die Druckqualität
verschlechtert.
Die Spezikationen des Netzkabels fallen je nach Land oder Region unterschiedlich aus.•
Prima di rimuovere la presa di alimentazione, assicurarsi che la spia ALIMENTAZIONE
•
(POWER) sia spenta. La rimozione della presa di alimentazione mentre la spia
ALIMENTAZIONE (POWER) si accende o lampeggia potrebbe causare l’essiccazione e
l’ostruzione della testina di stampa, con il conseguente peggioramento della qualità di stampa.
La specica del cavo di alimentazione varia in base al paese o alla regione. •
9
2
1
B
B
A
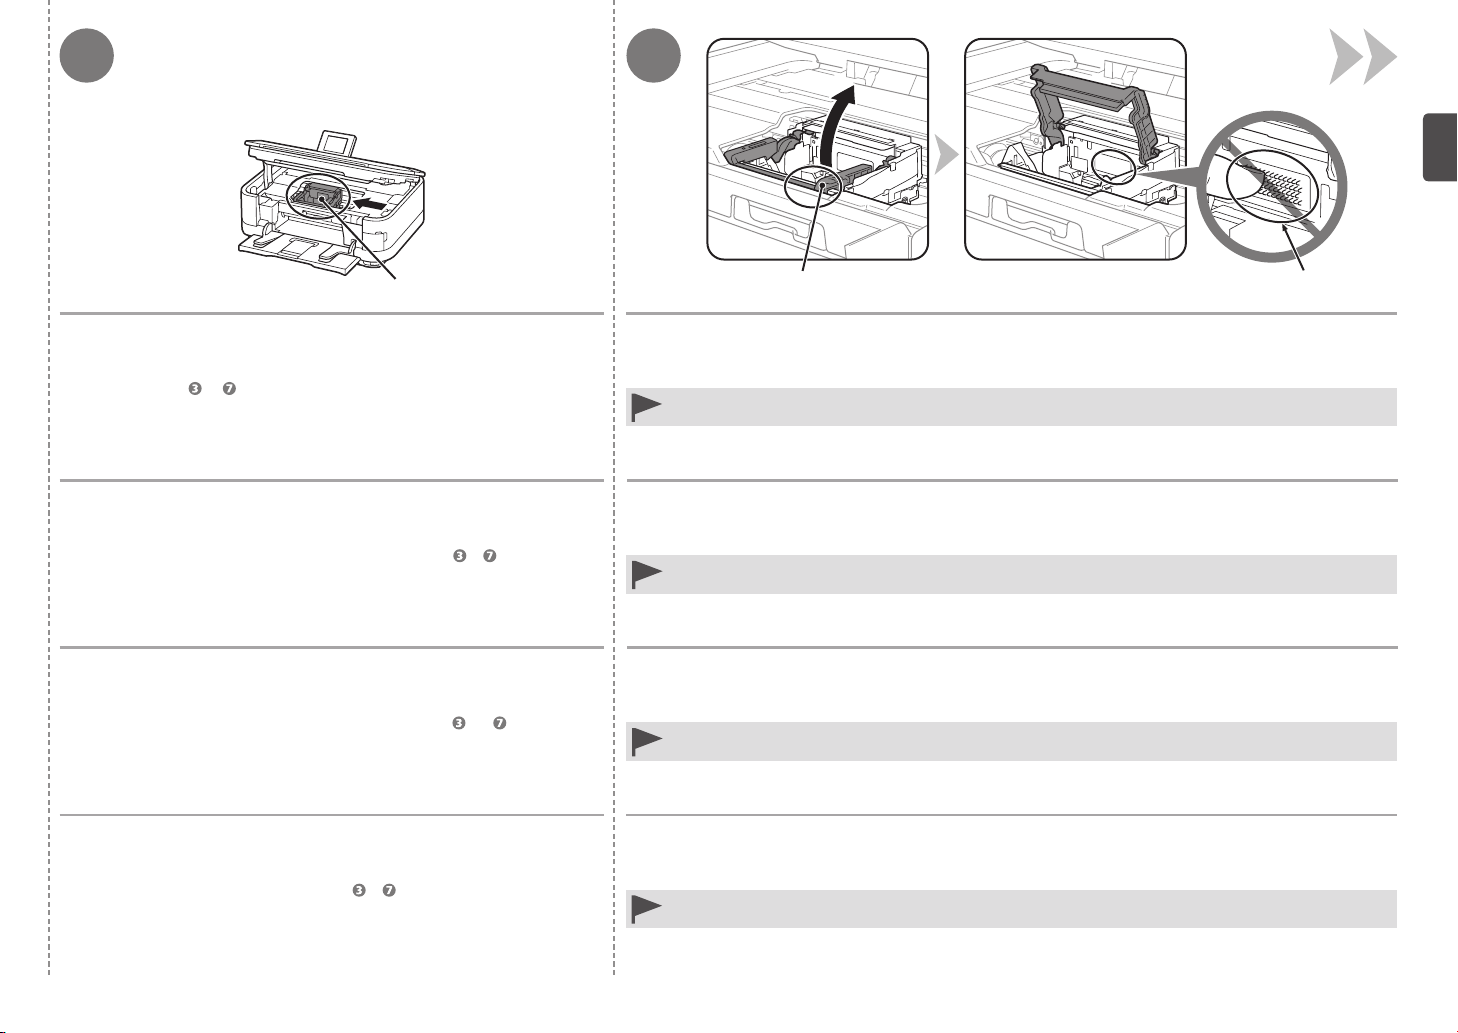
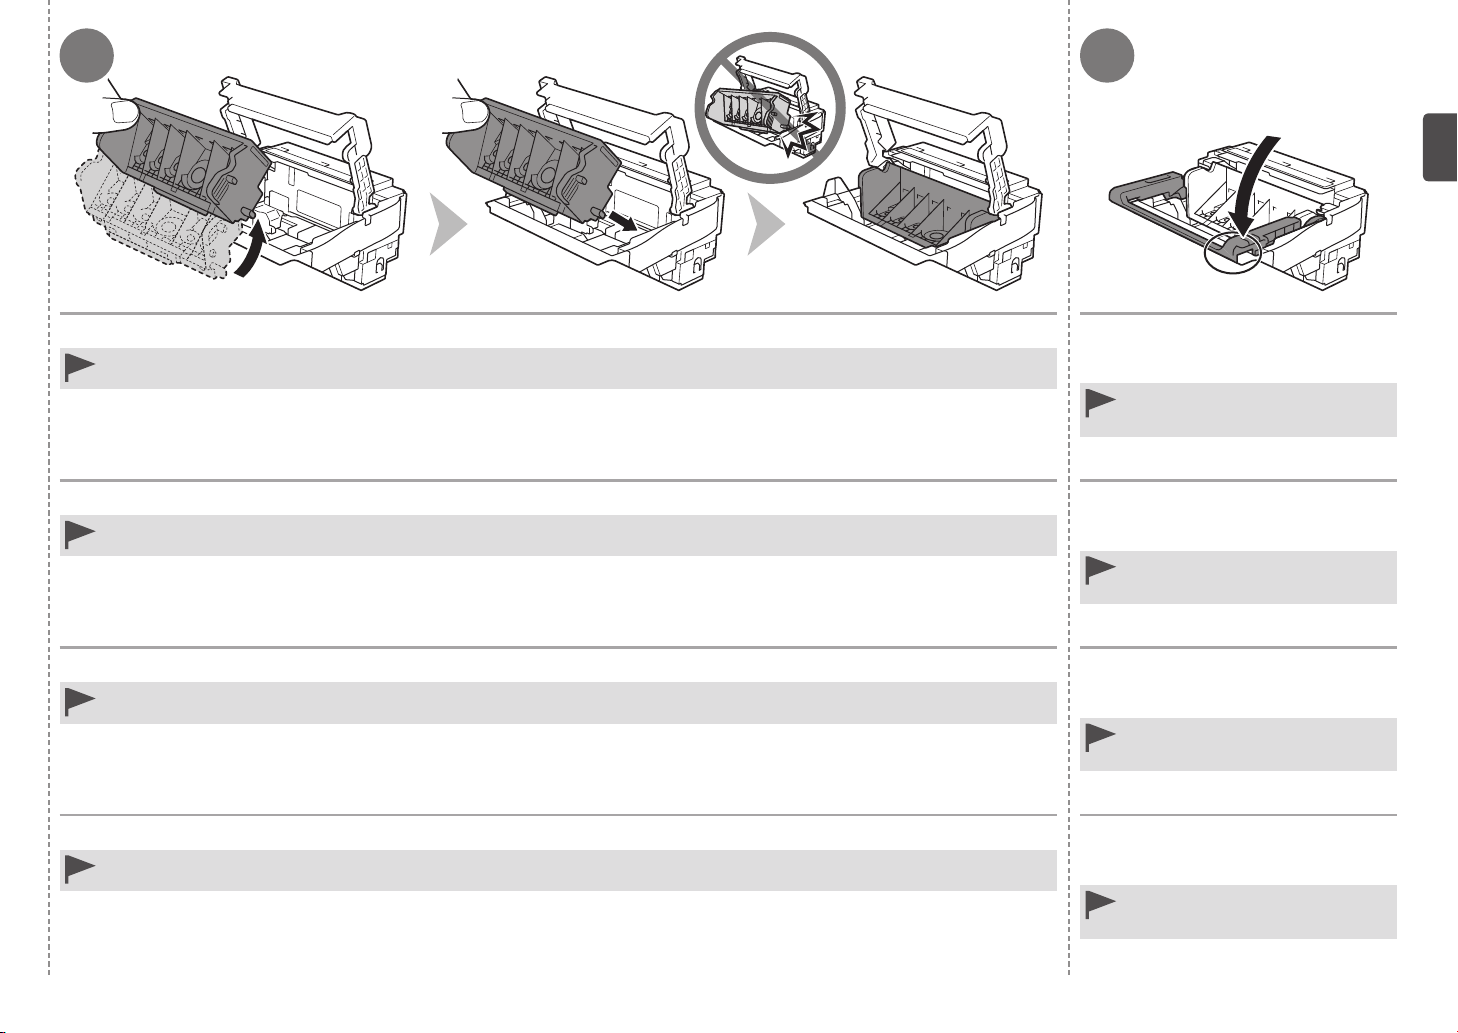
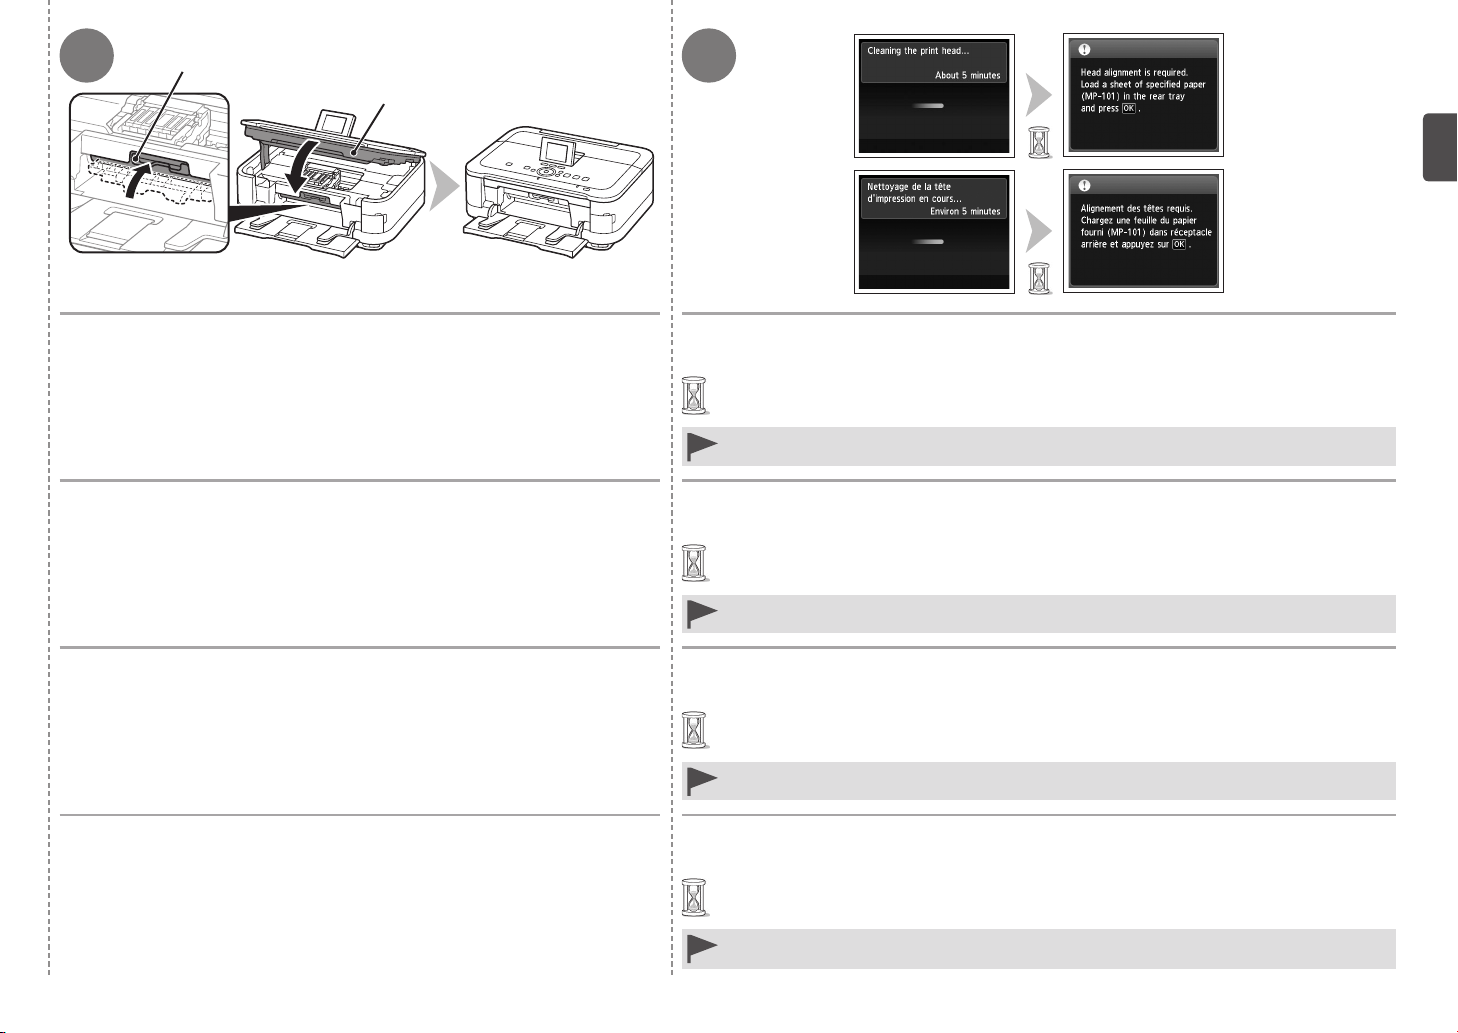
Lift the Scanning Unit (Cover) (A) until it stops.
Close the Document Cover (B) and lift it with the Scanning Unit (Cover).
10
Install the Print Head
Soulevez l’unité de numérisation (capot) (A) jusqu’à ce qu’elle se bloque.
Fermez le couvercle du scanner (B) et soulevez-le en même temps que l’unité de numérisation (capot).
Einbauen des Druckkopfs
Heben Sie das Scan-Modul (Abdeckung) (A) vollständig an.
Schließen Sie den Vorlagendeckel (B), und heben Sie ihn mit dem Scan-Modul (Abdeckung) an.
Installation de la tête d’impression
Installazione della testina di stampa
Sollevare l'unità di scansione (coperchio) (A) fino all'arresto.
Chiudere il coperchio dei documenti (B) e sollevarlo con l'unità di scansione (coperchio).
32
C
D
E
The Print Head Holder (C) moves to the installation position. Firmly lift the part (D) of the Print Head Lock Lever in the Print Head Holder until it stops.
If the Print Head Holder does not move, make sure that the machine is turned on.
For details, refer to to on page 7 in “1 Preparation”.
Le support de tête d’impression (C) se place en position
d’installation.
Si le porte-tête d'impression ne bouge pas, vérifiez que la machine est sous
tension. Pour plus d’informations, reportez-vous aux étapes à
la section « 1 Préparation ».
à la page 7 de
Der Druckkopfhalter (C) wird in die Installationsposition gefahren.
The Print Head Lock Lever may feel heavy.
Do not touch the inside of the Print Head Holder (E). The machine may not print properly if you touch it. •
Soulevez fermement la partie (D) du levier de verrouillage de tête d’impression du support de
tête d’impression jusqu’à ce qu’il s’arrête.
Le levier de verrouillage de tête d’impression peut paraître lourd.
Ne touchez pas l’intérieur du support de tête d’impression (E). La machine risque de ne pas imprimer
•
correctement si vous y touchez.
Drücken Sie den Sperrhebel für den Druckkopf des Druckkopfhalters am Teil (D) bis zum
Anschlag nach oben.
Falls sich die Druckkopfhalterung nicht verstellen lässt, überprüfen Sie, ob das
Gerät eingeschaltet ist. Einzelheiten hierzu finden Sie unter bis auf Seite 7
im Abschnitt „1 Vorbereitung“.
Il supporto della testina di stampa (C) si sposta nella posizione di
installazione.
Se il supporto della testina di stampa non si sposta, verificare che la stampante sia
accesa. Per ulteriori informazioni, vedere da a a pagina 7 in "1 Preparazione".
Der Sperrhebel für den Druckkopf kann schwergängig sein.
Vermeiden Sie jede Berührung der Komponenten im Inneren des Druckkopfhalters (E). Nach einer Berührung
•
druckt das Gerät unter Umständen nicht mehr einwandfrei.
Sollevare la parte (D) della leva di bloccaggio della testina di stampa nel supporto della testina
di stampa fino all'arresto.
La leva di bloccaggio della testina di stampa potrebbe sembrare dura.
Non toccare la parte interna del supporto della testina di stampa (E). In caso contrario, la stampante potrebbe
•
non stampare correttamente.
11
4
5
F
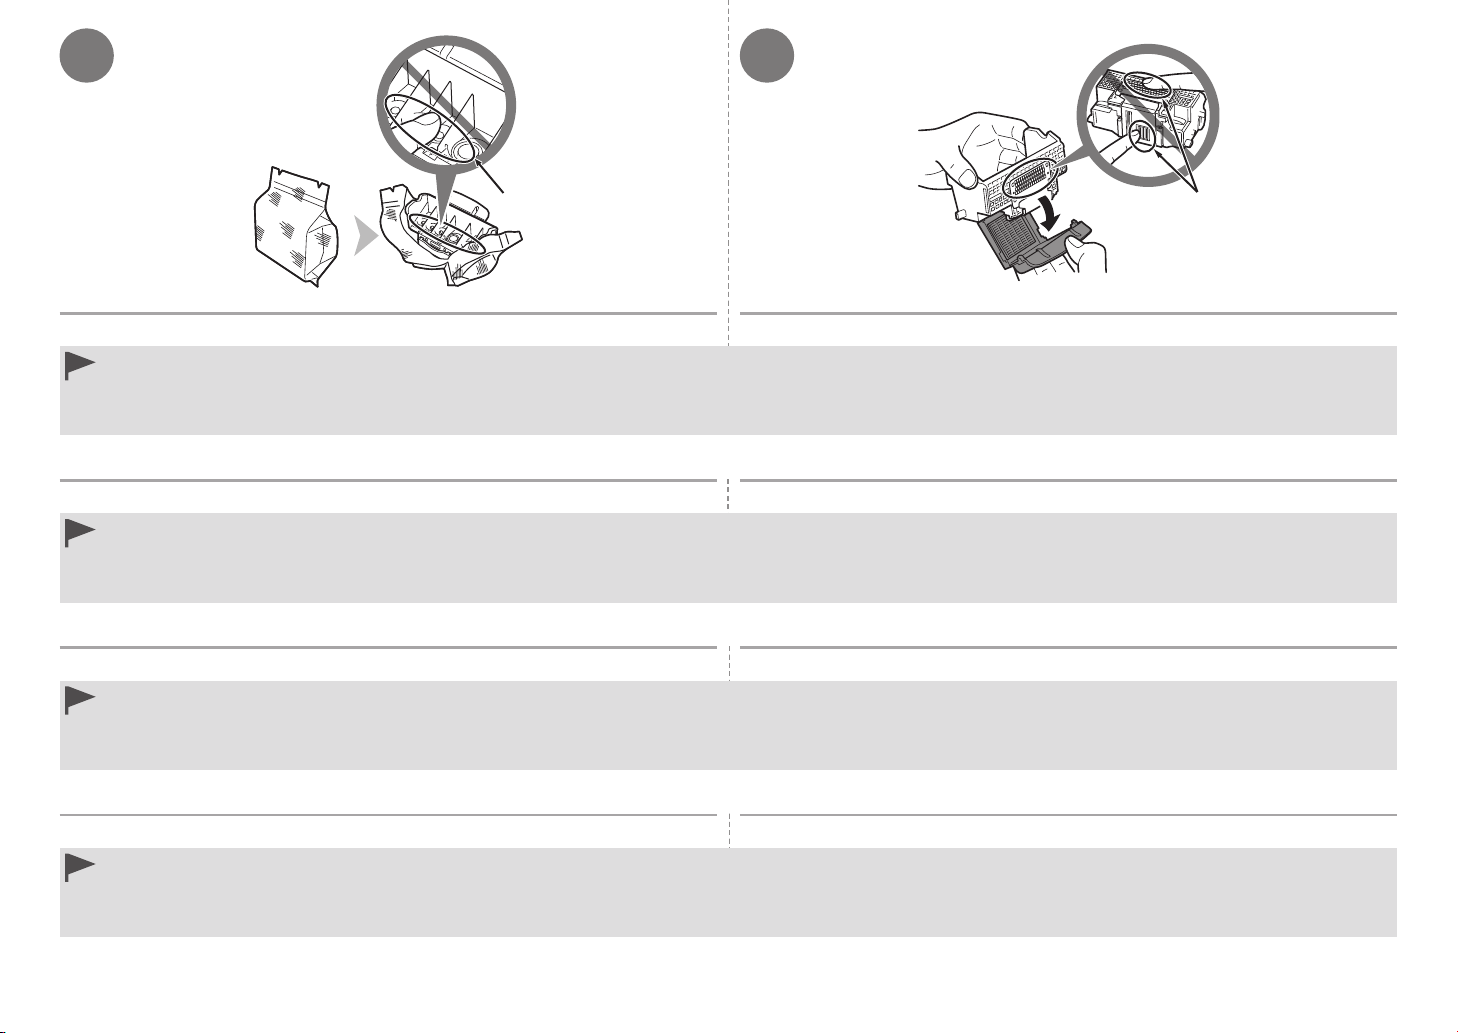
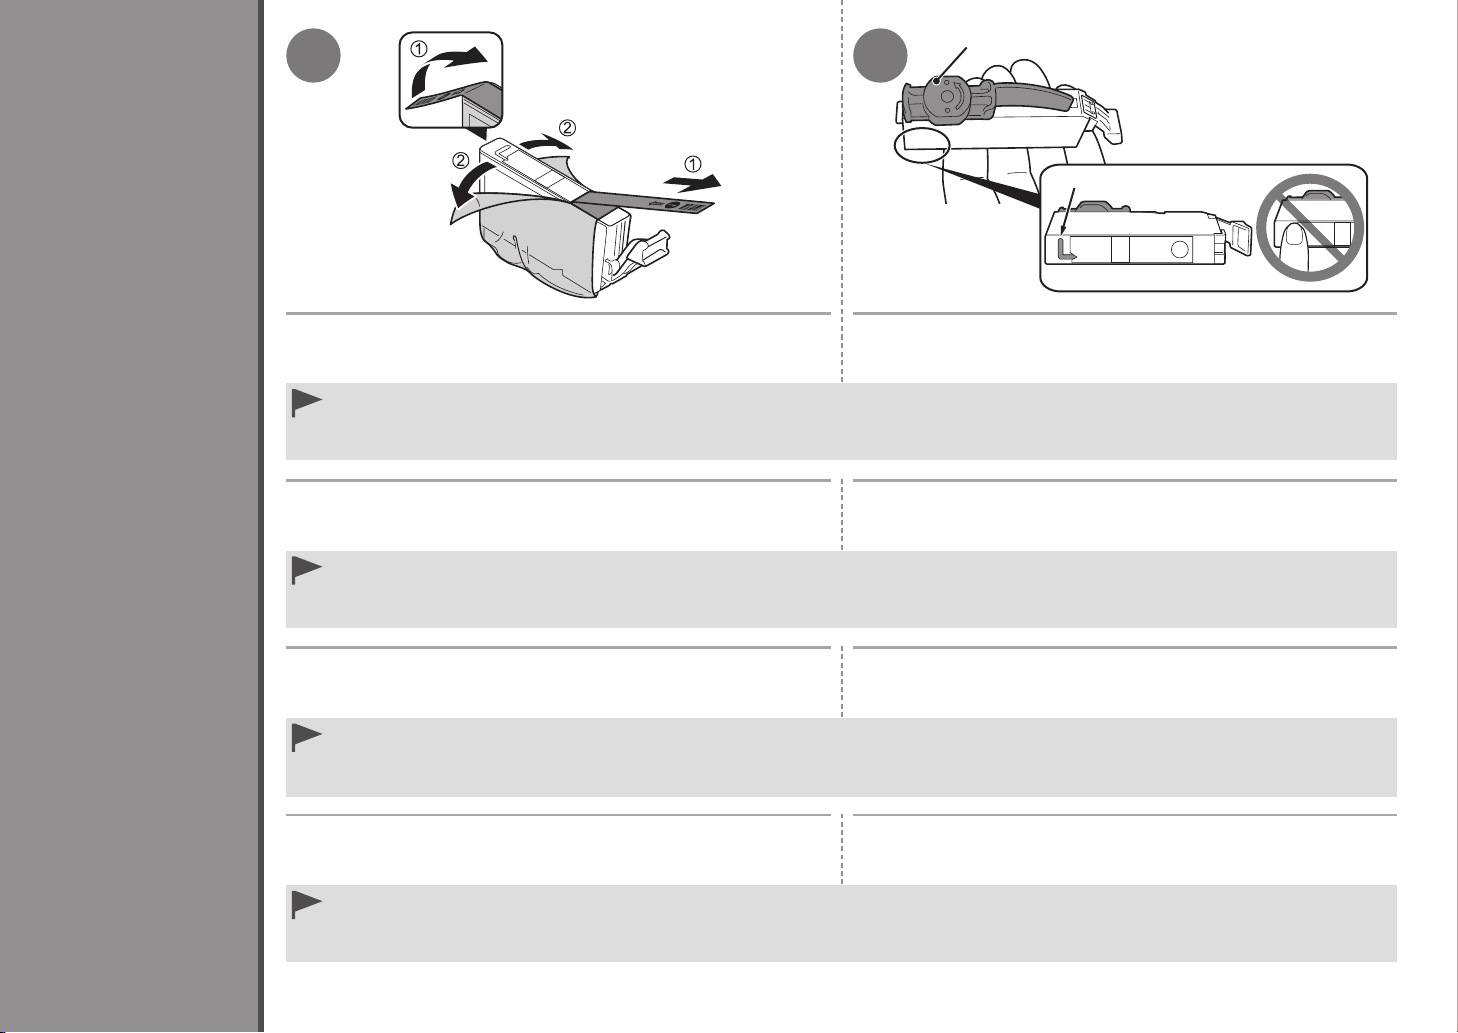
Remove the Print Head from the silver package. Remove the orange protective cap.
Handle the Print Head carefully. Do not drop or apply excessive pressure to it.
•
Do not touch the inside (F) or metal parts (G) of the Print Head. The machine may not print properly if you touch them.
•
There may be some transparent or light blue ink on the inside of the bag the Print Head comes in, or the inside of the protective cap – this has no effect on print quality. Be careful not to get ink on yourself
•
when handling these items.
Retirez la tête d’impression de l’emballage argenté. Retirez la capsule de protection orange.
Manipulez la tête d’impression avec précaution. Ne la faites pas tomber et n’exercez pas une trop grande pression dessus.
•
Ne touchez pas l’intérieur (F) ou les parties métalliques (G) de la tête d’impression. La machine risque de ne pas imprimer correctement.
•
Il peut y avoir de l’encre transparente ou bleu clair à l’intérieur du sachet de la tête d’impression ou dans la capsule de protection. Cela n’affecte pas la qualité d’impression. Veillez à ne pas mettre d’encre
•
sur vous lors de la manipulation de ces éléments.
Nehmen Sie den Druckkopf aus der Silberfolie. Ziehen Sie die orangefarbene Schutzkappe ab.
Behandeln Sie den Druckkopf vorsichtig. Lassen Sie ihn nicht fallen, und üben Sie keinen übermäßigen Druck auf ihn aus.
•
Vermeiden Sie jede Berührung der Komponenten im Inneren (F) oder der Metallteile (G) des Druckkopfs. Nach einer Berührung druckt das Gerät unter Umständen nicht mehr einwandfrei.
•
Auf der Innenseite der Umverpackung, in der der Druckkopf geliefert wird, oder auf der Innenseite der Schutzkappe ist unter Umständen ein transparenter oder hellblauer Tintenlm zu sehen. Auf die
•
Druckqualität hat das aber keinen Einuss. Achten Sie beim Umgang mit Teilen der Tintenversorgung darauf, dass keine Tinte auf Ihre Kleidung.
G
Rimuovere la testina di stampa dalla confezione di colore argento. Rimuovere il cappuccio protettivo arancione.
Maneggiare con cura la testina di stampa. Evitare di farla cadere o di applicarvi una pressione eccessiva.
•
Non toccare la parte interna (F) o le parti in metallo (G) della testina di stampa. In caso contrario, la stampante potrebbe non stampare correttamente.
•
All’interno della confezione della testina di stampa o del cappuccio protettivo è possibile che siano presenti tracce di inchiostro trasparente o blu chiaro. Ciò non inuisce sulla qualità di stampa. Fare attenzione
•
a non sporcarsi quando si maneggiano tali elementi.
12
76
Tilt the Print Head forward and set it in place as shown.
Do not knock the Print Head against the sides of the holder.
•
Install in a well-lit environment.
•
Inclinez la tête d’impression vers l’avant et mettez-la en place comme illustré.
Ne cognez pas la tête d’impression contre les bords du support.
•
Installez-la dans de bonnes conditions d’éclairage.
•
Halten Sie den Druckkopf nach vorne geneigt fest, und setzen Sie ihn ein, wie in der Abbildung gezeigt.
Stoßen Sie mit dem Druckkopf nicht seitlich an den Halter.
•
Achten Sie beim Einsetzen auf eine gute Beleuchtung.
•
Inclinare in avanti la testina di stampa e posizionarla come illustrato.
Evitare che la testina di stampa urti i lati del supporto.
•
Eseguire l’installazione della cartuccia in un ambiente adeguatamente illuminato.
•
Hold the Print Head Lock Lever firmly
and lower it completely.
Once you have installed the Print Head,
•
do not remove it unnecessarily.
Tenez fermement le levier de
verrouillage de tête d’impression et
abaissez-le complètement.
Une fois la tête d'impression installée,
•
ne la retirez que lorsque c'est
absolument nécessaire.
Halten Sie den Sperrhebel für den
Druckkopf fest, und klappen Sie ihn
vollständig nach unten.
Nach dem Einsetzen sollte der
•
Druckkopf nicht unnötig wieder
ausgebaut werden.
Afferrare saldamente la leva di
bloccaggio della testina di stampa
e abbassarla completamente.
Una volta installata la testina di stampa,
•
non rimuoverla se non in caso di
effettiva necessità.
13
3
A
1 2
B
Install the Ink Tanks
Installation des cartouches d’encre
Einsetzen der Tintenpatronen
Installazione dei serbatoi d’inchiostro
1. Remove the orange tape completely.
2. Remove the protective film completely.
Handle the ink tanks carefully. Do not drop or apply excessive pressure to them.
•
Be sure to use the supplied ink tanks.
•
If the orange tape remains on the L-shape air hole, ink may splash or the machine may not print properly.
•
If you push the sides of the ink tank with the L-shape air hole blocked, ink may splash.
•
1. Retirez complètement le ruban orange.
2. Retirez complètement le film protecteur.
Manipulez les réservoirs d’encre avec précaution. Ne les faites pas tomber et n’exercez pas une trop grande pression dessus.
•
Prenez soin d’utiliser les cartouches d’encre fournies.
•
Si vous laissez le ruban orange sur le trou d’arrivée d’air en forme de L, l’encre risque de faire des éclaboussures ou la machine de ne pas imprimer correctement.
•
Si vous appuyez sur les côtés de la cartouche d’encre alors que le trou d’arrivée d’air en forme de L est obstrué, l’encre risque de faire des éclaboussures.
•
1. Ziehen Sie das orangefarbene Klebeband vollständig ab.
2. Ziehen Sie die Schutzfolie vollständig ab.
Behandeln Sie die Tintenpatrone vorsichtig. Lassen Sie sie nicht fallen, und üben Sie keinen übermäßigen Druck auf sie aus.
•
Verwenden Sie nur die mitgelieferten Tintenpatronen.
•
Wenn das orangefarbene Klebeband nicht von der L-förmigen Belüftungsöffnung entfernt wird, kann Tinte austreten, oder das Gerät druckt unter Umständen nicht einwandfrei.
•
Wenn Sie Druck auf die Seiten der Tintenpatrone ausüben und die L-förmige Belüftungsöffnung blockiert ist, kann Tinte austreten.
•
1. Rimuovere completamente il nastro arancione.
2. Rimuovere completamente la pellicola protettiva.
Maneggiare con cura i serbatoi d’inchiostro. Non farli cadere né premerli con eccessiva forza.
•
Assicurarsi di utilizzare i serbatoi d'inchiostro forniti.
•
Se sul foro di areazione a forma di L resta del nastro arancione, l'inchiostro potrebbe fuoriuscire oppure la stampante potrebbe non stampare correttamente.
•
Se il serbatoio d'inchiostro viene premuto dai lati mentre il foro di areazione a forma di L è bloccato, l'inchiostro potrebbe fuoriuscire.
•
Hold the ink tank with the orange protective cap (A) pointing up
while being careful not to block the L-shape air hole (B).
Tenez la cartouche d’encre en orientant la capsule de protection
orange (A) vers le haut tout en prenant garde de ne pas obstruer
le trou d’arrivée d’air en forme de L (B).
Halten Sie den Tintenbehälter mit der orangefarbenen
Schutzkappe (A) nach oben. Achten Sie darauf, dass die L-förmige
Belüftungsöffnung (B) nicht blockiert ist.
Tenere il serbatoio d’inchiostro con il cappuccio protettivo (A)
arancione rivolto verso l’alto prestando attenzione a non bloccare
il foro di areazione a forma di L (B).
14
3 4
C
D
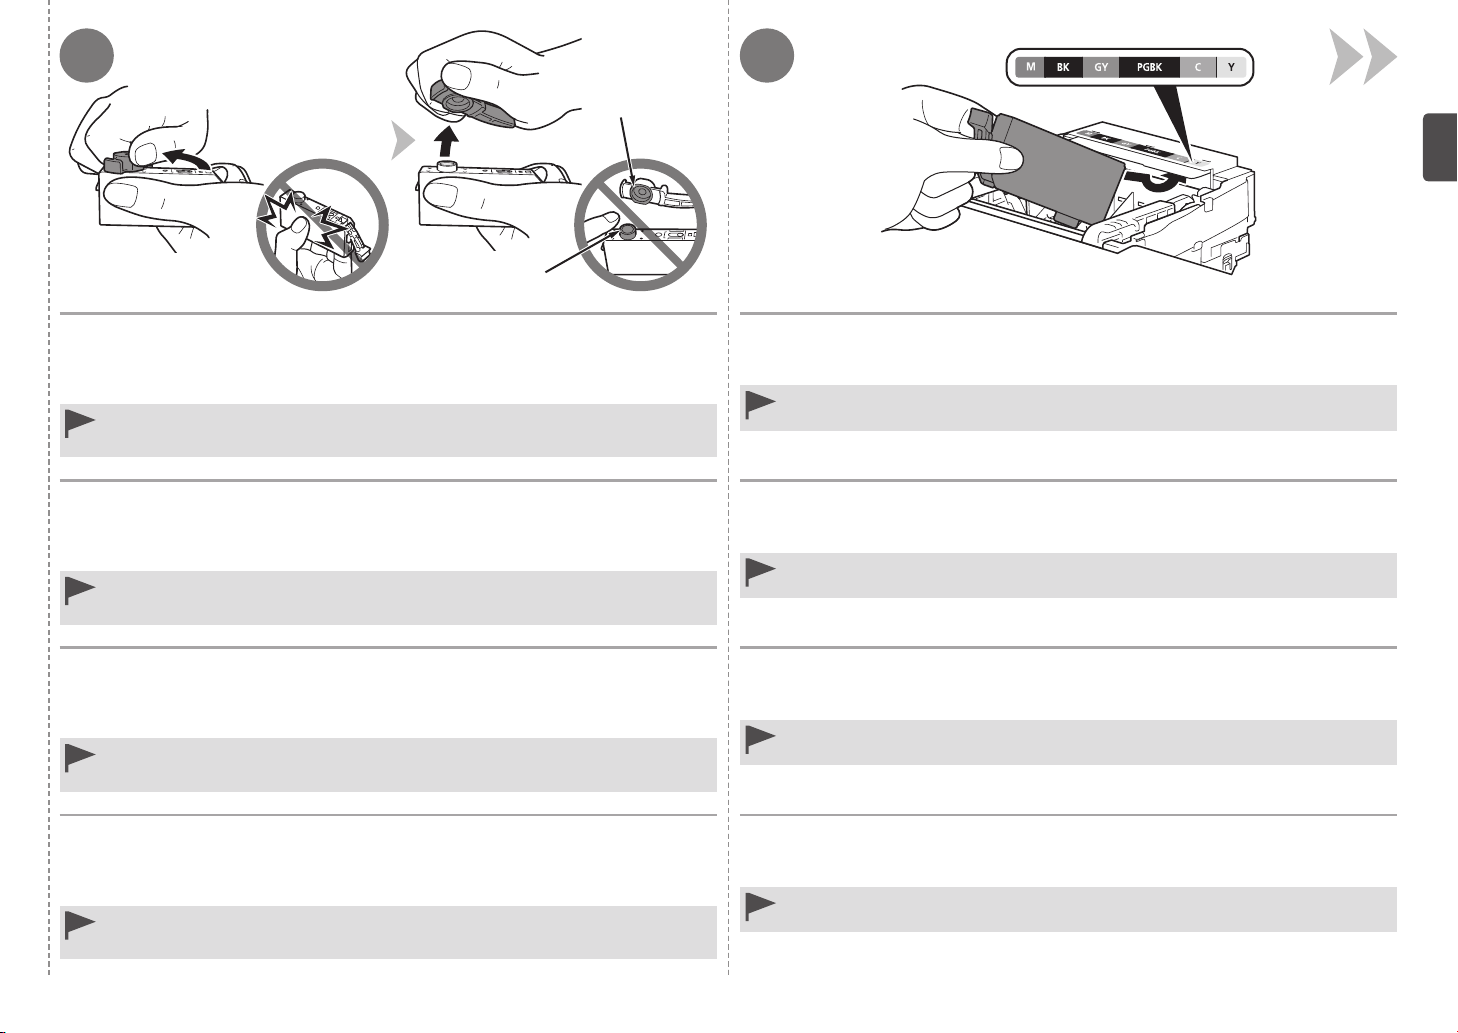
Hold the ink tank by its sides and slowly twist the orange protective cap 90
degrees horizontally to remove it off.
Do not push the sides of the ink tank.
Do not touch the inside (C) of the orange protective cap or the open ink port (D). The ink may
•
stain your hands if you touch them.
Tenez la cartouche d’encre par les bords et faites pivoter lentement la capsule de
protection orange de 90 degrés à l’horizontale pour la retirer.
N’appuyez pas sur les côtés de la cartouche d’encre.
Ne touchez pas l’intérieur (C) de la capsule de protection orange ou le port d’encre ouvert (D).
•
L’encre risque de tacher vos mains si vous les touchez.
Halten Sie die Tintenpatrone an beiden Seiten fest, drehen Sie die orangefarbene
Schutzkappe langsam horizontal um 90 Grad, und nehmen Sie sie ab.
Drücken Sie nicht seitlich auf den Tintenbehälter.
Vermeiden Sie jede Berührung der Innenseite (C) der orangefarbenen Schutzkappe und des
•
geöffneten Tintendurchlasses (D). Andernfalls kann Tinte an Ihre Hände gelangen.
Afferrare il serbatoio d'inchiostro dai lati e ruotare lentamente il cappuccio
protettivo di 90 gradi in senso orizzontale per rimuoverlo.
Non spingere il serbatoio d’inchiostro dai lati.
Non toccare la parte interna (C) del cappuccio protettivo arancione né la porta dell'inchiostro
•
aperta (D). Se toccati possono macchiare le mani.
Tilt the ink tank, then insert it under the label and against the back end of the slot.
Make sure that the color of the label matches the ink tank.
Install in a well-lit environment.•
Inclinez le réservoir d’encre, puis insérez-le sous l’étiquette, adossé contre
l’arrière de l’emplacement dédié.
Vérifiez que la couleur de l’étiquette correspond à celle du réservoir d’encre.
Procédez à l’installation dans un environnement bien éclairé.•
Halten Sie den Tintenbehälter nach vorne geneigt, führen Sie ihn unterhalb des
Aufklebers in den Schacht ein, und drücken Sie ihn nach hinten.
Die Farbe des Aufklebers muss mit der des Tintenbehälters übereinstimmen.
Achten Sie beim Einsetzen auf eine gut beleuchtete Umgebung.•
Inclinare il serbatoio d’inchiostro, quindi inserirlo sotto l’etichetta contro la parte
posteriore dello slot.
Assicurarsi che il colore del serbatoio di inchiostro corrisponda all’etichetta.
Eseguire l’installazione della cartuccia in un ambiente adeguatamente illuminato.•
15
5 6
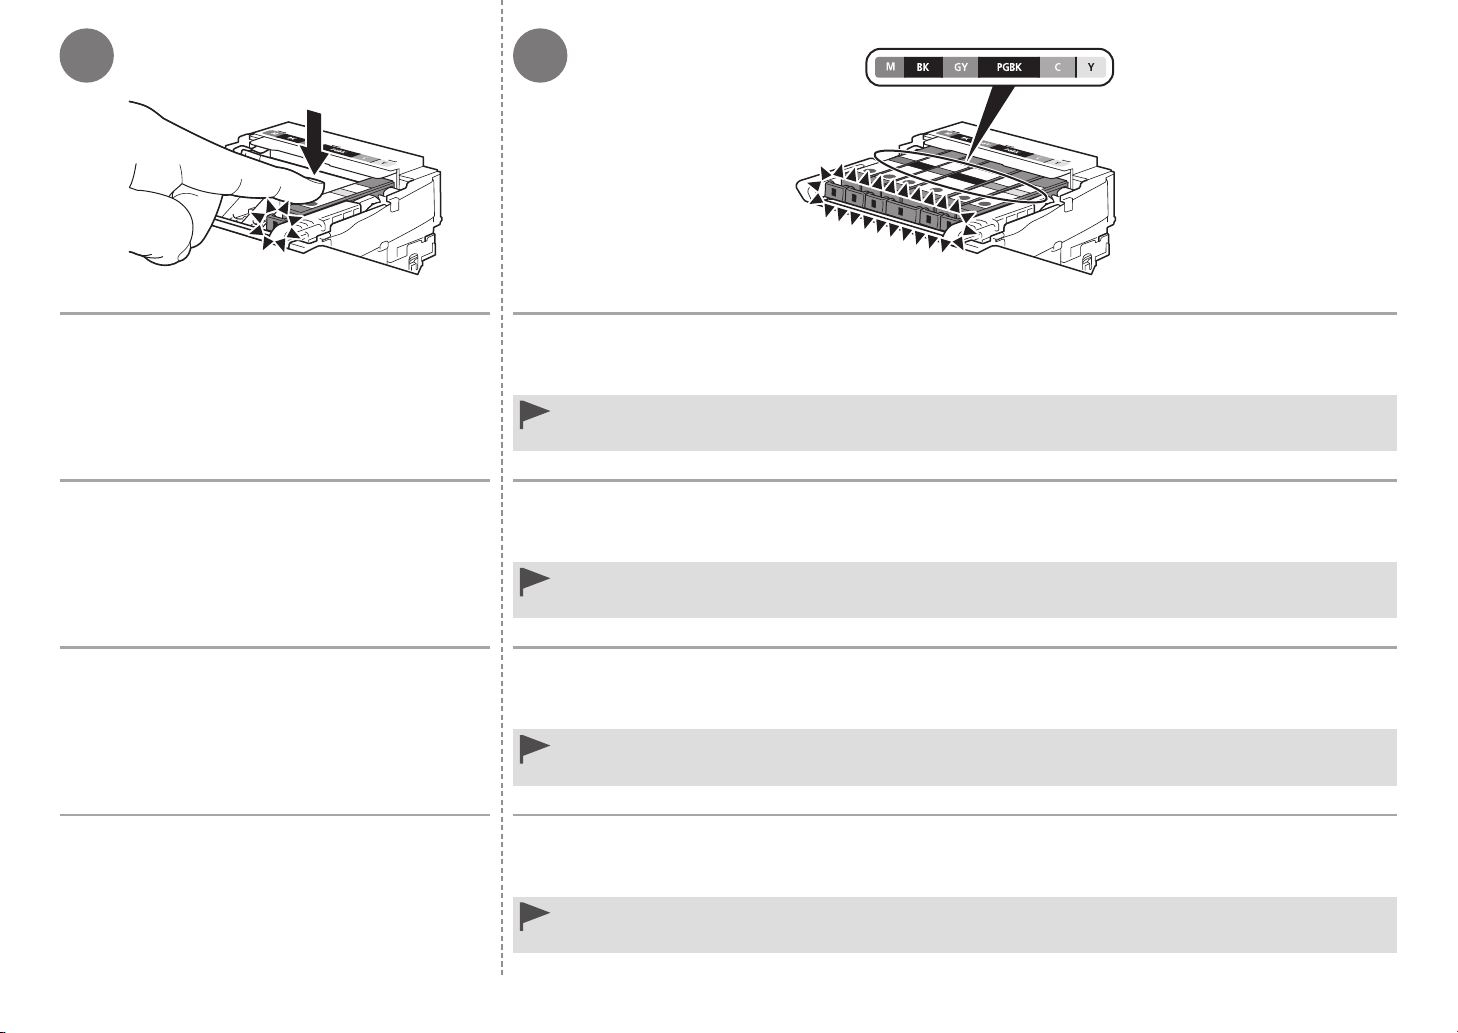
Press the PUSH mark on the ink tank firmly until it
clicks.
When the installation is completed properly, the Ink lamp lights red.
Appuyez fortement sur le repère PUSH du réservoir
d’encre jusqu’à ce qu’il se mette en place.
Lorsque l’installation est correctement effectuée, le voyant
d’encre (Ink) s’allume en rouge.
Drücken Sie fest auf die Markierung PUSH auf dem
Tintenbehälter, bis dieser hörbar einrastet.
Wenn der Tintenbehälter richtig eingesetzt wurde, leuchtet die
Anzeige für Tintenbehälter (Ink) rot.
Premere sul segno PUSH sul serbatoio di inchiostro
fino a quando il serbatoio d’inchiostro non scatta in
posizione.
Se l’installazione è stata eseguita correttamente, l’indicatore
luminoso dell’inchiostro (Ink) emetterà una luce rossa.
Install all the other ink tanks in the same way according to the color order indicated on the label.
Make sure all the Ink lamps light red.
Once you have installed the ink tanks, do not remove them unnecessarily.
•
If the Print Head Holder moves to the right, close and reopen the Scanning Unit (Cover).
•
Installez toutes les autres cartouches d’encre de la même manière, en respectant l’ordre des couleurs indiqué
sur l’étiquette.
Vérifiez que tous les témoins d’encre (Ink) sont allumés en rouge.
Après avoir installé les cartouches d’encre, ne les retirez pas inutilement.
•
Si le support de tête d’impression se déplace vers la droite, fermez, puis rouvrez l’unité de numérisation (capot).
•
Setzen Sie die übrigen Tintenbehälter auf dieselbe Weise ein. Beachten Sie dabei die Farbreihenfolge auf den
Aufklebern.
Stellen Sie sicher, dass alle Anzeige für Tintenbehälter (Ink) rot leuchten.
Nehmen Sie die Tintenpatronenpatronen nach dem Einsetzen nur dann heraus, wenn es unbedingt erforderlich ist.
•
Falls sich die Druckkopfhalterung nach rechts bewegt, schließen Sie das Scan-Modul (Abdeckung), und öffnen Sie es
•
anschließend wieder.
Installare tutti gli altri serbatoi d’inchiostro con la stessa procedura in base all’ordine di colore indicato
sull’etichetta.
Assicurarsi che tutte le spie dell’inchiostro (Ink) si accendano e diventino rosse.
Una volta installati, non rimuovere i serbatoi d'inchiostro, se non strettamente necessario.
•
Se il supporto della testina di stampa si sposta verso destra, chiudere e riaprire l'unità di scansione (coperchio).
•
16
7 8
F
E
Close the Scanning Unit (Cover) (E).
Make sure the Inner Cover (F) is closed.
Fermez l’unité de numérisation (capot) (E).
Vérifiez que le panneau interne (F) est fermé.
Schließen Sie das Scan-Modul (Abdeckung) (E).
Stellen Sie sicher, dass die Innere Abdeckung (F) geschlossen ist.
Chiudere l'unità di scansione (coperchio) (E).
Assicurarsi che il coperchio interno (F) sia chiuso.
Make sure that the LCD changes as shown in the illustration and go to the next step.
Do not touch the OK button yet.
It takes about 5 minutes before the LCD changes.
•
The machine may make some operating noises when preparing to print. This is normal operation.
•
If an error message is displayed on the LCD, make sure that the Print Head and the ink tanks are
•
correctly installed.
Vérifiez que l’affichage de l’écran LCD change comme indiqué sur l’illustration, puis
passez à l’étape suivante.
N’appuyez pas encore sur le bouton OK.
L’affichage de l’écran LCD change au bout de 5 minutes environ.
•
La machine peut émettre des bruits de fonctionnement pendant la préparation de l’impression.
•
Ceci est normal.
Si un message d’erreur s’afche sur l’écran LCD, vériez que la tête d’impression et les réservoirs
•
d’encre sont installés correctement.
Achten Sie darauf, dass sich die LCD-Anzeige wie oben gezeigt ändert,
und fahren Sie dann mit dem nächsten Schritt fort.
Drücken Sie noch nicht die Taste OK.
Es dauert ca. 5 Minuten, bis sich die LCD-Anzeige ändert.
•
Bei der Druckvorbereitung gibt das Gerät unter Umständen Betriebsgeräusche von sich. Dies ist
•
vollkommen normal.
Falls im LCD-Display eine Fehlermeldung angezeigt wird, überprüfen Sie, ob Druckkopf und
•
Tintenbehälter ordnungsgemäß eingebaut sind.
Assicurarsi che sul display LCD venga visualizzato il contenuto mostrato nella figura
e andare al passaggio successivo.
Non toccare ancora il pulsante OK.
La visualizzazione di tale contenuto sul display LCD richiede circa 5 minuti.
•
La stampante potrebbe emettere rumori durante la preparazione alla stampa. Tali rumori fanno
•
parte del normale funzionamento della stampante.
Se sul display LCD viene visualizzato un messaggio di errore, vericare che la testina di stampa
•
e i serbatoi di inchiostro siano stati installati correttamente.
17
4
1 32
A
B
D
C
18
Align the Print Head
Alignement de la tête d’impression
Ausrichten des Druckkopfs
Allineamento della testina di stampa
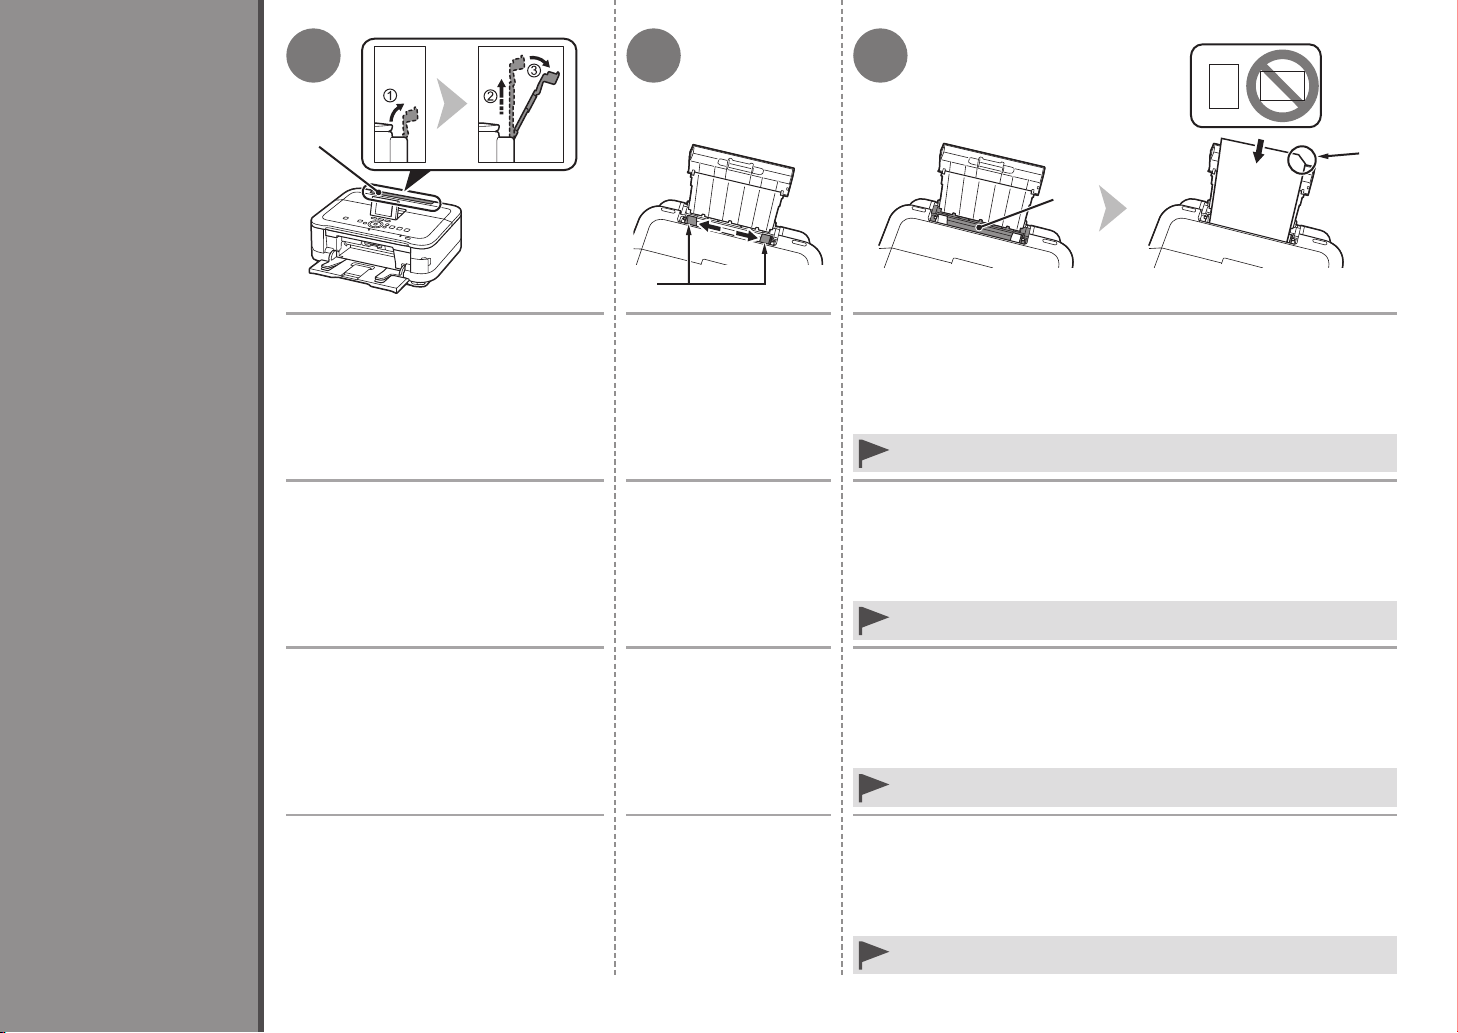
Prepare the Paper Support (A).
1. Open it.
2. Withdraw it upwards.
3. Tilt it back.
Préparez le support papier (A).
1. Déployez-le.
2. Tirez-le vers le haut.
3. Inclinez-le vers l’arrière.
Klappen Sie die Papierstütze (A) aus.
1. Öffnen Sie sie.
2. Ziehen Sie sie nach oben.
3. Kippen Sie sie nach hinten.
Preparare il supporto per la carta (A).
1. Aprirlo.
2. Estrarlo verso l'alto.
3. Inclinarlo nella parte posteriore.
Move the Paper Guides
(B) to both edges.
Ajustez les guides papier
(B) le long des deux
bords.
Schieben Sie die
Papierführungen (B) ganz
nach außen.
Spostare le guide della
carta (B) alle estremità
di entrambi i lati.
Load a sheet of supplied specialty paper (Matte Photo Paper MP-101)
in the Rear Tray (C).
Load paper in portrait orientation so that the cut corner (D) is at the top right.
Be sure to use MP-101 for Print Head Alignment.•
Chargez une feuille du papier spécial fourni (Papier Photo Mat MP-
101) dans le réceptacle arrière (C).
Chargez le papier en orientation Portrait de manière à ce que le coin coupé (D) soit
en haut à droite.
Veillez à utiliser du papier MP-101 pour l’alignement de la tête d’impression.•
Legen Sie ein Blatt des mitgelieferten Spezialpapiers (Fotopapier
Matt (Matte Photo Paper) MP-101) in das hintere Fach (C) ein.
Legen Sie das Papier im Hochformat so ein, dass sich die angeschnittene Ecke (D)
rechts oben befindet.
Verwenden Sie unbedingt MP-101 für die Ausrichtung des Druckkopfs.•
Caricare un foglio della carta speciale in dotazione (Carta
Fotografica Opaca (Matte Photo Paper) MP-101) nel vassoio
posteriore (C).
Caricare la carta con orientamento verticale in modo che l'angolo smussato (D)
sia in alto a destra.
Assicurarsi di utilizzare la carta MP-101 per l'allineamento della testina
•
di stampa.
4 65 7 8
E
F
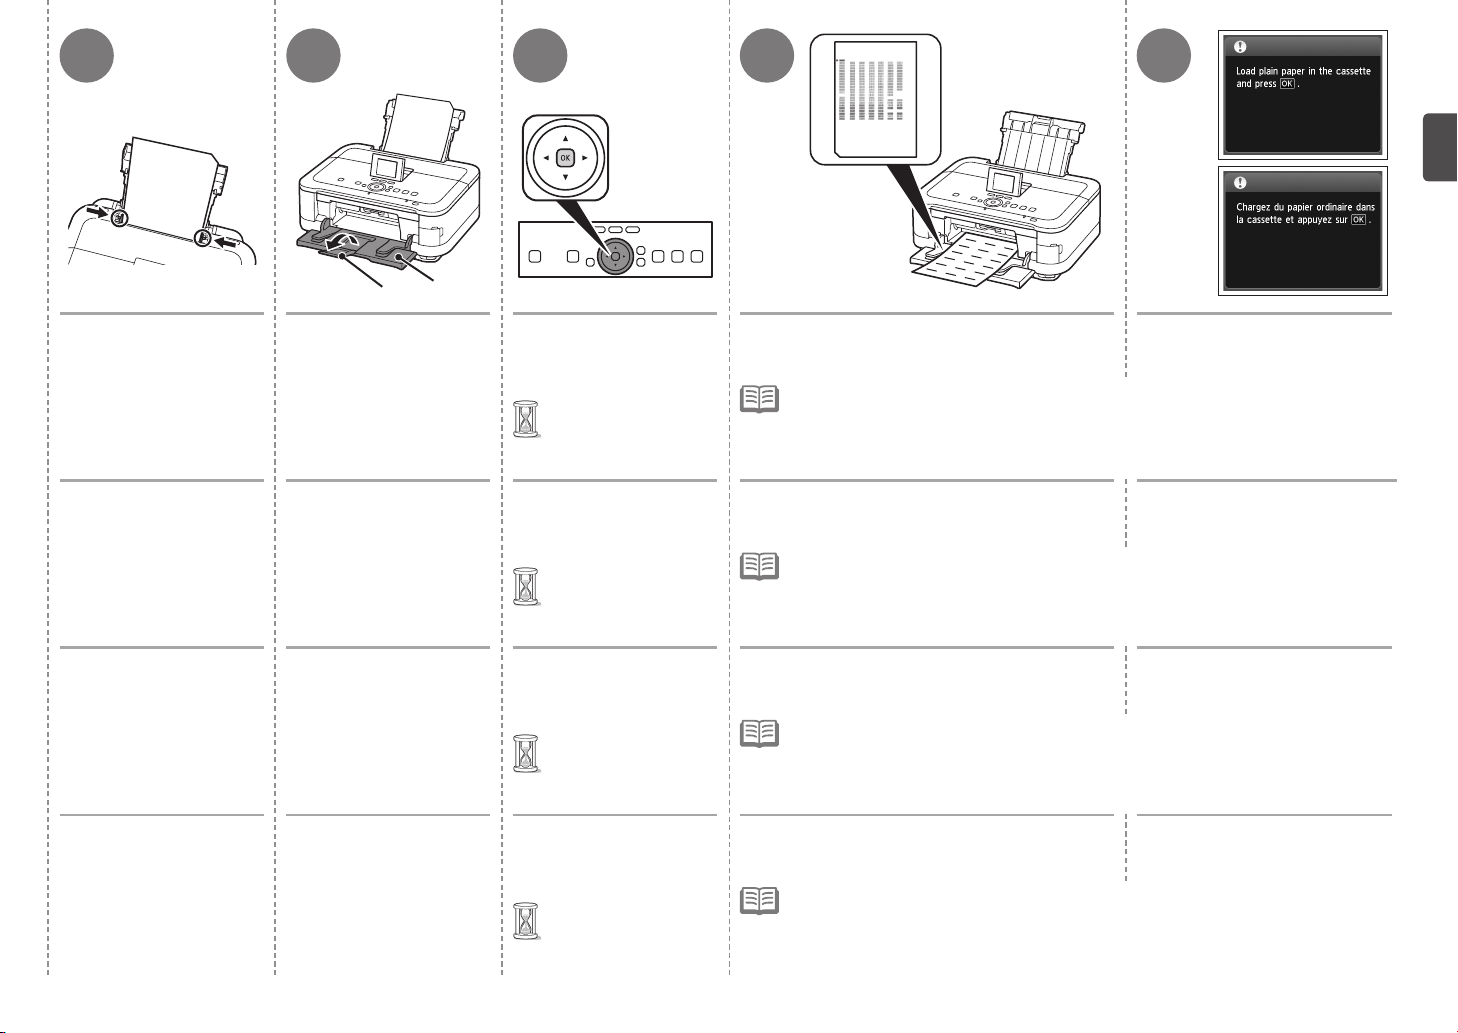
Slide the left and right
Paper Guides against
both edges of the paper.
Faites glissez les guides
papier gauche et droit
contre les deux bords
du papier.
Schieben Sie die linke
und rechte Papierführung
bis zum Anschlag an die
beiden Papierkanten.
Fare scorrere le guide
della carta destra
e sinistra fino a quando
non toccano entrambi
i bordi del foglio.
Make sure the Paper
Output Tray (E) is open,
then open the Output
Tray Extension (F).
If printing starts while the
Paper Output Tray is closed,
it will automatically open.
Vérifiez que le bac de
sortie papier (E) est
ouvert, puis déployez
l’extension du bac de
sortie papier (F).
Si l’impression démarre alors
que le bac de sortie papier
est fermé, celui-ci s’ouvre
automatiquement.
Öffnen Sie das
Papierausgabefach
(E) und dann die
Verlängerung des
Ausgabefachs (F).
Das Papierausgabefach wird
automatisch geöffnet, wenn
der Druckvorgang beginnt.
Assicurarsi che il vassoio
di uscita della carta (E)
sia aperto, quindi aprire
l'estensione del vassoio
di uscita (F).
Se la stampa ha inizio con
il vassoio di uscita della
carta chiuso, questo si aprirà
automaticamente.
Touch the OK button.
Print Head Alignment starts.
Print Head Alignment
•
takes about 4
minutes to complete.
Appuyez sur le bouton OK.
L’alignement de la tête
d’impression démarre.
L’alignement de la
•
tête d’impression
requiert 4 minutes
environ.
Drücken Sie die Taste OK.
Die Druckkopfausrichtung
beginnt.
Die Ausrichtung des
•
Druckkopfs nimmt
etwa 4 Minuten in
Anspruch.
Toccare il pulsante OK.
L'allineamento della testina di
stampa viene avviato.
L'allineamento della
•
testina di stampa
richiede circa 4 minuti.
When the pattern is printed, remove the
printed paper.
Print Head Alignment is now complete.
When an error message is displayed on the LCD, touch the OK button to clear the error, then
•
go to the next step. After the installation is complete, perform Print Head Alignment by referring
to “When Printing Becomes Faint or Colors Are Incorrect” in the on-screen manual: Basic
Guide.
The pattern is printed in black and blue.
•
Une fois le motif imprimé, retirez le papier
imprimé.
L'alignement de la tête d'impression est terminé.
Lorsqu’un message d’erreur est afché sur l’écran LCD, appuyez sur le bouton OK pour
•
effacer l’erreur, puis passez à l’étape suivante. Une fois l’installation terminée, effectuez
l’alignement de la tête d’impression conformément aux instructions de la section « L’impression
devient pâle ou les couleurs ne s’impriment plus correctement » du manuel en ligne
d’utilisation de base.
Le motif est imprimé en noir et bleu.
•
Wenn das Muster gedruckt ist, entnehmen Sie
das bedruckte Papier.
Die Ausrichtung des Druckkopfs ist nun abgeschlossen.
Wenn auf der LCD-Anzeige eine Fehlermeldung angezeigt wird, drücken Sie die Taste OK,
•
um den Fehler zu löschen, und fahren Sie mit dem nächsten Schritt fort. Richten Sie den
Druckkopf nach Abschluss der Installation aus. Informationen hierzu nden Sie unter „Bei
blassen Ausdrucken oder Farbabweichungen“ im Online-Handbuch Basishandbuch.
Das Muster wird in den Farben Schwarz und Blau gedruckt.
•
Quando viene stampato il motivo, rimuovere la
carta stampata.
L'allineamento della testina di stampa è stato completato.
Se sul display LCD viene visualizzato un messaggio di errore, toccare il pulsante OK per
•
risolvere il problema e andare al passaggio successivo. Al termine dell'installazione, eseguire
l'allineamento della testina di stampa facendo riferimento a "Le stampe sono sbiadite o i colori
non sono corretti" nel manuale a video: Guida Base.
Il motivo viene stampato in nero e blu.
•
Confirm the above message,
then go to the next step.
Vérifiez le message ci-dessus,
puis passez à l’étape suivante.
Guide
Bestätigen Sie die Meldung, und
fahren Sie mit dem nächsten
Schritt fort.
Verificare il messaggio
precedente, quindi andare
al passaggio successivo.
19
5
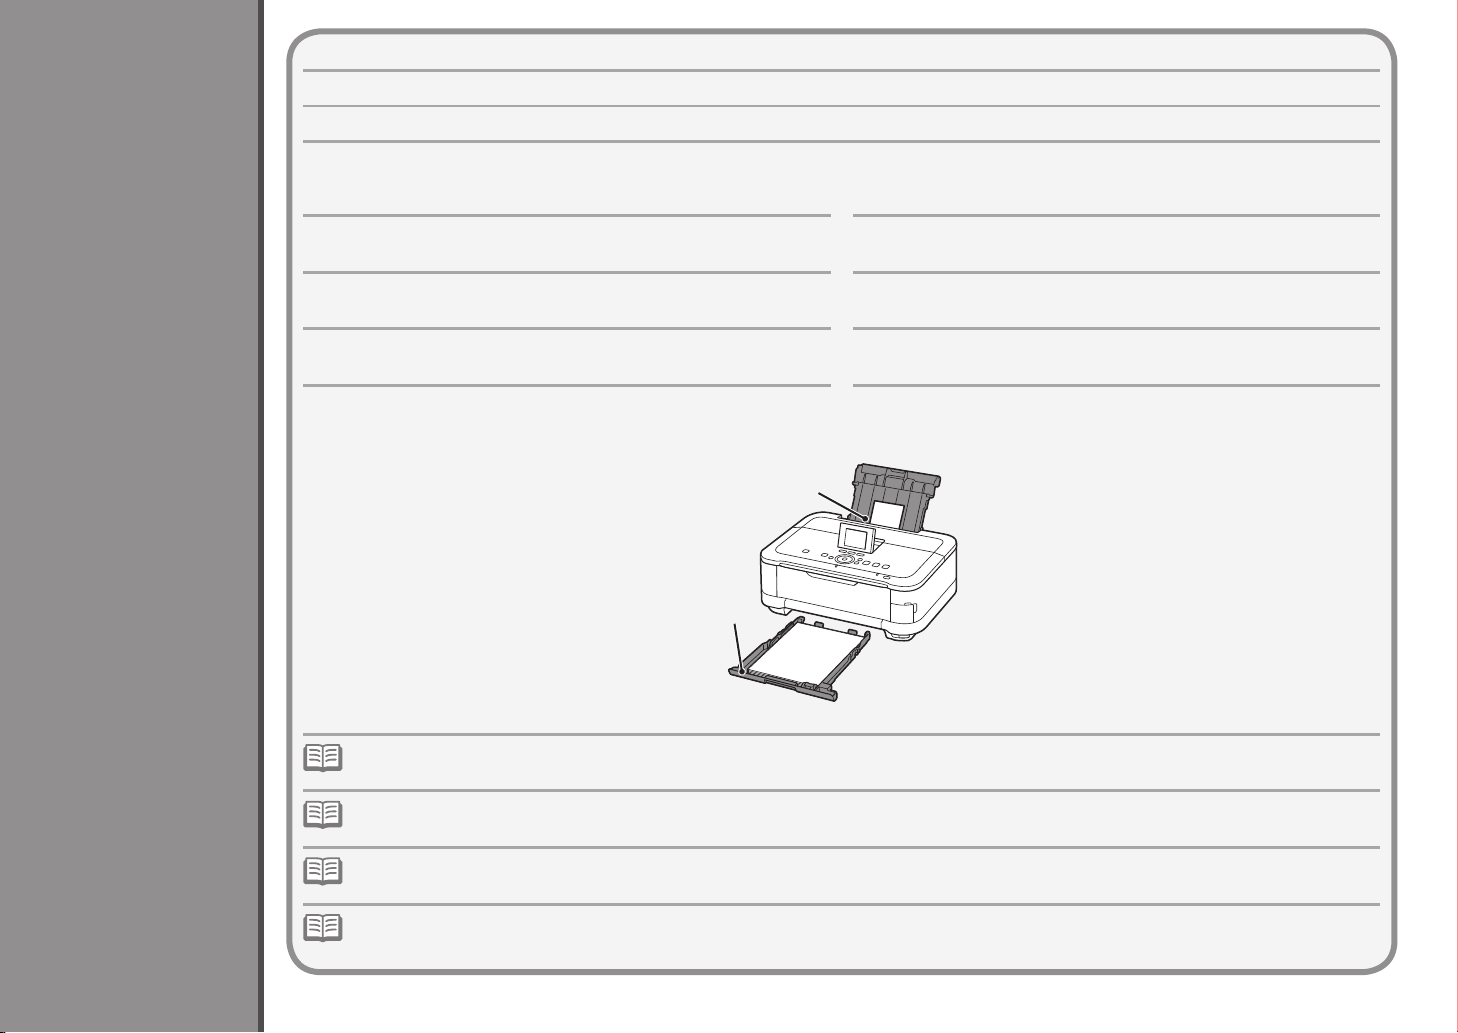
With the machine, the paper source varies depending on the media type.
Avec la machine, la source du papier varie en fonction du type de support.
Die Papierquelle des Geräts richtet sich nach dem verwendeten Medientyp.
Con la stampante, l'alimentazione della carta varia in base al tipo di supporto.
Specialty paper including photo paper
Load paper in the Rear Tray (A).
Papier spécial y compris le papier photo
Chargez du papier dans le réceptacle arrière (A).
Load Paper
Spezialpapier einschließlich Fotopapier
Legen Sie das Papier in das hintere Fach (A) ein.
Carta speciale, inclusa la carta fotograca
Caricare la carta nel vassoio posteriore (A).
Einlegen von Papier
Plain paper
Load paper in the Cassette (B).
Papier ordinaire
Chargez du papier dans la cassette (B).
Normalpapier
Legen Sie das Papier in die Kassette (B) ein.
Carta comune
Caricare la carta nel cassetto (B).
A
Chargement du papier
Caricamento della carta
B
For details on how to handle paper, refer to “Loading Paper” in the on-screen manual: Basic Guide after installation is complete. •
Pour plus d’informations sur la manipulation du papier, reportez-vous à la section « Chargement du papier » dans le manuel en ligne Guide d’utilisation de base
•
lorsque l’installation est terminée.
20
Details zum Umgang mit Papier nden Sie unter „Einlegen von Papier“ im Online-Handbuch: Basishandbuch, nachdem die Installation abgeschlossen ist.•
Per informazioni su come maneggiare la carta, consultare “Caricamento della carta” nel manuale a video: Guida Base al termine dell’installazione.•
How to load specialty paper in the Rear Tray□
Comment charger le papier spécial dans le réceptacle arrière□
Einlegen von Spezialpapier in das hintere Fach□
Modalità di caricamento della carta speciale nel vassoio posteriore□
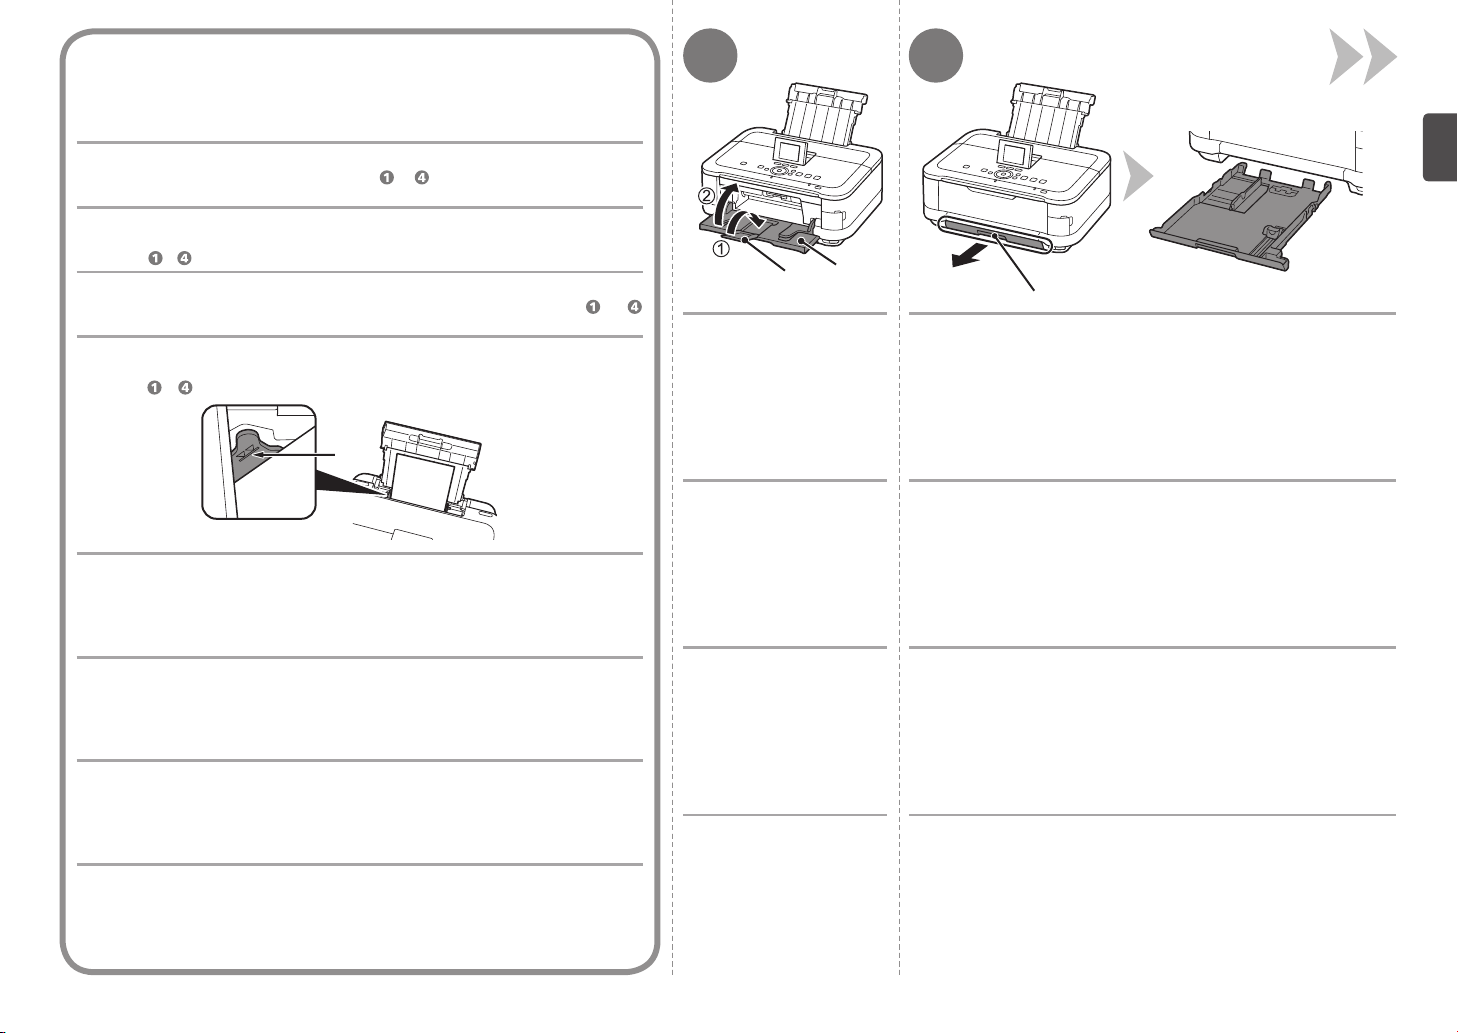
This section describes how to load plain paper in the Cassette. For details on how to
load specialty paper in the Rear Tray, refer to to in “4 Align the Print Head” on
page 18.
Cette section explique comment charger du papier ordinaire dans la cassette. Pour plus
d’informations sur le chargement du papier spécial dans le réceptacle arrière, reportez-vous
aux étapes à
In diesem Abschnitt wird das Einlegen von Normalpapier in die Kassette beschrieben.
Details zum Einlegen von Spezialpapier in das hintere Fach nden Sie unter bis
im Abschnitt „4 Ausrichten des Druckkopfs“ auf Seite 18.
In questa sezione viene descritto come caricare la carta comune nel cassetto. Per
ulteriori informazioni su come caricare la carta speciale nel vassoio posteriore,
vedere da a in "4 Allineamento della testina di stampa" a pagina 18.
de la section « 4 Alignement de la tête d’impression » à la page 18.
C
1
1. Close the Output Tray
Extension (D).
2. Close the Paper
Output Tray (E).
2
E
D
F
Pull out the Cassette (F).
Loading specialty paper
Load paper in portrait orientation with the printing side facing up.
•
Make sure that the height of the paper stack does not exceed the line (C).
•
Chargement du papier spécial
Chargez du papier dans le sens de la hauteur (orientation Portrait), face à imprimer vers
•
le haut.
Vériez que la hauteur du papier chargé ne dépasse pas la ligne (C).
•
Einlegen von Spezialpapier
Legen Sie das Papier im Hochformat mit der zu bedruckenden Seite nach oben ein.
•
Vergewissern Sie sich, dass die Höhe des Papierstapels nicht die Linie (C) übersteigt.
•
Caricamento della carta speciale
Caricare la carta con orientamento verticale con il lato di stampa rivolto verso l'alto.
•
Vericare che l'altezza della pila di carta non superi la linea (C).
•
bac de sortie papier
Retirez la cassette (F).1. Fermez l’extension du
(D).
2. Fermez le bac de
sortie papier (E).
Ziehen Sie die Kassette (F) heraus.1. Schließen Sie die
Verlängerung des
Ausgabefachs (D).
2. Schließen Sie das
Papierausgabefach
(E).
Estrarre il cassetto (F).1. Chiudere l'estensione
del vassoio di uscita
(D).
2. Chiudere il vassoio di
uscita della carta (E).
21
3
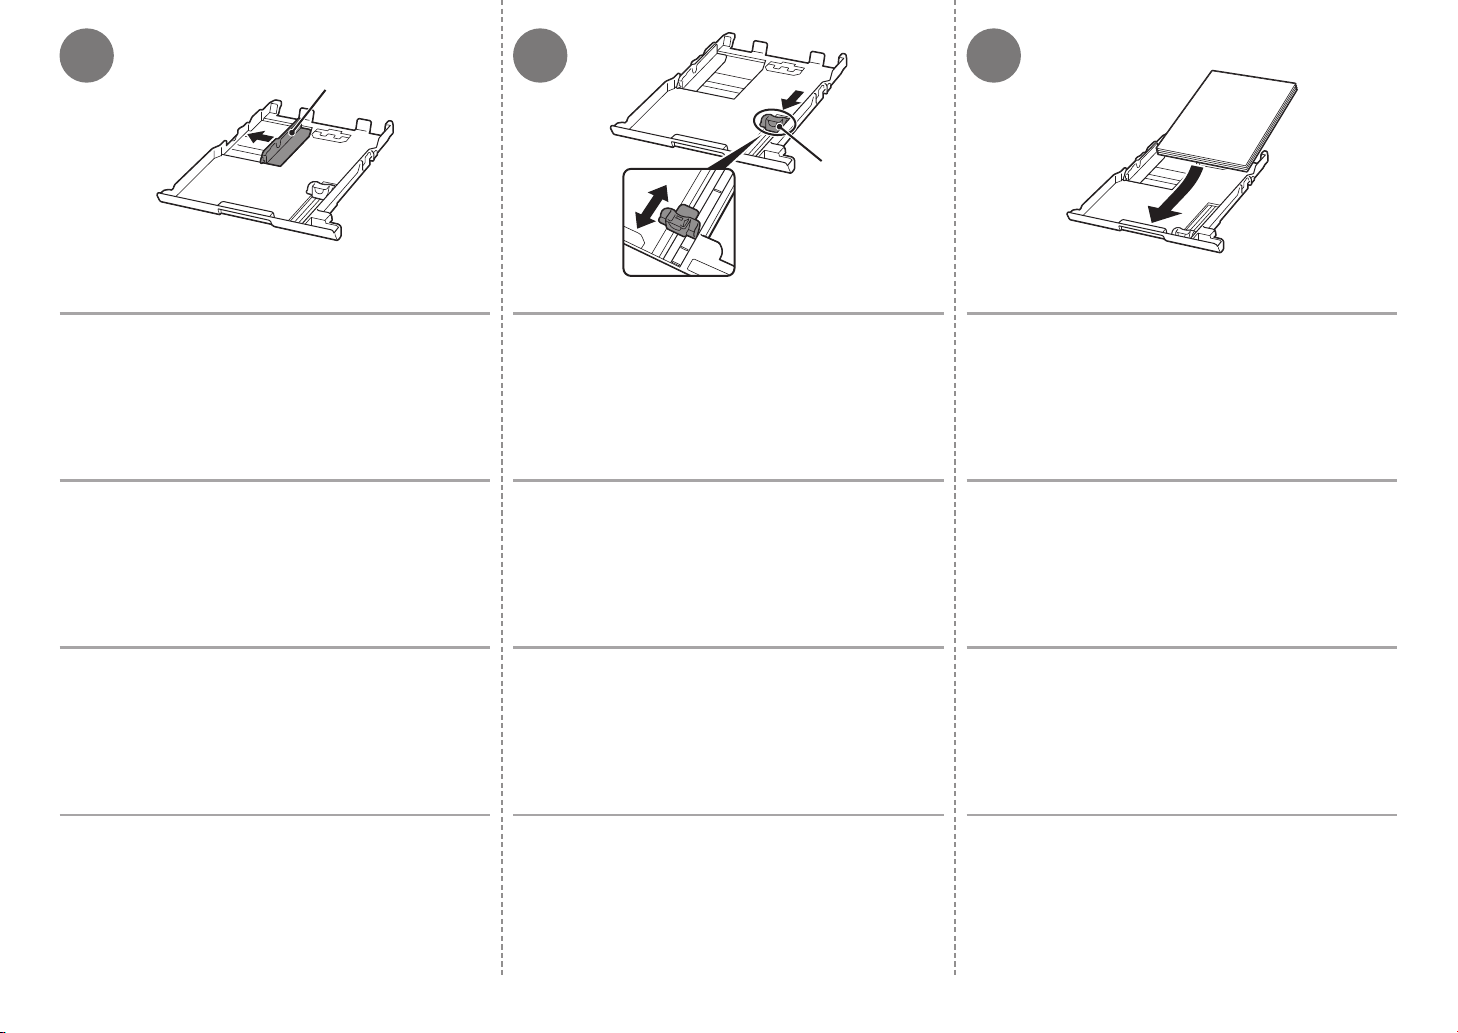
G
4 5
H
Move the left Paper Guide (G) to the edge. Slide the front Paper Guide (H) to align with the actual
Ajustez le guide papier (G) gauche sur le bord. Faites glisser le guide papier (H) avant pour l’aligner
Schieben Sie die linke Papierführung (G) ganz
nach außen.
Spostare la guida della carta (G) sinistra fino al bordo. Fare scorrere la guida della carta (H) anteriore per
size of the paper.
The front Paper Guide will click and stop when it aligns with the
corresponding mark of paper size.
sur le format réel du papier.
Le guide papier avant émet un bruit de déclic et s’arrête lorsqu’il
est aligné avec le repère de taille du papier correspondant.
Stellen Sie die vordere Papierführung (H) auf das
verwendete Papierformat ein.
Die vordere Papierführung rastet an der jeweiligen
Papierformatmarkierung ein.
allinearla all'effettivo formato della carta.
La guida della carta anteriore scatta in posizione quando risulta
allineata con il simbolo del formato carta corrispondente.
Load plain paper.
Load paper with the printing side facing down.
Chargez le papier ordinaire.
Chargez le papier face d’impression vers le bas.
Legen Sie Normalpapier ein.
Die zu bedruckende Seite muss dabei nach unten zeigen.
Caricare carta comune.
Caricare la carta con il lato di stampa rivolto verso il basso.
22
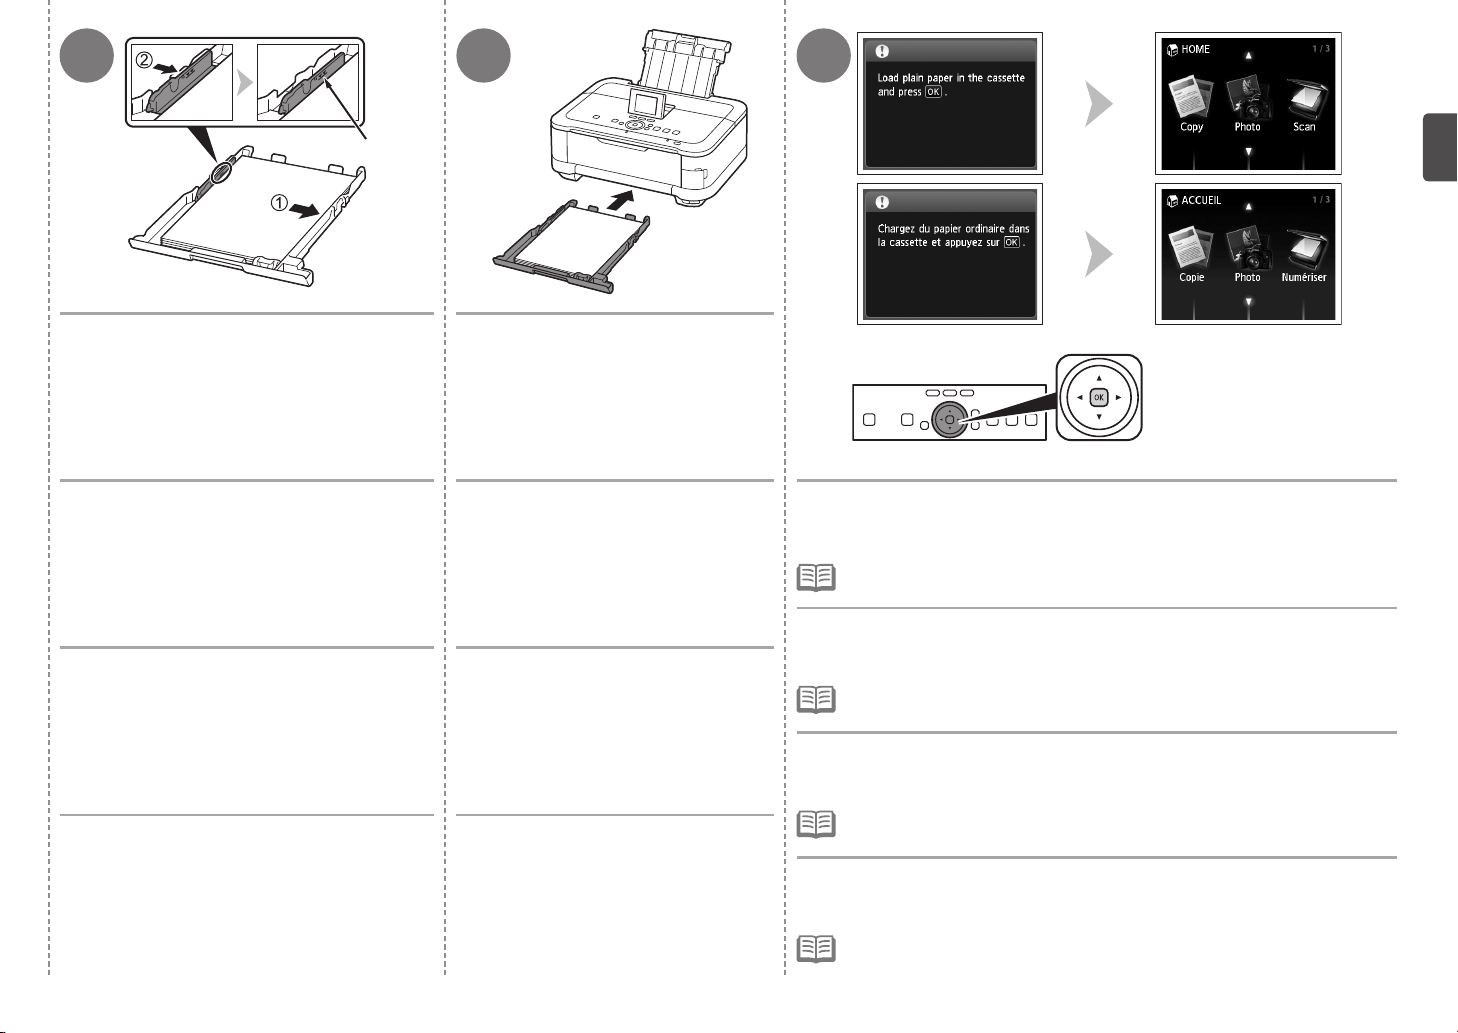
876
I
Align the paper to the right side of the Cassette
(1), and slide the left Paper Guide completely
against the left edge of the paper (2).
Make sure that the height of the paper stack does not
exceed the line (I).
Alignez le papier sur le côté droit de la
cassette (1) et faites glisser le guide papier
gauche à fond le long du bord gauche du
papier (2).
Vérifiez que la hauteur du papier chargé ne dépasse pas
la ligne (I).
Legen Sie das Papier an der rechten Seite der
Kassette (1) an, und schieben Sie die linke
Papierführung vollständig an die linke Kante
des Papiers (2).
Achten Sie darauf, dass der Papierstapel nicht höher ist
als die Linie (I).
Allineare la carta sul lato destro del cassetto
(1), quindi fare scorrere completamente la
guida della carta sinistra fino a toccare il bordo
sinistro della carta (2).
Verificare che l’altezza della pila di carta non superi la
linea (I).
Insert the Cassette slowly into the
machine until it clicks into place.
Insérez lentement la cassette dans la
machine jusqu’à ce qu’elle s’enclenche.
Setzen Sie die Kassette langsam in das
Gerät ein, bis sie einrastet.
Inserire lentamente il cassetto nella
stampante finché non scatta in
posizione.
Confirm the message on the LCD, then touch the OK button.
The HOME screen appears.
The LCD will turn off if the machine is not operated for about 5 minutes. To restore the
•
display, touch any button except the ON button.
Vériez le message afché sur l’écran LCD, puis appuyez sur le bouton OK.
L’écran ACCUEIL (HOME) s’affiche.
L’écran LCD s’éteint si la machine n’est pas utilisée pendant environ 5 minutes. Pour
•
restaurer l’afchage de l’écran, appuyez sur n’importe quel bouton, sauf MARCHE (ON).
Bestätigen Sie die Meldung auf der LCD-Anzeige, und drücken Sie die
Taste OK.
Der Bildschirm HOME wird angezeigt.
Die LCD-Anzeige schaltet sich ab, wenn das Gerät etwa fünf Minuten lang nicht
•
bedient wird. Um die Anzeige wiederherzustellen, drücken Sie eine beliebige Taste,
außer der Taste EIN (ON).
Verificare il messaggio visualizzato sul display LCD, quindi toccare il
pulsante OK.
Viene visualizzata la schermata HOME.
Se la stampante non viene messa in funzione per circa 5 minuti, il display LCD si
•
spegnerà. Per ripristinare il display, toccare qualsiasi pulsante tranne il pulsante ON.
23
 Loading...