

Canon PIXMA MG6120 Series, 4503B002 Getting Started
Canon Inkjet Photo All-In-One
Equipo multifunción fotográco Canon Inkjet
series
Getting Started
Read Me First
Guía de inicio
Léame en primer lugar
ENGLISH
ESPAÑOL
Make sure to read this manual before using the machine. Please keep it in hand for future reference.
Asegúrese de leer este manual antes de usar el equipo. Consérvelo a mano para utilizarlo como referencia en el futuro.

Contents■
1 Preparation P.4
2 Install the Print Head P.8
3 Install the Ink Tanks P.11
4 Align the Print Head P.14
5 Load Paper P.16
6 Select Connection Method P.19
7 Install the Software (USB Connection)
P.20
8 Wireless Setup P.26
Wireless Setup Using Easy Setup P.27
Wireless Setup Using WPS (Wi-Fi Protected
Setup) P.31
Wireless Setup Using WCN (Windows
Connect Now) P.34
9 Wired Setup P.35
10 Install the Software (Network
Connection) P.38
Install the Software P.39
Registration (Macintosh) P.42
Information P.45
11 Use from Additional Computers P.48
12 Try Using the Machine P.49
Print Photos from a Memory Card P.50
Try Copying P.53
Print Photos from a Computer P.55
13 Specications P.56
Symbols Used in This
■
Document
Prohibited actions.
Instructions including important
information.
In this guide, Windows 7 operating system is
•
referred to as Windows 7 and Windows Vista
operating system as Windows Vista.
In this guide, the screens are based on
•
Windows 7 Home Premium and Mac OS X
v.10.6.x. (Unless noted otherwise, the screens
are those of Windows 7.)
Microsoft is a registered trademark of Microsoft
•
Corporation.
Windows is a trademark or registered trademark
•
of Microsoft Corporation in the U.S. and/or other
countries.
Windows Vista is a trademark or registered
•
trademark of Microsoft Corporation in the U.S.
and/or other countries.
Internet Explorer is a trademark or registered
•
trademark of Microsoft Corporation in the U.S.
and/or other countries.
Macintosh, Mac, and AirPort are trademarks
•
of Apple Inc., registered in the U.S. and other
countries.
Bonjour is a trademark of Apple Inc., registered
•
in the U.S. and other countries.
Contenido■
1 Preparativos P.4
2 Instalación del cabezal de impresión P.8
3 Instalación de los depósitos de tinta P.11
4 Alineación del cabezal de impresión P.14
5 Carga del papel P.16
6 Selección del método de conexión P.19
7 Instalación del software (Conexión USB)
P.20
8 Conguración inalámbrica P.26
Conguración inalámbrica mediante
Conguración fácil (Easy Setup) P.27
Conguración inalámbrica mediante WPS
(Wi-Fi Protected Setup) P.31
Conguración inalámbrica mediante WCN
(Windows Connect Now) P.34
9 Conexión por cable P.35
10 Instalación del software (Conexión
de red) P.38
Instalación del software P.39
Registro (Macintosh) P.42
Información P.45
11 Uso desde ordenadores adicionales P.48
12 Pruebe el equipo P.49
Impresión de fotos desde una tarjeta de
memoria P.50
Realice una prueba de copia P.53
Impresión de fotografías desde un ordenador P.55
13 Especicaciones P.57
Símbolos utilizados en este
■
documento
Acciones prohibidas.
Instrucciones que incluyen
información importante.
En esta guía, para referirse al sistema operativo
•
Windows 7 se utiliza el término Windows 7 y para
referirse al sistema operativo Windows Vista se
utiliza el término Windows Vista.
Las pantallas de esta guía se basan en
•
Windows 7 Home Premium y Mac OS X v.10.6.x.
(A menos que se indique lo contrario, las
pantallas serán de Windows 7).
Microsoft es una marca comercial registrada
•
de Microsoft Corporation.
Windows es una marca comercial o una marca
•
comercial registrada de Microsoft Corporation
en EE UU y/u otros países.
•
Windows Vista es una marca comercial o una
marca comercial registrada de Microsoft
Corporation en EE UU y/u otros países.
Internet Explorer es una marca comercial
•
o una marca comercial registrada de Microsoft
Corporation en EE UU y/u otros países.
Macintosh, Mac y AirPort son marcas
•
comerciales de Apple Inc., registradas en
EE UU y en otros países.
Bonjour es una marca comercial de Apple Inc.,
•
registrada en EE UU y en otros países.
Model Number: K10360 (MG6120)
Número de modelo: K10360 (MG6120)
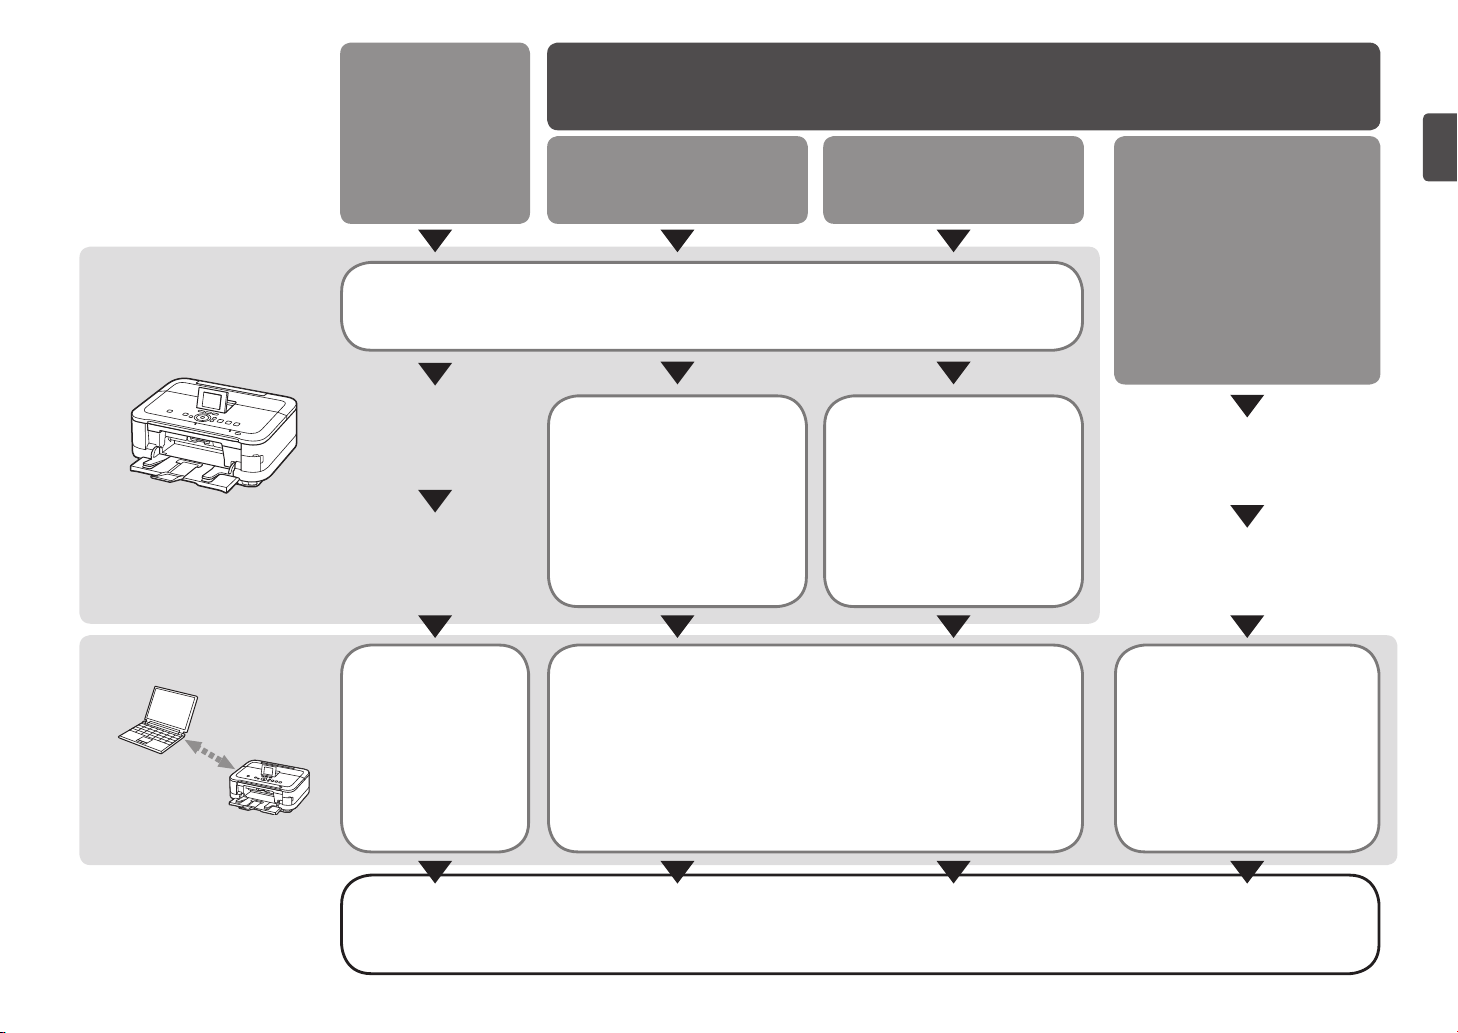
Machine Installation
■
Flow
USB Connection
Network Connection
Conexión de red
Flujo de instalación
■
del equipo
Conexión USB
Machine Preparation
Preparación del equipo
Software Installation
Wireless Connection
Conexión inalámbrica
Machine Wireless Setup
Conguración inalámbrica
del equipo
P.19, 26 – 34
Software Installation
Wired Connection
Conexión por cable
Machine Wired Setup
Conexión por cable
del equipo
P.19, 35 – 37
P.3 – 18
Using from Additional
Computers
(when the machine is already
connected to the network and you
want to add computers from which
to use the machine)
Uso desde ordenadores
adicionales
(cuando el equipo ya está
conectado a la red y se quieren
añadir ordenadores desde los
cuales utilizarlo)
Software Installation
Instalación del
software
P.19 – 25 P.38 – 47
Instalación del software
Installation Complete
Instalación nalizada
Try Using the Machine
Pruebe el equipo
Instalación del software
P.48, 38 – 47
P.49 – 55
1
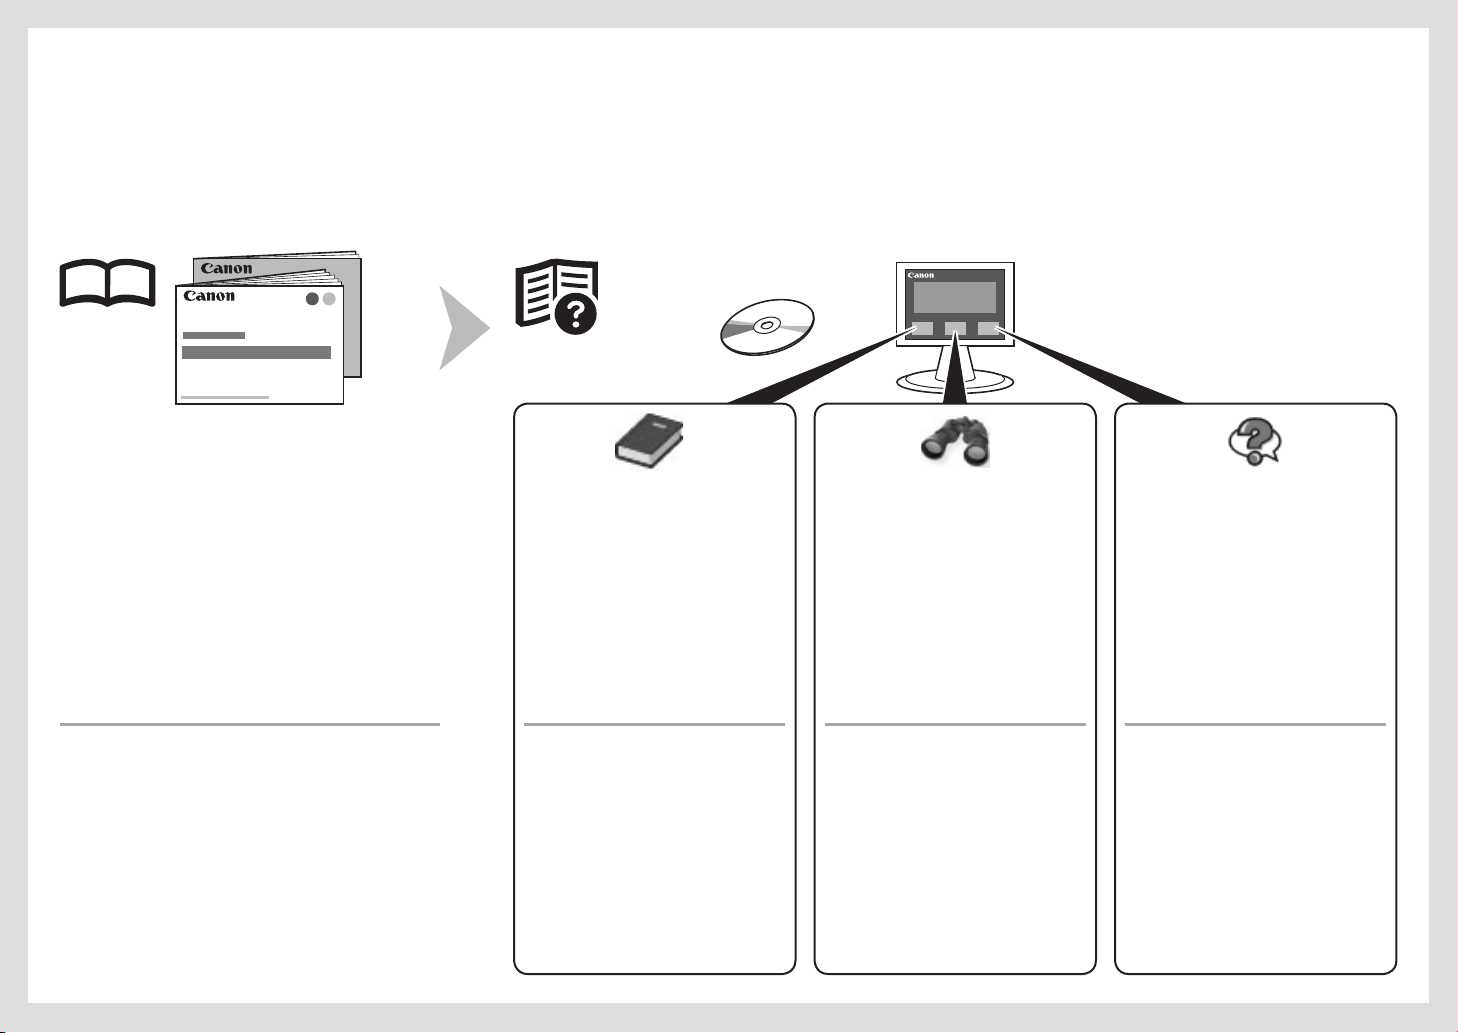
On-screen manuals can be viewed on a computer. They are included on the Setup CD-ROM and are installed during the software installation. For some languages parts of the manual may be displayed
in English. For details on opening the on-screen manuals, refer to page 49.
Los manuales en pantalla se pueden ver en un ordenador. Se incluyen en el CD-ROM de instalación (Setup CD-ROM) y se instalan durante el proceso de instalación del software. Quizá en algunos idiomas
haya partes del manual que aparezcan en inglés. Para obtener más información sobre cómo abrir los manuales en pantalla, consulte la página 49.
Get tin g S tar ted
•
(th is man ual )
Net wor k S etu p Tro ubl esh oot ing•
Describes how to set up and use your machine.
Describes basic operations and media,
and gives an introduction to other
functions available.
Adv anc ed Gui de Tr oub les hoo tin gBas ic Gui de
Describes various operating procedures
to make full use of machine.
Describes troubleshooting tips for
problems you may encounter when
using the machine.
Guí a d e i nic io
•
(e s te ma n ua l )
Sol uci ón de pro ble mas
•
de con fig ura ció n d e r ed
Describe cómo congurar y usar el equipo.
2
Describe las operaciones básicas y los
soportes y ofrece una introducción a otras
funciones disponibles.
Guí a a van zad a Sol uci ón de pro ble masGuí a b ási ca
Describe distintos procedimientos de
funcionamiento para aprovechar al
máximo todas las funciones del equipo.
Proporciona consejos para solucionar los
problemas que puedan surgir al utilizar
el equipo.
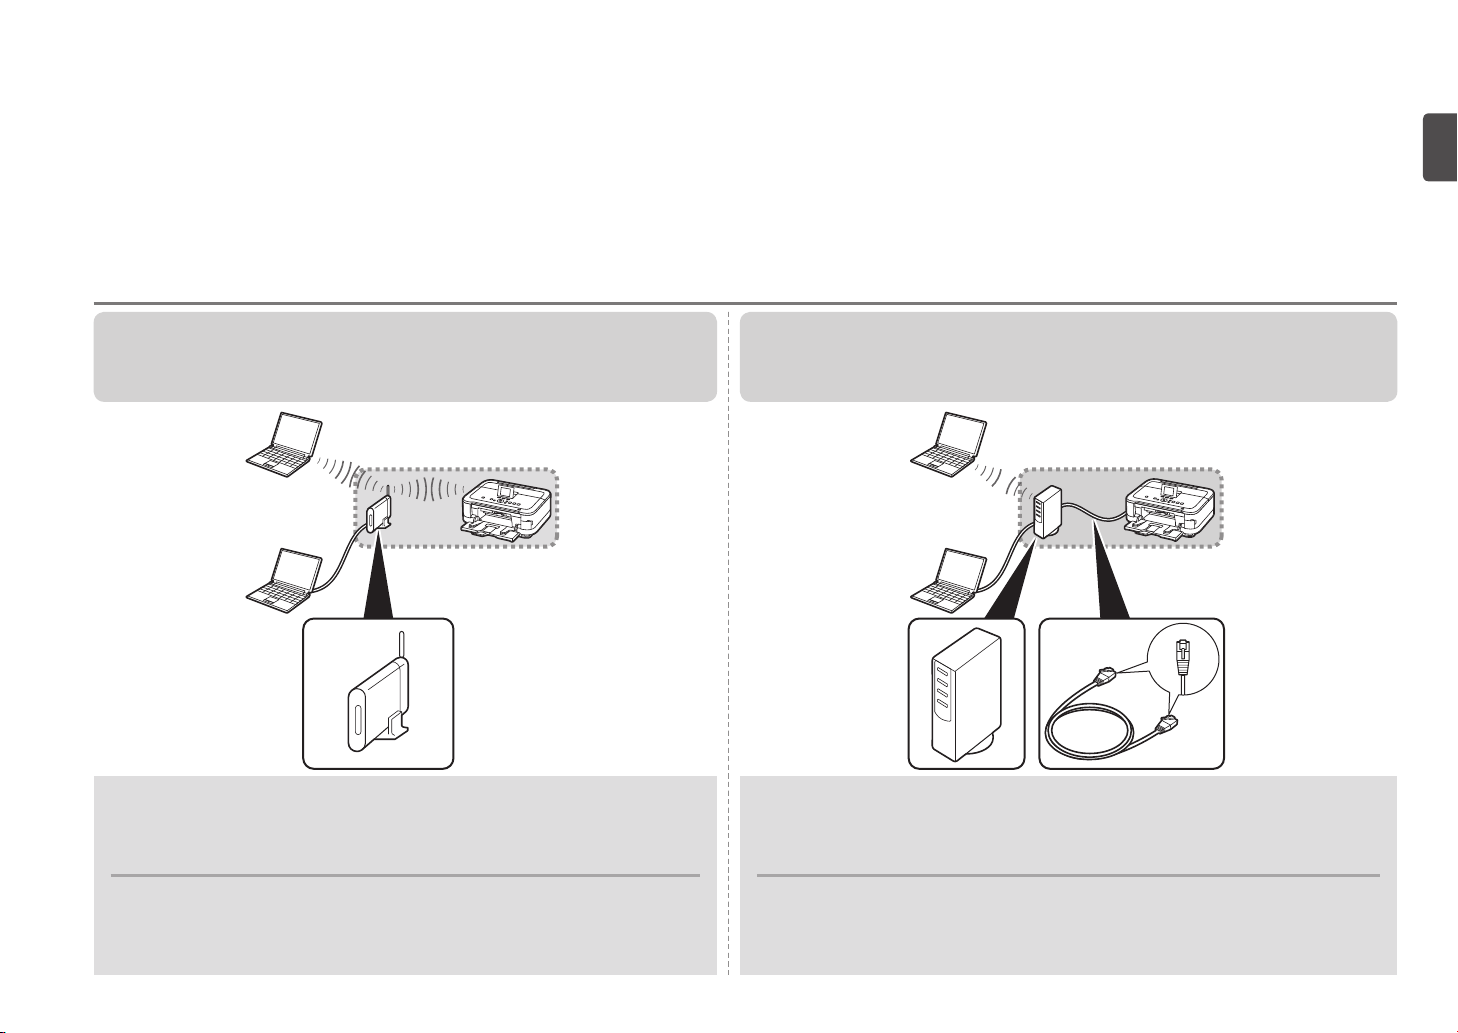
Devices Required for Wireless/Wired Connection■
Dispositivos necesarios para la conexión inalámbrica/por cable■
When using the machine over a wireless/wired connection, the following devices are required depending on the connection method.
Cuando el equipo se utilice mediante una conexión inalámbrica/por cable, se necesitarán los dispositivos siguientes en función del método de conexión.
Wireless Connection
Wired Connection
Conexión inalámbrica Conexión por cable
Access point or wireless router
Router, etc.
Punto de acceso o router
inalámbrico
A commercial access point or router that supports IEEE802.11b/g/n is required. A commercial network device (router, etc.) and Ethernet cable are required.
Se necesita un punto de acceso o router disponibles en comercios que sea
compatible con IEEE802.11b/g/n.
Router, etc.
Se necesita un dispositivo de red (router, etc.) y un cable Ethernet (disponibles
en comercios).
Ethernet cable
Cable Ethernet
3
1
1
A
Preparation
Preparativos
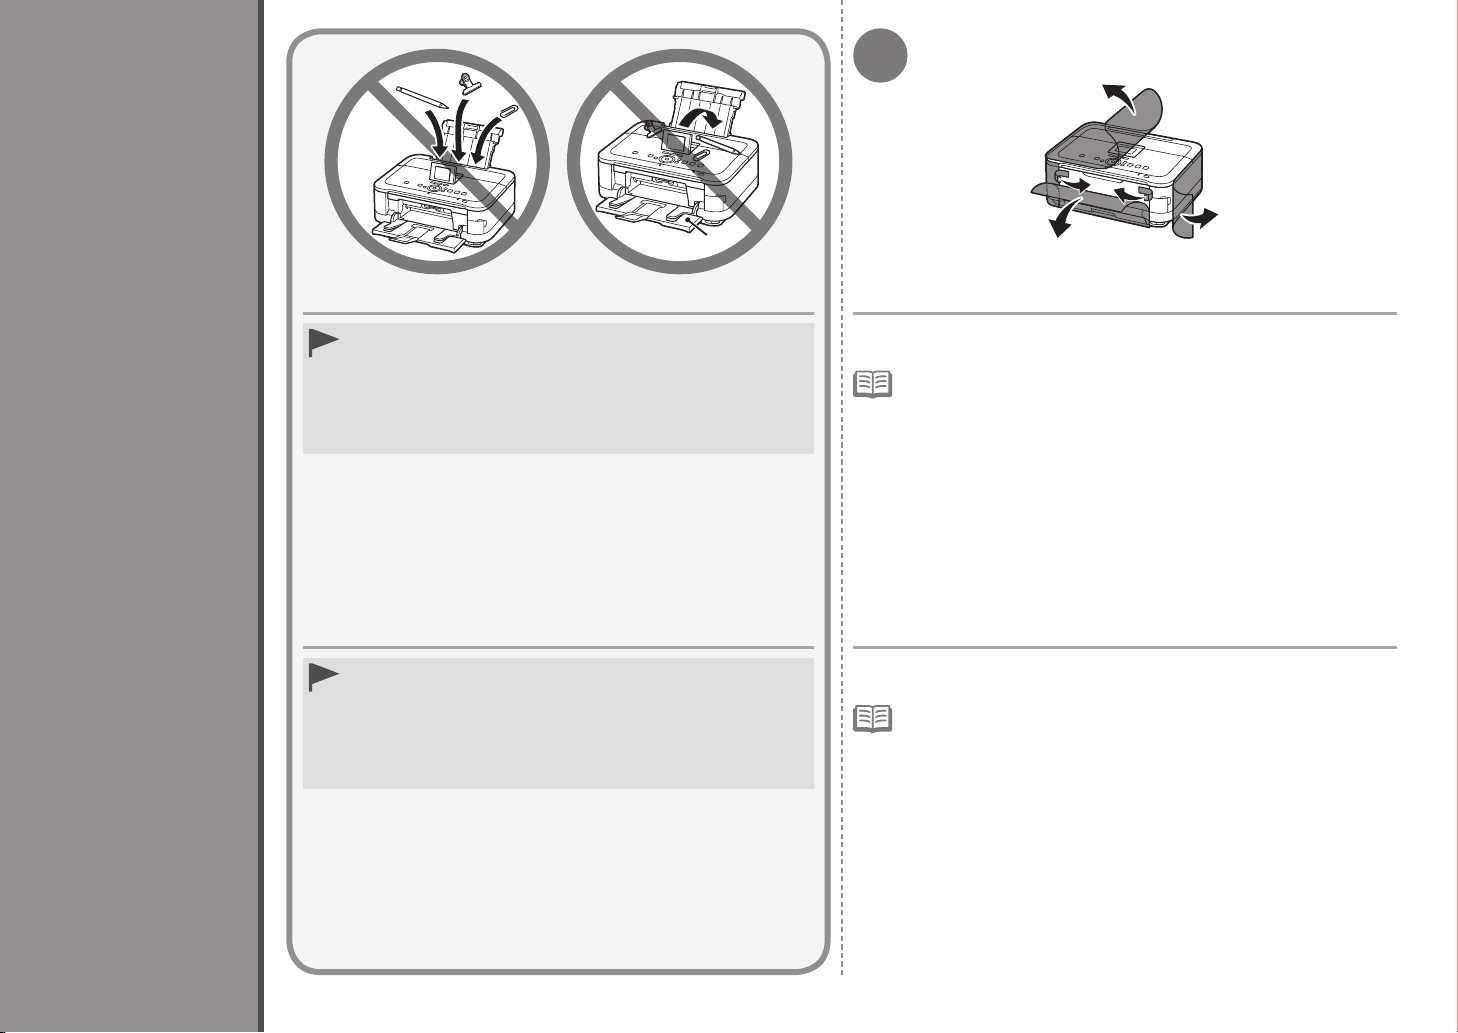
Do not install the machine where an object may fall on it. In addition,
•
do not place any object on the top of the machine. It may fall into the
machine when opening covers, resulting in malfunction.
Paper Output Tray (A) automatically opens when printing starts.
•
Do not place anything in front of the Paper Output Tray.
No instale el equipo en ningún lugar en el que le pudiera caer un
•
objeto encima. Además, no coloque ningún objeto encima del equipo.
Podría caer en el mismo al abrir las tapas, provocando un fallo de
funcionamiento.
La bandeja de salida del papel (A) se abre automáticamente cuando
•
comienza la impresión.
No coloque nada frente a la bandeja de salida del papel.
Remove all orange tape and protective materials from the inside and
outside of the machine.
The tape and protective materials may differ in shape and position from what
•
they actually are.
Retire todas las cintas naranjas y todos los materiales protectores
del interior y el exterior del equipo.
La forma y la posición de la cinta y los materiales protectores pueden variar
•
respecto a las reales.
4
2
A
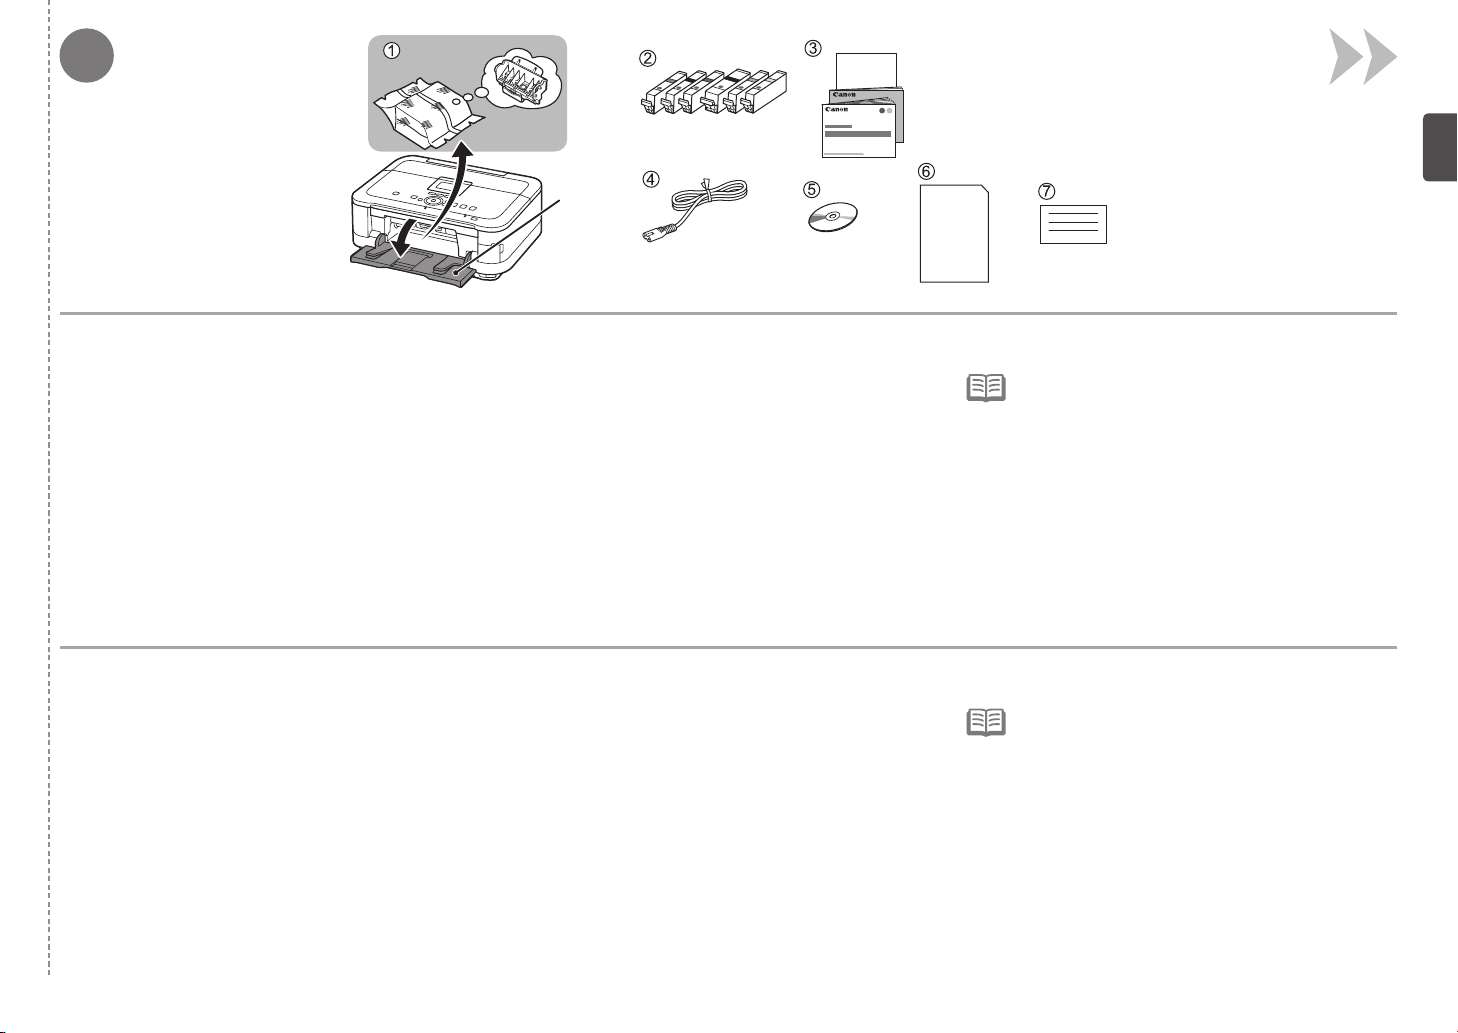
Make sure all the following items are supplied.
Some accessories (1) are stored within the Paper Output Tray (A). Open the Paper Output Tray to remove them.
1. Print Head
2. Ink tanks (6: M, BK, GY, PGBK, C, Y)
3. Manuals
4. Power cord
5. Setup CD-ROM (containing the drivers, applications and on-screen manuals)
6. Matte Photo Paper MP-101 (for Automatic Print Head Alignment)
7. Other documents
A USB cable is necessary to connect the machine with
•
your computer (USB connection only).
Compruebe que no falta ninguno de los elementos siguientes.
Algunos accesorios (1) se guardan dentro de la bandeja de salida del papel (A). Abra la bandeja de salida del papel para extraerlos.
1. Cabezal de impresión
2. Depósitos de tinta (6: M, BK, GY, PGBK, C, Y)
3. Manuales
4. Cable de alimentación
5. CD-ROM de instalación (Setup CD-ROM) (contiene los controladores, las aplicaciones y los manuales en pantalla)
6. Papel Fotográfico Mate (Matte Photo Paper) MP-101 (para la alineación automática del cabezal de impresión)
7. Otros documentos
Se necesita un cable USB para conectar el equipo
•
al ordenador (sólo mediante conexión USB).
5
3 4
B
C
D
5
E
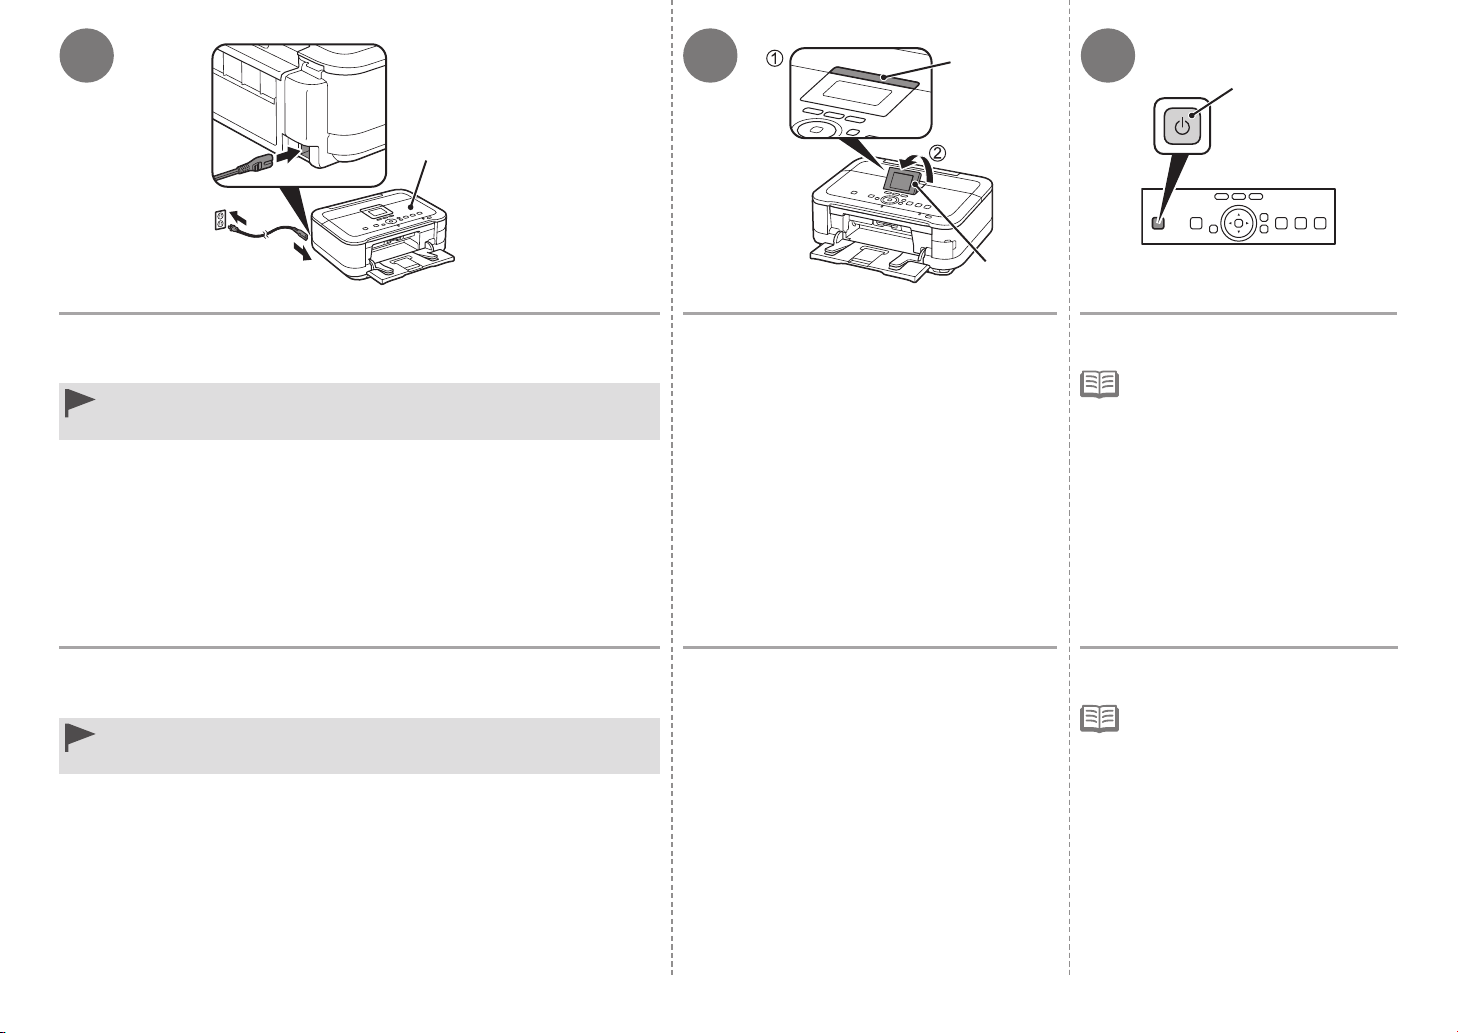
Insert the power cord into the connector on the left side at the back of the
machine and into the wall outlet firmly.
Do NOT connect the USB cable or Ethernet cable at this stage.
•
Make sure that the Document Cover (B) is closed.
•
Introduzca firmemente el cable de alimentación en el conector situado a la
izquierda de la parte posterior del equipo y a la toma de corriente.
NO conecte el cable USB o Ethernet en este momento.
•
Asegúrese de que la cubierta de documentos (B) esté cerrada.
•
Press the LCD open button (C) (1), then
adjust the LCD (Liquid Crystal Display) (D)
to a comfortable viewing angle (2).
Pulse el botón Abrir LCD (C) (1), ajuste
a continuación la pantalla LCD (pantalla de
cristal líquido) (D) para obtener un ángulo
de visión cómodo (2).
Press the ON button (E).
The machine may make some operating
•
noises. This is normal operation.
It takes about 4 seconds for the ON
•
button to work after the power cord
is plugged in.
Pulse el botón ACTIVADO (ON) (E).
El equipo puede producir algunos
•
ruidos durante el funcionamiento.
Esto es normal.
Una vez conectado el cable de
•
corriente, el botón ACTIVADO (ON)
tarda unos 4 segundos en ponerse
en funcionamiento.
6
6 7
F
G
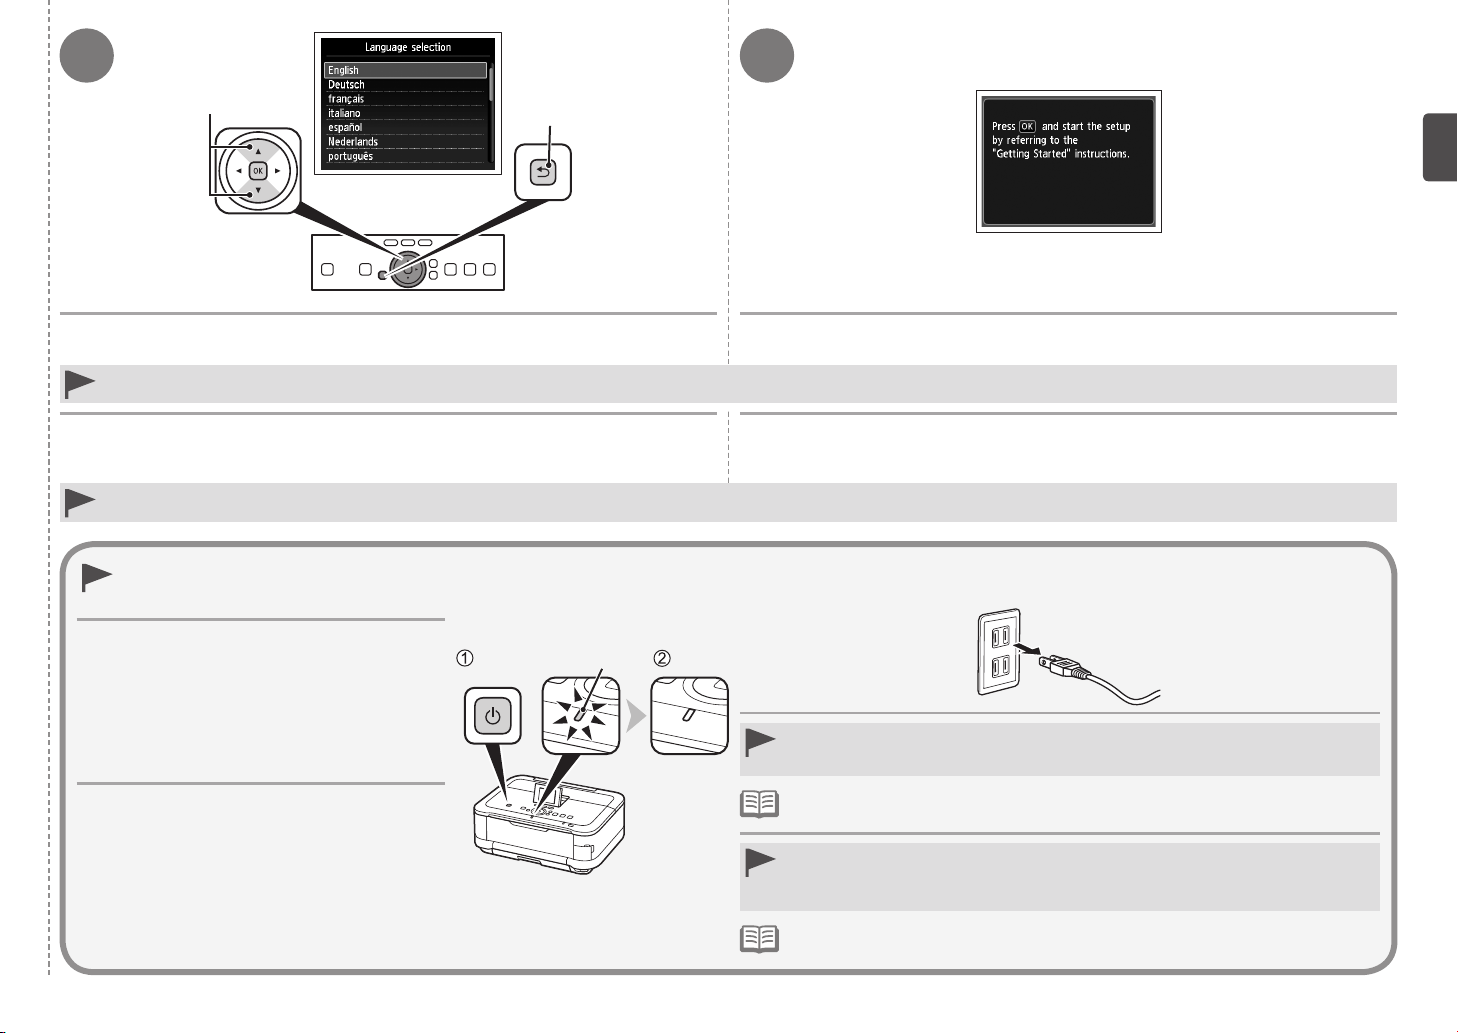
Use the { or } button (F) on the Operation Panel to select the language for the
LCD, then touch the OK button.
If an unintended language is displayed on the LCD, touch the Back button (G) to return to the Language selection screen. •
Utilice el botón { o } (F) del panel de control para seleccionar el idioma de la
pantalla LCD y, a continuación, toque el botón OK.
Si el idioma de la pantalla LCD no es el deseado, toque el botón Atrás (Back) (G) para volver a la pantalla Selección idioma (Language selection).•
When it is necessary to turn off the machine
Cuando sea necesario desconectar el equipo
Be sure to follow the procedure below.
1. Press the
2. Make sure that the
ON button to turn off the machine.
POWER lamp (H) is not lit.
H
When the above screen is displayed, touch the OK button and go to the next step.
Cuando aparezca la pantalla anterior, toque el botón OK y continúe con el
paso siguiente.
Operating noise may continue for up to 25 seconds until
the machine turns off.
Asegúrese de seguir el procedimiento que se explica
a continuación.
1. Pulse el botón
el equipo.
2. Asegúrese de que la luz de
(H) no está iluminada.
Hasta que el equipo se apague, se podrán seguir
escuchando ruidos de funcionamiento durante hasta
25 segundos.
ACTIVADO (ON) para desconectar
encendido (POWER)
When removing the power plug, make sure that the POWER lamp is not lit before removing
•
the plug. Removing the power plug while the POWER lamp lights up or ashes may cause
drying and clogging of the Print Head, resulting in poor printing.
The specication of the power cord differs for each country or region. •
Antes de retirar el cable de alimentación, asegúrese de que no esté iluminada la luz de
•
encendido (POWER). Si se retira el cable de alimentación mientras la luz de encendido
(POWER) está iluminada o parpadea, el cabezal de impresión se podría secar y obstruir,
teniendo como resultado una impresión de mala calidad.
Las especicaciones del cable de alimentación varían según el país o la región de uso.•
7
2
1
2
B
B
A
C
Install the Print Head
Instalación del cabezal de impresión
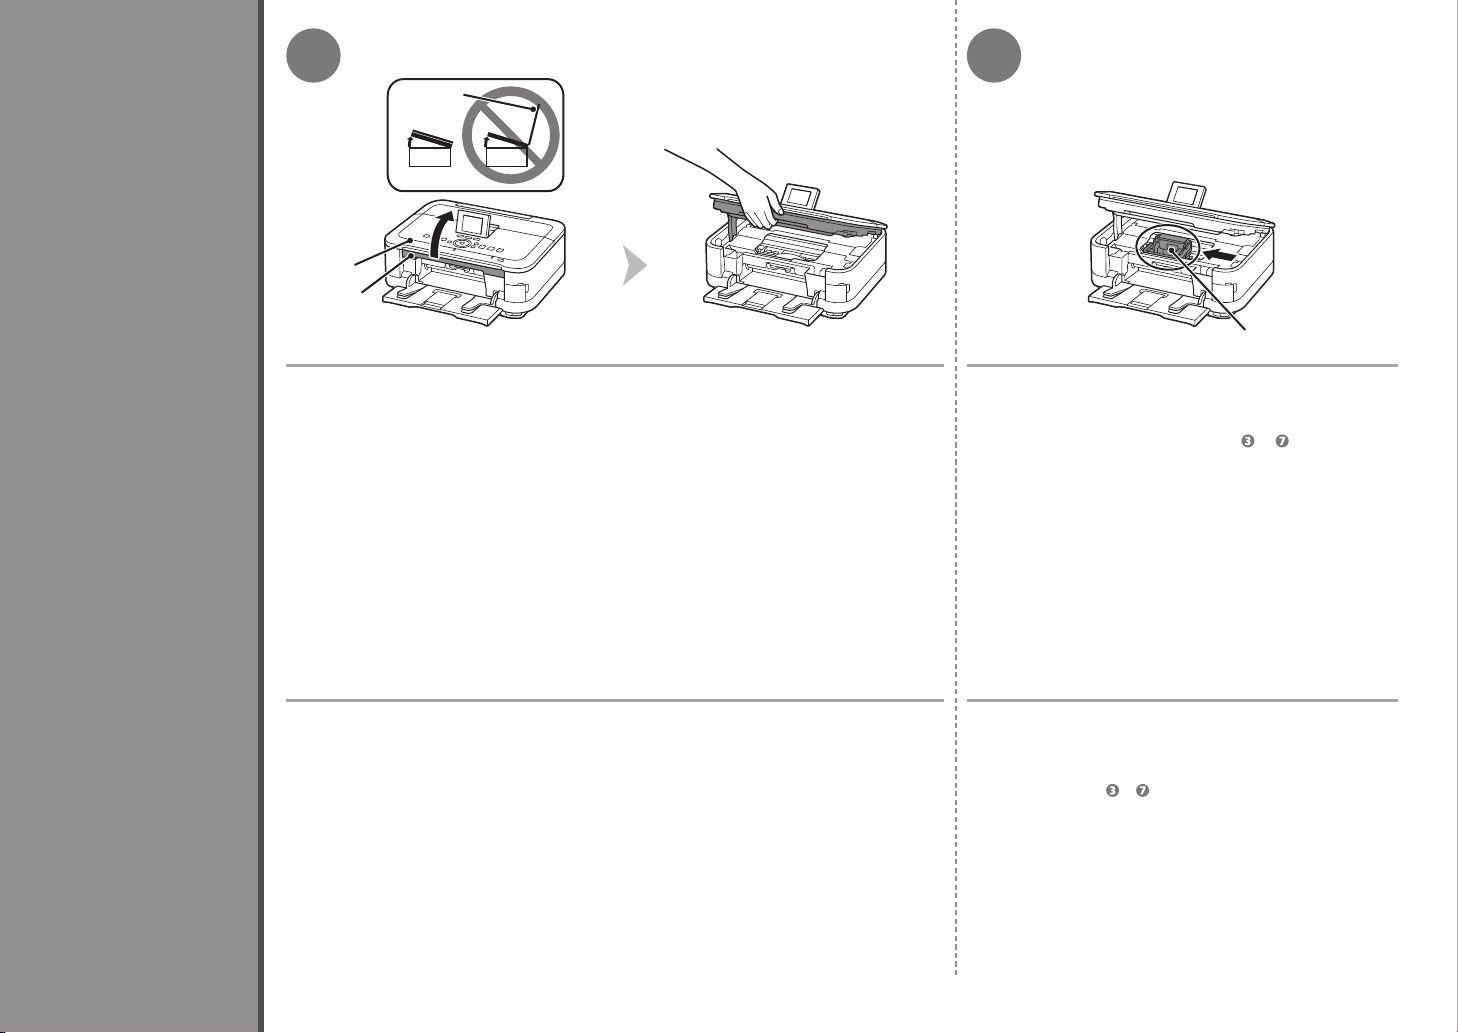
Lift the Scanning Unit (Cover) (A) until it stops.
Close the Document Cover (B) and lift it with the Scanning Unit (Cover).
Levante la unidad de escaneado (cubierta) (A) hasta que se detenga.
Cierre la cubierta de documentos (B) y levántela con la unidad de escaneado (cubierta).
The Print Head Holder (C) moves to the installation
position.
If the Print Head Holder does not move, make sure that the
machine is turned on. For details, refer to to on page 6 in
“1 Preparation”.
El soporte del cabezal de impresión (C) se desplazará
a la posición de instalación.
Si el soporte del cabezal de impresión no se desplaza, asegúrese
de que el equipo esté encendido. Para conocer todos los
detalles, consulte de a en la página 6 de "1 Preparativos".
8
3 5
4
D
E
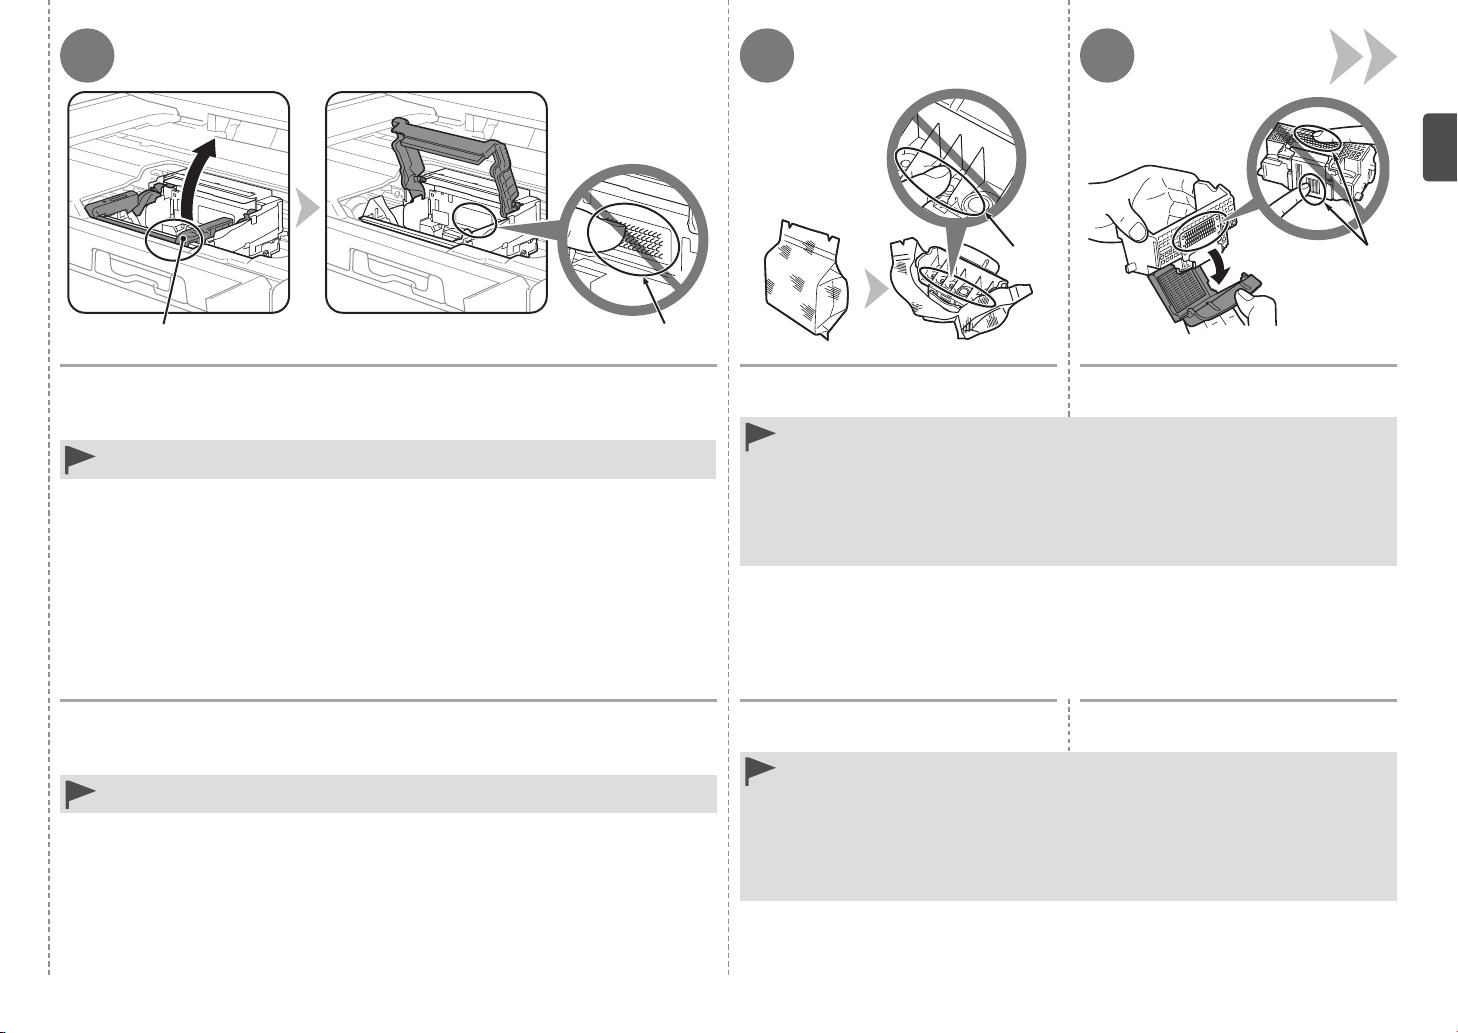
Firmly lift the part (D) of the Print Head Lock Lever in the Print Head Holder until
it stops.
The Print Head Lock Lever may feel heavy.
Do not touch the inside of the Print Head Holder (E). The machine may not print properly if you
•
touch it.
Levante rmemente la parte (D) de la palanca de bloqueo del cabezal de impresión
del soporte del cabezal de impresión hasta que se detenga.
La palanca de bloqueo del cabezal de impresión puede ofrecer cierta resistencia.
No toque el interior del soporte del cabezal de impresión (E). Si se toca, es posible que el
•
equipo no imprima correctamente.
Remove the Print Head from the
silver package.
Handle the Print Head carefully. Do not drop or apply excessive pressure to it.
•
Do not touch the inside (F) or metal parts (G) of the Print Head. The machine may not print
•
properly if you touch them.
There may be some transparent or light blue ink on the inside of the bag the Print Head comes
•
in, or the inside of the protective cap - this has no effect on print quality. Be careful not to get
ink on yourself when handling these items.
Retire el cabezal de impresión del
embalaje plateado.
Maneje el cabezal de impresión con cuidado. No lo deje caer ni le aplique una presión excesiva.
•
No toque el interior (F) ni las piezas metálicas (G) del cabezal de impresión. Si los toca, puede
•
que el equipo no imprima correctamente.
Puede haber un poco de tinta transparente o de color azul claro dentro de la bolsa en la que
•
viene el cabezal de impresión o dentro de la tapa protectora: esto no afecta a la calidad de
impresión. Tenga cuidado para no mancharse de tinta al manipular estos componentes.
F
G
Remove the orange protective cap.
Retire la tapa protectora naranja.
9
76
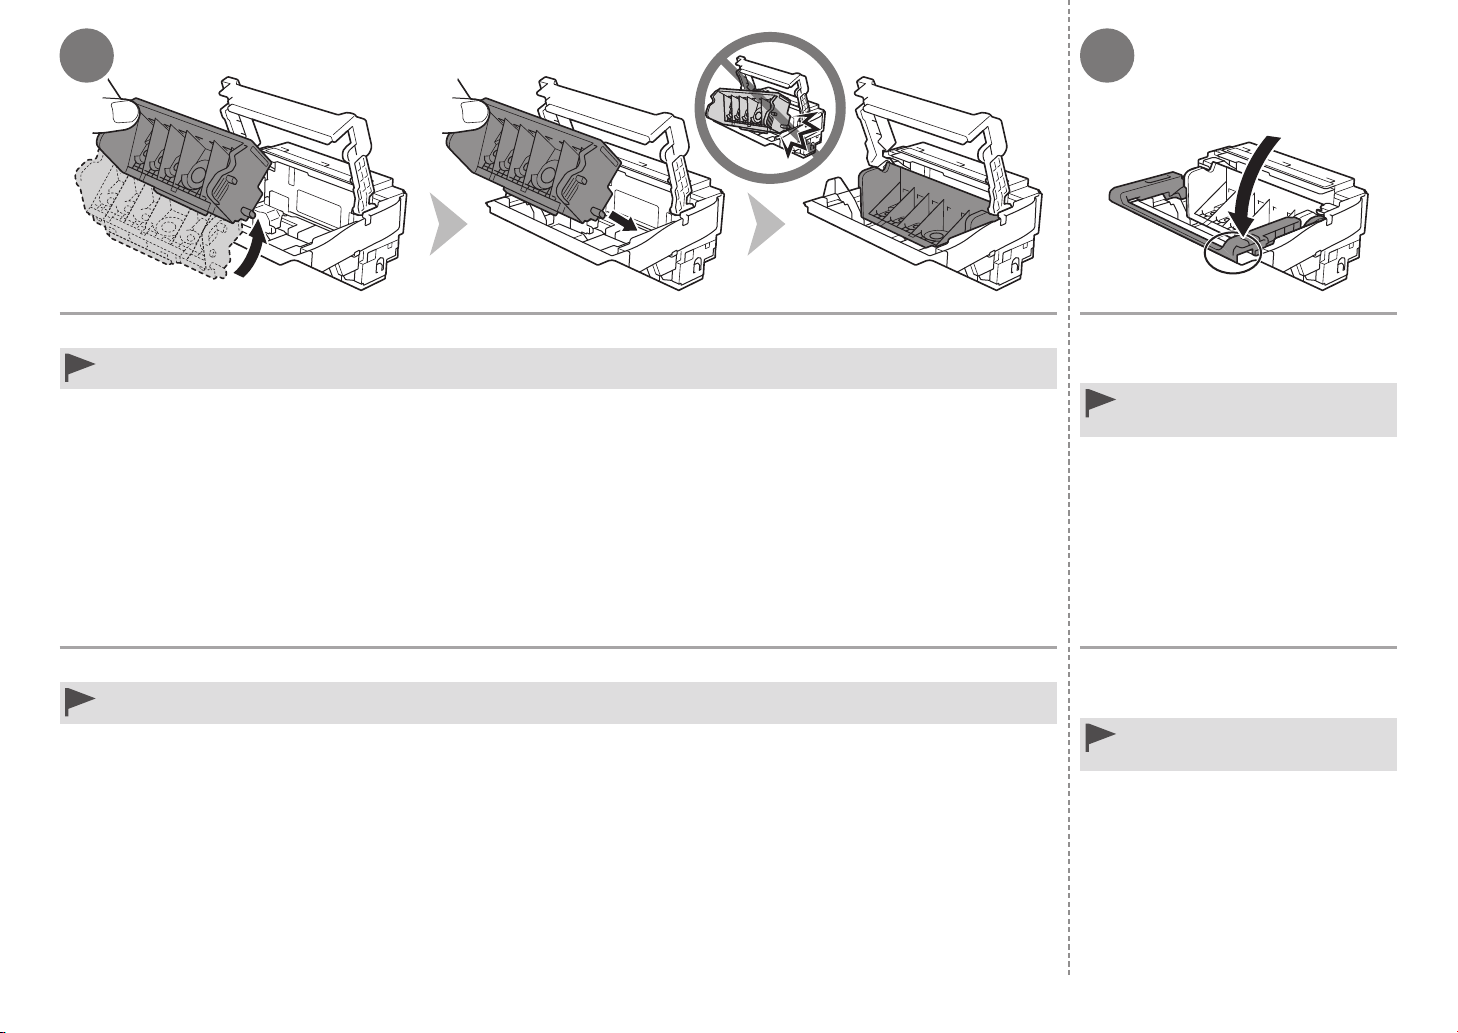
Tilt the Print Head forward and set it in place as shown.
Do not knock the Print Head against the sides of the holder.
•
Install in a well-lit environment.
•
Incline el cabezal de impresión hacia adelante y sitúelo como se muestra.
No golpee el cabezal de impresión contra los laterales del soporte.
•
Instálelo en un ambiente bien iluminado.
•
Hold the Print Head Lock Lever firmly
and lower it completely.
Once you have installed the Print Head,
•
do not remove it unnecessarily.
Sujete firmemente la palanca de
bloqueo del cabezal de impresión
y bájela por completo.
Una vez instalado el cabezal de
•
impresión, no lo retire si no es
necesario.
10
3
Install the Ink Tanks
1 2 3
B
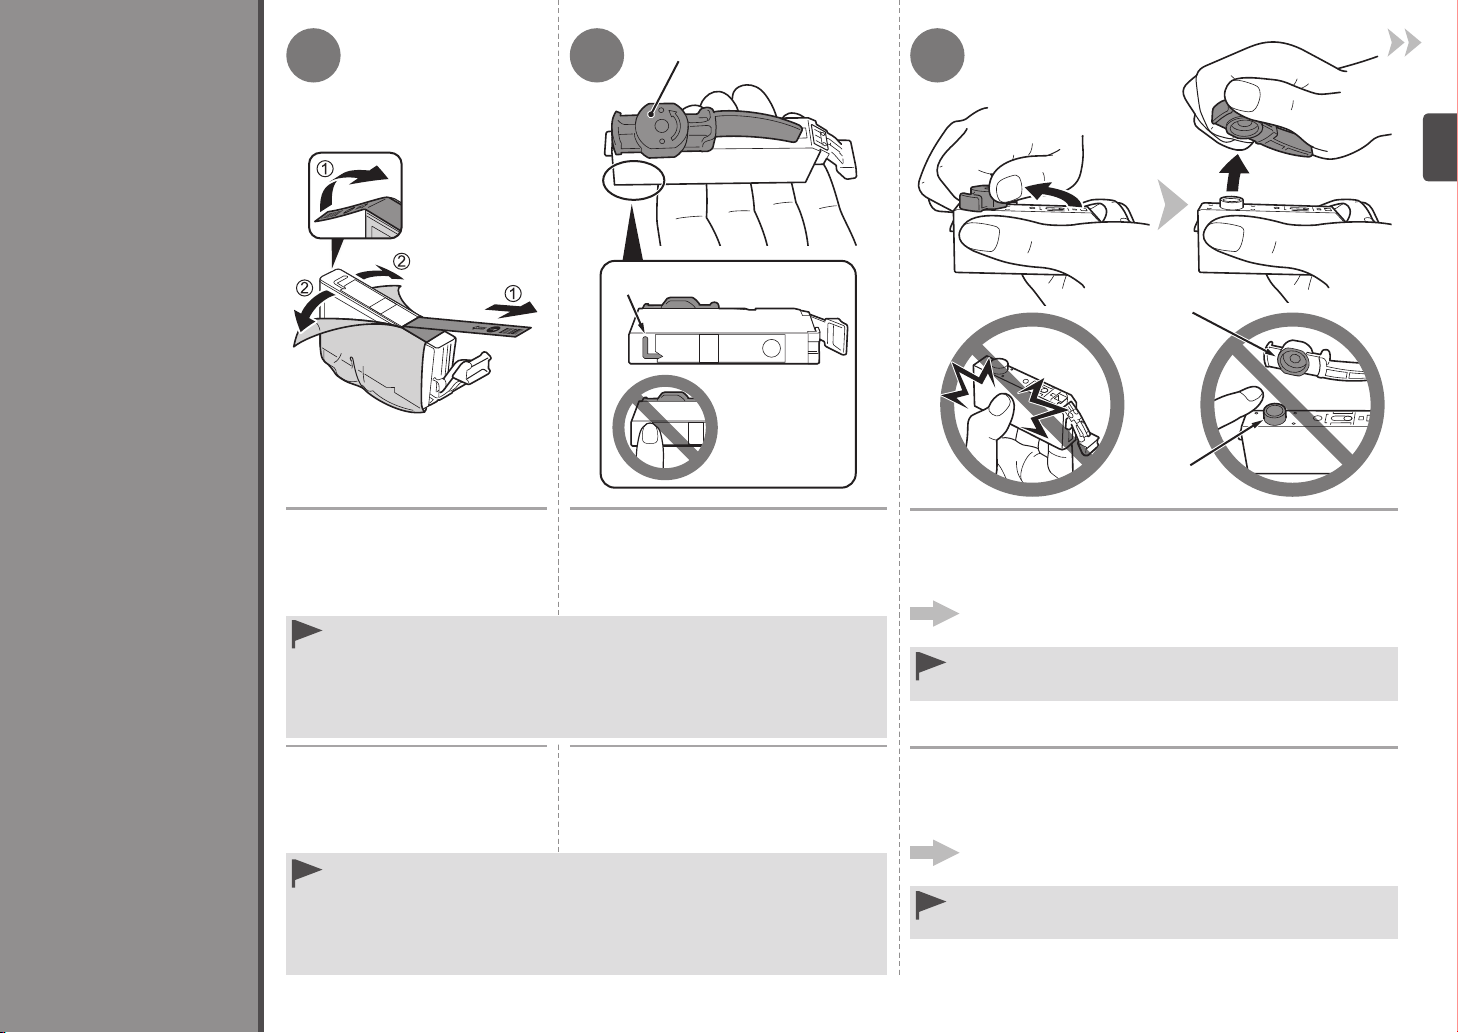
1. Remove the orange tape
completely.
2. Remove the protective film
completely.
Handle the ink tanks carefully. Do not drop or apply excessive pressure to them.
•
Be sure to use the supplied ink tanks.
•
If the orange tape remains on the L-shape air hole, ink may splash or the machine
•
may not print properly.
If you push the sides of the ink tank with the L-shape air hole blocked, ink may splash.
•
Hold the ink tank with the orange
protective cap (A) pointing up while
being careful not to block the L-shape
air hole (B).
A
C
D
Hold the ink tank by its sides and slowly twist the orange
protective cap 90 degrees horizontally to remove it off.
Do not push the sides of the ink tank.
Go to the next page.
Do not touch the inside (C) of the orange protective cap or the open
•
ink port (D). The ink may stain your hands if you touch them.
Instalación de los depósitos de tinta
1. Retire totalmente la cinta
naranja.
2. Retire totalmente la película
protectora.
Maneje los depósitos de tinta con cuidado. No los deje caer ni les aplique una
•
presión excesiva.
Asegúrese de usar los depósitos de tinta suministrados.
•
Si queda cinta naranja en el oricio de ventilación con forma de L, la tinta podría
•
salpicar o el equipo podría no imprimir correctamente.
Si se aprietan los laterales de un depósito de tinta con el oricio de ventilación
•
en forma de L bloqueado, la tinta podría salpicar.
Mantenga el depósito de tinta con
la tapa protectora (A) naranja hacia
arriba teniendo cuidado de no bloquear
el orificio de ventilación con forma
de L (B).
Sujete el depósito de tinta por los laterales y gire lentamente la
tapa protectora naranja 90 grados en horizontal para retirarla.
No apriete los laterales del depósito de tinta.
Vaya a la siguiente página.
No toque el interior (C) de la tapa protectora naranja ni la salida de
•
tinta abierta (D). Si los toca, podría mancharse las manos de tinta.
11
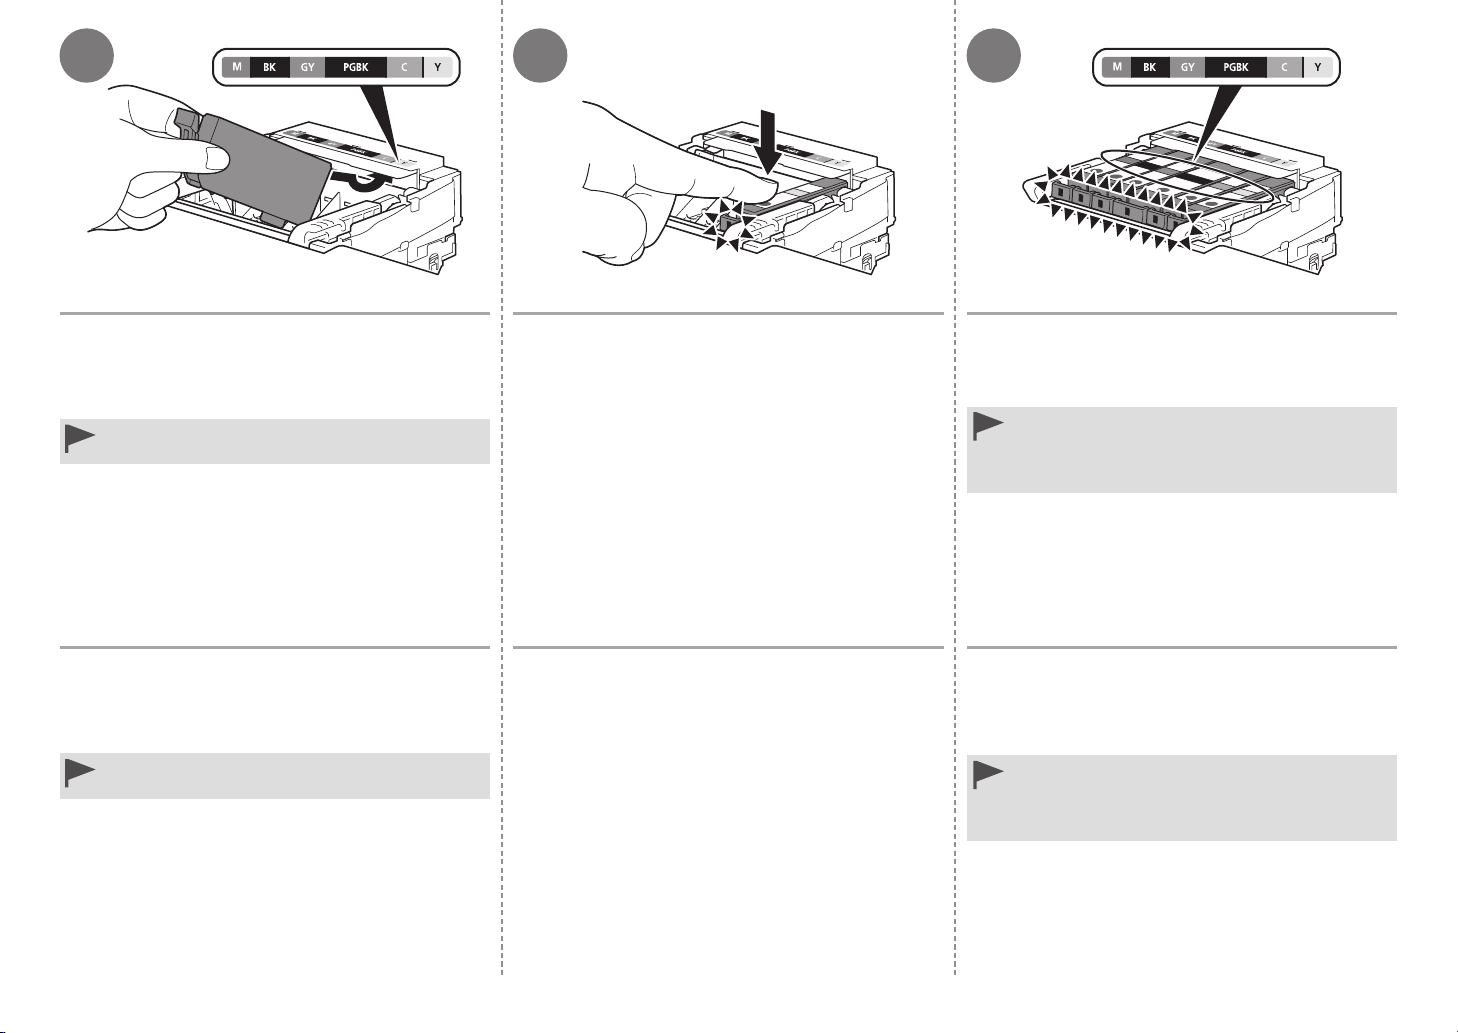
5 64
Tilt the ink tank, then insert it under the label and
against the back end of the slot.
Make sure that the color of the label matches the ink tank.
Install in a well-lit environment.•
Incline el depósito de tinta y, a continuación,
introdúzcalo bajo la etiqueta y contra la parte
trasera de la ranura.
Asegúrese de que el color de la etiqueta coincide con el del
depósito de tinta.
Instálelo en un entorno bien iluminado.•
Press the PUSH mark on the ink tank firmly until
it clicks.
When the installation is completed properly, the Ink lamp lights red.
Presione firmemente la marca PUSH del depósito de
tinta hasta que haga clic en su lugar.
Cuando la instalación finaliza correctamente, la lámpara de tinta
(Ink) se ilumina de color rojo.
Install all the other ink tanks in the same way according
to the color order indicated on the label.
Make sure all the Ink lamps light red.
Once you have installed the ink tanks, do not remove
•
them unnecessarily.
If the Print Head Holder moves to the right, close and
•
reopen the Scanning Unit (Cover).
Instale los demás depósitos de tinta de la misma
manera según el orden de los colores indicado en
la etiqueta.
Asegúrese de que todas las lámparas de tinta (Ink) están
encendidas de color rojo.
Una vez instalados los depósitos de tinta, no los extraiga
•
a menos que sea necesario.
Si el soporte del cabezal de impresión se desplaza hacia
•
la derecha, cierre la unidad de escaneado (cubierta)
y vuelva a abrirla.
12
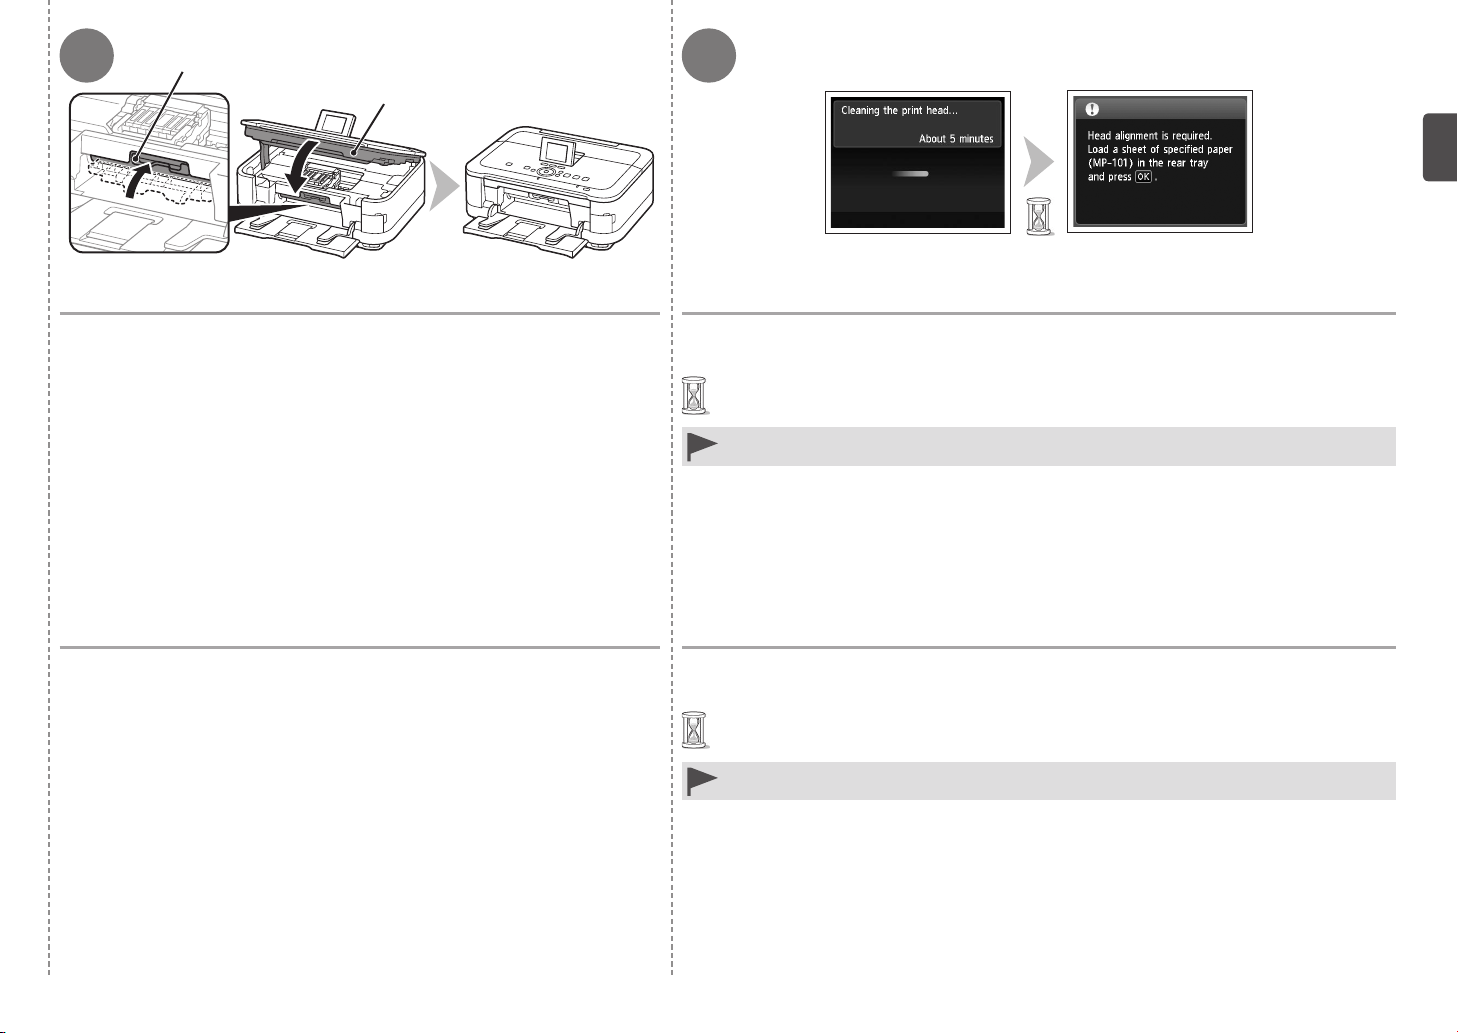
7 8
F
E
Close the Scanning Unit (Cover) (E).
Make sure the Inner Cover (F) is closed.
Cierre la unidad de escaneado (cubierta) (E).
Asegúrese de que la cubierta interior (F) esté cerrada.
Make sure that the LCD changes as shown in the illustration and go to the next step.
Do not touch the OK button yet.
It takes about 5 minutes before the LCD changes.
•
The machine may make some operating noises when preparing to print. This is normal operation.
•
If an error message is displayed on the LCD, make sure that the Print Head and the ink tanks are
•
correctly installed.
Asegúrese de que la pantalla LCD cambie como se muestra en la ilustración y vaya
al siguiente paso.
No toque todavía el botón OK.
Deberán transcurrir alrededor de 5 minutos para que cambie la pantalla LCD.
•
Es posible que el equipo emita ciertos ruidos de funcionamiento mientras se prepara para imprimir.
•
Esto es parte del funcionamiento normal.
Si aparece un mensaje de error en la pantalla LCD, asegúrese de que el cabezal de impresión y los
•
depósitos de tinta estén correctamente instalados.
13
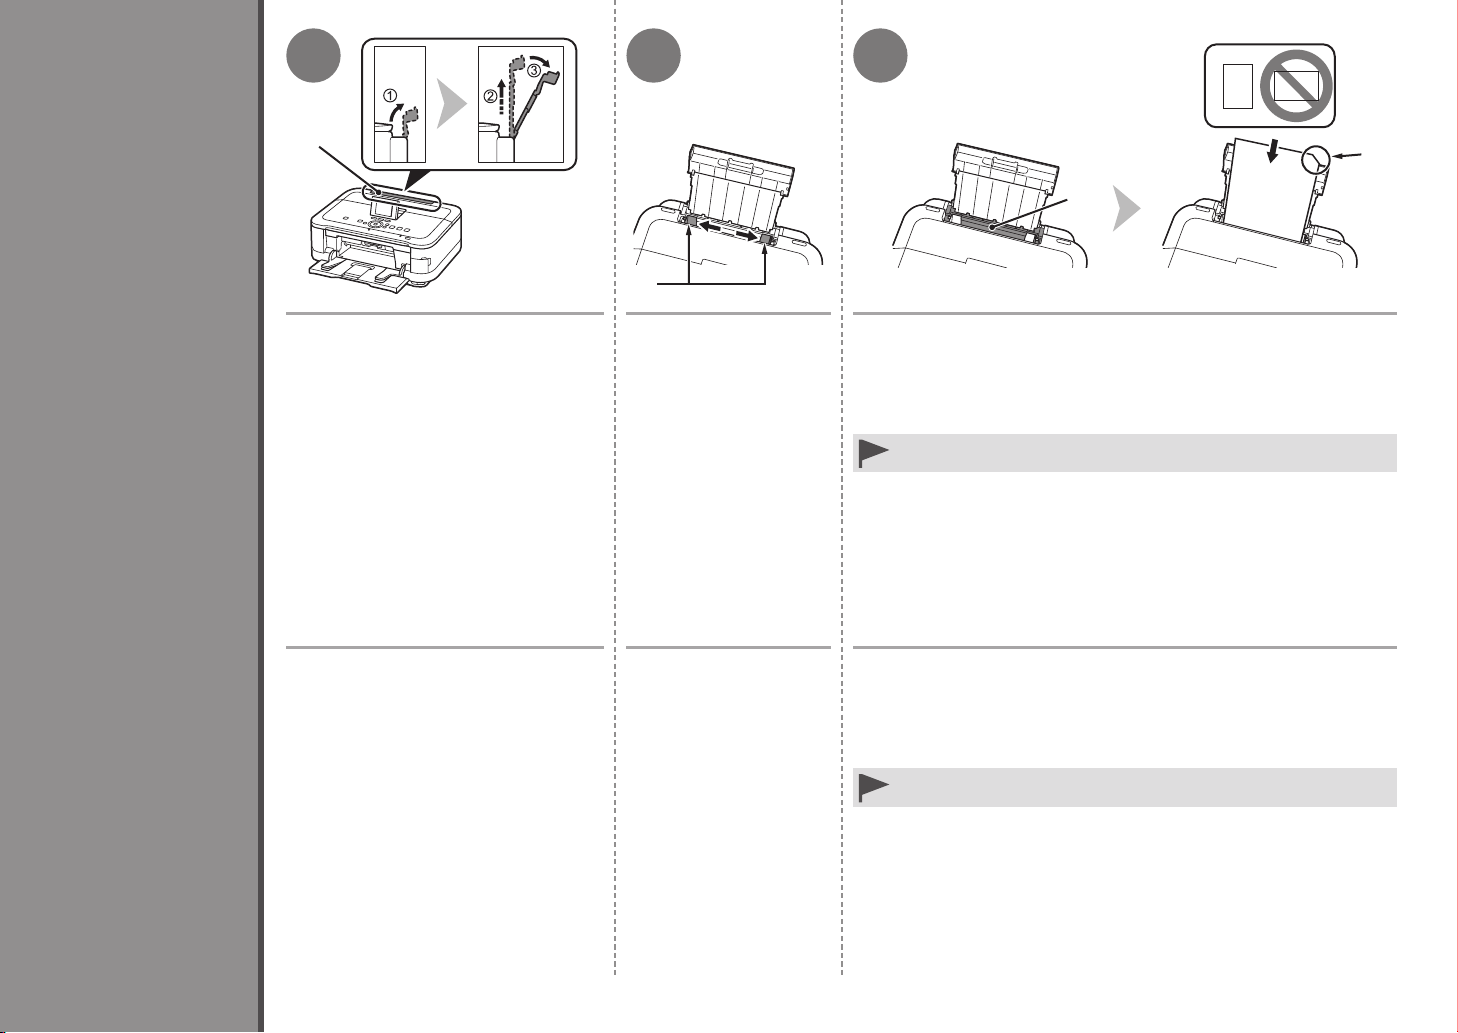
4
1 32
A
B
D
C
Align the Print Head
Alineación del cabezal de impresión
Prepare the Paper Support (A).
1. Open it.
2. Withdraw it upwards.
3. Tilt it back.
Prepare el soporte del papel (A).
1. Ábralo.
2. Tire de él hacia arriba.
3. Échelo hacia atrás.
Move the Paper Guides
(B) to both edges.
Desplace las guías del
papel (B) hasta ambos
bordes.
Load a sheet of supplied specialty paper (Matte Photo Paper MP-101)
in the Rear Tray (C).
Load paper in portrait orientation so that the cut corner (D) is at the top right.
Be sure to use MP-101 for Print Head Alignment.•
Cargue una hoja del papel especial suministrado (Papel Fotográfico
Mate (Matte Photo Paper) MP-101) en la bandeja posterior (C).
Cargue el papel con orientación vertical de manera que la esquina del corte (D)
esté en la parte superior derecha.
Asegúrese de utilizar el papel MP-101 para la alineación del cabezal
•
de impresión.
14
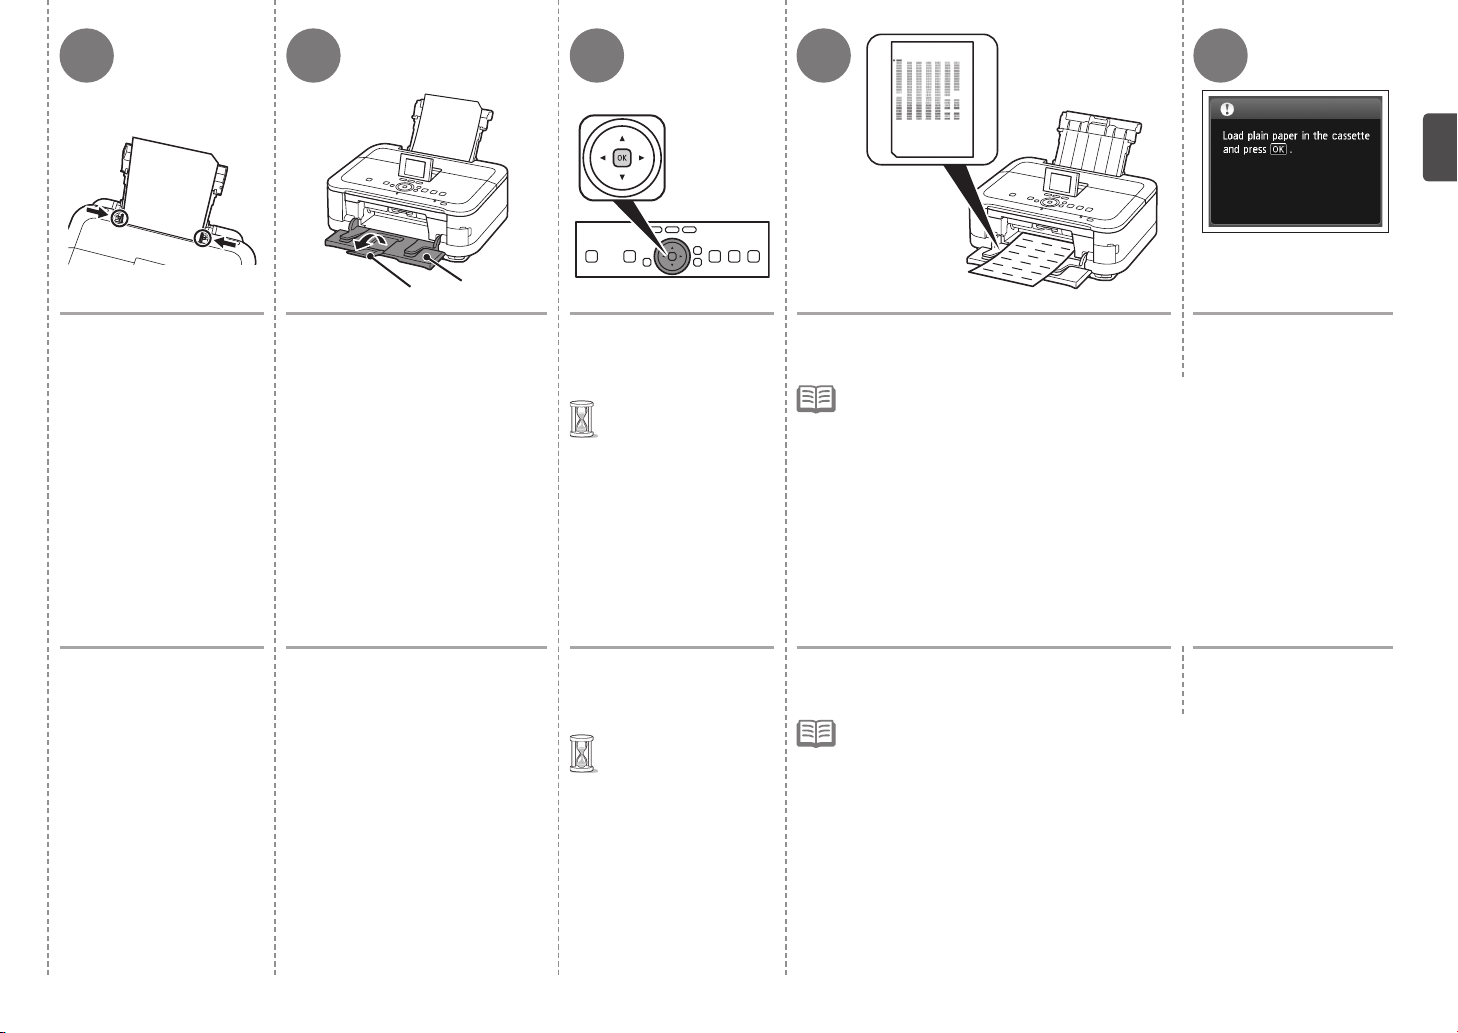
4 65 7 8
E
F
Slide the left and right
Paper Guides against
both edges of the paper.
Deslice las guías
de papel izquierda
y derecha contra ambos
bordes del papel.
Make sure the Paper Output
Tray (E) is open, then open
the Output Tray Extension (F).
If printing starts while the Paper Output
Tray is closed, it will automatically open.
Compruebe que la bandeja
de salida del papel (E) está
abierta y, a continuación, abra
la extensión de la bandeja de
salida (F).
Si la impresión comienza con la bandeja
de salida del papel cerrada, se abrirá
automáticamente.
Touch the OK button.
Print Head Alignment starts.
Print Head
•
Alignment takes
about 4 minutes
to complete.
Toque el botón OK.
Se iniciará la alineación del
cabezal de impresión.
La alineación
•
del cabezal de
impresión tarda
aproximadamente
4 minutos
en finalizar.
When the pattern is printed, remove the
printed paper.
Print Head Alignment is now complete.
When an error message is displayed on the LCD, touch the OK button to clear the
•
error, then go to the next step. After the installation is complete, perform Print Head
Alignment by referring to “When Printing Becomes Faint or Colors Are Incorrect” in the
on-screen manual: Basic Guide.
The pattern is printed in black and blue.
•
Cuando se haya imprimido el patrón, retire el
papel impreso.
La alineación del cabezal de impresión habrá concluido.
Si se muestra un mensaje de error en la pantalla LCD, toque el botón OK para
•
eliminarlo y continúe con el paso siguiente. Cuando nalice la instalación, lleve acabo
la alineación del cabezal de impresión tal como se explica en “Cuando la impresión
es borrosa o los colores no son los correctos” del manual en pantalla: Guía básica.
El patrón se imprime en negro y azul.
•
Confirm the above
message, then go to
the next step.
Compruebe el mensaje
anterior y continúe con
el paso siguiente.
15
5
Load Paper
With the machine, the paper source varies
depending on the media type.
Con el equipo, el origen del papel varía en
función del tipo de soporte.
Specialty paper
including photo paper
Load paper in the Rear Tray
(A).
Papel especial,
incluido el fotográco
Carga del papel
Cargue el papel en la
bandeja posterior (A).
B
Plain paper
Load paper in the Cassette
(B).
Papel normal
Cargue el papel en el
cassette (B).
A
How to load specialty paper in the Rear Tray □
Cómo se carga el papel especial en la
□
bandeja posterior
This section describes how to load plain paper in the
Cassette. For details on how to load specialty paper in the
Rear Tray, refer to to in “4 Align the Print Head” on
page 14.
En esta sección se describe cómo se carga el papel normal
en el cassette. Para obtener más información sobre cómo
se carga el papel especial en la bandeja posterior, consulte
de a de "4 Alineación del cabezal de impresión" en la
página 14.
C
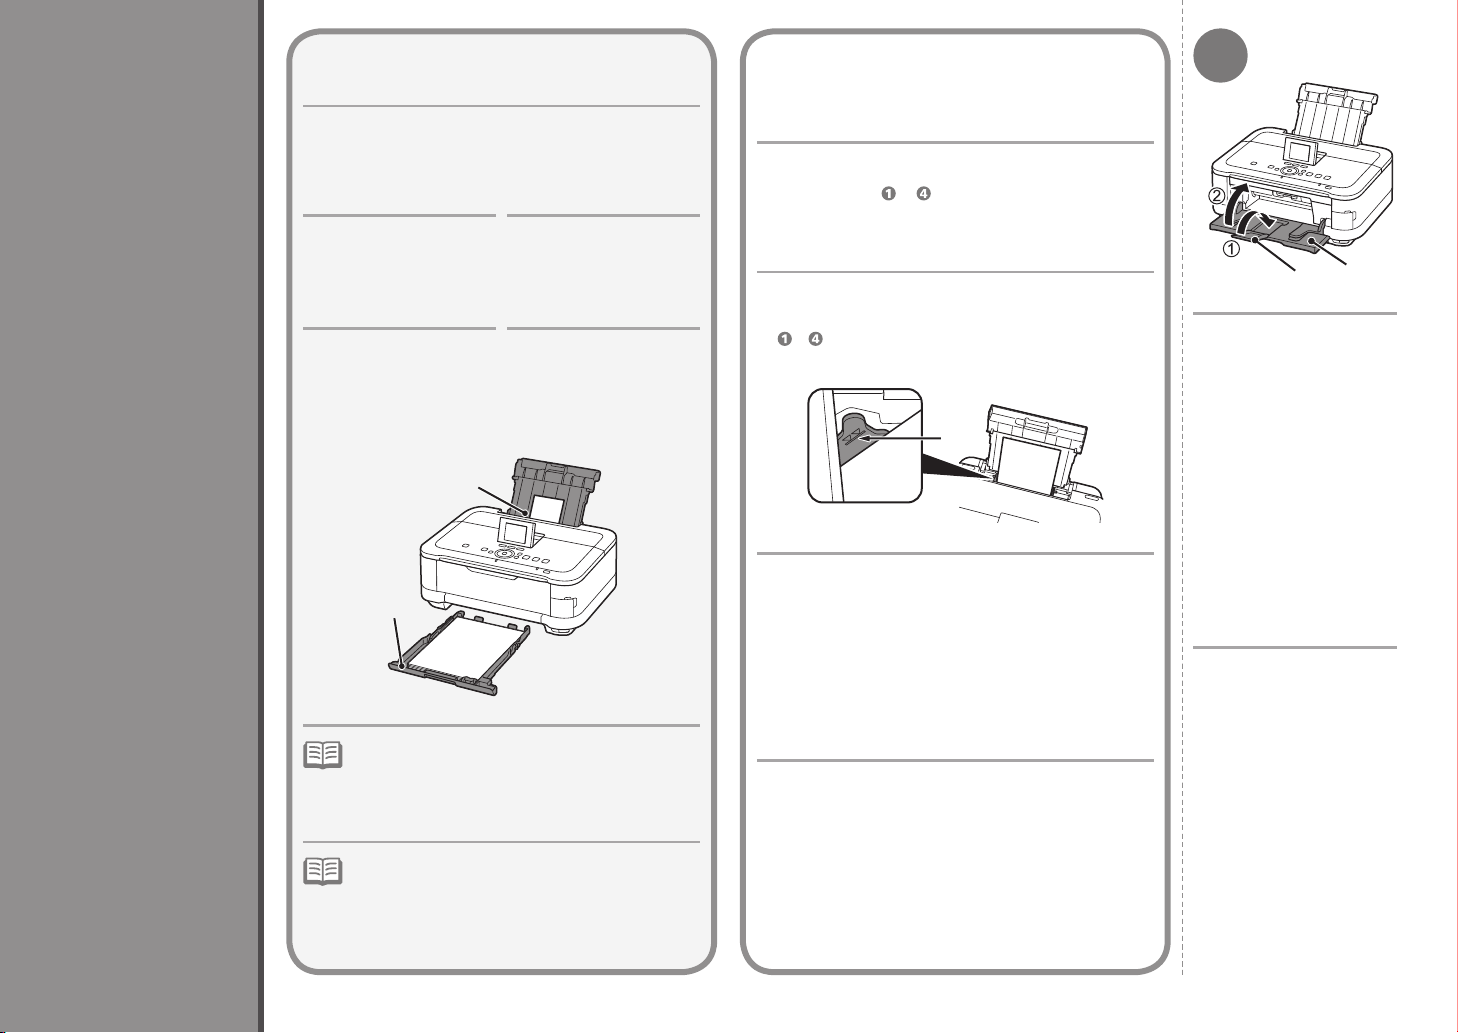
Loading specialty paper
Load paper in portrait orientation with the printing side
•
facing up.
Make sure that the height of the paper stack does not
•
exceed the line (C).
1
E
D
1. Close the Output Tray
Extension (D).
2. Close the Paper
Output Tray (E).
1. Cierre la extensión
de la bandeja de
salida (D).
16
For details on how to handle paper, refer to “Loading
•
Paper” in the on-screen manual: Basic Guide after
installation is complete.
Para obtener más información sobre cómo
•
manipular el papel, consulte “Carga del papel”
en el manual en pantalla:
de nalizar la instalación.
Guía básica después
Carga de papel especial
Cargue el papel con orientación vertical y el lado de impresión
•
hacia arriba.
Asegúrese de que la altura de la pila de papel no supere
•
la línea (C).
2. Cierre la bandeja de
salida del papel (E).
 Loading...