

Canon MG6400 series Online Manual

MG6400 series
Online Manual
Printing
Copying
English

Contents
Printing. . . . . . . . . . . . . . . . . . . . . . . . . . . . . . . . . . . . . . . . . . . . . . . . . . . . . . . . . 5
Printing from a Computer. . . . . . . . . . . . . . . . . . . . . . . . . . . . . . . . . . . . . . . . . . . . . . . . . . . 6
Printing with Application Software that You are Using (Printer Driver). . . . . . . . . . . . . . . . . . . . . . . . . . . 7
Printing with Easy Setup. . . . . . . . . . . . . . . . . . . . . . . . . . . . . . . . . . . . . . . . . . . . . . . . . . . . . . . . . . 8
Setting the Media Type with the Printer Driver. . . . . . . . . . . . . . . . . . . . . . . . . . . . . . . . . . . . 12
Various Printing Methods. . . . . . . . . . . . . . . . . . . . . . . . . . . . . . . . . . . . . . . . . . . . . . . . . . . . . . . . . 13
Setting the Number of Copies and Printing Order. . . . . . . . . . . . . . . . . . . . . . . . . . . . . . . . . . 14
Setting the Stapling Margin. . . . . . . . . . . . . . . . . . . . . . . . . . . . . . . . . . . . . . . . . . . . . . . . . . . 16
Execute Borderless Printing. . . . . . . . . . . . . . . . . . . . . . . . . . . . . . . . . . . . . . . . . . . . . . . . . . 18
Scaling the Printing to Fit the Paper Size. . . . . . . . . . . . . . . . . . . . . . . . . . . . . . . . . . . . . . . . 21
Scaled Printing. . . . . . . . . . . . . . . . . . . . . . . . . . . . . . . . . . . . . . . . . . . . . . . . . . . . . . . . . . . . . 23
Page Layout Printing. . . . . . . . . . . . . . . . . . . . . . . . . . . . . . . . . . . . . . . . . . . . . . . . . . . . . . . . 25
Duplex Printing. . . . . . . . . . . . . . . . . . . . . . . . . . . . . . . . . . . . . . . . . . . . . . . . . . . . . . . . . . . . 27
Printing on Postcards. . . . . . . . . . . . . . . . . . . . . . . . . . . . . . . . . . . . . . . . . . . . . . . . . . . . . . . . 30
Displaying the Print Results before Printing. . . . . . . . . . . . . . . . . . . . . . . . . . . . . . . . . . . . . . 31
Setting Paper Dimensions (Custom Size). . . . . . . . . . . . . . . . . . . . . . . . . . . . . . . . . . . . . . . . 32
Changing the Print Quality and Correcting Image Data. . . . . . . . . . . . . . . . . . . . . . . . . . . . . . . . . . 34
Setting the Print Quality Level (Custom). . . . . . . . . . . . . . . . . . . . . . . . . . . . . . . . . . . . . . . . . 35
Printing a Color Document in Monochrome. . . . . . . . . . . . . . . . . . . . . . . . . . . . . . . . . . . . . . . 37
Specifying Color Correction. . . . . . . . . . . . . . . . . . . . . . . . . . . . . . . . . . . . . . . . . . . . . . . . . . . 38
Optimal Photo Printing of Image Data. . . . . . . . . . . . . . . . . . . . . . . . . . . . . . . . . . . . . . . . . . . 40
Adjusting Colors with the Printer Driver. . . . . . . . . . . . . . . . . . . . . . . . . . . . . . . . . . . . . . . . . . 42
Printing with ICC Profiles (Specifying an ICC Profile from the Application Software). . . . . . . 44
Printing with ICC Profiles (Specifying an ICC Profile from the Printer Driver). . . . . . . . . . . . . 46
Interpreting the ICC Profile. . . . . . . . . . . . . . . . . . . . . . . . . . . . . . . . . . . . . . . . . . . . . . . . . . . 48
Adjusting Color Balance. . . . . . . . . . . . . . . . . . . . . . . . . . . . . . . . . . . . . . . . . . . . . . . . . . . . . 49
Adjusting Brightness. . . . . . . . . . . . . . . . . . . . . . . . . . . . . . . . . . . . . . . . . . . . . . . . . . . . . . . . 51
Adjusting Intensity. . . . . . . . . . . . . . . . . . . . . . . . . . . . . . . . . . . . . . . . . . . . . . . . . . . . . . . . . . 53
Adjusting Contrast. . . . . . . . . . . . . . . . . . . . . . . . . . . . . . . . . . . . . . . . . . . . . . . . . . . . . . . . . . 55
Overview of the Printer Driver. . . . . . . . . . . . . . . . . . . . . . . . . . . . . . . . . . . . . . . . . . . . . . . . . . . . . 57
Canon IJ Printer Driver. . . . . . . . . . . . . . . . . . . . . . . . . . . . . . . . . . . . . . . . . . . . . . . . . . . . . . 58
How to Open the Printer Driver Setup Window. . . . . . . . . . . . . . . . . . . . . . . . . . . . . . . . . . . . 59
Page Setup Dialog. . . . . . . . . . . . . . . . . . . . . . . . . . . . . . . . . . . . . . . . . . . . . . . . . . . . . . . . . . 60
Print Dialog. . . . . . . . . . . . . . . . . . . . . . . . . . . . . . . . . . . . . . . . . . . . . . . . . . . . . . . . . . . . . . . 61
Quality & Media. . . . . . . . . . . . . . . . . . . . . . . . . . . . . . . . . . . . . . . . . . . . . . . . . . . . . . . . . . . . 64
Color Options. . . . . . . . . . . . . . . . . . . . . . . . . . . . . . . . . . . . . . . . . . . . . . . . . . . . . . . . . . . . . . 66

Borderless Printing. . . . . . . . . . . . . . . . . . . . . . . . . . . . . . . . . . . . . . . . . . . . . . . . . . . . . . . . . 69
Margin. . . . . . . . . . . . . . . . . . . . . . . . . . . . . . . . . . . . . . . . . . . . . . . . . . . . . . . . . . . . . . . . . . . 70
Canon IJ Printer Utility. . . . . . . . . . . . . . . . . . . . . . . . . . . . . . . . . . . . . . . . . . . . . . . . . . . . . . . 71
Opening the Canon IJ Printer Utility. . . . . . . . . . . . . . . . . . . . . . . . . . . . . . . . . . . . . . . . . . . . 73
Maintenance of this Machine. . . . . . . . . . . . . . . . . . . . . . . . . . . . . . . . . . . . . . . . . . . . . . . . . . 74
Display the Printing Status Screen. . . . . . . . . . . . . . . . . . . . . . . . . . . . . . . . . . . . . . . . . . . . . 75
Deleting the Undesired Print Job. . . . . . . . . . . . . . . . . . . . . . . . . . . . . . . . . . . . . . . . . . . . . . . 77
Instructions for Use (Printer Driver). . . . . . . . . . . . . . . . . . . . . . . . . . . . . . . . . . . . . . . . . . . . . 78
Updating the Printer Driver. . . . . . . . . . . . . . . . . . . . . . . . . . . . . . . . . . . . . . . . . . . . . . . . . . . . . . . 79
Obtaining the Latest Printer Driver. . . . . . . . . . . . . . . . . . . . . . . . . . . . . . . . . . . . . . . . . . . . . 80
Delete the Unnecessary Canon IJ Printer from the Printer List. . . . . . . . . . . . . . . . . . . . . . . . 81
Before Installing the Printer Driver. . . . . . . . . . . . . . . . . . . . . . . . . . . . . . . . . . . . . . . . . . . . . . 82
Installing the Printer Driver. . . . . . . . . . . . . . . . . . . . . . . . . . . . . . . . . . . . . . . . . . . . . . . . . . . 83
Printing Using the Operation Panel of the Machine. . . . . . . . . . . . . . . . . . . . . . . . . . . . . . 85
Printing Photo Data. . . . . . . . . . . . . . . . . . . . . . . . . . . . . . . . . . . . . . . . . . . . . . . . . . . . . . . . . . . . . . . . . 86
Printing Photographs Saved on a Memory Card. . . . . . . . . . . . . . . . . . . . . . . . . . . . . . . . . . . . . . . 87
About Advanced photo Menu. . . . . . . . . . . . . . . . . . . . . . . . . . . . . . . . . . . . . . . . . . . . . . . . . . . . . 89
Selecting and Printing Photos. . . . . . . . . . . . . . . . . . . . . . . . . . . . . . . . . . . . . . . . . . . . . . . . . . . . . 90
Printing Photo with Trimming. . . . . . . . . . . . . . . . . . . . . . . . . . . . . . . . . . . . . . . . . . . . . . . . . . . . . . 93
Setting Items. . . . . . . . . . . . . . . . . . . . . . . . . . . . . . . . . . . . . . . . . . . . . . . . . . . . . . . . . . . . . . . . . . 95
Using Useful Display Functions. . . . . . . . . . . . . . . . . . . . . . . . . . . . . . . . . . . . . . . . . . . . . . . . . . . . 98
Using the Slide Show Function. . . . . . . . . . . . . . . . . . . . . . . . . . . . . . . . . . . . . . . . . . . . . . . . . . . . . . . . 99
Printing Photo While Viewing the Slide Show. . . . . . . . . . . . . . . . . . . . . . . . . . . . . . . . . . . . . . . . 100
Printing Template Forms Such As Lined Paper or Graph Paper. . . . . . . . . . . . . . . . . . . . . . . . . . . . . . 102
Printing Documents (PDF File) Saved on a Memory Card. . . . . . . . . . . . . . . . . . . . . . . . . . . . . . . . . . 105
Using Web Service Printing. . . . . . . . . . . . . . . . . . . . . . . . . . . . . . . . . . . . . . . . . . . . . . . 108
Notice for Web Service Printing. . . . . . . . . . . . . . . . . . . . . . . . . . . . . . . . . . . . . . . . . . . . . . . . . . . . . . . 109
Printing Photos in Online Photo Album. . . . . . . . . . . . . . . . . . . . . . . . . . . . . . . . . . . . . . . . . . . . . . . . . 111
Downloading and Printing Template Forms. . . . . . . . . . . . . . . . . . . . . . . . . . . . . . . . . . . . . . . . . . . . . . 115
Settings for Web Service. . . . . . . . . . . . . . . . . . . . . . . . . . . . . . . . . . . . . . . . . . . . . . . . . . . . . . . . . . . . 117
Printing from a Digital Camera. . . . . . . . . . . . . . . . . . . . . . . . . . . . . . . . . . . . . . . . . . . . . 120
Printing Photographs Directly from a PictBridge (Wireless LAN) Compliant Device. . . . . . . . . . . . . . . 121
About PictBridge (Wireless LAN) Print Settings. . . . . . . . . . . . . . . . . . . . . . . . . . . . . . . . . . . . . . . . . . . 123
Printing with the Access Point Mode. . . . . . . . . . . . . . . . . . . . . . . . . . . . . . . . . . . . . . . . 125
Copying. . . . . . . . . . . . . . . . . . . . . . . . . . . . . . . . . . . . . . . . . . . . . . . . . . . . . . . 127
Making Copies. . . . . . . . . . . . . . . . . . . . . . . . . . . . . . . . . . . . . . . . . . . . . . . . . . . . . . . . . 128

Displaying the Preview Screen. . . . . . . . . . . . . . . . . . . . . . . . . . . . . . . . . . . . . . . . . . . . . 130
Setting Items. . . . . . . . . . . . . . . . . . . . . . . . . . . . . . . . . . . . . . . . . . . . . . . . . . . . . . . . . . . 131
Reducing or Enlarging a Copy. . . . . . . . . . . . . . . . . . . . . . . . . . . . . . . . . . . . . . . . . . . . . 134
Two-Sided Copying. . . . . . . . . . . . . . . . . . . . . . . . . . . . . . . . . . . . . . . . . . . . . . . . . . . . . 136
About Special Copy Menu. . . . . . . . . . . . . . . . . . . . . . . . . . . . . . . . . . . . . . . . . . . . . . . . 138
Copying Two Pages to Fit onto a Single Page. . . . . . . . . . . . . . . . . . . . . . . . . . . . . . . . . 139
Copying Four Pages to Fit onto a Single Page. . . . . . . . . . . . . . . . . . . . . . . . . . . . . . . . . 142
Copying Thick Originals Such as Books. . . . . . . . . . . . . . . . . . . . . . . . . . . . . . . . . . . . . . 145
Copying without Borders. . . . . . . . . . . . . . . . . . . . . . . . . . . . . . . . . . . . . . . . . . . . . . . . . . 146
Copying Photos. . . . . . . . . . . . . . . . . . . . . . . . . . . . . . . . . . . . . . . . . . . . . . . . . . . . . . . . 147

Printing
Printing from a Computer
Printing with Application Software that You are Using (Printer Driver)
Printing Using the Operation Panel of the Machine
Printing Photo Data
Using the Slide Show Function
Printing Template Forms Such As Lined Paper or Graph Paper
Printing Documents (PDF File) Saved on a Memory Card
Using Web Service Printing
Notice for Web Service Printing
Printing Photos in Online Photo Album
Downloading and Printing Template Forms
Settings for Web Service
Printing from a Digital Camera
Printing Photographs Directly from a PictBridge (Wireless LAN) Compliant Device
About PictBridge (Wireless LAN) Print Settings
Printing with the Access Point Mode
5

Printing from a Computer
Printing with Application Software that You are Using (Printer Driver)
6

Printing with Application Software that You are Using
(Printer Driver)
Printing with Easy Setup Basic
Various Printing Methods
Changing the Print Quality and Correcting Image Data
Overview of the Printer Driver
Updating the Printer Driver
7
Printing with Easy Setup
The simple setup procedure for carrying out appropriate printing on this machine is as
follows:
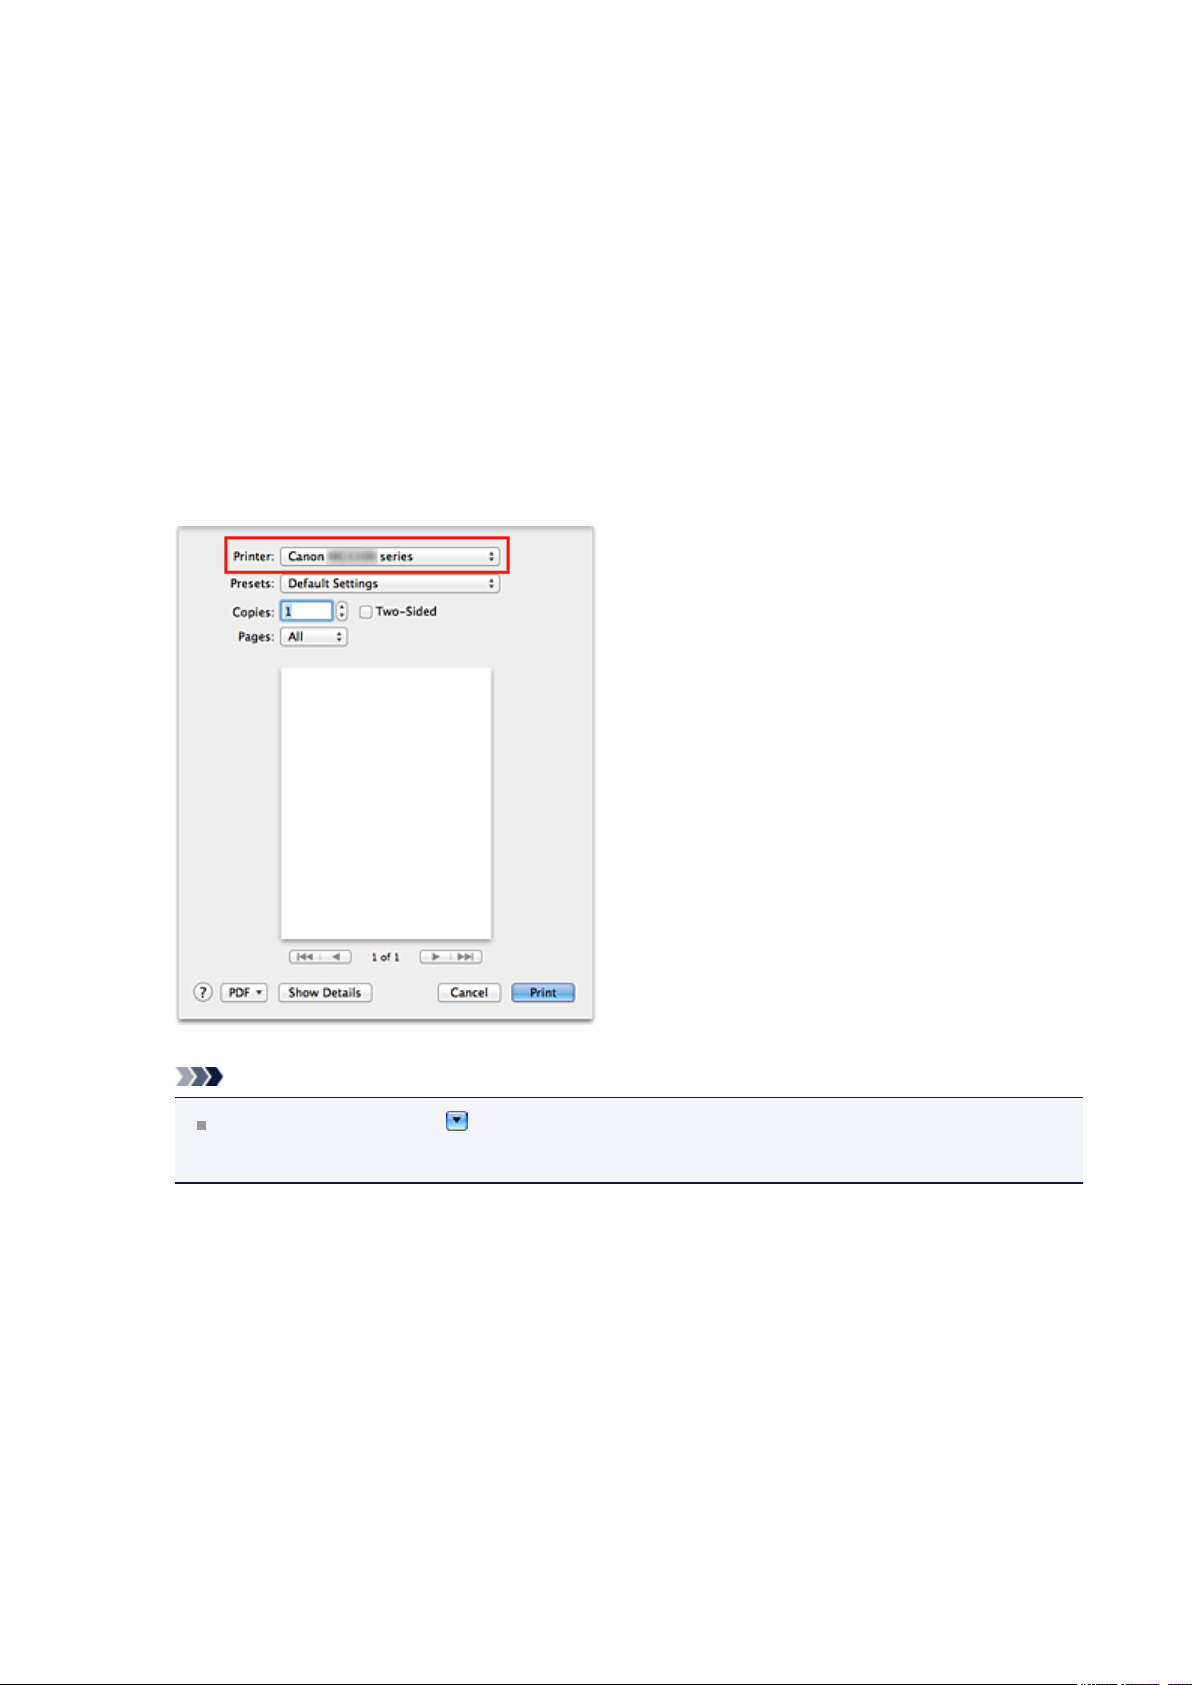
1. Check that the machine is turned on
2. Load paper on the machine
3. Select the printer
Select your model from the Printer list in the Print Dialog.
Note
Click Show Details ( (the disclosure triangle)) to switch the Setup window to
the detailed display.
4. Select the paper size
For Paper Size, select the paper size to be used.
If necessary, set the number of copies, the pages to be printed, and the orientation.
8
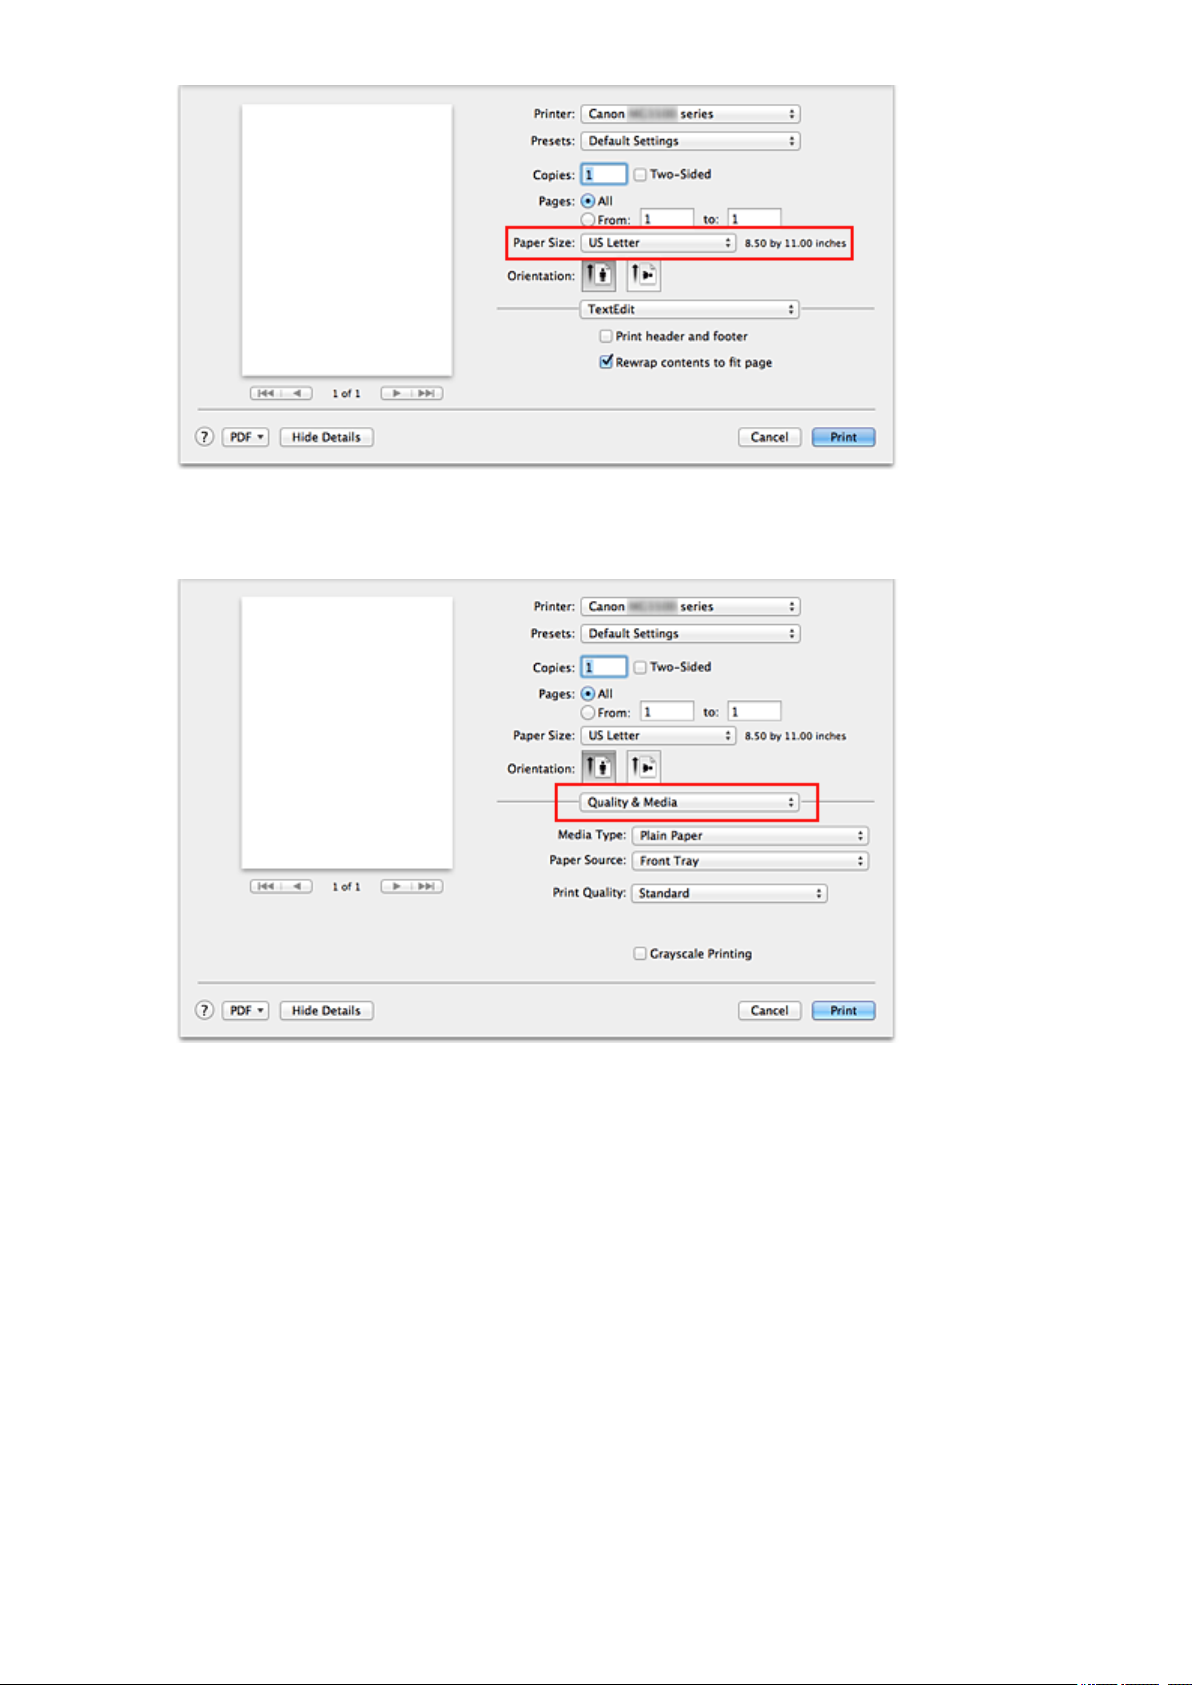
5.
Select Quality & Media from the pop-up menu
6. Select the media type
For Media Type, select the same paper type loaded in the machine.
9
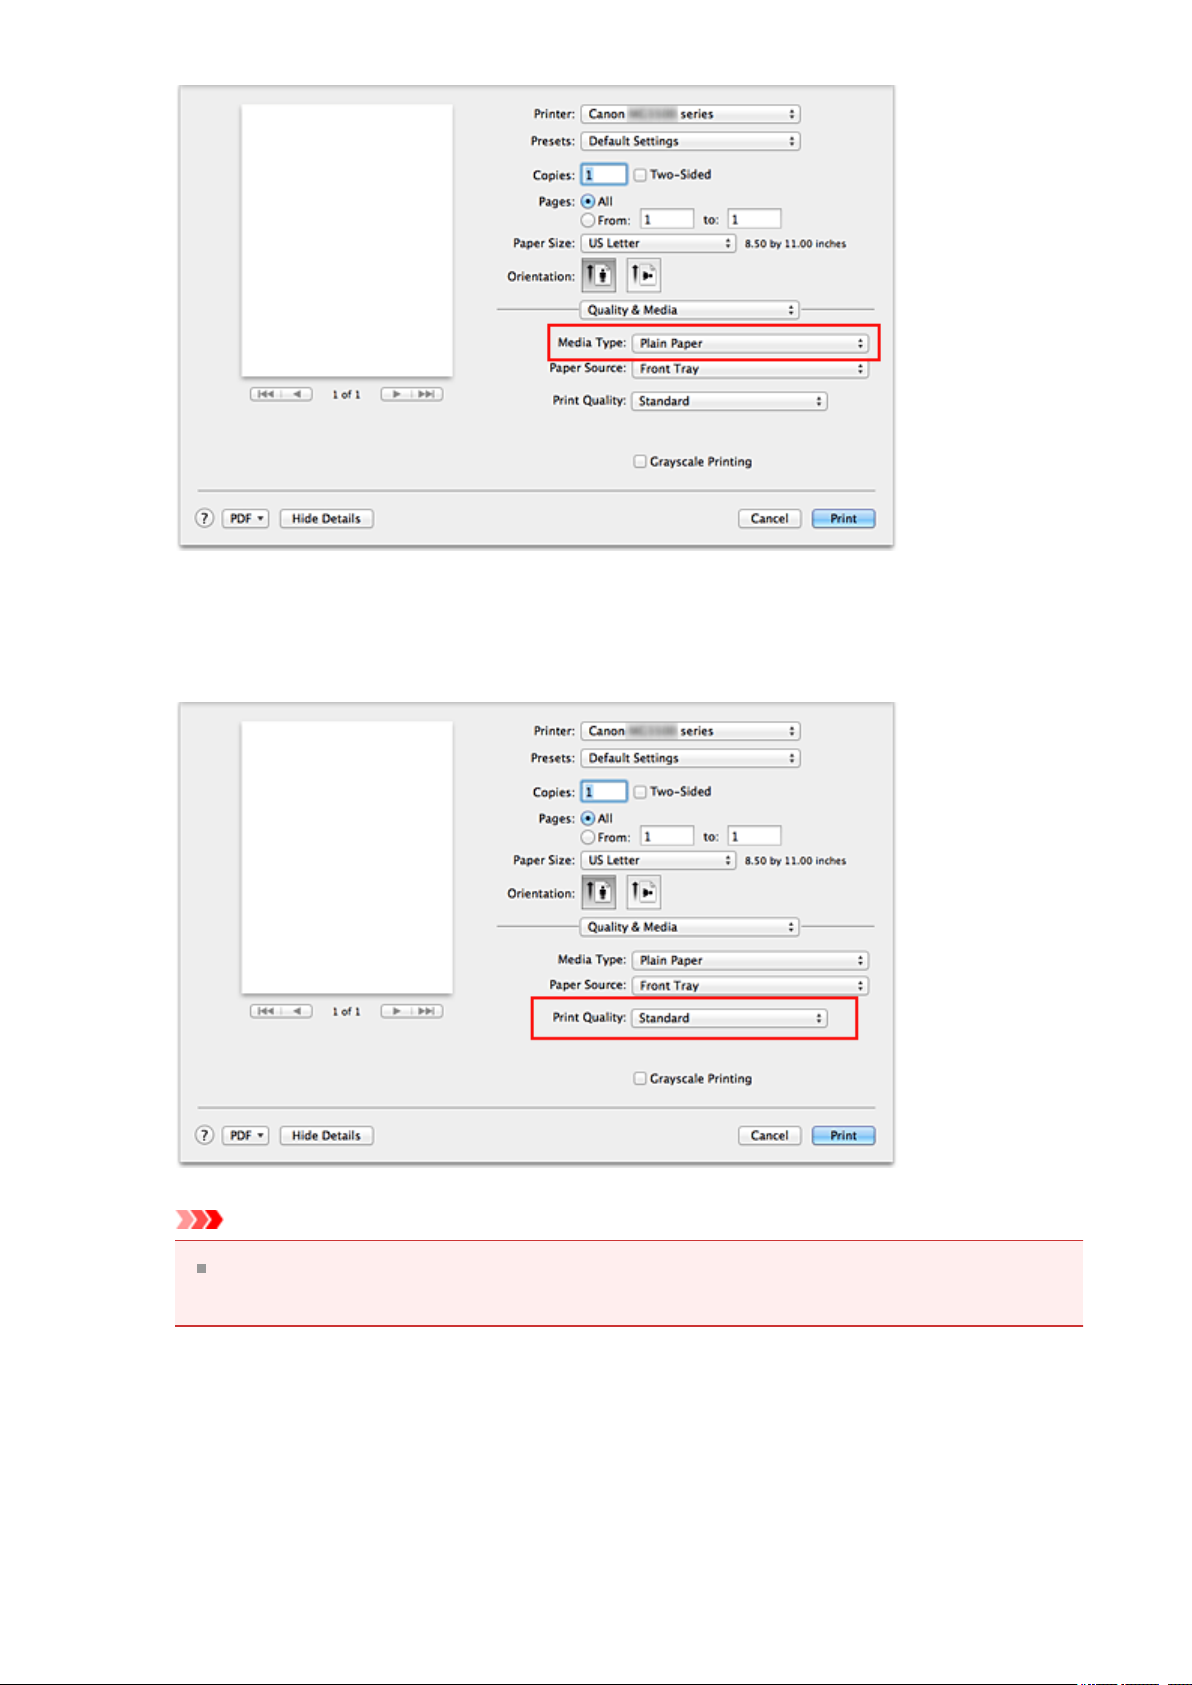
7. Select the print quality
For Print Quality, select High, Standard, or Draft according to your purpose.
Important
The print quality settings that can be selected may differ depending on a printing
profile.
8. Complete the setup
Click Print.
When you execute print, the document will be printed in accordance with the type
and size of the media.
10

Important
In the Presets section, click Save Current Settings as Preset... (Save As...) to
register the specified settings.
11
Setting the Media Type with the Printer Driver
When you use this machine, selecting a media type that matches the print purpose will help
you achieve the best print results.
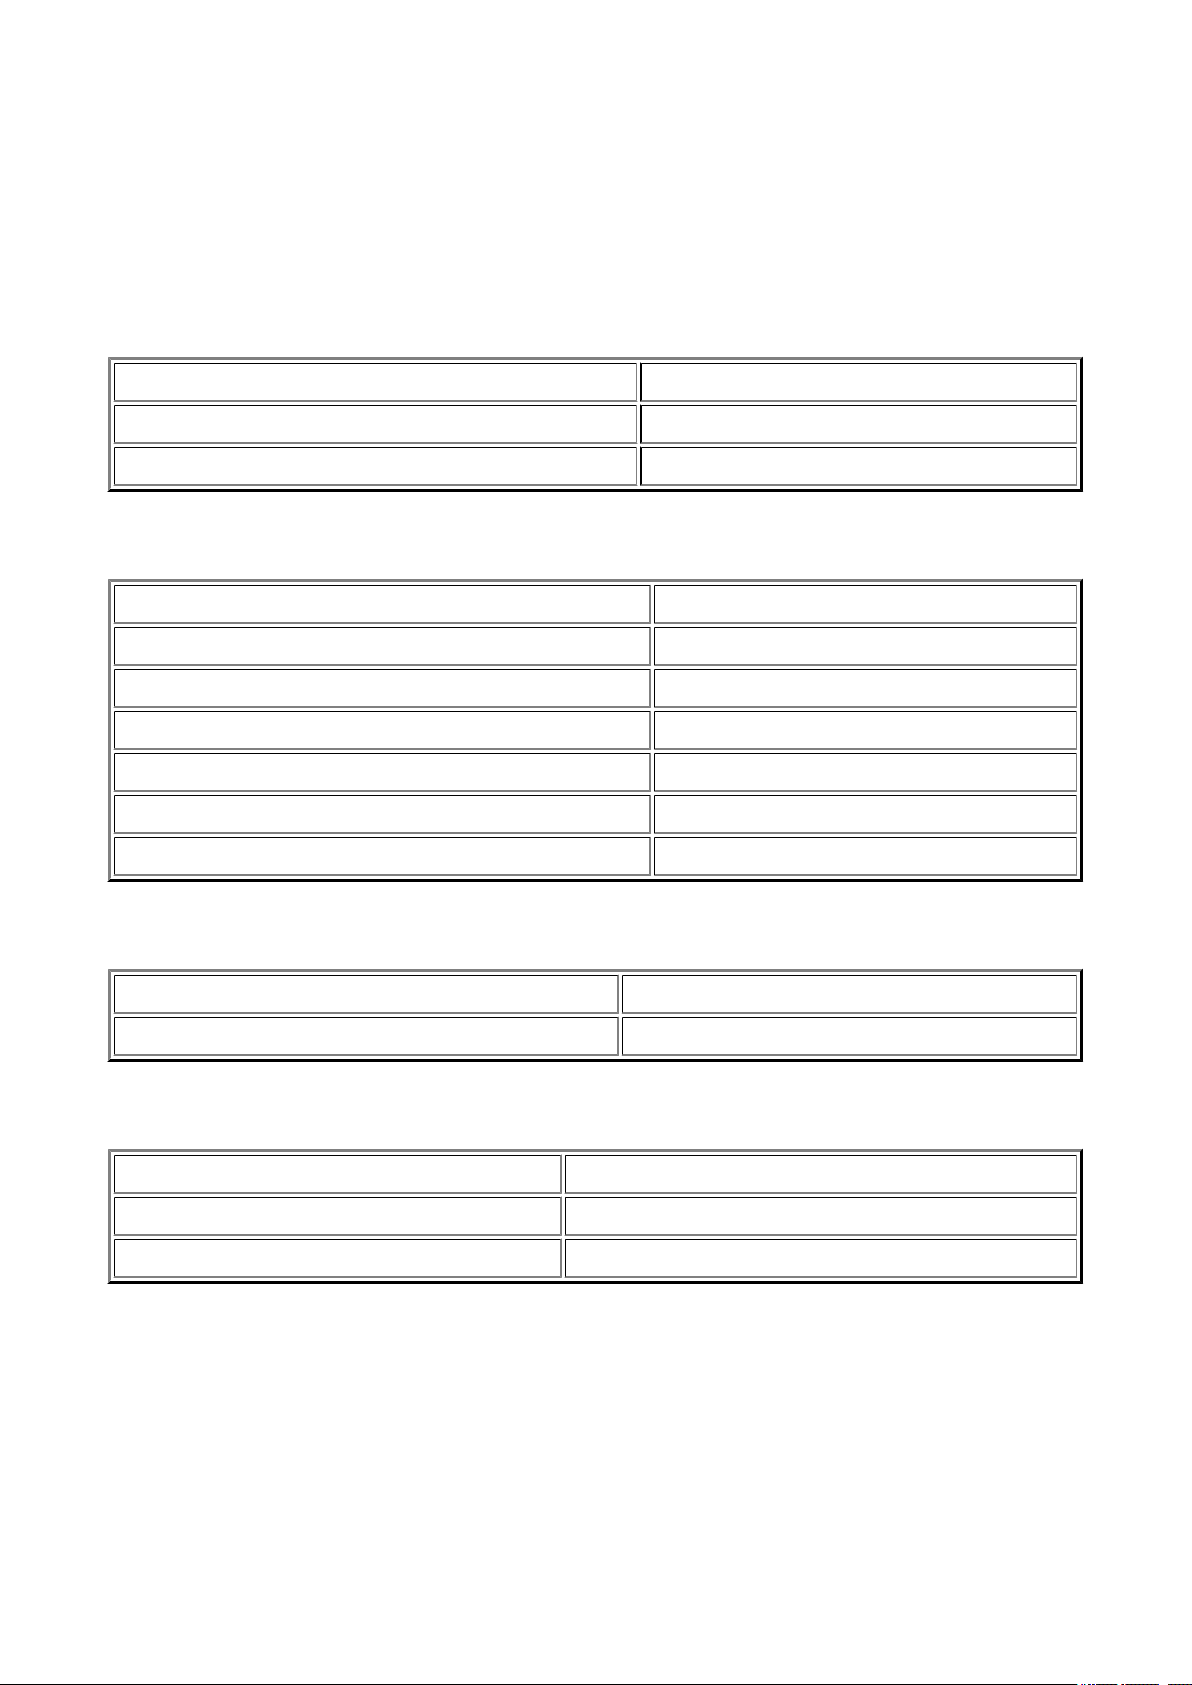
You can use the following media types on this machine.
Commercially available papers
Media name Media Type in the printer driver
Plain Paper (including recycled paper) Plain Paper
Envelopes Envelope
Canon genuine papers (Photo Printing)
Media name <Model No.> Media Type in the printer driver
Photo Paper Plus Glossy II <PP-201> Photo Paper Plus Glossy II
Photo Paper Pro Platinum <PT-101> Photo Paper Pro Platinum
Photo Paper Pro Luster <LU-101> Photo Paper Pro Luster
Photo Paper Plus Semi-gloss <SG-201> Photo Paper Plus Semi-gloss
Photo Paper Glossy <GP-501/GP-601> Glossy Photo Paper
Matte Photo Paper <MP-101> Matte Photo Paper
Canon genuine papers (Business Letter Printing)
Media name <Model No.> Media Type in the printer driver
High Resolution Paper <HR-101N> High Resolution Paper
Canon genuine papers (Original Products)
Media name <Model No.> Media Type in the printer driver
T-Shirt Transfers <TR-301> T-Shirt Transfers
Photo Stickers <PS-101> Photo Paper Plus Glossy II
12

Various Printing Methods
Setting the Number of Copies and Printing Order
Setting the Stapling Margin
Execute Borderless Printing
Scaling the Printing to Fit the Paper Size
Scaled Printing
Page Layout Printing
Duplex Printing
Printing on Postcards
Displaying the Print Results before Printing
Setting Paper Dimensions (Custom Size)
13
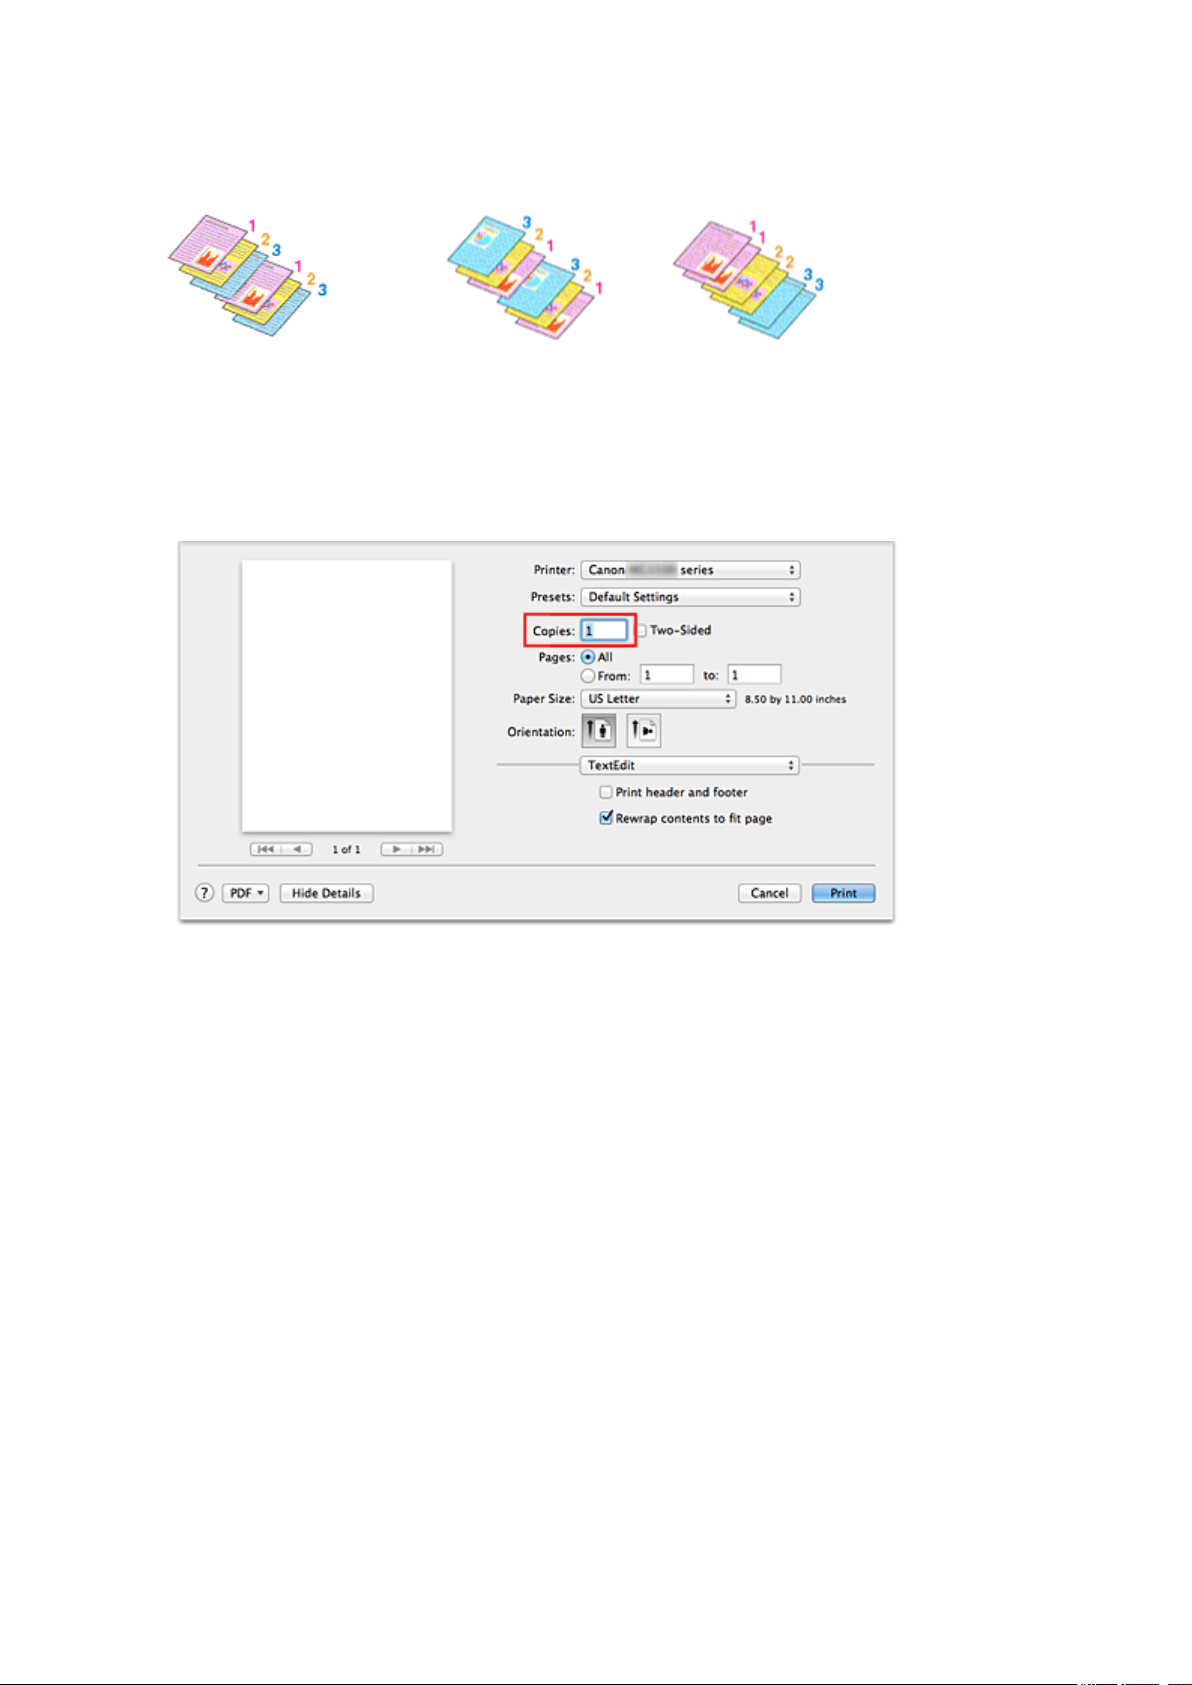
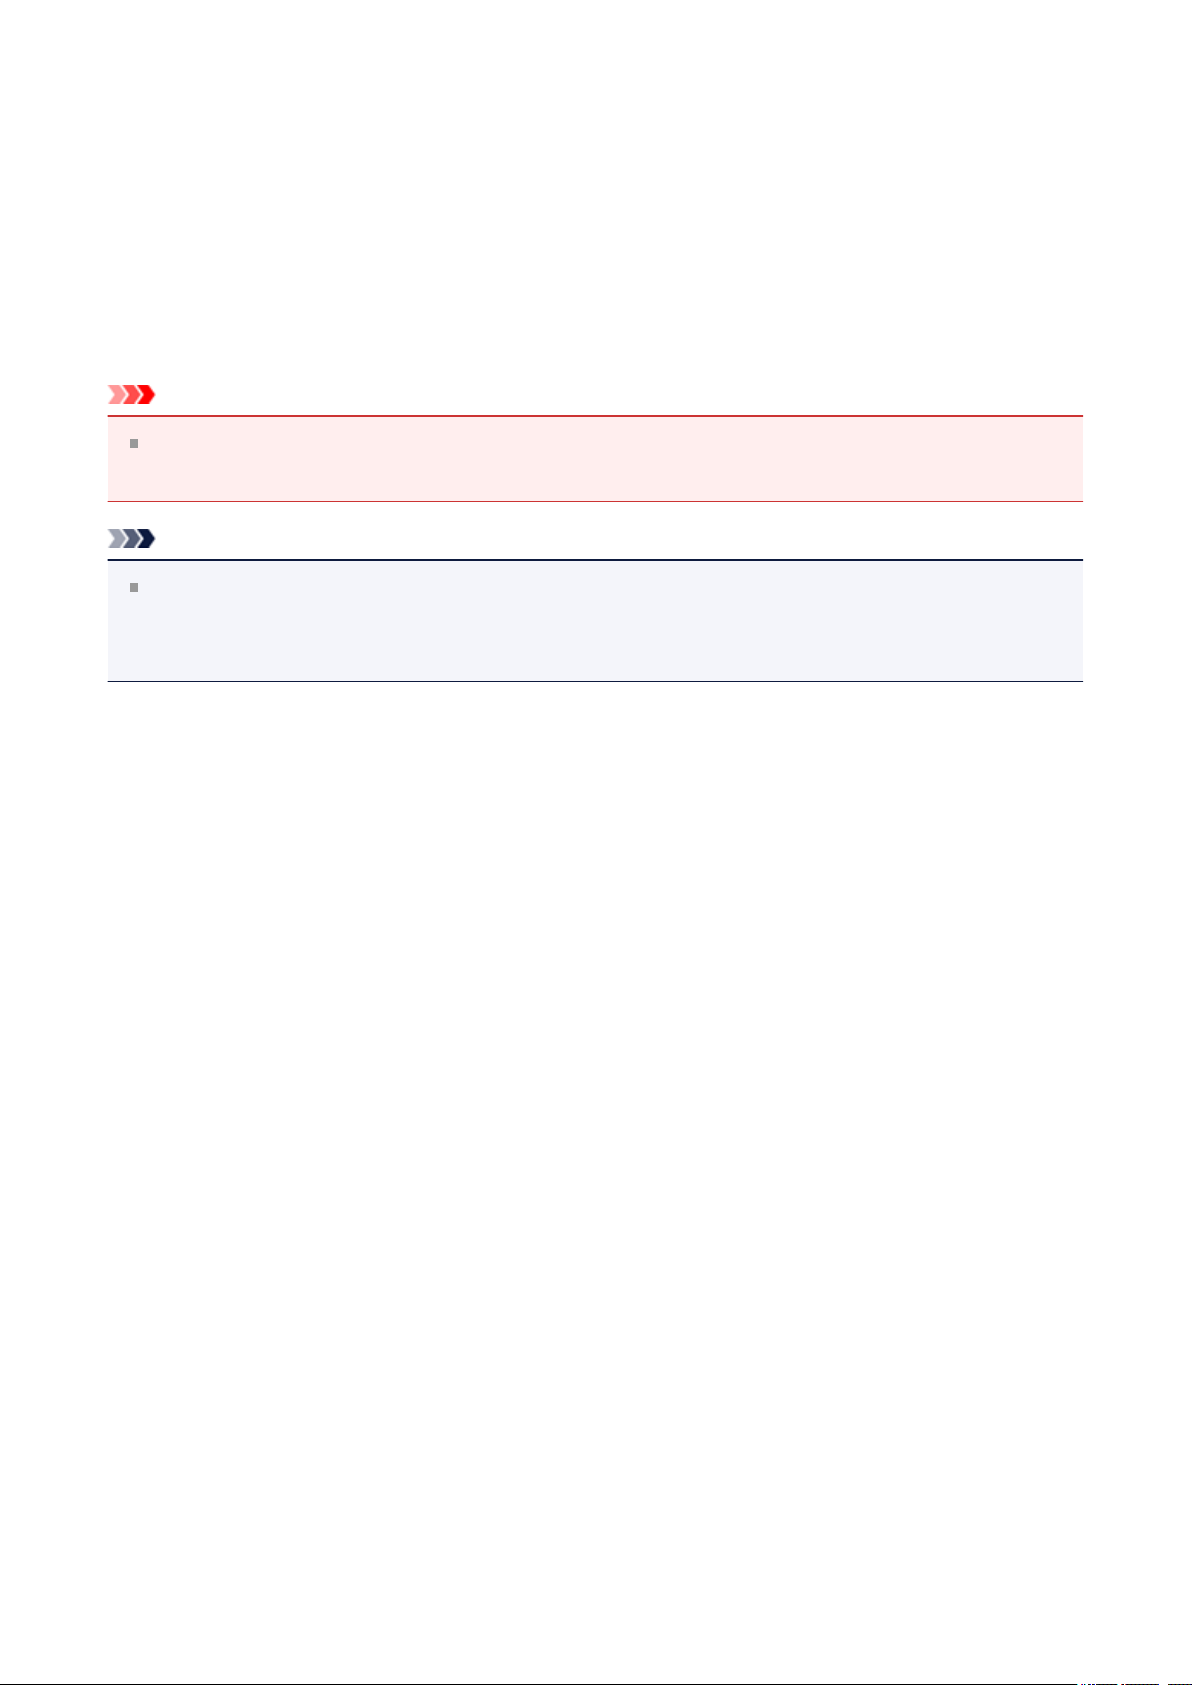
Setting the Number of Copies and Printing Order
Collate pages + Reverse Collate pages + Normal Reverse
The procedure for specifying the number of copies and printing order is as follows:
1. Specify the number of copies to be printed
Specify the number of copies to print from the Copies in the Print Dialog.
2. Select Paper Handling from the pop-up menu
3. Check the Collate pages check box when you are specifying multiple
copies in the Copies box
Check the Collate pages check box to print all the pages of a single copy together.
Uncheck this check box to print all pages with the same page number together.
4. Specify the print order
Check Page Order.
When you select Automatic or Reverse, printing starts from the last page.
When you select Normal, printing starts from the first page.
14

5. Complete the setup
Click Print.
When you execute print, the specified number of copies will be printed with the
specified printing order.
Important
When the application software that you used to create the document has the same
function, specify the settings on the printer driver. However, if the print results are not
acceptable, specify the function settings on the application software. When you specify
the number of copies and the printing order with both the application software and this
printer driver, the number of copies may be multiplied numbers of the two settings or the
specified printing order may not be enabled.
15
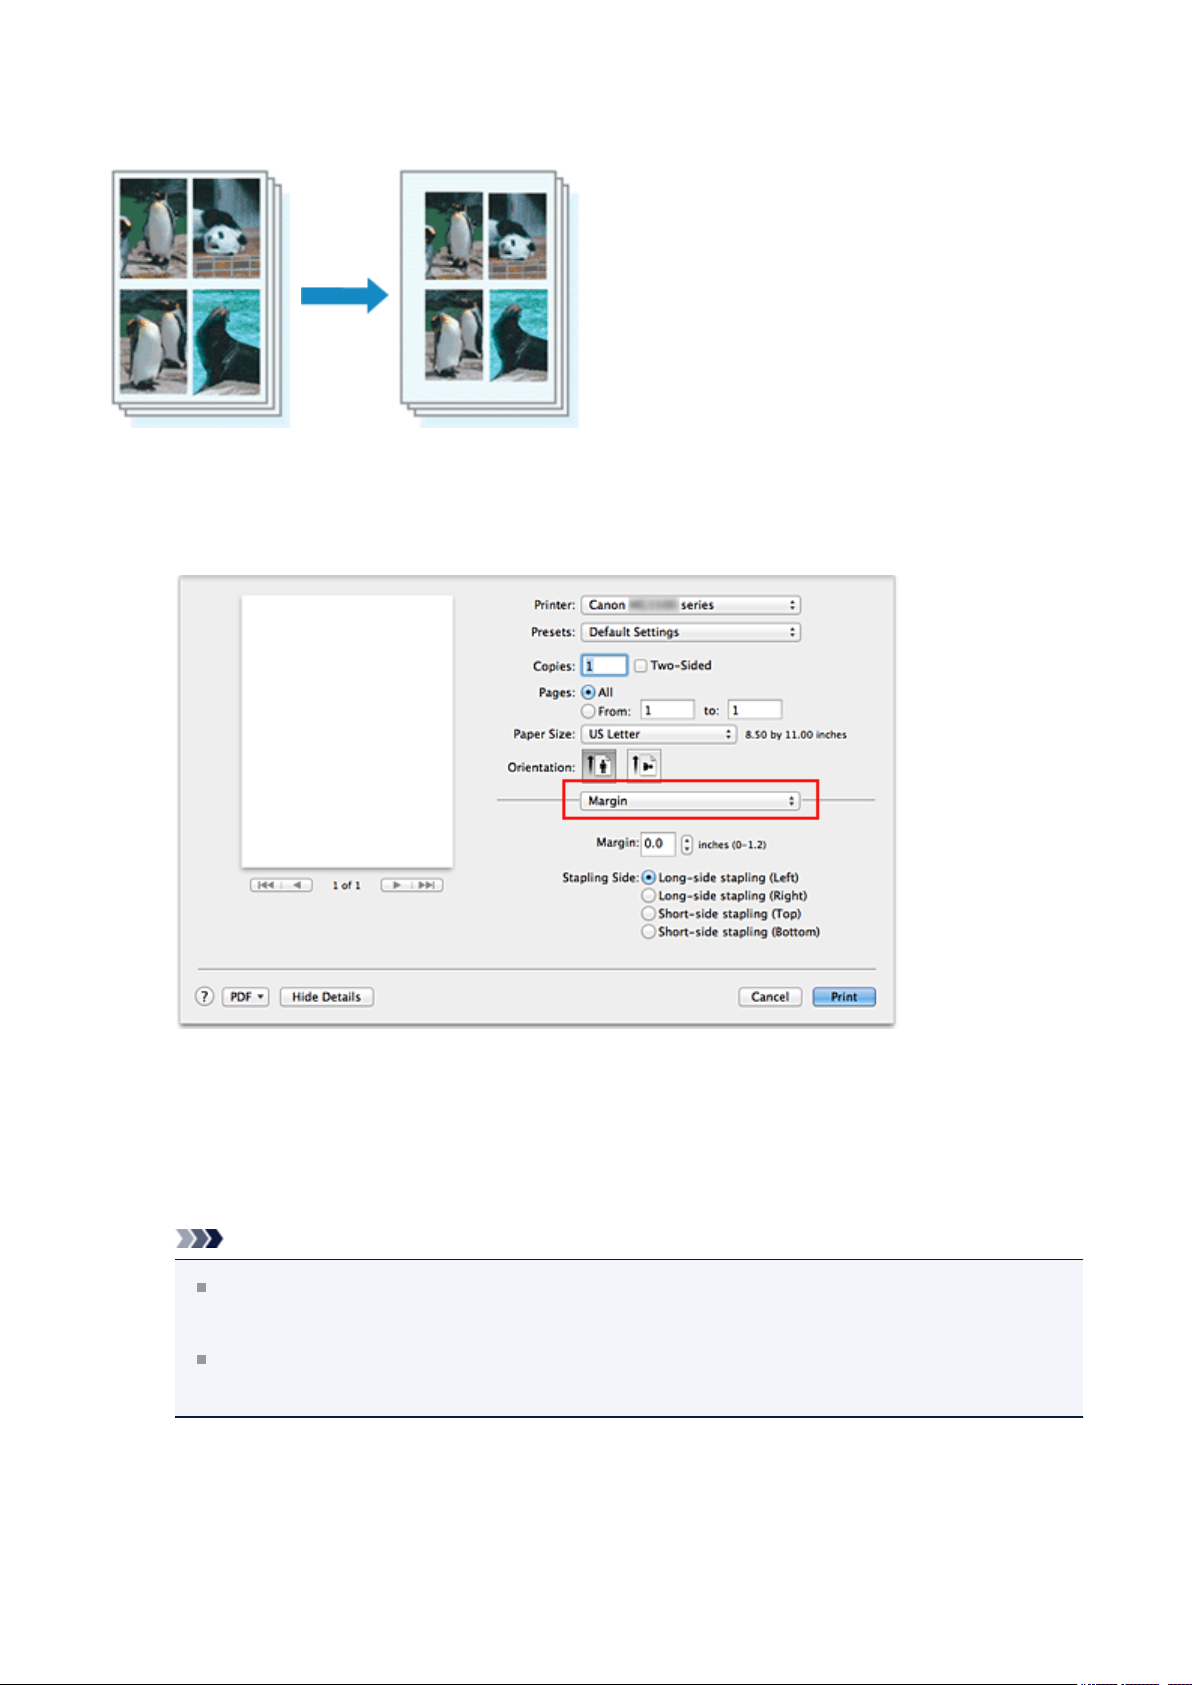
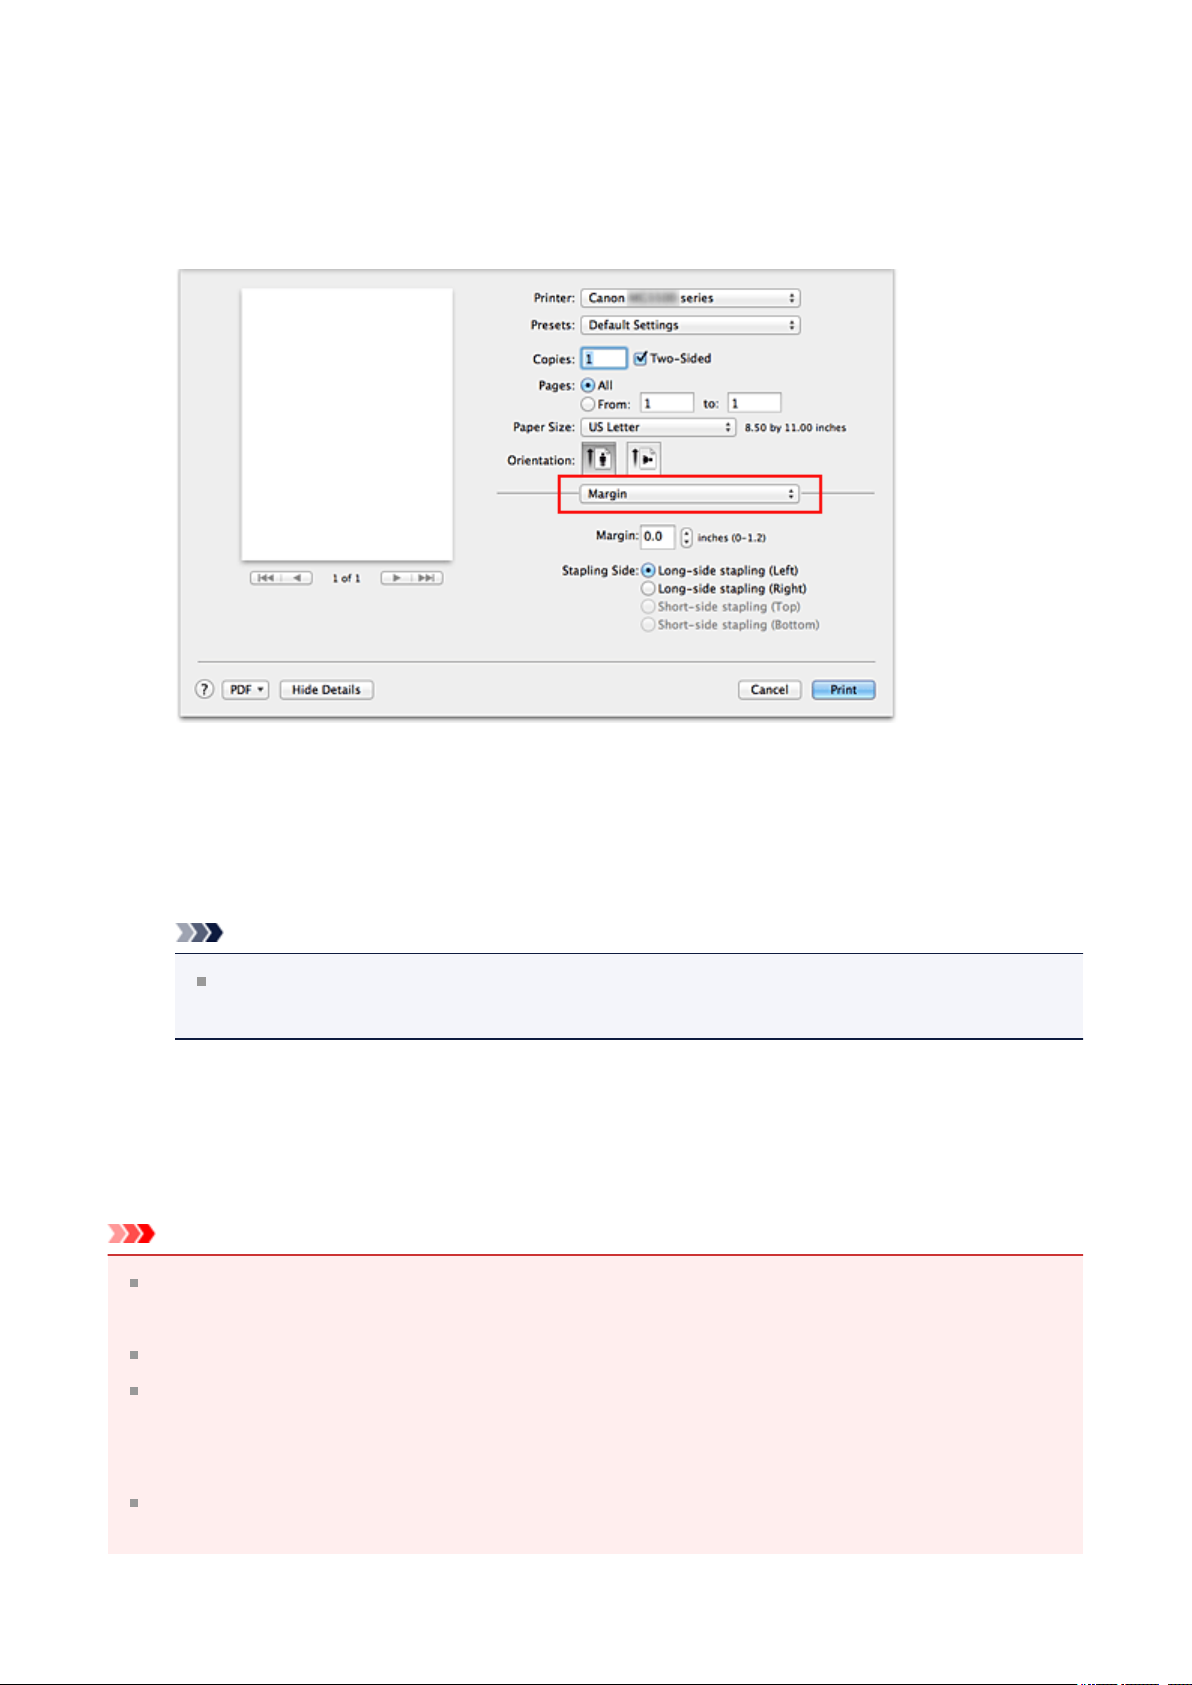
Setting the Stapling Margin
The procedure for setting the staple side and the margin width is as follows:
1. Select Margin from the pop-up menu on the Print Dialog
2. Set the staple side and the margin width
Select a stapling position from the Stapling Side list, and if necessary, set the
Margin width.
Note
The printer automatically reduces the print area depending on the staple
position margin.
Depending on the Two-Sided setting in the Layout pop-up menu, the Stapling
Side that can be selected differs.
3. Complete the setup
16

Click Print.
When you execute print, the data is printed with the specified staple side and margin
width.
Important
When borderless printing is enabled, Stapling Side and Margin appear grayed out
and are unavailable.
17
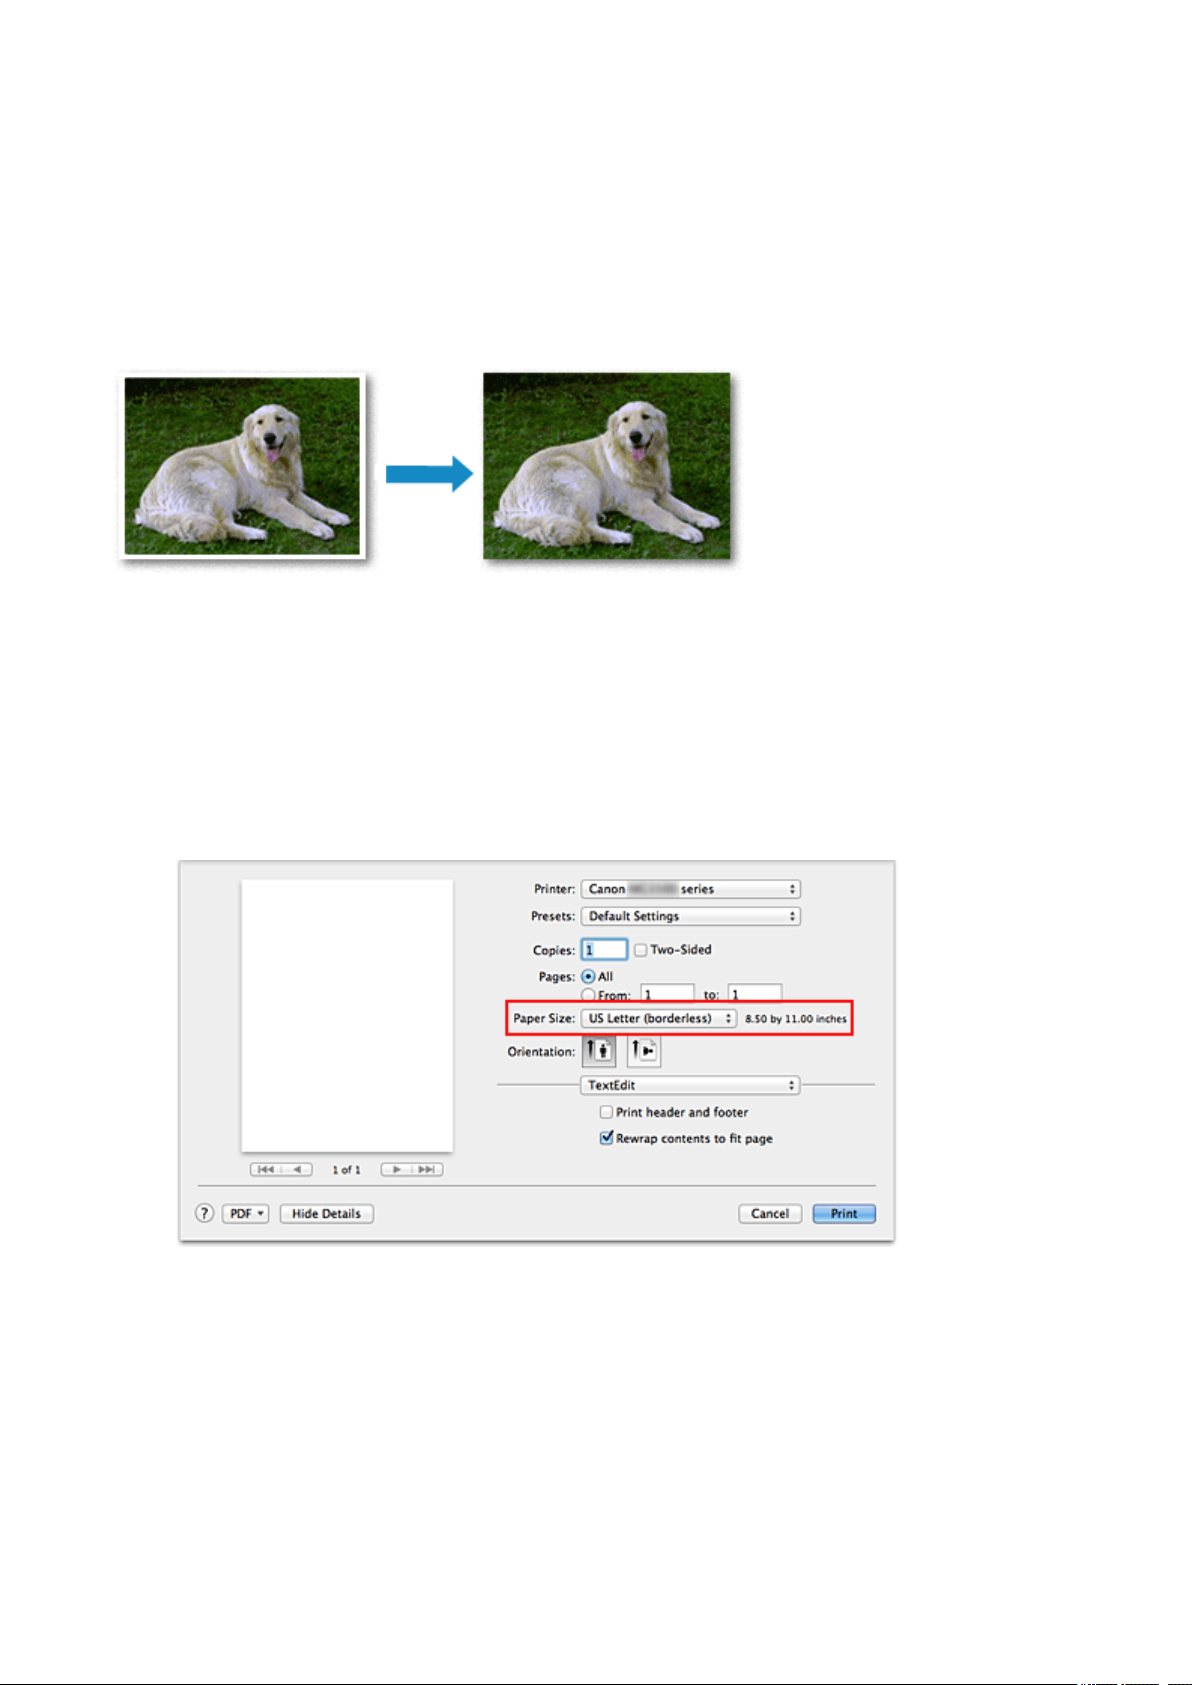
Execute Borderless Printing
The borderless printing function allows you to print data without any margin by enlarging the
data so that it extends slightly off the paper. In standard printing, margins are created
around the document area. However, in borderless printing function, these margins are not
created. When you want to print data such as a photo without providing any margin around
it, set borderless printing.
The procedure for performing borderless printing is as follows:
Setting Borderless Printing
1. Select the size of the paper for borderless printing
Select "XXX (borderless)" from the Paper Size in the Print Dialog.
2. Select Borderless Printing from the pop-up menu
3. Adjust the amount of extension from the paper
If necessary, adjust the amount of extension using the Amount of Extension slider.
Moving the slider to the right increases the amount extending off the paper, and
moving the slider to the left decreases the amount.
18
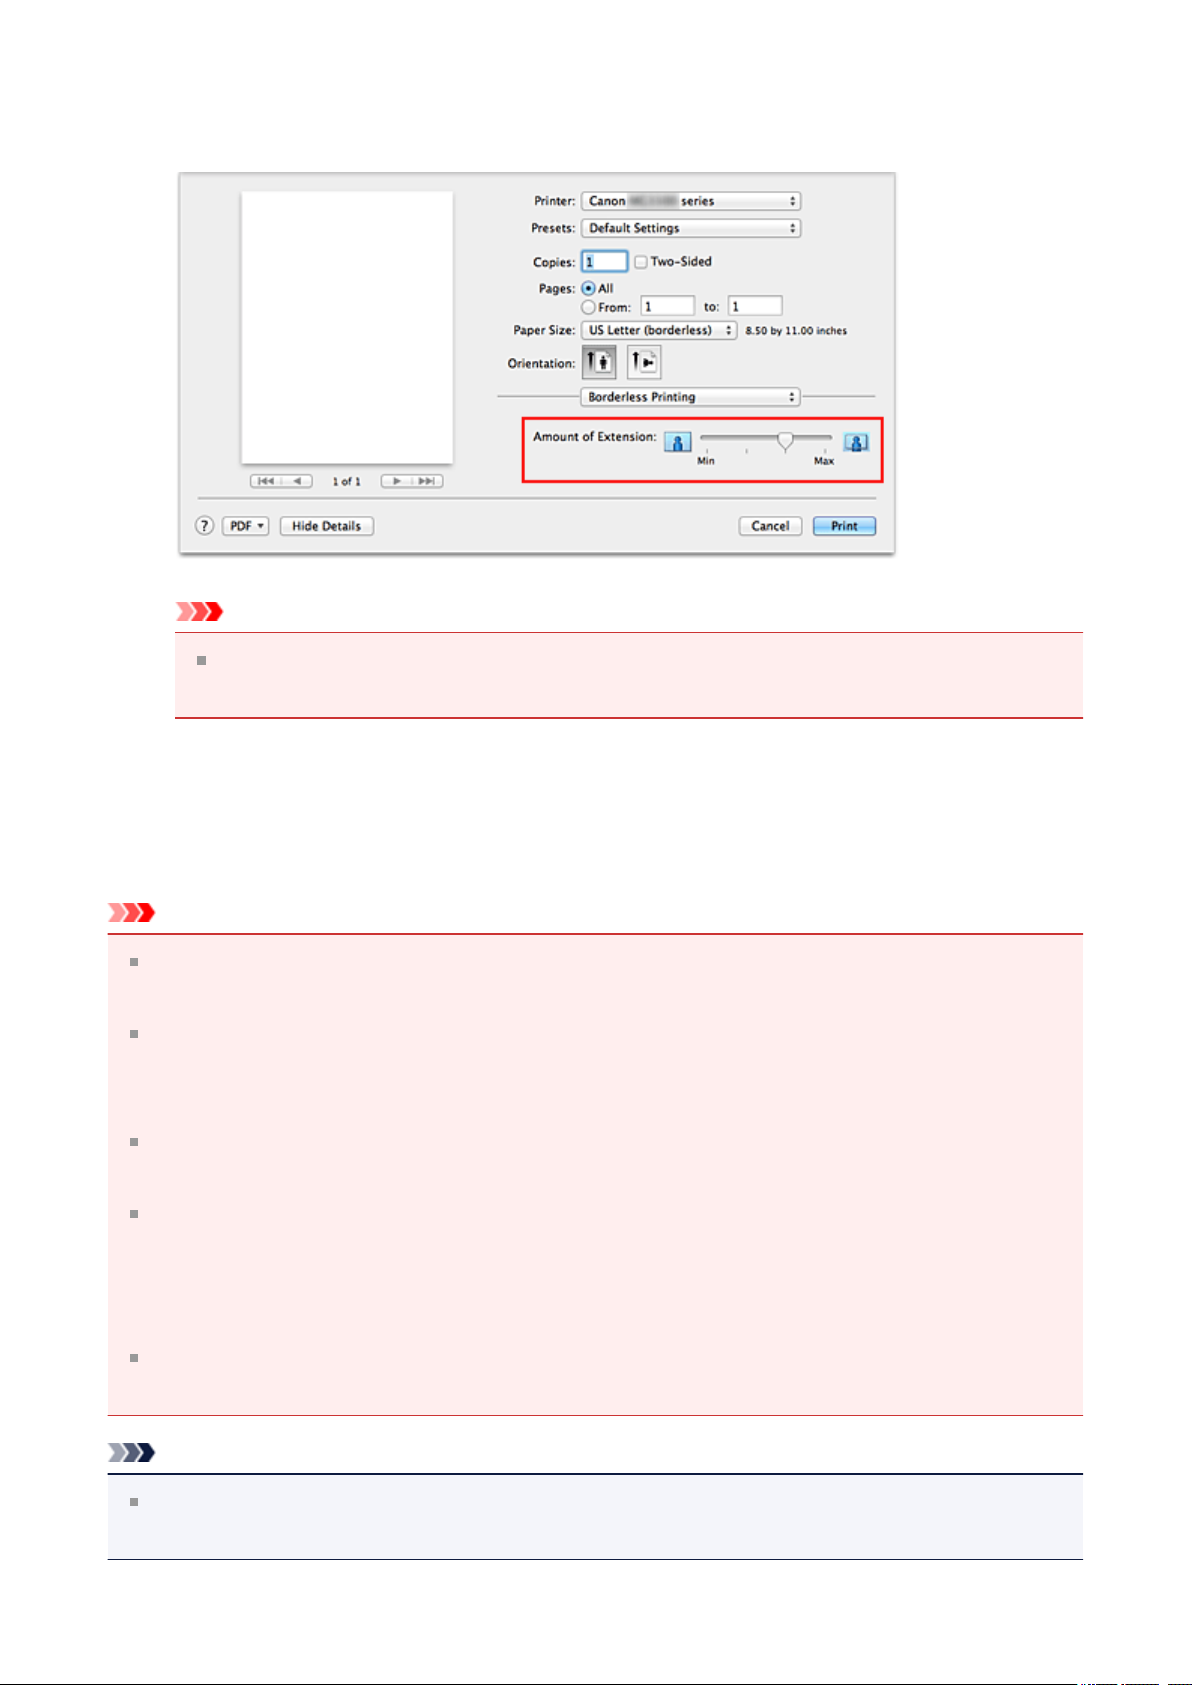
It is recommended to set the slider at the second position from the right for most
cases.
Important
When the Amount of Extension slider is set to the rightmost position, the back
side of the paper may become smudged.
4. Complete the setup
Click Print.
When you execute print, the data is printed without any margins on the paper.
Important
Borderless printing only supports specific paper sizes. Make sure to select a paper
size with the wording "(borderless)" from the Paper Size.
When borderless printing is enabled, Envelope, High Resolution Paper, and T-Shirt
Transfers appear grayed out and are unavailable in Media Type list of Quality & Media
of the pop-up menu in the Print dialog.
Print quality may deteriorate or the sheet may be stained at the top and bottom
depending on the type of paper used.
When the ratio of the height to the width differs from the image data, a portion of the
image may not be printed depending on the size of the media used.
In this case, crop the image data with an application software according to the paper
size.
When scaled printing or page layout printing is enabled, you cannot perform
borderless printing.
Note
When Plain Paper is selected from the Media Type menu of the Quality & Media,
borderless printing is not recommended.
19
Expanding the Range of the Document to Print
Setting a large amount of extension allows you to perform borderless printing with no
problems. However, the portion of the document extending off the paper range will not be
printed and for this reason, the subjects around the perimeter of a photo may not be printed.
Try borderless printing once. When you are not satisfied with the result of borderless
printing, reduce the amount of extension. The extension amount decreases as the Amount
of Extension slider is moved to the left.
Important
When the amount of extension is decreased, an unexpected margin may be produced
on the print, depending on the size of the paper.
Note
When the Amount of Extension slider is set to the leftmost position, image data will
be printed in the full size. If you set this when printing the address side of a postcard, the
postal code of the sender is printed in the correct position.
20
Scaling the Printing to Fit the Paper Size
The procedure for printing a document that is automatically enlarged or reduced to fit the
page size to be used is as follows:
1. Check the paper size
Check that the Paper Size in the Print Dialog is the same as the paper size that you
set in the application software.
2. Select Paper Handling from the pop-up menu
3. Set the print paper size
Check the Scale to fit paper size check box. Then from the Destination Paper Size
pop-up menu, select the paper size that is actually loaded in the machine.
4. If necessary, check the Scale down only check box
21

When you check this check box, the document will be reduced to fit to the paper size
when the document size is larger than the page size. The document will be printed in
the original size when the document size is smaller than the page size.
5. Complete the setup
Click Print.
When you execute print, the document will be enlarged or reduced to fit to the page
size.
22
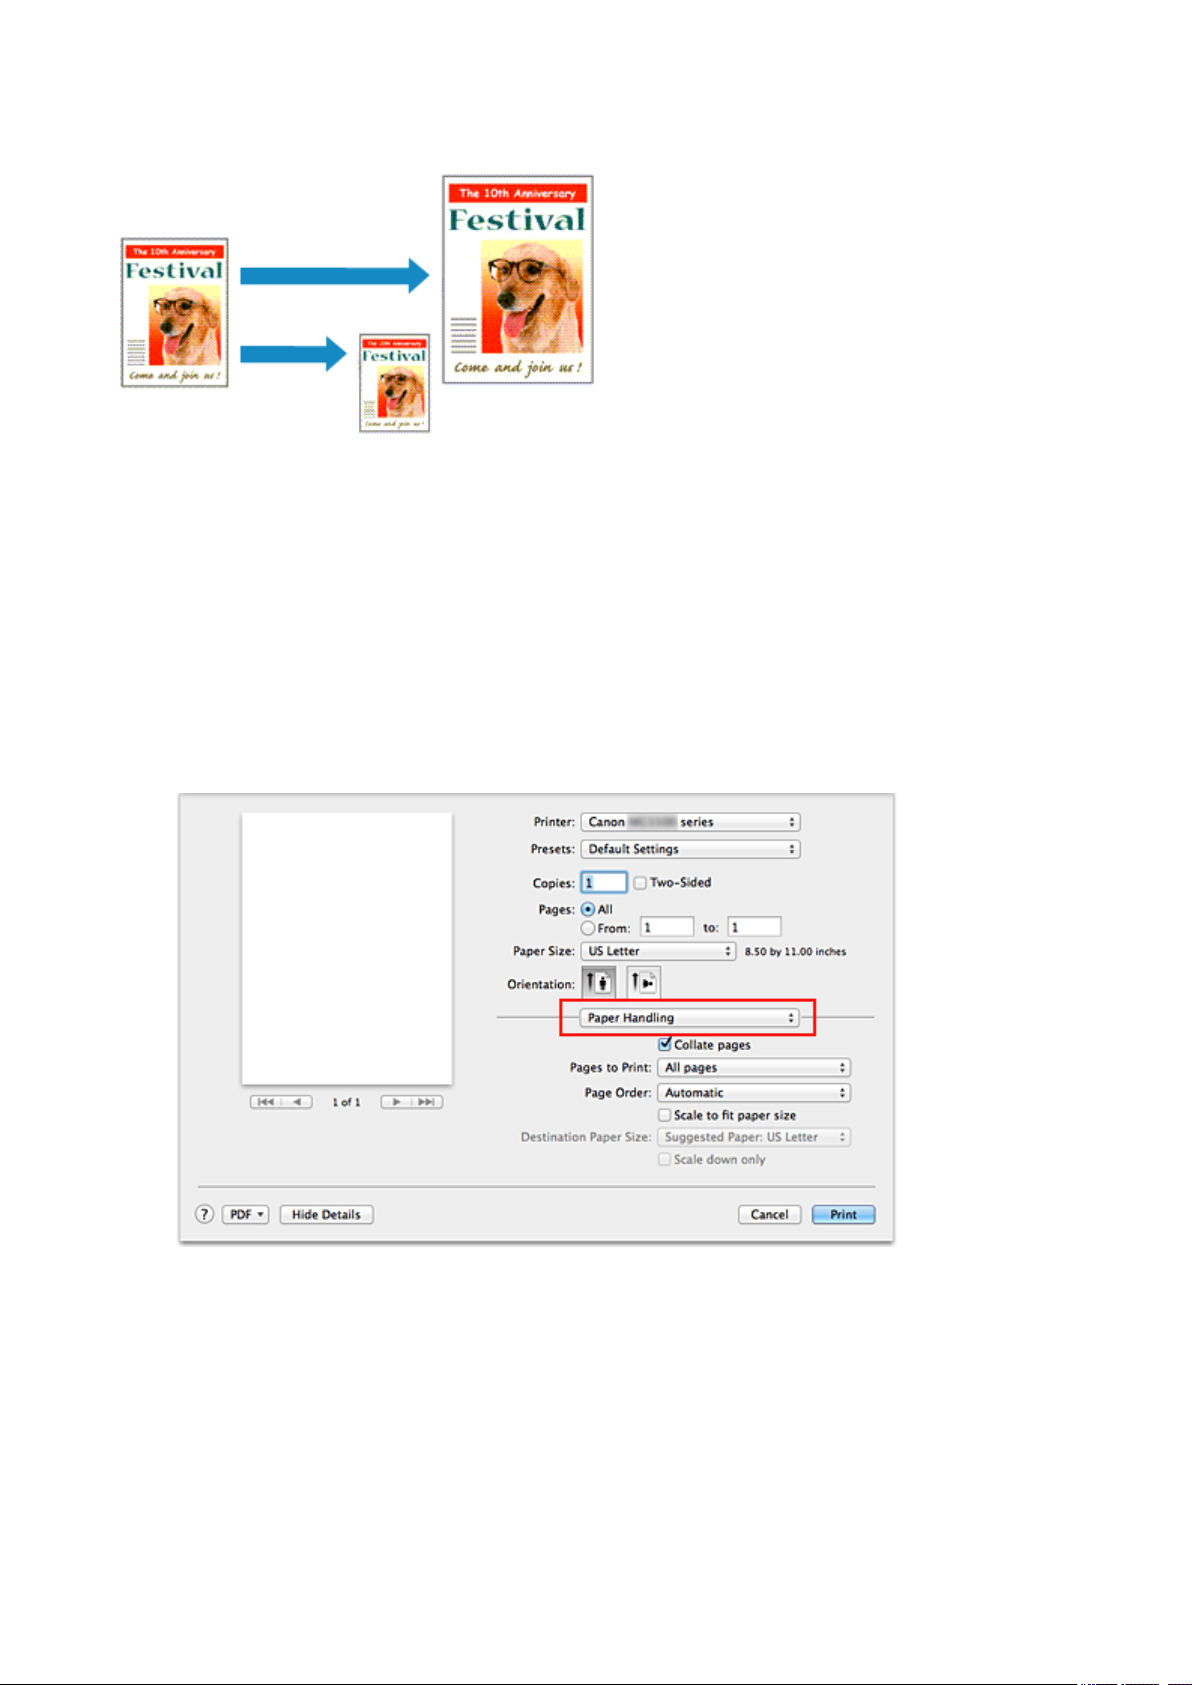
Scaled Printing
The procedure for printing a document with pages enlarged or reduced is as follows:
1. Select the printer
In the Page Setup Dialog, select your model name from the Format For list.
2. Set scaled printing
Specify the scaling factor in the Scale box, and click OK.
Note
If you are using Mac OS X v10.8 or Mac OS X v10.7, you can set the Scale rate
to a value in the range from 1 to 999%.
If you are using Mac OS X v10.6.8, set a value in the range from 1 to 10000%. If
you enter any other value, an error message will be displayed.
3. Complete the setup
On the Print Dialog, click Print.
When you execute print, the document will be printed with the specified scale.
23

Important
When the application software which you used to create the original has the scaled
printing function, configure the settings on your application software. You do not need to
configure the same setting in the Page Setup dialog.
24
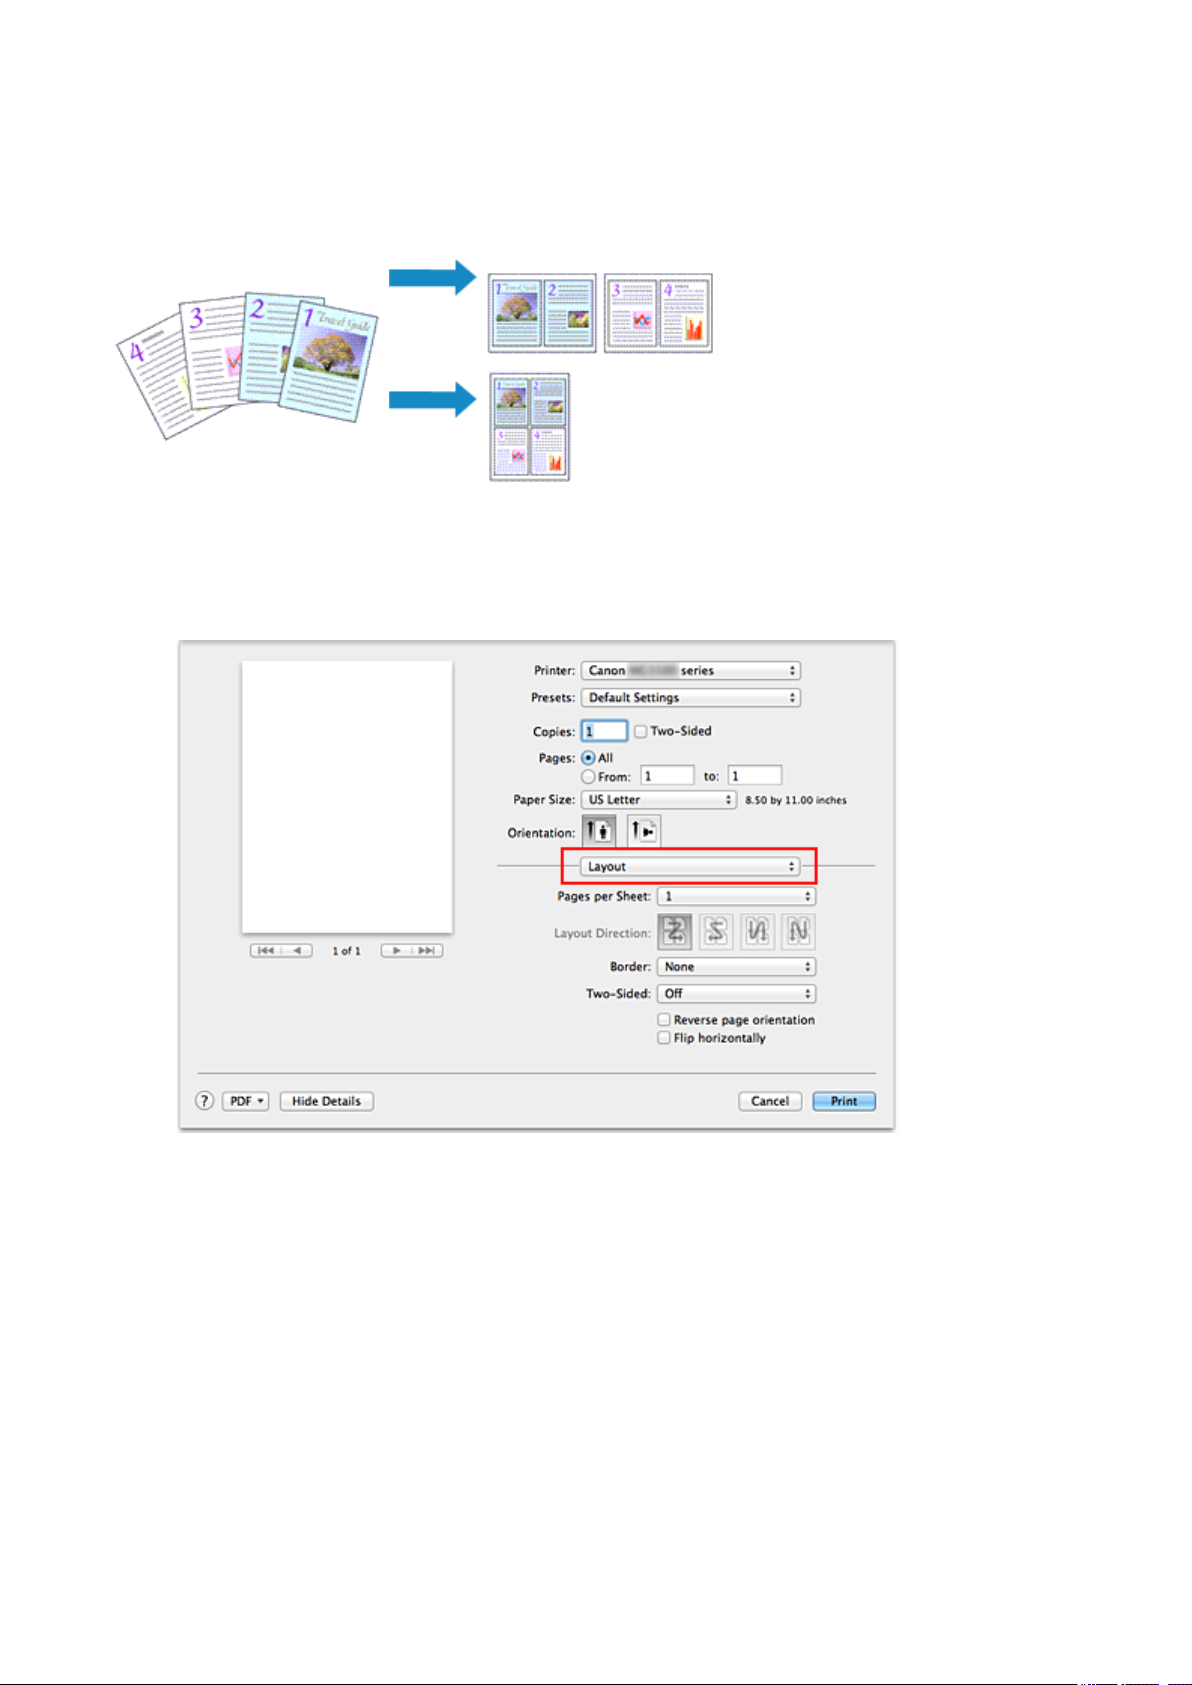
Page Layout Printing
The page layout printing function allows you to print more than one page image on a single
sheet of paper.
The procedure for performing page layout printing is as follows:
1. Select Layout from the pop-up menu in the Print Dialog
2. Set the number of original you print on one page
In Pages per Sheet, specify the number of page you print on one page.
3. If necessary, set the following items
Layout Direction
To change the page placement order, select an icon from the list.
Border
To print a page border around each document page, select a type of page border.
25

Reverse page orientation
Select this check box to change the paper orientation.
Flip horizontally
Select this check box to reverse left and right of the document.
4. Complete the setup
Click Print.
When you execute print, the specified number of pages will be arranged on each
sheet of paper in the specified order.
26
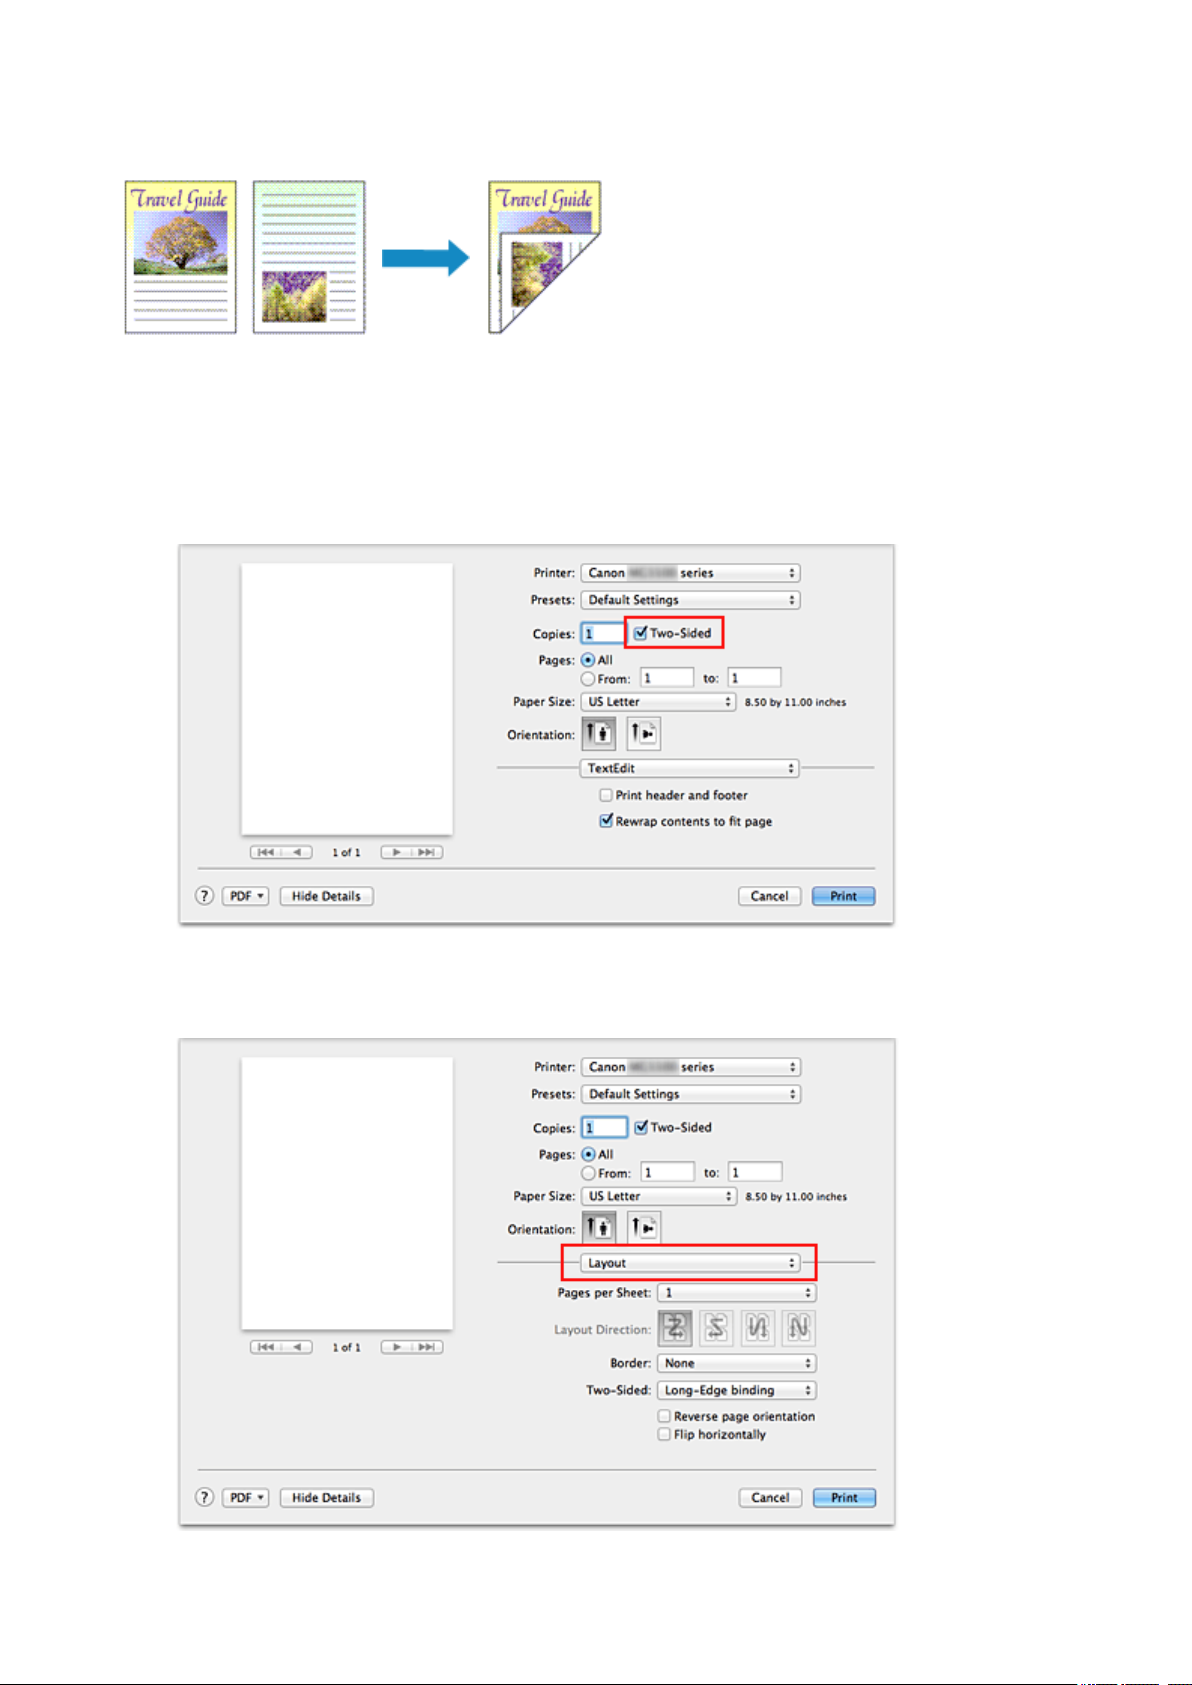
Duplex Printing
The procedure for printing data on both sides of one sheet of paper is as follows:
1. Set duplex printing
Check the Two-Sided check box in the Print Dialog.
2. Select Layout from the pop-up menu on the Print Dialog
27
3. Set the stapling side
For Two-Sided, select either Long-Edge binding or Short-Edge binding.
4. Select Margin from the pop-up menu on the Print Dialog
5. Set the stapling margin
If necessary, set the Margin width, and to change the Stapling Side, select a setting
from the list.
Note
Depending on the Two-Sided setting in the Layout pop-up menu, the Stapling
Side that can be selected differs.
6. Complete the setup
Click Print.
When you execute print, duplex printing will be started.
Important
When a media type other than Plain Paper is selected from Media Type menu of
Quality & Media, duplex printing cannot be executed.
When borderless printing is set, duplex printing cannot be executed.
Duplex printing can be performed only when one of the following paper sizes is
selected from Paper Size.
• US Letter, A4
After printing the front page, there is an ink drying wait time before starting to print the
back page (Operation stops temporarily). Do not touch the paper during this time. You
28

can change the ink drying wait time from Custom Settings in the Canon IJ Printer
Utility.
Note
If the back side of the paper becomes smudged during duplex printing, display the
pop-up menu of Canon IJ Printer Utility, select Cleaning from the menu, and then
perform Bottom Plate Cleaning.
When you use duplex printing, the print area becomes slightly smaller than the normal
print area.
Related Topics
Cleaning Inside the Machine
Changing the Machine Operation Mode
29
Printing on Postcards
This section describes the procedure for postcard printing.
1. Load postcard on the machine
2. Select paper size in the Print Dialog
Select Postcard or Postcard Double from the Paper Size menu.
Important
Return postcards can be used only when you print them from the computer.
When printing a return postcard, always set the paper size to Postcard Double
from your application software or the printer driver.
Do not fold the return postcard. If a crease is formed, the machine will not be
able to feed the postcard properly, and this condition will cause line shifts or a
paper jam.
With return postcards, borderless printing cannot be used.
3. Select Quality & Media from the pop-up menu
4. Select the media type
For Media Type, select the same paper type loaded in the machine.
Important
This machine cannot print on postcards that have photos or stickers attached.
When printing on each side of a postcard separately, you will get cleaner
printing if you print the message side first and then print the address side.
5. Complete the setup
Click Print.
When you execute printing, the data will be printed onto the postcard.
30
 Loading...