

Page 1
Back Previous Next
TOP
Introduction
Printing
Scanning a
Document
PC Faxing
Troubleshooting
Appendix
1
2
3
4
5
6
ENG
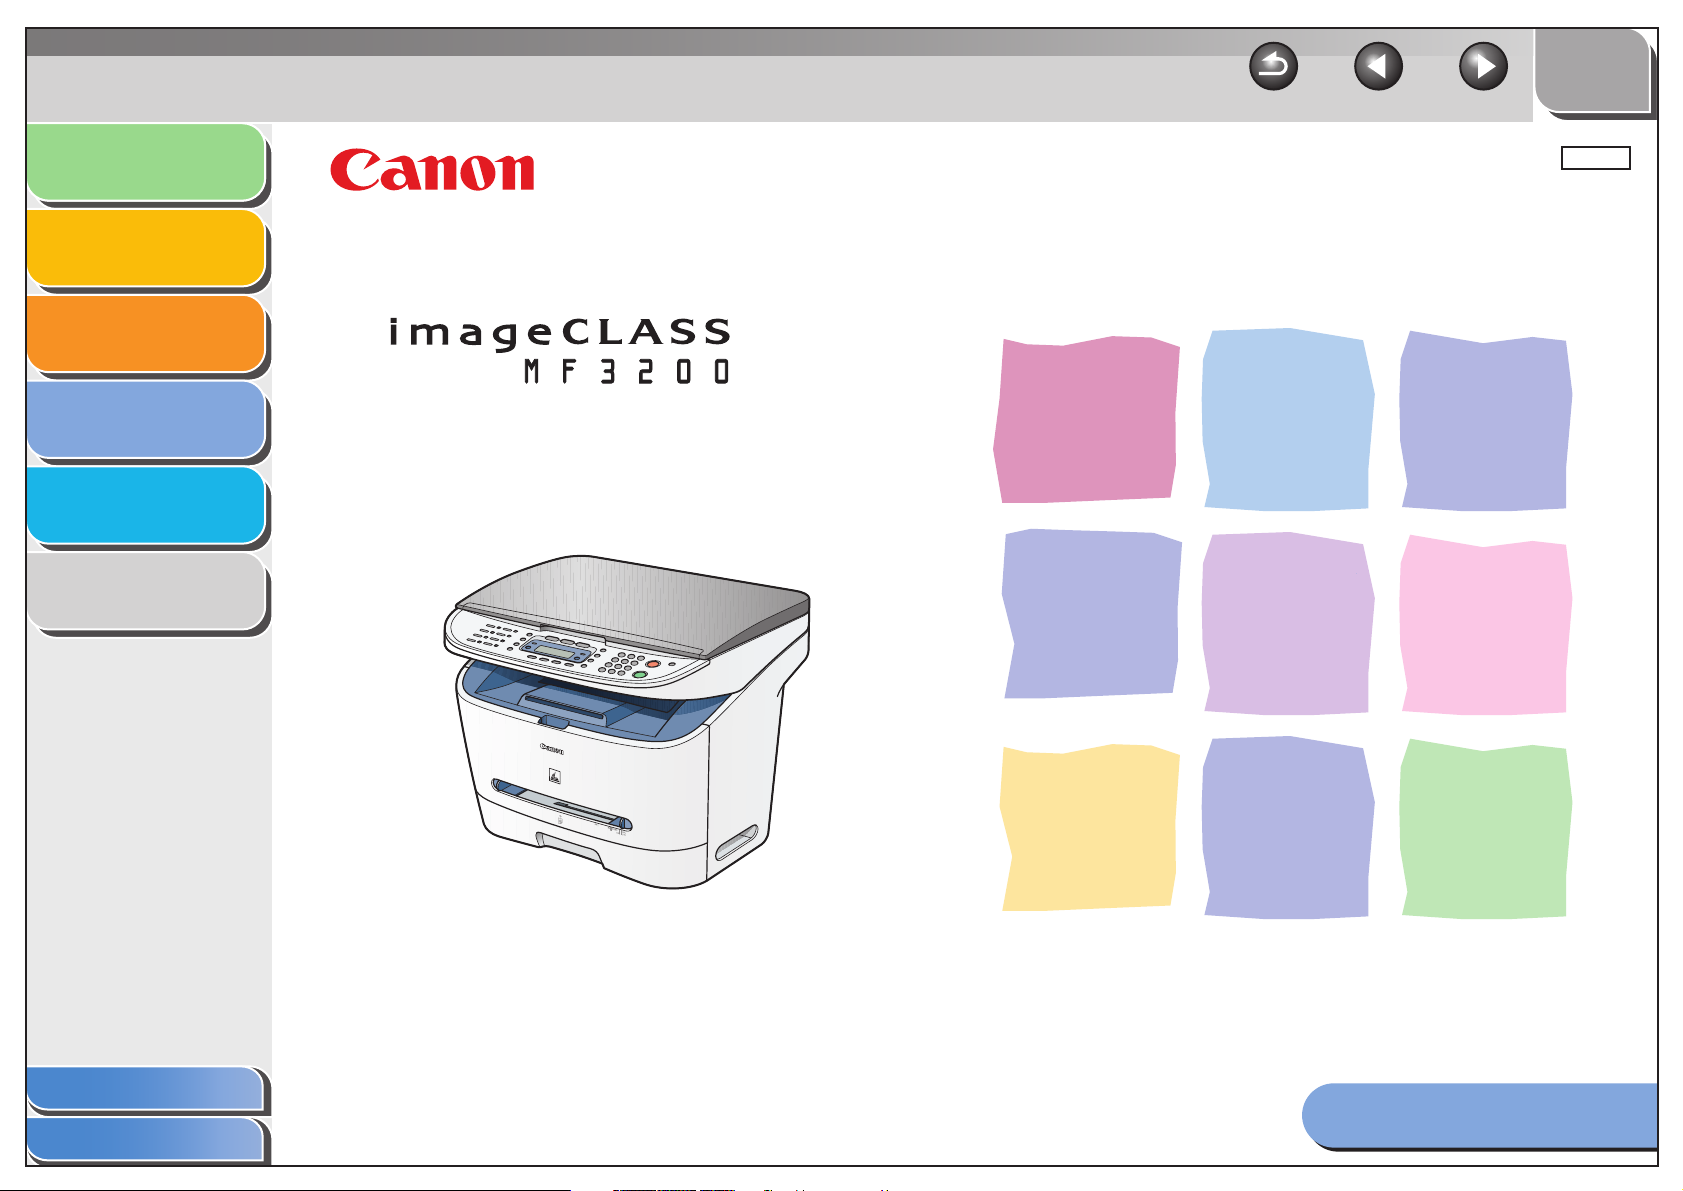
Software Guide
Series
Table of Contents
Index
Please read this guide before operating this equipment.
After you finish reading this guide, store it in a safe place
for future reference.
How to Use This Guide
Page 2
Introduction
TOP
Back Previous Next
Printing
Scanning a
Document
PC Faxing
Troubleshooting
Appendix
1
2
3
4
5
6
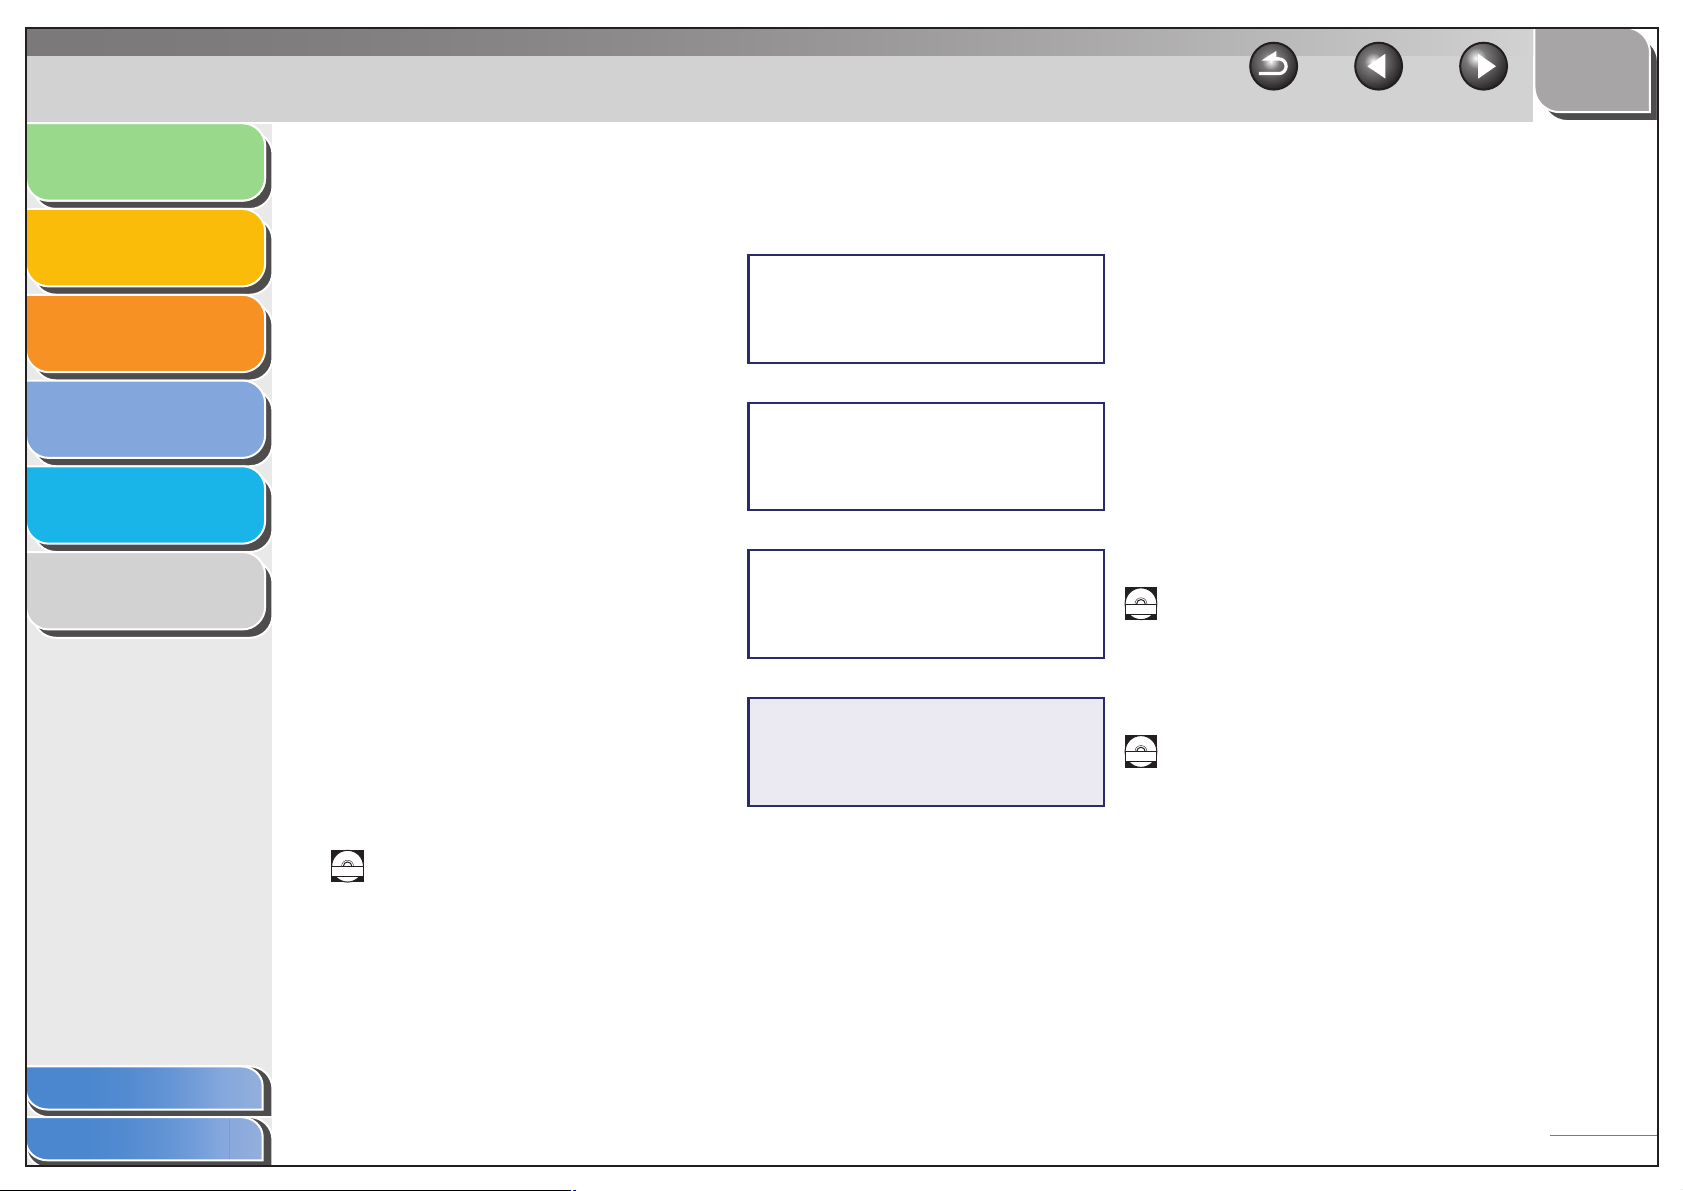
Manuals for the Machine
● Machine Set-Up
● Software Installation
● Basic Features
● Maintenance
● Machine Settings
● Specifications
● Advanced Features
● System Monitor
● Reports and Lists
● Printing Features
● Scanning Features
● PC Faxing Features
Starter Guide
Basic Guide
Advanced Guide
Software Guide
(This Document)
CD-ROM
CD-ROM
Table of Contents
Index
Indicates the manual is supplied in PDF format in the accompanying CD-ROM.
CD-ROM
● To view the manuals in PDF format, Adobe Reader/Acrobat Reader/Acrobat is required. If Adobe
Reader/ Acrobat Reader/Acrobat is not installed on your system, please download it from the Adobe
Systems Incorporated website (http://www.adobe.com).
● Considerable effort has been made to make sure that the manuals for the machine are free of
inaccuracies and omissions. However, as we are constantly improving our products if you need an exact
specification, please contact Canon.
● The machine illustration on the cover may differ slightly from your machine.
i
Page 3
Introduction
TOP
Back Previous Next
Printing
Scanning a
Document
PC Faxing
Troubleshooting
Appendix
1
2
3
4
5
6
Table of Contents
Manuals for the Machine ................................................................................i
How to Use This Guide............................................................................... viii
Legal Notices................................................................................................ xi
1 Introduction .................................................................................................................... 1-1
Where to Find Help.................................................................................... 1-2
Canon Support Center ........................................................................ 1-2
System Requirements ............................................................................... 1-3
Checking Installation ................................................................................. 1-4
Table of Contents
Index
Uninstalling and Reinstalling the Software ................................................ 1-5
Removing the MF Toolbox .................................................................. 1-5
Removing the MF Drivers ................................................................... 1-5
Reinstalling the Software .................................................................... 1-6
ii
Page 4

Introduction
TOP
Back Previous Next
Printing
Scanning a
Document
PC Faxing
Troubleshooting
Appendix
1
2
3
4
5
6
2 Printing............................................................................................................................ 2-1
Printing a Document .................................................................................. 2-2
Canceling Printing ............................................................................... 2-2
Changing Print Settings............................................................................. 2-4
From a Windows Application............................................................... 2-4
From the [Printers and Faxes]
(Windows 98/Me/2000/Vista: [Printers], Windows 7: [Devices and Print-
ers]) Folder.......................................................................................... 2-5
Windows 98/Me Properties........................................................................ 2-7
Windows 2000/XP/Vista/7 Properties and Printing Preferences ............. 2-26
Properties.......................................................................................... 2-27
Printing Preferences.......................................................................... 2-34
Using the Machine on Your Network ....................................................... 2-54
Table of Contents
Index
Setting the Machine as a Shared Printer .......................................... 2-54
Using the Shared Printer on Your Network ....................................... 2-60
iii
Page 5

Introduction
TOP
Back Previous Next
Printing
Scanning a
Document
PC Faxing
Troubleshooting
Appendix
1
2
3
4
5
6
3 Scanning a Document ................................................................................................... 3-1
Scanning with [Start] on the Machine ........................................................ 3-3
Setting the Scanning Function for [Start]................................................... 3-4
Setting Up [Start] to Operate in a Different Way from [Save].............. 3-4
Setting Up [Start] in the [Settings] Dialog Box..................................... 3-5
Setting Up [Start] in the [Scanners and Cameras] Folder ................... 3-5
Scanning with the MF Toolbox .................................................................. 3-7
MF Toolbox Settings.................................................................................. 3-9
Scanner Settings................................................................................. 3-9
Save Scanned Image to.................................................................... 3-11
External Program (Mail Program)...................................................... 3-12
Confirmation of the Scanned Image and Exif Settings
(Confirm the Scanned Image) ........................................................... 3-13
Table of Contents
Index
iv
Page 6

Introduction
TOP
Back Previous Next
Printing
Scanning a
Document
PC Faxing
Troubleshooting
Appendix
1
2
3
4
5
6
Scanning an Image from an Application.................................................. 3-15
Creating One PDF File from Two or More Pages.................................... 3-16
Setting Preferences and Scanning with
ScanGear MF .......................................................................................... 3-17
Switching between Simple Mode and Advanced Mode .................... 3-17
Using Simple Mode ........................................................................... 3-17
Using Advanced Mode ...................................................................... 3-20
Advanced Mode – Specifying the Parameters of a Scan.................. 3-22
Advanced Mode Settings .................................................................. 3-23
Determining Resolution..................................................................... 3-38
Scanning with the WIA Driver (Windows XP Only).................................. 3-40
Scanning from the [Scanner and Camera Wizard] Dialog Box
(Windows XP Only) ........................................................................... 3-40
Scanning from the [Windows FAX & Scan] Dialog Box
(Windows Vista/7 Only)..................................................................... 3-43
Table of Contents
Index
Scan from Windows Photo Gallery (Windows Vista Only) ................ 3-44
[New Scan] Dialog Box ..................................................................... 3-45
Scanning from an Application (Windows XP/Vista/7 Only) ............... 3-46
v
Page 7
Introduction
TOP
Back Previous Next
Printing
Scanning a
Document
PC Faxing
Troubleshooting
Appendix
1
2
3
4
5
6
4 PC Faxing........................................................................................................................ 4-1
Sending a Fax ........................................................................................... 4-3
Characters and Symbols for Fax Numbers ......................................... 4-4
Fax Sending Settings .......................................................................... 4-4
Changing Fax Settings ............................................................................ 4-14
From a Windows Application............................................................. 4-14
From the [Printers and Faxes] (Windows 98/Me/2000/Vista: [Printers],
Windows 7: [Devices and Printers]) Folder ....................................... 4-15
Windows 98/Me Fax Properties............................................................... 4-17
Windows 2000/XP/Vista/7 FAX Properties and
FAX Printing Preferences ........................................................................ 4-28
FAX Properties.................................................................................. 4-28
FAX Printing Preferences.................................................................. 4-32
Table of Contents
Index
Canon Cover Sheet Editor....................................................................... 4-42
Installing and Uninstalling Cover Sheet Editor .................................. 4-43
Opening, Saving, and Closing a File................................................. 4-46
Creating an Original Cover Sheet ..................................................... 4-48
Printing a Cover Sheet ...................................................................... 4-69
Registering an Original Cover Sheet as a Template......................... 4-69
vi
Page 8
Introduction
TOP
Back Previous Next
Printing
Scanning a
Document
PC Faxing
Troubleshooting
Appendix
1
2
3
4
5
6
5 Troubleshooting............................................................................................................. 5-1
Printer Problems........................................................................................ 5-2
Driver Problems......................................................................................... 5-5
Scanning Problems ................................................................................... 5-7
Installing and Uninstalling Problems........................................................ 5-13
6 Appendix......................................................................................................................... 6-1
Specifications ............................................................................................ 6-2
Printer Specifications .......................................................................... 6-2
Scanner Specifications........................................................................ 6-2
Glossary .................................................................................................... 6-3
Table of Contents
Index
Index........................................................................................................ 6-10
vii
Page 9
Introduction
TOP
Back Previous Next
Printing
Scanning a
Document
PC Faxing
Troubleshooting
Appendix
1
2
3
4
5
6
How to Use This Guide
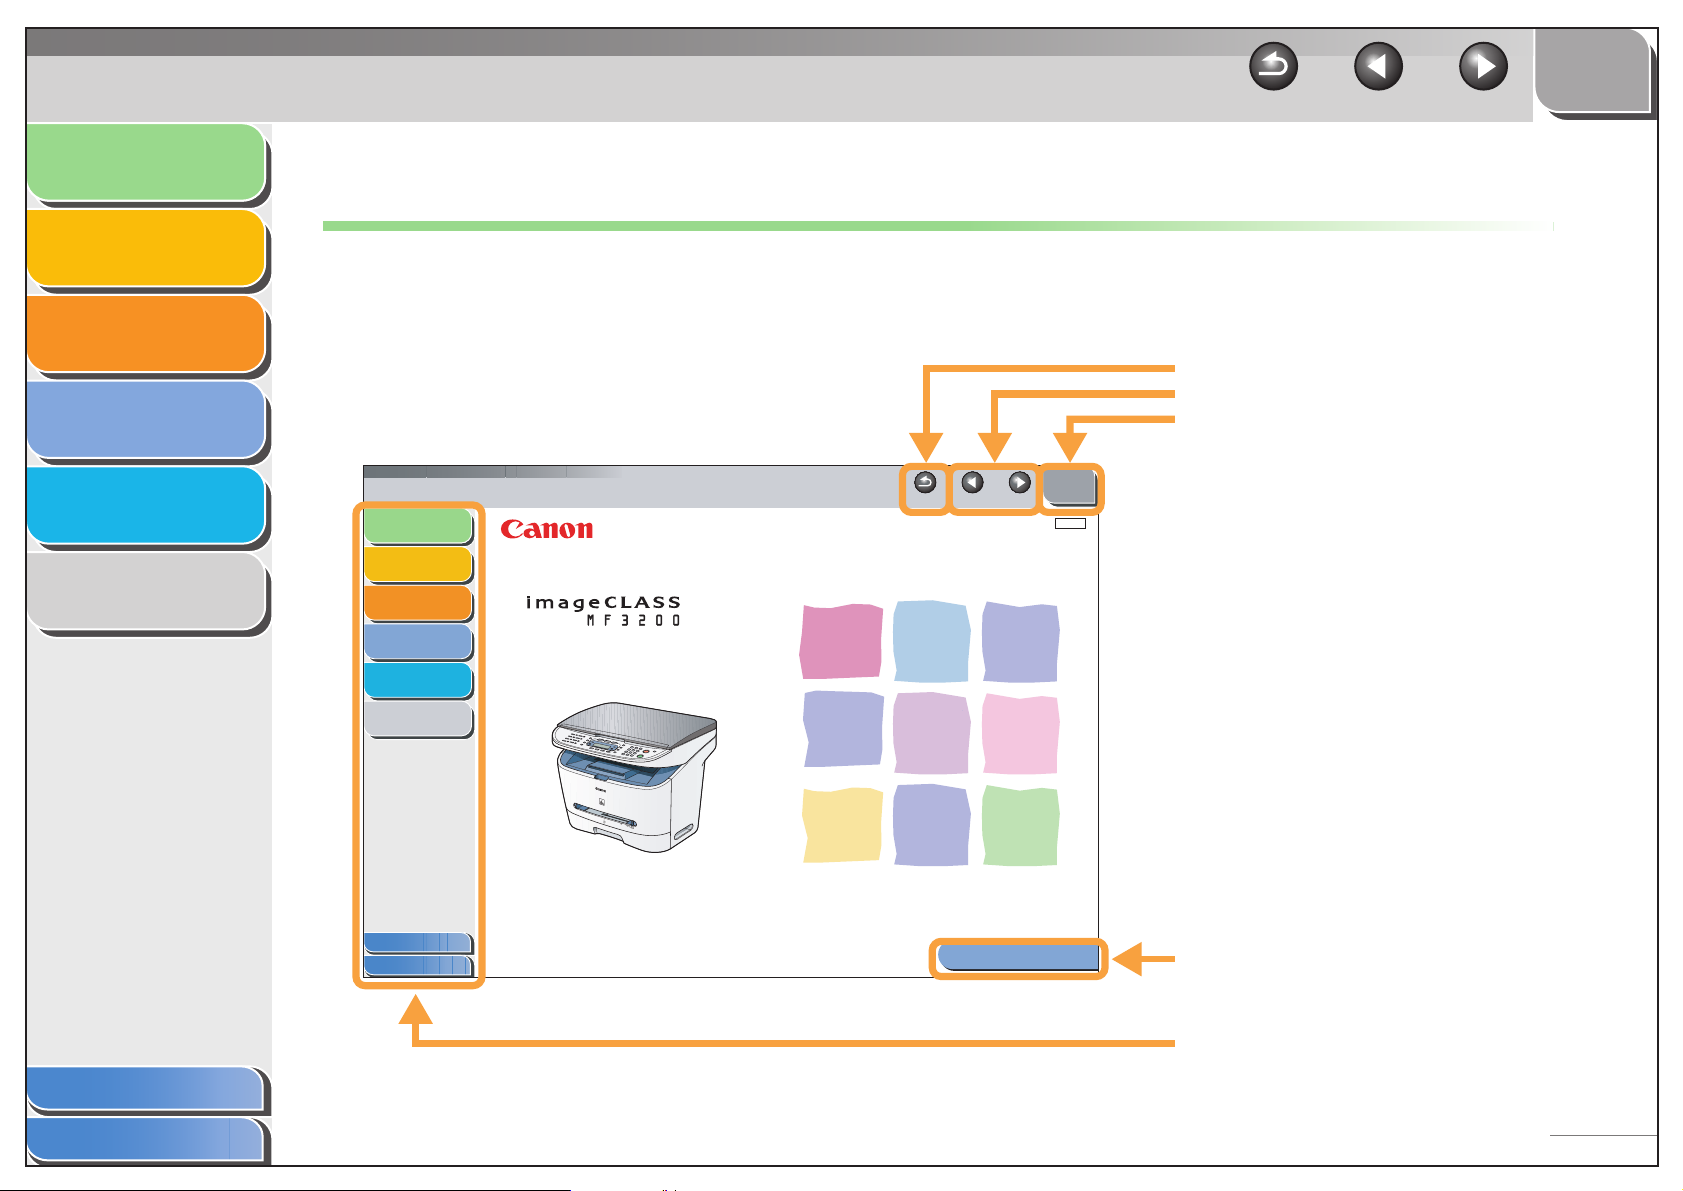
■ Using the Top Page
Introduction
Printing
Scanning a
Document
PC Faxing
Troubleshooting
Appendix
1
2
Software Guide
3
4
5
6
Series
Returns to the last page opened.
Displays the previous or next page.
Returns to the top page.
TOP
Back Previous Next
ENG
Table of Contents
Index
Table of Contents
Index
Please read this guide before operating this equipment.
After you finish reading this guide, store it in a safe place
for future reference.
How to Use This Guide
Displays the “How to Use This Guide” page.
Quick links to the list of things you can do, topics
for each chapter, table of contents, and the index.
viii
Page 10
Introduction
TOP
Back Previous Next
Printing
Scanning a
Document
PC Faxing
Troubleshooting
Appendix
1
2
3
4
5
6
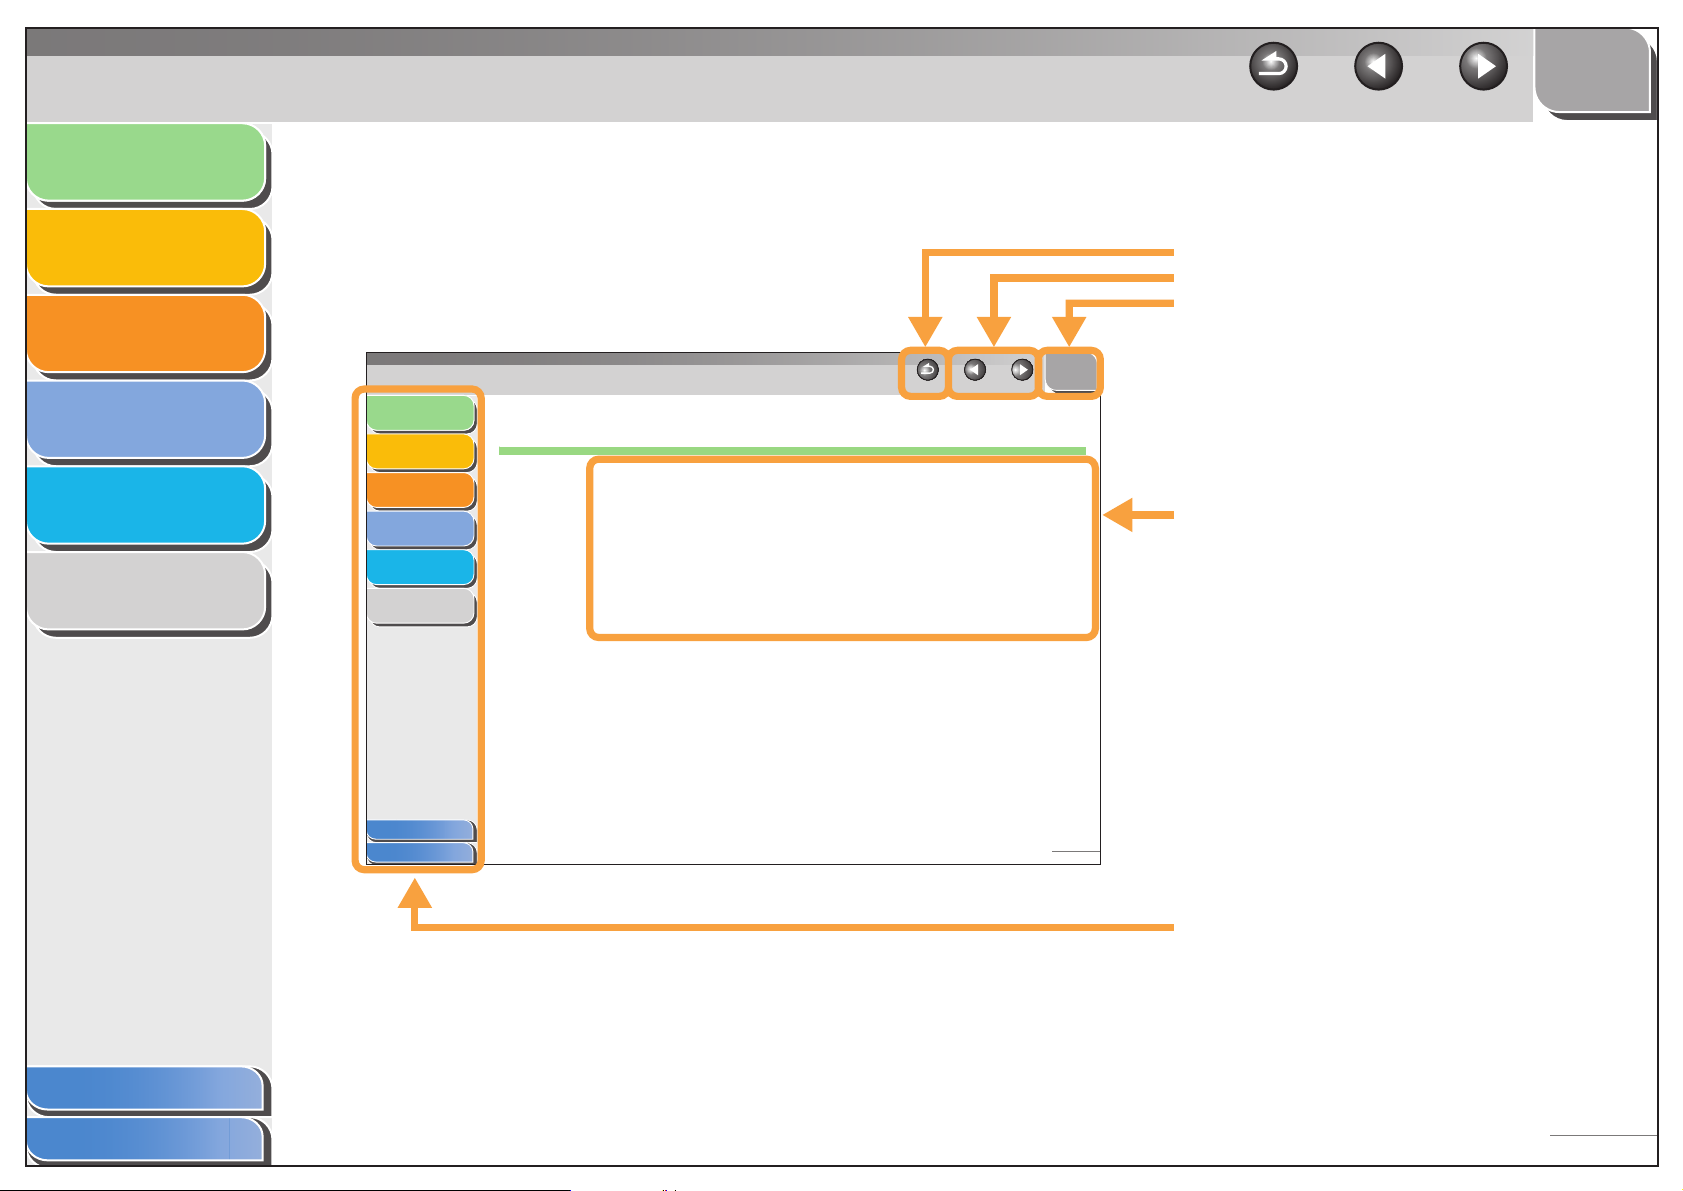
■ Using the Chapter Topic List
Introduction
Printing
Scanning a
Document
PC Faxing
Troubleshooting
Appendix
1
1 Introduction
2
3
4
5
6
Where to Find Help.................................................................................. 1-2
System Requirements............................................................................. 1-3
Checking Installation............................................................................... 1-4
Uninstalling and Reinstalling the Software........................................... 1-5
Removing the MF Toolbox...................................... 1-5
Removing the MF Drivers....................................... 1-5
Reinstalling the Software........................................ 1-6
Returns to the last page opened.
Displays the previous or next page.
Returns to the top page.
TOP
Back Previous Next
Table of contents for the chapter.
Table of Contents
Index
Table of Contents
Index
1-1
Quick links to the list of things you can do, topics
for each chapter, table of contents, and the index.
ix
Page 11
Introduction
Printing
Scanning a
Document
1
2
3
TOP
Back Previous Next
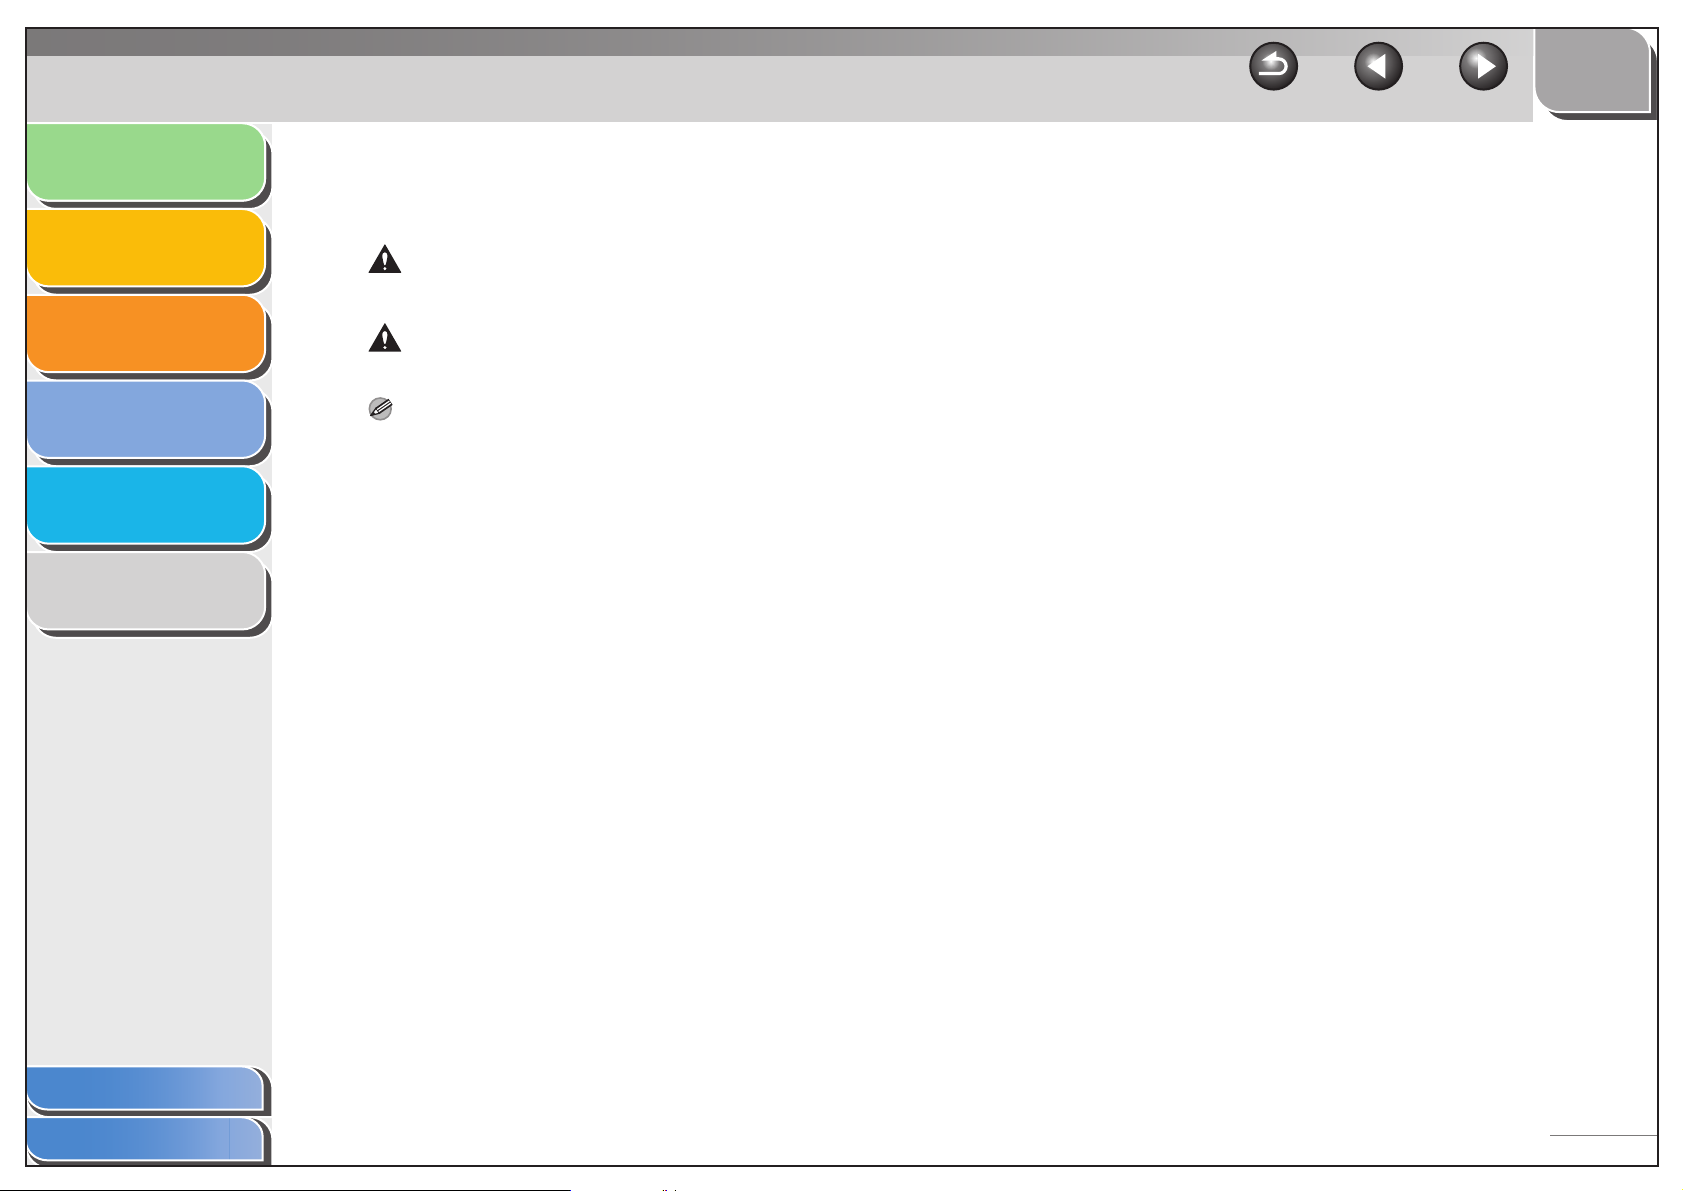
The following symbols are used throughout the manuals for the machine and indicate the warnings, cautions and notes you should
keep in mind when using the machine.
WARNI NG
Indicates a warning that may lead to death or serious injury if not observed.
CAUTION
Explains how to avoid actions that could injure you or damage your machine.
PC Faxing
Troubleshooting
Appendix
4
5
6
NOTE
Explains operating restrictions and how to avoid minor difficulties.
In addition, this guide uses a distinctive notation to identify buttons and information in the LCD:
– Menu items you select and the buttons you press on the screen appear in square brackets: [Preferences].
Table of Contents
Index
x
Page 12
Introduction
TOP
Back Previous Next
Printing
Scanning a
Document
PC Faxing
Troubleshooting
Appendix
1
2
3
4
5
6
Legal Notices
Trademarks
Canon, the Canon logo, and imageCLASS are trademarks of Canon Inc.
Microsoft, Windows, Windows Server, and Windows Vista are trademarks or registered trademarks of Microsoft Corporation in the U.S. and/or
other countries.
All other product and brand names are registered trademarks, trademarks or service marks of their respective owners.
Copyright
Copyright © 2009 by Canon Inc. All rights reserved. No part of this publication may be reproduced, transmitted, transcribed, stored in a retrieval
system, or translated into any language or computer language in any form or by any means, electronic, mechanical, magnetic, optical, chemical,
manual, or otherwise, without the prior written permission of Canon Inc.
Disclaimer
The information in this document is subject to change without notice.
CANON INC. MAKES NO WARRANTY OF ANY KIND WITH REGARD TO THIS MATERIAL, EITHER EXPRESS OR IMPLIED, EXCEPT AS
PROVIDED HEREIN, INCLUDING WITHOUT LIMITATION, THEREOF, WARRANTIES AS TO MARKETABILITY, MERCHANTABILITY,
FITNESS FOR A PARTICULAR PURPOSE OF USE OR AGAINST INFRINGEMENT OF ANY PATENT. CANON INC. SHALL NOT BE LIABLE
FOR ANY DIRECT, INCIDENTAL, OR CONSEQUENTIAL DAMAGES OF ANY NATURE, OR LOSSES OR EXPENSES RESULTING FROM
THE USE OF THIS MATERIAL.
Table of Contents
Index
xi
Page 13
Introduction
TOP
Back Previous Next
Printing
Scanning a
Document
PC Faxing
Troubleshooting
Appendix
1
2
3
4
5
6
1 Introduction
Where to Find Help.................................................................................. 1-2
System Requirements............................................................................. 1-3
Checking Installation............................................................................... 1-4
Uninstalling and Reinstalling the Software........................................... 1-5
Removing the MF Toolbox ...................................... 1-5
Removing the MF Drivers....................................... 1-5
Reinstalling the Software........................................ 1-6
Table of Contents
Index
1-1
Page 14
Introduction
TOP
Back Previous Next
Printing
Scanning a
Document
PC Faxing
Troubleshooting
Appendix
1
2
3
4
5
6
Where to Find Help
When you encounter a problem during installation of the
driver software or while operating your machine, consult
the following:
In This Manual
See Chapter 5, “Troubleshooting.”
In the Basic Guide
See Chapter 11, “Troubleshooting,” in the Basic Guide.
README. TXT File
The hints, limitations, and restrictions you need to be aware of
when installing and using the drivers are included in the
README.TXT file provided with the drivers.
Context Sensitive Help
This Help displays the explanation of each item in the current
dialog box. Use one of the following procedures to activate a
context sensitive help.
– Click (Help) in the title bar of the dialog box
desired item.
– Right click the desired item
– Select the desired item
→ select [What’s this?].
→ press [F1].
→ click the
■ Canon Support Center
If the above Help does not provide the information you need,
please contact the Canon Support Center at 1-800-828-4040
between the hours of 8:00 A.M. to 8:00 P.M. EST
Monday through Friday and 10:00 A.M. to 8:00 P.M. on
Saturday.
Table of Contents
Index
Online Help
You can locate additional help in the online help file provided
with the driver software. In the [Properties] dialog box, you can
click [Help] to display information about every feature and option
in the drivers.
1-2
Page 15
Introduction
TOP
Back Previous Next
Printing
Scanning a
Document
PC Faxing
Troubleshooting
Appendix
1
2
3
4
5
6
System Requirements
General
– IBM or IBM-compatible PC
– CD-ROM drive or network environment with the access to
CD-ROM
– PC equipped with a USB port and the USB class driver
installed
Microsoft Windows 98, 98SE
CPU: Intel
Memory: 64 MB of RAM, 128 MB or more is recommended
Microsoft Windows Me
CPU: Intel
Memory: 64 MB of RAM, 128 MB or more is recommended
Microsoft Windows 2000 Professional
CPU: Intel
Intel
Memory: 64 MB of RAM, 128 MB or more is recommended
(USB 1.1), 128 MB of RAM (USB 2.0)
®
Pentium® 90 MHz or higher
®
Pentium® 150 MHz or higher
®
®
Pentium® 133 MHz or higher (USB 1.1),
Pentium® II or higher (USB 2.0)
Microsoft Windows XP
CPU: Intel
Intel
Memory: 64 MB of RAM, 128 MB or more is recommended
(USB 1.1), 128 MB of RAM (USB 2.0)
Microsoft Windows Vista
CPU: 800 MHz or higher
Memory: 512 MB or more
Microsoft Windows 7
CPU: 1 GHz or faster
Memory: 1 GB or more
– The USB 2.0 Hi Speed connection requires a PC equipped with a
CPU faster than 300 MHz and more than 64 MB of RAM and with
Windows XP SP1 or later installed, or with a CPU faster than
133 MHz and more than 64 MB of RAM and with Windows 2000 SP4
installed. If your PC meets all of these requirements and is
preinstalled with USB 2.0 Host Controller, the USB 2.0 connection
will be guaranteed.
– When scanning a document, the necessary memory size may differ
depending on the scanning size and the memory usage of the
application.
®
®
NOTE
Pentium® 300 MHz or higher (USB 1.1),
Pentium® II/Celeron® 300 MHz or higher (USB 2.0)
Table of Contents
Index
1-3
Page 16
Introduction
TOP
Back Previous Next
Printing
Scanning a
Document
PC Faxing
Troubleshooting
Appendix
1
2
3
4
5
6
Checking Installation
Check if the drivers are installed successfully and the
machine is selected as the default printer.
NOTE
If your machine is selected in the printer box when you open the [Print]
dialog box in an application, which means your machine is set as the
default printer.
1. Open the [Printers and Faxes] (Windows 98/
Me/2000: [Printers]) folder.
Click [start] on the Windows task bar → select [Printers and
Faxes] (Windows 98/Me/2000: [Start] → [Settings] → [Printers]
Windows Vista: Click [Start] on the Windows task bar, → select
[Control Panel] → [Hardware and Sound] → double-click
[Printers]. Windows 7: Click [Start] on the Windows task bar, click
[Start] → select [Devices and Printers]).
Make sure the driver icon is displayed.
2. Select the default printer.
Select the printer icon for this machine, then select [Set as
Default Printer] (Windows 98/Me: [Set as Default]).
3. Open the [Scanners and Cameras] folder
(Windows 98/2000: the [Scanners and
Cameras Properties] dialog box).
Click [start] on the Windows task bar → select [Control Panel] →
[Printers and Other Hardware] → [Scanners and Cameras]
(Windows 98/Me/2000: [Start] → [Settings] → [Control Panel] →
double-click [Scanners and Cameras] Windows Vista: Click
[Start] → select [Control Panel] → [Hardware and Sound] →
double-clic [Scanners and Cameras].
Windows 7: Enter “scanner” in [Search programs and files] under
the [Start] menu → click [View scanners]).
4. Make sure that the corresponding scanner
driver is displayed.
5. If the [Canon MF Toolbox 4.9] icon is
displayed on the Windows desktop,
installation of the MF Toolbox 4.9 was
successful.
Table of Contents
Index
1-4
Page 17
Introduction
TOP
Back Previous Next
Printing
Scanning a
Document
PC Faxing
Troubleshooting
Appendix
1
2
3
4
5
6
Uninstalling and Reinstalling the Software
If you want to reinstall the software, you must remove the
currently installed software. Before you remove the driver,
make sure the following:
● You have the installation software available for
installation.
● No application is running on your computer.
NOTE
– To uninstall the software in Windows 2000/XP/Vista/7, you must be
the user with administrative privileges.
– When removing the software, first remove the MF Toolbox, and then
the MF drivers.
– For Windows Vista/7, click [Continue] or [Yes] to proceed if the [User
Account Control] dialog box appears.
■ Removing the MF Toolbox
1. Click [start] on the Windows task bar → [(All)
Programs] → [Canon] → [MF Toolbox 4.9] →
[Toolbox Uninstall].
■ Removing the MF Drivers
1. Click [start] on the Windows task bar → [(All)
Programs] → [Canon] → [MF3200 Series] →
[Uninstall (Drivers)].
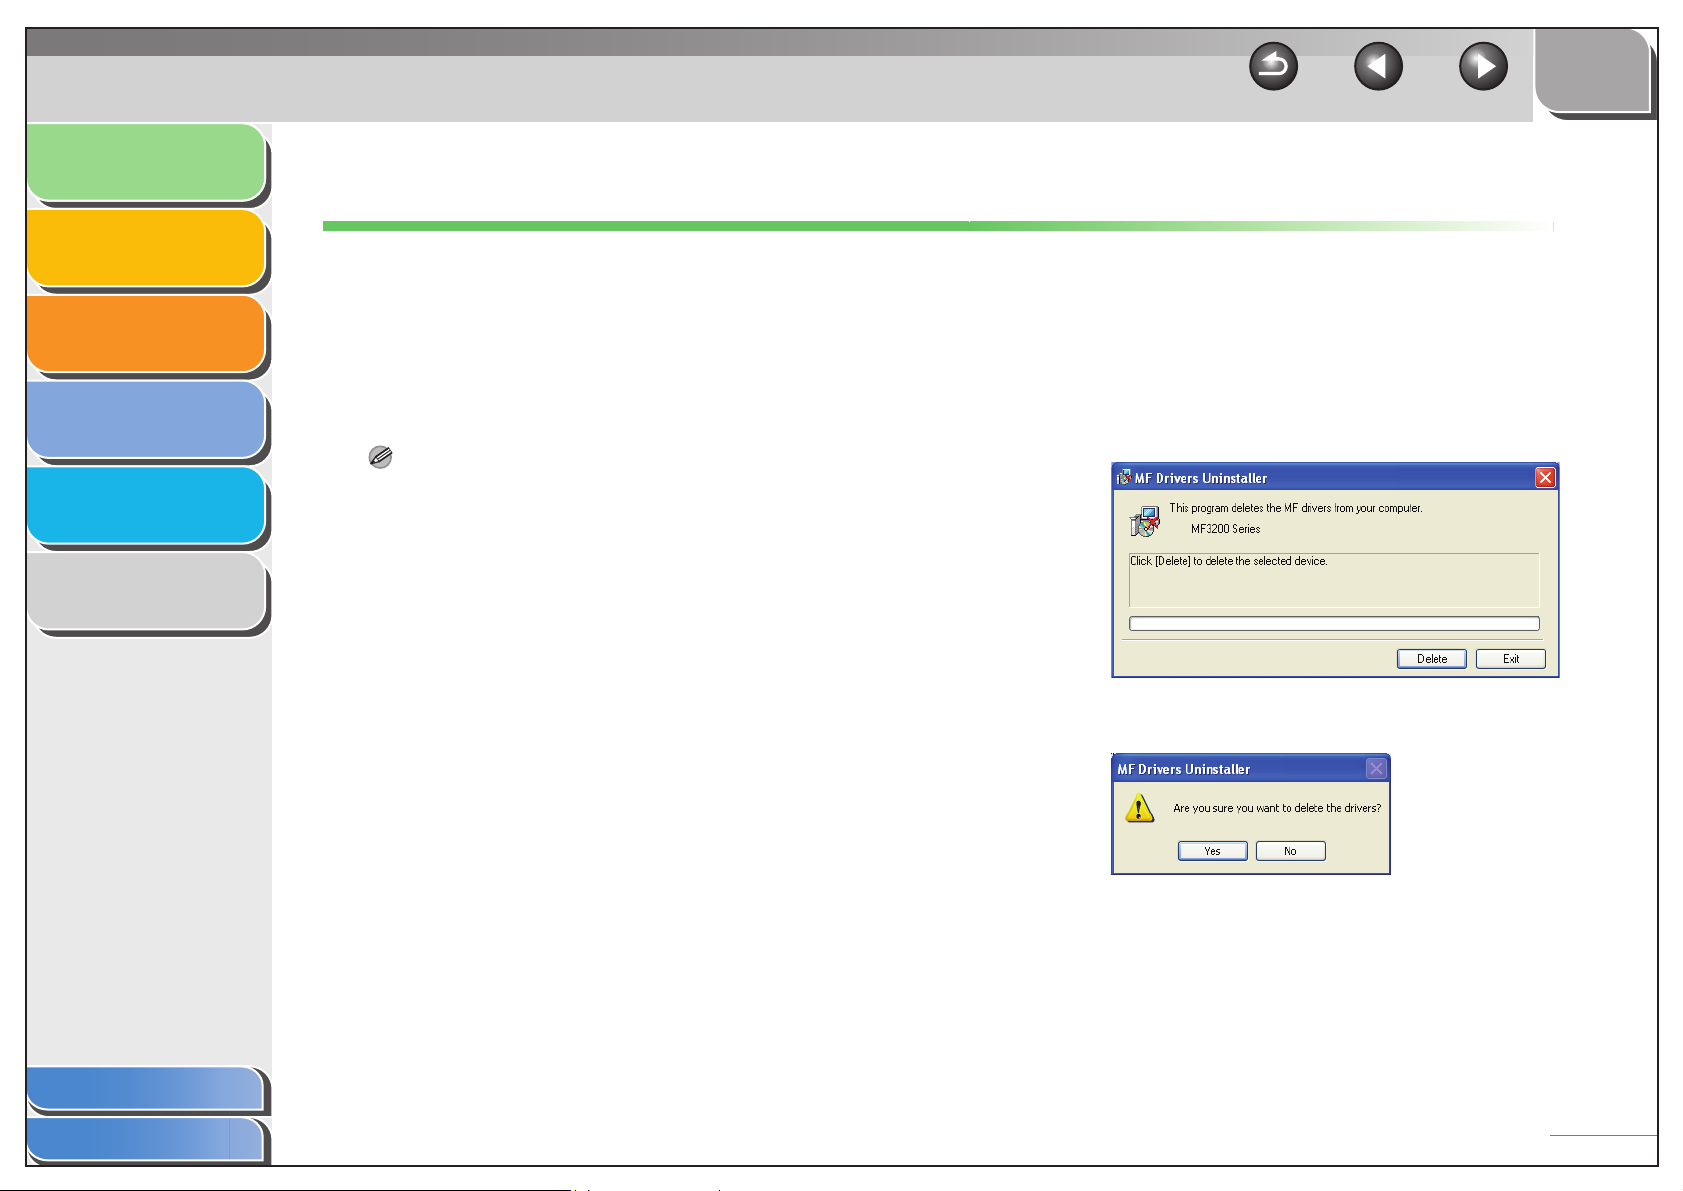
2. Click [Delete].
3. Click [Yes] to confirm the deletion.
Table of Contents
Index
2. Click [Remove].
3. Click [Exit].
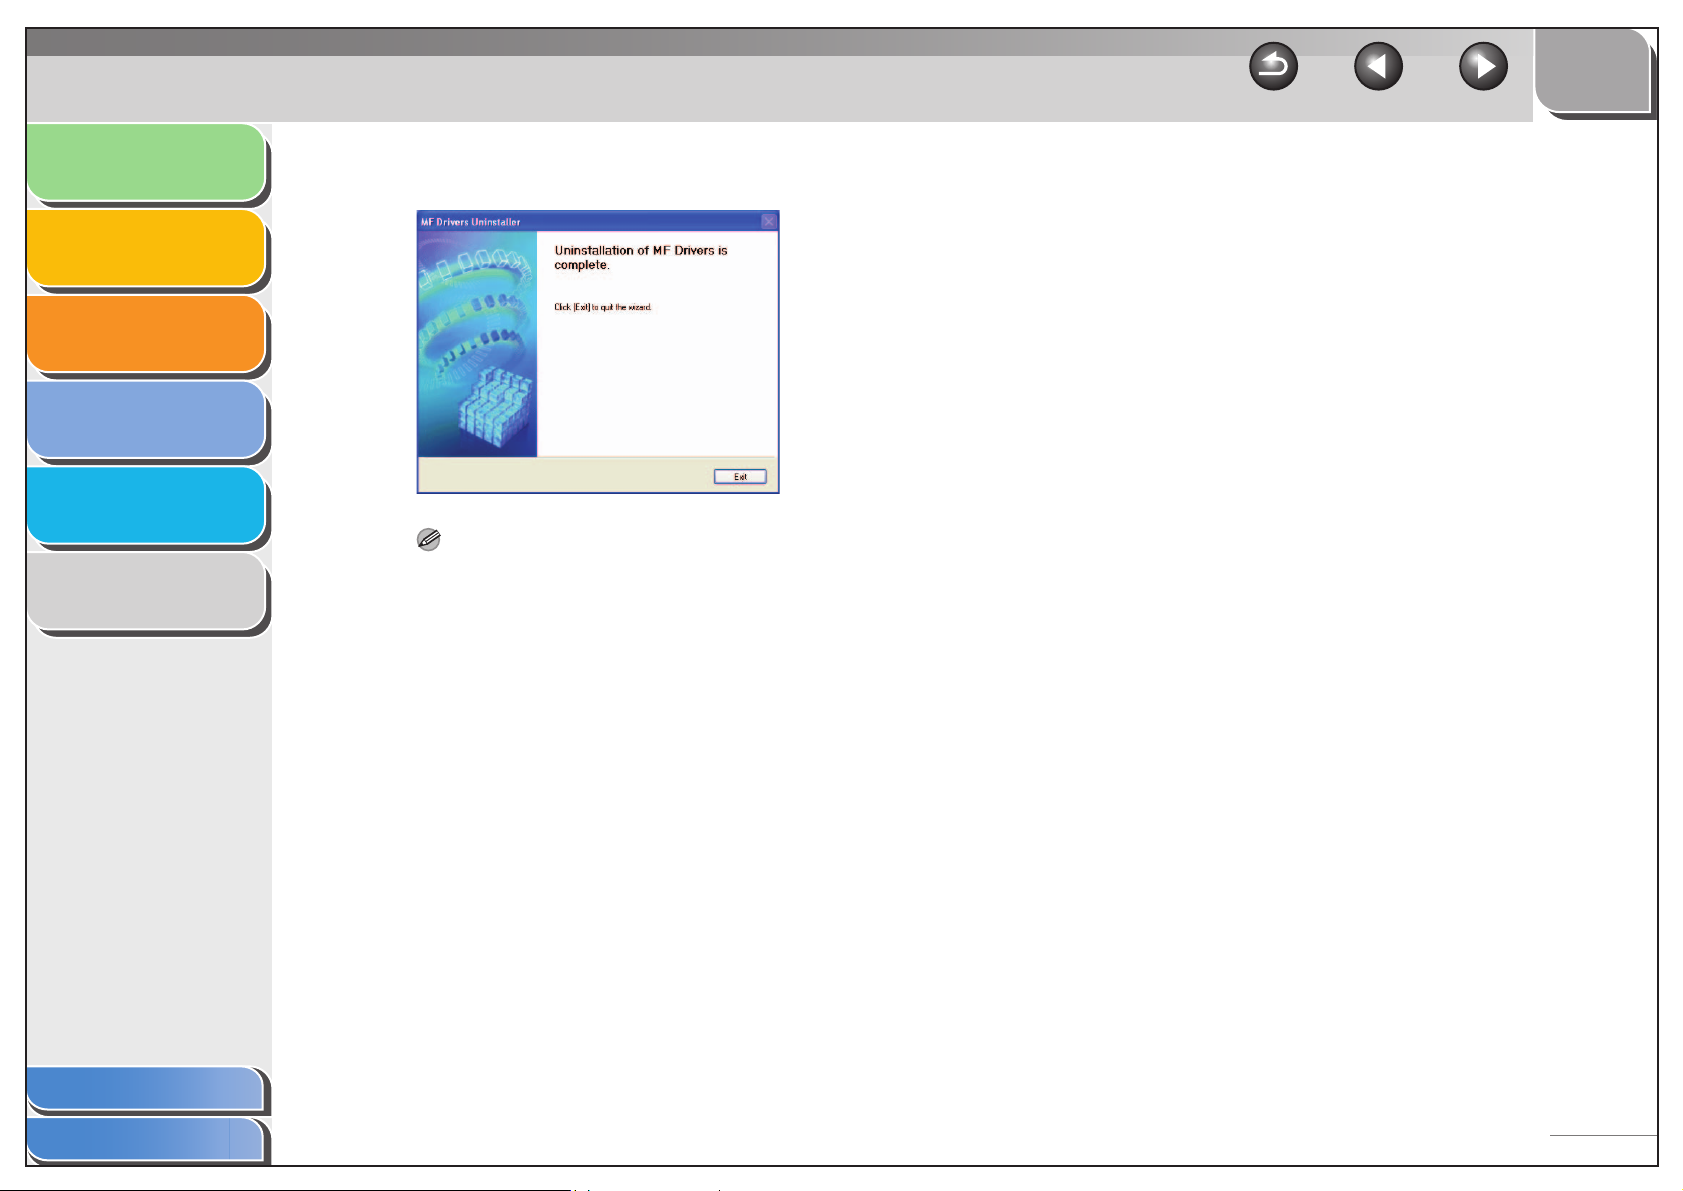
Uninstallation proceeds automatically and next dialog box
appears.
1-5
Page 18
Introduction
Printing
Scanning a
Document
PC Faxing
Troubleshooting
1
2
3
4
4. Click [Exit].
TOP
Back Previous Next
■ Reinstalling the Software
On the Windows desktop, click [start] → [(My) Computer]
(Windows 98/Me/2000: double-click [My Computer]). Open the
CD-ROM icon → double-click [MInst] ([MInst.exe]). The MF
Setup screen appears. For instructions on reinstalling the
software, see “Installing Software,” in the Starter Guide.
If you install the software using a copy on network or hard disk,
open the setup screen by double-clicking the [Setup.exe] icon.
Appendix
Table of Contents
5
6
NOTE
Restart your computer if asked to do so.
Index
1-6
Page 19
Introduction
TOP
Back Previous Next
Printing
Scanning a
Document
PC Faxing
Troubleshooting
Appendix
1
2
3
4
5
6
2Printing
Printing a Document ............................................................................... 2-2
Canceling Printing .................................................. 2-2
Changing Print Settings.......................................................................... 2-4
From a Windows Application .................................. 2-4
From the [Printers and Faxes]
(Windows 98/Me/2000: [Printers]) Folder ............... 2-5
Windows 98/Me Properties ..................................................................... 2-7
Windows 2000/XP/Vista/7 Properties and Printing Preferences.......... 2-26
Properties ............................................................. 2-27
Printing Preferences ............................................. 2-34
Table of Contents
Index
Using the Machine on Your Network ...................................................... 2-54
Setting the Machine as a Shared Printer.............. 2-54
Using the Shared Printer on Your Network........... 2-60
2-1
Page 20
Introduction
TOP
Back Previous Next
Printing
Scanning a
Document
PC Faxing
Troubleshooting
Appendix
1
2
3
4
5
6
Printing a Document
1. Open the document in an application.
2. Select the command to print.
In most cases, click [Print] from the [File] menu.
The [Print] dialog box appears.
3. From the [Select Printer] list box or the
[Name] drop-down list in the [Print] dialog
box, select the printer to be used.
4. Click [Preferences] or [Properties].
NOTE
Depending on the application you are using, select the printer to
be used in the [General] tab sheet in the [Print] dialog box, then
specify the print settings in the corresponding tab sheet. (Only for
Windows 2000.)
5. Specify the required settings → click [OK].
NOTE
For details, see “Changing Print Settings,” on p. 2-4.
6. Click [Print] or [OK].
Printing starts.
■ Canceling Printing
Windows 2000/XP
1. Open the [Printers and Faxes] (Windows 98/
Me/2000: [Printers]) folder.
Click [start] on the Windows task bar → select [Printers and
Faxes] (Windows 98/Me/2000: [Start]
[Printers]).
→ [Settings] →
2. Double-click the corresponding printer driver
icon.
3. Right click the print job → click [Cancel] or
[Cancel Printing] → [Yes].
NOTE
– For Windows 98/Me/2000, the job will be canceled when you
click [Cancel] or [Cancel Printing].
– You can also cancel a print job using [System Monitor] on the
operation panel of the machine. For details, see Chapter 3,
“System Monitor,” in the Advanced Guide.
Table of Contents
Index
NOTE
To cancel printing, click [Cancel].
2-2
Page 21
Introduction
TOP
Back Previous Next
Printing
Scanning a
Document
PC Faxing
Troubleshooting
Appendix
1
2
3
4
5
6
Windows Vista/7
1. Open the [Printers] folder.
Windows Vista: Click [Start] on the Windows task bar → select
[Control Panel] → click [Printer] under [Hardware and Sound].
Windows 7: Click [Start] on the Windows task bar → click
[Devices and Printers] on the [Start] menu.
2. Double-click the corresponding printer driver
icon.
3. Right click the print job → click [Cancel] →
[Yes].
You can cancel the print job also by selecting the print job →
click [Cancel] from [Document] on the toolbar → click [Yes].
NOTE
You can display the print job by clicking the printer icon and
selecting [See what's printing] on the toolbar.
Table of Contents
Index
2-3
Page 22
Introduction
TOP
Back Previous Next
Printing
Scanning a
Document
PC Faxing
Troubleshooting
Appendix
1
2
3
4
5
6
Changing Print Settings
To view or change the print settings, access the properties
or printing preferences dialog box of the printer driver.
You can access the properties dialog box either from the
application’s [Print] dialog box or the [Printers and Faxes]
(Windows 98/Me/2000/Vista: [Printers], Windows 7:
[Devices and Printers]) folder, and the printing preferences
dialog box from the [Printers and Faxes] (Windows 2000:
[Printers]) folder.
To access the dialog box, follow this procedure.
NOTE
– The properties dialog box enables you to set up the printer
configuration and configure the print settings for all Windows
applications. The printing preferences dialog box enables you to
specify the default settings for the printing options available when you
print with the machine. (Only for Windows 2000/XP/Vista.)
– The number of tabs displayed in the properties dialog box will vary,
depending on the type of operating system you are using and the
method you use to access the dialog box.
– The method you use to access the dialog boxes determines how long
the printing options remain in effect:
If you access the dialog box from an application’s [Print] dialog box,
your selected printing options apply only to the current print job. They
will not be stored when you close the application.
If you access the dialog box from the [Printers and Faxes] (Windows
98/Me/2000: [Printers], Windows 7: [Devices and Printers]) folder,
selected printing options apply to all Windows applications and
remain in effect until you change those settings.
■ From a Windows Application
Opening the Printing Preferences or Properties
Dialog Box
1. Select the command to print.
In most cases, click [Print] from the [File] menu.
The [Print] dialog box appears.
2. From the [Select Printer] list box or the
[Name] drop-down list in the [Print] dialog
box, select the printer to be used.
3. Click [Preferences] or [Properties].
The [Canon MF3200 Series Printing Preferences] or [Canon
MF3200 Series Properties] dialog box appears.
NOTE
Depending on the application you are using, select the printer to
be used in the [General] tab sheet in the [Print] dialog box, then
specify the print settings in the corresponding tab sheet. (Only for
Windows 2000.)
Table of Contents
Index
2-4
Page 23
Introduction
TOP
Back Previous Next
Printing
Scanning a
Document
PC Faxing
Troubleshooting
Appendix
1
2
3
4
5
6
■ From the [Printers and Faxes]
(Windows 98/Me/2000/Vista: [Printers],
Windows 7: [Devices and Printers])
Folder
Opening the Properties Dialog Box
1. Open the [Printers and Faxes] (Windows 98/
Me/2000: [Printers]) folder.
Click [start] on the Windows task bar → select [Printers and
Faxes] (Windows 98/Me/2000: [Start] → [Settings] → [Printers]).
2. Click the corresponding printer driver icon.
3. From the [File] menu, click [Properties].
You can also open the properties dialog box by right clicking the
corresponding printer driver icon and selecting [Properties] from
the pop-up menu.
The [Canon MF3200 Series Properties] dialog box appears.
Opening the Printing Preferences Dialog Box
(Windows 2000/XP)
1. Open the [Printers and Faxes] (Windows
2000: [Printers]) folder.
Click [start] on the Windows task bar → select [Printers and
Faxes].
2. Click the corresponding printer driver icon.
3. From the [File] menu, click [Printing
Preferences].
You can also open the printing preferences dialog box by right
clicking the corresponding printer driver icon and selecting
[Printing Preferences] from the pop-up menu.
The [Canon MF3200 Series Printing Preferences] dialog box
appears.
Table of Contents
Index
2-5
Page 24
Introduction
TOP
Back Previous Next
Printing
Scanning a
Document
PC Faxing
Troubleshooting
Appendix
1
2
3
4
5
6
Windows Vista/7
● Opening the Properties Dialog Box
1. Open the [Printers] folder.
Windows Vista: Click [Start] on the Windows task bar → select
[Control Panel] → click [Printer] under [Hardware and Sound].
Windows 7: Click [Start] on the Windows task bar → click
[Devices and Printers].
2. Right click the corresponding printer driver
icon and select [Properties] from the pop-up
menu.
You can open the properties dialog box also by clicking the
corresponding printer driver icon → [Set printer properties] on the
toolbar.
● Opening the Printing Preferences Dialog Box
1. Open the [Printers] folder.
Windows Vista: Click [Start] on the Windows task bar → select
[Control Panel] → click [Printer] under [Hardware and Sound].
Windows 7: Click [Start] on the Windows task bar → click
[Devices and Printers].
Table of Contents
Index
2. Right click the corresponding printer driver
icon and select [Printing Preferences] from
the pop-up menu.
You can open the printing preferences dialog box also by clicking
the corresponding printer driver icon → [Select printing
preferences] on the toolbar.
2-6
Page 25
Introduction
TOP
Back Previous Next
Printing
Scanning a
Document
PC Faxing
Troubleshooting
Appendix
1
2
3
4
5
6
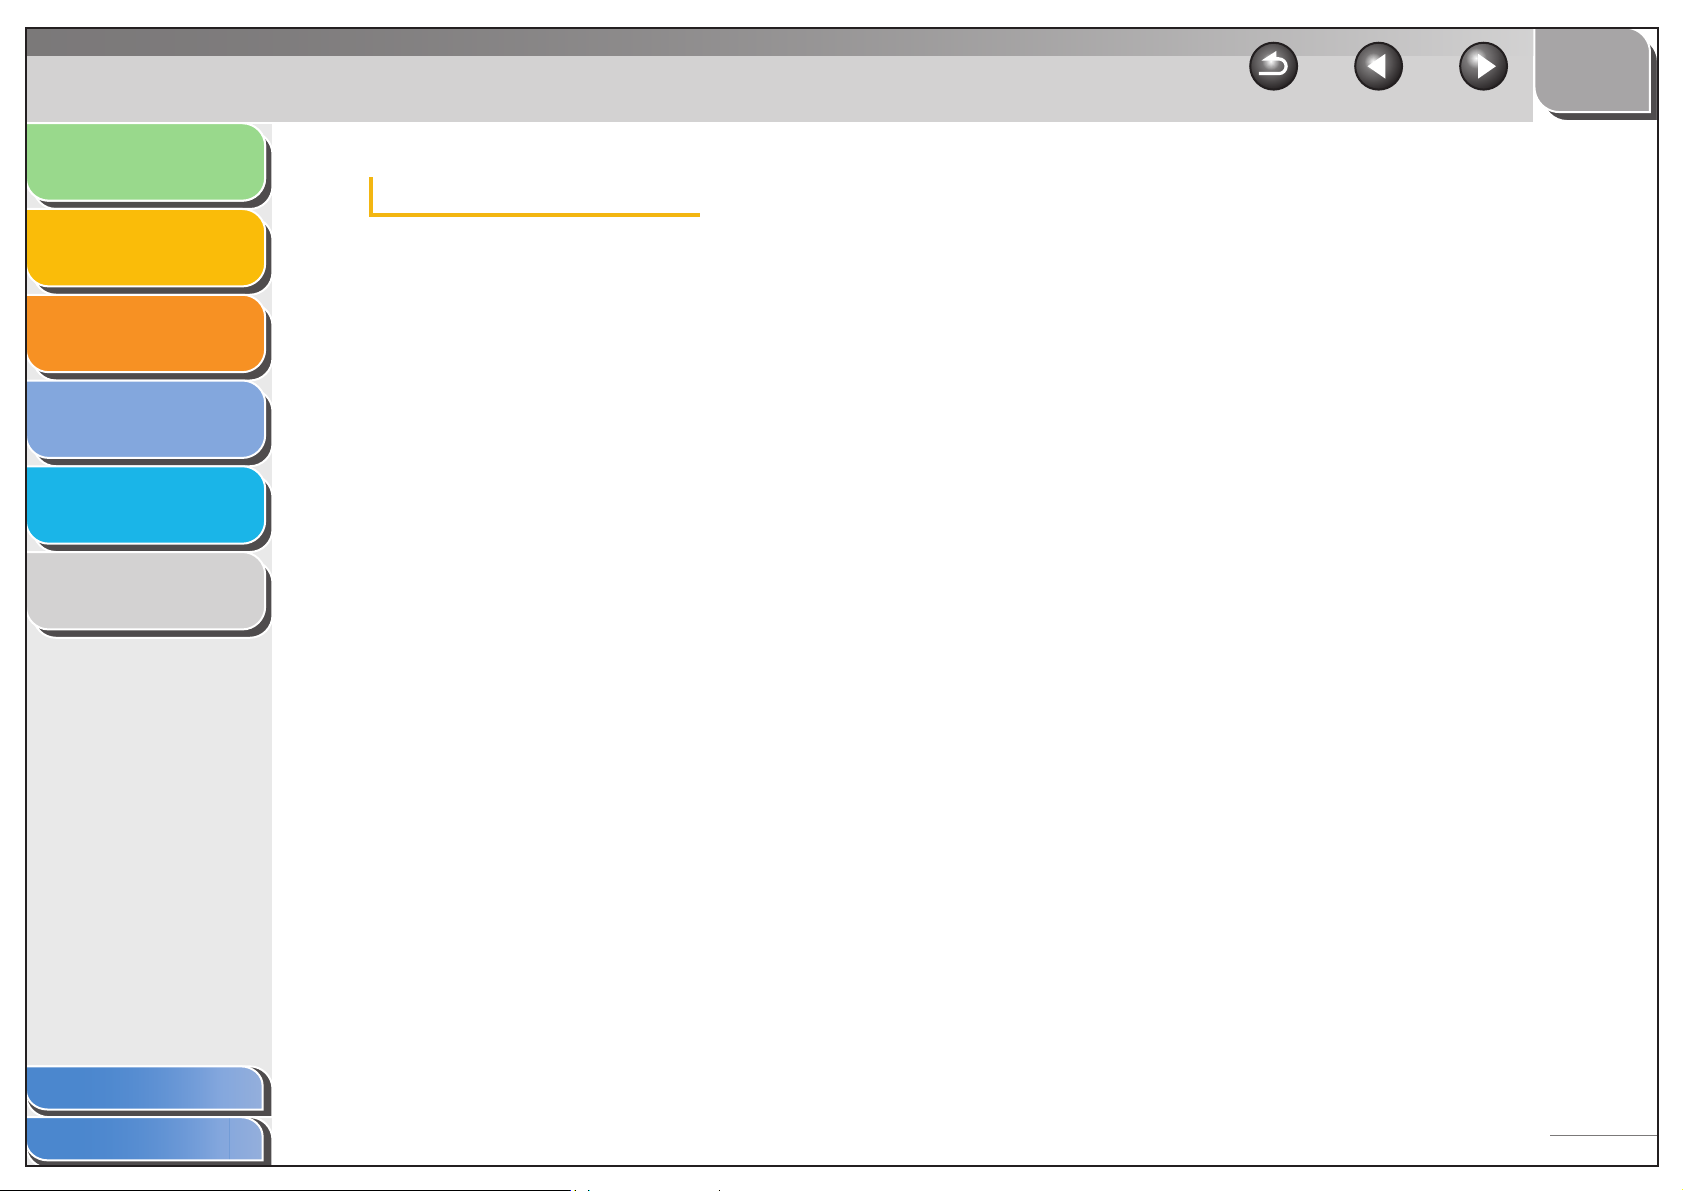
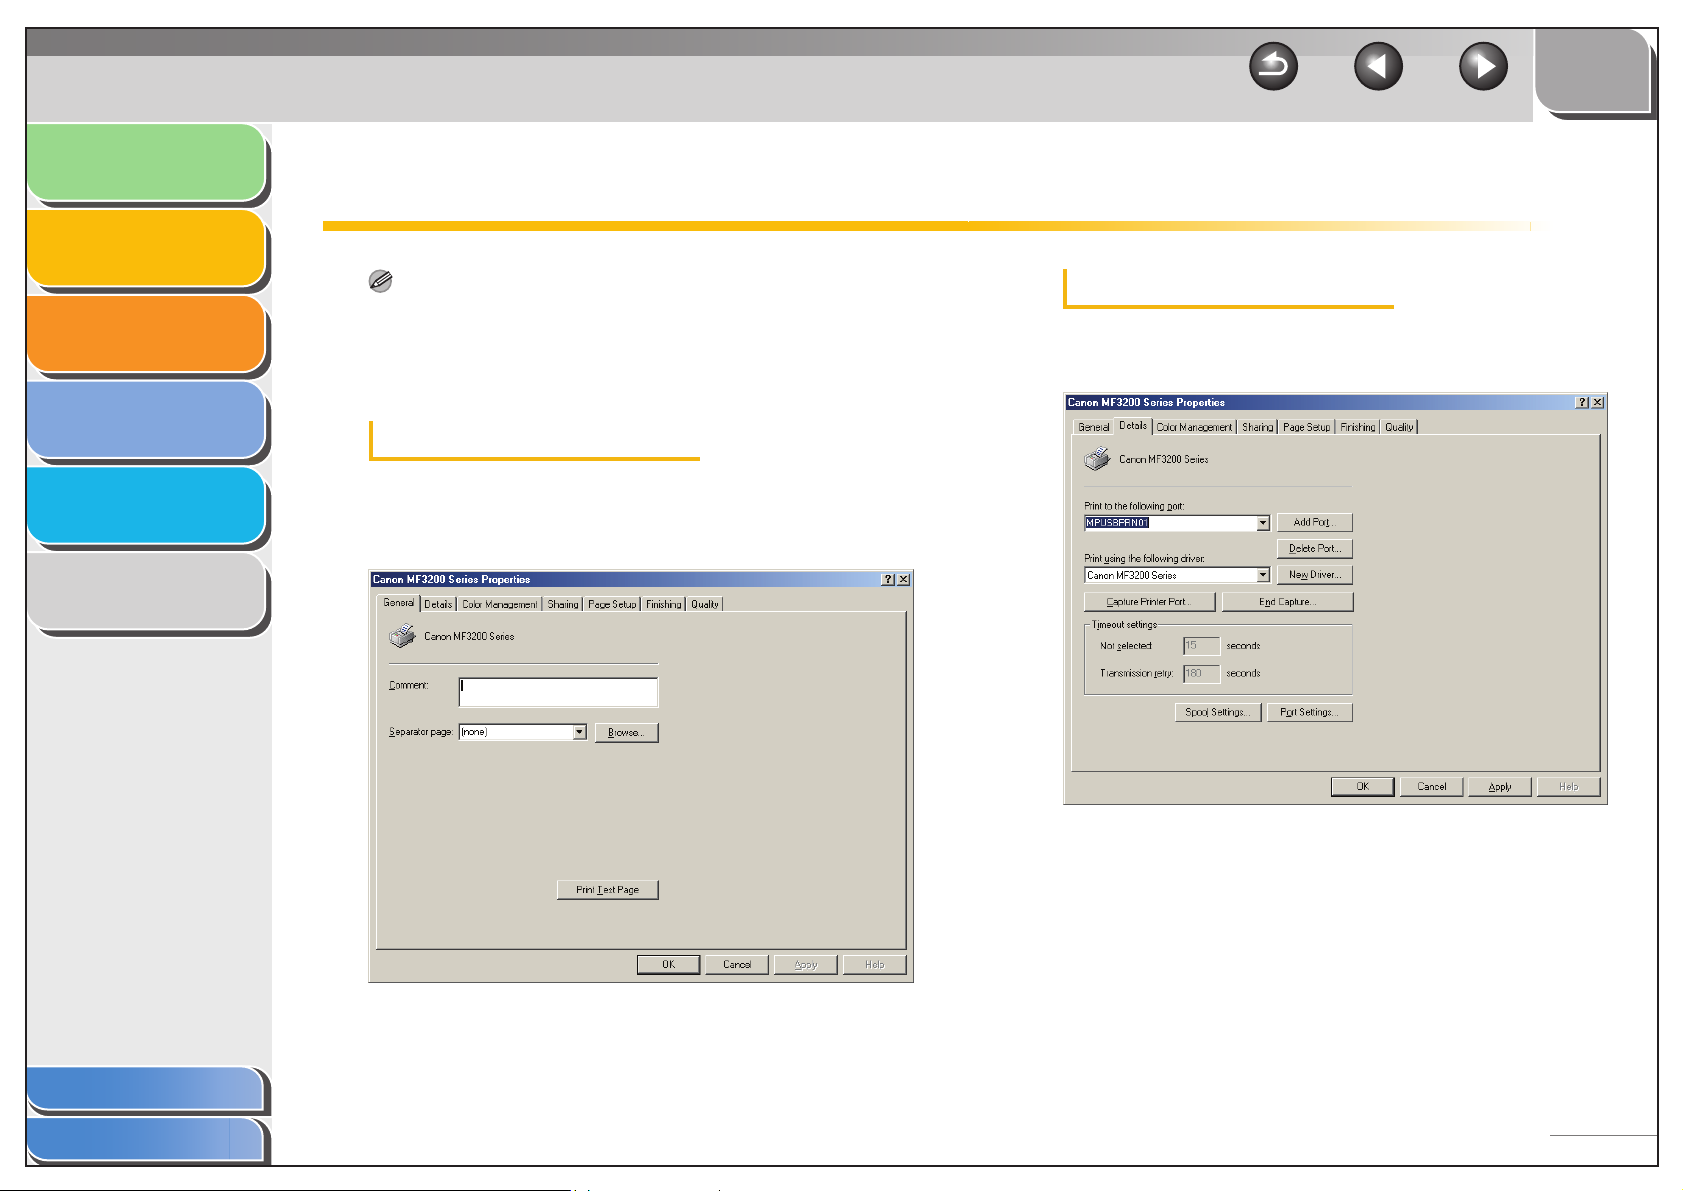
Windows 98/Me Properties
NOTE
– The screens shown below are displayed when you open [Canon
MF3200 Series Properties] from the [Printers] folder.
– The number of tabs displayed in the properties dialog box depends
on how you have your system set up.
General Tab
Lets you print a test page or define separator pages. Refer to
your Windows operating system documentation for more
information.
Details Tab
Specifies the printer port and timeout settings. Refer to your
Windows operating system documentation for more information.
Table of Contents
Index
2-7
Page 26
Introduction
TOP
Back Previous Next
Printing
Scanning a
Document
PC Faxing
Troubleshooting
Appendix
1
2
3
4
5
6
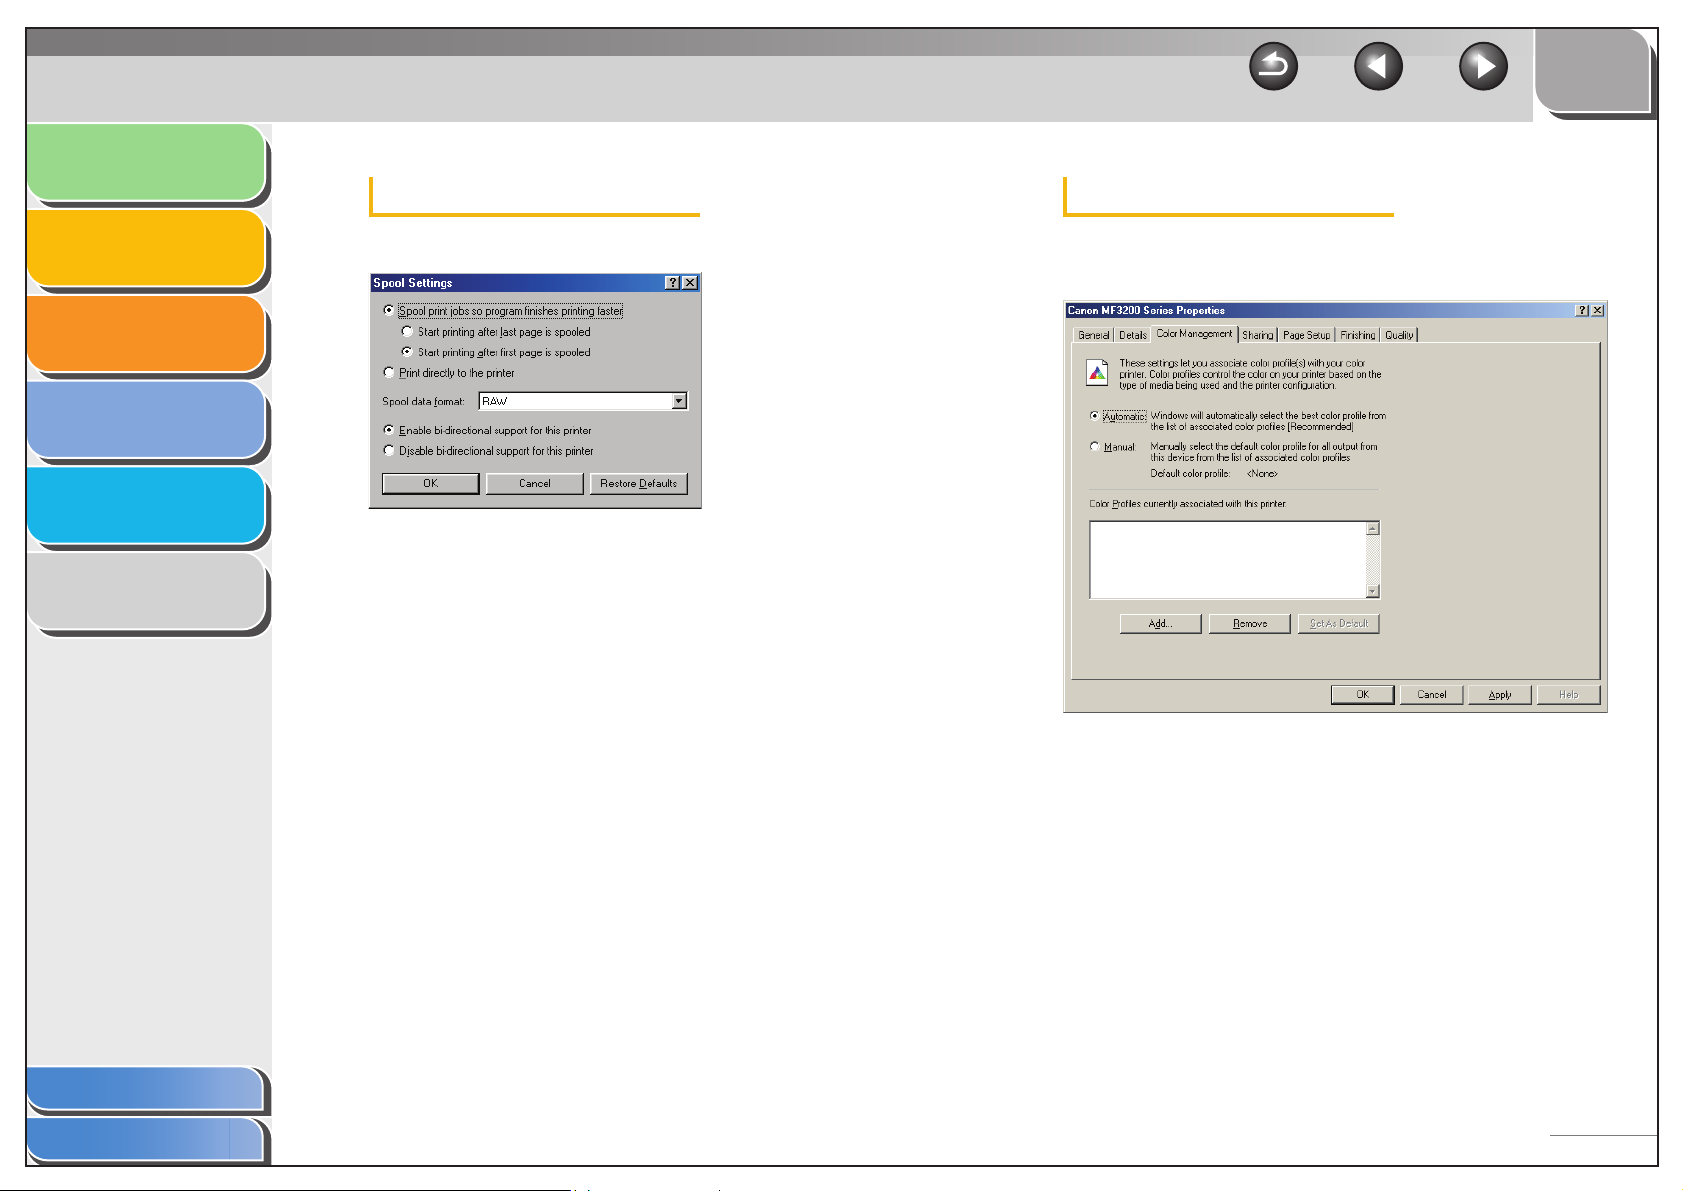
Spool Settings
The installer sets the following defaults.
Color Management Tab
Associate color profiles with your color printer. Refer to your
Windows operating system documentation for more information.
Table of Contents
Index
2-8
Page 27
Introduction
TOP
Back Previous Next
Printing
Scanning a
Document
PC Faxing
Troubleshooting
Appendix
1
2
3
4
5
6
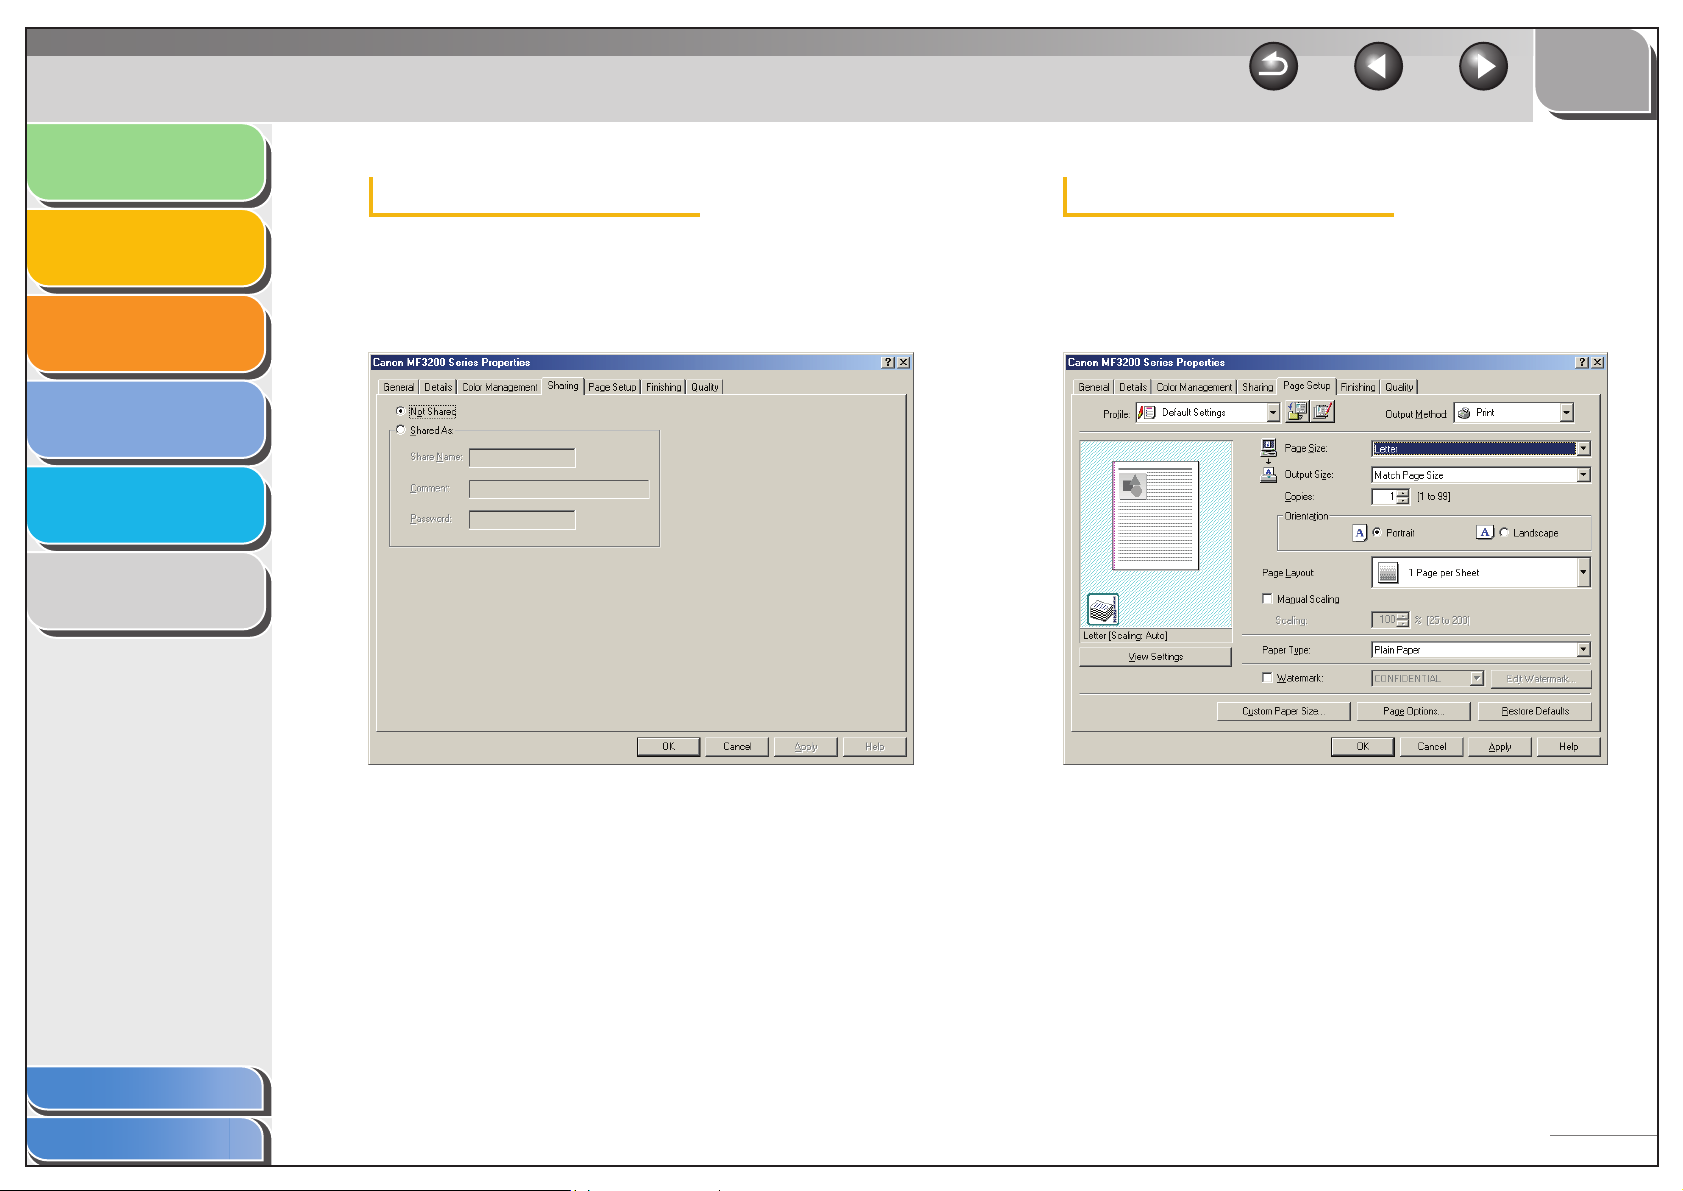
Sharing Tab
Specifies the printer sharing settings. This tab sheet is available
only when the printer sharing is enabled. (See “Using the
Machine on Your Network,” on p. 2-54.) Refer to your Windows
operating system documentation for more information.
Page Setup Tab
Specifies the page settings including the paper size, scaling,
number of copies, orientation, number of pages per sheet, etc.
For information on [Profile] and [Output Method], see “Profiles,”
on p. 2-22.
Table of Contents
Index
Default settings depend on the country/region of purchase.
2-9
Page 28
Introduction
TOP
Back Previous Next
Printing
Scanning a
Document
PC Faxing
Troubleshooting
Appendix
1
2
3
4
5
6
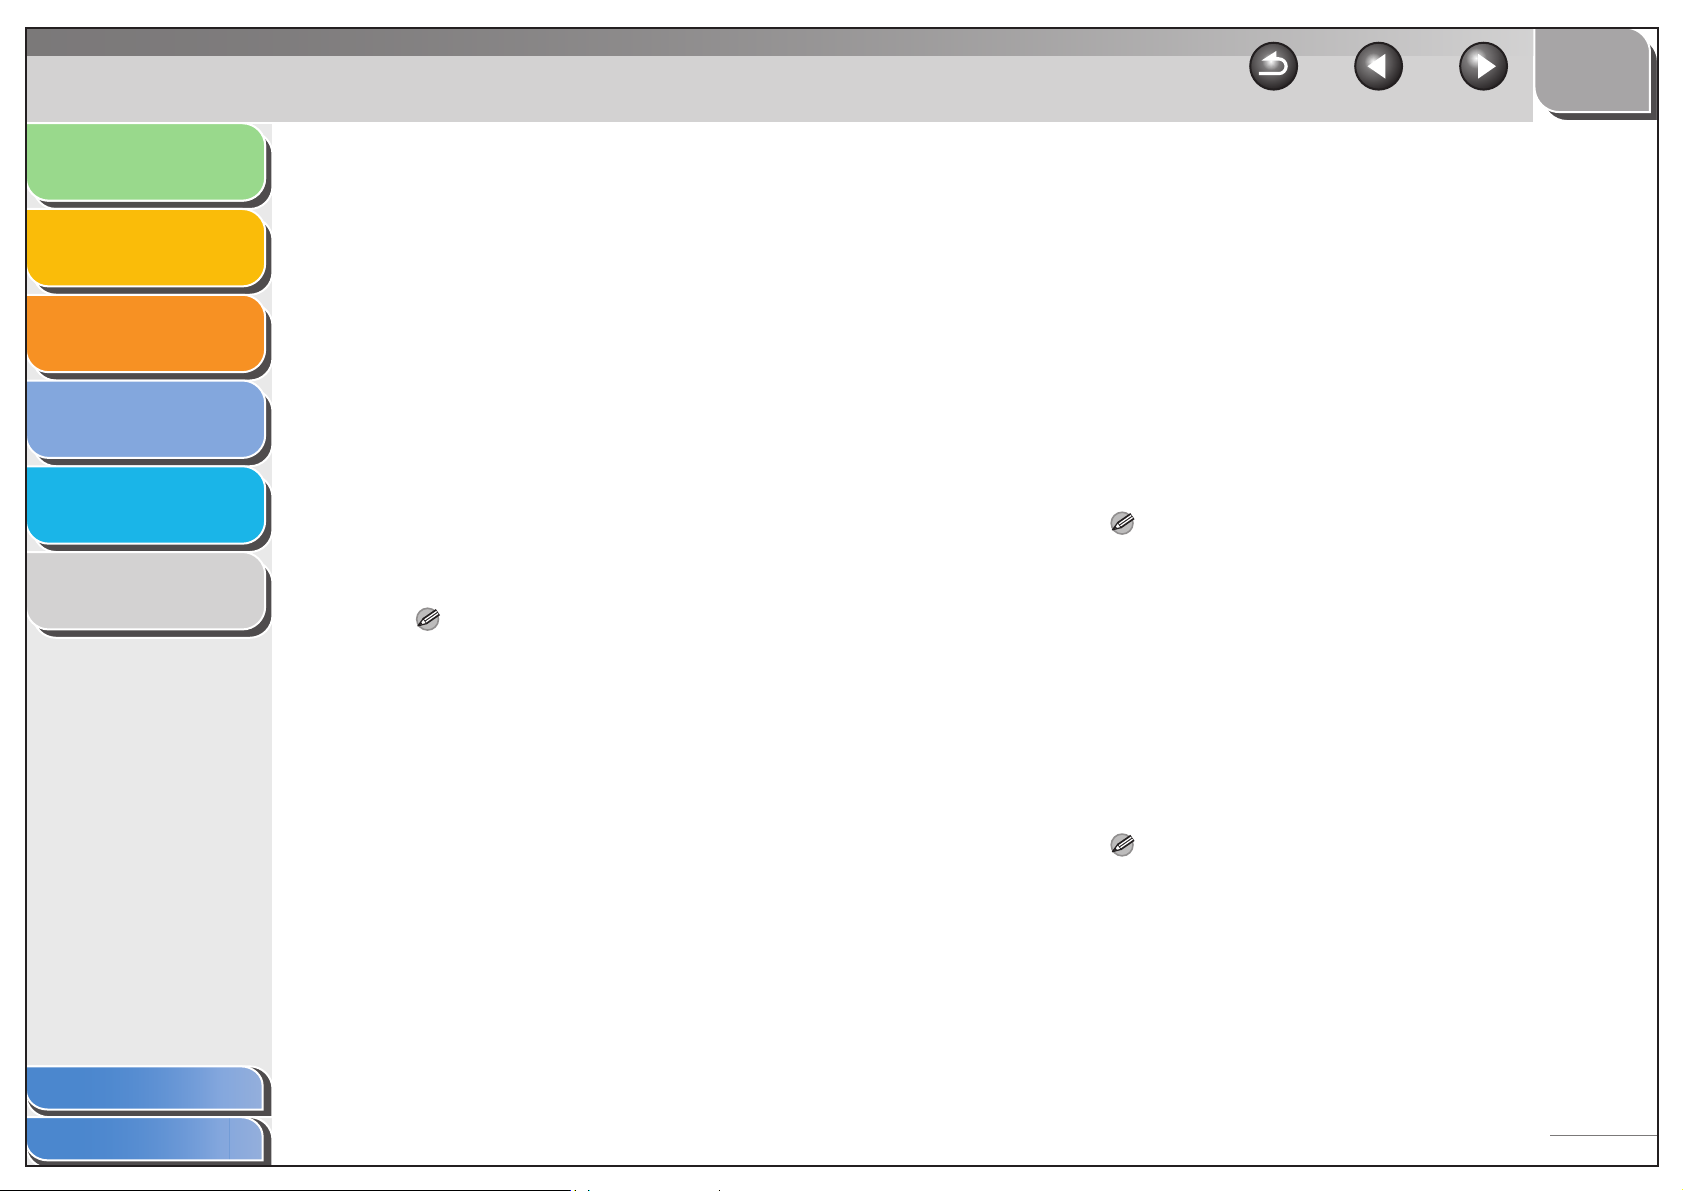
[Page Size] Selects the original page size to work with in
an application. Available options are;
[Letter], [11 x 17], [Legal], [Executive], [A5],
[B5], [A4], [B4], [A3], [Envelope Monarch],
[Envelope COM10], [Envelope DL],
[Envelope C5] and [Custom [Name Fixed]].
However, when [11 x 17], [B4], or [A3] is
selected in the [Page size], the original page
size is reduced to fit [Letter] automatically.
[Output Size] Selects the output paper size to print on.
When this option is set to anything other
than [Match Page Size], the original page
size is automatically reduced or enlarged to
fit the selected output paper size when
printed.
NOTE
Up to 50 sizes can be defined for [Custom Paper Size] with the
[Custom Paper Size Settings] option. (See “Custom Paper Size
Settings,” on p. 2-14.)
[Copies] Specifies the number of copies to be printed
(1 to 99).
[Orientation] Selects the direction of printing relative to
the paper ([Portrait] or [Landscape]).
[Page Layout] Selects the number (1, 2, 4, 6, 8, 9, or 16) of
original pages per sheet or [Poster] (2 x 2, 3
x 3, or 4 x 4 pages to comprise one sheet).
When this option is set to anything other
than [1 Page per Sheet] and [Poster], the
original page size is reduced to fit the
selected page layout when printed.
NOTE
– When [1 Page per Sheet] is selected, [Manual Scaling]
appears. When this option is set to anything other than [1 Page
per Sheet] or [Poster], [Page Order] appears instead of [Manual
Scaling] in its place.
– When [Poster] is selected, [Manual Scaling], [Watermark] and
[Page Options] are disabled.
[Manual Scaling] Reduces or enlarges the original page size.
Selecting this check box enables the edit box
on the right side to specify the magnification
factor (25 to 200%).
Table of Contents
Index
NOTE
If you select enlarge/reduce ratio on the [Print] screen of an
application software, select 100% in [Manual Scaling].
2-10
Page 29

Introduction
TOP
Back Previous Next
Printing
Scanning a
Document
PC Faxing
Troubleshooting
Appendix
1
2
3
4
5
6
[Page Order] Selects the order in which original pages are
placed on each sheet of the output paper
when more than one page is printed per
sheet.
[Paper Type] Selects the paper type to print. Available
paper types are as follows:
– Plain Paper (18 to 24 lb. (64 to 90 g/m
– Plain Paper L (18 to 24 lb. (64 to 90 g/m
– Heavy Paper (28 to 32 lb. (105 to
128 g/m
– Heavy Paper H (28 to 32 lb. (105 to
128 g/m
– Transparency
NOTE
– If paper curls excessively when printed with [Plain Paper]
selected, select [Plain Paper L].
– If print fixing is not sufficient when printed with [Heavy Paper]
selected, select [Heavy Paper H].
– When you select [Envelope Monarch], [Envelope COM10],
[Envelope DL], or [Envelope C5] as [Page Size] and [Match
Page Size] as [Output Size], [Paper Type] is automatically set to
[Envelope].
If you select [Envelope Monarch], [Envelope COM-10],
[Envelope DL], or [Envelope C5] as [Output Size], [Paper Type]
is automatically set to [Envelope] regardless of the setting of
[Page Size].
2
))
2
))
2
))
2
))
[Watermark] Inserts the selected watermark to be printed
on each page. Eight types of pre-defined
watermark are available:
–CONFIDENTIAL
–COPY
–DRAFT
– FILE COPY
–FINAL
–PRELIMINARY
–PROOF
– TOP SECRET
Selecting this check box enables [Edit
Watermark] to add a watermark.
NOTE
This option is disabled when [Page Layout] is set to [Poster].
[Edit Watermark] Opens the [Edit Watermark] dialog box. (See
“Edit Watermark,” on p. 2-12.)
[Custom Paper
Size]
[Page Options] Opens the [Page Options] dialog box. (See
NOTE
This option is disabled when [Page Layout] is set to [Poster].
Opens the [Custom Paper Size Settings]
dialog box. (See “Custom Paper Size
Settings,” on p. 2-14.)
“Page Options,” on p. 2-15.)
Table of Contents
Index
2-11
Page 30

Introduction
TOP
Back Previous Next
Printing
Scanning a
Document
PC Faxing
Troubleshooting
Appendix
1
2
3
4
5
6
[Restore Defaults] Resets all the current settings to their default
values.
[View Settings] Click this button to display the [View
Settings] dialog box. This dialog box allows
you to view and confirm all of the current
page settings in a listed from. (See “View
Settings,” on p. 2-25.)
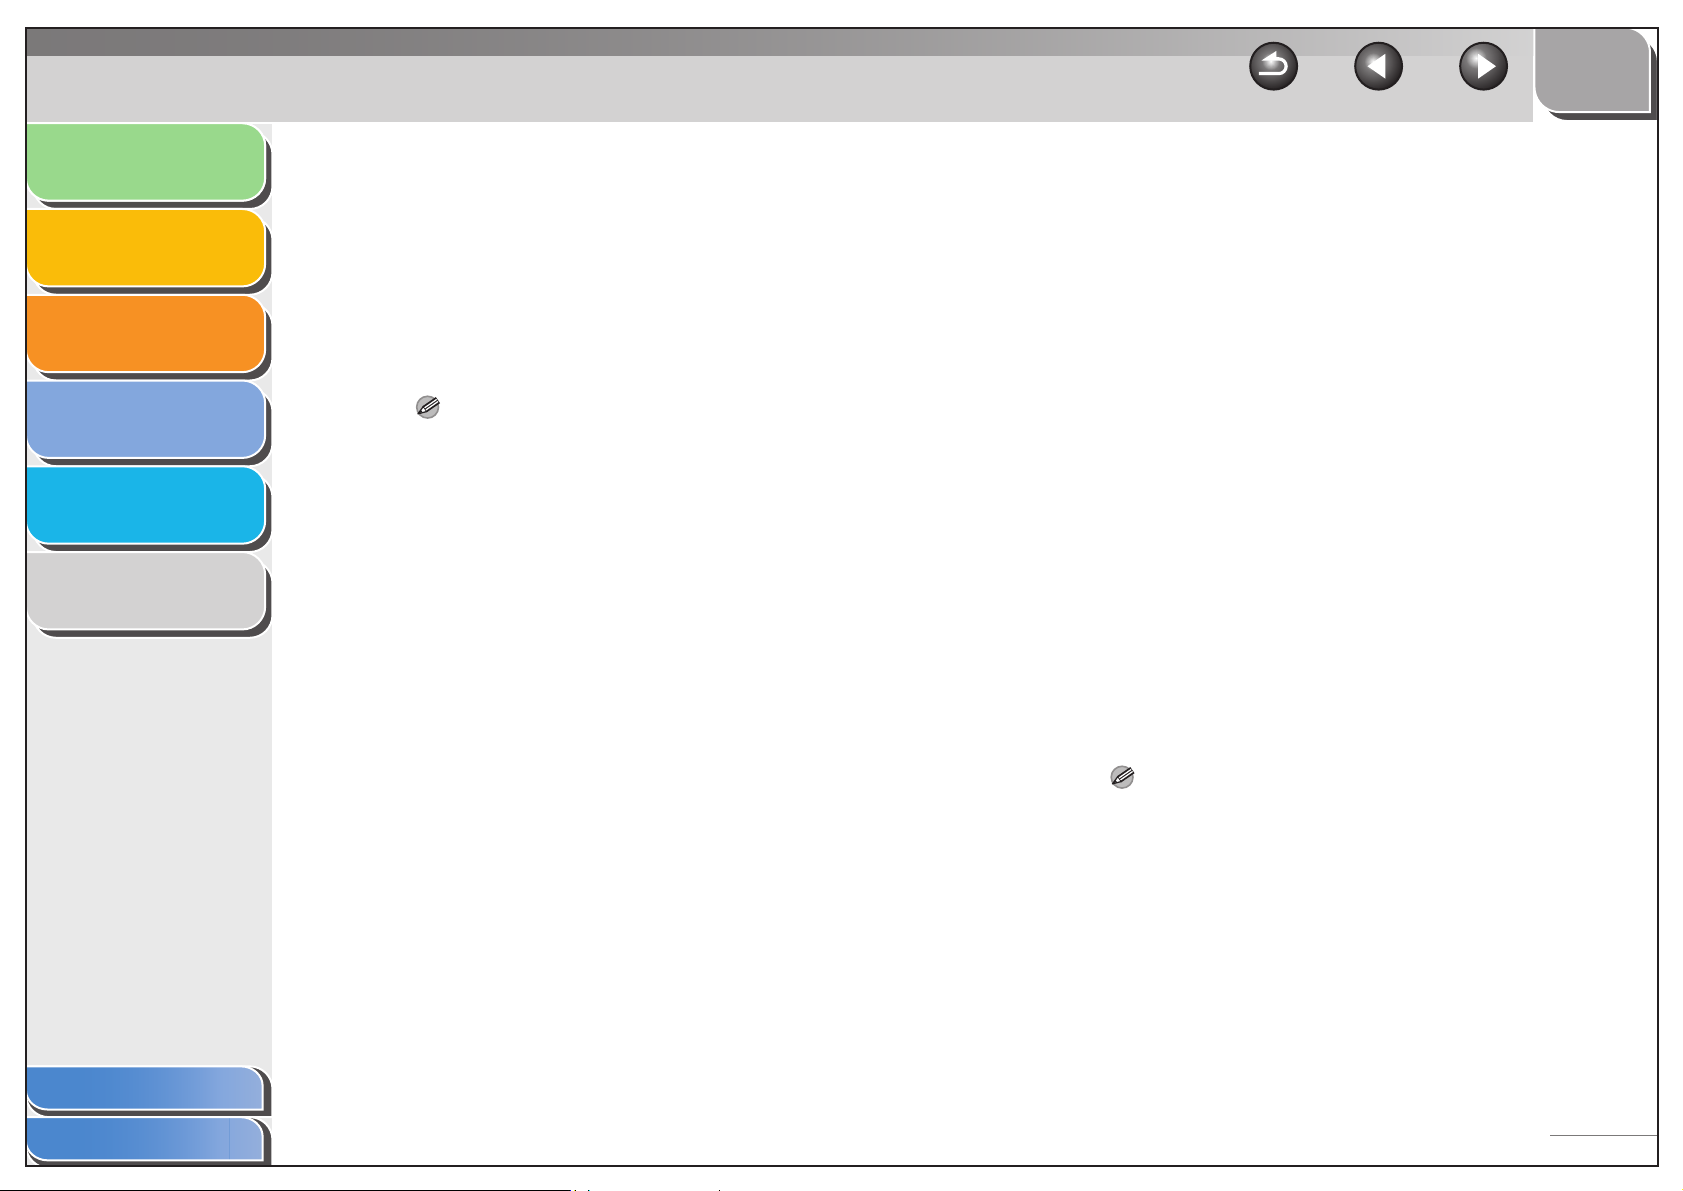
Edit Watermark
Clicking [Edit Watermark] in the [Page Setup] tab sheet opens
the [Edit Watermark] dialog box. This dialog box enables you to
insert a text string as a watermark onto pages. This option is
enabled only when the [Watermark] check box is selected in the
[Page Setup] tab sheet. (See “Page Setup Tab,” on p. 2-9.)
Table of Contents
Index
[Watermark List] Displays the names of registered
watermarks. The preview image in the upper
left part of the dialog box displays the
selected watermark with the specified
settings reflected.
2-12
Page 31
Introduction
TOP
Back Previous Next
Printing
Scanning a
Document
PC Faxing
Troubleshooting
Appendix
1
2
3
4
5
6
[Add] Registers a new watermark. Clicking this
button adds a blank name field in
[Watermark List] in which you enter the
name of watermark to be registered. Up to
50 watermarks can be registered.
[Delete] Removes the selected watermark from
[Watermark List].
NOTE
You cannot delete a pre-defined watermark or a watermark
currently selected in the [Page Setup] tab.
[Position] Specifies the position where the watermark
is printed on each page. You can enter the
values in the [X] and [Y] edit boxes (in a
range from –50 to 50), or use the X and Y
slide bars to move the position.
[Move to Center] Relocates the watermark to the center of the
page.
[Angle] Specifies the angle of watermark ([Upward
Left to Right], [Downward Left to Right], or
[Set Angle]). You can select the
corresponding radio button, or use the slide
bar to move the angle.
[Name] Displays and allows you to change the name
of the currently selected watermark.
[Text] Displays and allows you to change the text
string of the currently selected watermark.
[Font] Selects the font type of the watermark.
[Style] Selects the font style of the watermark.
Available styles are [Regular], [Italic], [Bold]
and [Bold Italic].
[Size] Specifies the font size of the watermark (1 to
500).
[Color] Selects the font color of the watermark.
[Border] Adds the frame to the watermark. You can
select the frame type ([Circle], [Rectangle],
or [None]).
[Print Style] Selects the type of watermark ([Transparent]
or [Overlap]).
[Print on First
Page Only]
NOTE
You cannot edit pre-defined watermarks.
Prints the selected watermark only on the
first page of the document.
Table of Contents
Index
2-13
Page 32
Introduction
TOP
Back Previous Next
Printing
Scanning a
Document
PC Faxing
Troubleshooting
Appendix
1
2
3
4
5
6
Custom Paper Size Settings
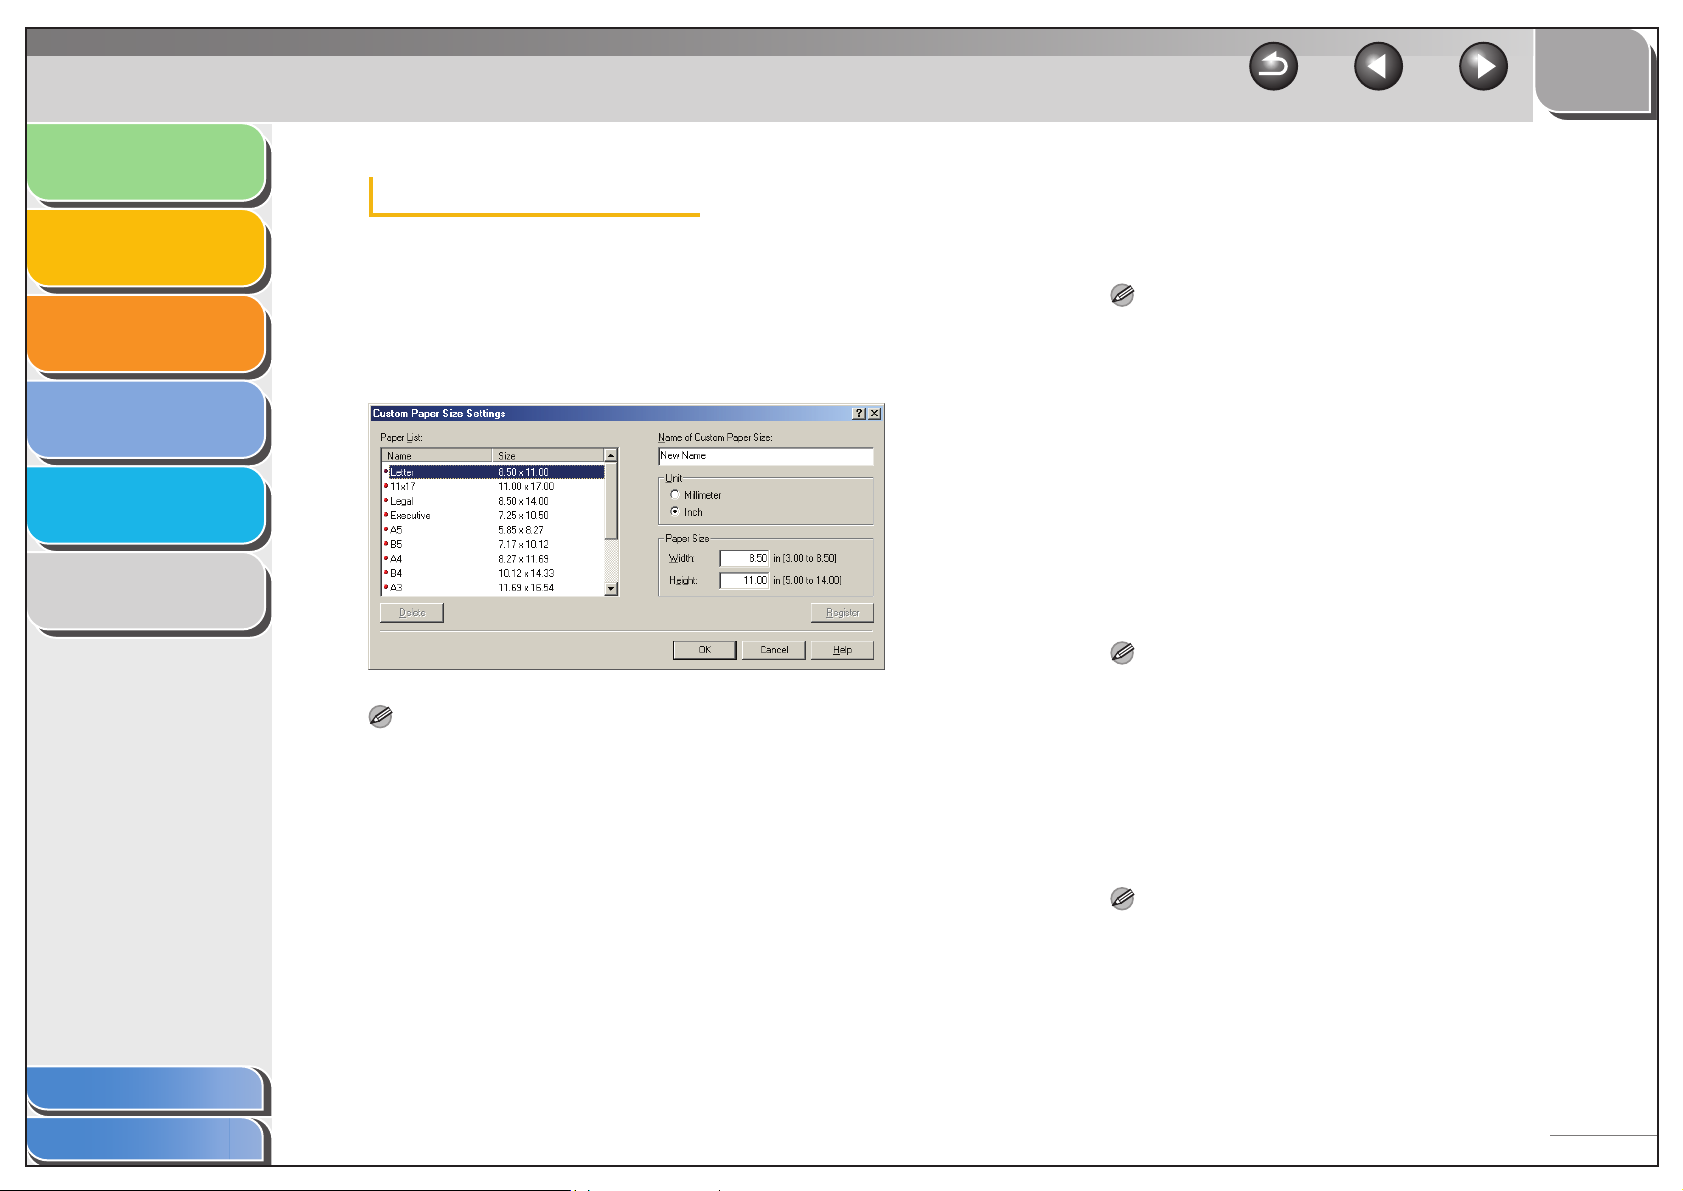
Clicking [Custom Paper Size] in the [Page Setup] tab sheet
opens the [Custom Paper Size Settings] dialog box. This dialog
box enables you to define custom paper sizes for quick selection
and register new custom paper sizes to the [Paper List] box. You
can specify the name, width, and height of each size. Up to 50
custom paper sizes can be defined.
NOTE
This setting is not available when the [Canon MF3200 Series
Properties] dialog box is opened from a Windows application.
[Paper List] Displays the paper sizes actually available.
Selects a paper size from which you can
create a custom paper size.
NOTE
You can share the custom paper sizes with all printers connected
to your computer. Up to 50 sizes can be defined for [Custom
Paper Size].
[Name of Custom
Paper Size]
[Unit] Selects the unit of measurement of paper
[Paper Size] Specifies the width and height of the custom
NOTE
Be sure that [Width] does not exceed [Height] when specifying
the values.
[Register] Registers the custom paper and adds its
Specifies the name of custom paper.
size ([Millimeter] or [Inch]).
paper.
name to [Paper List].
Table of Contents
Index
[Delete] Removes the selected custom paper from
[Paper List].
NOTE
You cannot delete a pre-defined paper size or a paper size
currently selected in the [Page Setup] tab.
2-14
Page 33
Introduction
TOP
Back Previous Next
Printing
Scanning a
Document
PC Faxing
Troubleshooting
Appendix
1
2
3
4
5
6
Page Options
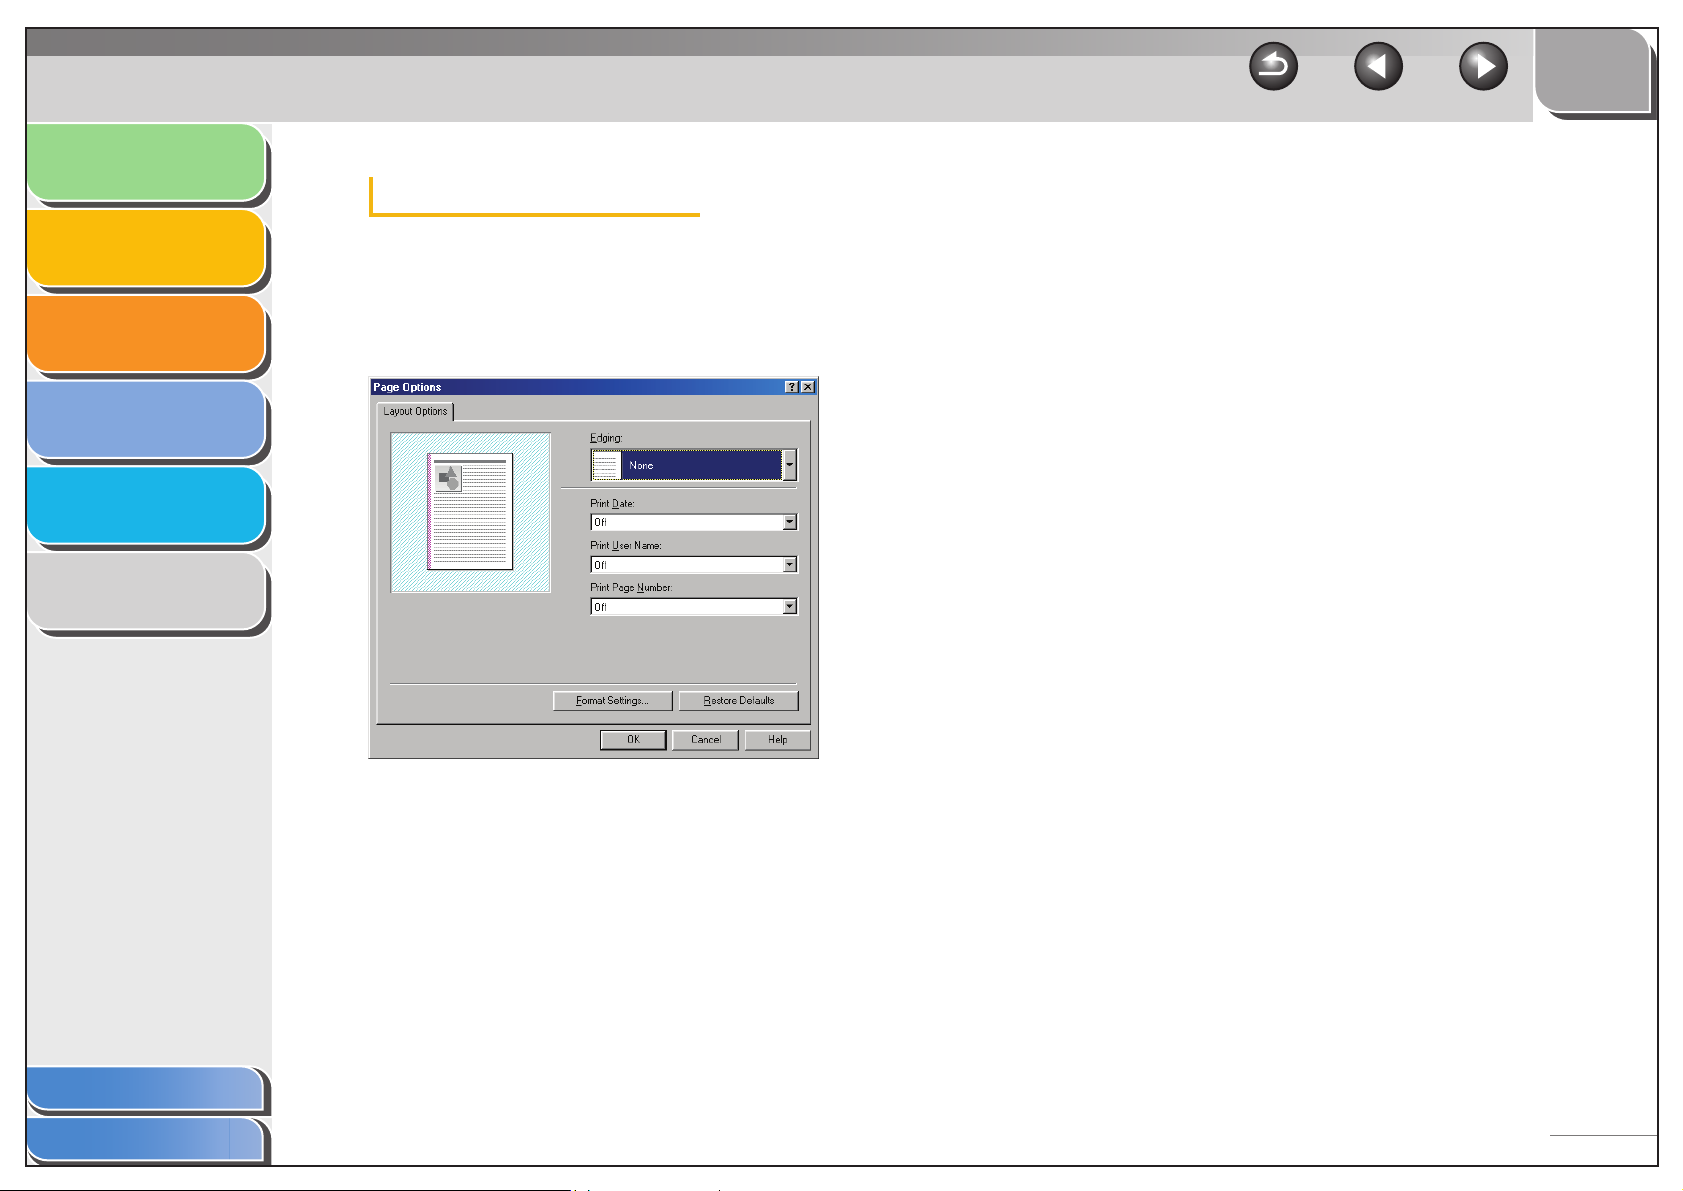
Clicking [Page Options] in the [Page Setup] tab sheet opens the
[Page Options] dialog box. This dialog box enables you to print
pages with a page frame, header, and footer. This option is
disabled when [Page Layout] in the [Page Setup] tab sheet is set
to [Poster]. (See “Page Setup Tab,” on p. 2-9.)
[Print Date] Selects if the date is printed on each page or
not. Six positions to print the date are
available.
[Print User Name] Selects if the user name is printed on each
page or not. Six positions to print the user
name are available.
[Print Page
Number]
[Format Settings] Click this button to display the [Format
[Restore Defaults] Resets all the current settings to their default
Selects if the page number is printed on
each page or not. Six positions to print the
page number are available.
Settings] dialog box. This dialog box allows
you to set the default font type, style, size,
and color, or reset to the factory default font
settings.
values.
Table of Contents
Index
[Edging] Adds a page frame to be printed on each
page. 11 options are available.
2-15
Page 34
Introduction
TOP
Back Previous Next
Printing
Scanning a
Document
PC Faxing
Troubleshooting
Appendix
1
2
3
4
5
6
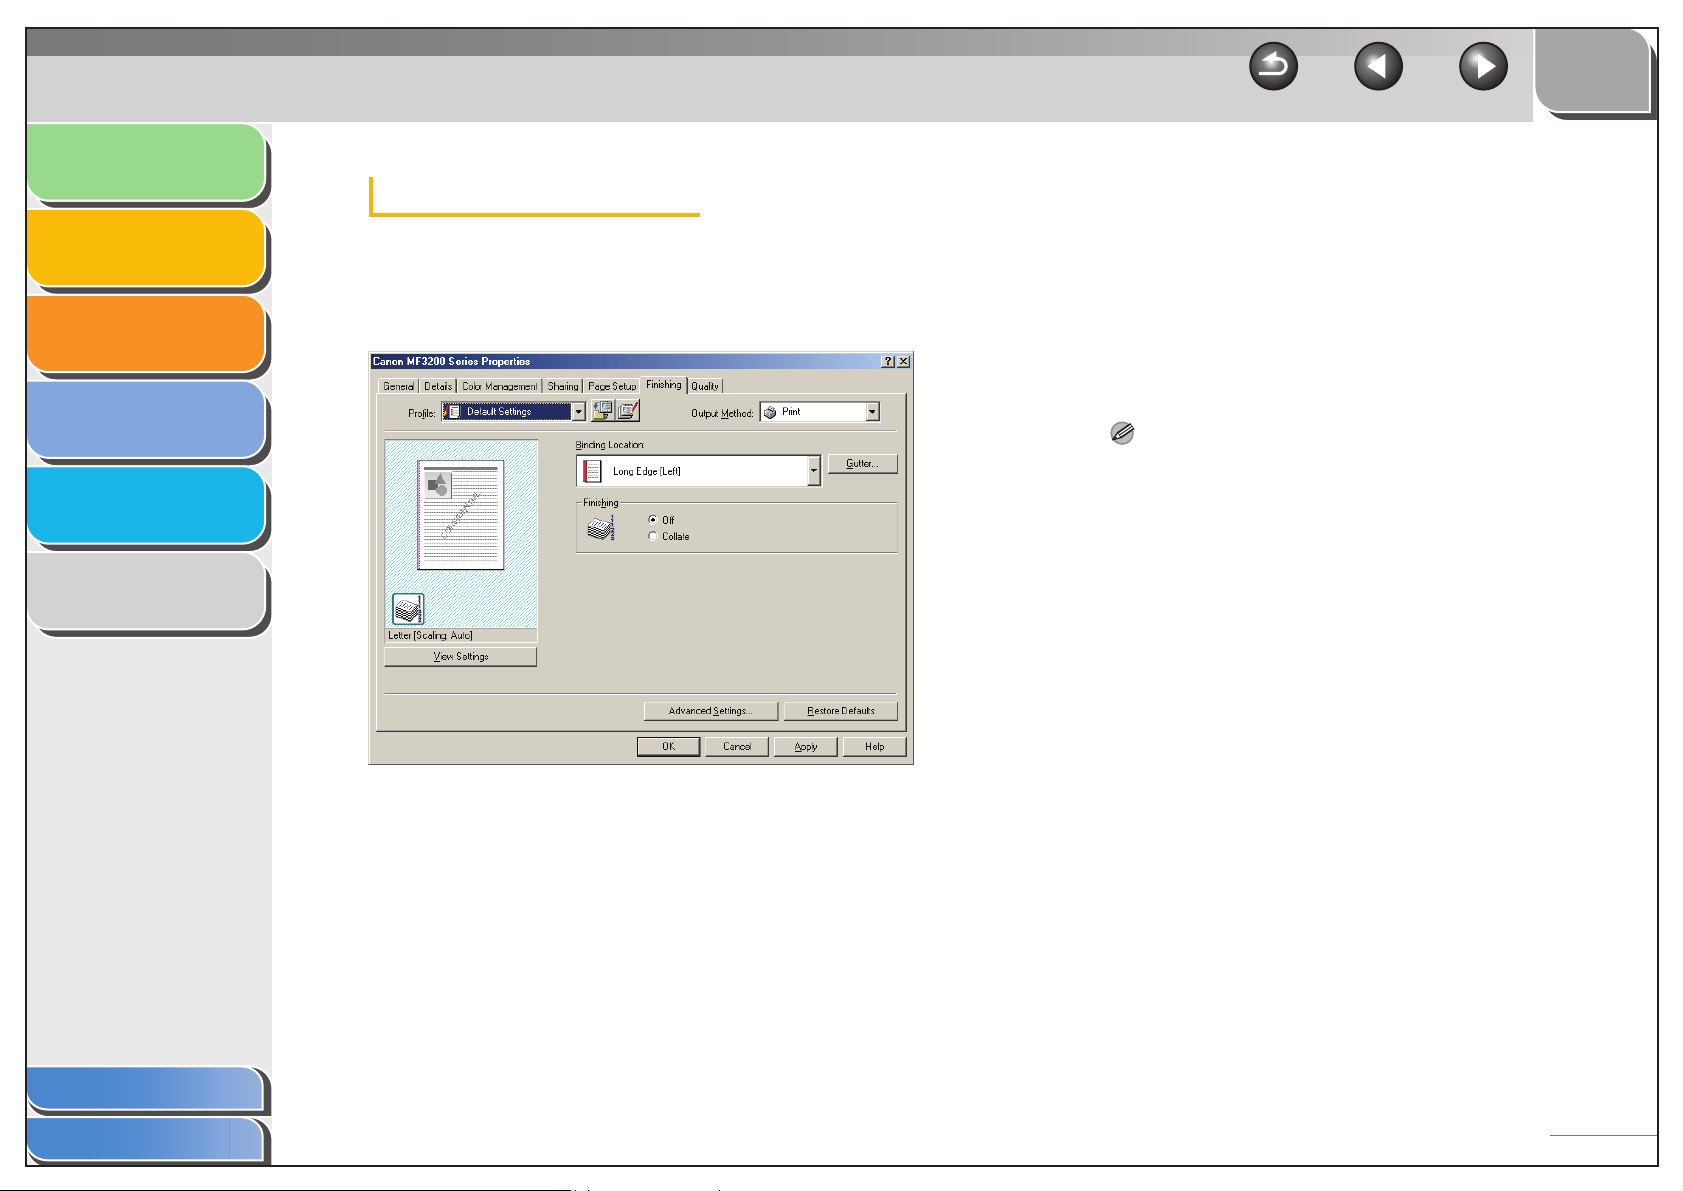
Finishing Tab
Specifies the finishing settings for the printed pages including
the collating and binding.
For information on [Profile] and [Output Method], see “Profiles,”
on p. 2-22.
[Binding Location] Selects a binding location for the printed
pages.
[Gutter] Click this button to set the gutter width for
binding a printed document. (See “Gutter
Settings,” on p. 2-17.)
[Finishing] Selects the Collate option to print a
document in correct binding order. For
example, when printing multiple copies of a
3-page document, the print order is 1, 2, 3,
1, 2, 3, and so on ([Off] or [Collate]).
NOTE
If you select [Collate] in [Finishing], the image on the left bottom
of the preview image will change.
[Advanced
Settings]
[Restore Defaults] Resets all the current settings to their default
[View Settings] Click this button to display the [View
Click this button to display [Advanced
Settings] dialog box for specifying the
finishing details. (See “Advanced Settings,”
on p. 2-17.)
values.
Settings] dialog box. This dialog box allows
you to view and confirm all of the current
page settings in a listed form. (See “View
Settings,” on p. 2-25.)
Table of Contents
Index
2-16
Page 35
Introduction
TOP
Back Previous Next
Printing
Scanning a
Document
PC Faxing
Troubleshooting
Appendix
1
2
3
4
5
6
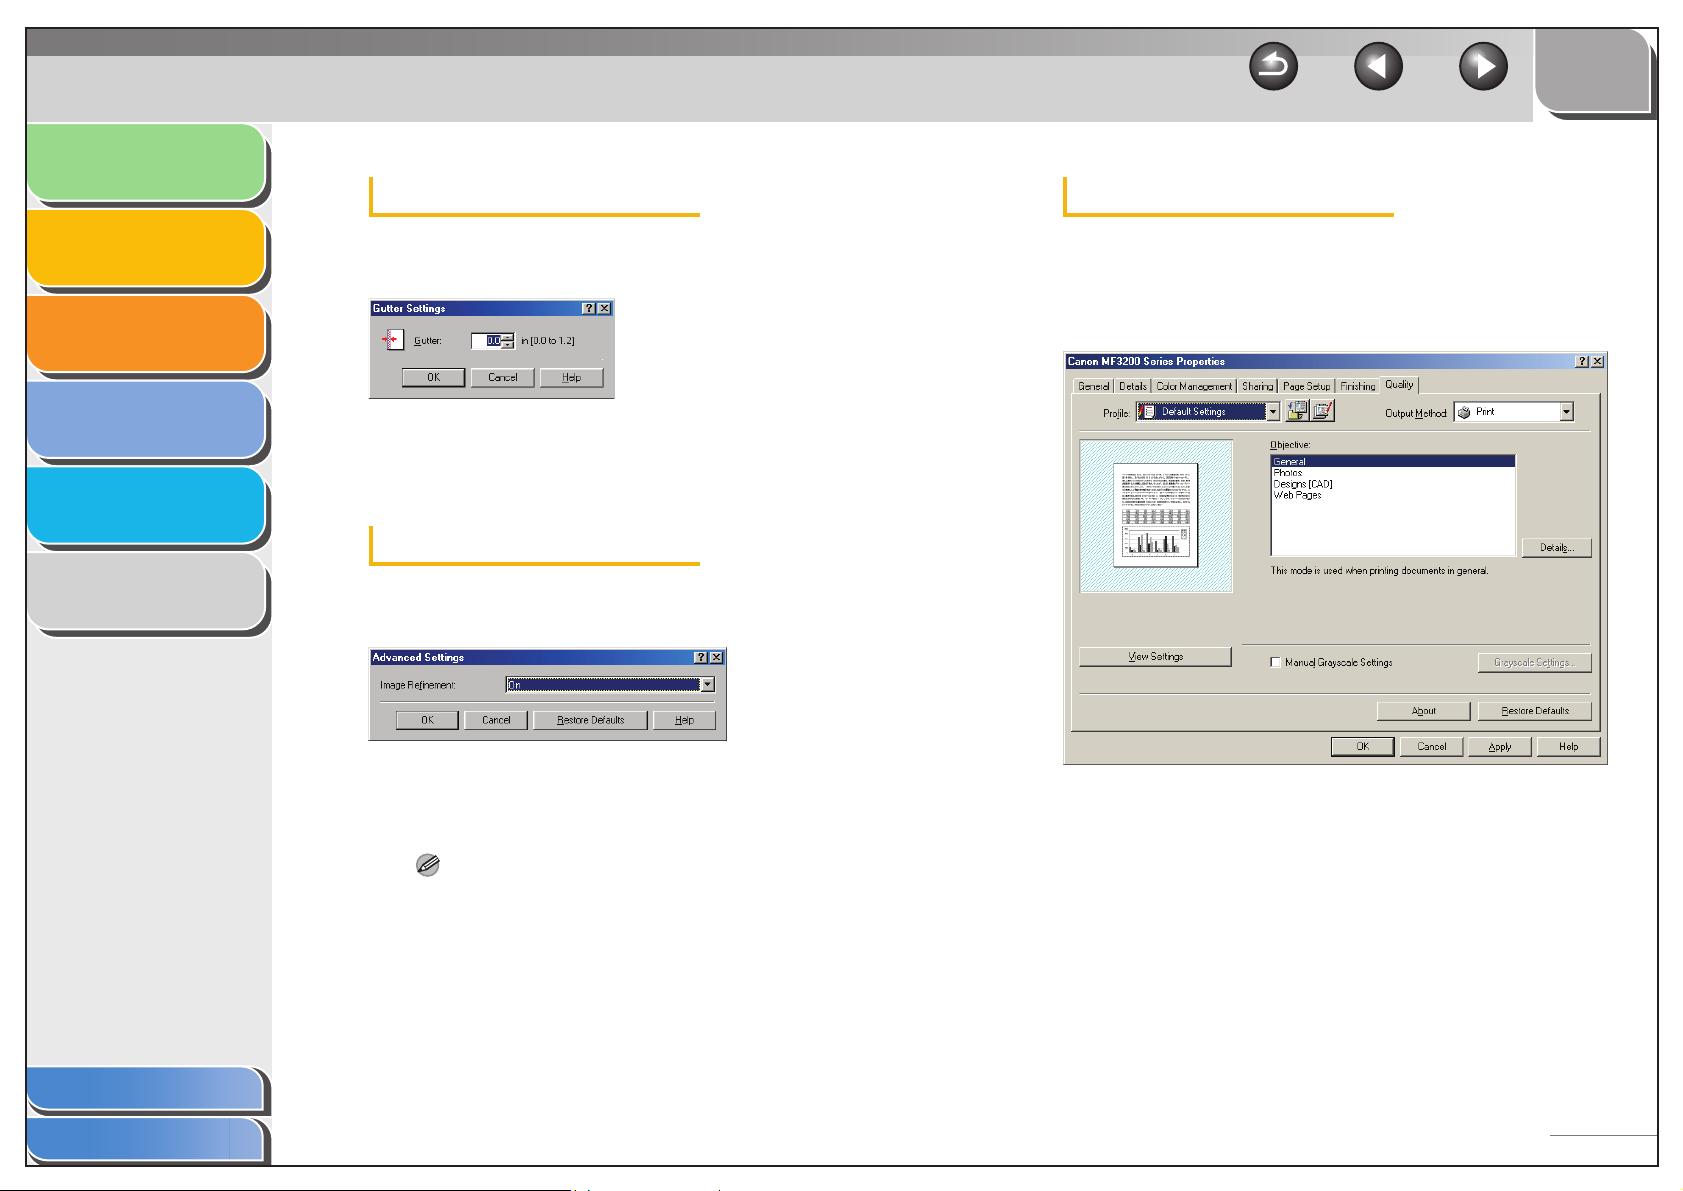
Gutter Settings
Clicking [Gutter] in the [Finishing] tab sheet opens the [Gutter
Settings] dialog box.
[Gutter] Specifies the gutter width in a range from 0.0
to 1 1/4 in. (0 to 30 mm).
Advanced Settings
Clicking [Advanced Settings] in the [Finishing] tab sheet opens
the [Advanced Settings] dialog box.
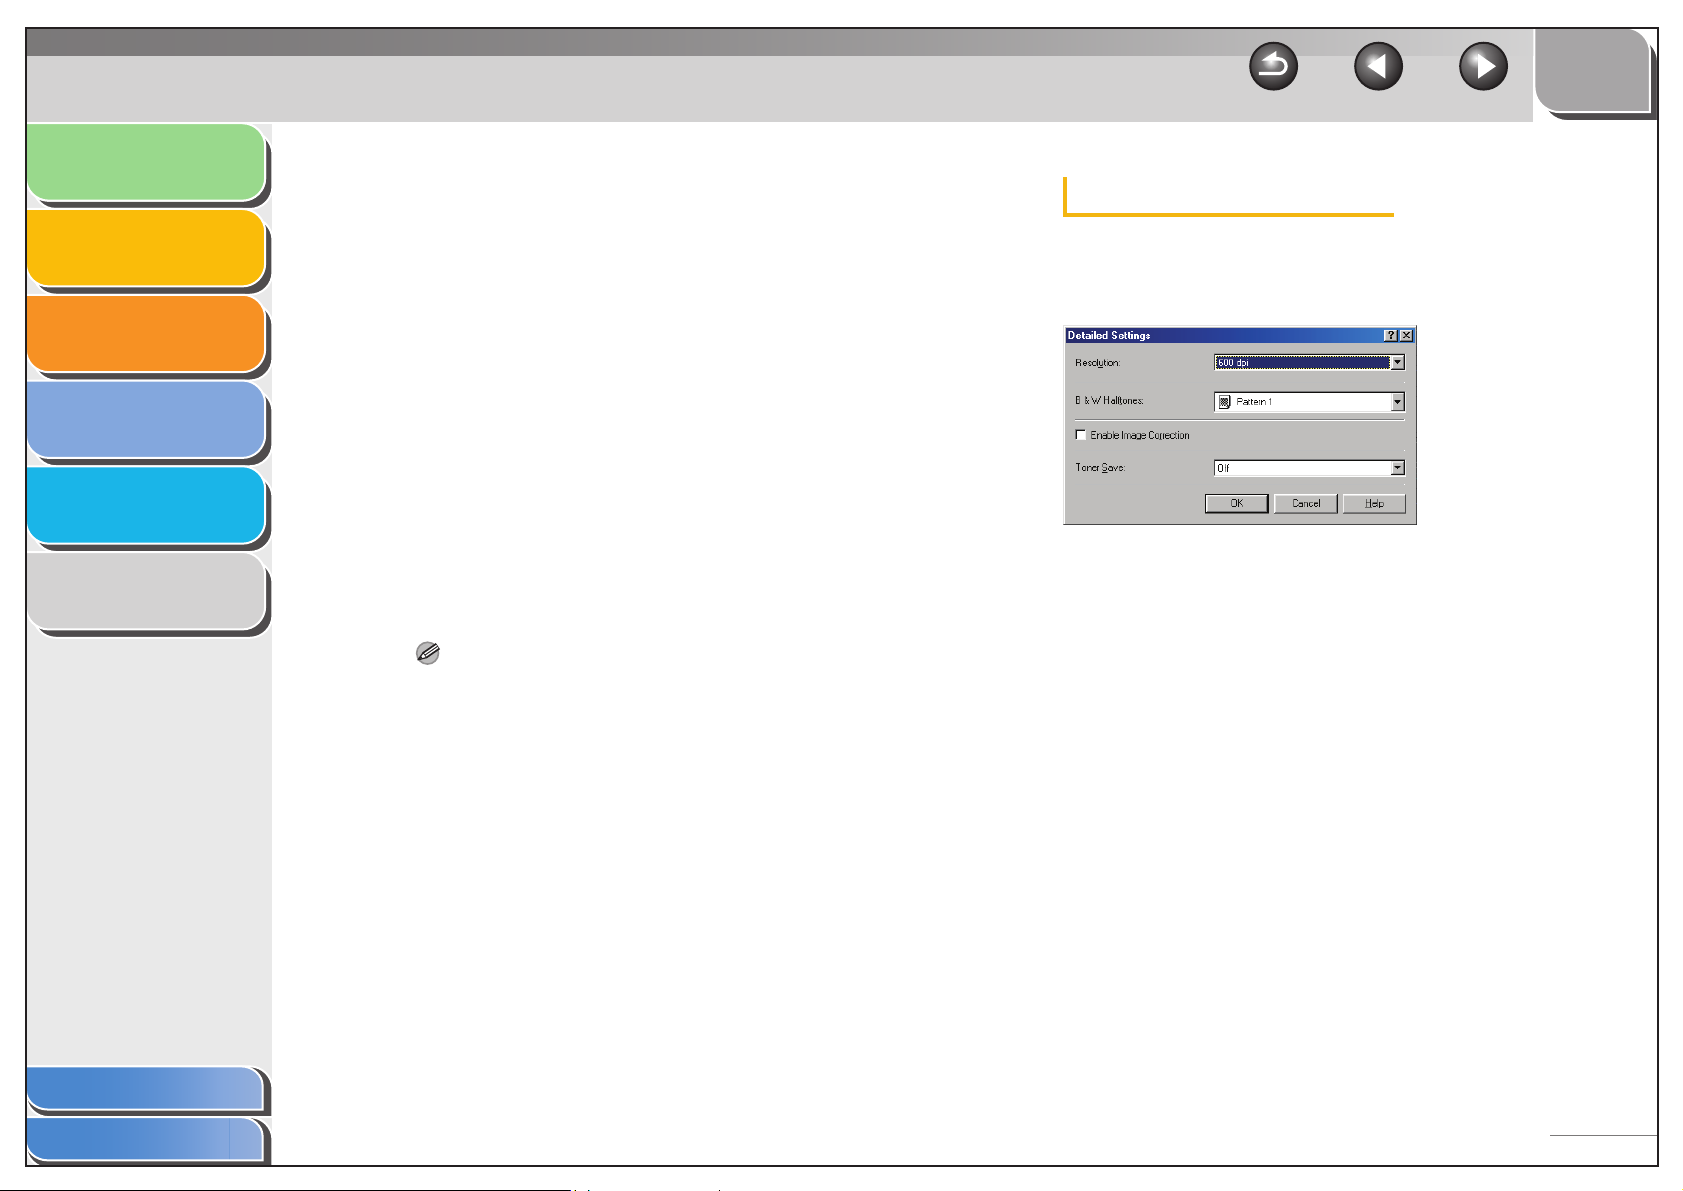
Quality Tab
Specifies the settings for print quality including the resolution
and contrast.
For more information on [Profile] and [Output Method], see
“Profiles,” on p. 2-22.
Table of Contents
Index
[Image
Refinement]
NOTE
If the [Resolution] in the [Detailed Settings] dialog box is set to
[300 dpi], a document is always printed with Super Smooting
function.
[Restore Defaults] Resets all the current settings to their default
Sets the Super Smoothing function of the
printer.
values.
[Objective] Selects the best setting for the print job
according to document content.
2-17
Page 36
Introduction
TOP
Back Previous Next
Printing
Scanning a
Document
PC Faxing
Troubleshooting
Appendix
1
2
3
4
5
6
[Details] Click this button to open the [Detailed
Settings] dialog box and make print quality
settings. (See “Detailed Settings,” on
p. 2-18.)
[Manual Grayscale
Settings]
[Grayscale
Settings]
NOTE
This option is enabled only when [Manual Grayscale Settings] is
selected.
[View Settings] Click this button to display the [View
Enables the manual grayscale. Selecting this
check box enables [Grayscale Settings] to
access the dialog box which enables you to
set the grayscale for images. (See
“Grayscale Settings,” on p. 2-19.)
Click this button after selecting the [Manual
Grayscale Settings] check box to manually
adjust the grayscale settings. The
[Grayscale Settings] dialog box allows you to
specify Brightness, Contrast, and Matching
Mode. (See “Grayscale Settings,” on
p. 2-19.)
Settings] dialog box. This dialog box allows
you to view and confirm all of the current
page settings in a listed form. (See “View
Settings,” on p. 2-25.)
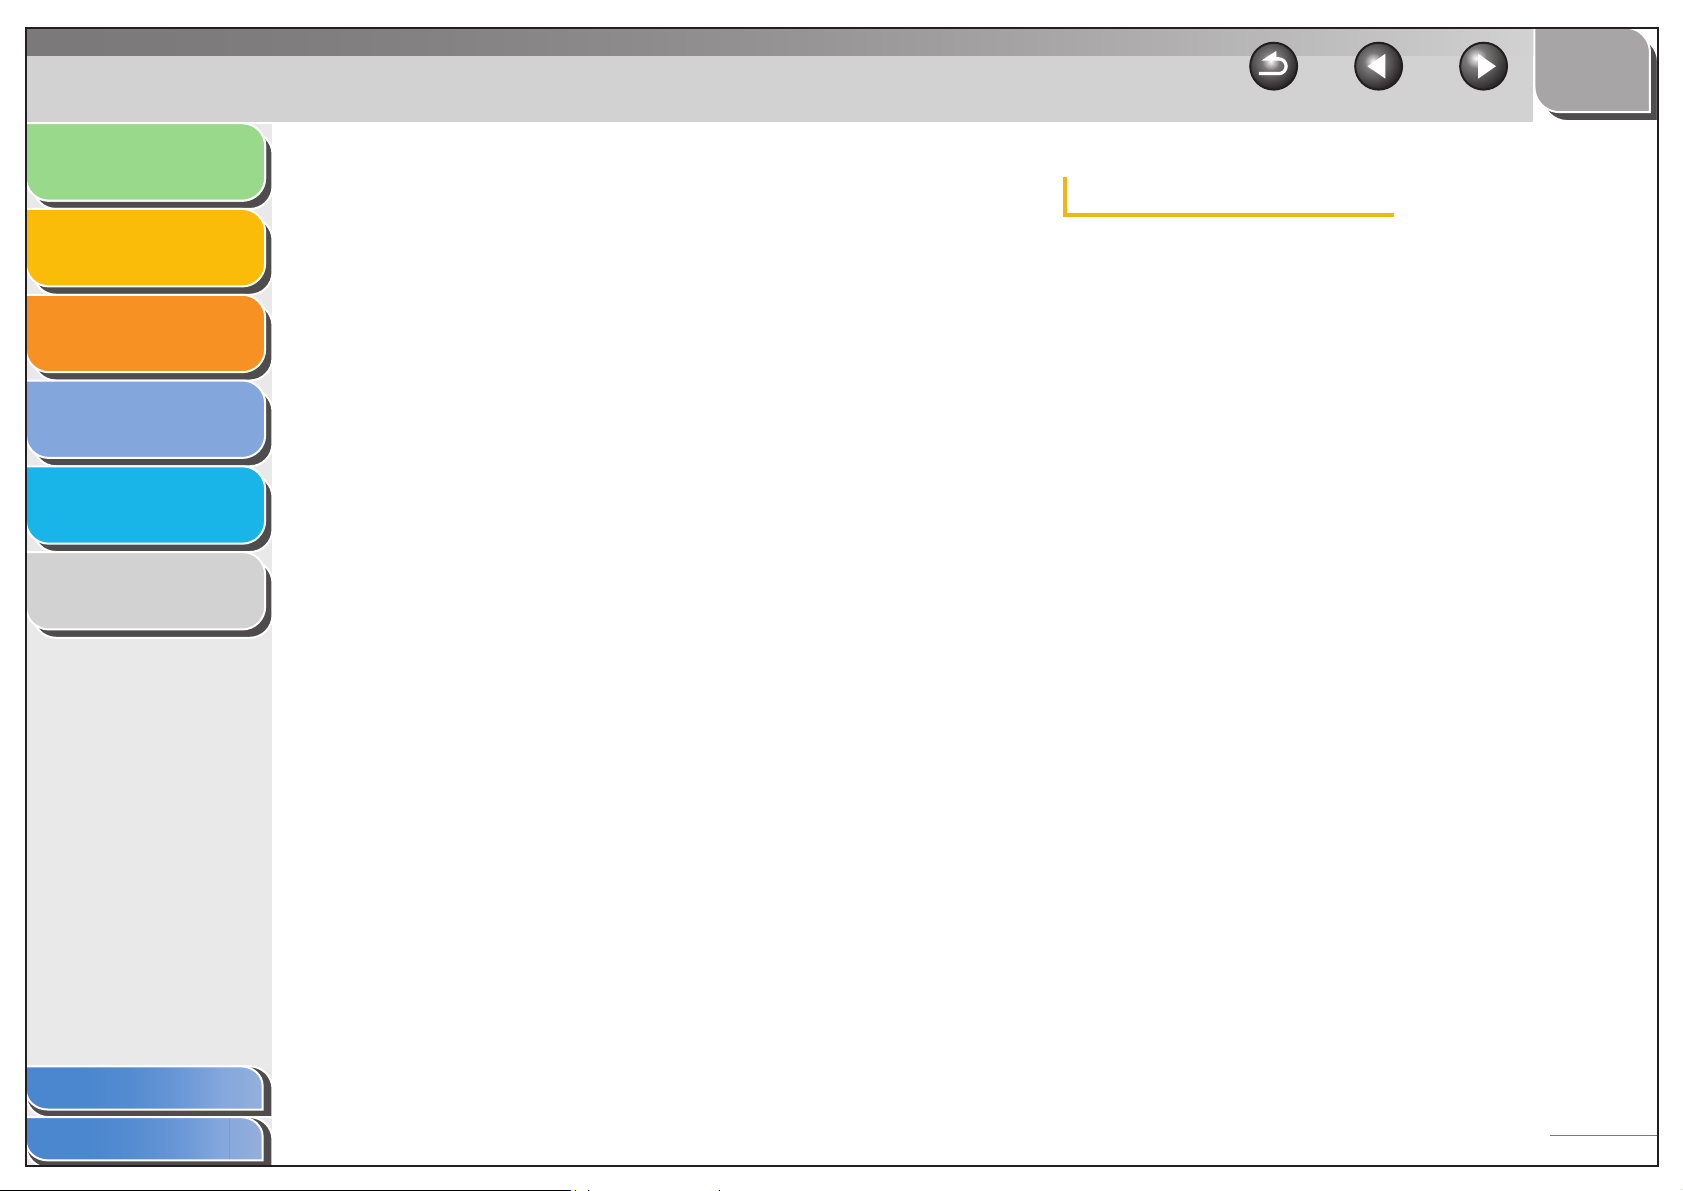
Detailed Settings
Clicking [Details] in the [Quality] tab sheet opens the [Detailed
Settings] dialog box. This dialog box enables you to specify the
detailed settings for print quality.
[Resolution] Selects the printer’s resolution in dot per
inch (600 dpi or 300 dpi).
Table of Contents
Index
[About] Displays the version information on the
driver.
[Restore Defaults] Resets all the current settings to their default
values.
2-18
Page 37
Introduction
TOP
Back Previous Next
Printing
Scanning a
Document
PC Faxing
Troubleshooting
Appendix
1
2
3
4
5
6
[B & W Halftones] Specifies the use of dithering for printing
halftone data.
Pattern 1:
Applies dither pattern of high-quality
gradient for printing Web pages or other
generic documents.
Pattern 2:
Applies dither pattern of high-quality tone for
printing pictures.
Pattern 3:
Applies dither pattern of clear-cut for printing
documents included with lines and figures.
None [Solid]:
Prints all colors in black except for white.
[Enable Image
Correction]
[Toner Save] Modifies print data to print lighter and
Select [Enable Image Correction] to smooth
out the streaking and coarse features that
tend to occur when printing enlarged image
files and photographs using a software
application.
conserve toner.
Printer Default:
Prints using the settings in the operation
panel of the printer.
Off:
Prints using normal density.
On:
Prints text lighter in printouts for
proofreading and choking.
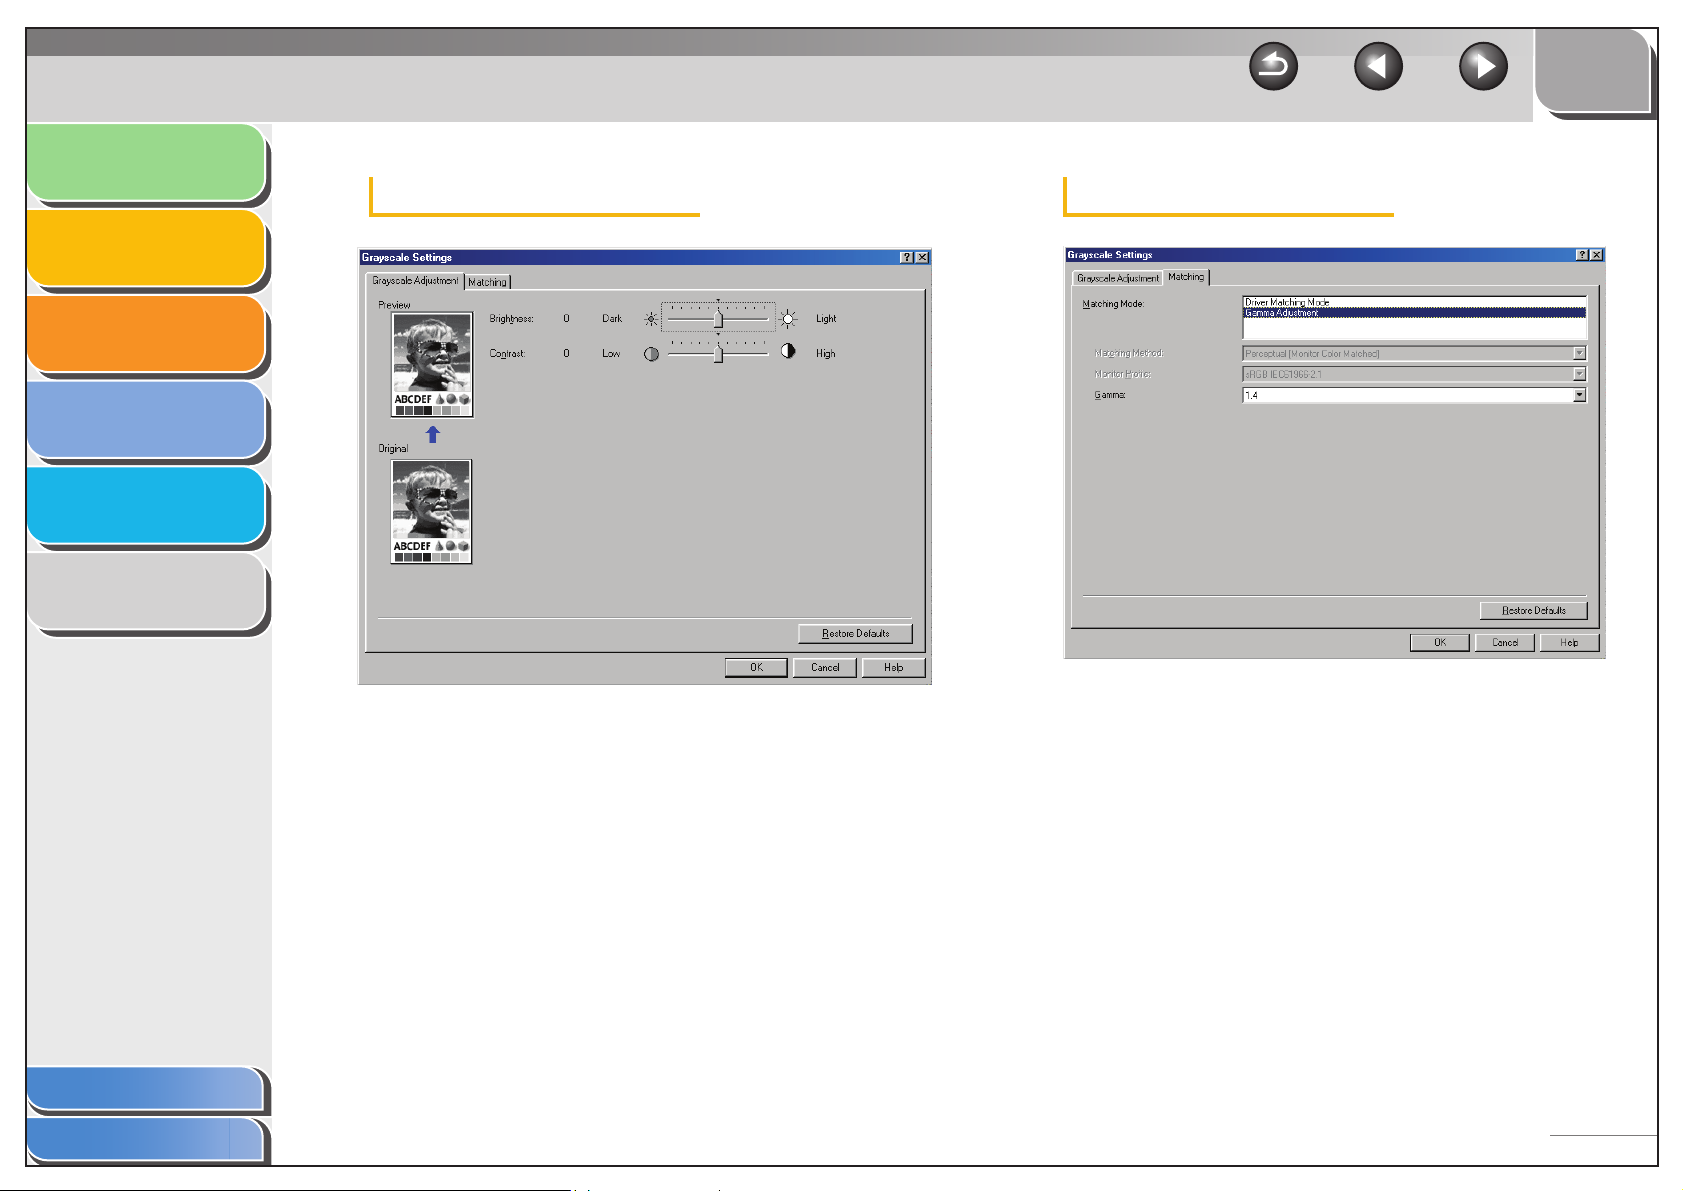
Grayscale Settings
Clicking [Grayscale Settings] in the [Quality] tab sheet opens the
[Grayscale Settings] dialog box. This dialog box enables you to
control the brightness and contrast of images. This function is
enabled only when [Manual Grayscale Setting] is selected in the
[Quality] tab sheet. (See “Quality Tab,” on p. 2-17.) Two tab
sheets are provided in this dialog box.
Table of Contents
Index
2-19
Page 38
Introduction
TOP
Back Previous Next
Printing
Scanning a
Document
PC Faxing
Troubleshooting
Appendix
1
2
3
4
5
6
Grayscale Adjustment Tab Matching Tab
[Matching Mode] You can specify the procedure for Color
[Preview] Displays the image with the currently
selected brightness and contrast reflected.
[Original] Displays the original image.
[Brightness] Adjusts the brightness of the preview image
in the range from –5 to 5.
[Contrast] Adjusts the contrast of the preview image in
the range from –5 to 5.
[Restore Defaults] Resets all the current settings to their default
values.
correction.
Driver Matching Mode:
Processes color in the printer driver. The
settings specified in [Matching Method] and
[Monitor Profile] will be enabled.
Gamma Adjustment:
Performs gamma adjustment with the
gamma correction value specified in the
[Gamma] box.
Table of Contents
Index
2-20
Page 39
Introduction
TOP
Back Previous Next
Printing
Scanning a
Document
PC Faxing
Troubleshooting
Appendix
1
2
3
4
5
6
[Matching Method] Specifies the matching method by assigning
highest priority when the [Driver Matching
Mode] is selected in the [Matching Mode]
box.
Perceptual [Monitor Color Matched]:
Gives priority to matching the hue of the
color on the monitor with the color of the
printed output.
Colorimetric:
Gives priority to reducing the color difference
between the original document on the
screen (a logo, for example) and the printed
output.
Saturation:
Gives priority to vividness in matching.
NOTE
This option can be selected only when [Driver Matching Mode] is
selected for [Matching Mode].
[Monitor Profile] Specifies the setting suitable for your
monitor when the [Driver Matching Mode] is
selected in the [Matching Mode] box.
[Gamma] Specifies the gamma correction value when
the [Gamma Adjustment] is selected in the
[Matching Mode] box.
The brightness of the document printout can
be adjusted without losing the brightest and
darkest portion of the document.
This option is useful when the printout result
is brighter than the original image (for
example, a photograph before scanning or
graphics displayed on the monitor), or when
you want to intentionally change the
brightness of the output.
Four gamma correction values are provided.
The larger the value, the darker the printout
is.
1.0
1.4
1.8
2.2
[Restore Defaults] Resets all the current settings to their default
values.
Table of Contents
Index
NOTE
– In the case where several gamma values are provided for one
option, select the higher gamma value to obtain better results if
the printed image is lighter than that of the monitor.
– If the monitor is set to a custom setting, it is difficult to produce
printed output similar to the color of the monitor when
performing matching.
2-21
Page 40
Introduction
TOP
Back Previous Next
Printing
Scanning a
Document
PC Faxing
Troubleshooting
Appendix
1
2
3
4
5
6
Profiles
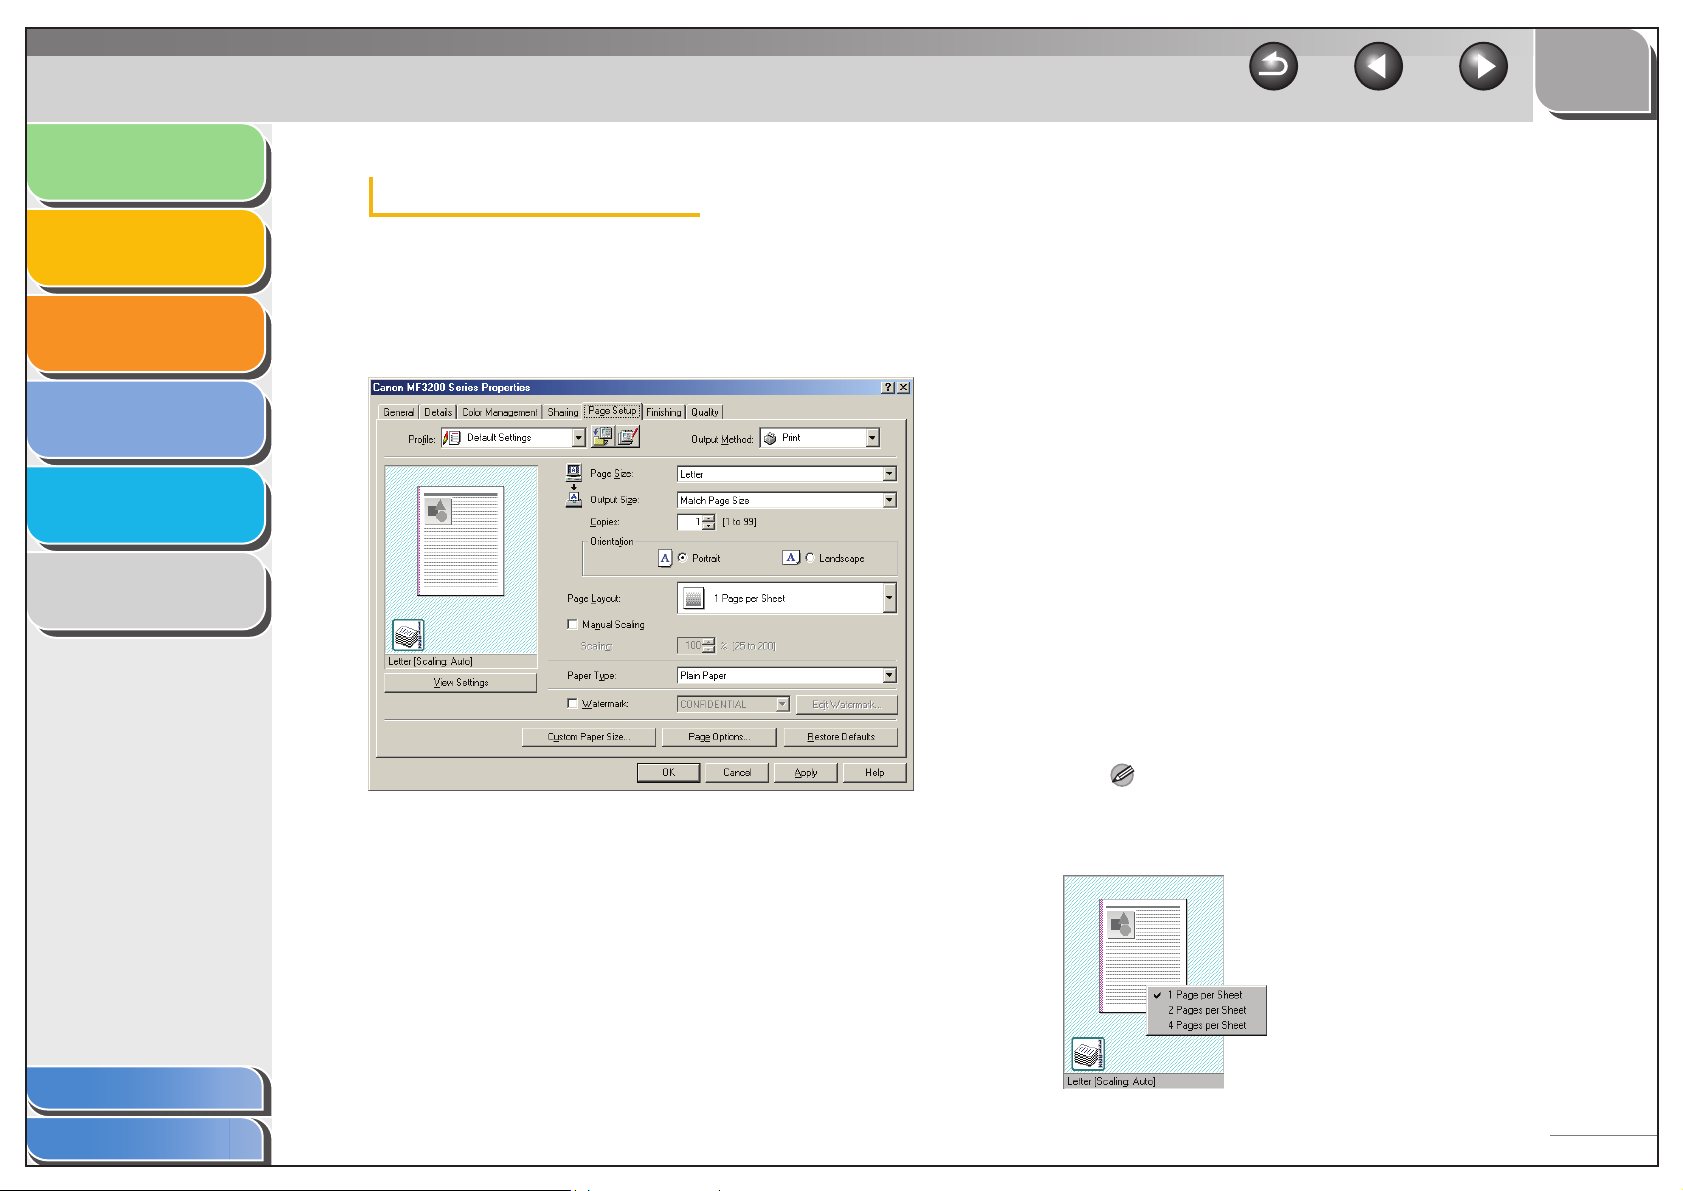
A registered combination of settings for the [Page Setup],
[Finishing] and [Quality] tab sheets is referred to as a profile.
The profile function commonly provided in each of these tab
sheets enables you to add, edit, and select a profile, which
facilitates your print jobs.
[Profile] Stores various printer driver settings, each
suitable for certain print jobs, as userdefined Profiles. Selecting Profiles from the
drop-down list enables the printer to perform
a variety of print jobs. A frequently
performed print job can also be saved as a
Profile.
Preview image Displays the image with the currently
selected settings reflected.
Changes the setting for [Page Layout] every
time you click anywhere inside the image of
the page. The setting changes in the
following order; [1 Page per Sheet]
[2 Pages per Sheet]
→ [1 Page per Sheet].
Right clicking the mouse button on the
preview image displays the pop-up menu,
from which you can also change the setting
for [Page Layout].
Clicking the edges of the preview image of
the page changes the binding location.
→ [4 Pages per Sheet]
→
Table of Contents
Index
NOTE
Settings made on the [Quality] tab are not reflected in the preview
image.
2-22
Page 41
Introduction
TOP
Back Previous Next
Printing
Scanning a
Document
PC Faxing
Troubleshooting
Appendix
1
2
3
4
5
6
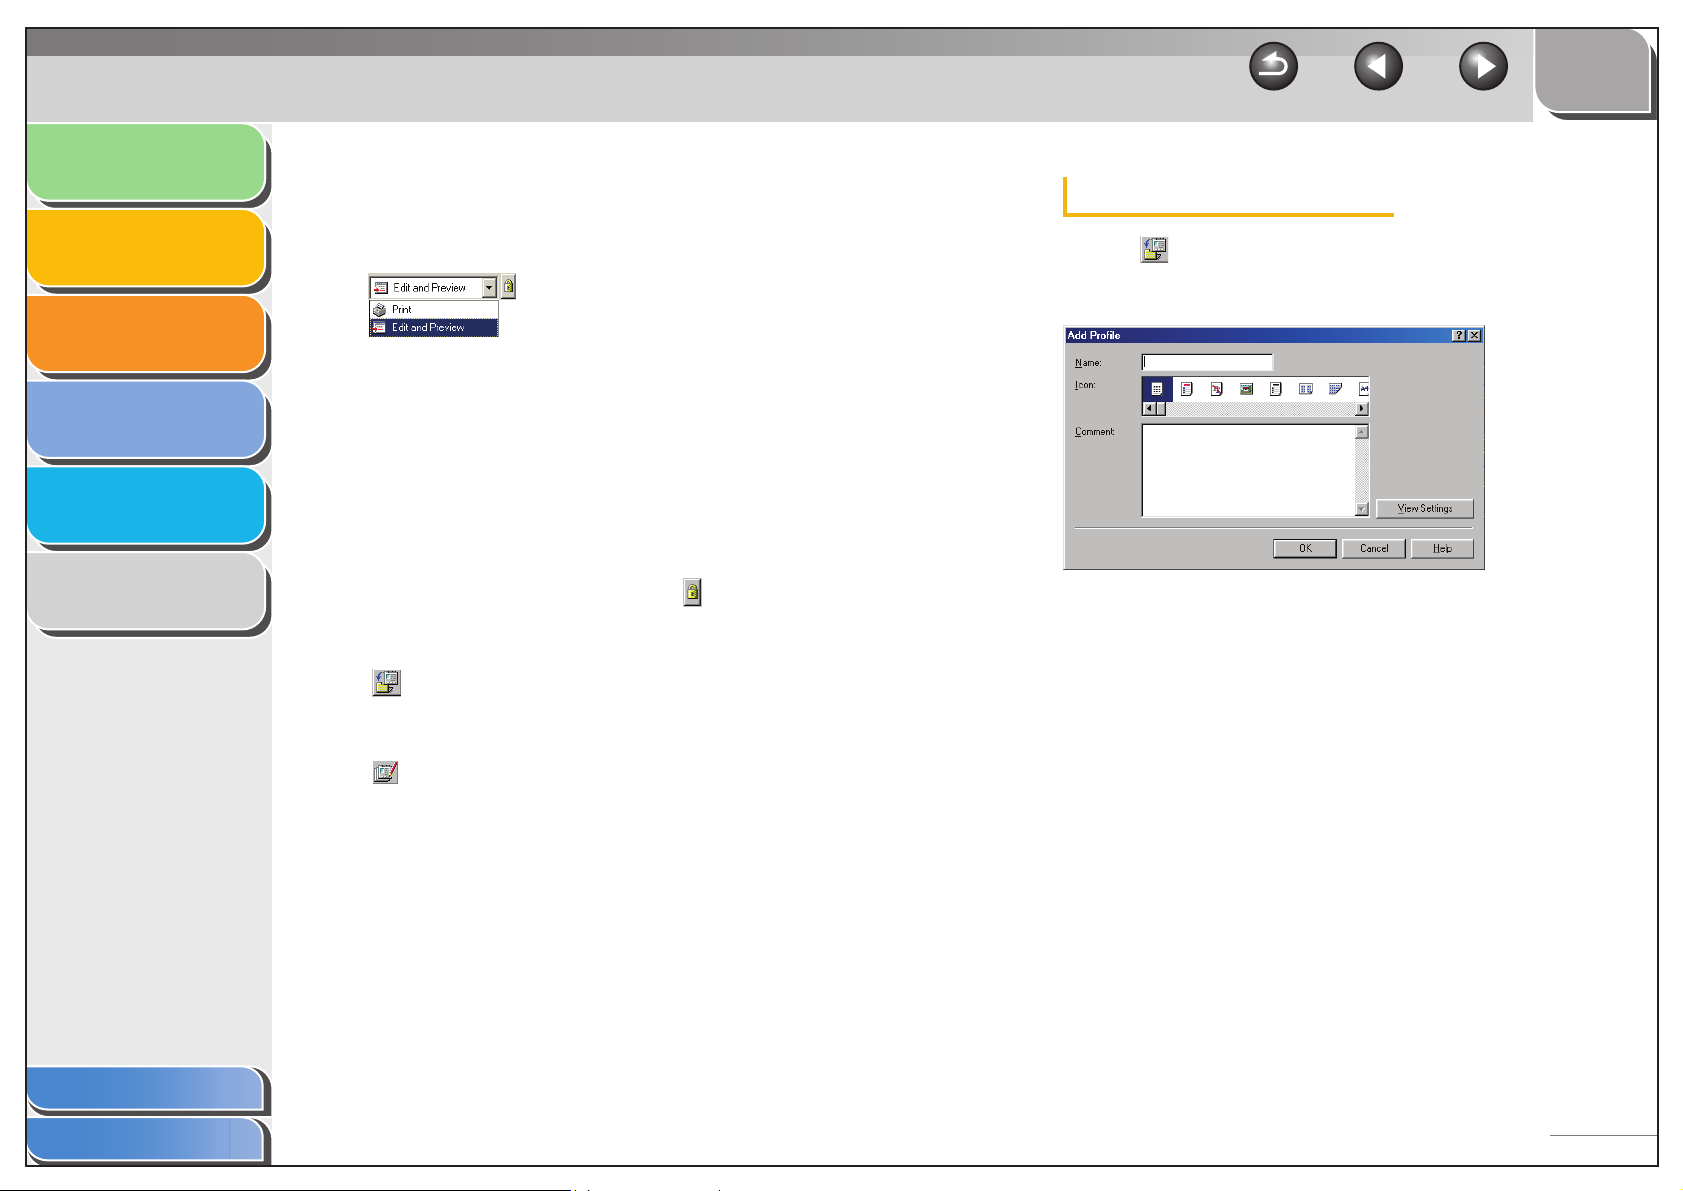
[Output Method] Switches the job mode between [Print] and
[Edit and Preview].
Print:
Executes a normal print job.
Edit and Preview:
Saves the data in the [Canon
PageComposer] dialog box. If you open
[Canon MF3200 Series Properties] from the
[Printers] folder and select the [Edit and
Preview] mode, (Lock) button appears on
the right side. When you click this button, the
[Edit and Preview] mode is locked.
(Add Profile) Click this button to display the [Add Profile]
dialog box to add a new Profile to the list.
(See “Add Profile,” on p. 2-23.)
(Edit Profile) Click this button to display the [Edit Profile]
dialog box to edit the name, icon, or
comment of a stored Profile. (See “Edit
Profile,” on p. 2-24.)
[View Settings] Click this button to display the [View
Settings] dialog box. This dialog box allows
you to view and confirm all of the current
page settings in a listed form. (See “View
Settings,” on p. 2-25.)
Add Profile
Clicking (Add Profile) opens the [Add Profile] dialog box.
This dialog box enables you to register a new profile with the
current settings. You can add up to 50 new profiles.
[Name] Specifies the name of the profile to be
registered.
[Icon] Selects an icon to represent the profile to be
registered.
[Comment] Adds comments on the profile to be
registered.
[View Settings] Click this button to display the [View
Settings] dialog box. This dialog box allows
you to view and confirm all of the current
page settings in a listed form. (See “View
Settings,” on p. 2-25.)
Table of Contents
Index
2-23
Page 42
Introduction
TOP
Back Previous Next
Printing
Scanning a
Document
PC Faxing
Troubleshooting
Appendix
1
2
3
4
5
6
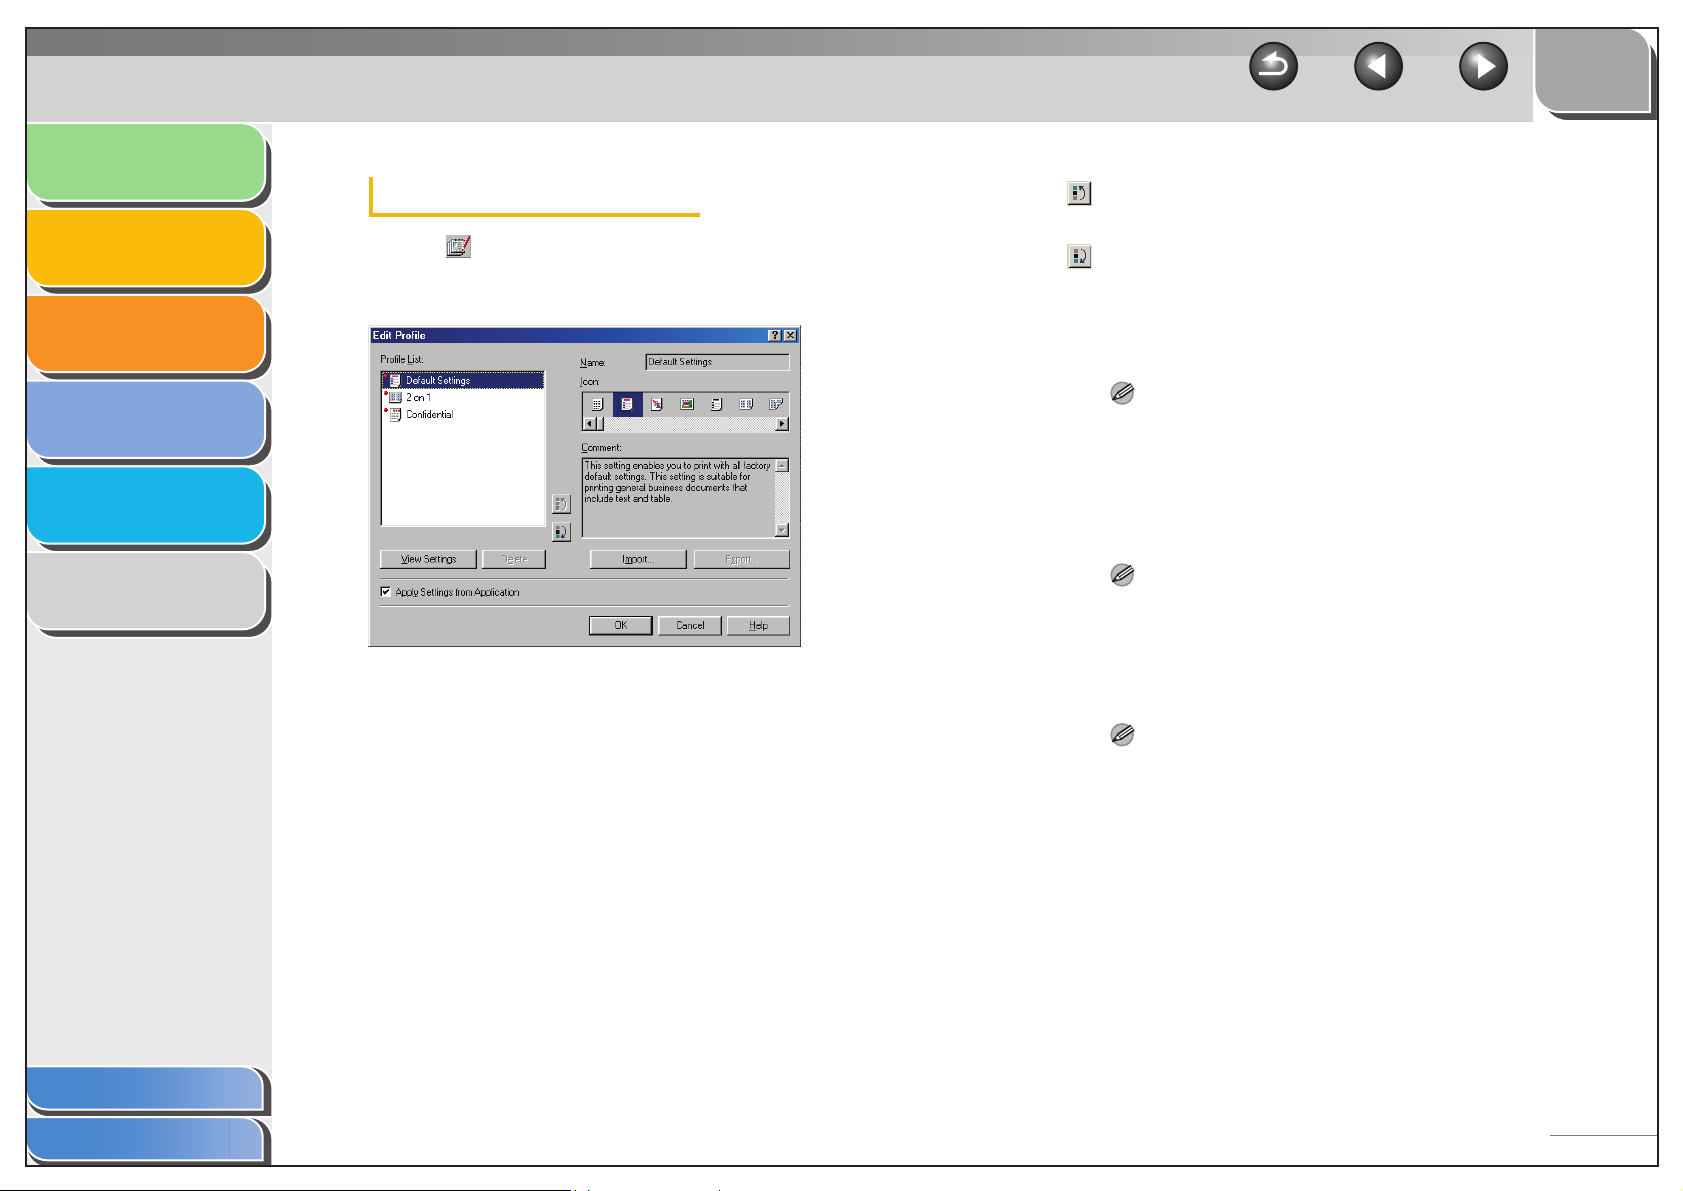
Edit Profile
Clicking (Edit Profile) opens the [Edit Profile] dialog box.
This dialog box enables you to edit the profile selected in [Profile
List].
[Profile List] Executes a normal print job.
[View Settings] Click this button to display the [View
Settings] dialog box. This dialog box allows
you to view and confirm all of the current
page settings in a listed form. (See “View
Settings,” on p. 2-25.)
(Move Up) Moves the profile selected in the [Profile List]
one position up.
(Move Down) Moves the profile selected in the [Profile List]
one position down.
[Delete] Removes the selected profile from [Profile
List].
NOTE
You cannot delete the pre-defined profiles and the profile that is
currently selected in [Profile] of the [Page Setup] tab.
[Name] Displays and allows you to change the name
of the currently selected profile.
NOTE
You cannot change the names for the pre-defined profiles.
[Icon] Displays and allows you to change the icon
representing the currently selected profile.
NOTE
You cannot change the icons for the pre-defined profiles.
Table of Contents
Index
2-24
Page 43
Introduction
TOP
Back Previous Next
Printing
Scanning a
Document
PC Faxing
Troubleshooting
Appendix
1
2
3
4
5
6
[Comment] Displays and allows you to change the
comment on the currently selected profile.
NOTE
You cannot change the comments for the pre-defined profiles.
[Import] Enables you to import profile information
from a file.
[Export] Enables you to export the selected profile
information to a file.
NOTE
When one of the pre-defined profiles is selected, this button is
disabled.
[Apply Settings
from Application]
Applies the selected profile only to the
settings other than [Page Size],
[Orientation], and [Copies].
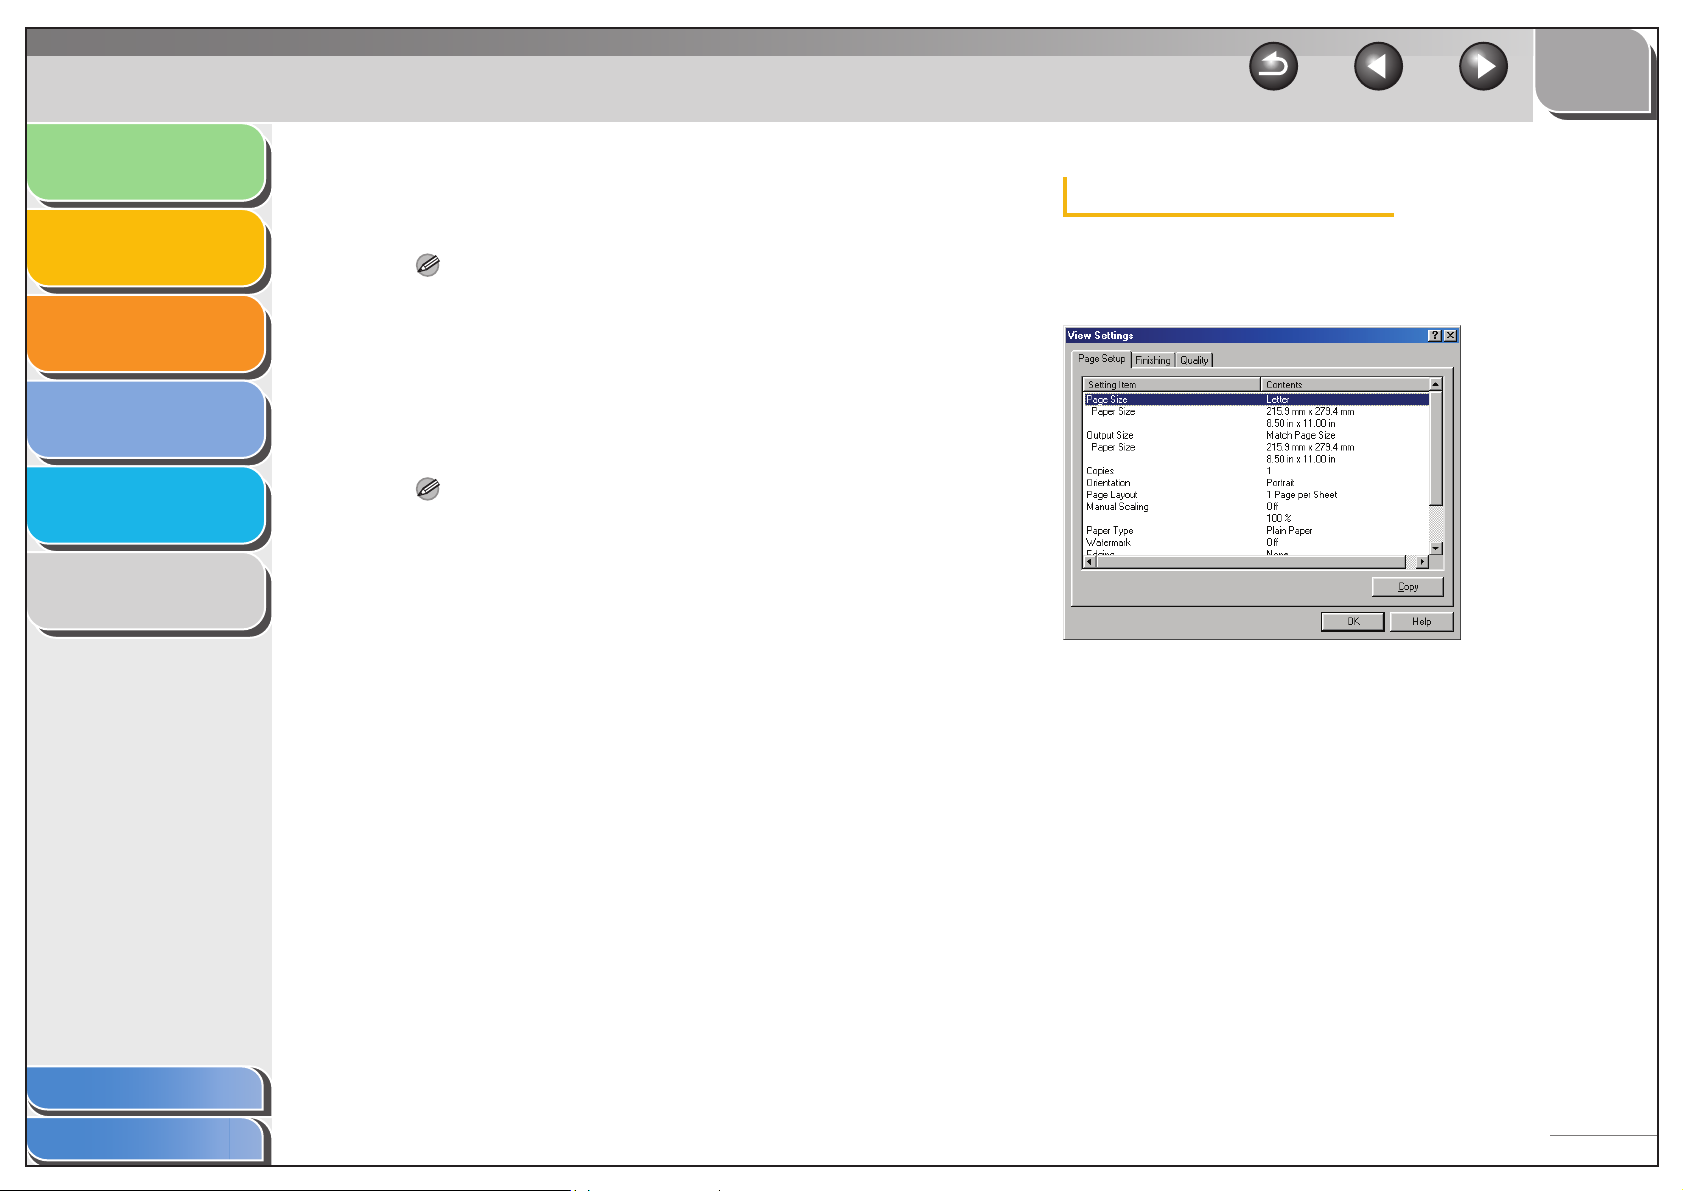
View Settings
Clicking [View Settings] opens the [View Settings] dialog box.
This dialog box displays the current settings in the [Page Setup],
[Finishing], and [Quality] tab sheets.
[Copy] Copies the contents of the current settings to
the clipboard.
Table of Contents
Index
2-25
Page 44
Introduction
TOP
Back Previous Next
Printing
Scanning a
Document
PC Faxing
Troubleshooting
Appendix
1
2
3
4
5
6
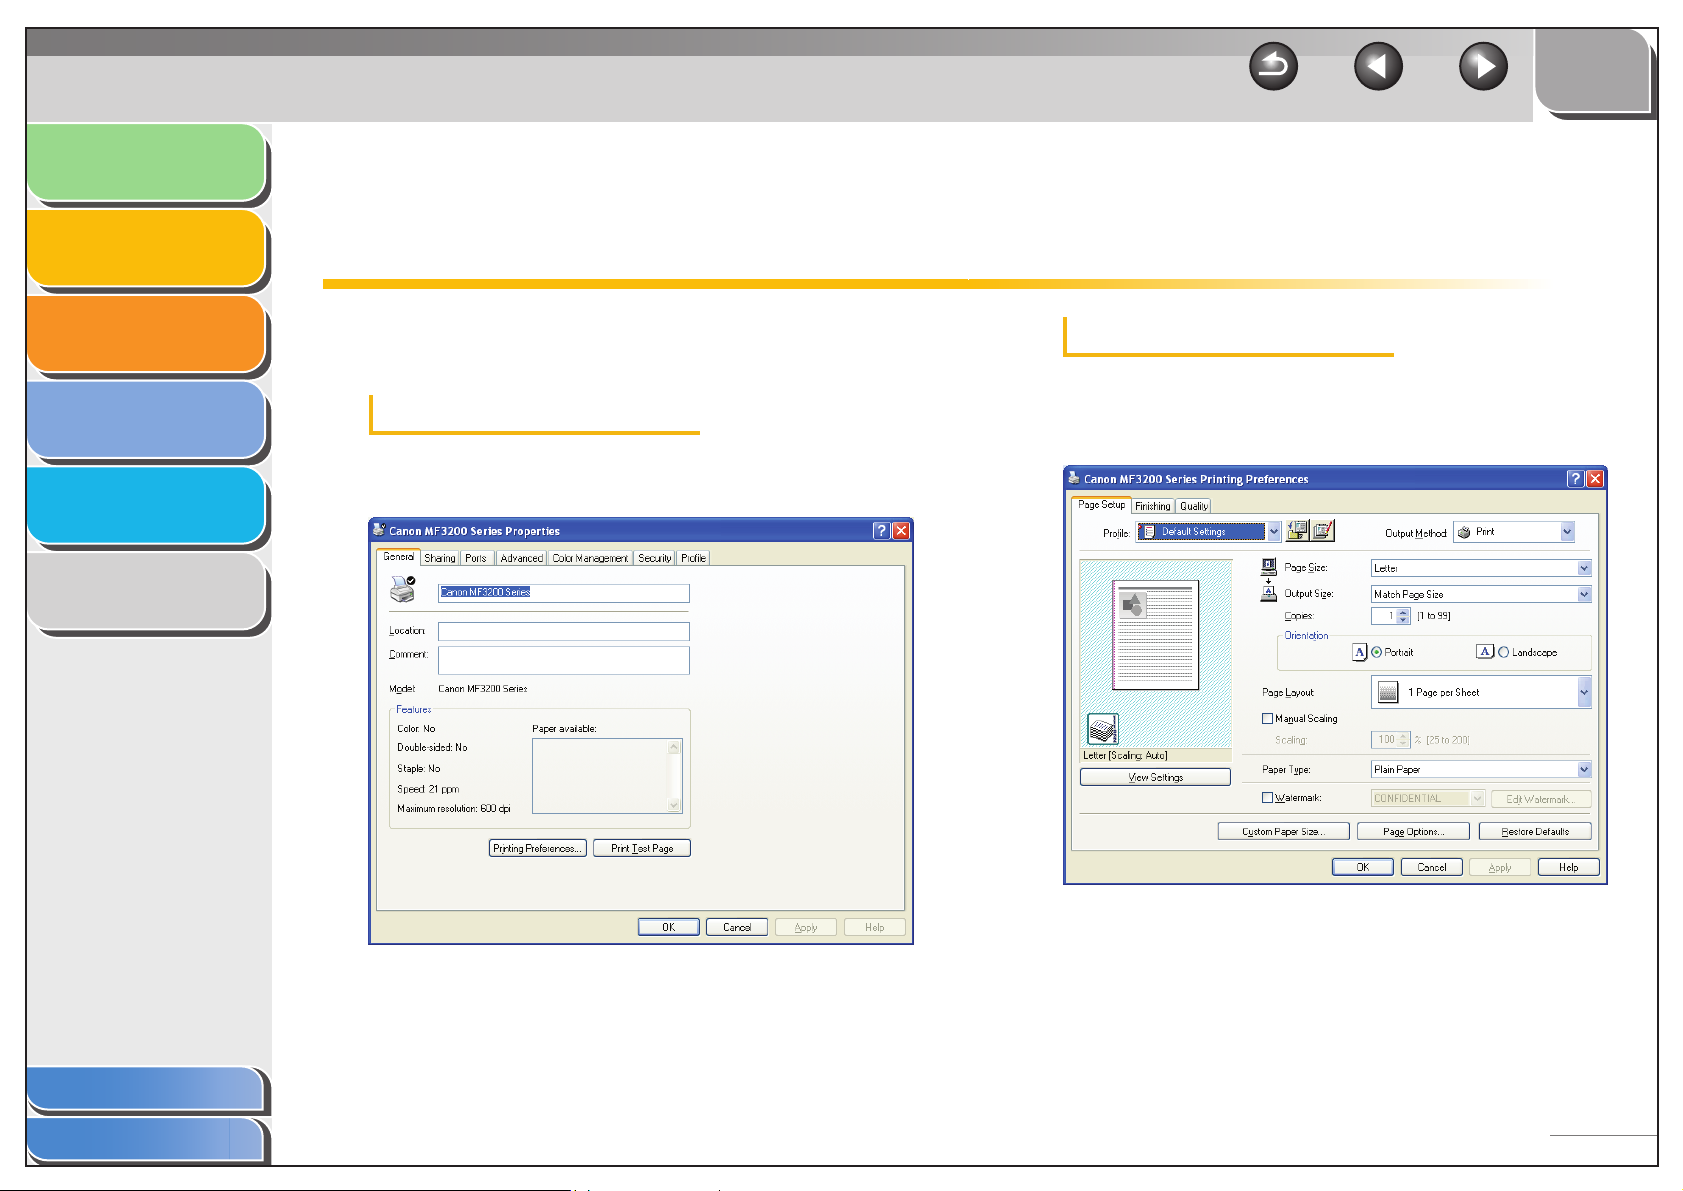
Windows 2000/XP/Vista/7 Properties and Printing Preferences
The printer driver for Windows 2000/XP has the following
two main dialog boxes:
The Properties Dialog Box
This dialog box enables you to set up the printer configuration
and configure the print settings for all Windows applications.
The Printing Preferences Dialog Box
This dialog box enables you to specify the default settings for
the printing options available when you print on the Canon
MF3200 Series printer.
Table of Contents
Index
2-26
Page 45
Introduction
TOP
Back Previous Next
Printing
Scanning a
Document
PC Faxing
Troubleshooting
Appendix
1
2
3
4
5
6
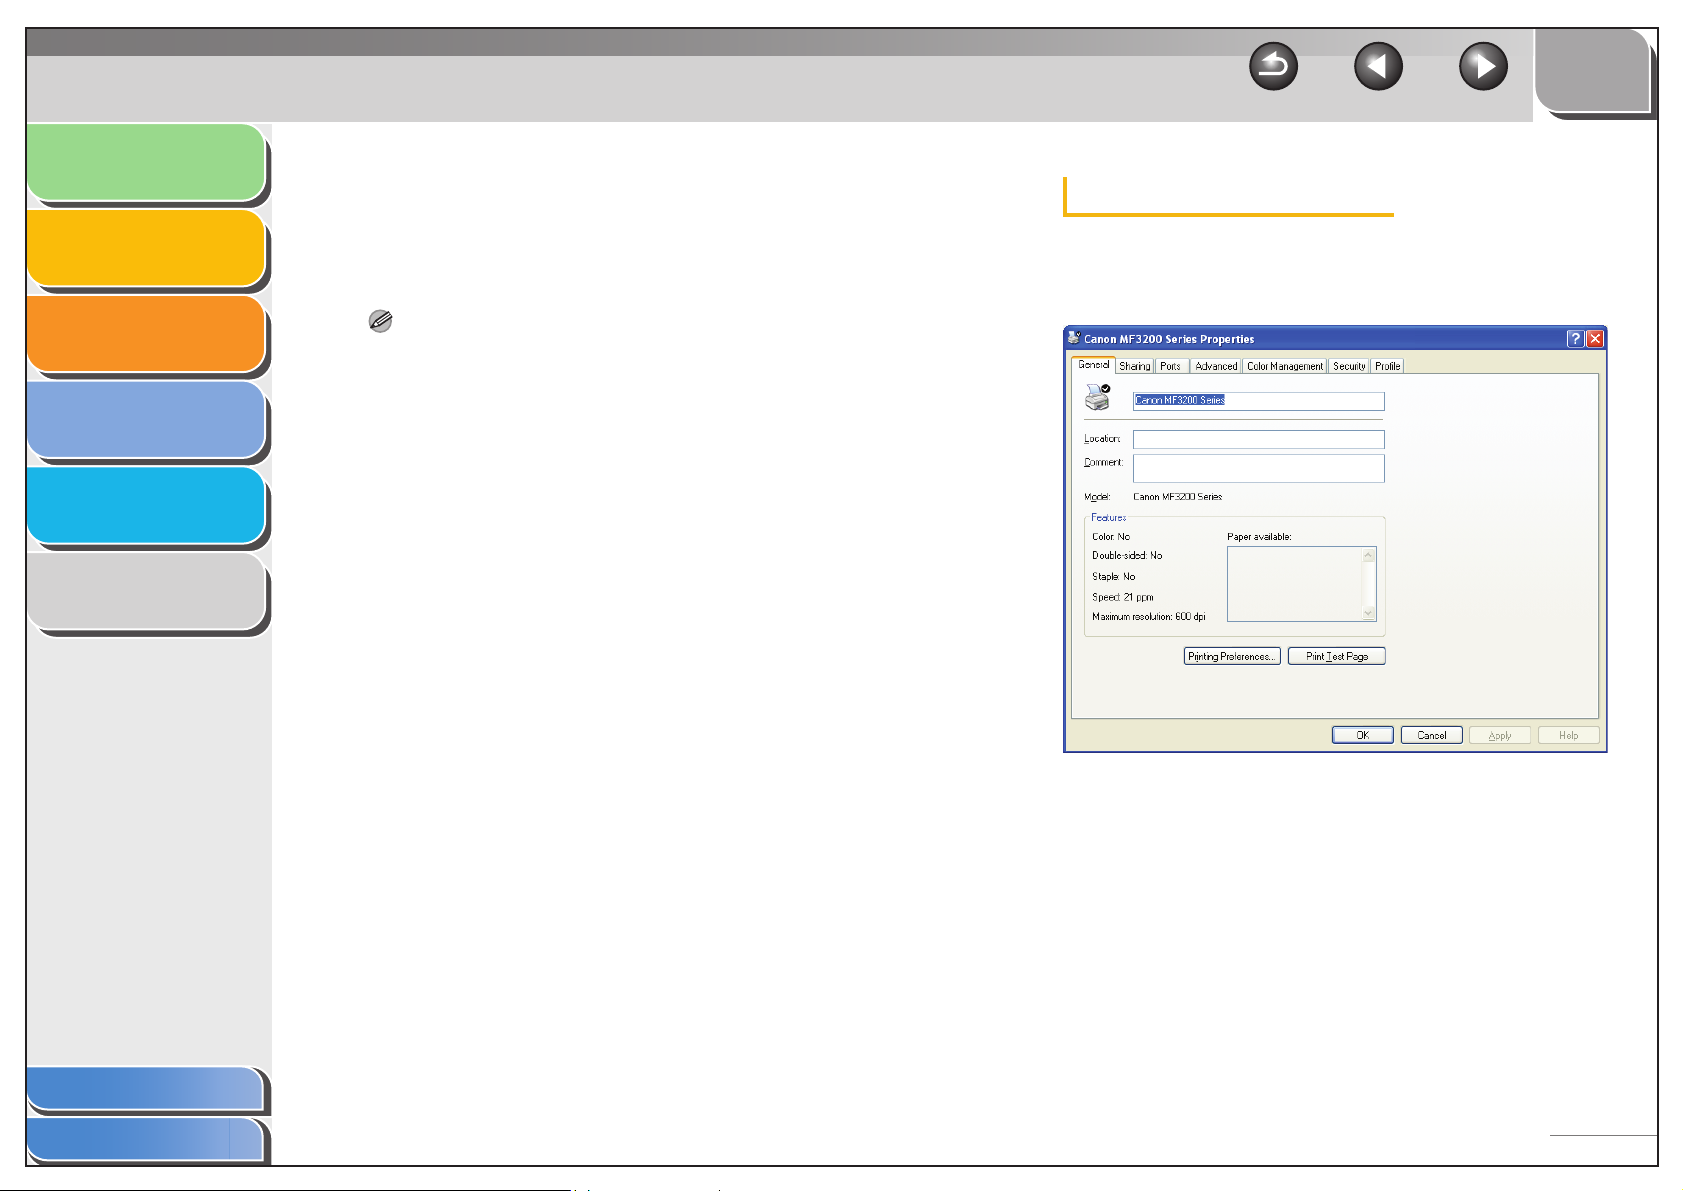
■ Properties
The [Canon MF3200 Series Properties] dialog box contains
several tab sheets that enable you to set up the printer
configuration and configure the print settings.
NOTE
– The number of tabs displayed in the properties dialog box depends
on how you have your system set up.
– For more information about the following features, see the online
help. (See “Online Help,” on p. 1-2.)
– The screen shots shown are from Windows XP.
General Tab
Lets you print a test page and define printing preferences. Refer
to your Windows operating system documentation for more
information.
Table of Contents
Index
2-27
Page 46
Introduction
TOP
Back Previous Next
Printing
Scanning a
Document
PC Faxing
Troubleshooting
Appendix
1
2
3
4
5
6
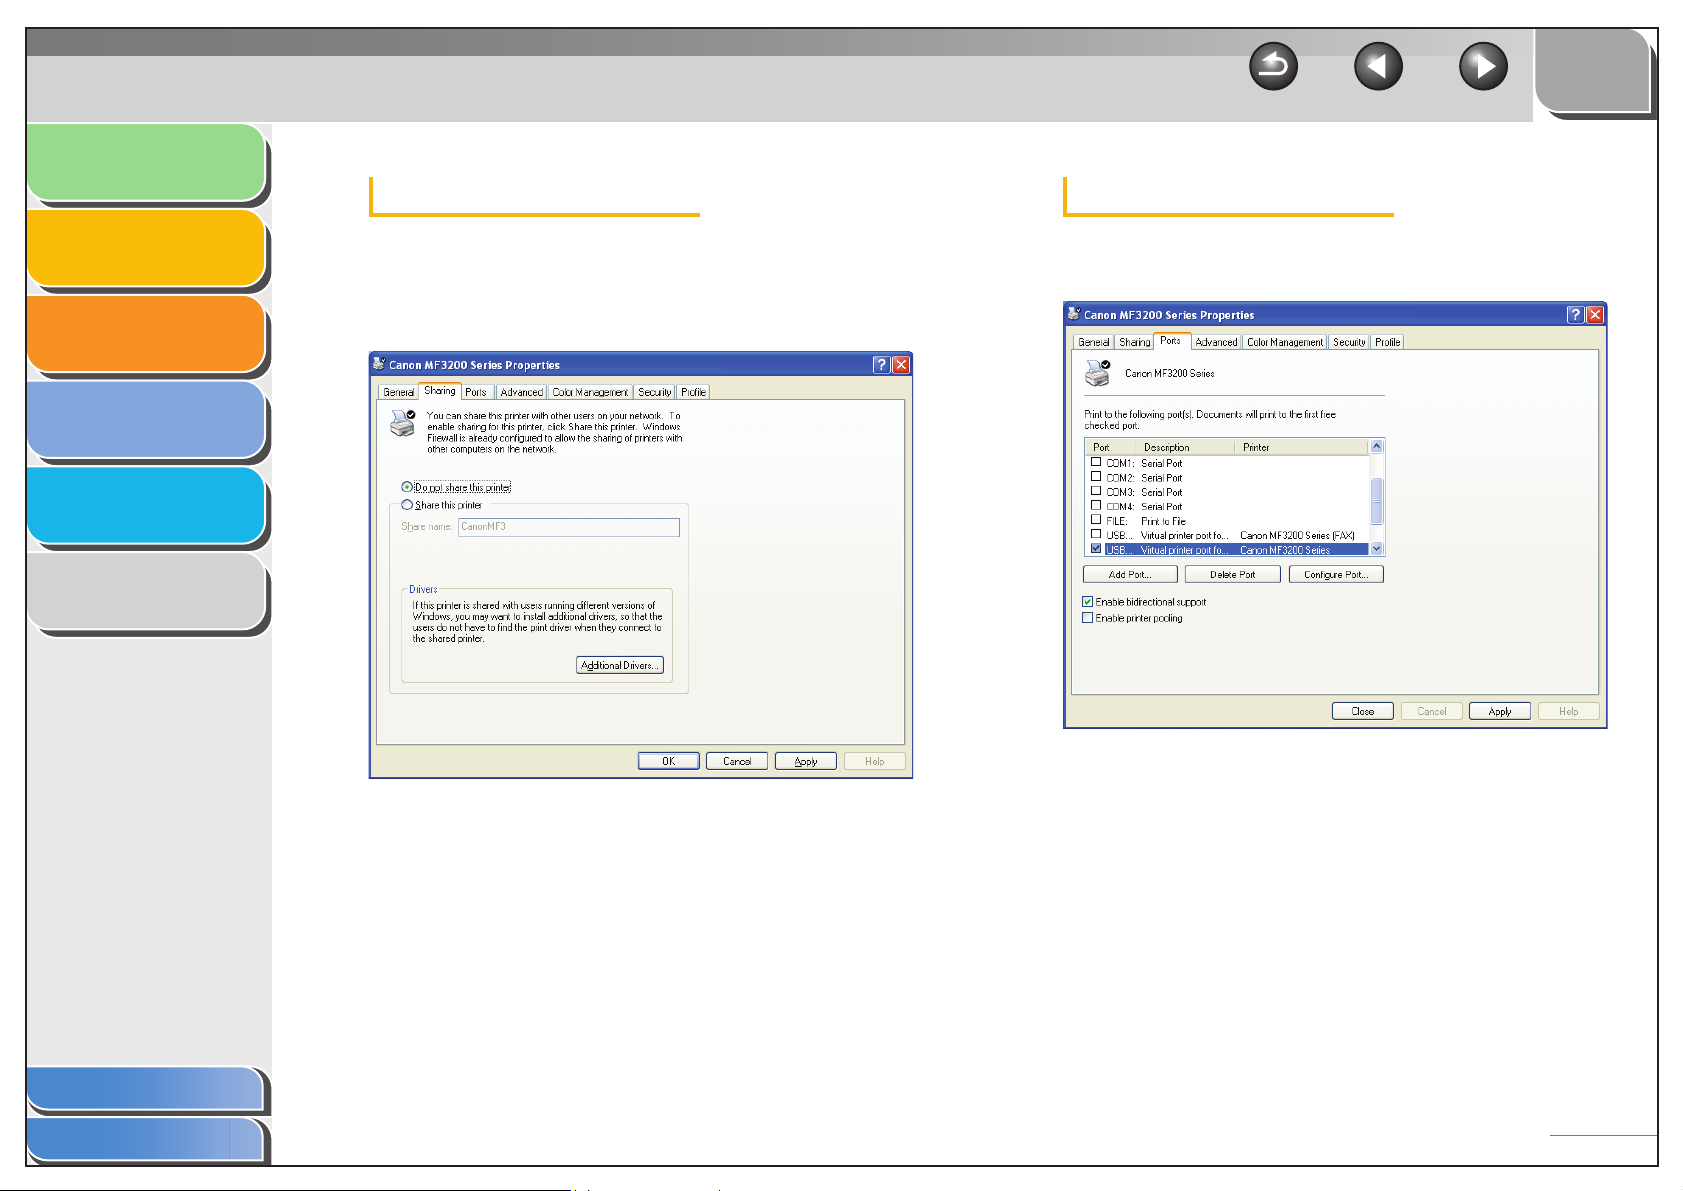
Sharing Tab
Specifies the printer sharing settings. This tab sheet is available
only when the sharing is enabled. (See “Using the Machine on
Your Network,” on p. 2-54.) Refer to your Windows operating
system documentation for more information.
Ports Tab
Specifies the port to which the printer is attached. Refer to your
Windows operating system documentation for more information.
Table of Contents
Index
2-28
Page 47
Introduction
TOP
Back Previous Next
Printing
Scanning a
Document
PC Faxing
Troubleshooting
Appendix
1
2
3
4
5
6
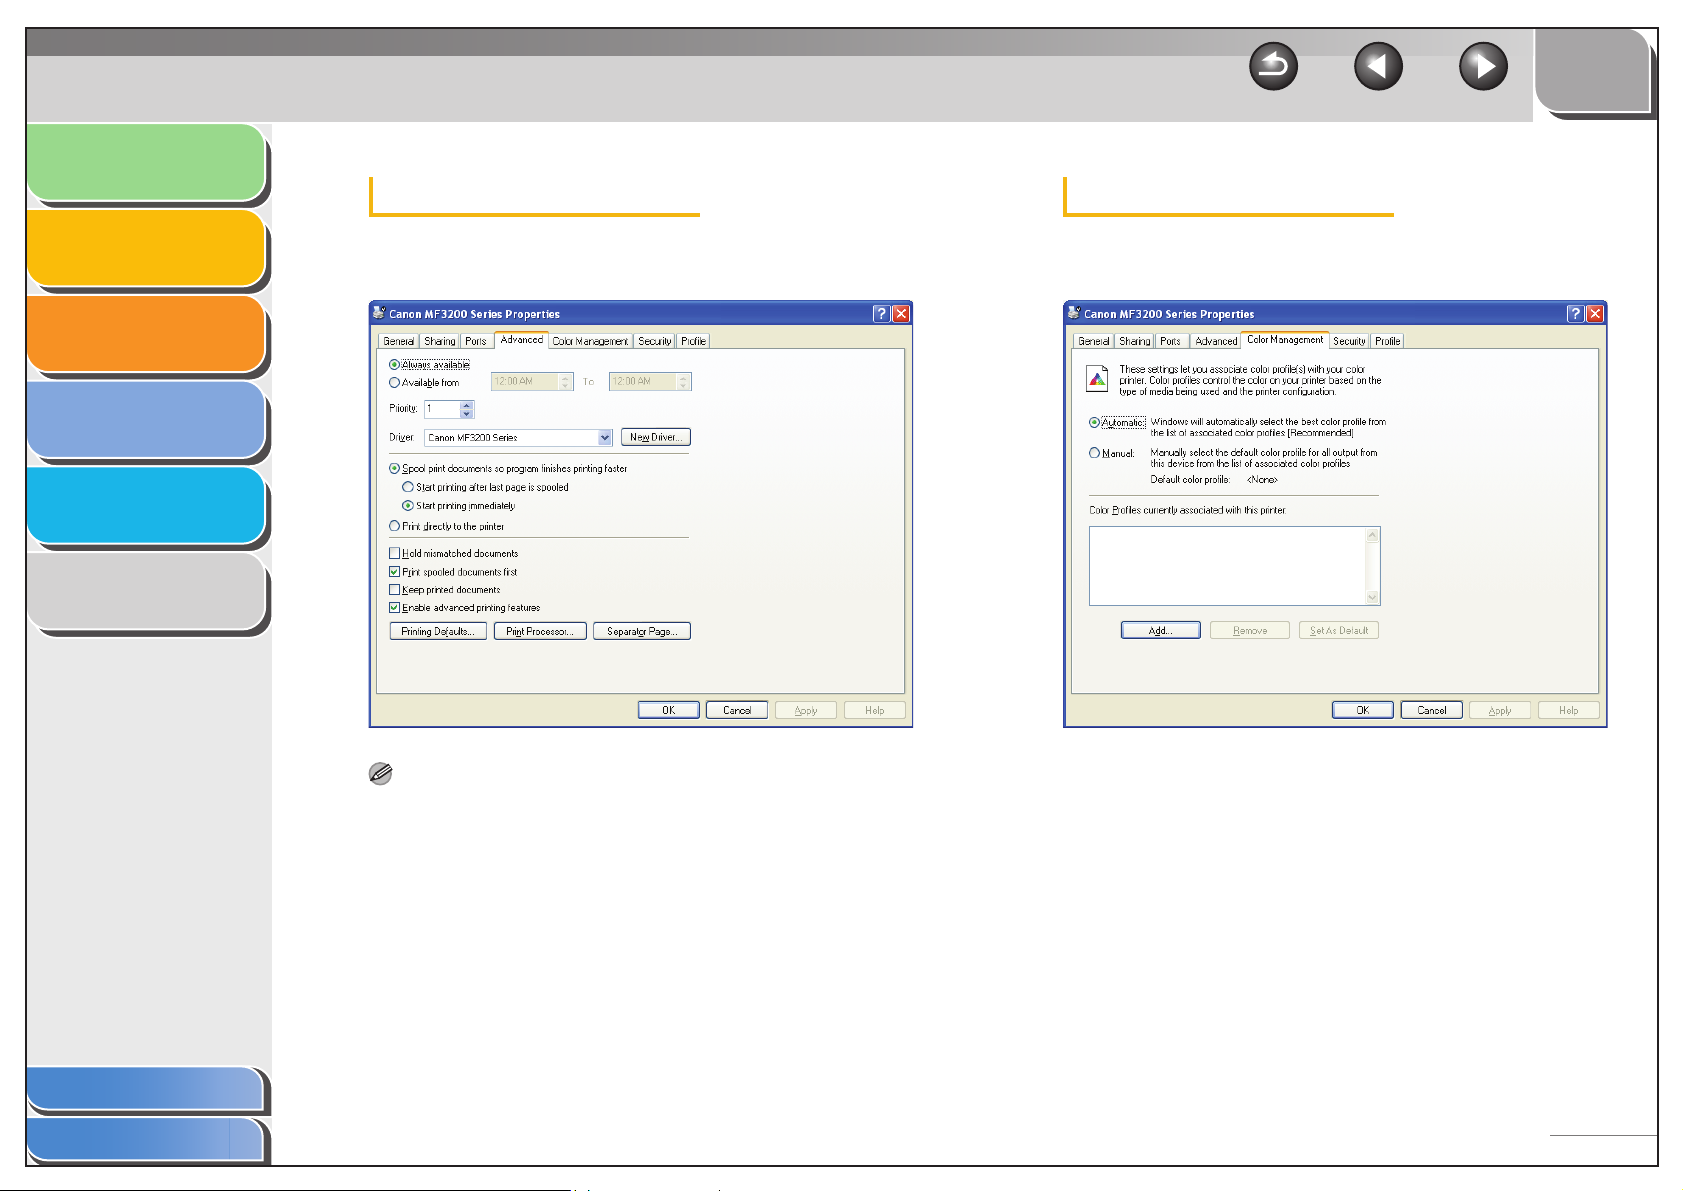
Advanced Tab
Specifies the settings for print spooling. Refer to your Windows
operating system documentation for more information.
NOTE
[Spool print documents so program finishes printing faster] and [Start
printing immediately] are set automatically when you install the printer
driver.
Color Management Tab
Associates color profiles with your color printer. Refer to your
Windows operating system documentation for more information.
Table of Contents
Index
2-29
Page 48
Introduction
TOP
Back Previous Next
Printing
Scanning a
Document
PC Faxing
Troubleshooting
Appendix
1
2
3
4
5
6
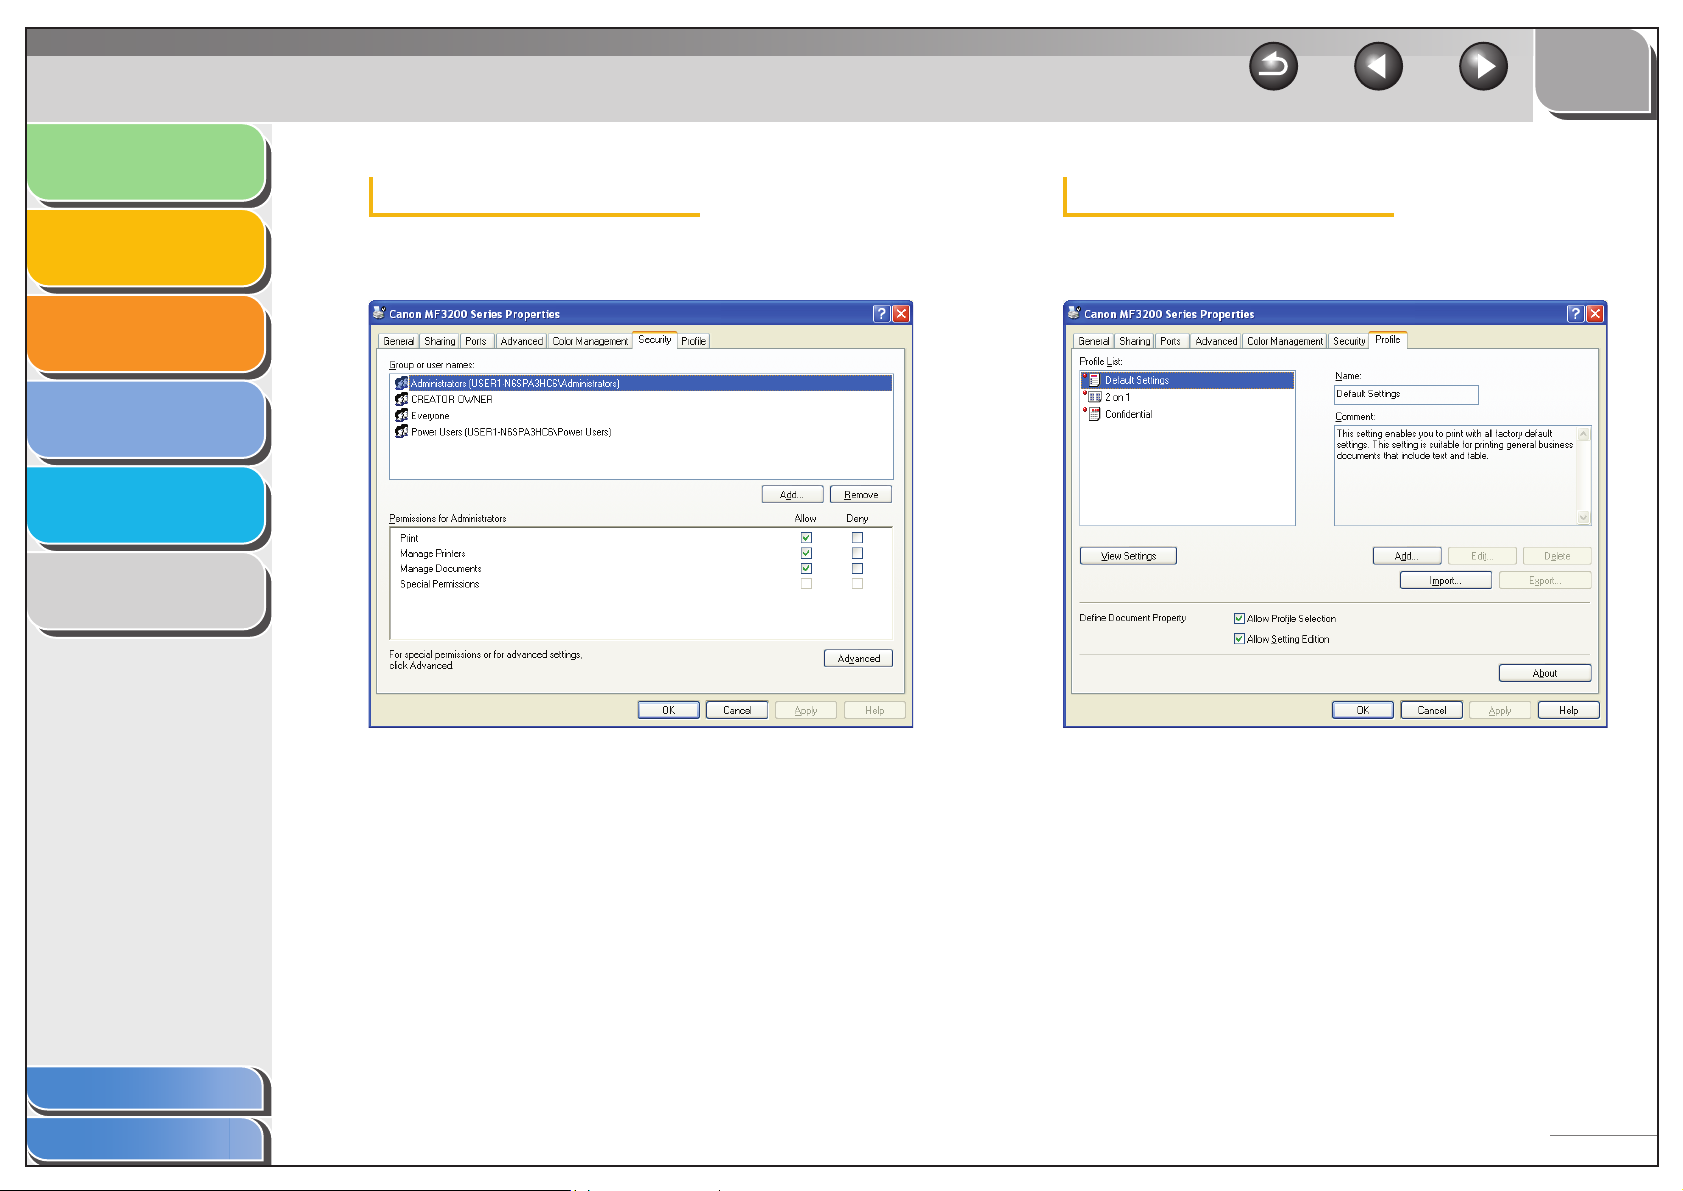
Security Tab
Specifies security settings. Refer to your operating system
documentation for more information.
Profile Tab
Enables you to add, edit, and select a profile to be applied to
print jobs.
Table of Contents
Index
[Profile List] Displays the list of registered profiles.
[Name] Displays the name of the profile currently
selected in [Profile List].
[Comment] Describes the currently selected profile.
[View Settings] Displays the settings of the currently
selected profile. (See “View Settings,” on
p. 2-53.)
2-30
Page 49
Introduction
TOP
Back Previous Next
Printing
Scanning a
Document
PC Faxing
Troubleshooting
Appendix
1
2
3
4
5
6
[Add] Opens the [Add/Edit Profile] dialog box
which enables you to register a new profile.
(See “Add/Edit Profile,” on p. 2-31.)
[Edit] Opens the [Add/Edit Profile] dialog box
which enables you to edit the registered
profiles. (See “Add/Edit Profile,” on p. 2-31.)
NOTE
When one of the pre-defined profiles is selected in [Profile List],
this button is disabled.
[Delete] Removes the selected profile from [Profile
List].
NOTE
When one of the pre-defined profiles is selected, this button is
disabled.
[Import] Enables you to import profile information
from a file.
[Export] Enables you to export the selected profile
information to a file.
[Define
Document
Property]
NOTE
When [Allow Profile Selection] is cleared, [Allow Setting Edition] is
disabled.
[About] Displays the version information on the
Controls the profile settings.
[Allow Profile Selection]:
Enables selection of profiles in the document
properties dialog box, or the printing
preferences dialog box.
[Allow Setting Edition]:
Enables addition and edition of profiles as
well as selection.
driver.
Add/Edit Profile
Clicking [Add] or [Edit] opens the [Add/Edit Profile] dialog box
which enables you to register new profiles and edit existing
profiles. This dialog box has four tab sheets.
Table of Contents
Index
NOTE
When one of the pre-defined profiles is selected, this button is
disabled.
2-31
Page 50
Introduction
TOP
Back Previous Next
Printing
Scanning a
Document
PC Faxing
Troubleshooting
Appendix
1
2
3
4
5
6
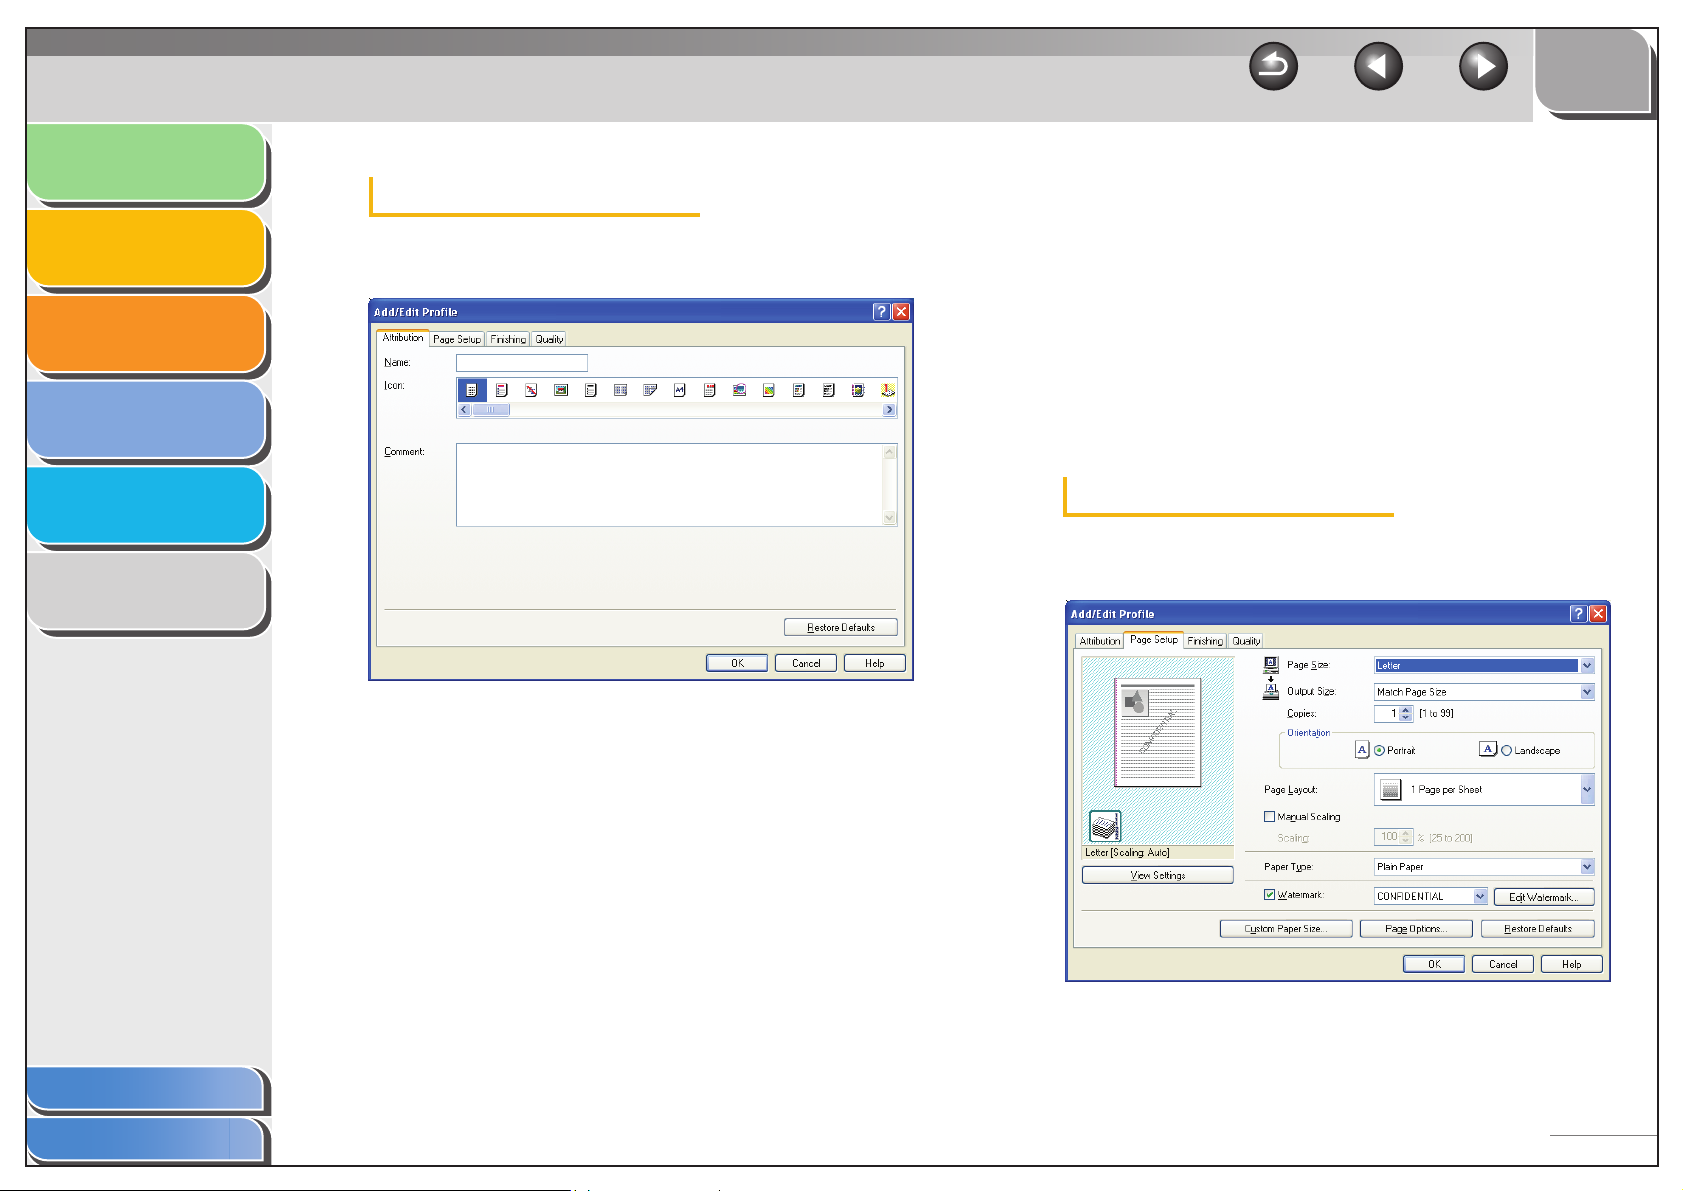
Attribution Tab
The [Attribution] tab sheet enables you to specify attributions of
the profile.
[Name] Specifies the name of the new profile, or
allows you to change the name of the profile
selected in the [Profile] tab sheet.
[Icon] Selects an icon to represent the new profile,
or allows you to change the icon of the
profile selected in the [Profile] tab sheet.
[Comment] Adds comments on the new profile, or allows
you to change the comments on the profile
selected in the [Profile] tab sheet.
[Restore Defaults] Resets all the current settings to the values
that displayed when opening the [Add/Edit
Profile] dialog box.
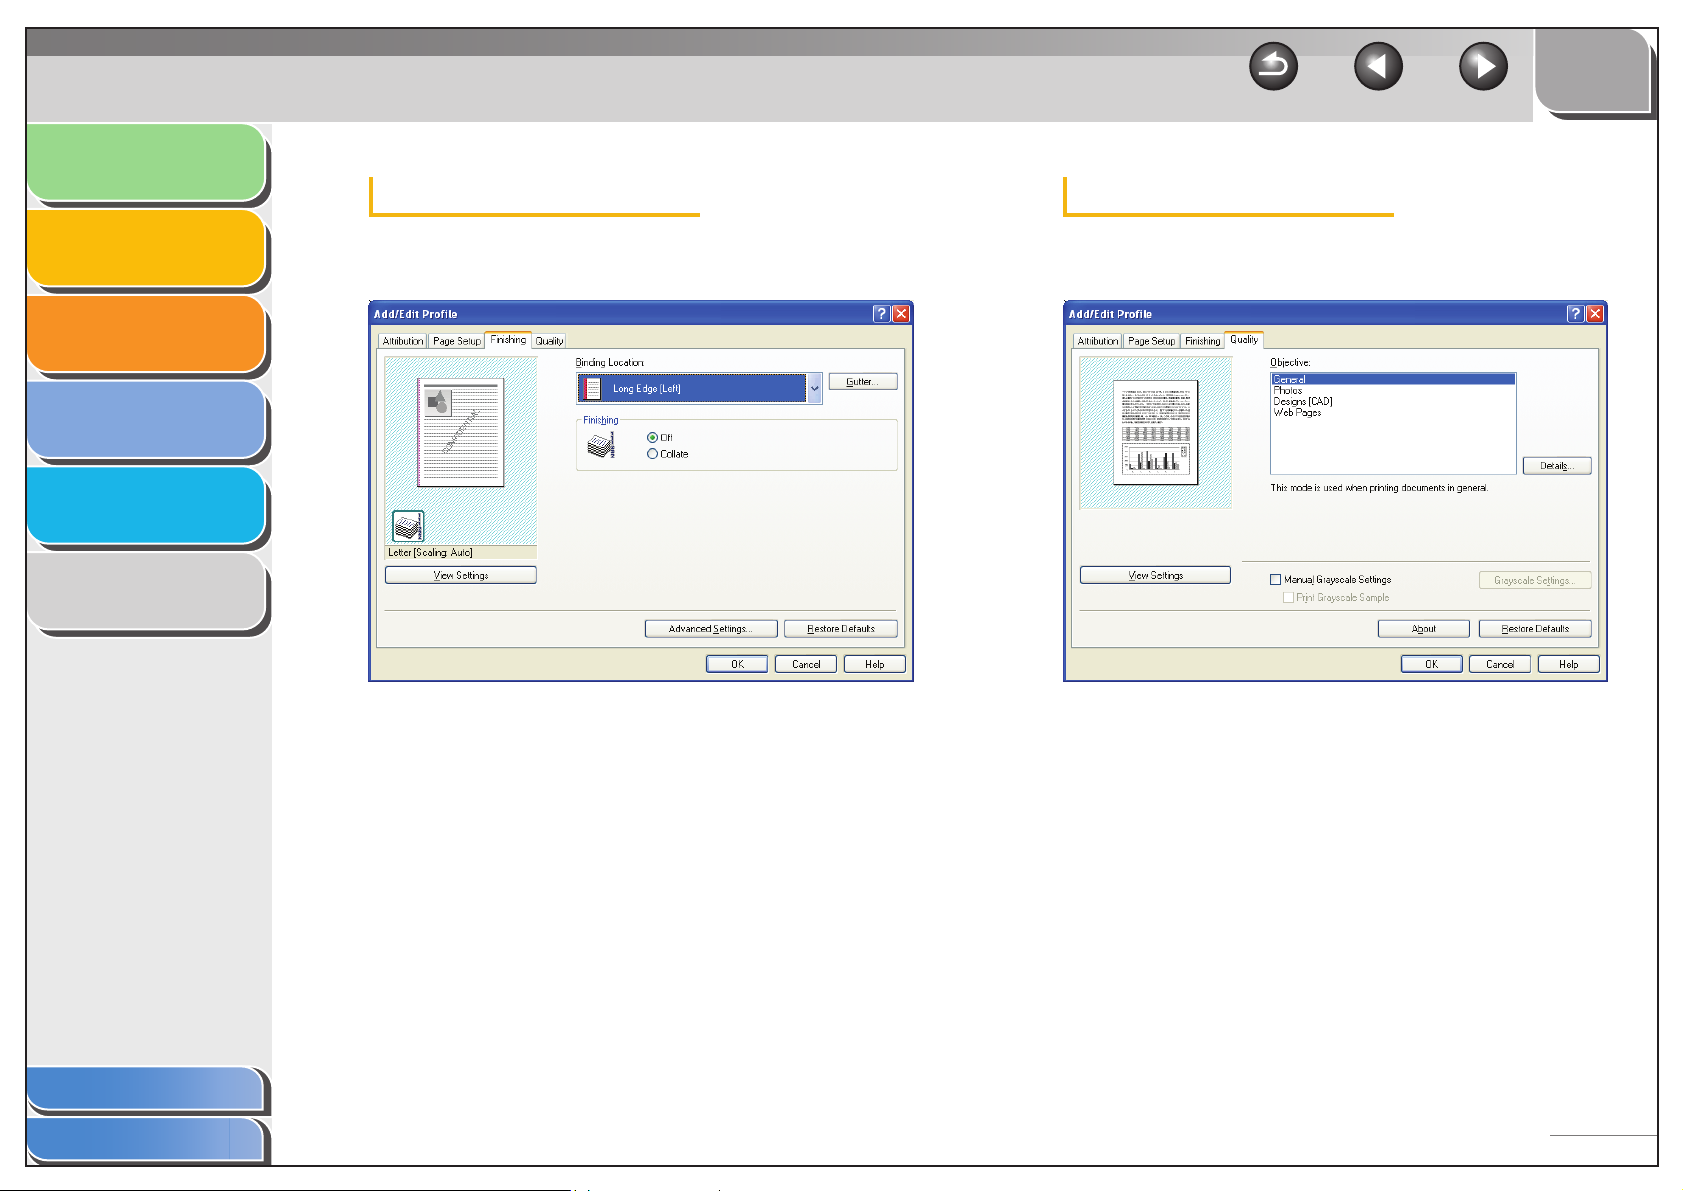
Page Setup Tab
Specifies the page settings including the paper size, scaling,
number of copies, orientation, and number of pages per sheet.
Table of Contents
Index
2-32
Page 51
Introduction
TOP
Back Previous Next
Printing
Scanning a
Document
PC Faxing
Troubleshooting
Appendix
1
2
3
4
5
6
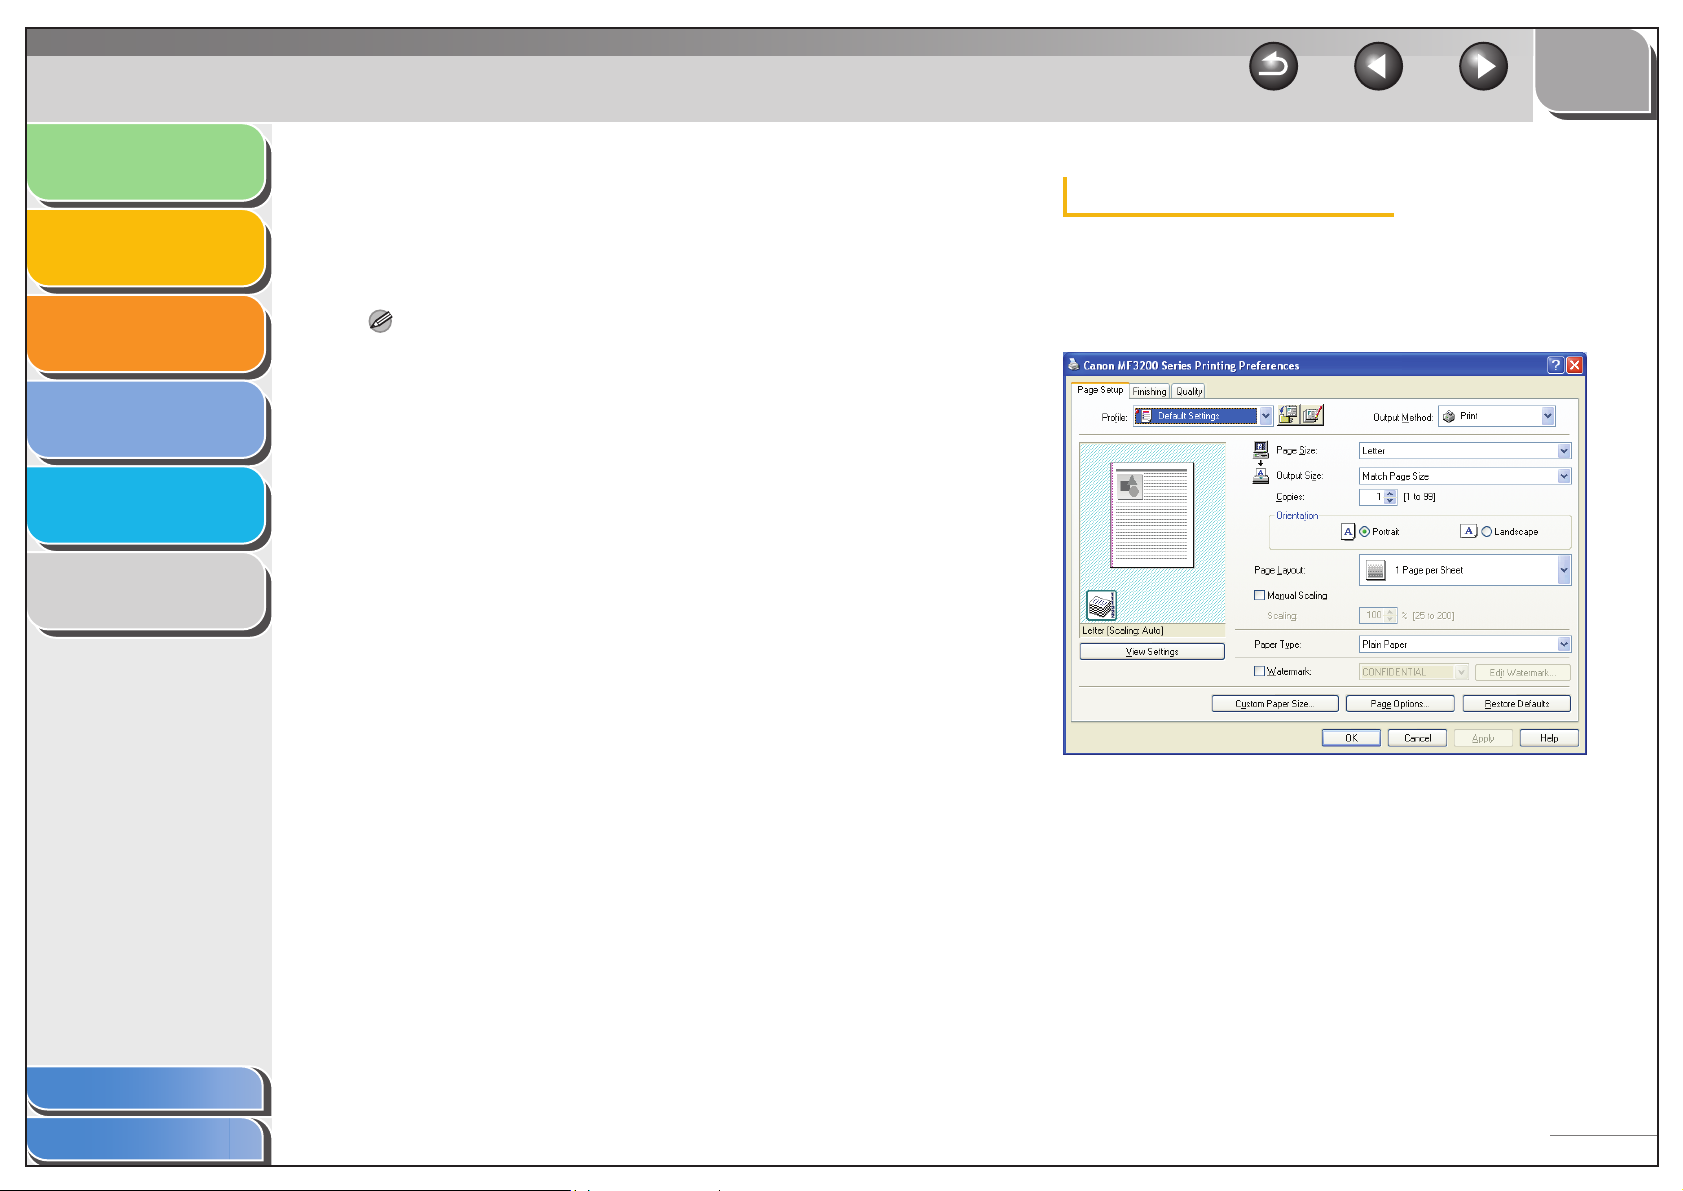
Finishing Tab
Specifies the finishing settings for the printed pages including
the collating and binding.
Quality Tab
Specifies the print quality including resolution, brightness and
contrast.
Table of Contents
Index
2-33
Page 52
Introduction
TOP
Back Previous Next
Printing
Scanning a
Document
PC Faxing
Troubleshooting
Appendix
1
2
3
4
5
6
■ Printing Preferences
The [Canon MF3200 Series Printing Preferences] dialog box
contains three tab sheets that enable you to specify the default
print settings for every print job.
NOTE
– If you access the equivalent dialog box from an application’s [Print]
dialog box, your selected printing options apply to the print jobs that
printed from the application. They will not be stored when you close
the application.
– For more information about the following features, see the online
help. (See “Online Help,” on p. 1-2.)
– The screen shots shown are from Windows XP.
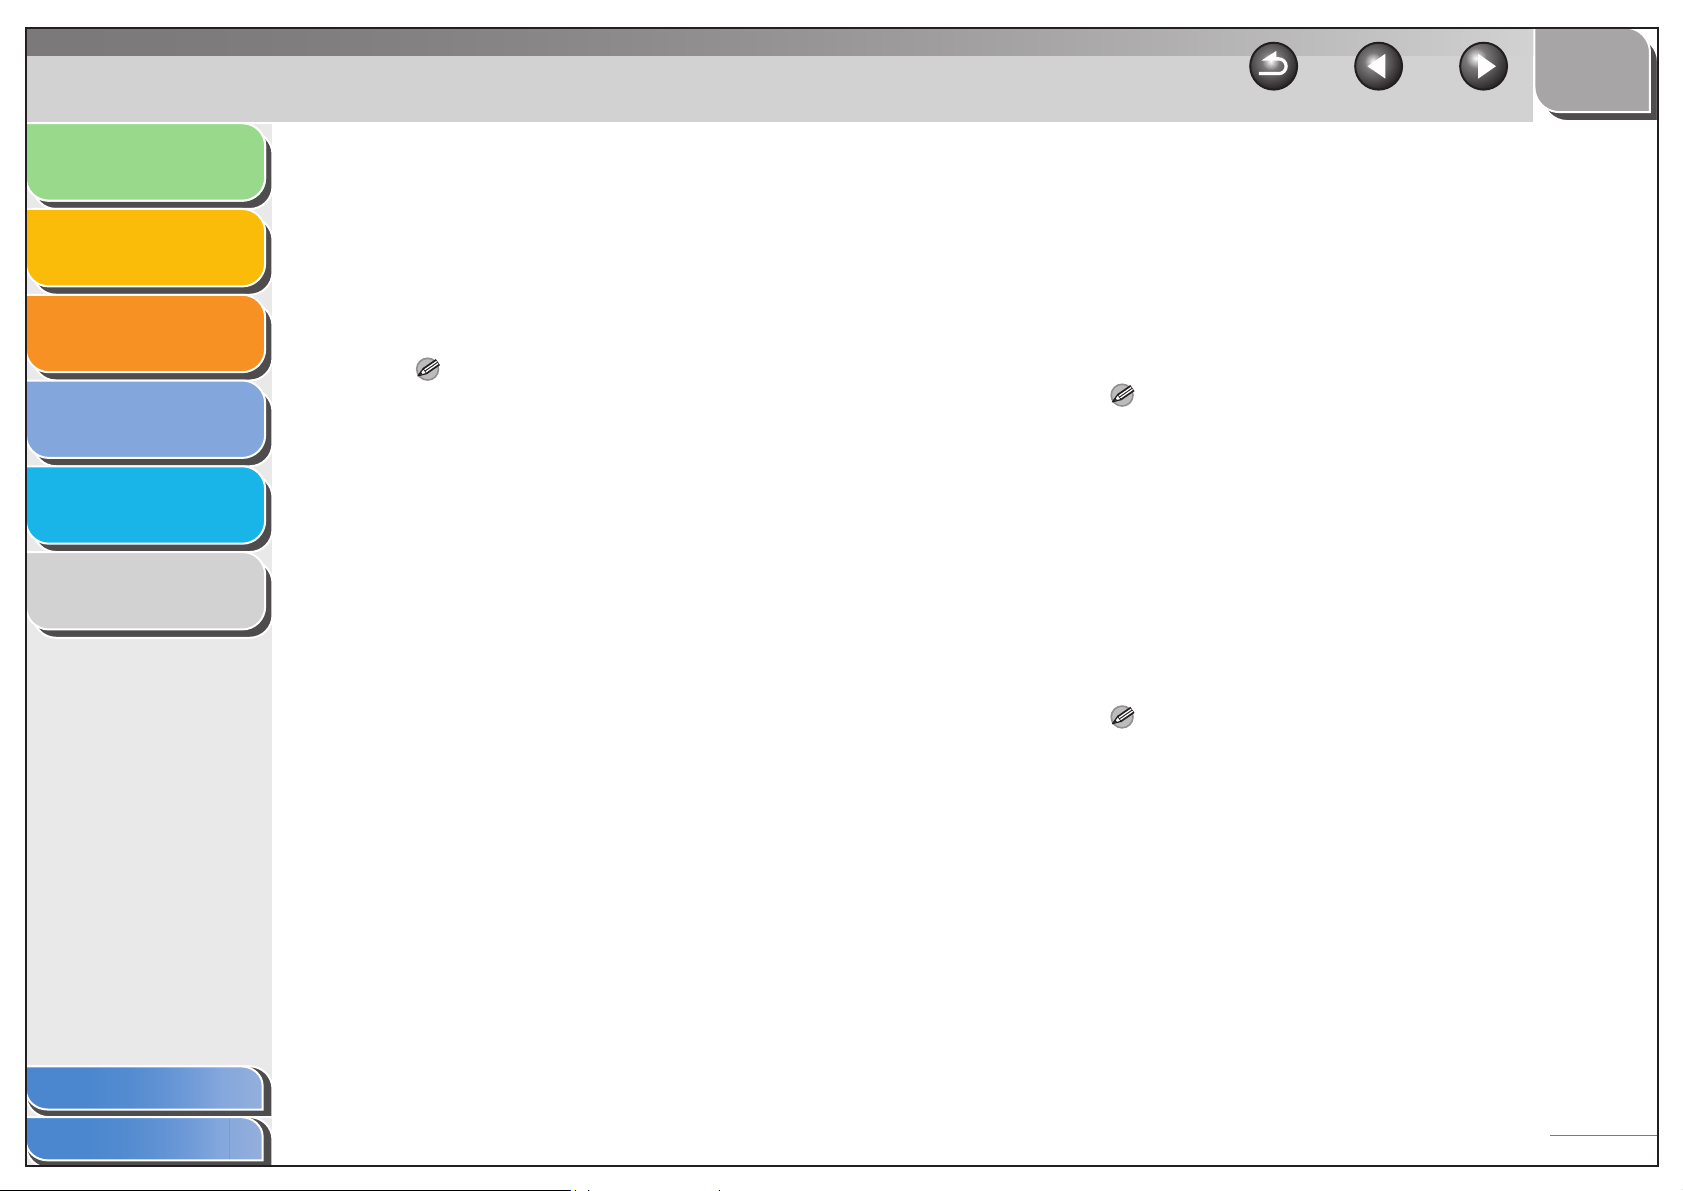
Page Setup Tab
Specifies the page settings including the paper size, scaling,
number of copies, orientation, number of pages per sheet, etc.
For information on [Profile] and [Output Method], see “Profiles,”
on p. 2-48.
Table of Contents
Index
Default settings depend on the country/region of purchase.
Preview image Displays the image with the currently
selected settings reflected. For details on
preview image, see “Preview image,” on
p. 2-49.
[Page Size] Selects the original page size to work with in
an application. If the printer does not have
the paper of your selection, the original
paper size will automatically be reduced to fit
the size of available paper.
2-34
Page 53
Introduction
TOP
Back Previous Next
Printing
Scanning a
Document
PC Faxing
Troubleshooting
Appendix
1
2
3
4
5
6
[Output Size] Selects the output paper size to print on.
When this option is set to anything other
than [Match Page Size], the original page
size is automatically reduced or enlarged to
fit the selected output paper size when
printed.
NOTE
[Custom Paper Size] with the [Custom Paper Size Settings]
option. (See “Custom Paper Size Settings,” on p. 2-39.)
[Copies] Specifies the number of copies to be printed
(1 to 99).
[Orientation] Selects the direction of printing relative to
the paper ([Portrait] or [Landscape]).
[Page Layout] Selects the number (1, 2, 4, 6, 8, 9, or 16) of
original pages per sheet or [Poster] (2 x 2, 3
x 3, or 4 x 4 pages to comprise one sheet).
When this option is set to anything other
than [1 Page per Sheet] and [Poster], the
original page size is reduced to fit the
selected page layout when printed.
NOTE
– When [1 Page per Sheet] is selected, [Manual Scaling]
appears. When this option is set to anything other than [1 Page
per Sheet] or [Poster], [Page Order] appears instead of [Manual
Scaling] in its place.
– When [Poster] is selected, [Manual Scaling], [Watermark] and
[Page Options] are disabled.
[Manual Scaling] Reduces or enlarges the original page size.
Selecting this check box enables the edit box
on the right side to specify the magnification
factor (25 to 200%).
NOTE
Set the enlarge/reduce ratio on the [Print] screen of the
application software. The value set in [Manual Scaling] of the
printer driver applies to all Windows applications.
Table of Contents
Index
2-35
Page 54
Introduction
TOP
Back Previous Next
Printing
Scanning a
Document
PC Faxing
Troubleshooting
Appendix
1
2
3
4
5
6
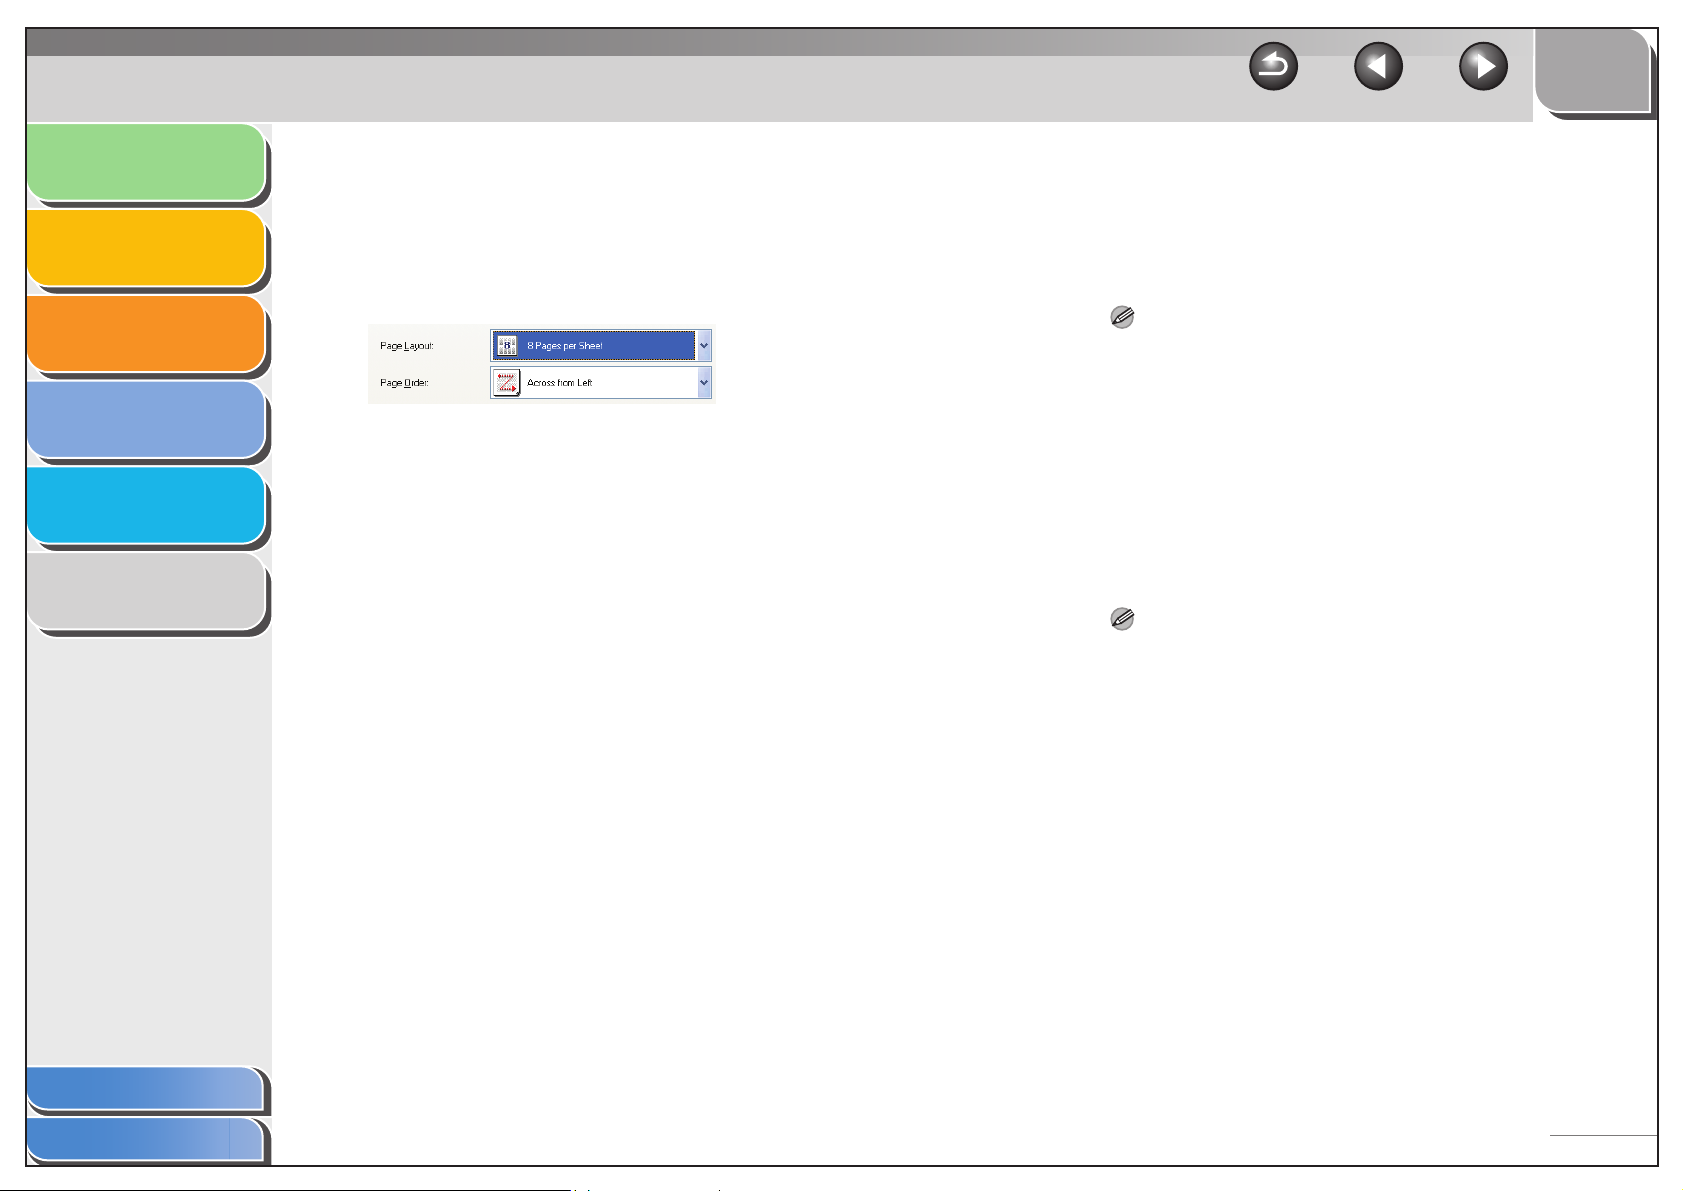
[Page Order] Selects the order in which original pages are
placed on each sheet of the output paper
when more than one page is printed per
sheet.
[Paper Type] Selects the paper type to print.
[Watermark] Inserts the selected watermark to be printed
on each page.
Selecting this check box enables [Edit
Watermark] to add a watermark.
NOTE
This option is disabled when [Page Layout] is set to [Poster].
[Edit Watermark] Click this button to specify detailed
watermark settings. (See “Edit Watermark,”
on p. 2-37.)
[Custom Paper
Size]
NOTE
– You can specify the dimensions for a paper size only in the
[Printer Properties] dialog box ([start] → [Printers and Faxes]
(Windows 2000/Vista: [Printers], Windows 7: [Devices and
Printers]). You cannot specify the dimensions from the
[Document Properties] dialog box (software application).
– Depending on the application you are using, you can specify
the dimensions for a paper size from the [Print] dialog box
accessed from the application. (Only for Windows 2000)
Click this button to specify the dimensions
for a paper size other than the provided
standard paper sizes. (See “Custom Paper
Size Settings,” on p. 2-39.)
Table of Contents
Index
2-36
Page 55
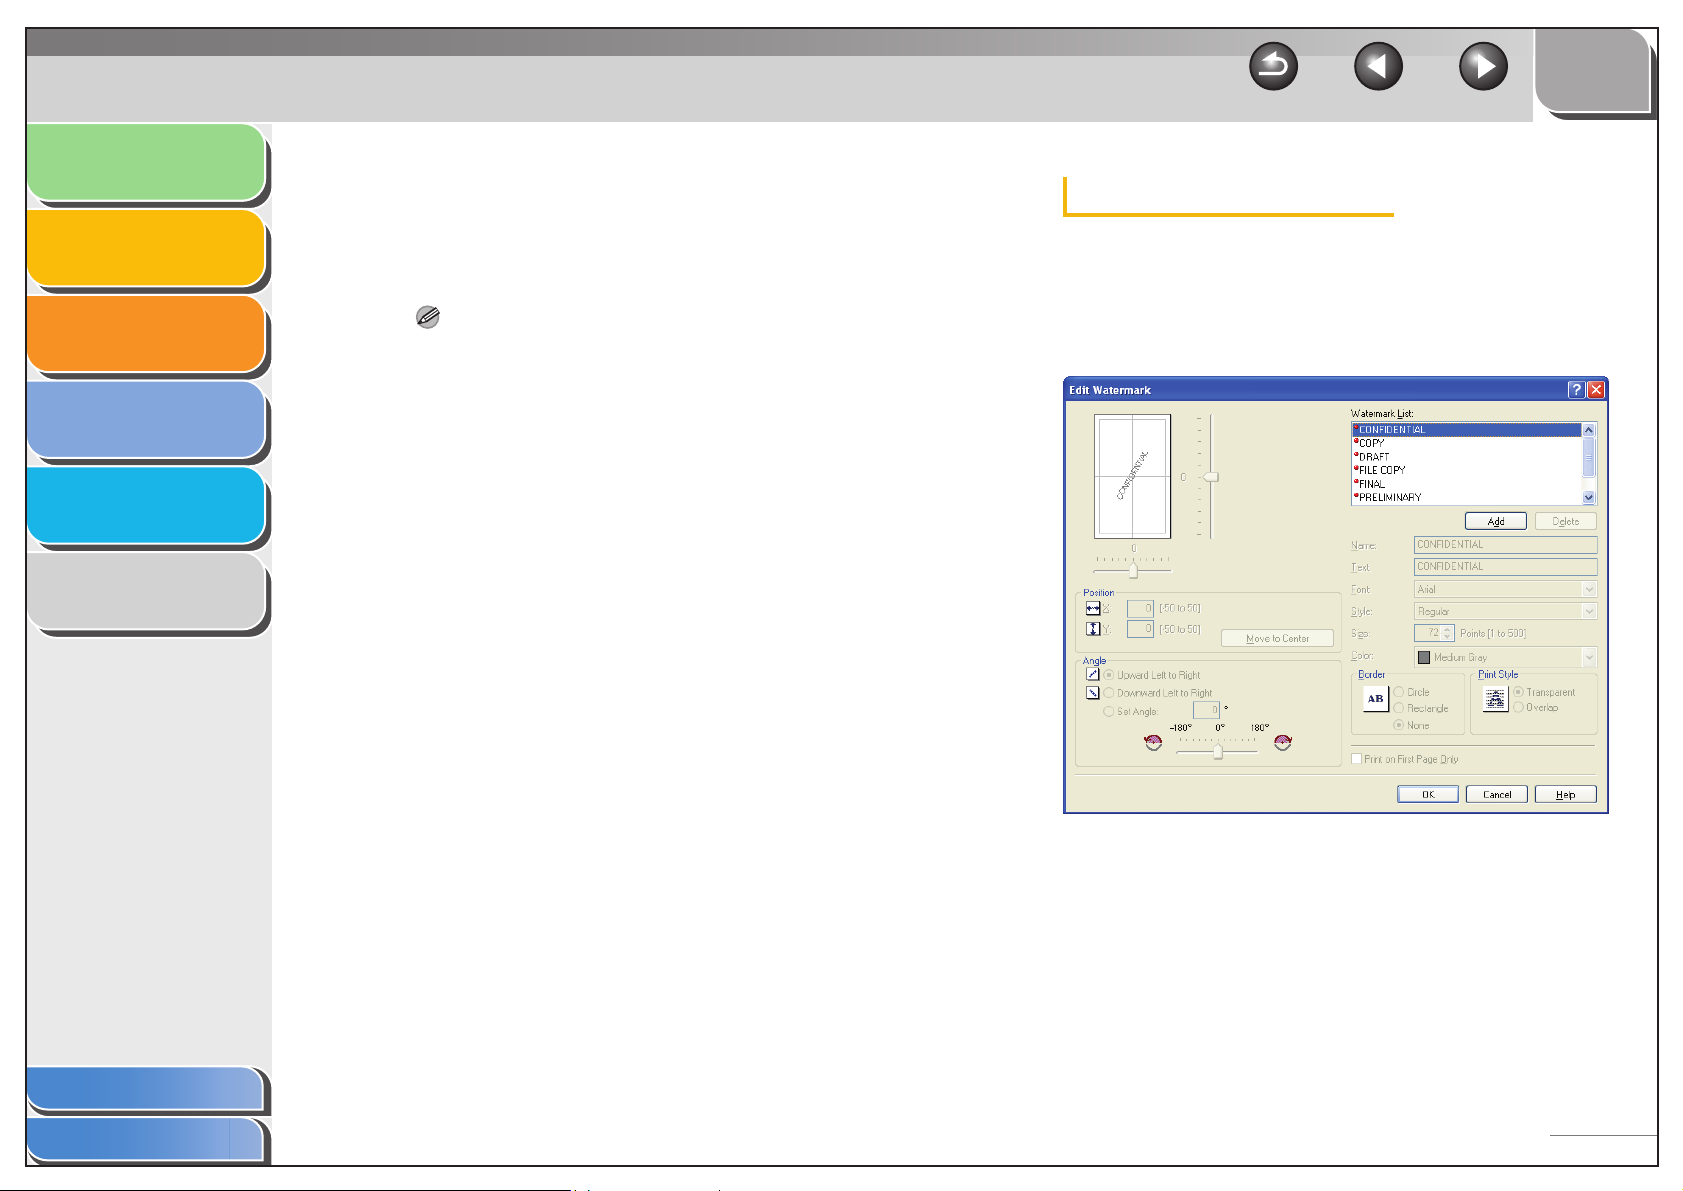
Introduction
TOP
Back Previous Next
Printing
Scanning a
Document
PC Faxing
Troubleshooting
Appendix
1
2
3
4
5
6
[Page Options] Click this button to select options for printing
dates, user name, page numbers, and
borders, etc. (See “Page Options,” on
p. 2-41.)
NOTE
This option is disabled when [Page Layout] is set to [Poster].
[Restore Defaults] Resets all the current settings to their default
values.
[View Settings] Click this button to display the [View
Settings] dialog box. This dialog box allows
you to view and confirm all of the current
page settings in a listed form. (See “View
Settings,” on p. 2-53.)
Edit Watermark
Clicking [Edit Watermark] in the [Page Setup] tab sheet opens
the [Edit Watermark] dialog box. This dialog box enables you to
insert a text string as a watermark onto pages. This option is
enabled only when the [Watermark] check box is selected in the
[Page Setup] tab sheet.
Table of Contents
Index
2-37
Page 56
Introduction
TOP
Back Previous Next
Printing
Scanning a
Document
PC Faxing
Troubleshooting
Appendix
1
2
3
4
5
6
[Watermark List] Displays the names of registered
watermarks. The preview image in the upper
left part of the dialog box displays the
selected watermark with the specified
settings reflected.
[Add] Registers a new watermark. Clicking this
button adds a blank name field in
[Watermark List] in which you enter the
name of watermark to be registered. Up to
50 watermarks can be registered.
[Delete] Removes the selected watermark from
[Watermark List].
NOTE
You cannot delete a pre-defined watermark or a watermark
currently selected in the [Page Setup] tab.
[Position] Specifies the position where the watermark
is printed on each page. You can enter the
values in the [X] and [Y] edit boxes (in a
range from –50 to 50), or use the X and Y
slide bars to move the position.
[Angle] Sets the angle of watermark ([Upward Left
to Right], [Downward Left to Right], or [Set
Angle]). You can select the corresponding
radio button, or use the slide bar to move the
angle, or enter a desired value in the [Set
Angle] edit box.
[Name] Displays and allows you to change the name
of the currently selected watermark.
[Text] Displays and allows you to change the text
string of the currently selected watermark.
[Font] Selects the font type of the watermark.
[Style] Selects the font style of the watermark.
Available styles are [Regular], [Italic], [Bold]
and [Bold Italic].
[Size] Specifies the font size of the watermark (1 to
500).
[Color] Selects the font color of the watermark.
Table of Contents
Index
[Move to Center] Relocates the watermark to the center of the
page.
2-38
Page 57
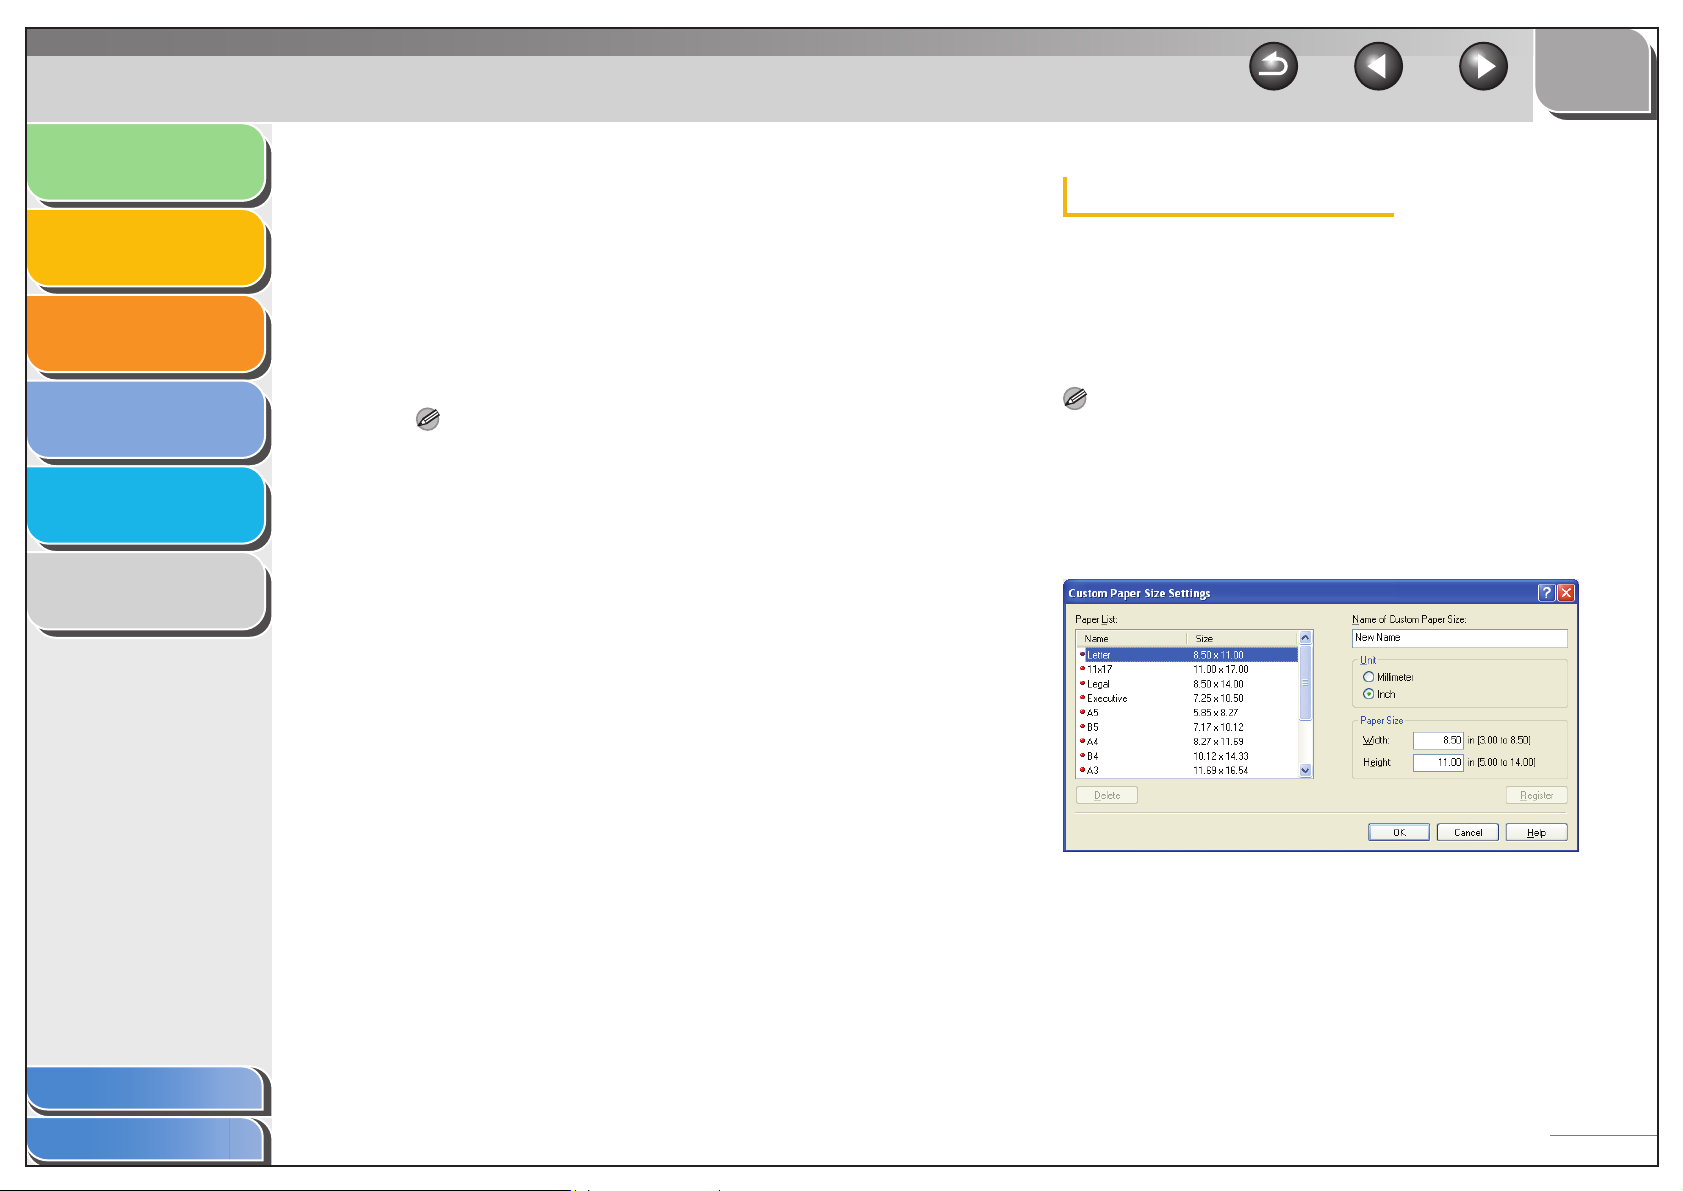
Introduction
TOP
Back Previous Next
Printing
Scanning a
Document
PC Faxing
Troubleshooting
Appendix
1
2
3
4
5
6
[Border] Adds the frame to the watermark. You can
select the frame type ([Circle], [Rectangle],
or [None]).
[Print Style] Selects the type of watermark ([Transparent]
or [Overlap]).
[Print on First
Page Only]
NOTE
You cannot edit pre-defined watermarks.
Prints the selected watermark only on the
first page of the document.
Custom Paper Size Settings
Clicking [Custom Paper Size] in the [Page Setup] tab sheet
opens the [Custom Paper Size Settings] dialog box. This dialog
box enables you to define custom paper sizes for quick selection
and register new custom paper sizes to the [Paper List] box. You
can specify the name, width, and height of each size.
NOTE
– This setting is available only when you open the [Canon MF3200
Series Printing Preferences] dialog box from the [Printers and Faxes]
(Windows 98/Me/2000/Vista: [Printers], Windows 7: [Devices and
Printers]) folder.
– Depending on the application you are using, you can specify the
dimensions for a paper size from the [Print] dialog box accessed from
the application. (Only for Windows 2000)
Table of Contents
Index
2-39
Page 58
Introduction
TOP
Back Previous Next
Printing
Scanning a
Document
PC Faxing
Troubleshooting
Appendix
1
2
3
4
5
6
[Paper List] Displays the paper sizes actually available.
Selects a paper size from which you can
create a custom paper size.
NOTE
– You can share the custom paper sizes with all printers
connected to your computer.
– To print across the longer axis of the page, set [Orientation] to
[Landscape].
[Name of Custom
Paper Size]
[Unit] Selects the unit of measurement of paper
[Paper Size] Specifies the width and height of the custom
NOTE
Be sure that [Width] does not exceed [Height] when specifying
the values.
Specifies the name of custom paper.
size ([Millimeter] or [Inch]).
paper.
[Register] Registers the custom paper and adds its
name to [Paper List].
NOTE
To register a new custom paper size, be sure to log on as a
member of Administrators or Power User (Windows 2000 only).
To change the paper size for the existing custom paper size, be
sure to log on as a member of Administrators.
[Delete] Removes the selected custom paper from
[Paper List].
NOTE
– You cannot delete a pre-defined paper size or a paper size
currently selected in the [Page Setup] tab.
– To delete a registered custom paper size, be sure to log on as a
member of Administrators.
Table of Contents
Index
2-40
Page 59
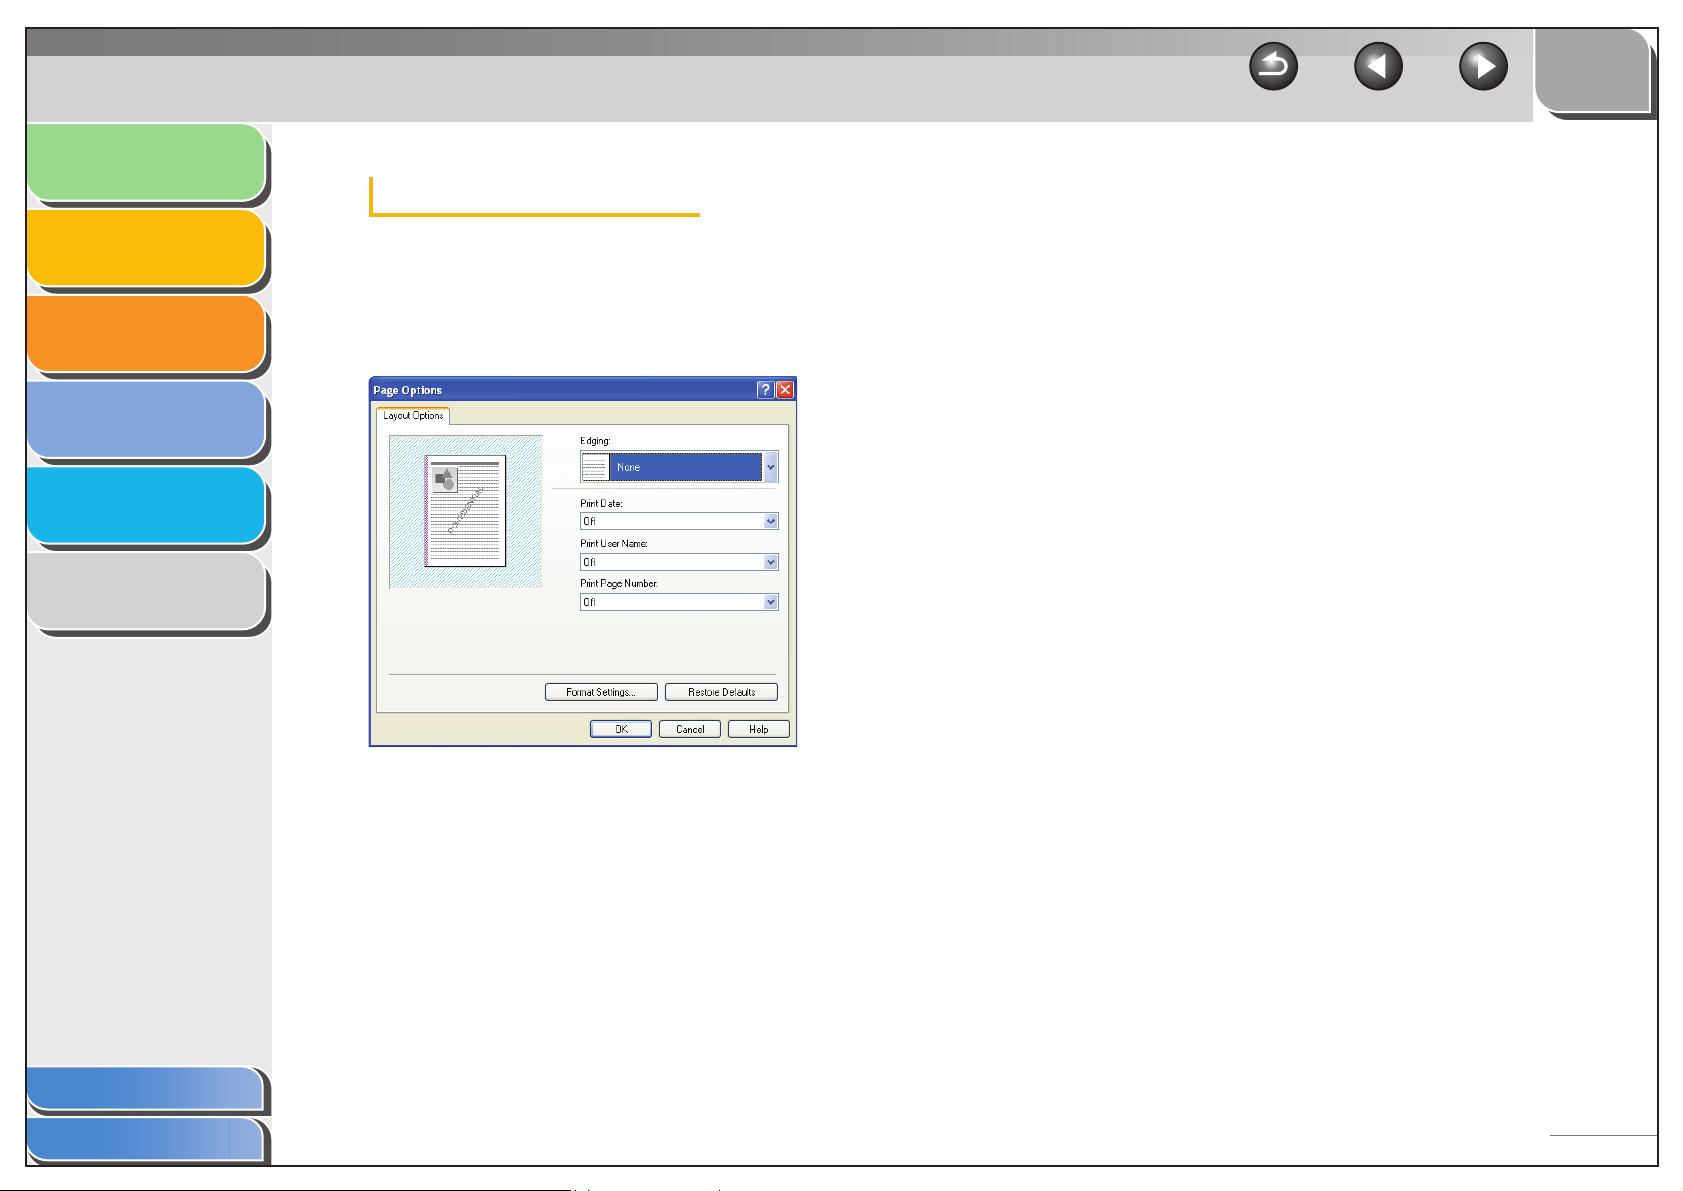
Introduction
TOP
Back Previous Next
Printing
Scanning a
Document
PC Faxing
Troubleshooting
Appendix
1
2
3
4
5
6
Page Options
Clicking [Page Options] in the [Page Setup] tab sheet opens the
[Page Options] dialog box. This dialog box enables you to print
pages with a page frame, header, and footer. This option is
disabled when [Page Layout] in the [Page Setup] tab sheet is set
to [Poster].
[Edging] Adds a page frame to be printed on each
page. 11 options are available. Edging is not
available to use with [Print Grayscale
Sample] in the [Quality] tab sheet. (See
“Quality Tab,” on p. 2-43.)
[Print Date] Selects if the date is printed on each page or
not. Six positions to print the date are
available.
[Print User Name] Selects if the user name is printed on each
page or not. Six positions to print the user
name are available.
[Print Page
Number]
[Format Settings] Click this button to display the [Format
[Restore Defaults] Resets all the current settings to their default
Selects if the page number is printed on
each page or not. Six positions to print the
page number are available.
Settings] dialog box. This dialog box allows
you to set the default font type, style, size,
and color, or reset to the factory default font
settings.
values.
Table of Contents
Index
2-41
Page 60
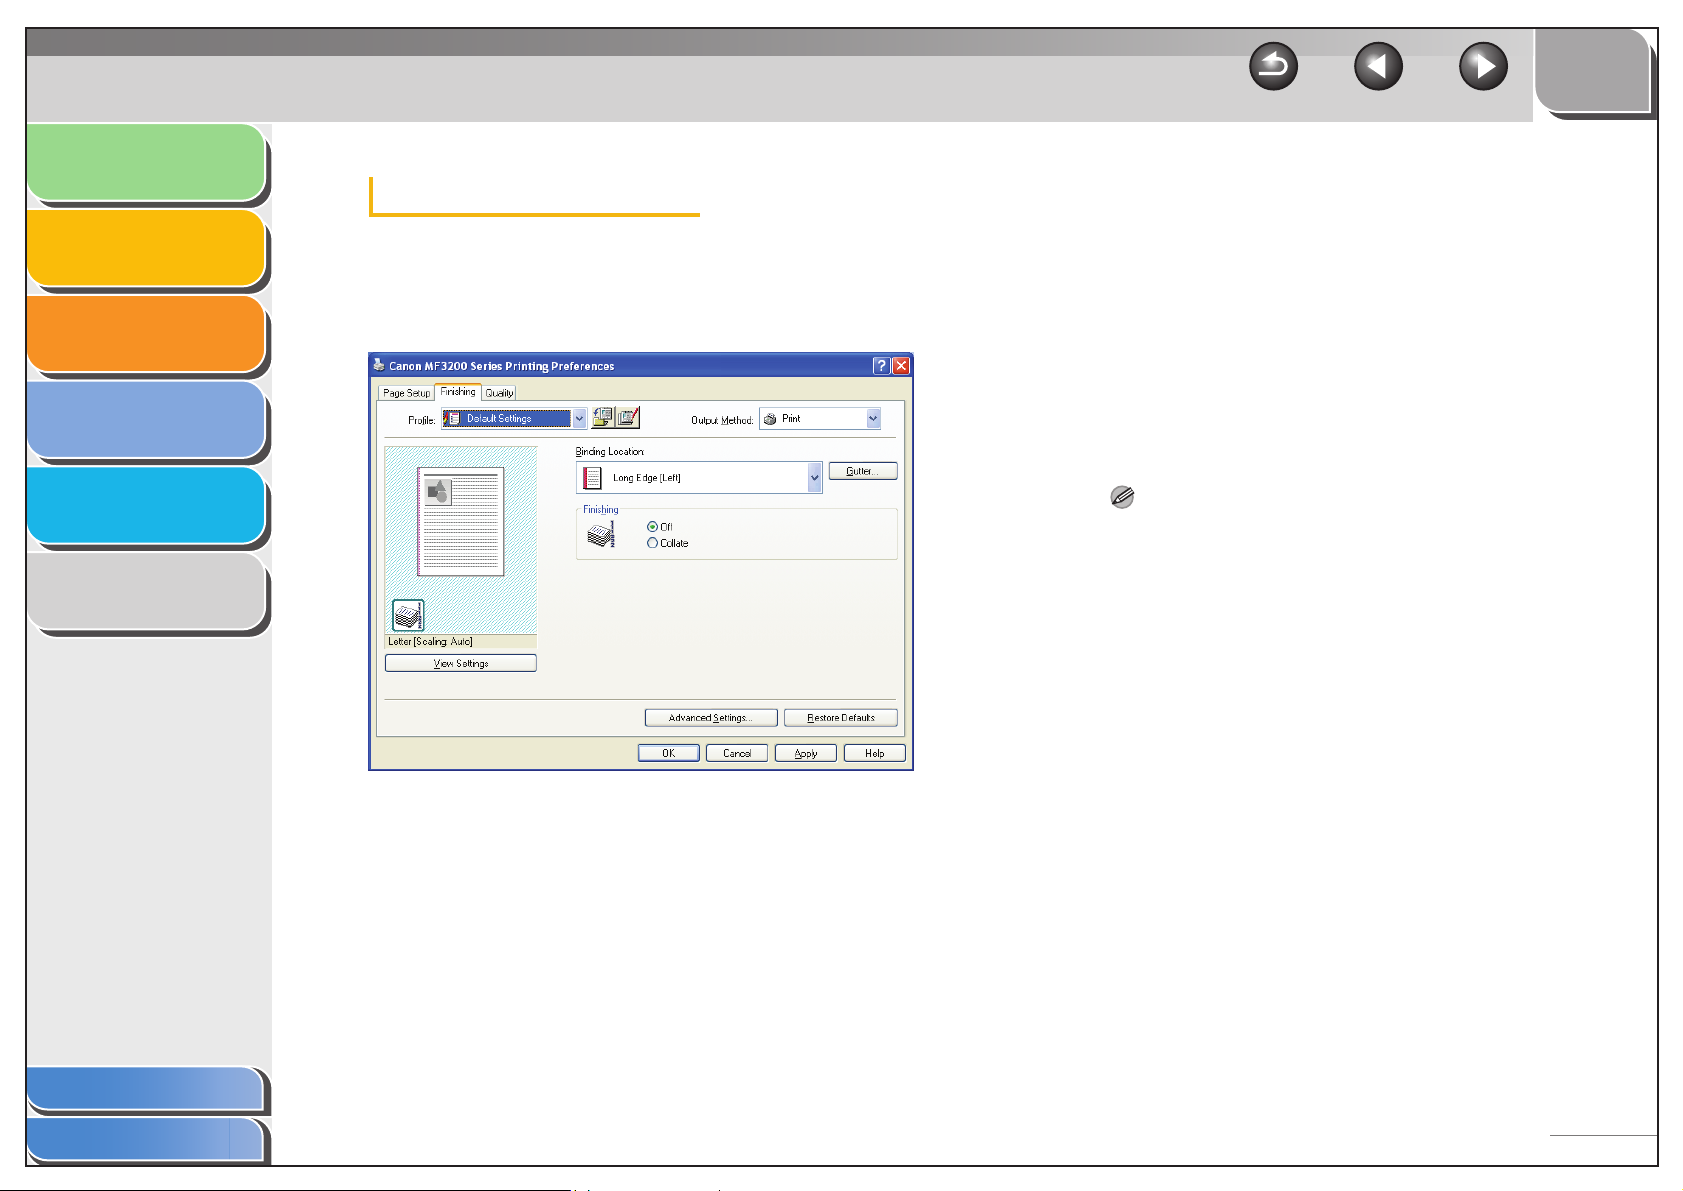
Introduction
TOP
Back Previous Next
Printing
Scanning a
Document
PC Faxing
Troubleshooting
Appendix
1
2
3
4
5
6
Finishing Tab
Specifies the finishing settings for the printed pages including
the collating and binding.
For information on [Profile] and [Output Method], see “Profiles,”
on p. 2-48.
[Binding Location] Selects a binding location for the printed
pages.
[Gutter] Click this button to set the gutter width for
binding a printed document. (See “Gutter
Settings,” on p. 2-43.)
[Finishing] Select the Collate option to print a document
in correct binding order. For example, when
printing multiple copies of a 3-page
document, the print order is 1, 2, 3, 1, 2, 3,
and so on ([Off] or [Collate]).
NOTE
If you select [Collate] in [Finishing], the image on the left bottom
of the preview image will change.
[Advanced
Settings]
[Restore Defaults] Resets all the current settings to their default
Click this button to display [Advanced
Settings] dialog box for specifying the
finishing details. (See “Advanced Settings,”
on p. 2-43.)
values.
Table of Contents
Index
Preview image Displays the image with the currently
selected settings reflected. For details on
preview image, see “Preview image,” on
p. 2-49.
[View Settings] Click this button to display the [View
Settings] dialog box. This dialog box allows
you to view and confirm all of the current
page settings in a listed form. (See “View
Settings,” on p. 2-53.)
2-42
Page 61
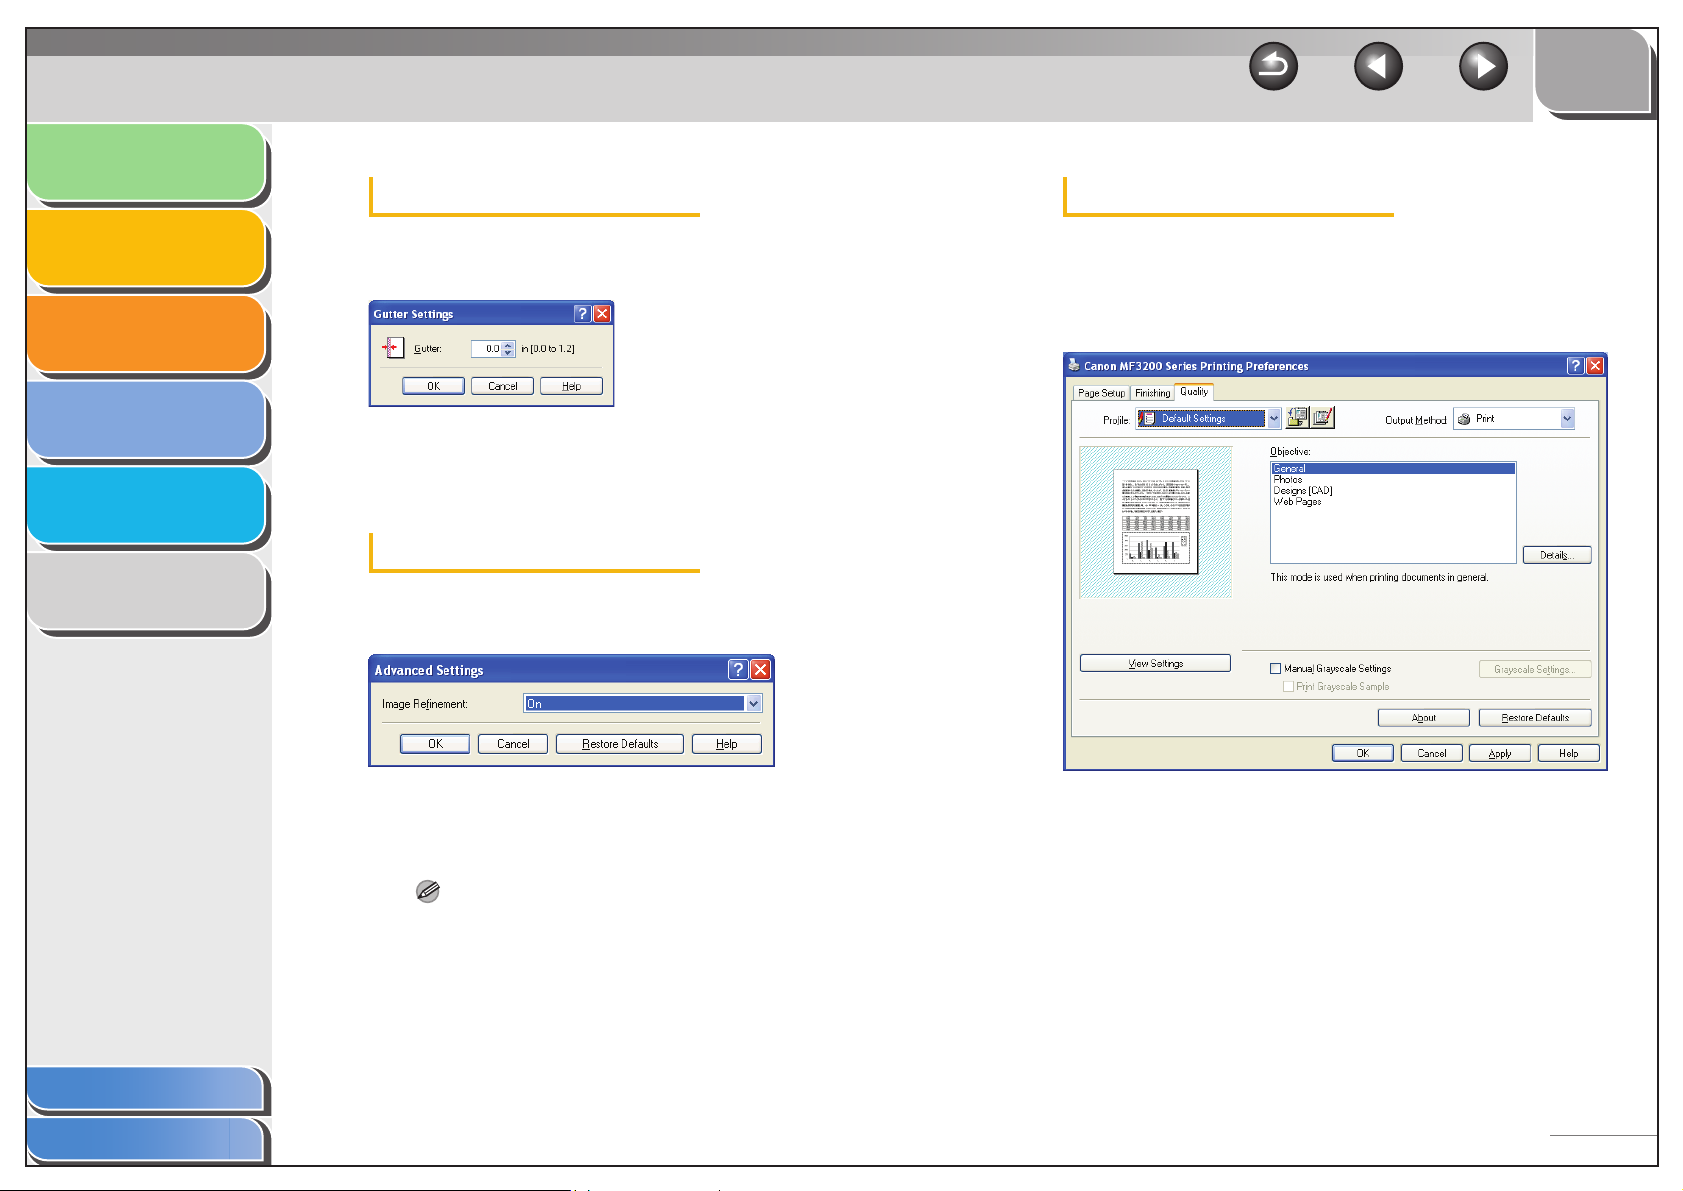
Introduction
TOP
Back Previous Next
Printing
Scanning a
Document
PC Faxing
Troubleshooting
Appendix
1
2
3
4
5
6
Gutter Settings
Clicking [Gutter] in the [Finishing] tab sheets opens the [Gutter
Settings] dialog box.
[Gutter] Specifies the gutter width in a range from 0.0
to 1 1/4 in. (0 to 30 mm).
Advanced Settings
Clicking [Advanced Settings] in the [Finishing] tab sheet opens
the [Advanced Settings] dialog box.
Quality Tab
Specifies the settings for print quality including the resolution
and contrast.
For information on [Profile] and [Output Method], see “Profiles,”
on p. 2-48.
Table of Contents
Index
[Image
Refinement]
NOTE
If the [Resolution] in the [Detailed Settings] dialog box is set to
[300 dpi], a document is always printed with Super Smooting
function.
[Restore Defaults] Resets all the current settings to their default
Sets the Super Smoothing function of the
printer.
values.
2-43
Page 62
Introduction
TOP
Back Previous Next
Printing
Scanning a
Document
PC Faxing
Troubleshooting
Appendix
1
2
3
4
5
6
[Objective] Selects the best setting for the print job
according to document content.
[Details] Click this button to open the [Detailed
Settings] dialog box and make print quality
settings. (See “Detailed Settings,” on
p. 2-45.)
[Manual Grayscale
Settings]
[Print Grayscale
Sample]
NOTE
This option is enabled only when [Manual Grayscale Settings] is
selected.
Enables the manual grayscale. Selecting this
check box enables [Grayscale Settings] to
access the dialog box which allows you to
set the grayscale for images. (See
“Grayscale Settings,” on p. 2-46.)
Prints nine thumbnails per sheet to provide
the print samples with the current grayscale
settings when printing the document.
[Grayscale
Settings]
NOTE
This option is enabled only when [Manual Grayscale Settings] is
selected.
[View Settings] Click this button to display the [View
[About] Displays the version information on the
[Restore Defaults] Resets all the current settings to their default
Click this button after selecting the [Manual
Grayscale Settings] check box to manually
adjust the grayscale settings. The [Grayscale
Settings] dialog box allows you to specify
Brightness, Contrast, and Matching Mode.
(See “Grayscale Settings,” on p. 2-46.)
Settings] dialog box. This dialog box allows
you to view and confirm all of the current
page settings in a listed form. (See “View
Settings,” on p. 2-53.)
driver.
values.
Table of Contents
Index
2-44
Page 63
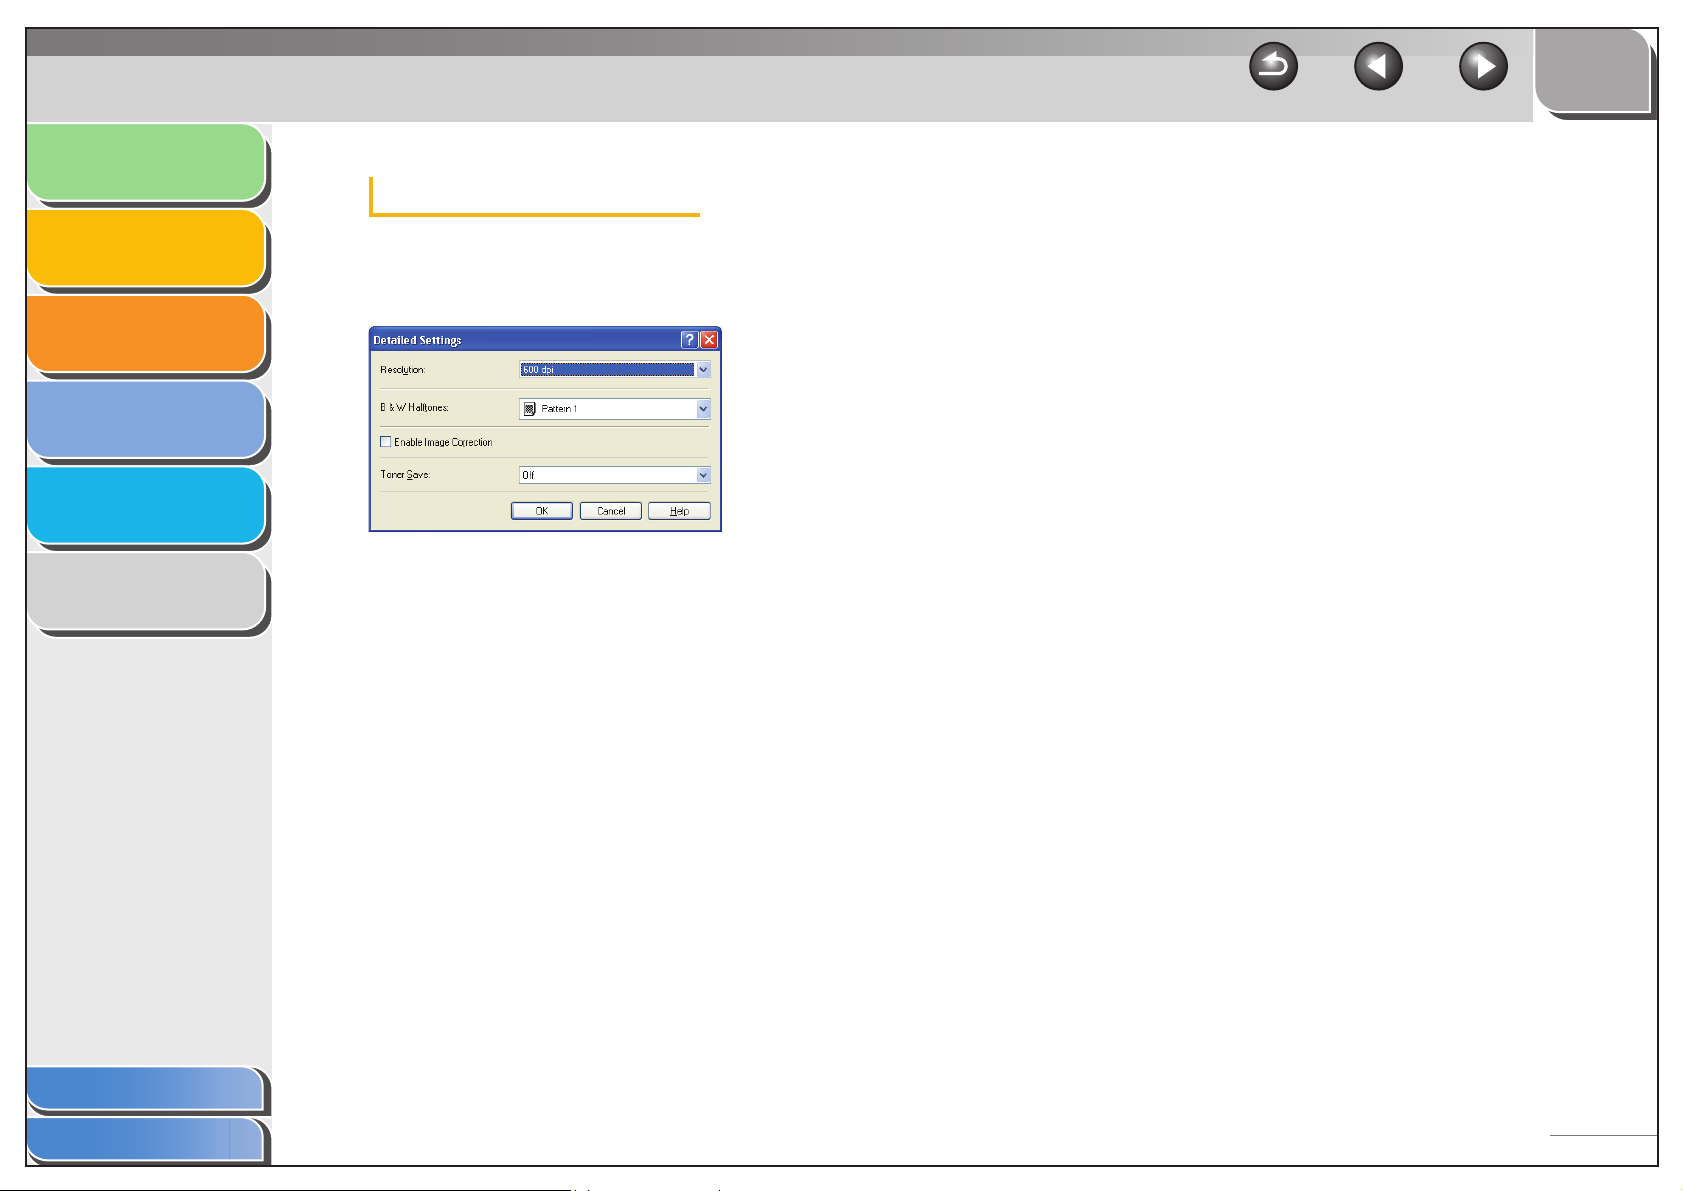
Introduction
TOP
Back Previous Next
Printing
Scanning a
Document
PC Faxing
Troubleshooting
Appendix
1
2
3
4
5
6
Detailed Settings
Clicking [Details] in the [Quality] tab sheet opens the [Detailed
Settings] dialog box. This dialog box enables you to specify
detailed settings for print quality.
[Resolution] Selects the printer’s resolution in dot per
inch (600 dpi or 300 dpi).
[B & W Halftones] Specifies the use of dithering for printing
halftone data.
Pattern1:
Applies dither pattern of high-quality
gradient for printing graphics and graphs
with gradation.
Pattern2:
Applies dither pattern of high-quality tone
with sharpness and stability for printing
image data such as pictures.
Pattern3:
Applies dither pattern of sensitive and
clearcut for printing documents including
with lines and figures.
None [Solid]:
Prints all colors in black except for white.
Table of Contents
Index
2-45
Page 64
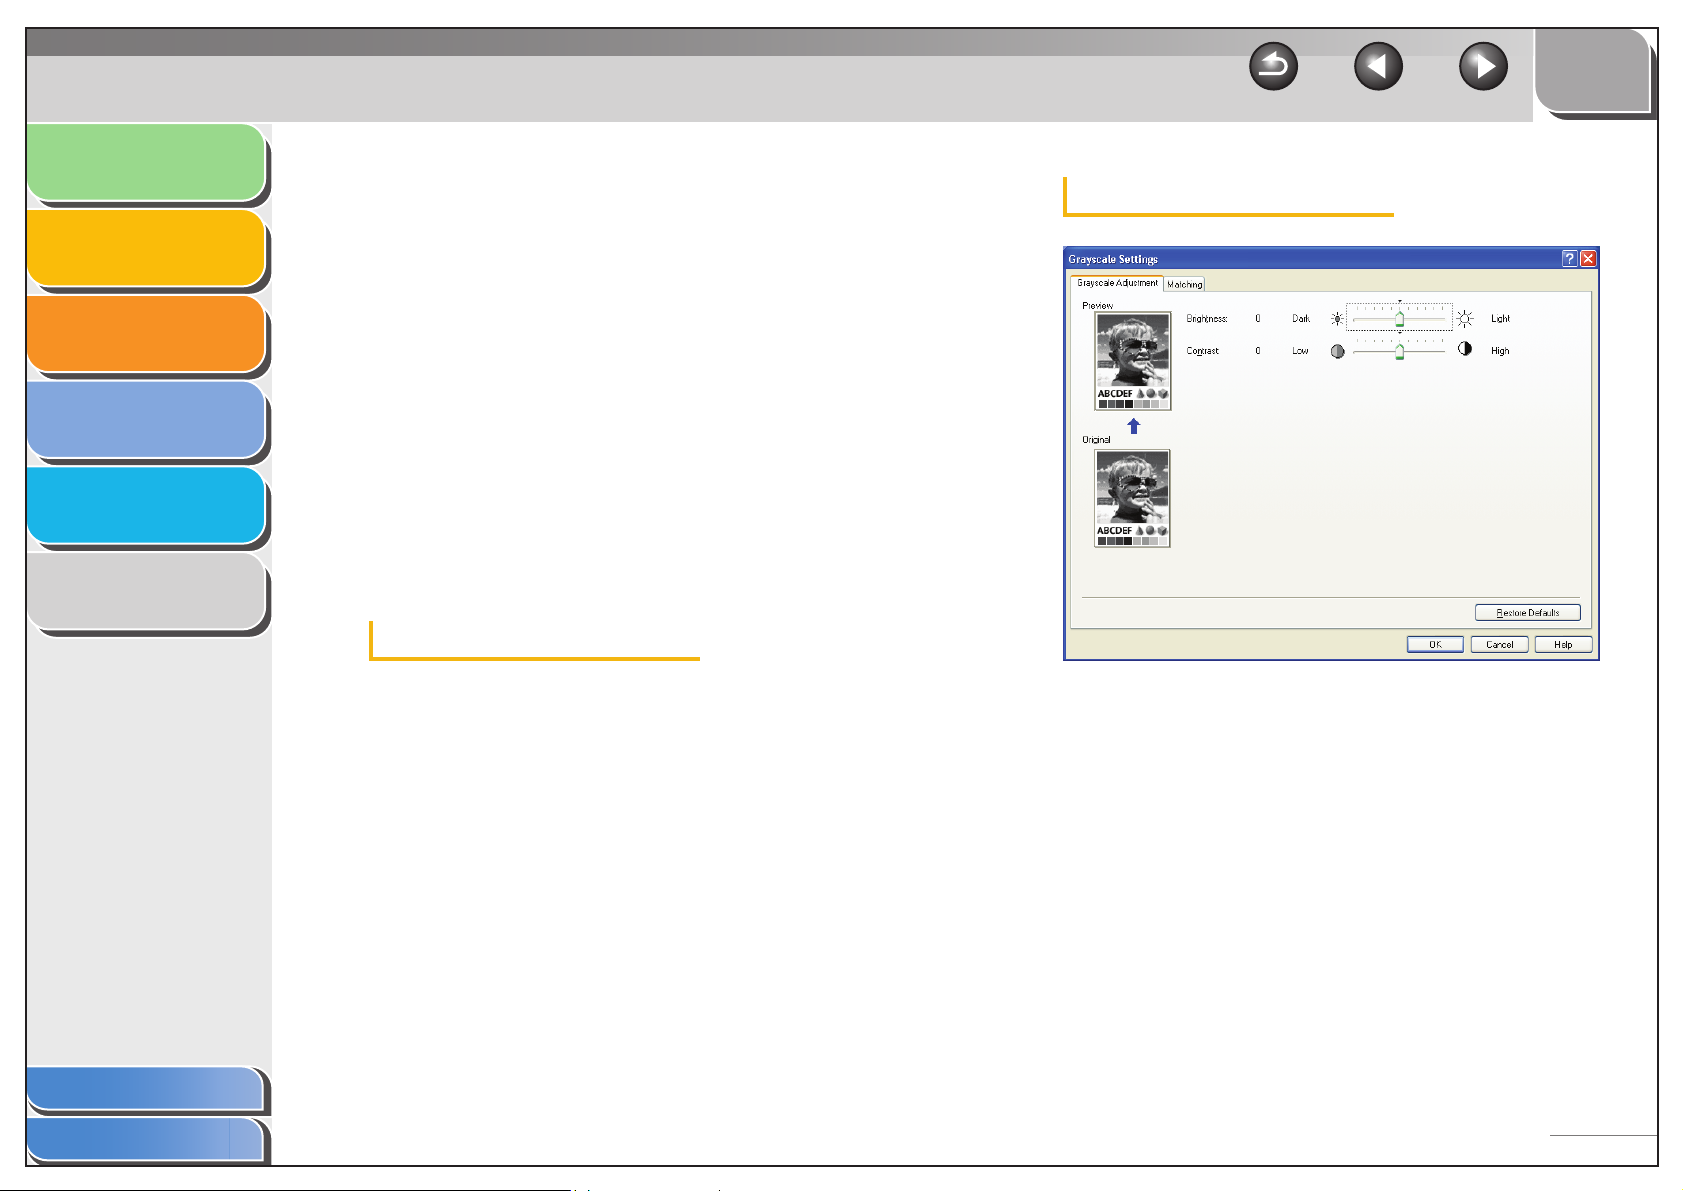
Introduction
TOP
Back Previous Next
Printing
Scanning a
Document
PC Faxing
Troubleshooting
Appendix
1
2
3
4
5
6
[Enable Image
Correction]
[Toner Save] Modifies print data to print lighter and
Grayscale Settings
Clicking [Grayscale Settings] in the [Quality] tab sheet opens the
[Grayscale Settings] dialog box. This dialog box enables you to
control the brightness and contrast of images. This function is
enabled only when [Manual Grayscale Settings] is selected in
the [Quality] tab sheet. (See “Quality Tab,” on p. 2-43.) Two tab
sheets are provided in this dialog box.
Select [Enable Image Correction] to smooth
out the streaking and coarse features that
tend to occur when printing enlarged image
files and photographs using a software
application.
conserve toner.
Printer Default:
Prints using the settings in the operation
panel of the printer.
Off:
Prints using normal density.
On:
Prints text lighter in printouts for
proofreading and checking.
Grayscale Adjustment Tab
[Preview] Displays the image with the currently
selected brightness and contrast reflected.
[Original] Displays the original image.
[Brightness] Adjusts the brightness of the preview image
in the range from –5 to 5.
Table of Contents
Index
[Contrast] Adjusts the contrast of the preview image in
the range from –5 to 5.
[Restore Defaults] Resets all the current settings to their default
values.
2-46
Page 65
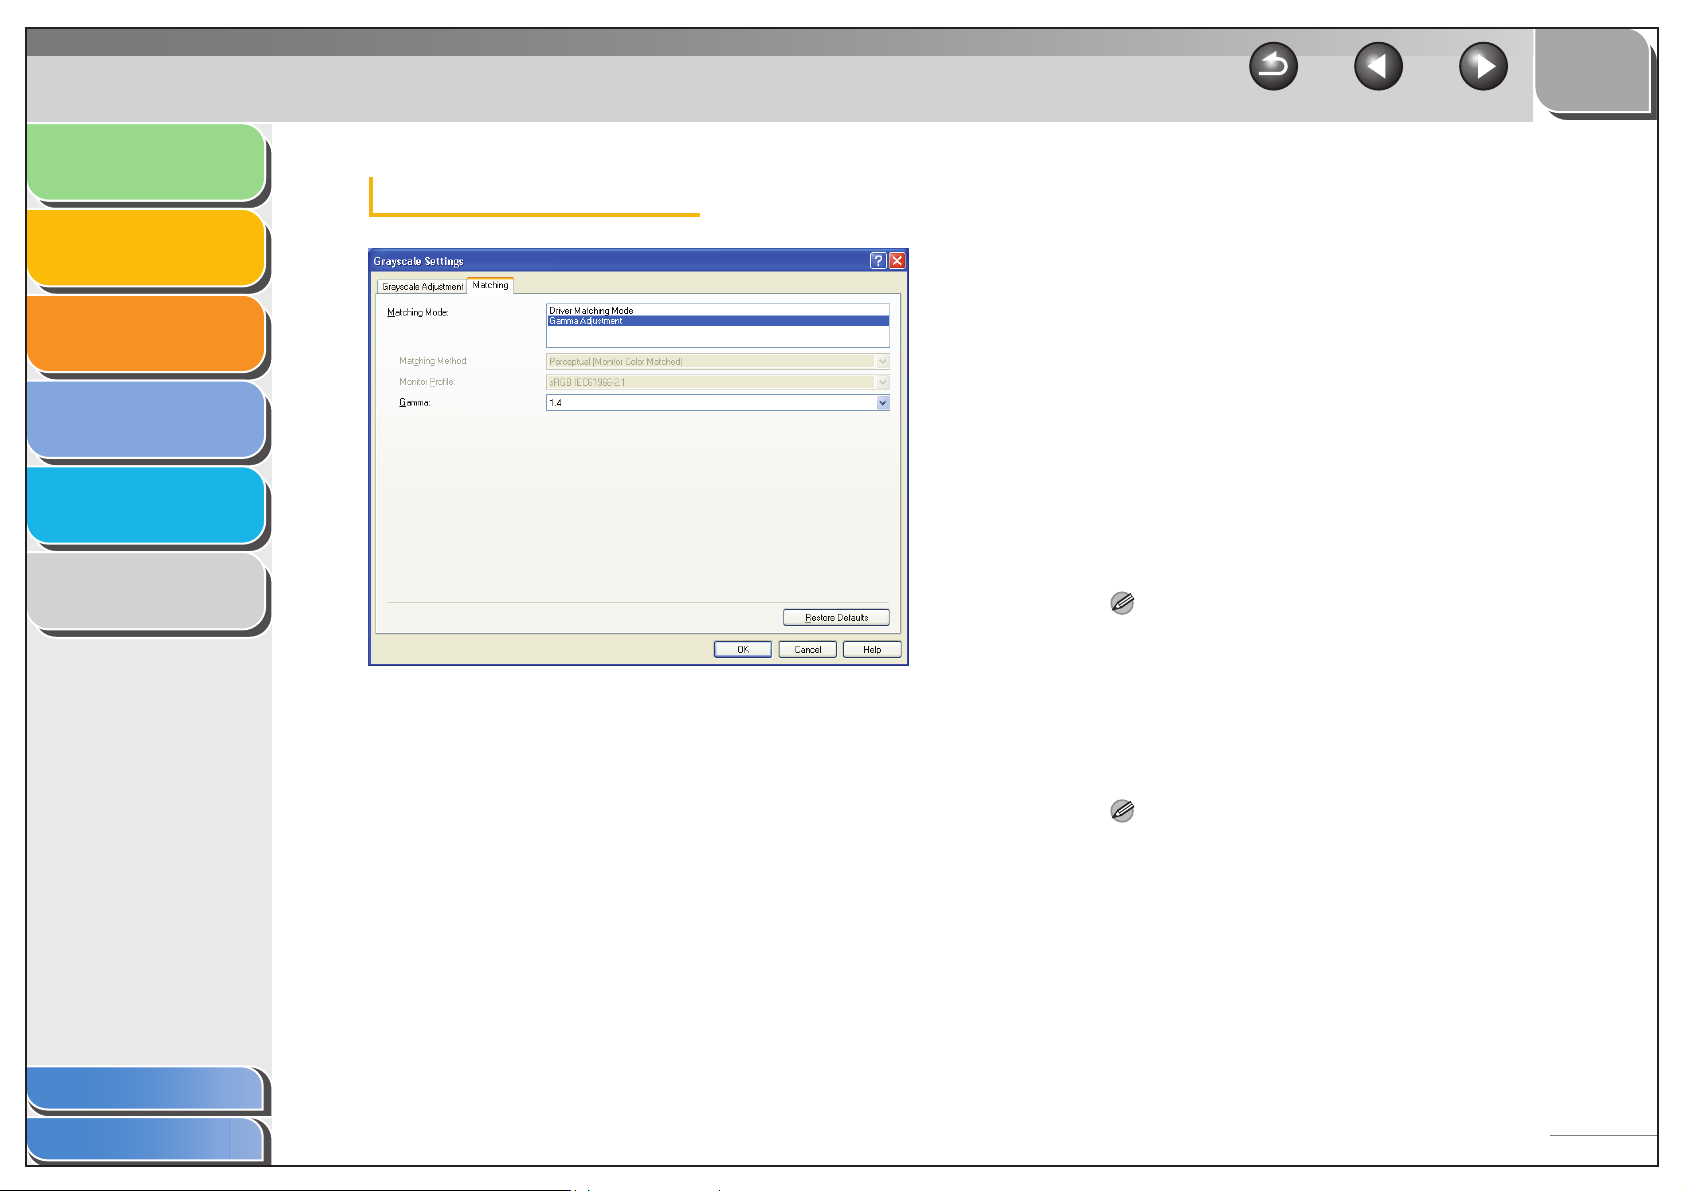
Introduction
TOP
Back Previous Next
Printing
Scanning a
Document
PC Faxing
Troubleshooting
Appendix
Table of Contents
1
2
3
4
5
6
Matching Tab
[Matching Mode] Specifies the procedure for color correction.
Driver Matching Mode:
Processes color in the printer driver. The
settings specified in [Matching Method] and
[Monitor Profile] will be enabled.
Gamma Adjustment:
Performs gamma adjustment with the
gamma correction value specified in the
[Gamma] box.
[Matching Method] Specifies the matching method by assigning
highest priority when the [Driver Matching
Mode] is selected in the [Matching Mode]
box.
Perceptual [Monitor Color Matched]:
Gives priority to matching the hue of the
color on the monitor with the color of the
printed output.
Colorimetric:
Gives priority to reducing the color difference
between the original document on the
screen (a logo, for example) and the printed
output.
Saturation:
Gives priority to vividness in matching.
NOTE
This option can be selected only when [Driver Matching Mode] is
selected for [Matching Mode].
[Monitor Profile] Specifies the setting suitable for your monitor
when the [Driver Matching Mode] is selected
in the [Matching Mode] box.
NOTE
– This option can be selected only when [Driver Matching Mode]
is selected for [Matching Mode].
– In the case where several gamma values are provided for one
option, select the higher gamma value to obtain better results if
the printed image is lighter than that of the monitor.
If the monitor is set to a custom setting, it is difficult to produce
printed output similar to the color of the monitor when
performing matching.
– If the monitor is set to a custom setting, it is difficult to produce
printed output similar to the color of the monitor when
performing matching.
Index
2-47
Page 66
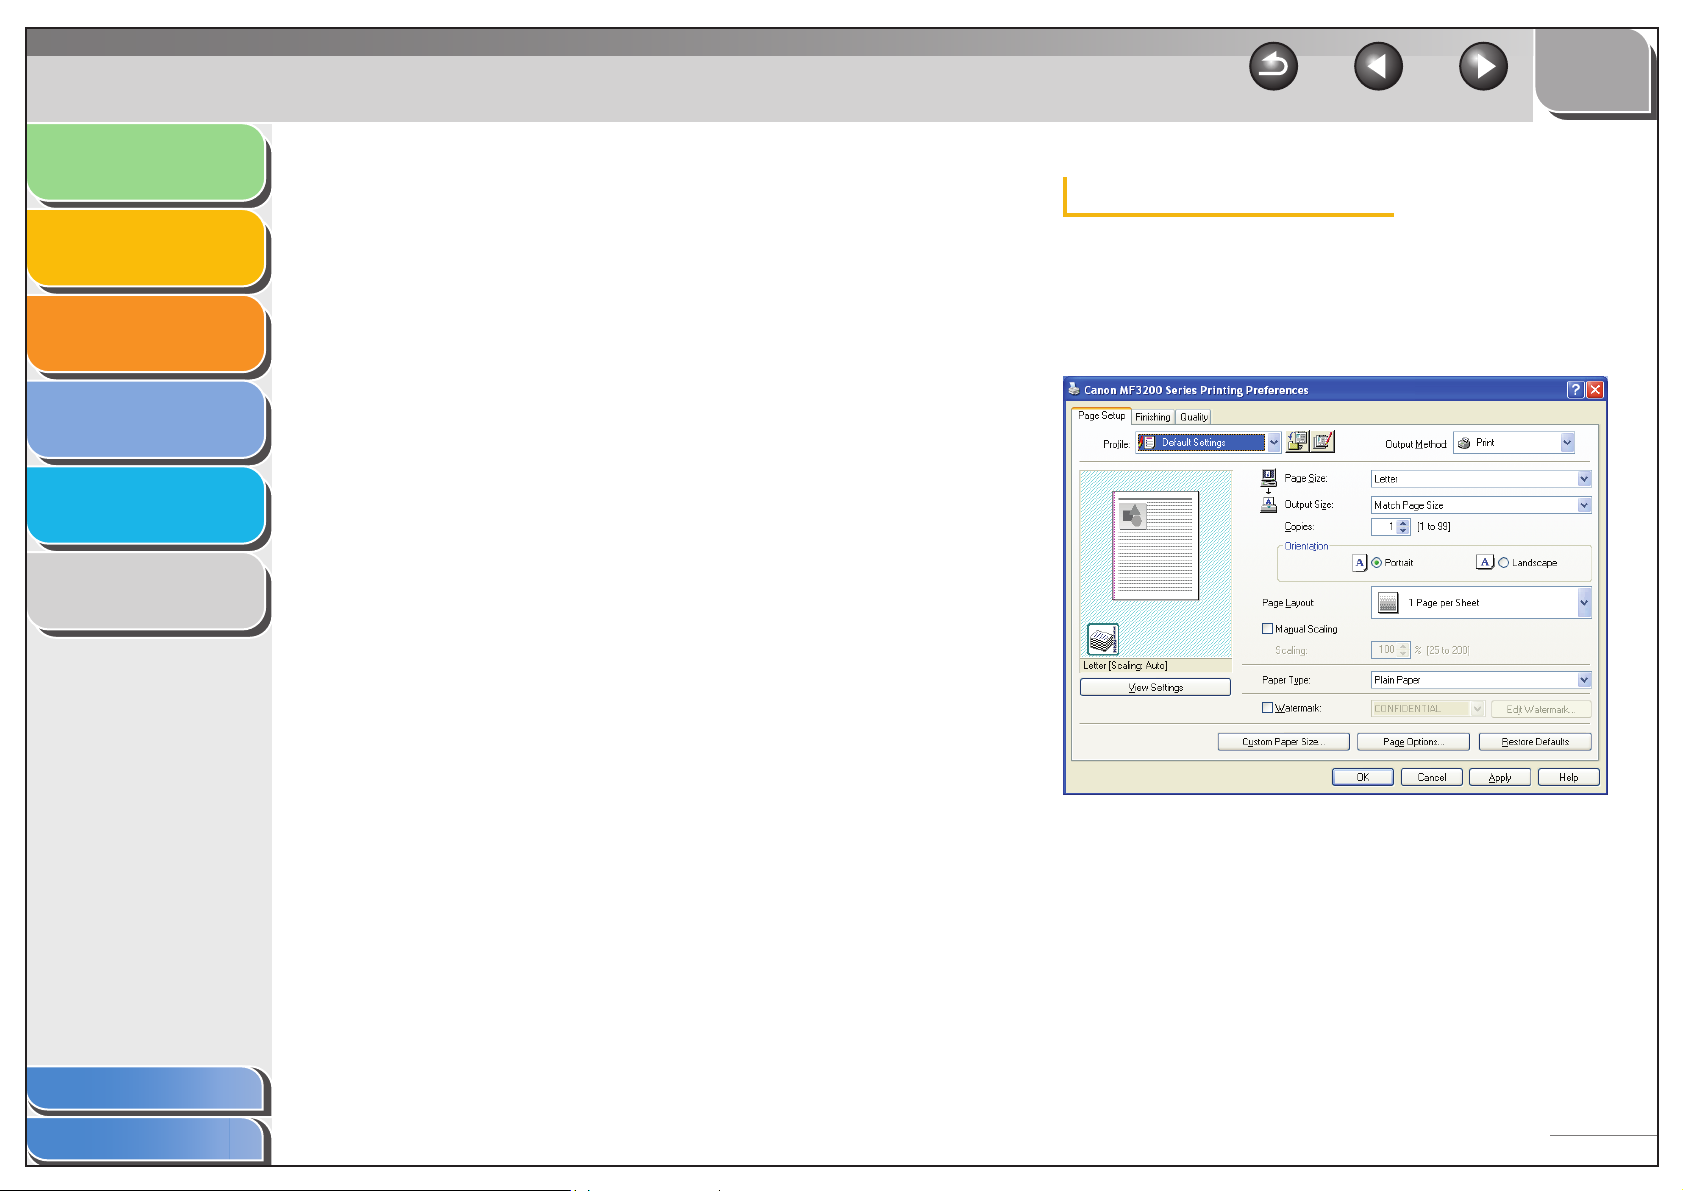
Introduction
TOP
Back Previous Next
Printing
Scanning a
Document
PC Faxing
Troubleshooting
Appendix
1
2
3
4
5
6
[Gamma] Specifies the gamma correction value when
the [Gamma Adjustment] is selected in the
[Matching Mode] box.
The brightness of the document printout can
be adjusted without losing the brightest and
darkest portion of the document.
This option is useful when the printout result
is brighter than the original image (for
example, a photograph before scanning or
graphics displayed on the monitor), or when
you want to intentionally change the
brightness of the output.
Four gamma correction values are provided.
The larger the value, the darker the printout
is.
1.0
1.4
1.8
2.2
[Restore Defaults] Resets all the current settings to their default
values.
Profiles
A registered combination of settings for the [Page Setup],
[Finishing], and [Quality] tab sheets is referred to as a profile.
The profile function commonly provided in each of these tab
sheets enables you to add, edit, and select a profile, which
facilitates your print jobs.
Table of Contents
Index
[Profile] Stores various printer driver settings, each
suitable for certain print jobs, as userdefined Profiles. Selecting Profiles from the
drop-down list enables the printer to perform
a variety of print jobs. A frequently
performed print job can also be saved as a
Profile.
2-48
Page 67
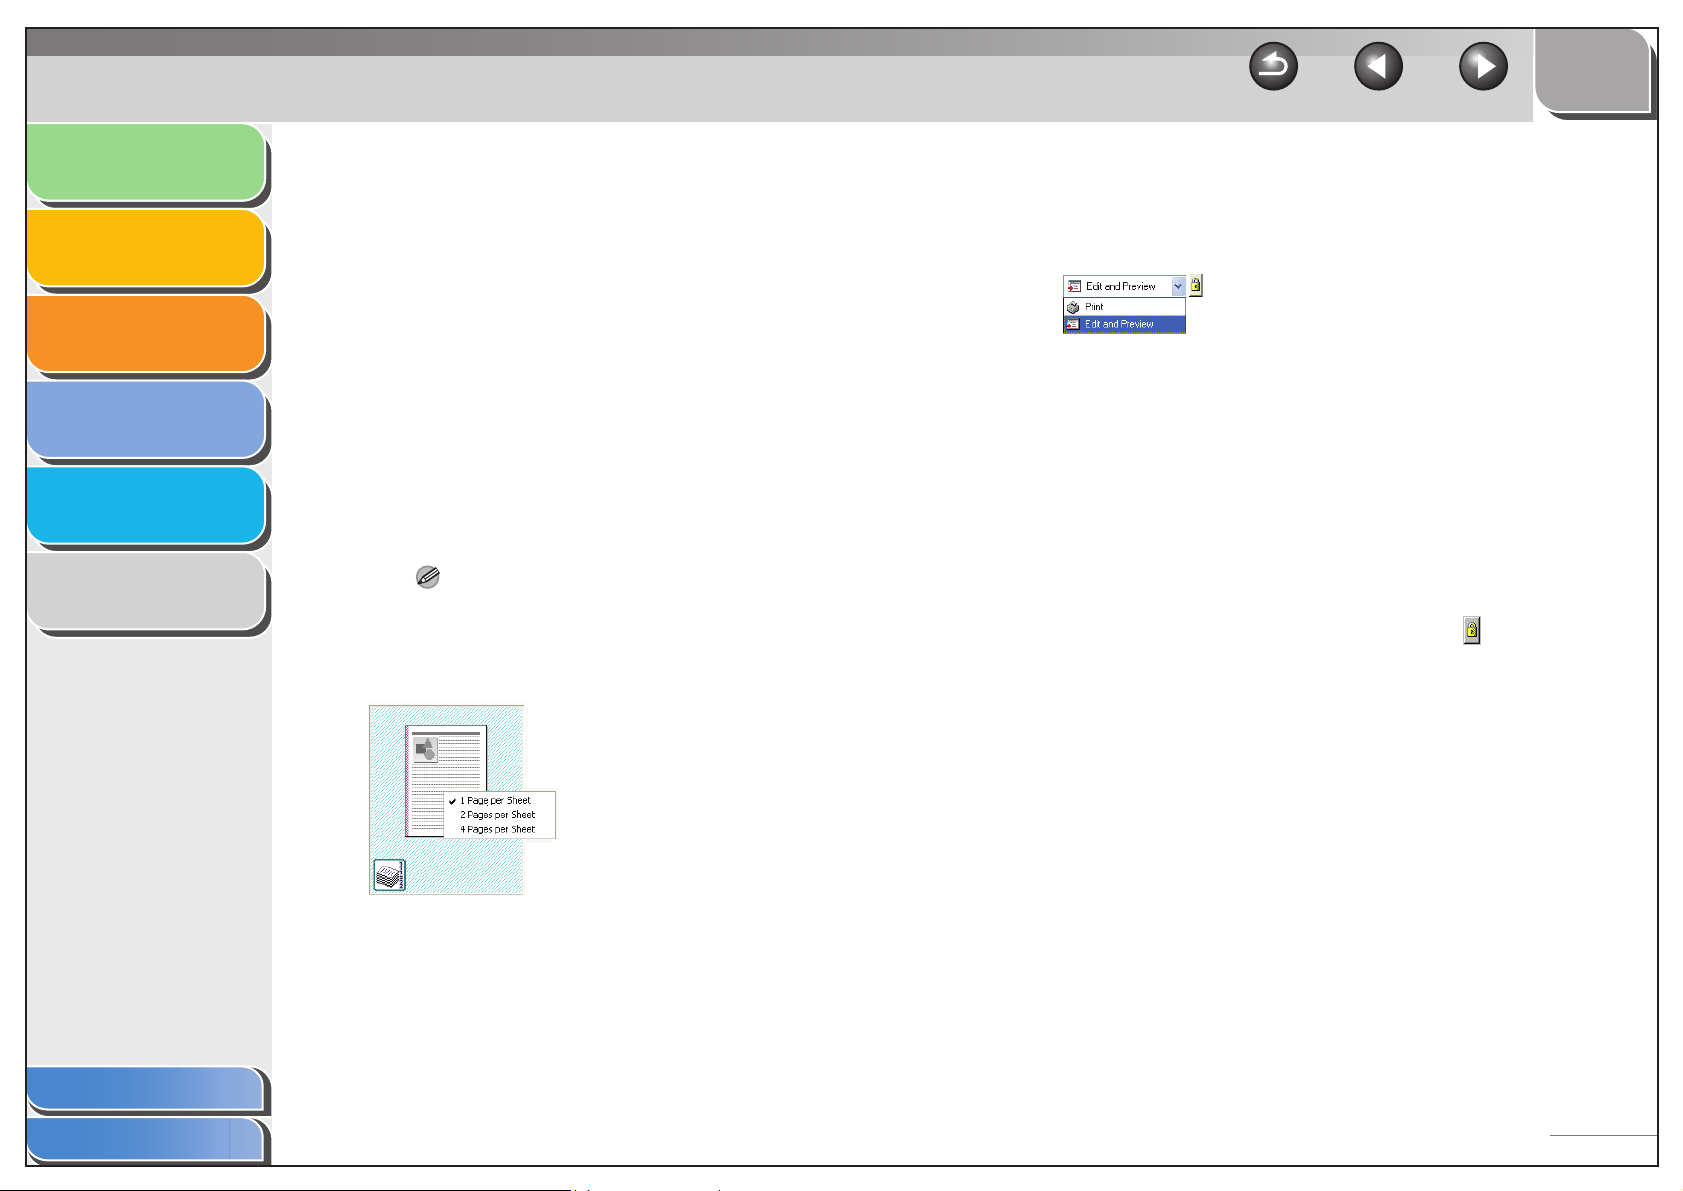
Introduction
TOP
Back Previous Next
Printing
Scanning a
Document
PC Faxing
Troubleshooting
Appendix
1
2
3
4
5
6
Preview image Displays the image with the currently
selected settings reflected.
Changes the setting for [Page Layout] every
time you click anywhere inside the image of
the page. The setting changes in the
following order; [1 Page per Sheet]
Pages per Sheet]
[1 Page per Sheet].
Right clicking the mouse button on the
preview image displays the pop-up menu,
from which you can also change the setting
for [Page Layout].
Clicking the edges of the preview image of
the page changes the binding location.
NOTE
Settings made on the [Quality] tab are not reflected in the preview
image.
→ [4 Pages per Sheet] →
→ [2
[Output Method] Switches the job mode between [Print] and
[Edit and Preview].
Print:
Executes a normal print job.
Edit and Preview:
Saves the data in the [Canon
PageComposer] dialog box. If you open
[Canon MF3200 Series Printing
Preferences] from the [Printers and Faxes]
(Windows 2000/Vista: [Printers], Windows 7:
[Devices and Printers]) folder and select the
[Edit and Preview] mode, (Lock) button
appears on the right side. When you click
this button, the [Edit and Preview] mode is
locked.
Table of Contents
Index
2-49
Page 68
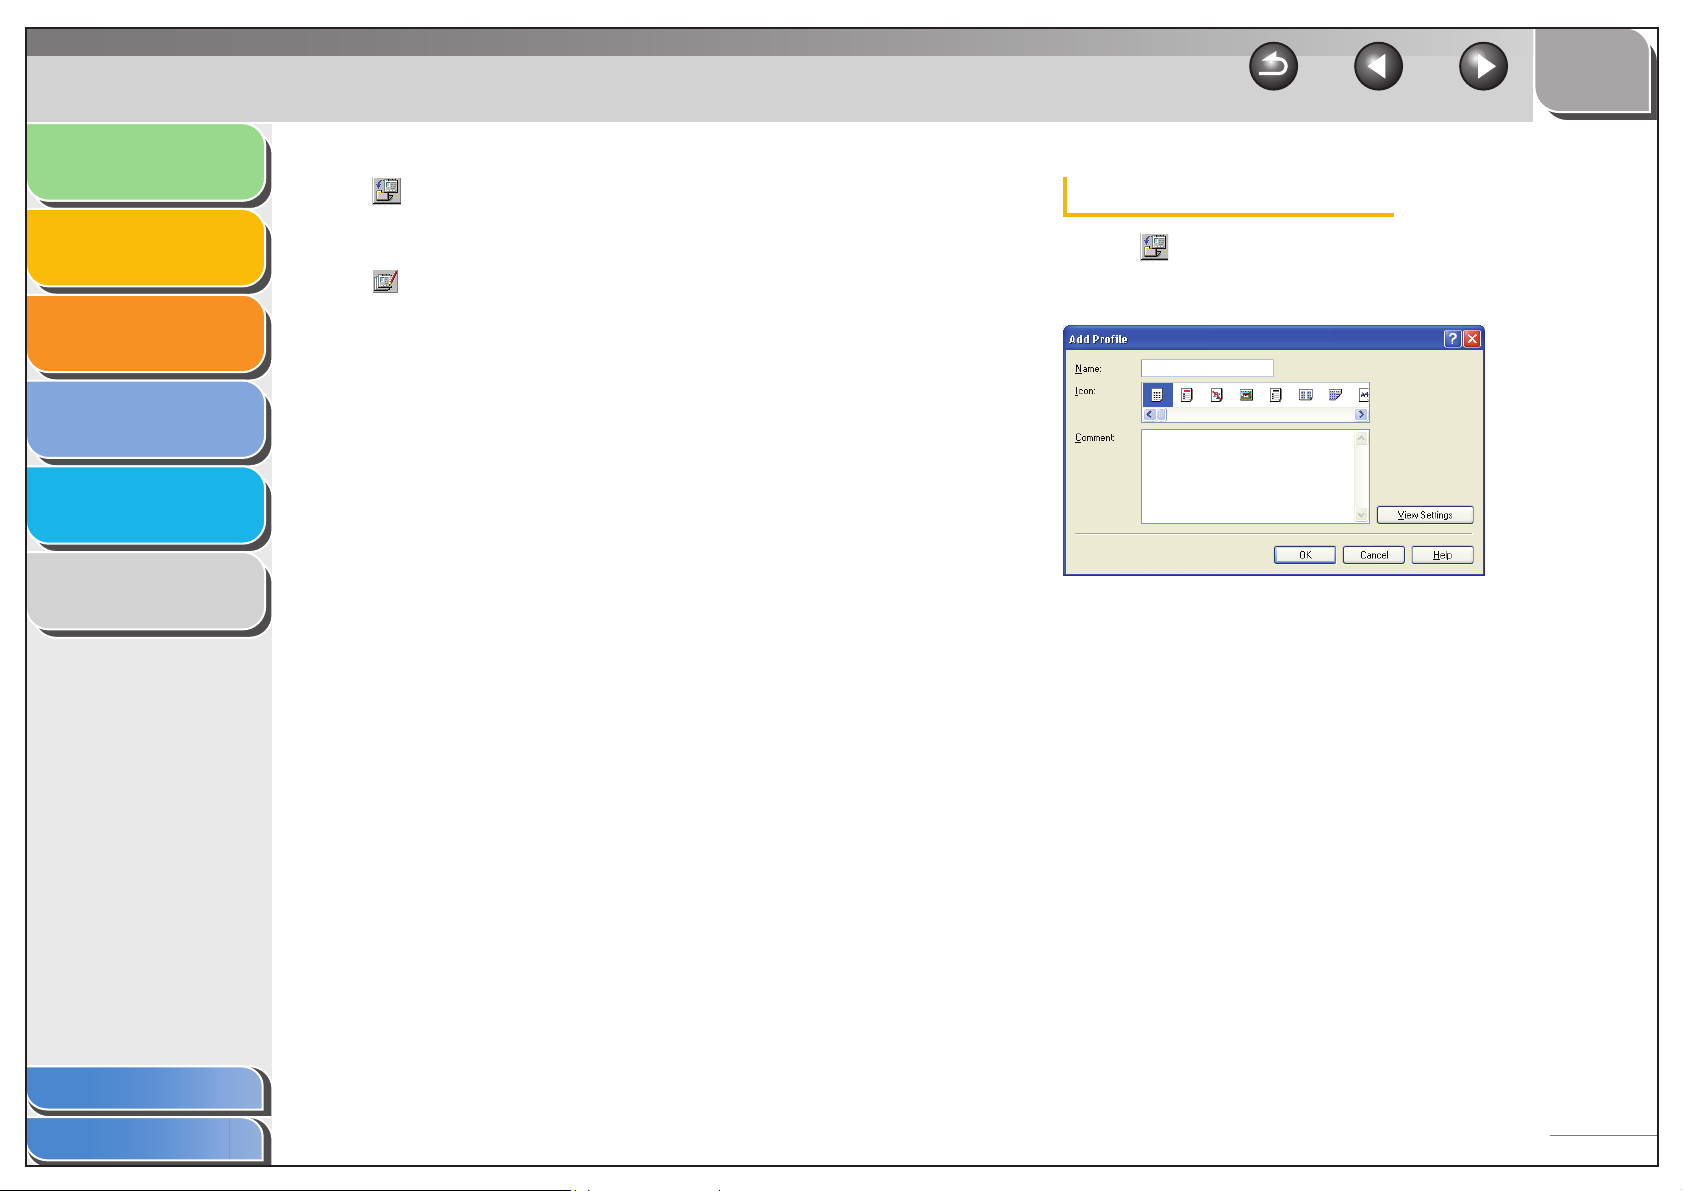
Introduction
TOP
Back Previous Next
Printing
Scanning a
Document
PC Faxing
Troubleshooting
Appendix
1
2
3
4
5
6
(Add Profile) Click this button to display the [Add Profile]
dialog box to add a new Profile to the list.
(See “Add Profile,” on p. 2-50.)
(Edit Profile) Click this button to display the [Edit Profile]
dialog box to edit the name, icon, or
comment of a stored Profile. (See “Edit
Profile,” on p. 2-51.)
[View Settings] Click this button to display the [View
Settings] dialog box. This dialog box allows
you to view and confirm all of the current
page settings in a listed form. (See “View
Settings,” on p. 2-53.)
Add Profile
Clicking (Add Profile) opens the [Add Profile] dialog box.
This dialog box enables you to register a new profile with the
current settings. You can add up to 50 new profiles.
[Name] Specifies the name of the profile to be
registered.
[Icon] Selects an icon to represent the profile to be
registered.
[Comment] Adds comments on the profile to be
registered.
Table of Contents
Index
[View Settings] Click this button to display the [View
Settings] dialog box. This dialog box allows
you to view and confirm all of the current
page settings in a listed form. (See “View
Settings,” on p. 2-53.)
2-50
Page 69
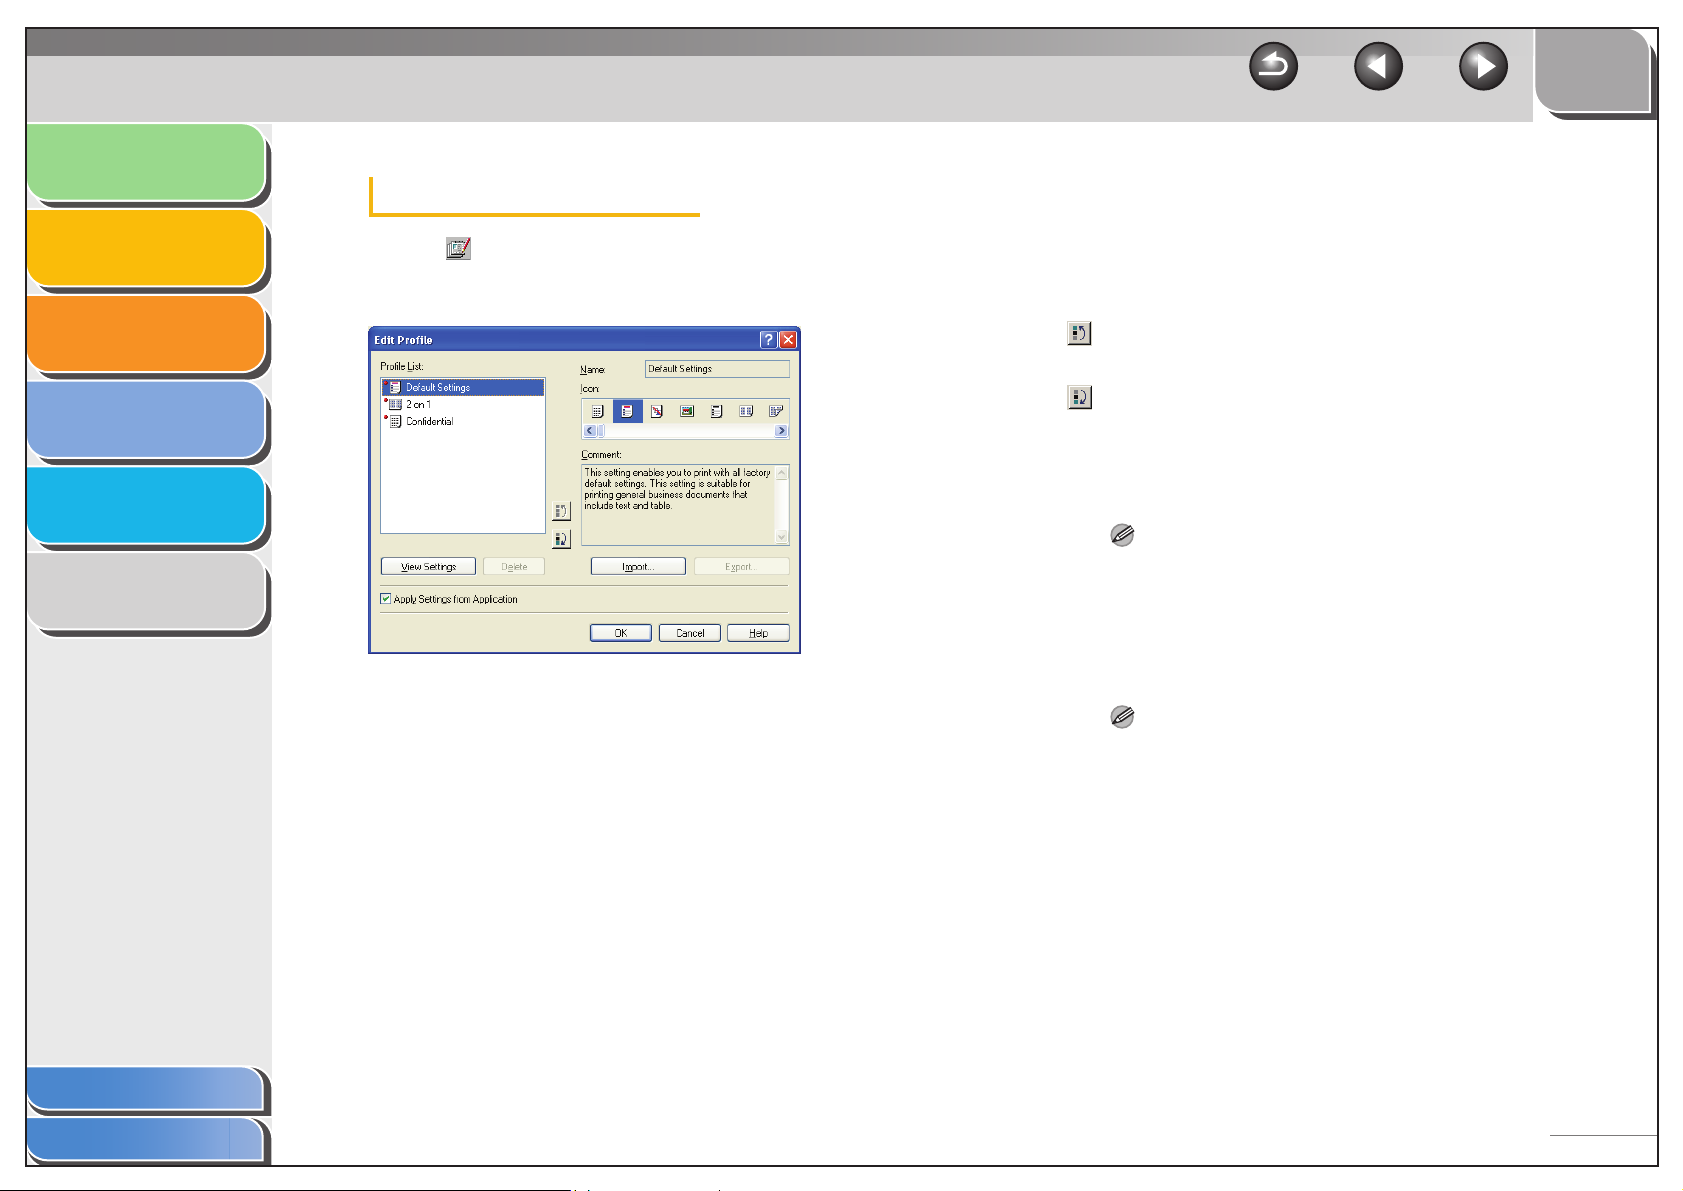
Introduction
TOP
Back Previous Next
Printing
Scanning a
Document
PC Faxing
Troubleshooting
Appendix
1
2
3
4
5
6
Edit Profile
Clicking (Edit Profile) opens the [Edit Profile] dialog box.
This dialog box enables you to edit the profile selected in [Profile
List].
[Profile List] Displays the list of registered profiles.
[View Settings] Click this button to display the [View
Settings] dialog box. This dialog box allows
you to view and confirm all of the current
page settings in a listed form. (See “View
Settings,” on p. 2-53.)
(Move Up) Moves the profile selected in the [Profile List]
one position up.
(Move Down) Moves the profile selected in the [Profile List]
one position down.
[Delete] Removes the selected profile from [Profile
List].
NOTE
You cannot delete the pre-defined profiles and the profile that is
currently selected in [Profile] of the [Page Setup] tab.
[Name] Displays and allows you to change the name
of the currently selected profile.
NOTE
You cannot change the names for the pre-defined profiles.
Table of Contents
Index
2-51
Page 70
Introduction
TOP
Back Previous Next
Printing
Scanning a
Document
PC Faxing
Troubleshooting
Appendix
1
2
3
4
5
6
[Icon] Displays and allows you to change the icon
representing the currently selected profile.
NOTE
You cannot change the icons for the pre-defined profiles.
[Comment] Displays and allows you to change the
comment on the currently selected profile.
NOTE
You cannot change the comments for the pre-defined profiles.
[Import] Enables you to import profile information
from a file.
[Export] Enables you to export the selected profile
information to a file.
NOTE
When one of the pre-defined profiles is selected, this button is
disabled.
[Apply Settings
from Application]
Applies the selected profile only to the
settings other than [Page Size],
[Orientation], and [Copies].
Table of Contents
Index
2-52
Page 71
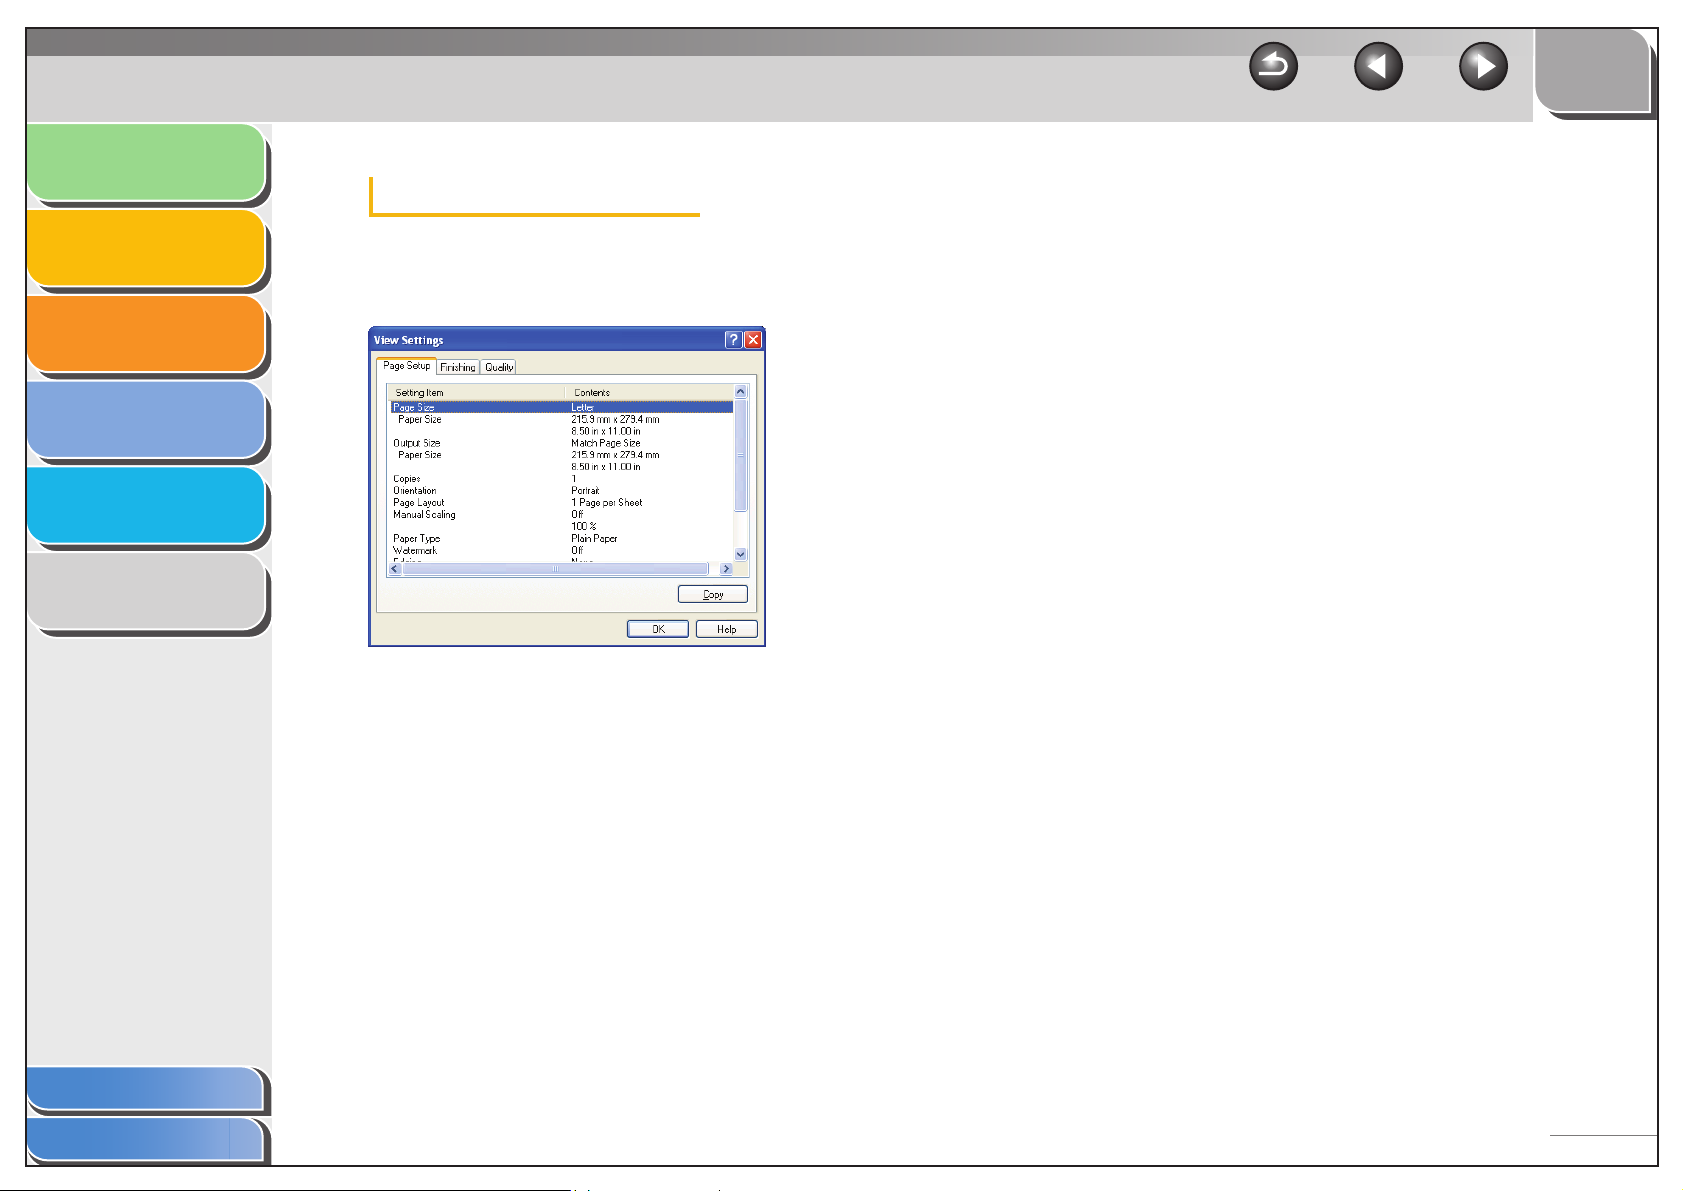
Introduction
TOP
Back Previous Next
Printing
Scanning a
Document
PC Faxing
Troubleshooting
Appendix
1
2
3
4
5
6
View Settings
Clicking [View Settings] opens the [View Settings] dialog box.
This dialog box displays the current settings in the [Page Setup],
[Finishing], and [Quality] tab sheets.
[Copy] Copies the contents of the current settings to
the clipboard.
Table of Contents
Index
2-53
Page 72
Introduction
TOP
Back Previous Next
Printing
Scanning a
Document
PC Faxing
Troubleshooting
Appendix
1
2
3
4
5
6
Using the Machine on Your Network
This section provides instructions for using the machine on
your network as a shared printer.
By setting your machine as a shared printer on your
network, the network users can share the machine for
printing. The print server and clients do not need to use the
same operating system, and it is possible to print from a
computer with different OS.
You can start printing simply by starting the server, even if
the server was not running when the client was started.
If the server is running on Windows 2000/XP/Vista/7, you
can print even if no one is logged into the server.
■ Setting the Machine as a Shared Printer
If you plan to share your machine on a network, install the print
server locally, then make the following settings. For more
information, see your print server system documentation.
Windows 2000/XP Server Settings
The following is the procedure to make your machine available
to your network users, under Windows 2000/XP.
● Adding Server Service (Windows XP)
1. Click [start] on the Windows task bar →
select [Control Panel].
The [Control Panel] folder appears.
2. Select [Network and Internet Connections] →
click [Network Connections].
The [Network Connections] folder appears.
3. Right click the [Local Area Connection] icon
→ select [Properties] from the pop-up menu.
The [Local Area Connection Properties] dialog box appears.
Table of Contents
Index
2-54
Page 73
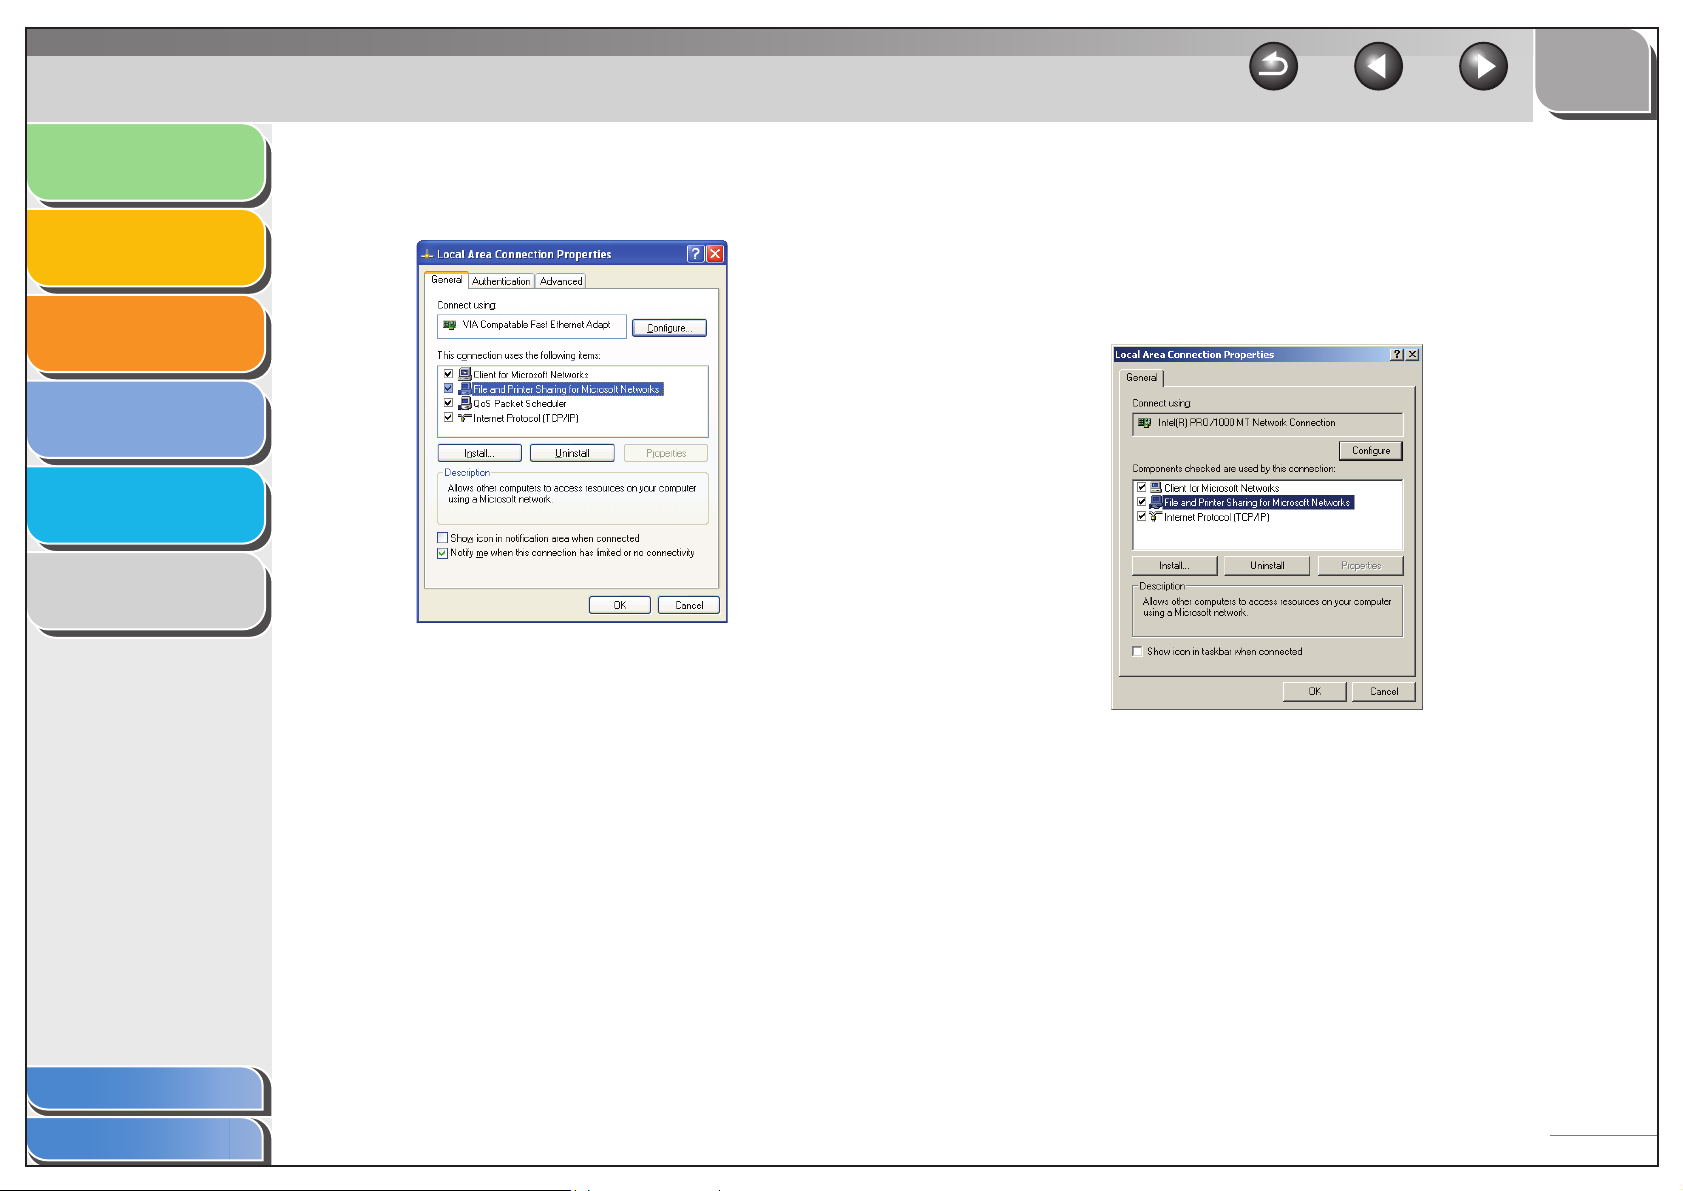
Introduction
Printing
1
4. Select [File and Printer Sharing for Microsoft
Networks] → click [OK].
TOP
Back Previous Next
2. Right click the [Local Area Connection] icon
→ select [Properties] from the pop-up menu.
The [Local Area Connection Properties] dialog box appears.
Scanning a
Document
PC Faxing
Troubleshooting
Appendix
2
3
4
5
6
The server service is added.
● Adding Server Service (Windows 2000)
1. Click [Start] on the Windows task bar →
select [Settings] → [Network and Dial-up
Connections].
The [Network and Dial-up Connections] folder appears.
3. Select [File and Printer Sharing for Microsoft
Networks] → click [OK].
The server service is added.
Table of Contents
Index
2-55
Page 74
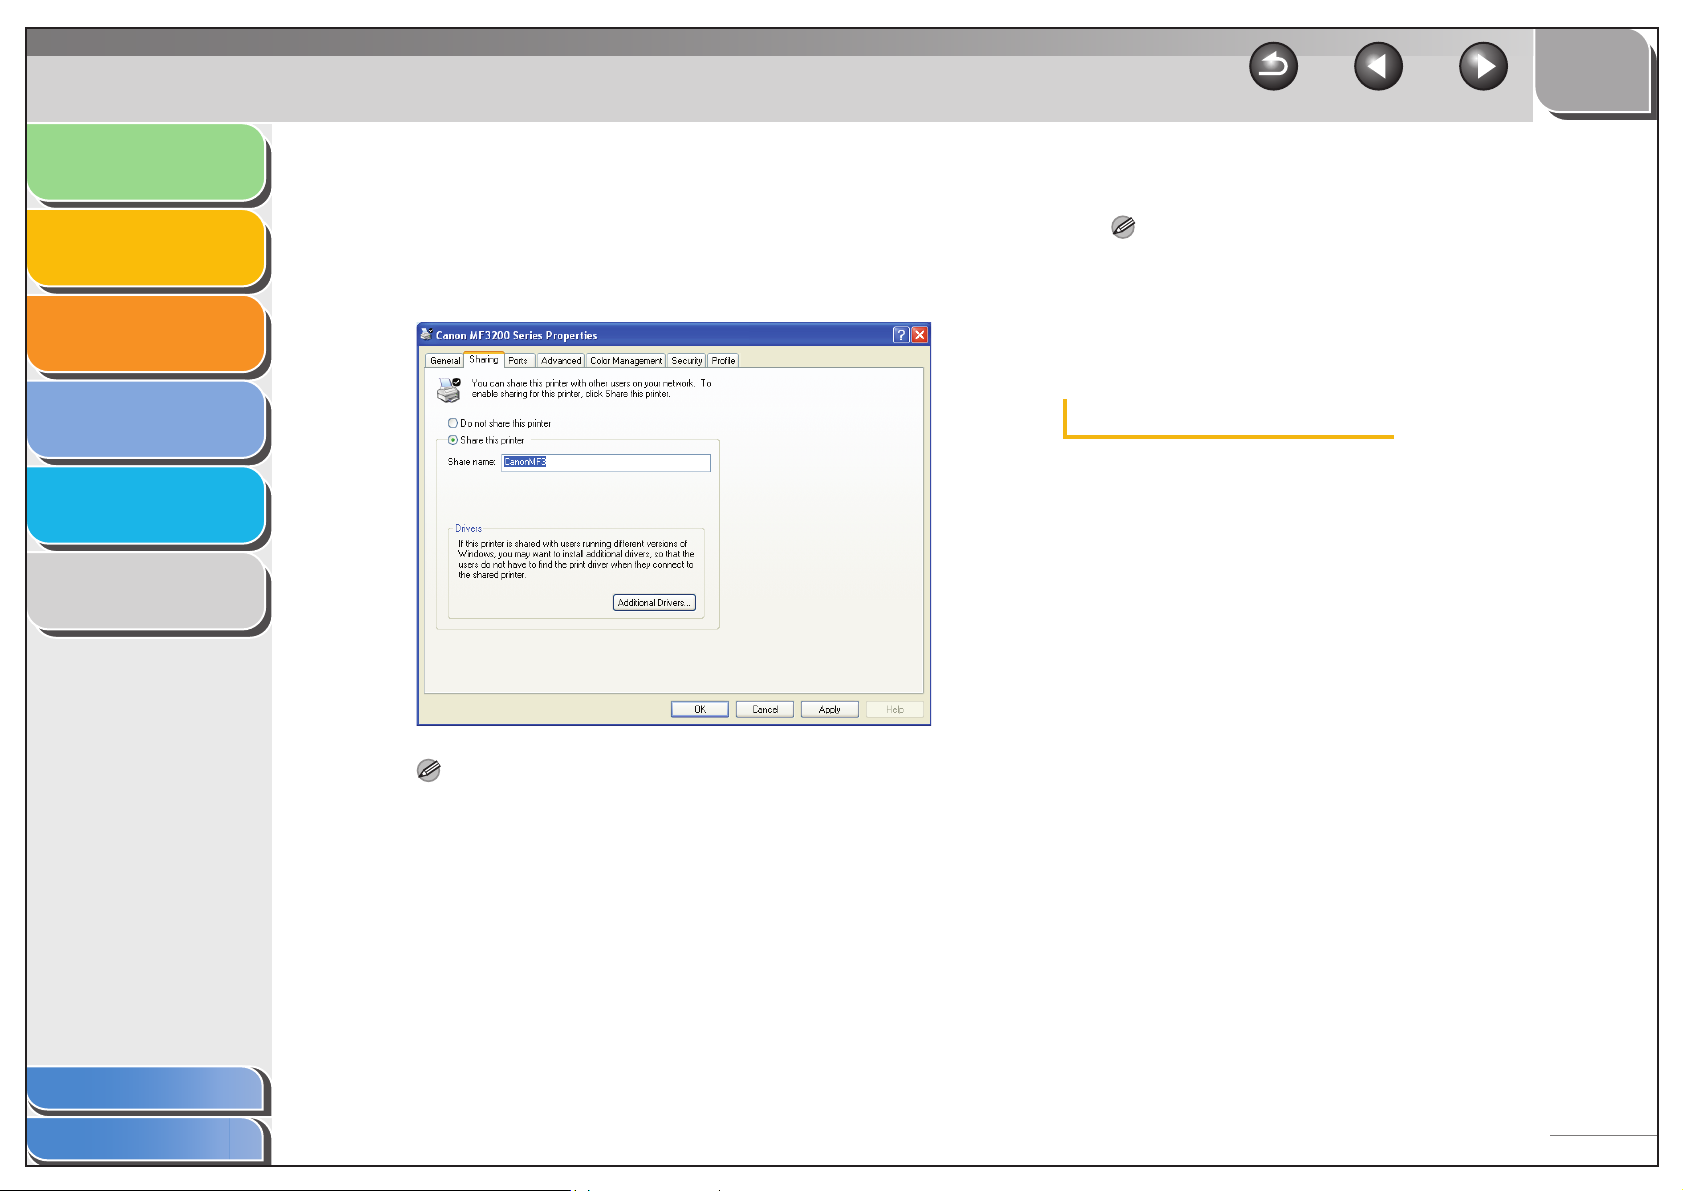
Introduction
Printing
Scanning a
Document
1
2
3
● Setting Printer Sharing
1. Open the printer properties dialog box →
select [Share this printer] (Windows 2000:
[Shared as]) in the [Sharing] tab sheet.
TOP
Back Previous Next
2. Enter a share name in the edit box as needed.
NOTE
Do not enter a space or special character in the [Share name]
edit box.
3. Click [OK].
The printer driver icon changes to indicate sharing.
PC Faxing
Troubleshooting
Appendix
4
5
6
Windows 98/Me Server Settings
The following is the procedure to make your machine available
to your network users, under Windows 98/Me.
The screen shots shown are from Windows 98.
● Adding Server Service
1. Click [Start] on the Windows task bar →
select [Settings] → [Control Panel].
The [Control Panel] folder appears.
2. Double-click the [Network] icon.
The [Network] dialog box appears.
NOTE
On how to open the printer properties dialog box, see “Changing
Print Settings,” on p. 2-4.
Table of Contents
Index
2-56
Page 75
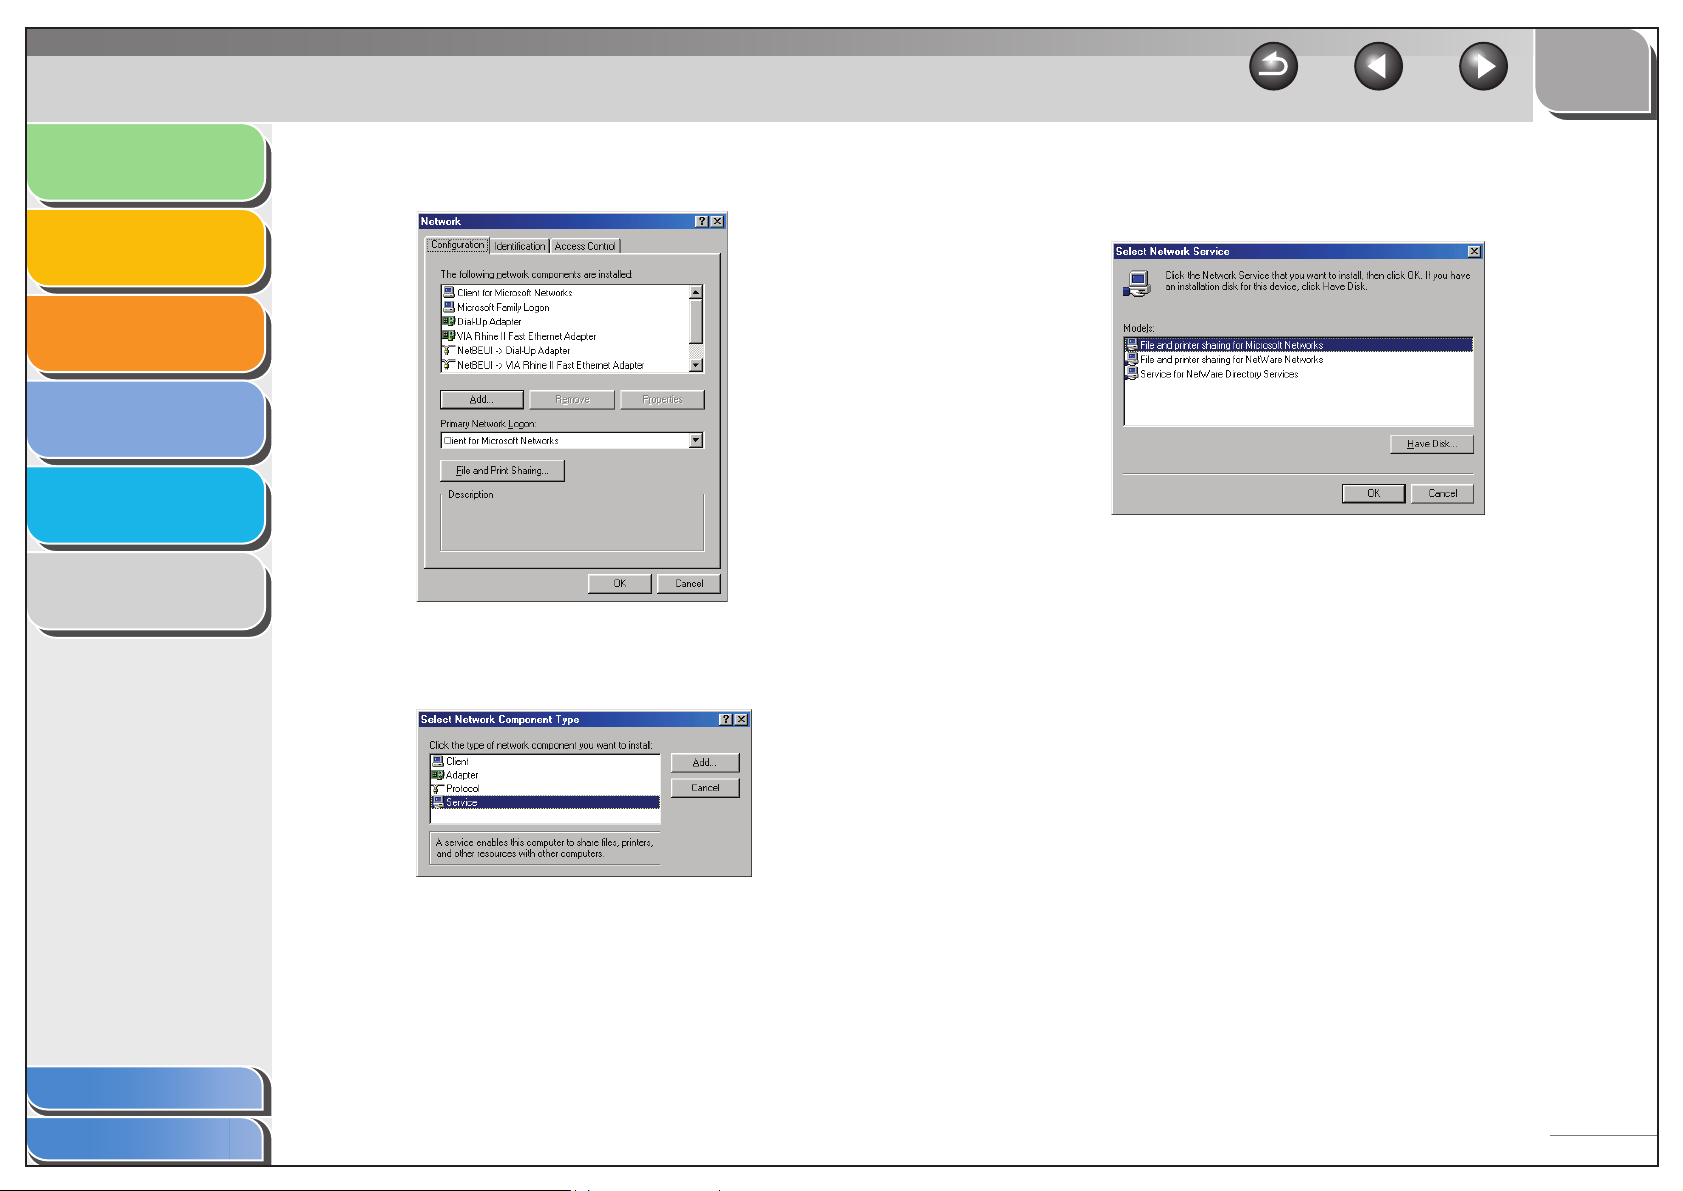
Introduction
Printing
Scanning a
Document
PC Faxing
Troubleshooting
Appendix
1
2
3
4
5
3. Click [Add] in the [Configuration] tab sheet.
TOP
Back Previous Next
5. Select [File and printer sharing for Microsoft
Networks] → click [OK].
Table of Contents
Index
6
The [Select Network Component Type] dialog box appears.
4. Select [Service] → click [Add].
The [Select Network Service] dialog box appears.
2-57
Page 76
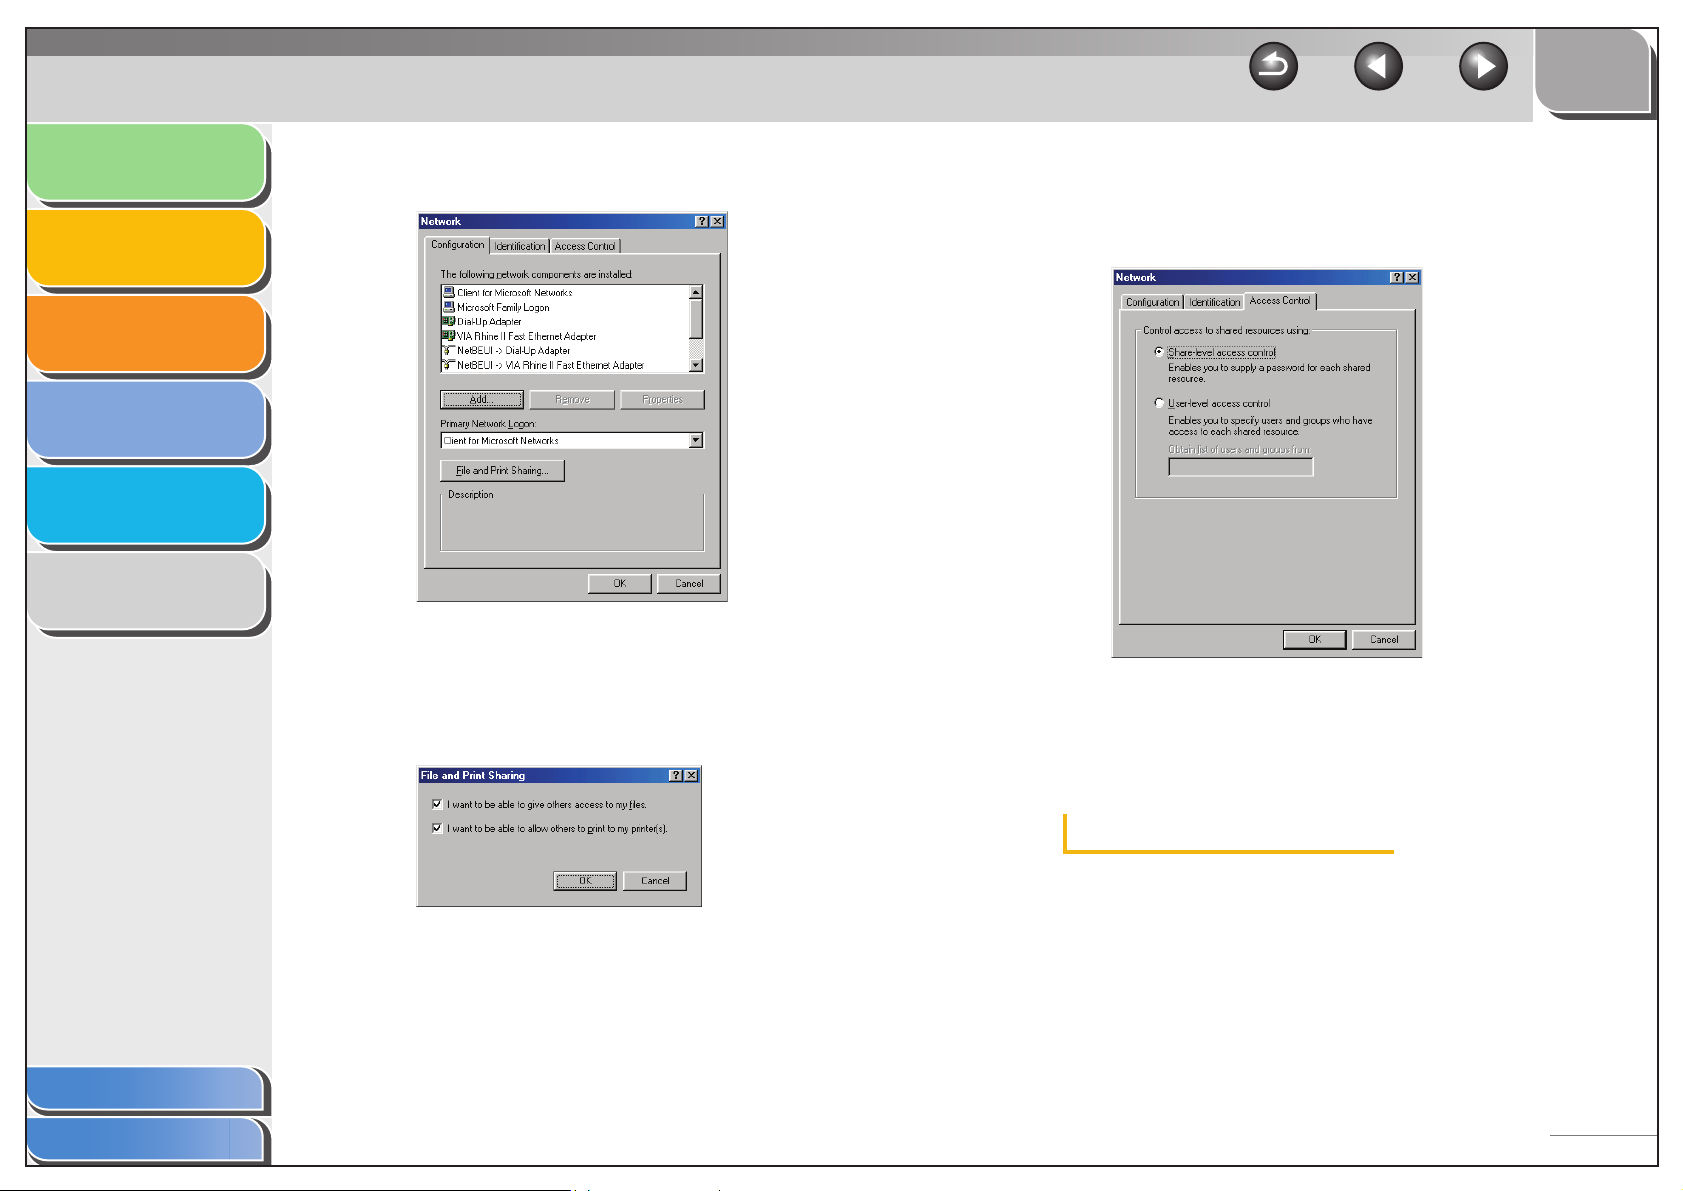
Introduction
Printing
Scanning a
Document
PC Faxing
Troubleshooting
Appendix
1
2
3
4
5
6. Click [File and Print Sharing].
TOP
Back Previous Next
8. Select the [Access Control] tab → [Share-
level access control] or [User-level access
control].
Table of Contents
Index
6
The [File and Print Sharing] dialog box appears.
7. Make sure that [I want to be able to allow
others to print to my printer(s).] is selected →
click [OK].
9. Click [OK].
The server service is added.
If the confirmation message dialog box appears, click [Yes] to
restart your computer.
Windows Vista/7 Server Settings
● Adding Server Service
1. Click [Start] on the Windows task bar →
select [Network].
The [Network] folder appears.
Windows 7: Click [Start] on the Windows task bar → [Control
→ select [View network status and tasks] under the
Panel]
[Network and Internet].
2-58
Page 77
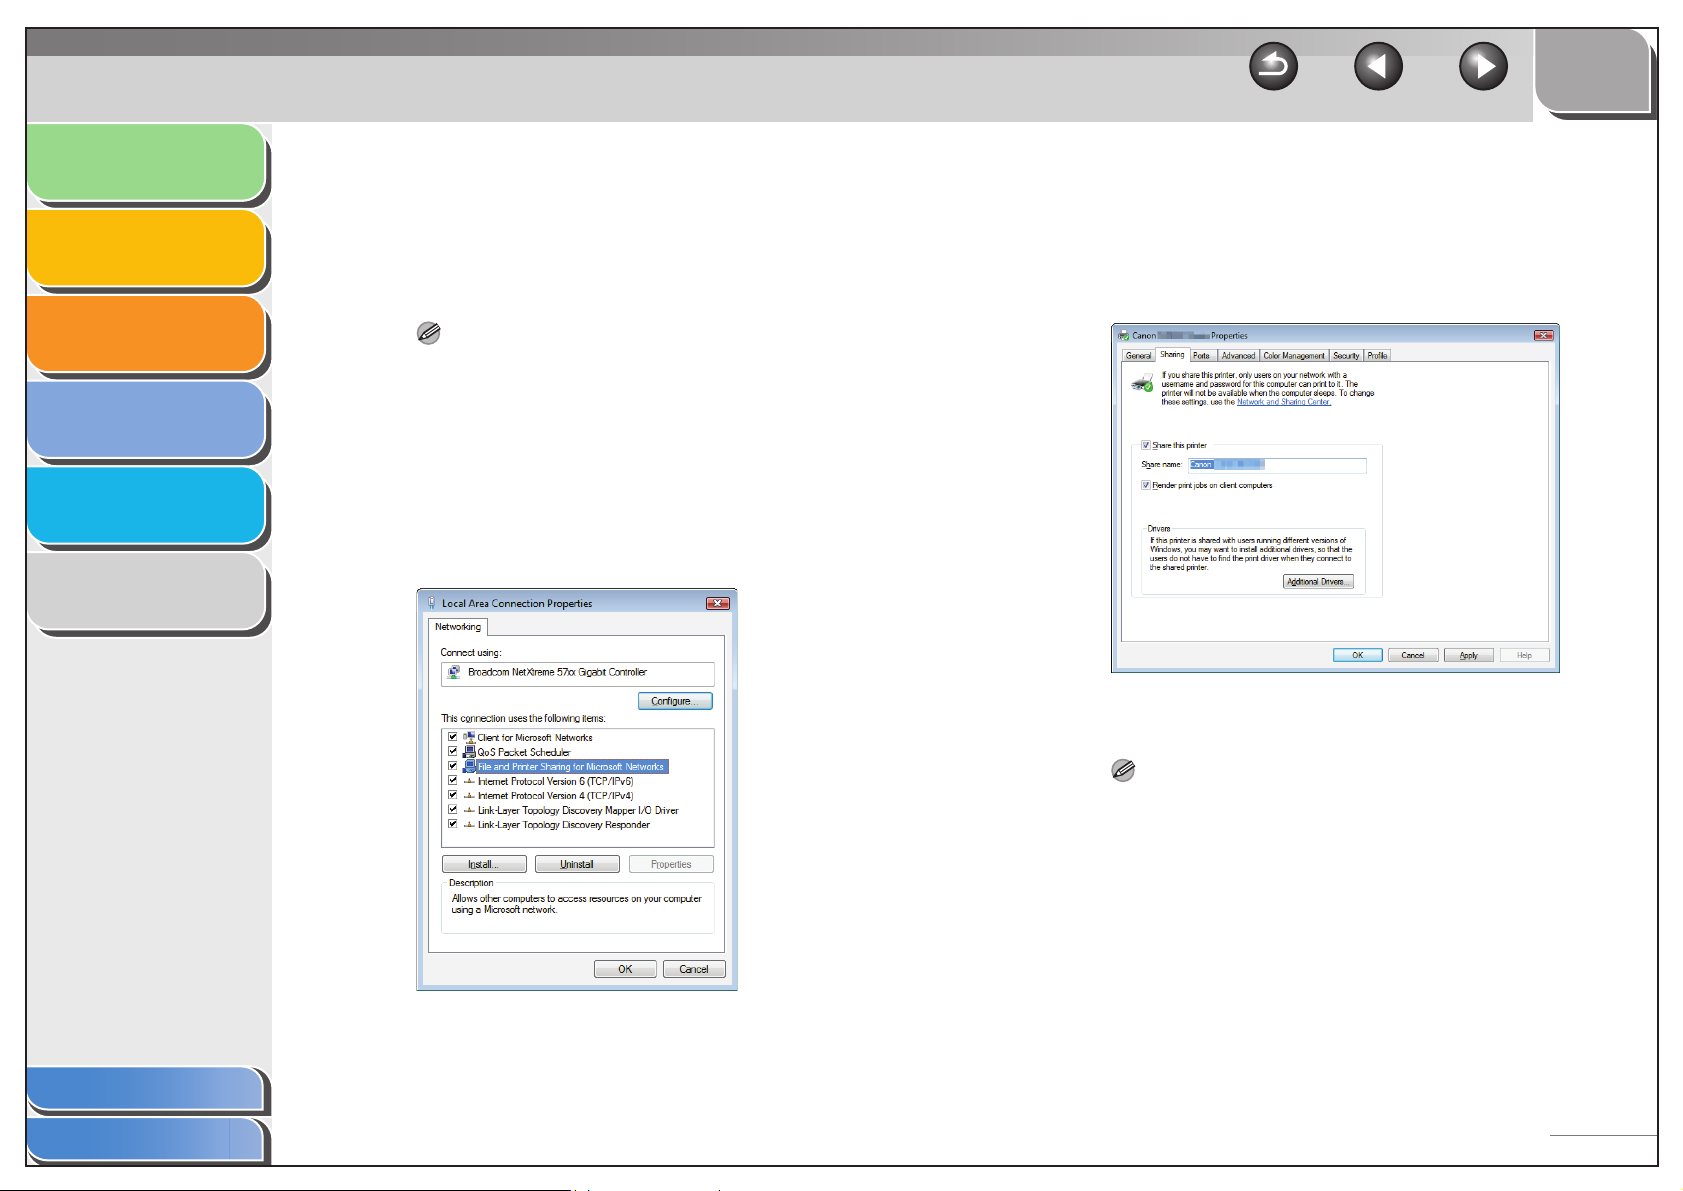
Introduction
Printing
Scanning a
Document
PC Faxing
Troubleshooting
1
2
3
4
2. Select [Network and Sharing Center] on the
toolbar → click [Manage network
connections].
Windows 7: Select [Change adapter settings].
The [Network Connections] folder appears.
NOTE
If the [User Account Control] dialog box appears, click [Continue]
to proceed.
3. Right click the [Local Area Connection] icon
→ select [Properties] from the pop-up menu.
The [Local Area Connection Properties] dialog box appears.
TOP
Back Previous Next
● Setting Printer Sharing
1. Open the printer properties dialog box →
click [Change sharing options] → select
[Share this printer] in the [Sharing] tab sheet.
Appendix
Table of Contents
5
6
4. Select [File and Printer Sharing for Microsoft
Networks] → click [OK].
NOTE
– If the [User Account Control] dialog box appears, click
[Continue] to proceed.
– On how to open the printer properties dialog box, see
“Changing Print Settings,” on p. 2-4.
The server service is added.
Index
2-59
Page 78
Introduction
Printing
Scanning a
Document
PC Faxing
1
2
3
2. Enter a share name in the edit box as needed.
NOTE
Do not enter a space or special character in the [Share name]
edit box.
3. Click [OK].
The printer driver icon changes to indicate sharing.
TOP
Back Previous Next
■ Using the Shared Printer on Your
Network
When the machine is already on your network and set as a
shared printer, you can use it via network. The easiest way to
make the machine available for your computer is using network
download. If your operating system is Windows 2000/XP/Vista/
7, you cannot download the driver from Windows 98/Me servers.
In that case, use [Add Printer Wizard].
Troubleshooting
Appendix
4
5
6
Network Download
The following is the procedure to connect to the shared printer
on your network using network download.
NOTE
Windows 2000/XP clients cannot download the driver from Windows
98/Me servers.
1. Open Windows Explorer → browse the
network until you see the icon of the shared
printer.
Table of Contents
Index
2-60
Page 79
Introduction
Printing
Scanning a
Document
PC Faxing
Troubleshooting
Appendix
1
2
3
4
5
6
2. Double-click the machine icon, or drag the
machine icon to your [Printers and Faxes]
(Windows 98/Me/2000/Vista: [Printers]
Windows 7: [Devices and Printers]) folder.
The [Add Printer Wizard] dialog box appears.
3. Follow the instructions on the screen to
complete the installation.
Add Printer Wizard (Windows 2000/XP)
The following is the procedure to connect to the shared printer
on your network using Windows 2000/XP.
NOTE
Installation in Windows 2000/XP needs to be done by a user with
administrator privileges.
1. Open the [Printers and Faxes] (Windows
2000: [Printers]) folder.
Click [start] on the Windows task bar, then select [Printers and
Faxes] (Windows 2000: [Start] → [Settings] → [Printers]).
2. Open the [Add Printer Wizard] dialog box.
Click [Add a printer] in [Printer Tasks] (Windows 2000: doubleclick the [Add Printer] icon).
TOP
Back Previous Next
3. Click [Next].
4. Select [A network printer, or a printer
attached to another computer] (Windows
2000: [Network printer]), then click [Next].
The [Specify a Printer] (Windows 2000: [Locate Your Printer])
dialog box appears.
5. Select [Connect to this printer (or to browse
for a printer, select this option and click
[Next])] (Windows 2000: [Type the printer
name, or click Next to browse for a printer])
→ enter the name of the printer you want to
connect to → click [Next].
If you do not know the name of the printer, click [Next] without
entering the name to proceed to the [Browse for Printer] dialog
box. In this dialog box, select the printer → click [Next].
NOTE
– If the printer name is invalid, it means the client cannot connect
the shared printer.
– If a suitable driver is not found, it probably means the server is
a Windows 98/Me computer.
6. Follow the instructions on the screen to
complete the installation.
Table of Contents
Index
2-61
Page 80
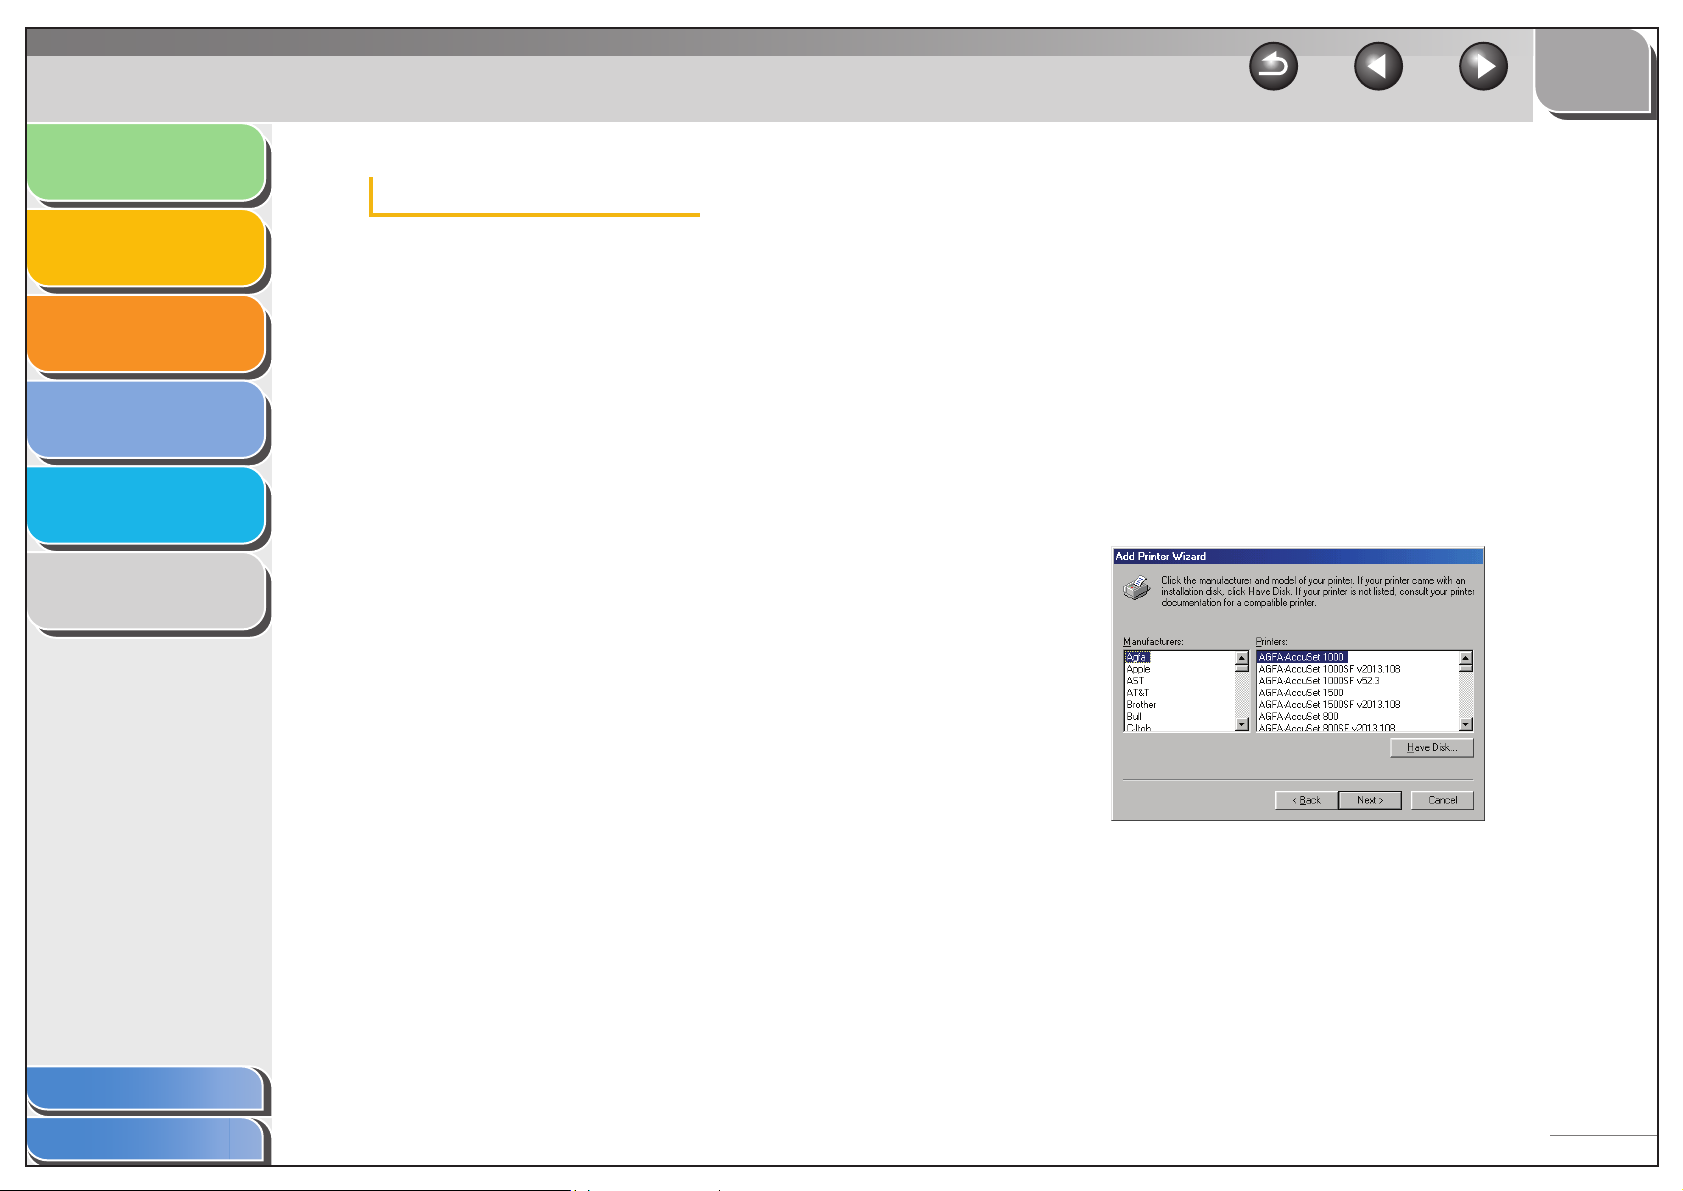
Introduction
Printing
Scanning a
Document
PC Faxing
Troubleshooting
1
2
3
4
5
Add Printer Wizard (Windows 98/Me)
The following is the procedure to connect to the shared printer
on your network using Windows 98/Me [Add Printer Wizard].
The screen shots shown are from Windows 98.
1. Click [Start] on the Windows task bar →
select [Settings] → [Printers].
The [Printers] folder appears.
2. Double-click the [Add Printer] icon.
The [Add Printer Wizard] dialog box appears.
3. Click [Next].
TOP
Back Previous Next
5. Enter the network path or print queue that
you want to connect to, or select the location
of the shared printer.
To enter the location directly:
Enter the path name or print queue in the edit box.
To select the location:
Click [Browse].
Select the location of the printer
Depending on your network environment, the installation of the
driver may be carried out automatically. In this case you need not
perform steps 7 through 10.
→ click [OK].
6. Click [Next].
7. Click [Have Disk].
Appendix
Table of Contents
Index
4. Select [Network printer] → click [Next].
6
The [Install From Disk] dialog box appears.
2-62
Page 81
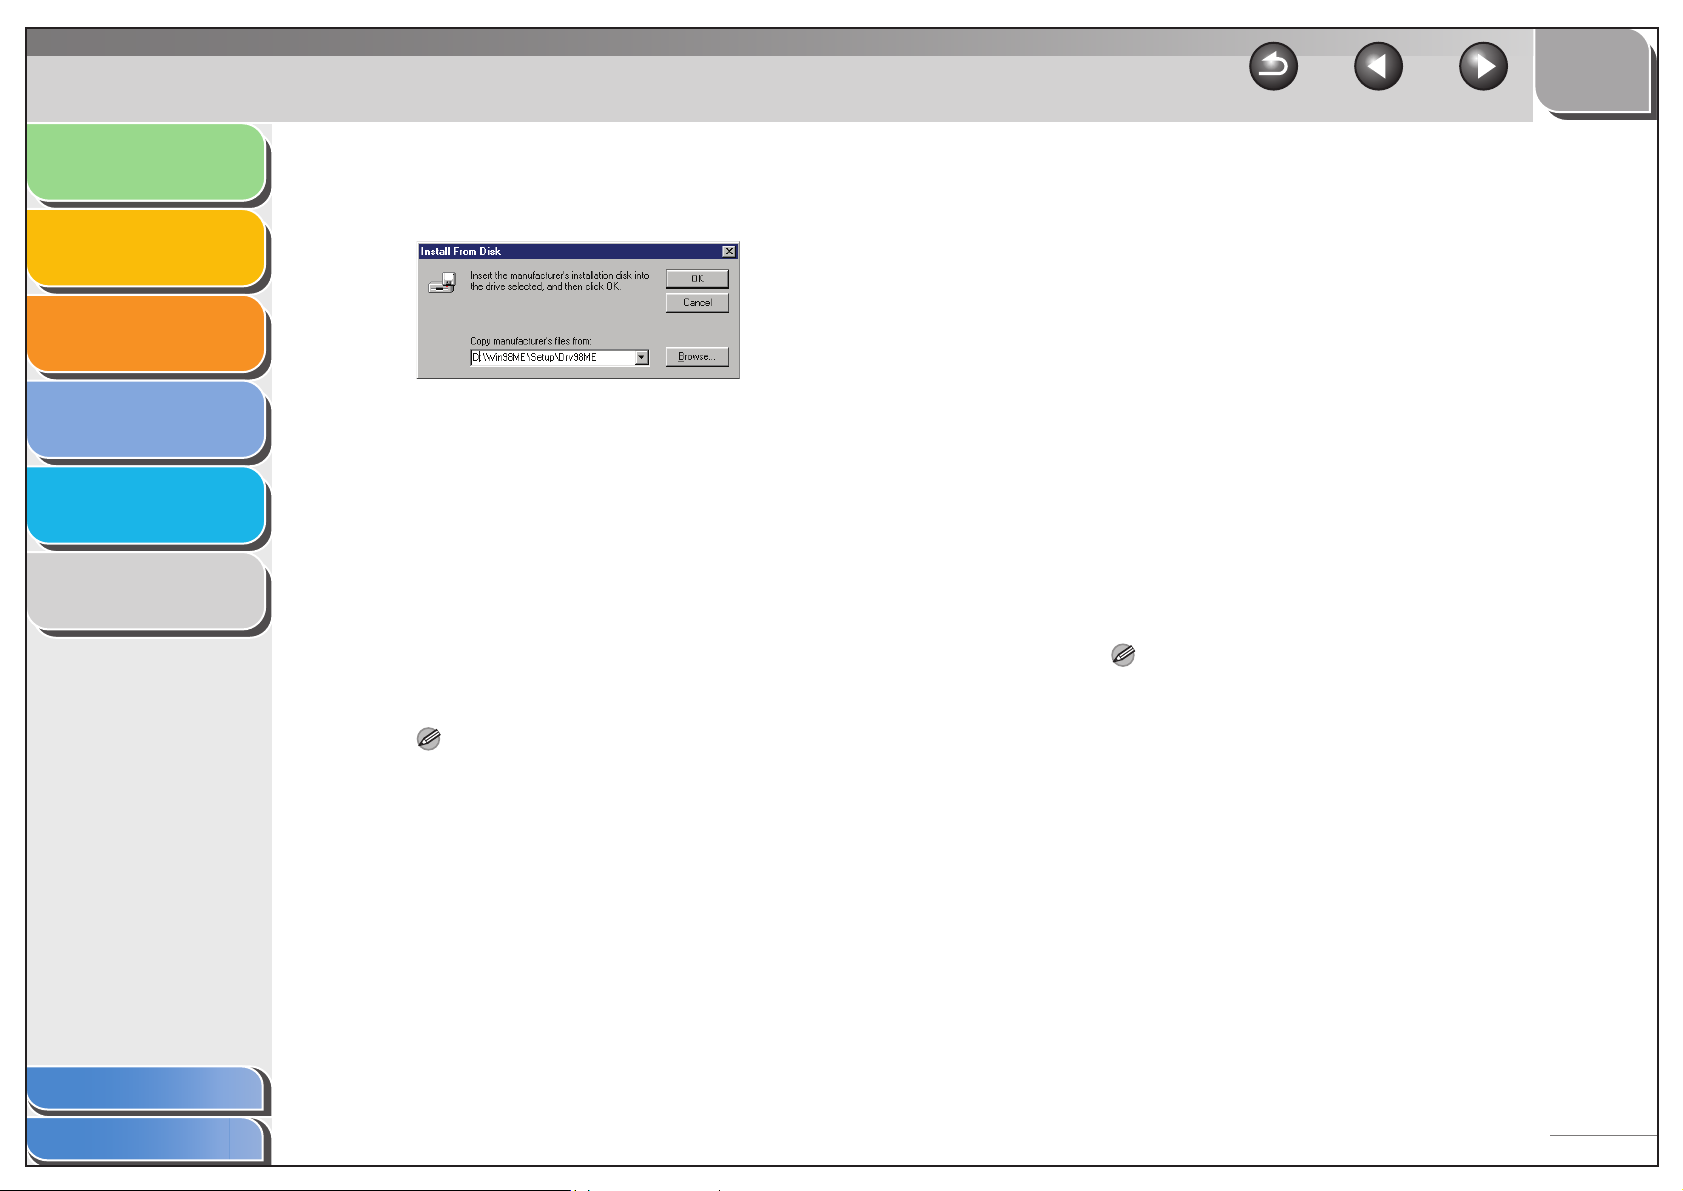
Introduction
Printing
Scanning a
Document
PC Faxing
Troubleshooting
Appendix
1
2
3
4
5
6
8. Select the location containing the printer
driver.
To specify in the default location:
Go to step 9.
To change the location:
Click [Browse].
Select the location containing the printer driver
You can also enter the path name directly in the edit box.
→ click [OK].
9. Click [OK].
10.Enter the name of the printer you want to use
→ click [Next].
If you accept the default name, leave the edit box as it is → click
[Next].
NOTE
If the connection fails, you will be able to install the printer but you
will not be able to use the printer until it comes back online.
11.Follow the instructions on the screen to
complete the installation.
TOP
Back Previous Next
● Windows Vista/7
1. Open the [Printers] folder.
Windows Vista: Click [Start] on the Windows task bar → select
[Control Panel]
Windows 7: Click [Start] menu on the Windows task bar →
[Devices and Printers]
→ click [Printer] under [Hardware and Sound].
2. Open the [Add Printer Wizard] dialog box.
Click [Add a printer] on the toolbar.
3. Click [Add a network, wireless or
Bluetoothprinter].
4. Select a printer from the printer list, then
click [Next].
If the desired printer is not listed, click [The printer that I want isn't
listed] and search for it.
NOTE
– If the printer name is invalid, it means the client cannot connect
the shared printer.
– If a suitable driver is not found, it probably means the server is
a Windows 98/Me computer.
5. Follow the instructions on the screen to
complete the installation.
Table of Contents
Index
2-63
Page 82
Introduction
TOP
Back Previous Next
Printing
Scanning a
Document
PC Faxing
Troubleshooting
Appendix
1
2
3
4
5
6
3 Scanning a Document
Scanning with [Start] on the Machine ................................................... 3-3
Setting the Scanning Function for [Start] ............................................. 3-4
Setting Up [Start] to Operate in a Different Way
from [Save] ............................................................. 3-4
Setting Up [Start] in the [Settings] Dialog Box........ 3-5
Setting Up [Start] in the [Scanners and Cameras]
Folder ..................................................................... 3-5
Scanning with the MF Toolbox ............................................................... 3-7
MF Toolbox Settings................................................................................ 3-9
Scanner Settings .................................................... 3-9
Table of Contents
Index
Save Scanned Image to ....................................... 3-11
External Program (Mail Program)......................... 3-12
Confirmation of the Scanned Image and Exif
Settings (Confirm the Scanned Image) ................ 3-13
3-1
Page 83
Introduction
TOP
Back Previous Next
Printing
Scanning a
Document
PC Faxing
Troubleshooting
Appendix
1
2
3
4
5
6
Scanning an Image from an Application ............................................. 3-15
Creating One PDF File from Two or More Pages ................................ 3-16
Setting Preferences and Scanning with ScanGear MF ...................... 3-17
Switching between Simple Mode and Advanced
Mode .................................................................. 3-17
Using Simple Mode .............................................. 3-17
Using Advanced Mode ......................................... 3-20
Advanced Mode – Specifying the Parameters of
a Scan .................................................................. 3-22
Advanced Mode Settings...................................... 3-23
Determining Resolution ........................................ 3-38
Scanning with the WIA Driver (Windows XP Only)............................. 3-40
Table of Contents
Index
Scanning from the [Scanner and Camera Wizard]
Dialog Box (Windows XP Only) ............................ 3-40
Scanning from an Application (Windows XP/Vista/7
Only) ..................................................................... 3-46
3-2
Page 84
Introduction
TOP
Back Previous Next
Printing
Scanning a
Document
PC Faxing
Troubleshooting
Appendix
1
2
3
4
5
6
Scanning with [Start] on the Machine
You can scan documents and transmit the scanned data to
your computer using the operation panel of the machine.
NOTE
Your machine must be connected via USB and the USB printer driver
must be loaded to scan. This machine does not support network
scanning.
1. Set documents.
2. Press [SCAN] on the machine.
3. Press [Start] on the machine.
If you are asked to select a program to launch, select “MF
Toolbox Ver4.9.” The scanned document will be processed
according to your settings.
When you use [Start] for the first time, a folder with the scanning
date will be created in the [My Pictures] folder in the [My
Documents] folder, and your document will be saved in this folder.
Table of Contents
Index
3-3
Page 85
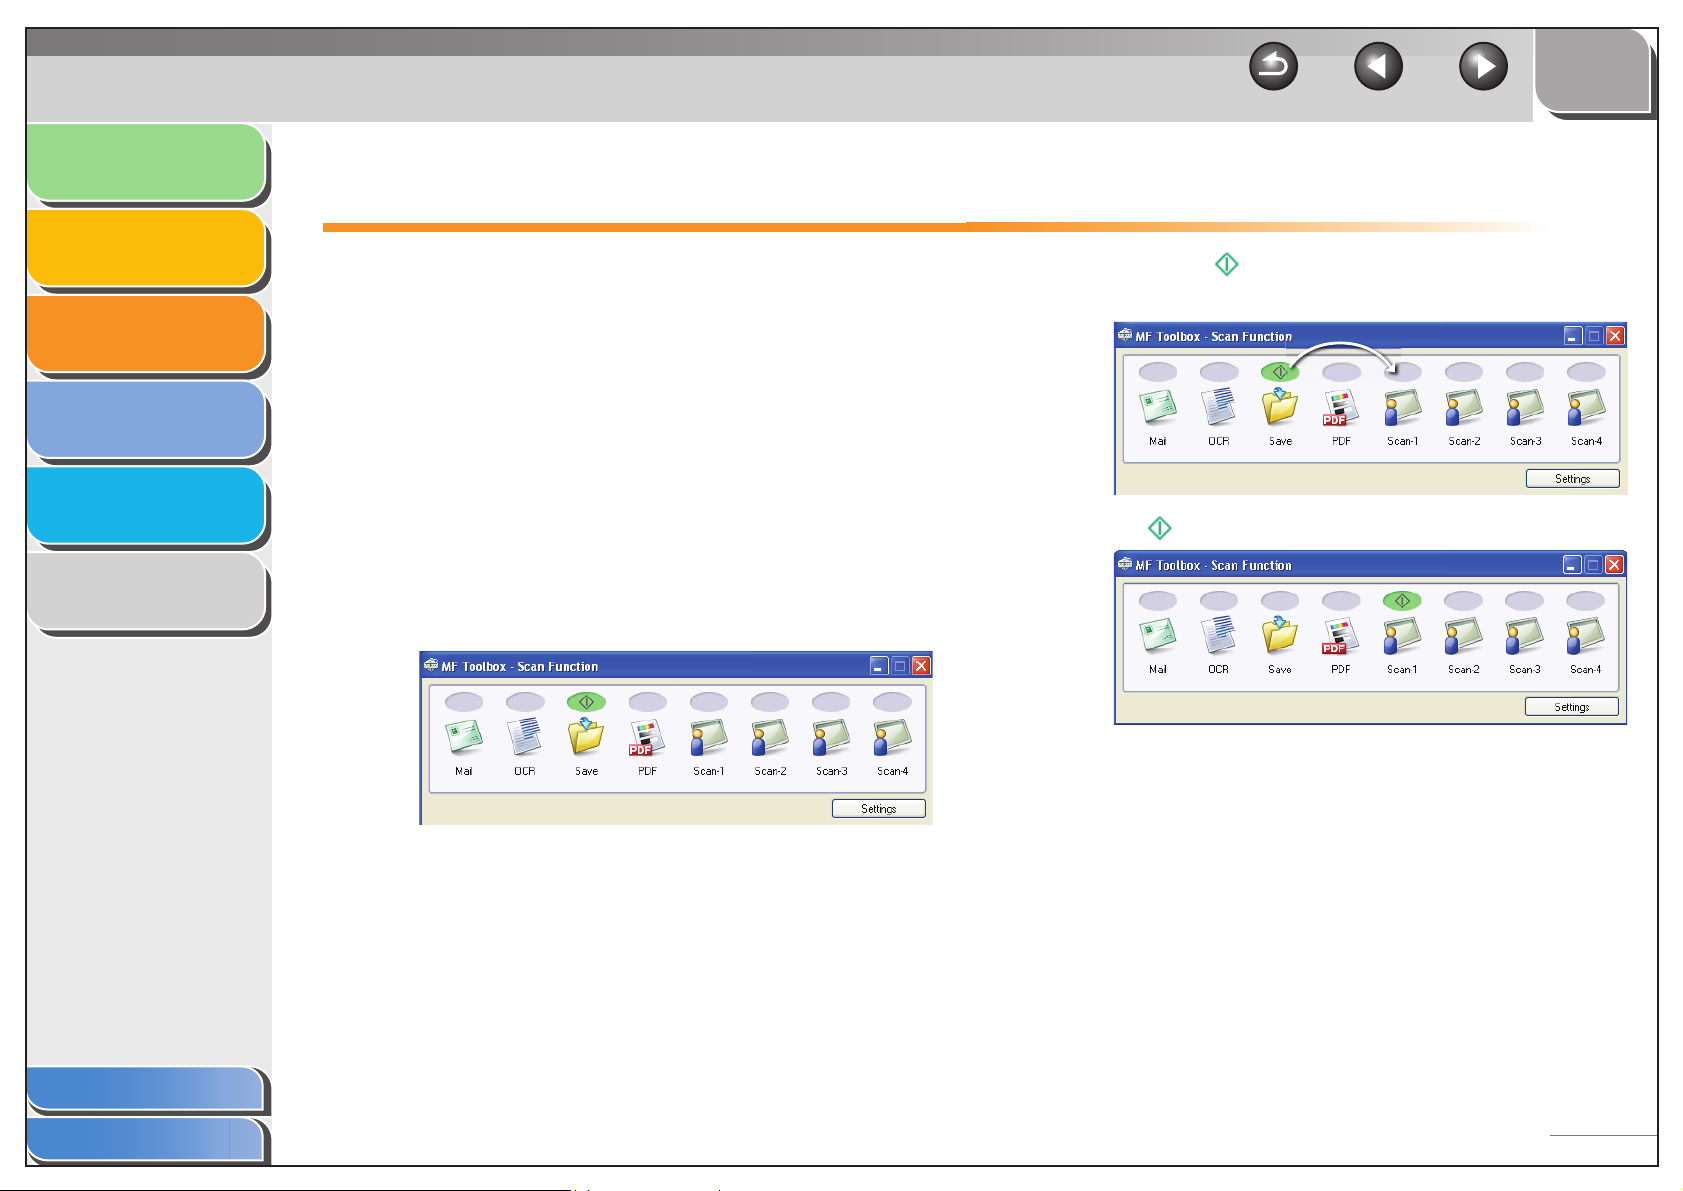
Introduction
TOP
Back Previous Next
Printing
Scanning a
Document
PC Faxing
Troubleshooting
Appendix
1
2
3
4
5
6
Setting the Scanning Function for [Start]
When you scan for the first time using [Start] on the
machine, scanning will occur in the same way as when you
click [Save] in the MF Toolbox. You can change the
scanning function set for [Start] on the machine.
■ Setting Up [Start] to Operate in a
Different Way from [Save]
1. On the Windows desktop, double-click the
[Canon MF Toolbox 4.9] icon to open the MF
Toolbox.
You can also open the MF Toolbox by clicking [Start] on the
Windows task bar → [(All) Programs] → [Canon] → [MF Toolbox
4.9] → [Toolbox 4.9].
2. Drag the mark over the button you want to
select.
The mark will be displayed above the button you select.
Table of Contents
Index
3-4
Page 86
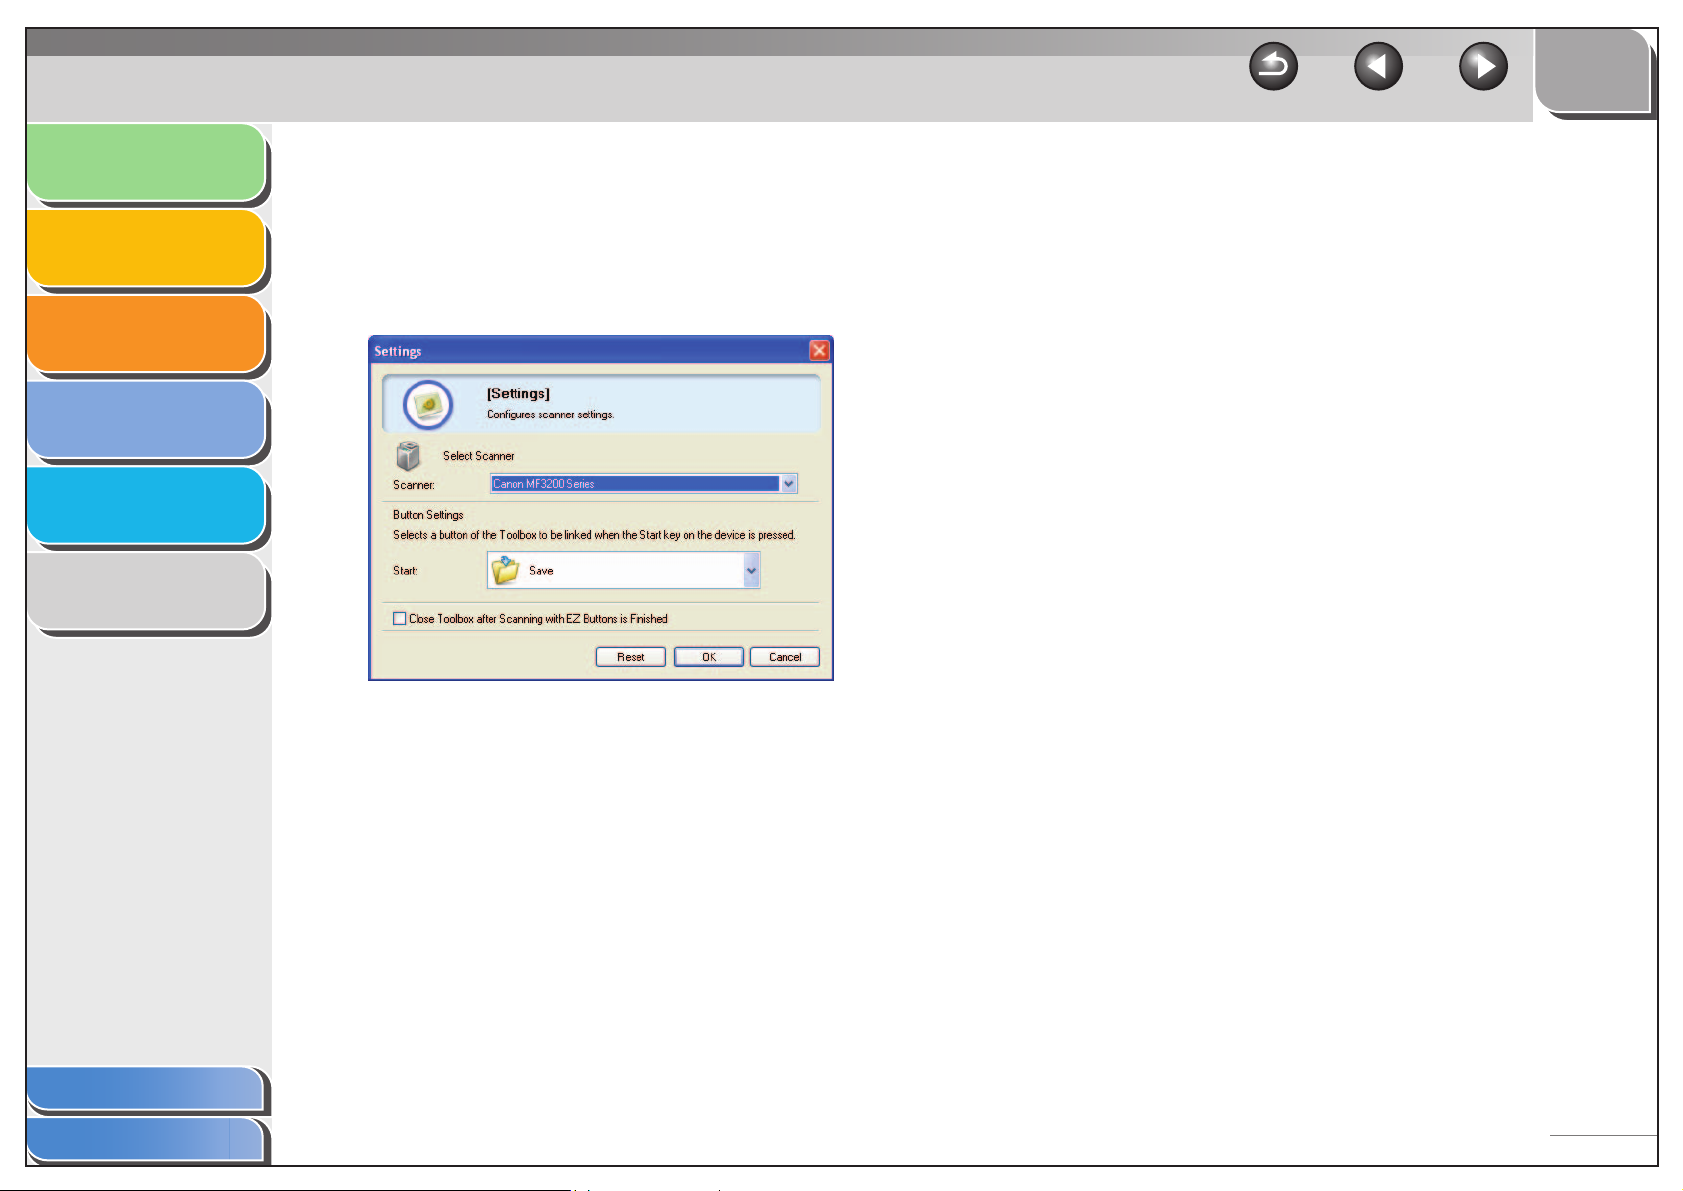
Introduction
TOP
Back Previous Next
Printing
Scanning a
Document
PC Faxing
Troubleshooting
Appendix
1
2
3
4
5
6
■ Setting Up [Start] in the [Settings]
Dialog Box
In the MF Toolbox, click [Settings] to open the [Settings] dialog
box. From the [Start] drop-down list, select the scanning function
you want to link [Start] to, then click [OK].
■ Setting Up [Start] in the [Scanners and
Cameras] Folder
1. Open the [Scanners and Cameras] folder
(Windows 98/2000: the [Scanners and
Cameras Properties] dialog box).
Click [start] on the Windows task bar → select [Control Panel] →
[Printers and Other Hardware] → [Scanners and Cameras]
(Windows 98/Me/2000: [Start] → [Settings] → [Control Panel] →
double-click [Scanners and Cameras], Windows Vista: [Start] →
[Control Panel] → [Hardware and Sound] → [Scanners and
Cameras]. 7: Enter "scanner" in [Search programs and files]
under [Start] on the Windows task bar → click [View scanners
and cameras]. ).
2. Click the corresponding scanner driver icon.
Table of Contents
Index
3-5
Page 87
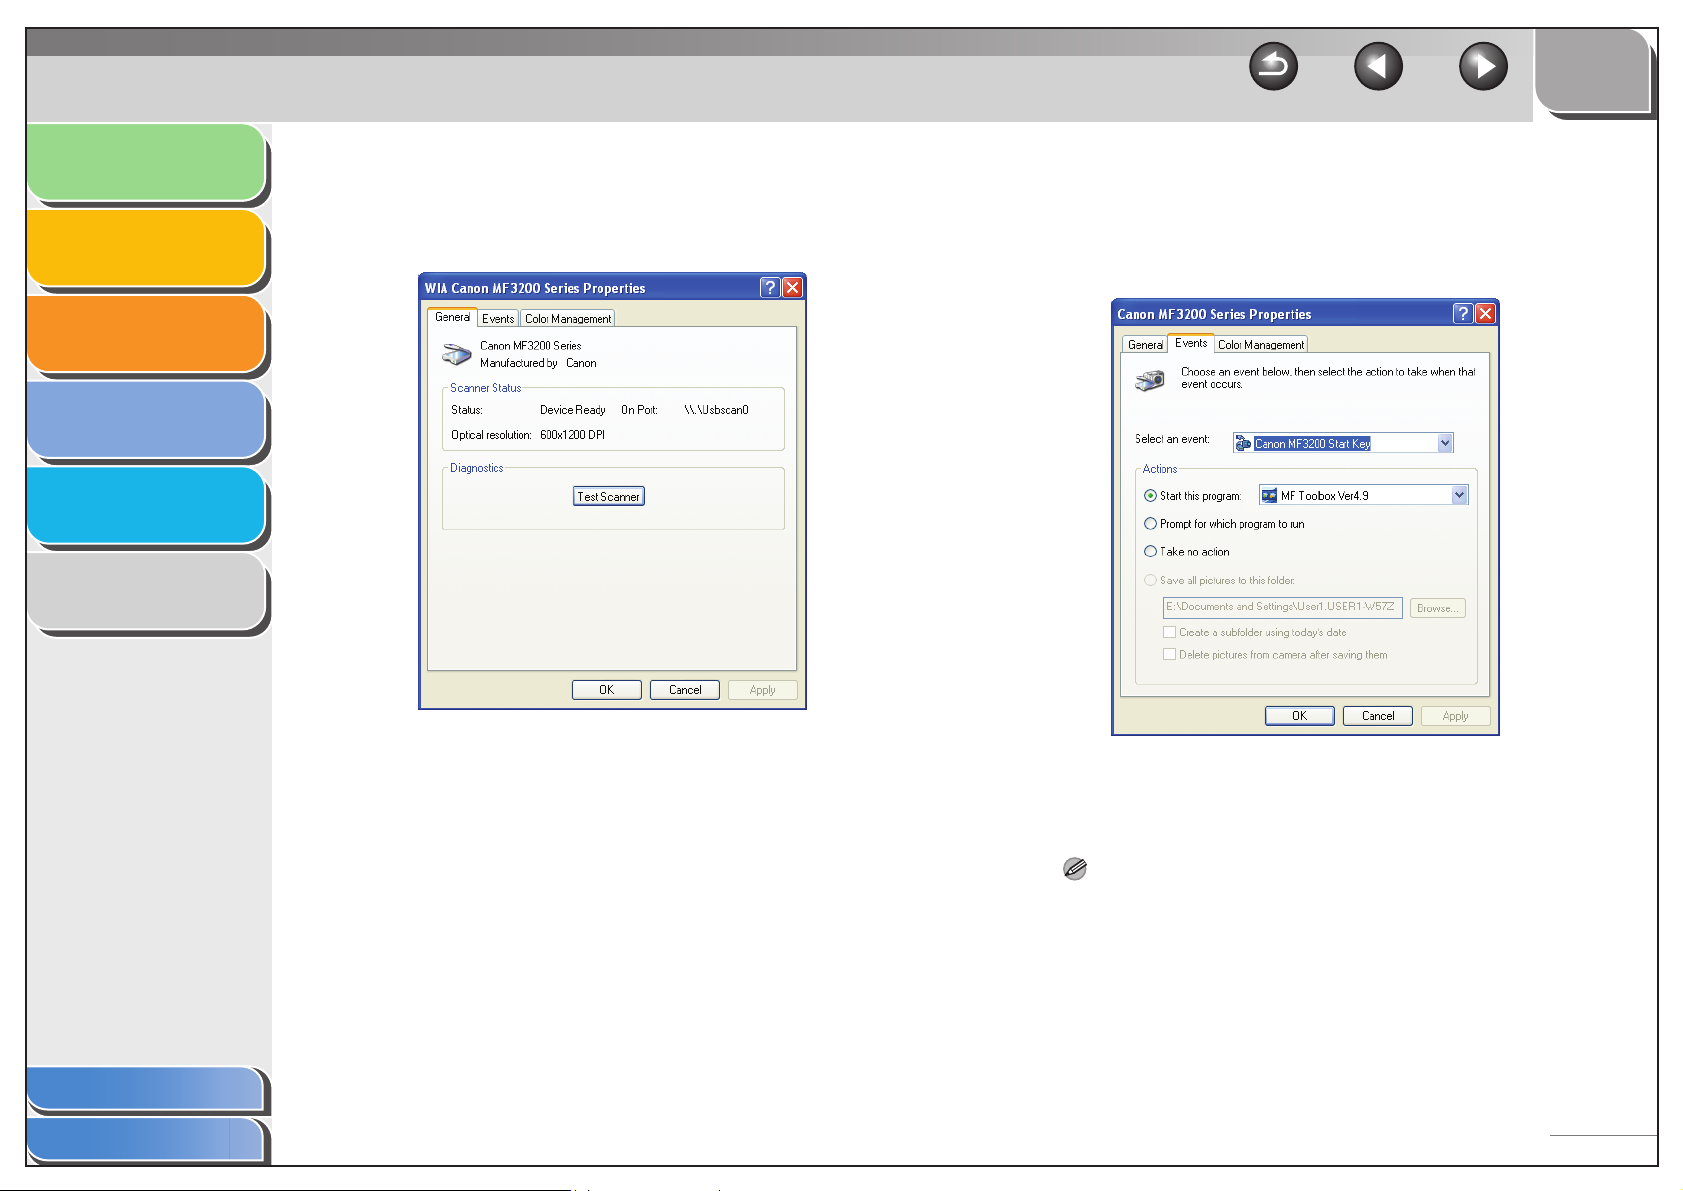
Introduction
Printing
Scanning a
Document
PC Faxing
Troubleshooting
Appendix
1
2
3
4
5
6
3. Select [Properties] from the [File] menu
(Windows 98/2000/Vista/7: Click
[(Scan)Properties]).
TOP
Back Previous Next
4. Specify an action for [Start].
On Windows XP/Vista/7:
Select the [Events] tab → select the option corresponding to your
machine from [Select an event] → select the operation for [Start]
in [Actions] → click [OK].
Table of Contents
Index
On Windows 98/Me/2000:
Select the [Events] tab → select the option corresponding to your
machine from [Scanner events] → select the operation for [Start]
in [Send to this application] → click [OK].
NOTE
If the settings you specified in the scanner property dialog box do not
work immediately, disconnect and reconnect the USB cable, or restart
your computer.
3-6
Page 88
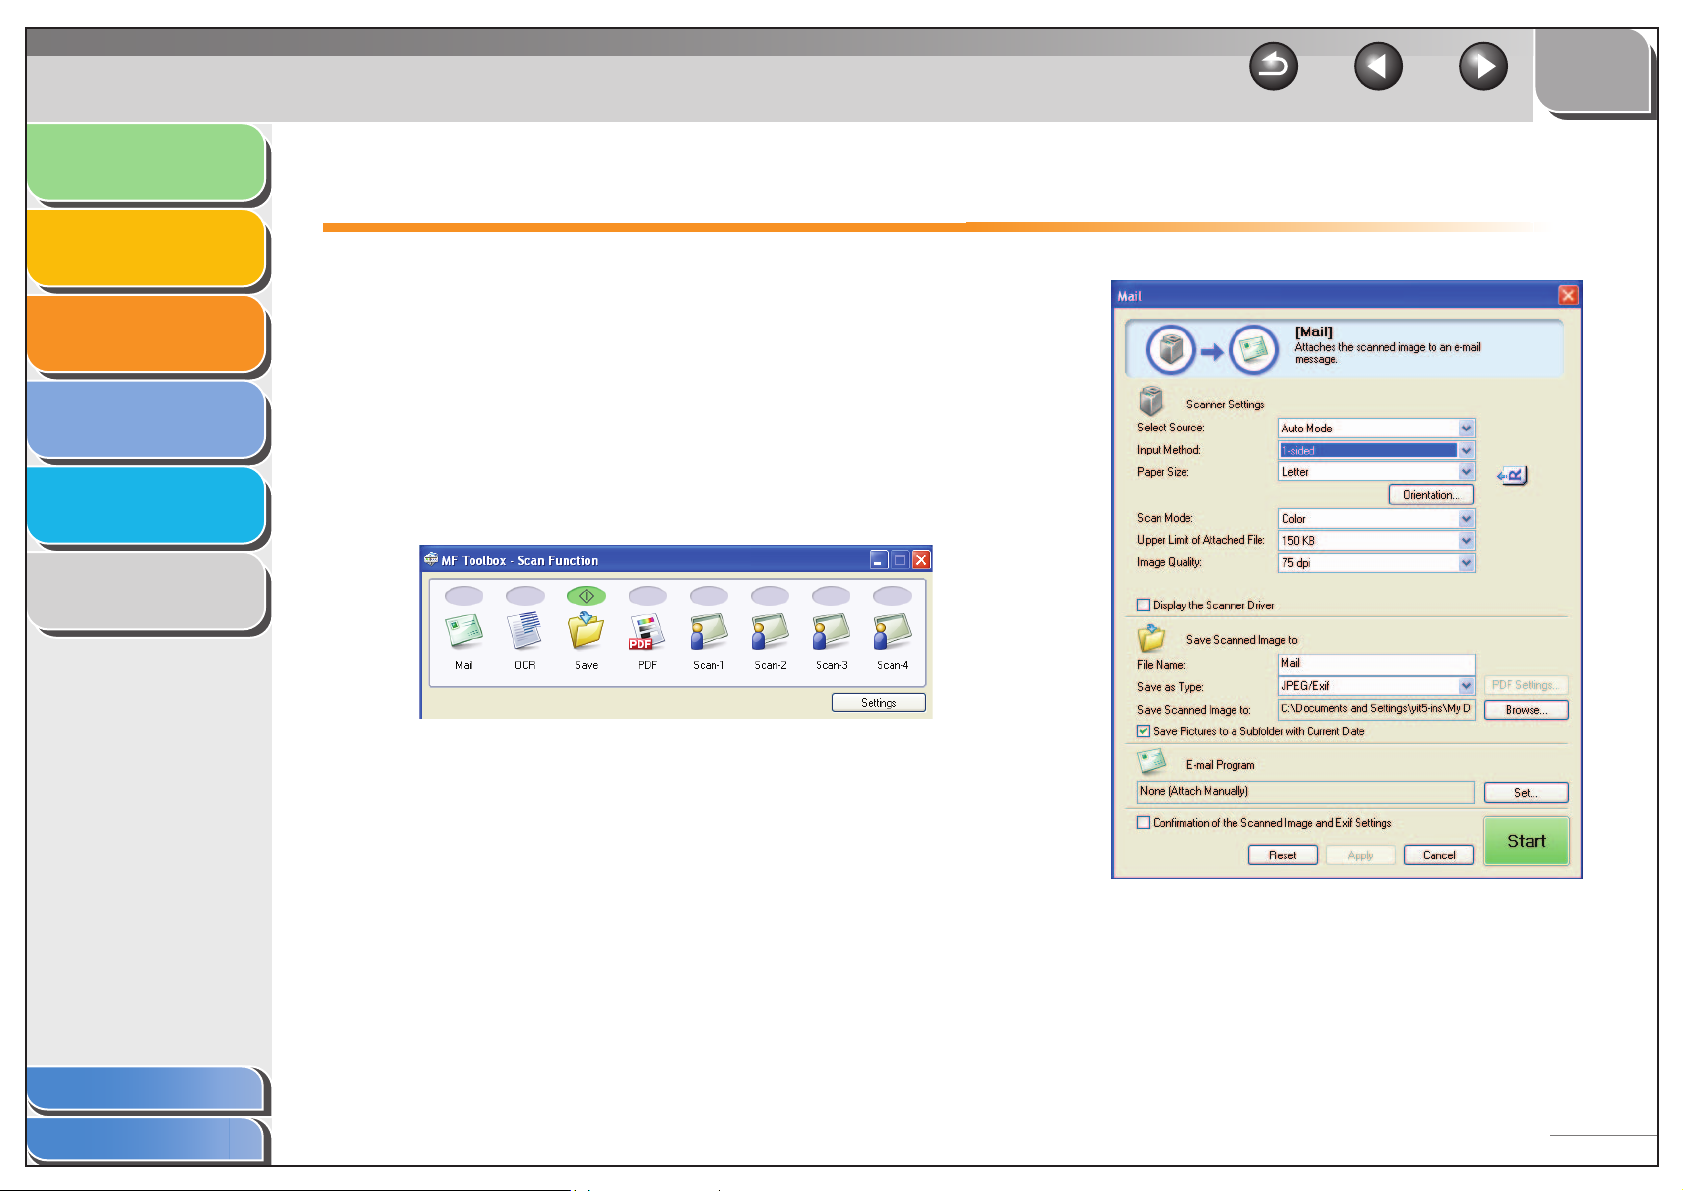
Introduction
TOP
Back Previous Next
Printing
Scanning a
Document
PC Faxing
Troubleshooting
Appendix
1
2
3
4
5
6
Scanning with the MF Toolbox
You can scan a document using the buttons on the MF
Toolbox.
1. Set documents.
2. On the Windows desktop, double-click the
[Canon MF Toolbox 4.9] icon to open the MF
Toolbox.
You can also open the MF Toolbox by clicking [start] on the
Windows task bar → [(All) Programs] → [Canon] → [MF Toolbox
4.9] → [Toolbox 4.9].
3. Click one of the scanning buttons.
[Mail]: The document will be scanned and attached to an e-mail
message in your e-mail application.
[OCR]: The text will be scanned and read by the OCR software.
[Save]: The document will be scanned and saved.
[PDF]: The text will be scanned and saved as a PDF file.
[Scan-1], [Scan-2], [Scan-3], [Scan-4]: The text will be scanned
and appear in the registered application. You can change the
button name by directly entering a new name (up to 8 characters
long) over the button name.
A dialog box appears for each of the buttons.
Example: [Mail] dialog box
Table of Contents
Index
3-7
Page 89
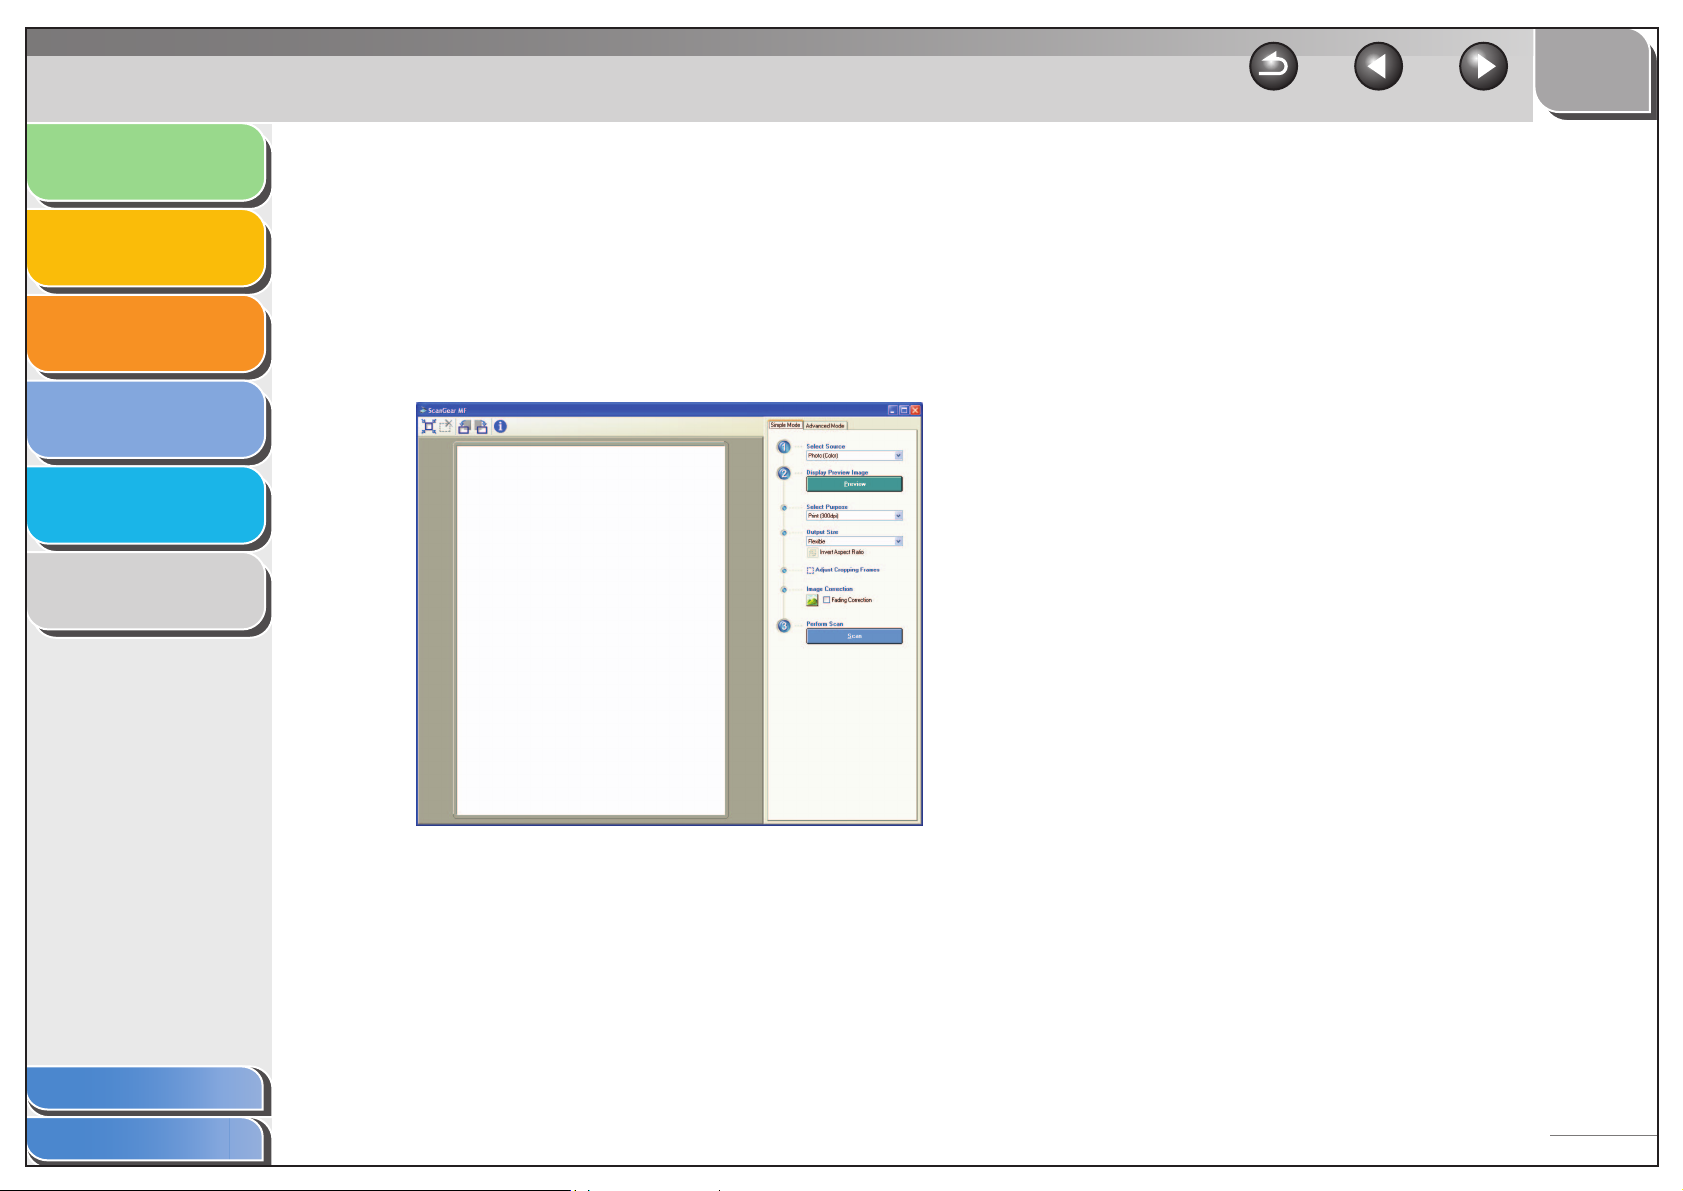
Introduction
Printing
Scanning a
Document
PC Faxing
Troubleshooting
1
2
3
4
5
4. Specify the required settings.
For details, see “MF Toolbox Settings,” on p. 3-9.
Select the [Display the Scanner Driver] check box, to display the
[ScanGear MF] dialog box on step 5. This check box is not
available when scanning with the [OCR] button.
If you want to keep the same settings for future scans, click
[Apply] before clicking [Start].
5. Click [Start].
TOP
Back Previous Next
6. Specify the required settings.
For details, see “Setting Preferences and Scanning with
ScanGear MF,” on p. 3-17.
7. Click [Scan].
If you click [Mail], [Save], or [PDF] in step 3, a folder with the
scanning date will be created in the [My Pictures] folder in the
[My Documents] folder, and your document will be saved in this
folder.
If you have applications registered to the [Mail], [OCR], [PDF],
[Scan-1], [Scan-2], [Scan-3] or [Scan-4] buttons, the scanned
image will be displayed in the application or attached to an e-mail
message after scanning. For details, see “External Program (Mail
Program),” on p. 3-12.
Appendix
Table of Contents
Index
6
For some models, the CD-ROM provided with the machine
contains the application Presto! PageManager which can be
used with the MF Toolbox. Presto! PageManager will be
registered in the [OCR] and [PDF] buttons of the MF Toolbox at
the time of installation.
When the [Display the Scanner Driver] check box is not selected
in step 5, the scanning will start.
3-8
Page 90
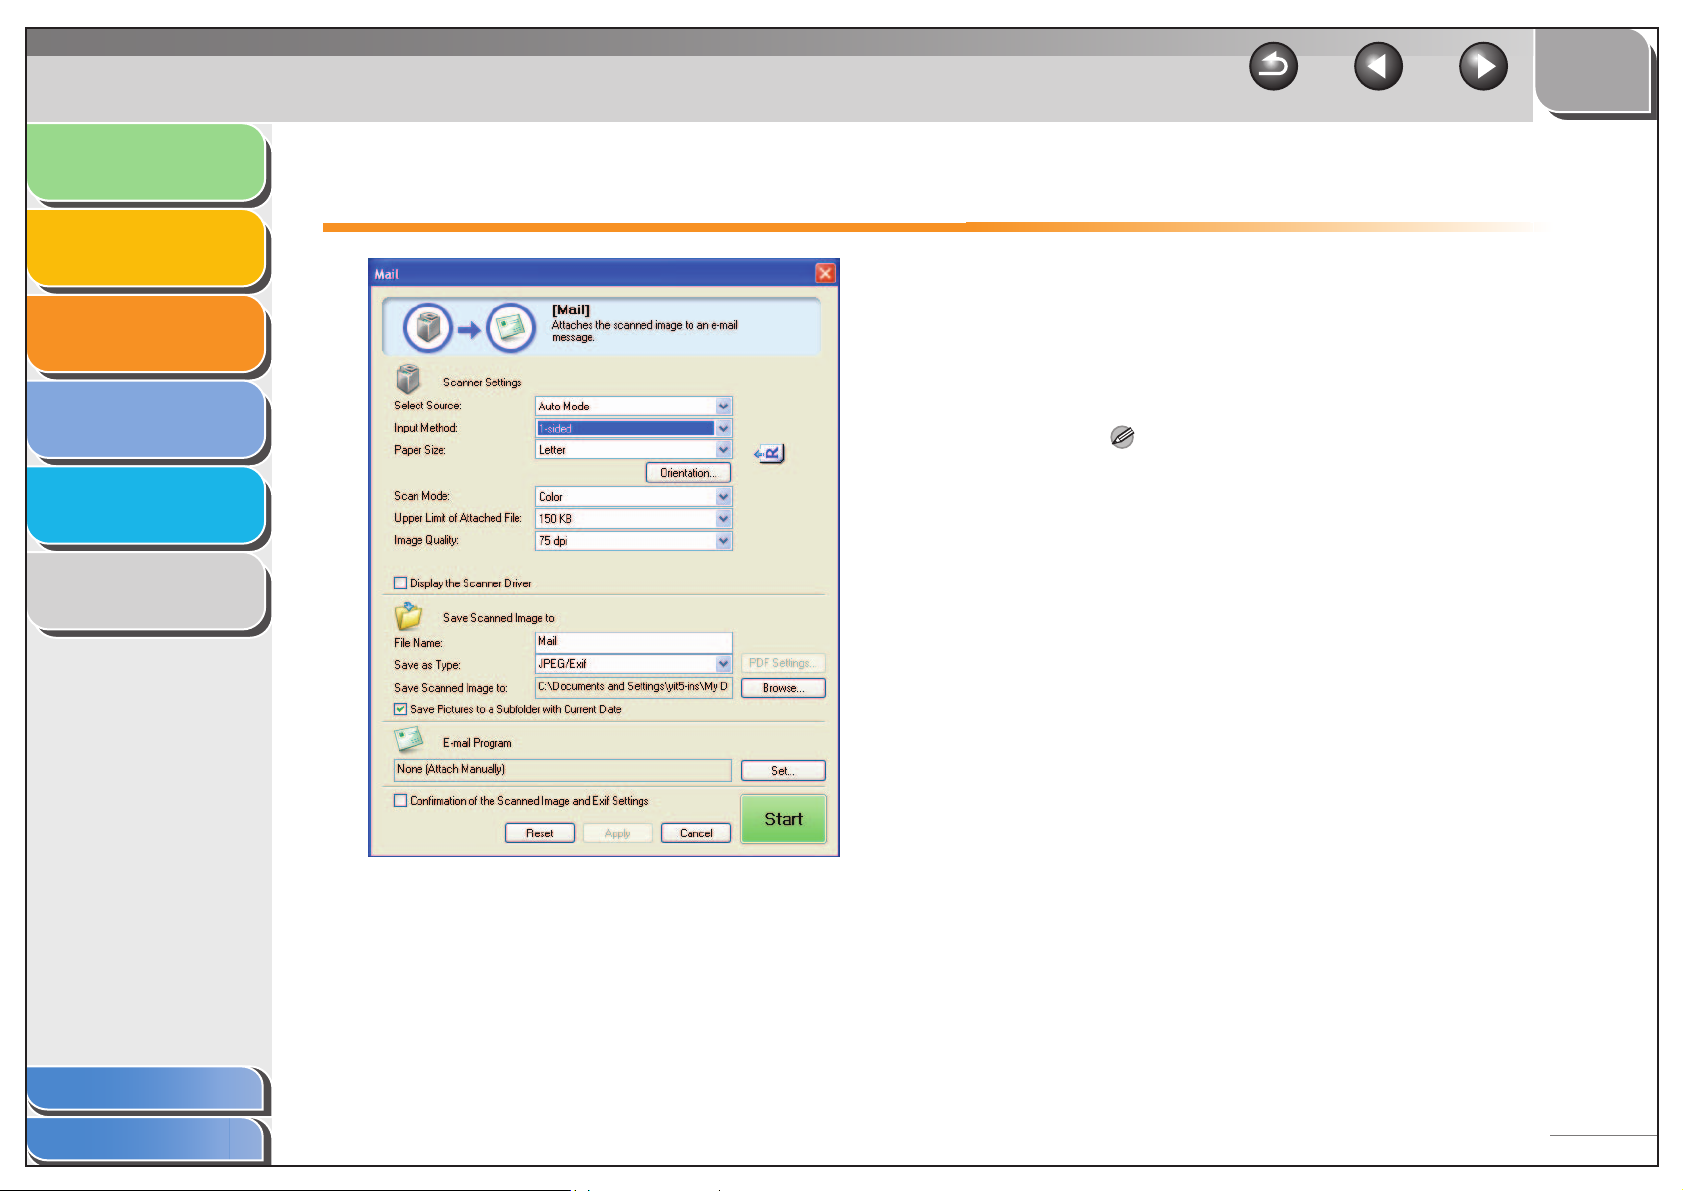
Introduction
TOP
Back Previous Next
Printing
Scanning a
Document
PC Faxing
Troubleshooting
Appendix
1
2
3
4
5
6
MF Toolbox Settings
■ Scanner Settings
You can specify the scanning mode, resolution, document size,
and file size of the scanned image.
[Select Source] Selects where the document is placed.
NOTE
You can select [Platen Glass] only.
[Paper Size] Selects the size and orientation of the
document to be scanned. Selecting
[Custom] opens the [Paper Size Settings]
dialog box which enables you to set the
custom paper size.
Table of Contents
Index
Example: [Mail] dialog box
3-9
Page 91
Introduction
TOP
Back Previous Next
Printing
Scanning a
Document
PC Faxing
Troubleshooting
Appendix
1
2
3
4
5
6
[Scan Mode] Selects the scan mode. The scan modes
you can select differ depending on the MF
Toolbox button you press.
[Black and White]:
Scans document as a black and white
image.
[Black and White (OCR)]:
Scans document as a black and white image
for OCR software.
[Grayscale]:
Scans document as a grayscale image
(similar to a monochrome picture).
[Color]:
Scans document as a color image.
[Color (Magazine)]:
Scans document as a color image with the
Descreen function, which enables you to
reduce the moiré when scanning printed
photographs and pictures.
[Upper Limit of
Attached File]
[Image Quality] Selects the scan resolution up to 600 dpi.
[Display the
Scanner Driver]
Selects an approximate upper size limit
(after compression) for the image you will
send. For an ordinary mail message,
[150 KB] is recommended.
You cannot select this item when [PDF],
[PDF (Multiple Pages)] or [PDF (Add Page)]
is selected in [Save as Type].
When scanning using the [OCR] button, or
[PDF], [PDF (Single Page)], [PDF (Multiple
Pages)], or [PDF (Add Page)] is selected in
[Save as Type], you can only select up to
400 dpi.
When scanning using the [Mail] button, the
resolution you can select depends on the
setting in [Upper Limit of Attached File].
If you select this check box, all items in the
[Scanner Settings] become invalid, and
when [Start] is clicked the [ScanGear MF]
dialog box appears and enables you to make
advanced settings for scanning.
This check box is not available when
scanning with the [OCR] button.
Table of Contents
Index
3-10
Page 92
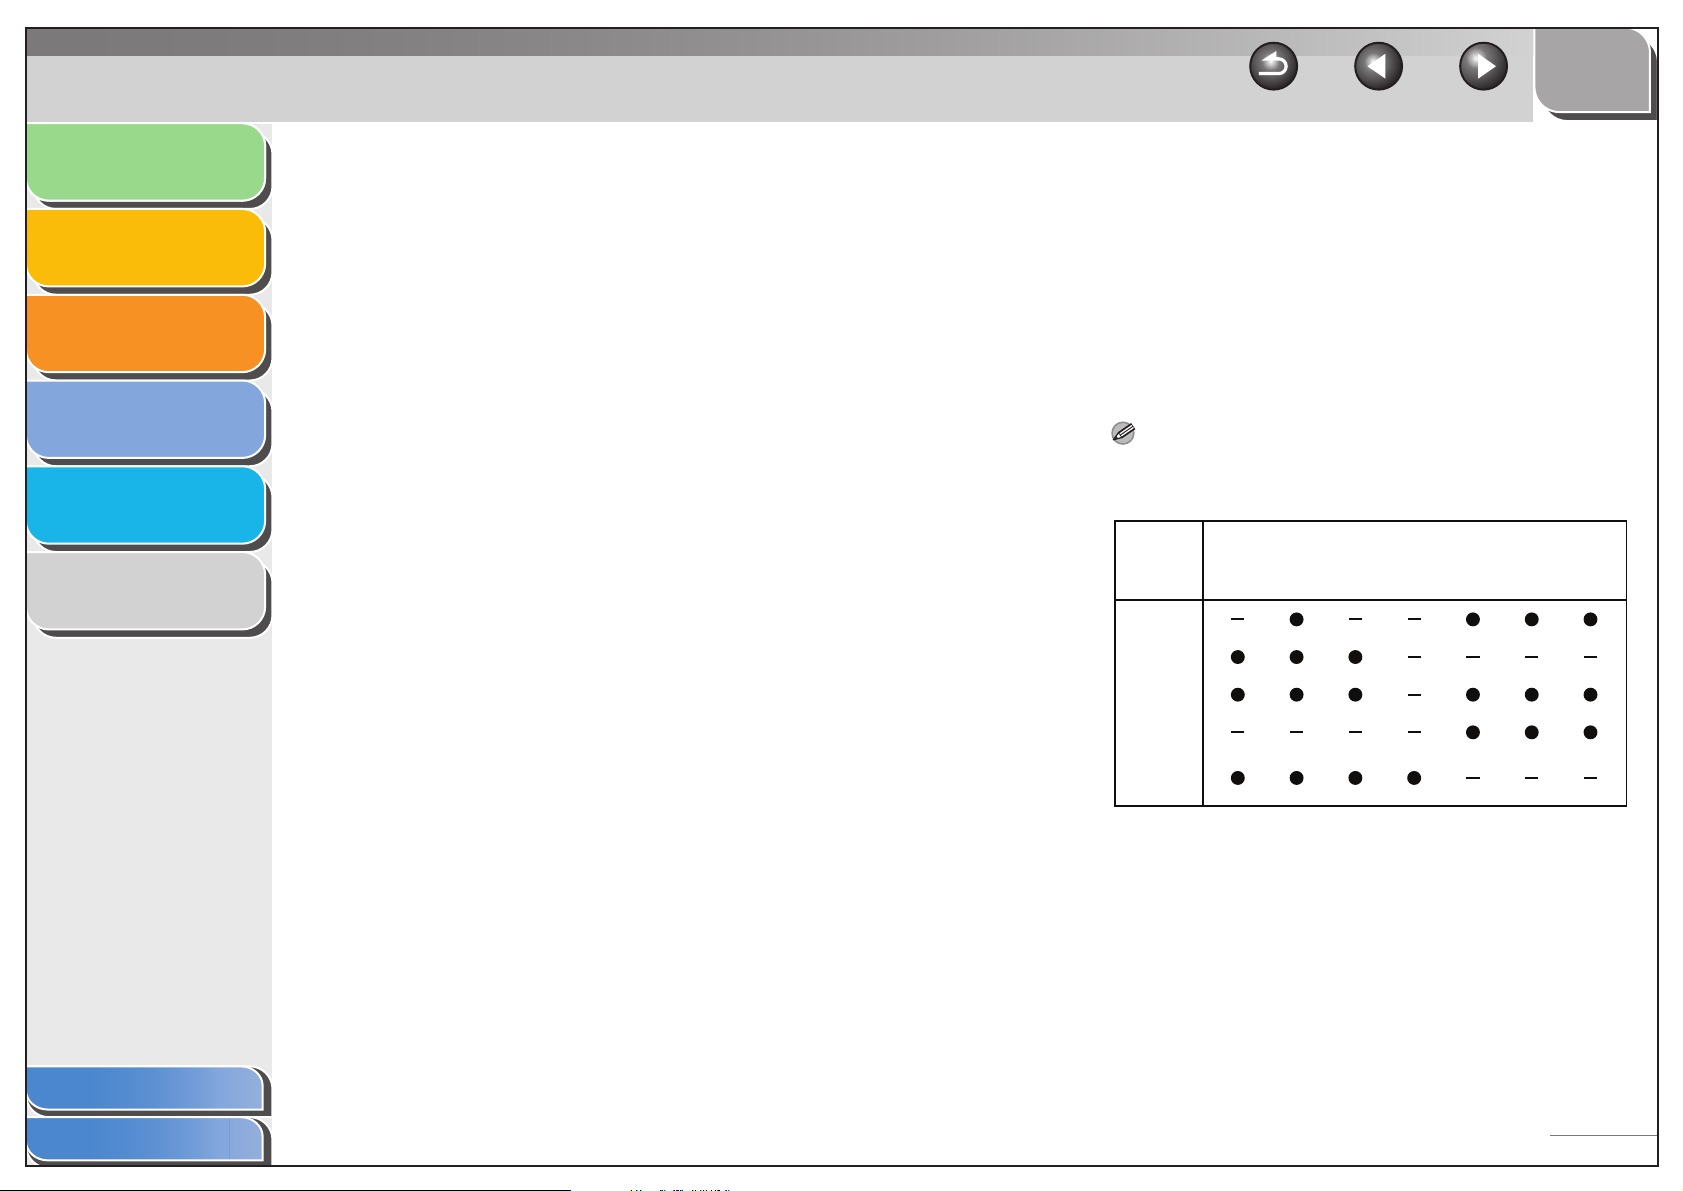
Introduction
TOP
Back Previous Next
Printing
Scanning a
Document
PC Faxing
Troubleshooting
Appendix
1
2
3
4
5
6
■ Save Scanned Image to
You can specify the file name, file format, and location to save
the scanned image. If you select PDF as a file format, you can
also specify the detailed settings for the PDF file.
[File Name] Enter a file name for the scanned image.
If you save another file with the same name,
four digits starting from 0001 will be attached
after the file name.
[Save as Type] Specifies the file type to save the scanned
image.
[BMP]:
Bitmap format.
[JPEG/Exif]:
JPEG/Exif format. This option is available
when [Grayscale], [Color] or [Color
(Magazine)] is selected in [Scan Mode].
[TIFF]:
TIFF format.
[PDF]:
PDF format.
[PDF(Single Page)]:
Creates a single-page PDF file.
[PDF (Multiple Pages)]:
Creates one PDF file from two or more
scanned pages. (See “Creating One PDF
File from Two or More Pages,” on p. 3-16.)
[PDF (Add Page)]:
Adds the scanned image to the last page of
an existing PDF file that was created with
the MF Toolbox.
NOTE
– The type of file which can be saved with each button is shown
below.
JPEG/
BMP TIFF PDF
[Mail]
[OCR]
[Save]
[PDF]
[Scan-1]to
[Scan-4]
– When [PDF], [PDF (Single Page)], [PDF (Multiple Pages)], or
[PDF (Add Page)] is selected and if an error message appears
indicating that the image size is too large, reduce the data size
of the scanned image. For details, see “Output Settings,” on
p. 3-25.
Exif
PDF
(Single
Page)
(Multiple
Pages)
PDF
PDF
(Add
Page)
Table of Contents
Index
3-11
Page 93
Introduction
TOP
Back Previous Next
Printing
Scanning a
Document
PC Faxing
Troubleshooting
Appendix
1
2
3
4
5
6
[PDF Settings] Opens the [PDF Settings] dialog box which
enables you to make advanced settings of
the PDF file. (See “Creating One PDF File
from Two or More Pages,” on p. 3-16.) This
button appears when [PDF], [PDF (Single
Page)], [PDF (Multiple Pages)] or [PDF (Add
Page)] is selected in [Save as Type].
[Save Scanned
Image to]
[Add Scanned
Image to]
Shows the location to save the scanned
images when an option other than [PDF
(Add Page)] is selected in [Save as Type]. To
change the location, click [Browse]
a folder
When you scan for the first time, a folder with
the scanning date will be created in the [My
Pictures] folder in the [My Documents]
folder, and your document will be saved in
this folder.
This item appears instead of [Save Scanned
Image to] when [PDF (Add Page)] is
selected in [Save as Type]. You can select
the PDF file to which you want to add the
scanned image.
→ click [OK].
→ select
■ External Program (Mail Program)
When scanning using the [OCR], [PDF], [Scan-1], [Scan-2],
[Scan-3] or [Scan-4] buttons, you can specify an application to
be used to display the scanned image. Click [Set]
application to use
application by dragging and dropping the application icon onto
the dialog box.
To delete the link to the application, click [Delete]
When scanning using the [Mail] button, you can specify an
e-mail software to which you want to attach the scanned image.
The MF Toolbox is compatible with e-mail software such as
Outlook Express, Microsoft Outlook, EUDORA, Netscape
Messenger and Windows Mail (Windows Vista only). Click [Set]
→ select the application to use → click [OK].
If [None (Attach Manually)] is displayed, you need to attach the
image file manually.
→ click [Open]. You can also specify an
→ select the
Table of Contents
Index
[Save Pictures to
a Subfolder with
Current Date]
Select this check box to create a folder with
current date (e.g. 2005-12-31) in the
specified location and save the scanned
images in this folder.
3-12
Page 94
Introduction
TOP
Back Previous Next
Printing
Scanning a
Document
PC Faxing
Troubleshooting
Appendix
1
2
3
4
5
6
■ Confirmation of the Scanned Image and
Exif Settings (Confirm the Scanned
Image)
You can preview the scanned images as thumbnail images, and
specify the file type and location to save them.
NOTE
You cannot use this function when scanning with the [OCR] button.
Select [Confirmation of the Scanned Image and Exif Settings]
(for the [PDF] button, [Confirm the Scanned Image])
[Start]. When the scanning is complete, the thumbnail of the
scanned image is displayed.
Confirm the thumbnail image
→ press [Save] or [Forward].
[Save as Type] Specifies the file type to save the scanned
image. The available file types are the same
as those listed in “Save Scanned Image to,”
on p. 3-11.
[Exif Settings] Opens the [Exif Settings] dialog box which
enables you to set the Exif information when
[JPEG/Exif] is selected in [Save as Type].
(See “Exif Settings,” on p. 3-14.)
→ specify the file type and location
→ click
[PDF Settings] Opens the [PDF Settings] dialog box which
enables you to make advanced settings of
the PDF file. (See “Creating One PDF File
from Two or More Pages,” on p. 3-16.) This
button appears when [PDF], [PDF (Single
Page)], [PDF (Multiple Pages)] or [PDF (Add
Page)] is selected in [Save as Type].
[Save Scanned
Image to]
[Add Scanned
Image to]
[Save Pictures to
a Subfolder with
Current Date]
Specifies the location to save the scanned
image.
This item appears instead of [Save Scanned
Image to] when [PDF (Add page)] is
selected in [Save as Type]. You can select
the PDF file to which you want to add the
scanned image.
Select this check box to create a folder with
current date inside the specified location and
save the scanned images in this folder. This
check box appears when the file type other
than [PDF (Add Page)] is selected in [Save
as Type].
Table of Contents
Index
3-13
Page 95
Introduction
TOP
Back Previous Next
Printing
Scanning a
Document
PC Faxing
Troubleshooting
Appendix
1
2
3
4
5
6
[Forward] Press to forward the scanned images to the
application you specified in the [Mail
Program] or the [External Program] setting.
[Save] Press to save the scanned images in the
specified location. This button appears
instead of [Forward].
[Cancel] Cancels the operation and returns to the
previous window. Deletes all the images
scanned in the operation.
Exif Settings
You can attach extra information in the EXIF format, such as the
description of the image, the date when the image was
scanned, etc., to the JPEG files. Select a scanned image from
the drop-down list to view and add information for the image.
[Basic
Information]
[Advanced
Information]
[Apply the Same
Setting of
Input Items
Automatically]
Displays the information automatically
acquired by scanning.
Displays the extra information you enter.
Select this check box to use the same values
you have specified in the previous scanning
operation.
Table of Contents
Index
3-14
Page 96
Introduction
TOP
Back Previous Next
Printing
Scanning a
Document
PC Faxing
Troubleshooting
Appendix
1
2
3
4
5
6
Scanning an Image from an Application
You can scan an image from a TWAIN- or WIA- (Windows
XP/Vista/7 only) compliant application and use the image in
that application. The following is an example of the
procedure.
1. Set documents.
2. Open the application you want to use.
3. Select the command to scan.
4. Select the scanner driver to be used.
With Windows XP/Vista/7, you can use the ScanGear MF or the
WIA driver as the scanner driver.
NOTE
You may not select the TWAIN driver on the ‘Paint’ tool that is
attached to Windows XP.
5. Specify the scanner settings → click [Scan].
For details, see “Setting Preferences and Scanning with
ScanGear MF,” on p. 3-17, or “Scanning with the WIA Driver
(Windows XP Only),” on p. 3-40.
Table of Contents
Index
3-15
Page 97
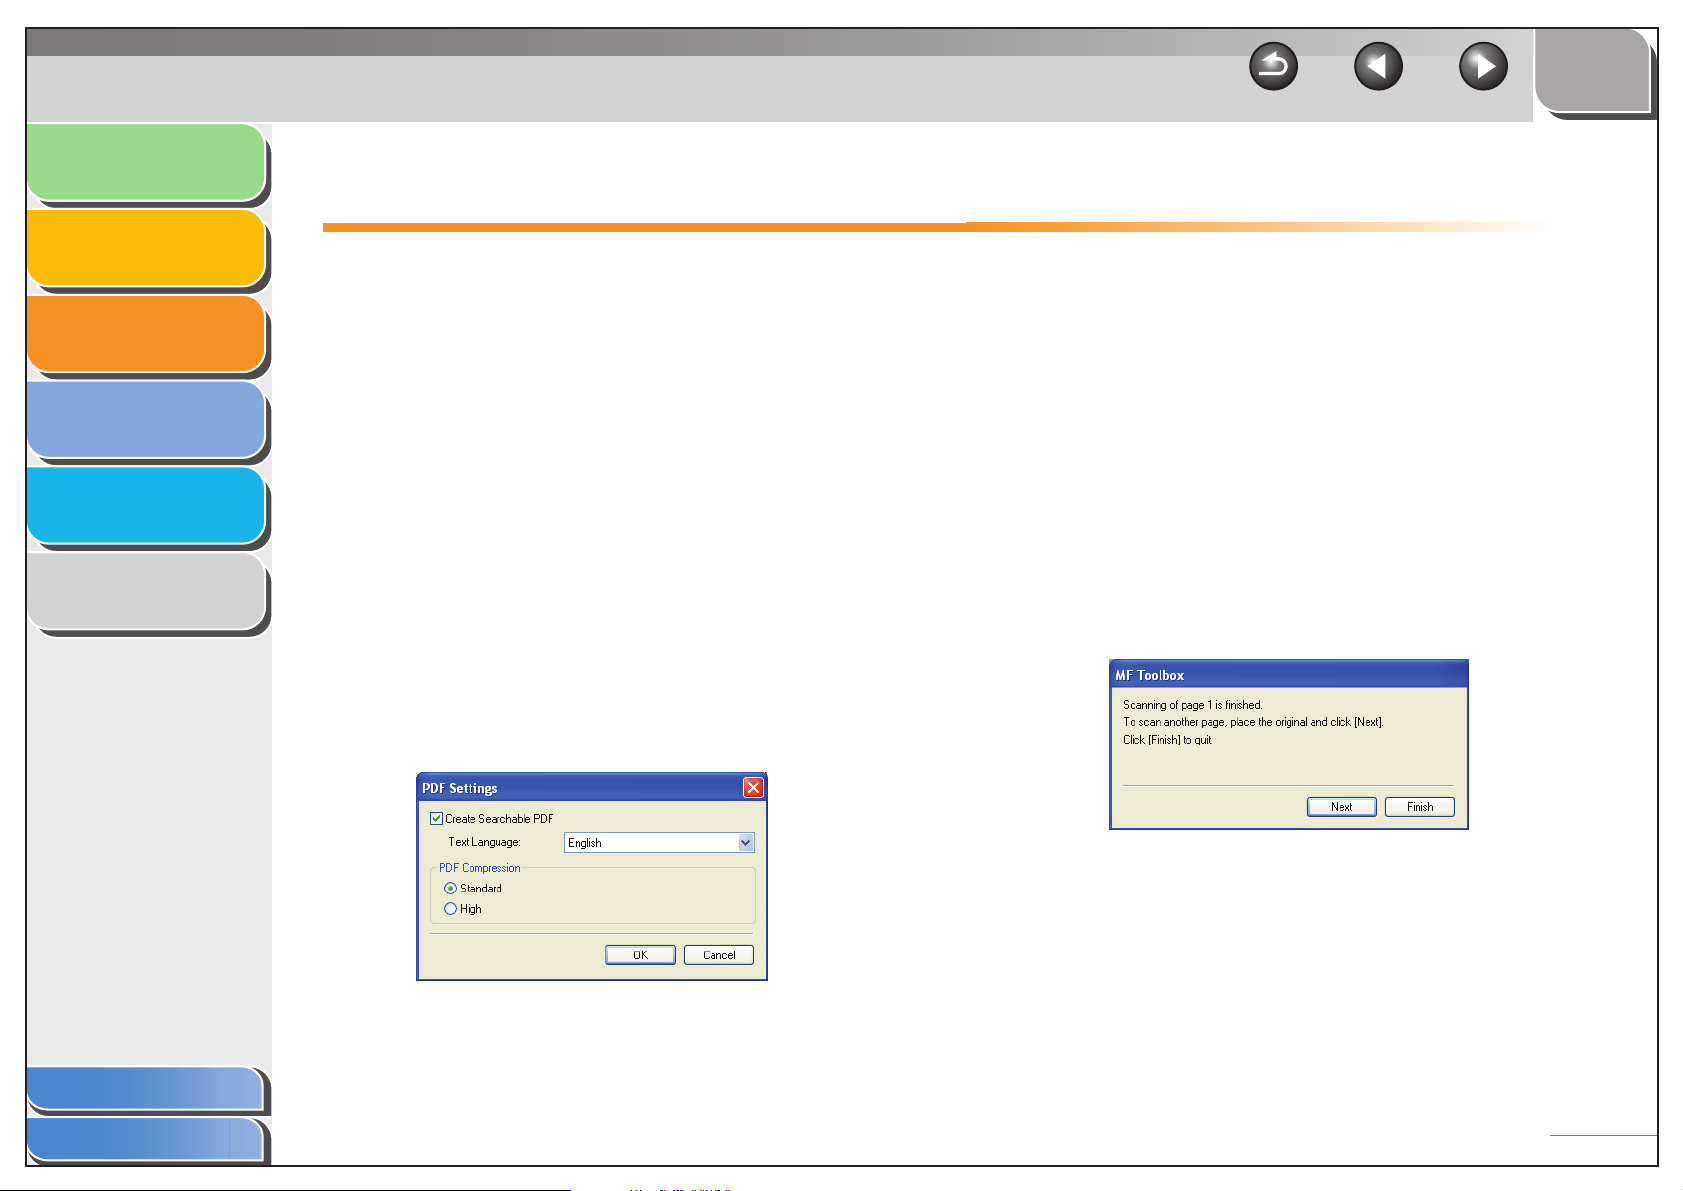
Introduction
TOP
Back Previous Next
Printing
Scanning a
Document
PC Faxing
Troubleshooting
Appendix
1
2
3
4
5
6
Creating One PDF File from Two or More Pages
You can scan two or more pages and make them into one
PDF file.
1. Set documents.
2. Double-click the [Canon MF Toolbox 4.9] icon
on the Windows desktop to open the MF
Toolbox.
You can also open the MF Toolbox by clicking [start] on the
Windows task bar → [(All) Programs] → [Canon] → [MF Toolbox
4.9] → [Toolbox 4.9].
3. Click [PDF].
4. Select [PDF (Multiple Pages)] in [Save as
Type].
5. Specify other required settings → click [PDF
Settings].
The [PDF Settings] dialog box appears.
6. Specify the required settings → click [OK].
[Create Searchable PDF]: Converts the characters in the
document to text data and makes the PDF document searchable
with keywords.
[Text Language]: Select the language of the text to be scanned.
The characters may be recognized more accurately if you select
[English] from this drop-down list and set [Image Quality] to [300
dpi] or higher in [Scanner Settings]. (See “Scanner Settings,” on
p. 3-9.)
[PDF Compression]: Select [High] for color images such as
photos or illustrations to be further compressed, reducing the file
size. For the other type of images, select [Standard].
7. Click [Start].
When you place the document on the platen glass, the following
dialog box appears as each page is scanned.
Table of Contents
Index
To continue to scan, place the next page and click [Next]. When
scanning is complete, click [Finish].
3-16
Page 98
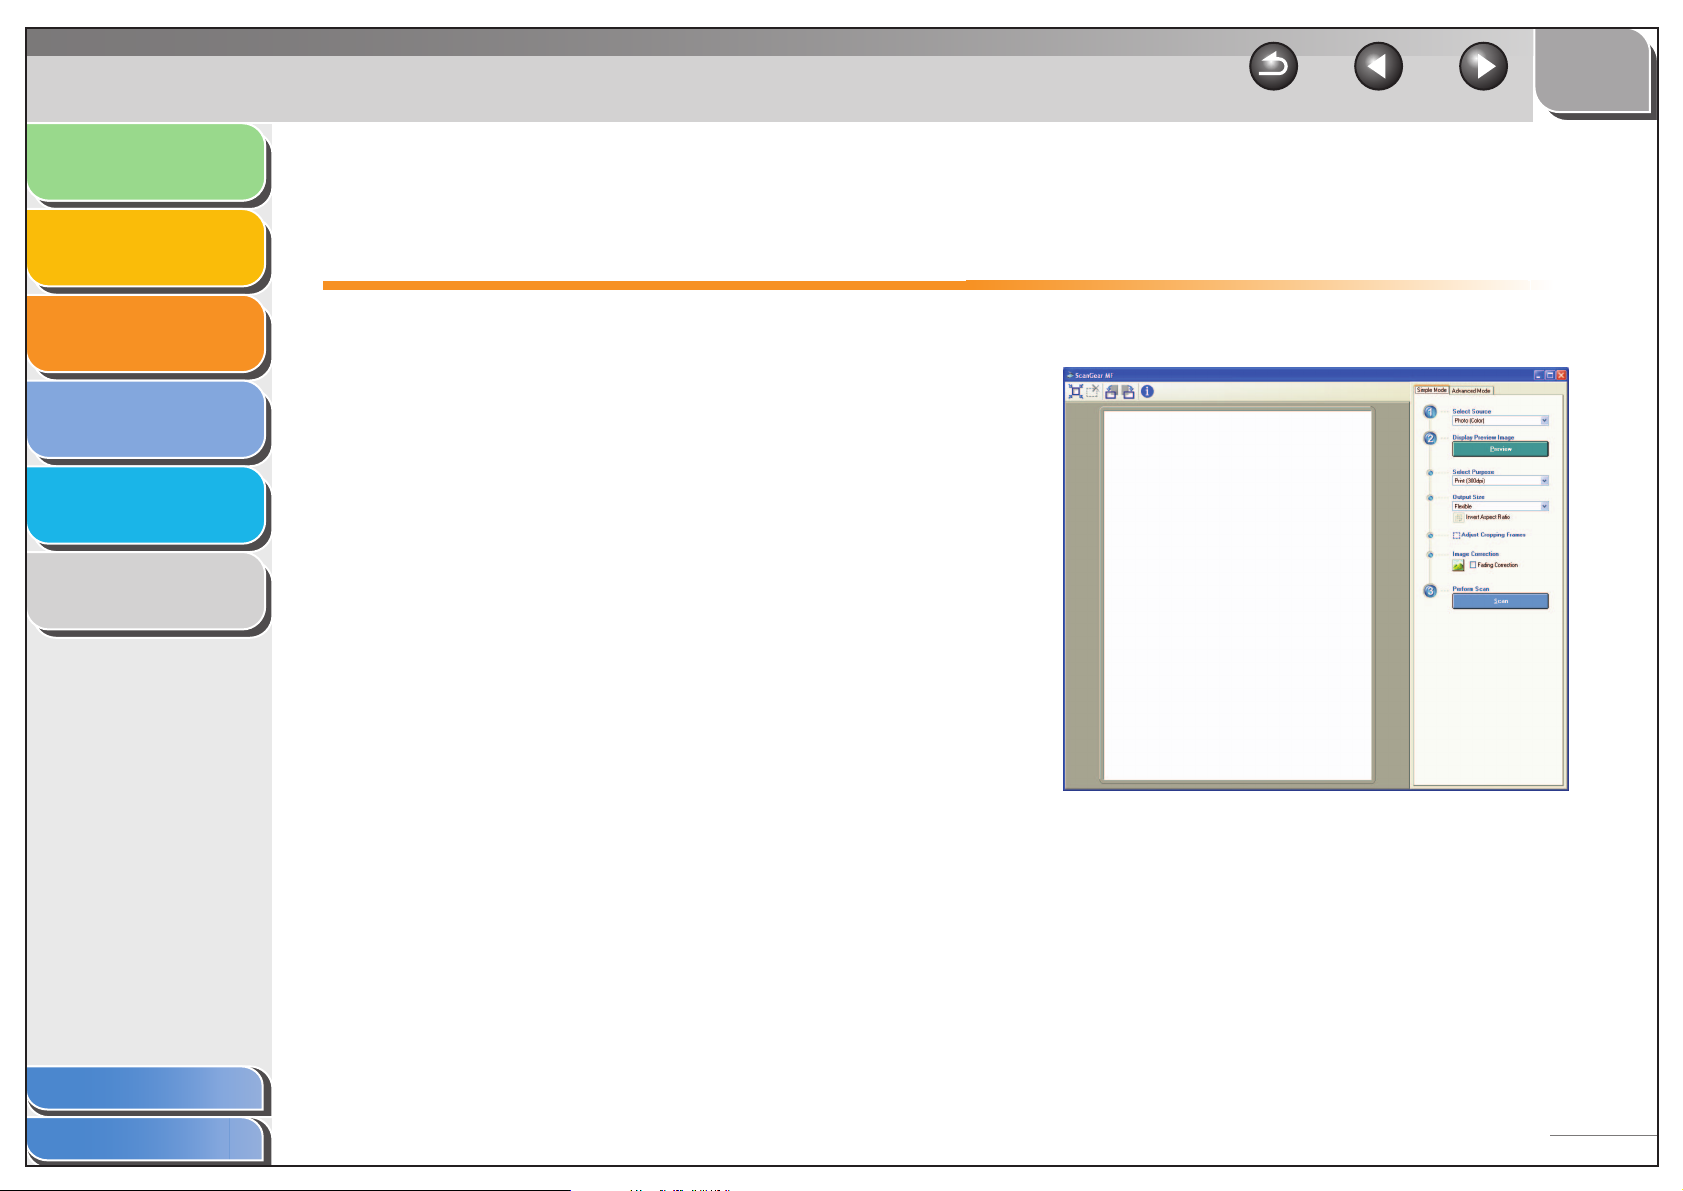
Introduction
TOP
Back Previous Next
Printing
Scanning a
Document
PC Faxing
Troubleshooting
Appendix
1
2
3
4
5
6
Setting Preferences and Scanning with ScanGear MF
The ScanGear MF enables you to preview the image to be
scanned and make detailed adjustments for the image. To
use the ScanGear MF, select [Display the Scanner Driver] in
the MF Toolbox, or scan from the application.
■ Switching between Simple Mode and
Advanced Mode
The ScanGear MF has two modes: [Simple Mode] and
[Advanced Mode]. With [Advanced Mode] you can perform
detailed settings such as resolution and contrast.
To switch between two modes, click the corresponding tab.
■ Using Simple Mode
Table of Contents
Index
1. Set documents.
3-17
Page 99
Introduction
Printing
Scanning a
Document
PC Faxing
Troubleshooting
Appendix
1
2
3
4
5
2. Select the document type in [Select Source].
[Photo (Color)]: To scan color photos.
[Magazine (Color)]: To scan color magazines (with the Descreen
function).
[Newspaper (B&W)]: To scan text and line drawings (black and
white).
[Document (Grayscale)]: To scan color image or text in
monochrome. Appropriate for scanning high-resolution
monochrome image.
NOTE
On how to turn off the automatic color correction for the
document type other than [Newspaper (B&W)], see “[Color
Settings] Tab,” on p. 3-36.
3. Click [Preview].
A preview of the scanned image appears in the preview window.
TOP
Back Previous Next
5. Select the output size of the scanned image
in [Output Size].
The options you can select vary depending on what you selected
in step 4.
Click to switch the orientation of the output size (landscape
or portrait).
6. Adjust the cropping frame and select the
[Fading Correction] check box as needed.
To adjust the cropping frame, click (Auto Crop) or drag the
corner or edge of the frame.
NOTE
The [Fading Correction] check box can be selected only when the
color preview image is displayed.
7. Click [Scan].
Table of Contents
Index
6
4. Select the use for the scanned image in
[Select Purpose].
You can select from [Print (300dpi)], [Image display (150dpi)], or
[OCR (300dpi)], depending on the document type you selected in
step 2. For details, see “Determining Resolution,” on p. 3-38.
3-18
Page 100
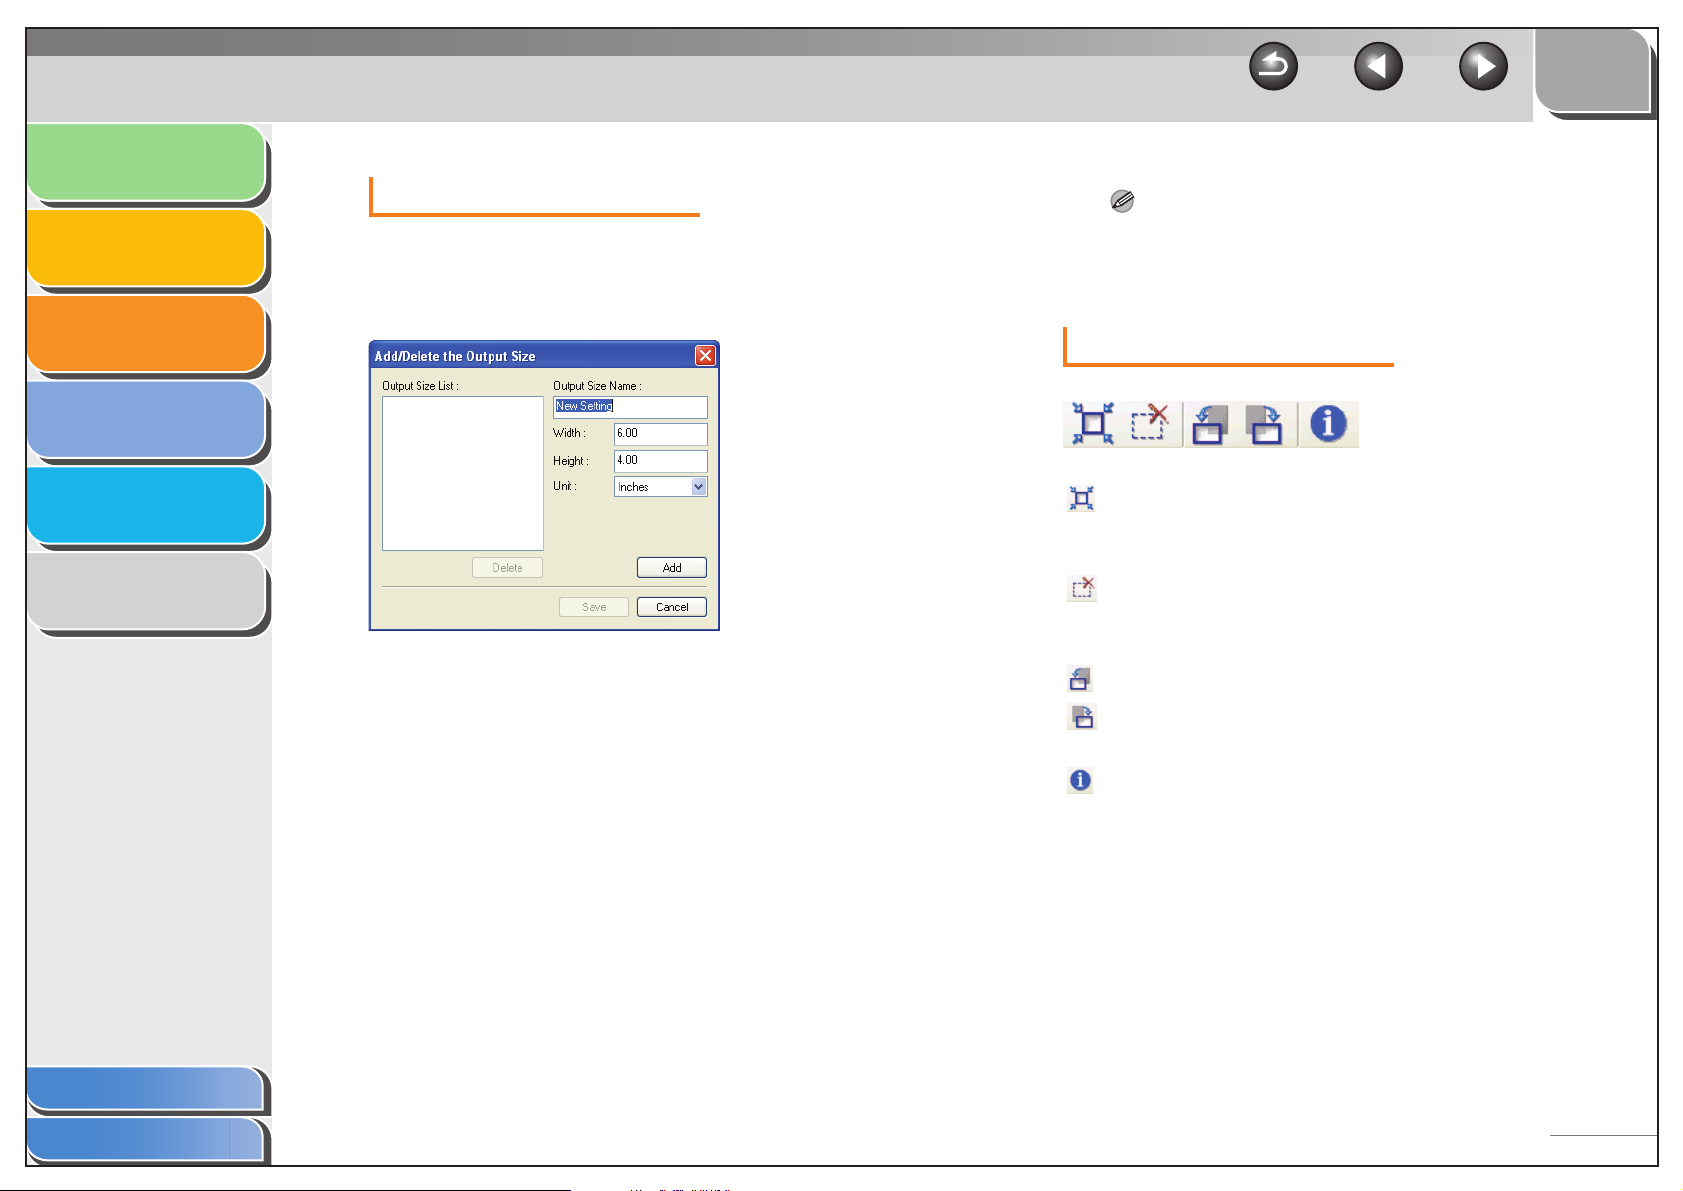
Introduction
TOP
Back Previous Next
Printing
Scanning a
Document
PC Faxing
Troubleshooting
Appendix
1
2
3
4
5
6
Add/Delete the Output Size
Selecting [Add/Delete] for [Output Size] opens the [Add/Delete
the Output Size] dialog box. This dialog box enables you to add
and delete the custom output size.
[Output Size
Name]
[Width] Specifies the width of the output size.
[Height] Specifies the height of the output size.
[Unit] Selects the unit of measurement for the
Specifies the output size name you want to
register.
output size.
NOTE
You cannot delete the output size that is currently selected in
[Output Size] of the [Simple Mode] tab.
Simple Mode Toolbar
(Auto Crop) Crops the image border automatically. You
can gradually crop the image by clicking this
button.
(Remove
Cropping
Frame)
(Left Rotate) Rotates the scanned image 90 degrees left.
(Right Rotate) Rotates the scanned image 90 degrees
(Information) Lists the scanning information.
Removes the selected cropping frames.
right.
Table of Contents
Index
[Add] Adds the output size to the [Output Size
List].
[Delete] Deletes the selected output size from the
[Output Size List].
[Save] Apply the settings specified in the [Add/
Delete the Output Size] dialog box.
3-19
 Loading...