

Page 1

㻝㻌㻛㻌㻟㻟㻢
Page 2

Important Safety Instructions 6
Installation
Power Supply
Handling
Maintenance and Inspections
Consumables
Basic Operations
Parts and Their Functions
Front Side
Back Side
Interior
Manual Feed Slot
Paper Drawer
Operation Panel
Display
Using the Operation Panel
Entering Text
Placing Documents
Loading Paper
Loading Paper in the Paper Drawer
Loading Paper in the Manual Feed Slot
Loading Envelopes
Loading Preprinted Paper
Specifying Paper Size and Type
Registering a Custom Paper Size
Entering Quiet Mode
Entering Sleep Mode
Setting Auto Shutdown Time
Copying
Basic Copy Operations
Canceling Copies
Various Copy Settings
Enlarging or Reducing
Selecting Document Type
Adjusting Density
Adjusting Sharpness
Copying Multiple Documents onto One Sheet (2 on 1/4 on 1)
Using the [Paper Save Copy] Key (MF211)
Copying Both Sides of an ID Card onto One Page
Collating Copies by Page
Changing Default Settings
Using the Machine as a Printer
Printing from a Computer
Printing a Document
Canceling Prints
Checking the Printing Status
Various Print Settings
Enlarging or Reducing
Collating Printouts by Page
7
9
10
12
13
15
17
18
19
20
21
22
23
27
30
32
34
35
37
40
42
44
45
47
49
51
52
53
54
56
58
59
60
61
62
63
64
65
66
67
68
69
70
72
74
75
76
78
㻞㻌㻛㻌㻟㻟㻢
Page 3

Printing Multiple Pages onto One Sheet 79
Printing Posters
Printing Borders
Printing Dates and Page Numbers
Printing Watermarks
Selecting Document Type
Saving Toner
Combining and Printing Multiple Documents
Configuring Print Settings to Your Needs
Registering Combinations of Frequently Used Print Settings
Changing Default Settings
Using AirPrint (MF212w)
Encrypting Communication of Print Data for Apple Devices with TLS
Configuring Settings for Key Pairs and Digital Certificates
Generating Key Pairs
Using CA-issued Key Pairs and Digital Certificates
Verifying Key Pairs and Digital Certificates
Using the Machine as a Scanner
Preparing to Use the Machine as a Scanner (MF212w)
Scanning from the Machine
Scanning Using the [Scan -> PC] Key
Scanning from a Computer
Scanning Using MF Toolbox
Configuring Scan Settings in MF Toolbox
Scanning Using an Application
Configuring Scan Settings in ScanGear MF
Configuring Scan Settings in Simple Mode
Configuring Scan Settings in Advanced Mode
Network (MF212w)
Connecting to a Network
Selecting Wired LAN or Wireless LAN
Connecting to a Wired LAN
Connecting to a Wireless LAN
Setting Up Connection Using WPS Push Button Mode
Setting Up Connection Using WPS PIN Code Mode
Setting Up Connection by Selecting a Wireless Router
Setting Up Connection by Specifying Detailed Settings
Checking the SSID and Network Key
Setting IP Addresses
Setting IPv4 Address
Setting IPv6 Addresses
Viewing Network Settings
Configuring the Machine for Printing from a Computer
Configuring Printing Protocols and WSD Functions
Configuring Printer Ports
Setting Up Print Server
Configuring the Machine for Your Network Environment
Configuring Ethernet Settings
Changing the Maximum Transmission Unit
80
81
82
83
85
86
87
90
91
93
94
99
102
103
108
111
113
114
115
117
120
121
127
131
132
133
135
145
146
148
149
150
152
154
156
158
161
163
164
166
169
172
173
176
179
182
183
185
㻟㻌㻛㻌㻟㻟㻢
Page 4

Setting a Wait Time for Connecting to a Network 186
Configuring DNS
Monitoring and Controlling the Machine with SNMP
Security
Protecting the Machine from Unauthorized Access
Setting the System Manager PIN
Restricting Communication by Using Firewalls (MF212w)
Specifying IP Addresses for Firewall Rules
Specifying MAC Addresses for Firewall Rules
Changing Port Numbers(MF212w)
Setting a Proxy (MF212w)
Restricting the Machine's Functions (MF212w)
Disabling HTTP Communication
Disabling Remote UI
Using Remote UI (MF212w)
Starting Remote UI
Remote UI Screens
Managing Documents and Checking the Machine Status
Setting Up Menu Options from Remote UI
Setting Menu List
Network Settings (MF212w)
Output Report
Preferences
Timer Settings
Copy Settings
Scan Settings
Printer Settings
Adjustment/Maintenance
System Management Settings
Initialize Menu
Troubleshooting
Clearing Jams
When an Error Message Appears
Common Problems
Installation/Settings Problems
Copying Problems
Printing Problems
When You Cannot Print Properly
Printing Results Are Not Satisfactory
Paper Creases or Curls
Paper Is Fed Incorrectly
When a Problem Cannot Be Solved
Maintenance
Cleaning the Machine
Exterior
Platen Glass
Fixing Assembly
Machine Interior
Replacing Toner Cartridges
187
191
194
195
196
197
198
201
203
204
206
207
208
209
210
212
214
217
219
220
227
228
231
235
236
237
239
244
250
251
252
256
260
261
263
264
265
266
270
271
272
273
274
275
276
277
278
280
㻠㻌㻛㻌㻟㻟㻢
Page 5

Before Replacing the Toner Cartridge 282
How to Replace Toner Cartridges
Relocating the Machine
Viewing the Counter Value
Initializing Settings
Initializing Menu
Initializing System Management Settings
Initializing All Data/Settings
Appendix
Feature Highlights
Going Green and Saving Money
Improving Efficiency
Going Digital
So Much More
Specifications
Machine Specifications
Wireless LAN Specifications (MF212w)
Document Type
Scan Area
Paper
Copy Specifications
Scanner Specifications
Printer Specifications
Consumables
Manuals Included with the Machine
Using e-Manual
Installing e-Manual
Uninstalling e-Manual
Screen Layout of e-Manual
Viewing e-Manual
Others
Basic Windows Operations
For Mac OS Users
Notice
Contact Us
284
286
287
288
289
290
291
292
293
294
295
297
299
301
302
303
304
305
306
308
309
310
311
312
313
314
317
319
324
325
326
331
332
336
㻡㻌㻛㻌㻟㻟㻢
Page 6

0L40-000
Important Safety Instructions
The content described in this chapter is for the prevention of damage to property and injury to users of the machine and others. Before
using this machine, read this chapter and follow the instructions to properly use this machine. Do not perform any operations not
described in this manual. Canon will not be responsible for any damages resulting from use not described in this manual, improper use,
or repair/changes not performed by Canon or a third party authorized by Canon.
㻢㻌㻛㻌㻟㻟㻢
Page 7
0L40-001
Installation
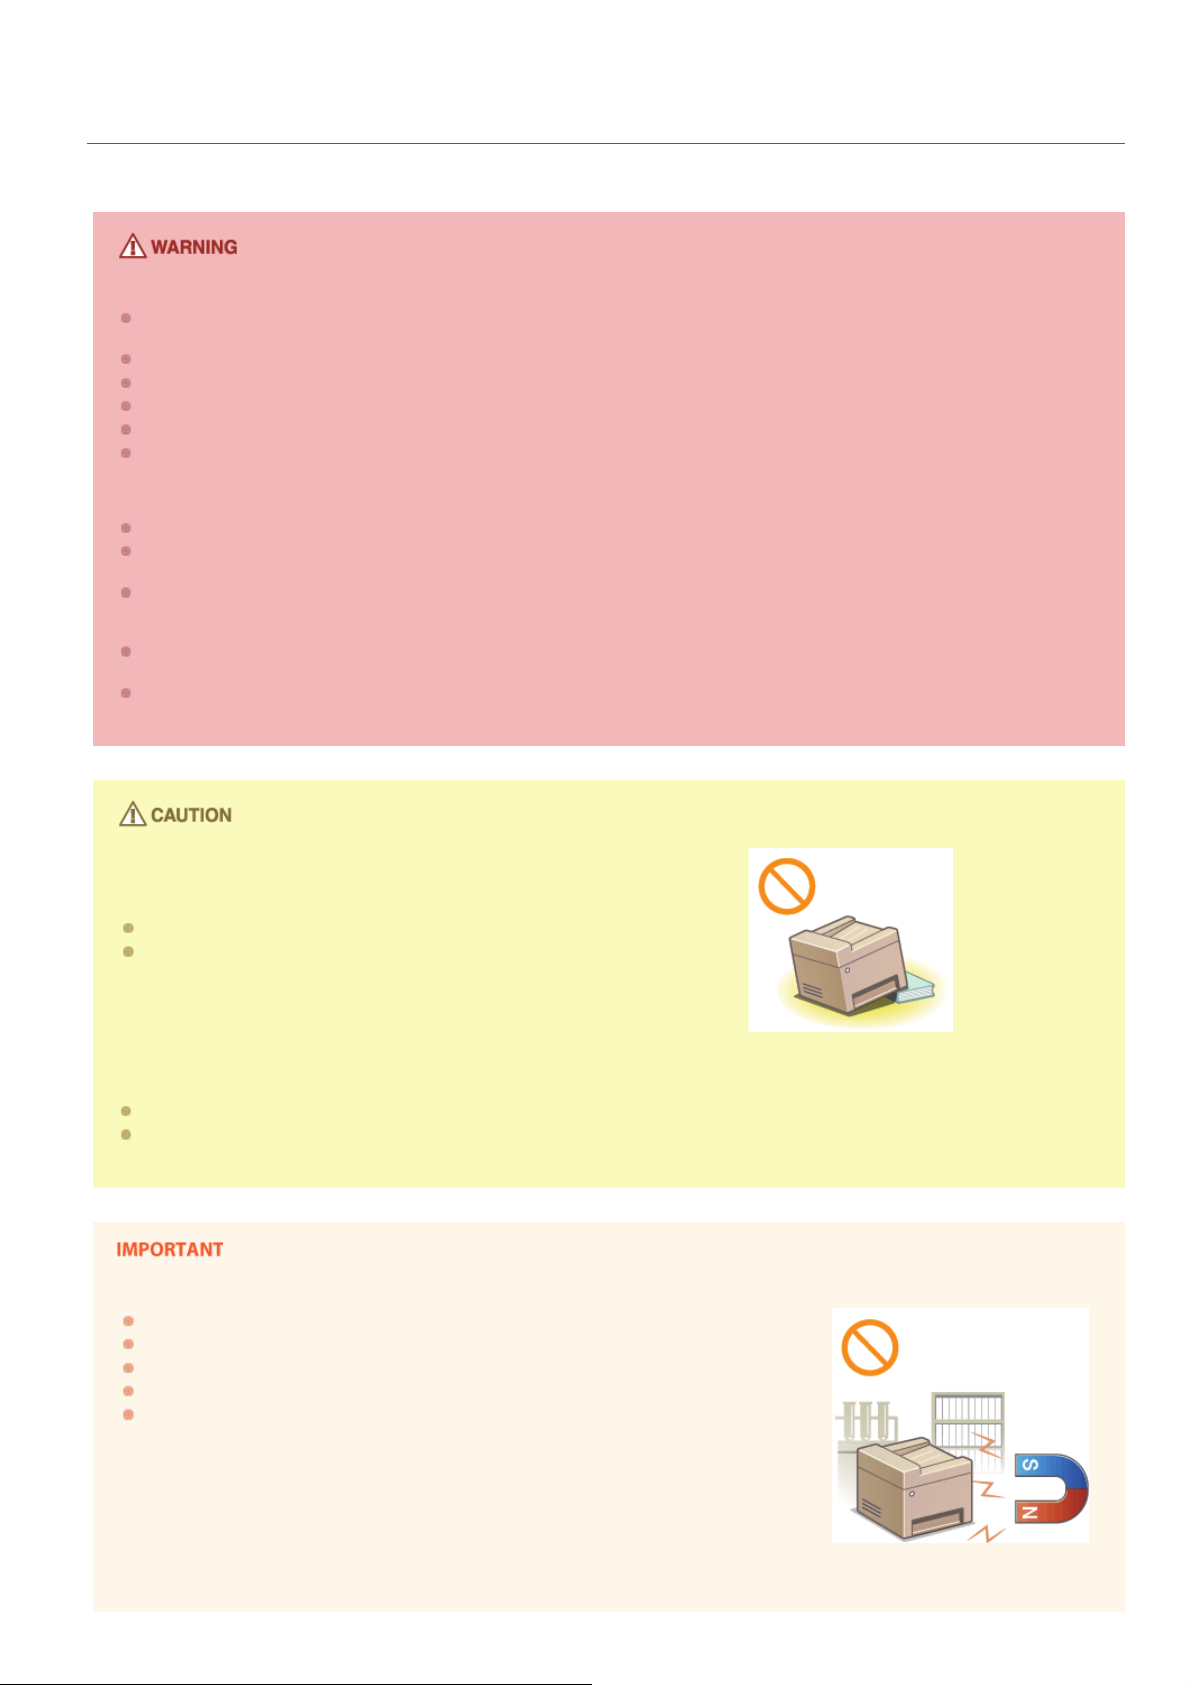
To use this machine safely and comfortably, carefully read the following precautions and install the machine in an appropriate location.
Do not install in a location that may result in a fire or electrical shock
A location where the ventilation slots are blocked
(too close to walls, beds, rugs, or similar objects)
A damp or dusty location
A location exposed to direct sunlight or outdoors
A location subject to high temperatures
A location exposed to open flames
Near alcohol, paint thinners or other flammable substances
Other warnings
Do not connect unapproved cables to this machine. Doing so may result in a fire or electrical shock.
Do not place necklaces and other metal objects or containers filled with liquid on the machine. If foreign substances come in
contact with electrical parts inside the machine, it may result in a fire or electrical shock.
When installing and removing the optional accessories, be sure to turn OFF the power, unplug the power plug, and then
disconnect all the interface cables and power cord from the machine. Otherwise, the power cord or interface cables may be
damaged, resulting in a fire or electrical shock.
Do not use near any medical equipment. Radiowaves emitted from this machine may interfere with medical equipment, which
may cause a malfunction and result in serious accidents.
If any foreign substance falls into this machine, unplug the power plug from the AC power outlet and contact your local
authorized Canon dealer.
Do not install in the following locations
The machine may drop or fall, resulting in injury.
Unstable location
Location exposed to vibrations
Other cautions
When carrying this machine, follow the instructions in this manual. If carried improperly, it may fall, resulting in injury.
When installing this machine, be careful not to get your hands caught between the machine and the floor or walls, or between
the paper drawers. Doing so may result in injury.
Do not install in the following locations that may result in damage
A location subject to dramatic changes in temperature or humidity
A location near equipment that generates magnetic or electromagnetic waves
A laboratory or location where chemical reactions occur
A location exposed to corrosive or toxic gases
A location that may warp from the weight of the machine or where the machine is
liable to sink (a carpet, etc.)
Avoid poorly ventilated locations
㻣㻌㻛㻌㻟㻟㻢
Page 8

This machine generates a slight amount of ozone, etc. during normal use. Although sensitivity to ozone, etc. may vary, this
amount is not harmful. Ozone, etc. may be more noticeable during extended use or long production runs, especially in poorly
ventilated rooms. It is recommended that the room where the machine operates be appropriately ventilated to maintain a
comfortable working environment. Also avoid locations where people would be exposed to emissions from the machine.
Do not install in a location where condensation occurs
Water droplets (condensation) may form inside the machine when the room where the machine is installed is heated rapidly, and
when the machine is moved from a cool or dry location to a hot or humid location. Using the machine under these conditions may
result in paper jams, poor print quality, or damage to the machine. Let the machine adjust to the ambient temperature and
humidity for at least 2 hours before use.
When using wireless LAN (MF212w)
Set the machine at a distance of 50 m or less from the wireless LAN router.
Do not set machine in a location where any object blocks communication. The signal may be degraded when passing through
walls or floors.
Keep the machine as far as possible from digital cordless phones, microwave ovens, or other equipment that emit radio waves.
In altitudes of 3,000 m or above sea level
Machines with a hard disk may not operate properly when used at high altitudes of about 3,000 meters above sea level, or
higher.
㻤㻌㻛㻌㻟㻟㻢
Page 9
0L40-002
Power Supply
This machine is compatible with voltages of 220 to 240 V, and electrical frequency of 50/60 Hz.
Use only a power supply that meets the specified voltage requirements. Failure to do so may result in a fire or electrical shock.
Do not use power cords other than the one provided, as this may result in a fire or electrical shock.
Do not modify, pull, forcibly bend, or perform any other act that may damage the power cord. Do not place heavy objects on
the power cord. Damaging the power cord may result in a fire or electrical shock.
Do not plug in or unplug the power plug with wet hands, as this may result in an electrical shock.
Do not use extension cords or multi-plug power strips with the machine. Doing so may result in a fire or electrical shock.
Do not wrap the power cord or tie it in a knot, as this may result in a fire or electrical shock.
Insert the power plug completely into the AC power outlet. Failure to do so may result in a fire or electrical shock.
Remove the power plug completely from the AC power outlet during a thunder storm. Failure to do so may result in a fire,
electrical shock, or damage to the machine.
Do not obstruct the power outlet where this machine is connected, so that you can unplug the power cord easily in an emergency.
When connecting power
Do not connect the machine to an uninterruptible power source.
If plugging this machine into an AC power outlet with multiple sockets, do not use the remaining sockets to connect other
devices.
Do not connect the power cord into the auxiliary outlet on a computer.
Other precautions
Electrical noise may cause this machine to malfunction or lose data.
㻥㻌㻛㻌㻟㻟㻢
Page 10
Handling
Immediately unplug the power plug from the AC power outlet and contact an authorized
Canon dealer if the machine makes an unusual noise, emits an unusual smell, or emits
smoke or excessive heat. Continued use may result in a fire or electrical shock.
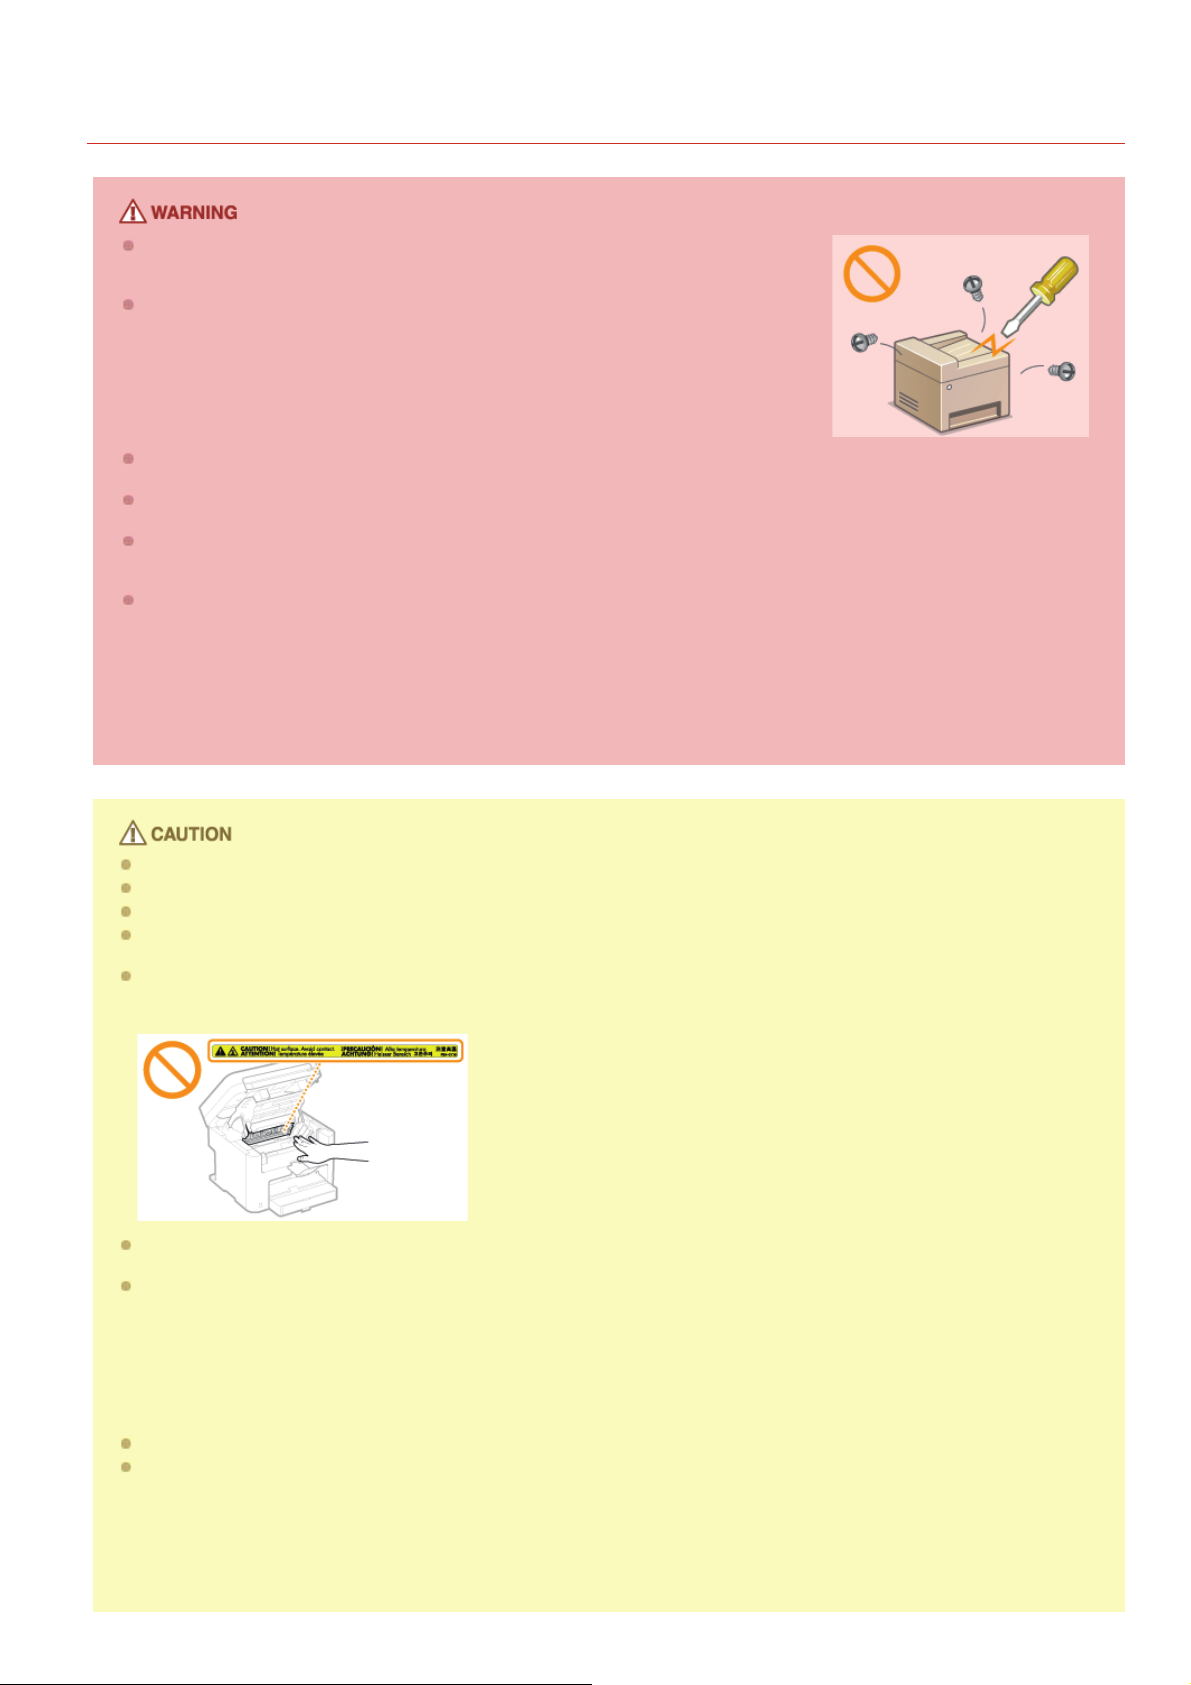
Do not disassemble or modify this machine. There are high-voltage and hightemperature components inside the machine which may result in a fire or electrical
shock.
Place the machine where children will not come in contact with the power cord and other cables or internal and electrical
parts. Failure to do so may result in unexpected accidents.
Do not use flammable sprays near this machine. If flammable substances come into contact with electrical parts inside this
machine, it may result in a fire or electrical shock.
When moving this machine, be sure to turn OFF the power of this machine and your computer, and then unplug the power
plug and interface cables. Failure to do so may damage the power cord or interface cables, resulting in a fire or electrical
shock.
When plugging or unplugging a USB cable when the power plug is plugged into an AC power outlet, do not touch the metal
part of the connector, as this may result in an electrical shock.
0L40-003
If you are using a cardiac pacemaker
This machine generates a low level magnetic flux. If you use a cardiac pacemaker and feel abnormalities, please move away from
this machine and consult your physician immediately.
Do not place heavy objects on this machine as they may fall, resulting in injury.
For your safety, please unplug the power cord if the machine will not be used for a long period of time.
Use caution when opening and closing covers to avoid injury to your hands.
Keep hands and clothing away from the rollers in the output area. If the rollers catch your hands or clothing, this may result
in personal injury.
The inside of the machine and the output slot are very hot during and immediately after use. Avoid contact with these areas to
prevent burns. Also, printed paper may be hot immediately after being output, so use caution when handling it. Failure to do
so may result in burns.
When copying with a thick book placed on the platen glass, do not press the platen glass cover forcefully. Doing so may
damage the platen glass and result in injury.
Be careful not to drop a heavy object, such as a dictionary, on the platen glass. Doing so may damage the platen glass and
result in injury.
Laser beam
This machine is classified as a Class 1 Laser Product under IEC 60825-1: 2007, EN60825-1: 2007. The laser beam can be harmful
to the human body. The laser beam is confined in the laser scanner unit by a cover, so there is no danger of the laser beam
escaping during normal machine operation. Read the following remarks and instructions for safety.
Never open covers other than those indicated in this manual.
Do not remove the caution label attached to the cover of the laser scanner unit.
If you operate the machine in manners other than the control, adjustment, and operating
procedures prescribed in this manual, this may result in hazardous radiation exposure.
If the laser beam should escape and enter your eyes, exposure may cause damage to
your eyes.
㻝㻜㻌㻛㻌㻟㻟㻢
Page 11
Laser diode information
wavelength: 785-800 nm
maximum power: 6 mW
When transporting the machine
To prevent damage to the machine during transport, perform the following.
Remove the toner cartridges.
Securely pack the machine in the original box with packing materials.
Other precautions
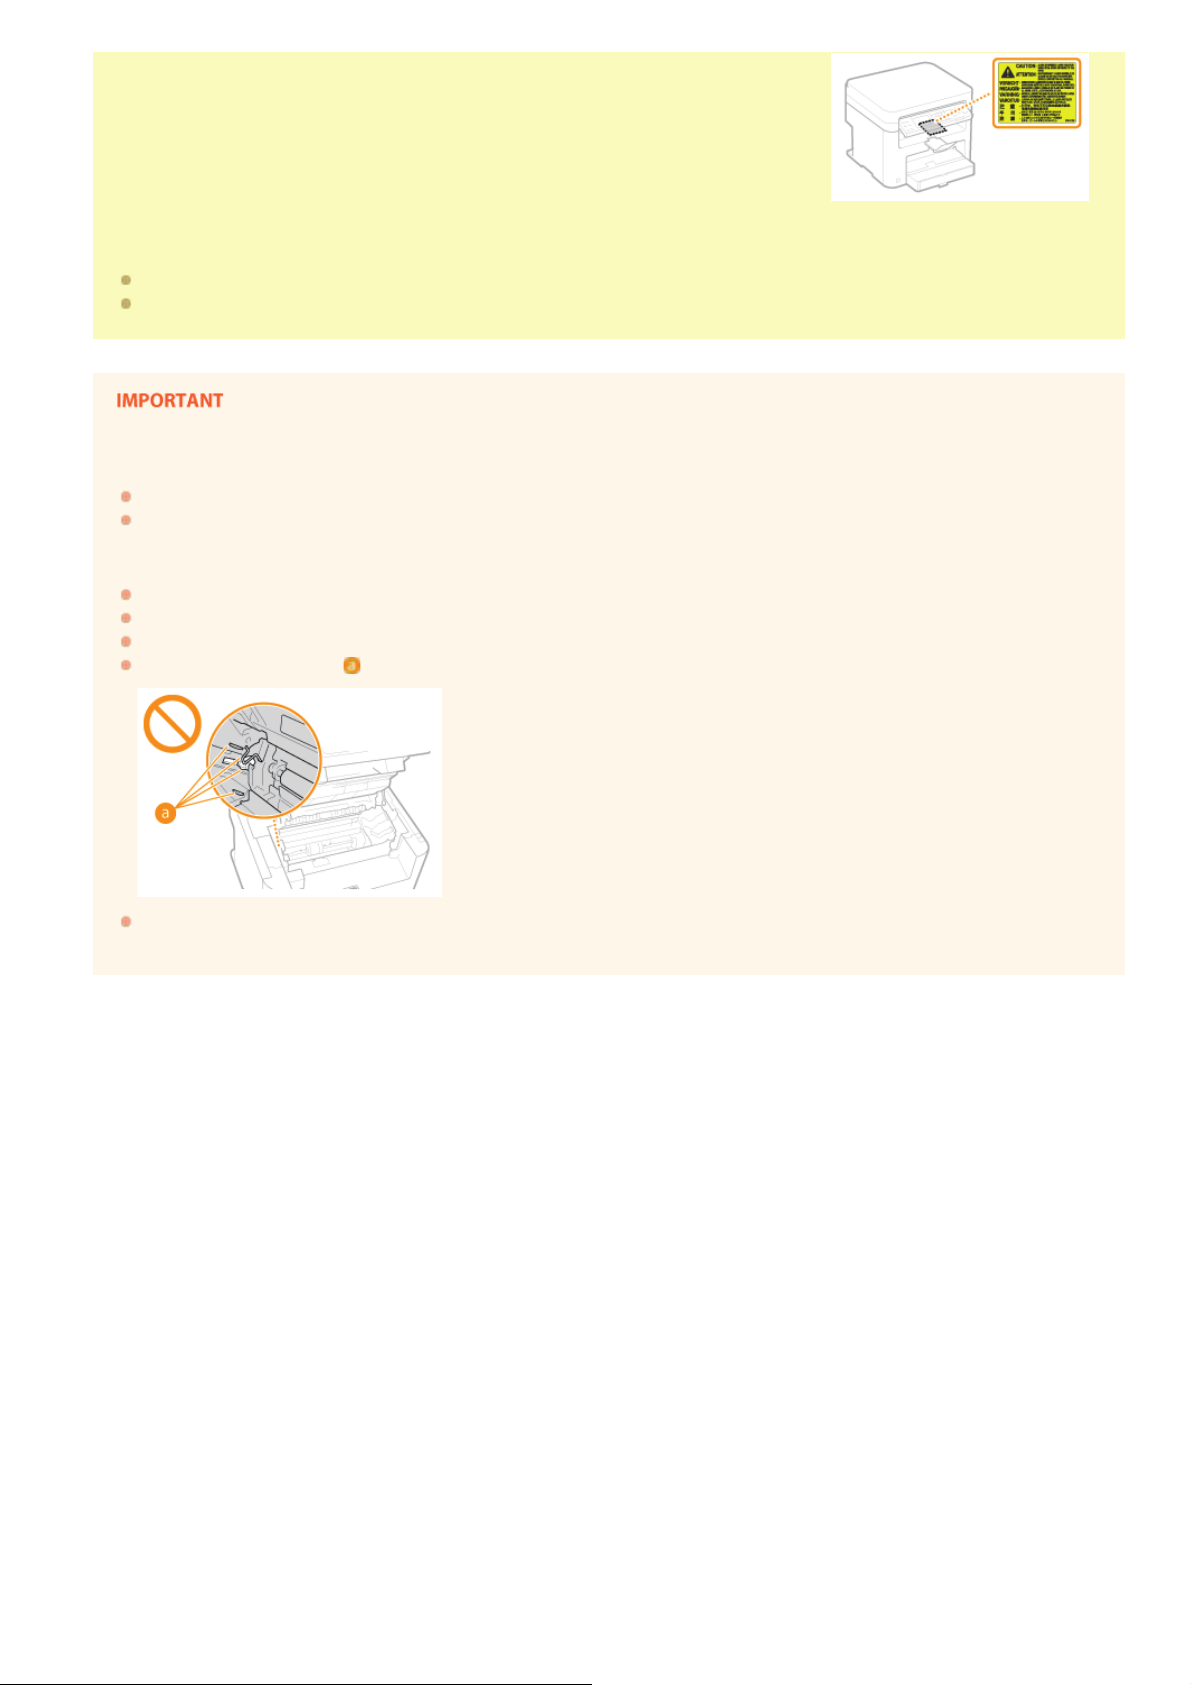
Follow the instructions in the caution label attached to this machine.
Avoid shaking or applying shock to this machine.
Do not forcibly open and close doors, covers, and other parts. Doing so may result in damage to the machine.
Do not touch the contacts (
). Doing so may result in damage to the machine.
Do not turn OFF the machine during printing. Also, do not open and close the cover and do not remove or insert paper during
printing. Doing so can cause paper jams.
㻝㻝㻌㻛㻌㻟㻟㻢
Page 12
Maintenance and Inspections
0L40-004
Clean this machine periodically. If dust accumulates, the machine may not operate properly. When cleaning, be sure to observe the
following. If a problem occurs during operation, see
requires an inspection, see
Before cleaning, turn OFF the power and unplug the power plug from the AC power outlet. Failure to do so may result in a fire
or electrical shock.
Unplug the power plug periodically and clean with a dry cloth to remove dust and grime. Accumulated dust may absorb
humidity in the air and may result in a fire if it comes into contact with electricity.
Use a damp, well wrung-out cloth to clean the machine. Dampen cleaning cloths with water only. Do not use alcohol,
benzenes, paint thinners, or other flammable substances. Do not use tissue paper or paper towels. If these substances come
into contact with electrical parts inside the machine, they may generate static electricity or result in a fire or electrical shock.
Check the power cord and plug periodically for damage. Check the machine for rust, dents, scratches, cracks, or excessive
heat generation. Use of poorly-maintained equipment may result in a fire or electrical shock.
The inside of the machine has high-temperature and high-voltage components. Touching these components may result in
burns. Do not touch any part of the machine that is not indicated in the manual.
When loading paper or removing jammed paper, be careful not to cut your hands with the edges of the paper.
When a Problem Cannot Be Solved.
Troubleshooting. If the problem cannot be resolved or you feel the machine
When removing jammed paper or replacing toner cartridges, be careful not to get any toner on your hands or clothing. If toner
gets on your hands or clothing, wash them immediately with cold water. Washing with warm water can cause toner to adhere
and be impossible to remove.
㻝㻞㻌㻛㻌㻟㻟㻢
Page 13
Consumables
Do not dispose of used toner cartridges in open flames. Also, do not store toner cartridges or paper in a location exposed to
open flames. This may cause the toner to ignite, and result in burns or fire.
If you accidentally spill or scatter toner, carefully wipe up the loose toner with a damp, soft cloth and avoid inhaling any toner
dust. Do not use a vacuum cleaner that is not equipped with safety measures to prevent dust explosions to clean up loose
toner. Doing so may cause damage to the vacuum cleaner or result in a dust explosion due to static discharge.
If you are using a cardiac pacemaker
Toner cartridges generate a low level magnetic flux. If you use a cardiac pacemaker and feel abnormalities, please move away
from toner cartridges and consult your physician immediately.
Use caution not to inhale any toner. If you should inhale toner, consult a physician immediately.
Use caution so that toner does not get into your eyes or mouth. If toner should get into your eyes or mouth, immediately
wash with cold water and consult a physician.
Use caution so that toner does not come into contact with your skin. If it should, wash with soap and cold water. If there is
any irritation on your skin, consult a physician immediately.
Keep the toner cartridges and other consumables out of the reach of small children. If toner is ingested, consult a physician or
poison control center immediately.
Do not disassemble or modify the toner cartridge. Doing so may cause the toner to scatter.
Remove the sealing tape of the toner cartridge completely without using excessive force. Doing otherwise may cause the toner
to scatter.
0L40-005
Handling the toner cartridge
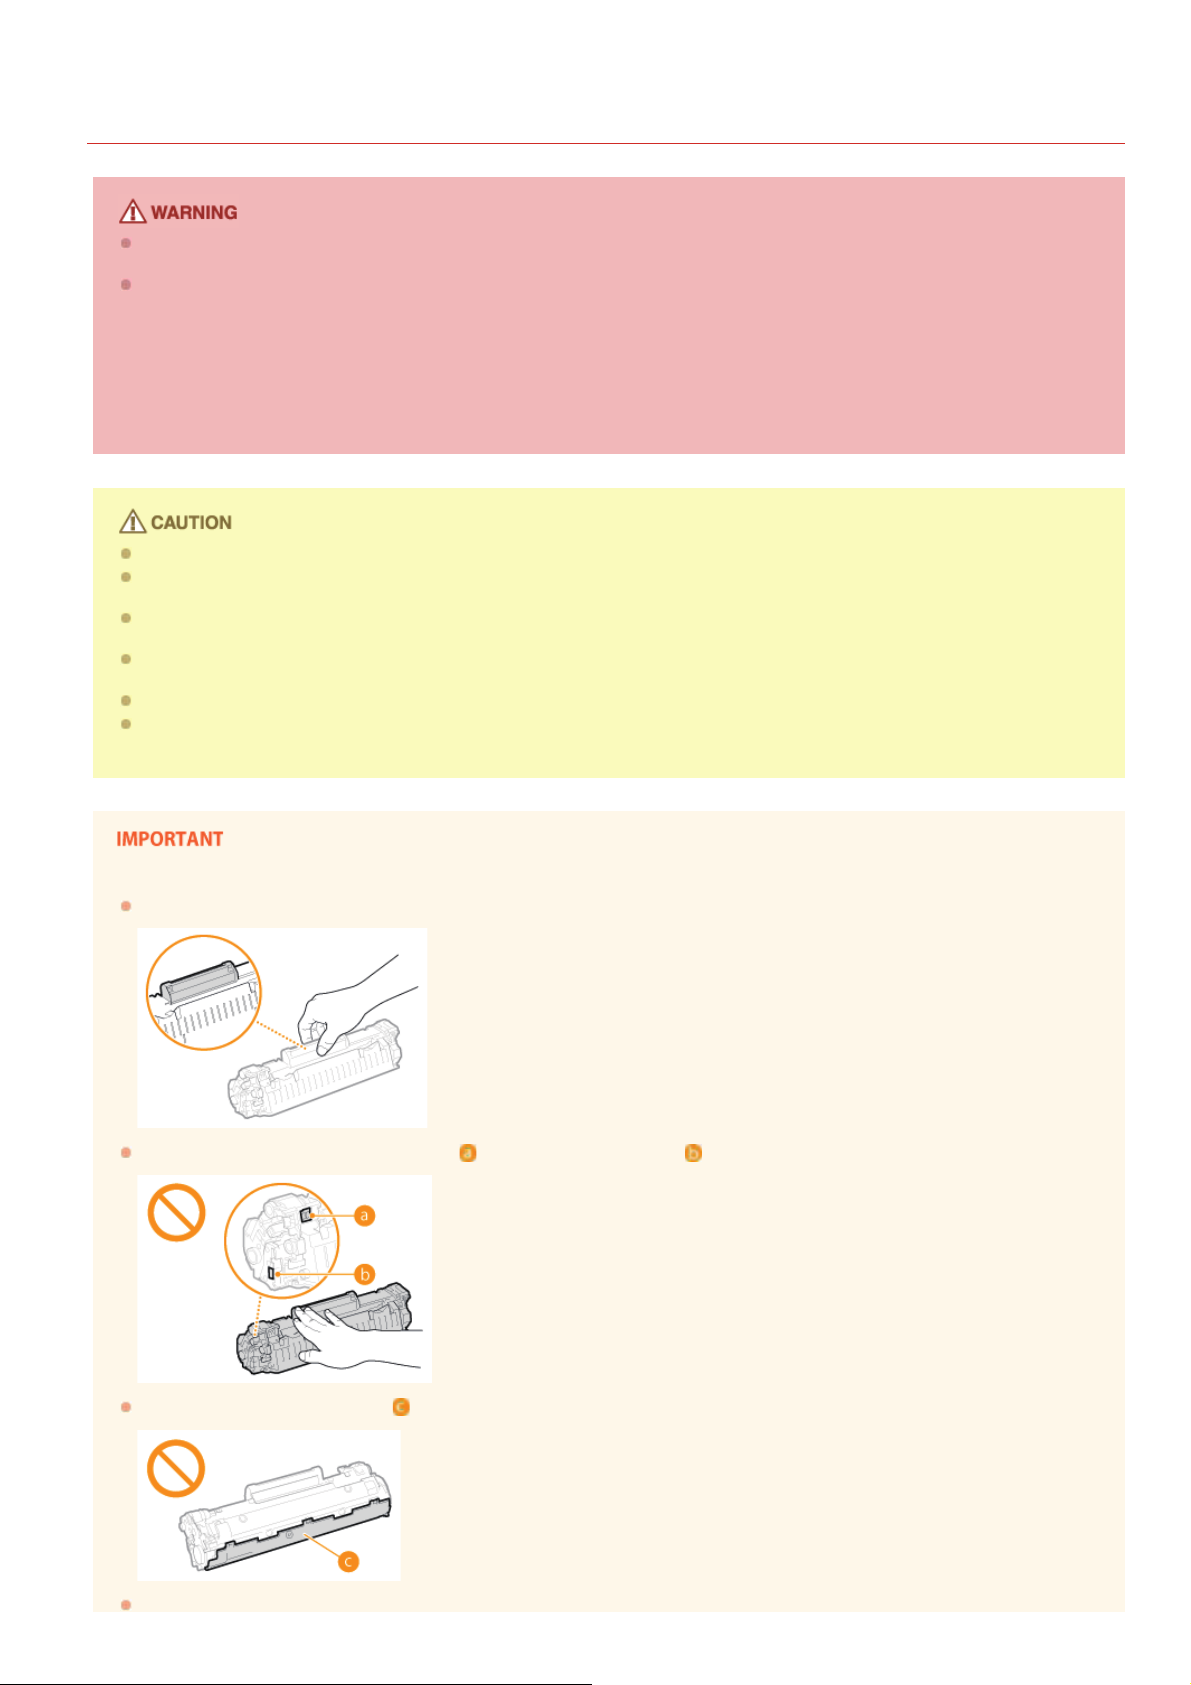
Hold the toner cartridge correctly as shown. Do not stand it up or turn it upside-down.
Do not touch the toner cartridge memory ( ) or the electrical contacts ( ).
Do not scratch the drum surface ( ) or expose it to light.
Do not remove the toner cartridge from this machine or from the protective bag unnecessarily.
㻝㻟㻌㻛㻌㻟㻟㻢
Page 14

The toner cartridge is a magnetic product. Keep it away from floppy disks, disk drives, and other devices that can be affected
by magnetism. Failure to do so may result in data loss.
Storing the toner cartridge
Store in the following environment to ensure safe and satisfactory use.
Storage temperature range: 0 to 35°C
Storage humidity range: 35 to 85% RH (relative humidity/no condensation)
Store without opening until the toner cartridge is to be used.
When removing the toner cartridge from this machine for storage, place the removed toner cartridge into the original
protective bag or wrap it with a thick cloth.
When storing the toner cartridge, do not store it upright or upside down. The toner will solidify and may not return to its
original condition even if it is shaken.
*
Even within the storable humidity range, water droplets (condensation) may develop inside the toner cartridge if there is a difference of temperature
inside and outside the toner cartridge. Condensation will adversely affect the print quality of toner cartridges.
*
Do not store the toner cartridge in the following locations
Locations exposed to open flames
Locations exposed to direct sunlight or bright light for five minutes or more
Locations exposed to excessive salty air
Locations where there are corrosive gases (i.e. aerosol sprays and ammonia)
Locations subject to high temperature and high humidity
Locations subject to dramatic changes in temperature and humidity where condensation may easily occur
Locations with a large amount of dust
Locations within the reach of children
Be careful of counterfeit toner cartridges
Please be aware that there are counterfeit Canon toner cartridges in the marketplace. Use of counterfeit toner cartridge may
result in poor print quality or machine performance. Canon is not responsible for any malfunction, accident or damage caused by
the use of counterfeit toner cartridge.
For more information, see canon.com/counterfeit.
Availability period of repairing parts and toner cartridges
The repairing parts and toner cartridges for the machine will be available for at least seven (7) years after production of this
machine model has been discontinued.
Toner cartridge packing materials
Save the protective bag for the toner cartridge. They are required when transporting this machine.
The packing materials may be changed in form or placement, or may be added or removed without notice.
Dispose of the removed sealing tape according to local regulations.
When disposing of a used toner cartridge
Place the toner container into its protective bag to prevent the toner from scattering, and then dispose of the toner cartridge
according to local regulations.
㻝㻠㻌㻛㻌㻟㻟㻢
Page 15
0L40-006
Basic Operations
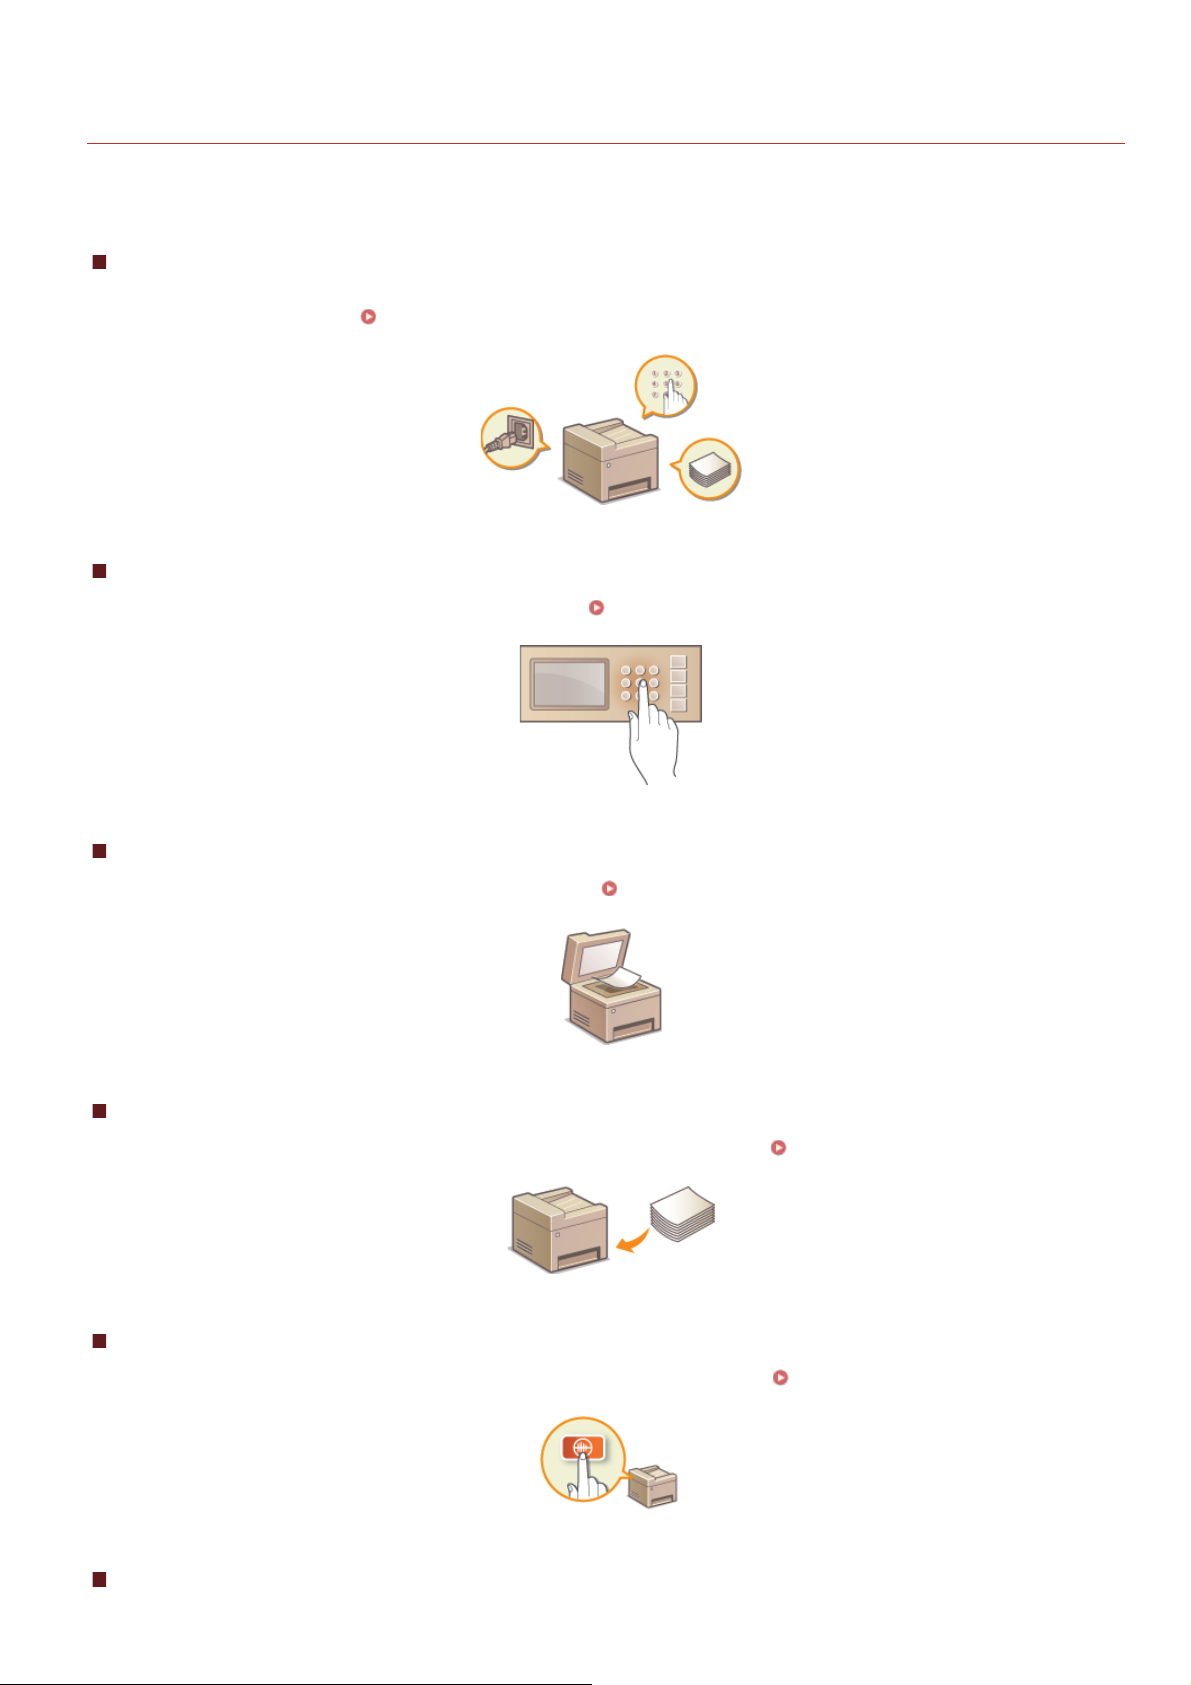
This chapter describes basic operations, such as how to use the operation panel or how to load the paper and documents, that are
frequently performed to use the functions of the machine.
Parts and Their Functions
This section describes the exterior and interior parts of the machine and their functions, as well as how to use the keys on the operation
panel and how to view the display.
Parts and Their Functions
Using the Operation Panel
This section describes how to toggle the display and select items. Using the Operation Panel
Placing Documents
This section describes how to place documents on the platen glass. Placing Documents
Loading Paper
This section describes how to load the paper into the paper drawer and manual feed slot. Loading Paper
Entering Quiet Mode
This section describes how to place the machine in quiet mode to reduce operation sound. Entering Quiet Mode
Entering Sleep Mode
㻝㻡㻌㻛㻌㻟㻟㻢
Page 16

This section describes how to set the sleep mode. Entering Sleep Mode
Setting Auto Shutdown Time
This section describes how to enable the <Auto Shutdown Time> setting. Setting Auto Shutdown Time
㻝㻢㻌㻛㻌㻟㻟㻢
Page 17

0L40-007
Parts and Their Functions
This section describes the parts of the machine (exterior, front and back side, and interior) and how they function. In addition to
describing the parts of the machine used for such basic operations as placing documents, loading paper, and replacing the toner
cartridges, this section also describes the keys on the operation panel and display. Read this section for tips on how to use the machine
properly.
Front Side
Back Side
Interior
Manual Feed Slot
Paper Drawer
Operation Panel
㻝㻣㻌㻛㻌㻟㻟㻢
Page 18
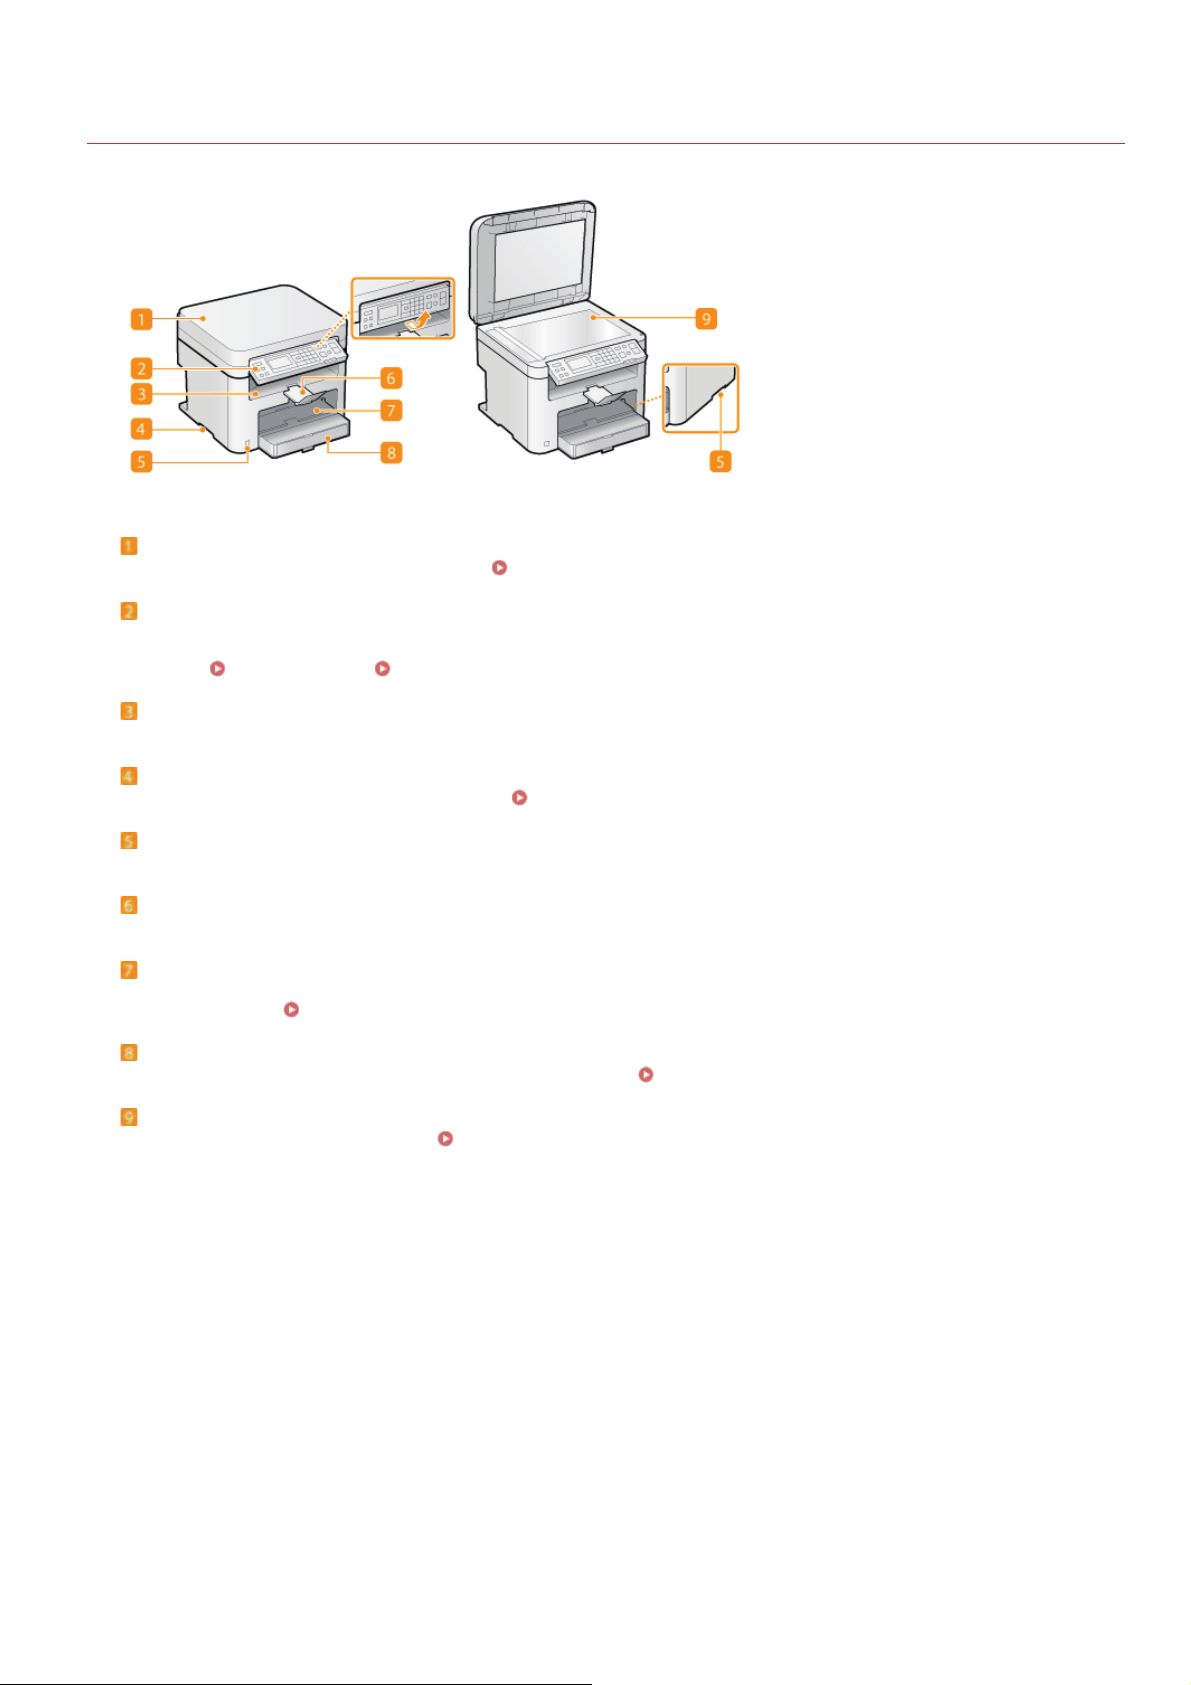
Front Side
Platen glass cover
Open to place documents on the platen glass.
Operation panel
The operation panel consists of keys such as the numeric keys and [Start] key, a display, and status indicators. You can perform
all the operations and specify settings from the operation panel. You can move it up or down so it is easier to
operate.
Operation Panel Display
Placing Documents
0L40-008
Output tray
Printed paper is output to the output tray.
Lift handles
Hold the lift handles when carrying the machine.
Power switch
Turns the power ON or OFF. To restart the machine, turn OFF the machine, wait for at least 10 seconds, and turn it back ON.
Paper stopper
Prevents paper that has been output after printing from falling.
Manual feed slot
Load the paper into the manual feed slot when you want to temporarily use a type of paper different from that which is loaded in
the paper drawer.
Paper drawer
Load the type of paper you frequently use into the paper drawer.
Platen glass
Place documents to copy or scan here.
Loading Paper in the Manual Feed Slot
Placing Documents
Relocating the Machine
Loading Paper in the Paper Drawer
㻝㻤㻌㻛㻌㻟㻟㻢
Page 19
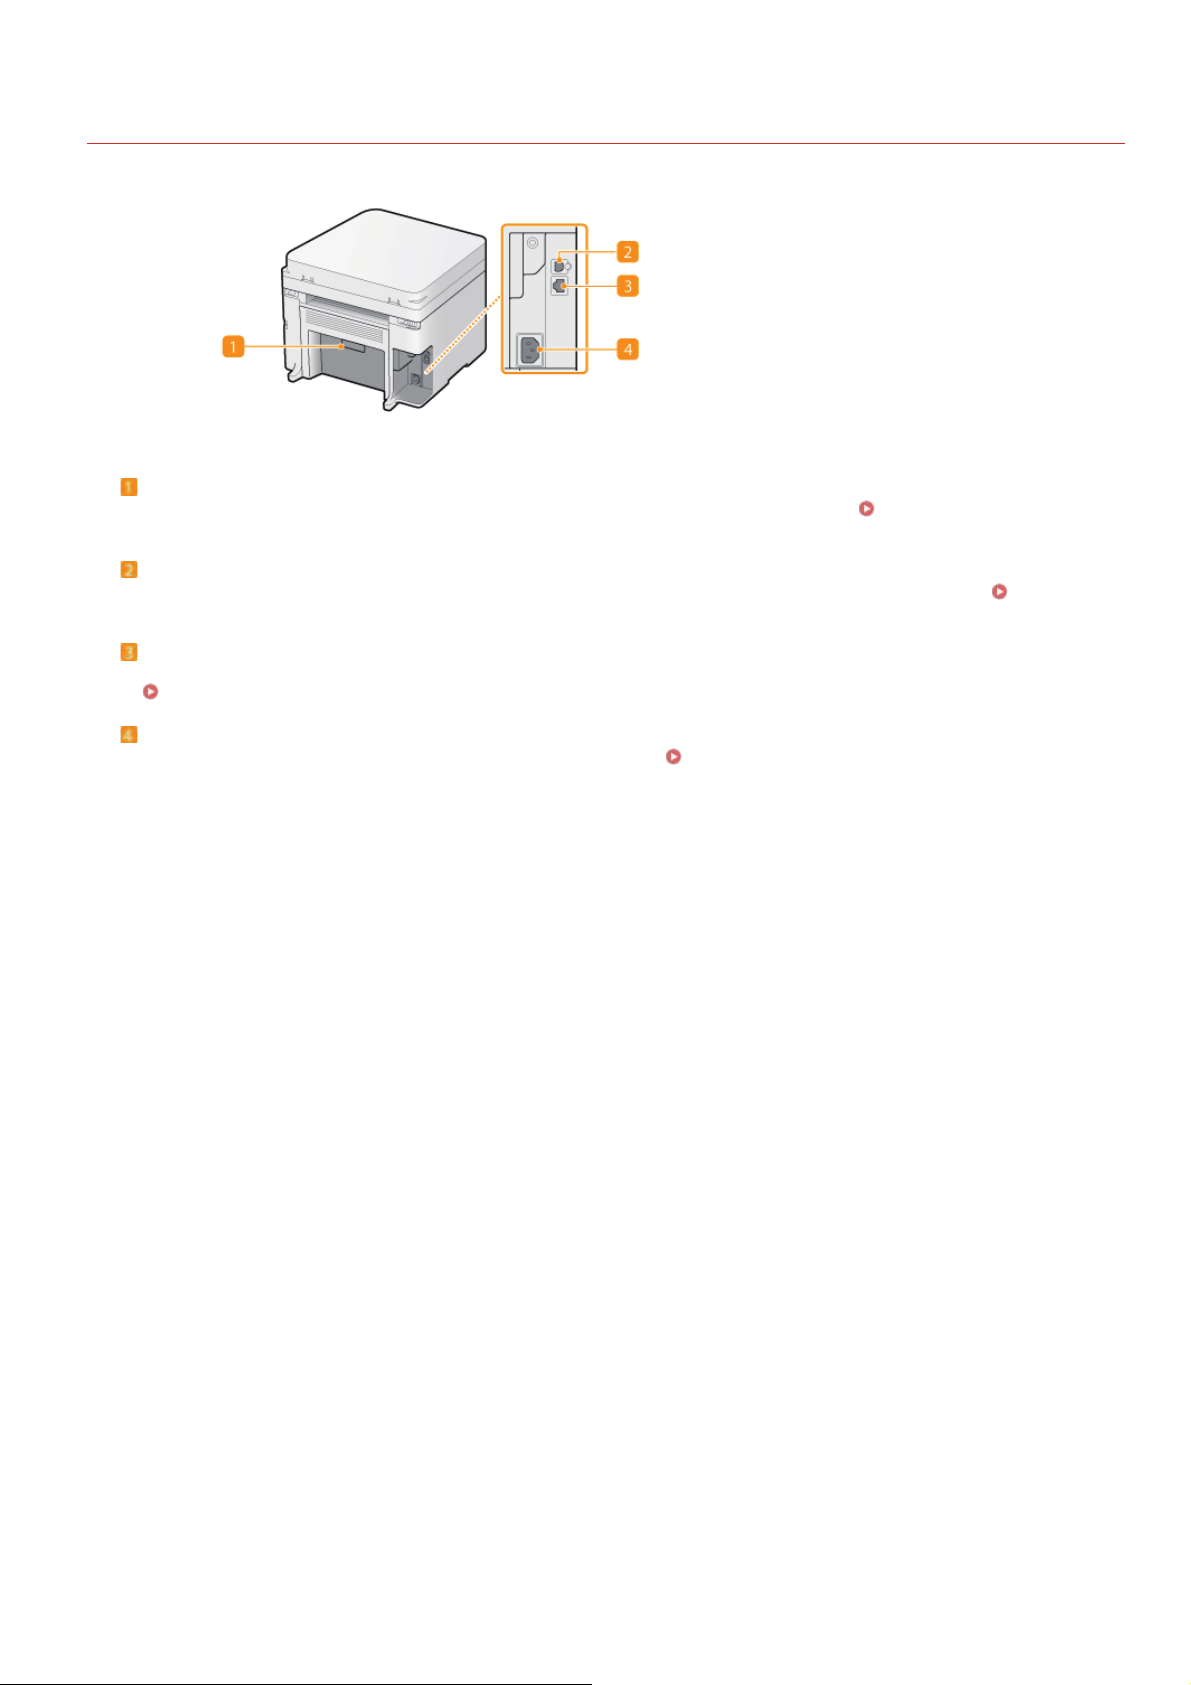
Back Side
Rating label
The label shows the serial number, which is needed when making inquiries about the machine.
Solved
USB port
Connect a USB cable when connecting the machine and a computer. For connection steps, see "Getting Started".
Included with the Machine
0L40-009
When a Problem Cannot Be
Manuals
LAN port (MF212w)
Connect a LAN cable when connecting the machine to a wired LAN router, etc. For connection steps, see "Getting Started".
Manuals Included with the Machine
Power socket
Connect the power cord. For connection steps, see "Getting Started".
Manuals Included with the Machine
㻝㻥㻌㻛㻌㻟㻟㻢
Page 20
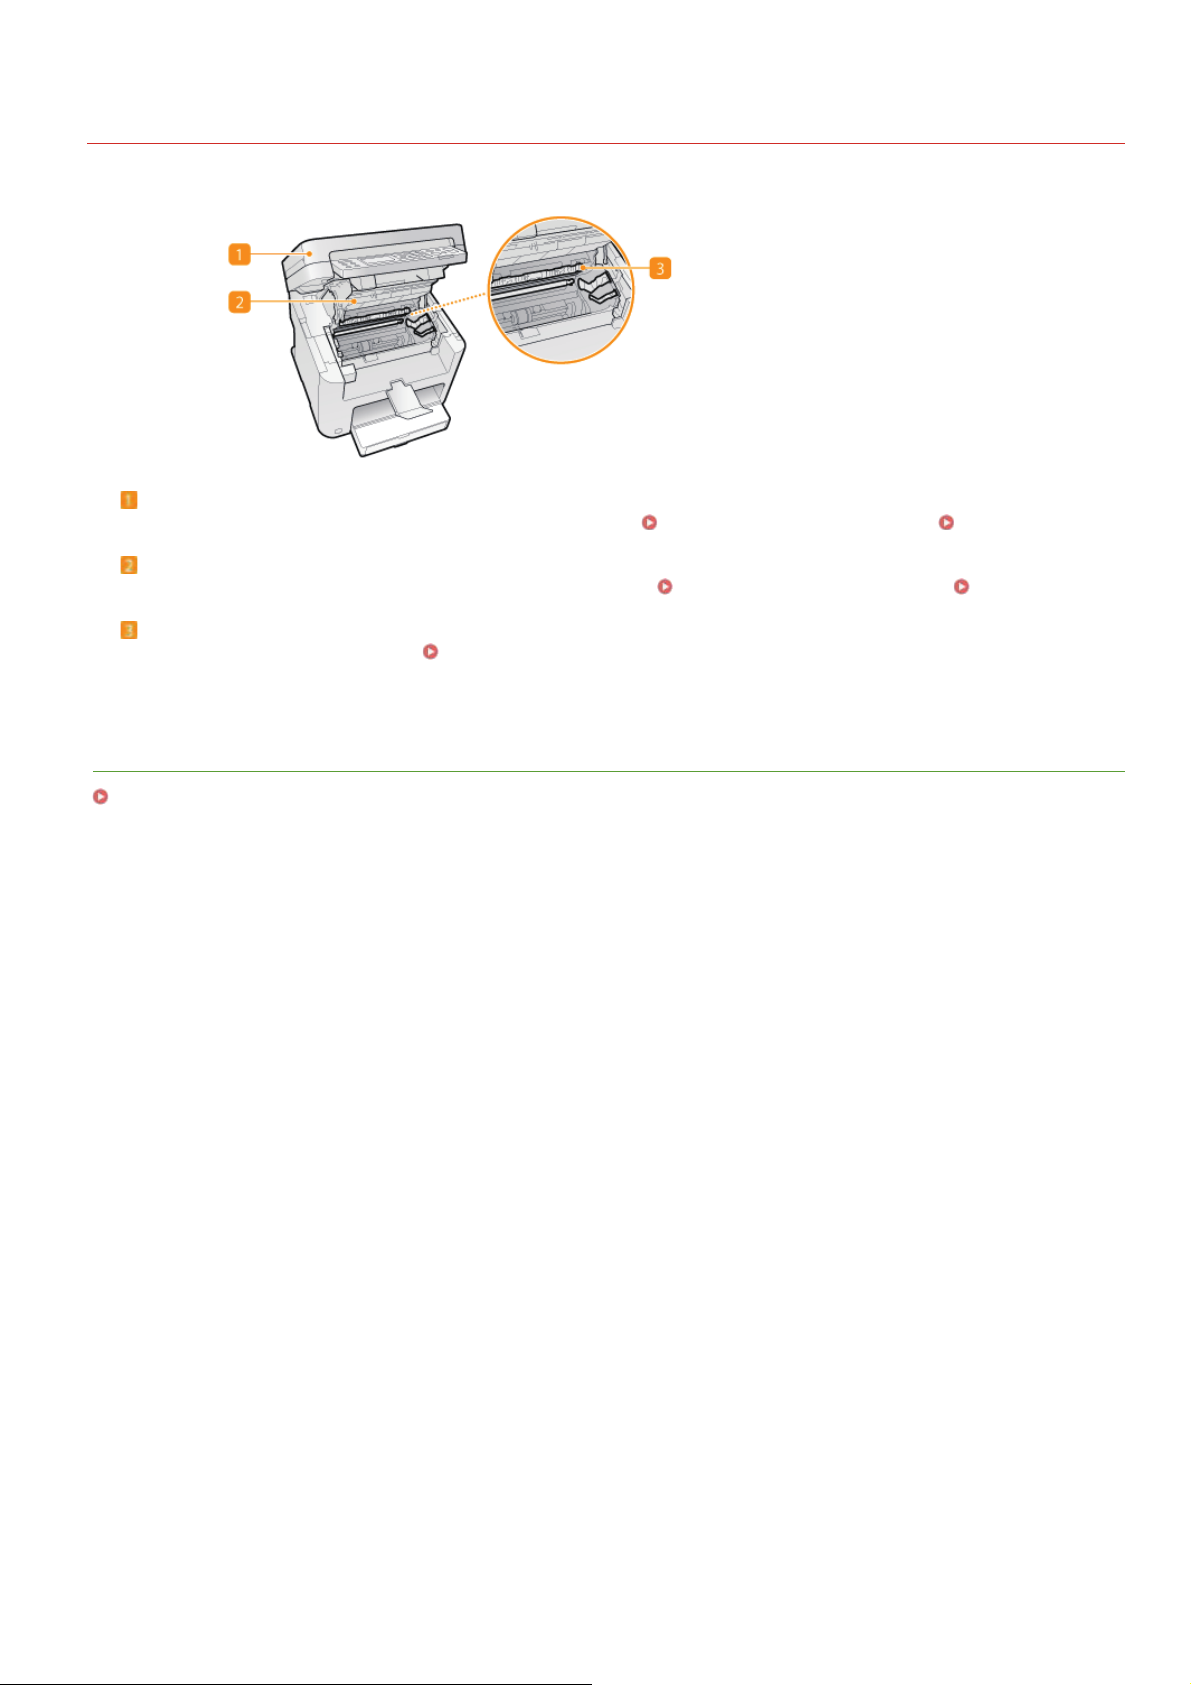
Interior
Operation panel
Lift this panel to replace the toner cartridges or clear paper jams.
Toner cover
Open this cover to replace the toner cartridges or clear paper jams.
Paper exit guide
Open this guide to clear paper jams.
Clearing Jams
0L40-00A
How to Replace Toner Cartridges Clearing Jams
How to Replace Toner Cartridges Clearing Jams
LINKS
How to Replace Toner Cartridges
㻞㻜㻌㻛㻌㻟㻟㻢
Page 21
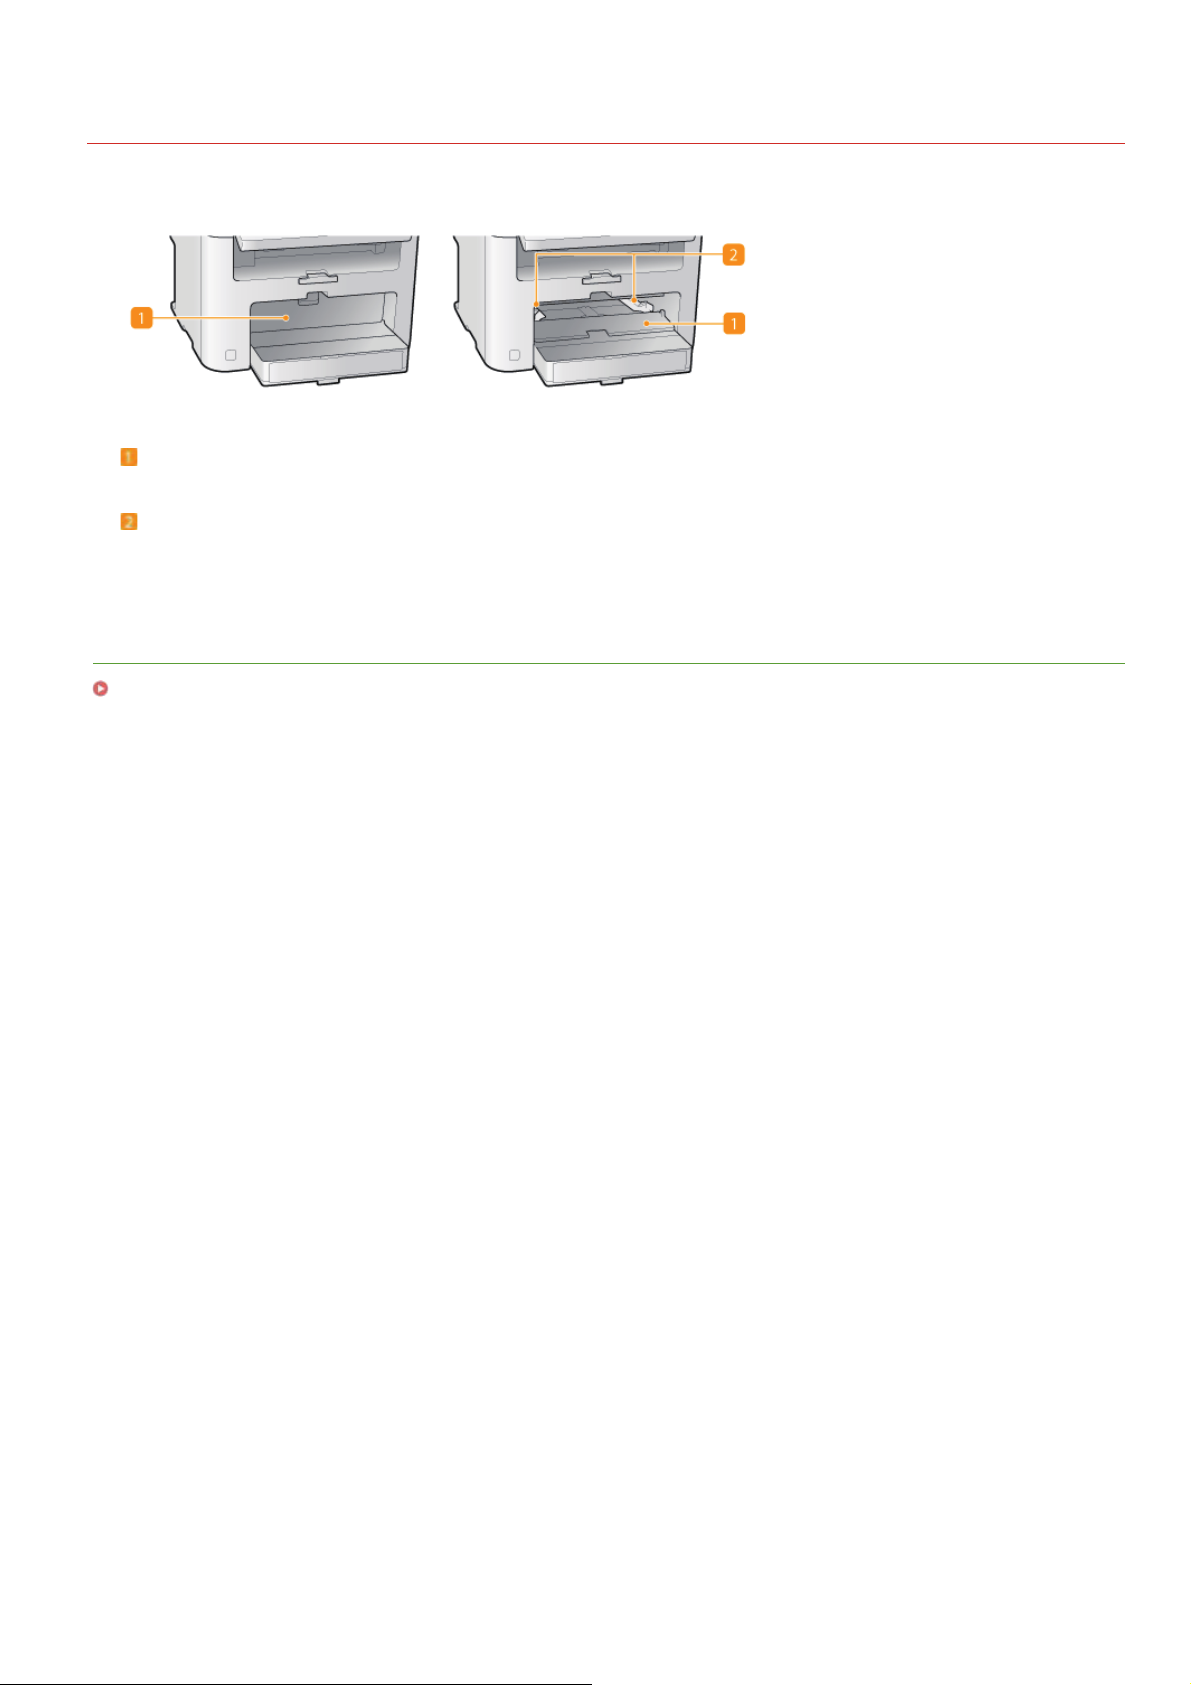
Manual Feed Slot
Manual feed cover
Open this slot to load paper in the manual feed slot.
Paper guides
Adjust the paper guides to exactly the width of the loaded paper to ensure that paper is fed straight into the machine.
0L40-00C
LINKS
Loading Paper in the Manual Feed Slot
㻞㻝㻌㻛㻌㻟㻟㻢
Page 22
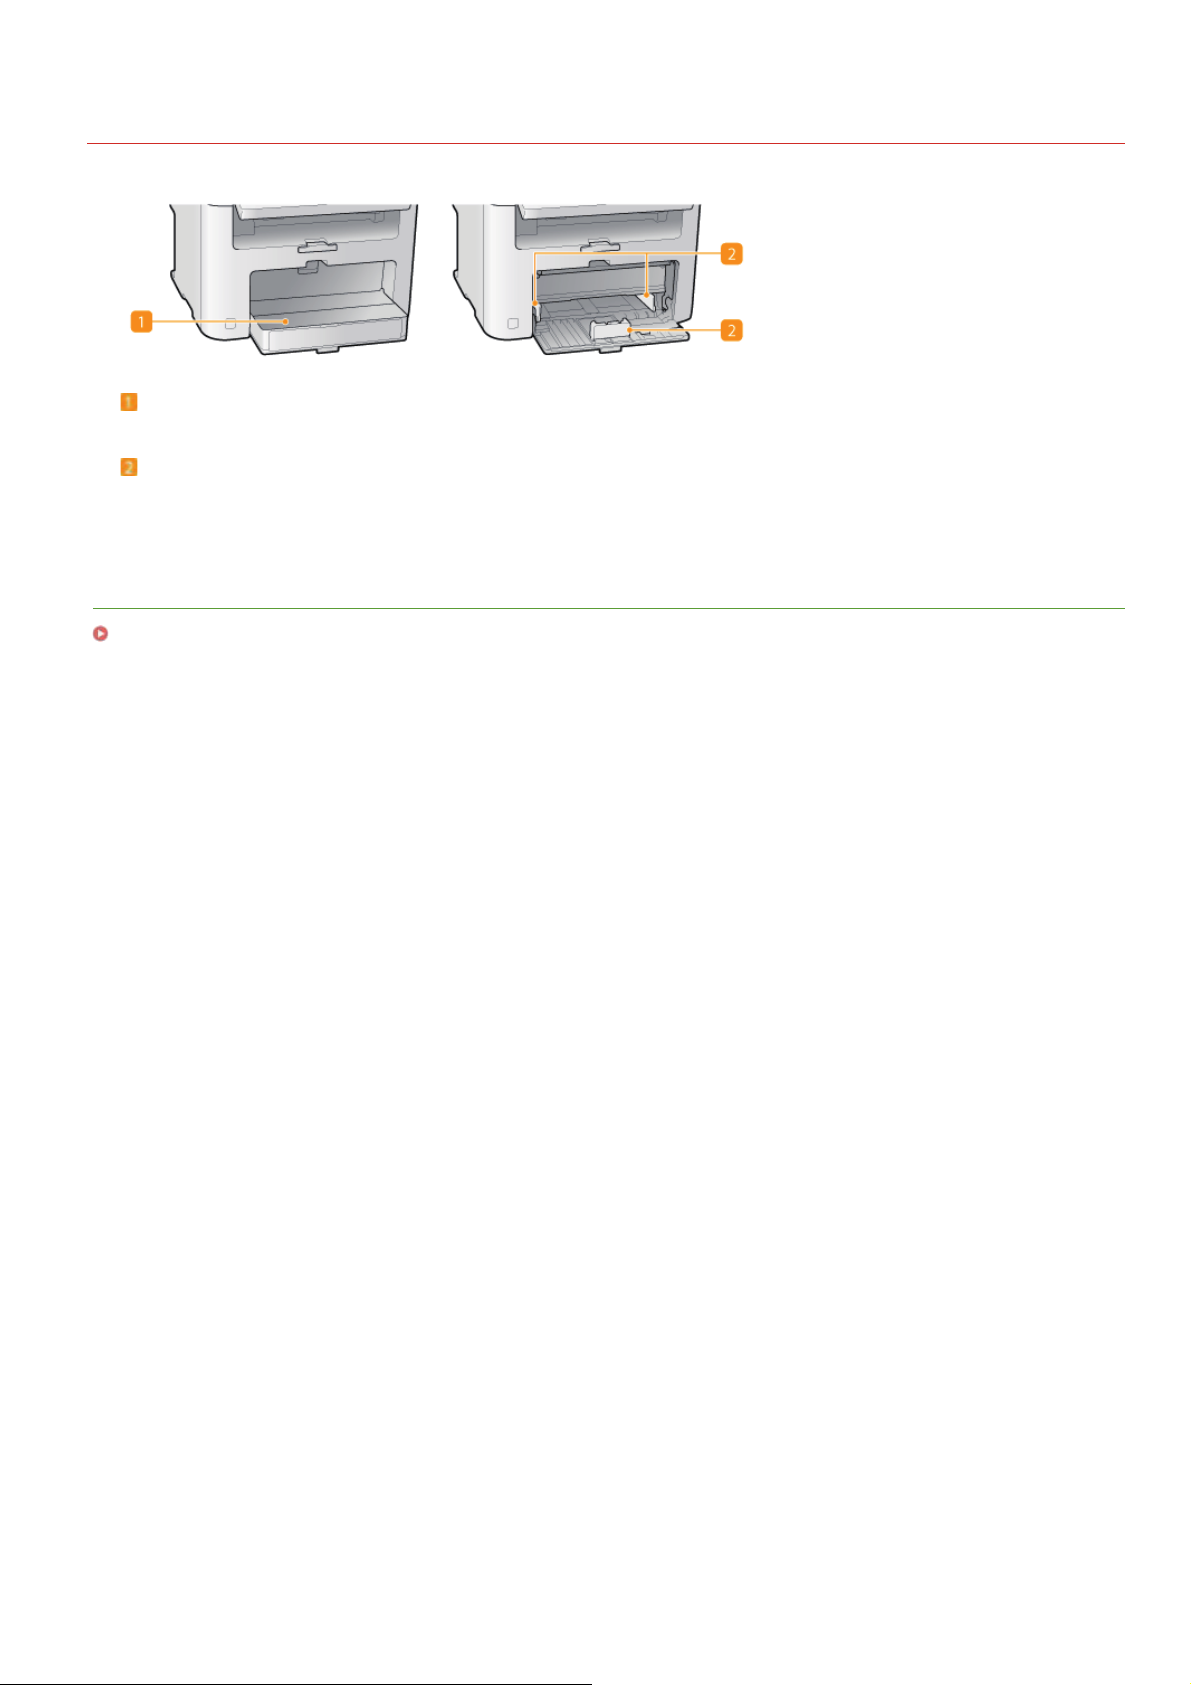
Paper Drawer
Dust cover
Open this cover to load paper in the paper drawer.
Paper guides
Adjust the paper guides to exactly the size of the loaded paper to ensure that paper is fed straight into the machine.
LINKS
Loading Paper in the Paper Drawer
0L40-00E
㻞㻞㻌㻛㻌㻟㻟㻢
Page 23
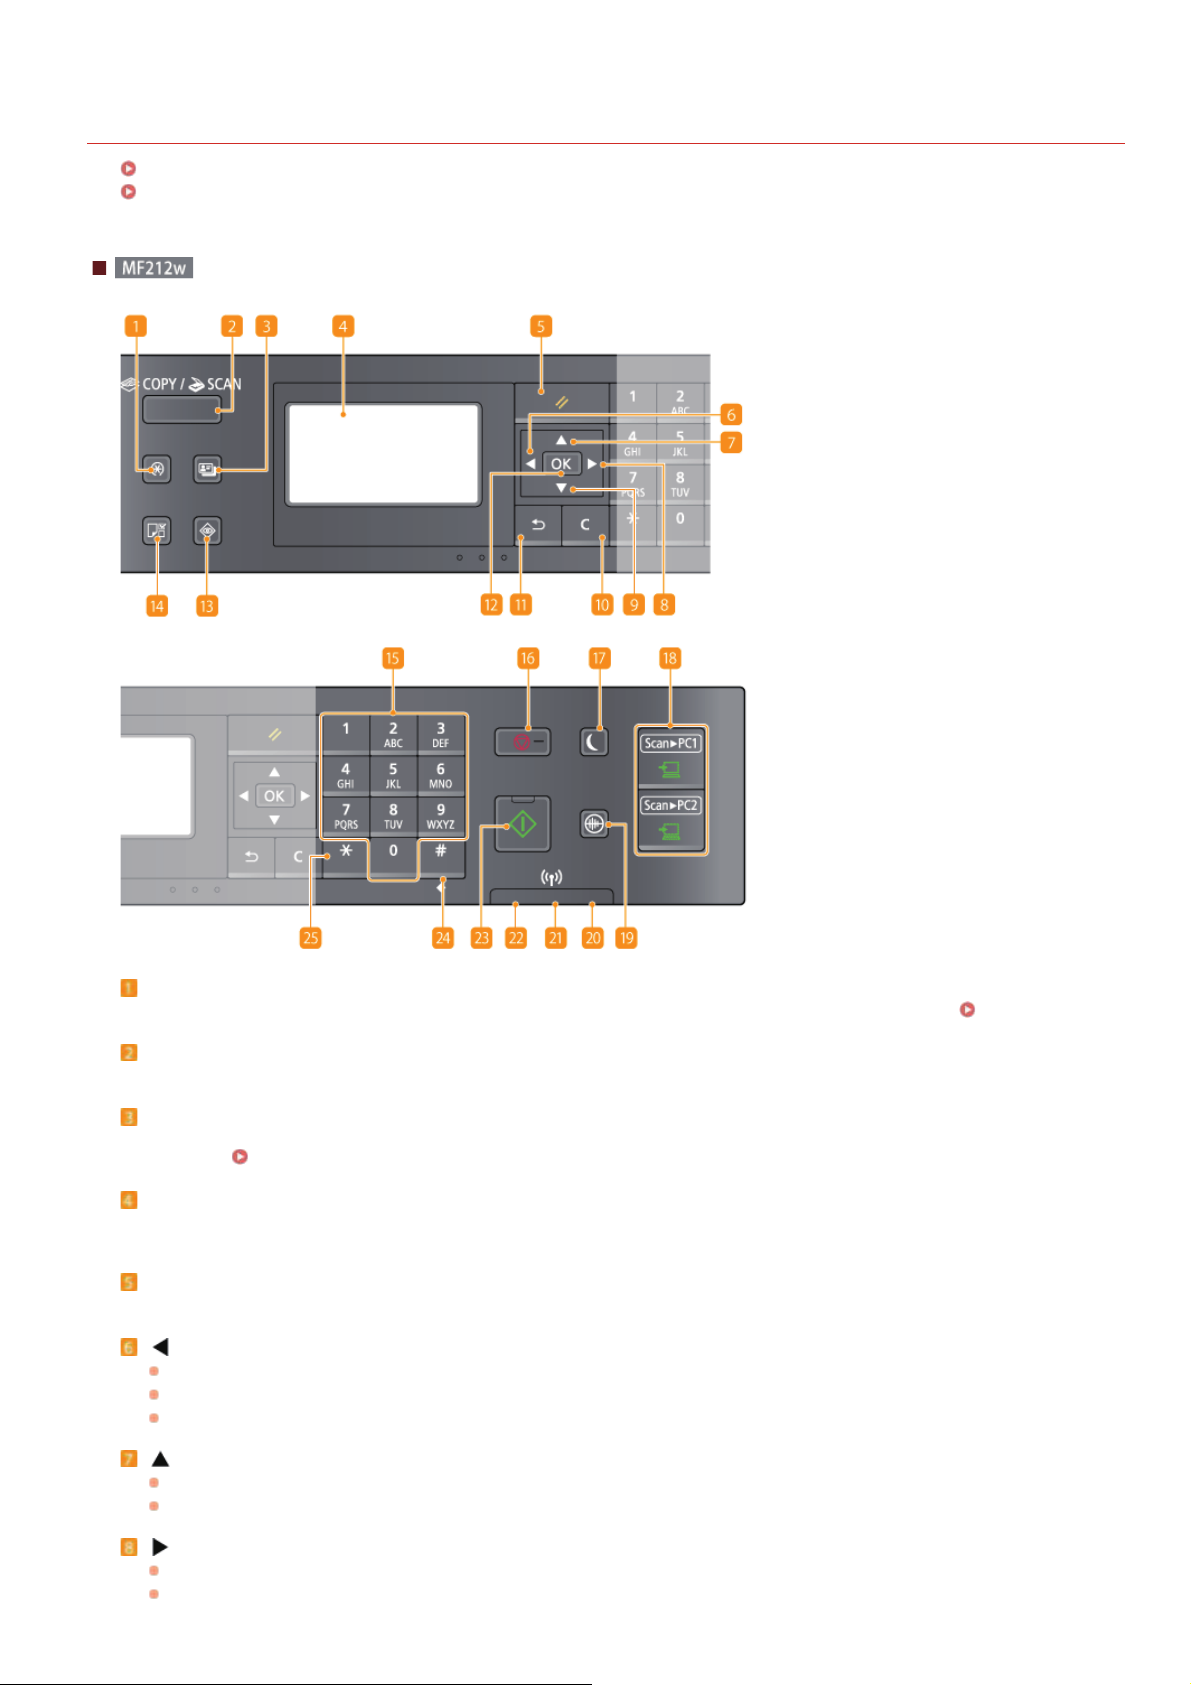
Operation Panel
MF212w
MF211
0L40-0A6
[Menu] key
Press to start specifying many of the settings for the machine, such as <Timer Settings> or <Preferences>.
[COPY/SCAN] key
Press to switch the mode to copy or scan.
[ID Card Copy] key
Press to enter a mode for copying the front and back sides of a driver's license or other ID card onto the same side of a page at
actual size.
Display
Displays the operation and status screens for copying and other functions, as well as the status of the machine and error
information. Also, view the screen when specifying the settings of the machine.
[Reset] key
Press to cancel the settings and restore the previously specified settings.
[ ] key
When specifying settings, press to return to the previous screen.
When entering text, press to move the cursor to the left.
Press to decrease a setting value such as density for scanning, copying, etc.
[ ] key
When specifying settings, press to select the item above the currently selected item.
When changing setting values, press to increase a value.
[ ] key
When specifying settings, press to proceed to the next screen.
When entering text, press to move the cursor to the right.
Copying Both Sides of an ID Card onto One Page
Setting Menu List
㻞㻟㻌㻛㻌㻟㻟㻢
Page 24

Press to increase a setting value such as density for scanning, copying, etc.
[ ] key
When specifying settings, press to select the item below the currently selected item.
When changing setting values, press to decrease a value.
[Clear] key
Press to delete the entered numbers and text.
[Back] key
Press to return to the previous screen. If you press this key when specifying settings, for example, the settings are not applied
and the display returns to the previous screen.
[OK] key
Press to apply settings or specified details.
[Status Monitor] key
Press to check the status of printing or copy to view the usage history. You can also check the status of the machine, such as the
remaining amounts of paper and toner, or whether any errors occurred.
[Paper Setting] key
Press to select the paper you want to use, or to set the size and type of paper loaded in the paper source.
Size and Type
Numeric keys ([0]-[9] keys)
Press to enter numbers and text.
[Stop] key
Press to cancel copying, scanning, and other operations.
Entering Text
Display
Specifying Paper
[Energy Saver] key
Press to put the machine into sleep mode. The key lights up green when the machine is in sleep mode. Press the key again to exit
sleep mode.
[Scan -> PC1]/ [Scan - > PC2] keys
Press to send the scanned documents to the registered computer for each key.
[Quiet Mode] key
Press to put the machine into quiet mode. While in quiet mode this key is lit in green. Press the key again to exit quiet mode.
Entering Quiet Mode
[Error] indicator
Blinks or lights up when an error such as a paper jam occurs
Wi- Fi indicator
Lights up when the machine is connected to wireless LAN.
[Processing/Data] indicator
Blinks while operations such as sending or printing are being performed. Lights up when there are documents waiting to be
processed.
[Start] key
Press to scan or copy documents.
[#] key
Press to enter symbols such as "@" or "/".
[*] key
Press to switch the type of text that is entered.
Entering Sleep Mode
Scanning Using the [Scan -> PC] Key
㻞㻠㻌㻛㻌㻟㻟㻢
Page 25
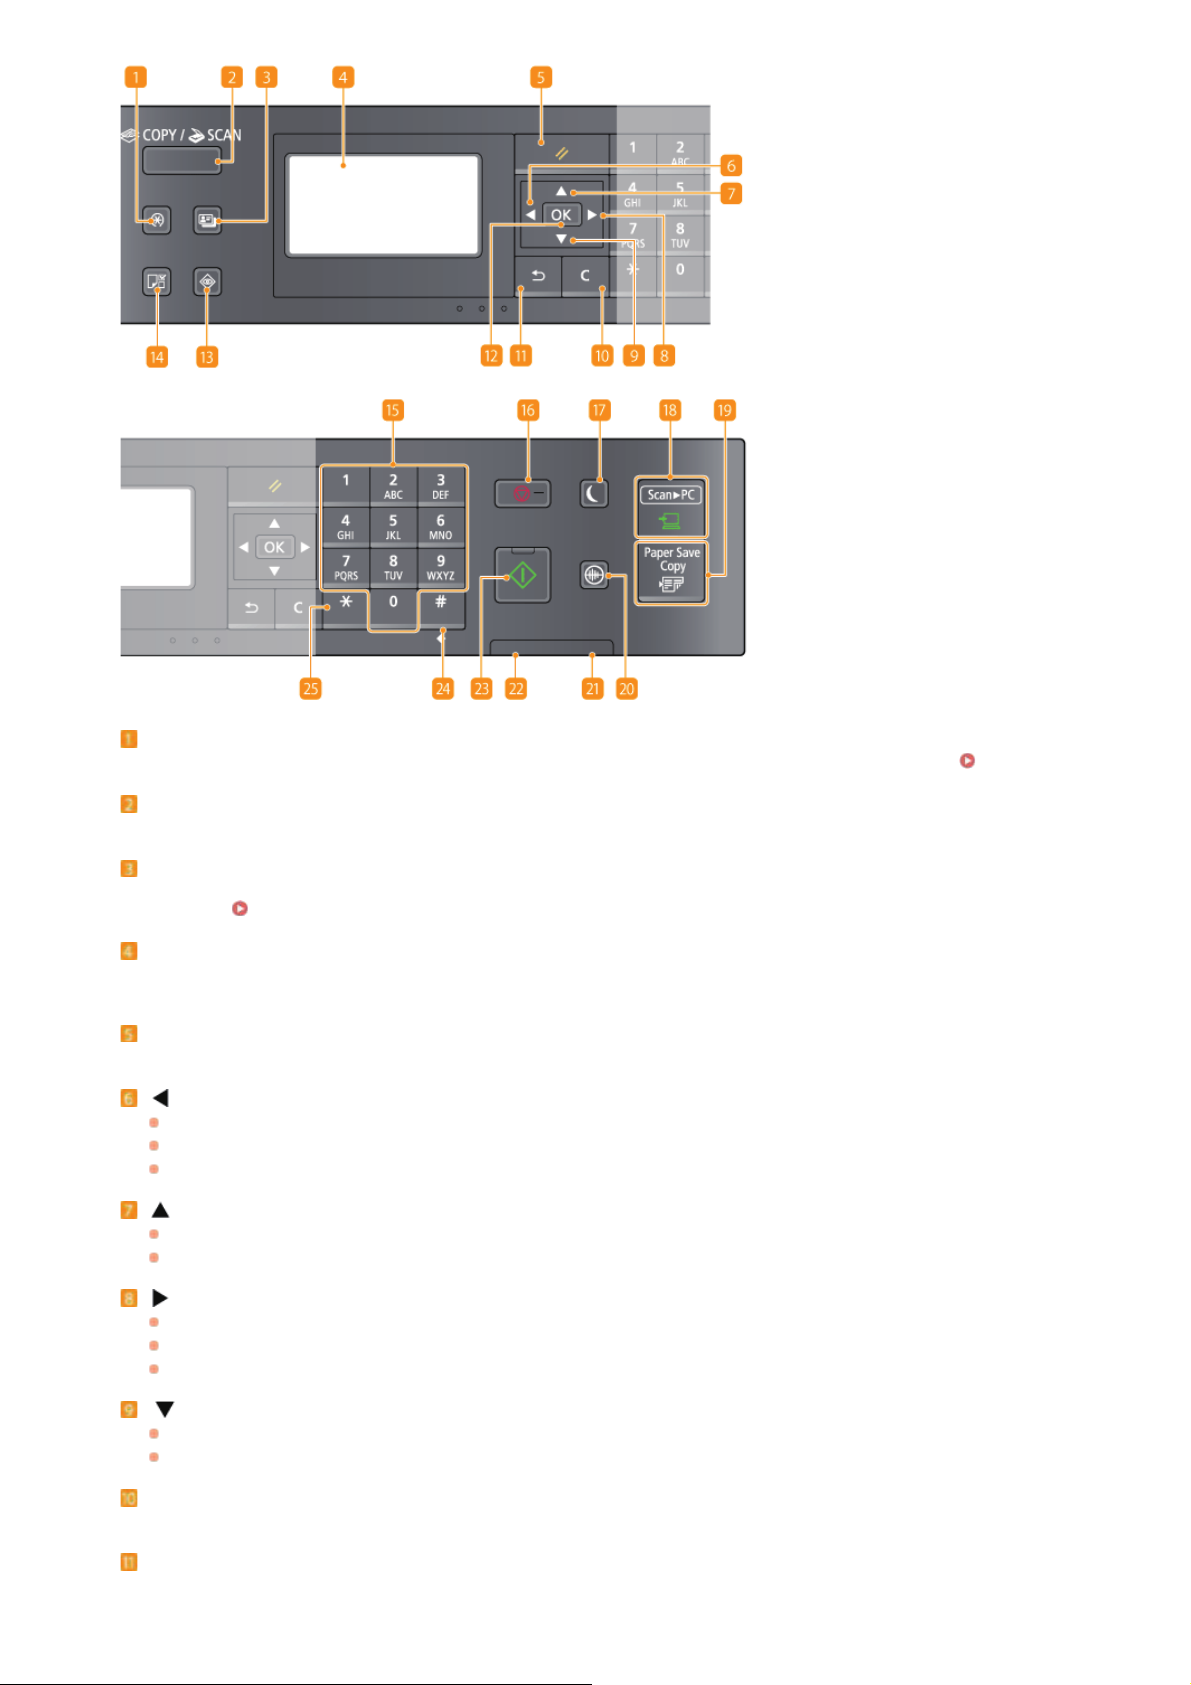
[Menu] key
Press to start specifying many of the settings for the machine, such as <Timer Settings> or <Preferences>.
[COPY/SCAN] key
Press to switch the mode to copy or scan.
[ID Card Copy] key
Press to enter a mode for copying the front and back sides of a driver's license or other ID card onto the same side of a page at
actual size.
Display
Displays the operation and status screens for copying and other functions, as well as the status of the machine and error
information. Also, view the screen when specifying the settings of the machine.
[Reset] key
Press to cancel the settings and restore the previously specified settings.
[ ] key
When specifying settings, press to return to the previous screen.
When entering text, press to move the cursor to the left.
Press to decrease a setting value such as density for scanning, copying, etc.
[ ] key
When specifying settings, press to select the item above the currently selected item.
When changing setting values, press to increase a value.
[ ] key
When specifying settings, press to proceed to the next screen.
When entering text, press to move the cursor to the right.
Press to increase a setting value such as density for scanning, copying, etc.
Copying Both Sides of an ID Card onto One Page
Setting Menu List
[ ] key
When specifying settings, press to select the item below the currently selected item.
When changing setting values, press to decrease a value.
[Clear] key
Press to delete the entered numbers and text.
[Back] key
Press to return to the previous screen. If you press this key when specifying settings, for example, the settings are not applied
and the display returns to the previous screen.
㻞㻡㻌㻛㻌㻟㻟㻢
Page 26

[OK] key
Press to apply settings or specified details.
[Status Monitor] key
Press to check the status of printing or copy to view the usage history. You can also check the status of the machine, such as the
remaining amounts of paper and toner, or whether any errors occurred.
[Paper Setting] key
Press to select the paper you want to use, or to set the size and type of paper loaded in the paper source.
Size and Type
Numeric keys ([0]-[9] keys)
Press to enter numbers and text.
[Stop] key
Press to cancel copying, scanning, and other operations.
[Energy Saver] key
Press to put the machine into sleep mode. The key lights up green when the machine is in sleep mode. Press the key again to exit
sleep mode.
[Scan -> PC] key
Press to send the scanned documents to the registered computer.
[Paper Save Copy] key
Press to put the machine into paper save copy mode for copying multiple document pages reduced on a single sheet.
[Paper Save Copy] Key (MF211)
Entering Sleep Mode
Entering Text
Display
Specifying Paper
Scanning Using the [Scan -> PC] Key
Using the
[Quiet Mode] key
Press to put the machine into quiet mode. While in quiet mode this key is lit in green. Press the key again to exit quiet mode.
Entering Quiet Mode
[Error] indicator
Blinks or lights up when an error such as a paper jam occurs
[Processing/Data] indicator
Blinks while operations such as sending or printing are being performed. Lights up when there are documents waiting to be
processed.
[Start] key
Press to scan or copy documents.
[#] key
Press to enter symbols such as "@" or "/".
[*] key
Press to switch the type of text that is entered.
LINKS
Using the Operation Panel
㻞㻢㻌㻛㻌㻟㻟㻢
Page 27
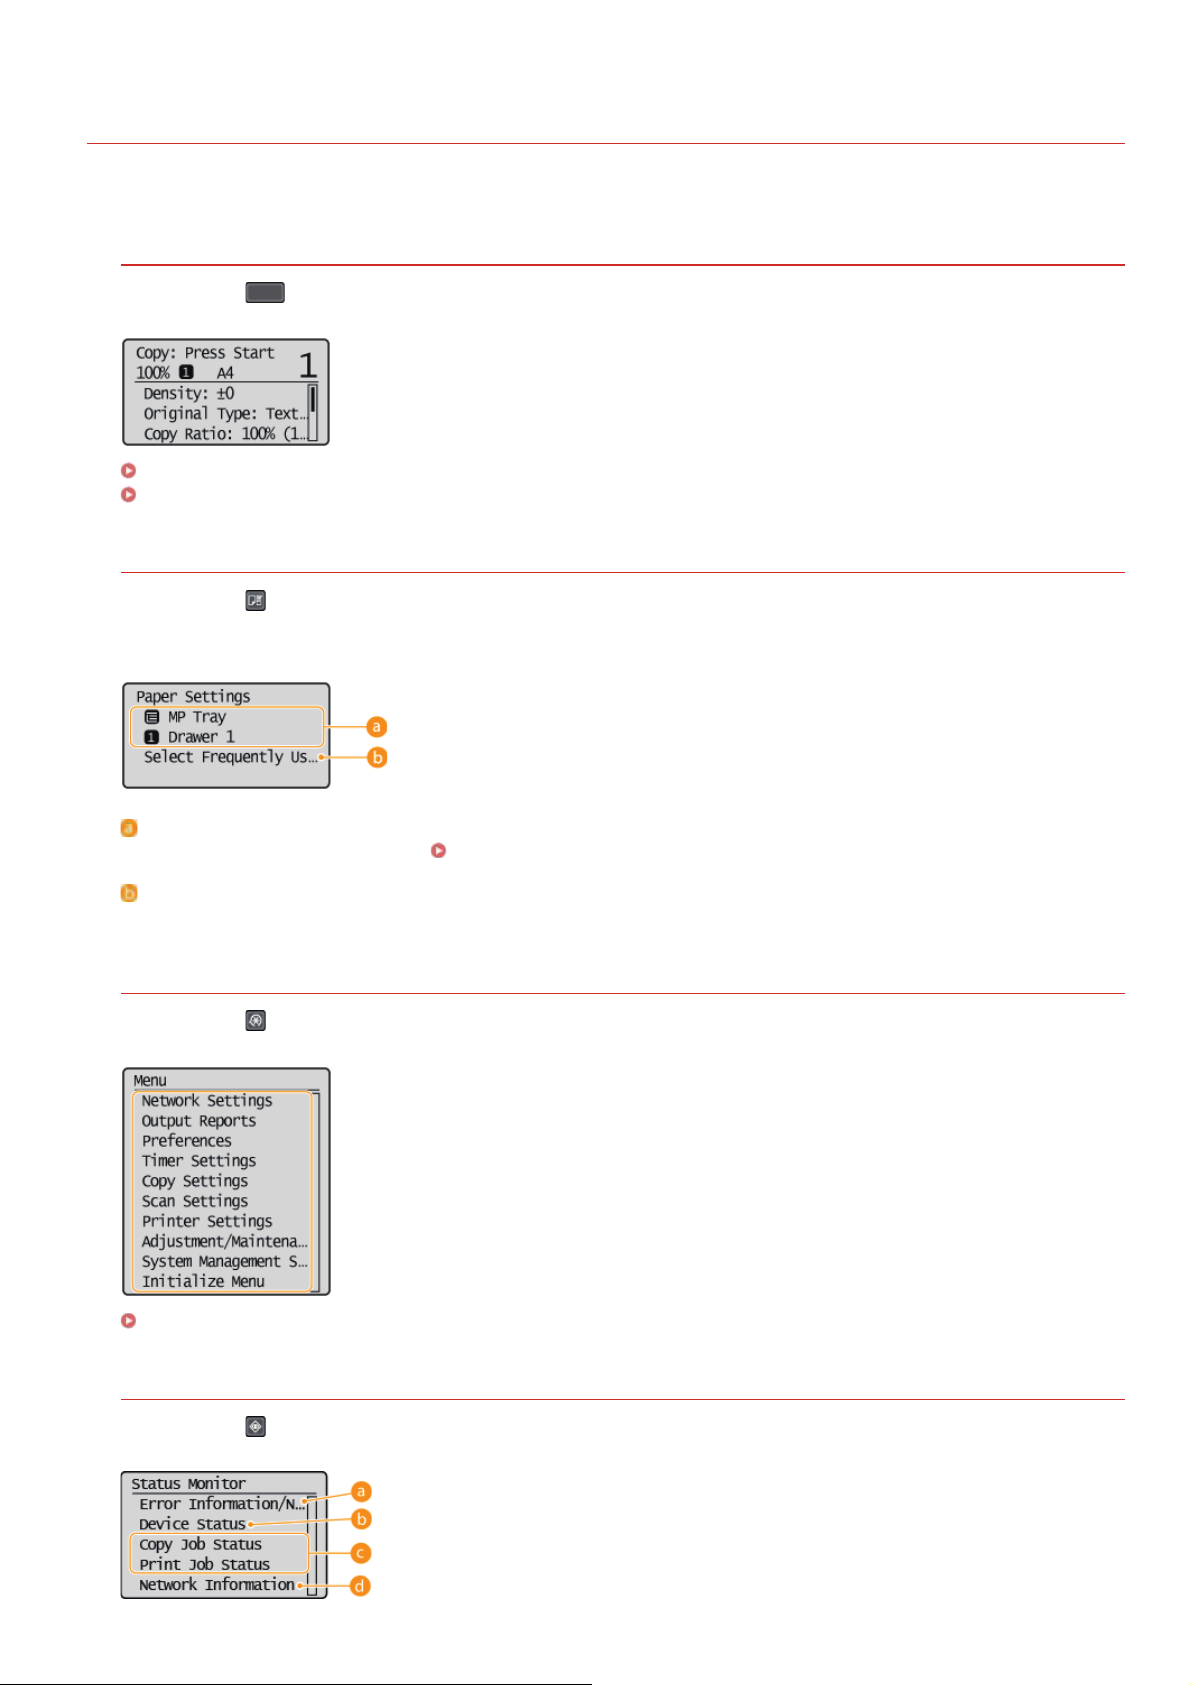
0L40-00H
Display
The display shows the screens for copying, scanning, and other functions, as well as the screens for specifying settings for these
functions. You can also check information such as error messages and communication status on the display.
Main Screen
When you press (COPY/SCAN) the main screen for the selected function is displayed. The copy main screen is shown below as
an example.
Basic Copy Operations
Preparing to Use the Machine as a Scanner (MF212w)
<Paper Settings> Screen
When you press (Paper Setting) to select the paper to copy or print on, the <Paper Settings> screen is displayed. Select the
paper on the screen. Also, for example, you can press this key to change the paper settings when you load a paper size that is
different from the previously loaded paper size. Note that the paper setting must be correctly specified so that the paper is fed
properly.
Selecting Paper Tray
Use to select the paper for each tray.
<Select Frequently Used Paper Sizes>
You can set the machine to display only frequently used paper sizes in the selection screen.
Specifying Paper Size and Type
<Menu> Screen
When you press , the <Menu> screen is displayed. On this screen, you can start specifying general machine settings such as
<Preferences> or <Timer Settings>, as well as many of the settings for each function, such as copy and scan.
Setting Menu List
<Status Monitor> Screen
When you press , a screen is displayed that enables you to check the status of documents that are being printed or copied, as well
as the status of the machine such as the toner levels or type of loaded paper.
㻞㻣㻌㻛㻌㻟㻟㻢
Page 28
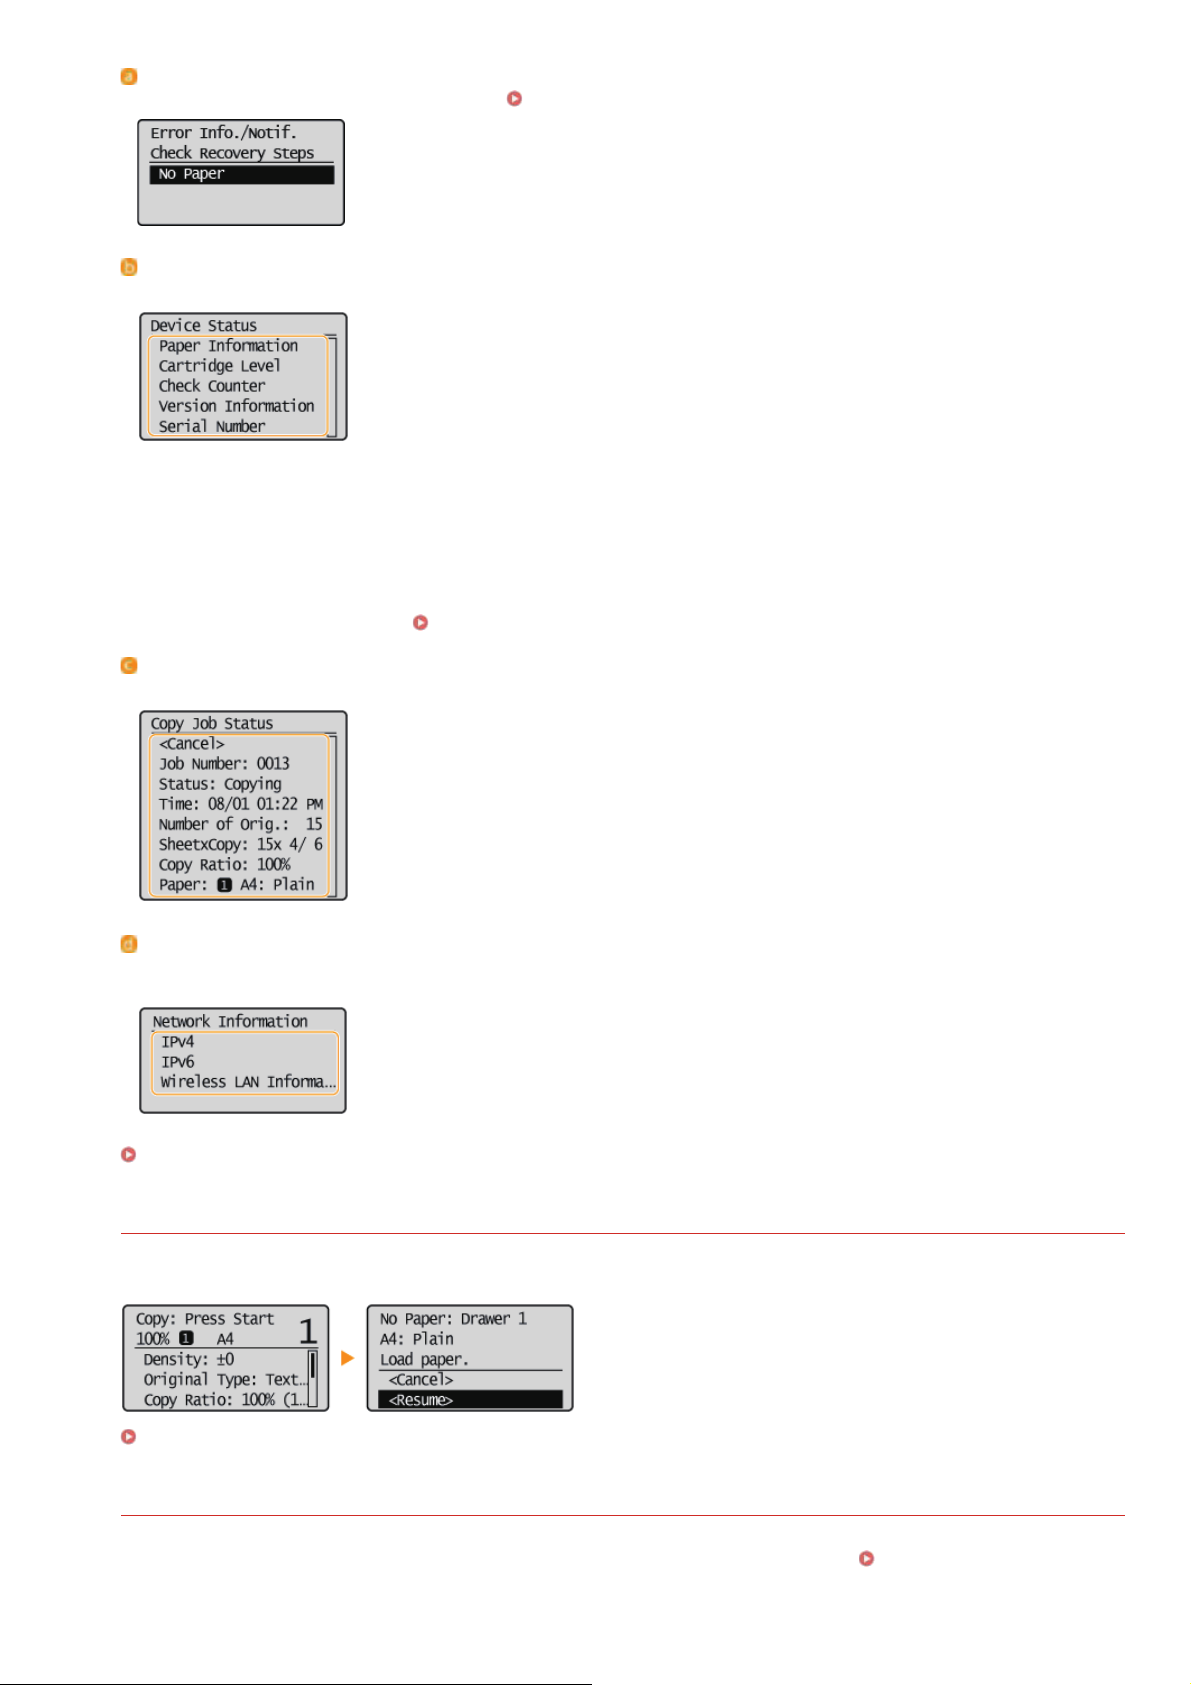
<Error Information/Notification>
Displays the details of any errors that occurred.
<Device Status>
Displays the status of the machine, such as the amount of paper or toner remaining.
<Paper Information>
Displays whether paper is loaded in each paper source.
<Cartridge Level>
Displays the amount of toner remaining. Depending on the environment in which your machine is located, other internal parts
may reach the end of their lifetime before the toner runs out.
When an Error Message Appears
<Check Counter>
Displays the totals for printouts.
Status of copy/print jobs
Displays the current status of the selected item. The <Copy Job Status> screen is shown below as an example.
<Network Information> (MF212w)
Displays the network settings such as the IP address of the machine and status such as the condition of wireless LAN
communications.
Viewing Network Settings
Viewing the Counter Value
When a Message Is Displayed
Messages are displayed at the top of the screen in situations such as when toner level is low or when a cover is left open. The
display alternates between showing the normal screen and the message.
When an Error Message Appears
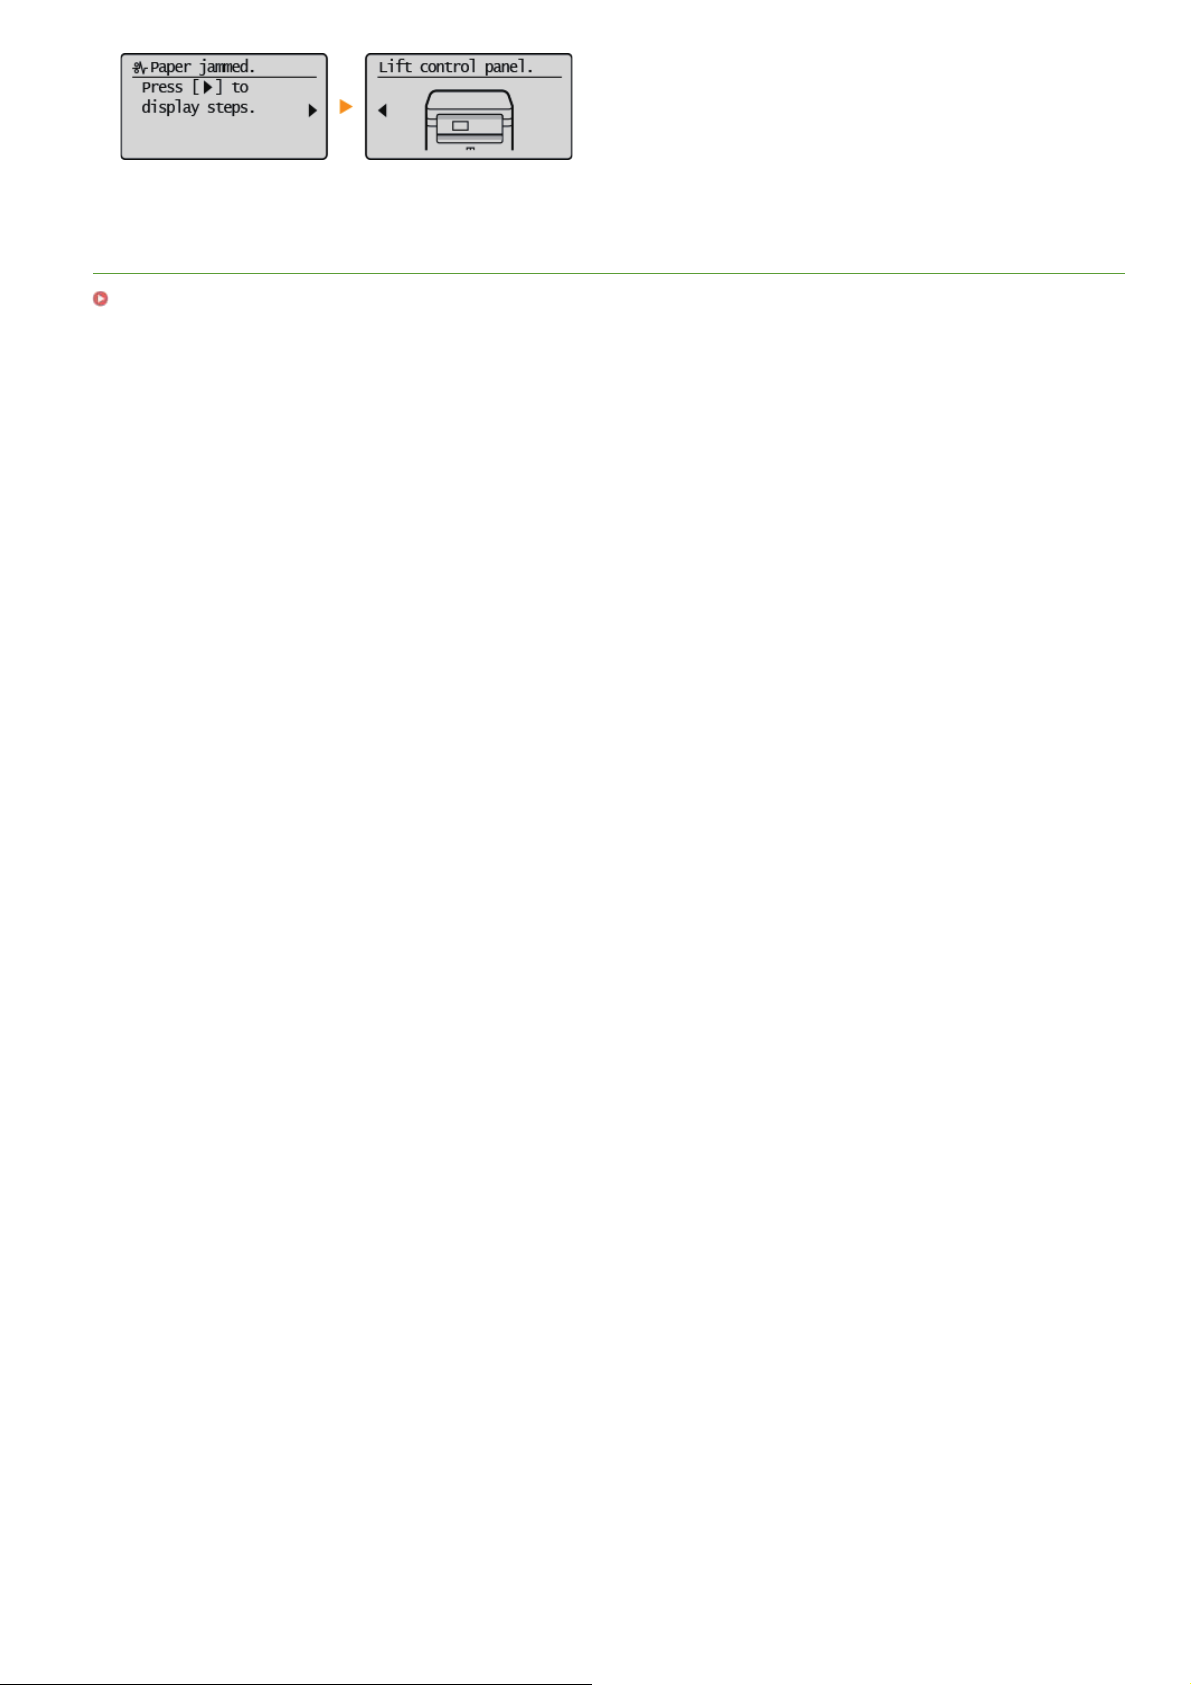
When an Error Occurs
In some cases when an error occurs, instructions on how to respond to the error are displayed. Follow the on-screen instructions to
solve the problem. The screen displayed when a paper jam occurs is shown below as an example (
Appears).
When an Error Message
㻞㻤㻌㻛㻌㻟㻟㻢
Page 29
LINKS
Using the Operation Panel
㻞㻥㻌㻛㻌㻟㻟㻢
Page 30
Using the Operation Panel
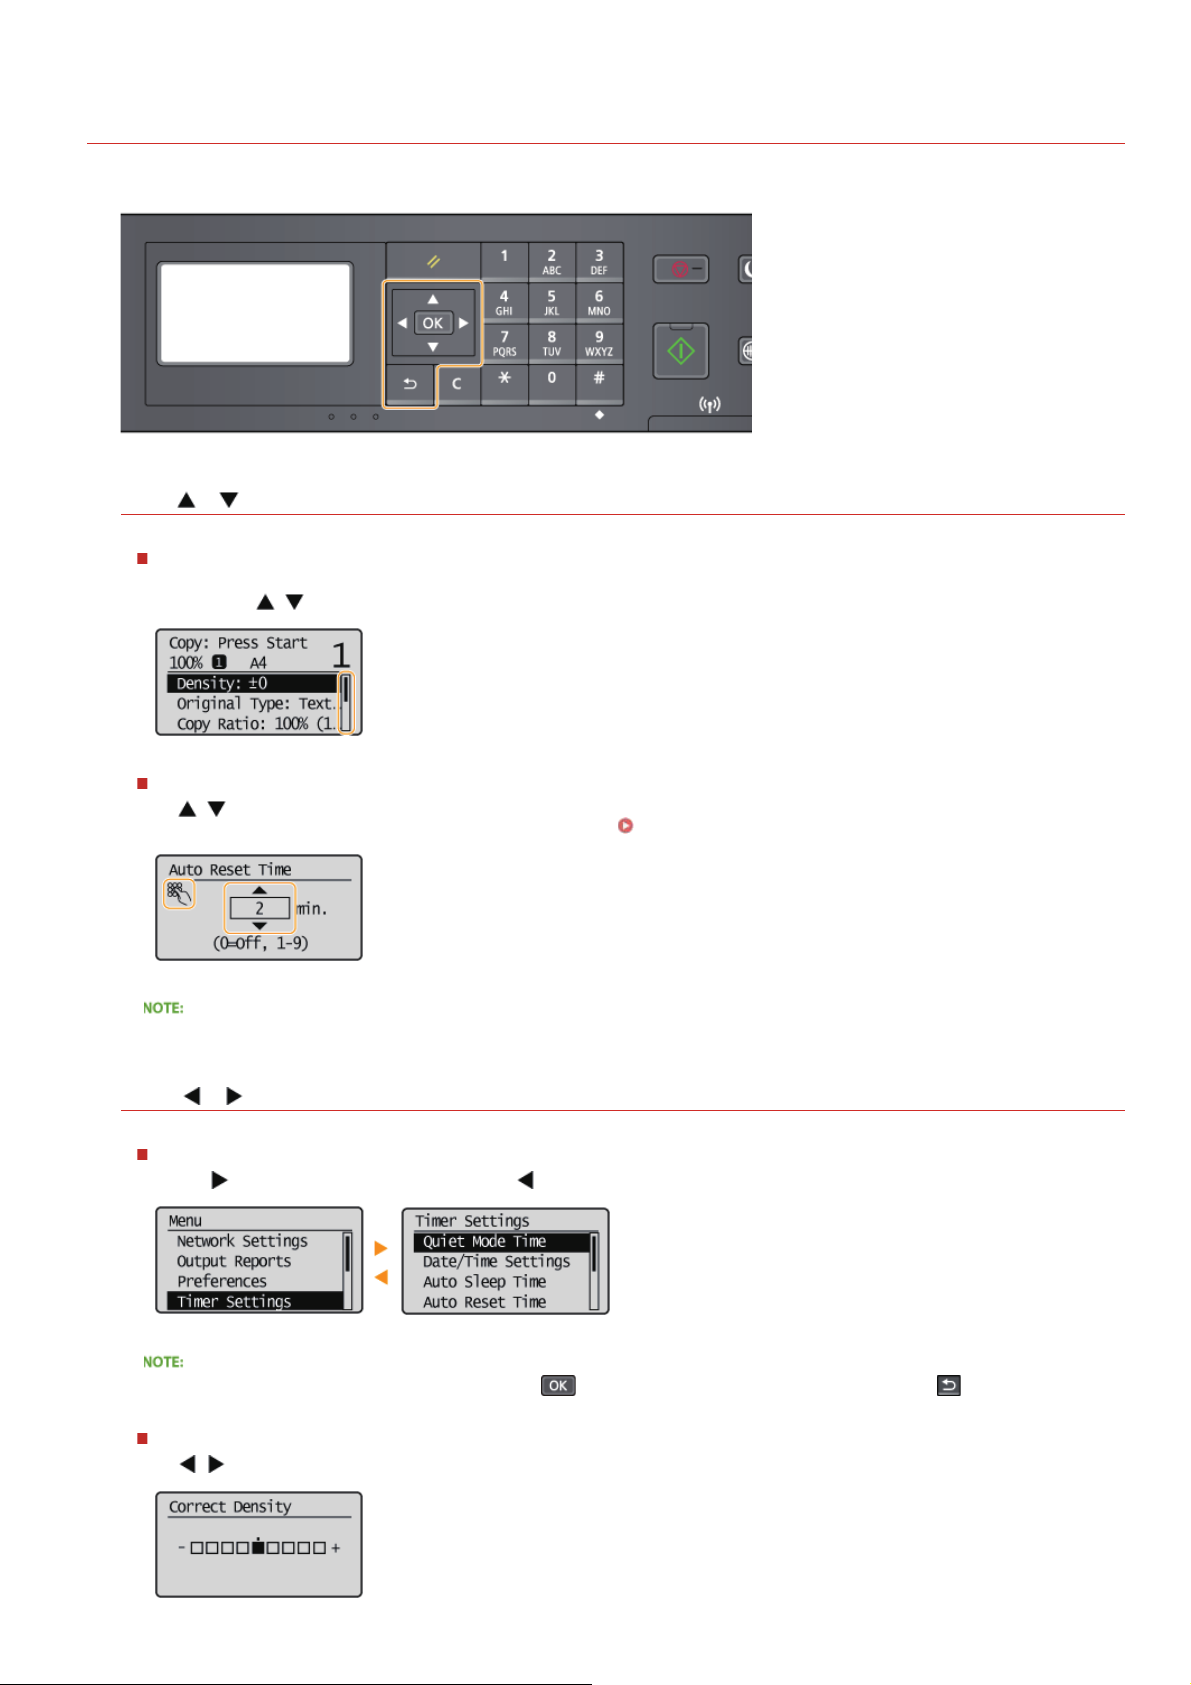
Use the keys shown below to specify settings and adjust values.
Using /
Scrolling the screen
The scroll bar is displayed on the right side of the screen when not all of the information fits on one screen. If the scroll bar is
displayed, use
/ to scroll up or down. The text and background colors of an item are inverted when it is selected.
0L40-00K
Changing a setting value
Use / when entering numbers. You can also enter the value directly using the numeric keys when the numeric key icon is
displayed in the top-left corner of the screen, as shown below.
The numbers in parentheses beneath the value input field indicate the range of possible values.
Entering Text
Using /
Proceeding to next screen/Returning to previous screen
Press to proceed to the next screen. Press to return to the previous screen.
You can also proceed to the next screen by pressing , and return to the previous screen by pressing .
Adjusting a setting value
Use / when adjusting the value on a scale.
㻟㻜㻌㻛㻌㻟㻟㻢
Page 31
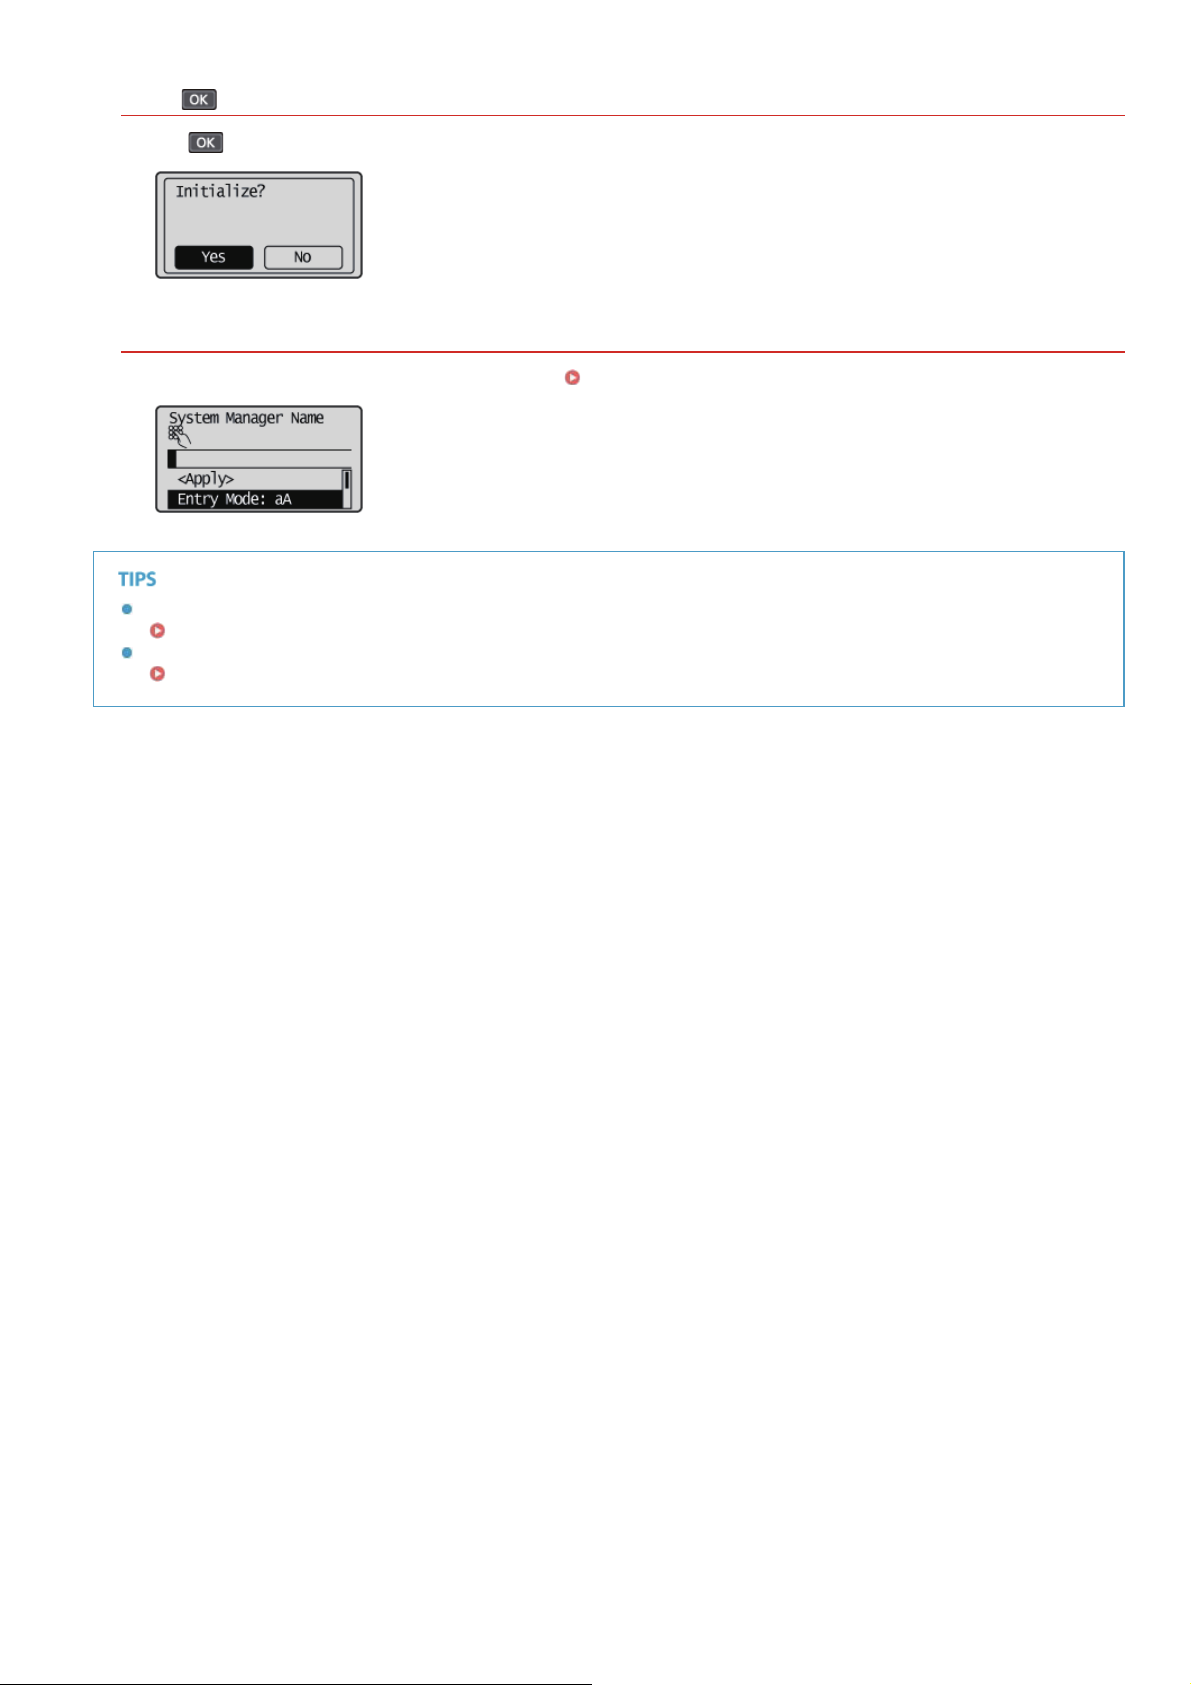
Using
Press to apply a setting.
Using the Numeric Keys
Use the numeric keys when entering text and numbers. Entering Text
You can change a variety of display-related settings, such as the scrolling speed or display language:
Display Settings
To change the screen that is automatically displayed when the machine remains idle for a specified length of time:
Function After Auto Reset
㻟㻝㻌㻛㻌㻟㻟㻢
Page 32
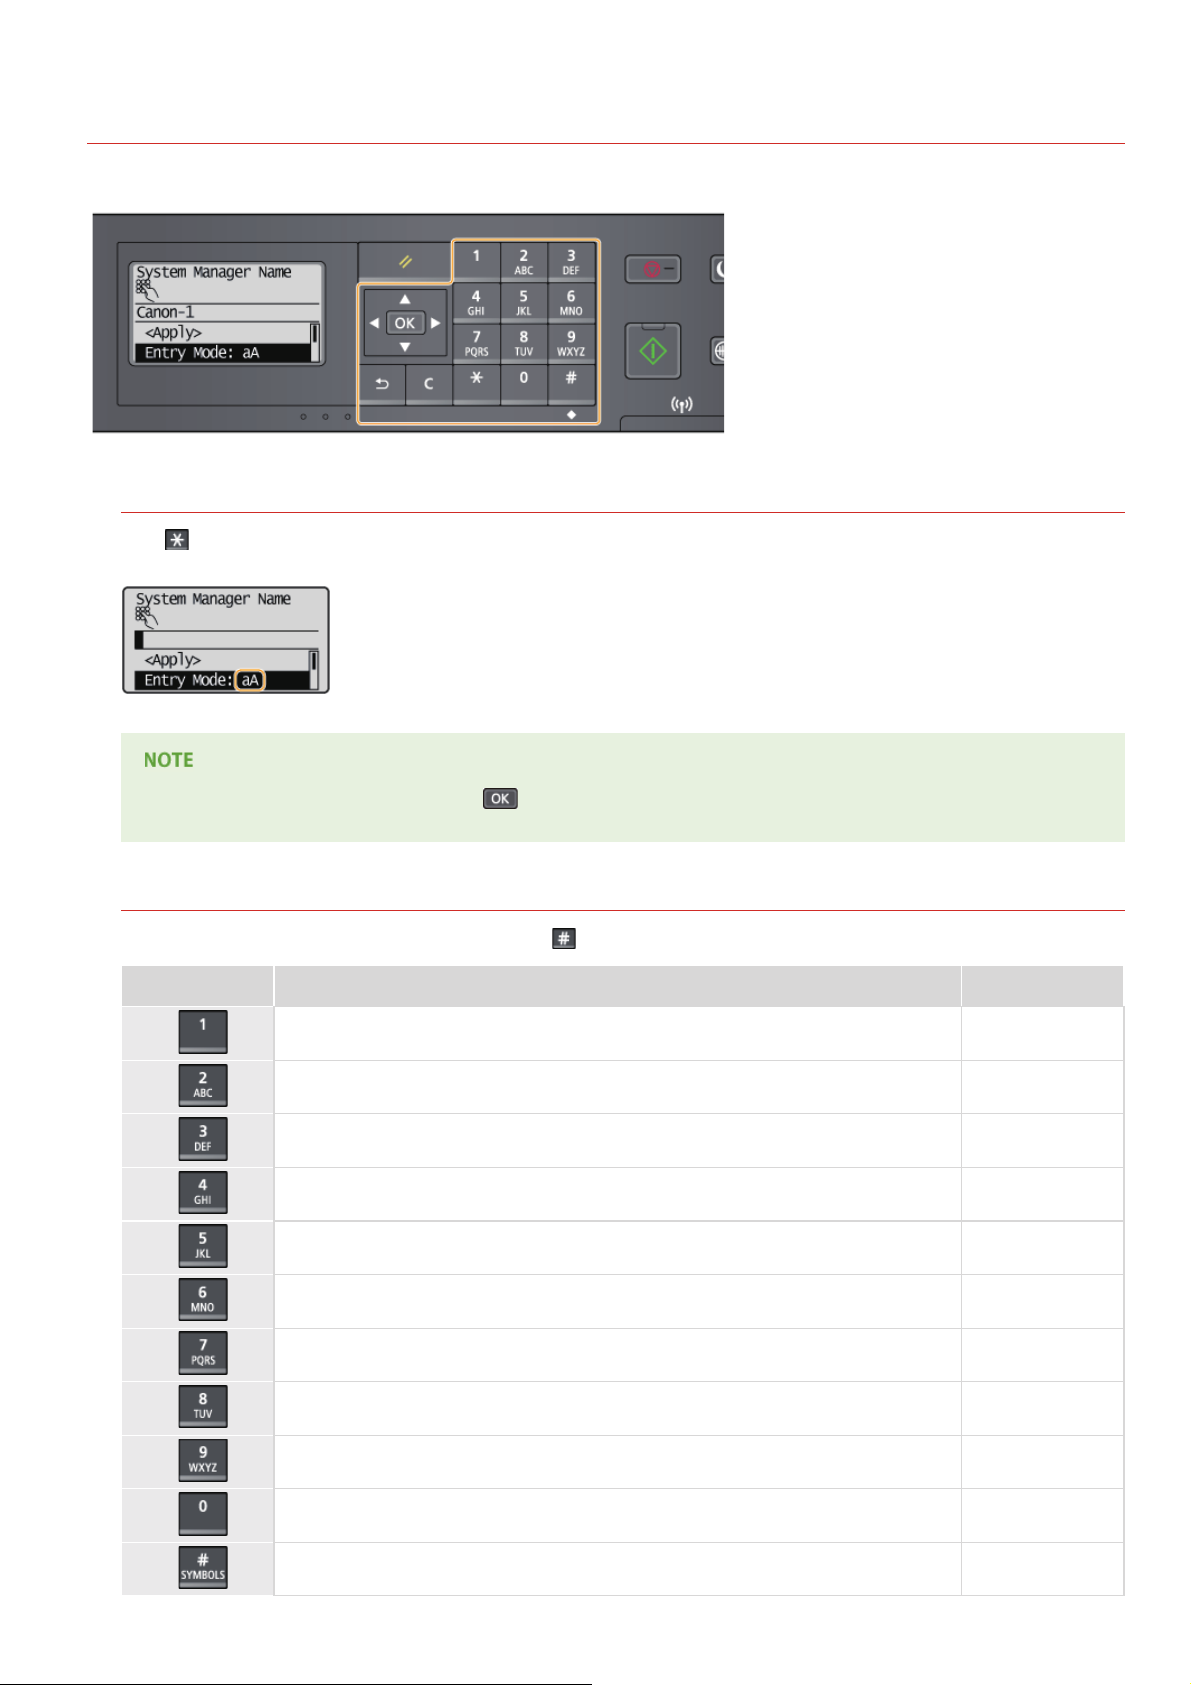
Entering Text
Use the numeric keys to enter text and values.
Switching the Type of Text
Press to switch the type of text that is entered. The currently selected type of text is indicated by the "aA" or "12" of <Entry
Mode>.
0L40-00L
You can also select <Entry Mode> and press to switch the type of text.
Types of Text That Can Be Entered
The text that can be entered using the numeric keys and are listed below.
Key aA 12
@ . - _ /
ABCabc 2
DEFdef 3
GHIghi 4
JKLjkl 5
MNOmno 6
PQRSpqrs 7
1
TUVtuv 8
WXYZwxyz 9
(Not available) 0
(space) - . * # ! ” , ; : ^ ` _ = / | ’ ? $ @ % & + \ ~ ( ) [ ] { } < > (Not available)
㻟㻞㻌㻛㻌㻟㻟㻢
Page 33
Press or select <Symbol> and press when the type of text that is entered is <aA> to display a screen for selecting
symbols. Use the
Deleting Text
One character is deleted each time is pressed. Press and hold to delete all of the entered text.
Moving the Cursor (Entering a Space)
Press or to move the cursor. To enter a space, move the cursor to the end of the text, and press .
Example of Entering Text and Numbers
Example: "Canon-1"
Press repeatedly until <aA> is selected.
1
Press repeatedly until the letter "C" is selected.
2
Press repeatedly until the letter "a" is selected.
3
Press repeatedly until the letter "n" is selected.
4
/ / / keys to select the symbol to enter, and press .
Press repeatedly until the letter "o" is selected.
5
Press repeatedly until the letter "n" is selected.
6
Press repeatedly until the symbol "- " is selected.
7
Press repeatedly until <12> is selected.
8
Press .
9
Press / to highlight <Apply>, and then press .
10
㻟㻟㻌㻛㻌㻟㻟㻢
Page 34
Placing Documents
0L40-00R
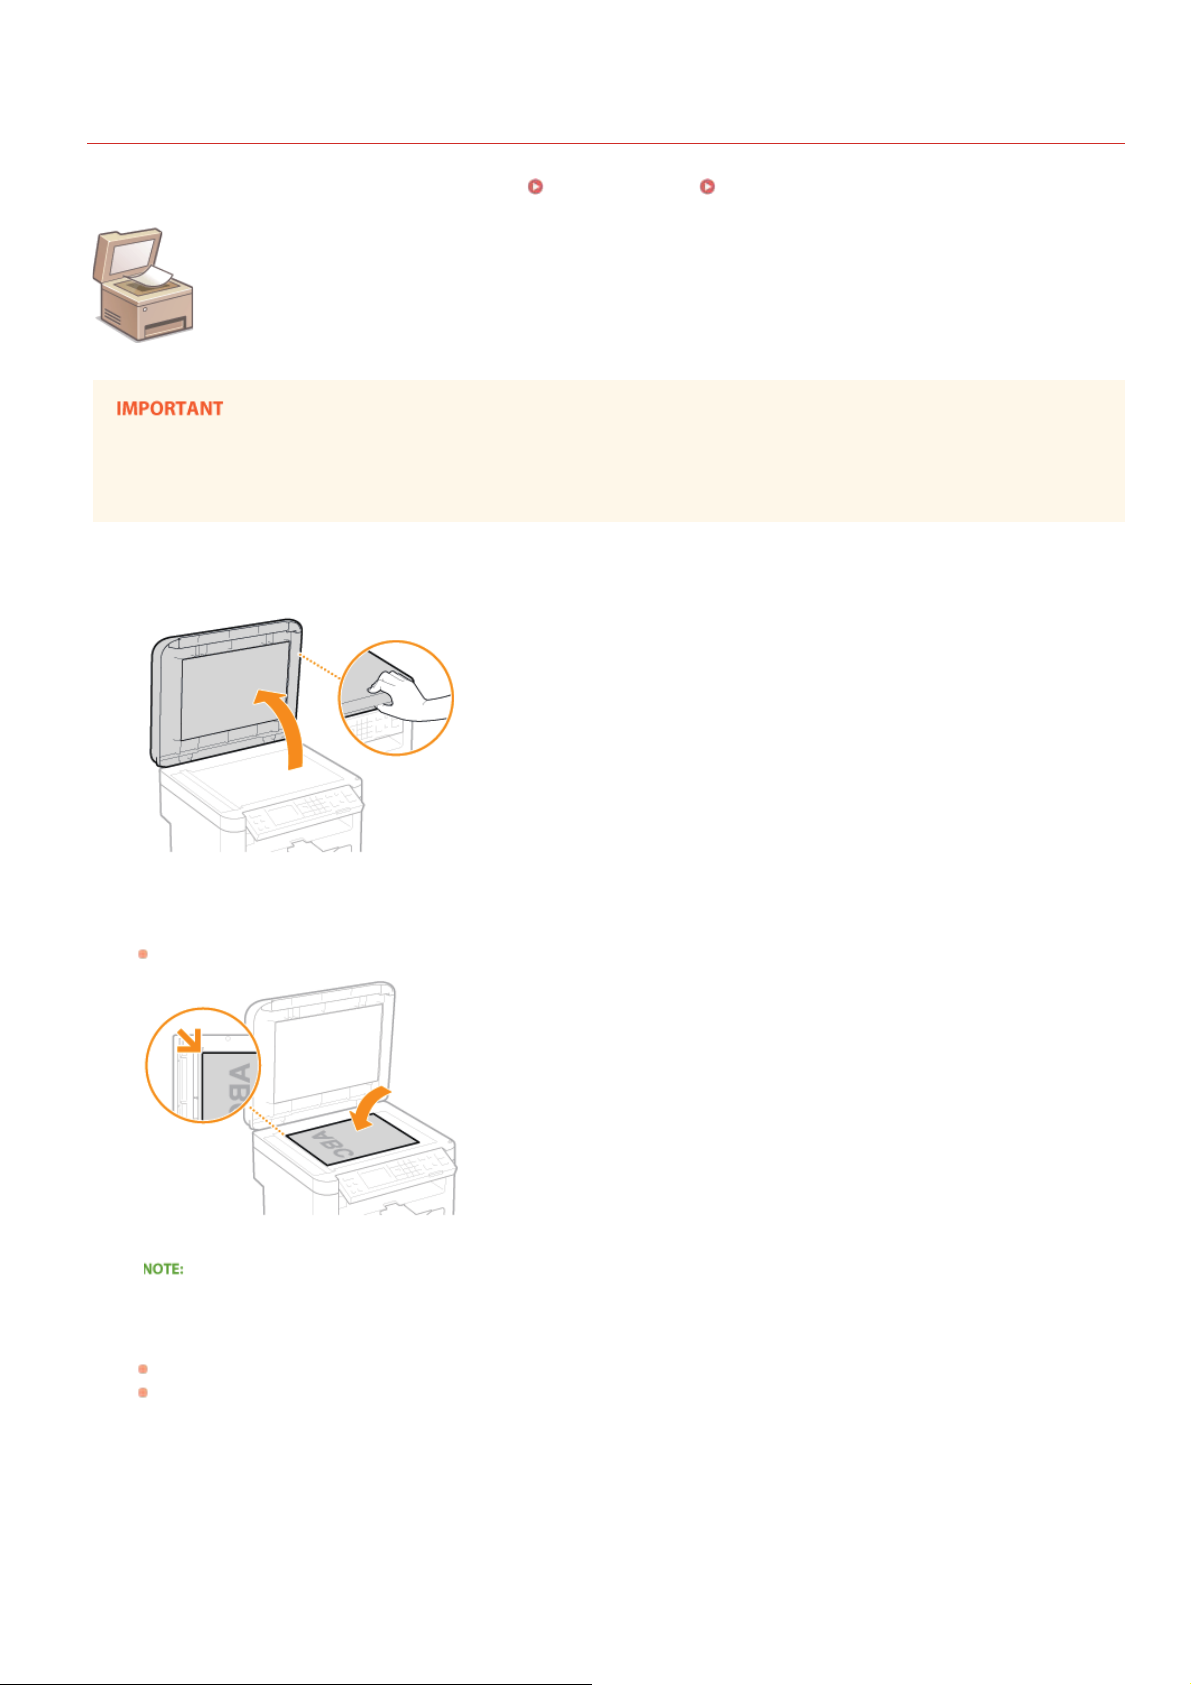
Place documents on the platen glass. For information about the types of documents that can be placed on the platen glass, and
information about the scannable area of a document, see
Use documents that are completely dry
When placing documents, make sure that any glue, ink, or correction fluid on the documents has completely dried.
Open the platen glass cover.
1
Document Type or Scan Area.
Place the document face down on the platen glass.
2
Align the corner of the document with the top-left corner of the platen glass.
To scan transparent documents (for example, tracing paper or transparencies), cover them with plain white paper.
Gently close the platen glass cover.
3
The machine is ready to scan the document.
When scanning is complete, remove the document from the platen glass.
㻟㻠㻌㻛㻌㻟㻟㻢
Page 35
0L40-00S
Loading Paper
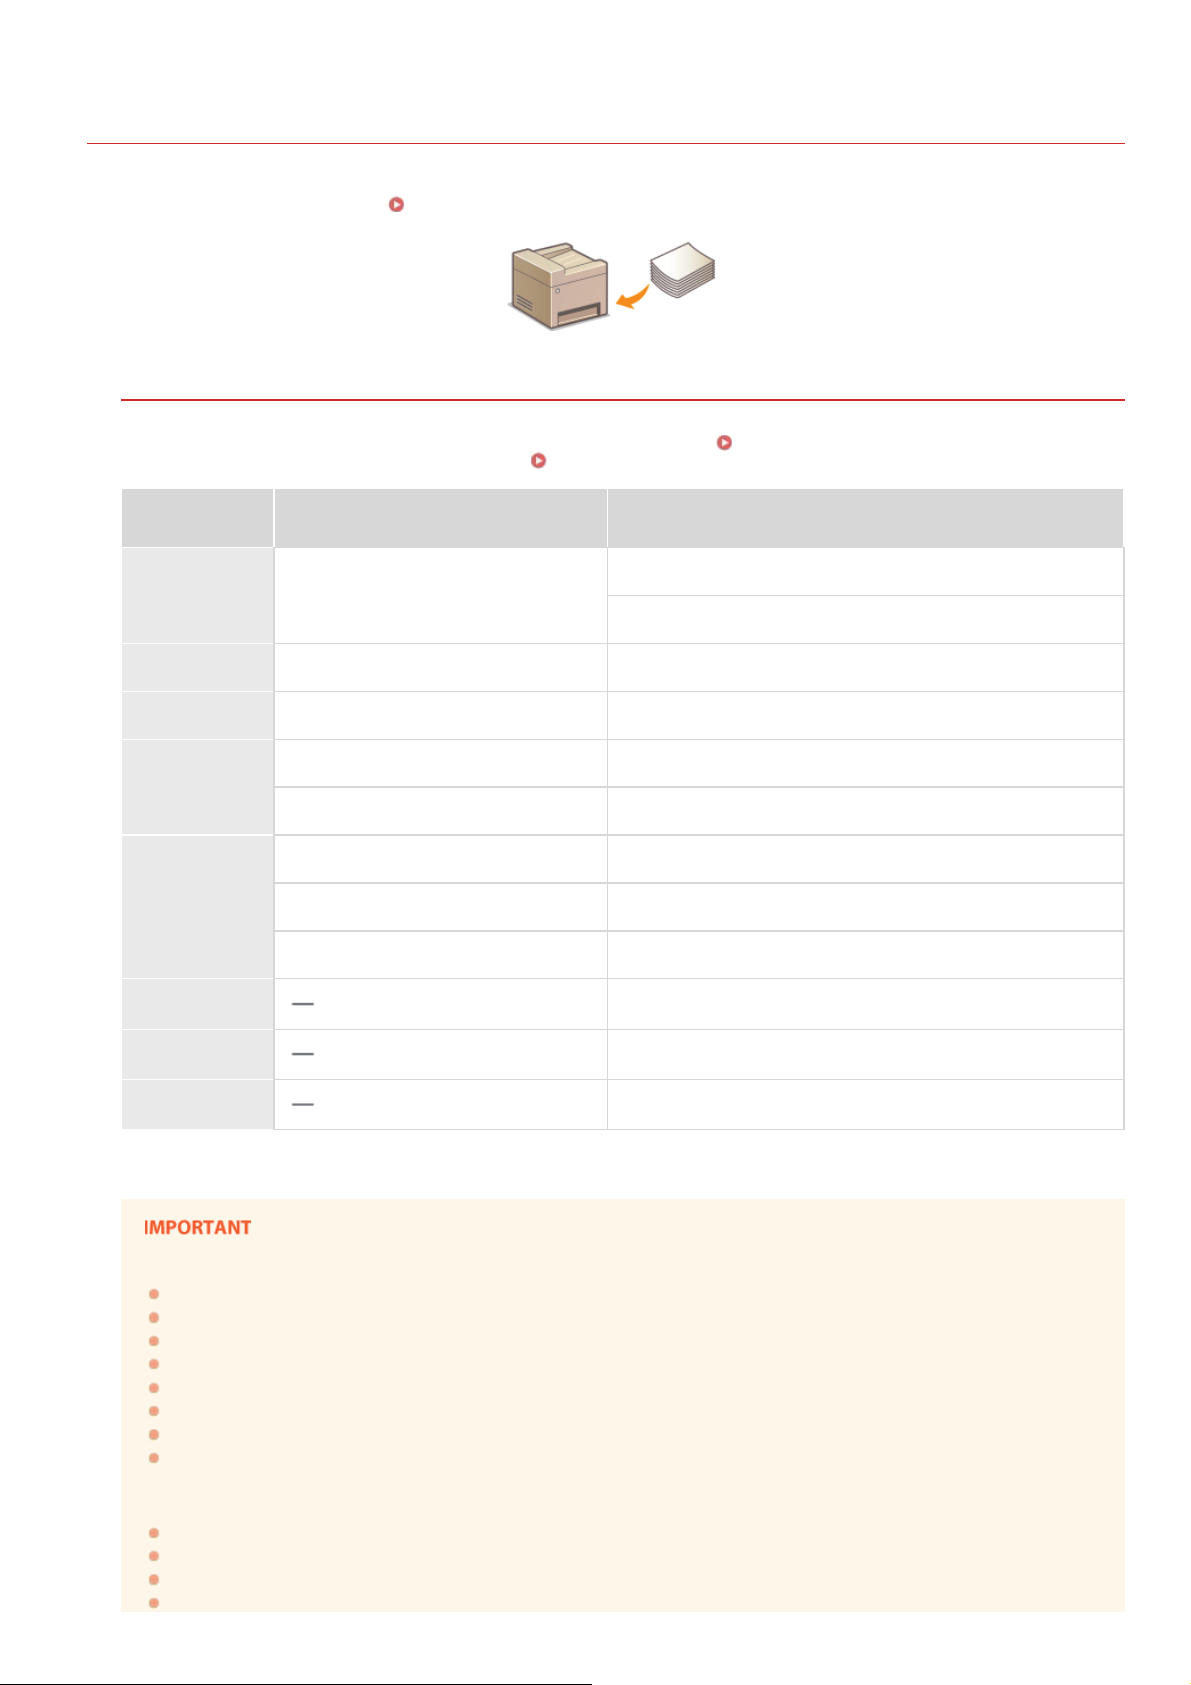
You can load the paper into the paper drawer or manual feed slot. Load the paper you usually use into the paper drawer. The paper
drawer is convenient when using large amounts of paper. Use the manual feed slot when you temporarily use size or type of paper that
is not loaded in the paper drawer. See
Paper Type and Setting for the Machine
Paper for available paper sizes.
See the table below to specify the paper settings according to the type and weight of the paper to load into the paper source. For
more information about how to specify the paper settings on the machine, see
of paper that can be loaded in each paper source, see
Paper Type Paper Weight
Plain paper 60 to 90 g/m²
Recycled paper 60 to 90 g/m² <Recycled>
Color paper 60 to 90 g/m² <Color>
90 to 120 g/m² <Heavy 1 (90-120 g/m²)>
Heavy paper
120 to 163 g/m² <Heavy 2 (120-163 g/m²)>
60 to 90 g/m² <Bond 1 (60-90 g/m²)>
Bond paper
Envelope
90 to 120 g/m² <Bond 2 (90-120 g/m²)>
120 to 163 g/m² <Bond 3 (120-163 g/m²)>
Paper.
<Plain (60-90 g/m²)>
<Plain L (60-90 g/m²)>
<Envelope>
Specifying Paper Size and Type. For the amount
Paper Setting
on the Machine
*
Transparency
Label
*
If set to <Plain> and that printout is curled, specify <Plain L> and print again.
<Transparency>
<Labels>
Do not use the following types of paper:
Wrinkled or creased paper
Curled or rolled paper
Torn paper
Damp paper
Very thin paper
Paper printed by a thermal transfer printer
Highly textured paper
Glossy paper
Paper handling and storage
Store the paper on a flat surface.
Keep the paper wrapped in its original package to protect the paper from moisture or dryness.
Do not store the paper in such a way that may cause it to curl or fold.
Do not store the paper vertically or stack too much paper.
㻟㻡㻌㻛㻌㻟㻟㻢
Page 36

Do not store the paper in direct sunlight, or in a place subject to high humidity, dryness, or drastic changes in temperature
or humidity.
When printing on paper that has absorbed moisture
Steam may emit from the paper output area, or water droplets may form on the back side of the operation panel or around
the paper output area. There is nothing unusual about any of these occurrences, which occur when the heat generated from
fixing toner on the paper causes moisture in the paper to evaporate (most likely to occur at low room temperatures).
LINKS
Registering a Custom Paper Size
㻟㻢㻌㻛㻌㻟㻟㻢
Page 37
Loading Paper in the Paper Drawer
0L40-00U
Load the paper that you usually use in the paper drawer. When you want to print on paper that is not loaded in the paper drawer, load
the paper in the manual feed slot.
Make sure to load paper in portrait orientation
Paper cannot be loaded in landscape orientation. Make sure to load the paper in portrait orientation.
Lift the dust cover.
1
Loading Paper in the Manual Feed Slot
Slide the paper guides apart.
2
Size abbreviations on the paper guides
The abbreviations on the paper guides in the paper drawer indicate paper sizes as follows:
LGL: Legal
LTR: Letter
STMT: Statement
EXEC: Executive
Insert the paper into the paper drawer until the paper stops.
3
Fan the paper stack well, and tap it on a flat surface to align the edges.
㻟㻣㻌㻛㻌㻟㻟㻢
Page 38
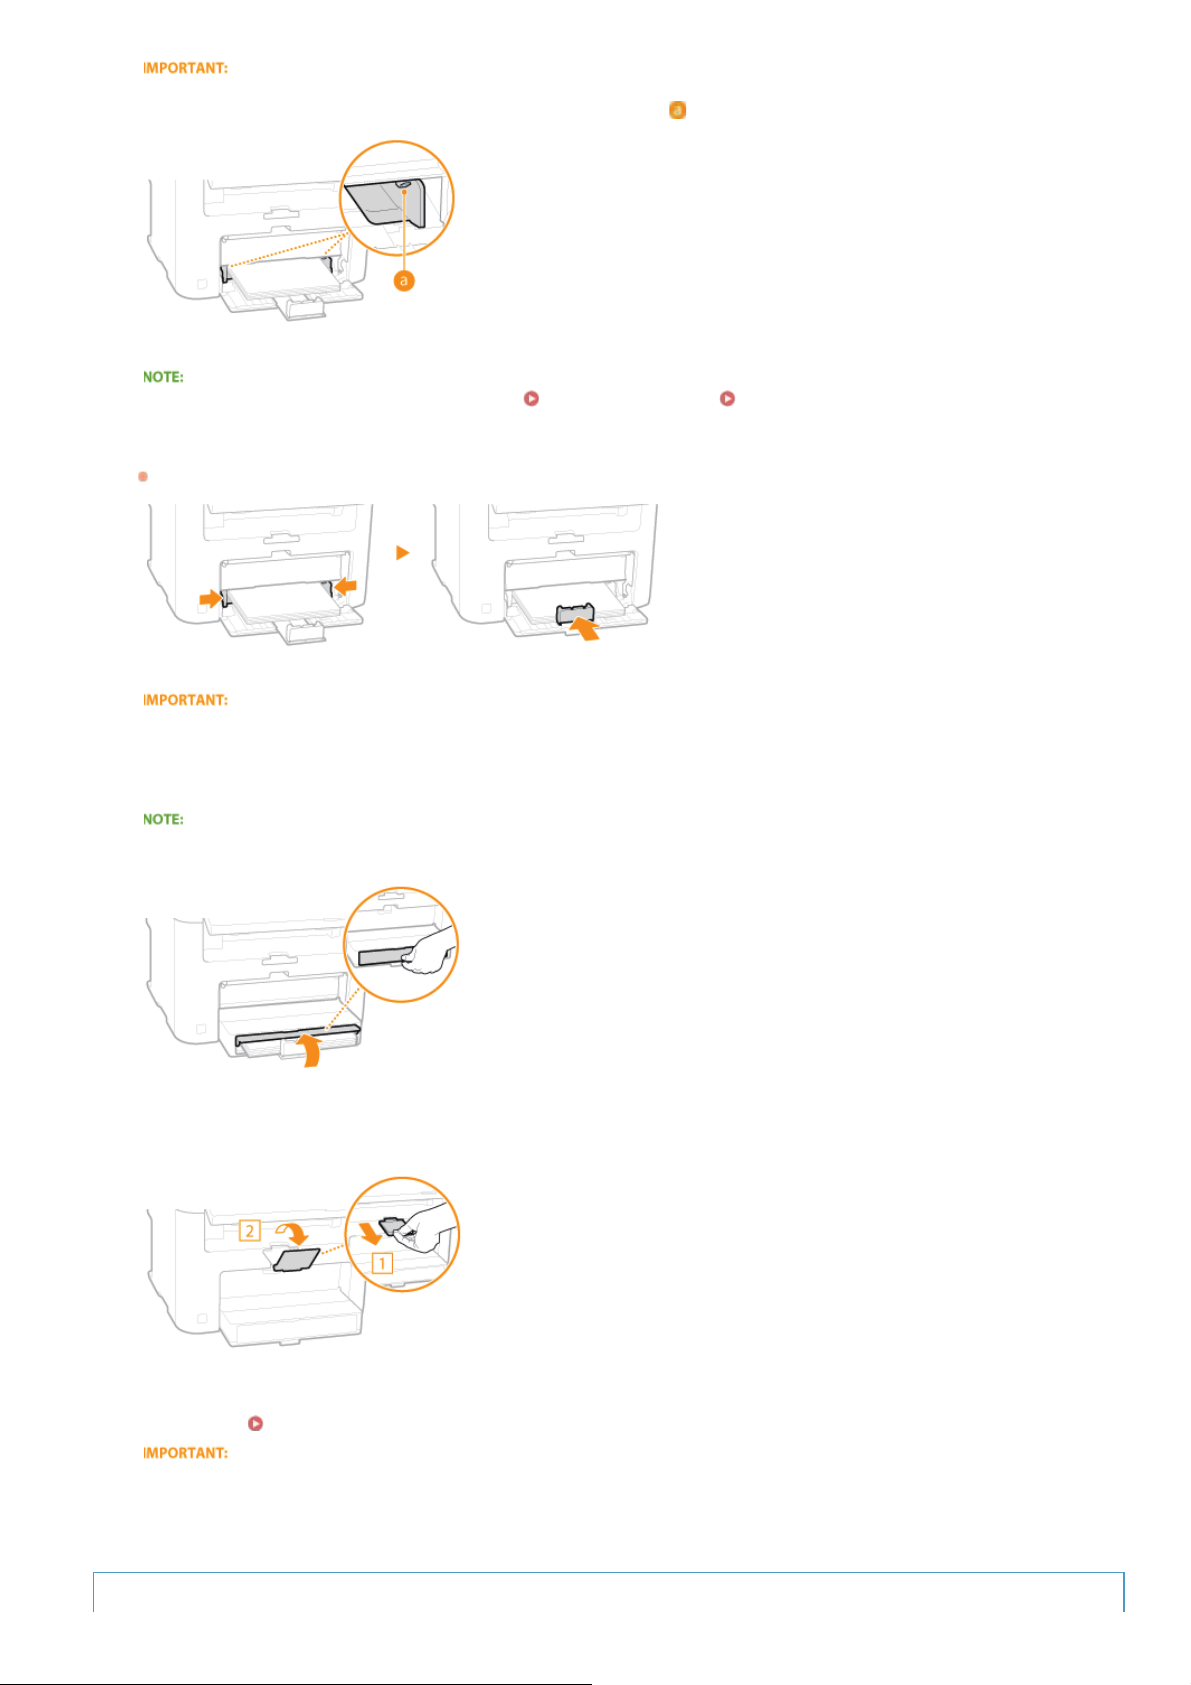
Do not exceed the load limit guide when loading paper
Make sure that the paper stack does not exceed the load limit guide (
When loading envelopes or paper with a logo, see Loading Envelopes or Loading Preprinted Paper.
Align the paper guides against the edges of the paper.
4
Move the paper guides in so they are exactly the width of the paper.
). Loading too much paper can cause paper jams.
Align the paper guides securely against the edges of the paper
Paper guides that are too loose or too tight can cause misfeeds or paper jams.
Lower the dust cover.
5
When Legal size paper is loaded
The paper guides at the rear edge of the paper will be extended. Open the dust cover extension, then lower the dust cover.
Pull out the paper stopper to open.
6
Continue to Specifying Paper Size and Type
»
When changing the paper size or type
The factory default settings for paper size and type are <A4> and <Plain (60-90 g/m²)>, respectively. If you load a different size
or type of paper into the machine, make sure to change the settings. If you do not change the settings, the machine cannot print
properly.
Printing on the Back Side of Printed Paper (Manual 2-Sided Printing)
㻟㻤㻌㻛㻌㻟㻟㻢
Page 39

You can print on the back side of printed paper. Flatten any curls on the printed paper and insert it into the manual feed slot
Loading Paper in the Manual Feed Slot), with the side to print face up (previously printed side face down).
(
Load one sheet at a time per each print.
You can use only the paper printed with this machine.
You cannot print on the side that has previously been printed on.
If you are using A5 paper, the reverse side may not be printed correctly.
LINKS
Paper
㻟㻥㻌㻛㻌㻟㻟㻢
Page 40
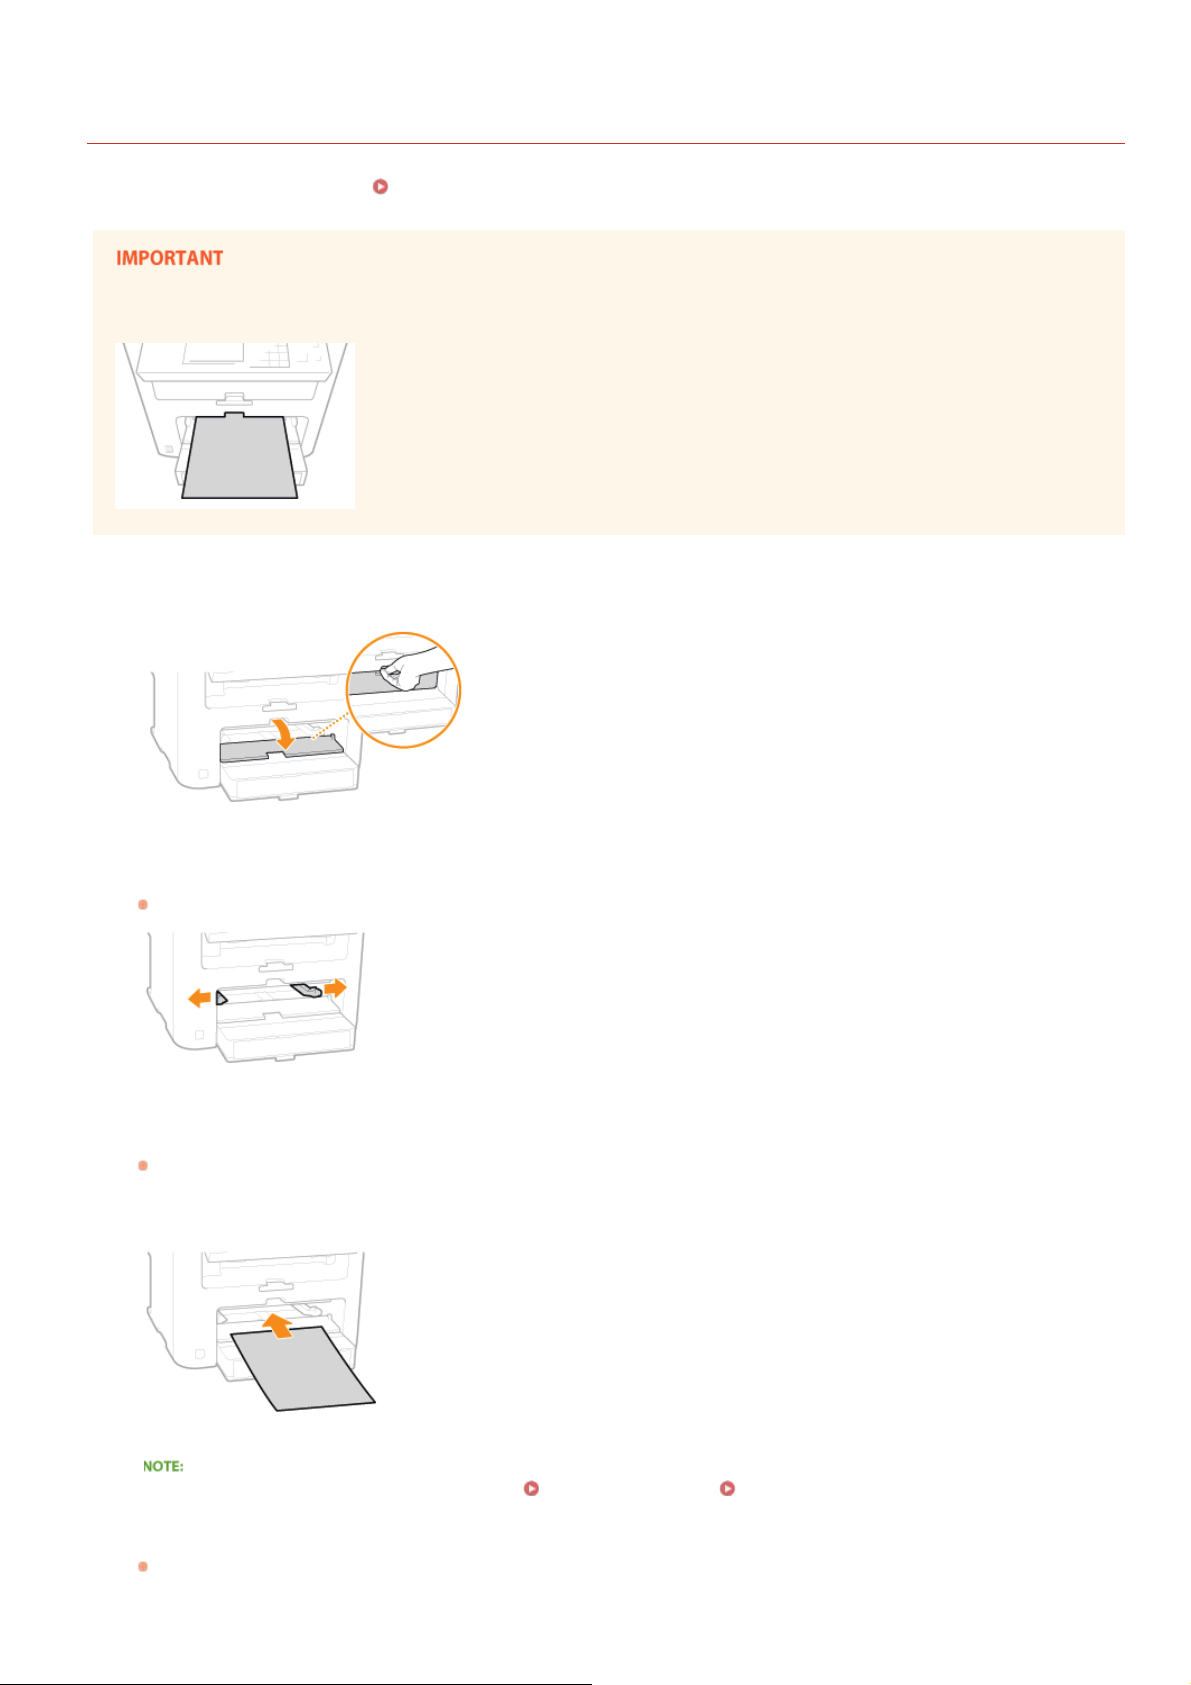
Loading Paper in the Manual Feed Slot
0L40-00W
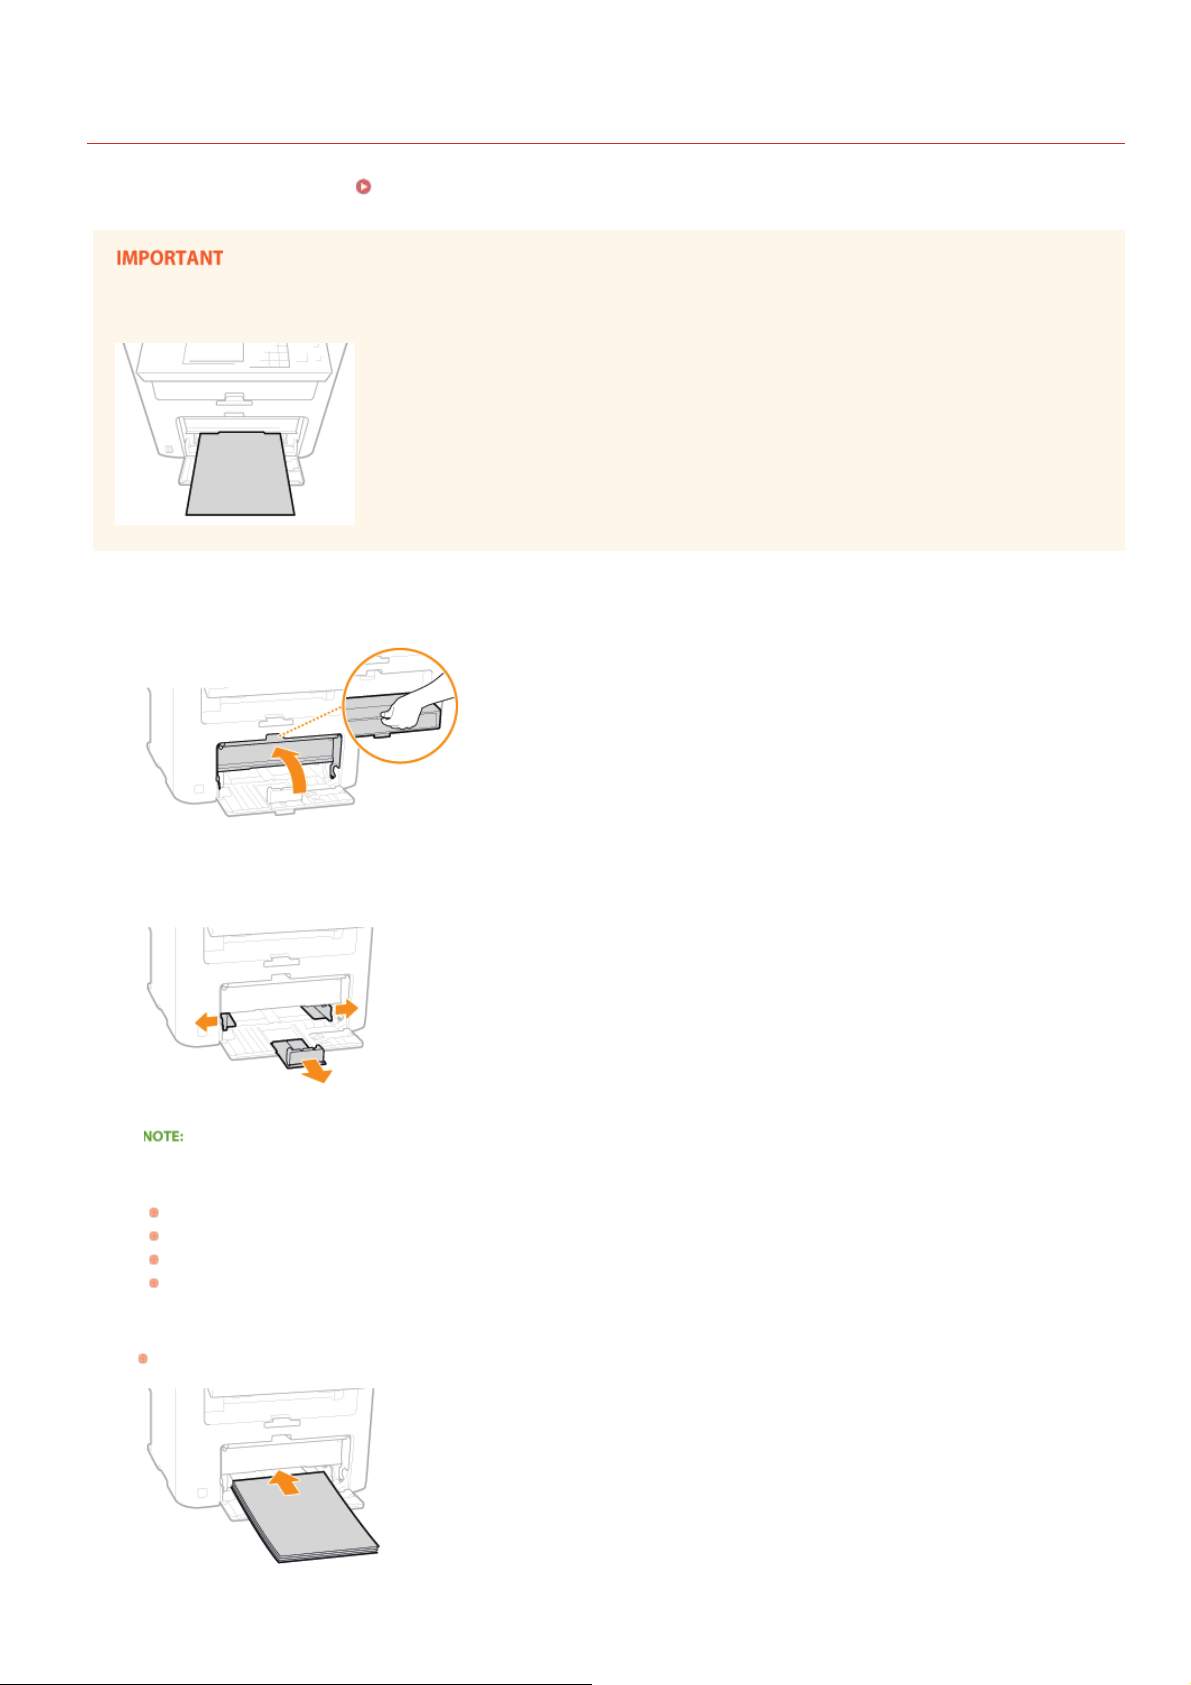
When you want to print on paper that is not loaded in the paper drawer, load the paper in the manual feed slot. Load the paper that
you usually use in the paper drawer.
Make sure to load paper in portrait orientation
Paper cannot be loaded in landscape orientation. Make sure to load the paper in portrait orientation.
Open the manual feed cover.
1
Loading Paper in the Paper Drawer
Spread the paper guides apart.
2
Slide the paper guides outward.
Insert the paper into the manual feed slot until the paper stops.
3
Load the paper in portrait orientation (with the short edge toward the machine), with the print side face up. Paper cannot be
loaded in landscape orientation.
When loading envelopes or paper with a logo, see Loading Envelopes or Loading Preprinted Paper.
Align the paper guides against the edges of the paper.
4
Slide the paper guides inward until they are aligned securely against the edges of the paper.
㻠㻜㻌㻛㻌㻟㻟㻢
Page 41

Align the paper guides securely against the edges of the paper
Paper guides that are too loose or too tight can cause misfeeds or paper jams.
Pull out the paper stopper to open.
5
Continue to Specifying Paper Size and Type
»
㻠㻝㻌㻛㻌㻟㻟㻢
Page 42
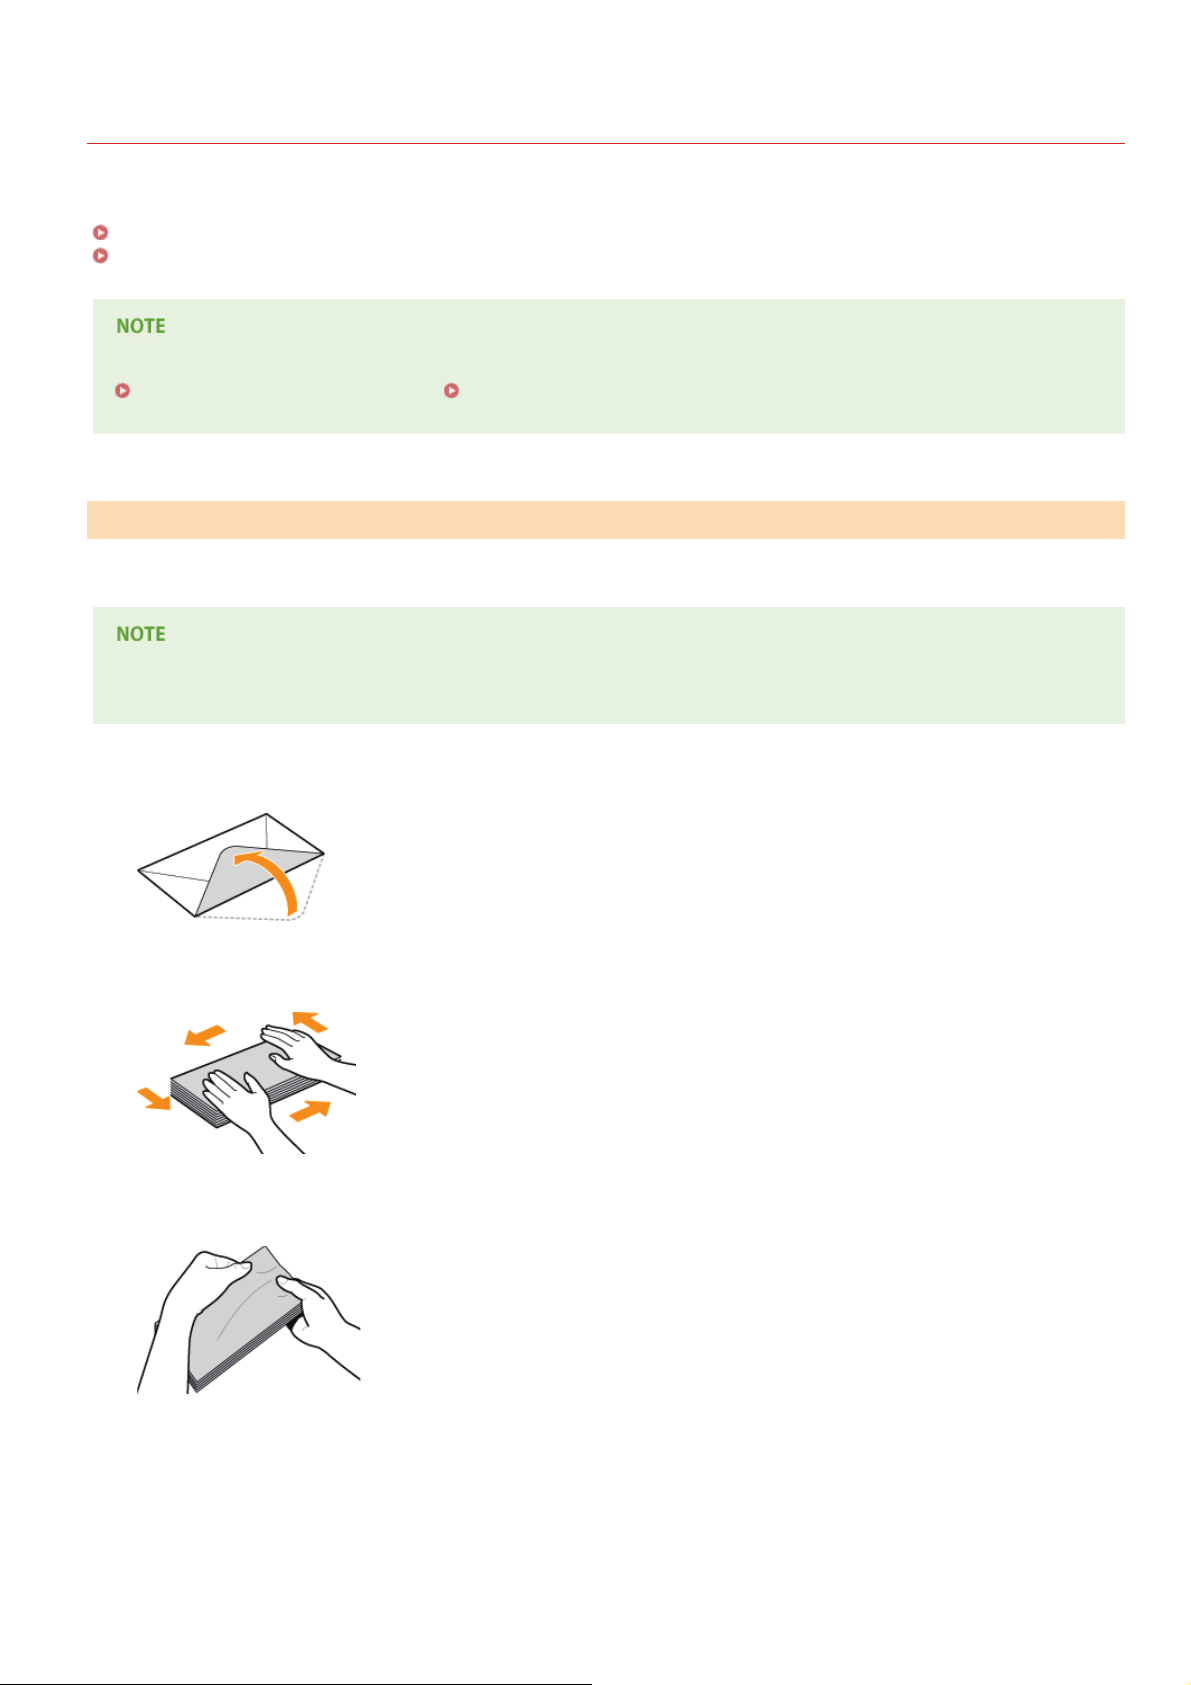
0L40-00X
Loading Envelopes
Make sure to flatten any curls on envelopes before loading them. Also pay attention to the orientation of envelopes and which side is
face up.
Before Loading Envelopes
Loaded Orientation
This section describes how to load envelopes in the orientation you want, as well as procedures that you need to complete before
loading envelopes. For a description of the general procedure for loading envelopes in the paper drawer or manual feed slot, see
Loading Paper in the Paper Drawer or Loading Paper in the Manual Feed Slot.
Before Loading Envelopes
Follow the procedure below to prepare the envelopes before loading.
Only one envelope at a time can be loaded in the manual feed slot. Follow steps 1 to 4 in the procedure below to prepare the
envelope for loading.
Close the flap of each envelope.
1
Flatten them to release any remaining air, and make sure that the edges are pressed tightly.
2
Loosen any stiff corners of the envelopes and flatten any curls.
3
Align the edges of the envelope on a flat surface.
4
㻠㻞㻌㻛㻌㻟㻟㻢
Page 43
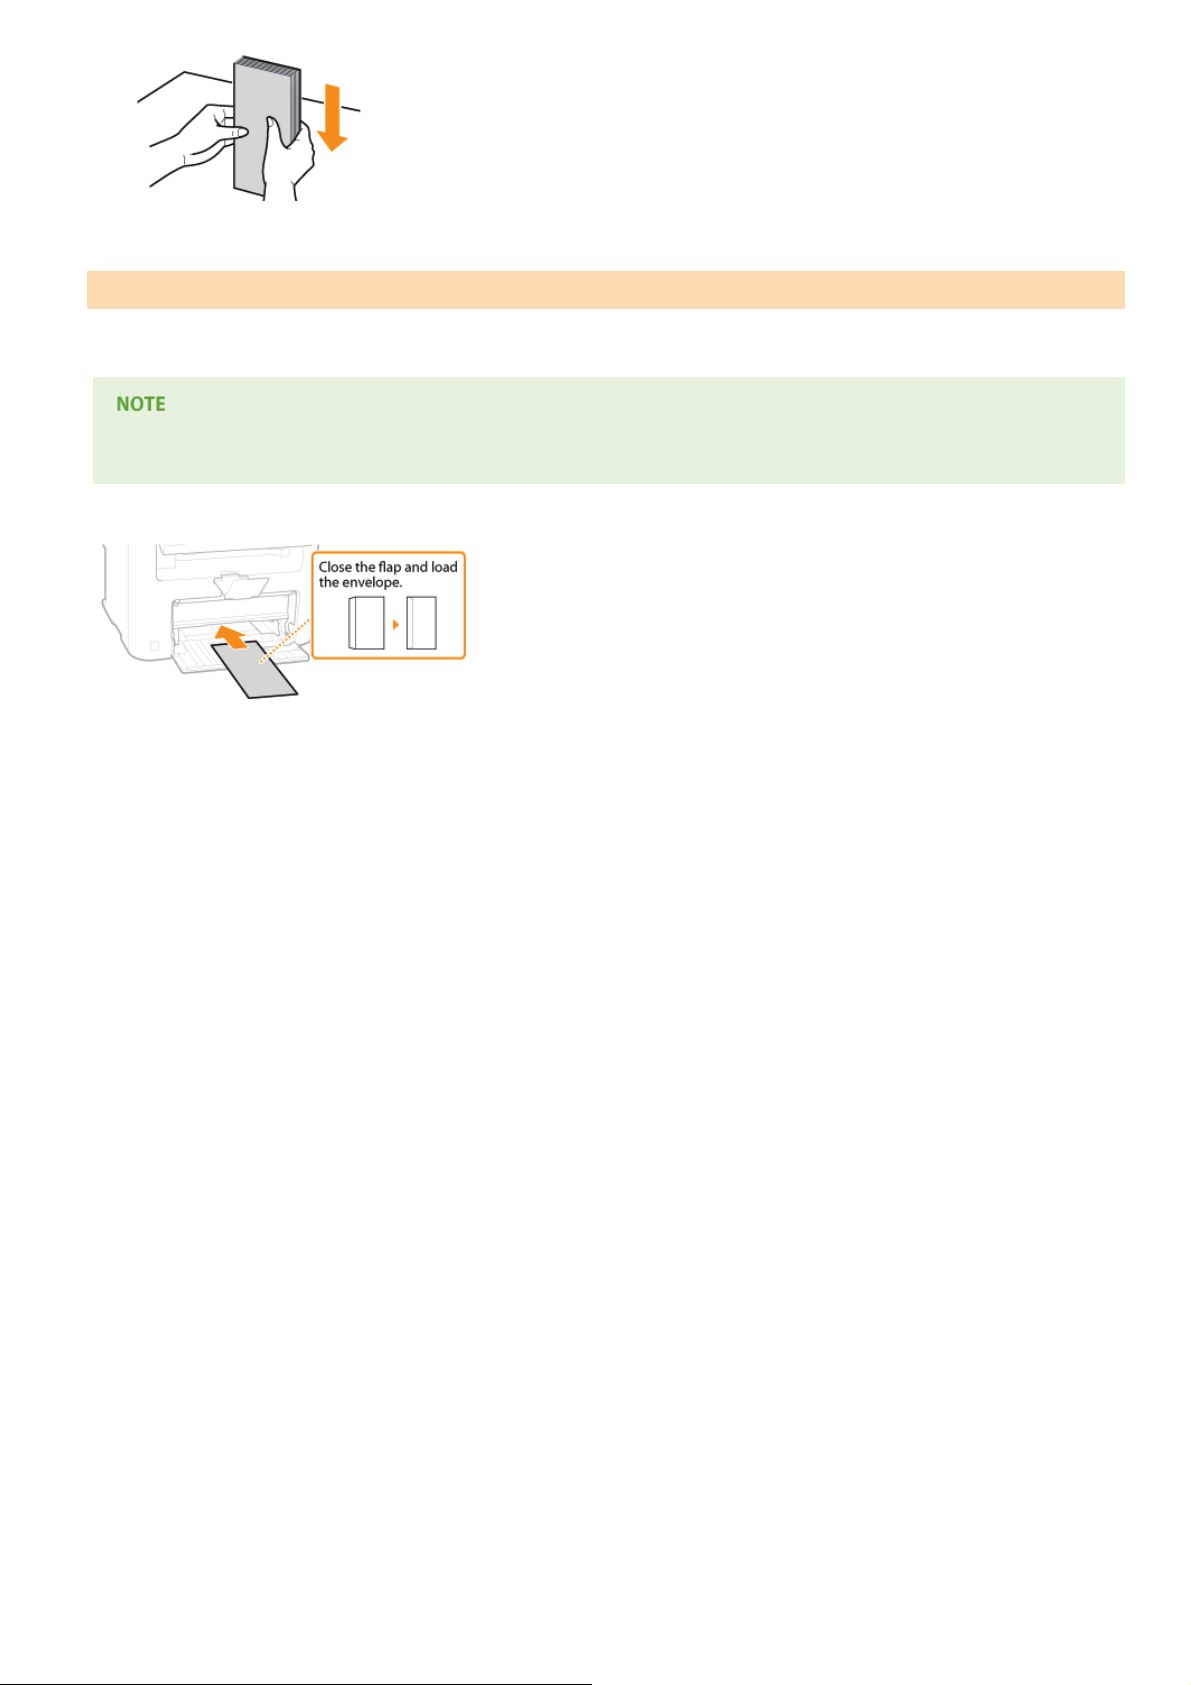
Loaded Orientation
Load the envelopes in portrait orientation, short edge first, with the non-glued side (front side) face up.
Load envelopes in the same orientation for both the paper drawer and manual feed slot.
Load the envelopes so that their flaps are at the left.
㻠㻟㻌㻛㻌㻟㻟㻢
Page 44
0L40-00Y
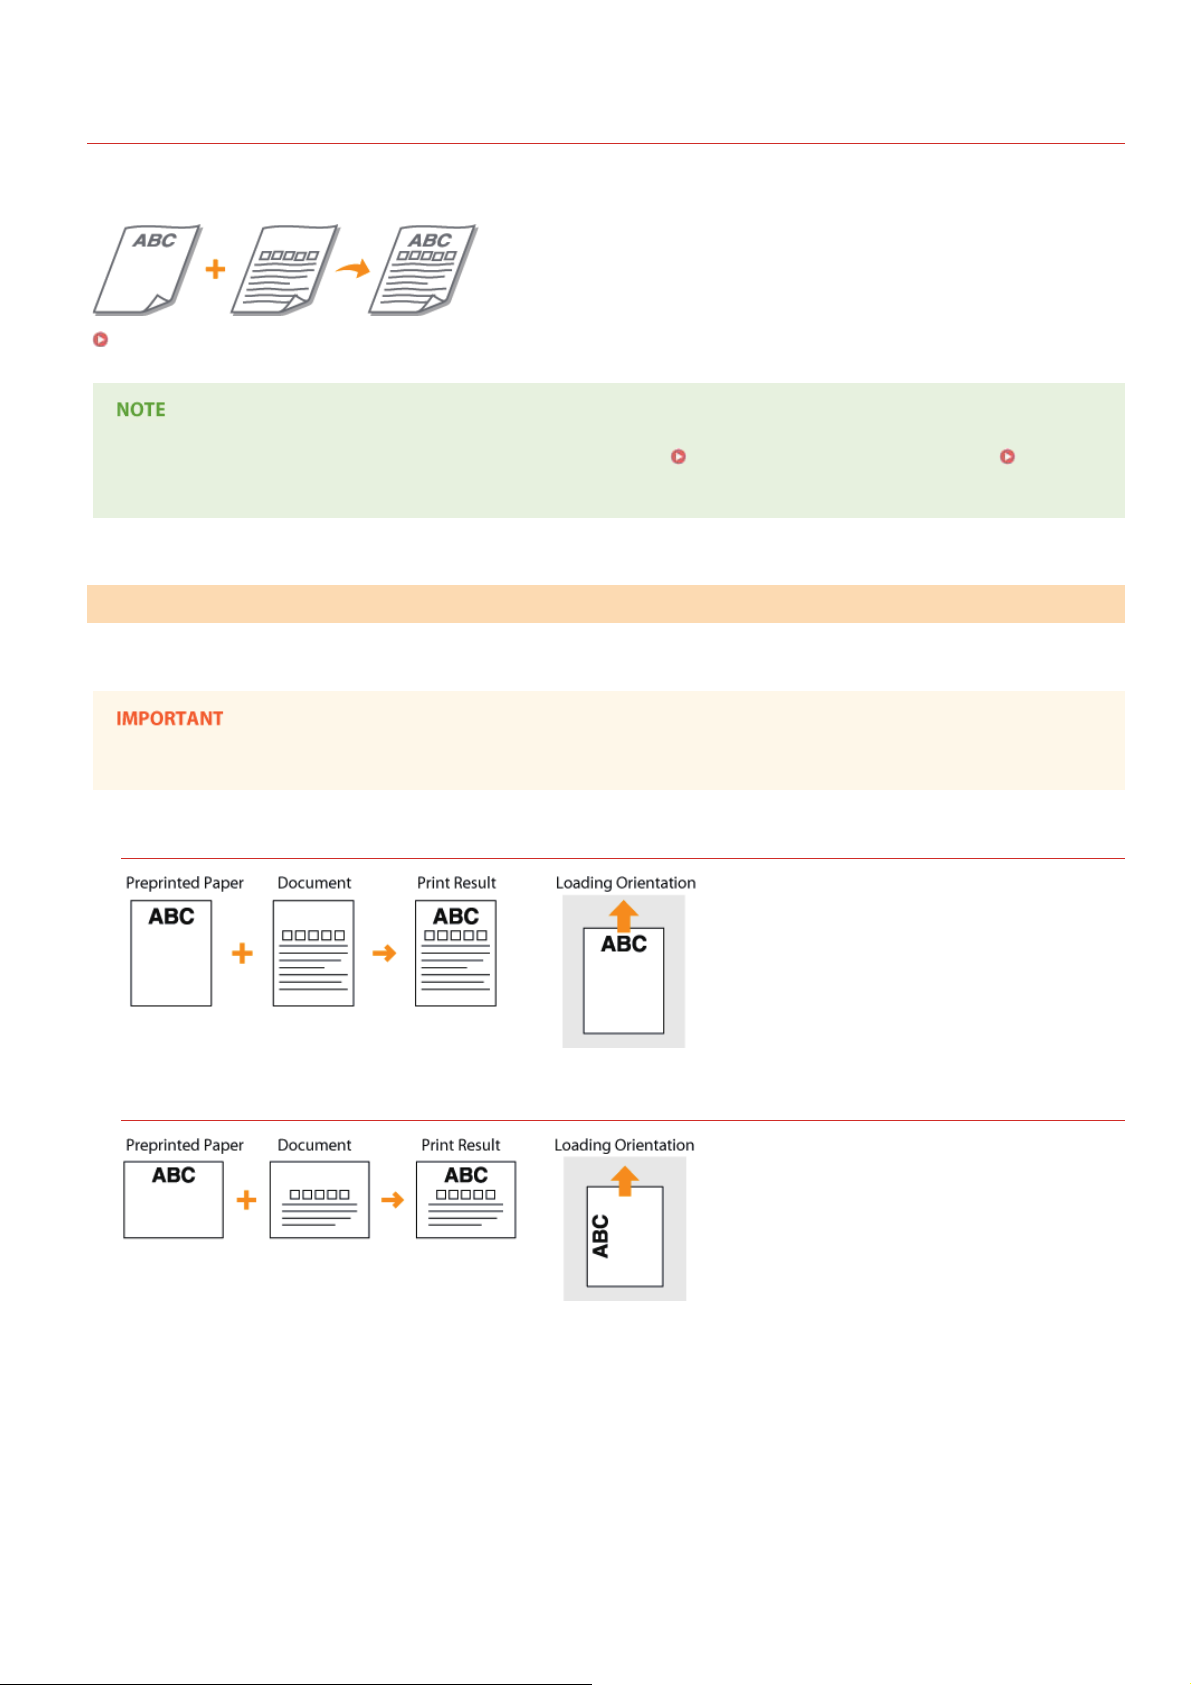
Loading Preprinted Paper
When you use paper that has been preprinted with a logo, pay attention to the orientation of the paper when loading. Load the paper
properly so that printing is performed on the correct side of the paper with a logo.
Making Printouts on Paper with Logos
This section mainly describes how to load preprinted paper with the proper facing and orientation. For a description of the general
procedure for loading paper in the paper drawer or manual feed slot, see
Paper in the Manual Feed Slot.
Loading Paper in the Paper Drawer or Loading
Making Printouts on Paper with Logos
Load the paper with the logo side (the side to print the document) face up.
Load only one sheet of paper in the manual feed slot each time you print.
Printing on Paper with Logos in Portrait Orientation
Printing on Paper with Logos in Landscape Orientation
㻠㻠㻌㻛㻌㻟㻟㻢
Page 45
0L40-010
Specifying Paper Size and Type
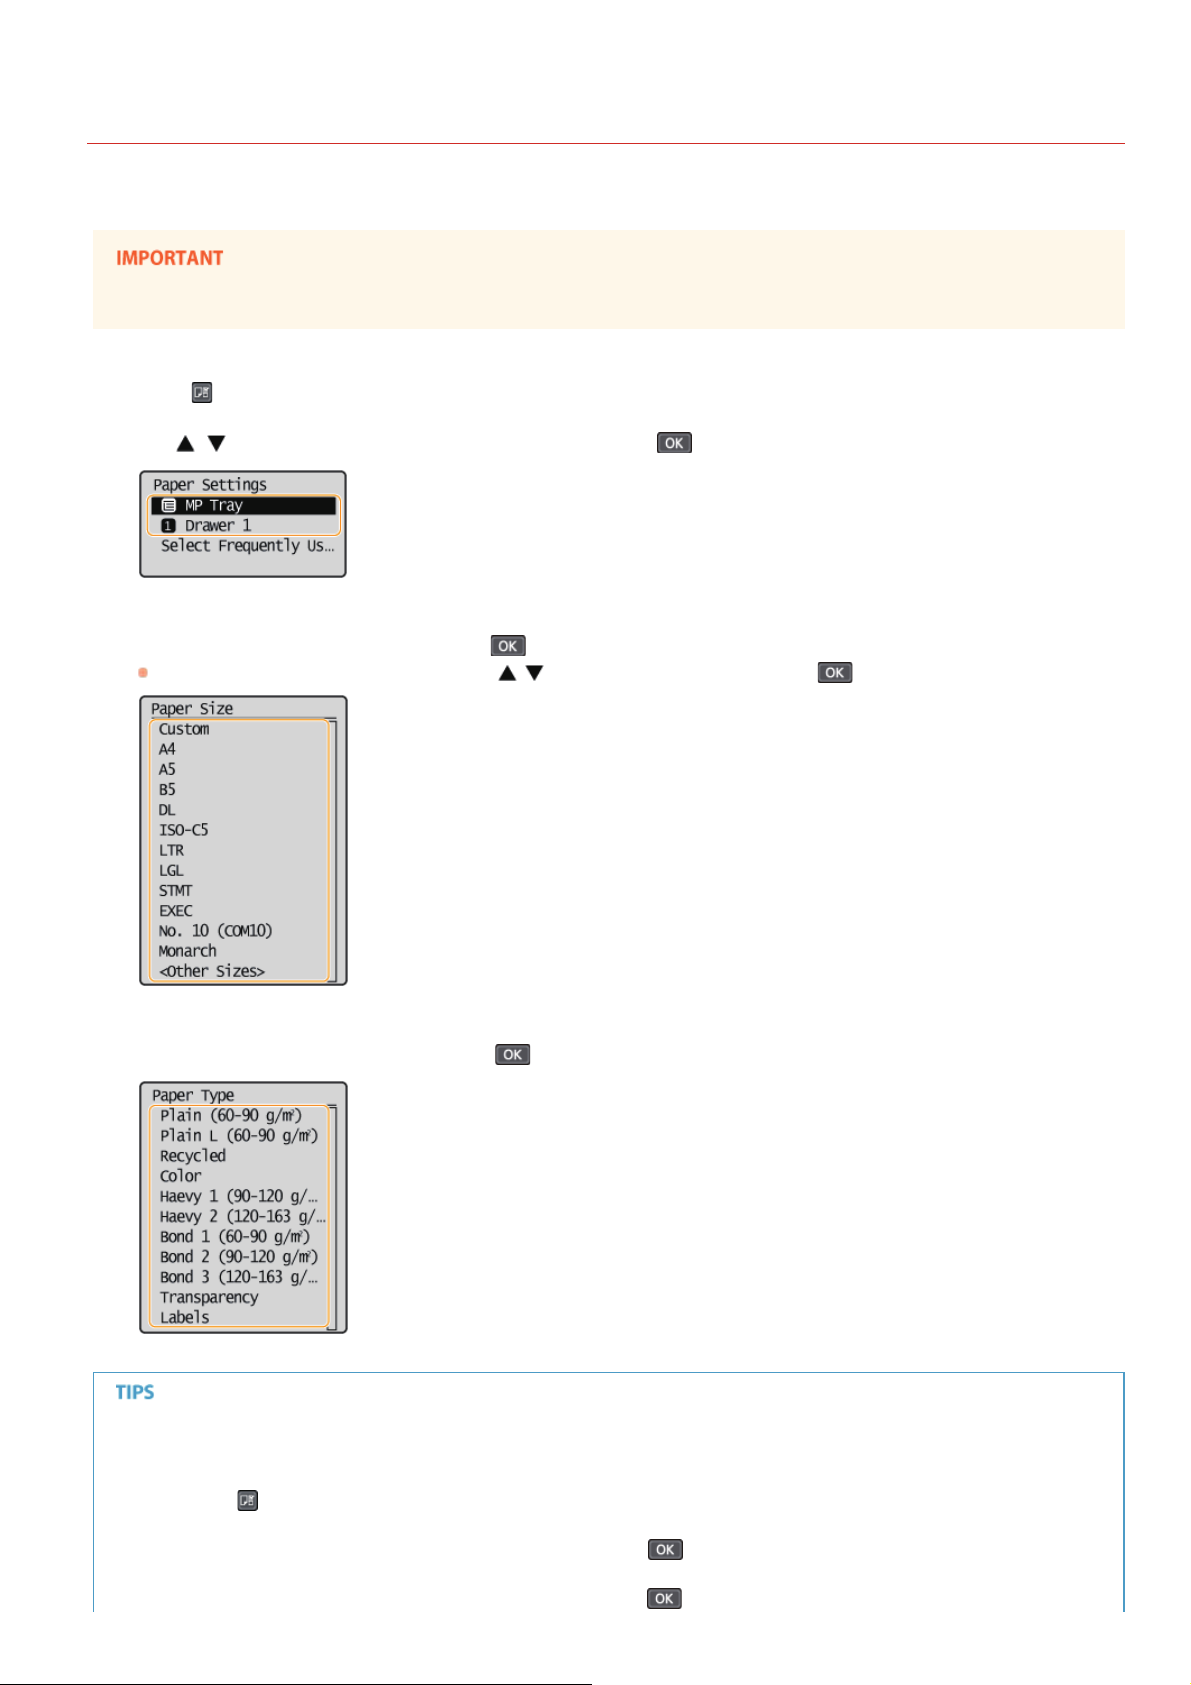
You must specify the paper size and type settings to match the paper that is loaded. Make sure to change the paper settings when you
load the paper that is different from the previously loaded paper.
If the setting does not match the size and type of loaded paper, a paper jam or printing error may occur.
Press (Paper Setting).
1
Use / to select <MP Tray> or <Drawer 1>, and press .
2
Select the loaded paper size, and press .
3
If the loaded paper size is not displayed, use / to select <Other Sizes>, and press .
Select the loaded paper type, and press .
4
When a frequently used paper size is known
You can set the machine to display only frequently used paper sizes in the selection screen.
Press (Paper Setting).
1
Select <Select Frequently Used Paper Sizes>, and press .
2
Select <Multi-Purpose Tray> or <Drawer 1>, and press .
3
㻠㻡㻌㻛㻌㻟㻟㻢
Page 46
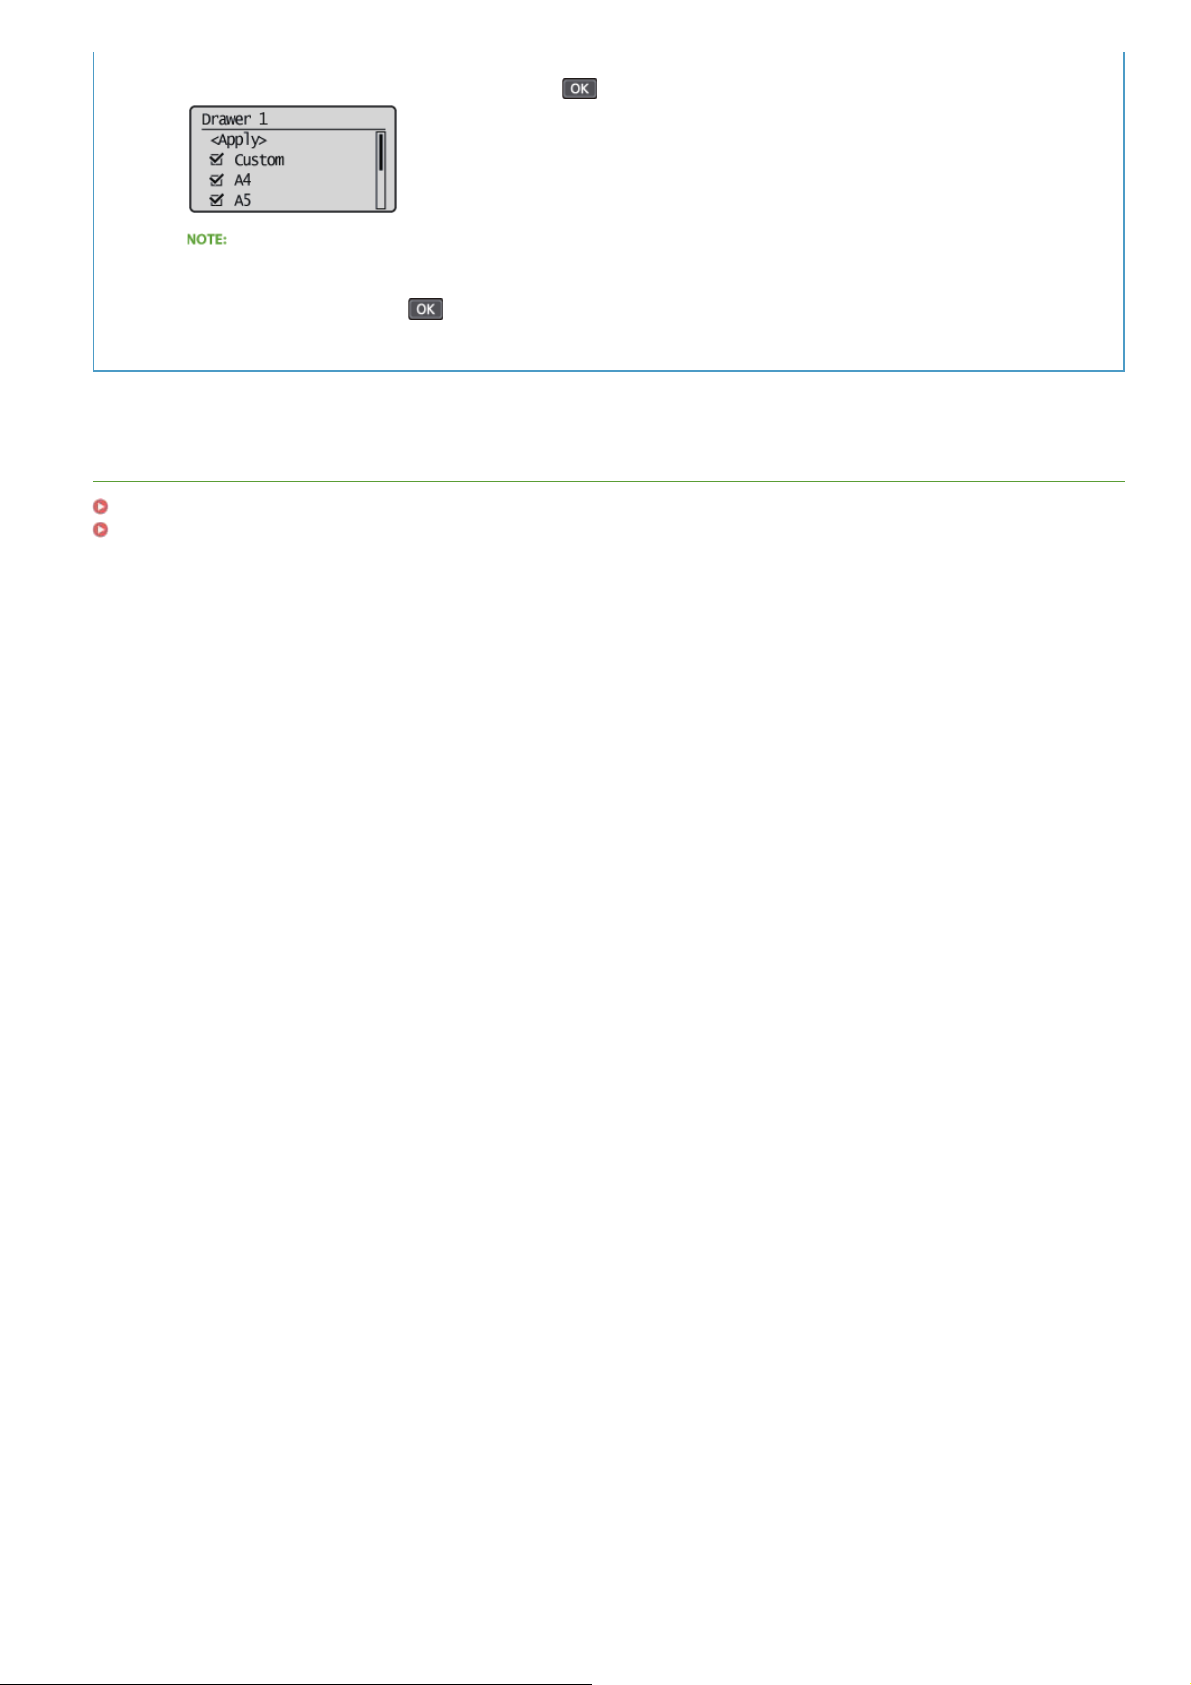
Select a frequently used paper size and press to checkmark it.
4
Uncheckmarked paper sizes are displayed in the <Other Sizes> screen.
Select <Apply>, and press .
5
LINKS
Loading Paper in the Paper Drawer
Paper
㻠㻢㻌㻛㻌㻟㻟㻢
Page 47
Registering a Custom Paper Size
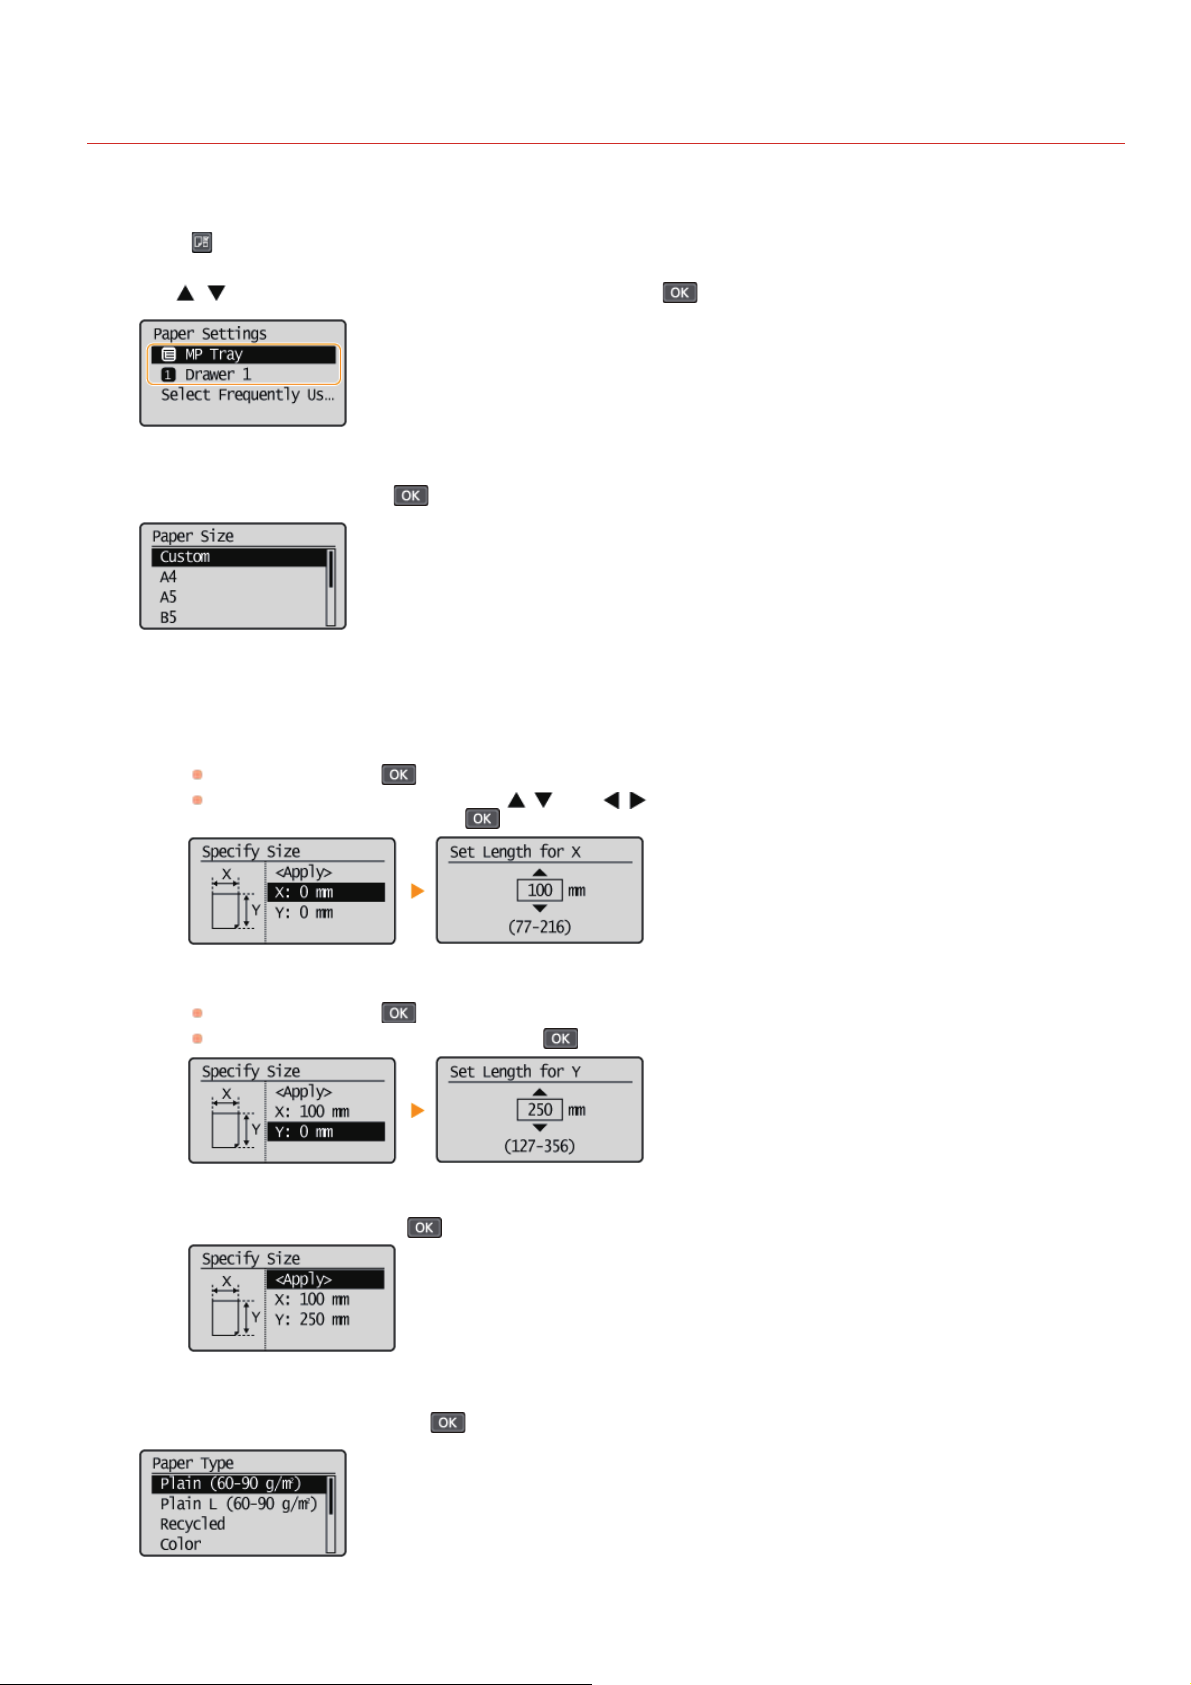
You can register one frequently used custom paper size each for the paper drawer and manual feed slot.
Press (Paper Setting).
1
Use / to select <MP Tray> or <Drawer 1>, and press .
2
Select <Custom>, and press .
3
0L40-011
Specify the paper size.
4
Specify the length of the <X> (shorter) side.
1
Select <X>, and press
Input the length of the <X> side using
numbers and fractions, and press
Specify the length of the <Y> (longer) side.
2
Select <Y>, and press
Input the length of the <Y> side, and press
Select <Apply>, and press .
3
.
/ , with / to move the cursor between the digits for inputting whole
.
.
.
Select the paper type, and press .
5
㻠㻣㻌㻛㻌㻟㻟㻢
Page 48

LINKS
Loading Paper in the Paper Drawer
Loading Paper in the Manual Feed Slot
㻠㻤㻌㻛㻌㻟㻟㻢
Page 49
0L40-017
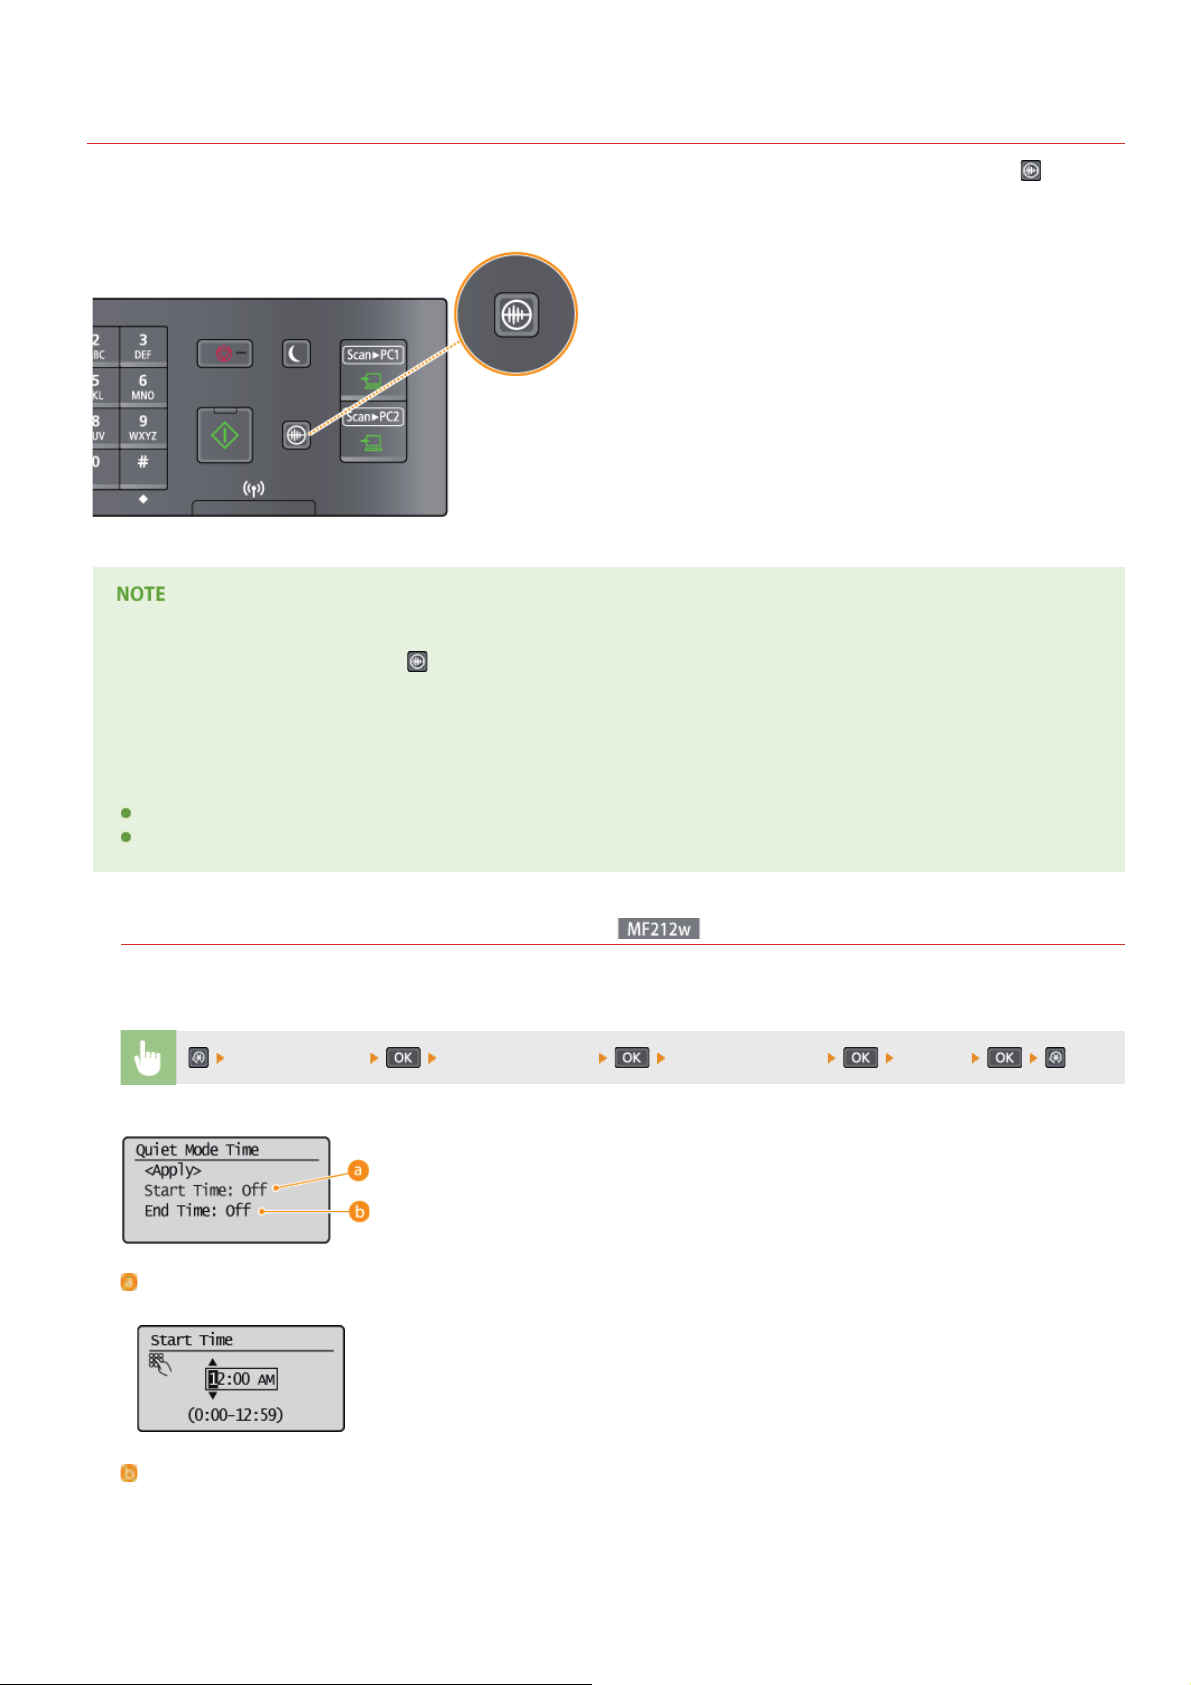
Entering Quiet Mode
The quiet mode function reduces the operation sound of the machine. For example, when using the machine at night, press on the
operation panel. With only this operation, you can easily minimize operation sound. You can also specify a time for the machine to
automatically enter quiet mode.
When in quiet mode
When the machine enters quiet mode, lights up green.
When quiet mode is enabled
The operation of functions becomes slower.
When the machine cannot enter quiet mode
The machine is in Special Mode
A particular paper size or paper type is specified
Specifying a time for the machine to enter quiet mode
You can specify a time for the machine to enter or exit quiet mode automatically. For example, this is useful when wanting to reduce
operation noise only for late-night operation.
<Timer Settings> <Quiet Mode Time> Specify each setting <Apply>
<Start Time>
Specify a time for entering quiet mode. To set, select <On> then specify the time.
<End Time>
Specify a time for exiting quiet mode. To set, select <On> then specify the time.
㻠㻥㻌㻛㻌㻟㻟㻢
Page 50

Exiting Quiet Mode
Press to exit quiet mode.
㻡㻜㻌㻛㻌㻟㻟㻢
Page 51
Entering Sleep Mode
0L40-018
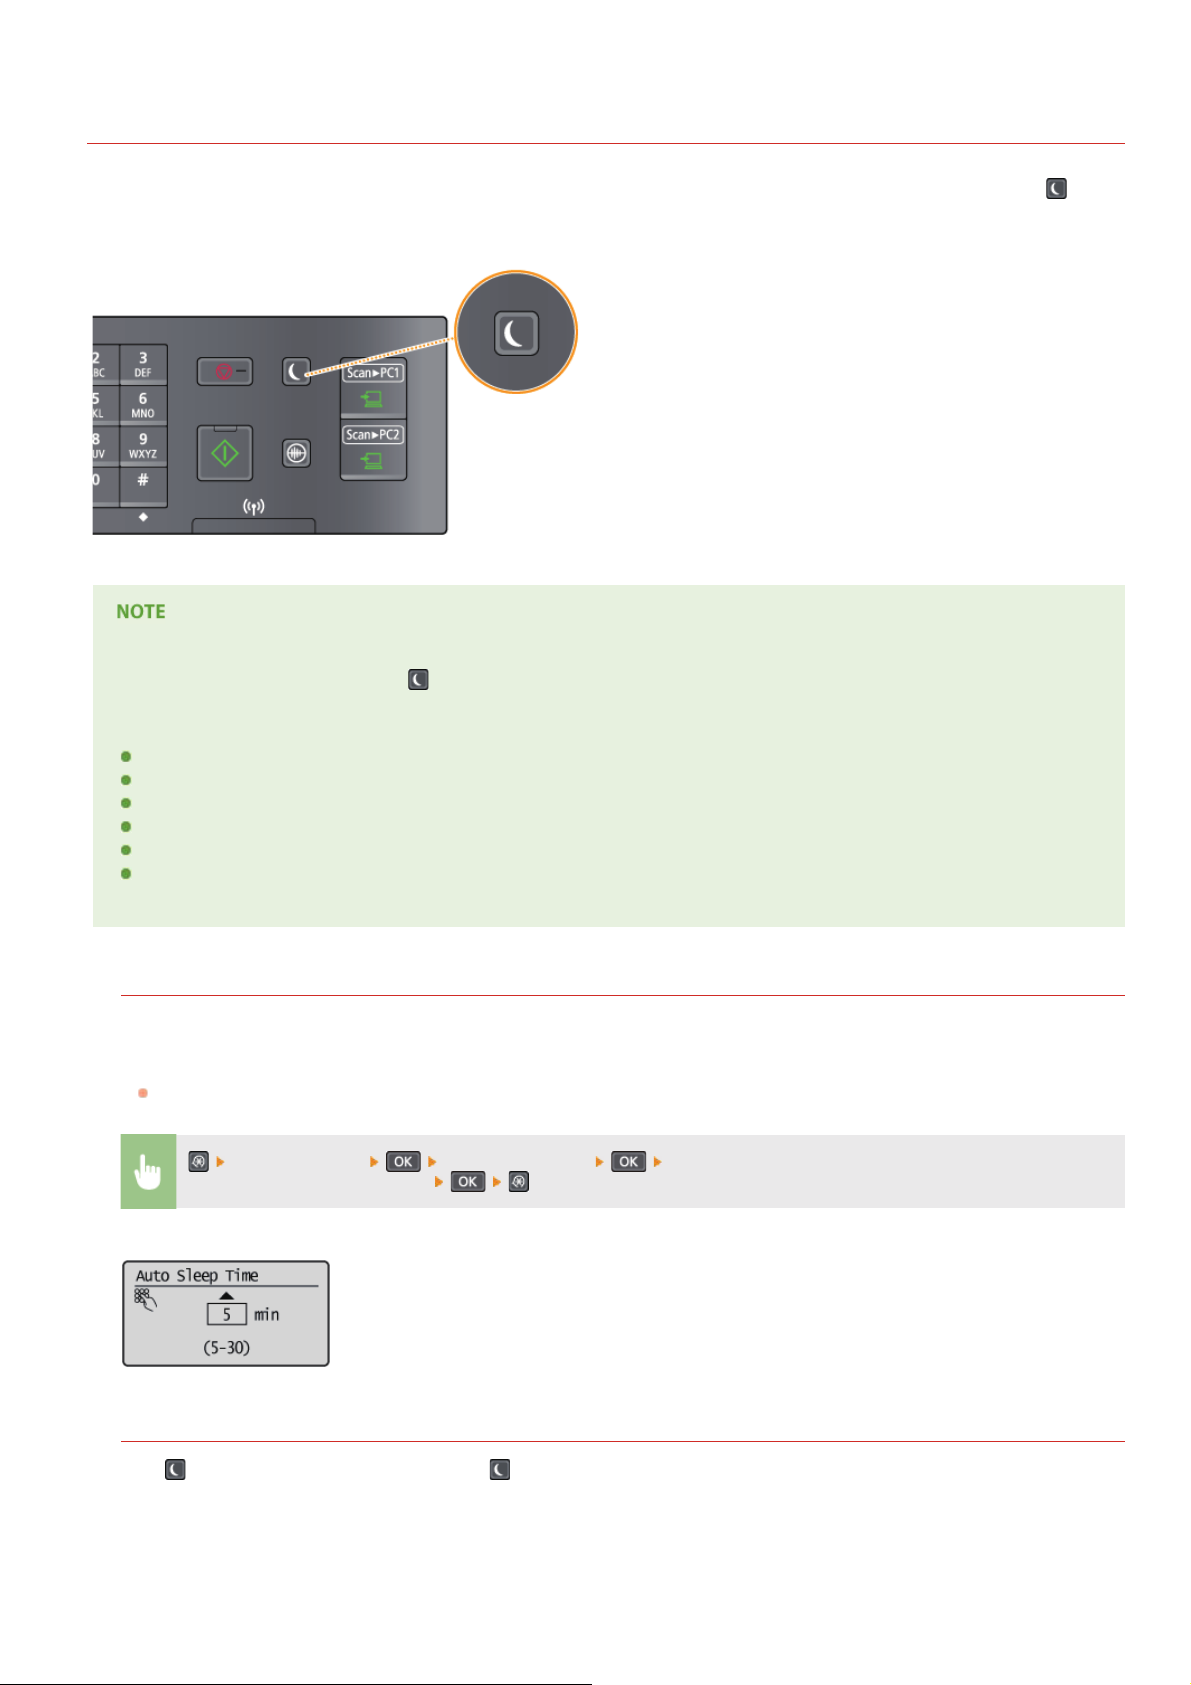
The sleep mode function reduces the amount of power consumed by the machine by disabling power flow to the operation panel. If no
operations will be performed on the machine for a while, such as during a lunch break, you can save power simply by pressing
operation panel. You can also use the Auto Sleep Time setting to automatically put the machine into sleep mode if it remains idle for a
specified length of time.
on the
When in sleep mode
When the machine enters sleep mode, lights up green.
Situations in which the machine does not enter sleep mode
When the machine is in operation
When the [Processing/Data] indicator is lit up or blinking
When the machine is performing an operation such as adjustment or cleaning
When a paper jam occurs
When the menu screen is displayed
When an error message is displayed on the screen (There are some exceptions. The machine sometimes enters sleep mode
when error messages are displayed.)
When You Want to Set the Auto Sleep Timer
The factory default settings for the amount of time that elapses before the machine enters auto sleep mode are listed below. We
recommend using the factory default settings to save the most power. If you want to change the amount of time that elapses before
the machine enters auto sleep mode, follow the procedure below.
5 minutes (setting range is 5 to 30 minutes)
<Timer Settings> <Auto Sleep Time> Set the amount of time that elapses before the machine
automatically enters sleep mode
Exiting Sleep Mode
Press . You can also press any key other than to exit sleep mode.
㻡㻝㻌㻛㻌㻟㻟㻢
Page 52
0L40-0A7
Setting Auto Shutdown Time
By enabling this setting, you can set the machine to automatically shut down. The machine automatically turns OFF after the specified
period of idle time has elapsed since entering the sleep mode. You can cut electric power consumption at night and on holidays if you
forget to turn OFF the machine.
<Timer Settings> <Auto Shutdown Time> Set the time period
IMPORTANT
Before setting <Auto Shutdown Time> (MF212w)
When the <Auto Shutdown Time> setting is enabled, the machine may automatically shut down even if you are operating the
machine from the Remote UI or from the Send Function Setting Tool. A malfunction may occur, particularly if the machine
shuts down while data is being imported. When you import data using the Remote UI or use the Send Function Setting Tool,
set <Auto Shutdown Time> to <0> (Off) in advance.
NOTE
The default setting is 4 hours.
MF212w users: If any setting of the [Timer Settings] is changed from the Remote UI while the machine is in the sleep
mode, the timer for the <Auto Shutdown Time> setting is reset to the beginning. The machine automatically shuts down
after the specified period of idle time has elapsed since the timer was reset.
㻡㻞㻌㻛㻌㻟㻟㻢
Page 53
0L40-019
Copying
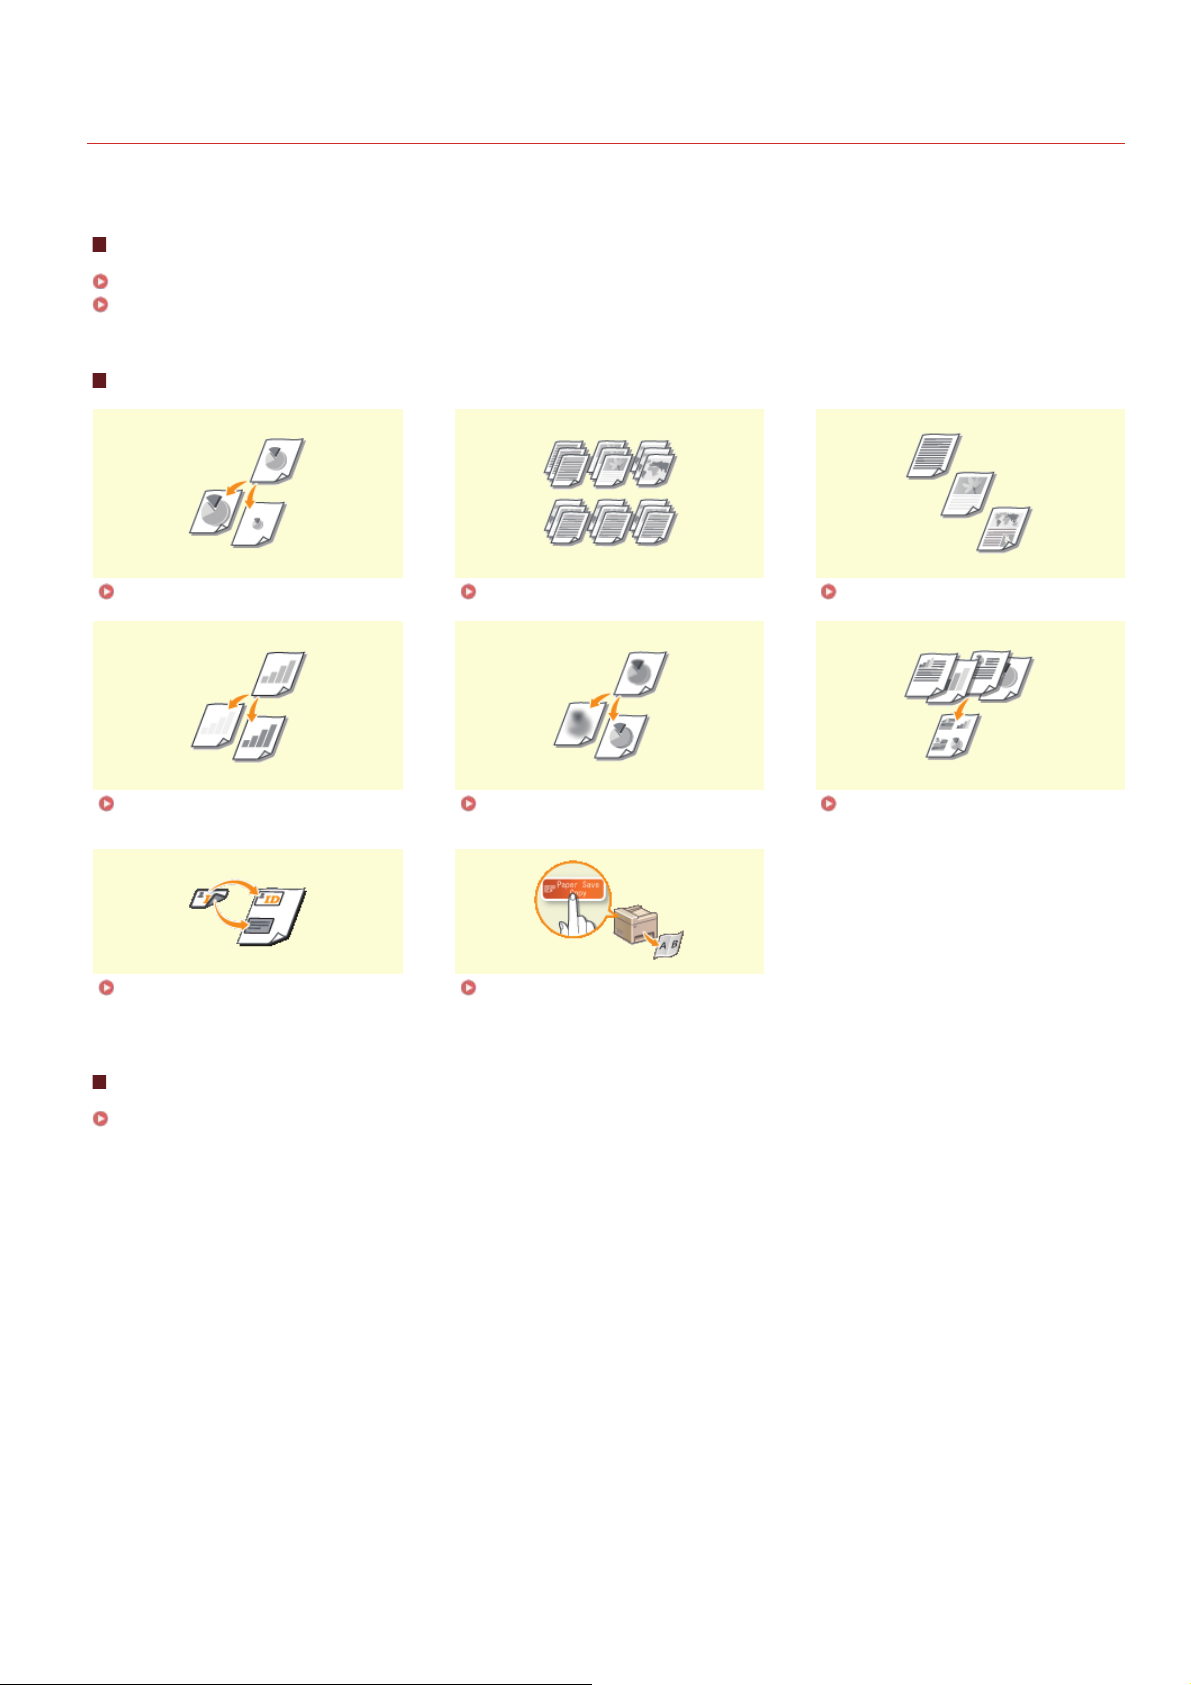
This chapter describes basic copy operations and various other useful copy functions, such as copying several pages onto a single sheet.
Using Basic Operations
Basic Copy Operations
Canceling Copies
Using Copy Settings to Suit Your Needs
Enlarging or Reducing Collating Copies by Page Selecting Document Type
Adjusting Density Adjusting Sharpness Copying Multiple Documents onto
Copying Both Sides of an ID Card
onto One Page
Using the [Paper Save Copy] Key
(MF211)
One Sheet (2 on 1/4 on 1)
Simplifying Your Frequent Copy Operations
Changing Default Settings
㻡㻟㻌㻛㻌㻟㻟㻢
Page 54
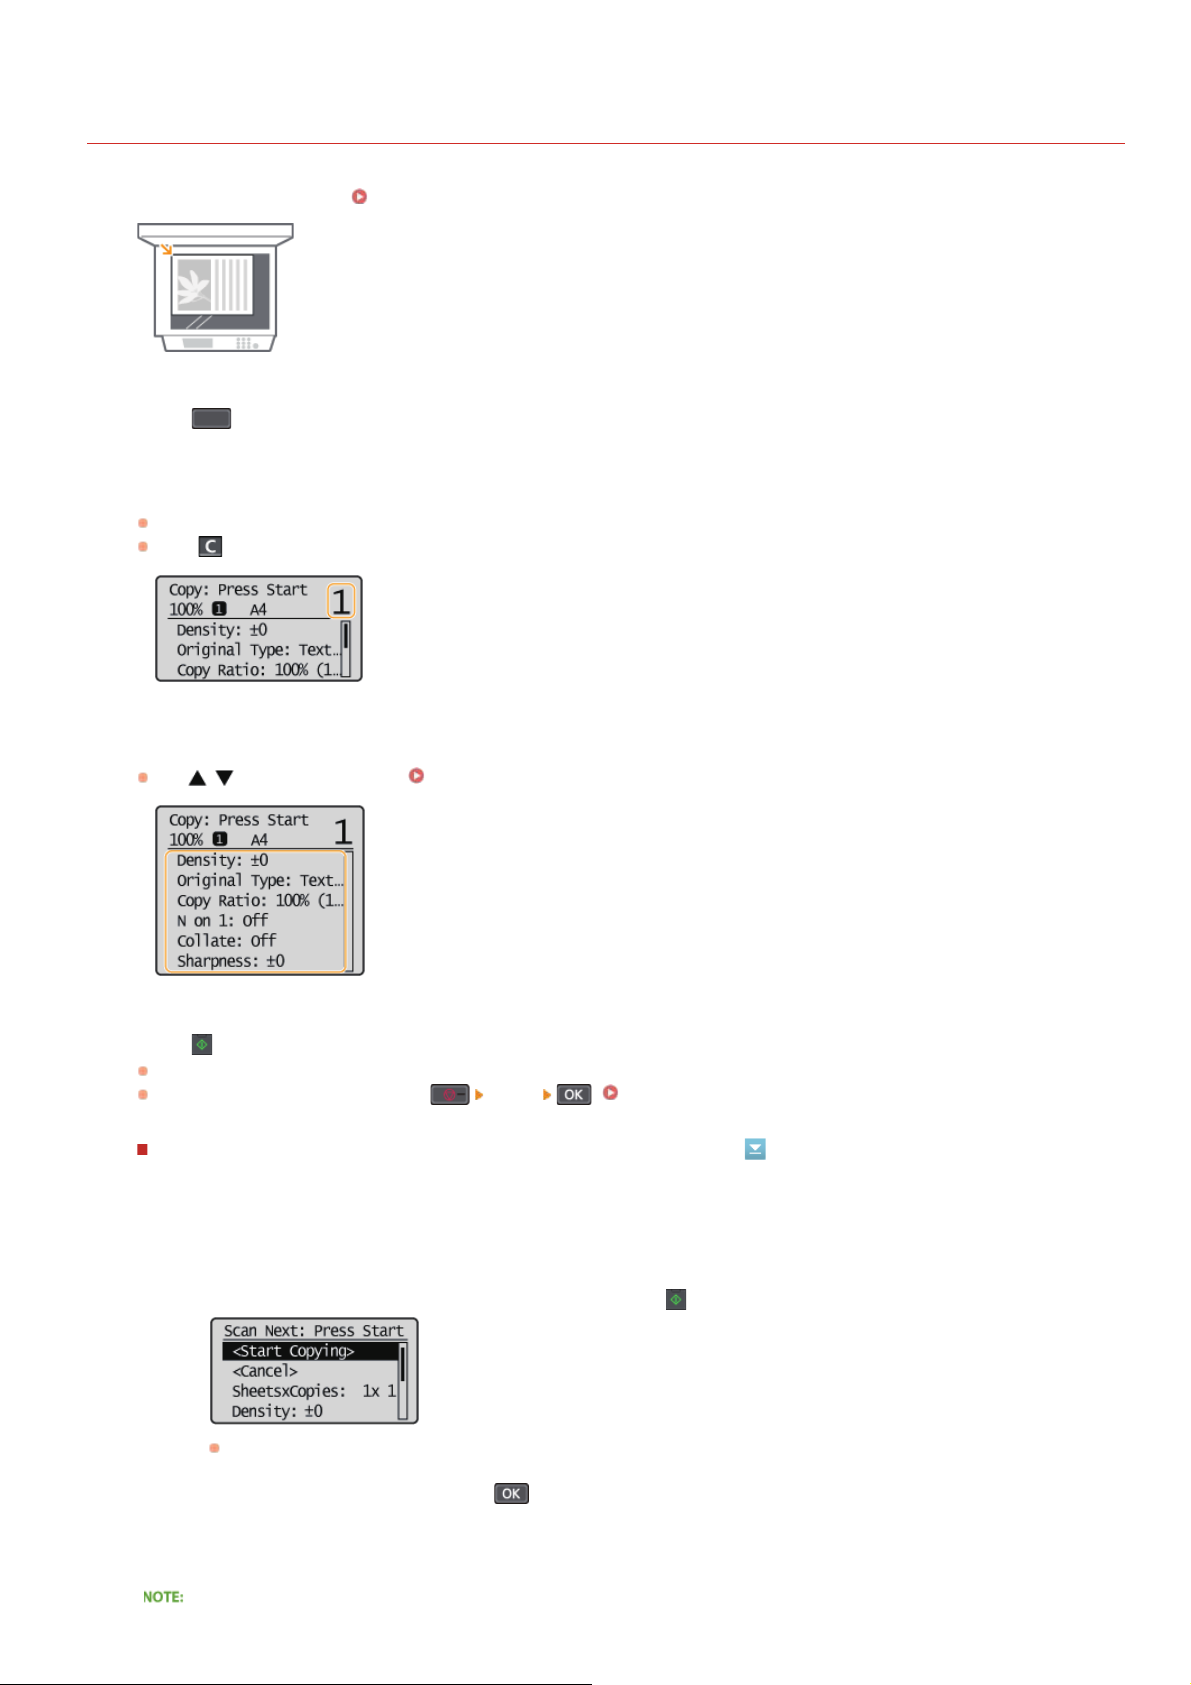
Basic Copy Operations
Place the document(s). Placing Documents
1
Press (COPY/SCAN) to switch to the Copy mode screen.
2
Enter the number of copies using the numeric keys.
3
Enter a quantity from 1 to 99.
Press
to cancel the entered quantity.
0L40-01A
Specify the copy settings as necessary.
4
Use / to select the settings. Various Copy Settings
Press .
5
Copying starts.
If you want to cancel copying, press
When copying several pages onto a single sheet or when collating
When <N on 1> is any setting other than <Off> or <Collate> is set to <On>, copy after first scanning all of the
document.
Place the next document on the platen glass, and press .
1
<Yes> . Canceling Copies
Repeat this step until you finish scanning the entire document.
Select <Start Copying>, and press .
2
㻡㻠㻌㻛㻌㻟㻟㻢
Page 55

When the <Size/Settings Mismatch> memessage appears.
When an Error Message Appears
When copying documents with text or images that extend to the edges of the page
The edges of the document might not be copied. For more information about the scan margins, see Scan Area.
If you always want to make copies with the same settings:
Changing Default Settings
㻡㻡㻌㻛㻌㻟㻟㻢
Page 56
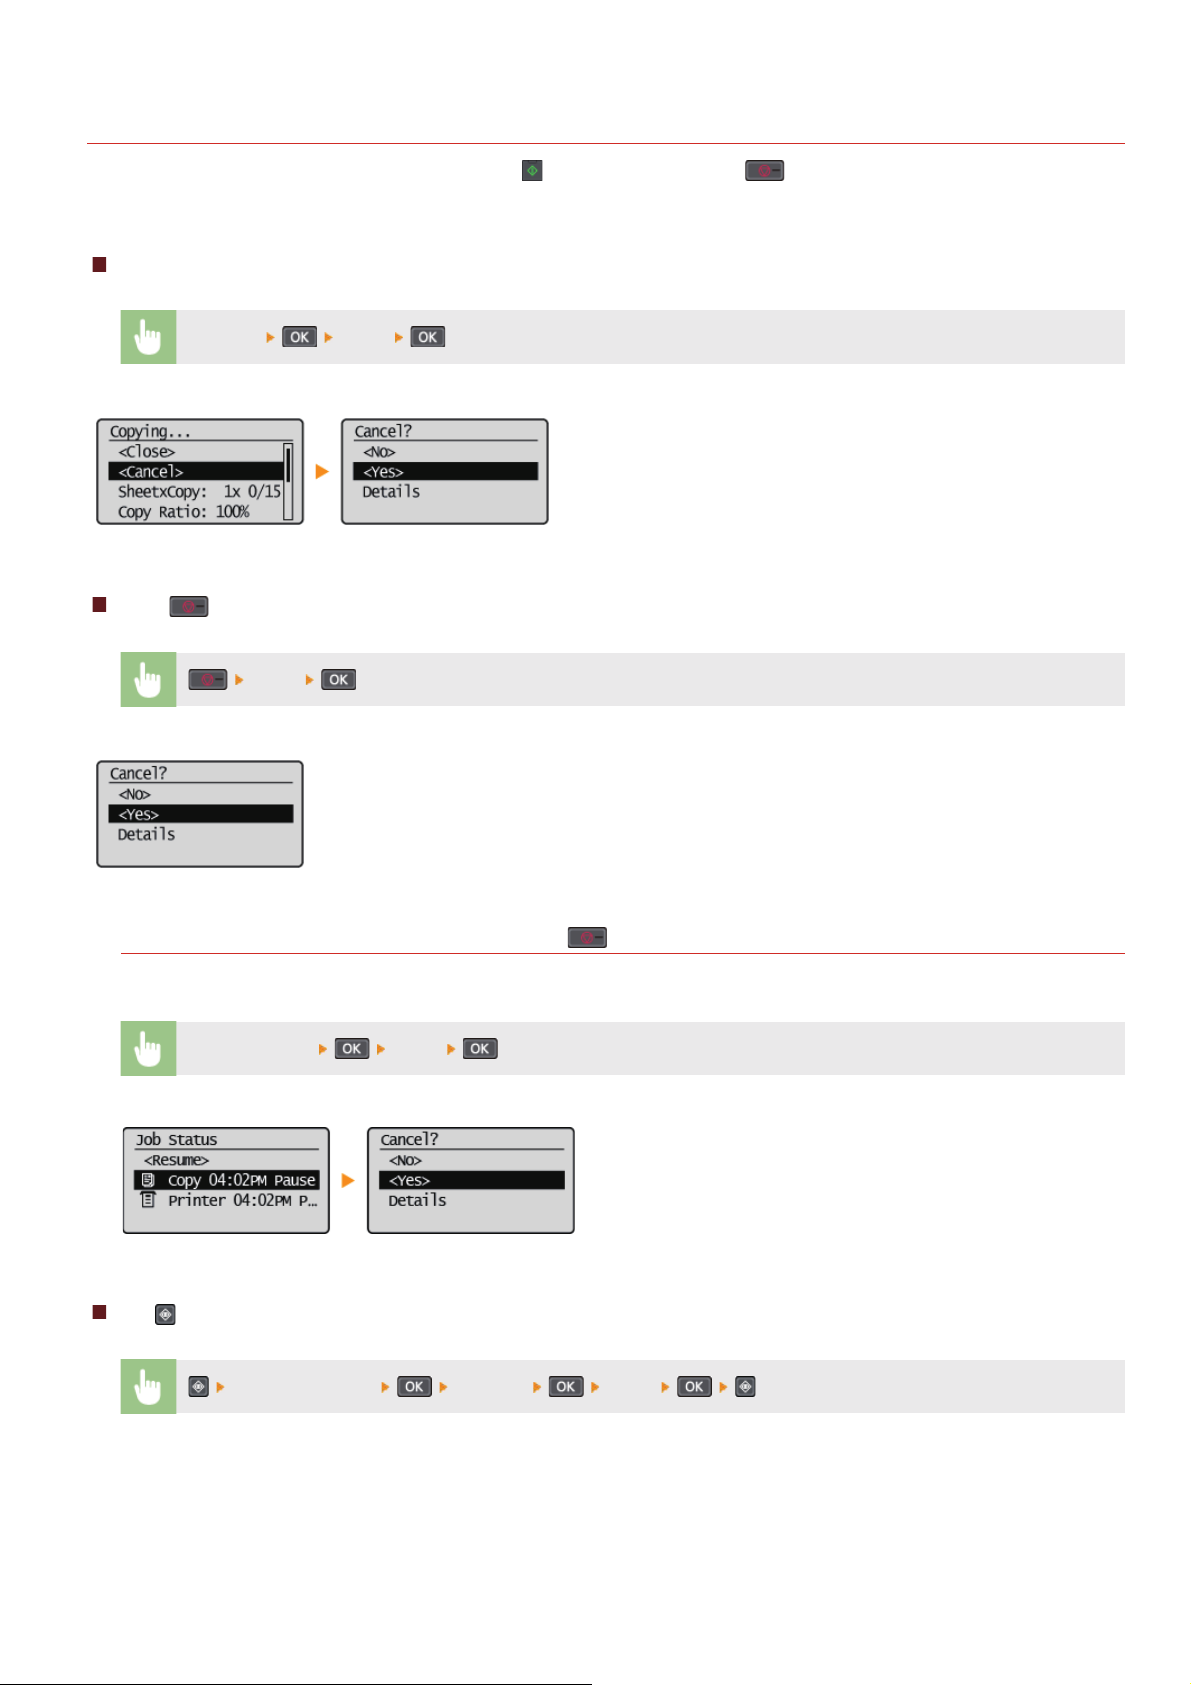
0L40-01C
Canceling Copies
If you want to cancel copying immediately after pressing , select <Cancel> or press on the operation panel. You can also cancel
copying after checking the copy status.
Canceling in the Screen That is Displayed While Copying
<Cancel> <Yes>
Press to Cancel
<Yes>
If the Screen Displays a List of Documents When is Pressed
Documents have been scanned and are waiting to be printed. Select the copy document to cancel.
Select cancel job
<Yes>
Use to Cancel
<Copy Job Status> <Cancel> <Yes>
㻡㻢㻌㻛㻌㻟㻟㻢
Page 57
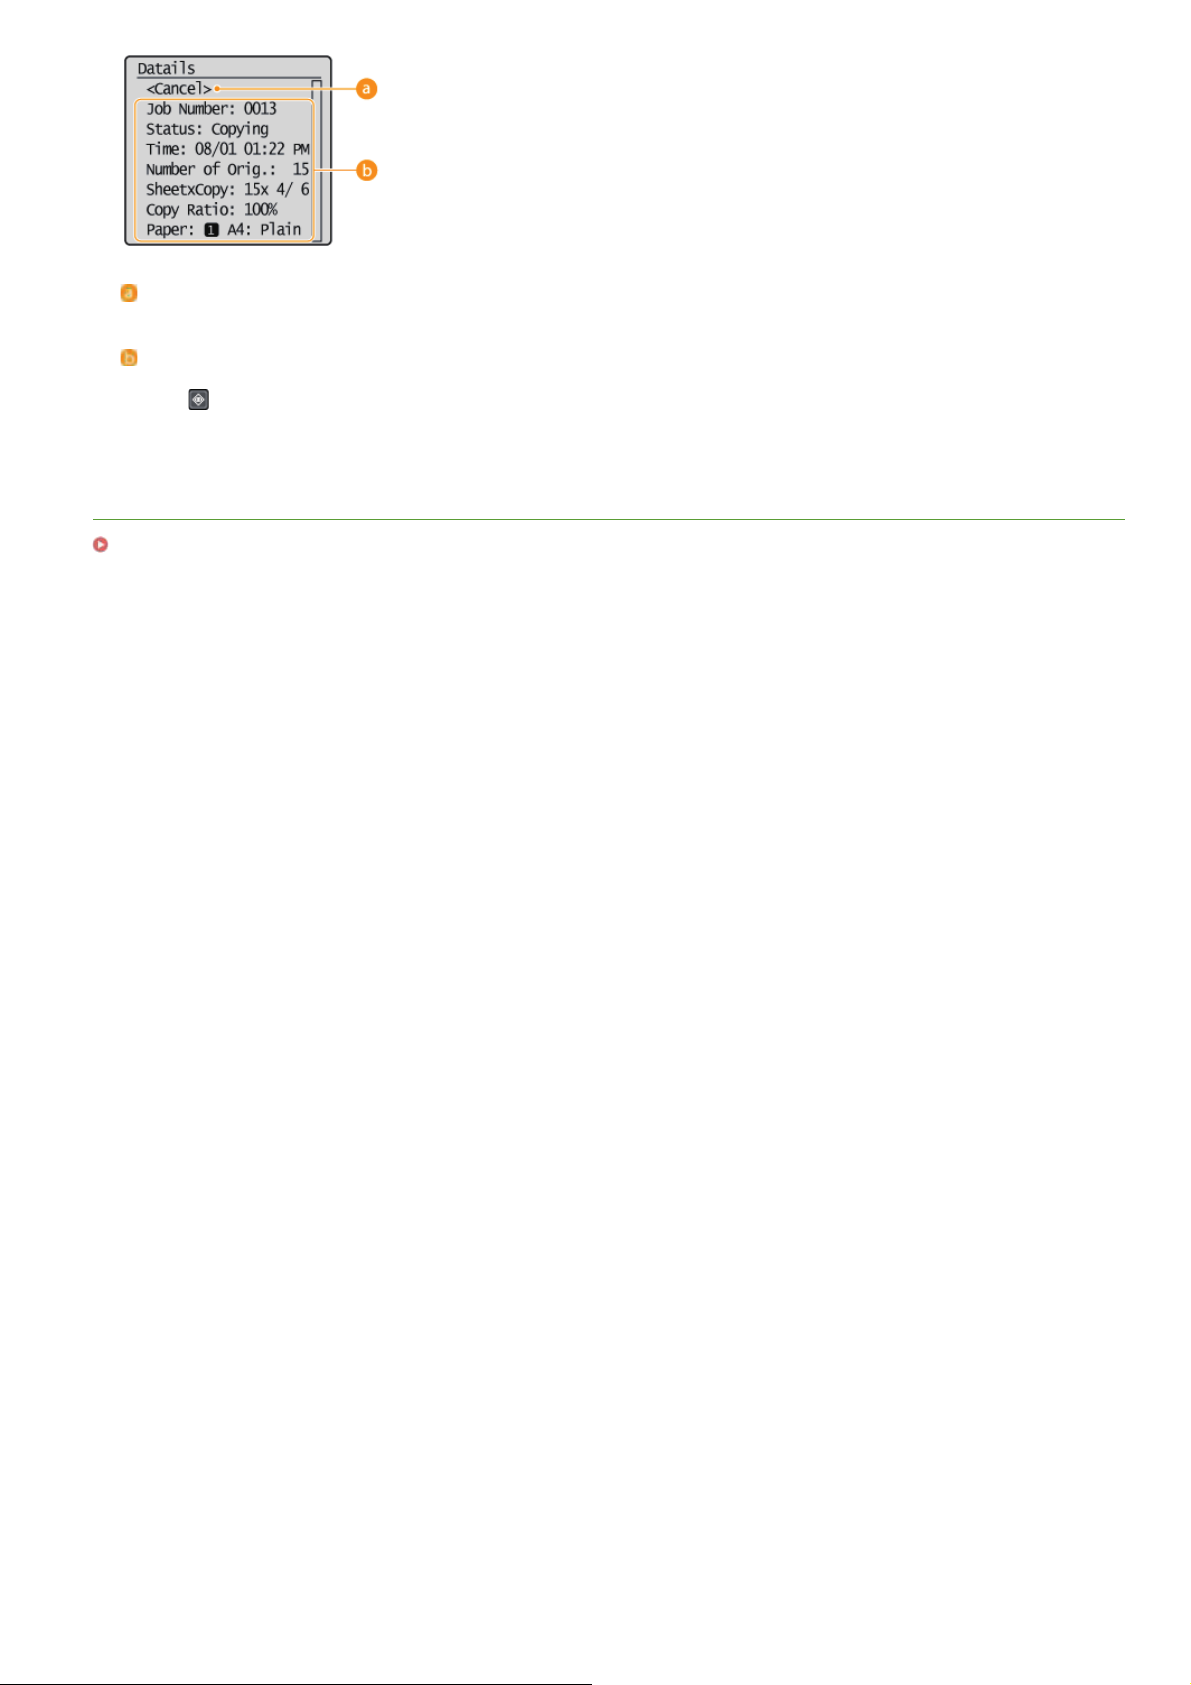
<Cancel>
Cancels copying.
Copy details
The number of copies, settings, and other details are displayed. If you only want to check the details without canceling copying,
press
to return to the copy main screen.
LINKS
Basic Copy Operations
㻡㻣㻌㻛㻌㻟㻟㻢
Page 58
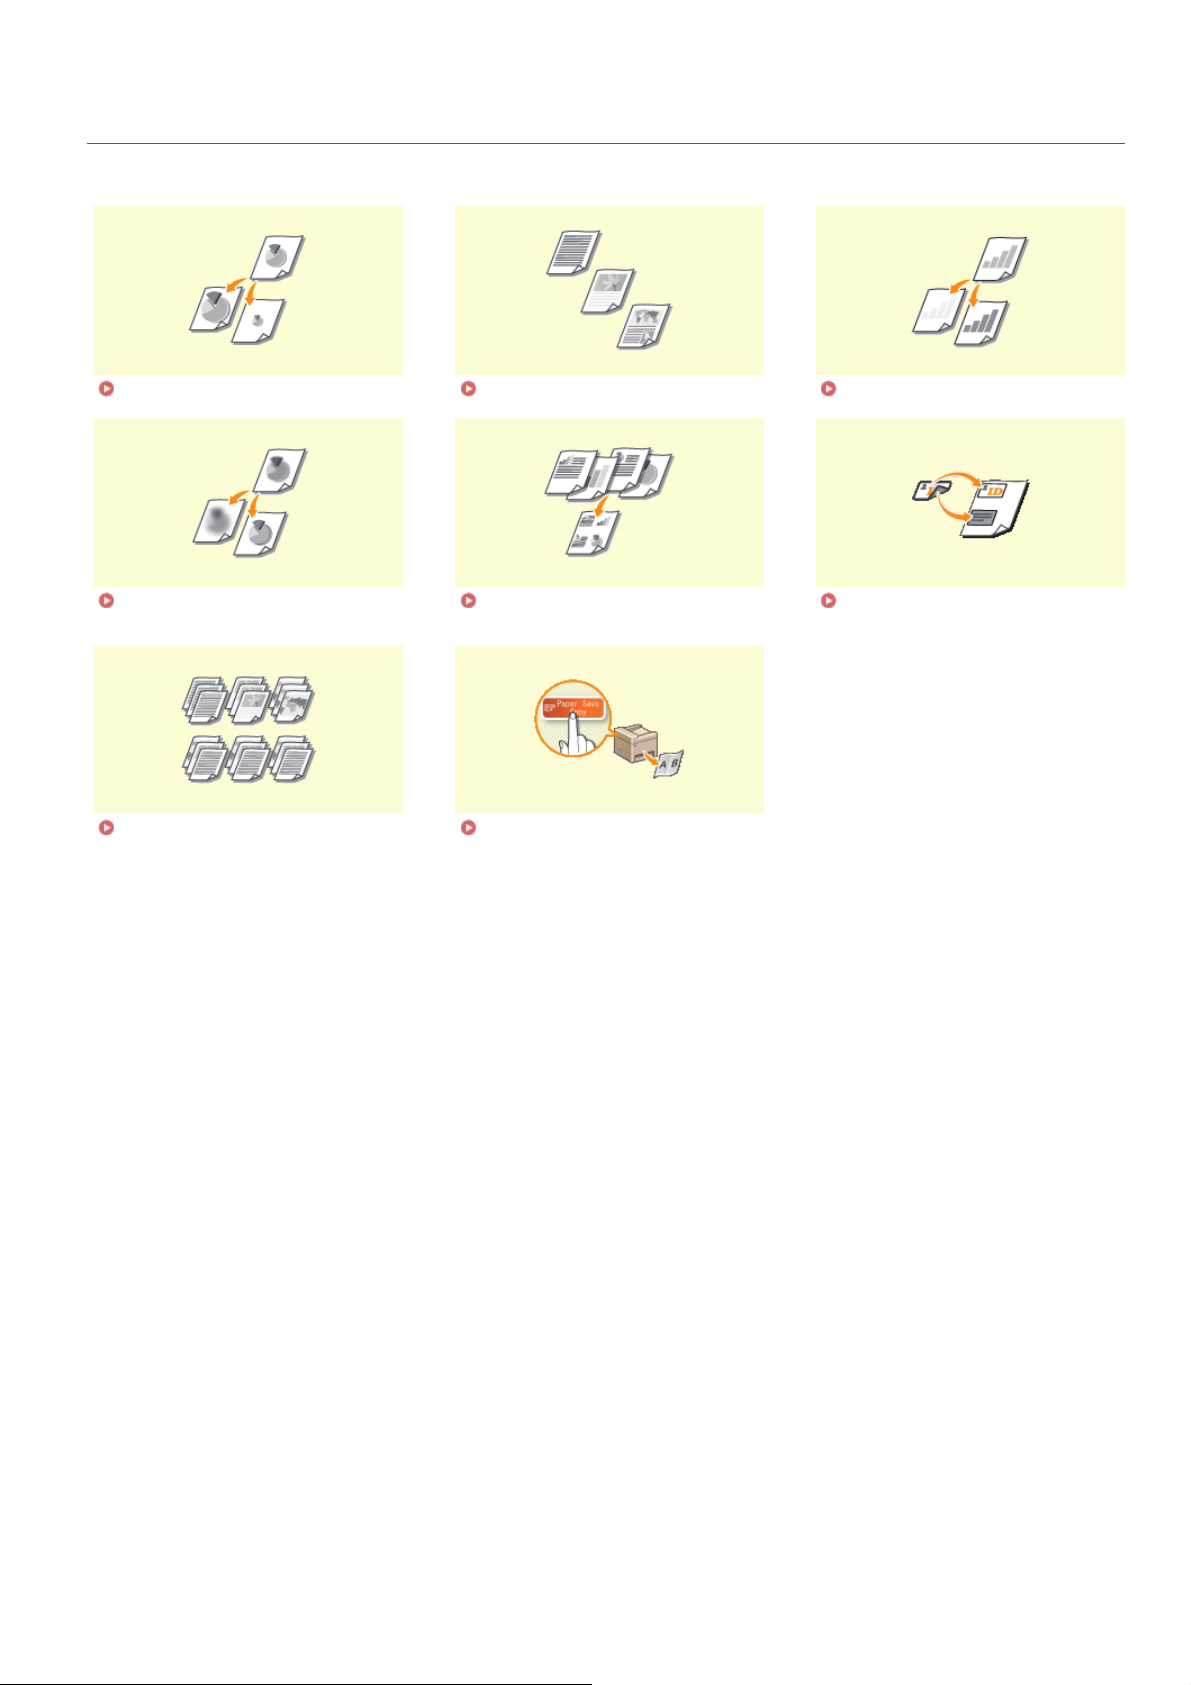
0L40-01E
Various Copy Settings
A variety of settings are available to suit your needs, such as when you want to save paper or make your documents easier to read.
Enlarging or Reducing Selecting Document Type Adjusting Density
Adjusting Sharpness Copying Multiple Documents onto
Collating Copies by Page Using the [Paper Save Copy] Key
One Sheet (2 on 1/4 on 1)
(MF211)
Copying Both Sides of an ID Card
onto One Page
㻡㻤㻌㻛㻌㻟㻟㻢
Page 59
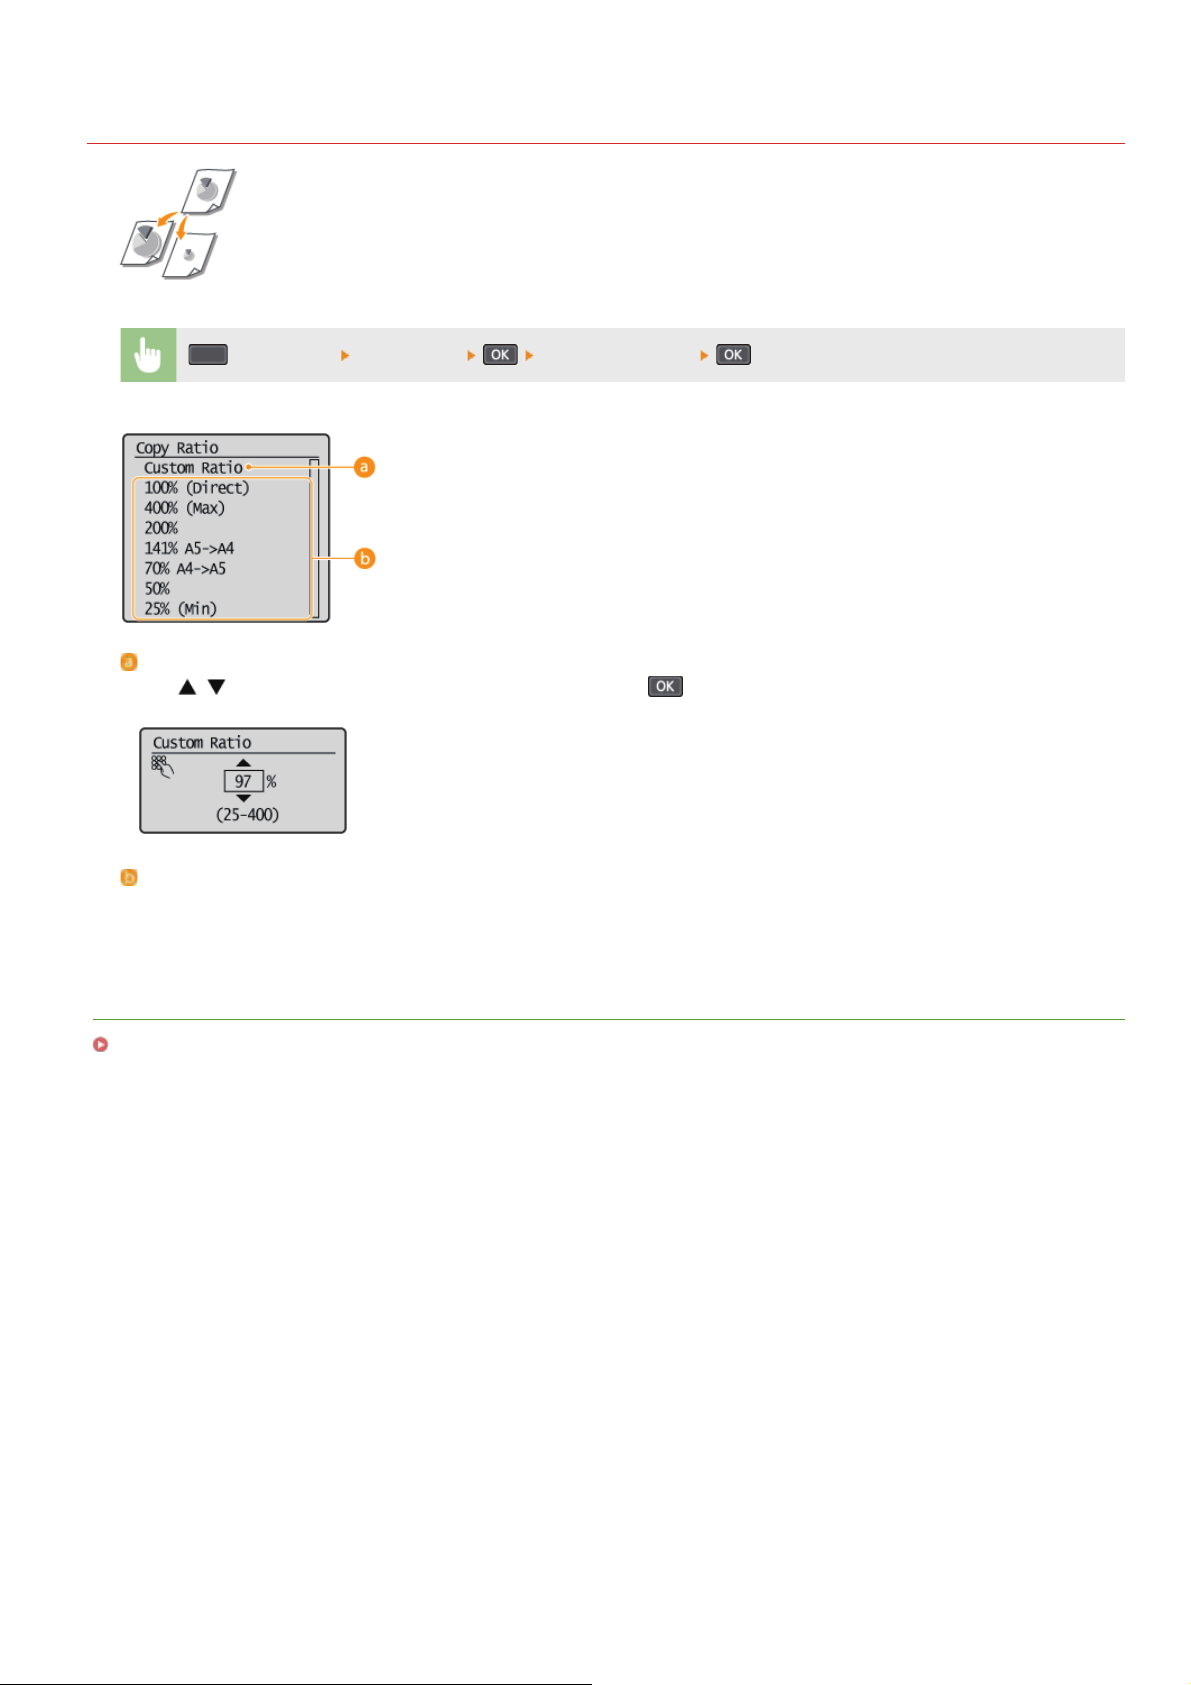
Enlarging or Reducing
You can enlarge or reduce copies by using a preset copy ratio such as <A5->A4>, or by setting a custom
copy ratio in increments of 1%.
(COPY/SCAN) <Copy Ratio> Select the copy ratio
0L40-01F
<Custom Ratio>
Use
/ or the numeric keys to enter the copy ratio, and press . You can set any copy ratio from 25% to 400% in 1%
increments.
Preset copy ratio
Select a copy ratio.
LINKS
Basic Copy Operations
㻡㻥㻌㻛㻌㻟㻟㻢
Page 60
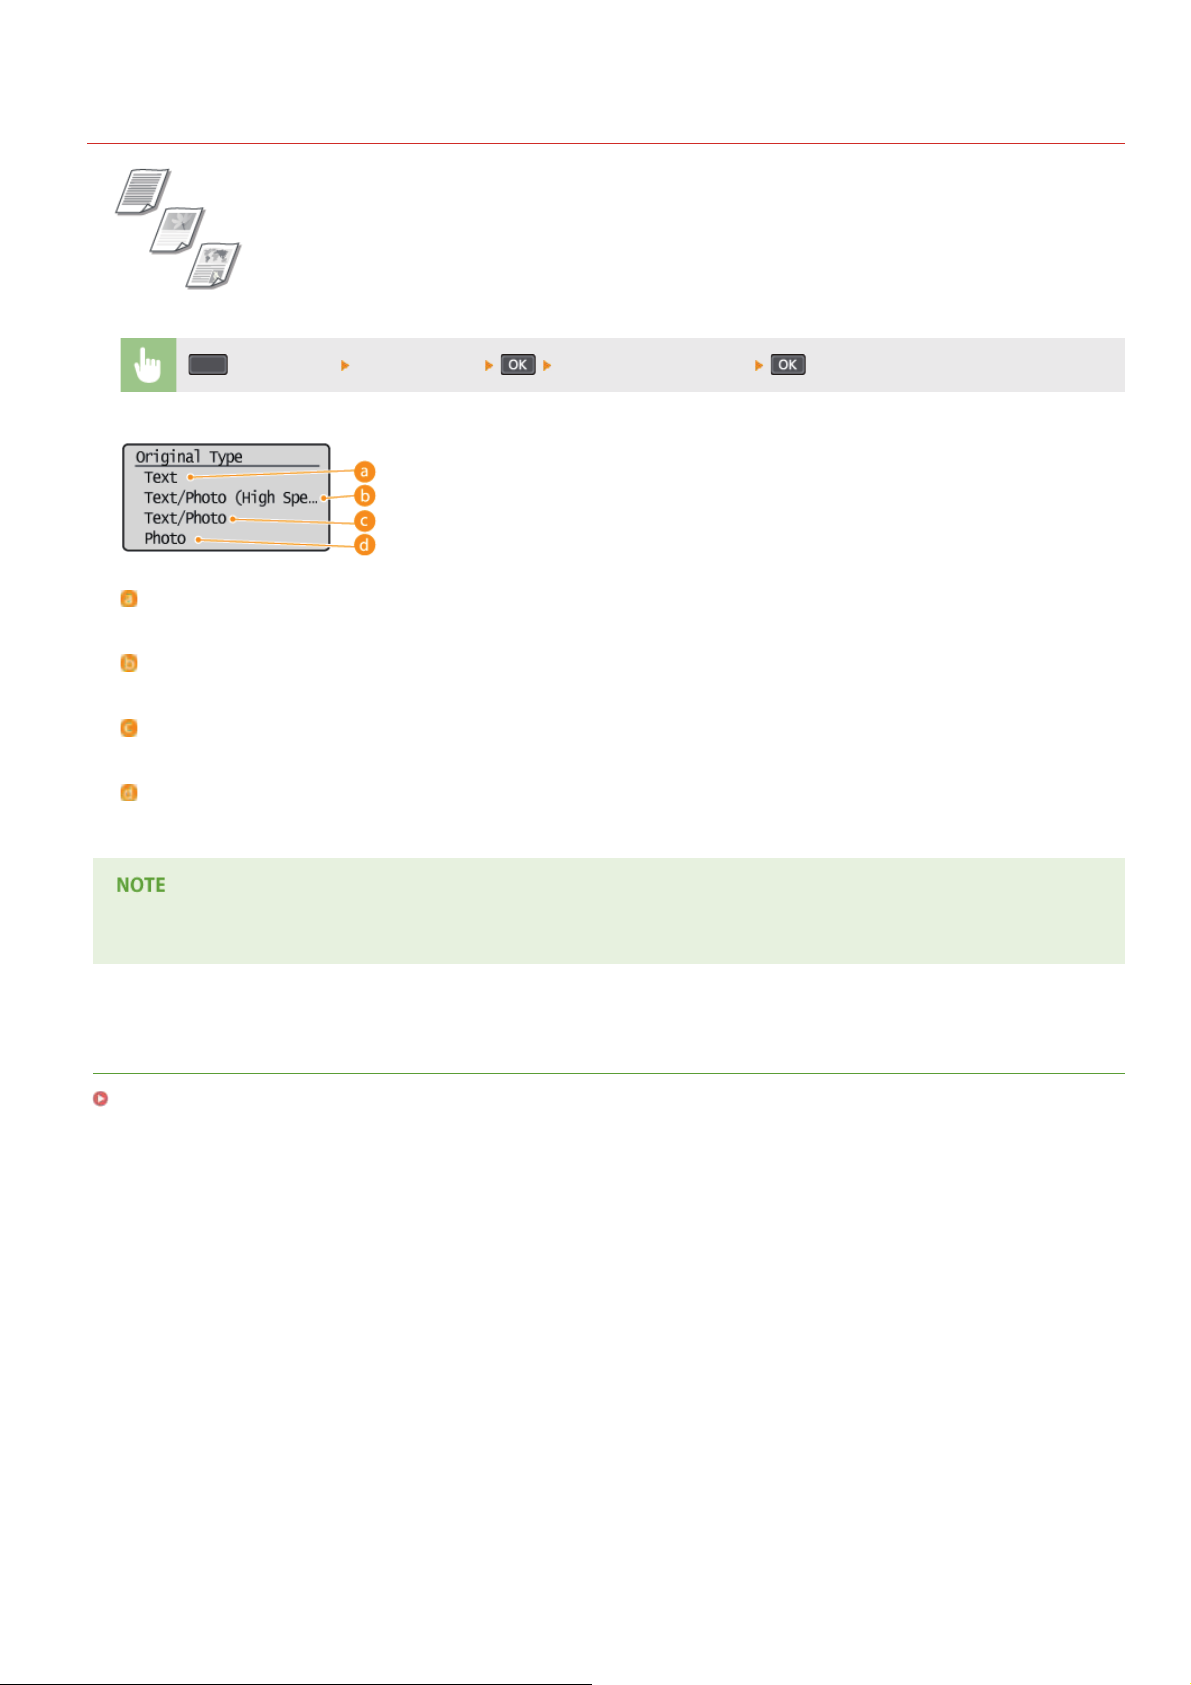
Selecting Document Type
You can select the optical image quality for the copy depending on the document type, such as text-only
documents, documents with charts and graphs, or magazine photos.
(COPY/SCAN) <Original Type> Select the document type
<Text>
Suitable when copying documents that only contain text.
0L40-01H
<Text/Photo (High Speed)>
Suitable when copying documents that contain both text and photos. Priority is given to speed over image quality.
<Text/Photo>
Suitable when copying documents that contain both text and photos.
<Photo>
Suitable when copying documents that contain printed photos, such as magazines or pamphlets.
If <Text/Photo (High Speed)>, <Text/Photo>, or <Photo> is selected and <Density> is set to <Auto Density>, it changes to
<Manual Density>.
LINKS
Basic Copy Operations
㻢㻜㻌㻛㻌㻟㻟㻢
Page 61
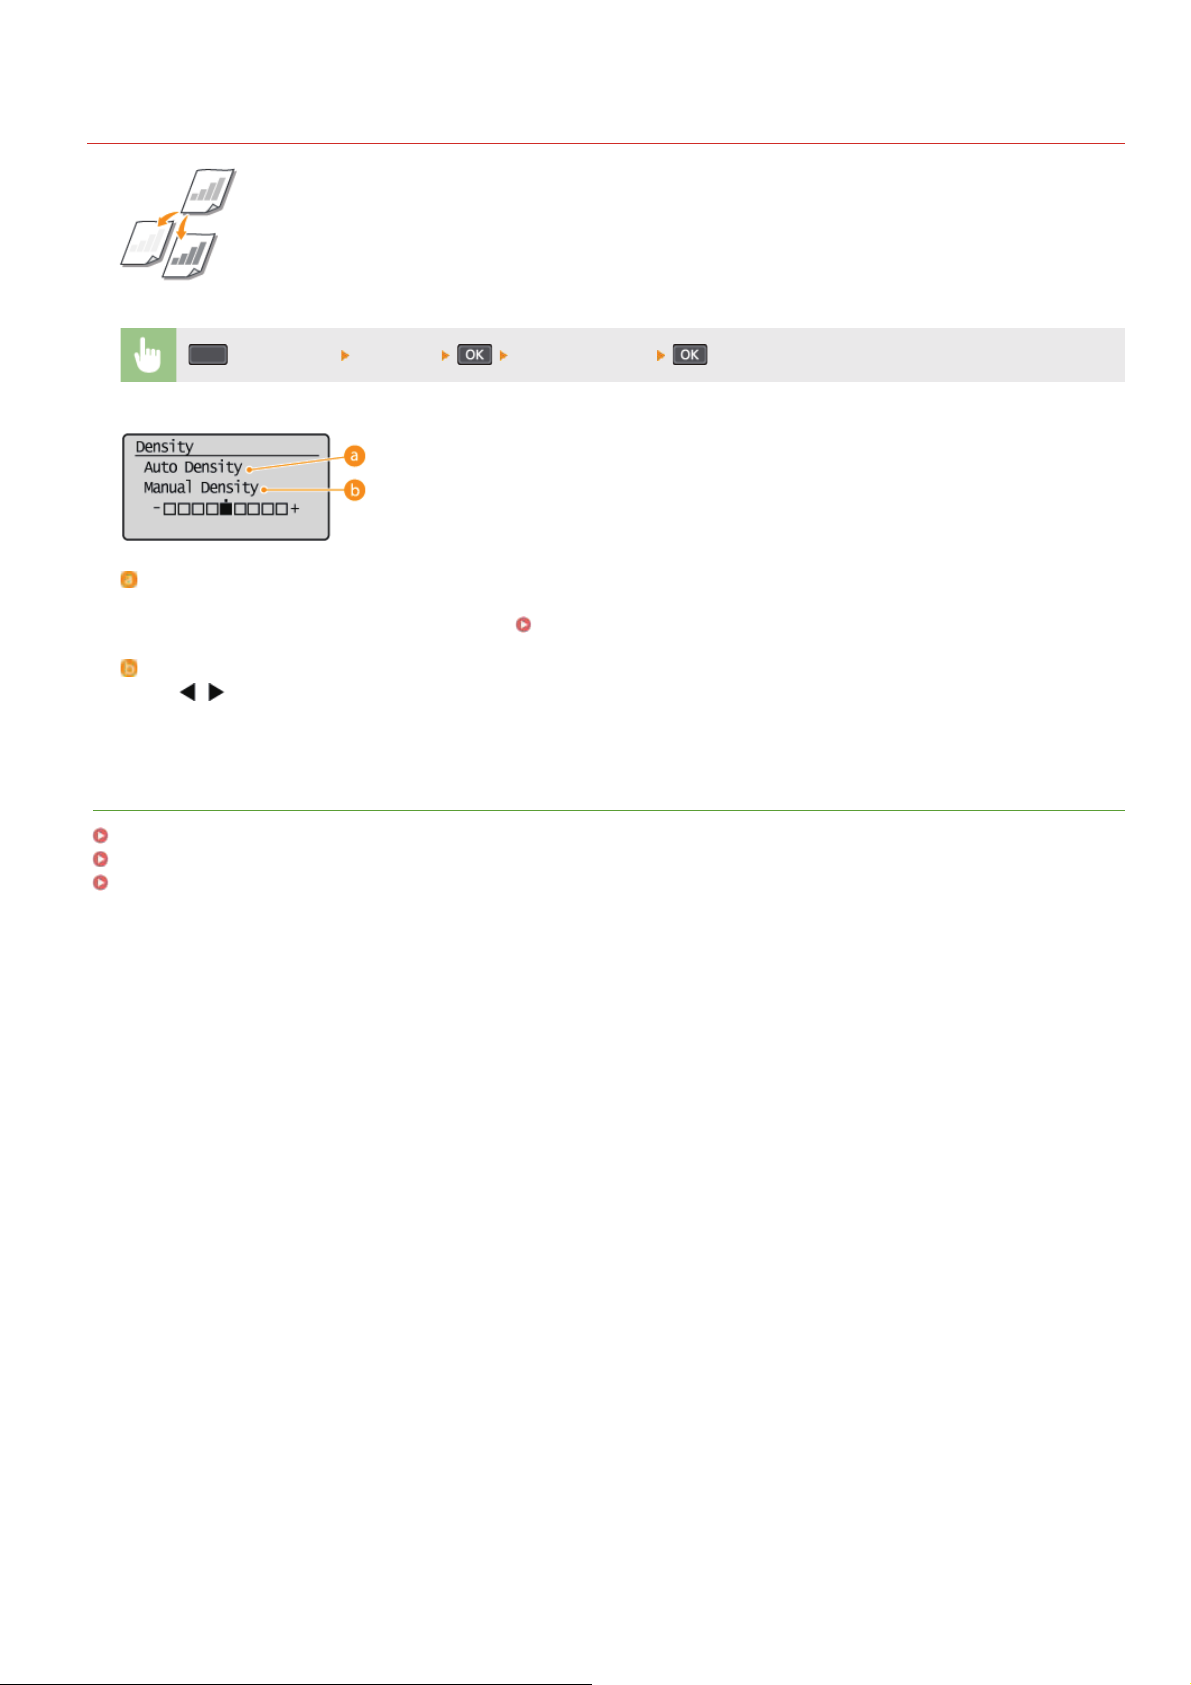
Adjusting Density
You can adjust the density of the copy if the text or images in a document are too light or dark. You can also
automatically set an optimal density for a document.
(COPY/SCAN) <Density> Adjust the density
<Auto Density>
An optimal density for the document is automatically set.
<Original Type> is automatically set to <Text>. (
0L40-01J
Selecting Document Type)
<Manual Density>
Use
/ to adjust the density.
LINKS
Basic Copy Operations
Adjusting Sharpness
Correct Density
㻢㻝㻌㻛㻌㻟㻟㻢
Page 62
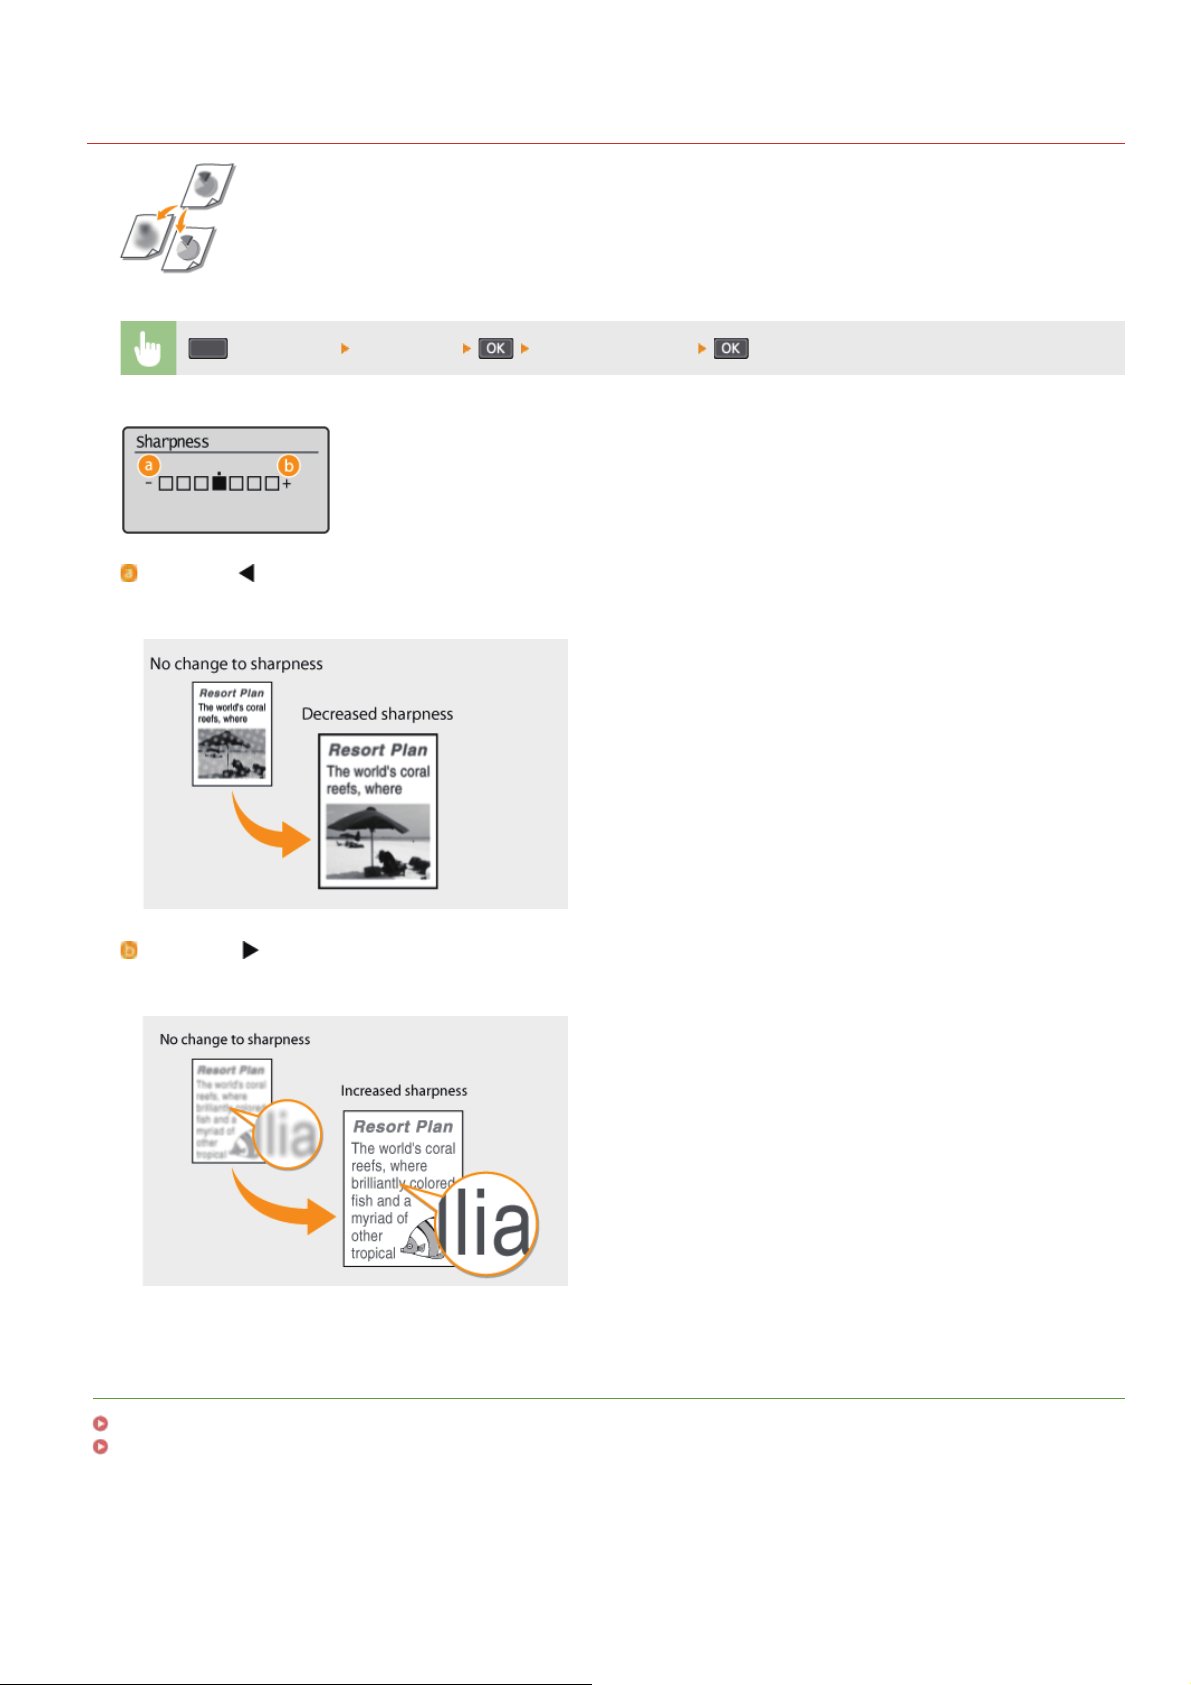
Adjusting Sharpness
You can adjust sharpness of the copied image. Increase the sharpness to sharpen blurred text and lines, or
decrease the sharpness to improve the appearance of magazine photos.
(COPY/SCAN) <Sharpness> Adjust the sharpness
<->: Press
Decreases the sharpness, resulting in a softer image.
Example: If you want to improve the appearance of magazine photos
0L40-01K
<+>: Press
Increases the image sharpness.
Example: If you want to sharpen text and lines written in pencil
LINKS
Basic Copy Operations
Adjusting Density
㻢㻞㻌㻛㻌㻟㻟㻢
Page 63
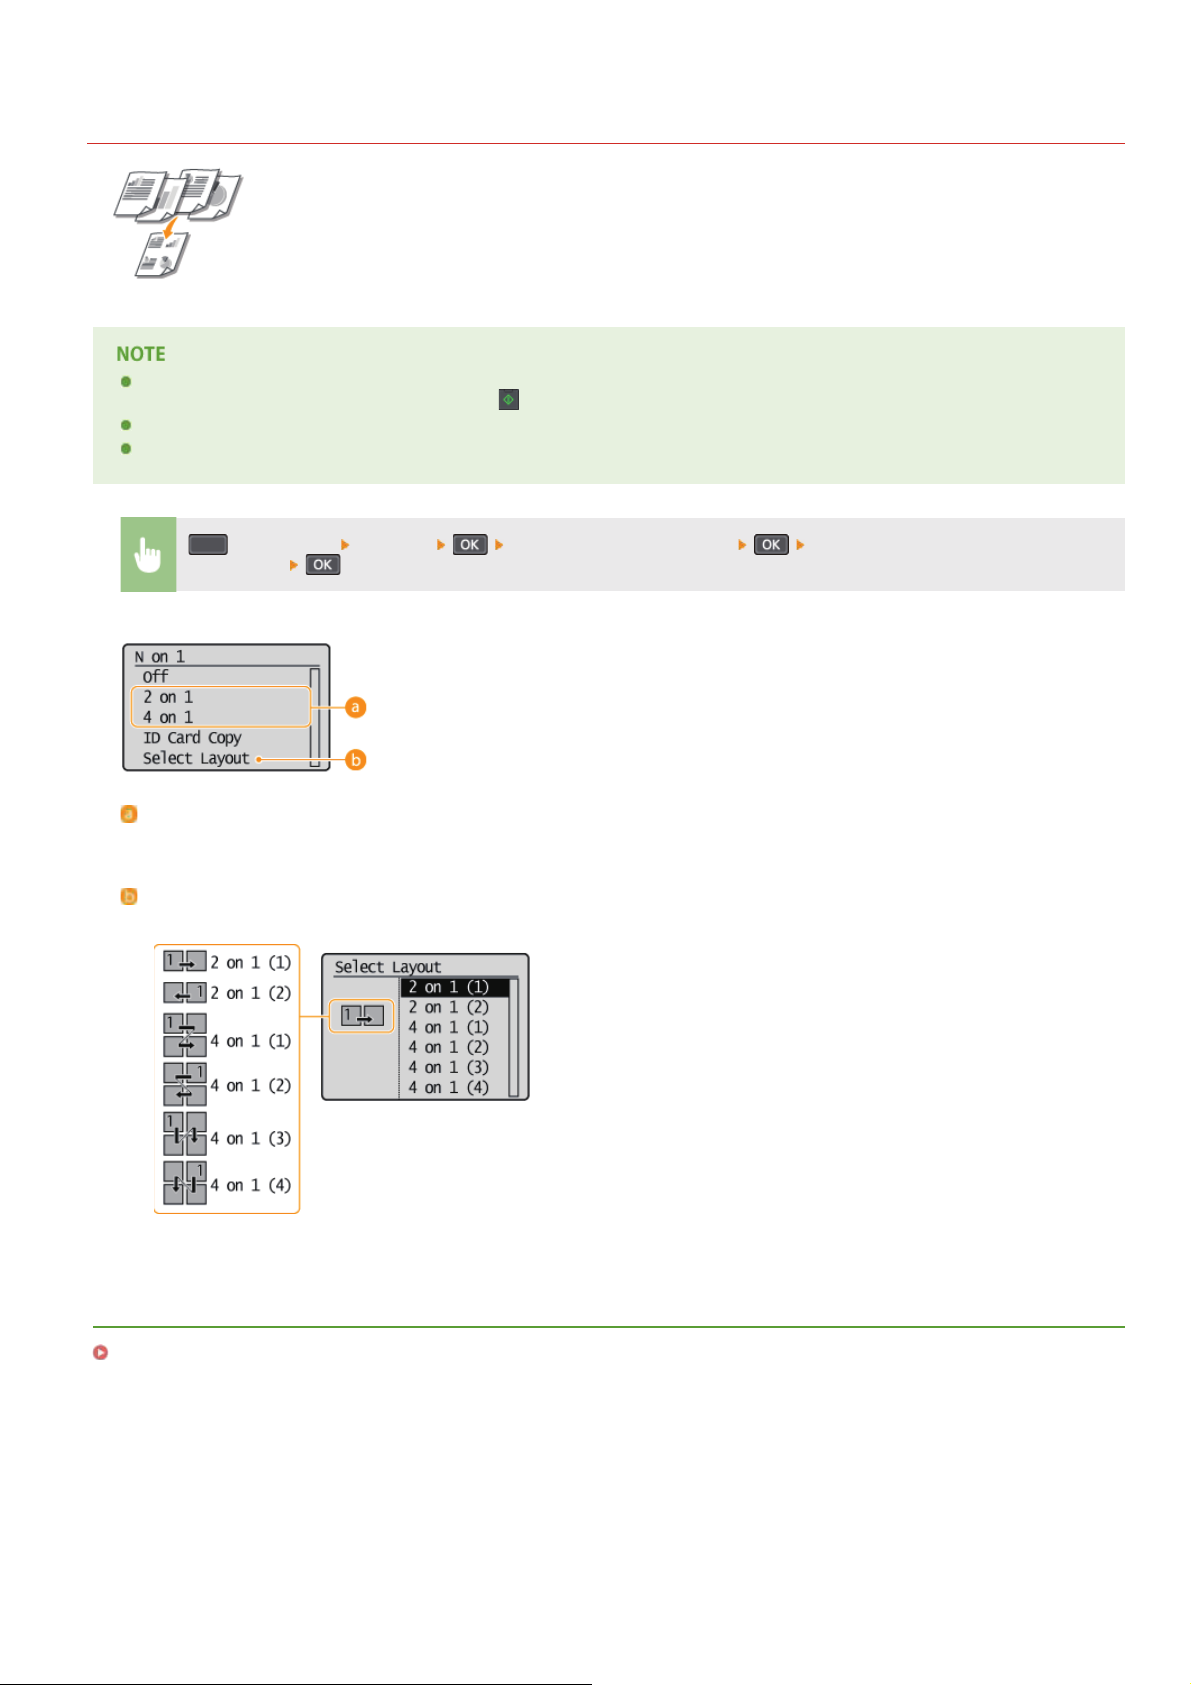
Copying Multiple Documents onto One Sheet (2 on 1/4 on 1)
You can copy two or four documents onto a single sheet at a reduced size. This decreases the number of
pages, enabling you to save paper.
0L40-01R
Using <2 on 1>/<4 on 1> reduces the copy ratio automatically (the copy ratio is displayed on the screen). You can increase
or further reduce the copy ratio before pressing
<2 on 1>/<4 on 1> is not available when using <ID Card Copy>.
When you copy multiple documents onto one page, margins may be created in the copied image.
(COPY/SCAN) <N on 1> Select <2 on 1> or <4 on 1> Select the document size on the <Scan
Size> screen
<2 on 1>/<4 on 1>
Select <2 on 1> to copy two pages of documents onto a single sheet, or select <4 on 1> to copy four pages of documents onto a
single sheet.
<Select Layout>
Specify how to arrange the documents on the page.
, but the edges of the document might not be copied if you increase it.
LINKS
Basic Copy Operations
㻢㻟㻌㻛㻌㻟㻟㻢
Page 64
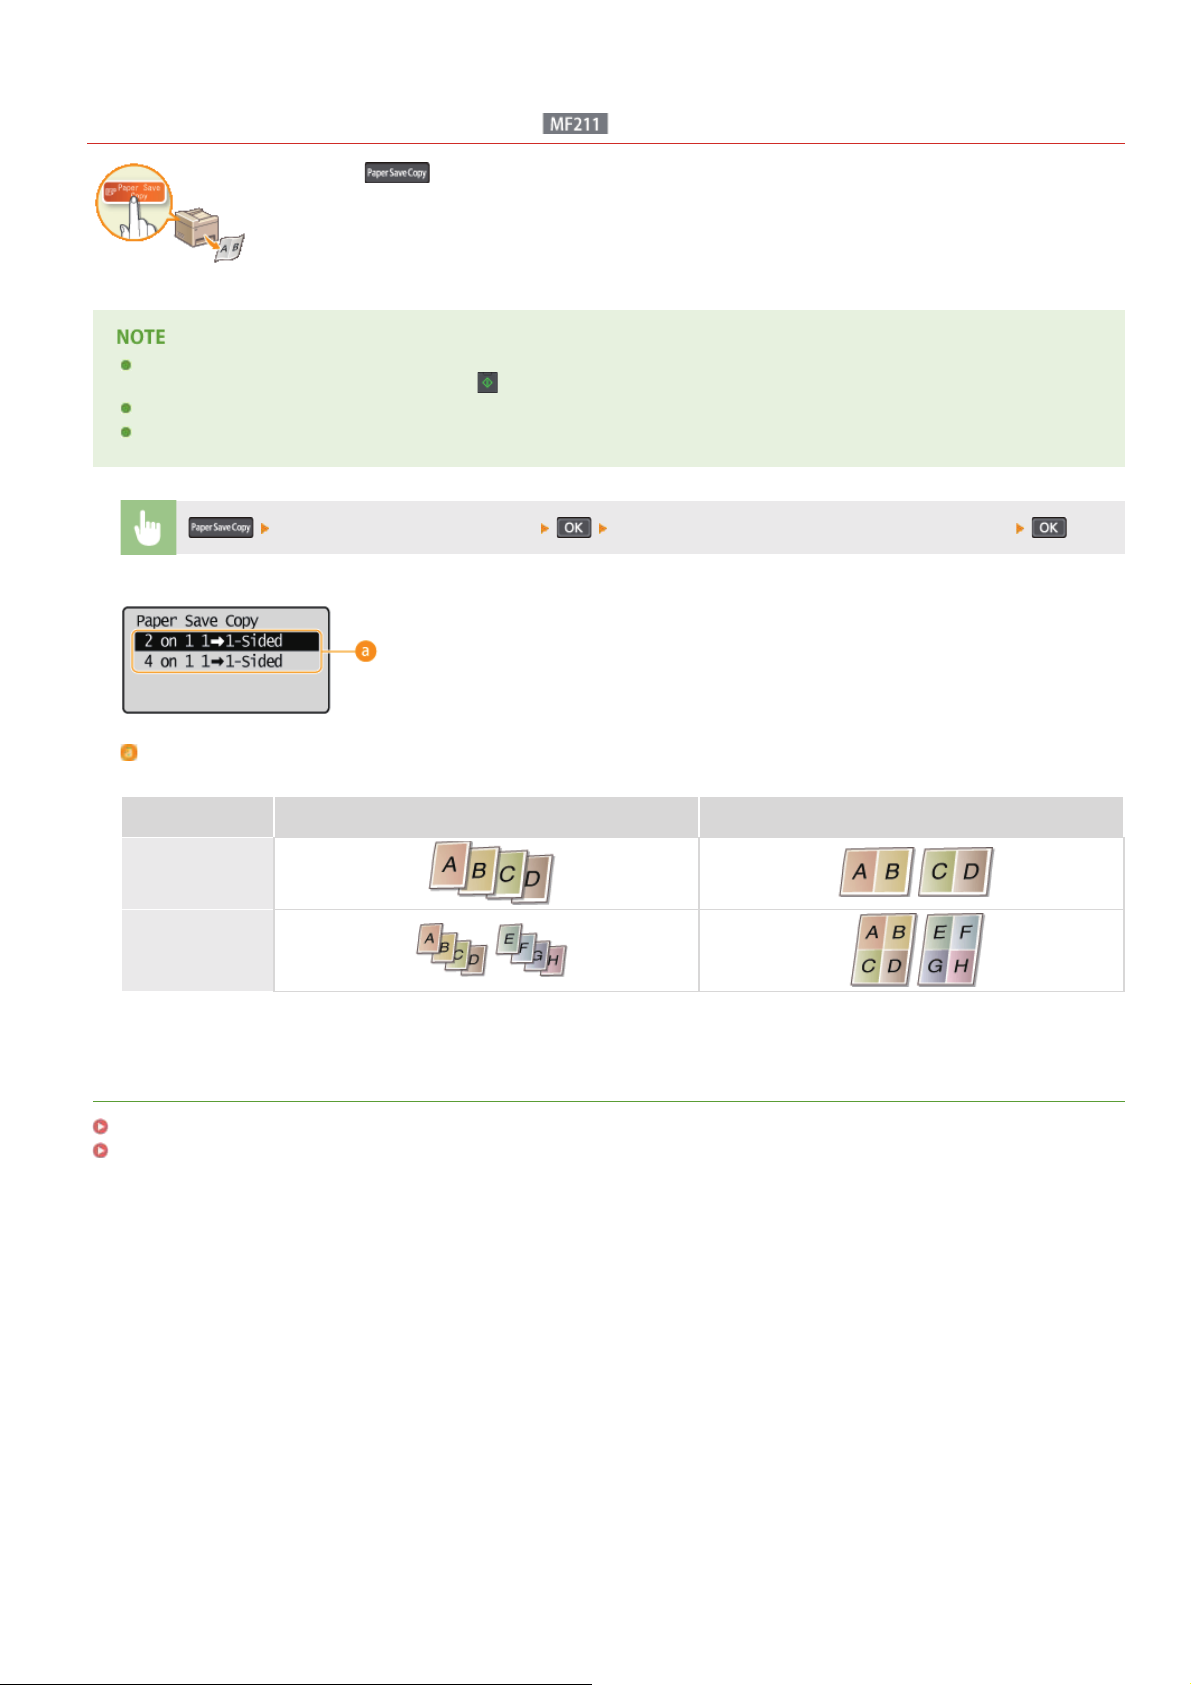
Using the [Paper Save Copy] Key
Pressing the places the machine in paper save copy mode. Multiple document pages are copied onto a
single sheet, allowing you to save on paper.
0L40-01S
Using <Paper Save Copy> reduces the copy ratio automatically (the copy ratio is displayed on the screen). You can increase or
further reduce the copy ratio before pressing
<Paper Save Copy> is not available when using <2 on 1>/<4 on 1> or <ID Card Copy>.
When you copy multiple documents onto one page, margins may be created in the copied image.
Select the paper save copy setting Select the document size on the <Scan Size> screen
Paper save copy settings
Select one of four setting combinations.
Original (Portrait) Copy
<2 on 1 1->1Sided>
<4 on 1 1->1Sided>
, but the edges of the document might not be copied if you increase it.
LINKS
Basic Copy Operations
Copying Multiple Documents onto One Sheet (2 on 1/4 on 1)
㻢㻠㻌㻛㻌㻟㻟㻢
Page 65
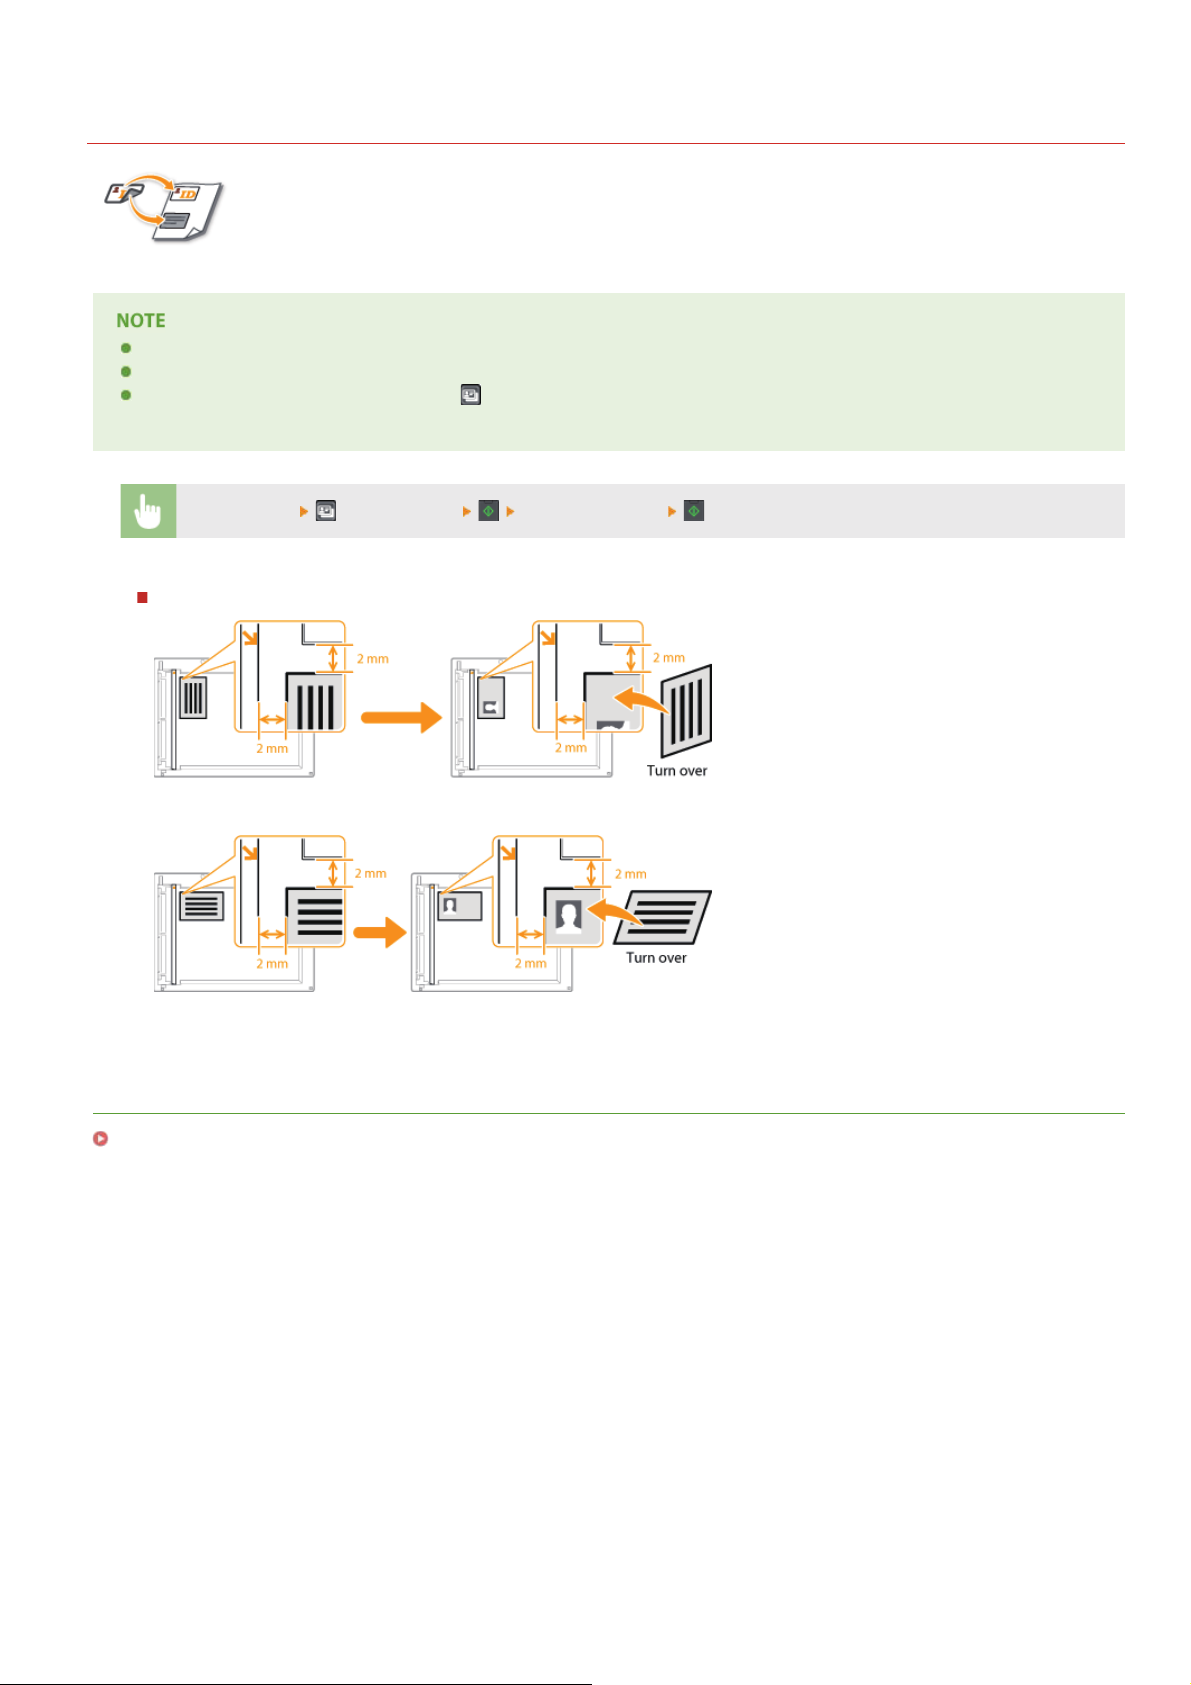
Copying Both Sides of an ID Card onto One Page
You can use <ID Card Copy> to copy the front and back sides of a card onto the same side of a page. This
function is useful when copying a driver's license or ID card.
<ID Card Copy> is available with A4/Letter size paper or larger.
<Copy Ratio> is automatically set to <100%>.
When <2 on 1>/<4 on 1> is set, pressing
instance, set <N on 1> to <Off> or change it to <ID Card Copy>.
(ID Card Copy) will not place the machine in ID Card Copy mode. In this
0L40-01U
Place the card
How to place the card
(ID Card Copy) Turn the card over
LINKS
Basic Copy Operations
㻢㻡㻌㻛㻌㻟㻟㻢
Page 66
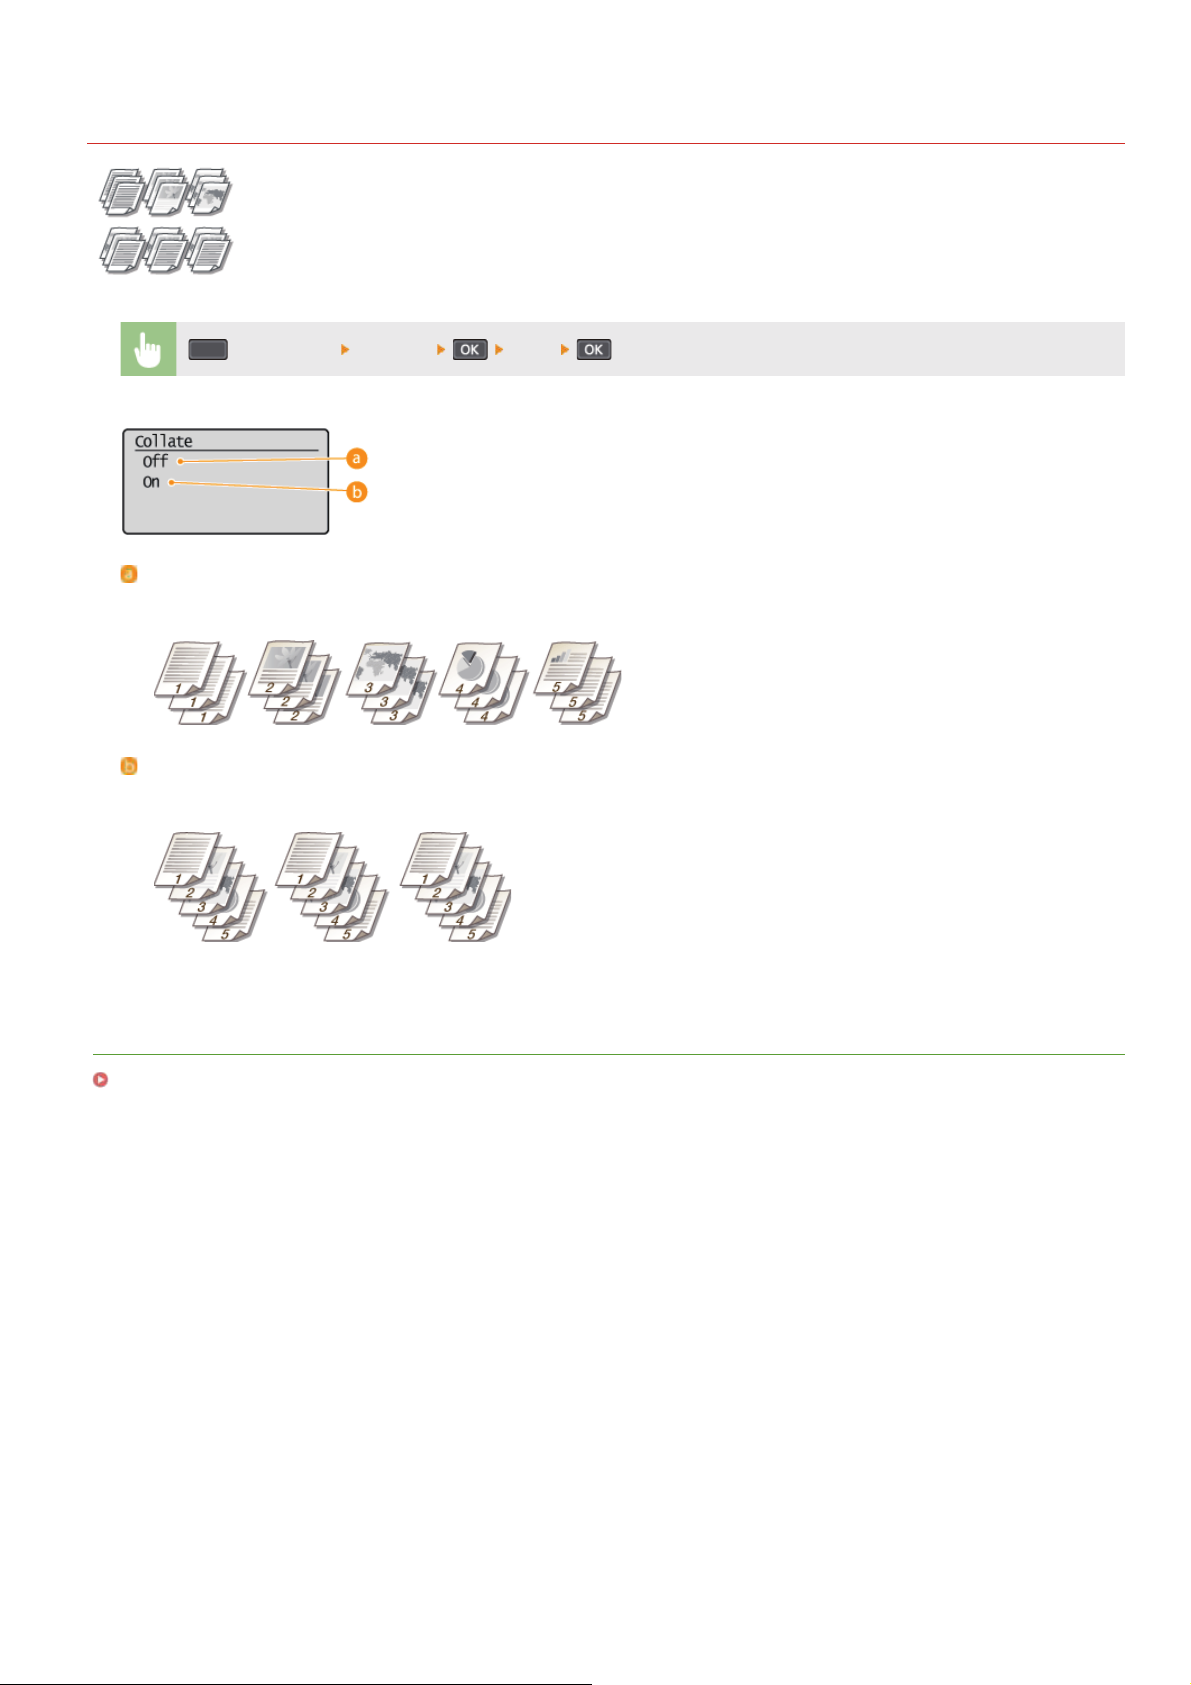
Collating Copies by Page
When preparing multiple copies of multi-page documents, set <Collate> to <On> to collate copies in sequential
page order. This function is useful when preparing handouts for meetings or presentations.
(COPY/SCAN) <Collate> <On>
<Off>
The copies are grouped by page and not collated. For example, if you are making three copies of a five-page document, the
printouts will be arranged in the following page order: 1, 1, 1, 2, 2, 2, 3, 3, 3, 4, 4, 4, 5, 5, 5.
0L40-01W
<On>
The copies are grouped into complete sets in sequential page order. For example, if you are making three copies of a five-page
document, the printouts will be arranged in the following page order: 1, 2, 3, 4, 5, 1, 2, 3, 4, 5, 1, 2, 3, 4, 5.
LINKS
Basic Copy Operations
㻢㻢㻌㻛㻌㻟㻟㻢
Page 67
0L40-01X
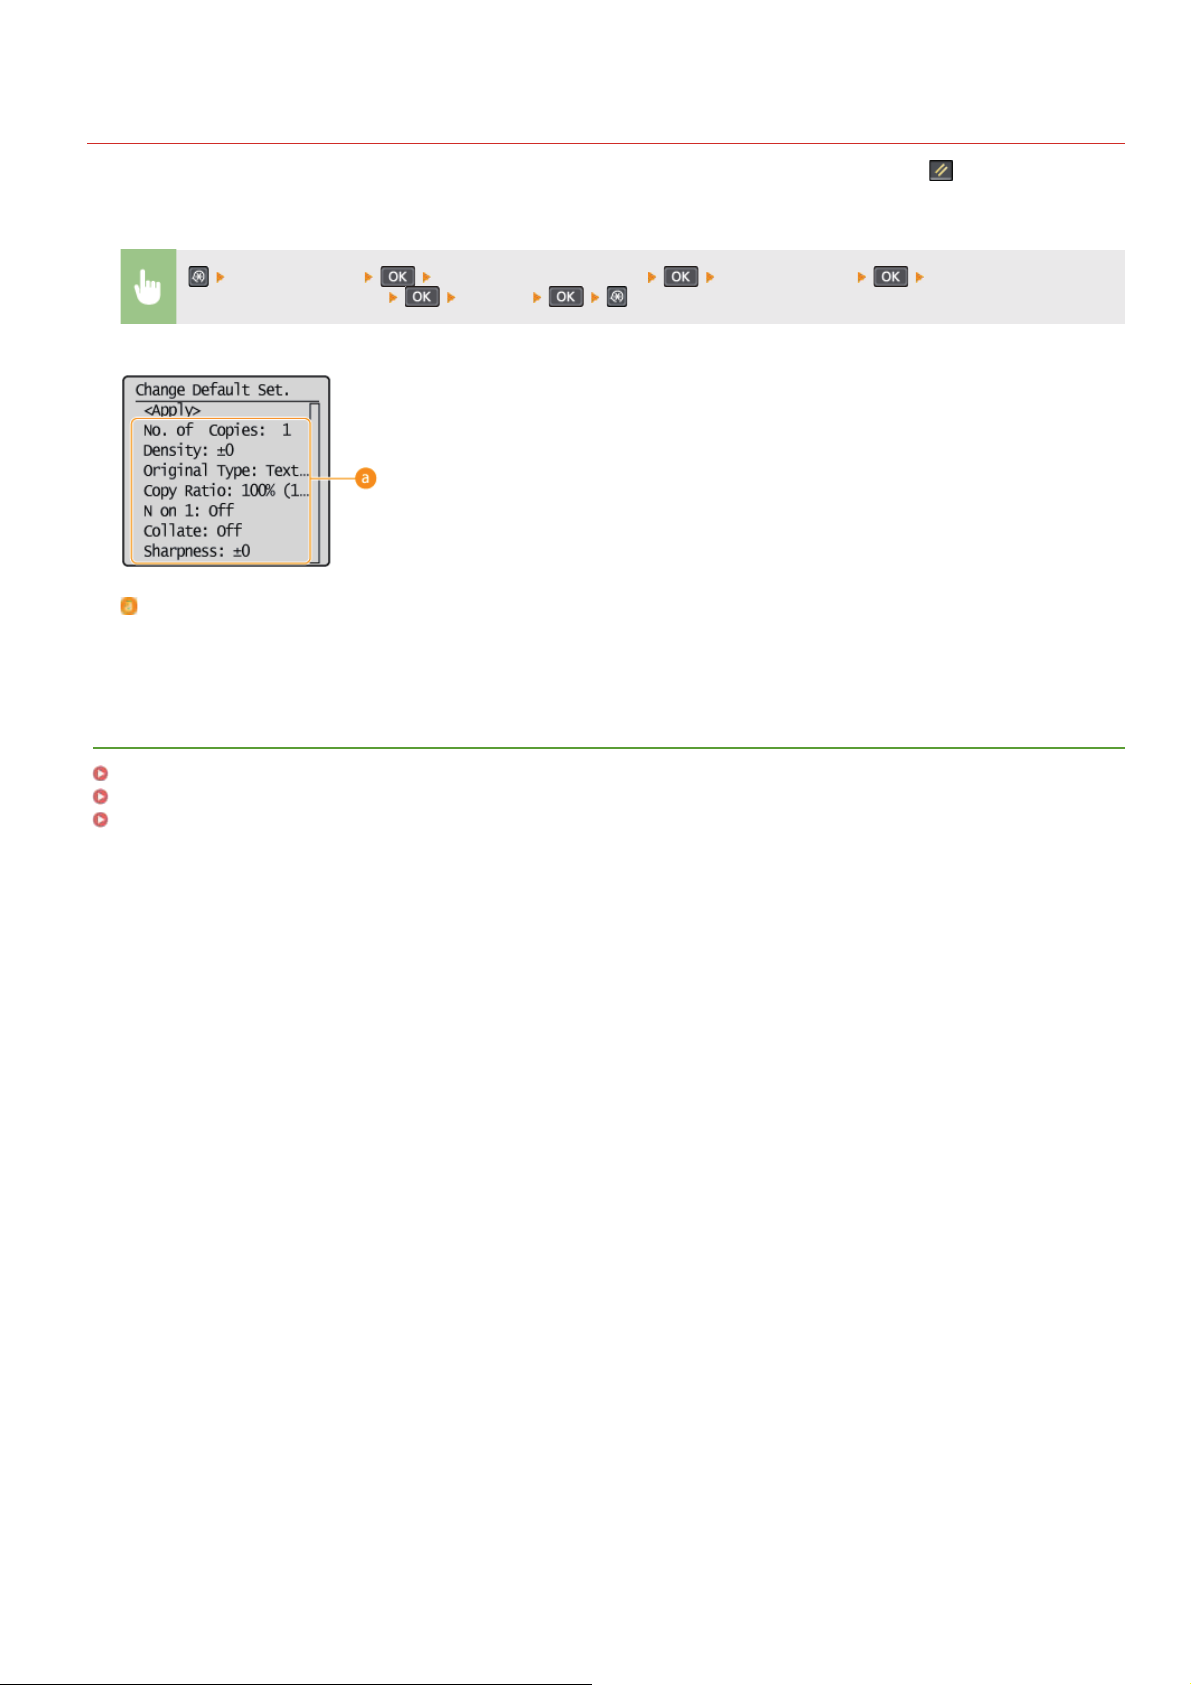
Changing Default Settings
The default settings are the settings that are displayed whenever you turn ON the machine, or when you press . If you change these
default settings to match the operations that you perform frequently, you can eliminate the need to configure the same settings every
time you make copies.
<Copy Settings> <Change Default Settings> Select the setting Change the default
value of the selected item
Settings
Select the item you want to set, and change the default value.
<Apply>
LINKS
Basic Copy Operations
Various Copy Settings
Copy Settings
㻢㻣㻌㻛㻌㻟㻟㻢
Page 68
0L40-03A
Using the Machine as a Printer
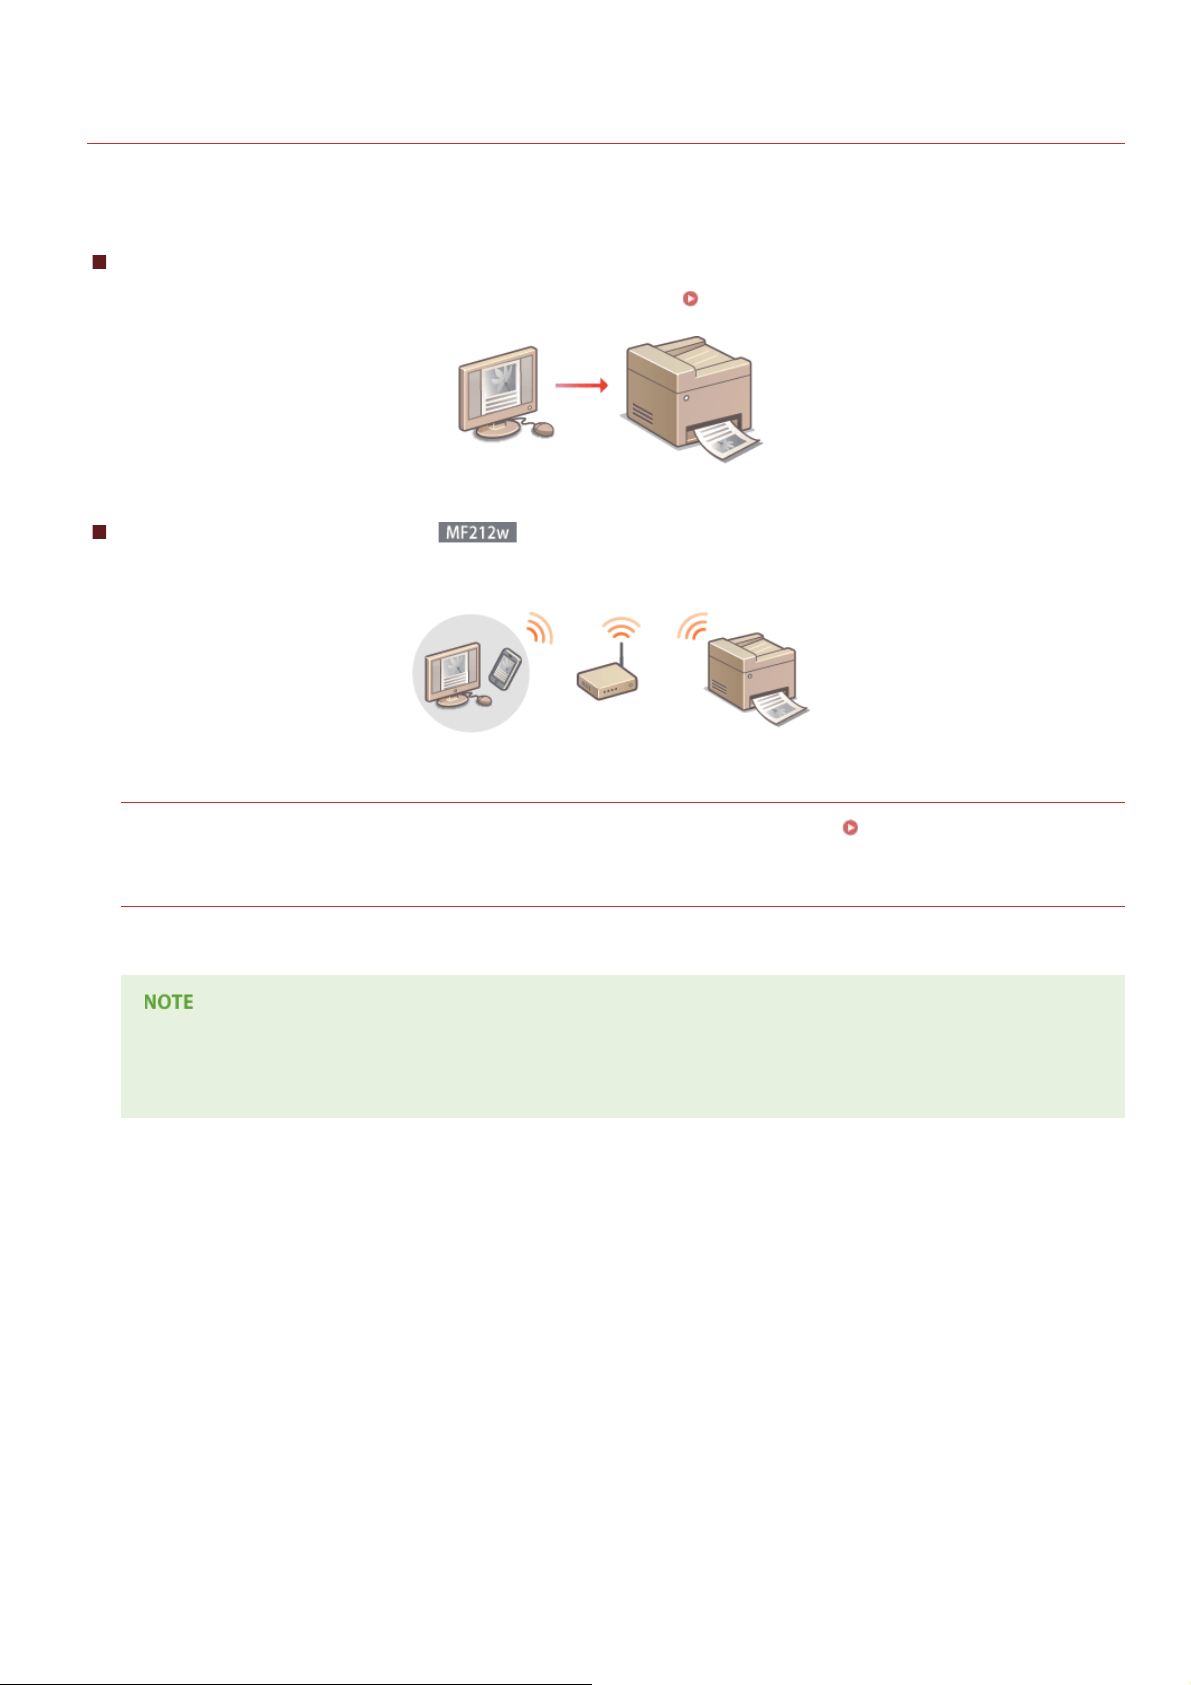
There are many ways to use the machine as a printer. You can print documents on your computer by using the printer driver, or print
from portable devices using AirPrint. Make full use of the print functions to suit your needs.
Printing from a Computer
You can print a document made on your computer by using the printer driver. Printing from a Computer
Printing from a Smartphone/Tablet
You can print a document made on your smartphone or tablet from an iPhone/iPad or Android terminal.
Using AirPrint
You can print without using a printer driver by sending print data wirelessly from Apple devices. Using AirPrint (MF212w)
Printing with the Canon Mobile Application
You can print from the machine using a smartphone or tablet. For more information on this function, see the Canon website.
This machine also supports Mopria . With Mopria , you can print using a single driver even with an other-brand printer, as
well as print using common operation and settings for each printer. For information on supported models and operating
system environments, visit http://www.mopria.org.
TM TM
㻢㻤㻌㻛㻌㻟㻟㻢
Page 69
0L40-03C
Printing from a Computer
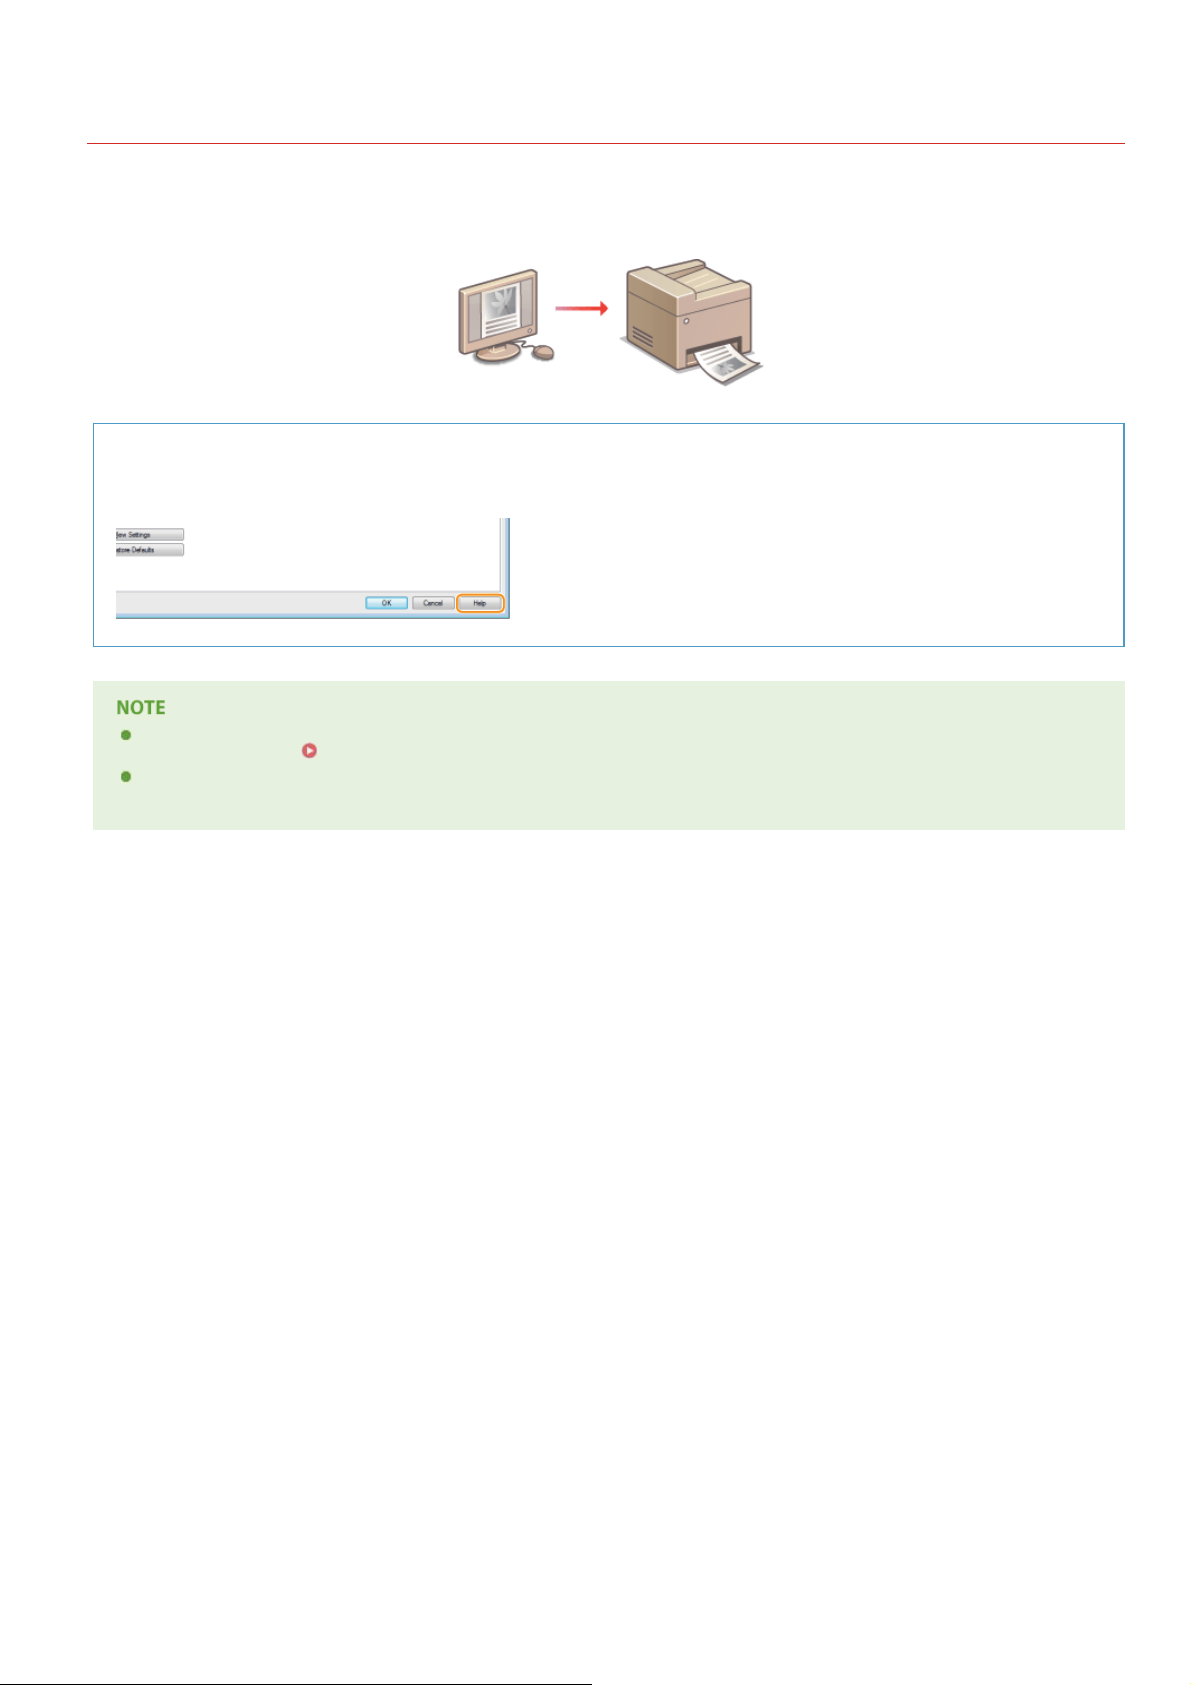
You can print a document made with an application on your computer by using the printer driver. There are useful settings on the printer
driver such as enlarging/reducing that enable you to print your documents in various ways. Before you can use this function, you need to
complete some procedures, such as installing the printer driver on your computer. For more information, see MF Driver Installation
Guide.
About the Printer Driver Help
Clicking [Help] on the printer driver screen displays the Help screen. On this screen, you can see the detailed descriptions that
are not in the e-Manual.
If you are a Macintosh user, see MF Driver Installation Guide for installing the printer drivers and Printer Driver's Help for
using print functions (
Depending on the operating system and the type or version of the printer driver you are using, the printer driver screens in
this manual may differ from your screens.
For Mac OS Users).
㻢㻥㻌㻛㻌㻟㻟㻢
Page 70
Printing a Document
This section describes how to print a document on your computer by using the printer driver.
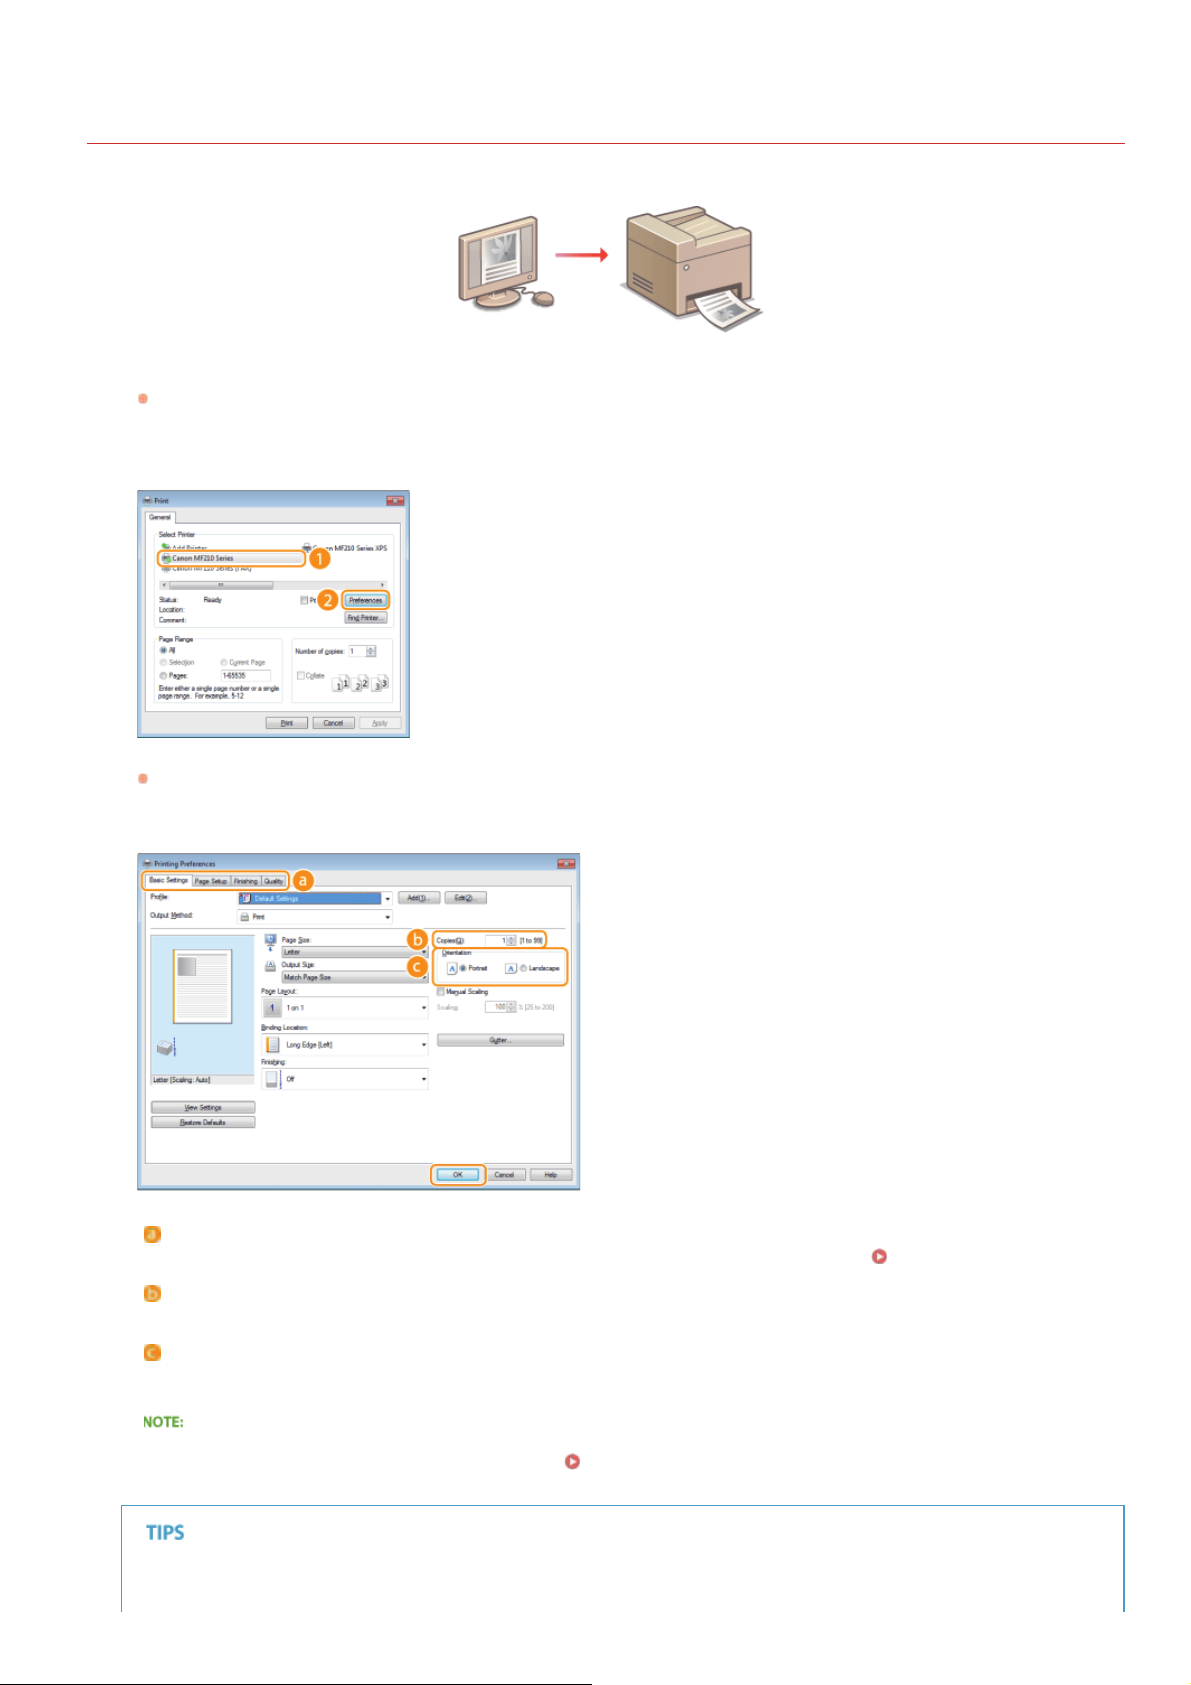
Open a document in an application and display the print dialog box.
1
How to display the print dialog box differs for each application. For more information, see the instruction manual for the
application you are using.
Select the printer driver for the machine, and click [Preferences] (or [Properties]).
2
0L40-03E
The screen that is displayed differs depending on the application you are using.
Specify the print settings such as the number of copies and print orientation, and click [OK].
3
Tabs
Click each tab to display the print setting screens and specify the print settings as necessary.
[Copies]
Specify the number of copies.
[Orientation]
Specify the print orientation ([Portrait] or [Landscape]). The orientation setting for the document that is specified on the
application is usually reflected on the printer driver.
Various Print Settings
You can register the settings you specified in this step as a "profile" and use the profile whenever you print. You can eliminate the
need to specify the same settings every time you print.
Registering Combinations of Frequently Used Print Settings
Clickable UI
You can easily specify the page layout, binding position, etc. intuitively on the preview image. For more information, click
㻣㻜㻌㻛㻌㻟㻟㻢
Page 71
[Help] on the printer driver screen.
Click [Print] (or [OK]).
4
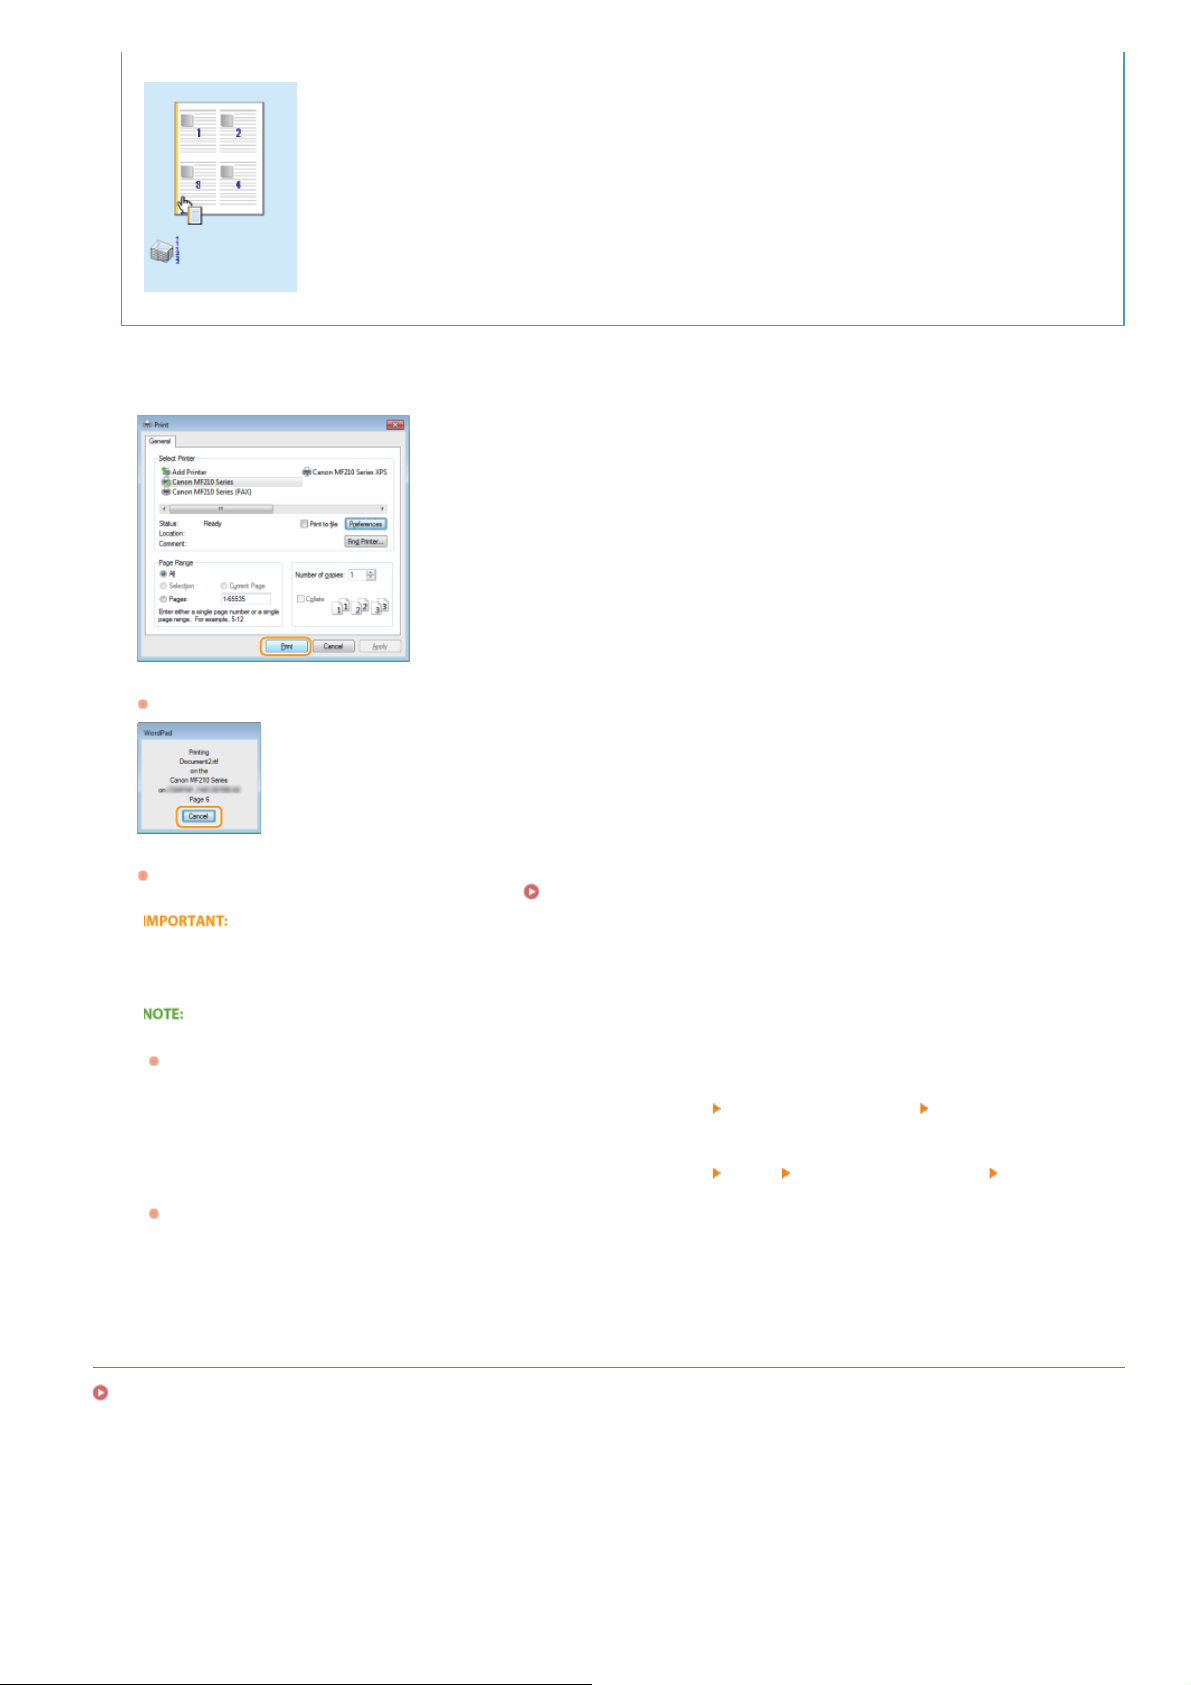
Printing starts. On some applications, a screen like shown below appears.
To cancel printing, click [Cancel] when the screen shown above is displayed. After the screen disappears or if the screen is not
displayed, you can cancel printing in other ways.
Do not touch printed pages
Do not touch newly printed sheets with your fingers or a cloth. You may get your fingers or the cloth dirty, and the toner may
smear or come off the page.
When printing from the Windows Store app in Windows 8/8.1/Server 2012/Server 2012 R2
Follow the procedure below.
Windows 8/Server 2012
Display the charms at the right of the screen, and tap or click [Devices]
in this way, you can only specify settings for some of the print functions.
Windows 8.1/Server 2012 R2
Display the charms at the right of the screen, and tap or click [Devices]
you print in this way, you can only specify settings for some of the print functions.
If the message [The printer requires your attention. Go to the desktop to take care of it.] is displayed, go to the desktop and
follow the instructions in the displayed dialog box. This message appears when the machine is set to display the user name
during printing and similar instances.
Canceling Prints
the printer you are using [Print] . When you print
[Print] the printer you are using [Print] . When
LINKS
Checking the Printing Status
㻣㻝㻌㻛㻌㻟㻟㻢
Page 72
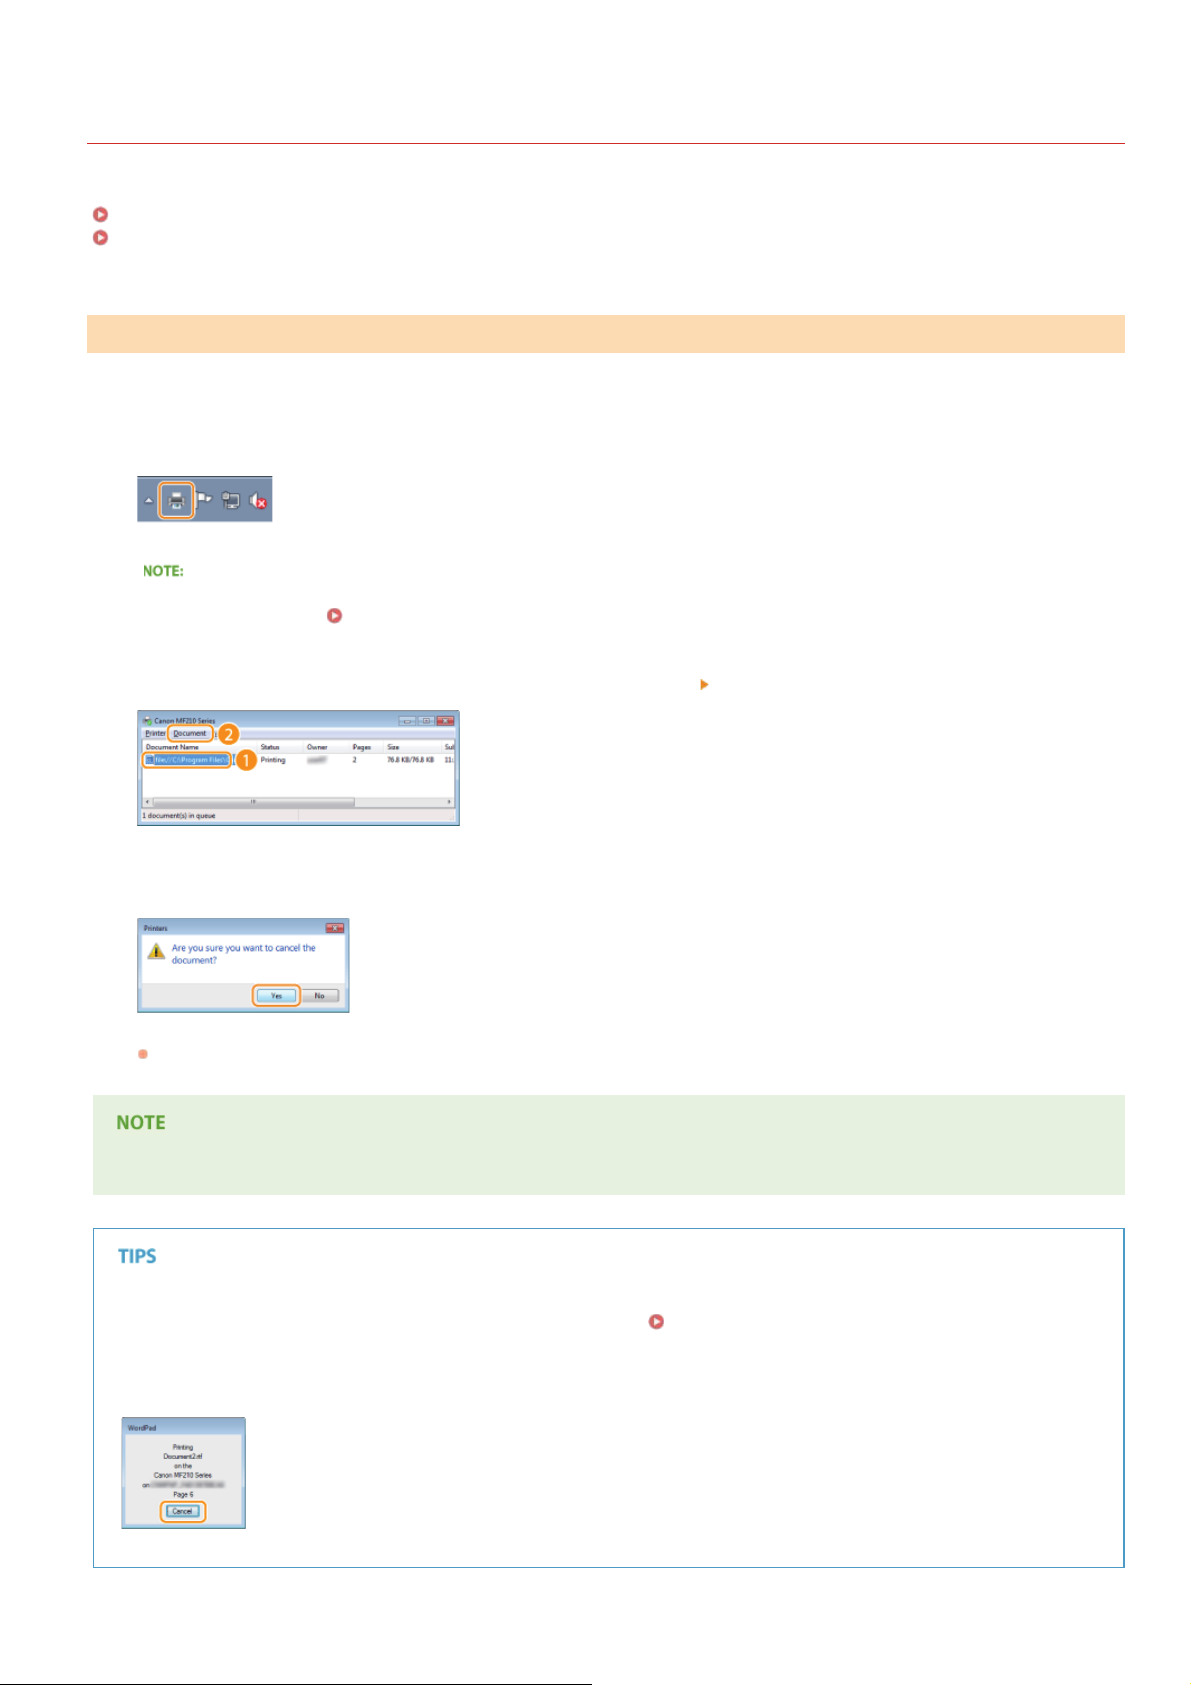
Canceling Prints
You can cancel printing from your computer or on the operation panel of the machine.
From a Computer
From the Operation Panel
From a Computer
You can cancel printing from the printer icon displayed on the system tray on the desktop.
Double-click the printer icon.
1
When the printer icon is not displayed
Open the printer folder (
double-click the icon of the printer driver for the machine).
Displaying the Printer Folder ), right-click your printer icon, and click [See what's printing] (or
0L40-03F
Select the document you want to cancel, and click [Document] [Cancel].
2
Click [Yes].
3
Printing of the selected document is canceled.
Several pages may be output after you cancel printing.
Canceling from the Remote UI (MF212w)
You can cancel printing from the [Job Status] page on the Remote UI: Checking Current Status of Print Documents
Canceling from an application
On some applications, a screen like shown below appears. You can cancel printing by clicking [Cancel].
㻣㻞㻌㻛㻌㻟㻟㻢
Page 73
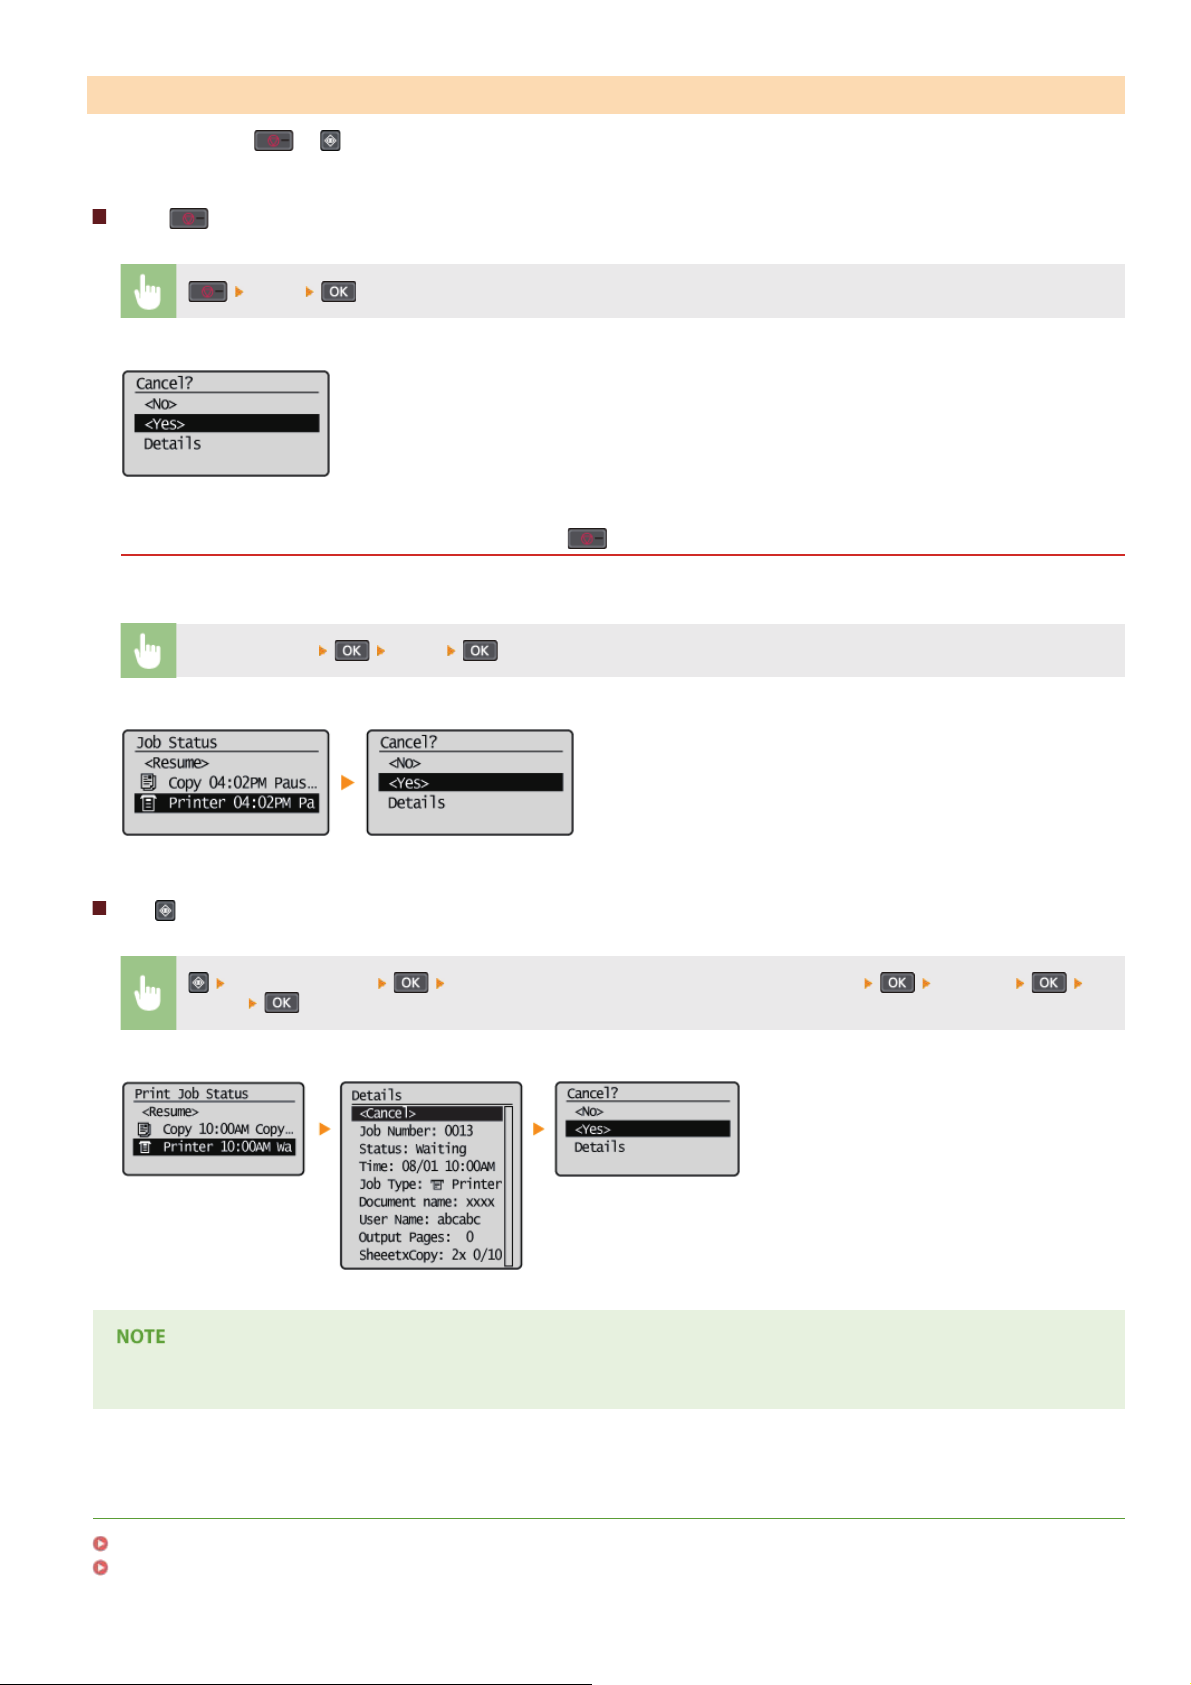
From the Operation Panel
Cancel printing using or .
Press to Cancel
<Yes>
If the Screen Displays a List of Documents When is Pressed
Select the document to cancel.
Select cancel job
Use to Cancel
<Print Job Status> Select the document on the <Print Job Status> screen <Cancel>
<Yes>
<Yes>
Several pages may be output after you cancel printing.
LINKS
Printing a Document
Checking the Printing Status
㻣㻟㻌㻛㻌㻟㻟㻢
Page 74
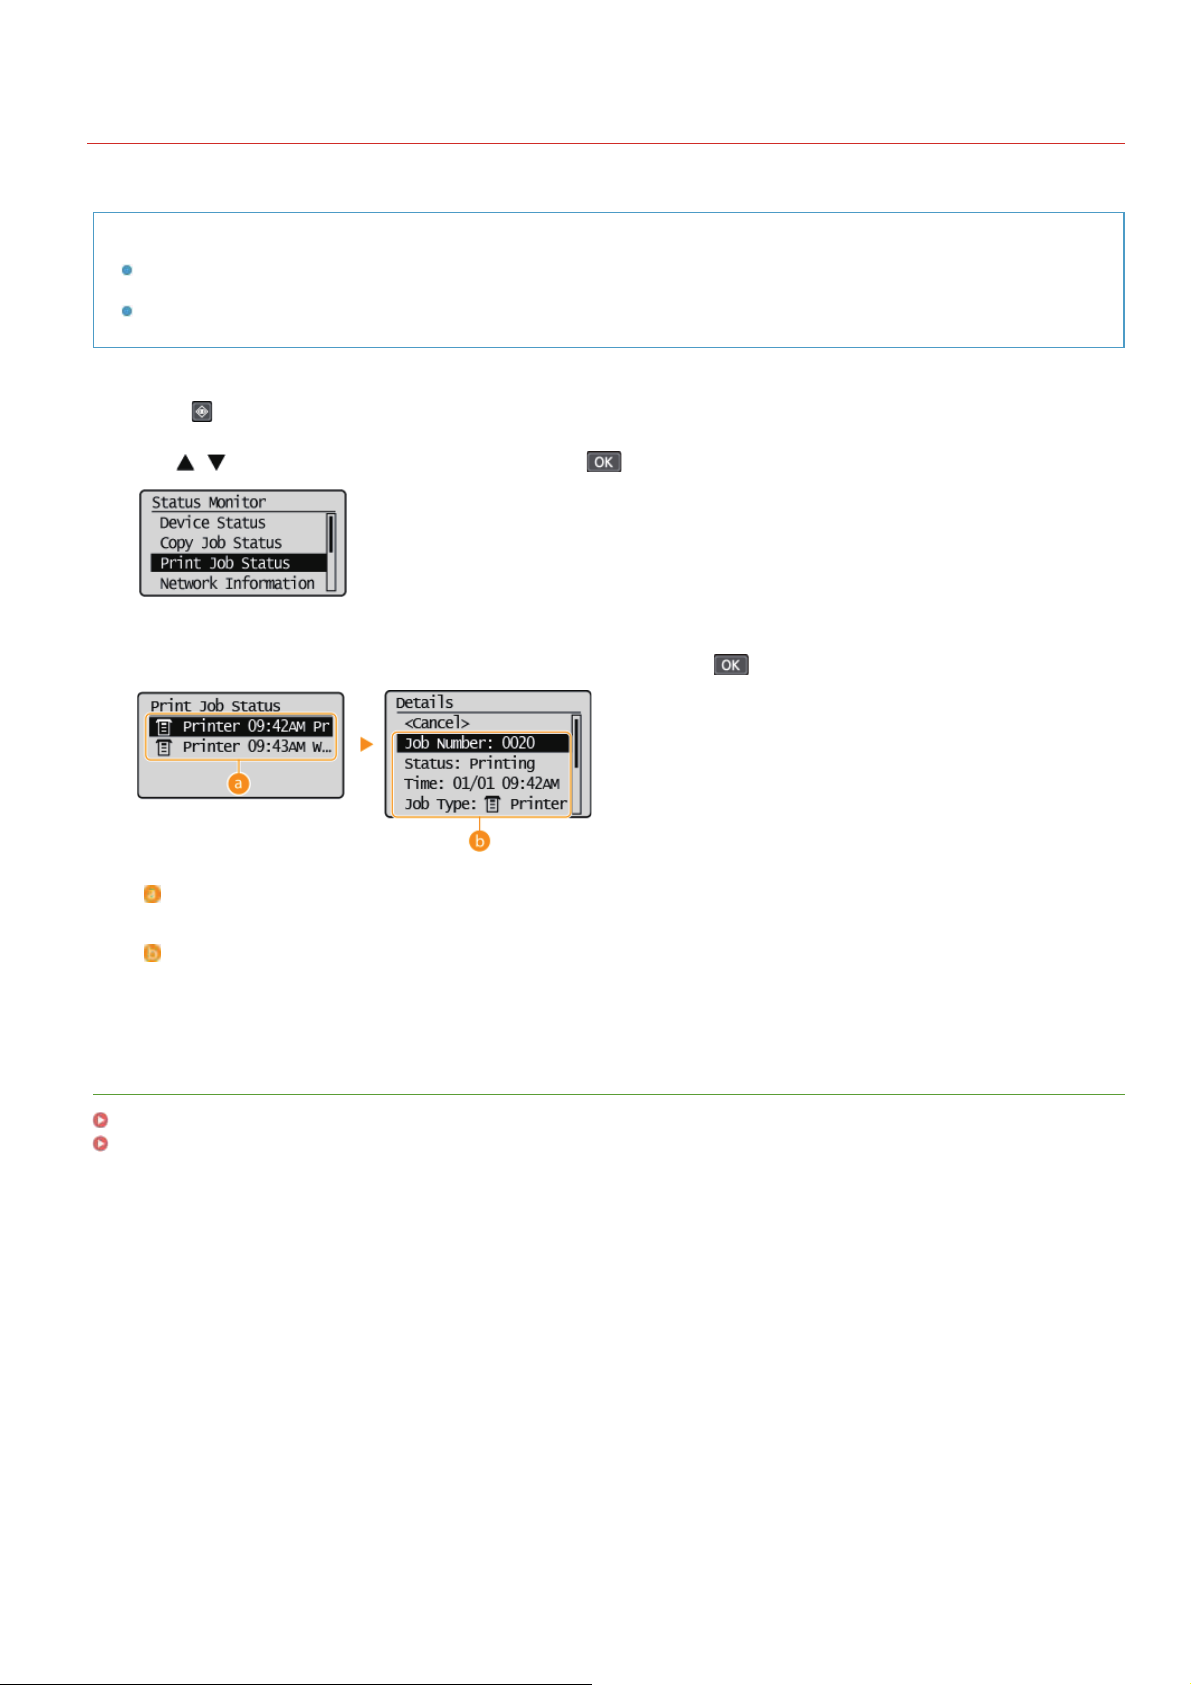
Checking the Printing Status
You can check the current print statuses.
Useful in the Following Cases
When your documents are not printed for a long time, you may want to see the waiting list of the documents waiting to be
printed.
When you cannot find your printouts that you thought had been printed, you may want to see whether an error has occurred.
Press .
1
Use / to select <Print Job Status>, and press .
2
0L40-03H
Select the document whose status you want to check, and press .
3
<Print Job Status>
Displays a list of the documents that are being processed or are waiting to be processed.
<Details>
Displays detailed information about the document selected from the list.
LINKS
Printing a Document
Canceling Prints
㻣㻠㻌㻛㻌㻟㻟㻢
Page 75
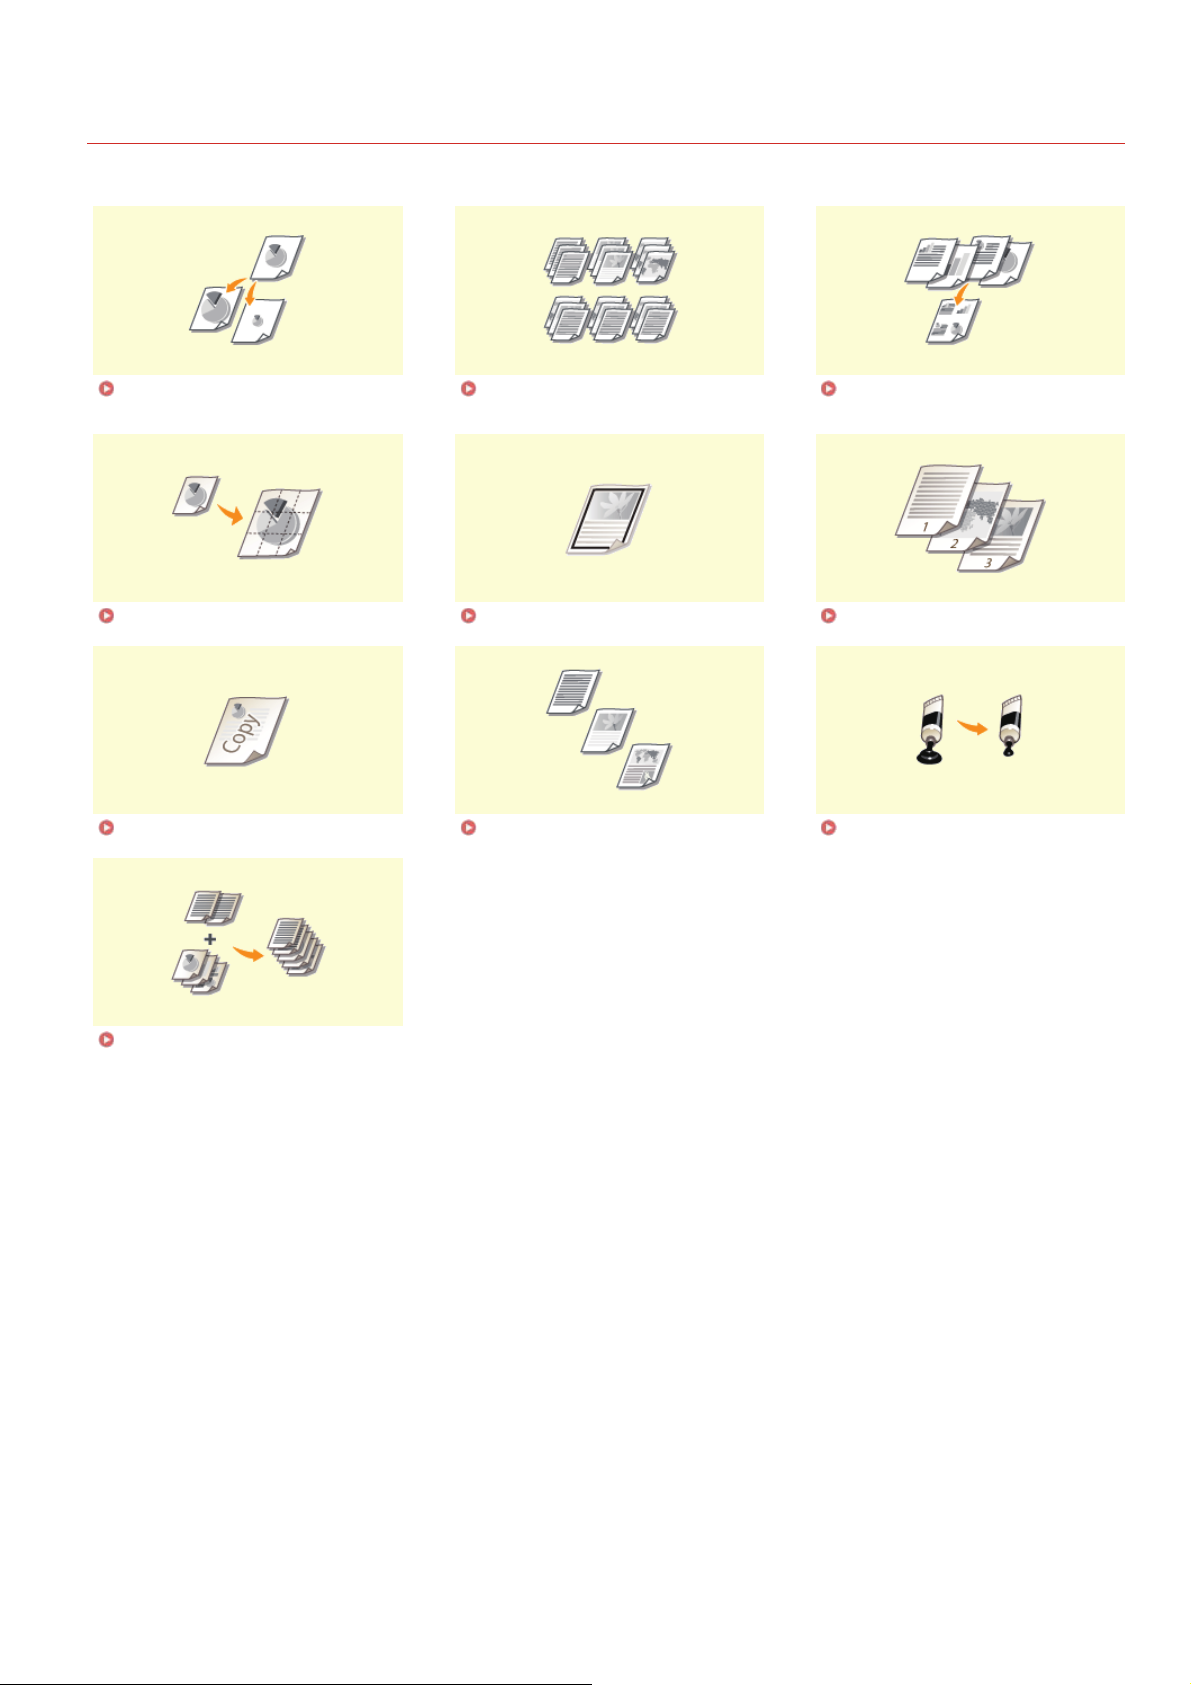
Various Print Settings
There are a variety of settings to suit your needs, such as Enlarged/Reduced.
0L40-03J
Enlarging or Reducing Collating Printouts by Page Printing Multiple Pages onto One
Printing Posters Printing Borders Printing Dates and Page Numbers
Printing Watermarks Selecting Document Type Saving Toner
Sheet
Combining and Printing Multiple
Documents
㻣㻡㻌㻛㻌㻟㻟㻢
Page 76
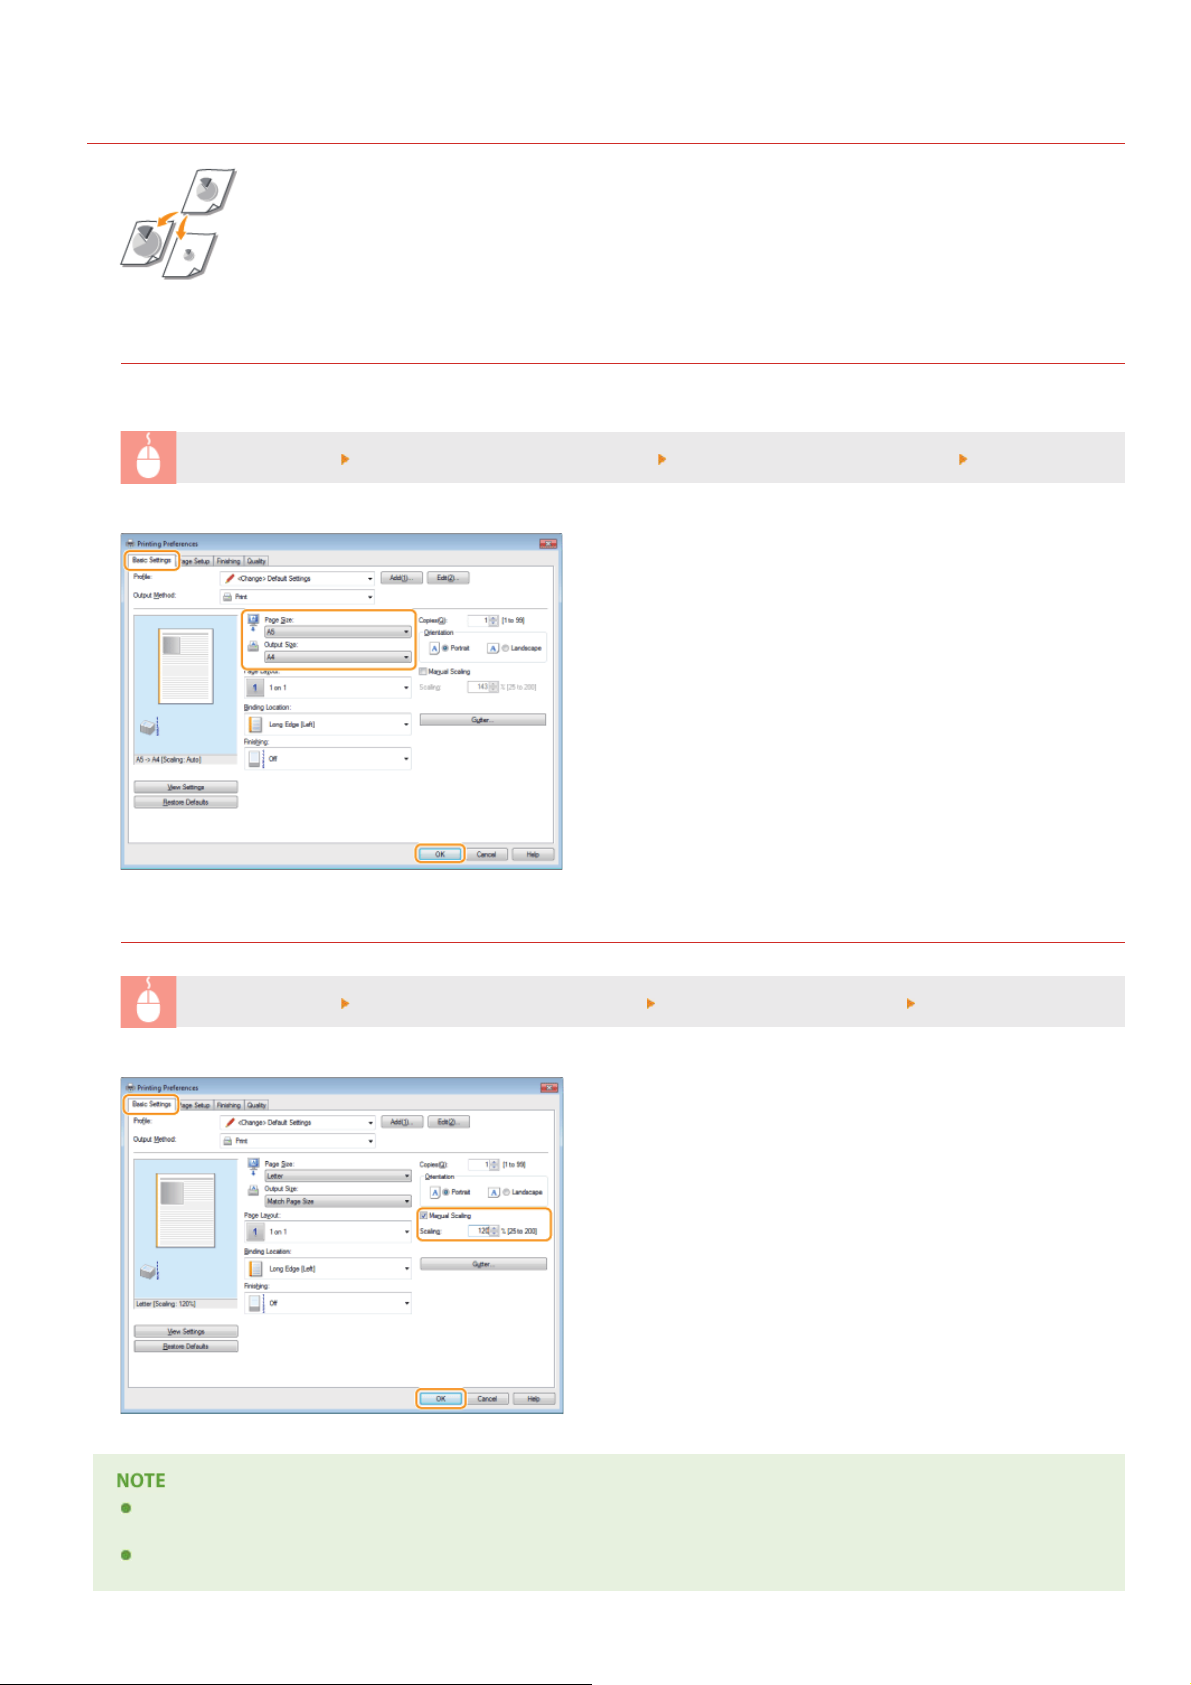
Enlarging or Reducing
You can make enlarged or reduced printouts by using a preset print ratio, such as A5 to A4, or a custom print
ratio that you set in increments of 1%.
Setting Print Ratio by Specifying the Original Document and Paper Size (Preset Ratio)
The print ratio is automatically set based on the document and paper size you have specified.
0L40-03K
[Basic Settings] tab
Select the document size in [Page Size] Select the paper size in [Output Size] [OK]
Specifying Print Ratio in Increments of 1%
[Basic Settings] tab Select the [Manual Scaling] check box Enter the print ratio in [Scaling] [OK]
Depending on the selected paper size, you may not be able to set the optimum enlarging/reducing ratio. For example, there
may be large blank spaces on your printout, or portions of the document that are missing.
The enlarging/reducing settings on some applications have priority over those on the printer driver.
㻣㻢㻌㻛㻌㻟㻟㻢
Page 77

LINKS
Printing a Document
㻣㻣㻌㻛㻌㻟㻟㻢
Page 78
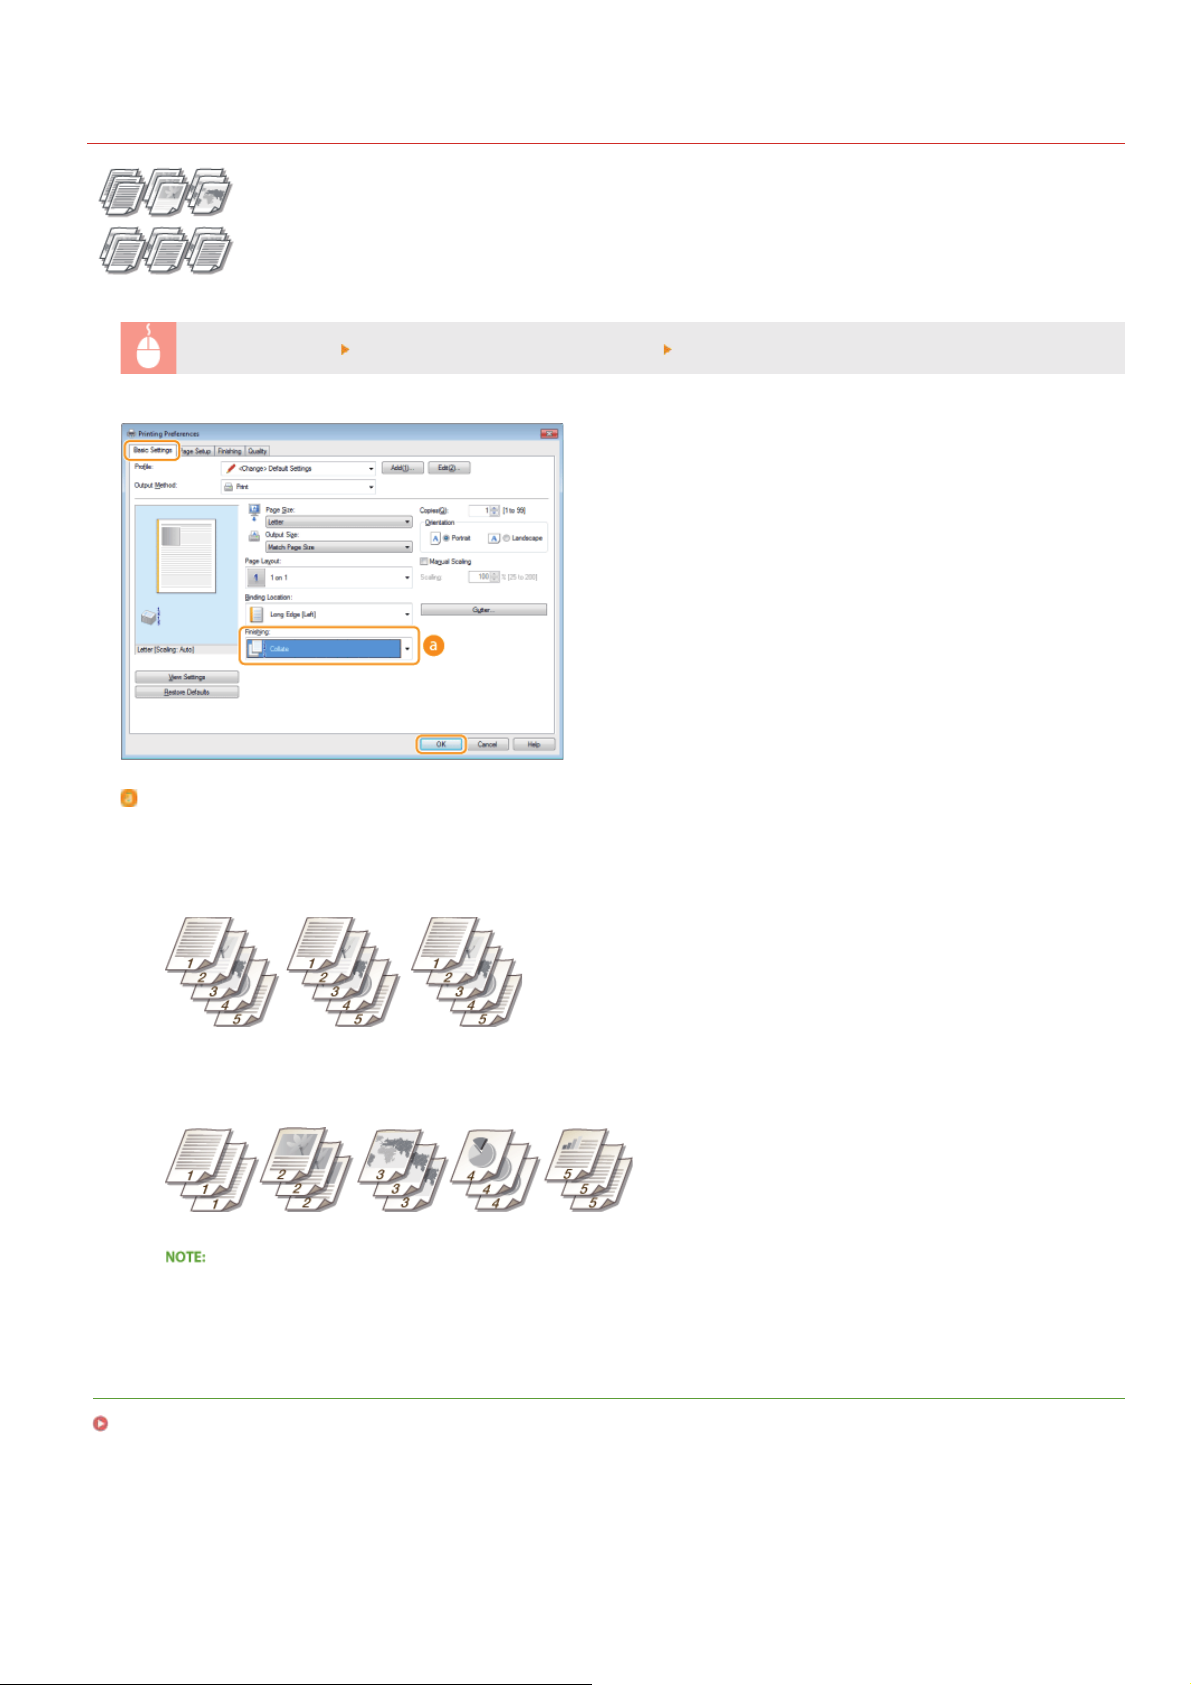
Collating Printouts by Page
When printing copies of multi-page documents, select [Collate] to print complete sets in sequential page order.
This function is useful when preparing handouts for meetings or presentations.
0L40-03R
[Basic Settings] tab
[Finishing]
Specify the sorting method of the printouts when printing multiple-page documents.
[Collate]
The printouts are grouped into complete sets in sequential page order. For example, if you are printing three copies of a fivepage document, the printouts will be arranged in the following page order: 1, 2, 3, 4, 5, 1, 2, 3, 4, 5, 1, 2, 3, 4, 5.
Select [Collate] or [Group] in [Finishing] [OK]
[Group]
The printouts are not collated. For example, if you are printing three copies of a five-page document, the printouts will be
arranged in the following page order: 1, 1, 1, 2, 2, 2, 3, 3, 3, 4, 4, 4, 5, 5, 5.
If you select [Off], whether the printouts are collated or not depends on the setting made on the application.
LINKS
Printing a Document
㻣㻤㻌㻛㻌㻟㻟㻢
Page 79
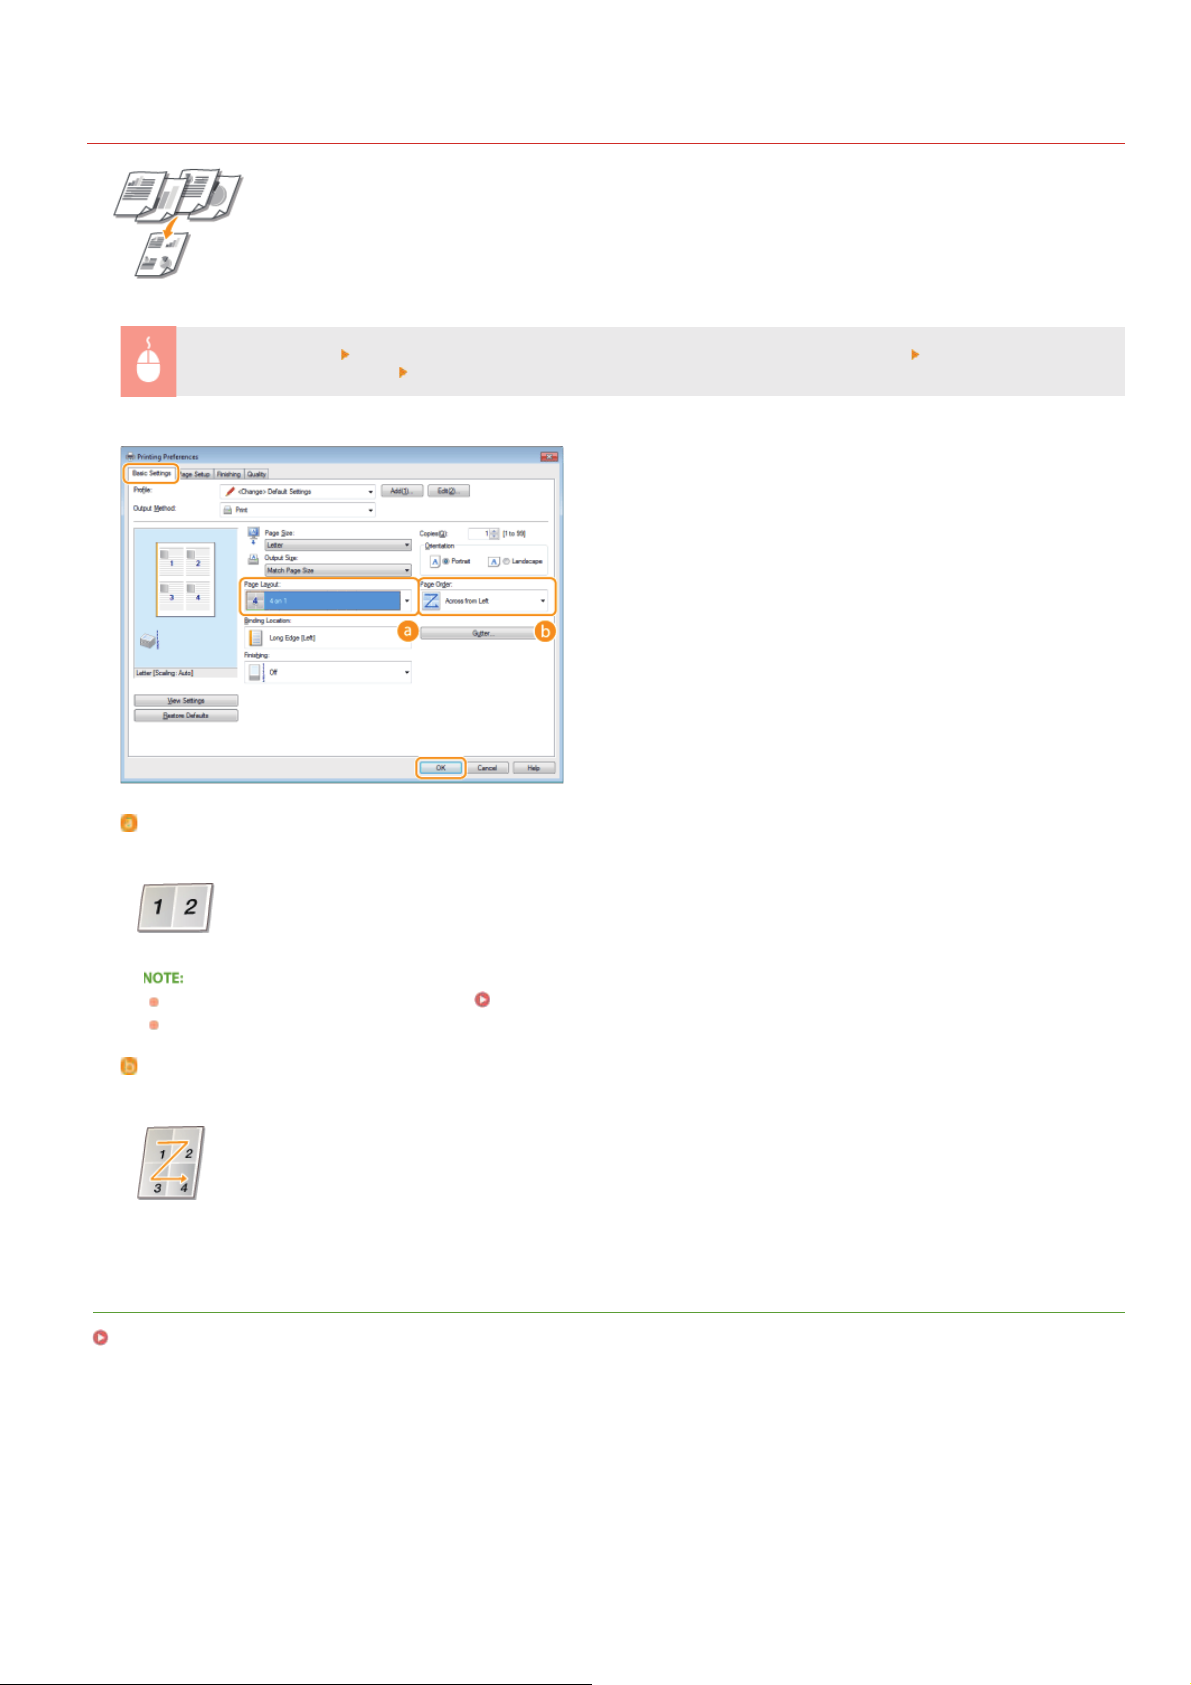
Printing Multiple Pages onto One Sheet
You can print multiple pages onto a single sheet. For example, you can print four or nine pages onto a single
sheet by using [4 on 1] or [9 on 1]. Use this function if you want to save paper or to view your document in
thumbnails.
0L40-03S
[Basic Settings] tab
the page distribution layout
[Page Layout]
Select the number of pages to print onto a single sheet from [1 on 1] to [16 on 1]. For example, to print 16 pages onto a single
sheet, select [16 on 1].
In [Page Layout], select the number of pages to print onto a single sheet In [Page Order], select
[OK]
For options such as [Poster [2 x 2]], see Printing Posters.
Printing may not be performed properly if you combine this setting with an application setting for collating printouts.
[Page Order]
Select a page distribution layout. For example, if you select [Across from Left], the first page is printed on the top left, and then
the rest of the pages are arranged rightward.
LINKS
Printing a Document
㻣㻥㻌㻛㻌㻟㻟㻢
Page 80
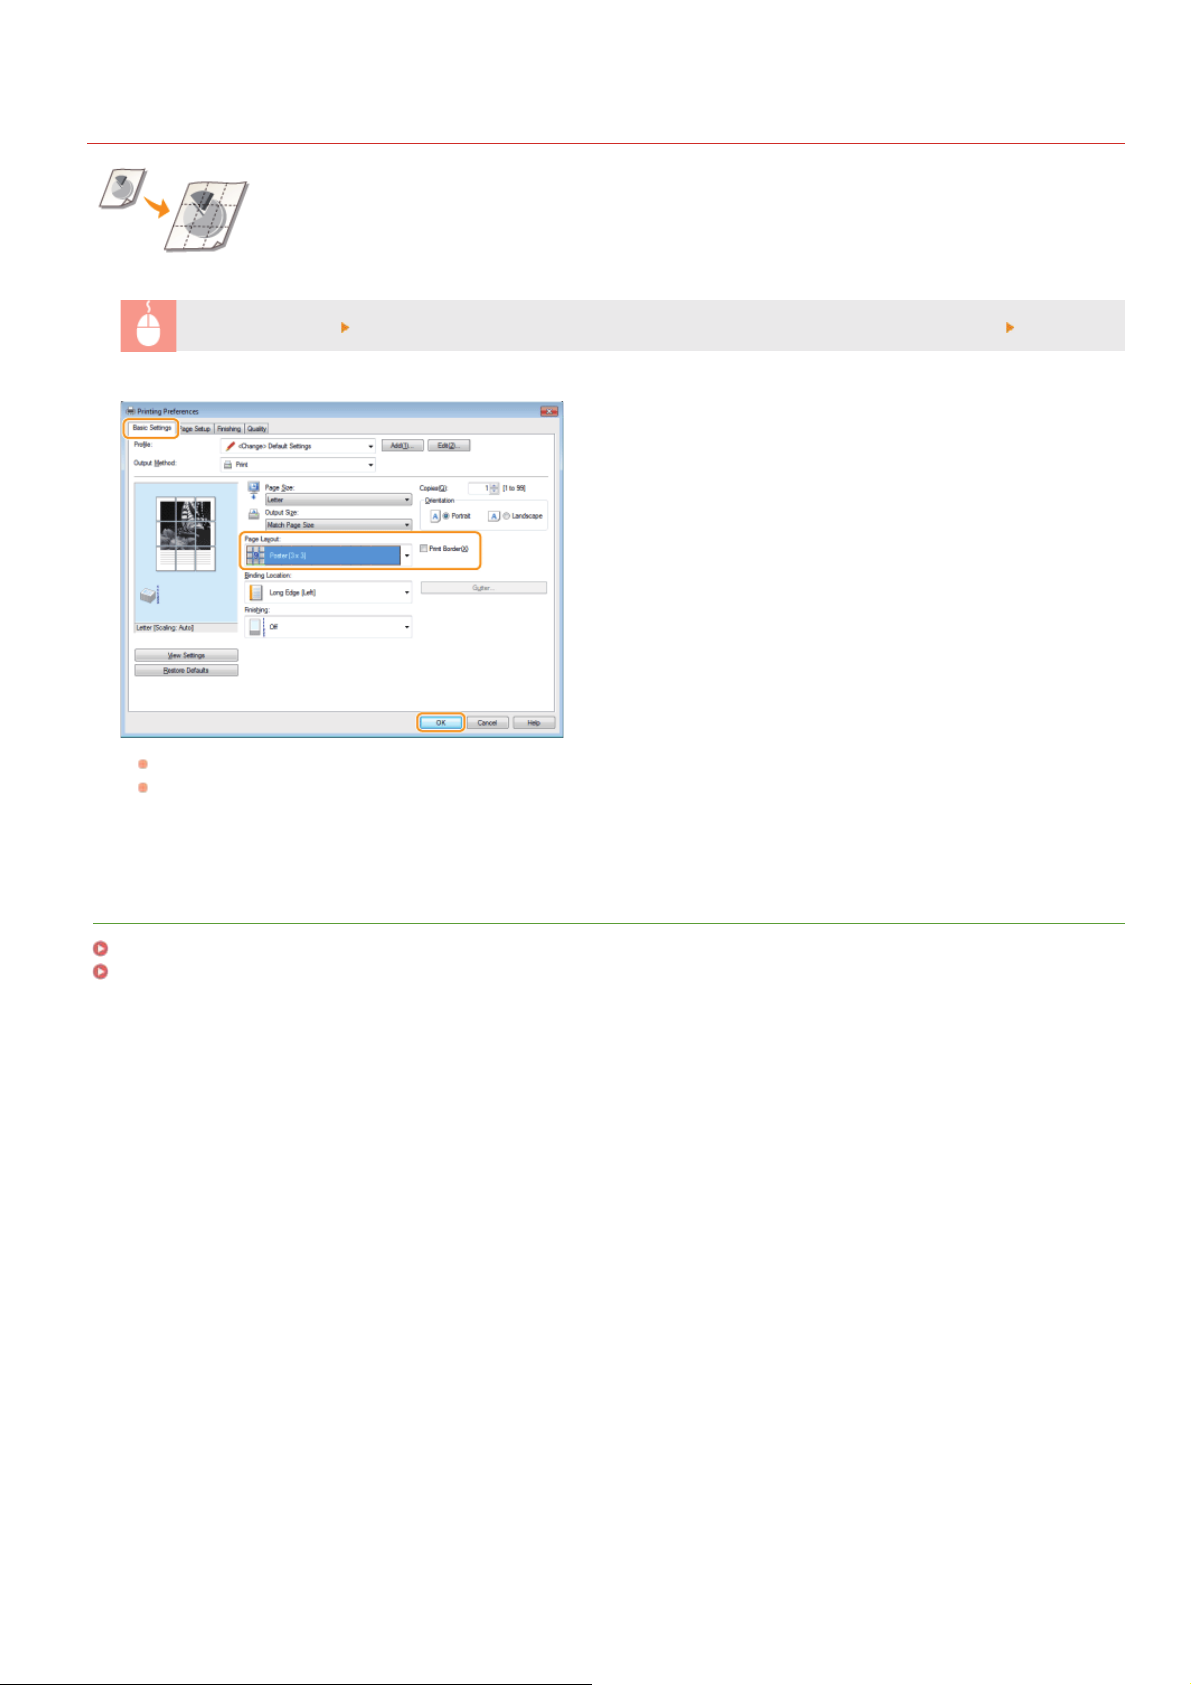
Printing Posters
You can print one page of a document onto multiple pages. For example, if you make a one-page A4-size
document nine times larger, you will have a poster 3x3 A4 size sheets large after you print the document and
paste it together.
0L40-03U
[Basic Settings] tab
There are four size settings:[Poster [1 x 2]], [Poster [2 x 2]], [Poster [3 x 3]], and [Poster [4 x 4]].
Select the [Print Border] check box to add borders on your printouts. The borders are helpful if you want to paste the printouts
together or cut off the margins.
In [Page Layout], select the dimensions of your poster (for example, [Poster [2 x 2]]) [OK]
LINKS
Printing a Document
Enlarging or Reducing
㻤㻜㻌㻛㻌㻟㻟㻢
Page 81
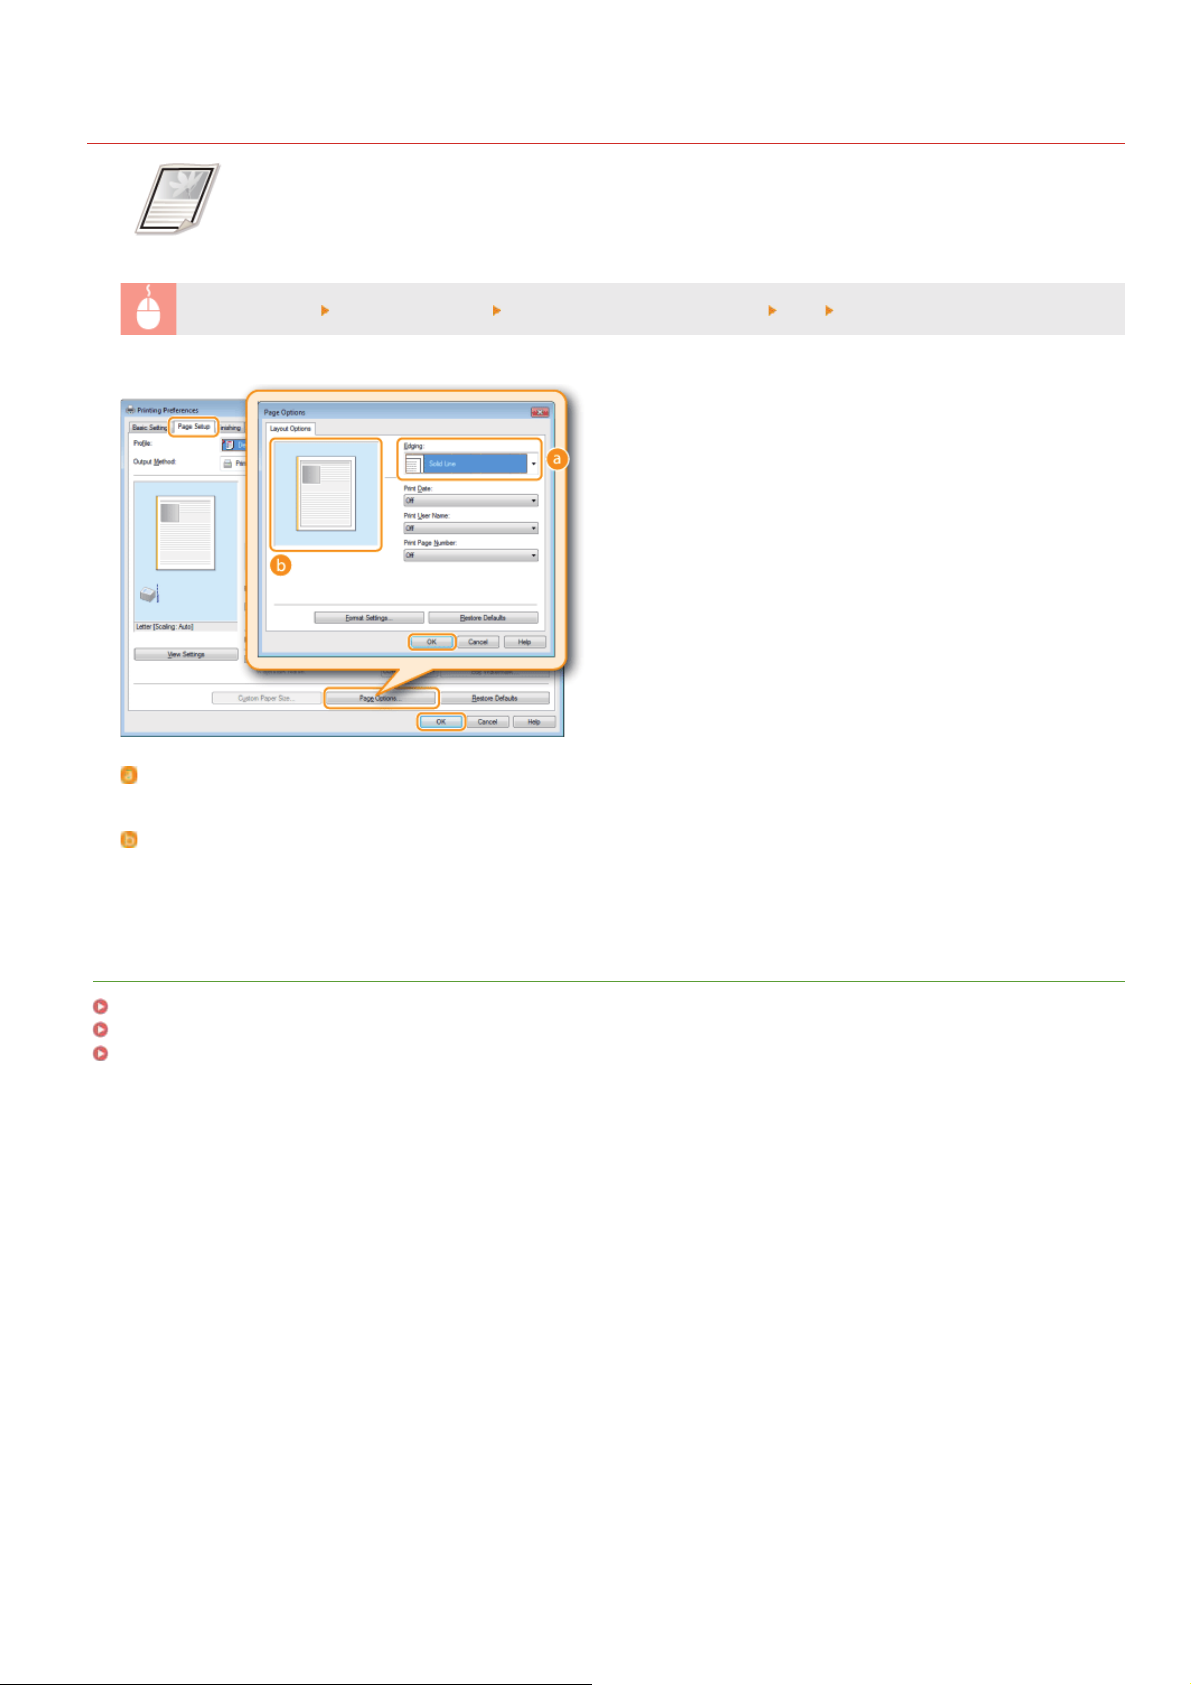
Printing Borders
0L40-03X
You can add borders, such as broken lines or double lines, in the margins of printouts.
[Page Setup] tab
[Edging]
Select the border type.
Preview
Displays a preview with the selected border.
Click [Page Options] Select the border type in [Edging] [OK] [OK]
LINKS
Printing a Document
Printing Dates and Page Numbers
Printing Watermarks
㻤㻝㻌㻛㻌㻟㻟㻢
Page 82
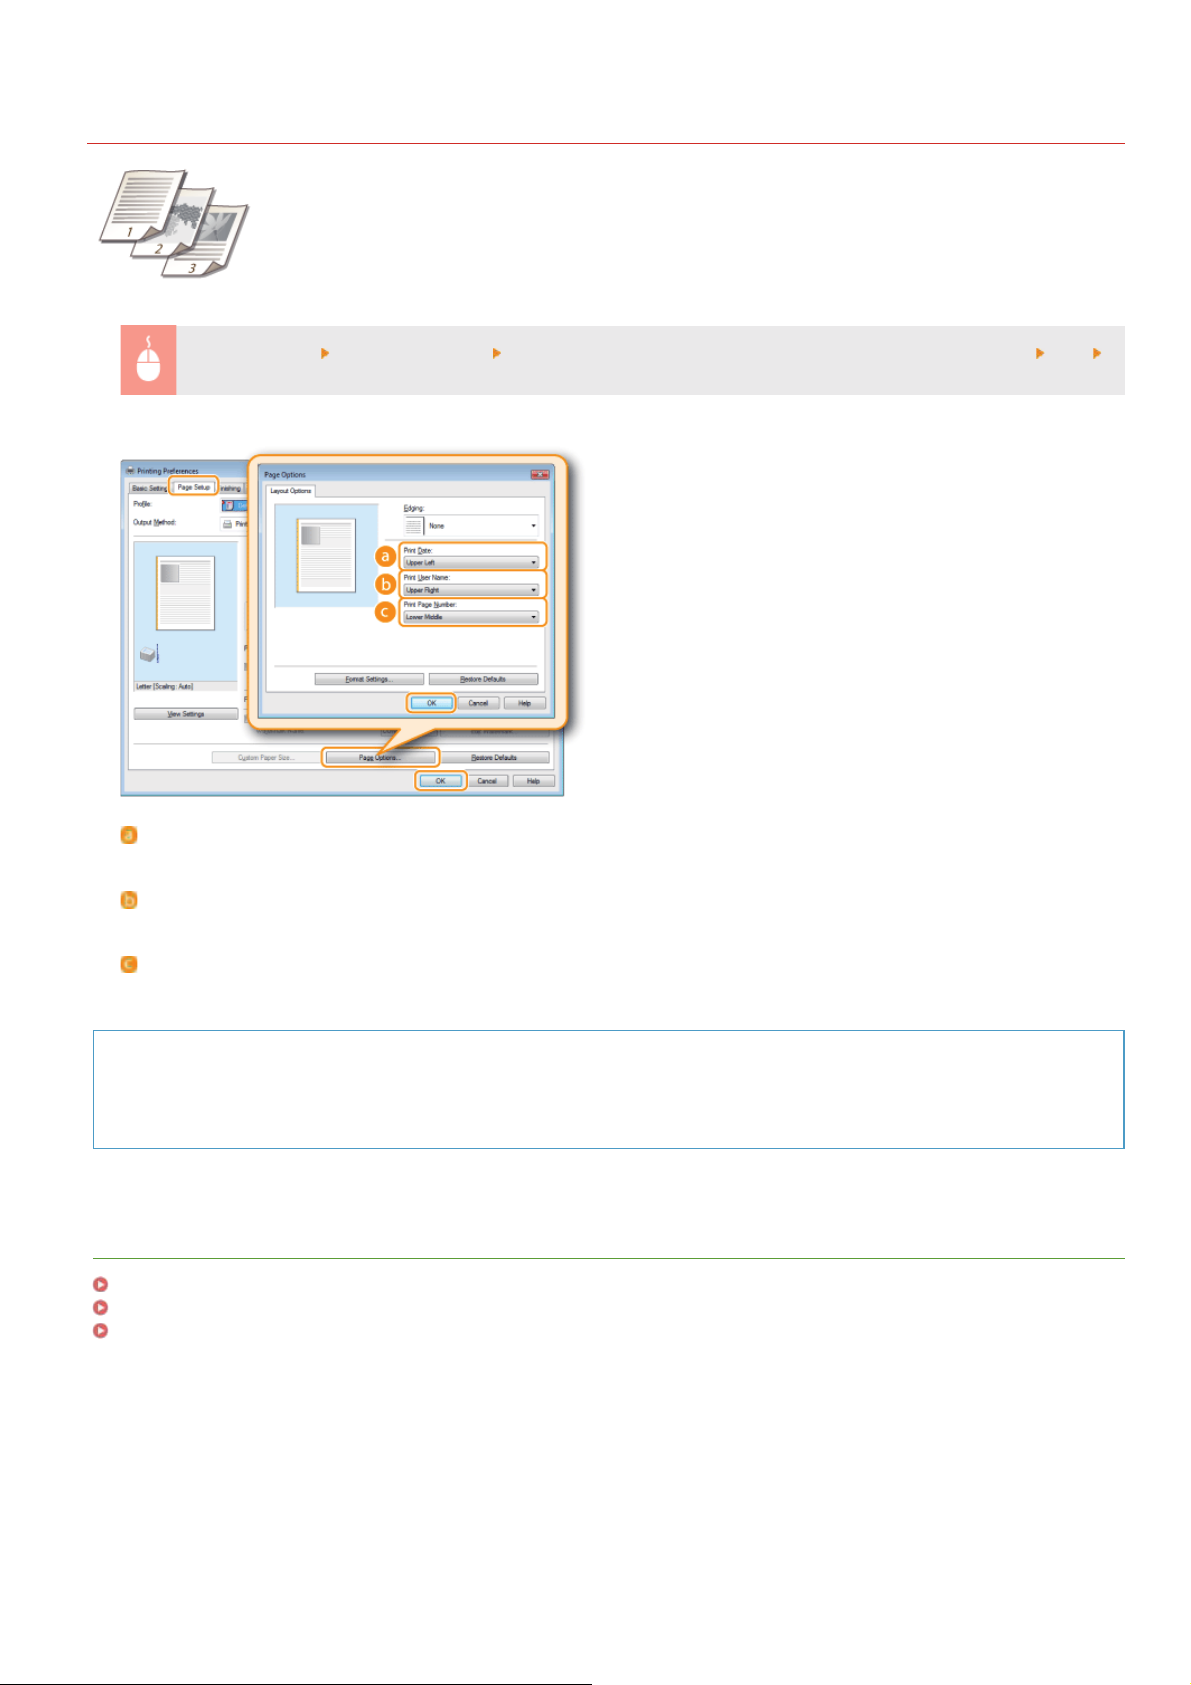
Printing Dates and Page Numbers
You can print the information such as dates or page numbers, and you can specify where to print this
information on the document (upper-left, lower-right, etc.).
0L40-03Y
[Page Setup] tab
[OK]
[Print Date]
Specify the position to print the print date.
[Print User Name]
Specify the position to print the user name (logon name) for the computer used to print the document.
Click [Page Options] Select the print position of the print date, user name or page number [OK]
[Print Page Number]
Specify the position to print the page number.
Changing the Print Format of Dates and Page Numbers
You can change formatting details such as font and font size when printing dates, logon names, or page numbers. Click [Format
Settings] on the Page Options screen shown above to specify the details.
LINKS
Printing a Document
Printing Borders
Printing Watermarks
㻤㻞㻌㻛㻌㻟㻟㻢
Page 83
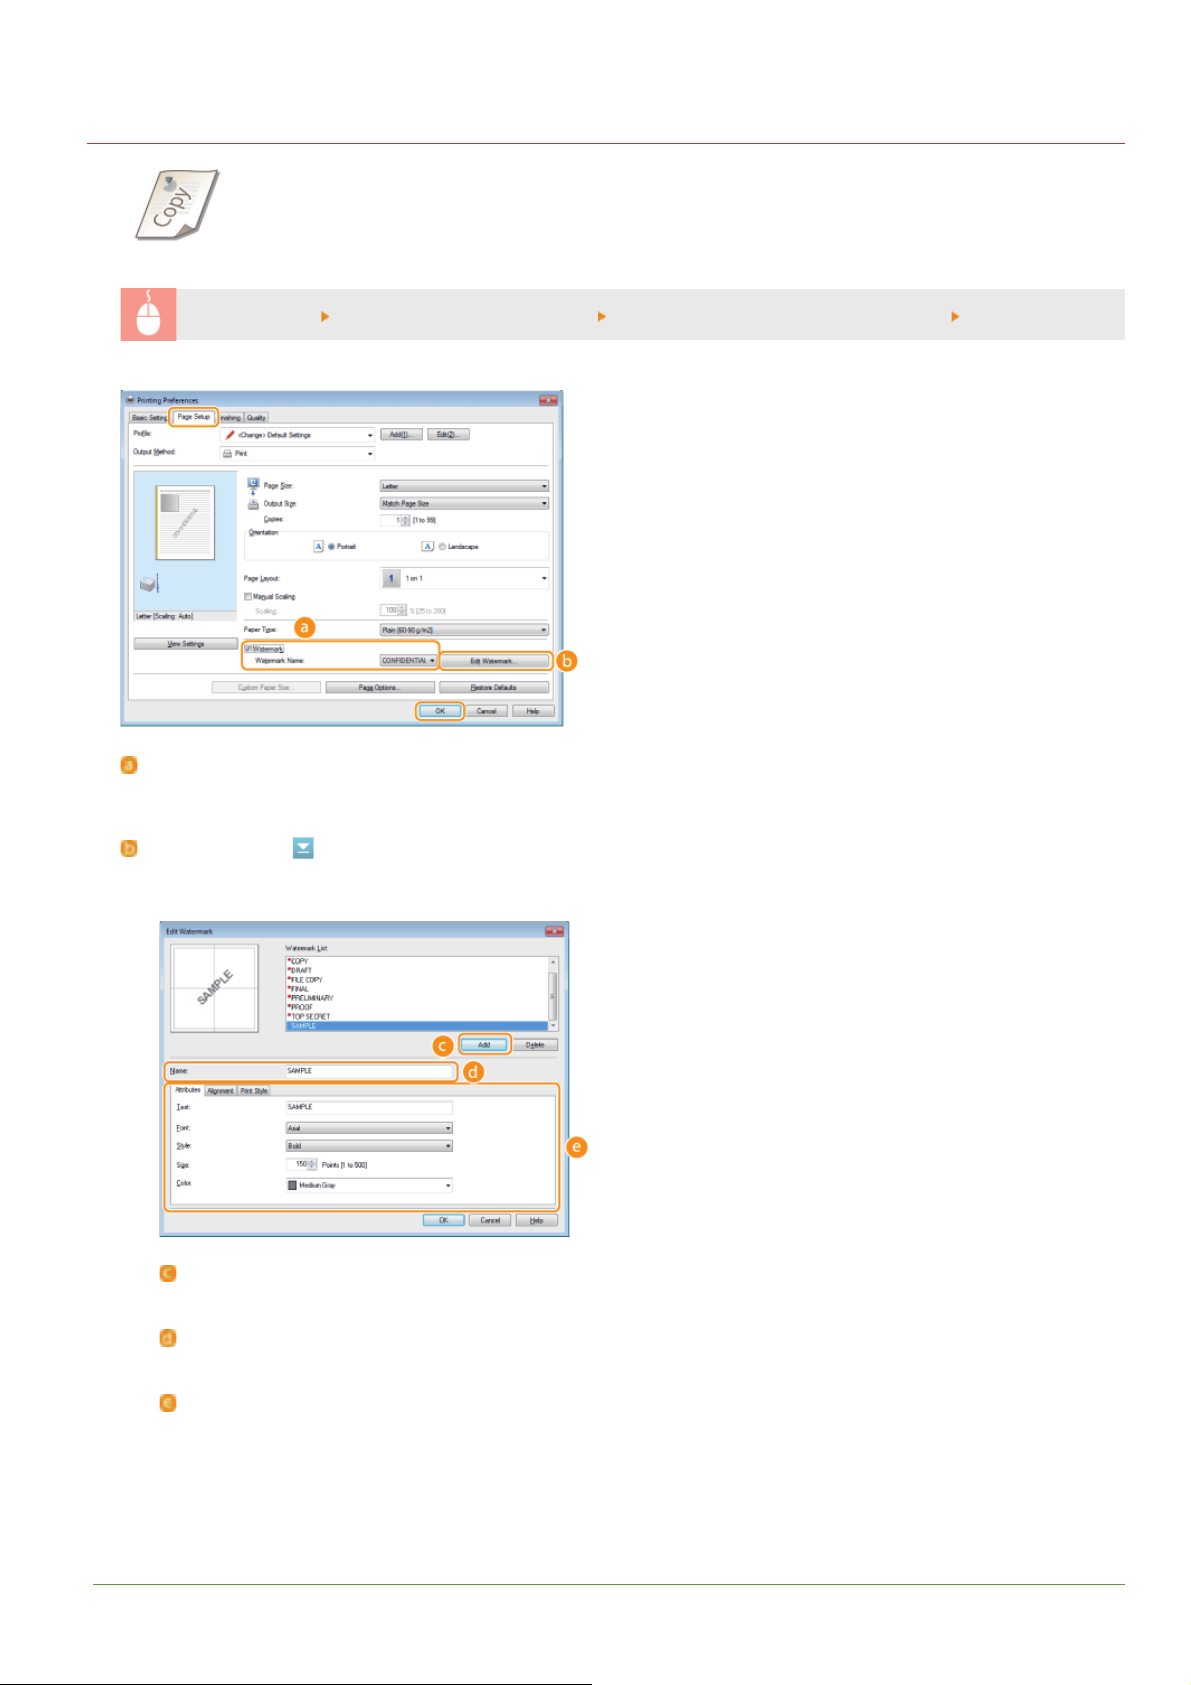
Printing Watermarks
You can print watermarks such as "COPY" or "CONFIDENTIAL" over the document. You can create new
watermarks or use pre-registered watermarks.
0L40-040
[Page Setup] tab
[Watermark]/[Watermark Name]
Select the [Watermark] check box to display the list of the watermarks in the [Watermark Name] drop-down list. Select a
watermark from the menu.
[Edit Watermark]
Displays the screen to create or edit watermarks.
Select the [Watermark] check box Select a watermark from [Watermark Name] [OK]
LINKS
[Add]
Click to create a new watermark. Up to 50 watermarks can be registered.
[Name]
Enter the created watermark name.
[Attributes]/[Alignment]/[Print Style]
Click each tab to specify the text, color, or print position of the watermark. For more information, click [Help] on the
printer driver screen.
㻤㻟㻌㻛㻌㻟㻟㻢
Page 84

Printing a Document
Printing Borders
Printing Dates and Page Numbers
㻤㻠㻌㻛㻌㻟㻟㻢
Page 85
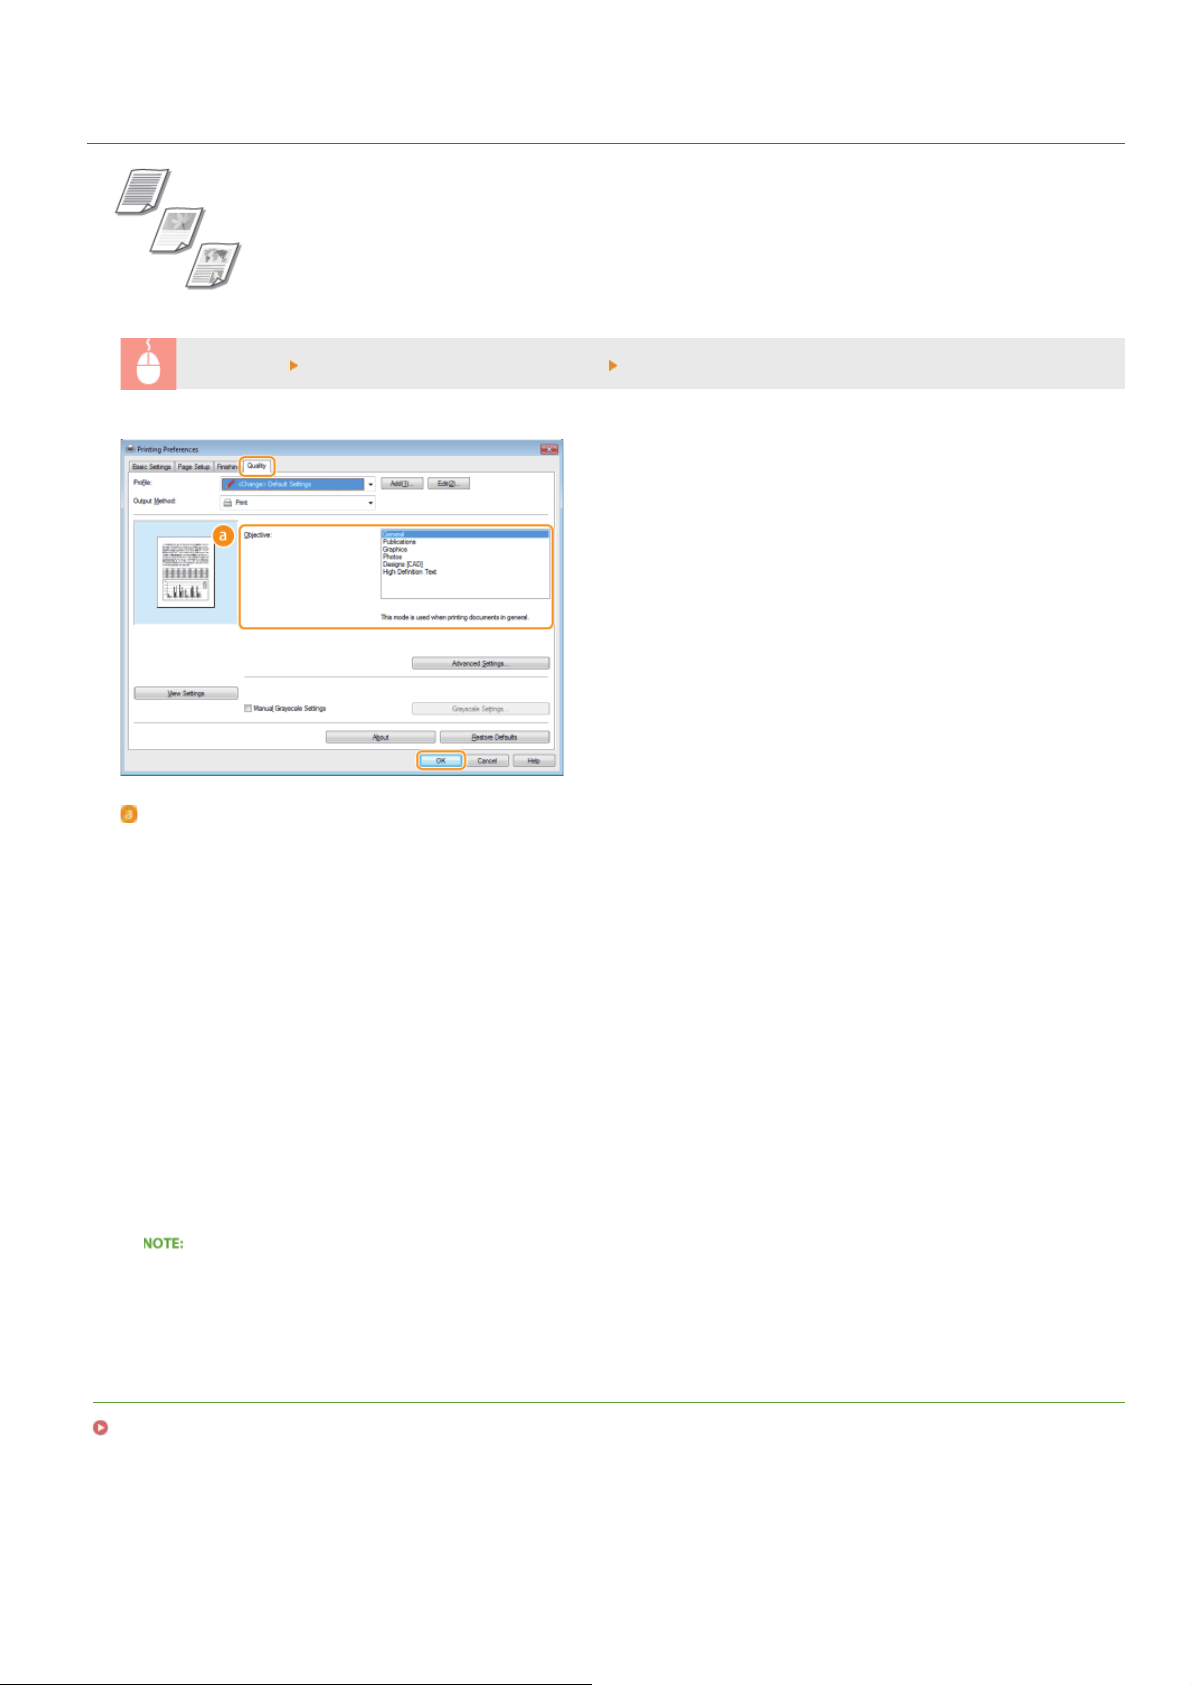
Selecting Document Type
You can specify the document type to ensure optimal image quality. There are different settings for photo
documents, documents that have charts or graphs, and documents that have design drawings with fine lines.
0L40-041
[Quality] tab
[Objective]
Select an option that suits the document type or purpose of printing. For example, select [General] for general use, or select
[Photos] when you want to print photo images in optimal print quality.
[General]
A versatile option that is suitable when printing most documents.
[Publications]
Suitable when printing documents that have a mix of photo images, charts, and graphs.
Select the document type in [Objective] [OK]
[Graphics]
Suitable when printing documents that have charts or graphs.
[Photos]
Suitable when printing photo images.
[Designs [CAD]]
Suitable when printing design drawings that have many fine lines.
[High Definition Text]
Suitable when printing documents that have small characters.
To specify detailed settings for each item selected on [Objective], click [Advanced Settings]. For more information, click [Help] on
the printer driver screen.
LINKS
Printing a Document
㻤㻡㻌㻛㻌㻟㻟㻢
Page 86
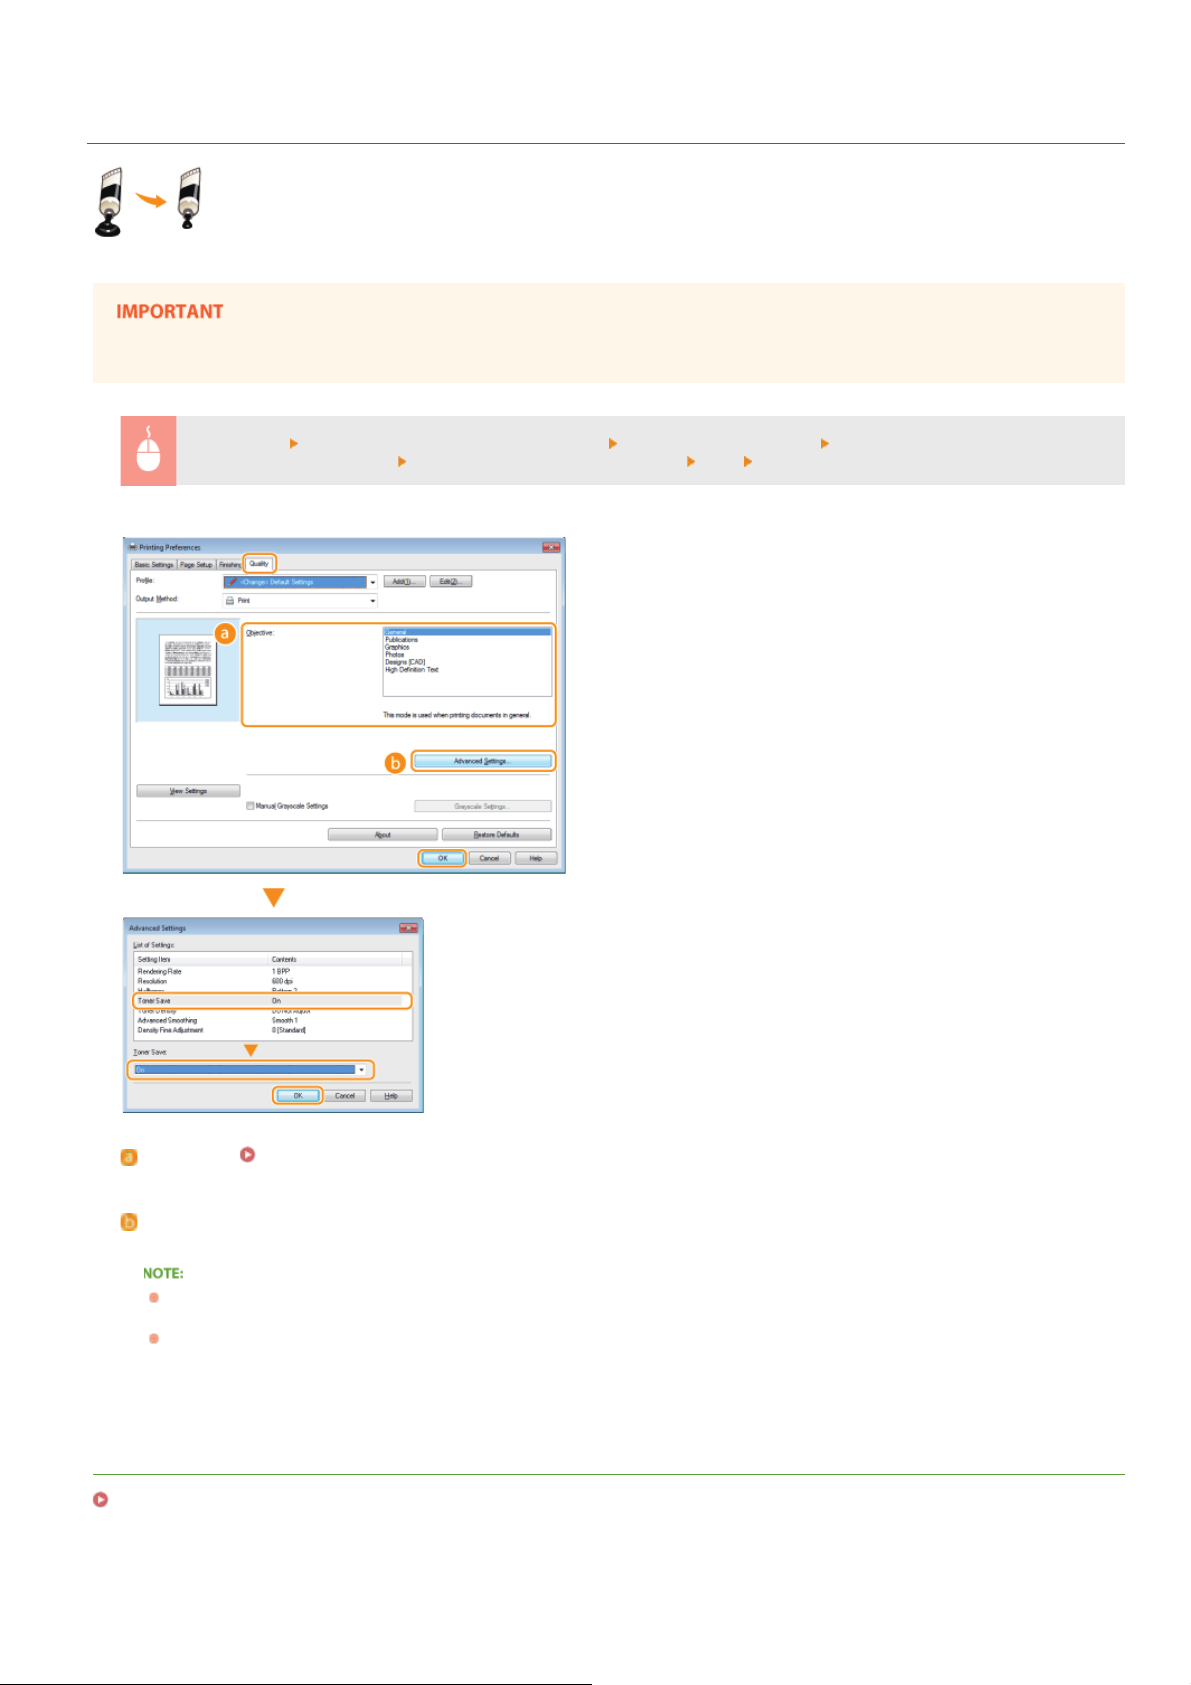
Saving Toner
You can set the printer driver to print documents using less toner.
When the toner save setting is enabled, fine lines and portions with lighter print density may become blurred.
0L40-042
[Quality] tab
[Advanced Settings] screen
Select the document type in [Objective] Click [Advanced Settings] Select [Toner Save] in the
Select [On] from the drop-down list [OK] [OK]
[Objective] Selecting Document Type
Select the document type for which you want to enable the toner save setting.
[Advanced Settings]
A screen with settings is displayed. Click [Toner Save] and select [On] from the drop-down list on the bottom of the screen.
You can specify whether to enable the toner save setting for each document type. Specify the toner save setting for each
document type listed in [Objective].
In the [Advanced Settings] screen, you can specify various print settings other than toner save settings. For more information,
click [Help] on the printer driver screen.
LINKS
Printing a Document
㻤㻢㻌㻛㻌㻟㻟㻢
Page 87
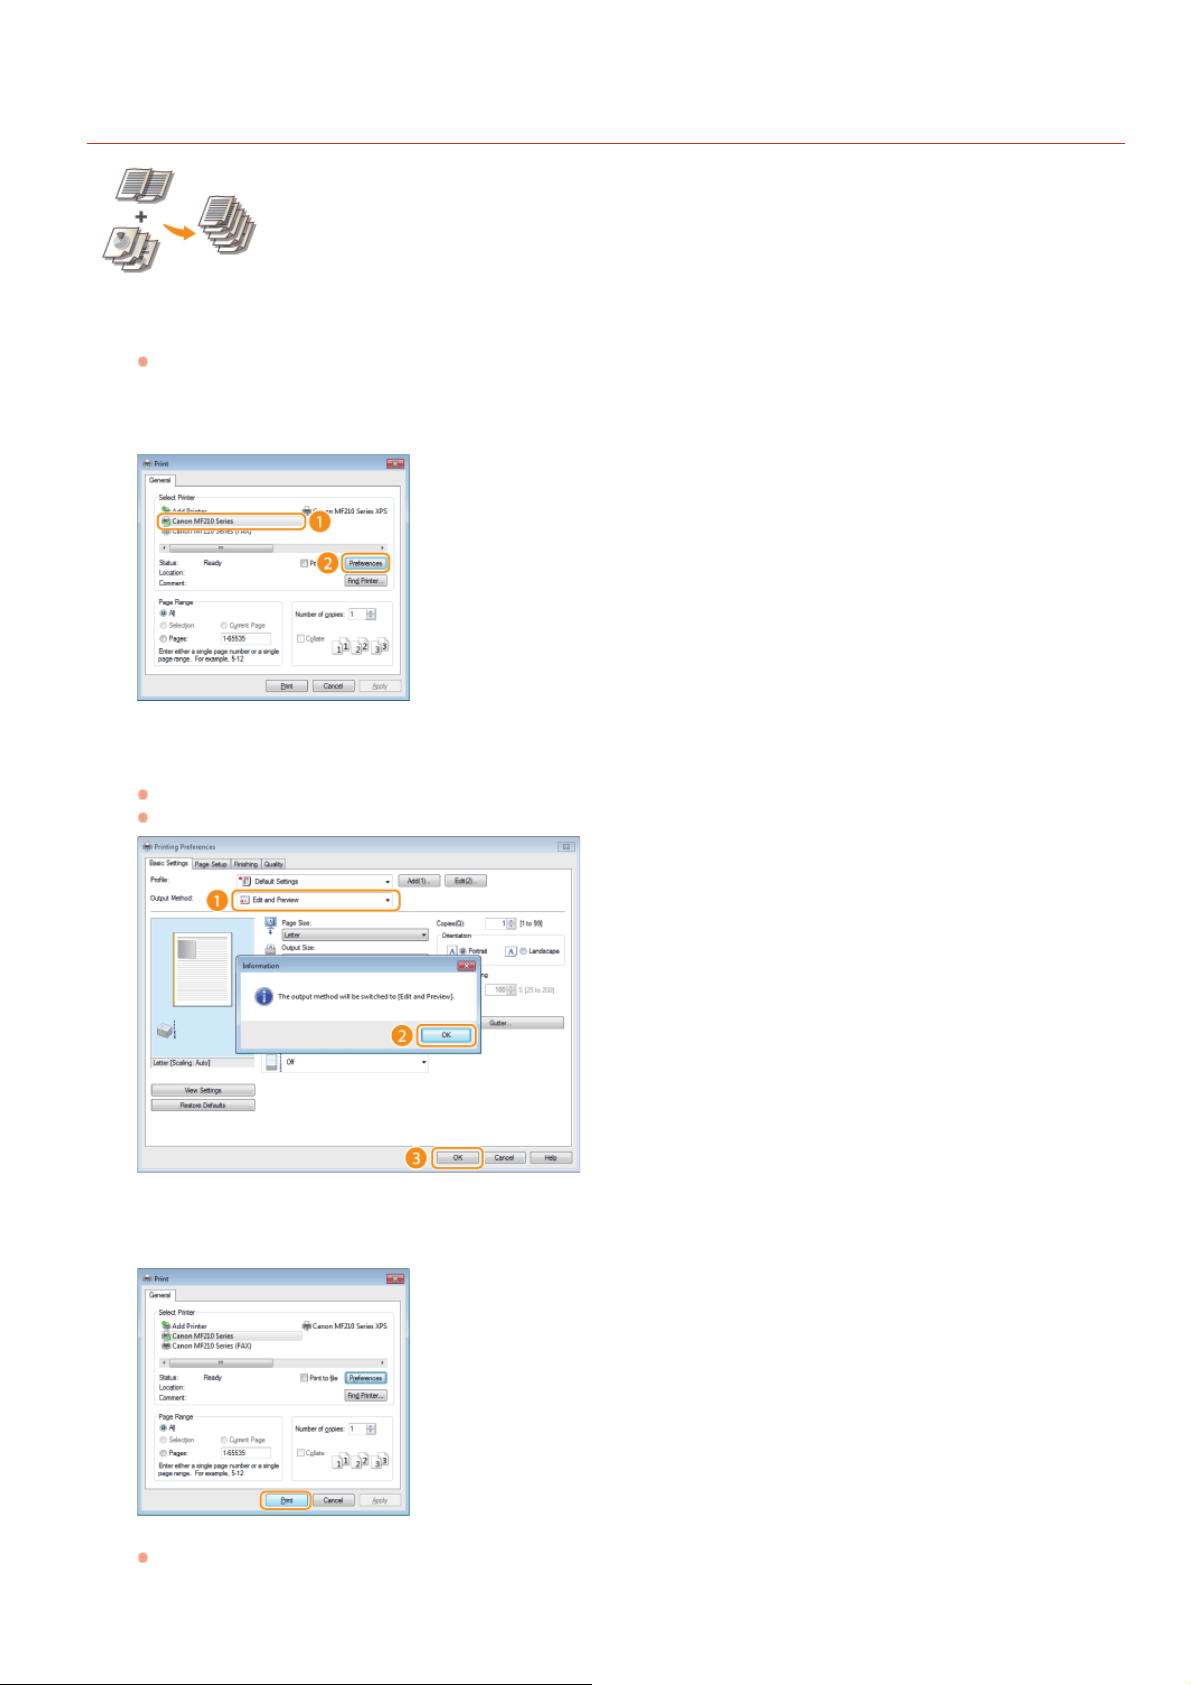
Combining and Printing Multiple Documents
By using Canon PageComposer, you can combine multiple documents into one print job and print the job with
specified print settings. This function, for example, enables you to combine documents made with different
applications and print all of the pages in the same paper size.
Open a document in an application and display the print dialog box.
1
How to display the print dialog box differs for each application. For more information, see the instruction manual for the
application you are using.
Select the printer driver for the machine, and click [Preferences] (or [Properties]).
2
0L40-043
Select [Edit and Preview] in [Output Method].
3
Click [OK] on the [Information] pop-up screen.
Click [OK] at the bottom of the screen.
Click [Print] (or [OK]).
4
The Canon PageComposer starts. Printing does not start in this step.
㻤㻣㻌㻛㻌㻟㻟㻢
Page 88
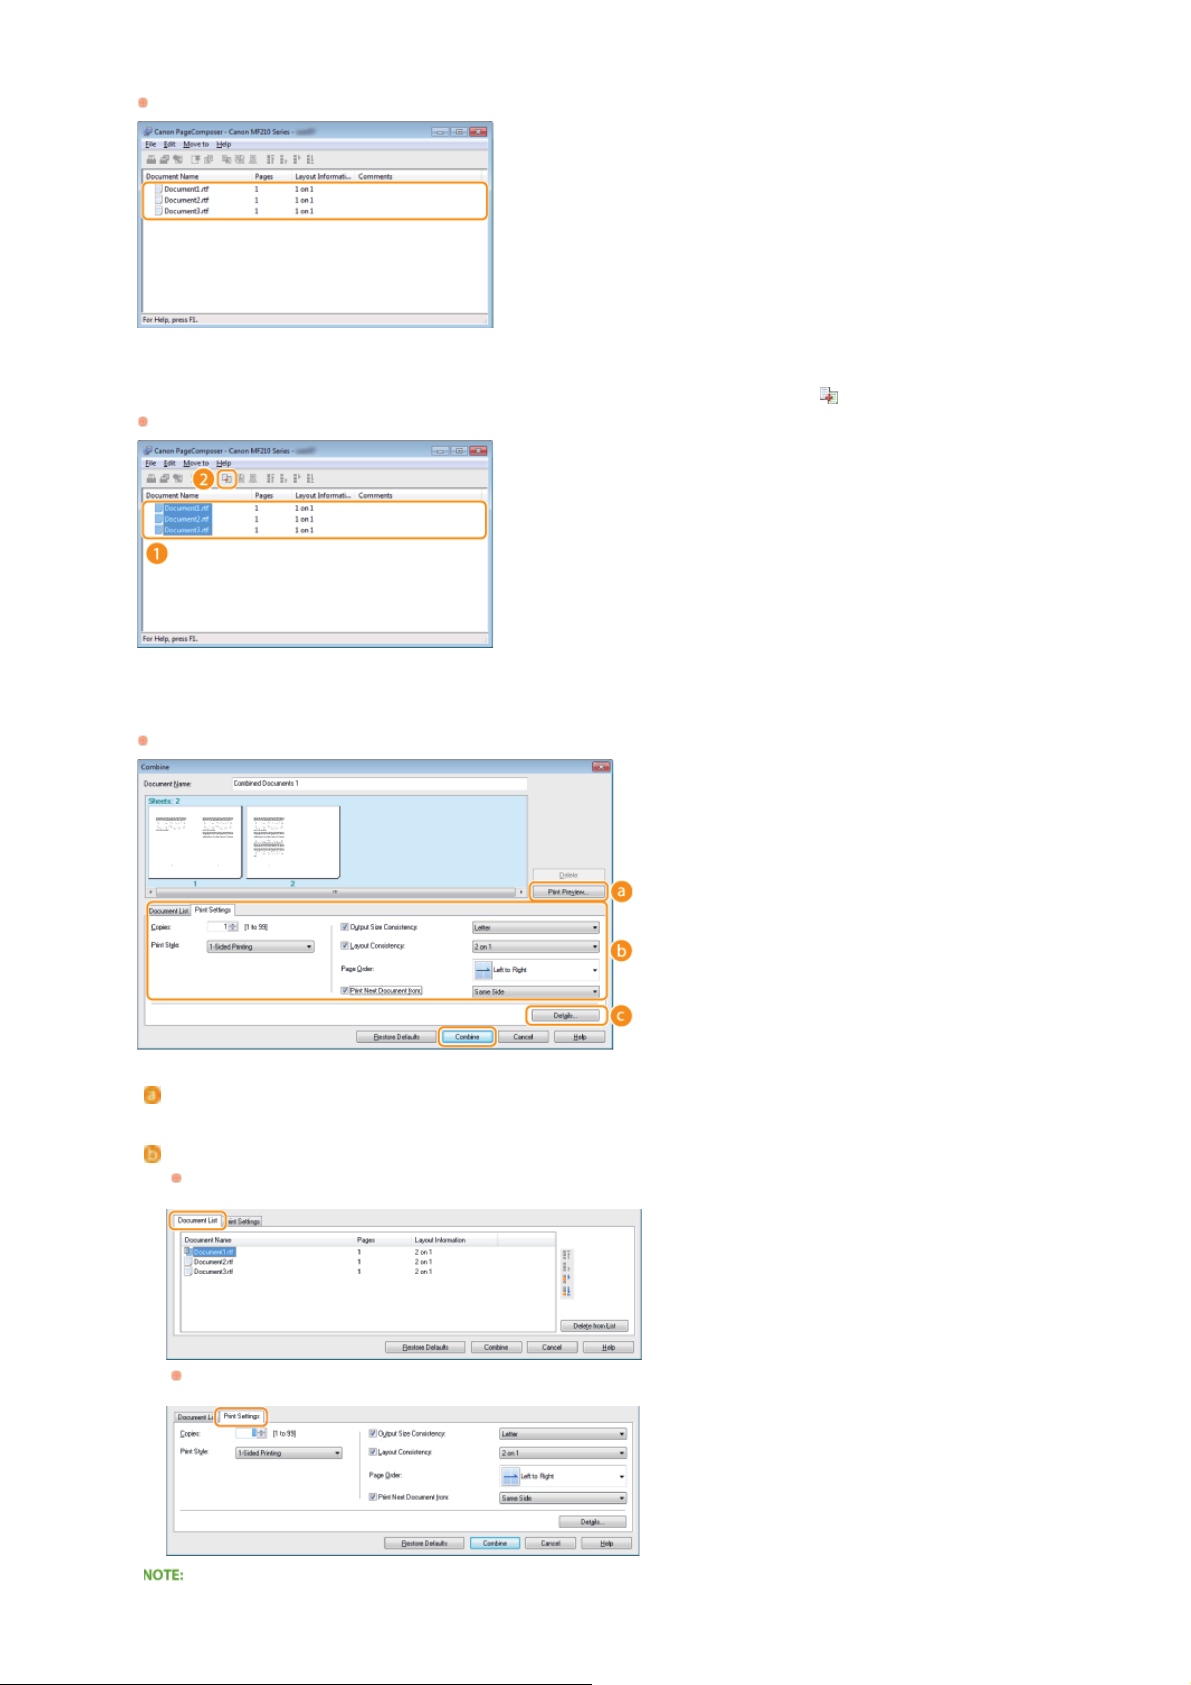
Repeat steps 1 to 4 for the documents you want to combine.
5
The documents are added to the Canon PageComposer.
From the [Document Name] list, select the documents to combine, and click .
6
To select multiple documents, click the documents while holding down [SHIFT] key or [CTRL] key.
Change the settings as necessary, and click [Combine].
7
The documents selected in step 6 are combined.
[Print Preview]
Displays a preview of the document to be printed.
[Document List]/[Print Settings]
Click the [Document List] tab to display the documents added in steps 1 to 4. You can remove documents by selecting them
in the list and clicking [Delete from List].
Click the [Print Settings] tab to display the screen for specifying print settings such as the number of copies. The settings
specified here are applied to the whole print job.
For more information, click [Help] on the Canon PageComposer screen.
㻤㻤㻌㻛㻌㻟㻟㻢
Page 89
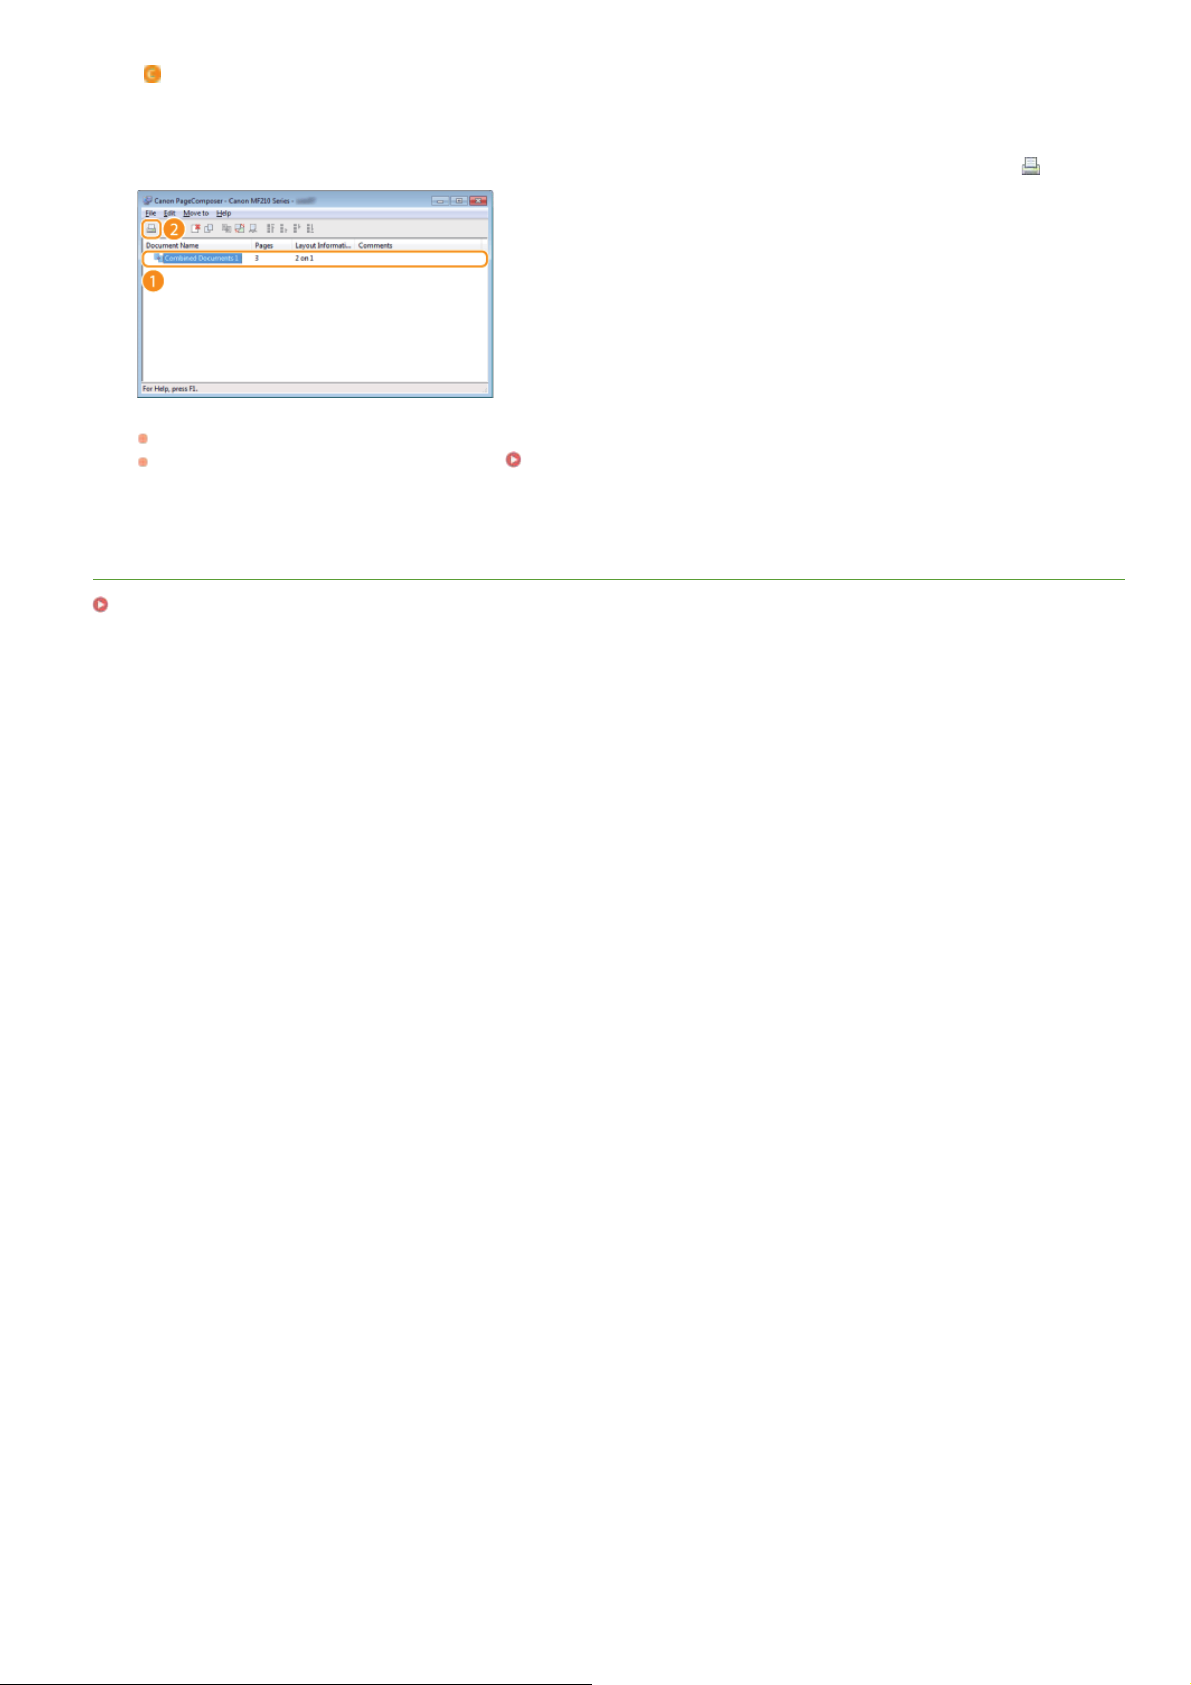
[Details]
Displays the print setting screen of the printer driver. There are fewer settings available than when using the ordinary printing
method.
On the [Document Name] list, select the combined-document print job you want to print, and click .
8
Printing starts.
For instructions on how to cancel printing, see
LINKS
Printing a Document
Canceling Prints.
㻤㻥㻌㻛㻌㻟㻟㻢
Page 90
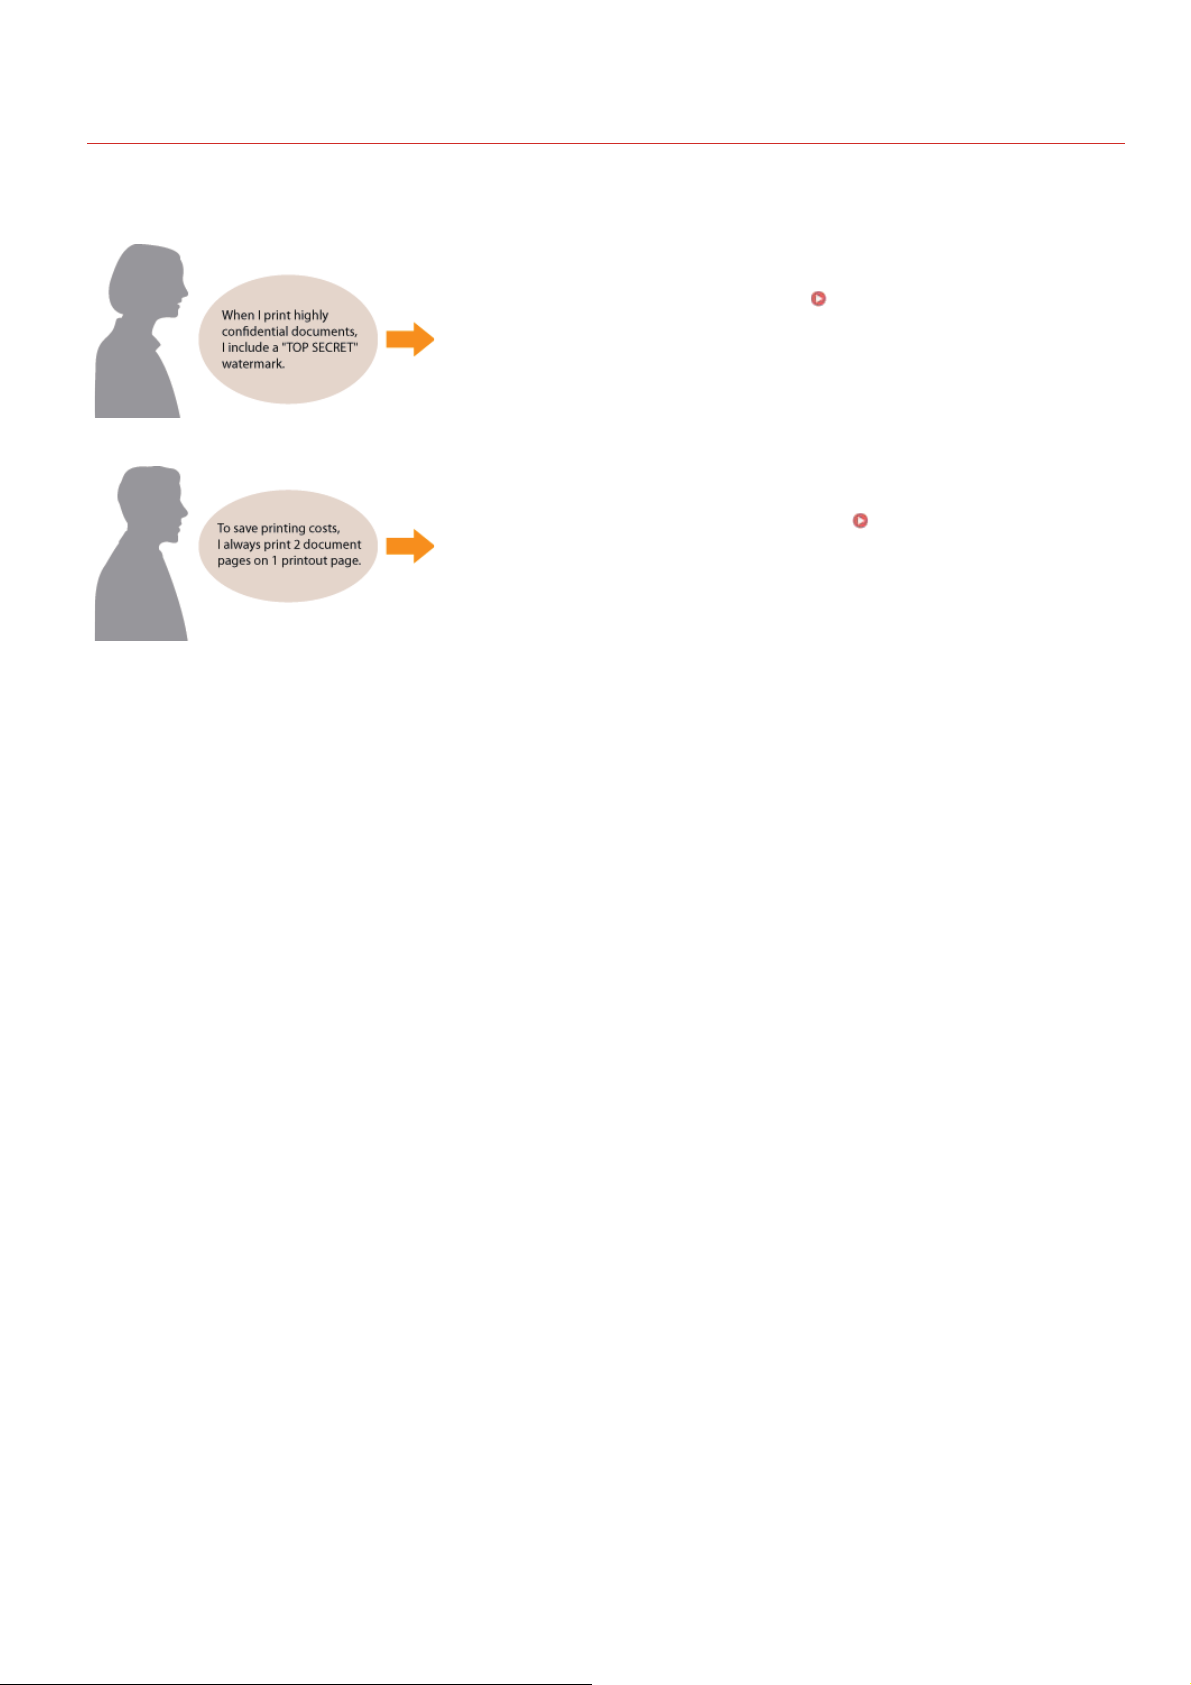
0L40-044
Configuring Print Settings to Your Needs
You can register combinations of settings as "profiles" to suit your different printing objectives. Also, you can register the settings that
you frequently use as the default settings. Once the default settings are registered, they are displayed automatically in the printer driver
screen, and you can skip the operations to specify them and proceed to printing immediately.
Set "TOP SECRET" as a watermark and register it in "profiles." You can then select this
watermark from profiles whenever you need it.
Frequently Used Print Settings
Set [2 on 1] as a default setting in the printer driver. From the next print job, every
printout page will show 2 pages from the document.
Registering Combinations of
Changing Default Settings
㻥㻜㻌㻛㻌㻟㻟㻢
Page 91
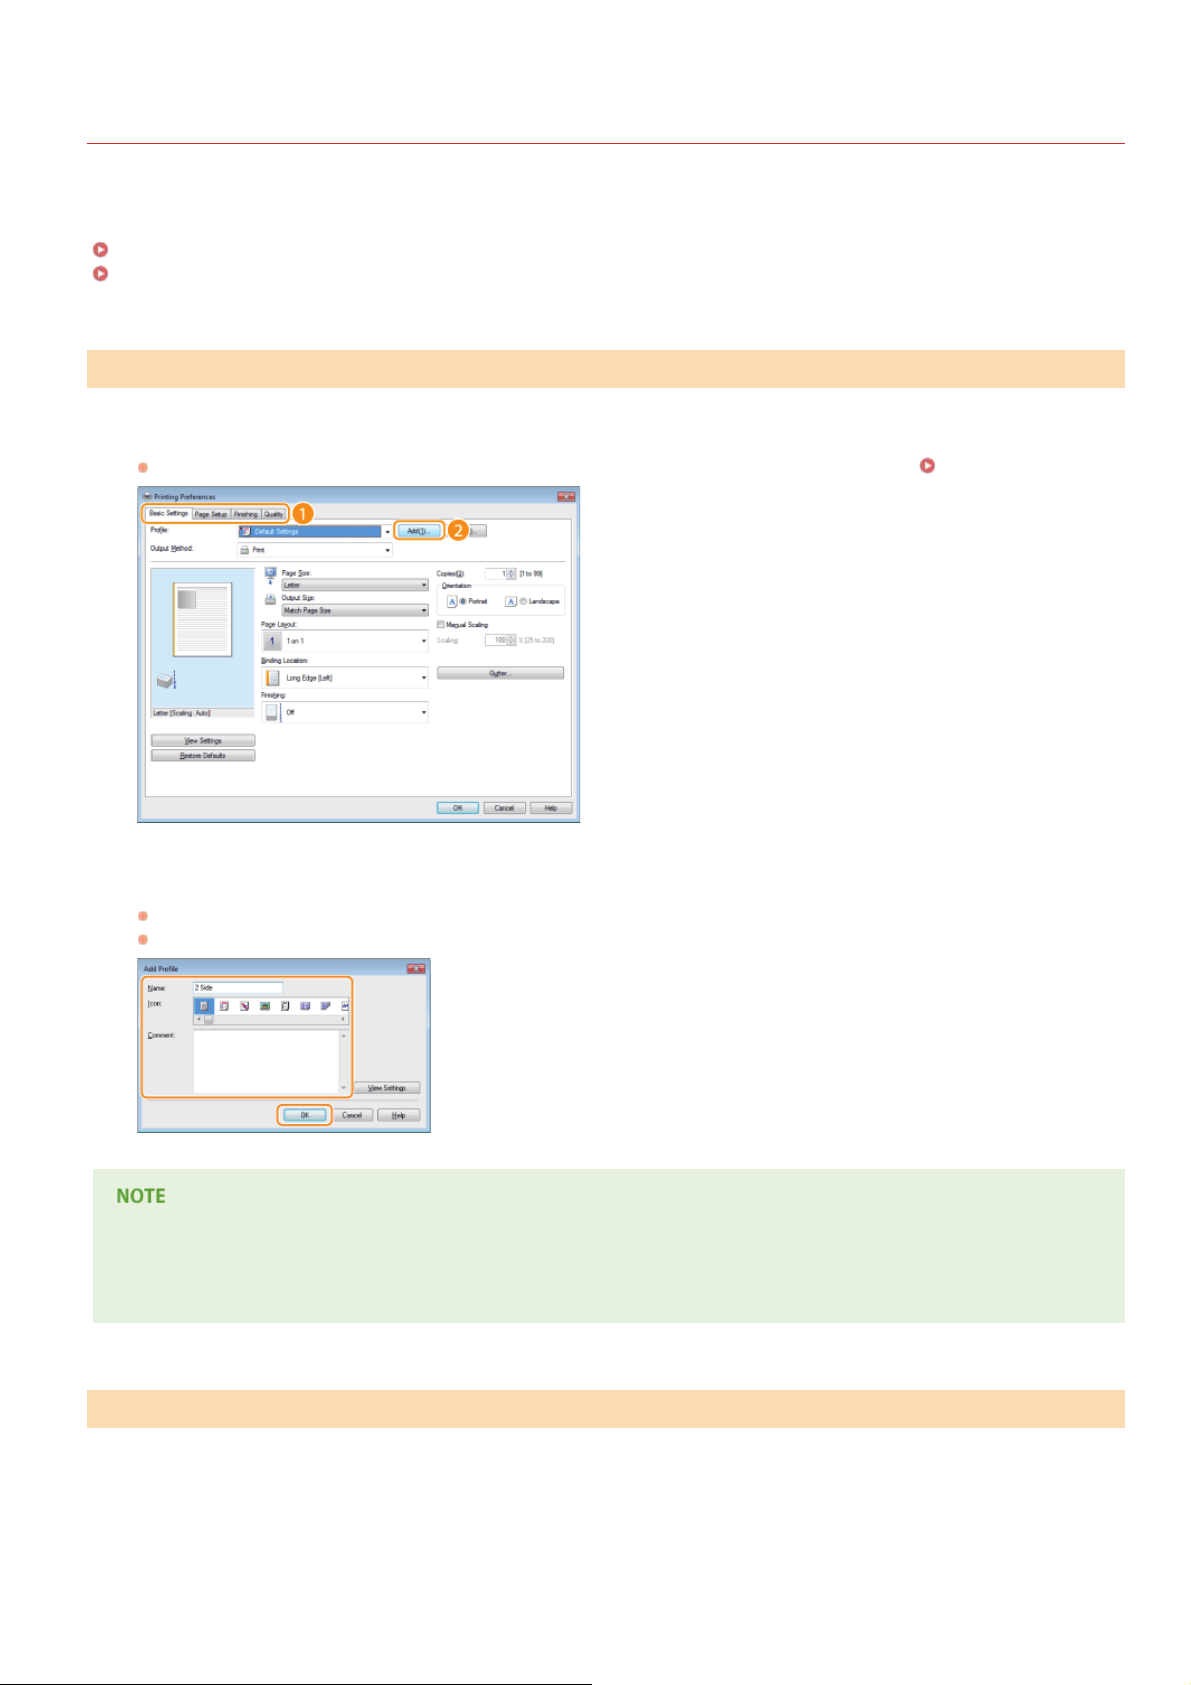
0L40-045
Registering Combinations of Frequently Used Print Settings
Specifying combinations of settings such as "landscape orientation on A4 size paper in save toner mode" every time you print is time
consuming. If you register your frequently used combinations of print settings as "profiles," you can specify print settings simply by
selecting one of the profiles from the list. This section explains how to register profiles and how to print using profiles.
Registering a Profile
Selecting a Profile
Registering a Profile
Change the settings that you want to register as a profile, and click [Add].
1
Make print settings as required on the [Basic Settings], [Page Setup], [Finishing], and [Quality] tabs. Various Print Settings
Enter a profile name in [Name], select an icon, and then click [OK].
2
As necessary, enter comments about the profile in [Comment].
Click [View Settings] to see the settings that will be registered.
Editing a profile
By clicking [Edit] on the right side of [Profile] on the screen shown in step 1, you can change the name, icon, or comment of the
profiles you have previously registered. However, you cannot edit the pre-registered profiles.
Selecting a Profile
Simply select the profile that suits your objective, and click [OK].
㻥㻝㻌㻛㻌㻟㻟㻢
Page 92
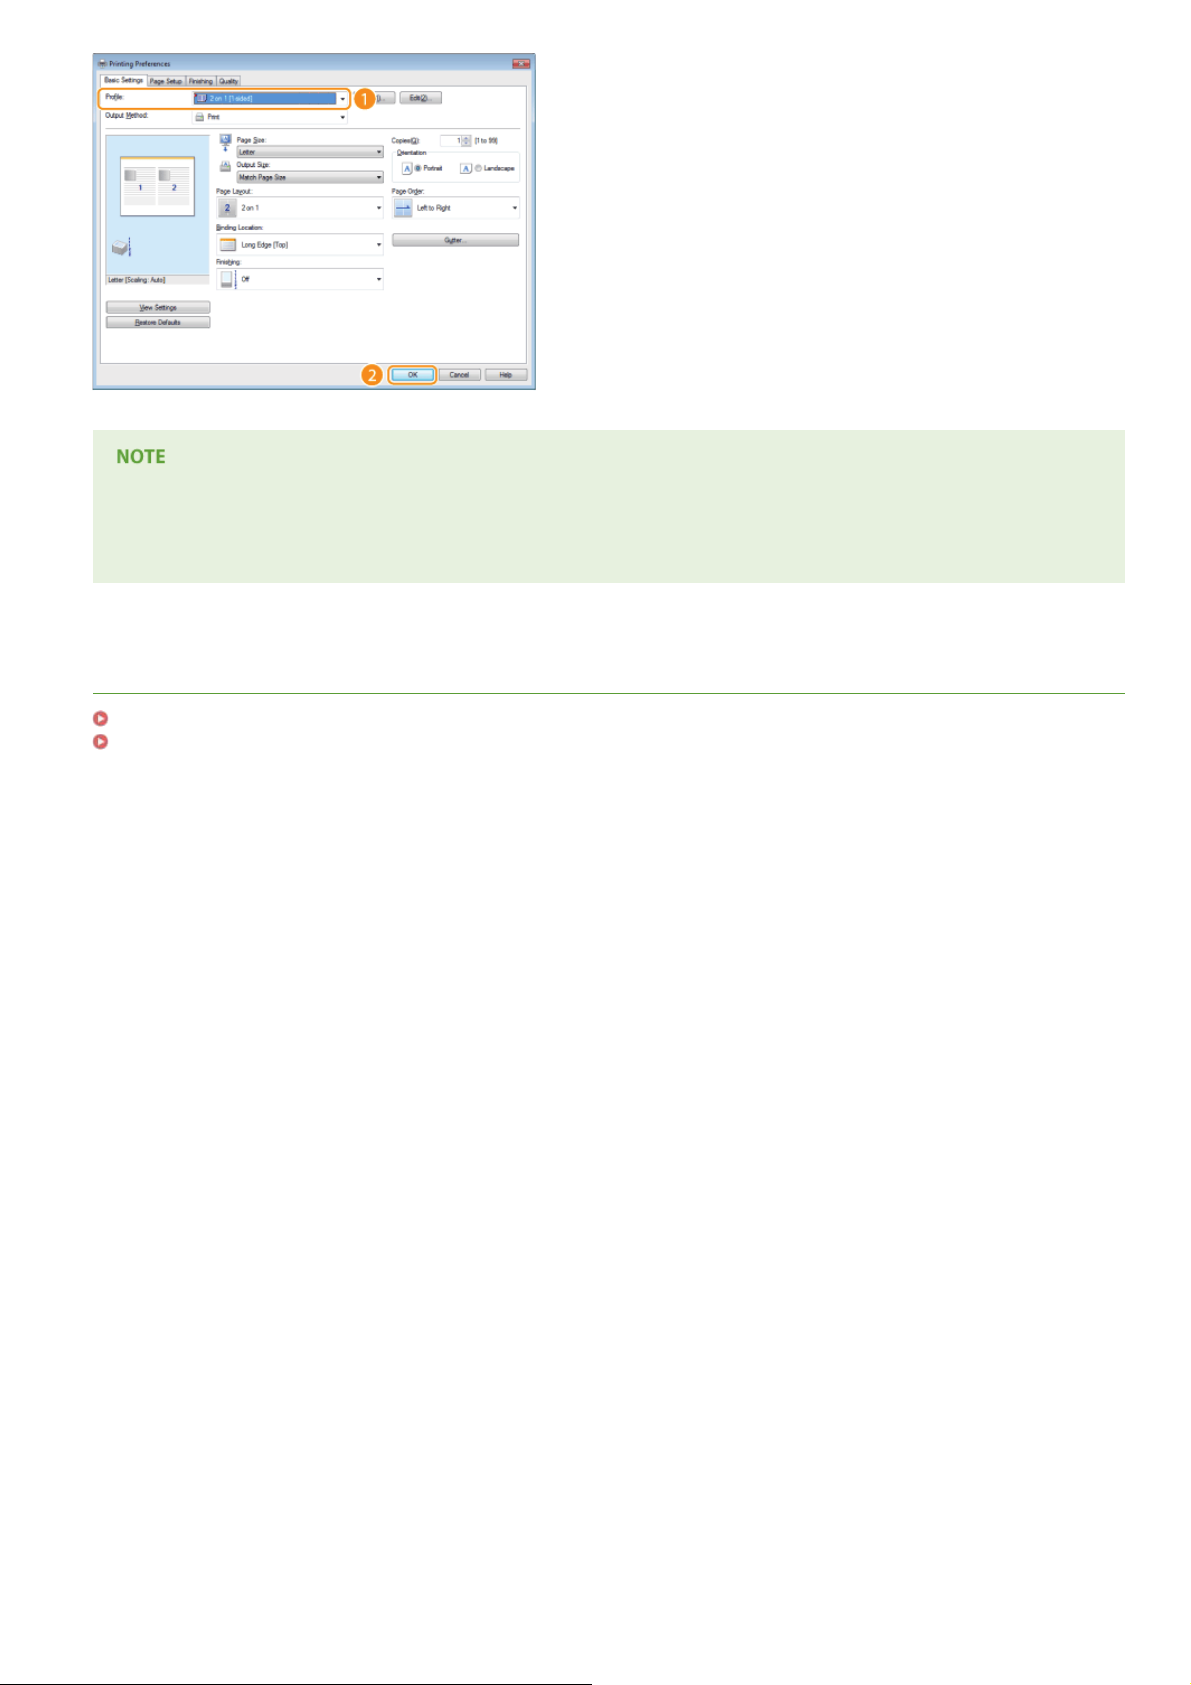
Changing the settings of the currently selected profile
You can change the settings of the currently selected profile. In addition, the changed settings can be registered as another
profile.
LINKS
Printing a Document
Changing Default Settings
㻥㻞㻌㻛㻌㻟㻟㻢
Page 93
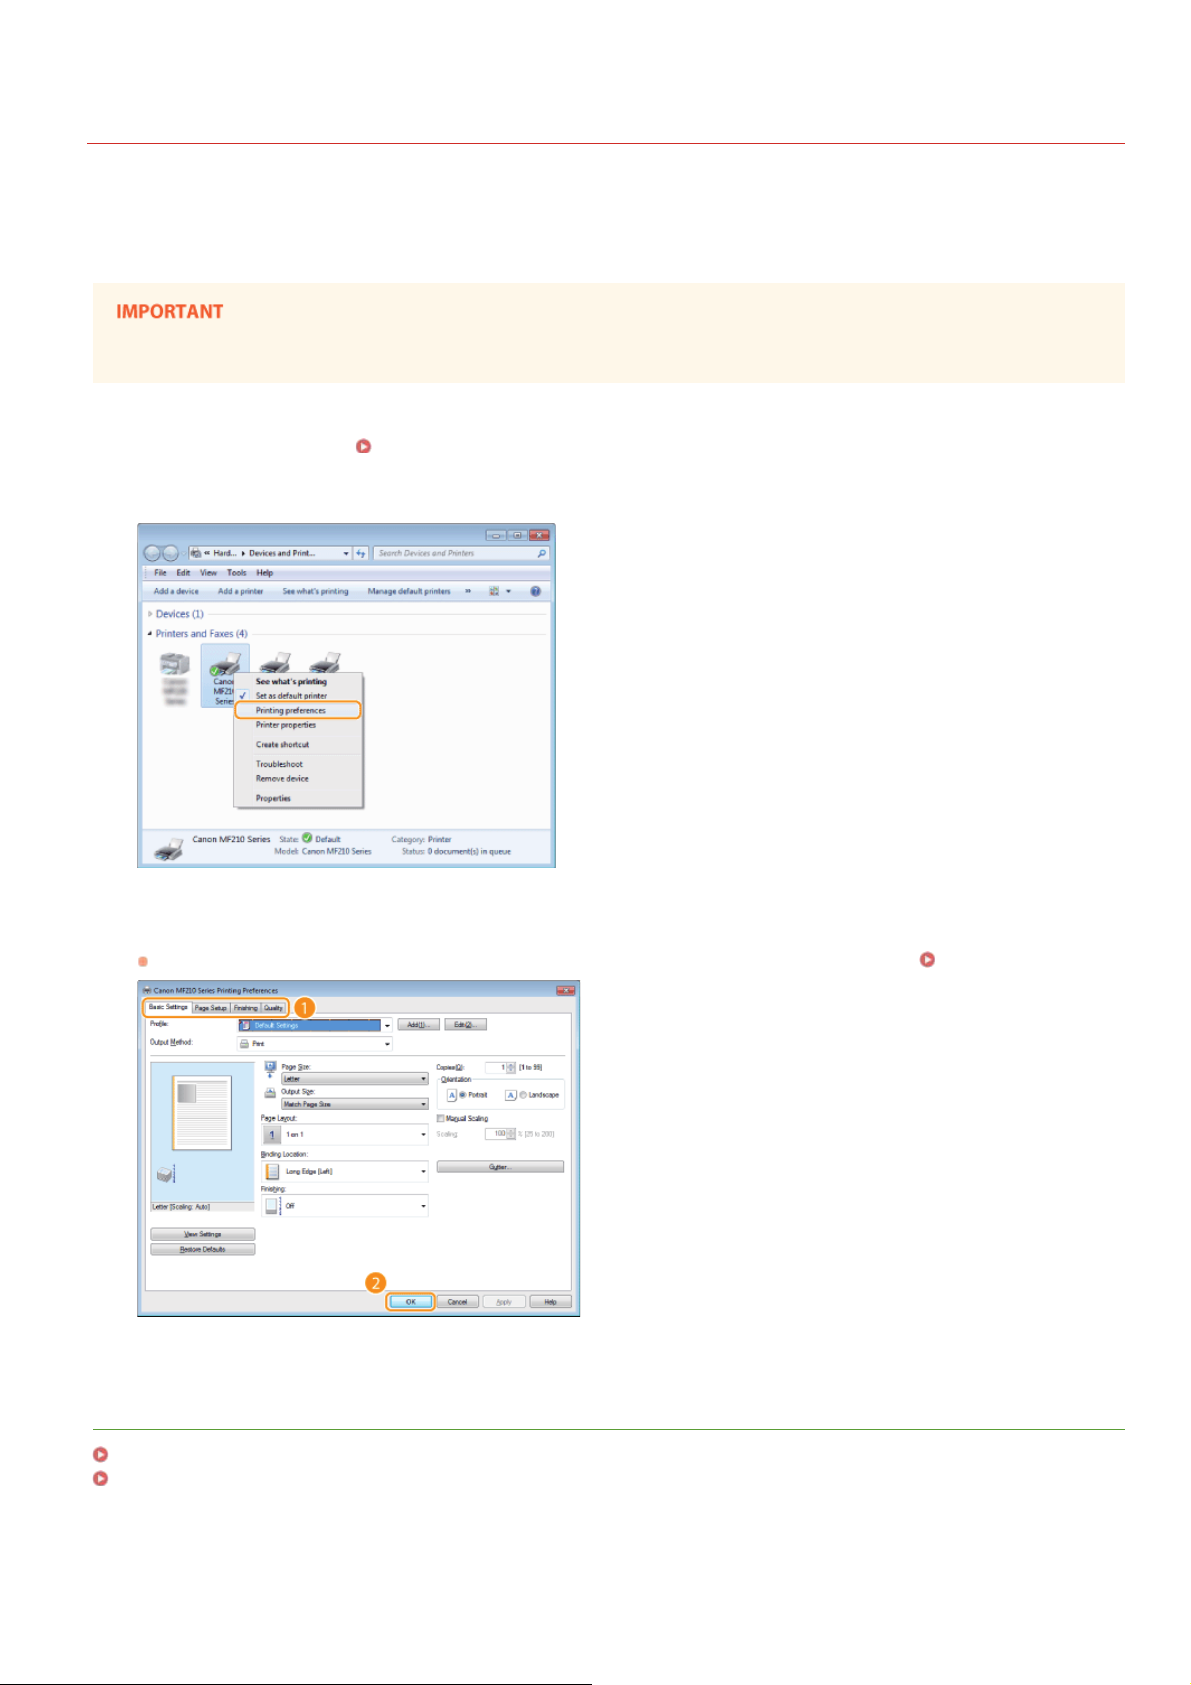
0L40-046
Changing Default Settings
The default settings are the settings that are first displayed whenever you open the print settings screen of the printer driver. You can
change these settings to the settings that you use most often. For example, if you always want to print 2 document pages on each
printout page, set [2 on 1] as the default page layout setting. From the next time that you open the printer driver screen, the setting
will always be [2 on 1], eliminating the need to
change this setting every time you make prints.
To perform the following procedure, log on to your computer with an administrator account.
Open the printer folder. Displaying the Printer Folder
1
Right-click the icon of the machine and then click [Printing preferences].
2
Change the settings on the printing preferences screen, and click [OK].
3
Make print settings as required on the [Basic Settings], [Page Setup], [Finishing], and [Quality] tabs. Various Print Settings
LINKS
Printing a Document
Registering Combinations of Frequently Used Print Settings
㻥㻟㻌㻛㻌㻟㻟㻢
Page 94
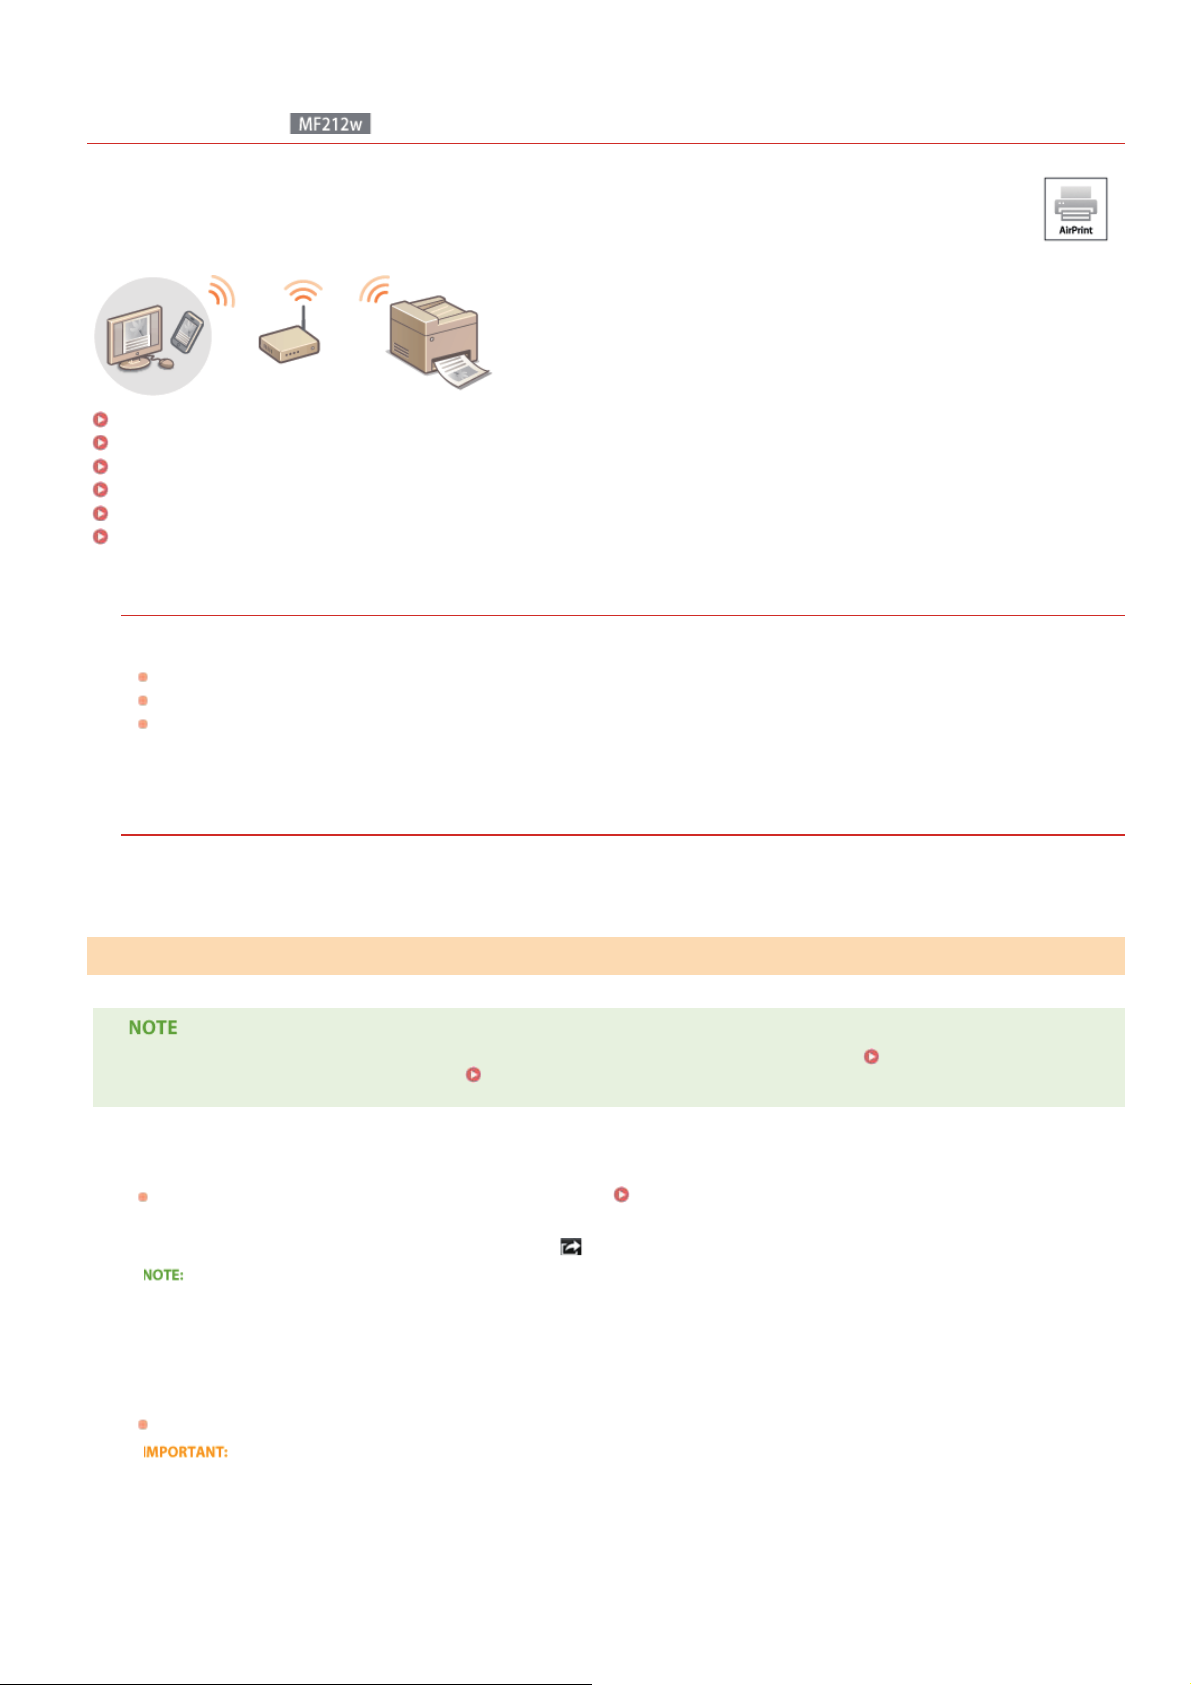
Using AirPrint
You do not necessarily need to use a computer for printing photos, e-mails, Web pages, and other documents. AirPrint
enables you to wirelessly print from Apple devices such as iPad , iPhone , iPod touch , and Macintosh without using the
printer driver.
Printing from iPad, iPhone, or iPod touch
Printing from Macintosh
Canceling AirPrint Printing
Changing AirPrint Settings
Troubleshooting for AirPrint
Others
System Requirements
To use AirPrint, you need one of the following devices with the latest version of iOS:
0L40-047
iPad (all models)
iPhone (3GS or later)
iPod touch (3rd generation or later)
If you use Macintosh, OS X v10.7 or later is required.
Network Environment
Apple devices (iPad/iPhone/iPod touch/Macintosh) and the machine must be connected to the same LAN.
Printing from iPad, iPhone, or iPod touch
To install security functionality in AirPrint, set a key pair and a digital certificate before using TLS. Encrypting Communication
of Print Data for Apple Devices with TLS
Make sure that the machine is turned ON and is connected to the LAN.
1
For information on how to make sure, see "Getting Started". Manuals Included with the Machine
From the application on your Apple device, tap to display the menu options.
2
Configuring Settings for Key Pairs and Digital Certificates
Icon shape differs depending on the application that you are using.
From the drop -down list, tap [Print].
3
Select this machine from [Printer] in [Printer Options].
4
The printers connected to the network are displayed. Select this machine in this step.
[Printer Options] is not displayed on applications that do not support AirPrint. You cannot print by using those applications.
Specify the print settings as necessary.
5
Number of copies
Tap [+] or [-] on the right side of [1 Copy] to set the number of copies.
㻥㻠㻌㻛㻌㻟㻟㻢
Page 95
[Range]
Tap [Range] and [All Pages] or specify the range of the pages to print when printing a document with multiple pages.
The available settings on [Printer Options] differ depending on the application you are using.
Available paper sizes differ depending on the application you are using.
Tap [Print].
6
Printing starts.
To cancel printing
Checking the print status
During the printing process, the [Print Center] icon is displayed in the list of recently used applications on the Apple device, and
you can use it to check the print status. To display the list of recently used applications, press the [Home] button twice.
Printing from Macintosh
Canceling AirPrint Printing
To install security functionality in AirPrint, set a key pair and a digital certificate before using TLS. Encrypting Communication
of Print Data for Apple Devices with TLS
Add the machine to your Macintosh with [System Preferences] [Print & Scan].
1
Make sure that the machine is turned ON and is connected to the LAN.
2
For information on how to make sure, see "Getting Started". Manuals Included with the Machine
Open a document in an application and display the print dialog box.
3
How to display the print dialog box differs for each application. For more information, see the instruction manual for the
application you are using.
Select this machine in the print dialog box.
4
The printers connected to your Macintosh are displayed. Select this machine in this step.
Specify the print settings as necessary.
5
[Presets]
Specify the print settings by selecting a preset setting from the drop-down list.
[Copies]
Specify the number of copies.
[Pages]
Specify the range of the pages to print when printing a document with multiple pages.
Configuring Settings for Key Pairs and Digital Certificates
The available settings differ depending on the application you are using.
Click [Print].
6
Printing starts.
To cancel printing
Canceling AirPrint Printing
You have two options to cancel printing. You can cancel printing from the operation panel of the machine (
an Apple device with the following procedure.
Canceling from iPad, iPhone, or iPod touch
Press the [Home] button twice.
1
Canceling AirPrint Printing
㻥㻡㻌㻛㻌㻟㻟㻢
Canceling Prints), or from
Page 96
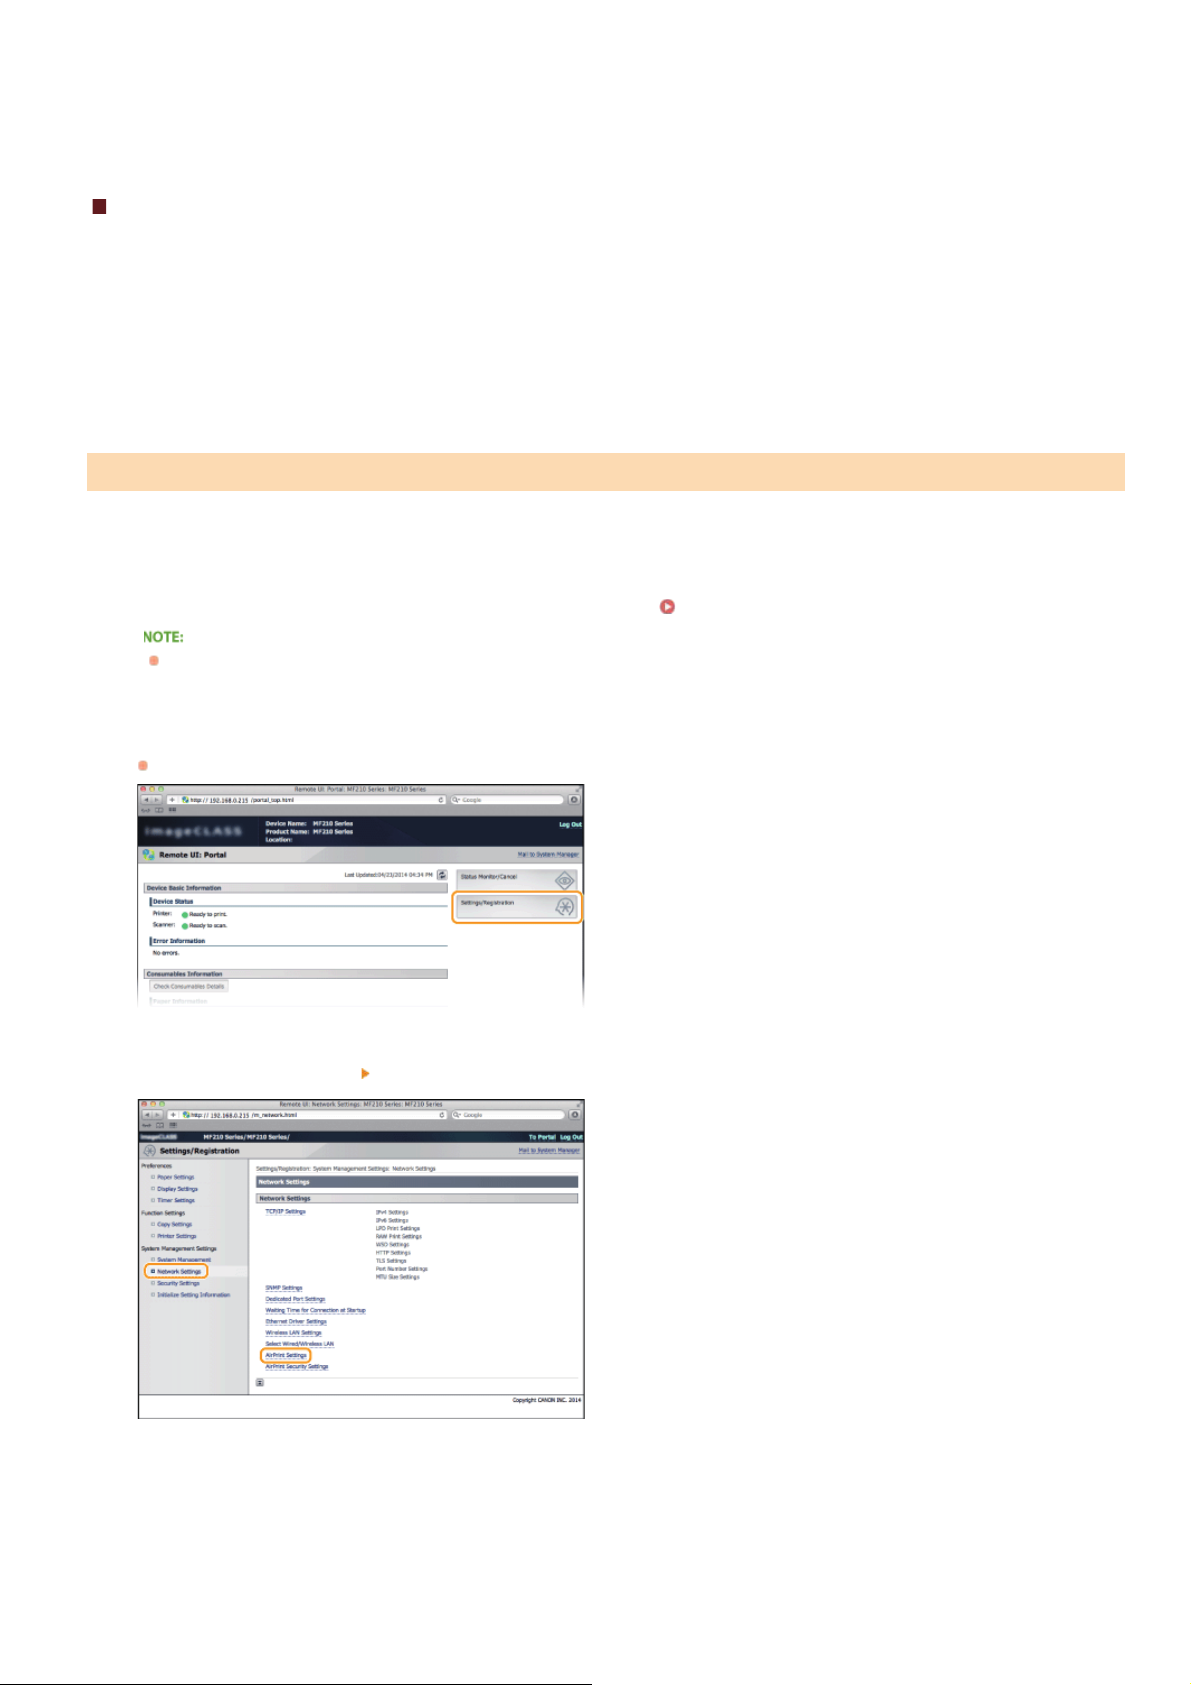
Tap [Print Center] to display the list of the documents to be printed.
2
Tap the document you want to cancel, and tap [Cancel Printing].
3
Canceling from Macintosh
Click the printer icon that is displayed in the Dock on the desktop.
1
Click the document you want to cancel.
2
Click [Delete].
3
Changing AirPrint Settings
You can register information, including the name of the machine and installation location, that is used for identifying the machine. You
can also disable the AirPrint function of the machine. Use the Remote UI to change these settings.
Start the Remote UI and log on in System Manager Mode. Starting Remote UI
1
Depending on your Web browser, the procedure to start the Remote UI may be different. See the instruction manuals for the
Web browser you are using.
Click [Settings/Registration].
2
If you are using a mobile device, such as iPad, iPhone, or iPod touch, read "click" as "tap" in this section.
Click [Network Settings] [AirPrint Settings].
3
Click [Edit...].
4
㻥㻢㻌㻛㻌㻟㻟㻢
Page 97
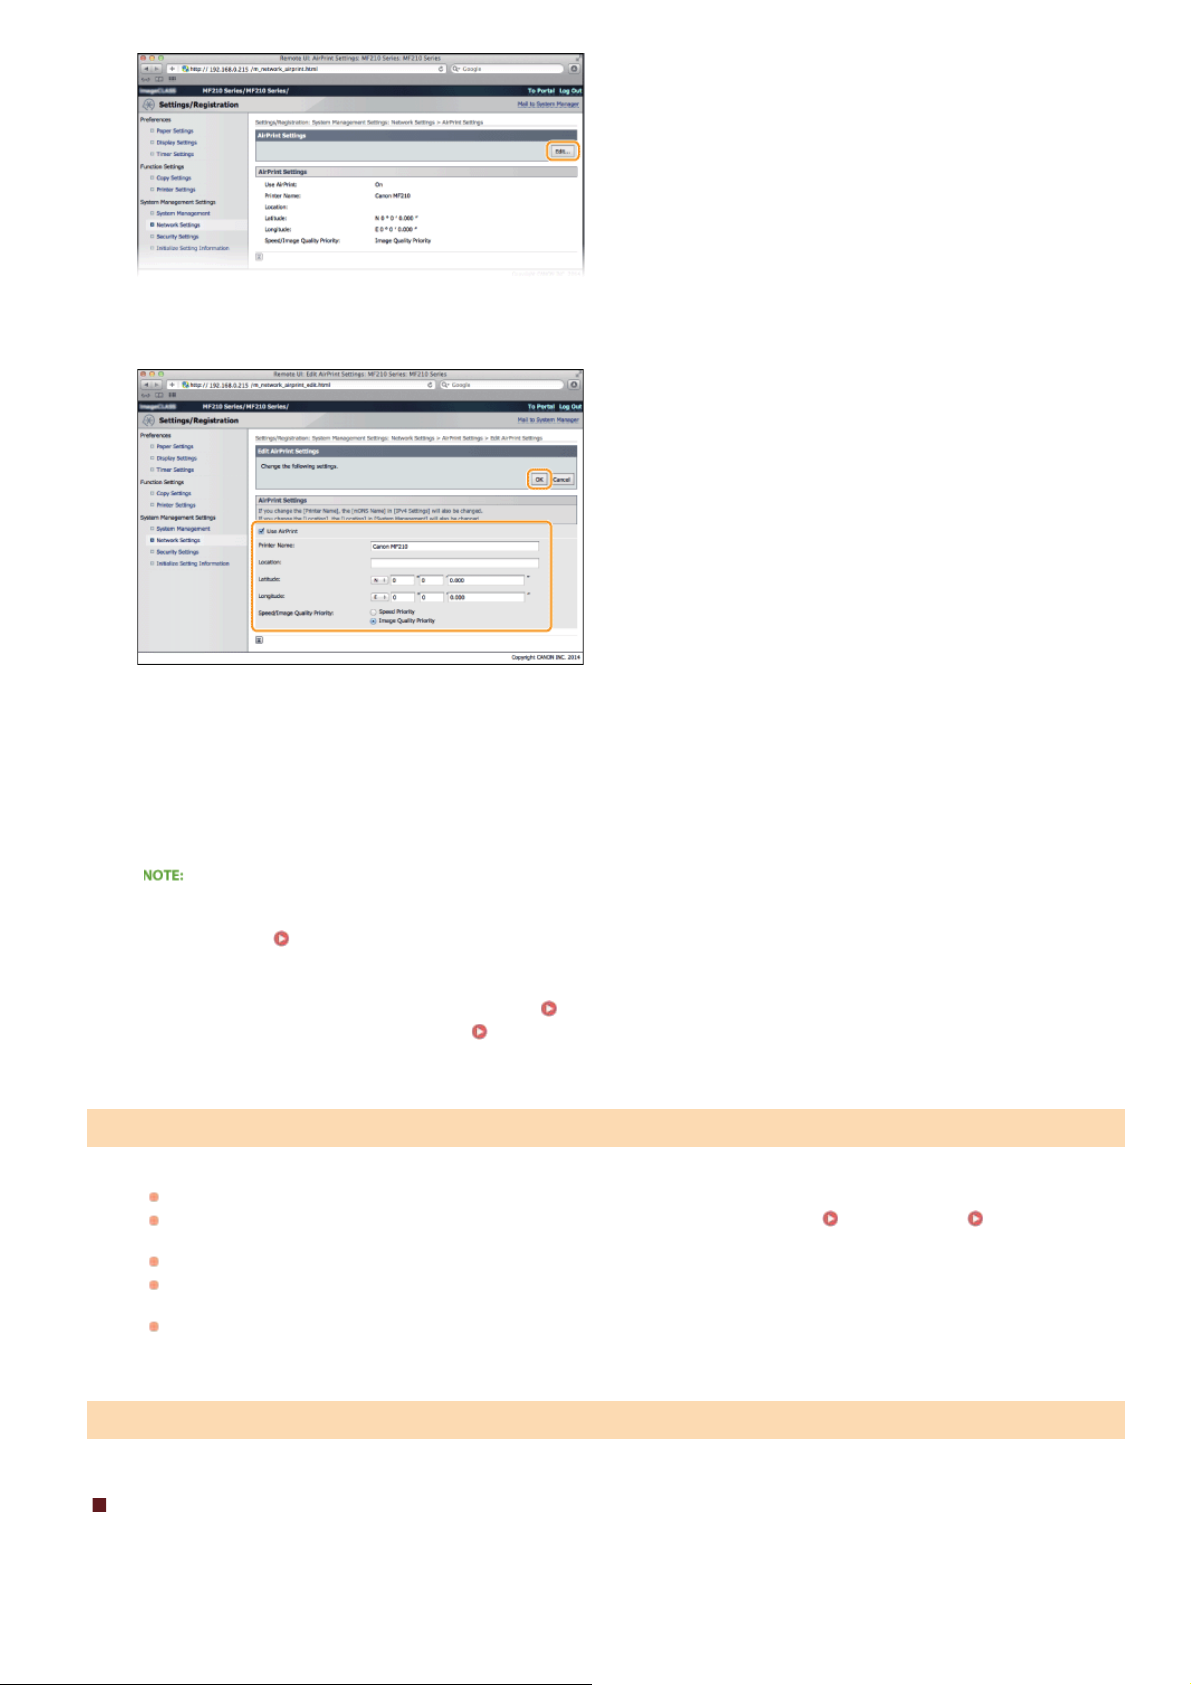
Specify the required settings, and click [OK].
5
[Use AirPrint]
Select the check box to enable printing with AirPrint. To disable AirPrint, clear the check box.
[Printer Name]/[Location]/[Latitude]/[Longitude]
Enter the name and the installation location information to help you identify this machine when operating your Apple device. This
information is useful if you have more than one AirPrint printer.
[AirPrint Speed/Image Quality Priority]
Select [Speed Priority] or [Image Quality Priority] as the quality mode for printing with AirPrint. This function is only enabled when
printing a PDF.
If you change [Printer Name]
If the set [Printer Name] is changed, you may become unable to print from a Macintosh you were using. This occurs because
<mDNS Name> (
Printer name and location
[Printer Name] and [Location] are reflected in the following settings respectively:
・[Printer Name] can also be set in <mDNS Name> (
・[Location] can also be set in <Location> (
Configuring DNS ) for IPv4 is also changed. In this case, add this machine to the Macintosh again.
IPv4 Settings).
Device Information Settings ).
Troubleshooting for AirPrint
You cannot print using AirPrint.
Make sure that the machine is turned ON. If the machine is turned ON, restart the machine and see if the problem is solved.
Make sure that the paper is loaded in the machine and the machine has enough toner.
Cartridges
Make sure that no error message is displayed in the machine’s display.
Make sure that Apple devices (iPad/iPhone/iPod touch/Macintosh) and the machine are connected to the same LAN. If the
machine is turned ON, it may take several minutes before the machine is ready for communication.
Make sure that Bonjour on Apple devices is enabled.
Loading Paper Replacing Toner
Others
Checking Consumables on Macintosh
You can display the screen for AirPrint, on which you can not only access the AirPrint Settings but also view information about
consumables, such as paper and toner.
㻥㻣㻌㻛㻌㻟㻟㻢
Page 98
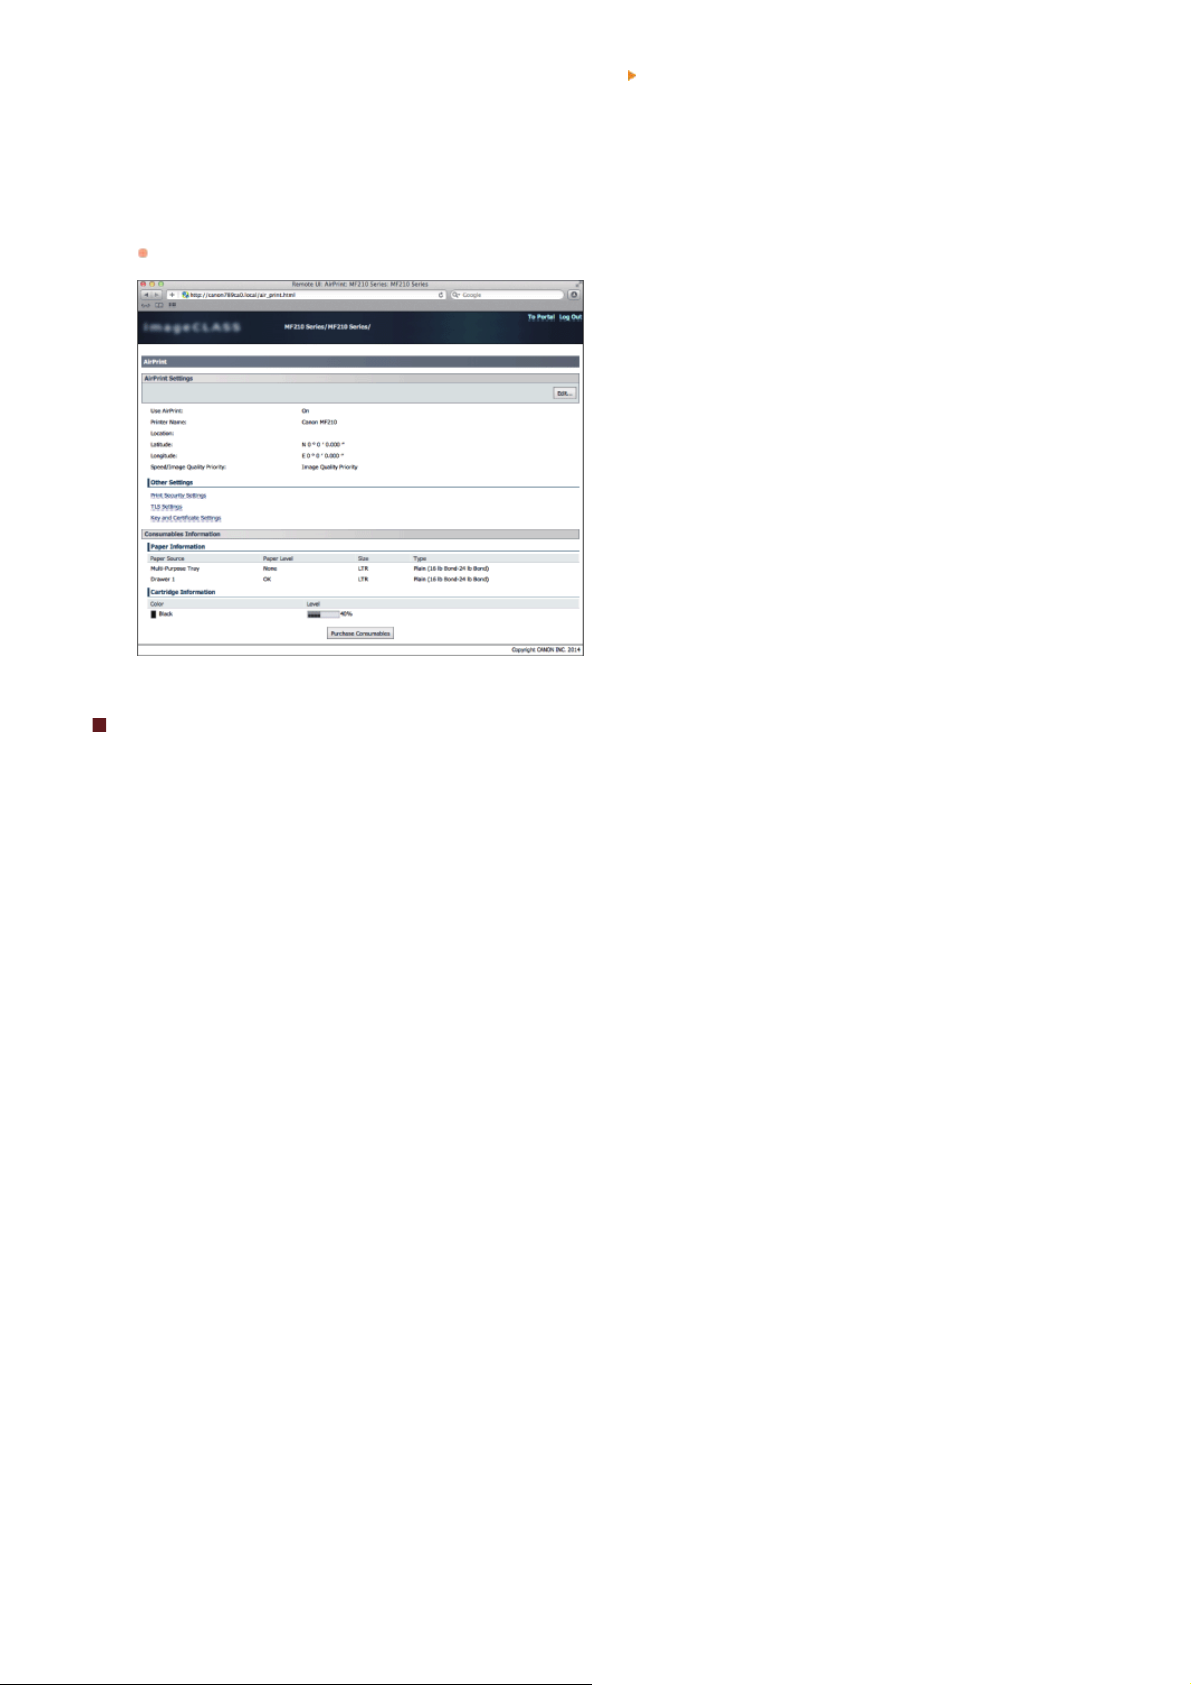
Click [System Preferences] in the Dock on the desktop [Print & Scan].
1
Select your printer and click [Options & Supplies].
2
Click [Show Printer Webpage].
3
Log on to the Remote UI in System Manager Mode.
4
To check the machine status or supplies, you can also log on in End-User Mode.
Trademarks
Apple, Bonjour, iPad, iPhone, iPod touch, Macintosh, Mac OS, and OS X are trademarks of Apple Inc., registered in the U.S. and other
countries. AirPrint and the AirPrint logo are trademarks of Apple Inc.
㻥㻤㻌㻛㻌㻟㻟㻢
Page 99
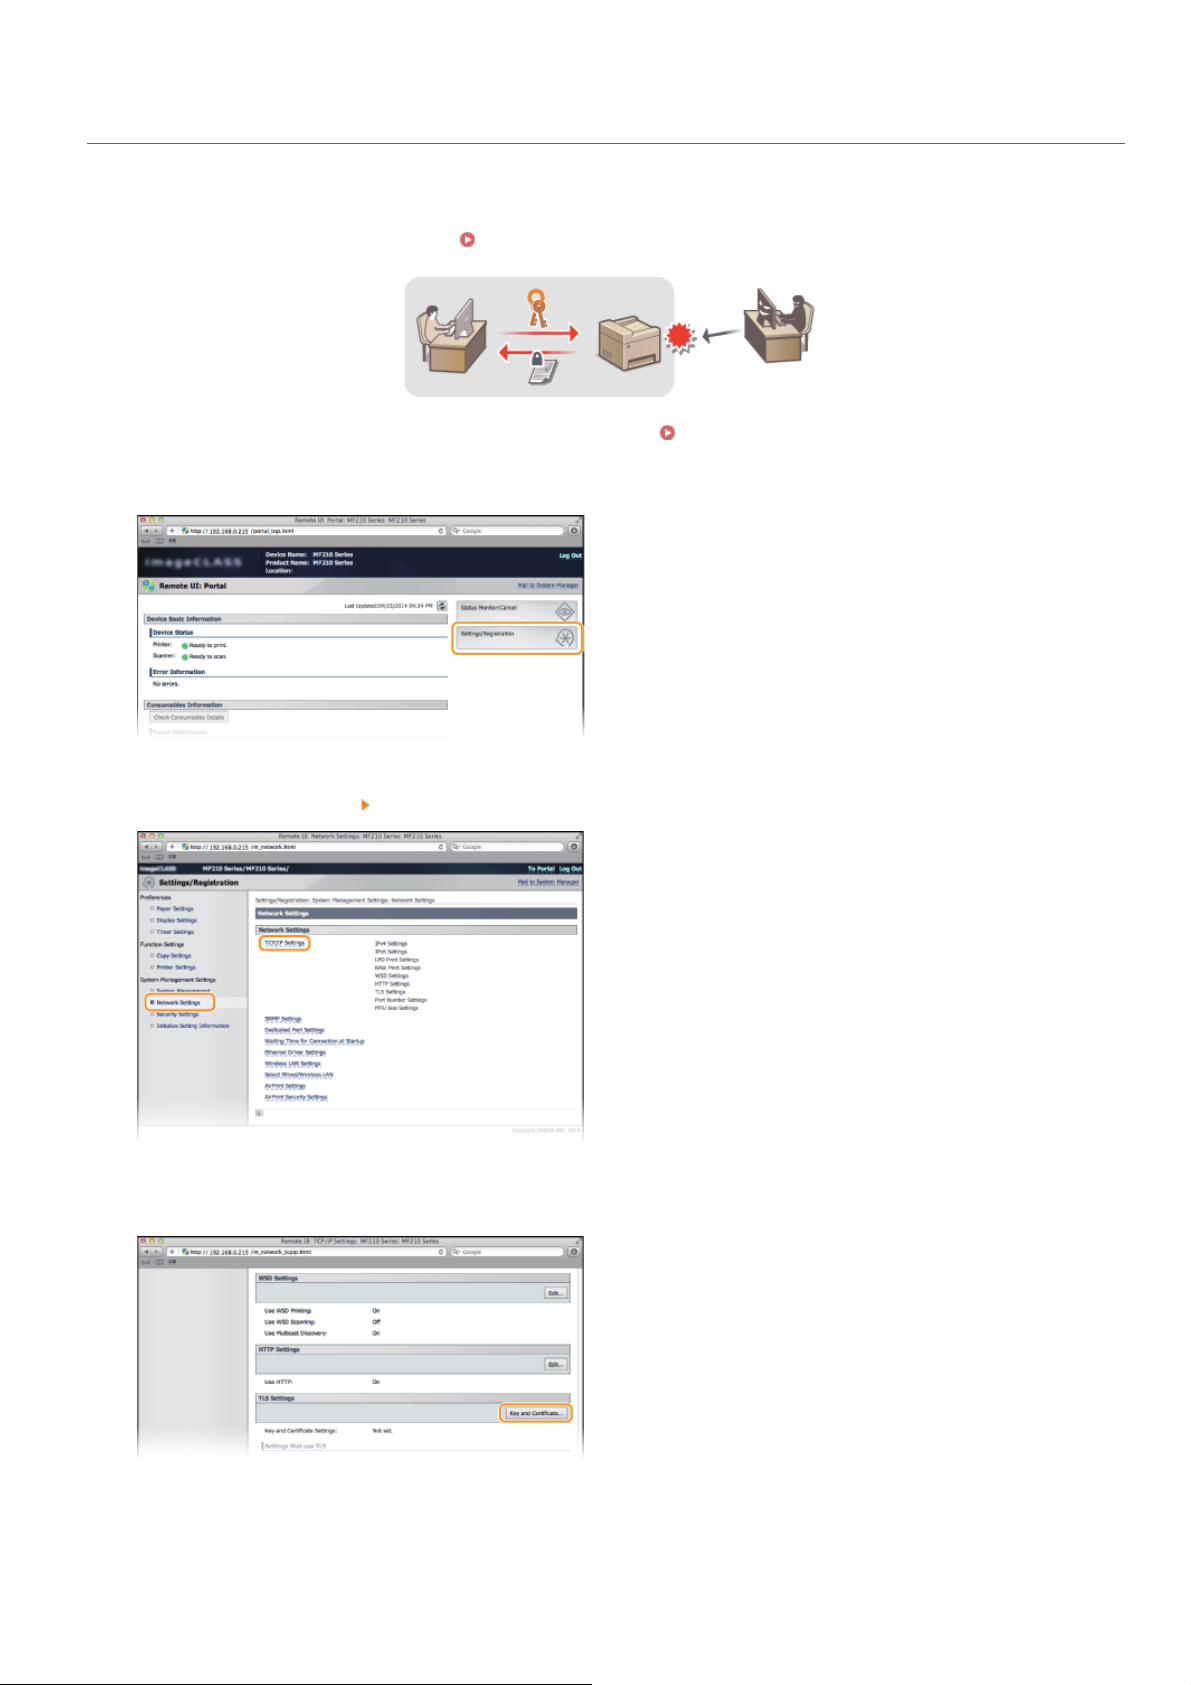
0L40-048
Encrypting Communication of Print Data for Apple Devices with TLS
Authorized users may incur unanticipated losses from attacks by malicious third parties, such as sniffing, spoofing, and tampering of data
as it flows over a network. To protect your important and valuable information from these attacks, you can use AirPrint on this machine
to encrypt communication between the machine and an Apple device with Transport Layer Security (TLS). TLS allows data to be
encrypted and sent or received over the network. To use TLS, you need to specify a key pair and enable the TLS function. Generate or
install the key pair for TLS before enabling TLS (
Start the Remote UI and log on in System Manager Mode. Starting Remote UI
1
Click [Settings/Registration].
2
Configuring Settings for Key Pairs and Digital Certificates).
Click [Network Settings] [TCP/IP Settings].
3
Click [Key and Certificate...] in [TLS Settings].
4
Click [Register Default Key] on the right of the key pair you want to use.
5
㻥㻥㻌㻛㻌㻟㻟㻢
Page 100
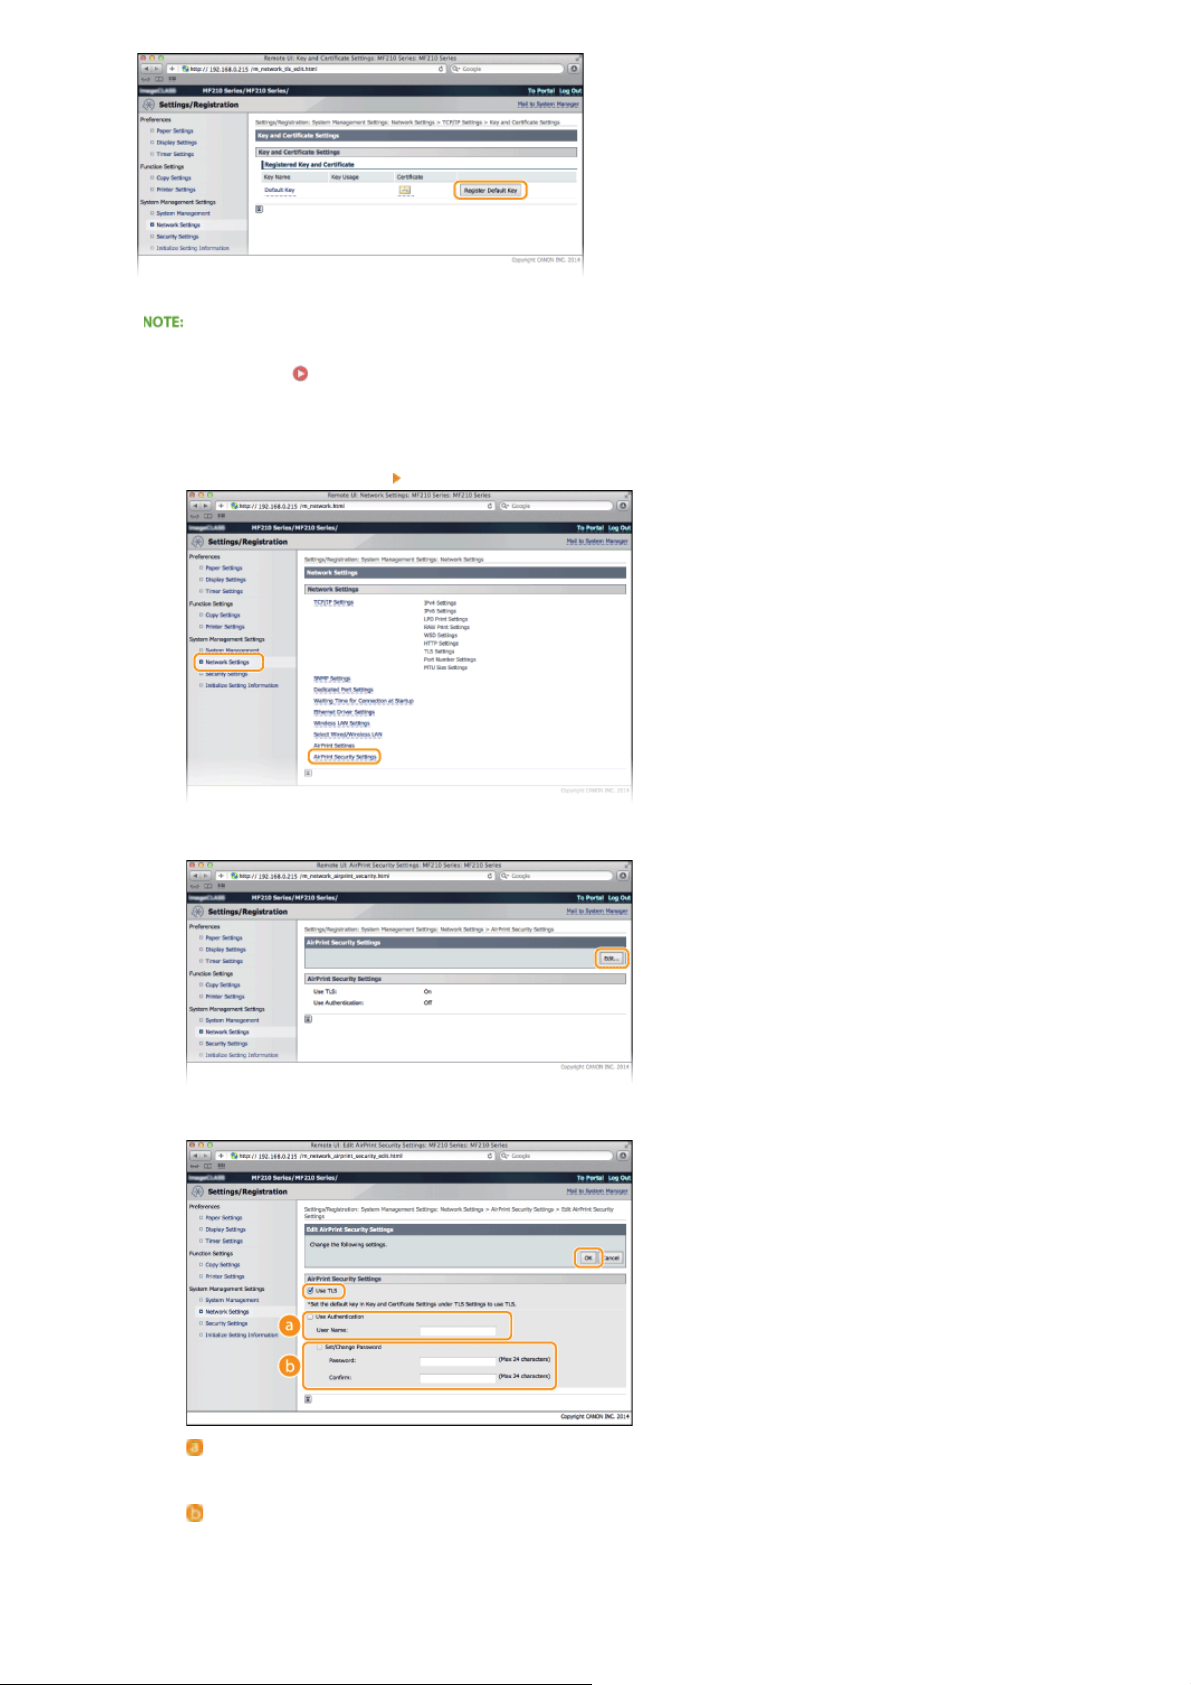
Viewing details of a certificate
You can check the details of the certificate or verify the certificate by clicking the corresponding text link under [Key Name], or
the certificate icon.
Enable TLS for the Remote UI.
6
Click [Network Settings] [AirPrint Security Settings].
1
Click [Edit...].
2
Verifying Key Pairs and Digital Certificates
Select the [Use TLS] check box, set required items, and then click [OK].
3
[Use Authentication]
When using AirPrint, you can use authentication. To use authentication, select the check box and then specify a [User
Name].
[Set/Change Password]
Specify a password to use for authentication. To specify a password, select the check box and then specify the password
in [Password] and [Confirm].
㻝㻜㻜㻌㻛㻌㻟㻟㻢
 Loading...