

Canon Laser Shot LBP-2410 Getting Started Manual
Contents
LASER SHOT LBP-2410
Getting Started Guide
Step1 Taking the Printer out of the Package and
Installing the Printer ........................................ 6
Confirming the Package Contents.............................. 6
Carrying the Printer to the Installation Site................. 6
Step2 Connecting the Power Cord and Turning the
Printer ON......................................................... 8
Step3 Installing a Drum Cartridge and Toner
Cartridges....................................................... 10
Step4 Loading Paper................................................ 17
Loading Paper in the Multi-purpose Tray.................. 17
Selecting an Output Tray .......................................... 20
Step5 Installing the Software and Connecting the
Printer to a Computer .................................... 22
After Completing Installation .................................... 25
Printing a Test Page.................................................. 26
When Installation Fails ............................................. 27
Step6 Installing the Optional Equipment................ 31
Installing the 250-sheet Paper Feeder ..................... 31
Installing the Network Board (AXIS 1611)................ 40
Appendix...................................................................... 44
Contents of CD-ROM
.................................................. 44
English
Read this manual carefully before using your printer.
Save this manual for future reference.
This manual describes the instructions to get
your printer ready for use.
Manuals for the Printer
Getting Started Guide (This Manual)
User's Guide
Instructions for printing, regular maintenance, and troubleshooting
CD-ROM
Guides with this symbol are PDF manuals included on the
accompanying CD-ROM.
(Before using the CD-ROM, see "Contents of CD-ROM," on p.44.)
CD-ROM
CD-ROM

Preface
Conventions
The following symbols are used in this manual to explain procedures,
restrictions, handling precautions, and instructions that should be observed
for safety.
WARNING
Indicates a warning concerning operations that may lead to death or
personal injuries if not performed correctly. In order to use the printer
safely, always pay attention to these warnings.
CAUTION
Indicates a caution concerning operations that may lead to personal
injuries or damage to properties if not performed correctly. In order
to use the printer safely, always pay attention to these cautions.
IMPORTANT
Indicates operational requirements and restrictions. Be sure to read
these items carefully in order to operate the printer correctly, and to
avoid damaging the printer.
NOTE
Indicates a clarification of an operation, or contains additional
explanations for a procedure. Reading these notes is highly
recommended.
Abbreviations Used in this Manual
In this manual, product names and model names are abbreviated as follows:
®
Microsoft
®
Microsoft
Windows
®
Microsoft
®
Microsoft
®
Microsoft
LASER SHOT LBP-2410: LBP-2410
®
Windows
Windows
Windows
Windows
98 operating system: Windows 98
®
Millennium Edition operating system
®
2000 operating system: Windows 2000
®
XP operating system: Windows XP
®
operating system: Windows
: Windows Me
Trademarks
Canon, the Canon logo, LASER SHOT, LBP, and NetSpot are trademarks of
Canon Inc.
®
Adobe
and Acrobat are trademarks of Adobe Systems Incorporated.
IBM and PowerPC are trademarks of International Business Machines
Corporation in the United States.
Microsoft and Windows are registered trademarks of Microsoft Corporation in
the United States and/or other countries.
Ethernet is a trademark of Xerox Corporation in the United States.
Other product and company names herein may be the trademarks of their
respective owners.
Copyright 2003 by Canon Inc. All rights reserved.
No part of this publication may be reproduced or transmitted in
any form or by any means, electronic or mechanical, including
photocopying and recording, or by any information storage or
retrieval system without the prior written permission of Canon
Inc.
Notice
Canon makes no guarantees of any kind with regard to this
manual. Canon shall not be held liable for errors contained
herein or for consequential or incidental damages incurred as a
result of acting on information contained in the manual.
2
■
■
●
●
●
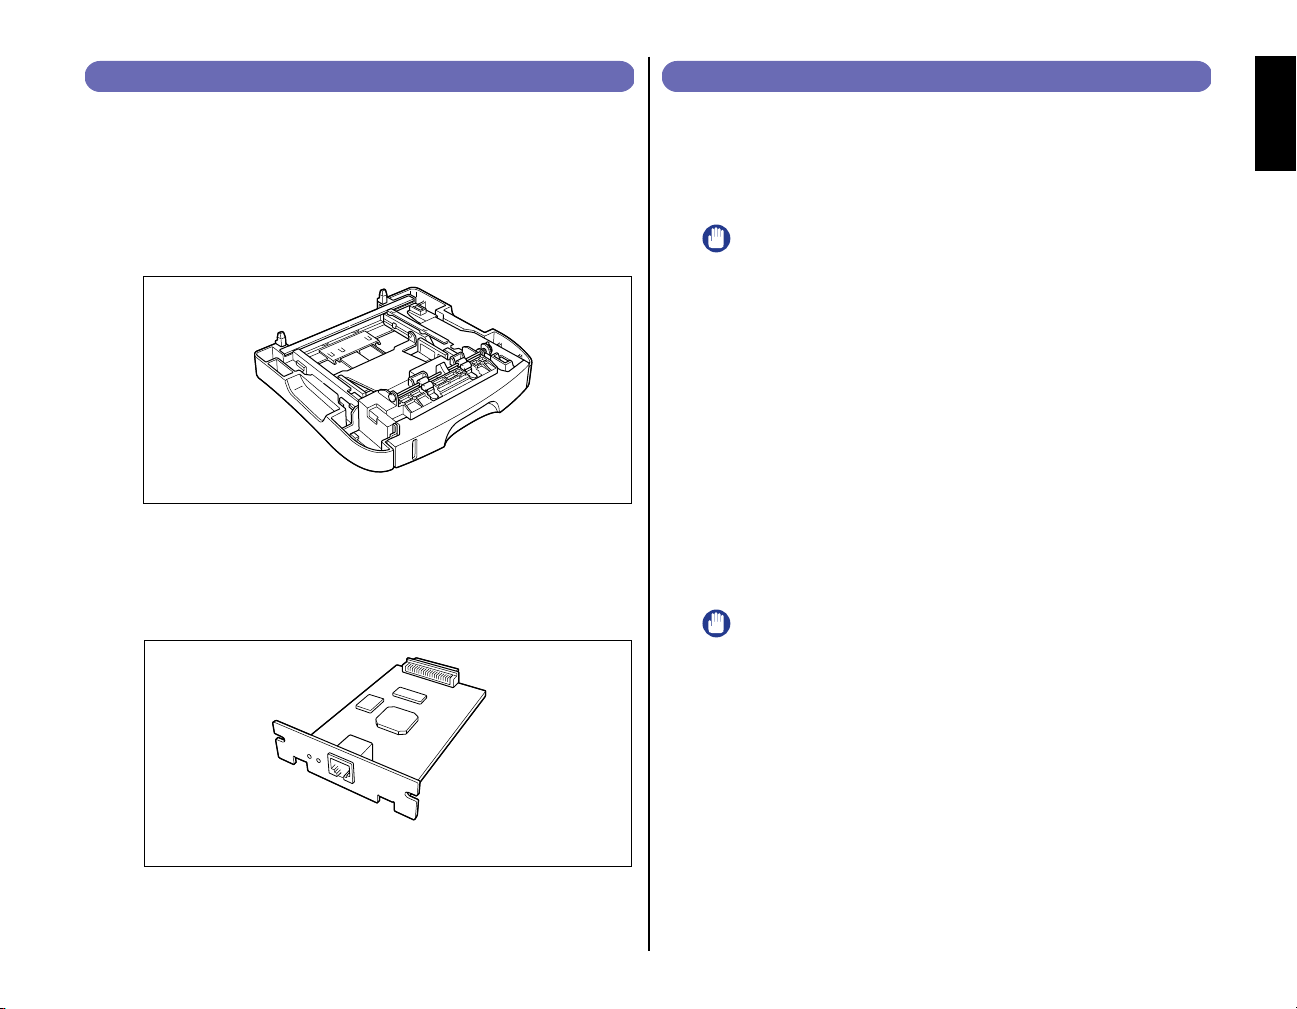
Optional Equipment
The following options are available to use the printer to its full extent
accurately. For the optional items, consult the store where you purchased the
printer.
250-sheet Paper Feeder
A 250-sheet paper feeder can be installed at the bottom of this printer. Up
to approximately 250 sheets of plain paper (64 g/m
A5, Legal, Letter, and Executive can be loaded in this cassette.
Paper Feeder Unit PF-87
Network Board (AXIS 1611)
By installing the optional network board (AXIS 1611), you can use the
LBP-2410 directly connected to the network.
For more details on the AXIS 1611, access the web site of Axis
Communications (http://www.axis.com/).
2
) in sizes of A4, B5,
Installation Site
Installation Environment
In order to operate the printer smoothly and safely, install the printer where
"Temperature/Humidity Conditions", "Power Conditions", and "Installing
Conditions" described in "Installation Environment" are fulfilled.
IMPORTANT
Before installing the printer, be sure to read "Important Safety Instructions"
in the User's Guide .
Use power supplies rated for voltages in the following ranges.
100 - 127 V (±10%) 50/60 Hz (± 2 Hz)
220 - 240 V (±10%) 50/60 Hz (± 2 Hz)
The maximum power consumption for the printer is 1102 W* or below for 220
- 240 V model (1043 W* for 100 - 127 V model)
Electrical noise or a dramatic drop in power voltage may not only result in
faulty operation or loss of data in the printer, but also in the computer as well.
*Note: 1139 W (220 - 240 V model) / 1067 W (100 - 127 V model) or below when installed
with full options. However, the momentum peak upon turning the power ON is
excluded from the value.
Use the printer where the temperature and humidity are in the following
ranges.
Ambient temperature: 10-30 °C (50 - 86 °F)
Ambient humidity: 10-80 % RH (no condensation)
IMPORTANT
Condensation may occur in the printer in the following situations. Leave
the printer in a new environment for over two hours before it is used so that
the printer can get accustomed to the ambient temperature and humidity. If
condensation occurs in the printer, it may result in misfeeds which will
result in paper jams and printer malfunctions.
- When the room where the printer is installed is heated suddenly
- When the printer is moved from a cool and dry area to a hot and humid
area
English
Network Board (AXIS 1611)
3

●
NOTE
To customers using an ultrasonic humidifier
Impurities contained in tap water or well water are emitted from an
ultrasonic humidifier. Impurities accumulated in the printer may result in
printer malfunctions. If an ultrasonic humidifier is used in the same room
as the printer, use pure water or water that does not contain impurities.
Install the printer in the following environment
• A place where sufficient space can be secured
• A well-ventilated room
• A flat surface
• A sturdy platform that can easily tolerate the weight of the printer and optional
equipment
WARNING
Do not install the printer near alcohol, paint thinner, or other
flammable substances. If flammable substances come into contact
with the electrical parts inside the printer, it may result in a fire or
electrical shock.
CAUTION
•
Do not install the printer in the following locations, as it may result in
a fire or electrical shock.
- A damp or dusty location
- A location exposed to smoke and steam such as near stoves and
humidifiers
- A location exposed to rain or snow
- A location near water faucets or water
- A location exposed to direct sunlight
- A location subject to high temperatures
- A location near open flames
•
Do not install the printer in unstable locations, such as unsteady
platforms or inclined floors, or in locations subject to excessive
vibrations as this may cause the printer to fall or tip over, resulting in
personal injuries.
- A poorly ventilated room
- Near devices that generate magnetic or electromagnetic waves
- In rooms such as laboratories where chemical reactions occur
- In a room where corrosive or poisonous chemicals such as salt or
ammonia are present in the air
- A platform that may warp from the weight of the printer and optional
equipment, or where the printer is liable to sink (such as on a carpet or
mat)
IMPORTANT
Do not install the printer in the following areas. It may result in damaging
the printer.
- An environment where the temperature and/or humidity can change
dramatically, or where condensation occurs
4
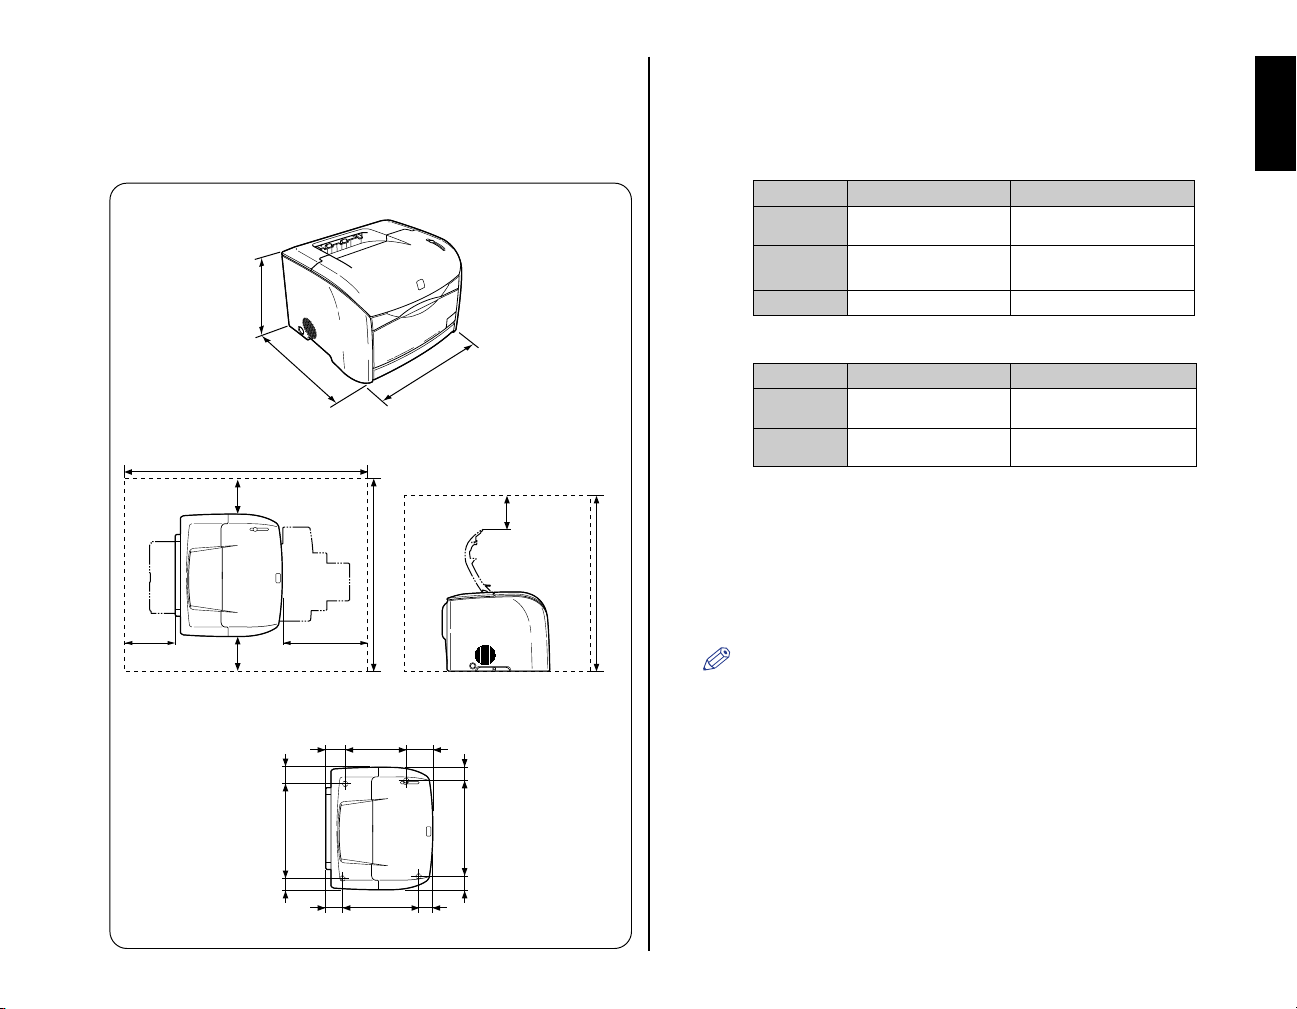
Installation Space
Secure space around the printer as shown below, and install the printer on a
platform that can tolerate the weight sufficiently. The dimensions of each
section, required peripheral space, foot position, and installed height are shown
in the figure.
Dimensions of the Printer
325
451
Required Peripheral Space
987
100100
328208
Foot Position
682
27978 94
482
(mm)
100
707
(mm)
System Requirements
Operating system software environment
• Microsoft Windows 98/Me
• Microsoft Windows 2000/XP
System Requirements (minimum required)
Windows 98/Me
CPU
Memory (RAM)
Hard Disk
System Requirements (recommended)
CPU
Memory (RAM)
Pentium 300 MHz or higher
64 MB or more
20 MB or more
Windows 98/Me
PentiumIII 600 MHz or higher
64 MB or more
Interface Environment
When connecting by USB
• Windows 98/Me: USB Full-Speed (USB1.1 equivalent)
• Windows 2000/XP: USB 2.0 Hi-Speed/USB Full-Speed (USB1.1 equivalent)
When connecting to a network (Requires an optional network board)
• Connector: 10Base-T or 100Base-TX
• Protocol: TCP/IP, NetBIOS/NetBEUI (TCP/IP only for Windows XP)
NOTE
When using Sound, PC synthesizer (and the driver for PCM synthesizer)
must be installed. Do not use a PC Speaker driver (such as speaker.drv).
Windows 2000/XP
Pentium 300 MHz or higher
Windows 2000: 64 MB or more
Windows XP: 128 MB or more
15 MB or more
* PC/AT compatibles
Windows 2000/XP
PentiumIII 600 MHz or higher
Windows 2000: 128 MB or more
Windows XP: 256 MB or more
English
357 78.546.5
31978 54
344 7167
(mm)
5
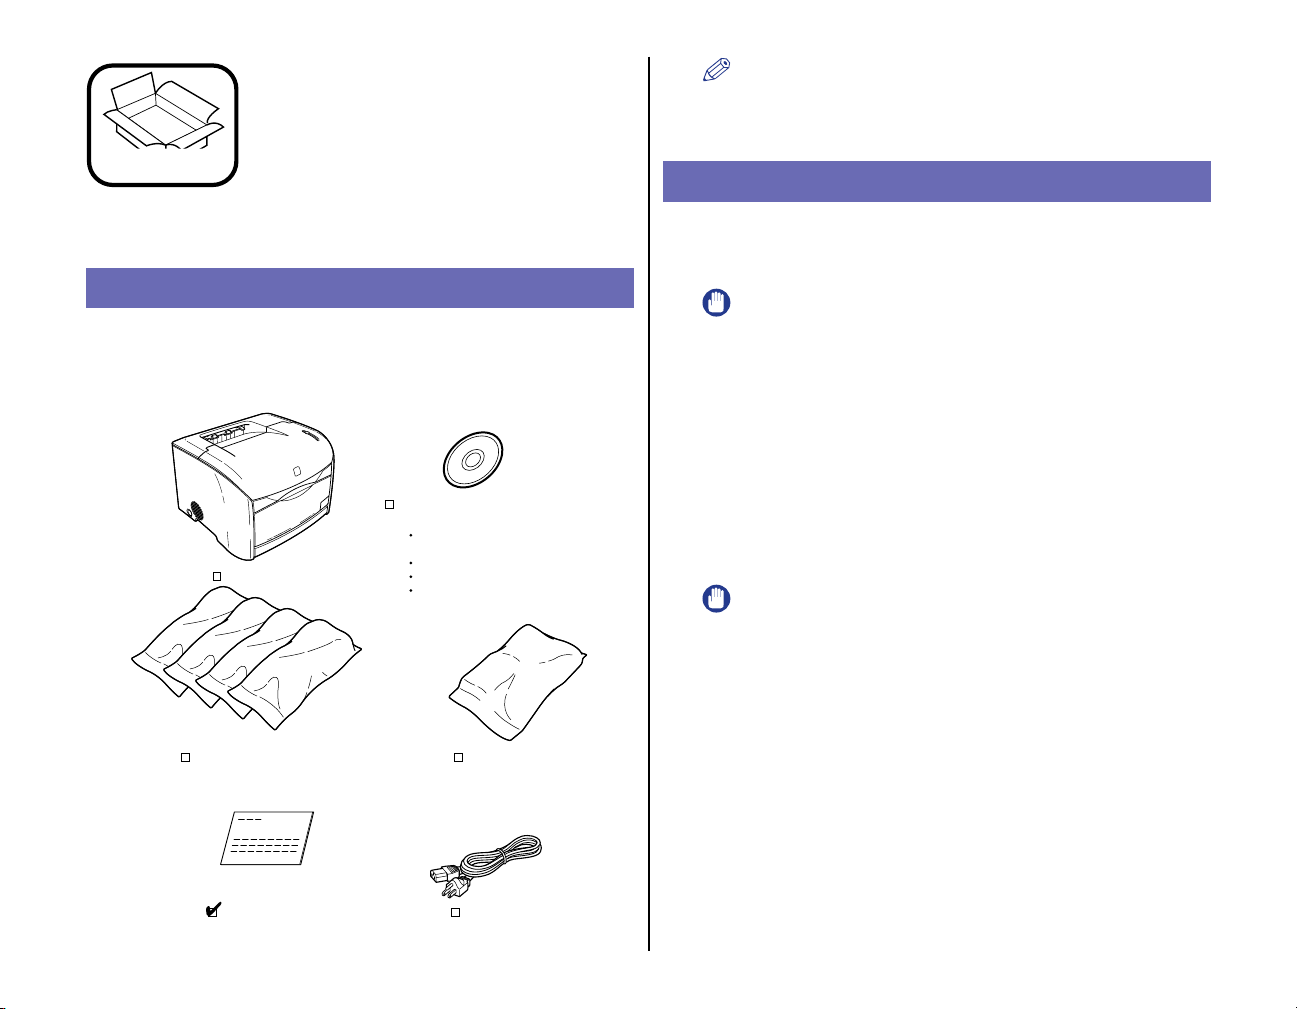
Taking the Printer out of
the Package and
Step1
Installing the Printer
Confirming the Package Contents
Confirm that the following items are contained in the package before installing
the printer. If an item is missing or damaged, please contact the store where
the printer was purchased.
CD-ROM
[User Software for LBP-2410]
CAPT (Canon Advanced
Printing Technology) software
Printer
USB Class Driver
Getting Started Guide (This Manual)
User's Guide
NOTE
Interface cables are not included with this printer. Have cables that can be
used with your computer or the connection method available.
Carrying the Printer to the Installation Site
Once the installation site is determined, take the printer out of the package and
carry it to the subject location.
IMPORTANT
•
Install the printer on a platform such as a desk that can tolerate the weight
of the printer sufficiently.
•
Do not install the printer and optional equipment on a platform that may
warp from their weight, or where they are liable to sink (such as on a
carpet or mat).
•
When installing an optional 250-sheet paper feeder, install the paper
feeder before taking the printer out of the package. For the installation
procedure, See "Installing the 250-sheet Paper Feeder," on p. 31.
1
Take the printer out of the package.
IMPORTANT
Be sure that sufficient space is secured before taking the printer out of the
package.
Toner Cartridge (x4)
(EP-87 Toner Cartridge)
Getting Started Guide
(This Manual)
6
Drum Cartridge
EP-87 Drum Cartridge)
(
Power Cord
2
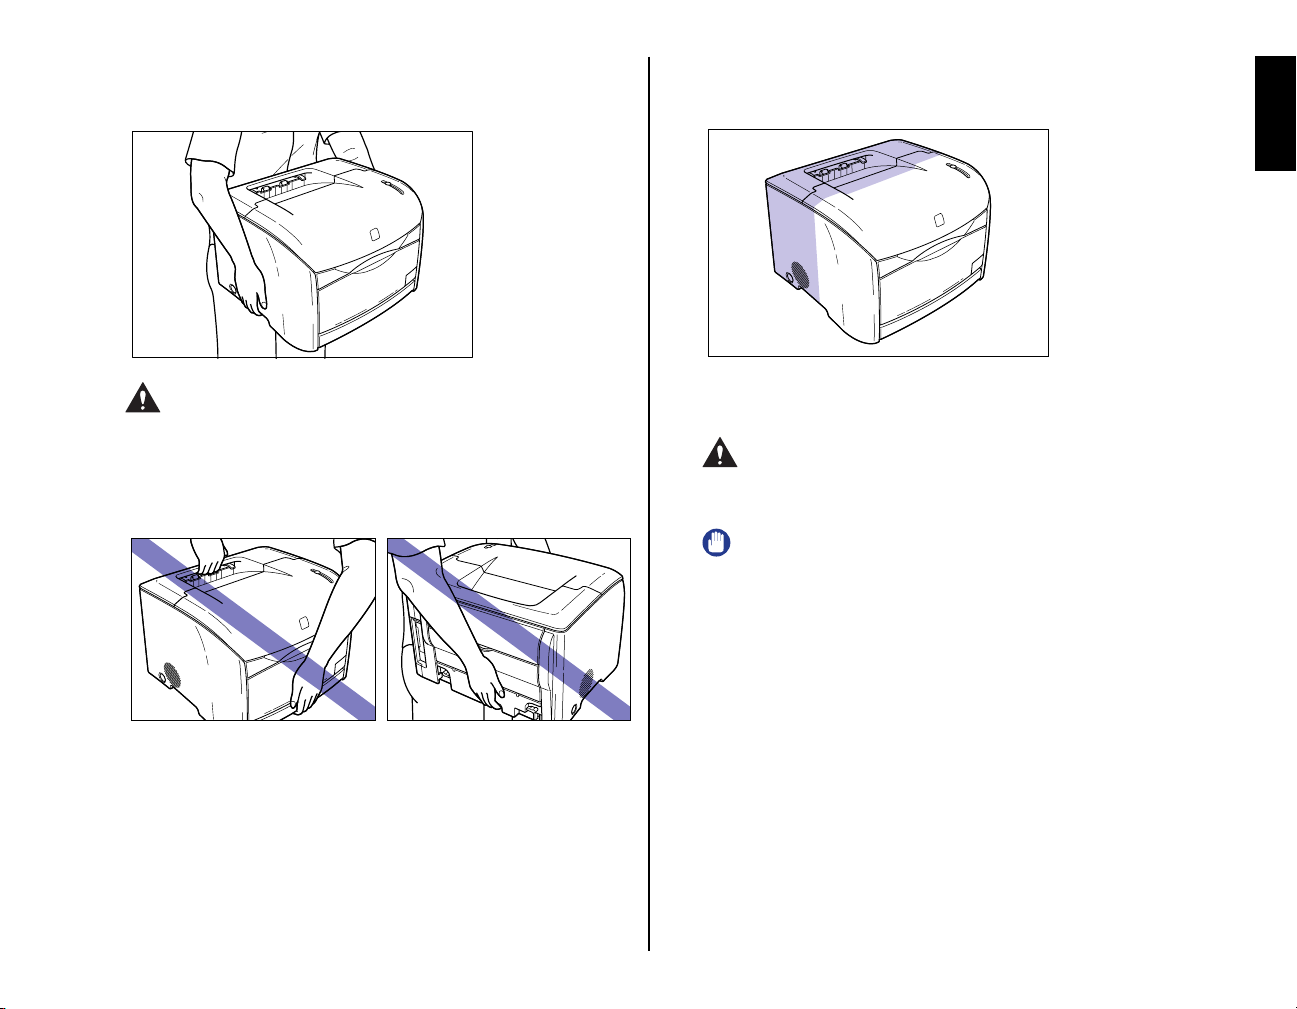
Carry the printer to the installation site.
Hold the grips located on both sides of the printer securely with both hands.
The back portion of the printer is relatively heavy. Be careful not to
•
get off-balanced when lifting the printer. The printer may drop and
result in personal injuries.
Heavier on the
back portion
English
CAUTION
•
This printer weighs approximately 15 kg when a drum cartridge and
toner cartridges are not installed. Be careful not to hurt your back or
other portions of your body when carrying the printer.
•
Be careful not to hold parts other than the grips for moving the
printer. The printer may drop and result in personal injuries.
3
Set the printer down carefully at the installation site.
CAUTION
Set the printer down slowly and carefully. Be careful not to hurt your
hands.
IMPORTANT
Be sure that there is sufficient space for installing optional equipment and
connecting cables at the installation site.
7
Connecting the Power
2
Connect the supplied power cord into the power socket.
Step2
Printer ON
IMPORTANT
One AC outlet should be used exclusively for the printer.
•
•
Do not connect the power cord to the auxiliary outlet on the computer.
Do not connect this printer to an uninterruptible power source. It may result
•
in a computer or printer glitch or breakdown due to a power failure.
1
Confirm that the power switch is turned OFF.
The printer is OFF when the power switch is flush with the surface of the printer.
Cord and Turning the
Connect the power plug into the AC outlet.
3
8
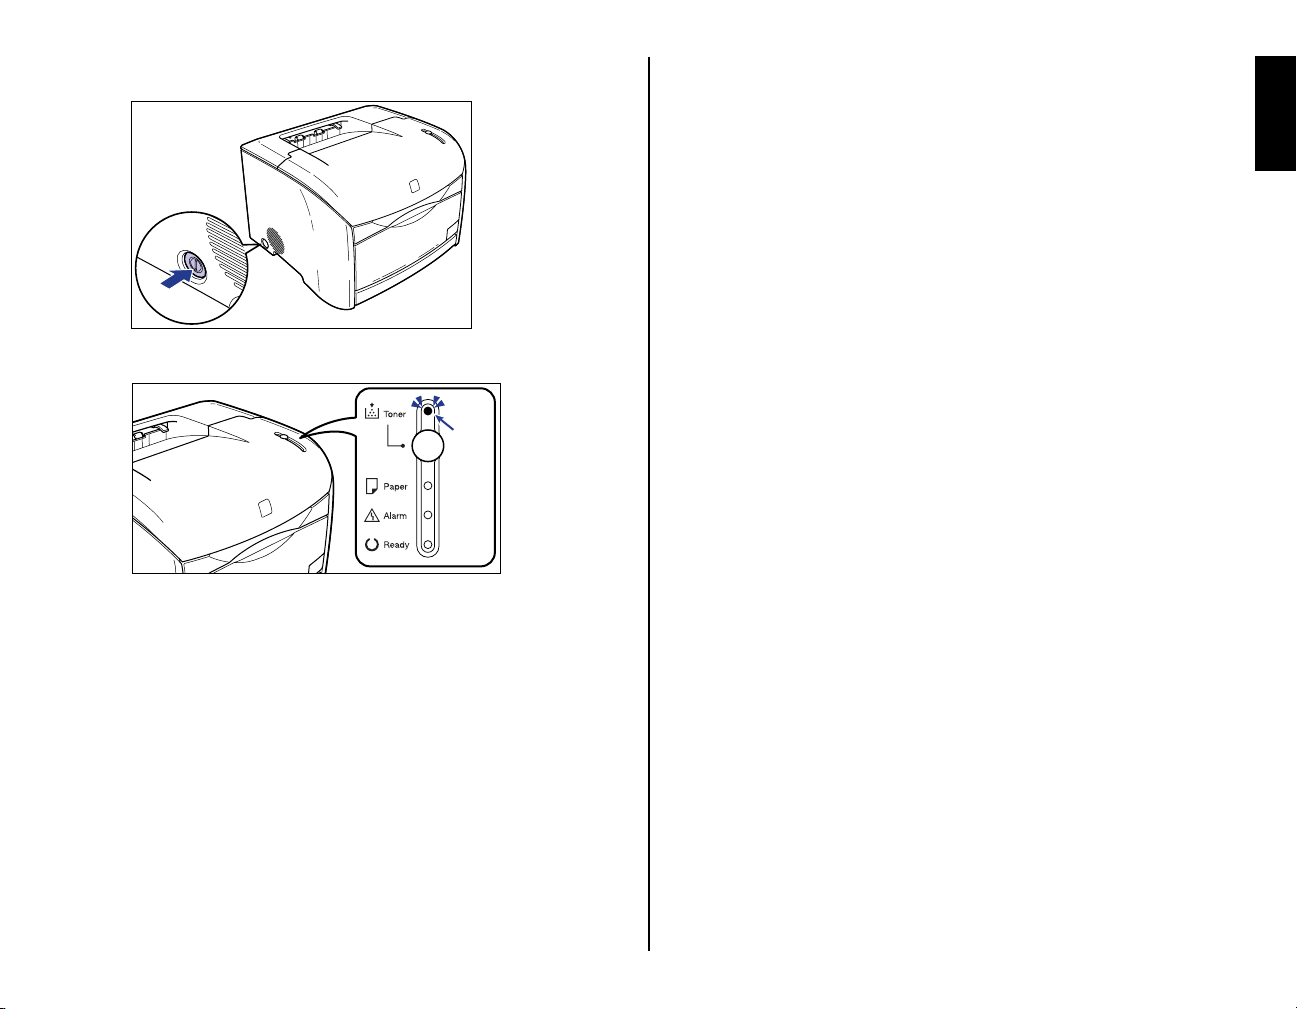
4
Press the power switch on the printer to turn it ON.
The Toner lamp (red) will go on after a short period of time.
Illuminate
English
9
Installing a Drum
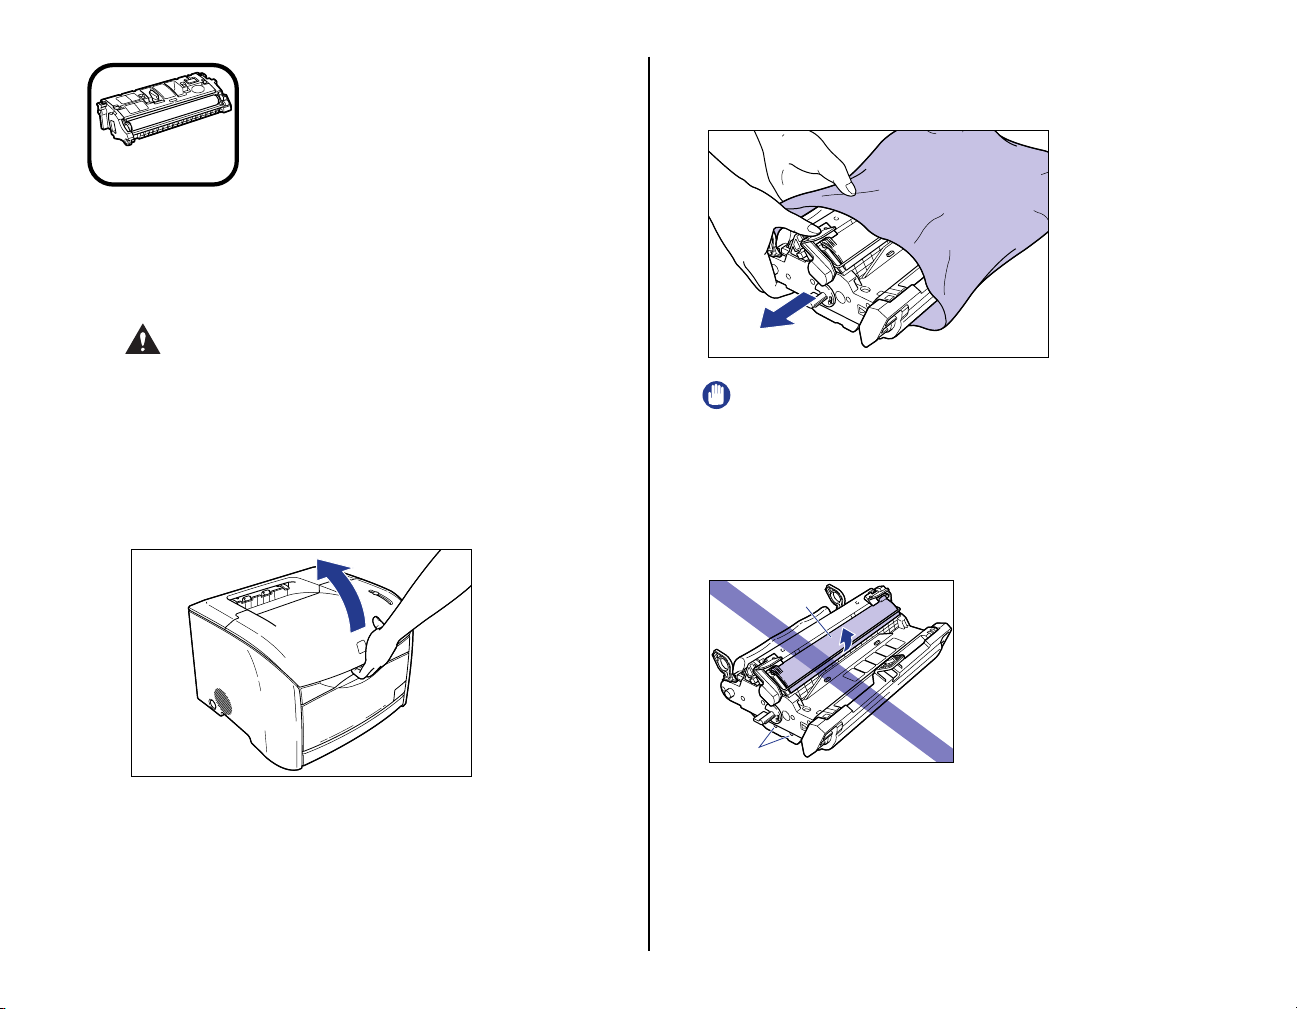
2
Take the drum cartridge out of the protective bag.
Open the protective bag with scissors, so as not to damage the cartridge.
Step3
Cartridges
For details on handling the cartridges, See Chapter 5 "Routine
Maintenance" in the User's Guide .
CAUTION
Be careful not to allow the toner to come into contact with your
hands or clothing. If toner comes into contact, wash it off
immediately with cold water. Washing with warm water will set the
toner and make it difficult to remove the toner stains.
1
Open the upper cover.
Hold the grip on the upper cover and open it until it stops.
Cartridge and Toner
IMPORTANT
Keep the protective bag in which the cartridge came in. It may be required
•
when taking out the drum cartridge for printer maintenance.
•
Print quality may deteriorate if you touch or damage the drum that is set
inside. Be careful not to touch the drum or open the drum protective
shutter. Be careful not to hold or touch the portions that are not described
for this procedure such as the sensors. It may result in damage to the
printer.
Drum protective
shutter
10
Sensors
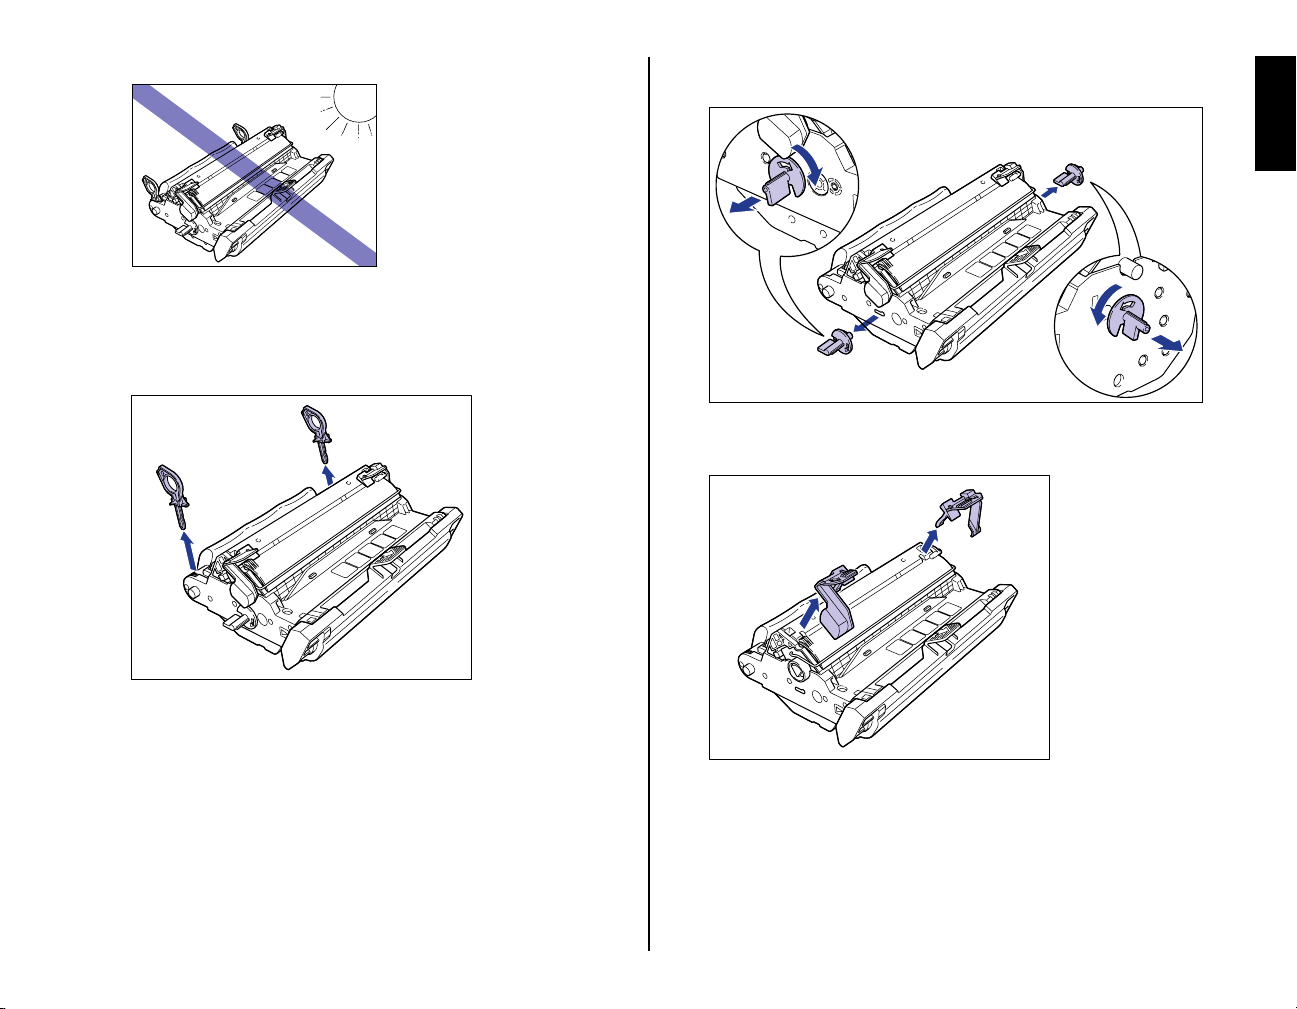
Do not expose the drum cartridge to direct sunlight or strong light.
•
c
Remove the packing materials
arrows until they stop and pulling them away.
d
and
by turning them in the direction of the
Remove the packing materials (7 pieces).
3
Remove the packing materials
pulling them in the direction of the arrows.
a
and
b
b
a
by hooking your fingers into the tab and
c
Remove the packing materials
in the direction of the arrows.
e
e
f
d
and
by holding the grips and pulling them
f
English
11
Hold the packing material
g
and remove it as shown in the figure.
g
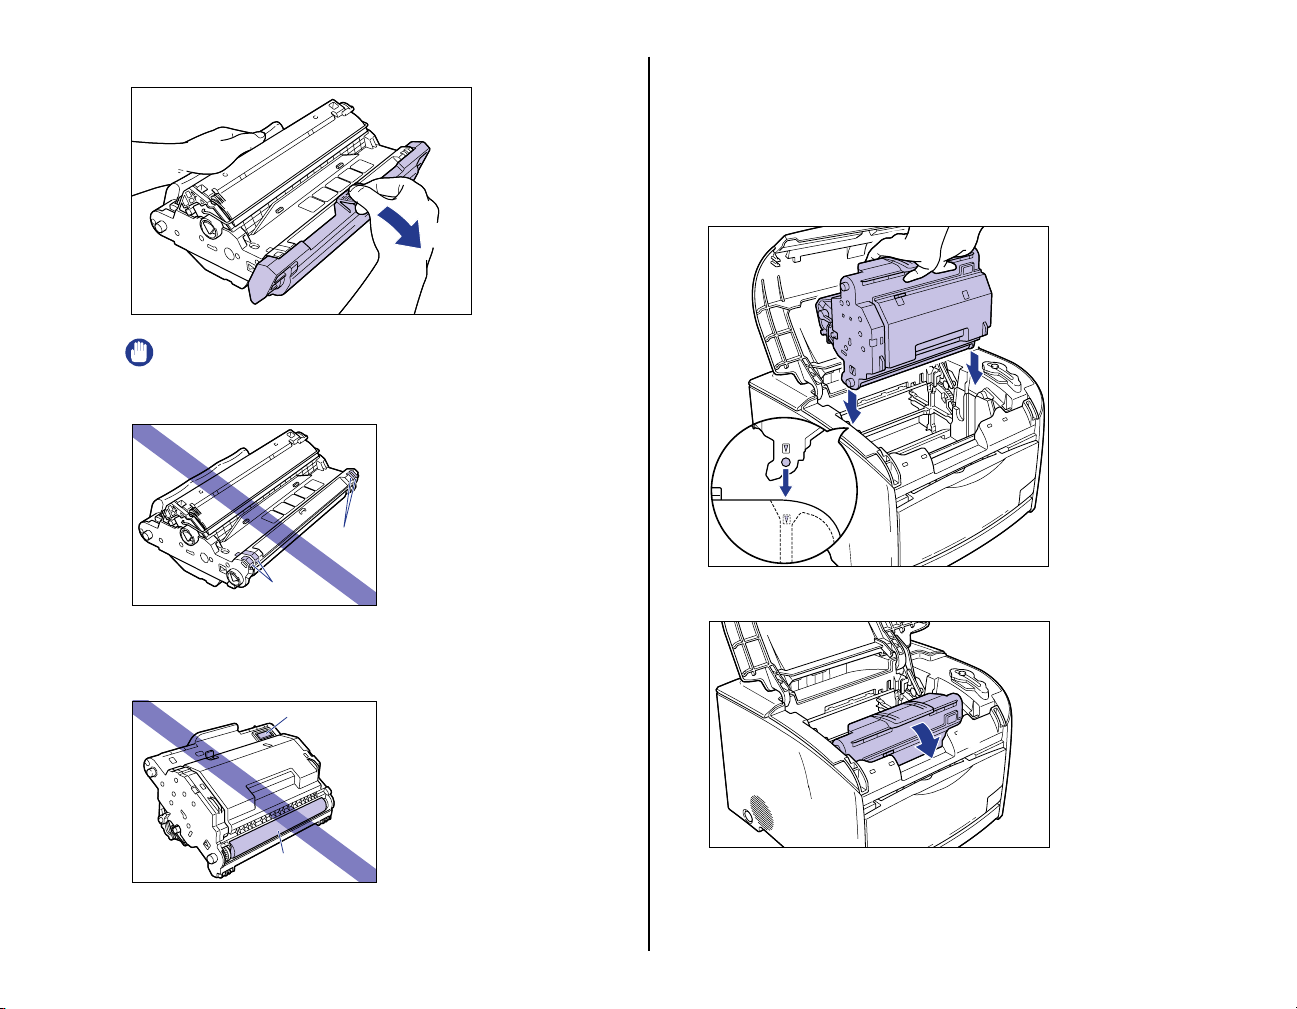
IMPORTANT
Do not hold or touch the electrical contacts. It may result in damage to the
•
printer.
Electrical
contacts
Electrical
contacts
Do not hold or touch the imaging transfer belt. The image quality may
•
deteriorate. Do not apply shock to the drum cartridge memory or bring it
near magnetic waves. It may result in damage to the printer.
Drum cartridge memory
Dispose of the packing materials according to local regulations.
•
4
Hold the drum cartridge with both hands and install it in the
printer.
Position the triangular mark on the drum cartridge with the triangular mark on the
printer and install the drum cartridge
a
.
a
Lock the drum cartridge by pushing it down toward you
b
.
b
12
Imaging
transfer belt
After removing the packing materials, install the drum cartridge in the
•
printer as soon as possible.

IMPORTANT
Lock the drum cartridge securely so that it may be in the state shown in
the figure.
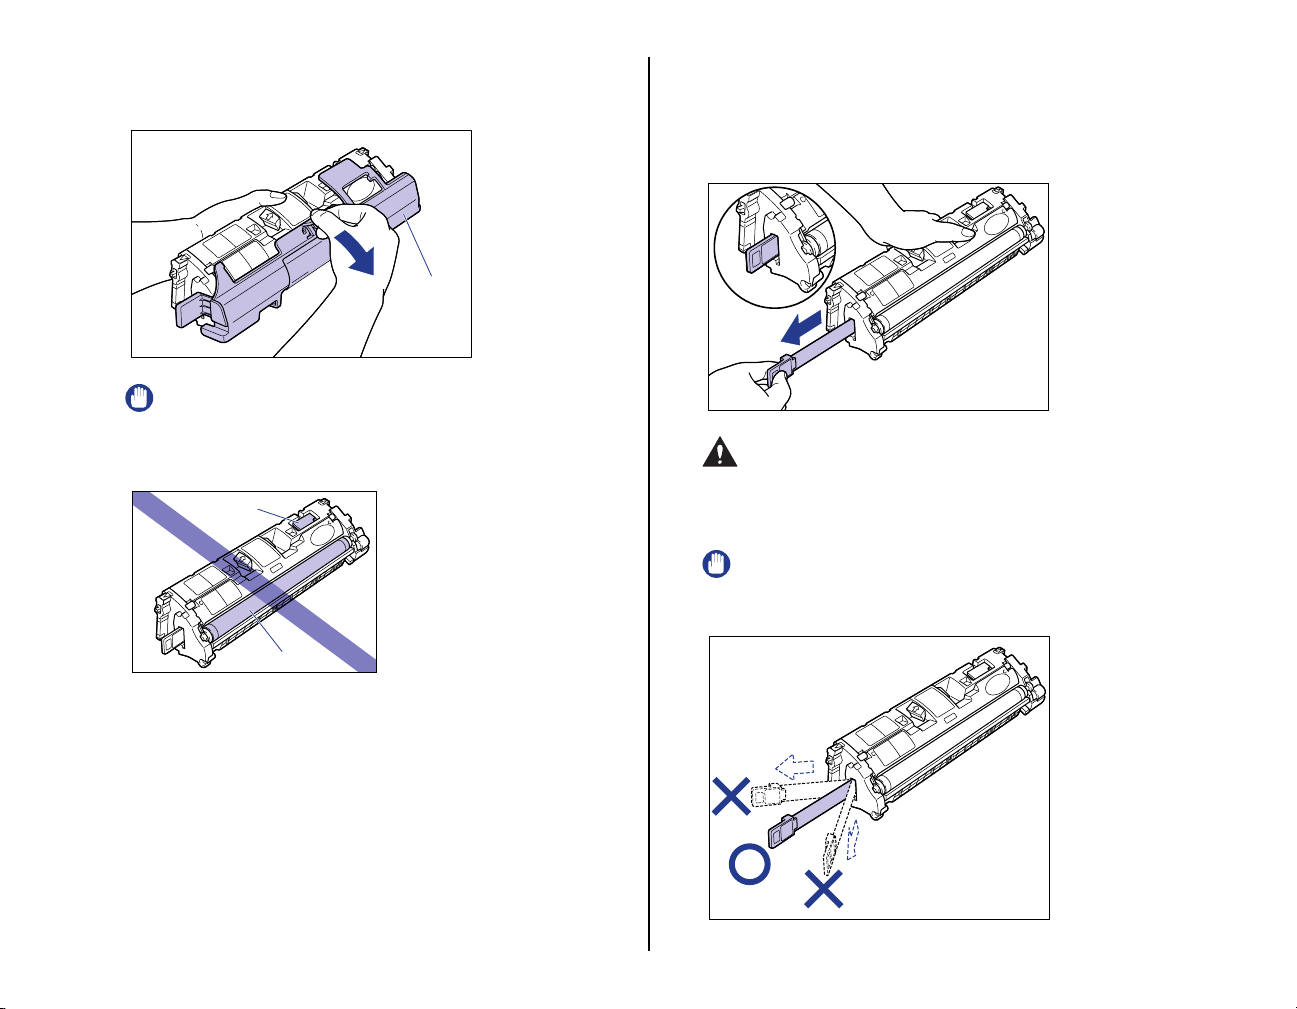
Confirm the color of the label on the toner cartridge holder,
5
then take out the toner cartridge of the same color from the
protective bag.
Open the protective bag with scissors, so as not to damage the cartridge.
Be careful not to hold or touch the prohibited portions such as the sensor
•
or electrical contacts. It may result in damage to the printer.
Electrical
contacts
Sensor
6
Hold the toner cartridge as shown in the figure, shake it
gently 5 or 6 times from side to side aaaa, then back and forth
bbbb to distribute the toner evenly inside.
a
b
English
IMPORTANT
Keep the protective bag in which the cartridge came in. It may be required
•
when taking out the cartridge for printer maintenance.
IMPORTANT
• If the toner is not distributed evenly, it may result in a deterioration in print
quality. Be sure to carry out this procedure properly.
• Be sure to shake the cartridge gently. Toner may spill if the cartridge is
handled without caution.
13
7
Remove the protective cover.
Hold the protective cover and remove it as shown in the figure.
Protective
cover
IMPORTANT
• Do not touch or hold the developing roller. The image quality may
deteriorate if you do. Do not apply shock to the toner cartridge memory or
bring it near magnetic waves as this may result in damage to the printer.
Toner cartridge
memory
8
Place the toner cartridge on a flat surface, then pull out the
sealing tape (Approx. 45 cm in length) slowly while
supporting the toner cartridge.
Hold the tab on the sealing tape and pull it out straight.
CAUTION
If the sealing tape is pulled out forcefully or stopped at midpoint,
toner may spill. If toner gets into your eyes or mouth, wash it away
immediately and consult a physician.
IMPORTANT
• Do not pull the sealing tape diagonally, upwards, or downwards. If the tape
is severed, it may become difficult to pull it out completely.
14
Developing roller
• Keep the protective cover with which the cartridge from removed. It may
be required when taking out the toner cartridge for printer maintenance.
 Loading...