

Canon K10285, Pixma ip5300 Quick Start Manual
Quick Start Guide
Table of Contents
How to Use the Documentation Provided
Reading the On-Screen Manuals
Preparing the Printer
Installing the Printer Driver
Introduction
Loading Printing Paper
Basic Printing
Printing Photographs Directly from a Compliant Device 12
Replacing an Ink Tank
1
2
3
5
7
8
10
18
BE
QT5-0495-V02

Exif Print
This printer supports ExifPrint.
Exif Print is a standard for enhancing the communication between digital cameras and printers.
By connecting to an Exif Print-compliant digital camera, the camer
shooting is used and optimized, yielding extremely high quality prints.
a’s image data at the time of
Canadian Radio Interference Regulations
This digital apparatus does not exceed the Class B limits for radio noise emissions from a
digital apparatus as set out in the interference-causing equipment standard entitled “Digital
Apparatus,”
ICES-003 of the Industry Canada.
Cet appareil numérique respecte les limites de bruits radioélectriques applicables aux appareils
numériques de Classe B prescrites dans la norme sur le matériel brouilleur NMB-003
d'Industrie Canada intitulée « Appareils numériques ».
International ENERGY STAR® Program
As an ENERGY STAR® Partner, Canon Inc. has determined that this product meets the
ENERGY STAR guidelines for energy efficiency.
®
The International ENERGY STAR
program that promotes energy saving through the use of computer and other
office equipment. The program backs the development and dissemination of
products with functions that effectively reduce energy consumption. It is an
open system in which business can participate voluntarily. The targeted
products are office equipment such as computers, monitors, printer
and copiers.
Their standards and logos are uniform among participating nations.
Office Equipment Program is a global
s, faxes
Power Requirements
Never use a power supply voltage other than that supplied in the country of purchase. Using
the incorrect voltage could cause a fire or electric shock. The correct power supply voltages
and frequencies are as follows:
AC 100-240V, 50/60Hz
About Consumables
Consumables (ink tanks / FINE Cartridges) are available for 5 years after production has
stopped.
Safety Precautions
Warning
z Never attempt to plug the power cord into the power outlet or unplug the power cord when your hands are wet.
z Never damage, modify, stretch, or excessively bend or twist the power cord. Do not place heavy objects on the
power cord.
z Never use any power supply other than the standard power supply available in the country of purchase. Using
the incorrect voltage and frequency could cause a fire or electric shock.
z Always push the plug all the way into the power outlet.
Caution
z For safety reasons, store ink tanks out of the reach of small children.
z Do not drop or shake ink tanks as this may cause the ink to leak out and stain your clothes and hands.
Also read the Safety Precautions in the User’s Guide on-screen manual. Observe the warnings and
cautions to avoid personal injury or damage to the printer.
Model Number: K10285 (iP5300)

How to Use the Documentation Provided
Easy Setup Instructions (Setup Sheet)
Be sure to read this sheet first.
This sheet includes instructions for setting up your printer and getting it ready
for use.
Quick Start Guide (This guide)
Read this guide when starting to use the printer.
After following instructions in the Easy Setup Instructions (Setup Sheet), we
recommend you read this guide to familiarize yourself with the basic operations,
for example, printing from your computer and a PictBridge compliant device.
On-screen Manuals
User’s Guide
Read this guide when starting to use the printer.
If the Quick Start Guide does not provide you enough information, please refer
to the User’s Guide that can be installed from the Setup CD-ROM. This guide
provides detailed instructions for:
z printing from your computer
z compatible media types
z routine maintenance
z troubleshooting
Additional guides are also available for advanced features.
Printer Driver Guide
Refer to this guide for full instructions on printer driver setting.
Photo Application Guide
Refer to this guide for instructions on using the various application software
included on the Setup CD-ROM.
1How to Use the Documentation Provided
Reading the On-screen Manuals
Along with this Quick Start Guide, on-screen manuals are also supplied with your printer. For
detailed instructions on installing the on-screen manuals, refer to the Easy Setup Instructions (Setup
Sheet).
You can view the on-screen manuals in the following way:
To view the on-screen manual, double-click the iP5300 On-screen Manual shortcut icon on the
desktop, or click Start > All Programs (or Programs) > Canon iP5300 Manual > iP5300 On-
screen Manual.
System Requirements
Browser: Windows HTML Help Viewer
Note
z Microsoft Internet Explorer® 5.0 or later must be installed.
z The on-screen manual may not be displayed properly depending on your operating system or
Internet Explorer version. We recommend that you keep your system up to date with Windows
Update.
To view the on-screen manual, double-click the iP5300 On-screen Manual alias on the desktop.
Note
Users in Asia only:
If you installed the User’s Guide from the Manual folder in the Setup CD-ROM, open the folder in which
you copied the User’s Guide and double-click top.htm.
System Requirements
Browser: Help Viewer
Note
z The on-screen manual may not be displayed properly depending on your operating system. We
recommend that you keep your system up to date.
z We recommend using Safari as your Web browser to view the HTML format on-screen
manuals. If Safari is not installed on your computer, download it from Apple Computer, Inc.
website and install it.
2 Reading the On-screen Manuals
Preparing the Printer
Be sure to read the Easy Setup Instructions (Setup Sheet) first for setting up your printer and getting
it ready for use.
Unpack the printer
Please confirm the included items against the illustration printed on the lid of the packing box.
Important
z Do not connect the USB cable until after the software is installed.
z A USB cable is necessary to connect the printer with your computer.
1 Turn on the printer.
Caution
Be sure to remove the tapes before you turn on the printer.
Note
The tape position is subject to change.
2 Install the Print Head.
Caution
Do not touch internal parts other than the Print Head Lock Lever.
Important
If the Top Cover is open for more than 10 minutes, the Print Head Holder moves to the right side. In
this case, close the Top Cover, and open it again.
Note
z There might be some transparent or light blue ink on the inside of the bag the print head comes
in, or the inside of the protective cap - this has no effect on print quality. Be careful not to get ink
on yourself when handling these items.
z Do not reattach the protective cap once it has been removed.
3 Install the ink tanks.
Important
z Make sure that all the ink tanks are installed in the correct position, matching the label. The
printer cannot be used unless all the ink tanks are installed.
z Once you have installed the ink tanks, the POWER lamp will flash green. Wait for about 2
minutes, until the POWER lamp stops flashing and changes to steady, non-flashing green and
the printer has stopped making operating noises, before proceeding.
Note
z Be sure to remove the clear film from the ink tank in the exact order as shown in step 3 of the
Easy Setup Instructions (Setup Sheet).
z Do not squeeze the side of ink tanks as this may cause the ink to leak out and stain your clothes
and hands.
z Do not reattach the protective cap once you have removed it.
z The ALARM lamp on the printer still flashes orange if an ink tank is not installed properly. Open
the Top Cover and make sure that position of all the ink tanks match the label.
3Preparing the Printer

4 Load printing paper.
In the following process, you will be required to perform the Print Head Alignment, and you
will need two sheets of supplied paper (MP-101) loaded with the printing side (whiter side)
facing UP in the Auto Sheet Feeder.
Important
z When loading paper in the Auto Sheet Feeder, make sure that the Auto Sheet Feeder lamp is
lit.
z Always load paper in portrait orientation. Loading paper in landscape orientation can cause the
paper to be jammed.
4 Preparing the Printer
Installing the Printer Driver
Information Common to Windows® and Macintosh
Notes on the Installation Process
z If the Select Language screen appears, select a language, then click Next.
z If the Select Your Place of Residence screen appears, select your place of residence, then
click Next.
z There are two ways of installing the printer driver and other software:
Easy Install: the items included on the Setup CD-ROM are installed automatically
Custom Install: you can select particular items to install
z When the User Registration screen appears, if you click Register and your computer is
connected to the Internet, the on-screen instructions to register your product will appear.
Registration can also be performed from the icon on the desktop after installation is
completed.
Notes on the Print Head Alignment
z Load two sheets of supplied paper (MP-101) with the printing side (whiter side) facing UP.
z Print Head Alignment will take about 14 minutes to complete. Do not open the Top Cover
while printing.
z If the pattern is not printed successfully, refer to “Eleven flashes” in “ALARM Lamp Flashes
Orange” in the User’s Guide on-screen manual.
®
Information for Windows
Note
z When installing the printer driver in Windows XP or Windows 2000, log on to the system as a
member of the Administrators group.
z Before installing the driver, disable all anti-virus
programs and automatically loading programs.
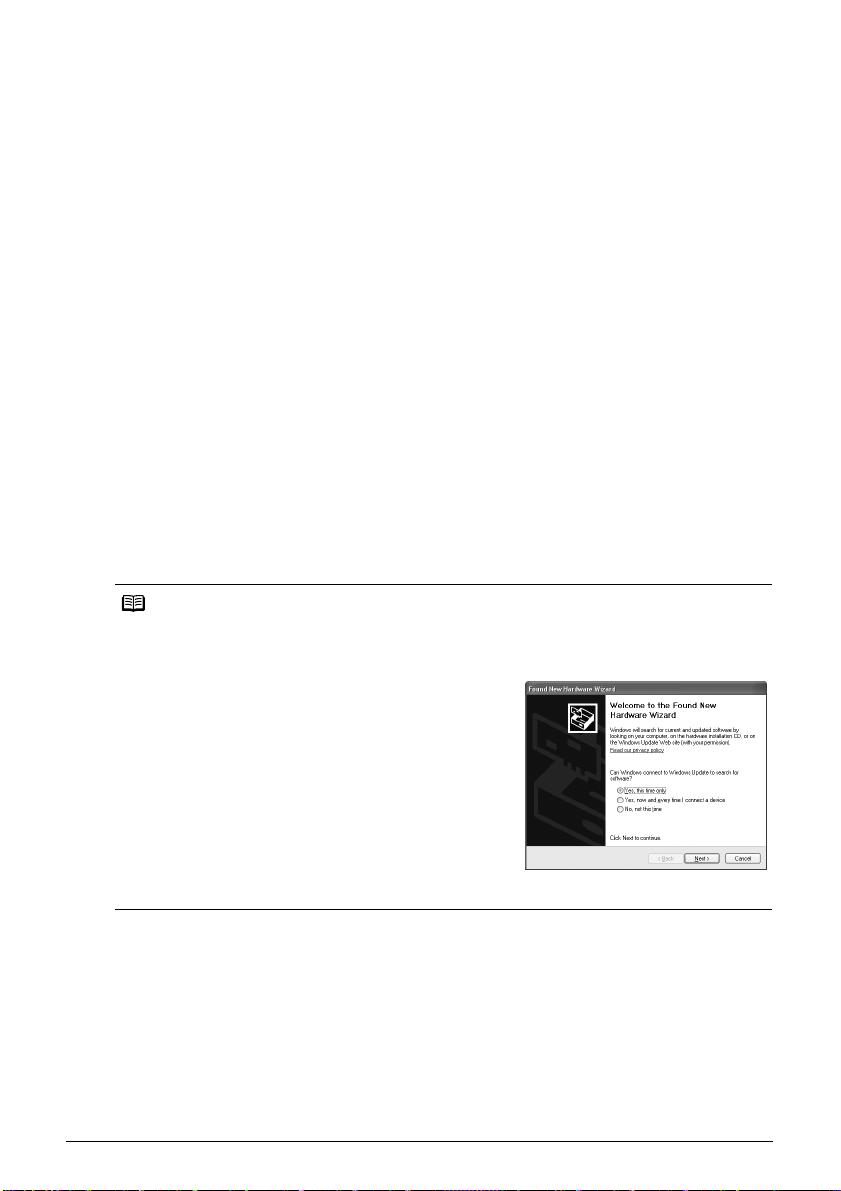
z If the following screen appears automatically, remove
the USB cable connected to your computer. Next, click
Cancel to quit the screen and turn off the printer. Then
start the installation process again. For details on the
installation process, refer to the Easy Setup Instructions
(Setup Sheet).
z To install PhotoRecord or Adobe® RGB (1998), click
Custom Install and follow the instruction on the screen.
z Adobe RGB (1998) cannot be installed in Windows Me
and Windows 98.
z When a message asking for your confirmation to restart
your computer appears during the installation process,
click OK. The system is restarted automatically.
z If the connection is not recognized, refer to “Cannot
Install the Printer Driver” in the User’s Guide on-screen manual.
5Installing the Printer Driver

Information for Macintosh
Note
z Do not remove or insert the USB cable during installation, as this may result in the computer or
printer not operating normally.
z Before installing the driver, disable all anti-virus programs and automatically loading programs
or remove them from your system folder.
z When you perform the Print Head Alignment and cannot find your printer name in Printer List,
click Add to add the printer. For details, refer to the Printer Setup Utility Help in the Mac® Help.
z Users in Asia only:
To in s t a l l t h e User’s Guide on-screen manual in a language other than the installed one, doubleclick the Manual folder in Setup CD-ROM, Canon folder, and then copy a language folder to
your hard disk.
6 Installing the Printer Driver
 Loading...