

Page 1

Canon
li
B
B
IXUS M-1 s
B English B Français
0 Español Q Portugués
is
Page 2

Handling Precautions
1. This camera is not resistant to water, and should not
be used outdoors if it is raining or snowing. If it is
accidentaiiy dropped in water, contact an authorized
Canon service facility. Keep the camera out of sait
spray and excessive humidity, if used at the beach,
clean it thoroughiy afterward with a dry cloth.
2. Store the camera in a cool, dry, dust-free place. Be
sure to keep the camera out of direct suniight, and
away from “hot spots” such as the trunk or rear
window sheif of a car. Avoid places where mothballs
are used, and use a desiccant in excessive humidity.
3. Do not attempt to disassemble the camera yourself,
since there is high-voltage circuitry inside.
4. The battery may explode or cause burns if
disassembled, recharged, shorted, exposed to high
temperatures, or disposed of in a fire.
5. Use a biower brush to remove dust and sand from
the lens and inside the camera. Do not appiy any
fluids to the lens or body. Take the camera to an
authorized Canon sen/ice facility for a more
thorough cleaning if necessary.
6. Film passing through X-ray examinations at an
airport may be exposed and ruined even when
ioaded in the camera. Request a different method of
inspection to avoid damage.
7. Coior reproduction may be adverseiy affected if the
film is ieft in the camera for a long time. Aiways
develop exposed film promptly.
Page 3

This device compiies with Part 15 of the FCC Ruies. Operation
is subject to the foiiowing two conditions: (1) This device may
not cause harmful interference, and (2) this device must
accept any interference received, inciuding interference that
may cause undesired operation.
Do not make any changes or modifications to the equipment
uniess otherwise specified in the instructions, if such changes
or modifications shouid be made, you couid be required to
stop operation of the equipment.
This equipment has been tested and found to compiy with the
iimits for a ciass B digital device, pursuant to part 15 of the
FCC Rules. These limits are designed to provide reasonable
protection against harmful interference in a residential
installation. This equipment generates, uses and can radiate
radio frequency energy and, if not installed and used in
accordance with the instructions, may cause harmful
interference to radio communications.
However, there is no guarantee that interference will not occur
in a particular installation If this equipment does cause
harmful interference to radio or television reception, which can
be determined by turning the equipment off and on, the user is
encouraged to try to correct the interference by one or more of
the following measures:
• Reorient or relocate the receiving antenna.
• Increase the separation between the equipment and receiver
• Consult the dealer or an experienced radio/TV technician for
help.
This digital apparatus does not exceed the Class B limits for
radio noise emissions from digifal apparatus as set out in the
interference-causing equipment standard entitled "Digital
Apparatus", ICES-003 of fhe Industry Canada
Cet appareil numérique respecte les limites de bruits
radioélectriques applicables aux appareils numériques de
Classe B prescrites dans la norme sur le matériel brouilleur:
"Appareils Numériques", NMB-003 édictée par l'Industrie
Canada
The C€ Mark is a Directive conformity mark of fhe
European Community (EC)
C€
B3
Page 4

Thank you for purchasing this Canon product.
Before taking pictures, piease read these instructions
carefuiiy tor a thorough understanding of how the
camera operates.
Table of Contents
These instructions are divided into tour sections:
introduction, Basic Operations, Advanced Operations,
and Additionai information. When first using the
camera, be sure to read the instructions from the
introduction.
1 Convention
I The foilowing convention is used in these instructions:
I
Warnings you should observe when using the
camera.
i l*fil Additional information on using the camera.
Introduction
1
Handling Precautions
Table of Contents ...............................................4
ADVANCED PHOTO SYSTEM Features
Advanced Photo System Quick Reference.... 8
Camera Quick Reference
Nomenclature ....................................................12
Attaching the Strap.............................................14
Basic Operations
Q] Inserting the Battery
m Loading the Film Cartridge
Checking the Film Information
H] Turning the Power On
Checking the Battery Power.......................... 19
S] Holding the Camera......................................20
[U Viewfinder
........................................
...........
..................................
.....................................
...........................
......................
.................................
....................................................
2
6
10
15
16
17
18
21
B4
Page 5

.6 Shooting Range ..............................................22
Shooting Through a Window .........................22
El Selecting the Print Type (C/H/P)
[Bl Shutter Button Action
Green/Orange Indicators
91 Removing the Film Cariridge
Rim Cartridge Processing
Handling Rim Cartridges After Exposure
.....................
...................................
.............................
........................
............................
.....
Advanced Operations
<§>V Changing the Flash Mode.......................28
J ] Auto Flash Mode without Red-eye
Reduction
\Z' <g> Auto Flash Mode with Red-eye
Reduction
Red-eye Reduction Function
r3 | » Flash ON Mode....................................... 33
Uj ® Flash OFF Mode
H<S>V Slow-synchro Mode with Red-eye
Reduction
Focus Lock
....................................................
....................................................
...................
.......................................
...................................................
.....................................................
36
ci> Self-timer Shooting......................................37
Date and Time Imprinting
...............................
38
Changing the Date Formal............................39
Setting and Adjusting the DateTTime.
..............
Imprinting Titles................................................ 42
Selecting the Title Language
Selecting the Title
.........................................
......................
Additional Information
Troubleshooting
Questions and Answers ...................................45
Specifications ...................................................46
................................................
23
24
25
26
27
27
29
30
32
34
35
40
42
43
44
B5
Page 6
ADVANCED PHOTO SYSTEM
This camera supports the new Advanced Photo
System. This system, as well as Canon’s advanced
technology has made it possible to produce a
camera that is smaller than any previous camera.
Here are some of the special features of this system.
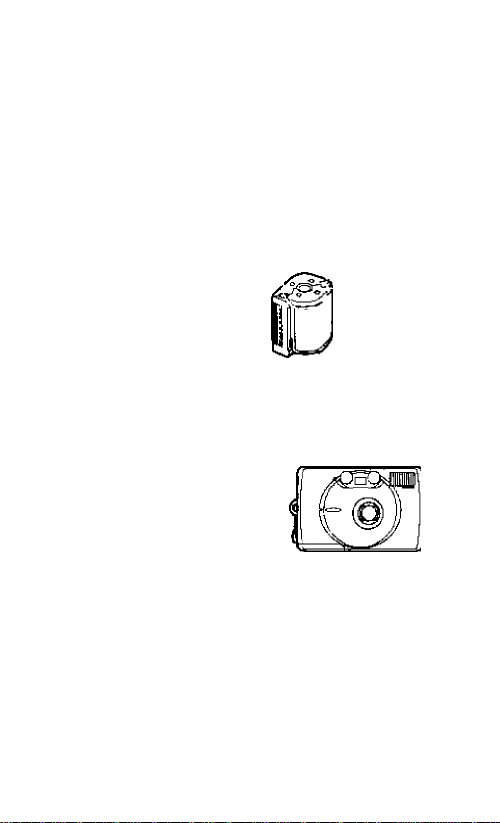
Q] New Film
The new 1X240 film comes in
a compact fiim cartridge with
no leader This new drop-in
film can be easily loaded by
anyone, and replaces all
previous hard-to-load films.
In addition, the visual
exposure indicator on the top
of the cartridge shows whether the film cartridge is
unexposed, partial, exposed, or processed.
Visual exposure indicators
O Unexposed
D Partial
S3 Exposed
0 Processed
[U New Camera Size
The Advanced Photo System
allows cameras and film
cartridges to be much more
compact than previously
possible (Canon model
comparison)
Moreover. Canon's advanced
technology has made it possible to produce this ultra
compact camera.
L-.
me
Page 7
Features
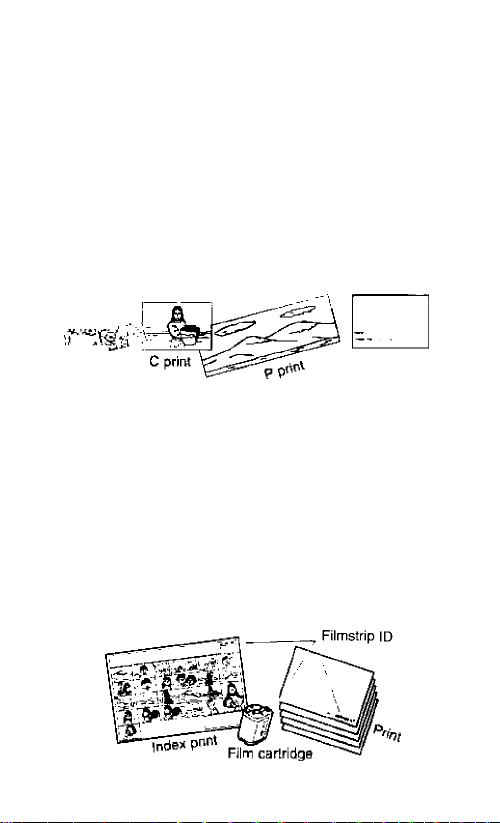
IH New Type Prints
The Advanced Photo System allows the camera to shoot
three types of prints: in addition to classic print types (C
print), you can now shoot wide-angie (H print) and panorama
(P print) prints.
The Advanced Photo System can aiso imprint date/time
information on the back of the print, or on the front and back
of the print. The system can aiso imprint titie text on the back
of the print.
'Character size, shape, coior, position, and abiiity to print on
both sides may vary according to the individuai photo shop
yS'r
Vi
Back of the
prfm
[4] New Processing Methods
Previous 135 (35mm) film has always been refurned from
the processing lab as negative strips. This has made
ordering reprints inconvenient since each picture must be
found on the negative strips. With the Advanced Photo
System however, the negative film is returned from the
certified shop reioaded in its cartridge, accompanied by an
index print Unlike hard-to-see negative strips of previous
cameras, this index print (where all shots can be viewed)
makes reviewing prints much easier Users can now order
reprints simply by matching the ID on the back of the print or
on the index print with the ID on the film cartridge, and then
specifying the print number to be reprinted at the photo
shop
_ J
B7
Page 8
Advanced Photo System Quick Reference
Previous film
P print
n
Exposure data
recorded here
B8
Film
Data recorded on film
(example)
• Date and title
• Print type
• Film orientation
• Flash ON/OFF
• Subject brightness
Etc.
i
Page 9

For further details, refer to the page indicated.
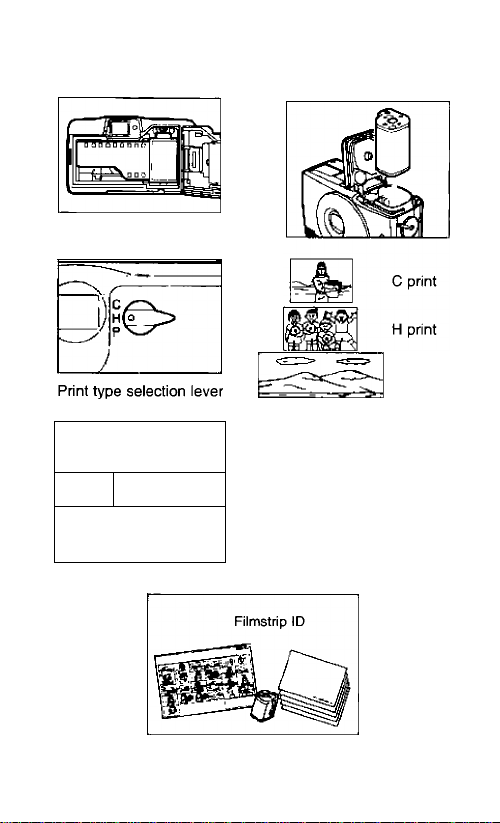
Simple film cartridge loading. (-^ 16)
I • Unlike previous 135 (35mm) film, there is no need to
open the back cover and pull the film leader across the
back of the camera.
Choose the print type with the print type
selection lever. (—> 23)
^ You can choose from three print types.
• C print: Classic print
• H print: Wide-angle print
• P print: Panorama print
A variety of data (IX information) is recorded
magnetically on the film surface.
• All the information described at left can be recorded on
the film,
• The exposure information is used in the printing process
to produoe better quality prints.
Exposed film cartridges can be processed for
printing at Advanced Photo System certified
shops. 27)
^ After developing the film, the shop will return your
pictures, along with an index print, and the film
cartridge with the film inside
• When ordering reprints from a certified shop, just match
the ID on the back of the print or on the index print
sheet with the ID on the film cartridge, and specify
which prints you want.
0-9
Page 10
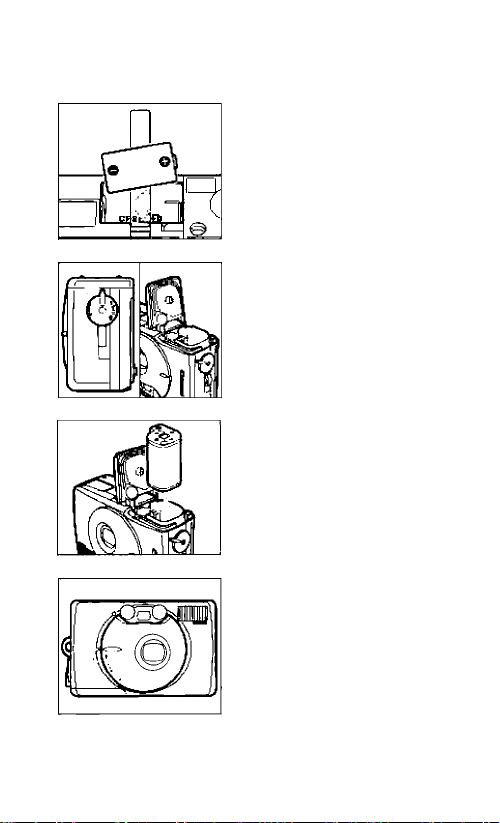
Camera Quick Reference
Open the battery cover
and insert the battery.
(-15)
• Cióse the battery covet after
inserting the battery.
Open the film cartridge
compartment cover.
(-16)
•To open, rotate the knob to
the left.
Insert the film cartridge
and close the film
compartment cover.
(^16)
• Check that the visual
exposure indicator is
O(unexposed)
Slide the main switch
downwards to the
OPEN/CLOSE position
to turn the camera on.
(^18)
^The lens cover is opened.
^The switch automatically
returns to its original
position.
S-io
Page 11
For further details, refer to the page indicated.
Select the print type
with the print type
selection lever. (-^ 23)
^ The viewfinder fieid
changes
Place the AF mark over
the subject and press
the shutter button.
H 24)
^The fiash fires
automaticaliy in iow iight
AF mark
conditions.
When the film cartridge
has finished and the
film has rewound,
remove the cartridge
from the camera. (-» 26)
• Check that the
on the LCD panei is blinking
then open the film cartridge
compartment cover
• Remove the film and close
the film cartridge
compartment cover.
0
indicator
Page 12
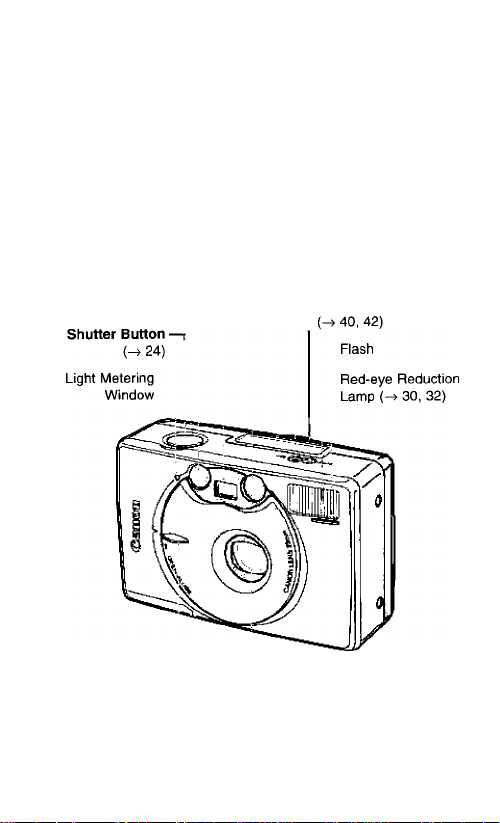
Nomenclature
I) is shorthand for ‘‘See page
AF Light Receptor
Viewfinder Window
AF Light Emitter
Main Switch
H18)
LCD Panei 14)
Set Button (-> 39, 40)
Seiect Button
Lens
Ii-12
Page 13
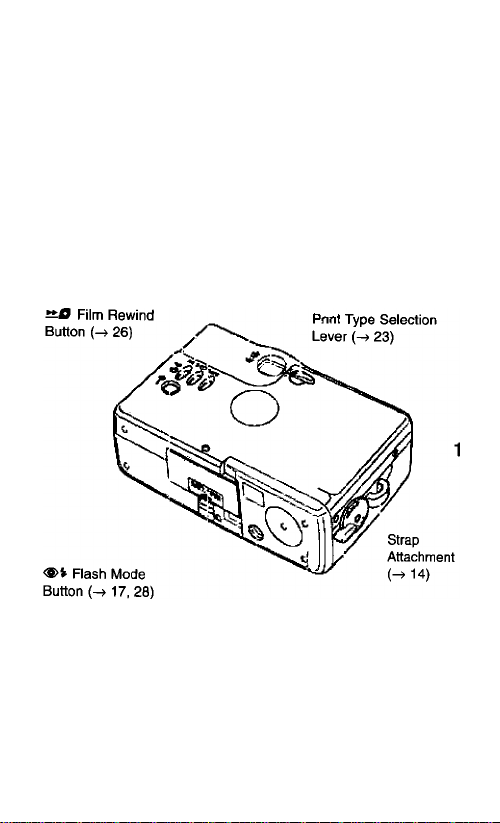
DATE Button
38, 40, 42)
0 Self-timer Button
H 37)
TITLE Button
42, 43)
Battery Cover (-> 15)
Orange Indicator (-> 25)
Green Indicator {-> 25)
Viewfinder (-> 21)
Film Cartridge
Compartment
Cover Knob
(-> 16, 26)
Film Cartridge
Compartment Cover
Tripod Socket
B-13
Page 14
Nomenclature/Attaching the Strap
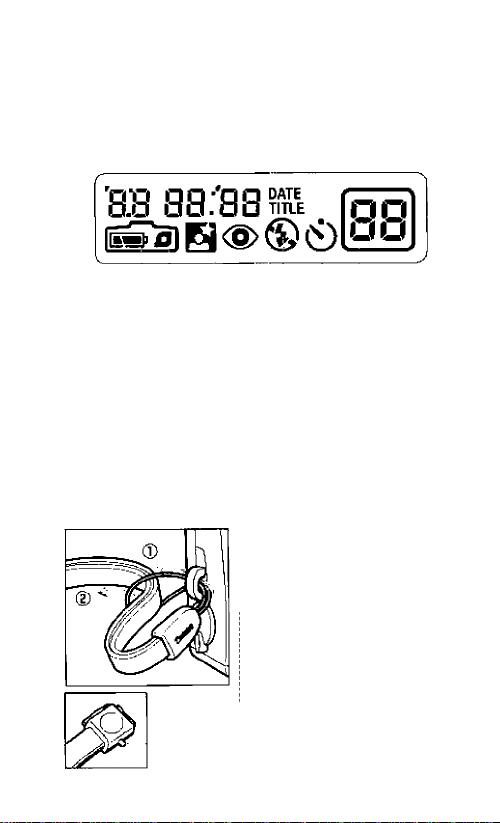
LCD Panel
Two-sided Date imprinting
Date/Title indicator
Battery Check
indicator
Film Cartridge
Indicator
Slow-synchro Indicator i Flash ON Indicator
Red-eye Reduction Indicator ® Flash OFF Indicator
Normally the necessary indicators will be displayed on
the LCD panel.
Seiection indicator
Titie Seiection indicator
Frame Counter
Self-timer Indicator
Attaching the Strap
Before using your camera, attach the strap provided.
Be careful not to drop the camera.
* •
Pass the strap through the
strap attachment on the
side of the camera.
• Follow step (D before step (D.
’ Use the push-button projection
on the strap clasp to press the
Select 40), Set 39), and
the film rewind buttons
(^26)
S'I4
Push-button projection
Page 15
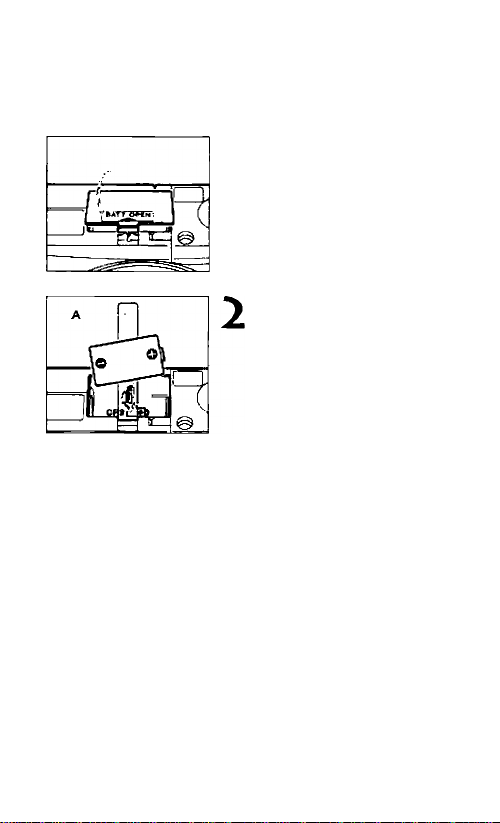
LU Inserting the Battery
Battery: One lithium battery (CR2)
Open the battery cover.
• While pressing the ridges
1
on the battery cover, lift off
the cover
Insert the battery.
• Insert the battery with the +
and - terminal positioned
correctly with the release
tape ® is behind the battery
^ The IMP indicator is
displayed on the LCD
panel
Close the battery cover.
}
• Be careful not to trap the
release tape when closing
,r^
Removing the Battery
• Slowly pull the end of the release tape to remove the battery
the battery cover.
^ If"
...........
” blinks in the LCD
panel, after you change
the battery, you will need
to reset the date to the
correct date and time
{-^ 40),
•
• After removing the battery to replace It. do not touch
any of the switches on the camera. This will allow the
dale and time settings to be retained for
approximately five seconds.
B 15
Page 16

[I] Loading the Film Cartridge
Open the film cartridge
compartment cover.
• Rotate the film cartridge
compartment cover knob to
the left.
Load a film cartridge.
• Load the film cartridge with
the visual exposure
indicator end facing
oufwards.
• Always use unexposed film
H 17).
Close the film cartridge
compartment cover.
• Close until it clicks
^ The
0
indicator on the
LCD panel lights up.
(■ga gaa""
Film cartridge
indicator
Frame counter
B-16
The film automatically
advances to the first
J
frame and “1” is
displayed in the frame
counter.
• If "1” is nof displayed, check
if fhe film cartridge is
loaded correctly.
Page 17

Film cartridges
• Use 1X240 film cartridge.
• Previous 135 (35mnn) print film cannot
be used.
• Use film cartndges whose visual
exposure indicator Is O (unexposed).
O(unexposed)
s
Checking the Film Information
Turn off the camera and
press the flash mode button
(<§>»)•
^ The information is displayed in
the LCD panel as shown in the
illustration below.
Total number of frames
Film type
□
Film speed
• Film cartridges with the
<1
D (partial) indicator
cannot be used in this
camera
• If a cartridge with the D (partial) indicator is loaded, it
will be set to 03 (exposed) and you will not be able to
take any more pictures with that cartridge.
>lf D (partial), 03 (exposed) or □(processed) film
cartridges are loaded, the "0" in the frame counter
and the O indicator will blink. Reload with a O
(unexposed) film cartridge.
The film types displayed are:
Cn : Color negative film
Cr : Color reversal (slide) film
bJ. : Black and White
(monochrome) film
- - : Other type of film
'3S
* •
Cl
B-17
Page 18

[H Turning the Power On
Slide the main switch
downwards to the
OPEN/CLOSE position.
^ The lens cover is opened.
•♦The switch automatically
returns to its original position.
^ The flash mode is set to auto
flash (full auto operation)
mode
Turning the power off
Siide the main switch
downwards to the
OPEN/CLOSE position.
•♦ The lens cover is closed
The switch automatically
returns to its original position.
S-18
Page 19

Checking the Battery Power
Check that I"!' is displayed on the LCD panel
when the power is turned on.
Shooting capacity with a new battery - Approx. 22
film cartridges of 25 exposures, at normal
temperatures with 50% flash use. (Data based on
Canon’s Standard Test Method.)
i'98 9 80“’'
CZE
\
_________________
1
V,
Battery Check Indicator
1^ (Lit): Battery is full
EI3 (Lit): Have a new battery ready
EZDi (Blinks): Replace the battery (^ 15)
• Use one lithium battery (CR2).
■ Before shooting, be sure to check the battery
power. I
• The shooting capacity is reduced to about 1/3 of
normal if the camera is used at low temperatures. |
• When traveling or planning to take many pictures, j
be sure to take a supply of spare batteries, they I
may not be available where you are. j
■ Shooting continuously with the flash will cause the
battery power to fall momentarily, and the LCD
panel display may be incorrect. Turn the power off!
I and wait a while before turning it back on. I
S-19
Page 20

[4] Holding the Camera
To take sharp pictures, and prevent camera shake,
hold the camera as shown in the illustrations below.
JLL-
-----
/
\ ''
• To avoid Including your fingers in the shot and camera shake,
always hoid the camera with both hands.
• Keep your eibows close to your body.
■ Hold the camera against your nose and iook through the
viewfinder.
•
• Be careful to keep hair and fingers from blocking the |
lens, AF light emitter/receptor, light metering
window, and flash. |
AF light emitter Flash \
Light metering window
y
AF light receptor |
S-20
Page 21

[H Viewfinder
•000
viewfinder Frames
Picture Frame
Compose your picture within this
frame. (H print)
AFMark
Place this mark over the subject
you wish to take.
- viewfinder
_J
1-21
Page 22

[U Shooting Range
The shooting range of the camera varies according to
the flash mode selected.
•In Flash OFF mode (-> 34) the shooting range is 1 m
(3.3 ft.) to infinity.
• in ali other modes 28) the shooting range is 0.6 m
(2 ft.) to infinity. However, the flash will fire if the range
is between 0.6 and 1 m (2 and 3.3 ft.). This means
you wiil not be abie to take the picture until the flash
has charged (max. three sec.). Be sure to press the
shutter button halfway and take the picture after the
green and orange lamps are lit.
Flash OFF mode
(^ 34)
All other modes
28)
0 6m 1m
Flash fires every time
1 m Shooting Range OO
----------------
Shooting Range
I
Shooting Through a Window
Subject 9 through a window, set the
Window camera at an appropriate
Camera
ins.), if you are too far away from the window, the
camera may focus on the glass of the window rather
than the subject.
If you are taking a picture
angie, with camera as
close to the window as
possible (within 20 cm/7.9
B-22
1
Page 23

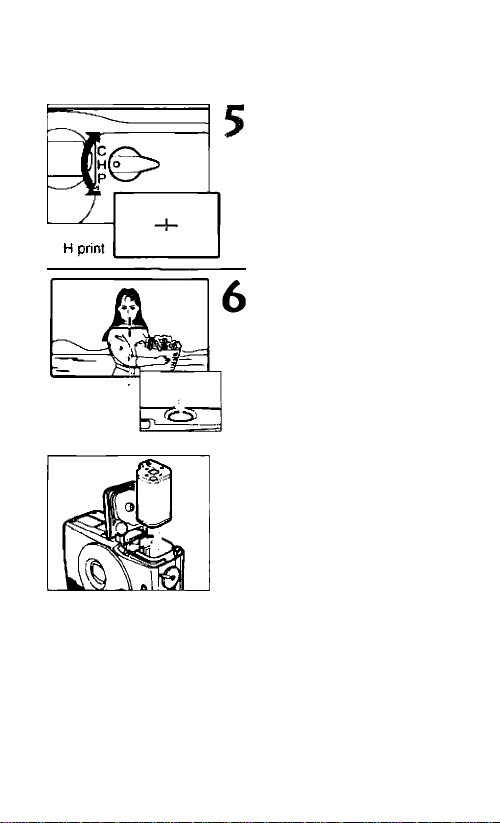
in Selecting the Print Type
You can choose from three print types with this
camera: C print, H print or P print.
Print type selection
lever
Use the print type selection
lever to select the desired
print type.
• You can change the print type in
mid roll.
H prtnl
The viewfinder field changes when the print type selection
lever is used The black areas in the viewfinder will not be
printed
C print
Choose a print type suitable for the subject you are shooting
H print
P print
► For accurate framing for P prints, you should be 2 m
(6.6 ft.) or further from the subject.
B-23
Page 24

[U Shutter Button Action
This camera has a two-step shutter button.
When the shutter button is pressed haifway, the
exposure and focus are set. When the button is
pressed fuliy, the shutter is released.
Place the AF mark over
the subject and press
the shutter button
halfway.
^The subject is focused.
• Check that the green
indicator is lit.
• Keep the shutter button
pressed halfway.
Press the shutter
button fully.
• Press the shutter button
gently.
^The shutter is released.
* •
• There Is a very short Interval between the shutter
button being pressed and the shutter being released.
SI
As a general guide, it is best to hold the camera still
until you hear the film start to wind forward.
0-24
Page 25

Green/Orange Indicators
When the shutter button is pressed halfway, the
indicators iight up or blink to indicate whether or not
shooting is possible.
Green indicator
Orange indicator
Green indicator
Lights up:
Blinks (4 times/sec ):
Ready for shooting (Subject in focus)
Ciose-range warning (See ® beiow)
Orange indicator
Lights up:
Biinks (4 times/sec.):
® If the close-range warning appears, release the
shutter button and move away from the subject
slightly, then press the shutter button halfway
again. The close-range warning range is as
shown in the table below. However, the
indicator may light up when the subject is
closer than 30 cm (1 ft.). Make sure that you
are not too close to the subject.
Film Type
C/H
P
® We recommend you mount the camera on a
tripod if the camera shake warning appears.
Flash has charged
Camera shake warning in "Flash
OFF" mode (See (D below)
Flash Mode
Other than
Flash OFF
Flash OFF
All modes
Close Range
Warning Range
30 to 60 cm
(1 to 2 ft.)
30 cm to 1 m
(1 to 3.3 ft.)
30 cm to 2 m
(1 to 6.6 ft.)
0-25
Page 26

H] Removing the Film Cartridge
The film rewinds automatically when it reaches the end.
The frame counter counts down during film rewinding.
When the film has been fully rewound, the O indicator
on the LCD panel blinks. Check that the
the LCD panel is blinking before removing the cartridge
from the camera.
0
indicator on
Check that
0
blinking.
■gs згo
• Press the film rewind button
(ii.0) if
0
is not blinking.
Open the film cartridge
compartment cover.
• Rotate the film cartridge
compartment cover knob to
the left.
Remove the film
cartridge.
^ The
0
indicator on the
LCD panel disappears.
^The visual exposure
indicator on the film
cartridge becomes L3
(exposed).
Rewinding a film cartridge in mid-roll
• Press the film rewind button (^0)
• The visual exposure indicator on the
film cartridge changes to £3 (exposed).
B-26
is
* •
Page 27

Film Cartridge Processing
• Exposed film cartridges can be processed for
printing at Advanced Photo System certified
shops.
• All certified shops do the following:
© Return your cartridge with the film inside.
@ Process all three types of prints.
@ Make an index print sheet.
® Use the print quality data for better quality prints.
® Imprint the date and title on the back of the print.
Handling Film Cartridges After Exposure
• When ordering reprints at a certified shop, be sure
to match the ID number from the back of the print
you want or from the index print with the ID on the
film cartridge before handing in your film cartridge.
FlIrDSlrip ID
' Handle and store index prints and returned film
cartridges carefully.
' The visual exposure indicator is set to C3
(exposed) for film cartridges that have been fully
exposed, and to □ (processed) for film cartridges
that have been developed,
' Do not place cameras or film cartridges near
televisions, speakers, or other sources of strong
magnetic fields
0-27
Page 28

Changing the Flash Mode
The flash can be made to fire every time you take a
picture, or it can be turned off. Choose a mode suitable
for the subject and place you are shooting. Select the
flash mode while the camera is turned on.
Press the flash mode
button (<S>i).
• You can check the mode on the
LCD panel
* <*> Auto flash without red-eye reduction 29)
*: <S>(») Auto flash with red-eye reduction (-> 30)
* Flash ON 33)
® Flash OFF (-> 34)
Slow-synchro with red-eye reduction (-> 35)
*: When the flash is set to fire automatically, (V) appears on the LCD
panel when the shutter button Is pressed halfway
• The default setting when the camera is turned on is
(t). To change to <®>(v) after the power is turned on,
turn the power off whan Is displayed. When the
power is turned on again,will be displayed. To
revert to tha original state, tum the power off when
(S) is selected.
-28
Page 29

Q] Auto Flash Mode without Red-eye Reduction
Set this mode for taking pictures without peopie, or if
you want to shoot right away without the red-eye
reduction function.
in iow iight conditions, the fiash fires automaticaily
when the shutter button is pressed.
Slide the main switch
downwards to the
OPEN/CLOSE position to
turn the power on.
’9s sгo‘
□)
Flash Distance Range (With color print film)
Film Speed Flash Range
ISO too 0 6 to 2.3 m (2 to 7 6 ft.)
ISO 200 0.6 to 3,2 m (2 to 10,5 ft.)
ISO 400 0.6 to 4,6 m (2 to 15 ft.)
• If <#) Is displayed on the LCD panel, press the flash
mode button until all the flash mode indicators
disappear.
0-29
Page 30

Changing the Flash Mode
[U Auto Flash Mode with Red-eye
Reduction
Set this mode when shooting pictures of people in low
light conditions to reduce redeye effect 32). When
the shutter button is pressed, the red-eye reduction
lamp lights up and the flash fires.
Press the flash mode
button (<g>V) until <S> is
displayed on the LCD
panel.
Stay within about 2 m/
6.6 ft of your subject.
• The red-eye reduction lamp
is only effective within this
distance.
* •
Tell your subject to
look at the camera.
• The red-eye reduction
function is not effective
unless the subject looks
straight at the lamp.
0-30
Page 31

Press the shutter
button halfway.
The red-eye reduction
lamp lights up and the
shutter will not release for
about one second
• Keep the shutter button
pressed halfway.
After about one
second, press the
shutter button fully.
^ The flash fires and the
shutter is released
* When the red-eye reduction lamp lights up, the
shutter will not release for about one second. This is
Q
to increase the effectiveness of the red-eye reduction
function. If you want to shoot right away, turn the red
eye reduction function off with the flash mode button
(«■»).
Important gulctellnes for using the red-eye
reduction function
0
1. This function is not etfeclive unless the subject looks
directly at the red-eye reduction lamp while it is lit.
Be sure to tell your subject to look straight at the
lamp.
2. Stay within 2 m (6.6 ft.) of your subject.
3. The efficacy of the red-eye reduction function varies
from person to person.
4. Try to raise the ambient light level as much as
possible.
B-31
Page 32

Changing the Flash Mode
Red-eye Reduction Function
With flash photography in dark places, the subject’s
eyes may appear red. This phenomenon is called
“red-eye” and occurs when flash illumination reflects
off the retina.
With the red-eye reduction function (<3> indicator),
the red-eye reduction lamp lights up to illuminate
.the subject for about one second before the flash is
fired. This will minimize the chances of red-eye.
0-32
Page 33

Flash ON Mode
m
The flash fires regardless of the light conditions.
Set this mode for fill-in flash during the day, or to
soften the outline of the subject.
Press the flash mode
button (<S>V) until V is
displayed on the LCD
panel.
'38 9 80
B-33
Page 34

Changing the Flash Mode
S] Flash OFF Mode
The flash will not fire even in low light conditions.
Use this mode where flash photography is prohibited,
for night views, or for available-light photography.
Press the flash mode
button (<S>V) until ® is
displayed on the LCD
panel.
> A slow shutter speed fmajt. approx. 1/2 sec.) is set In
low light conditions; be careful not to move the
B
camera,
■ II the orange Indicator blinks to Indicate camera
shake, place the camera on a steady surface or
mount it on a tripod.
B-34
Page 35

E R P' • Slow-synchro Mode with
Red-eye Reduction
This mode is effective when taking pictures of people
with an evening or nocturnal background. Flash and
slow shutter speed are effectively combined, so that
the flash illuminates the subject, ánd the slow shutter
speed captures the distant background.
Press the flash mode
button until 5 , <£>
and are displayed on the
LCD panel.
• A slower shutter speed (max. approx. 1/2 sec.) is set
in this mode; be sure to use a tripod to avoid camera
shake. Also, tell your subject to keep still for a
moment after the flash has fired.
• The red-eye reduction function operates In this mode.
• In certain shooting situations. "Auto ttash" mode may
be more effective for shooting. We therefore
recommend you take pictures in txjth ''Slow-synchro'
and "Auto flash" modes.
•
0-35
Page 36

Focus Lock
Use this mode to focus on a subject positioned close
to the edge of the picture frame.
Center the AF mark
over the subject and
press the shutter
button halfway.
^ The subject is focused
when the green indicator
lights up.
• Keep the shutter button
pressed halfway.
With the shutter button
pressed halfway, frame
your picture as desired.
Then press the shutter
button fully.
^The shutter is released.
• Be careful not to change the distance between the
subject and the camera. If you do change it, redo
focus lock.
0-36
Page 37

0 Self-timer Shooting
Include yourself In the picture by delaying shutter
release with the self-timer. Place the camera on a
steady surface, or mount it on a tripod.
Select the self-timer mode while the camera is turned
on.
Press the self-timer
button (
^The 0 indicator is
0
).
dispiayed on the LCD
panei
Compose the picture,
then press the shutter
button.
^ The red-eye reduction
lamp blinks (once/sec.) for
about 10 seconds before
the shutter is released.
^ The LCD panel counts
down the remaining
seconds.
Canceling the self-timer
•Press the self-timer button (0) again.
■ Do not stand in front of the camera when pressing the I
o
shutter button: this will cause incorrect focus.
■ The lamp blinks more rapidly appronimateiy two
seconds before the shutter Is released. However, if i
the red-eye reduction function has been activated, thel
lamp will remain [h during the last two seconds before |
the shutter is released.
1
0-37
Page 38

Date and Time Imprinting
The date and time that a photo is taken can be
imprinted on the back or the front and back of the print.
Press the DATE button.
• The mode changes every time
you press the button.
LCD Panel Date Display
g ?D“"-
’98
IH'85 ■
80
is;85 -
80
*: The date and time format for the date display (e g. 20
14:25) is printed using the format selected in Date mode
• Character size, shape, color, position, and abiiity
to print on both sides may vary according to the
5
individuai photo shop.
• Date, time, and title are not photographically
imprinted on the film, but are imprinted as part of the
developing process, using data (IX information)
magnetically recorded on the film.
• In addition to date/time imprinting, the back of the
print provides space to imprint the ID of the film
cartridge and the frame number.
■ Date mode
(front and back imprint)
■ Date + Time mode *
(front and back imprint)
- Date + Time mode *
(back imprint only)
11-38
Page 39

Changing the Date Format
In Date mode, press the Set
button to select the date
format.
• Use the push-button projection
on the strap clasp.
^ The date format changes in the
following order:
year/month/day
-> nronth/day/year
t
^38 9?D"
-> day/month/year.
Year/month/day
I
9 80^8"
^ — Month/day/year
I
80 988"
Day/month/year
1-39
Page 40

Setting and Adjusting the Date/Time
After changing the battery, or when traveling
internationaliy, it may be necessary to set or adjust the
camera's date and time using the following procedure.
If “
............
change the battery, perform steps 2, 3, 4, and 6.
” blinks on the LCD panel when you
Select button
ITil
\k
Set button
li-40
DATE button
Press the DATE button to
display the Date mode.
• The time is set in Date +
Time mode, step 5
Press the Select button.
• Use the push-button
projection on the strap
clasp.
^ When you replace the
battery, the blinking
.......
” display changes to
‘"98 1 r.
• The digits to be set start
blinking.
Press the Set button.
• Use the push-button
projection on the strap
clasp,
• Press repeatedly until the
blinking digits show the
desired value.
* •
Page 41

Repeat steps 2 and 3 until all
digit settings and adjustments
are completed, then press the
Select button to end.
[1
S«l«4 p) SbL
. |( “-------' blinks on the LCD panei [no Dale
o
imprinting) when the battery is replaced, reset the
date and time.
• Press the Set button to advance the digit by one. or
ili
hold for two seconds or more to advance the value
s
oontinuously.
• The date cannot be set or adjusted in Date + Time
mods.
• After removing the battery to replace it. do not touch
any of the switches on the camera. This allows the
date and time settings to be retained for
approximately five seconds.
• The date adjustment is
complete when the digits
stop blinking
Press the DATE button to
display the Date + Time
mode.
Repeat steps 2 and 3 until all
digit settings and adjustments
are completed, then press the
Select button to end.
• The time adjustment is
complete when the in the
time display stops blinking.
Ml
Page 42

Imprinting Titles
You can imprint titles on the back of the print. Select a
title from the different titles available while the camera
Is turned on.
Selecting the Title Language
Press the TITLE button.
^ The word TITLE is
displayed on the LCD
panel.
Press the Select button
to select the language.
:t(y;:g)s
- Ì
Canceling Title Imprinting
• Press the DATE button until the word TITLE
disappears from the LCD panel.
• The titie imprinting function automaticaliy returns to a |
date/time setting after one frame is exposed.
s
To continuously imprint the same title, hold down the
Title button for two seconds or longer (until the word
TITLE blinks on the LCD panel).
• Character size, shape, color, position, and ability
to print on both sides may vary according to the
individual photo shop.
• The date and time as set by the Date function are
also printed with the title.
• If you want information imprinted on the front of your
prints, be sure to check with the photo shop, that they
provide this service, before the film is processed.
• The language changes
every time you press in this
order: Japanese, English,
French, German, Spanish,
Italian.
•
B-42
Page 43

Selecting the Title
Once you have selected the language for your title,
you can select the title.
Press the TITLE button.
^ The title number changes
every time you press.
• Select the title you want to
use, then take the picture.
TITLE button Sequence
E-1 1 LOVE YOU
E-2 THANK YOU
E-3 SEASON’S GREETING
Japanese Titles German Titles
J-1 D-1 ICH LIEBE DICH
J-2 * ! D-2 DANKESCHON
J-3 i] '7'f -< XV a !
J-4 3Pv^ !
J-5 D-5 FROHES NEUES JAHR
i
f
E-5 HAPPY BIRTHDAY
k
I
E-4 CONGRATULATIONS
k
\
D-3 HERZLICHE GLÜCKWÜNSCHE
D-4 FRÖHLICHE WEIHNACHTEN
French Titles Spanish Titles
F-1 JETAIME ES-1 TE QUIERO
F-2 MERCI ES-2 GRACIAS
F-3 MEILLEURS VOEUX ES-3 FELICES PASCUAS
F-4 JOYEUX ANNIVERSAIRE ES-4 FELIZ CUMPLEAÑOS
F-5 FÉLICITATIONS ES-5 FELICIDADES
Italian Titles
1-1 Tl AMO
I-2 GRAZIE
I-3 BUONE FESTE
I-4 BUON COMPLEANNO
I-5 CONGRATULAZIONI
0-43
Page 44

Troubleshooting
In case of trouble check the table below before taking
your camera to be repaired.
Problem
The battery check
indicator blinks. expired.
The battery check •No battery is loaded
indicator is •The battery is
not displayed inserted with the
The shutter does
not release.
The photographs •When the shutter
are blurred was released, the
Cause Remedy
•The battery has
wrong polarities
•The battery has
completely
expired.
•The power is
turned off
•The battery has
expired.
•A cartridge that
cannot be used
has been loaded
in the camera
•The shutter will be
released only after
the red-eye
reduction lamp is lit
for about 1 second
AF light emitter/
receptor were
blocked.
•In self-timer
shooting, you
stood immediately
in front of the
camera when
pressing the
shutter button
•The camera moved
when the shutter
button was pressed
(camera shake)
Page
•Replace the 15
battery.
•Load a battery 15
•Reinsert the
battery correctly
•Replace the
battery
•Turn the power on.
•Replace the
battery
•Remove the film
cartridge and load
a new one.
•Keep pressed until
the shutter is
released
•Change the flash
mode
•Ensure that the 20
AF light emitter/
receptor are not
blocked by hair,
fingers, etc.
•Make sure you do
not stand
immediately in
front of the
camera when
pressing the
shutter button
•Press the shutter
button gently
16, 26
15
15
18
15
31
28
37
24
a-44
Page 45

Problem Cause
"H" is (jisplayed on
the LCD panel
The film cartridge
compartment cover
will not open, even
when the film
counter reads 0
•The self-diagnosis
function detected
an error
•A problem
occurred after
rewinding
Remedy
•Remove the
battery from the
camera When “H"
disappears from
the LCD display,
load the battery
again
•Press the film
rewind button
(itU)
Page
Questions and Answers
Q1 Can format 135 (35mm) film be used?
A1 No it cannot be used Use 1X240 film cartridge.
Q2
Can slide film be used with this camera?
Yes it can, if the film speed is less than ISO 400.
A2
Q3
What is ISO?
The ISO number indicates the film's sensitivity to light in
A3
numerical terms. The higher the number, the more
sensitive the film is to light.
The picture was taken with date imprinting, but it
04
doesn’t appear on the index print. Why is this?
The date and time are recorded on the film surface
A4
magnetically. This data is read electronically and printed
during the printing process. This is why the date and time 4
data may not appear on the index print sheets.
Compared to a 35mm camera, what is this camera’s
05
23 mm focal length equivalent to?
Approximately 29 mm (for H prints).
A5
15
26
0-45
Page 46

Specifications
Type: 1X240 lens/shutter type, AF, fully automatic
camera with magnetic IX functions
Image Size: 16.7 x 30.2 mm
Lens: Canon 23 mm f/4.8
Focus Control: Active auto-focus system
Shooting Distance: 0.6 m (2.0 ft.) to infinity
(Flash OFF mode: 1 m (3.3 ft.) to infinity
Shutter: Combination aperture and program
electromagnetic drive shutter
Viewfinder: Real-image viewfinder
Picture coverage: Approx 87%
Viewfinder Displays: Picture frame, AF mark
Viewfinder Eyepiece Area:
Green indicator: Ready for shooting or cióse range
warning
Orange indicator: Fiash charge completion indicator or
camera shake warning
Film Loading: Automatic (automatic biank film
advance)
Film Winding: Automatic
Film Rewinding: Automatic at end of film, mid-roll
rewinding possible
Frame Counter: Counts up during winding, counts
down during rewinding
Self-timer: Electronically-controlled 10-second delay
timer, activated by pressing the shutter button. The
red-eye reduction lamp blinks during operation and
the frame counter counts down the remaining
seconds.
Metering Range (ISO 100):
AUTO/Flash ON modes:
1/60 f/4.8 to 1/650 f/14 (approx. EV 10.4 to EV 17)
Flash OFF/Slow-synchro modes:
1/2 f/4.8 to 1/650 f/14 (approx. EV 5.5 to EV 17)
li-46
Page 47

Film Speed Setting: ISO 25 to 10000; Automatically
set in 1/3-step increments
Built-in Flash: Internal flash with automatic operation
in low light conditions
Flash Range: ISO 100: 0.6 to 2.3 m (2 to 7.6 ft.)
ISO 200: 0.6 to 3.2 m (2 to 10.5 ft.)
Flash Recycling Time: Approx. 3 seconds (with new
battery)
Flash Conditions: With flash mode button
® Full-auto mode: Automatically fires in low light
conditions
C?) Auto mode with red-eye reduction: Automatically
fires in low light conditions
(D Flash ON mode: Fires every time
® Flash OFF mode: Does not fire
(D Slow-synchro mode: Fires every time (with red
eye reduction)
Date/Title Function:
Type: Built-in LCD panel and automatic calendar
with quartz digital date/time clock, programmed with
dates until the year 2040 (compensates
automatically for long and short months and leap
years)
Data types: Date/Date -i- Time, Titles (6 languages, 5
formats)
Character type; Depends on the lab's capabilities
Data color: Depends on the lab’s capabilities
Power Supply: One lithium battery (CR2, 3V)
Shooting Capacity: Approx. 22 film cartridges of 25-
exp. (at normal temperatures with 50% flash use)
Dimensions (W x H x D): 85 x 55 x 34.5 mm
(3.4 X 2.2 x 1.4 in)
Weight: 115 g (4 1 oz.) (without battery)
• All data are based on Canon's Standard Test Method
• Subject to change without notice
0-47
Page 48

B2
Français
Page 49

MEMO
Page 50

Салол
CANON INC. 30-2, Shimomaruko 3-chome, Ohta-ku, Tokyo 146-8501, Jaf
- CANON U.S.A. INC.
For all inquiries concerning this camera, call toll free in the U.S.
1 -800-828-4040
or write to:
Customer Relations,
Canon U.S.A,, Inc.
One Canon Plaza, Lake Success, N.Y. 11042-1198
- CANON CANADA INC. HEADQUARTERS
6390 Dixie Road, Mississauga, Ontario L5T 1P7, Canada
CANON CANADA INC. MONTREAL BRANCH
5990, Côte-de-Liesse, Montréal Québec H4T 1V7, Canada
CANON CANADA INC. CALGARY OFFICE
2828, 16th Street, N.E. Calgary, Alberta T2E 7K7, Canada
For all inquiries concerning this camera, call toll free in Canada
EUROPE, -
AFRICA &
MIDDLE EAST
CENTRAL & ------- CANON LATIN AMERICA, INC. DEPTO DE VENTAS
SOUTH AMERICA 6505 Blue Lagoon Drive, Suite 325, Miami, FL33126 U.S.A.
ASIA
------------------
OCEANIA
JAPAN •
CT1-7404-000
1-800-828-4040
- CANON EUROPA N.V.
Bovenkerkerweg 59-61, P.O. Box 2262, 1180 EG Amstelveen,
The Netherlands
CANON PHOTO VIDEO FRANCE S.A.
11, Avenue Dubonnet Le Doublon 92407 Courbevoie Cedex, France
CANON UK LTD.
Brent Trading Centre, North Circular Road, London NW10 OJF, Unite
Kingdom
CANON EURO-PHOTO G. m. b. H.
Siemensring 90-92, D-47877 Willich, Germany
CANON ITALIA S.p.A.
Palazzo L, Strada 6, 20089 Rozzano, Milanofiori, Milano, Italy
CANON Benelux N.V./S.A.
Bessenveldstraat 7, 1831 Diegem (Machelen), Belgium
CANON Schweiz AG
Geschäftsbereich Wiederverkauf, Industriestrasse 12, СН-8305 DietI
Switzerland
CANON G. m. b. H.
Oberlaaerstrasse 233, 4th floor, 1100 Wien, Austria
CANON LATIN AMERICA, INC. CENTRO DE SERVICIO Y
REPARACION
Apartado 2019, Zona Ubre de Colón, República de Panamá
CANON SINGAPORE РТЕ. LTD.
79 Anson Road #09-01/06 Singapore 079906
-----------
CANON AUSTRALIA PTY. LTD.
1 Thomas Holt Drive, North Ryde, N.S.W. 2113, Australia
CANON NEW ZEALAND LTD.
Fred Thomas Drive, P.O. Box 33-336, Takapuna, Auckland, New Zealand
- CANON SALES CO., INC.
12-15 Mita, 3-Chome, Minato-ku, Tokyo 108-8011, Japan
©CANON INC. 1998
PRINTED IN MALAY
0398S
 Loading...