

Canon IXUS I7 User Manual
ENGLISH
Before Using the Camera
Shooting
Playback/Erasing
Print/Transfer Settings
Viewing Images on a TV set
Customizing the Camera
Troubleshooting
List of Messages
Advanced
Appendix
Camera User Guide
This guide explains camera features and procedures in detail.
Main Features
Shooting
Automatically adjusts shooting settings to
match particular conditions (Scene
mode)
Vertical shooting function (Vertical
Shutter Release)
Avoid the effects of camera shake or
blurry subjects when shooting by using
high ISO speed
Automatically detects camera orientation
with an Intelligent Orientation sensor
Changes image colors to create special
effects (Color Accent, Color Swap)
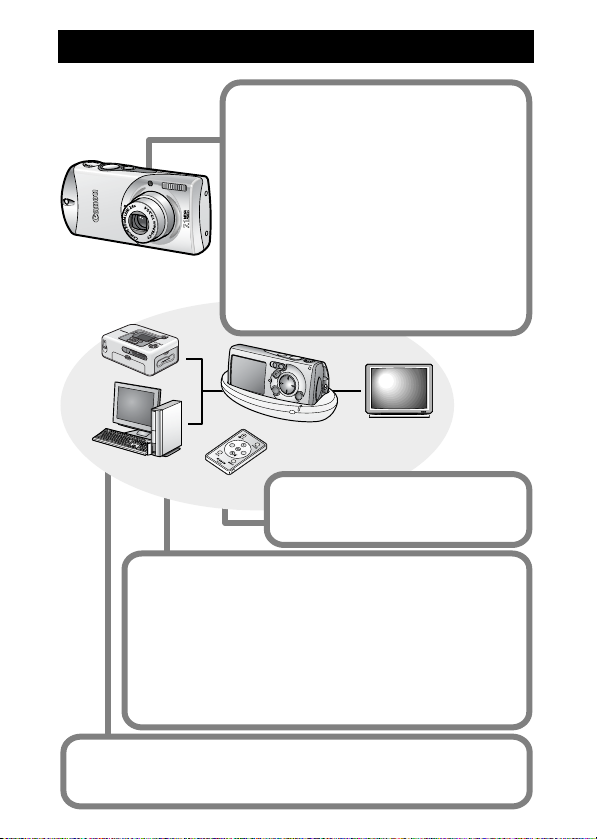
Camera Station
Wireless Controller
Playback
Organizes Images by Category
Plays movies with sound
Auto plays slideshows
Editing
Adds effects to still images with the My Colors function
Records sound memos for still images
Edits movies
Printing
Makes printing easy with the Print/Share button
Also supports non-Canon brand PictBridge compliant printers
Transfers data to a computer
Effortlessly transfers data with
the Print/Share button.
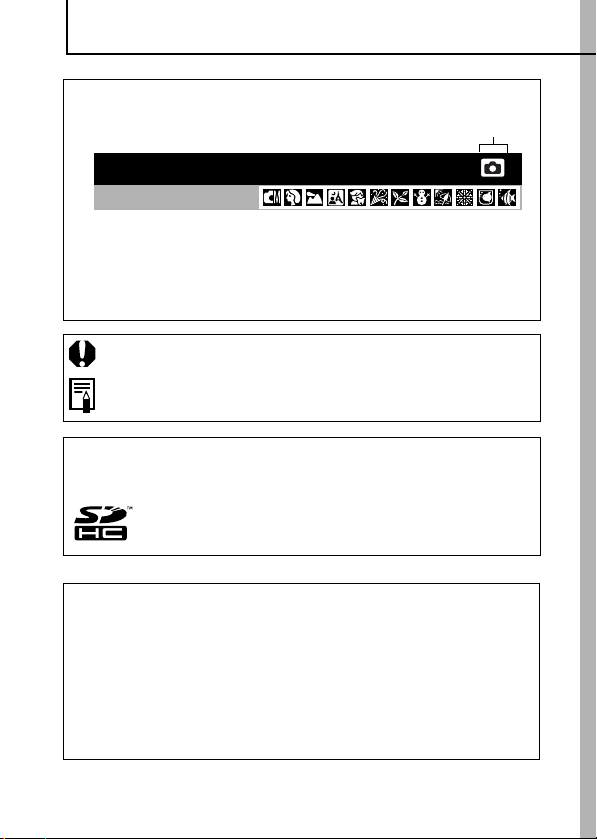
Conventions Used in this Guide
Icons appearing below titles indicate the modes in which the
procedure can be used.
Mode Switch
Continuous Shooting
Shooting Mode
See Functions Available in Each Shooting Mode (p. 138).
In this guide, the Basic Camera User Guide is referred to as the
Basic Guide, and the Advanced Camera User Guide is referred to
as the Advanced Guide.
This mark denotes issues that may affect the camera’s operation.
This mark denotes additional topics that complement the basic
operating procedures.
You can use SD memory cards, SDHC memory cards and
MultiMediaCards with this camera. These cards are collectively called
memory cards in this guide.
Use of genuine Canon accessories is recommended.
This product is designed to achieve excellent performance when
used with genuine Canon accessories. Canon shall not be liable
for any damage to this product and/or accidents such as fire, etc.,
caused by the malfunction of non-genuine Canon accessories
(e.g., a leakage and/or explosion of a battery pack). Please note
that this warranty does not apply to repairs arising out of the
malfunction of non-genuine Canon accessories, although you
may request such repairs on a chargeable basis.
1

Table of Contents
Items marked with a are lists or charts that summarize camera
functions or procedures.
Conventions Used in this Guide . . . . . . . . . . . . . . . . . . . . . . 1
Handling Precautions . . . . . . . . . . . . . . . . . . . . . . . . . . . . . . 5
Please Read. . . . . . . . . . . . . . . . . . . . . . . . . . . . . . . . . . . . . . 5
Safety Precautions . . . . . . . . . . . . . . . . . . . . . . . . . . . . . . . . . 6
Preventing Malfunctions . . . . . . . . . . . . . . . . . . . . . . . . . . . . 11
Before Using the Camera—Basic Operations . . . . . . . . . . 12
Using the LCD Monitor . . . . . . . . . . . . . . . . . . . . . . . . . . . . . 12
LCD Monitor Brightness (Night Display Function) . . . . . . . . 13
Information Displayed on the LCD Monitor . . . . . . . . . . . . . 14
Power Saving Function . . . . . . . . . . . . . . . . . . . . . . . . . . . . 19
Setting the World Clock . . . . . . . . . . . . . . . . . . . . . . . . . . . . 20
Menus and Settings . . . . . . . . . . . . . . . . . . . . . . . . . . . . . . . 22
Menu List . . . . . . . . . . . . . . . . . . . . . . . . . . . . . . . . . . . . . . . 24
Resetting Settings to Their Default Values. . . . . . . . . . . . . . 28
Formatting Memory Cards . . . . . . . . . . . . . . . . . . . . . . . . . . 29
Shooting . . . . . . . . . . . . . . . . . . . . . . . . . . . . . . . . . . . . . . . 30
Changing the Recording Pixels and Compression (Still Images) 30
Red-Eye Reduction Function . . . . . . . . . . . . . . . . . . . . . . . . 32
Setting the Slow Synchro Function . . . . . . . . . . . . . . . . . . . 32
Using the Digital Zoom . . . . . . . . . . . . . . . . . . . . . . . . . . . . . 33
Continuous Shooting . . . . . . . . . . . . . . . . . . . . . . . . . . . . . . 34
Postcard Mode . . . . . . . . . . . . . . . . . . . . . . . . . . . . . . . . . . . 35
Embedding the Date in the Image Data . . . . . . . . . . . . . . 35
Setting the Display Overlay . . . . . . . . . . . . . . . . . . . . . . . . . 36
Shooting Vertically (Vertical Shutter Release) . . . . . . . . . . . 37
Movie Shooting. . . . . . . . . . . . . . . . . . . . . . . . . . . . . . . . 38
Shooting Panoramic Images (Stitch Assist) . . . . . . . . . . . . . 42
2

Switching between Focusing Modes. . . . . . . . . . . . . . . . . . . 44
Shooting Hard-to-Focus Subjects (Focus Lock, AF Lock) . . 45
Switching between Metering Modes . . . . . . . . . . . . . . . . . . . 47
Adjusting the Exposure Compensation . . . . . . . . . . . . . . . . . 48
Shooting in Long Shutter Mode
Adjusting the Tone (White Balance)
Shooting in a My Colors Mode
Changing Colors . . . . . . . . . . . . . . . . . . . . . . . . . . . . . . . . . . 56
Adjusting the ISO Speed
Setting the Auto Rotate Function
Creating an Image Destination (Folder) . . . . . . . . . . . . . . . . 63
Resetting the File Number
. . . . . . . . . . . . . . . . . . . . . . . . 49
. . . . . . . . . . . . . . . . . . . . 51
. . . . . . . . . . . . . . . . . . . . . . . . 54
. . . . . . . . . . . . . . . . . . . . . . . . . . . . . 61
. . . . . . . . . . . . . . . . . . . . . . . 62
. . . . . . . . . . . . . . . . . . . . . . . . . . . 65
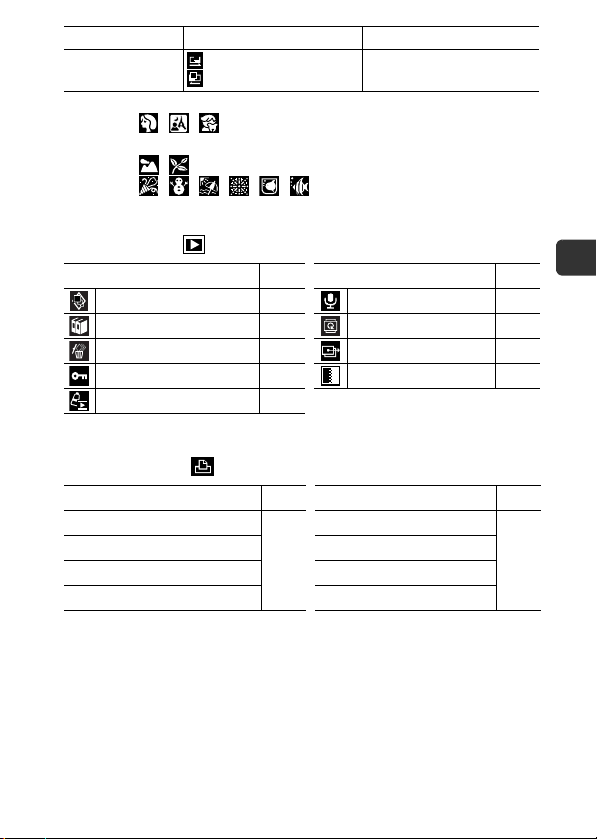
Playback/Erasing. . . . . . . . . . . . . . . . . . . . . . . . . . . . . . . . . 67
Magnifying Images . . . . . . . . . . . . . . . . . . . . . . . . . . . . . 67
Viewing Images in Sets of Nine (Index Playback). . . . . . . . . 68
Organizing Images by Category (My Category) . . . . . . . . . . 69
Jumping to Images . . . . . . . . . . . . . . . . . . . . . . . . . . . . . . . . 70
Viewing Movies . . . . . . . . . . . . . . . . . . . . . . . . . . . . . . . . . . . 72
Editing Movies. . . . . . . . . . . . . . . . . . . . . . . . . . . . . . . . . . . . 74
Rotating Images in the Display . . . . . . . . . . . . . . . . . . . . . . . 76
Playback with Transition Effects . . . . . . . . . . . . . . . . . . . . . . 77
Adding Effects with the My Colors Function . . . . . . . . . . . . . 78
Attaching Sound Memos to Images . . . . . . . . . . . . . . . . . . . 80
Automated Playback (Slide Shows) . . . . . . . . . . . . . . . . . . . 82
Protecting Images . . . . . . . . . . . . . . . . . . . . . . . . . . . . . . . . . 87
Erasing Images . . . . . . . . . . . . . . . . . . . . . . . . . . . . . . . . . . . 89
Print Settings/Transfer Settings. . . . . . . . . . . . . . . . . . . . . . 91
Setting the DPOF Print Settings . . . . . . . . . . . . . . . . . . . . . . 91
Setting the DPOF Transfer Settings . . . . . . . . . . . . . . . . . . . 95
3

Viewing Images on a TV set. . . . . . . . . . . . . . . . . . . . . . . . 97
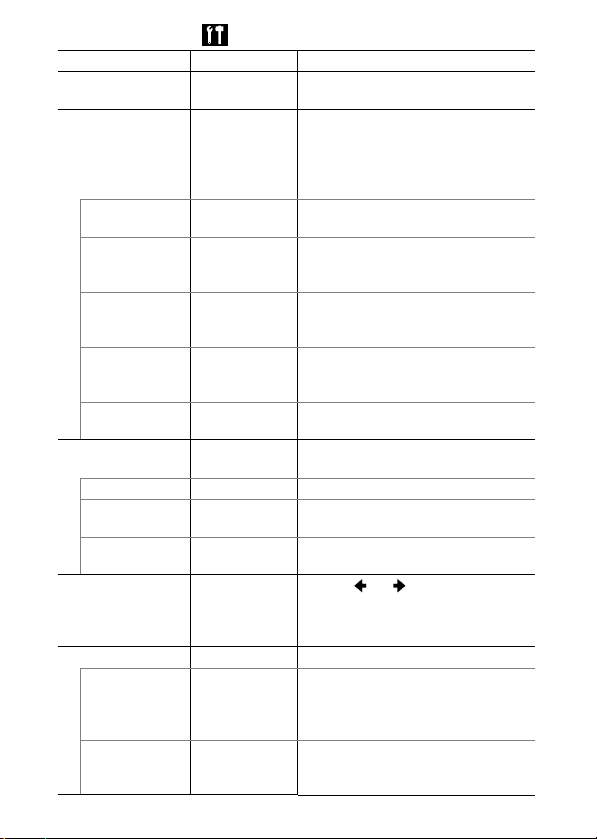
Customizing the Camera (My Camera Settings) . . . . . . . . 98
Changing My Camera Settings
Registering My Camera Settings
. . . . . . . . . . . . . . . . . . . . . . . . 98
. . . . . . . . . . . . . . . . . . . . . . 99
Troubleshooting . . . . . . . . . . . . . . . . . . . . . . . . . . . . . . . . 101
Camera. . . . . . . . . . . . . . . . . . . . . . . . . . . . . . . . . . . . . . . . 101
When the power is turned on . . . . . . . . . . . . . . . . . . . . . . . 101
LCD monitor . . . . . . . . . . . . . . . . . . . . . . . . . . . . . . . . . . . . 102
Shooting . . . . . . . . . . . . . . . . . . . . . . . . . . . . . . . . . . . . . . . 103
Shooting Movies. . . . . . . . . . . . . . . . . . . . . . . . . . . . . . . . . 107
Playback. . . . . . . . . . . . . . . . . . . . . . . . . . . . . . . . . . . . . . . 108
Battery . . . . . . . . . . . . . . . . . . . . . . . . . . . . . . . . . . . . . . . . 109
TV monitor output. . . . . . . . . . . . . . . . . . . . . . . . . . . . . . . . 109
Printing on Direct Print Compatible Printers. . . . . . . . . . . . 110
List of Messages. . . . . . . . . . . . . . . . . . . . . . . . . . . . . . . . 111
Appendix. . . . . . . . . . . . . . . . . . . . . . . . . . . . . . . . . . . . . . 115
Battery Handling. . . . . . . . . . . . . . . . . . . . . . . . . . . . . . . . . 115
Handling the Memory Card . . . . . . . . . . . . . . . . . . . . . . . . 117
Using the Battery Charger (Sold Separately) . . . . . . . . . . . 119
Using an Externally Mounted Flash (Sold Separately). . . . 120
Camera Care and Maintenance . . . . . . . . . . . . . . . . . . . . . 122
Specifications . . . . . . . . . . . . . . . . . . . . . . . . . . . . . . . . . . . 123
INDEX. . . . . . . . . . . . . . . . . . . . . . . . . . . . . . . . . . . . . . . . 134
Functions Available in Each Shooting Mode . . . . . . . . . . 138
4

Handling Precautions
Please Read
Test Shots
Before you try to photograph important subjects, we highly
recommend that you shoot several trial images to confirm that the
camera is operating and being operated correctly.
Please note that Canon Inc., its subsidiaries and affiliates, and its
distributors are not liable for any consequential damages arising
from any malfunction of a camera or accessory, including memory
cards, that results in the failure of an image to be recorded or to be
recorded in a way that is machine readable.
Warning Against Copyright Infringement
Please note that Canon digital cameras are intended for personal
use and should never be used in a manner that infringes upon or
contravenes international or domestic copyright laws and
regulations. Please be advised that in certain cases the copying of
images from performances, exhibitions, or commercial properties
by means of a camera or other device may contravene copyright or
other legal rights even if the image was shot for personal use.
Warranty Limitations
For information on your camera's warranty, please refer to the
Canon European Warranty System (EWS) Booklet supplied with
your camera.
For Canon Customer Support contacts, please see rear of the
European Warranty System (EWS) Booklet.
5

Camera Body Temperature
If your camera is used for prolonged periods, the camera body
may become warm. Please be aware of this and take care when
operating the camera for an extended period.
About the LCD Monitor
The LCD monitor is produced with extremely high-precision
manufacturing techniques. More than 99.99% of the pixels
operate to specification. Less than 0.01% of the pixels may
occasionally misfire or appear as red or black dots. This has no
effect on the recorded image and does not constitute a
malfunction.
Video Format
Please set the camera's video signal format to the one used in your
region before using it with a TV monitor (p. 97).
Language Setting
Please see the Basic Guide (p. 11) to change the language setting.
Safety Precautions
Before using the camera, please ensure that you read the safety
precautions described below and in the "Safety Precautions"
section of the Basic Camera User Guide. Always ensure that the
camera is operated correctly.
The safety precautions noted on the following pages are intended
to instruct you in the safe and correct operation of the camera and
its accessories to prevent injuries or damage to yourself, other
persons and equipment. Be sure you fully understand them before
reading the rest of the manual.
Equipment refers to the camera, camera station, compact power
adapter or separately sold battery charger.
Battery refers to the battery pack.
6

Warnings
Equipment
Do not aim the camera directly into the sun or at other
intense light sources that could damage your eyesight.
Store this equipment out of the reach of children and infants.
• Wrist strap: Placement of the strap around the child's neck could
result in asphyxiation.
• Memory card: Dangerous if accidentally swallowed. If this
occurs, contact a doctor immediately.
Do not attempt to disassemble or alter any part of the
equipment that is not expressly described in this guide.
To avoid the risk of high-voltage electrical shock, do not
touch the flash portion of the camera if it has been damaged.
Stop operating the equipment immediately if it emits smoke
or noxious fumes.
Do not allow the equipment to come into contact with, or
become immersed in, water or other liquids. If the exterior
comes into contact with liquids or salt air, wipe it dry with a
soft, absorbent cloth.
Continued use of the equipment may result in fire or electrical
shock. Immediately turn the camera power off and remove the
camera battery or unplug the power cord from the power outlet.
Please consult your camera distributor or the closest Canon
Customer Support Help Desk.
Do not use substances containing alcohol, benzine,
thinners or other flammable substances to clean or
maintain the equipment.
Do not cut, damage, alter or place heavy items on the power cord.
Use only recommended power accessories.
Remove the power cord on a regular periodic basis and
wipe away the dust and dirt that collects on the plug, the
exterior of the power outlet and the surrounding area.
Do not handle the power cord if your hands are wet.
Continued use of the equipment may result in fire or electrical
shock.
7

Battery
Do not place the battery near a heat source or expose it to
direct flame or heat.
The battery should not be immersed in water or sea water.
Do not attempt to disassemble, alter or apply heat to the
battery.
Avoid dropping or subjecting the battery to severe impacts
that could damage the casing.
Use only recommended battery and accessories.
Use of battery not expressly recommended for this equipment
may cause explosions or leaks, resulting in fire, injury and
damage to the surroundings. In the event that a battery leaks and
the eyes, mouth, skin or clothing contact these substances,
immediately flush with water and seek medical assistance.
Disconnect the compact power adapter from both the
camera station and the power outlet, or disconnect the
battery charger from the power outlet after recharging or
when not in use to avoid fire and other hazards.
Do not place anything, such as tablecloths, carpets,
bedding or cushions, on top of the equipment while it is
charging.
Continued use over a long period may cause the units to overheat
and distort, resulting in fire.
Use only the specified compact power adapter and battery
charger to charge the battery.
The compact power adapter and battery charger are
designed for exclusive use with your camera. Do not use it
with other products or batteries.
There is a risk of overheating and distortion which could result in
fire or electrical shock.
Before you discard a battery, cover the terminals with tape
or other insulators to prevent direct contact with other
objects.
Contact with the metallic components of other materials in waste
containers may lead to fire or explosions.
8
Others
Do not trigger the flash in close proximity to human or
animal eyes. Exposure to the intense light produced by the
flash may damage eyesight.
In particular, remain at least one meter (39 inches) away from
infants when using the flash.
Keep objects that are sensitive to magnetic fields (such as
credit cards) away from the speaker of the camera.
Such items may lose data or stop working.
Cautions
Equipment
Be careful not to bang the camera or subject it to strong
impacts or shocks that could lead to injury or damage the
equipment when wearing or holding it by the strap.
Do not store the equipment in humid or dusty areas.
Do not allow metal objects (such as pins or keys) or dirt to
contact the charger terminals or plug.
Such conditions could lead to fire, electrical shock or other
damage.
Avoid using, placing or storing the equipment in places
subject to strong sunlight or high temperatures, such as the
dashboard or trunk (boot) of a car.
Do not use the equipment in a manner that exceeds the
rated capacity of the electrical outlet or wiring accessories.
Do not use if the power cord or plug are damaged, or if not
fully plugged into the outlet.
Do not use in locations with poor ventilation.
The above-mentioned can cause leakage, overheating or
explosion, resulting in fire, burns or other injuries. High
temperatures may also cause deformation of the casing.
When not using the camera for extended periods of time,
remove the battery from the camera or battery charger and
store the equipment in a safe place.
The battery can run down.
9

Equipment
Do not connect compact power adapters or battery
chargers to devices such as electrical transformers for
foreign travel because it may lead to malfunctions,
excessive heat generation, fire, electric shock or injury.
Flash
Do not operate the flash with dirt, dust or other items stuck
to the surface of the flash.
Be careful not to cover the flash with your fingers or
clothing when shooting.
The flash may be damaged and emit smoke or noise. The
resulting heat build-up could damage the flash.
Do not touch the surface of the flash after taking several
pictures in rapid succession.
Doing so could result in burns.
10

Preventing Malfunctions
Avoid Strong Magnetic Fields
Never place the camera in close proximity to electric motors
or other equipment generating strong electromagnetic
fields.
Exposure to strong magnetic fields may cause malfunctions or
corrupt image data.
Avoid Condensation Related Problems
When moving the equipment rapidly from a cold place to a
hot place, you can avoid condensation by placing the
equipment in an airtight, resealable plastic bag and letting it
adjust to temperature changes slowly before removing it
from the bag.
Moving the equipment rapidly from a cold place to a hot place may
cause condensation (water droplets) to form on its external and
internal surfaces.
If Condensation Forms Inside the Camera
Stop using the camera immediately.
Continued use may damage the equipment. Remove the memory
card and battery or compact power adapter from the camera and
wait until the moisture evaporates completely before resuming
use.
11
Before Using the Camera—Basic Operations
Using the LCD Monitor
You can switch between display styles for information shown on the
LCD monitor as follows.
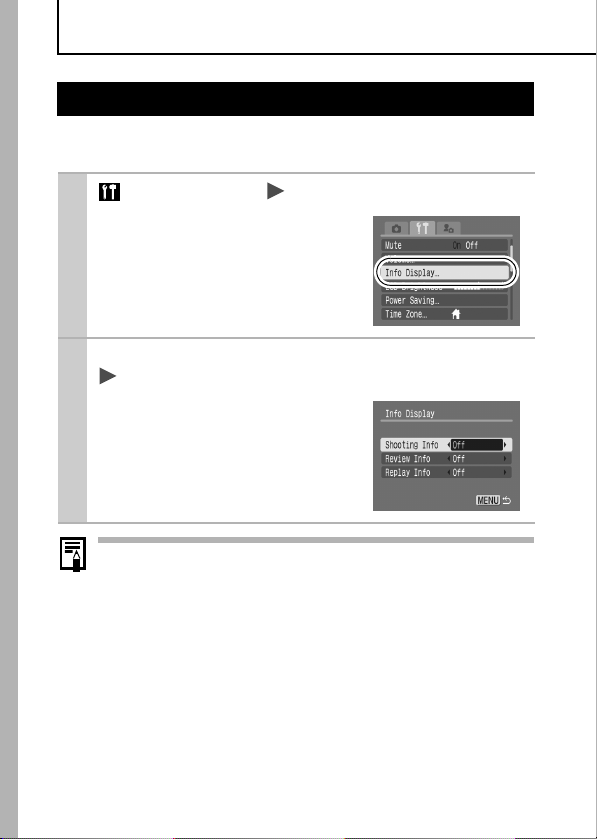
1 (Set up) Menu [Info Display].
See Menus and Settings (p. 23).
2 [Shooting Info]/[Review Info]/[Replay Info]
Select a display mode.
See Menus and Settings (p. 23).
In a shooting mode, the shooting
information will display for approximately 6 seconds when you
change a setting, regardless of the
selected info display mode setting.
The LCD monitor will not switch to detailed display in
magnified display (p. 67), or index playback mode (p. 68).
12
Using the Clock
You can display the current date and time
for a 5-second* interval using the following
two methods.
* Default setting
Method 1
Hold the FUNC./SET button down while turning on the power.
Method 2
In a shooting mode, hold the
FUNC./SET
button down.
If you hold the camera horizontally, it displays the time. If you hold
it vertically, the time and date display.
However, if you hold the camera vertically and use method 1 to
display the date and time, the time will be initially displayed in the
same way as when the camera is held horizontally.
You can change the display color by pressing the or
button.
The clock display will cease when the display interval is over or
when you operate the FUNC./SET, MENU or shutter button or
the mode switch.
The clock’s display interval can be changed in the (Set up)
menu (p. 27).
LCD Monitor Brightness (Night Display Function)
When shooting in dark conditions, the camera automatically
brightens the LCD monitor to suit the brightness of the subject*,
making it easier to frame the subject.
* The movement of the subject shown on the LCD monitor will be jerky, but it
will not affect the recorded images. The brightness of the image displayed
in the monitor, and the brightness of the actual image recorded will be
different.
Before Using the Camera—Basic Operations
13
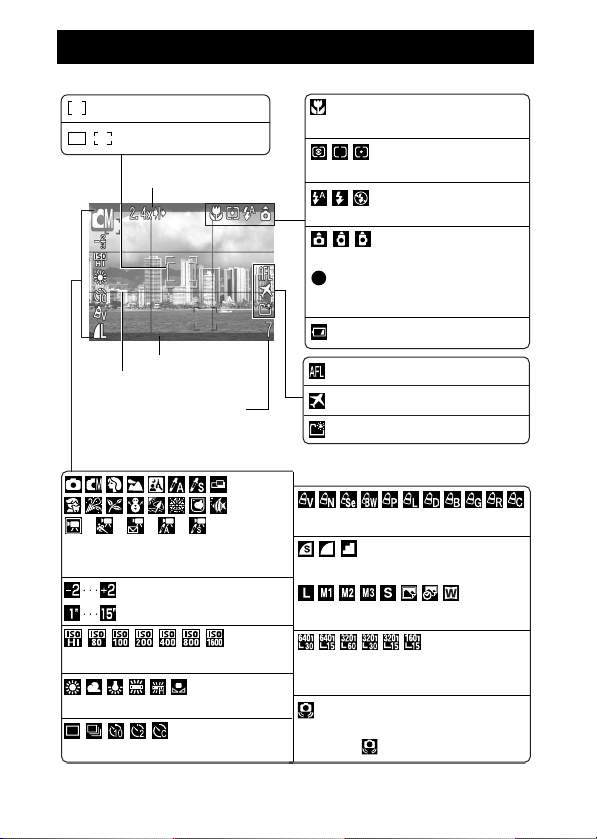
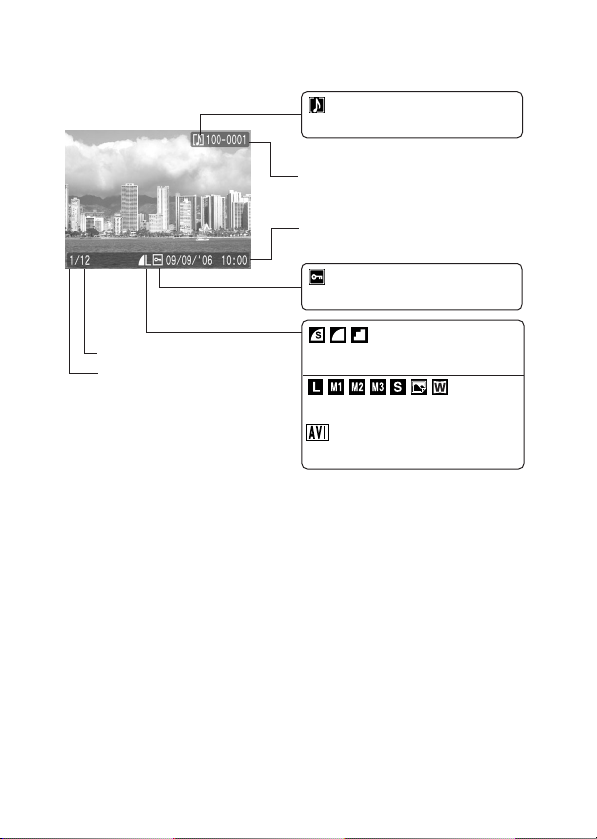
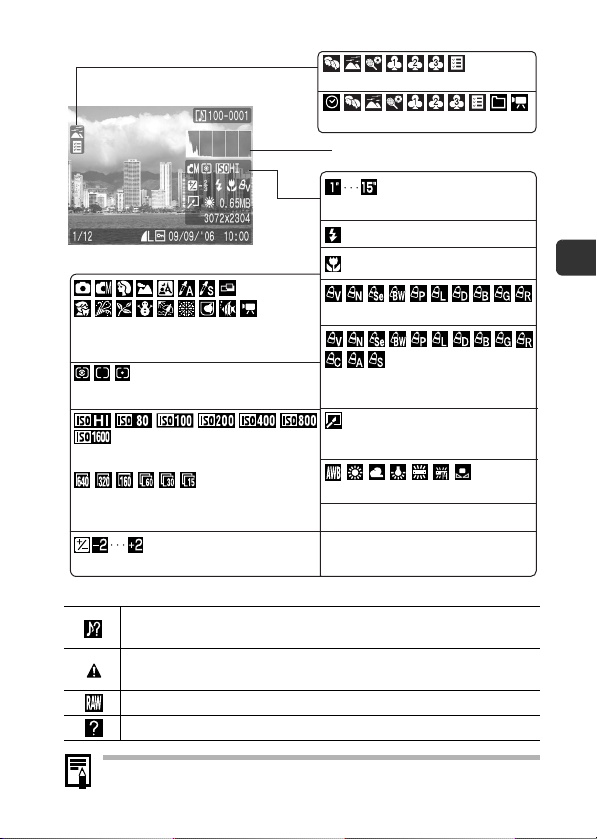
Information Displayed on the LCD Monitor
Shooting Information (Shooting mode)
*
Spot Frame
*
AF Frame (p. 44)
Zoom Magnification* (p. 33)
3:2 Guide* (p. 36)
Grid Lines* (p. 36)
• Stills: Recordable Shots
• Movies: Remaining Time/
Elapsed Time
Macro (Basic Guide p. 17)
Metering Mode (p. 47)
Flash (Basic Guide p. 16)
Auto Rotate (p. 62)
*
Rec.
Movie Recording (p. 38)
*
Low Battery (p. 115)
*
AF Lock (p. 45)
Time Zone (p. 20)
*
Create Folder (p. 63)
* * * * *
Shooting Mode (p. 38, 42, 56, 58,
Basic Guide pp. 13 – 15)
Exposure Compensation (p. 48)
Long Shutter Mode (p. 49)
ISO Speed (p. 61)
White Balance
Shooting Method (p. 34, Basic p. 18)
* Appears even if the LCD monitor is set to Standard display.
(p. 51)
My Colors
Compression
Recording Pixels (Still Images) (p. 30)
Recording Pixels/
(Movie) (p. 41)
(Red)*
(The shutter speed will also display
when the displays.)
14
(p. 54)
(Still Images)
Frame Rate
Camera Shake Warning (p. 102)
(p. 30)
If the indicator blinks orange and the camera shake icon
displays, it indicates there is insufficient illumination and a
slow shutter speed will be selected. Shoot using the
following methods.
- Raise the ISO speed (p. 61).
- Select a flash setting other than (flash off)
(Basic Guide p. 16).
- Attach the camera to a tripod or other device.
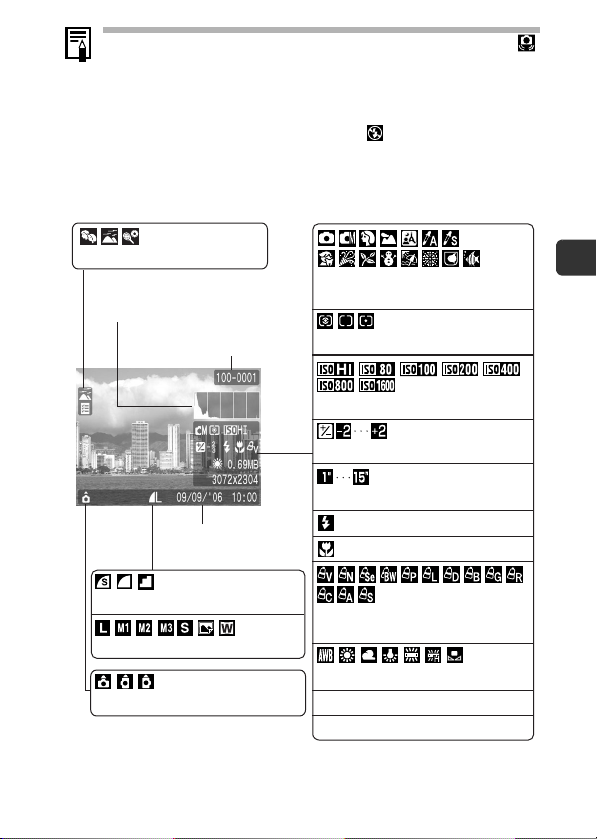
Review Info
Auto Category (p. 24)
Shooting Mode (p. 38, 42, 56, 58,
Histogram (p. 18)
Folder Number/File Number
Shooting Date/Time
Basic Guide pp. 13 – 15)
Metering Mode (p. 47)
ISO Speed (p. 61)
Exposure Compensation (p. 48)
Long Shutter Mode (p. 49)
Flash (Basic Guide p. 16)
Macro (Basic Guide p. 17)
Before Using the Camera—Basic Operations
Compression (Still Images) (p. 30)
Recording Pixels (Still Images) (p. 30)
Auto Rotate (p. 62)
My Colors (Shooting) (p. 54),
Color Accent/Color Swap (p. 56)
White Balance
File Size
Recording Pixels (Still Images) (p. 30)
(p. 51)
15
Playback Information (Playback Mode)
Standard
WAVE Format Sound (p. 80)
Folder Number-File Number
Shooting Date/Time
Protection Status (p. 87)
16
Total number of images
Displayed image number
Compression (Still Images)
Recording Pixels (Still Images) (p. 30)
Movie
(p. 72)
(p. 30)
Detailed
Shooting Mode (p. 38, 42, 56, 58,
Basic Guide pp. 13 – 15)
Metering Mode (p. 47)
My Category (p. 69)
Defined Playback (p. 70)
Histogram
Long Shutter Mode (p. 49)
Flash (Basic Guide p. 16)
Macro (Basic Guide p. 17)
Before Using the Camera—Basic Operations
My Colors (Playback) (p. 78)
My Colors (Shooting) (p. 54),
Color Accent/Color Swap (p. 56)
ISO Speed (p. 61)
Recording Pixels/Frame Rate (Movies)
(p. 41)
Exposure Compensation (p. 48)
Image with the My Colors effect (p. 78)
White Balance (p. 51)
File Size
Recording Pixels (Still Images) (p. 30)
Movie Length (Movies) (p. 38)
The following information may also be displayed with some images.
A sound file in a format other than the WAVE format is attached or the
file format is not recognized.
JPEG image not conforming to Design rule for Camera File System
Standards
RAW image
Unrecognized data type
Information for images shot on other cameras may not display
correctly.
17
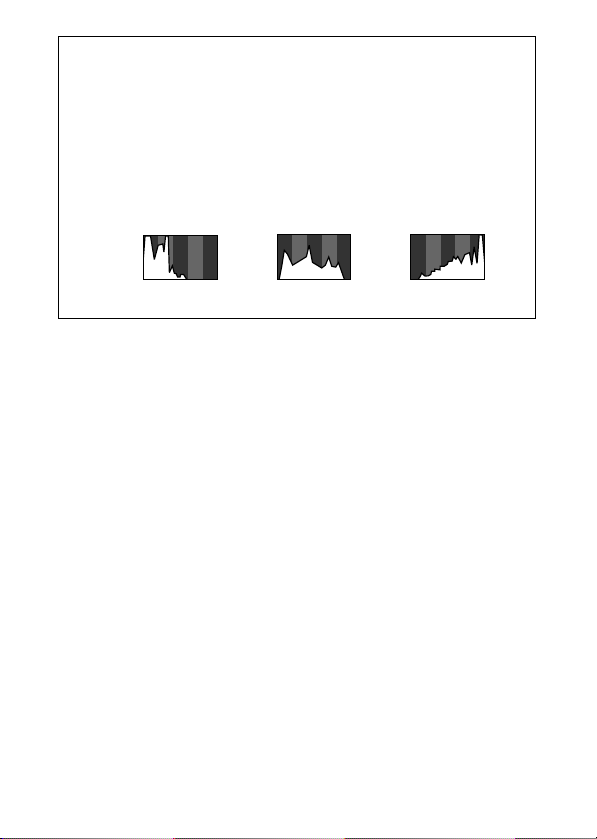
Histogram Function
The histogram is a graph that allows you to check the brightness
of the image. The greater the bias toward the left in the graph, the
darker the image. The greater the bias toward the right, the
brighter the image.
If the image is too dark, adjust the exposure compensation to a
positive value. Similarly, adjust the exposure compensation to a
negative value if the image is too bright (p. 48).
Sample Histograms
Balanced ImageDark Image Bright Image
18
Power Saving Function
This camera is equipped with a power saving function. The power
will shut off in the following circumstances. Press the power button
again to restore power.
Shooting Mode
Playback Mode
Connected to a Printer
* This time can be changed.
The power saving function will not activate during a slide
show or while the camera is connected to a computer.
The power saving function settings can be changed (p. 26).
Powers down approximately 3 minutes after the last
control is accessed on the camera. The LCD monitor
automatically turns off 1 minute* after the last control is
accessed even if [Auto Power Down] is set to [Off].
Press any button other than the power button or change
the camera orientation to turn the LCD monitor back on.
Powers down approximately 5 minutes after the last
control is accessed on the camera.
Before Using the Camera—Basic Operations
19

Setting the World Clock
When traveling abroad, you can record images with local dates and
times simply by switching the time zone setting if you pre-register
the destination time zones. You can enjoy the convenience of not
having to switch the Date/Time settings.
Setting the Home/World Time Zones
1 (Set up) Menu [Time Zone] .
See Menus and Settings (p. 23).
2
3
4 .
20
.
Use the or button to
select a home time zone
.
To set the daylight saving option,
use the or button to display
. The time will advance by 1 hour.
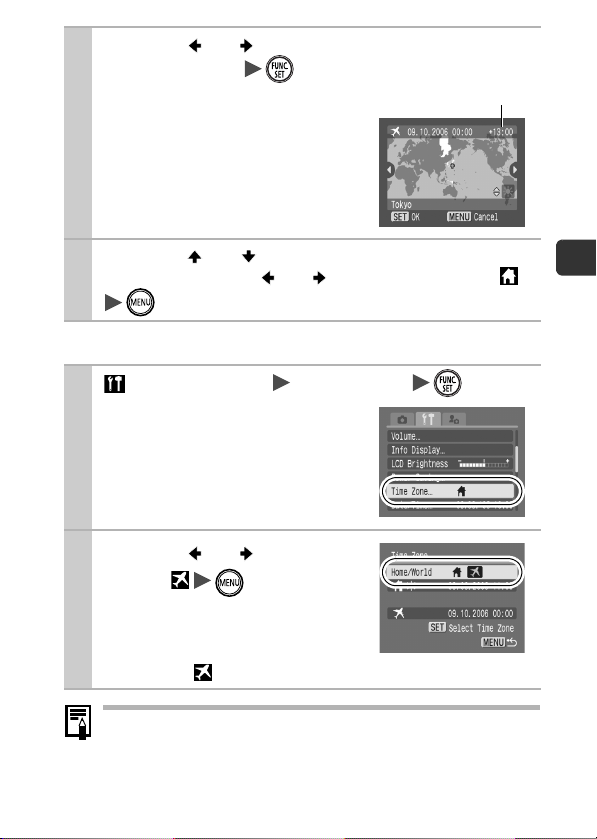
5 Use the or button to select a destina-
tion time zone .
As in Step 3, you can set daylight
saving time.
Time Difference from the
Home Time Zone
6 Use the or button to select [Home/
World], and the or button to select
.
Switching to the Destination Time Zone
1 (Set up) Menu [Time Zone] .
See Menus and Settings (p. 23).
2
Use the or button to
select
To change the destination time
zone, use the FUNC./SET button.
When you switch to the destination
time zone, will display on the monitor.
.
Before Using the Camera—Basic Operations
If you change the date and time when the World option is
selected, the Home date and time will also change
automatically.
21
Menus and Settings
Menus are used to set the shooting, playback and print settings as
well as such camera settings as the date/time and electronic beep.
The following menus are available.
FUNC. Menu
Rec., Play, Print, Set up and My Camera Menus
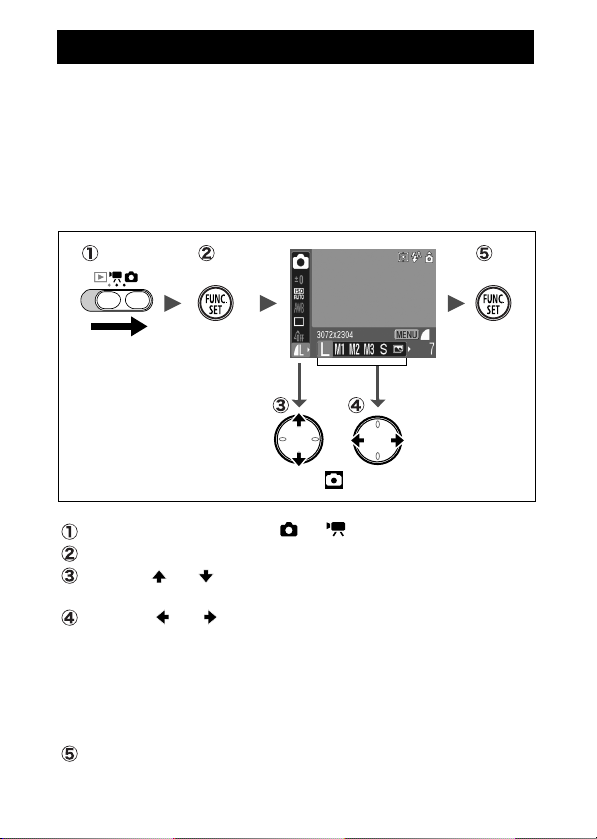
FUNC. Menu
This menu sets many of the common shooting functions.
This example shows the FUNC. menu in (Auto) mode.
Slide the mode switch to or .
Press the FUNC./SET button.
Use the or button to select a menu item.
• Some items may not be selectable in some shooting modes.
Use the or button to select an option for the menu
item.
• You can select further options with the MENU button for some
options.
• After selecting an option, you can press the shutter button to
shoot immediately. After shooting, this menu will appear again,
allowing you to adjust the settings easily.
Press the FUNC./SET button.
22
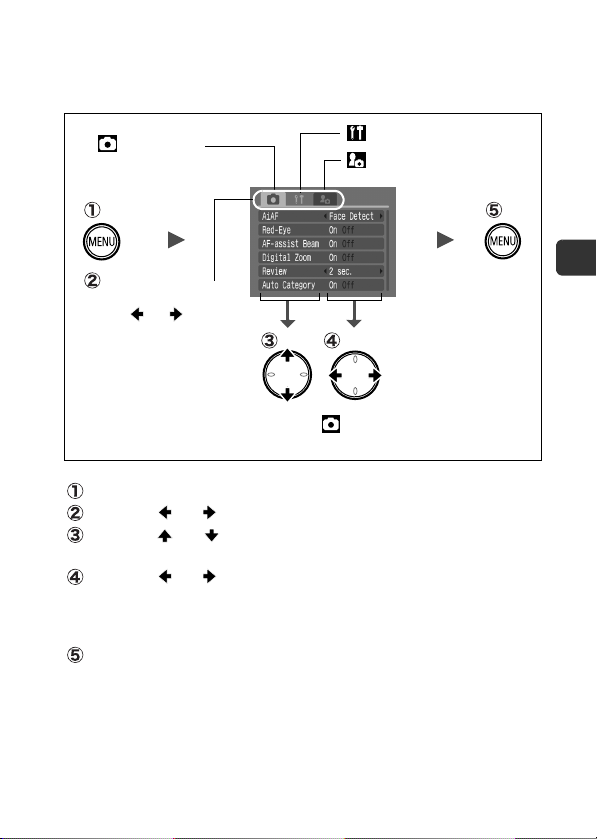
Rec., Play, Print, Set up and My Camera
Menus
Convenient settings for shooting, playback or printing can be set
with these menus.
(Rec.) Menu
(Set up) Menu
(My Camera) Menu
You can switch
between menus with
the or button
when this part is
selected.
This example shows the Rec. menu in (Auto) mode.
In playback mode, the Play, Print, Set up and My Camera menus display.
Press the MENU button.
Use the or button to switch between menus.
Use the or button to select menu items.
• Some items may not be selectable in some shooting modes.
Use the or button to select an option.
• Menu items followed by an ellipsis (...) can only be set after
pressing the FUNC./SET button to display the next menu.
Press the FUNC./SET button again to confirm the setting.
Press the MENU button.
Before Using the Camera—Basic Operations
23
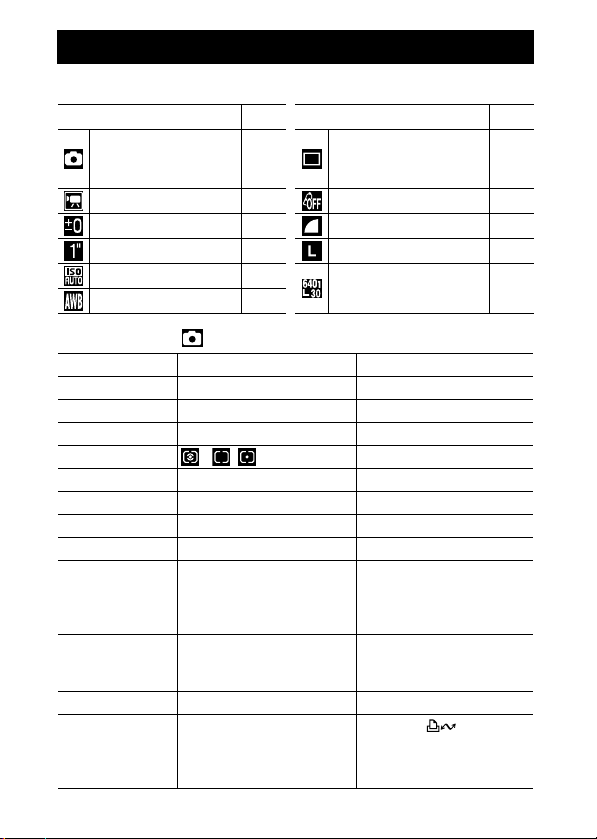
Menu List
FUNC. Menu
Menu Item Page Menu Item Page
Shooting Mode
Movie Mode
Exposure Compensation
Long Shutter Mode
ISO Speed
White Balance
Rec. Menu
Menu Item Options Page/Topic
AiAF Face Detect*/On/Off p. 44
Slow Synchro On/Off* p. 32
Red-Eye On*/Off p. 32
Light Metering */ / p. 47
AF-assist Beam On*/Off p. 104
Digital Zoom On*/Off p. 33
Review Off/2*–10 seconds/Hold Basic Guide p. 13
Save Original On/Off* p. 60
Auto Category
Disp. Overlay Off*/Grid Lines/3:2 Guide/
Date Stamp Off*/Date/Date & Time p. 35
Vert. Shutter On*/Off Allows the button to
The icons shown below are the default settings.
Basic
p. 12
p. 38
p. 48
p. 49
p. 61
p. 51
On*/Off
Both (movie mode: Off*/Grid
Lines)
Drive Mode
My Colors
Compression (Still Image)
Recording Pixels (Still Image)
Recording Pixels
Frame Rate (Movie)
Sets whether or not images
are automatically classified
into categories during
shooting.*
release the shutter when the
camera is held vertically
(p. 37).
/
* Default setting
1
p. 36
24
p. 34,
Basic
p. 18
p. 54
p. 30
p. 30
p. 41
Long Shutter On/Off* p. 49
Stitch Assist
*1
They are classified according to the following categories.
People: , , or images with faces detected if [Face Detect] has
been selected in [AiAF] mode.
Scenery:
Events: , , , , ,
,
left to right*/
right to left
p. 42
Play Menu
Menu Item Page Menu Item Page
Slide Show p. 82 Sound Memo p. 80
My Category p. 69 Rotate p. 76
Erase p. 89 Transfer Order p. 95
Protect p. 87 Transition p. 77
My Colors p. 78
Print Menu
Menu Item Page Menu Item Page
Print
Select Images & Qty. Select All Images
Select by Date Clear All Selections
Select by Category Print Settings
Select by Folder
p. 91
Before Using the Camera—Basic Operations
p. 91
25
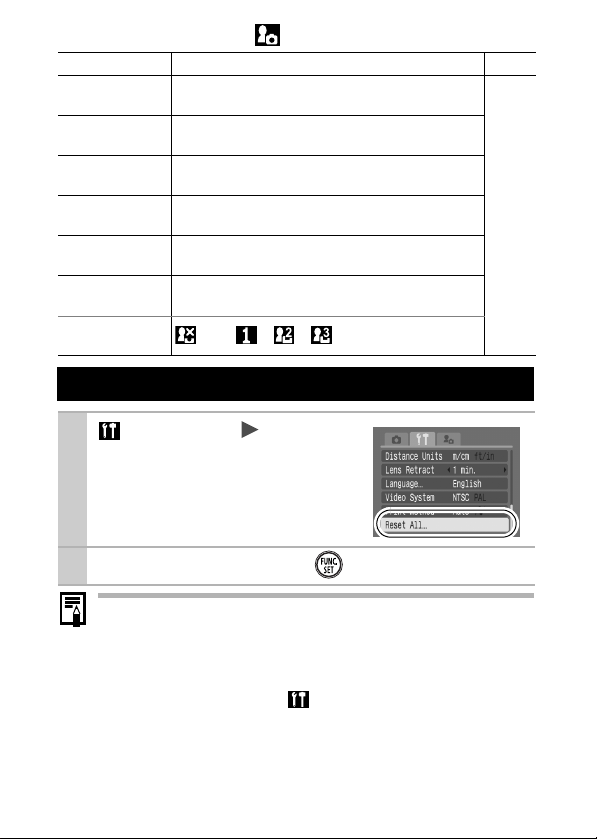
Set up Menu
Menu Item Options Page/Topic
Mute On/Off* Set to [On] to silence all sounds except
Volume Off/1/2*/3/4/5 Adjusts the volume of the start-up
Start-up Vol. Adjusts the volume of the start-up
Operation Vol. Adjusts the volume of the operation
Selftimer Vol. Adjusts the volume of the self-timer
Shutter Volume
Playback Vol. Adjusts the volume of movie sounds
Info Display Switches between info display modes
Shooting Info Off*/On Display mode for the shooting modes
Review Info Off*/On
Replay Info Off*/Standard/
LCD Brightness -7 to 0* to +7 Use the or button to adjust the
Power Saving p. 19
Auto Power
Down
Display Off 10 sec./20 sec./
Detailed
On*/Off Sets whether or not the camera
30 sec./1 min.*/2
min./3min.
warning sounds. (Basic p. 12)
sound, operation sound, self-timer
sound, shutter sound and playback
sound. The volume cannot be adjusted
if [Mute] is set to [On].
sound when the camera is turned on.
sound that plays when any button other
than the shutter button is pressed.
sound played 2 sec. before the shutter
is released.
Adjusts the volume of the sound played when
the shutter releases. The shutter sound does
not play when a movie is recording.
and sound memos.
(p. 12).
Display mode for the review period
immediately after an image is recorded
Display mode in the playback mode
brightness. You can check the
brightness in the LCD monitor while
you are adjusting the setting.
automatically powers down after a set
period of time elapses without the
camera being operated.
Sets the length of time before the LCD
monitor turns off when no camera
operation is performed.
* Default setting
26

Time Zone Home*/World p. 20
Date/Time Basic Guide p. 11
Clock Display
0–10*1 sec./20
sec./30 sec./1
min./2 min./3
p. 13
min.
Format You can also set it to perform a low
level format (p. 29).
File Numbering Continuous*/
Auto Reset
p. 65
Create Folder p. 63
Create New Folder
Check mark
(On)/
Creates a folder for the next shooting
session.
No check mark
(Off)
Auto Create
Off*/Daily/
You can also set the Auto Create time.
Monday–Sunday/
Monthly
Auto Rotate On*/Off p. 62
Distance Units m/cm* / ft/in Sets the units used to display distances
in the macro mode. (Basic p. 17)
Lens Retract 1 min.*/0 sec. Sets the timing of the lens retraction
when you switch from the shooting to
the playback mode.
Language Basic Guide
p. 11
Video System NTSC/PAL p. 97
Print Method Auto*/ See below. *
2
Reset All p. 28
*1Default setting is 5 seconds.
*2You can change the printer connection method. There is usually no need to
change the settings, but select when you print an image recorded in
the (Widescreen) mode at the full page setting for wide paper using a
Canon SELPHY CP730/CP720/CP710/CP510 Compact Photo Printer.
Since this setting is saved even when the power is turned off, ensure that
you return the setting to [Auto] to print other image sizes. (However, it
cannot be changed while the printer is connected.)
Before Using the Camera—Basic Operations
27
My Camera Menu
Menu Item Available Settings Page
Theme Selects a common theme for each My Camera
Start-up Image Sets the image displayed when the camera power is
Start-up Sound Sets the sound played when the camera power is
Operation Sound Sets the sound played when any button other than
Selftimer Sound Sets the sound played 2 seconds before the shutter
Shutter Sound Sets the sound played when the shutter button is
My Camera Menu
Contents
settings item.
turned on.
turned on.
the shutter button is pressed.
releases in self-timer mode.
pressed. There is no shutter sound for movies.
(Off)/
*
/ /
* Default setting
p. 98
Resetting Settings to Their Default Values
28
1
2
(Set up) Menu [Reset All].
See Menus and Settings (p. 23).
Select [OK] and press .
Settings cannot be reset when the camera is connected to a
computer or to a printer.
The following cannot be reset.
- Shooting mode
- The [Time Zone], [Date/Time], [Language] and [Video
System] options in the (Set up) menu (p. 27)
- White balance data recorded with the custom white
balance function (p. 52)
- Colors specified in the [Color Accent] (p. 56) or [Color
Swap] (p. 58) modes.
- Newly added My Camera settings (p. 99)
 Loading...