Canon iR5000, iR6000 Service Handbook

iR5000/iR6000
SERVICE
HANDBOOK
REVISION 0
JULY 2000
COPYRIGHT
©
2000 CANON INC. CANON iR5000/iR6000 REV.0 JULY 2000 PRINTED IN JAPAN (IMPRIME AU JAPON)
FY8-23BB-000

Application
This manual has been issued by Canon Inc. for qualified persons to learn technical theory, installation,
maintenance, and repair of products. This manual covers all localities where the products are sold. For
this reason, there may be information in this manual that does not apply to your locality.
Corrections
This manual may contain technical inaccuracies or typographical errors due to improvements or
changes in products. When changes occur in applicable products or in the contents of this manual,
Canon will release technical information as the need arises. In the event of major changes in the contents
of this manual over a long or short period, Canon will issue a new edition of this manual.
The following paragraph does not apply to any countries where such provisions are inconsistent with
local law.
Trademarks
The product names and company names used in this manual are the registered trademarks of the
individual companies.
Copyright
This manual is copyrighted with all rights reserved. Under the copyright laws, this manual may not be
copied, reproduced or translated into another language, in whole or in part, without the written consent
of Canon Inc.
COPYRIGHT © 2000 CANON INC.
Printed in Japan
Imprimé au Japon
Caution
Use of this manual should be strictly supervised to avoid disclosure of
confidential information.
COPYRIGHT© 2000 CANON INC. CANON iR5000/iR6000 REV.0 JULY 2000 PRINTED IN JAPAN (IMPRIME AU JAPON)

CONTENTS
Contents
CHAPTER 1 MAINTENANCE AND INSPECTION
1. Periodical Servicing Chart ..............1-1
1.1 Reader Unit................................1-1
1.2 Printer Unit ................................1-1
1.3 Cleaning the photosensitive
drum ........................................... 1-4
2. Periodically Replaced Parts .............. 1-5
2.1 Guide to Timing of
Replacement ............................... 1-5
2.2 Reader Unit ................................ 1-5
2.3 Printer Unit ................................ 1-6
3. Consumables and Durables.............. 1-7
3.1 Guide to Timing of
Replacement ............................... 1-7
3.2 Reader Unit ................................ 1-7
3.3 Printer Unit ................................ 1-8
3.4 Side Paper Deck ......................... 1-9
4. Points to Note for Periodical
Servicing ........................................ 1-10
5. Image Adjustment Basic
Procedure ....................................... 1-11
5.1 Making Pre-Checks ................. 1-11
5.2 Making Checks on the Printer
Unit (1/2) ................................. 1-12
5.3 Making Checks on the Printer
Unit (2/2) ................................. 1-13
5.4 Making Checks on the
Reader Unit .............................. 1-14
CHAPTER 2 STANDARDS AND ADJUSTMENTS
1. Image Adjustments........................... 2-1
1.1 Standards of Image Position ...... 2-1
1.2 Checking the Image Position ..... 2-2
1.3 Adjusting the Left/Right
Image Margin ............................. 2-2
1.3.1 Cassette 3/4 .......................... 2-2
1.3.2 Left/Right Front Deck .......... 2-3
1.3.3 Manual Feed Tray ................ 2-3
1.3.4 Duplex Feeding Unit ............ 2-4
1.3.5 Side Paper Deck ................... 2-4
1.4 Adjusting the Image Leading
Edge Margin............................... 2-5
1.5 Adjusting the Left/Right
Non-Image Width ......................2-5
1.6 Adjusting the Leading Edge
Non-Image Width ....................... 2-6
2. Scanning System .............................. 2-7
2.1 Replacing the Scanner Drive
Cable .......................................... 2-7
2.1.1 Removing the Scanner System
Drive Cable .......................... 2-7
2.1.2 Routing the Scanner
Drive Cable .......................... 2-9
2.2 Adjusting the Position of the
Scanner Mirror Base ................ 2-10
2.3 After Replacing the Scanning
Lamp ........................................ 2-12
3. Image Formation System ................ 2-13
3.1 Routing the Grid Wire of the
Primary Charging Assembly ....2-13
3.2 Routing the Charging Wire of
Charging Assemblies ............... 2-15
3.2.1 Routing the Charging
Wire ................................... 2-15
3.2.2 Adjusting the Heiqht of the
Charging Wire.................... 2-18
3.3 Mounting the Drum Cleaning
Blade ........................................ 2-19
3.3.1 Removing the Cleaning
Blade ..................................2-19
3.3.2 Mounting the Cleaning
Blade ..................................2-20

CONTENTS
3.4 Mounting the Developing
Blade ........................................ 2-22
3.4.1 Removing the Blade Unit ... 2-22
3.4.2 Mounting the Blade ............ 2-22
3.5 Replacing the Potential Sensor/
Potential Control PCB .............. 2-23
3.5.1 Removing the Potential Sensor/
Potential Control PCB ....... 2-23
3.5.2 Adjusting the Potential
Sensor ................................ 2-25
4. Pickup/Feeding System .................. 2-27
4.1 Orientation of the Deck/Cassette
Pickup Roller ...........................2-27
4.2 Orientation of the Deck/Cassette
Separation Roller .....................2-28
4.3 Orientation of the Feeding
Roller of the Deck/Cassette
Pickup Assembly...................... 2-28
4.4 Orientation of the Pickup Roller
of the Side Paper Deck ............. 2-29
4.5 Orientation of the Feeding Roller
of the Side Paper Deck ............. 2-30
4.6 Adjusting the Pressure of the
Separation Roller of the Deck/
Cassette .................................... 2-31
4.7 Adjusting the Pressure of the
Separation Roller of the Manual
Feed Tray ................................. 2-32
4.8 Adjusting the Fixing Inlet
Guide Solenoid (SL1) .............. 2-33
4.9 Adjusting the Position of the
Pickup Solenoid (SL3, SL4)
of the Cassette 3/4 .................... 2-34
4.10 Adjusting the Position of the Deliv-
ery Flapper Solenoid (SL5) .....2-35
4.11 Adjusting the Position of the Right
Deck Pickup Solenoid (SL6) ... 2-35
4.12 Adjusting the Position of the Left
Deck Pickup Solenoid (SL7) ... 2-36
4.13 Adjusting the Position of the
Reversing Flapper Solenoid
(SL8) ........................................ 2-36
4.14 Adjusting the Position of the
Fixing Web Solenoid (SL9) ...... 2-37
4.14.1 New Fixing Web .................. 2-37
4.14.2 Existing Fixing Web ............ 2-37
4.15 Position of the Side Paper
Deck Pickup Roller Releasing
Solenoid ................................... 2-38
4.16 Attaching the Timing Belt of the
Manual Feed Tray Assembly ... 2-38
4.17 Attaching the Drive Belt .......... 2-39
5. Fixing System ................................ 2-40
5.1 Points to Note When Mounting
the Fixing Heater ...................... 2-40
5.2 Position of the Fixing Inlet
Guide ........................................ 2-40
5.3 Adjusting the Lower Roller
Pressure (nip) ........................... 2-41
5.3.1 T aking Measurements ........ 2-41
5.3.2 Standards ........................... 2-41
5.3.3 Making Adjustments .......... 2-41
6. Laser Exposure System .................. 2-42
6.1 When Replacing the Scanner
Unit .......................................... 2-42
7. Electrical Parts ................................ 2-43
7.1 When Replacing the CCD
Unit .......................................... 2-43
7.2 When Replacing the Reader
controller PCB .......................... 2-43
7.3 When Replacing the Main
Controller PCB ......................... 2-44
7.4 When Replacing the HDD
Unit .......................................... 2-44
7.5 When Replacing the DC
Controller PCB ......................... 2-45
7.6 When Replacing the
High-Voltage PCB .................... 2-46
8. Checking the Surface Potential
Control System ............................... 2-47
8.1 Outline ...................................... 2-47
8.2 Disabling the Auto Control
Mechanism ............................... 2-47
8.3 Zero Level Check ..................... 2-48
8.3.1 Method 1 ............................ 2-48
8.3.2 Method 2 ............................ 2-50
8.4 Checking the Potential
System ...................................... 2-53

CONTENTS
8.5 Conv ersion Table for the
Potential Control System .......... 2-55
8.6 Emergency Measures for a
Fault in the Potential Sensor ..... 2-59
9. Checking the Environment Sensor ... 2-60
9.1 Procedure ................................. 2-60
9.2 Emergency Measure for a Fault
in the Environment Sensor ....... 2-60
10. Checking the Photointerrupters....... 2-61
10.1 Using a Meter........................... 2-61
10.2 Using Service Mode................. 2-61
10.3 Check List ................................ 2-61
CHAPTER 3 ARRANGEMENT AND FUNCTIONS OF
ELECTRICAL PARTS
1.1 Clutches ..................................... 3-1
1.1.1 Reader Unit..........................3-1
1.1.2 Printer Unit .......................... 3-1
1.2 Solenoids and Switches .............3-2
1.2.1 Reader Unit..........................3-3
1.2.2 Printer Unit .......................... 3-3
1.3 Motors ........................................ 3-4
1.3.1 Reader Unit..........................3-5
1.3.2 Printer Unit .......................... 3-5
1.4 Fans ............................................ 3-6
1.4.1 Reader Unit..........................3-7
1.4.2 Printer unit ........................... 3-7
1.5 Sensors ....................................... 3-8
1.5.1 Reader Unit........................3-10
1.5.2 Printer Unit ........................ 3-10
1.6 Lamps, Heaters, and Others ..... 3-12
1.6.1 Reader Unit ........................ 3-13
1.6.2 Printer Unit ........................ 3-13
1.7 PCBs ........................................ 3-14
1.7.1 Reader Unit ........................ 3-15
1.7.2 Printer unit ......................... 3-15
1.8 Variable Resistors (VR), LightEmitting Diodes (LED), and
Check Pins by PCB .................. 3-16
1.8.1 Main Controller PCB ......... 3-16
1.8.2 DC Controller PCB ............ 3-17
1.8.3 Reader Controller PCB ...... 3-18
1.8.4 Power Supply PCB ............ 3-18
1.8.5 HVT PCB .......................... 3-19
1.8.6 Drum Heater Control
PCB ................................... 3-19
CHAPTER 4 SERVICE MODE
1. Organization of Service Mode ......... 4-1
1.1 Outline ....................................... 4-1
1.2 Starting Service Mode and
Making Selections ...................... 4-2
1.3 Ending Service Mode ................. 4-3
1.4 Backing Up Service Mode ......... 4-3
1.5 Basic Operations ........................ 4-4
1.5.1 Initial Screen ........................ 4-4
1.5.2 Level 1/Level 2 Screen ......... 4-4
1.5.3 Level 3 Screen ...................... 4-5
2. DISPLAY (control/display mode) .... 4-6
2.1 COPIER ..................................... 4-6
2.2 FEEDER .................................. 4-19
3. I/O (I/O display mode) ................... 4-20
3.1 DC-CON.................................. 4-21
3.2 R-CON..................................... 4-29
3.3 MN-CON................................. 4-31
3.4 FEEDER .................................. 4-33
3.5 SOR TE R ..................................4-36
4. ADJUST (adjustment mode) .......... 4-44
4.1 COPIER ................................... 4-44
4.2 FEEDER .................................. 4-57
3.5.1 Finisher Block .................... 4-36
3.5.2 Saddle Stitcher Unit ........... 4-41

CONTENTS
4.3 SOR TER ..................................4-58
5. FUNCTION (operation/inspection
mode).............................................. 4-59
5.1 COPIER ................................... 4-59
5.2 FEEDER .................................. 4-75
6. OPTION (settings mode) ...............4-76
6.1 COPIER ................................... 4-76
6.2 FEEDER .................................. 4-92
6.3 SORTER ..................................4-92
6.4 BOARD.................................... 4-93
7. TEST (test print mode) .................. 4-94
8. COUNTER (counter mode) ...........4-98
CHAPTER 5 SELF DIAGNOSIS
1. Error Codes ......................................5-1
1.1 List of Error Codes .................... 5-1
1.2 Self Diagnosis of the ADF ....... 5-13
1.3 Self Diagnosis of the Finisher ... 5-14
1.4 Self Diagnosis of the Saddle
APPENDIX
A. GENERAL TIMING CHART........ A -1
B. LIST OF SIGNALS/ABBREVIA-
TIONS ............................................. A -3
C. General Circuit Diagram .................. A -9
D. PAPER DECK -G1 GENERAL
CIRCUIT DIAGRAM .................. A-11
E. SHIFT TRAY GENERAL
CIRCUIT DIAGRAM .................. A-12
F. SPECIFICATIONS ...................... A-13
1.1 Copier ...................................... A-13
1.1.1 Type .................................. A-13
1.1.2 Method .............................. A-13
1.1.3 Functions .......................... A-14
1.1.4 Others ............................... A-19
1.2 Paper Deck-G1 ....................... A-22
1.3 Shift Tray-B1 .......................... A-23
G. List of Special T ools...................... A-24
H. List of Solvents/Oils ..................... A-26
Stitcher ..................................... 5-18
CHAPTER 1 MAINTENANCE AND INSPECTION
CHAPTER 1 MAINTENANCE AND INSPECTION
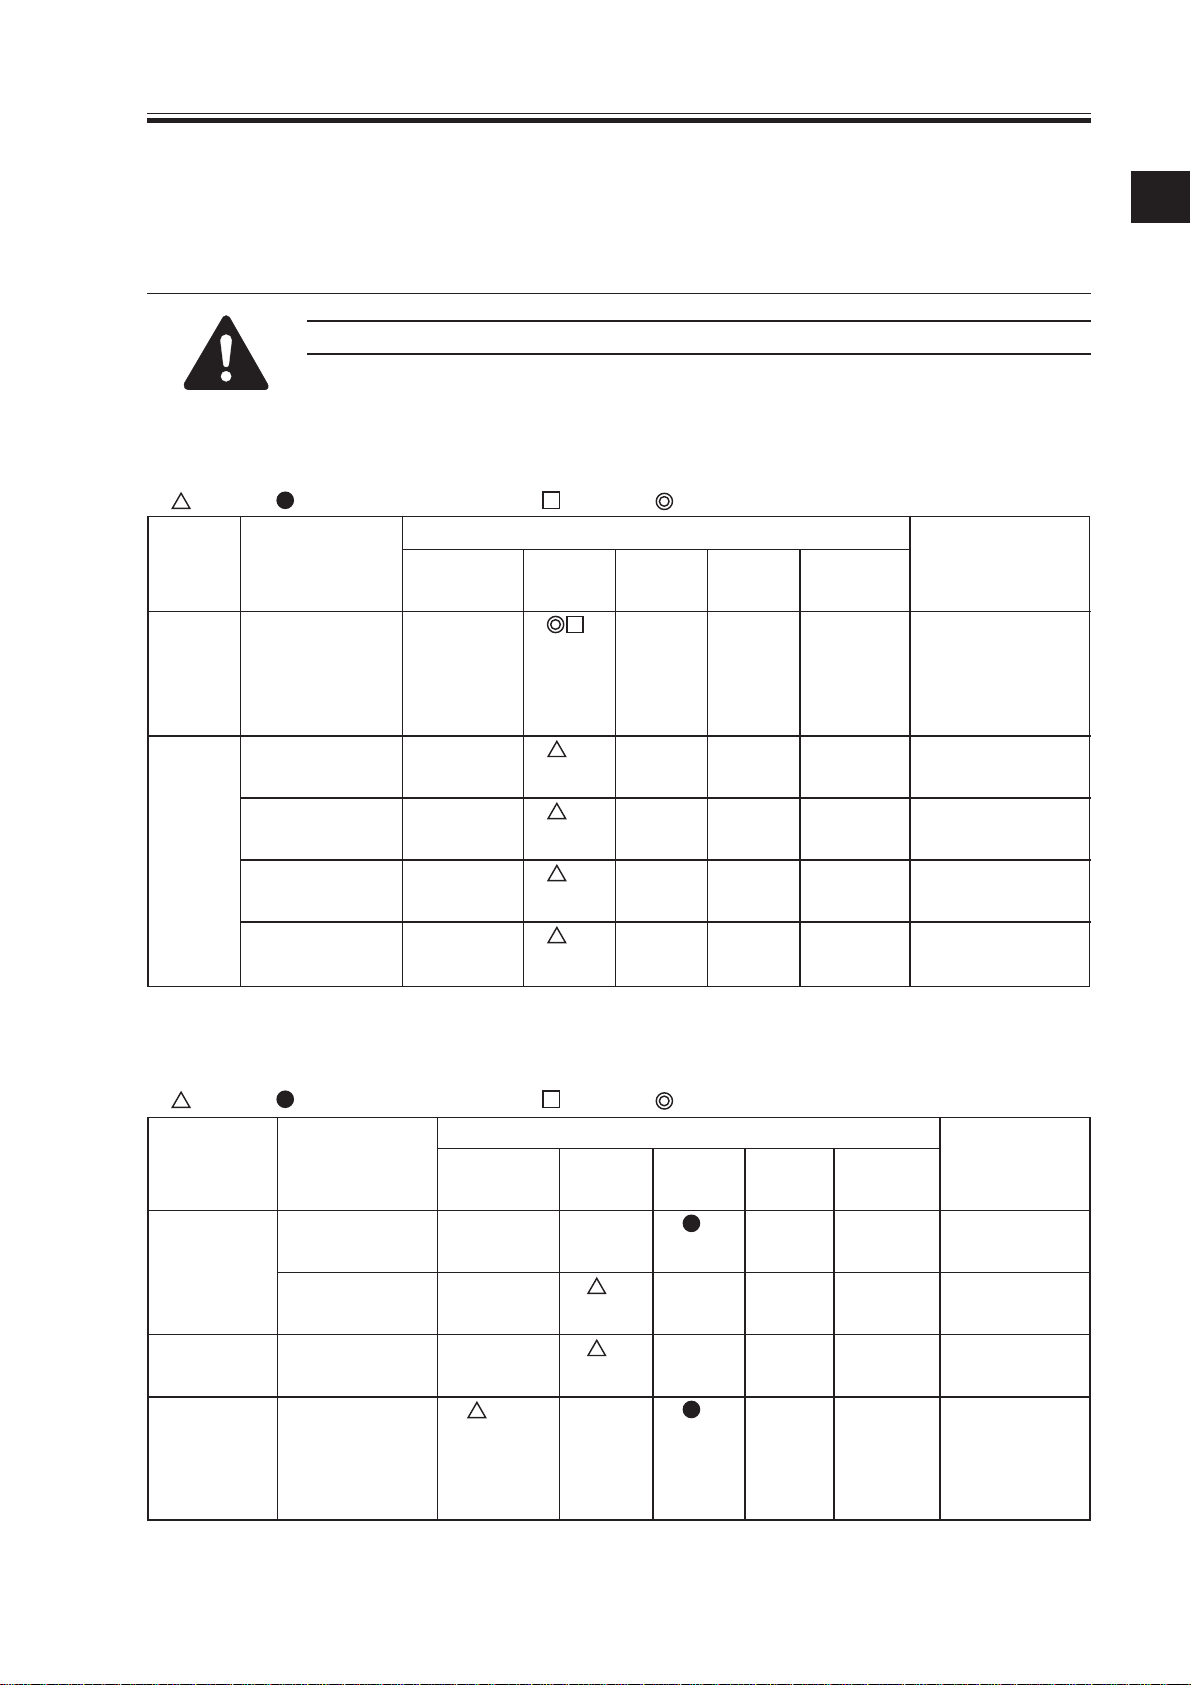
1.Periodical Servicing Char t
Do not use solvents or oils other than those indicated.
1.1 Reader Unit
: Clean : Replace ×: Lubricate : Adjust : Inspect
Intervals
Unit Part Upon every every every every Remarks
installation 250,000 500,000 750,000 1,000,000
Scanner Scanner cable
Optical Scanner rail
path (FY9-6011)
Copyboard
glass
No. 1 through
No. 3 mirrors
Scanner
reflecting plate
×
Only at fist
250,000
(inpection/
adjustment).
Silicone oil
1
1.2 Printer Unit
: Clean : Replace ×: Lubricate : Adjust : Inspect
Intervals
Unit Part Upon every every every every Remarks
installation 250,000 500,000 750,0001,000,000
Externals/ Ozone filter
controls (FM3)
Dust-proofing
filter (FM2) from surface.
Laser Dust-proof
optical path glass
Charging Charging wire
assembly (primary, pre- ment, execute
transfer, trans- wire cleaning
fer/separation) 5 times.
Remove dust
After replace-
1-1
CHAPTER 1 MAINTENANCE AND INSPECTION
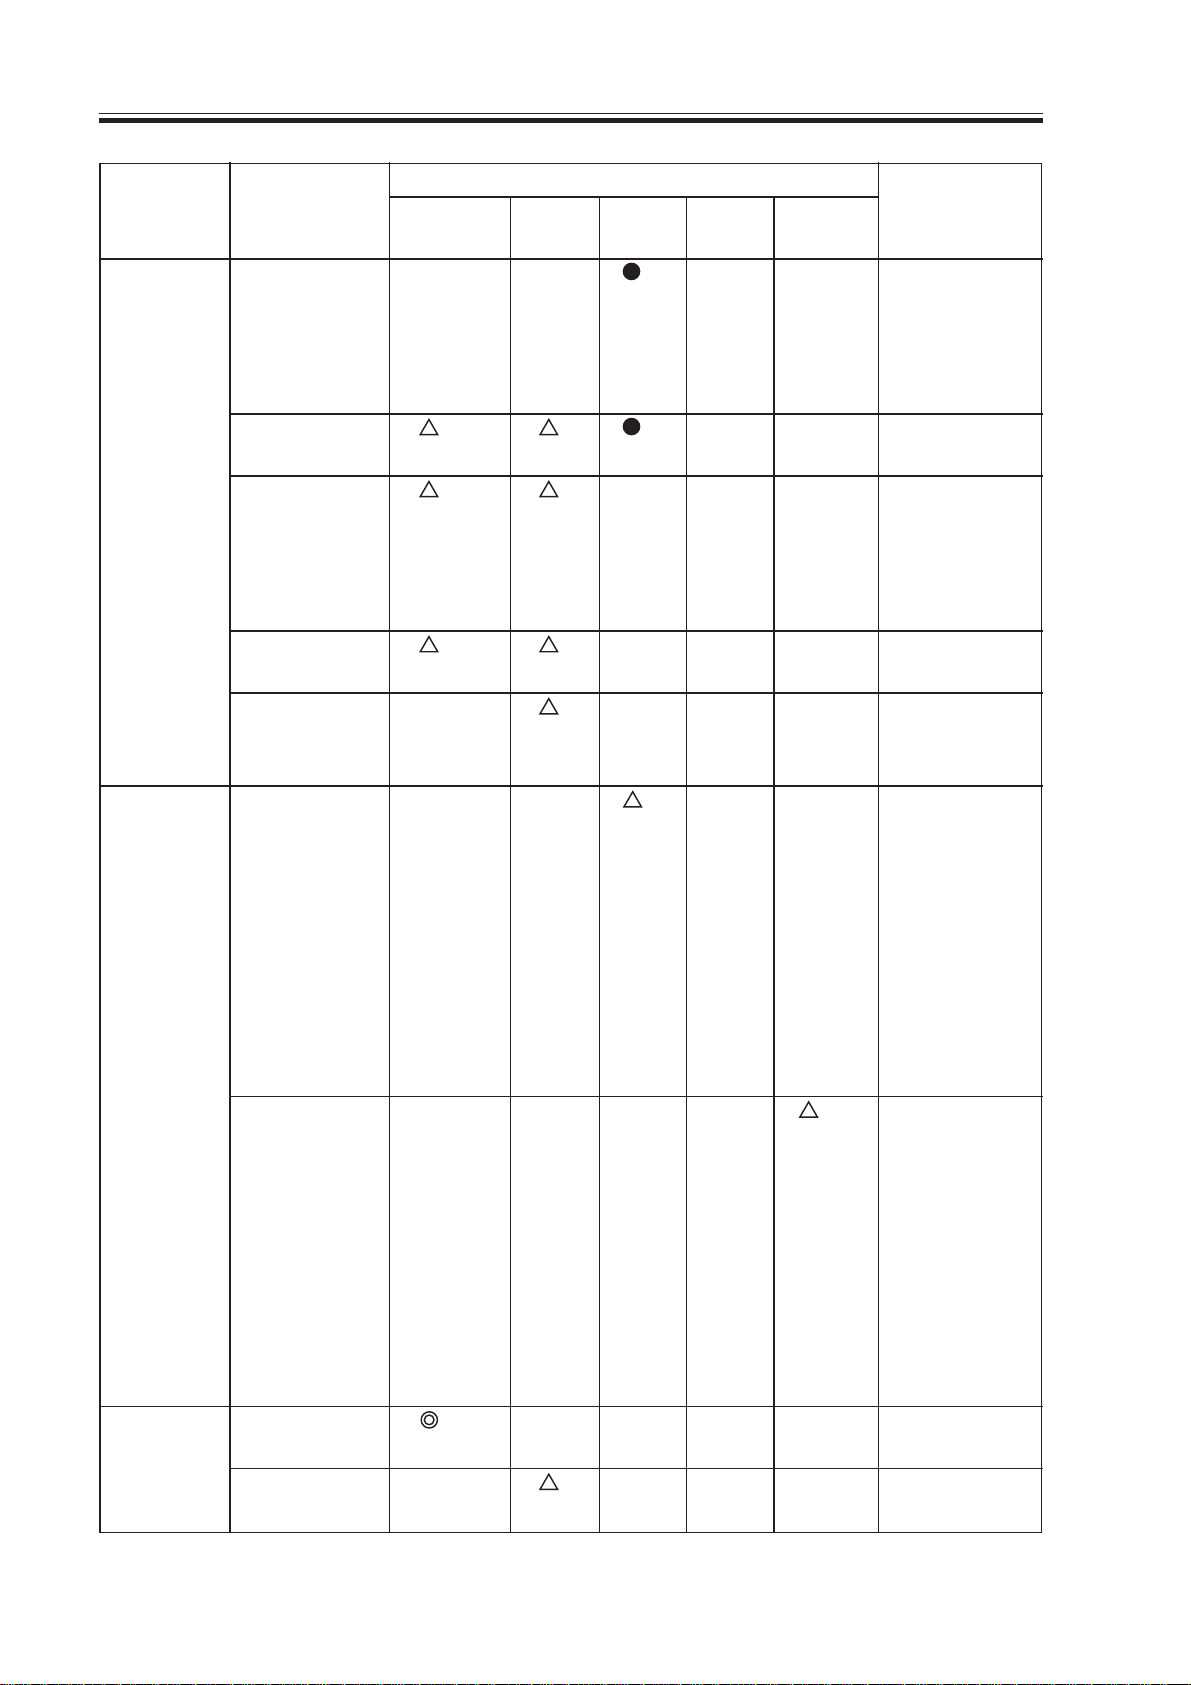
Intervals
Unit Part Upon every every every every Remarks
installation 250,000 500,000 750,0001,000,000
Charging Charging wire
assembly cleaner charging wire
(primary, pre- simultatransfer, trans- neously.
fer/separation)
Grid wire
(primary)
Charging
assembly
shielding plate
(each charging
assembly)
Roller
electrode
Primary antistray toner
sheet
Photosensi- Photosensitive
tive drum drum and drum
Electrode (for
slip ring of alcohol;
drum heater) 2) protruding
Developing Developing
assembly cylinder
Developing
assembly roll
×
Replace with
Use alcohol
cleaning powder (CK-
0429); for instructions, see
6. “Cleaning
the Photosensitive
Drum.”
Clean with
1) electrode,
wall of electrode (where
FY9-6008 is
applied).
· Charge col lecting brush
1-2
CHAPTER 1 MAINTENANCE AND INSPECTION
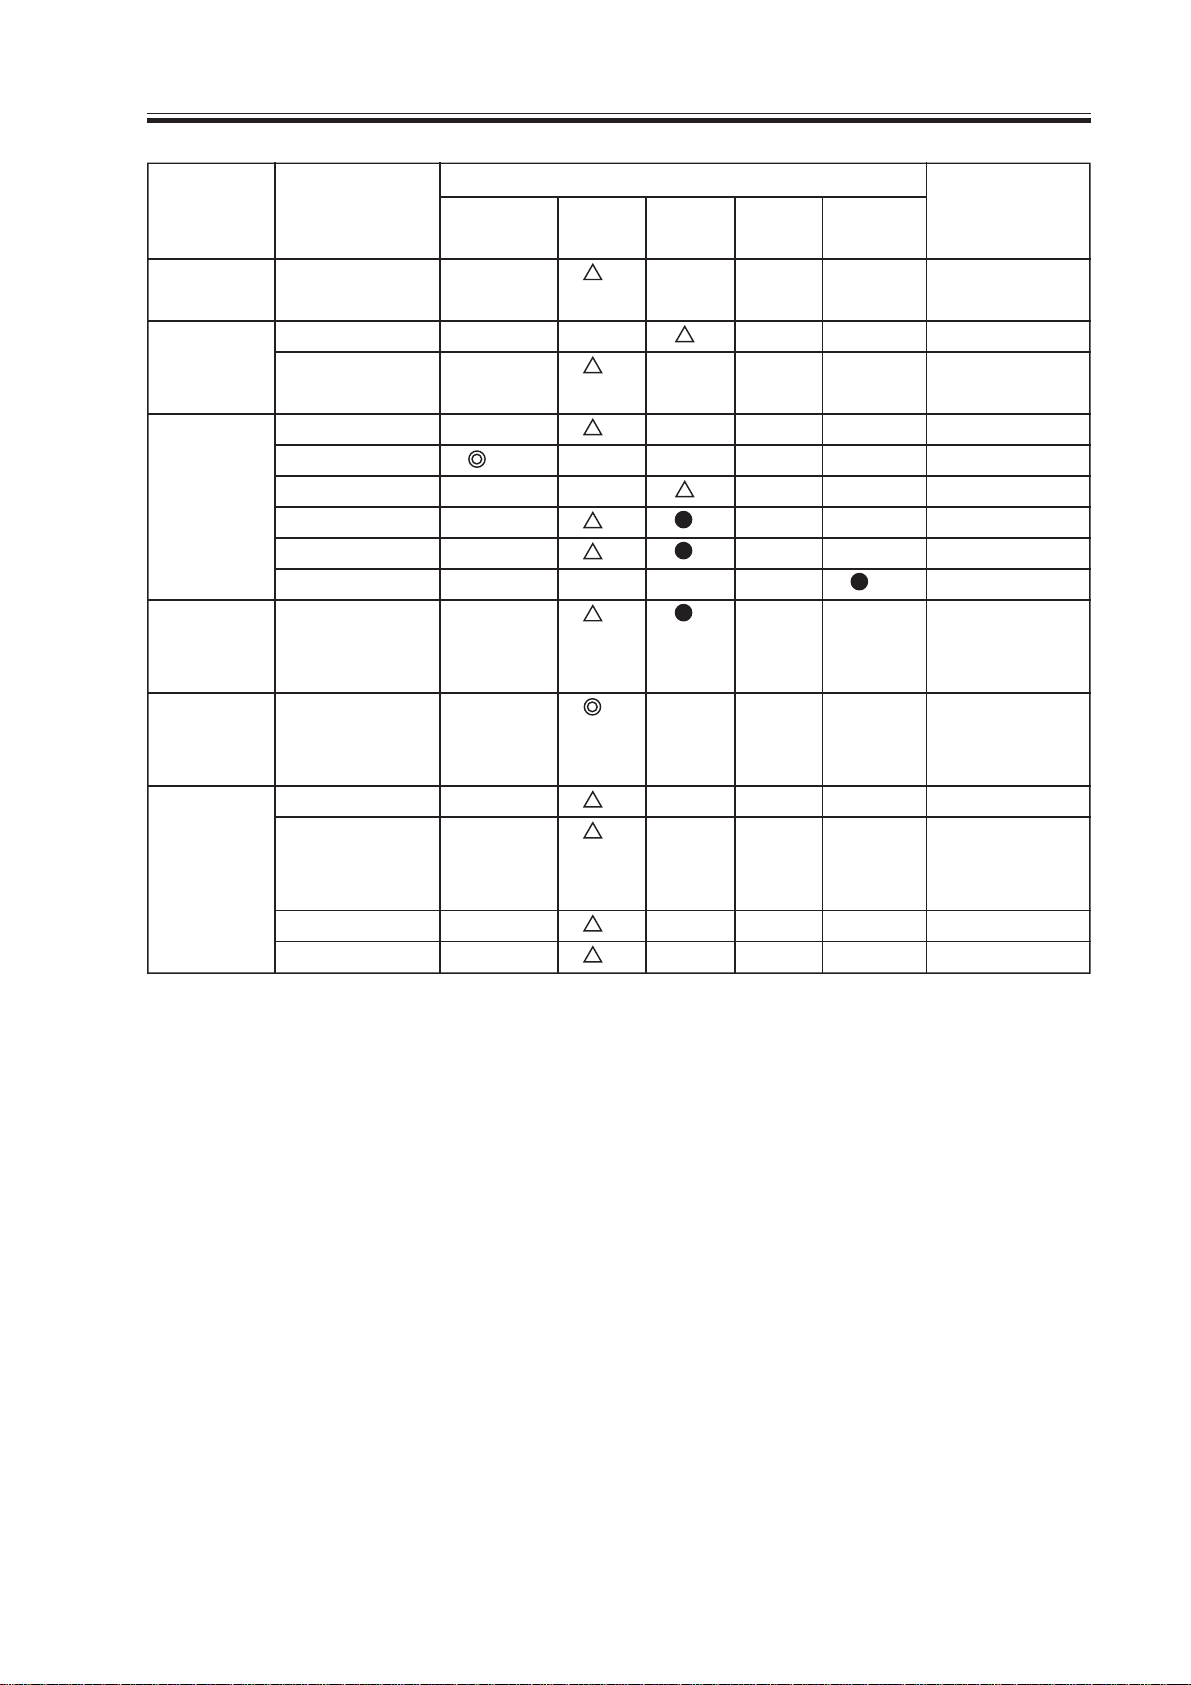
Intervals
Unit Part Upon every every every every Remarks
installation 250,000 500,000 750,0001,000,000
Developing Anti strayassembly toner sheet
Cleaner Side scraper
Toner dish
(rear, front)
Fixing Inlet guide
assembly Web
Oil dish
Thermistor
Sub thermistor
Thermal switch
Delivery Separation
assembly claw (upper,
lower)
Waste tonerWaste toner Inspect case,
collection b ox and remove
area toner.
Pickup/ Transfer guide
feeding Registration
assembly roller (upper,
lower)
Feeding belt
Feeding rollers
1-3
CHAPTER 1 MAINTENANCE AND INSPECTION
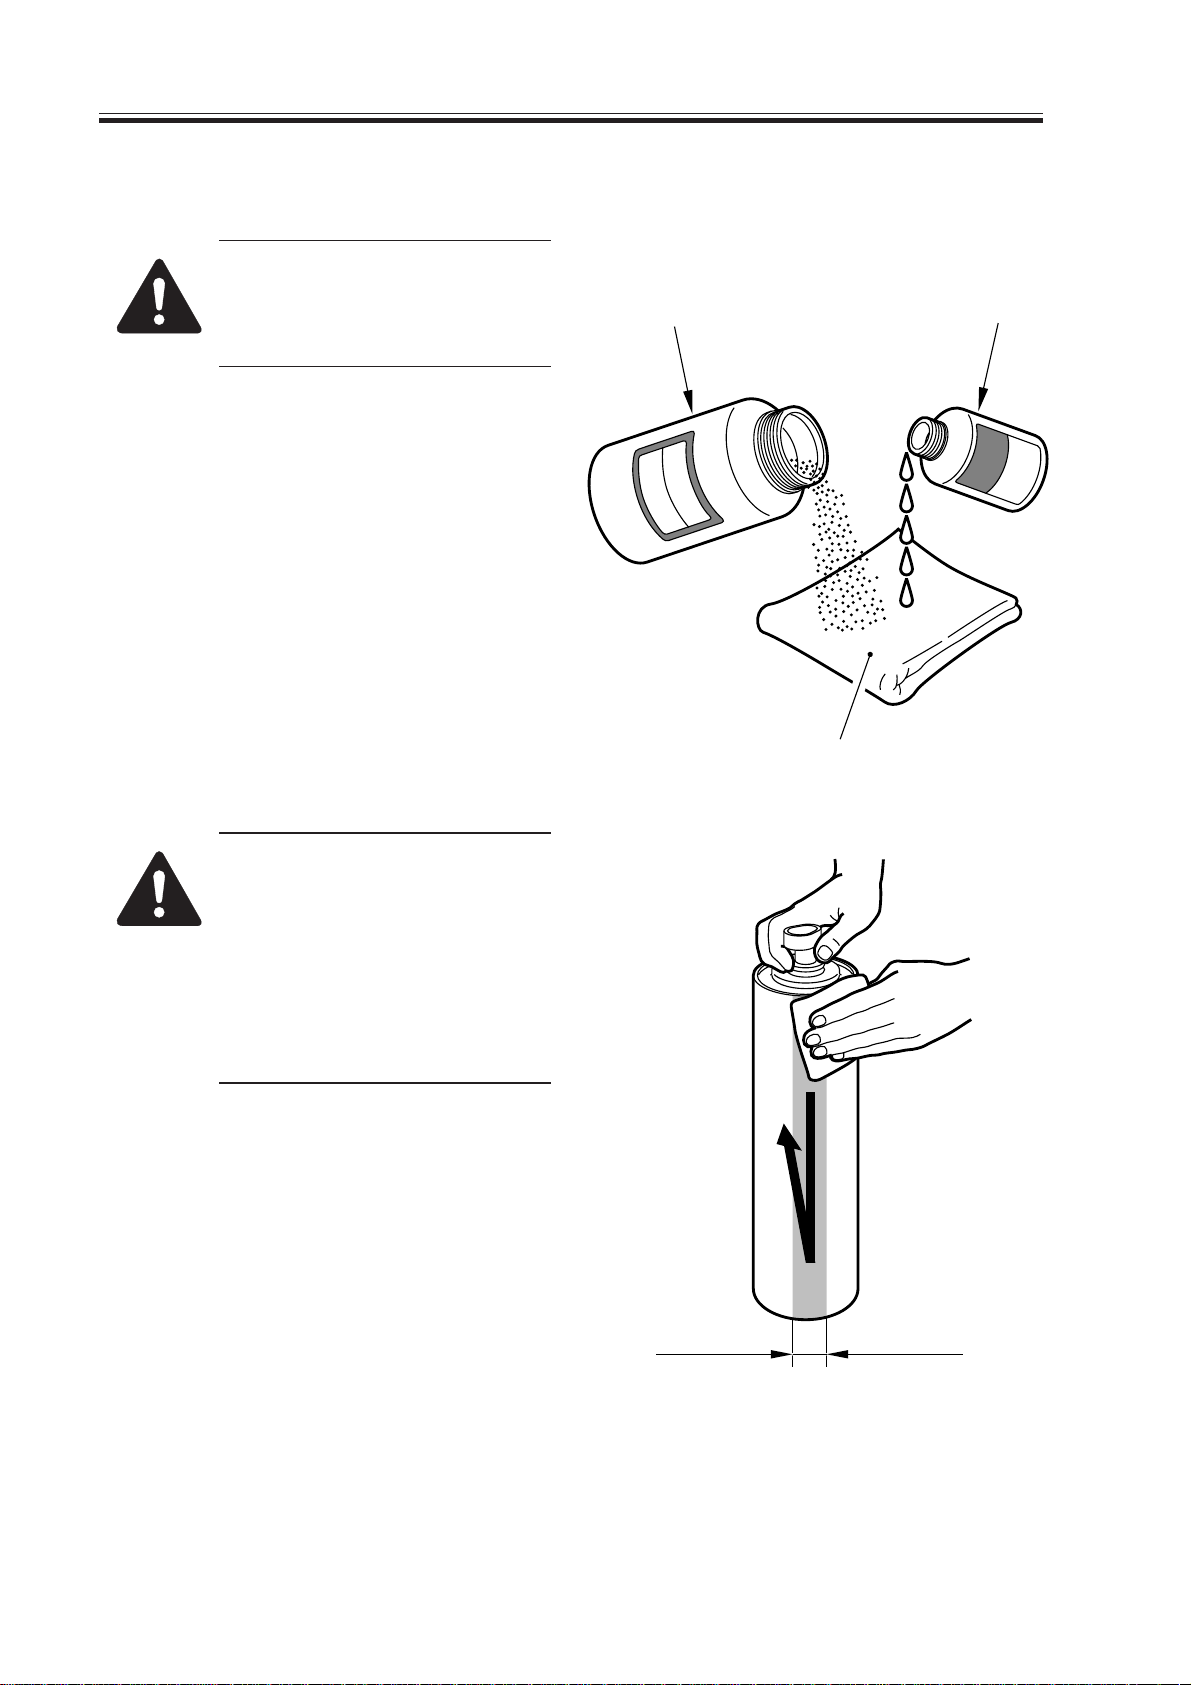
1.3 Cleaning the photosensitive drum
Do not rotate the magnet roll
during work. Otherwise, waste
toner may fall through the
cleaner assembly.
1) Slide out the process unit. (Be sure to
place the drum protective sheet over the
fixing/feeding unit.)
2) Take out the photosensitive drum.
3) Moisten lint-free paper [1] with 5 to 10
cc of alcohol [2]; then, pour 0.2 to 0.3 g
of drum cleaning powder (CK-0429) [3]
on the lint-free paper.
4) While butting the lint-free paper relatively strongly against the photosensitive drum, wipe the surface of the drum
from the front to the rear and from the
rear to the front.
CK-0429
[3]
[2]
[1]
F01-103-01
• Keep the widths of cleaning to
5 to 10 cm in the peripheral
direction of the drum.
• Move the lint-free paper back
and forth 15 to 20 times over a
single area.
Forcing the lint-free paper will
not affect the life of the drum.
5) When the alcohol has evaporated, dry
wipe the surface with lint-free paper. If
the area is uneven, go back to step 4),
and increase the back-and-forth movements.
6) Rotate the drum for the width (5 to 10
cm), and repeat steps 3) through 5) until
the entire area of the surface has been
cleaned.
5 to 10cm
1-4
F01-103-02

CHAPTER 1 MAINTENANCE AND INSPECTION
2.Periodically Replaced Par ts
Some parts of the machine must be replaced on a periodical basis to ensure a specific
level of machine performance. (Once they fail, the consequences are likely to be considerable.)
Whenever possible, schedule the replacement to coincide with a scheduled visit to the
user’s.
2.1 Guide to Timing of Replacement
You can check the timing of replacement for periodically replaced parts in service mode:
COPIER>COUNTER>PRDC-1.
2.2 Reader Unit
The reader unit does not have parts that require periodical replacement.
1-5

CHAPTER 1 MAINTENANCE AND INSPECTION
2.3 Printer Unit
As of June 2000
No. Part name Part No. Q’ty Life Remarks
1 Primary, pre-transfer, transfer, FB4-3687 AR 500,000*
separation charging wire
2 Primary grid wire FY1-0883 AR 500,000
3 Primary charging wire FF5-6883 2 500,000 Strengthened polish
cleaner 1 type (blue)
4 Primary charging wire FF2-6884 2 500,000 Strengthened polish
cleaner 2 type (blue)
5 Transfer charging wire FF5-6883 1 500,000 Strengthened polish
cleaner 1 type (blue)
6 Transfer charging wire FF5-6884 1 500,000 Strengthened polish
cleaner 2 type (blue)
7 Separation charging wire FF5-3090 1 500,000
cleaner
8 Pre-transfer charging wire FF5-3090 1 500,000
cleaner
9 Main thermistor FH7-7529 1 500,000
10 Sub thermistor FG5-8812 1 500,000
11 Ozone filter FB5-5570 1 500,000
12 Thermal switch FH7-7154 1 1,000,000
*Do not use the old type (gold plated). After replacement of the charge wire, be sure to
execute wire cleaning in service mode. (COPIER>FUNCTION>CLEANING>WIRECLN)
T01-203-01
The indicated life of each part is for reference only, and is subject to the site
Memo
environment and the conditions of use.
1-6

CHAPTER 1 MAINTENANCE AND INSPECTION
3.Consumables and Durables
Some parts of the machine are likely to require replacement because of wear or damage
once or more over the period of machine warranty. Replace them when they fail.
3.1 Guide to Timing of Replacement
You can check the timing of replacement for durables in service mode:
COPIER>COUNTER>DRBL-1.
3.2 Reader Unit
The reader unit does not have parts that are classified as “consumables” or “durables.”
1-7

CHAPTER 1 MAINTENANCE AND INSPECTION
3.3 Printer Unit
As of June 2000
No. Part name Part No. Q’ty Life Remarks
1 Pickup/feeding roller FB1-8581 1 120,000
(manual feed roller)
2 Separation roller FB5-0873 1 120,000
(manual feed tray)
3 Pickup roller FF5-1220 8 250,000 Each holder uses 2 pc.
4 Pickup/feeding roller FF5-9779 8 250,000 Each holder uses 2 pc.
(deck, cassette)
5 Separation roller FB2-7777 4 250,000
(deck, cassette)
6 Cleaner separation claw FB2-6899 3 500,000
7 Pre-separation charging FA4-1867 1 500,000
assembly scraper
8 Fixing upper roller FB4-3690 1 500,000
9 Fixing lower roller FB5-3619 1 500,000
10 Fixing web FY1-1157 1 500,000
11 Insulating bush (front/rear) FB5-3613 2 500,000 Replace simultaneously
with fixing upper roller.
12 Delivery upper separation claw FB5-3625 6 500,000
13 Delivery lower separation claw FA2-9037 2 1,000,000
14 Developing cylinder FG5-8235 1 1,000,000
15 Developing assembly roll FB2-6933 2 1,000,000
16 Cleaning blade FA4-1827 1 1,000,000 Both edges are used;
each for 500,000; apply
toner upon replacement.
17 Primary corona assembly FG6-5927 1 1,000,000
18 Transfer/separation corona FG6-5911 1 1,000,000
assembly
19 Pre-transfer corona assembly FG6-5045 1 1,000,000
1-8
T01-303-01

CHAPTER 1 MAINTENANCE AND INSPECTION
3.4 Side Paper Deck
As of June 2000
No. Part name Part No. Q’ty Life Remarks
1 Pickup roller (front) FF5-1220 1 250,000
2 Pickup roller (rear) FF5-1221 1 250,000
3 Feeding roller FF5-9779 1 250,000
4 Separation roller FB2-7777-020 1 250,000
T01-304-01
1-9
CHAPTER 1 MAINTENANCE AND INSPECTION
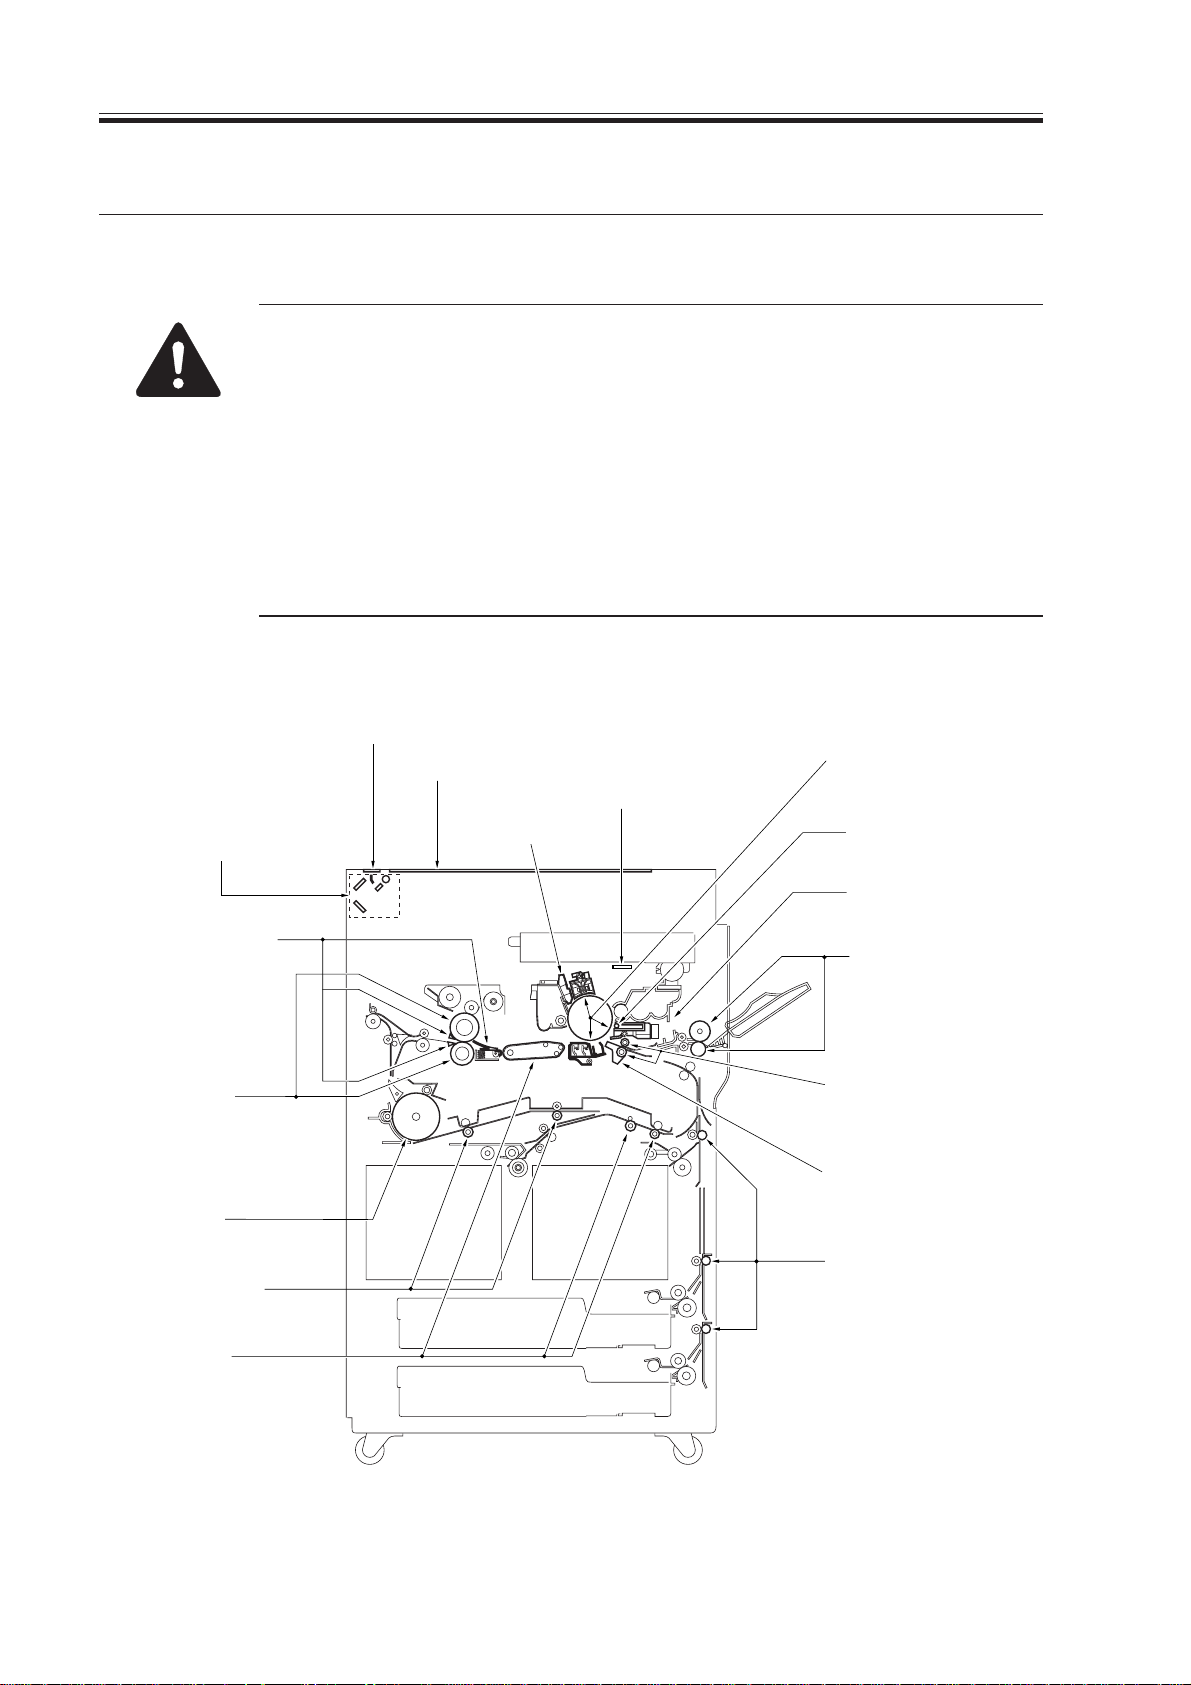
4.Points to Note for Periodical Ser vicing
Unless otherwise instructed, clean with lint-free paper and alcohol.
• Make a thorough check of the block (front, rear) for melting by leakage,
deformation by heat, cracking, discoloration (yellowing). If a fault is
found, replace the part with a new one immediately.
• Check the block (front, rear) including its inside.
• Do not use a cloth on which metal powder is found.
• If you have used solvent, make sure that the part has dried completely
before mounting it back to the machine.
· • Do not use a moist cloth unless specifically indicated.
• Be sure to provide scheduled servicing/replacement at the specified intervals.
Scanning lamp
Dry wipe with lint-free paper.
Reflecting plate
Clean with a blower brush.
No. 1 through No. 3 mirrors
Clean it with a blower brush;
if dirt is excessive, dry wipe
with lint-free paper.
Separation claw, fixing
assembly inlet guide
Clean with solvent
and lint-free paper.
Fixing roller
(upper/lower)
Use cleaning oil and
lint-free paper.
Reversing roller
Duplex Feeding Roller
(right/left)
Reading glass
Copyboard glass
Dust-proofing glass
Dry wipe with lint-free paper.
Pre-exposure glass
Primary/Transfer/Separation/
Pre-transfer charging assembly
Dry wipe with lint-free paper;
then, clean with alcohol.
Dust-collecting roller
Disposing of toner.
Developing assembly base
Clean with a moist
cloth; see Note 1.
Pickup/feeding roller
Registration roller
Transfer guide
Vertical path roller
Feeding assembly
Clean with a moist
cloth; see Note 1.
1-10
Note 1: Do to leave traces of water.
F01-401-01
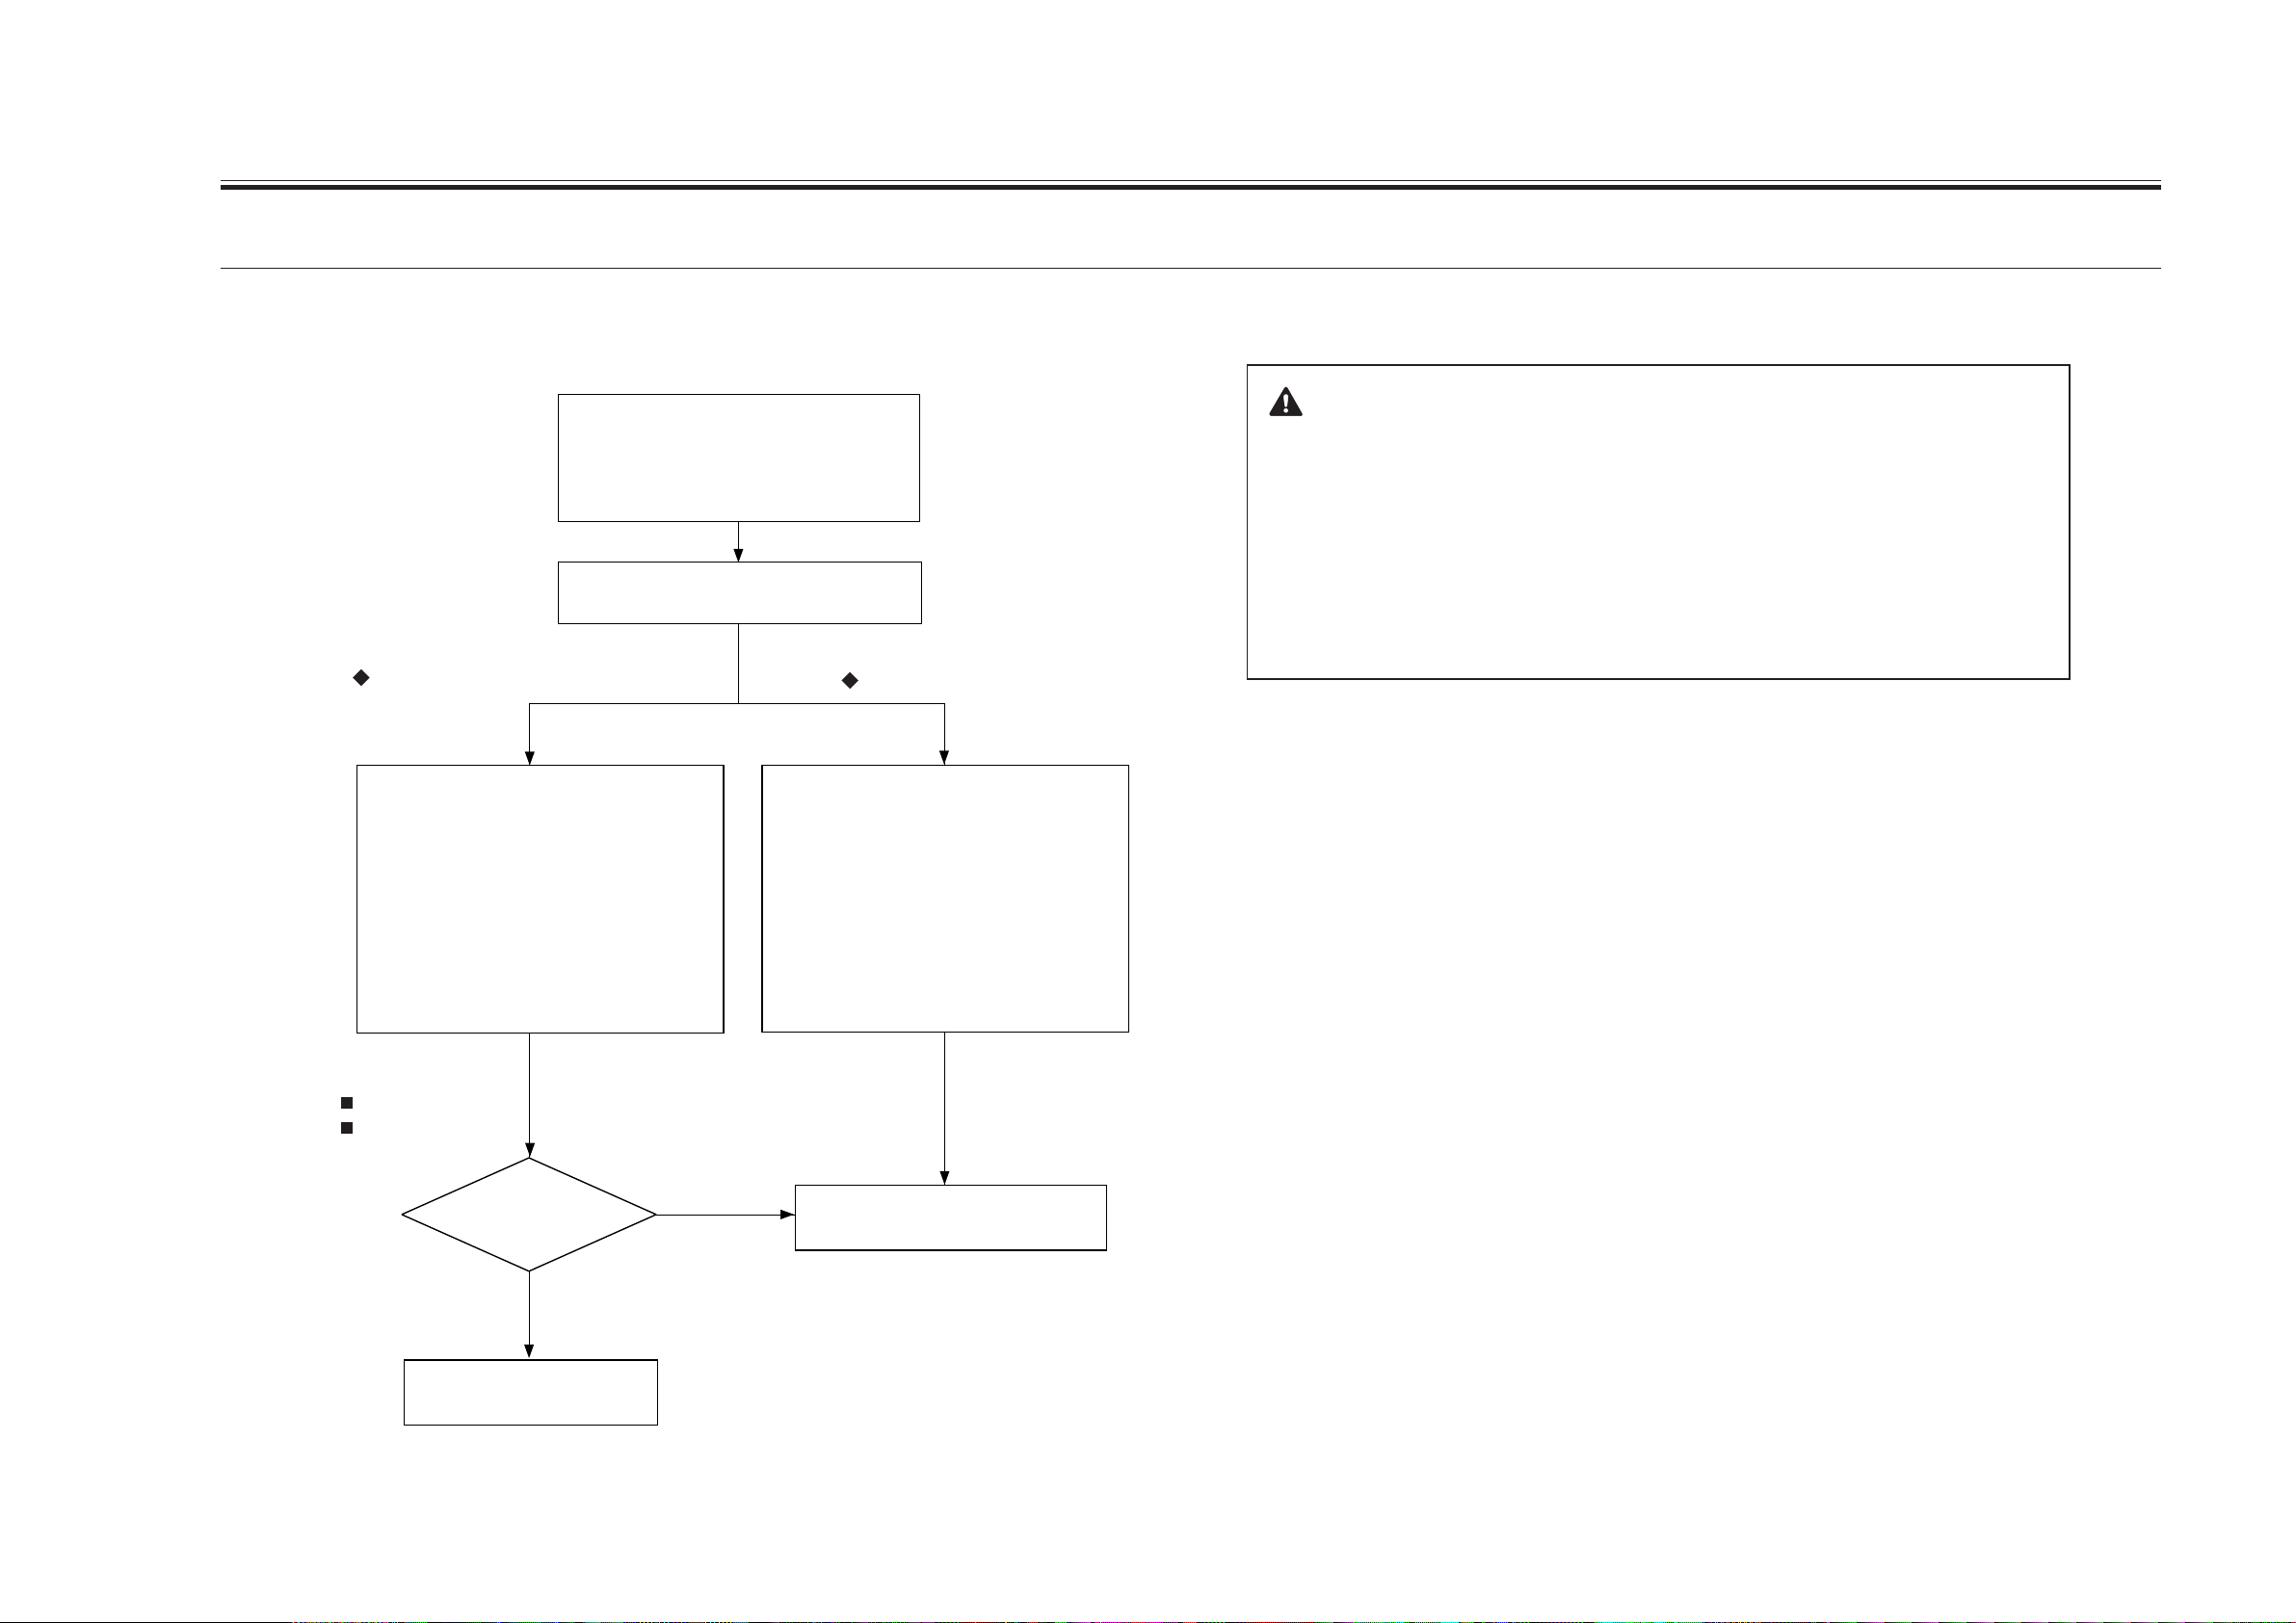
5.Image Adjustment Basic Procedure
5.1 Making Pre-Checks
<Pre-Checks>
CHAPTER 1 IMAGE ADJUSTMENT BASIC PROCEDURE
Clean the following:
1. Primary charging assembly grid wire
2. Primary charging wire
3. Pre-transfer charging wire
4. Transfer charging wire
Check the following:
1. Height of charging wire
If a fault is found on copy images,
Using the NA3 Chart, make two copies each
in the following modes:
1. AE mode
2. Text mode
3. Text/photo mode
Generate several of the following test sheets:
1. 04 (blank)
2. 05 (halftone)
3. 06 (solid black)
Points to Note When Making Checks on the Printer Side
The machine's potential control mechanism is designed for both
copier image output and printer (PDL) image output, and its parameters
for potential control in service mode may be adjusted independently of
each other.
As such, when an image fault occurs, try to find out which side is
causing it, and generate the appropriate images (data) for adjustment of
related parameters.
If a fault is found on printer images,
Generate several each of the following
printer (PDL) images
1. Image with large background
(to check for fogging)
2. Image including solid black
(to check solid black density)
3. Image including halftone
(to check halftone density)
Output Conditions
F value=5
potential control: ON
Are the test
prints normal?
YES
Perform 5.4 “ Making Checks
on the Reader Unit.”
NO
Perform 5.2 “ Making Checks on the
Printer Unit.”
1-11
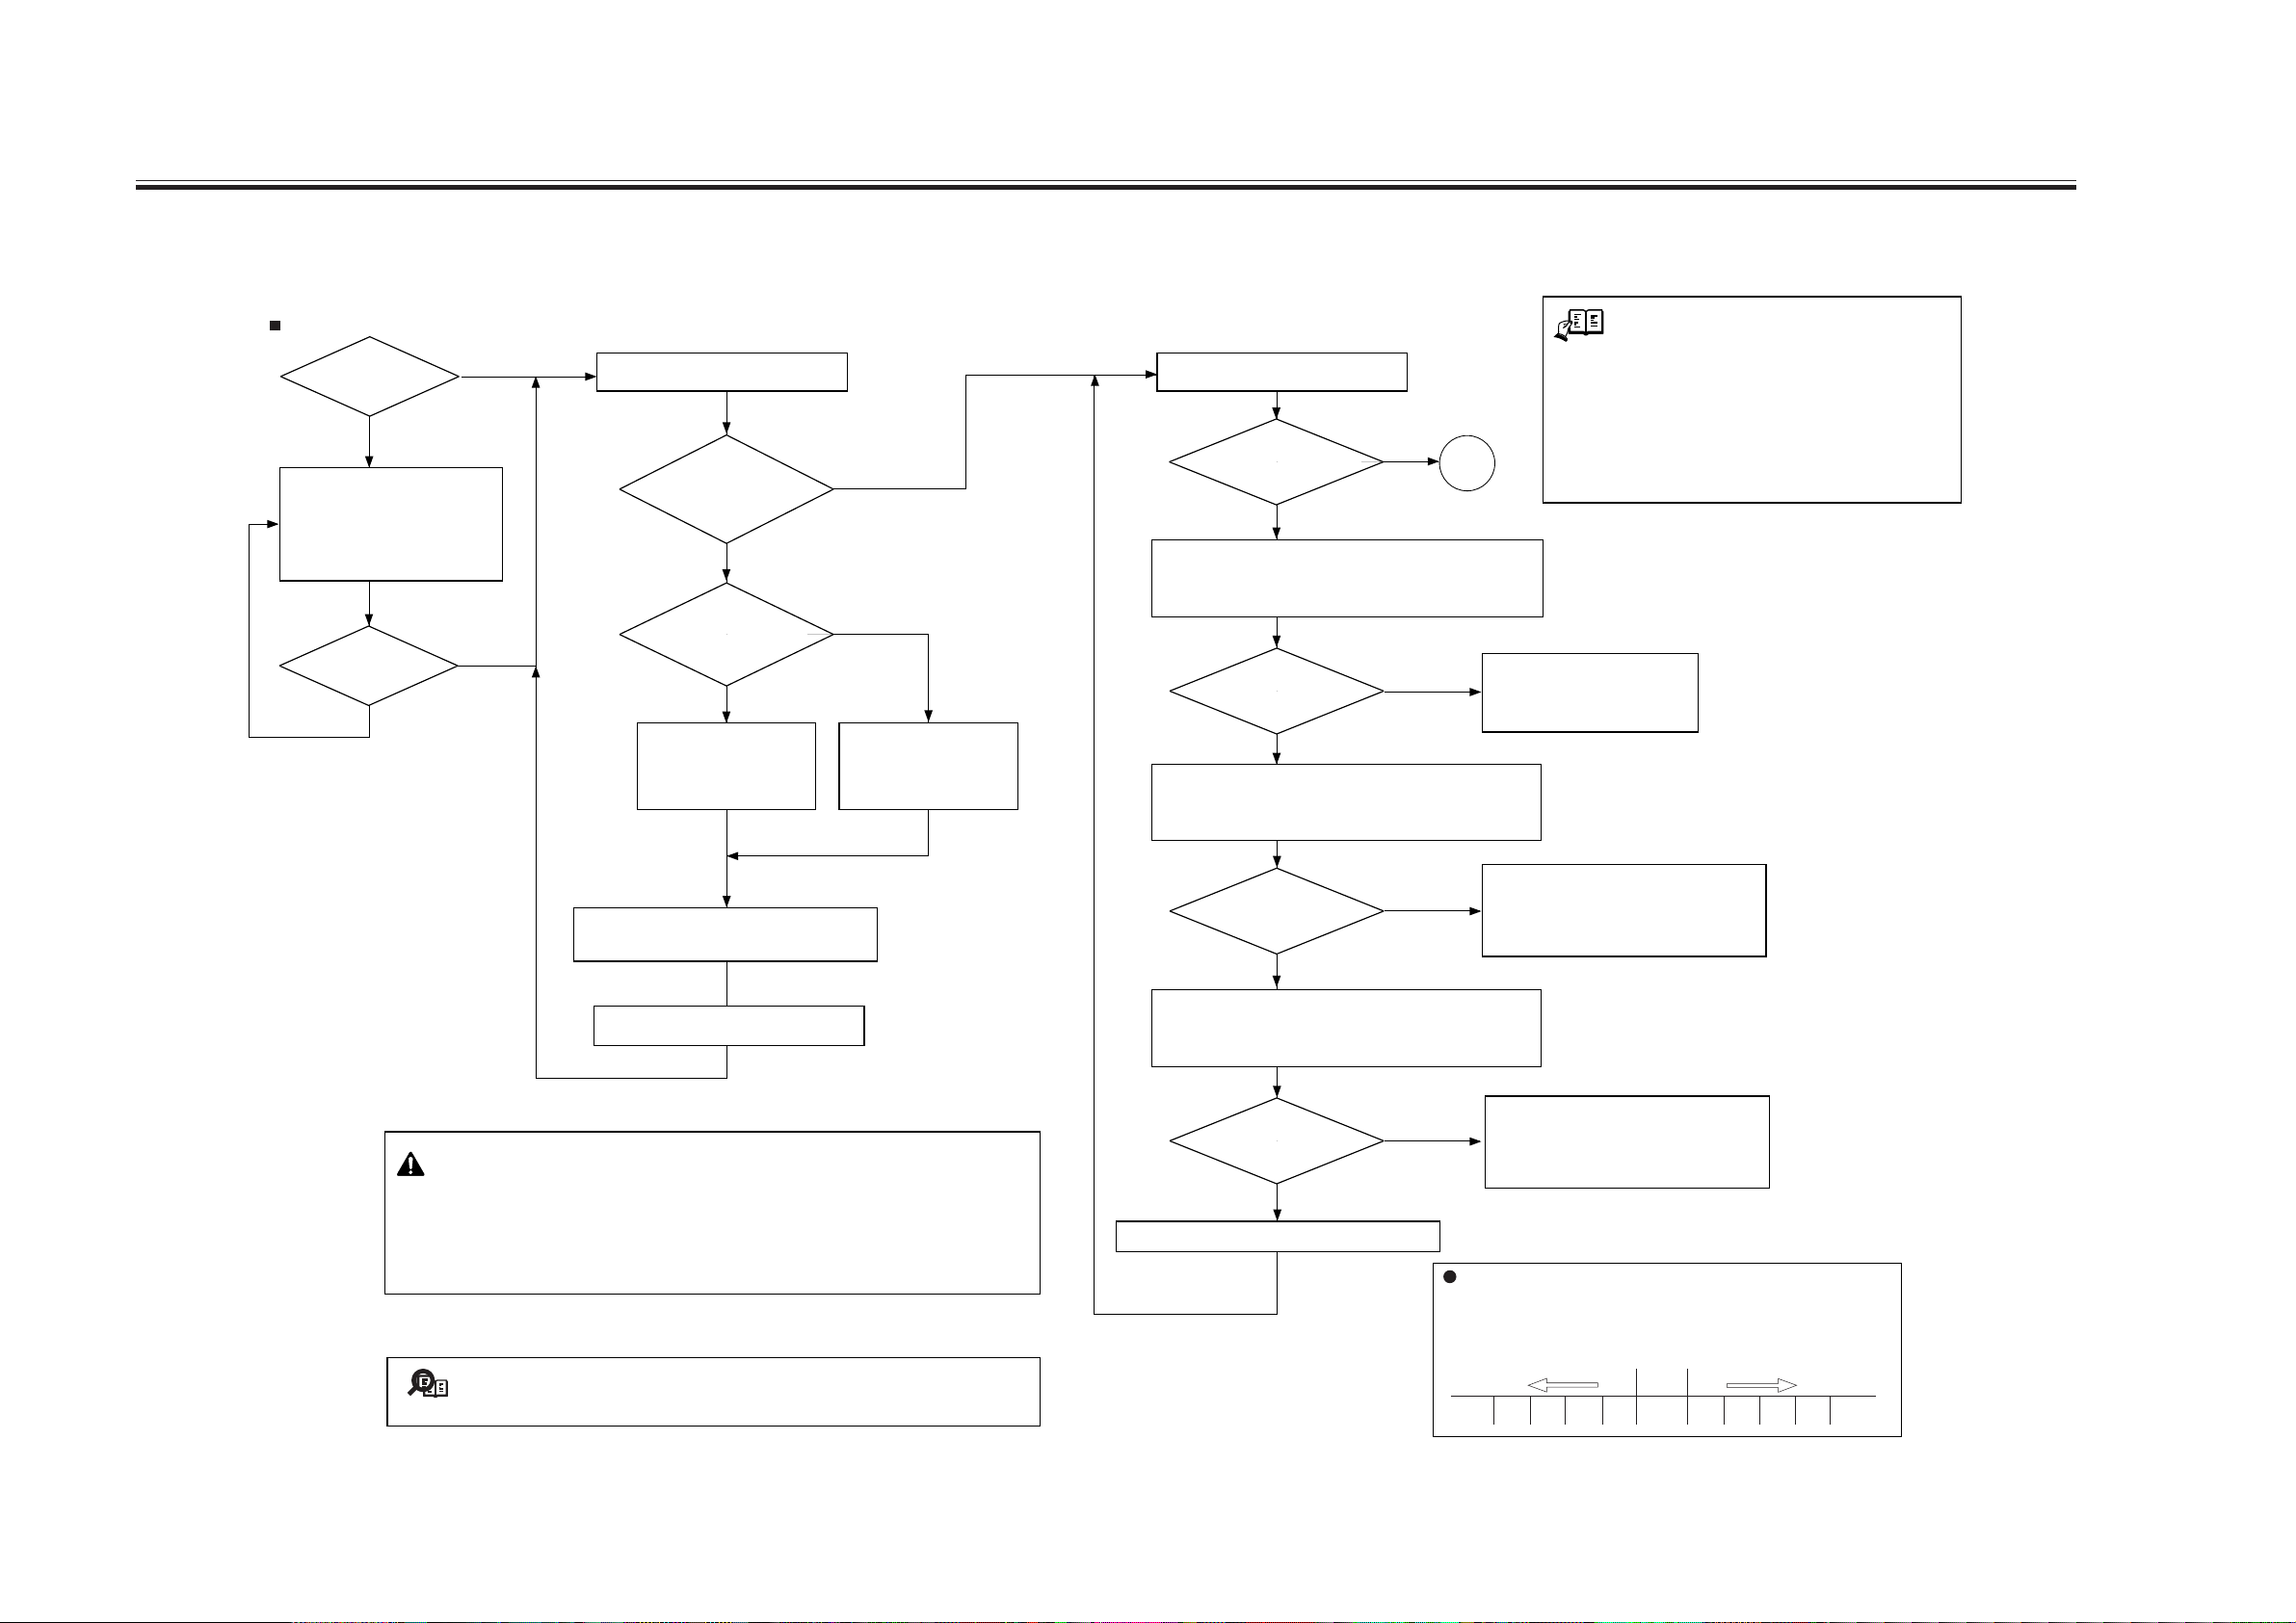
CHAPTER 1 IMAGE ADJUSTMENT BASIC PROCEDURE
5.2 Making Checks on the Printer Unit (1/2)
<Checking Images>
Checking Halftone Images
Are there vertical
lines in the image?
YES
Clean the following; also check
for foreign matter:
1. Dust-proofing glass
2. Charging assemblies
Are there vertical
lines in the image?
NO
YES
NO
<Checking the Density Slope>
Generate a halftone image.
Is there a
difference in density between
front and rear?
YES
Is the rear lighter?
YES
Turn the adjusting screw
found at the front of the
primary charging assembly
clockwise. (2 full turns max.)
NO
NO
Turn the adjusting screw
found at the rear of the
primary charging assembly
clockwise. (2 full turns max.)
<Checking fro Fogging>
Generate a blank print.
Is it foggy?
NO
A
YES
Check the following readings in service mode:
COPIER>DISPLAY>DPOT>VDM (for copier image)
COPIER>DISPLAY>DPOT>VDM-P (for printer image)
Are the readings ± 6 V
of the target value?
(*1)
NO
Check the primary charging
system and the potential control
system; if normal, replace the
photosensitive drum.
YES
Check the following readings in service mode:
COPIER>DISPLAY>DPOT>VL1M (for copier image)
COPIER>DISPLAY>DPOT>VL1M-P (for printer image)
REF.
*1:VD target value
COPIER >DISPLAY >DPOT >VDT (for copier image)
COPIER >DISPLAY >DPOT >VDT-P (for printer image)
*2:VL1 target value
COPIER >DISPLAY >DPOT >VD1T (for copier image)
COPIER >DISPLAY >DPOT >VD1T-P (for printer image)
Make the selections in service mode, and turn off
and then on the main power switch:
COPIER>FUNCTION>DPC>DPC.
Execute forced
potential control.
Generate one print of a halftone image.
1. If there still is a difference in density after giving the adjusting screw 2 turns (each turn
causing a change of about 0.7 mm), check the scanning lamp and the scanner for soiling.
2. When making a clockwise turn, be sure that the intervals between wire grid runs are not
larger than 9 mm.
When making a counterclockwise turn, be sure that the intervals between wire grid runs
are not smaller than 7.5 mm.
3. The machine will not execute potential control even when the main power switch is
turned off and then on if the temperature of the fixing assembly is 150˚C or higher.
Moving the wire from the photosensitive drum causes the image to be lighter, while
Memo
moving it closer causes the images to be darker.
Are the readings ± 6 V
of the target value?
(*2)
NO
YES
Check the following readings in service mode:
COPIER>DISPLAY>DPOT>VL2M (for copier image)
COPIER>DISPLAY>DPOT>VL2M-P (for printer image)
NO
Are the readings 70 ± 15 V?
YES
Adjust the offset value of the VL target potential.
Adjusting the Offset of the VL Target Potential
(DE-OFFSET/DE-OFFSET-P)
Vary the value using the following as a guide:
COPIER>ADJUST>V-CONT>DE-OFST (for copier image)
COPIER>ADJUST>V-CONT>DE-OFST-P (for printer image)
Check the following, and replace them if
necessary:
1. Laser (for output)
2. Potential control system
3. Photosensitive drum
Check the following, and replace them if
necessary.
1. Laser (for output)
2. Potential control system
3. Photosensitive drum
Lighter image Darker image
Default
-50 -40 -30 -20 -10 0 +10 +20 +30 +40 +50
1-12
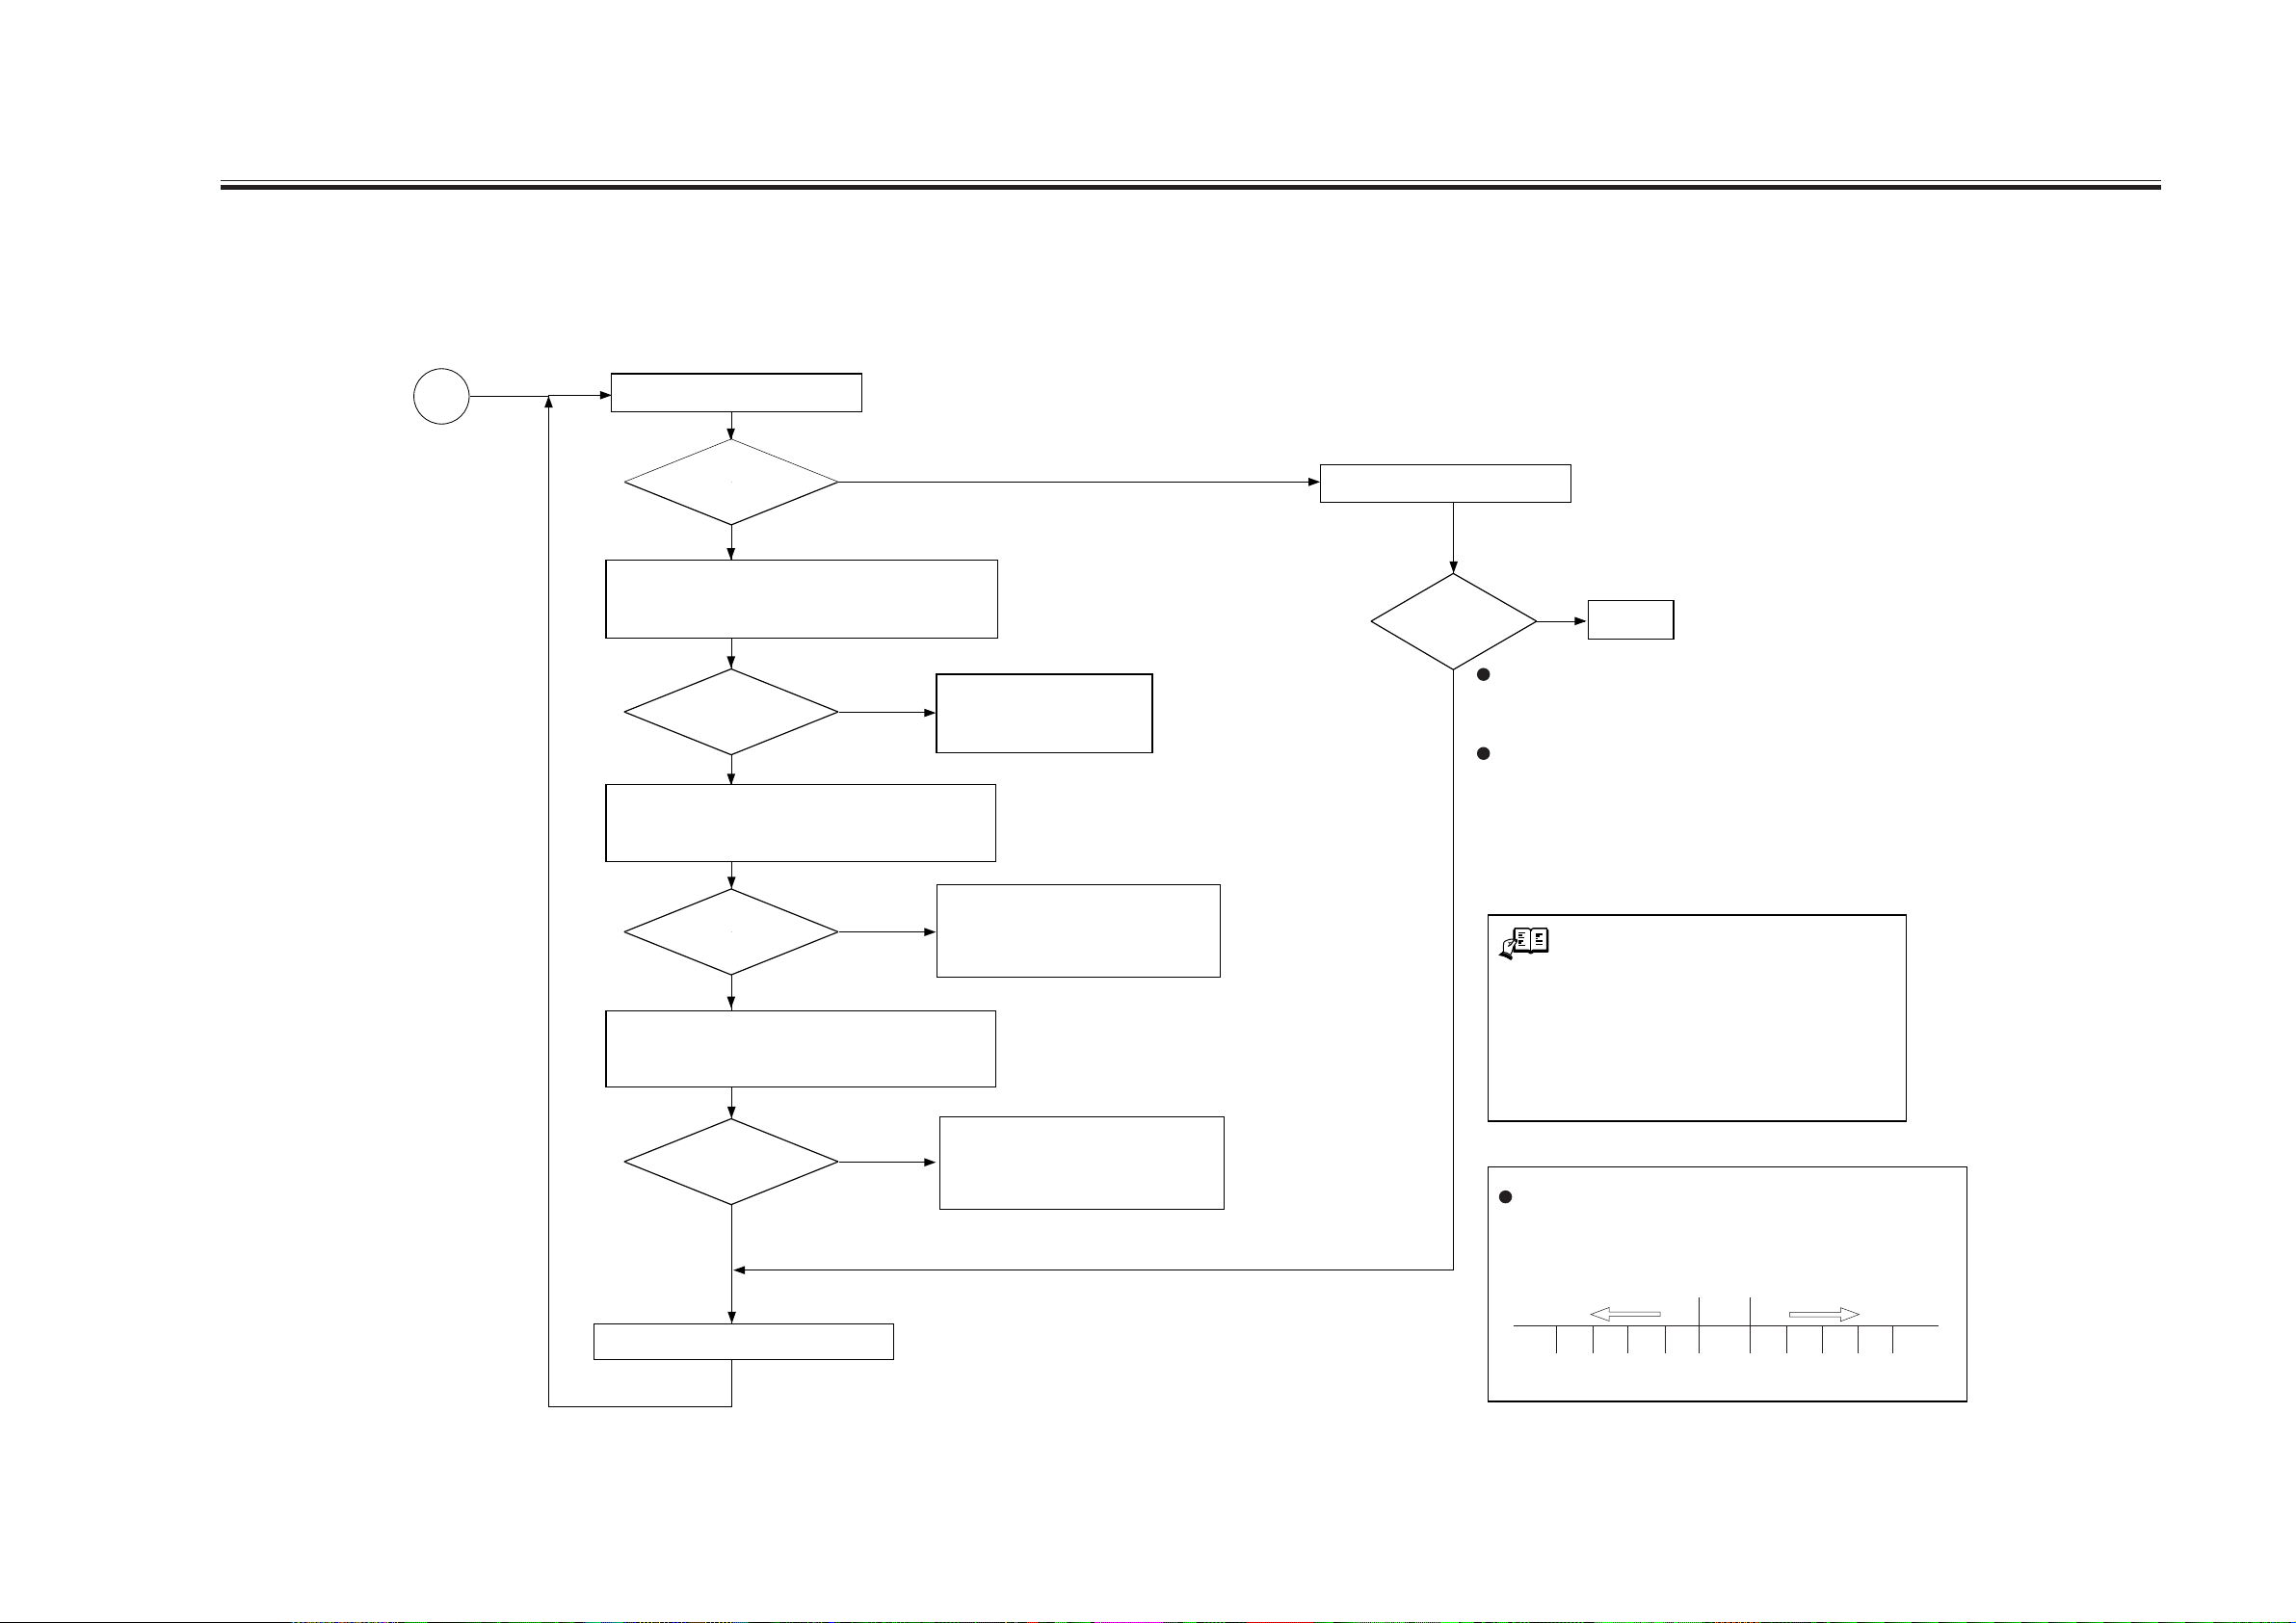
5.3 Making Checks on the Printer Unit (2/2)
<Checking the Solid Black Density>
CHAPTER 1 IMAGE ADJUSTMENT BASIC PROCEDURE
A
Generate a solid black print.
Is the density
too low or too high (too
light or too dark)?
YES
Check the following readings in service mode:
COPIER>DISPLAY>DPOT>VDM (for copier image)
COPIER>DISPLAY>DPOT>VDM-P (for printer image)
Are the
readings ± 6 V of the
target value?
(*1)
YES
Check the following readings in service mode:
COPIER>DISPLAY>DPOT>VL1M (for copier image)
COPIER>DISPLAY>DPOT>VL1M-P (for printer image)
Are the
readings ± 6 V of the
target value?
(*2)
YES
Check the following readings in service mode:
COPIER>DISPLAY>DPOT>VL2M (for copier image)
COPIER>DISPLAY>DPOT>VL2M-P (for printer image)
Are the readings
70 ± 15 V?
YES
NO
NO
NO
NO
Check the primary charging
system; if normal, replace the
photosensitive drum.
Check the following, and replace them if
necessary:
1. Laser (for output)
2. Potential control system
3. Photosensitive drum
Check the following, and replace them if
necessary:
1. Laser (for output)
2. Potential control system
3. Photosensitive drum
<Checking the Halftone Density>
Generate a halftone image.
Is the halftone
density optimum?
NO
YES
To check a copier image,
See if No. 6 and No. 7 (halftone) of the Test Chart is
reproduced to the more or less the same density.
To check a printer (PDL) image,
See if the density of the halftone area represents the
original data properly.
REF.
*1:VD target value
COPIER >DISPLAY >DPOT >VDT (for copier image)
COPIER >DISPLAY >DPOT >VDT-P (for printer image)
*2:VL1 target value
COPIER >DISPLAY >DPOT >VD1T (for copier image)
COPIER >DISPLAY >DPOT >VD1T-P (for printer image)
Adjusting the Offset Value of the VD Target Potential
(VD-OFFSET/VD-OFFSET-P)
COPIER>ADJUST>V-CONT>VD-OFST (for copier image)
COPIER>ADJUST>V-CONT>VD-VD-OFST-P (for printer image)
End.
Adjust the offset of the VD target potential.
Lighter image Darker image
Default
-5 -4 -3 -2 -1 0 +1 +2 +3 +4 +5
1-13
CHAPTER 1 IMAGE ADJUSTMENT BASIC PROCEDURE
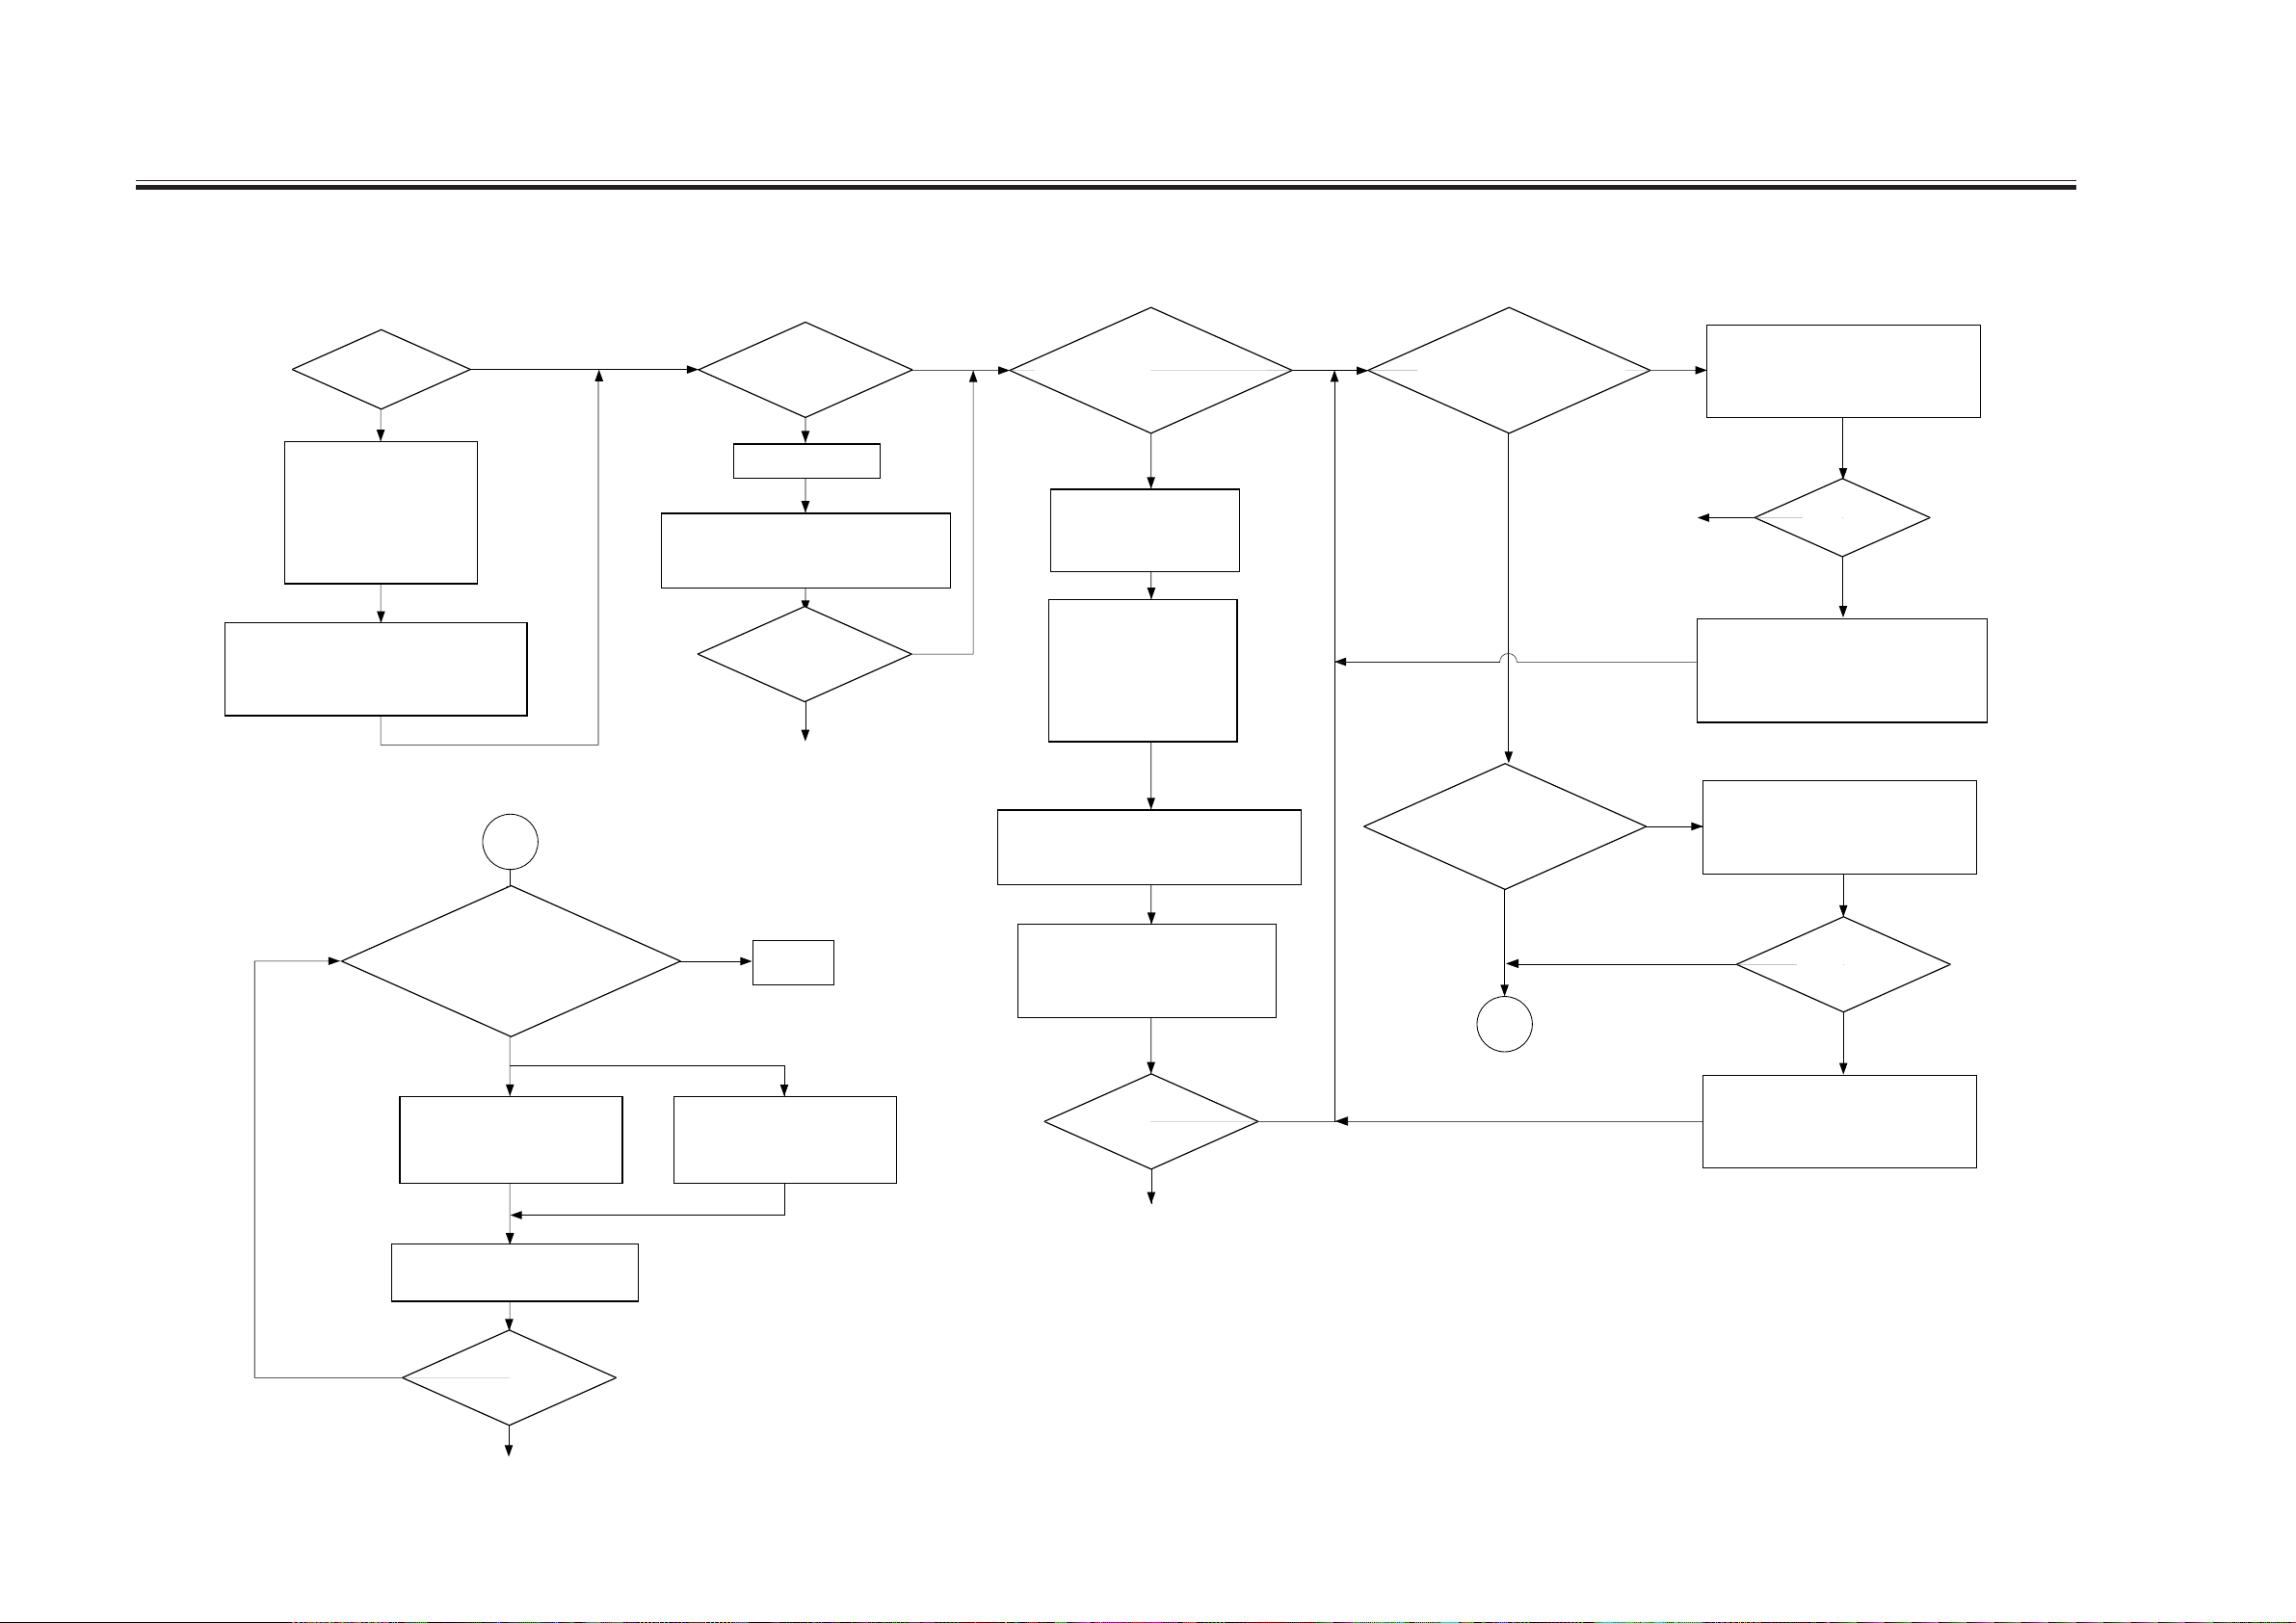
5.4 Making Checks on the Reader Unit
<Making Image Initial Checks> <Checking the Density Slope>
Are there vertical
lines in the images?
YES
Clean the following:
1. Mirrors
2. Lens
3. Standard white plate
(mounted to back of
copyboard glass)
4. Copyboard glass
Execute shading in service mode:
COPIER>FUNCTION>CCD>CCD-ADJ
<Checking Halftone Density>
NO
Execute shading in service mode:
COPIER>FUNCTION>CCD>CCD-ADJ
Is there a difference
in density between
front and rear?
YES
Clean the mirrors.
Is there a
difference in density
between front
and rear?
YES
Perform the instructions under
“ Checking the Density Slope”
for the printer unit.
B
<Checking the Solid Black Density>
NO
NO
Executing Potential Control
Turn off and then on the power switch; then,
make a copy.
Make a copy of
the NA3 Chart in text mode. Is
gray scale No. 1 (solid black)
too light?
YES
Check the life of the
scanning lamp; if it has
reached the end of its
life, replace it.
Clean the following:
1. Mirrors
2. Lens
3. Standard white plate
4. Scanning lamp
5. Reflecting plate
NO
<Checking for Fogging>
Make a copy of
the NA3 Chart in text mode.
Is the white background
foggy?
NO
Perform the instructions
under “nChecking for
Fogging”g on the printer side.
Make a copy of the
NA3 Chart in AE mode. Is the
output foggy?
YES
YES
Execute shading adjustment in service
mode:
COPIER>FUNCTION>CCD>CCD-ADJ.
NO
Increase the white level target value for
shading correction in service mode:
COPIER>ADJUST>CCD>SH-TRGT
(40 max.).
Execute shading adjustment in service
mode:
COPIER>FUNCTION>CCD>CCD-ADJ.
Is the white
background
foggy?
YES
When
the A3 Chart
is copied in text/photo
mode, is the density of No.8 optimum
when compared with Nos.7
through 9?
NO
If it is too light,
Increase the setting of the
following in service mode:
COPIER > ADJUST > DENS
>DENS-ADJ
Make one copy of the A3 Chart in
text/photo mode.
Is the
density of gray scale
YES
No.8 (halftone)
different?
NO
YES
If it is too dark,
Decrease the setting of the
following in service mode:
COPIER > ADJUST > DENS
>DENS-ADJ
End.
Execute shading adjustment in service
mode:
COPIER>FUNCTION>CCD>CCD-ADJ.
Is the density of
gray scale No. 1 (solid black)
too low (light)?
YES
Perform the instructions under
“ Checking the Solid Black Density”
for the printer unit.
NO
NO
B
NO
Decrease the value of AE density
adjustment in service mode:
COPIER>ADJUST>AE>AE-TBL.
Is the white
background
foggy?
YES
1-14
Go to “ Checking the Halftone Density” for the printer side.
CHAPTER 2 STANDARDS AND ADJUSTMENTS
CHAPTER 2 STANDARDS AND ADJUSTMENTS
1.Image Adjustments
1.1 Standards of Image Position
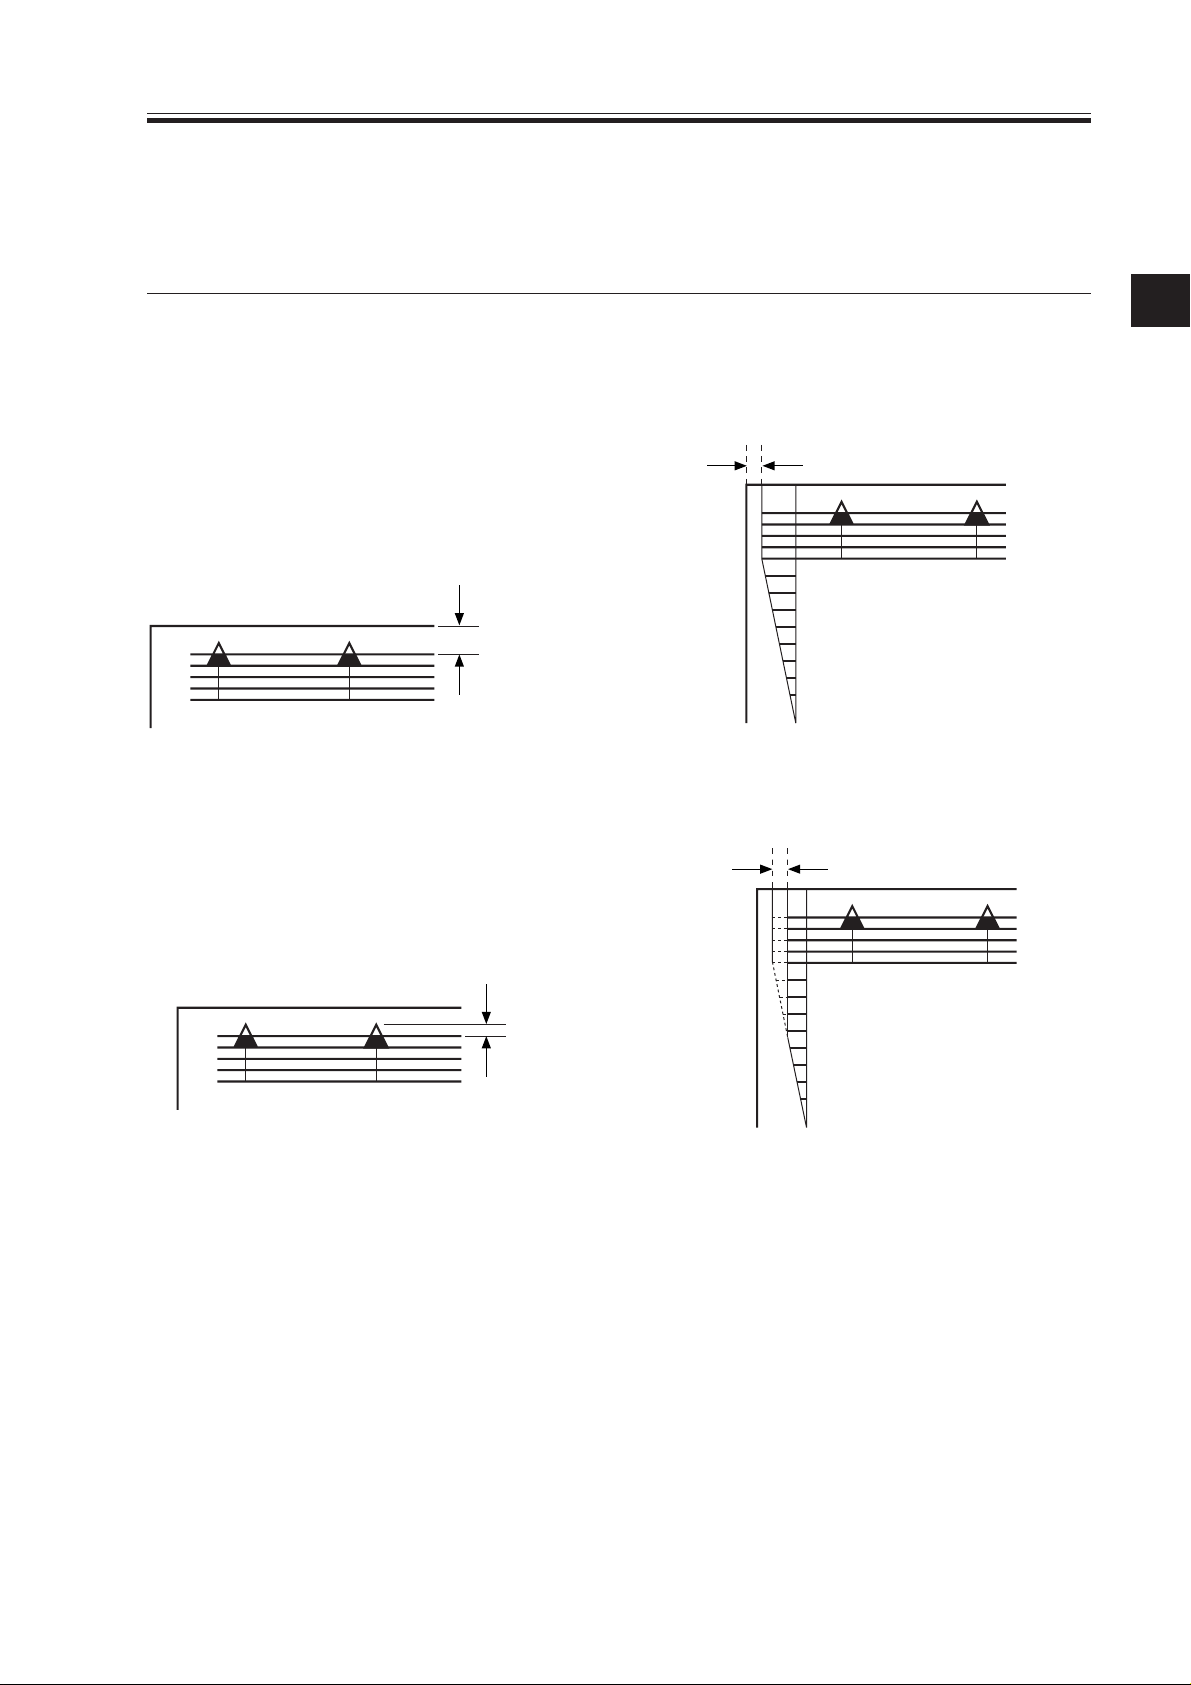
The image margin/non-image width of a print made in Direct must be as follows:
2.5±1.5mm
0
2
2
4.0
+1.5mm
- 1.0mm
4
6
8
10
F02-101-01 Image Leading Edge Margin F02-101-02 Left/Right Image Margin
2.5mm±1.5
0
2
4
6
+1.5mm
4.0
- 1.0mm
F02-101-03 Leading Edge Non-Image
F02-101-04 Left/Right Non-Image Width
8
10
Width
2-1
CHAPTER 2 STANDARDS AND ADJUSTMENTS
1.2 Checking the Image Position
Make prints using the following as the source of paper (10 prints each), and check to see
that the image margin and the non-image width are as indicated:
• Each cassette
• Front deck (left, right)
• Manual feed tray
• Duplex feeding unit
• Side paper deck
If not as indicated, adjust the image position in the following order:
1. Adjusting the left/right image margin (registration)
2. Adjusting the image leading edge margin (registration)
3. Adjusting the left/right non-image width (CCD read start position)
4. Leading edge non-image width (scanner image leading edge position)
1.3 Adjusting the Left/Right Image Margin
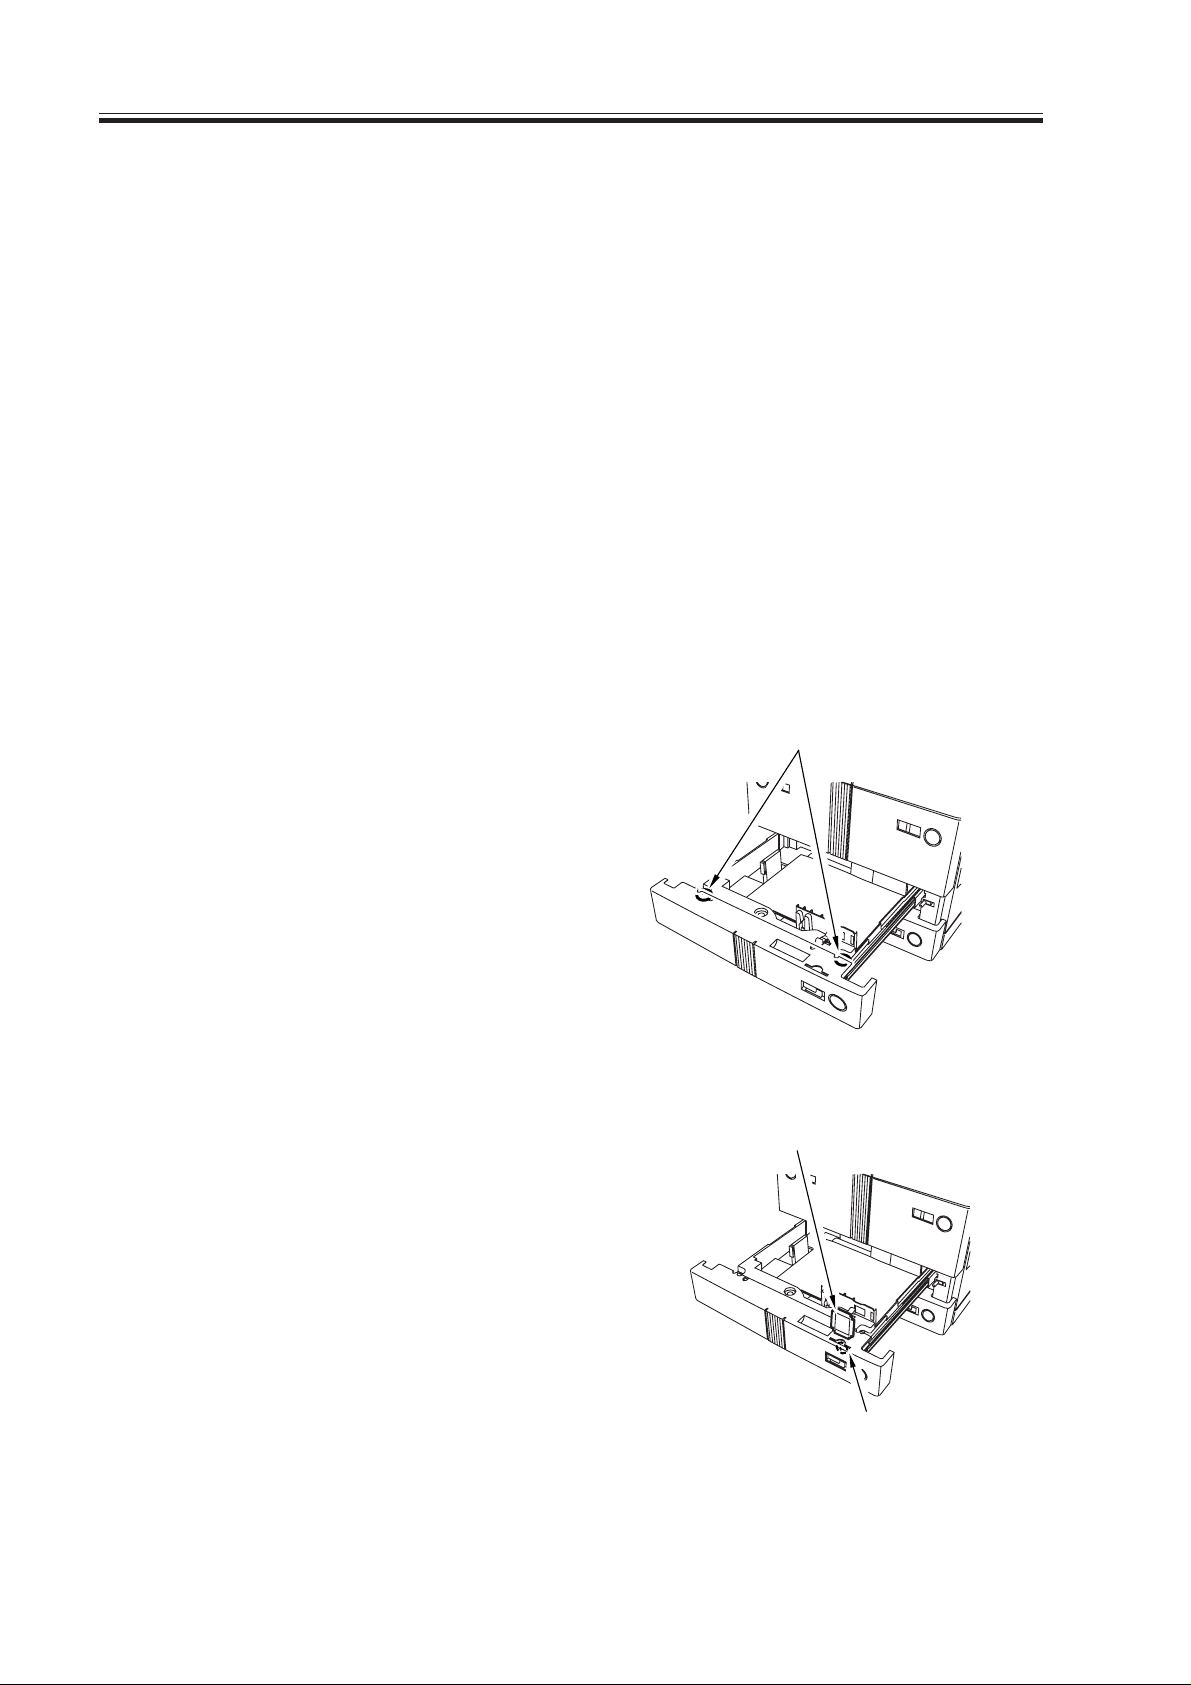
1.3.1 Cassette 3/4
1) Loosen the two fixing screws [1] found
on the left and the right of the cassette.
2) Remove the paper size plate [2], and
turn the adjusting screw [3] found in the
opening of the paper size plate [2] to
adjust the position; then, tighten the two
fixing screws [1].
After making the adjustment, be sure to
execute the following service mode:
COPIER>FUNCTION>CST>C3STMTR/A4R or C4-STMTR/A4R
[1]
F02-103-01
[2]
2-2
[3]
F02-103-02
CHAPTER 2 STANDARDS AND ADJUSTMENTS
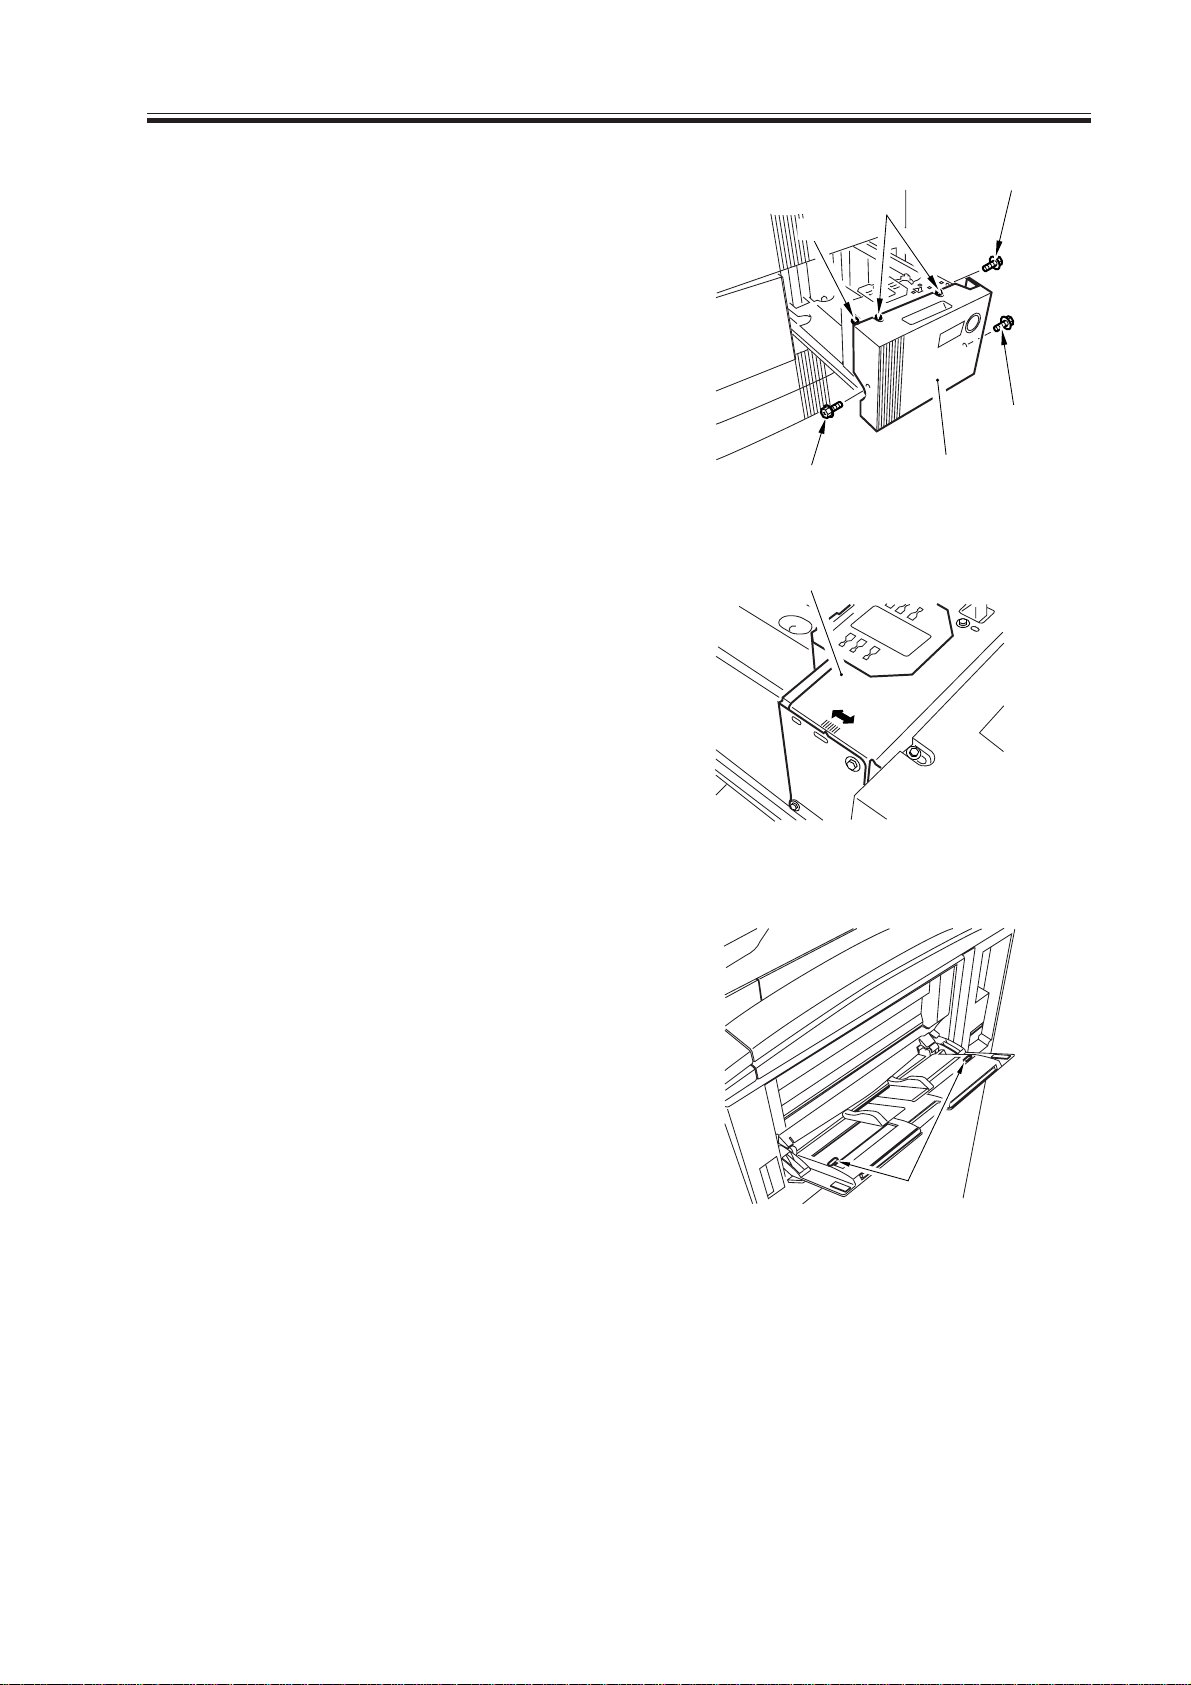
1.3.2 Left/Right Front Deck
1) Loosen the four screws [2] and the two
fixing screws [3] of the cassette front
cover [1].
2) Move the cassette guide assembly
(front) [4] to the front or the rear to
make adjustments.
[2]
[3]
[2]
F02-103-03
[4]
[3]
[2]
[1]
1.3.3 Manual Feed Tra y
1) Loosen the two mounting screws [1] of
the manual feed tray, and adjust the position of the manual feed tray.
F02-103-04
[1]
F02-103-05
2-3
CHAPTER 2 STANDARDS AND ADJUSTMENTS
1.3.4 Duplex Feeding Unit
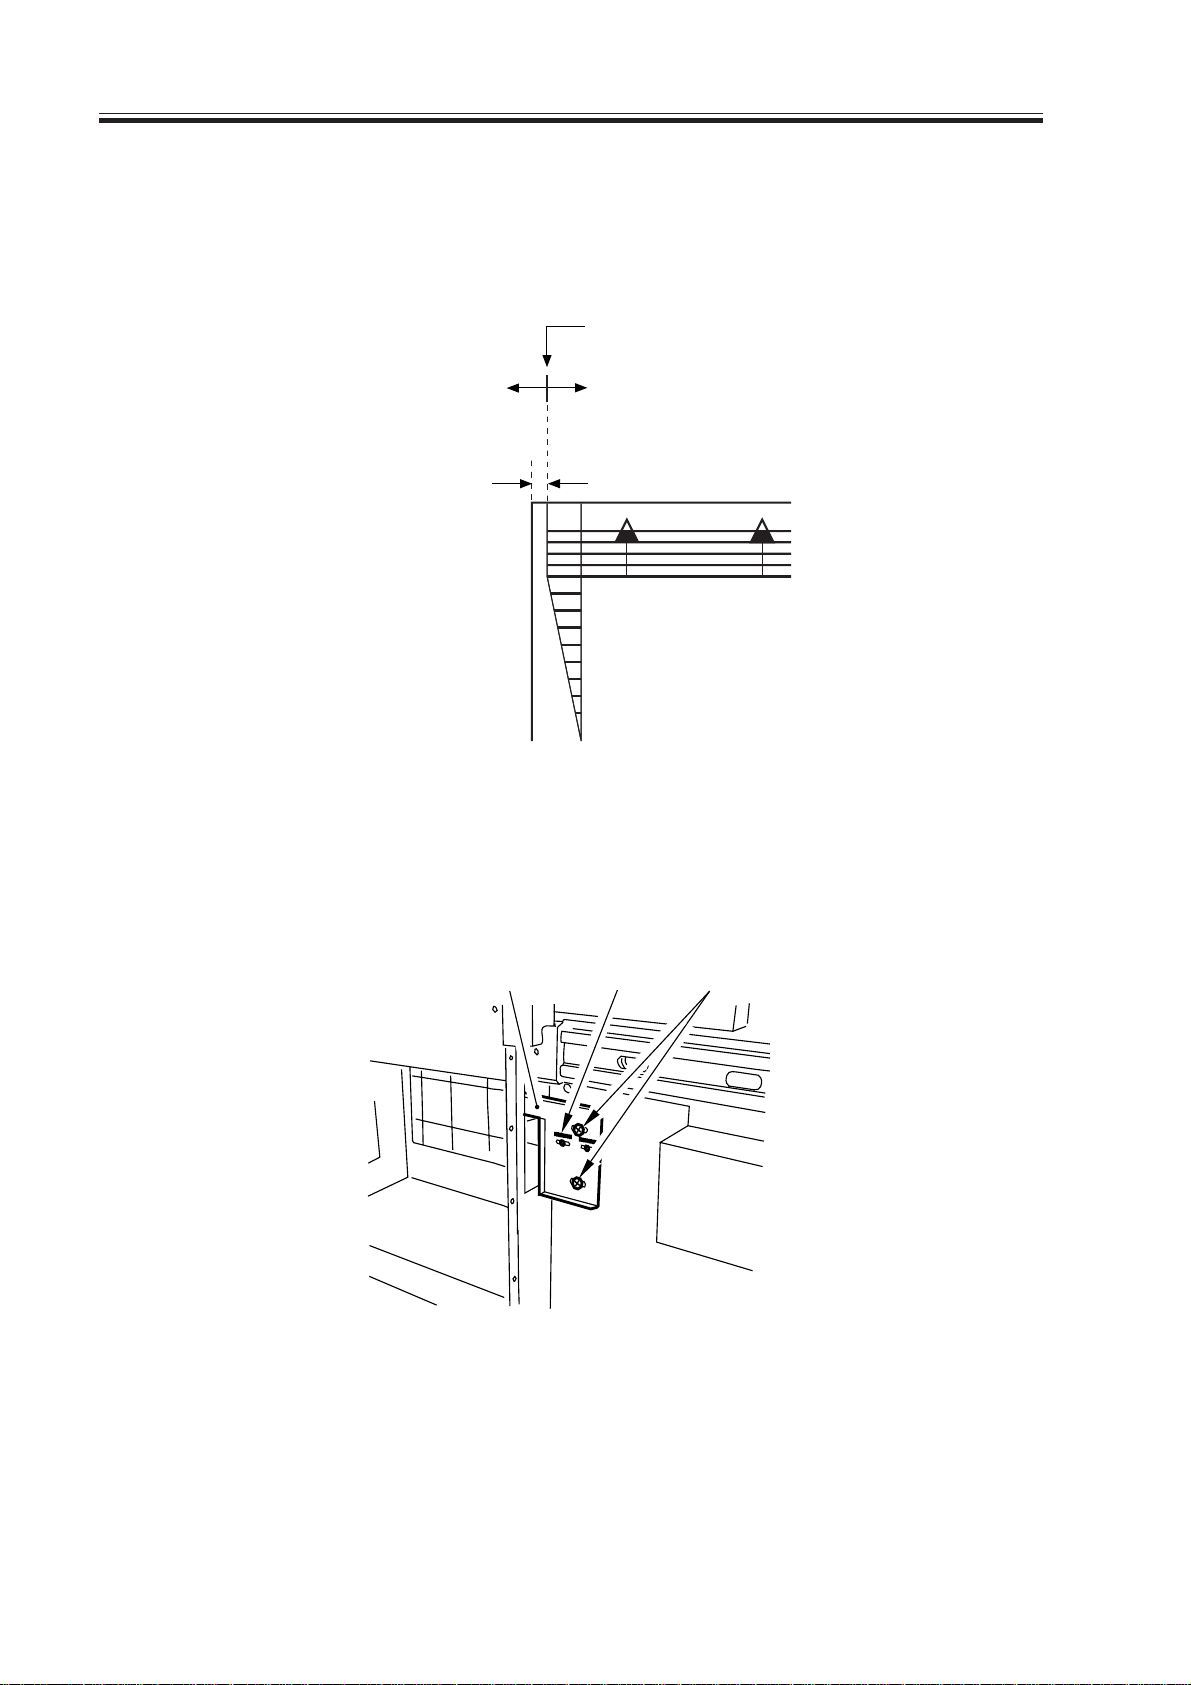
1) Adjust the image margin as indicated using service mode: COPIER>ADJUST>FeedADJ>ADJ-REFE.
Edge of paper
Decreasing the ADF-REFE setting
(A decrease by ‘ 23’ will
ecrease the margin by 1 mm.)
Increasing the ADJ-REFE setting
(An increase by ‘ 23’ will increase
the margin by 1 mm.)
2.5mm±2.0
0
0
2
2
4
4
6
6
8
8
10
10
F02-103-06
1.3.5 Side Paper Deck
1) Slide out the compartment, and turn the two screws to adjust the position of the latch
plate of the deck open solenoid. (At this time, use the index on the latch plate as a
guide.)
Latch plate
Index
Screws
2-4
F02-103-07
CHAPTER 2 STANDARDS AND ADJUSTMENTS
1.4 Adjusting the Image Leading Edge Margin
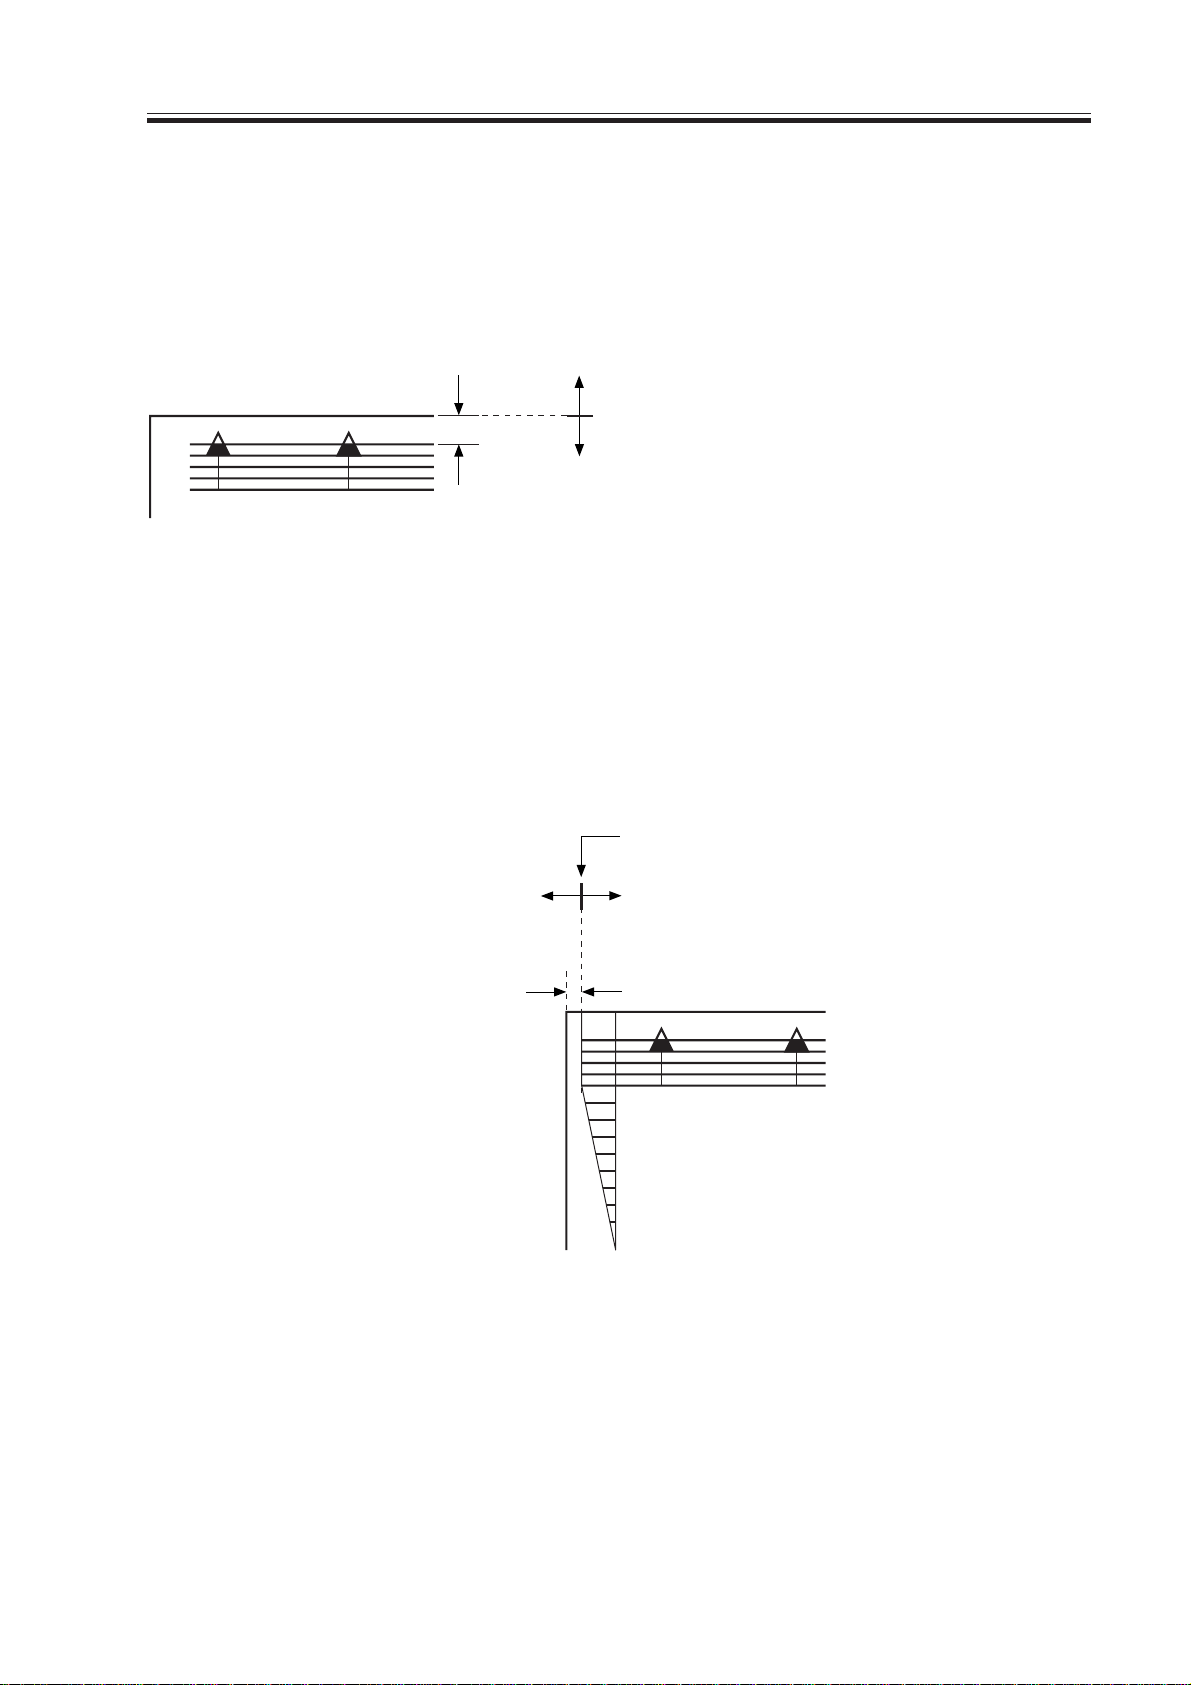
1) Adjust the image margin in service mode so that it is as indicated:
COPIER>ADJUST>Feed-ADJ>REGIST.
Decreasing the REGIST setting
(A decrease by ‘10’ will increase the margin by 1 mm.)
Edge of paper
Increasing the REGIST setting
(An increase by ‘10’ will decrease the margin by 1 mm.)
F02-104-01
1.5 Adjusting the Left/Right Non-Image Width
1) Adjust the non-image width in service mode so that it is as indicated:
COPIER>ADJUST>ADJ-XY>ADJ-Y.
Edge of image
Decreasing the ADJ-Y setting
(A decrease by ‘12’ will
decrease the margin by 1 mm.)
Increasing the ADJ-Y setting
(An increase by ‘12’ will increase
the non-image width by 1 mm.)
2.5mm±2.0
0
2
4
6
8
10
F02-105-01
2-5

CHAPTER 2 STANDARDS AND ADJUSTMENTS
1.6 Adjusting the Leading Edge Non-Image Width
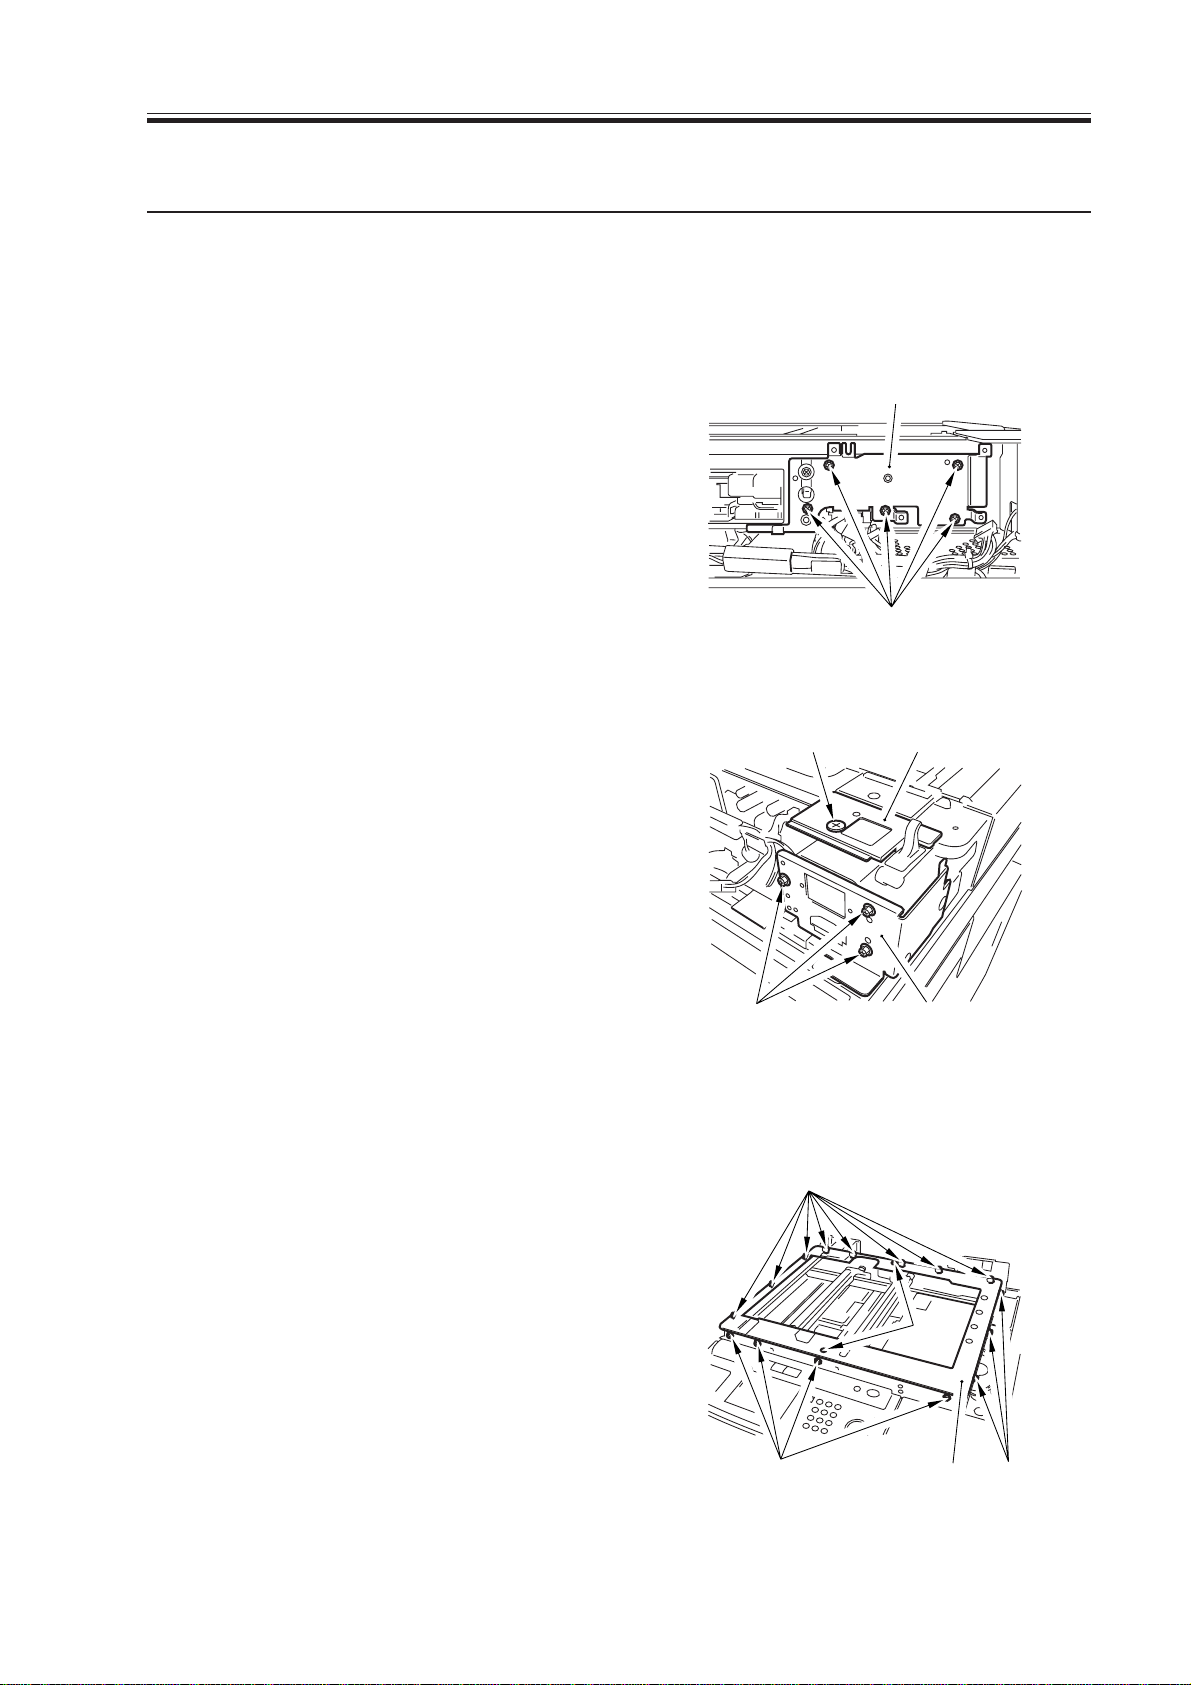
1) Adjust the non-image width in service mode so that it is as indicated:
COPIER>ADJUST>ADJ-XY>ADJ-X.
Decreasing the ADJ-X setting
(A decrease by '12' will decrease the width by 1 mm.)
Image leading edge
Increasing the ADJ-X setting
(An increase by '12' will increase the width by 1 mm.)
F02-106-01
2-6
CHAPTER 2 STANDARDS AND ADJUSTMENTS
2.Scanning System
2.1 Replacing the Scanner Drive Cable
2.1.1 Removing the Scanner System Drive Cable
Obtain the following before starting to replace the scanner drive cable:
• mirror positioning tool (FY9-3040-000)
1) Remove the ADF.
2) Remove the copyboard glass.
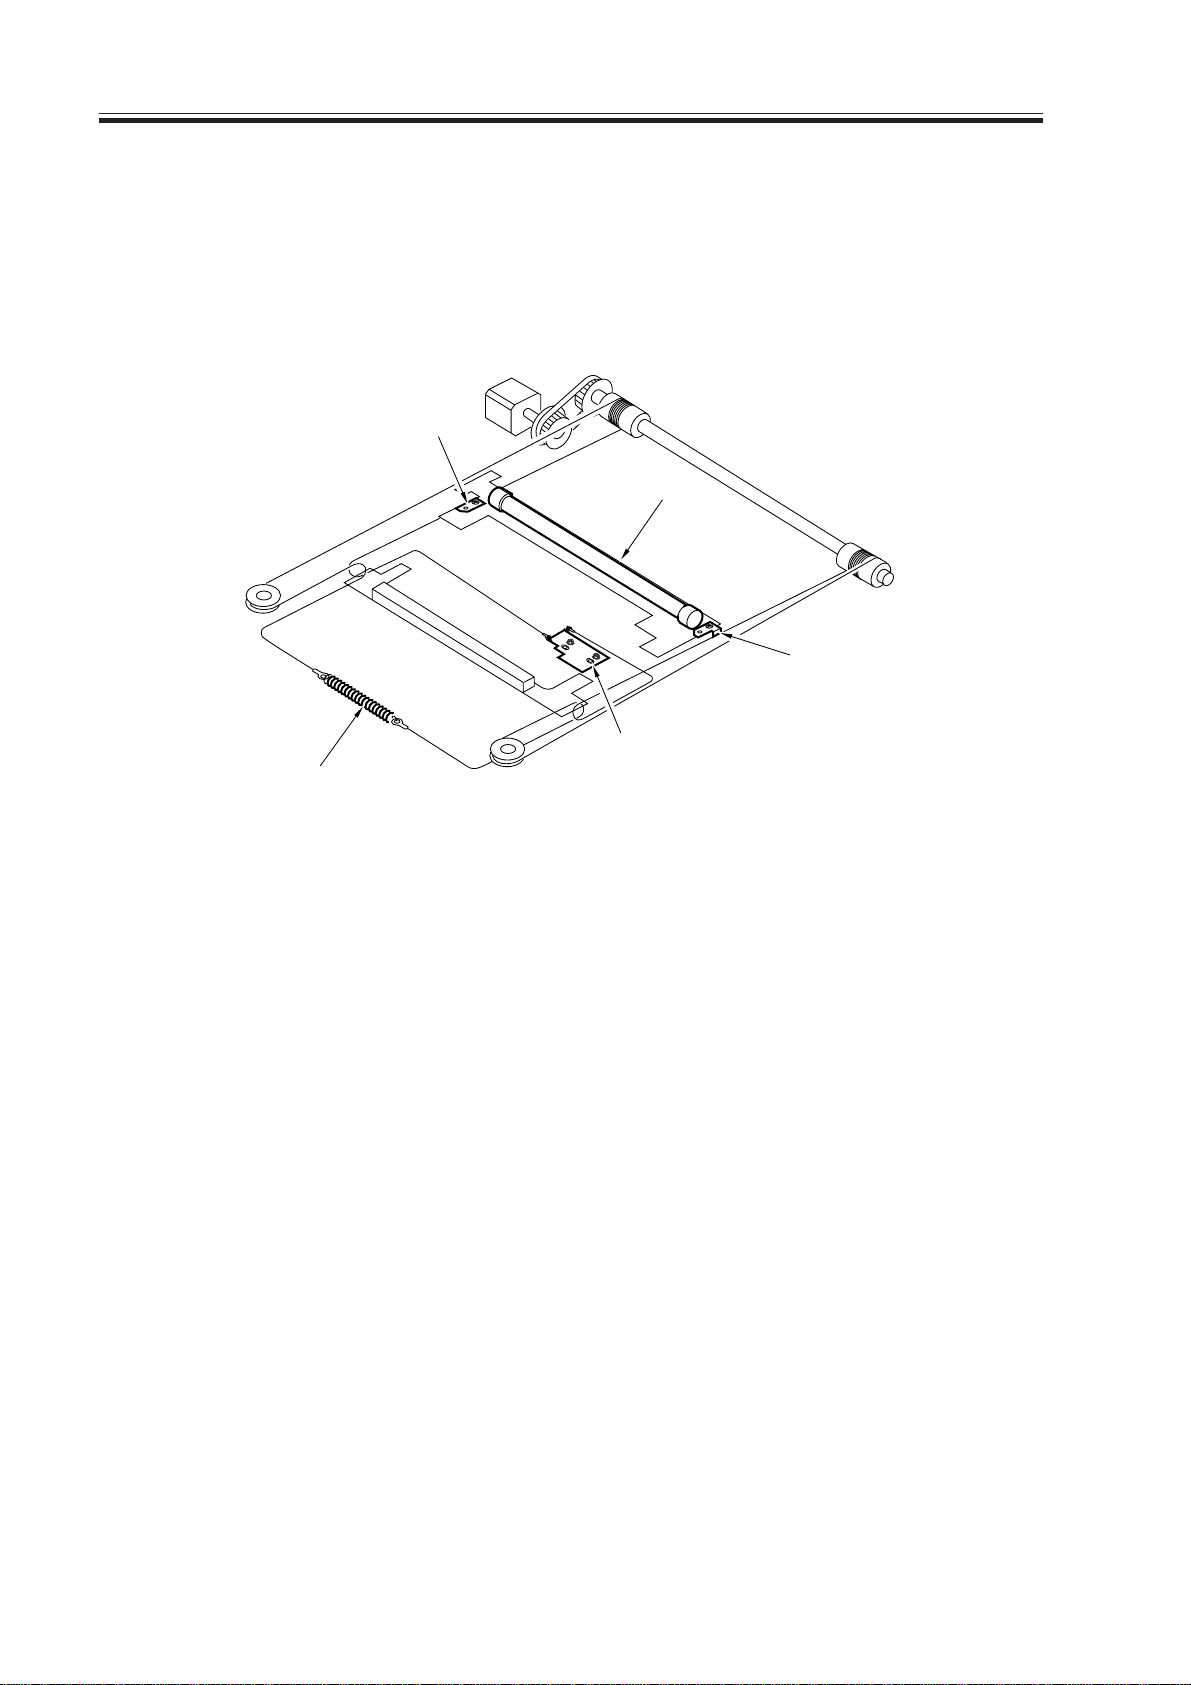
3) Remove the reader left cover and the
reader front cover.
4) Remove the motor cover. (See steps 1)
through 4) used to the motor.)
5) Remove the five screws [1], and detach
the PCB base [2].
6) Remove the screw [3], and detach the
ADF base (left) [4]; then, remove the
three screws [5], and detach the
copyboard sensor base [7].
[2]
[1]
F02-201-01
[3] [4]
7) Remove the 15 screws [7], and remove
the two screws [8]; then, detach the
reader upper frame [9].
[5]
F02-201-02
[7]
[7]
F02-201-03
[6]
[8]
[9]
[7]
2-7
CHAPTER 2 STANDARDS AND ADJUSTMENTS
8) Remove the two cable fixing screws
[11] of the No. 1 mirror base [10].
9) Remove the two springs [12] used to
secure the cable in place.
10) Remove the cable fixing plate [13] and
each pulley cable.
[11]
[10]
[11]
[12]
[13]
F02-201-04
2-8
CHAPTER 2 STANDARDS AND ADJUSTMENTS
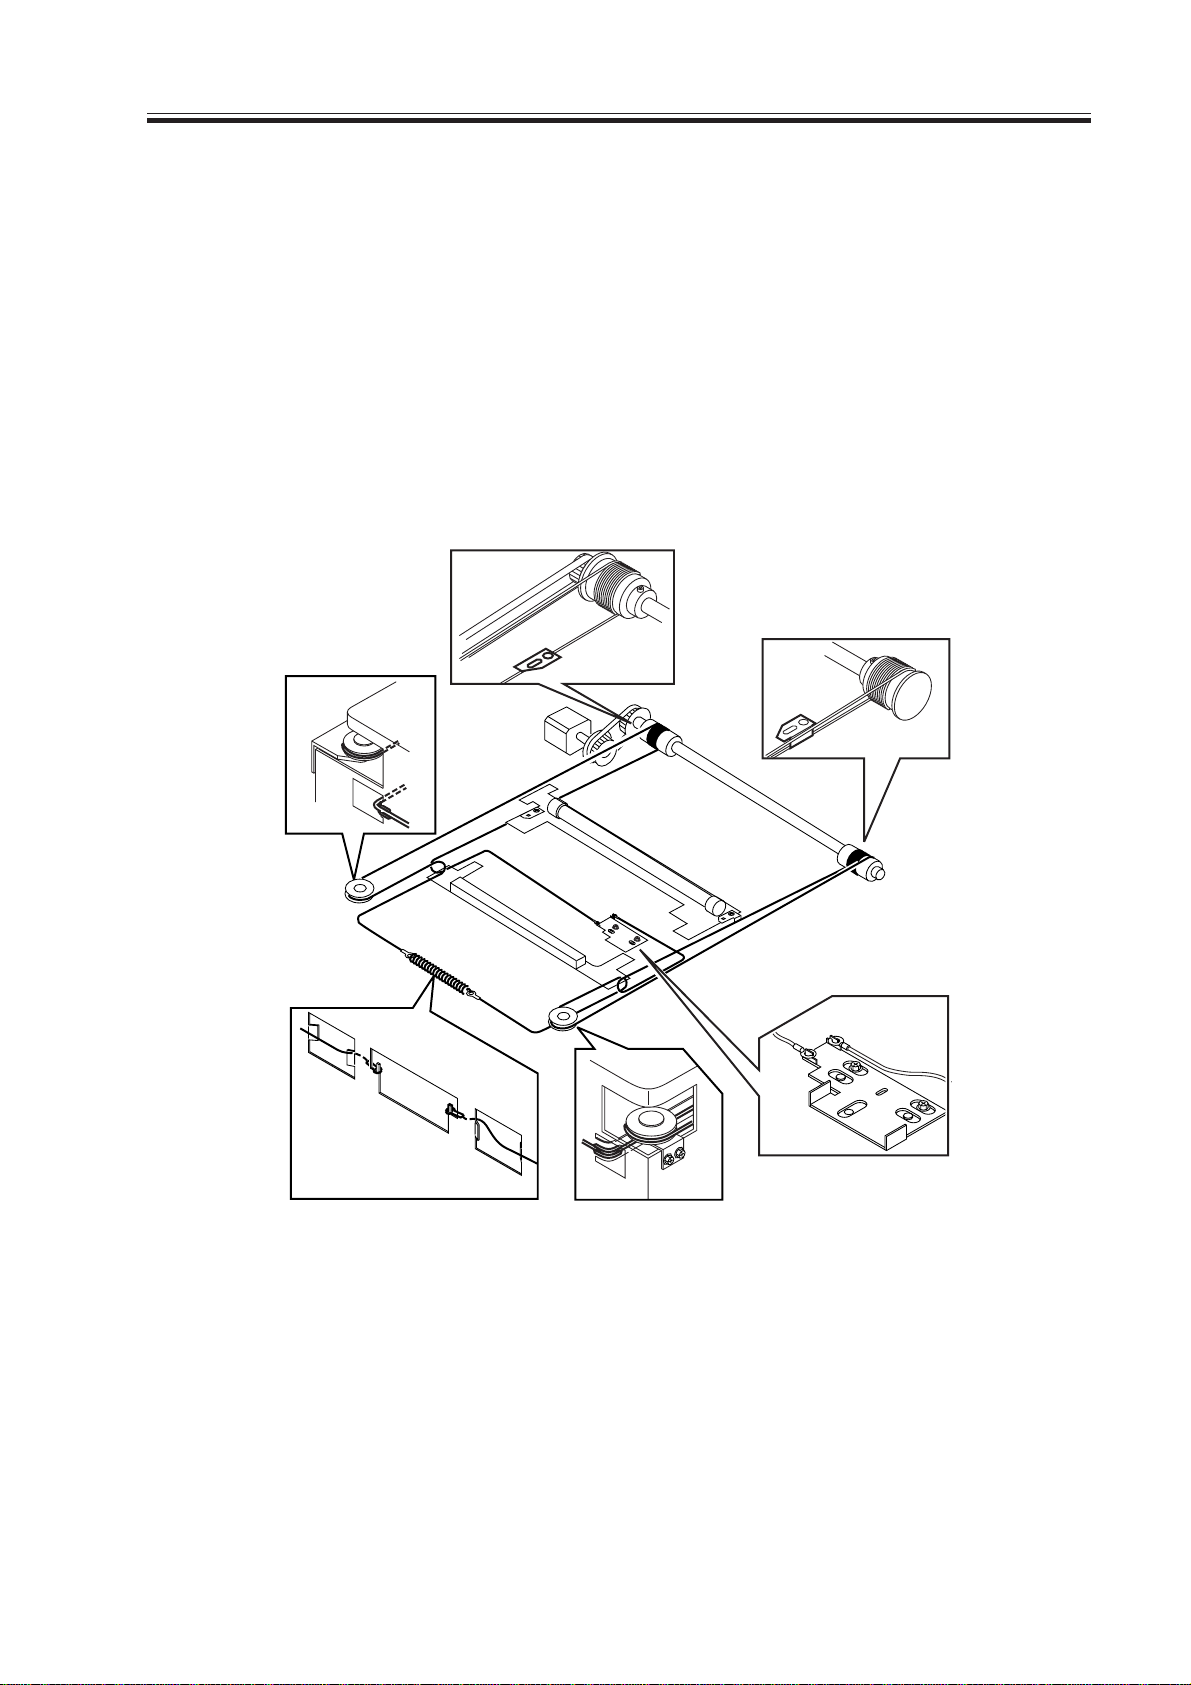
2.1.2 Routing the Scanner Drive Cable
Route the scanner cable to each pulley and hook mirror base in the order indicated:
1) Loosen the screw on the cable fixing plate.
2) Fit the ball of the cable into the hole of the drive pulley, and wind the ca ble (4 times inward, 5 times outward); then, tape it in place. When winding, be sure that the cable
metal fixing is inside.
3) Hook the cable on each pulley, and temporarily fix one end to the cable fixing plate and
the other end to the hook of the reader frame.
4) Temporarily fix the cable metal fixing to the No. 1 mirror base. (Do not fully secure it.)
5) Mount the reader paper frame.
F02-201-05
2-9
CHAPTER 2 STANDARDS AND ADJUSTMENTS
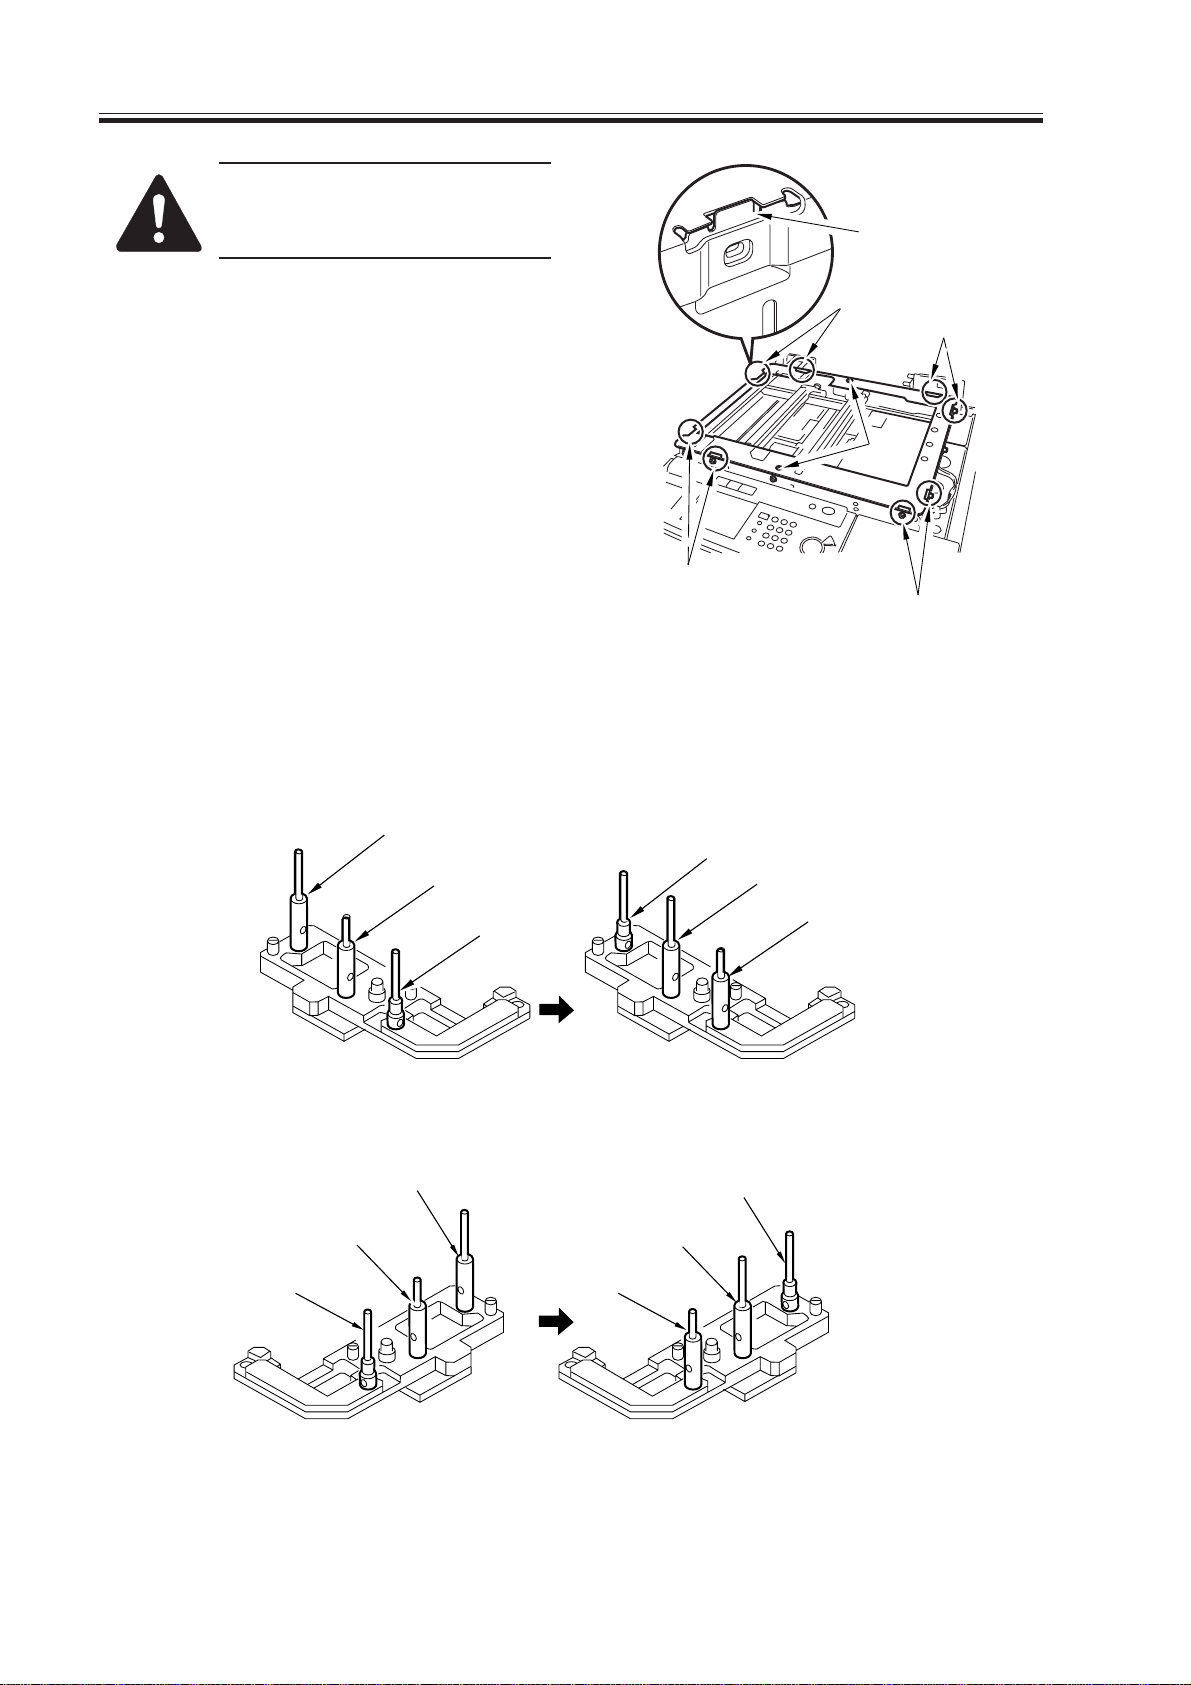
When mounting the reader upper frame, be sure to go through
the following steps:
[2]
1) Fit the eight claws [1] of the reader
[1]
frame correctly into the cut-offs in the
reader upper frame.
2) Secure the positions [2] of the four left/
right claws using screws.
3) Fit the two screws [3] at the end.
[1]
[3]
F02-201-06
2.2 Adjusting the Position of the Scanner Mirror Base
1) Set the pins of the mirror position tool
as indicated.
[C]
[A]
[B]
[C]
[1]
[1]
[A]
Initial FY9-3009-040 configuration
(for rear)
[C]
[B]
[A]
Initial FY9-3009-040 configuration
(for front)
[B]
Configuration used for the machine
(for rear)
[A]
[C]
[B]
Configuration used for the machine
(for front)
2-10
F02-202-01
 Loading...