


Getting Started En
Mise en route Fr
Erste Schritte De
Introduzione It
Introducción Es
Please read "Important Safety Instructions" before operating this product. After you finish reading
this guide, store it in a safe place for future reference.
The information in this document is subject to change without notice.
FT6-2099 (000)
canon.com/oip-manual
Getting Started
Please read “Important Safety Instructions” before operating
this product.
After you finish reading this guide, store it in a safe place for
future reference.
The information in this document is subject to change
without notice.
P.14
Mise en route
Prenez connaissance des "Consignes de sécurité
importantes" avant toute utilisation de ce produit.
Après en avoir pris connaissance, conservez ce guide dans
un endroit sûr en vue de consultations ultérieures.
Les informations contenues dans ce document peuvent être
modifiées sans avis préalable.
P.30
Erste Schritte
Lesen Sie vor der Inbetriebnahme dieses Produkts den
Abschnitt "Wichtige Sicherheitsvorschriften".
Nachdem Sie diese Anleitung gelesen haben, bewahren Sie
sie zum späteren Nachschlagen an einem sicheren Platz auf.
Die Angaben in diesem Dokument können ohne vorherige
Ankündigung geändert werden.
P.46
Introduzione
Prima di utilizzare il prodotto, leggere la sezione "Importanti
istruzioni per la sicurezza".
Dopo aver letto la presente guida introduttiva, conservarla in
un luogo sicuro per future consultazioni.
Le informazioni contenute in questo documento sono
soggette a modifiche senza preavviso.
P.62
Introducción
Lea las "Instrucciones de seguridad importantes" antes de
usar este producto.
Cuando termine de leer esta guía, guárdela en un lugar
seguro para futuras consultas.
La información de este documento puede ser modificada sin
previo aviso.
P.78
You can access
canon.com/oip-manual to read the User’s Guide that
describes all functions of this machine.
Le guide de l'utilisateur,
qui décrit toutes les fonctions de cet appareil se trouve sur
canon.com/oip-manual.
Sie können auf
canon.com/oip-manual zugreifen, um das
Anwenderhandbuch zu lesen, in dem alle Funktionen dieses
Geräts erläutert sind.
Per una descrizione di tutte le funzioni della macchina,
consultare la Guida per l'utente disponibile sul sito canon.
com/oip-manual.
Puede acceder a
canon.com/oip-manual para leer la Guía de usuario donde
se describen todas las funciones de este equipo.
2

Contents
Installation Requirements ..........................................................4
About the Supplied Manuals ....................................................4
Navigating the Menu and Text Input Method ....................5
Turning ON/OFF the Power .......................................................5
Specifying the Initial Settings ...................................................6
Choosing the Method to Connect the Machine to the
Computer .........................................................................................6
Connecting via a LAN ..................................................................6
Connecting via a USB Cable ......................................................7
Sommaire
Exigences d'installation ............................................................20
À propos des manuels fournis ............................................... 20
Navigation dans le menu et méthode de saisie de texte.. 21
Mise sous/hors tension ............................................................21
Spéci cation des réglages initiaux ...................................... 22
Choix de la méthode de connexion de l'appareil à
l'ordinateur ................................................................................... 22
Connexion par réseau ............................................................... 22
Connexion via un câble USB...................................................23
Inhalt
Anforderungen an den Aufstellort ....................................... 36
Informationen zu den mitgelieferten Handbüchern ....36
Navigieren durch das Menü und Texteingabemethode ... 37
Ein-/Ausschalten der Stromversorgung ............................. 37
Angeben der Anfangseinstellungen ................................... 38
Auswählen der Methode für die Verbindung des Geräts
mit einem Computer ................................................................. 38
Herstellen einer Verbindung über LAN ..............................38
Herstellen einer Verbindung über USB-Kabel ..................39
Connecting via a Wireless LAN .................................................7
Setting Wireless LAN ....................................................................8
Checking That the Wireless LAN Setting is Completed 10
Setting a Paper Size and Type ................................................ 10
Perform Useful Tasks .................................................................11
Clearing Paper Jams .................................................................. 12
Replacing Toner Cartridge ...................................................... 13
Appendix ....................................................................................... 14
Connexion par réseau sans l ................................................23
Con guration d'un réseau sans l ........................................24
Véri cation que le réglage du réseau sans l est
terminé ...........................................................................................26
Con guration d'un format et d'un type de papier ......... 26
Exécution de tâches utiles.......................................................27
Élimination des bourrages de papier .................................. 28
Remplacement de la cartouche de toner .......................... 29
Annexe ........................................................................................... 30
Herstellen einer Verbindung über Wireless LAN ............. 39
Einstellen des Wireless LAN .................................................... 40
Überprüfen, ob die Wireless LAN-Einstellung
vorgenommen wurde...............................................................42
Einstellen eines Papierformats und eines Papiertyps ... 42
Nützliche Aufgaben durchführen.........................................43
Beseitigen von Papierstaus ..................................................... 44
Ersetzen der Tonerpatrone ......................................................45
Anhang...........................................................................................46
Sommario
Requisiti per l'installazione .....................................................52
Informazioni sui manuali forniti a corredo ........................ 52
Navigazione del menu e metodo di immissione del testo
Accensione/spegnimento ....................................................... 53
Selezione delle impostazioni iniziali ...................................54
Selezione del metodo di connessione della macchina al
computer .......................................................................................54
Connessione tramite una LAN ...............................................54
Collegamento tramite cavo USB ...........................................55
.. 53
Contenido
Requisitos de instalación ......................................................... 68
Acerca de los manuales suministrados ..............................68
Navegación por el menú y método de introducción de texto
Encendido/Apagado del equipo ..........................................69
Especi cación de la con guración inicial .......................... 70
Selección del método para conectar el equipo al
ordenador ..................................................................................... 70
Conexión a través de una red LAN .......................................70
Conexión con un cable USB....................................................71
.. 69
Connessione tramite una LAN wireless ..............................55
Impostazione della LAN wireless .......................................... 56
Veri ca del completamento dell'impostazione della LAN
wireless...........................................................................................58
Impostazione di formato e tipo di carta ............................58
Come eseguire attività utili ..................................................... 59
Eliminazione degli inceppamenti della carta ...................60
Sostituzione della cartuccia toner ........................................61
Appendice .....................................................................................62
Conexión mediante una red LAN inalámbrica ................. 71
Con guración de LAN inalámbrica ...................................... 72
Veri cación de si se completó la con guración de la LAN
inalámbrica ................................................................................... 74
Ajuste del tamaño y el tipo del papel ................................. 74
Tareas útiles ..................................................................................75
Eliminación de atascos de papel ..........................................76
Sustitución del cartucho de tóner ........................................77
Apéndice ....................................................................................... 78
3
3
Installation Requirements
100 mm or more
*
533 mm
1,022.9 mm
* Feeder (Optional for imageRUNNER 2206N)
1,285 mm
About the Supplied Manuals
①
Getting Started (This manual):
Read this manual rst. This manual describes the basic
machine settings, operations, and cautions. Be sure to read
this manual before using the machine.
②
MF Driver Installation Guide (Visit the website):
You can access
canon.com/oip-manual to read the MF Driver
③
User’s Guide (Visit the website):
Installation Guide that describes software
installation.
You can access
canon.com/oip-manual to read the User’s Guide
that describes all functions of this machine.
En
4

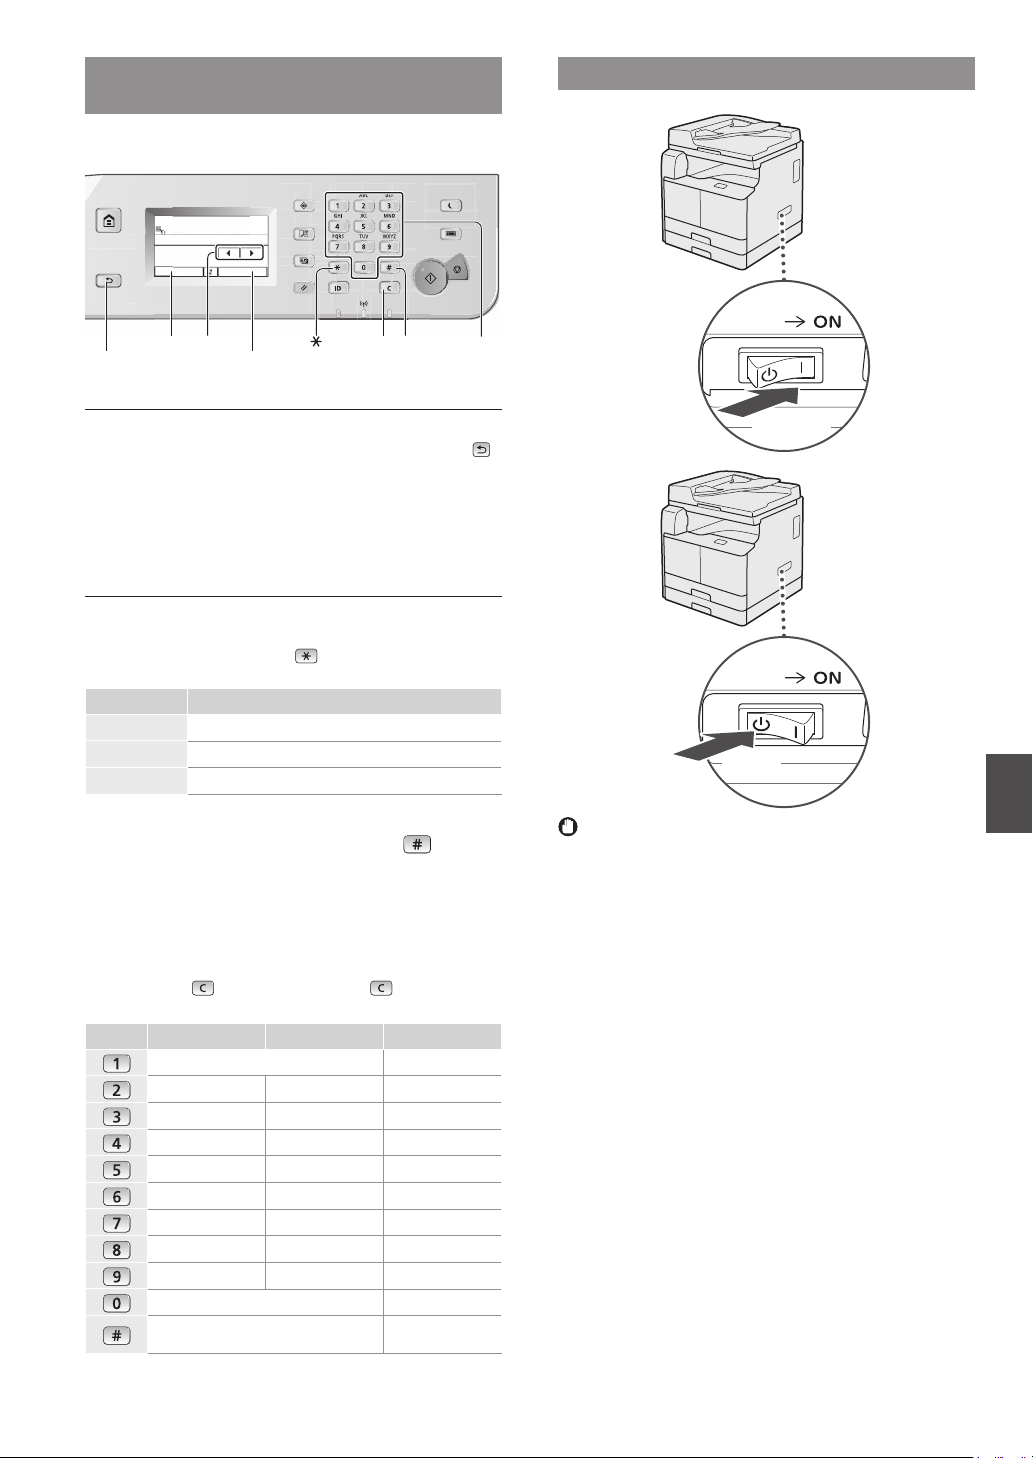
Navigating the Menu and Text Input Method
The control panel shown here is for the imageRUNNER 2206iF.
The available keys vary depending on the model.
Turning ON/OFF the Power
<A/a/12>Back
Register Unit Name
Canon-1
A/a/12
◄►
A
Apply
<Apply>
Numeric
keys
Clear
#
Navigating the Menu
Item selection
Tap an item to select it. Press to return to the previous
screen.
Setting con rmation
Tap the item. However, when <Apply> appears, tap <Apply>.
Text Input Method
Changing entry mode
Tap <A/a/12> to change the entry mode. You can also press
to change the entry mode.
Entry mode Available text
<A> Uppercase alphabetic letters and symbols
<a> Lowercase alphabetic letters and symbols
<12> Numbers
Entering text, symbols, and numbers
Enter with the numeric keys or
Moving the cursor (Entering a space)
Tap <◄> or <►> to move the cursor. To enter a space, move
the cursor to the end of the text, and tap <►>.
Deleting characters
Delete with . Pressing and holding deletes all characters.
Entry mode: <A> Entry mode: <a> Entry mode: <12>
@ . - _ / 1
ABC abc 2
DEF def 3
GHI ghi 4
JKL jkl 5
MNO mno 6
PQRS pqrs 7
TUV tuv 8
WXYZ wxyz 9
(Not available) 0
(space) - . * # ! “ , ; : ^ ` _ = / | ‘ ? $ @ % & + \ ˜ ( )
[ ] { } < >
.
(Not available)
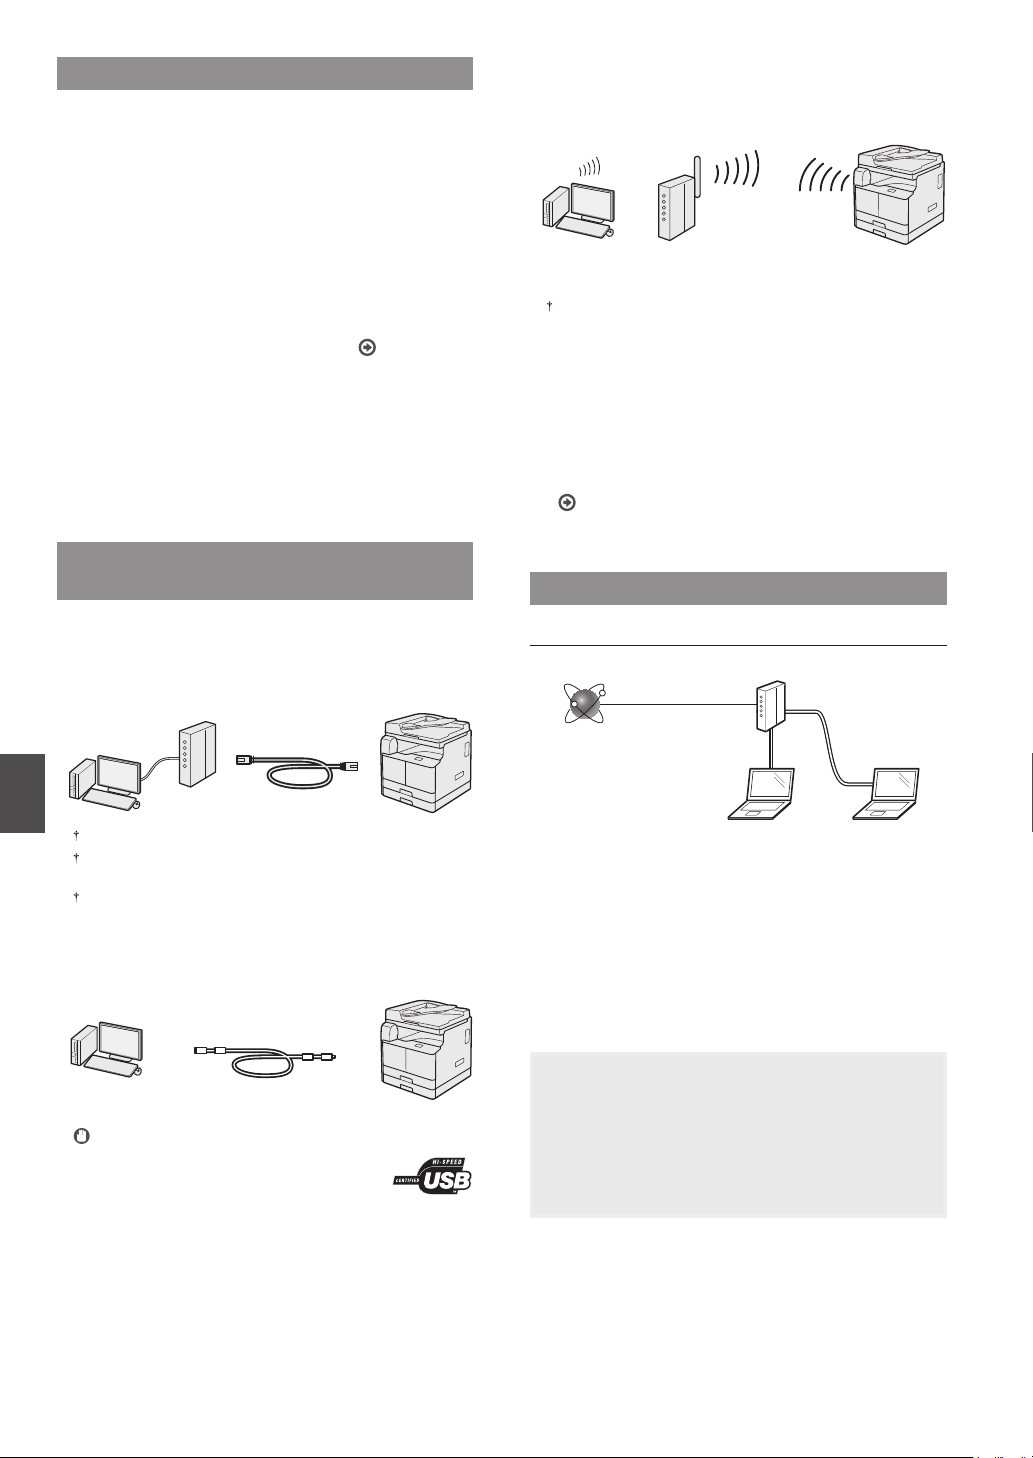
ON
En
OFF
• Make sure that the power plug is rmly inserted into the
power outlet.
• Do not connect the USB cable at this time. Connect it
when installing software.
5
Specifying the Initial Settings
Follow the instructions on the screen to perform the following:
• Set the language
• Set the country and region
• Set the time zone
• Set the date and time
• Register the Purchase Information
• Set the Remote UI Access PIN
• Set the Wireless LAN Connecting
For details on navigating the menu and how to input the
numbers, see “Navigating the Menu and Text Input Method”
(
P.5).
Setting the Remote UI Access PIN is recommended when
using Remote UI to prevent unauthorized access by a third
party. The Remote UI uses a Web browser to operate the
machine, check the status, and specify settings, enabling you
to manage the machine while remaining at your desk. For
information on using the Remote UI, see the User’s Guide.
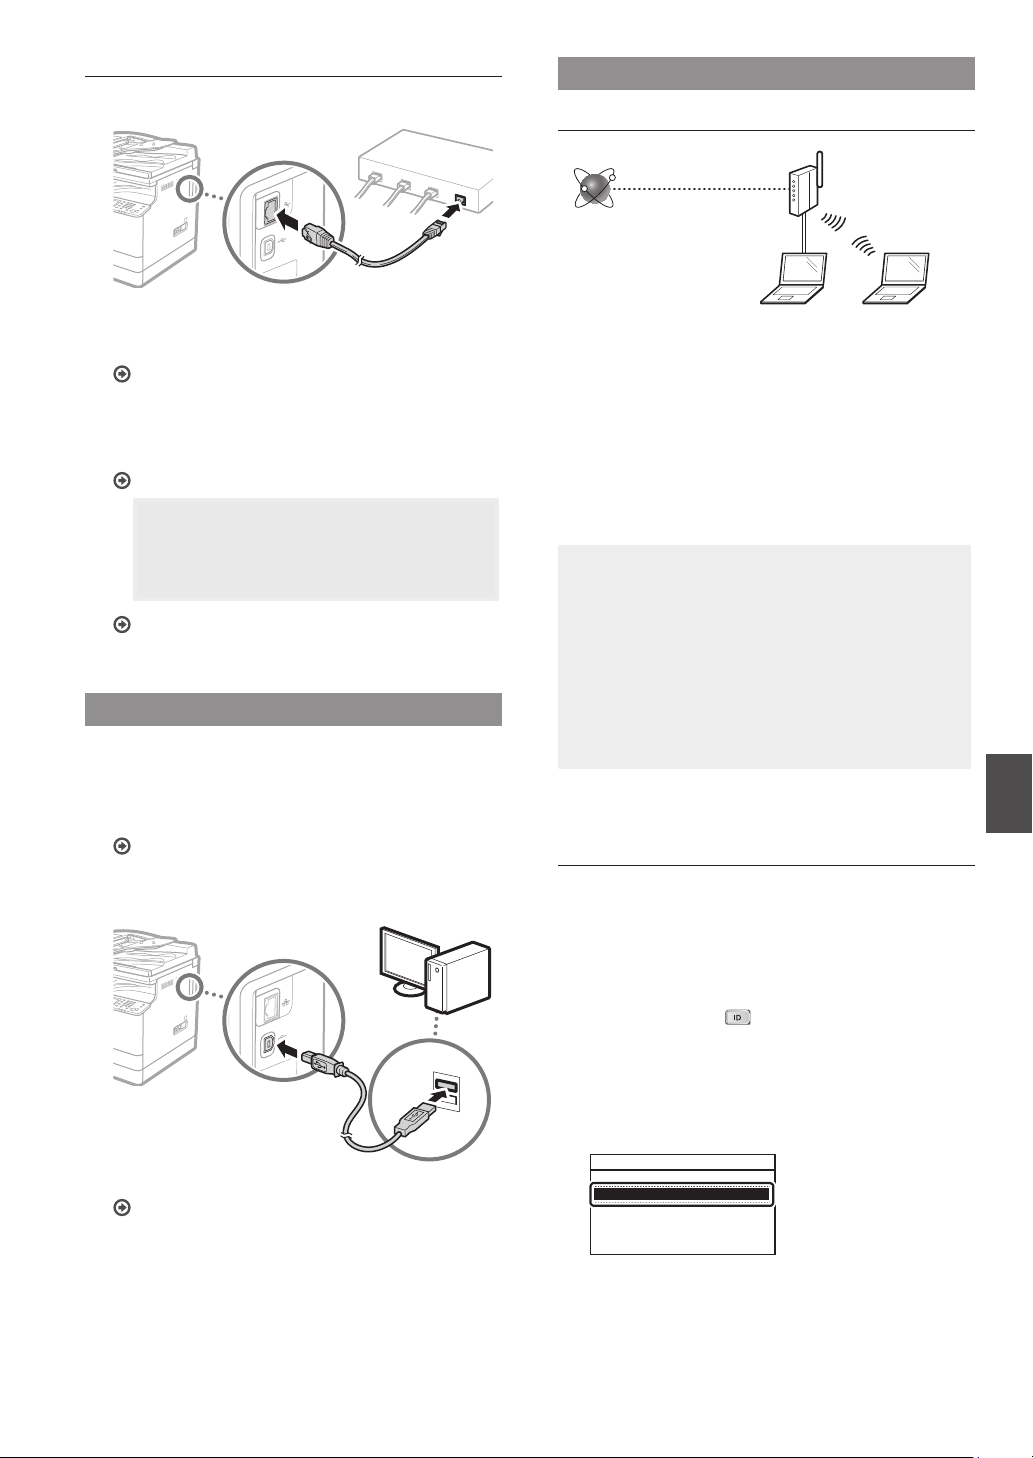
Choosing the Method to Connect the
Machine to the Computer
•
Connecting via a Wireless LAN
You can connect the machine to the computer through a
wireless router*. Since it is connected to wireless, no LAN
cables are needed.
* A wireless router (access point), which supports IEEE802.11b/g/n,
is required.
Connect the computer to the router by cable or wirelessly.
If you do not sure whether your router is wireless or wired:
See the instruction manual provided with your network
device, or contact the manufacturer.
•
Direct Connection
Connect a mobile device to the machine wirelessly and
directly without routing through a wireless LAN router (or
access point).
User’s Guide “Connecting Directly (Access Point Mode)”
•
Connecting via a LAN
You can connect the machine to the computer through a
wired LAN router. Use a LAN cable to connect the machine
to the router.
En
Connect the computer to the router by cable or wirelessly.
Make sure that there are ports available on the router to connect
the machine and the computer.
Have a Category 5 or higher twisted pair LAN cable ready.
•
Connecting via a USB cable
You can connect the machine to the computer using a USB
cable.
IMPORTANT
A USB cable is not included in this package. Please
obtain a suitable cable for your computer. Make
sure that the USB cable you use has the following
mark.
Connecting via a LAN
Checking Before the Setup
Internet
Are the computer and the router properly connected using
a LAN cable?
For more information, see the instruction manual for the
network device you are using, or contact the networking
device manufacturer.
Have the network settings on the computer been
completed?
If the computer is not properly con gured, you may not use
the wired LAN connection even after completing the following
settings.
NOTE
• When you connect to a network environment that is not
security protected, your personal information could be
disclosed to third parties. Please use caution.
• If you connect through a LAN in the o ce, contact your
network administrator.
Router
LAN cable
6
Setting Up the LAN Connection
Connect the LAN cable.
1
Connecting via a Wireless LAN
Checking Before the Setup
Wireless LAN Router
Internet
The IP address will be automatically con gured in 2
minutes. If you want to set the IP address manually, see
the following items.
User’s Guide “Setting IP Addresses”
Install the drivers on your computer using the
2
provided CD-ROM/DVD-ROM.
See “Installing the software” (P.10).
NOTE
The scanner driver cannot be installed if the
machine and your computer are connected in an
IPv6 environment.
Proceed to “Setting a Paper Size and Type” (P.10).
Connecting via a USB Cable
Connect the USB cable after installing the drivers.
Install the drivers on your computer using the
1
provided CD-ROM/DVD-ROM.
See “Installing the software” (P.10).
Connect the USB cable.
2
Is the computer connected to the router (access point)
correctly by a LAN cable or wireless LAN?
For more information, see the instruction manual for the
network device you are using, or contact the networking
device manufacturer.
Have the network settings on the computer been
completed?
If the computer is not properly con gured, you may not use
the wireless LAN connection even after completing the
following settings.
NOTE
• You cannot connect both the wired LAN and wireless
LAN at the same time. In addition, the machine is set to
the “Wired LAN” by default.
• When you connect to a network environment that is
not security protected, your personal information
could be disclosed to third parties. Please use caution.
• If you connect through a LAN in the o ce, contact your
network administrator.
Switching the Connection Method to Wireless LAN
Tap <Menu> in the <Home> Screen.
1
Tap <Network Settings>.
2
If a screen for entering a System Manager ID and PIN is
displayed, enter the System Manager ID and PIN, tap <Apply>,
and press .
En
Proceed to “Setting a Paper Size and Type” (P.10).
Tap <Select Wired/Wireless LAN>.
3
Tap <Wireless LAN>.
4
Select LAN
Wired LAN
Wireless LAN
7
Checking the Router
Select the connection method to the wireless LAN. Select from
the following two methods depending on the router (access
point) that you are using.
There is a button.
This machine supports WPS
(Wi-Fi Protected Setup). You
can easily set up if your router
(access point) has a button,
and if the
router.
If you are not sure whether or not your router supports WPS, please
see the manual included in the product, or contact the product
manufacturer.
There is no button.
If there is no button on your
router (access point), you may
manually select SSID and
complete the settings. In this
case, you need to remember
SSID and network key of your
router (access point).
See “Checking That the
Wireless LAN Setting is Completed” (P.10) to learn how to
nd out your SSID and network key.
En
To set up with WPS PIN code method, or setup manually:
User’s Guide “Connecting to a Wireless LAN”
mark is on the
Setting Wireless LAN
Push Button Mode
Tap <Menu> in the <Home> Screen.
1
Tap <Network Settings>.
2
If a screen for entering a System Manager ID and PIN is
displayed, enter the System Manager ID and PIN, tap
<Apply>, and press .
Tap <Wireless LAN Settings>.
3
Read the message that is displayed, and tap <OK>.
4
Tap <WPS Push Button Mode>.
5
Wireless LAN Settings
SSID Settings
WPS Push Button Mode
WPS PIN Code Mode
Power Save Mode
Wireless LAN Information
Tap <Yes>.
6
Press and hold* the button until the lamp lights or
7
blinks.
You should press the WPS button within 2 minutes after
you tap <Yes> in step 6.
* The time that you should hold the button may vary depending
on the router you are using.
Wait approximately 2 minutes after the connection.
8
IP address is set during this period of time.
When an error message appears:
Tap <Close> to close the screen, retry the settings. If
the access point cannot be detected even after
retrying, see the following.
User’s Guide “When an Error Message Appears”
When checking the network connection:
You can check if the machine is properly connected to the
network using a computer that connected to a network.
User’s Guide “Viewing Network Settings”
To set IP address manually:
User’s Guide “Connecting to a Wireless LAN”
8
Setting the Access Point Manually
Check SSID or Network Key for a Wireless LAN
1
Router/Access Point.
• Check the label on the Wireless LAN router.
Write down the name of SSID and network key
2
displayed in step 1. When multiple access points are
displayed, write all SSIDs that are displayed.
Enter the network key that you have written
10
down.
Enter the network key using the numeric keys, and tap
<Apply>.
WEP Key (5-26 Characters)
XXXXXXXX
A
ApplyA/a/12
SSID
It is sometimes written as name of network, or name of
access point. If there are multiple SSIDs, please write down
all.
Network Key
It is sometimes written as PIN, WEP key, WPA/WPA2
passphrase, PSK or preshared key.
Tap <Menu> in the <Home> Screen.
3
Tap <Network Settings>.
4
If a screen for entering a System Manager ID and PIN is
displayed, enter the System Manager ID and PIN, tap
<Apply>, and press .
Tap <Wireless LAN Settings>.
5
Read the message that is displayed, and tap <OK>.
6
Tap <Yes>.
11
After the <Connected.> screen is displayed, wait
12
until the Wi-Fi indicator stops blinking and turns
on.
Wait approximately 2 minutes after the
13
connection.
IP address is set during this period of time.
When an error message appears:
Tap <Close> to close the screen, check whether or not
the network key is correct, and then retry the settings.
If the access point cannot be detected even after
retrying, see the following.
User’s Guide “When an Error Message Appears”
To set IP address manually:
User’s Guide “Connecting to a Wireless LAN”
En
Tap <SSID Settings>.
7
Tap <Select Access Point>.
8
SSID Settings
Select Access Point
Enter Manually
Select a wireless LAN router.
9
If multiple matched SSIDs are displayed, select the ID that
is listed rst (the one with the strongest signal).
9
Checking That the Wireless LAN Setting is Completed
Setting a Paper Size and Type
Press .
1
Tap <Network Information>.
2
Tap <IPv4>.
3
Tap <IP Address>.
4
Take note of the IP address.
5
IP Address
XXX.XXX.XXX.XXX
Close
Tap <Close>.
6
Press .
7
Start a web browser from a computer, enter
8
“http://<IP address of the machine>/” in the address
eld, and then press [Enter] on your keyboard.
Follow the instructions on the screen to set the paper size and
type.
Paper Settings
Multi-Purpose Tray
Drawer 1
Drawer 2
Select Frequently Used Pape...
Installing the software
• The procedure described here is only applicable when
your computer runs on the Windows OS. For more
details on the software installation procedure, see the
driver’s manual.
• For the installation when your computer runs on the
macOS, see the driver’s manual.
• Your machine may not come with the driver for the
macOS, depending on the time of purchase. New
drivers are uploaded to the Canon website, and you can
download and use the latest one.
1.
En
Check that the screen of the Remote UI is displayed.
9
Connection is completed if the screen is displayed.
When the screen is not displayed correctly:
User’s Guide “Common Problems”
2.
If the screen is not displayed properly, re-insert the
CD-ROM/DVD-ROM or search for “D:\MInst.exe” on
the Windows platform (This description assumes
that “D:” is the CD-ROM/DVD-ROM drive name).
10
Perform Useful Tasks
A variety of functions are available. An overview of some useful functions is provided below.
Copy
Enlarged/Reduced Copies
You can enlarge or reduce standard size
documents to copy on standard size
paper or specify the copy ratio in
percentage.
2-Sided Copying**
You can copy 1-sided documents on
both sides of paper.
Collating
You can sort copies into sets arranged
in page order.
Reduced Layout
You can reduce multiple documents to
copy them onto one sheet.
2 on 1 4 on 1
Copying ID Card
You can make a copy of a 2-sided card
onto one side of paper.
Fax*
Sending a Document Directly from a
Computer (PC Fax)
In addition to the normal sending and
receiving faxes, you can use the PC fax.
Sending
You can register fax destinations in the
Address Book. You can specify the
destinations using various methods,
enabling you to send documents
quickly and easily.
• Destination search
• One-touch keys
• Coded dialing
• Destination Group
• Specifying from the sending history
• Sequential broadcast
Receiving
•
Receiving in the memory
You can store the received documents
in the memory. You can print the stored
documents at any time, and if you do
not need them, you can delete them.
•
Remote Receiving
If an external telephone is connected,
you can switch to the fax receiving
mode immediately by dialing the ID
number for fax receiving using the dial
buttons of the telephone during a
phone call.
Print
Enlarged/Reduced Printing
2-Sided Printing**
Reduced Layout
You can reduce multiple documents to
print them onto one sheet.
2 on 1 4 on 1
Booklet Printing**
Poster Printing
Watermark Printing
Combining and Printing Multiple
Documents
Selecting a “Pro le”
Network Settings
This machine comes equipped with a
network interface that you can
construct a network environment easily.
You can print a document, use the PC
fax*, and use the network scan from all
computers which are connected with
the machine. The machine supports to
increase work e ciency as a shared
machine in the o ce.
Scan
Saving the Documents Using the
Control Panel of the Machine
1
Documents
2
Data
3
Saving the Documents Using
Operations from a Computer
•
Scanning with the MF Scan Utility
Documents
1
2
•
Scanning from an Application
•
Scanning with the WIA Driver
3
Data
E-mailing Scanned Documents***
You can send scanned documents to
your e-mail application.
+
Documents Data E-mail
Sending Scanned Documents to a File
Server***
You can send scanned documents to a
le server.
Documents Data File server
Remote UI
You can understand the condition of
the machine from the computers on the
network. You can access the machine
and manage jobs or specify various
settings via network.
* imageRUNNER 2206iF Only
** Function is built in for imageRUNNER 2206iF. The
optional Duplex Unit is required for
imageRUNNER 2206N.
*** Function is built in for imageRUNNER 2206iF. The
optional Send Kit is required for imageRUNNER
2206N.
En
11

Clearing Paper Jams
If the following screen appears, a paper jam has occurred in the feeder or inside the
machine. Follow the procedure displayed on the screen to remove the jammed
document or paper. This manual indicates only areas where paper jams occur. For details
on the procedures, see the User’s Guide.
Feeder (DADF-AY )
Output Area
(Optional for imageRUNNER 2206N)
Paper jammed.
Press [Next] to display the
steps.
Previous Next
Paper Drawer 1
En
(Optional for imageRUNNER 2206N)
Duplex Unit-C
Multi-Purpose Tray Fixing assembly Cassette Feeding Module-AD
(Optional)
12
Replacing Toner Cartridge
Toner cartridges are consumables. When the toner becomes nearly empty or has run out completely in the middle of a job run, a
message appears on the screen, or the following problems may occur. Take the appropriate action accordingly.
When a Message Appears
When the toner becomes nearly empty or has run out in the middle of a job run, a message appears on the screen.
Message
<Prepare the
toner cartridge.>
<Replace the
toner cartridge.>
When the message is
displayed on the screen
The toner cartridge needs
to be replaced soon.
The toner cartridge has
reached the end of its
lifetime.
Description and solutions
Make sure that you have a replacement toner cartridge ready. We recommend
checking the level of remaining toner before printing high-volume documents.
User’s Guide “Replacing the Toner Cartridge”
Replace the toner cartridge.
User’s Guide ”Replacing the Toner Cartridge”
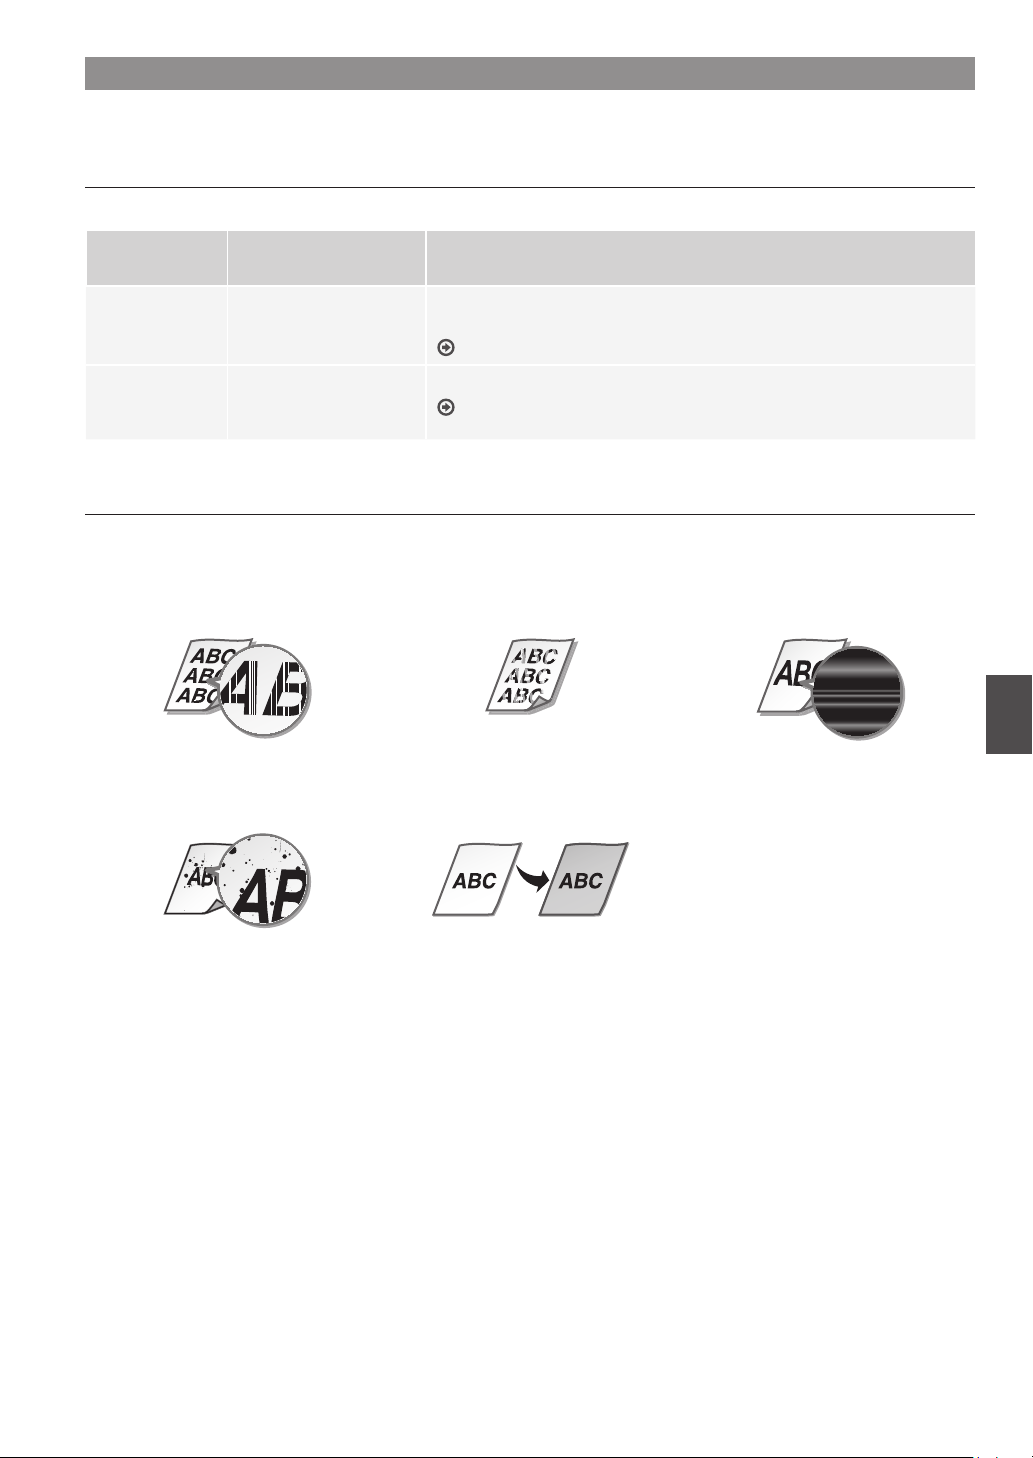
If Printouts are Poor in Quality
If your printouts begin to show any of the characteristics below, the toner cartridge is nearly empty. Replace the nearly empty toner
cartridge even if no message is displayed.
White streaks appear Partially faded Density is uneven
Toner smudges and splatters
appear Printouts are grayish
En
13
Appendix
En
Important Safety
Instructions
This chapter describes important safety
instructions for the prevention of injury to users
of this machine and others, and damage to
property. Read this chapter before using the
machine, and follow the instructions to use the
machine properly. Do not perform any operations
not described in this manual. Canon will not be
responsible for any damages resulting from
operations not described in this manual,
improper use, or repair or changes not performed
by Canon or a third party authorized by Canon.
Improper operation or use of this machine could
result in personal injury and/or damage requiring
extensive repair that may not be covered under
your Limited Warranty.
WARNING
Indicates a warning concerning operations
that may lead to death or injury to persons if
not performed correctly. To use the machine
safely, always pay attention to these
warnings.
CAUTION
Indicates a caution concerning operations
that may lead to injury to persons if not
performed correctly. To use the machine
safely, always pay attention to these cautions.
IMPORTANT
Indicates operational requirements and
restrictions. Be sure to read these items
carefully to operate the machine correctly
and avoid damage to the machine or
property.
Installation
To use this machine safely and comfortably,
carefully read the following precautions and
install the machine in an appropriate location.
WARNING
Do not install in a location that may result in a
fire or electrical shock
• A location where the ventilation slots are
blocked (too close to walls, beds, sofas, rugs, or
similar objects)
• A damp or dusty location
• A location exposed to direct sunlight or
outdoors
• A location subject to high temperatures
• A location exposed to open flames
• Near alcohol, paint thinners or other
flammable substances
Other warnings
• Do not connect unapproved cables to this
machine. Doing so may result in a fire or
electrical shock.
• Do not place necklaces and other metal
objects or containers filled with liquid on the
machine. If foreign substances come in
contact with electrical parts inside the
machine, it may result in a fire or electrical
shock.
• If any foreign substance falls into this machine,
unplug the power plug from the AC power
outlet and contact your local authorized
Canon dealer.
CAUTION
Do not install in the following locations
The machine may drop or fall, resulting in injury.
• An unstable location
• A location exposed to vibrations
IMPORTANT
Do not install in the following locations
Doing so may result in damage to the machine.
• A location subject to temperature and
humidity extremes, whether low or high
• A location subject to dramatic changes in
temperature or humidity
• A location near equipment that generates
magnetic or electromagnetic waves
• A laboratory or location where chemical
reactions occur
• A location exposed to corrosive or toxic gases
• A location that may warp from the weight of
the machine or where the machine is liable to
sink (a carpet, etc.)
Avoid poorly ventilated locations
This machine generates a slight amount of ozone
and other emissions during normal use. These
emissions are not harmful to health. However,
they may be noticeable during extended use or
long production runs in poorly ventilated rooms.
To maintain a comfortable working environment,
it is recommended that the room where the
machine operates be appropriately ventilated.
Also avoid locations where people would be
exposed to emissions from the machine.
Do not install in a location where condensation
occurs
Water droplets (condensation) may form inside
the machine when the room where the machine
is installed is heated rapidly, and when the
machine is moved from a cool or dry location to a
hot or humid location. Using the machine under
these conditions may result in paper jams, poor
print quality, or damage to the machine. Let the
machine adjust to the ambient temperature and
humidity for at least 2 hours before use.
Avoid installing the machine near computers or
other precision electronic equipment.
Electrical interference and vibrations generated
by the machine while printing can adversely
affect the operation of such equipment.
Avoid installing the machine near televisions,
radios, or similar electronic equipment.
The machine might interfere with sound and
picture signal reception. Insert the power plug
into a dedicated power outlet, and maintain as
much space as possible between the machine
and other electronic equipment.
In altitudes of above sea level 3,000 m or higher
Machines with a hard disk may not operate
properly when used at high altitudes of about
3,000 meters above sea level, or higher.
Connecting the Telephone Line
This machine conforms to a analog telephone
line standard. The machine can be connected to
the public switched telephone network (PSTN)
only. If you connect the machine to a digital
telephone line or a dedicated telephone line, it
might impede proper operation of the machine
and could be the cause of damage. Make sure to
confirm a type of telephone line before
connecting the machine. Contact your optical
fiber line or IP telephone line service providers if
you want to connect the machine to those
telephone lines.
When using wireless LAN
• Install the machine at a distance of 50 meters
or less from the wireless LAN router.
• As far as possible, install in a location where
communication is not blocked by intervening
objects. The signal may be degraded when
passing through walls or floors.
• Keep the machine as far as possible from
digital cordless phones, microwave ovens, or
other equipment that emits radio waves.
• Do not use near medical equipment. Radio
waves emitted from this machine may
interfere with medical equipment, which may
result in malfunctions and accidents.
If the operating noise concerns you
Depending on the use environment and
operating mode, if the operating noise is of
concern, it is recommended that the machine be
installed in a place other than the office.
Moving the Machine
If you intend to move the machine, even to a
location on the same floor of your building,
contact your local authorized Canon dealer
beforehand. Do not attempt to move the
machine yourself.
Power Supply
WARNING
• Use only a power supply that meets the
specified voltage requirements. Failure to do
so may result in a fire or electrical shock.
• The machine must be connected to a
socket-outlet with grounding connection by
the provided power cord.
• Do not use power cords other than the one
provided, as this may result in a fire or
electrical shock.
• The provided power cord is intended for use
with this machine. Do not connect the power
cord to other devices.
• Do not modify, pull, forcibly bend, or perform
any other act that may damage the power
cord. Do not place heavy objects on the
power cord. Damaging the power cord may
result in a fire or electrical shock.
• Do not plug in or unplug the power plug with
wet hands, as this may result in an electrical
shock.
• Do not use extension cords or multi-plug
power strips with the machine. Doing so may
result in a fire or electrical shock.
• Do not wrap the power cord or tie it in a knot,
as this may result in a fire or electrical shock.
• Insert the power plug completely into the AC
power outlet. Failure to do so may result in a
fire or electrical shock.
• Remove the power plug completely from the
AC power outlet during a thunder storm.
Failure to do so may result in a fire, electrical
shock, or damage to the machine.
• Make sure that the power supply for the
machine is safe, and has a steady voltage.
• Keep the power cord away from a heat source;
failure to do this may cause the power cord
coating to melt, resulting in a fire or electrical
shock.
Avoid the following situations:
If excessive stress is applied to the connection
part of the power cord, it may damage the power
cord or the wires inside the machine may
disconnect. This could result in a fire.
–Connecting and disconnecting the power
cord frequently.
–Tripping over the power cord.
–The power cord is bent near the connection
part, and continuous stress is being applied to
the power outlet or the connection part.
–Applying excessive force on the power plug.
CAUTION
• Install this machine near the power outlet and
leave sufficient space around the power plug
so that it can be unplugged easily in an
emergency.
14
IMPORTANT
When connecting power
• Do not connect the power cord to an
uninterruptible power source. Doing so may
result in malfunction of or damage to the
machine at power failure.
• If you plug this machine into an AC power
outlet with multiple sockets, do not use the
remaining sockets to connect other devices.
• Do not connect the power cord to the
auxiliary AC power outlet on a computer.
Other precautions
• Electrical noise may cause this machine to
malfunction or lose data.
Handling
WARNING
• Immediately unplug the power plug from the
AC power outlet and contact an authorized
Canon dealer if the machine makes an unusual
noise, emits an unusual smell, or emits smoke
or excessive heat. Continued use may result in
a fire or electrical shock.
• Do not disassemble or modify this machine.
There are high-voltage and high-temperature
components inside the machine. Disassembly
or modification may result in a fire or electrical
shock.
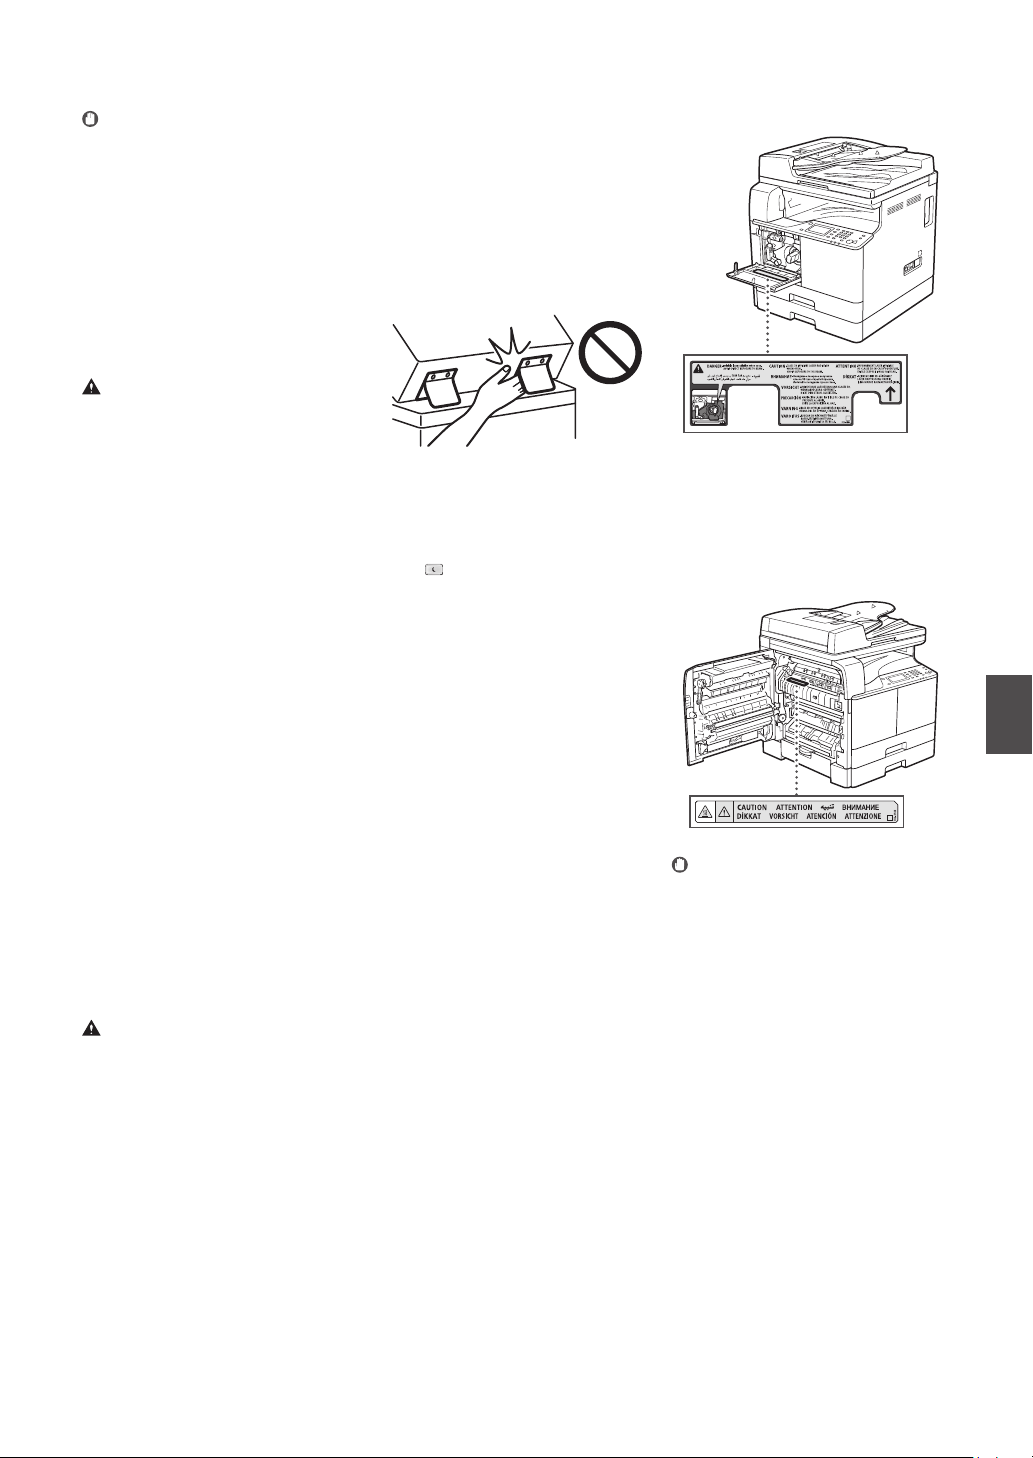
• Place the machine where children will not
come in contact with the power cord and
other cables or gears and electrical parts
inside the machine. Failure to do so may result
in unexpected accidents.
• Do not use flammable sprays near this
machine. If flammable substances come into
contact with electrical parts inside this
machine, it may result in a fire or electrical
shock.
• When moving this machine, be sure to turn
OFF the power of this machine, and then
unplug the power plug and interface cables.
Failure to do so may damage the power cord
or interface cables, resulting in a fire or
electrical shock.
• When plugging or unplugging a USB cable
when the power plug is plugged into an AC
power outlet, do not touch the metal part of
the connector, as this may result in an
electrical shock.
If you are using a cardiac pacemaker
This machine generates a low level magnetic flux
and ultrasonic waves. If you use a cardiac
pacemaker and feel abnormalities, please move
away from this machine and consult your
physician immediately.
CAUTION
• Do not place heavy objects on this machine as
they may fall, resulting in injury.
• For safety, unplug the power plug if the
machine will not be used for a long period of
time.
• Use caution when opening and closing covers
to avoid injury to your hands.
• Keep hands and clothing away from the rollers
in the output area. If the rollers catch your
hands or clothing, this may result in personal
injury.
• The inside of the machine and the output slot
are very hot during and immediately after use.
Avoid contact with these areas to prevent
burns. Also, printed paper may be hot
immediately after being output, so use
caution when handling it. Failure to do so may
result in burns.
Feeder or platen glass cover
• Do not press down hard on the feeder or the
platen glass cover when using the platen glass
to make copies of thick books. Doing so may
damage the platen glass and result in personal
injury.
• Close the feeder or the platen glass cover
gently to avoid catching your hands, as this
may result in personal injury.
• Be careful not to put your hands or fingers into
the feeder or the platen glass cover.
Otherwise, you may be injured.
Paper drawer
• Do not insert your hand into the machine
while the paper drawer is removed, as this
may result in personal injury.
Energy Saver key
Laser Safety
This product is confirmed as a Class 1 laser
product in IEC60825-1:2014 and EN60825-1:2014.
CLASS 1 LASER PRODUCT
LASER KLASSE 1
APPAREIL À LASER DE CLASSE 1
APPARECCHIO LASER DI CLASSE 1
PRODUCTO LÁSER DE CLASE 1
APARELHO A LASER DE CLASSE 1
LUOKAN 1 LASER-TUOTE
LASERPRODUKT KLASS 1
The laser beam can be harmful to human bodies.
Since radiation emitted inside the product is
completely confined within protective housings
and external covers, the laser beam cannot
escape from the machine during any phase of
user operation. Read the following remarks and
instructions for safety.
(Energy Saver) for safety when the
• Press
machine will not be used for a long period of
time, such as overnight. Also, turn OFF the
main power switch, and disconnect the power
cord for safety when the machine will not be
used for an extended period of time, such as
during consecutive holidays.
• Never open covers other than those instructed
in the manuals for this machine.
• If the laser beam should escape and enter
your eyes, exposure may cause damage to
your eyes.
• Use of controls, adjustments, or performance
of procedures other than those specified in
this manual may result in hazardous radiation
exposure.
Laser Safety Caution
Fixing Unit
When removing jammed paper or when
inspecting the inside of the machine, do not
expose yourself to the heat emitted from the
fixing unit and its surroundings for a prolonged
period of time. Doing so may result in low
temperature burns, even though you did not
touch the fixing unit and its surroundings directly.
En
IMPORTANT
• Follow the instructions on the caution label
attached to this machine.
• Do not subject the machine to strong shocks
or vibration.
• Do not forcibly open and close doors, covers,
and other parts. Doing so may result in
damage to the machine.
• Do not turn the main power switch OFF or
open the covers while the machine is in
operation. This may result in paper jams.
• Use a modular cable that is shorter than 3
meters.
• Use a USB cable that is shorter than 3 meters.
15
Appendix
En
Safety-Related Symbols
Power switch: “ON” position
Power switch: “OFF” position
Power switch: “STAND-BY” position
Push-push switch “ON” “OFF”
Protective earthing terminal
Dangerous voltage inside. Do not open
covers other than instructed.
CAUTION: Hot surface. Do not touch.
Class II equipment
Moving parts: Keep body parts away from
moving parts
CAUTION: An electrical shock may occur.
Remove all the power plugs from the power
outlet.
There are sharp edges. Keep body parts away
from sharp edges.
[NOTE]
Some of symbols shown above may not be
affixed depending on the product.
Maintenance and Inspections
Clean this machine periodically. If dust
accumulates, the machine may not operate
properly. When cleaning, be sure to observe the
following. If a problem occurs during operation,
see “Troubleshooting” in the User’s Guide. If the
problem cannot be resolved or you feel the
machine requires an inspection, see “When a
Problem Cannot Be Solved” in the User’s Guide.
WARNING
• Before cleaning, turn OFF the power and
unplug the power plug from the AC power
outlet. Failure to do so may result in a fire or
electrical shock.
• Unplug the power plug periodically and clean
with a dry cloth to remove dust and grime.
Accumulated dust may absorb humidity in the
air and may result in a fire if it comes into
contact with electricity.
• Use a damp, well wrung-out cloth to clean the
machine. Dampen cleaning cloths with water
only. Do not use alcohol, benzine, paint
thinner, or other flammable substances. Do
not use tissue paper or paper towels. If these
substances come into contact with electrical
parts inside the machine, they may generate
static electricity or result in a fire or electrical
shock.
• Check the power cord and plug periodically
for damage. Check the machine for rust, dents,
scratches, cracks, or excessive heat generation.
Use of poorly-maintained equipment may
result in a fire or electrical shock.
CAUTION
• The inside of the machine has hightemperature and high-voltage components.
Touching these components may result in
burns. Do not touch any part of the machine
that is not indicated in the manual.
• When loading paper or removing jammed
paper, be careful not to cut your hands with
the edges of the paper.
Consumables
WARNING
• Do not throw toner cartridges into open
flame, or do not store them or printing/copy
paper in a place exposed to open flame. This
may cause them to ignite, resulting in burns or
fire.
• If you accidentally spill or scatter toner,
carefully gather the toner particles together or
wipe them up with a soft, damp cloth in a way
that prevents inhalation. Never use a vacuum
cleaner that does not have safeguards against
dust explosions to clean up spilled toner.
Doing so may cause a malfunction in the
vacuum cleaner, or result in a dust explosion
due to static discharge.
CAUTION
• Keep toner and other consumables out of the
reach of small children. If these items are
ingested, consult a physician immediately.
• If toner touches your clothes or skin, wash it
away with water immediately. Do not use
warm water, as this may cause toner to fix,
resulting in a permanent stain.
• Do not dismantle the toner cartridge, as doing
so may cause toner to fly out and enter your
eyes or mouth. If toner gets into your eyes or
mouth, wash them immediately with cold
water and immediately consult a physician.
• If toner escapes from the toner cartridge,
make sure not to ingest the toner or allow it to
directly touch your skin. If your skin still feels
irritated after washing it, or you ingest toner,
consult a physician immediately.
IMPORTANT
• Store toner cartridges in a cool location, away
from direct sunlight.
Notice
Product Name
Safety regulations require the product’s name to
be registered.
In some regions where this product is sold, the
following name(s) in parentheses ( ) may be
registered instead.
imageRUNNER 2206iF (F193390)
imageRUNNER 2206N (F193392)
EMC requirements of EC Directive
This equipment conforms with the essential EMC
requirements of EC Directive. We declare that this
product conforms with the EMC requirements of
EC Directive at nominal mains input 230 V, 50 Hz
although the rated input of the product is 220 to
240 V, 50/60 Hz. Use of shielded cable is necessary
to comply with the technical EMC requirements
of EC Directive.
EU WEEE and Battery Directives
You can see the WEEE and Battery Directives
information in the latest User’s Guide (HTML
manual) from the Canon website (canon.com/
oip-manual).
Wireless LAN Regulatory Information
Regulatory information for users in Jordan
imageRUNNER 2206iF/2206N includes approved
Wireless LAN Module (Model name: Type1KA).
Contains Wireless LAN Module approved by TRC/
LPD/2017/19
Regulatory information for users in UAE
imageRUNNER 2206iF/2206N includes approved
Wireless LAN Module (Model name: Type1KA).
TRA
REGISTERED No: ER51217/17
DEALER No: DA0073692/11
RE Directive
(Only for European radio equipment)
RE Declaration of Conformity
English (EN) Hereby, Canon Inc. declares that
this equipment is in compliance with Directive
2014/53/EU.
The full text of the EU declaration of conformity is
available at the following internet address:
http://www.canon-europe.com/ce-documentation
Wireless LAN Specifications
Frequency band(s):2412-2472MHz
Maximum radio-frequency power:15.9 dBm
Czech (CS) Tímto společnost Canon Inc.
prohlašuje, že toto zařízení je v souladu se
směrnicí 2014/53/EU.
Úplné znění EU prohlášení o shodě je k dispozici
na této internetové adrese:
http://www.canon-europe.com/ce-documentation
Technické údaje bezdrátové LAN
Pásmo(a) frekvence: 2412-2472 MHz
Maximální výkon rádiové frekvence: 15.9 dBm
Danish (DA) Hermed erklærer Canon Inc., at
dette udstyr er i overensstemmelse med direktiv
2014/53/EU.
EU-overensstemmelseserklæringens fulde tekst
kan findes på følgende internetadresse:
http://www.canon-europe.com/ce-documentation
Trådløs LAN specofikationer
Frekvensbånd: 2412-2472 MHz
Maks. radio-frekvenseffekt: 15.9 dBm
German (DE) Hiermit erklärt Canon Inc, dass
diese Anlage der Richtlinie 2014/53/EU
entspricht.
Der vollständige Text der EUKonformitätserklärung ist unter der folgenden
Internetadresse verfügbar:
http://www.canon-europe.com/ce-documentation
WLAN-Spezifikationen
Frequenzbereich(e): 2412-2472 MHz
Maximale Funkfrequenzleistung: 15.9 dBm
Estonian (ET) Käesolevaga deklareerib Canon
Inc., et käesolev seade vastab direktiivi 2014/53/
EL nõuetele.
ELi vastavusdeklaratsiooni täielik tekst on
kättesaadav järgmisel internetiaadressil:
http://www.canon-europe.com/ce-documentation
Juhtmevaba LAN-i spetsifikatsioonid
Sagedusriba(d): 2412-2472 MHz
Maksimaalne raadiosageduslik võimsus: 15.9 dBm
Spanish (ES) Por la presente, Canon Inc. declara
que este equipo es conforme con la Directiva
2014/53/UE.
El texto completo de la declaración UE de
conformidad está disponible en la dirección de
Internet siguiente:
http://www.canon-europe.com/ce-documentation
Especificaciones LAN inalámbrica
Banda(s) de frecuencia: 2412-2472 MHz
Potencia máxima de radiofrecuencia: 15.9 dBm
16

Greek (EL) Με την παρούσα, η Canon Inc.
δηλώνει ότι ο παρών εξοπλισμός συμμορφώνεται
με την Οδηγία 2014/53/ΕΕ.
Το πλήρες κείμενο της δήλωσης συμμόρφωσης
της ΕΕ διατίθεται στην ακόλουθη διεύθυνση στο
διαδίκτυο:
http://www.canon-europe.com/ce-documentation
Προδιαγραφές ασύρματου LAN (WLAN)
Ζώνες συχνότητας: 2412-2472 MHz
Μέγιστη ισχύς ραδιοσυχνότητας: 15.9 dBm
French (FR) Le soussigné, Canon Inc., déclare
que le présent équipement est conforme à la
Directive 2014/53/UE.
Le texte complet de la déclaration UE de
conformité est disponible à l'adresse internet
suivante :
http://www.canon-europe.com/ce-documentation
Spécifications LAN sans fil
Bande(s) de fréquence: 2412-2472 MHz
Puissance maximale de radiofréquence: 15.9 dBm
Italian (IT) Con la presente, Canon Inc. dichiara
che questa apparecchiatura è conforme alla
direttiva 2014/53/UE.
Il testo completo della dichiarazione di
conformità UE è disponibile al seguente indirizzo
Internet:
http://www.canon-europe.com/ce-documentation
Caratteristiche LAN wireless
Banda/e di frequenza: 2412-2472 MHz
Potenza massima a radiofrequenza: 15.9 dBm
Latvian (LV) Canon Inc. ar šo deklarē, ka šī
iekārta atbilst Direktīvai 2014/53/ES.
Pilns ES atbilstības deklarācijas teksts ir pieejams
šādā interneta vietnē:
http://www.canon-europe.com/ce-documentation
Bezvadu LAN specifikācijas
Frekvences josla(s): 2412-2472 MHz
Maksimālā radiofrekvences jauda: 15.9 dBm
Lithuanian (LT) Šiuo dokumentu „Canon Inc.“
patvirtina, kad ši įranga atitinka direktyvą
2014/53/ES.
Visas ES atitikties deklaracijos tekstas prieinamas
šiuo interneto adresu:
http://www.canon-europe.com/ce-documentation
Belaidžio LAN specifikacijos
Dažnio diapazonas(-ai): 2412-2472 MHz
Maksimali radijo ryšio dažnio galia: 15.9 dBm
Dutch (NL) Hierbij verklaar ik, Canon Inc., dat
deze apparatuur conform is met Richtlijn
2014/53/EU.
De volledige tekst van de EUconformiteitsverklaring kan worden
geraadpleegd op het volgende internetadres:
http://www.canon-europe.com/ce-documentation
Draadloos LAN specificaties
Frequentieband(en): 2412-2472 MHz
Maximaal radiofrequentievermogen: 15.9 dBm
Maltese (MT) B'dan, Canon, qed tiddikjara li dan
it-tip ta' tagħmir huwa konformi mad-Direttiva
2014/53/UE.
It-test kollu tad-dikjarazzjoni ta' konformità tal-UE
huwa disponibbli f'dan is-sit fuq l-internet:
http://www.canon-europe.com/ce-documentation
Speċifikazzjonijiet tal-Wireless LAN
Band(i) tal-Frekwenza: 2412-2472 MHz
Qawwa ta' frekwenza tar-radju massima: 15.9
dBm
Hungarian (HU) A Canon Inc. igazolja, hogy ez a
berendezés megfelel a 2014/53/EU irányelvnek.
Az EU-megfelelőségi nyilatkozat teljes szövege
elérhető a következő internetes címen:
http://www.canon-europe.com/ce-documentation
Vezeték nélküli LAN műszaki adatai
Frekvenciasáv(ok): 2412-2472 MHz
Maximális rádiofrekvenciás teljesítmény: 15.9 dBm
Polish (PL) Canon Inc. niniejszym oświadcza, że
niniejsze urządzenie jest zgodne z dyrektywą
2014/53/UE.
Pełny tekst deklaracji zgodności UE jest dostępny
pod następującym adresem internetowym:
http://www.canon-europe.com/ce-documentation
Specyfikacja bezprzewodowej sieci LAN
Pasmo(-a) częstotliwości: 2412-2472MHz
Maksymalna moc na częstotliwościach
radiowych: 15.9 dBm
Portuguese (PT) Por este meio, a Canon Inc.
declara que o presente equipamento está em
conformidade com a Diretiva 2014/53/UE.
O texto integral da declaração de conformidade
da UE está disponível no seguinte endereço de
Internet:
http://www.canon-europe.com/ce-documentation
Especificações de LAN Sem Fios
Banda(s) de frequências: 2412-2472 MHz
Potência máxima de radiofrequência: 15.9 dBm
Slovene (SL) Canon Inc. potrjuje, da je ta oprema
v skladu z Direktivo 2014/53/EU.
Celotno besedilo izjave EU o skladnosti je na voljo
na naslednjem spletnem naslovu:
http://www.canon-europe.com/ce-documentation
Specifikacije za brezžični LAN
Frekvenčna območja: 2412-2472 MHz
Največja radiofrekvenčna moč: 15.9 dBm
Slovak (SK) Spoločnosť Canon Inc. týmto
vyhlasuje, že toto zariadenie je v súlade so
smernicou 2014/53/EÚ.
Úplné znenie EÚ vyhlásenia o zhode je k
dispozícii na tejto internetovej adrese:
http://www.canon-europe.com/ce-documentation
Technické údaje bezdrôtovej LAN
Pásmo (a) frekvencia: 2412-2472 MHz
Maximálny výkon rádiovej frekvencie: 15.9 dBm
Finnish (FI) Canon Inc. vakuuttaatäten, että tämä
laite on direktiivin 2014/53/EU mukainen.
EU-vaatimustenmukaisuusvakuutuksen
täysimittainen teksti on saatavilla seuraavassa
internetosoitteessa:
http://www.canon-europe.com/ce-documentation
Langattoman LAN:in tekniset ominaisuudet
Taajuuskaista(t): 2412-2472 MHz
Suurin radiotaajuusteho: 15.9 dBm
Swedish (SV) Härmed försäkrar Canon Inc. att
denna utrustning överensstämmer med direktiv
2014/53/EU.
Den fullständiga texten till EU-försäkran om
överensstämmelse finns tillgänglig på följande
webbadress:
http://www.canon-europe.com/ce-documentation
Specifikationer för trådlöst LAN
Frekvensband: 2412-2472 MHz
Maximal radiofrekvenseffekt: 15.9 dBm
Romanian (RO) Prin prezenta, Canon Inc. declară
că acest echipament este în conformitate cu
Directiva 2014/53/UE.
Textul integral al declarației UE de conformitate
este disponibil la următoarea adresă internet:
http://www.canon-europe.com/ce-documentation
Specificații wireless LAN
Benzi de frecvență: 2412-2472 MHz
Putere maximă a frecvenței radio: 15.9 dBm
Bulgarian (BG) С настоящото Canon Inc.
декларира, че това съоръжение е в
съответствие с Директива 2014/53/ЕС.
Цялостният текст на ЕС декларацията за
съответствие може да се намери на следния
интернет адрес:
http://www.canon-europe.com/ce-documentation
Спецификация на безжичната LAN
Честотна лента(и): 2412-2472 MHz
Максимална радиочестотна мощност: 15.9 dBm
Croatian (HR) Canon Inc. ovime izjavljuje da je
oprema u skladu s Direktivom 2014/53/EU.
Cjeloviti tekst EU izjave o sukladnosti dostupan je
na sljedećoj internetskoj adresi:
http://www.canon-europe.com/ce-documentation
Specifikacije bežičnog LAN-a
Frekvencijski pojas(evi): 2412-2472 MHz
Maksimalna snaga radijske frekvencije: 15.9 dBm
Irish (GA) Dearbhaíonn Canon Inc., leis seo, go
bhfuil an trealamh seo i gcomhlíonadh leis an
Treoir 2014/53/AE.
Tá an téacs iomlán de Dhearbhú Comhréireachta
AE ar fáil ag seoladh an láithreáin ghréasáin mar
seo a leanas:
http://www.canon-europe.com/ce-documentation
Sonraíochtaí LAN Gan Sreang
Banda(í) minicíochta: 2412-2472 MHz
Uaschumhacht radaimhinicíochta: 15.9 dBm
Norwegian (NO) Herved erklærer Canon Inc. at
dette utstyret er i overensstemmelse med direktiv
2014/53/EU.
Den fulle teksten til EUs samsvarserklæring er
tilgjengelig på følgende Internett-adresse:
http://www.canon-europe.com/ce-documentation
Trådløs LAN-spesifikasjoner
Bølgelengde: 2412-2472 MHz
Maks radiofrekvensstyrke: 15.9 dBm
Icelandic (IS) Hér með lýsir Canon Inc því yfir að
þessi búnaður er í samræmi við tilskipun 2014/53/
ESB.
Allur texti ESB-samræmisyfirlýsingar er í boði á
eftirfarandi veffangi:
http://www.canon-europe.com/ce-documentation
Tæknilýsingar fyrir þráðlausa nettengingu
Tíðnisvið: 2412-2472 MHz
Hámarksstyrkur útvarpstíðnibylgja: 15.9 dBm
Legal Limitations on the Usage of Your Product
and the Use of Images
Using your product to scan, print or otherwise
reproduce certain documents, and the use of
such images as scanned, printed or otherwise
reproduced by your product, may be prohibited
by law and may result in criminal and/or civil
liability. A non-exhaustive list of these documents
is set forth below. This list is intended to be a
guide only. If you are uncertain about the legality
of using your product to scan, print or otherwise
reproduce any particular document, and/or of
the use of the images scanned, printed or
otherwise reproduced, you should consult in
advance with your legal advisor for guidance.
• Paper Money
• Travelers Checks
• Money Orders
• Food Stamps
• Certificates of Deposit
• Passports
• Postage Stamps (canceled or uncanceled)
• Immigration Papers
• Identifying Badges or Insignias
• Internal Revenue Stamps (canceled or
uncanceled)
• Selective Service or Draft Papers
• Bonds or Other Certificates of Indebtedness
• Checks or Drafts Issued by Governmental
Agencies
• Stock Certificates
• Motor Vehicle Licenses and Certificates of Title
• Copyrighted Works/Works of Art without
Permission of Copyright Owner
Disclaimers
• The information in this document is subject to
change without notice.
En
17

Appendix
En
• CANON INC. MAKES NO WARRANTY OF ANY
KIND WITH REGARD TO THIS MATERIAL, EITHER
EXPRESS OR IMPLIED, EXCEPT AS PROVIDED
HEREIN, INCLUDING WITHOUT LIMITATION,
THEREOF, WARRANTIES AS TO MARKETABILITY,
MERCHANTABILITY, FITNESS FOR A
PARTICULAR PURPOSE OF USE, OR NONINFRINGEMENT. CANON INC. SHALL NOT BE
LIABLE FOR ANY DIRECT, INCIDENTAL, OR
CONSEQUENTIAL DAMAGES OF ANY NATURE,
OR LOSSES OR EXPENSES RESULTING FROM
THE USE OF THIS MATERIAL.
About This Manual
Keys and Buttons Used in This Manual
The following symbols and key names are a few
examples of how keys to be pressed are
expressed in this manual.
• Operation panel keys: [Key icon]
Example:
• Display: <Specify destination.>
• Buttons and items on the computer display:
[Preferences]
Illustrations
Illustrations used in this manual are those
displayed when the imageRUNNER 2206iF has
the following optional equipment attached to it:
• Cassette Feeding Module-AD
Trademarks
Mac is a trademark of Apple Inc.
Microsoft, Windows, Windows Vista, Windows
Server, Internet Explorer, Excel, and PowerPoint
are either registered trademarks or trademarks of
Microsoft Corporation in the United States and/
or other countries.
Other product and company names herein may
be the trademarks of their respective owners.
(7) You may not modify, adapt, translate, rent,
lease or loan the SOFTWARE or create
derivative works based on the SOFTWARE.
(8) You are not entitled to remove or make
separate copies of the SOFTWARE from the
PRODUCT.
(9) The human-readable portion (the source
code) of the SOFTWARE is not licensed to you.
Notwithstanding (1) through (9) above, the
PRODUCT includes third-party software modules
accompanying the other license conditions, and
these software modules are subject to the other
license conditions.
Please refer to the other license conditions of
third-party software modules described in
Appendix of Manual for the corresponding the
PRODUCT. This Manual is available at http://canon.
com/oip-manual.
By using the PRODUCT, you shall be deemed to
have agreed to all applicable license conditions. If
you do not agree to these license conditions,
please contact your service representative.
V_180517
Third Party Software
This Canon product (the “PRODUCT”) includes
third-party software modules. Use and
distribution of these software modules, including
any updates of such software modules
(collectively, the “SOFT WARE”) are subject to
license conditions (1) through (9) below.
(1) You agree that you will comply with any
applicable export control laws, restrictions or
regulations of the countries involved in the
event that this PRODUCT including the
SOFTWARE is shipped, transferred or exported
into any country.
(2) Rights holders of the SOFTWARE retain in all
respects the title, ownership and intellectual
property rights in and to the SOFTWARE.
Except as expressly provided herein, no
license or right, expressed or implied, is
hereby conveyed or granted by rights holders
of the SOFTWARE to you for any intellectual
property of rights holders of the SOFTWARE.
(3) You may use the SOFTWARE solely for use
with the PRODUCT.
(4) You may not assign, sublicense, market,
distribute, or transfer the SOFTWARE to any
third party without prior written consent of
rights holders of the SOFTWARE.
(5) Notwithstanding the foregoing, you may
transfer the SOFTWARE only when (a) you
assign all of your rights to the PRODUCT and
all rights and obligations under the license
conditions to transferee and (b) such
transferee agrees to be bound by all these
conditions.
(6) You may not decompile, reverse engineer,
disassemble or otherwise reduce the code of
the SOFTWARE to human readable form.
18

Memo
19

Exigences d'installation
100mm ou plus
*
533mm
1022,9mm
* Chargeur (optionnel pour imageRUNNER 2206N)
1285mm
À propos des manuels fournis
①
Mise en route (ce manuel):
Commencez par lire ce manuel. Ce manuel décrit les réglages,
les opérations et les précautions de base de l'appareil. Veillez à
lire ce manuel avant d'utiliser l'appareil.
②
Guide d'installation de MF Driver (Visitez le site Web):
Le guide d'installation
③
Guide de l'utilisateur (Visitez le site Web):
de MF Driver qui décrit l'installation du logiciel se
trouve sur canon.com/oip-manual.
Le guide de l'utilisateur,
qui décrit toutes les fonctions de cet appareil se
trouve sur canon.com/oip-manual.
Fr
20
Navigation dans le menu et méthode de
saisie de texte
Le panneau de commande a ché ici est celui d'imageRUNNER
2206iF. Les touches disponibles varient en fonction du modèle.
Mise sous/hors tension
Retour
Mémoriser nom unité
Canon-1
A/a/12
<A/a/12>
◄►
A
Appliquer
<Appliquer>
E acer # Touches
numériques
Navigation dans le menu
Sélection d'options
Appuyez sur une option pour la sélectionner. Appuyez sur
pour revenir à l'écran précédent.
Con rmation des réglages
Appuyez sur l'option. Toutefois, lorsque <Appliquer> s'a che,
appuyez sur <Appliquer>.
Méthode de saisie de texte
Changement de mode de saisie
Appuyez sur <A/a/12> pour changer le mode de saisie. Vous
pouvez également appuyer sur
saisie.
Mode de saisie Texte disponible
<A> Majuscules alphabétiques et symboles
<a> Minuscules alphabétiques et symboles
<12> Nombres
Saisie de texte, de symboles et de nombres
Saisissez à l'aide des touches numériques ou de
Déplacement du curseur (saisie d'un espace)
Appuyez sur <◄> ou <►> pour déplacer le curseur. Pour
saisir un espace, déplacez le curseur à la n du texte et
appuyez sur <►>.
Suppression de caractères
Supprimez avec . Un appui prolongé sur permet de
supprimer tous les caractères.
Mode de saisie: <A> Mode de saisie: <a> Mode de saisie: <12>
@ . - _ / 1
AÀÂBCÇ aàâbcç 2
DEËÉÈÊF deëéèêf 3
GHIÏÎ ghiïî 4
JKL jkl 5
MNOÔ mnoô 6
PQRS pqrs 7
TUÜÙÛV tuüùûv 8
WXYZ wxyz 9
(non disponible) 0
(espace) - . * # ! “ , ; : ^ ` _ = / | ‘ ? $ @ % & + \ ˜ ( )
[ ] { } < >
pour changer le mode de
.
(non disponible)
MARCHE
ARRET
Fr
• Assurez-vous que le cordon d'alimentation est
fermement inséré dans la prise secteur.
• Ne connectez pas le câble USB à ce stade. Connectez-le
lors de l'installation du logiciel.
21
Spéci cation des réglages initiaux
Suivez les instructions a chées à l'écran pour e ectuer les
actions suivantes:
• Con gurer la langue
• Con gurer le pays et la région
• Con gurer le fuseau horaire
• Con gurer la date et l'heure
• Enregistrer les informations d'achat
• Con gurer le PIN d'accès à l'IU distante
• Con gurer la connexion du réseau sans l
Pour plus de détails sur la navigation dans le menu et la
méthode de saisie de nombres, reportez-vous à "Navigation
dans le menu et méthode de saisie de texte" (
Il est recommandé de con gurer le PIN d'accès à l'IU distante
lorsque vous utilisez l'IU distante a n d'éviter tout accès non
autorisé par une tierce partie. L'IU distante a recours à un
navigateur Web pour utiliser l'appareil, en véri er l'état et
spéci er des réglages qui vous permettent de gérer l'appareil
tout en restant à votre bureau. Pour plus d'informations sur
l'utilisation de l'IU distante, reportez-vous au Guide de
l'utilisateur.
P.21).
Choix de la méthode de connexion de
l'appareil à l'ordinateur
•
Connexion par réseau
Vous pouvez connecter l'appareil à un ordinateur par
l'intermédiaire d'un routeur de réseau laire. Utilisez un
câble réseau pour connecter l'appareil au routeur.
•
Connexion par réseau sans l
Vous pouvez connecter l'appareil à un ordinateur par
l'intermédiaire d'un routeur sans l*. Comme il est connecté
sans l, aucun câble réseau n'est nécessaire.
* Un routeur sans l (points d'accès) qui prend en charge la norme
IEEE802.11b/g/n est requis.
Connectez l'ordinateur au routeur par un câble ou sans l.
Si vous ne savez pas si votre routeur est laire ou sans l:
Consultez le mode d'emploi fourni avec votre périphérique
réseau ou contactez le fabricant.
•
Connexion directe
Connectez sans l un périphérique mobile à l'appareil et
directement, sans passer par un routeur de réseau sans l
(ou points d'accès).
Guide de l'utilisateur "Connexion directe (mode point
d'accès)"
Connexion par réseau
Véri cation avant la con guration
Internet
Routeur
Fr
Connectez l'ordinateur au routeur par un câble ou sans l.
Assurez-vous qu'il existe des ports disponibles sur le routeur pour
connecter l'appareil et l'ordinateur.
Préparez un câble réseau de catégorie 5 à paires torsadées.
•
Connexion via un câble USB
Vous pouvez connecter l'appareil à un ordinateur à l'aide
d'un câble USB.
IMPORTANT
Aucun câble USB n'est fourni dans le colis. Procurezvous un câble adapté à votre ordinateur.
Assurez-vous que le câble USB que vous utilisez
porte le symbole suivant.
Câble réseau
L'ordinateur et le routeur sont-ils correctement connectés
via un câble réseau?
Pour plus d'informations, consultez le mode d'emploi du
périphérique réseau que vous utilisez ou contactez le fabricant
du périphérique de mise en réseau.
Les réglages réseau sur l'ordinateur ont-ils été e ectués?
Si l'ordinateur n'est pas correctement con guré, il est possible
que vous ne puissiez pas utiliser la connexion réseau laire,
même après avoir e ectué les réglages suivants.
REMARQUE
• Lorsque vous vous connectez à un environnement
réseau non sécurisé, vos informations personnelles
peuvent être dévoilées à des tierces parties. Soyez
vigilant.
• Si vous vous connectez via un réseau au bureau,
contactez votre administrateur réseau.
22
Con guration de la connexion réseau
Connectez le câble réseau.
1
Connexion par réseau sans l
Véri cation avant la con guration
Routeur de réseau
sans l
Internet
Il est possible de con gurer automatiquement l'adresse IP
en 2minutes. Si vous souhaitez con gurer manuellement
l'adresse IP, reportez-vous aux éléments suivants.
Guide de l'utilisateur "Con guration les adresses IP"
Installez les pilotes sur votre ordinateur à l'aide du
2
CD-ROM/DVD-ROM fourni.
Reportez-vous à "Installation du logiciel" (P. 26).
REMARQUE
Le pilote de scanner ne peut pas être installé si
l'appareil et votre ordinateur sont connectés dans
un environnement IPv6.
Passez à "Con guration d'un format et d'un type de papier"
(P. 26).
Connexion via un câble USB
Connectez le câble USB après avoir installé les pilotes.
Installez les pilotes sur votre ordinateur à l'aide du
1
CD-ROM/DVD-ROM fourni.
Reportez-vous à "Installation du logiciel" (P. 26).
L'ordinateur est-il correctement connecté au routeur (point
d'accès) par l'intermédiaire d'un câble réseau ou d'un
réseau sans l?
Pour plus d'informations, consultez le mode d'emploi du
périphérique réseau que vous utilisez ou contactez le fabricant
du périphérique de mise en réseau.
Les réglages réseau sur l'ordinateur ont-ils été e ectués?
Si l'ordinateur n'est pas correctement con guré, il est possible
que vous ne puissiez pas utiliser la connexion réseau sans l,
même après avoir e ectué les réglages suivants.
REMARQUE
• Vous ne pouvez pas vous connecter simultanément
avec le réseau laire et le réseau sans l. En outre, par
défaut, l'appareil est réglé sur "Réseau laire".
• Lorsque vous vous connectez à un environnement
réseau non sécurisé, vos informations personnelles
peuvent être dévoilées à des tierces parties. Soyez
vigilant.
• Si vous vous connectez via un réseau au bureau,
contactez votre administrateur réseau.
Fr
Changement de la méthode de connexion pour
passer au réseau sans l
Connectez le câble USB.
2
Passez à "Con guration d'un format et d'un type de papier"
(P. 26).
Appuyez sur <Menu> sur l'écran <Accueil>.
1
Appuyez sur <Réglages réseau>.
2
Si un écran permettant de saisir un ID et un PIN
d'administrateur système s'a che, saisissez-les, appuyez sur
<Appliquer>, puis sur .
Appuyez sur <Sélectionner réseau câblé/sans l>.
3
Appuyez sur <Réseau sans l>.
4
Sélection du réseau local
Réseau câblé
Réseau sans fil
23
Véri cation du routeur
Sélectionnez la méthode de connexion au réseau sans l.
Choisissez l'une des deux méthodes de suivantes selon le
routeur (point d'accès) que vous utilisez.
Un bouton est présent.
Cet appareil prend en charge
WPS (Wi-Fi Protected Setup).
Vous pouvez facilement le
con gurer si votre routeur
(point d'accès) possède un
bouton et si le symbole
gure sur le routeur.
Si vous n'êtes pas certain que votre routeur prend en charge WPS,
consultez le manuel fourni avec le produit ou contactez le fabricant
du produit.
Aucun bouton n'est présent.
Si aucun bouton n'est présent
sur votre routeur (point
d'accès), vous pouvez
sélectionner manuellement le
SSID et e ectuer les réglages.
Dans ce cas, vous devez
mémoriser le SSID et la clé
réseau de votre routeur (point
d'accès).
Reportez-vous à "Vérification que le réglage du réseau sans fil
est terminé" (P. 26) pour savoir comment trouver le SSID et
la clé réseau.
Pour une con guration à l'aide de la méthode du code PIN
Fr
WPS ou une con guration manuelle:
Guide de l'utilisateur "Connexion à un réseau sans l"
Con guration d'un réseau sans l
Mode bouton-poussoir
Appuyez sur <Menu> sur l'écran <Accueil>.
1
Appuyez sur <Mode bouton WPS>.
5
Réglages réseau sans fil
Réglages réseau sans fil
Mode bouton WPS
Mode code PIN WPS
Mode économie d'énergie
Informations du réseau sans
Appuyez sur <Oui>.
6
Appuyez de manière prolongée* sur le bouton,
7
jusqu'à ce que le témoin s'allume ou clignote.
Vous devez appuyer sur le bouton WPS dans les 2minutes
après avoir appuyé sur <Oui> à l'étape6.
* La durée pendant laquelle vous devez maintenir le bouton
enfoncé peut varier en fonction du routeur que vous utilisez.
Patientez environ 2minutes après la connexion.
8
L'adresse IP est con gurée pendant cette période.
Lorsqu'un message d'erreur s'a che:
Appuyez sur <Fermer> pour fermer l'écran et réessayer
les réglages. Si le point d'accès ne peut pas être
détecté, même après avoir essayé, reportez-vous au
point suivant.
Guide de l'utilisateur "Lorsqu'un message d'erreur
s'a che"
Lors de la véri cation de la connexion réseau:
Vous pouvez véri er si l'appareil est correctement connecté
au réseau à l'aide d'un ordinateur qui y est également
connecté.
Guide de l'utilisateur "A chage des paramètres réseau"
Pour con gurer manuellement l'adresse IP:
Guide de l'utilisateur "Connexion à un réseau sans l"
Appuyez sur <Réglages réseau>.
2
Si un écran permettant de saisir un ID et un PIN
d'administrateur système s'a che, saisissez-les, appuyez
sur <Appliquer>, puis sur
Appuyez sur <Réglages réseau sans l>.
3
Lisez le message a ché et appuyez sur <OK>.
4
.
24
Con guration manuelle du point d'accès
Véri ez le SSID ou la clé réseau d'un routeur/point
1
d'accès du réseau sans l.
• Véri ez l'étiquette sur le routeur de réseau sans l.
Inscrivez le nom du SSID et la clé réseau a chés à
2
l'étape1. Si plusieurs points d'accès sont a chés,
inscrivez tous les SSID a chés.
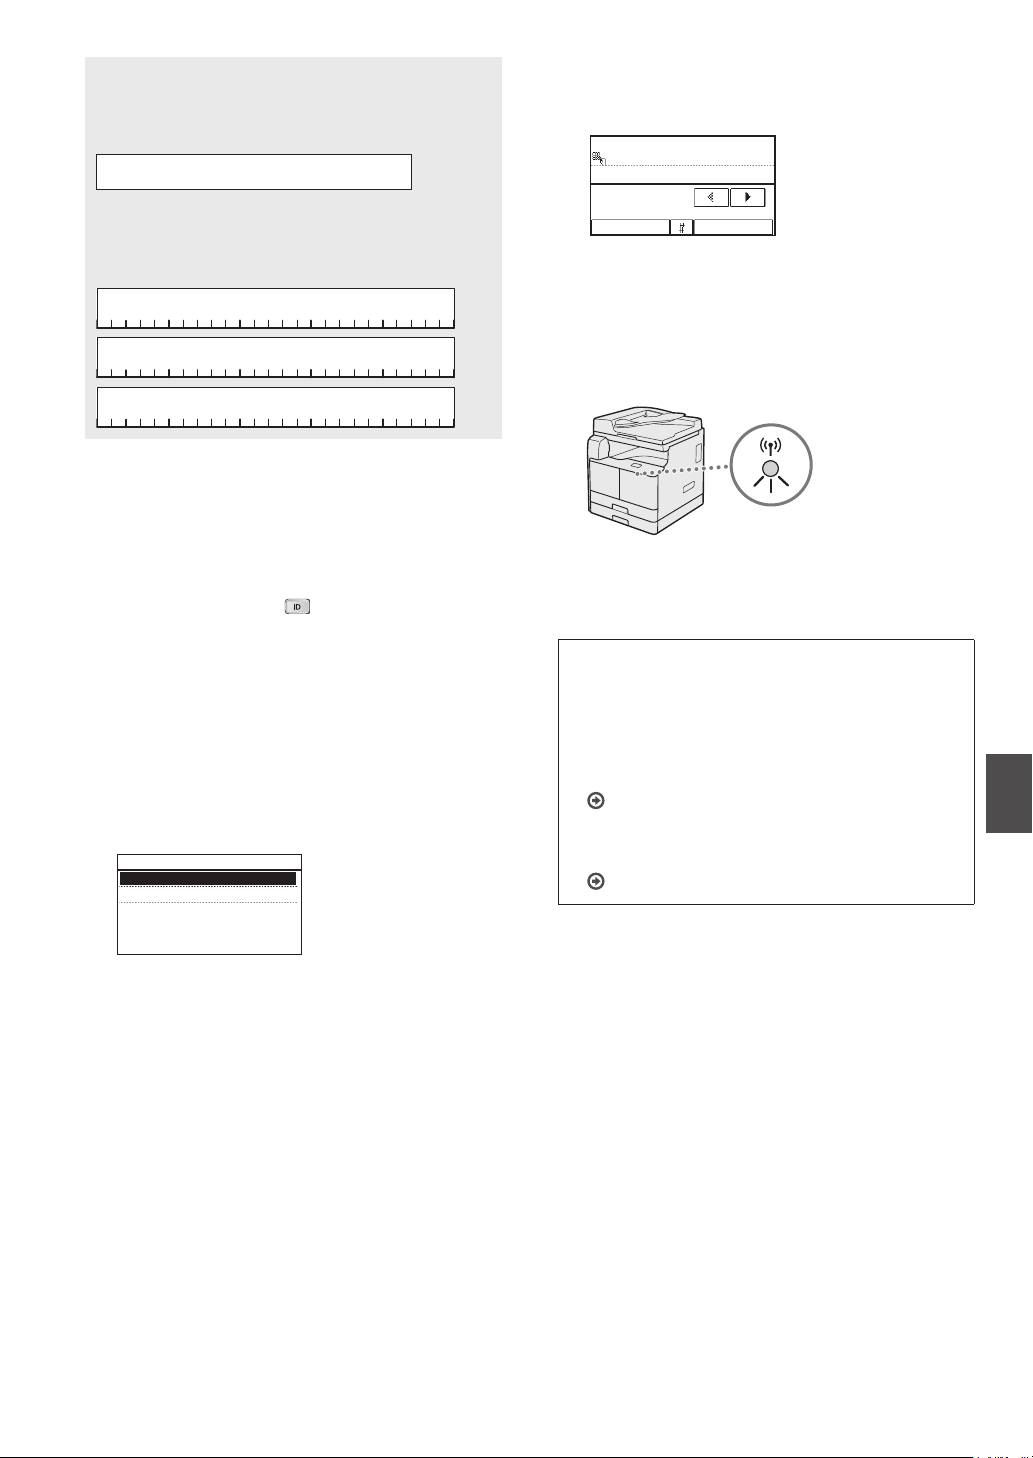
SSID
Il est parfois inscrit sous forme d'un nom de réseau ou d'un
nom de point d'accès. S'il existe plusieurs SSID, inscrivez les
tous.
Saisissez la clé réseau que vous avez inscrite.
10
Saisissez une clé réseau à l'aide des touches numériques,
et appuyez sur <Appliquer>.
Clé WEP (5-26 caractères)
XXXXXXXX
A
Clé réseau
Elle est parfois inscrite sous la forme d'un PIN, d'une clé
WEP, d'une phrase de passe WPA/WPA2, ou d'une clé
prépartagée ou PSK.
Appuyez sur <Menu> sur l'écran <Accueil>.
3
Appuyez sur <Réglages réseau>.
4
Si un écran permettant de saisir un ID et un PIN
d'administrateur système s'a che, saisissez-les, appuyez
sur <Appliquer>, puis sur .
Appuyez sur <Réglages réseau sans l>.
5
Lisez le message a ché et appuyez sur <OK>.
6
Appuyez sur <Réglages SSID>.
7
Appuyez sur <Sélection du point d'accès>.
8
Réglages SSID
Sélection du point d'accès
Saisie manuelle
AppliquerA/a/12
Appuyez sur <Oui>.
11
Une fois l'écran <Connecté.> a ché, patientez
12
jusqu'à ce que le témoin Wi-Fi cesse de clignoter
pour rester allumé.
Patientez environ 2minutes après la connexion
13
L'adresse IP est con gurée pendant cette période.
Lorsqu'un message d'erreur s'a che:
Appuyez sur <Fermer> pour fermer l'écran, véri ez si la
clé réseau incorrecte ou non, puis réessayez de
con gurer les réglages.
Si le point d'accès ne peut pas être détecté, même
après avoir essayé, reportez-vous au point suivant.
Guide de l'utilisateur "Lorsqu'un message d'erreur
s'a che"
Pour con gurer manuellement l'adresse IP:
Guide de l'utilisateur "Connexion à un réseau sans l"
Fr
Sélectionnez un routeur de réseau sans l.
9
Si plusieurs SSID correspondants sont a chés,
sélectionnez l'ID indiqué en premier (celui avec le signal le
plus fort).
25
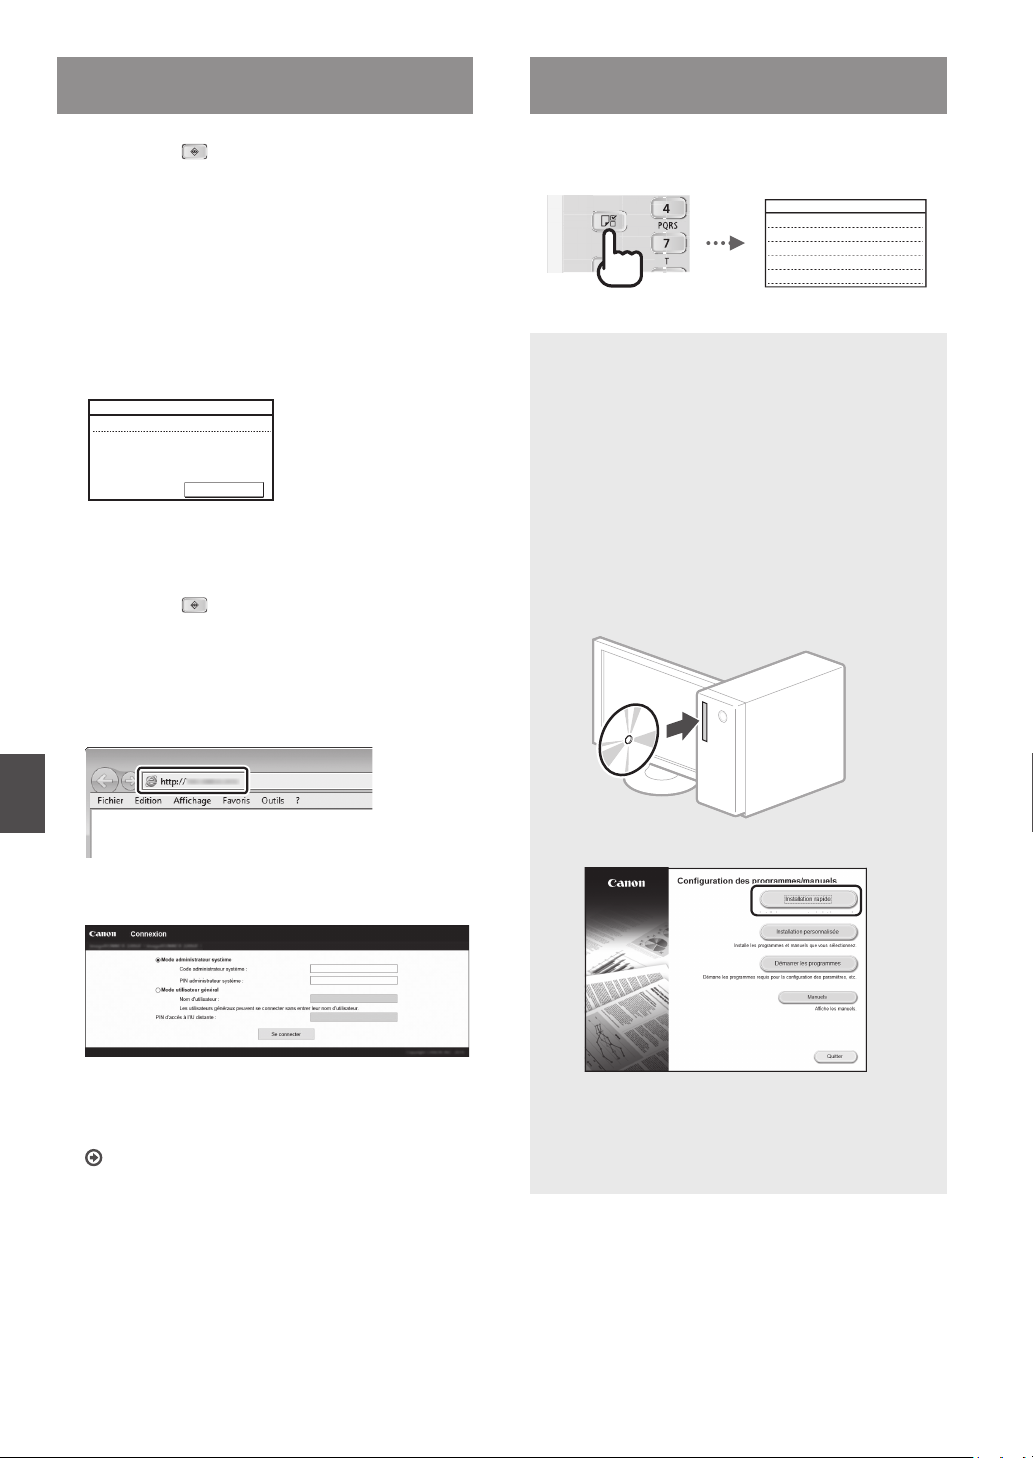
Véri cation que le réglage du réseau sans l
est terminé
Con guration d'un format et d'un type de
papier
Appuyez sur .
1
Appuyez sur <Informations réseau>.
2
Appuyez sur <IPv4>.
3
Appuyez sur <Adresse IP>.
4
Notez l'adresse IP.
5
Adresse IP
XXX.XXX.XXX.XXX
Fermer
Appuyez sur <Fermer>.
6
Appuyez sur .
7
Ouvrez un navigateur Web sur un ordinateur,
8
saisissez "http://<adresse IP de l'appareil>/" dans le
champ de l'adresse, puis appuyez sur [Entrée] sur
votre clavier.
Suivez les instructions à l'écran pour con gurer le format et le
type de papier.
Réglages papier
Bac multifonctions
Cassette 1
Cassette 2
Sélection de réglages de cop
Installation du logiciel
• La procédure décrite ici n'est applicable que pour un
ordinateur fonctionnant sous le système d'exploitation
Windows. Pour en savoir davantage sur la procédure
d'installation du logiciel, consultez le manuel du pilote.
• Pour l'installation sur un ordinateur sous macOS,
consultez le manuel du pilote.
• Selon sa date d'achat, il est possible que l'appareil ne
soit pas livré avec le pilote pour macOS. Les nouveaux
pilotes sont disponibles sur le site Web Canon où vous
pouvez télécharger et utiliser la dernière version.
1.
Fr
2.
Véri ez que l'écran de l'IU distante est a ché.
9
La connexion est établie si l'écran est a ché.
Si l'écran ne s'a che pas correctement:
Guide de l'utilisateur "Problèmes courants"
Si l'écran ne s'a che pas correctement, réinsérez le
CD-ROM/DVD-ROM ou recherchez "D:\MInst.exe"
sur la plateforme Windows. (Cette description
suppose que "D:" est le nom du CD-ROM/DVDROM.)
26

Exécution de tâches utiles
Plusieurs fonctions sont disponibles. Vous trouverez une présentation des fonctions les plus pratique ci-dessous.
Copie
Copies agrandies/réduites
Vous pouvez agrandir ou réduire des
documents de format standard pour les
copier sur du papier de format standard
ou spéci er un facteur de copie sous
forme d'un pourcentage.
Copie recto-verso**
Vous pouvez e ectuer une copie de
documents recto des deux côtés du
papier.
Collationnement
Vous pouvez trier des copies en jeux
classés selon l'ordre des pages.
Mise en page réduite
Vous pouvez réduire plusieurs
documents pour les copier sur une
seule feuille.
2 sur 1 4 sur 1
Copie de carte d'identité
Vous pouvez e ectuer une copie d'une
carte recto-verso sur un côté du papier.
Fax*
Envoi d'un document directement
depuis un ordinateur (PC Fax)
Outre l'envoi et la réception normaux
de fax, vous pouvez utiliser le PC fax.
Envoi
Vous pouvez enregistrer des
destinations de fax dans le carnet
d'adresses. Vous pouvez spéci er les
destinations selon plusieurs méthodes,
ce qui vous permet d'envoyer des
documents rapidement et facilement.
• Recherche de destination
• Touches uniques
• Numérotation codée
• Groupe de destinations
• Spéci cation depuis un historique
d'envois
• Di usion séquentielle
Réception
•
Réception dans la mémoire
Vous pouvez stocker les documents
reçus dans la mémoire. Vous pouvez
imprimer les documents stockés à tout
moment et, si vous n'en avez plus
besoin, vous pouvez les supprimer.
•
Réception à distance
Si un téléphone externe et connecté,
vous pouvez passer immédiatement en
mode de réception de fax en
composant le numéro d'ID de réception
de fax grâce au bouton de
numérotation sur le téléphone pendant
un appel téléphonique.
Impression
Impression agrandie/réduite
Impression recto-verso**
Mise en page réduite
Vous pouvez réduire plusieurs
documents pour les imprimer sur une
seule feuille.
2 sur 1 4 sur 1
Impression de brochures**
Impression d'a ches
Impression de ligranes
Combinaison et impression de
plusieurs documents
Sélection d'un "Pro l"
Réglages réseau
L'appareil est équipé d'une interface
réseau qui vous permet de développer
facilement un environnement réseau.
Vous pouvez imprimer un document,
utiliser le PC fax* et la numérisation via
le réseau depuis tous les ordinateurs
connectés à l'appareil. L'appareil peut
être partagé au bureau a n
d'augmenter l'e cacité du travail.
Numériser
Enregistrement de documents à
l'aide du panneau de commandes de
l'appareil
1
Documents
2
Données
3
Enregistrement de documents à
l'aide d'opérations depuis un
ordinateur
•
Numérisation avec MF Scan Utility
Documents
1
2
•
Numérisation depuis une application
•
Numérisation avec le pilote WIA
3
Données
Envoi par e-mail de documents
numérisés***
Vous pouvez envoyer des documents
numérisés dans votre application de
messagerie.
+
Documents Données E-mail
Envoi de documents numérisés à un
serveur de chiers***
Vous pouvez envoyer des documents
numérisés à un serveur de chiers.
Documents Données Serveur de
chiers
IU distante
Vous pouvez comprendre l'état de
l'appareil à partir des ordinateurs du
réseau. Il vous su t d'accéder à
l'appareil et de gérer les tâches ou de
spéci er divers réglages via le réseau.
* imageRUNNER 2206iF uniquement
** La fonction est intégrée à imageRUNNER 2206iF.
L'unité recto verso-C est requise pour
imageRUNNER 2206N.
*** La fonction est intégrée à imageRUNNER 2206iF.
Le kit d'envoi est requis pour imageRUNNER
2206N.
Fr
27

Élimination des bourrages de papier
Si l'écran suivant s'a che, cela signi e qu'un bourrage de papier s'est produit dans le
chargeur ou à l'intérieur de l'appareil. Suivez la procédure a chée à l'écran pour éliminer
le bourrage de papier. Ce manuel indique uniquement les zones où des bourrages de
document ou de papier se produisent. Pour plus de détails sur les procédures, reportezvous au Guide de l'utilisateur.
Chargeur (CRV-AY)
Zone de sortie
(optionnel pour imageRUNNER 2206N)
Bourrage papier.
Appuyer sur [Suivant] pour
afficher les étapes.
Précédent Suivant
Cassette à papier1
Fr
(optionnelle pour imageRUNNER 2206N)
Unité recto verso-C
Bac multifonctions Ensemble de xation Module Une Cassette-AD
(optionnel)
28

Remplacement de la cartouche de toner
Les cartouches de toner sont des consommables. Lorsque le toner est presque épuisé ou s'il s'est complètement épuisé pendant
l'exécution d'une tâche, un message s'a che à l'écran, ou les problèmes suivants pourraient survenir. Prenez les mesures appropriées.
Lorsqu'un message s'a che
Lorsque le toner est presque épuisé ou s'il s'est épuisé pendant l'exécution d'une tâche, un message s'a che à l'écran.
Message
<Préparez la
cartouche de
toner.>
<Remplacez la
cartouche de
toner.>
Lorsque le message est
a ché à l'écran
La cartouche de toner
doit être bientôt
remplacée.
La cartouche de toner a
atteint la n de sa durée
de vie..
Description et solutions
Assurez-vous de disposer d'une cartouche de toner prête. Nous vous
recommandons de véri er le niveau de toner restant avant d'imprimer des
documents volumineux.
Guide de l'utilisateur "Remplacement de la cartouche de toner"
Remplacez la cartouche de toner.
Guide de l'utilisateur "Remplacement de la cartouche de toner"
Si les épreuves sont de mauvaise qualité
Si les caractéristiques ci-dessous commencent à apparaître sur les épreuves, cela signi e que la cartouche de toner est presque vide.
Remplacez la cartouche de toner presque vide, même si aucun message n'est a ché.
Des traînées blanches apparaissent Impression partiellement estompée La densité est inégale
Des taches et des éclaboussures
apparaissent Les impressions sont grisâtres
Fr
29

Annexe
Consignes de sécurité
importantes
Ce chapitre décrit des consignes de sécurité
importantes pour la prévention des blessures des
utilisateurs de cet appareil et autres ainsi que des
dommages aux biens. Lisez ce chapitre avant
d'utiliser l'appareil et suivez les instructions pour
l'utiliser correctement. N'effectuez aucune
opération non décrite dans ce manuel. Canon ne
peut être tenu responsable des dommages
résultant d'opérations non décrites dans ce
manuel, d'une utilisation incorrecte ou de
réparations ou modifications ayant pas été
effectuées par Canon ou une tierce partie agréée
par Canon. Une opération ou une utilisation
incorrecte de cet appareil pourrait provoquer des
blessures et/ou des dommages nécessitant
d'importantes réparations qui pourraient ne pas
être couvertes par votre garantie limitée.
AVERTISSEMENT
Indique un avertissement relatif à des
opérations qui pourraient provoquer la mort
ou des blessures si elles ne sont pas
effectuées correctement. Pour utiliser
l'appareil en toute sécurité, prêtez toujours
attention à ces avertissements.
ATTENTION
Indique une précaution relative à des
opérations qui pourraient provoquer des
blessures si elles ne sont pas effectuées
correctement. Pour utiliser l'appareil en toute
sécurité, prêtez toujours attention à ces
précautions.
IMPORTANT
Fr
Indique des exigences et restrictions
d'utilisation. Veillez à les lire soigneusement
pour utiliser correctement l'appareil et éviter
d'endommager l'appareil ou des biens.
Installation
Pour utiliser l'appareil en toute sécurité et sans
difficulté, lisez soigneusement les précautions
suivantes et installez-le dans un endroit
approprié.
AVERTISSEMENT
Ne l'installez pas dans un endroit où un
incendie ou un choc électrique pourrait
survenir
• Un endroit où les fentes de ventilation sont
bloquées (trop proche de murs, lits, canapés,
tapis ou objets semblables)
• Un endroit humide ou poussiéreux
• Un endroit exposé à la lumière directe du
soleil ou à l'extérieur
• Un endroit soumis à des températures élevées
• Un endroit exposé à des flammes découvertes
• A proximité d'alcool, de diluants pour peinture
ou d'autres substances inflammables
Autres avertissements
• Ne branchez pas de câbles non homologués
sur cet appareil. Cela pourrait provoquer un
incendie ou un choc électrique.
• Ne posez pas de colliers ou autres objets
métalliques, ou de récipients remplis de
liquide sur l'appareil. Si des corps étrangers
entrent en contact avec les parties électriques
situées à l'intérieur de l'appareil, cela pourrait
provoquer un incendie ou un choc électrique.
• Si une substance étrangère tombe à l'intérieur
de l'appareil, débranchez la fiche
d'alimentation de la prise secteur et contactez
votre distributeur agréé Canon.
ATTENTION
Ne procédez pas l'installation dans les endroits
suivants
L'appareil pourrait tomber et provoquer des
blessures.
• Un endroit instable
• Un endroit soumis à des vibrations
IMPORTANT
Ne procédez pas l'installation dans les endroits
suivants
Cela pourrait endommager l'appareil.
• Un endroit soumis à des températures et une
humidité extrêmes, basses ou élevées
• Un endroit soumis à d'importantes variations
de température ou d'humidité
• Un endroit à proximité d'un équipement
générant des ondes magnétiques ou
électromagnétiques
• Un laboratoire ou un endroit où des réactions
chimiques se produisent
• Un endroit exposé à des gaz corrosifs ou
toxiques
• Un endroit qui pourrait se déformer sous le
poids de l'appareil ou un endroit où l'appareil
est susceptible de s'enfoncer (un tapis, etc.)
Evitez les endroits mal aérés
Cet appareil génère une petite quantité d'ozone
et d'autres émissions en fonctionnement normal.
Ces émissions ne sont pas nocives pour la santé.
Toutefois, pourriez en noter la présence pendant
une utilisation prolongée ou lors de travaux de
production volumineux dans des pièces mal
aérées. Pour maintenir un environnement de
travail confortable, il est recommandé que la
pièce de travail de l'appareil soit aérée de manière
appropriée. Evitez également les endroits où les
personnes seraient exposées à des émissions
provenant de l'appareil.
Ne procédez pas à l'installation dans un endroit
où se forme de la condensation
Des gouttes d'eau (condensation) pourraient se
former à l'intérieur de l'appareil lorsque la pièce
où il est installé est rapidement chauffée, et
lorsque l'appareil est déplacé d'un endroit frais
sec dans un endroit chaud ou humide.
L'utilisation de l'appareil dans ces conditions
pourrait provoquer des bourrages de papier, une
mauvaise qualité d'impression ou endommager
l'appareil. Laissez l'appareil s'adapter à la
température et à l'humidité ambiantes pendant
au moins 2heures avant usage.
Évitez d'installer l'appareil à proximité
d'ordinateurs ou d'autres équipements
électroniques de précision.
Les interférences électriques et les vibrations
générées par l'appareil pendant l'impression
peuvent avoir un effet négatif sur le
fonctionnement de ces équipements.
Évitez d'installer l'appareil à proximité de
téléviseurs, de radios ou d'équipements
électroniques similaires.
L'appareil peut interférer avec la réception des
signaux sonores et d'image. Branchez la fiche
d'alimentation sur une prise secteur dédiée et
laissez autant d'espace que possible entre
l'appareil et les autres équipements
électroniques.
A des altitudes d'au moins 3000m au-dessus
du niveau de la mer
Les appareils comportant un disque dur pourrait
ne pas fonctionner correctement lorsqu'ils sont
utilisés à des altitudes élevées d'environ 3000m
(ou plus) au-dessus du niveau de la mer.
Raccordement d'une ligne téléphonique
Cet appareil est conforme à la norme des lignes
téléphoniques analogiques. L'appareil peut être
raccordé au réseau téléphonique public
commuté (PSTN) uniquement. Si vous raccordez
l'appareil à une ligne téléphonique numérique ou
à une ligne téléphonique dédiée, cela pourrait
nuire au bon fonctionnement de l'appareil et
éventuellement l'endommager. Veillez à
confirmer le type de ligne téléphonique avant de
raccorder l'appareil. Contactez votre fournisseur
de services de ligne en fibres optiques ou de
ligne téléphonique IP si vous souhaitez raccorder
l'appareil à ces lignes téléphoniques.
Lors de l'utilisation d'un réseau sans fil
• Installez l'appareil à une distance de 50m au
maximum du routeur de réseau sans fil.
• Dans la mesure du possible, procédez à
l'installation dans un endroit où la
communication n'est pas bloquée par des
objets perturbateurs. Le signal pourrait être
dégradé lorsqu'il traverse des murs ou des sols.
• Tenez l'appareil aussi éloigné que possible des
téléphones numériques sans fil, des fours à
micro-ondes et autres équipements émettant
des ondes radio.
• Ne pas utiliser à proximité d'un équipement
médical. Les ondes radio émises par l'appareil
pourraient interférer avec l'équipement
médical et provoquer des dysfonctionnements
et des accidents.
Si le bruit du fonctionnement vous inquiète
Selon l'environnement d'utilisation et le mode de
fonctionnement, si le bruit de fonctionnement
représente un souci, il est recommandé d'installer
l'appareil dans un autre endroit que le bureau.
Déplacement de l'appareil
Si vous avez l'intention de déplacer l'appareil,
même dans un endroit situé au même étage de
votre bâtiment, contactez préalablement votre
distributeur agréé Canon. Ne tentez pas de
déplacer l'appareil vous-même.
Alimentation
AVERTISSEMENT
• Utilisez uniquement une alimentation
conforme aux exigences de tension spécifiées.
Sinon, cela pourrait provoquer un incendie ou
un choc électrique.
• L'appareil doit être connecté à une prise de
courant dotée d'une mise à la terre à l'aide du
cordon d'alimentation fourni.
• N'utilisez pas un autre cordon d'alimentation
que celui fourni, car cela pourrait provoquer
un incendie ou un choc électrique.
• Le cordon d'alimentation fourni est destiné à
une utilisation avec cet appareil. Ne le
branchez pas sur d'autres appareils.
• Vous ne devez pas modifier, tirer, courber
excessivement ou effectuer toute autre action
qui pourrait endommager le cordon
d'alimentation. Ne posez pas d'objets lourds
sur le cordon d'alimentation. Le fait
d'endommager le cordon pourrait provoquer
un incendie ou un choc électrique.
• Ne branchez et ne débranchez pas la fiche
d'alimentation avec les mains humides, car
cela pourrait provoquer un choc électrique.
• N'utilisez pas de rallonge ou de multiprises
avec l'appareil. Cela pourrait provoquer un
incendie ou un choc électrique.
30

• N'enroulez pas le cordon d'alimentation et n'y
faites pas de nœud, car cela pourrait
provoquer un incendie ou un choc électrique.
• Insérez à fond la fiche d'alimentation dans la
prise secteur. Sinon, cela pourrait provoquer
un incendie ou un choc électrique.
• Retirez complètement la fiche d'alimentation
de la prise secteur lors d'un orage. Sinon, cela
pourrait provoquer un incendie, un choc
électrique ou endommager l'appareil.
• Assurez-vous que l'alimentation de l'appareil
est sûre et que sa tension est stable.
• Tenez le cordon d'alimentation à l'écart de
toute source de chaleur; sinon, cela pourrait
faire fondre le revêtement du cordon
d'alimentation et provoquer un incendie ou
un choc électrique.
Evitez les situations suivantes:
Si vous appliquez une tension excessive sur la
partie de connexion du cordon d'alimentation,
cela pourrait l'endommager ou les fils situés à
l'intérieur de l'appareil pourraient se débrancher.
Cela pourrait provoquer un incendie.
–Branchements et débranchements fréquents
du cordon d'alimentation.
–Trébucher sur le cordon d'alimentation.
–Le cordon d'alimentation est courbé à
proximité de la partie branchée et un stress
continu est appliqué sur la prise secteur ou la
partie branchée.
–Application d'une force excessive sur la fiche
d'alimentation.
ATTENTION
• Installez cet appareil à proximité de la prise
d'alimentation et laissez suffisamment
d'espace autour de la fiche d'alimentation afin
de pouvoir la débrancher facilement cas
d'urgence.
IMPORTANT
Raccordement de l'alimentation
• Ne raccordez pas le cordon d'alimentation à
un système d'alimentation sans coupure. Cela
pourrait provoquer un dysfonctionnement ou
endommager l'appareil en cas de panne de
courant.
• Si vous branchez cet appareil sur une prise
secteur à plusieurs entrées, n'utilisez pas les
prises restantes pour raccordez d'autres
appareils.
• Ne branchez pas le cordon d'alimentation sur
la prise secteur auxiliaire d'un ordinateur.
Autres précautions
• Des perturbations électriques pourraient
provoquer un dysfonctionnement ou une
perte de données au niveau de cet appareil.
Manipulation
AVERTISSEMENT
• Débranchez immédiatement la fiche
d'alimentation de la prise secteur et contactez
un distributeur agréé Canon si l'appareil émet
des bruits ou une odeur inhabituels, ou s'il
génère de la fumée ou une chaleur excessive.
Continuer à l'utiliser dans ces conditions
pourrait provoquer un incendie ou un choc
électrique.
• Ne démontez et ne modifiez pas cet appareil.
Il existe des composants sous haute tension et
température élevée à l'intérieur de l'appareil.
Leur démontage ou modification pourrait
provoquer un incendie ou un choc électrique.
• Placer l'appareil à un endroit où les enfants ne
pourront pas entrer en contact avec le cordon
d'alimentation, d'autres câbles ou équipement
et pièces électriques à l'intérieur de l'appareil.
Sinon, cela pourrait être à l'origine d'accidents
imprévus.
• N'utilisez pas d'aérosols inflammables à
proximité de cet appareil. Si des substances
inflammables entrent en contact avec les
pièces électriques situées à l'intérieur, cela
pourrait provoquer un incendie ou un choc
électrique.
• Lorsque vous déplacez l'appareil, veillez à
couper son alimentation, puis à débrancher la
fiche d'alimentation et les câbles d'interface.
Sinon, vous pourriez les endommager et
provoquer un incendie ou un choc électrique.
• Lors du branchement ou du débranchement
d'un câble USB alors que la fiche
d'alimentation est branchée sur une prise
secteur, ne touchez pas la partie métallique du
connecteur car vous pourriez subir un choc
électrique.
Si vous utilisez un stimulateur cardiaque
Cet appareil génère un flux magnétique et des
ondes ultrasonores de faible niveau. Si vous
utilisez un stimulateur cardiaque et ressentez des
anomalies, éloignez-vous de cet appareil et
consultez immédiatement votre médecin.
ATTENTION
• Ne posez pas d'objets lourds sur cet appareil
car ils pourraient tomber et provoquer des
blessures.
• Pour des raisons de sécurité, débranchez la
fiche d'alimentation si l'appareil ne doit pas
être utilisé pendant une période prolongée.
• Soyez prudent lorsque vous ouvrez et fermez
les capots afin d'éviter de vous blesser les
mains.
• Tenez les mains et les vêtements à l'écart des
rouleaux de la zone de sortie. Si les rouleaux
happent vos vêtements ou vos mains, cela
pourrait provoquer des blessures corporelles.
• L'intérieur de l'appareil et la fente de sortie
sont très chauds pendant et juste après
l'utilisation. Evitez tout contact avec ces zones
pour ne pas vous brûler. En outre, comme le
papier imprimé peut être chaud juste après
son impression soyez prudent lorsque vous le
manipulez. Sinon, vous pourriez vous brûler.
Chargeur ou capot de la vitre d'exposition
• N'appuyez pas fortement sur le chargeur ou le
capot de la vitre d'exposition lorsque vous
utilisez la vitre d'exposition pour effectuer des
copies de livres épais. Cela pourrait
endommager la vitre d'exposition et
provoquer des blessures corporelles.
• Fermez doucement le chargeur ou le capot de
la vitre d'exposition afin d'éviter de vous
coincer les mains, car cela pourrait provoquer
des blessures corporelles.
• Veillez à ne pas poser les mains ou les doigts
sur le chargeur ou le capot de la vitre
d'exposition. Sinon, vous pourriez vous blesser.
Cassette à papier
• N'introduisez pas la main dans l'appareil
lorsque la cassette à papier est retirée, car cela
pourrait provoquer des blessures corporelles.
Touche Economie d'énergie
• Appuyez sur
sécurité lorsque l'appareil n'est pas utilisé
pendant une période prolongée, par exemple
la nuit. En outre, coupez l'interrupteur
d'alimentation principal et débranchez le
cordon d'alimentation pour des raisons de
sécurité si l'appareil ne doit pas être utilisé
pendant une période prolongée, par exemple
pendant des jours de vacances consécutifs.
Sécurité relative au laser
Ce produit est confirmé comme produit laser de
classe1, conformément aux normes IEC608251:2014 et EN60825-1:2014.
CLASS 1 LASER PRODUCT
LASER KLASSE 1
APPAREIL À LASER DE CLASSE 1
APPARECCHIO LASER DI CLASSE 1
PRODUCTO LÁSER DE CLASE 1
APARELHO A LASER DE CLASSE 1
LUOKAN 1 LASER-TUOTE
LASERPRODUKT KLASS 1
Le faisceau laser peut être nocif pour le corps
humain. Comme le rayonnement émis à
l'intérieur du produit est entièrement confiné
dans des logements de protection et des capots
externes, le faisceau laser ne peut pas s'échapper
de l'appareil, quelle que soit l'opération effectuée
par l'utilisateur. Lisez les remarques et les
instructions suivantes pour plus de sécurité.
• N'ouvrez jamais de capots autres que ceux
indiqués dans les manuels de cet appareil.
• Vous pourriez vous blesser les yeux si le
faisceau laser s'échappait et y pénétrait.
• Utiliser d'autres commandes, réglages ou
procédures que celles spécifiées dans le
présent manuel pourrait entraîner un risque
d'exposition au rayonnement.
Consignes de sécurité du laser
(Economie d'énergie) par
Fr
31

Annexe
Unité de fixation
Lorsque vous éliminez un bourrage de papier ou
que vous inspectez l'intérieur de l'appareil, ne
vous exposez pas à la chaleur émise par l'unité de
fixation et son environnement pendant une
période prolongée. Cela pourrait provoquer des
brûlures à basse température, même si vous ne
touchez pas directement l'unité de fixation et son
environnement.
IMPORTANT
• Suivez les instructions indiquées sur l'étiquette
de précaution apposée sur cet appareil.
• Ne soumettez pas l'appareil à des chocs ou
des vibrations violents.
• Ne forcez pas pour ouvrir ou fermer les portes,
les couvercles et d'autres parties.Cela pourrait
endommager l'appareil.
• Ne coupez pas le principal interrupteur
d'alimentation et n'ouvrez pas les capots
lorsque l'appareil est en cours de
fonctionnement. Cela pourrait provoquer des
bourrages de papier.
• Utilisez un câble modulaire d'une longueur
inférieure à 3mètres.
• Utilisez un câble USB d'une longueur
Fr
inférieure à 3mètres.
Symboles relatifs à la sécurité
Interrupteur d'alimentation: position "ON"
Interrupteur d'alimentation: position "OFF"
Interrupteur d'alimentation: position
"STAND-BY"
Interrupteur à poussoir à enclenchement
"OFF"
"ON"
Borne de protection avec mise à la terre
Tension dangereuse à l'intérieur. Ne pas
ouvrir les capots autres que ceux indiqués.
ATTENTION: surface chaude. Ne pas toucher.
Equipement de classeII
Pièces mobiles: tenir les parties du corps à
l'écart des pièces mobiles
ATTENTION: Il existe un risque d'électrisation.
Retirez toutes les fiches de la prise électrique.
L'appareil présente des arêtes coupantes.
Tenez-vous à l'écart des arêtes coupantes.
[REMARQUE]
Il est possible que certains des symboles ne
soient pas apposés en fonction du produit.
Maintenance et inspections
Nettoyez périodiquement cet appareil. Si de la
poussière s'accumule, il pourrait ne pas
fonctionner correctement. Lors du nettoyage,
veillez à respecter les points suivants. En cas de
problèmes pendant le fonctionnement, consultez
"Dépannage" dans le Guide de l'utilisateur. Si vous
ne parvenez pas à résoudre le problème ou si
vous estimez que l'appareil nécessite une
inspection, reportez-vous à "Lorsqu'un problème
ne peut pas être résolu" dans le Guide de
l'utilisateur.
AVERTISSEMENT
• Avant le nettoyage, coupez l'alimentation et
débranchez la fiche d'alimentation de la prise
secteur. Sinon, cela pourrait provoquer un
incendie ou un choc électrique.
• Débranchez périodiquement la fiche
d'alimentation et nettoyez-la à l'aide d'un
chiffon sec afin d'éliminer la poussière et la
crasse. La poussière accumulée peut absorber
l'humidité de l'air et provoquer un incendie si
elle entre en contact avec l'électricité.
• Utilisez un chiffon humide bien essoré pour
nettoyer l'appareil. Trempez les chiffons de
nettoyage uniquement dans de l'eau. N'utilisez
aucune substance inflammable telle que de
l'alcool, de la benzine ou du diluant à peinture.
Ne pas utiliser de mouchoirs ou de serviettes
en papier. Si ces substances entrent en contact
avec les parties électriques à l'intérieur de
l'appareil, elles peuvent générer de l'électricité
statique ou provoquée un incendie ou un
choc électrique.
• Vérifiez périodiquement le cordon et la fiche
d'alimentation pour rechercher d'éventuels
dommages. Vérifiez que l'appareil ne
comporte pas de rouille, de bosses, de rayures,
de fissures ou qu'il ne génère pas de chaleur
excessive. L'utilisation d'un équipement mal
entretenu pourrait provoquer un incendie ou
un choc électrique.
ATTENTION
• L'intérieur de l'appareil possède des
composants sous haute température et haute
tension. Le fait de toucher ces composants
pourrait provoquer des brûlures. Ne touchez
aucune pièce de l'appareil qui n'est pas
indiquée dans le manuel.
• Lors du chargement du papier ou de
l'élimination d'un bourrage de papier, veillez à
ne pas couper les mains avec les bords du
papier.
Consommables
AVERTISSEMENT
• Ne jetez pas les cartouches de toner dans un
feu nu, ne les stockez pas, ainsi que le papier
d'impression/copie, dans un endroit exposé à
une flamme nue. Cela pourrait provoquer leur
ignition et entraîné des brûlures ou un
incendie.
• Si vous renversez accidentellement du toner,
récupérez soigneusement les particules de
toner ou essuyez-les à l'aide d'un chiffon doux
et humide, d'une manière qui empêche leur
inhalation. N'utilisez pas d'aspirateur ne
disposant pas de protection contre les
explosions de poussière pour nettoyer du
toner renversé. Cela pourrait provoquer un
dysfonctionnement de l'aspirateur ou une
explosion de poussières en raison de la
décharge d'électricité statique.
ATTENTION
• Laissez le toner et autres consommables hors
de portée des enfants en bas âge. S'ils
ingèrent ces éléments, consultez
immédiatement un médecin.
• Si le toner entre en contact avec vos
vêtements ou votre peau, lavez-les
immédiatement à l'eau. N'utilisez pas d'eau
chaude car cela pourrait provoquer la fixation
du toner et provoquer une tache permanente.
• Ne démontez pas la cartouche de toner, car il
pourrait s'échapper et pénétrer dans vos yeux
ou votre bouche. Si du toner pénètre dans vos
yeux ou votre bouche, lavez-les
immédiatement à l'eau froide et consultez
immédiatement un médecin.
• Si du toner s'échappe de la cartouche de
toner, veillez à ne pas l'ingérer et ne le laissez
pas entrer en contact avec votre peau. Si vous
sentez une irritation niveau de la peau après
l'avoir lavé ou si vous ingérer du toner,
consultez immédiatement un médecin.
IMPORTANT
• Stockez les cartouches de toner dans un
endroit frais, à l'abri de la lumière directe du
soleil.
Avis
Nom du produit
Les réglementations relatives à la sécurité
nécessitent l'enregistrement du nom du produit.
Dans certaines régions où ce produit est vendu,
le ou les noms suivants entre parenthèses ( )
peuvent être enregistré à la place.
imageRUNNER 2206iF (F193390)
imageRUNNER 2206N (F193392)
Exigences CEM de la directive CE
Cet équipement est conforme aux exigences
essentielles de CEM de la directive CE. Nous
déclarons que le présent produit est conforme
aux exigences CEM de la directive CE de l'entrée
secteur nominale de 230V, 50Hz, bien que
l'entrée nominale du produit soit de 220 à 240V,
50/60Hz. L'utilisation d'un câble blindé est
nécessaire pour la conformité aux exigences
techniques CEM de la directive CE.
Directives sur les batteries et DEEE de l'UE
Vous pouvez consulter les informations sur les
directives sur les batteries et DEEE dans le dernier
Guide de l'utilisateur (manuel HTML) sur le site
Web Canon (canon.com/oip-manual).
Wireless LAN Regulatory Information
Regulatory information for users in Jordan
imageRUNNER 2206iF/2206N includes approved
Wireless LAN Module (Model name: Type1KA).
Contains Wireless LAN Module approved by TRC/
LPD/2017/19
Regulatory information for users in UAE
imageRUNNER 2206iF/2206N includes approved
Wireless LAN Module (Model name: Type1KA).
TRA
REGISTERED No: ER51217/17
DEALER No: DA0073692/11
Directive ER
(Uniquement pour l'équipement radio
européen)
32

Déclaration de conformité ER
English (EN) Hereby, Canon Inc. declares that
this equipment is in compliance with Directive
2014/53/EU.
The full text of the EU declaration of conformity is
available at the following internet address:
http://www.canon-europe.com/ce-documentation
Wireless LAN Specifications
Frequency band(s):2412-2472MHz
Maximum radio-frequency power:15.9 dBm
Czech (CS) Tímto společnost Canon Inc.
prohlašuje, že toto zařízení je v souladu se
směrnicí 2014/53/EU.
Úplné znění EU prohlášení o shodě je k dispozici
na této internetové adrese:
http://www.canon-europe.com/ce-documentation
Technické údaje bezdrátové LAN
Pásmo(a) frekvence: 2412-2472 MHz
Maximální výkon rádiové frekvence: 15.9 dBm
Danish (DA) Hermed erklærer Canon Inc., at
dette udstyr er i overensstemmelse med direktiv
2014/53/EU.
EU-overensstemmelseserklæringens fulde tekst
kan findes på følgende internetadresse:
http://www.canon-europe.com/ce-documentation
Trådløs LAN specofikationer
Frekvensbånd: 2412-2472 MHz
Maks. radio-frekvenseffekt: 15.9 dBm
German (DE) Hiermit erklärt Canon Inc, dass
diese Anlage der Richtlinie 2014/53/EU
entspricht.
Der vollständige Text der EUKonformitätserklärung ist unter der folgenden
Internetadresse verfügbar:
http://www.canon-europe.com/ce-documentation
WLAN-Spezifikationen
Frequenzbereich(e): 2412-2472 MHz
Maximale Funkfrequenzleistung: 15.9 dBm
Estonian (ET) Käesolevaga deklareerib Canon
Inc., et käesolev seade vastab direktiivi 2014/53/
EL nõuetele.
ELi vastavusdeklaratsiooni täielik tekst on
kättesaadav järgmisel internetiaadressil:
http://www.canon-europe.com/ce-documentation
Juhtmevaba LAN-i spetsifikatsioonid
Sagedusriba(d): 2412-2472 MHz
Maksimaalne raadiosageduslik võimsus: 15.9 dBm
Spanish (ES) Por la presente, Canon Inc. declara
que este equipo es conforme con la Directiva
2014/53/UE.
El texto completo de la declaración UE de
conformidad está disponible en la dirección de
Internet siguiente:
http://www.canon-europe.com/ce-documentation
Especificaciones LAN inalámbrica
Banda(s) de frecuencia: 2412-2472 MHz
Potencia máxima de radiofrecuencia: 15.9 dBm
Greek (EL) Με την παρούσα, η Canon Inc.
δηλώνει ότι ο παρών εξοπλισμός συμμορφώνεται
με την Οδηγία 2014/53/ΕΕ.
Το πλήρες κείμενο της δήλωσης συμμόρφωσης
της ΕΕ διατίθεται στην ακόλουθη διεύθυνση στο
διαδίκτυο:
http://www.canon-europe.com/ce-documentation
Προδιαγραφές ασύρματου LAN (WLAN)
Ζώνες συχνότητας: 2412-2472 MHz
Μέγιστη ισχύς ραδιοσυχνότητας: 15.9 dBm
French (FR) Le soussigné, Canon Inc., déclare
que le présent équipement est conforme à la
Directive 2014/53/UE.
Le texte complet de la déclaration UE de
conformité est disponible à l'adresse internet
suivante :
http://www.canon-europe.com/ce-documentation
Spécifications LAN sans fil
Bande(s) de fréquence: 2412-2472 MHz
Puissance maximale de radiofréquence: 15.9 dBm
Italian (IT) Con la presente, Canon Inc. dichiara
che questa apparecchiatura è conforme alla
direttiva 2014/53/UE.
Il testo completo della dichiarazione di
conformità UE è disponibile al seguente indirizzo
Internet:
http://www.canon-europe.com/ce-documentation
Caratteristiche LAN wireless
Banda/e di frequenza: 2412-2472 MHz
Potenza massima a radiofrequenza: 15.9 dBm
Latvian (LV) Canon Inc. ar šo deklarē, ka šī
iekārta atbilst Direktīvai 2014/53/ES.
Pilns ES atbilstības deklarācijas teksts ir pieejams
šādā interneta vietnē:
http://www.canon-europe.com/ce-documentation
Bezvadu LAN specifikācijas
Frekvences josla(s): 2412-2472 MHz
Maksimālā radiofrekvences jauda: 15.9 dBm
Lithuanian (LT) Šiuo dokumentu „Canon Inc.“
patvirtina, kad ši įranga atitinka direktyvą
2014/53/ES.
Visas ES atitikties deklaracijos tekstas prieinamas
šiuo interneto adresu:
http://www.canon-europe.com/ce-documentation
Belaidžio LAN specifikacijos
Dažnio diapazonas(-ai): 2412-2472 MHz
Maksimali radijo ryšio dažnio galia: 15.9 dBm
Dutch (NL) Hierbij verklaar ik, Canon Inc., dat
deze apparatuur conform is met Richtlijn
2014/53/EU.
De volledige tekst van de EUconformiteitsverklaring kan worden
geraadpleegd op het volgende internetadres:
http://www.canon-europe.com/ce-documentation
Draadloos LAN specificaties
Frequentieband(en): 2412-2472 MHz
Maximaal radiofrequentievermogen: 15.9 dBm
Maltese (MT) B'dan, Canon, qed tiddikjara li dan
it-tip ta' tagħmir huwa konformi mad-Direttiva
2014/53/UE.
It-test kollu tad-dikjarazzjoni ta' konformità tal-UE
huwa disponibbli f'dan is-sit fuq l-internet:
http://www.canon-europe.com/ce-documentation
Speċifikazzjonijiet tal-Wireless LAN
Band(i) tal-Frekwenza: 2412-2472 MHz
Qawwa ta' frekwenza tar-radju massima: 15.9
dBm
Hungarian (HU) A Canon Inc. igazolja, hogy ez a
berendezés megfelel a 2014/53/EU irányelvnek.
Az EU-megfelelőségi nyilatkozat teljes szövege
elérhető a következő internetes címen:
http://www.canon-europe.com/ce-documentation
Vezeték nélküli LAN műszaki adatai
Frekvenciasáv(ok): 2412-2472 MHz
Maximális rádiofrekvenciás teljesítmény: 15.9 dBm
Polish (PL) Canon Inc. niniejszym oświadcza, że
niniejsze urządzenie jest zgodne z dyrektywą
2014/53/UE.
Pełny tekst deklaracji zgodności UE jest dostępny
pod następującym adresem internetowym:
http://www.canon-europe.com/ce-documentation
Specyfikacja bezprzewodowej sieci LAN
Pasmo(-a) częstotliwości: 2412-2472MHz
Maksymalna moc na częstotliwościach
radiowych: 15.9 dBm
Portuguese (PT) Por este meio, a Canon Inc.
declara que o presente equipamento está em
conformidade com a Diretiva 2014/53/UE.
O texto integral da declaração de conformidade
da UE está disponível no seguinte endereço de
Internet:
http://www.canon-europe.com/ce-documentation
Especificações de LAN Sem Fios
Banda(s) de frequências: 2412-2472 MHz
Potência máxima de radiofrequência: 15.9 dBm
Slovene (SL) Canon Inc. potrjuje, da je ta oprema
v skladu z Direktivo 2014/53/EU.
Celotno besedilo izjave EU o skladnosti je na voljo
na naslednjem spletnem naslovu:
http://www.canon-europe.com/ce-documentation
Specifikacije za brezžični LAN
Frekvenčna območja: 2412-2472 MHz
Največja radiofrekvenčna moč: 15.9 dBm
Slovak (SK) Spoločnosť Canon Inc. týmto
vyhlasuje, že toto zariadenie je v súlade so
smernicou 2014/53/EÚ.
Úplné znenie EÚ vyhlásenia o zhode je k
dispozícii na tejto internetovej adrese:
http://www.canon-europe.com/ce-documentation
Technické údaje bezdrôtovej LAN
Pásmo (a) frekvencia: 2412-2472 MHz
Maximálny výkon rádiovej frekvencie: 15.9 dBm
Finnish (FI) Canon Inc. vakuuttaatäten, että tämä
laite on direktiivin 2014/53/EU mukainen.
EU-vaatimustenmukaisuusvakuutuksen
täysimittainen teksti on saatavilla seuraavassa
internetosoitteessa:
http://www.canon-europe.com/ce-documentation
Langattoman LAN:in tekniset ominaisuudet
Taajuuskaista(t): 2412-2472 MHz
Suurin radiotaajuusteho: 15.9 dBm
Swedish (SV) Härmed försäkrar Canon Inc. att
denna utrustning överensstämmer med direktiv
2014/53/EU.
Den fullständiga texten till EU-försäkran om
överensstämmelse finns tillgänglig på följande
webbadress:
http://www.canon-europe.com/ce-documentation
Specifikationer för trådlöst LAN
Frekvensband: 2412-2472 MHz
Maximal radiofrekvenseffekt: 15.9 dBm
Romanian (RO) Prin prezenta, Canon Inc. declară
că acest echipament este în conformitate cu
Directiva 2014/53/UE.
Textul integral al declarației UE de conformitate
este disponibil la următoarea adresă internet:
http://www.canon-europe.com/ce-documentation
Specificații wireless LAN
Benzi de frecvență: 2412-2472 MHz
Putere maximă a frecvenței radio: 15.9 dBm
Bulgarian (BG) С настоящото Canon Inc.
декларира, че това съоръжение е в
съответствие с Директива 2014/53/ЕС.
Цялостният текст на ЕС декларацията за
съответствие може да се намери на следния
интернет адрес:
http://www.canon-europe.com/ce-documentation
Спецификация на безжичната LAN
Честотна лента(и): 2412-2472 MHz
Максимална радиочестотна мощност: 15.9 dBm
Croatian (HR) Canon Inc. ovime izjavljuje da je
oprema u skladu s Direktivom 2014/53/EU.
Cjeloviti tekst EU izjave o sukladnosti dostupan je
na sljedećoj internetskoj adresi:
http://www.canon-europe.com/ce-documentation
Specifikacije bežičnog LAN-a
Frekvencijski pojas(evi): 2412-2472 MHz
Maksimalna snaga radijske frekvencije: 15.9 dBm
Fr
33

Annexe
Irish (GA) Dearbhaíonn Canon Inc., leis seo, go
bhfuil an trealamh seo i gcomhlíonadh leis an
Treoir 2014/53/AE.
Tá an téacs iomlán de Dhearbhú Comhréireachta
AE ar fáil ag seoladh an láithreáin ghréasáin mar
seo a leanas:
http://www.canon-europe.com/ce-documentation
Sonraíochtaí LAN Gan Sreang
Banda(í) minicíochta: 2412-2472 MHz
Uaschumhacht radaimhinicíochta: 15.9 dBm
Norwegian (NO) Herved erklærer Canon Inc. at
dette utstyret er i overensstemmelse med direktiv
2014/53/EU.
Den fulle teksten til EUs samsvarserklæring er
tilgjengelig på følgende Internett-adresse:
http://www.canon-europe.com/ce-documentation
Trådløs LAN-spesifikasjoner
Bølgelengde: 2412-2472 MHz
Maks radiofrekvensstyrke: 15.9 dBm
Icelandic (IS) Hér með lýsir Canon Inc því yfir að
þessi búnaður er í samræmi við tilskipun 2014/53/
ESB.
Allur texti ESB-samræmisyfirlýsingar er í boði á
eftirfarandi veffangi:
http://www.canon-europe.com/ce-documentation
Tæknilýsingar fyrir þráðlausa nettengingu
Tíðnisvið: 2412-2472 MHz
Hámarksstyrkur útvarpstíðnibylgja: 15.9 dBm
Limitations légales quant à l'utilisation de votre
produit et à l'utilisation des images
L'utilisation de votre produit pour numériser,
imprimer ou reproduire certains documents, ainsi
que l'utilisation de ces images numérisées,
imprimées ou autrement reproduites par votre
produit, peut être interdite par la loi et peut
entraîner une responsabilité criminelle et/ou
civile. Cette liste est uniquement fournie à titre de
guide. Si vous n'êtes pas certain de la légalité de
l'utilisation de votre produit pour numériser,
Fr
imprimer ou reproduire un document particulier,
et/ou de l'utilisation des images numérisées,
imprimées ou reproduites, vous pouvez consulter
à l'avance votre conseiller législatif pour
information.
• Papier-monnaie
• Chèques de voyage
• Mandats postaux
• Bons de nourriture
• Certificats de dépôt
• Passeports
• Timbres postaux (annulés ou non)
• Documents d'immigration
• Badges ou insignes d'identification
• Timbres de revenus internes (annulés ou non)
• Papiers de traite ou de Selective Service
• Obligations ou autres certifications de dette
• Chèques ou traites émis par les organismes
gouvernementaux
• Certificats d'actions
• Permis de véhicule motorisé et certificats de
titres
• Œuvres sous droits d'auteur/œuvre d'art sans
autorisation du propriétaire des droits d'auteur
Avis de non-responsabilité
• Les informations contenues dans le présent
document sont soumises à modifications sans
préavis.
• A L'EXCEPTION DE LA GARANTIE CI-INCLUSE,
CANON INC. NE FOURNIT AUCUNE AUTRE
GARANTIE QUELCONQUE AVEC CETTE
MACHINE, EXPLICITE OU IMPLICITE, Y COMPRIS
MAIS NON LIMITEE A TOUTE GARANTIE DE
COMMERCIALISATION, DE VALEUR
COMMERCIALE, D'ADEQUATION A UN USAGE
PARTICULIER OU DE CONTREFAÇON. CANON
INC. NE POURRA PAS ETRE TENU POUR
RESPONSABLE DES DOMMAGES DIRECTS,
SECONDAIRES OU INDIRECTS DE QUELQUE
NATURE QUE CE SOIT, NI MEME DES PERTES
OU DES FRAIS RESULTANT DE L'EMPLOI DE CE
MATERIEL.
A propos du présent
manuel
Touches et boutons utilisés dans ce manuel
Les symboles et les noms de touches suivants
sont quelques exemples de la manière dont les
touches à presser sont exprimés dans ce manuel.
• Touche du panneau de commande: [Icône de
la touche]
Exemple:
• Afficheur: <Spécifier destination.>
• Boutons et éléments de l'écran de
l'ordinateur: [Préférences]
Illustrations
Les illustrations utilisées dans ce manuel sont
celles affichées lorsque l'équipement optionnel
suivant est monté sur l'imageRUNNER 2206iF:
• Module Une Cassette-AD
Marques commerciales
Mac est une marque commerciale d'Apple Inc.
Microsoft, Windows, Windows Vista, Windows
Server, Internet Explorer, Excel et PowerPoint sont
des marques déposées ou des marques
commerciales de Microsoft Corporation aux
États-Unis et/ou dans d'autres pays.
Les autres noms de produits et de sociétés cités
ici peuvent être des marques commerciales de
leurs propriétaires respectifs.
Logiciels tiers
Ce produit Canon ("PRODUIT") comprend des
modules logiciels tiers. L'utilisation et la
distribution de ces modules logiciels, notamment
les mises à jour de ces modules logiciels
(collectivement appelés "LOGICIELS") sont
soumises aux conditions de licence (1) à (9)
indiquées ci-dessous.
(1) Vous acceptez de vous conformer à toutes les
lois, restrictions ou réglementations relatives
au contrôle d'exportation des pays impliqués,
dans le cas où le PRODUIT comprenant les
LOGICIELS est expédié, transféré ou exporté
dans un pays.
(2) Les détenteurs des droits des LOGICIELS
conservent à tous égards, le titre, la propriété
et les droits de propriété intellectuelle sur et
vis-à-vis des LOGICIELS. Sauf mention
contraire expressément spécifiée ici, aucune
licence ou droit, explicite ou implicite, n'est
par la présente transmise ou octroyée par les
détenteurs des droits des LOGICIELS à vous,
pour quelque propriété intellectuelle des
détenteurs des droits des LOGICIELS.
(3) Vous pouvez utiliser les LOGICIELS
uniquement afin d'utiliser le PRODUIT.
(4) Vous ne pouvez pas affecter, octroyer de
sous-licence, commercialiser, distribuer ou
transférer les LOGICIELS à une tierce partie
sans l'accord écrit préalable des détenteurs
des droits des LOGICIELS.
(5) Nonobstant ce qui précède, vous pouvez
transférer les LOGICIELS uniquement si (a)
vous affectez tous vos droits vis-à-vis du
PRODUIT et tous les droits et obligations
soumis aux conditions de licence au
cessionnaire et (b) ce cessionnaire accepte par
écrit d'être lié par ces conditions.
(6) Vous n'êtes pas autorisé à décompiler, faire de
l'ingénierie inverse, désassembler ou réduire
le code des LOGICIELS sous une forme lisible
par un être humain.
(7) Vous n'êtes pas autorisé à modifier, adapter,
traduire, louer, louer à bail ou prêter les
LOGICIELS ni à créer des travaux dérivés basés
sur les LOGICIELS.
(8) Vous n'êtes pas autorisé à supprimer des
LOGICIELS du PRODUIT, ni à en faire des
copies.
(9) La licence de la partie lisible par un être
humain (le code source) des LOGICIELS ne
vous est pas octroyée.
Nonobstant les clauses (1) à (9) ci-dessus, le
PRODUIT comprend des modules logiciels tiers
qui accompagnent les autres conditions de
licence, et ces modules logiciels sont soumis à
d'autres conditions de licence.
Veuillez vous reporter aux autres conditions de
licence des modules logiciels tiers décrites en
annexe du manuel du PRODUIT correspondant.
Ce manuel est disponible à l'adresse http://canon.
com/oip-manual.
En utilisant le PRODUIT, il est considéré que vous
acceptez toutes les conditions de licence
applicables. Si vous n'acceptez pas les conditions
de licence, veuillez contacter votre représentant
de service.
V_180517
34

Note
35

Anforderungen an den Aufstellort
mind. 100mm
*
533mm
1.022,9mm
* Zufuhr (optional für imageRUNNER 2206N)
1.285mm
Informationen zu den mitgelieferten
Handbüchern
①
Erste Schritte (dieses Handbuch):
Lesen Sie dieses Handbuch als Erstes. In diesem Handbuch
werden die grundlegenden Geräteeinstellungen, Vorgänge
und Vorsichtsmaßnahmen beschrieben. Lesen Sie dieses
Handbuch unbedingt, bevor Sie das Gerät in Betrieb nehmen.
②
Installationshandbuch für den MF-Treiber (besuchen Sie
die Website):
Sie können auf
canon.com/oip-manual zugreifen, um das
③
Anwenderhandbuch (besuchen Sie die Website):
Installationshandbuch für den MF-Treiber zu lesen,
in dem die Softwareinstallation erläutert ist.
Sie können auf
canon.com/oip-manual zugreifen, um das
Anwenderhandbuch zu lesen, in dem alle
Funktionen dieses Geräts erläutert sind.
De
36

Navigieren durch das Menü und
Texteingabemethode
Die hier gezeigte Systemsteuerung ist die des imageRUNNER
2206iF. Welche Tasten zur Verfügung stehen, hängt vom Modell ab.
Ein-/Ausschalten der Stromversorgung
Zurück
Name der Einheit registrieren
Canon-1
A/a/12
<A/a/12>
◄►
A
Anwenden
<Anwenden>
Löschen #
Zahlentasten
Navigieren durch das Menü
Elementauswahl
Tippen Sie auf ein Element, um es auszuwählen. Drücken Sie
, um zum vorherigen Bildschirm zurückzukehren.
Einstellungsbestätigung
Tippen Sie auf das Element. Wenn jedoch <Anwenden>
angezeigt wird, tippen Sie auf <Anwenden>.
Texteingabemethode
Ändern des Eingabemodus
Tippen Sie auf <A/a/12>, um den Eingabemodus zu ändern. Sie
können auch
Eingabemodus Verfügbarer Text
<A> Großbuchstaben und Symbole
<a> Kleinbuchstaben und Symbole
<12> Zahlen
drücken, um den Eingabemodus zu ändern.
EIN
AUS
Eingeben von Text, Symbolen und Zahlen
Nehmen Sie die Eingabe mit den Zahlentasten oder mit
vor.
Versetzen des Cursors (Eingeben eines Leerzeichens)
Tippen Sie auf <◄> oder <►>, um den Cursor zu versetzen.
Zur Eingabe eines Leerzeichens versetzen Sie den Cursor an
das Ende des Textes, und tippen Sie auf <►>.
Löschen von Zeichen
Löschen Sie mit . Wenn Sie gedrückt halten, werden alle
Zeichen gelöscht.
Eingabemodus: <A> Eingabemodus: <a> Eingabemodus: <12>
@ . - _ / 1
AÄBC aäbc 2
DEF def 3
GHI ghi 4
JKL jkl 5
MNOÖ mnoö 6
PQRSß pqrs 7
TUÜV tuüv 8
WXYZ wxyz 9
(nicht verfügbar) 0
- . * # ! “ , ; : ^ ` _ = / | ‘ ? $ @ % & + \ ˜ ( ) [ ] { } < >
(Leerzeichen)
(nicht verfügbar)
• Stellen Sie sicher, dass der Netzstecker fest in die
Netzsteckdose gesteckt wurde.
• Schließen Sie das USB-Kabel nicht zu diesem Zeitpunkt
an. Schließen Sie es an, wenn Sie die Software
installieren.
De
37

Angeben der Anfangseinstellungen
Folgen Sie den Anweisungen auf dem Bildschirm, um
Folgendes durchzuführen:
• Sprache festlegen
• Land und Region festlegen
• Zeitzone festlegen
• Datum und Uhrzeit festlegen
• Kau nformationen registrieren
• PIN für Remote UI festlegen
• Wireless LAN-Verbindung festlegen
Details zum Navigieren durch das Menü und zur Eingabe von
Zahlen nden Sie unter "Navigieren durch das Menü und
Texteingabemethode" (
Wenn Sie Remote UI verwenden, wird die Festlegung einer PIN
für Remote UI empfohlen, um einen unbefugten Zugri durch
Dritte zu verhindern. Remote UI verwendet einen Webbrowser,
über den Sie das Gerät bedienen, den Status überprüfen und
Einstellungen angeben, sodass Sie das Gerät von Ihrem
Schreibtisch aus verwalten können. Informationen zur
Verwendung von Remote UI nden Sie im
Anwenderhandbuch.
S. 37).
Auswählen der Methode für die Verbindung
des Geräts mit einem Computer
•
Herstellen einer Verbindung über LAN
Sie können das Gerät mit dem Computer über einen Wired
LAN-Router verbinden. Verbinden Sie das Gerät mit dem
Router über ein LAN-Kabel.
•
Herstellen einer Verbindung über Wireless
LAN
Sie können das Gerät mit dem Computer über einen
Wireless LAN-Router* verbinden. Da die Verbindung
drahtlos erfolgt, werden keine LAN-Kabel benötigt.
* Es ist ein Wireless LAN-Router (Zugri spunkt) erforderlich, der
IEEE802.11b/g/n unterstützt.
Verbinden Sie den Computer mit dem Router über Kabel oder
drahtlos.
Wenn Sie sich nicht sicher sind, ob Ihr Router ein Wireless
oder Wired LAN-Router ist:
Lesen Sie in der Anleitung zu Ihrem Netzwerkgerät nach, oder
wenden Sie sich an den Hersteller.
•
Direkte Verbindung
Verbinden Sie ein Mobilgerät mit dem Gerät drahtlos und
direkt ohne Routing über einen Wireless LAN-Router (oder
Zugri spunkt).
Anwenderhandbuch "Herstellung einer direkten
Verbindung (Zugri spunktmodus)"
Herstellen einer Verbindung über LAN
Vor der Einrichtung überprüfen
Internet
Router
Verbinden Sie den Computer mit dem Router über Kabel oder
drahtlos.
De
Vergewissern Sie sich, dass am Router Ports zur Verfügung stehen,
um das Gerät und den Computer zu verbinden.
Halten Sie ein Twisted-Pair-LAN-Kabel der Kategorie 5 oder höher
bereit.
•
Herstellen einer Verbindung über USB-Kabel
Sie können das Gerät mit dem Computer über ein
USB-Kabel verbinden.
WICHTIG
In diesem Paket ist kein USB-Kabel enthalten.
Besorgen Sie ein passendes Kabel für Ihren
Computer. Stellen Sie sicher, dass das verwendete
USB-Kabel mit folgender Markierung versehen ist.
LAN-Kabel
Sind der Computer und der Router ordnungsgemäß über
ein LAN-Kabel verbunden?
Weitere Informationen nden Sie in der Anleitung zu dem von
Ihnen verwendeten Netzwerkgerät, oder wenden Sie sich an
den Hersteller des Netzwerkgeräts.
Wurden die Netzwerkeinstellungen auf dem Computer
vorgenommen?
Wenn der Computer nicht ordnungsgemäß kon guriert
wurde, können Sie die Wired LAN-Verbindung möglicherweise
nicht verwenden, auch wenn Sie die folgenden Einstellungen
vorgenommen haben.
HINWEIS
• Wenn Sie eine Verbindung zu einer Netzwerkumgebung
herstellen, die nicht sicherheitsgeschützt ist, könnten
Ihre persönlichen Daten Dritten zugänglich sein. Seien
Sie vorsichtig.
• Wenn Sie eine Verbindung über ein LAN im Büro
herstellen, wenden Sie sich an Ihren
Netzwerkadministrator.
38

Einrichten der LAN-Verbindung
Schließen Sie das LAN-Kabel an.
1
Die IP-Adresse wird innerhalb von 2 Minuten automatisch
kon guriert. Wenn Sie die IP-Adresse manuell einstellen
möchten, lesen Sie Folgendes.
Anwenderhandbuch "Einstellen von IP-Adressen"
Installieren Sie die Treiber auf dem Computer
2
mithilfe der mitgelieferten CD-ROM/DVD-ROM.
Siehe "Installieren der Software" (S. 42).
HINWEIS
Der Scannertreiber kann nicht installiert werden,
wenn das Gerät und der Computer in einer
IPv6-Umgebung verbunden sind.
Fahren Sie mit "Einstellen eines Papierformats und eines
Papiertyps" (S. 42) fort.
Herstellen einer Verbindung über USBKabel
Schließen Sie das USB-Kabel an, nachdem Sie die Treiber
installiert haben.
Installieren Sie die Treiber auf dem Computer
1
mithilfe der mitgelieferten CD-ROM/DVD-ROM.
Siehe "Installieren der Software" (S. 42).
Schließen Sie das USB-Kabel an.
2
Herstellen einer Verbindung über Wireless
LAN
Vor der Einrichtung überprüfen
Wireless LAN-Router
Internet
Ist der Computer mit dem Router (Zugri spunkt) über ein
LAN-Kabel oder ein Wireless LAN korrekt verbunden?
Weitere Informationen nden Sie in der Anleitung zu dem von
Ihnen verwendeten Netzwerkgerät, oder wenden Sie sich an
den Hersteller des Netzwerkgeräts.
Wurden die Netzwerkeinstellungen auf dem Computer
vorgenommen?
Wenn der Computer nicht ordnungsgemäß kon guriert
wurde, können Sie die Wireless LAN-Verbindung
möglicherweise nicht verwenden, auch wenn Sie die
folgenden Einstellungen vorgenommen haben.
HINWEIS
• Sie können eine Wired LAN- und Wireless LANVerbindung nicht gleichzeitig herstellen. Zudem ist das
Gerät standardmäßig auf "Wired LAN" eingestellt.
• Wenn Sie eine Verbindung zu einer
Netzwerkumgebung herstellen, die nicht
sicherheitsgeschützt ist, könnten Ihre persönlichen
Daten Dritten zugänglich sein. Seien Sie vorsichtig.
• Wenn Sie eine Verbindung über ein LAN im Büro
herstellen, wenden Sie sich an Ihren
Netzwerkadministrator.
Wechseln der Verbindungsmethode zu Wireless
LAN
Tippen Sie auf dem Bildschirm <Startseite> auf
1
<Menü>.
De
Fahren Sie mit "Einstellen eines Papierformats und eines
Papiertyps" (S. 42) fort.
Tippen Sie auf <Netzwerkeinstellungen>.
2
Wenn ein Bildschirm zur Eingabe einer Systemmanager-ID
und -PIN angezeigt wird, geben Sie die Systemmanager-ID
und -PIN ein, tippen Sie auf <Anwenden>, und drücken Sie
.
Tippen Sie auf <Wired/Wireless LAN wählen>.
3
Tippen Sie auf <Wireless LAN>.
4
LAN wählen
Wired LAN
Wireless LAN
39

Überprüfen des Routers
Wählen Sie die Methode der Verbindung zum Wireless LAN
aus. Wählen Sie abhängig vom Router (Zugri spunkt), den Sie
verwenden, eine der beiden folgenden Methoden aus.
Es gibt eine Taste.
Dieses Gerät unterstützt WPS
(Wi-Fi Protected Setup). Sie
können die Einrichtung
mühelos vornehmen, wenn Ihr
Router (Zugri spunkt) über
eine Taste verfügt und sich auf
dem Router die Markierung
be ndet.
Wenn Sie sich nicht sicher sind, ob Ihr Router WPS unterstützt, lesen
Sie im Handbuch zum Produkt nach, oder wenden Sie sich an den
Hersteller des Produkts.
Es gibt keine Taste.
Wenn Ihr Router
(Zugri spunkt) über keine
Taste verfügt, können Sie die
SSID manuell auswählen und
die Einstellungen manuell
vornehmen. In diesem Fall
müssen Sie sich die SSID und
den Netzwerkschlüssel Ihres
Routers (Zugri spunkt) merken.
Unter "Überprüfen, ob die Wireless LAN-Einstellung
vorgenommen wurde" (S. 42) erfahren Sie, wie Sie Ihre SSID
und Ihren Netzwerkschlüssel heraus nden.
So nehmen Sie die Einrichtung mit der WPS-PINCodemethode oder manuell vor
Anwenderhandbuch "Herstellen einer Verbindung zu einem
De
Wireless LAN"
Einstellen des Wireless LAN
Tastendruckmodus
Tippen Sie auf dem Bildschirm <Startseite> auf
1
<Menü>.
Tippen Sie auf <WPS Tastendrückmethode>.
5
Einstellungen WLAN
Einstellungen SSID
WPS Tastendrückmethode
Modus WPS PIN-Code
Energiesparmodus
WLAN-Informationen
Tippen Sie auf <Ja>.
6
Halten Sie die Taste gedrückt*, bis die Lampe
7
leuchtet oder blinkt.
Sie sollten die WPS-Taste innerhalb von 2 Minuten nach
dem Tippen auf <Ja> in Schritt 6 drücken.
* Wie lange Sie die Taste gedrückt halten sollten, hängt von dem
von Ihnen verwendeten Router ab.
Warten Sie ca. 2 Minuten nach der Verbindung.
8
Die IP-Adresse wird in diesem Zeitraum eingestellt.
Wenn eine Fehlermeldung angezeigt wird:
Tippen Sie auf <Schließen>, um den Bildschirm zu
schließen, und wiederholen Sie die Einstellungen.
Wenn der Zugri spunkt auch nach der Wiederholung
nicht erkannt werden kann, lesen Sie Folgendes.
Anwenderhandbuch "Wenn eine Fehlermeldung
angezeigt wird"
Beim Überprüfen der Netzwerkverbindung:
Sie können über einen Computer, der mit einem Netzwerk
verbunden ist, überprüfen, ob das Gerät mit dem Netzwerk
ordnungsgemäß verbunden ist.
Anwenderhandbuch "Anzeigen von
Netzwerkeinstellungen"
So stellen Sie die IP-Adresse manuell ein
Anwenderhandbuch "Herstellen einer Verbindung zu
einem Wireless LAN"
Tippen Sie auf <Netzwerkeinstellungen>.
2
Wenn ein Bildschirm zur Eingabe einer Systemmanager-ID
und -PIN angezeigt wird, geben Sie die Systemmanager-ID
und -PIN ein, tippen Sie auf <Anwenden>, und drücken
Sie .
Tippen Sie auf <Einstellungen WLAN>.
3
Lesen Sie die angezeigte Meldung, und tippen Sie
4
auf <OK>.
40

Manuelles Einstellen des Zugri spunkts
Überprüfen Sie die SSID oder den
1
Netzwerkschlüssel für einen Wireless LAN-Router/
Zugri spunkt.
• Überprüfen Sie das Etikett auf dem Wireless LAN-Router.
Notieren Sie sich den in Schritt 1 angezeigten
2
Namen der SSID und den Netzwerkschlüssel. Wenn
mehrere Zugri spunkte angezeigt werden, notieren
Sie sich alle angezeigten SSIDs.
SSID
Sie wird manchmal als Name des Netzwerks oder Name
des Zugri spunkts aufgeführt. Wenn mehrere SSIDs
vorhanden sind, notieren Sie sich alle SSIDs.
Netzwerkschlüssel
Er wird manchmal als PIN, WEP-Schlüssel, WPA/WPA2Passphrase, PSK oder Pre-Shared-Key aufgeführt.
Geben Sie den Netzwerkschlüssel ein, den Sie sich
10
notiert haben.
Geben Sie den Netzwerkschlüssel über die Zahlentasten
ein, und tippen Sie auf <Anwenden>.
WEP-Schlüssel (5-26 Zeichen)
XXXXXXXX
Tippen Sie auf <Ja>.
11
Nach der Anzeige des Bildschirms <Verbunden.>
12
warten Sie, bis die Wi-Fi-Anzeige nicht mehr
blinkt, sondern leuchtet.
Warten Sie ca. 2 Minuten nach der Verbindung.
13
Die IP-Adresse wird in diesem Zeitraum eingestellt.
A
AnwendenA/a/12
Tippen Sie auf dem Bildschirm <Startseite> auf
3
<Menü>.
Tippen Sie auf <Netzwerkeinstellungen>.
4
Wenn ein Bildschirm zur Eingabe einer Systemmanager-ID
und -PIN angezeigt wird, geben Sie die Systemmanager-ID
und -PIN ein, tippen Sie auf <Anwenden>, und drücken
Sie .
Tippen Sie auf <Einstellungen WLAN>.
5
Lesen Sie die angezeigte Meldung, und tippen Sie
6
auf <OK>.
Tippen Sie auf <Einstellungen SSID>.
7
Tippen Sie auf <Zugri spunkt wählen>.
8
Einstellungen SSID
Zugriffspunkt wählen
Manuell eingeben
Wenn eine Fehlermeldung angezeigt wird:
Tippen Sie auf <Schließen>, um den Bildschirm zu
schließen, überprüfen Sie, ob der Netzwerkschlüssel
korrekt ist, und wiederholen Sie dann die Einstellungen.
Wenn der Zugri spunkt auch nach der Wiederholung
nicht erkannt werden kann, lesen Sie Folgendes.
Anwenderhandbuch "Wenn eine Fehlermeldung
angezeigt wird"
So stellen Sie die IP-Adresse manuell ein
Anwenderhandbuch "Herstellen einer Verbindung zu
einem Wireless LAN"
De
Wählen Sie einen Wireless LAN-Router aus.
9
Wenn mehrere übereinstimmende SSIDs angezeigt
werden, wählen Sie die ID aus, die als erstes aufgelistet ist
(die mit dem stärksten Signal).
41

Überprüfen, ob die Wireless LAN-Einstellung
vorgenommen wurde
Einstellen eines Papierformats und eines
Papiertyps
Drücken Sie .
1
Tippen Sie auf <Netzwerkinformationen>.
2
Tippen Sie auf <IPv4>.
3
Tippen Sie auf <IP-Adresse>.
4
Notieren Sie sich die IP-Adresse.
5
IP-Adresse
XXX.XXX.XXX.XXX
Schließen
Tippen Sie auf <Schließen>.
6
Drücken Sie .
7
Starten Sie über einen Computer einen
8
Webbrowser, geben Sie in das Adressfeld
"http://<IP-Adresse des Geräts>/" ein, und drücken
Sie dann auf der Tastatur die Taste [Eingabe].
Folgen Sie den Anweisungen auf dem Bildschirm, um das
Papierformat und den Papiertyp einzustellen.
Einstellungen Papier
Mehrzweckfach
Kassette 1
Kassette 2
Häufig verwendete Papierform
Installieren der Software
• Das hier beschriebene Verfahren ist nur anwendbar,
wenn auf Ihrem Computer ein Windows-Betriebssystem
ausgeführt wird. Weitere Einzelheiten zum SoftwareInstallationsverfahren nden Sie im Treiber-Handbuch.
• Näheres zur Installation, wenn auf Ihrem Computer ein
macOS ausgeführt wird, nden Sie im TreiberHandbuch.
• Je nach Zeitpunkt des Kaufs be ndet sich
möglicherweise kein Treiber für macOS im
Lieferumfang Ihres Geräts. Neue Treiber werden jedoch
auf die Canon Website hochgeladen, so dass Sie die
neuesten Treiber herunterladen und verwenden
können.
1.
De
Vergewissern Sie sich, dass der Bildschirm von
9
Remote UI angezeigt wird.
Die Einstellung der Verbindung wurde vorgenommen,
wenn der Bildschirm angezeigt wird.
Wenn der Bildschirm nicht korrekt angezeigt wird:
Anwenderhandbuch "Häu ge Probleme"
42
2.
Wenn der Bildschirm nicht ordnungsgemäß
angezeigt wird, setzen Sie die CD-ROM/DVD-ROM
erneut ein, oder suchen Sie nach "D:\MInst.exe" auf
der Windows-Plattform. (In dieser Beschreibung
wird davon ausgegangen, dass "D:" die Bezeichnung
des CD-ROM-/DVD-ROM-Laufwerks ist.)

Nützliche Aufgaben durchführen
Es stehen zahlreiche Funktionen zur Verfügung. Im Folgenden nden Sie einen Überblick über einige nützliche Funktionen.
Kopieren
Vergrößerte/Verkleinerte Kopien
Sie können Dokumente im
Standardformat vergrößern oder
verkleinern, um sie auf Papier im
Standardformat zu kopieren, oder den
Kopierfaktor in Prozent angeben.
Doppelseitiges Kopieren**
Sie können einseitige Dokumente auf
beide Seiten eines Blatt Papiers
kopieren.
Sortieren
Sie können Kopien in Sätzen sortieren,
die in Seitenreihenfolge des Dokuments
angeordnet sind.
Verkleinertes Layout
Sie können mehrere Dokumente
verkleinern, um sie auf ein Blatt zu
kopieren.
2 auf 1 4 auf 1
Kopieren einer ID-Karte
Sie können eine Kopie einer
doppelseitigen Karte auf einer Seite
eines Blatt Papiers herstellen.
Faxen*
Direktes Senden eines Dokuments
von einem Computer (PC-Fax)
Neben dem normalen Senden und
Empfangen von Faxen können Sie das
PC-Fax verwenden.
Senden
Sie können Faxempfänger im
Adressbuch speichern. Für die Angabe
der Empfänger stehen Ihnen
verschiedene Methoden zur Verfügung,
mit denen Sie Dokumente schnell und
mühelos senden können.
• Empfängersuche
• Zielwahltasten
• Kodierte Wahl
• Empfängergruppe
• Angeben aus dem Sendungsverlauf
• Rundsendung
Empfangen
•
Empfangen im Speicher
Sie können die empfangenen
Dokumente im Speicher speichern. Sie
können die gespeicherten Dokumente
jederzeit drucken, und wenn Sie sie nicht
benötigen, können Sie sie löschen.
•
Fernempfang
Wenn ein externes Telefon
angeschlossen ist, können Sie sofort in
den Faxempfangsmodus wechseln,
indem Sie während eines Telefonats die
ID-Nummer für den Faxempfang über
die Wähltasten des Telefons wählen.
Drucken
Vergrößerter/Verkleinerter Druck
Doppelseitiges Drucken**
Verkleinertes Layout
Sie können mehrere Dokumente
verkleinern, um sie auf einem Blatt zu
drucken.
2 auf 1 4 auf 1
Broschürendruck**
Posterdruck
Wasserzeichendruck
Kombinieren und Drucken mehrerer
Dokumente
Auswählen eines "Pro ls"
Netzwerkeinstellungen
Das Gerät ist mit einer
Netzwerkschnittstelle ausgestattet,
sodass Sie problemlos eine
Netzwerkumgebung aufbauen können.
Sie können von allen Computern, die
mit dem Gerät verbunden sind, ein
Dokument drucken und das PC-Fax*
sowie den Netzwerkscan verwenden.
Das Gerät unterstützt als gemeinsam
genutztes Gerät im Büro die Steigerung
der Arbeitse zienz.
Scannen
Speichern der Dokumente über die
Systemsteuerung des Geräts
1
Dokumente
2
Daten
3
Speichern der Dokumente über
Vorgänge von einem Computer aus
•
Scannen mit MF Scan Utility
Dokumente
1
2
•
Scannen über eine Anwendung
•
Scannen mit dem WIA-Treiber
3
Daten
Senden gescannter Dokumente per
E-Mail***
Sie können gescannte Dokumente an
Ihre E-Mail-Anwendung senden.
+
Dokumente Daten E-Mail
Senden gescannter Dokumente an
einen Dateiserver***
Sie können gescannte Dokumente an
einen Dateiserver senden.
Dokumente Daten Dateiserver
Remote UI
Sie können den Zustand des Geräts
über die Computer im Netzwerk
einsehen. Sie können über das
Netzwerk auf das Gerät zugreifen und
Aufträge verwalten oder verschiedene
Einstellungen angeben.
* nur imageRUNNER 2206iF
** Die Funktion ist für imageRUNNER 2206iF
integriert. Für imageRUNNER 2206N ist die
optionale Duplex-Einheit erforderlich.
*** Die Funktion ist für imageRUNNER 2206iF
integriert. Für imageRUNNER 2206N ist das
optionale Sendekit (Send Kit) erforderlich.
De
43

Beseitigen von Papierstaus
Wenn der folgende Bildschirm angezeigt wird, ist in der Zufuhr oder im Geräteinneren
ein Papierstau aufgetreten. Folgen Sie der auf dem Bildschirm angezeigten
Vorgehensweise, um das gestaute Dokument oder Papier zu entfernen. In diesem
Handbuch werden nur die Bereiche angegeben, in denen Papierstaus auftreten. Details
zu den Vorgehensweisen nden Sie im Anwenderhandbuch.
Zufuhr (D-ADF AY)
Ausgabebereich
(optional für imageRUNNER 2206N)
Papier ist gestaut.
Zeigen Sie mit [Weiter] die
Schritte an.
Zurück Weiter
Papierkassette 1
De
Duplex-Einheit C
(optional für imageRUNNER 2206N)
Multifunktionsfach Fixiereinheit Kassetteneinheit AD
(optional)
44

Ersetzen der Tonerpatrone
Tonerpatronen sind Verbrauchsmaterialien. Wenn der Toner während einer Auftragsausführung fast oder vollständig verbraucht ist,
wird auf dem Bildschirm eine Meldung angezeigt, oder es können die folgenden Probleme auftreten. Tre en Sie dementsprechend
eine geeignete Maßnahme.
Wenn eine Meldung angezeigt wird
Wenn der Toner während einer Auftragsausführung fast oder völlig verbraucht ist, wird auf dem Bildschirm eine Meldung angezeigt.
Meldung
<Tonerpatrone
vorbereiten.>
<Tonerpatrone
tauschen.>
Wenn die Meldung auf
dem Bildschirm angezeigt
wird
Die Tonerpatrone muss
bald ersetzt werden.
Die Tonerpatrone hat das
Ende ihrer Nutzungsdauer
erreicht.
Beschreibung und Lösungen
Stellen Sie sicher, dass Sie eine Ersatztonerpatrone bereit haben. Es wird
empfohlen, vor dem Drucken großvolumiger Dokumente den Stand des
verbliebenen Toners zu überprüfen.
Anwenderhandbuch "Ersetzen der Tonerpatrone"
Ersetzen Sie die Tonerpatrone.
Anwenderhandbuch "Ersetzen der Tonerpatrone"
Wenn die Qualität der Ausdrucke nicht zufriedenstellend ist
Wenn die Ausdrucke erste Anzeichen der unten aufgeführten Eigenschaften zeigen, ist die Tonerpatrone fast leer. Ersetzen Sie die fast
leere Tonerpatrone, auch wenn keine Meldung angezeigt wird.
Weiße Streifen sind zu sehen Teilweise blass Dichte ist ungleichmäßig
Toner ecken und -spritzer sind zu
sehen Ausdrucke sind gräulich
De
45

De
Anhang
Wichtige
Sicherheitsvorschriften
In diesem Kapitel werden wichtige
Sicherheitsvorschriften zur Vermeidung von
Verletzungen bei den Benutzern dieses Geräts
und anderen Personen und von Sachschäden
beschrieben. Lesen Sie dieses Kapitel vor der
Inbetriebnahme des Geräts durch, und befolgen
Sie die Anweisungen für die ordnungsgemäße
Verwendung des Geräts. Bedienen und
verwenden Sie das Gerät ausschließlich wie in
dieser Anleitung beschrieben. Canon übernimmt
keine Haftung für Schäden, die durch eine nicht
in dieser Anleitung beschriebene Bedienung,
durch unsachgemäßen Gebrauch oder durch
nicht von Canon oder von Canon autorisierten
Dritten durchgeführte Reparaturen oder
Veränderungen entstehen. Eine unsachgemäße
Bedienung oder ein unsachgemäßer Gebrauch
könnte zu Personenschäden und/oder
Sachschäden führen, die erhebliche
Reparaturmaßnahmen erforderlich machen, die
möglicherweise nicht im Rahmen Ihrer
eingeschränkten Garantie abgedeckt sind.
WARNUNG
Wenn Sie eine so gekennzeichnete Warnung
nicht beachten, können ernsthafte
Verletzungen oder Tod die Folge sein. Bitte
beachten Sie diese Warnungen unbedingt,
um den sicheren Betrieb zu gewährleisten.
VORSICHT
So wird eine Vorsichtsmaßnahme in Bezug
auf Vorgänge gekennzeichnet, die zu
Personenschäden führen können, wenn sie
nicht korrekt ausgeführt werden. Bitte
beachten Sie diese Maßnahmen unbedingt,
um den sicheren Betrieb zu gewährleisten.
WICHTIG
So werden Anforderungen und
Einschränkungen in Bezug auf die Bedienung
gekennzeichnet. Lesen Sie diese Punkte
unbedingt sorgfältig durch, um das Gerät
ordnungsgemäß zu bedienen und Geräteoder Sachschäden zu vermeiden.
Installation
Lesen Sie die folgenden Sicherheitshinweise
sorgfältig durch, und stellen Sie das Gerät an
einem geeigneten Ort auf, sodass Sie es sicher
und komfortabel verwenden können.
WARNUNG
Zur Vermeidung von Feuer oder einem
Stromschlag nicht an folgenden Orten
aufstellen
• Orte, an denen die Lüftungsschlitze blockiert
sind (zu nahe an Wänden, Betten, Sofas,
Teppichen oder ähnlichen Gegenständen)
• Orte, die Feuchtigkeit oder Staub ausgesetzt
sind
• Orte, die direktem Sonnenlicht ausgesetzt
sind, oder im Freien
• Orte, die hohen Temperaturen ausgesetzt sind
• Orte in der Nähe offener Flammen
• In der Nähe von Alkohol, Farbverdünnern oder
anderen entzündlichen Substanzen
Sonstige Warnungen
• Schließen Sie keine nicht zugelassenen Kabel
an das Gerät an. Andernfalls besteht
Feuergefahr oder die Gefahr eines
Stromschlags.
• Legen Sie weder Halsketten noch andere
Metallgegenstände auf das Gerät, und stellen
Sie keine mit Flüssigkeiten gefüllten Gefäße
darauf. Wenn Fremdkörper in Kontakt mit
elektrischen Teilen im Gerät kommen, besteht
Feuergefahr oder die Gefahr eines
Stromschlags.
• Trennen Sie den Netzstecker von der
Netzsteckdose, und wenden Sie sich an Ihren
autorisierten Canon Händler vor Ort, wenn
Fremdkörper in das Gerät gelangt sind.
VORSICHT
Nicht an folgenden Orten aufstellen
Das Gerät könnte herunterfallen und
Verletzungen verursachen.
• Instabile Flächen
• Orte, die Vibrationen ausgesetzt sind
WICHTIG
Nicht an folgenden Orten aufstellen
Andernfalls besteht die Gefahr von Schäden am
Gerät.
• Orte, die extremen Temperaturen und
extremer Luftfeuchtigkeit, ob niedrig oder
hoch, ausgesetzt sind
• Orte mit stark schwankender Temperatur oder
Luftfeuchtigkeit
• Orte in der Nähe von Geräten, die
magnetische oder elektromagnetische Wellen
erzeugen
• Labore oder andere Orte, an denen chemische
Reaktionen stattfinden
• Orte, die korrosiven oder toxischen Gasen
ausgesetzt sind
• Orte, die sich unter dem Gewicht des Geräts
verformen könnten oder an denen das Gerät
einsinken könnte (z.B. auf einem Teppich o.Ä.)
Schlecht belüftete Aufstellorte vermeiden
Das Gerät erzeugt im normalen Betrieb eine
geringe Menge Ozon und andere Emissionen.
Diese Emissionen sind nicht
gesundheitsschädlich. Bei längerem Gebrauch
oder langen Produktionszyklen in schlecht
belüfteten Räumen können sie sich allerdings
bemerkbar machen. Der Raum, in dem das Gerät
betrieben wird, sollte ausreichend gelüftet
werden, um für ein angenehmes Arbeitsumfeld
zu sorgen. Darüber hinaus sollten Aufstellorte
gemieden werden, an denen Personen den
Emissionen des Geräts ausgesetzt sein würden.
Nicht an Orten mit Feuchtigkeitskondensation
aufstellen
Es können sich im Geräteinneren Wassertropfen
(Kondensation) bilden, wenn der Raum, in dem
das Gerät installiert ist, schnell aufgewärmt wird
und wenn das Gerät von einem kühlen oder
trockenen Ort an einen heißen oder feuchten Ort
umgesetzt wird. Die Verwendung des Geräts
unter diesen Bedingungen kann zu Papierstaus,
zu einer verminderten Druckqualität oder zur
Beschädigung des Geräts führen. Warten Sie vor
dem Gebrauch mindestens 2Stunden, bis sich
das Gerät an die Umgebungstemperatur und
Luftfeuchtigkeit angeglichen hat.
Stellen Sie das Gerät nicht in der Nähe von
Computern oder anderen elektronischen
Präzisionsgeräten auf.
Die vom Gerät während des Druckvorgangs
generierten elektrischen Interferenzen und
Schwingungen können den Betrieb solcher
Geräte negativ beeinflussen.
Stellen Sie das Gerät nicht in der Nähe von
Fernsehern, Radios oder ähnlichen
elektronischen Geräten auf.
Das Gerät stört möglicherweise den Bild- und
Tonsignalempfang. Stecken Sie den Netzstecker
in eine dedizierte Netzsteckdose, und lassen Sie
so viel Platz wie möglich zwischen dem Gerät
und anderen elektronischen Geräten.
In Höhen von 3.000m oder höher über dem
Meeresspiegel
Geräte mit einer Festplatte funktionieren
möglicherweise nicht ordnungsgemäß, wenn sie
an Orten, die ca. 3.000 Meter oder höher über
dem Meeresspiegel liegen, verwendet werden.
Anschließen an die Telefonleitung
Dieses Gerät entspricht einem analogen
Telefonleitungsstandard. Das Gerät kann nur an
das öffentliche Festnetz (PSTN) angeschlossen
werden. Wenn Sie das Gerät an eine digitale
Telefonleitung oder eine dedizierte Telefonleitung
anschließen, kann dies den einwandfreien Betrieb
des Geräts beeinträchtigen und zu Schäden
führen. Überprüfen Sie unbedingt den
Telefonleitungstyp, bevor Sie das Gerät
anschließen. Wenden Sie sich an den Anbieter
Ihrer Glasfaserleitung oder Ihrer IP-Telefonleitung,
wenn Sie das Gerät an diese Telefonleitungen
anschließen möchten.
Bei Verwendung einer Wireless LANVerbindung
• Stellen Sie das Gerät maximal 50 Meter vom
Wireless LAN-Router entfernt auf.
• Stellen Sie das Gerät nach Möglichkeit an
einem Ort auf, an dem die Kommunikation
nicht durch Hindernisse blockiert ist. Wände
oder Böden können das Signal abschwächen.
• Halten Sie das Gerät möglichst weit von
digitalen schnurlosen Telefonen,
Mikrowellenherden oder anderen Geräten
fern, die Radiowellen abstrahlen.
• Verwenden Sie das Gerät nicht in der Nähe
von medizinischen Geräten. Die von diesem
Gerät abgestrahlten Funkwellen können
Störungen bei medizinischen Geräten
verursachen, was zu Fehlfunktionen und
schweren Unfällen führen kann.
Wenn das Betriebsgeräusch Probleme bereitet
Wenn das Betriebsgeräusch je nach
Nutzungsumgebung und Betriebsmodus ein
Problem darstellt, empfiehlt es sich, das Gerät
nicht am Arbeitsplatz, sondern an einem anderen
Ort aufzustellen.
Transportieren des Geräts
Wenn Sie das Gerät transportieren möchten,
wenden Sie sich vorab an Ihren autorisierten
Canon Händler vor Ort, auch wenn Sie das Gerät
nur an einen anderen Ort auf derselben Etage des
Gebäudes transportieren möchten. Versuchen Sie
nicht, das Gerät selbst zu transportieren.
Stromversorgung
WARNUNG
• Schließen Sie das Gerät ausschließlich an
einen Netzanschluss mit der angegebenen
Netzspannung an. Andernfalls besteht
Feuergefahr oder die Gefahr eines
Stromschlags.
• Das Gerät muss über das mitgelieferte
Netzkabel an eine Steckdose mit
Erdungsanschluss angeschlossen werden.
• Verwenden Sie ausschließlich das mitgelieferte
Netzkabel. Andernfalls besteht Feuergefahr
oder die Gefahr eines Stromschlags.
• Das mitgelieferte Netzkabel ist zur
Verwendung mit diesem System vorgesehen.
Schließen Sie das Netzkabel nicht an andere
Geräte an.
46

• Modifizieren Sie das Netzkabel nicht, ziehen
Sie nicht daran, biegen Sie es nicht übermäßig,
und achten Sie darauf, es nicht anderweitig zu
beschädigen. Stellen Sie keine schweren
Gegenstände auf das Netzkabel. Bei einem
beschädigten Netzkabel besteht Feuergefahr
oder die Gefahr eines Stromschlags.
• Berühren Sie den Netzstecker beim
Anschließen und Trennen nicht mit feuchten
Händen. Andernfalls besteht die Gefahr eines
Stromschlags.
• Verwenden Sie für das Gerät keine
Verlängerungskabel oder
Mehrfachsteckdosen. Andernfalls besteht
Feuergefahr oder die Gefahr eines
Stromschlags.
• Wickeln Sie das Netzkabel nicht auf, und
verknoten Sie es nicht. Andernfalls besteht
Feuergefahr oder die Gefahr eines
Stromschlags.
• Stecken Sie den Netzstecker vollständig in die
Netzsteckdose. Andernfalls besteht
Feuergefahr oder die Gefahr eines
Stromschlags.
• Trennen Sie den Netzstecker während eines
Gewitters vollständig von der Netzsteckdose.
Andernfalls besteht Feuergefahr, die Gefahr
eines Stromschlags oder von Schäden am
Gerät.
• Vergewissern Sie sich, dass die
Stromversorgung für das Gerät sicher ist und
die Spannung konstant ist.
• Halten Sie das Netzkabel von Wärmequellen
fern; andernfalls kann die Beschichtung des
Netzkabels schmelzen. In diesem Fall besteht
Feuergefahr oder die Gefahr eines
Stromschlags.
Vermeiden Sie die folgenden Situationen:
Durch übermäßiges Belasten des
Netzkabelanschlusses kann das Netzkabel
beschädigt werden oder die Drähte im
Geräteinneren werden möglicherweise
unterbrochen. In diesem Fall besteht Feuergefahr.
–Häufiges Anschließen und Abtrennen des
Netzkabels.
–Stolpern über das Netzkabel.
–Das Netzkabel wird am Anschluss gebogen,
und die Netzsteckdose oder der Anschluss
werden dauerhaft belastet.
–Übermäßige Gewaltanwendung im Umgang
mit dem Netzstecker.
VORSICHT
• Stellen Sie dieses System in der Nähe einer
Steckdose auf, und lassen Sie ausreichend
freien Platz um den Netzstecker, damit er im
Notfall leicht abgezogen werden kann.
WICHTIG
Bei Anschluss an den Netzstrom
• Schließen Sie das Netzkabel nicht an eine
unterbrechungsfreie Stromversorgung an.
Andernfalls kann bei einem Stromausfall eine
Fehlfunktion oder ein Schaden am Gerät
entstehen.
• Wenn Sie das Gerät an eine Netzsteckdose mit
mehreren Steckdosen anschließen, schließen
Sie an die übrigen Steckdosen keine weiteren
Geräte an.
• Verbinden Sie das Netzkabel nicht mit dem
Hilfsstromausgang eines Computers.
Sonstige Sicherheitshinweise
• Elektrische Störstrahlung kann bei diesem
Gerät zu Fehlfunktionen oder Datenverlust
führen.
Handhabung
WARNUNG
• Trennen Sie umgehend den Netzstecker von
der Netzsteckdose, und wenden Sie sich an
einen autorisierten Canon Händler, wenn von
dem Gerät ungewöhnliche Geräusche oder
Gerüche ausgehen oder es zu Rauch- oder
übermäßiger Wärmeentwicklung kommt. Bei
fortgesetztem Betrieb besteht Feuergefahr
oder die Gefahr eines Stromschlags.
• Zerlegen und modifizieren Sie das Gerät nicht.
Im Gerät befinden sich Teile, die
Hochspannung führen und sehr heiß sind. Bei
Zerlegung oder Modifizierung besteht
Feuergefahr oder die Gefahr eines
Stromschlags.
• Stellen Sie das Gerät so auf, dass Kinder das
Netzkabel, andere Kabel, Getriebe oder
elektrische Bauteile im Gerät nicht berühren
können. Andernfalls besteht Unfallgefahr.
• Verwenden Sie keine entzündlichen Sprays in
der Nähe des Geräts. Wenn entzündliche
Substanzen in Kontakt mit elektrischen Teilen
im Gerät kommen, besteht Feuergefahr oder
die Gefahr eines Stromschlags.
• Schalten Sie zum Umstellen des Geräts
unbedingt das Gerät AUS, und lösen Sie den
Netzstecker und die Schnittstellenkabel.
Andernfalls können das Netzkabel oder die
Schnittstellenkabel beschädigt werden. In
diesem Fall besteht Feuergefahr oder die
Gefahr eines Stromschlags.
• Berühren Sie beim Anschließen oder Trennen
eines USB-Kabels nicht den Metallteil des
Steckers, wenn der Netzstecker in eine
Netzsteckdose eingesteckt ist. Andernfalls
besteht die Gefahr eines Stromschlags.
Für Personen mit Herzschrittmacher
Dieses Gerät erzeugt ein geringes magnetisches
Feld und Ultraschallwellen. Wenn Sie einen
Herzschrittmacher haben und Abnormalitäten
feststellen, entfernen Sie sich von dem Gerät, und
konsultieren Sie unverzüglich Ihren Arzt.
VORSICHT
• Stellen Sie keine schweren Gegenstände auf
das Gerät. Diese könnten herunterfallen und
Verletzungen verursachen.
• Ziehen Sie aus Sicherheitsgründen den
Netzstecker aus der Netzsteckdose, wenn Sie
das Gerät längere Zeit nicht verwenden
wollen.
• Gehen Sie beim Öffnen und Schließen von
Abdeckungen vorsichtig vor, damit Sie sich
nicht an den Händen verletzen.
• Halten Sie Hände und Kleidungsstücke von
den Rollen im Ausgabebereich fern. Wenn Sie
mit den Händen oder Kleidungsstücken in die
Rollen geraten, besteht Verletzungsgefahr.
• Das Innere des Geräts und die
Ausgabeöffnung sind während und
unmittelbar nach dem Gebrauch sehr heiß.
Berühren Sie diese Bereiche nicht, um
Verbrennungen zu vermeiden. Auch das vom
Gerät ausgegebene Papier kann direkt nach
dem Bedrucken heiß sein. Gehen Sie
vorsichtig damit um. Andernfalls besteht
Verbrennungsgefahr.
Zufuhr oder Vorlagenglasabdeckung
• Drücken Sie die Zufuhr oder die
Vorlagenglasabdeckung nicht fest herunter,
wenn Sie Kopien von dicken Büchern über das
Vorlagenglas durchführen. Andernfalls besteht
die Gefahr von Schäden am Vorlagenglas und
von Verletzungen.
• Schließen Sie die Zufuhr oder die
Vorlagenglasabdeckung vorsichtig, damit Sie
nicht Ihre Hände einklemmen, da dies zu
Verletzungen führen kann.
• Achten Sie darauf, dass Sie mit Ihren Händen
oder Fingern nicht in die Zufuhr oder die
Vorlagenglasabdeckung geraten. Andernfalls
besteht Verletzungsgefahr.
Papierkassette
• Greifen Sie nicht mit der Hand in das Gerät,
während die Papierkassette entfernt wird, da
dies zu Verletzungen führen kann.
Taste Stromsparmodus
• Drücken Sie aus Sicherheitsgründen
(Stromsparmodus), wenn das Gerät über einen
langen Zeitraum, z.B. über Nacht nicht
verwendet wird. Schalten Sie aus
Sicherheitsgründen zudem das Gerät über
den Hauptnetzschalter AUS, und trennen Sie
das Netzkabel ab, wenn das Gerät über einen
längeren Zeitraum, z.B. während
aufeinanderfolgender Feiertage, nicht
verwendet wird.
Lasersicherheit
Dieses Produkt ist als Laserprodukt der Klasse 1
nach IEC60825-1:2014 und EN60825-1:2014
eingestuft.
CLASS 1 LASER PRODUCT
LASER KLASSE 1
APPAREIL À LASER DE CLASSE 1
APPARECCHIO LASER DI CLASSE 1
PRODUCTO LÁSER DE CLASE 1
APARELHO A LASER DE CLASSE 1
LUOKAN 1 LASER-TUOTE
LASERPRODUKT KLASS 1
Der Laserstrahl kann für den Menschen gefährlich
sein. Da die im Inneren des Produkts emittierte
Laserstrahlung durch Schutzgehäuse und äußere
Abdeckungen vollständig abgeschirmt wird, kann
der Laserstrahl zu keinem Zeitpunkt während der
Bedienung des Geräts durch den Benutzer aus
dem Gerät entweichen. Lesen Sie die folgenden
Bemerkungen und Sicherheitshinweise.
• Öffnen Sie nur die Abdeckungen, die Sie laut
den Handbüchern für dieses Gerät öffnen
dürfen.
• Wenn der Laserstrahl aus dem Gerät austritt,
kann eine Bestrahlung der Augen schwere
Sehschäden zur Folge haben.
• Bei nicht in diesem Handbuch beschriebener
Verwendung von Steuerelementen oder bei
nicht in diesem Handbuch beschriebenen
Justierungen sowie bei Nichteinhaltung der in
diesem Handbuch beschriebenen Verfahren
kann gefährliche Strahlung freigesetzt werden.
De
47

De
Anhang
Hinweis zur Lasersicherheit
Fixiereinheit
Wenn Sie gestautes Papier entfernen oder das
Geräteinnere überprüfen, achten Sie darauf, dass
Sie sich nicht über einen längeren Zeitraum der
von der Fixiereinheit und ihrer Umgebung
abgegebenen Wärme aussetzen. Andernfalls
könnte es zu Niedrigtemperaturverbrennungen
kommen, auch wenn Sie die Fixiereinheit und
ihre Umgebung nicht direkt berührt haben.
WICHTIG
• Befolgen Sie die Anweisungen auf dem
Warnaufkleber am Gerät.
• Setzen Sie das Gerät keinen starken
Erschütterungen oder Vibrationen aus.
• Öffnen und schließen Sie Türen, Abdeckungen
und andere Teile nicht gewaltsam. Andernfalls
besteht die Gefahr von Schäden am Gerät.
• Schalten Sie den Hauptnetzschalter nicht AUS
und öffnen Sie keine Abdeckungen während
das Gerät in Betrieb ist. Andernfalls besteht die
Gefahr von Papierstaus.
• Verwenden Sie ein Modularkabel mit einer
Länge von maximal 3 Metern.
• Verwenden Sie ein USB-Kabel mit einer Länge
von maximal 3 Metern.
Sicherheitsbedingte Symbole
Netzschalter: Position "EIN"
Netzschalter: Position "AUS"
Netzschalter: Position "STANDBY"
Druckschalter "EIN" "AUS"
Schutzerdungsschiene
Gefährliche Spannung. Abdeckungen nur
nach Anleitung öffnen.
VORSICHT: Heiße Oberfläche. Nicht berühren.
Gerät der Klasse II
Bewegliche Teile: Halten Sie Körperteile von
den beweglichen Teilen fern
VORSICHT: Gefahr eines elektrischen Schlags.
Ziehen Sie alle Netzstecker aus der
Steckdose.
Es gibt scharfe Kanten. Halten Sie Körperteile
von den scharfen Kanten fern.
[HINWEIS]
Einige der oben aufgeführten Symbole sind je
nach Produkt möglicherweise nicht angebracht.
Wartung und Überprüfung
Reinigen Sie dieses Gerät regelmäßig. Wenn sich
Staub ansammelt, funktioniert das Gerät
möglicherweise nicht ordnungsgemäß. Beachten
Sie beim Reinigen die folgenden Anweisungen.
Wenn während des Betriebs ein Problem auftritt,
lesen Sie im Anwenderhandbuch unter
"Fehlerbehebung" nach. Wenn Sie das Problem
nicht lösen können oder der Meinung sind, dass
eine Überprüfung erforderlich ist, lesen Sie im
Anwenderhandbuch unter "Wenn sich ein
Problem nicht beheben lässt" nach.
WARNUNG
• Schalten Sie das Gerät vor dem Reinigen AUS,
und trennen Sie den Netzstecker von der
Netzsteckdose. Andernfalls besteht
Feuergefahr oder die Gefahr eines
Stromschlags.
• Ziehen Sie den Netzstecker regelmäßig ab,
und reinigen Sie ihn mit einem trockenen
Tuch von Staub und Schmutz.
Staubablagerungen können die Feuchtigkeit
aus der Luft aufnehmen, und wenn Strom
fließt, besteht Feuergefahr.
• Reinigen Sie das Gerät mit einem feuchten,
gut ausgewrungenen Tuch. Verwenden Sie
zum Reinigen ausschließlich Wasser.
Verwenden Sie weder Alkohol, Benzin,
Farbverdünner oder andere entzündliche
Substanzen. Verwenden Sie keine
Papiertaschentücher oder Papiertücher. Wenn
solche Substanzen mit den elektrischen Teilen
im Gerät in Kontakt kommen, kann sich
statische Elektrizität bilden, und es besteht
Feuergefahr oder die Gefahr eines
Stromschlags.
• Überprüfen Sie das Netzkabel und den
Netzstecker regelmäßig auf Beschädigungen.
Überprüfen Sie das Gerät auf Rost, Dellen,
Kratzer, Sprünge und übermäßige
Wärmeentwicklung. Bei Verwendung schlecht
gepflegter oder beschädigter Geräte besteht
Feuergefahr oder die Gefahr eines
Stromschlags.
VORSICHT
• Das Geräteinnere enthält Teile, die eine hohe
Temperatur oder hohe Spannungen
aufweisen. Beim Berühren dieser
Komponenten besteht Verbrennungsgefahr.
Berühren Sie nur Teile des Geräts, auf die in
dieser Anleitung verwiesen wird.
• Achten Sie beim Einlegen von Papier oder
beim Beseitigen von Papierstau darauf, sich
nicht an den Papierkanten zu schneiden.
Verbrauchsmaterial
WARNUNG
• Werfen Sie Tonerpatronen nicht in offene
Flammen, und lagern Sie diese sowie Druck-/
Kopierpapier nicht in der Nähe offener
Flammen. Andernfalls können sich diese
Materialien entzünden, sodass Verbrennungsoder Feuergefahr besteht.
• Wenn Toner versehentlich verschüttet oder
verstreut wird, kehren Sie die Tonerpartikel
vorsichtig zusammen oder nehmen Sie die
Tonerpartikel mit einem weichen,
angefeuchteten Tuch so auf, dass Sie den
Tonerstaub nicht einatmen. Verwenden Sie
zum Aufnehmen von verschüttetem Toner
niemals Staubsauger ohne
Schutzvorrichtungen gegen
Staubexplosionen. Andernfalls kann es zu
einer Fehlfunktion des Staubsaugers kommen
oder aufgrund von statischer Aufladung eine
Staubexplosion verursacht werden.
VORSICHT
• Bewahren Sie Toner und andere
Verbrauchsmaterialien außerhalb der
Reichweite von kleinen Kindern auf. Wenn
diese Materialien verschluckt werden,
konsultieren Sie unverzüglich einen Arzt.
• Wenn Toner mit Ihrer Kleidung oder Haut in
Berührung kommt, waschen Sie ihn sofort mit
Wasser ab. Verwenden Sie kein warmes Wasser,
da dadurch der Toner fixiert wird, was zu
dauerhaften Flecken führt.
• Zerlegen Sie die Tonerpatrone nicht, da dabei
Toner austreten und in die Augen oder den
Mund gelangen kann. Wenn Toner in die
Augen oder den Mund gelangt, waschen Sie
ihn sofort mit kaltem Wasser ab, und
konsultieren Sie unverzüglich einen Arzt.
• Wenn Toner aus der Tonerpatrone austritt,
achten Sie darauf, dass Sie den Toner nicht
verschlucken und Ihre Haut nicht in Berührung
mit dem Toner kommt. Wenn Sie nach dem
Waschen immer noch Hautreizungen spüren
oder Sie Toner verschluckt haben, konsultieren
Sie unverzüglich einen Arzt.
WICHTIG
• Lagern Sie Tonerpatronen an einem kühlen
Ort, der keinem direkten Sonnenlicht
ausgesetzt ist.
48

Hinweise
Produktname
Gemäß den Sicherheitsbestimmungen muss der
Produktname registriert werden.
In einigen Regionen, in denen dieses Produkt
verkauft wird, können stattdessen die folgenden
Namen in Klammern ( ) registriert werden.
imageRUNNER 2206iF (F193390)
imageRUNNER 2206N (F193392)
EMV-Anforderungen der EU-Richtlinie
Dieses Gerät inklusive Ausstattung erfüllt die
wesentlichen EMV-Anforderungen der EURichtlinie. Wir erklären hiermit, dass dieses
Produkt mit den EMV-Anforderungen der
EU-Richtlinie zu Stromversorgungsnetzen von
230 V, 50 Hz genügt, obwohl die Nennspannung
des Produktes bei 220 bis 240 V, 50/60 Hz liegt.
Die Verwendung von abgeschirmten Kabeln ist
notwendig, um die technischen EMVAnforderungen der EU-Richtlinie zu erfüllen.
WEEE- und Batterien-Richtlinien der EU
Informationen zu den WEEE- und BatterienRichtlinien finden Sie im neuesten
Anwenderhandbuch (HTML-Anleitung) auf der
Canon Website (canon.com/oip-manual).
Umweltzeichen Blauer Engel
Information nur für Deutschland
Wenn Sie mehr über Canon Produkte und den
Blauen Engel erfahren wollen, gehen Sie bitte auf
unsere Canon Home Page. Hier finden Sie mit
dem Blauen Engel ausgezeichnete Canon
Produkte und deren Nutzerinformationen.
Wireless LAN Regulatory Information
Regulatory information for users in Jordan
imageRUNNER 2206iF/2206N includes approved
Wireless LAN Module (Model name: Type1KA).
Contains Wireless LAN Module approved by TRC/
LPD/2017/19
Regulatory information for users in UAE
imageRUNNER 2206iF/2206N includes approved
Wireless LAN Module (Model name: Type1KA).
TRA
REGISTERED No: ER51217/17
DEALER No: DA0073692/11
RE-Richtlinie
(nur für europäische Funkanlagen)
RE-Konformitätserklärung
English (EN) Hereby, Canon Inc. declares that
this equipment is in compliance with Directive
2014/53/EU.
The full text of the EU declaration of conformity is
available at the following internet address:
http://www.canon-europe.com/ce-documentation
Wireless LAN Specifications
Frequency band(s):2412-2472MHz
Maximum radio-frequency power:15.9 dBm
Czech (CS) Tímto společnost Canon Inc.
prohlašuje, že toto zařízení je v souladu se
směrnicí 2014/53/EU.
Úplné znění EU prohlášení o shodě je k dispozici
na této internetové adrese:
http://www.canon-europe.com/ce-documentation
Technické údaje bezdrátové LAN
Pásmo(a) frekvence: 2412-2472 MHz
Maximální výkon rádiové frekvence: 15.9 dBm
Danish (DA) Hermed erklærer Canon Inc., at
dette udstyr er i overensstemmelse med direktiv
2014/53/EU.
EU-overensstemmelseserklæringens fulde tekst
kan findes på følgende internetadresse:
http://www.canon-europe.com/ce-documentation
Trådløs LAN specofikationer
Frekvensbånd: 2412-2472 MHz
Maks. radio-frekvenseffekt: 15.9 dBm
German (DE) Hiermit erklärt Canon Inc, dass
diese Anlage der Richtlinie 2014/53/EU
entspricht.
Der vollständige Text der EUKonformitätserklärung ist unter der folgenden
Internetadresse verfügbar:
http://www.canon-europe.com/ce-documentation
WLAN-Spezifikationen
Frequenzbereich(e): 2412-2472 MHz
Maximale Funkfrequenzleistung: 15.9 dBm
Estonian (ET) Käesolevaga deklareerib Canon
Inc., et käesolev seade vastab direktiivi 2014/53/
EL nõuetele.
ELi vastavusdeklaratsiooni täielik tekst on
kättesaadav järgmisel internetiaadressil:
http://www.canon-europe.com/ce-documentation
Juhtmevaba LAN-i spetsifikatsioonid
Sagedusriba(d): 2412-2472 MHz
Maksimaalne raadiosageduslik võimsus: 15.9 dBm
Spanish (ES) Por la presente, Canon Inc. declara
que este equipo es conforme con la Directiva
2014/53/UE.
El texto completo de la declaración UE de
conformidad está disponible en la dirección de
Internet siguiente:
http://www.canon-europe.com/ce-documentation
Especificaciones LAN inalámbrica
Banda(s) de frecuencia: 2412-2472 MHz
Potencia máxima de radiofrecuencia: 15.9 dBm
Greek (EL) Με την παρούσα, η Canon Inc.
δηλώνει ότι ο παρών εξοπλισμός συμμορφώνεται
με την Οδηγία 2014/53/ΕΕ.
Το πλήρες κείμενο της δήλωσης συμμόρφωσης
της ΕΕ διατίθεται στην ακόλουθη διεύθυνση στο
διαδίκτυο:
http://www.canon-europe.com/ce-documentation
Προδιαγραφές ασύρματου LAN (WLAN)
Ζώνες συχνότητας: 2412-2472 MHz
Μέγιστη ισχύς ραδιοσυχνότητας: 15.9 dBm
French (FR) Le soussigné, Canon Inc., déclare
que le présent équipement est conforme à la
Directive 2014/53/UE.
Le texte complet de la déclaration UE de
conformité est disponible à l'adresse internet
suivante :
http://www.canon-europe.com/ce-documentation
Spécifications LAN sans fil
Bande(s) de fréquence: 2412-2472 MHz
Puissance maximale de radiofréquence: 15.9 dBm
Italian (IT) Con la presente, Canon Inc. dichiara
che questa apparecchiatura è conforme alla
direttiva 2014/53/UE.
Il testo completo della dichiarazione di
conformità UE è disponibile al seguente indirizzo
Internet:
http://www.canon-europe.com/ce-documentation
Caratteristiche LAN wireless
Banda/e di frequenza: 2412-2472 MHz
Potenza massima a radiofrequenza: 15.9 dBm
Latvian (LV) Canon Inc. ar šo deklarē, ka šī
iekārta atbilst Direktīvai 2014/53/ES.
Pilns ES atbilstības deklarācijas teksts ir pieejams
šādā interneta vietnē:
http://www.canon-europe.com/ce-documentation
Bezvadu LAN specifikācijas
Frekvences josla(s): 2412-2472 MHz
Maksimālā radiofrekvences jauda: 15.9 dBm
Lithuanian (LT) Šiuo dokumentu „Canon Inc.“
patvirtina, kad ši įranga atitinka direktyvą
2014/53/ES.
Visas ES atitikties deklaracijos tekstas prieinamas
šiuo interneto adresu:
http://www.canon-europe.com/ce-documentation
Belaidžio LAN specifikacijos
Dažnio diapazonas(-ai): 2412-2472 MHz
Maksimali radijo ryšio dažnio galia: 15.9 dBm
Dutch (NL) Hierbij verklaar ik, Canon Inc., dat
deze apparatuur conform is met Richtlijn
2014/53/EU.
De volledige tekst van de EUconformiteitsverklaring kan worden
geraadpleegd op het volgende internetadres:
http://www.canon-europe.com/ce-documentation
Draadloos LAN specificaties
Frequentieband(en): 2412-2472 MHz
Maximaal radiofrequentievermogen: 15.9 dBm
Maltese (MT) B'dan, Canon, qed tiddikjara li dan
it-tip ta' tagħmir huwa konformi mad-Direttiva
2014/53/UE.
It-test kollu tad-dikjarazzjoni ta' konformità tal-UE
huwa disponibbli f'dan is-sit fuq l-internet:
http://www.canon-europe.com/ce-documentation
Speċifikazzjonijiet tal-Wireless LAN
Band(i) tal-Frekwenza: 2412-2472 MHz
Qawwa ta' frekwenza tar-radju massima: 15.9
dBm
Hungarian (HU) A Canon Inc. igazolja, hogy ez a
berendezés megfelel a 2014/53/EU irányelvnek.
Az EU-megfelelőségi nyilatkozat teljes szövege
elérhető a következő internetes címen:
http://www.canon-europe.com/ce-documentation
Vezeték nélküli LAN műszaki adatai
Frekvenciasáv(ok): 2412-2472 MHz
Maximális rádiofrekvenciás teljesítmény: 15.9 dBm
Polish (PL) Canon Inc. niniejszym oświadcza, że
niniejsze urządzenie jest zgodne z dyrektywą
2014/53/UE.
Pełny tekst deklaracji zgodności UE jest dostępny
pod następującym adresem internetowym:
http://www.canon-europe.com/ce-documentation
Specyfikacja bezprzewodowej sieci LAN
Pasmo(-a) częstotliwości: 2412-2472MHz
Maksymalna moc na częstotliwościach
radiowych: 15.9 dBm
Portuguese (PT) Por este meio, a Canon Inc.
declara que o presente equipamento está em
conformidade com a Diretiva 2014/53/UE.
O texto integral da declaração de conformidade
da UE está disponível no seguinte endereço de
Internet:
http://www.canon-europe.com/ce-documentation
Especificações de LAN Sem Fios
Banda(s) de frequências: 2412-2472 MHz
Potência máxima de radiofrequência: 15.9 dBm
Slovene (SL) Canon Inc. potrjuje, da je ta oprema
v skladu z Direktivo 2014/53/EU.
Celotno besedilo izjave EU o skladnosti je na voljo
na naslednjem spletnem naslovu:
http://www.canon-europe.com/ce-documentation
Specifikacije za brezžični LAN
Frekvenčna območja: 2412-2472 MHz
Največja radiofrekvenčna moč: 15.9 dBm
De
49

Anhang
De
Slovak (SK) Spoločnosť Canon Inc. týmto
vyhlasuje, že toto zariadenie je v súlade so
smernicou 2014/53/EÚ.
Úplné znenie EÚ vyhlásenia o zhode je k
dispozícii na tejto internetovej adrese:
http://www.canon-europe.com/ce-documentation
Technické údaje bezdrôtovej LAN
Pásmo (a) frekvencia: 2412-2472 MHz
Maximálny výkon rádiovej frekvencie: 15.9 dBm
Finnish (FI) Canon Inc. vakuuttaatäten, että tämä
laite on direktiivin 2014/53/EU mukainen.
EU-vaatimustenmukaisuusvakuutuksen
täysimittainen teksti on saatavilla seuraavassa
internetosoitteessa:
http://www.canon-europe.com/ce-documentation
Langattoman LAN:in tekniset ominaisuudet
Taajuuskaista(t): 2412-2472 MHz
Suurin radiotaajuusteho: 15.9 dBm
Swedish (SV) Härmed försäkrar Canon Inc. att
denna utrustning överensstämmer med direktiv
2014/53/EU.
Den fullständiga texten till EU-försäkran om
överensstämmelse finns tillgänglig på följande
webbadress:
http://www.canon-europe.com/ce-documentation
Specifikationer för trådlöst LAN
Frekvensband: 2412-2472 MHz
Maximal radiofrekvenseffekt: 15.9 dBm
Romanian (RO) Prin prezenta, Canon Inc. declară
că acest echipament este în conformitate cu
Directiva 2014/53/UE.
Textul integral al declarației UE de conformitate
este disponibil la următoarea adresă internet:
http://www.canon-europe.com/ce-documentation
Specificații wireless LAN
Benzi de frecvență: 2412-2472 MHz
Putere maximă a frecvenței radio: 15.9 dBm
Bulgarian (BG) С настоящото Canon Inc.
декларира, че това съоръжение е в
съответствие с Директива 2014/53/ЕС.
Цялостният текст на ЕС декларацията за
съответствие може да се намери на следния
интернет адрес:
http://www.canon-europe.com/ce-documentation
Спецификация на безжичната LAN
Честотна лента(и): 2412-2472 MHz
Максимална радиочестотна мощност: 15.9 dBm
Croatian (HR) Canon Inc. ovime izjavljuje da je
oprema u skladu s Direktivom 2014/53/EU.
Cjeloviti tekst EU izjave o sukladnosti dostupan je
na sljedećoj internetskoj adresi:
http://www.canon-europe.com/ce-documentation
Specifikacije bežičnog LAN-a
Frekvencijski pojas(evi): 2412-2472 MHz
Maksimalna snaga radijske frekvencije: 15.9 dBm
Irish (GA) Dearbhaíonn Canon Inc., leis seo, go
bhfuil an trealamh seo i gcomhlíonadh leis an
Treoir 2014/53/AE.
Tá an téacs iomlán de Dhearbhú Comhréireachta
AE ar fáil ag seoladh an láithreáin ghréasáin mar
seo a leanas:
http://www.canon-europe.com/ce-documentation
Sonraíochtaí LAN Gan Sreang
Banda(í) minicíochta: 2412-2472 MHz
Uaschumhacht radaimhinicíochta: 15.9 dBm
Norwegian (NO) Herved erklærer Canon Inc. at
dette utstyret er i overensstemmelse med direktiv
2014/53/EU.
Den fulle teksten til EUs samsvarserklæring er
tilgjengelig på følgende Internett-adresse:
http://www.canon-europe.com/ce-documentation
Trådløs LAN-spesifikasjoner
Bølgelengde: 2412-2472 MHz
Maks radiofrekvensstyrke: 15.9 dBm
Icelandic (IS) Hér með lýsir Canon Inc því yfir að
þessi búnaður er í samræmi við tilskipun 2014/53/
ESB.
Allur texti ESB-samræmisyfirlýsingar er í boði á
eftirfarandi veffangi:
http://www.canon-europe.com/ce-documentation
Tæknilýsingar fyrir þráðlausa nettengingu
Tíðnisvið: 2412-2472 MHz
Hámarksstyrkur útvarpstíðnibylgja: 15.9 dBm
Rechtliche Beschränkungen für die
Verwendung dieses Produkts und der
Verwendung der Bilder
Scannen, Drucken oder anderweitiges
Reproduzieren bestimmter Dokumente mit
diesem Gerät und die Verwendung von Bildern,
die Sie mit diesem Gerät gescannt, gedruckt oder
anderweitig reproduziert haben, ist unter
Umständen gesetzlich verboten und kann
zivilrechtlich und/oder strafrechtlich verfolgt
werden. Eine nicht vollständige Liste dieser
Dokumente ist nachstehend aufgeführt. Diese
Liste soll nur als Anhaltspunkt dienen. Wenn Sie
nicht sicher sind, ob Sie ein bestimmtes
Dokument mit dem Gerät scannen, drucken oder
anderweitig reproduzieren und Bilder, die Sie mit
diesem Gerät gescannt, gedruckt oder
anderweitig reproduziert haben, verwenden
dürfen, holen Sie vorab rechtlichen Rat ein.
• Papiergeld
• Reiseschecks
• Zahlungsanweisungen
• Lebensmittelmarken
• Einlagenzertifikate
• Reisepässe
• Briefmarken (gestempelt oder ungestempelt)
• Einwanderungspapiere
• Erkennungsmarken oder Ehrenabzeichen
• Steuermarken (gestempelt oder
ungestempelt)
• Bestimmte Dienst- oder Entwurfspapiere
• Anleihen oder andere Schuldverschreibungen
• Ausgestellte Schecks oder Wechsel von
Regierungsbehörden
• Aktienzertifikate
• Fahrzeugscheine und Fahrzeugbriefe
• Urheberrechtlich geschützte Werke/
Kunstwerke ohne Genehmigung der
Urheberrechtinhaber
Andere Warnhinweise
Das Gerät ist nicht für die Benutzung im
unmittelbaren Gesichtsfeld am
Bildschirmarbeitsplatz vorgesehen.
Um störende Reflexionen am
Bildschirmarbeitsplatz zu vermeiden, darf dieses
Produkt nicht im unmittelbaren Gesichtsfeld
platziert werden.
Haftungsausschluss
• Die Angaben in diesem Dokument können
ohne vorherige Ankündigung geändert
werden.
• CANON INC. GIBT BEZÜGLICH DIESES
MATERIALS KEINE GEWÄHRLEISTUNGEN
JEGLICHER ART, WEDER VERTRAGLICH NOCH
GESETZLICH, AUSSER DEN HIER
ANGEGEBENEN, EINSCHLIESSLICH, JEDOCH
NICHT BESCHRÄNKT AUF,
GEWÄHRLEISTUNGEN FÜR MARKTFÄHIGKEIT,
HANDELSÜBLICHE QUALITÄT, EIGNUNG FÜR
EINEN BESTIMMTEN ZWECK UND
PATENTVERLETZUNG. CANON INC. HAFTET
NICHT FÜR DIREKTE UND BEILÄUFIG
ENTSTANDENE SCHÄDEN ODER
FOLGESCHÄDEN JEDWEDER ART SOWIE FÜR
EINKOMMENSVERLUSTE, DIE AUS DER
NUTZUNG DIESE MATERIALS ENTSTEHEN.
Informationen zu
dieser Anleitung
Tasten und Schaltflächen in dieser Anleitung
Die folgenden Beispiele von Symbolen und
Tastennamen zeigen, wie die zu drückenden
Tasten in dieser Anleitung dargestellt werden.
• Tasten des Bedienfelds: [Tastensymbol]
Beispiel:
• Display: <Empfänger definieren.>
• Schaltflächen und Elemente auf dem
Computerbildschirm: [Einstellungen]
Abbildungen
Die in diesem Handbuch verwendeten
Abbildungen sind die Abbildungen, die
angezeigt werden, wenn am imageRUNNER
2206iF die folgende optionale Ausstattung
angebracht ist:
• Kassetteneinheit AD
Warenzeichen
Mac ist ein Warenzeichen von Apple Inc.
Microsoft, Windows, Windows Vista, Windows
Server, Internet Explorer, Excel und PowerPoint
sind Warenzeichen oder eingetragene
Warenzeichen der Microsoft Corporation in den
USA und/oder anderen Ländern.
Andere Firmen- oder Produktnamen, die in dieser
Anleitung verwendet werden und nicht in dieser
Liste erwähnt sind, können Warenzeichen der
entsprechenden Firmen sein.
Software von
Drittanbietern
Dieses Canon Produkt (das "PRODUKT") enthält
Softwaremodule von Drittanbietern. Die Nutzung
und Verteilung dieser Softwaremodule,
einschließlich etwaiger Aktualisierungen dieser
Softwaremodule (zusammen die "SOFTWARE")
unterliegen den nachfolgenden
Lizenzbedingungen (1) bis (9).
(1) Sie erklären sich damit einverstanden, dass Sie
alle geltenden Exportkontrollgesetze,
Einschränkungen oder Vorschriften der
beteiligten Länder in dem Fall einhalten, dass
dieses PRODUKT einschließlich der SOFTWARE
in ein anderes Land versandt, überführt oder
exportiert wird.
(2) Rechteinhaber der SOFTWARE behalten in
jeder Hinsicht Titel, Eigentum und Rechte am
geistigen Eigentum in und an der SOFTWARE.
Sofern nicht ausdrücklich vorgesehen, wird
keine Lizenz oder das Recht, ausdrücklich
oder implizit, seitens der Rechteinhaber der
SOFTWARE für etwaige Eigentumsrechte der
Rechteinhaber der SOFTWARE an Sie
übertragen oder gewährt.
(3) Sie dürfen die SOFTWARE ausschließlich mit
dem PRODUKT verwenden.
(4) Sie dürfen die SOFTWARE nicht an Dritte ohne
vorherige schriftliche Einverständniserklärung
der Rechteinhaber der SOFTWARE zuweisen,
unterlizenzieren, vermarkten, verteilen oder
übertragen.
(5) Ungeachtet des Vorstehenden, dürfen Sie die
SOFTWARE nur übertragen, wenn Sie (a) alle
Ihre Rechte an das PRODUKT und alle Rechte
und Verpflichtungen unter den
Lizenzbedingungen an den
Übertragungsempfänger übertragen und (b)
dieser Übertragungsempfänger zustimmt, an
alle diese Bedingungen gebunden zu sein.
(6) Sie dürfen den Code der SOFTWARE nicht
dekompilieren, auflösen, disassemblieren oder
anderweitig in eine für den Menschen lesbare
Form zurückentwickeln.
50

(7) Es ist Ihnen nicht gestattet, die SOFTWARE zu
ändern, anzupassen, zu übersetzen, zu
vermieten oder zu verleihen oder andere
Werke auf der Grundlage der SOFTWARE
abzuleiten.
(8) Sie sind nicht berechtigt die SOFTWARE von
dem PRODUKT zu entfernen oder separate
Kopien zu erstellen.
(9) Der für den Menschen lesbare Teil (der
Quellcode) der SOFTWARE wird nicht an Sie
lizenziert.
Ungeachtet der obigen Punkte (1) bis (9) gilt
Folgendes: das PRODUKT beinhaltet
Softwaremodule von Drittanbietern, denen
andere Lizenzbedingungen beiliegen, und diese
Softwaremodule unterliegen den anderen
Lizenzbedingungen.
Lesen Sie die anderen Lizenzbedingungen für
Softwaremodule von Drittanbietern, die im
Anhang der Anleitung für das entsprechende
PRODUKT beschrieben sind. Das Handbuch kann
von der Canon Webseite http://canon.com/
oip-manual heruntergeladen werden.
Durch die Nutzung des PRODUKTS gelten für Sie
alle geltenden Lizenzbedingungen als
vereinbart. Wenden Sie sich an unseren
Kundendienstvertreter, wenn Sie diesen
Lizenzbedingungen nicht zustimmen.
V_180517
51
De

Requisiti per l'installazione
100 mm o più
*
1.285 mm
Informazioni sui manuali forniti a corredo
①
Introduzione (questo manuale):
Leggere questo manuale come prima cosa. In esso sono
descritte le impostazioni, le operazioni e le avvertenze di base
della macchina. Leggere attentamente questo manuale prima
di utilizzare la macchina.
②
Guida all'installazione del driver MF (visitare il sito
Web) :
533 mm
1.022,9 mm
* Alimentatore (opzionale per imageRUNNER 2206N)
③
Guida per l'utente (visitare i sito Web):
Per una descrizione dell'installazione del software,
consultare la Guida all'installazione del driver MF
disponibile sul sito canon.com/oip-manual.
Per una descrizione di tutte le funzioni della
macchina, consultare la Guida per l'utente
disponibile sul sito canon.com/oip-manual.
It
52

Navigazione del menu e metodo di
immissione del testo
Il pannello di controllo qui mostrato è relativo al modello
imageRUNNER 2206iF. I tasti disponibili variano in base al
modello.
Accensione/spegnimento
Indietro
Registra nome unità
Canon-1
A/a/12
<A/a/12>
◄►
A
Applica
<Applica>
Cancella # Tasti
numerici
Navigazione del menu
Selezione voce
Toccare una voce per selezionarla. Premere per tornare alla
schermata precedente.
Conferma impostazione
Toccare la voce. Tuttavia, quando appare <Applica>, toccare
<Applica>.
Metodo d'inserimento testo
Modi ca della modalità d'inserimento
Toccare <A/a/12> per modi care la modalità d'inserimento. È
possibile anche premere
d'inserimento.
Modalità
d'inserimento
<A> Lettere alfabetiche e simboli maiuscoli
<a> Lettere alfabetiche e simboli minuscoli
<12> Numeri
Inserimento di testi, simboli e numeri
Inserire con i tasti numerici o
Spostamento del cursore (Inserimento di uno spazio)
Toccare <◄> o <►> per spostare il cursore. Per inserire uno
spazio, spostare il cursore alla ne del testo e toccare <►>.
Eliminazione di caratteri
Eliminare con . Tenendo premuto si eliminano tutti i
caratteri.
Modalità
d'inserimento: <A>
AÀBC aàbc 2
DEÈF deèf 3
GHIÌ ghiì 4
JKL jkl 5
MNOÒ mnoò 6
PQRS pqrs 7
TUÙV tuùv 8
WXYZ wxyz 9
- . * # ! “ , ; : ^ ` _ = / | ‘ ? $ @ % & + \ ˜ ( ) [ ] { } < >
per modi care la modalità
Testo disponibile
.
Modalità
d'inserimento: <a>
@ . - _ / 1
(Non disponibile) 0
(spazio)
Modalità
d'inserimento: <12>
(Non disponibile)
ON
OFF
• Assicurarsi che la spina di alimentazione sia saldamente
inserita nella presa di corrente.
• Non collegare il cavo USB in questo momento.
Collegarlo quando si installa il software.
It
53

Selezione delle impostazioni iniziali
Seguire le istruzioni nella schermata per eseguire le seguenti
operazioni:
• Impostazione della lingua
• Impostazione del paese e della regione
• Impostazione de fuso orario
• Impostazione di data e ora
• Registrazione delle informazioni di acquisto
• Impostazione del PIN accesso IU remota
• Impostazione della connessione LAN wireless
Per informazioni dettagliate sulla navigazione dei menu e su
come immettere i numeri, vedere "Navigazione del menu e
metodo di immissione del testo" (
L'impostazione del PIN accesso IU remota è raccomandata
quando si utilizza l'IU remota per impedire l'accesso non
autorizzato di terzi. L'IU remota consente di utilizzare un
browser per eseguire operazioni sulla macchina, controllarne
lo stato e speci care le impostazioni, permettendo all'utente
di gestire la macchina senza lasciare la propria scrivania. Per
informazioni sull'uso dell'IU remota, consultare la Guida per
l'utente.
Pag. 53).
Selezione del metodo di connessione della
macchina al computer
•
Connessione tramite una LAN
È possibile connettere la macchina al computer attraverso il
router di una LAN cablata. Utilizzare un cavo LAN per
collegare la macchina al router.
•
Connessione tramite una LAN wireless
È possibile connettere la macchina al computer attraverso
un router wireless*. Quando la connessione wireless è
stabilita, i cavi LAN non sono più necessari.
* È richiesto un router wireless (access point) che supporti lo
standard IEEE802.11b/g/n.
Connettere il computer al router via cavo o wireless.
Se non si conosce la modalità di connessione del proprio
router (wireless o cablato):
Consultare il manuale delle istruzioni fornito con il dispositivo
di rete oppure rivolgersi al produttore.
•
Connessione diretta
Connettere un dispositivo mobile alla macchina in modalità
wireless e direttamente, senza passare attraverso un router
LAN wireless (o access point).
Guida per l'utente "Connessione diretta (modalità
access point)"
Connessione tramite una LAN
Controllo prima della con gurazione
Internet
Router
Connettere il computer al router via cavo o wireless.
Assicurarsi che sul router siano disponibili porte libere che
consentano la connessione della macchina al computer.
Preparare un cavo LAN a doppini ritorti di categoria 5 o superiore.
•
Collegamento tramite cavo USB
It
È possibile collegare la macchina al computer utilizzando un
cavo USB.
IMPORTANTE
Nella confezione non è incluso un cavo USB.
Procurarsi un cavo adatto per il proprio computer.
Assicurarsi he il cavo USB utilizzato abbia il
seguente contrassegno.
Cavo LAN
Computer e router sono connessi correttamente tramite
un cavo LAN?
Per ulteriori informazioni, consultare il manuale delle istruzioni
del dispositivo di rete utilizzato o rivolgersi al produttore del
dispositivo di rete.
Le impostazioni di rete sul computer sono state
completate?
Se il computer non è correttamente con gurato, non sarà
possibile utilizzare la connessione LAN cablata anche dopo
aver completato le impostazioni seguenti.
NOTA
• Quando si stabilisce la connessione a un ambiente di
rete non protetto dal punto di vista della sicurezza, le
informazioni personali potrebbero essere divulgate a
terzi. Porre attenzione a questo aspetto.
• Se si e ettua la connessione tramite una LAN
nell'u cio, contattare l'amministratore di rete.
54

Con gurazione della connessione LAN
Collegare il cavo LAN.
1
Connessione tramite una LAN wireless
Controllo prima della con gurazione
Router LAN wireless
Internet
L'indirizzo IP verrà con gurato automaticamente in 2
minuti. Se si desidera impostare l'indirizzo IP
manualmente, vedere le sezioni seguenti.
Guida per l'utente "Impostazione degli indirizzi IP"
Installare i driver sul computer utilizzando il
2
CD-ROM/DVD-ROM in dotazione.
Vedere "Installazione del software" (pag. 58).
NOTA
Non è possibile installare il driver dello scanner se
macchina e computer sono connessi a un
ambiente con protocollo IPv6.
Continuare da "Impostazione di formato e tipo di carta"
(pag. 58).
Collegamento tramite cavo USB
Collegare il cavo USB dopo aver installato i driver.
Installare i driver sul computer utilizzando il
1
CD-ROM/DVD-ROM in dotazione.
Vedere "Installazione del software" (pag. 58).
Collegare il cavo USB.
2
Il computer è connesso correttamente al router (access
point) tramite un cavo LAN o una LAN wireless?
Per ulteriori informazioni, consultare il manuale delle istruzioni
del dispositivo di rete utilizzato o rivolgersi al produttore del
dispositivo di rete.
Le impostazioni di rete sul computer sono state
completate?
Se il computer non è correttamente con gurato, non sarà
possibile utilizzare la connessione LAN wireless anche dopo
aver completato le impostazioni seguenti.
NOTA
• Non è possibile stabilire la connessione
contemporaneamente alla LAN cablata e alla LAN
wireless. Inoltre, per impostazione prede nita la
macchina è con gurata per la "LAN cablata".
• Quando si stabilisce la connessione a un ambiente di
rete non protetto dal punto di vista della sicurezza, le
informazioni personali potrebbero essere divulgate a
terzi. Porre attenzione a questo aspetto.
• Se si e ettua la connessione tramite una LAN
nell'u cio, contattare l'amministratore di rete.
Cambio del metodo di connessione a LAN
wireless
Toccare <Menu> nella <Schermata principale>.
1
Continuare da "Impostazione di formato e tipo di carta"
(pag. 58).
Toccare <Impostazioni rete>.
2
Se viene visualizzata una schermata per l'immissione di ID e
PIN del gestore del sistema, inserire ID e PIN gestore sistema,
toccare <Applica> e premere .
Toccare <Seleziona LAN cablata/wireless>.
3
Toccare <LAN wireless>.
4
Seleziona LAN
LAN cablata
LAN wireless
It
55

Controllo del router
Selezionare il metodo di connessione alla LAN wireless.
Selezionare uno dei seguenti due metodi in base al router
(access point) utilizzato.
È disponibile un pulsante.
Questa macchina supporta
WPS (Wi-Fi Protected Setup).
Se sul router è disponibile il
pulsante di questa tecnologia
e se su di esso è presente il
contrassegno
con gurazione del router
(access point) sarà molto più semplice.
In caso di incertezza se il router supporti o meno la tecnologia WPS,
consultare il manuale fornito a corredo del router o rivolgersi al suo
produttore.
Non è disponibile un pulsante.
Se sul router (access point) non
è disponibile il pulsante, è
possibile operare
manualmente selezionando il
SSID e completando le
impostazioni. In questo caso, è
necessario ricordare il SSID e la
chiave di rete del router
(access point).
Vedere "Verifica del completamento dell'impostazione della
LAN wireless" (pag. 58) per sapere come trovare il SSID e la
chiave di rete.
Per e ettuare la con gurazione con il metodo del codice
PIN WPS o manualmente:
Guida per l'utente "Connessione a una LAN wireless"
, la
Impostazione della LAN wireless
It
Modalità con pulsante
Toccare <Menu> nella <Schermata principale>.
1
Toccare <Modo pulsante di comando per WPS>.
5
Impostazioni LAN wireless
Impostazioni SSID
Modo pulsante di comando per
Modo codice PIN per WPS
Modo risparmio energia
Informazioni LAN wireless
Toccare <Sì>.
6
Tenere premuto* il pulsante nché la spia non si
7
accede o lampeggia.
È necessario premere il pulsante WPS entro 2 minuti dopo
aver toccato <Sì> al passaggio 6.
* Il tempo per cui occorre tenere premuto il pulsante può variare
in base al router utilizzato.
Attendere circa 2 minuti dopo la connessione.
8
Durante questo periodo di tempo viene impostato
l'indirizzo IP.
Se compare un messaggio di errore:
Toccare <Chiudi> per chiudere la schermata, riprovare
le impostazioni. Se l'access point non viene trovato
dopo il nuovo tentativo, vedere la sezione seguente.
Guida per l'utente "Quando viene visualizzato un
messaggio di errore"
Controllo della connessione di rete:
È possibile controllare se la macchina è correttamente
connessa alla rete utilizzando un computer connesso a una
rete.
Guida per l'utente "Visualizzazione delle impostazioni di
rete"
Per impostare l'indirizzo IP manualmente:
Guida per l'utente "Connessione a una LAN wireless"
Toccare <Impostazioni rete>.
2
Se viene visualizzata una schermata per l'immissione di ID
e PIN del gestore del sistema, inserire ID e PIN gestore
sistema, toccare <Applica> e premere .
Toccare <Impostazioni LAN wireless>.
3
Leggere il messaggio visualizzato e scegliere <OK>.
4
56

Impostazione manuale dell'accesso point
Controllo di SSID o chiave di rete per un router/
1
access point di una LAN wireless.
• Controllare l'etichetta sul router LAN wireless.
Annotare il SSID e la chiave di rete visualizzati al
2
passaggio 1. Quando vengono mostrati più access
point, annotare tutti i SSID visualizzati.
SSID
Viene talvolta de nito anche nome della rete o nome
dell'access point. Se sono presenti SSID multipli, annotarli
tutti.
Chiave di rete
Viene de nita anche PIN, chiave WEP, passphrase WPA/
WPA2, PSK o chiave pre-condivisa.
Inserire la chiave di rete annotata.
10
Inserire la chiave di rete utilizzando i tasti numerici e
toccare <Applica>.
Chiave WEP (5-26 caratteri)
XXXXXXXX
Toccare <Sì>.
11
Alla visualizzazione della schermata <Connesso.>,
12
attendere che l'indicatore Wi-Fi smetta di
lampeggiare e si accenda sso.
Attendere circa 2 minuti dopo la connessione.
13
Durante questo periodo di tempo viene impostato
l'indirizzo IP.
A
ApplicaA/a/12
Toccare <Menu> nella <Schermata principale>.
3
Toccare <Impostazioni rete>.
4
Se viene visualizzata una schermata per l'immissione di ID
e PIN del gestore del sistema, inserire ID e PIN gestore
sistema, toccare <Applica> e premere .
Toccare <Impostazioni LAN wireless>.
5
Leggere il messaggio visualizzato e scegliere <OK>.
6
Toccare <Impostazioni SSID>.
7
Toccare <Seleziona punto di accesso>.
8
Impostazioni SSID
Seleziona punto di accesso
Immissione manuale
Selezionare un router LAN wireless.
9
Se vengono visualizzati più SSID corrispondenti,
selezionare l'ID elencato per primo (presumibilmente
quello con il segnale più forte).
Se compare un messaggio di errore:
Toccare <Chiudi> per chiudere la schermata,
controllare se la chiave di rete è corretta e riprovare le
impostazioni.
Se l'access point non viene trovato dopo il nuovo
tentativo, vedere la sezione seguente.
Guida per l'utente "Quando viene visualizzato un
messaggio di errore"
Per impostare l'indirizzo IP manualmente:
Guida per l'utente "Connessione a una LAN wireless"
It
57

Veri ca del completamento
dell'impostazione della LAN wireless
Premere .
1
Toccare <Informazioni rete>.
2
Toccare <IPv4>.
3
Toccare <Indirizzo IP>.
4
Prendere nota dell'indirizzo IP.
5
Indirizzo IP
XXX.XXX.XXX.XXX
Chiudi
Toccare <Chiudi>.
6
Impostazione di formato e tipo di carta
Seguire le istruzioni nella schermata per impostare il formato e
il tipo di carta.
Impostazioni carta
Vassoio multiuso
Cassetto 1
Cassetto 2
Seleziona formati carta più
Installazione del software
• La procedura qui descritta è valida solo se nel computer
in uso è installato il sistema operativo Windows. Per
maggiori informazioni sulla procedura di installazione
del software, consultare il manuale del driver.
• Per l'installazione su computer che utilizzano il sistema
operativo macOS, consultare il manuale del driver.
• A seconda del momento dell'acquisto, la macchina può
non essere dotata del driver per il macOS. I nuovi driver
vengono caricati sul sito web Canon, in modo che sia
possibile scaricare e usare i più recenti.
Premere .
7
Avviare il browser da un computer, inserire
8
"http://<indirizzo IP della macchina>/" nel campo
dell'indirizzo e premere [Invio] sulla tastiera.
1.
2.
Veri care che venga visualizzata la schermata
9
dell'IU remota.
It
Se la schermata viene visualizzata, la connessione è
completa.
Se la schermata non viene visualizzata correttamente:
Guida per l'utente "Problemi comuni"
Se la schermata non viene visualizzata
correttamente, reinserire il CD-ROM/DVD-ROM o
cercare "D:\MInst.exe" nella piattaforma Windows (in
questa descrizione "D:" designa l'unità CD-ROM/
DVD-ROM).
58

Come eseguire attività utili
L'unità mette a disposizione una serie di funzioni. Di seguito viene fornita una panoramica di alcune funzioni utili.
Copia
Copie ingrandite/rimpicciolite
È possibile aumentare o ridurre le
dimensioni standard dei documenti da
copiare su carta in formato standard o
speci care il rapporto di copia in
percentuale.
Copia fronte-retro**
È possibile copiare documenti di un lato
su entrambi le facciate del foglio.
Fascicolazione
È possibile ordinare le copie
disponendole in ordine di pagina.
Layout ridotto
È possibile ridurre più documenti per
copiarli su un singolo foglio.
2 in 1 4 in 1
Copia del documento d'identità
È possibile copiare un documento
fronte-retro su una singola facciata del
foglio.
Fax*
Invio di un documento direttamente
da un computer (PC Fax)
Oltre alle normali attività di invio e
ricezione dei fax, è possibile utilizzare il
PC Fax.
Invio
È possibile registrare le destinazioni fax
nella Rubrica. Le destinazioni possono
essere selezionati in vari modi,
permettendo all'utente di inviare fax in
maniera semplice e rapida.
• Ricerca della destinazione
• Tasti one-touch
• Composizione codi cata
• Gruppo di destinazioni
• Selezione dalla cronologia degli invii
• Broadcast sequenziale
Ricezione
•
Ricezione in memoria
È possibile archiviare i documenti
ricevuti in memoria. I documenti
possono essere stampati in qualsiasi
momento ed eliminati quando non
servono più.
•
Ricezione remota
Se è collegato un telefono esterno, è
possibile passare alla modalità di
ricezione fax immediatamente
componendo il numero ID per la
ricezione fax utilizzando i pulsanti di
composizione del telefono durante una
telefonata.
Stampa
Stampa ingrandita/rimpicciolita
Stampa fronte-retro**
Layout ridotto
È possibile ridurre più documenti per
stampandoli su un singolo foglio.
2 in 1 4 in 1
Stampa di opuscoli**
Stampa di poster
Stampa ligrana
Combinazione e stampa di
documenti multipli
Selezione di un "Pro lo"
Impostazioni di rete
La macchina è dotata di un'interfaccia
di rete che consente di creare
facilmente un ambiente di rete. È
possibile stampare un documento,
utilizzare i PC fax* e adoperare la
scansione in rete da tutti i computer
connessi alla macchina. La macchina
supporta l'aumento dell'e cienza del
lavoro quando opera come macchina
condivisa in u cio.
Scansione
Salvataggio dei documenti
utilizzando il pannello di controllo
della macchina
1
Documenti
2
3
Dati
Salvataggio dei documenti
utilizzando operazioni svolte da un
computer
•
Scansione con MF Scan Utility
Documenti
1
2
•
Scansione da un'applicazione
•
Scansione con il driver WIA
3
Dati
Invio dei documenti scansionati via
email***
È possibile inviare i documenti
scansionati alla propria applicazione di
email.
+
Documenti Dati Email
Invio dei documenti scansionati a un
le server***
È possibile inviare i documenti
scansionati a un le server.
Documenti Dati File server
IU remota
È possibile comprendere la condizione
della macchina dai computer nella rete.
È possibile accedere alla macchina e
gestire i lavori oppure speci care varie
impostazioni attraverso la rete.
* Solo imageRUNNER 2206iF
** La funzione è integrata per imageRUNNER
2206iF. Per imageRUNNER 2206N è richiesta la
Duplex Unit opzionale.
*** La funzione è integrata per imageRUNNER
2206iF. Per imageRUNNER 2206N è richiesto il
Send Kit opzionale.
It
59

Eliminazione degli inceppamenti della carta
Se compare la schermata seguente, nell'alimentatore o all'interno della macchina si è
veri cato un inceppamento della carta. Seguire la procedura visualizzata nella schermata
per rimuovere il documento o la carta inceppata. Questo manuale indica solo le aree in
cui la carta può incepparsi. Per i dettagli sulle procedure, consultare la Guida per l'utente.
Alimentatore (DADF-AY)
Area di uscita
(Opzionale per imageRUNNER 2206N)
Inceppamento carta.
Premere [Avanti] per
visualizzare le fasi.
Indietro Avanti
Cassetto della carta 1
(Opzionale per imageRUNNER 2206N)
Duplex Unit-C
It
Vassoio multiuso Gruppo di ssaggio Cassette Feeding Module-AD
(Opzionale)
60

Sostituzione della cartuccia toner
Le cartuccia toner sono materiali di consumo. Quando il toner si approssima all'esaurimento o si è esaurito completamente nel mezzo
di un lavoro, sullo schermo viene visualizzato un messaggio o possono veri carsi i seguenti problemi. Intraprendere l'azione
raccomandata conseguente.
Quando compare un messaggio
Quando il toner si approssima all'esaurimento o si è esaurito nel mezzo di un lavoro, sullo schermo viene visualizzato un messaggio.
Messaggio
<Preparare la
cartuccia toner.>
<Sostituire la
cartuccia toner.>
Quando viene visualizzato
il messaggio a schermo
La cartuccia toner dovrà
presto essere sostituita.
La cartuccia toner ha
raggiunto il termine della
sua vita utile.
Descrizione e soluzioni
Preparare una cartuccia toner sostitutiva e tenerla pronta. È consigliabile
controllare il livello del toner rimanente prima di stampare documenti molto
lunghi.
Guida per l'utente "Sostituzione della cartuccia toner"
Sostituire la cartuccia toner.
Guida per l'utente "Sostituzione della cartuccia toner"
Se le stampe sono di scarsa qualità
Se le stampe iniziano a mostrare una delle caratteristiche seguenti, la cartuccia toner è quasi vuota. Sostituire la cartuccia toner quasi
vuota se non viene visualizzato alcun messaggio.
Compaiono strisce bianche Parzialmente sbiadite La densità è irregolare
Sono presenti macchie e schizzi di
toner Le stampe sono grigiastre
61
It

Appendice
Importanti istruzioni
per la sicurezza
In questo capitolo sono riportate importanti
istruzioni per la sicurezza da rispettare per
prevenire infortuni agli utenti di questa macchina
e ad altri e per evitare danni alle proprietà.
Leggere attentamente questo capitolo prima di
utilizzare la macchina e attenersi alle istruzioni per
adoperarla correttamente. Non utilizzare l'unità in
modi non descritti in questo manuale. Canon non
potrà essere ritenuta resposabile per danni
conseguenti da un uso diverso da quello
descritto in questo manuale, eseguendo
operazioni non contemplate o effettuando
riparazioni e/o modifiche non effettuate
direttamente da Canon o da una terza parte
autorizzata da Canon. L'uso improprio della
macchina o operazioni errate possono causare
danni alle persone e/o danni alle proprietà che
possono richiedere riparazioni costose, non
coperte dalla Garanzia limitata.
AVVERTIMENTO
Indica un avvertimento che riguarda
operazioni che se non seguite correttamente
sono potenzialmente pericolose o addirittura
letali per le persone. Per utilizzare la
macchina in sicurezza, prestare sempre
attenzione a questi avvertimenti.
ATTENZIONE
Indica un avviso che riguarda operazioni che
se non seguite correttamente sono
potenzialmente pericolose per le persone.
Per utilizzare la macchina in sicurezza,
prestare sempre attenzione a questi avvisi.
IMPORTANTE
Indica requisiti e limitazioni operative.
Leggere queste indicazioni con attenzione
per utilizzare correttamente la macchina ed
evitare danni a macchina e proprietà.
Installazione
Per utilizzare la macchina in modo sicuro e
comodo, leggere attentamente le precauzioni
It
seguenti e installare la macchina in una posizione
appropriata.
AVVERTIMENTO
Non installare in luoghi in cui potrebbe
verificarsi un incendio o una scossa elettrica
• In una posizione dove le prese d'aria siano
ostruite (troppo vicino a una parete, su un
letto, divano, tappeti o oggetti simili)
• In un luogo umido o polveroso
• In un luogo esposto direttamente alla luce del
sole o all'esterno
• In un luogo soggetto a temperature elevate
• In un luogo esposto a fiamme aperte
• Nelle vicinanze di alcol, solventi per vernici o
altre sostanze infiammabili
Altri avvertimenti
• Non collegare cavi inappropriati per questa
macchina. Ciò potrebbe dar luogo a un
incendio o una scossa elettrica.
• Non appoggiare sulla macchina collane o altri
oggetti metallici o contenitori pieni di liquidi.
Se sostante estranee vengono a contatto con
le parti elettriche interne alla macchina, può
verificarsi un incendio o una scossa elettrica.
• In caso di ingresso di sostanze estranee nella
macchina, scollegare la spina di alimentazione
dalla presa di corrente e rivolgersi al
rivenditore Canon autorizzato di zona.
ATTENZIONE
Non installare nei luoghi seguenti
La macchina può cadere, ferire le persone e
causare danni.
• Una posizione instabile
• Un luogo esposto a vibrazioni
IMPORTANTE
Non installare nei luoghi seguenti
che possono danneggiare la macchina.
• Luoghi soggetti a valori estremi, sia alti che
bassi, di temperatura e umidità
• Luoghi soggetti a cambiamenti repentini e
significativi di temperatura e umidità
• Luoghi situati in prossimità di apparecchiature
che generano onde magnetiche o
elettromagnetiche
• Laboratori o strutture in cui si verificano
reazioni chimiche
• Luoghi esposti a gas tossici o corrosivi
• Luoghi che possono deformarsi con il peso
della macchina o in cui la macchina può
affondare (tappeti, cuscini e così via)
Evitare i luoghi scarsamente ventilati
La macchina genera una piccola quantità di
ozono e altre emissioni durante l'uso normale.
Queste emissioni non sono dannose per la salute.
Tuttavia potrebbero essere più facili da notare in
un uso esteso o prolungato, con stampe continue
in stanze poco ventilate. Per conservare un
ambiente di lavoro confortevole, è consigliabile
che la stanza in cui si trova la macchina sia
sufficientemente ventilata. Evitare anche i luoghi
in cui le persone possono essere esposte alle
emissioni della macchina.
Non installare nei luoghi in cui possa verificarsi
della condensa
Se la stanza in cui si trova la macchina viene
riscaldata rapidamente o se la macchina viene
spostata da un punto fresco e asciutto a un punto
umido, al suo interno possono formarsi gocce
d'acqua, cioè condensa. Usando la macchina in
queste condizioni può dar luogo a inceppamenti
della carta, scarsa qualità di stampa o danni alla
macchina. Aspettare almeno 2 ore che le
macchina si adegui alla temperatura e all'umidità
dell'ambiente prima di utilizzarla.
Evitare di installare la macchina in prossimità di
computer o altre apparecchiature elettroniche
di precisione.
Le interferenze elettriche e le vibrazioni generate
dalla macchina mentre stampa possono influire
negativamente sul funzionamento di dette
apparecchiature.
Evitare di installare la macchina vicino a
televisori, radio o apparecchiature elettroniche
simili.
La macchina potrebbe interferire con la ricezione
dei segnali audio e video. Inserire la spina di
alimentazione in una presa di corrente dedicata e
assicurare quanto più spazio possibile tra la
macchina e tutte le altre apparecchiature
elettroniche.
Ad altitudini di 3.000 m o più sul livello del
mare
Le macchine con un hard disk potranno non
funzionare correttamente quando vengono usate
ad altitudini elevate, quali 3.000 metri sul livello
del mare o superiori.
Collegamento della linea telefonica
Questa macchina è conforme allo standard di una
linea telefonica analogica. La macchina può
essere collegata solo alla rete telefonica generale
(RTG). Il collegamento della macchina a una linea
telefonica digitale o a una linea telefonica
dedicata potrebbe impedirne il corretto
funzionamento e provocare danni. Assicurarsi di
verificare il tipo di linea telefonica prima di
collegare la macchina. Contattare i provider del
servizio della linea telefonica IP o della linea a
fibre ottiche per collegare la macchina a tali tipi di
linea.
Quando si utilizza la LAN wireless
• Installare la macchina a una distanza di
massimo 50 metri dal router LAN wireless.
• Per quanto possibile, preferire l'installazione in
luoghi in cui la comunicazione non sarà
ostacolata dagli oggetti che si interpongono. Il
segnale potrebbe degradarsi passando
attraverso pareti o pavimenti.
• Allontanare il più possibile la macchina da
telefoni cordless digitali, forni a microonde o
altre apparecchiature che emettono onde
radio.
• Non utilizzare apparecchiature mediche nelle
vicinanze. Le onde radio emesse dalla
macchina possono interferire con le
apparecchiature mediche, causando
malfunzionamenti e incidenti.
Se il rumore di funzionamento è fastidioso
In base all'ambiente d'uso e alla modalità
operativa, se il rumore di funzionamento è un
problema si consiglia di installare la macchina in
un luogo diverso dall'ufficio.
Spostamento della macchina
Se occorre spostare la macchina, anche se in un
punto diverso dello stesso piano dell'edificio,
contattare prima il rivenditore Canon autorizzato
locale. Non provare a spostare la macchina da
soli.
Alimentazione
AVVERTIMENTO
• Utilizzare solo un alimentatore conforme ai
requisiti di tensione specificati. In caso
contrario potrebbero verificarsi incendi o
scosse elettriche.
• La macchina dev'essere collegata a una presa
dotata di messa a terra utilizzando il cavo di
alimentazione fornito a corredo.
• Non utilizzare cavi di alimentazione diversi da
quello fornito a corredo, in quanto potrebbe
verificarsi un incendio o una scossa elettrica.
• Il cavo di alimentazione fornito è pensato per
essere utilizzato con questa specifica
macchina. Non collegare il cavo di
alimentazione ad altri dispositivi.
• Non modificare, tirare, piegare forzatamente o
eseguire altre azioni che potrebbero
danneggiare il cavo di alimentazione. Non
posizionare oggetti pesanti sul cavo di
alimentazione. In caso contrario, potrebbero
verificarsi incendi o scosse elettriche.
• Non inserire o staccare la spina con le mani
bagnate, in quanto potrebbero verificarsi
scosse elettriche.
• Non utilizzare prolunghe o prese multiple con
la macchina. Ciò potrebbe dar luogo a un
incendio o una scossa elettrica.
• Non avvolgere il cavo di alimentazione né
annodarlo, in quanto potrebbero verificarsi
incendi o scosse elettriche.
• Inserire la spina di alimentazione
completamente nella presa CA. In caso
contrario potrebbero verificarsi incendi o
scosse elettriche.
62

• Estrarre la spina di alimentazione
completamente dalla presa CA durante i
temporali. In caso contrario potrebbero
verificarsi incendi, scosse elettriche o danni
alla macchina.
• Assicurarsi che l'alimentazione della macchina
sia sicura e che la tensione sia stabile.
• Tenere il cavo di alimentazione lontano dalle
fonti di calore; in caso contrario il rivestimento
del cavo di alimentazione potrebbe fondere e
causare incendi e scosse elettriche.
Evitare le seguenti situazioni:
Se viene applicata una forza eccessiva al punto di
collegamento del cavo di alimentazione, questo
potrebbe danneggiare il cavo e i fili conduttori
all'interno della macchina potrebbero scollegarsi.
C'è il rischio di un incendio.
–Collegare e scollegare il cavo di alimentazione
con troppa frequenza.
–Inciampare sul cavo di alimentazione.
–Il cavo di alimentazione è piegato nel punto di
collegamento ed è applicata una forza
continua alla presa di corrente o al punto di
collegamento.
–Applicare una forza eccessiva alla spina.
ATTENZIONE
• Installare la macchina vicino a una presa di
corrente e lasciare uno spazio sufficiente
attorno alla spina in modo da poterla
scollegare facilmente in caso di emergenza.
IMPORTANTE
Quando si collega l'alimentazione
• Non collegare il cavo di alimentazione a un
gruppo di continuità. Ciò potrebbe provocare
danni alla macchina in caso di mancanza di
corrente.
• Se si collega la macchina a una presa di
corrente CA multipla, non utilizzare le prese
rimanenti per collegare altri dispositivi.
• Non collegare il cavo di alimentazione al
connettore di alimentazione CA ausiliario di un
computer.
Altre precauzioni
• Il rumore elettrio può causare il
malfunzionamento della macchina o la perdita
di dati.
Gestione
AVVERTIMENTO
• Scollegare immediatamente la spina dalla
presa di corrente CA e contattare un
rivenditore autorizzato Canon se la macchina
fa un rumore insolito, se emette un odore
inusuale o se emette fumo o calore eccessivo.
Se si continua a usare la macchina potrebbero
verificarsi scosse elettriche o un incendio.
• Non smontare o modificare la macchina. Al
suo interno sono presenti componenti ad alta
tensione e ad alta temperatura. Smontando o
modificando la macchina si può incorrere in
una scossa elettrica o un incendio.
• Posizionare la macchina dove il suo cavo di
alimentazione, gli altri cavi, gli ingranaggi e le
parti elettriche interne non possano venire a
contatto con i bambini. C'è il pericolo di
incidenti imprevisti di grave entità.
• Non utilizzare spray infiammabili vicino alla
macchina. Se sostante infiammabili vengono a
contatto con le parti elettriche interne alla
macchina, può verificarsi un incendio o una
scossa elettrica.
• Quando si sposta la macchina, assicurarsi di
averla spenta e di aver scollegare il cavo di
alimentazione e i cavi di interfaccia. In caso
contrario il cavo di alimentazione e i cavi di
interfaccia possono danneggiarsi e causare
scosse elettriche o incendio.
• Quando si collega/scollega un cavo USB
mentre il cavo di alimentazione è collegato a
una presa elettrica CA, non toccare la parte
metallica del connettore poiché c'è il rischio di
una scossa elettrica.
Se si usa un pacemaker cardiaco
La macchina genera un flusso magnetico di basso
livello e onde ultrasoniche. Se si utilizza un
pacemaker cardiaco e si avvertono delle
anomalie, allontanarsi dalla macchina e
consultare immediatamente un medico.
ATTENZIONE
• Non appoggiare oggetti pesanti sulla
macchina perché potrebbero cadere,
causando infortuni.
• Per sicurezza, scollegare il cavo di
alimentazione se la macchina non verrà
utilizzata per un periodo di tempo prolungato.
• Fare attenzione quando si aprono/chiudono i
pannelli per evitare infortuni alle mani.
• Tenere le mani e i vestiti lontani dai rulli
nell'area di uscita. I rulli potrebbe intrappolare
le mani o i vestiti e causare un infortunio.
• L'interno della macchina e lo slot di uscita
sono molto caldi durante e immediatamente
dopo l'uso. Evitare il contatto con queste aree
per non rimediare bruciature. Anche la carta
stampata potrebbe essere molto calda
immediatamente dopo la stampa,
maneggiarla con cautela, altrimenti ci si
potrebbe scottare.
Alimentatore o coperchio del vetro di lettura
• Non esercitare una pressione eccessiva
sull'alimentatore o sul coperchio del vetro di
lettura quando si utilizza il vetro di lettura per
fare copie di libri spessi. Il vetro di lettura si
danneggerebbe e si potrebbe incorrere in un
infortunio.
• Chiudere l'alimentatore o il coperchio del
vetro di lettura delicatamente per evitare di
farsi male alle mani.
• Fare attenzione a non porre le mani e le dita
nell'alimentatore o nel coperchio del vetro di
lettura perché così facendo ci si può
infortunare.
Cassetto della carta
• Non inserire la mano nella macchina mentre il
cassetto della carta è stato rimosso, poiché ci
si potrebbe infortunare.
Tasto Risparmio energetico
• Per sicurezza, premere
energetico) se la macchina non verrà utilizzata
per un periodo di tempo prolungato, come ad
esempio durante la notte. Inoltre, per
sicurezza, spegnere l'interruttore di
alimentazione e scollegare il cavo di
alimentazione se la macchina non verrà
utilizzata per lunghi periodi, come ad esempio
durante giorni di ferie consecutivi.
Sicurezza laser
Questo prodotto è certificato come apparecchio
laser di Classe 1 secondo le direttive IEC608251:2014 e EN60825-1:2014.
CLASS 1 LASER PRODUCT
LASER KLASSE 1
APPAREIL À LASER DE CLASSE 1
(Risparmio
APPARECCHIO LASER DI CLASSE 1
PRODUCTO LÁSER DE CLASE 1
APARELHO A LASER DE CLASSE 1
LUOKAN 1 LASER-TUOTE
LASERPRODUKT KLASS 1
Il fascio laser può essere dannoso per il corpo
umano. Poiché la radiazione emessa all'interno
del prodotto è completamente confinata in un
alloggiamento protettivo e coperchi esterni, il
fascio laser non può uscire dalla macchina in
nessun momento durante l'uso da parte
dell'utente. Leggere le seguenti note e istruzioni
per la sicurezza.
• Mai aprire i coperchi oltre a quelli indicati nei
manuali per la macchina.
• Se il fascio laser dovesse uscire e entrare negli
occhi, l'esposizione potrebbe causare danni
agli occhi.
• L'utilizzo di controlli, regolazioni o l'esecuzione
di procedure diverse da quelle specificate in
questo manuale può provocare l'esposizione a
radiazioni pericolose.
Avviso sicurezza laser
Unità di fissaggio
Quando si rimuove la carta inceppata o quando si
ispeziona l'interno della macchina, fare attenzione
al calore emesso per molto tempo dall'unità di
fissaggio e dai componenti nelle sue vicinanze.
Ciò potrebbe comportare bruciature di bassa
temperatura anche senza aver toccato
direttamente l'unità di fissaggio o gli elementi a
esso circostanti.
IMPORTANTE
• Seguire le istruzioni sull'etichetta di avviso
riportata sulla macchina.
• Non sottoporre la macchina a urti o vibrazioni
di elevata entità.
• Non aprire o chiudere in modo forzato
sportelli, coperchi, pannelli e altre parti. La
macchina potrebbe danneggiarsi.
It
63

Appendice
• Non spegnere l'interruttore di alimentazione o
aprire i coperchi quando la macchina è in
funzione. La carta potrebbe incepparsi.
• Utilizzare un cavo modulare di massimo 3
metri.
• Utilizzare un cavo USB di massimo 3 metri.
Simboli correlati alla sicurezza
Interruttore di alimentazione: posizione
"ACCESO"
Interruttore di alimentazione: posizione
"SPENTO"
Interruttore di alimentazione: posizione
"STAND-BY"
Interruttore "ACCESO" "SPENTO"
Terminale di messa a terra di protezione
Tensione pericolosa all'interno. Non aprire i
coperchi in modo diverso da quanto indicato
nelle istruzioni.
ATTENZIONE: superficie calda. Non toccare.
Apparecchiatura di Classe II
Parti in movimento: tenere il corpo lontano
dalle parti in movimento
ATTENZIONE: Si può verificare una scossa
elettrica. Rimuovere tutte le spine di
alimentazione dalla presa di corrente.
Sono presenti bordi taglienti. Tenere il corpo
lontano dai bordi taglienti.
[NOTA]
Alcuni dei simboli mostrati sopra possono non
essere presenti in base al prodotto.
Manutenzione e ispezioni
Pulire regolarmente la macchina. Se si accumula
della polvere, la macchina potrebbe non
funzionare correttamente. Durante la pulizia,
osservare i seguenti aspetti. Se si verifica un
problema durante il funzionamento, vedere
"Risoluzione dei problemi" nella Guida per
l'utente. Se il problema non può essere risolto o
se si pensa che la macchina richieda un'ispezione,
vedere "Quando non è possibile risolvere un
problema" nella Guida per l'utente.
AVVERTIMENTO
It
• Prima di pulirla, spegnere la macchina e
scollegare il cavo di alimentazione dalla presa
di corrente. In caso contrario potrebbero
verificarsi incendi o scosse elettriche.
• Scollegare la spina di alimentazione
periodicamente e pulirla con un panno
asciutto per rimuovere polvere e sporco. La
polvere accumulata potrebbe assorbire
umidità dall'aria e causare un incendio
venendo a contatto con l'elettricità.
• Utilizzare un panno umido e ben strizzato per
pulire la macchina. Inumidire il panno con sola
acqua. Non utilizzare alcol, benzina, solvente
per vernici o altre sostanze infiammabili. Non
utilizzare carta velina o tovagliolini di carta. Se
queste sostanze entrano a contatto con le
parti elettriche all'interno della macchina
possono generare elettricità statica o causare
un incendio o una scossa elettrica.
• Verificare periodicamente che il cavo e la spina
di alimentazione non presentino danni.
Controllare la macchina per escludere la
presenza di ruggine, ammaccature, graffi,
crepe o eccessivo riscaldamento. L'uso di
apparecchiatura con manutenzione scarsa
può comportare la nascita di un incendio o
scosse elettriche.
ATTENZIONE
• L'interno della macchina presenta componenti
ad alta temperatura e alta tensione. Toccando
questi componenti si può incorrere in
bruciature. Non toccare alcuna parte del
manuale che non sia indicata nel manuale.
• Quando si carica carta o si rimuove carta
inceppata, fare attensione a non tagliarsi le
mani con i bordi dei fogli.
Materiali di consumo
AVVERTIMENTO
• Non gettare le cartucce toner nel fuoco e non
conservarle né stampare/copiare carta in
luoghi esposti al fuoco. Potrebbe svilupparsi
un incendio e causare bruciature.
• Se accidentalmente si versa del toner,
raccogliere con attenzione le particelle di
toner utilizzando anche un panno inumidito,
in modo da evitare l'inalazione. Non utilizzare
un aspirapolvere perché non contiene un
sistema antiesplosione della polvere da toner
versato. Se si fa ciò, l'aspirapolvere potrebbe
non funzionare correttamente e causare
l'esplosione della polvere dovuta a scariche
statiche.
ATTENZIONE
• Tenere il toner e gli altri consumabili lontani
dalla portata dei bambini. Se questi elementi
dovessero essere ingeriti, rivolgersi
immediatamente a un medico.
• Se il toner viene a contatto con gli indumenti
o la pelle, lavare immediatamente con acqua.
Non utilizzare acqua calda perché potrebbe
causare il fissaggio del toner, causando
macchine permanenti.
• Non smontare le cartucce toner, perché così
facendo il toner potrebbe fuoriuscire e
penetrare negli occhi e nella bocca. Se il toner
finisce negli occhi o nella bocca, lavare
immediatamente con acqua fredda e rivolgersi
a un medico al più presto.
• Se del toner fuoriesce dalla cartuccia toner,
non ingerirlo e non permettere il contatto
diretto con la pelle. Se dopo averla lavata la
pelle è ancora irritata, o se si è ingerito del
toner, rivolgersi immediatamente a un medico.
IMPORTANTE
• Conservare le cartucce toner in un luogo
fresco, lontano dalla luce diretta del sole.
Avviso
Nome del prodotto
Le normative di sicurezza richiedono la
registrazione del nome del prodotto.
In alcune regioni, potrebbero essere registrati i
seguenti nomi alternativi, indicati fra parentesi ( ).
imageRUNNER 2206iF (F193390)
imageRUNNER 2206N (F193392)
Requisiti di compatibilità elettromagnetica
(EMC) della Direttiva CE
Questa apparecchiatura è conforme con i requisiti
essenziali di compatibilità elettromagnetica (EMC)
della direttiva CE. Dichiariamo che questo
prodotto è conforme con i requisiti EMC della
direttiva CE per una tensione nominale di
ingresso di 230V, 50 Hz, sebbene la tensione
nominale di questo prodotto sia 220 - 240V, 50/60
Hz. L'uso di un cavo schermato è necessario per
conformità con i requisiti tecnici di compatibilità
elettromagnetica (EMC) della Direttiva CE.
Direttive su WEEE e batterie
Le informazioni sulle direttive su WEEE e batterie
sono consultabili nella Guida per l'utente
(manuale in formato HTML) più recente sul sito
Web di Canon (canon.com/oip-manual).
Wireless LAN Regulatory Information
Regulatory information for users in Jordan
imageRUNNER 2206iF/2206N includes approved
Wireless LAN Module (Model name: Type1KA).
Contains Wireless LAN Module approved by TRC/
LPD/2017/19
Regulatory information for users in UAE
imageRUNNER 2206iF/2206N includes approved
Wireless LAN Module (Model name: Type1KA).
TRA
REGISTERED No: ER51217/17
DEALER No: DA0073692/11
Direttiva sulle apparecchiature radio
(Solo per apparecchiature radio europee)
Dichiarazione di conformità delle
apparecchiature radio
English (EN) Hereby, Canon Inc. declares that
this equipment is in compliance with Directive
2014/53/EU.
The full text of the EU declaration of conformity is
available at the following internet address:
http://www.canon-europe.com/ce-documentation
Wireless LAN Specifications
Frequency band(s):2412-2472MHz
Maximum radio-frequency power:15.9 dBm
Czech (CS) Tímto společnost Canon Inc.
prohlašuje, že toto zařízení je v souladu se
směrnicí 2014/53/EU.
Úplné znění EU prohlášení o shodě je k dispozici
na této internetové adrese:
http://www.canon-europe.com/ce-documentation
Technické údaje bezdrátové LAN
Pásmo(a) frekvence: 2412-2472 MHz
Maximální výkon rádiové frekvence: 15.9 dBm
Danish (DA) Hermed erklærer Canon Inc., at
dette udstyr er i overensstemmelse med direktiv
2014/53/EU.
EU-overensstemmelseserklæringens fulde tekst
kan findes på følgende internetadresse:
http://www.canon-europe.com/ce-documentation
Trådløs LAN specofikationer
Frekvensbånd: 2412-2472 MHz
Maks. radio-frekvenseffekt: 15.9 dBm
German (DE) Hiermit erklärt Canon Inc, dass
diese Anlage der Richtlinie 2014/53/EU
entspricht.
Der vollständige Text der EUKonformitätserklärung ist unter der folgenden
Internetadresse verfügbar:
http://www.canon-europe.com/ce-documentation
WLAN-Spezifikationen
Frequenzbereich(e): 2412-2472 MHz
Maximale Funkfrequenzleistung: 15.9 dBm
Estonian (ET) Käesolevaga deklareerib Canon
Inc., et käesolev seade vastab direktiivi 2014/53/
EL nõuetele.
ELi vastavusdeklaratsiooni täielik tekst on
kättesaadav järgmisel internetiaadressil:
http://www.canon-europe.com/ce-documentation
Juhtmevaba LAN-i spetsifikatsioonid
Sagedusriba(d): 2412-2472 MHz
Maksimaalne raadiosageduslik võimsus: 15.9 dBm
64

Spanish (ES) Por la presente, Canon Inc. declara
que este equipo es conforme con la Directiva
2014/53/UE.
El texto completo de la declaración UE de
conformidad está disponible en la dirección de
Internet siguiente:
http://www.canon-europe.com/ce-documentation
Especificaciones LAN inalámbrica
Banda(s) de frecuencia: 2412-2472 MHz
Potencia máxima de radiofrecuencia: 15.9 dBm
Greek (EL) Με την παρούσα, η Canon Inc.
δηλώνει ότι ο παρών εξοπλισμός συμμορφώνεται
με την Οδηγία 2014/53/ΕΕ.
Το πλήρες κείμενο της δήλωσης συμμόρφωσης
της ΕΕ διατίθεται στην ακόλουθη διεύθυνση στο
διαδίκτυο:
http://www.canon-europe.com/ce-documentation
Προδιαγραφές ασύρματου LAN (WLAN)
Ζώνες συχνότητας: 2412-2472 MHz
Μέγιστη ισχύς ραδιοσυχνότητας: 15.9 dBm
French (FR) Le soussigné, Canon Inc., déclare
que le présent équipement est conforme à la
Directive 2014/53/UE.
Le texte complet de la déclaration UE de
conformité est disponible à l'adresse internet
suivante :
http://www.canon-europe.com/ce-documentation
Spécifications LAN sans fil
Bande(s) de fréquence: 2412-2472 MHz
Puissance maximale de radiofréquence: 15.9 dBm
Italian (IT) Con la presente, Canon Inc. dichiara
che questa apparecchiatura è conforme alla
direttiva 2014/53/UE.
Il testo completo della dichiarazione di
conformità UE è disponibile al seguente indirizzo
Internet:
http://www.canon-europe.com/ce-documentation
Caratteristiche LAN wireless
Banda/e di frequenza: 2412-2472 MHz
Potenza massima a radiofrequenza: 15.9 dBm
Latvian (LV) Canon Inc. ar šo deklarē, ka šī
iekārta atbilst Direktīvai 2014/53/ES.
Pilns ES atbilstības deklarācijas teksts ir pieejams
šādā interneta vietnē:
http://www.canon-europe.com/ce-documentation
Bezvadu LAN specifikācijas
Frekvences josla(s): 2412-2472 MHz
Maksimālā radiofrekvences jauda: 15.9 dBm
Lithuanian (LT) Šiuo dokumentu „Canon Inc.“
patvirtina, kad ši įranga atitinka direktyvą
2014/53/ES.
Visas ES atitikties deklaracijos tekstas prieinamas
šiuo interneto adresu:
http://www.canon-europe.com/ce-documentation
Belaidžio LAN specifikacijos
Dažnio diapazonas(-ai): 2412-2472 MHz
Maksimali radijo ryšio dažnio galia: 15.9 dBm
Dutch (NL) Hierbij verklaar ik, Canon Inc., dat
deze apparatuur conform is met Richtlijn
2014/53/EU.
De volledige tekst van de EUconformiteitsverklaring kan worden
geraadpleegd op het volgende internetadres:
http://www.canon-europe.com/ce-documentation
Draadloos LAN specificaties
Frequentieband(en): 2412-2472 MHz
Maximaal radiofrequentievermogen: 15.9 dBm
Maltese (MT) B'dan, Canon, qed tiddikjara li dan
it-tip ta' tagħmir huwa konformi mad-Direttiva
2014/53/UE.
It-test kollu tad-dikjarazzjoni ta' konformità tal-UE
huwa disponibbli f'dan is-sit fuq l-internet:
http://www.canon-europe.com/ce-documentation
Speċifikazzjonijiet tal-Wireless LAN
Band(i) tal-Frekwenza: 2412-2472 MHz
Qawwa ta' frekwenza tar-radju massima: 15.9
dBm
Hungarian (HU) A Canon Inc. igazolja, hogy ez a
berendezés megfelel a 2014/53/EU irányelvnek.
Az EU-megfelelőségi nyilatkozat teljes szövege
elérhető a következő internetes címen:
http://www.canon-europe.com/ce-documentation
Vezeték nélküli LAN műszaki adatai
Frekvenciasáv(ok): 2412-2472 MHz
Maximális rádiofrekvenciás teljesítmény: 15.9 dBm
Polish (PL) Canon Inc. niniejszym oświadcza, że
niniejsze urządzenie jest zgodne z dyrektywą
2014/53/UE.
Pełny tekst deklaracji zgodności UE jest dostępny
pod następującym adresem internetowym:
http://www.canon-europe.com/ce-documentation
Specyfikacja bezprzewodowej sieci LAN
Pasmo(-a) częstotliwości: 2412-2472MHz
Maksymalna moc na częstotliwościach
radiowych: 15.9 dBm
Portuguese (PT) Por este meio, a Canon Inc.
declara que o presente equipamento está em
conformidade com a Diretiva 2014/53/UE.
O texto integral da declaração de conformidade
da UE está disponível no seguinte endereço de
Internet:
http://www.canon-europe.com/ce-documentation
Especificações de LAN Sem Fios
Banda(s) de frequências: 2412-2472 MHz
Potência máxima de radiofrequência: 15.9 dBm
Slovene (SL) Canon Inc. potrjuje, da je ta oprema
v skladu z Direktivo 2014/53/EU.
Celotno besedilo izjave EU o skladnosti je na voljo
na naslednjem spletnem naslovu:
http://www.canon-europe.com/ce-documentation
Specifikacije za brezžični LAN
Frekvenčna območja: 2412-2472 MHz
Največja radiofrekvenčna moč: 15.9 dBm
Slovak (SK) Spoločnosť Canon Inc. týmto
vyhlasuje, že toto zariadenie je v súlade so
smernicou 2014/53/EÚ.
Úplné znenie EÚ vyhlásenia o zhode je k
dispozícii na tejto internetovej adrese:
http://www.canon-europe.com/ce-documentation
Technické údaje bezdrôtovej LAN
Pásmo (a) frekvencia: 2412-2472 MHz
Maximálny výkon rádiovej frekvencie: 15.9 dBm
Finnish (FI) Canon Inc. vakuuttaatäten, että tämä
laite on direktiivin 2014/53/EU mukainen.
EU-vaatimustenmukaisuusvakuutuksen
täysimittainen teksti on saatavilla seuraavassa
internetosoitteessa:
http://www.canon-europe.com/ce-documentation
Langattoman LAN:in tekniset ominaisuudet
Taajuuskaista(t): 2412-2472 MHz
Suurin radiotaajuusteho: 15.9 dBm
Swedish (SV) Härmed försäkrar Canon Inc. att
denna utrustning överensstämmer med direktiv
2014/53/EU.
Den fullständiga texten till EU-försäkran om
överensstämmelse finns tillgänglig på följande
webbadress:
http://www.canon-europe.com/ce-documentation
Specifikationer för trådlöst LAN
Frekvensband: 2412-2472 MHz
Maximal radiofrekvenseffekt: 15.9 dBm
Romanian (RO) Prin prezenta, Canon Inc. declară
că acest echipament este în conformitate cu
Directiva 2014/53/UE.
Textul integral al declarației UE de conformitate
este disponibil la următoarea adresă internet:
http://www.canon-europe.com/ce-documentation
Specificații wireless LAN
Benzi de frecvență: 2412-2472 MHz
Putere maximă a frecvenței radio: 15.9 dBm
Bulgarian (BG) С настоящото Canon Inc.
декларира, че това съоръжение е в
съответствие с Директива 2014/53/ЕС.
Цялостният текст на ЕС декларацията за
съответствие може да се намери на следния
интернет адрес:
http://www.canon-europe.com/ce-documentation
Спецификация на безжичната LAN
Честотна лента(и): 2412-2472 MHz
Максимална радиочестотна мощност: 15.9 dBm
Croatian (HR) Canon Inc. ovime izjavljuje da je
oprema u skladu s Direktivom 2014/53/EU.
Cjeloviti tekst EU izjave o sukladnosti dostupan je
na sljedećoj internetskoj adresi:
http://www.canon-europe.com/ce-documentation
Specifikacije bežičnog LAN-a
Frekvencijski pojas(evi): 2412-2472 MHz
Maksimalna snaga radijske frekvencije: 15.9 dBm
Irish (GA) Dearbhaíonn Canon Inc., leis seo, go
bhfuil an trealamh seo i gcomhlíonadh leis an
Treoir 2014/53/AE.
Tá an téacs iomlán de Dhearbhú Comhréireachta
AE ar fáil ag seoladh an láithreáin ghréasáin mar
seo a leanas:
http://www.canon-europe.com/ce-documentation
Sonraíochtaí LAN Gan Sreang
Banda(í) minicíochta: 2412-2472 MHz
Uaschumhacht radaimhinicíochta: 15.9 dBm
Norwegian (NO) Herved erklærer Canon Inc. at
dette utstyret er i overensstemmelse med direktiv
2014/53/EU.
Den fulle teksten til EUs samsvarserklæring er
tilgjengelig på følgende Internett-adresse:
http://www.canon-europe.com/ce-documentation
Trådløs LAN-spesifikasjoner
Bølgelengde: 2412-2472 MHz
Maks radiofrekvensstyrke: 15.9 dBm
Icelandic (IS) Hér með lýsir Canon Inc því yfir að
þessi búnaður er í samræmi við tilskipun 2014/53/
ESB.
Allur texti ESB-samræmisyfirlýsingar er í boði á
eftirfarandi veffangi:
http://www.canon-europe.com/ce-documentation
Tæknilýsingar fyrir þráðlausa nettengingu
Tíðnisvið: 2412-2472 MHz
Hámarksstyrkur útvarpstíðnibylgja: 15.9 dBm
Limitazioni legali nell'uso del prodotto e
nell'uso delle immagini
L'uso del prodotto per scansionare, stampare o
riprodurre in altro modo determinati documenti,
e l'impiego di dette immagini scansionate,
stampate o riprodotte in altro modo dal prodotto
possono essere vietati dalla lagge e possono
violare il codice civile e/o panale del proprio
paese. Di seguito è riportato un elenco di questi
documenti. L'elenco non intende essere esaustivo
ma costituire solo una guida. Se non si è certi
della legalità nell'uso del prodotto per
scansionare, stampare o riprodurre in altro modo
un particolare documento, e/o nell'uso delle
immagini scansionate, stampate o riprodotte in
altro modo, consultare prima un legale.
• Banconote
• Travel-check
• Vaglia postali
• Buoni pasto
It
65

Appendice
• Certificati di deposito
• Passaporti
• Francobolli (annullati o non annullati)
• Permessi di soggiorno
• Badge di identificazione o onoreficenze
• Valori bollati interni (annullati o non annullati)
• Coscrizioni o cartoline di precetto
• Obbligazioni o altri certificati di debito
• Assegni o cambiali emessi da pubblica
amministrazione
• Certificazioni di azioni
• Patenti e certificazioni di titolo
• Opere protette da copyright/opere d'arte
senza il permesso del proprietario del
copyright
Esonero di responsabilità
• Le informazioni contenute in questo
documento sono soggette a modifiche senza
preavviso.
• CANON INC. NON FORNISCE GARANZIE DI
ALCUN TIPO, ESPLICITE O IMPLICITE, IN MERITO
AL PRESENTE DOCUMENTO, AD ECCEZIONE DI
QUANTO ESPRESSAMENTE INDICATO NEL
DOCUMENTO STESSO, INCLUSE, SENZA
LIMITAZIONI, GARANZIE DI COMMERCIABILITÀ,
IDONEITÀ PER UNO SCOPO PARTICOLARE O
MANCATA VIOLAZIONE. CANON INC. NON È
RESPONSABILE DI EVENTUALI DANNI DIRETTI,
ACCIDENTALI, CONSEQUENZIALI O DI ALTRO
GENERE, NÉ DI DANNI CAUSATI DALLA
PERDITA DI DATI DERIVANTI DALL'USO DI
QUESTO MATERIALE.
Informazioni su questo
manuale
Tasti e pulsanti utilizzati nel presente manuale
I simboli e i nomi dei tasti seguenti sono alcuni
esempi di come sono illustrati nel manuale i tasti
da premere.
• Tasti del pannello operativo: [icona Tasto]
Esempio:
• Visualizzazione: <Specif. destinazione.>
• Pulsanti e voci nella schermata del computer:
[Preferenze]
Illustrazioni
Le illustrazioni utilizzate in questo manuale sono
quelle visualizzate quando al modello
imageRUNNER 2206iF sono state installate le
seguenti apparecchiature opzionali:
It
• Cassette Feeding Module-AD
Marchi
Mac è un marchio commerciale di Apple Inc.
Microsoft, Windows, Windows Vista, Windows
Server, Internet Explorer, Excel e PowerPoint sono
marchi di fabbrica o marchi registrati di Microsoft
Corporation negli Stati Uniti e/o in altri paesi.
Gli altri nomi di prodotto e di azienda indicati nel
manuale possono essere marchi di fabbrica dei
rispettivi proprietari.
(2) I titolari dei diritti del SOFTWARE mantengono
a tutti gli effetti il titolo, il possesso e i diritti di
proprietà intellettuale correlati al SOFTWARE.
Se non diversamente indicato in questo
documento, nessuna licenza o diritto,
espresso o implicito, viene quindi fornito o
assegnato dai titolari dei diritti del SOFTWARE
all'utente in merito alla proprietà intellettuale
dei titolari di diritti del SOFTWARE.
(3) Il SOFTWARE può essere utilizzato
esclusivamente con il PRODOTTO.
(4) Non è consentito assegnare, concedere in
sublicenza, commercializzare, distribuire o
trasferire il SOFTWARE a terze parti senza
previo consenso scritto dei titolari dei diritti
del SOFTWARE.
(5) Ciò nonostante, il SOFTWARE può essere
trasferito solo nel caso in cui (a) si assegnano
tutti i propri diritti sul PRODOTTO e tutti i
diritti e gli obblighi previsti dalle condizioni
della licenza al cessionario e (b) il cessionario
accetta di essere vincolato a tutte queste
condizioni.
(6) Non è consentito decompilare, decodificare,
disassemblare o in altro modo semplificare il
codice del SOFTWARE in un formato
umanamente leggibile.
(7) Non è possibile modificare, adattare, tradurre,
affittare, noleggiare o prestare il SOFTWARE o
creare lavori derivati sulla base del SOFTWARE.
(8) Non è consentito rimuovere o creare copie
separate del SOFTWARE dal PRODOTTO.
(9) La parte umanamente leggibile (codice
sorgente) del SOFTWARE non è concessa in
licenza all'utente.
Nonostante quanto indicato a punti da (1) a (9), il
PRODOTTO include moduli software di terze parti
che seguono le altre condizioni di licenza,
pertanto tali moduli software sono soggetti alle
altre condizioni di licenza.
Fare riferimento alle altre condizioni di licenza di
moduli software di terze parti descritte
nell'Appendice del Manuale relativo al
PRODOTTO corrispondente. Questo manuale è
disponibile sul sito http://canon.com/oip-manual.
L'utilizzo del PRODOTTO comporta l'accettazione
di tutte le condizioni di licenza applicabili. In caso
di disaccordo con tali condizioni di licenza,
contattare il tecnico di assistenza.
V_180517
Software di terzi
Questo prodotto Canon (il "PRODOTTO")
contiene moduli software terze parti. L'uso e la
distribuzione di questi moduli software, compresi
eventuali aggiornamenti (complessivamente, il
"SOFTWARE") sono soggetti alle condizioni di
licenza da (1) a (9) fornite di seguito.
(1) Si accetta di conformarsi a qualunque legge
vigente sul controllo dell'esportazione,
restrizioni o normative dei paesi interessati nel
caso in cui questo PRODOTTO, incluso il
SOFTWARE, sia spedito, trasferito o esportato
in un altro paese.
66

Memo
67

Requisitos de instalación
100 mm o más
*
533 mm
1.022,9 mm
* Alimentador (opcional para imageRUNNER 2206N)
1.285 mm
Acerca de los manuales suministrados
①
Introducción (este manual):
Lea este manual en primer lugar. Este manual describe los
ajustes básicos del equipo, las operaciones y las precauciones.
Asegúrese de leer este manual antes de utilizar el equipo.
②
Guía de instalación del controlador MF (visite el sitio
web):
Podrá acceder a
canon.com/oip-manual para leer la Guía de
③
Guía de usuario (visite el sitio web):
instalación del controlador MF que describe la
instalación del software.
Puede acceder a
canon.com/oip-manual para leer la Guía de
usuario donde se describen todas las funciones de
este equipo.
Es
68

Navegación por el menú y método de
introducción de texto
El panel de control mostrado aquí es el del modelo
imageRUNNER 2206iF. Las teclas disponibles varían en función
del modelo.
Encendido/Apagado del equipo
Back
Guardar nombre equipo
Canon-1
A/a/12
<A/a/12>
◄►
A
Aplicar
<Aplicar>
Clear # Teclas
numéricas
Navegación por el menú
Selección de elementos
Pulse sobre un elemento para seleccionarlo. Pulse para
volver a la pantalla anterior.
Con rmación de la con guración
Pulse sobre el elemento. Sin embargo, cuando aparezca
<Aplicar>, pulse <Aplicar>.
Método de introducción de texto
Cambio del modo de entrada
Pulse <A/a/12> para cambiar el modo de entrada. También
podrá pulsar
Modo de entrada Texto disponible
<A> Letras alfabéticas mayúsculas y símbolos
<a> Letras alfabéticas minúsculas y símbolos
<12> Números
Introducción de texto, símbolos y números
Introduzca con las teclas numéricas o
Desplazamiento del cursor (introducción de un espacio)
Pulse <◄> o <►> para desplazar el cursor. Para introducir un
espacio, mueva el cursor hasta el nal del texto y pulse <►>.
Eliminación de caracteres
Elimine con . Si se pulsa y mantiene presionado se
eliminarán todos los caracteres.
para cambiar el modo de entrada.
.
Modo de entrada: <A> Modo de entrada: <a>
@ . - _ / 1
ABC abc 2
DEF def 3
GHI ghi 4
JKL jkl 5
MNÑO mnño 6
PQRS pqrs 7
TUV tuv 8
WXYZ wxyz 9
(No disponible) бйнуъь 0
- . * # ! “ , ; : ^ ` _ = / | ‘ ? $ @ % & + \ ˜ ( ) [ ] { } < >
(espacio)
Modo de entrada:
<12>
(No disponible)
ACTIVADO
DESACTIVADO
• Asegúrese de que el enchufe esté insertado rmemente
en la toma de corriente.
• No conecte el cable USB en este momento, conéctelo
cuando esté instalando el software.
Es
69

Especi cación de la con guración inicial
Siga las instrucciones de la pantalla para llevar a cabo lo
siguiente:
• Establecer el idioma
• De nir el país y la región
• Establecer la zona horaria
• Ajustar la fecha y la hora
• Registrar la información de compra
• Con gurar el PIN acceso a IU remota
• Con gurar la conexión de LAN inalámbrica
Para obtener una información detallada sobre cómo navegar
por el menú y cómo introducir los números, consulte
"Navegación por el menú y método de introducción de texto"
(
Página 69).
Se recomienda con gurar el PIN acceso a IU remota cuando
utilice la IU remota para impedir el acceso no autorizado por
parte de terceros. La IU remota emplea un navegador web
para utilizar el equipo, comprobar el estado y especi car las
opciones, permitiéndole administrar el equipo mientras
permanece en su escritorio. Para obtener información sobre la
utilización de la IU remota, consulte la Guía de usuario.
Selección del método para conectar el
equipo al ordenador
•
Conexión mediante una red LAN inalámbrica
Ahora podrá conectar el equipo a un ordenador mediante
un router inalámbrico*. Como la conexión es inalámbrica,
no se requieren cables de LAN.
* Se requiere un router (o punto de acceso) inalámbrico compatible
con IEEE802.11b/g/n.
Conecte el ordenador al router mediante cable o de forma
inalámbrica.
Para determinar si su router es inalámbrico o no:
Consulte el manual de instrucciones suministrado con el
dispositivo de red que está utilizando, o bien, póngase en
contacto con el fabricante.
•
Conexión directa
Conecte un dispositivo móvil al equipo de forma
inalámbrica y directamente sin encaminar a través de un
router de red (o punto de acceso) inalámbrico.
En la Guía de usuario, consulte "Conectar directamente
(Modo de punto de acceso)"
•
Conexión a través de una red LAN
Podrá conectar el equipo al ordenador mediante un router
de LAN con cable. Use un cable de LAN para conectar el
equipo al router.
Conecte el ordenador al router mediante cable o de forma
inalámbrica.
Asegúrese de que haya puertos disponibles en el router para
conectar el equipo y el ordenador.
Tenga listo un cable de LAN de par trenzado de Categoría 5 o
superior.
•
Conexión con un cable USB
Podrá conectar el equipo al ordenador con un cable USB.
Es
IMPORTANTE
En este paquete no se incluye un cable USB.
Obtenga un cable adecuado para su ordenador.
Asegúrese de que el cable USB utilizado tenga la
siguiente marca.
Conexión a través de una red LAN
Comprobación antes de la con guración
Internet
¿El ordenador y el router están conectados correctamente
con un cable de LAN?
Para obtener más información, consulte el manual de
instrucciones del dispositivo de red que está utilizando, o bien,
póngase en contacto con el fabricante.
¿Se completó la con guración de la red en el ordenador?
Si el ordenador no está con gurado correctamente, es posible
que no pueda usar la conexión de LAN cableada ni siquiera
después de llevar a cabo los siguientes ajustes.
NOTA
• Cuando se conecte a un entorno de red que no esté
protegido, es posible que otras personas puedan ver su
información personal. Sea cuidadoso.
• Para conectarse mediante una LAN en la o cina,
consulte al administrador de red.
Router
Cable de LAN
70

Con guración de la conexión de LAN
Conecte el cable de LAN.
1
La dirección IP se con gura automáticamente en 2
minutos. Si desea con gurar la dirección IP manualmente,
consulte lo siguiente.
En la Guía de usuario, consulte "Con guración de
direcciones IP"
Instale los controladores en el ordenador utilizando
2
el CD-ROM/DVD-ROM suministrado.
Consulte "Instalación del software" (pág.74).
NOTA
El controlador del escáner no podrá instalarse si el
equipo y el ordenador están conectados en un
entorno IPv6.
Proceda con "Ajuste del tamaño y el tipo del papel"
(pág.74).
Conexión con un cable USB
Conecte el cable USB tras la instalación de los controladores.
Conexión mediante una red LAN
inalámbrica
Comprobación antes de la con guración
Router de LAN
inalámbrico
Internet
¿El ordenador está conectado correctamente al router
(punto de acceso) mediante un cable de LAN o una LAN
inalámbrica?
Para obtener más información, consulte el manual de
instrucciones del dispositivo de red que está utilizando, o bien,
póngase en contacto con el fabricante.
¿Se completó la con guración de la red en el ordenador?
Si el ordenador no está con gurado correctamente, es posible
que no pueda usar la conexión de LAN inalámbrica ni siquiera
después de completar los siguientes ajustes.
NOTA
• No podrá utilizar una red LAN cableada y una LAN
inalámbrica al mismo tiempo. Asimismo, el equipo está
con gurado de manera predeterminada como "LAN
cableada".
• Cuando se conecte a un entorno de red que no esté
protegido, es posible que otras personas puedan ver su
información personal. Sea cuidadoso.
• Para conectarse mediante una LAN en la o cina,
consulte al administrador de red.
Instale los controladores en el ordenador utilizando
1
el CD-ROM/DVD-ROM suministrado.
Consulte "Instalación del software" (pág.74).
Conecte el cable USB.
2
Proceda con "Ajuste del tamaño y el tipo del papel"
(pág.74).
Cambio del método de conexión a la red LAN
inalámbrica
Pulse <Menú> en la pantalla <Inicio>.
1
Pulse <Opciones de red>.
2
Si apareciera una pantalla para introducir el ID y el PIN del
administrador del sistema, introduzca el ID y el PIN del
administrador del sistema, pulse <Aplicar> y luego pulse .
Pulse <Seleccionar LAN con cable/inalámbrica>.
3
Pulse <LAN inalámbrica>.
4
Seleccionar LAN
LAN con cable
LAN inalámbrica
Es
71

Veri cación del router
Seleccione el método de conexión para la LAN inalámbrica.
Seleccione uno de los siguientes dos métodos en función del
router (punto de acceso) que esté utilizando.
Hay un botón.
Este equipo es compatible con
WPS (Wi-Fi Protected Setup,
Instalación protegida por
Wi-Fi). Podrá llevar a cabo
fácilmente la instalación si su
router (punto de acceso)
dispone de un botón y si existe
la marca
Si no está seguro de si el router admite o no WPS, consulte el manual
suministrado con el producto o póngase en contacto con el
fabricante.
No hay ningún botón.
Si no hay un botón en el router
(punto de acceso), podrá
seleccionar manualmente el
SSID y completar la
con guración. En este caso,
deberá recordar el SSID y la
clave de red del router (punto
de acceso).
Consulte "Verificación de si se completó la configuración de la
LAN inalámbrica" (pág.74) para obtener más información
sobre el SSID y la clave de red.
Para realizar la con guración con el método de código PIN
de WPS o realizar la con guración manualmente:
En la Guía de usuario, consulte "Conexión a una red
inalámbrica"
en el router.
Con guración de LAN inalámbrica
Modo de botón pulsador
Pulse <Menú> en la pantalla <Inicio>.
1
Es
Pulse <Opciones de red>.
2
Si apareciera una pantalla para introducir el ID y el PIN del
administrador del sistema, introduzca el ID y el PIN del
administrador del sistema, pulse <Aplicar> y luego pulse
.
Pulse <Modo de pulsador WPS>.
5
Opciones de LAN inalámbrica
Opciones de SSID
Modo de pulsador WPS
Modo de código PIN WPS
Modo de ahorro de energía
Información de LAN inalámbri
Pulse <Sí>.
6
Mantenga pulsado* el botón hasta que la luz se
7
encienda o parpadee.
Deberá pulsar el botón WPS dentro de los 2 minutos
posteriores a la pulsación de <Sí> en el paso 6.
* El tiempo que se debe mantener pulsado el botón puede variar
en función del router que se utilice.
Espere aproximadamente 2 minutos después de la
8
conexión.
La dirección IP se establece durante este período.
Cuando aparece un mensaje de error:
Pulse <Cerrar> para cerrar la pantalla y luego vuelva a
intentar la con guración. Si, el punto de acceso no
pudiera detectarse ni siquiera después de reintentarlo,
consulte lo siguiente.
En la Guía de usuario, consulte "Cuando aparece un
mensaje de error"
Veri cación de la conexión de red:
Podrá veri car si el equipo está bien conectado a la red con
un ordenador que esté conectado a una red.
En la Guía de usuario, consulte "Visualización de las
opciones de red"
Para con gurar manualmente la dirección IP:
En la Guía de usuario, consulte "Conexión a una red
inalámbrica"
Pulse <Opciones de LAN inalámbrica>.
3
Lea el mensaje mostrado, y pulse <OK>.
4
72

Con guración manual del punto de acceso
Compruebe el SSID o la clave de red del router o
1
punto de acceso de LAN inalámbrica.
• Compruebe la etiqueta ubicada sobre el router de LAN
inalámbrica.
Introduzca la clave de red que tenga anotada.
10
Introduzca la clave de red utilizando las teclas
numéricas, y pulse <Aplicar>.
Clave WEP (5-26 caracteres)
XXXXXXXX
A
Tome nota del nombre del SSID y de la clave de red
2
mostrados en el paso 1. Si aparecen múltiples
puntos de acceso, tome nota de todos ellos.
SSID
A veces se escribe como el nombre de la red o el nombre
del punto de acceso. Si existen múltiples SSID, tome nota
de todos ellos.
Clave de red
A veces se escribe como PIN, clave WEP, frase de contraseña
WPA/WPA2 o PSK (clave precompartida).
Pulse <Menú> en la pantalla <Inicio>.
3
Pulse <Opciones de red>.
4
Si apareciera una pantalla para introducir el ID y el PIN del
administrador del sistema, introduzca el ID y el PIN del
administrador del sistema, pulse <Aplicar> y luego pulse
.
Pulse <Opciones de LAN inalámbrica>.
5
Lea el mensaje mostrado, y pulse <OK>.
6
AplicarA/a/12
Pulse <Sí>.
11
Cuando aparezca la pantalla <Conectado.>,
12
espere hasta que el indicador de Wi-Fi deje de
parpadear y se ilumine de forma ja.
Espere aproximadamente 2 minutos después de la
13
conexión.
La dirección IP se establece durante este período.
Cuando aparece un mensaje de error:
Pulse <Cerrar> para cerrar la pantalla, veri que si la
clave de red es correcta o no y, luego, vuelva a
reintentar la con guración.
Si el punto de acceso no se puede conectar después de
volver a intentarlo, consulte lo siguiente.
En la Guía de usuario, consulte "Cuando aparece un
mensaje de error"
Para con gurar manualmente la dirección IP:
En la Guía de usuario, consulte "Conexión a una red
inalámbrica"
Pulse <Opciones de SSID>.
7
Pulse <Seleccionar punto de acceso>.
8
Opciones de SSID
Seleccionar punto de acceso
Introducir manualmente
Seleccione un router de red inalámbrico.
9
Si se muestran varios SSID asociados, seleccione el ID que
aparece primero en la lista (el que tiene la señal más
fuerte).
Es
73

Veri cación de si se completó la
con guración de la LAN inalámbrica
Pulse .
1
Pulse <Información de red>.
2
Pulse <IPv4>.
3
Pulse <Dirección IP>.
4
Tome nota de la dirección IP.
5
Dirección IP
XXX.XXX.XXX.XXX
Cerrar
Pulse <Cerrar>.
6
Pulse .
7
Inicie el navegador web del ordenador e introduzca
8
"http://<dirección IP del equipo>/" en el campo de
dirección y, a continuación, pulse la tecla [Intro] en
el teclado.
Ajuste del tamaño y el tipo del papel
Siga las instrucciones de la pantalla para establecer el tamaño
y el tipo de papel.
Opciones de papel
Bandeja multiuso
Casete 1
Casete 2
Seleccionar tamaños de papel
Instalación del software
• El procedimiento descrito aquí solamente es aplicable
si su ordenador utiliza el sistema operativo Windows.
Para obtener más información sobre el procedimiento
de instalación del software, consulte el manual del
controlador.
• Para la instalación en un ordenador con sistema
operativo macOS, consulte el manual del controlador.
• Su equipo podría no incluir el controlador para el
sistema operativo macOS, dependiendo del momento
de la compra. Podrá encontrar controladores nuevos en
el sitio web de Canon, y descargar y utilizar el más
reciente.
1.
2.
Compruebe que se muestra la pantalla de la IU
9
remota.
Es
Si aparece la pantalla se completó la conexión.
Si no se muestra correctamente la pantalla:
En la Guía de usuario, consulte "Problemas comunes"
Si no apareciera la pantalla correctamente, vuelva a
introducir el CD-ROM/DVD-ROM o busque "D:\
MInst.exe" en la plataforma de Windows (en esta
descripción se sobreentiende que "D:" es el nombre
de la unidad de CD-ROM/DVD-ROM).
74

Tareas útiles
Existe una gran variedad de funciones disponibles. A continuación se proporciona una visión general de algunas funciones útiles.
Copia
Ampliación/reducción de copias
Podrá ampliar o reducir los documentos
de tamaño estándar para copiar en
papel de tamaño estándar, o especi car
una escala de copia en porcentajes.
Copia a doble cara**
Podrá copiar documentos de una cara
en ambas caras del papel.
Intercalado
Podrá clasi car las copias en juegos
ordenados por páginas.
Diseño de página reducido
Podrá reducir varios documentos para
copiarlos en una sola hoja.
2 en 1 4 en 1
Copia de tarjetas de identidad
Es posible realizar la copia de una
tarjeta de dos caras en una sola cara del
papel.
Fax*
Envío de documentos directamente
desde el ordenador (PC Fax)
Además del envío y la recepción
habituales de faxes, podrá usar PC fax.
Recepción
•
Recepción en la memoria
Podrá almacenar en la memoria los
documentos recibidos. Podrá imprimir
los documentos almacenados en
cualquier momento y, si no los necesita,
podrá eliminarlos.
•
Recepción remota
Si se conecta un teléfono externo,
podrá cambiar al modo de recepción de
fax inmediatamente marcando el
número de ID para la recepción de fax
utilizando los botones de marcación del
teléfono durante una llamada
telefónica.
Impresión
Impresión ampliada/reducida
Impresión a doble cara**
Diseño de página reducido
Podrá reducir varios documentos para
imprimirlos en una sola hoja.
2 en 1 4 en 1
Impresión en cuadernillo**
Lectura
Almacenamiento de documentos con
el panel de control del equipo
1
Documentos
2
Datos
Almacenamiento de documentos con
las operaciones del ordenador
•
Lectura con MF Scan Utility
2
•
Lectura desde una aplicación
•
Lectura con el controlador WIA
3
Datos
Envío por correo electrónico de
documentos escaneados***
Podrá enviar los documentos
escaneados a su aplicación de correo
electrónico.
Documentos Datos E-mail
3
Documentos
1
+
Envío
Podrá registrar destinos de fax en la
libreta de direcciones. Y podrá
especi car destinos con diferentes
métodos, lo que le permitirá enviar
documentos rápida y fácilmente.
• Búsqueda de destinos
• Teclas de acceso directo
• Marcación codi cada
• Grupo de destinos
• Especi cación desde el historial de
envío
• Difusión secuencial
Impresión de pósteres
Impresión de marcas sobreimpresas
Combinación e impresión de varios
documentos
Selección de un "Per l"
Opciones de red
Este equipo viene equipado con una
interfaz de red que le permitirá
construir con facilidad un entorno de
red. Podrá usar las funciones de
impresión, PC fax* y escaneado en red
desde todos los ordenadores que estén
conectados con el equipo. El equipo
admite el incremento de trabajo
e cazmente como equipo compartido
en la o cina.
Envío de documentos escaneados a
un servidor de archivos***
Podrá enviar los documentos
escaneados a un servidor de archivos.
Documentos Datos Servidor de
archivos
IU remota
Podrá comprender el estado del equipo
desde los ordenadores de la red. Podrá
acceder al equipo y administrar trabajos
o especi car diversos ajustes desde la
red.
* imageRUNNER 2206iF únicamente
** La función está incorporada para imageRUNNER
2206iF. La Unidad dúplex opcional es necesaria
para imageRUNNER 2206N.
*** La función está incorporada para imageRUNNER
2206iF. El kit de envío opcional es necesario para
imageRUNNER 2206N.
Es
75

Eliminación de atascos de papel
Si aparece la siguiente pantalla, es posible que se haya producido un atasco de papel en
el alimentador o en el interior del equipo. Siga el procedimiento que aparece en la
pantalla para extraer el documento o el papel atascado. Este manual indica solamente las
áreas en las que se producen los atascos de papel. Para obtener información detallada
sobre los procedimientos, consulte la Guía de usuario.
Alimentador (DADF-AY)
Área de salida
(opcional para imageRUNNER 2206N)
Papel atascado.
Pulse [Siguiente] para que
se muestren los pasos.
Anterior Siguiente
Casete de papel 1
(opcional para imageRUNNER 2206N)
Unidad dúplex-C
Es
Bandeja multifunción Unidad de jación Módulo de Alimentación por Cassette AD
(opcional)
76

Sustitución del cartucho de tóner
Los cartuchos de tóner son productos consumibles. Cuando el tóner esté a punto de agotarse o se haya agotado completamente en
medio de la ejecución de un trabajo, aparecerá un mensaje en la pantalla o podrían producirse los siguientes problemas. Lleve a cabo
la acción adecuada pertinente.
Cuando aparezca un mensaje
Cuando el tóner esté a punto de agotarse o se haya agotado durante la ejecución de un trabajo, aparecerá un mensaje en la pantalla.
Mensaje
<Prepare el
cartucho de
tóner.>
<Cambie el
cartucho de
tóner.>
Cuando se muestre el
mensaje en la pantalla
El cartucho de tóner
necesita cambiarse en
breve.
El cartucho de tóner ha
alcanzado el n de su vida
útil.
Descripción y soluciones
Asegúrese de tener listo un cartucho de tóner de sustitución. Se recomienda
comprobar el nivel de tóner restante antes de imprimir documentos de gran
volumen.
En la Guía de usuario, consulte "Sustitución del cartucho de tóner"
Sustituya el cartucho de tóner.
En la Guía de usuario, consulte "Sustitución del cartucho de tóner"
Si las impresiones no son de buena calidad
Si las impresiones comienzan a presentar alguna de las siguientes características, esto signi cará que el cartucho de tóner está
prácticamente agotado. Sustituya el cartucho de tóner casi agotado aunque no aparezca ningún mensaje.
Aparecen rayas blancas Parcialmente difuminado La densidad de impresión es
irregular
Aparecen manchas de tóner y
salpicaduras Las impresiones son grisáceas
Es
77

Apéndice
Instrucciones de
seguridad importantes
En este capítulo se describen instrucciones de
seguridad importantes para la prevención de
lesiones a los usuarios del equipo u otras
personas, así como daños en la propiedad. Antes
de utilizar este equipo, lea este capítulo y siga las
instrucciones para poder utilizar el equipo
correctamente. No realice operaciones que no se
describan en este manual. Canon no se
responsabilizará de aquellos daños resultantes de
operaciones no descritas en este manual, uso
inadecuado o reparaciones o cambios no
realizados por Canon o una tercera parte
autorizada por Canon. El uso o funcionamiento
inadecuado del equipo podría provocar lesiones
personales y/o daños que requieran reparaciones
importantes que podrían no estar cubiertas por la
Garantía limitada.
ADVERTENCIA
Indica una advertencia relativa a operaciones
que pueden ocasionar la muerte o lesiones
personales si no se ejecutan correctamente.
Para utilizar el equipo de forma segura, preste
atención siempre a estas advertencias.
ATENCIÓN
Indica una precaución relativa a operaciones
que pueden ocasionar lesiones personales si
no se ejecutan correctamente. Para utilizar el
equipo de forma segura, preste atención
siempre a estas precauciones.
IMPORTANTE
Indica requisitos y limitaciones de uso. Lea
estos puntos atentamente para utilizar
correctamente el equipo y evitar así su
deterioro o el de otros elementos.
Instalación
Para utilizar este equipo de una forma cómoda y
segura, lea detenidamente las siguientes
precauciones e instale el equipo en un lugar
adecuado.
ADVERTENCIA
No lo instale en lugares que puedan producir
descargas eléctricas o incendios
• Lugares donde las ranuras de ventilación
queden bloqueadas (demasiado cerca de
Es
paredes, camas, sofás, alfombras u objetos
similares)
• Lugares húmedos o polvorientos
• Lugares expuestos a la luz solar directa o a la
intemperie
• Lugares sometidos a altas temperaturas
• Lugares expuestos a llamas abiertas
• Cerca de alcohol, disolventes de pintura u
otras sustancias inflamables
Otras advertencias
• No conecte cables no aprobados en este
equipo. De lo contrario, podrían producirse
descargas eléctricas o incendios.
• No coloque collares, otros objetos metálicos ni
recipientes llenos de líquido sobre el equipo.
Si alguna sustancia extraña entrara en
contacto con las piezas eléctricas del equipo,
podrían producirse descargas eléctricas o
incendios.
• Si cayera alguna sustancia extraña sobre el
equipo, desconecte el enchufe de la toma de
corriente de CA y póngase en contacto con su
distribuidor autorizado local de Canon.
ATENCIÓN
No instale el equipo en los siguientes lugares
Lugares en los que el equipo pudiera caerse y
provocar lesiones.
• Lugares inestables
• Lugares expuestos a vibraciones
IMPORTANTE
No instale el equipo en los siguientes lugares
De otro modo, podrían producirse daños en el
equipo.
• Lugares sometidos a temperatura y humedad
extremas, tanto bajas como altas
• Lugares sujetos a cambios drásticos de
temperatura o humedad
• Lugares situados cerca de equipos que
generen ondas magnéticas o
electromagnéticas
• Laboratorios o lugares en los que se
produzcan reacciones químicas
• Lugares expuestos a gases corrosivos o tóxicos
• Lugares que puedan deformarse debido al
peso del equipo o lugares en los que el
equipo pueda hundirse (alfombras, etc.)
Evite los lugares con poca ventilación
Este equipo genera una escasa cantidad de
ozono y otras emisiones durante el uso normal.
Dichas emisiones no son perjudiciales para la
salud. No obstante, podrían percibirse con mayor
facilidad durante el uso prolongado del equipo o
durante los ciclos de producción largos,
especialmente en habitaciones poco ventiladas.
Para mantener un entorno de trabajo confortable,
se recomienda que la habitación en la que vaya a
utilizarse el equipo esté adecuadamente
ventilada. Evite asimismo lugares en los que las
personas pudieran verse expuestas a las
emisiones del equipo.
No instale el equipo en lugares en los que se
produzca condensación
Podrían formarse gotas de agua (condensación)
en el interior del equipo si la sala en la que se ha
instalado se calienta rápidamente o si el equipo
se traslada de un lugar fresco o seco a un lugar
cálido o húmedo. El uso del equipo en estas
condiciones podría producir atascos de papel,
una mala calidad de impresión o incluso daños
en el equipo. Deje que el equipo se adapte a la
humedad y a la temperatura ambiente durante
un mínimo de 2 horas antes de utilizarlo.
Evite instalar el equipo cerca de ordenadores u
otros equipos electrónicos de precisión.
Las interferencias eléctricas y las vibraciones
generadas por el equipo durante la impresión
podrían afectar negativamente al funcionamiento
de dichos equipos.
Evite instalar el equipo cerca de televisores,
aparatos de radio u otros equipos electrónicos
similares.
El equipo podría interferir en la recepción de la
señal de sonido e imagen. Inserte el enchufe en
una toma de corriente dedicada y mantenga el
máximo espacio posible entre el equipo y otros
equipos electrónicos.
En altitudes de 3.000m o más sobre el nivel del
mar
Los equipos que llevan incorporado un disco
duro podrían no funcionar correctamente si se
utilizan en altitudes elevadas, de unos 3.000
metros o más por encima del nivel del mar.
Conexión de la línea telefónica
Este equipo está en conformidad con la
normativa sobre líneas telefónicas analógicas y
únicamente podrá conectarse a una red
telefónica pública conmutada (Public Switched
Telephone Network, PSTN). La conexión del
equipo a una línea telefónica digital o a una línea
telefónica dedicada podría impedir el
funcionamiento adecuado del equipo y causar
daños. Asegúrese de comprobar el tipo de línea
telefónica antes de conectar el equipo. Póngase
en contacto con su proveedor de servicio de
línea de fibra óptica o de telefonía a través de IP, si
desea conectar el equipo a dichas líneas
telefónicas.
Cuando se utiliza una red inalámbrica
• Instale el equipo a una distancia de 50 metros
o menos con respecto al router de red LAN
inalámbrica.
• En la medida de lo posible, instale en un lugar
en que la comunicación no se vea bloqueada
por objetos interpuestos. La señal podría
degradarse al traspasar paredes o suelos.
• Mantenga el equipo lo más alejado posible de
teléfonos inalámbricos digitales, hornos
microondas u otros equipos que emitan ondas
de radio.
• No utilice cerca de equipos médicos. Las
ondas de radio emitidas por este equipo
podrían interferir con los equipos médicos, lo
que podría tener como resultado fallos de
funcionamiento y accidentes.
Si el ruido del funcionamiento le preocupa
Dependiendo del entorno de uso y del modo
operativo, si el ruido operativo constituyera un
problema, se recomienda instalar el equipo en un
lugar distinto de la oficina.
Desplazamiento del equipo
Si desea mover el equipo, incluso a algún lugar
en la misma planta de su edificio, póngase en
contacto de antemano con su distribuidor de
Canon local autorizado. No intente mover el
equipo sin ayuda.
Suministro eléctrico
ADVERTENCIA
• Utilice únicamente un suministro eléctrico que
cumpla los requisitos de voltaje especificados.
De lo contrario, podrían producirse descargas
eléctricas o incendios.
• El equipo deberá conectarse a una toma de
corriente con conexión a tierra mediante el
cable de alimentación suministrado.
• No utilice cables de alimentación distintos al
suministrado, ya que podrían producirse
descargas eléctricas o incendios.
• El cable de alimentación suministrado está
previsto para ser utilizado con este equipo. No
conecte el cable de alimentación a otros
dispositivos.
• No modifique, estire, doble con fuerza ni trate
el cable de alimentación de forma que pudiera
dañarlo. No coloque objetos pesados sobre el
cable de alimentación. Si se produjeran daños
en el cable de alimentación, podrían
producirse descargas eléctricas o incendios.
• No conecte ni desconecte el enchufe de la
toma de corriente con las manos mojadas, ya
que podrían producirse descargas eléctricas.
• No utilice alargadores ni bases múltiples con el
equipo. De lo contrario, podrían producirse
descargas eléctricas o incendios.
• No enrolle el cable de alimentación ni lo
anude, ya que podrían producirse descargas
eléctricas o incendios.
• Inserte por completo el enchufe en la toma de
corriente de CA. De lo contrario, podrían
producirse descargas eléctricas o incendios.
78

• Retire totalmente el enchufe de la toma de
corriente de CA durante las tormentas
eléctricas. De lo contrario, podrían producirse
descargas eléctricas, incendios o daños en el
equipo.
• Asegúrese de que la alimentación del equipo
es segura y el voltaje estable.
• Mantenga el cable de la alimentación
apartado de fuentes de calor; de lo contrario,
podría derretirse la funda del cable y ocasionar
un incendio o descargas eléctricas.
Evite las siguientes situaciones:
Si se aplica un esfuerzo excesivo a la parte de
conexión del cable de alimentación, esto podría
dañar el cable de alimentación o los cables del
interior del equipo podrían desconectarse. Esto
también podría causar un incendio.
–Conectar y desconectar el cable de
alimentación con frecuencia.
–Tropezar con el cable de alimentación.
–El cable de alimentación está curvado cerca de
la parte de conexión, y se aplica un esfuerzo
continuo a la toma de corriente o a la parte de
conexión.
–Aplicación de fuerza excesiva sobre el enchufe.
ATENCIÓN
• Instale este equipo cerca de la toma de
corriente y deje espacio suficiente alrededor
del enchufe para poder desconectarlo
fácilmente en una situación de emergencia.
IMPORTANTE
Conexión de la alimentación
• No conecte el cable de alimentación a un
sistema de alimentación ininterrumpida (SAI,
UPS). Esto podría provocar fallos de
funcionamiento o averías en el equipo en caso
de corte de corriente.
• Si conectara este equipo a una regleta de
alimentación de CA con múltiples tomas, no
utilice las tomas restantes para conectar otros
dispositivos.
• No conecte el cable de alimentación a la salida
auxiliar de alimentación de CA de un
ordenador.
Otras precauciones
• Las perturbaciones eléctricas podrían producir
fallos de funcionamiento en el equipo o
pérdidas de datos.
Manipulación
ADVERTENCIA
• Desconecte inmediatamente el enchufe de la
toma de corriente de CA y póngase en
contacto con un distribuidor autorizado de
Canon si el equipo hiciera algún ruido inusual,
despidiera olores extraños o emitiera humo o
un calor excesivo. El uso continuado podría
provocar descargas eléctricas o incendios.
• No desmonte ni modifique este equipo. En el
interior del mismo existen componentes de
alta tensión y alta temperatura. El desmontaje
o modificación de los mismos podría tener
como resultado descargas eléctricas o
incendios.
• Coloque el equipo en lugares en los que los
niños no puedan acceder al cable de
alimentación y a otros cables o engranajes y
piezas eléctricas del interior del equipo. De lo
contrario, podrían producirse accidentes
inesperados.
• No utilice pulverizadores inflamables cerca de
este equipo. Si alguna sustancia inflamable
entrara en contacto con las piezas eléctricas
del interior del equipo, podrían producirse
descargas eléctricas o incendios.
• A la hora de trasladar este equipo, asegúrese
de apagarlo y, a continuación, desconecte el
enchufe y los cables de interfaz. De lo
contrario, el cable de alimentación o los cables
de interfaz podrían resultar dañados, lo que a
su vez podría producir descargas eléctricas o
incendios.
• A la hora de enchufar o desenchufar un cable
USB cuando la clavija de toma de corriente
está conectada a un receptáculo de
alimentación de CA, no toque la parte
metálica del conector, ya que podrían
producirse descargas eléctricas.
Si utiliza un marcapasos cardíaco
Este equipo genera un flujo magnético de bajo
nivel y ondas ultrasónicas. Si utiliza un
marcapasos cardíaco y detecta anomalías, aléjese
del equipo y acuda inmediatamente a un médico.
ATENCIÓN
• No coloque objetos pesados sobre el equipo,
ya que podrían caerse y provocar lesiones.
• Por su seguridad, desconecte el enchufe si no
va a utilizar el equipo durante un período de
tiempo prolongado.
• Tenga cuidado cuando abra y cierre las tapas
para evitar lesionarse las manos.
• Mantenga las manos y la ropa alejadas de los
rodillos del área de salida. Si sus manos o su
ropa se quedaran atrapadas entre los rodillos,
podrían producirse lesiones personales.
• La parte interna del equipo y la ranura de
impresión se calientan mucho durante e
inmediatamente después de su uso. Evite
tocar estas zonas para evitar quemaduras.
Asimismo, el papel impreso podría estar
caliente justo después de salir, por lo que
deberá tener cuidado a la hora de tocarlo. De
lo contrario, podría sufrir quemaduras.
Alimentador o tapa de cristal de la platina
• No presione el alimentador o la tapa del cristal
de la platina con demasiada fuerza cuando
utilice el cristal de la platina para realizar
copias de libros gruesos. De lo contrario,
podrían producirse daños en el cristal de la
platina que, a su vez, podrían provocar
lesiones personales.
• Cierre el alimentador o la tapa del cristal de la
platina suavemente para no pillarse las manos,
ya que esto podría tener como resultado
lesiones personales.
• Procure no meter las manos o los dedos en el
alimentador o en la tapa del cristal de la
platina. De otro modo, podría resultar
lesionado.
Casete de papel
• No introduzca las manos en el equipo
mientras se extrae el casete de papel, ya que
esto podría tener como resultado lesiones
personales.
Tecla [Energy Saver]
Seguridad de láser
Este producto está confirmado como producto
láser de Clase 1 en IEC60825-1:2014 y EN608251:2014.
CLASS 1 LASER PRODUCT
LASER KLASSE 1
APPAREIL À LASER DE CLASSE 1
APPARECCHIO LASER DI CLASSE 1
PRODUCTO LÁSER DE CLASE 1
APARELHO A LASER DE CLASSE 1
LUOKAN 1 LASER-TUOTE
LASERPRODUKT KLASS 1
El haz de láser puede ser peligroso para el cuerpo
humano. Como la radiación que se emite en el
interior del producto está cerrada por completo
dentro de los alojamientos de protección y las
cubiertas exteriores, el haz de láser no puede
escapar del equipo durante ninguna fase de la
utilización por parte del usuario. Lea las siguientes
observaciones e instrucciones por su seguridad.
Precaución sobre seguridad de láser
(Energy Saver) por razones de
• Pulse
seguridad si no va a utilizar el equipo durante
un largo período de tiempo, por ejemplo, por
la noche. Apague asimismo el interruptor de
alimentación y desconecte el cable de
alimentación por razones de seguridad si no
va a utilizar el equipo durante un largo
período de tiempo, por ejemplo, durante
varios días festivos consecutivos.
• No abra nunca cubiertas distintas de las
indicadas en los manuales de este equipo.
• Si el haz de láser escapara y entrara en
contacto con sus ojos, la exposición al mismo
podría causarle daños oculares.
• El uso de controles, ajustes o procedimientos
que no se especifiquen en este manual podría
tener como resultado una exposición a
radiación peligrosa.
Es
79

Apéndice
Unidad de fijación
Al extraer el papel atascado o inspeccionar el
interior del equipo, no se exponga al calor
emitido por la unidad de fijación y el área
circundante durante un período de tiempo
prolongado. Esto podría tener como resultado
quemaduras por baja temperatura, aunque no
haya tocado la unidad de fijación y el área
circundante directamente.
IMPORTANTE
• Siga las instrucciones de la etiqueta de
precaución que encontrará en el equipo.
• No someta el equipo a golpes fuertes o
vibraciones.
• No abra ni cierre puertas, tapas u otras piezas a
la fuerza. De lo contrario, podrían producirse
daños en el equipo.
• No apague el interruptor de alimentación
principal ni abra las tapas mientras el equipo
se encuentre en funcionamiento. Podrían
producirse atascos de papel.
• Utilice un cable modular con una longitud
inferior a 3 metros.
• Utilice un cable USB con una longitud inferior
a 3 metros.
Símbolos relacionados con la seguridad
Interruptor de alimentación: posición "ON"
Interruptor de alimentación: posición "OFF"
Interruptor de alimentación: posición
"STAND-BY"
Interruptor push-push "ON" "OFF"
Terminal de tierra de protección
Tensión peligrosa en el interior. No abra
ninguna tapa que no se indique.
Es
ATENCIÓN: superficie caliente. No toque.
Equipo de Clase II
Piezas en movimiento: mantenga las partes
del cuerpo alejadas de las piezas en
movimiento
ATENCIÓN: Es posible que se produzca una
descarga eléctrica. Desconecte todos los
enchufes de la toma de corriente.
Posee bordes afilados. Mantenga las partes
del cuerpo alejadas de los bordes afilados.
[NOTA]
Algunos de los símbolos mostrados
anteriormente podrían no estar fijados en función
del producto.
Mantenimiento e inspecciones
Limpie este equipo periódicamente. Si se
acumulara polvo, es posible que el equipo no
funcione correctamente. Durante la limpieza,
asegúrese de tener en cuenta lo siguiente. Si se
produjera algún problema durante el
funcionamiento, consulte "Solución de
problemas" en la Guía de usuario. Si el problema
no pudiera resolverse o cree que el quipo
necesita una revisión, consulte "Cuando no
puede solucionarse un problema" en la Guía de
usuario.
ADVERTENCIA
• Antes de la limpieza, apague el equipo y
desconecte el enchufe de la toma de corriente
de CA. De lo contrario, podrían producirse
descargas eléctricas o incendios.
• Desconecte el enchufe periódicamente y
límpielo con un paño seco para eliminar el
polvo y la suciedad. El polvo acumulado
podría absorber la humedad del aire y
provocar un incendio si entrara en contacto
con electricidad.
• Utilice un paño húmedo y bien escurrido para
limpiar el equipo. Humedezca los paños de
limpieza únicamente con agua. No emplee
alcohol, bencina, disolvente u otras sustancias
inflamables. No utilice pañuelos ni toallitas de
papel. Si estas sustancias entraran en contacto
con las piezas eléctricas del interior del equipo,
podrían generar electricidad estática o
provocar descargas eléctricas o incendios.
• Revise el cable de alimentación y el enchufe
periódicamente para comprobar si se han
producido daños. Controle el óxido, las
abolladuras, los arañazos, las grietas o la
generación de calor excesivo en el equipo. Los
equipos no sometidos a un buen proceso de
mantenimiento podrían producir descargas
eléctricas o incendios.
ATENCIÓN
• El equipo incluye en su interior componentes
de alta tensión y alta temperatura. Si toca
estos componentes, podrían ocasionarle
quemaduras. No toque ninguna parte del
equipo que no se indique en el manual.
• A la hora de cargar papel o quitar hojas de
papel atascadas, tenga cuidado para no
cortarse las manos con los bordes del papel.
Consumibles
ADVERTENCIA
• No arroje los cartuchos de tóner usados a
llamas abiertas ni guarde los cartuchos o el
papel de impresión/copia en lugares
expuestos a llamas abiertas. Esto podría causar
su ignición y provocar quemaduras o
incendios.
• Si accidentalmente se derramara o dispersara
tóner, reúna cuidadosamente las partículas de
tóner o límpielas con un paño suave y
húmedo de manera que se evite la inhalación.
Para limpiar el tóner derramado, no utilice
nunca una aspiradora que no disponga de
medidas de protección contra explosiones de
polvo. Al hacerlo, podría provocar un fallo de
funcionamiento en la aspiradora, o tener
como resultado una explosión de polvo
debido a las descargas estáticas.
ATENCIÓN
• Mantenga el tóner y otros consumibles fuera
del alcance de los niños. Si alguien los
ingiriera, acuda al médico inmediatamente.
• Si el tóner entrara en contacto con sus manos
o su ropa, lave inmediatamente con agua. No
utilice agua caliente, ya que esto podría fijar el
tóner y causar manchas permanentes.
• No intente desmontar el cartucho de tóner, ya
que el tóner podría esparcirse y entrarle en los
ojos o en la boca. Si el tóner le entrara en los
ojos o en la boca, lávese inmediatamente con
agua fría y acuda al médico a la mayor
brevedad.
• Si el cartucho de tóner presentara una fuga de
tóner, asegúrese de no ingerirlo y no permita
que entre en contacto directo con su piel. Si
sintiera la piel irritada después de lavarla o
hubiera ingerido tóner, acuda al médico
inmediatamente.
IMPORTANTE
• Almacene los cartuchos de tóner en un lugar
fresco y lejos de la luz solar directa.
Aviso
Nombre del producto
Las normativas sobre seguridad requieren que el
nombre del producto esté registrado.
En algunas regiones donde se vende este
producto, podría(n) estar registrado(s) en su lugar
el (los) siguiente(s) nombre(s) entre paréntesis ( ).
imageRUNNER 2206iF (F193390)
imageRUNNER 2206N (F193392)
Directiva de la CE sobre compatibilidad
electromagnética
Este equipo cumple con los requisitos esenciales
de la Directiva de la CE sobre compatibilidad
electromagnética. Declaramos que este producto
cumple con los requisitos de compatibilidad
electromagnética de la Directiva de la CE cuando
la tensión de entrada nominal es de 230 V y 50 Hz
aunque la tensión de entrada prevista para el
producto es de 220 a 240 V y de 50/60 Hz. El
empleo de cables apantallados es necesario para
cumplir con los requisitos técnicos de la Directiva
de compatibilidad electromagnética.
Directivas RAEE y sobre baterías y pilas de la UE
Podrá ver la información sobre la Directivas RAEE
y sobre baterías y pilas en la Guía de usuario más
reciente (manual en formato HTML) en el sitio
web de Canon (canon.com/oip-manual).
Wireless LAN Regulatory Information
Regulatory information for users in Jordan
imageRUNNER 2206iF/2206N includes approved
Wireless LAN Module (Model name: Type1KA).
Contains Wireless LAN Module approved by TRC/
LPD/2017/19
Regulatory information for users in UAE
imageRUNNER 2206iF/2206N includes approved
Wireless LAN Module (Model name: Type1KA).
TRA
REGISTERED No: ER51217/17
DEALER No: DA0073692/11
Directiva sobre RE
(solamente para radioequipos europeos)
Declaración de conformidad con la
directiva sobre RE
English (EN) Hereby, Canon Inc. declares that
this equipment is in compliance with Directive
2014/53/EU.
The full text of the EU declaration of conformity is
available at the following internet address:
http://www.canon-europe.com/ce-documentation
Wireless LAN Specifications
Frequency band(s):2412-2472MHz
Maximum radio-frequency power:15.9 dBm
80

Czech (CS) Tímto společnost Canon Inc.
prohlašuje, že toto zařízení je v souladu se
směrnicí 2014/53/EU.
Úplné znění EU prohlášení o shodě je k dispozici
na této internetové adrese:
http://www.canon-europe.com/ce-documentation
Technické údaje bezdrátové LAN
Pásmo(a) frekvence: 2412-2472 MHz
Maximální výkon rádiové frekvence: 15.9 dBm
Danish (DA) Hermed erklærer Canon Inc., at
dette udstyr er i overensstemmelse med direktiv
2014/53/EU.
EU-overensstemmelseserklæringens fulde tekst
kan findes på følgende internetadresse:
http://www.canon-europe.com/ce-documentation
Trådløs LAN specofikationer
Frekvensbånd: 2412-2472 MHz
Maks. radio-frekvenseffekt: 15.9 dBm
German (DE) Hiermit erklärt Canon Inc, dass
diese Anlage der Richtlinie 2014/53/EU
entspricht.
Der vollständige Text der EUKonformitätserklärung ist unter der folgenden
Internetadresse verfügbar:
http://www.canon-europe.com/ce-documentation
WLAN-Spezifikationen
Frequenzbereich(e): 2412-2472 MHz
Maximale Funkfrequenzleistung: 15.9 dBm
Estonian (ET) Käesolevaga deklareerib Canon
Inc., et käesolev seade vastab direktiivi 2014/53/
EL nõuetele.
ELi vastavusdeklaratsiooni täielik tekst on
kättesaadav järgmisel internetiaadressil:
http://www.canon-europe.com/ce-documentation
Juhtmevaba LAN-i spetsifikatsioonid
Sagedusriba(d): 2412-2472 MHz
Maksimaalne raadiosageduslik võimsus: 15.9 dBm
Spanish (ES) Por la presente, Canon Inc. declara
que este equipo es conforme con la Directiva
2014/53/UE.
El texto completo de la declaración UE de
conformidad está disponible en la dirección de
Internet siguiente:
http://www.canon-europe.com/ce-documentation
Especificaciones LAN inalámbrica
Banda(s) de frecuencia: 2412-2472 MHz
Potencia máxima de radiofrecuencia: 15.9 dBm
Greek (EL) Με την παρούσα, η Canon Inc.
δηλώνει ότι ο παρών εξοπλισμός συμμορφώνεται
με την Οδηγία 2014/53/ΕΕ.
Το πλήρες κείμενο της δήλωσης συμμόρφωσης
της ΕΕ διατίθεται στην ακόλουθη διεύθυνση στο
διαδίκτυο:
http://www.canon-europe.com/ce-documentation
Προδιαγραφές ασύρματου LAN (WLAN)
Ζώνες συχνότητας: 2412-2472 MHz
Μέγιστη ισχύς ραδιοσυχνότητας: 15.9 dBm
French (FR) Le soussigné, Canon Inc., déclare
que le présent équipement est conforme à la
Directive 2014/53/UE.
Le texte complet de la déclaration UE de
conformité est disponible à l'adresse internet
suivante :
http://www.canon-europe.com/ce-documentation
Spécifications LAN sans fil
Bande(s) de fréquence: 2412-2472 MHz
Puissance maximale de radiofréquence: 15.9 dBm
Italian (IT) Con la presente, Canon Inc. dichiara
che questa apparecchiatura è conforme alla
direttiva 2014/53/UE.
Il testo completo della dichiarazione di
conformità UE è disponibile al seguente indirizzo
Internet:
http://www.canon-europe.com/ce-documentation
Caratteristiche LAN wireless
Banda/e di frequenza: 2412-2472 MHz
Potenza massima a radiofrequenza: 15.9 dBm
Latvian (LV) Canon Inc. ar šo deklarē, ka šī
iekārta atbilst Direktīvai 2014/53/ES.
Pilns ES atbilstības deklarācijas teksts ir pieejams
šādā interneta vietnē:
http://www.canon-europe.com/ce-documentation
Bezvadu LAN specifikācijas
Frekvences josla(s): 2412-2472 MHz
Maksimālā radiofrekvences jauda: 15.9 dBm
Lithuanian (LT) Šiuo dokumentu „Canon Inc.“
patvirtina, kad ši įranga atitinka direktyvą
2014/53/ES.
Visas ES atitikties deklaracijos tekstas prieinamas
šiuo interneto adresu:
http://www.canon-europe.com/ce-documentation
Belaidžio LAN specifikacijos
Dažnio diapazonas(-ai): 2412-2472 MHz
Maksimali radijo ryšio dažnio galia: 15.9 dBm
Dutch (NL) Hierbij verklaar ik, Canon Inc., dat
deze apparatuur conform is met Richtlijn
2014/53/EU.
De volledige tekst van de EUconformiteitsverklaring kan worden
geraadpleegd op het volgende internetadres:
http://www.canon-europe.com/ce-documentation
Draadloos LAN specificaties
Frequentieband(en): 2412-2472 MHz
Maximaal radiofrequentievermogen: 15.9 dBm
Maltese (MT) B'dan, Canon, qed tiddikjara li dan
it-tip ta' tagħmir huwa konformi mad-Direttiva
2014/53/UE.
It-test kollu tad-dikjarazzjoni ta' konformità tal-UE
huwa disponibbli f'dan is-sit fuq l-internet:
http://www.canon-europe.com/ce-documentation
Speċifikazzjonijiet tal-Wireless LAN
Band(i) tal-Frekwenza: 2412-2472 MHz
Qawwa ta' frekwenza tar-radju massima: 15.9
dBm
Hungarian (HU) A Canon Inc. igazolja, hogy ez a
berendezés megfelel a 2014/53/EU irányelvnek.
Az EU-megfelelőségi nyilatkozat teljes szövege
elérhető a következő internetes címen:
http://www.canon-europe.com/ce-documentation
Vezeték nélküli LAN műszaki adatai
Frekvenciasáv(ok): 2412-2472 MHz
Maximális rádiofrekvenciás teljesítmény: 15.9 dBm
Polish (PL) Canon Inc. niniejszym oświadcza, że
niniejsze urządzenie jest zgodne z dyrektywą
2014/53/UE.
Pełny tekst deklaracji zgodności UE jest dostępny
pod następującym adresem internetowym:
http://www.canon-europe.com/ce-documentation
Specyfikacja bezprzewodowej sieci LAN
Pasmo(-a) częstotliwości: 2412-2472MHz
Maksymalna moc na częstotliwościach
radiowych: 15.9 dBm
Portuguese (PT) Por este meio, a Canon Inc.
declara que o presente equipamento está em
conformidade com a Diretiva 2014/53/UE.
O texto integral da declaração de conformidade
da UE está disponível no seguinte endereço de
Internet:
http://www.canon-europe.com/ce-documentation
Especificações de LAN Sem Fios
Banda(s) de frequências: 2412-2472 MHz
Potência máxima de radiofrequência: 15.9 dBm
Slovene (SL) Canon Inc. potrjuje, da je ta oprema
v skladu z Direktivo 2014/53/EU.
Celotno besedilo izjave EU o skladnosti je na voljo
na naslednjem spletnem naslovu:
http://www.canon-europe.com/ce-documentation
Specifikacije za brezžični LAN
Frekvenčna območja: 2412-2472 MHz
Največja radiofrekvenčna moč: 15.9 dBm
Slovak (SK) Spoločnosť Canon Inc. týmto
vyhlasuje, že toto zariadenie je v súlade so
smernicou 2014/53/EÚ.
Úplné znenie EÚ vyhlásenia o zhode je k
dispozícii na tejto internetovej adrese:
http://www.canon-europe.com/ce-documentation
Technické údaje bezdrôtovej LAN
Pásmo (a) frekvencia: 2412-2472 MHz
Maximálny výkon rádiovej frekvencie: 15.9 dBm
Finnish (FI) Canon Inc. vakuuttaatäten, että tämä
laite on direktiivin 2014/53/EU mukainen.
EU-vaatimustenmukaisuusvakuutuksen
täysimittainen teksti on saatavilla seuraavassa
internetosoitteessa:
http://www.canon-europe.com/ce-documentation
Langattoman LAN:in tekniset ominaisuudet
Taajuuskaista(t): 2412-2472 MHz
Suurin radiotaajuusteho: 15.9 dBm
Swedish (SV) Härmed försäkrar Canon Inc. att
denna utrustning överensstämmer med direktiv
2014/53/EU.
Den fullständiga texten till EU-försäkran om
överensstämmelse finns tillgänglig på följande
webbadress:
http://www.canon-europe.com/ce-documentation
Specifikationer för trådlöst LAN
Frekvensband: 2412-2472 MHz
Maximal radiofrekvenseffekt: 15.9 dBm
Romanian (RO) Prin prezenta, Canon Inc. declară
că acest echipament este în conformitate cu
Directiva 2014/53/UE.
Textul integral al declarației UE de conformitate
este disponibil la următoarea adresă internet:
http://www.canon-europe.com/ce-documentation
Specificații wireless LAN
Benzi de frecvență: 2412-2472 MHz
Putere maximă a frecvenței radio: 15.9 dBm
Bulgarian (BG) С настоящото Canon Inc.
декларира, че това съоръжение е в
съответствие с Директива 2014/53/ЕС.
Цялостният текст на ЕС декларацията за
съответствие може да се намери на следния
интернет адрес:
http://www.canon-europe.com/ce-documentation
Спецификация на безжичната LAN
Честотна лента(и): 2412-2472 MHz
Максимална радиочестотна мощност: 15.9 dBm
Croatian (HR) Canon Inc. ovime izjavljuje da je
oprema u skladu s Direktivom 2014/53/EU.
Cjeloviti tekst EU izjave o sukladnosti dostupan je
na sljedećoj internetskoj adresi:
http://www.canon-europe.com/ce-documentation
Specifikacije bežičnog LAN-a
Frekvencijski pojas(evi): 2412-2472 MHz
Maksimalna snaga radijske frekvencije: 15.9 dBm
Irish (GA) Dearbhaíonn Canon Inc., leis seo, go
bhfuil an trealamh seo i gcomhlíonadh leis an
Treoir 2014/53/AE.
Tá an téacs iomlán de Dhearbhú Comhréireachta
AE ar fáil ag seoladh an láithreáin ghréasáin mar
seo a leanas:
http://www.canon-europe.com/ce-documentation
Sonraíochtaí LAN Gan Sreang
Banda(í) minicíochta: 2412-2472 MHz
Uaschumhacht radaimhinicíochta: 15.9 dBm
Es
81

Apéndice
Norwegian (NO) Herved erklærer Canon Inc. at
dette utstyret er i overensstemmelse med direktiv
2014/53/EU.
Den fulle teksten til EUs samsvarserklæring er
tilgjengelig på følgende Internett-adresse:
http://www.canon-europe.com/ce-documentation
Trådløs LAN-spesifikasjoner
Bølgelengde: 2412-2472 MHz
Maks radiofrekvensstyrke: 15.9 dBm
Icelandic (IS) Hér með lýsir Canon Inc því yfir að
þessi búnaður er í samræmi við tilskipun 2014/53/
ESB.
Allur texti ESB-samræmisyfirlýsingar er í boði á
eftirfarandi veffangi:
http://www.canon-europe.com/ce-documentation
Tæknilýsingar fyrir þráðlausa nettengingu
Tíðnisvið: 2412-2472 MHz
Hámarksstyrkur útvarpstíðnibylgja: 15.9 dBm
Limitaciones legales sobre el uso del producto
y sobre el empleo de imágenes
El uso del producto para escanear, imprimir o
reproducir de otro modo ciertos documentos y el
empleo de tales imágenes escaneadas, impresas
o reproducidas de otro modo con su producto,
puede estar prohibido por la ley y podría infringir
las leyes del código penal y/o civil. A
continuación se ha preparado una amplia lista de
estos documentos. Esta lista es meramente una
guía. Si usted no está seguro sobre la legalidad
del empleo del producto para escanear, imprimir
o reproducir de otro modo cualquier documento
en particular y/o sobre el empleo de las imágenes
escaneadas, impresas o de otro modo
reproducidas, deberá consultar de antemano a
un asesor legal para que le oriente.
• Papel moneda
• Cheques de viaje
• Giros postales
• Cupones de alimentos
• Certificados de depósito
• Pasaportes
• Sellos postales (matasellados o no)
• Documentos de inmigración
• Chapas o insignias de identificación
• Sellos de ingresos fiscales (matasellados o no)
• Documentos de servicio selectivo o de
llamamiento a filas
• Bonos u otros certificados de endeudamiento
• Cheques o letras de cambio emitidos por
organismos gubernamentales
• Certificados bursátiles
• Licencias de vehículos motorizados y
certificados de titularidad
• Obras protegidas por los derechos de la
propiedad intelectual/Obras de arte sin
Es
permiso del propietario de los derechos de
autor
Aviso legal
• La información de este documento puede ser
modificada sin previo aviso.
• CANON INC. NO OFRECE GARANTÍAS DE
NINGÚN TIPO EN RELACIÓN CON ESTE
MATERIAL, YA SEAN EXPRESAS O IMPLÍCITAS,
EXCEPTO EN LA MEDIDA EN QUE SE DESCRIBE
EN ESTE DOCUMENTO, INCLUIDAS, SIN
LIMITACIÓN, LAS RESPECTIVAS GARANTÍAS DE
PUBLICIDAD, COMERCIABILIDAD,
ADECUACIÓN A UN FIN DETERMINADO O
AUSENCIA DE INFRACCIÓN. CANON INC. NO
ASUME NINGUNA RESPONSABILIDAD EN
CUANTO A LOS DAÑOS DIRECTOS, FORTUITOS
O RESULTANTES, INDEPENDIENTEMENTE DE LA
NATURALEZA DE ÉSTOS, O EN CUANTO A LAS
PÉRDIDAS O GASTOS QUE SE DERIVEN DEL
USO DE ESTE MATERIAL.
Acerca de este manual
Teclas y botones utilizados en este manual
Los siguientes nombres de teclas y símbolos son
algunos ejemplos de cómo se expresa en este
manual cómo deben pulsarse las teclas.
• Teclas del panel de control: [Icono de tecla]
Ejemplo:
• Aparece en pantalla: <Especifique destino.>
• Botones y elementos en la pantalla del
ordenador: [Preferencias]
Ilustraciones
Las ilustraciones utilizadas en este manual son las
mostradas cuando imageRUNNER 2206iF tiene
los siguientes equipos opcionales acoplados:
• Módulo de Alimentación por Cassette AD
Marcas comerciales
Mac es una marca comercial de Apple Inc.
Microsoft, Windows, Windows Vista, Windows
Server, Internet Explorer, Excel y PowerPoint son
marcas registradas o marcas comerciales de
Microsoft Corporation en los Estados Unidos y/u
otros países.
El resto de nombres de productos y compañías
aquí mencionados son marcas comerciales de sus
respectivos propietarios.
Software de terceros
Este producto de Canon (el “PRODUCTO”) incluye
módulos de software de terceros. El uso y la
distribución de dichos módulos de software,
incluyendo cualquier actualización de los mismos
(colectivamente, el “SOFTWARE”), están sujetos a
las condiciones de licencia (1) a (9) que se
presentan a continuación.
(1) Usted acepta cumplir todas las leyes,
restricciones o normativas aplicables relativas
al control de las exportaciones de los países
implicados en caso de que este PRODUCTO,
incluido el SOFTWARE, sea enviado,
transferido o exportado a cualquier país.
(2) Los titulares de los derechos del SOFTWARE
conservan en todos los aspectos la titularidad,
la propiedad y los derechos de la propiedad
intelectual inherentes y relativos al
SOFTWARE. Salvo que aquí se indique
expresamente, mediante el presente
documento los titulares de los derechos del
SOFTWARE no le transfieren ni otorgan
ninguna licencia o derecho, ni expresos ni
implícitos, relativos a la propiedad intelectual
del SOFTWARE.
(3) Podrá utilizar el SOFTWARE únicamente para
uso con el PRODUCTO.
(4) No podrá ceder, otorgar sublicencias,
comercializar, distribuir o transferir el
SOFTWARE a ningún tercero sin el
consentimiento previo por escrito de los
titulares de los derechos del SOFTWARE.
(5) A pesar de lo anterior, podrá transferir el
SOFTWARE únicamente cuando (a) ceda
todos sus derechos respecto al PRODUCTO y
todos los derechos y obligaciones
establecidos en las condiciones de licencia al
receptor y (b) el receptor acepte acatar la
totalidad de dichas condiciones.
(6) No podrá descompilar, invertir la ingeniería,
desensamblar o reducir de cualquier otro
modo el código del SOFTWARE a una forma
legible por el ser humano.
(7) No podrá modificar, adaptar, traducir, alquilar,
arrendar o prestar el SOFTWARE ni crear obras
derivadas basadas en el SOFTWARE.
(8) No tendrá derecho a eliminar o efectuar
copias independientes del SOFTWARE del
PRODUCTO.
(9) No se le otorga ninguna licencia sobre la
parte legible por el ser humano (el código
fuente) del SOFTWARE.
A pesar de los puntos (1) a (9) anteriores, el
PRODUCTO incluye módulos de software de
terceros que pueden tener otras condiciones de
licencia, por lo que dichos módulos de software
estarán sujetos asimismo a las condiciones de
licencia correspondientes.
Consulte las demás condiciones de licencia de los
módulos de software de terceros descritas en el
Apéndice del Manual correspondiente al
PRODUCTO. Este manual se encuentra disponible
en http://canon.com/oip-manual.
Al usar el PRODUCTO, se entenderá que ha
aceptado todas las condiciones de licencia
aplicables. Si no está de acuerdo con las
condiciones de licencia, póngase en contacto
con su representante de servicio.
V_180517
82

Notas
83

CANON INC.
30-2, Shimomaruko 3-chome, Ohta-ku, Tokyo 146-8501, Japan
CANON U.S.A., INC.
One Canon Park, Melville, NY 11747, U.S.A.
CANON CANADA INC.
8000 Mississauga Road Brampton ON L6Y 5Z7, Canada
CANON EUROPA N.V.
Bovenkerkerweg 59, 1185 XB Amstelveen, The Netherlands
(See http://www.canon-europe.com/ for details on your regional dealer)
CANON AUSTRALIA PTY LTD
Building A, The Park Estate, 5 Talavera Road, Macquarie Park, NSW 2113, Australia
CANON CHINA CO. LTD.
2F Jinbao Building No.89, Jinbao Street, Dongcheng District, Beijing 100005, China
CANON SINGAPORE PTE LTD
1 Fusionopolis Place, #15-10, Galaxis, Singapore 138522
FT6-2099 (000) XXXXXXXXXX Copyright CANON INC. 2018 PRINTED IN KOREA
 Loading...