

Canon Image Runner 2000, Image Runner 1600 Series, imageRunner 2000 Series Series Manual
Manuals for the Machine
The manuals for this machine are divided as follows. Please refer to them for detailed information.
The manuals supplied with optional equipment are included in the list below. Depending on the system
configuration and product purchased, some manuals may not be needed.
Basic Operation..............................................
Troubleshooting .............................................
Reference Guide
Copying Instructions ........................................
Copying Guide
(This Document)
\
Remote User Interface Instructions ......................
Remote UI Guide
Setting Up the Network Connection and the CD-ROM
Software ......................................................
Setup Guide
PS/PCL Printer Instructions ................................
PS/PCL Printer Guide
Network Connectivity and Setup Instructions ...........
Network Guide
PCL Printer Driver Installation and Instructions ........
PCL Driver Guide
CD-ROM
CD-ROM
CD-ROM
CD-ROM
•
The product illustration on the cover may differ slightly from your product.

1
2
3
4
How This Manual Is Organized
Basic Copying Features
Special Copying Features
Setting/Storing Specifications of the Copy Functions
Appendix
Includes the Combination of Functions Chart and Index.
Chapter 1
Chapter 2
Chapter 3
Chapter 4
•
Considerable effort has been made to ensure that this manual is free of inaccuracies and omissions.
•
However, as we are constantly improving our products, if you need an exact specification, please contact Canon.

ii
Table of Contents
Preface . . . . . . . . . . . . . . . . . . . . . . . . . . . . . . . . . . . . . . . . . . . . . . . . . . . . . . . . . .iv
How to Use This Manual . . . . . . . . . . . . . . . . . . . . . . . . . . . . . . . . . . . . . . . . . . . iv
Symbols Used in This Manual . . . . . . . . . . . . . . . . . . . . . . . . . . . . . . . . . . . . . . iv
Keys Used in This Manual . . . . . . . . . . . . . . . . . . . . . . . . . . . . . . . . . . . . . . . . . iv
Illustrations Used in This Manual . . . . . . . . . . . . . . . . . . . . . . . . . . . . . . . . . . . . v
Legal Notices . . . . . . . . . . . . . . . . . . . . . . . . . . . . . . . . . . . . . . . . . . . . . . . . . . . . . v
Chapter 1 Basic Copying Features
Overview of the imageRUNNER 2000/1600 . . . . . . . . . . . . . . . . . . . . . . . . . . . 1-2
Various Copying Features . . . . . . . . . . . . . . . . . . . . . . . . . . . . . . . . . . . . . . . 1-2
Flow of Copy Operations . . . . . . . . . . . . . . . . . . . . . . . . . . . . . . . . . . . . . . . . . 1-3
Placing Originals . . . . . . . . . . . . . . . . . . . . . . . . . . . . . . . . . . . . . . . . . . . . . . . . 1-7
Orientation . . . . . . . . . . . . . . . . . . . . . . . . . . . . . . . . . . . . . . . . . . . . . . . . . . . 1-8
Platen Glass. . . . . . . . . . . . . . . . . . . . . . . . . . . . . . . . . . . . . . . . . . . . . . . . . . 1-9
Optional Feeder (ADF-J1) . . . . . . . . . . . . . . . . . . . . . . . . . . . . . . . . . . . . . . 1-12
Flow of Checking/Canceling Operations . . . . . . . . . . . . . . . . . . . . . . . . . . . . 1-14
Canceling a Job . . . . . . . . . . . . . . . . . . . . . . . . . . . . . . . . . . . . . . . . . . . . . . . . 1-15
Canceling with [Stop] . . . . . . . . . . . . . . . . . . . . . . . . . . . . . . . . . . . . . . . . . . 1-15
Canceling from the Monitor Screen . . . . . . . . . . . . . . . . . . . . . . . . . . . . . . . 1-16
Copy Quantity . . . . . . . . . . . . . . . . . . . . . . . . . . . . . . . . . . . . . . . . . . . . . . . . . 1-18
Specifying the Required Number of Copies . . . . . . . . . . . . . . . . . . . . . . . . . 1-18
Changing the Copy Quantity . . . . . . . . . . . . . . . . . . . . . . . . . . . . . . . . . . . . 1-18
Paper Selection . . . . . . . . . . . . . . . . . . . . . . . . . . . . . . . . . . . . . . . . . . . . . . . . 1-19
Automatic Paper Selection . . . . . . . . . . . . . . . . . . . . . . . . . . . . . . . . . . . . . . 1-19
Manual Paper Selection . . . . . . . . . . . . . . . . . . . . . . . . . . . . . . . . . . . . . . . . 1-20
Copy Exposure and Image Quality Adjustment . . . . . . . . . . . . . . . . . . . . . . 1-22
Copy Exposure (Manual) . . . . . . . . . . . . . . . . . . . . . . . . . . . . . . . . . . . . . . . 1-22
Image Quality (Manual) . . . . . . . . . . . . . . . . . . . . . . . . . . . . . . . . . . . . . . . . 1-23
Copy Exposure and Image Quality (Automatic) . . . . . . . . . . . . . . . . . . . . . . 1-25
Changing the Copy Zoom Ratio . . . . . . . . . . . . . . . . . . . . . . . . . . . . . . . . . . . 1-26
Preset Zoom. . . . . . . . . . . . . . . . . . . . . . . . . . . . . . . . . . . . . . . . . . . . . . . . . 1-26
Zoom by Percentage . . . . . . . . . . . . . . . . . . . . . . . . . . . . . . . . . . . . . . . . . . 1-27
Collating Copies. . . . . . . . . . . . . . . . . . . . . . . . . . . . . . . . . . . . . . . . . . . . . . . . 1-29
Page Order (Collate) . . . . . . . . . . . . . . . . . . . . . . . . . . . . . . . . . . . . . . . . . . 1-31
Page Order (Staple) . . . . . . . . . . . . . . . . . . . . . . . . . . . . . . . . . . . . . . . . . . . 1-33
Reserved Copying . . . . . . . . . . . . . . . . . . . . . . . . . . . . . . . . . . . . . . . . . . . . . . 1-34

iii
Reserving Copy Jobs While Printing . . . . . . . . . . . . . . . . . . . . . . . . . . . . . . .1-34
Interrupt Mode . . . . . . . . . . . . . . . . . . . . . . . . . . . . . . . . . . . . . . . . . . . . . . . . . .1-36
Chapter 2 Special Copying Features
Two-Page Separation . . . . . . . . . . . . . . . . . . . . . . . . . . . . . . . . . . . . . . . . . . . . .2-2
Margin Mode . . . . . . . . . . . . . . . . . . . . . . . . . . . . . . . . . . . . . . . . . . . . . . . . . . . .2-5
Frame Erase . . . . . . . . . . . . . . . . . . . . . . . . . . . . . . . . . . . . . . . . . . . . . . . . . . . . .2-7
Original Frame Erase. . . . . . . . . . . . . . . . . . . . . . . . . . . . . . . . . . . . . . . . . . . .2-9
Book Frame Erase . . . . . . . . . . . . . . . . . . . . . . . . . . . . . . . . . . . . . . . . . . . . . 2-11
Hole Punch Erase . . . . . . . . . . . . . . . . . . . . . . . . . . . . . . . . . . . . . . . . . . . . . 2-12
2 on 1 Combination . . . . . . . . . . . . . . . . . . . . . . . . . . . . . . . . . . . . . . . . . . . . . . 2-15
Chapter 3 Setting/Storing Specifications of the Copy Functions
Copy Settings Table. . . . . . . . . . . . . . . . . . . . . . . . . . . . . . . . . . . . . . . . . . . . . . . 3-2
Changing the Current Standard Settings . . . . . . . . . . . . . . . . . . . . . . . . . . . . .3-3
Standard Exposure . . . . . . . . . . . . . . . . . . . . . . . . . . . . . . . . . . . . . . . . . . . . . 3-3
Standard Zoom Ratio. . . . . . . . . . . . . . . . . . . . . . . . . . . . . . . . . . . . . . . . . . . .3-5
Standard Copy Quantity. . . . . . . . . . . . . . . . . . . . . . . . . . . . . . . . . . . . . . . . . .3-6
Standard Frame Erase Width. . . . . . . . . . . . . . . . . . . . . . . . . . . . . . . . . . . . . .3-7
Auto Collate . . . . . . . . . . . . . . . . . . . . . . . . . . . . . . . . . . . . . . . . . . . . . . . . . . .3-8
Rotate Collate . . . . . . . . . . . . . . . . . . . . . . . . . . . . . . . . . . . . . . . . . . . . . . . . . 3-9
Sharpness . . . . . . . . . . . . . . . . . . . . . . . . . . . . . . . . . . . . . . . . . . . . . . . . . . . 3-10
Prescan . . . . . . . . . . . . . . . . . . . . . . . . . . . . . . . . . . . . . . . . . . . . . . . . . . . . .3-12
Chapter 4 Appendix
Combination of Functions Chart . . . . . . . . . . . . . . . . . . . . . . . . . . . . . . . . . . . . 4-2
Index . . . . . . . . . . . . . . . . . . . . . . . . . . . . . . . . . . . . . . . . . . . . . . . . . . . . . . . . . . . 4-5

iv
Preface
Thank you for purchasing the Canon imageRUNNER 2000/1600 Series. Please read this
manual thoroughly before operating the product in order to familiarize yourself with its
capabilities, and to make the most of its many functions. After reading this manual, store it in
a safe place for future reference.
How to Use This Manual
Symbols Used in This Manual
The following symbols are used in this manual to explain procedures, restrictions,
handling precautions, and instructions that should be observed for safety.
Keys Used in This Manual
The following symbols and keynames are a few examples of how control panel keys
are expressed in this manual:
<Key icon> [Key Name]
[Start]
[Paper Select]
WARNING
Indicates a warning concerning operations that may lead to
death or injury to persons if not performed correctly. In order
to use the machine safely, always pay attention to these
warnings.
CAUTION
Indicates a caution concerning operations that may lead to
injury to persons, or damage to property if not performed correctly. In
order to use the machine safely, always pay attention to these
cautions.
IMPORTANT
Indicates operational requirements and restrictions. Be sure to read
these items carefully in order to operate the machine correctly, and to
avoid damage to the machine.
NOTE
Indicates a clarification of an operation, or contains additional
explanations for a procedure. Reading these notes is highly
recommended.
Start
Paper Select
v
Illustrations Used in This Manual
Unless otherwise mentioned, illustrations used in this manual are those displayed
when the imageRUNNER 1600 has the following optional equipment attached to it:
the Feeder (ADF-J1), Finisher-L1, and the Cassette Feeding Module-F1.
Legal Notices
Canon, the Canon logo, and imageRUNNER are trademarks of Canon Inc.
Other products and company names herein may be the trademarks of their respective
owners.
Copyright 2002 by Canon, Inc. All rights reserved.
No part of this publication may be reproduced or transmitted in any form or by any means,
electronic or mechanical, including photocopying and recording, or by any information
storage or retrieval system without the prior written permission of Canon, Inc.
The information in this document is subject to change without notice.
CANON INC. MAKES NO WARRANTY OF ANY KIND WITH REGARD TO THIS MATERIAL,
EITHER EXPRESS OR IMPLIED, EXCEPT AS PROVIDED HEREIN, INCLUDING
WITHOUT LIMITATION THEREOF, WARRANTIES AS TO MAKETABILITY,
MERCHANTABILITY, FOR A PARTICULAR PURPOSE OF USE, OR AGAINST
INFRINGEMENT OF ANY PATENT. CANON INC. SHALL NOT BE LIABLE FOR ANY
DIRECT, INCIDENTAL, OR CONSEQUENTIAL DAMAGES OF ANY NATURE, OR LOSSES
OR EXPENSES RESULTING FROM THE USE OF THIS MATERIAL.

vi

CHAPTER
1-1
1
Basic Copying Features
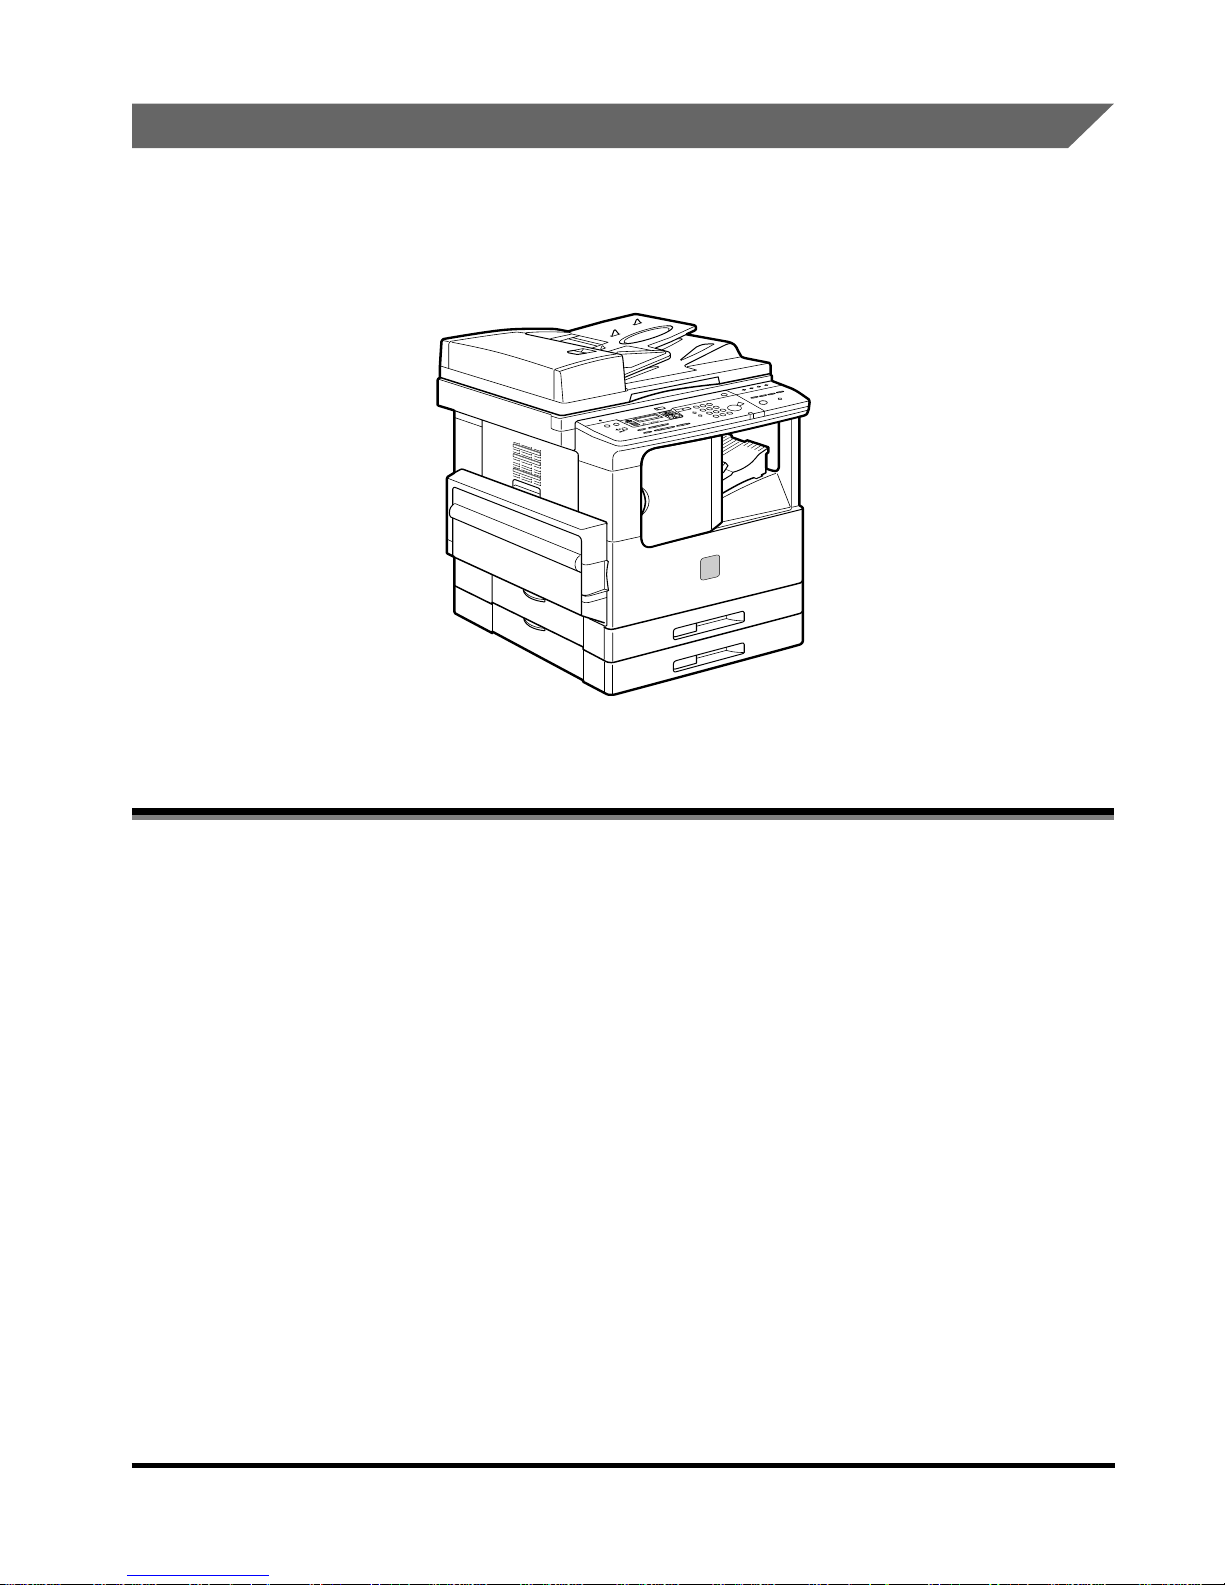
This chapter describes the basic copying features.
Overview of the imageRUNNER 2000/1600. . . . . . . . . . . . . . . . . . . . . . . . . . . . . . . . . . . 1-2
Various Copying Features . . . . . . . . . . . . . . . . . . . . . . . . . . . . . . . . . . . . . . . . . . . . . . . . . . . . . .1-2
Flow of Copy Operations . . . . . . . . . . . . . . . . . . . . . . . . . . . . . . . . . . . . . . . . . . . . . . . . . 1-3
Placing Originals. . . . . . . . . . . . . . . . . . . . . . . . . . . . . . . . . . . . . . . . . . . . . . . . . . . . . . . . 1-7
Orientation . . . . . . . . . . . . . . . . . . . . . . . . . . . . . . . . . . . . . . . . . . . . . . . . . . . . . . . . . . . . . . . . . .1-8
Platen Glass . . . . . . . . . . . . . . . . . . . . . . . . . . . . . . . . . . . . . . . . . . . . . . . . . . . . . . . . . . . . . . . . .1-9
Optional Feeder (ADF-J1) . . . . . . . . . . . . . . . . . . . . . . . . . . . . . . . . . . . . . . . . . . . . . . . . . . . . .1-12
Flow of Checking/Canceling Operations. . . . . . . . . . . . . . . . . . . . . . . . . . . . . . . . . . . . . 1-14
Canceling a Job . . . . . . . . . . . . . . . . . . . . . . . . . . . . . . . . . . . . . . . . . . . . . . . . . . . . . . . 1-15
Canceling with [Stop] . . . . . . . . . . . . . . . . . . . . . . . . . . . . . . . . . . . . . . . . . . . . . . . . . . . . . . . . .1-15
Canceling from the Monitor Screen . . . . . . . . . . . . . . . . . . . . . . . . . . . . . . . . . . . . . . . . . . . . . .1-16
Copy Quantity . . . . . . . . . . . . . . . . . . . . . . . . . . . . . . . . . . . . . . . . . . . . . . . . . . . . . . . . . 1-18
Specifying the Required Number of Copies . . . . . . . . . . . . . . . . . . . . . . . . . . . . . . . . . . . . . . .1-18
Changing the Copy Quantity . . . . . . . . . . . . . . . . . . . . . . . . . . . . . . . . . . . . . . . . . . . . . . . . . . .1-18
Paper Selection . . . . . . . . . . . . . . . . . . . . . . . . . . . . . . . . . . . . . . . . . . . . . . . . . . . . . . .1-19
Automatic Paper Selection . . . . . . . . . . . . . . . . . . . . . . . . . . . . . . . . . . . . . . . . . . . . . . . . . . . . .1-19
Manual Paper Selection . . . . . . . . . . . . . . . . . . . . . . . . . . . . . . . . . . . . . . . . . . . . . . . . . . . . . . .1-20
Copy Exposure and Image Quality Adjustments . . . . . . . . . . . . . . . . . . . . . . . . . . . . . . 1-22
Copy Exposure (Manual) . . . . . . . . . . . . . . . . . . . . . . . . . . . . . . . . . . . . . . . . . . . . . . . . . . . . . .1-22
Image Quality (Manual) . . . . . . . . . . . . . . . . . . . . . . . . . . . . . . . . . . . . . . . . . . . . . . . . . . . . . . .1-23
Copy Exposure and Image Quality (Automatic). . . . . . . . . . . . . . . . . . . . . . . . . . . . . . . . . . . . .1-25
Changing the Copy Zoom Ratio . . . . . . . . . . . . . . . . . . . . . . . . . . . . . . . . . . . . . . . . . . .1-26
Preset Zoom . . . . . . . . . . . . . . . . . . . . . . . . . . . . . . . . . . . . . . . . . . . . . . . . . . . . . . . . . . . . . . . .1-26
Zoom by Percentage . . . . . . . . . . . . . . . . . . . . . . . . . . . . . . . . . . . . . . . . . . . . . . . . . . . . . . . . .1-27
Collating Copies . . . . . . . . . . . . . . . . . . . . . . . . . . . . . . . . . . . . . . . . . . . . . . . . . . . . . . . 1-29
Page Order (Collate) . . . . . . . . . . . . . . . . . . . . . . . . . . . . . . . . . . . . . . . . . . . . . . . . . . . . . . . . .1-31
Page Order (Staple) . . . . . . . . . . . . . . . . . . . . . . . . . . . . . . . . . . . . . . . . . . . . . . . . . . . . . . . . . .1-33
Reserved Copying . . . . . . . . . . . . . . . . . . . . . . . . . . . . . . . . . . . . . . . . . . . . . . . . . . . . . 1-34
Reserving Copy Jobs While Printing . . . . . . . . . . . . . . . . . . . . . . . . . . . . . . . . . . . . . . . . . . . . .1-34
Interrupt Mode . . . . . . . . . . . . . . . . . . . . . . . . . . . . . . . . . . . . . . . . . . . . . . . . . . . . . . . .1-36

Overview of the imageRUNNER 2000/1600
1-2
Basic Copying Features
1
Overview of the imageRUNNER 2000/1600
Various Copying Features
■
Flexible Document Handling
To make a copy of an original, you have the choice of setting the document in the optional
Feeder (ADF-J1) when attached, or placing it directly onto the platen glass. The feeder is
useful when copying a multi page document, and the platen glass is ideal when copying a
single page document, or from a book.
■
Copy Ratio
You can manually select a reduction/enlargement ratio from 50% to 200%. You can also
set the unit to select an appropriate ratio to fit the paper size you are copying onto.
■
Automatic and Manual Copy Exposure/Image Quality Adjustment
The machine can automatically set the most appropriate image quality settings, including
the exposure, for the document you are copying. You can also manually adjust them to get
the best output quality.
■
Collate
With the optional Finisher-L1 or Inner 2-Way Tray attached, you can select various
finishing modes to collate the copies by copy sets.
■
Frame Erase
This feature allows you to erase unwanted shadows, borders, and binding marks from
around an original. When copying directly from a book, you can also erase the center line
and edges on the copy. To make a copy from a book, use the platen glass.
■
Margin Mode
This feature allows you to create a margin on the top, bottom, left, or right of the document
for use when binding the document together. This is convenient if you later want to staple
or insert binding holes.
■
Two-Page Separation
Double spread pages in magazines or books can be copied onto separate sheets of
paper in one operation. This feature works only when the document is copied from the
platen glass.
■
2 on 1 Combination
You can copy two pages of a document onto a single page.
■
Energy Saver Mode
This machine incorporates an energy saver feature to conserve power. In energy saver
mode, the display and the operation panel lamps go out automatically when the unit
remains idle for a specified period of time.
Flow of Copy Operations
1-3
1
Basic Copying Features
Flow of Copy Operations
This section describes the flow of basic copy operations.
NOTE
• For the following items:
- Main power and Energy Saver button, see the
Reference Guide.
- Routine maintenance, see the
Reference Guide.
• If the platen glass is dirty, the output quality may deteriorate. Always keep the platen
glass clean.
• Do not touch the platen cover while copying. Rocking the cover can distort the image
being copied.
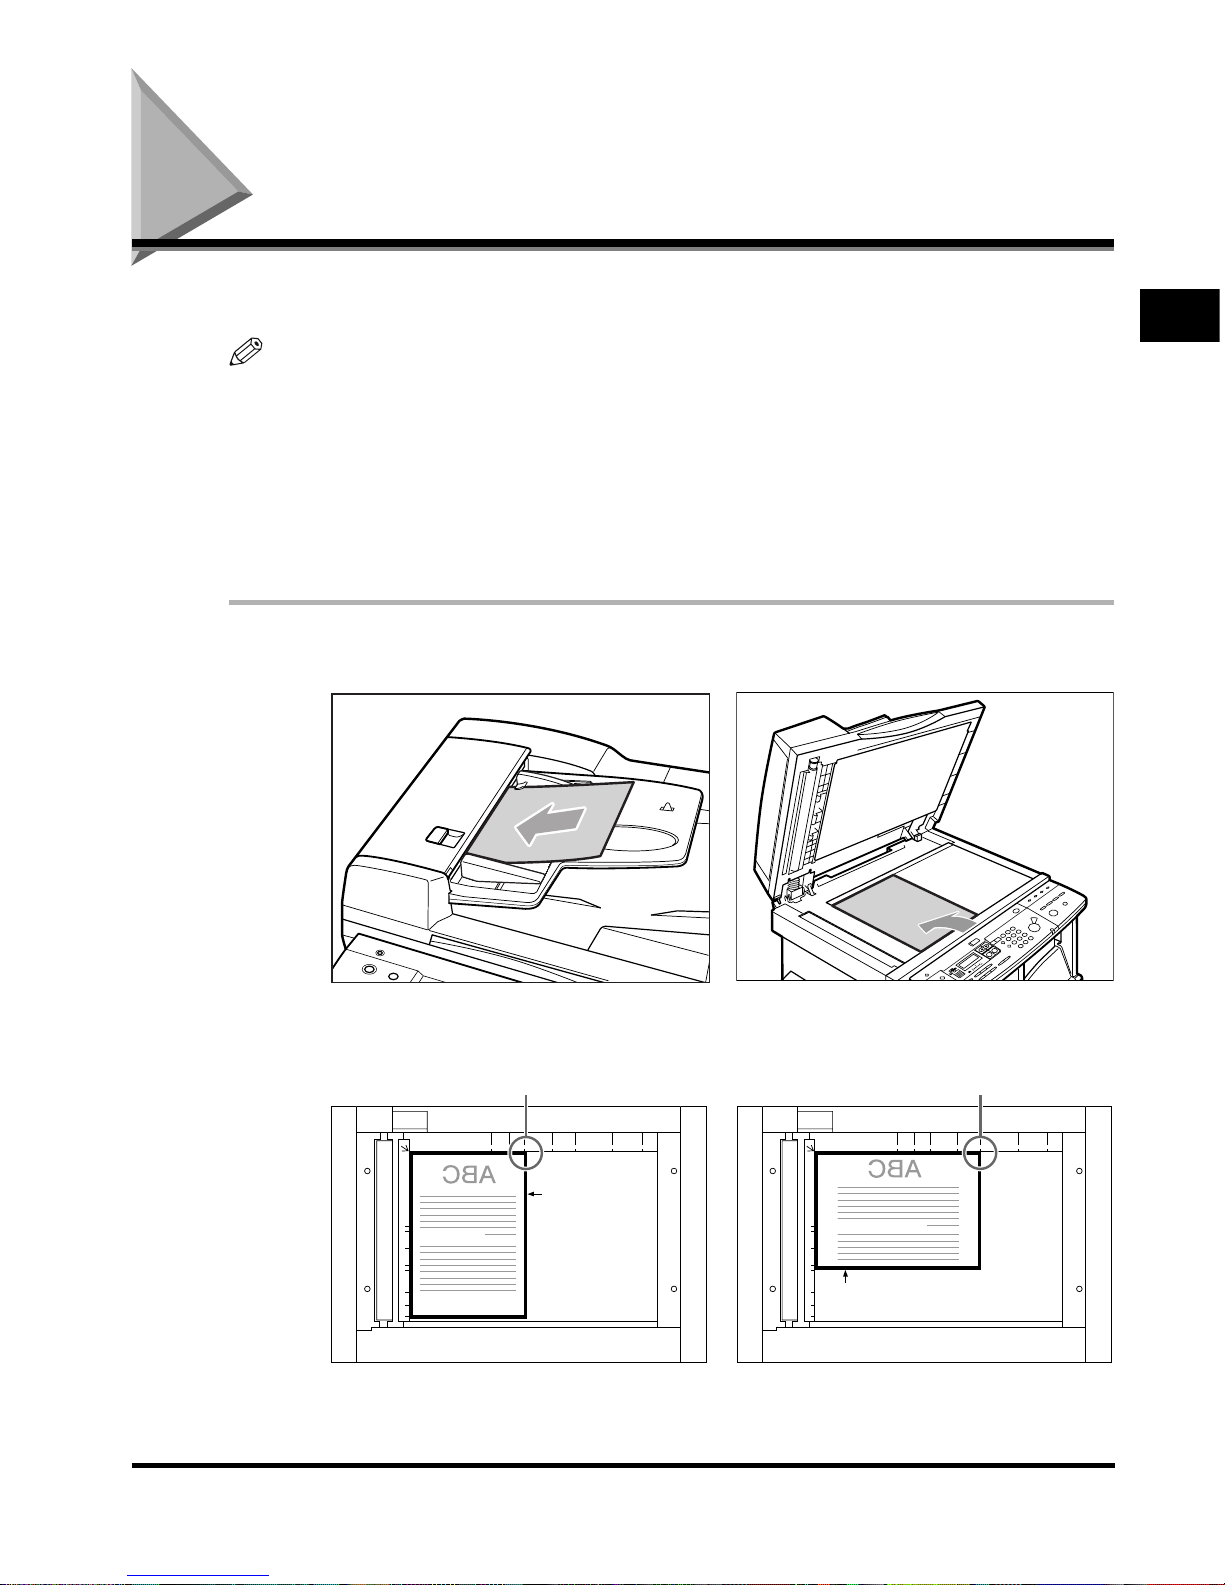
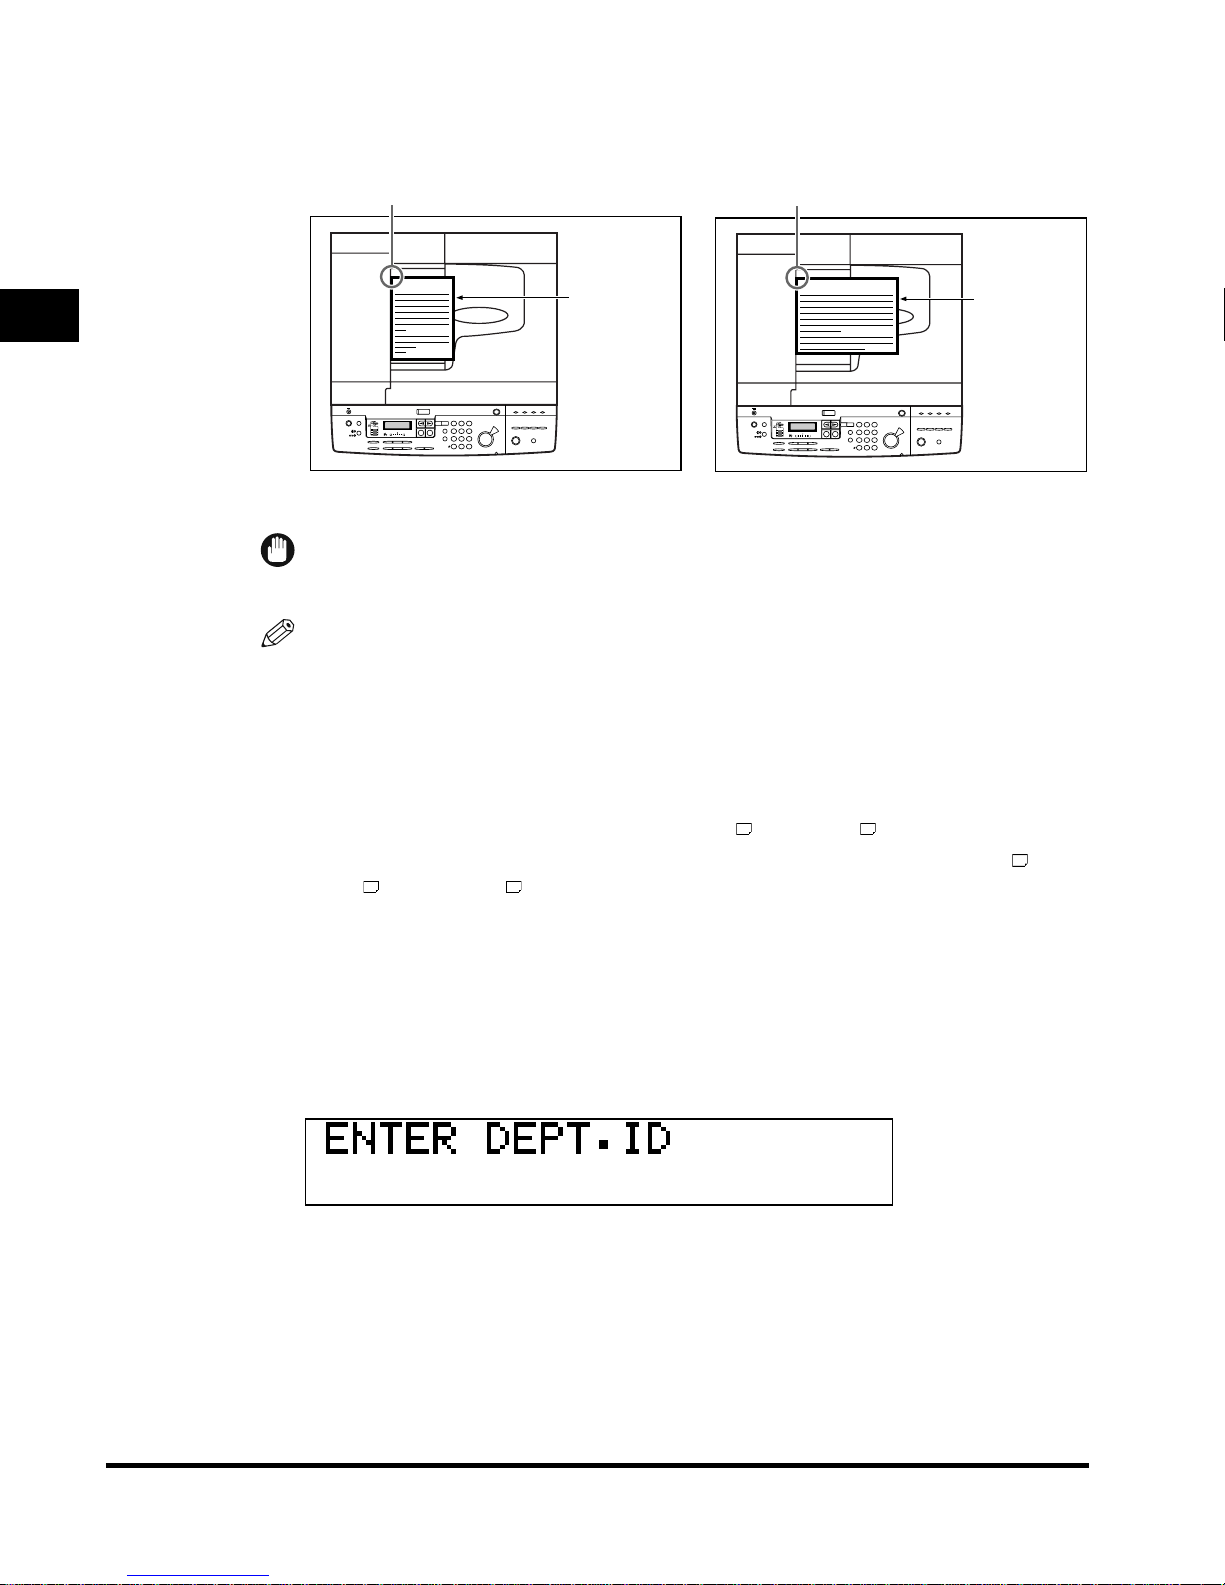
1
Place your original.
You can set the original both vertically and horizontally.
Platen Glass
Vertical Placement Horizontal Placement
Original
(face down)
Copies are stapled here.
Original (face down)
Copies are stapled here.
Flow of Copy Operations
1-4
1
Basic Copying Features
Feeder
Staple copy: place the original face up
Vertical Placement Horizontal Placement
IMPORTANT
The copies are stapled at the part equivalent to the upper left side of the original.
NOTE
• If the top edge of the original is not aligned with the back edge of the platen glass
(by the arrow in the top left corner), prints may not be made correctly, depending on
the mode you have set.
• STMT and LTR originals can be placed either vertically or horizontally. However,
the scanning speed for horizontally placed originals is somewhat slower than for
vertically placed originals. You can place originals horizontally when printing with a
Preset Zoom, such as when processing LTR
to 11''x17'' .
• Horizontally placed LTR, LGL and 11''x17'' originals are referred to as LTR ,
LGL and 11''x17'' .
• LGL and 11''x17'' originals must be placed horizontally.
• If <AUTO SORT> is set to <ON>, the Collate or the Offset Collate mode is
automatically set if you place your originals in the feeder. (See “Auto Collate,” on p.
3-8.)
● If the message <ENTER DEPT. ID> is displayed:
■ Enter the Department ID and password. (See the Reference Guide.)
ABC
Original
(face up)
Copies are stapled here.
ABC
Original
(face up)
Copies are stapled here.
Flow of Copy Operations
1-5
Basic Copying Features
1
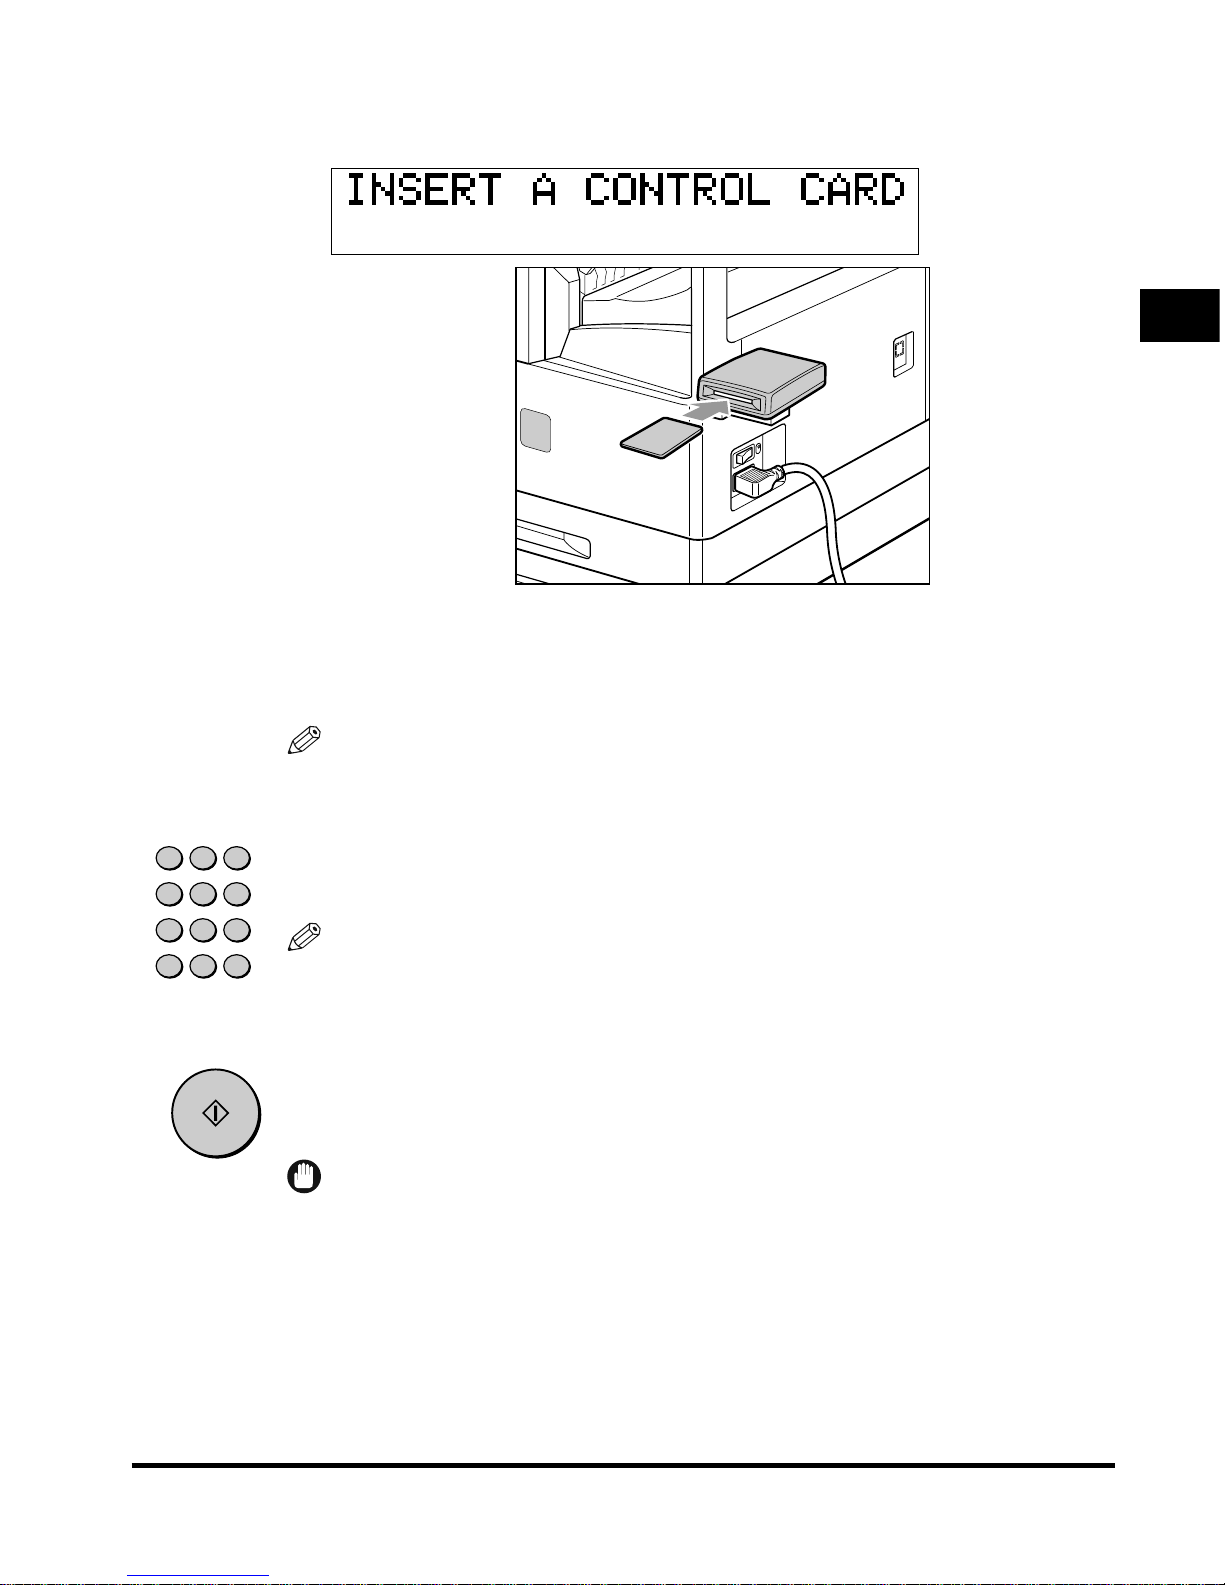
● If the message <INSERT A CONTROL CARD> is displayed:
■ Insert a control card. (See the Reference Guide.)
2
Set the desired copy mode (paper selection, image quality,
copy exposure, copy ratio, and finishing).
NOTE
For details about these settings, see the pages from 1-19 in this chapter, or
Chapter 2 “Special Copying Features”.
3
Enter the copy quantity (1 to 99) using the numeric keys.
NOTE
For instructions on setting the number of copies, see “Specifying the Required
Number of Copies,” on p. 1-18.
4
Press [Start].
Copying starts.
IMPORTANT
While copying, you cannot change the copy mode settings, such as the copy
quantity, paper size, and copy ratio.
1 2 3
4 5 6
7 809
I D
0
C
Clear
Start
Flow of Copy Operations
1-6
1
Basic Copying Features
NOTE
• If there is a current job, the machine scans the original, and waits to print it. Printing
starts when the current job is completed.
• When scanning is complete, remove your original.
• If you have set Department ID Management, press [ID]. (See the Reference
Guide.)
• If the optional card reader is attached, remove the control card. (See the Reference
Guide.)
● If you want to reserve a copy job while the machine is printing:
■ Place the original ➞ press [Start]. (See “Reserving Copy Jobs While Printing,”
on p. 1-34.)
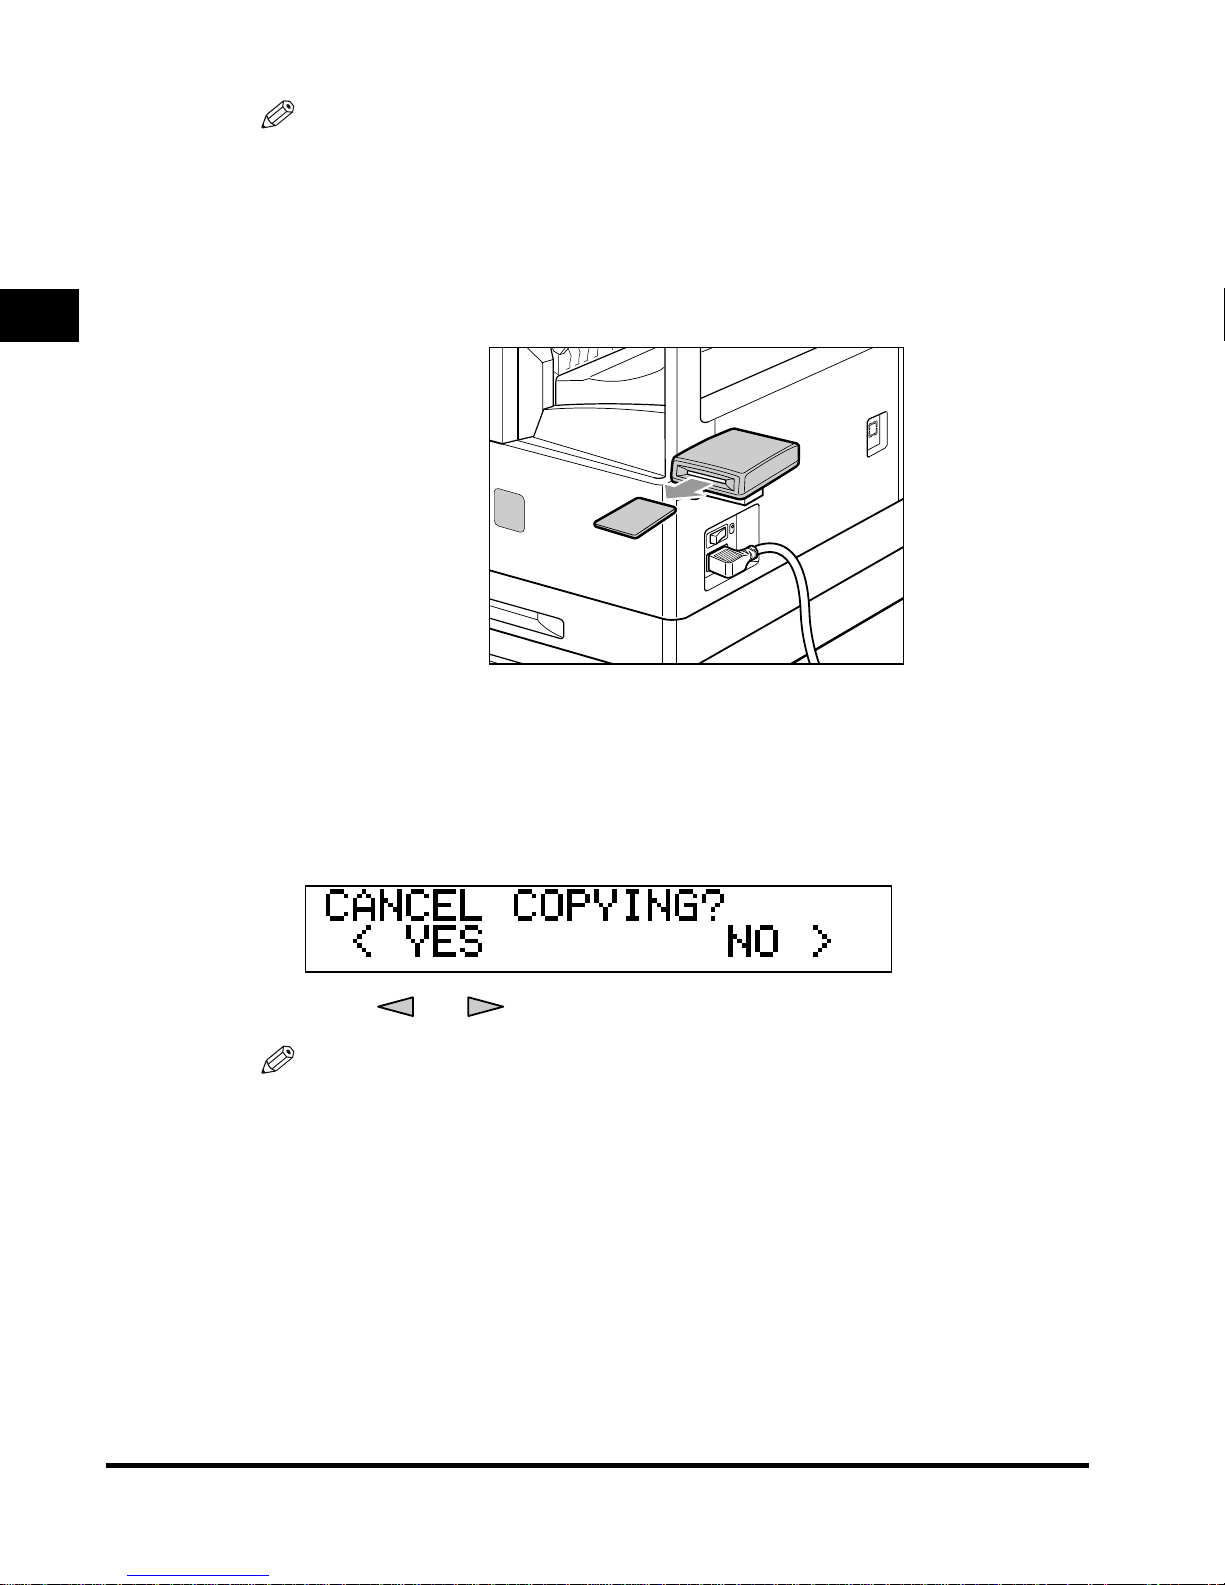
●
If you want to cancel a copy job:
■ Press [Stop].
Press [ ] or [ ] to select <YES> or <NO>.
NOTE
• After you have pressed [Stop], several copies may be output from the machine.
• You can also cancel a copy job from the Monitor screen. (See the Reference
Guide.)
● If you want to interrupt a copy job:
■ To interrupt a copy job when you need to make priority copies, press [Interrupt].
For instructions on interrupting a copy job, see “Interrupt Mode,” on p. 1-36.

Placing Originals
1-7
1
Basic Copying Features
Placing Originals
Place your originals on the platen glass or in the feeder, depending on the size and
type of paper that you want to print and the settings that you have programmed.
■ Platen glass
Place the originals on the platen glass when scanning bound originals (such as books
and magazines), originals on heavy or lightweight paper, and transparencies.
■ Feeder (when attached)
Place a stack of originals in the optional feeder, and press [Start]. The machine
automatically scans them into memory.
Placing Originals
1-8
1
Basic Copying Features
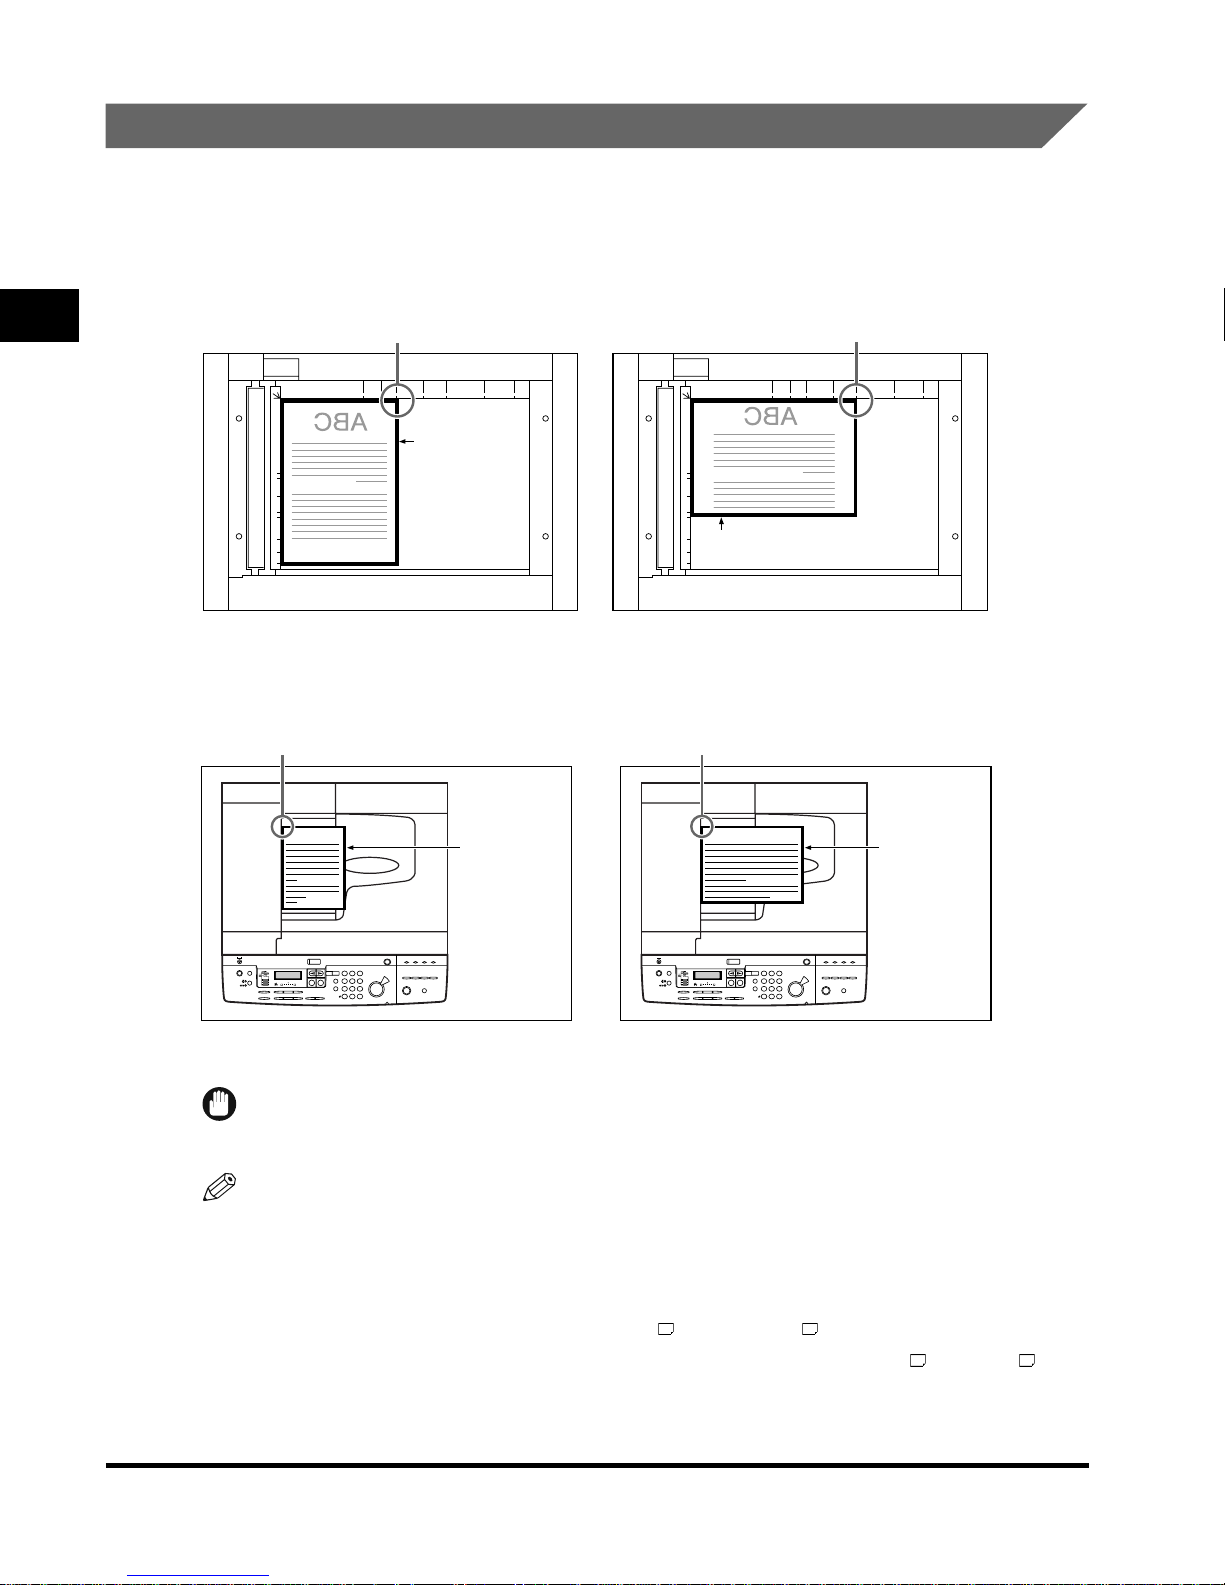
Orientation
You can place original either vertically or horizontally. Always align the top edge of
your original with the back edge of the platen glass (by the arrow in the top left
corner), or with the back edge of the feeder.
Platen glass
Vertical placement Horizontal placement
Feeder
Staple copy: place the original face up
Vertical placement Horizontal placement
IMPORTANT
The copies are stapled at the part equivalent to the upper left side of the original.
NOTE
• If the top edge of the original is not aligned with the back edge of the platen glass, prints
may not be made correctly, depending on the mode you have set.
• The scanning speed for horizontally placed originals is somewhat slower than for
vertically placed originals. You can place originals horizontally when scanning with Preset
Zoom mode, such as when enlarging LTR to 11"
✕
17" .
• Horizontally placed STMT and LTR originals are referred to as STMT and LTR .
• 11"
✕
17" and LGL originals must be placed horizontally.
Original
(face down)
Copies are stapled here.
Original (face down)
Copies are stapled here.
ABC
Original
(face up)
Copies are stapled here.
ABC
Original
(face up)
Copies are stapled here.
Placing Originals
1-9
Basic Copying Features
1
• To get the same output result as when the original is placed on the platen glass, place it
upside down and face up. However, when using the stapler function, the Finisher rotates
the output automatically.
Platen Glass
You should use the platen glass when scanning books and other bound originals
(such as books and magazines), heavy or lightweight paper originals, and
transparencies into memory.
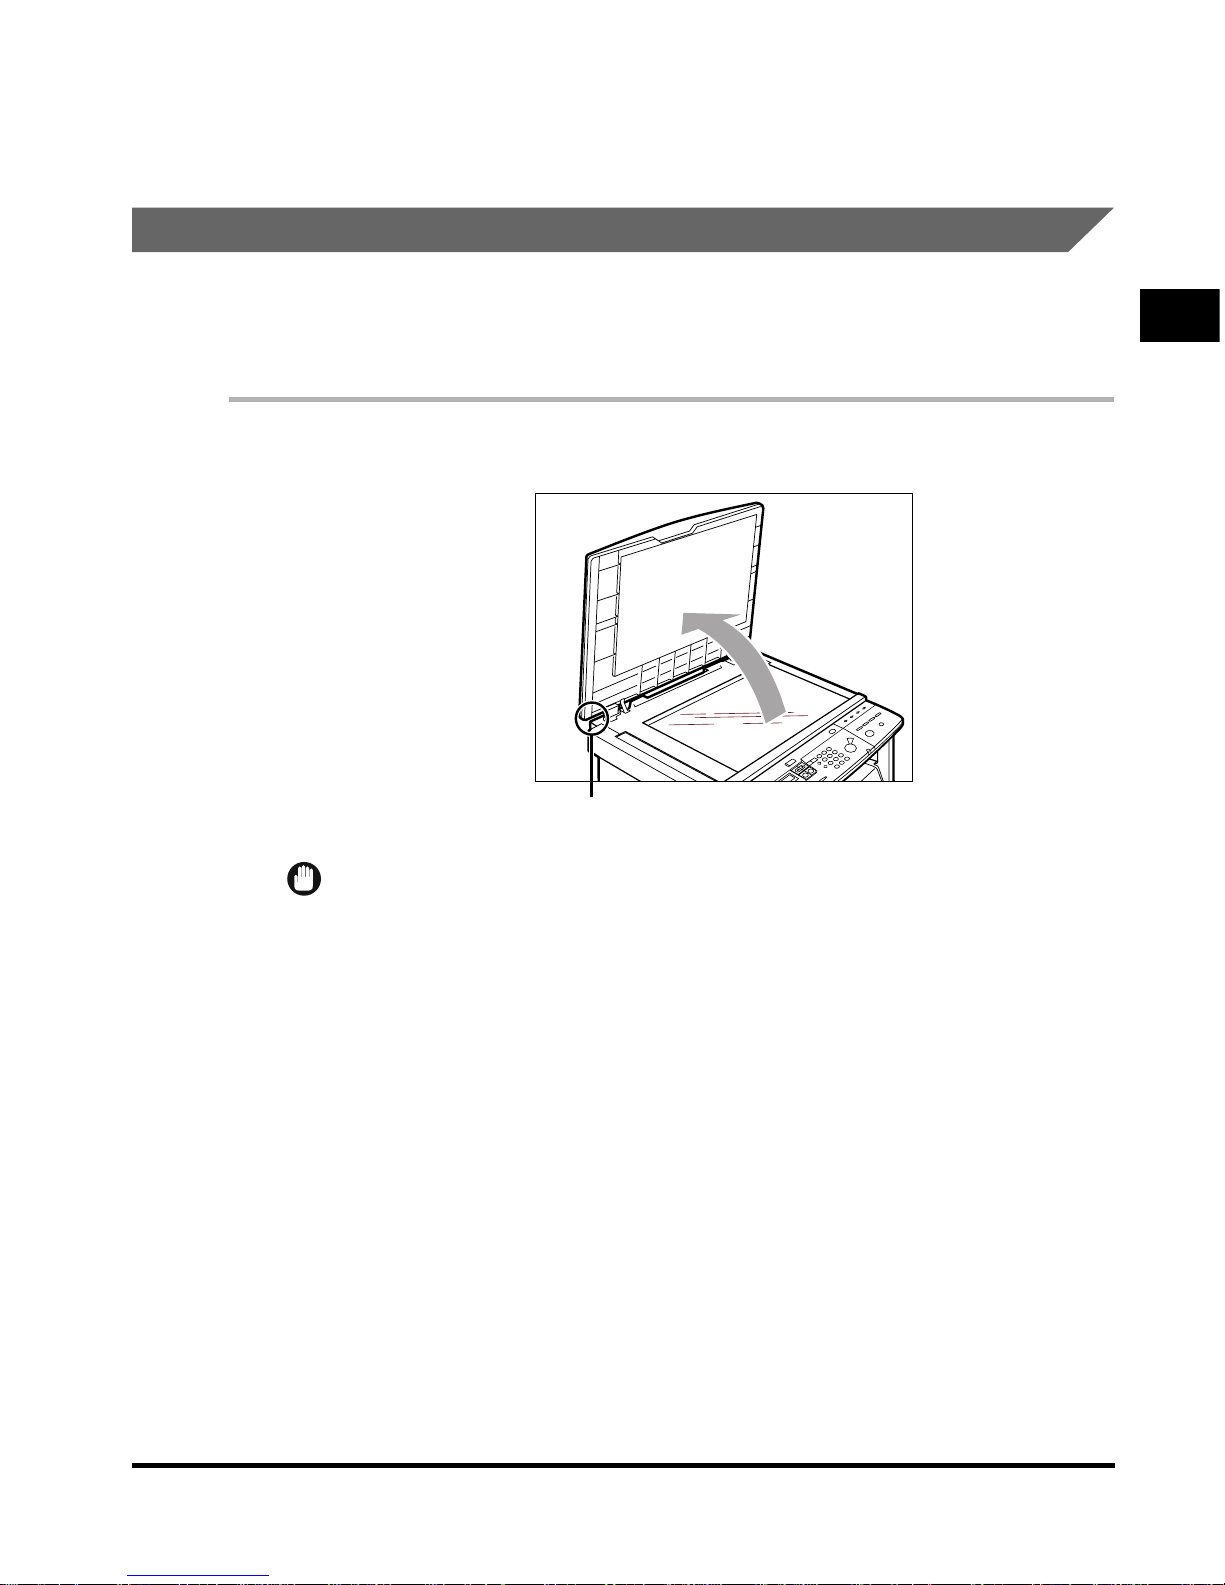
1
Lift up the feeder/platen glass cover.
IMPORTANT
The machine is equipped with an open/close sensor of the feeder/platen glass
cover. When placing originals on the platen glass, lift the feeder/platen glass cover
about 30 cm. If the sensor does not detach from the feeder/platen glass cover, the
size of originals may not be detected correctly.
Open/ Close
sensor
Placing Originals
1-10
1
Basic Copying Features
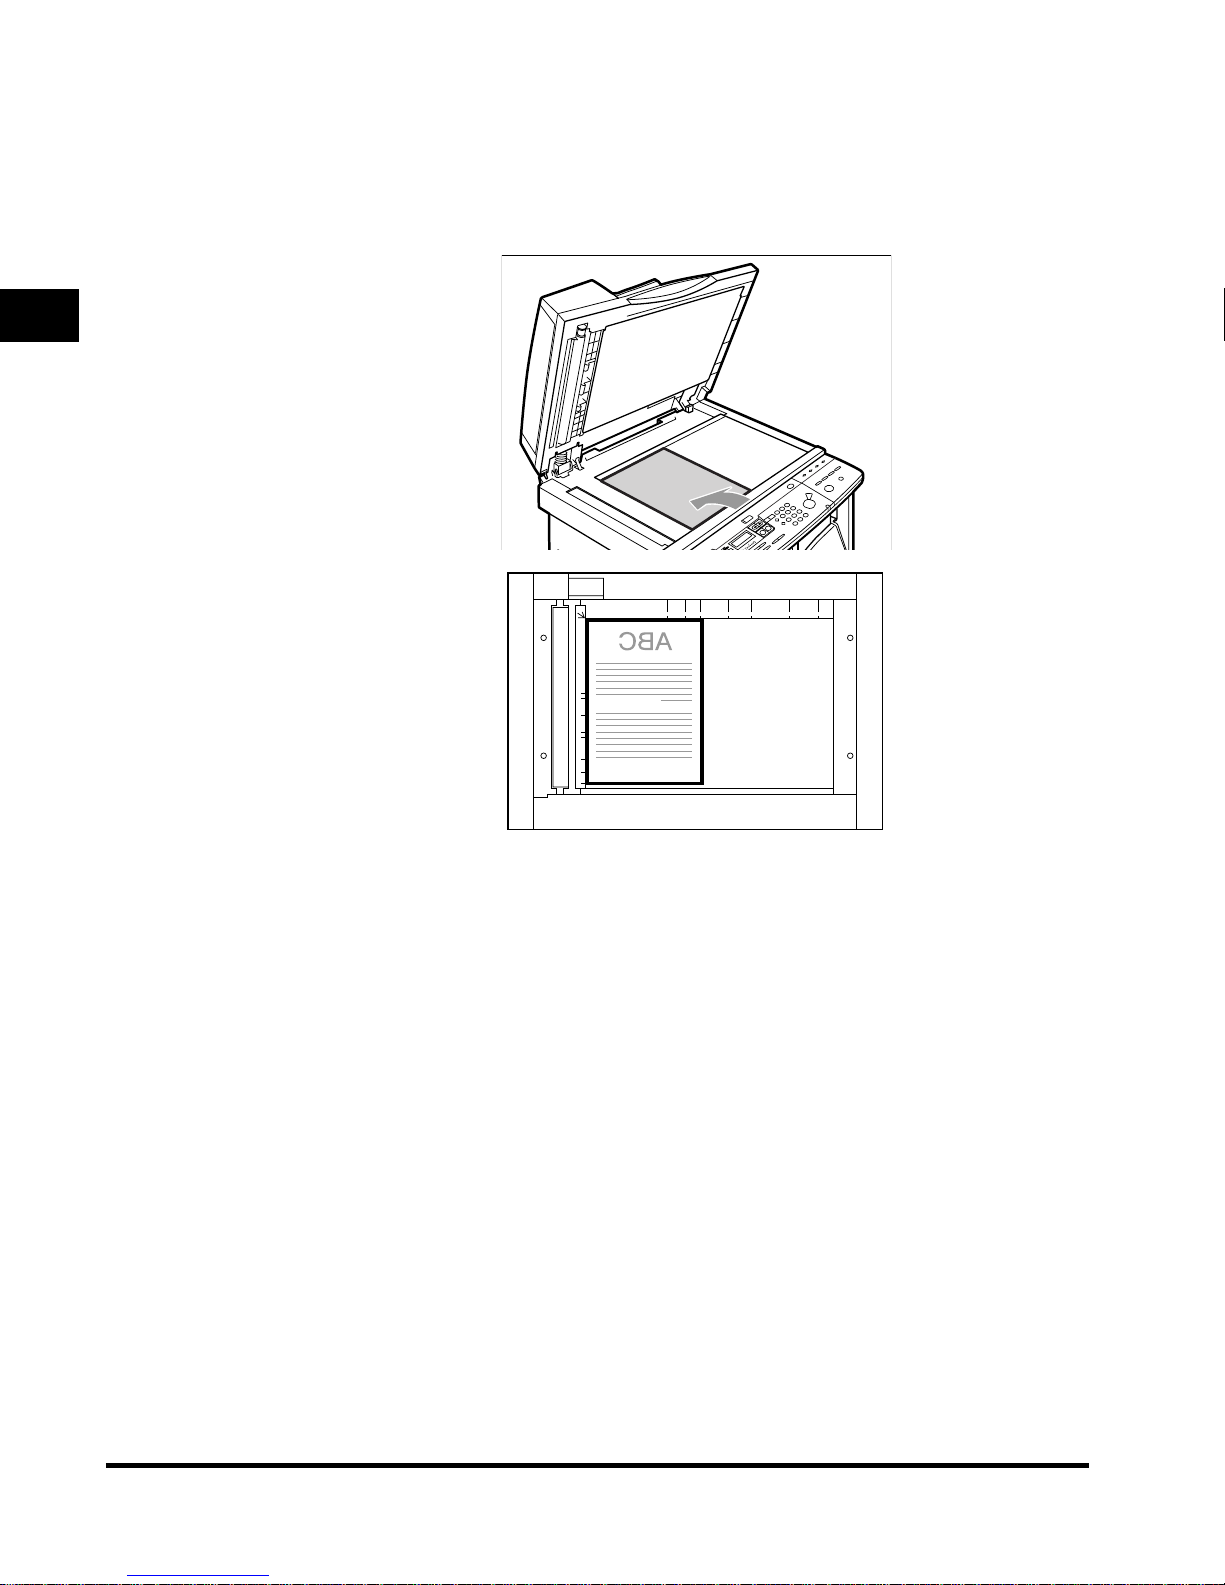
2
Place your original face down.
The surface that you want to scan into memory must be placed face down. Align
the top edge of your original with the back edge of the platen glass (by the arrow
in the top left corner).
Place books and other bound originals on the platen glass in the same way.
If you are enlarging STMT or LTR originals to LGL or 11" ✕ 17" paper, place the
original horizontally on the platen glass, and align it with the STMT or LTR marks.
Placing Originals
1-11
Basic Copying Features
1
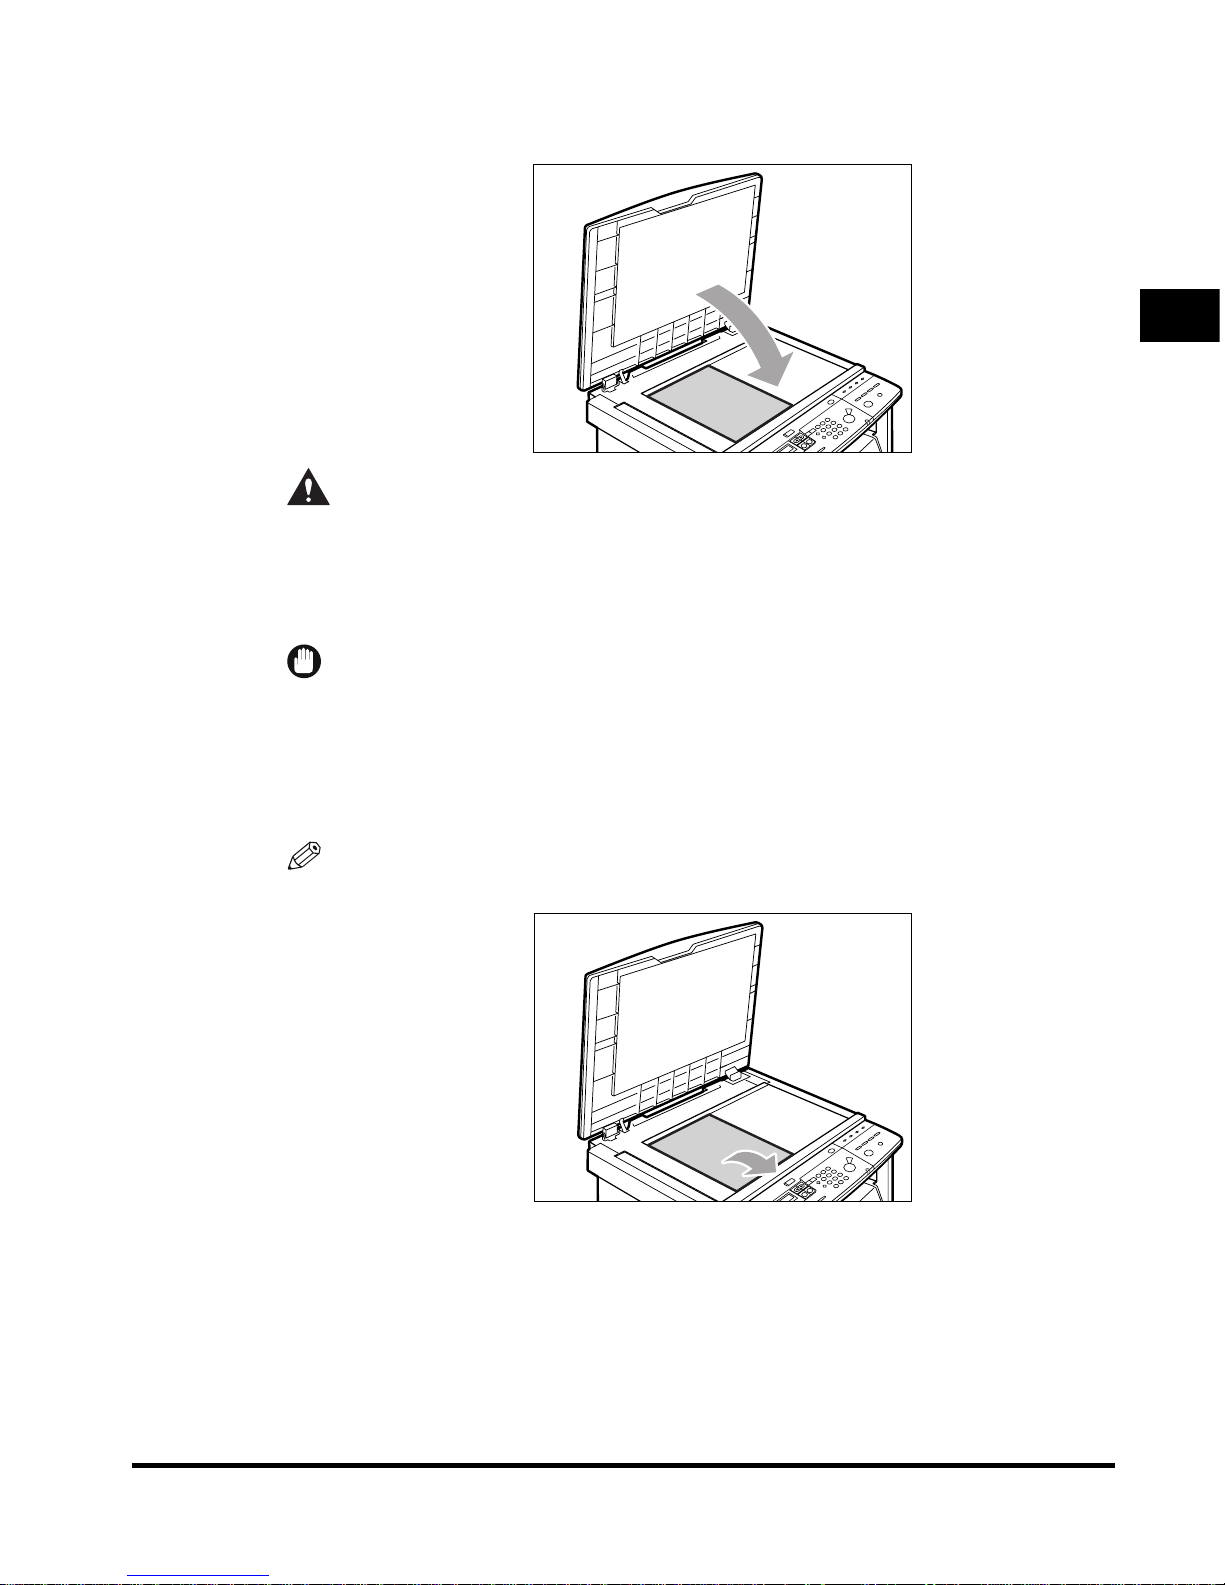
3
Gently lower the feeder/platen glass cover.
CAUTION
• Close the feeder/platen glass cover gently, to avoid catching your hand, as
this may result in personal injury.
• Do not press down the feeder/platen glass cover with force when scanning
thick books. This may damage the platen glass and cause personal injury.
IMPORTANT
• If you are placing originals on the platen glass, the size of the original is detected
after the platen glass cover has been lowered. Be sure to lower the platen glass
cover before copying.
• STMT originals and postcards cannot be detected. Follow the instructions on the
display and specify the original size or select the paper size.
NOTE
Remove the original from the platen glass when scanning is completed.
Placing Originals
1-12
1
Basic Copying Features
Optional Feeder (ADF-J1)
If the machine is equipped with the optional feeder, place a stack of originals, and
press [Start]. The machine automatically scans them into memory.
You can place the following originals in the original supply tray:
• Weight: 10 to 32-lb bond [37 to 128g/m2](set the originals one-by-one when they are very
thin (10 to 14-lb [37 to 51 g/m
2
]) or very thick (28 to 32-lb [105 to 128 g/m2])
• Size: 11'' ✕ 17'' , LGL , LTR , or LTR .
• Tray capacity: 50 sheets (LTR or smaller)
25 sheets (LGL or larger)
IMPORTANT
• Do not place the following types of originals in the feeder:
- Originals with tears or large binding holes
- Severely curled originals or originals with sharp folds
- Clipped or stapled originals
- Carbon backed paper or other originals which might not feed smoothly
- Transparencies and other highly transparent originals
• Avoid scanning the same original using the feeder more than approximately 30 times.
From being scanned repeatedly, the original gets folded or torn, which may cause a
paper jam.
• If the feeder rollers are dirty from scanning an original written in pencil, perform the
Feeder Cleaning procedure. (See the Reference Guide.)
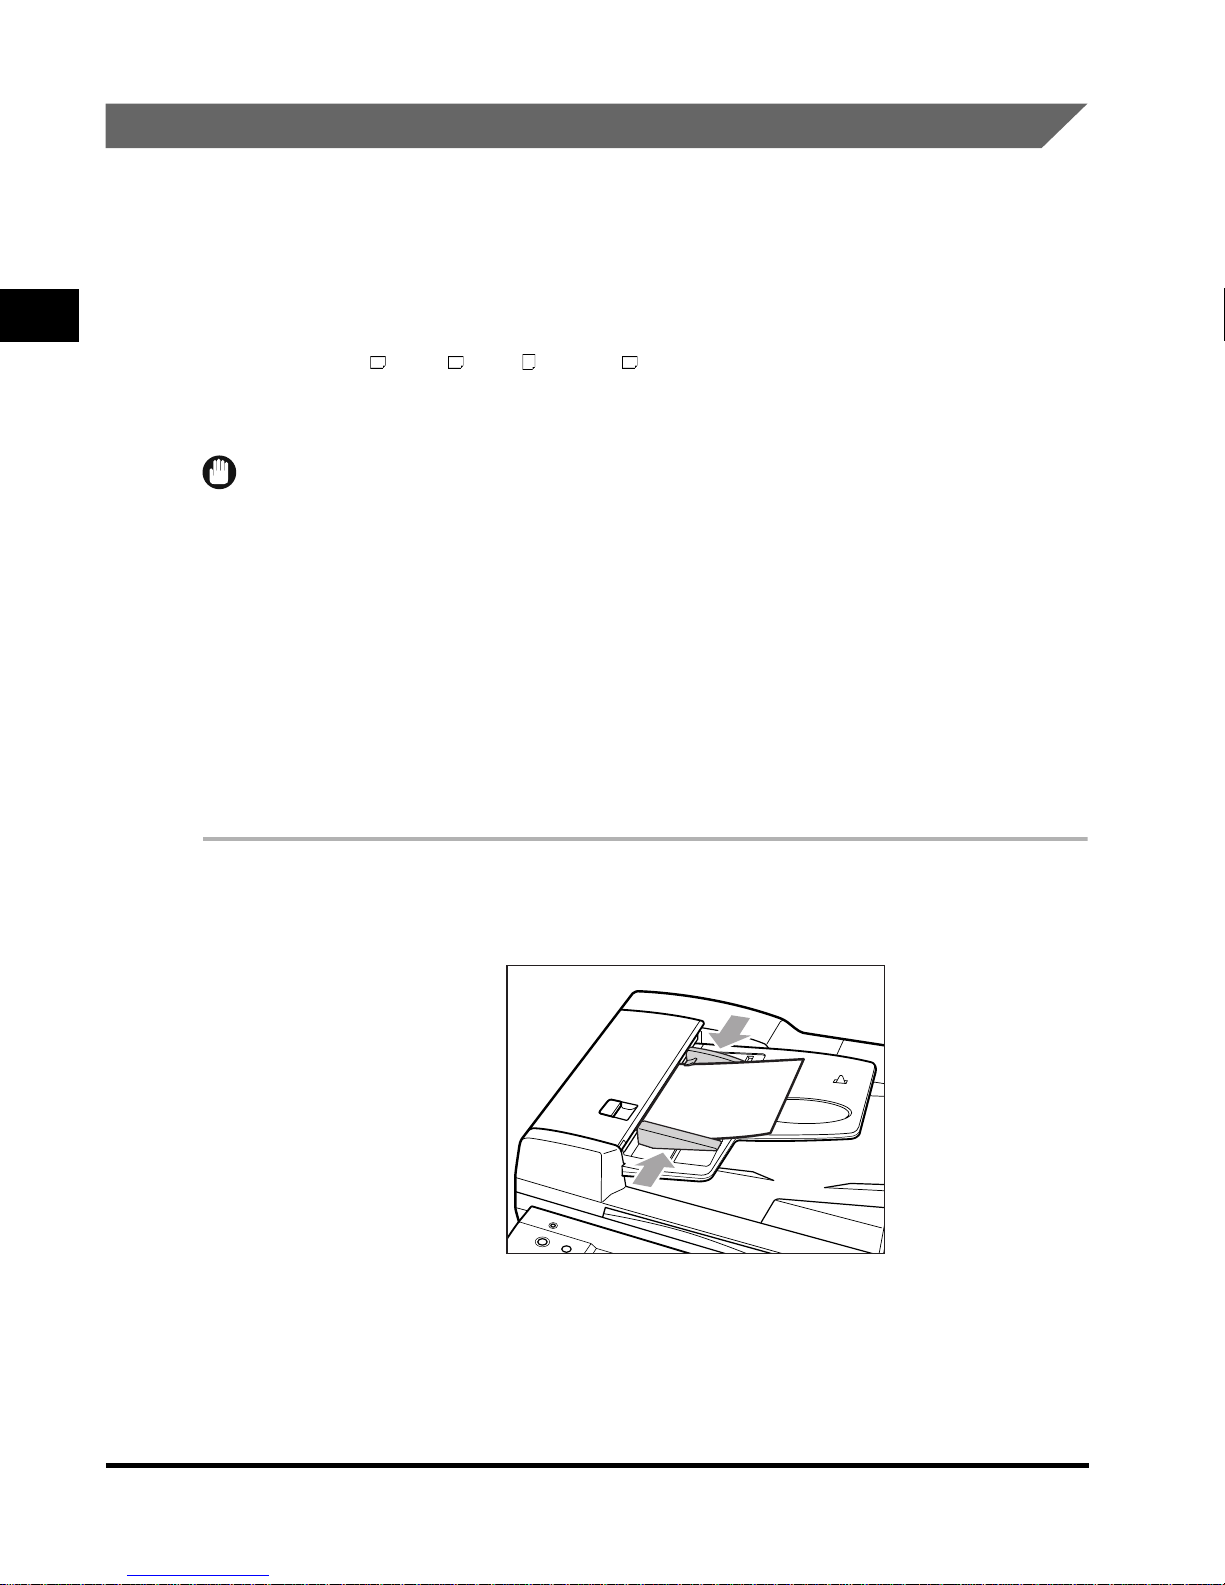
1
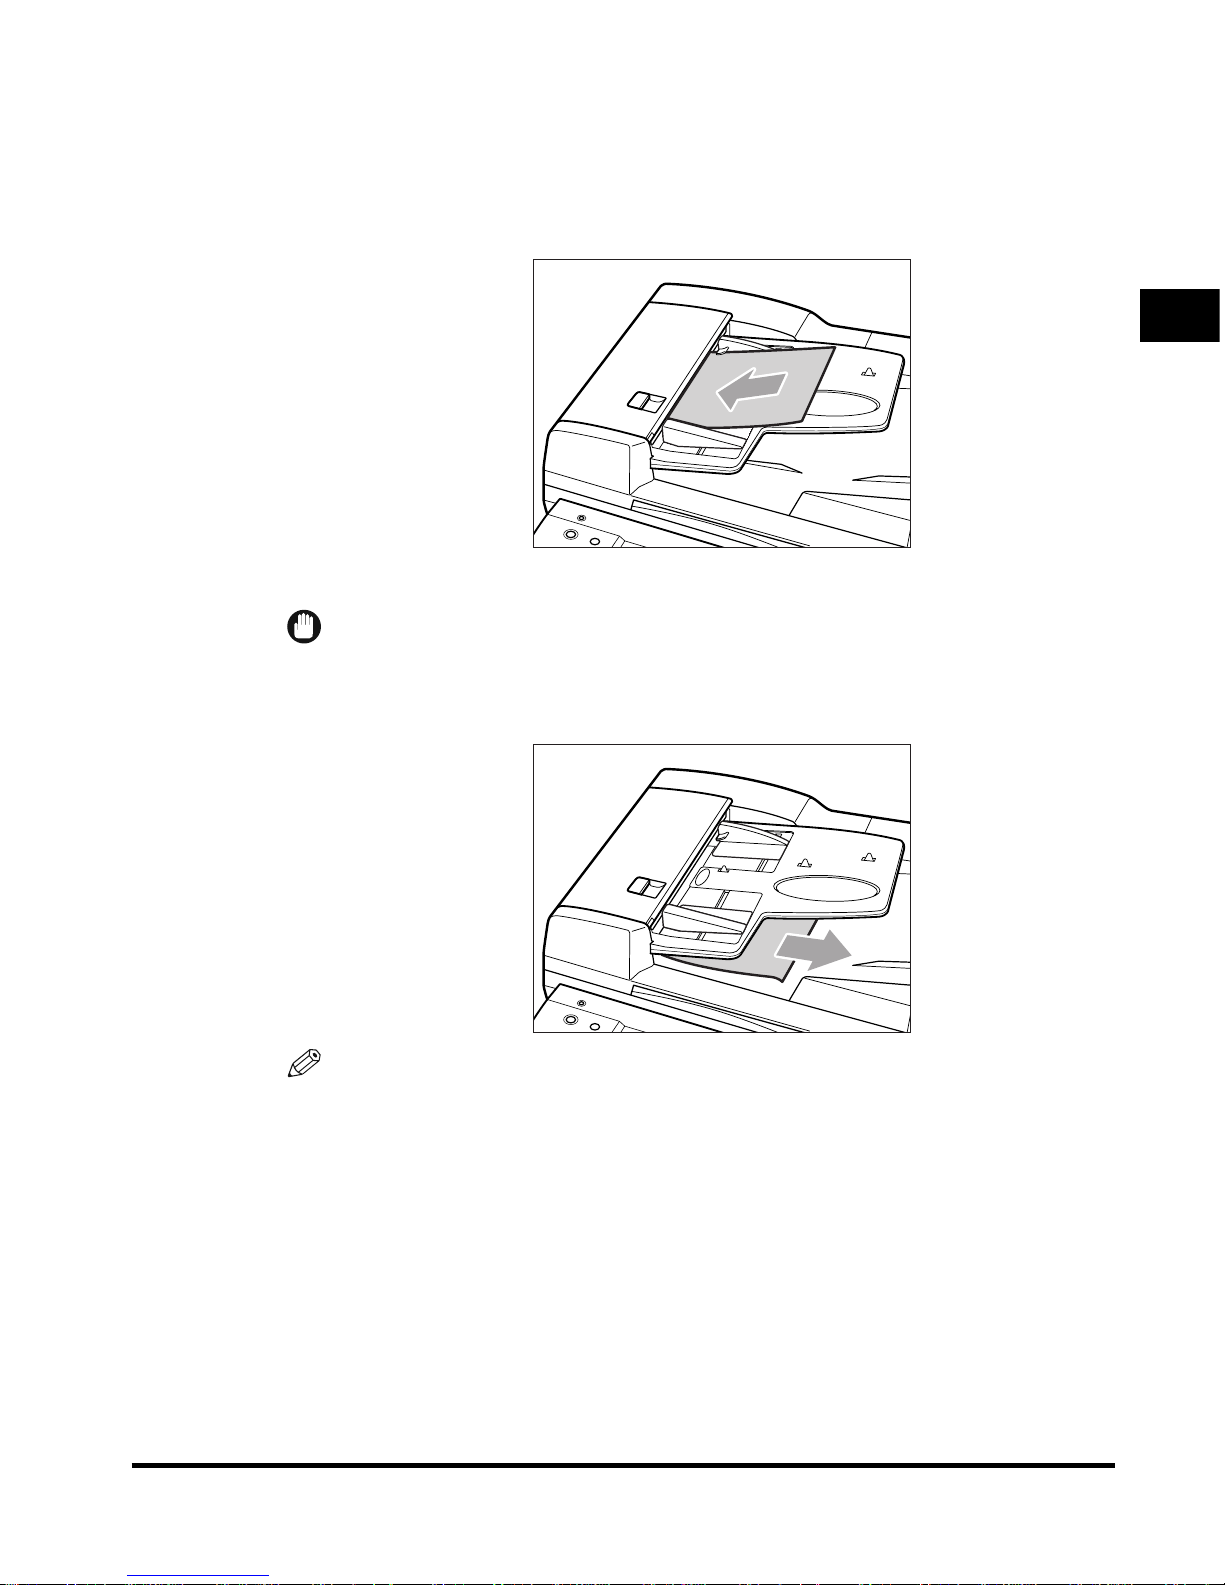
Adjust the slide guides to fit the size of the originals.
Placing Originals
1-13
Basic Copying Features
1
2
Neatly place your originals face up in the original supply tray.
If you are enlarging LTR originals to LGL or 11'' ✕ 17'' paper, place your originals
horizontally.
Place your originals into the feeder as they will go, until the original set indicator
is lit.
A beep sounds when the original is set correctly.
IMPORTANT
• Do not add or remove originals while they are being scanned.
• When scanning is completed, remove the originals from the original output tray to
avoid paper jams.
NOTE
The scanned originals are output face down to the original output tray.
Flow of Checking/Canceling Operations
1-14
Basic Copying Features
1
Flow of Checking/Canceling Operations
When you press [Monitor], the Monitor screen appears allowing you to check and
cancel the copy jobs.
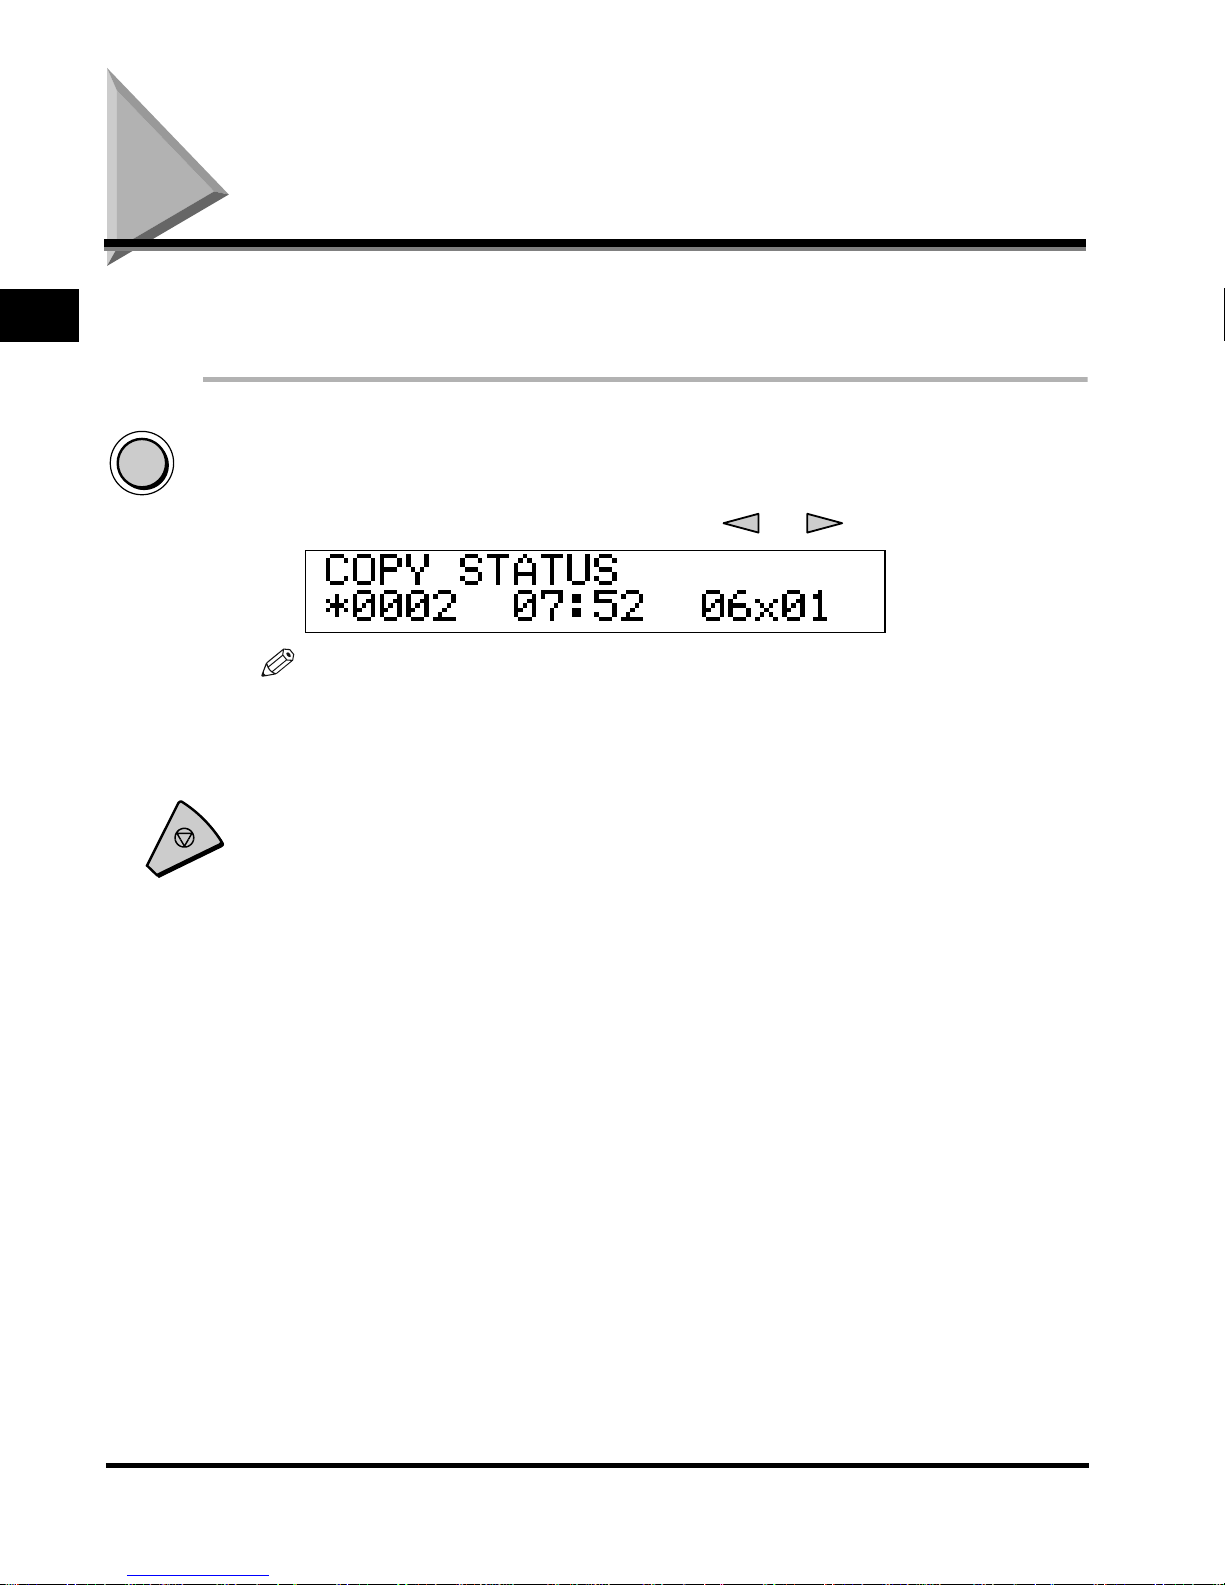
1
Press [Monitor].
The current copy job appears on the display.
To scroll through the list of the jobs, press [ ] or [ ].
NOTE
• To check the status of the print jobs sent from a computer, see the PS/PCL Printer
Guide Supplied with the optional Printer Board.
• The Monitor screen does not appear during scanning.
2
Press [Stop] to return to the standby mode.
Monitor
Stop

Canceling a Job
1-15
1
Basic Copying Features
Canceling a Job
You can cancel a job in several ways.
Canceling with [Stop]
1
Press [Stop].
● If you press [Stop] during scanning
■ Press [OK].
The scanning stops and the job will be canceled.
NOTE
If you press [Stop] during scanning when copying from the optional feeder, the
original may stop inside the feeder. In such a case, remove the original from inside
the feeder following the procedure described in “Clearing Paper Jams in the
Feeder,” on p. 7-4 in the Reference Guide.
● If there is only one job which is being printed
■ Press [ ] to select ‘YES’.
If you do not want to cancel the job, press [ ].
Stop
Canceling a Job
1-16
1
Basic Copying Features
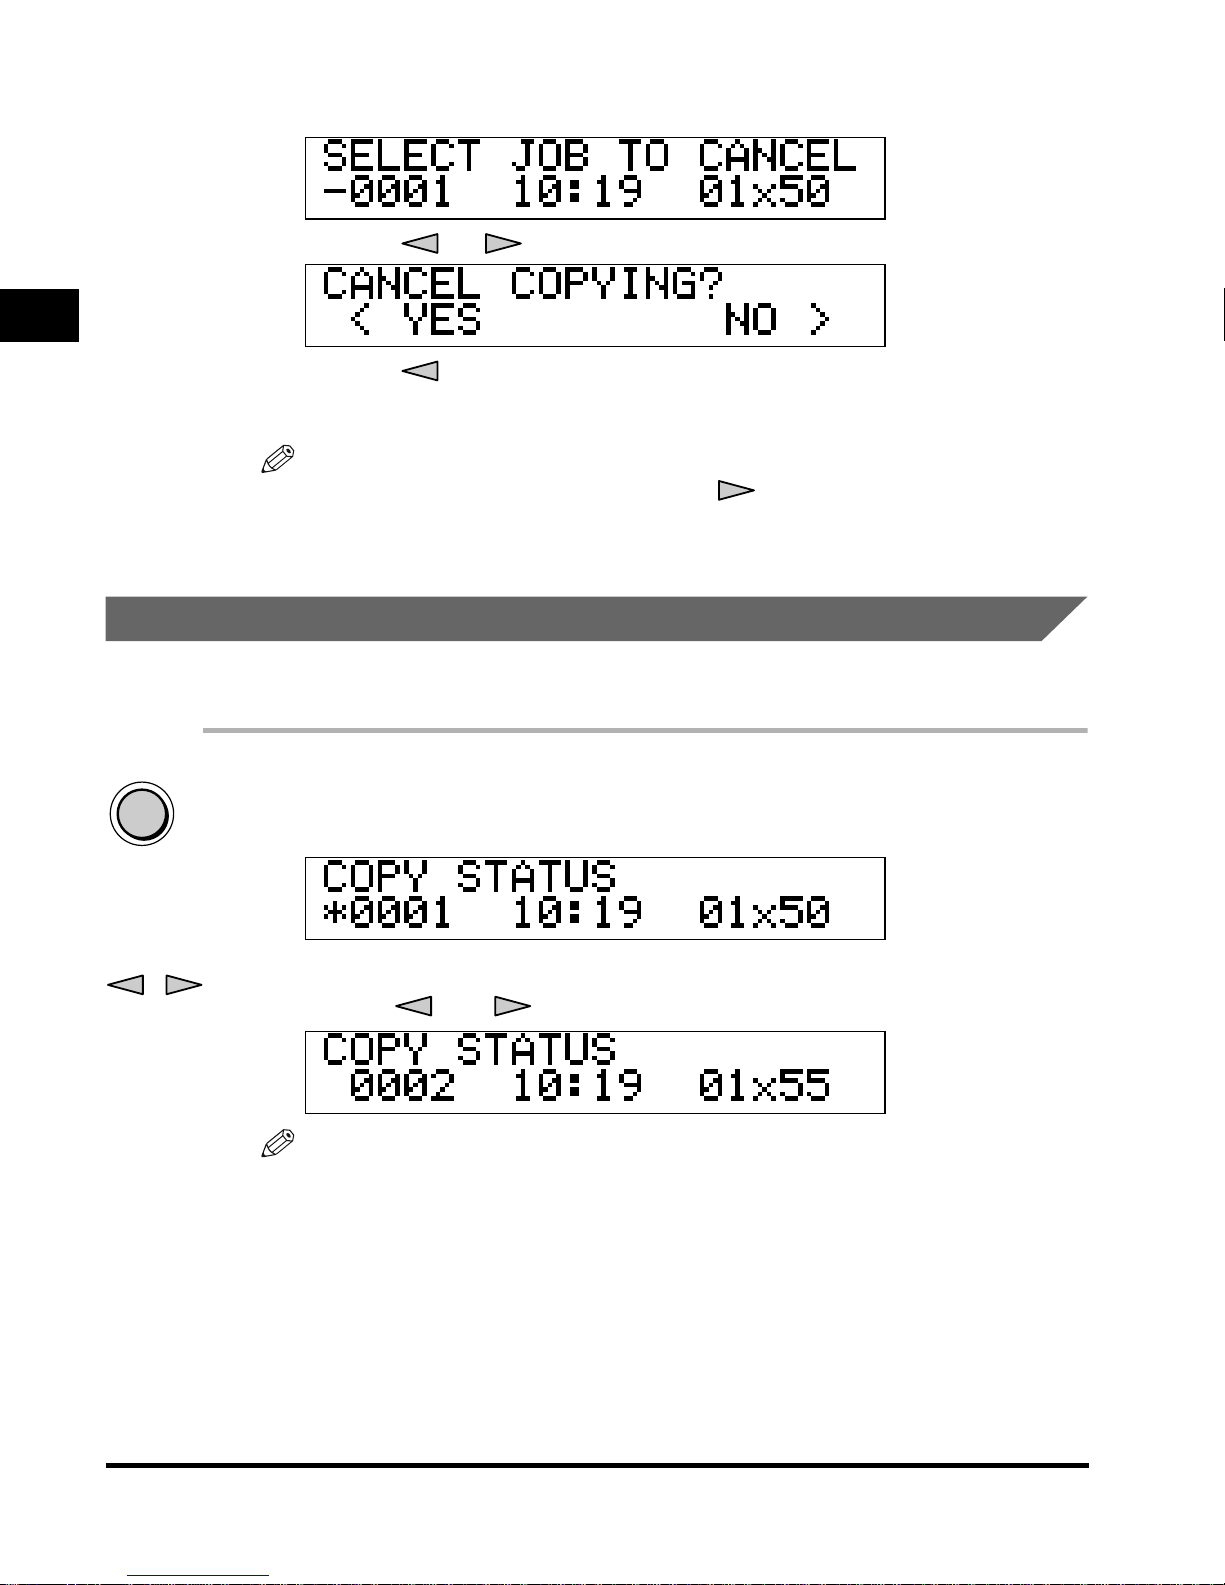
● If there are multiple jobs:
■ Press [ ] or [ ] to select the job to be canceled.
■ Press [ ] to select ‘YES’.
The selected job will be canceled.
NOTE
• If you do not want to cancel the job, press [
]
.
• You cannot select multiple jobs and cancel them all at once. When canceling
multiple jobs, select and cancel one by one.
Canceling from the Monitor Screen
You can cancel a job while it is waiting to be processed, or during printing.
1
Press [Monitor].
The current copy job appears on the display.
2
Press [ ] or [ ] to scroll through the job list.
NOTE
The job numbers are displayed depending on the job status as follows:
- With an asterisk (
∗): Current job
- With a dash (-): Stopped job
- With no mark: Reserved job
Monitor

Canceling a Job
1-17
Basic Copying Features
1
3
Press [Clear].
4
Press [ ] to select ‘YES’.
The selected job will be canceled.
NOTE
• If you want to cancel another job, repeat steps 3 to 5.
• You cannot select multiple jobs and cancel them all at once. When canceling
multiple jobs, select and cancel one by one.
• If you do not want to cancel the job, press [
]
to select ‘NO’.
5
Press [Stop] to return to the standby mode.
C
Clear
Stop
Copy Quantity
1-18
Basic Copying Features
1
Copy Quantity
You can make up to 99 copies for each copy job.
Specifying the Required Number of Copies
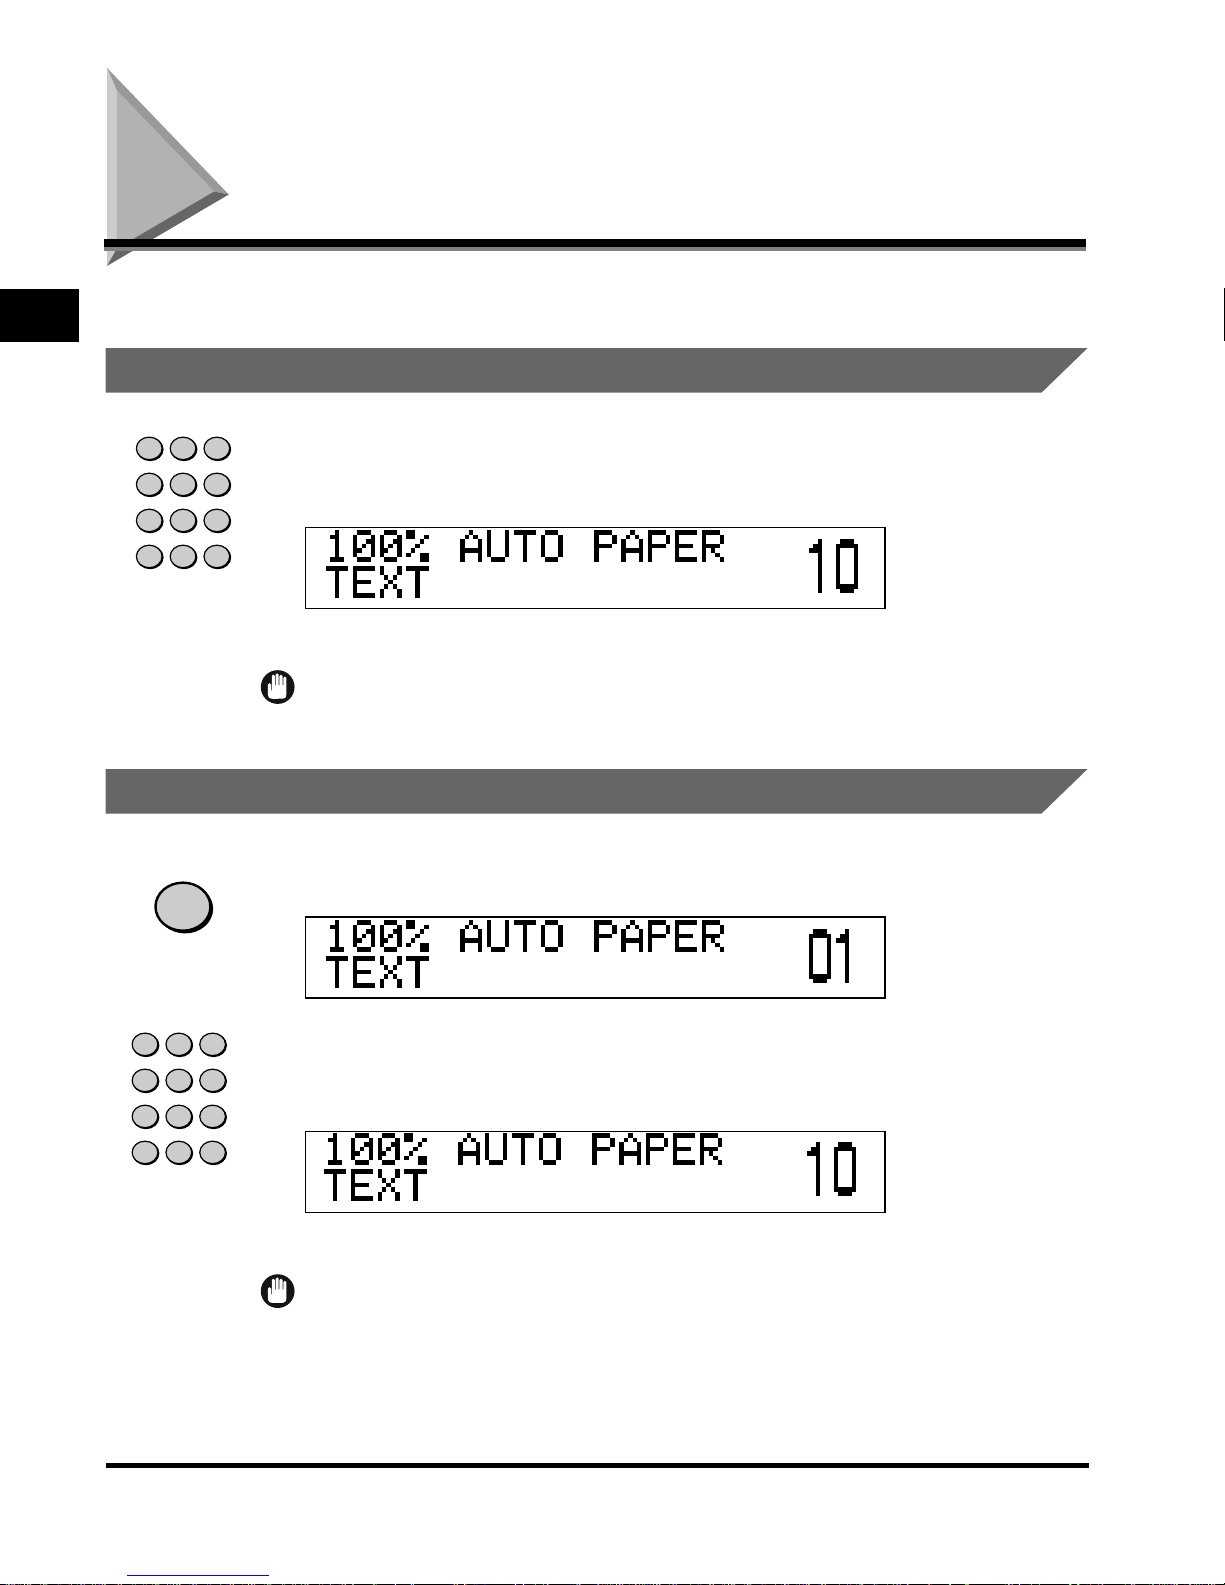
1
Press the numeric keys to enter the desired copy quantity
(1 to 99).
The copy quantity appears on the right side of the display.
IMPORTANT
You cannot change the copy quantity while copying.
Changing the Copy Quantity
1
Press [Clear] to clear the entered number.
2
Press the numeric keys to enter the desired copy quantity
(1 to 99).
The copy quantity appears on the right side of the display.
IMPORTANT
You cannot change the copy quantity while copying.
1 2 3
4 5 6
7 809
I D
0
C
Clear
C
Clear
1 2 3
4 5 6
7 809
I D
0
C
Clear
 Loading...