

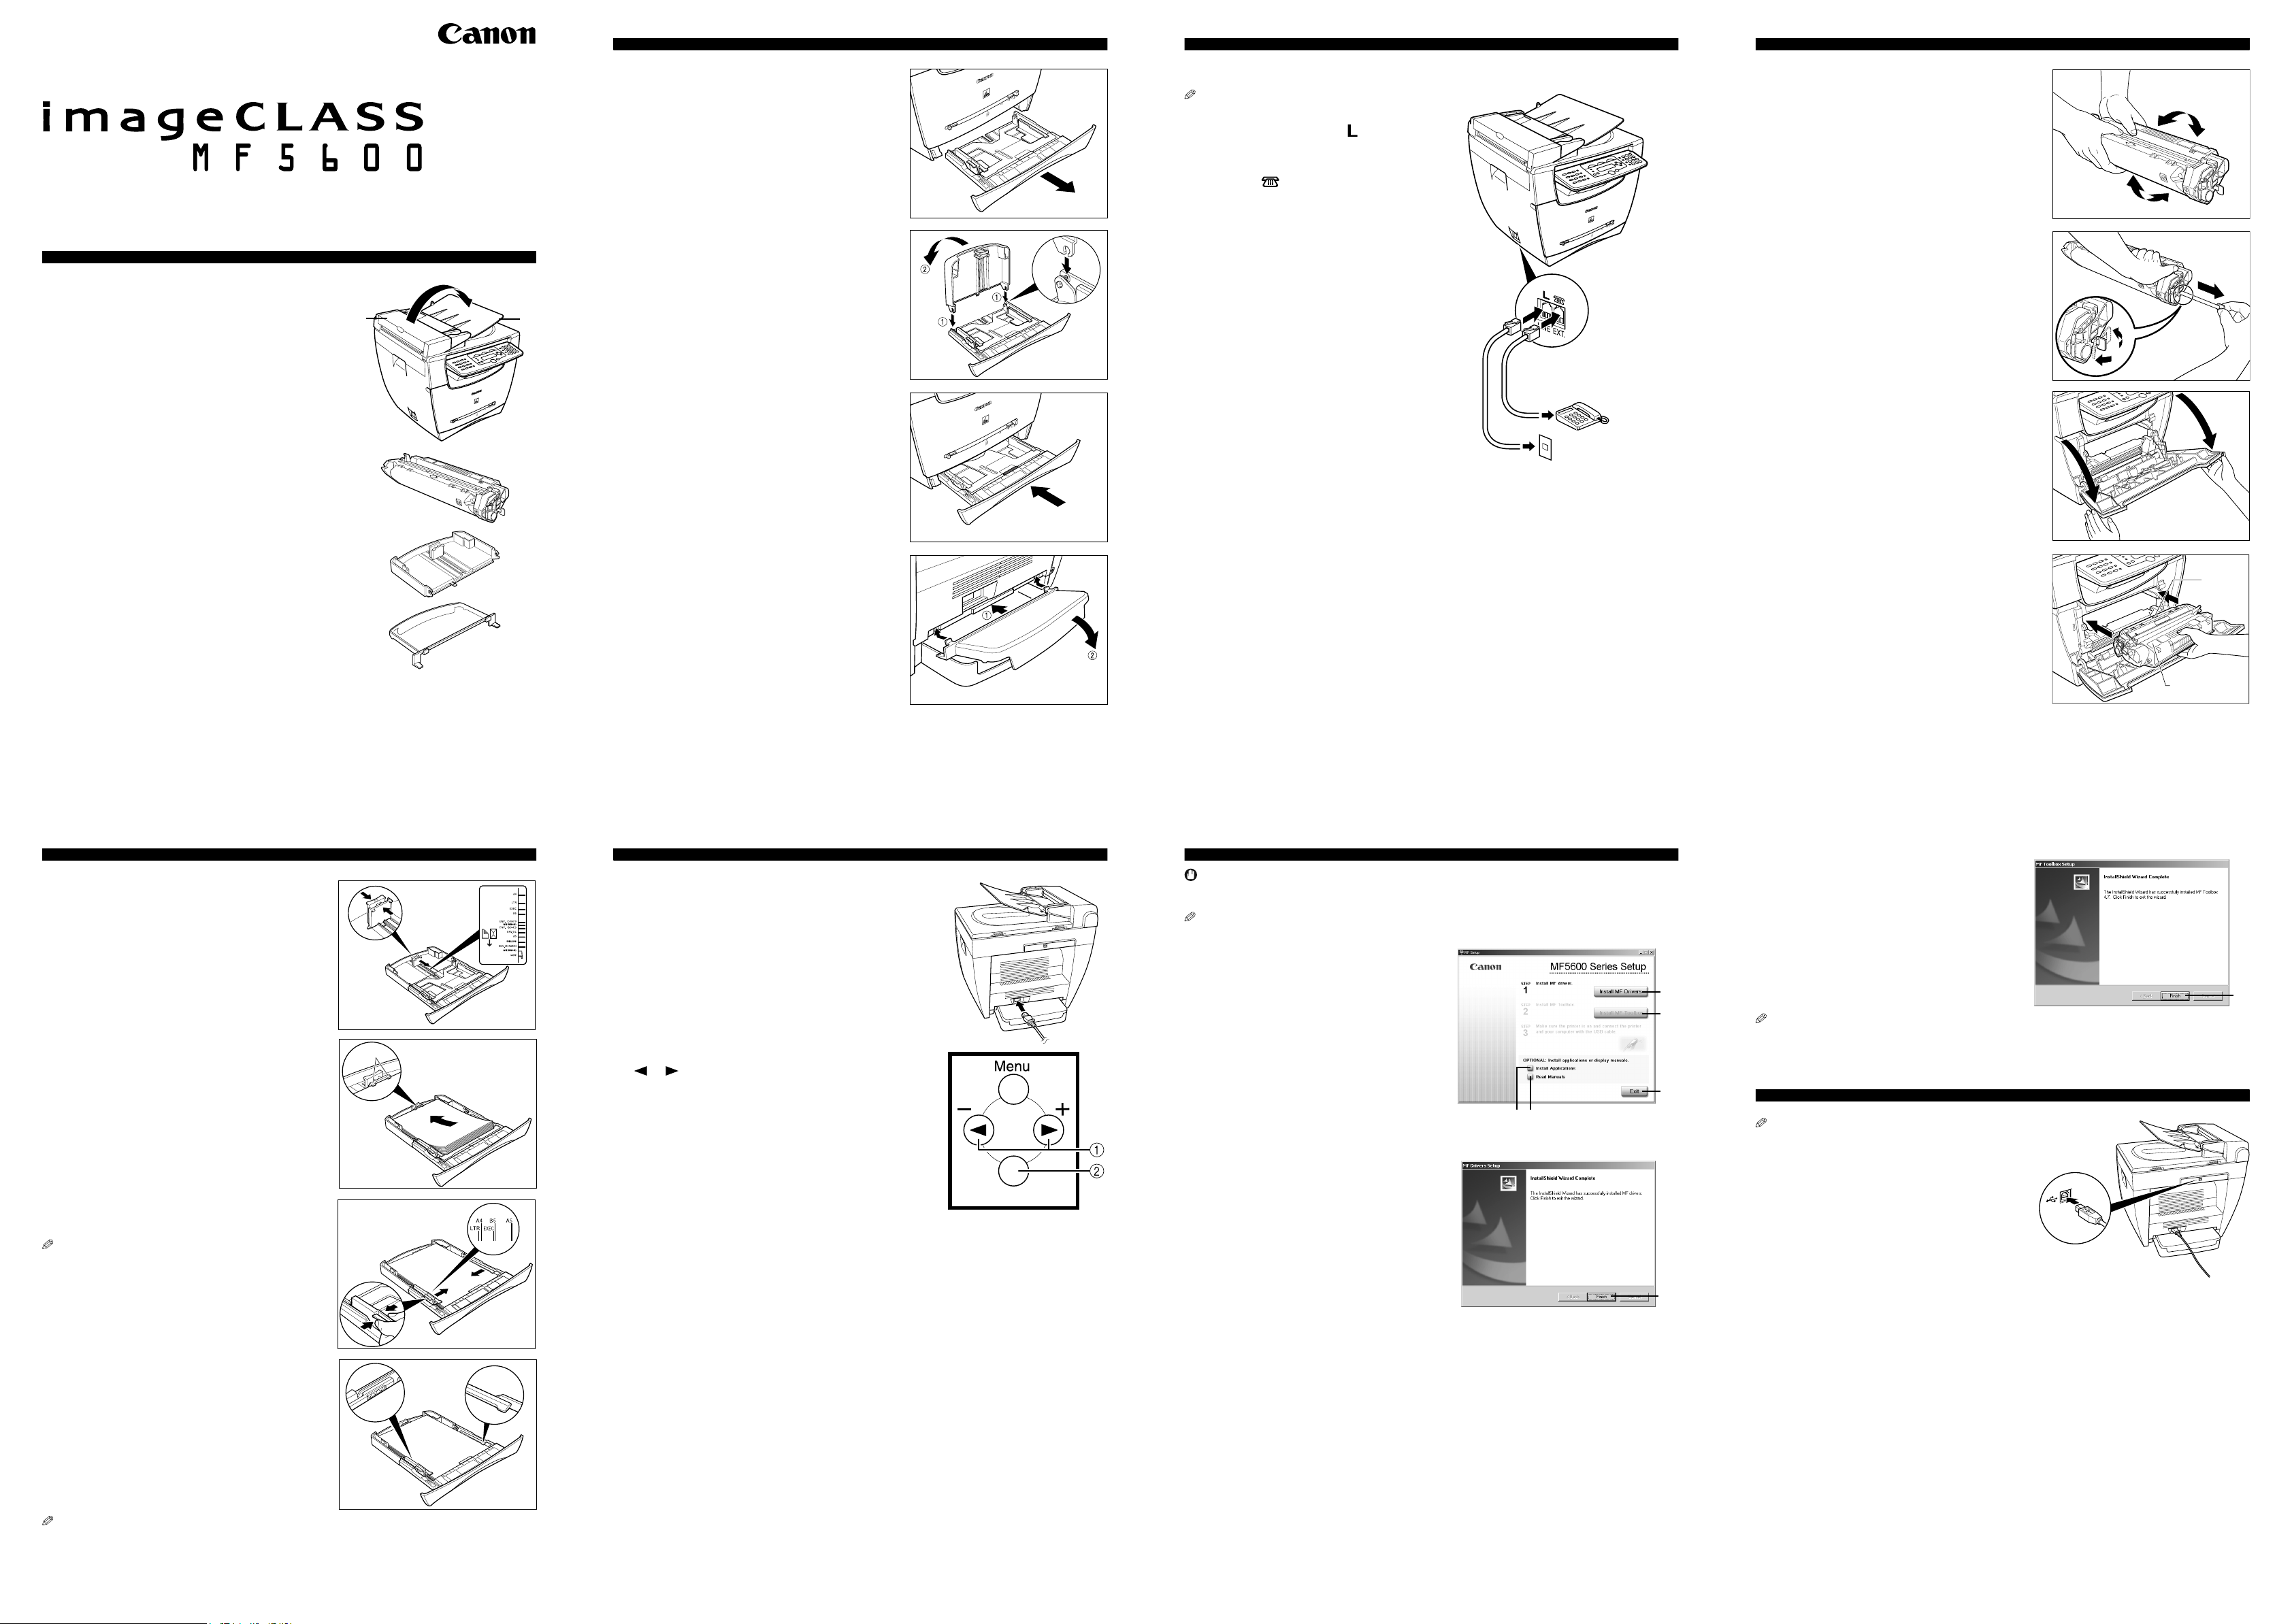
Canon imageCLASS MF5630, imageCLASS MF5600 Series Setup Sheet
E
2 Install paper cassette
A
B
NOTE
3 Connect telephone cable
4 Install cartridge
Set-Up Sheet
Thank you for purchasing the Canon imageCLASS MF5600 Series.
Follow the instructions in this document first to set up the machine.
1 Unpack machine
1. Carefully remove the machine from the box and
place it on a flat surface.
2. Remove all shipping tapes from the machine.
3. Hold the document feeder (A) with one hand, and open the
document feeder tray (B) with the other.
4. Check that you have these items:
• Cartridge (C)
• Cassette extension (D)
• Extension cover (E)
• Power cord
• USB cable
• Telephone cable (MF5650 only)
• Destination labels (MF5650 only)
• Quick Reference Guide
• Facsimile Guide (MF5650 only)
• User Software CD-ROM
• Registration card
A
C
D
Series
1. Pull out the paper cassette.
2. Attach the cassette extension to the cassette.
B
3. Insert the cassette back into the machine.
4. Attach the extension cover on the back of the machine.
For MF5650 only:
NOTE
• Use a telephone cable 3 m long or less.
1. Connect the telephone line to (LINE). Connect the
other end to the wall jack (A).
2. Optional: Connect a telephone (B) or an answering
machine to (EXT.).
1. Remove the cartridge from the bag. Keep the bag for
future use.
2. Rock the cartridge several times to distribute toner
evenly.
3. Hold the cartridge. Break the tab (A) and pull out the
seal (B) completely.
4. Open the front cover.
5. Hold the cartridge with instructions (C) face up and
arrow (D) pointing to the machine. Insert the cartridge
as far as it will go.
6. Close the front cover completely.
B
A
D
5 Load paper
1. Pull out the paper cassette from the machine.
2. Adjust the rear paper end guide to match the paper
size.
3. Load paper into the cassette. Make sure the paper
stack sits below the hooks (A).
C
6 Connect power cord
1. Connect the power cord into the rear socket and the wall outlet.
A
2. If the message <DISPLAY LANGUAGE> appears, press
or a to select the desired language for the LCD.
Press [OK] b.
7 Install software
IMPORTANT
• Do not connect the USB cable before installing the software. If you connect the USB cable before
installing the software and the Found New Hardware Wizard screen appears, click [Cancel].
NOTE
• For Windows 2000/XP, log on as Administrator to install the software.
1. Turn on your computer.
2. Quit any open applications, including virus checking
software.
3. Insert the User Software CD into the CD-ROM
drive.
4. When the MF Setup screen appears, click [Install
MF Drivers] (A).
• If the MF Setup screen is not displayed, on the
Windows desktop, click My Computer. Open the
CD-ROM icon, then double-click Setup (Setup.exe).
A
C
G
STEP 2 Install MF Toolbox:
1. On the MF Setup screen, click [Install MF Toolbox]
(C).
2. When the MF Toolbox Setup screen appears, follow
the instructions on the screen.
3. When the installation is complete, click [Finish] (D)
to close the MF Toolbox Setup screen.
D
NOTE
• To install accompanying applications, click [Install Applications] (E) on the MF Setup screen.
• To read manuals in the User Software CD, click [Read Manuals] (F) on the MF Setup screen.
8 Connect USB cable
4. Adjust the side paper end guides to match the paper
size.
NOTE
• If the rear and side paper end guides are not properly
adjusted to the paper size, the machine may not deliver
printouts.
5. Even out the edges of the paper stack. Make sure the
height of the paper stack does not exceed the limit
marks (B).
6. Insert the paper cassette into the machine as far as it
will go.
EF
STEP 1 Install MF Drivers:
1. When the MF Drivers Setup screen appears, follow
the instructions on the screen.
OK
2. When the installation is complete, click [Finish] (B)
to close the MF Drivers Setup screen.
B
B
• Use of a cable 3 m long or less is recommended.
1. Make sure the machine’s power is turned on, and
connect the cable to the USB port on the back of the
machine. Then connect the other end of the cable to
the USB port on your computer.
2. Click [Exit] (G) to close the MF Setup screen.
Remove the User Software CD from the CD-ROM
drive and store it in a safe place.
You have now completed machine setup.
NOTE
• If the cassette is not fully inserted into the machine, paper jams may occur.
• Make sure the correct paper size is specified in the <1.PAPER SETTINGS> menu. See 3.1 “Set
Paper Size” in the Quick Reference Guide.
Part no. FA7-6014 (000)
All other products and brand names are registered
trademarks or trademarks of their respective owners.
Specifications subject to change without notice.
Canon is a trademark of Canon Inc.
©2004 Canon Inc.
 Loading...