

Page 1
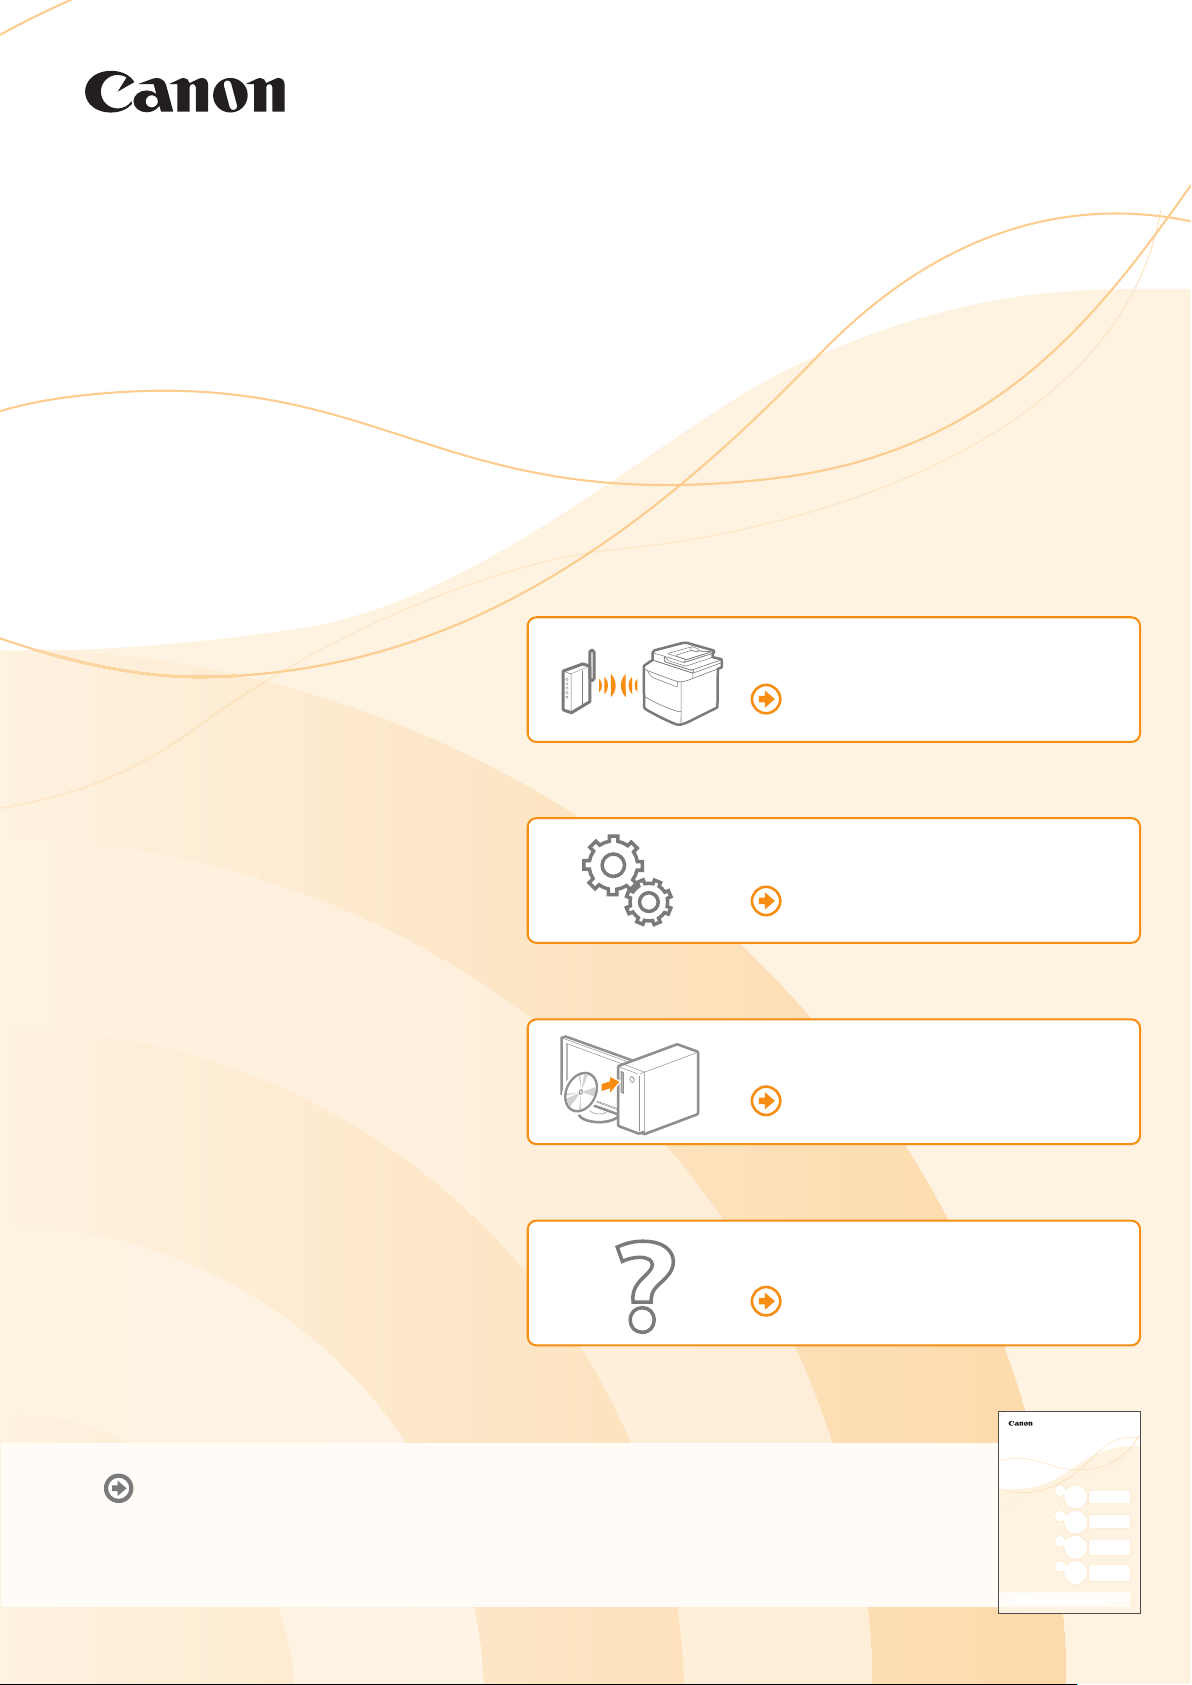
Wireless LAN
Read this guide before setting up the wireless LAN
This guide describes the wireless LAN set up procedure, and problems encountered during the confi guration.
After you fi nish reading this guide, store it in a safe place for future reference. See the “Starter Guide” for
machine installation and settings for connection methods other than the wireless LAN.
Prepare for Wireless LAN Connection
Setting the Wireless LAN
Installing the Software
Troubleshooting
Setting Guide
Prepare for Wireless LAN Connection
P.2
Setting the Wireless LAN
P.4
Installing the Software
▲
P.10
Troubleshooting
P.14
Read this guide before setting up the wireless LAN
This guide describes the wireless LAN set up procedure, and problems encountered during the confi guration.
After you fi nish reading this guide, store it in a safe place for future reference. See the “Starter Guide” for
machine installation and settings for connection methods other than the wireless LAN.
Page 2
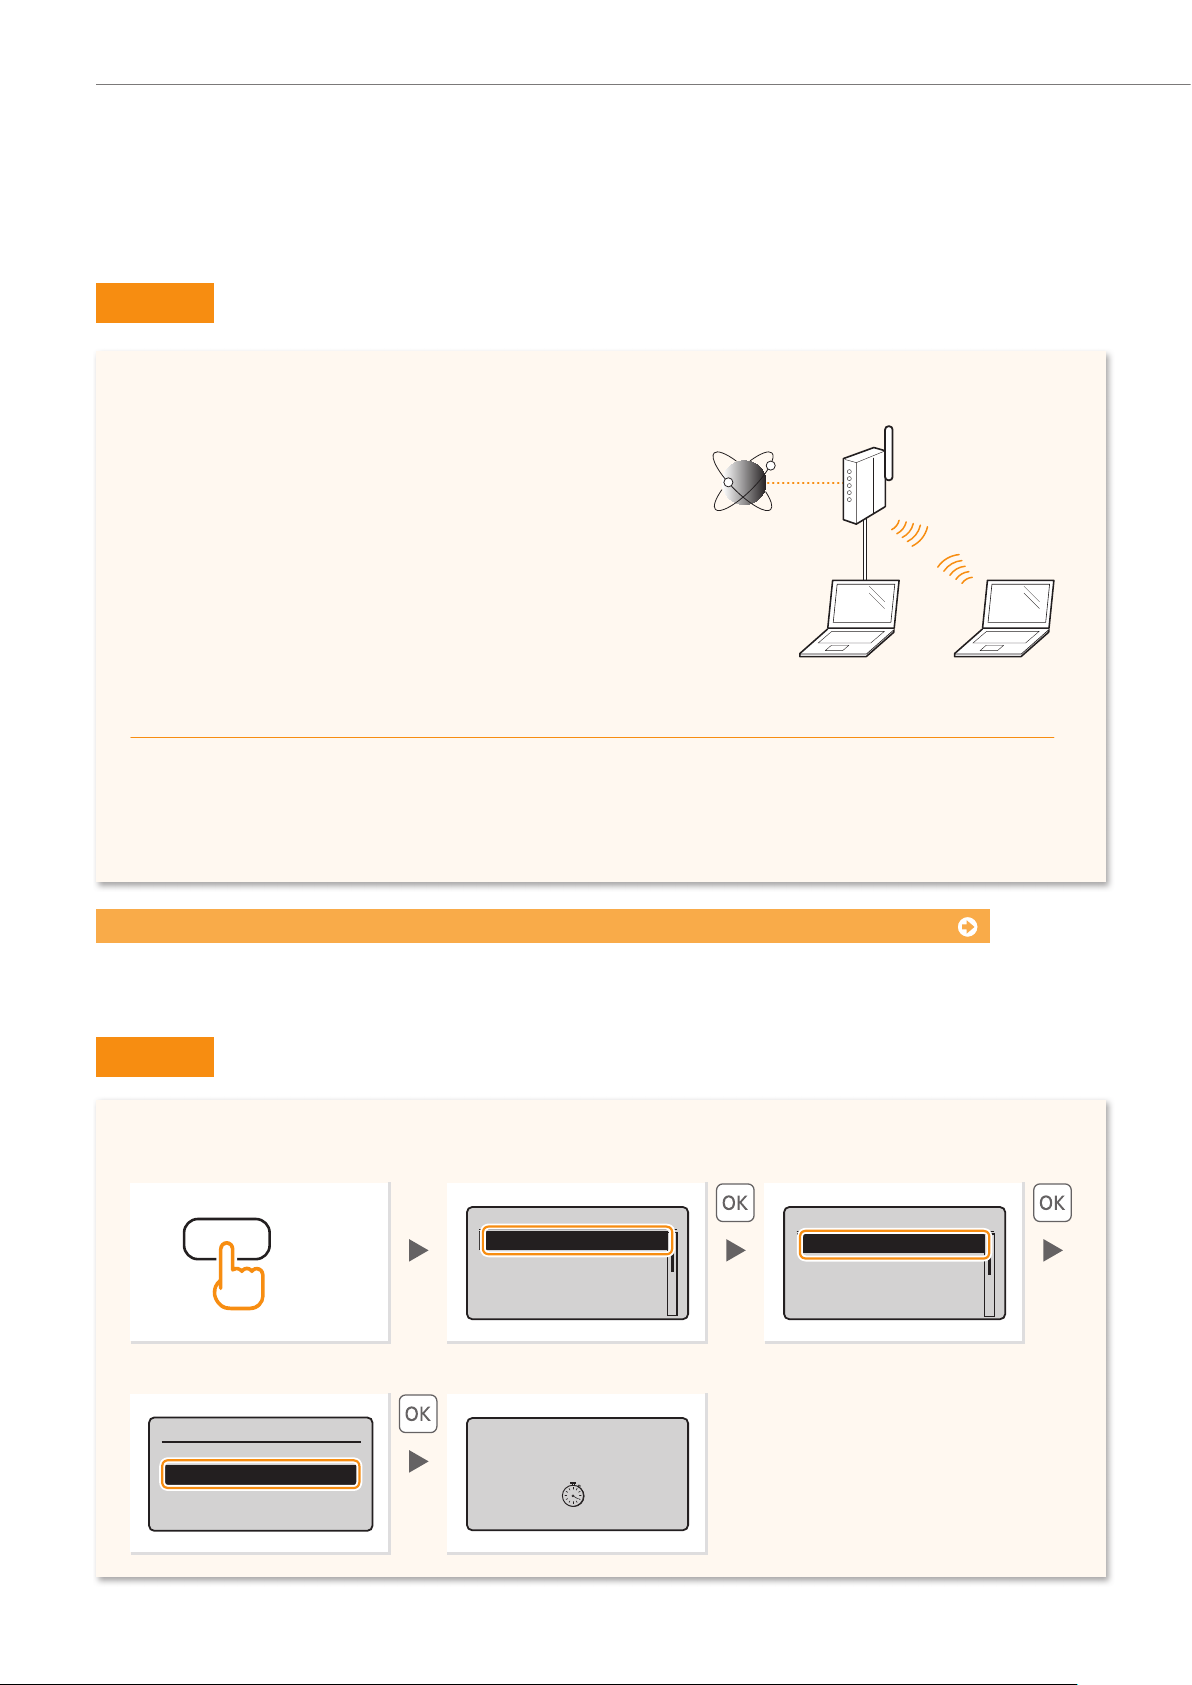
Prepare for Wireless LAN Connection
Step 1
Check the Following First.
Is the computer connected to the router (or the
access point) properly?
For more information, see the instruction manual for the
network device you are using, or contact the networking
device manufacturer.
Internet Router
Have the network settings on the computer
been completed?
If the computer is not properly confi gured, you may not
use the wireless LAN connection even after completing
the following settings.
NOTE
• You cannot connect both a wired LAN and wireless
LAN at the same time. In addition, the machine is set
to the “Wired LAN” by default.
When proceeding from “Connecting the Power Cord” in the Starter Guide
Proceed to “Check Your Router.” on P.3.
• When you connect to a network environment that is
not security protected, your personal information may
be disclosed to third parties. Please use caution.
• If you connect through a LAN in the offi ce,
your network administrator.
contact
2
Step 2
Switch the Connection Method to Wireless LAN.
Press [▲] or [▼] to
highlight an option.
Menu
(Menu)
Network Settings
Preferences
Timer Settings
Copy Settings
Select LAN
Wired LAN
Wireless LAN
Configuring
settings...
Network Settings
Select Wired/Wireles
Wireless LAN Settin...
TCP/IP Settings
SNMPv1 Settings
Page 3
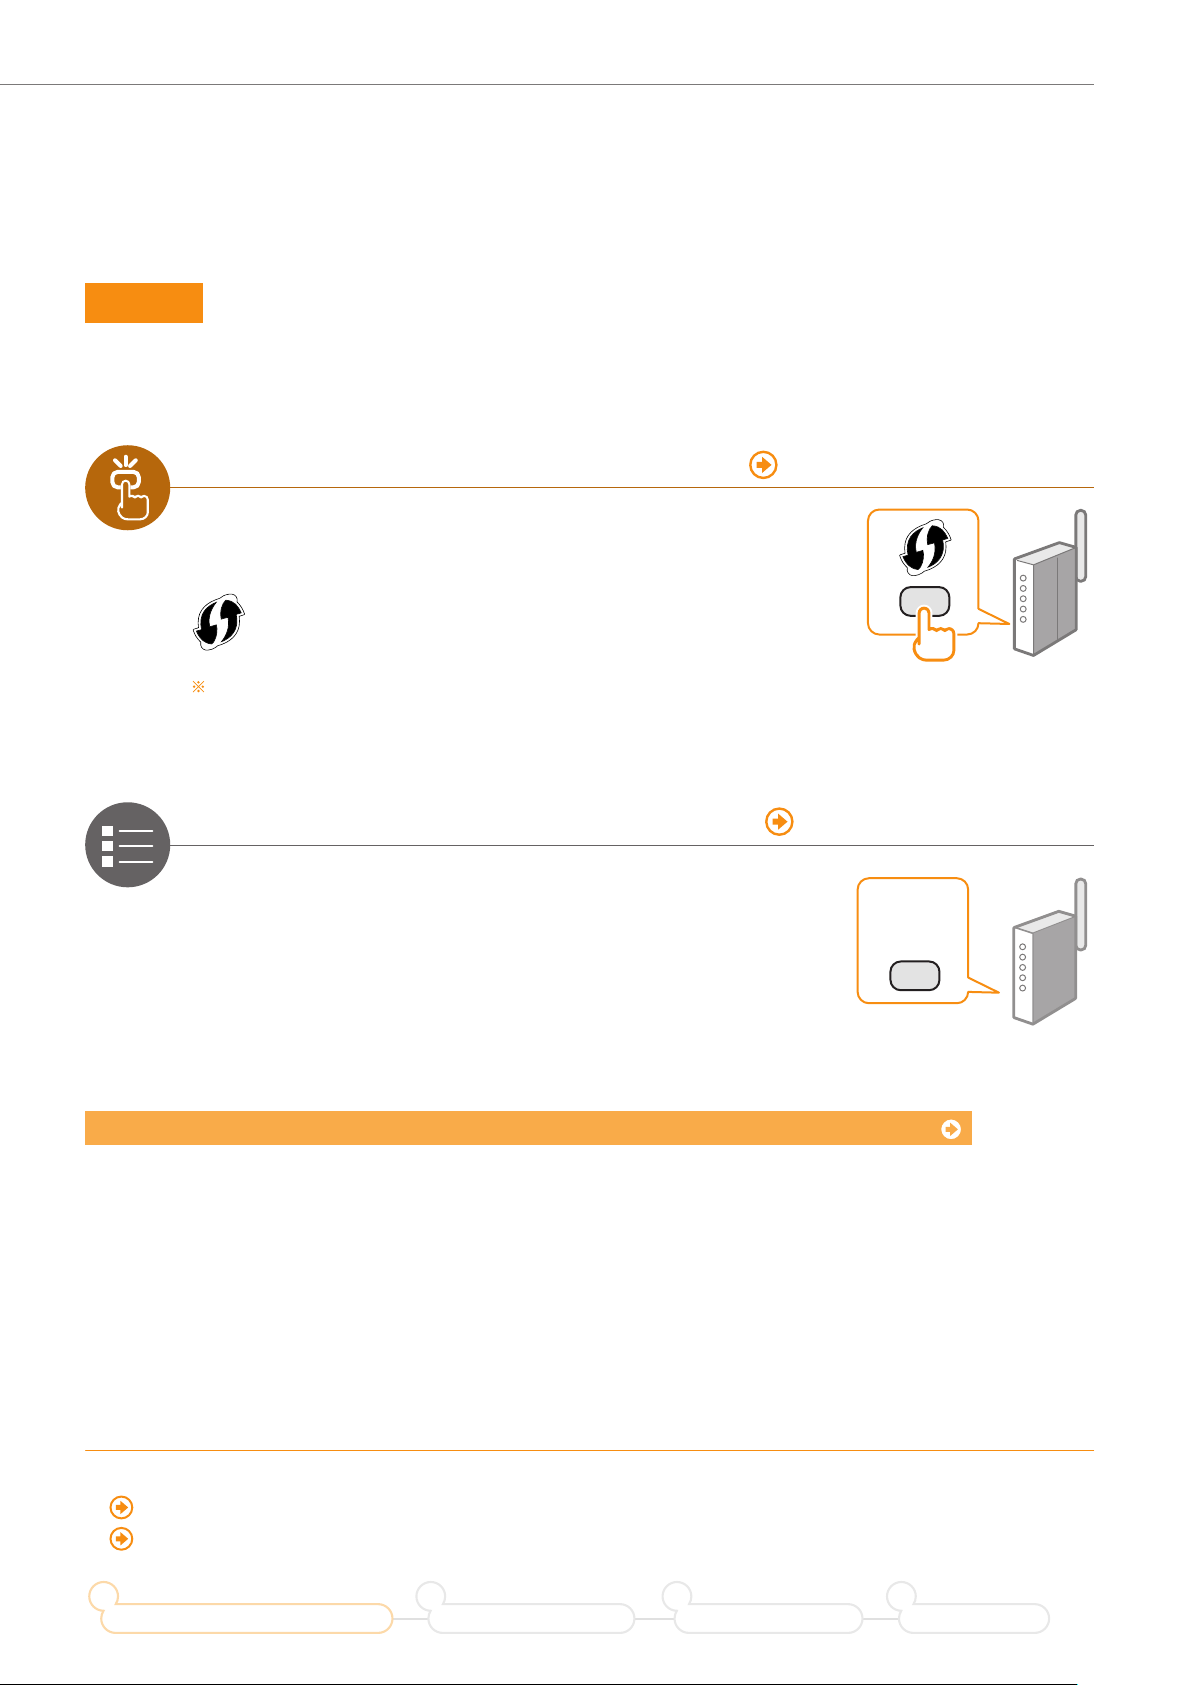
Prepare for Wireless LAN Connection
Step 3
Select the method to set up the wireless LAN from the following two methods, depending on the router or access
point that you are using.
Check Your Router.
There is a button. P. 4 (Push Button Mode)
This machine supports WPS (Wi-Fi Protected Setup). You can
easily setup if your router or access point has a button, and if the
following mark is on the router.
If you are not sure whether your router supports WPS, please see the manual
included in the product, or contact the product manufacturer.
There is no button. P. 6 (Manual Selection)
If there is no button on your router or access point, you may
manually select the SSID and complete the settings. In this case,
you need to remember the SSID and network key of your router or
access point. See “Check the SSID (Network Name/Access Point
Name) and Network Key” (P.6) to learn how to fi nd out your SSID
and network key.
When proceeding from “Connecting the Power Cord” in the Starter Guide
Proceed to step on P.4.
?
To setup with “WPS PIN Code Mode,” or setup manually:
“Setting the Machine Using WPS (PIN Code Mode)” in the e-Manual.
“Setting by Manually Entering SSID” in the e-Manual.
1
Prepare for Wireless LAN Connection
2
Setting the Wireless LAN
3
Installing the Software
4
Troubleshooting
3
Page 4
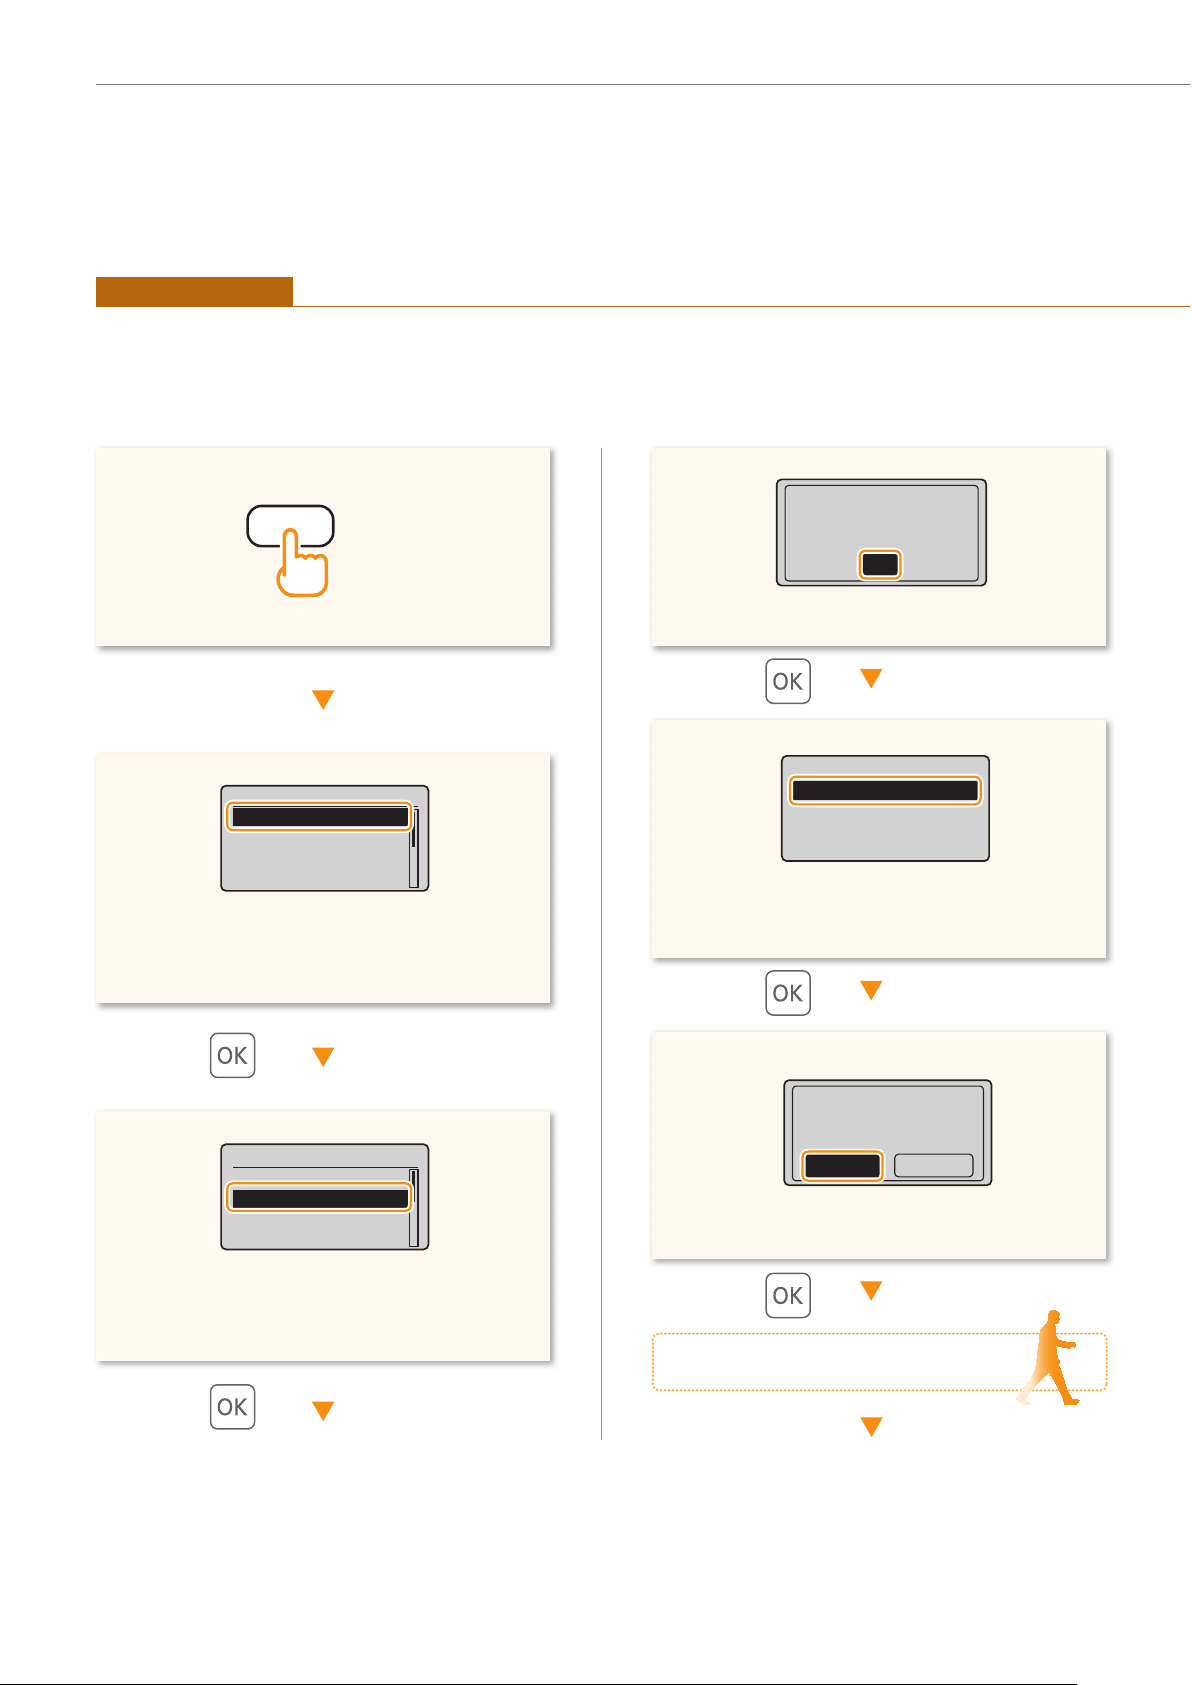
Setting the Wireless LAN
Push Button Mode
Setting via WPS
Read the instruction manual for your network device fi rst to learn how to confi gure the settings.
(Menu)
• Press [▲] or [▼] to highlight <Network
Settings>.
Menu
Network Settings
Preferences
Timer Settings
Copy Settings
• Press [▲] or [▼] to highlight <WPS Push Button
Mode>.
See Wireless LAN
Setting Guide to
perform settings.
OK
Wireless LAN Settings
WPS Push Button Mode
WPS PIN Code Mode
SSID Settings
Wireless LAN Informa...
4
• Press [▲] or [▼] to highlight <Wireless LAN
Settings>.
Network Settings
Select Wired/Wirele...
Wireless LAN Setting
TCP/IP Settings
SNMPv1 Settings
Do you want to
connect with new
settings?
NoYes
• Press [◀] to highlight <Yes>.
Move to the router
Page 5

Setting the Wireless LAN
• You should press the WPS button within 2
minutes after you select <Yes> in step .
• Press and hold* the button until the lamp lights
or blinks
* The time that you should hold the button may vary
depending on the router you are using.
.
Move to the machine
When an error message appears:
Press [OK] to close the screen, check whether or
not the network key is correct, and then retry the
settings.
If the access point cannot be detected even after
retrying, see the following.
“When an Error Message Appears” (P.14)
When checking the network connection:
You can check if the machine is properly connected
to the network using a computer that is connected
to a network.
”Checking that the Wireless LAN Setting is
Completed” (P.9)
When setting an IP address manually:
“Setting the IPv4 Address” in the e-Manual
• After the <Connected.> screen is displayed,
wait until the Wi-Fi indicator stops blinking and
turns on.
Wait approximately 2 minutes
after the connection is completed.
The IP address is set during this time period.
Proceed to P.9
1
Prepare for Wireless LAN Connection
2
Setting the Wireless LAN
3
Installing the Software
4
Troubleshooting
5
Page 6
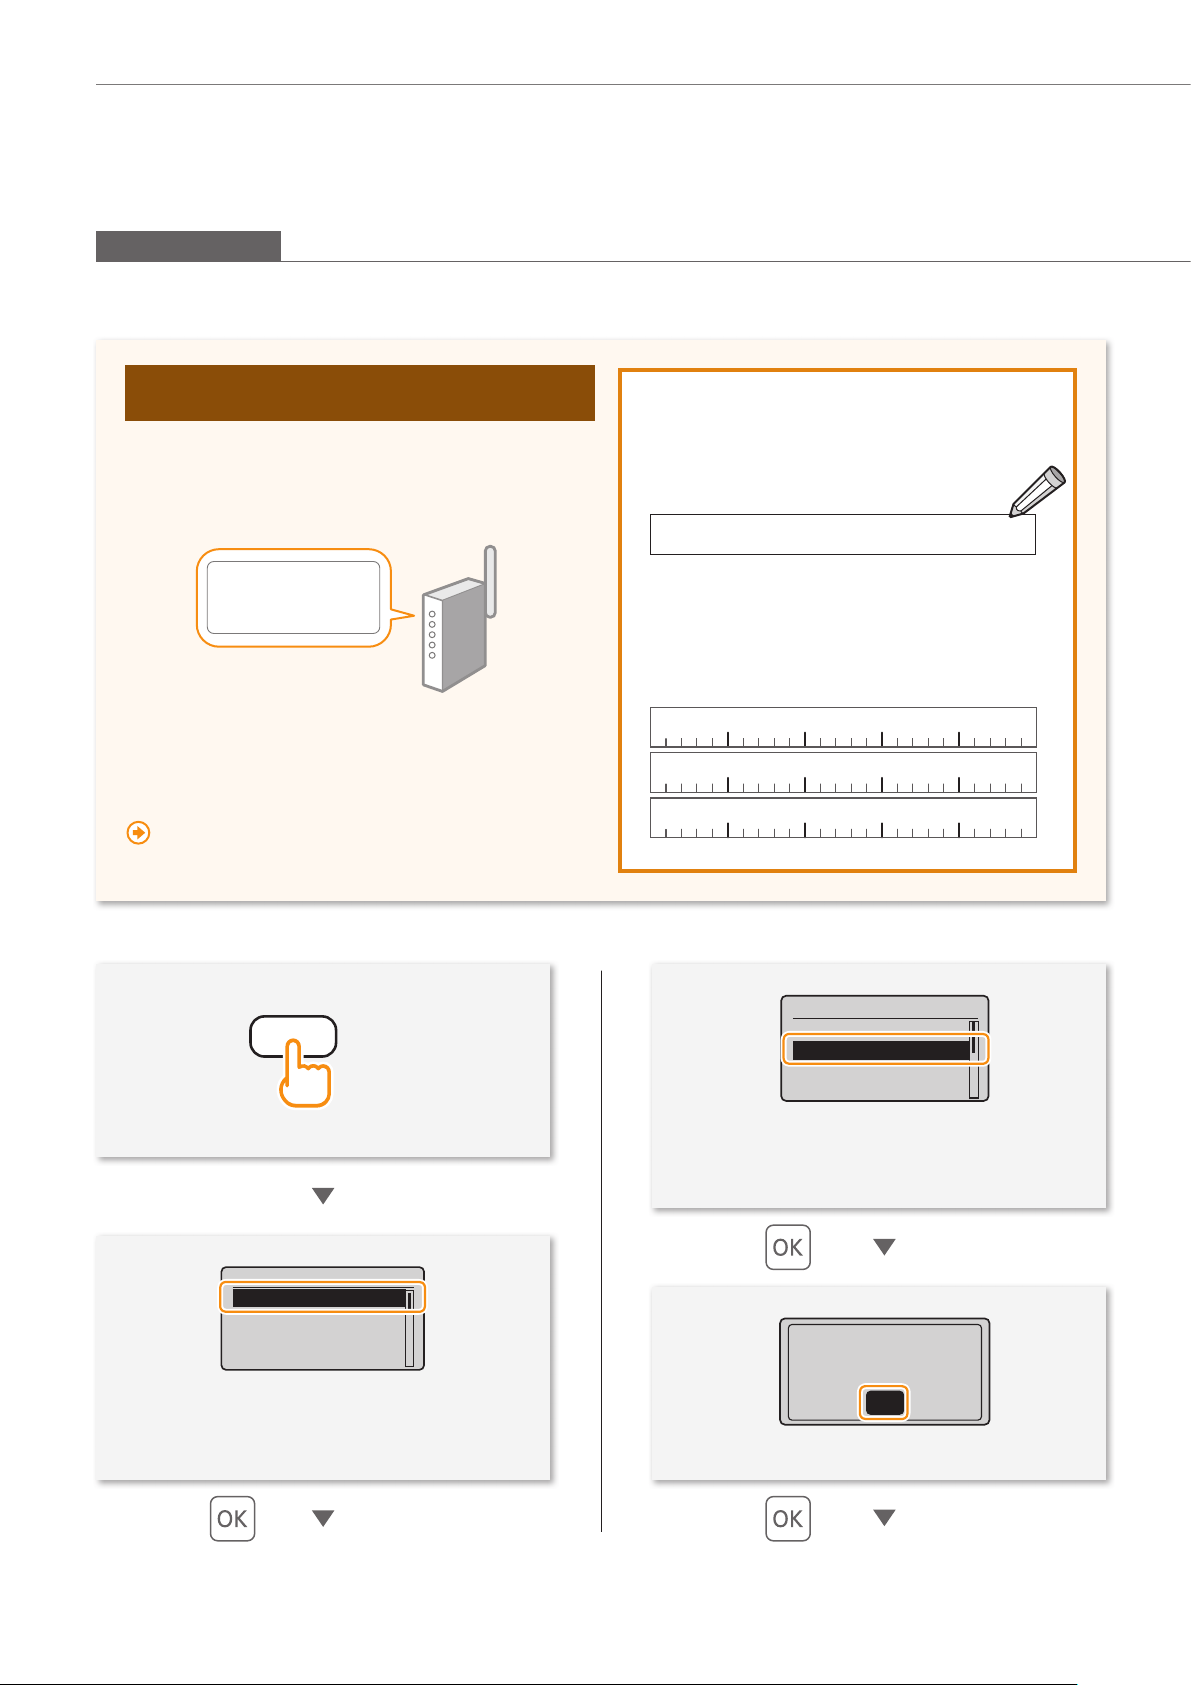
Setting the Wireless LAN
Manual Selection
Setting by Selecting the SSID (Network or Access Point)
Check the SSID (Network Name/Access Point
Name) and Network Key
Fill in the blanks on the right after checking one of the
follo
wing methods.
Check a label attached on the wireless LAN router.
• SSID
It is sometimes written as the name of network,
or name of access point. If there are multiple
SSIDs, please write them all down.
SSID :XXXXXXXXXXXX
Network Key
・
・
・
:XXXXXXXXXXXX
Check using Canon MF/LBP wireless Setup
Assistant*
* Included in User Software CD-ROM, which is supplied with the
machine.
““Checking SSID or Network Key for a Wireless LAN
Router/Access Point” (P.20)
(Menu)
• Network Key
It is sometimes written as PIN, WEP key, WPA/
WPA2 passphrase, PSK , or preshared key.
• Press [▲] or [▼] to highlight <Wireless LAN
Settings>.
Network Settings
Select Wired/Wirele
Wireless LAN Setting
TCP/IP Settings
SNMPv1 Settings
...
6
• Press [▲] or [▼] to highlight <Network
Settings>.
Menu
Network Settings
Preferences
Timer Settings
Copy Settings
See Wireless LAN
Setting Guide to
perform settings.
OK
Page 7
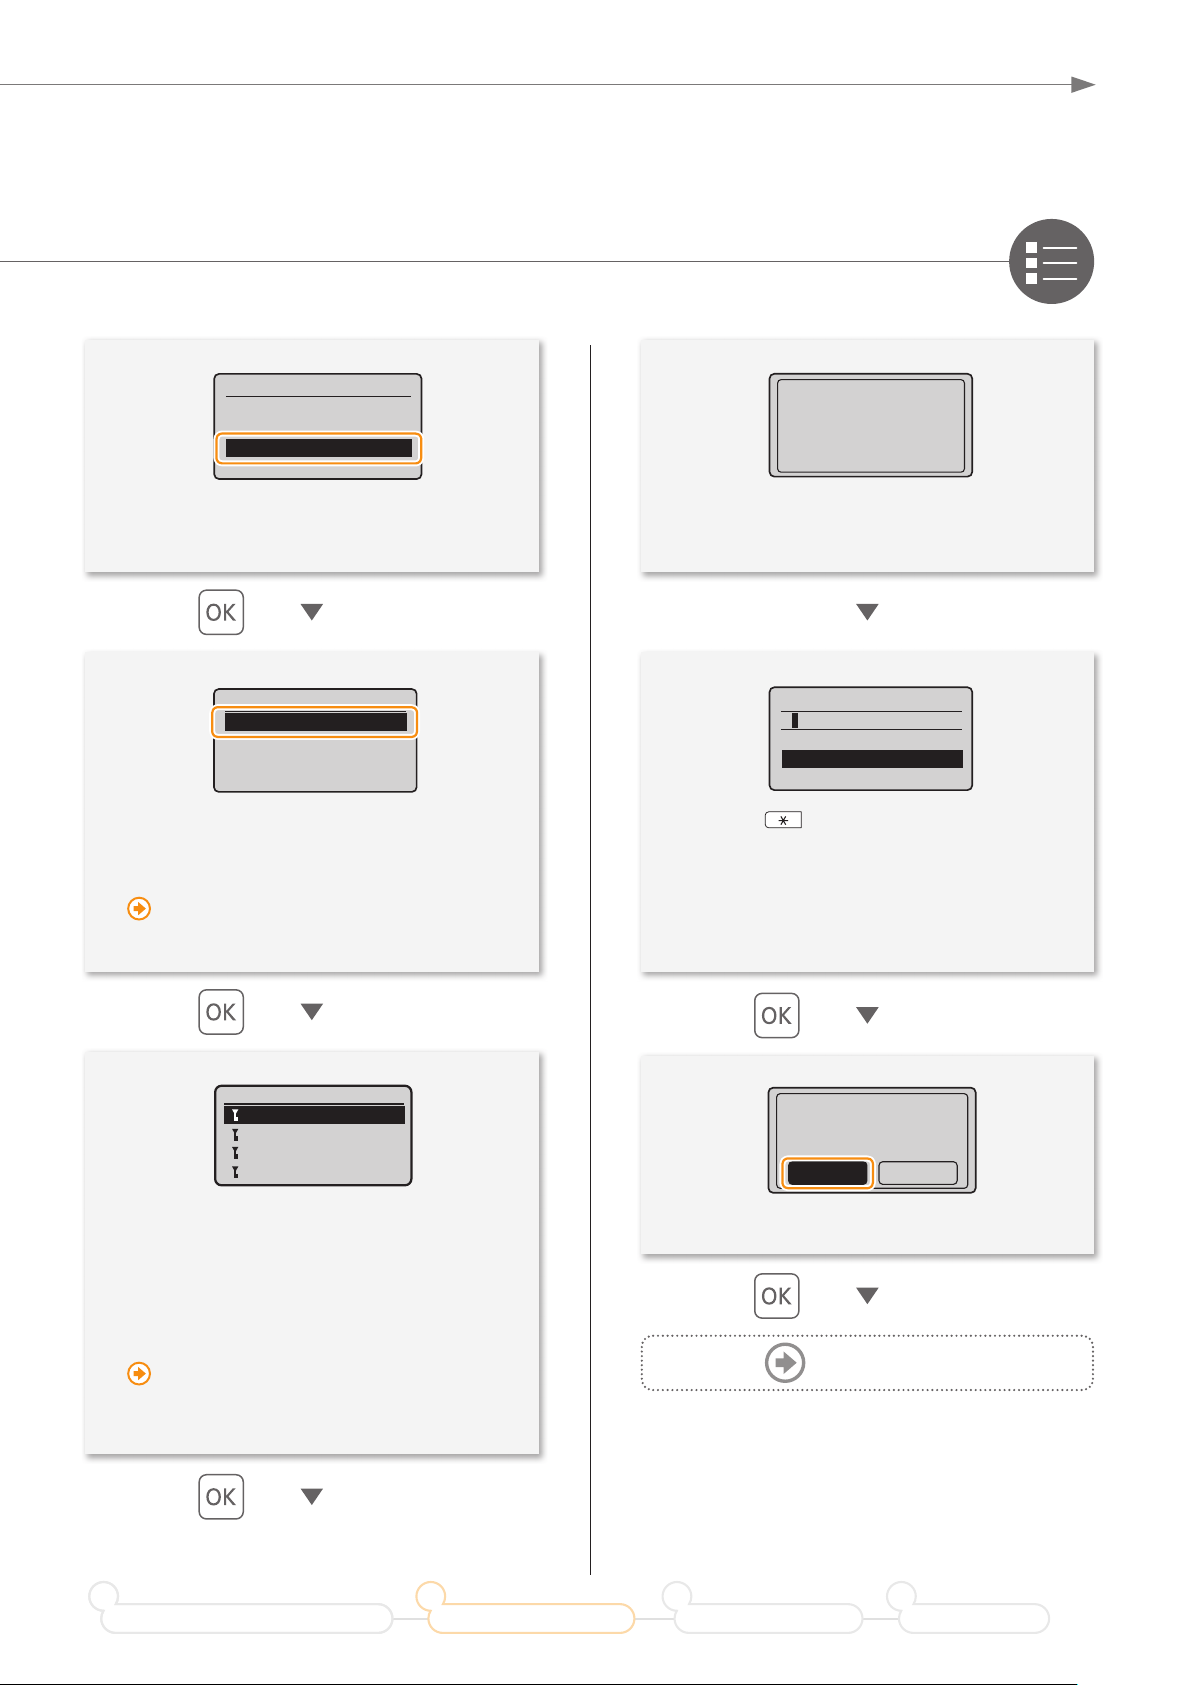
Setting the Wireless LAN
• Press [▲] or [▼] to highlight <SSID Settings>.
• Press [▲] or [▼] to highlight <Select Access
oint>.
P
Wireless LAN Settings
WPS Push Button Mode
WPS PIN Code Mode
SSID Settings
Wireless LAN Informa
SSID Settings
Select Access Point
Manual Settings
...
If “Cannot fi nd access point” is displayed:
““When an Error Message Appears” (P.14)
Proceeding to
screen for entering
access point network
key.
WEP Key (5-26 Char.)
<Apply>
Entry Mode: A
Press [
<Entry Mode>.
Enter the network key using the numeric
keys.
Press [▲] or [▼] to highlight <Apply>.
](Tone), and then highlight
• Press [▲] or [▼] to highlight the access point
you wr
• If multiple matched SSIDs are displayed,
select the ID that is listed fi rst (the one with
the strongest signal).
Select Access Point
SampleABCD WEP 13
SampleEFGHIJ WPA-PS
SampleKL WPA2-PSK 9
SampleMNOP None 7
ote down.
If no SSID has been found:
““Checking SSID or Network Key for a
Wireless LAN Router/Access Point” (P.20)
1
Prepare for Wireless LAN Connection
2
Setting the Wireless LAN
• Press [◀] to highlight <Yes>.
Do you want to
connect with new
settings?
Next Page
3
Installing the Software
NoYes
4
Troubleshooting
7
7
Page 8
Setting the Wireless LAN
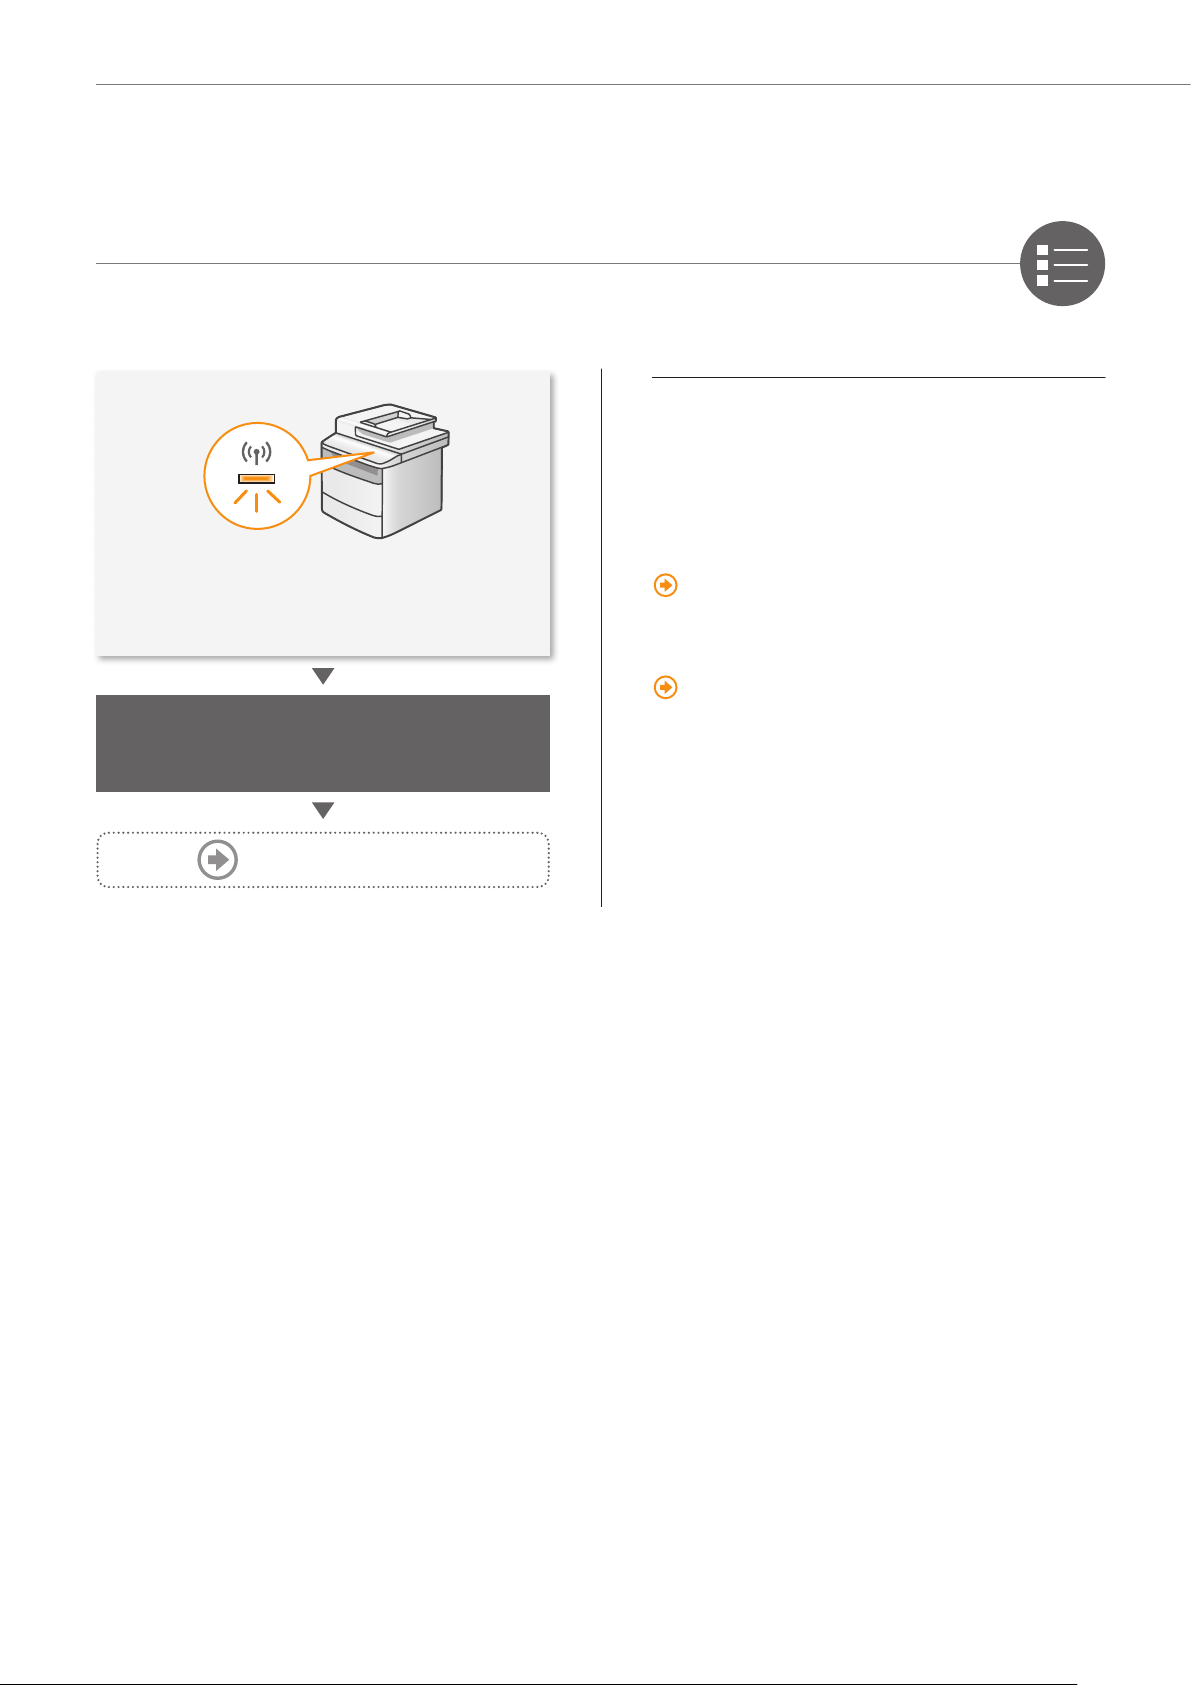
• After the <Connected.> screen is displayed,
wait until the Wi-Fi indicator stops blinking
and turns on.
Wait approximately 2 minutes
after the connection is completed.
The IP address is set during this time period.
Proceed to P.9
When an error message appears:
Press [OK] to close the screen, check whether the
network key is correct or not, and then retry the
settings from step .
If the access point cannot be detected even after
retrying, see the following.
“When an Error Message Appears” (P.14)
When setting IP address manually:
“Setting the IPv4 Address” in the e-Manual
8
Page 9

Checking that the Wireless LAN Setting is Completed
(Status Monitor/Cancel) (Status Monitor/Cancel)
Start a web browser from the computer
Setting the Wireless LAN
• Press [▲] or [▼] to highlight <Network
Information>.
• Press [▲] or [▼] to highlight <IPv4>.
Status Monitor/Cancel
Coy Job Status
Fax Job Status/Hist
Print Job Status
Network Information
Network Information
IPv4
IPv6
Wireless LAN Informa
IPv4
IP Address
Subnet Mask
Gateway Address
Host Name
...
• Enter [http://<IP address that you have written
down in step >/] in the addr
then press [Enter] on your keyboard.
ess fi eld, and
...
• Check that the screen of the Remote UI is
display
ed.
• Press [▲] or [▼] to highlight <IP Address>.
• Take note of the IP address.
1
Prepare for Wireless LAN Connection
IP Address
192.168.0.215
2
Setting the Wireless LAN
Connection is completed
when the screen is displayed.
Proceed to P.10
When the screen is not displayed
correctly:
“The Remote UI is not displayed.” (P.17)
3
Installing the Software
4
Troubleshooting
9
Page 10

◀
Select
◀
Click!
◀
Click!
Installing the Software
Click!
▶
◀
Select
Windows
Install the MF Drivers and the MF Toolbox. Make sure that the machine is turned ON, and log on to Windows as a
user with administrative privileges. Shut down all applications that are running. See the e-Manual for details about
installation.
NOTE
• If you are operating in the IPv6 environment, you may not install the software following the procedures below. See “Installing
the MF Drivers on the WSD Network” in the e-Manual.
• You may not use the scan function in the IPv6 environment.
▲
User Software CD-ROM
◀
• Printer, fax, scanner drivers, and MF Toolbox
will be installed.
• Select [Custom Installation] to install Presto!
P
ageManager and the e-Manual.
When the screen is not displayed correctly:
• Windows XP/Server 2003
[Start] Menu → [Run] → enter [D:\MInst.exe*]
→ [OK]
• Windows Vista/7/Server 2008
t] Menu
[Star
(or [Start Search]) → enter [D:\MInst.exe*] →
press the [Enter] k
• Windows 8/Server 2012
Right-click the low
→ [Run] → enter [D:\MInst.exe*] → [OK]
* The CD-ROM drive name is indicated as "D:" in this
manual.
→ [Search programs and fi les]
ey
er-left corner of the screen
Click!
◀
Select ✔✔
▶
Click!
• Follow the instructions on the screen to continue.
• We ask for the user’s cooperation for the Product
Extended Surv
descriptions on the screen.
ey Program. For details, see the
• Take the CD-ROM out, if necessary.
The PC connection via the wireless
LAN is now complete.
◀
Select ✔✔
◀
Click!
10
Page 11

Installing the Software
◀
Click!
◀
Enter
◀
Click!
◀
Double-click!
◀
Click!
◀
Click!
Macintosh
Install the MF drivers for Macintosh. It requires Mac OS X 10.5.8 version or later. The installation screen varies
depending on the version of Mac OS X.
This operation is for Macintosh. If using Windows, proceed to P.10.
▲
Insert the User Software CD-ROM and
double-click the CD-ROM icon.
▼
◀
Double-click!
▼
Follow the instructions
on the screen to continue.
▼
• Installing the drivers is now complete.
Continued with registratiion operations on the
desktop.
▼
◀
Click!
◀
Click!
• Depending on the system environment, the
dialog box may not be displayed. In this case,
proceed to next step.
▼
1
Prepare for Wireless LAN Connection
◀
Enter
◀
Click!
2
Setting the Wireless LAN
3
Installing the Software
▼
Next Page
4
Troubleshooting
◀
Click!
11
Page 12

Installing the Software
◀
Click!
◀
Select
◀
Click!
◀
Select
◀
Select
◀
Click
◀
Click!
◀
Enter
◀
Select
◀
Click!
◀
Select
Macintosh
◀
Click!
Connecting with the manual setting
◀
Click!
◀
Select
• If you are using Mac OS X 10.5.8, click [+],
select [CanonMF4800] or [CanonMF4700]
from the dialog box displayed, and then
proceed to next step..
▼
◀
Click!
Select a printer name for which [Bonjour] is
[
displayed in the [Kind] or [Connection] column.
If you are using Mac OS X 10.5.x, select the
corresponding driv
er from [Print Using].
◀
◀
◀
Select
Select
Click
• [IPP (Internet Printing Protocol)] is not supported.
▼
◀
Enter
◀
Select
▼
◀
Select
12
• An IP address is automatically confi gur
y the Bonjour function. If there is not the
b
Bonjour function or you want to set the
IP address manually, see “Setting the IP
Address” in the e-Manual.
ed
▼
◀
Click!
Page 13

◀
◀
Click!
◀
Click!
◀
Check that this
machine is added.
Click!
Installing the Software
• If you are using Mac OS X 10.5.x,
select [Select a driver to use] and the
corresponding driver from [Print Using], and
then click [Add].
▼
◀
Click!
◀
Check that this
machine is added.
Computer connection via the
wired LAN is now complete.
1
Prepare for Wireless LAN Connection
2
Setting the Wireless LAN
3
Installing the Software
4
Troubleshooting
13
Page 14

Troubleshooting
When an Error Message Appears
Could not connect.
More than one access
point was detected.
Close
Cannot find access
point.
Close
Action
• Wait for a while and try again.
Action 1
• Router’s push button might not be
pressed in the time limit.
Repeat the
setup with the proper procedure.
If the message still appears:
Check network connection referring to “Cannot Connect to the Network” (P.18). If the
access point cannot be determined even after checking the network connection,
check the security settings on the router.
Action 2
• The correct SSID might not be
entered.
Confi rm the router’s SSID
and repeat the setup.
Action
WPS connection
failed.
Close
Wireless connection
failed.
Close
1. Check that the wireless LAN router or access point that you are using
supports WP
S function.
2. If the router is WPS capable:
Check network connection referring to “Cannot Connect to the Network” (P.18).
If the r
Manually select a specifi c router f
outer is not WPS capable:
or your network identifi cation. (P.6)
Action
• Turn OFF the machine and turn it back ON, and then repeat the setup.
If the message still appears:
Check network connection referring to “Cannot Connect to the Network” (P.18).
If the access point cannot be determined even after checking the network
connection, check the security settings on the router.
14
Page 15

Action
Troubleshooting
Could not connect.
Check PSK settings.
Close
Shared Key auth.
failed. Check WEP
settings.
Close
• Enter the correct network key and repeat the setup.
If the message still appears:
Check network connection referring to “Cannot Connect to the Network” (P.18).
Action
• Enter the correct network key and repeat the setup.
If the message still appears:
Change the WEP encryption on the router to “Shared Key,” or change the WEP
authentication method on the machine to <Open Sy
stem>.
Confi gure all the settings manually to change the setting to <Open System>.
(See the e-Manual)
Action
Open authentication
failed. Check WEP
settings.
Close
• Change the WEP authentication method on the machine to <Shared Key>.
Confi gure all the settings manually to change the setting to <Shared Key>.
(See the e-Manual)
If the message still appears:
Change the MAC address for the machine and the computer you are using to the
ed settings.
allow
1
Prepare for Wireless LAN Connection
2
Setting the Wireless LAN
3
Installing the Software
4
Troubleshooting
15
Page 16

Troubleshooting
If Problems Occur
The SSID of the
wireless LAN router
or access point is not
displayed in the list of
access points.
Cause 1
The SSID of the wireless LAN router or access point that you wrote down on
P.6 is incorr
Action
• Check the wireless LAN or access point’s SSID.
• Specify the settings again.
Cause 2
ect.
“Checking SSID or Network Key for a Wireless LAN Router/Access
Point” (P.20)
“Setting by Selecting the SSID (Network or Access Point)” (P.6)
Cannot detect the SSID
or network key of the
wireless LAN router or
access point.
The machine cannot detect the wireless LAN router or access points because
there is a pr
Action
• Check the network connection.
Action
“Checking SSID or Network Key for a Wireless LAN Router/Access Point”
(P.20)
oblem with the network connection.
“Cannot Connect to the Network” (P.18)
16
Page 17

Troubleshooting
Cause 1
The machine’s IP address is not set correctly.
Action
• Enable the DHCP function for the wireless LAN router or access point, and
specify the setting again.
See the instruction manual of the router, or contact the manufacturer.
Cause 2
The wireless LAN router or access point network key is not correctly
specifi ed to the machine.
A
ction
The Remote UI is not
displayed.
• Enable the DHCP function for the wireless LAN router or access point, and
specify the setting again.
“Checking SSID or Network Key for a Wireless LAN Router/Access
Point” (P.20)
• Specify the settings again.
“Setting by Selecting the SSID (Network or Access Point)” (P.6)
Cause 3
A wrong SSID is selected.
Action
• Check the wireless LAN or access point’s SSID.
“Checking SSID or Network Key for a Wireless LAN Router/Access
Point” (P.20)
• Enable the DHCP function for the wireless LAN router or access point, and
specify the setting again.
“Setting by Selecting the SSID (Network or Access Point)” (P.6)
1
Prepare for Wireless LAN Connection
2
Setting the Wireless LAN
3
Installing the Software
4
Troubleshooting
17
Page 18

Troubleshooting
Cannot Connect to the Network
Check the following items to make sure that the machine is ready to be connected to a network.
Check the status of the computer.
• Have the settings for the computer, the wireless LAN router, or access point been
completed?
• Are the cables (power cable or network cables) for the wireless LAN router or access point
disconnected?
• Is the wireless LAN router or access point turned ON?
If you cannot connect to the Internet even after checking:
• Turn OFF each device and turn each one back ON.
• Wait a few moments, and reconnect to the Internet.
Check if the machine is turned ON.
• When the power is already turned ON, turn the power OFF and turn it back ON.
Check the installation sites for the machine and the wireless LAN router
(access point).
• Is the distance between the machine and the wireless LAN router (access point) close
enough to communicate?
• Is there any obstacle, such as a wall, between the machine and the wireless LAN router
(access point)?
• Is there any electronic device, such as a microwave or a digital cordless phone, that emit
electronic wave?
18
Within 164' (50 m)
The machine
Wireless LAN router
or access point
Specify the settings again.
“Setting via WPS” (P.4)
“Setting by Selecting the SSID (Network or Access Point)” (P.6)
Proceed to the next page if you still cannot connect the machine to the network.
Page 19

Troubleshooting
Check the settings of the wireless LAN router (access point).
If one of followings is the case:
“Setting by Manually Entering SSID” in the e-Manual
• The MAC address fi ltering is enabled.
• Stealth function*: Enabled
• Deny ANY**: Enabled
• WEP key is set between <WEP Key 1> and <WEP key 4>, but the WEP key to use is not properly selected
in <Select
• WEP key (hexadecimal): Automatically generated by the wireless LAN router or access point.
* A function that makes the wireless LAN router or access point invisible to the SSIDs on other devices.
** A function that makes the wireless LAN router or access point deny a connection when another device’s SSID is set to “Any” or
“Empty.
WEP K
”
ey>.
If one of following is the case, change the settings of the wireless LAN router (access point).
• The MAC address fi ltering is enabled.
• An encryption method only when communicating using IEEE802.11n: WEP or TKIP
For the operation method of the wireless LAN router (access point), read the instruction manual for the wireless LAN
router or access point, or contact the manufacturer of the wireless LAN router or access point.
1
Prepare for Wireless LAN Connection
2
Setting the Wireless LAN
3
Installing the Software
4
Troubleshooting
19
19
Page 20

Appendix
◀
Click!
Click!
▶
Checking SSID or Network Key for a Wireless LAN Router/Access Point
You can check the SSID or the network key using “Canon MF/LBP Wireless Setup Assistant,” which is included in
the supplied User Software CD-ROM with the machine.
• Write down the name of the access point
(SSID) and network key on P.6, and then
continue the setup procedure.
User Software CD-ROM
▲
Click!
If multiple access points are displayed:
Write down all SSIDs that are displayed.
SampleABCD WEP 01234567890123456789ABCDEF
SampleEFGHIJ WPA-PSK 543210EDCBA
SampleK WPA2-PSK 1234ABCD
◀
Click!
▶
Perform the procedure up to step in
“Setting by Selecting SSID (Netw
Access Point)” (P.6).
Select the SSID that matches the one you
wrote do
Write down the network key for the SSID
you selected.
wn from the displayed SSID in step
.
SampleABCD WEP 01234567890123456789ABCDEF
SampleEFGHIJ WPA-PSK 543210EDCBA
SampleK WPA2-PSK 1234ABCD
ork or
20
• When the License Agreement screen
appears, please read thoroughly, and click
[Yes] to agree.
SampleEFGHIJ WPA-PSK 543210EDCBA
Perform the procedure from step in
“Setting by Selecting SSID (Netw
Access Point)” (P.6)”
ork or
If the information for the wireless LAN
router is not displayed:
• Click the [Refresh] button.
• If the information is not displayed when
you click the [R
computer settings for a wireless LAN router
or access point are complete.
efresh] button, check if the
Return to step on P.7
Page 21

21
Page 22

22
Page 23

23
Page 24

Contacting the Service Center
Contacting the Service Center
When you have a problem with your machine, refer to
“Troubleshooting” in the Basic Operation Guide or the
e-Manual fi rst. If you cannot solve the problem after
referring the manuals, contact the Canon Authorized
Service Facilities or the Canon Customer Care Center.
Canon Customer Care Center
1-800-OK-CANON
(U.S.A./Canada)
U.S.A
Monday through Friday
From 8:00 A.M. to 8:00 P.M. EST
Canada
Monday through Friday
From 9:00 A.M. to 8:00 P.M. EST
http://www.canon.ca/
CANON INC.
30-2, Shimomaruko 3-chome, Ohta-ku, Tokyo 146-8501, Japan
CANON MARKETING JAPAN INC.
16-6, Konan 2-chome, Minato-ku, Tokyo 108-8011, Japan
CANON U.S.A., INC.
One Canon Park, Melville, NY 11747, U.S.A.
CANON EUROPA N.V.
Bovenkerkerweg 59, 1185 XB Amstelveen, The Netherlands
CANON CHINA CO. LTD.
15F Jinbao Building No.89, Jinbao Street, Dongcheng District, Beijing 100005, PRC
CANON SINGAPORE PTE LTD
1 HarbourFront Avenue, #04-01 Keppel Bay Tower, Singapore 098632
CANON AUSTRALIA PTY LTD
1 Thomas Holt Drive, North Ryde, Sydney NSW 2113, Australia
CANON GLOBAL WORLDWIDE SITES
http://www.canon.com/
FT6-0297 (010) XXXXXXXXXX © CANON INC. 2013 PRINTED IN KOREA
 Loading...