

Page 1
Basic Operation Guide
For information about machine setup and software
installation, see the Starter Guide.
This guide describes the basic use of
the machine. Read this guide after
finishing the machine setup.
Read ”Important Safety Instructions”
first ĺp..
Keep this manual for future reference.
For information about advanced operations and
specifications, see the e-Manual included on the User
Software CD-ROM.
Page 2
This Manual
Manuals for the Machine
Starter Guide
The Starter Guide describes setting up the machine and installing the software.
Be sure to read this manual before using the machine.
Wireless LAN Setting Guide (MF4890dw/MF4880dw Only)
This manual describes Wireless LAN setup procedures and causes and countermeasures
for trouble you might face during the setup. Be sure to read this manual before using the
machine.
Basic Operation Guide
The Basic Operation Guide describes common use and basic functions of the copy,
fax, and print functions.
e-Manual
The e-Manual includes information about all functions and con gurations of the machine.
This manual is included on the User Software CD-ROM. Use the e-Manual’s search function
to easily nd the information you want.
For Macintosh Users
The examples shown in this manual are based on the operation in the Windows
environment. To view how to use printer driver, fax driver, and scanner driver, refer
to the driver guides included in the User Software CD-ROM and the driver’s help.
Displaying Driver Guides
To view the Driver Guides, double-click the HTML les from the following folders
on the User Software CD-ROM.
• Canon MF Printer Driver Installation Guide [Documents] [Print]
[Guide] [index.html]
• Canon Fax Driver Installation Guide [Documents] [Fax] [Guide]
[index.html]
• Canon Scanner Driver Guide [Documents] [Scan] [Guide]
[index.html]
Displaying from Driver’s Help System
From each driver panel, click [ ]
2
Page 3
How to Use This Manual
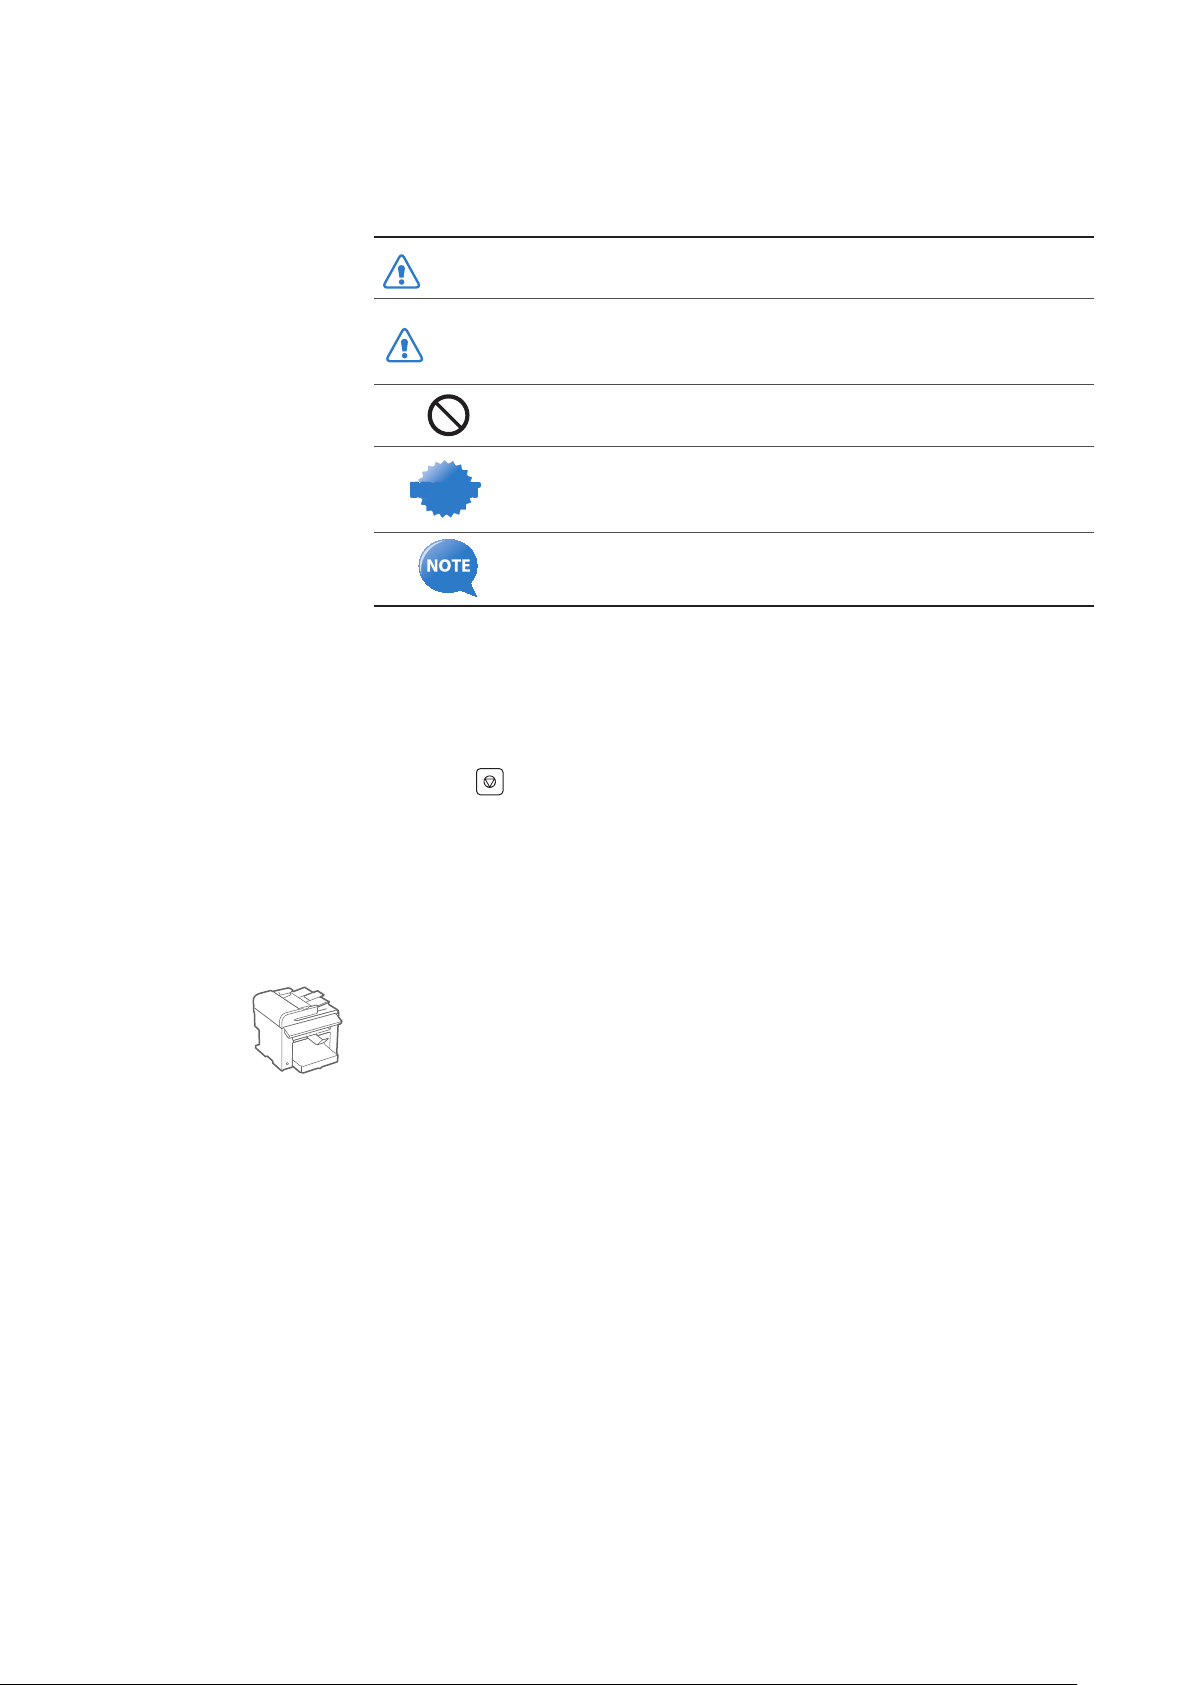
Symbols Used in This Manual
WARNING
CAUTION
IMPORTANTIMPORTANT
Indicates a situation that may lead to death or injury to persons.
To u
se the machine safely, always pay attention to these warnings.
Indicates a situation that may lead to injury to persons or damage to
eq
uipment. To use the machine safely, always pay attention to these
cautions.
Indicates an operation that must not be performed. Read these items
carefully, and make sure not to perform the described operations.
Indicates operational requirements and restrictions. Be sure to read
these items carefully to operate the machine correctly and avoid
damage to the machine or property.
Indicates a clari cation of an operation or additional explanations for a
procedure. Reading these notes is highly recommended.
Keys and Buttons Used in This Manual
In this manual, the following styles are used to represent keys, messages on the display, and
buttons or other items on a computer screen.
• Operation panel keys: [Key icon] (Key name)
Example: [ ] (Stop)
• Display: <Message>
Example: <Specify Destination>
• Buttons and items on a computer screen: [Item]
Example: [Preference]
Illustrations Used in This Manual
Illustrations Used in This Manual
Illustrations of the MF4890dw are used in this manual. If a procedure or topic applies to only
one mac
Displays Used in This Manual
The display shown in this manual is the factory preset display for the MF4890dw.
De
display may di er.
hine, this will be clearly indicated in the manual (for example, “MF4880dw”).
pending on the system con guration and product purchased, the appearance of the
3
Page 4
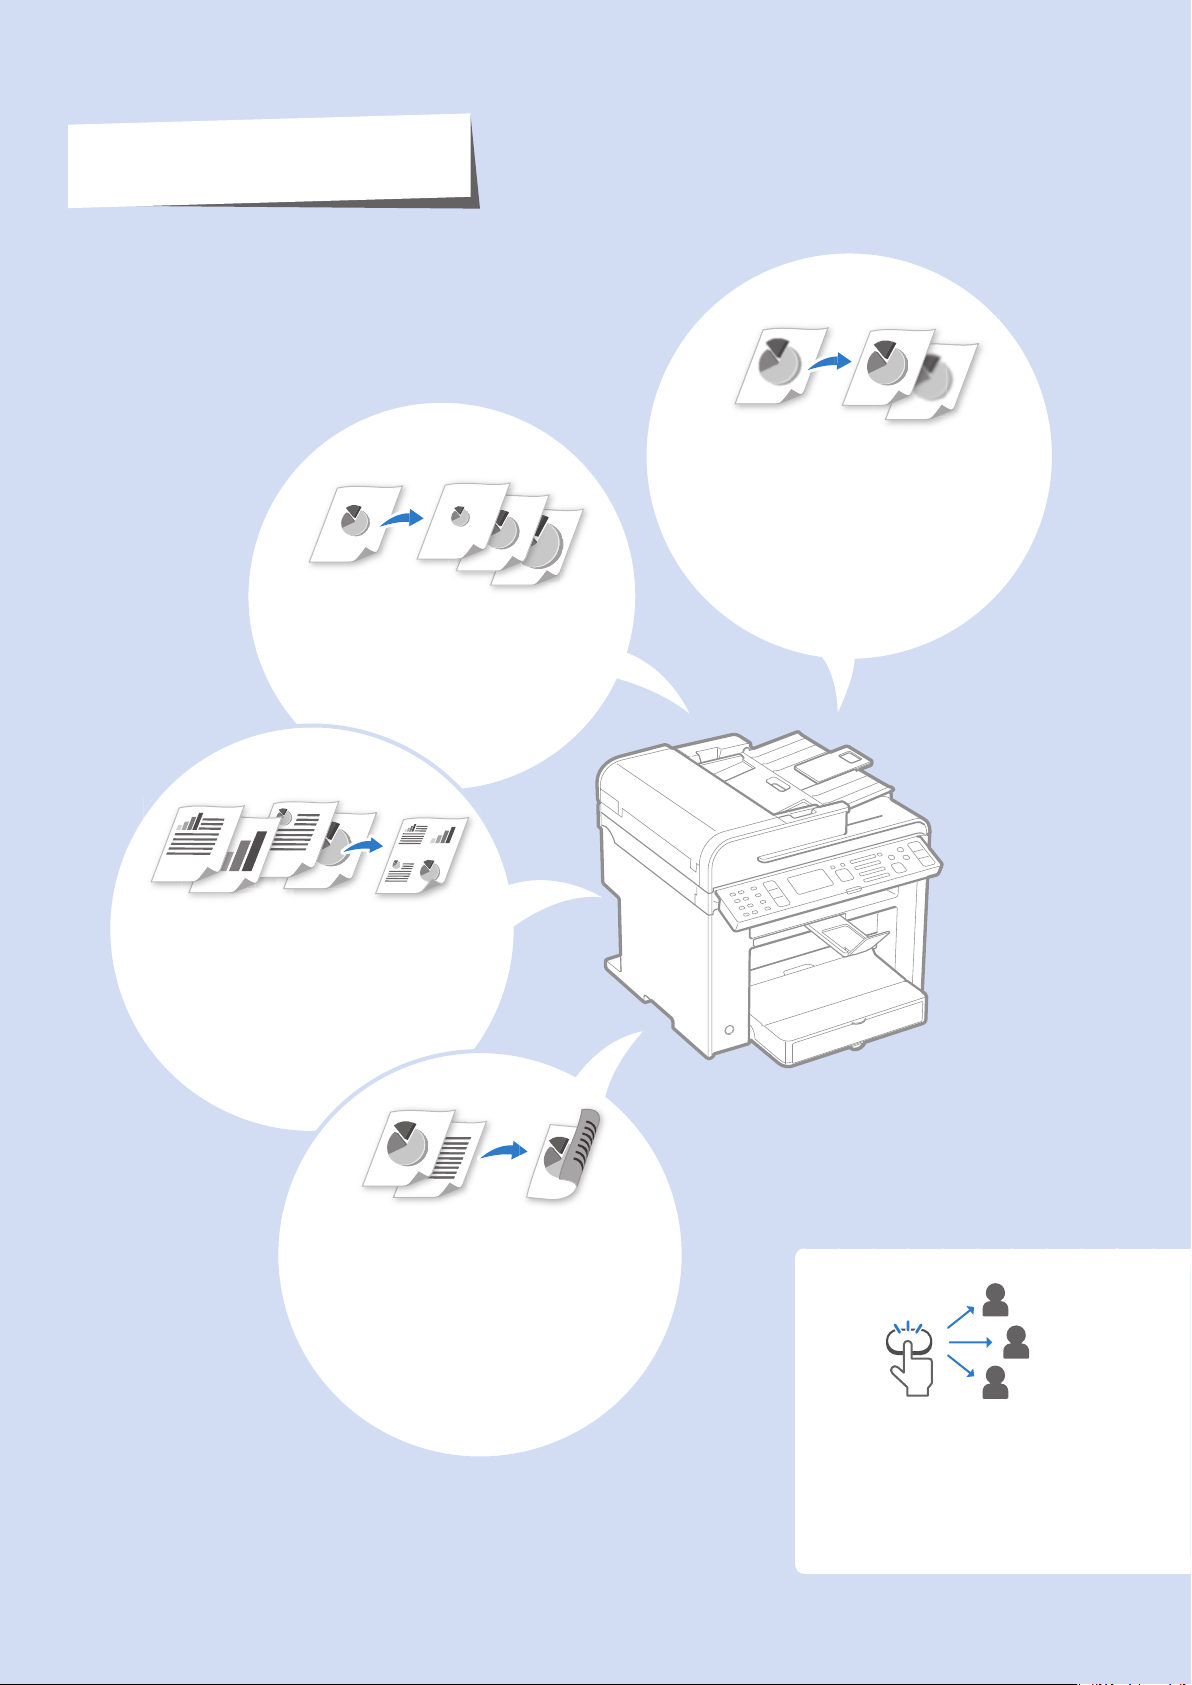
Main Functions
Adjusting Quality
Adjust image quality by setting the
density, resolution, and sharpness.
• Copy → P. 3 2
Enlarging and Reducing
• Copy → P. 3 1
• Print → P. 4 0
Multiple Documents onto
Single Page
Print multiple pages onto a single page.
• Copy → P. 3 5
• Print → P. 4 2
• Fax → P. 5 2
2-Sided Printing*
Print copies, received faxes, or
documents on both sides of paper.
Fax
• Copy → P. 3 4
• Print → P. 4 1
• Fax → P. 6 9
One-touch/Coded/Group
Dialing
Specify fax destinations using onetouch keys, coded dial, and group
dial.
* MF4890dw/MF4880dwonly
4
→ P. 4 8
Page 5
Copy
1
2
3
1
2
3
1
2
3
1
1
1
2
2
2
3
3
3
<ON>
<OFF>
Collating Copies → P. 3 5
Collate copies when copying multiple documents.
Print
Booklet Printing* → P. 4 3
• Combine two pages onto a single
page, and then print on both sides.
• Make a booklet by folding printouts
in half and binding.
Poster Printing → P. 4 4
• Magnify and divide a single-paged
• Make a poster by combining the
Scan
Copying ID Card → P. 3 6
Copy both sides of an ID card onto a single page.
image to print on multiple sheets of
paper.
prints together.
Watermark Printing → P. 4 5
Add watermarks, such as “COPY” or
“DRAFT”, to the document.
Scanning using the Operation Panel → P. 7 5
Select a computer to save scanned images in and scan
images directly from the operation panel.
Receiving in the Memory
→ P. 6 4
• Store received faxes in the memory.
• Print or forward the received fax after
con rming the sender.
* MF4890dw/MF4880dwonly
Remote Scanning from Computers → P.7 8
Set to use the remote scan from the machine, and then
scan images from a computer using the MF Toolbox.
Sequential Broadcasting
→ P. 5 8
Send the same document to multiple
destinations at a time.
1
2
Polling Receiving →
Retrieve pre-loaded documents from
a sender’s fax machine.
5
Page 6
Contents
Basic Operation
Learn the Names and Functions of Each Part of the Machine ……… 10
Front Side …………………………………………………………… 10
In
terior ……………………………………………………………… 12
Back Side …………………………………………………………… 13
Learn the Functions of the Operation Panel ………………………… 14
w
itch to Copy/Fax/Scan Mode ……………………………………… 16
S
Enter Text …………………………………………………………… 17
Set Date and Time …………………………………………………… 18
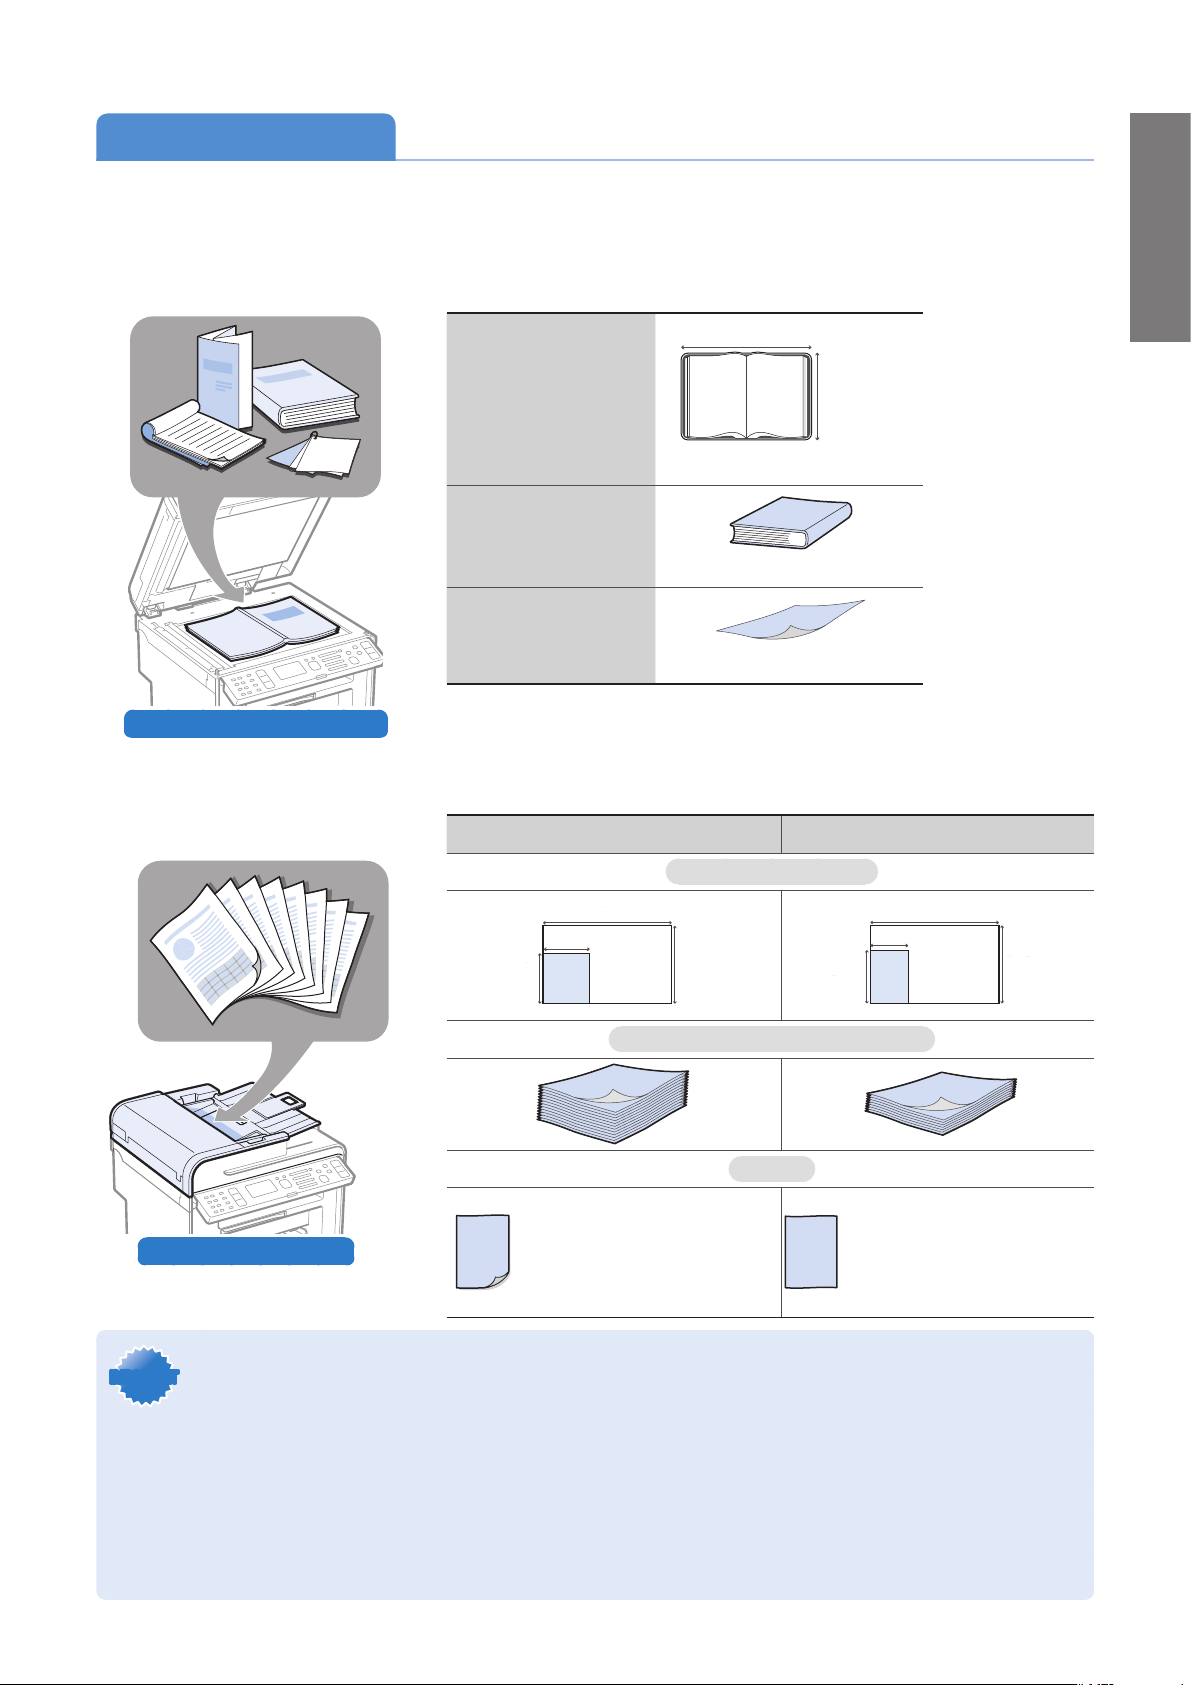
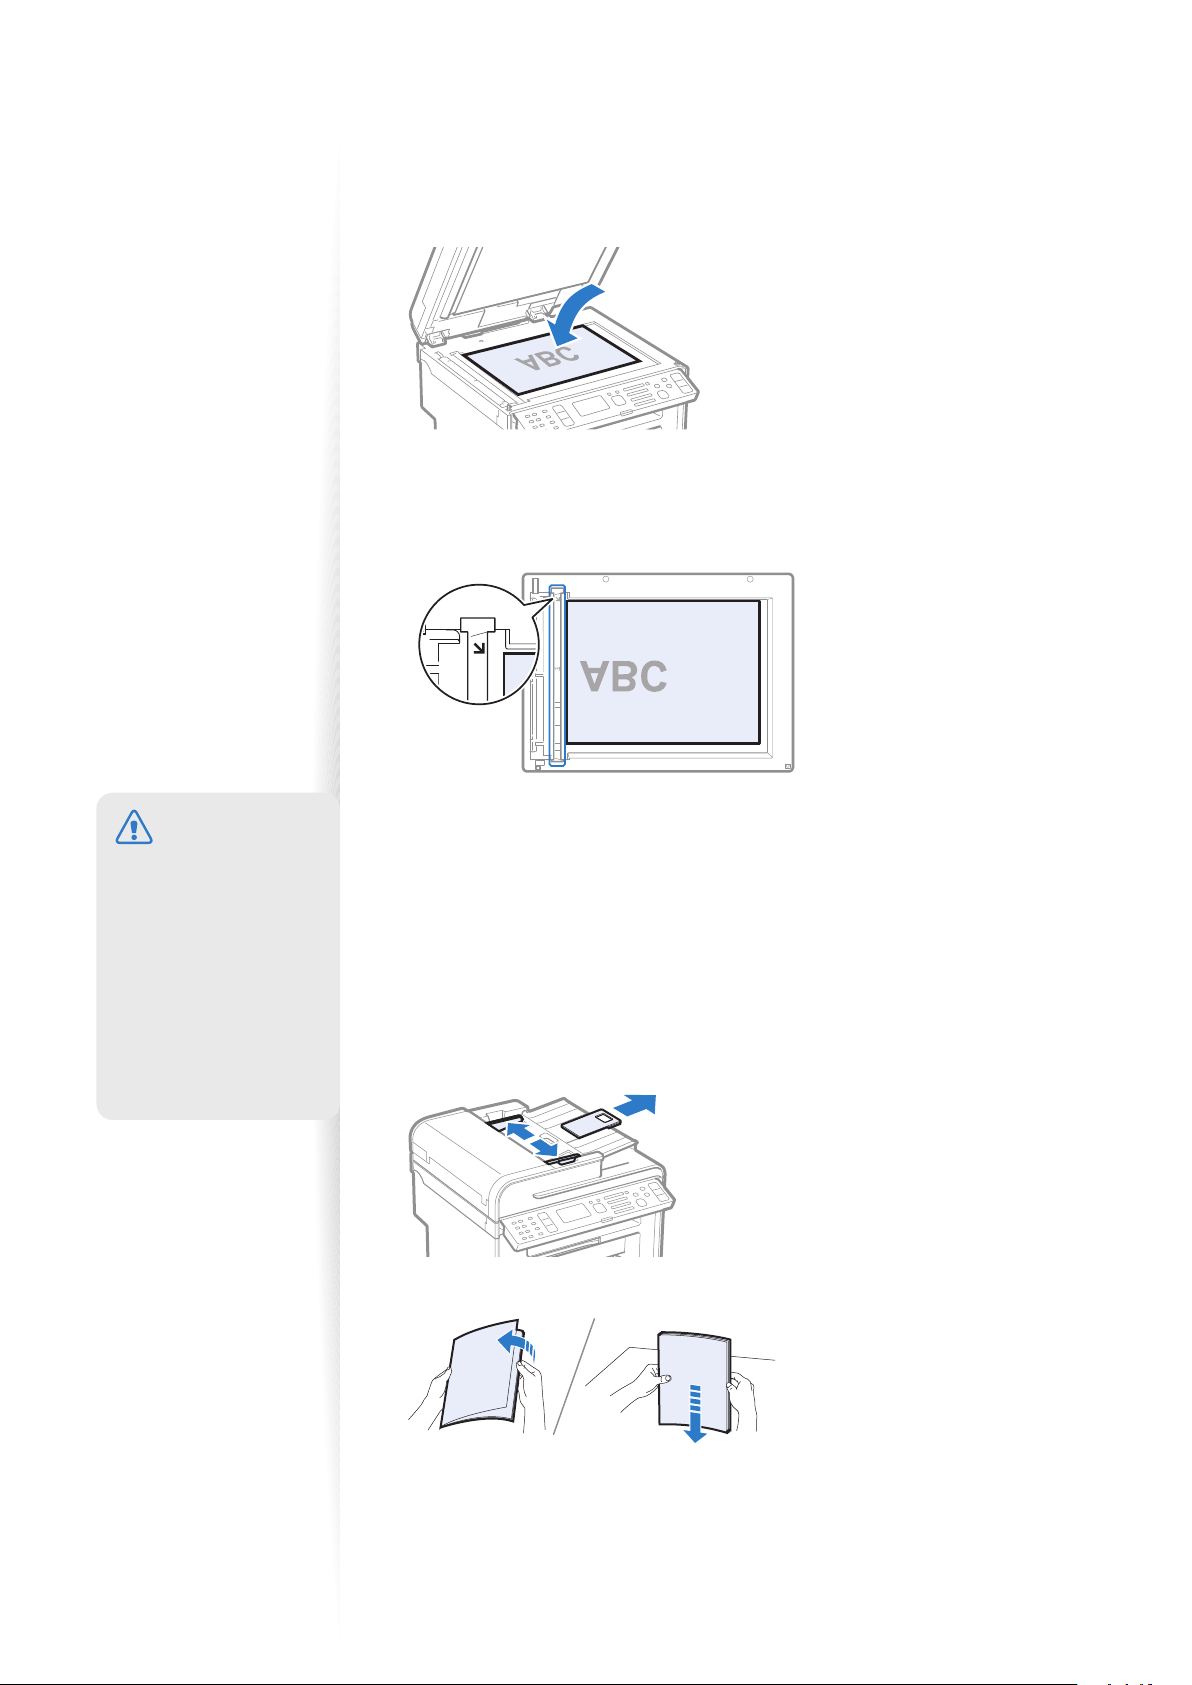
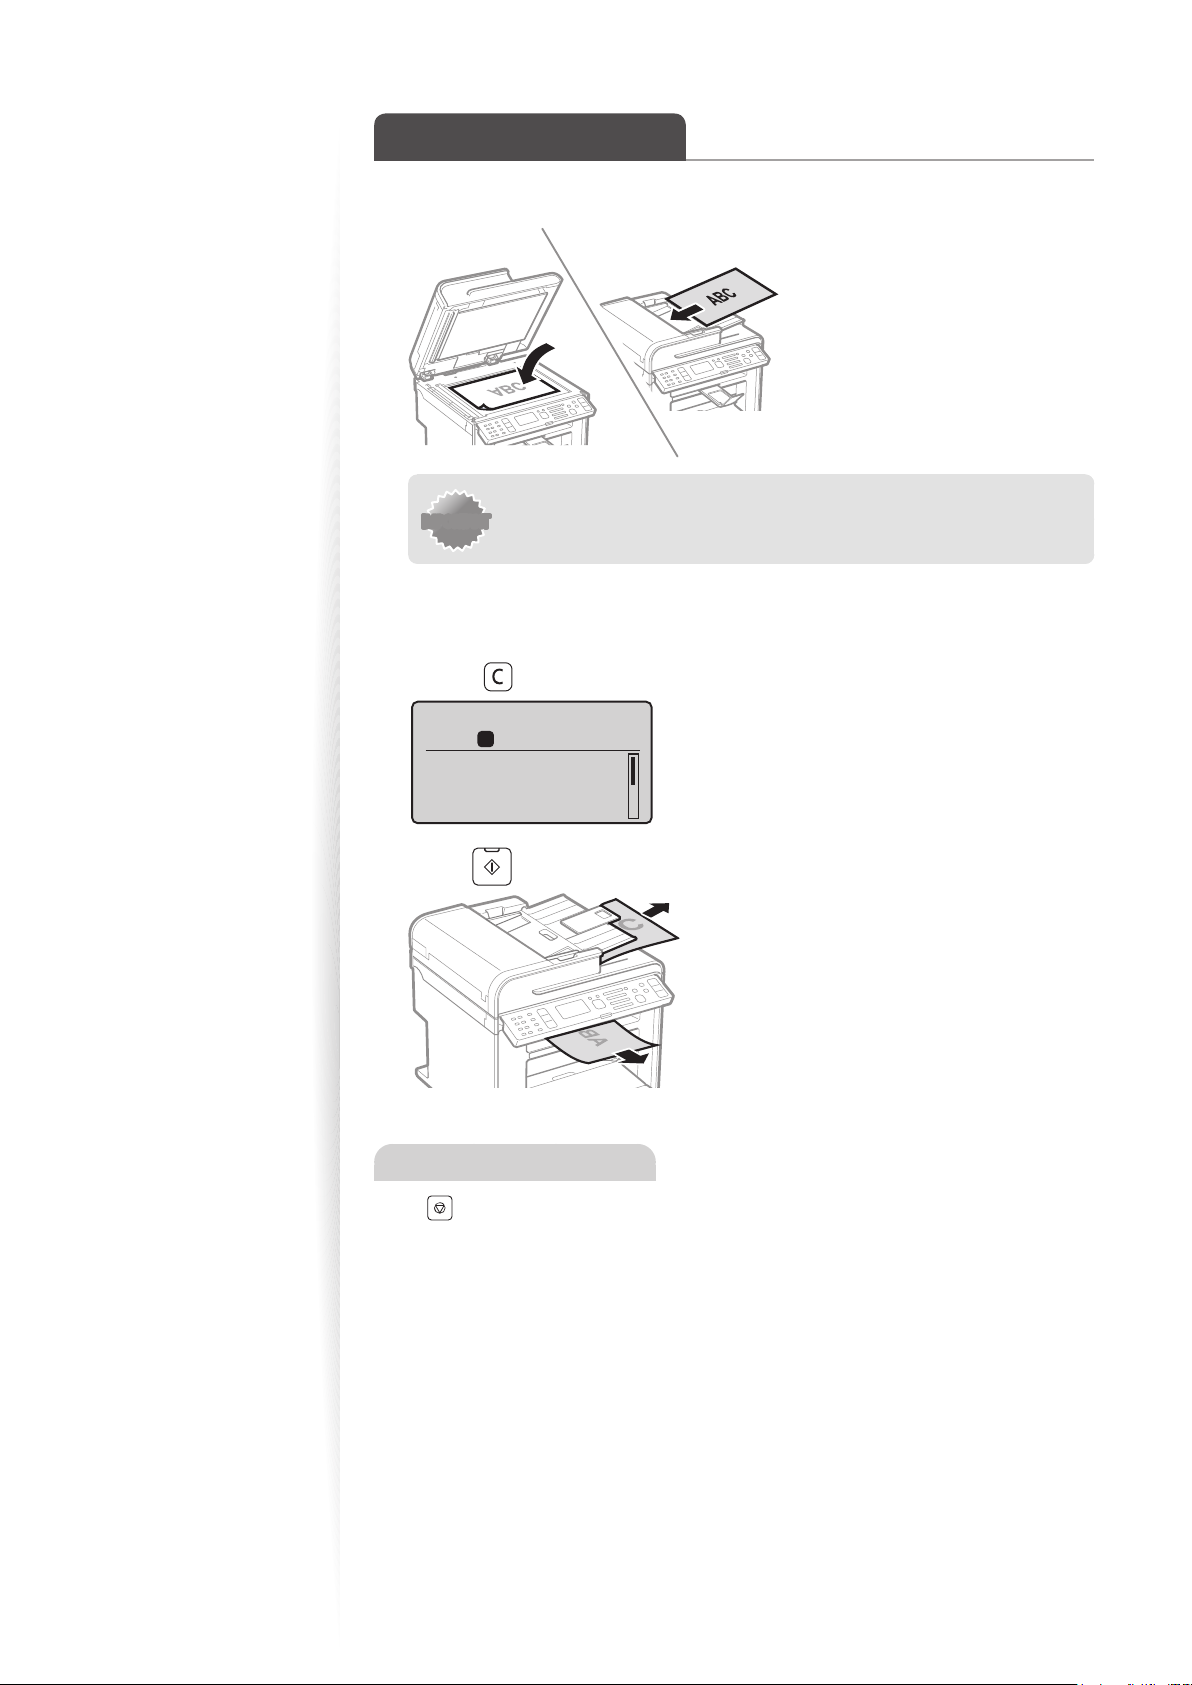
Place Documents …………………………………………………… 19
Placing Documents on the Platen Glass …………………………… 20
Placing Documents in the Feeder …………………………………… 20
Load Paper …………………………………………………………… 22
Loading Paper in the Paper Cassette ………………………………… 23
ing Paper in the Multi-Purpose Tray …………………………… 24
Load
Loading Envelopes or Paper with a Letterhead ……………………… 25
Setting a Paper Size and Type ……………………………………… 26
Switch to the Quiet Mode …………………………………………… 27
w
itch to the Sleep Mode …………………………………………… 27
S
Use the Toner Saver Mode …………………………………………… 28
Copy
Make a Basic Copy …………………………………………………… 30
Copy by Saving Paper ………………………………………………… 31
Enlarge or Reduce Copies …………………………………………… 31
Adjust the Image Quality for Copy …………………………………… 32
Adjusting the density ……………………………………………… 32
Selecting the Document Type ……………………………………… 32
Adjusting the sharpness …………………………………………… 33
Make Double-Sided Copies (MF4890dw/MF4880dw Only) ………… 34
o
py Multiple Pages onto One Sheet ……………………………… 35
C
Collate Copies ………………………………………………………… 35
Copy a Double-Sided ID Card ………………………………………… 36
View and Cancel Copy Jobs ………………………………………… 37
Change the Default Copy Settings …………………………………… 37
6
Page 7
(→ p.105)
You can see frequentely asked
questions about the receive mode.
Print
Print a Document …………………………………………………… 40
Enlarge or Reduce a Document ……………………………………… 40
Print a Double-Sided Document (MF4890dw/MF4880dw Only) …… 41
Print Multiple Pages onto One Sheet ………………………………… 42
Print a Booklet (MF4890dw/MF4880dw Only) ……………………… 43
Print a Poster ………………………………………………………… 44
Add Watermarks to a Printout ……………………………………… 45
View and Cancel Print Jobs …………………………………………… 46
Fax
Register Numbers in the Address Book ……………………………… 48
Registering Numbers to One-Touch Keys …………………………… 48
Regi
stering Numbers to Coded Dialing Codes ……………………… 49
Registering Recipients for Group Dialing …………………………… 50
Editing and Deleting Registered Destinations ……………………… 52
Adjust the Image Quality for Fax …………………………………… 52
Adjusting the Density ……………………………………………… 52
lec
ting the Resolution …………………………………………… 53
Se
Adjusting the Sharpness …………………………………………… 53
Specifying the Double-Sided Document Format (MF4890dw Only) … 54
Changing the Default Settings ……………………………………… 54
Send a Fax …………………………………………………………… 55
Entering a Fax Number with the Alphanumeric Keys ………………… 55
s
ing the One-Touch Keys ………………………………………… 56
U
Using the Coded Dialing Codes……………………………………… 56
Searching the Address Book ………………………………………… 57
Redialing …………………………………………………………… 57
Sending a Fax to Multiple Destinations (Sequential Broadcast) ……… 58
Sending a Fax to an International Destination (Adding Pauses) ……… 58
Calling a Recipient before Sending a Fax …………………………… 59
Receive a Fax (Receive Mode) ………………………………………… 60
Using the Machine for Fax Only ……………………………………… 61
ing the Machine for Faxing and Phoning ………………………… 61
s
U
Using the Answering Machine ……………………………………… 62
Using the Machine Primarily for Phoning …………………………… 62
Receiving Faxes in Manual Mode …………………………………… 63
Receive a Fax from Memory ………………………………………… 64
Switching to Memory Lock Mode …………………………………… 64
i
ewing/Canceling/Forwarding Received Fax Documents ………… 65
V
Printing Received Fax Documents …………………………………… 65
View/Cancel/Forward a Fax Job ……………………………………… 66
h
ange the Fax Settings ……………………………………………… 66
C
Changing Fax Sending Settings ……………………………………… 66
Rest
ricting Fax Sending Functions …………………………………… 68
Changing Fax RX Settings …………………………………………… 69
Changing Communication Management Settings ………………… 70
7
Page 8

(→ p.106)
You can see frequentely asked
questions about the scan function.
Scan
Understand the Scanning Method …………………………………… 74
Scan a Document with the Operation Panel ………………………… 75
Scanning a Document Using a Shortcut Key ………………………… 77
Scan a Document with the MF Toolbox ……………………………… 78
Con guring Scan Settings Using the MF Toolbox …………………… 80
Scan a Document with the Scanner Driver ………………………… 82
Maintenance and Management
Clean the Machine …………………………………………………… 84
Cleaning the Exterior and Interior …………………………………… 84
Cl
eaning the Fixing Unit …………………………………………… 85
Cleaning the Platen Glass and Feeder ……………………………… 86
Check and Replace Toner Cartridges ………………………………… 87
Checking the Toner Level …………………………………………… 87
o
nserving the Toner to Extend the Life of Toner Cartridges ………… 88
C
Replacing the Toner Cartridge ……………………………………… 88
Manage Using the Report and List Functions ……………………… 91
n
gure Settings Using the Remote UI …………………………… 92
Co
Trou bl es hoo ti ng
Clear Jams …………………………………………………………… 94
Clearing Document Jams in the Feeder……………………………… 95
Cl
earing Paper Jams Inside the Machine …………………………… 96
Resolve a Displayed Message ………………………………………… 100
Resolve a
Improve Output Quality ……………………………………………… 102
Resolve a Problem …………………………………………………… 104
n Error Code ………………………………………………… 101
FAQ …………………………………………………………………… 105
If a Power Failure Occurs ……………………………………………… 108
Recycling Used Cartridges …………………………………………… 108
The Clean Earth Campaign …………………………………………… 108
Important Safety Instructions ……………………………………… 109
Legal Notices ………………………………………………………… 111
Laser Safety …………………………………………………………… 114
8
Page 9
Basic Operation
This chapter describes overall information about the machine, and how to
place the documents and load the paper. Read this chapter rst.
Learn the Names and Functions of Each Part of the Machine ……… 10
Front Side …………………………………………………………… 10
In
terior ……………………………………………………………… 12
Back Side …………………………………………………………… 13
Learn the Functions of the Operation Panel ………………………… 14
w
itch to Copy/Fax/Scan Mode ……………………………………… 16
S
Enter Text …………………………………………………………… 17
Set Date and Time …………………………………………………… 18
Place Documents …………………………………………………… 19
Placing Documents on the Platen Glass …………………………… 20
Placing Documents in the Feeder …………………………………… 20
Load Paper …………………………………………………………… 22
Loading Paper in the Paper Cassette ………………………………… 23
ing Paper in the Multi-Purpose Tray …………………………… 24
Load
Loading Envelopes or Paper with a Letterhead ……………………… 25
Setting a Paper Size and Type ……………………………………… 26
Switch to the Quiet Mode …………………………………………… 27
w
itch to the Sleep Mode …………………………………………… 27
S
Use the Toner Saver Mode …………………………………………… 28
9
Page 10
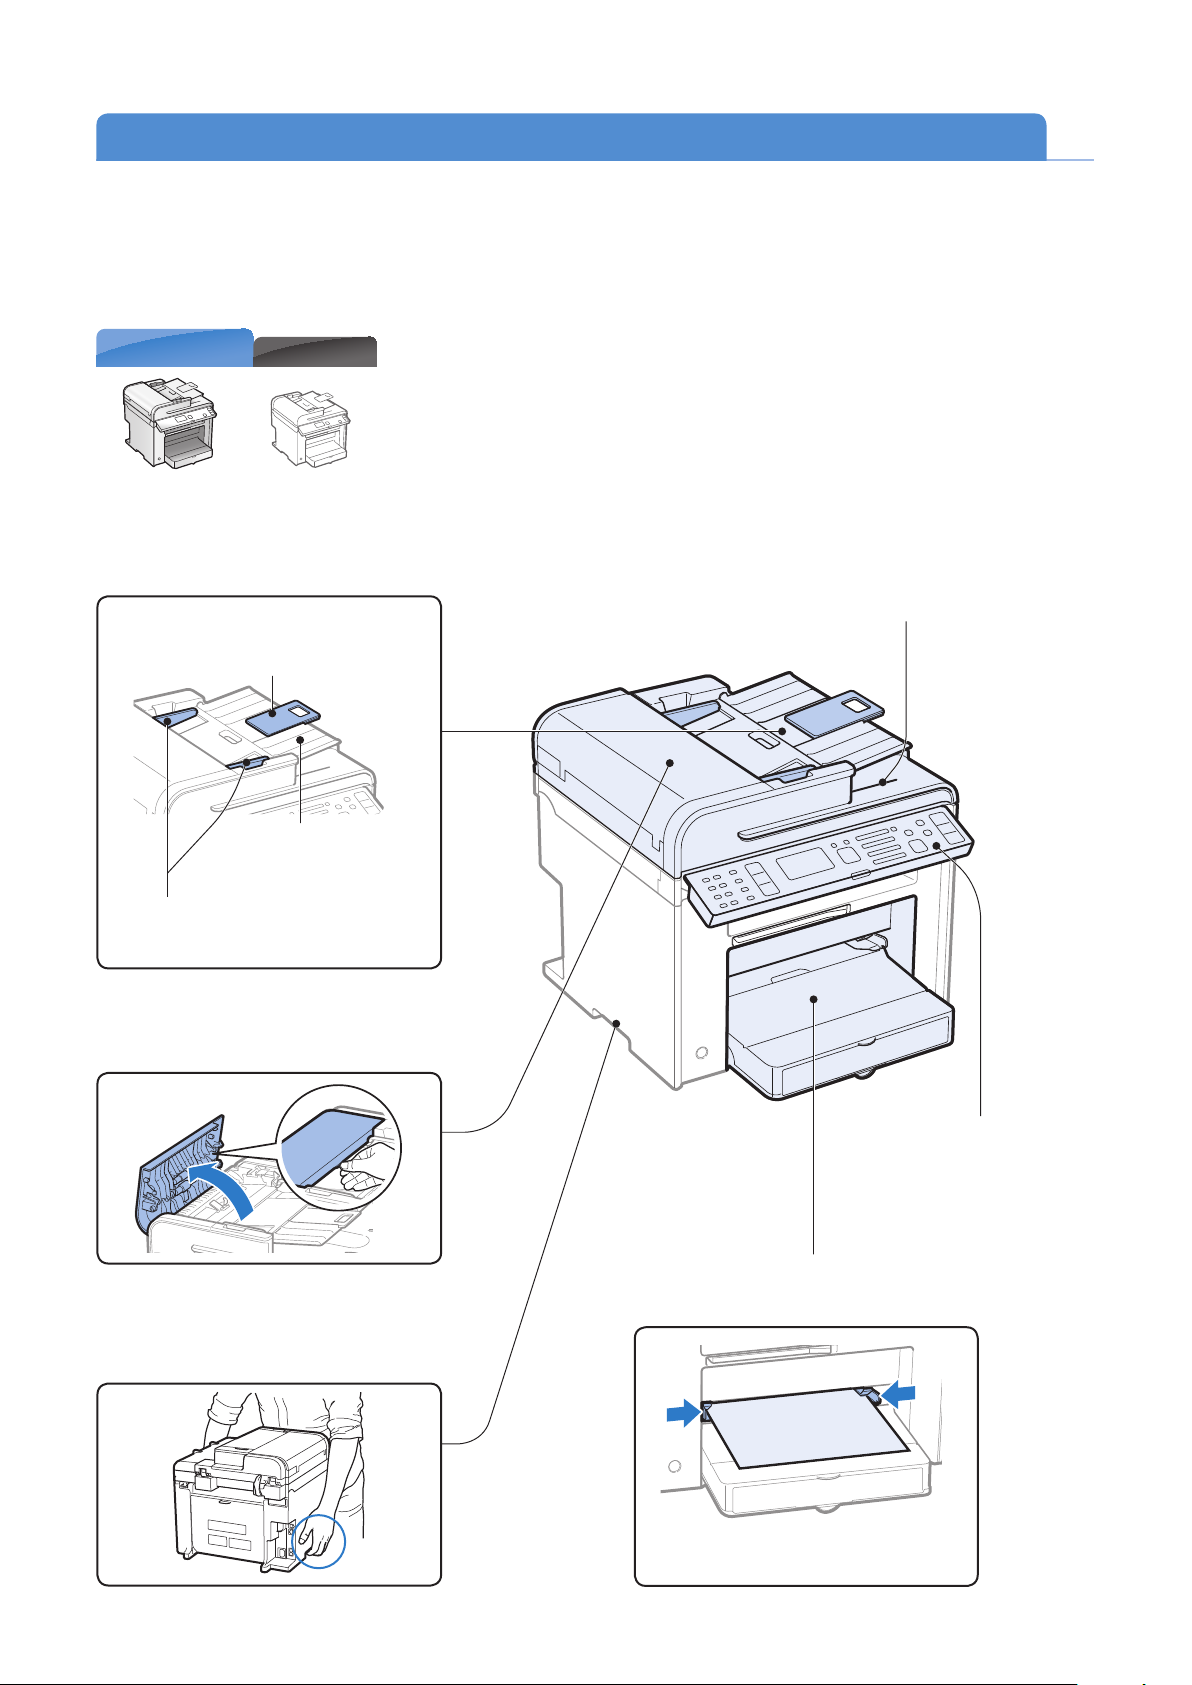
Learn the Names and Functions of Each Part of the Machine
Front Side
MF4890dw
MF4880dw/MF4770n
Feeder
Automatically feeds documents into the
machine (
Document guides
Adjust these guides to t the document.
→P. 2 0 ) .
Tray extension
Pull out to load large size
uments.
doc
Document feeder tray
Place your documents in
tray.
this
Document return tray
Returns documents after
scanning.
Feeder cover
Open this cover to clear paper jams (→P.9 5 ) .
Lift handles (left, right)
Hold these handles to lift or transport
the machine.
Operation panel
Use the panel to control
the machine (
Multi-purpose tray
Load paper one by one manually (→P. 2 4) .
Paper guides
Adjust these guides to t the paper.
→P.1 4) .
10
Page 11
Platen glass
Used to scan non-standard size paper
or books, as well as standard size
paper (
→P. 2 0 ) .
Output tray
Printed documents are output here
Basic Operation
Scanning area
Scans documents
from the feeder.
Power button
Turn the power ON or OFF.
Ventilation slots
(MF4890dw/
MF4880dw only)
Allows heat to escape
from inside of the
machine. Leave more
than 4” (10 cm) of space
around the machine.
Output tray extension
Pull out the tray extension when
ing paper larger than LTR.
us
Paper stopper
Use the paper stopper to
ent paper from falling out
prev
of the output tray.
Paper cassette (Auto)
Load paper here (→P. 2 3) .
Dust cover
Close after loading the paper.
Paper guides
Adjust these guides to t the paper.
11
Page 12
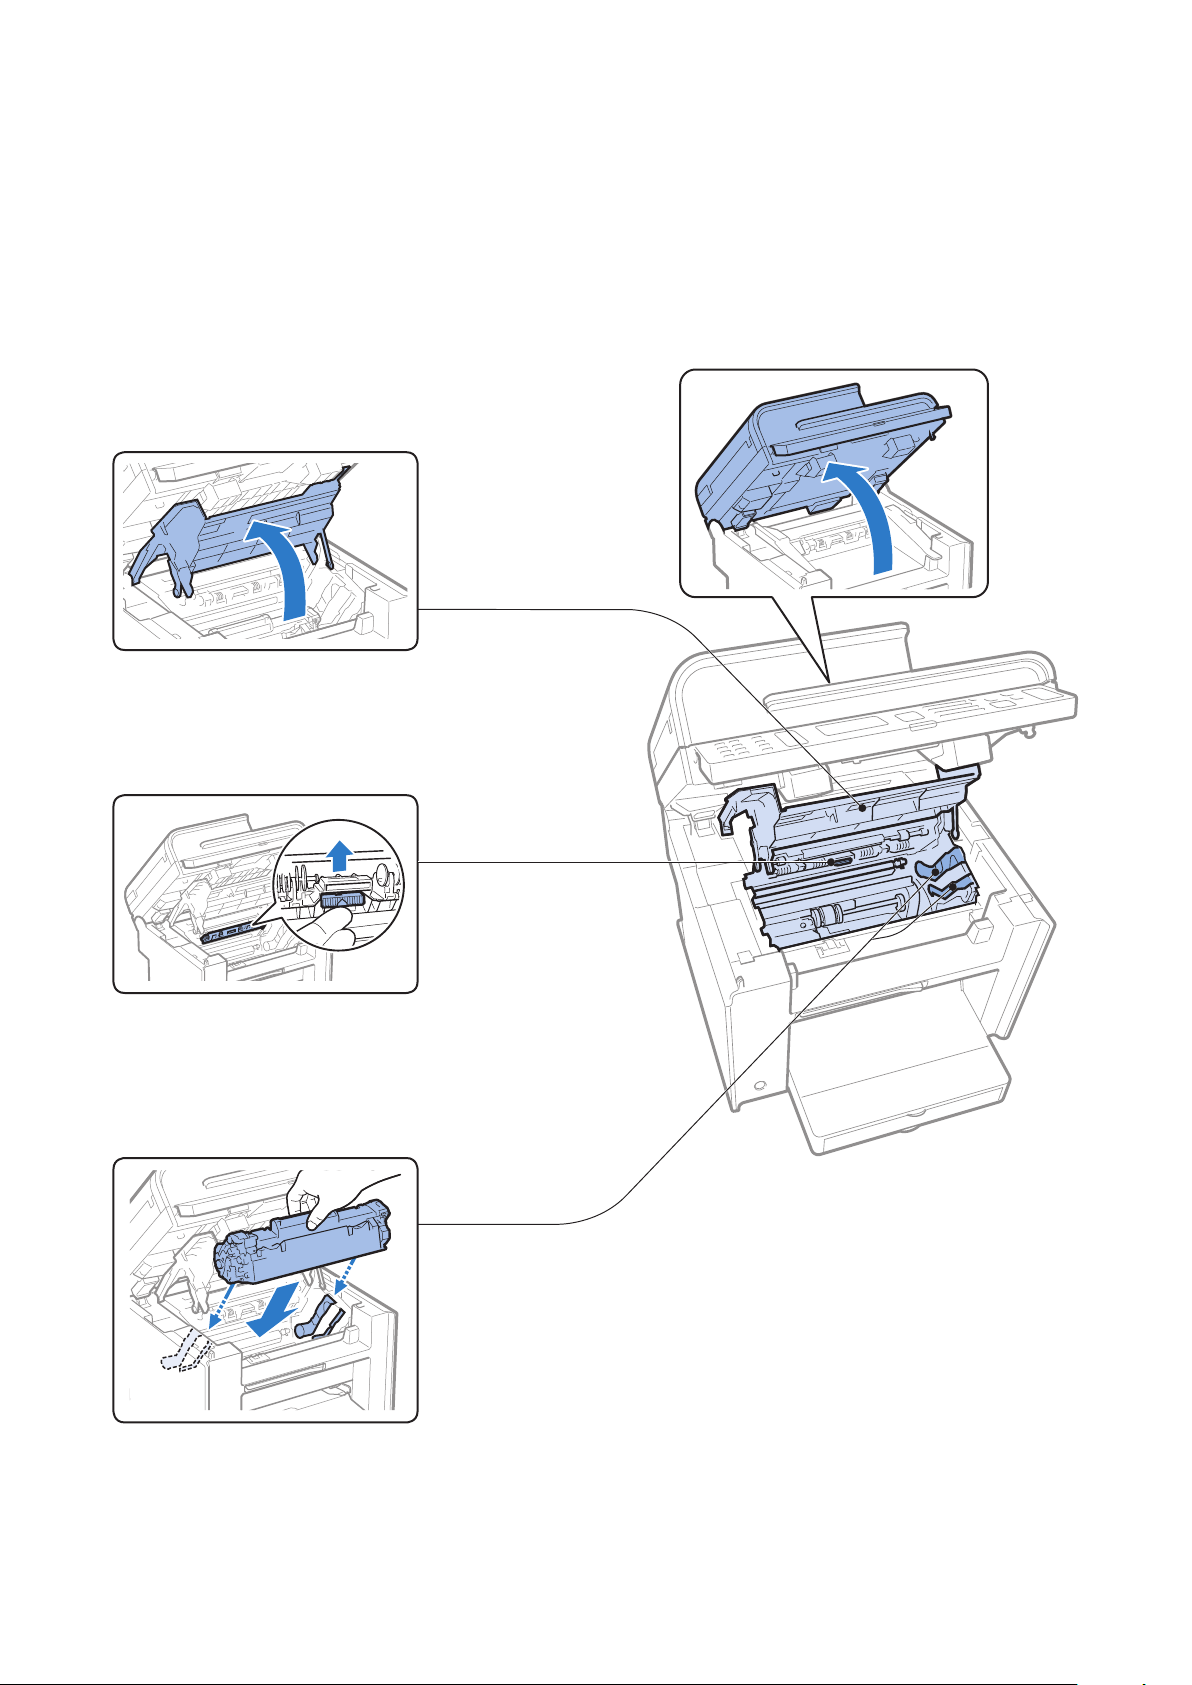
Interior
Toner cover
Open this cover to access the toner
cartridge or clear paper jams (
→P. 8 8, P. 9 6 ) .
Paper exit guide
Open this guide to clear paper jams
(
→P. 9 6) .
Toner guides
When inserting the toner cartridge,
t the protrusions on the toner
cartridge into these guides (
→P. 8 8 ) .
12
Page 13
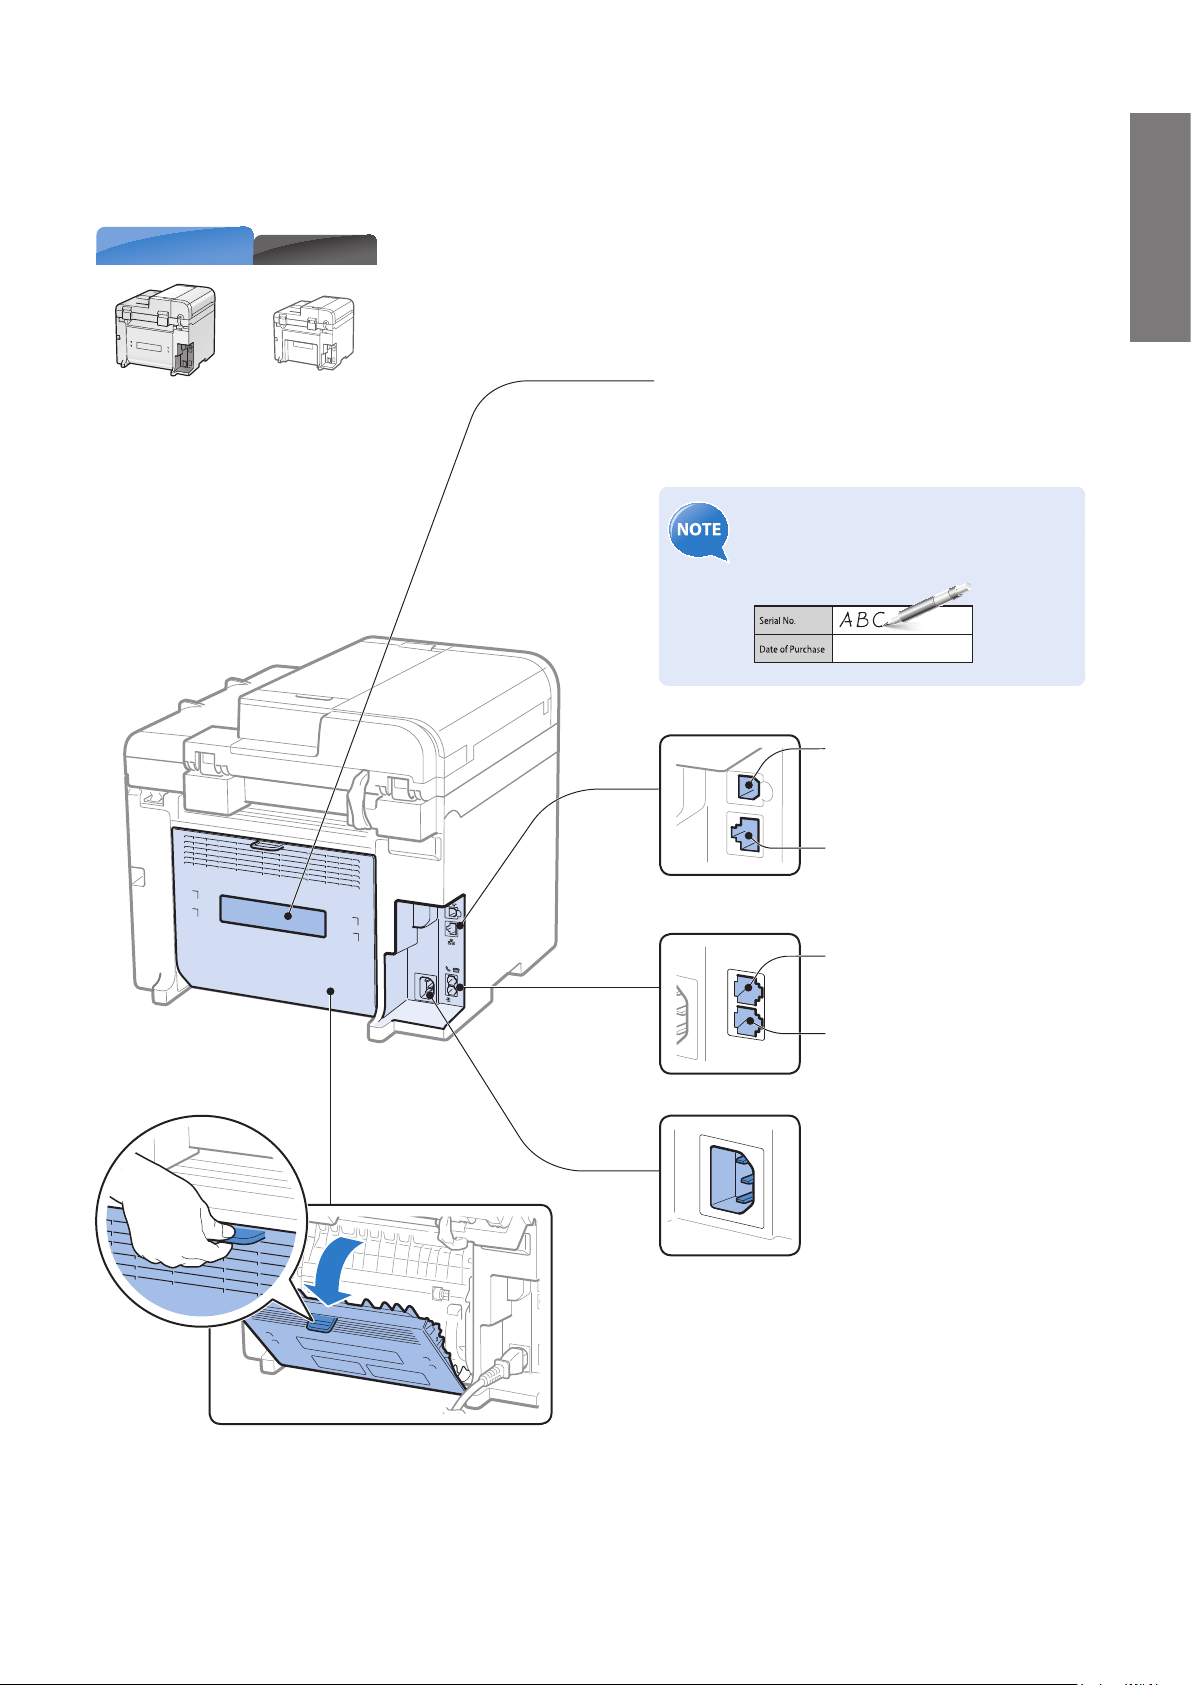
Back Side
Basic Operation
MF4890dw/MF4880dw
MF4770n
Rating label
The machine’s serial number (consists of three
letters and a 5-digit number) and the required
voltage and current are speci ed.
Write the serial number on the back
cover of this guide for reference when
contacting the Canon Customer Center.
USB port
Connect to a computer via a
USB cable.
LAN port
Connect to a network via a
LAN cable.
HAND
SET
EXT.
LINE
External device jack
Connect an external telephone.
Telephone line jack
Connect a telephone line.
Power socket
Connect the power cord.
Rear cover
(MF4890dw/MF4880dw only)
Open this cover to clear paper jams when using
the 2-sided copy function (
→P. 9 9) .
13
Page 14
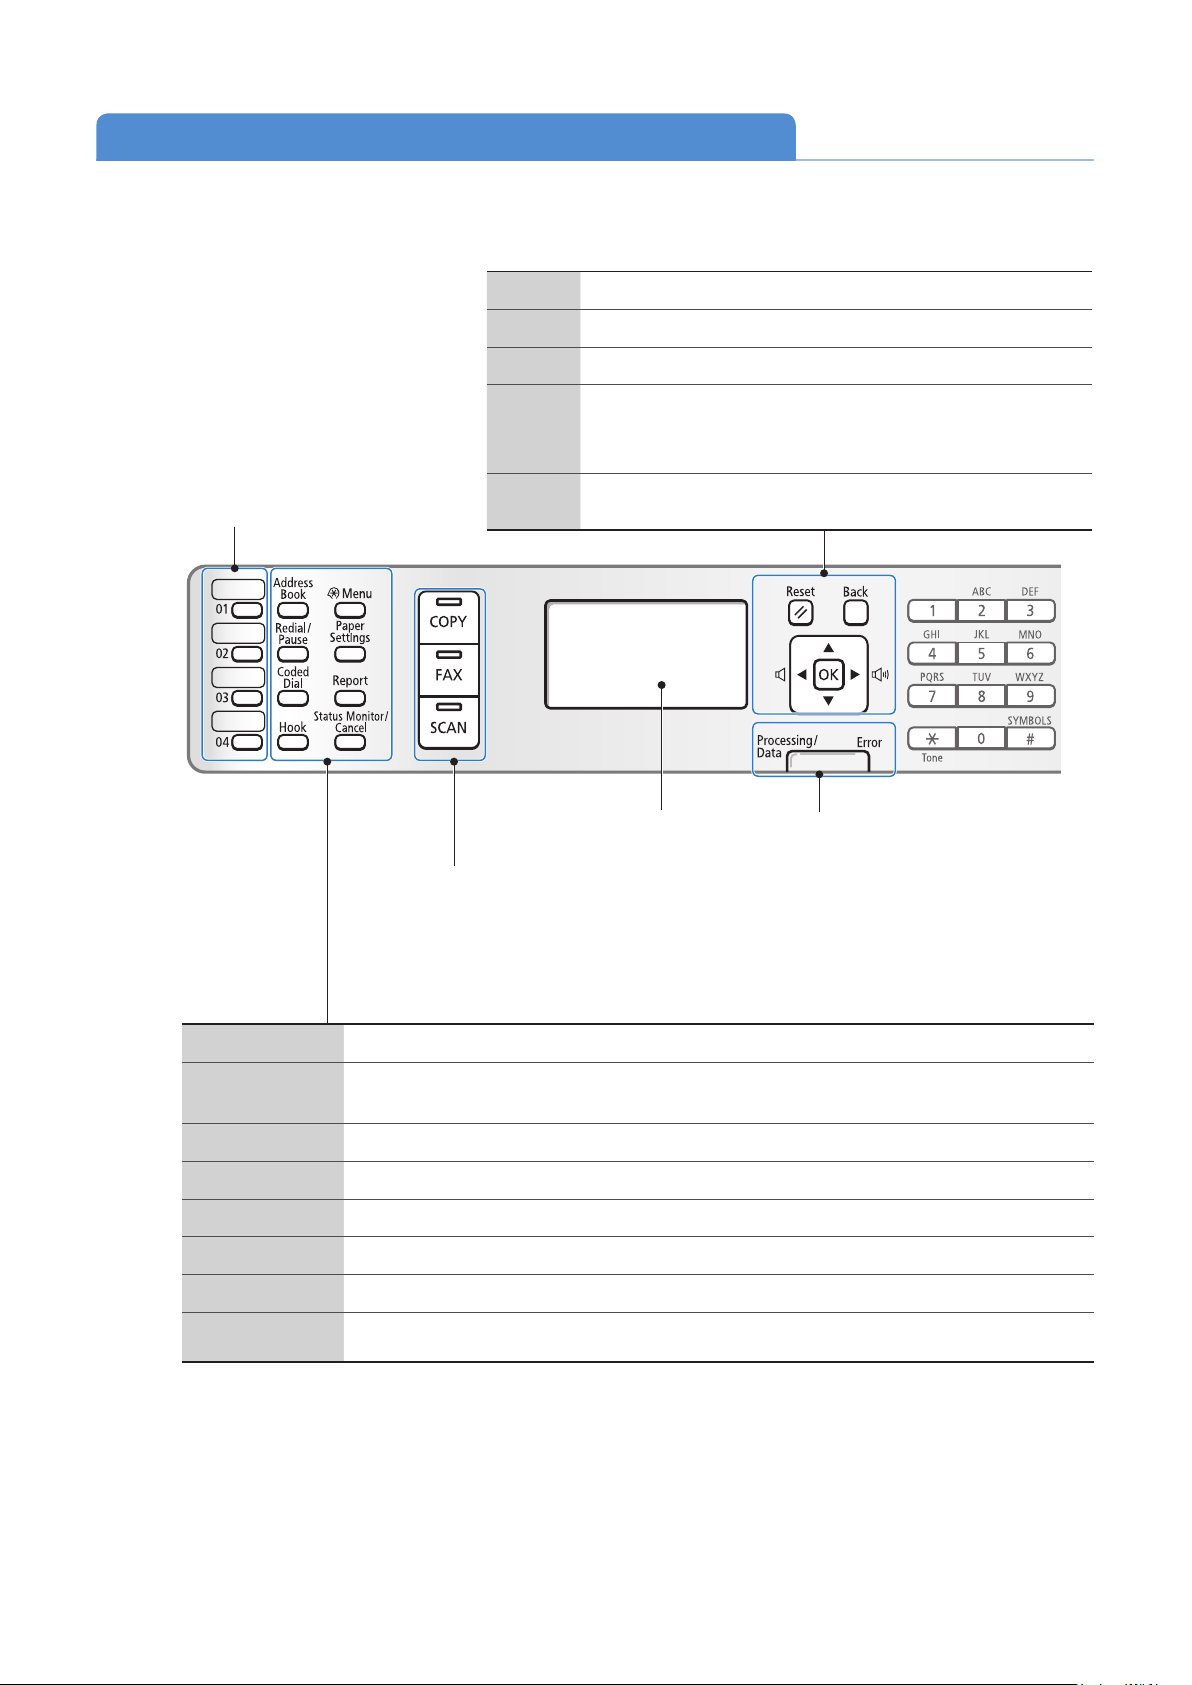
Learn the Functions of the Operation Panel
Navigate the menu or options.
(See “Navigating the Menu” on the next page.)
Reset Press to return to standby mode.
Back Press to return to the previous screen.
▲/▼ Press to scroll up and down, or to increase or decrease a value.
Press to return to the previous screen, proceed to the next
•
One-touch Speed Dial Keys
Press to specify recipients
gistered to one-touch keys
re
(→p.56).
◄/►
OK Press to con rm an action or setting.
screen, or move the cursor to the left or right.
• Press to decrease or increase the fax ring volume.
Display
Mode switching keys
Press to switch the mode to copy,
x, or scan (→p.27).
fa
Address Book Press to search for recipients registered in the address book (→p.57).
Redial/Pause
Coded Dial Press to enter a recipient’s code for coded speed dialing (
Hook Press to dial a number without using a telephone or handset.
Menu Press to access menu functions (see “Navigating the Menu” at the bottom of the next page).
Paper Settings Press to specify paper size and type for the paper cassette or multi-purpose tray (
Report Press to manually print reports and lists (
Status Monitor/
Cancel
When faxing, press to redial the last three numbers called or insert a pause in a fax number
→p.57, p.58).
(
→p.91).
P
ress to view or cancel jobs. You can also check the status of the machine (→p.37, p.46, p.66).
Processing/Data Indicator
The indicator blinks while sending or
ceiving data and remains lit when jobs
re
are waiting in memory.
Error Indicator
The indicator blinks when an error occurs.
→p.56).
→p.26).
14
Page 15

Enter letters and numbers (→p.17).
0 to 9
(Numeric Keys)
Press to enter letters and numbers.
• Press to switch the character entry mode.
*
#
• When sending a fax, press to switch
between pulse and tone dialing.
Press to enter symbols.
Scan►PC1/ Scan►PC2
Press to send the scanned documents to the
gistered computer for each keys.
re
Paper Save Copy
Press to copy with a preset setting to save paper.
Basic Operation
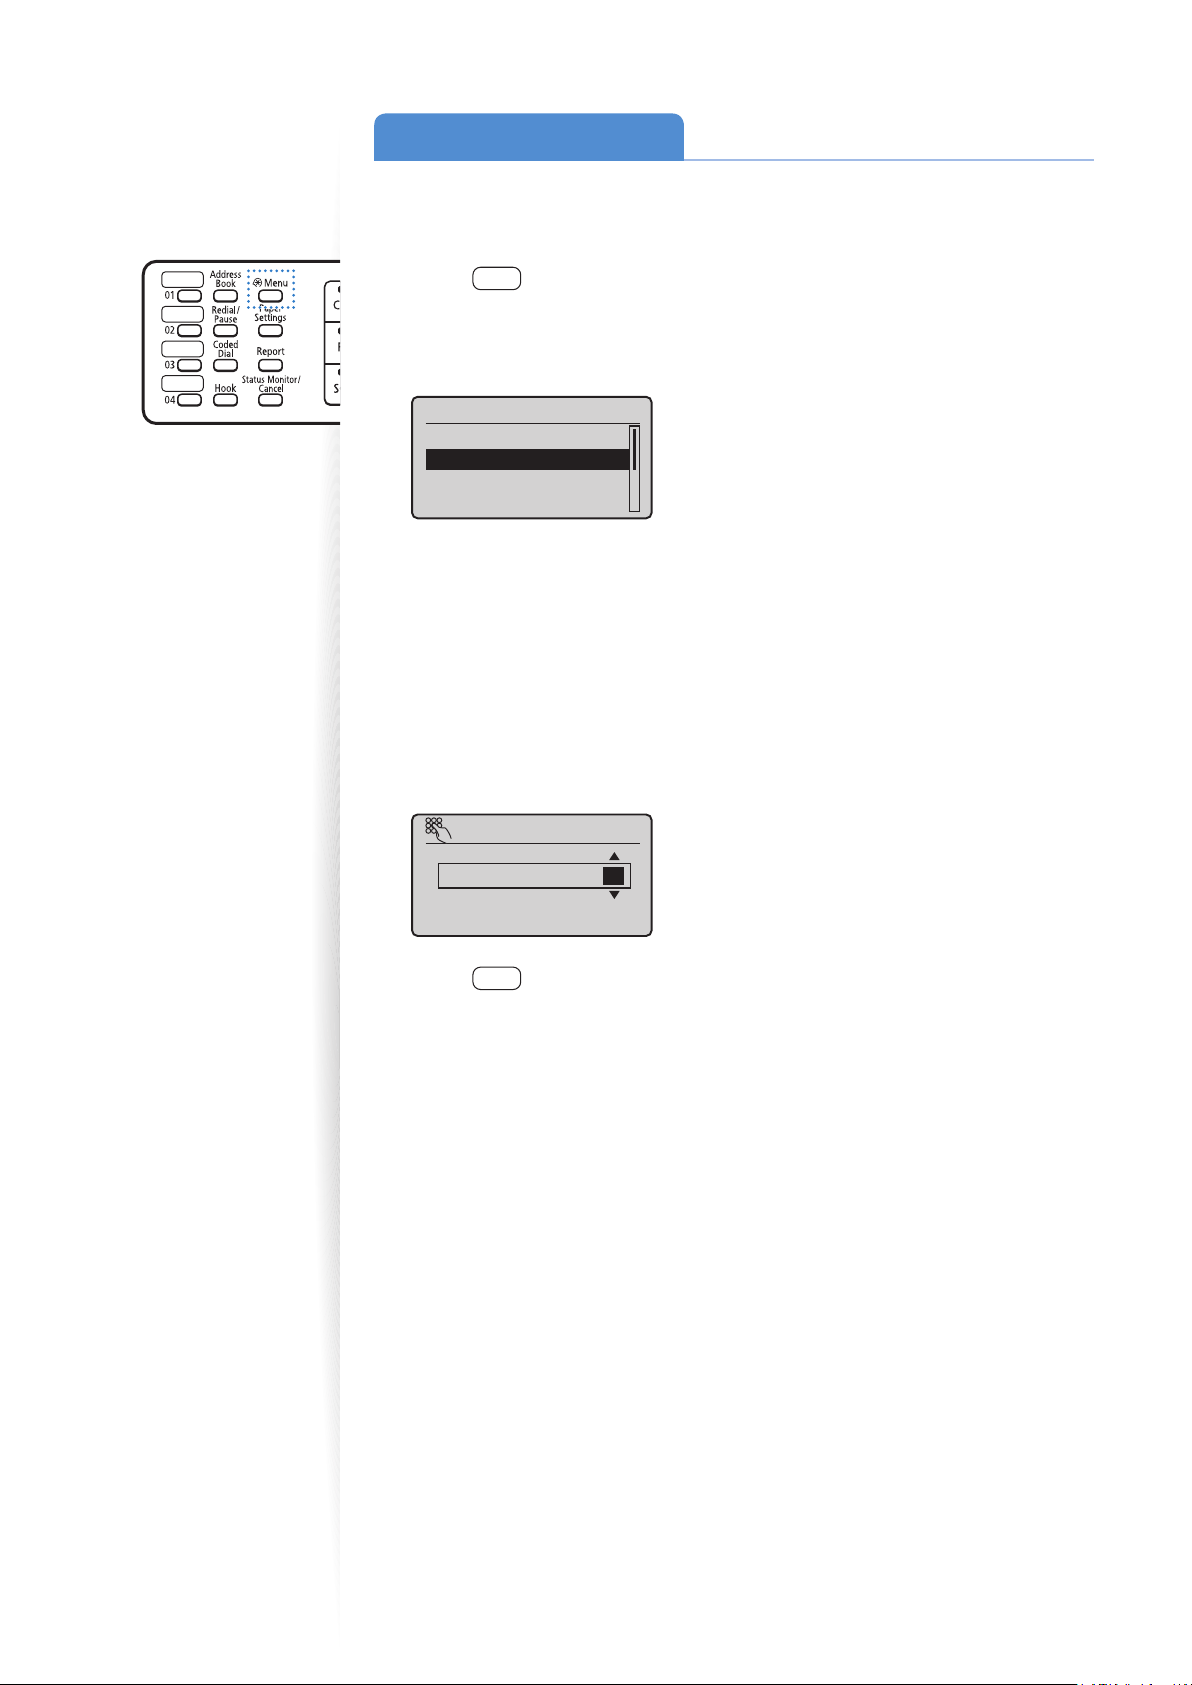
Navigating the Menu
Example: Adjust the density
Menu
Press [
(Menu).
Network Settings
]
Preferences
Timer Settings
Copy Settings
Press [
an item, and then press [OK].
Clear Press to delete letters and numbers.
Stop Press to cancel jobs.
Start Press to start copying or sending a fax.
Energy Saver
Quiet Mode Press to reduce the noise when performing a job (
Wi-Fi Indicator
(MF4890dw/
MF4880dw only)
Press [ ] (Back) or [◄] to
return to the previous screen.
▲] or [▼] to highlight
Press to manually set or cancel the Sleep mode. The Energy
er indicator lights green while in the Sleep mode (→p.27).
Sav
→p.27).
Turns on when the machine is connected to Wireless LAN.
Copy Settings
Change Defaults
Correct Density
Press [▲] or [▼] to highlight
an item, and then press [OK].
Correct Density
- +
Press [◄] or [►] to adjust the
level, and then press [OK].
(If necessary, press [
▲] or [▼].)
If you close the menu before you press [OK], the changes made to the
settings are not saved.
Press [ ] (Menu) to save
the setting.
15
Page 16
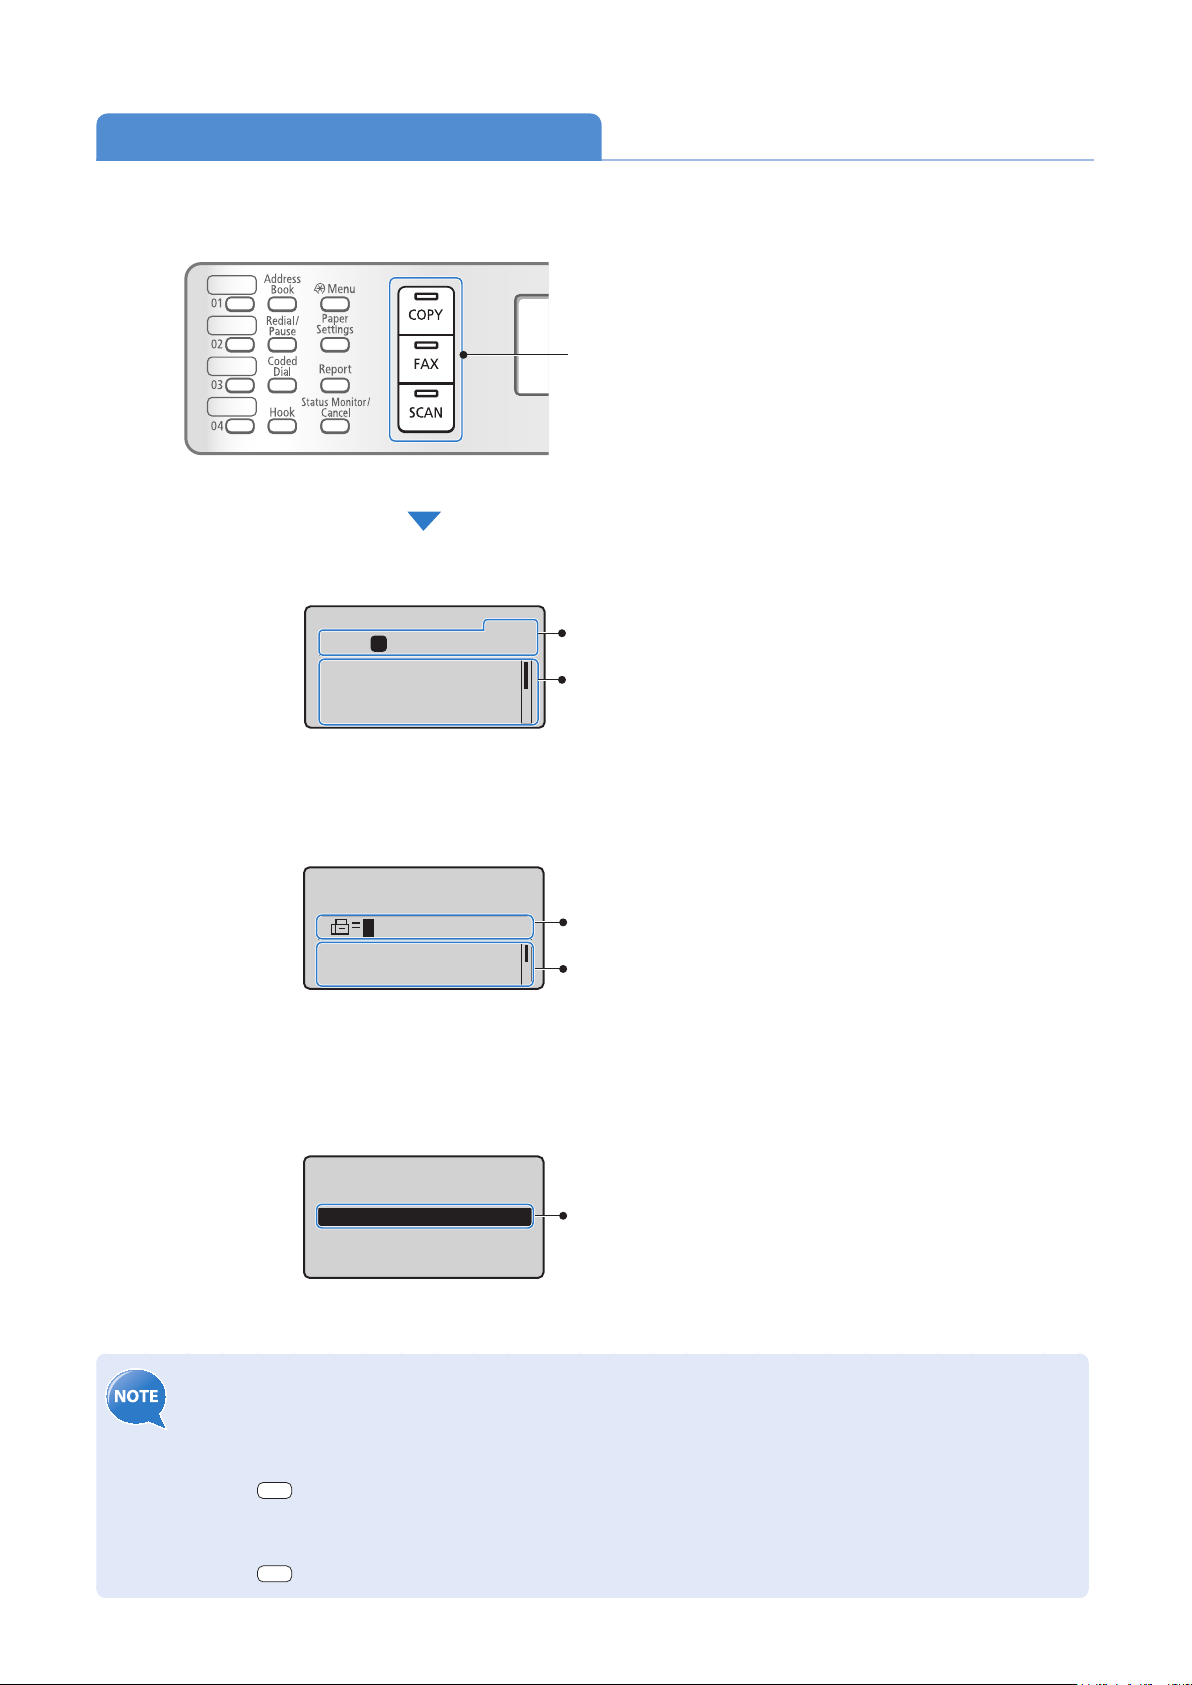
Switch to Copy/Fax/Scan Mode
Switch to Copy, Fax, or Scan mode rst to use each mode.
If you do not operate the machine for a while, the machine
returns to the Copy mode (standby mode) automatically.
Copy Mode
Copy: Press Start
1
100% LTR
Density: 0
Original Type: Text
2-Sided: Off
+
-
01
...
Press the desired mode key.
Displays the copy ratio, paper source,
paper size, and number of copies.
To change the settings:
1. Press [
2. Press [
▲] or [
then press [OK].
▲], [
values, and then press [OK].
] to highlight an item, and
▼
], [◄] or [►] to specify the
▼
Fax Mode
Specify destination.
01/01/2012 12:52AM
RX Mode: Auto
Resolution: 200 x 1
...
Displays the recipient’s number.
To change the settings:
1. Press [
2. Press [
▲] or [
then press [OK].
▲], [
values, and then press [OK].
] to highlight an item, and
▼
], [◄] or [►] to specify the
▼
Scan Mode
Select the scan type.
Computer
Remote Scanner
• If you use the Fax mode for the rst time:
Fax setup guide will appear on the display. Refer to the on-screen instructions and Starter Guide to con gure
ettings.
the s
• To set a frequently used mode to the standby mode:
Press [
screen [OK].
] (Menu) <Preferences> <Display Settings> <Select Default Screen> Select the
• To specify how long the machine waits before returning to standby mode:
Press [
] (Menu) <Timer Settings> <Auto Reset Time> Specify the time [OK].
To select the scan method:
▲] or [
Press [
then press [OK].
] to highlight an item, and
▼
16
Page 17
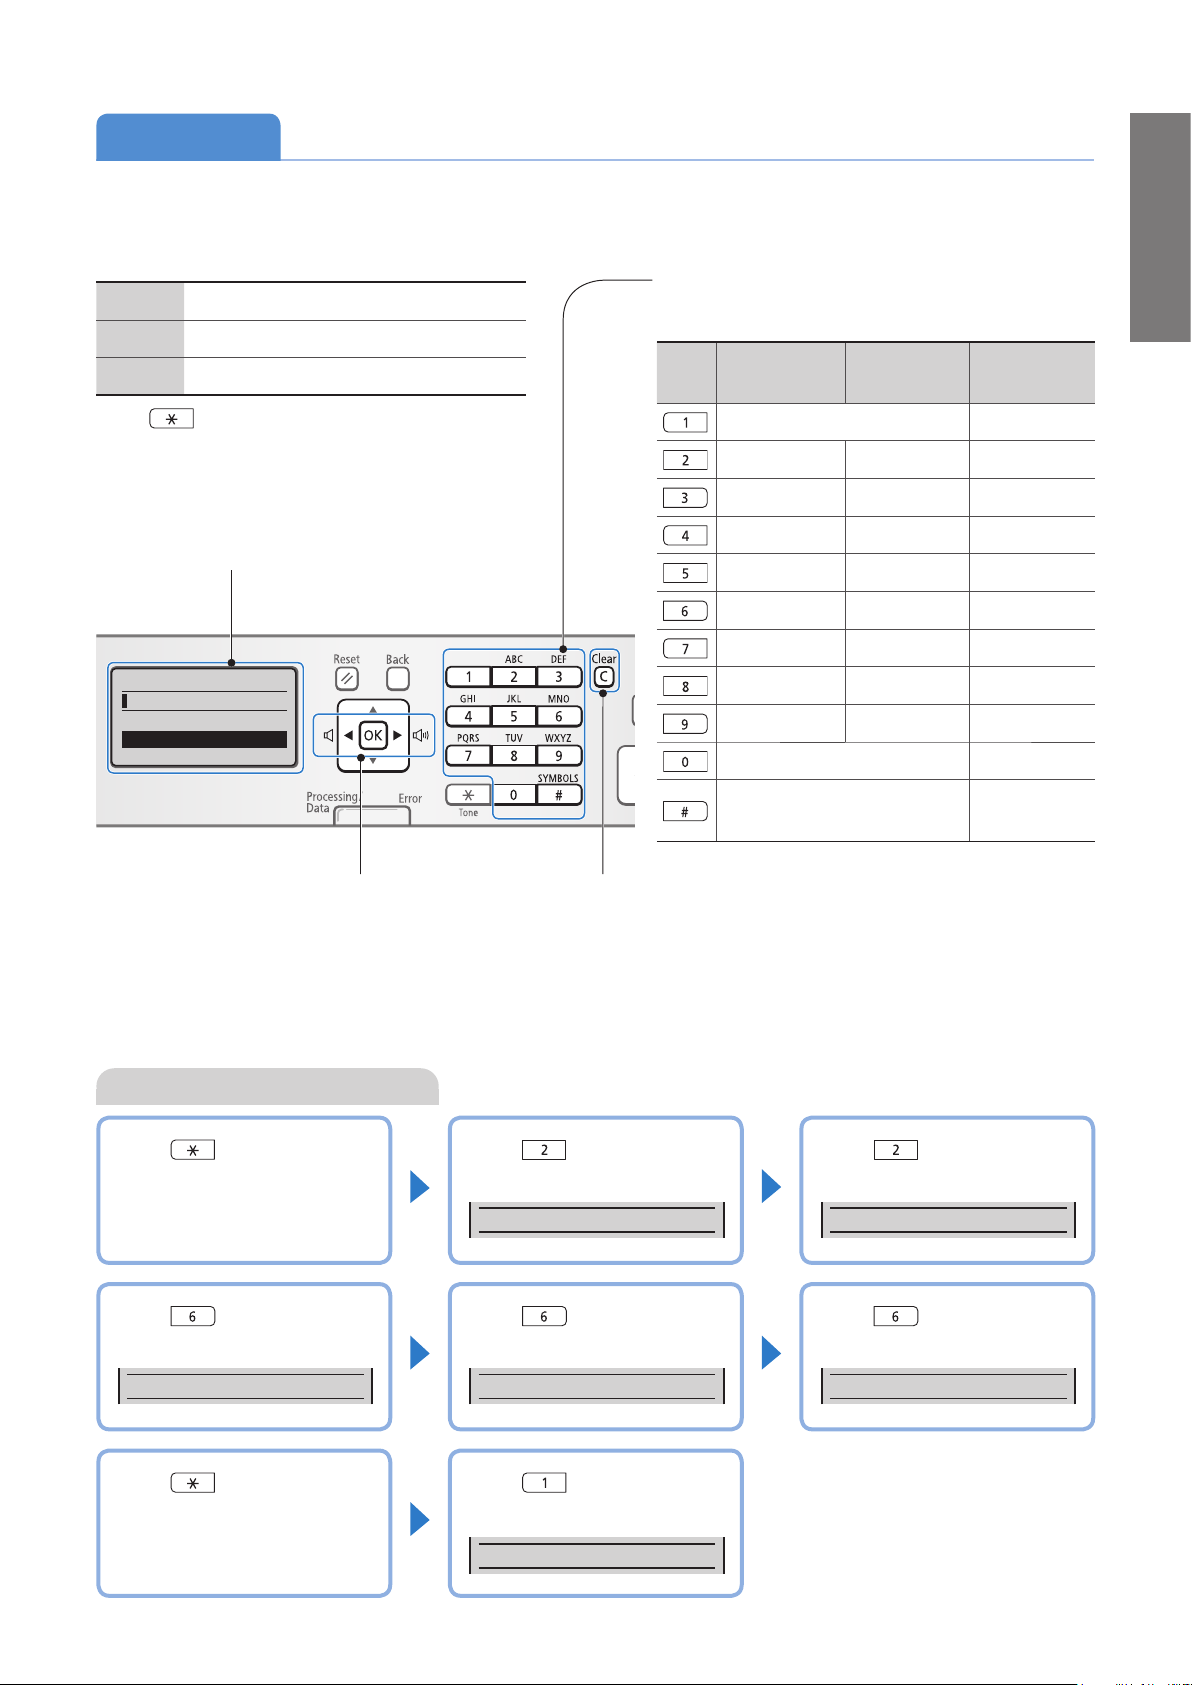
Enter Text
Enter characters with the alphanumeric keys.
Basic Operation
To switch entry modes:
<A> Uppercase alphabetic letters and symbols
<a> Lowercase alphabetic letters and symbols
<12> Numbers
ess [
Pr
or
1. Press [
and then press [OK].
2. Press [
mode, and then press [OK].
Register Unit Name
<Apply>
Entry Mode: A
] (Tone) repeatedly.
▲] or [
▲] or [
] to highlight <Entry Mode>,
▼
] to highlight the desired
▼
To enter text, symbols, and numbers:
Press a key several times until the desired character is
sp
layed.
di
Key
Entry mode:
<A>
ABC abc 2
DEF def 3
GHI ghi 4
JKL jkl 5
MNO mno 6
PQRS pqrs 7
TUV tuv 8
WXYZ wxyz 9
(Not available) 0
- . * # ! " , ; : ^ ` _ = / | ´ ? $ @
% & + \ ( ) [ ] { } < >
Entry mode:
<a>
@.-_/ 1
Entry mode:
<12>
(Not available)
• Press to move the cursor.
• To enter a space, move the cursor to the
end of the text, and then press [►].
Example: Enter “CANON1”
Press [ ] to switch the
entry mode to <A>.
Press [ ] until the letter “N”
appears on the screen.
▌
CAN
• Press to delete the last character.
• Press and hold to delete all text.
Press [ ] until the letter “C”
appears on the screen.
▌
C
Press [ ] until the letter “O”
appears on the screen.
▌
CANO
Press [ ] until the letter “A”
appears on the screen.
▌
CA
Press [ ] until the letter “N”
appears on the screen.
CANON
▌
Press [ ] to switch the
entry mode to <12>.
Press [ ] to enter “1.”
CANON1
▌
17
Page 18
Set Date and Time
If the incorrect date or time is printed on faxes or reports, change the date and time
settings.
Press [ ] (Menu).
1
Press [▲] or [
2
Press [▲] or [
3
Timer Settings
Quiet Mode Time Set
Time & Date Settings
Auto Sleep Time
Auto Reset Time
Press [▲] or [
4
[OK].
To change the display format for the date or time, specify <Date Display Type> or
•
<12/24 Hour Clock>.
• To use daylight savings time, set <Daylight Savings> to <On>, and then specify
the starting date and the ending date.
Use the numeric keys to enter the date and time, and then press [OK].
5
To move the cursor, press [◄] or [►].
•
• To switch between <AM> or <PM>, press [▲] or [
Current Time Set.
01/01/2012 12:52 AM
] to highlight <Timer Settings>, and then press [OK].
▼
] to highlight <Time & Date Settings>, and then press [OK].
▼
...
] to highlight <Current Time Settings>, and then press
▼
].
▼
6
(0:00-12:59)
Press [ ] (Menu) to close the screen.
18
Page 19
Place Documents
1-sided document
13.3 to 27.9 lb Bond (50 to 105 g/m²)
2-sided document
16.0 to 27.9 lb Bond (60 to 105 g/m²)
1-sided document
13.3 to 27.9 lb Bond (50 to 105 g/m²)
50 sheets
35 sheets
Min.
Min.
Max.
Max.
Choose the appropriate way to place documents according to the document’s type.
When placing non-standard documents
such as heavy paper, small paper, or
booklets:
Check available documents
113/4"(297mm)
Basic Operation
Use the platen glass. (→p.20)
When placing multiple documents
of plain paper in the same size,
thickness, and weight:
Size (Width X Length)
Weight
Capacity
Check available documents
MF4890dw MF4880dw/MF4770n
14"(356mm)
14"(356mm)
5"(127mm)
5"(127mm)
Max.
51/2"
51/2"
(140mm)
(140mm)
Min.
81/2"
(215.9mm)
Maximum
Maximum 4.4 lb (2 kg)
1 sheet
Size (Width X Length)
81/2"
81/2"
(216mm)
(216mm)
57/8"
57/8"
(148mm)
(148mm)
14"(356mm)
14"(356mm)
41/8"(105mm)
41/8"(105mm)
Max.
Min.
81/2"
81/2"
(216mm)
(216mm)
Use the feeder. (→p.20)
• Place a document after glue, ink, or correction uid on the document is completely dry.
IMPORTANTIMPORTANT
• To prevent paper jams in the feeder, place a document on the platen glass when using the following types of
paper:
- Wrinkled or creased paper
- Carbon paper or carbon-backed paper
- Curled or rolled paper
- Torn paper
- Thin paper
- Documents with staples or paper clips attached
- Transparency
Capacity (For 21 lb Bond (80 g/m²))
50 sheets
Weight
1-sided document
13.3 to 27.9 lb Bond (50 to 105 g/m²)
2-sided document
16.0 to 27.9 lb Bond (60 to 105 g/m²)
35 sheets
1-sided document
13.3 to 27.9 lb Bond (50 to 105 g/m²)
19
Page 20
Placing Documents on the Platen Glass
Open the feeder.
1
Place your document face down.
2
Align the document with the appropriate paper size marks.
3
If the document does not match any of the paper size marks, align the upper left
•
edge of your document with the arrow mark.
• If the document is a transparency, place white paper above the document.
STMT
A5
B5
A4
LTR
CAUTION
• When closing the
feeder, be careful not
to get your ngers
caught.
• Do not press down
on the feeder
forcefully. This may
damage the platen
glass and cause
personal injury.
Close the feeder.
4
Placing Documents in the Feeder
Open the document feeder tray.
1
Spread the document guides a little wider than the document’s width.
2
When placing large documents, pull out the extension tray.
Fan the document stack and align the edges of the pages.
3
20
Thoroughly fan the
paper in small batches.
Align the edges a few
times on a at surface.
Page 21
Neatly place the documents face up.
A
B
4
Place the document under the load limit guides (A).
•
• Make sure that the paper stack does not exceed the load limit marks (B).
Align the document guides tightly to the width of the document.
5
Basic Operation
IMPORTANTIMPORTANT
IMPORTANTIMPORTANT
If the document guides are too loose or too tight, this may result in
misfeeds or paper jams.
• While scanning documents, do not add or remove documents.
• When scanning is complete, remove the document from the document
return tray to avoid paper jams.
• Do not scan the same document more than 30 times. When a document
is scanned repeatedly, the paper can become wrinkled, earmarked, or
torn, which may result in paper jams.
21
Page 22

Load Paper
p
Before loading paper, check the paper is the right type. If you load inappropriate paper
repeatedly, this may cause paper jams.
te
Paper such as Legal, Letter, Statement, Executive, and envelopes can be used. For details
about the available paper or precautions, see [Basic Operation] [Loading paper] in
the e-Manual.
tep
Check if the type of paper is appropriate.
1
To prevent paper jams, do not use any of the following:
• Wrinkled or creased paper
• Curled or rolled paper
• Tor n paper
• Damp paper
• Paper printed with a thermal transfer printer
(Do not copy on the reverse side.)
Select where to load paper, and then load the paper.
2
Use the multi-purpose tray when
loading a sheet of
small-sized paper or
heavy paper (→p.24).
Use the paper cassette when
loading a stack of
plain paper in the
same size, thickness,
and weight (
→p.23).
22
Check if the type of paper is appropriate.
If the setting is di erent from the size of the loaded paper, an error message
appears, or printing is not performed correctly.
Page 23
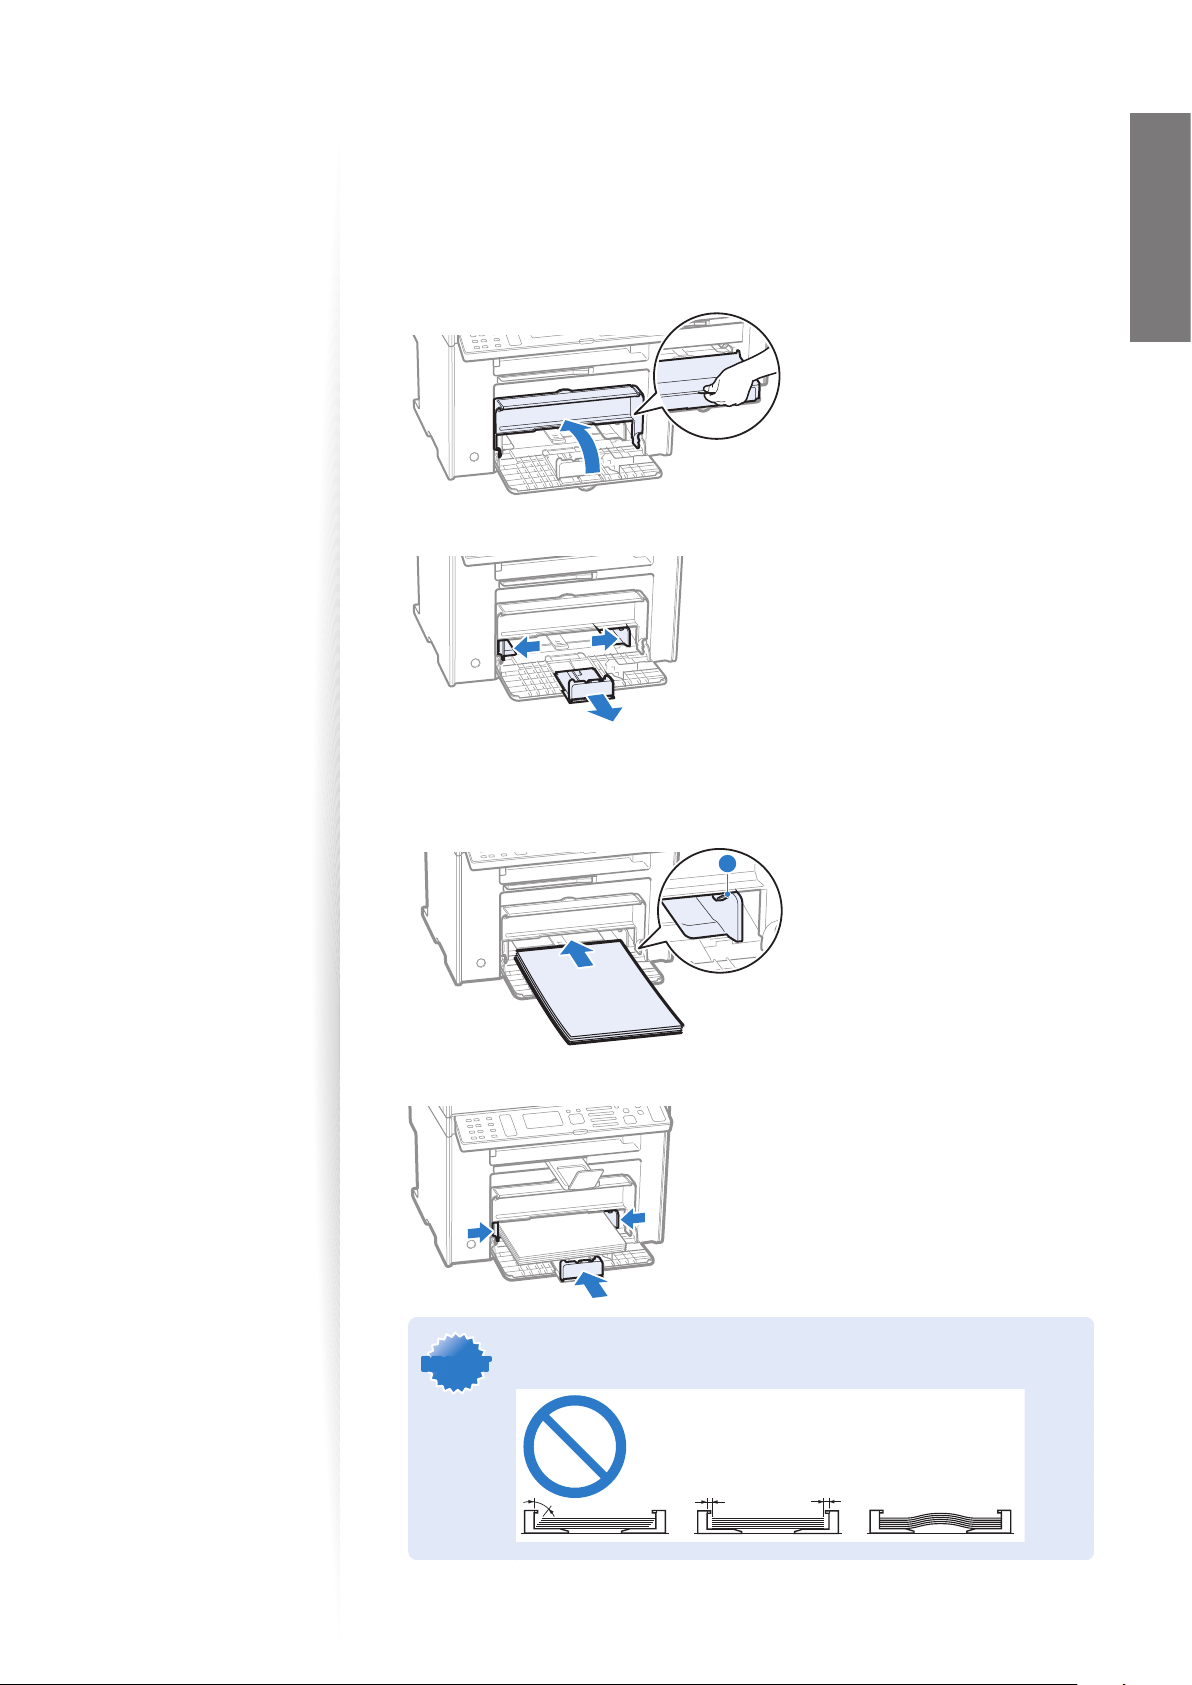
Loading Paper in the Paper Cassette
This section describes how to load letter paper in the Paper Cassette. When loading
envelopes or paper with a letterhead, see ”Loading Envelopes or Paper with a Letterhead”
(
→p.25).
Lift the dust cover.
1
Spread the paper guides a little wider than the paper size.
2
Basic Operation
Gently load the paper into the paper cassette with the print side face up,
3
until the edge of the paper stack meets the back of the paper cassette.
Make sure that the paper stack does not exceed the load limit guides (A).
•
A
Adjust the paper guides tightly to the width and length of the paper.
4
IMPORTANTIMPORTANT
If the paper guides are too loose or too tight, this may result in misfeeds
or paper jams.
23
Page 24
Close the dust cover.
5
Specify the loaded paper size and type (→p.25).
6
Loading Paper in the Multi-Purpose Tray
Spread the paper guides a little wider than the paper.
1
Gently load the paper into the paper cassette with the print side face up,
2
and adjust the paper guides tightly to the width of the paper.
If the paper guides are too loose or too tight, this may result in misfeeds
IMPORTANTIMPORTANT
Specify the loaded paper size and type (→p.26).
3
or paper jams.
24
Page 25
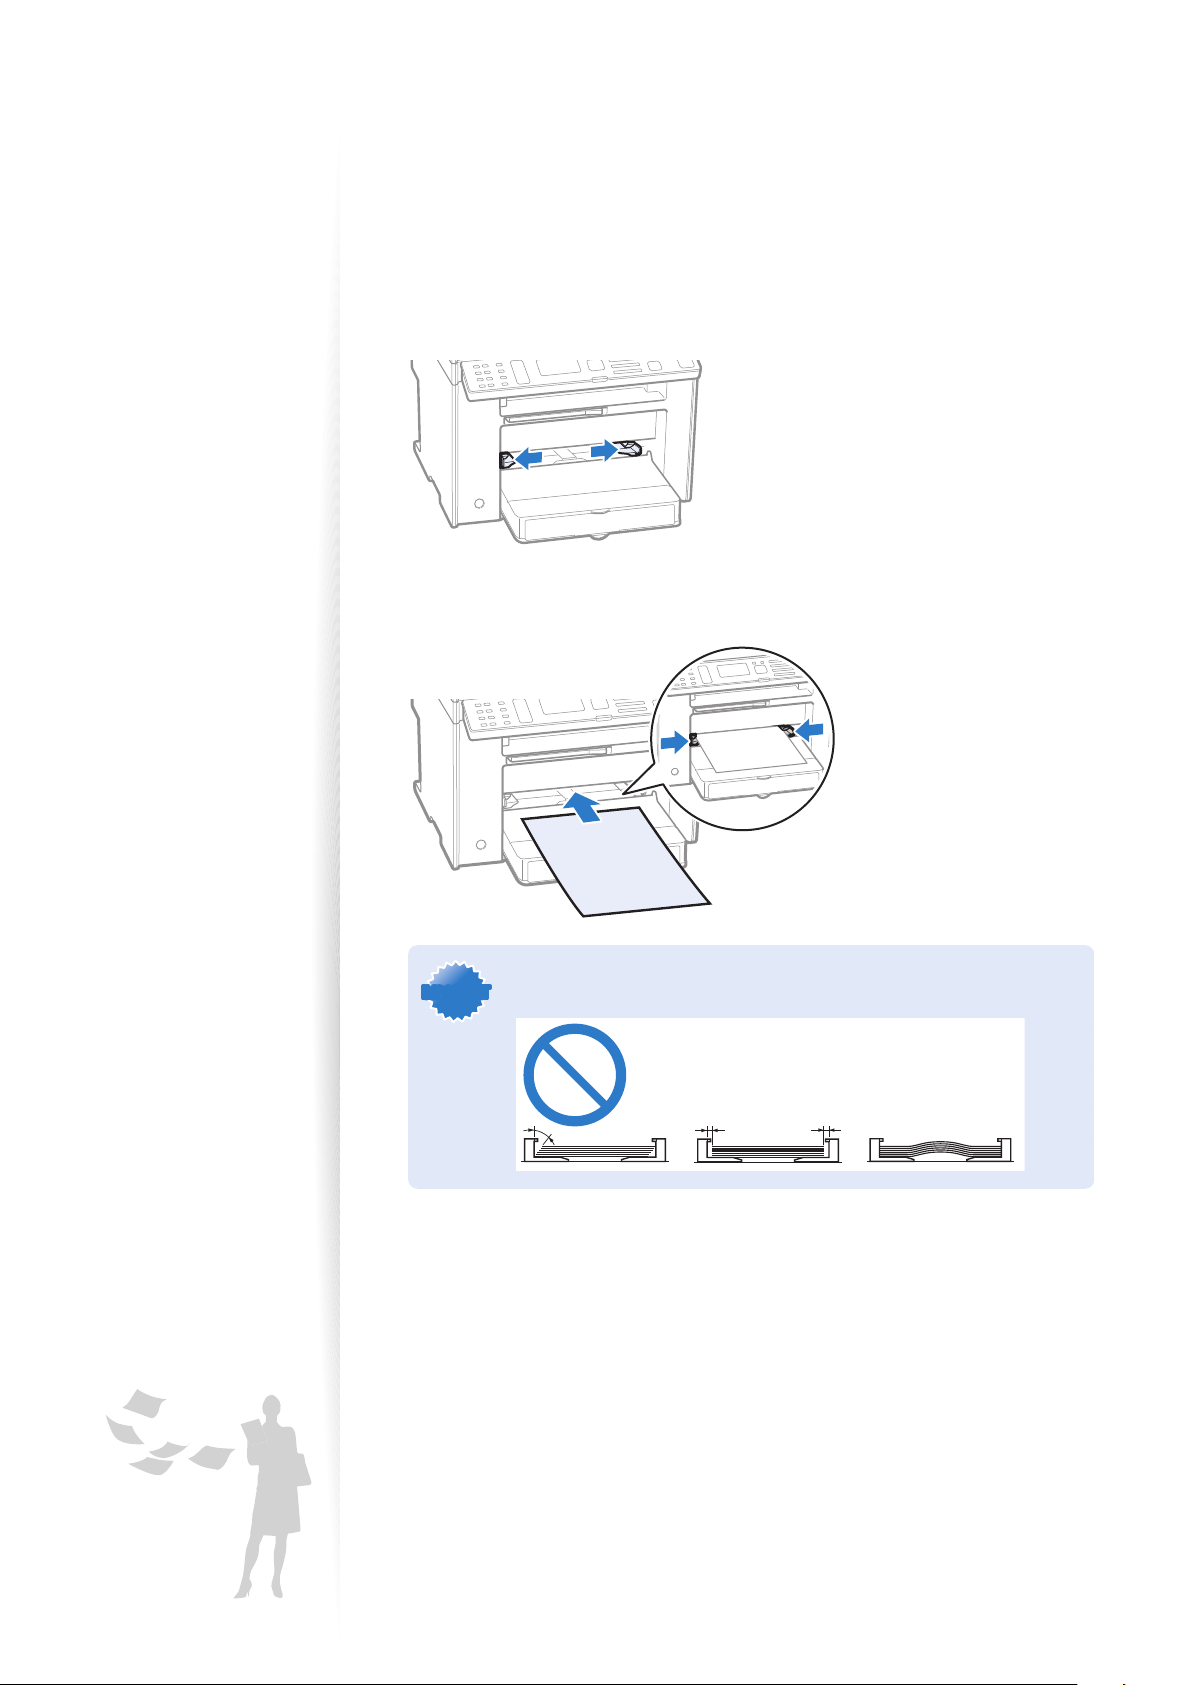
Loading Envelopes or Paper with a Letterhead
This section describes how to load envelopes and paper with a letterhead.
Envelopes
Before Loading
Basic Operation
Flatten envelopes
to release any
remaining air.
Loading Orientation
Load the envelopes with the aps face up.
Loosen any sti corners of the
envelopes, and atten any
curls, as shown in the gure.
Envelope
No.10, DL, ISO-C5
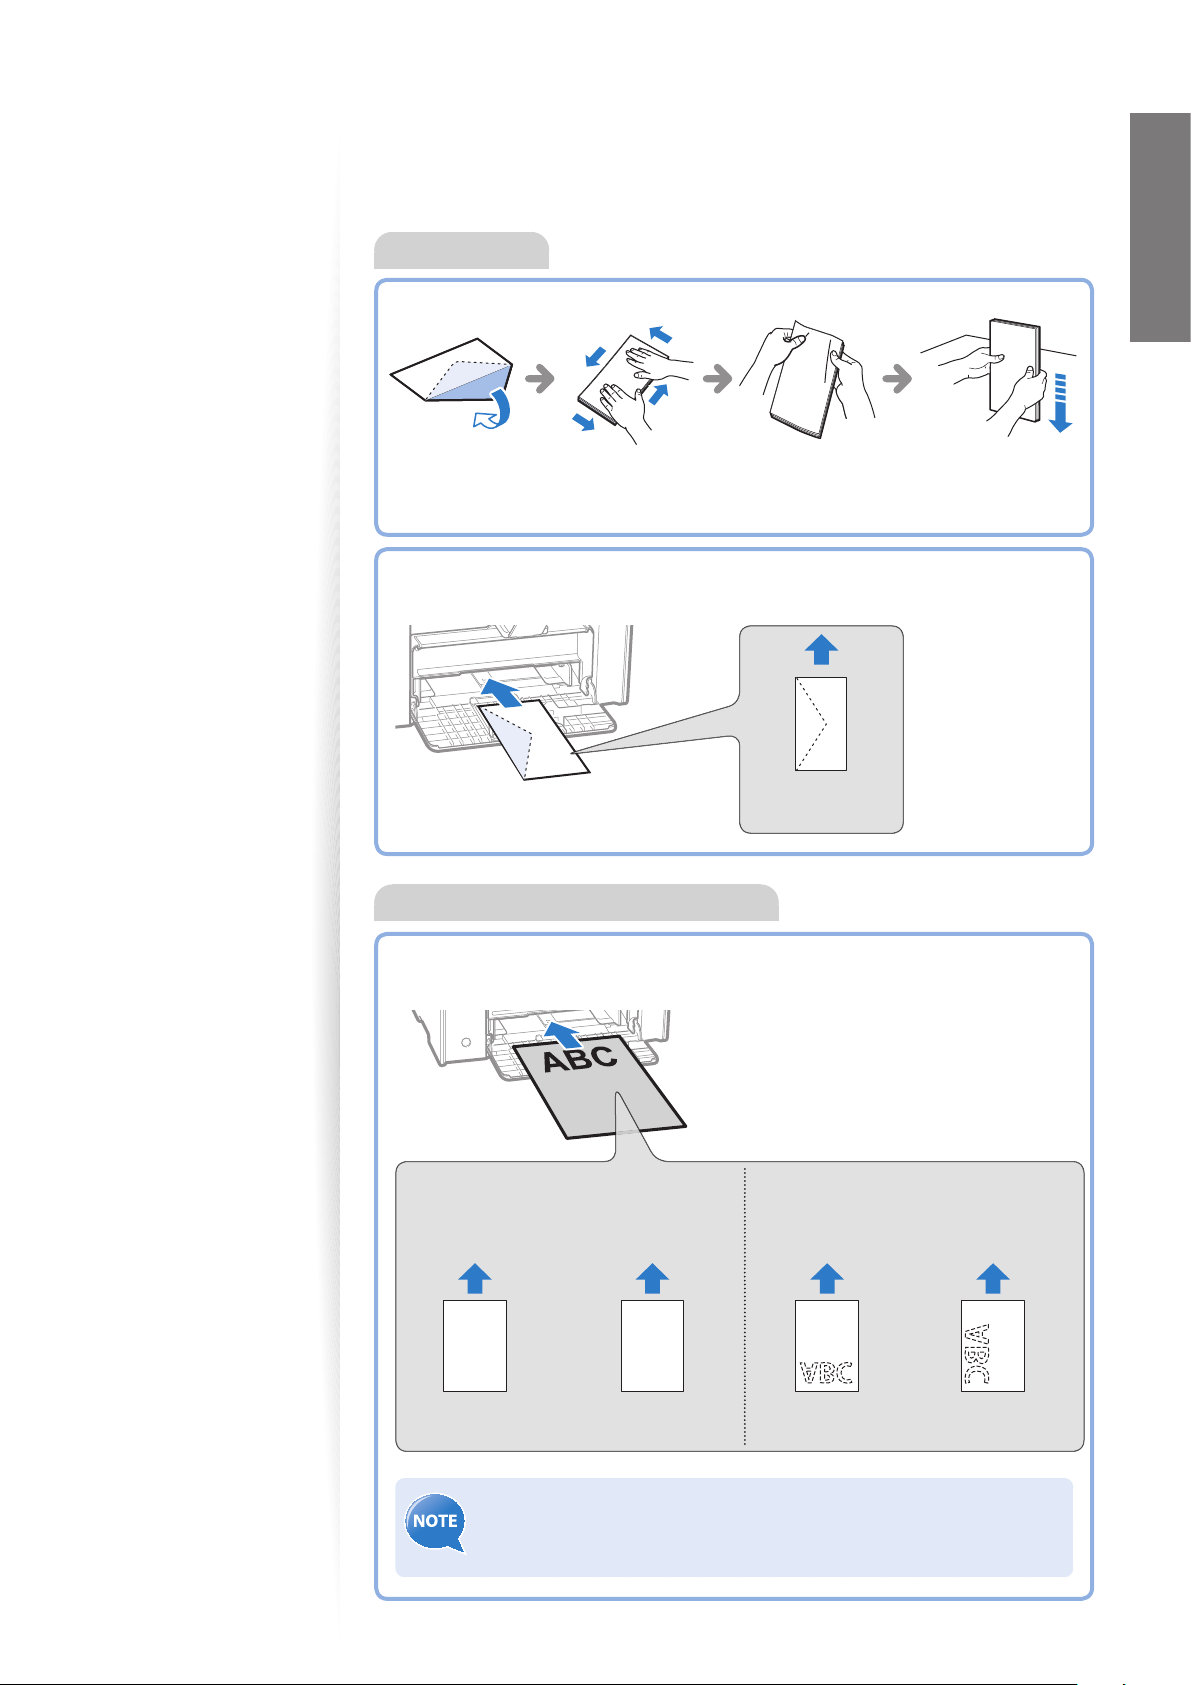
Paper with a Letterhead or Logo
Loading Orientation
Load the paper properly by following the instructions below.
1-sided printing
Load the paper with the printed
side face up.
ABC
When printing with
portrait layout
If <Print Side Priority> is selected, load the paper with the printed
side face down regardless of 1-sided or 2-sided printing. For details, see
[Basic Operation]
When printing with
landscape layout
2-sided printing
(MF4890dw/MF4880dw only)
Load the paper with the printed
side face down.
ABC
When printing with
portrait layout
[Select the Print Side] in the e-Manual.
When printing with
landscape layout
25
Page 26
Setting a Paper Size and Type
Make sure that the Paper Settings match the size and the type of the loaded paper.
Press [ ] (Paper Settings).
1
Press [▲] or [▼] to highlight <MP Tray> or <Drawer 1>, and then press
2
[OK].
Press [▲] or [
3
To specify the paper size manually, select <Custom Size>, and then refer to
•
“Specify a Paper Size Manually” at the bottom of this page to specify the size.
Paper Size
LTR
LGL
STMT
EXEC
Press [▲] or [
4
Paper Type
Plain (16 lb Bond-24
Plain L (16 lb Bond
Recycled
Color
Press [ ] (Paper Settings) to close the screen.
5
] to highlight the desired paper size, and then press [OK].
▼
] to highlight the desired paper type, and then press [OK].
▼
...
Specify a Paper Size Manually
For paper size, specify within the possible range of length and width (<Y> ≥ <X>).
Press [▲] or [
1
Use the numeric keys to specify the width, and then press [OK].
2
Set Length for X
Press [▲] or [
3
Use the numeric keys to specify the length, and then press [OK].
4
Press [▲] or [
5
] to highlight <X>, and then press [OK].
▼
3_ 0/0 "
(3-8_1/2)
] to highlight <Y>, and then press [OK].
▼
] to highlight <Apply>, and then press [OK].
▼
26
Page 27

Switch to the Quiet Mode
You can switch to and cancel the Quiet mode, by pressing [ ] (Quiet Mode).
• By default, the Quiet mode is set to <O >. To change this setting to <On>,
and specify the time to switch to the Quiet mode automatically, press
[ ] (Menu) <Timer Settings> <Quiet Mode Time Settings>,
and then specify a time.
• When the Quiet mode is On, the processing speed of functions becomes
slower.
• The Quiet mode cannot be used with some paper sizes or types.
• The Special mode has higher priority than the Quiet mode.
• The Quiet mode only reduces noise that occurs while the machine is
performing jobs. This does not a ect the speaker or the key volume. To
lower or set <O >, <Entry Tone> or <Job Done Tone>, refer to the
[Basic Operation] [Adjust the Volume] in the e-Manual
Basic Operation
Switch to the Sleep Mode
You can switch to and cancel the Sleep mode, by pressing [ ] (Energy Saver).
When the Processing/Data indicator is lit or blinking, the machine will not enter the
Sleep mode, because an operation is in progress or an error has occurred.
By default, the machine automatically enters the Sleep mode if you do not
perform any functions for 5 minutes. To change this setting, press [ ]
(Menu) <Timer Settings> <Auto Sleep Time>, and then specify a
time.
27
Page 28
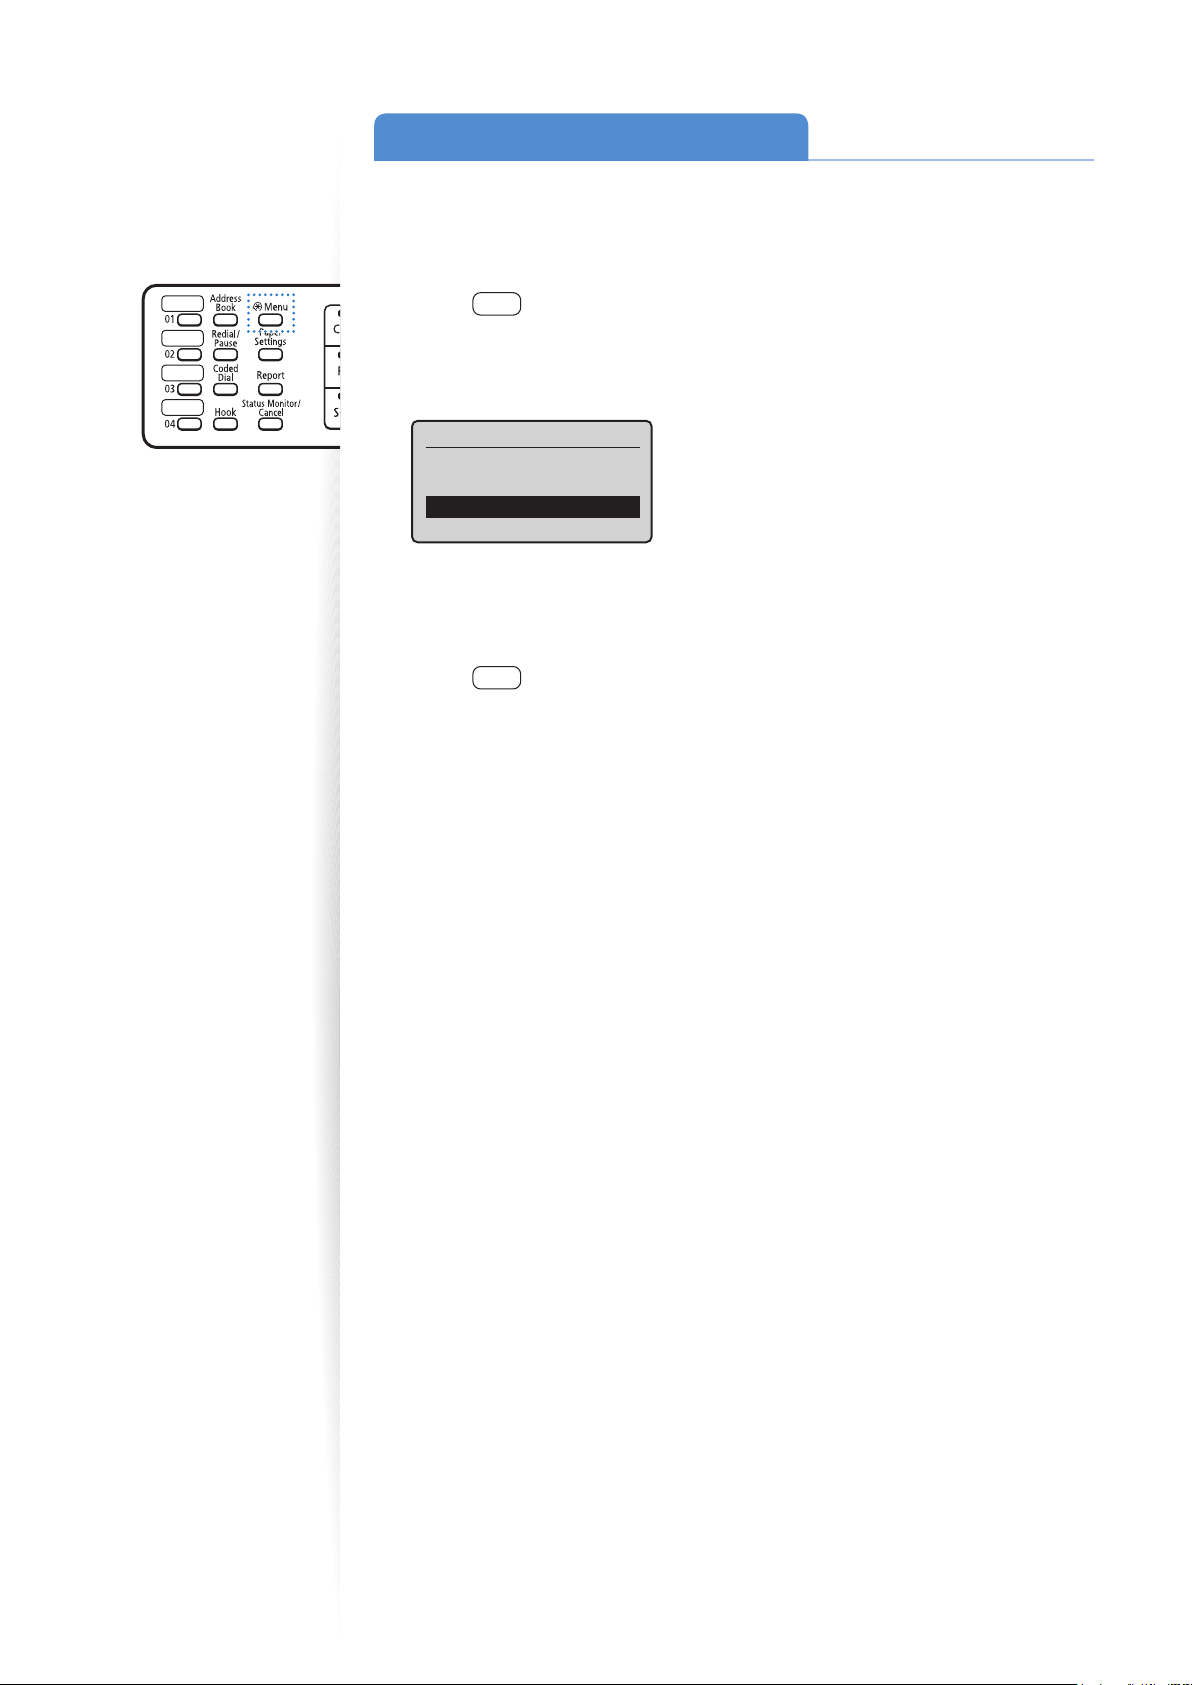
Use the Toner Saver Mode
You can set whether or not to conserve toner when copying or faxing. When using the
Toner Saver mode, the output may not be clear, as subtle details, such as thin lines and light
colors, may not be clearly reproduced.
Press [ ] (Menu).
1
Press [▲] or [
2
Press [▲] or [
3
Preferences
Sound Volume Control
Display Settings
Toner Saver Mode
Paper Feed Method Sw
Press [▲] or [
4
Press [▲] or [
5
Press [ ] (Menu) to close the screen.
6
] to highlight <Preferences>, and then press [OK].
▼
] to highlight <Toner Saver Mode>, and then press [OK].
▼
...
] to highlight <Copy> or <Fax>, and then press [OK].
▼
] to highlight <On> or <O >, and then press [OK].
▼
28
Page 29
Copy
This chapter describes basic copy functions.
Make a Basic Copy …………………………………………………… 30
Copy by Saving Paper ………………………………………………… 31
Enlarge or Reduce Copies …………………………………………… 31
Adjust the Image Quality for Copy …………………………………… 32
Adjusting the density ……………………………………………… 32
Selec
ting the Document Type ……………………………………… 32
Adjusting the sharpness …………………………………………… 33
Make Double-Sided Copies (MF4890dw/MF4880dw Only) ………… 34
o
py Multiple Pages onto One Sheet ……………………………… 35
C
Collate Copies ………………………………………………………… 35
Copy a Double-Sided ID Card ………………………………………… 36
View and Cancel Copy Jobs ………………………………………… 37
Change the Default Copy Settings …………………………………… 37
29
Page 30
Make a Basic Copy
Place your documents (→p.19).
1
IMPORTANTIMPORTANT
Switch to the Copy mode (→p.16).
2
Enter the desired copy quantity (1 to 99) with the alphanumeric keys.
3
Press [ ] (Clear) to delete the entered copy quantity.
•
Copy: Press Start
100% LTR
Density: 0
Original Type: Text
2-Sided: Off
Press [ ] (Start).
4
If the document guides are too loose or too tight, this may result in
misfeeds or paper jams.
1
+
-
01
...
30
Canceling Copy Jobs
Press [ ] (Stop) twice.
* It is valid when only one job is processing or waiting.
Page 31

Copy by Saving Paper
You can save paper with [ ] (Paper Save Copy) when making a copy.
Place your documents (→p.19)
1
Press [ ] (Paper Save Copy).
2
Press [▲] or [
3
press [OK].
<2 on 1 1→2-Sided>* Copy two pages onto each of both sides of paper.
<4 on 1 1
<2 on 1 1
<4 on 1 1
* MF4890dw/MF4880dw only
Press [▲] or [
4
If a document is placed on the platen glass, you may specify the scan size as <LGL>
•
size, but the actual size is <A4> size.
Press [ ] (Start).
5
When placing your
documents in the feeder
When placing your
documents on the
ten glass
pla
] to highlight the desired dcombination option, and then
▼
→2-Sided>* Copy four pages onto each of both sides of paper.
→1-Sided> Copy two pages onto one side of each paper..
→1-Sided> Copy four pages onto one side of each paper.
] to highlight the document size, and then press [OK].
▼
Copying starts automatically.
1. Place the next page on the platen glass, and then
pr
s [ ] (Start).
es
• Press [ ] (Start) for every scanning.
2. After scanning all your documents, press [
to highlight <Start Copying>, and then press [OK].
Copy
▲] or [▼]
Enlarge or Reduce Copies
Enlarge or reduce copies using preset copy ratios or custom copy ratios.
Place your documents (→p.19).
1
Switch to the Copy mode (→p.16).
2
Press [▲] or [▼] to highlight <Copy Ratio>, and then press [OK].
3
Press [▲] or [▼] to highlight the desired ratio, and then press [OK].
4
If you want to set a copy ratio in 1% increments, select <Custom Ratio>, and then
•
enter the copy ratio using the numeric keys or press [▲] or [▼] to specify the ratio.
Copy Ratio
Custom Ratio
100% Direct
400% Max
200%
Press [ ] (Start).
5
31
Page 32

Adjust the Image Quality for Copy
Relation between the density and document type:
If <Density> i
to <Tex t>.
Adjusting the density
You can make the density brighter or darker than the original documents.
Place your documents (→p.19).
1
Switch to the Copy mode (→p.16).
2
Press [▲] or [▼] to highlight <Density>, and then press [OK].
3
Press [◄] or [►] to adjust the density , and then press [OK].
4
Select <Auto Density> to use the density that is most suitable for the document.
•
Density
Auto Density
Manual Density
- +
s set to <Auto Density>, <Original Type> will be changed
– : Less density (lighter)
+ : More density (darker)
Press [ ] (Start).
5
Selecting the Document Type
Select the appropriate document type.
Place your documents (→p.19).
1
Switch to the Copy mode (→ p.16).
2
Press [▲] or [▼] to highlight <Original Type>, and then press [OK].
3
Press [▲] or [▼] to highlight the appropriate document type, and then
4
press [OK].
<Te x t> Best suited for text-only documents.
<Text /Photo (High
ed)>
Spe
<Te x t/ Ph o to > Suitable for documents that contain text and photos.
<Photo> Suitable for documents that contain large photos.
Suitable for documents that contain text and photos.
(Sca
nned documents are at a low resolution at high
speed.)
32
Press [ ] (Start).
5
Page 33

Adjusting the sharpness
You can sharpen or soften the edges of images by adjusting the sharpness.
Place your documents (→p.19).
1
Switch to the Copy mode (→p.16).
2
Press [▲] or [▼] to highlight <Sharpness>, and then press [OK].
3
Press [◄] or [►] to adjust the sharpness, and then press [OK].
4
Copy
Sharpness
- +
Press [ ] (Start).
5
– : Less sharpness
(Suitable for photos)
+ : More sharpness
(Suitable for documents written in pen or
pencil)
33
Page 34

Make Double-Sided Copies
(MF4890dw/MF4880dw Only)
You can make double-sided copies from single-sided documents. When using the
MF4
890dw, you can also make double-sided or single-sided copies from double-sided
documents.
Place your documents (→p.19).
1
To make double-sided copies from single-sided documents, place the documents in
•
the feeder or on the platen glass.
• To make double-sided or single-sided copies from double-sided documents, place
documents in the feeder.
Switch to the Copy mode (→p.16).
2
Press [▲] or [▼] to higlight <2-Sided>, and then press [OK].
3
Press [▲] or [▼] to highlight the 2-sided copy format, and then press
4
[OK].
2-Sided
Off
1 2-Sided
2 2-Sided
2 1-Sided
Press [ ] (Start).
5
When placing your
documents in the feeder
When placing your
documents on the
platen glass
Copying starts automatically.
1. Press [
2. Place the next page on the platen glass, and then
3. After scanning all your documents, press [
▲] or [▼] to highlight the size of the original
document, and then press [OK].
• You may specify the scan size as <LGL> size, but
the actual size is <A4> size.
press [
• Press [ ] (Start) for every scanning.
to highlight <Start Copying>, and then press [OK].
] (Start).
▲] or [▼]
Specifying the orientation
If you select <Format Settings> at step 4 above, you may specify the orientation of your
documents and the desired nishing format.
34
<Calendar Type> <Book Ty pe>
Page 35

Copy Multiple Pages onto One Sheet
You can combine multiple pages (two or four pages) onto one copy sheet.
Place your documents (→p.19).
1
Switch to the Copy mode (→p.16).
2
Press [▲] or [▼] to highlight <N on 1>, and then press [OK].
3
Press [▲] or [▼] to highlight <2 on 1> or <4 on 1>, and then press [OK].
4
N on 1
Off
2 on 1
4 on 1
ID Card Copy
Press [▲] or [▼] to highlight the desired scan size, and then press [OK].
5
You may specify the scan size as <LGL> size, but the actual size is <A4> size.
•
Press [ ] (Start).
6
Copy
1
2
3
<ON>
1
1
1
Specifying the page layout manually
If you select <Select Layout> at step 4 above, you may specify the desired page layout.
<2 on 1 (1)> <2 on 1 (2)> <4 on 1 (1)> <4 on 1 (2)> <4 on 1 (3)> <4 on 1 (4)>
Collate Copies
1
2
3
2
2
2
1
2
3
3
3
3
You can arrange copies into sets arranged in page order by using the <Collate> function
when making multiple copies of multiple documents.
Place your documents (→p.19).
1
Switch to the Copy mode (→p.16).
2
Press [▲] or [▼] to highlight <Collate>, and then press [OK].
3
<OFF>
Press [▲] or [▼] to highlight <On>, and then press [OK].
4
Press [ ] (Start).
5
35
Page 36

Copy a Double-Sided ID Card
A5
STMT
A5
STMT
A5
STMT
You can make a copy of a double-sided ID card onto single-sided paper.
Place an ID on the platen glass.
1
Place the card at the center of the left edge of the platen glass, with a 1/4” (5 mm)
•
space created.
To place the card horizontally
STMT
A5
To place the card vertically
B5
A4
LTR
STMT
A5
B5
A4
LTR
5mm5mm
5mm5mm
Switch to the Copy mode (→p.16).
2
Press [▲] or [▼] to highlight <N on 1>, and then press [OK].
3
Press [▲] or [▼] to highlight <ID Card Copy>, and then press [OK].
4
Press [ ] (Start).
5
Turn and place the card.
6
STMT
A5
B5
A4
LTR
Press [ ] (Start).
7
• The copy ratio is automatically set to <100%>.
• You can only use Letter size or larger paper for ID card copying.
36
Page 37

View and Cancel Copy Jobs
You can view or cancel copy jobs while the jobs are in progress.
Press [ ] (Status Monitor/Cancel).
1
Press [▲] or [▼] to highlight <Copy Job Status>, and then press [OK].
2
View the details of a copy job or cancel the job.
3
To view the details, press [▲] or [▼].
•
• To cancel the job, press [▲] or [▼] to highlight <Cancel>, and then press [OK].
Copy Job Status
<Cancel>
Job Number: 0001
Status: Copying
Time: 01/01 12:52 AM
Press [ ] (Status Monitor/Cancel) to close the screen.
4
Copy
Change the Default Copy Settings
You can change the default copy settings that are applied when the machine is restarted,
[ ] (Reset) is pressed or the screen is returned to the default screen after auto reset is
performed.
Press [ ] (Menu).
1
Press [▲] or [▼] to highlight <Copy Settings>, and then press [OK].
2
Press [▲] or [▼] to highlight <Change Defaults>, and then press [OK].
3
Press [▲] or [▼] to highlight the desired option, and then press [OK].
4
<No. of Copies> Select the copy quantity.
<Density> Make the density lighter or darker.
<Original Type> Select the image quality.
<2-Sided>* Copy 1-sided document to 2 sides.
<Copy Ratio> Select the copy ratio.
<N on 1> Copy multiple documents onto one sheet.
<Collate>
Collate copies of a complete copy job arranged in page
q
uential order or by page.
se
<Sharpness> Emphasize the outline of the image or decrease the contrast.
* MF4890dw/MF4880dw only
Specify the desired setting.
5
After you have speci ed the setting, press [▲] or [▼] to highlight
6
<Apply>, and then press [OK].
Press [ ] (Menu) to close the screen.
7
37
Page 38

Memo
3838
Page 39

This chapter describes basic Print functions.
Print a Document …………………………………………………… 40
Enlarge or Reduce a Document ……………………………………… 40
Print a Double-Sided Document (MF4890dw/MF4880dw Only) …… 41
Print Multiple Pages onto One Sheet ………………………………… 42
Print a Booklet (MF4890dw/MF4880dw Only) ……………………… 43
Print a Poster ………………………………………………………… 44
Add Watermarks to a Printout ……………………………………… 45
View and Cancel Print Jobs …………………………………………… 46
Before using the printing functions, connect the machine to a computer
and install the printer driver on the computer. See the Starter Guide to learn
how to install the printer driver.
• You cannot specify printing options with the printer driver and another
application at the same time.
• Your computer screen may di er from the images shown here,
depending on your operating system and the type and version of the
printer driver.
39
Page 40

Print a Document
Make sure that a computer and the machine are connected properly, and
1
the printer driver is installed on the computer.
Open a document from an application, and then open the Print window.
2
Select your printer driver, and click [Preferences] (or [Properties]).
3
Specify the print settings such as the number of copies and print
4
orientation, and click [OK].
Click [Print] to start printing.
5
Canceling Print Jobs
Press [ ] (Stop) twice.
* It is valid when only one job is processing or waiting.
Enlarge or Reduce a Document
You can enlarge or reduce the data to t the paper size automatically, or specify a custom
ratio.
Open a document from an application, and then open the Print window.
1
Select your printer driver, click [Preferences] (or [Properties]), and display
2
the Printing Preferences window.
40
Page 41

Click the [Basic Settings] tab, and then specify the print ratio.
3
Select the paper size of
the document.
To automatically scale
the document to t the
loaded paper, select an
output size.
To specify the print ratio
manually, select [Manual
Scaling], and then specify
the scaling ratio.
Click [OK] to return to the Print window.
4
Click [OK] to start printing.
5
Print a Double-Sided Document
(MF4890dw/MF4880dw Only)
Print
You can print on both sides of paper.
Open a document from an application, and then open the Print window.
1
Select your printer driver, click [Preferences] (or [Properties]), and display
2
the Printing Preferences window.
Click the [Basic Settings] tab, and then specify the settings for double-
3
sided printing.
Select [2-sided Printing].
Select the binding edge.
Click [OK] to return to the Print window.
4
Click [OK] to start printing.
5
Supported document sizes for double-sided printing varies depending on
the models. For details, see [Speci cations] [Supported Paper Types]
in the e-Manual..
41
Page 42

Print Multiple Pages onto One Sheet
You can reduce and print 2, 4, 6, 8, 9, or 16 pages of an original document onto a single
sheet of paper. This feature allows you to save paper or to view several pages at once.
Open a document from an application, and then open the Print window.
1
Select your printer driver, click [Preferences] (or [Properties]), and display
2
the Printing Preferences window.
Click the [Basic Settings] tab, and then specify the number of pages and a
3
page layout.
Select the number of pages
to print on a single page.
Select the page layout.
Click [OK] to return to the Print window.
4
Click [OK] to start printing.
5
You cannot enlarge or reduce the documents manually when using this
function.
42
Page 43

Print a Booklet
(MF4890dw/MF4880dw Only)
You can print pages side-by-side, and then fold them to create a booklet.
Open a document from an application, and then open the Print window.
1
Select your printer driver, click [Preferences] (or [Properties]), and display
2
the Printing Preferences window.
Click the [Basic Settings] tab, select [Booklet Printing], and then click
3
[Booklet].
Print
Specify the settings for the booklet, and then click [OK].
4
To specify the margin for binding, select the
check box, and then enter the value.
Click [OK] to return to the Print window.
5
Click [OK] to start printing.
6
Make a booklet by folding the printouts in half.
7
You can choose to print all
pages at once or print sets
of pages according to the
speci ed number of pages.
43
Page 44

Print a Poster
You can enlarge a one-page document and print it on multiple pages. You can then
combine the printed pages to create a large poster.
Open a document from an application, and then open the Print window.
1
Select your printer driver, click [Preferences] (or [Properties]), and display
2
the Printing Preferences window.
Click [Basic Settings] tab, and then select [Poster(N×N)] from the
3
[Page Layout] drop-down menu.
Select [Poster [N×N]]
(N×N is split numbers of
divided pages wide by
high).
Click [OK] to return to the Print window.
4
Click [OK] to start printing.
5
Make a poster by gluing or taping the printouts together.
6
You cannot combine this feature with watermark printing, manual scaling, or
printing multiple pages onto one sheet.
44
Page 45

Add Watermarks to a Printout
You can add watermarks, such as “DRAFT,” to a document.
Open a document from an application, and then open the Print window.
1
Select your printer driver, click [Preferences] (or [Properties]), and display
2
the Printing Preferences window.
Click the [Page Setup] tab, and then specify the settings for watermark
3
printing.
Select to add
watermarks.
Select the desired
watermark.
Select to create a
new original stamp.
Print
To create a new original watermark, click [Edit Watermark], and then
4
enter the new text.
Select to create a new
watermark.
Delete the selected
watermark from the list.
Enter the created watermark
name.
Specify watermark options.
Click [OK] to return to the Print window.
5
Click [OK] to start printing.
6
You can register up to 50 new watermarks, in addition to the provided
watermarks.
45
Page 46

View and Cancel Print Jobs
You can view or cancel print jobs that are waiting or in progress.
Press [ ] (Status Monitor/Cancel).
1
Press [▲] or [▼] to highlight <Print Job Status>, and then press [OK].
2
View the details of a print job or cancel the job.
3
Press [▲] or [▼] to view the print job status.
•
• Press [OK] to view the detailed information.
• To cancel the job, press [▲] or [▼] to highlight <Cancel>, and then press [OK].
Details
<Cancel>
Job Number: 0020
Status: Printing
Time: 01/01 09:42AM
Press [ ] (Status Monitor/Cancel) to close the screen.
4
46
Page 47

(→ p.105)
You can see frequentely asked
q
uestions about the receive mode.
About PC Fax
You can fax documents directly
om a computer using PC Fax (Fax
fr
driver). By faxing directly from the
computer, you can reserve paper
and toner, and send a higher-quality
fax document. See “PC Fax” in the
e-Manual.
Fax
This chapter describes the basic fax functions.
Register Numbers in the Address Book ……………………………… 48
Registering Numbers to One-Touch Keys …………………………… 48
Regi
stering Numbers to Coded Dialing Codes ……………………… 49
Registering Recipients for Group Dialing …………………………… 50
Editing and Deleting Registered Destinations ……………………… 52
Adjust the Image Quality for Fax …………………………………… 52
Adjusting the Density ……………………………………………… 52
lec
ting the Resolution …………………………………………… 53
Se
Adjusting the Sharpness …………………………………………… 53
Specifying the Double-Sided Document Format (MF4890dw Only) … 54
Changing the Default Settings ……………………………………… 54
Send a Fax …………………………………………………………… 55
Entering a Fax Number with the Alphanumeric Keys ………………… 55
s
ing the One-Touch Keys ………………………………………… 56
U
Using the Coded Dialing Codes……………………………………… 56
Searching the Address Book ………………………………………… 57
Redialing …………………………………………………………… 57
Sending a Fax to Multiple Destinations
(Sequential Broadcast) ……………………………………………… 58
Sending a Fax to an International Destination (Adding Pauses) ……… 58
Calling a Recipient before Sending a Fax …………………………… 59
Receive a Fax (Receive Mode) ………………………………………… 60
Using the Machine for Fax Only ……………………………………… 61
s
ing the Machine for Faxing and Phoning ………………………… 61
U
Using the Answering Machine ……………………………………… 62
Using the Machine Primarily for Phoning …………………………… 62
Receiving Faxes in Manual Mode …………………………………… 63
Receive a Fax from Memory ………………………………………… 64
Switching to Memory Lock Mode …………………………………… 64
iewing/Canceling/Forwarding Received Fax Documents ………… 65
V
Printing Received Fax Documents …………………………………… 65
View/Cancel/Forward a Fax Job ……………………………………… 66
h
ange the Fax Settings ……………………………………………… 66
C
Changing Fax Sending Settings ……………………………………… 66
Rest
ricting Fax Sending Functions …………………………………… 68
Changing Fax RX Settings …………………………………………… 69
Changing Communication Management Settings ………………… 70
4747
Page 48

Register Numbers in the Address Book
You can register frequently-used numbers in the address book. You can register numbers to
one-touch keys or coded dialing codes for convenient dialing.
• To set an address book PIN, press [ ] (Menu) <System Settings>
<Restrict TX Function> <Address Book PIN>, and then specify
the PIN.
• If the address book is protected with a PIN, you must enter the PIN when
you press [ ] (Address Book). Enter your PIN, and then press [OK] to
use the address book.
• The address book can be saved as a le to your computer using the
Remote UI. The machine can read the le saved in your computer. For
more details about Remote UI, see the e-Manual.
• With the Address Book Import/Export Tool that is supplied on the User
Software CD-ROM, you can export address book entries that are registered
to the machine or import the entries that are created or edited from the
MF Driver.
Registering Numbers to One-Touch Keys
To send a fax to a destination registered to a one-touch key, see “Using the One-Touch Keys”
(→p.56).
Switch to the Fax mode, and then press [ ] (Address Book).
1
CANON 0123456789
GroupA 2 Destin
User01 01234567
All A-Z
Press [◄] or [►] to highlight < > (Menu).
2
Press [▲] or [
3
] to highlight <Register New Destination to Address
▼
...
...
Press [
or a screen for searching registered destinations.
: Display registered coded dialing codes.
: Display the number of registered
: Display registered one-touch keys.
] or [►] to switch to the menu screen
◄
: Display the address book menu.
All
: Display all registered destinations.
A-Z
YZ
~
: Display registered destinations
sorted by name.
destinations in a group.
Book>, and then press [OK].
Press [▲] or [
4
Press [▲] or [
5
Press [▲] or [
6
] to highlight <One-Touch>, and then press [OK].
▼
] to highlight <Fax>, and then press [OK].
▼
] to highlight the number of the one-touch key you want
▼
to register (01 to 04), and then press [OK].
You can register fax numbers to each of the 4 one-touch dial keys.
•
48
Enter Registration No.
01 Not Registered
02 Not Registered
03 Not Registered
04 Not Registered
Page 49

Press [▲] or [
7
Enter a name for the destination, press [▲] or [▼] to highlight <Apply>,
8
and then press [OK].
Name (Max 16 char.)
CANON
<Apply>
Entry Mode: A
Press [▲] or [▼] to highlight <Destination>, and then press [OK].
9
Enter the fax number, press [▲] or [▼] to highlight <Apply>, and then
10
press [OK].
Select <Set Details> to specify detailed options as needed.
•
] to highlight <Name>, and then press [OK].
▼
Destination (Max 40)
0123456789
<Apply>
Set Details
Press [▲] or [▼] to highlight <Apply>, and then press [OK].
11
Press [ ] (Back) to close the screen.
12
Registering Numbers to Coded Dialing Codes
To send a fax to a destination that is registered to a coded dialing code,
see ”Using the Coded Dialing Codes” (→p.56).
Switch to the Fax mode, and then press [ ] (Address Book).
1
Press [◄] or [►] to highlight < > (Menu).
2
Press [▲] or [▼] to highlight <Register New Destination to Address
3
Book>, and then press [OK].
Fax
Fax
Press [▲] or [▼] to highlight <Coded Dial>, and then press [OK].
4
Press [▲] or [▼] to highlight <Fax>, and then press [OK].
5
Press [▲] or [▼] to highlight <Name>, and then press [OK].
6
Enter a name for the destination, press [▲] or [▼] to highlight <Apply>,
7
and then press [OK].
Name (Max 16 char.)
CANON
<Apply>
Entry Mode: A
49
Page 50

Press [▲] or [
8
] to highlight <Destination>, and then press [OK].
▼
Enter the fax number, press [▲] or [
9
press [OK].
Select <Set Details> to specify detailed options as needed.
•
Destination (Max 40)
0123456789
<Apply>
Set Details
Press [▲] or [▼] to highlight <Coded Dial>, and then press [OK].
10
Press [▲] or [▼] to highlight the coded dialing number you want to
11
register (001 to 100), and then press [OK].
Up to 100 coded dialing codes are available.
•
Enter Registration No.
001 Not Registered
002 Not Registered
003 Not Registered
004 Not Registered
Press [▲] or [▼] to highlight <Apply>, and then press [OK].
12
] to highlight <Apply>, and then
▼
Press [ ] (Back) to close the screen.
13
Registering Recipients for Group Dialing
You can register a group of multiple recipients to an one-touch keys or a coded dialing
code. It is useful when sending a fax to multiple destinations at once.
• Register group addresses to an unused one-touch key or coded dialing
IMPORTANTIMPORTANT
Switch to the Fax mode, and then press [ ] (Address Book).
1
Press [◄] or [►] to highlight < > (Menu).
2
Press [▲] or [
3
Book>, and then press [OK].
codes. Make sure that you leave some unused one-touch keys or coded
dialing codes for group dialing.
• Individual destinations must be registered to one-touch keys or coded
dialing codes before they can be added to a group.
] to highlight <Register New Destination to Address
▼
50
Press [▲] or [
4
to.
You can select between coded dialing and one-touch key.
•
] to highlight a destination type to register the group dial
▼
Page 51

Press [▲] or [
5
Destination Type
Fax
Group
If you selected <One-Touch> in step 4, press [▲] or [▼] to highlight an
6
] to highlight <Group>, and then press [OK].
▼
empty one-touch key (01 to 04), and then press [OK].
If you selected <Coded Dial> in step 4, proceed to step 7.
•
Press [▲] or [▼] to highlight <Name>, and then press [OK].
7
Enter a name for the destination, press [▲] or [▼] to highlight <Apply>,
8
and then press [OK].
Name (Max 16 char.)
CANON
<Apply>
Entry Mode: A
Press [▲] or [▼] to highlight <Destinations>, and then press [OK].
9
Fax
Press [▲] or [▼] to highlight <Add>, and then press [OK].
10
Press [▲] or [▼] to highlight the destination you want to add, and then
11
press [OK].
CANON 0123456789
GroupA 2 Destin
User01 01234567
Repeat steps 10 and 11 to add more destinations as needed.
12
Press [▲] or [▼] to highlight <Apply>, and then press [OK].
13
Destination
<Apply>
<Add>
CANON01 0123456789
CANON02 9876543210
Press [▲] or [▼] to highlight <Apply>, and then press [OK].
14
Group
<Apply>
Name: GROUP
Destinations: 003
One-Touch: 03
All A-Z
...
...
Press [ ] (Back) to close the screen.
15
51
Page 52

Editing and Deleting Registered Destinations
You can edit or delete destinations registered in the address book.
Switch to the Fax mode, and then press [ ] (Address Book).
1
Press [◄] or [►] to highlight < > (Menu).
2
Press [▲] or [▼] to highlight the desired option, and then press [OK].
3
• For a one-touch key or coded dialing code, edit the
name, fax number, one-touch key, or coded dialing
<Edit Address Book>
<Address Book Details> View the details for the destination.
code.
• For a group, edit the group name, delete
destinations registered to the group, or add new
destinations to the group.
<Delete From Address
Book>
Select the desired destination, and then press [OK].
4
Select the desired option, and then edit or delete the destination.
5
Press [ ] (Back) to close the screen.
6
Delete destinations from the address book.
Adjust the Image Quality for Fax
Adjusting the Density
You can adjust the density of a fax darker or lighter.
Place your documents (→p.19).
1
Switch to the Fax mode (→p.16).
2
52
Press [▲] or [▼] to highlight <Density>, and then press [OK].
3
Press [◄] or [►] to adjust the density, and then press [OK].
4
Density
- +
Send a fax to the desired destination (→p.55).
5
– : Less density (lighter)
+ : More density (darker)
Page 53

Selecting the Resolution
You can select a resolution that is appropriate for the document. Set a higher resolution for
documents that contain small text.
Place your documents (→p.19).
1
Switch to the Fax mode (→p.16).
2
Press [▲] or [▼] to highlight <Resolution>, and then press [OK].
3
Select the desired resolution, and then press [OK].
4
<200 dpi x 100 dpi (Normal)> For general text documents
<200 dpi x 200 dpi (Fine)> For ne text documents
<200 dpi x 200 dpi (Photo)> For documents that contain photographs
<200 dpi x 400 dpi (Super ne)
Send a fax to the desired destination (→p.55).
5
> For documents that contain very ne text
Fax
Adjusting the Sharpness
You can sharpen or soften the edges of images by adjusting the sharpness.
Place your documents (→p.19).
1
Switch to the Fax mode (→p.16).
2
Press [▲] or [▼] to highlight <Sharpness>, and then press [OK].
3
Press [◄] or [►] to adjust the sharpness, and then press [OK].
4
Sharpness
- +
Send a fax to the desired destination (→p.55).
5
– : Less sharpness
(Suitable for photos)
+ : More sharpness
(Suitable for documents written in pen or
pencil)
53
Page 54

Specifying the Double-Sided Document Format
(MF4890dw Only)
You can set the document format to scan double-sided documents automatically.
Place your documents in the feeder (→p.20).
1
Switch to the Fax mode (→p.16).
2
Press [▲] or [
3
Press [▲] or [
4
<O > Read only one side of documents.
<Book Type>
<Calendar Type>
Send a fax to the desired destination (→p.55).
5
] to highlight <2-Sided Original>, and then press [OK].
▼
] to highlight the desired option, and then press [OK].
▼
• Read both sides of documents.
• Select when the document is
book type.
• Read both sides of documents.
• Select when the document is
calendar type.
Changing the Default Settings
You can change the default settings that is applied when the machine is restarted, [ ]
(Reset) is pressed or the screen is returned to the default screen after auto screen is
performed.
Press [ ] (Menu).
1
Press [▲] or [
2
Press [▲] or [
3
Press [▲] or [
4
Press [▲] or [
5
<Resolution> Make the resolution higher or lower.
<Density> Make the density lighter or darker.
<2-Sided Original>
890dw only)
(MF4
<Sharpness>
Specify the desired setting.
6
After you have speci ed the setting, press [▲] or [
7
<Apply>, and then press [OK].
Press [ ] (Menu) to close the screen.
8
] to highlight <Fax TX Settings>, and then press [OK].
▼
] to highlight <TX Function Settings>, and then press [OK].
▼
] to highlight <Change Defaults>, and then press [OK].
▼
] to highlight the desired option, and then press [OK].
▼
Set whether to read one side of documents or both sides of
do
uments automatically.
c
Emphasize the outline of the image or decrease the
rast.
cont
] to highlight
▼
54
Page 55

Send a Fax
Entering a Fax Number with the Alphanumeric Keys
Place your documents (→p.19).
1
Fax
IMPORTANTIMPORTANT
Switch to the Fax mode (→p.16).
2
Enter the recipient’s fax number with the alphanumeric keys.
3
Send: Press Start
Destinations: 001
012XXXXXX
RX Mode: Auto
Resolution: 200 x 1
Press [ ] (Start).
4
When loading documents
into the feeder
When placing documents
on the platen glass
If the document guides are too loose or too tight, this may result in
misfeeds or paper jams.
...
Scanning documents starts. The fax is sent after the
scanning is nished.
1. Press [
2. After placing next page, press [
▲] or
original document, and then press [OK].
] to highlight the size of the
[▼
• Press [ ] (Start) for each page.
3. When all pages are scanned completely, press
[
▲] or [
then press [OK].
] to highlight <Start Sending>, and
▼
] (Start).
If the recipient’s line is busy or an error occurs, the machine automatically
redials the last destination. The default number of reattempts is two, and the
interval between each attempt is two minutes.
To change the default settings, press [ ] (Menu) <Fax TX Settings>
<TX Function Settings> <Auto Redial>, and then change the
setting to <On>.
Canceling Fax Jobs
Press [ ] (Stop) twice.
* It is valid when only one job is processing or waiting.
55
Page 56

Using the One-Touch Keys
You can easily send faxes to a destination registered to a one-touch key. You can send faxes
to multiple destinations at once, if a group is registered to the one-touch key.
Place your documents (→p.19).
1
Switch to the Fax mode (→p.16).
2
Adjust the image quality of the documents as needed (→p.52).
3
Press the one-touch key of the desired destination.
4
The number registered to the one-touch key is displayed. If you accidentally select
•
an incorrect destination, press [ ] (Clear) and then press another one-touch key.
• When speci ed by one-touch keys or coded dialing codes, a screen for con rming
the destination may appear. After con rmation, press [OK] to start sending a fax.
Send: Press Start
Destinations: 001
User01 01234567
RX Mode: Auto
Resolution: 200 X 1
Press [ ] (Start).
5
...
Using the Coded Dialing Codes
You can easily send faxes to a destination registered to a coded dialing code. You can send
faxes to multiple destinations at once, if a group is registered to a coded dialing code.
Place your documents (→p.19).
1
Switch to the Fax mode (→p.16).
2
Adjust the image quality of the documents as needed (→p.52).
3
Press [ ] (Coded Dial).
4
Enter the three-digit registration number (001 to 100) with the
5
alphanumeric keys.
The destination number registered to the coded dialing code is displayed. If you
•
accidentally select an incorrect destination, press [ ] (Clear) and then enter
another dial code.
• When speci ed by one-touch keys or coded dialing codes, a screen for con rming
the destination may appear. After con rmation, press [OK] to start sending a fax.
Enter coded dial no.
*
*001
Send: Press Start
Destinations: 001
Canon 0123456789
RX Mode: Auto
Resolution: 200 X 1
...
56
Press [ ] (Start).
6
Page 57

Searching the Address Book
You can search a name registered to the address book.
Place your documents (→p.19).
1
Switch to the Fax mode (→p.16).
2
Adjust the image quality of the documents as needed (→p.52).
3
Press [ ] (Address Book).
4
Press [◄] or [►] to search for a recipient.
5
CANON 0123456789
GroupA 2 Destin
User01 01234567
All A-Z
...
...
Select <All> or an initial
in the recipient’s name.
Fax
Press [▲] or [
6
Press [ ] (Start).
7
] to highlight the desired recipient, and then press [OK].
▼
Redialing
If you send faxes by entering the fax number manually, the last three destinations are stored
in the memory. You can send faxes to the stored destinations.
Place your documents (→p.19).
1
Switch to the Fax mode (→p.16).
2
Press [ ] (Redial/Pause).
3
Press [▲] or [▼] to highlight the destination, and then press [OK].
4
Redial
012XXXXXX
Press [ ] (Start).
5
• To automatically enter the last destination used, press [ ] (Hook).
When the dial tone sounds, press [ ] (Redial/Pause).
• The destinations stored in the memory are deleted, if you restart the
machine.
57
Page 58

Sending a Fax to Multiple Destinations (Sequential Broadcast)
You can send the same document to multiple recipients at once.
Place your documents (→p.19).
1
Switch to the Fax mode (→p.16).
2
Specify the destination.
3
Press [▲] or [
4
<Address Book> Select a destination from the address book.
<Coded Dial>
<Specify Next
Destinat
Send: Press Start
Destinations: 001
0123456789
Address Book
Coded Dial
Specify the destination, and then press [OK].
5
Repeat steps 4-5 to enter additional destinations as needed.
6
<Specify Next Destination (New)> is available up to 10 destinations.
•
• To con rm or delete destinations, press [▲] or [
<Con rm/Edit Destination>, and then press [OK].
Press [ ] (Start).
7
] to select the desired method for specifying destinations.
▼
Enter the numbers registered in the coded dialing
es.
cod
ion (New)>
Enter the destination with the alphanumeric keys.
] to highlight
▼
58
Sending a Fax to an International Destination (Adding Pauses)
When sending faxes to international destinations, it is sometimes di cult to connect to a
recipient, due to the long distance that the signal must travel. You can insert a pause after
the international access code to reduce this problem.
Place your documents (→p.19).
1
Switch to the Fax mode (→p.16).
2
Use the alphanumeric keys to enter the international access code.
3
For details about international access codes, contact your telephone service provider.
•
Press [ ] (Redial/Pause) to enter a pause.
4
The letter <p> is displayed to indicate the pause.
•
• The default pause added before the number is two seconds. To change the pause
time, see “<Pause Time>” (→p.67).
• To add another pause, press [ ] (Redial/Pause) again.
Use the alphanumeric keys to enter the country code, area code, and fax
5
number.
Page 59

Press [ ] (Redial/Pause), and then press [OK].
6
A pause added to the end of the number is xed at 10 seconds.
•
Press [ ] (Start).
7
Calling a Recipient before Sending a Fax
In the following cases, follow the procedure below to send faxes:
• If you want to call a recipient before sending a fax
• If the recipient’s machine cannot receive a fax automatically
To use this function, you must connect the handset or an external telephone
to the machine. If they are not connected, use another telephone to make
sure the recipient to switch the fax mode to receive fax.
Place your documents (→p.19).
1
Switch to the Fax mode (→p.16).
2
Lift the telephone receiver.
3
A dial tone sounds.
•
Fax
Dial the recipient’s fax number.
4
Ask the recipient to allow his or her machine to receive faxes.
5
When you hear a beep, press [ ] (Start), and then replace the
6
telephone receiver.
59
Page 60

Receive a Fax (Receive Mode)
)?
?
de
e
.
e
ode
.
Your machine provides multiple methods for automatically or manually receiving faxes. Select the receive mode that best suits
your needs.
(→ p.105)
You can see frequantely asked questions about the receive mode.
Do you want to
use a telephone
voice call
Ye s
o you want to
use an answering
machine
No
o you want to
automatically
receive faxes?
No
Ye s
Ye s
onnect an answering
chine to the machine
onnect an external
elephone to the machine.
<Auto> mo
See “Using the Machine for Fax
Only” (.61).
<Answering Machine> mod
See “Using the
nswering Machine“
.62)
<FAX/TEL Auto Switch> mod
See “Using the
Machine for Faxing
and Phoning” (.61).
No
<Manual> m
See “Using the
Machine Primarily for
Phoning“ (.62).
• For details about each mode, see [RX Mode] in the e-Manual.
• Depending on the connected telephone, you may not normally receive a fax. If you are using an external telephone
that has fax functions, disable the external telephone’s auto receive functions.
• If <RX Mode> is set to <Auto> or <FAX/TEL Auto Switch>, you can specify whether or not the external
telephone rings when receiving an incoming call. Also, you can specify the number of rings.
Press [ ] (Menu) <Fax RX Settings> <RX Function Settings> <Incoming Ring>.
60
Page 61

Using the Machine for Fax Only
Set the fax receive mode to <Auto>.
Switch to the Fax mode (→p.16).
1
Press [▲] or [
2
Press [▲] or [
3
RX Mode
Auto
Fax/Tel Auto Switch
Manual
Answering Machine
] to highlight <RX Mode>, and then press [OK].
▼
] to highlight <Auto>, and then press [OK].
▼
When a Fax or Call Comes In
When a fax comes in, the machine automatically begins receiving the fax after two rings.
If a voice call comes in, the caller will hear a fax tone.
To change the number of rings before the machine receives a fax, press
[ ] (Menu) <Fax RX Settings> <RX Function Settings>
<Incoming Ring> <On>, and then specify the number of rings.
Fax
Using the Machine for Faxing and Phoning
Set the fax receive mode to <Fax/Tel Auto Switch>.
Switch to the Fax mode (→p.16).
1
Press [▲] or [▼] to highlight <RX Mode>, and then press [OK].
2
Press [▲] or [▼] to highlight <Fax/Tel Auto Switch>, and then press [OK].
3
RX Mode
Auto
Fax/Tel Auto Switch
Manual
Answering Machine
Specify ring settings.
4
<Ring Start
Time>
<Incoming
g Time>
Rin
<After Ring>
Specify how long the machine will attempt to detect a fax tone
before the machine starts ringing (4-30 seconds).
Specify how long the machine will ring during an incoming call
(15-300 seconds).
Specify how the machine should behave when an incoming call
not answered:
is
• <End>: Disconnects the call.
• <RX>: Receives a fax.
After you have speci ed the setting, press [▲] or [
5
<Apply>, and then press [OK].
] to highlight
▼
61
Page 62

When a Fax or Call Comes In
The machine automatically detects whether the call is a fax or voice call after two rings.
If the call is a fax, the machine starts receiving the fax. If the call is a voice call, the machine
rings until it is answered or the caller hangs up.
Using the Answering Machine
Set the fax receive mode to <Answering Machine>.
Switch to the Fax mode (→p.16).
1
Press [▲] or [
2
Press [▲] or [
3
RX Mode
Auto
Fax/Tel Auto Switch
Manual
Answering Machine
] to highlight <RX Mode>, and then press [OK].
▼
] to highlight <Answering Machine>, and then press [OK].
▼
When a Fax or Call Comes In
The connected answering machine answers the call, and if the call is a fax, the machine
starts receiving the fax. If the call is a voice call, the answering machine answers and records
the caller’s message.
Before use the answering machine, set the number of rings before the
answering machine activates to at least two, and then record a greeting.
62
Using the Machine Primarily for Phoning
Set the fax receive mode to <Manual>.
Switch to the Fax mode (→p.16).
1
Press [▲] or [▼] to highlight <RX Mode>, and then press [OK].
2
Press [▲] or [▼] to highlight <Manual>, and then press [OK].
3
RX Mode
Auto
Fax/Tel Auto Switch
Manual
Answering Machine
Page 63

When a Fax or Call Comes In
The machine continuously rings in Manual mode. Pick up the receiver of the external
telephone to answer the call. If the call is a fax, you will hear a beep. See “Receiving Faxes in
Manual Mode,” to manually switch to receive mode.
Receiving Faxes in Manual Mode
If you hear a beep when you answer a call in manual mode, the call is a fax. Follow the
2
procedure below to manually switch to receive mode.
5
If you hear a beep when you answer the call, press [ ] and [ ]
1
(Remote RX ID).
Hang up the receiver.
2
Fax
To change the remote RX ID, press [ ] (Menu) <Fax RX Settings>
<RX Function Settings> <Remote RX> <On>, and then specify a
remote RX ID.
63
Page 64

Receive a Fax from Memory
If a fax is stored in memory, you can view the sender of the received fax and print or forward
the fax.
Switching to Memory Lock Mode
Press [ ] (Menu).
1
Press [▲] or [▼] to highlight <System Settings>, and then press [OK].
2
Press [▲] or [▼] to highlight <Communication Management Settings>,
3
and then press [OK].
Press [▲] or [▼] to highlight <Memory Lock Settings>, and then press
4
[OK].
Press [▲] or [▼] to highlight <On>, and then press [OK].
5
Set the details as needed.
6
Register a seven-digit PIN to protect the memory lock
set
tings.
<Memory Lock
PIN>
Set the RX Result Report to print automatically when faxes
e received into the memory.
ar
• <O >: Do not print the RX Result Report.
• <On>: Print the RX Result Report.
<Report Print>
Set th
<Memory Lock
Time>
After you have speci ed the setting, press [▲] or [▼] to highlight
7
<Apply>, and then press [OK].
speci ed time. When the preset time starts, the machine is
switched to receive fax into the memory. When the preset
time ends, faxes stored in the memory are automatically
printed and the memory receiving feature is deactivated.
You can use numbers between "0" and "9," but
cannot register consecutive digits that consist of
only "0" as a PIN.
To use this feature, you must also activate the
<RX Result Report> item:
[ ] (Report) <Report Settings>
<RX Result Report>
The default setting is <O >.
is feature to receive faxes into the memory only for a
64
Press [ ] (Menu) to close the screen.
8
Page 65

Viewing/Canceling/Forwarding Received Fax Documents
You can view the sender of the fax stored in memory. You can also delete unnecessary faxes
or forward them to other destinations.
Press [ ] (Status Monitor/Cancel).
1
Press [▲] or [
2
[OK].
Press [▲] or [
3
Press [▲] or [
4
To delete the fax job, press [▲] or [▼] to highlight <Delete>, press [◄] or [►] to
•
highlight <Yes >, and then press [OK].
• To forward the fax, press [▲] or [
and then press [OK].
Details
<Delete>
<Forward>
Job Number: 5004
Status: Waiting to
Press [ ] (Status Monitor/Cancel) to close the screen.
5
] to highlight <Fax Job Status/History>, and then press
▼
] to highlight <RX Job Status>, and then press [OK].
▼
] to highlight a job to be checked, and then press [OK].
▼
] to highlight <Forward>, specify destination,
▼
...
Printing Received Fax Documents
When the memory receiving is deactivated, all faxes stored in the memory are automatically
printed.
Fax
IMPORTANTIMPORTANT
Press [ ] (Menu).
1
Press [▲] or [
2
Press [▲] or [
3
and then press [OK].
Press [▲] or [
4
[OK].
Press [▲] or [
5
•
Press [ ] (Menu) to close the screen.
6
The machine does not support the function to select fax documents to
print. Delete the unnecessary documents rst.
] to highlight <System Settings>, and then press [OK].
▼
] to highlight <Communication Management Settings>,
▼
] to highlight <Memory Lock Settings>, and then press
▼
] to highlight <O >, and then press [OK].
▼
All faxes stored in the memory are printed.
65
Page 66

View/Cancel/Forward a Fax Job
You can view or cancel fax jobs that are waiting or in progress.
Press [ ] (Status Monitor/Cancel).
1
Press [▲] or [
2
[OK].
Press [▲] or [
3
then press [OK].
Press [▲] or [
4
To cancel the job, in <TX Job Status>, press [▲] or [▼] to select <Cancel>.
•
Details
<Cancel>
Job Number: 0004
Status: Sending
Time: 01/01 12:52AM
• To delete or forward the job, in <RX Job Status>, press [▲] or [
<Delete> or <Forward> (→p.65).
Details
<Delete>
<Forward>
Job Number: 5004
Status: Receiving
Press [ ] (Status Monitor/Cancel) to close the screen.
5
] to highlight <Fax Job Status/History>, and then press
▼
] to highlight <TX Job Status> or <RX Job Status>, and
▼
] to highlight a job to be checked, and then press [OK].
▼
] to select
▼
Change the Fax Settings
You can change the fax settings for sending and receiving to suit your needs.
Changing Fax Sending Settings
Press [ ] (Menu).
1
Press [▲] or [
2
Press [▲] or [
3
and then press [OK].
Press [▲] or [▼] to highlight the desired item, and then press [OK].
4
See “Settings for Sending Faxes.”
•
Basic Settings
Register Unit Teleph
Register Unit Name
Select Line Type
Public Line Connect
Specify the setting values, and then press [OK].
5
] to highlight <Fax TX Settings>, and then press [OK].
▼
] to highlight <Basic Settings> or <TX Function Settings>,
▼
TX Function Settings
Change Defaults
ECM TX
Pause Time
...
Auto Redial
66
Press [ ] (Menu) to close the screen.
6
Page 67

Settings for Sending Faxes
Settings
<Register Unit
Te
lephone Number>
<Register Unit Name>
Options
Bold: Default settings
Details
Register your machine name (the name of company or the
u
er) or a fax number for the machine.
s
The name and number that you register will appear at the top
of the fax.
If you cannot send a fax, change the line type.
<Select Line Type>
Pulse
Ton
e
If you are not sure about your telephone line
type, contact your local telephone company.
If you cannot make a call or do not hear a ring tone when
the fax receive mode is set to <Fax/Tel Auto Switch> and
an external telephone is connected, change this setting to
<Adapter 1> or <Adapter 2>.
Specify whether or not to sound an alarm when the handset
of the external telephone is left unhooked at the end of a fax
communication.
<Public Line
nection>
Con
<O -H
ook Alarm>
Direct
Adapte
r 1
Adapter 2
O
On
- O -Hook Alarm Volume:
1 to 5
<Change Defaults> You can specify frequently used settings as the default.
Fax
<ECM TX>
O
On
<Pause Time> 1 to 2 to 15 (seconds)
O
On
- Redial Times: 1 to 2 to 10
<Auto Redial>
(times)
- Redial Interval: 2 to 99
(minutes)
- Redial When Err Occurs: O ,
On
O
On
<Sender ID>
- Print Location: On Image,
Above Image
- Mark No. as TEL/FAX: FAX , TEL
e Error Correction Mode (ECM) automatically detects and
Th
corrects errors during fax communication. Using the ECM
function can diminish send errors even over poor connections.
pecify the length of pauses added to fax destination
S
numbers.
Set auto redialing to automatically reattempt to connect to
a destination if the line is busy or an error occurs. You can
also specify the how many times to redial a number and the
interval between attempts.
Specify whether or not to include the sender ID at the top of
recipient’s faxes. Information such as your fax number and
name is included, enabling the recipient to recognize the
sender.
Fax/Telephone Number
Sending Date/Time
01/01/2012 02:07 PM FAX 123XXXXXXX CANON P.0001
Telephone Number
(FAX No.)
Mark
Sender Name
(Unit Name)
Page Number
<Check Dial Tone Before
Sending>
O
On
Wh
en sending a fax, you can specify whether or not to verify
the dial tone before dialing.
67
Page 68

Restricting Fax Sending Functions
Press [ ] (Menu).
1
Press [▲] or [
2
Press [▲] or [
3
Press [▲] or [
4
See “Settings for Restricting Fax Sending.”
•
Restrict TX Function
Address Book PIN
Restrict New Destin
Allow Fax Driver TX
Restrict Sending Fr
Specify the setting values, and then press [OK].
5
Press [ ] (Menu) to close the Menu screen.
6
] to highlight <System Settings>, and then press [OK].
▼
] to highlight <Restrict TX Function>, and then press [OK].
▼
] to highlight the desired item, and then press [OK].
▼
...
...
Settings for Restricting Fax Sending
Settings
<Address Book PIN>
Options
Bold: Default settings
Details
Specify a PIN to protect the address book. The PIN will be
re
quired to register, edit, or delete destinations.
<Restrict New
t
Destina
<Allow Fax Driver TX>
<Restrict Sending From
Histor
<Fax No. Con rmation
Re
<One-Touch/Coded Dial
TX C
<Restrict Sequential
Broadcast>
ions>
y>
-Entry>
on rmation>
O
On
O
On
O
On
O
On
O
On
O
Con
rm Sequential
Broadcast
Reject Sequential Broadcast
t
rict the destinations that can be speci ed to pre-registered
Res
one-touch keys or coded dialing codes. Restricting destinations
will prevent the following operations:
• Specifying a destination with the numeric keys
• Registering new destinations to the address book, one-touch
keys, or coded dialing codes
• Changing destinations that are registered to the address
book, one-touch keys, or coded dialing codes
ecify whether or not to allow faxes to be sent via a
Sp
computer’s fax driver.
Sp
ecify whether or not to restrict sending faxes from history by
pressing [
Sp
ecify whether or not to require a con rmation before
sending a fax. If you activate this feature, you must re-enter the
fax number before sending a fax.
Selec
t whether or not to require con rmation when specifying
a destination by the one-touch key or coded dialing code.
Specify whether or not to restrict faxes to multiple recipients.
If <Con rm Sequential Broadcast> is selected, a
con rmation screen is displayed when you send a fax to
multiple recipients. If <Reject Sequential Broadcast> is
selected, you cannot send a fax to multiple recipients.
] (Redial/Pause).
68
Page 69

Changing Fax RX Settings
Press [ ] (Menu).
1
Press [▲] or [
2
Press [▲] or [
3
Press [▲] or [
4
See “Settings for Receiving Faxes.”
•
RX Function Settings
ECM RX
Incoming Ring
Remote RX
Switch to Auto RX
Specify the setting values, and then press [OK].
5
Press [ ] (Menu) to close the screen.
6
] to highlight <Fax RX Settings>, and then press [OK].
▼
] to highlight <RX Function Settings> or <RX Print Settings>, and then press [OK].
▼
] to highlight the desired item, and then press [OK].
▼
RX Print Settings
2-Sided Printing
Reduce RX Size
RX Page Footer
Continue Print. When
Settings for Receiving Faxes
Settings
<ECM RX>
Options
Bold: Default settings
O
On
...
Details
Th
e Error Correction Mode (ECM) automatically detects
and corrects errors during fax communication. Using the
ECM function can diminish receive errors even over poor
connections.
Fax
<Incoming Ring>
<Remote RX>
<Switch to Auto RX>
<2-Sided Printing*>
O
On
- Ring Times: 1 to 2 to 99
(times)
O
On
- Remote RX ID: 00 to 25 to 99
O
On
- Ring Time till Auto RX: 1 to 15
to 99 (seconds)
O
On
Specify whether or not the external telephone will ring during
an incoming call if <RX Mode> is set to <Auto> or
<Fax/Tel Auto Switch>.
After the external telephone rings for speci ed times, the
machine automatically starts receiving the fax, if the call is a fax.
If the call is a voice call, the machine rings only when
<RX Mode> is set to <Fax/Tel Auto Switch>.
Specify whether or not to remotely instruct the machine to
switch to fax mode when an external telephone is connected.
To send the instruction to the machine, you must dial the
remote RX ID from the external telephone. You can also specify
a remote RX ID.
2
5
Specify how long an incoming call should ring before the
machine automatically switches to fax mode. This option is
available when the receive mode is set to <Manual>.
ecify whether or not to print documents on both sides of the
Sp
paper.
69
Page 70

Settings
Options
Bold: Default settings
Details
Set to scale images automatically so they t the selected paper
size or to reduce the image according to the speci ed ratio.
Sp
ecify whether or not to print a received date, day of the
week, time, number, and page number at the bottom of the
page when printing received faxes.
01/01/2012 SAT 02:07 PM [TX/RX NO 5001] P.0001
Sp
ecify whether or not to continue printing received faxes
when the toner is nearly out.
<Reduce RX Size>
<RX Page Footer>
<Continue Print. When
Toner Is Nearly Out>
* MF4890dw/MF4880dw only
O
On
- Reduction Ratio: Auto, 97%,
95%, 90%, 75%
- Reduction Direction: Vertical/
Horizontal, Vertical Only
O
On
O
On
Changing Communication Management Settings
Press [ ] (Menu).
1
Press [▲] or [
2
Press [▲] or [
3
Press [▲] or [
4
If you select <Fax Settings>, you can select a sub-item.
•
] to highlight <System Settings>, and then press [OK].
▼
] to highlight <Communication Management Settings>, and then press [OK].
▼
] to highlight the desired item, and then press [OK].
▼
• See “Communication Management Settings.”
Communication Mgt. Set
Fax Settings
Memory Lock Settings
Specify the setting values, and then press [OK].
5
Press [ ] (Menu) to close the screen.
6
70
Page 71

Communication Management Settings
Settings
<TX Start Speed>
tart Speed>
<RX S
<Memory Lock
tings>
Set
Options
Bold: Default settings
33600 bps
144
00 bps
9600 bps
7200 bps
4800 bps
240 0 bps
O
On
- Memory Lock PIN: Seven-digit number
- Report Print: O , On
- Memory Lock Time: O , On
Details
Change the transmission or receiving start speed if you
have di culty sending or receiving faxes.
Generally, received documents are immediately printed.
However, you can specify whether or not to store
received faxes in memory before printing. You can then
print the stored faxes at any time or delete them without
printing to save paper.
Fax
71
Page 72

Memo
7272
Page 73

Scan
This chapter describes the basic scan functions.
(→ p.106)
You can see frequentely asked
q
uestions about the scan function.
Understand the Scanning Method …………………………………… 74
Scan a Document with the Operation Panel ………………………… 75
Scanning a Document Using a Shortcut Key ………………………… 77
Scan a Document with the MF Toolbox ……………………………… 78
Con guring Scan Settings Using the MF Toolbox …………………… 80
Scan a Document with the Scanner Driver ………………………… 82
7373
Page 74

Basic
Method
Understand the Scanning Method
Scanning with
Detailed Scan
Settings
e
,
o
Various scanning methods are provided.
Basic
Method
onnect your
to
e machine.
Scan a Document with the Operation
Panel (
You can use the operation panel to scan an image, and
then send the image to a computer.
→p.75, p.77).
Scan a Document with the MF Toolbox
→p.78).
(
You can set the various scan settings with the MF
Tool box.
Scanning with
Detailed Scan
Settings
(Use a driver from a
computer)
t
t
e
Scan a Document with the Scanner Driver
→p.82).
c
(
You can set the various scan settings with the scanner
driver (ScanGear MF Window).
Scan a Document using WIA driver
For more details, see [Scanning] [Scanning Using
the WIA Driver (Windows XP/Vista/7/8 Only)] in the
e-Manual.
Scan a Document using a TWAIN driver
For more details, see [Scanning] [Scanning an Image
from an Application] in the e-Manual.
74
Page 75

Scan a Document with the Operation Panel
You can scan a document using the Scan mode.
Make sure that a computer and the machine are connected (See the
1
Starter Guide).
Place your documents (→p.19).
2
Switch to the Scan mode (→p.16).
3
Press [▲] or [
4
Select the scan type.
] to highlight <Computer>, and then press [OK].
▼
Scan
Computer
Remote Scanner
Press [▲] or [
5
When multiple computers are connected, the computer connected by a USB cable
•
is listed on the top.
Specify destination.
USER01
Press [▲] or [
6
<Color Scan>
<B&W Scan>
<Custom 1>
] to specify a destination, and then press [OK].
▼
] to specify the scan settings.
▼
• Scan the document in color (300 dpi), and then save as a
PDF le.
• PDF settings: Searchable/Compact
Scan the document in black and white (300 dpi), and then
ve as a TIFF le.
sa
Scan the document in color (300 dpi), and then save as a
G/Exif le.
JPE
<Custom 2>
• Scan the document in color (300 dpi), and then save as a
PDF le.
• PDF settings: Searchable/Standard
75
Page 76

Press [OK] to start scanning.
7
When placing your
documents in the feeder
When placing your
documents on the
ten glass
pla
Scanning operation starts.
1. To continuously scan the document, press [
[▼] to highlight <Scan Next Original>, and then
press [OK].
2. press [
▲] or [▼] to highlight <Store and Finish>,
and then press [OK].
• When scanning is complete, the folder that contains the scanned images is opened
on the screen of the computer.
▲] or
Canceling Scan Jobs
Press [ ] (Stop) twice.
* It is valid when only one job is processing or waiting.
Default Folder for Saving Scanned Images
By default, a new folder named after the date you scanned is created in the [Pictures] folder.
(For Windows XP, the folder is created in the [My Pictures] folder in [My Documents].)
76
Page 77

Scanning a Document Using a Shortcut Key
You can perform a scan easily by registering destinations and frequently used settings in
shortcut keys in advance.
Registering a Shortcut Key
Press [ ] (Menu).
1
Press [▲] or [
2
Press [▲] or [
3
[OK].
Press [▲] or [
4
To con rm the destination registered in the shortcut key, select
•
<Con rm Destination>.
Shortcut Key Settings
Register
Confirm Destination
Press [▲] or [
5
and then press [OK].
Press [▲] or [
6
Press [▲] or [
7
When a computer is connected by a USB cable, proceed to step 8.
•
Press [▲] or [
8
] to highlight <Scan Settings>, and then press [OK].
▼
] to highlight <Shortcut Key Settings>, and then press
▼
] to highlight <Register>, and then press [OK].
▼
] to highlight the shortcut key that you want to register,
▼
] to highlight the connection method, and then press [OK].
▼
] to highlight the destination, and then press [OK].
▼
] to highlight the scan settings, and then press [OK].
▼
Scan
• Scan the document in color (300 dpi), and then save as a
<Color Scan>
<B&W Scan>
<Custom 1>
<Custom 2>
Press [ ] (Menu) to close the screen.
9
PDF le.
• PDF settings: Searchable/Compact
Scan the document in black and white (300 dpi), and then
ve as a TIFF le.
sa
Scan the document in color (300 dpi), and then save as a
G/Exif le.
JPE
• Scan the document in color (300 dpi), and then save as a
PDF le.
• PDF settings: Searchable/Compact
77
Page 78

Performing a Scan Using a Shortcut Key
Make sure that the computer and the machine is connected (See the
1
Starter Guide).
Place documents (→p.19).
2
Press [ ] (Scan►PC1) or [ ] (Scan►PC2) into which the desired
3
destination is registered.
When placing your
documents in the feeder
When placing your
documents on the
ten glass
pla
• When scanning is complete, the folder that contains the scanned images is opened
on the screen of the computer.
Scanning operation starts.
1. To continuously scan the document, press [
[▼] to highlight <Scan Next Original>, and then
press [OK].
2. press [
▲] or [▼] to highlight <Store and Finish>,
and then press [OK].
Scanning operation starts.
▲] or
Scan a Document with the MF Toolbox
You can specify various scan settings if you select <Remote Scanner> from the operation
panel, and then open the MF Toolbox.
Make sure that a computer and the machine are connected properly, and
1
the MF Toolbox is installed on the computer (See the Starter Guide).
Place your documents (→p.19).
2
Use the platen glass for a higher scan quality.
•
Switch to the Scan mode (→p.16).
3
Press [▲] or [
4
Select the scan type.
Computer
Remote Scanner
From your computer, double-click the [Canon MF Toolbox 4.9] icon.
5
] to highlight <Remote Scanner>, and then press [OK].
▼
78
Page 79

When the MF Toolbox appears, click the desired scan mode button.
6
• The scan preset for an e-mail attachment is displayed.
[Mail]
[OCR]
[Save]
[PDF]
[Color Scan]
[B&
W Scan]
[Custom 1]
[Custom 2]
When the scan setting window appears, specify the scan settings as
7
needed (
→p.80).
• The scanned document will be attached to a new message
in your e-mail application.
• The scan preset for the OCR (Optical Character Reader) is
displayed.
• The scanned document will be read by your OCR software.
• The scan preset for a high quality scanning is displayed.
• The scanned document will be saved in the default folder
or in a destination that you specify.
• The scan preset for the multiple page searchable PDF is
displayed.
• The scanned document will be saved as a PDF le.
• The custom setting is displayed.
• The scanned document will be saved in a destination.
Scan
Click [OK] to start scanning.
8
When scanning is complete, the folder in which the scanned document is saved is
•
opened automatically.
• The scanned document will be opened in the registered application.
When scanning is complete, click [ ] to close the MF Toolbox.
9
79
Page 80

Con guring Scan Settings Using the MF Toolbox
This section describes the layout and features of each setting dialog box of the MF Toolbox.
For more details, see [Scanning] → [Using the MF Toolbox] in the
e-Manual.
• Set the location of a document to
be scanned.
• [Auto Mode] that detects
the source automatically is
recommended.
Set the size of the document to
be scanned.
• Set the color mode.
• This setting is not available when
scanning using the [Color Scan]
or [B&W Scan] button.
Example: When [Mail] or [PDF] menu is selected in MF Toolbox
• Set the size limit of attached les.
• This setting is available only when
scanning using the [Mail] button.
• Set the scanning resolution.
• If you select a higher resolution,
the image quality becomes higher,
and the le size becomes bigger.
• Set the le name, le type, and
location to be saved for the
scanned image.
• Manually set the location to save
the scanned image by clicking
[Browse].
• Select to specify the format or
location to save the scanned
image after scanning.
Reset the con gured settings to the
default values.
Scanning
starts.
80
Page 81

• Select to specify the scan settings using the
scanner driver (→p.82).
• When [Start] is clicked with this check box
selected, the [ScanGear MF] dialog box
appears.
• This check box is not available when you scan
using the [OCR] button.
Set the orientation of the document.
Set the PDF le type to save the scanned
image.
PDF (Single
Page)
PDF
ltiple
(Mu
Pages)
Creates a single-page
PDF le.
Save all scanned
images as a single PDF
l e .
• Add the scanned
image to the last
page of an existing
PDF (Add
es)
Pag
If you selected PDF as the le type, you
can create a searchable PDF. Also, you
can set the compression ratio.
PDF le.
• Click [Browse] on
[Save Scanned
Image to] to select a
PDF le to add.
Scan
• Set an application to display the scanned image.
• Click [Set] to select an application or drag and drop the
application icon.
• Click [Delete] to save the le without using the applications.
81
Page 82

Scan a Document with the Scanner Driver
If you use the scanner driver window (ScanGear MF Window), you can use various features
and scan only the necessary part with the preview function.
Make sure that a computer and the machine are connected properly, and
1
the MF Toolbox is installed on the computer (See the Starter Guide).
Place your documents (→p.19).
2
Switch to the Scan mode (→p.16).
3
Press [▲] or [
4
From your computer, double-click the [Canon MF Toolbox 4.9] icon.
5
When the MF Toolbox appears, click the desired scan mode button.
6
You may not use the ScanGear MF when using the [OCR] mode.
•
When the scan setting window appears, select the [Display the Scanner
7
Driver] check box, and then click [Start].
Select [Preview] on the scanner driver dialog box, and then specify
8
settings as needed.
] to highlight <Remote Scanner>, and then press [OK].
▼
Crops the borders detected in the preview image.
Deletes the selected cropping frames.
Rotates the image 90 degrees to the left.
Rotates the image 90 degrees to the right.
Specify various
scanner settings
on each tab.
82
You can preview the
image applied to the
scan setting values.
Click [Scan] to start scanning.
9
When scanning is complete, the folder in which the scanned document is saved
•
opens automatically.
• If an application is speci ed, the scanned document will be opened in the
application.
When scanning is complete, click [ ] to close the MF Toolbox.
10
Page 83

Maintenance and Management
This chapter describes how to clean the machine, replace the toner cartridge,
and explains the report and list functions used for managing the machine.
Clean the Machine …………………………………………………… 84
Cleaning the Exterior and Interior …………………………………… 84
Cl
eaning the Fixing Unit …………………………………………… 85
Cleaning the Platen Glass and Feeder ……………………………… 86
Check and Replace Toner Cartridges ………………………………… 87
Checking the Toner Level …………………………………………… 87
o
nserving the Toner to Extend the Life of Toner Cartridges ………… 88
C
Replacing the Toner Cartridge ……………………………………… 88
Manage Using the Report and List Functions ……………………… 91
n
gure Settings Using the Remote UI …………………………… 92
Co
83
Page 84

Clean the Machine
Clean the exterior and interior of the machine, platen glass, feeder, and the xing unit
periodically.
Cleaning the Exterior and Interior
Clean the exterior and interior of the machine to prevent toner powder and paper dust
from accumulating inside.
For safety, be sure to turn OFF the machine and disconnect all cables from
IMPORTANTIMPORTANT
Cleaning the Exterior
Turn OFF the machine and disconnect all the cables from the machine.
1
Remove any documents from the platen glass or feeder.
2
the machine before cleaning the machine. When you nish cleaning the
machine, wait for it to dry completely before reconnecting the power cord,
and then turn ON the power.
Clean the exterior of the machine and ventilation slots with a soft, well
3
wrung-out cloth dampened with water or a mild detergent that has been
diluted with water.
Wait for the printer to dry completely.
4
Reconnect all the cables, and then turn ON the power.
5
Cleaning the Interior
Turn OFF the machine and disconnect all the cables from the machine.
1
Remove any documents from the platen glass or feeder.
2
84
Lift the scanning platform, open the toner cover, and then remove the
3
toner cartridge.
Page 85

Remove any toner or paper debris from the interior of the machine, with
4
a soft, dry cloth that is clean and lint-free.
Insert the toner cartridge.
5
Close the toner cover, and then lower the scanning platform.
6
Reconnect all the cables, and then turn ON the power.
7
CAUTION
(A)(A)
When closing the scanning platform:
Be careful not to get your ngers caught.
Do not touch the xing
Touching the xing unit (A) may cause
s as it becomes very hot during use.
burn
If you get toner on your hands or
clothi
ng:
If toner gets on your hands or clothing,
h them immediately with cold water.
was
Washing with warm water makes it
impossible to remove the toner stains.
Cleaning the Fixing Unit
Clean the xing unit when black streaks appear on printed pages.
Press [ ] (Menu).
1
Press [▲] or [
2
[OK].
] to highlight <Adjustment/Maintenance>, and then press
▼
unit (A).
Maintenance and Management
Press [▲] or [
3
Load Letter size plain paper in the multi-purpose tray, and then press
4
[OK].
The cleaning process begins. Cleaning takes approximately 90 seconds.
•
When the cleaning is complete, press [ ] (Menu) to close the screen.
5
] to highlight <Clean Fixing Unit>, and then press [OK].
▼
85
Page 86

Cleaning the Platen Glass and Feeder
If a scanned image has unexpected specks, clean the platen glass and feeder.
Cleaning the Platen Glass
Turn OFF the machine and disconnect all the cables from the machine.
1
Remove any documents from the platen glass.
2
Open the feeder.
3
Clean the platen glass and the under surface of the feeder.
4
Clean the platen glass with a well wrung out cloth dampened with water and wipe it
•
with a soft, dry cloth.
Close the feeder.
5
Reconnect all the cables, and then turn ON the power.
6
Cleaning the Feeder
Turn OFF the machine and disconnect all the cables from the machine.
1
Remove any documents from the feeder.
2
Open the feeder cover, clean the rollers with a well wrung-out cloth
3
dampened with water, and then wipe them with a soft and dry cloth.
MF4890dw
MF4880dw/
MF4770n
86
Close the feeder cover.
4
Reconnect all the cables, and then turn ON the power.
5
Page 87

Check and Replace Toner Cartridges
Toner cartridges are consumable products. When the toner has almost run out, a message
appears in the display and streaks may appear on printed pages. Check the toner level, and
replace the toner cartridge if necessary.
Toner is nearly out.
Density: 0
Original Type: Text
2-Sided: Off
+
-
Check the toner level, as needed. See the bottom of this page.
Prepare toner
cartridge.
Density: 0
...
Original Type: Text
2-Sided: Off
+
-
Gently shake the toner cartridge 5-6 times to
evenly distribute the toner (→p.88).
When <Toner is nearly out.> message still
appears in display, or print result is not improved,
replace the toner cartridge (→p.88).
OR
...
Maintenance and Management
When the <Toner is nearly out.> message appears on the display, the
incoming faxes will be stored in the memory without printing. You can also
set to print the received faxes, however, the printed documents may be light
or blurred.
Press [
<Continue Print. When Toner Is Nearly Out> <On>, and then press
[OK].
] (Menu) <Fax RX Settings> <RX Print Settings>
Checking the Toner Level
Press [ ] (Status Monitor/Cancel).
1
Press [▲] or [▼] to highlight <Device Status>, and then press [OK].
2
Press [▲] or [▼] to highlight <Remaining Toner>, and then press [OK].
3
Check the toner level.
4
The toner level will appear as <OK>, <Low>, o r < Nearly Out>.
•
Press [ ] (Status Monitor/Cancel) to close the screen.
5
87
Page 88

CAUTION
If toner comes in
ntact with your
co
hands or clothing, wash
them immediately in
cold water. Do not use
warm water, as it will
set the toner and make
it di cult to remove
the toner stains.
Conserving the Toner to Extend the Life of Toner Cartridges
If you redistribute the toner, you may be able to print for some time until the toner runs out.
Lift the scanning platform, open the toner cover, and then remove the
1
toner cartridge.
Gently shake the toner cartridge 5-6 times to evenly distribute the toner.
2
Insert the toner cartridge.
3
88
Close the toner cover, and then lower the scanning platform.
4
Replacing the Toner Cartridge
You can purchase replacement toner cartridges from your local authorized Canon dealer.
Supported Canon Genuine Toner Cartridge:
Canon Cartridge 128
Page 89

Open the operation panel and the toner cover, and then remove the
1
toner cartridge.
Prepare a new toner cartridge.
2
Store the protective bag. It is required when you remove the toner cartridge for
•
printer maintenance or other purposes.
Shake the toner cartridge 5-6
times to evenly distribute the
toner.
IMPORTANTIMPORTANT
Maintenance and Management
Place the toner cartridge on a
at surface, remove the tab, and
carefully pull the sealing tape
completely out (20” (50 cm)).
When pulling out the sealing tape:
• Do not pull the sealing tape at an angle or up and down. If the tape
breaks, it may not be pulled out completely.
• Even if the sealing tape stops at midpoint, pull it out of the toner
cartridge completely.
• If any tape remains in the toner cartridge, this may result in poor print
quality. If you are using the Fax, please note that you can only print
the received data once, because the received data is deleted once it
is printed.
Disposing of the removed sealing tape:
Dispose of the packing materials according to local regulations.
89
Page 90

Insert the toner cartridge.
3
Close the toner cover, and then lower the scanning platform.
4
WARNING
Do not dispose of a used toner cartridge in open ames.
This may cause the toner remaining inside the cartridge to ignite, resulting in burns
re.
or a
When cleaning up spilled or scattered toner:
If you accidentally spill or scatter toner, carefully gather the toner particles together
e them up with a soft, damp cloth in a way that prevents inhalation.
or wip
Never use a vacuum cleaner that does not have safeguards against dust explosions
to clean up spilled toner. Doing so may cause a malfunction in the vacuum cleaner,
or result in a dust explosion due to static discharge.
CAUTION
Precautions to take when you get toner onto your hands or into clothing:
If toner comes in contact with your hands or clothing, wash them immediately in
ld water. Do not use warm water, as it will set the toner and make it di cult to
co
remove the toner stains.
Do not allow the toner to scatter.
Do not pull out the sealing tape forcefully or stop before it is removed, as this
y cause toner to spill out. If toner gets into your eyes or mouth, ush them
ma
immediately with cold water and immediately consult a physician.
• Follow all local and federal regulations when disposing of the sealing tape
removed from the new toner cartridge.
• Canon will collect and recycle your used toner cartridges (→p.108).
90
• For more details about handling toner cartridges, see [Handling Toner
Cartridges] in the e-Manual.
Page 91

Manage Using the Report and List Functions
Job No.
Address
Name
Start Time
Call Length
Sheets
Result
0123
0123456789
name
01/01 02:07 AM
01'15
1
NG
#018 Busy/No Signal
Print out reports or lists to view communication status, address book information, or
settings, for monitoring the machine.
Press [ ] (Report).
1
Press [▲] or [▼] to highlight <Print Report Lists>, and then press [OK].
2
Press [▲] or [
3
<Address Book List>
<User Data List> Information about the machine and settings
<Communication
Management
Report>
Follow the on-screen instructions to print the report or list.
4
Press [ ] (Report) to close the screen.
5
] to highlight a report or list, and then press [OK].
▼
Numbers that are registered in the address book (coded
dialing codes, one-touch keys, and groups)
Fax communication history
• To set the report not to be printed automatically, If an error occurs while
sending or receiving faxes, report is printed automatically. Con rm the error
code printed on the report and resolve the problem (→p.101).
Maintenance and Management
Error code
• To change when to print the send or receive result report, or
communication management list, select <Report Settings> at the step
2 above. For details, see [Basic Operation] [Printing the Report
Automatically] in the e-Manual.
• Report and list printouts are limited to 10 pages.
91
Page 92

Con gure Settings Using the Remote UI
If the machine is connected to a network, you can monitor and con gure the machine from
the computer using the Remote UI.
Con gure the network settings for the machine (See the Starter Guide)
1
Set the machine used on a TCP/IP network, and then connect the machine and a
•
computer to a network router or hub.
Start the web browser, enter “http://<the IP address of the machine>/” in
2
the address led, and then press [Enter] key on your keyboard.
Input Example: http://192.168.0.215/
•
Log on to the Remote UI.
3
92
[System Manager
Mode]
[End-User Mode]
When the setting screen is displayed, select the desired menu.
4
For more details, see [Setting and Managing from Computer] in the e-Manual.
•
You can use and con gure all features and settings of
the Remote UI.
You can check device status, con rm settings, and view
ou can also enter a user name to handle jobs with
jobs. Y
a matching user name.
Page 93

Troubleshooting
This chapter describes how to clear paper jams and o ers solutions to
problems you may be having.
Clear Jams …………………………………………………………… 94
Clearing Document Jams in the Feeder……………………………… 95
Cl
earing Paper Jams Inside the Machine …………………………… 96
Resolve a Displayed Message ………………………………………… 100
e a
Resolv
Improve Output Quality ……………………………………………… 102
Resolve a Problem …………………………………………………… 104
n Error Code ………………………………………………… 101
93
Page 94

Clear Jams
When <Paper jam.> appears on the display, a paper jam has occurred in the feeder or
inside the machine. To remove the jammed document or paper, follow the instructions on
the display.
Paper jam.
Press [ ] to
display steps.
WARNING
When removing jammed documents or paper:
Use caution to avoid paper cuts.
When removing jammed paper or inspecting the inside of the machine:
Do not allow necklaces, bracelets, or other metal objects to touch the inside of the
chine, as this may result in burns or electrical shock.
ma
CAUTION
If loose toner comes into contact with your skin or clothing:
Wash with cold water. Do not wash with warm water, as this will set the toner and
se it to stain your skin or clothing.
cau
When removing jammed documents or paper:
If paper is jammed, remove it carefully so that no pieces of paper remain inside the
machine according to the displayed message. Also, do not put your hand in an
area other than indicated areas, as this may result in personal injuries or burns.
IMPORTANTIMPORTANT
If the jammed paper is torn:
Remove all torn pieces to avoid further jams.
If repeated paper jams occur:
Do the following:
• Make sure that the following packing material is completely
removed.
This part (a plastic part
attached to the end of paper)
is also a packing material. Be
sure to remove it.
• Fan the paper stack and tap the edge on a at surface to align the
paper before loading it into the machine.
• Make sure that the paper meets the requirements for use (→ p.22).
• Make sure that you have removed all scraps of paper from the inside
of the machine.
94
Page 95

Clearing Document Jams in the Feeder
After removing any documents placed in the feeder, follow the procedure below to remove
jammed documents.
MF4890dw
Open the feeder cover and lift the lock release lever.
1
Remove any jammed document by pulling it gently.
2
Hold the green grip, and then open the inner cover.
3
Remove any jammed document by pulling it gently.
4
Close the inner cover.
5
Replace the release lever and close the feeder cover.
6
Trou bl esh oo ti ng
Place documents in the feeder.
7
95
Page 96

MF4880dw/MF4770n
Open the feeder cover.
1
Remove any jammed document by pulling it gently.
2
Close the feeder cover.
3
Place documents in the feeder.
4
Clearing Paper Jams Inside the Machine
Follow the procedure below to remove jammed paper.
StepStep
Lift the scanning platform, and then open the toner cover.
1
Remove the toner cartridge.
2
Remove any jammed paper by pulling it gently.
3
Check and remove the jammed paper inside the machine.
1
96
Page 97

Push up the green colored part (A), and then pull the paper exit guide (B)
4
to open.
(A)
Remove any jammed paper by pulling it gently.
5
Lift the paper exit guide, and then rmly close it.
6
Ensure that each end of the paper exit guide is closed.
•
Gently pull any jammed paper downward from between the xing unit
7
(B)
(A) and roller (B) until the leading edge emerges from the machine.
(A)
(B)
When the leading edge emerges, hold both sides of the jammed paper
8
and carefully pull it out.
Trou bl esh oo ti ng
97
Page 98

StepStep
Remove any jammed paper by pulling it gently.
1
Lift the dust cover, and then remove any paper loaded in the paper
2
cassette.
Remove any jammed paper by pulling it gently.
3
Check and remove the jammed paper in the paper cassette.
2
Reload paper into the paper cassette, and then lower the dust cover.
4
98
Page 99

Step
(MF4890dw/MF4880dw only)
Open the rear cover.
1
Remove any jammed paper by pulling it gently.
2
Close the rear cover.
3
Check and remove the jammed paper in the rear cover.
3
Step
Insert the toner cartridge.
1
Close the toner cover and lower the scanning platform.
2
Lower the scanning platform and restore to a printable
4
condition.
CAUTION
Do not touch the xing unit (A).
Touching the xing unit (A) may cause
s as it becomes very hot during
burn
use.
(A)(A)
Do not touch the transfer roller (B).
Touching the transfer roller may
damage the machine.
(A)(B)
Trou bl esh oo ti ng
99
Page 100

Resolve a Displayed Message
This section describes some of messages related to the toner, memory, and paper.
For more details about other messages, see [Tr oubl es ho ot ing ]
[Onscreen Messages] in the e-Manual.
Message Action
<Prepare toner
car
tridge.>
<Toner is nearly out.>
<Memory is full.>
<Memory is full.
Scanning c
Print?>
<Check toner
tridge.>
car
<Incorrect Size/Setting>
<No Paper: Drawer 1>
<No P
<Insert toner
cartridge.>
anceled.
aper: MP Tray>
The toner cartridge needs to be replaced soon. Prepare the replacement toner cartridge
(→p.88).
When the toner is evenly distributed inside the cartridge, it can be used for some time. If this
mes
age does not disappear, replace the toner cartridge (→p.88).
s
If this message is displayed while receiving a fax, the incoming fax will be stored in the
memory without being printed.
Reports may not be printed, even if they are set to be printed automatically.
• If there are any jobs waiting to be sent or printed, wait until the jobs are complete.
• Split the job into smaller subsets or reduce the scanning resolution and try to send them
again (→p.53).
• Print pages successfully scanned or cancel the job.
• Split the job into smaller subsets or change the <Original Type>. Change the document
type in <Photo -> . .. -> Te xt > order.
The toner cartridge needs to be replaced soon. Prepare the replacement toner cartridge. If
Canon ge
We recommend Canon genuine toner cartridges as replacement toner cartridges.
nuine toner cartridge is not used, this message can appear.
• Change the <Paper Settings> to the size of the loaded paper (→p.26).
• When printing with the printer driver, verify that the paper size setting on the computer is
correct.
Load paper same as the paper type displayed on the screen (
The toner cartridge is not inserted. Insert the toner cartridge.
→p.22).
100
 Loading...