

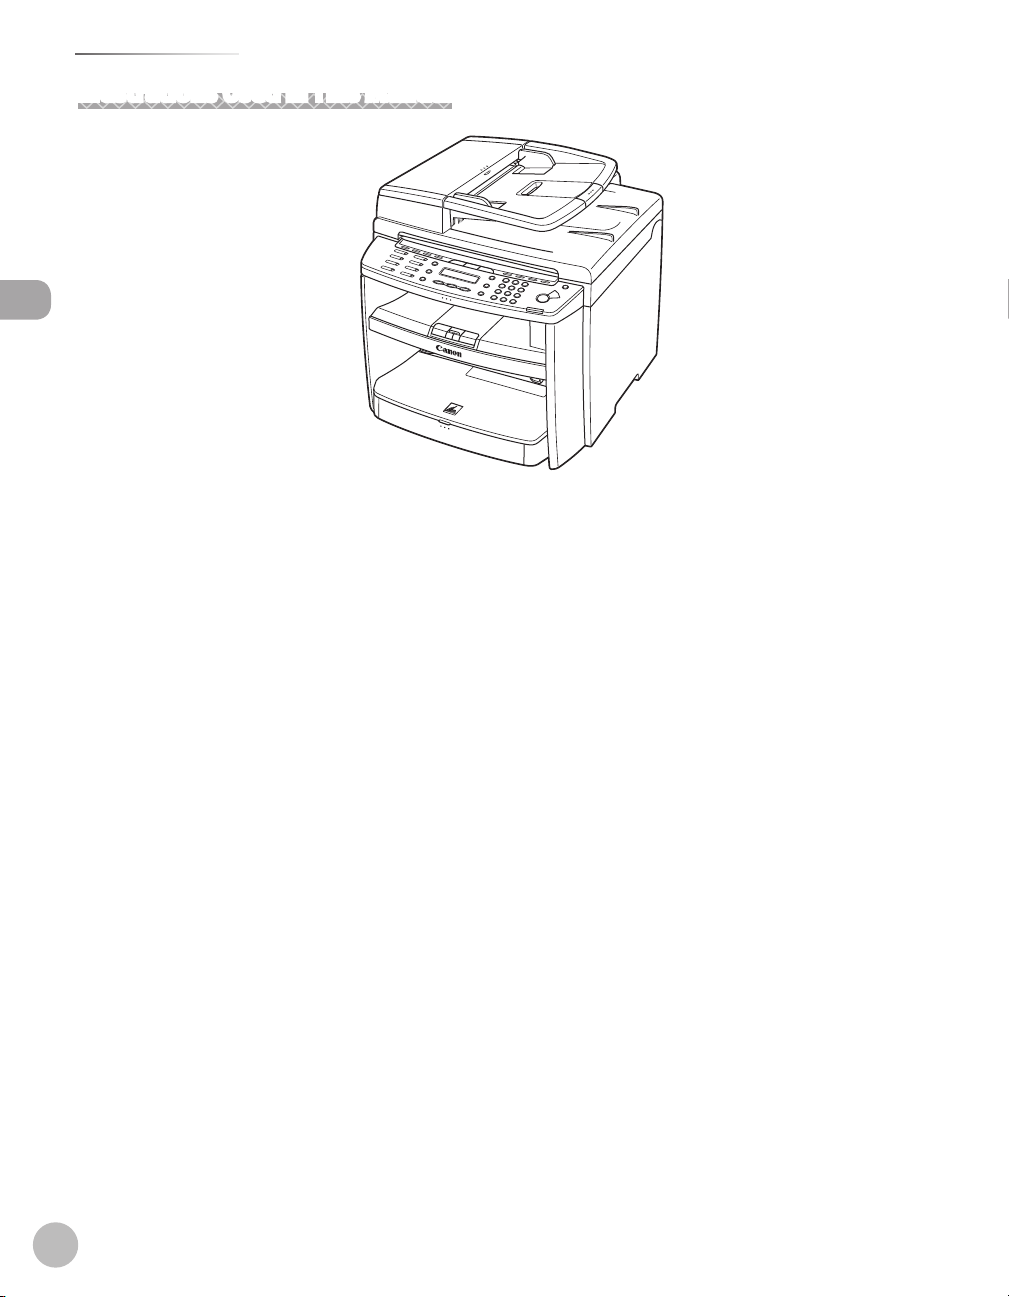
Canon 2711B019AB, imageCLASS MF4380dn, imageCLASS MF4350d, imageCLASS MF4330d, imageCLASS MF4370dn Basic Operation Manual
...
Basic Operation Guide
Before Using the Machine
Documents and Print Media
Registering Destinations in the Address Book
Copying
Fax
Printing
Scanning
Network
Settings from a PC
Maintenance
Troubleshooting
Machine Settings
Appendix
Please read this guide before operating this product.
After you finish reading this guide, store it in a safe place for future reference.

Manuals for the Machine
Manuals for the Machine
The manuals for this machine are divided as follows. Please refer to them for detailed information.
Read this manual first.
Overview of Machine Functions
Starter Guide
Read this manual to learn the
required settings and connections
before using the machine.
●
Set Up the Machine to Suit Your Purposes
●
Set Up the Machine
●
Make FaxSettings (MF4380dn/MF4370dn/
●
MF4350d/MF4340d Only)
Set Up Network Connection (MF4380dn/
●
MF4370dn Only)
Set Up Computers and Software
●
Appendix
●
Manuals for the Machine
Read this manual next.
Before Using the Machine
Basic Operation Guide
Read this manual to learn
information about basic operations
and machine functions.
Read the sections of these manuals that correspond to your intended use.
e-Manual
Read this manual to learn detailed
information about advanced
machine operations and functions,
and how to customize machine
settings.
To view the manuals in PDF format, Adobe Reader/Adobe Acrobat Reader is required. If Adobe Reader/
●
●
Documents and Print Media
●
Registering Destinations in the Address Book
●
Copying
●
Fax (MF4380dn/MF4370dn/MF4350d/
●
MF4340d Only)
Printing
●
Scanning
●
Network (MF4380dn/MF4370dn Only)
●
Settings from a PC (MF4380dn/MF4370dn
●
Only)
Maintenance
●
Troubleshooting
●
Machine Settings
●
Appendix
●
(Located on Manual CD)
Advanced features
●
Network settings (MF4380dn/MF4370dn Only)
●
Remote user interface (MF4380dn/MF4370dn
●
Only)
System settings
●
Troubleshooting
●
This Document
Adobe Acrobat Reader is not installed on your system, please download it from the Adobe Systems
Incorporated website.
●
Considerable effort has been made to make sure that the manuals for the machine are free of inaccuracies
and omissions. However, as we are constantly improving our products, if you need an exact specification,
please contact Canon.
●
The machine illustration in this manual may differ slightly from your machine.
i
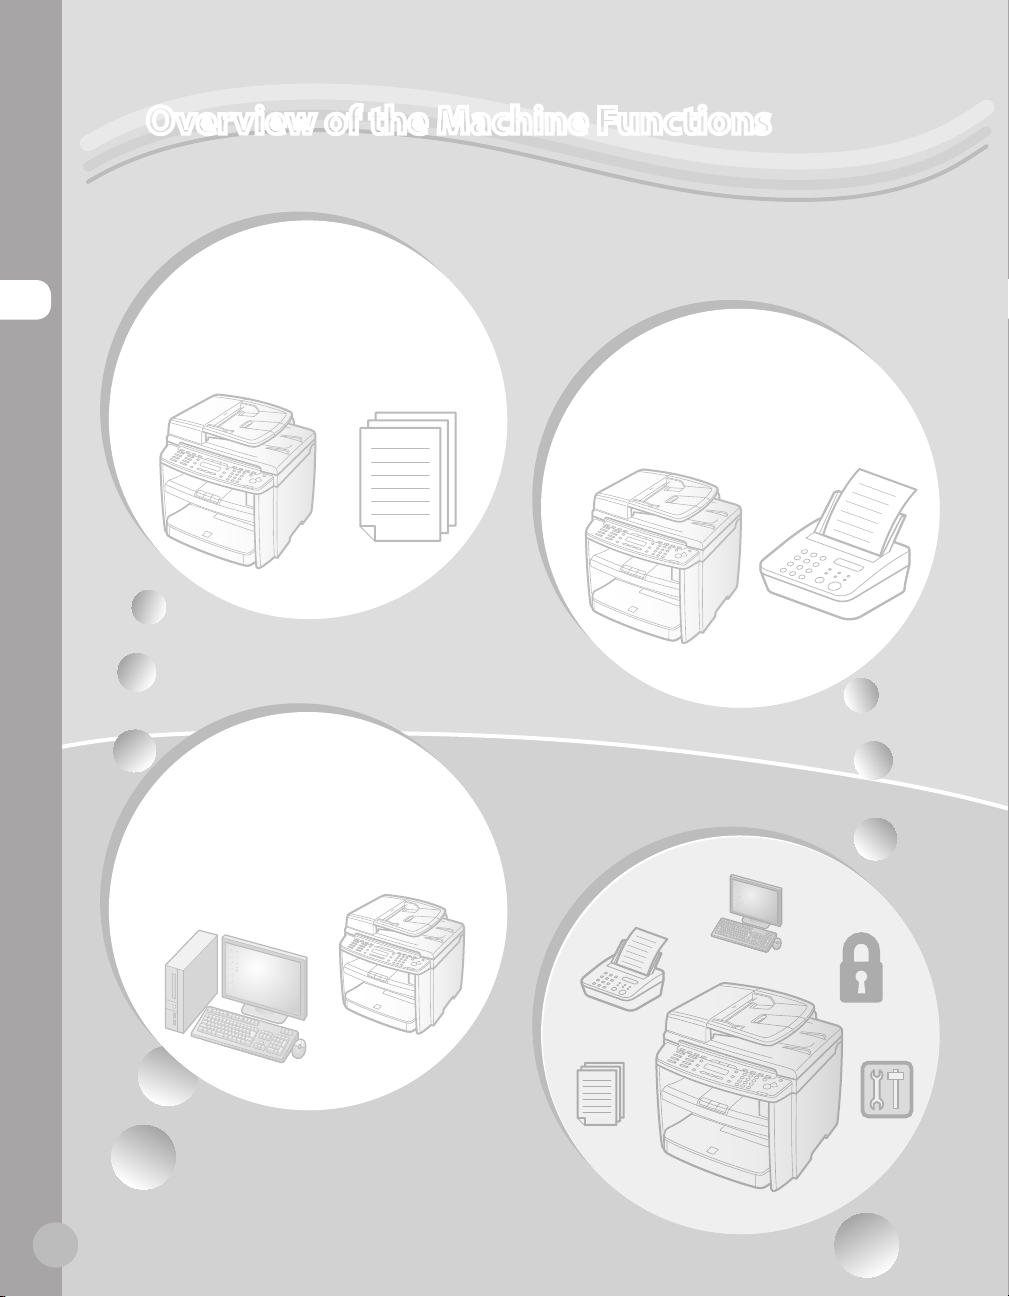
Overview of the Machine Functions
Depending on the system configuration and product purchased, some functions may not be
available.
Copying
Overview of the Machine Functions
You can use various copy functions.
Basic Operation Guide
Copying (see on p. 4-1)
e-Manual
Copy
Printing
You can use various print functions
by printing from a computer.
Basic Operation Guide
Printing (see on p. 6-1)
e-Manual
Print
Faxing
(MF4380dn/MF4370dn/
MF4350d/MF4340d Only)
In addition to the normal faxing, you can
send faxes from a computer.
Basic Operation Guide
Fax (see on p. 5-1)
e-Manual
Fax
ii
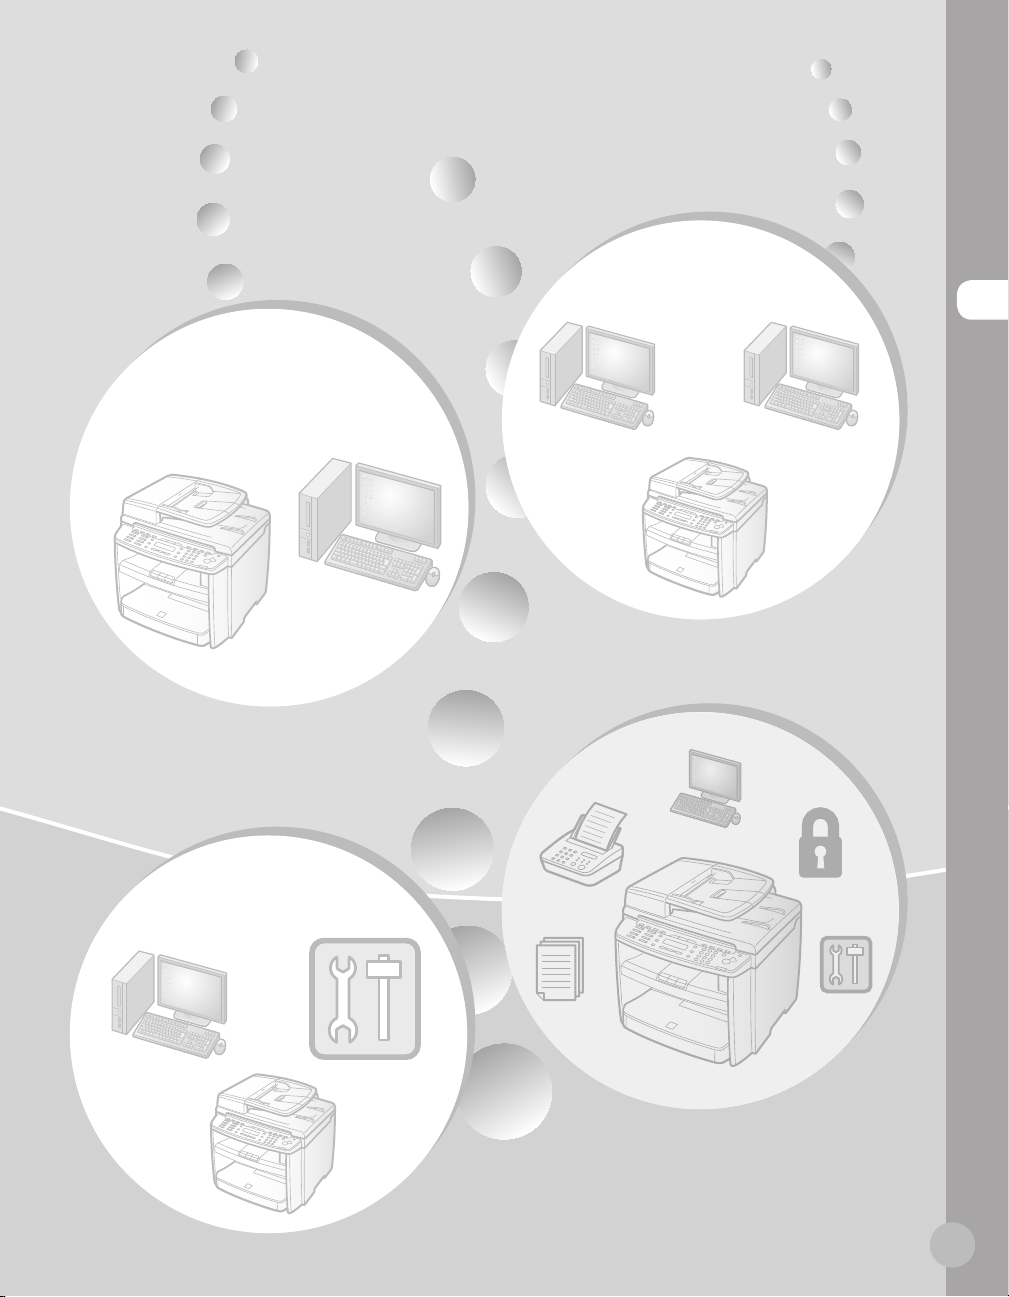
Network
(MF4380dn/MF4370dn Only)
Overview of the Machine Functions
Scanning
You can retrieve documents scanned
with this machine to your computer.
Basic Operation Guide
Scanning (see on p. 7-1)
e-Manual
Scan
Remote User
Interface
(MF4380dn/MF4370dn Only)
This machine can be connected to a
network. Connecting to a network enables
you to use various functions.
Basic Operation Guide
Network (see on p. 8-1)
e-Manual
Network Settings
You can set and manage this machine
easily and quickly from a computer.
Basic Operation Guide
Settings from a PC (see on p. 9-1)
e-Manual
Settings from a PC
iii

Contents
Manuals for the Machine ..................................i
Preface .............................................................viii
Available Features .............................................viii
How to Use This Guide .................................... ix
Symbols Used in This Manual ......................... ix
Contents
Keys and Buttons Used in This Manual ........ ix
Abbreviations Used in This Manual .............. ix
Illustrations Used in This Manual .....................x
Safety Precautions ........................................... xi
Important Safety Instructions ......................... xi
Handling and Maintenance ............................. xi
Location ................................................................. xii
Power Supply ......................................................xiv
Telephone Equipment ..................................... xiv
Legal Notices ................................................... xv
IPv6 Ready Logo .................................................xv
Trademarks ........................................................... xv
Copyright..............................................................xvi
Third Party Software ........................................ xvii
The Software Subjected to the Other
Conditions ..........................................................xviii
Disclaimers .........................................................xviii
Legal Limitations on the Usage of Your
Product and the Use of Images ..................xviii
Laser Safety .................................................... xix
1 Before Using the Machine ......1-1
Machine Components ..................................1-2
External View (Front) ....................................... 1-2
External View (Back) ........................................1-5
Operation Panel .............................................1-8
Main Operation Panel ..................................... 1-8
Fax Operation Panel (MF4380dn/
MF4370dn/MF4350d/MF4340d Only) .... 1-11
Display (Standby Mode) ............................ 1-12
Copy Mode .......................................................1-12
Fax Mode (MF4380dn/MF4370dn/
MF4350d/MF4340d Only) ...........................1-12
Scan Mode ........................................................1-12
oner Cartridge ........................................... 1-13
T
Maintaining the Toner Cartridge ..............1-14
Checking the Toner Level ............................1-14
Entering Characters ................................... 1-16
Telephone Line Settings ............................ 1-17
Timer Settings ............................................. 1-18
Setting the Sleep Mode ...............................1-18
Setting the Daylight Saving Time .............1-19
2 Documents and Print
Media ...................................... 2-1
Documents Requirements ...........................2-2
Scanning Area ................................................2-3
Placing Documents .......................................2-4
On the Platen Glass .......................................... 2-4
In the ADF (MF4380dn/MF4370dn/
MF4350d/MF4330d Only) ............................. 2-5
Paper Requirements .....................................2-6
Printable Area ................................................2-7
Loading Paper ................................................2-8
In the Paper Cassette ...................................... 2-8
In the Multi-Purpose Tray ............................2-11
Setting Paper Size and Type ..................... 2-14
For the Paper Cassette ..................................2-14
For the Multi-Purpose Tray ..........................2-15
3 Registering Destinations in the
Address Book
(MF4380dn/MF4370dn/
MF4350d/MF4340d Only) ......3-1
About the Address Book ..............................3-2
iv

Contents
Storing/Editing One-Touch Keys ................3-3
Registering One-Touch Keys ........................ 3-3
Editing One-Touch Keys ................................. 3-3
Erasing One-Touch Keys ................................. 3-4
Storing/Editing Coded Dial Codes .............3-6
Registering Coded Dial Codes ..................... 3-6
Editing Coded Dial Codes .............................. 3-6
Erasing Coded Dial Codes ............................. 3-7
Storing/Editing Recipients for Group
Dialing .............................................................3-9
Registering Group Addresses....................... 3-9
Adding New Destination to Group ..........3-10
Deleting Destination from Group ............3-10
Changing Group Name ................................ 3-11
Deleting Group Addresses ..........................3-11
4 Copying ..................................4-1
Overview of Copy Functions .......................4-2
Basic Copying Method ..................................4-4
Canceling Copy Jobs .....................................4-5
Selecting Image Quality ...............................4-6
Adjusting Density ..........................................4-8
Adjusting Automatically ................................ 4-8
Adjusting Manually .......................................... 4-9
Enlarge/Reduce Images ............................ 4-10
Preset Zoom .....................................................4-10
Custom Copy Ratio ........................................ 4-11
Collating Copies .......................................... 4-13
Multiple Documents onto One Sheet
(2 on 1) .......................................................... 4-15
2 on 1 Combination ....................................... 4-15
Copying ID Card .............................................. 4-16
2-Sided Copying ......................................... 4-18
1 to 2-Sided Copying .....................................4-19
2 to 2-Sided Copying (MF4380dn
Only) .................................................................... 4-20
2 to 1-Sided Copying (MF4380dn
Only) .................................................................... 4-21
Selecting Paper Size Group ...................... 4-22
Changing Standard Mode ......................... 4-23
Viewing Copy Settings .............................. 4-24
5 Fax (MF4380dn/MF4370dn/
MF4350d/MF4340d Only) ......5-1
Overview of Fax Functions ..........................5-2
Introduction to Using Fax Functions .........5-4
Methods for Receiving Faxes........................ 5-4
Selecting the Receive Mode .......................5-10
Setting the Current Date and Time ..........5-11
Setting the Type of Telephone Line .........5-11
Registering the Machine’s Name ..............5-12
Registering Your Machine’s Fax
Number ..............................................................5-12
Sending Fax Documents ........................... 5-13
Basic Methods for Sending Faxes .............5-13
Calling from an Extension ...........................5-13
Calling the Recipient before Sending
Fax Documents (Manual Sending) ........... 5-14
Switching Temporarily to Tone Dialing ...5-15
Dialing an Overseas Number (With
Pauses)................................................................5-16
Basic Methods for Sending PC Faxes .......5-17
Canceling Sending Fax Documents ........ 5-18
Specifying Destinations ............................ 5-19
Specifying a New Fax Number ...................5-19
Using the One-Touch Keys ..........................5-20
Using Coded Dial Codes ..............................5-20
Using the Group Addresses ........................5-21
Using the Address Book Key .......................5-21
Sending Documents to More Than
One Location (Broadcasting) ......................5-22
Adjusting Density ....................................... 5-24
Selecting Image Quality ............................ 5-25
2-Sided Document (MF4380dn Only) ..... 5-26
Redialing When the Line Is Busy .............. 5-27
Redialing Manually ........................................5-27
Redialing Automatically ............................... 5-27
Checking the Dial Line before Sending .. 5-29
Changing Standard Mode ......................... 5-30
Printing the TX Terminal ID ....................... 5-31
Contents
v

Contents
Send Start Speed ........................................ 5-32
Registering the Outside Line Access
Number in the R-Key .................................. 5-33
Printing Received Documents on Both
Sides of Paper .............................................. 5-34
Reducing a Received Document .............. 5-35
Printing Footer Information on a
Received Document ................................... 5-36
Contents
Specifying the Way of Printing When
Toner Runs Out ........................................... 5-37
Setting the Incoming Ring ........................ 5-38
Receiving Documents Manually with an
External Telephone (Remote RX) ............. 5-39
Activating the Remote Reception ............ 5-39
Receiving Documents with the Remote
Reception .......................................................... 5-40
Selecting the Receive Mode for
Printing ......................................................... 5-41
Rejecting Incoming Faxes from the
Unidentified Senders ................................. 5-42
Receive Start Speed ................................... 5-43
Receiving Documents in Memory
without Printing Out (Memory Lock
Reception) .................................................... 5-44
Printing All Documents Stored in the
Memory Lock Reception Mode ................ 5-46
Forwarding Received Fax Documents in
Memory ........................................................ 5-47
Checking/Changing the Status of Fax
Documents in Memory .............................. 5-48
Checking/Deleting Fax Transmission
Documents .......................................................5-48
Checking/Deleting Fax Reception
Documents .......................................................5-49
Checking the Fax Log ....................................5-49
Scaling Documents .......................................6-7
rinting Multiple Pages on One Sheet ......6-9
P
2-Sided Printing .......................................... 6-10
Checking and Canceling Print Jobs ......... 6-11
7 Scanning ................................. 7-1
Overview of Scanner Functions ..................7-2
Introduction to Using Scanner
Functions .........................................................7-3
For Scanning Documents to a Computer
Connected with USB Cable ........................... 7-3
For Scanning Documents from a
Networked Computer (MF4380dn/
MF4370dn Only) ............................................... 7-3
Basic Scanning Operations ..........................7-4
Scanning Documents to a Computer
Connected with USB Cable ........................... 7-4
Scanning Documents from a
Networked Computer (MF4380dn/
MF4370dn Only) ............................................... 7-4
Canceling Scan Jobs to a Computer
Connected with USB Cable ........................... 7-5
8 Network (MF4380dn/
MF4370dn Only) ..................... 8-1
Flowchart for Setting Up Network .............8-2
What is the Network? ....................................8-3
Overview of Network Functions .................8-4
9 Settings from a PC
(MF4380dn/MF4370dn Only)
Overview of Remote UI ................................9-2
Starting the Remote UI .................................9-4
..9-1
6 Printing ...................................6-1
Overview of the Print Functions .................6-2
Introduction to Using Print Functions .......6-4
Printing Documents from a Computer ......6-5
vi
10 Maintenance ........................10-1
Cleaning the Machine ................................ 10-2
Exterior ...............................................................10-2
Interior ................................................................ 10-2

Contents
Fuser Roller ....................................................... 10-5
Scanning Area ..................................................10-6
Replacing the Toner Cartridge ................. 10-9
When a Message Appears ...........................10-9
Redistributing Toner ................................... 10-10
Replacing the Toner Cartridge with a
New One ......................................................... 10-12
Transporting the Machine ...................... 10-16
For MF4380dn/MF4370dn ....................... 10-16
For MF4350d/MF4340d/MF4330d/
MF4320d ......................................................... 10-19
11 Troubleshooting ..................11-1
Clearing Jams .............................................. 11-2
Document Jams .............................................. 11-2
Paper Jams ........................................................11-5
Error Messages .......................................... 11-16
Error Codes ................................................ 11-19
If <LOAD CORRECT PAPER> is
displayed .................................................... 11-20
Reloading the Paper ................................... 11-20
Changing the Paper Size Setting ........... 11-20
If a Power Failure Occurs (MF4380dn/
MF4370dn/MF4350d/MF4340d Only) .. 11-21
If You Cannot Solve a Problem ............... 11-22
FAX SETTINGS (MF4380dn/MF4370dn/
MF4350d/MF4340d Only) ...........................12-6
ADDRESS BOOK SET. (MF4380dn/
MF4370dn/MF4350d/MF4340d Only) .... 12-7
PRINTER SETTINGS .........................................12-7
TIMER SETTINGS .............................................12-8
ADJUST./CLEANING .......................................12-9
REPORT SETTINGS (MF4380dn/
MF4370dn/MF4350d/MF4340d Only) .... 12-9
SYSTEM SETTINGS ....................................... 12-10
13 Appendix ..............................13-1
Specifications .............................................. 13-2
General ...............................................................13-2
Copier .................................................................13-4
Printer .................................................................13-4
Scanner (Scanning via USB) ........................13-4
Scanner (Scanning via Network) ............... 13-4
Facsimile ............................................................13-5
Telephone .........................................................13-5
Index ............................................................. 13-6
Contents
12 Machine Settings .................12-1
Machine Settings ........................................ 12-2
Printing USER DATA LIST ..............................12-2
Accessing the Setting Menu .......................12-2
Setting Menu ............................................... 12-4
VOLUME CONTROL SETTINGS
(MF4380dn/MF4370dn/MF4350d/
MF4340d Only) ................................................12-4
BROADCAST (MF4380dn/MF4370dn/
MF4350d/MF4340d Only) ...........................12-4
COMMON SETTINGS ...................................... 12-4
COPY SETTINGS ...............................................12-5
vii
Preface
Preface
Thank you for choosing a Canon product. Before using the machine, please read the
following instructions for your safety.
Model Names
F156602 (MF4380dn/MF4370dn/MF4350d/MF4340d)
Preface
F156600 (MF4330d/MF4320d)
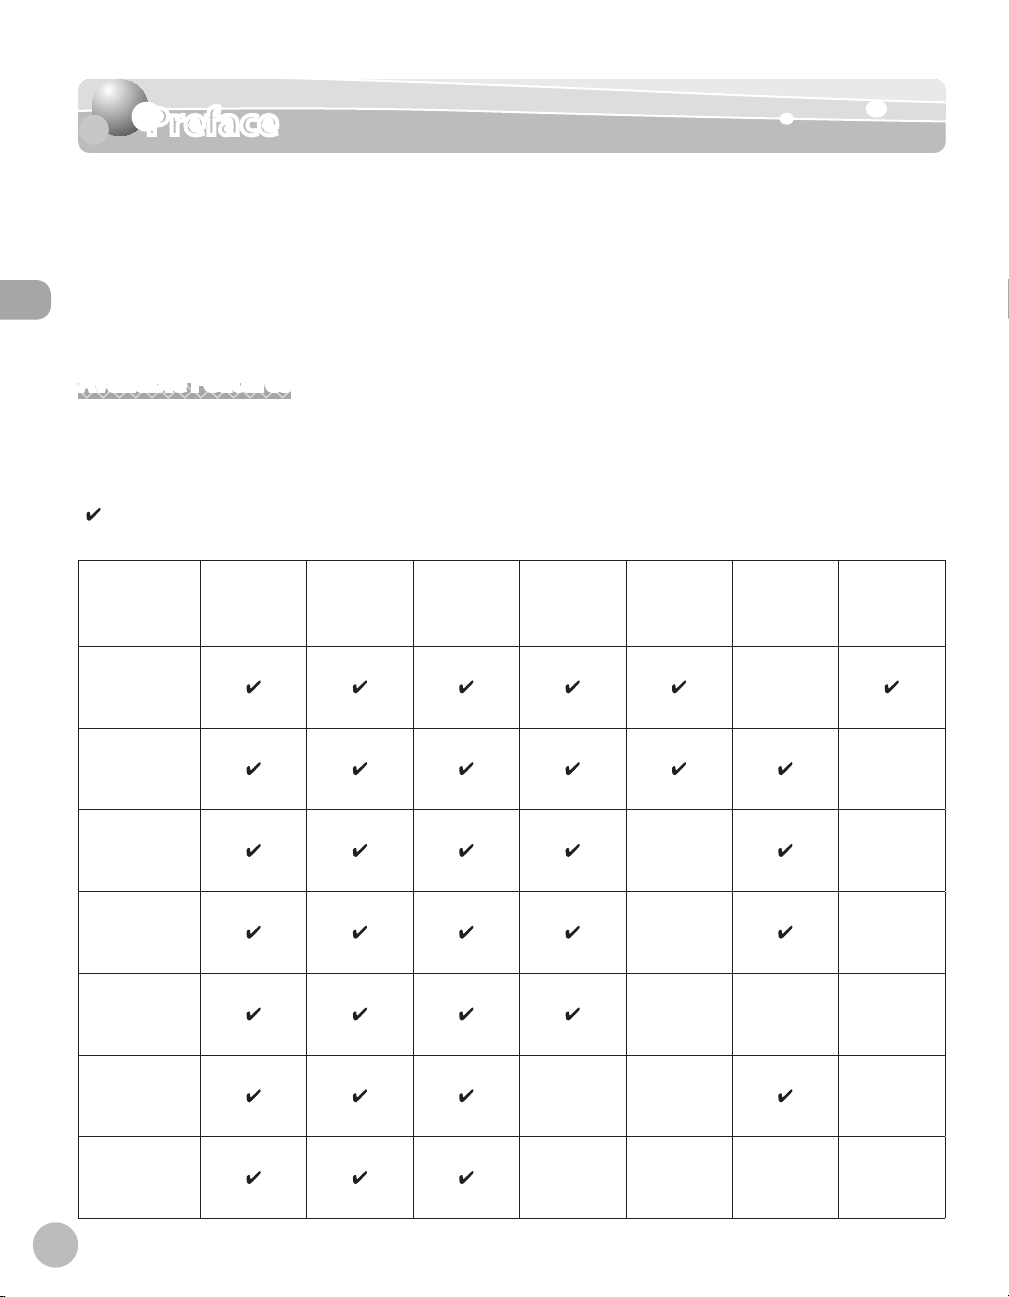
Available Features
The procedures described in this manual are based on the imageCLASS MF4380dn. Depending on the system
configuration and product purchased, some features described in the manuals may not be functional. The
table below shows the available features on a product basis.
: available
—: not available
imageCLASS
MF4380dn
imageCLASS
MF4370dn
imageCLASS
MF4350d
imageCLASS
MF4350d
imageCLASS
MF4340d
imageCLASS
MF4330d
COPY PRINT SCAN FAX
— — —
Remote UI
(Network
Board)
Simplex
ADF
—
— —
— —
— — —
Duplex
ADF
—
viii
imageCLASS
MF4320d
— — — —

How to Use This Guide
How to Use This Guide
Symbols Used in This Manual
The following symbols are used in this manual to explain procedures, restrictions, handling precautions, and
instructions that should be observed for safety.
Indicates a warning that may lead to death or serious injury if not observed.
Explains how to avoid actions that could injure you or damage your machine.
Explains operating restrictions and how to avoid minor difficulties.
Keys and Buttons Used in This Manual
The following symbols and key names are a few examples of how keys to be pressed are expressed in this
manual.
Operation Panel Keys: <Key icon> + [Key name]
–
Example:
Buttons on the computer operation screen: [Button name]
–
Example: [OK]
Information in the display appears in angle brackets: <LOAD PAPER>.
–
[Stop/Reset].
Abbreviations Used in This Manual
In this manual, product names and model names are abbreviated as follows:
Microsoft Windows 2000 operating system : Windows 2000
Microsoft Windows XP operating system : Windows XP
Microsoft Windows Vista operating system : Windows Vista
Microsoft Windows 7 operating system : Windows 7
Microsoft Windows Server 2003 operating system : Windows Server 2003
Microsoft Windows Server 2008 operating system : Windows Server 2008
Microsoft Windows operating system : Windows
How to Use This Guide
ix
How to Use This Guide
Illustrations Used in This Manual
How to Use This Guide
Illustrations used in this manual are the model MF4380dn. When there is any difference among MF4380dn,
MF4370dn, MF4350d, MF4340d, MF4330d, and MF4320d, it is clearly indicated in the text, e.g., “For
MF4380dn.”
For information on the standard features for each model, see “Available Features,
” on p. viii.
The display used in this manual is the factory preset display for the MF4380dn in default setting. Depending
on the system configuration and product purchased, the appearance of the display may differ.
x
Safety Precautions
Safety Precautions
Important Safety Instructions
Except as specifically described in this guide, do not attempt to service the machine yourself. Never attempt to disassemble the
machine: opening and removing its interior covers will expose you to dangerous voltages and other risks. For all service, contact your
local authorized Canon dealer.
Handling and Maintenance
Be careful when removing printed paper from output trays or when aligning it, because it may be hot and result in burn injury.
Follow all warnings and instructions marked on the machine.
–
Do not subject the machine to strong physical shocks or vibrations.
–
Always unplug the machine before moving or cleaning it.
–
To avoid paper jams, never unplug the power cord, open the left cover or add or remove paper in the
–
machine while printing.
When transporting the machine, be sure to remove the toner cartridge from the machine.
–
Place the toner cartridge in its original protective bag or wrap it in a thick cloth to prevent exposure to light.
–
Always grip the handle on the sides of the machine when you lift the machine. Never lift the machine by
–
any of its trays or attachments.
Do not insert any objects into the slots or openings on the machine since they may touch dangerous
–
voltage points or short out parts. This could result in fire or electric shock.
Do not allow small objects (such as pins, paper clips, or staples) to fall into the machine.
–
To avoid spillage in or around the machine, do not eat or drink near it.
–
Keep the machine clean. Dust accumulation can prevent the machine from operating properly.
–
Toner cartridge for this machine will be available for at least seven (7) years (or any such longer period as
–
required by applicable laws) after production of this machine model has been discontinued.
Unplug the machine from the wall outlet and contact your local authorized Canon dealer in any of the
–
following cases:
When the power cord or plug is damaged or frayed.
•
If liquid or small object has fallen into the machine.
•
If the machine has been exposed to rain or water.
•
If the machine does not operate normally when you have followed the instructions in this guide. Adjust
•
only those controls that are covered by the instructions in this guide. Improper adjustment of other
controls may result in damage and may require extensive work by a qualified technician to restore the
product to normal operation.
If the machine has been dropped.
•
If the machine exhibits a distinct change in performance, indicating a need for servicing.
•
Safety Precautions
xi

Safety Precautions
–
–
Location
–
–
Safety Precautions
–
–
–
–
–
–
–
–
–
Do not place your hands, hair, clothing, etc., near the exit and feed rollers. Even if the machine is not in
operation, your hands, hair, or clothing may get caught in the rollers, which may result in personal injury or
damage if the machine suddenly starts printing.
Be careful when removing printed paper from paper delivery tray or when aligning it, because it may be hot
and result in burn injury.
Place the machine on a flat, stable, vibration-free surface that is strong enough to support its weight.
Place the machine in a cool, dry, clean, well ventilated place.
Make sure the area is free from dust.
Make sure the location is not exposed to high temperature or humidity.
Keep the machine away from direct sunlight as this can damage it. If you have to place the machine near a
window, install heavy curtains or blinds.
Do not use the machine near water. Make sure that no wet or humid objects come into contact with the
machine.
Do not use or store the machine outdoors.
Do not place the machine near devices that contain magnets or generate magnetic fields, such as speakers.
If possible, place the machine near an existing telephone line outlet for easy connection of the telephone
line cord, and to avoid the expense of installing a new outlet.
Place the machine near a standard 220-240 V AC (50/60 Hz) power outlet.
To ensure reliable operation of the machine and to protect it from overheating (which can cause it to
operate abnormally and create a fire risk), do not block the exhaust vent. Never block or cover any openings
on the machine by placing it on a bed, sofa, rug, or other similar surface. Do not place the machine in a
cupboard or built-in installation, or near a radiator or other heat source unless proper ventilation is
provided. Leave at least 100 mm around all sides of the machine.
xii

MF4380dn
●
●
MF4370dn
Safety Precautions
Safety Precautions
●
MF4350d/MF4330d
xiii

Safety Precautions
MF4340d/MF4320d
●
Safety Precautions
Do not stack boxes or furniture around the power outlet. Keep the area free so you can reach the outlet
–
quickly. If you notice anything unusual (smoke, strange odors, noises) around the machine, unplug the
power cord immediately. Contact your local authorized Canon dealer.
–
Do not allow anything to rest on the power cord, and do not place the machine where the cord will be
walked on. Make sure the cord is not knotted or kinked.
Power Supply
–
During electrical storms, unplug the power cord from the power outlet. (Any sent or received documents
stored in memory are backed up for about 5 minutes.)
–
Whenever you unplug the power cord, wait at least five seconds before you plug it in again.
–
Do not plug the power cord into an uninterruptible power supply (UPS).
This product emits low level magnetic flux. If you use a cardiac pacemaker and feel abnormalities, please move away from this product
and consult your doctor.
Telephone Equipment
When using telephone equipment, basic safety precautions should always be followed to reduce the risk of fire, electric shock, and
injury to persons, including the following:
1. Do not use this machine near water (i.e., near a bathtub, kitchen sink, or laundry tub), or in a wet basement or near a swimming pool.
2. Avoid using the telephone during an electrical storm, as there may be a remote risk of electric shock from lightning.
3. Do not use the telephone to report a gas leak in the vicinity of the leak.
xiv
Legal Notices
Legal Notices
As an ENERGY STAR Partner, Canon Inc. has determined that this product meets the
ENERGY STAR Program for energy efficiency.
The International ENERGY STAR Office Equipment Program is an international program
that promotes energy saving through the use of computers and other office
equipment.
The program backs the development and dissemination of products with functions
that effectively reduce energy consumption. It is an open system in which business
proprietors can participate voluntarily.
The targeted products are office equipment, such as computers, displays, printers,
facsimiles, and copiers. The standards and logos are uniform among participating
nations.
Legal Notices
IPv6 Ready Logo
The protocol stack included in this machine has obtained the IPv6 Ready Logo Phase-
1 established by the IPv6 Forum.
Trademarks
Canon, the Canon logo, and imageCLASS are registered trademarks of Canon Inc. in the United States and
may also be trademarks or registered trademarks in other countries.
Microsoft, Windows, Windows Server and Windows Vista are trademarks or registered trademarks of Microsoft
Corporation in the U.S. and/or other countries.
All other product and brand names are registered trademarks, trademarks or service marks of their respective
owners.
xv

Legal Notices
Copyright
Copyright © 2009 by Canon Inc. All rights reserved. No part of this publication may be reproduced,
transmitted, transcribed, stored in a retrieval system, or translated into any language or computer language in
any form or by any means, electronic, mechanical, magnetic, optical, chemical, manual, or otherwise, without
the prior written permission of Canon Inc.
This product contains software made available to Canon Inc. or its licenser(s) under the terms (a) through (c)
listed below.
Legal Notices
(a)
Copyright © 1990 The Regents of the University of California.
All rights reserved.
Redistribution and use in source and binary forms are permitted provided that the above copyright notice
and this paragraph are duplicated in all such forms and that any documentation, advertising materials, and
other materials related to such distribution and use acknowledge that the software was developed by the
University of California, Berkeley. The name of the University may not be used to endorse or promote products
derived from this software without specific prior written permission.
THIS SOFTWARE IS PROVIDED “AS IS’’ AND WITHOUT ANY EXPRESS OR IMPLIED WARRANTIES, INCLUDING,
WITHOUT LIMITATION, THE IMPLIED WARRANTIES OF MERCHANTABILITY AND FITNESS FOR A PARTICULAR
PURPOSE.
The software was developed by the University of California, Berkeley.
(b)
Copyright © 1995, 1996 Cygnus Support.
All rights reserved.
Redistribution and use in source and binary forms are permitted provided that the above copyright notice
and this paragraph are duplicated in all such forms and that any documentation, advertising materials, and
other materials related to such distribution and use acknowledge that the software was developed at Cygnus
Support, Inc. Cygnus Support, Inc. may not be used to endorse or promote products derived from this
software without specific prior written permission.
THIS SOFTWARE IS PROVIDED “AS IS’’ AND WITHOUT ANY EXPRESS OR IMPLIED WARRANTIES, INCLUDING,
WITHOUT LIMITATION, THE IMPLIED WARRANTIES OF MERCHANTABILITY AND FITNESS FOR A PARTICULAR
PURPOSE.
The software was developed at Cygnus Support, Inc.
xvi

Legal Notices
(c)
Copyright © 1994, 1997 Cygnus Solutions.
All rights reserved.
Redistribution and use in source and binary forms are permitted provided that the above copyright notice
and this paragraph are duplicated in all such forms and that any documentation, advertising materials, and
other materials related to such distribution and use acknowledge that the software was developed at Cygnus
Solutions. Cygnus Solutions may not be used to endorse or promote products derived from this software
without specific prior written permission.
THIS SOFTWARE IS PROVIDED “AS IS’’ AND WITHOUT ANY EXPRESS OR IMPLIED WARRANTIES, INCLUDING,
WITHOUT LIMITATION, THE IMPLIED WARRANTIES OF MERCHANTABILITY AND FITNESS FOR A PARTICULAR
PURPOSE.
The software was developed at Cygnus Solutions.
Third Party Software
This product includes software and/or software modules that are licensed by third parties (LICENSORS). Use
and distribution of this software and/or software modules (the “SOFTWARE”) are subject to conditions (1)
through (9) below unless the other conditions accompany the software and/or software module. In such
cases, these software and/or software module are subject to the other conditions.
Legal Notices
(1) You agree that you will comply with any applicable export control laws, restrictions or regulations of the
countries involved in the event that the SOFTWARE is shipped, transferred or exported into any country.
(2) LICENSORS retain in all respects the title, ownership and intellectual property rights in and to the
SOFTWARE. Except as expressly provided herein, no license or right, expressed or implied, is hereby conveyed
or granted by Canon’s licenser to you for any intellectual property of LICENSORS.
(3) You may use the SOFTWARE solely for use with the Canon product you purchased (the “PRODUCT”).
(4) You may not assign, sublicense, market, distribute, or transfer the SOFTWARE to any third party without
prior written consent of Canon and LICENSORS.
(5) Notwithstanding the foregoing, you may transfer the SOFTWARE only when (a) you assign all of your rights
to the PRODUCT and all rights and obligations under the conditions to transferee and (b) such transferee
agrees to be bound by all these conditions.
(6) You may not decompile, reverse engineer, disassemble or otherwise reduce the code of the SOFTWARE to
human readable form.
(7) You may not modify, adapt, translate, rent, lease or loan the SOFTWARE or create derivative works based on
the SOFTWARE.
(8) You are not entitled to remove or make separate copies of the SOFTWARE from the PRODUCT.
(9) The human-readable portion (the source code) of the SOFTWARE is not licensed to you.
xvii
Legal Notices
The Software Subjected to the Other Conditions
Please refer to e-Manual on a CD-ROM bundled with this product, for more detail and corresponding license
conditions.
Disclaimers
The information in this document is subject to change without notice.
CANON INC. MAKES NO WARRANTY OF ANY KIND WITH REGARD TO THIS MATERIAL, EITHER EXPRESS OR
IMPLIED, EXCEPT AS PROVIDED HEREIN, INCLUDING WITHOUT LIMITATION, THEREOF, WARRANTIES AS TO
Legal Notices
MARKETABILITY, MERCHANTABILITY, FITNESS FOR A PARTICULAR PURPOSE OF USE OR NON-INFRINGEMENT.
CANON INC. SHALL NOT BE LIABLE FOR ANY DIRECT, INCIDENTAL, OR CONSEQUENTIAL DAMAGES OF ANY
NATURE, OR LOSSES OR EXPENSES RESULTING FROM THE USE OF THIS MATERIAL.
Legal Limitations on the Usage of Your Product and the Use of Images
Using your product to scan, print or otherwise reproduce certain documents, and the use of such images as
scanned, printed or otherwise reproduced by your product, may be prohibited by law and may result in
criminal and/or civil liability.
A non-exhaustive list of these documents is set forth below. This list is intended to be a guide only. If you are
uncertain about the legality of using your product to scan, print or otherwise reproduce any particular
document, and/or of the use of the images scanned, printed or otherwise reproduced, you should consult in
advance with your legal advisor for guidance.
Paper Money– Travelers Checks–
Money Orders– Food Stamps–
Certificates of Deposit– Passports–
Postage Stamps (canceled or uncanceled) – Immigration Papers–
Identifying Badges or Insignias– Internal Revenue Stamps (canceled or
Selective Service or Draft Papers– Bonds or Other Certificates of Indebtedness–
Checks or Drafts Issued by Governmental
– Stock Certificates–
Agencies
Motor Vehicle Licenses and Certificates of Title– Copyrighted Works/Works of Art without
xviii
–
uncanceled)
–
Permission of Copyright Owner
Laser Safety
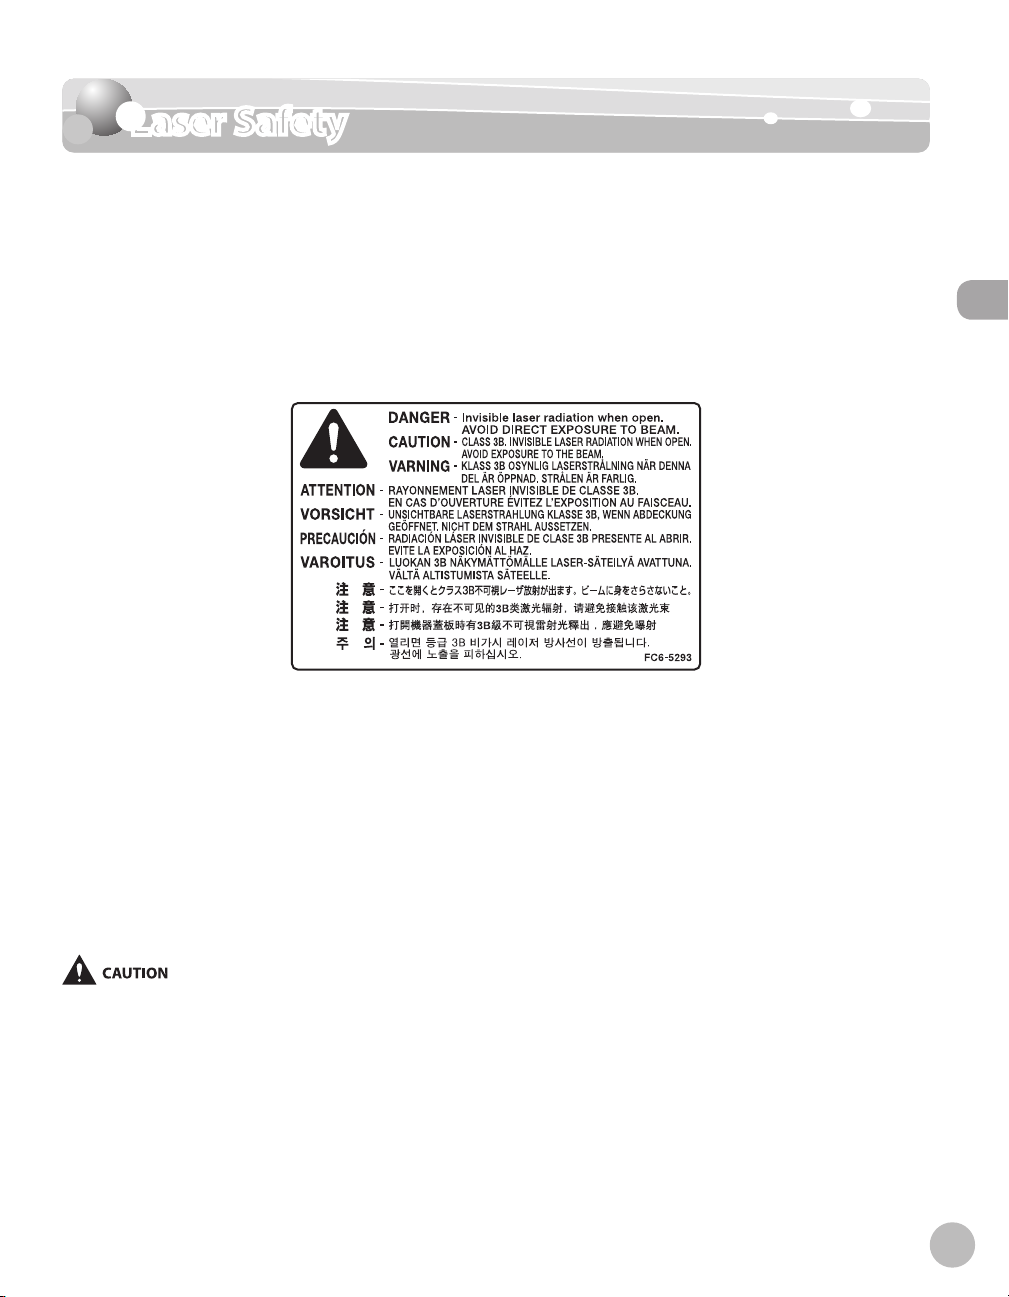
Laser Safety
Laser Safety Information
Laser radiation could be hazardous to the human body. For this reason, laser radiation emitted inside this
equipment is hermetically sealed within the protective housing and external cover. No radiation can leak from
the machine in the normal operation of the product by the user.
This machine is classified as a Class 1 Laser Product under IEC 60825-1:1993, EN60825-1: 1994.
220–240 V Model
The label shown below is attached to the laser scan unit on the machine.
Laser Safety
This machine has been classified under IEC 60825-1: 1993, EN60825-1:1994 and conforms to the following
classes:
CLASS 1 LASER PRODUCT
LASER KLASSE 1
APPAREIL A RAYONNEMENT LASER DE CLASSE 1
APPARECCHIO LASER DI CLASSE 1
PRODUCTO LASER DE CLASE 1
APARELHO A LASER DE CLASSE 1
Use of controls, adjustments, or performance of procedures other than those specified in the manuals for the machine may result in
hazardous radiation exposure.
xix

xx
Before Using the Machine
1
This chapter describes what you should know before using this machine, such as the names of the parts and their
functions, and basic settings to use various functions.
Machine Components .................................................1-2
External View (Front) ..........................................................1-2
External View (Back) ............................................................1-5
Operation Panel ...........................................................1-8
Main Operation Panel ........................................................1-8
Fax Operation Panel (MF4380dn/MF4370dn/
MF4350d/MF4340d Only) .............................................. 1-11
Display (Standby Mode) ............................................1-12
Copy Mode ..........................................................................1-12
Fax Mode (MF4380dn/MF4370dn/MF4350d/
MF4340d Only) .................................................................. 1-12
Scan Mode ........................................................................... 1-12
Toner Cartridge ..........................................................1-13
Maintaining the Toner Cartridge ................................. 1-14
Checking the Toner Level............................................... 1-14
Entering Characters ...................................................1-16
Telephone Line Settings............................................1-17
Timer Settings ............................................................1-18
Setting the Sleep Mode .................................................. 1-18
Setting the Daylight Saving Time ............................... 1-19
Before Using the Machine
Machine Components
Machine Components
This section describes the parts names of the machine and their functions.
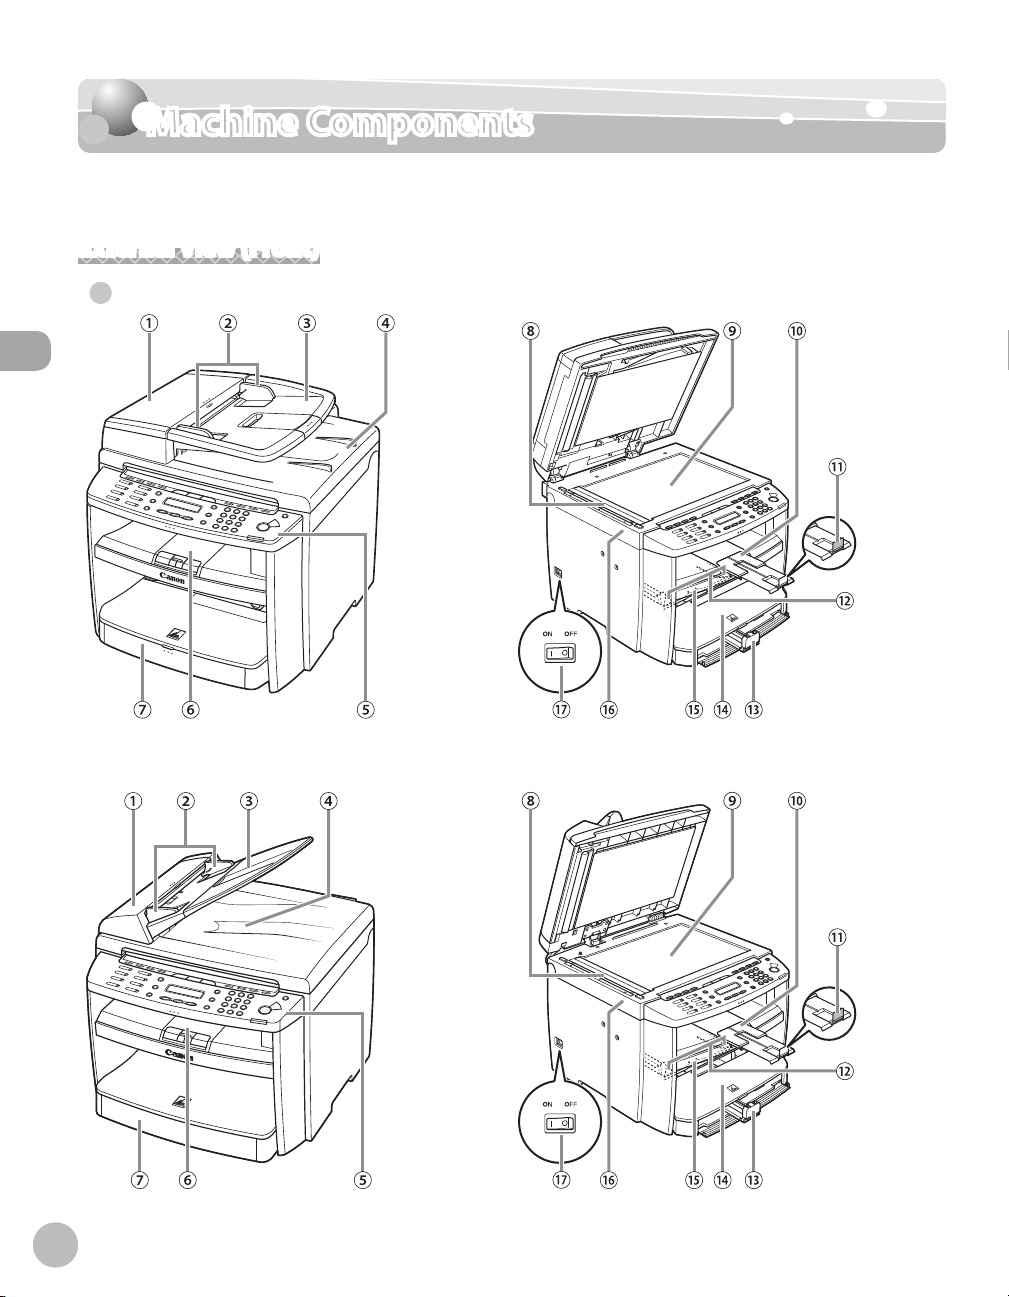
External View (Front)
MF4380dn●
Before Using the Machine
1-2
MF4370dn●
Machine Components
MF4350d/MF4330d●
Before Using the Machine
MF4340d/MF4320d●
1-3

Machine Components
①ADF (Automatic Document Feeder)
Holds documents and feeds them automatically
into the scanning area.
②Slide guides
Adjust to the width of the document.
③Document feeder tray
Holds documents.
④Document delivery tray
Receives documents.
⑤Operation panel
Before Using the Machine
Controls the machine.
⑥Output tray
Receives copies, prints and faxes.
⑦ Paper cassette (For MF4380dn/MF4370dn)/Paper
feeding tray (For MF4350d/MF4340d/MF4330d/
MF4320d)
Loads the paper supply.
⑧Scanning area
Scans documents from the ADF.
⑨Platen glass
Place documents.
⑩Output tray extension
Extends for the output tray.
⑪Paper stopper
Prevents the paper from falling off the output
tray. Open the paper stopper from its original
position for A4/LTR paper. For LGL paper, pull out
the output tray extension first, and then open the
paper stopper.
⑫Slide guides for multi-purpose tray
Adjust to the width of the paper.
⑬Paper guide rail
Holds the paper supply.
⑭Dust cover
Protects the paper supply in the paper cassette or
paper feeding tray from the dirt and dust.
⑮Multi-purpose tray
Feeds paper when you insert one by one
manually.
⑯Scanning platform
Open this platform when replacing the toner
cartridge or clearing paper jams.
⑰Main power switch
Turns the power ON or OFF.
⑱Platen glass cover
Open this cover when placing a document on the
platen glass.
1-4
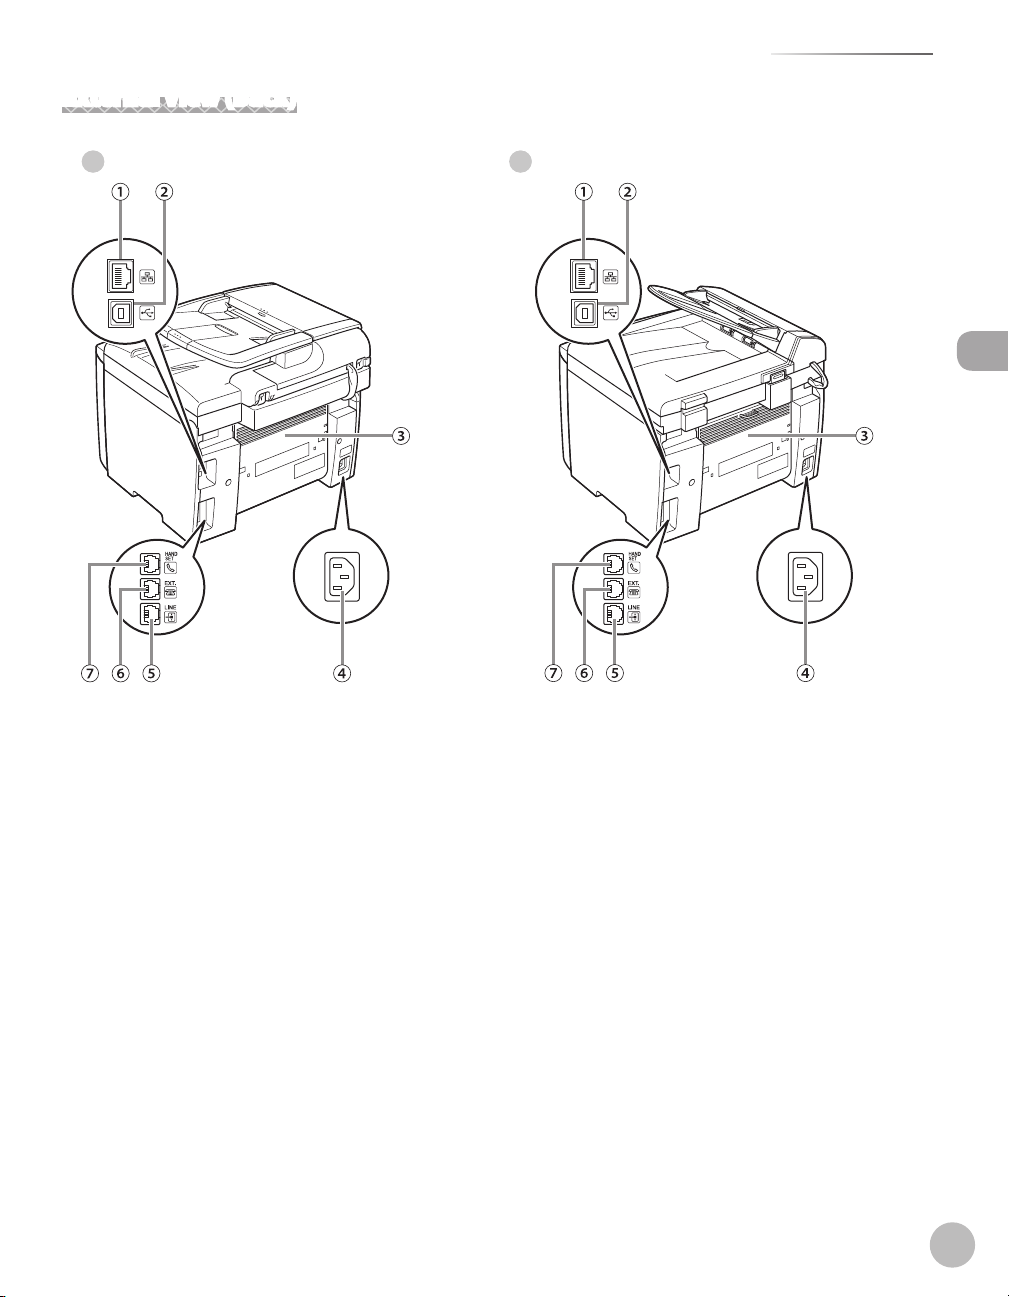
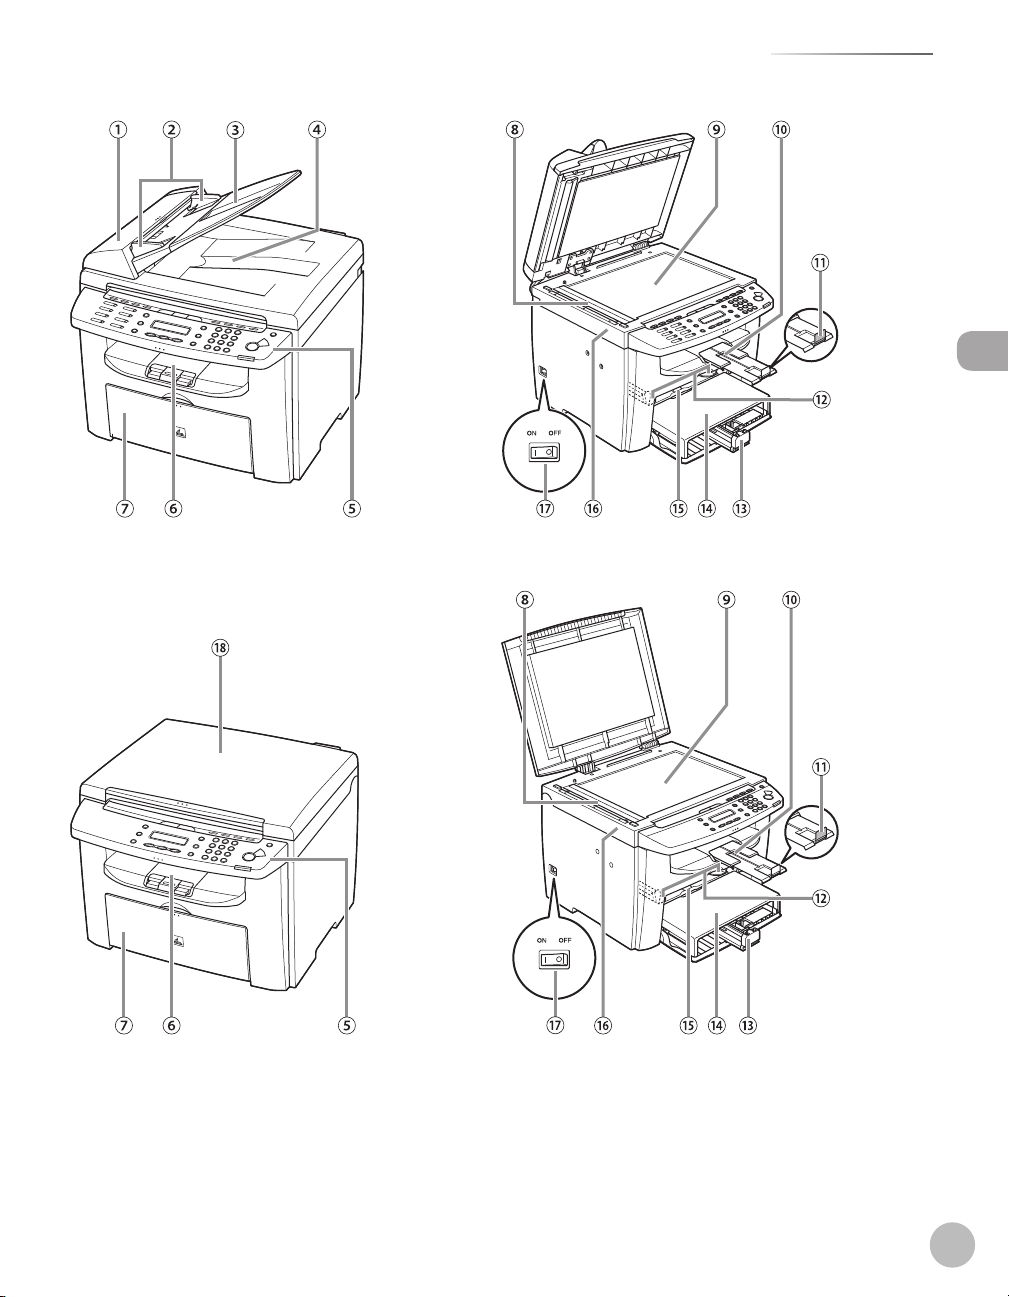
External View (Back)
MF4380dn● MF4370dn●
Machine Components
Before Using the Machine
1-5
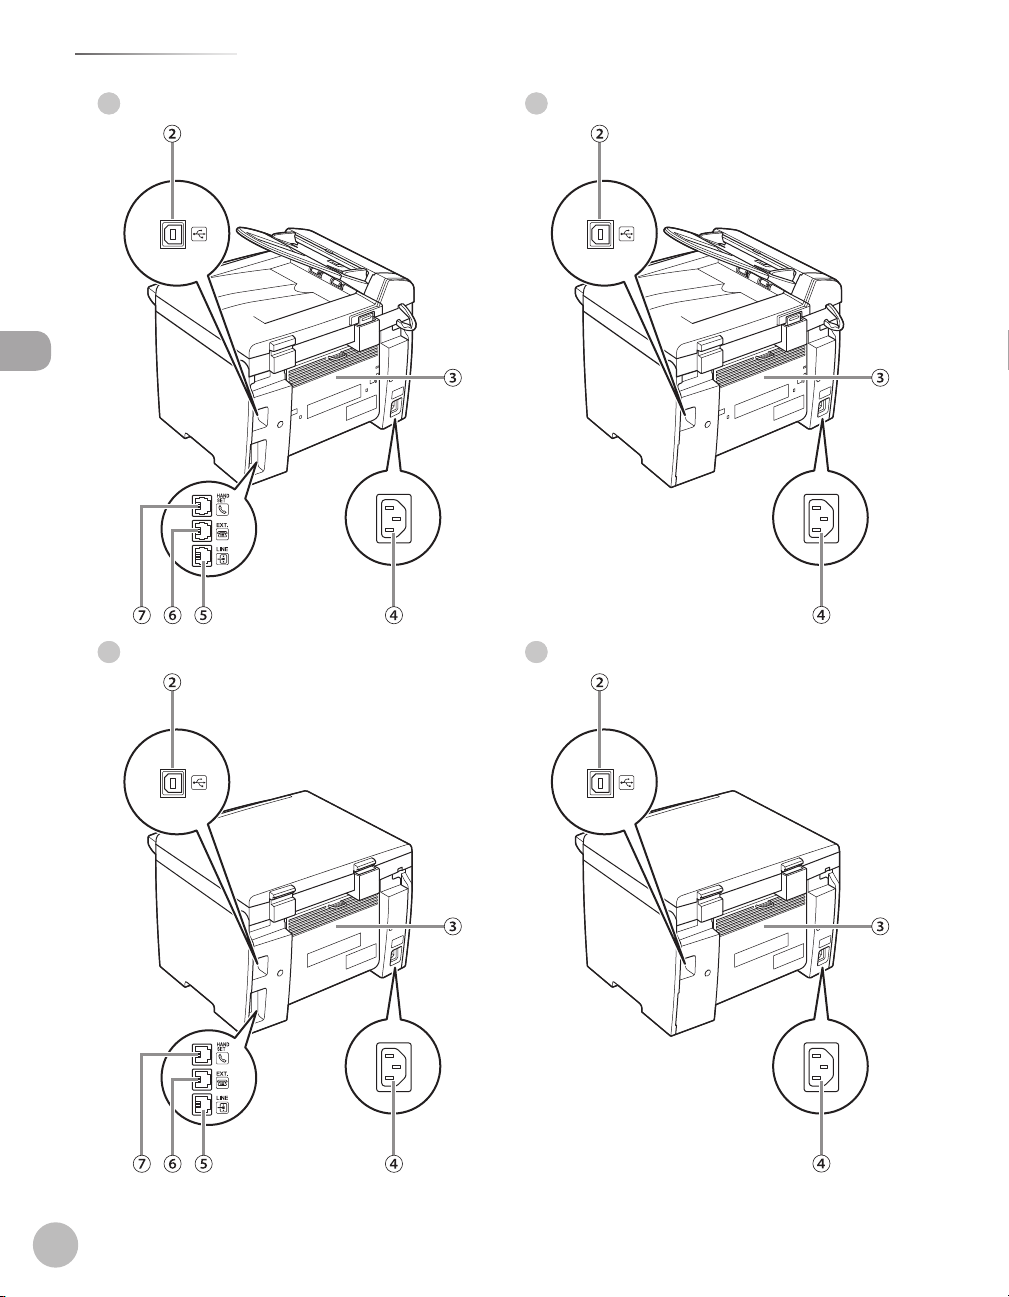
Machine Components
Before Using the Machine
MF4350d● MF4330d●
MF4340d● MF4320d●
1-6

①Ethernet port (MF4380dn/MF4370dn Only)
Connect the network cable.
②USB port
Connect the USB (Universal Serial Bus) cable.
③Rear cover
Open this cover when clearing paper jams.
④Power socket
Connect the power cord.
⑤Telephone line jack
Connect the telephone cable.
⑥External device jack
Connect an external device.
⑦Handset jack
Connect an optional handset cable.
Machine Components
Before Using the Machine
1-7

Operation Panel
Operation Panel
This section describes the names and functions of the operation panel keys, and describes
all the parts on the operation panel.
Main Operation Panel
MF4380dn/MF4370dn/MF4350d/MF4340d
●
Before Using the Machine
1-8
●
MF4330d/MF4320d

Operation Panel
①[Paper Settings] key
Press to specify the paper size and type for the
paper cassette or multi-purpose tray.
②[Job Cancel/Status Monitor] key
Press to check and cancel jobs being processed
or waiting to be processed.
③[COPY] key
Press to switch to the Copy mode.
④[FAX] key
Press to switch to the Fax mode.
⑤[SCAN] key
Press to switch to the Scan mode.
⑥[Menu] key
Press to select or cancel the modes in Additional
Functions.
⑦[2-Sided] key
MF4380dn: Press to copy or fax 2-sided
documents.
MF4370dn/MF4350d/MF4340d/MF4330d/
MF4320d:
Press to copy 1-sided documents as 2-sided
copies.
⑧[Enlarge/Reduce] key
Press to enlarge or reduce copy ratio.
⑨[Density] key
MF4380dn/MF4370dn/MF4350d/MF4340d:
Press to adjust the density for copy or documents
you send.
MF4330d/MF4320d: Press to adjust the density
for copy.
⑩[Image Quality] key
MF4380dn/MF4370dn/MF4350d/MF4340d:
Press to select image quality for copy or fax.
MF4330d/MF4320d: Press to select image
quality for copy.
⑪[Collate/2 on 1] key
Press to collate copies, or press to set 2 on 1
copying.
Also press to set ID card copying.
⑫[Energy Saver] key
Press to set or cancel the Sleep mode
manually. The key lights green when the
Sleep mode is set, and goes off when the
mode is canceled.
⑬[Stop/Reset] key
Press to stop a current job. Also, press to
return the machine to the standby mode.
⑭Error indicator
Blinks when an error has occurred.
⑮Processing/Data indicator
MF4380dn/MF4370dn/MF4350d/MF4340d:
Blinks while sending or receiving faxes. Lights
when the machine has waiting jobs and
stores the data in memory.
MF4330d/MF4320d: Lights when the machine
has waiting jobs.
⑯[Start] key
MF4380dn/MF4370dn/MF4350d/MF4340d:
Press to start copying, scanning and sending
faxes.
MF4330d/MF4320d: Press to start copying
and scanning.
⑰Numeric keys
Enter letters and numbers.
⑱[Tone] key
Press to switch from rotary pulse to tone
dialing.
⑲[Clear] key
Press to clear entered alphanumeric
characters.
] key
⑳[
Press to increase the value for various
settings. Also press to see the next item in the
menu.
㉑[OK] key
Press to accept a set function or mode.
Before Using the Machine
1-9

Operation Panel
㉒[ ] key
㉓Display
㉔[Report] key
Before Using the Machine
Press to decrease the value for various
settings. Also press to see the previous item in
the menu.
Displays messages and prompts during
operation. Displays selection, text, and
numbers when adjusting the settings.
MF4380dn/MF4370dn/MF4350d/MF4340d:
Press to print reports and lists manually.
MF4330d/MF4320d: Press to print the USER
DATA LIST.
1-10

Operation Panel
Fax Operation Panel (MF4380dn/MF4370dn/MF4350d/MF4340d Only)
①[Hook] key
Press when you want to dial without lifting up
the handset of the external telephone.
②[Redial/Pause] key
Press to redial the last dialed number when
fax is standing by, or press to insert a pause
when entering a fax number.
③[Coded Dial] key
Press to specify recipients registered under
coded dial codes.
④[Address Book] key
Press to search pre-registered recipients
under one-touch keys and coded dial codes
by name or fax number.
⑤[R] key
Press to dial an outside line access number or
an extension number when the machine is
connected through a switchboard (PBX).
⑥One-Touch keys
Press to specify recipients registered under
one-touch keys.
Before Using the Machine
1-11

Display (Standby Mode)
T E X T / P H O T O 1
1 0 0 % A 4
F a x O n l y S T A N D A R D
3 1 / 1 2 2 0 0 8 W E D 1 5 : 5 0
S C A N N I N G M O D E
Display (Standby Mode)
Copy Mode
Before Using the Machine
①Zoom ratio
②Paper size
③Quantity
④Image quality
⑤Density
Fax Mode (MF4380dn/MF4370dn/ MF4350d/MF4340d Only)
Scan Mode
Depending on your needs, you can change the standby
–
display which appears when the main power switch is turned
ON. For details, see “Introduction of the Machine,” in the eManual.
When the main power switch is turned ON, the display
–
displays <PLEASE WAIT> until the standby display appears.
If the machine remains idle for one minute, the display returns
–
to the standby mode (Auto Clear Function).
①Date & Time
②Image quality
③Receive mode
1-12

Toner Cartridge
Toner Cartridge
The average print yield of the Canon genuine starter toner cartridge which comes with the
machine is 1,000 pages, the Canon genuine replacement toner cartridge is 2,000 pages. The
page counts are on the basis of “ISO/ IEC 19752”* when printing A4 size paper with the
default print density setting. The level of toner consumption varies depending on the type
of documents printed. If your average document contains a lot of graphics, tables, or charts,
the print yield of your toner cartridge will be fewer as they consume more toner. When you
are replacing a toner cartridge, make sure to use a toner cartridge designed for this
product. To purchase the Canon genuine replacement toner cartridge, contact your local
authorized Canon dealer or Canon help line.
* “ISO/IEC 19752” is the global standard related to “Method for the determination of toner
cartridge yield for monochromatic electrophotographic printers and multi-function devices
that may contain printer components” issued by ISO (International Organization for
Standardization).
Before Using the Machine
Model Name Type
MF4380dn/MF4370dn/
MF4350d/MF4340d/
MF4330d/MF4320d
Supported Canon Genuine
Toner Cartridge
Bundled Canon FX9 S-Cartridge 1,000 pages
Replacement Canon FX9 Cartridge 2,000 pages
Average Print Yield
1-13

Toner Cartridge
T O N E R G A U G E
0 % 1 0 0 %
T O N E R G A U G E
0 % 1 0 0 %
T O N E R G A U G E
Maintaining the Toner Cartridge
Note the following when handling the toner
cartridge.
–
Do not place the toner cartridge in fire. Toner powder is
flammable.
–
If there is a toner powder leakage, make sure not to inhale or
touch the toner powder. If it comes in contact with your skin,
rinse with cold water using soap. If you feel an irritation on
your skin or inhale the powder, consult a doctor immediately.
–
When removing the toner cartridge from the machine, make
Before Using the Machine
sure to remove it carefully. If not removed with care, the toner
powder may scatter and come in contact with your eyes and
mouth. If this happens, rinse with water and consult a doctor
immediately.
–
Keep the toner cartridge away from small children. If they
ingest the toner powder, consult a doctor immediately.
–
Do not disassemble the toner cartridge. The toner powder
may scatter and come in contact with your eyes and mouth. If
this happens, rinse with water and consult a doctor
immediately.
Keep the toner cartridge away from computer screens, disk
–
drives, and floppy disks. The magnet inside the toner cartridge
may harm these items.
Avoid locations subject to high temperature, high humidity, or
–
rapid changes in temperature.
Do not expose the toner cartridge to direct sunlight or bright
–
light for more than five minutes.
Store the toner cartridge in its protective bag. Do not open
–
the bag until you are ready to install the toner cartridge in the
machine.
Save the toner cartridge’s protective bag in case you need to
–
repack and transport the toner cartridge at a later date.
Do not store the toner cartridge in a salty atmosphere or
–
where there are corrosive gases such as from aerosol sprays.
Do not remove the toner cartridge from the machine
–
unnecessarily.
Do not open the drum protective shutter on the toner
–
cartridge. Print quality may deteriorate if the drum surface is
exposed to light or is damaged.
Always hold the toner cartridge by its handle to avoid
–
touching the drum protective shutter.
Do not place the toner cartridge in an upright or an upside
–
down position. If toner becomes caked in the toner cartridge,
it may become impossible to free it even by shaking the toner
cartridge.
For optimum print quality, when you replace toner cartridges,
–
using Canon genuine ones is recommended.
Be careful of counterfeit toner cartridges
–
Please be aware that there are counterfeit Canon toner
cartridges in the marketplace. Use of counterfeit toner
cartridge may result in poor print quality or machine
performance. Canon is not responsible for any malfunction,
accident or damage caused by the use of counterfeit toner
cartridge.
For more information,
see http://www.canon.com/counterfeit.
Checking the Toner Level
You can check the amount of toner remaining in the
toner cartridge.
Press [Job Cancel/Status Monitor]
1
repeatedly to select <TONER GAUGE>,
then press [OK].
The toner level is displayed in the display at five
levels. If the toner gauge indicates that the toner
is empty, it is recommended that the toner
cartridge be replaced. (See “Replacing the Toner
Cartridge,
■ Toner full
■ Toner high
” on p. 10-9.)
1-14

0 % 1 0 0 %
T O N E R G A U G E
0 % 1 0 0 %
T O N E R G A U G E
0 % 1 0 0 %
T O N E R G A U G E
2
■ Toner low
■ Toner near empty
■ Toner empty
Press [Stop/Reset] to return to the
standby mode.
Toner Cartridge
Before Using the Machine
1-15

Entering Characters
C
N A M E [ A ]
C a
N A M E [ A ]
C a n
N A M E [ A ]
C a n o
N A M E [ A ]
C a n o n
N A M E [ A ]
Entering Characters
For displays that require alphanumeric entries, follow the procedure below to enter
characters.
Example: Enter <Canon>. For details on entering characters, see “Information About the
Keys,” in the Starter Guide or “Set Up the Machine,” in the e-Manual.
Before Using the Machine
1
2
3
4
Press repeatedly until an uppercase
<C> appears.
Press [ ] to move the cursor to the
right, then press until an <a> appears.
Press until an <n> appears.
Press [ ] to move the cursor to the
right, then press until an <o> appears.
Press [ ] to move the cursor to the
5
right, then press until an <n> appears.
1-16

Telephone Line Settings
5 F A X S E T T I N G S
M E N U
2 U S E R S E T T I N G S
F A X S E T T I N G S
3 T E L L I N E T Y P E
U S E R S E T T I N G S
T O U C H T O N E
T E L L I N E T Y P E
Telephone Line Settings Settings
(MF4380dn/
MF4370dn/MF4350d/MF4340d Only)
Set the type of telephone line that is connected to the machine.
If this setting is incorrect, you will be unable to communicate with other machines. Make
sure to check the type of telephone line that you are using, and make the correct setting.
The default setting is <TOUCH TONE>
1
2
3
Press [Menu].
Press [ ] or [ ] to select <FAX
SETTINGS>, then press [OK].
Press [ ] or [ ] to select <USER
SETTINGS>, then press [OK].
6
Press [Stop/Reset] to return to the
standby mode.
Before Using the Machine
Press [ ] or [ ] to select <TEL LINE
4
TYPE>, then press [OK].
Press [ ] or [ ] to select the
5
telephone line type, then press [OK].
<TOUCH TONE>: Tone dialing
–
<ROTARY PULSE>: Pulse dialing
–
If you do not know the type of telephone line
–
you use, contact your local telephone
company.
1-17

Timer Settings
8 T I M E R S E T T I N G S
M E N U
O N
A U T O S L E E P
O N
A U T O S L E E P
5 M I N .
A U T O S L E E P T I M E
Timer Settings
The timer settings enables you to set the Sleep Mode and the Daylight Saving Time.
Setting the Sleep Mode
If the machine remains idle for a certain period of
time, it automatically enters the Sleep mode.
Before Using the Machine
The default settings are as follows:
–
<AUTO SLEEP>: ON
–
<AUTO SLEEP TIME>: 5MIN.
Press [Menu].
1
Press [ ] or [ ] to select <TIMER
2
SETTINGS>, then press [OK].
Press [ ] or [ ] to select <AUTO
3
SLEEP>, then press [OK].
Press [ ] or [ ] to select <ON>, then
4
press [OK].
5
6
Press [ ] or [ ] to select the desired
interval, then press [OK].
You can set the interval from 3 to 30 minutes
–
(in one-minute increments).
You can also enter values using
–
[numeric keys].
Press [Stop/Reset] to return to the
standby mode.
[Energy Saver] lights green when the
–
machine enters the Sleep mode.
To enter the Sleep mode manually, press
–
[Energy Saver] on the operation panel.
The machine will not enter the Sleep mode
–
when:
the machine is in operation
•
the Processing/Data indicator lights or blinks
•
a message appears on the display and the
•
Error indicator blinks
paper is loaded in the multi-purpose tray
•
a paper jam occurs in the machine
•
the optional handset or the handset of the
•
external telephone is off the hook
The machine will leave the Sleep mode when:
–
you press [Energy Saver] on the operation
•
panel
a fax is received
•
the optional handset or the handset of the
•
external telephone is off the hook
a print job is sent from a computer, and the
•
print is started
–
1-18

Timer Settings
8 T I M E R S E T T I N G S
M E N U
4 D A Y L I G H T S V . T I M E
T I M E R S E T T I N G S
O N
D A Y L I G H T S V . T I M E
1 B E G I N D A T E / T I M E
D A Y L I G H T S V . T I M E
1 M O N T H
B E G I N D A T E / T I M E
M A R C H
M O N T H
2 W E E K
B E G I N D A T E / T I M E
S E C O N D W E E K
W E E K
3 D A Y
B E G I N D A T E / T I M E
S U N D A Y
D A Y
2 E N D D A T E / T I M E
D A Y L I G H T S V . T I M E
Setting the Daylight Saving Time
In some countries or areas, time is advanced
throughout the summer season. This is called
“Daylight Saving Time.” This section describes how
to set the Daylight Saving Time.
The default setting is <ON>.
This function is not available for Singapore, Hong Kong, and
Malaysia.
Press [Menu].
1
Press [ ] or [ ] to select <TIMER
2
SETTINGS>, then press [OK].
Press [ ] or [ ] to select <DAYLIGHT
3
SV.TIME>, then press [OK].
Press [ ] or [ ] to select the month,
7
then press [OK].
Press [ ] or [ ] to select <WEEK>,
8
then press [OK].
Press [ ] or [ ] to select the week,
9
then press [OK].
Press [ ] or [ ] to select <DAY>, then
10
press [OK].
Before Using the Machine
Press [ ] or [ ] to select <ON>, then
4
press [OK].
Press [ ] or [ ] to select <BEGIN
5
DATE/TIME>, then press [OK].
Press [ ] or [ ] to select <MONTH>,
6
then press [OK].
Press [ ] or [ ] to select the day, then
11
12
press [OK].
Press [ ] or [ ] to select <END DATE/
TIME>, then press [OK].
1-19

Before Using the Machine
1 M O N T H
E N D D A T E / T I M E
N O V E M B E R
M O N T H
2 W E E K
E N D D A T E / T I M E
S E C O N D W E E K
W E E K
3 D A Y
E N D D A T E / T I M E
S U N D A Y
D A Y
Timer Settings
Press [ ] or [ ] to select <MONTH>,
13
14
15
16
then press [OK].
Press [ ] or [ ] to select the month,
then press [OK].
Press [ ] or [ ] to select <WEEK>,
then press [OK].
Press [ ] or [ ] to select the week,
then press [OK].
Press [ ] or [ ] to select <DAY>, then
17
18
19
1-20
press [OK].
Press [ ] or [ ] to select the day, then
press [OK].
Press [Stop/Reset] to return to the
standby mode.

Documents
and Print
2
Media
This chapter describes the types of paper and documents that can be used with the machine and how to load paper
in the paper cassette and the multi-purpose tray.
Documents Requirements ..........................................2-2
Scanning Area ..............................................................2-3
Placing Documents ...................................................... 2-4
On the Platen Glass .............................................................2-4
In the ADF (MF4380dn/MF4370dn/MF4350d/
MF4330d Only) .....................................................................2-5
Paper Requirements ....................................................2-6
Printable Area .............................................................. 2-7
Loading Paper ..............................................................2-8
In the Paper Cassette ..........................................................2-8
In the Multi-Purpose Tray ............................................... 2-11
Setting Paper Size and Type .....................................2-14
For the Paper Cassette .................................................... 2-14
For the Multi-Purpose Tray ............................................ 2-15
Documents and Print Media

Documents Requirements
Documents Requirements
Platen Glass ADF
Documents and Print Media
Type Plain paper
Size (W × L) M
–
Thick documents
–
Photographs
–
Small documents (e.g., index cards)
–
Special types of paper (e.g., tracing
–
1
paper*
Books (Height: Maximum 24 mm)
–
, transparencies*1, etc.)
Plain paper (Multi-page documents of the
same size, thickness and weight or one-page
documents.)
aximum 216 × 297 mm Maximum 216 × 356 mm
Minimum 105 × 148.5 mm
Weight Maximum 2 kg 40 to 105 g/m
Quantity 1 sheet Maximum 35 sheets*
2
2
(Maximum 10 sheets for LGL documents)
*1 When copying transparent documents such as tracing paper or transparencies, use a piece of plain white paper to cover the
document after placing it face-down on the platen glass.
*2 80 g/m2 paper
Do not place the document on the platen glass or in the ADF until the glue, ink or correction fluid on the
●
document is completely dry.
●
To prevent document jams in the feeder, do not use any of the following:
•
Wrinkled or creased paper
•
Carbon paper or carbon-backed paper
•
Curled or rolled paper
•
Coated paper
•
Torn paper
•
Onion skin or thin paper
•
Documents with staples or paper clips attached
•
Paper printed with a thermal transfer printer
•
Transparencies
2-2

Scanning Area
Scanning Area
Make sure your document's text and graphics fall within the shaded area in the following
diagram. Note that the margin widths listed are approximate and there may be slight
variations in actual use.
Documents and Print Media
2-3

Placing Documents
Placing Documents
This section describes how to place your documents on the platen glass and in the ADF.
On the Platen Glass
Lift up the ADF.
1
Documents and Print Media
Place a document face down.
2
3
Align the document with the appropriate
paper size marks.
If your document does not match any of the
paper size marks, align the center of your
document with the arrow mark.
2-4

Placing Documents
4
Gently lower the ADF.
The document is ready for scanning.
When closing the ADF, be careful not to get
–
your fingers caught, as this may result in
personal injury.
Do not press down the ADF forcefully, as this
–
may damage the platen glass and cause
personal injury.
Remove the document from the platen glass
when scanning is complete.
2
3
Adjust the slide guides to the width of the
documents.
Neatly place the documents face up in
the document feeder tray.
The documents are ready for scanning.
Documents and Print Media
In the ADF (MF4380dn/MF4370dn/ MF4350d/MF4330d Only)
Fan the documents stack and even the
1
edges.
Do not add or remove documents while they
–
are being scanned.
When scanning is complete, remove the
–
documents from the document delivery tray to
avoid paper jams.
Avoid using ADF to scan the same documents
–
more than 30 times. When scanned repeatedly,
documents can become folded or torn, which
may cause paper jams.
If the feeder rollers are soiled from scanning
–
documents written in pencil, clean them. (See
“Cleaning the Machine,” on p. 10-2.)
2-5
Paper Requirements
Paper Requirements
Paper cassette Multi-purpose tray
Size (W × L) A4, B5, A5, Executive, Envelope (COM10 (#10), Monarch, DL, ISO-C5 (162 × 229 mm),
Oficio, Brazil-Oficio, Mexico-Oficio, Government-LTR, Government-LGL, Foolscap, LTR,
LGL, 76 × 127 to 216 × 356 mm
Weight 60 to 163 g/m
2
Quantity Maximum 250 sheets (Height: maximum
Maximum 1 sheet
25 mm)
Type
Documents and Print Media
The default paper size is A4. If you use a different paper size, you need to change the paper size settings. (See “Setting Paper Size and
Type,” on p. 2-14.)
To prevent paper jams, do not use any of the following:
●
•
Wrinkled or creased paper
•
Curled or rolled paper
•
Coated paper
•
Torn paper
•
Damp paper
•
Very thin paper
•
Paper which has been printed on using a thermal transfer printer (Do not copy on the reverse side.)
●
The following types of paper do not print well:
•
Highly textured paper
•
Very smooth paper
•
Shiny paper
●
Make sure the paper is free from dust, lint, and oil stains.
●
Make sure to test paper before purchasing large quantities.
●
Store all paper wrapped and on a flat surface until ready for use. Keep opened packs in their original
Plain Paper, Plain Paper L, Heavy Paper, Heavy Paper H, Transparency
packaging in a cool, dry location.
●
Store paper at 18°C–24°C, 40%–60% relative humidity.
●
Use only the transparencies designed for laser printers. Canon recommends you to use Canon type
transparencies with this machine.
2-6

Printable Area
Printable Area
The shaded area indicates the approximate printable area of A4 paper. Note that the margin
widths listed are approximate and there may be slight variations in actual use.
Documents and Print Media
2-7

Loading Paper
Loading Paper
This section describes how to load paper in the paper cassette and the multi-purpose tray.
The default paper size/type is set to <A4> and <PLAIN PAPER> in the setting menu. When you load other size and/or type of
paper, change the paper size/type setting by pressing [Paper Settings]. (See “Setting Paper Size and Type,” on p. 2-14.)
In the Paper Cassette
Follow the procedure below to load paper in the
Documents and Print Media
paper cassette.
For MF4380dn/MF4370dn
●
Take out the dust cover.
1
Open the front panel of the paper
2
cassette.
3
4
Slide out the paper guide rail (A).
Slide the side paper guides (A) to match
the size of paper.
2-8
If the paper guides do not fit the size of the paper,
the printout may be skewed.

Loading Paper
5
6
Fan the paper stack and even the edges.
Load the paper into the paper cassette
with the print side up. Make sure the
paper stack sits below the small fin (A) on
the side paper guide.
8
Close the front panel of the paper
cassette.
To load Legal-size paper, leave the front panel of
paper cassette open and adjust the paper guide
rail (A) for Legal size paper.
Documents and Print Media
7
Adjust the paper guide rail to match the
size of paper.
9
Match up the edge of the dust cover (A)
and the edge of the paper cassette (B),
and place the cover on top of the
cassette.
2-9

Loading Paper
Documents and Print Media
For MF4350d/MF4340d/MF4330d/
●
MF4320d
Open the paper feeding tray.
1
Take out the dust cover from inside the
2
machine.
4
5
Slide the side paper guides (A) to match
the size of paper.
If the paper guides do not fit the size of the paper,
the printout may be skewed.
Fan the paper stack and even the edges.
2-10
3
Slide out the paper guide rail (A).
Loading Paper
6
7
Load the paper into the paper feeding
tray with the print side up. Make sure the
paper stack sits below the hook (A) on the
side paper guide.
Adjust the paper guide rail to match the
size of paper.
In the Multi-Purpose Tray
Use the multi-purpose tray when you want to copy
or print on the different paper which is in the paper
cassette. Load paper one by one in the multi-
purpose tray.
The paper in the multi-purpose tray is fed prior to the paper in
–
the paper cassette.
The recommended envelopes are COM10 (#10), MONARCH,
–
DL, and ISOC5. Using other envelopes may affect the quality
of the printout.
Make sure to set the correct paper size in the printer driver.
–
When printing received documents or reports, paper can be
–
fed only from the paper cassette. If paper is loaded into the
multi-purpose tray, <REMOVE MP PAPER> appears.
For MF4380dn/MF4370dn
●
Spread the paper guides a little wider
1
than the actual paper width.
Documents and Print Media
8
Aligning the protrusions (A) on the both
sides of the dust cover to the guides (B)
inside the machine, set the dust cover.
2-11

Loading Paper
Documents and Print Media
2
When setting paper, gently insert the
paper into the multi-purpose tray with
the print side up.
When setting an envelope, gently insert the
envelope into the multi-purpose tray with the
print side up and the right edge (i.e., closer to
the stamp) first.
3
4
Slide the paper guides so that they fit to
both sides of the paper.
If the paper guides do not fit the size of the paper,
the print quality may be deteriorated.
Specify the size and the type of the paper
you load.
For details on how to specify the paper size and
type, see “Setting Paper Size and Type,
14.
” on p. 2-
2-12
When you load paper with a logo on, position the
paper with the print side up (logo side) and insert
it so that the top of the paper feeds first in the
multi-purpose tray.
For MF4350d/MF4340d/MF4330d/
●
MF4320d
Spread the paper guides a little wider
1
than the actual paper width.

Loading Paper
2
When setting paper, gently insert the
paper into the multi-purpose tray with
the print side up.
When setting an envelope, gently insert the
envelope into the multi-purpose tray with the
print side up and the right edge (i.e., closer to
the stamp) first.
3
4
Slide the paper guides so that they fit to
both sides of the paper.
If the paper guides do not fit the size of the paper,
the print quality may be deteriorated.
Specify the size and the type of the paper
you load.
For details on how to specify the paper size and
type, see “Setting Paper Size and Type,
14.
Documents and Print Media
” on p. 2-
When you load paper with a logo on, position the
paper with the print side up (logo side) and insert
it so that the top of the paper feeds first in the
multi-purpose tray.
2-13

Setting Paper Size and Type
C A S S E T T E
A 4
P A P E R S I Z E
Ex.
P L A I N P A P E R
P A P E R T Y P E
Ex.
Documents and Print Media
Setting Paper Size and Type
This section describes how to specify the paper size and type you are loading in the paper
cassette and the multi-purpose tray. Whenever you change the paper size and type in the
cassette and the tray, follow the procedure in this section to adjust the paper size and type
settings for the cassette and the tray.
The default settings are as follows:
<PAPER SIZE>: A4
–
<PAPER TYPE>: PLAIN PAPER
–
For the Paper Cassette
Press [Paper Settings] repeatedly to
1
select <CASSETTE>, then press [OK].
Press [ ] or [ ] to select the paper
2
size, then press [OK].
You can select from the following paper sizes:
<A4>, <B5>, <A5>, <EXECUTIVE>, <COM10>,
<MONARCH>, <DL>, <ISO-C5>, <OFICIO>,
<BRAZIL-OFICIO>, <MEXICO-OFICIO>,
<GOVERNMENT-LETTER>, <GOVERNMENTLEGAL>, <FOOLSCAP>, <LTR>, <LGL>
3
Press [ ] or [ ] to select the paper
type, then press [OK].
You can select from the following paper types:
–
<PLAIN PAPER> or <PLAIN PAPER L>*
Plain paper (64 g/m
<HEAVY PAPER> or <HEAVY PAPER H>*
–
Heavy paper (Paper cassette: 105 g/m
128 g/m
163 g/m
<TRANSPARENCY> for Transparency
–
1
*
If paper curls excessively when printed with
<PLAIN PAPER> selected, select <PLAIN PAPER
L>.
2
If print fixing is not sufficient when printed
*
with <HEAVY PAPER> selected, select <HEAVY
PAPER H>.
If you have selected <B5>, <A5>, <EXECUTIVE>,
<COM10>, <MONARCH>, <DL> or <ISO-C5> for
the paper size in step 2, <PAPER TYPE> is not
displayed.
2
, Multi-purpose tray: 105 g/m2 to
2
) or Envelope
2
to 90 g/m2)
1
for
2
to
2
for
2-14

Setting Paper Size and Type
M P T R A Y
A 4
P A P E R S I Z E
Ex.
P L A I N P A P E R
P A P E R T Y P E
Ex.
For the Multi-Purpose Tray
Press [Paper Settings] repeatedly to
1
select <MP TRAY>, then press [OK].
Press [ ] or [ ] to select the paper
2
size, then press [OK].
You can select from the following paper sizes:
<A4>, <B5>, <A5>, <EXECUTIVE>, <COM10>,
<MONARCH>, <DL>, <ISO-C5>, <OFICIO>,
<BRAZIL-OFICIO>, <MEXICO-OFICIO>,
<GOVERNMENT-LETTER>, <GOVERNMENTLEGAL>, <FOOLSCAP>, <LTR>, <LGL>
3
Press [ ] or [ ] to select the paper
type, then press [OK].
You can select from the following paper types:
–
<PLAIN PAPER> or <PLAIN PAPER L>*
Plain paper (64 g/m
<HEAVY PAPER> or <HEAVY PAPER H>*
–
Heavy paper (Paper cassette: 105 g/m
128 g/m
163 g/m
<TRANSPARENCY> for Transparency
–
1
*
If paper curls excessively when printed with
<PLAIN PAPER> selected, select <PLAIN PAPER
L>.
2
If print fixing is not sufficient when printed
*
with <HEAVY PAPER> selected, select <HEAVY
PAPER H>.
If you have selected <B5>, <A5>, <EXECUTIVE>,
<COM10>, <MONARCH>, <DL> or <ISO-C5> for
the paper size in step 2, <PAPER TYPE> is not
displayed.
2
, Multi-purpose tray: 105 g/m2 to
2
) or Envelope
2
to 90 g/m2)
1
for
2
to
2
for
Documents and Print Media
2-15

Documents and Print Media
2-16

Registering Destinations
in the Address Book
(MF4380dn/MF4370dn/MF4350d/MF4340d
Only)
This chapter describes how to register destinations in the Address Book, and how to edit and erase registered
information.
About the Address Book .............................................3-2
Storing/Editing One-Touch Keys ................................3-3
Registering One-Touch Keys ............................................3-3
Editing One-Touch Keys ....................................................3-3
Erasing One-Touch Keys ....................................................3-4
Storing/Editing Coded Dial Codes ..............................3-6
Registering Coded Dial Codes ........................................3-6
Editing Coded Dial Codes .................................................3-6
Erasing Coded Dial Codes .................................................3-7
Storing/Editing Recipients for Group Dialing ...........3-9
Registering Group Addresses ..........................................3-9
Adding New Destination to Group ............................3-10
Deleting Destination from Group ............................... 3-10
Changing Group Name ..................................................3-11
Deleting Group Addresses ............................................ 3-11
3
Registering Destinations in the Address Book (MF4380dn/MF4370dn/MF4350d/MF4340d Only)

About the Address Book
About the Address Book
The Address Book is a feature used for storing fax numbers. The Address Book is divided
into one-touch keys and coded dial codes. You can store up to 7 destinations in one-touch
keys, and 100 destinations in coded dial codes, for a total of 107 destinations in the whole
Address Book. You can also register multiple destinations for a group address, and assign a
one-touch key or coded dial code to this group.
Registering a destination in the Address Book saves you the effort of entering that
destination’s fax number each time you send a fax.
Destinations stored in the Address Book can be exported to your computer as a file, which can be imported into the
–
Registering Destinations in the Address Book (MF4380dn/MF4370dn/MF4350d/MF4340d Only)
machine. For information on exporting the Address Book, see Online Help.
For easy reference, it is recommended to print the list of recipients registered in one-touch keys or coded dial codes. (See
–
“Introduction of the Machine,” in the e-Manual.)
3-2

Storing/Editing One-Touch Keys
6 A D D R E S S B O O K S E T .
M E N U
1 1 - T O U C H S P D D I A L
A D D R E S S B O O K S E T .
[ 0 1 ] N O T R E G I S T E R E D
1 - T O U C H S P D D I A L
C a n o n A
N A M E [ A ]
Ex.
1 2 3 X X X X X X X
T E L N U M B E R E N T R Y
Ex.
6 A D D R E S S B O O K S E T .
M E N U
1 1 - T O U C H S P D D I A L
A D D R E S S B O O K S E T .
Storing/Editing One-Touch Keys
This section describes how to register destinations for one-touch keys and to edit the
registered one-touch keys.
Registering One-Touch Keys
Press [Menu].
1
Press [ ] or [ ] to select <ADDRESS
2
BOOK SET.>, then press [OK].
Press [ ] or [ ] to select <1-TOUCH
3
SPD DIAL>, then press [OK].
Press [ ] or [ ] to select a one-touch
4
key (01 to 07) for which you want to
register the fax number, then press [OK].
Enter the fax number you register (up to
6
50 digits, including spaces and pauses)
with – [numeric keys], then press
[OK].
To register another one-touch key, repeat the
procedure from step 4.
Press [Stop/Reset] to return to the
7
standby mode.
Editing One-Touch Keys
Press [Menu].
1
Press [ ] or [ ] to select <ADDRESS
2
BOOK SET.>, then press [OK].
Registering Destinations in the Address Book (MF4380dn/MF4370dn/MF4350d/MF4340d Only)
You can also select a one-touch key by pressing
the corresponding one-touch key.
Enter the destination name (up to 20
5
letters, including spaces) with –
[numeric keys], then press [OK].
3
Press [ ] or [ ] to select <1-TOUCH
SPD DIAL>, then press [OK].
3-3

Storing/Editing One-Touch Keys
[ 0 1 ] C a n o n A
1 - T O U C H S P D D I A L
Ex.
C a n o n A
N A M E [ A ]
Ex.
C a n o n B
N A M E [ A ]
Ex.
1 2 3 X X X X X X X
T E L N U M B E R E N T R Y
Ex.
1 2 4 X X X X X X X
T E L N U M B E R E N T R Y
Ex.
6 A D D R E S S B O O K S E T .
M E N U
1 1 - T O U C H S P D D I A L
A D D R E S S B O O K S E T .
[ 0 1 ] C a n o n A
1 - T O U C H S P D D I A L
Ex.
N A M E [ A ]
Press [ ] or [ ] to select the one-
4
touch key (01 to 07) you want to edit,
then press [OK].
You can also select a one-touch key by pressing
the corresponding one-touch key.
Press [ ] repeatedly to go to the
5
character you want to change, then press
[Clear].
Registering Destinations in the Address Book (MF4380dn/MF4370dn/MF4350d/MF4340d Only)
To delete the entire entry, press and hold
[Clear].
Enter a new character with –
6
[numeric keys], then press [OK].
Press [Stop/Reset] to return to the
9
standby mode.
Erasing One-Touch Keys
Press [Menu].
1
Press [ ] or [ ] to select <ADDRESS
2
BOOK SET.>, then press [OK].
Press [ ] or [ ] to select <1-TOUCH
3
SPD DIAL>, then press [OK].
Press [ ] or [ ] to select a one-touch
4
key (01 to 07) you want to erase, then
press [OK].
Press [ ] repeatedly to go to the
7
number you want to change, then press
[Clear].
To delete the entire entry, press and hold
[Clear].
Enter a new number with – [numeric
8
keys], then press [OK].
3-4
5
You can also select a one-touch key by pressing
the corresponding one-touch key.
Press and hold [Clear] to erase the
destination name, then press [OK].

6
T E L N U M B E R E N T R Y
7
Press and hold [Clear] to erase the fax
number, then press [OK].
If you erase the fax number, the registered name
is cleared automatically.
Press [Stop/Reset] to return to the
standby mode.
Storing/Editing One-Touch Keys
Registering Destinations in the Address Book (MF4380dn/MF4370dn/MF4350d/MF4340d Only)
3-5

Storing/Editing Coded Dial Codes
6 A D D R E S S B O O K S E T .
M E N U
2 C O D E D D I A L
A D D R E S S B O O K S E T .
[ * 0 0 ] N O T R E G I S T E R E D
C O D E D D I A L
C a n o n C
N A M E
Ex.
1 2 3 X X X X X X X
T E L N U M B E R E N T R Y
Ex.
6 A D D R E S S B O O K S E T .
M E N U
2 C O D E D D I A L
A D D R E S S B O O K S E T .
Storing/Editing Coded Dial Codes
This section describes how to register destinations for coded dial codes and to edit the
registered coded dial codes.
Registering Coded Dial Codes
Press [Menu].
1
Press [ ] or [ ] to select <ADDRESS
2
Registering Destinations in the Address Book (MF4380dn/MF4370dn/MF4350d/MF4340d Only)
3
4
BOOK SET.>, then press [OK].
Press [ ] or [ ] to select <CODED
DIAL>, then press [OK].
Press [ ] or [ ] to select a coded dial
code (00 to 99) for which you want to
register the fax number, then press [OK].
Enter the fax number you register (up to
6
50 digits, including spaces and pauses)
with – [numeric keys], then press
[OK].
To register another coded dial code, repeat the
procedure from step 4.
Press [Stop/Reset] to return to the
7
standby mode.
Editing Coded Dial Codes
Press [Menu].
1
Press [ ] or [ ] to select <ADDRESS
2
BOOK SET.>, then press [OK].
You can also select a coded dial code by
pressing
desired two-digit code.
Enter the destination name (up to 20
5
letters, including spaces) with –
[numeric keys], then press [OK].
3-6
[Coded Dial] followed by the
3
Press [ ] or [ ] to select <CODED
DIAL>, then press [OK].

Storing/Editing Coded Dial Codes
[ * 0 0 ] C a n o n C
C O D E D D I A L
Ex.
C a n o n C
N A M E
Ex.
C a n o n D
N A M E
Ex.
1 2 3 X X X X X X X
T E L N U M B E R E N T R Y
Ex.
1 2 4 X X X X X X X
T E L N U M B E R E N T R Y
Ex.
6 A D D R E S S B O O K S E T .
M E N U
2 C O D E D D I A L
A D D R E S S B O O K S E T .
[ * 0 0 ] C a n o n C
C O D E D D I A L
Ex.
N A M E [ A ]
4
5
6
Press [ ] or [ ] to select the coded
dial code (00 to 99) you want to edit, then
press [OK].
You can also select a coded dial code by
pressing
two-digit code.
Press [ ] repeatedly to go to the
character you want to change, then press
[Clear].
To delete the entire entry, press and hold
[Clear].
Enter a new character with –
[numeric keys], then press [OK].
[Coded Dial] followed by the
Erasing Coded Dial Codes
Press [Menu].
1
Press [ ] or [ ] to select <ADDRESS
2
BOOK SET.>, then press [OK].
Press [ ] or [ ] to select <CODED
3
DIAL>, then press [OK].
Press [ ] or [ ] to select the coded
4
dial code (00 to 99) you want to erase,
then press [OK].
Registering Destinations in the Address Book (MF4380dn/MF4370dn/MF4350d/MF4340d Only)
Press [ ] repeatedly to go to the
7
number you want to change, then press
[Clear].
To delete the entire entry, press and hold
[Clear].
Enter a new number with – [numeric
8
keys], then press [OK].
Press [Stop/Reset] to return to the
9
standby mode.
5
You can also select a coded dial code by
pressing
two-digit code.
Press and hold [Clear] to erase the
destination name, then press [OK].
[Coded Dial] followed by the
3-7

Press and hold [Clear] to erase the fax
T E L N U M B E R E N T R Y
6
number, then press [OK].
If you erase the fax number, the registered name
is cleared automatically.
Press [Stop/Reset] to return to the
7
standby mode.
Registering Destinations in the Address Book (MF4380dn/MF4370dn/MF4350d/MF4340d Only)
3-8

Storing/Editing Recipients for Group Dialing
6 A D D R E S S B O O K S E T .
M E N U
3 G R O U P D I A L
A D D R E S S B O O K S E T .
[ 0 5 ] N O T R E G I S T E R E D
G R O U P D I A L
C a n o n G r o u p
N A M E [ A ]
Ex.
[ 0 2 ] C a n o n E
N O . 0 0 2 = 1 2 3 X X X X X X
Ex.
Storing/Editing Recipients for Group Dialing
This section describes how to register destinations for group addresses and to edit the
registered group addresses.
Registering Group Addresses
The recipients must be registered in one-touch keys or coded
dial codes beforehand.
Press [Menu].
1
Press [ ] or [ ] to select <ADDRESS
2
BOOK SET.>, then press [OK].
Press [ ] or [ ] to select <GROUP
3
DIAL>, then press [OK].
Press [ ] or [ ] to select an empty
4
one-touch key that you want to set as the
group address, then press [OK].
5
6
Enter the group name (up to 20 letters,
including spaces) with the numeric keys,
then press [OK].
Select the destinations you want to
register in the group (up to 50
destinations) until all destinations are
registered, then press [OK].
To enter a recipient stored under a one-touch
–
dial key, press the desired one-touch dial key.
To enter a recipient stored under a coded dial
–
code, press
the two-digit code with
keys]. For multiple entries, press
[Coded Dial] between each entry.
To register another group, repeat the
–
procedure from step 4.
[Coded Dial], then enter
–
[numeric
Registering Destinations in the Address Book (MF4380dn/MF4370dn/MF4350d/MF4340d Only)
You can also select a one-touch dial key by
pressing the corresponding one-touch dial key.
7
You can review the destinations which have been
already entered with [ ] or [ ].
Press [Stop/Reset] to return to the
standby mode.
3-9

Storing/Editing Recipients for Group Dialing
6 A D D R E S S B O O K S E T .
M E N U
3 G R O U P D I A L
A D D R E S S B O O K S E T .
[ 0 5 ] C a n o n G r o u p
G R O U P D I A L
Ex.
C a n o n G r o u p
N A M E [ A ]
Ex.
[ 0 3 ] C a n o n F
N O . 0 0 3 = 1 2 3 X X X X X X
Ex.
6 A D D R E S S B O O K S E T .
M E N U
3 G R O U P D I A L
A D D R E S S B O O K S E T .
[ 0 5 ] C a n o n G r o u p
G R O U P D I A L
Ex.
C a n o n G r o u p
N A M E [ A ]
Ex.
[ 0 3 ] C a n o n F
N O . 0 0 3 = 1 2 3 X X X X X X
Ex.
Adding New Destination to Group
Press [Menu].
1
Press [ ] or [ ] to select <ADDRESS
2
BOOK SET.>, then press [OK].
Press [ ] or [ ] to select <GROUP
3
DIAL>, then press [OK].
Registering Destinations in the Address Book (MF4380dn/MF4370dn/MF4350d/MF4340d Only)
Press [ ] or [ ] to select a group to
4
edit, then press [OK].
Deleting Destination from Group
Press [Menu].
1
Press [ ] or [ ] to select <ADDRESS
2
BOOK SET.>, then press [OK].
Press [ ] or [ ] to select <GROUP
3
DIAL>, then press [OK].
Press [ ] or [ ] to select a group to
4
edit, then press [OK].
You can specify a group to edit by pressing the
corresponding one-touch key.
Press [OK].
5
Select the destination you want to add to
6
the group, then press [OK].
For details on specifying a recipient from
Address Book, see “Registering Group Addresses,”
. 3-9.
on p
Press [Stop/Reset] to return to the
7
standby mode.
3-10
5
6
You can specify a group to edit by pressing the
corresponding one-touch key.
Press [OK].
Press [ ] or [ ] to display the
recipient you want to delete from the
group, then press [Clear].
Repeat this step if you want to delete another
recipient.

Storing/Editing Recipients for Group Dialing
[ 0 2 ] C a n o n E
N O . 0 0 2 = 1 2 3 X X X X X X
Ex.
6 A D D R E S S B O O K S E T .
M E N U
3 G R O U P D I A L
A D D R E S S B O O K S E T .
[ 0 5 ] C a n o n G r o u p A
G R O U P D I A L
Ex.
C a n o n G r o u p A
N A M E [ A ]
Ex.
C a n o n G r o u p B
N A M E [ A ]
Ex.
[ 0 5 ] C a n o n G r o u p B
G R O U P D I A L
Ex.
6 A D D R E S S B O O K S E T .
M E N U
3 G R O U P D I A L
A D D R E S S B O O K S E T .
[ 0 5 ] C a n o n G r o u p
G R O U P D I A L
Ex.
Press [OK].
7
Press [Stop/Reset] to return to the
8
standby mode.
Changing Group Name
Press [Menu].
1
Press [ ] or [ ] to select <ADDRESS
2
BOOK SET.>, then press [OK].
Press [ ] or [ ] to select <GROUP
3
DIAL>, then press [OK].
Enter a new character with –
6
[numeric keys], then press [OK].
Press [OK].
7
Press [Stop/Reset] to return to the
8
standby mode.
Deleting Group Addresses
Press [Menu].
1
Press [ ] or [ ] to select <ADDRESS
2
BOOK SET.>, then press [OK].
Registering Destinations in the Address Book (MF4380dn/MF4370dn/MF4350d/MF4340d Only)
Press [ ] or [ ] to select a group to
4
edit, then press [OK].
You can specify a group to edit by pressing the
corresponding one-touch key.
Press [ ] repeatedly to go to the
5
character you want to change, then press
[Clear].
To delete the entire name, press and hold
[Clear].
3
4
Press [ ] or [ ] to select <GROUP
DIAL>, then press [OK].
Press [ ] or [ ] to select a group to
delete, then press [OK].
You can specify a group to delete by pressing
the corresponding one-touch key.
3-11
Storing/Editing Recipients for Group Dialing
C a n o n G r o u p
N A M E [ A ]
Ex.
N O . 0 0 1 =
Press [OK].
5
Press [Clear] repeatedly until all
6
recipients are deleted, then press [OK].
When you delete all destinations, the registered
Registering Destinations in the Address Book (MF4380dn/MF4370dn/MF4350d/MF4340d Only)
7
name is cleared automatically.
Press [Stop/Reset] to return to the
standby mode.
3-12

Copying
This chapter describes the copying features.
Overview of Copy Functions .......................................4-2
Basic Copying Method ................................................4-4
Canceling Copy Jobs ....................................................4-5
Selecting Image Quality ..............................................4-6
Adjusting Density ........................................................4-8
Adjusting Automatically ...................................................4-8
Adjusting Manually .............................................................4-9
Enlarge/Reduce Images ............................................4-10
Preset Zoom........................................................................4-10
Custom Copy Ratio...........................................................4-11
Collating Copies .........................................................4-13
Multiple Documents onto One Sheet (2 on 1) .........4-15
2 on 1 Combination ......................................................... 4-15
Copying ID Card ................................................................ 4-16
2-Sided Copying ........................................................4-18
1 to 2-Sided Copying ....................................................... 4-19
2 to 2-Sided Copying (MF4380dn Only) ................... 4-20
2 to 1-Sided Copying (MF4380dn Only) ................... 4-21
Selecting Paper Size Group ......................................4-22
Changing Standard Mode .........................................4-23
Viewing Copy Settings ..............................................4-24
4
Copying

Overview of Copy Functions
Copying
Overview of Copy Functions
In addition to enlarging/reducing copies, you can make 2-sided copies or use the 2 on 1
mode, which reduces 2 page documents to fit on one sheet of paper.
4-2
(p. 4-6)
(p. 4-8)

(p. 4-18)
Overview of Copy Functions
(p. 4-10)
Copying
(p
. 4-15)
4-3

Basic Copying Method
T E X T / P H O T O 1
1 0 0 % A 4
Basic Copying Method
This section describes the basic procedure for copying.
Copying
1
2
Place documents on the platen glass or
load them in the ADF.
For details, see “Placing Documents,” on p. 2-4.
–
Close the ADF/platen glass cover after placing
–
your documents.
For documents you can copy, see “Documents
–
Requirements,
Press [COPY].
If you want to adjust the image quality, see
–
“Selecting Image Quality,
If you want to adjust the density, see
–
“Adjusting Density”
If you want to adjust the zoom ratio, see
–
“Enlarge/Reduce Images”
” on p. 2-2.
” on p. 4-6.
on p. 4-8.
on p. 4-10.
3
4
Use – [numeric keys] to enter the
desired copy quantity (1 to 99).
The copy quantity appears on the right
–
side of the display.
If you make a mistake when entering
–
values, press [Clear] and enter the correct
values.
You cannot change the copy quantity while the
machine is copying.
Press [Start].
4-4

Canceling Copy Jobs
< Y E S N O >
C A N C E L C O P Y I N G ?
Canceling Copy Jobs
You can cancel scanning or ongoing jobs.
If you cancel a copy job during scanning, make sure to remove the document.
Press [Stop/Reset].
1
When the <CANCEL COPYING?> message
2
appears, press [ ] to select <YES>.
The job is canceled, and the copy quantity is
reset.
Copying
4-5

Copying
Selecting Image Quality
Selecting Image Quality
You can adjust the image quality of copies according to the types of documents. A correct
selection is necessary for the optimal reproduction of the colors of the document. These
settings return to the default values if the machine remains idle for a certain period of time
or if you press
The default settings is <TEXT/PHOTO>.
[Stop/Reset].
Combinations of these four modes (TEXT/PHOTO, TEXT, PHOTO, TEXT/PHOTO+) cannot be selected at the same time. If
–
you select one of these modes, the previously set mode is canceled.
If the document is a transparency, select the document type, then adjust the exposure to the most appropriate level for
–
the document.
Press [Image Quality] repeatedly
3
to select the document type.
<TEXT/PHOTO>: For documents that contain
–
text and photos
<TEXT>: For text documents
–
<PHOTO>: For documents that contain fine
–
text or photos
<TEXT/PHOTO+>: For documents that
–
contain fine text and photos
Copy density automatically changes to the
manual mode when <TEXT/PHOTO>, <PHOTO>,
or <TEXT/PHOTO+> is set.
1
2
Place documents.
For details, see “Placing Documents,” on p. 2-4.
Press [COPY].
4-6

4
T E X T / P H O T O 1
1 0 0 % A 4
5
Use – [numeric keys] to enter the
desired copy quantity (1 to 99).
Press [Start].
If you want to copy multiple documents using
the platen glass, place a document and press
[Start] once for each page. When scanning is
complete, press [OK].
Selecting Image Quality
Copying
4-7

Copying
A U T O
D E N S I T Y
A T E X T 1
1 0 0 % A 4
Ex.
Adjusting Density
Adjusting Density
You can adjust the density to the most appropriate level for the document either
automatically or manually.
The default setting is <MANUAL> (5).
Adjusting Automatically
You can adjust the density to the most appropriate
level for the document automatically.
Place documents.
1
For details, see “Placing Documents,” on p. 2-4.
Press [COPY].
2
3
4
5
Press [Density] twice to select
<AUTO>, then press [OK].
The image quality is automatically set to <TEXT>.
Use – [numeric keys] to enter the
desired copy quantity (1 to 99).
Press [Start].
If you want to copy multiple documents using
the platen glass, place a document and press
[Start] once for each page. When scanning is
complete, press [OK].
4-8
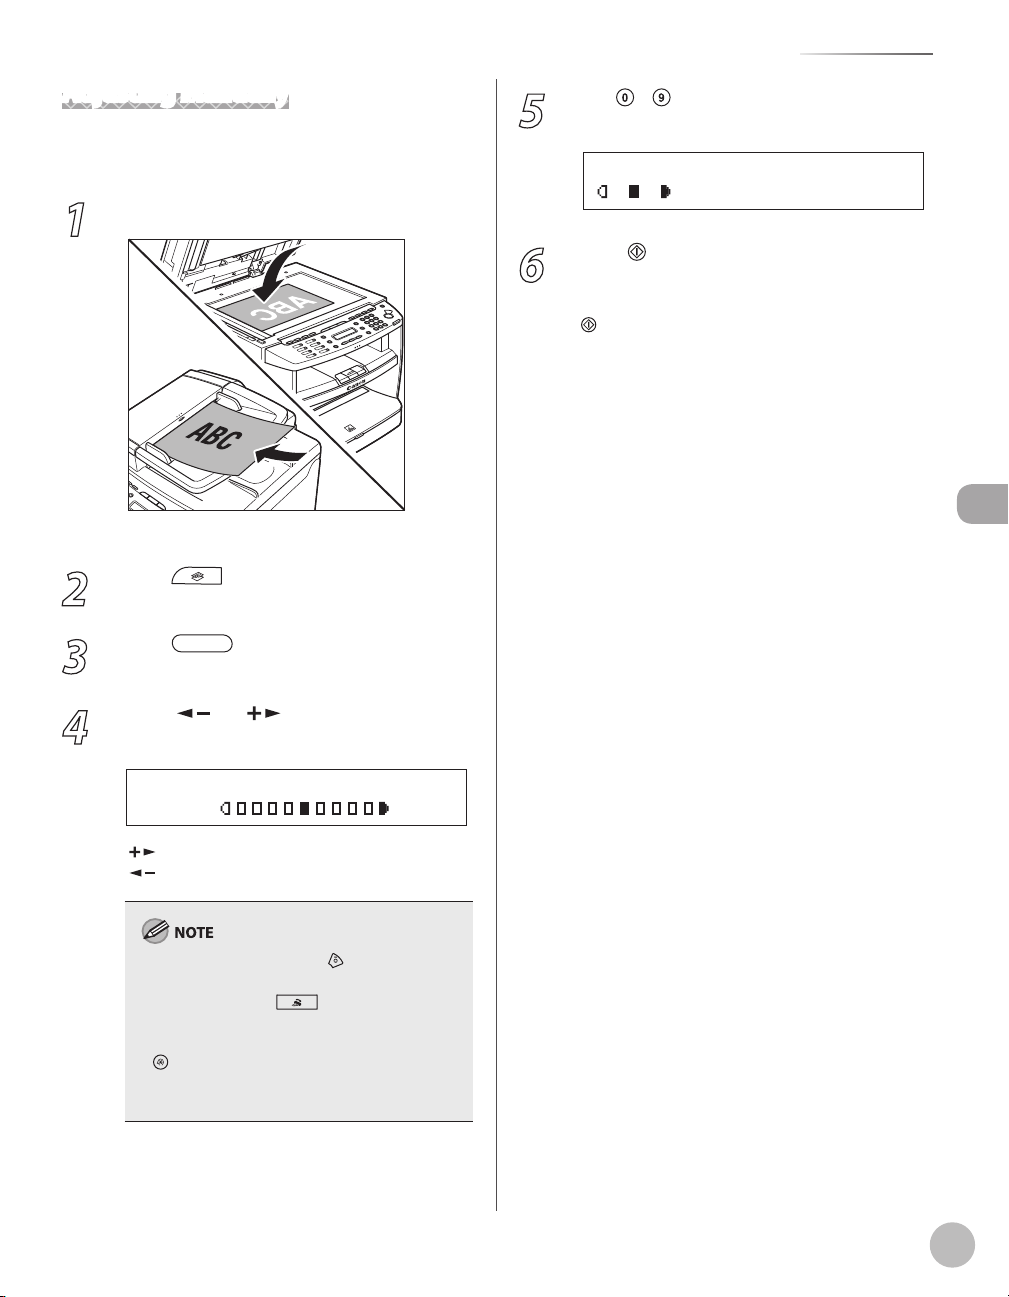
Adjusting Density
- L T D K +
D E N S I T Y
T E X T / P H O T O 1
1 0 0 % A 4
Adjusting Manually
You can adjust the density to the most appropriate
level for the document manually.
Place documents.
1
For details, see “Placing Documents,” on p. 2-4.
Press [COPY].
2
Press [Density] to select the
3
manual mode.
5
6
Use – [numeric keys] to enter the
desired copy quantity (1 to 99).
Press [Start].
If you want to copy multiple documents using
the platen glass, place a document and press
[Start] once for each page. When scanning is
complete, press [OK].
Copying
Press [ ] or [ ] to adjust the copy
4
density, then press [OK].
[ ]: to make light documents darker
]: to make dark documents lighter
[
To cancel all settings, press [Stop/Reset].
–
When you switch the mode by pressing the
–
mode keys such as [FAX], all settings will
be canceled. If you want to keep the settings,
set the density as follows:
[Menu] → <COPY SETTINGS> → <STANDARD
SETTINGS> → <DENSITY> → <MANUAL> (See
“COPY SETTINGS,” on p. 12-5.)
4-9

Copying
- 1 0 0 % +
P R E S E T R A T I O
Enlarge/Reduce Images
Enlarge/Reduce Images
You can convert a standard-sized document to a different standard-sized copy (preset
zoom), or you can enlarge or reduce images in 1% increments (custom copy ratio).
The default setting is <100%>.
Preset Zoom
You can enlarge or reduce standard size documents
to another standard paper size.
Place documents.
1
For details, see “Placing Documents,” on p. 2-4.
Press [COPY].
2
3
Press [Enlarge/Reduce].
4-10

4
7 0 % A 4 A 5
P R E S E T R A T I O
Ex.
T E X T / P H O T O 1
7 0 % A 4
Ex.
- 1 0 0 % +
Z O O M 5 0 - 2 0 0 %
- 9 5 % +
Z O O M 5 0 - 2 0 0 %
Ex.
Press [ ] or [ ] to select the copy
ratio, then press [OK].
<200% MAX.>
–
<141% A5 → A4>
–
<122% A5 → B5>
–
<115% B5 → A4>
–
<100%>
–
<86% A4 → B5>
–
<81% B5 → A5>
–
<70% A4 → A5>
–
<50% MIN.>
–
1
2
Place documents.
For details, see “Placing Documents,” on p. 2-4.
Press [COPY].
When <PAPER SIZE GROUP> in the <COPY
SETTINGS> menu is set to <INCHES> or <A>, the
preset copy ratios change as follows:
INCHES: 50%, 64%, 78%, 100%, 129%, 200%
A: 50%, 70%, 100%, 141%, 200%
Use – [numeric keys] to enter the
5
desired copy quantity (1 to 99).
Press [Start].
6
If you want to copy multiple documents using
the platen glass, place a document and press
[Start] once for each page. When scanning is
complete, press [OK].
Custom Copy Ratio
You can enlarge or reduce images by any copy ratio,
in 1% increments. The available copy ratios are from
50% to 200%.
3
4
Press [Enlarge/Reduce] twice.
Use – [numeric keys] to enter the
copy ratio, then press [OK].
You can also use [ ] or [ ] to adjust the
zoom ratio. To increase the zoom ratio, press
]. To decrease the copy ratio, press [ ].
[
To return the copy ratio to 100%, press
[Enlarge/Reduce] repeatedly to display
<100%>, then press [OK].
Copying
4-11

Enlarge/Reduce Images
T E X T / P H O T O 1
9 5 % A 4
Ex.
5
6
Copying
Use – [numeric keys] to enter the
desired copy quantity (1 to 99).
Press [Start].
If you want to copy multiple documents using
the platen glass, place a document and press
[Start] once for each page. When scanning is
complete, press [OK].
4-12
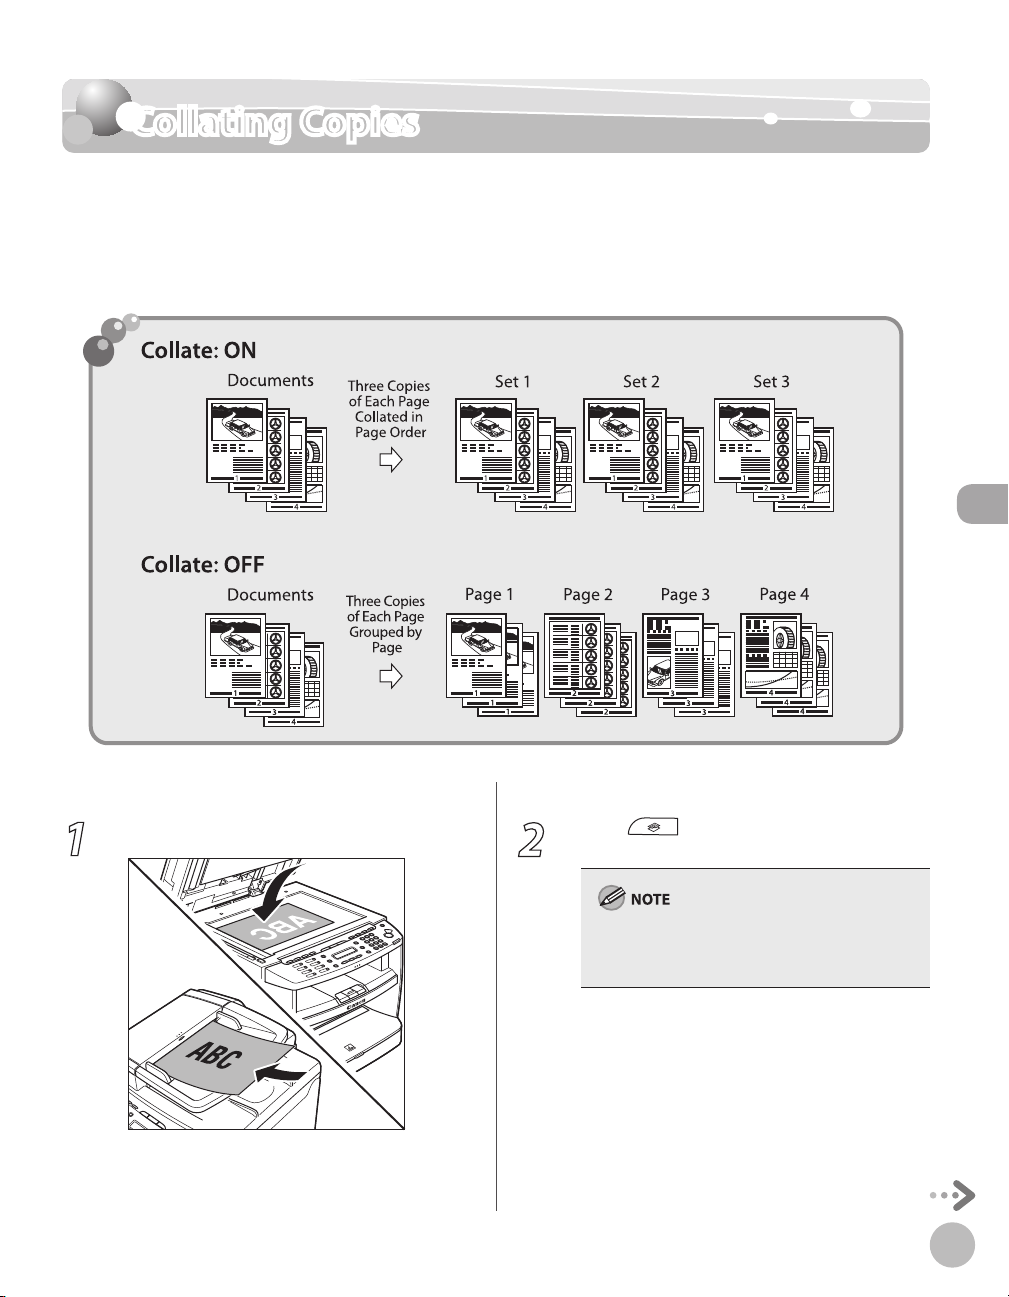
Collating Copies
Collating Copies
You can sort copies into sets arranged in page order. This function is useful when making
handouts for meetings. This feature can be used together with both “2-Sided Copying,” (see
. 4-18) and “Multiple Documents onto One Sheet (2 on 1),
p
The default setting is <OFF>.
” (see p. 4-15).
Copying
1
Place documents.
For details, see “Placing Documents,” on p. 2-4.
2
Press [COPY].
If <AUTO COLLATE> is set to <ON> in
<STANDARD SETTINGS> in <COPY SET TINGS>,
skip to step 4.
4-13
Copying
C O L L A T E
C O L L A T E / 2 O N 1
T E X T / P H O T O 1
1 0 0 % * A 4
Collating Copies
Press [Collate/2 on 1].
3
If you want to use <COLLATE> and “2 on 1
–
Combination”
select <COLLATE+2 ON 1>, then press [OK].
–
If you want to use <COLLATE> and the 2sided copying at the same time, go to step 3
of “1 to 2-Sided Copying”
Sided Copying (MF4380dn Only)”
or “2 to 1-Sided Copying (MF4380dn Only)”
(see p
Use – [numeric keys] to enter the
4
desired copy quantity (1 to 99).
Press [Start].
5
–
If you want to copy multiple documents using
the platen glass, place a document and press
is complete, press [OK].
–
The machine prints the remaining sets of
copies.
(see p. 4-15) at the same time,
(see p. 4-19), “2 to 2-
(see p. 4-20),
. 4-21).
[Start] once for each page. When scanning
To cancel all settings, press [Stop/Reset].
–
When you switch the mode by pressing the
–
mode keys such as [FAX], all settings will
be canceled. If you want to keep the settings,
set the collate mode as follows:
[Menu] → <COPY SETTINGS> → <STANDARD
SETTINGS> → <AUTO COLLATE> → <ON> (See
“COPY SETTINGS,” on p. 12-5.)”
When scanning multiple page documents,
–
<MEMORY FULL> may appear in the display
and scanning may be canceled. If this happens,
press [Stop/Reset] to return to the standby
mode.
4-14

Multiple Documents onto One Sheet (2 on 1)
Multiple Documents onto One Sheet (2 on 1)
This mode enables you to reduce two-page documents to fit on one sheet of paper (1-sided/
2-sided).
Copying
2 on 1 Combination
2 on 1 mode automatically reduces two documents
to fit on the selected paper size. You can make well-
organized copies by copying multiple documents
onto one sheet. This mode enables you to cut print
costs by saving copy papers, and it is also useful for
saving space. This feature can be used together with
both ”Collating Copies”
Copying”
The default setting is <OFF>.
The reduction ratio is automatically set so that the documents fit
onto the selected paper size.
(see p. 4-18).
(see p. 4-13) and ”2-Sided
1
Place documents.
For details, see “Placing Documents,” on p. 2-4.
4-15

Multiple Documents onto One Sheet (2 on 1)
2 O N 1
C O L L A T E / 2 O N 1
T E X T / P H O T O 1
6 9 % * A 4
Ex.
I D C A R D C O P Y
C O L L A T E / 2 O N 1
Copying
2
3
4
Press [COPY].
Press [Collate/2 on 1] repeatedly
to select <2 ON 1>, then press [OK].
If you want to use <2 ON 1> and “Collating
–
(see p. 4-13) at the same time, select
Copies”
<COLLATE+2 ON 1>, then press [OK].
–
If you want to use <2 ON 1> and the 2-sided
copying at the same time, go to step 3 of “1 to
2-Sided Copying”
Copying (MF4380dn Only)”
to 1-Sided Copying (MF4380dn Only)” (see
. 4-21).
p
Use – [numeric keys] to enter the
desired copy quantity (1 to 99).
(see p. 4-19), “2 to 2-Sided
(see p. 4-20), or “2
Copying ID Card
You can make a copy of a 2-sided card onto one
side of a paper. This mode is useful when copying ID
cards.
You must place a document on the platen glass when using
–
this function.
The zoom ratio will automatically be set to <100%> with this
–
feature. You cannot change the copy size.
The paper size you can use is A4 or LTR If you select other
–
paper size in the paper size setting, the ID card copy function
will be canceled automatically.
When you select the ID card copy, the other copy settings you
–
made, such as the copy ratio and paper size, will be canceled
automatically.
This function cannot be used with the 2 on 1 mode, the
–
collating mode, or the 2-sided copying mode.
Place a card on the platen glass.
1
Place a card as indicated below.
–
Press [Start].
5
–
If you want to copy multiple documents using
the platen glass, place a document and press
[Start] once for each page. When scanning
is complete, press [OK].
To cancel all settings, press [Stop/Reset].
–
A maximum of 1/8" (4 mm) margin will be
–
produced between the two reduced
documents in 2 on 1 copying.
4-16
2
3
–
Align the center of a card with the arrow
mark.
Press [COPY].
Press [Collate/2 on 1] repeatedly
to select <ID CARD COPY>, then press
[OK].

4
T E X T / P H O T O 1
1 0 0 % * A 4
5
6
Use – [numeric keys] to enter the
desired copy quantity (1 to 99).
Press [start].
Turn and place the card.
Place the card as indicated below.
–
–
Align the center of a card with the arrow
mark.
Multiple Documents onto One Sheet (2 on 1)
Copying
Press [start].
7
To cancel all settings, press [Stop/Reset]
4-17

Copying
2-Sided Copying
2-Sided Copying
This mode enables you to make 2-sided copies from 1-sided or 2-sided documents, or make
1-sided copies from 2-sided documents. This enables you to cut print costs in half when
copying in large quantities.
This feature can be used together with both “Collating Copies”
Combination”
(see p. 4-15).
The default setting is <OFF>.
(see p. 4-13) and “2 on 1
4-18
Paper used to make 2-sided copies must conform to the following specifications:
Paper size: A4, LTR (envelopes cannot be used for 2-sided copying)
–
Paper weight: 64 to 80 g/m
–
2

1 to 2-Sided Copying
1 > 2 - S I D E D
2 - S I D E D
B O O K T Y P E
T Y P E O F O U T P U T
T E X T / P H O T O 1
1 0 0 % A 4
2-Sided Copying
You can make 2-sided copies from 1-sided
documents.
Place documents.
1
For details, see “Placing Documents,” on p. 2-4.
Press [COPY].
2
Press [2-Sided] to select <1 >2-SIDED>,
3
then press [OK].
If there are odd number of documents when the
1-Sided to 2-Sided mode is used, the back side of
the last copy is left blank.
5
6
For the landscape oriented documents:
When <BOOK TYPE> is selected, the front and
back sides of the copy will have the opposite topbottom orientation. When <CALENDAR TYPE> is
selected, the front and back sides of the copy will
have the same top-bottom orientation.
Use – [numeric keys] to enter the
desired copy quantity (1 to 99).
Press [Start].
If you want to copy multiple documents using
the platen glass, place a document and press
[Start] once for each page. When scanning is
complete, press [OK].
To cancel all settings, press [Stop/Reset].
–
When you switch the mode by pressing the
–
mode keys such as [FAX], all settings will
be canceled. If you want to keep the settings,
store the settings as follows:
[Menu] → <COPY SETTINGS> → <STANDARD
SETTINGS> → <2-SIDED> (See “COPY SETTINGS,”
on p. 12-5.)
You can skip step 4. In this case, the machine
–
scans 1-sided documents to make 2-sided,
<BOOK TYPE> copies.
Copying
Press [ ] or [ ] to select <BOOK
4
TYPE> or <CALENDAR TYPE>, then press
[OK].
<BOOK TYPE>: The front and back sides of the
copy will have the same top-bottom orientation.
<CALENDAR TYPE>: The front and back sides of
the copy will have the opposite top-bottom
orientation.
4-19

2-Sided Copying
2 > 2 - S I D E D
2 - S I D E D
B O O K T Y P E
T Y P E O F O R I G I N A L
B O O K T Y P E
T Y P E O F O U T P U T
T E X T / P H O T O 1
1 0 0 % * A 4
2 to 2-Sided Copying (MF4380dn Only)
You can make 2-sided copies from 2-sided
documents.
Place documents in the ADF.
1
For details, see “Placing Documents,” on p. 2-4.
Copying
2
3
Press [COPY].
Press [2-Sided] repeatedly to select
<2 > 2-SIDED>, then press [OK].
5
6
7
Press [ ] or [ ] to select <BOOK
TYPE> or <CALENDAR TYPE> for the
output layout, then press [OK].
<BOOK TYPE>: The front and back sides of the
copy will have the same top-bottom orientation.
<CALENDAR TYPE>: The front and back sides of
the copy will have the opposite top-bottom
orientation.
Use – [numeric keys] to enter the
desired copy quantity (1 to 99).
Press [Start].
If you want to copy multiple documents using
the platen glass, place a document and press
[Start] once for each page. When scanning is
complete, press [OK].
Press [ ] or [ ] to select <BOOK
4
TYPE> or <CALENDAR TYPE> for the
document layout, then press [OK].
<BOOK TYPE>: The front and back sides of the
document will have the same top-bottom
orientation.
<CALENDAR TYPE>: The front and back sides of
the document will have the opposite topbottom orientation.
4-20
To cancel all settings, press [Stop/Reset].
–
When you switch the mode by pressing the
–
mode keys such as [FAX], all settings will
be canceled. If you want to keep the settings,
store the settings as follows:
[Menu] → <COPY SETTINGS> → <STANDARD
SETTINGS> → <2-SIDED> (See “COPY SETTINGS,”
on p. 12-5.)
You can skip steps 5 and 6. In this case, the
–
machine scans 2-sided documents in the
<BOOK TYPE> orientation and outputs the
same way.
If you press [Start] in step 5 after selected
–
<CALENDAR TYPE>, the machine scans 2-sided
documents in the <CALENDAR TYPE>
orientation and outputs the same way.

2-Sided Copying
2 > 1 - S I D E D
2 - S I D E D
B O O K T Y P E
T Y P E O F O R I G I N A L
T E X T / P H O T O 1
1 0 0 % * A 4
2 to 1-Sided Copying (MF4380dn Only)
You can make 1-sided copies from 2-sided
documents.
Place documents in the ADF.
1
For details, see “Placing Documents,” on p. 2-4.
Press [COPY].
2
Press [2-Sided] to select <2 >1-SIDED>,
3
then press [OK].
5
6
Use – [numeric keys] to enter the
desired copy quantity (1 to 99).
Press [Start].
If you want to copy multiple documents using
–
the platen glass, place a document and press
[Start] once for each page. When scanning
is complete, press [OK].
–
You can skip step 5. In this case, the machine
scans 2-sided documents in the <BOOK
TYPE> orientation to make 1-sided copies.
To cancel all settings, press [Stop/Reset].
–
When you switch the mode by pressing the
–
mode keys such as [FAX], all settings will
be canceled. If you want to keep the settings,
store the settings as follows:
[Menu] → <COPY SETTINGS> → <STANDARD
SETTINGS> → <2-SIDED> (See “COPY SETTINGS,”
on p. 12-5.)
Copying
Press [ ] or [ ] to select <BOOK
4
TYPE> or <CALENDAR TYPE>, then press
[OK].
<BOOK TYPE>: The front and back sides of the
–
document have the same top-bottom
orientation.
<CALENDAR TYPE>: The front and back sides
–
of the document will have the opposite topbottom orientation.
4-21

Selecting Paper Size Group
4 C O P Y S E T T I N G S
M E N U
2 P A P E R S I Z E G R O U P
C O P Y S E T T I N G S
A B
P A P E R S I Z E G R O U P
Selecting Paper Size Group
This section describes how to select the paper size group.
The default setting is <AB>.
Press [Menu].
1
Press [ ] or [ ] to select <COPY
2
SETTINGS>, then press [OK].
Copying
3
4
Press [ ] or [ ] to select <PAPER SIZE
GROUP>, then press [OK].
Press [ ] or [ ] to select a paper size
group, then press [OK].
You can select from the following paper size
groups: <AB>, <INCHES>, <A>
4-22

Changing Standard Mode
4 C O P Y S E T T I N G S
M E N U
1 S T A N D A R D S E T T I N G S
C O P Y S E T T I N G S
1 I M A G E Q U A L I T Y
S T A N D A R D S E T T I N G S
Changing Standard Mode
The Standard mode is the combination of copy modes that the machine automatically
applies when the power is turned ON, or when
the Standard mode to suit your needs.
The default settings are the followings:
–
<IMAGE QUALITY>: TEXT/PHOTO
–
<DENSITY>: MANUAL (5)
–
<ZOOM RATIO>: 100%
–
<AUTO COLLATE>: OFF
–
<2-SIDED>: OFF
[Stop/Reset] is pressed. You can change
1
2
3
Press [Menu].
Press [ ] or [ ] to select <COPY
SETTINGS>, then press [OK].
Press [ ] or [ ] to select <STANDARD
SETTINGS>, then press [OK].
4
5
Press [ ] or [ ] to select the desired
setting item, then press [OK].
You can specify the following settings:
–
<IMAGE QUALITY>
–
<DENSITY>
–
<ZOOM RATIO>
–
<AUTO COLLATE>
–
<2-SIDED>
If you press [Stop/Reset] before pressing [OK],
the setting will not be registered.
Press [Stop/Reset] to return to the
standby mode.
Press [Menu] to return to the previous display.
Copying
4-23

Copying
V I E W S E T T I N G S
2 O N 1
Viewing Copy Settings
Viewing Copy Settings
You can check the current copy settings for <COLLATE>, <2-SIDED>, <2 ON 1>, and <ID CARD
COPY>.
Press [Job Cancel/Status Monitor]
1
repeatedly to select <VIEW SETTINGS>,
then press [OK].
The current settings for <COLLATE>, <2-SIDED>,
<2 ON 1>, and <ID CARD COPY> appear on the
LCD display.
4-24

Fax
(MF4380dn/MF4370dn/
MF4350d/MF4340d Only)
This chapter describes how to use fax functions.
5
Overview of Fax Functions ..........................................5-2
Introduction to Using Fax Functions ..........................5-4
Methods for Receiving Faxes ...........................................5-4
Selecting the Receive Mode .........................................5-10
Setting the Current Date and Time ............................5-11
Setting the Type of Telephone Line ...........................5-11
Registering the Machine’s Name................................. 5-12
Registering Your Machine’s Fax Number .................. 5-12
Sending Fax Documents ...........................................5-13
Basic Methods for Sending Faxes ...............................5-13
Calling from an Extension .............................................. 5-13
Calling the Recipient before Sending Fax
Documents (Manual Sending) ..................................... 5-14
Switching Temporarily to Tone Dialing ..................... 5-15
Dialing an Overseas Number (With Pauses) ...........5-16
Basic Methods for Sending PC Faxes ......................... 5-17
Canceling Sending Fax Documents ..........................5-18
Specifying Destinations ............................................5-19
Specifying a New Fax Number ..................................... 5-19
Using the One-Touch Keys ............................................ 5-20
Using Coded Dial Codes ................................................. 5-20
Using the Group Addresses ..........................................5-21
Using the Address Book Key ......................................... 5-21
Sending Documents to More Than One Location
(Broadcasting) .................................................................... 5-22
Adjusting Density ......................................................5-24
Selecting Image Quality ............................................5-25
2-Sided Document (MF4380dn Only) ......................5-26
Redialing When the Line Is Busy ...............................5-27
Redialing Manually........................................................... 5-27
Redialing Automatically ................................................. 5-27
Checking the Dial Line before Sending ...................5-29
Changing Standard Mode .........................................5-30
Printing the TX Terminal ID .......................................5-31
Send Start Speed .......................................................5-32
Registering the Outside Line Access Number in
the R-Key ....................................................................5-33
Printing Received Documents on Both Sides of
Paper...........................................................................5-34
Reducing a Received Document ...............................5-35
Printing Footer Information on a Received
Document ...................................................................5-36
Specifying the Way of Printing When Toner Runs
Out ..............................................................................5-37
Setting the Incoming Ring ........................................5-38
Receiving Documents Manually with an External
Telephone (Remote RX) .............................................5-39
Activating the Remote Reception ..............................5-39
Receiving Documents with the Remote
Reception ............................................................................5-40
Selecting the Receive Mode for Printing .................5-41
Rejecting Incoming Faxes from the Unidentified
Senders .......................................................................5-42
Receive Start Speed ...................................................5-43
Receiving Documents in Memory without
Printing Out (Memory Lock Reception) ...................5-44
Printing All Documents Stored in the Memory
Lock Reception Mode ................................................5-46
Forwarding Received Fax Documents in Memory ..5-47
Checking/Changing the Status of Fax Documents
in Memory ..................................................................5-48
Checking/Deleting Fax Transmission
Documents.......................................................................... 5-48
Checking/Deleting Fax Reception Documents .....5-49
Checking the Fax Log ...................................................... 5-49
Fax (MF4380dn/MF4370dn/MF4350d/MF4340d Only)

Overview of Fax Functions
Overview of Fax Functions
In addition to the Super G3 fax function, you can send faxes from your computer. You can
also forward received fax documents to specified destinations.
(p. 5-13) (p. 5-17)
Fax (MF4380dn/MF4370dn/MF4350d/MF4340d Only)
(p. 5-25)
(p. 5-24)
(p
. 5-26)
(p
. 5-13)
(p
. 5-47)
5-2

(p. 5-19)
Overview of Fax Functions
(p.
(p
. 5-39)
5-44)
Fax (MF4380dn/MF4370dn/MF4350d/MF4340d Only)
5-3

Introduction to Using Fax Functions
Introduction to Using Fax Functions
This section describes the settings you need to make before using fax functions.
Make sure to set the following items first:
●
Your fax number
Register your machine’s fax number. (See “Make Fax Settings,” in the Starter Guide.)
●
Your personal name or company name
Register your name or company name. (See “Make Fax Settings,” in the Starter Guide.)
●
Time and date
Set the current time and date. (See “Setting the Current Date and Time,
Your telephone line type
●
Set the type of telephone line that is connected to the machine. (See “Setting the Type of Telephone
” on p. 5-11.)
Line,
Fax receiving mode
●
Set how the machine receives fax documents to suit your needs. (See “Methods for Receiving Faxes,”
. 5-4.)
Fax (MF4380dn/MF4370dn/MF4350d/MF4340d Only)
on p
Methods for Receiving Faxes
” on p. 5-11.)
Your machine offers several methods for receiving fax documents. You can receive documents automatically
or manually. Follow the chart below to choose the fax receive mode that best suits your needs.
The default setting is <FaxOnly>.
Printing fax documents and scanning documents over the network cannot be processed at the same time. If this happens, these
documents are handled differently depending on the following:
If you scan documents when the machine is receiving fax documents, or the machine receives fax documents when scanning
–
documents, the machine scans documents first, then starts printing the fax documents when scanning is complete.
If you scan documents when the machine is printing received fax documents, scanning is canceled. Wait for the fax documents to be
–
printed out, then perform the scanning operation again.
5-4

Introduction to Using Fax Functions
FaxOnly
●
In this mode, the machine receives documents automatically. Select this mode if you use the machine for fax
operations only, and not for voice communications using an external telephone.
●
Before using this mode
Simply set the receive mode to <FaxOnly>. (See “Selecting the Receive Mode,
●
When an incoming call is received
–
With no external telephone connected to the machine:
•
For fax calls, the machine receives fax documents automatically.
•
For telephone calls, you cannot talk to the caller.
–
With external telephone connected to the machine:
” on p. 5-10.)
Fax (MF4380dn/MF4370dn/MF4350d/MF4340d Only)
If you want to change <INCOMING RING>, see “Setting the Incoming Ring,” on p. 5-38.
5-5
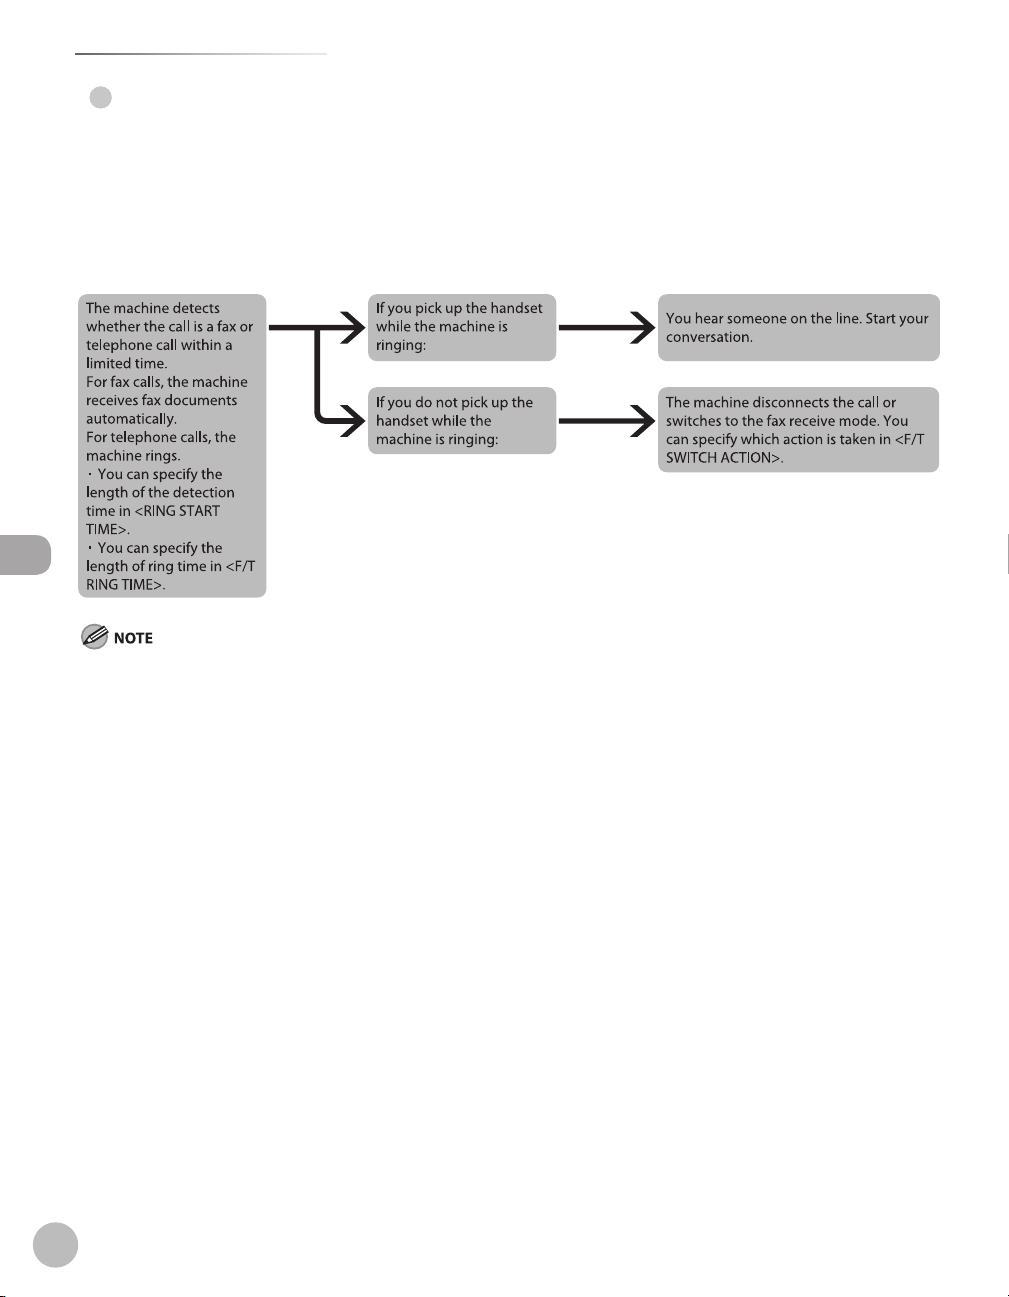
Introduction to Using Fax Functions
FaxTel
●
In this mode, the machine receives documents automatically for fax calls and rings for telephone calls.
●
Before using this mode
Make sure to do the following:
–
Connect your external telephone to the machine. (See “Make Fax Settings,” in the Starter Guide.)
–
Set the receive mode to <FaxTel>. (See “Selecting the Receive Mode,
●
When an incoming call is received
Fax (MF4380dn/MF4370dn/MF4350d/MF4340d Only)
” on p. 5-10.)
If you want to change <RING START TIME>, <F/T RING TIME>, or <F/T SWITCH ACTION>, see “Selecting the Receive Mode,” on p. 5-10.
5-6

Introduction to Using Fax Functions
AnsMode
●
In this mode, the machine receives documents automatically for fax calls and your answering machine records
a message for telephone calls.
●
Before using this mode
Make sure to do the following:
–
Connect your external telephone with built-in answering machine to the machine. (See “Make Fax Settings,”
in the Starter Guide.)
–
Set your answering machine to answer after 1 to 2 rings.
–
Record a message on your answering machine. (When you record a message, we recommend you insert
about 4 seconds of silence at the beginning of the message, or limit the message to 20 seconds.)
–
Set the receive mode to <AnsMode>. (See “Selecting the Receive Mode,
●
When an incoming call is received
” on p. 5-10.)
Fax (MF4380dn/MF4370dn/MF4350d/MF4340d Only)
This mode does not support voice mail.
–
Make sure to change the receive mode if you turn off your answering machine; otherwise, the machine cannot receive fax documents
–
automatically.
5-7
 Loading...