

Canon FilmGet FS User Manual

CanoScan FS4000US Driver Software
FilmGet FS
User’s Guide
Quick Start
To jump right into scanning
Chapter 1 to Chapter 4
To proceed at a more leisurely pace
You can start using your CanoScan scanner with either of these
procedures!!
Appendix: Troubleshooting
For problems during installation or use
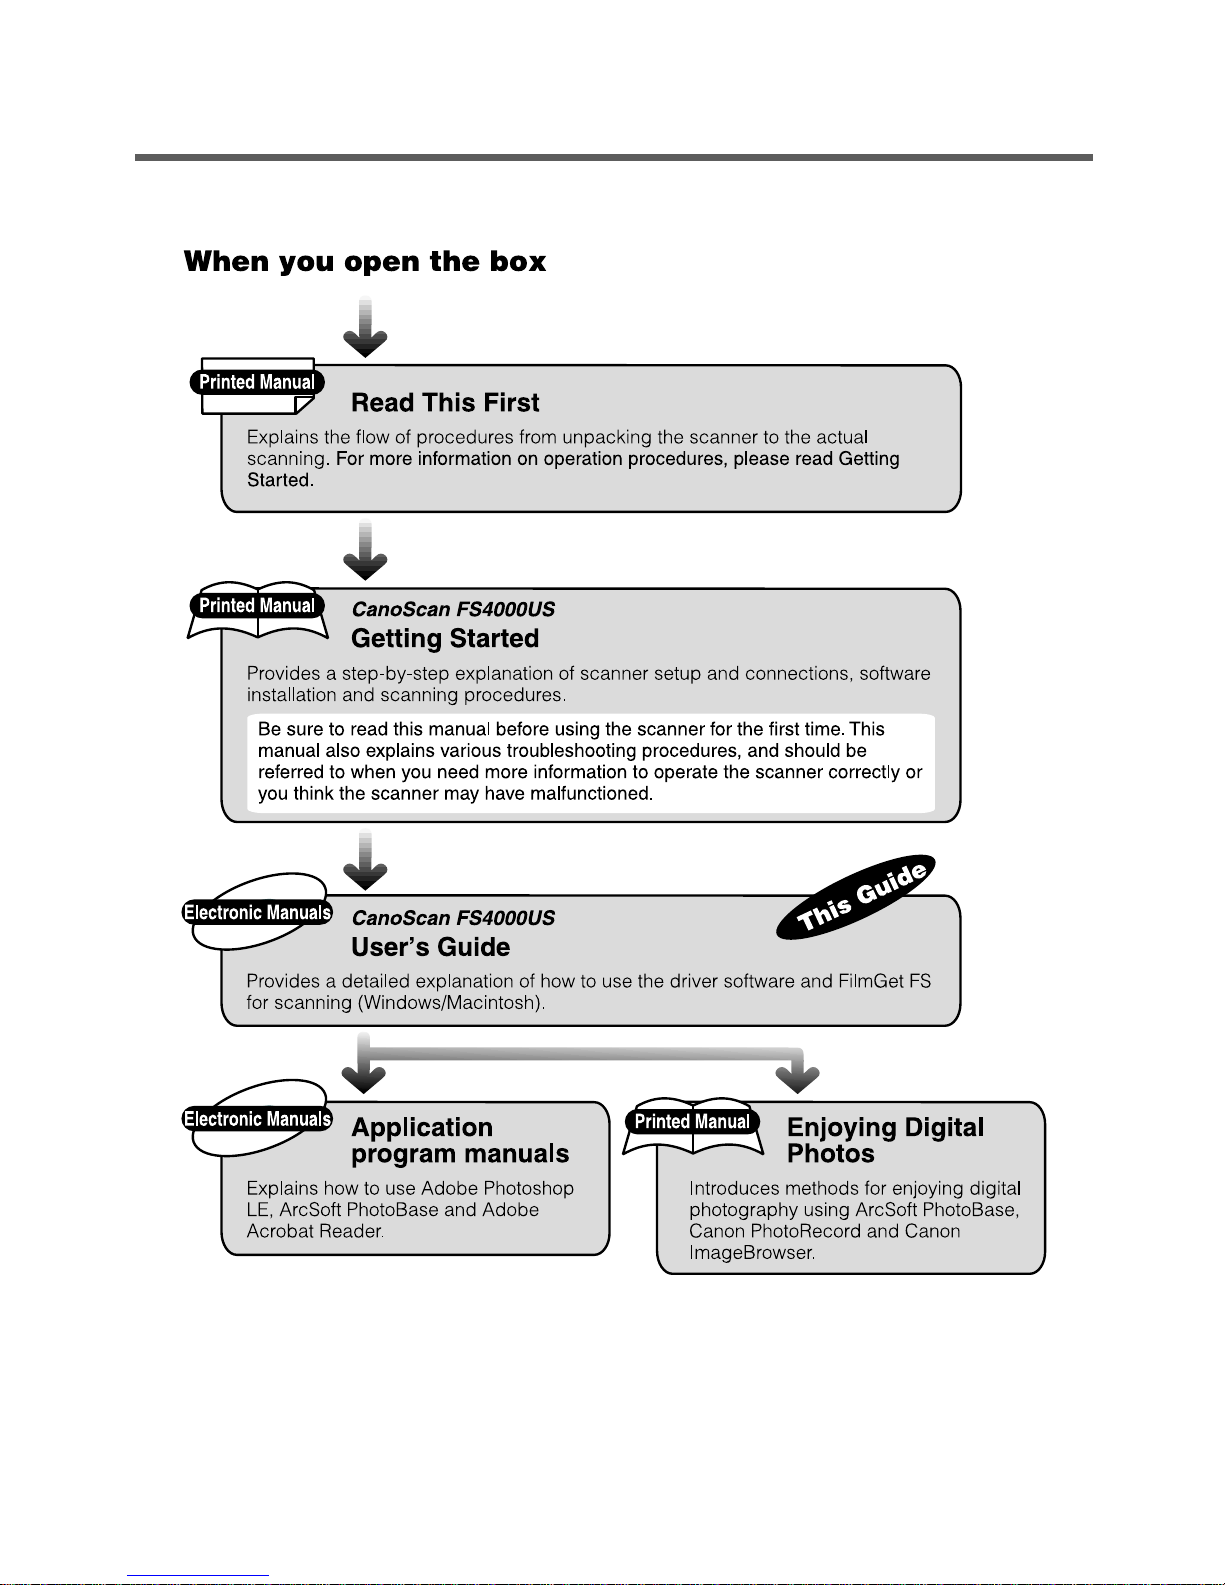
How to Use the Manuals
The various CanoScan scanner manuals are used for the following purposes.

1
1
2
3
4
5
FilmGet FS User’s Guide
How to Use this Guide
This is the user’s guide for FilmGet FS for Windows and FilmGet FS for Macintosh, the driver software
for CanoScan FS4000US film scanners. Start the Windows version as a TWAIN driver from within
TWAIN-compliant applications and the Macintosh version as the plug-in compliant driver software
from within plug-in compatible applications.
This guide explains how to use FilmGet FS after starting the driver software from within the
application program. (The operations after starting the driver software are nearly the same for both
the Windows and Macintosh versions.) Please read this guide in conjunction with your Windows and
Macintosh guides and the guides for individual TWAIN-compliant or plug-in compliant application
programs.
Organization of the Guide
This user’s guide is organized as follows.
Quick Start <To jump right into scanning>
This is a digest of the scanning procedures using FilmGet FS.
Read this to start using the scanner immediately.
Chapter 1 Before Scanning
An explanation of starting and exiting FilmGet FS, and an introduction of FilmGet FS window names
and functions.
All users read this section.
Chapter 2 Scanning
A step-by-step explanation of scanning procedures using FilmGet FS.
All users read this section.
Chapter 3 Scanning Setup
An explanation of how to set the scan settings such as input resolution (how finely to read the
image) and output target. Read this section as required.
Chapter 4 Adjusting Images
An explanation of how to adjust the coloring and brightness of preview images. Read this section
as required.
Chapter 5 Other Functions
An explanation of the FilmGet FS menu items and settings. Read this section as required.
Appendices
Troubleshooting, glossary and index. Refer to these sections as required.

2
1
2
3
4
5
FilmGet FS User’s Guide
Symbols in this Guide
The following symbols are used to draw your attention to important topics throughout the guide.
This symbol introduces operating precautions and other critical information. Be sure
to read these topics.
This symbol introduces supplementary information. Read these topics at your
discretion.
Notation and Screen Samples
• Windows 98 Second Edition, Windows 2000 Professional and Windows Millennium Edition are
referred to as Windows 98 SE, Windows 2000 and Windows Me, respectively. Also, unless
otherwise specified, references to Windows in this guide include all of Windows 98, Windows 98
SE, Windows 2000 and Windows Me.
• Both FilmGet FS for Windows and FilmGet FS for Macintosh are referred to as FilmGet FS.
• Although the screen samples provided in this guide mostly show the Windows 98 version of
FilmGet FS, the Macintosh version features a virtually identical user interface. Separate
explanations are provided only for items requiring different procedures.
• Adobe Photoshop LE and Adobe Acrobat Reader are referred to as Photoshop LE and Acrobat
Reader, respectively.
• Adobe, Acrobat and Photoshop are trademarks of Adobe Systems Incorporated.
• Microsoft and Windows are registered trademarks of Microsoft Corporation in the U.S. and other countries.
• Macintosh, Power Macintosh, Mac OS and ColorSync are registered trademarks or trademarks of Apple
Computer Inc. in the U.S. and other countries.
• CanoScan, FilmGet and FARE are trademarks of Canon Inc.
• Other names and products not mentioned above may be trademarks or registered trademarks of their
respective companies.
Disclaimer
1. No part of this guide may be reproduced, transmitted, transcribed, stored in a retrieval system,
or translated into any language in any form, by any means, without the prior written permission
of Canon Inc.
2. Canon Inc. reserves the right to change the contents of this guide and the specifications of the
hardware and software described herein at any time without prior notice.
3. While every effort has been made to ensure that the information contained in this guide is
accurate and complete, no liability can be accepted for any errors or omissions. We respectfully
request that you notify the nearest Canon Customer Support Help Desk if you have any
questions or suggestions about this guide.
4. Please be aware that the use of text and images scanned from published material for other than
personal purposes may be prohibited.
5. Portions of this guide are copyrighted by Adobe Systems Incorporated, and are reproduced
herein under permission from Adobe Systems Incorporated.

3
1
2
3
4
5
FilmGet FS User’s Guid e
FilmGet FS Features
● A Scanner Driver that Adjusts Images Too
FilmGet FS is the driver software for the CanoScan FS4000US scanner, and is equipped with a
variety of image processing functions and input and output controls. The Windows version can be
opened as a 32-bit TWAIN driver from within TWAIN-compliant application programs. The Macintosh
version can be opened as a plug-in from within plug-in compliant application programs.
● Color Matching System Support
(Windows: ColorGear, Macintosh: ColorSync)
This software supports color matching systems so that the colors read by the scanner are faithfully
reproduced on your monitor without forcing you to perform any troublesome adjustments.
● Batch Scanning of Multiple Frames
Save time and effort by setting the color adjustment and resolution settings for individual frames and
then scanning the selected frames in a single batch. You can scan up to six frames of 35 mm (135)
film, four frames of slide-mounted film, or 40 frames of APS (IX240) film in a single batch.
• APS film refers to APS standard film.
APS is the abbreviation for Advanced Photo System.
● Dirt and Scratch Correction Function FARE
This software is equipped with the FARE (Film Automatic Retouching and Enhancement) dirt and
scratch correction function. This function eliminates troublesome and time consuming cleaning and
scratch retouching work by automatically identifying dirt and scratches on the film surface and
correcting these defects to provide a clear image.
● Easy Scanning with Auto Settings
Settings for images that are to be used for specific purposes, such as for display on a monitor, for
output to a printer or for transmission in a fax, can be set automatically. You are now free to scan
without bothering with resolution and size settings.
● Tool Tips Provide Guidance
Guidance is always at hand when you position the mouse cursor over a button or tool. The tool tips
provide useful information if you are unsure how to use an item.
● Common Windows and Macintosh User Interface
The Windows and Macintosh versions of FilmGet FS both share the same user-friendly window
design and functions. You can switch between either platform without noticing the transition.

4
1
2
3
4
5
FilmGet FS User’s Guide
Table of Contents
How to Use this Guide.......................................................................1
FilmGet FS Features ..........................................................................3
Quick Start................................................................................................10
Windows Setup........................................................................................18
System Requirements .....................................................................18
Installing FilmGet FS........................................................................18
Starting and Exiting FilmGet FS.......................................................19
Macintosh Setup.................................................. ....... ...... ...... ....... ...... ....21
System Requirements .....................................................................21
Installing FilmGet FS........................................................................21
Starting and Exiting FilmGet FS.......................................................22
FilmGet FS Main Window........................................................................24
Main Window ........................................................................24
Main Windows .....................................................................25
Menu Bar in the Main Window.........................................................25
Toolbar in the Main Window.............................................................25
FilmGet FS Thumbnail Window..............................................................26
Thumbnail Window ..........................................................................26
Toolbar in the Thumbnail Window....................................................26
How to Find Help .....................................................................................27
Tool Tips ..........................................................................................27
QUICK START For Those Who Prefer to Jump Right into Scanning
Chapter 1 Before Scanning

5
1
2
3
4
5
FilmGet FS User’s Guid e
Scanning Procedures.................................................................... ...... .... 29
Loading Film .............................. ....... ...... ....... ...... ....... ...... ...... ....... ...... ....30
Inserting the Film Holder .................................................................30
Ejecting the Film Holder ..................................................................31
Switching between Windows..................................................................32
Switching to the Main Window ........................................................32
Switching to the Thumbnail Window ...............................................32
Selecting the Film Type.............................................. ...... ...... ....... ...... ....33
Film Type Setting .............................................................................33
Setting the Color Mode ...........................................................................34
Color Mode Setting..........................................................................34
Determining the Color Mode ...........................................................35
Thumbnail Scanning ...............................................................................36
Displaying the Thumbnail Window ..................................................36
Initiating a Thumbnail Scan .............................................................36
Selecting Frames.....................................................................................37
Selecting/Deselecting All ................................................................37
Selecting/Deselecting a Single Frame ............................................37
Rotating and Flipping Thumbnail Images .............................................38
Rotating and Flipping Images .........................................................38
Transferring Thumbnail Images to the Application Program ..............39
Transferring Thumbnail Images .......................................................39
Previewing to Inspect the Images ..........................................................40
Previewing .......................................................................................40
Switching between Preview Images................................................41
Adjusting Preview Images ......................................................................42
Zooming an Image for Verification ..................................................42
Moving an Image within the Preview Area ......................................43
Rotating and Flipping Images .........................................................43
Using Auto Correction on Images ...................................................44
Chapter 2 Scanning

6
1
2
3
4
5
FilmGet FS User’s Guide
Adjusting the Scan Settings...................................................................45
Adjusting Brightness and Coloring .......................................................46
Selecting the Scan Area..........................................................................47
Selecting the Scan Area ..................................................................47
Adjusting the Scan Area Selection Frame.......................................48
Adjusting the Selected Scan Area ..................................................48
Final Scan.................................................................................................49
Scanning the Selected Frames .......................................................49
Exiting FilmGet FS ...........................................................................50
Scan Setting Modes.................................................................................52
Important Facts about Scan Settings ..............................................52
Guide to the Scan Settings Section.................................................53
Procedures Common to All Scan Modes ........................................54
Using File Mode .......................................................................................56
Selecting an Input Resolution..........................................................56
Select an Output Resolution............................................................57
Image Size Settings.........................................................................57
Using Text/Printer/Fax Mode...................................................................60
Selecting the Paper Size .................................................................60
Selecting the Display Size...............................................................60
Selecting an Output Target..............................................................61
Image and File Sizes .......................................................................61
Using Display Mode.................................................................................62
Selecting a Monitor Resolution........................................................62
Selecting the Display Size...............................................................62
Image and File Sizes .......................................................................62
Using Photo Size Mode...........................................................................63
Selecting a Photo Size.....................................................................63
Selecting an Output Target..............................................................64
Image and File Sizes .......................................................................64
Chapter 3 Adjusting the Scan Settings

7
1
2
3
4
5
FilmGet FS User’s Guid e
Using Custom Mode................................................................................65
Preset Scan Settings .......................................................................65
Customizing the Pull-Down Menu ...................................................66
Adding Scan Settings and Menu Items..................................................68
Adding Scan Settings......................................................................68
Adding and Deleting Menu Items ...................................................69
Image Adjustment Modes .......................................................................72
Guide to the Image Adjustment Section .........................................72
Adjustment Mode Types..................................................................73
Procedures Common to All Image Adjustment Modes ...................74
How to Use Each Image Adjustment Mode ....................................76
Adjusting a Histogram ............................................................................77
Guide to the Histogram Tab.............................................................77
Interpreting a Histogram .................................................................78
How to Adjust a Histogram..............................................................78
Adjusting the Tone Curve .......................................................................79
Guide to the Tone Curve Tab ...........................................................79
Interpreting Tone Curves .................................................................80
Adjusting a Tone Curve ...................................................................80
Adjusting the Brightness/Contrast ........................................................81
Guide to the Brightness/Contrast Tab .............................................81
Adjusting the Brightness .................................................................82
Adjusting the Contrast .....................................................................82
Adjusting the Color Balance...................................................................83
Guide to the Color Balance Tab ......................................................83
Adjusting the Threshold Value...............................................................84
Guide to the Threshold Value Tab ...................................................84
Chapter 4 Adjusting Images

8
1
2
3
4
5
FilmGet FS User’s Guide
[Settings] Menu........................................................................................86
Adjusting the Exposure ...................................................................86
Setting the Clean Dust/Scratches Function (FARE) ........................87
Adjusting the Focus.........................................................................88
Use Color Matching.........................................................................89
Setting the Monitor Gamma Value ...................................................90
Setting the Preferences ...................................................................91
Setting the Power Saving Features .................................................93
Restoring the Default Settings.........................................................93
[Device] and [Help] Menus......................................................................96
Checking a Scanner ........................................................................96
Viewing the Device Version Information ..........................................96
Viewing the Software Version Information .......................................96
Troubleshooting.......................................................................................98
FilmGet FS Error Messages..................................................................105
Uninstalling FilmGet FS .............................................................109
Uninstalling and Reinstalling FilmGet FS ................................112
Glossary .................................................................................................115
Index .......................................................................................................120
Chapter 5 Other Functions
Appendices

CanoScan FS4000US Film Scanner
9
1
2
3
4
5
FilmGet FS User’s Guid e
QUICK START
For Those Who Prefer to Jump Right
into Scanning

QUICK START
10
1
2
3
4
5
FilmGet FS User’s Guide
Quick Start
This section provides the essentials of scanning with FilmGet FS. For those who prefer to jump right
into scanning, simply follow the procedures below.
If you wish more inform ation in a particular proce dure, refer to the pa ges quoted for that topic.
1
Install the FilmGet FS software.
• Proceed directly to step 2 if you have already installed the FilmGet FS
software according to the instructions in Getting Started.
See Getting Started p. 30.
• Connect the scanner to your computer and turn on the power. When the
“Add New Hardware Wizard” screen appears, place the supplied
“CanoScan Setup CD-ROM” into the CD-ROM drive and follow the
instructions in the messages to install the software.
See Getting Started p. 50.
(1) Place the supplied “CanoScan Setup CD-ROM” into the CD-ROM drive.
(2) When CanoScan Setup Utility starts, select
[Install the Software]
and
install Photoshop LE. Be sure to reboot your computer after installation is
finished.
(3) Start CanoScan Setup Utility again, select
[Install the Software]
and install
FilmGet FS together with the supplied application program.
QUICK START
11
1
2
3
4
5
FilmGet FS User’s Guid e
2
Start FilmGet FS.
See p. 19.
• Start a TWAIN-compliant application program such as Photoshop LE, and
start FilmGet FS using the menu item or button.
See p. 22.
• Start a plug-in-compliant application program such as Photoshop LE, and
select FilmGet FS using the menu item or button.
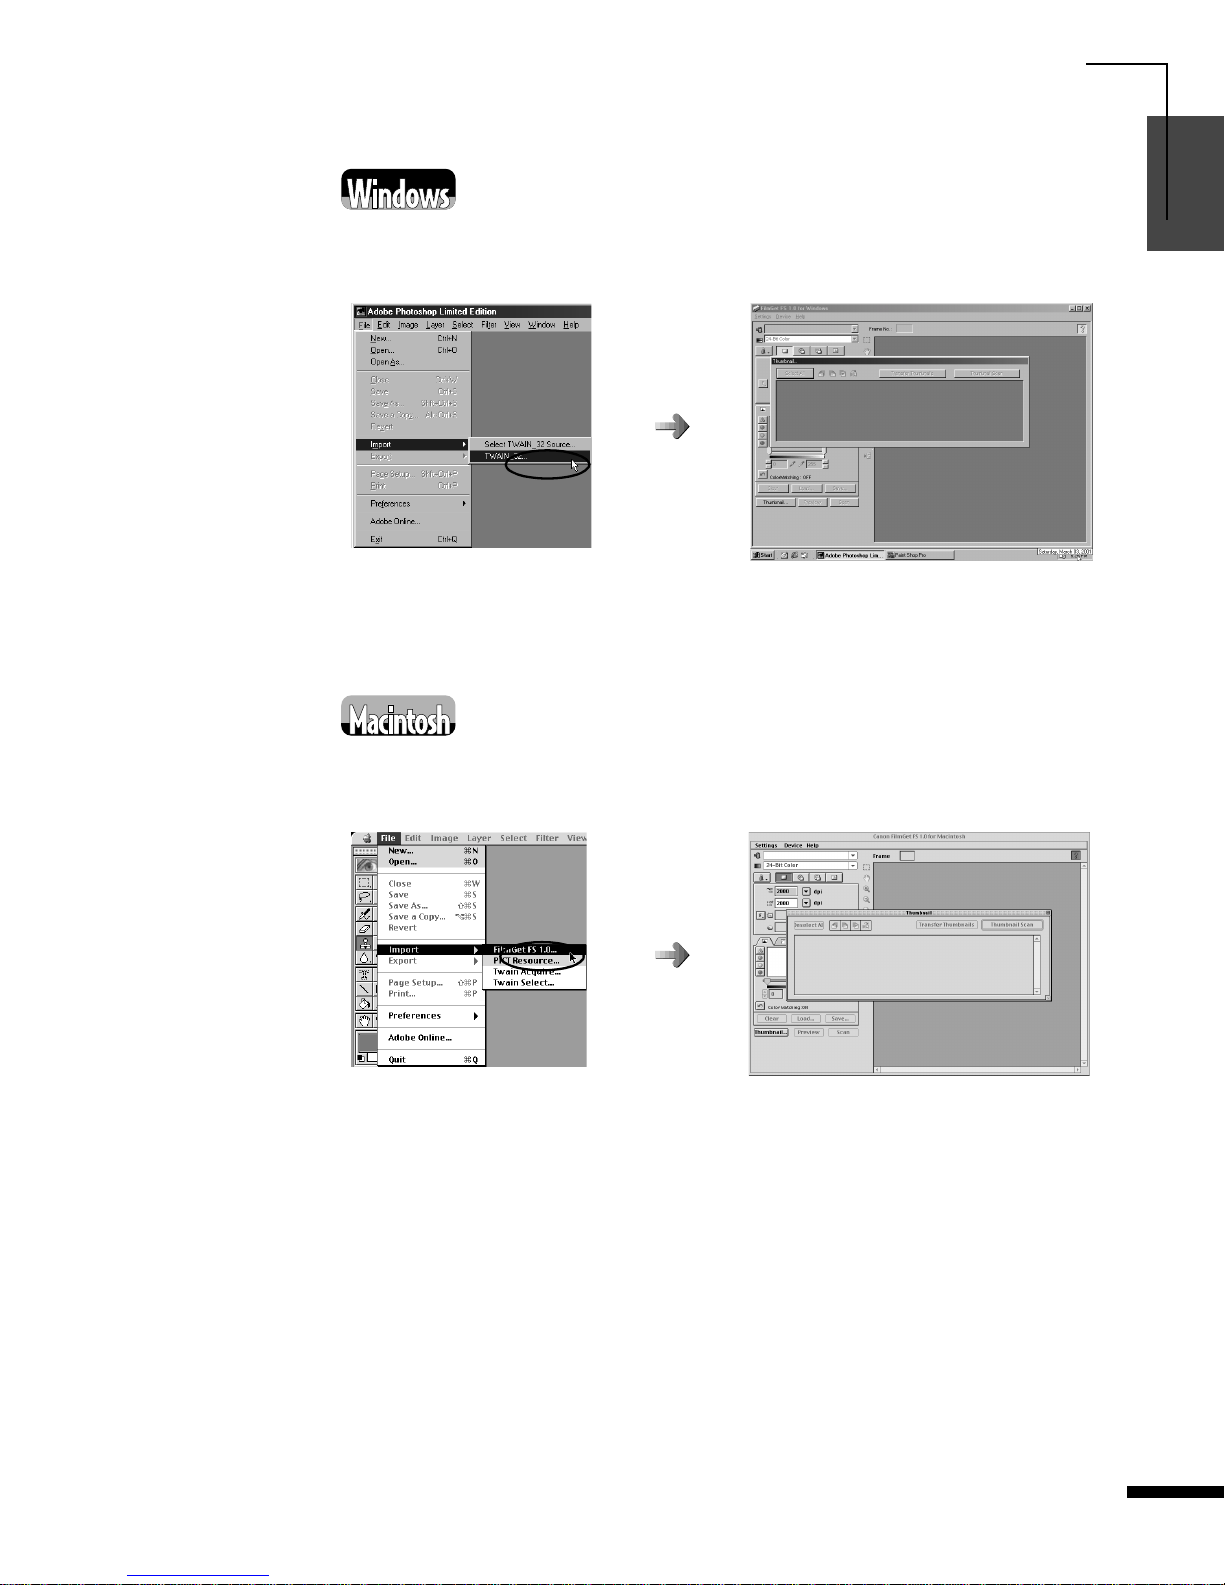
When using Photoshop LE, click the
[File]
menu and select
[Import]
and
[TWAIN_32...]
.
Thumbnail Windo w
Main Window
When using Photoshop LE, click the
[File]
menu and select
[Import]
and
[FilmGet FS 1.0...]
.
Thumbnail Windo w
Main Window

QUICK START
12
1
2
3
4
5
FilmGet FS User’s Guide
3
Load the film. See p. 30.
4
Set the film type and color mode. See pp. 33 to 35.
(1) Click the main window to switch the window.
(2) Select a film type (color/
monochrome, negative/positive) that
matches the film you are scanning.
(3) Set the color mode (color, grayscale,
or black and white).
5
Make a thumbnail scan of all the frames on the film. See p. 36.
(1) Click the
[Thumbnail…]
button in the main window to display the
thumbnail window.
(2) Click the
[Thumbnail Scan]
button in the thumbnail window.
(1) Hold the film holder horizontally
with the mark facing
upwards.
(3) Insert the end with the
mark into the film
holder slot of the
scanner.
(2) Check that the [R] mark can be seen
properly from the right side.
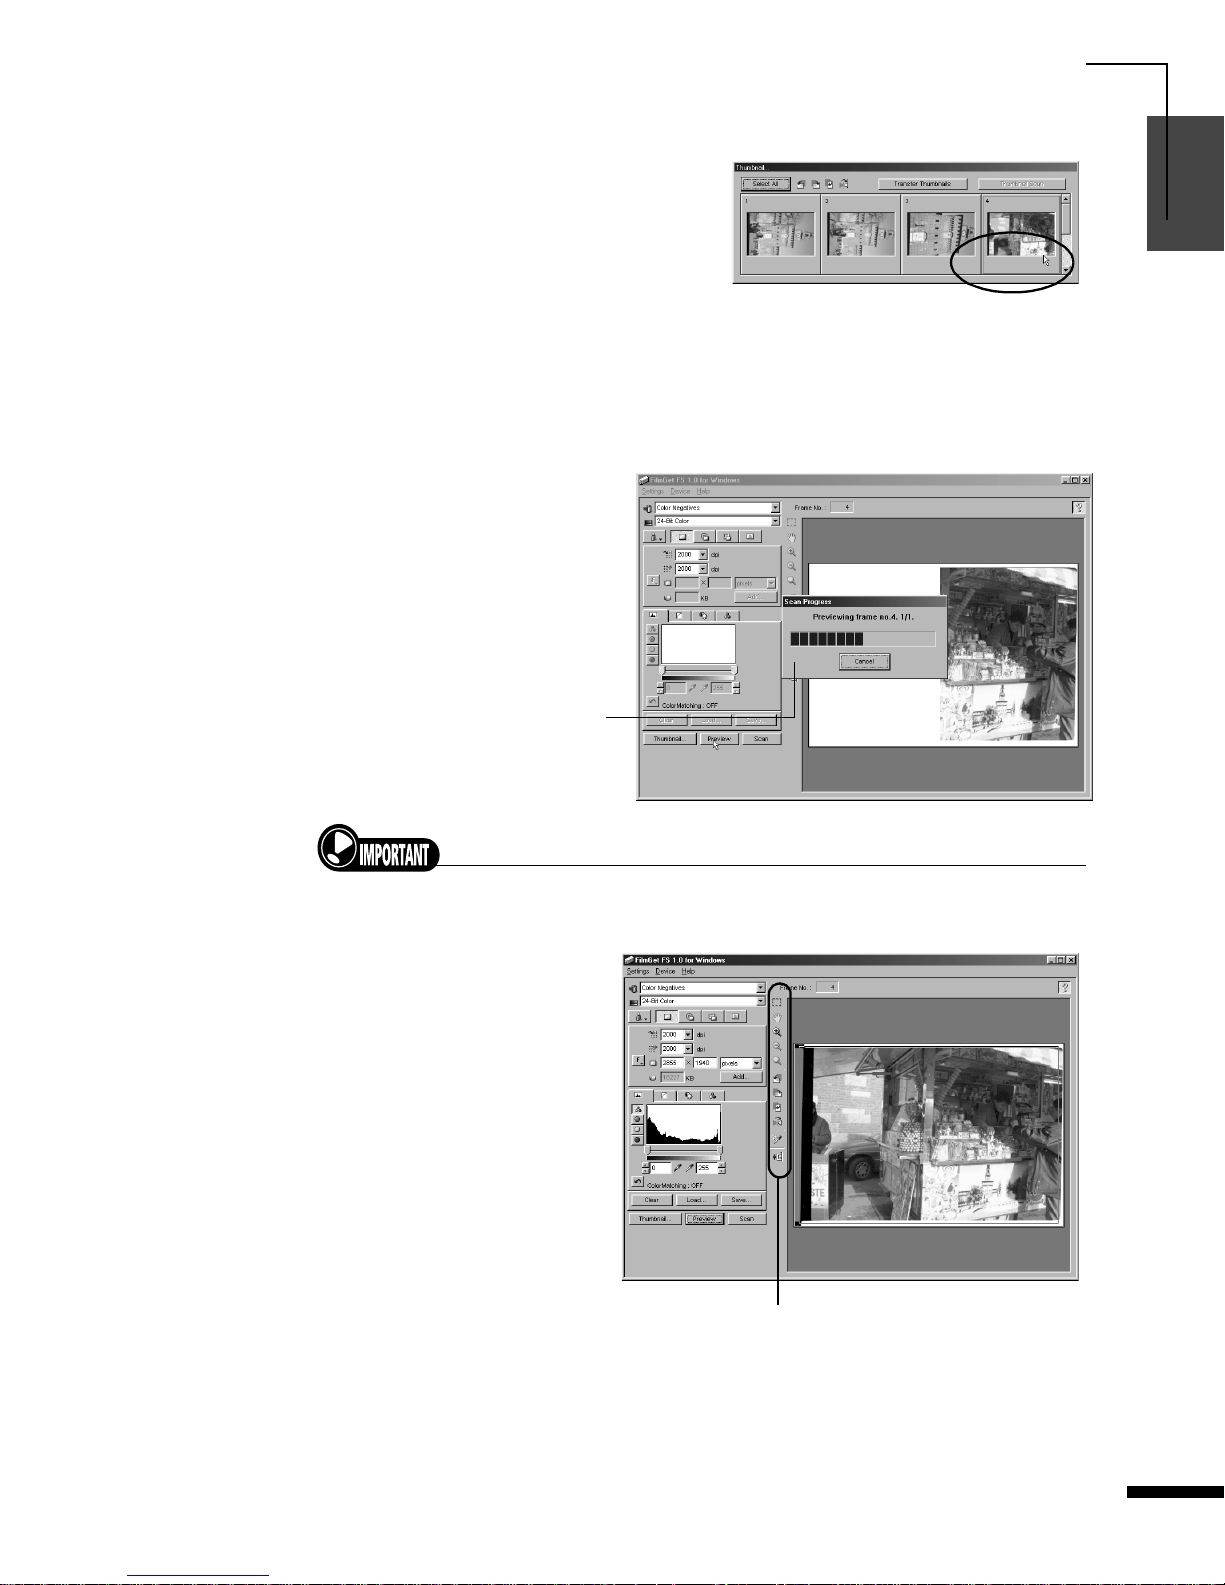
The thumbnail scan progress bar
will be displayed. Click the
[Cancel]
button if you wish to
stop the thumbnail scan.
QUICK START
13
1
2
3
4
5
FilmGet FS User’s Guid e
6
Select a frame you wish to scan. See pp. 37, 38.
• Click a frame to select that
frame. The selected frame will
be displayed with a red border.
• If necessary, rotate or flip the
frame to change the orientation.
7
Preview the image for the selected frame. See pp. 40, 41.
• Switch to the main window and click the
[Preview]
button.
• The image will be displayed in the preview area.
• For details on switching between the main window and the thumbnail
window, see page 32.
• You can only preview one frame at a time.
8
If necessary, adjust the preview image. See pp. 42 to 44.
• If the preview image
orientation and
brightness are not to your
satisfaction, adjust the
images frame by frame
using the toolbar in the
preview area. You can
zoom, rotate or flip the
image, or perform auto
retouching.
The preview progress bar will be
displayed. Click the
[Cancel]
button if you wish to stop the
preview.
Preview Area
Toolbar
QUICK START
14
1
2
3
4
5
FilmGet FS User’s Guide
9
If necessary, set the scan settings. See p. 45.
• If the purpose is clear such as for printout or display on a monitor, set the
resolution, output target and other settings for each frame using the scan
setting section functions.
• If the purpose is undecided, scan at default settings. In this case the images
are scanned with file mode settings (scanning settings for storage in files).
10
If necessary, adjust the image brightness and coloring. See p. 46.
• If the preview image brightness and coloring are not to your satisfaction,
adjust the images frame by frame using the image adjustment section
functions.
• When using the image adjustment section functions, remove the check from the “Use
Color Matching” option in the [Color Matching] item of the [Settings] menu.
See p. 89.
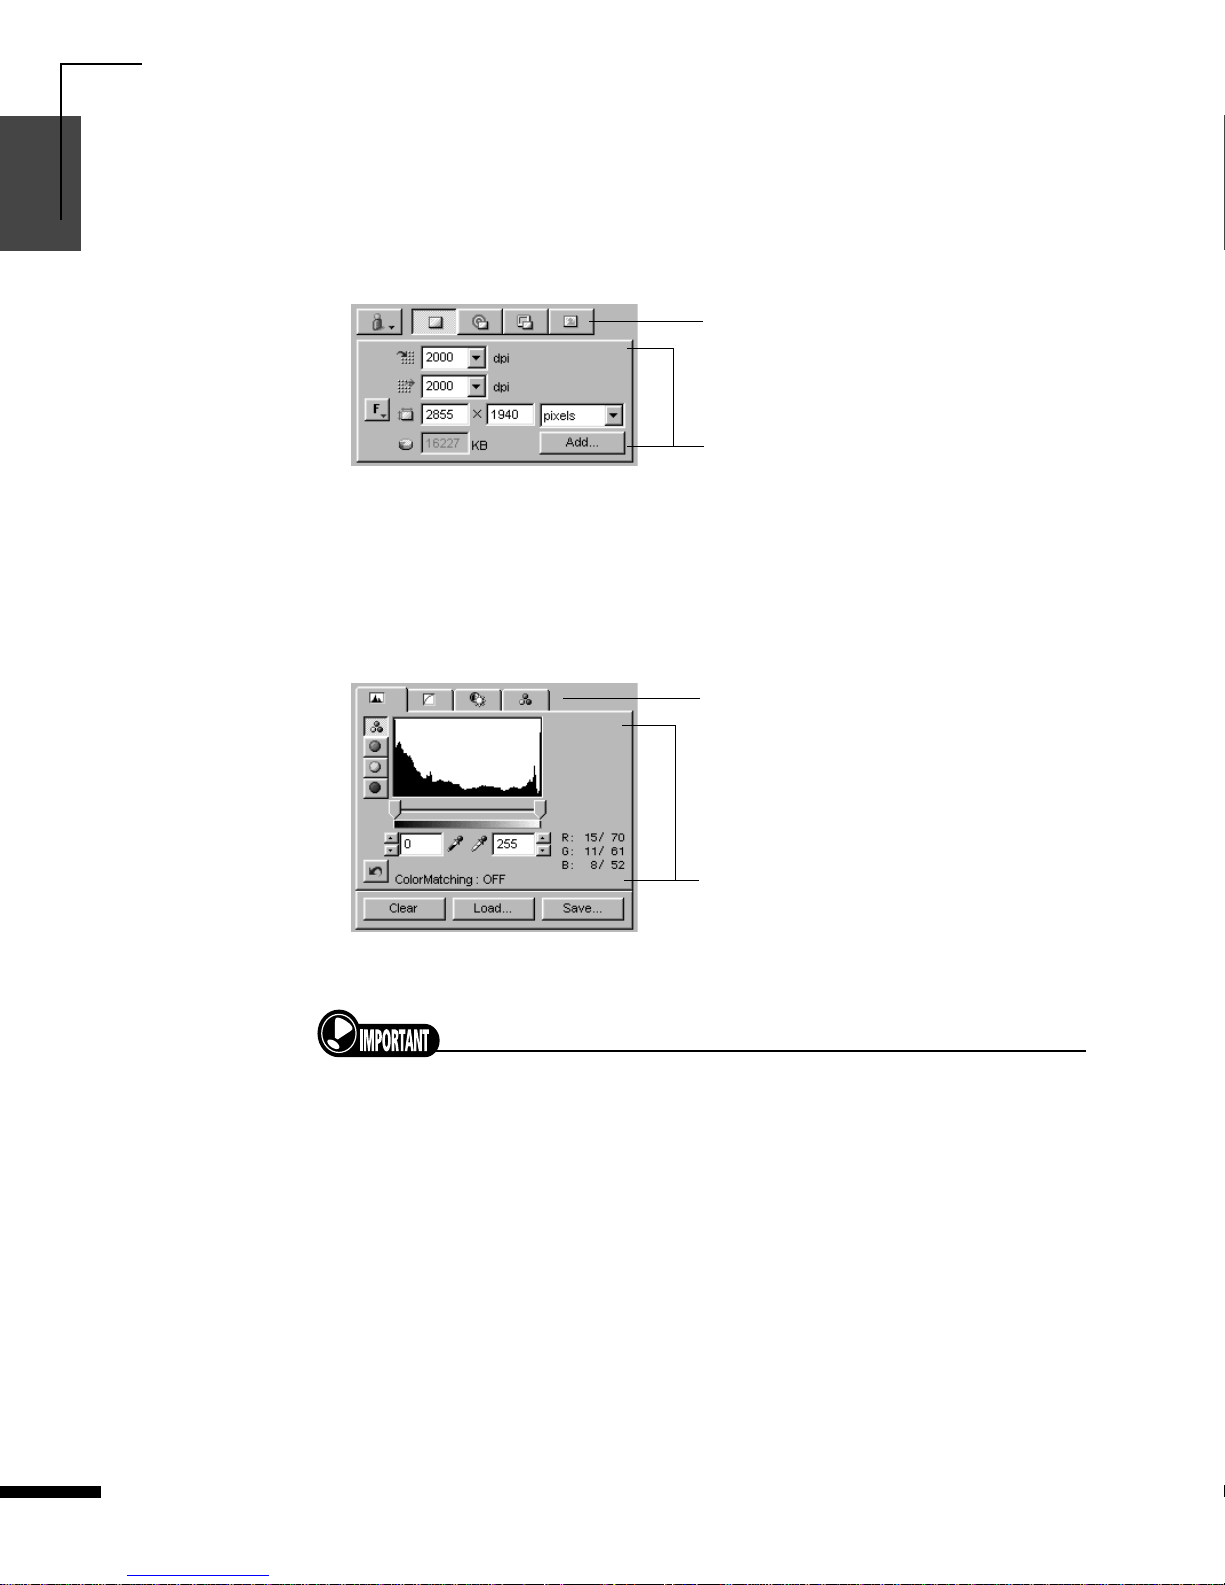
Select a mode corresponding to the
purpose of the scanned image.
Set the values for each item.
Scan Settings Section
Select an image adjustment mode
(Contrast, Brightness, etc.).
Set the values for each item.
Image Adjustment Section
QUICK START
15
1
2
3
4
5
FilmGet FS User’s Guid e
11
Select the scan area for each image. See pp. 47, 48.
• Drag the ‘+’ shaped
mouse cursor diagonally
to select a scan area.
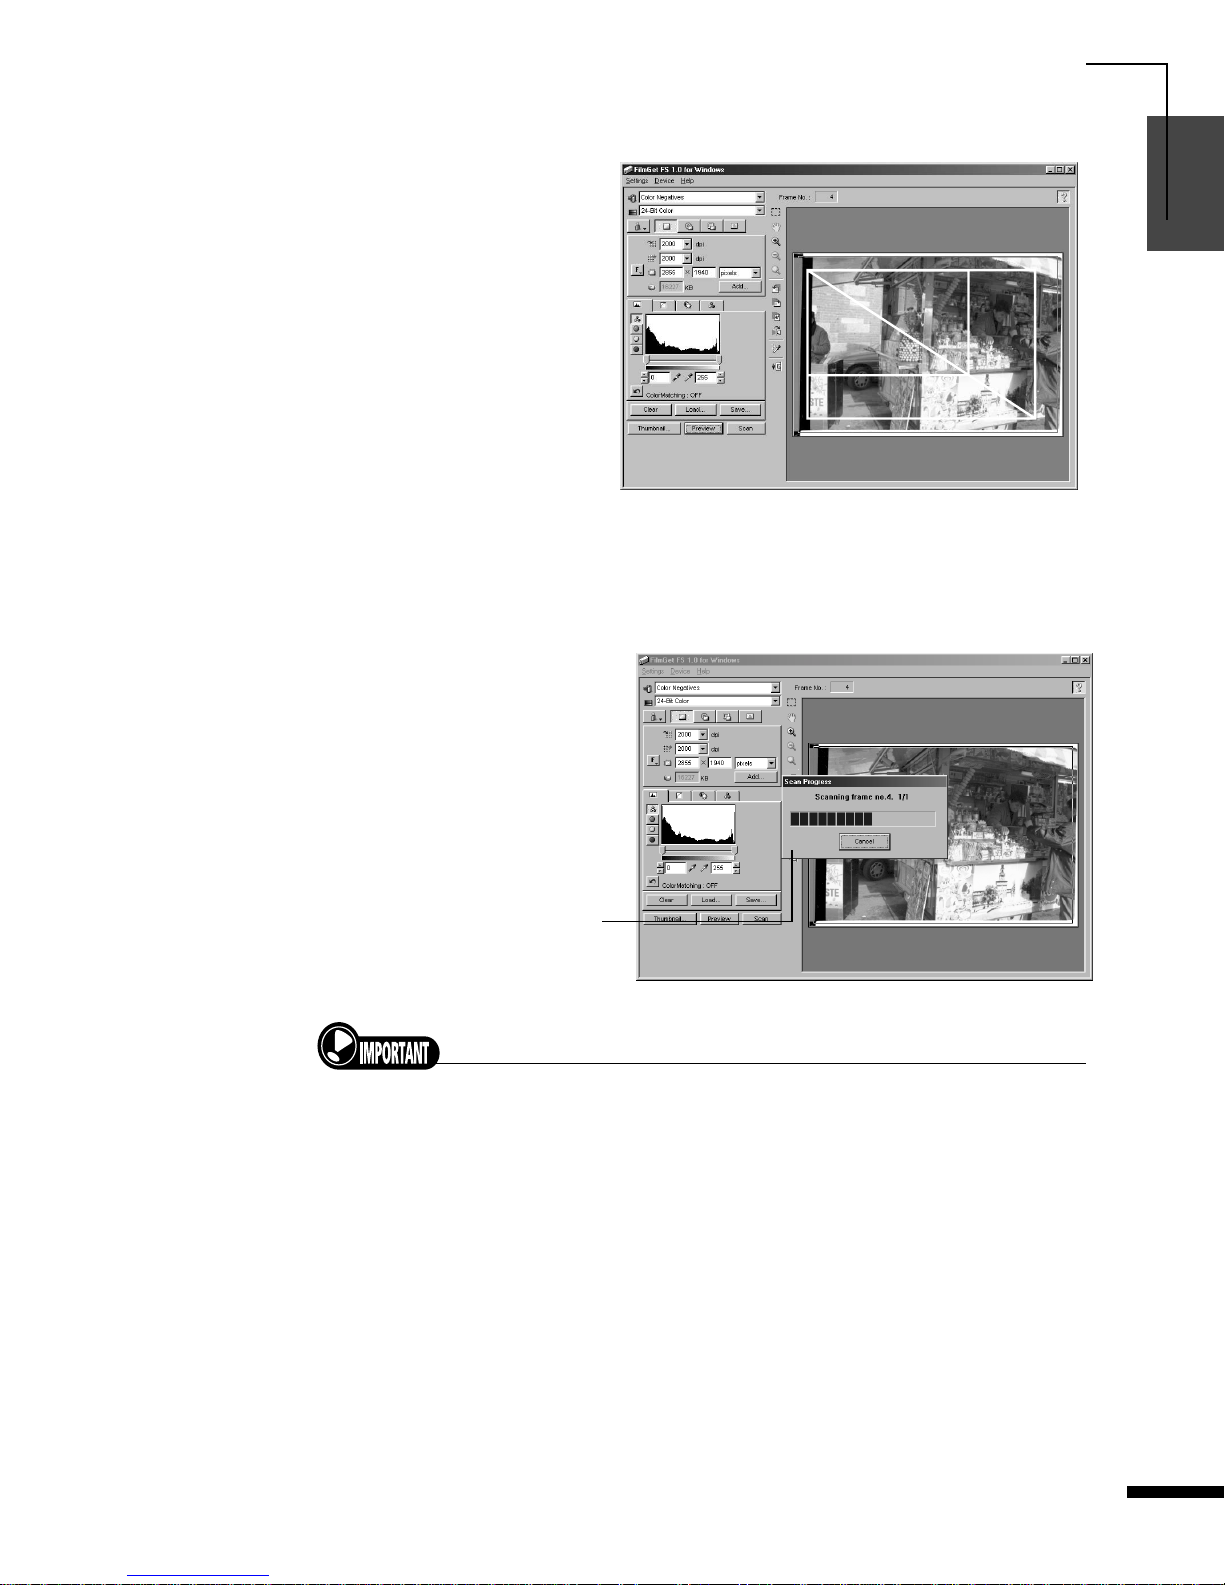
12
Initiate the final scan. See p. 49.
• Click the
[Scan]
button.
• Scanning is executed. The scanned image will not appear in the preview
area, and will instead be transferred to the application program from which
FilmGet FS was started.
• To scan multiple frames in a batch, select the frames to be scanned beforehand at the
thumbnail window.
The scan progress bar will be
displayed. Click the
[Cancel]
button if you wish to stop the
scan.

QUICK START
16
1
2
3
4
5
FilmGet FS User’s Guide
13
Click the (close box) at the top right of the window to close the
window.
• For the Macintosh version, click the (close box) at the top left of the
window to close the window.
• The scanned image will be displayed in the window of the application
program from which FilmGet FS was started.
14
Retouch the image as required. See the manual for your application
program.
• Print or save the image to a disk with the application program from which
FilmGet FS was started.
The scanned images of all
the selected frames will be
displayed.

CanoScan FS4000US Film Scanner
17
1
2
3
4
5
FilmGet FS User’s Guid e
CHAPTER 1
Before Scanning
This section introduces procedures and main window and thumbnail window
names and functions that you should be familiar with before actually using
FilmGet FS.
All users read this section.
Windows Setup...............................................................18
Macintosh Setup.............................................................21
FilmGet FS Main Window ..............................................24
FilmGet FS Thumbnail Window ....................................26
How to Find Help............................................................27

Before Scanning
18
1
2
3
4
5
FilmGet FS User’s Guide
Windows Setup
System Requirements
The computer you use to run FilmGet FS must meet the following minimum requirements. Check your
computer and install FilmGet FS onto the hard disk drive.
• FilmGet FS operation is not guaranteed on home-made or shop brand PCs.
• FilmGet FS is not compatible with NEC PC-9800/9821 series computers.
• Only one CanoScan scanner may be connected to a computer at a time.
• Please note that the system may become unstable because the computer’s energy saving mode
(sleep mode) is not supported.
Installing FilmGet FS
Install FilmGet FS according to the instructions in “2. Installing the Driver Software” of
“Chapter 2 Using the Scanner with Windows” in Getting Started supplied with the scanner.
Computer
USB connection: IBM PC-AT compatible computer with standard
USB configuration
SCSI connection: IBM PC-AT compatible computer with SCSI card
installed
Operating System
Windows 98, Windows 98 SE, Windows 2000, Windows Me
CPU
Windows 98: Pentium 133 MHz or faster
Windows 98 SE: Pentium 133 MHz or faster
Windows 2000: Pentium 133 MHz or faster
Windows Me: Pentium 150 MHz or faster
RAM
64 MB or more (128 MB or more recommended)
Display
High Color (16 bit) or better, 800 x 600 pixels or better
Interface
USB 1.1/SCSI II
Hard Disk Capacity
500 MB or more (1 GB or more recommended) available after
installing the application program
CD-ROM Drive
Required
Required Application
Program
Photoshop LE or other TWAIN-compliant application program
Before Scanning
19
1
2
3
4
5
FilmGet FS User’s Guide
Starting and Exiting FilmGet FS
■
Starting FilmGet FS
FilmGet FS must be started from within a TWAIN-compliant application program. It cannot be started
independently. Photoshop LE is used in the example below.
1
Start Photoshop LE.
• If you are using a different TWAIN-compliant application program, start that
program.
• When using Photoshop LE, you must increase the allotted memory in order to start
FilmGet FS. For more information please see page 41 “Increasing the Memory
Allocated to Photoshop LE” of Getting Started.
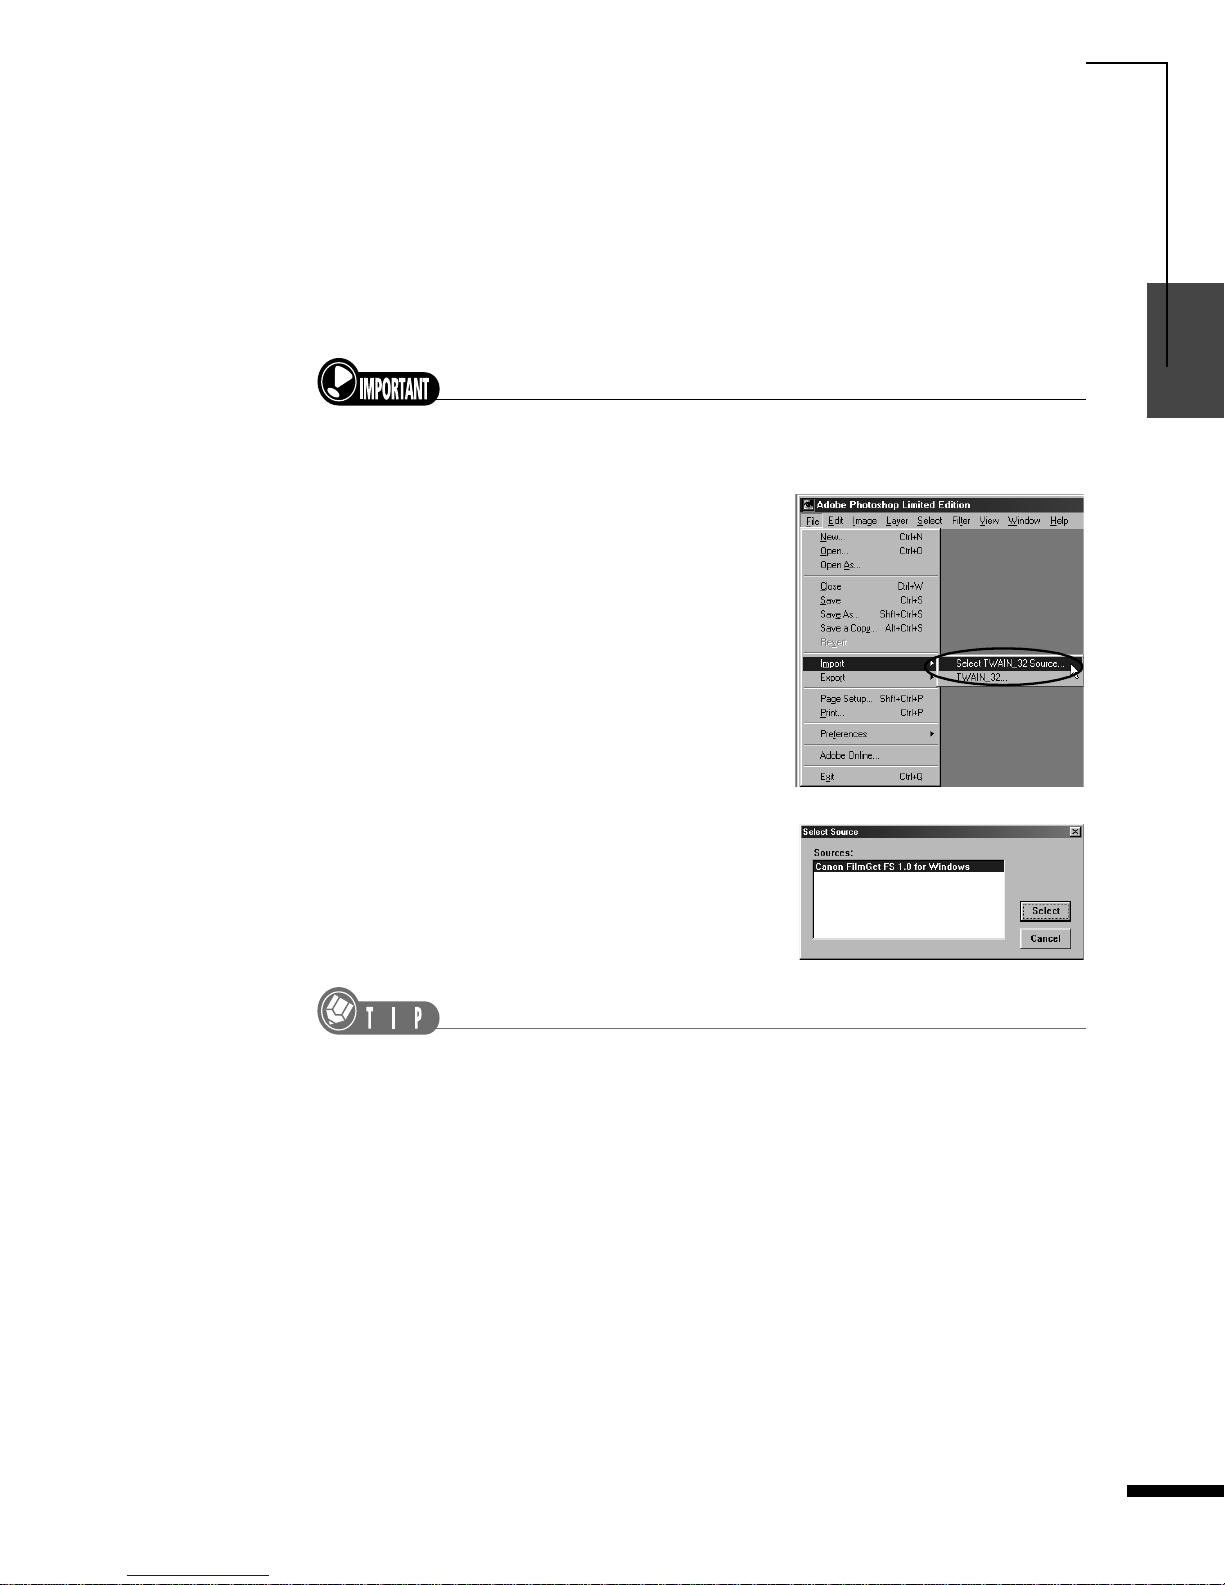
2
Click the [File] menu and select [Import]
and [Select TWAIN_32 Source...].
3
The Select Source dialog will be
displayed. Select [Canon FilmGet FS 1.0
for Windows] from the list and click the
[Select] button.
• The operations in steps 2 and 3 are not necessary if no driver software for other
scanners or digital cameras has been installed.
• Once FilmGet FS has been selected, you do not need to reselect it as long as you do
not disconnect the scanner or change the settings.

Before Scanning
20
1
2
3
4
5
FilmGet FS User’s Guide
■
Exiting FilmGet FS
4
Click the [File] menu and select
[Import] and [TWAIN_32...].
• FilmGet FS starts, and the main
window and thumbnail window will
be displayed.
• Scanning is performed using these
windows.
• Please refer to the manuals accompanying the individual software package for the
procedures for starting FilmGet FS from within a TWAIN-compliant application program
other than Photoshop LE.
1
Click the (close box) at the top right of the main window.
• The FilmGet FS windows will close.
• FilmGet FS will automatically close after scanning has finished when the “Close
FilmGet FS after Acquire” option has been checked in the [Preferences...] item of the
[Settings] menu. See p. 92.
Thumbnail Window
Main Window

Before Scanning
21
1
2
3
4
5
FilmGet FS User’s Guid e
Macintosh Setup
System Requirements
The computer you use to run FilmGet FS must meet the following minimum requirements. Check your
computer and install FilmGet FS onto the hard disk drive.
• Operation is not guaranteed on Macintosh-compatible computers.
• Only one CanoScan scanner may be connected to a computer at a time.
• Please note that the system may become unstable because the computer’s energy saving mode
(sleep mode) is not supported.
Installing FilmGet FS
Install FilmGet FS according to the instructions in “1. Installing the Software” of “Chapter 3
Using the Scanner with a Macintosh” in Getting Started supplied with the scanner.
Computer
USB connection: Macintosh with standard USB configuration
SCSI connection: Macintosh with standard SCSI configuration or
SCSI card installed
Operating System
Mac OS 8.6 - 9.1
CPU
Power PC G3 or greater
RAM
64 MB or more (128 MB or more recommended)
Display
32,000 colors or better, 800 x 600 pixels or better
Interface
USB 1.1/SCSI II
Hard Disk Capacity
500 MB or more (1 GB or more recommended) available after
installing the application program
CD-ROM Drive
Required
Required Application
Program
Photoshop LE or other plug-in compliant application program
Before Scanning
22
1
2
3
4
5
FilmGet FS User’s Guide
Starting and Exiting FilmGet FS
■
Starting FilmGet FS
FilmGet FS must be started from within a plug-in compliant application program. It cannot be started
independently. Photoshop LE is used in the example below.
• When using Photoshop LE, you must increase the allotted memory in order to start FilmGet FS. For more
information please see page 65 “Increasing the Memory Allocated to Photoshop LE” of Getting Started.
.
1
Start Photoshop LE.
• If you are using a different plug-in compliant application program, start that
program.
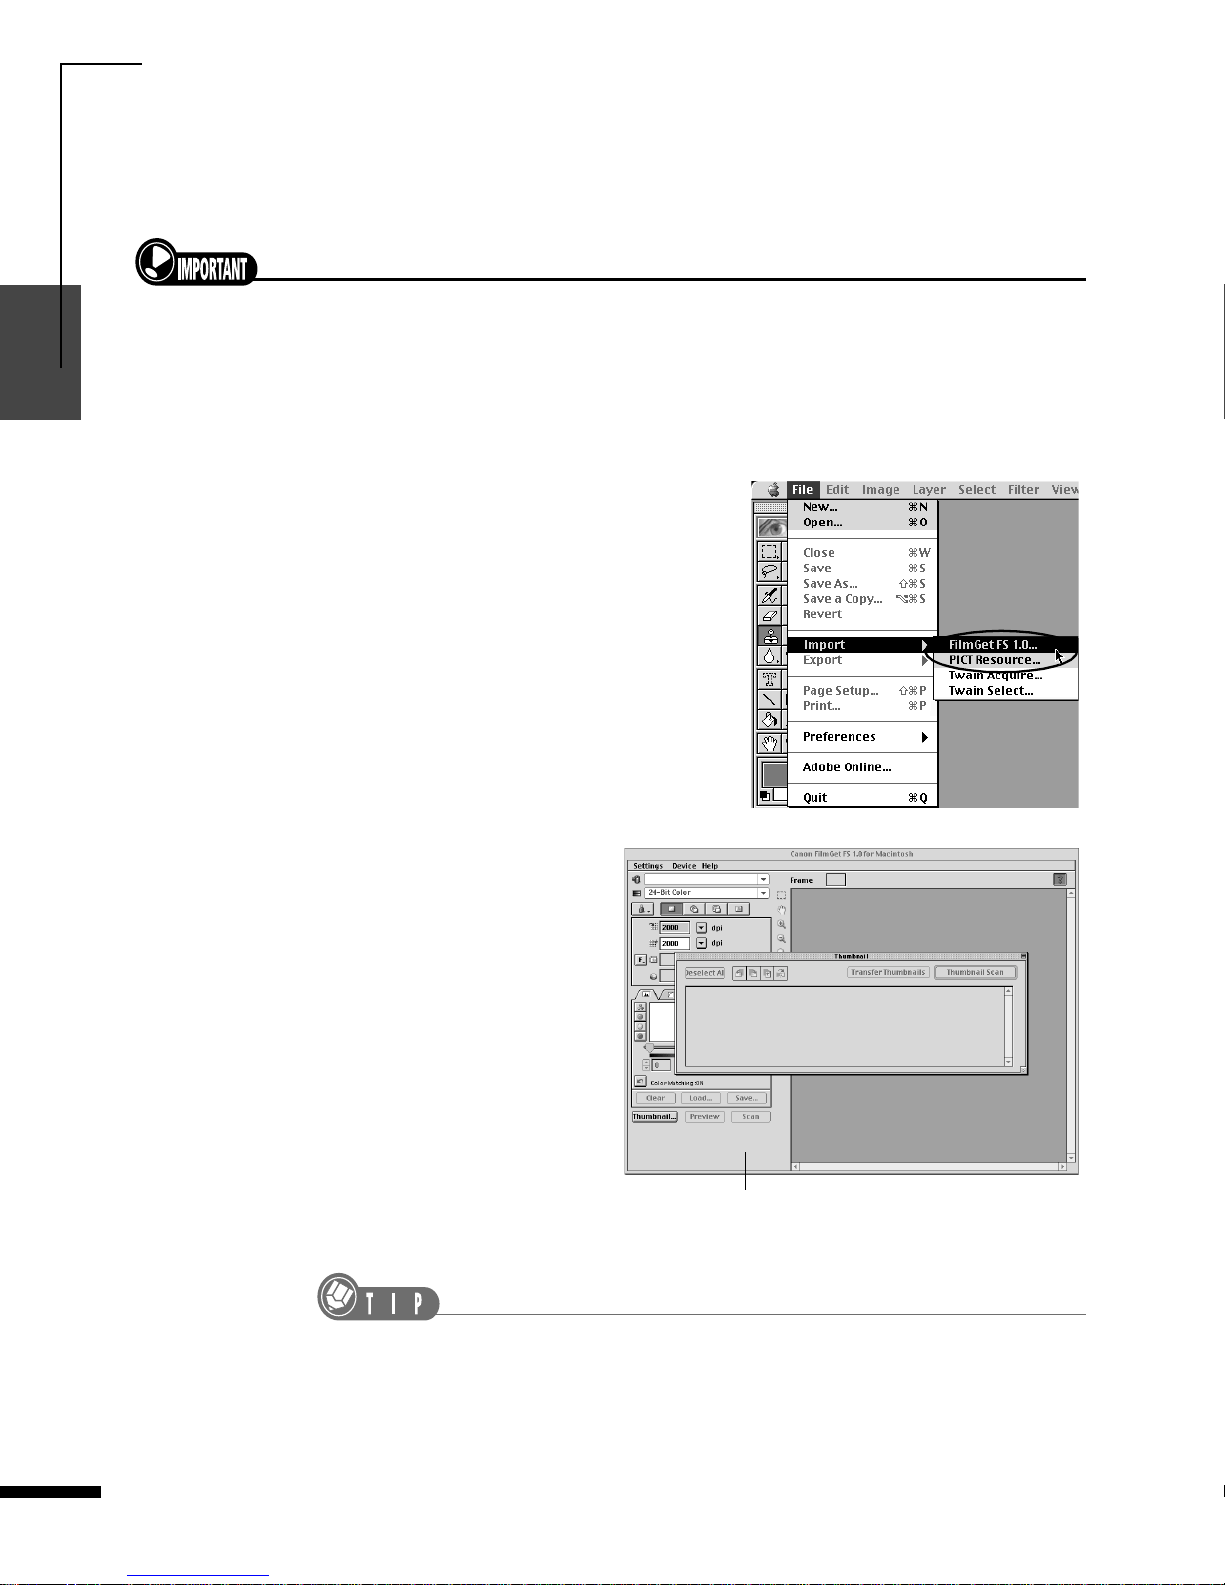
2
Click the [File] menu and select
[Import] and [FilmGet FS 1.0...].
• FilmGet FS starts, and
the main window and
thumbnail window will
be displayed.
• Scanning is performed
using these windows.
• Please refer to the manuals accompanying the individual software package for the
procedures for starting FilmGet FS from within a plug-in compliant application
program other than Photoshop LE.
Thumbnail Window
Main Window

Before Scanning
23
1
2
3
4
5
FilmGet FS User’s Guid e
■
Exiting FilmGet FS
1
Click the (close box) at the top left of the main window.
• The FilmGet FS windows will close.
• FilmGet FS will automatically close after scanning has finished when the “Close
FilmGet FS after Acquire” option has been checked in the [Preferences...] item.
See p. 92.
Before Scanning
24
1
2
3
4
5
FilmGet FS User’s Guide
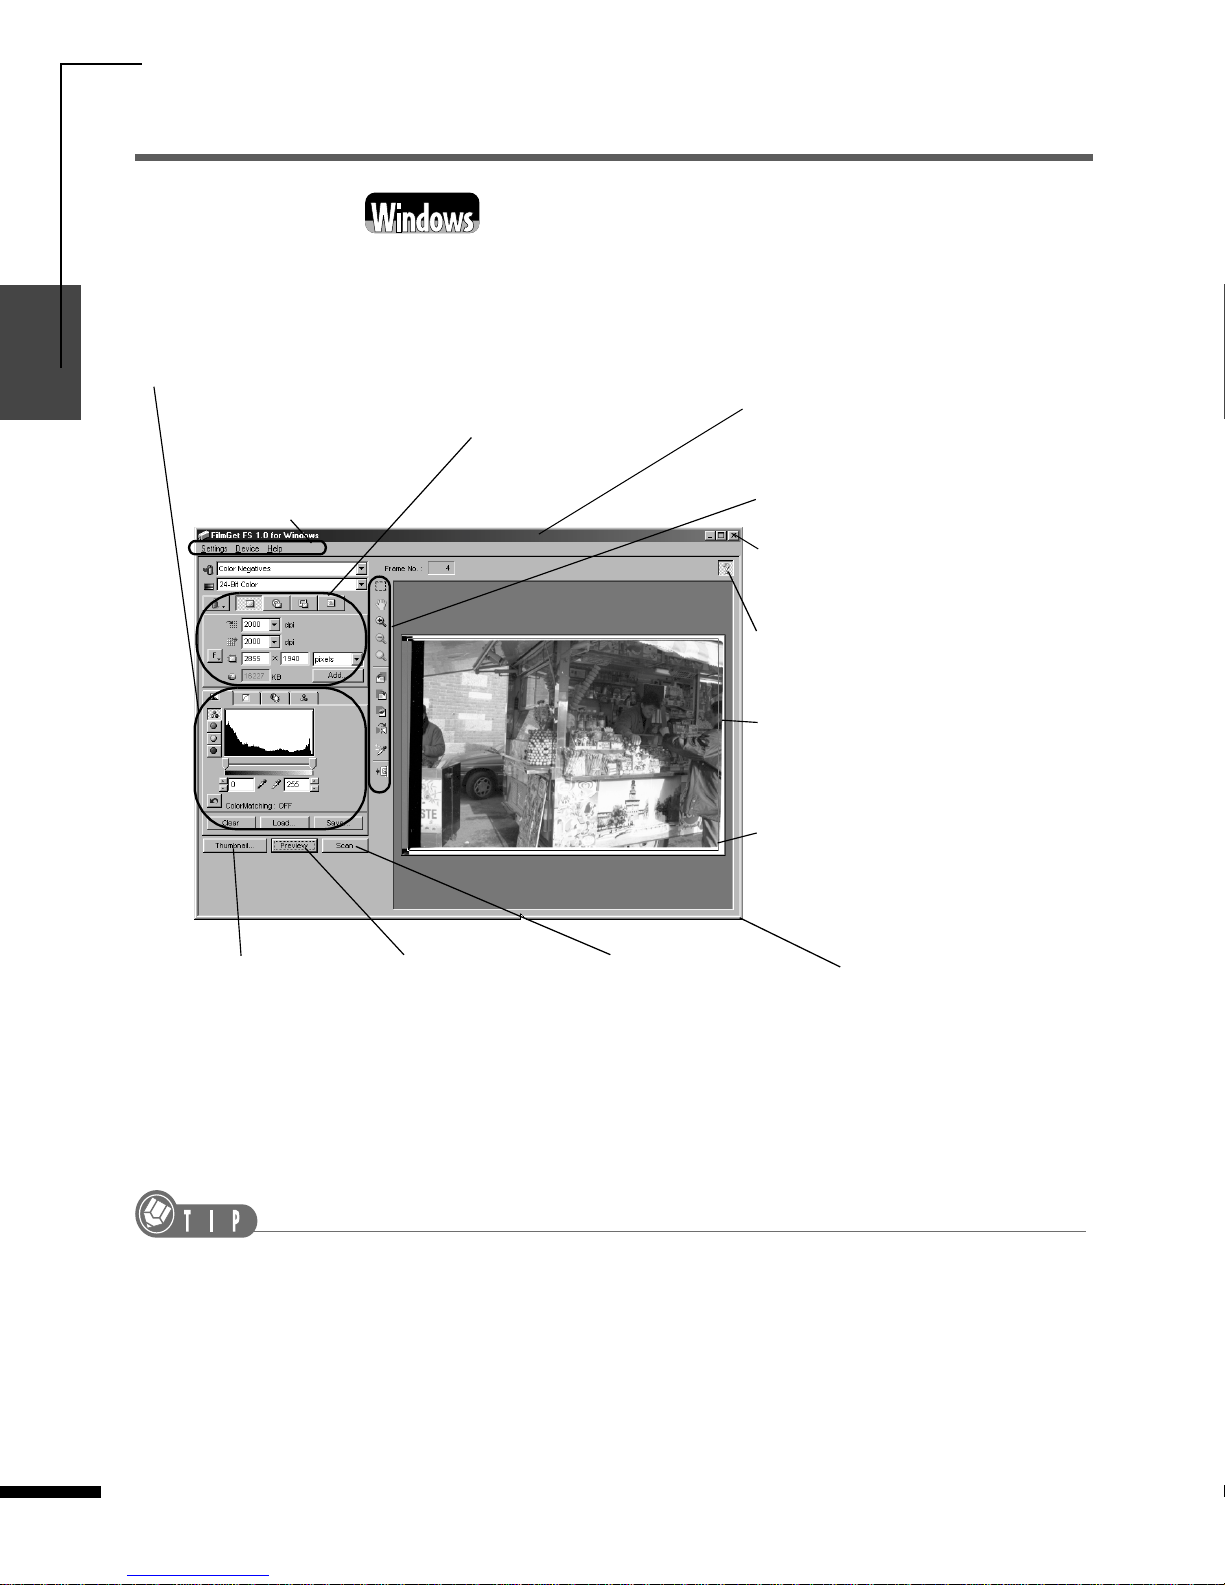
FilmGet FS Main Window
Main Window
The main window is displayed together with the thumbnail window (See p. 26) when FilmGet FS is
started within the application program.
• Some items and buttons are grayed out and not available when a film holder is not inserted into the scanner.
Image Adju s t ment Section
Adjusts the brightness and
coloring of preview images.
Scan Settings Section
Sets the resolution and output
target settings according to the
primary purpose of the scanned
image.
Title Bar
Displays the window title. Click here
and drag the window to change its
position on the desktop.
Menu Bar
Contains the various
commands and settings
to control how FilmGet
FS operates.
Toolbar
Contains the tools for rotating,
flipping and zooming the preview
image.
Preview Area
Displays the preview image for a
single frame. Use this area to set the
scan area and inspect adjustments to
the image.
Close Box
Closes FilmGet FS.
Show/Hide Tool Tips
Shows or hides the tool tips.
Scan Area Frame
The image within the area enclosed
by this frame is scanned.
Window Resizing
Click and drag anywhere
along the right or bottom
edges (Windows) or click
and drag the lower right
corner (Macintosh) to
resize the window.
[Scan] button
Initiates the final scan of
all selected images and
transfers the scanned
images to the application
program from which
FilmGet FS was started.
[Preview] button
Initiates a preview scan
and displays the
images one at a time in
the preview area.
[Thumbnail…] button
Displays the thumbnail
window (See p. 26) in
front of the main window
when it is hidden by the
main window.
Before Scanning
25
1
2
3
4
5
FilmGet FS User’s Guid e
Main Windows
The FilmGet FS main window is virtually indistinguishable between the Windows and Macintosh
versions. The primary difference is the location of the close box. On the Macintosh version it is
located at the top left corner of the window.
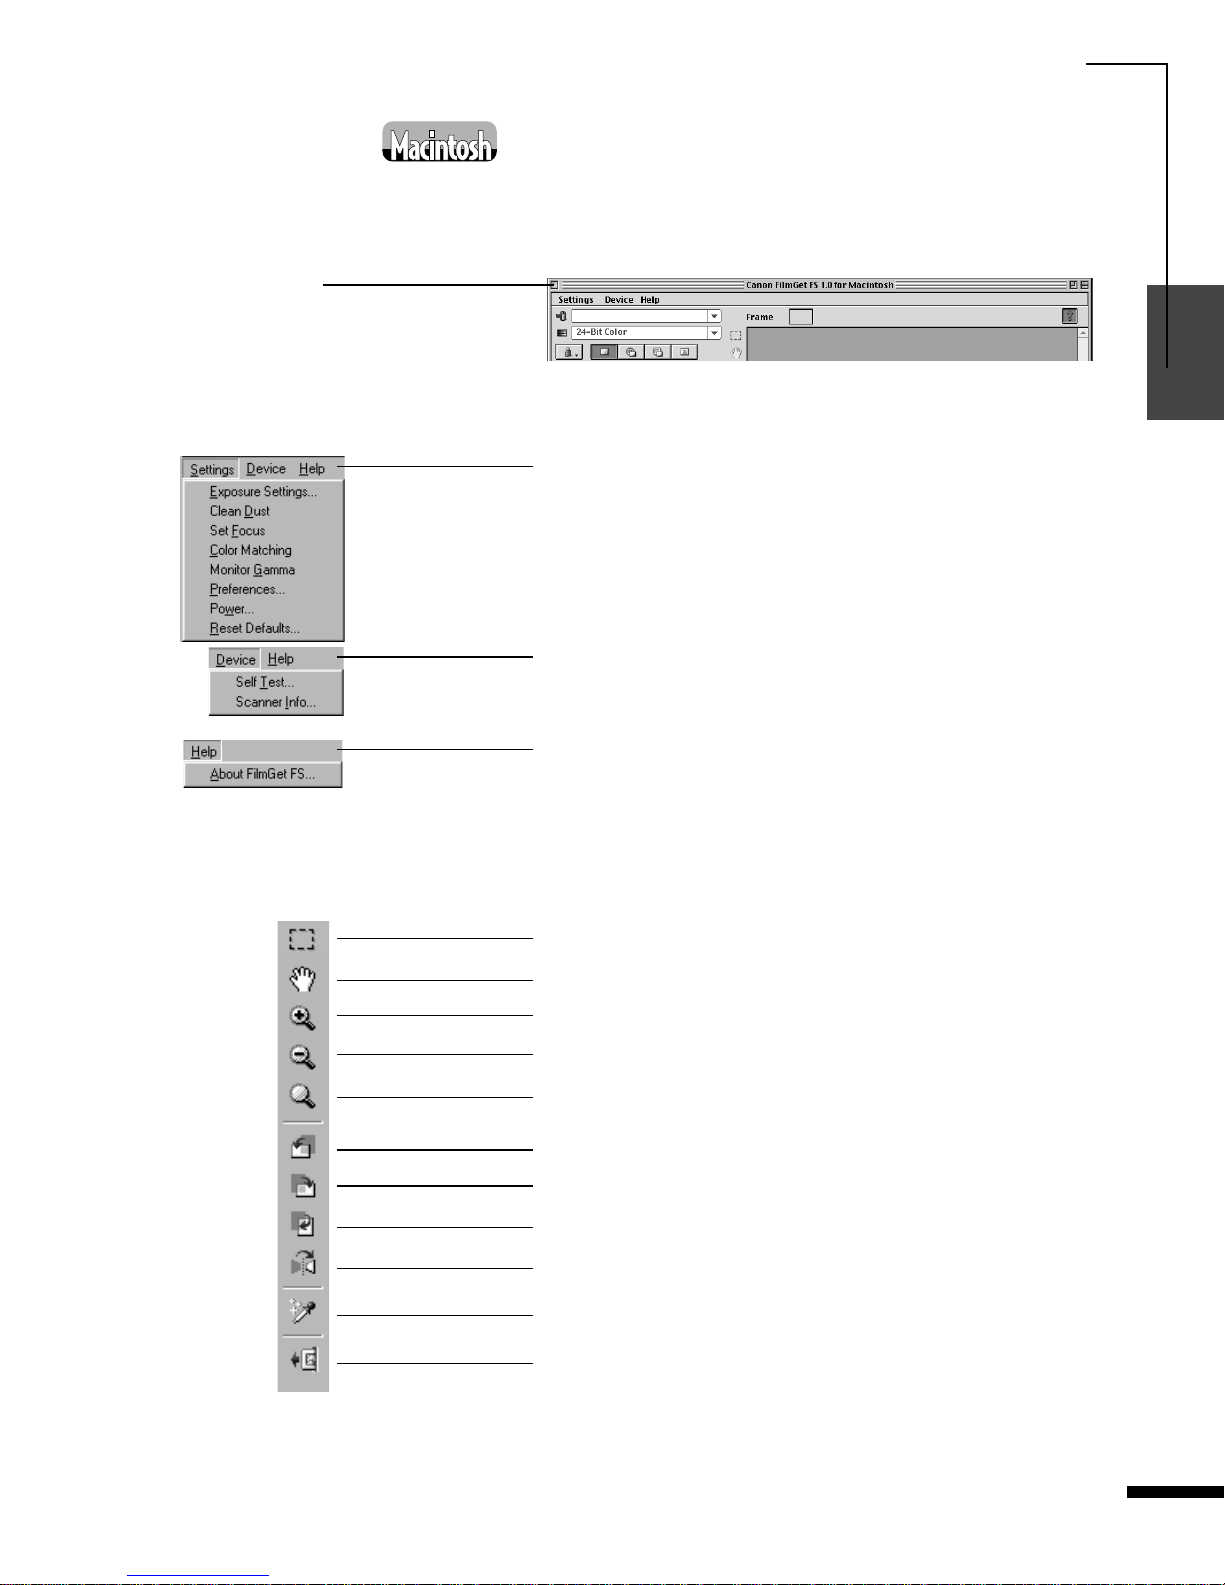
Menu Bar in the Main Window
Toolbar in the Main Window
Close Box
Closes FilmGet FS.
[Settings] menu
Sets the auto exposure, focus adjustment, and color matching
system settings among others. See p. 86.
[Device] menu
Runs a scanner test or displays scanner information. See p. 96.
[Help] menu
Displays FilmGet FS help topics or software version data.
See p. 96.
Selector Tool. See pp. 43, 47, 78.
Film Eject Tool. See p. 42.
Auto Correct Tool. See p . 44.
Flip Tool. See p. 43.
Rotate 180 Degrees Too l. See p. 43.
Rotate 90 Degrees Left To ol. See p. 43.
Rotate 90 Degrees Right To ol. See p. 43.
Zoom Reset Tool. See p. 42.
Zoom Out Tool. See p. 42.
Zoom In Tool. See p. 42.
Grab T o ol. See p. 43.
Before Scanning
26
1
2
3
4
5
FilmGet FS User’s Guide
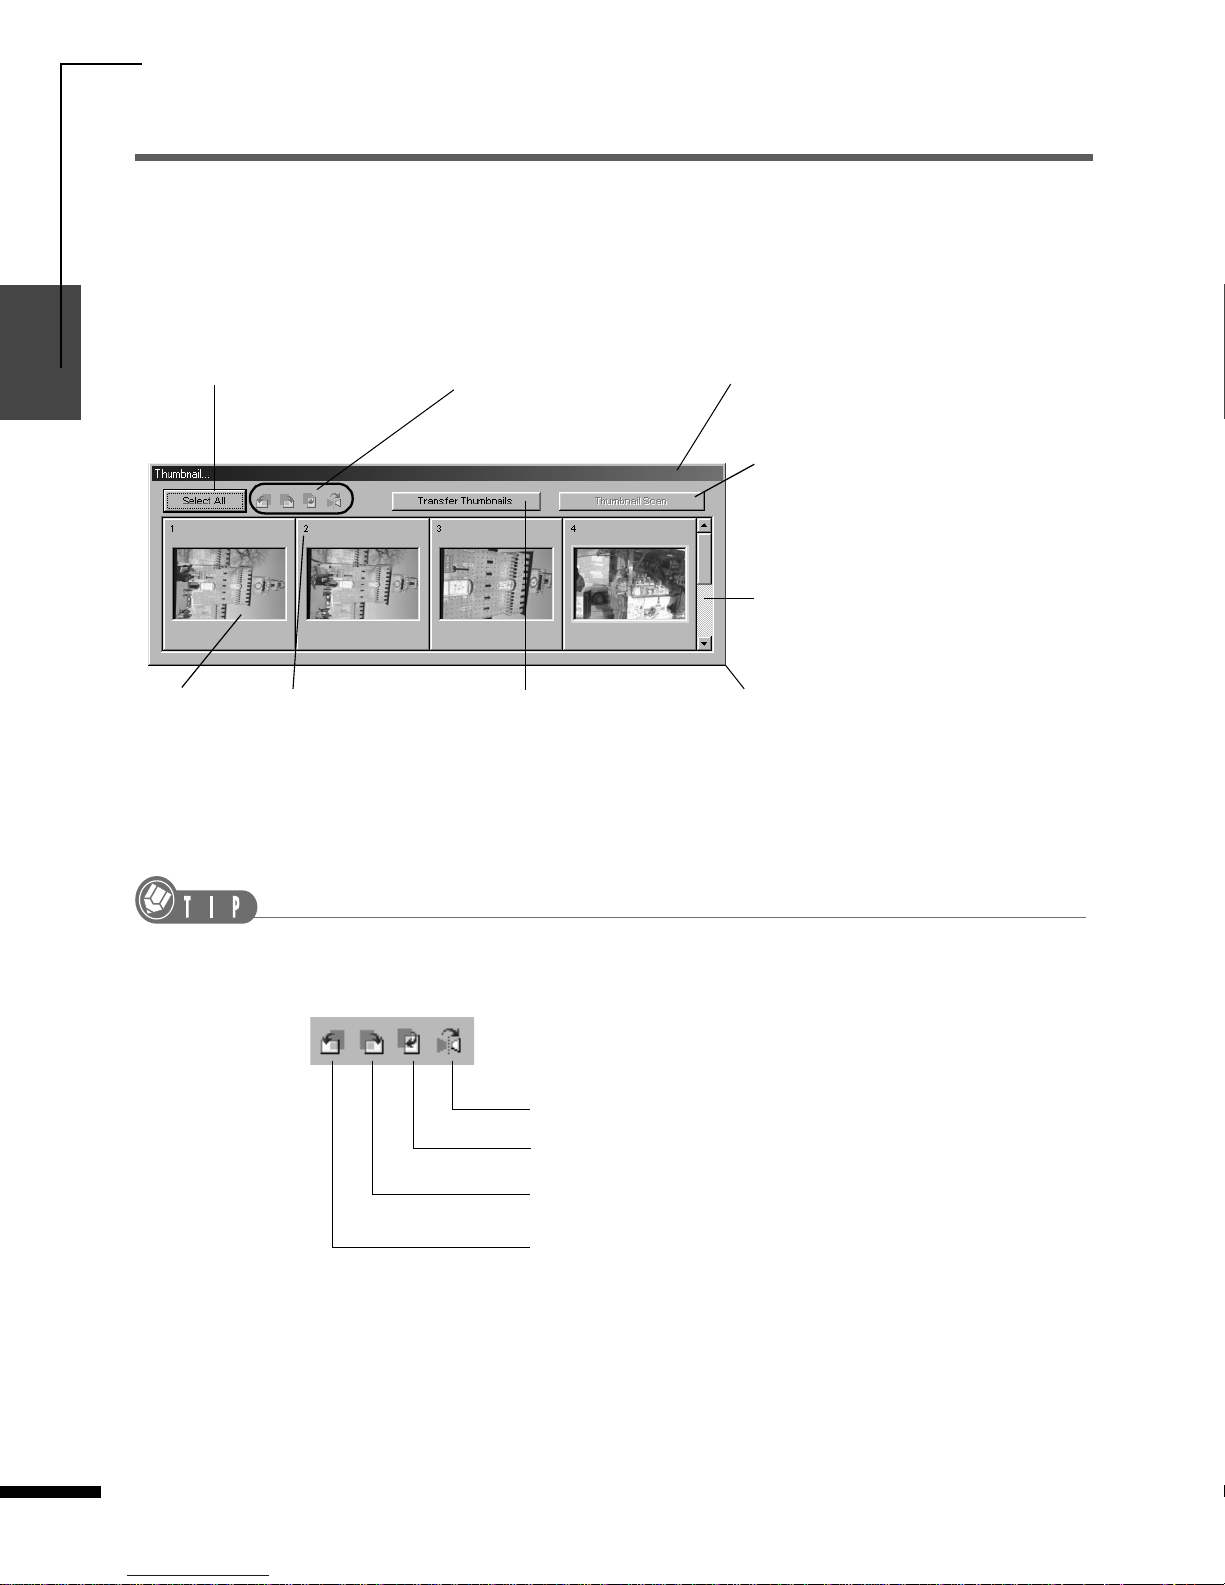
FilmGet FS Thumbnail Window
Thumbnail Window
The thumbnail window is the window that appears when you click the
[Thumbnail...]
button in the
main window (See p. 24). This window is displayed together with the main window when FilmGet FS
is started within the application program.
• When a film holder is not inserted into the scanner, no frames will be displayed.
Toolbar in the Thumbnail Window
[Select All] button
Selects all of the frames.
When clicked, it changes to
the
[Deselect All]
button.
Toolbar
Contains the tools for rotating
or flipping the thumbnail
images.
Title Bar
Click here and drag the window to
change the window position on the
desktop.
[Thumbnail Scan] button
Initiates a thumbnail scan of all
frames and displays the thumbnail
images.
Scroll Bar
Lets you scroll to view thumbnail
images that are not currently
displayed.
Window Resizing
Make the window larger in order to display
more frames at one time.
Click and drag anywhere along the right or
bottom edges (Windows) or click and drag
the lower right corner (Macintosh) to resize
the window.
Frame No. [Transfer Thumbnails] but ton
Transfers the selected
thumbnail images to the
application program.
Frame
Flip Tool. See p. 38.
Rotate 180 Degrees Too l. See p. 38.
Rotate 90 Degrees Right To ol. See p. 38.
Rotate 90 Degrees Left Tool. See p. 38.
Before Scanning
27
1
2
3
4
5
FilmGet FS User’s Guid e
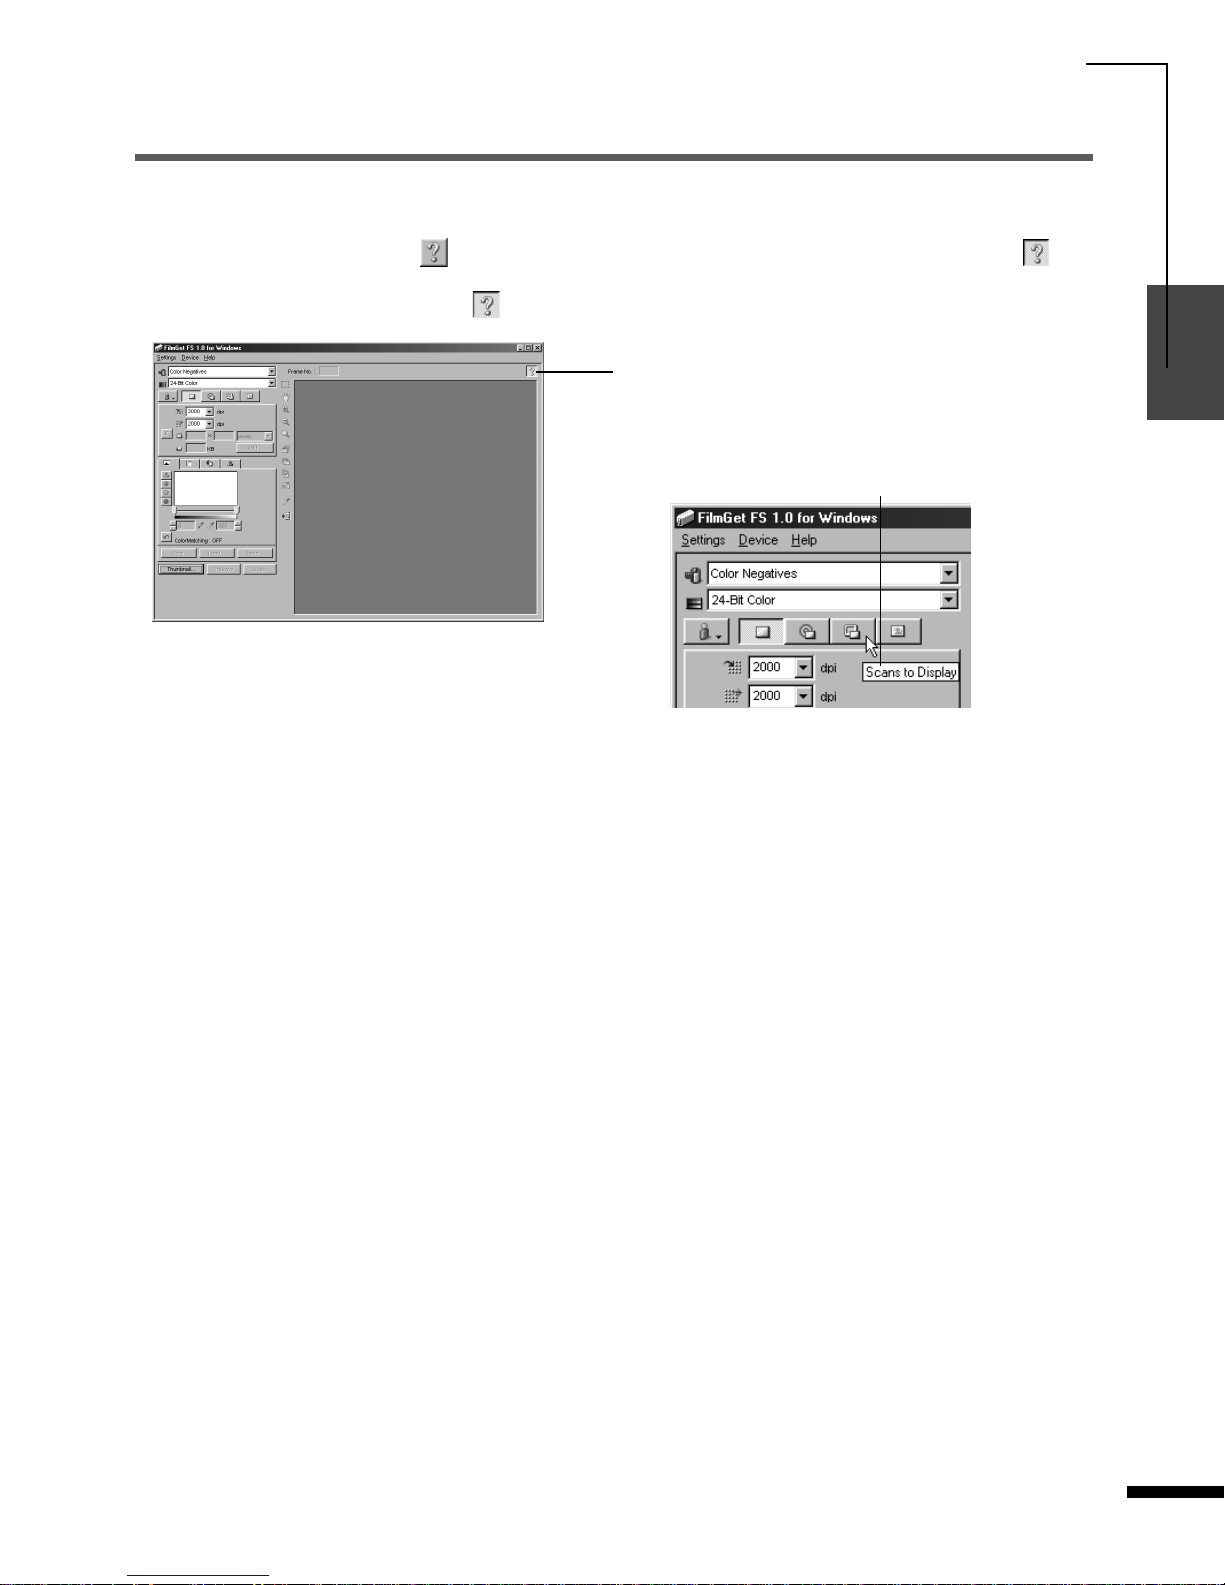
How to Find Help
Tool Tips
FilmGet FS is equipped with tool tips that explain the functions of the buttons and tools in the
windows. When you click the (Show/Hide Tool Tips) button, the button will change to the
button. In this state, positioning the mouse cursor over a button or tool will display the tool tip for that
item. To hide the tool tips, click the button again.
Show/Hide Tool Tips Button
Tool Tip

CanoScan FS4000US Film Scanner
28
1
2
3
4
5
FilmGet FS User’s Guide
CHAPTER 2
Scanning
This section provides a step-by-step explanation of scanning operations
using FilmGet FS, from loading the film to thumbnail scanning and preview
scanning.
All users read this section.
Scanning Procedures ....................................................29
Loading Film...................................................................30
Switching between Windows........................................32
Selecting the Film Type .................................................33
Setting the Color Mode................................. ....... ...... .... 34
Thumbnail Scanning......................................................36
Selecting Frames ....................... ....... ...... ...... .................37
Rotating and Flipping Thumbnail Images....................38
Transferring Thumbnail Images to the Application
Program .....................................................................39
Previewing to Inspect the Images.................................40
Adjusting Preview Images.............................................42
Adjusting the Scan Settings..........................................45
Adjusting Brightness and Coloring..............................46
Selecting the Scan Area ................................................47
Final Scan .......................................................................49
 Loading...