

Page 1
Digital Photo Professional Instruction Manual
Cover/Table of
Contents
Canon Utilities
Digital Photo Professional Ver.2.0
Compatible Models
EOS-1D Mark II N EOS 5D
EOS-1Ds Mark II
EOS-1D Mark II EOS 20D
EOS-1Ds
EOS DIGITAL REBEL XT/350D DIGITAL
EOS DIGITAL REBEL/300D DIGITAL
Table of Contents
Introduction
Displaying Thumbnail Images and
1
2
3
4
Performing Basic Edits in the Main Window
Performing Detailed Edits in the Edit
Window
Performing Detailed Edits in the Edit
Image Window
Displaying an Image in the Quick
Check Window
Introduction
Displaying Thumbnail Images
and Performing Basic Edits
in the Main Window
Performing Detailed
Edits in the Edit
Window
Performing Detailed
Edits in the Edit
Image Window
Displaying an
Image in the Quick
Check Window
1
2
3
4
EOS-1D EOS 10D
EOS D60
EOS D30
PowerShot Pro1
5
Reference
Index
CT1-7133DPPME-000 © CANON INC. 2005
Reference
5
Index
Page 2
READ CAREFULLY BEFORE USING!
CANON SOFTWARE LICENSE AGREEMENT
IMPORTANT - READ THIS AGREEMENT BEFORE USING THE SOFTWARE ON THE CD-
ROM IN THIS BOX. BY USING THE SOFTWARE, YOU AGREE TO BE BOUND BY THE
TERMS OF THIS AGREEMENT.
This is a license agreement (the [Agreement]) between you and Canon Inc. ([Canon]).
IF YOU DO NOT AGREE TO THE TERMS AND CONDITIONS OF THIS AGREEMENT, DO
NOT USE THE SOFTWARE PROGRAM ON THE CD-ROM AND THE USER MANUAL IN
THIS BOX (COLLECTIVELY, THE [SOFTWARE]) AND RETURN THE SOFTWARE WITHIN 30
DAYS FROM THE DATE OF PURCHASE TO YOUR POINT OF PURCHASE FOR A
REFUND.
In consideration of the right to use the SOFTWARE, you agree to abide by the terms and
conditions of this Agreement.
1. LICENSE: Canon grants you the non-exclusive right to use the SOFTWARE only on a single
computer. You may physically transfer the SOFTWARE from one computer to another
provided that the SOFTWARE is used on only one computer at a time. You shall not install
or use the SOFTWARE on a network, multiple CPU, multiple site arrangement, or any other
hardware configuration where the SOFTWARE is accessible to more than one CPU or to
more than one user.
YOU SHALL NOT ASSIGN, SUBLICENSE, RENT, LEASE, LOAN, CONVEY OR OTHERWISE
USE, TRANSFER, COPY, TRANSLATE, CONVERT TO ANOTHER PROGRAMMING
LANGUAGE, ALTER, MODIFY, DECOMPILE OR DISASSEMBLE THE SOFTWARE, IN WHOLE
OR IN PART, EXCEPT AS EXPRESSLY PROVIDED IN THIS AGREEMENT.
2. BACK-UP COPY: You may make one copy of the SOFTWARE solely for back-up purposes,
or copy the SOFTWARE onto the permanent storage device (e.g. a hard disk) of your
computer and retain the original for back-up purposes. Any other copying of the
SOFTWARE is a violation of this Agreement. You must reproduce and include the copyright
notice on the back-up copy.
3. SUPPORT AND UPDATES: Canon is not responsible for providing maintenance or support
for use of the SOFTWARE. No updates, fixes or support will be made available for the
SOFTWARE.
4. LIMITED WARRANTY AND LIMITATION OF LIABILITY: It is your responsibility to choose,
maintain and match the hardware and software components of your computer system. Thus
Canon does not guarantee uninterrupted service or correction of errors or that the functions
or performance of the SOFTWARE will meet your requirements. THE SOFTWARE IS
LICENSED ON AN [AS IS] BASIS AND WITHOUT WARRANTY OF ANY KIND. The CD-
ROM storing the SOFTWARE is warranted only against defective material under normal use
for a period of ninety (90) days after purchase from an authorized Canon dealer as
evidenced by your sales receipt. Your sole remedy for a defective CD-ROM shall be
replacement of the same without charge when returned by you at your expense to your
point of purchase and proven to be defective upon inspection. The replacement CD-ROM
will be warranted for the remainder of the original ninety (90) day warranty period of the
defective CD-ROM. The limited warranty does not apply if the failure of the CD-ROM
resulted from accident, abuse or misapplication of the SOFTWARE and shall not extend to
anyone other than the original user of the SOFTWARE.
EXCEPT AS SPECIFICALLY SET FORTH IN THIS PARAGRAPH 4, CANON, CANON’S
SUBSIDIARIES, DISTRIBUTORS AND DEALERS DISCLAIM ALL WARRANTIES, EXPRESS
OR IMPLIED, INCLUDING ANY WARRANTY OF MERCHANTABILITY OR FITNESS FOR A
PARTICULAR PURPOSE, WITH RESPECT TO THE SOFTWARE.
NEITHER CANON NOR ANY OF CANON’S SUBSIDIARIES, DISTRIBUTORS OR DEALERS
IS LIABLE FOR ANY DAMAGES HOWSOEVER CAUSED, INCLUDING WITHOUT
LIMITATION, DIRECT, CONSEQUENTIAL OR INCIDENTAL LOSS OR DAMAGE INCLUDING
LOSS OF PROFITS, EXPENSE OR INCONVENIENCE HOWSOEVER CAUSED OR
ARISING OUT OF THE SOFTWARE OR THE USE THEREOF.
NEITHER CANON, NOR ANY OF CANON’S SUBSIDIARIES, DISTRIBUTORS OR DEALERS
SHALL HAVE ANY OBLIGATION TO INDEMNIFY YOU AGAINST ANY CLAIM OR SUIT
BROUGHT BY A THIRD PARTY ALLEGING THAT THE SOFTWARE OR THE USE THEREOF
INFRINGES ANY INTELLECTUAL PROPERTY OF SUCH THIRD PARTY.
5. TERM: This Agreement is effective upon your using the SOFTWARE and remains in effect
until expiration of all copyright interests in the SOFTWARE unless earlier terminated. You
may terminate this Agreement by destroying the SOFTWARE. This Agreement will also
terminate without notice to you if you fail to comply with any of the terms of this Agreement
and you must then promptly return the SOFTWARE. In addition, Canon may enforce its
other legal rights.
6. U.S. GOVERNMENT RESTRICTED RIGHTS NOTICE: The SOFTWARE is provided with
restricted rights. Use, duplication or disclosure is subject to restrictions as set forth in either
subparagraph (c) (1) (ii) of the Rights in Technical Data and Computer software clause at
DFARs 252.227-7013 or subparagraph (c) (1) and (2) of the Commercial Computer
Software Restricted Rights Clause at FAR 52.227-19, as applicable.
7. SEVERABILITY: In the event that any provision of this Agreement is declared or found to be
illegal by any court or tribunal of competent jurisdiction, such provision shall be null and void
with respect to the jurisdiction of that court or tribunal and all the remaining provisions of this
Agreement shall remain in full force and effect.
8. CONTROLLING LAW: The terms of this Agreement as it relates to purchases of the
Software in the United States of America shall be governed and construed in all respects in
accordance with the laws and regulations of the State of New York, without reference to
choice of law principles. The terms of this Agreement as it relates to purchases of the
Software in Canada shall be governed by the laws of the province of Ontario.
9. OWNERSHIP: All rights, including but not limited to copyrights and trade secret rights, to the
SOFTWARE belong to Canon, its affiliated corporations and third party licensors. Your use
of the SOFTWARE is subject to the United States, Canada and other applicable copyright
and trademark laws and nothing in this Agreement constitutes a waiver of the rights of
Canon, its affiliated corporations and third party licensors under such laws.
Nothing contained in Paragraph 1 shall be construed to give Canon any ownership rights in
any images, graphics or textual material that you save in connection with the Software.
10.ACKNOWLEDGEMENT: BY USING THE SOFTWARE, YOU ACKNOWLEDGE THAT YOU
HAVE READ THIS AGREEMENT, UNDERSTOOD IT, AND AGREE TO BE BOUND BY ITS
TERMS AND CONDITIONS. YOU ALSO AGREE THAT THIS AGREEMENT IS THE
COMPLETE AND EXCLUSIVE STATEMENT OF AGREEMENT BETWEEN YOU AND
CANON CONCERNING THE SUBJECT MATTER HEREOF AND SUPERSEDES ALL
PROPOSALS OR PRIOR AGREEMENTS, VERBAL OR WRITTEN, AND ANY OTHER
COMMUNICATIONS BETWEEN THE PARTIES RELATING TO THE SUBJECT MATTER
HEREOF. NO AMENDMENT TO THIS AGREEMENT SHALL BE EFFECTIVE UNLESS
SIGNED BY A DULY AUTHORIZED OFFICER OF CANON.
Cover/Table of
Contents
Introduction
Displaying Thumbnail Images
and Performing Basic Edits
in the Main Window
Performing Detailed
Edits in the Edit
Window
Performing Detailed
Edits in the Edit
Image Window
Displaying an
Image in the Quick
Check Window
1
2
3
4
Reference
5
Index
1
Page 3
Introduction
Cover/Table of
Contents
This chapter includes information on the precautions to be read before using Digital Photo
Professional, how to use this Instruction Manual, the system requirements and the supported
image types. It also explains the functions and window structure, and gives examples of
operation.
About This Manual
Thank you for purchasing this Canon product.
Precautions for using this product safely and icons to help you with procedures, etc. are
described at the beginning of this Instruction Manual. Please be sure to read these first before
proceeding to the information in the other chapters.
O It is prohibited to reproduce, in whole or part, the contents of this Instruction Manual without
permission.
O Canon may change without notice the software specifications and contents of this
Instruction Manual.
O The software screens and displays printed in this Instruction Manual may differ slightly from
the actual software.
O The content of this Instruction Manual has been reviewed thoroughly. However, if you
should notice any errors or omissions, please contact a Canon Service Center.
O Please note that irrespective of the above-mentioned, Canon does not take responsibility for
the outcome of the operation of the software.
Safety Precautions
Please read the safety precautions carefully before using this product. Ensure that you use the
product correctly according to the procedures described in these instructions.
The following safety precautions are intended to instruct you in the safe and correct operation
of the product and its accessories to prevent injuries or damage to yourself, other persons and
property. Please read and ensure that you understand them before you proceed to the other
sections of these instructions.
Warning
Do not play the supplied CD-ROM(s) in any CD-ROM Player that does not support data CD-ROMs. The
extremely loud sound that may result from playing the CD-ROM(s) in an audio CD player (music player)
could damage the speakers. It is also possible to suffer hearing losses from listening with headphones to
the loud sounds of a data CD-ROM played on a music CD player.
Trademark Acknowledgments
O Canon and EOS are trademarks of Canon Inc.
O iBook, iMac and QuickTime are trademarks of Apple Computer Inc.
O Macintosh, PowerBook and Power Macintosh are trademarks of Apple Computer Inc.,
registered in the United States and other countries.
O Click on the item to display its page.
Main Features ..................................................................................................................... 0-2
System Requirements........................................................................................................ 0-2
Supported Images .............................................................................................................. 0-2
Function Window Configuration ....................................................................................... 0-3
Example of Operation ........................................................................................................ 0-4
O Adobe and Photoshop are registered trademarks or trademarks of Adobe Systems
Incorporated in the United States and/or other countries.
O Other names and products not mentioned above may be registered trademarks or
trademarks of their respective companies.
How to Read the Manual and the Conventions Used
O In this manual, the screens used in the examples are from Mac OS X 10.3.
O In this document, square brackets [ ] are used to indicate items such as window names,
menu names and button names that appear on the computer screen.
O
Text inside < > in this document indicates the keys on the keyboard and camera button names.
O Asterisk in (p. *-*) in this document shows reference pages.
O in this document indicates the sequence of operation as shown below.
Example: [View] menu [Sort] [File name]
O The explanations given below describe the type of content indicated by the respective icons.
: Marks information that should be read before use to prevent problems that would
interfere with the functioning of software and computer.
: Marks additional information that you will find helpful.
O Click any of the chapter content buttons at the right of the Instruction Manual to display the
front page of each chapter.
O Clicking the buttons on the bottom right of the Instruction Manual allows you to move as
follows:
: Displays the previous page.
: Displays the next page.
: Returns to the previously displayed page.
0-1
Introduction
Displaying Thumbnail Images
and Performing Basic Edits
in the Main Window
Performing Detailed
Edits in the Edit
Window
Performing Detailed
Edits in the Edit
Image Window
Displaying an
Image in the Quick
Check Window
1
2
3
4
Reference
5
Index
Page 4
Main Features
Digital Photo Professional (DPP) software is designed for editing RAW images shot with Canon
digital cameras and has the following features and functions to meet the requirements of
professional and high-end amateurs who mainly shoot RAW images.
High-speed processing of RAW images
O DPP has made possible, using Canon’s own high performance algorithm, high-speed
processing and high-speed display of RAW images.
O DPP, Canon’s genuine software, has made possible high-image quality processing.
Operation and window variety that can respond to a professional’s workflow
O DPP’s operation is easy, compatible with the workflow of a professional, and has a variety of
function windows.
O In the main window, images can be displayed as a list (thumbnail image display), selected,
rearranged, and basic editing can be performed.
O In the edit image window, one of multiple images can be selected and enlarged, checked,
and detailed editing can be performed.
O In the edit window, one image can be enlarged, checked, and detailed editing can be
performed.
O In the quick check window, images can be displayed one after the other, checked and
selected.
Real-time image editing
O DPP has various image editing functions where the results of editing are reflected in an
image in real-time.
O You can adjust all image editing functions with 16 bit high precision.
O DPP can perform various kinds of image editing with the RAW image adjustment function
that is richer and has a larger degree of freedom than the image adjustment features of the
camera. It also has the RGB image adjustment function that can edit RAW images and RGB
images (JPEG images, TIFF images). There is almost no image deterioration of RAW
images edited with the RAW image adjustment function.
O RAW image adjustment features:
Brightness adjustment, white balance adjustment, Picture Style setting.
O RAW image and RGB image (JPEG images, TIFF images) adjustment features:
Tone curve adjustment, color adjustment, sharpness, trimming, image correction (repair,
copy stamp), image rotation (90° to the left or right).
O DPP can save, import or apply recipe data (results of various adjustments made to an
edited image) to other images.
O The before and after editing comparative display function allows you to compare and adjust
an image displayed in a window showing the before and after versions.
A diversity of functions
O DPP can select and organize images using 3 kinds of check marks.
O DPP can send one image to Photoshop or a batch of multiple images to optional image
editing software .
O DPP can print single copies of compatible images including RAW images.
O Together with Easy-PhotoPrint and Canon BJ printers, DPP can print compatible images
including RAW images simply and in high quality.
O DPP can convert and save RAW images as TIFF or JPEG images and attach an ICC profile.
O DPP can convert and save a batch of multiple RAW images (batch processing).
O DPP can change a batch of file names (rename function).
O Together with EOS Capture, DPP is compatible with remote shooting.
Color management
O DPP is compatible with Color Management System.
O DPP is compatible with 5 kinds of color space (sRGB, Adobe RGB, Wide Gamut RGB,
Apple RGB, ColorMatch RGB).
O DPP can attach ICC profiles to a saved image.
O DPP can set monitor and printer profiles.
O With the CMYK simulation function, DPP can simulate the color of an image when printed
with a printer, etc. in a CMYK environment.
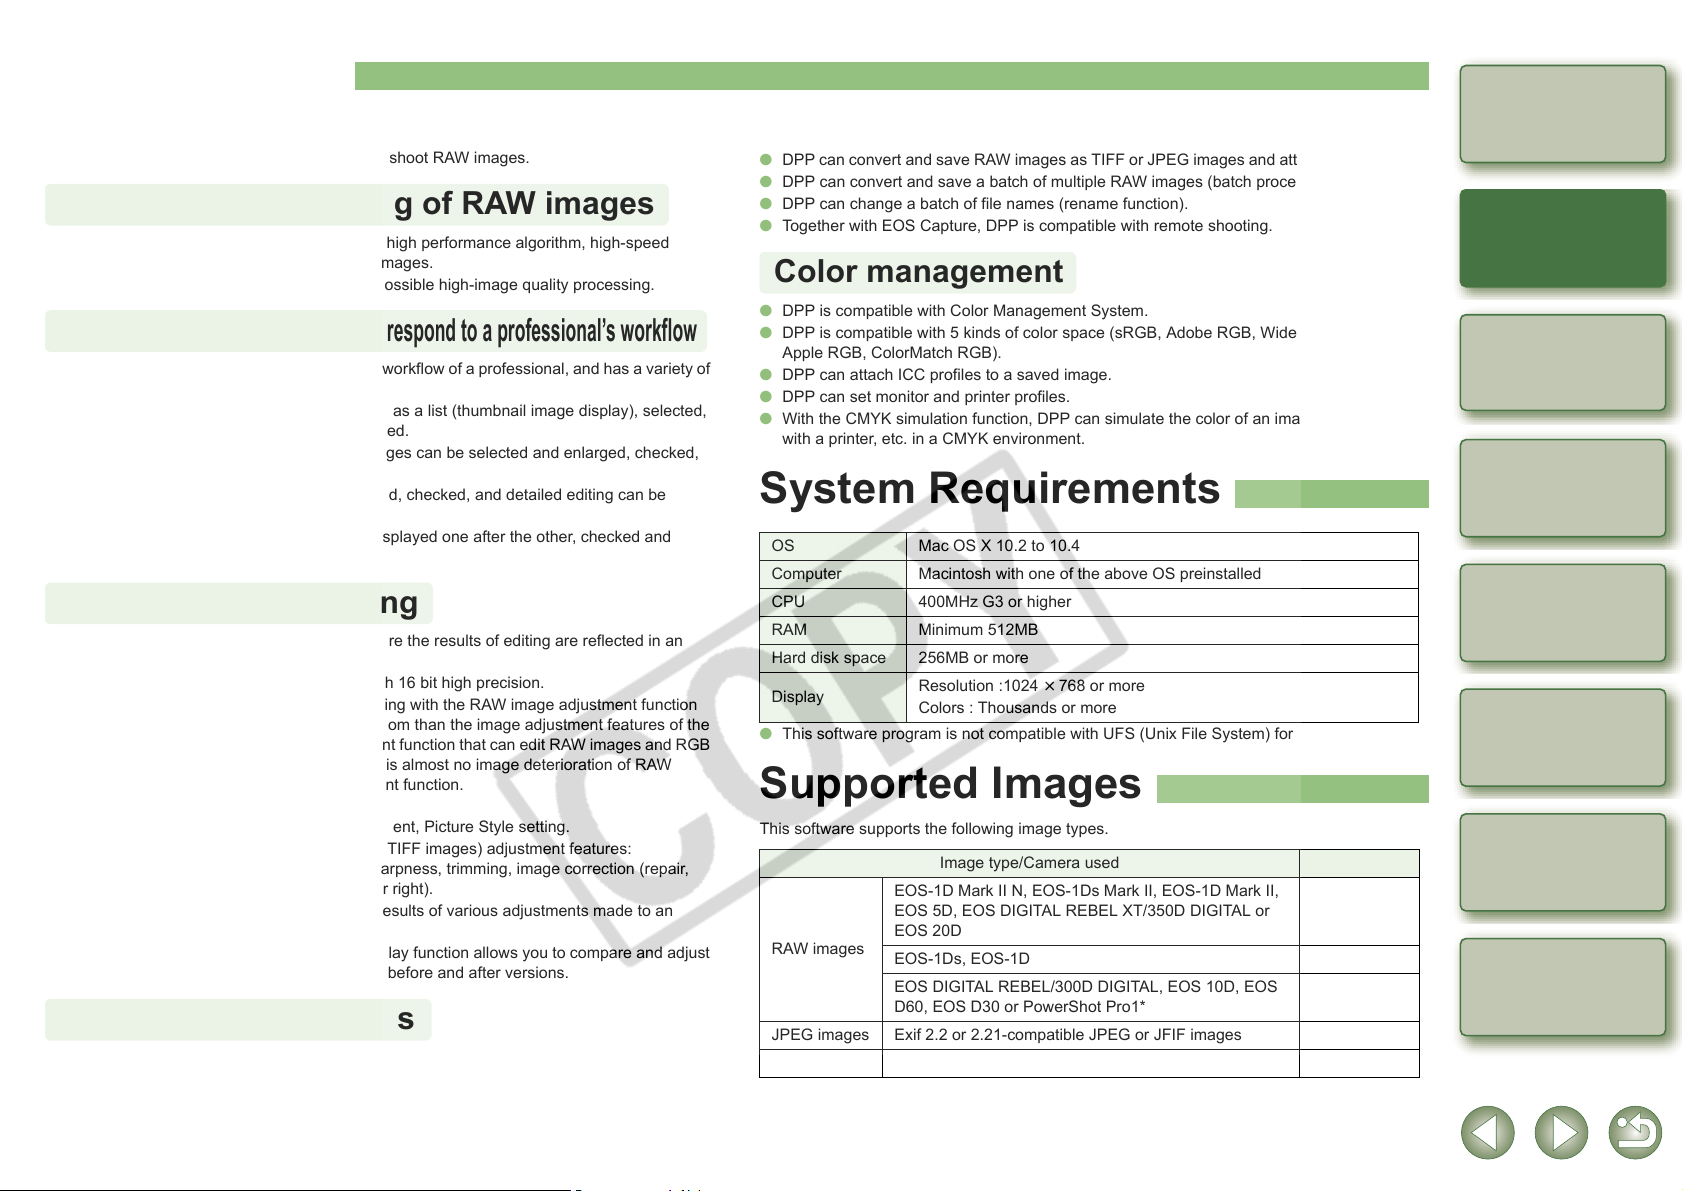
System Requirements
OS Mac OS X 10.2 to 10.4
Computer Macintosh with one of the above OS preinstalled
CPU 400MHz G3 or higher
RAM Minimum 512MB
Hard disk space 256MB or more
Display
O This software program is not compatible with UFS (Unix File System) formatted disks.
Resolution :1024 × 768 or more
Colors : Thousands or more
Supported Images
This software supports the following image types.
Image type/Camera used Extension
EOS-1D Mark II N, EOS-1Ds Mark II, EOS-1D Mark II,
EOS 5D, EOS DIGITAL REBEL XT/350D DIGITAL or
RAW images
JPEG images Exif 2.2 or 2.21-compatible JPEG or JFIF images .JPG, .JPEG
TIFF images Exif-compatible TIFF images .TIF, .TIFF
*You cannot edit with the Digital Photo Professional RAW image editing function.
EOS 20D
EOS-1Ds, EOS-1D .TIF
EOS DIGITAL REBEL/300D DIGITAL, EOS 10D, EOS
D60, EOS D30 or PowerShot Pro1*
.CR2
.CRW
0-2
Cover/Table of
Contents
Introduction
Displaying Thumbnail Images
and Performing Basic Edits
in the Main Window
Performing Detailed
Edits in the Edit
Window
Performing Detailed
Edits in the Edit
Image Window
Displaying an
Image in the Quick
Check Window
1
2
3
4
Reference
5
Index
Page 5
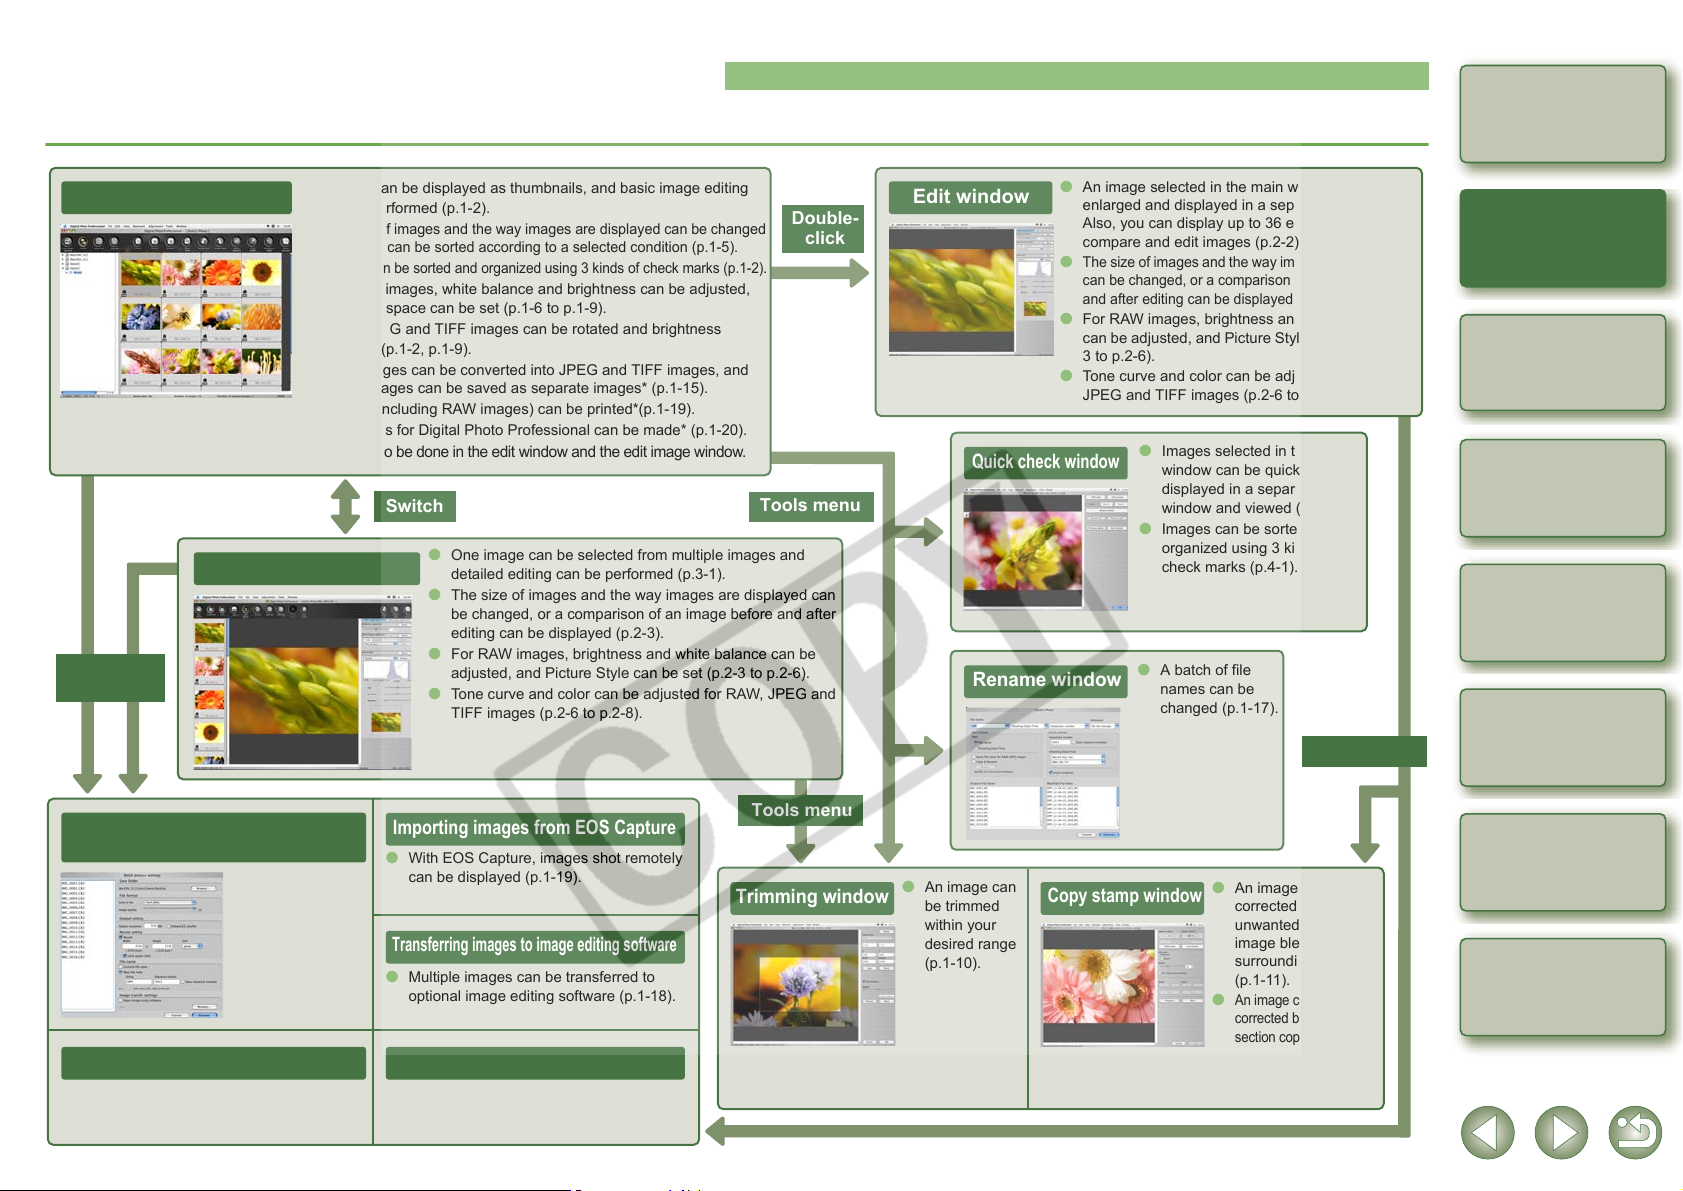
Function Window Configuration
Digital Photo Professional comprises the windows and function windows shown below, centering on the main window that is displayed when DPP starts up.
Cover/Table of
Contents
Main window
Button or
menu
O Images can be displayed as thumbnails, and basic image editing
can be performed (p.1-2).
O
The size of images and the way images are displayed can be changed
or images can be sorted according to a selected condition (p.1-5).
O
Images can be sorted and organized using 3 kinds of check marks (p.1-2).
O For RAW images, white balance and brightness can be adjusted,
and color space can be set (p.1-6 to p.1-9).
O RAW, JPEG and TIFF images can be rotated and brightness
adjusted (p.1-2, p.1-9).
O RAW images can be converted into JPEG and TIFF images, and
edited images can be saved as separate images* (p.1-15).
O Images (including RAW images) can be printed*(p.1-19).
O All settings for Digital Photo Professional can be made* (p.1-20).
* This can also be done in the edit window and the edit image window.
Edit image window
Switch
O One image can be selected from multiple images and
detailed editing can be performed (p.3-1).
O The size of images and the way images are displayed can
be changed, or a comparison of an image before and after
editing can be displayed (p.2-3).
O For RAW images, brightness and white balance can be
adjusted, and Picture Style can be set (p.2-3 to p.2-6).
O Tone curve and color can be adjusted for RAW, JPEG and
TIFF images (p.2-6 to p.2-8).
Double-
click
Tools menu
Edit window
Quick check window
Rename window
O An image selected in the main window can be
enlarged and displayed in a separate window.
Also, you can display up to 36 edit windows to
compare and edit images (p.2-2).
O
The size of images and the way images are displayed
can be changed, or a comparison of an image before
and after editing can be displayed (p.2-3).
O For RAW images, brightness and white balance
can be adjusted, and Picture Style can be set (p.23 to p.2-6).
O Tone curve and color can be adjusted for RAW,
JPEG and TIFF images (p.2-6 to p.2-8).
O Images selected in the main
window can be quickly
displayed in a separate
window and viewed (p.4-1).
O Images can be sorted and
organized using 3 kinds of
check marks (p.4-1).
O A batch of file
names can be
changed (p.1-17).
Tools menu
Introduction
Displaying Thumbnail Images
and Performing Basic Edits
in the Main Window
Performing Detailed
Edits in the Edit
Window
Performing Detailed
Edits in the Edit
Image Window
Displaying an
Image in the Quick
Check Window
1
2
3
4
Window for batch conversion and
saving of images (batch processing)
O
A batch of multiple
RAW images can be
converted and saved
to JPEG or TIFF
images, and a batch
of edited images can
be saved as separate
images (p.1-16).
Printing with Easy-PhotoPrint
O Images can be printed together with Easy-
PhotoPrint on Canon BJ printers (p.1-19).
Importing images from EOS Capture
O With EOS Capture, images shot remotely
can be displayed (p.1-19).
Transferring images to image editing software
O Multiple images can be transferred to
optional image editing software (p.1-18).
Transferring an image to Adobe Photoshop
O One image can be transferred to Adobe
Photoshop (p.1-18).
Tools menu
Trimming window
O An image can
be trimmed
within your
desired range
(p.1-10).
Copy stamp window
O An image can be
corrected so that
unwanted spots in the
image blend with
surrounding color
(p.1-11).
O
An image can be
corrected by pasting a
section copied from
another part of the same
image to an unwanted
part of the image (p.1-12).
Reference
5
Index
0-3
Page 6
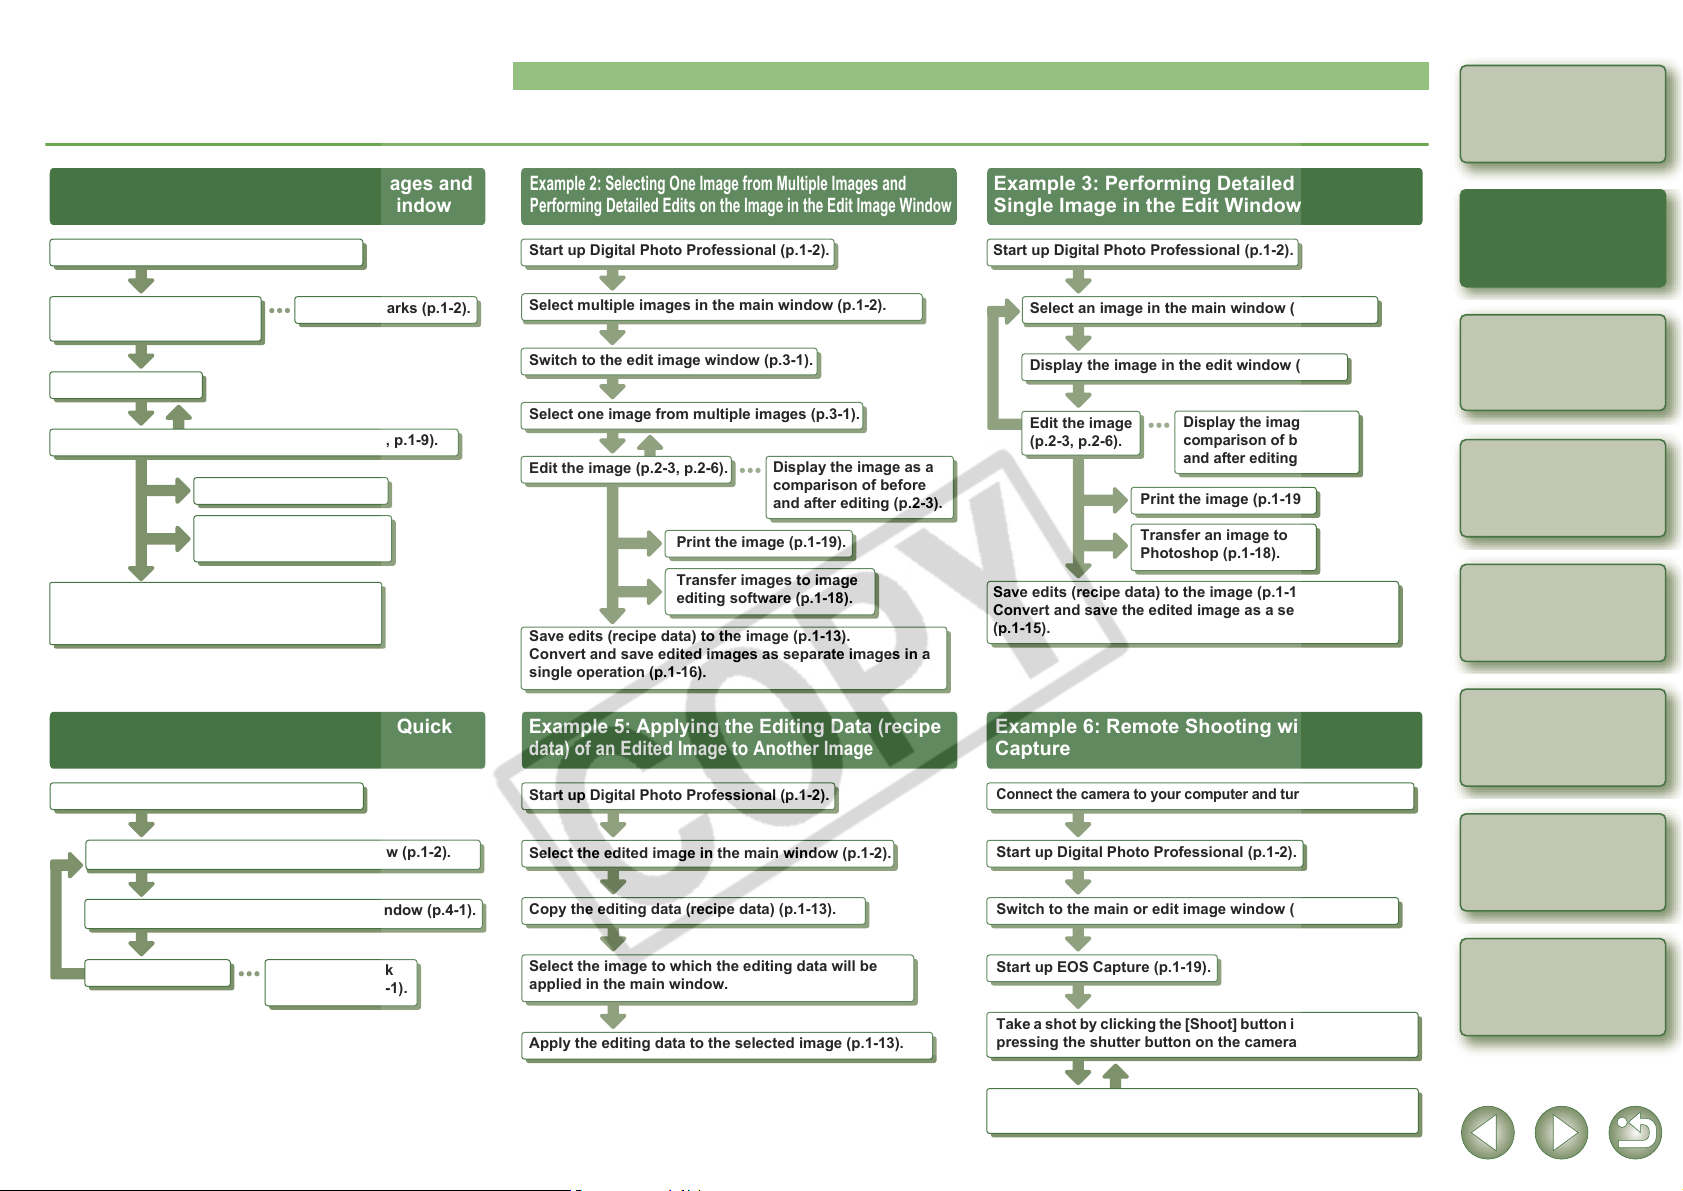
Example of Operation
The following shows typical flows of operating Digital Photo Professional.
Cover/Table of
Contents
Example 1: Displaying Thumbnail Images and
Performing Basic Edits in the Main Window
Start up Digital Photo Professional (p.1-2).
Display images in the main
window (p.1-2).
Sort images (p.1-5).
Select an image and perform basic edits (p.1-6, p.1-9).
Print the images (p.1-19).
Transfer images to image
editing software (p.1-18).
Save edits (recipe data) to the image (p.1-13).
Convert and save edited images as separate
images in a single operation (p.1-16).
Example 4: Checking Images in the Quick
Check Window
Start up Digital Photo Professional (p.1-2).
Set check marks (p.1-2).
Example 2: Selecting One Image from Multiple Images and
Performing Detailed Edits on the Image in the Edit Image Window
Start up Digital Photo Professional (p.1-2).
Select multiple images in the main window (p.1-2).
Switch to the edit image window (p.3-1).
Select one image from multiple images (p.3-1).
Edit the image (p.2-3, p.2-6).
Print the image (p.1-19).
Transfer images to image
editing software (p.1-18).
Save edits (recipe data) to the image (p.1-13).
Convert and save edited images as separate images in a
single operation (p.1-16).
Example 5: Applying the Editing Data (recipe
data) of an Edited Image to Another Image
Start up Digital Photo Professional (p.1-2).
Display the image as a
comparison of before
and after editing (p.2-3).
Example 3: Performing Detailed Edits on a
Single Image in the Edit Window
Start up Digital Photo Professional (p.1-2).
Select an image in the main window (p.1-2).
Display the image in the edit window (p.2-2).
Edit the image
(p.2-3, p.2-6).
Save edits (recipe data) to the image (p.1-13).
Convert and save the edited image as a separate image
(p.1-15).
Example 6: Remote Shooting with EOS
Capture
Connect the camera to your computer and turn the camera on.
Display the image as a
comparison of before
and after editing (p.2-3).
Print the image (p.1-19).
Transfer an image to
Photoshop (p.1-18).
Introduction
Displaying Thumbnail Images
and Performing Basic Edits
in the Main Window
Performing Detailed
Edits in the Edit
Window
Performing Detailed
Edits in the Edit
Image Window
Displaying an
Image in the Quick
Check Window
1
2
3
4
Select multiple images in the main window (p.1-2).
Display the images in the quick check window (p.4-1).
Check the images.
Set a check mark
to an image (p.4-1).
Select the edited image in the main window (p.1-2).
Copy the editing data (recipe data) (p.1-13).
Select the image to which the editing data will be
applied in the main window.
Apply the editing data to the selected image (p.1-13).
Start up Digital Photo Professional (p.1-2).
Reference
5
Switch to the main or edit image window (p.1-2, p.3-1).
Start up EOS Capture (p.1-19).
Index
Take a shot by clicking the [Shoot] button in EOS Capture or
pressing the shutter button on the camera.
Check the image, which is displayed in the main or edit
image window.
0-4
Page 7
1
Displaying Thumbnail Images and Performing Basic Edits in the Main Window
Cover/Table of
Contents
This chapter describes the functions of the main window, and how to display
images and perform basic edits on them.
O Click on the item to display its page.
Starting up Digital Photo Professional............................................................. 1-2
Displaying Images..............................................................................................1-3
Handling the Folders..........................................................................................1-4
Creating a New Folder.....................................................................................1-4
Registering Frequent Use Folders with the Bookmark .................................... 1-4
Organizing Bookmarks..................................................................................... 1-4
Copying an Image............................................................................................1-5
Deleting Images..................................................................................................1-5
Selecting the Image Display Mode ...................................................................1-5
Selecting the Thumbnail Size .......................................................................... 1-5
Image with Information Display........................................................................ 1-5
Sorting Images.................................................................................................1-5
Displaying Image Information ..........................................................................1-6
Displaying the Edit Window ............................................................................. 1-6
Displaying the Edit Image Window .................................................................. 1-6
Displaying the Quick Check Window ...............................................................1-6
Editing RAW Images ..........................................................................................1-6
Adjusting the White Balance............................................................................ 1-6
Click White Balance Function ..........................................................................1-8
Adjusting the Brightness ..................................................................................1-9
Specifying Color Space.................................................................................... 1-9
Editing Images.................................................................................................... 1-9
Adjusting the Brightness ..................................................................................1-9
Trimming Images ...........................................................................................1-10
Correcting an Image ...................................................................................... 1-11
Using Edits (Recipe Data)................................................................................1-13
Saving the Recipes ........................................................................................1-13
Loading and Pasting Recipes ........................................................................1-13
Copying Recipes and Applying to Other Images ...........................................1-13
Reverting Edited Images to Their Original Condition...................................1-14
Reverting to Last Saved Settings...................................................................1-14
Reverting to Shot Settings .............................................................................1-14
Saving Edited Images ......................................................................................1-14
Saving by Overwriting ....................................................................................1-14
Saving and Renaming....................................................................................1-14
Adding a Thumbnail of the Image..................................................................1-14
Converting and Saving RAW Images while Renaming Them........................1-15
Converting and Saving Images in a Single Operation (Batch-processing) .... 1-16
Changing File Names in a Single Operation..................................................1-17
Transferring Images to Image Editing Software............................................1-18
Transferring One Image to Photoshop........................................................... 1-18
Transferring Multiple Images to Image Editing Software ...............................1-18
Printing Images ................................................................................................ 1-19
Printing with Easy-PhotoPrint ........................................................................ 1-19
Displaying Images in EOS Capture................................................................. 1-19
Specifying Preferences....................................................................................1-20
Introduction
Displaying Thumbnail Images
and Performing Basic Edits
in the Main Window
Performing Detailed
Edits in the Edit
Window
Performing Detailed
Edits in the Edit
Image Window
Displaying an
Image in the Quick
Check Window
1
2
3
4
Reference
5
Index
1-1
Page 8
Starting up Digital Photo Professional
Click [Digital Photo Professional]
registered in the Dock.
¿ The main window is displayed.
O Alternatively, you can start up Digital
Photo Professional by double-clicking the
[Canon Utilities] folder [Digital Photo
Professional] folder [Digital Photo
Professional] icon.
Menu bar
Displays the [Digital Photo Professional], [File], [Edit], [View],
[Bookmark], [Adjustment], [Tools] and [Window] menus.
The main window switches to the edit image window (p.1-6, p.3-1).
Displays/hides the folder area.
Selects all the images in the image display area.
All the selected images in the image display area are deselected.
Folder area
The images in the selected folder are displayed in the image
display area.
Selects and sets one from the 3 check marks to the selected image.
The path for the folder selected in the folder area is
displayed.
Main Window
Removes all the check marks of the selected images.
Rotates the selected image 90° to the left or right.
Toolbar
Adjusts the white balance of a RAW image (p.1-6).
Adjusts a RAW image with click white balance (p.1-8).
Adjusts the brightness of a RAW image (p.1-9).
Saves all the images in a single
operation (p.1-16).
Image display area
Cover/Table of
Contents
Introduction
Displaying Thumbnail Images
and Performing Basic Edits
in the Main Window
Performing Detailed
Edits in the Edit
Window
Performing Detailed
Edits in the Edit
Image Window
Displaying an
Image in the Quick
Check Window
1
2
3
4
Displays the coordinates of the cursor position and the RGB
values (8-bit conversion) of an image while operating the click
white balance (p.1-8).
O To select an image, click the target image.
O To select multiple images, hold down the
O To select sequential images, click the first image and then hold down the <shift> key
and click the last image.
For information on shortcut keys, refer to the “Shortcut List” (p.5-2).
<> key and click the images.
Displays whether or not recipe data (p.1-13)
is attached to the selected image.
When you set CMYK simulation
profile (p.1-21), [CMYK] is displayed.
Displays the number of the currently selected images.
Displays the total number of images.
O To select RAW images only or images that have check marks set only, select the
[Edit] menu [Select RAW photos only] or [Select check mark* photos only].
(* represents a check mark number from 1 to 3.)
O To display or hide the toolbar, select the [View] menu [Toolbar].
O To quit Digital Photo Professional, select [Digital Photo Professional] menu [Quit
Digital Photo Professional].
Reference
5
Index
1-2
Page 9
Information Displayed with Images
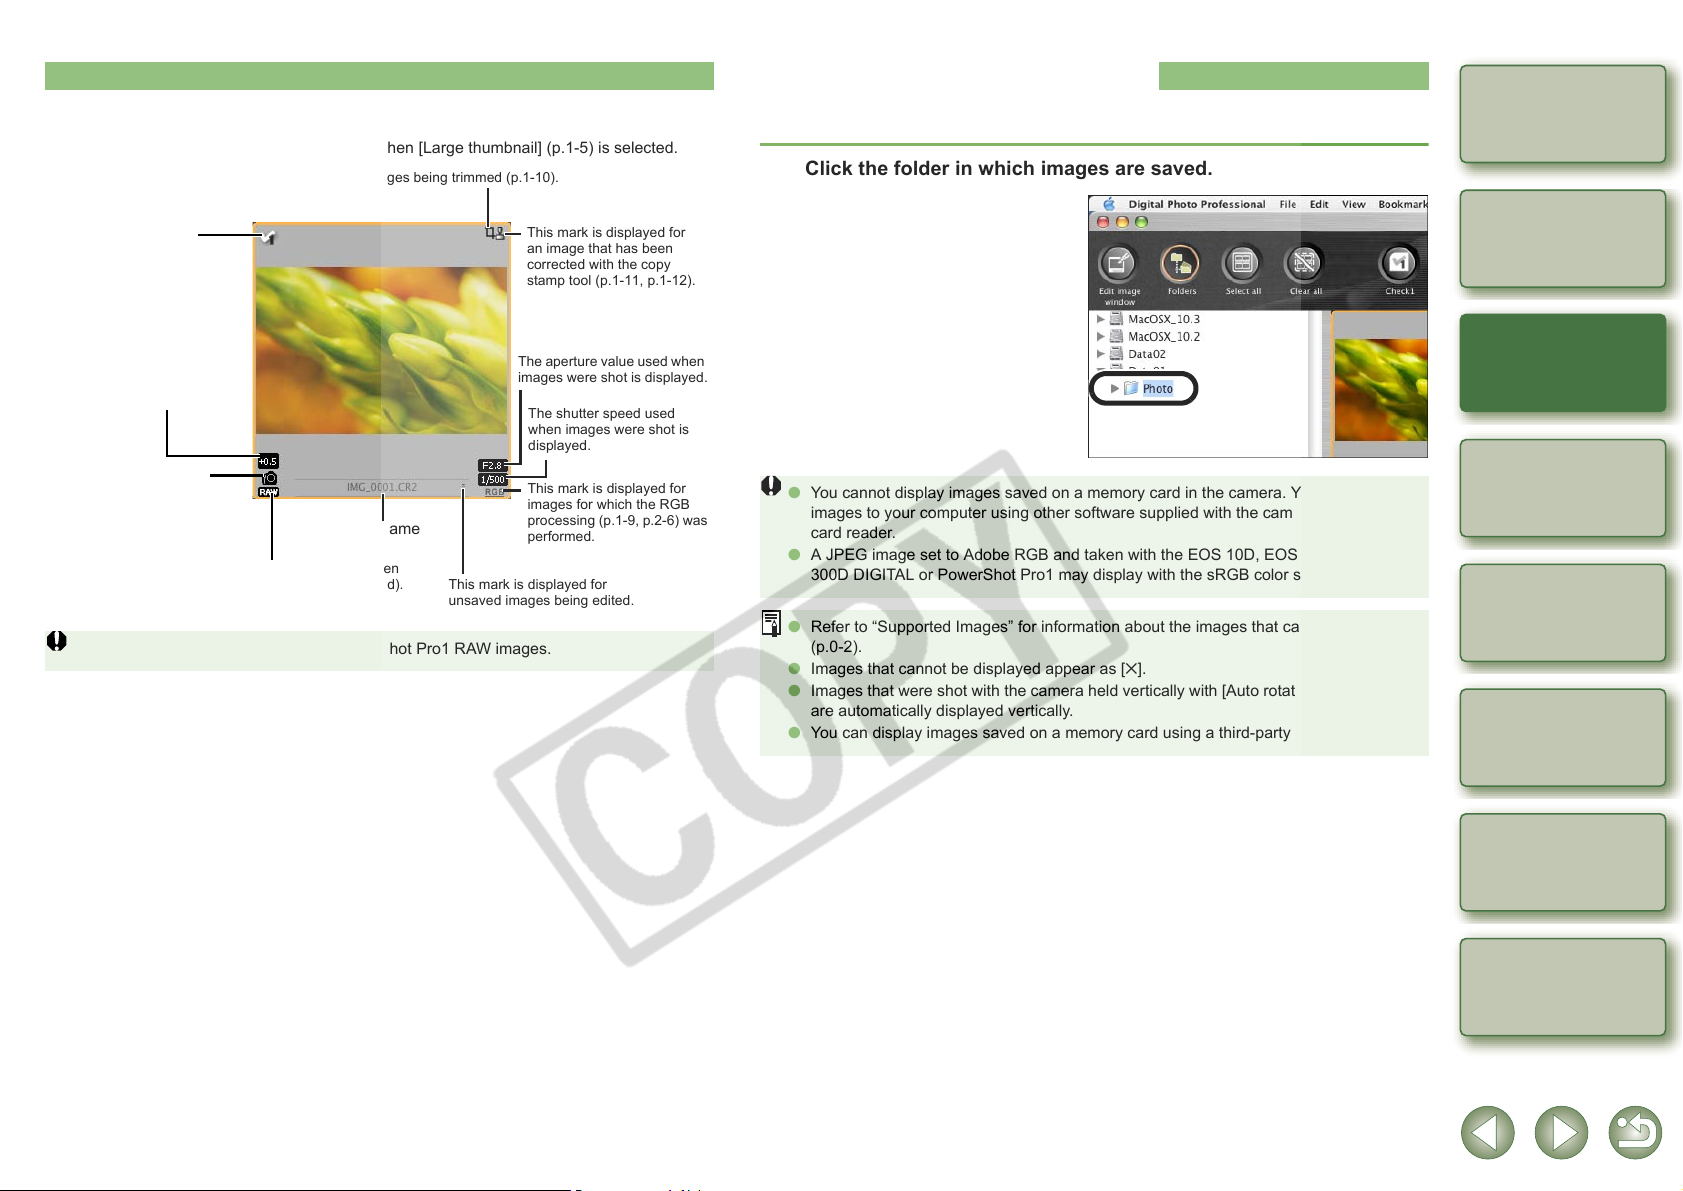
The following shows the information displayed when [Large thumbnail] (p.1-5) is selected.
This mark is displayed for images being trimmed (p.1-10).
Displaying Images
Cover/Table of
You can display images saved on your computer in the main window.
Contents
Click the folder in which images are saved.
This mark is displayed
when a check mark is
set (p.1-2, p.4-1).
This value is displayed for RAW
images for which the brightness
was adjusted (p.1-9).
The icon for the specified
white balance is displayed
with RAW images only
(p.1-7).
The [RAW] symbol is displayed for RAW images. (When
[Small thumbnail] is selected, the [R] symbol is displayed).
No symbol is displayed for JPEG and TIFF images.
The [RAW] mark is not displayed for PowerShot Pro1 RAW images.
File name
This mark is displayed for
unsaved images being edited.
This mark is displayed for
an image that has been
corrected with the copy
stamp tool (p.1-11, p.1-12).
The aperture value used when
images were shot is displayed.
The shutter speed used
when images were shot is
displayed.
This mark is displayed for
images for which the RGB
processing (p.1-9, p.2-6) was
performed.
O You cannot display images saved on a memory card in the camera. You must save
images to your computer using other software supplied with the camera or a third-party
card reader.
O A JPEG image set to Adobe RGB and taken with the EOS 10D, EOS DIGITAL REBEL/
300D DIGITAL or PowerShot Pro1 may display with the sRGB color space applied.
O Refer to “Supported Images” for information about the images that can be displayed
(p.0-2).
O Images that cannot be displayed appear as [].
O Images that were shot with the camera held vertically with [Auto rotate] setting to <ON>
are automatically displayed vertically.
O You can display images saved on a memory card using a third-party card reader.
Introduction
Displaying Thumbnail Images
and Performing Basic Edits
in the Main Window
Performing Detailed
Edits in the Edit
Window
Performing Detailed
Edits in the Edit
Image Window
Displaying an
Image in the Quick
Check Window
1
2
3
4
1-3
Reference
5
Index
Page 10
Handling the Folders
Th
You can handle the folder on the menu that appears by clicking on the folder while holding
down the <control> key.
Click on the folder while holding down the <control> key, and then
select an option from the menu that appears.
O You can drag and drop folders in
the folder area to move them to
the other folders. You can also
copy the folders by dragging and
dropping them while holding down
the <option> key.
Creating a New Folder
You can create a new folder in the folder area.
In the folder area, select the location where the new folder is to be
created.
1
Registering Frequent Use Folders with the Bookmark
You can register frequent use folders with the [Bookmark] menu.
Select a folder in the folder area.
1
Select [Bookmark] menu [Add].
2
¿ The selected folder is registered with the [Bookmark] menu.
O The registered folder can be selected from the [Bookmark] menu.
Organizing Bookmarks
You can change the name of the folder or delete the folder that was registered with the
[Bookmark] menu.
Select [Bookmark] menu [Organize].
1
¿ The [Sort bookmarks] dialog box appears.
Change the folder name or delete the folder.
2
e path and name of the folder that is selected
in the bookmark folder area is displayed.
Cover/Table of
Contents
Introduction
Displaying Thumbnail Images
and Performing Basic Edits
in the Main Window
Performing Detailed
Edits in the Edit
Window
Performing Detailed
Edits in the Edit
Image Window
1
2
3
Select the [File] menu [Create New Folder].
2
¿ The create new folder dialog box appears.
Enter a folder name.
3
¿ The folder is created.
The folder path that is selected in the
bookmark folder area is displayed.
Bookmark folder area
O To change the folder name, select the folder in the bookmark folder area, change the
displayed folder name, and then click the [Change] button.
O To delete the folder, select the folder in the bookmark folder area, then click the
[Delete] button.
Click the [Close] button.
3
1-4
Displaying an
Image in the Quick
Check Window
4
Reference
5
Index
Page 11

Copying an Image
You can copy and save an image to another folder.
Select the image to be copied.
1
Select the [Edit] menu [Copy].
2
¿ The image is copied.
Select the folder to which the image is to be saved.
3
Selecting the Image Display Mode
You can change the size or method and sort images according to a selected condition.
Selecting the Thumbnail Size
The available image sizes are [Large thumbnail], [Middle thumbnail], and [Small thumbnail].
Various information (p.1-3) is displayed in the display frame.
Select [View] menu Select the size to be set.
¿ The images are displayed in the selected size.
Image with Information Display
You can display the brightness histogram and the shooting information for images.
Cover/Table of
Contents
Introduction
Displaying Thumbnail Images
and Performing Basic Edits
in the Main Window
1
Select the [Edit] menu [Paste].
4
¿ The image is copied to the selected folder.
Deleting Images
You can move unnecessary images to the Trash on your computer and delete them.
Select images and then select [File] menu [Delete].
1
¿ The images are moved to the Trash.
Select [Finder] menu on the desktop [Empty Trash].
2
¿ The images are deleted.
O Images that you deleted in step 2 cannot be restored. Check carefully before deleting
images.
O When multiple images are selected, all the selected images will be deleted. Take
particular care when you have just finished a task involving the selection of multiple
images.
In addition to [CRW_YYYY.CRW] (RAW images) and [IMG_YYYY.JPG] (JPEG images),
[CRW_YYYY.THM] (images for displaying camera indexes) is saved in the folder
[xxxCANON] where images you have taken with the EOS 10D, EOS DIGITAL REBEL/
300D DIGITAL, EOS D60, EOS D30 and PowerShot Pro1 are saved. With Digital Photo
Professional, [CRW_YYYY.THM] images are not displayed and therefore you cannot move
or delete them.
Move or delete [CRW_YYYY.THM] images on the Finder.
[xxx] of folder names and [YYYY] of image names represent a number.
Select [View] menu [Thumbnail with information].
¿ The images with attached information are displayed.
Sorting Images
You can sort images according to a condition you select.
Select [View] menu [Sort] Select the condition to be set.
¿ The images are sorted according to the selected condition.
[File name] : File names are sorted in alphanumeric order (0 to 9 a to z).
[RAW priority] : Displayed in the following order:
RAW images (CR2 CRW TIF) RGB images (JPG
TIF)
If multiple images have the same extension, they are sorted in
order of [File name].
[Check mark1] : Displayed in the following order:
[Check mark2]
[Check mark3]
[Shooting Data/Time] : Sorted by shooting date and time. If multiple images were
check-marked images with selected number check-marked
images with other numbers images without check marks
If multiple images have the same check mark number, they
are sorted in order of [File name].
taken on the same date and time, they are sorted in order of
[File name].
Performing Detailed
Edits in the Edit
Window
2
Performing Detailed
Edits in the Edit
Image Window
Displaying an
Image in the Quick
Check Window
3
4
Reference
5
Index
1-5
Page 12
Displaying Image Information
You can check various information for images.
Editing RAW Images
You can perform various edits on the RAW images that are supported by Digital Photo
Professional. With RAW image editing (p.1-6 to p.1-9), there is hardly any of the deterioration
which accompanies image editing. You can therefore edit an image multiple times while
preserving the image quality at the time the image was shot.
Cover/Table of
Contents
Select an image and then select [File] menu ` [Info].
¿ The image information appears.
Image information may not appear for JPEG images set to Adobe RGB and shot with the
EOS 10D, EOS DIGITAL REBEL/300D DIGITAL or PowerShot Pro1.
Displaying the Edit Window
You can enlarge the image and perform detailed edits.
Double-click an image.
¿ The edit window appears.
O See Chapter 2 “Performing Detailed Edits in the Edit Window” for the information on
the edit window.
Displaying the Edit Image Window
You can select one image from multiple images and perform detailed edits.
Select multiple images and then click the [Edit image window] button.
¿ The main window switches to the
edit image window.
O See Chapter 3 “Performing
Detailed Edits in the Edit Image
Window” for the information on the
edit image window.
Displaying the Quick Check Window
You can individually display images in a larger size and can quickly view and check each image.
Select a RAW image.
1
Edit the RAW image (p.1-6 to p.1-9).
2
O You can apply edits to other images by copying and pasting the edit data to the other
images (p.1-13).
O You can revert edited images to the last saved settings or shot settings (p.1-14).
Save the edited image (p.1-14).
3
O You cannot edit PowerShot Pro1 RAW images.
O Before quitting Digital Photo Professional, you must save the edited images (p.1-14).
O When multiple images are selected, the edits are applied to all the selected images.
O The editing data can be saved in a separate file (p.1-13).
O The edited images can be transferred to image editing software (p.1-18).
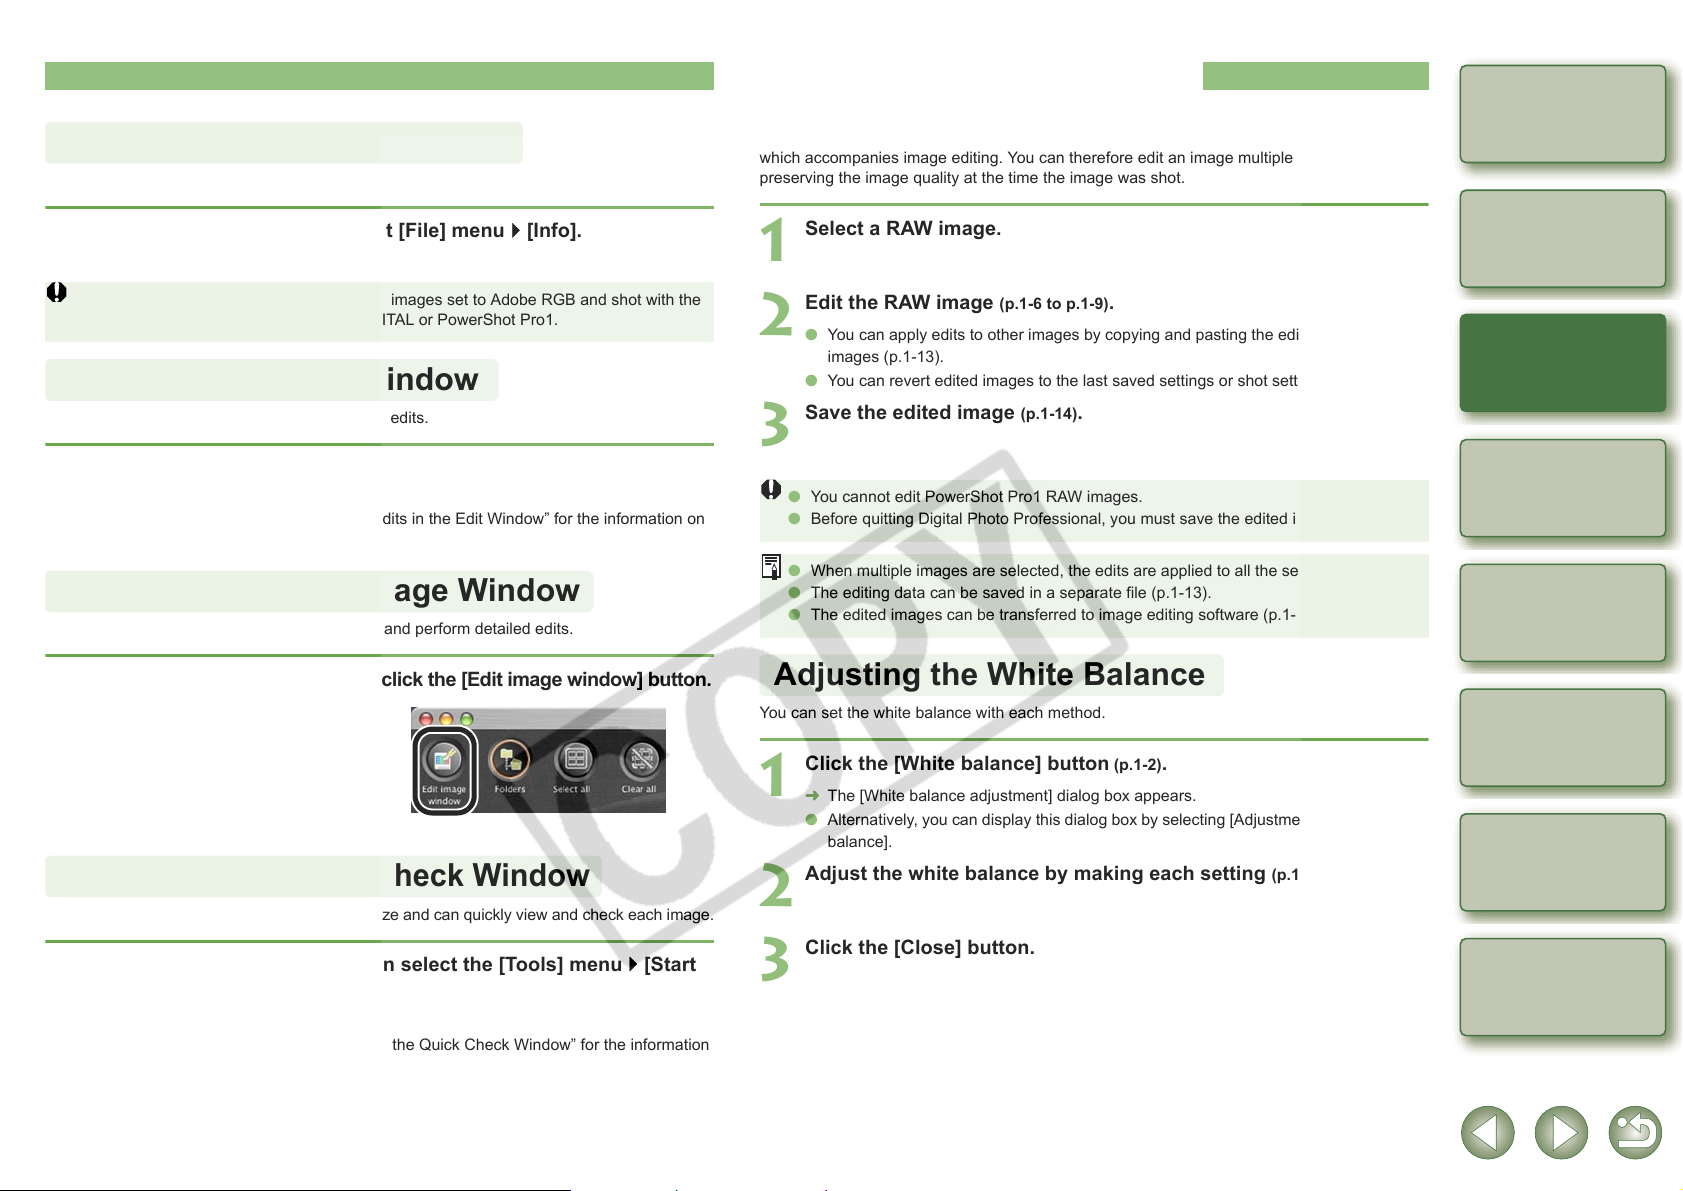
Adjusting the White Balance
You can set the white balance with each method.
Click the [White balance] button (p.1-2).
1
¿ The [White balance adjustment] dialog box appears.
O Alternatively, you can display this dialog box by selecting [Adjustment] menu ` [White
balance].
Adjust the white balance by making each setting (p.1-7, p.1-8).
2
Introduction
Displaying Thumbnail Images
and Performing Basic Edits
in the Main Window
Performing Detailed
Edits in the Edit
Window
Performing Detailed
Edits in the Edit
Image Window
Displaying an
Image in the Quick
Check Window
1
2
3
4
Reference
5
Select multiple images and then select the [Tools] menu ` [Start
Quick check tool].
¿ The quick check window appears.
O See Chapter 4 “Displaying an Image in the Quick Check Window” for the information
on the quick check window.
Click the [Close] button.
3
Index
1-6
Page 13
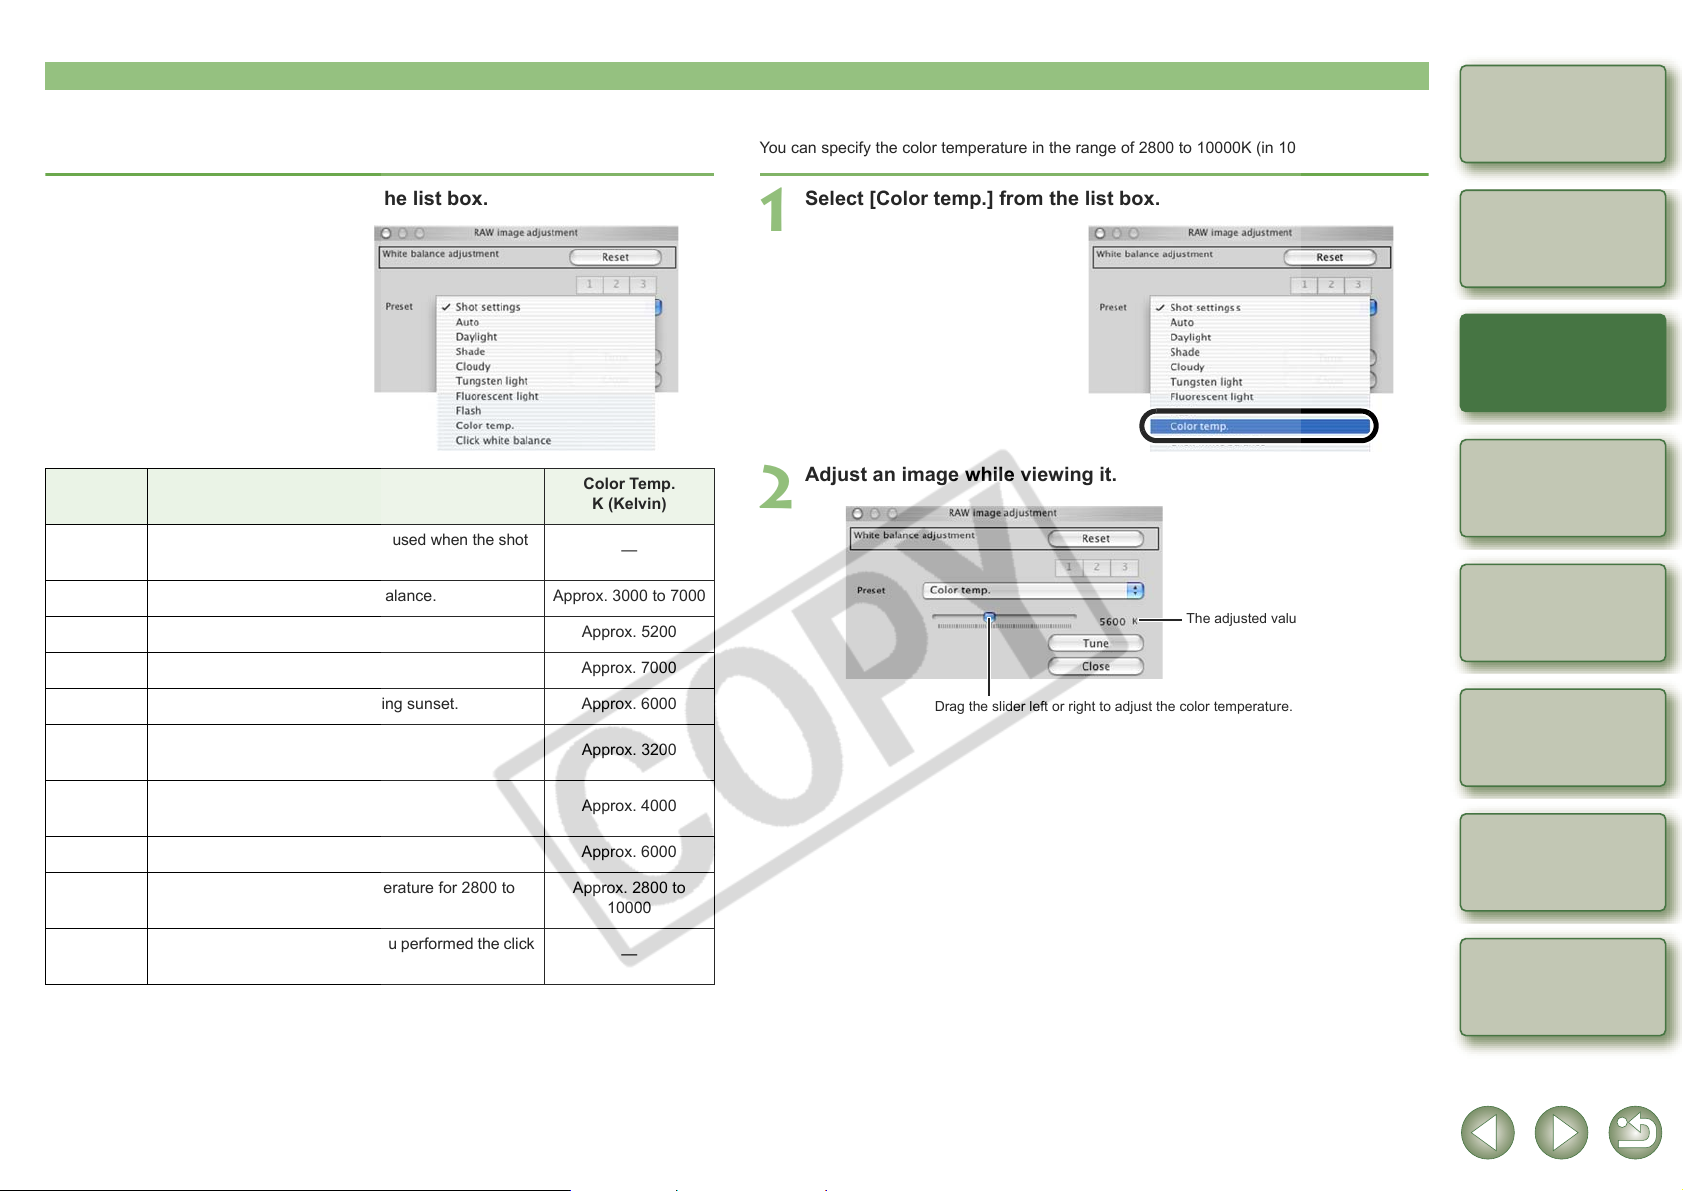
Selecting the White Balance
You can specify the white balance.
Specifying the Color Temperature
You can specify the color temperature in the range of 2800 to 10000K (in 100K increments).
Cover/Table of
Contents
Select the white balance from the list box.
White
Balance
Shot
settings
Auto Automatically adjusts the white balance. Approx. 3000 to 7000
Daylight For sunny daylight outdoors. Approx. 5200
Shade For shaded areas outdoors. Approx. 7000
Cloudy For cloudy or hazy days and during sunset. Approx. 6000
Tungsten
light
Fluorescent
light
To apply the white balance setting used when the shot
was taken.
For tungsten (light bulb) light. Approx. 3200
For white fluorescent light. Approx. 4000
Details
Color Temp.
K (Kelvin)
—
Select [Color temp.] from the list box.
1
Adjust an image while viewing it.
2
Drag the slider left or right to adjust the color temperature.
The adjusted value appears.
Introduction
Displaying Thumbnail Images
and Performing Basic Edits
in the Main Window
Performing Detailed
Edits in the Edit
Window
Performing Detailed
Edits in the Edit
Image Window
Displaying an
Image in the Quick
Check Window
1
2
3
4
Flash When flash is used. Approx. 6000
Color temp.
Click white
balance
You can manually set color temperature for 2800 to
10000K (in 100K increments).
Displayed for images on which you performed the click
white balance.
Approx. 2800 to
10000
Reference
5
—
Index
1-7
Page 14

Adjusting with the Color Wheel
You can select a desired color from the color wheel.
You can also specify the hue in the range of 0 to 359 (in 1-stop increments), and the saturation
in the range of 0 to 255 (in 1-stop increments).
Click the [Tune] button.
1
¿ The color wheel appears.
Personal White Balance
You can apply the personal white balance (p.2-4) that you registered in the edit window or the
edit image window to images.
Click the [1], [2] or [3] button.
¿ The registered personal white
balance is applied to the image.
Cover/Table of
Contents
Introduction
Displaying Thumbnail Images
and Performing Basic Edits
in the Main Window
1
Adjust an image while viewing it.
2
O Drag [ ] to adjust an image.
You can enter a value or click the [] / []
buttons to specify the hue and saturation.
You cannot use the personal white balance if you have not registered it.
Click White Balance Function
Makes white the standard for the point you selected and color in the image is adjusted.
Click the [Click (RAW)] button (p.1-2).
1
¿ When you move the cursor over the image, the cursor [ ] changes to [ ].
Click the point where is to be the standard.
2
¿ The color in the image is adjusted
with white as the standard on the
point you selected.
O If you click on another point over
the image, the white balance is
adjusted again.
O When you finish this operation,
click the [Click (RAW)] button.
O The coordinates of the cursor position and the RGB values (8-bit conversion) of the
image are displayed in the lower left of the main window (p.1-2).
O The image is adjusted based on the value of 1 1 pixels from the clicked point.
O Even if you have selected a neutral gray point of the image, the result of adjustments is
the same as when you select a white point.
Performing Detailed
Edits in the Edit
Window
2
Performing Detailed
Edits in the Edit
Image Window
Displaying an
Image in the Quick
Check Window
3
4
Reference
5
Index
1-8
Page 15

Adjusting the Brightness
You can adjust the brightness in the range of –2.0 to +2.0 (in 0.01-stop increments when
entering a value).
Click the [Brightness (RAW)] button (p.1-2).
1
¿ The [Brightness adjustment] dialog box appears.
O Alternatively, you can display this dialog box by selecting [Adjustment] menu
[Brightness adjustment (RAW)].
Adjust an image while viewing it.
2
Drag the slider left or right to adjust the brightness.
Editing Images
You can perform various edits on the RAW, JPEG, and TIFF images that are supported by
Digital Photo Professional.
Select an image.
1
Edit the image (p.1-9 to p.1-12).
2
O You can apply edits to other images by copying and pasting the edit data to the other
images (p.1-13).
O You can revert edited images to the last saved settings or shot settings (p.1-14).
Save the edited image (p.1-14).
3
Cover/Table of
Contents
Introduction
Displaying Thumbnail Images
and Performing Basic Edits
in the Main Window
1
Restores the image to its original settings.
Enter a value to adjust the brightness.
Click the [Close] button.
3
Specifying Color Space
You can set a color space other than the one set in [Default settings of Work color space] in the
preferences (p.1-21).
Select [Adjustment] menu [Work color space] Select a color
space to be set.
¿ The selected color space is set.
The specified color space is added to the ICC profile that is embedded in TIFF or JPEG
images that have been converted from RAW images and saved (p.1-15, p.1-16).
A color space is the reproducible color range (the characteristics of color gamut). Digital
Photo Professional supports the following 5 kinds of color space.
sRGB : Standard color space for Windows. Widely used for the standard color
space of monitors, digital cameras, and scanners.
Adobe RGB : A wider color space than sRGB. Mainly used for printing for business
purposes.
Wide Gamut RGB : A wider color space than Adobe RGB.
Apple RGB : Standard color space for Macintosh. A slightly wider color space than
sRGB.
ColorMatch RGB : A slightly wider color space than sRGB. Mainly used for printing for
business purposes.
Before quitting Digital Photo Professional, you must save the edited images (p.1-14).
O When multiple images are selected, the edits are applied to all the selected images.
O The editing data can be saved in a separate file (p.1-13).
O The edited images can be transferred to image editing software (p.1-18).
Adjusting the Brightness
You can adjust the brightness of an image in the range of –100 to +100 (in 1-step increments
when entering a value).
Select [Adjustment] menu [Brightness adjustment].
1
¿ The [Brightness adjustment] dialog box appears.
Adjust an image while viewing it.
2
Drag the slider left or right to adjust the brightness.
Restores the image to its original settings.
Enter a value to adjust the brightness.
Click the [Close] button.
3
Performing Detailed
Edits in the Edit
Window
2
Performing Detailed
Edits in the Edit
Image Window
Displaying an
Image in the Quick
Check Window
3
4
Reference
5
Index
1-9
Page 16

Trimming Images
You can trim an image within your desired range.
Select the [Tools] menu [Start Trimming tool].
1
¿ The trimming window appears.
Trim the image.
2
O Select a ratio from the [Aspect ratio] list box, and drag the trimming range as shown in
the diagram.
Select the vertical/horizontal
ratio of the trimming range.
Displays the upper left
coordinates of the trimming range
you have set. You can also set the
coordinates by entering your
desired numbers.
Copies the trimming range you
have set.
Displays borders around the
trimming range.
Displays the full screen. To return
to the original view, click this
button again.
To switch between full screen
display/normal screen display,
press the < > + <F11> keys on
the keyboard.
Returns settings to the original
settings.
Displays the ratio selected from
the [Aspect ratio] list box. You
can also enter your own ratio
when you select [Custom] from
the [Aspect ratio] list box.
Displays the size of the
trimming range you have set.
You can also set the size by
entering your desired numbers.
The trimming range copied
from another image is reflected
in the image displayed.*
Drag the slider left or right to set
the level of opacity outside the
trimming range.
Displays the next image.*
Displays the previous image.*
Cover/Table of
Contents
Introduction
Displaying Thumbnail Images
and Performing Basic Edits
in the Main Window
Performing Detailed
Edits in the Edit
Window
Performing Detailed
Edits in the Edit
Image Window
1
2
3
Displays the coordinate position of the cursor.
When you have set the trimming range, the upper left and lower right XY coordinates,
width, height and aspect ratio of the frame are displayed.
O If you move the cursor in the trimming range you have set, the [ ] changes to [ ].
You can move the trimming range by dragging.
O If you move the cursor to the four corners of the trimming range you have set, the
[ ] changes to [ ]. You can change the trimming range size by dragging.
O When [Free] is selected in the [Aspect ratio] list box, move the cursor to all four sides
of the set trimming range and [ ] will change to [ ] or [ ]. The size of the
trimming range can be changed by dragging.
Applies the settings and closes the window.Cancels all settings and closes the window.
*Functions when you have selected multiple images and the trimming windows are displayed.
Click the [OK] button.
3
O You can also set the [Aspect ratio] and switch between full screen/normal screen from
the menu that appears by clicking on the image while holding down <control> key.
O For information on shortcut keys, refer to the “Shortcut List” (p.5-3).
1-10
Displaying an
Image in the Quick
Check Window
4
Reference
5
Index
Page 17

Correcting an Image
You can correct an image using the repair function or the copy stamp function.
Repairing
You can correct an image so that unwanted spots (spots you want to delete) on the image
blend with surrounding color.
Select the [Tools] menu [Start Stamp tool].
1
¿ The copy stamp window appears.
Click the [100% View] button.
2
¿ The image is displayed in the 100% view.
[Repair (Light)] button
Corrects an isolated light spot
within the correction range to
match the surrounding color.
The image is displayed at 100%
(actual pixel size). Click this
button again to display the image
in the size that fits to the window.
Drag the slider left or right, or
click the [] / [] buttons to
set the correction range.
Undoes the previous action.
Reverts to the original condition
before any corrections were
performed.
Copies the content of the
corrections specified.
Displays the previous image.*
[Repair (Dark)] button
Corrects an isolated dark
spot within the correction
range to match the
surrounding color.
Displays the full screen. To
return to the original view, click
this button again.
To switch between full screen
display/normal screen display,
press the < > + <F11> keys
on the keyboard.
Redoes all the corrections.
Redoes the previous correction.
Applies to the image the
content of the corrections
copied.
Displays the next image.*
Cover/Table of
Contents
Introduction
Displaying Thumbnail Images
and Performing Basic Edits
in the Main Window
Performing Detailed
Edits in the Edit
Window
1
2
Display the section you want to correct.
3
O Drag the image to display the section you want to correct.
Click the [Repair (Light)] button or the [Repair (Dark)] button.
4
O When the unwanted spot (spot you want to delete) is light in color, click the [Repair
(Light)] button and when it is dark in color, click the [Repair (Dark)] button.
¿ Move the cursor over the image and the correction range is displayed as [O].
Cancels all settings and closes
the window.
*Functions when you have selected multiple images and the copy stamp windows are displayed.
Cover the unwanted spot in the image with the correction range
[ ] and click.
5
¿ The unwanted spot within the correction range is corrected.
O If you then click on the image, the unwanted spots within the selected correction
range are corrected.
O To correct another section of the image, cancel the repair function by clicking the
[Repair (Light)] button or the [Repair (Dark)] button, and perform the operation from
step 3 again.
Click the [OK] button.
Applies the settings and closes
the window.
6
When sections of the image that cannot be corrected with the repair function have been
selected, [ ] is displayed.
O In step 2, you can double-click on the section you want to correct to display the 100%
view. You can also double-click again to return to the original view.
O For information on shortcut keys, refer to the “Shortcut List” (p.5-3).
1-11
Performing Detailed
Edits in the Edit
Image Window
Displaying an
Image in the Quick
Check Window
3
4
Reference
5
Index
Page 18

Copy Stamp
You can correct an image by pasting a section copied from another part of the same image to
an unwanted part of the image.
Select the [Tools] menu [Start Stamp tool].
1
¿ The copy stamp window appears.
Click the [100% view] button.
2
¿ The image is displayed in the 100% view.
Specifies the section to copy.
Only functions with [100% view].
The image is displayed at 100%
(actual pixel size). Click the
button again to display the
image in the size that fits to the
window.
You can select the pen type.
With [Brush] selected, the pasted
image’s borders simulate a brush.
With [Pencil] selected, the pasted
image’s borders are sharp.
Fix the position of copy source.
Undoes the previous action.
Reverts to the original condition
before any corrections were
performed.
Copies the content of the
corrections specified.
Displays the previous image.*
Displays the full screen. To
return to the original view,
click this button again.
To switch between full
screen display/normal
screen display, press the
< > + <F11> keys on the
keyboard.
Drag the slider left or right,
or click the [] / []
buttons to set the size
(radius) of the image to be
pasted.
Redoes all the corrections.
Redoes the previous
correction.
Applies to the image the
content of the corrections
copied.
Displays the next image.*
Cover/Table of
Contents
Introduction
Displaying Thumbnail Images
and Performing Basic Edits
in the Main Window
Performing Detailed
Edits in the Edit
Window
Performing Detailed
Edits in the Edit
Image Window
1
2
3
Display the section you want to correct.
3
O Drag the image to display the section you want to correct.
Specify the section to copy.
4
O Click the [Select Copy Source] button and then click the section to copy.
O To change the copied section, repeat the above procedure.
Cancels all settings and closes
the window.
*Functions when you have selected multiple images and the copy stamp windows are displayed.
Correct the image.
5
O Click or drag on the section you want to correct on the image. [+] in the window
indicates the copy origin, and [ ] indicates the copy destination.
¿ The copied image is pasted in the position where you dragged.
Click the [OK] button.
Applies the settings and
closes the window.
6
O In step 2, you can double-click on the section you want to correct to display the 100%
view. You can also double-click again to return to the original view.
O In step 4, you can also specify the section to copy by holding down the <option> key
and clicking.
O For information on shortcut keys, refer to the “Shortcut List” (p.5-3).
1-12
Displaying an
Image in the Quick
Check Window
4
Reference
5
Index
Page 19

Using Edits (Recipe Data)
Editing data that has been applied to RAW images (p.1-6 to p.1-9, p.2-3 to p.2-6) or editing
data that has been applied to JPEG, TIFF, and RAW images (p.1-9 to p.1-12, p.2-6 to p.2-8)
can be copied and applied to other images. Editing data can also be saved as a separate file
containing editing data only and loaded into other images. In Digital Photo Professional, editing
data is referred to as “recipe data”.
Saving the Recipes
Select an image and then select [Edit] menu [Save recipe in file].
1
¿ The [Save] dialog box appears.
Select the destination folder, enter the file name, and then click
the [Save] button.
2
O When you select [Save recipe in file], only recipe data (editing data) is saved as a
separate file. If you wish to save the image to which the edits were applied, see “Saving
Edited Images” (p.1-14).
O Image rotation (p.1-2), trimming (p.1-10) and image correction (repair, copy stamp) (p.1-
11, p.1-12) are not included in recipe data.
Loading and Pasting Recipes
Copying Recipes and Applying to Other Images
Select the image from which a recipe will be copied and then
select [Edit] menu [Copy recipe to clipboard].
1
¿ The recipe is copied.
Select the image to which the recipe will be applied and then
select [Edit] menu [Paste recipe to selected photo].
2
¿ The recipe is applied to the image.
O Image rotation (p.1-2), trimming (p.1-10) and image correction (repair, copy stamp) (p.1-
11, p.1-12) are not included in recipe data.
O Editing data that can be performed on RAW images only (p.1-6 to p.1-9, p.2-3 to p.2-6)
cannot be applied to JPEG and TIFF images. If you try to apply editing data that can be
applied to all image types (JPEG, TIFF, or RAW images) (p.1-9 to p.1-12, p.2-6 to p.2-8)
together with editing data that can be applied only to RAW images (p.1-6 to p.1-9, p.2-3
to p.2-6), and the target image is in JPEG or TIFF, only the editing data applicable to
JPEG and TIFF is applied.
Cover/Table of
Contents
Introduction
Displaying Thumbnail Images
and Performing Basic Edits
in the Main Window
Performing Detailed
Edits in the Edit
Window
Performing Detailed
Edits in the Edit
Image Window
1
2
3
Select an image and then select [Edit] menu [Read recipe from
file].
1
¿ The [Open] dialog box appears.
Select a recipe and click the [Open] button.
2
Select an image to which the recipe will be applied and then
select [Edit] menu [Paste recipe to selected photo].
3
Editing data that can be performed on RAW images only (p.1-6 to p.1-9, p.2-3 to p.2-6)
cannot be applied to JPEG and TIFF images. If you try to apply editing data that can be
applied to all image types (JPEG, TIFF, or RAW images) (p.1-9 to p.1-12, p.2-6 to p.2-8)
together with editing data that can be applied only to RAW images (p.1-6 to p.1-9, p.2-3 to
p.2-6), and the target image is in JPEG or TIFF, only the editing data applicable to JPEG
and TIFF is applied.
1-13
Displaying an
Image in the Quick
Check Window
4
Reference
5
Index
Page 20

Reverting Edited Images to Their Original Condition
You can cancel all the edits for images, and revert the edited images to their original settings
before being edited or when shots were taken.
Saving Edited Images
You can apply edits to one or more images and save the edited images.
Saving by Overwriting
Reverting to Last Saved Settings
You can apply edits to an image and overwrite the existing image.
Cover/Table of
Contents
Select an image and then select [Adjustment] menu [Revert to
last saved settings].
If you select multiple images, all the edited images that you selected are reverted to the last
saved settings.
Reverting to Shot Settings
Select an image and then select [Adjustment] menu [Revert to
shot settings].
If you select multiple images, all the edited images that you selected are reverted to the
shot settings.
Select an image and then select [File] menu [Add recipe and
save].
Saving and Renaming
You can apply edits to images and save the new images with another name.
Select an image and then select [File] menu [Add recipe and
save as].
1
¿ The [Save as] dialog box appears.
Select the destination folder, enter the file name, and then click
the [Save] button.
2
Adding a Thumbnail of the Image
You can create new thumbnails to use for display in the main window, and add to each image.
The images will be displayed in the main window quicker and the quality of the images will
increase.
Select the image and then select [File] menu [Add thumbnail to
image and save].
A large number of images may take some time to add.
Introduction
Displaying Thumbnail Images
and Performing Basic Edits
in the Main Window
Performing Detailed
Edits in the Edit
Window
Performing Detailed
Edits in the Edit
Image Window
Displaying an
Image in the Quick
Check Window
1
2
3
4
1-14
Reference
5
Index
Page 21

Converting and Saving RAW Images while Renaming Them
You can convert edited RAW images to the TIFF or JPEG and save them with another name.
Cover/Table of
Contents
Select an image and then select [File] menu [Convert and save].
1
¿ The [Convert and save] dialog box appears.
Specify the settings and click the [Save] button.
2
Specify the drive or folder to which the image will be saved.
Select an image type used when the image is saved.
The image types and extensions used for the saved images are
shown below.
Image Type Extension
Exif-JPEG .JPG
Exif-TIFF 8bit .TIF
TIFF 16bit .TIF
Specify a value between 1 and 60,000 dpi as the output resolution
used for the image to be saved.
Check this checkbox to change the size of the image to be saved.
Set the width of the image.
Check this checkbox to fix the vertical/horizontal ratio of the image.
Enter the name of the image to be saved.
Displays the contents of the drive or folder.
If you have selected [Exif-JPEG] in the [Kind of file] list box,
set the image quality (compression rate) with a range of 1 to
10 by dragging the slider left or right. Higher values give
better JPEG image quality.
Check this checkbox to embed an ICC profile in the image to
be saved.
Set the height of the image.
Select a unit of measurement.
Saves the image.
Cancels all settings and closes the window.
Introduction
Displaying Thumbnail Images
and Performing Basic Edits
in the Main Window
Performing Detailed
Edits in the Edit
Window
Performing Detailed
Edits in the Edit
Image Window
Displaying an
Image in the Quick
Check Window
1
2
3
4
If you have saved an image in which [Wide Gamut RGB], [Apple RGB] or [ColorMatch RGB]
color space (p.1-9, p.1-21) has been specified, an ICC Profile is automatically embedded
even if you have not checked [Embed ICC profile].
O You can save and rename images without editing them.
O [Resize setting] changes the image size by applying the larger numeric value set in
“Width” or “Height” to the longer edge of the image, even when horizontal and vertical
images are mixed together.
O When you have set the tone curve to [Linear] (p.2-6), select [TIFF 16bit] and save.
O The specified preferences (p.1-21) or individually specified color space (p.1-9) are
added to the ICC profile embedded in TIFF or JPEG images. An ICC profile contains
color information, such as color properties and color spaces of devices which are
authorized by International Color Consortium (ICC). With this ICC profile, many color
management systems can minimize the color differences between devices.
Reference
5
Index
1-15
Page 22

Converting and Saving Images in a Single Operation (Batch-processing)
4
You can save and rename multiple edited images in a single operation. You can also convert edited RAW images to JPEG or TIFF and save them in a single operation.
Cover/Table of
Contents
Edit an image (p.1-6 to p.1-12).
1
Select images to be
converted and saved in a
2
single operation.
Click the [Batch process]
button
3
¿ The [Batch process settings]
O Alternatively, you can display this
Specify the settings.
Click the [Execute] botton.
¿ The processing window appears,
5
¿ When processing is complete, the
Click the [Terminate] button.
(p.1-2).
dialog box appears.
dialog box by selecting [File] menu
[Batch process].
allowing images to be saved in a
single operation.
images are saved in the specified
folder and the [Terminate] button
appears on the processing
window.
Displays the file names of the images to be saved as a batch.
Specify a value between 1 and 60,000 dpi
as the output resolution used for the
images to be saved.
Check this checkbox to change the size of
the images to be saved.
Set the width of the images.
Check this checkbox to fix the vertical/
horizontal ratio of the images.
Select this to save images without
renaming them.
Select this to rename images while
saving them.
Transfers images converted/saved in
a single operation to image editing
software (p.1-18).
6
O You cannot save multiple images in a single operation unless you specify [Sequence
number] when the [New file name] is selected for [File name].
Select an image type used when the images are saved.
For the image type and extension used when the image is
saved, refer to the table in [Convert and save] (p.1-15).
Specify the folder where the images are to be
saved after conversion. The specified folder
name appears to the side of the [Browse] button.
If you have selected [Exif-JPEG] in the [Kind of file]
list box, set the image quality (compression rate)
with a range of 1 to 10 by dragging the slider left or
right. Higher values give better JPEG quality.
Check this checkbox to embed an ICC profile
in the images to be saved.
Set the height of the images.
Select a unit of measurement.
Specify the character string and sequence number
when [New file name] is selected.
The set content is displayed as an example in [Ex.].
You can store the set sequence numbers.
Starts batch processing.
Cancels all settings and closes the window.
O If you have saved an image in which [Wide Gamut RGB], [Apple RGB] or [ColorMatch
RGB] color space (p.1-9, p.1-21) has been specified, an ICC Profile is automatically
embedded even if you have not checked [Embed ICC profile].
Introduction
Displaying Thumbnail Images
and Performing Basic Edits
in the Main Window
Performing Detailed
Edits in the Edit
Window
Performing Detailed
Edits in the Edit
Image Window
Displaying an
Image in the Quick
Check Window
1
2
3
4
Reference
5
O You can also save and rename multiple images without editing them in a single
operation.
O [Resize setting] changes the image size by applying the larger numeric value set in
“Width” or “Height” to the longer edge of the image, even when horizontal and vertical
images are mixed together.
O The batch process function is independent of other functions. Therefore, during batch
saving, you can perform other operations in the main, edit and edit image windows.
O The specified preferences (p.1-21) or individually specified color space (p.1-9) are
added to the ICC profile embedded in TIFF or JPEG images. An ICC profile contains
color information, such as color properties and color spaces of devices which are
authorized by International Color Consortium (ICC). With this ICC profile, many color
management systems can minimize the color differences between devices.
Index
1-16
Page 23

Changing File Names in a Single Operation
You can change file names in a single operation.
Select the images for which you want to change the file names.
1
Cover/Table of
Contents
Select the [Tools] menu [Start Rename tool].
2
¿ The rename tool window appears.
Specify the settings and then click the [Execute] button.
3
¿ The operation begins and the file names are changed.
Selects the order of the files.
Makes the file names of simultaneously
recorded RAW and JPEG images the same
(except for the extension).
Copies the image and changes the file name.
When [Copy & Rename] is checked, specifies
the save destination of the copied images.
The original file names are displayed.
Select an item to be set in the file name from each item.
Selects the extension.
You can store a set sequence number.
When setting the sequence number, enter
the start number and the number of figures.
Selects the shot date and time format.
Enters an underbar.
The modified file names are displayed.
Introduction
Displaying Thumbnail Images
and Performing Basic Edits
in the Main Window
Performing Detailed
Edits in the Edit
Window
Performing Detailed
Edits in the Edit
Image Window
Displaying an
Image in the Quick
Check Window
1
2
3
4
Modifies the file names.
Cancels all settings and closes the window.
Reference
5
Index
1-17
Page 24

Transferring Images to Image Editing Software
Transferring One Image to Photoshop
You can transfer an image to Adobe Photoshop.
Transferring Multiple Images to Image Editing Software
You can transfer multiple images to image editing software. The description given here uses
Adobe Photoshop CS, as an example.
Cover/Table of
Contents
Select the image to transfer to Photoshop.
1
Select [Tools] menu [Transfer to Photoshop].
2
¿ Photoshop starts up and displays the transferred image.
¿ RAW images are converted to TIFF 16bit images before being transferred.
O In order to transfer images, you will need Adobe Photoshop.
O Compatible versions of Photoshop are CS and 7.0. You cannot transfer images to
Photoshop Elements.
O
One image can be transferred at a time. You cannot transfer multiple images at a time.
O When images are transferred, they are automatically converted to the TIFF 16bit
images and the ICC profile is attached to each of them. The specified preferences
(p.1-21) or individually specified work color space (p.1-9) information are added to the
ICC profile, which allows Photoshop to display images including that color
information.
Set convert/save in a single operation.
1
O Follow steps 1 to 4 of “Converting and Saving Images in a Single Operation (Batch-
processing)” (p.1-16).
Click [Browse] button in the [Batch process settings] window.
2
¿ The [Open] window appears.
Select the image editing software (Photoshop CS) to which you
will transfer the images.
3
O In the drive on which you installed Photoshop CS, select [Applications] folder
[Adobe Photoshop CS] folder [Adobe Photoshop CS], and then click the [Open]
button.
¿ The [Open] window closes and Photoshop is set in [Image transfer settings] in the
[Batch process settings] window.
Check the [Open image using software].
4
Click the [Execute] button.
5
¿ The processing window appears and saving in a single operation begins.
¿ When saving in a single operation is completed, Photoshop starts up and the
transferred images are displayed.
In order to transfer images, you will need image editing software such as Adobe
Photoshop.
Introduction
Displaying Thumbnail Images
and Performing Basic Edits
in the Main Window
Performing Detailed
Edits in the Edit
Window
Performing Detailed
Edits in the Edit
Image Window
Displaying an
Image in the Quick
Check Window
1
2
3
4
Reference
5
1-18
Index
Page 25

Printing Images
Images can be automatically adjusted and printed within the print range.
Select an image and then select [File] menu [Print].
1
Select a printer to be used and then click the [Print] button.
2
¿ Printing begins.
O Selecting [File] menu [Page setup] allows you to specify paper sizes.
O You can set a printer profile to be used for printing. You can select a rendering intent
(matching method) when you have set the profile (p.1-21).
O If you have set CMYK simulation profile (p.1-21), the image is printed in a tone
corresponding to the specified [CMYK simulation profile].
Printing with Easy-PhotoPrint
Easy-PhotoPrint is printing software dedicated for Canon BJ printers.
If Easy-PhotoPrint 2.1 or later has been installed in your computer, you can print images with
Easy-PhotoPrint.
Displaying Images in EOS Capture
Digital Photo Professional version 2.0 is compatible with EOS Capture version 1.1 or later.
If you have EOS Capture version 1.1 or later installed on your computer, Digital Photo
Professional displays the images shot with EOS Capture.
Connect the camera to your computer and set the camera’s power
switch to <ON>.
1
O When [CameraWindow] and other windows are displayed, close all the displayed
windows.
Select [Tools] menu [Start EOS Capture].
2
¿ EOS Capture starts up.
Take a shot.
3
O Click the [Shoot] button in EOS Capture or press the shutter button on the camera to
take a shot.
¿ The shot image is displayed in the Digital Photo Professional main window.
When EOS Capture starts up, you can switch the Digital Photo Professional window
automatically from the main window to the edit image window (p.1-20).
Cover/Table of
Contents
Introduction
Displaying Thumbnail Images
and Performing Basic Edits
in the Main Window
Performing Detailed
Edits in the Edit
Window
1
2
Select an image and then select [File] menu [Print with Easy-
PhotoPrint].
¿ Easy-PhotoPrint starts up.
O Follow the instructions displayed on the Easy-PhotoPrint window to print images.
O To print images with Easy-PhotoPrint, you need Easy-PhotoPrint 2.1 or later and a
Canon BJ printer that supports Easy-PhotoPrint 2.1 or later.
O The specified output resolution (p.1-20) and trimming (p.1-10) are not supported.
O The setting of CMYK simulation (p.1-21) is not supported.
You can set a rendering intent (matching method) when printing (p.1-21).
1-19
Performing Detailed
Edits in the Edit
Image Window
Displaying an
Image in the Quick
Check Window
3
4
Reference
5
Index
Page 26

Specifying Preferences
You can specify various settings for Digital Photo Professional.
Select [Digital Photo Professional] menu [Preferences].
1
¿ The [Preferences] dialog box appears.
Allows you to specify the grid spacing in a range of 8 to 256 pixels used when
the grid lines (p.2-3) are displayed in the edit window or the edit image window.
Cover/Table of
Contents
Select the desired tab, specify the settings, and then click the
[OK] button.
2
¿ The settings are applied and the [Preferences] dialog box closes.
Allows you to select whether the edited image is saved automatically or the confirmation dialog box
is displayed, when you quit Digital Photo Professional or change images displayed in the main
window to the ones in another folder.
Allows you to select whether the folder that was open the last time is displayed or the
specified folder is always displayed when Digital Photo Professional starts up.
Displays the description
of [Operating mode].
If you check this checkbox, the edit
image window is displayed automatically
when you start up EOS Capture.
Applies the settings and closes
the window.
If you check this checkbox, an image opened in the edit window will appear
selected in the main window.
Select the display mode for displaying the edited and original
images for comparison in the edit or edit image window (p.2-3).
Introduction
Displaying Thumbnail Images
and Performing Basic Edits
in the Main Window
Performing Detailed
Edits in the Edit
Window
Performing Detailed
Edits in the Edit
Image Window
Displaying an
Image in the Quick
Check Window
1
2
3
4
Allows you to set the output resolution
default value from 1 to 60,000 dpi when
RAW images are converted to JPEG or
TIFF images and saved.
Specify the image quality for displaying or saving images.
[Quality priority] : Images are displayed and saved with maximum quality because additional filter
[Standard] : Images are displayed at maximum speed with no additional filter processing.
[Speed priority] : Images are displayed and saved at maximum speed because no additional filter
processings are applied. However, it takes more time to display or save images.
Images are saved at the same quality as [Quality priority].
processing is applied.
Cancels all settings and closes
the window.
Reference
5
Index
1-20
Page 27

Allows you to select the histogram displayed in the [RGB image adjustment] tab sheet on the
tool palette.
Select [Tone curve mode] (tone curve display), [Interpolation method] (tie method) displayed
in the [RGB image adjustment] tab sheet on the tool palette (p.2-7).
Check to preserve [Hue], [Saturation]
and [Sharpness] set for each Picture
Style item (p.2-5, p.2-6).
Allows you to select whether the tool palette is displayed as [Docking display]
(within the window) or [Floating display] (another window).
Select a color space for the monitor. If you select the [Monitor profile], click the [Browse] button and
select a profile for the used monitor.
Select a work color space from
5 kinds of color space.
Select a rendering intent (matching
method) when a printing profile has
been set.
Select a rendering intent (matching
method) when a CMYK simulation
profile has been set.
Select a rendering intent
for printing with Easy-
method)
PhotoPrint (p.1-19).
Select a CMYK simulation profile to be used in CMYK simulation. The image is displayed in the
colors of the selected profile and you can simulate the color used when you print in a CMYK
environment such as that of a printer. With this setting, [CMYK] is displayed at the bottom of each
window (p.1-2, p.2-2, p.3-1). The CMYK simulation display can be temporarily canceled in the
edit window (p.2-2) and the edit image window (p.3-1) by holding down the <space> key on the
keyboard.
Select a printer profile to be used for printing images (p.1-19).
(matching
O When you restart Digital Photo Professional after changing [Default settings of RGB
Tone curve mode] in the [Tool palette] tab sheet or [Default settings of Work color
space] in the [Color management] tab sheet, the setting content is applied. However,
the setting content is not applied to an image which has been edited before a change
was made (p.1-9 to p.1-12, p.2-6 to p.2-8) and which has a [RGB] mark displayed
(p.1-3). Change an individual tone curve with the menu (p.2-7) that appears by
clicking on the tone curve while holding down the <control> key, an individual color
space by selecting the [Adjustment] menu [Work color space] (p.1-9).
O To select a monitor or printer profile, you need to have previously installed the monitor
and printer profiles to be used on the computer. For details on the monitor and printer
profiles to be used, refer to the user manual of each device.
O The specified color space is added to the ICC profile that is embedded in TIFF or
JPEG images that have been converted from RAW images and saved (p.1-15, p.1-
16).
A color space is the reproducible color range (the characteristics of color gamut).
Digital Photo Professional supports the following 5 kinds of color space.
sRGB : Standard color space for Windows. Widely used for the standard
Adobe RGB : A wider color space than sRGB. Mainly used for printing for
Wide Gamut RGB : A wider color space than Adobe RGB.
Apple RGB : Standard color space for Macintosh. A slightly wider color space
ColorMatch RGB : A slightly wider color space than sRGB. Mainly used for printing for
O You can select a rendering intent (matching method) from [Perceptual] or
[Colorimetric] for color conversion when printing an image.
Perceptual : Matching method generally suited to natural images such as
Colorimetric : Matching method generally suited to graphic-type images such as
O With [CMYK simulation profile], you can simulate the color used when you print in a
CMYK environment such as that of a printer. Digital Photo Professional is compatible
with the following 4 types of printing profiles.
Euro Standard v1.00
JMPA v1.10 : Profile normally used for book printing, etc. in Japan, suitable for
U.S. Web Coated v1.00
JapanColor2001 type3
color space of monitors, digital cameras, and scanners.
business purposes.
than sRGB.
business purposes.
photographs which minutely expresses intermediate colors such as
skin tones and the blue of the sky.
photographs which expresses an image in the vivid primary colors
of red, blue and yellow.
: Profile normally used for book printing in Europe, suitable for
simulation of standard European printing.
simulation of magazine advertising standard color printing.
: Profile normally used for book printing in North America, suitable
for simulation of North American standard printing.
: Profile becoming a standard in the Japanese printing industry,
suitable for simulation of JapanColor standard printing.
Cover/Table of
Contents
Introduction
Displaying Thumbnail Images
and Performing Basic Edits
in the Main Window
Performing Detailed
Edits in the Edit
Window
Performing Detailed
Edits in the Edit
Image Window
Displaying an
Image in the Quick
Check Window
1
2
3
4
Reference
5
Index
1-21
Page 28

2
Performing Detailed Edits in the Edit Window
Cover/Table of
Contents
This chapter describes the functions of the edit window, and how to display
images and perform detailed edits on them.
This chapter describes the functions that you can operate in the edit window only. For
instructions on operating the functions common to those in the main window, refer to the page
described with each item.
O Click on the item to display its page.
Displaying the Edit Window ..............................................................................2-2
Selecting the Image Display Mode....................................................................2-3
Selecting the Display Size ...............................................................................2-3
Displaying the Grid Lines.................................................................................2-3
Displaying the Edited Image and the Original at the Same Time .................... 2-3
Editing RAW Images ..........................................................................................2-3
Adjusting the Brightness ..................................................................................2-3
Adjusting the White Balance ............................................................................2-4
Setting Picture Style.........................................................................................2-5
Editing Images....................................................................................................2-6
Adjusting the Tone Curve ................................................................................ 2-7
Introduction
Displaying Thumbnail Images
and Performing Basic Edits
in the Main Window
Performing Detailed
Edits in the Edit
Window
Performing Detailed
Edits in the Edit
Image Window
Displaying an
Image in the Quick
Check Window
1
2
3
4
2-1
Reference
5
Index
Page 29

Displaying the Edit Window
You can enlarge a single image and perform detailed edits on it in the edit window.
You can display multiple edit windows and edit them while comparing each of them (up to 36 images can be displayed).
O This chapter describes the functions that you can operate in the edit window only.
For instructions on operating the functions common to those in the main window, refer to the page described with each item.
Cover/Table of
Contents
Double-click a thumbnail
image in the main window.
¿ The edit window appears.
¿ A low resolution image is
displayed first in the edit window,
and then it switches to a high
resolution image.
O Alternatively, you can display this
window by selecting [File] menu
[Open in Edit window].
Image display area
Displays the coordinates of the
cursor position and the RGB values
(8-bit conversion) of an image.
O To display or hide the tool palette, select the [View] menu [Tool palette].
O To quit the edit window, select [File] menu [Close Window].
Menu bar
Displays the [Digital Photo Professional],
[File], [Edit], [View], [Adjustment], [Tools] and
[Window] menus.
Displays the operation mode (p.1-20).
Displays the color space ([RAW] is displayed for RAW images)
of the image and the work color space (p.1-9, p.1-21).
Edit Window
The path for the image and
file name are displayed.
When you set CMYK simulation profile (p.1-21), [CMYK] is displayed.
The CMYK simulation display can be canceled temporarily by holding
down the <space> key on the keyboard.
For some images, it may take some time to switch to the high resolution image.
Tool palette
RAW image adjustment tab sheet (p.2-3)
RGB image adjustment tab sheet (p.2-6)
If you set the tool palette to [Docking display] (p.1-21) and
make the edit window large, a thumbnail of the image will be
displayed. (When the tool palette is set to [Floating display]
(p.1-21), the thumbnail image is always displayed.) The
enlarged display position is displayed on the thumbnail and
you can move the display position by dragging.
Introduction
Displaying Thumbnail Images
and Performing Basic Edits
in the Main Window
Performing Detailed
Edits in the Edit
Window
Performing Detailed
Edits in the Edit
Image Window
Displaying an
Image in the Quick
Check Window
1
2
3
4
Reference
5
Index
O You can select whether the tool palette is displayed as another window or displayed
within the same window (p.1-21).
O For information on shortcut keys, refer to the “Shortcut List” (p.5-2).
2-2
Page 30

Selecting the Image Display Mode
You can change the size and method in which images are displayed.
Selecting the Display Size
You can select the image size from [Fit to window] (Fitting to the image display area), [50%
view], [100% view] (actual pixel size), and [200% view].
Select [View] menu Select the size to be set.
¿ The image is displayed in the selected size.
O When you display an image in a larger size, you can change the display position by
dragging the image.
In the [Fit to window] display, if you double-click a section you want to enlarge, the display
changes to the [100% view] display. If you double-click on the image in the [50% view],
[100% view] or [200% view] display, the display changes to the [Fit to window] display.
Displaying the Grid Lines
You can display grid lines that allow you to check the horizontal or vertical level of the image.
Select [View] menu [Grid lines].
¿ Grid lines are displayed on the image.
O Performing the same operation again hides the grid lines.
You can specify the grid spacing (p.1-20).
Displaying the Edited Image and the Original at the Same Time
You can display the edited image and the original at the same time.
Select [View] menu [Before/after comparison].
¿ A split window with the image before and after editing is displayed.
The way the image is displayed can be changed (p.1-20).
Changing the Display Position
You can also tile images vertically.
Select [View] menu [Change up/down/left/right].
O Performing the same operation again tiles images horizontally.
Editing RAW Images
You can perform more detailed edits on RAW images that are supported by Digital Photo
Professional, than in the main window. With RAW image editing (p.2-3 to p.2-6), there is hardly
any of the deterioration which accompanies image editing. You can therefore edit an image
multiple times while preserving the image quality at the time the image was shot.
Display the RAW image in the edit window (p.2-2).
1
O When multiple images are displayed, click the image for which you wish to edit to
place it in the top window.
Select the [RAW image adjustment] tab on the tool palette.
2
¿ The [RAW image adjustment] tab
sheet appears.
Edit the RAW images (p.2-3 to p.2-6).
3
O You can apply edits to other images by copying and pasting the edit data to the other
images (p.1-13).
O You can revert edited images to the last saved settings or shot settings (p.1-14).
Compare the edited image with the original (see left).
4
Save the edited image (p.1-14).
5
O You cannot edit PowerShot Pro1 RAW images.
O Before quitting Digital Photo Professional, you must save the edited images (p.1-14).
The editing data can be saved in a separate file (p.1-13).
Adjusting the Brightness
You can adjust the brightness in the range of –2.0 to +2.0 (in 0.01-stop increments when
entering a value).
Adjust an image while viewing it.
Drag the slider left or right to adjust the brightness.
Restores the image to its original settings.
Cover/Table of
Contents
Introduction
Displaying Thumbnail Images
and Performing Basic Edits
in the Main Window
Performing Detailed
Edits in the Edit
Window
Performing Detailed
Edits in the Edit
Image Window
Displaying an
Image in the Quick
Check Window
1
2
3
4
Reference
5
Index
Enter a value to adjust the brightness.
2-3
Page 31

Adjusting the White Balance
You can set the white balance with each method.
Adjusting with the Color Wheel (p.1-8)
You can select a desired color from the color wheel. You can also specify the hue in the range
of 0 to 359 (in 1-stop increments), and the saturation in the range of 0 to 255 (in 1-stop
increments).
Cover/Table of
Contents
Selecting the White Balance (p.1-7)
You can set the white balance.
Specifying the Color Temperature (p.1-7)
You can specify the color temperature in the range of 2800 to 10000K (in 100K increments).
Click White Balance Function
Makes white the standard for the point you selected and color in the image is adjusted.
Click the [Click] button.
1
¿ When you move the cursor over
the image, the cursor [ ] changes
to [ ].
Click the point where is to be the standard.
2
Registering Adjusted White Balance
(Personal White Balance)
You can register up to 3 adjusted white balance data as personal white balance settings.
Adjust the white balance.
1
Click the [Register] button.
2
¿ The [Register personal white
balance] dialog box appears.
Select the number of the button to be registered from the list.
3
Click the [OK] button.
4
Introduction
Displaying Thumbnail Images
and Performing Basic Edits
in the Main Window
Performing Detailed
Edits in the Edit
Window
Performing Detailed
Edits in the Edit
Image Window
Displaying an
Image in the Quick
Check Window
1
2
3
4
¿ The color in the image is adjusted with white as the standard on the point you
selected.
O If you click on another point over the image, the white balance is adjusted again.
O When you finish this operation, click the [Click] button.
O The image is adjusted based on the average value of the range of 5 5 pixels from the
clicked point.
O Even if you have selected a neutral gray point of the image, the result of adjustments is
the same as when you select a white point.
Reference
5
Personal White Balance (p.1-8)
You can apply the registered personal white balance to images.
Index
2-4
Page 32

Setting Picture Style
Applying a Picture Style file
You can load and apply to images Picture Style files downloaded from Canon’s web site and
saved on your computer.
Cover/Table of
Contents
Selecting a Picture Style
You can set the Picture Style.
Select a Picture Style from the list box.
Standard
Landscape
Portrait
Neutral
Faithful
B/W
(Picture Style file set
in the camera)
[loaded Picture Style
file]
The image looks vivid, sharp, and crisp.
For vivid blues and greens, and very sharp and crisp images.
For nice skin tones. The image looks slightly sharp and crisp.
By changing the [Hue] (p.2-6), you can adjust the skin tone.
For natural colors and subdued images. No sharpness is applied.
When the subject is photographed under a color temperature of 5200K, the color
is adjusted colorimetrically to match the subject’s color. No sharpness is applied.
For black-and-white images.
Displayed when selecting an image shot with Picture Style file set in the camera.
In the list, the caption name of the Picture Style file set in the camera is displayed
with ( ) attached.
The Picture Style loaded by clicking the [Browse] button is applied.
In the list, the caption name of the Picture Style file loaded by clicking the
[Browse] button is displayed with [ ] attached.
Click the [Browse] button.
1
¿ The [Open] window is displayed.
Select a Picture Style file and click the [Open] button.
2
¿ The Picture Style file is loaded.
Select loaded Picture Style file from the list box.
3
¿ The loaded Picture Style file is applied to the image.
A Picture Style file is a file that expands the Picture Style function. For detailed information
on Picture Style files, refer to Canon’s web site.
Adjusting the Shadow and Highlight Points
You can specify the shadow point (the darkest point) and highlight point (the brightest point) to
adjust the gradation of images.
Adjust an image while viewing it.
When you move the cursor to the left edge of the graph, the cursor [ ] changes to [ ].
Drag the slider right to adjust the shadow point.
When you move the cursor to
the right edge of the graph, the
cursor [ ] changes to [ ].
Drag the slider left to adjust the
highlight point.
Introduction
Displaying Thumbnail Images
and Performing Basic Edits
in the Main Window
Performing Detailed
Edits in the Edit
Window
Performing Detailed
Edits in the Edit
Image Window
Displaying an
Image in the Quick
Check Window
1
2
3
4
Reference
5
2-5
Index
Page 33

Selecting the Tone Curve
You can select the tone curve.
Editing Images
You can perform various edits on the RAW, JPEG, and TIFF images that are supported by
Digital Photo Professional.
Cover/Table of
Contents
Select a tone curve while viewing the image.
9 types of tone curve can be selected
by dragging the slider left or right.
You can select [Linear] when you wish to adjust the image separately in image editing
software such as Photoshop.
Adjusting the Hue, Saturation and Sharpness
The hue and saturation can be adjusted in the range of -4 to +4 (in 1-step increments), and
sharpness in the range of 0 to 10 (in 1-step increments).
Also, when [B/W] is selected from the [Picture Style] list box (p.2-5), you can select from 5
types of [Filter effect] displayed ([None], [Yellow], [Orange], [Red], [Green]), and 5 types of
[Toning effect] ([None], [Sepia], [Blue], [Purple], [Green]).
Adjust an image while viewing it.
The set numerical value is displayed.
Checking a checkbox selects
the linear tone curve.
Drag the slider left or right to
adjust the hue, saturation and
sharpness.
Display the image in the edit window (p.2-2).
1
O When multiple images are displayed, click the image for which you wish to edit to
place it on the top window.
Select the [RGB image adjustment] tab on the tool palette.
2
¿ The [RGB image adjustment] tab sheet
appears.
Edit the image (p.2-7, p.2-8).
3
O You can apply edits to other images by copying and pasting the edit data to the other
images (p.1-13).
O You can revert edited images to the last saved settings or shot settings (p.1-14).
Compare the edited image with the original (p.2-3).
4
Save the edited image (p.1-14).
5
Before quitting Digital Photo Professional, you must save the edited images (p.1-14).
The editing data can be saved in a separate file (p.1-13).
Introduction
Displaying Thumbnail Images
and Performing Basic Edits
in the Main Window
Performing Detailed
Edits in the Edit
Window
Performing Detailed
Edits in the Edit
Image Window
Displaying an
Image in the Quick
Check Window
1
2
3
4
2-6
Reference
5
Index
Page 34

Adjusting the Tone Curve
A tone curve shows the brightness and color saturation for the original image (input) and the
adjusted image (output) in the form of a line graph. You can use the tone curve to adjust the
image brightness and color saturation values that were set by the camera automatically when
the shot was taken. Also, you can adjust the input and output of the entire image in a single
operation, or individually adjust the input and output of [R] (Red), [G] (Green) and [B] (Blue).
The horizontal axis shows the brightness and color saturation for the original image (input), with
the left-hand end indicating shadow (darker areas of the image) and the right-hand end
indicating highlights (brighter areas of the image).
The vertical axis shows the brightness and color saturation for the adjusted image (output), with
the lower end indicating shadow and the upper end indicating highlights.
Adjusting the Tone Curve
Click the button to select a channel.
1
Adjust the tone curve.
2
O Clicking the tone curve shows [ ] on the tone curve. Drag [ ] to your desired
location.
O You can specify up to 8 points of [ ].
O Double-clicking [ ] deletes it.
When you move the cursor to the top of the graph,
Enter a value to specify
the maximum output.
When you move the
cursor to the left edge of
the graph, the cursor [ ]
changes to [ ].
Drag the slider right to
adjust the shadow point.
[ ] changes to [ ].
Drag it downward to adjust the highlight point in
the output side.
Horizontal axis: Input level
Vertical axis: Output level
When you move the cursor to
the right edge of the graph, the
cursor [ ] changes to [ ].
Drag the slider left to adjust the
highlight point.
Cover/Table of
Contents
Introduction
Displaying Thumbnail Images
and Performing Basic Edits
in the Main Window
Performing Detailed
Edits in the Edit
Window
1
2
The same settings are applied
to all RGB channels.
The settings are applied to the B channel.
The settings are applied to the G channel.
The settings are applied to the R channel.
Enter a value to specify
the minimum output.
Enter a value in the range of 0 to 247
(in 1-stop increments) to adjust the
shadow point.
The minimum number of steps between the shadow point and the highlight point is 8.
You can change the tone curve interpolation method (Curve/Straight) or tone curve
modes (RGB R G B/Luminance R G B) from the menu that appears by clicking on a tone
curve while holding down <control> key, or from the [Tool palette] tab sheet in the
[Preferences] dialog box (p.1-21).
When you move the cursor to the bottom of the graph,
[ ] changes to [ ].
Drag it upward to adjust the shadow point in the
output side.
Enter a value in the range of 8
to 255 (in 1-stop increments)
to adjust the highlight point.
Performing Detailed
Edits in the Edit
Image Window
Displaying an
Image in the Quick
Check Window
3
4
Reference
5
Index
2-7
Page 35

Click White Balance Function
Makes white the standard for the point you selected and color in the image is adjusted.
Click the [Click] button.
1
¿ When you move the cursor over the
image, the cursor [ ] changes to [ ].
Click the point where is to be the standard.
2
¿ The color in the image is adjusted with white as the standard on the point you
selected.
O If you click on another point over the image, the white balance is adjusted again.
O When you finish this operation, click the [Click] button.
O The image is adjusted based on the value of 1 1 pixels from the clicked point.
O Even if you have selected a neutral gray point of the image, the result of adjustments is
the same as when you select a white point.
Adjusting the Luminance and Contrast
You can adjust the luminance and contrast in the range of –100 to +100 (in 1-stop increments
when entering a value).
Adjust an image while viewing it.
Drag the slider left or right to adjust the luminance and contrast.
Enter a value to adjust the
luminance and contrast.
Adjusting the Hue, Saturation and Sharpness
You can adjust the hue in the range of -30 to +30 (in 1-step increments when entering a value),
the saturation in the range of 0 to 200 (in 1-step increments when entering a value) and the
sharpness in the range of 0 to 500 (in 1-step increments when entering a value).
Adjust an image while viewing it.
Restores the image to its original settings.
Enter a value to adjust the
hue, saturation and
sharpness.
Drag the slider left or right to adjust the hue, saturation sharpness.
Cover/Table of
Contents
Introduction
Displaying Thumbnail Images
and Performing Basic Edits
in the Main Window
Performing Detailed
Edits in the Edit
Window
Performing Detailed
Edits in the Edit
Image Window
Displaying an
Image in the Quick
Check Window
1
2
3
4
Reference
5
2-8
Index
Page 36

Performing Detailed Edits in the Edit Image Window
3
In the edit image window, you can select one image from multiple images and perform detailed edits on the selected image.
O The functions of the edit image window are the same as those of the main window (chapter 1) and of the edit window (chapter 2).
For detailed instructions on operating these functions, refer to the page described with each item.
Cover/Table of
Contents
Select multiple images in the main window.
1
Click the [Edit image window] button.
2
¿ The main window switches to the edit image window.
O The image clicked in the thumbnail image display area
is displayed in the image display area.
¿ A low resolution image is displayed first, and then it
switches to a high resolution image.
O Alternatively, you can display this window by selecting
[View] menu [Edit in Edit image window].
The edit image window switches to the main window.
Shows/hides the thumbnail image display area.
Shows/hides the tool palette.
Displays grid lines on the selected image.
Fits the image in the window.
Scales down the image 50%.
Thumbnail image display area
Image display area
When you display an image in a larger size, you can
change the display position by dragging the image.
Displays the operation mode (p.1-20).
Displays the coordinates of the cursor position and
the RGB values (8-bit conversion) of an image.
O Select the [View] menu [Change thumbnail position] to change the position of the thumbnail
image display area.
To delete an image from the thumbnail image display area, select the [File] menu [Delete from list].
O
O To quit the edit image window, click the [Main window] button.
For some images, it may take some time to switch to the high resolution image.
The path for the image and
file name are displayed.
Menu bar
Displays the [Digital Photo Professional], [File], [Edit], [View],
[Adjustment], [Tools] and [Window] menus.
Displays the image at 100% (actual pixel size).
Edit Image Window
Scales up the image 200%.
Selects the previous image.
Selects the next image.
Toolbar
Displays the color space ([RAW] is displayed
for RAW images) of the image and the work
color space (p.1-9, p.1-21).
O You can select whether the tool palette is displayed as another window or displayed
within the same window (p.1-21).
O For information on shortcut keys, refer to the “Shortcut List” (p.5-3).
Rotates the selected image 90° to the left or right.
Saves all the images in a single operation (p.1-16).
Tool palette
RAW image adjustment tab sheet (p.2-3)
RGB image adjustment tab sheet (p.2-6)
If you set the tool palette to
[Docking display] (p.1-21)
and make the edit image
window large, a thumbnail of
the image will be displayed.
(When the tool palette is set
to [Floating display] (p.1-21),
the thumbnail image is
always displayed.)
The enlarged display
position is displayed on the
thumbnail and you can move
the display position by
dragging.
When you set CMYK simulation profile (p.1-21),
[CMYK] is displayed. The CMYK simulation
display can be canceled temporarily by holding
down the <space> key on the keyboard.
Introduction
Displaying Thumbnail Images
and Performing Basic Edits
in the Main Window
Performing Detailed
Edits in the Edit
Window
Performing Detailed
Edits in the Edit
Image Window
Displaying an
Image in the Quick
Check Window
1
2
3
4
Reference
5
Index
3-1
Page 37

Displaying an Image in the Quick Check Window
4
4
In the quick check window, enlarged images are displayed and they can be quickly viewed and
checked.
Cover/Table of
Contents
Select multiple images in the main window.
1
Select the [Tool] menu [Start Quick check tool].
2
¿ The quick check window appears.
View and check the images.
The path for the image and file
name are displayed.
3
Click the [OK] button.
Displays a set check mark number.
Image display area
Quick Check Window
Scales down the image 50%.
If you have set [50% view], you can
change the display position of an image
by dragging the image.
Displays the full screen.
To return to the original view, click this button again.
To switch between full screen display/normal screen
display, press the < > + <F11> keys on the keyboard.
Selects and sets a number from 3 types of
check marks.
Removes all the check marks.
Rotates the image 90° to the left or right.
Displays the next image.
Displays the previous image.
Introduction
Displaying Thumbnail Images
and Performing Basic Edits
in the Main Window
Performing Detailed
Edits in the Edit
Window
Performing Detailed
Edits in the Edit
Image Window
Displaying an
Image in the Quick
Check Window
1
2
3
4
O You can also specify each setting or switch between full screen/normal screen from
the menu that appears by clicking on the window while holding down the <control>
key.
O For information on shortcut keys, refer to the “Shortcut List” (p.5-2).
Applies specified settings to the image and
closes the quick check window.
Reference
5
Index
4-1
Page 38

5
Reference
Cover/Table of
Contents
This chapter provides troubleshooting, the instructions on uninstalling Digital Photo
Professional, and shortcut key list to allow you to use Digital Photo Professional easily.
Troubleshooting
If you could not complete the installation correctly, Digital Photo Professional does not work, or
could not display images with Digital Photo Professional, consult the items described below.
Installation failed.
O Are you logged into an account other than the Administrator account?
You cannot install software unless you are logged into an account with Administrator
privileges. Log in again into an account with Administrator privileges.
For how to log in and how to specify Administrator settings, refer to the User’s Manual for
the Macintosh computer you are using or for OS X.
Digital Photo Professional does not work.
O Does your computer meet the system requirements for Digital Photo
Professional?
Check the system requirements (p.0-2).
O Is there enough RAM (memory)?
Check the system requirements (p.0-2).
O Is the screen resolution less than [1024 768]?
Specify [1024 768] or more for the screen resolution (p.0-2).
O Is the color less than [Thousands]?
Specify [Thousands] or more for the color (p.0-2).
O Are multiple applications running?
Quit any applications other than Digital Photo Professional. Even if your computer has
the RAM capacity (memory) described in system requirements (p.0-2), if other
application is running at the same time as Digital Photo Professional, you may not have
sufficient RAM (memory).
O Is the preferences file for Digital Photo Professional corrupted?
The preferences file for Digital Photo Professional may be damaged. Quit any
applications that are running, delete the preferences file from the [Preferences] folder
using the following procedure, and then restart Digital Photo Professional.
Open the hard disk drive where the system is saved the [Users] folder Folder for the
logged in user the [Library] folder the [Preferences] folder and then delete
[com.canon.Digital Photo Professional.plist].
For Macintosh operating systems OS X 10.2, double-click the startup disk click the
[Home] button the [Library] folder to open the [Preferences] folder and delete
[com.canon.Digital Photo Professional.plist].
O Click on the item to display its page.
Shortcut Key List................................................................................................................ 5-2
Index .................................................................................................................................... 5-4
Uninstalling the Software
O Log into the account used when installation was performed.
O Quit any applications before uninstalling Digital Photo Professional.
O When you have moved the folders to be deleted to the Trash, select [Finder] menu [Empty
Trash] to empty the Trash. You cannot reinstall Digital Photo Professional until you have
emptied the Trash.
Display the folder containing the [Digital Photo Professional]
folder.
1
O Open the [Canon Utilities] folder.
Move the [Digital Photo Professional] folder to the Trash.
2
Select [Finder] menu [Empty Trash].
3
¿ The [Digital Photo Professional] folder is deleted.
O When uninstallation ends, restart your computer.
You cannot retrieve data that you have emptied into the Trash and deleted, so be
particularly careful when deleting data.
Introduction
Displaying Thumbnail Images
and Performing Basic Edits
in the Main Window
Performing Detailed
Edits in the Edit
Window
Performing Detailed
Edits in the Edit
Image Window
Displaying an
Image in the Quick
Check Window
1
2
3
4
Reference
5
Index
Could not display images with Digital Photo Professional.
O Did you try to display images other than the image types that are supported
by Digital Photo Professional?
Check the supported images (p.0-2).
5-1
Page 39

Shortcut Key List
Main Window
Operation Key Operation Key
Preferences
Hide Digital Photo
Professional
Hide Others option
Quit Digital Photo
Professional
Open in Edit window
Open Window + N
Close window
Add recipe and save
Add recipe and save as shift
Add thumbnail to image
and save
Convert and save
Batch process
Create New Folder shift
Page setup shift
Print
Print with Easy-PhotoPrint
Delete
Info display
Copy
Paste
Select all
Clear all shift
+ , Select RAW photos only option + + A
+ H
+ + H
+ Q
+ O Copy recipe to clipboard option + + C
+ W Edit in Edit image window +
+ S Large thumbnail + 1
+ + S Middle thumbnail + 2
shift
+ + T Small thumbnail + 3
+ D Thumbnail with information + 4
+ B Rotate left + L
+ + N Rotate right + R
+ + P Add check mark1 + F1
+ P Add check mark2 + F2
+ E Add check mark3 + F3
+ delete Remove check mark + F4
+ I Start Quick check tool option + + F
+ C Start Trimming tool option + + T
+ V Start Stamp tool option + + S
+ A Start Rename tool option + + R
+ + A Minimize Window + M
Select check mark1 photos
only
Select check mark2 photos
only
Select check mark3 photos
only
Paste recipe to selected
photo
option + + 1
option + + 2
option + + 3
option + + V
Edit Window
Operation Key Operation Key
Preferences
Hide Digital Photo
Professional
Hide Others option + + H100% view + 2
Quit Digital Photo
Professional
Close Window
Add recipe and save + S Rotate right
Add recipe and save as shift
Convert and save
Page setup shift
Print
Info display
Copy recipe to clipboard option + + C Start Stamp tool option
Paste recipe to selected
photo
Show/hide
Tool palette
+ , Fit to window + 4
+ H50% view + 1
+ Q200% view + 3
+ W Rotate left + L
+ + S Add check mark1 + F1
+ D Add check mark2 + F2
+ + P Add check mark3 + F3
+ P Remove check mark + F4
+ I Start Trimming tool option + + T
option
+ + V Minimize Window + M
Cancel CMYK simulation
+ T
(only functions while
holding down the key)
+ + S
space
Quick Check Window
Operation Key Operation Key
Switch between full screen/
normal screen
Switch back to normal
screen
Switch between 50% view/
fit to window
Add check mark1
Add check mark2
Add check mark3
+ F11 Rotate left + L
esc Rotate right
+ F10 Display the first image home
+ F1 Display the last image end
+ F2 Display the previous image +
+ F3 Display the next image +
+ R
+ R
Cover/Table of
Contents
Introduction
Displaying Thumbnail Images
and Performing Basic Edits
in the Main Window
Performing Detailed
Edits in the Edit
Window
Performing Detailed
Edits in the Edit
Image Window
Displaying an
Image in the Quick
Check Window
1
2
3
4
Reference
5
Index
Remove check mark
+ F4 – –
5-2
Page 40

Edit Image Window
Operation Key Operation Key
Trimming Window
Operation Key Operation Key
Cover/Table of
Contents
Preferences
Hide Digital Photo
Professional
Hide Others option + + H Fit to window + 4
Quit Digital Photo
Professional
Close Window
Add recipe and save
Add recipe and save as shift
Convert and save
Batch process
Page setup shift
Print
Print with Easy-PhotoPrint
Delete from list
Info display
Copy recipe to clipboard option
Paste recipe option
+ , Return to main window +
+ H Show/hide Tool palette + T
+ Q 50% view + 1
+ W 100% view + 2
+ S 200% view + 3
+ + S Rotate left + L
+ D Rotate right + R
+ B Add check mark1 + F1
+ + P Add check mark2 + F2
+ P Add check mark3 + F3
+ E Remove check mark + F4
+ delete Start Trimming tool option + + T
+ I Start Stamp tool option + + S
+ + C Minimize Window + M
Cancel CMYK simulation
+ + V
(only functions while
holding down the key)
space
Display the previous image +
Display the next image
Switch between full screen/
normal screen
+ Reset the trimming range delete
+ F11
Copy Stamp Window
Operation Key Operation Key
Switch between full screen/
normal screen
Switch back to normal
screen
Display the previous image
Display the next image
Copy the content of the
corrections
Paste the content of the
corrections copied (only
functions when an image
with the same number of
pixels for length and width
is selected)
+ F11
esc
+
+
Switch back to normal
screen
Close the trimming window
without saving the settings
Revert to the original
condition before any
corrections were performed
Set the radius of the copy
destination or correction
range in 5 pixel units
Set the radius of the copy
destination or correction
range in 1 pixel units
Select copy source* (only
functions when in 100%
view)
Change the display
+ C
+ V Set the pen type to brush* 1
position after copy source
is selected (only functions
when in 100% view)
esc
option + + Z
option
option
shift
+ + ,
shift
+ +
option + click
control + drag
+ W
+ + ,
+ +
Introduction
Displaying Thumbnail Images
and Performing Basic Edits
in the Main Window
Performing Detailed
Edits in the Edit
Window
Performing Detailed
Edits in the Edit
Image Window
Displaying an
Image in the Quick
Check Window
1
2
3
4
Reference
5
Redo the previous
correction
Redo all the corrections option
Undo the previous action
* Only functions when using copy stamp functions (p.1-12).
+ Y Set the pen type to pencil* 2
+ + Y
+ Z– –
Change the display
position briefly
Index
space + drag
5-3
Page 41

Index
A
Adjusting the Brightness ........................... 1-9
Adjusting the Brightness (RAW) ........ 1-9, 2-3
Adjusting the Tone Curve ......................... 2-7
Adjusting the Hue, Saturation and
Sharpness ............................................ 2-8
Adjusting the Luminance and Contrast 2-8
Adjusting the Tone Curve ..................... 2-7
Click White Balance Function ............... 2-8
Adjusting the White Balance .............1-6, 2-4
Adjusting with the Color Wheel ..... 1-8, 2-4
Click White Balance Function ........ 1-8, 2-4
Personal White Balance ................ 1-8, 2-4
Registering Adjusted White Balance
(Personal White Balance) ..................... 2-4
Selecting the White Balance ......... 1-7, 2-4
Specifying the Color Temperature . 1-7, 2-4
C
Changing File Names in a Single
Operation ................................................ 1-17
Copy Stamp Window ..................... 1-11, 1-12
Correcting Images
Copy Stamp ........................................ 1-12
Repairing ............................................ 1-11
D
Deleting Images ....................................... 1-5
Displaying Images .................................... 1-3
Displaying Images in EOS Capture ........ 1-19
Displaying the Edit Image Window ........... 3-1
Displaying the Edit Window ...................... 2-2
Displaying the Quick Check Window ........ 4-1
E
Edit Image Window .................................. 3-1
Edit Window ............................................. 2-2
Editing Images ................................... 1-9, 2-6
Editing RAW Images ......................... 1-6, 2-3
Example of Operation ............................... 0-4
Exiting Digital Photo Professional ............. 1-2
Exiting the Edit Image Window ................. 3-1
Exiting the Edit Window ............................ 2-2
F
Function Window Configuration ................ 0-3
H
Handling the Folders ................................1-4
I
Information Displayed with Images ........... 1-3
M
Main Features ........................................... 0-2
Main Window ............................................ 1-2
P
Printing Images ....................................... 1-19
Printing with Easy-PhotoPrint ............. 1-19
Q
Quick Check Window ...............................4-1
R
Reverting Edited Images to Their Original
Condition
Reverting to Last Saved Settings .......1-14
Reverting to Shot Settings .................. 1-14
Rotating Images .......................................1-2
S
Saving Edited Images
Adding a Thumbnail of the Image ....... 1-14
Converting and Saving Images in a Single
Operation (Batch-processing) ............. 1-16
Converting and Saving RAW Images while
Renaming Them ................................. 1-15
Saving and Renaming ........................1-14
Saving by Overwriting ......................... 1-14
Selecting the Image Display Mode (Edit
Window, Edit Image Window)
Displaying the Edited Image and the
Original at the Same Time .................... 2-3
Displaying the Grid Lines ......................2-3
Selecting the Display Size .............2-3, 3-1
Selecting the Image Display Mode (Main
Window)
Displaying Image Information ...............1-6
Displaying the Edit Image Window .......1-6
Displaying the Edit Window ..................1-6
Displaying the Quick Check Window .... 1-6
Image with Information Display ............. 1-5
Selecting the Thumbnail Size ...............1-5
Sorting Images ...................................... 1-5
Setting Picture Style
Adjusting the Hue, Saturation and
Sharpness ............................................. 2-6
Adjusting the Shadow and Highlight
Points .................................................... 2-5
Applying a Picture Style file ..................2-5
Selecting a Picture Style .......................2-5
Setting Picture Styles
Selecting the Tone Curve .....................2-6
Shortcut Key List
Copy Stamp Window ............................ 5-3
Edit Image Window ...............................5-3
Edit Window .......................................... 5-2
Main Window ........................................5-2
Quick Check Window ............................ 5-2
Trimming Window ................................. 5-3
Specifying Color Space ............................ 1-9
Specifying Preferences ........................... 1-20
Starting up Digital Photo Professional ...... 1-2
Supported Images ....................................0-2
System Requirements ..............................0-2
T
Tool Palette
RAW image adjustment tab
sheet ............................................. 2-2, 3-1
RGB image adjustment tab
sheet ............................................. 2-2, 3-1
Transferring Images to Image Editing
Software
Transferring Multiple Images to Image
Editing Software ..................................1-18
Transferring One Image to
Photoshop ...........................................1-18
Trimming Images ....................................1-10
Trimming Window ...................................1-10
Troubleshooting ........................................5-1
U
Uninstalling the Software .......................... 5-1
Using Edits (Recipe Data)
Copying Recipes and Applying to Other
Images ................................................1-13
Loading and Pasting Recipes .............1-13
Saving the Recipes .............................1-13
Cover/Table of
Contents
Introduction
Displaying Thumbnail Images
and Performing Basic Edits
in the Main Window
Performing Detailed
Edits in the Edit
Window
Performing Detailed
Edits in the Edit
Image Window
Displaying an
Image in the Quick
Check Window
1
2
3
4
Reference
5
Index
5-4
 Loading...